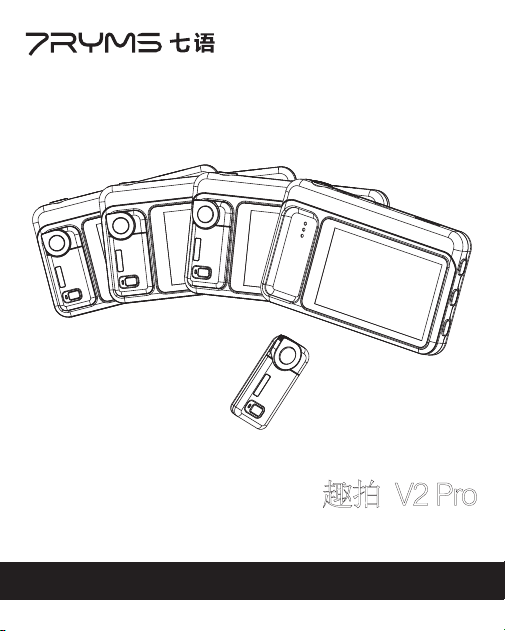
Wireless Phone Monitor Screen
Qshot V2 Pro
User Manual

Foreword
Thank you for purchasing the 7RYMS Qshot V2 Pro Wireless Phone Monitor
Screen.
Main Features
· Wired/Wireless Dual Modes
· 2.4G/5G Dual-Band 50m Wireless Transmission with Low Latency
· Support 4K/60fps Stable Output(iOS phones need to use APP “BlackMagic
Camera”)
· Integrated Wireless Remote Control, Support Shoot/Zoom/Flip Camera
· 3.1-inch HD Screen, 450nit High-Brightness Display
· Built-in Speaker, Real-time Playing
· 1500mAh Battery, Supports about 5 Hours of Battery Life
· Multiple USB-C Ports, Support External Mic and Power Delivery to Phone
· MagSafe Magnetic Design for Quick and Stable Attachment
· 1/4 Screw Hole for Tripods, Stabilizers, and Other Extension Devices
· Widely Compatible with iOS, Android, and HarmonyOS Devices
Product Usage Notice
01
When used with the iPhone camera, the device only supports recording
at 4K30fps and below. To record at 4K60fps without stuttering, users
need to download and use the APP “BlackMagic Camera”.
iPhone users need to enable the zoom function before using the focal
adjustment function: select “Settings > Accessibility > Zoom > On”.
The phone screen will zoom in. Double-tap the phone screen with three
fingers to return to full screen.
In wired mode, Android/HarmonyOS phone users need to download
the APP “HCCast” to use the product.
If the phone can not connect with the monitor screen in wireless
mode, please switch the monitor screen's signal channel (long press
the monitor screen's signal channel button)

02
Device Storage Notice
Do not place the product near or inside heating equipment,
cooking equipment, high-pressure containers, etc., to prevent battery
overheating and explosion.
Please prevent it from falling, collision and pounding, otherwise
it may cause product failure.
Please store the device in a dry, cool and clean place.
Please keep the device away from the heat, direct sunlight and
other corrosive liquids.
Please do not disassemble the device by yourself to avoid
mechanical damage.
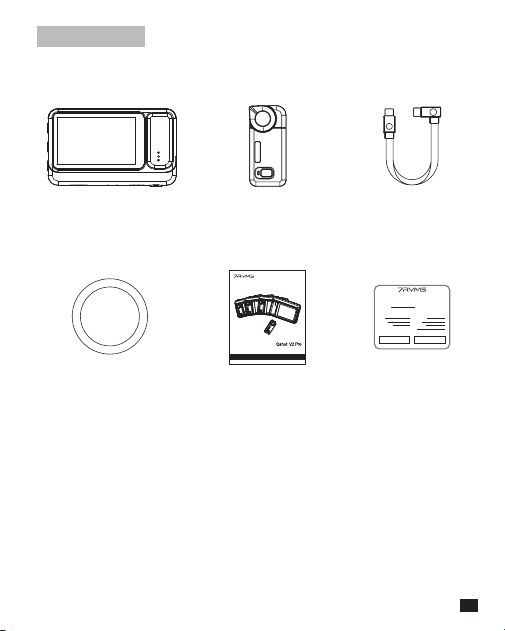
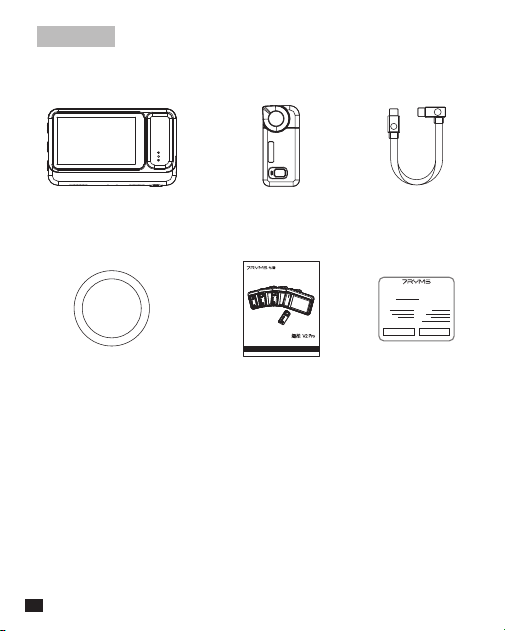
Packing List
Vendor:
Vendor Tel:
Date of Purchase:
Customer Name:
Address:
Email Address:
Tel:
WARRANTY CARD
www.7ryms-audio.com
Errun Electronic Technology
Product Model:
Vendor's information Customer information
Vendor's Signature: Product SN:
Phone Monitor
Screen*1
Magnetic Remote
Control*1
Magnetic Ring*1 User Manual*1 Warranty Card*1
USB-C Data/Charging
Cable*1
03
Wireless Phone Monitor Screen
Qshot V2 Pro
User Manual
Components and Instruction
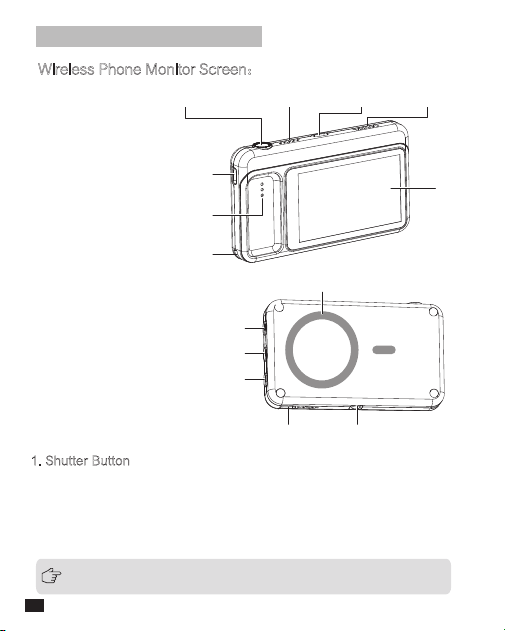
Wireless Phone Monitor Screen:
Shutter Button Heat Sink Hole SpeakerMicrophone Port
1/4 Screw Hole
String Hole
Mirror/ Screen Flip Button
Power/Brightness Adjustment Button
Aspect Ratio/Signal Channel Button
Screen
Remote Control Charging Contacts
Wired Projection/Firmware
Upgrade/Power Supply Port
The button works when remote control is connected to mobile phone
Bluetooth and placed in the charging case
04
Charging Port
Magsafe Magnetic Position
1. Shutter Button
1.1 Short press to take photos/record videos;
1.2 For iOS phones, long press to record video by default; for some
Android/HarmonyOS phones, long press to take photos continuously by
default. (Please adjust the settings on your phone if record mode is
needed)
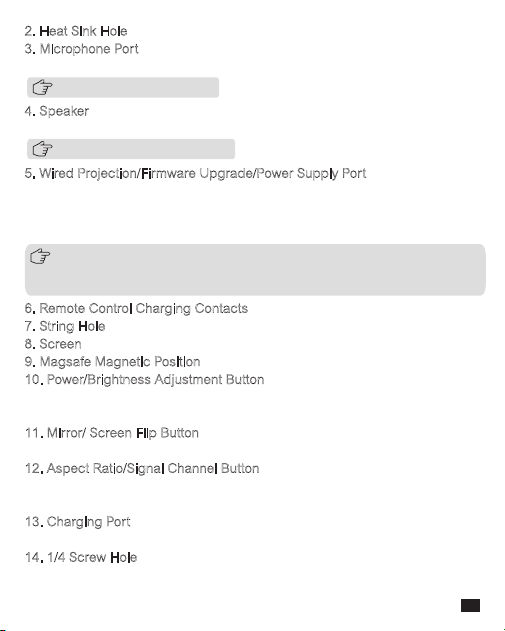
2. Heat Sink Hole
3. Microphone Port
Plug in external microphone
4. Speaker
Play the sound of smartphone when connected to it
5. Wired Projection/Firmware Upgrade/Power Supply Port
Connect with the smartphone to monitor screen in wired mode, or connect with the
computer for firmware upgrade via the USB-C data cable; when the monitor screen
is being charged, it can supply power for smartphone( the power is supplied by the
adapter, not by the built-in battery of monitor screen)
6. Remote Control Charging Contacts
7. String Hole
8. Screen
9. Magsafe Magnetic Position
10. Power/Brightness Adjustment Button
Long press to power on/off; short press to adjust the brightness of screen
(5-level)
11. Mirror/ Screen Flip Button
Long press to mirror; short press to rotate the screen 180°
12. Aspect Ratio/Signal Channel Button
Short press to adjust the aspect ratio(5-level magnification); long press to
switch signal channel
13. Charging Port
Connect with power source to charge the monitor screen
14. 1/4 Screw Hole
Connect with a tripod, stabilizer or other devices
It works only in wireless mode
It works only in wired mode
1. The smartphone cannot supply power to monitor screen in reverse
2. In wired mode, Android/HarmonyOS users need to download the third-party
APP “HCCast” to use the monitor screen function
05
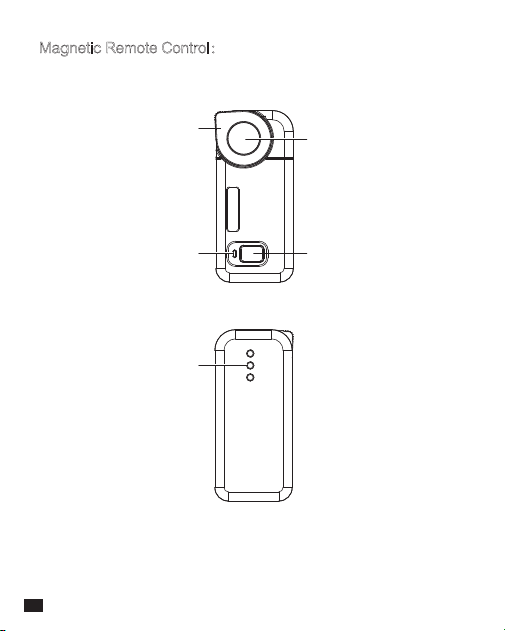
Magnetic Remote Control:
Focal Adjustment Dial
Work Indicator Light
Charging Contact
Shutter Button
Wakeup/Flip Button
06
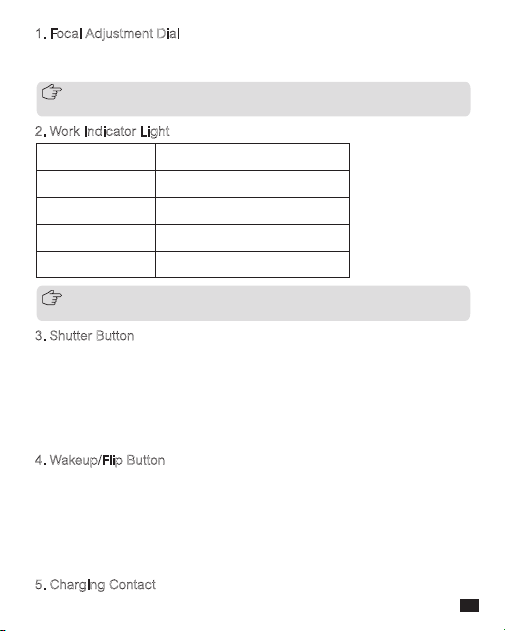
1. Focal Adjustment Dial
Press the dial left/right slightly to zoom out/zoom in focal length;
long press for continuous adjustment
2. Work Indicator Light
3. Shutter Button
3.1 Half-press to autofocus;
3.2 Shot press to take photos/record videos;
3.3 For iOS phones, long press to record video by default; for
some Android/HarmonyOS phones, long press to take photos
continuously by default. (Please adjust the settings on your phone
if record mode is needed)
4. Wakeup/Flip Button
4.1. Short press to wake up remote control when in standby; short
press to switch photo/video mode during normal use; double-click
to switch front/rear camera.
4.2. Long press to wake up the camera(it can wake up Android and
HarmonyOS phones directly, but only wakes up iPhone when the phone
screen is off. It does not support waking up Samsung phones currently).
5. Charging Contact
iOS phone users need to enable zoom function first: select “Settings >
Accessibility > Zoom > On”
The remote control will auto-shutdown if unpaired or unused for over
30 minutes
Unpair Blue light blinks slowly
Paired Blue light keeps on
Low Power Red light blinks slowly
Charging Red light keeps on
Fully Charged Blue light keeps on
07
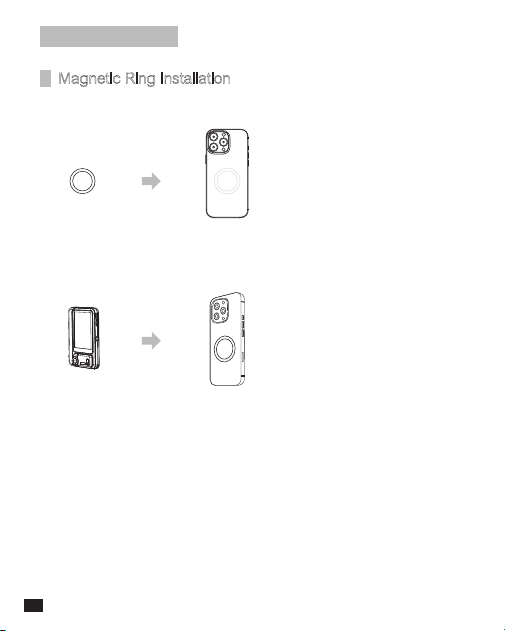
Operation Guide
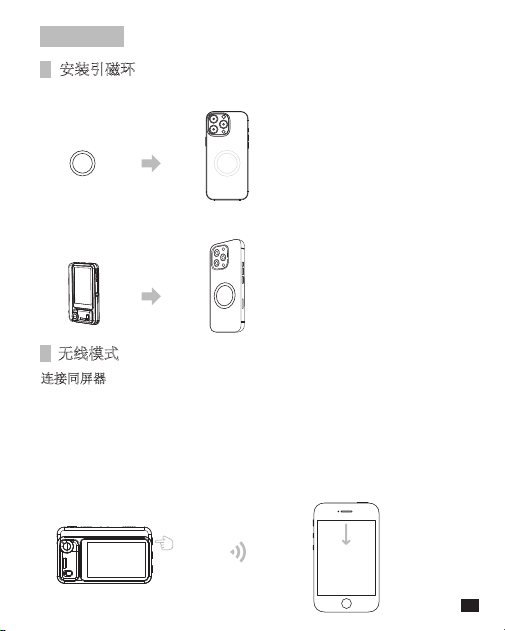
Magnetic Ring Installation
1. Attach the magnetic ring to a suitable position on your phone's back
2. Align the magnetic position of the monitor screen with the magnetic
ring on the phone and secure it in place.
08
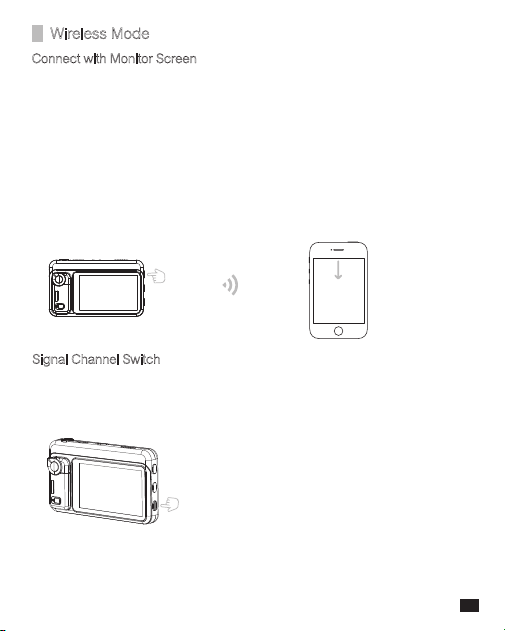
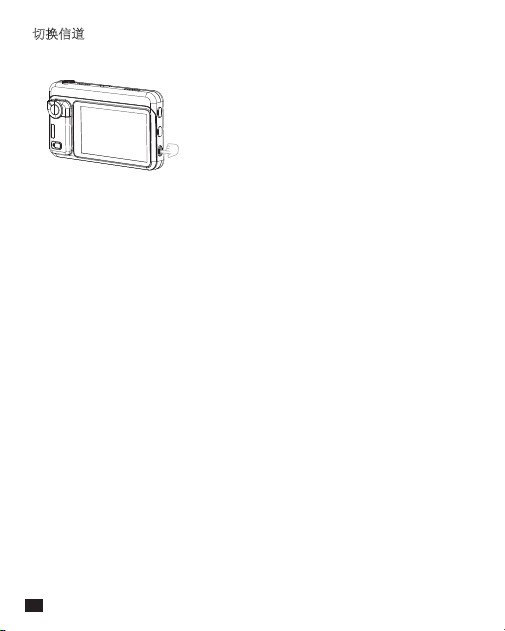
Signal Channel Switch ( If the phone can not connect with monitor screen in
wireless mode, please switch the signal channel)
1. Long press the monitor screen's signal channel button to switch to
channel 2
2. Select the pairing name to connect again on your phone
3. If the connection fails, please switch to channel 3 ( 3 channels available)
4. Once connected, it will project the phone screen
09
Wireless Mode
Connect with Monitor Screen
1. Long press the power button of monitor screen to turn it on
2. Slide down the control center of your phone, for iPhones: select Screen
Mirroring;for Android/HarmonyOS phones: select Cast Phone Screen/
Wireless Projection; for Samsung phones: select Smart View
3. Search the pairing name: Qshot V2 Pro-XXXXXX (the last 6 digits are the
factory-set custom code)
4. Enter the PIN code for the first connection: 1234
5. Once connected, it will project the phone screen
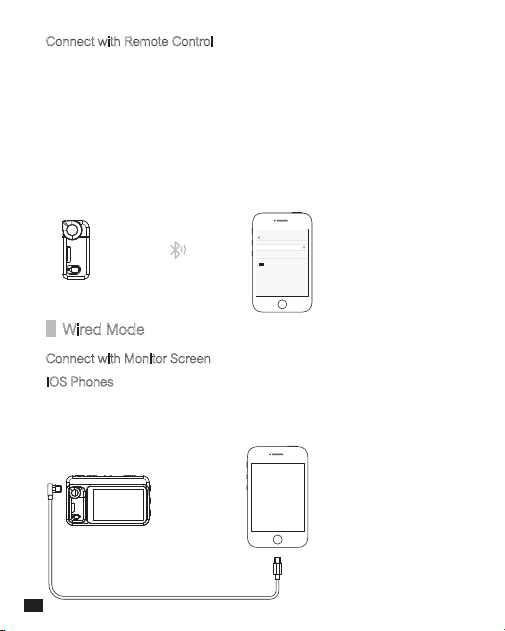
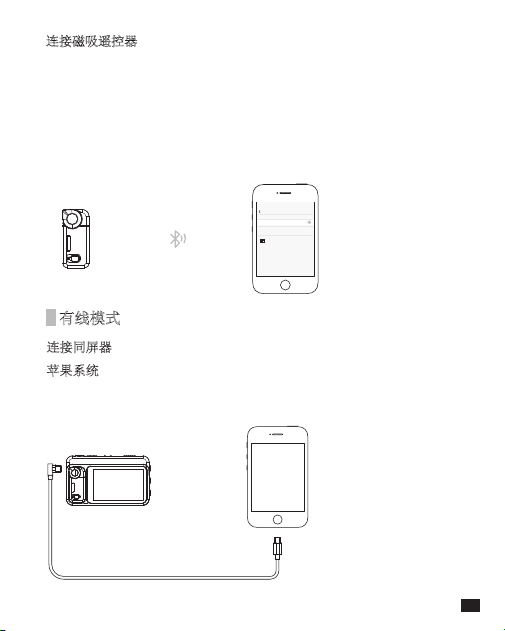
Wired Mode
Connect with Monitor Screen
iOS Phones
1. Connect the phone with monitor screen via the USB-C data cable
2. Once connected, it can turn on automatically and project the phone
screen
10
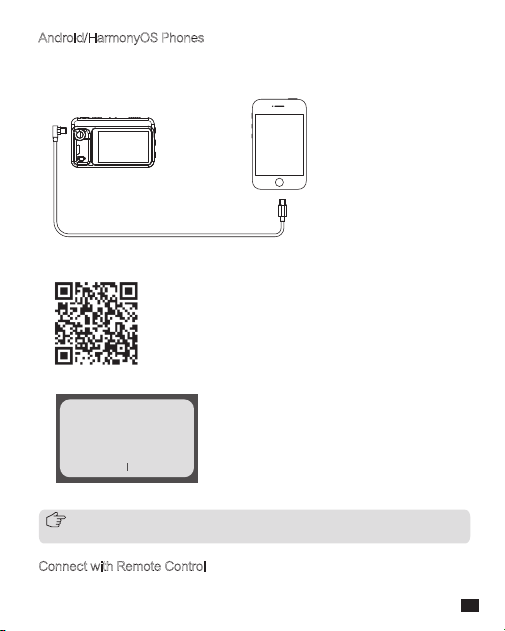
Connect with Remote Control
1. Take out the remote control from charging case (it will automatically
power on)
2. Turn on the phone Bluetooth, search and pair with: 7RYMS_Qshot_V2
3. Android/HarmonyOS phones can pair directly; iOS phones should
enable zoom function first: Settings > Accessibility > Zoom > On (The
phone screen will zoom in. Double-tap the phone screen with three
fingers to return to full screen)
4. Once connected, it can control the shooting screen
蓝牙
蓝牙
7RYMS_Qshot_V2
Please turn off the mirror function if you change the wireless connection
to wired connection
Connect with Remote Control
Please refer to the steps of wireless mode operation
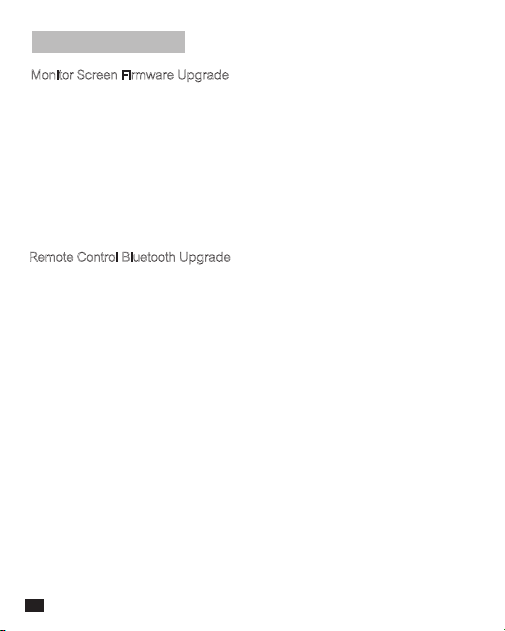
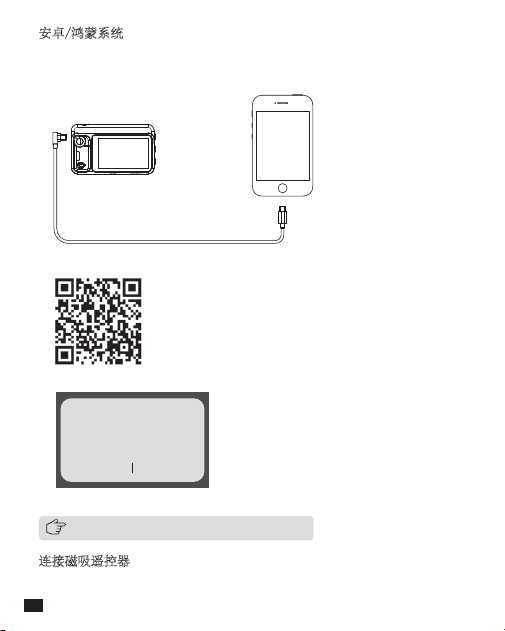
Android/HarmonyOS Phones
Take the HUAWEI HarmonyOS phone as an example:
1. Connect the phone with monitor screen via the USB-C data cable and it
will automatically turn on
2. Scan the QR code on monitor screen to download the third-party
APP “HCCast”
3. Open the HCCast and allow HCCast to record/project the screen
4. Once connected, it can project the phone screen
11
Allow HCCast to record/project the screen?
This app will record or project everything
on the screen.To protect your privacy,
avoid entering passwords or opening
private information such as payment
details,messages, and photos.
DENY ALLOW
Firmware Upgrade
12
Monitor Screen Firmware Upgrade
1. Download the Qshot V2 Pro firmware upgrade package to the computer
from the 7RYMS official website
2. After turning off the monitor screen, long press the power and mirror
button in sync to enter copy mode
3. Connect the firmware upgrade port of monitor screen with computer via
the USB data cable, and open the USB flash disk folder
4. Copy the firmware upgrade package to the folder, then it will upgrade
automatically
Remote Control Bluetooth Upgrade
1. Search and download the official APP “7RYMS” in your smartphone's
APP store
2. Open the “7RYMS”—Add the device—Start to scan—Connect with the
remote control
3. Enter the device homepage in the APP—Click the “+” icon in the upper
right corner—Firmware Upgrade—Upgrade
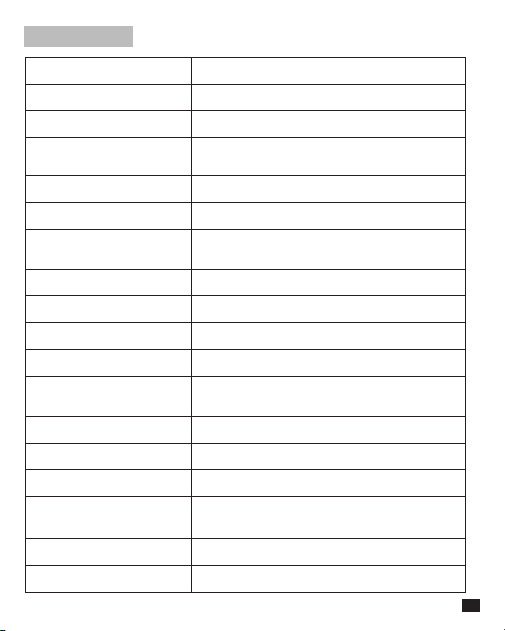
Specification
13
Charging Time
Duration
Net Weight
Working Temperature
Storage Temperature
Battery Type
Dimension
Monitor Screen: 1.5H Remote Control: 1H
Monitor Screen: 5H Remote Control: 24H
Monitor Screen:118g Remote Control: 10g
0℃ ~ 45℃
-10℃ ~ 60℃
Monitor Screen: Lithium Polymer 1500mAh 3.7V
Remote Control: Lithium Polymer 65mAh 3.8V
Monitor Screen: 112.2x67.1x15mm
Remote Control: 47.5x22x10.1mm
Screen Dimension
Screen Viewing Angle
Screen Resolution
3.1-inch
Full-view IPS
480*800
USB-C
Wired Monitor Screen
Interface
Audio Interface
Charging Interface
USB Charging Specification
Rated Power
USB-C (Only available for wired monitor screen)
USB-C
5V/2.0A
1.5W
Control Method
Connection Method
Transmission Distance
Monitor Screen: 50 meters
Remote Control: 35 meters
Button,Bluetooth
WIFI, USB,Bluetooth
无线手机同屏器
趣拍 V2 Pro
说明书

前言
感谢您购买七语趣拍V2 Pro无线手机同屏器。
主要功能
·有线/无线双模式
·2.4G/5G双频无线传输,低延迟,50米稳定传输
·支持高达4K/60fps稳定输出(iOS手机需下载第三方APP“BlackMagic Camera”)
·一体式蓝牙无线遥控、拍照/变焦/翻转摄像头等多功能集成
·3.1英寸高清屏、450Nit高亮显示
·内置扬声器,即拍即听
·1500mAh电池,续航约5小时
·多USBC接口设计,支持外接麦克风及手机直通供电
·MagSafe磁吸设计,快捷稳固
·1/4标准螺孔,兼容三脚架、稳定器等拓展设备
·广泛兼容,全面支持 IOS、安卓及鸿蒙设备
产品使用注意事项
01
搭配苹果原生相机使用时,本设备仅支持4K30及以下帧率录制,如需
录制无卡顿4K60帧率,需下载第三方APP BlackMagic Camera。
苹果系统手机使用焦段调节功能前需开启缩放功能:选择“设置-辅助功能-
缩放-开启”。此时手机屏幕会放大,三指双击手机屏幕后恢复全屏。
有线模式下,安卓/鸿蒙系统手机需下载第三方APP HCCast使用同屏功能。
如无线同屏时,手机显示无法连接,请切换同屏器信道(长按同屏器的信道
切换按键)
设备保存注意事项
请勿将本产品放置在加热设备、烹饪设备、高压容器内或附近,以防止
电池过热发生爆炸。
请避免使用时掉落、碰撞或重击,否则可能造成产品故障。
请在干燥、阴凉、清洁的环境中保存本产品。
避免热源、阳光直射或其他腐蚀性液体。
请勿自行拆卸本产品,避免机械损坏。
包装清单
02
Vendor:
Vendor Tel:
Date of Purchase:
Customer Name:
Address:
Email Address:
Tel:
WARRANTY CARD
www.7ryms-audio.com
Errun Electronic Technology
Product Model:
Vendor's information Customer information
Vendor's Signature: Product SN:
手机同屏器*1 磁吸遥控器*1
引磁环*1 说明书*1 保修卡*1
USB-C数据线*1
无线手机同屏器
趣拍 V2 Pro
说明书
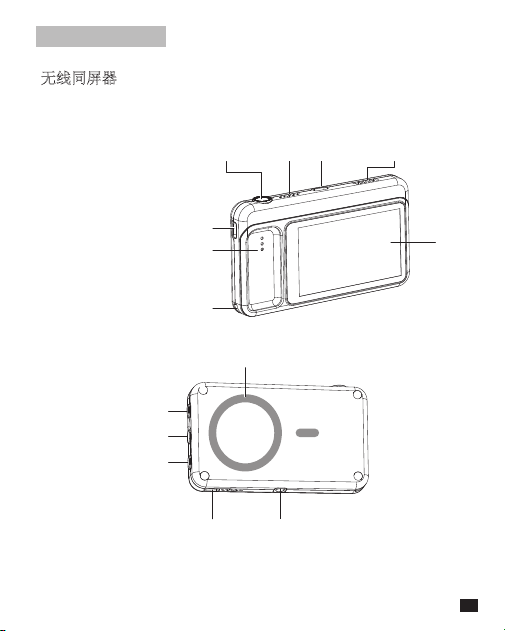
部件介绍及说明
无线同屏器
快门按键 散热孔 扬声器麦克风接口
1/4螺纹孔
挂绳位置
镜像/屏幕翻转按键
电源/亮度调节按键
画面比例/信道切换按键
屏幕
遥控器充电触点
有线同屏/固件升级/手机供电接口
03
充电接口
Magsafe磁吸部位
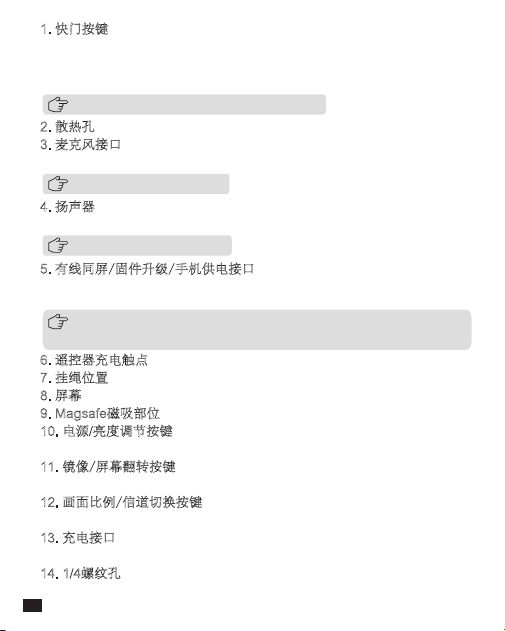
1. 快门按键
1.1 短按手机拍照/视频录制;
1.2 长按苹果系统手机默认摄像;部分安卓/鸿蒙系统手机默认连拍(如需
更改为摄像模式,请通过手机自行设置)
2.
散热孔
3. 麦克风接口
连接外置麦克风使用
4.
扬声器
连接手机使用将同步外放手机声音
5.
有线同屏/固件升级/手机供电接口
使用USB-C线材连接手机进行同屏;连接电脑进行固件升级;同屏器处于充电状
态下可为手机供电(此时由适配器供电,非同屏器内置电池供电)
6. 遥控器充电触点
7. 挂绳位置
8. 屏幕
9. Magsafe磁吸部位
10. 电源/亮度调节按键
长按开机/关机;短按调节屏幕亮度(5级循环)
11.
镜像/屏幕翻转按键
长按切换当前画面为镜像;短按旋转屏幕180°
12.
画面比例/信道切换按键
短按调整画面大小(5级放大);长按切换信道
13.
充电接口
连接电源给同屏器充电
14. 1/4
螺纹孔
可连接三脚架/稳定器等设备使用
该功能需遥控器连接手机蓝牙并在仓方可使用
该功能仅对无线连接起作用
该功能仅对有线连接起作用
1. 手机不支持反向供电同屏器
2. 安卓/鸿蒙系统手机需下载第三方APP HCCast使用有线同屏功能
04
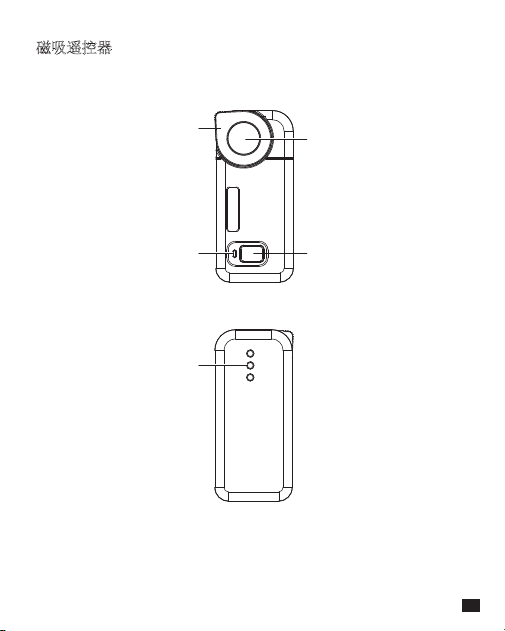
磁吸遥控器
焦段调节拨轮
工作指示灯
充电触点
快门按键
唤醒/反转按键
05
06
1.
焦段调节拨轮
向左拨动缩小一格焦段;向右拨动放大一格焦段;长拨可连续缩小/放大焦段
2.
工作指示灯
3. 快门按键
3.1 半按自动对焦;
3.2 短按手机拍照/视频录制;
3.3 长按苹果系统手机默认摄像;部分安卓/鸿蒙系统手机默认连拍(如需
更改为摄像模式,请通过手机自行设置)
4.
唤醒/反转按键
4.1. 待机时短按可唤醒遥控器;连接使用时短按切换拍照/摄像两种模式;
双击切换前置/后置摄像头;
4.2.长按可唤醒拍照功能(安卓/鸿蒙系统可直接唤醒,苹果仅支持息屏状态
时唤醒,三星系统暂不支持快速唤醒功能)。
5.
充电触点
苹果手机使用该功能前需先开启缩放:选择“设置-辅助功能-缩放-开启”
遥控器无连接无操作30分钟后,即自动关机
未配对 蓝灯慢闪
已配对 蓝灯长亮
电量不足 红灯慢闪
充电中 红灯长亮
电量充满 蓝灯长亮
操作指南
无线模式
安装引磁环
连接同屏器
1. 长按同屏器电源按键开机
2. 下滑手机控制中心界面,苹果系统手机点击屏幕镜像;安卓/鸿蒙手机
点击手机投屏;三星手机点击Smart View
3. 查找配对名:Qshot V2 Pro-XXXXXX(后6位为出厂自定义编码)
4. 首次连接需输入Pin码:1234
5. 连接成功后即可同步手机屏幕画面
1. 将引磁环粘贴在手机背面合适位置
2. 将同屏器背部Magsafe磁吸部位吸附在引磁环位置,固定即可
07
切换信道(如无线同屏时,手机显示无法连接,请切换同屏器信道)
1. 长按同屏器的信道切换按键切换至第2信道
2. 再次点击配对名进行连接
3. 如仍未连接成功,请再次切换至第3信道(3个信道可选)
4. 连接成功后,同屏器将自动同步手机画面
08
有线模式
连接同屏器
苹果系统
1. 使用数据线连接手机与同屏器
2. 连接成功后同屏器即自动开机并同步手机屏幕画面
09
连接磁吸遥控器
1. 将磁吸遥控器从充电仓取出(自动开机)
2. 开启手机蓝牙,连接配对名:7RYMS Qshot V2
3. 安卓/鸿蒙系统手机可直接配对;苹果系统手机需先开启缩放功能:
手机设置-辅助功能-缩放-开启(此时手机屏幕会放大,三指双击手机
屏幕后恢复全屏。)
4. 连接成功后即可操控手机拍摄画面
蓝牙
蓝牙
7RYMS Qshot V2
无线连接改为有线连接时,需关闭镜像功能
连接磁吸遥控器
请参照无线模式步骤进行操作
安卓/鸿蒙系统
下面以华为鸿蒙为例:
1. 使用数据线连接手机与同屏器,连接后同屏器即自动开机
2. 手机扫描同屏器上的二维码,下载第三方APP HCCast
3. 打开HCCast,按照步骤指示同意授权
4. 完成后同屏器即可同步手机屏幕画面
10
是否允许“HCCast”录制/投射您的屏幕
允许后,此应用将录制/投射您屏幕上显
示的所有内容。请注意保护个人敏感信
息,如音频、密码、付款信息、照片、
消息等。
禁止 允许
升级
11
同屏器固件升级
1. 在七语官网下载Qshot V2 Pro固件升级包至电脑
2. 先将同屏器关机,再同时长按电源和镜像按键进入拷贝模式
3. 使用USB数据线,通过固件升级接口连接同屏器与电脑,打开U盘文件
4. 将固件升级包拷贝至文件夹中即可自动升级
遥控器蓝牙升级
1. 在手机应用市场搜索并下载七语官方APP:7RYMS
2. 打开APP—添加设备—开始扫描—连接遥控器
3. 进入APP设备主页—点击右上角+图标—固件升级—升级
规格参数
12
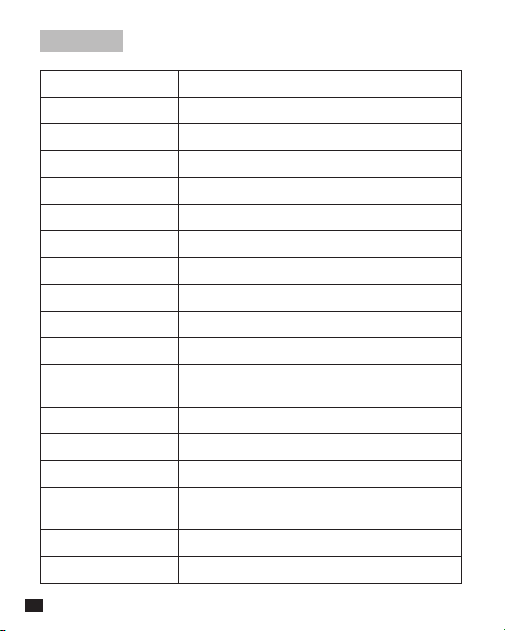
屏幕尺寸
屏幕视角
屏幕分辨率
传输距离
控制方式
连接方式
有线同屏接口
音频接口
充电接口
USB充电规格
额定功率
充电时间
续航时间
净重
工作温度
存储温度
电池类型
尺寸
3.1英寸
全视角IPS
480*800
同屏器:50米 遥控器:35米
按键,蓝牙
WIFI, USB,蓝牙
USB-C
USB-C (仅有线同屏时可用)
USB-C
5V/2.0A
1.5W
同屏器: 1.5小时 遥控器: 1小时
同屏器: 5小时 遥控器: 24小时
同屏器: 118g 遥控器: 10g
0℃ ~ 45℃
-10℃ ~ 60℃
同屏器:锂聚合物 1500mAh 3.7V
遥控器:锂聚合物 65mAh 3.8V
同屏器: 112.2x67.1x15mm
遥控器: 47.5x22x10.1mm

FCC Statement
This device complies with part 15 of the FCC rules. Operation is subject to the following
two conditions: (1) this device may not cause harmful interference, and (2)
this device must accept any interference received, including interference that may cause
undesired operation.
Changes or modifications not expressly approved by the party responsible for compliance
could void the user's authority to operate the equipment.
NOTE: This equipment has been tested and found to comply with the limits for a Class B
digital device, pursuant to part 15 of the FCC Rules. These limits are
designed to provide reasonable protection against harmful interference in a residential
installation. This equipment generates uses and can radiate radio frequency
energy and, if not installed and used in accordance with the instructions, may cause
harmful interference to radio communications. However, there is no guarantee
that interference will not occur in a particular installation. If this equipment does cause
harmful interference to radio or television reception, which can be
determined by turning the equipment off and on, the user is encouraged to try to correct
the interference by one or more of the following measures:
• Reorient or relocate the receiving antenna.
• Increase the separation between the equipment and receiver.
• Connect the equipment into an outlet on a circuit different from that to which the
receiver is connected.
• Consult the dealer or an experienced radio/TV technician for help.
The device has been evaluated to meet general RF exposure requirement. The device
can be used in portable exposure condition without restriction.

