01 02 03 04 05 06 07 08
09 10 11 12 13 14 15
CONSUMER SAFETY INFORMATION: PLEASE READ THIS MANUAL BEFORE
INSTALLING AND OPERATING THIS APPLIANCE. FAILURE TO FOLLOW THESE
INSTRUCTIONS MAY RESULT IN A POSSIBLE ELECTRIC SHOCK, FIRE HAZARD,
AND/OR INJURY AND WILL VOID THE WARRANTY.
WARNING: IF THE INFORMATION IN THIS MANUAL IS NOT FOLLOWED, AN
ELECTRIC SHOCK OR FIRE MAY RESULT IN PROPERTY DAMAGE, PERSONAL
INJURY, OR LOSS OF LIFE.
THIS INSTRUCTION BOOKLET CONTAINS IMPORTANT SAFETY INFORMATION.
PLEASE READ AND KEEP FOR FUTURE REFERENCE.
261046
ELECTRIC FIREPLACE
HOMEOWNERS OPERATING MANUAL
ZF36D03F
ZF42D03F
ZF50D03L
ZF60D03L
MODELS:

01 02 03 04 05 06 07 08
09 10 11 12 13 14 15
IMPORTANT INSTRUCTIONS
When using electrical appliances, basic precautions should always be followed to reduce the risk of fire, electrical
shock, and/or injury including the following:
1. Read all instructions before using this heater.
2. This heater is hot when in use. To avoid burns, do not let bare skin touch hot surfaces. If provided, use handles when
moving this heater.
DANGER: High temperature may be generated under certain abnormal conditions. Do not partially or fully cover or
obstruct the front of the heater.
WARNING: In order to avoid overheating, do not cover the heater. It cannot be used in a closet.
3. CAUTION: The appliance should not be used by children or persons with reduced physical, sensory or mental
capabilities.
4. Children should be advised not to play with the appliance.
5. Always unplug this appliance when not in use.
6. Do not operate any heater with a damaged cord or plug or after the appliance malfunctions, or if it has been dropped
or damaged in any manner.
7. If the supply cord is damaged, it must be replaced by the manufacturer, it’s service agent or similarly qualified
persons in order to avoid a hazard.
8. Any repairs to this fireplace should be carried out by a qualified service person.
9. Under no circumstances should this fireplace be modified. Parts having to be removed for servicing must be replaced
prior to operating this fireplace again.
10. Do not use outdoors.
11. This heater is not intended for use in bathrooms, laundry areas and similar indoor locations. Never locate this
appliance where it may fall into a bathtub or other water container.
12. Do not run cord under carpeting. Do not cover cord with throw rugs, runners or the like. Arrange cord away from
traffic areas and where it will not be tripped over.
13. To disconnect this appliance, turn controls to the off position, then remove plug from outlet.
14. Connect to properly grounded outlet only.
15. This appliance, when installed, must be electrically grounded in accordance with local codes or, in the absence of
local codes, with the current CSA C22.1 Canadian Electrical Code or for USA installations, follow local codes and the
National Electrical Code, ANSI/NFPA NO.70.
16. There is a protective thermostat limiter inside the heater. When the inner temperature over heat, the thermostat
limiter will shut off the power supply to avoid the risk of fire damage to the appliance.
17. The heaters must not be located immediately below a socket-outlet.
18. Do not insert or allow foreign objects to enter any ventilation or exhaust opening as this may cause an electric shock
or fire, or damage the appliance.
19. To prevent a possible fire, do not block air intakes or exhaust in any manner. Do not use on soft surfaces, like bed,
where opening may become blocked.
20. This appliance has hot and arcing or sparking parts inside. Do not use where gasoline, paint, or flammable liquids
are used or stored. This fireplace should not be used as a drying rack for clothing. Christmas stockings or decorations
should not be hung in area of it.
21. Use this appliance only as described in the manual. Any other use not recommended by the
manufacturer may cause fire, electric shock or injury to persons.
22. Always plug heaters directly into a wall outlet/receptacle. Never use with an extension cord or relocatable power tap
(outlet/power strip).
SAVE THESE INSTRUCTIONS
01 02 03 04 05 06 07 08
09 10 11 12 13 14 15
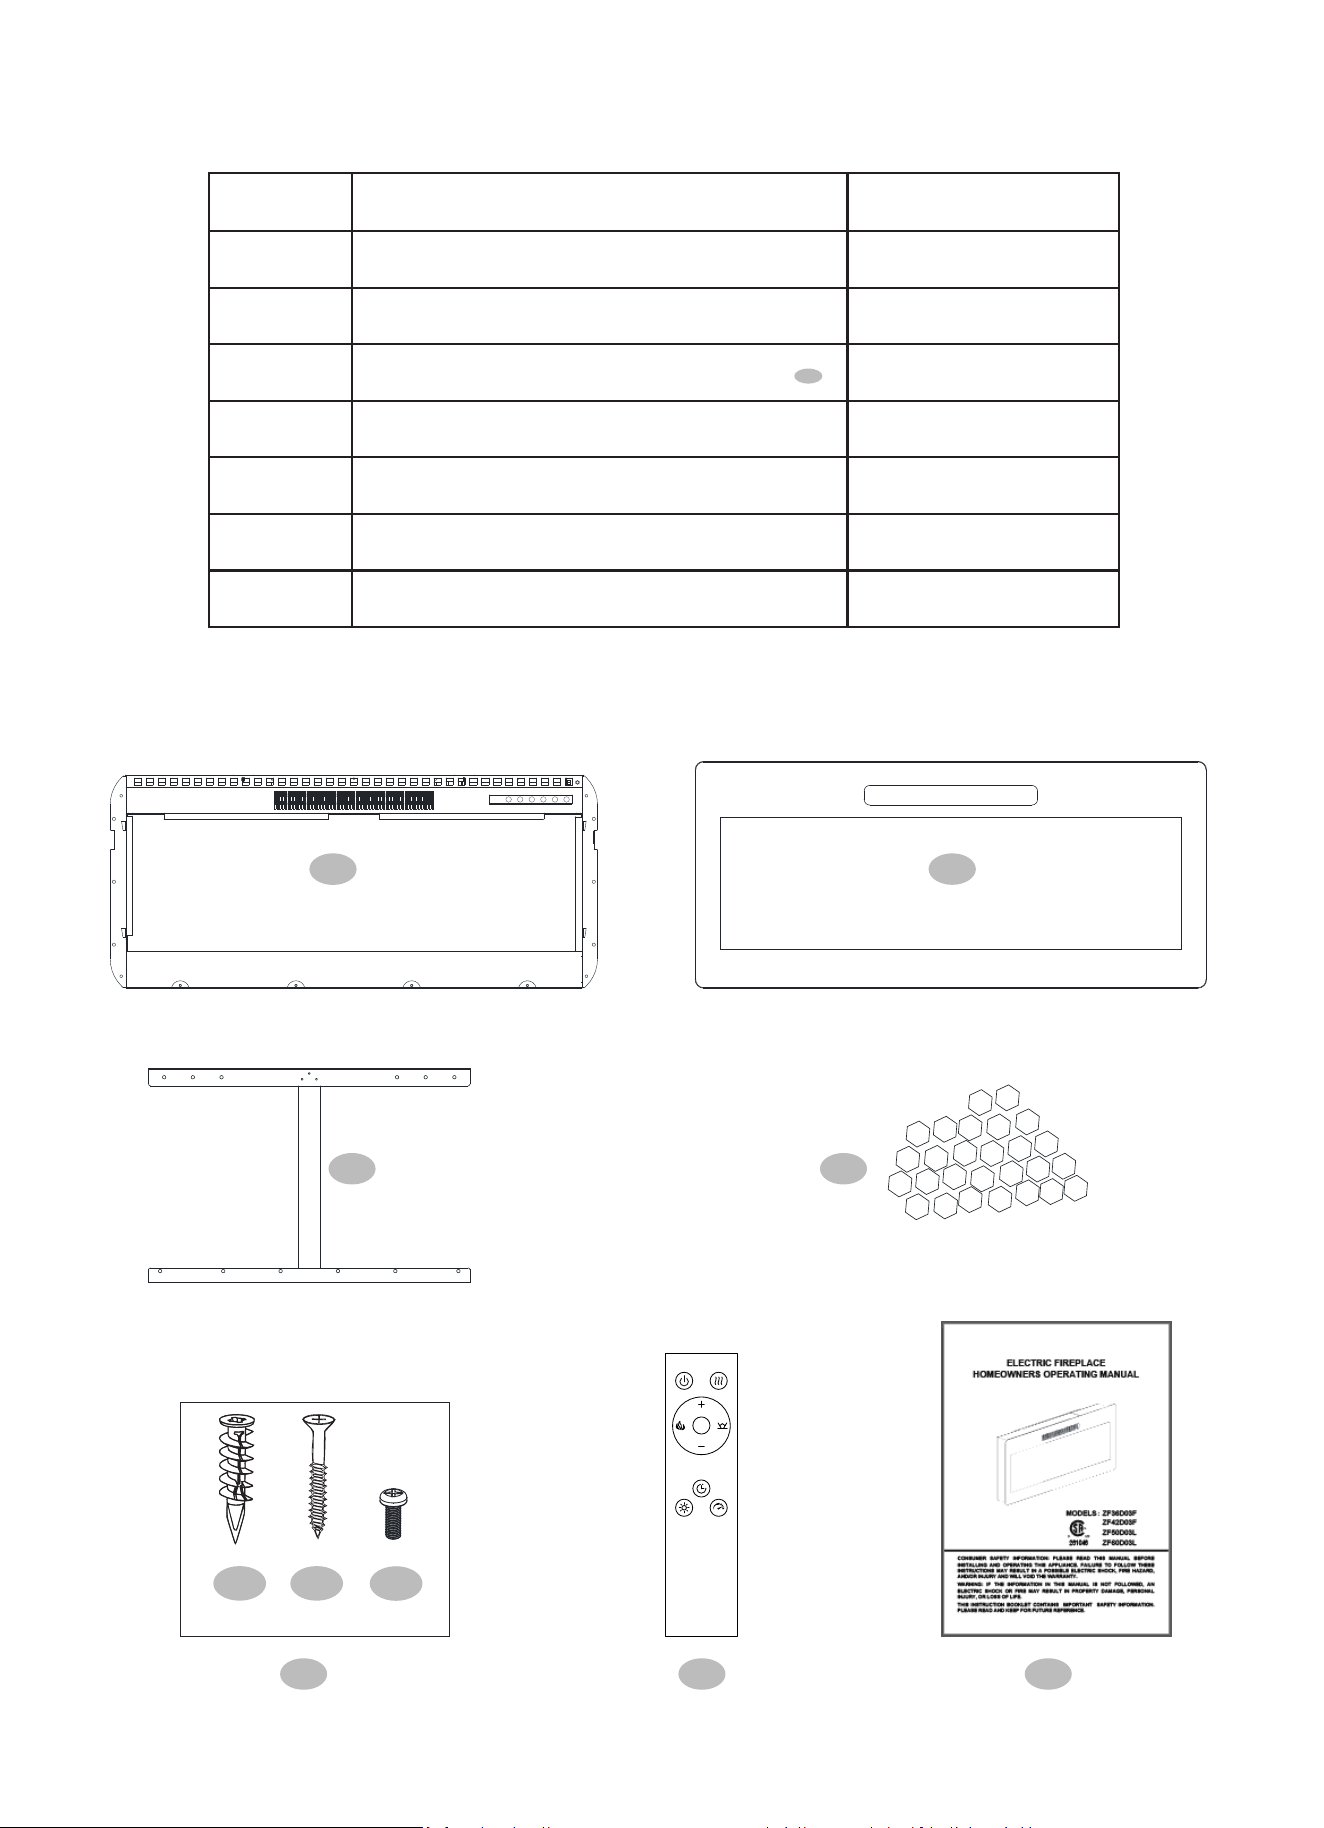
PACKAGE CONTENTS
5 76
2
3 4
1
(Attached To The Fireplace )
Fireplace
DESCRIPTION QTYCODE
Glass Front
Acrylic Crystals
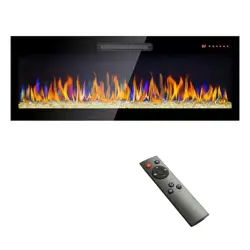
Remote Control
Manual
Hardware Screw Bag
Mounting Bracket
1 1
1
1
1 Bag
1 Bag
1
1
2
3
4
5
6
7
x2
C
x4
A
x6
B
1
01 02 03 04 05 06 07 08
09 10 11 12 13 14 15
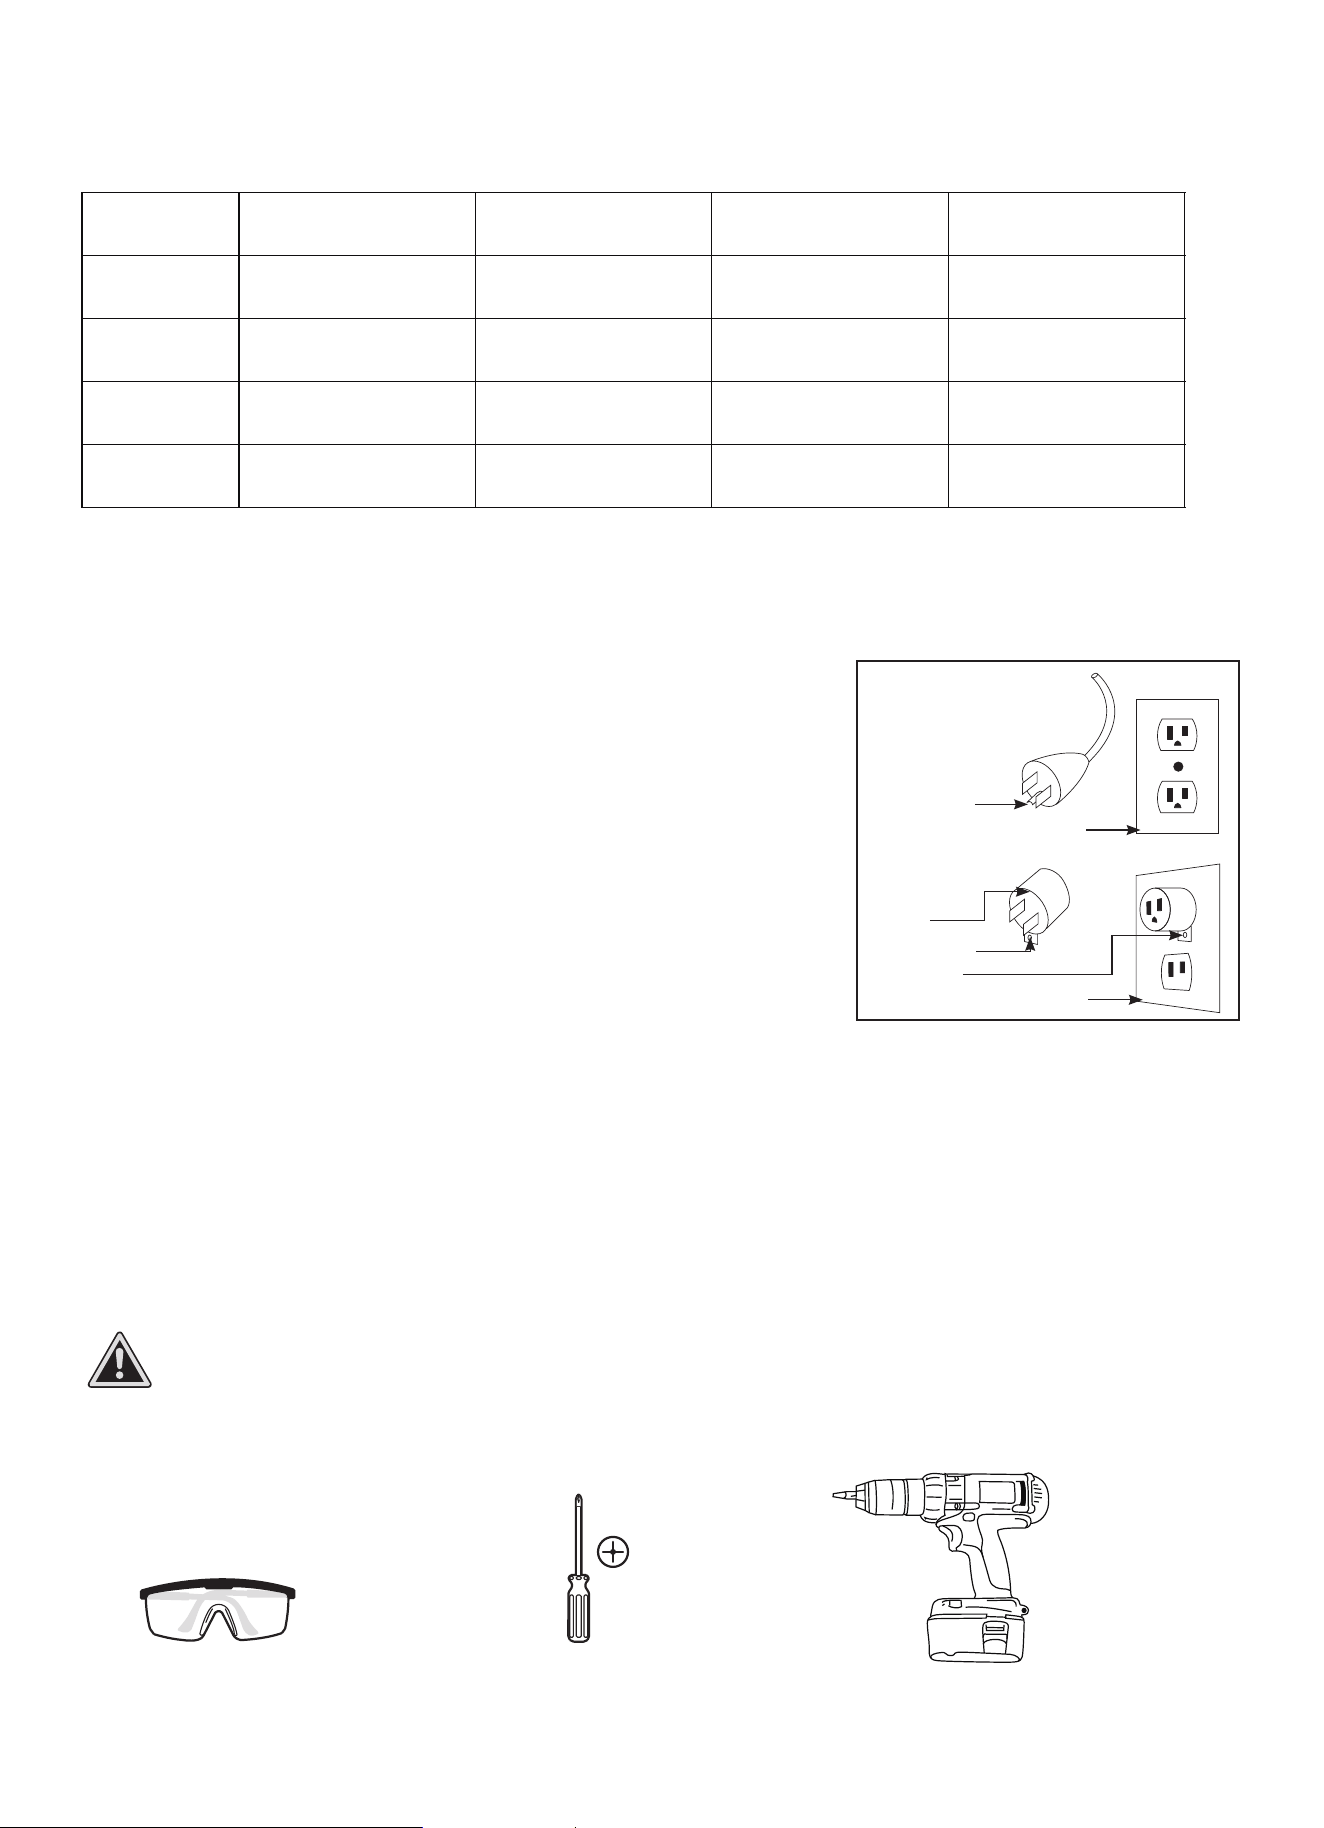
GROUNDING INSTRUCTIONS:
This heater is for use on 120 volts. The cord has a plug as shown at (A)
in figure 1. An adapter as shown at (C) is available for connecting
three-blade grounding-type plugs to two-slot receptacles. The green
grounding lug extending from the adapter must be connected to a
permanent ground such as a properly grounded outlet box. The
adapter should not be used if a three-slot grounded receptacle is
available.
NOTE: Adapters are NOT for use in Canada
Grounding Pin
Cover of Grounded Outlet Box
Adapter
Grounding Lug
Metal Screw
Cover of Grounded Outlet Box
B
C
A
Figure 1
SPECIFICATIONS
PRE-INSTALLATION
120 V
1400 W
60 Hz
120 V
1400 W
60 Hz
120 V
1400 W
60 Hz
120 V
1400 W
60 Hz
ZF42D03FZF36D03F
36” x 4.2” x 16” 42” x 4.2” x 16” 50” x 4.2” x 18.6” 60” x 4.2” x 18.6”
Model NO.
Dimension
(W x D x H)
ZF50D03L ZF60D03L
Rating
Voltage
Frequency
PLANNING INSTALLATION
TOOLS REQUIRED (not included)
Before you begin assembly, locate the instructions and hardware. Compare all parts with the Hardware Included and
Package Contents lists. Be sure you have all the parts and can identify them. A helping hand is always good.
Assemble your fireplace with an adult assistant if possible. Some pieces are heavy and will need to be held by a
helper. Assembly time will take approximately 5-20 minutes.
CAUTION: This carton includes a GLASS panel! Always use extreme caution when handling glass.
Failure to do so could result in personal injury or property damage.
Safety goggles Phillips screwdriver
Power drill
01 02 03 04 05 06 07 08
09 10 11 12 13 14 15
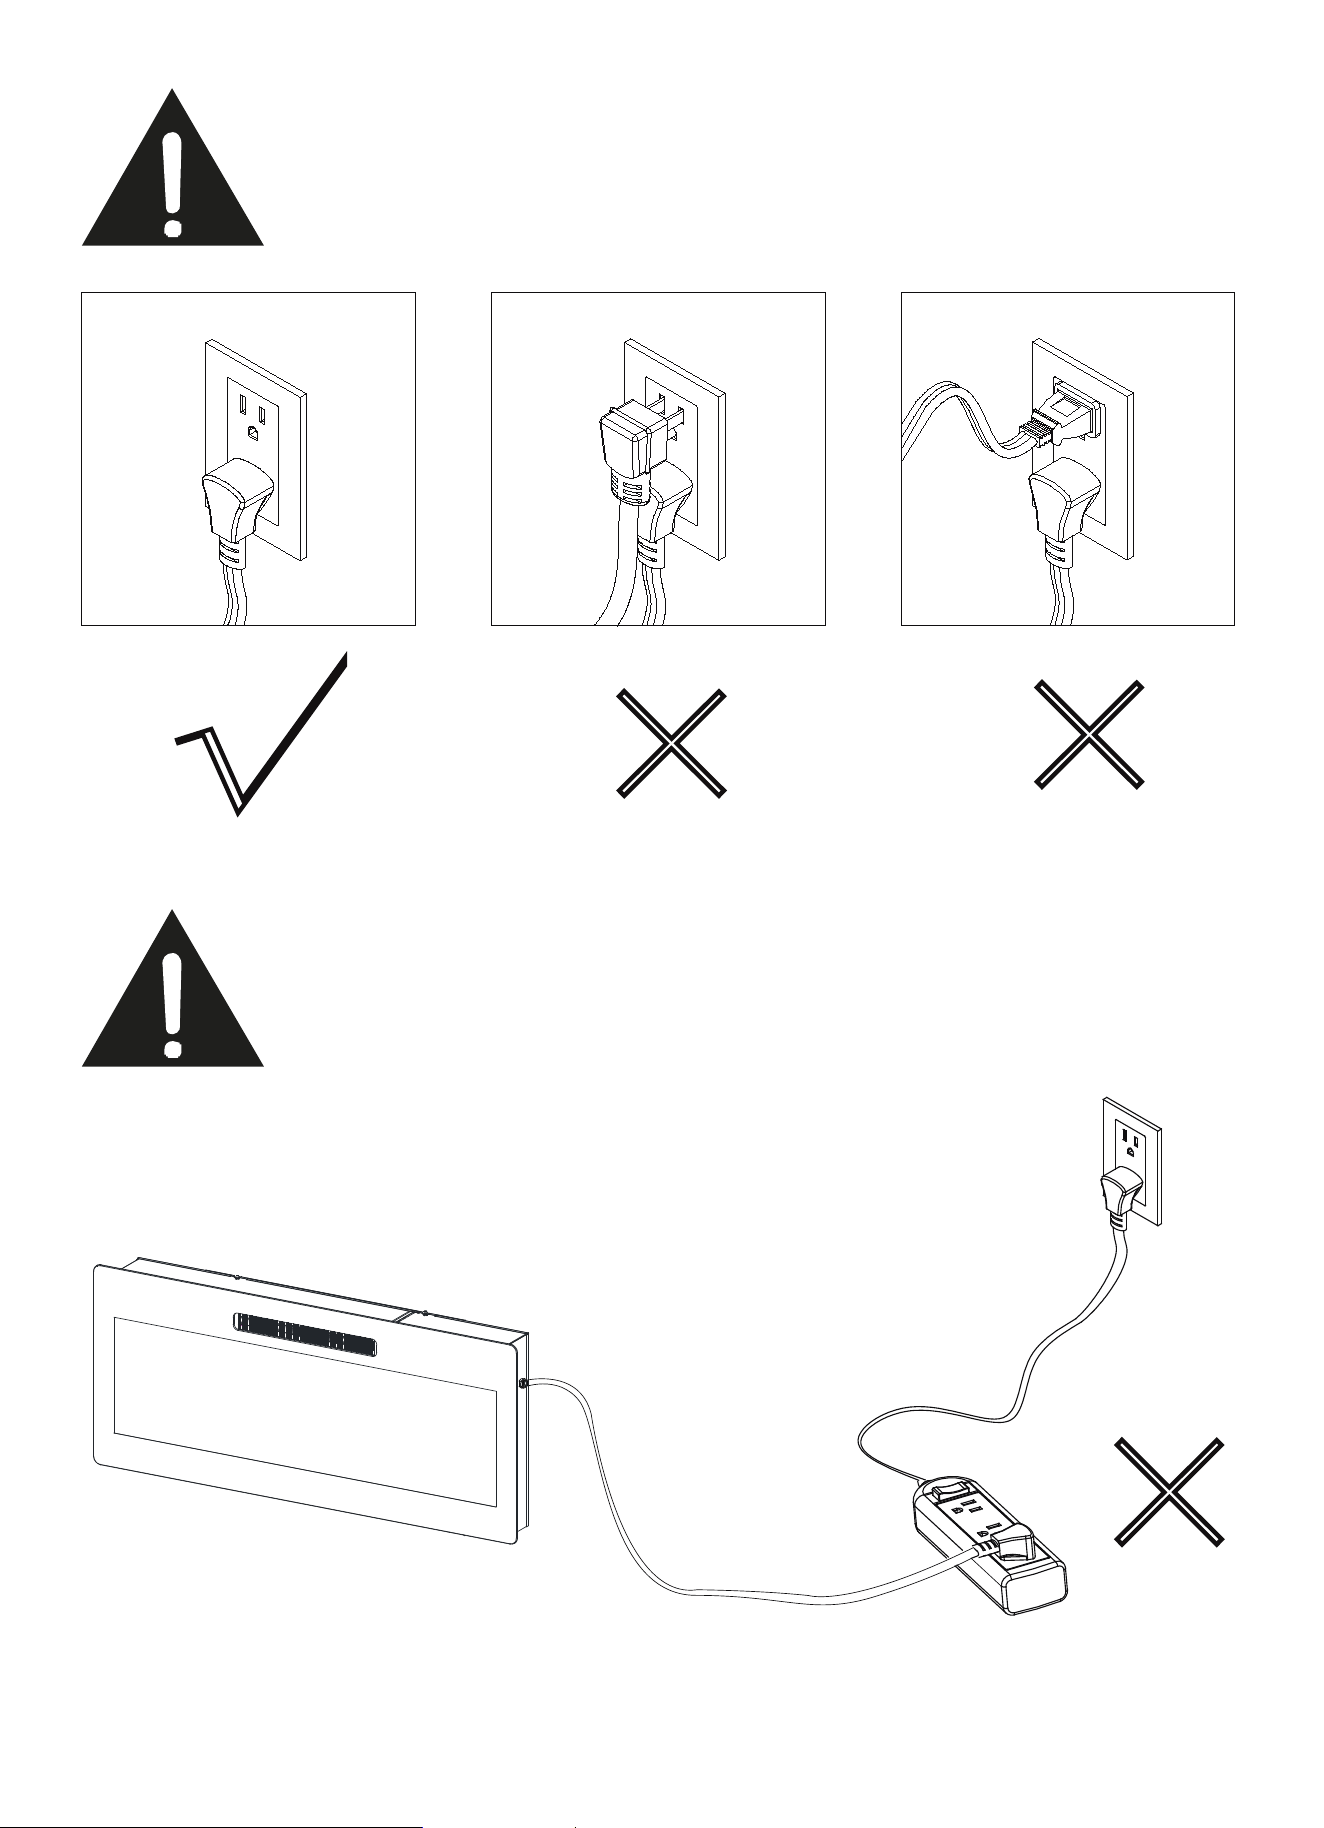
Do not share a socket with other appliances
when using electric fireplaces, please use a
dedicated socket.
Never use with an extension cord or
relocatable power tap (outlet / power strip).
√
×
×
×
01 02 03 04 05 06 07 08
09 10 11 12 13 14 15
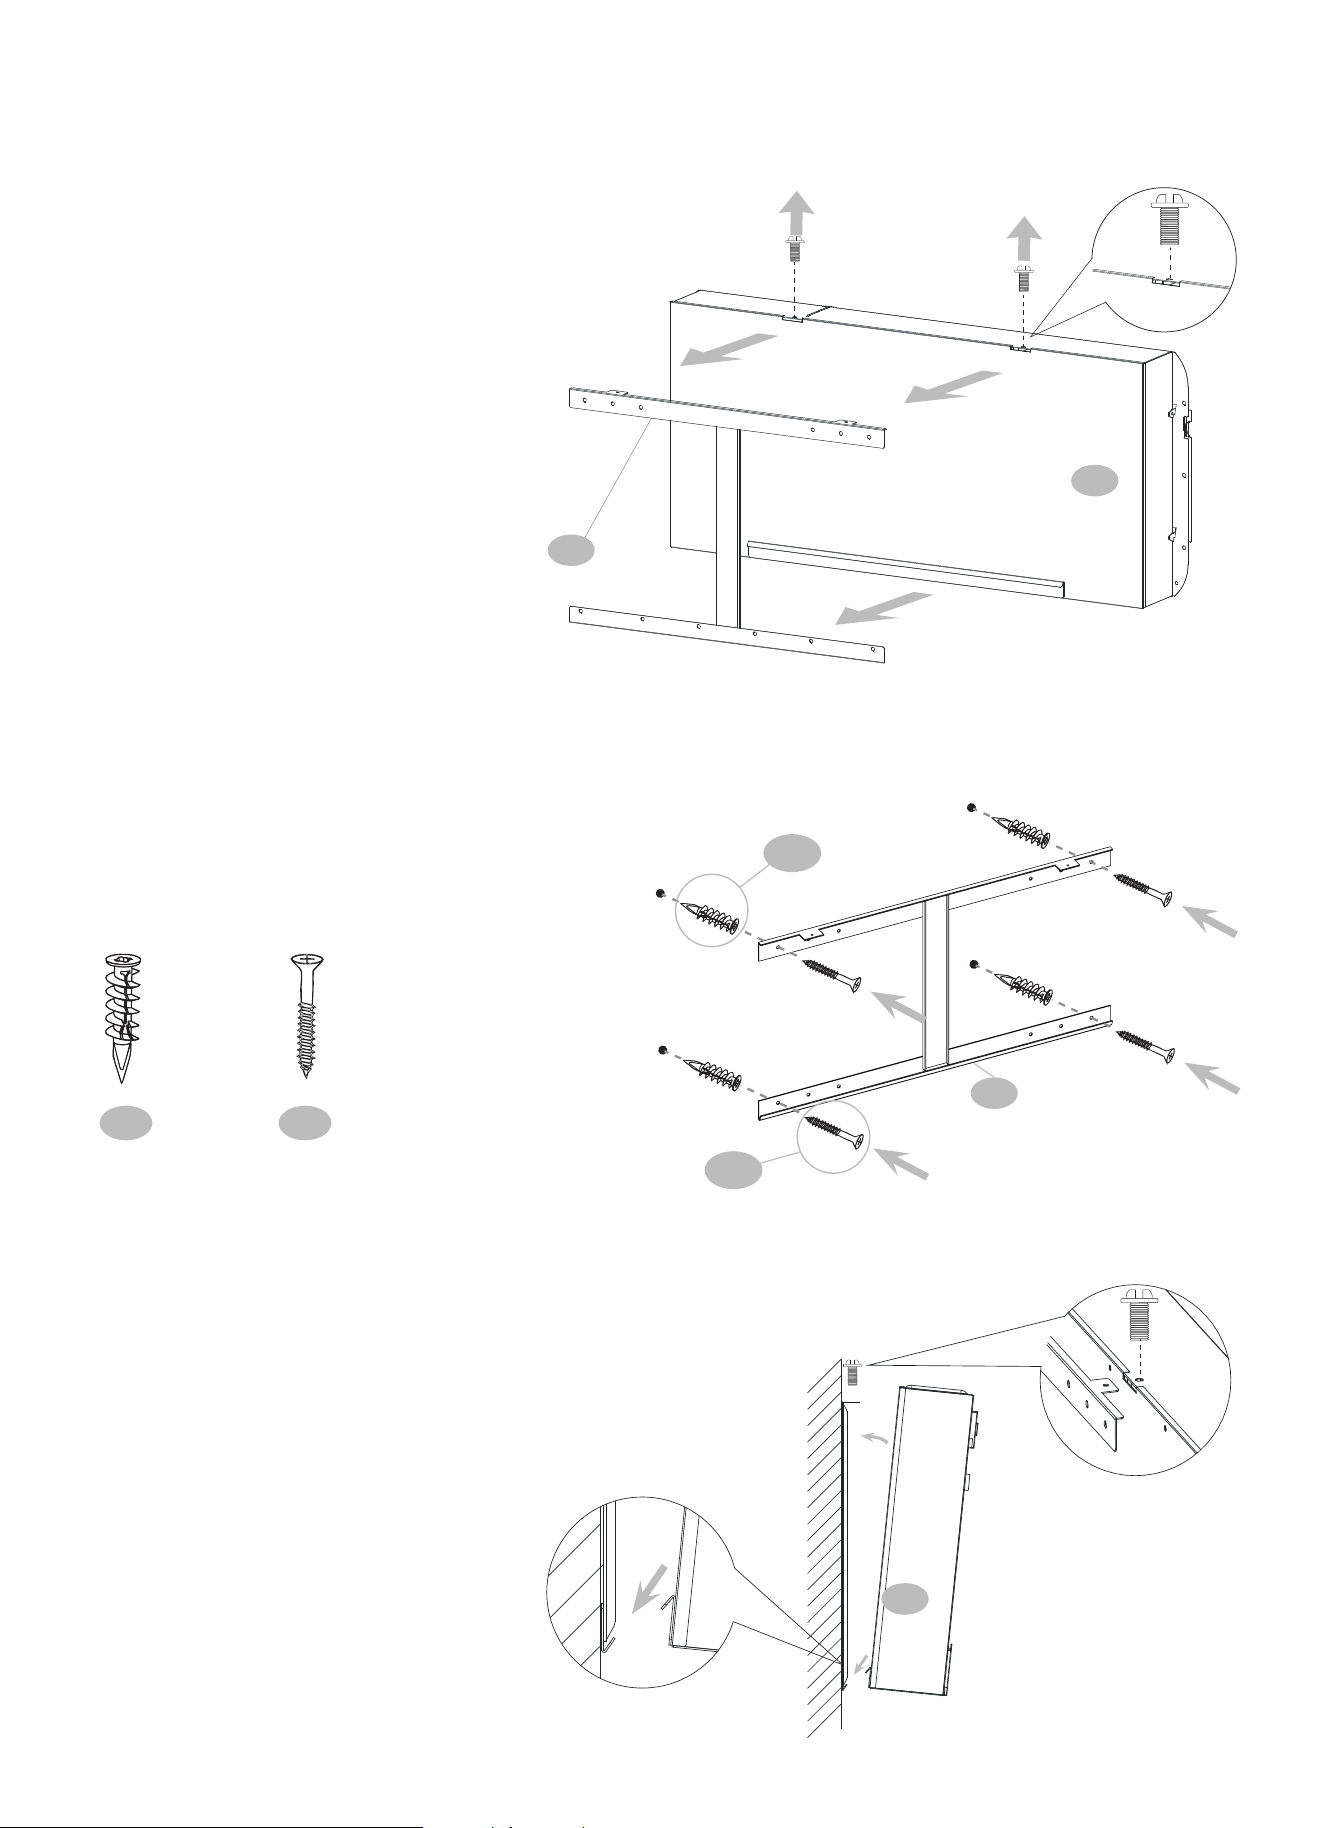
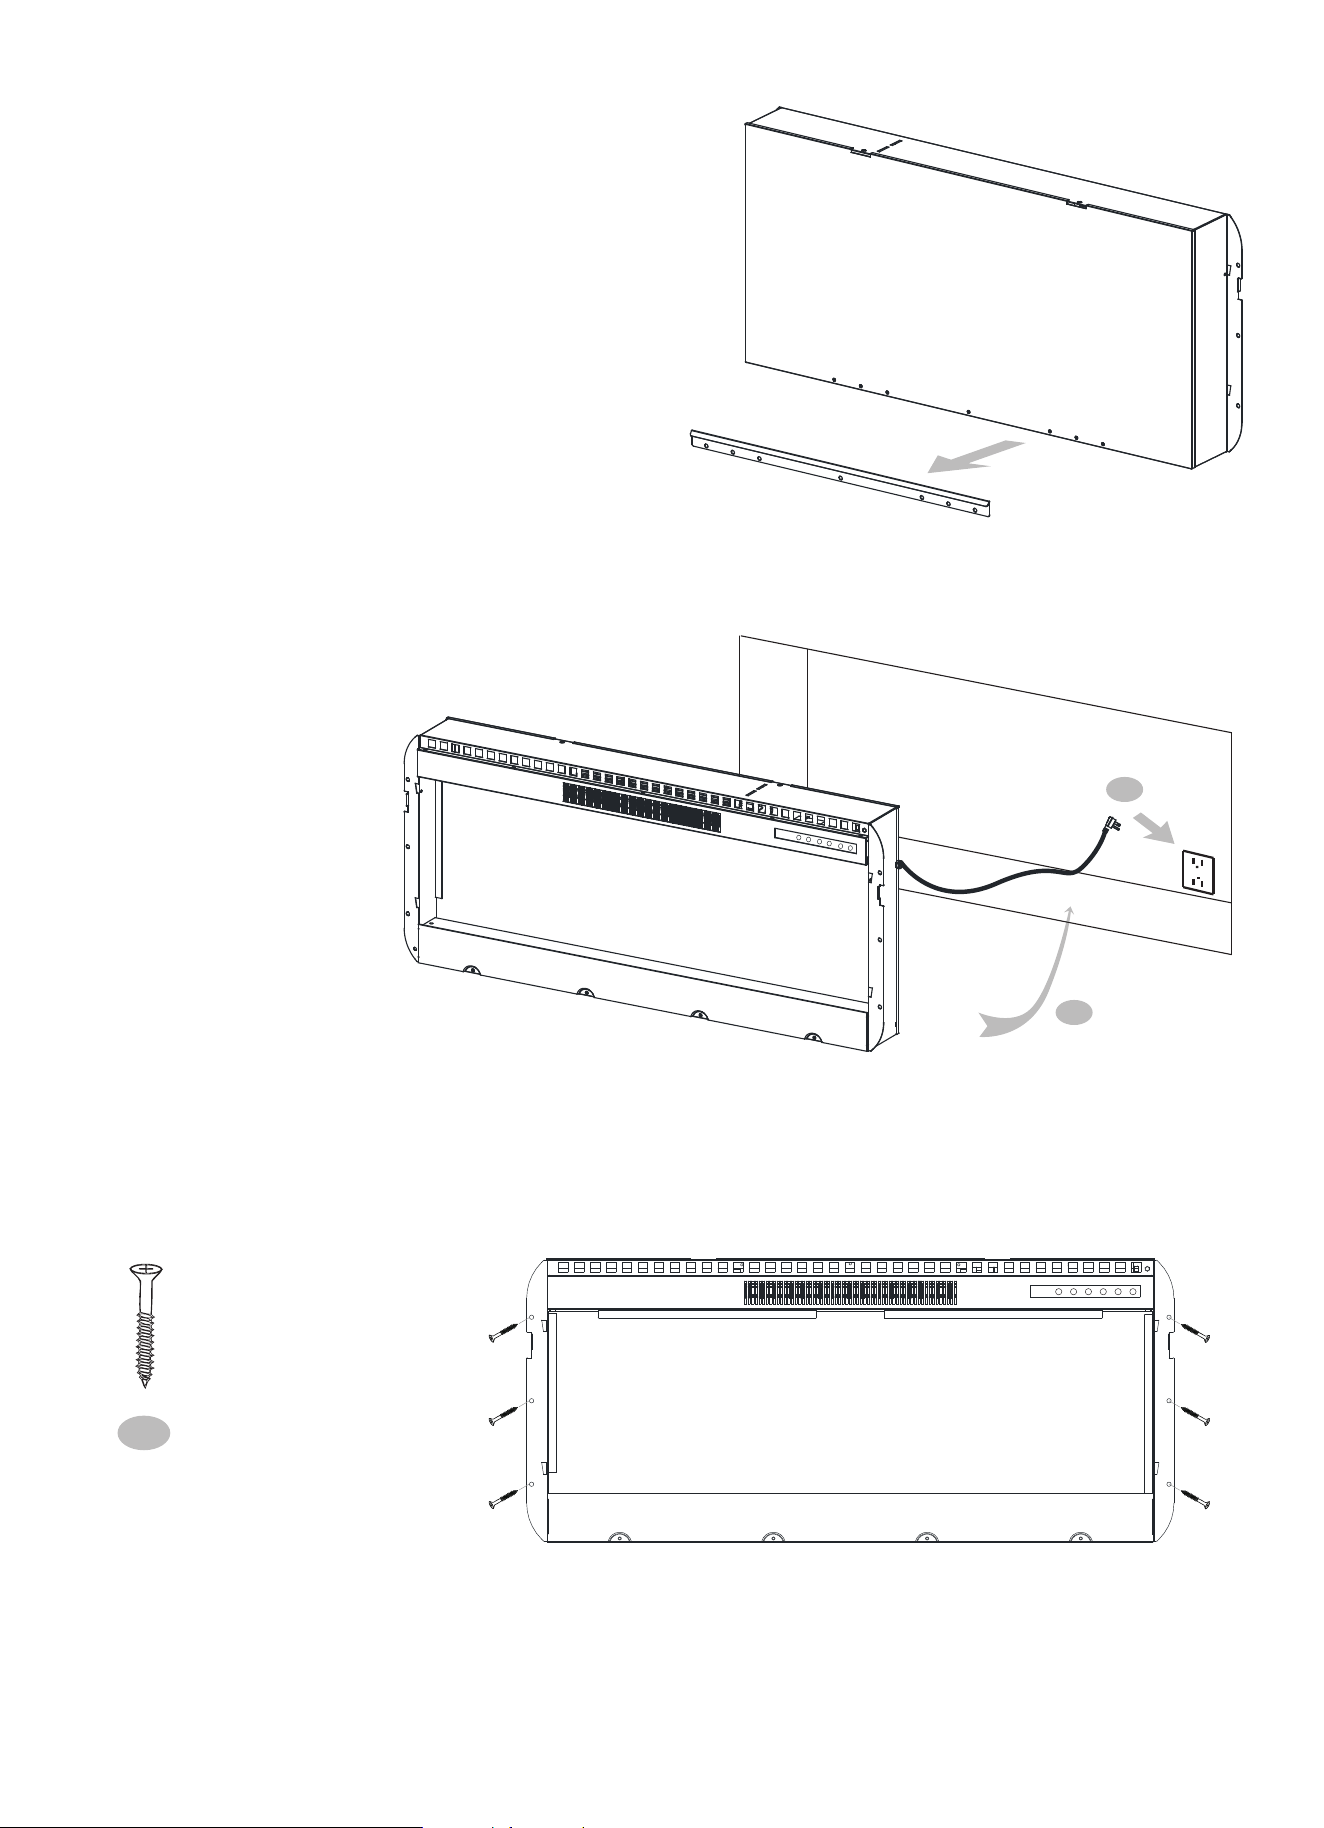
INSTALLATION (WALL MOUNTING)
1. Remove the mounting bracket
from the back of the fireplace.
2. Attach the mounting bracket to a wall.
NOTE: Wall anchor is not needed if the bracket
is to be mount directly on the wall studs.
3
1
x4
B
x4
A
3
x4
A
x4
B
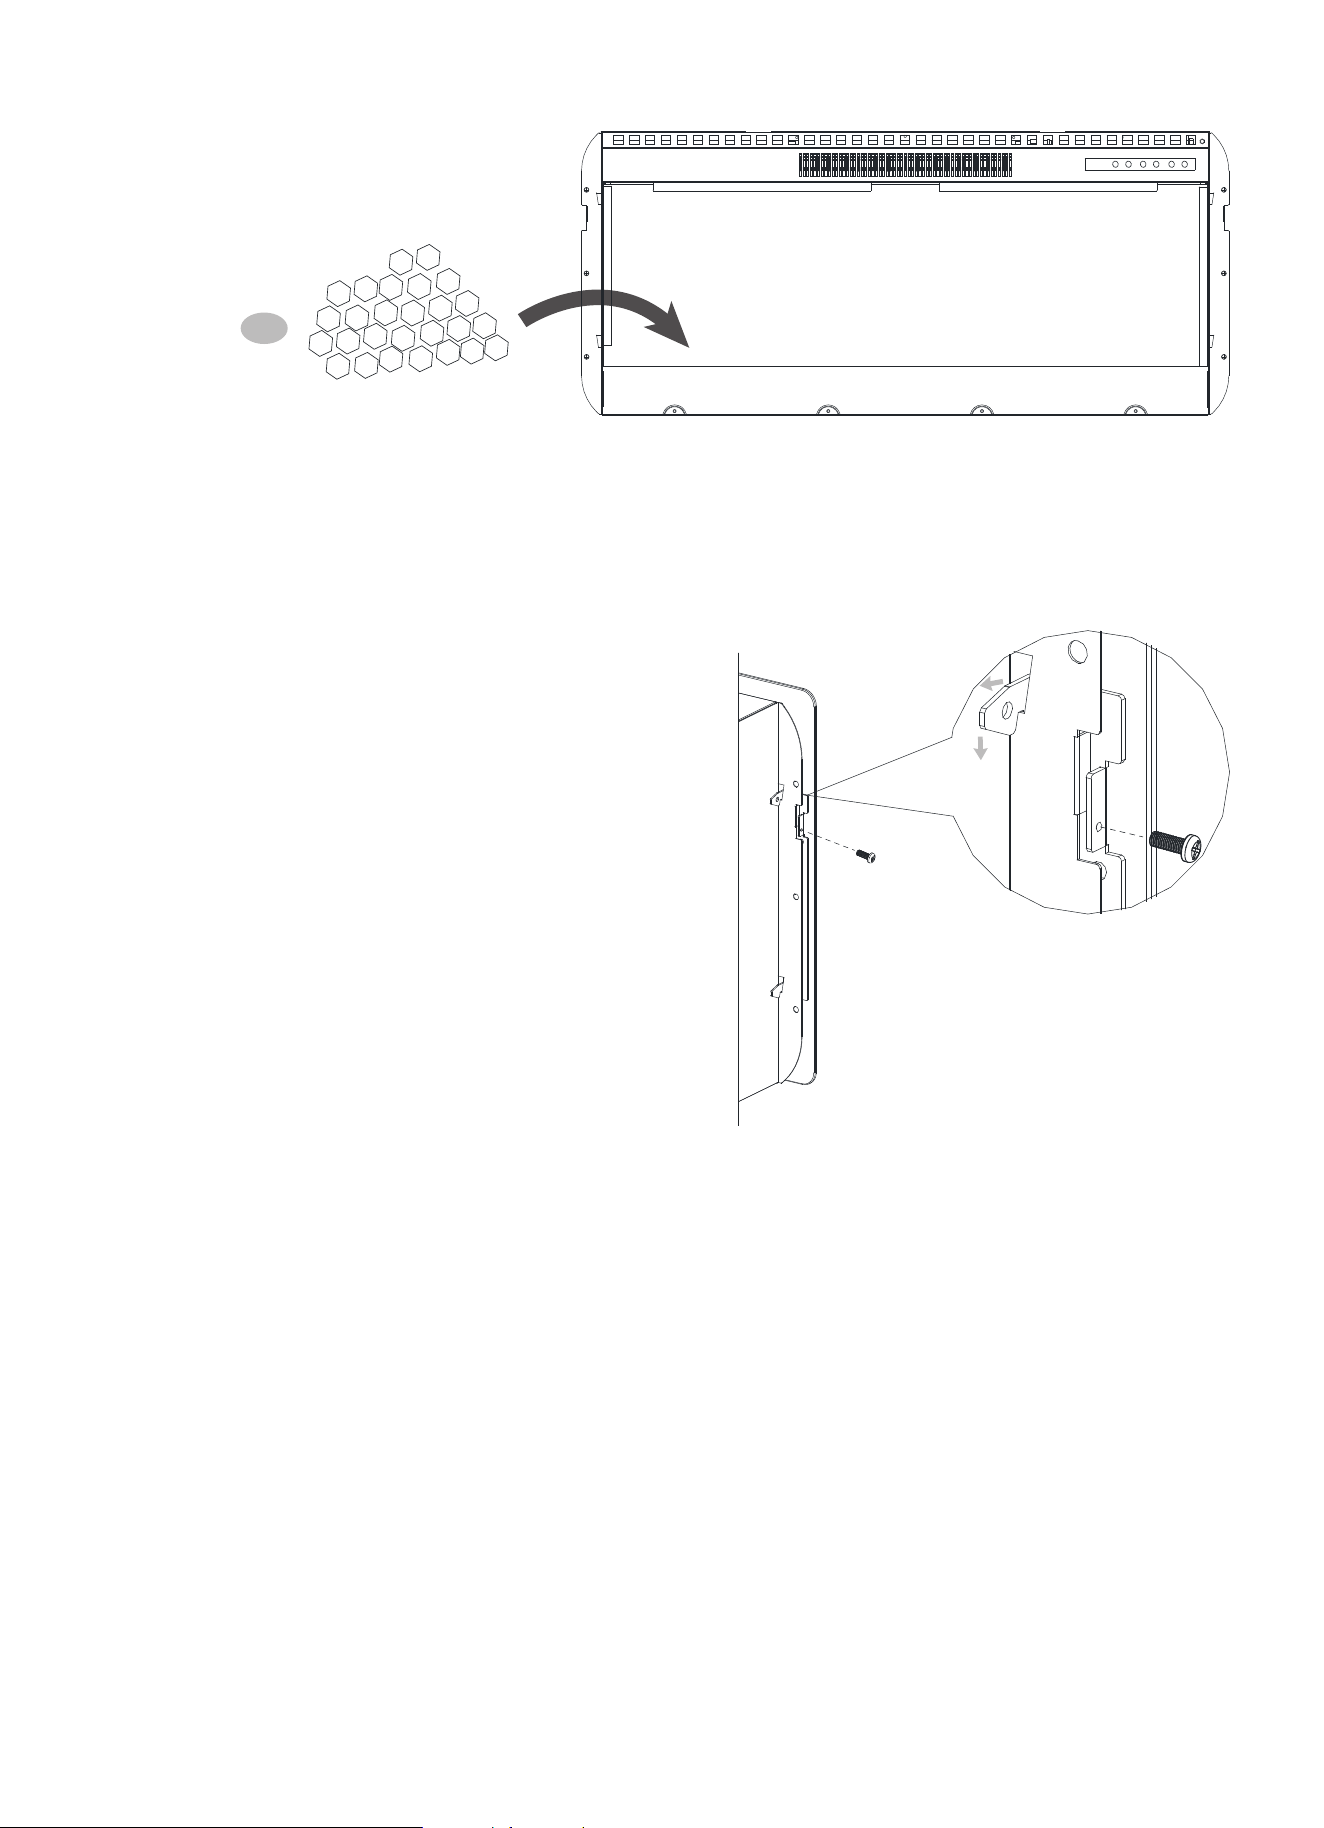
3. Hang the fireplace on the mounting bracket.
Secure the fireplace to the mounting bracket with the
two screws removed in Step 1.
wall
1
01 02 03 04 05 06 07 08
09 10 11 12 13 14 15
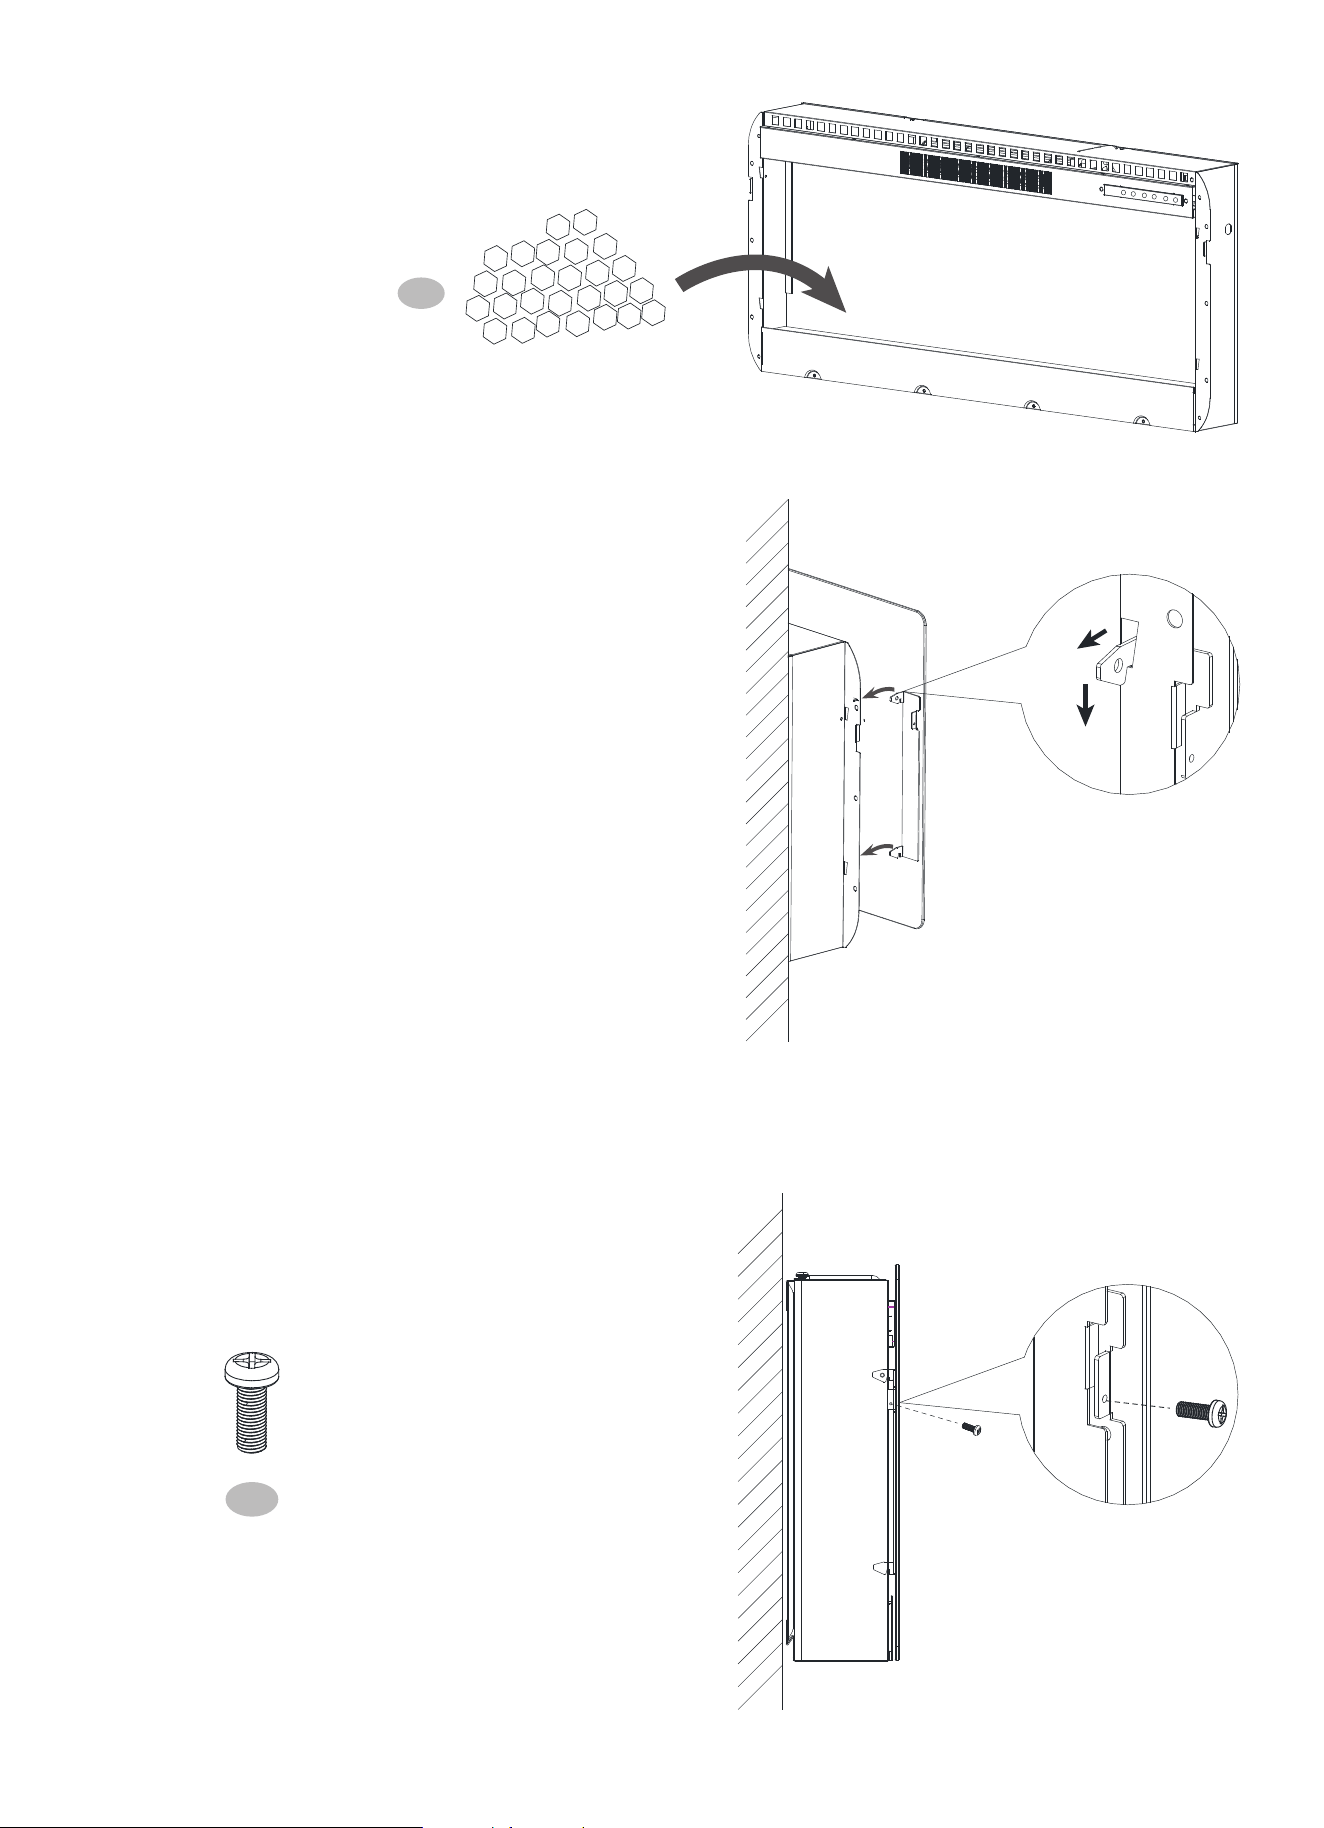
4. Place decorative crystals inside the fireplace.
4
5. Put the glass front panel on the fireplace.
CAUTION: Careful when handling glass
to prevent injury or damage.
wall
6. Secure the glass front panel to the
fireplace with the provided screws C.
wall
x2
C
01 02 03 04 05 06 07 08
09 10 11 12 13 14 15
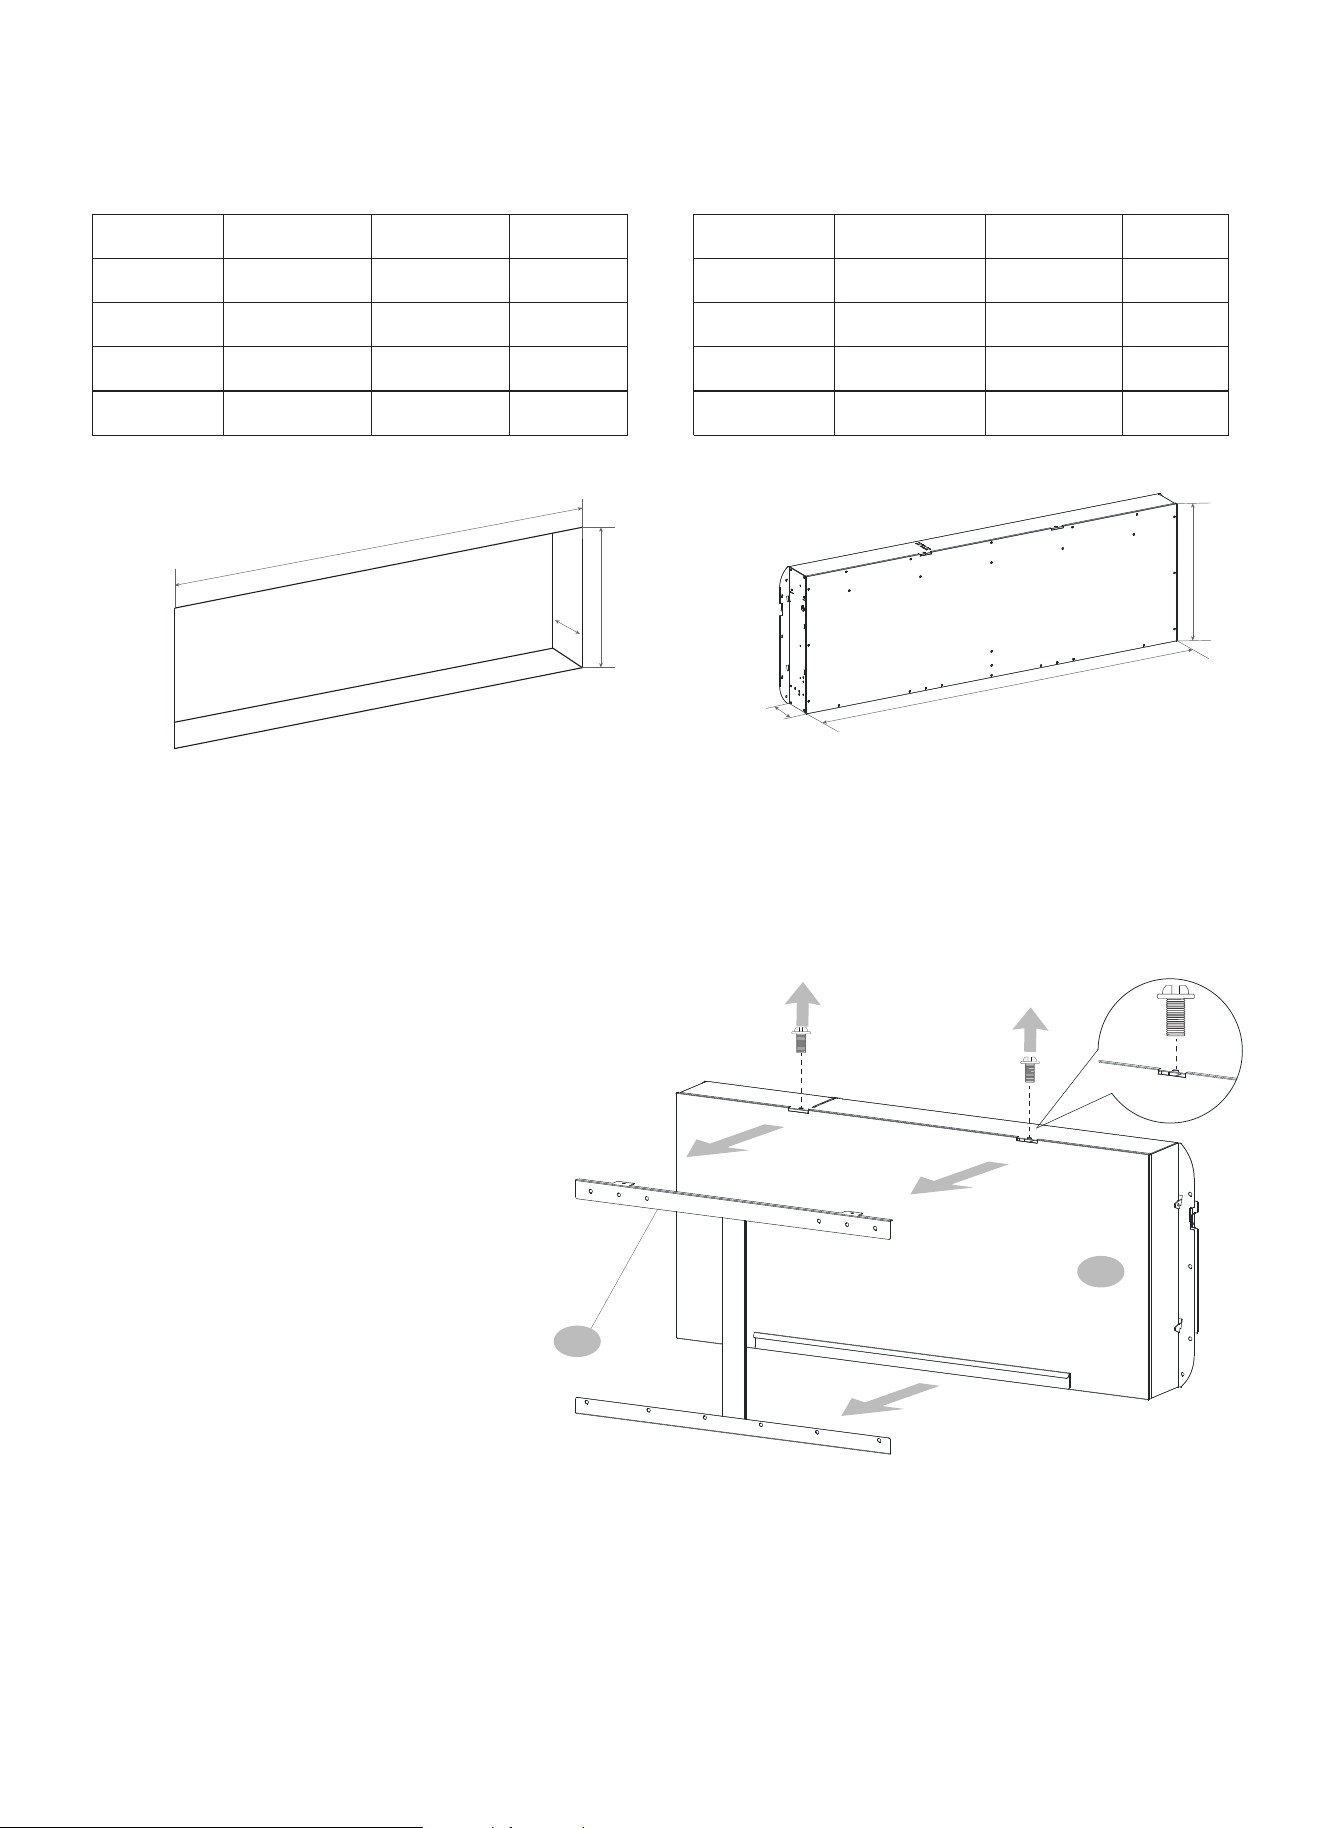
INSTALLATION (IN WALL)
1. Remove the mounting bracket
from the back of the fireplace.
3
1
Cabinet - in / cm fireplace - in / cm
Model
ZF36D03F 33.6/85.3 15.8/40.2 4.9/12.4
ZF42D03F 39.6/100.6 15.8/40.2 4.9/12.4
ZF50D03L 47.6/120.9 18.4/46.7 4.9/12.4
ZF60D03L 57.6/146.3 18.4/46.7 4.9/12.4
A B C Model
ZF36D03F 33.1/84.1 15.4/39.2 3.8/9.7
ZF42D03F 39.1/99.4 15.4/39.2 3.8/9.7
ZF50D03L 47.1/119.7 18.1/46.0 3.8/9.7
ZF60D03L 57.1/145.1 18.1/46.0 3.8/9.7
A1 B1 C1
A
B
C
A1
C1
B1
WARNING: Cabinet construction and electrical outlet wiring must comply with local bulding codes regulations to reduce
the risk of fire, electrical shock and injury to persons.
01 02 03 04 05 06 07 08
09 10 11 12 13 14 15
NOTE: Screw back the 7 screws to the fireplace.
2. Remove the Hang board from
the back of the fireplace.
3. Plug into the power supply and push the
fireplace into the cabinet.
1
2
4. Use supplied screws B to secure the fireplace to cabinet.
x6
B
01 02 03 04 05 06 07 08
09
10 11 12 13 14 15
4
5. Place decorative crystals inside the fireplace.
6. Put the glass front panel on the fireplace.
CAUTION: Careful when handling glass
to prevent injury or damage.
CAUTION: After hanging the glass front panel,
1 minute to recheck the touch-panel is necessary.
Otherwise it will touch without any reaction.
Then secure the glass front panel to the
fireplace with the provided screws C.
01 02 03 04 05 06 07 08
09 10
11 12 13 14 15
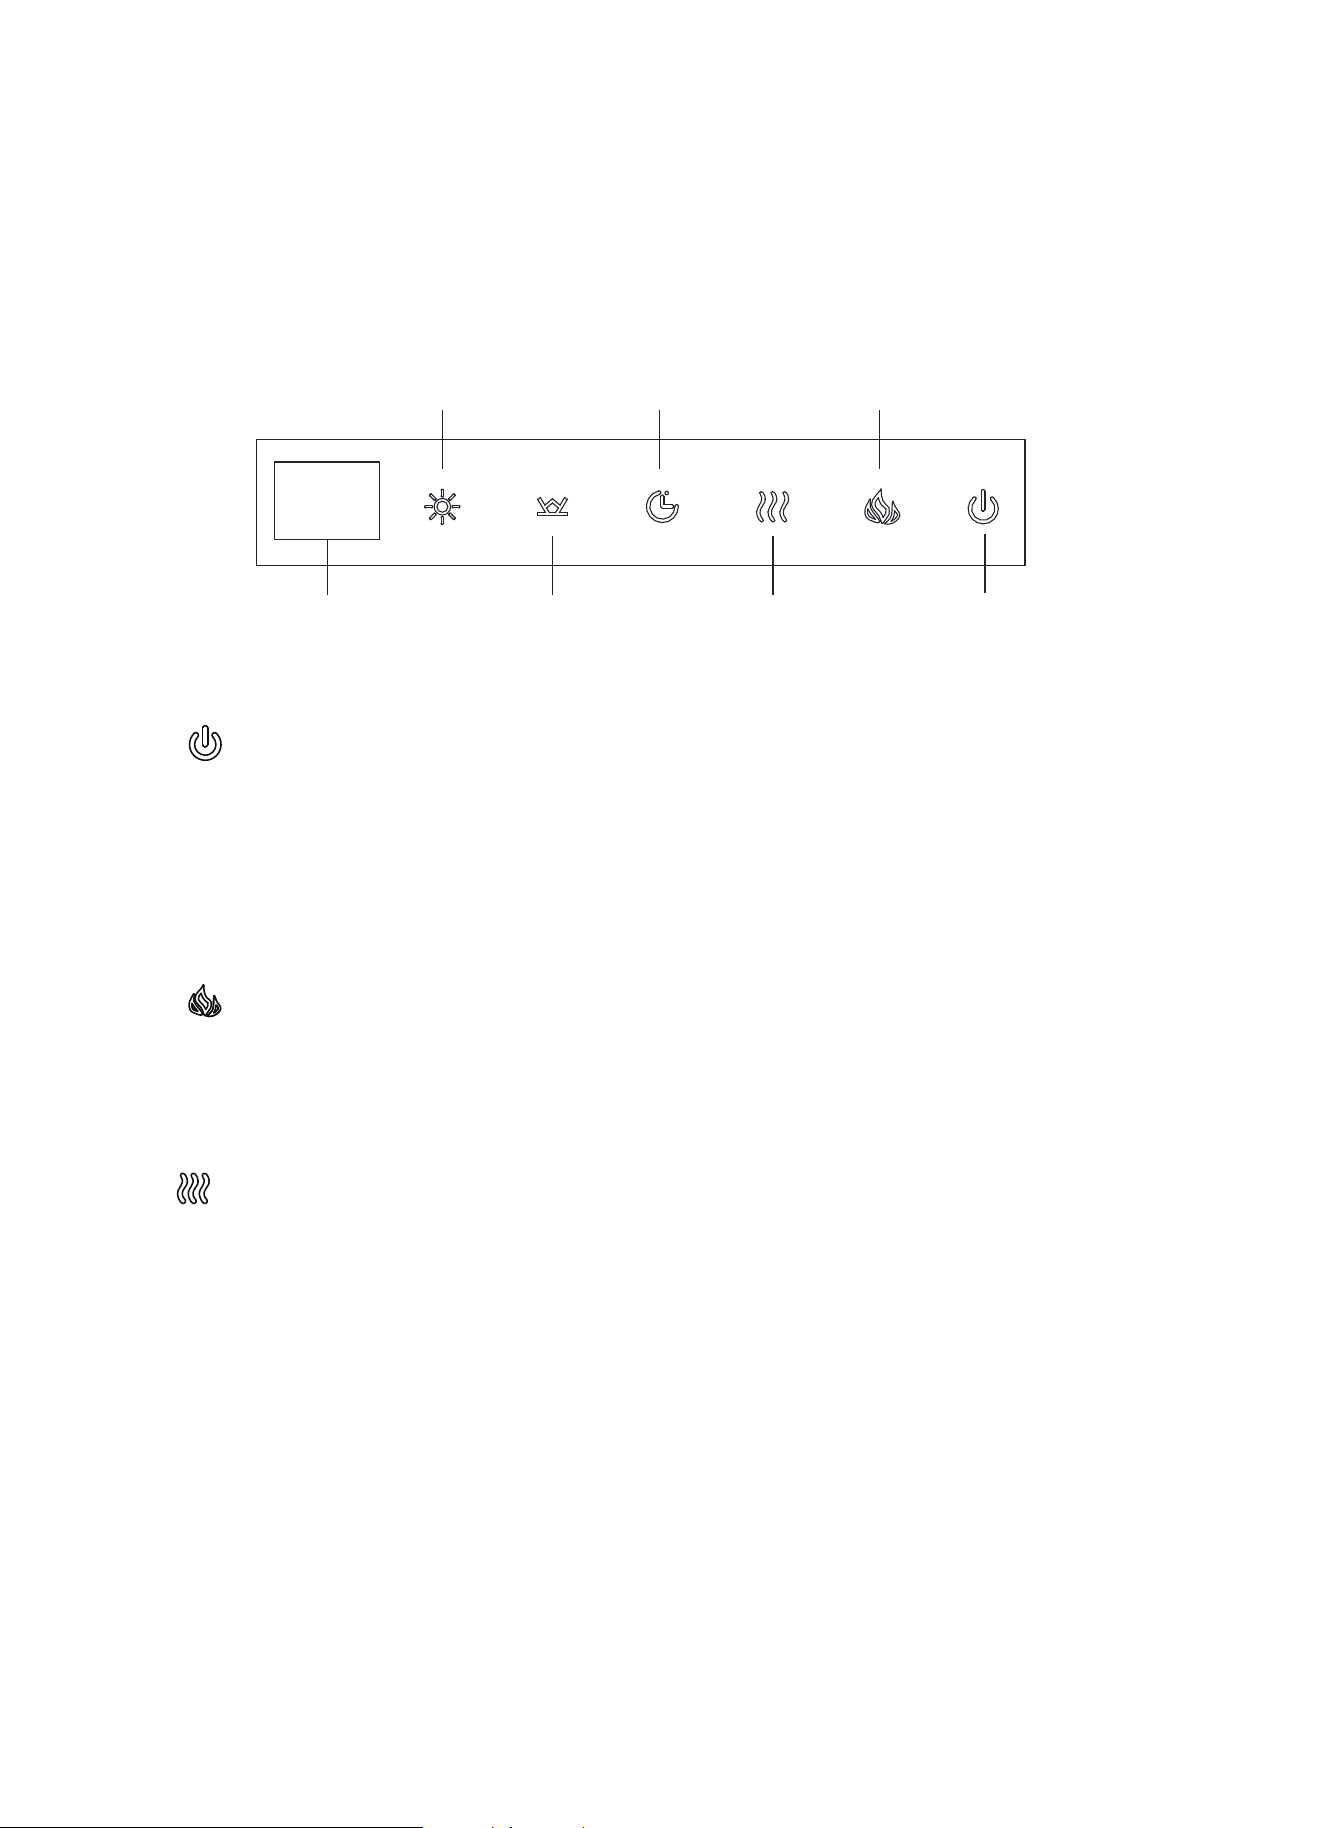
OPERATING INSTRUCTION
The control panel is located on the top right corner of the unit.
To control the unit, touch any button to wake up the control panel. The power button will flash, and all other buttons will
light up.
The control panel will turn off after 10 seconds of inactivity.
Power ButtonHeat ButtonEmber Bed ButtonDisplay Window
Flame ButtonTimer Button
Brightness Button
Power
The Power Button turns the fireplace ON and OFF. When the fireplace is OFF, touch any button to wake up the control
panel, and the power button will flash.Then touch the Power Button to turn on the fireplace. Touch the Power Button
again to turn off the fireplace.
The fireplace has a built-in memory function and when turned back on it starts at the last used settings (except timer).
If the fireplace is disconnected from the main power source, it reverts to the default settings.
Flame
This button is used to turn flames ON, to alter the flame color and to turn flames OFF. Press the Flame button multiple
times to cycle through color rotation option (01), 15 color options (02, 03, 04, 05, 06, 07, 08, 09, 10, 11, 12, 13, 14, 15,
16) and flames OFF.
Heater
This button is used to turn heater ON, to alter the temperature. With temperature displayed and blink, Press the heat
button multiple times to cycle through:82℉ -ON - 64℉-66℉-68℉-70℉-72℉-74℉-76℉-78℉-80℉(27℃-ON - 18
℃-19℃-20℃-21℃-22℃-23℃-24℃-25℃-26℃).
With temperature displayed and not blink, Press the heat button once to turn heater OFF.
Temperature unit convert function: When the heater is on, press and hold the Power Button for 5 seconds, current
temperature unit display will flash 3 times and convert to another temperature unit (Note: Temperature unit convert
function can't be set with the remote control).
Lock & unlock heater function: press and hold the Heater Button for 10 seconds, the ember bed will flash 6 times,
indicating that the heater function is locked. To unlock the heater function, just repress and hold the heater button for
10 seconds again, then the ember bed will also flash 6 times indicating the heater function is unlocked and to recover
the original states which you have set.(Note: Lock & unlock heater function can't be set with the remote control).
Control Panel

01 02 03 04 05 06 07 08
09 10 11
12 13 14 15
Timer
The TIMER has adjustable setting at range from 1 hour to 9 hours and OFF. As shown the following: 1h-2h-3h-4h-5h-
6h-7h-8h-9h-OFF. Once you have set the timer, and the timer is up, it will close all the functions and enter standby
mode. In this mode, you should touch the power button to restart the fireplace.
Ember Bed
This button is used to turn ember bed ON, to alter the ember bed color and to turn ember bed OFF. Press the Ember
Bed button multiple times to cycle through color rotation option (01), 15 color options (02, 03, 04, 05, 06, 07, 08, 09,
10, 11, 12, 13, 14, 15, 16) and ember bed OFF.
Brightness
This button is used to adjust the brightness of flame and ember bed.
When flame is on and ( 02, 03, 04, 05, 06, 07, 08, 09, 10, 11, 12, 13, 14, 15, 16) is displayed, press the Brightness
Button to change the brightness of the flames from the available options: L5, L4, L3, L2,L1. L5 is the brightest and L1
is the darkest.
When ember bed is on and ( 02, 03, 04, 05, 06, 07, 08, 09, 10, 11, 12, 13, 14, 15, 16) is displayed, press the
Brightness Button to change the brightness of the ember bed from the available options: d5, d4, d3, d2,d1. d5 is the
brightest and d1 is the darkest.
NOTE: Brightness control is not operational when the flame setting at 01 and the ember bed light effect setting at 01.
01 02 03 04 05 06 07 08
09 10 11 12
13 14 15
The Speed Button is used to adjust the flame speed.
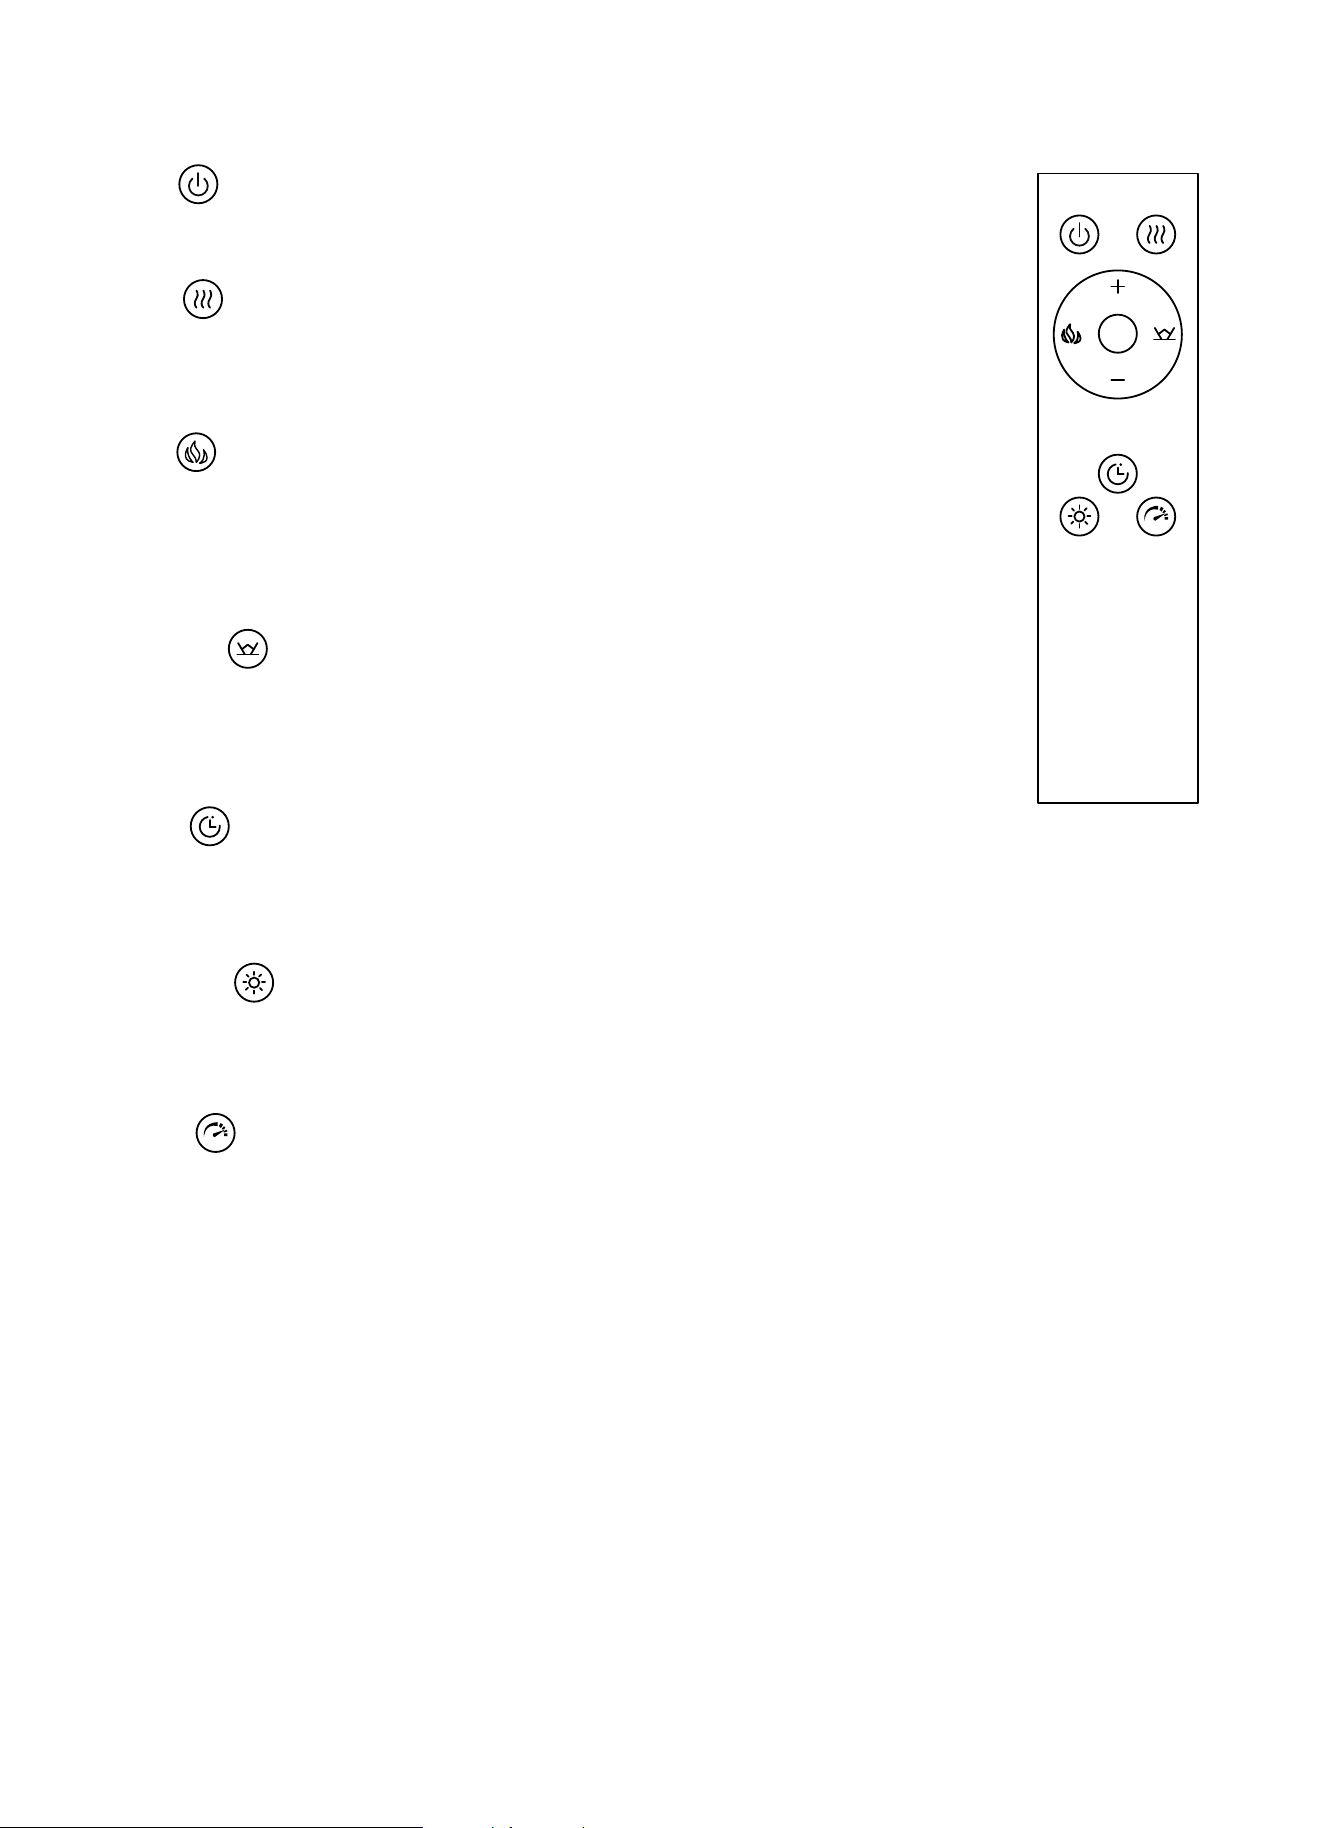
REMOTE CONTROL
Power
Heat
Flame
The Power Button turns the fireplace ON and OFF.
The Heat Button turns the heat ON and OFF. Press “+” or ”-” button to set the
temperature.
The Flame Button turns the flame ON and OFF. Press “+” or ”-” button to set the
flame color.
Ember bed
The Ember Bed Button turns the ember bed ON and OFF. Press “+” or ”-” button to set the
ember bed color.
Timer
Brightness
Speed
The Timer Button turns the timer ON and OFF. Press “+” or ”-” button to set the timer.
The Brightness Button is used to adjust the brightness of flame and ember bed.
01 02 03 04 05 06 07 08
09 10 11 12 13
14 15
MAINTENANCE
REMOTE CONTROL
Clean the metal trim using a water-dampened soft, clean cloth. DO NOT use brass polish or household cleaners as
these products will damage the metal trim.
The motors used on the fan and the flame generator assembly are prelubricated for extended bearing life and require
no further lubrication. However, periodic cleaning/vacuuming of the fan/heater and air intake/output vents is
recommended. The heater should be cleaned and inspected regularly, depending on conditions, and at least at yearly
intervals.
WARNING: Any electrical repairs of this unit should be carried out by a licensed electrician in accordance with
national and local codes.
WARNING: Disconnect power by unplugging the power and allowing heater to cool before attempting any
maintenance or cleaning to reduce the risk of fire, electric shock, or injury.
NOTE: When the heater is not in use, the heater should be stored in a dry location, away from possible damage. The
power cord should be stored properly to avoid contact with hot or sharp objects.
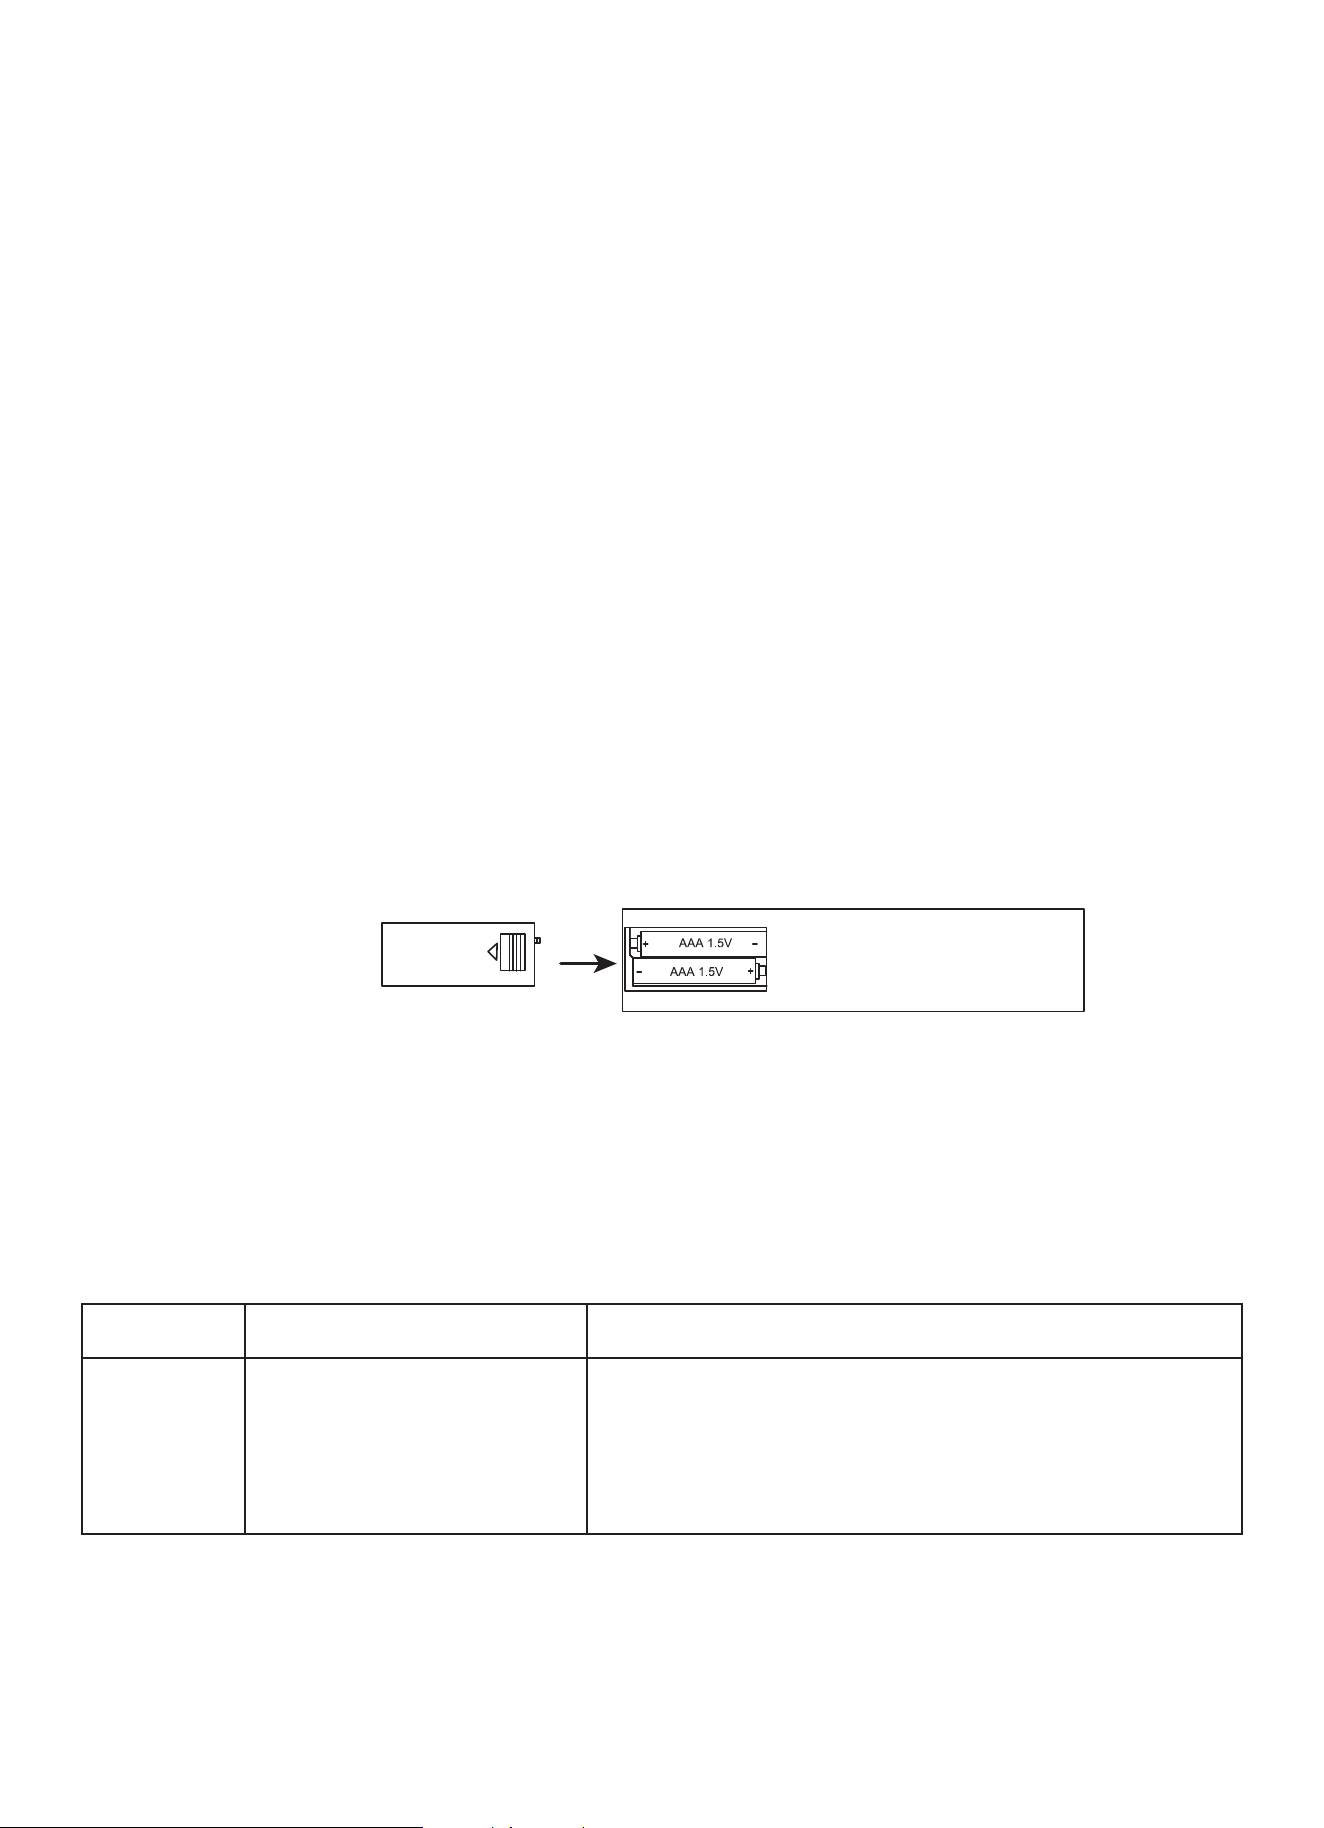
The battery compartment is located on the back end of the remote control.
1. Press and slide the battery cover open.
2. Insert two 1.5V (AAA) batteries (included) ensuring they are installed correctly with regard to the polarities (+ and -)
marked on the inside of the battery compartment.
3. Replace the battery cover.
NOTE: The battery should be removed if the product is to be left unused for a long time.
When replacing the batteries, replace both batteries at the same time with new batteries of the correct type.
• Do not mix old and new batteries.
• Do not mix alkaline, standard (Carbon-Zinc), or rechargeable (Nicad, Nimh, etc) batteries.
TROUBLESHOOTING
Fault code Fault Cause Solution
The heater not working. If the vents are dirty or clogged. Unplug the power,
clean the dust and debris of the vent area. Wait for 5
minutes, plug in and turn on the heater. If the heater
still don't work, please call after-sales service.
E3

01 02 03 04 05 06 07 08
09 10 11 12 13 14
15
1 YEAR LIMITED WARRANTY
IF WARRANTY SERVICE IS NEEDED
Electrical Fireplace Basic Warranty
Our electrical fireplace is free from manufacturing and material defects for a period of one year from date of purchase,
subject to the following conditions and limitations.
1. This electric fireplace must be installed and operated at all times in accordance with the installation and operating
instructions furnished with the product, Any unauthorized repair, alteration, willful abuse, accident, or misuse of the
product shall nullify this warranty.
2. This warranty is non-transferable, and is made to the original owner, provided that the purchase was made through
an authorized supplier of the company.
3. The warranty is limited to the repair or replacement of parts found to be defective in material or workmanship,
provided that such part(s) have been subjected to normal conditions of use and service, after said defect si confirmed
by the Company’s inspection.
4. The Company may, at its discretion, fully discharge all obligation with respect to this warranty by refunding the
wholesale price of the defective part(s).
5. Any installation, labor, construction, transportation, or other related costs/expenses arising from defective part(s),re-
pair, replacement, or otherwise of same, will not be covered by this warranty, nor shall the Company assume respon-
sibility for same.
6. The owner/user assumes all other risks, if any, including the risk of any direct, indirect or consequential loss or
damage arising out of the use, or inability to use the product, except as provided by law.
7. All other warranties-expressed of implied-with respect to the product, its components and accessories, or any
obligation/liabilities on the part of the Company are hereby expressly included.
8. The Company neither assumes, nor authorizes any third party to assume, on its behalf, any other liabilities with
respect to the sale of our product.
9. The warranties as outlined within this document do not apply to 3rd party accessories used in conjunction with the
installation of this product.
This warranty is void if :
a. The fireplace is subjected to prolonged periods of dampness or condensation.
b. Any unauthorized alteration, willful abuse, accident, or misuse of the product.
c. You do not have the original receipt of purchase.
Call at +8676939011427 or Contact the company email:[email protected]
Make sure you have sales receipt, location of purchase and the model/serial number of your product.