User Manual
TV Headphones
01
Packing list
02
03
04
05
06
07
08
Audio Output
Settings
03-07
Connection
steps
09
10
Charging Method 1
11
Charging Method 2
12
Daiy User Guideds
13
modeds
14
Q&A
Audio Output
Settings
15-17
FAQ
Table of contents
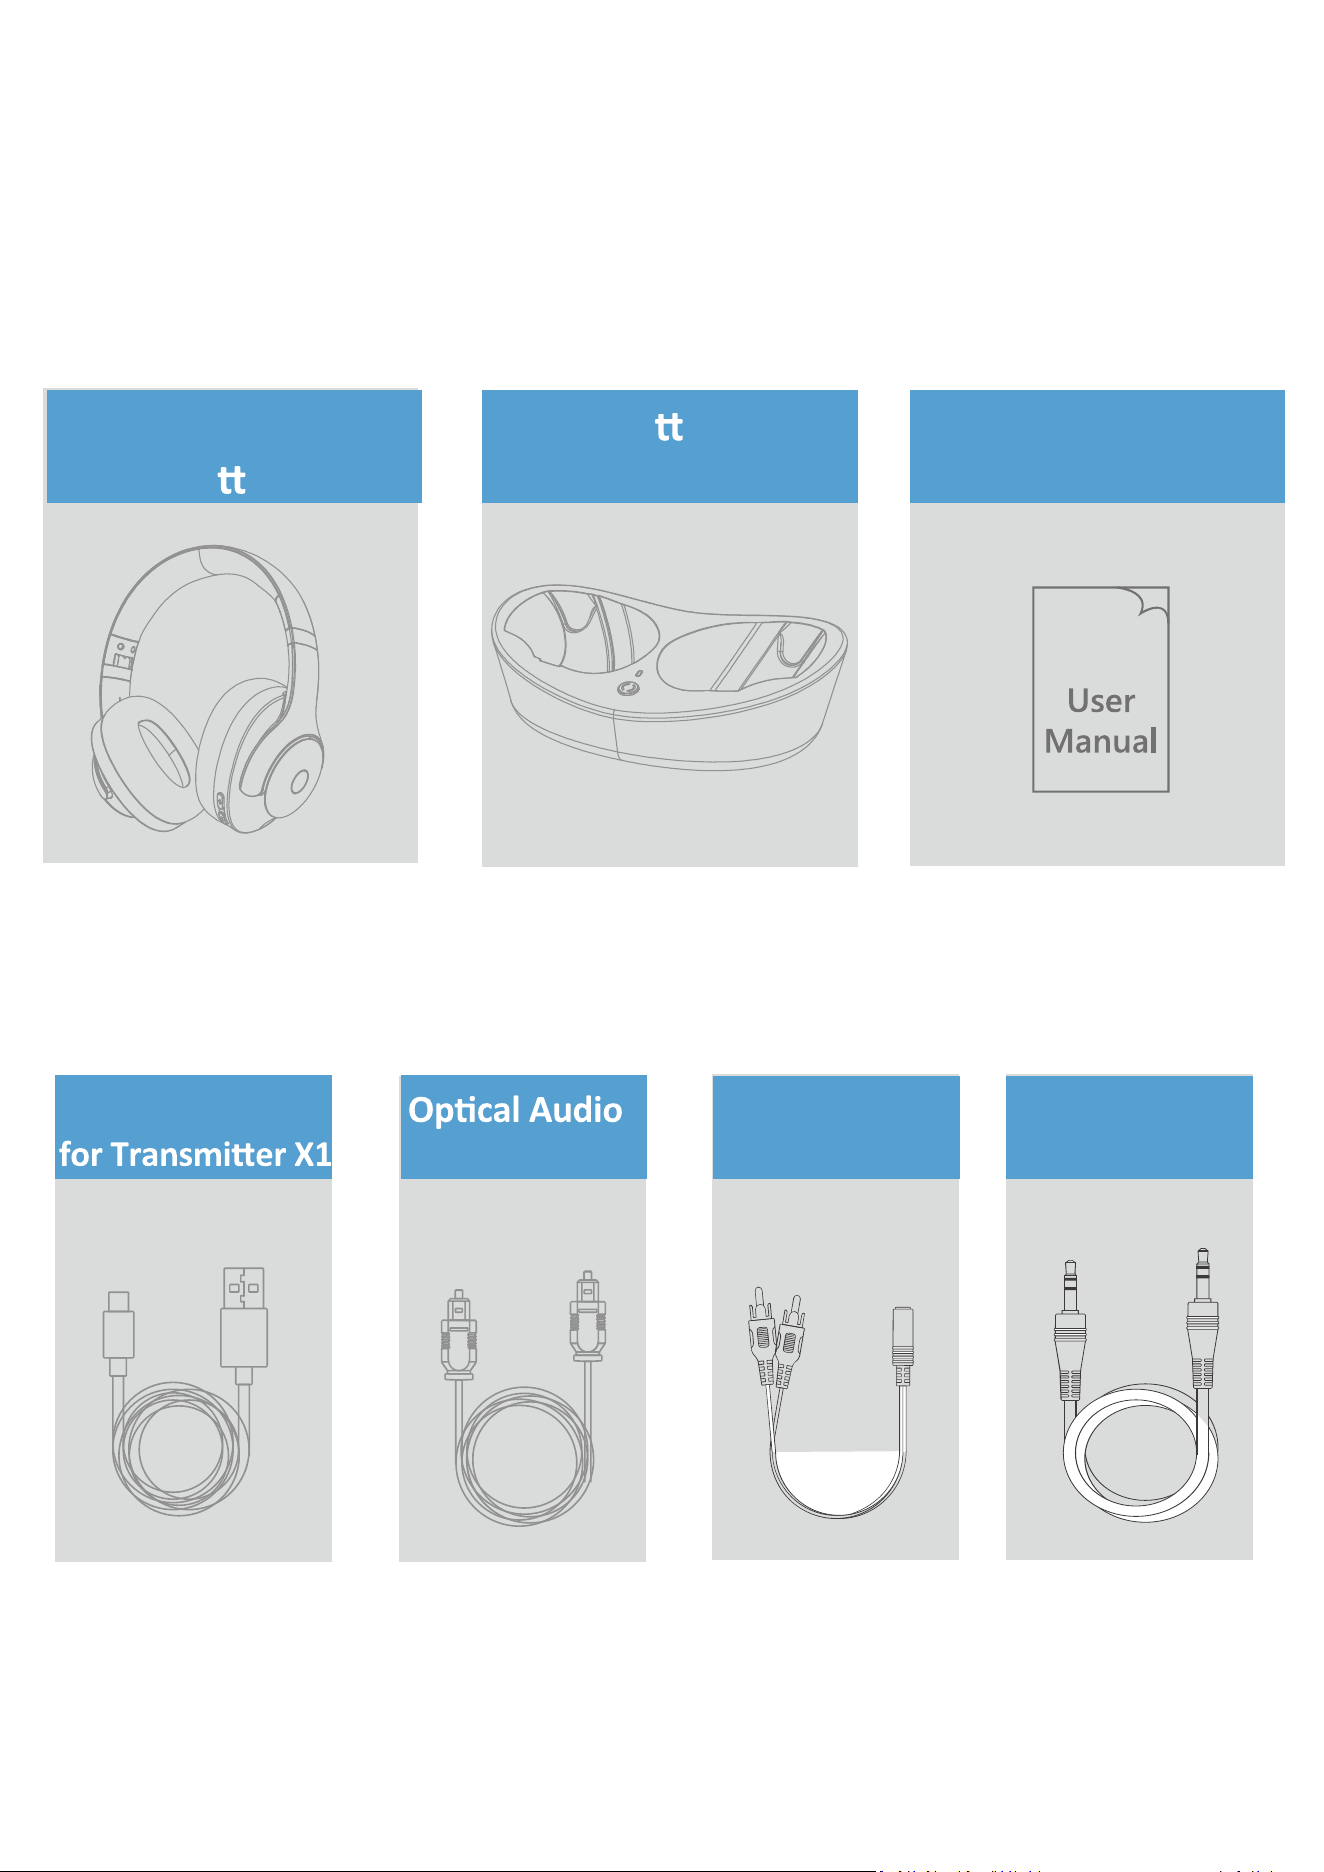
AUX 3.5mm
Audio Cable X1 Cable X1
AUX 3.5mm to
RCA Adapter X1
Power Cable
Transmi er
Charging Dock X1
Power Cable for
Transmi er X1
Packing list
TV Headphones
Manual X1
01
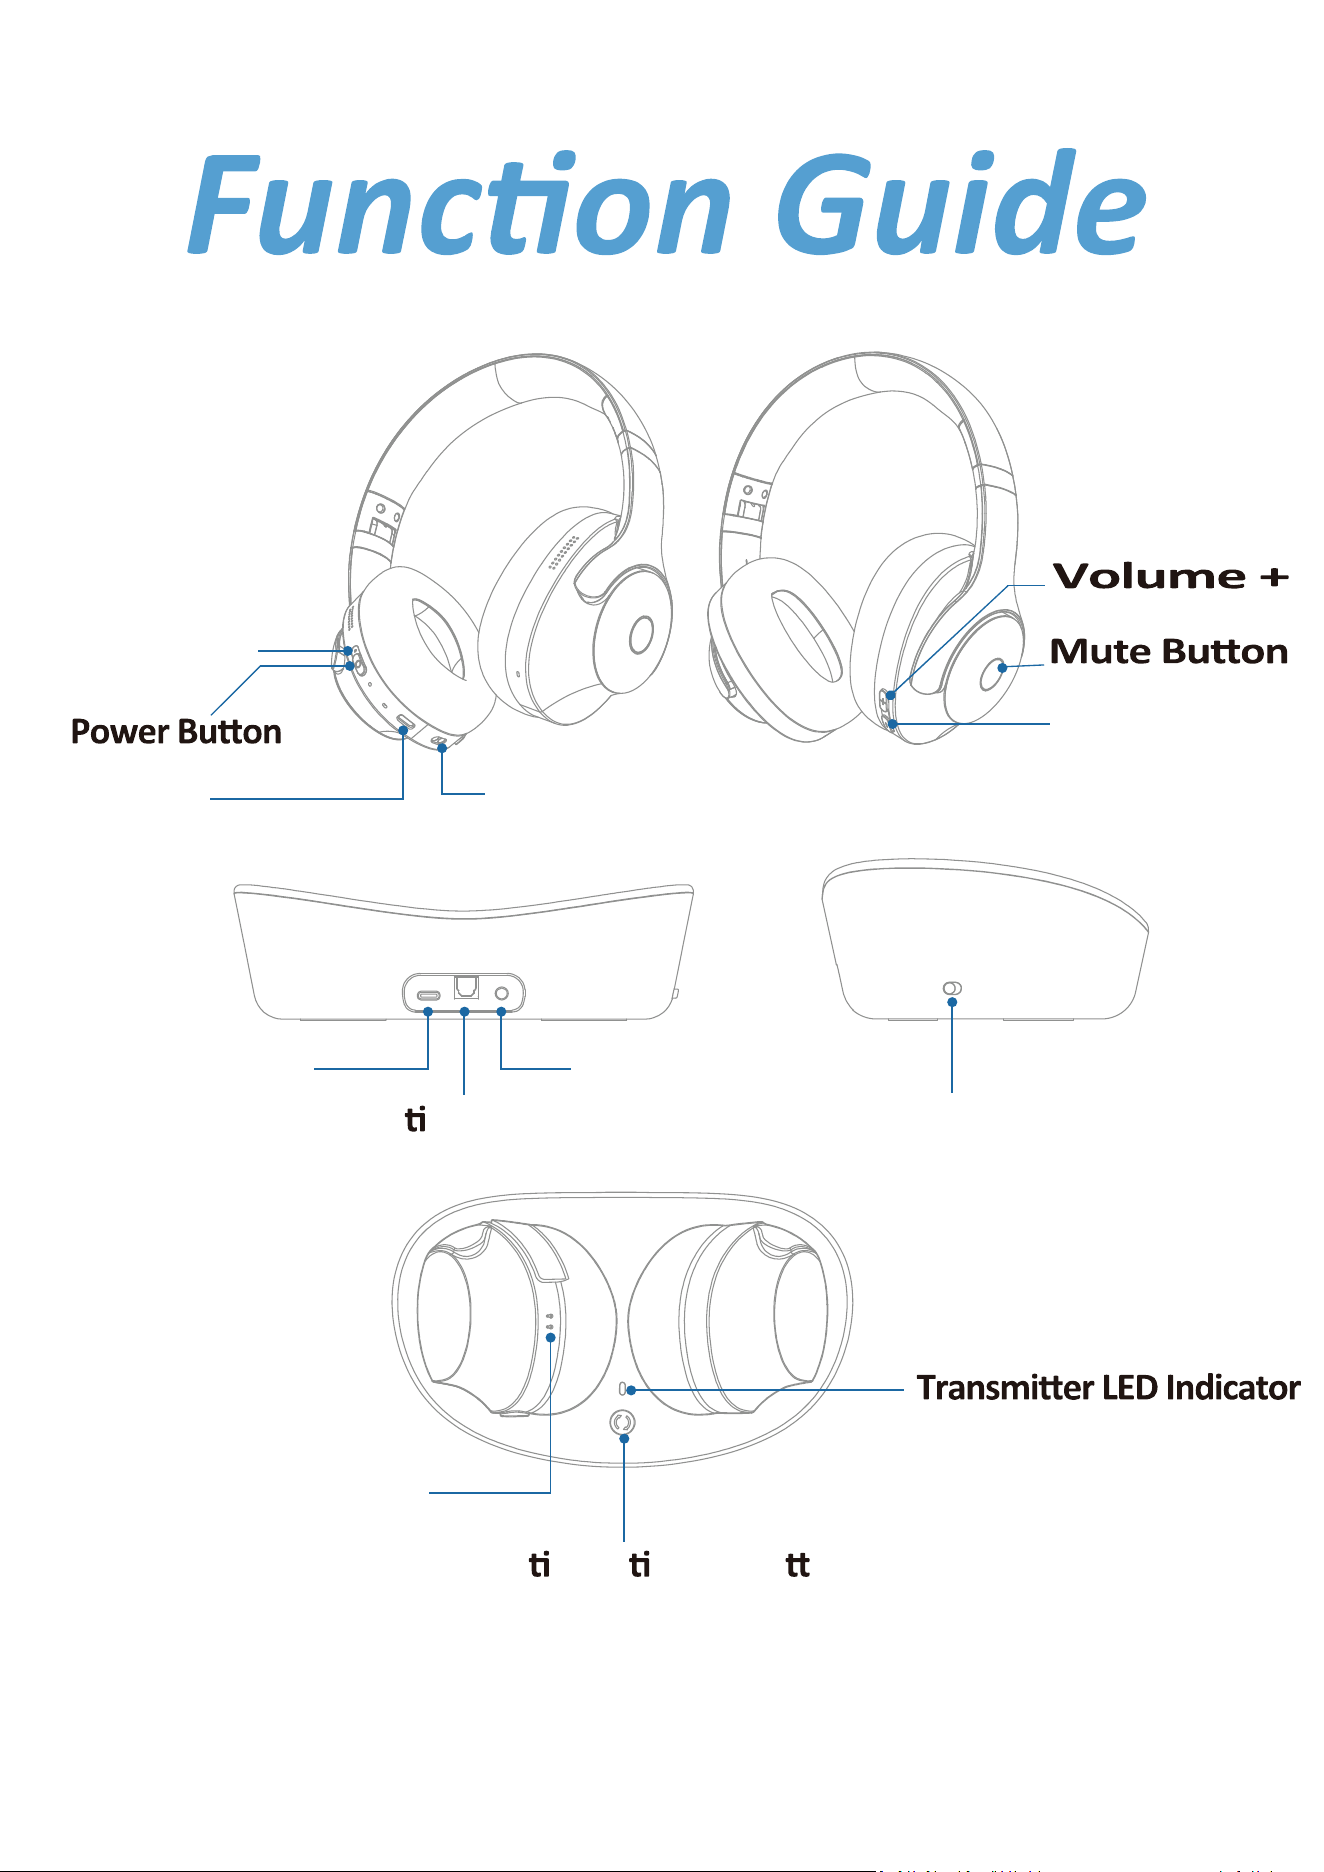
Volume -
Indicator
USB-C
Charge Port
Charging Contacts
Power Input
AUX Input from TV
Op cal Input from TV
Charging Pins
Mul func onal Bu on (MFB)
Power Digital Optical
Aux
Base Switch
OFF / ON
OFF ON
02
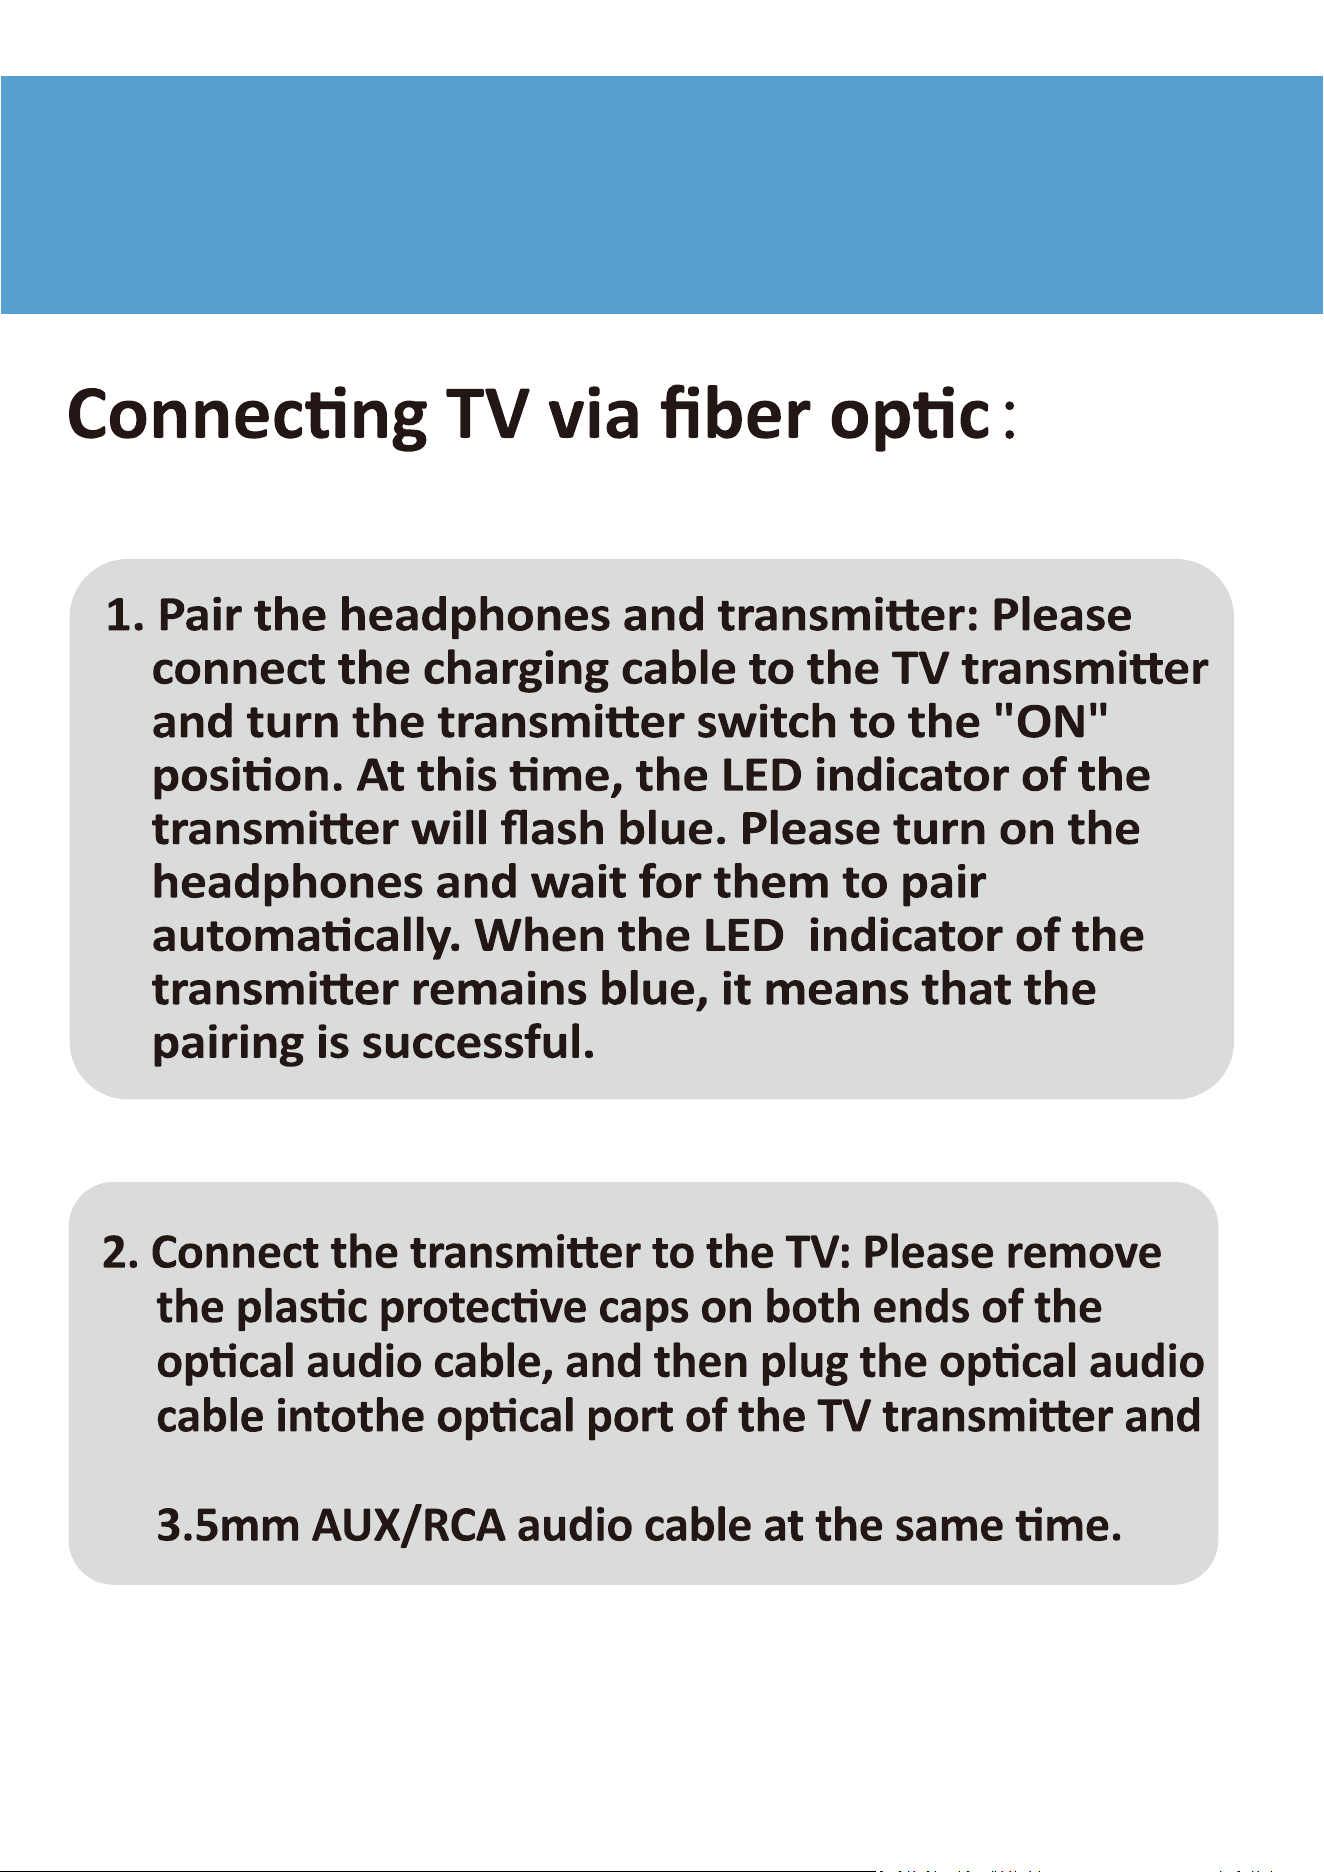
the TV. Please note that you should not plug in the
Connection steps
03
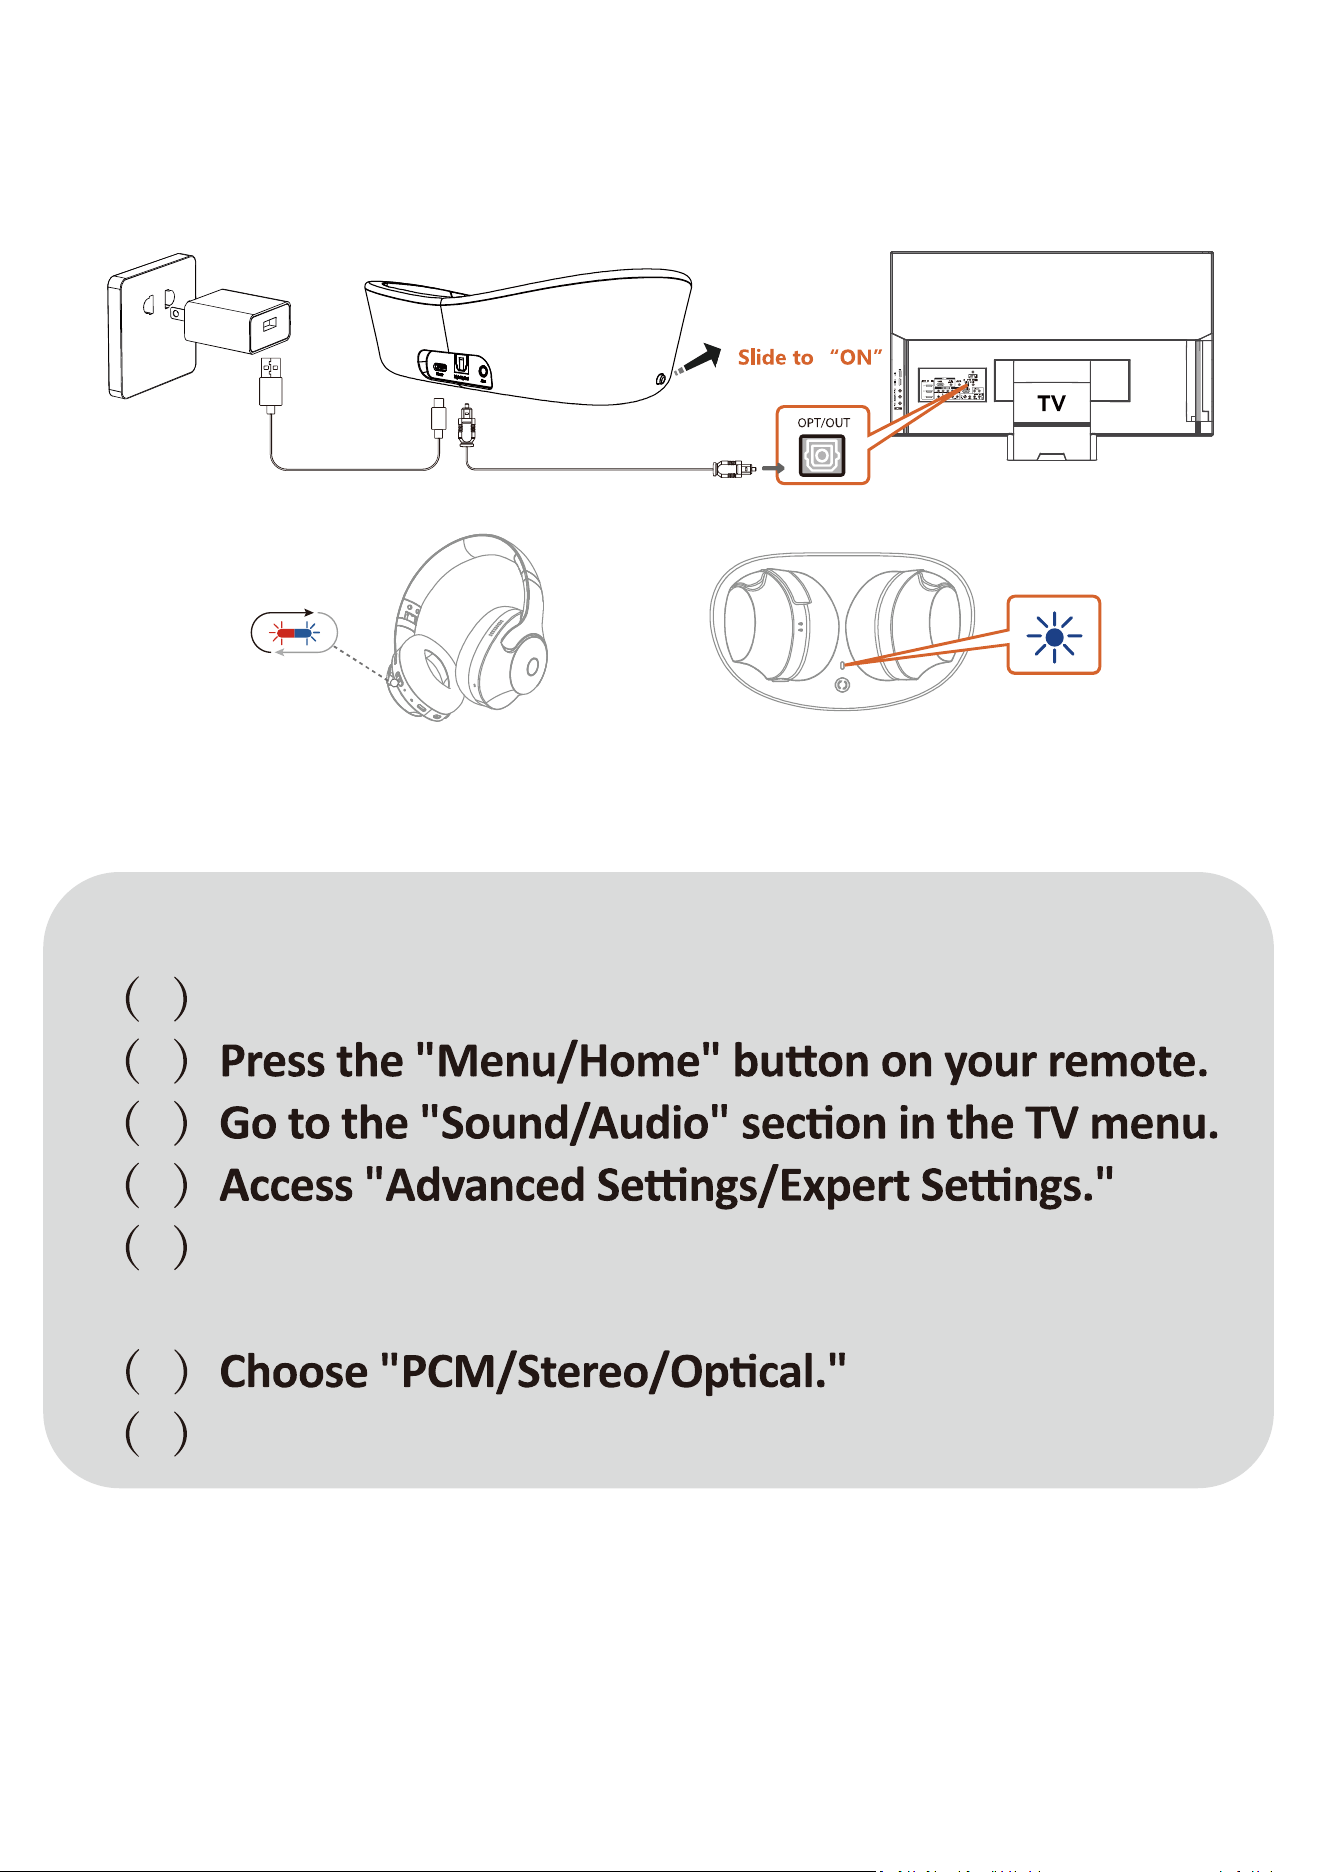
3.Set up TV audio output:
1 Power on your TV.
2
3
4
5 Select "Digital Audio Output Format/Audio Output"
and press "OK."
6
7 Your audio output setup is now complete.
Step1 Step2
LED
04
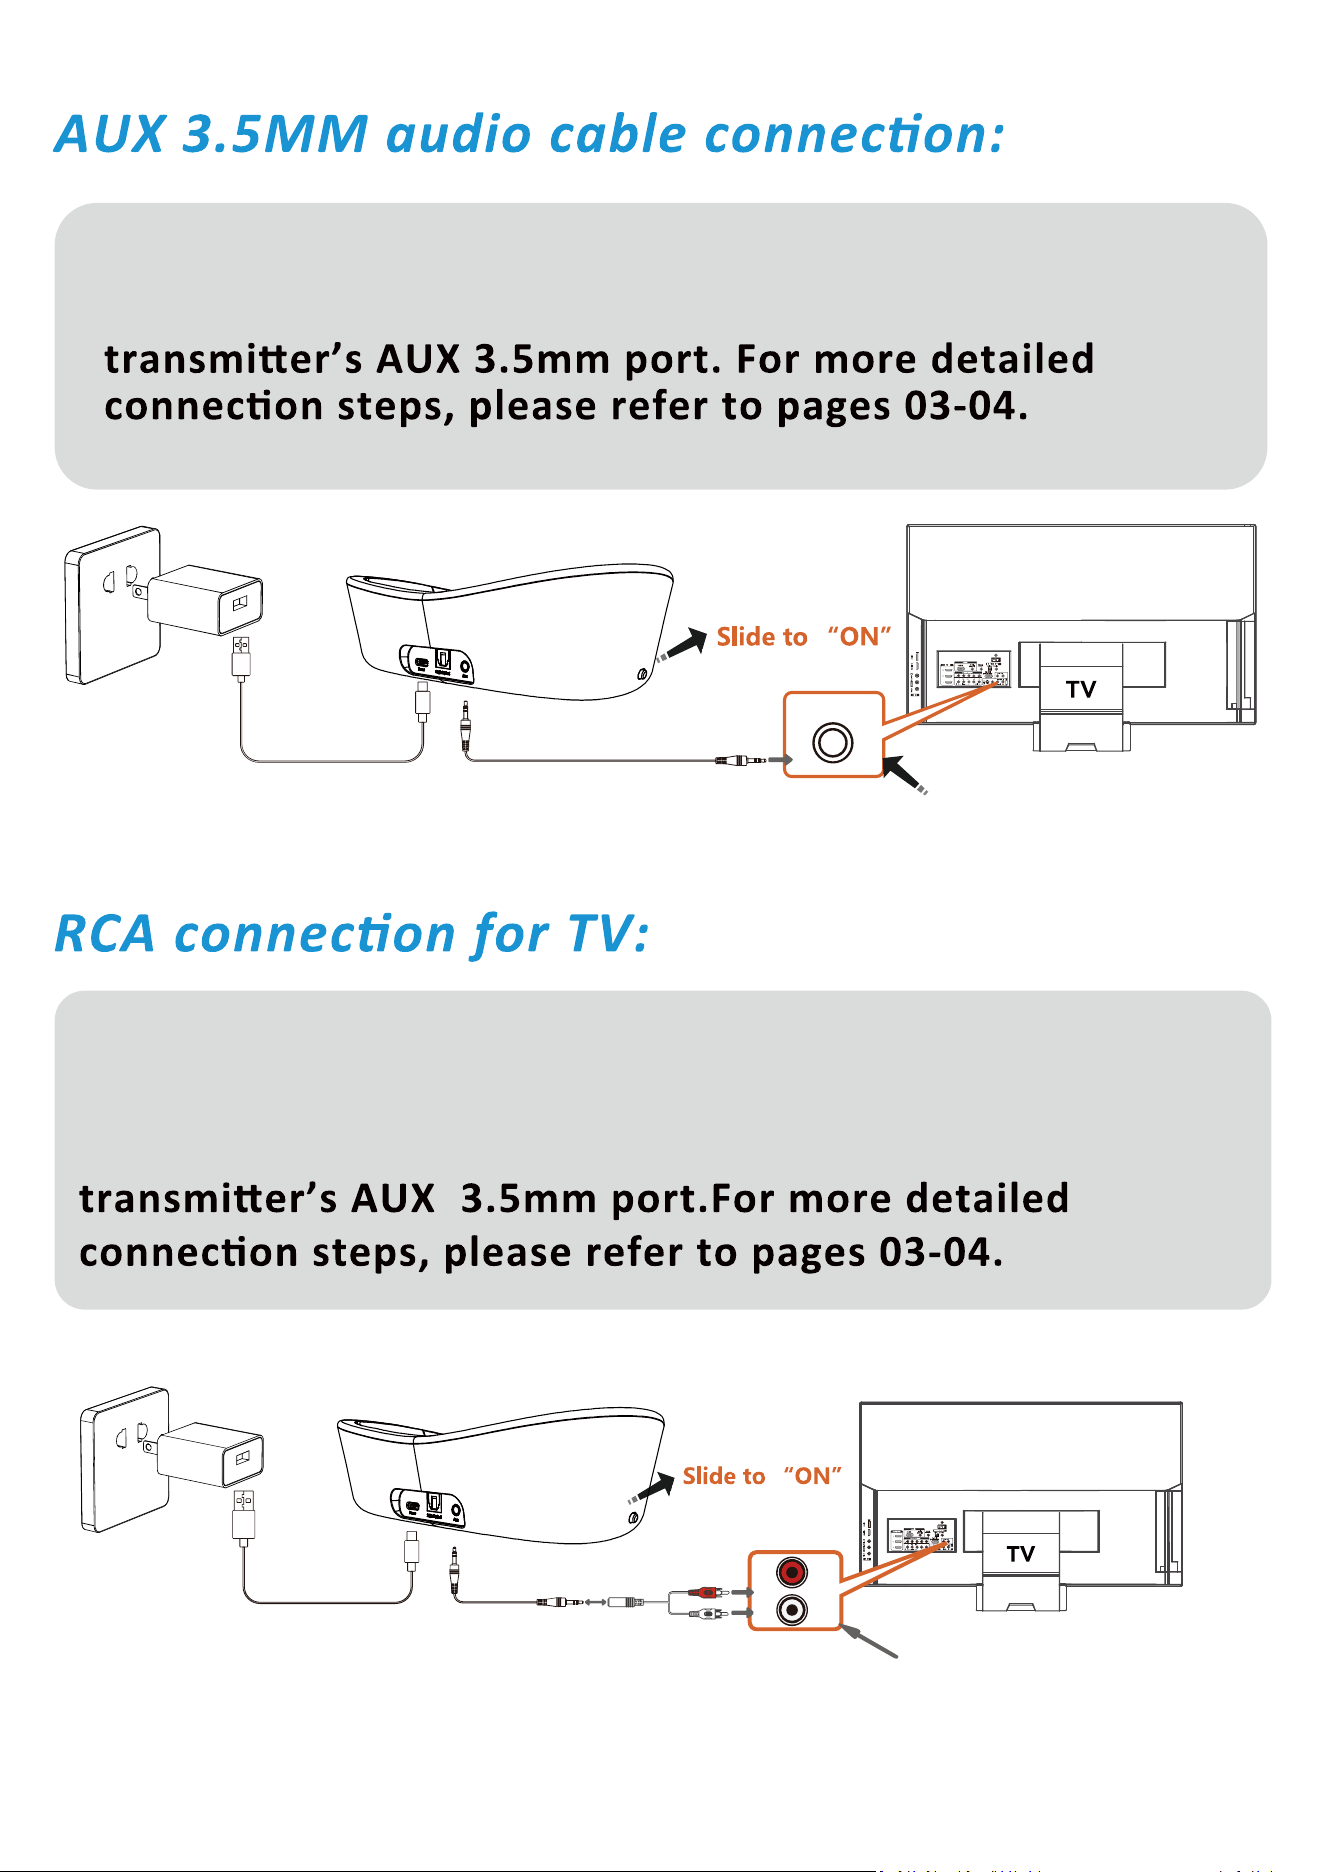
Connect the provided RCA adapter to the AUX 3.5mm audio
cable. Plug the red & white RCA connectors into the TV’s
“AUDIO OUT” ports, then plug the other end into the
Plug the provided AUX 3.5mm cable into the TV’s AUX
3.5mm output port, then plug the other end into the
Step1 Step2
“AUDIO OUT”
Step1 Step2
“AUX 3.5mm”
05
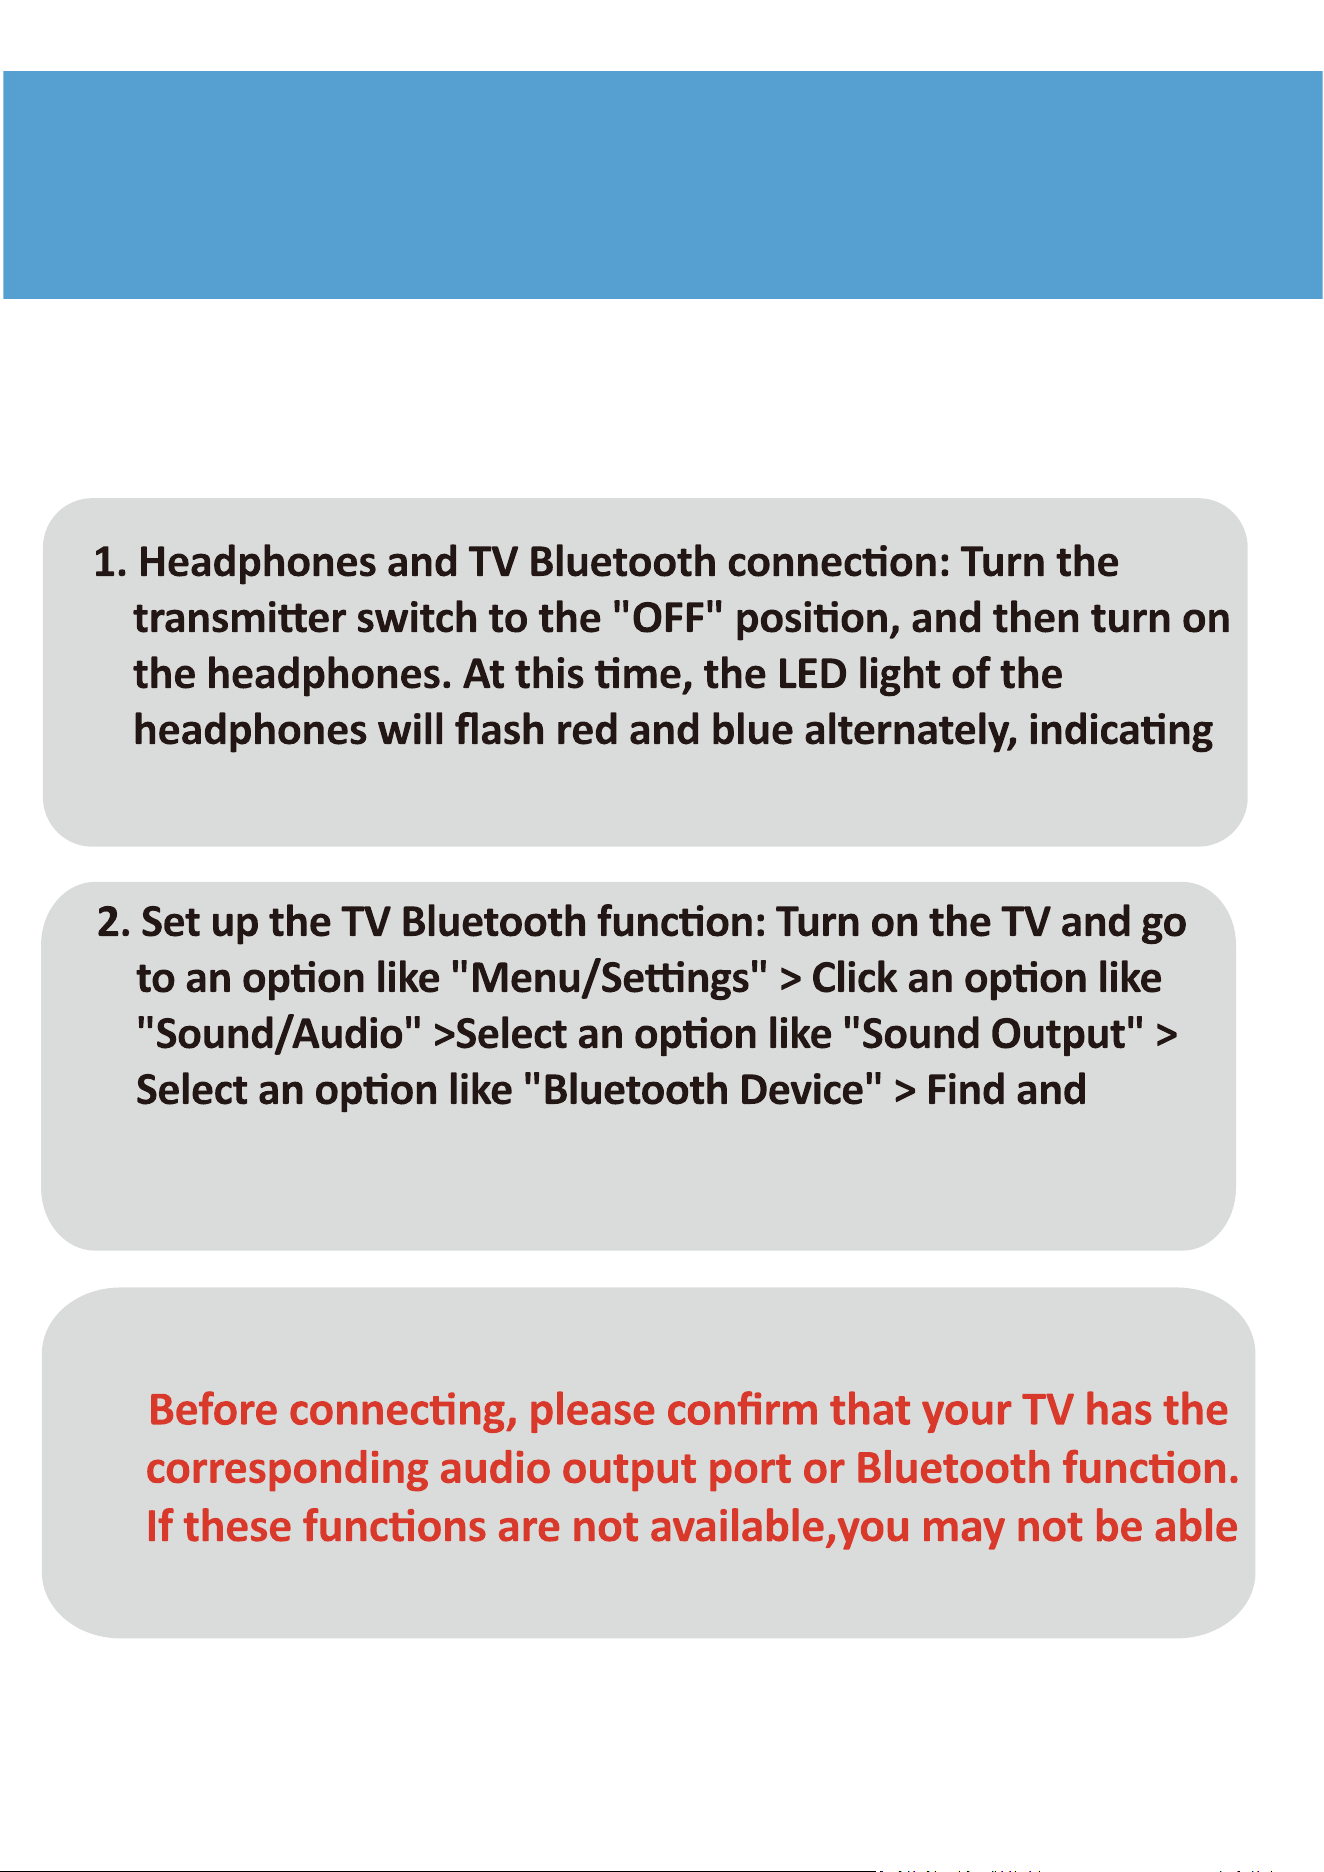
Kindly remind:
to connect to the headphones.
select "TV-001" > Click"Pair and Connect" > Complete
pairing
that the headphones have entered pairing mode.
Connection steps
Connect the headphones to the
TV via Bluetooth:
06
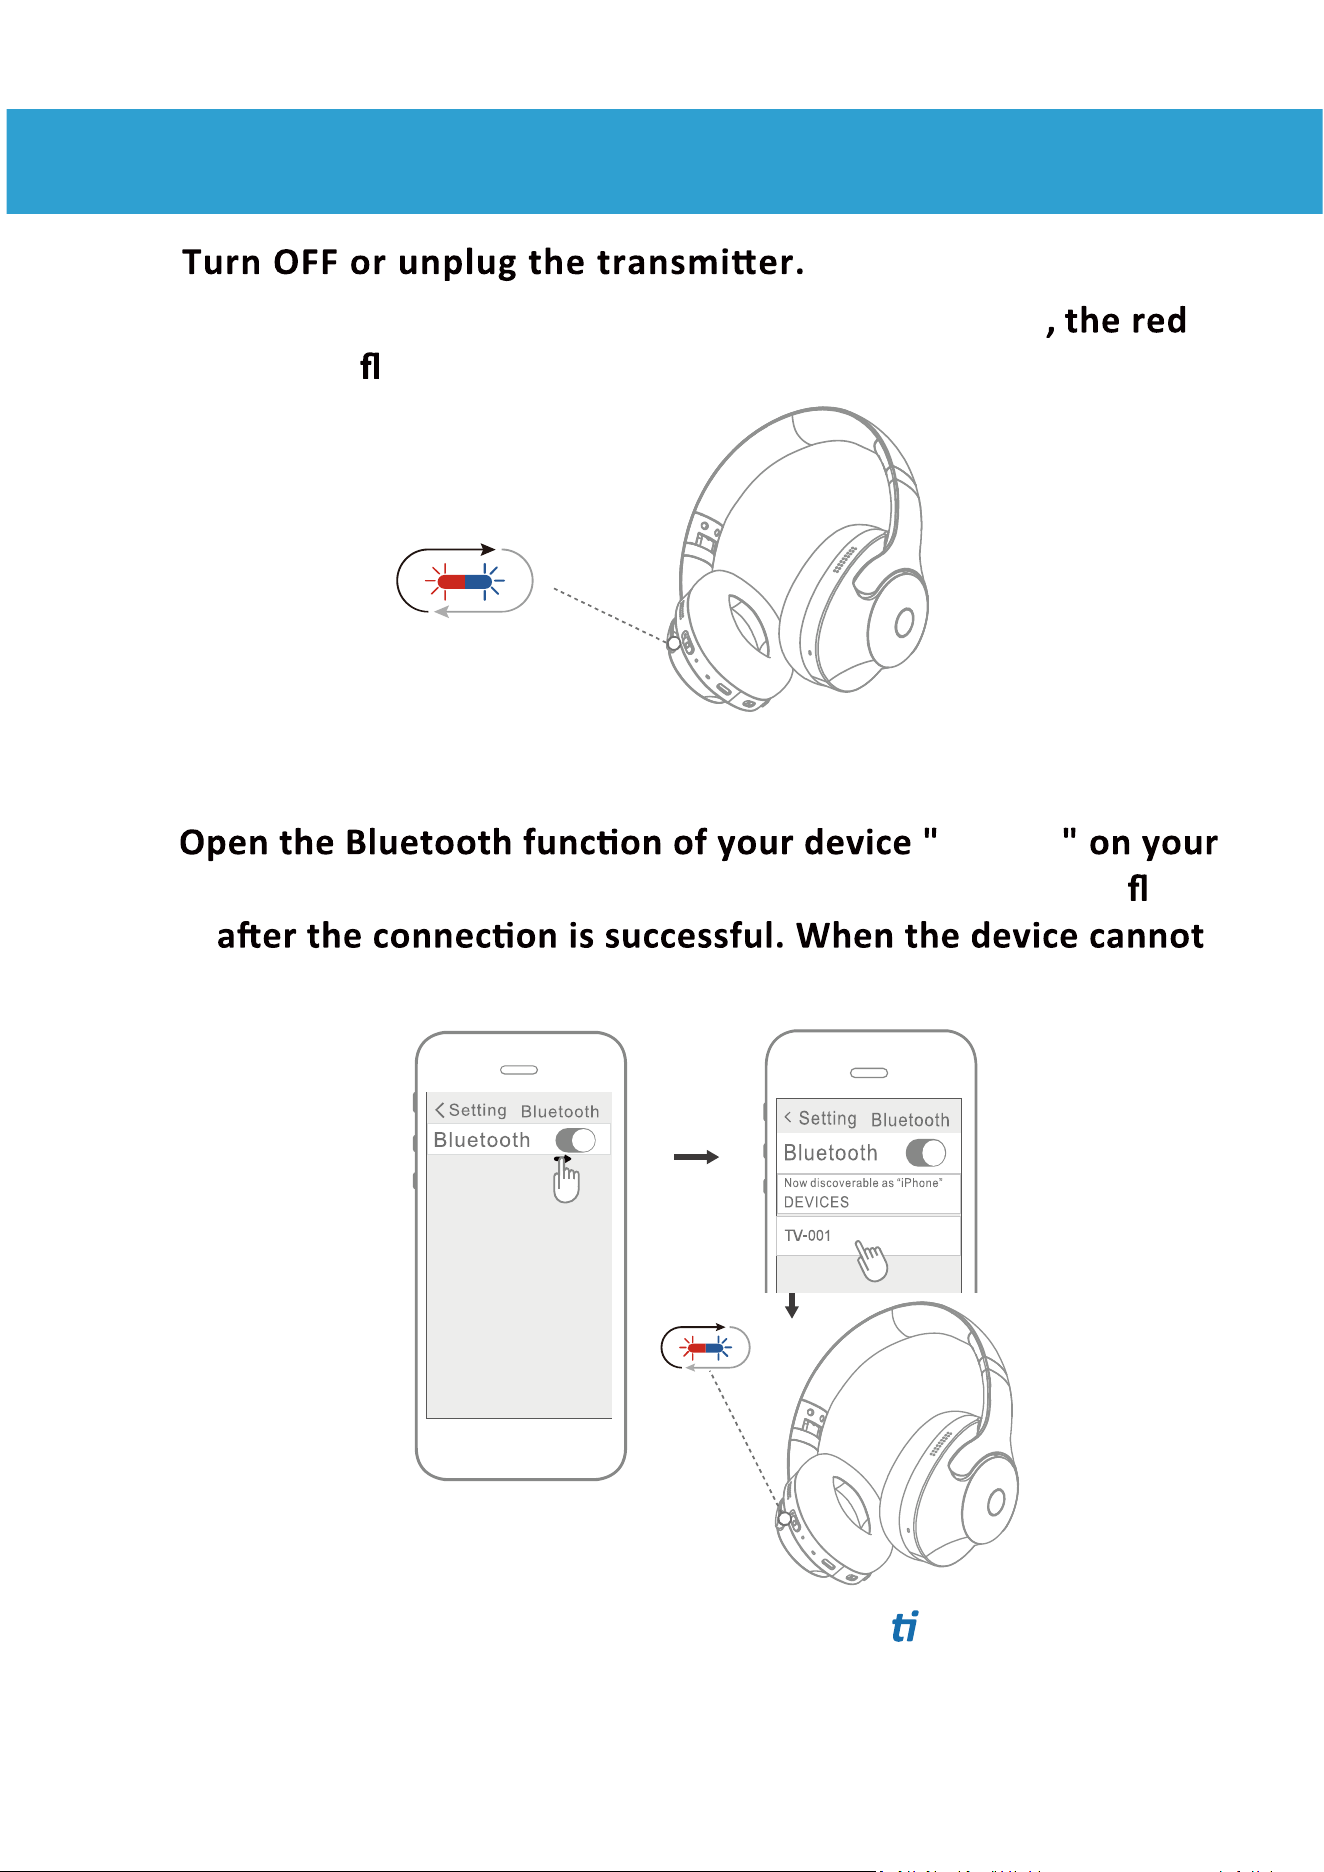
Search and Connec on
LED
LED
Pairing
07
Step1:
Sep2:
and blue lights ash alternately to enter the pairing mode.
Step3:
device Bluetooth lists. The LED indicator light turns blue and ashes
search for Bluetooth, please shut down the Bluetooth and restart
the search.
Using the Headphone with Your Mobile phone/Tablet
Long press the ppwer key to trun on the headphone
TV-001
slowly
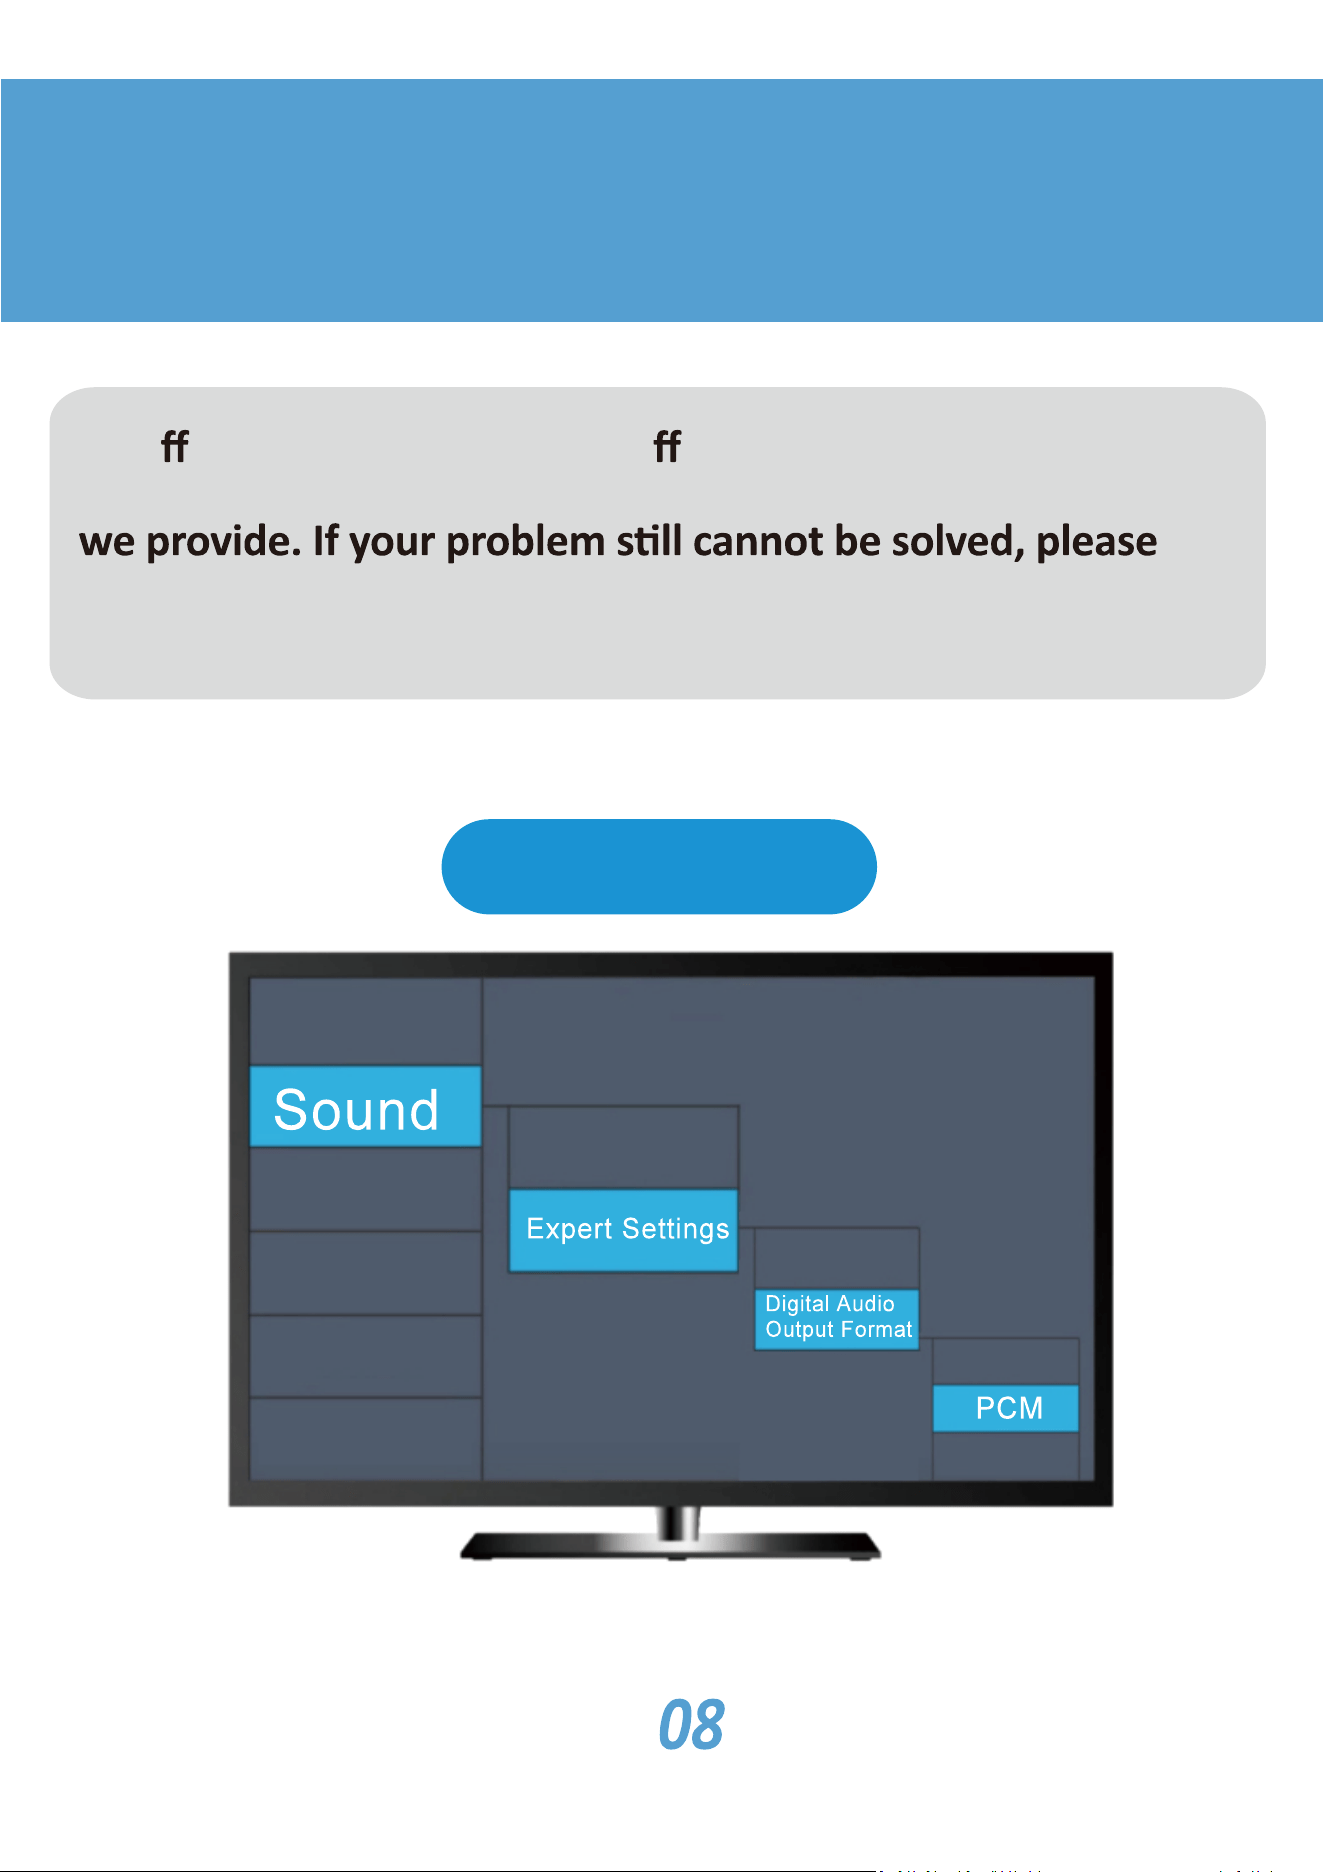
Audio Output Settings
Di erent brands will have di erent setup steps. Please refer
to the general steps and the setup steps of the three brands
contact our brand email immediately and we will solve your
problem for you as soon as possible.
SAMSUNG TV
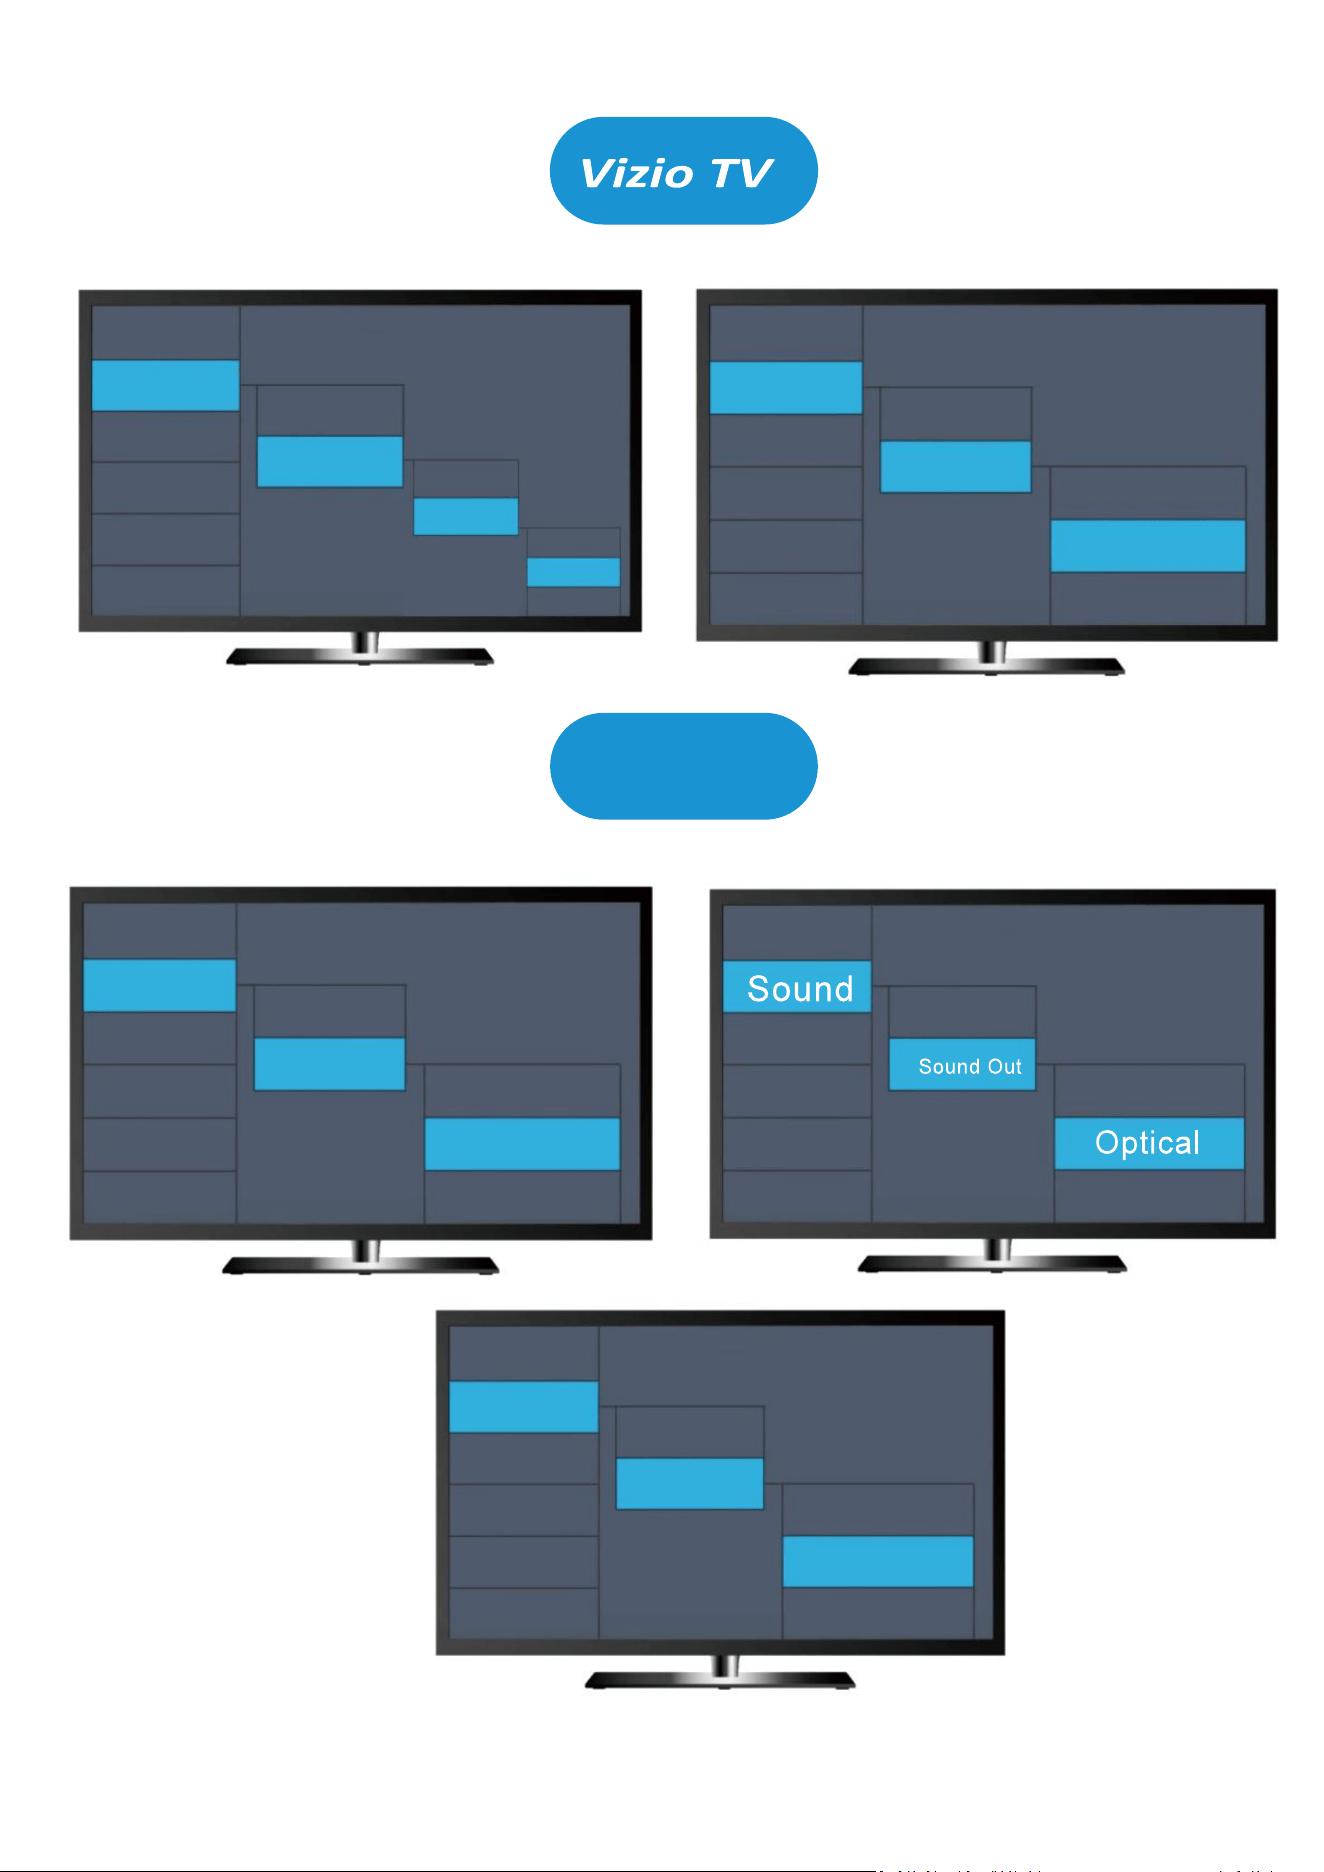
Menu
Audio
Digital Audio
Out
PCM
Audio
Surround Sound
OFF
01
02
LG TV
Digital Sound Out
PCM
Optical
Sound
Dolby Atmos
Off
01
02
03
09
Please charge the headphones at once when the Red LE ashes.
ng
base to the USB Adapter with the USB-C cable, if it is not
connected to Bluetooth headphones, the LED indicator on
the charging bas ashes red and blue alternately. If it is
already connected to Bluetooth headphones, the LED indicator
on the charging base is steady blue.
Step2. Charge the headphones: Place the headphones on the charging
base. The LED indicator on the base changes from a solid blue
light to solid red light.
Step3. The headphones are fully charged: The LED indicator on the
ng that the
headphones are fully charged.
Charging Method 1
10
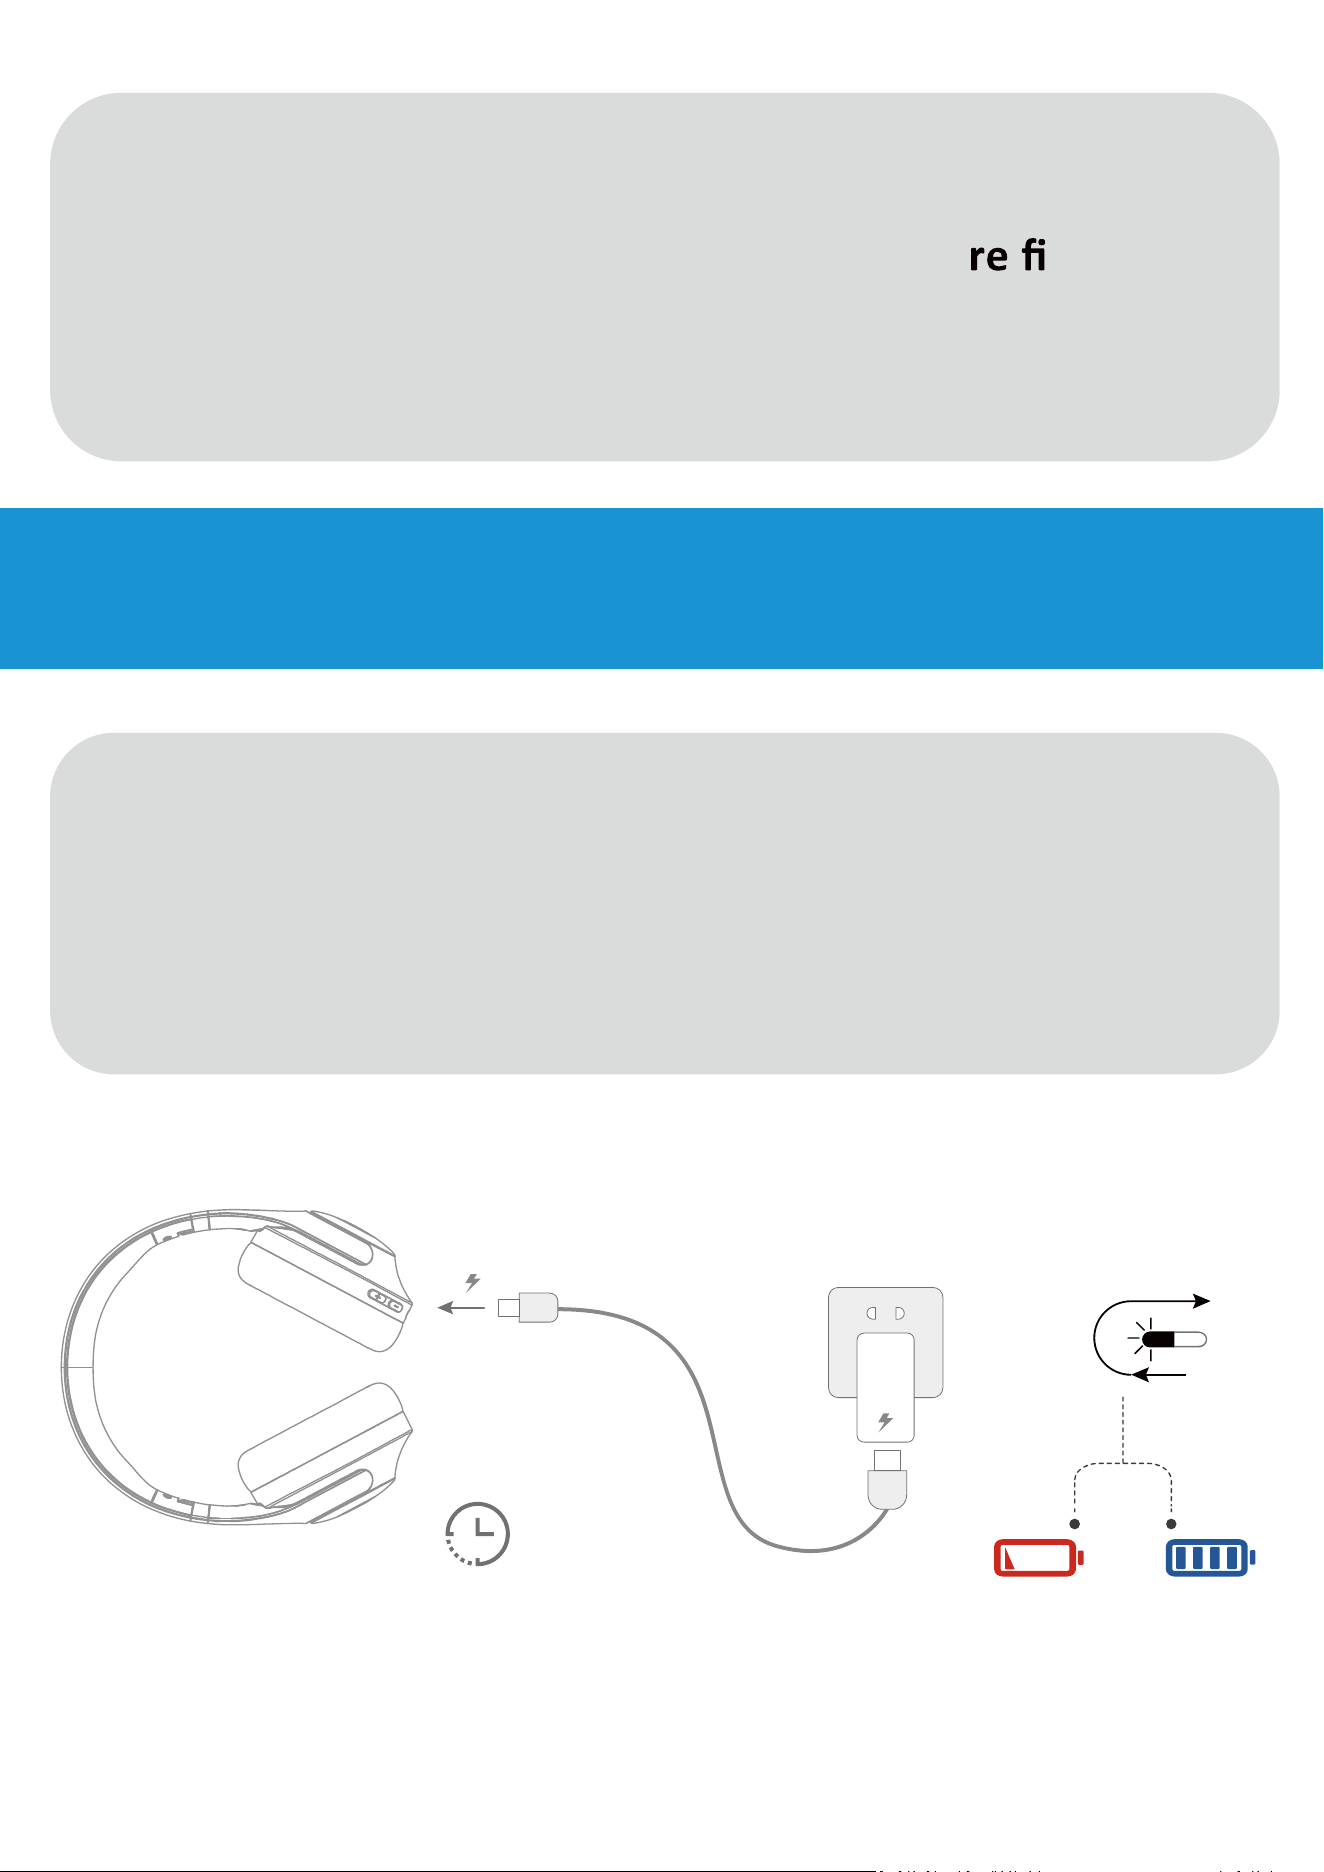
2 H
LED
1. Connect the Type-C interface to the headphones, and
connect the USB Type-A to a booted PC, wall charger,
or power bank.
2. The LED indicator lights in steady red when the
headphones are charging. Charging is completed in
about 2 hours and the lights in steady blue.
Tips:
1. It is recommended to use the Charging base to charge
the headphones when the headphones a nished
using or out of power.
2. The headphones cannot be used during the charging
process.
Charging Method 2
11
1.In order to facilitate your next use, the headphones can
charging without needing to turn it o . When you want
to use it again, just remove the headphones, and it will
2. When the headphones is charging, the LED indicator of
headphone's LED indicator will be solide blue, and the
indicates that you have correctly placed the headphones
on the base for charging, and the charging process is
complete.
3. If the following two incorrect states appear when you
place the headphones on the base, please adjust the
next use.
Daily Use Guide
How to Charge Your Headphones Properly
12
connect to the headphones under the Bluetooth paired
device list.
3. If the headphones is st connected to a new Bluetooth
Using the Headphones with Your Mobile Phone / Tablet.
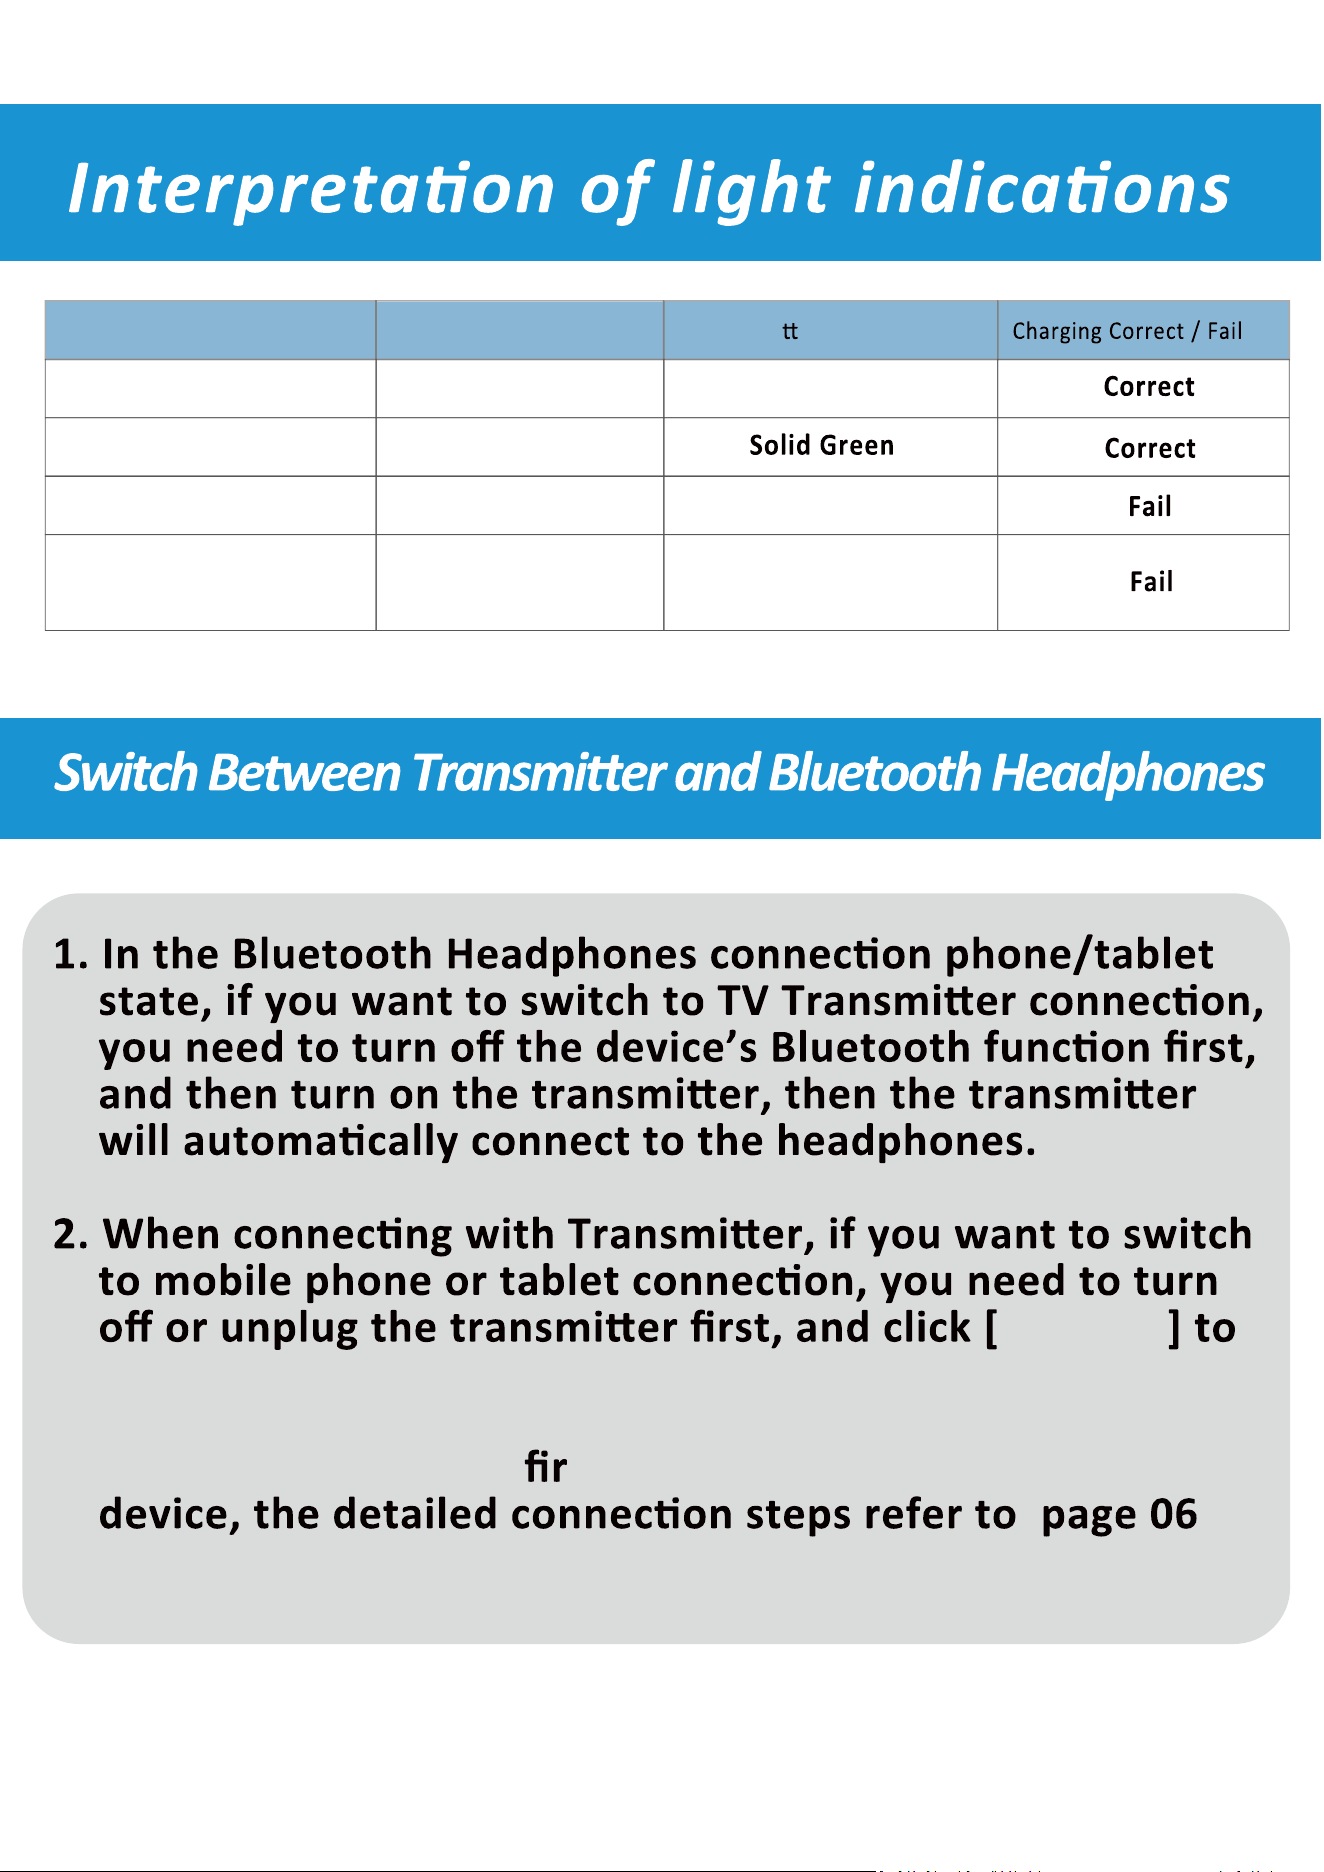
Status Headphones Indicator Transmi er Indicator
Charge
Fully charged
Headphones Connected
Solid Red
Solid Blue
Flashes Blue
Solid Red
Solid Blue
Headphones Charging
Failed
Flash Red & Green
Alternately
No Display
13
TV-001
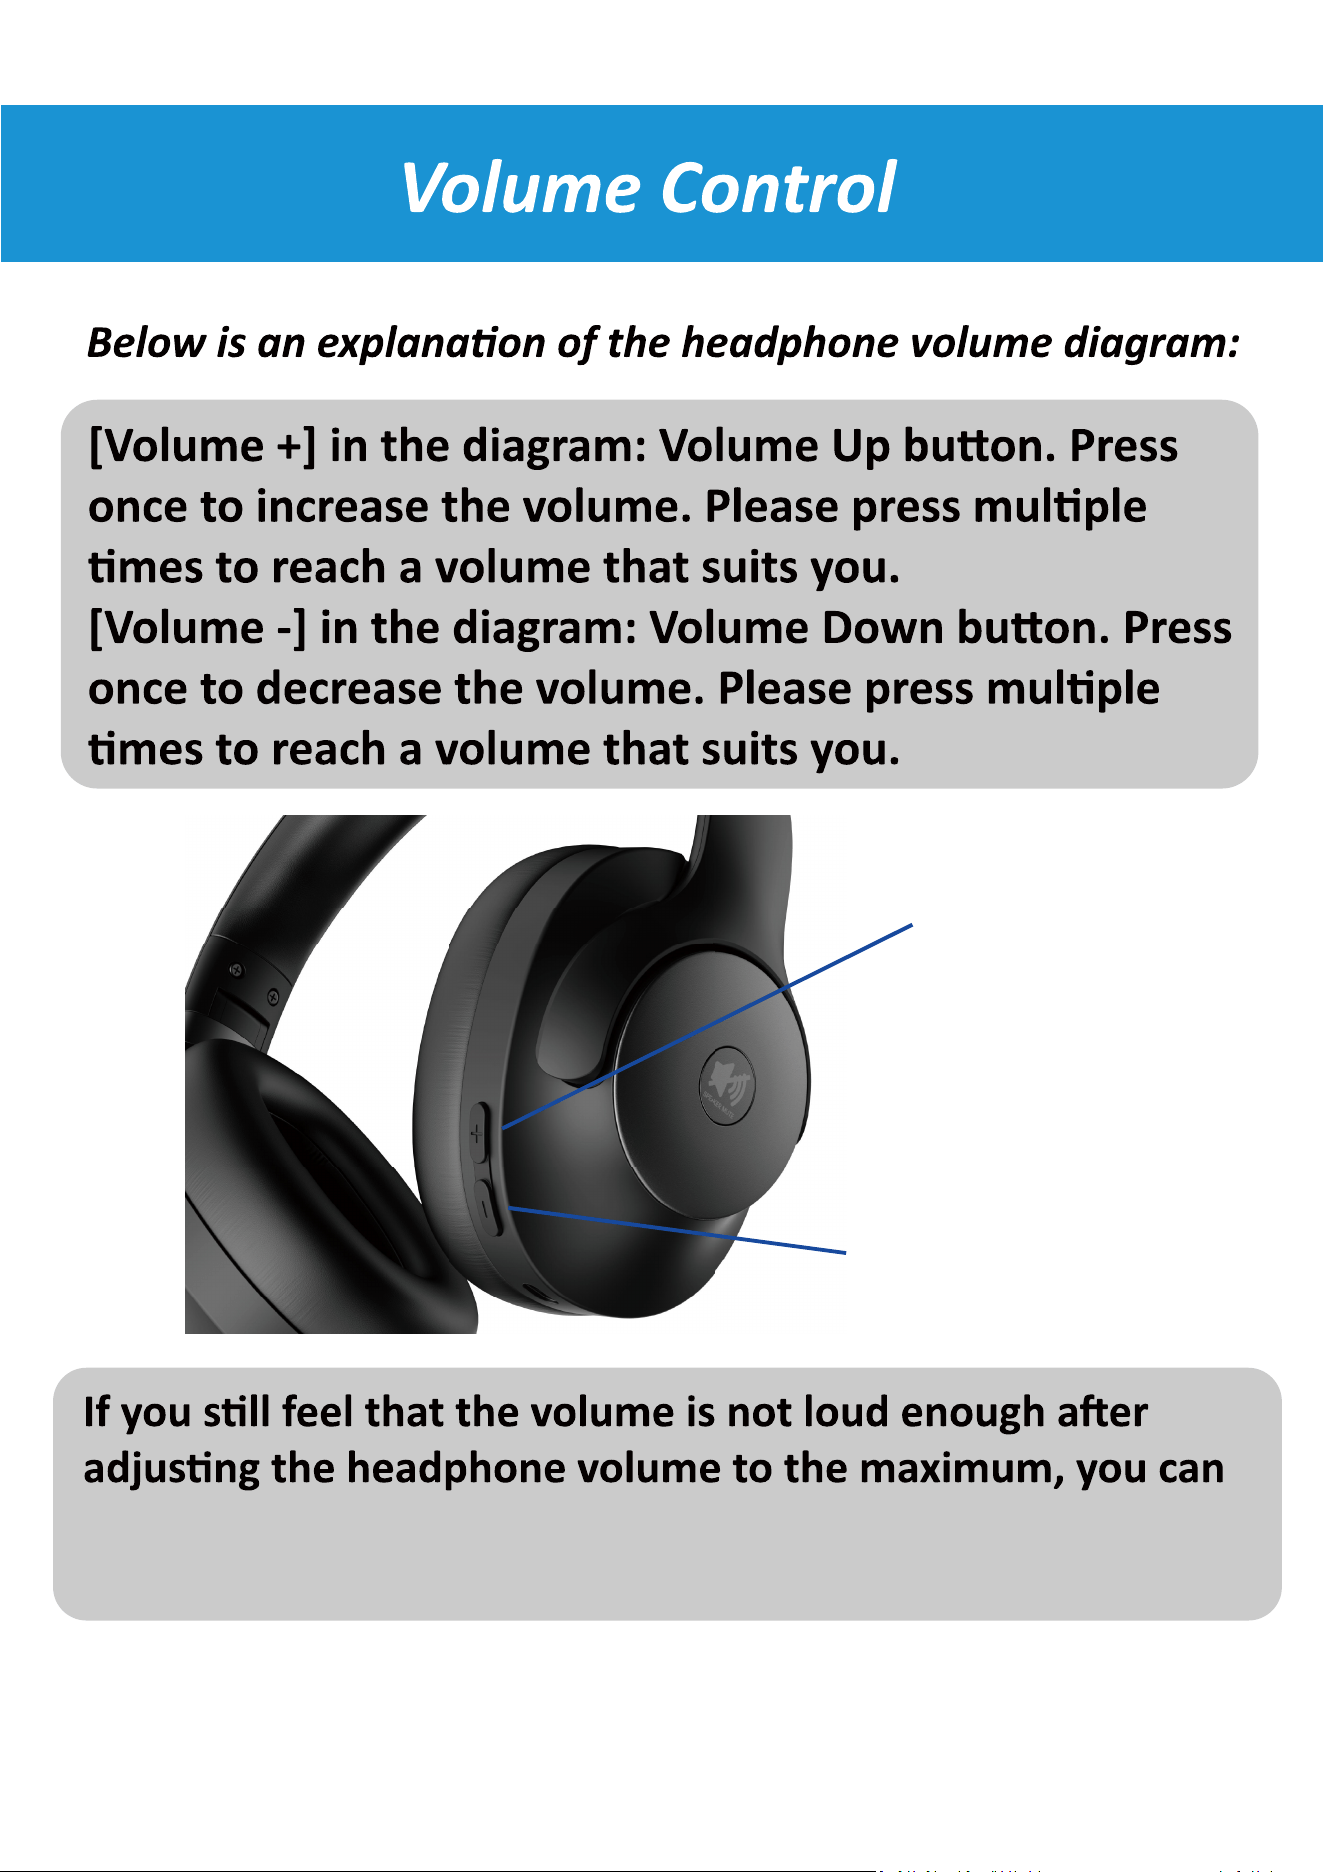
Volume+
Volume-
adjust the TV volume through the remote control, so that our
headphone volume will increase on the original basis.
14
Q: Why the TV-001 headphones cannot reconnect to the
A: If you encounter this issue, follow these steps:
(1) If a pop-up window appears on the TV, choose to
to the TV.
headphones are paired with the TV, remove the
Device List > Edit > Select M1 Headphones >
Delete. (Note: The path may vary based on your TV
make/model).
(3) Turn or unplug the TV. (Note: Using the
remote to turn the TV may not fully disconnect
Q: How to select SPDIF/AUX?
AUX audio cable is inserted.
FAQ
Q: Why can't I turn up the volume?
A: You can increase the volume using the headphone's volume +
and won't t on the TV volume bar simultaneously. For
15
FAQ
Q: Can I have audio through my TV's speakers and Bluetooth
A: Whether you can use both your TV's speakers and Bluetooth
headphones simultaneously depends on whether your TV
supports dual audio output. Here's how to check:
(2) Change the output to "OPTICAL" or "EXTERNAL SPEAKER".
(3) If you hear sound through your headphones, go back to
"SOUND OUTPUT".
(4) Change the output back to "TV SPEAKER".
If you can hear sound from both your TV's speakers and
Bluetooth headphones using these steps, then your TV
supports dual audio output. Otherwise, it may not be
possible with your current TV model.
Q: How do I know if the headphones are charged?
A: Follow these steps:
(1) While charging, both the LED lights on the headset and
(2) Once fully charged, the LED on the headset turns solid
headphones on it, they're not charging. In that case, pick up
the headset, adjust the headband, and place it back on the
16
Q: How to connect headphones to TV via transmitter?
A: Here are the steps:
1. Plug the optical audio cable into both the transmitter and
your TV.
2. Ensure the transmitter and headset are paired.
3. Set the TV’s audio output format to PCM/Stereo/Optical.
Additional information:
If you're using a TV box, cable box, Apple TV, or DirecTV, use
its remote control to access the TV box's menu and switch
the audio format to PCM or stereo as well. Detailed setup
steps may vary by model, so refer to your TV manual or
Q: What should I do when the headphones are paired but the
TV sound isn't synced (Optical connection)?
A: Here's a simple guide:
1. Check if the headphones are muted by pressing the Mute
Button once and listening for the prompt "Sound On".
2. Turn on your TV and access its menu by pressing something
like "Menu" or "Home" on the remote
3. Navigate to "Sound" or "Audio" settings.
4. Look for "Advanced Settings" or "Expert Settings" and select it.
5. Find "Digital Output Audio Format", "SPDIF", or "Audio
Output", and select it.
6. Choose "PCM", "Stereo", or "Optical".
with your headphones. Menu names may vary depending on
your TV model.
17
FAQ


FCC Warning
This device complies with part 15 of the FCC Rules. Operation is subject to the following two conditions:
(1) This device may not cause harmful interference, and (2) this device must accept any interference
received, including interference that may cause undesired operation.
Any Changes or modifications not expressly approved by the party responsible for compliance could
void the user's authority to operate the equipment.
Note: This equipment has been tested and found to comply with the limits for a Class B digital device,
pursuant to part 15 of the FCC Rules. These limits are designed to provide reasonable protection
against harmful interference in a residential installation. This equipment generates uses and can radiate
radio frequency energy and, if not installed and used in accordance with the instructions, may cause
harmful interference to radio communications. However, there is no guarantee that interference will not
occur in a particular installation. If this equipment does cause harmful interference to radio or television
reception, which can be determined by turning the equipment off and on, the user is encouraged to try to
correct the interference by one or more of the following measures:
-Reorient or relocate the receiving antenna.
-Increase the separation between the equipment and receiver.
-Connect the equipment into an outlet on a circuit different from that to which the receiver is
connected.
-Consult the dealer or an experienced radio/TV technician for help.
The device has been evaluated to meet general RF exposure requirement. The device can be used in
portable exposure condition without restriction.