REFRIGERANT
R32
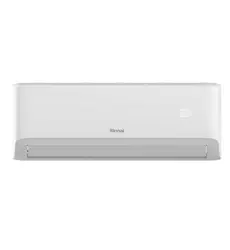
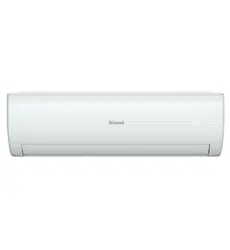
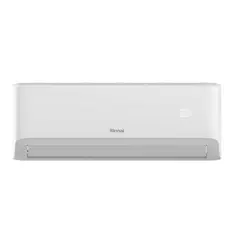
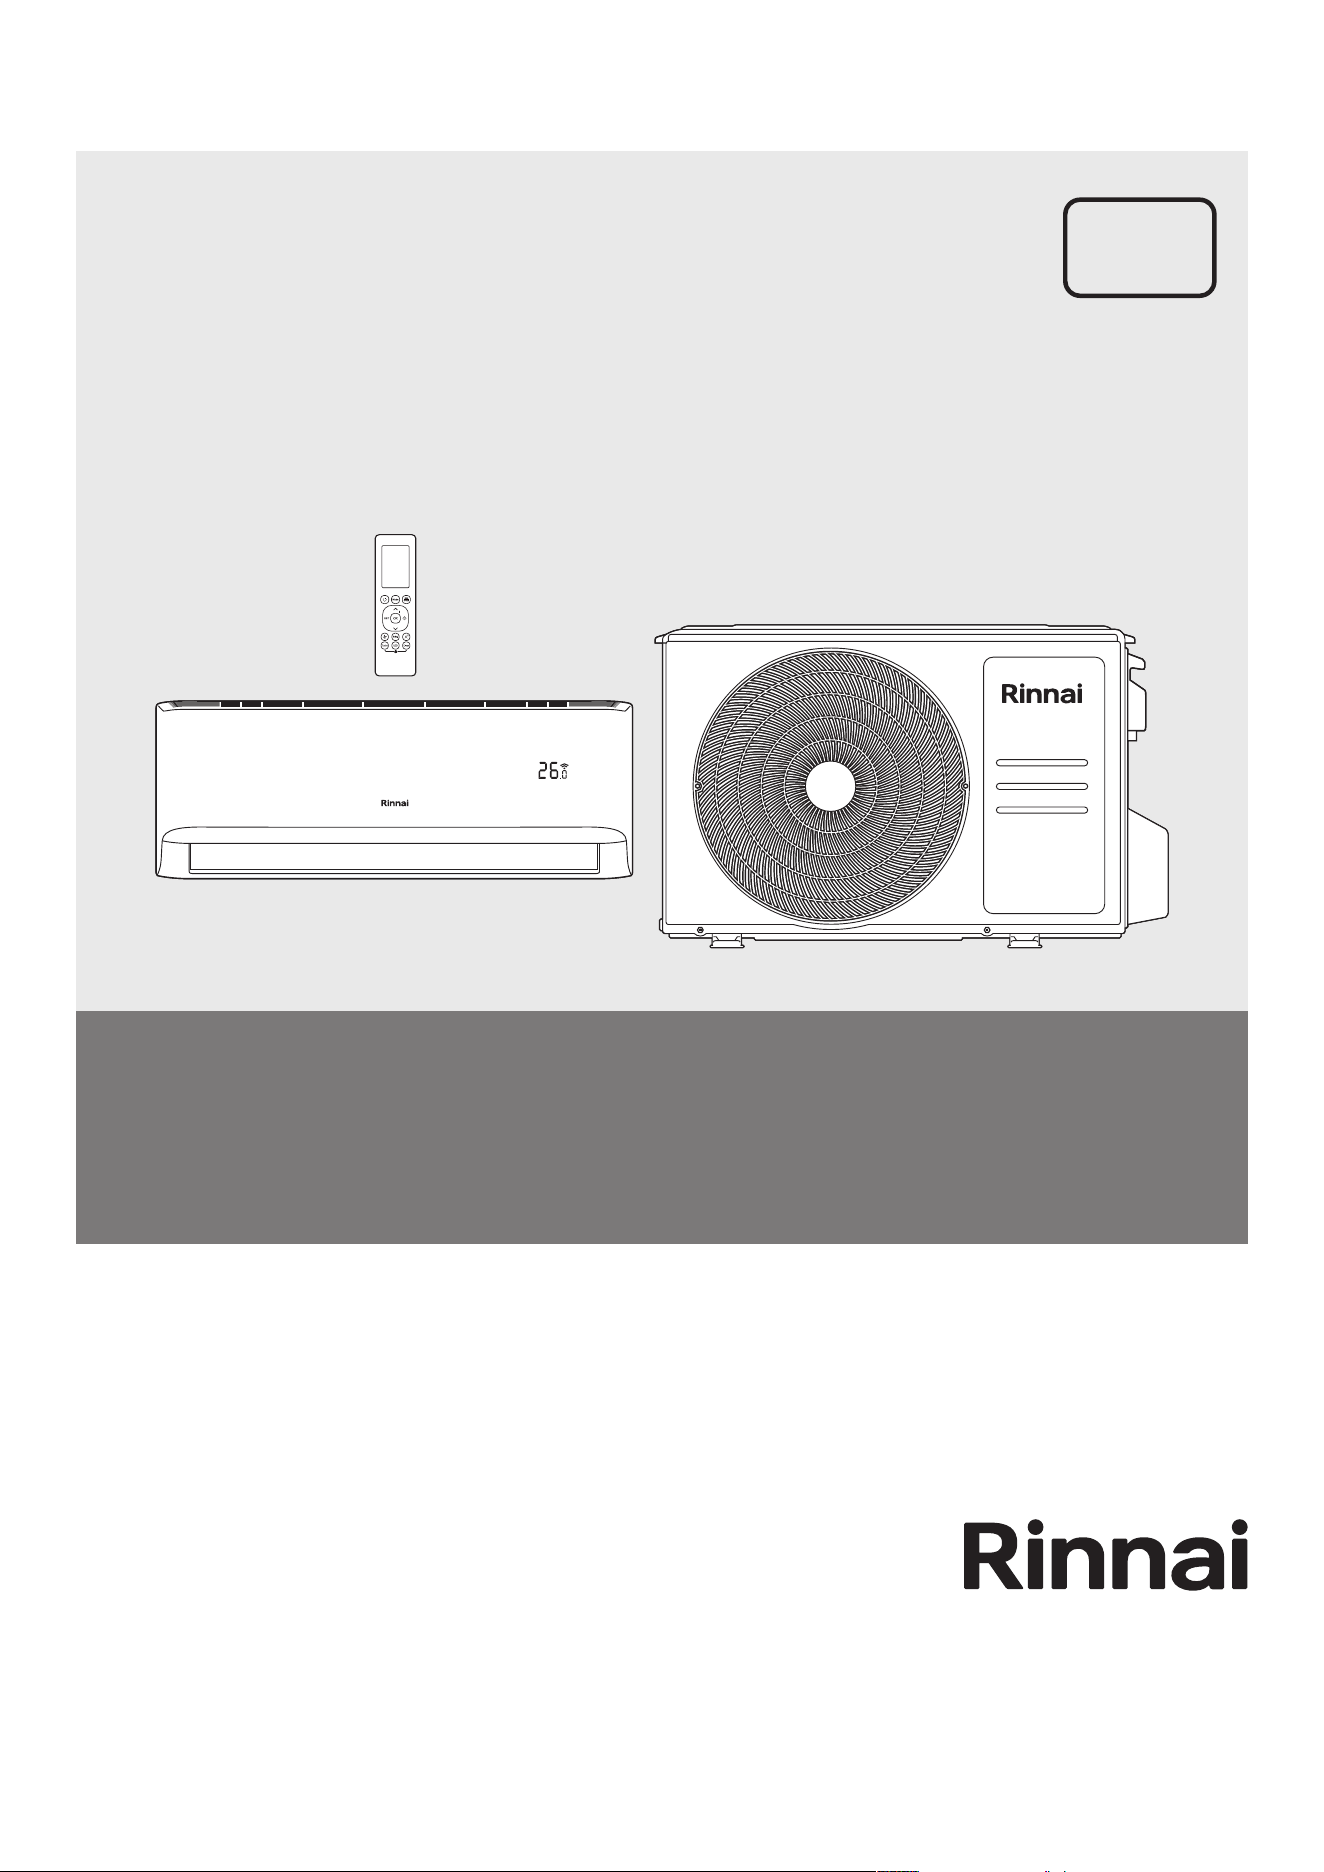
TX Series Split Type Wall Mounted Air Conditioner
Installation Manual
MODELS
System Indoor Outdoor
HSNRTX25 HINRTX25 HONRTX25
HSNRTX35 HINRTX35 HONRTX35
HSNRTX50 HINRTX50 HONRTX50
HSNRTX60 HINRTX60 HONRTX60
HSNRTX70 HINRTX70 HONRTX70
HSNRTX80 HINRTX80 HONRTX80
HSNRTX90 HINRTX90 HONRTX90
Rinnai 2 TX Series Split AC IM
REFRIGERANT
R32
This appliance must be installed in accordance with:
• Manufacturer’s Installation Instructions.
• Current AS/NZS 3000, AS/NZS 5141, AS/NZS 5149.
• Local regulations, including local OH&S requirements,
and Municipal Building Codes, including the National
Construction Code (NCC).
This appliance must be installed, maintained and removed
only by an Authorised Person.Rinnai recommends that this
appliance be serviced once a year.
For continued safety of this appliance it must be installed
and maintained in accordance with the manufacturer’s
instructions.
Product Registration
If in Australia, to register your product warranty online, please scan the QR code or
visit www.rinnai.com.au/support/warranty-registration
Rinnai 3 TX Series Split AC IM
TABLE OF CONTENTS
Warnings and Important Information 4
Accessories 10
Installation Summary 11
Indoor Unit �������������������������������������������������������������������������������������������������������������������������������������������������������� 11
System Schematic �������������������������������������������������������������������������������������������������������������������������������������������� 12
Indoor Installation 13
Installation Instructions ������������������������������������������������������������������������������������������������������������������������������������� 13
Mounting Plates and Wall Clearances �������������������������������������������������������������������������������������������������������������� 14
Refrigerant Piping and Drainage ���������������������������������������������������������������������������������������������������������������������� 15
Electrical Connections �������������������������������������������������������������������������������������������������������������������������������������� 16
Mounting the Unit ��������������������������������������������������������������������������������������������������������������������������������������������� 18
Installation Instructions ������������������������������������������������������������������������������������������������������������������������������������� 19
Outdoor Installation 19
Outdoor Unit Location �������������������������������������������������������������������������������������������������������������������������������������� 19
Outdoor Unit Mounting Dimensions ����������������������������������������������������������������������������������������������������������������� 21
Signal and Power Cables ��������������������������������������������������������������������������������������������������������������������������������� 22
Refrigerant Piping Connection 23
Cutting and Preparing Piping ��������������������������������������������������������������������������������������������������������������������������� 23
Connecting Piping �������������������������������������������������������������������������������������������������������������������������������������������� 25
Air Evacuation 26
Calculating Additional Refrigerant Requirements ��������������������������������������������������������������������������������������������� 27
Electrical and Gas Leak Checks 28
Test Run 29
Checklist 30
Final Checklist �������������������������������������������������������������������������������������������������������������������������������������������������� 30
Specications 31
Contacts 36
Rinnai 4 TX Series Split AC IM
WARNING
READ ALL INSTRUCTIONS BEFORE USING THE APPLIANCE.
Always comply with the following precautions to avoid dangerous situations and to ensure
optimum performance.
Failure to carefully read and follow all instructions in this manual can result in equipment
malfunction, property damage, personal injury and/or death.
DANGER: Indicates an imminently hazardous situation which, if not avoided, will result in
personal injury or death.
WARNINGS: Indicates a potentially hazardous situation which, if not avoided, could result in
personal injury or death.
CAUTIONS: Indicates a potentially hazardous situation which, if not avoided, could result in
minor or moderate injury or damage to the appliance. It may also be used to alert against unsafe
practices.
WARNING
REGULATORY
This appliance shall be installed in accordance with:
Manufacturer’s Installation Instructions.
Current AS/NZS 3000, AS/NZS 5141, AS/NZS 5149.
Local Regulations and Municipal Building Codes including local OH&S requirements.
This appliance must be installed, maintained and removed ONLY by an Authorised Person.
For continued safety of this appliance it must be installed and maintained in accordance with the
manufacturers instructions.
This appliance uses R32 refrigerant.
This appliance is heavy, use 2 people or mechanical lifting device. Improper lifting may result in
serious injury.
Take care when opening or unpacking this appliance. Failure to do so may result in serious injury
or product failure.
DO NOT modify the electrical wiring of this appliance. If the control power wiring is damaged
or deteriorated then it must be replaced by an authorised person. Failure to do so may result in
electricshock,re,seriousinjuryorproductfailure.
DO NOT install the air conditioner on an unstable or non level surface or where there may be a
danger of it falling. It may result in death, serious injury, or product failure.
DO NOT install the outdoor unit where noise may cause nuisance.
DO NOT install the outdoor unit where it will be exposed to sea wind (salt spray) as this will
reduce durability.
IMPORTANT
MANDATORY INSPECTION PRIOR TO INSTALLATION
Immediately report any damage or discrepancies to the Supplier of the appliance. This
appliance was inspected and tested at the time of manufacture and packaging, and released for
transportation without known damage. Upon receipt, inspect the exterior for evidence of rough
handling in shipment. Ensure that the appliance is labelled correctly for the gas and electrical
supply, and/or other services it is intended to be connected to.
For safety and warranty purposes, appliances that may be damaged or incorrect MUST NOT be
installed or operated under any circumstances. Installation of damaged or incorrect appliances
may contravene local government regulations. Rinnai disclaims any liability or responsibility
whatsoever in relation to the installation or operation of damaged or incorrect appliances.
WARNINGS AND IMPORTANT INFORMATION

Rinnai 5 TX Series Split AC IM
WARNING
INSTALLATION
This appliance shall be installed in accordance with local electrical safety regulations by an
authorised person such as a licensed electrician. Contact an authorised service technician for
repair or maintenance of this appliance.
Onlyusetheincludedaccessories,parts,andspeciedpartsforinstallation.Usingnon-standard
partscancausewaterleakage,electricalshock,re,andcancausetheunittofail.
Installtheunitinarmlocationthatcansupporttheunit’sweight.Ifthechosenlocationcannot
support the unit’s weight, or the installation is not done properly, the unit may drop and cause
serious injury and damage.
DO NOT turn on the power until all work has been completed.
When moving or relocating the air conditioner, consult experienced service technicians for
disconnection and reinstallation of the unit.
How to install the appliance to its support, please read the information for details in “indoor unit
installation” and “outdoor unit installation” sections.
For units that have an auxiliary electric heater, DO NOT install the unit within 1 meter (3 feet) of
any combustible materials.
DO NOT install the unit in a location that may be exposed to combustible gas leaks. If combustible
gasaccumulatesaroundtheunit,itmaycausere.
Install drainage piping according to the instructions in this manual. Improper drainage may cause
water damage to your home and property.
This appliance is a Type 1 Electrical Appliance.
Make sure the live wire, neutral wire and earth wire in the power socket are properly connected.
Inadequateorincorrectelectricalconnectionsmaycausereorelectricshock.
The yellow-green wire in air conditioner is the earthing wire which cannot be used for other
purposes. Improper earthing may cause electric shock.
The circuit breaker must have the functions of magnetic tripping and heat tripping to prevent
short circuit and overload.
Use a standard circuit breaker and fuse conforming with the rating of the appliances.
The unit must be earthed in accordance with local regulations.
Connect all wiring tightly. Failure to do so may result in electric shock or product failure.
DO NOT supply power to the unit until all wiring and tubing are completed.
Select an installation location where the components can be mounted securely and accessible
for service and replacement.
Make sure tubing is properly insulated to ensure optimum performance.
Install the drain hose properly for smooth drainage of condensed water.
Make sure to check for and rectify any refrigerant leaks after you install or repair the unit.
This appliance uses R32 (diuoromethane) refrigerant, which is a ammable gas class 2.2
according to AS/NZS 1677 and must be handled by a refrigeration mechanic with appropriate
Australian refrigerant handling licence.
WARNINGS AND IMPORTANT INFORMATION
Rinnai 6 TX Series Split AC IM
WARNING
WARNINGRiskofre/ammablematerial.Iftherefrigerantisleaked,togetherwithan
external ignition source, there is a possibility of ignition.
Read the OPERATING INSTRUCTIONS carefully before operation.
Service personnel are required to carefully read the OPERATING INSTRUCTIONS and
INSTALLATION MANUAL before operation.
Further information is available in the OPERATING INSTRUCTIONS, INSTALLATION
MANUAL, and the like.
Certain levels of refrigerant require minimum room sizes. Please ensure that these minimum
room sizes are adhered to for standard installations (up to 10m pipe length). If larger refrigerant
charges than standard are used then please consult AS/NZS 60335.2.40 to determine the safe
minimumoorareafortheinstallation.
Make sure that the area has been made safe by having suitable ventilation and is free from ignition
sources before charging or releasing the charge of R32.
Model HSNRTX25 HSNRTX35 HSNRTX50 HSNRTX60 HSNRTX70 HSNRTX80 HSNRTX90
Standard Charge (kg) 0.62 0.85 1.26 1.26 1.40 1.40 2.20
Minimum Floor Area (m
2
) 4.0 4.0 4.0 4.0 4.0 4.0 5.4
WARNING
WARNINGS FOR PRODUCT USE
Ifanabnormalsituationarises(likeaburningsmell),immediatelyturnotheunitanddisconnect
thepower.Callyourdealerforinstructionstoavoidelectricshock,reorinjury.
DO NOTinsertngers,rodsorotherobjectsintotheairinletoroutlet.Thismaycauseinjury,
since the fan may be rotating at high speeds.
DO NOTuseammablesprayssuchashairspray,lacquerorpaintneartheunit.Thismaycause
reorcombustion.
DO NOT operate the air conditioner in places near or around combustible gases. Emitted gas
may collect around the unit and cause explosion.
DO NOT operate your air conditioner in a wet room such as a bathroom or laundry room. Too
much exposure to water can cause electrical components to short circuit.
DO NOT expose your body directly to cool air for a prolonged period of time.
DO NOT allow children to play with the air conditioner. Children must be supervised around the
unit at all times.
If the air conditioner is used together with burners or other heating devices, thoroughly ventilate
theroomtoavoidoxygendeciency.
In certain functional environments, such as kitchens, server rooms, etc., the use of specially
designedair-conditioningunitsishighlyrecommended.
WARNINGS AND IMPORTANT INFORMATION
Rinnai 7 TX Series Split AC IM
OPERATION
DO NOT let the air conditioner run for extended periods when the humidity is very high or when
doors or windows are left open. As this may result in an excessive operational loading and lead
to product failure.
DO NOT cover or place articles on any part of this appliance.
DO NOT touch, operate or clean the air conditioner with wet hands. It may result in electric
shock or product failure.
DO NOT insert hands or other objects through the air inlet or outlet while the appliance is
operating. It may result in electric shock or product failure.
DO NOT placeaheaterorotherheatingappliancesnearthisappliance,alwaysensuresucient
ventilation when using this appliance and a heating appliance at the same time. Failure to do so
mayresultinproductmis-operation.
Turnmainpowerobeforecleaning.Failuretodosomayresultinre,electricshock,orproduct
failure.
DO NOT use solvents, abrasives or harsh detergent to clean any part or surface of this appliance
or spray water or allow liquids to enter the indoor unit. The enclosure of the appliance and remote
control can be cleaned using a soft, damp cloth and a mild detergent.
NEVERtouchthemetalpartsoftheairconditionerwhenyouremovetheairlter.Itmayresult
in electric shock or product failure.
DO NOT leaveammablematerialsneartheappliance.Itmayresultinexplosionorre.
Ifthereisexcessivenoise,smellorsmokecomingfromtheappliance,turntheapplianceo,
isolate the power supply and contact a service agent.
DO NOToperatetheapplianceifithasbeensubmergedintowaterduetoooding,contacta
serviceagent.Failuretodosomayresultinelectricshock,re,seriousinjury,orproductfailure.
This appliance is not intended for use by persons (including children) with reduced physical,
sensory or mental capabilities, or lack of experience and knowledge unless they have been given
supervision or instruction concerning use of the appliance by a person responsible for their
safety.
Children should be supervised to ensure that they DO NOT play with the appliance.
The air conditioning system is designed to achieve consumer comfort. It is NOT designed
for commercial applications requiring a controlled atmosphere (i.e. computer rooms, food
preservation, etc.)
DO NOT blocktheinletoroutletofairow.Itmayresultproductinfailure.
DO NOT drink the condensate water drained from the appliance. This condensate is not potable
and may present a health risk if consumed.
DO NOT expose people, animals or plants directly to the cold or hot discharge of the appliance.
It may result in serious injury.
DO NOT mix the batteries for the remote control with other types of batteries or mix new batteries
with used batteries. Failure to do so may result in product failure. STOP using the remote control
ifthereisabatteryuidleak.
OPERATION RANGE LIMITATIONS
The table below indicates the temperature ranges the air conditioner can be operated within.
MODE Cool Mode Heat Mode Dry Mode
Room Temperature 16°C - 32°C 0°C - 30°C 10°C - 32°C
Outdoor Temperature -15°C ~ 50°C -15°C ~ 24°C 0°C ~ 50°C
WARNING
WARNINGS AND IMPORTANT INFORMATION
Rinnai 8 TX Series Split AC IM
WARNING
CLEANING AND MAINTENANCE WARNINGS
Turnothedeviceanddisconnectthepowerbeforecleaning.Failuretodosocancauseelectrical
shock.
DO NOT clean the air conditioner with excessive amounts of water.
DO NOT clean the air conditioner with combustible cleaning agents. Combustible cleaning
agentscancausereordeformation.
CAUTION
OPERATING CAUTIONS
Turnotheairconditioneranddisconnectthepowerifyouarenotgoingtouseitforalongtime.
Turnoandunplugtheunitduringstorms.
Make sure that water condensation can drain unhindered from the unit.
DO NOT operate the air conditioner with wet hands. This may cause electric shock.
DO NOT use device for any other purpose than its intended use.
DO NOT climb onto or place objects on top of the outdoor unit.
DO NOT allow the air conditioner to operate for long periods of time with doors or windows
open, or if the humidity is very high.
WARNING
ELECTRICAL WARNINGS
Only use the specied power cord. If the power cord is damaged, it must be replaced by the
manufacturer,itsserviceagentorsimilarlyqualiedpersonsinordertoavoidahazard.
Keep power plug clean. Remove any dust or grime that accumulates on or around the plug. Dirty
plugscancausereorelectricshock.
DO NOTpullpowercordtounplugunit.Holdtheplugrmlyandpullitfromtheoutlet.Pulling
directlyonthecordcandamageit,whichcanleadtoreorelectricshock.
DO NOT modify the length of the power supply cord or use an extension cord to power the unit.
DO NOTsharetheelectricaloutletwithotherappliances.Improperorinsucientpowersupply
cancausereorelectricalshock.
The product must be properly grounded at the time of installation, or electrical shock may occur.
For all electrical work, follow all local and national wiring standards, regulations, and the
Installation Manual. Connect cables tightly, and clamp them securely to prevent external forces
fromdamagingtheterminal.Improperelectricalconnectionscanoverheatandcausere,and
may also cause shock. All electrical connections must be made according to the Electrical
Connection
Diagram located on the panels of the indoor and outdoor units.
All wiring must be properly arranged to ensure that the control board cover can close properly. If
the control board cover is not closed properly, it can lead to corrosion and cause the connection
pointsontheterminaltoheatup,catchre,orcauseelectricalshock.
If connectingpower toxed wiring,an all-poledisconnection devicewhich has at least 3mm
clearances in all poles, and have a leakage current that may exceed 10mA, the residual current
device (RCD) having a rated residual operating current not exceeding 30mA, and disconnection
mustbeincorporatedinthexedwiringinaccordancewiththewiringrules.
WARNINGS AND IMPORTANT INFORMATION

Rinnai 9 TX Series Split AC IM
NOTE
FUSE SPECIFICATIONS
The air conditioner’s circuit board (PCB) is designed with a fuse to provide overcurrent protection.
Thespecicationsofthefuseareprintedonthecircuitboard,suchas:
T3.15AL/250VAC, T5AL/250VAC, T3.15A/250VAC, T5A/250VAC, T20A/250VAC, T30A/250VAC,etc.
NOTE: FortheunitsusingR32refrigerant,onlytheblast-proofceramicfusecanbeused.
NOTE
FLUORINATED GASES
This air-conditioningunit contains uorinatedgreenhouse gases. Forspecic information on
the type of gas and the amount, please refer to the relevant label on the appliance itself or the
“Operation Manual” in the packaging of the outdoor unit.
Installation, service, maintenance and repair of this unit must be performed by a certied
technician.
Productuninstallationandrecyclingmustbeperformedbyacertiedtechnician.
For equipment that contains uorinated greenhouse gases in quantities of 5 tonnes of CO
2
equivalent or more, but of less than 50 tonnes of CO
2
equivalent, If the system has a leak detection
system installed, it must be checked for leaks at least every 24 months.
Whentheunitischeckedforleaks,properrecord-keepingofallchecksisstronglyrecommended.
WARNINGS AND IMPORTANT INFORMATION
Rinnai 10 TX Series Split AC IM
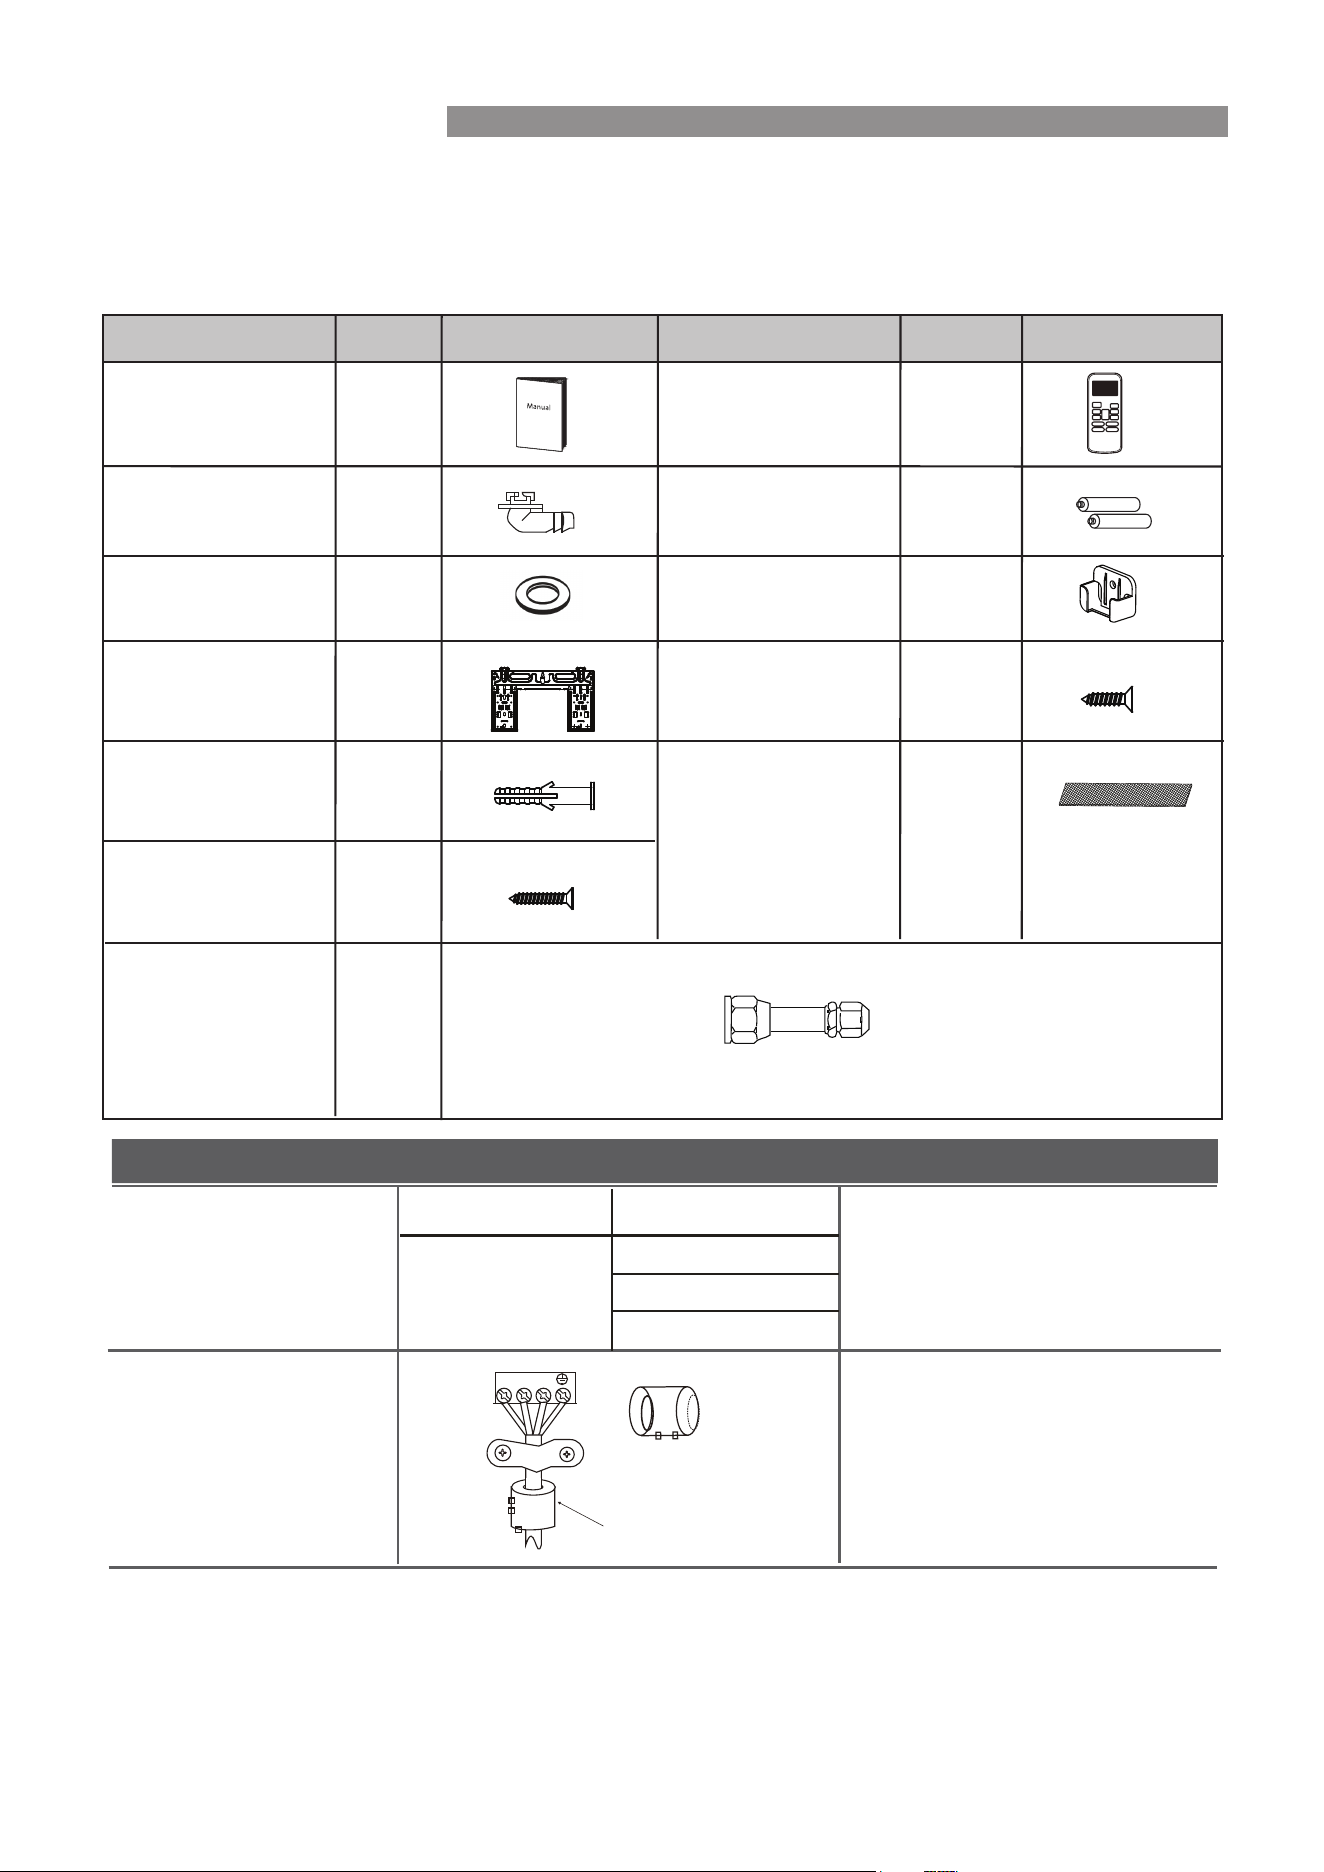
The air conditioning system comes with the following accessories. Use all of the installation parts
and accessories to install the air conditioner. Improper installation may result in water leakage,
electrical shock and fire, or cause the equipment to fail. The items are not included
with the air conditioner must be purchased separately.
Magnetic ring and belt
Varies by model
1 2 3
(if supplied ,please refer to
the wiring diagram to install
it on the connective cable. )
Pass the belt through
the hole of the Magnetic
ring to fix it on the cable
Name
Shape Quantity(PC)
(Need to be installed on
the back of main air filter
by the authorised
technician while installing
the machine)
Mounting plate
fixing screw
Remote controller
Fixing screw for
remote controller
holder(optional)
Remote controller
holder(optional)
Drain joint
(for cooling &
heating models)
Seal
(for cooling &
heating models)
Mounting plate
Manual
Parts you must purc hase
separately. Consult the dealer
about the proper pipe size of
the unit you purchased.
Connect ing pipe
assembly
Liquid side
Gas side
Φ
6.35
Φ
9.52
Φ
12.7
Φ
16
2~3
1
Name of Accessories
Q‘ty(pc)
Shape
1
1
1
Name of Accessories
Q‘ty(pc)
Shape
Anchor
1
2
1
2
Battery
1~2
5~8
5~8
Small Filter
Transfer connector
(Φ19 transfer to
Φ16. Packed with
the indoor unit)
ACCESSORIES
Rinnai 11 TX Series Split AC IM
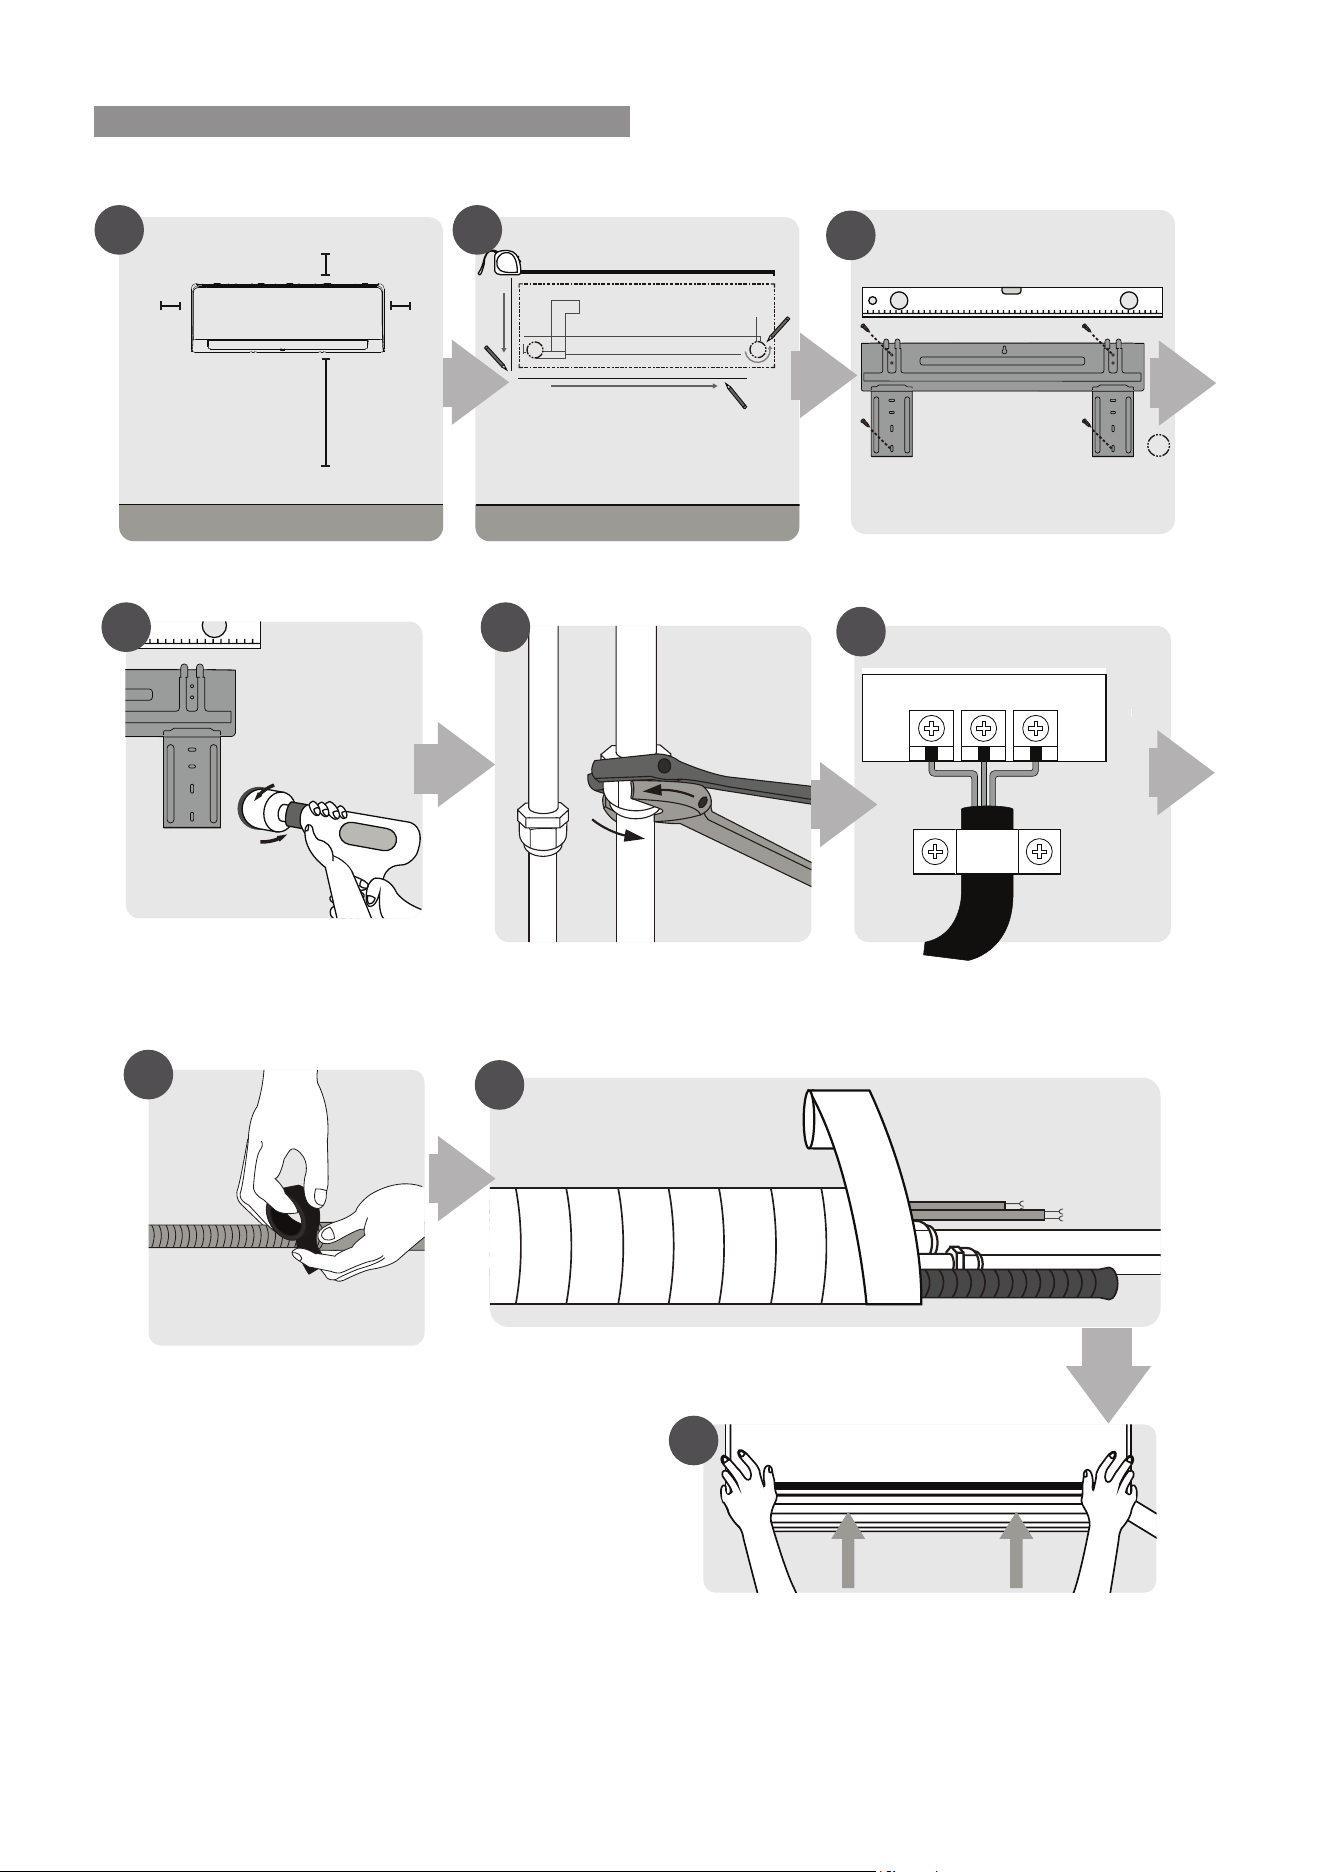
INDOOR UNIT
Select Installation Location
Attach Mounting Plate
Determine Wall Hole Position
1 2
3
Drill Wall Hole
4
120mm
2000mm
120mm
150mm
Mount Indoor Unit
STEP
8
Wrap Piping and Cable
Connect Piping
Prepare Drain Hose
Connect Wiring
4
5
6
7
8
9
INSTALLATION SUMMARY
Rinnai 12 TX Series Split AC IM
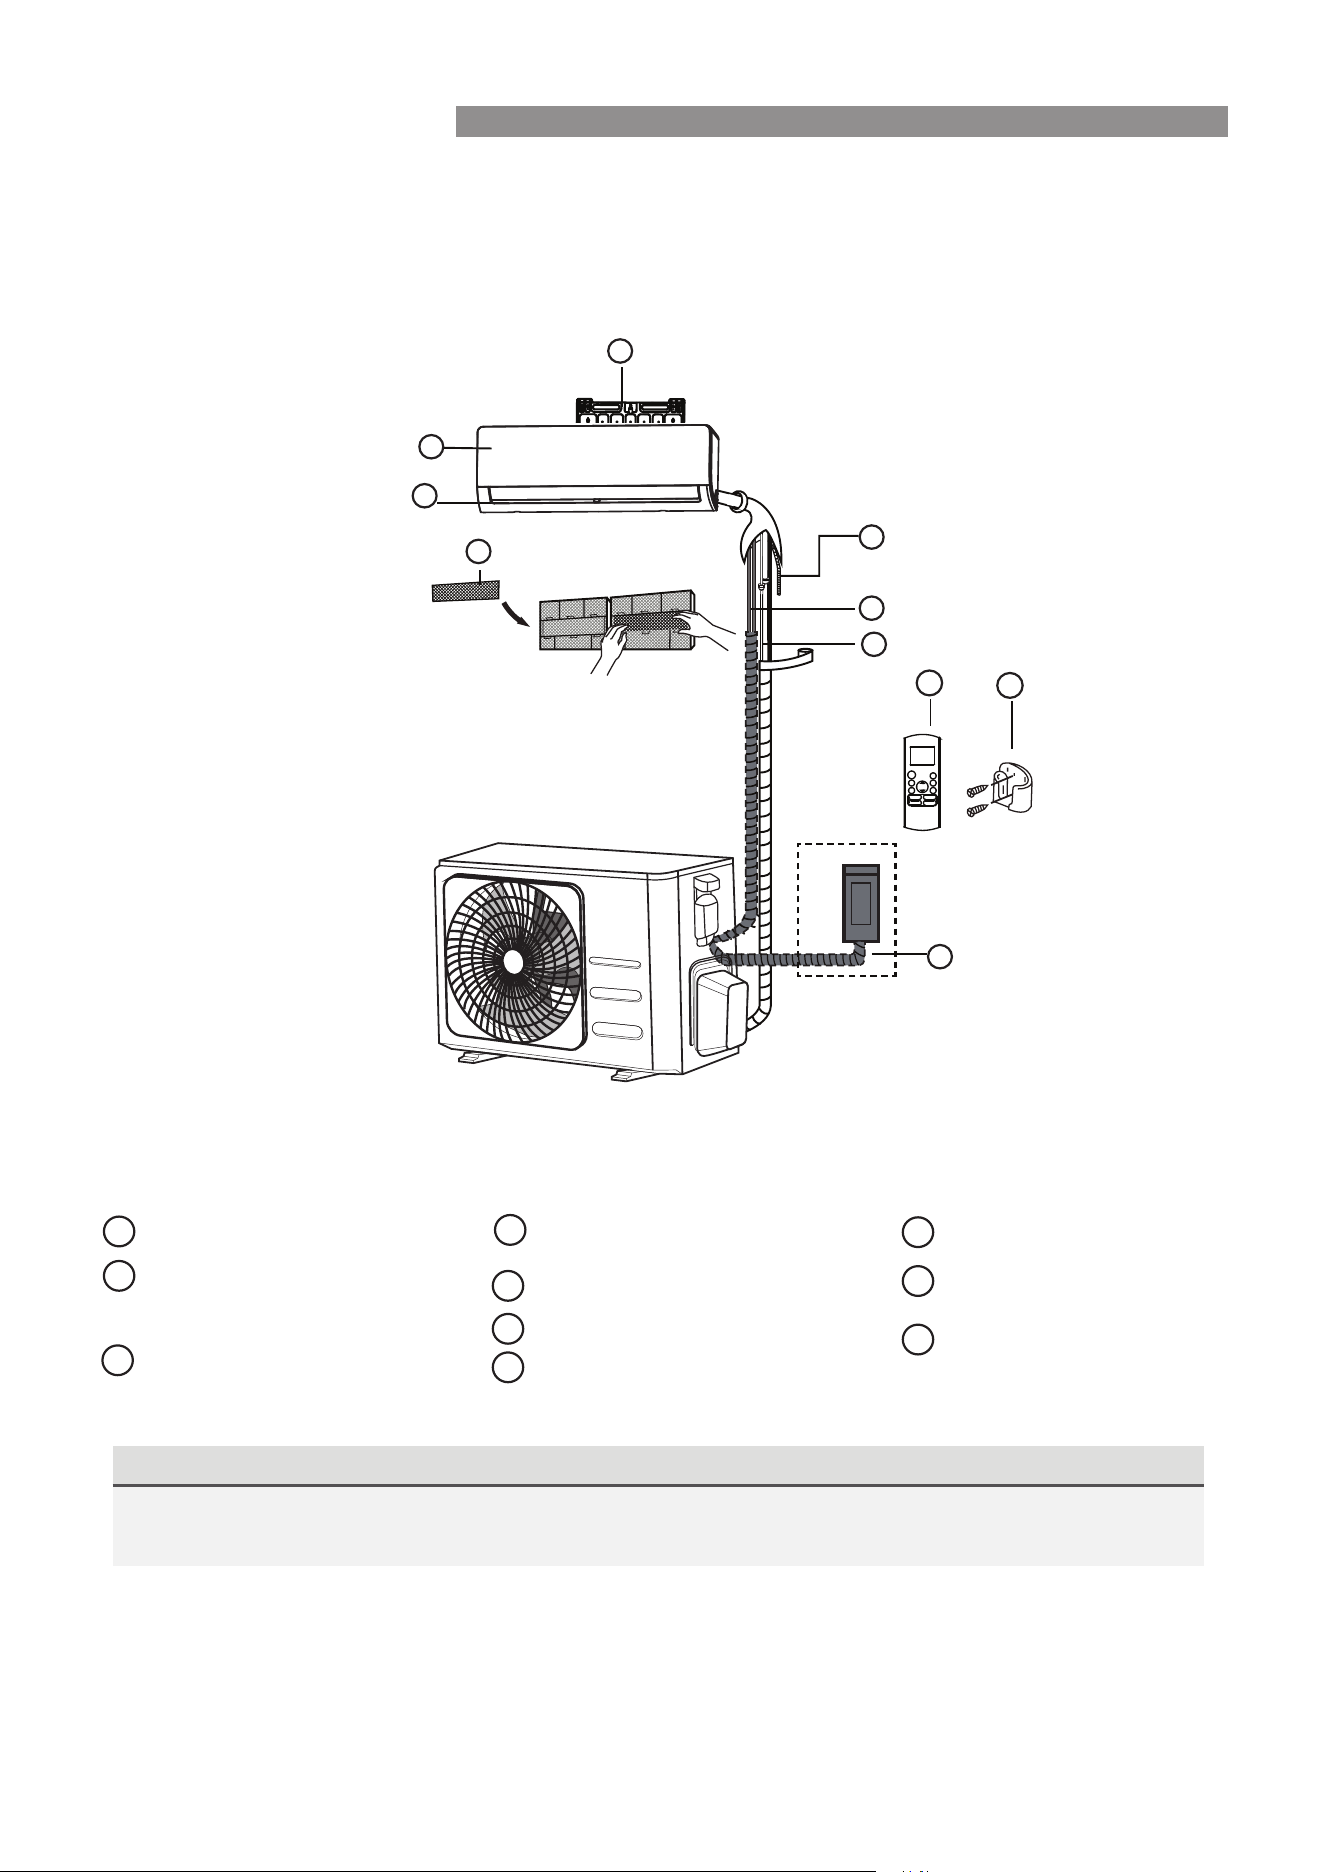
SYSTEM SCHEMATIC
NOTE ON ILLUSTRATIONS
Illustrations in this manual are for explanatory purposes. The actual shape of your indoor
unit may be slightly different. The actual shape shall prevail.
NOTE: The installation must be performed in accordance with the requirement of local and
national standards. The installation may be slightly different in different areas.
Wall Mounting Plate
Refrigerant Piping
Signal Cable
Remote Controller
Drainage Pipe
Louvre
Remote controller Holder
(Some Units)
Functional Filter (On Back of
Main Filter - Some Units)
Front Panel
Outdoor Unit Power Cable
(Some Units)
1
2
3
4
5
6
7
8
9
10
1
2
3
5
6
7
8
9
10
4
INSTALLATION SUMMARY
Rinnai 13 TX Series Split AC IM
INSTALLATION INSTRUCTIONS
PRIOR TO INSTALLATION
Before installing the indoor unit, refer to the
label on the product box to make sure that the
model number of the indoor unit matches the
model number of the outdoor unit.
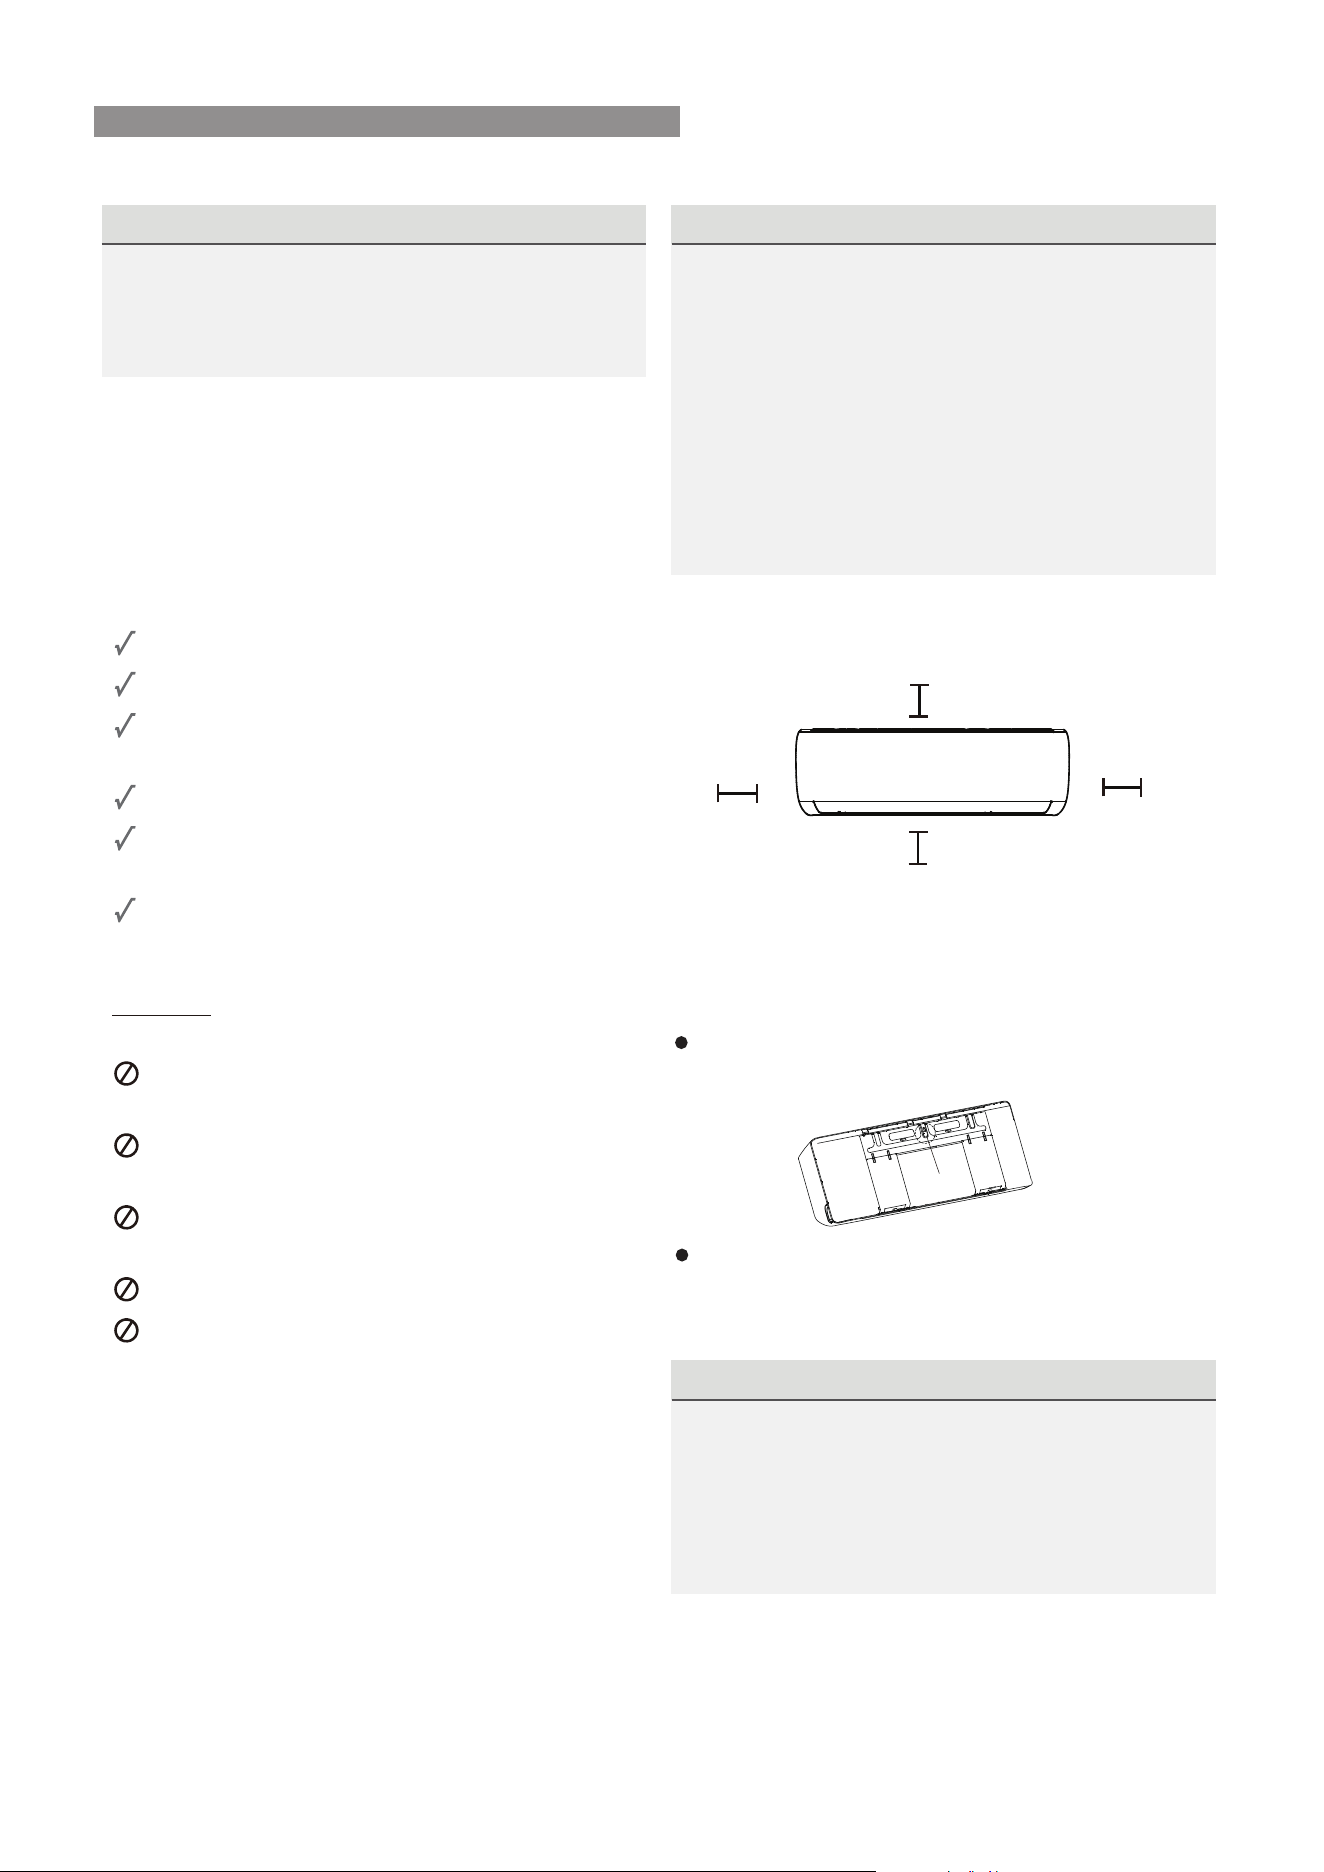
Step 1: Select installation location
Before installing the indoor unit, you must
choose an appropriate location. The following
are standards that will help you choose an
appropriate location for the unit.
Proper installation locations meet the
following standards:
Good air circulation
Convenient drainage
Noise from the unit will not disturb other
people
Firm and solid—the location will not vibrate
Strong enough to support the weight of the
unit
A location at least one meter from all other
electrical devices (e.g., TV, radio, computer)
DO NOT
install unit in the following
locations:
Near any source of heat, steam, or
combustible gas
Near flammable items such as curtains or
clothing
Near any obstacle that might block air
circulation
Near the doorway
In a location subject to direct sunlight
NOTE ABOUT WALL HOLE:
If there is no fixed refrigerant piping:
While choosing a location, be aware that you
should leave ample room for a wall hole (see
Drill wall hole for connective piping step)
for the signal cable and refrigerant piping
that connect the indoor and outdoor units.
The default position for all piping is the right
side of the indoor unit (while facing the unit).
However, the unit can accommodate piping to
both the left and right.
Refer to the following diagram to ensure
proper distance from walls and ceiling:
Step 2: Attach mounting plate to wall
The mounting plate is the device on which you
will mount the indoor unit.
Remove the screw that attaches the mounting
plate to the back of the indoor unit.
Secure the mounting plate to the wall with
the screws provided. Make sure that mounting
plate is flat against the wall.
120mm
or more
2000mm or more
120mm
or more
150mm or more
NOTE FOR CONCRETE OR BRICK WALLS:
Screw
If the wall is made of brick, concrete, or similar
material, drill 5mm-diameter holes in the wall
and insert the sleeve anchors provided. Secure
the mounting plate to the wall by tightening the
screws directly into the clip anchors.
INDOOR INSTALLATION
Rinnai 14 TX Series Split AC IM
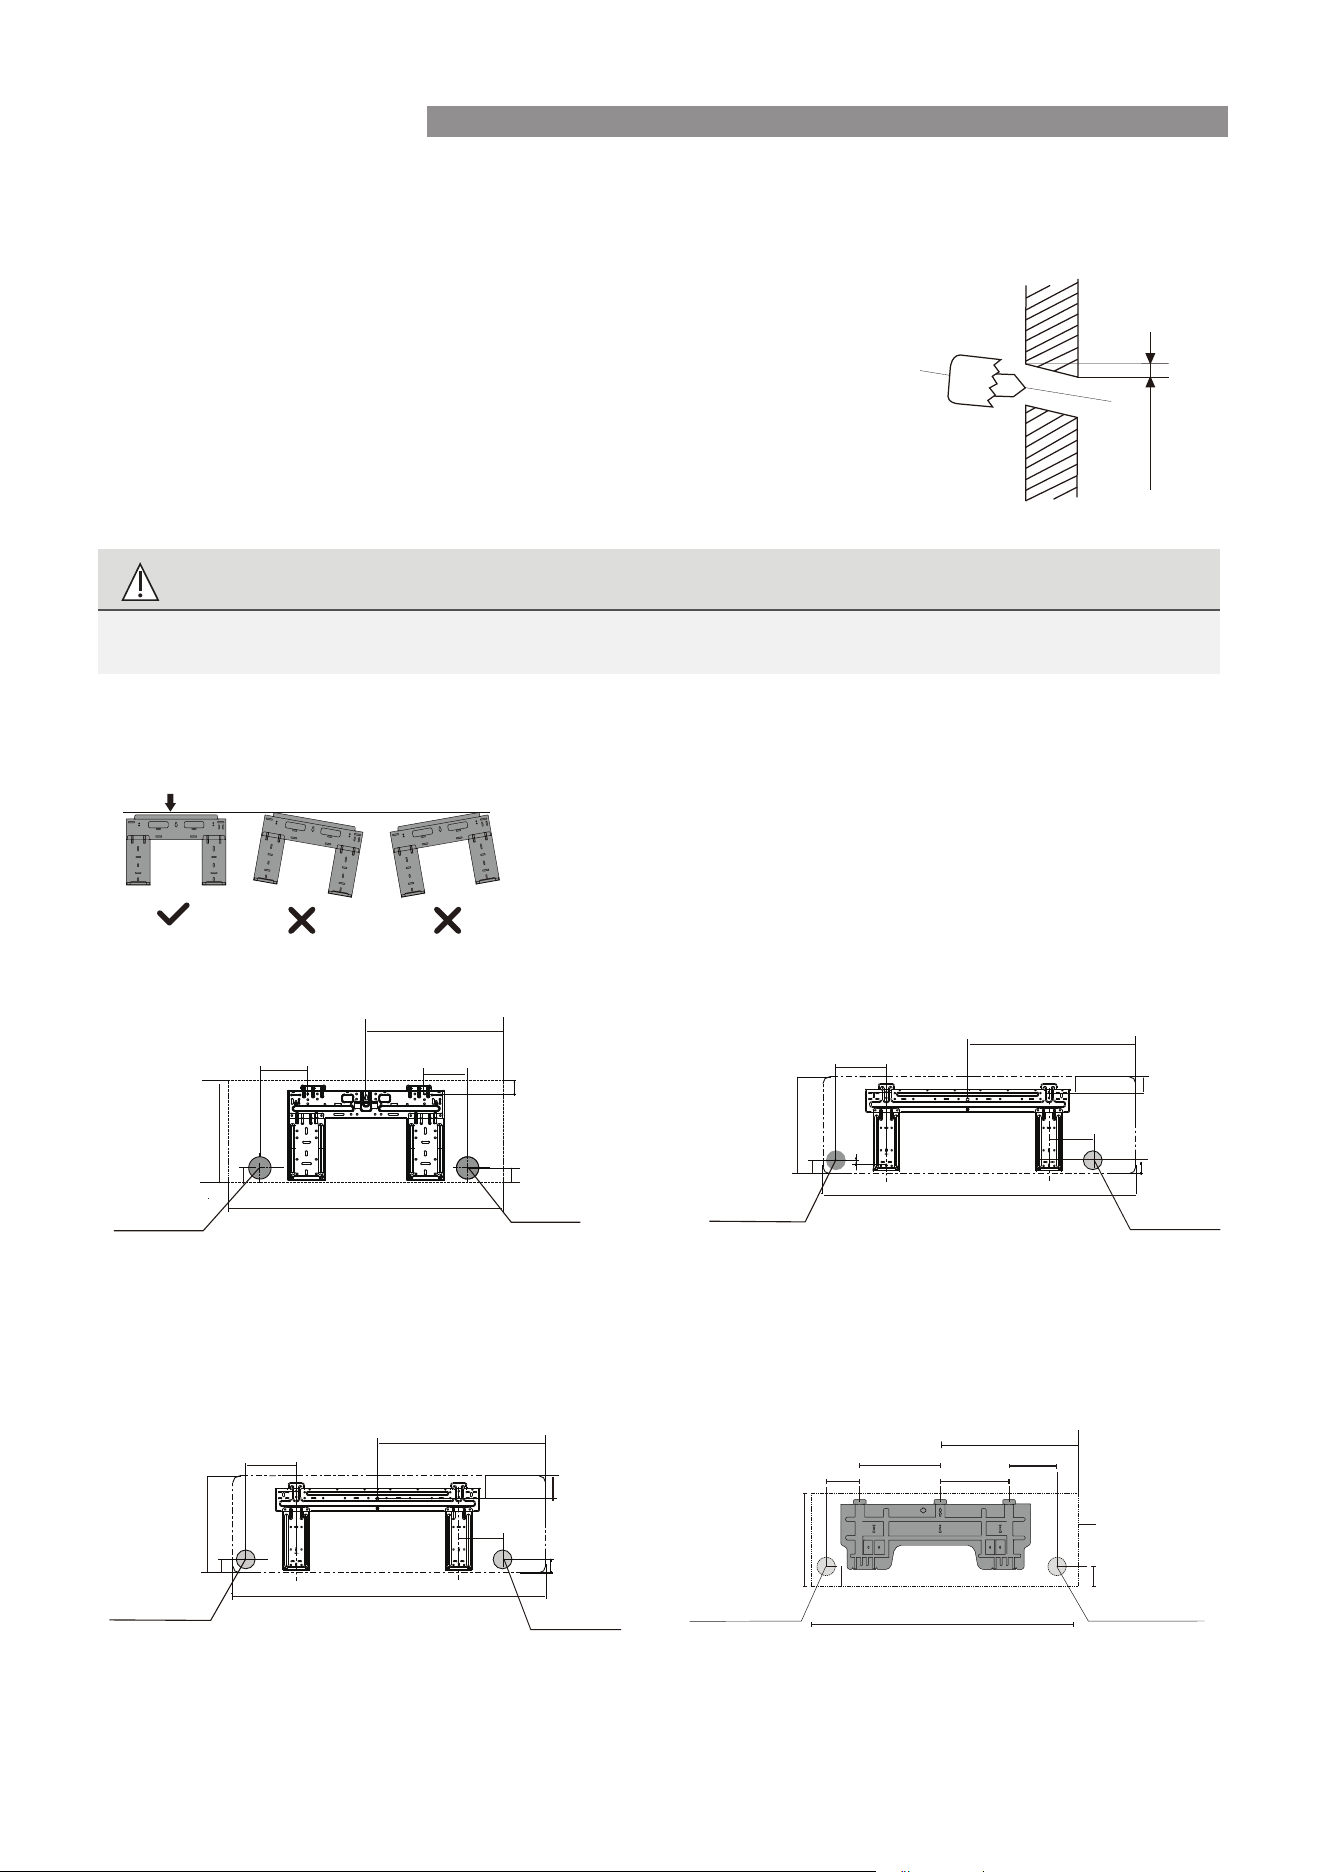
Step 3: Drill wall hole for connective piping
1.
W all
Indoor Outdoor
mm7-5
(0.2-0.275in)
Correct orientation of Mounting Plate
2.
Using a 65mm or 90mm (depending on models)core drill, drill a hole
in the wall. Make sure that the hole
is drilled at
a downward angle, so
that the outdoor end of the hole is lower than the indoor end by
about 5mm to 7mm . This will ensure proper water drainage.
Determine the location of the wall hole based on the position of
the mounting plate. Refer to Mounting Plate Dimensions.
3.
CAUTION
Left rear wall
hole 65mm
Left rear wall
hole 65mm
Left rear wall hole
90mm
Right rear wall
hole 65mm
Right rear wall
hole 65mm
Right rear wall hole
90mm
520mm
579mm
95mm
97mm
45mm
29mm
41mm
70mm
53mm
53mm
136mm
149mm
971mm
1082mm
806mm
403mm
321mm
338mm
296mm
45mm
37mm
45mm
45mm
130mm
133mm
172mm
362mm
Left rear wall
hole 90mm
Right rear wall
hole 90mm
1259mm
Indoor unit outline
52mm
389mm
332mm
257mm
644mm
52mm
Place the protective wall cuff in the hole. This protects the edges of
the hole and will help seal it when you finish the installation process.
When drilling the wall hole, make sure to avoid wires, plumbing, and other sensitive components.
2.5 and 3.5kW
5.0 and 6.0kW
7.0 and 8.0kW
9.0kW
MOUNTING PLATES AND WALL CLEARANCES
INDOOR INSTALLATION
Rinnai 15 TX Series Split AC IM
REFRIGERANT PIPING AND DRAINAGE
3.
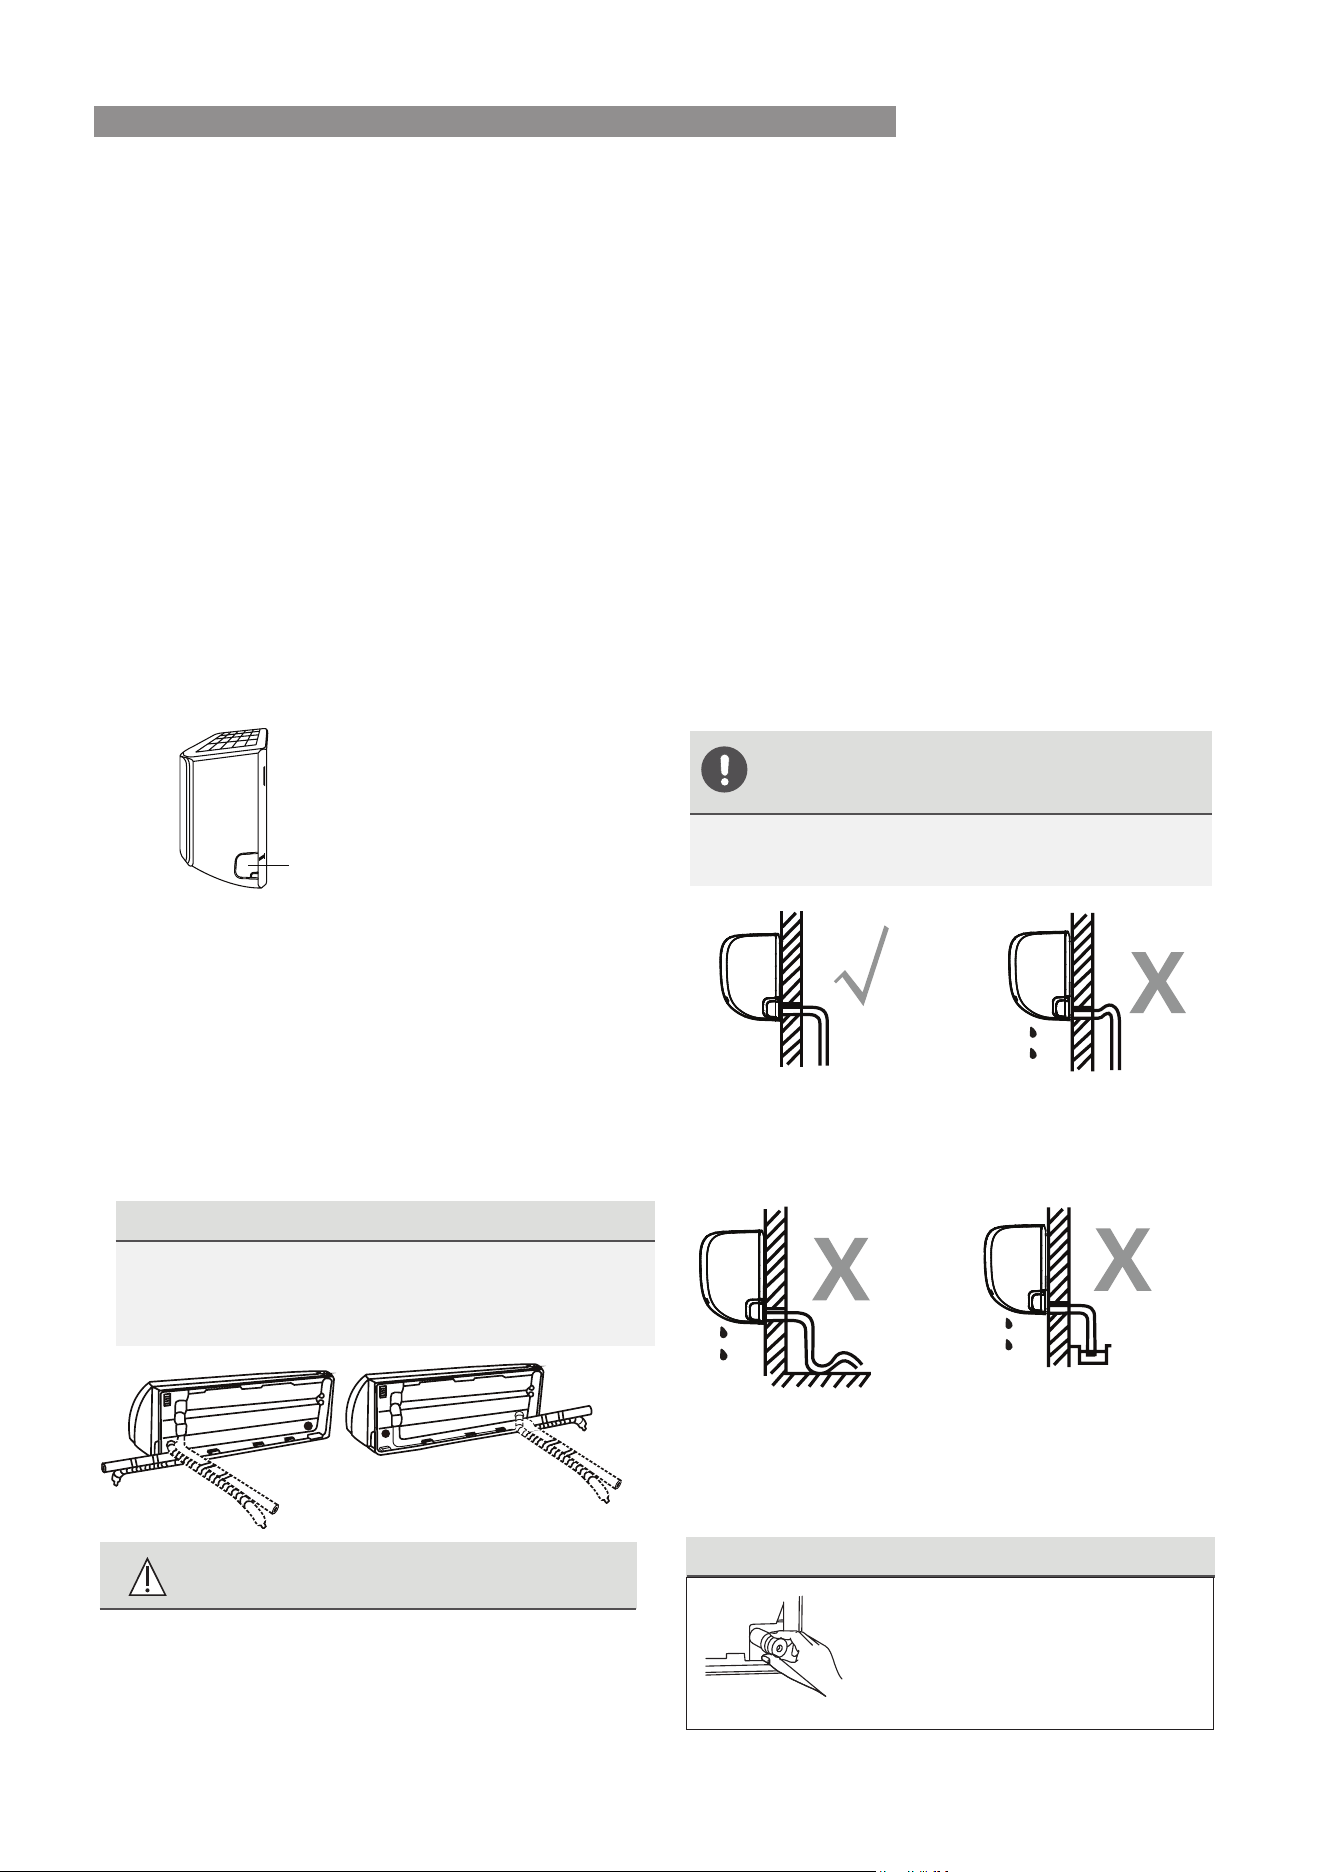
NOTE ON PIPING ANGLE
Refrigerant piping can exit the indoor unit from
four different angles:Left-hand side,Right-hand
side, Left rear, Right rear.
Knock-out Panel
CAUTION
Be extremely careful not to dent or damage
the piping while bending them away from
the unit. Any dents in the piping will affect
the unit’s performance.
NOTE ON DRAIN HOSE
PLACEMENT
Make sure to arrange the drain hose
according to the following figures.
.
PLUG THE UNUSED DRAIN HOLE
To prevent unwanted leaks
you must plug the unused
drain hole with the rubber
plug provided.
CORRECT
Make sure there are no kinks
or dent in drain hose to ensure
proper drainage.
NOT CORRECT
Kinks in the drain hose
will create water traps.
NOT CORRECT
Do not place the end of the
drain hose in water or in
containers that collect water.
This will prevent proper
drainage.
NOT CORRECT
Kinks in the drain hose
will create water traps.
Step 4: Prepare refrigerant piping
The refrigerant piping is inside an insulating
sleeve attached to the back of the unit. Prepare the
piping before passing it
through the hole in the wall.
1. Based on the position of the wall hole relative
to the mounting plate, choose the side which
the piping will exit.
2. If wall hole is behind unit, keep the knock-out
panel in place. If the wall hole is to the side,
remove the plastic knock-out panel from that
side of the unit. This will create a slot through
which piping can exit. Use needle nose pliers if
necessary. There is a pre-cut Groove to assist.
The slot size is determined by pipe diameter.
If existing connective piping is already
embedded in the wall, proceed directly to
the Connect Drain Hose step. If there is no
embedded piping, connect the indoor unit’s
refrigerant piping to the connective piping
that will join the indoor and outdoor units.
Refer to the Refrigerant Piping Connection
section of this manual for detailed instructions.
Step 5: Connect drain hose
By default, the drain hose is attached to the left
hand side of unit (when facing the back of the
unit). It may also be attached to the right-hand
side. To ensure proper drainage, attach the
drain hose on the same side that refrigerant
piping exits. Attach drain hose extension
(purchased separately) to the end of drain hose.
•
Wrap the connection point firmly with
Teflon tape to ensure a good seal and to
prevent leaks.
•
For the portion of the drain hose that will
remain indoors, wrap it with foam pipe
insulation to prevent condensation.
•
Remove the air filter and pour a small
amount of water into the drain pan to make
sure that water flows smoothly.
INDOOR INSTALLATION
Rinnai 16 TX Series Split AC IM
ELECTRICAL CONNECTIONS
WARNING
ALL WIRING MUST BE PERFORMED
STRICTLY IN ACCORDANCE WITH THE
WIRING DIAGRAM LOCATED ON REAR
OF THE INDOOR UNIT FRONT PANEL .
WARNING
BEFORE PERFORMING ANY ELECTRICAL
OR WIRING WORK, TURN OFF THE
MAIN POWER TO THE SYSTEM.
Step 6: Connect signal and power cables
The signal cable enables communication
between the indoor and outdoor units.
Prepare the power cable for connection
following current the current version of
electrical standard AS/NZS 3000.
Cable Types
•
Indoor Power Cable
(if applicable):
H05VV-F or H05V2V2-F
•
Outdoor Power Cable: H07RN-F or H05RN-F
•
Signal Cable: H07RN-F
BEFORE PERFORMING ANY
ELECTRICAL WORK, READ THESE
REGULATIONS
1. All wiring must comply with local and national
electrical codes, regulations and must be
installed by a licensed electrician.
2. All electrical connections must be made
according to the Electrical Connection Diagram
located on the panels of the indoor and outdoor
units.
3. If there is a serious safety issue with the power
supply, stop work immediately. Explain your
reasoning to the client, and refuse to install the
unit until the safety issue is properly resolved.
4. Power voltage should be within 90-110% of
rated voltage. Insufficient power supply can
cause malfunction, electrical shock, or fire.
5. If connecting power to fixed wiring, a surge
protector and main power switch should be
installed.
6. If connecting power to fixed wiring, a switch
or circuit breaker that disconnects all poles and
has a contact separation of at least 3mm
must be incorporated in the fixed wiring. The
qualified technician must use an approved
circuit breaker or switch.
7. Only connect the unit to an individual branch
circuit outlet. Do not connect another appliance
to that outlet.
8. Make sure to properly ground the air conditioner.
9. Every wire must be firmly connected. Loose
wiring can cause the terminal to overheat,
resulting in product malfunction and possible fire.
Do not let wires touch or rest against refrigerant
tubing, the compressor, or any moving parts
within the unit.
If the unit has an auxiliary electric heater, it must
be installed at least 1m away from any combustible
materials.
To avoid getting an electric shock, never touch
the electrical components soon after the power
supply has been turned off. After turning off
the power, always wait 10 minutes or more
before you touch the electrical components.
10.
11.
12.
CHOOSE THE RIGHT CABLE SIZE
The size of the power supply cable, signal
cable, fuse, and switch needed is determined
by maximum current of the unit.
Prepare the cable for connection following
the current version of electrical standard
AS/NZS 3000. Maximum current is indicated
on the nameplate located on the side panel.
INDOOR INSTALLATION
Rinnai 17 TX Series Split AC IM
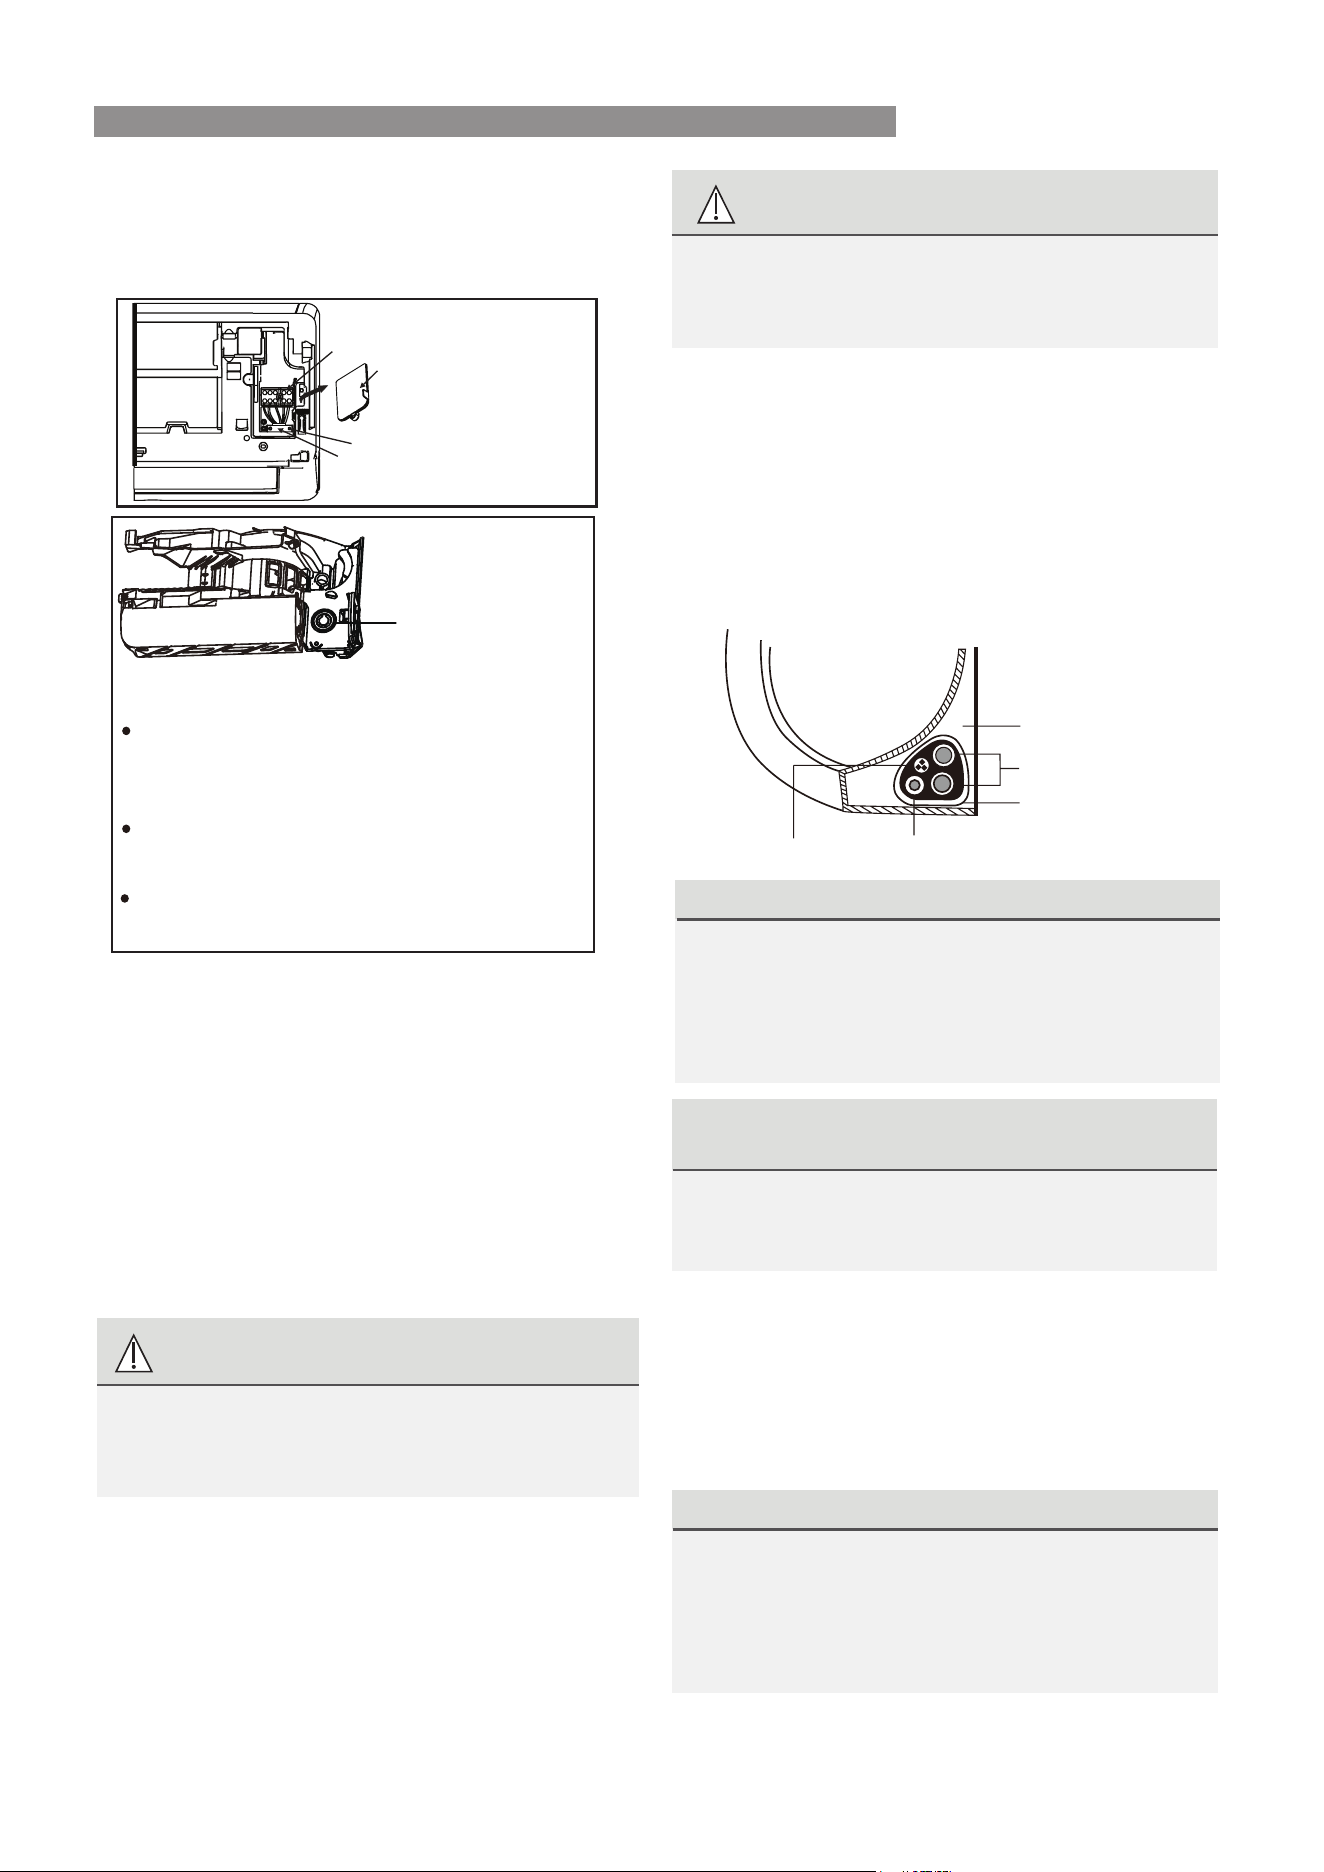
1.
O
pen front panel of the indoor unit.
2.
Using a screwdriver, open the wire box cover
on the right side of the unit. This will reveal
the terminal block.
Terminal block
Front view
Back view
(For some units only)
Knock-out panel
NOTE:
For the units with conduit tube to connect the
cable, remove the big plastic konck-out panel to
create a slot through which the conduit tube can
be installed.
For the units with five-core cable, remove the
middle small plactic knock-out panel to create
a slot through which the cable can exit.
Use needle nose pliers if the plastic panel is too
difficult to remove by hand.
Wire cover
Screw
Cable clamp
3.
Unscrew the cable clamp below the terminal
block and place it to the side.
4.
Facing the back of the unit, remove the plastic
panel on the bottom left-hand side.
5.
Feed the signal wire through this slot, from
the back of the unit to the front.
6.
Facing the front of the unit, connect the wire
according to the indoor unit’s wiring diagram,
connect the u-lug and firmly screw each wire
to its corresponding terminal.
CAUTION
DO NOT MIX UP LIVE AND NULL WIRES
This is dangerous, and can cause the air
conditioning unit to malfunction.
7.
After checking to make sure every connection
is secure, use the cable clamp to fasten the
signal cable to the unit. Screw the cable clamp
down tightly.
8.
Replace the wire cover on the front of the
unit, and the plastic panel on the back.
DRAIN HOSE MUST BE ON BOTTOM
Make sure that the drain hose is at the bottom
of the bundle. Putting the drain hose at the
top of the bundle can cause the drain pan
to overflow, which can lead to fire or water
damage.
DO NOT INTERTWINE SIGNAL CABLE WITH
OTHER WIRES
While bundling these items together, do not
intertwine or cross the signal cable with any
other wiring.
2.
Using adhesive vinyl tape, attach the drain
hose to the underside of the refrigerant pipes.
3.
Using insulation tape, wrap the signal wire,
refrigerant pipes, and drain hose tightly
together. Double-check that all items are
bundled.
DO NOT WRAP ENDS OF PIPING
When wrapping the bundle, keep the ends
of the piping unwrapped. You need to access
them to test for leaks at the end of the
installation process (refer to Electrical Checks
and Leak Checks section of this manual).
NOTE ABOUT WIRING
THE WIRING CONNECTION PROCESS MAY
DIFFER SLIGHTLY BETWEEN UNITS AND
REGIONS.
Before passing the piping, drain hose, and the
signal cable through the wall hole, you must
bundle them together to save space, protect
them, and insulate them.
1.
Bundle the drain hose, refrigerant pipes, and
signal cable as shown below:
Indoor Unit
Space behind unit
Refrigerant piping
Drain hose
Signal wire
Insulation tape
Step 7: Wrap piping and cables
INDOOR INSTALLATION
Rinnai 18 TX Series Split AC IM
MOUNTING THE UNIT
Move to left or right
30-50mm
30-50mm
UNIT IS ADJUSTABLE
The hooks on the mounting plate are smaller
than the holes on the back of the unit. If you
find that you don’t have ample room to
connect embedded pipes to the indoor unit,
the unit can be adjusted left or right by about
30-50mm , depending on the model.
Step 8: Mount indoor unit
If you installed new connective piping to the
outdoor unit, do the following:
1.
If you have already passed the refrigerant
piping through the hole in the wall, proceed
to Step 4.
2.
Otherwise, double-check that the ends of the
refrigerant pipes are sealed to prevent dirt or
foreign materials from entering the pipes.
3.
Slowly pass the wrapped bundle of refrigerant
pipes, drain hose, and signal wire through the
hole in the wall.
4.
Hook the top of the indoor unit on the upper
hook of the mounting plate.
5.
Check that unit is hooked firmly on mounting
by applying slight pressure to the left and
right-hand sides of the unit. The unit should
not jiggle or shift.
6.
Using even pressure, push down on the
bottom half of the unit. Keep pushing down
until the unit snaps onto the hooks along the
bottom of the mounting plate.
7.
Again, check that the unit is firmly mounted
by applying slight pressure to the left and the
right-hand sides of the unit.
If refrigerant piping is already embedded in
the wall, do the following:
1.
Hook the top of the indoor unit on the upper
hook of the mounting plate.
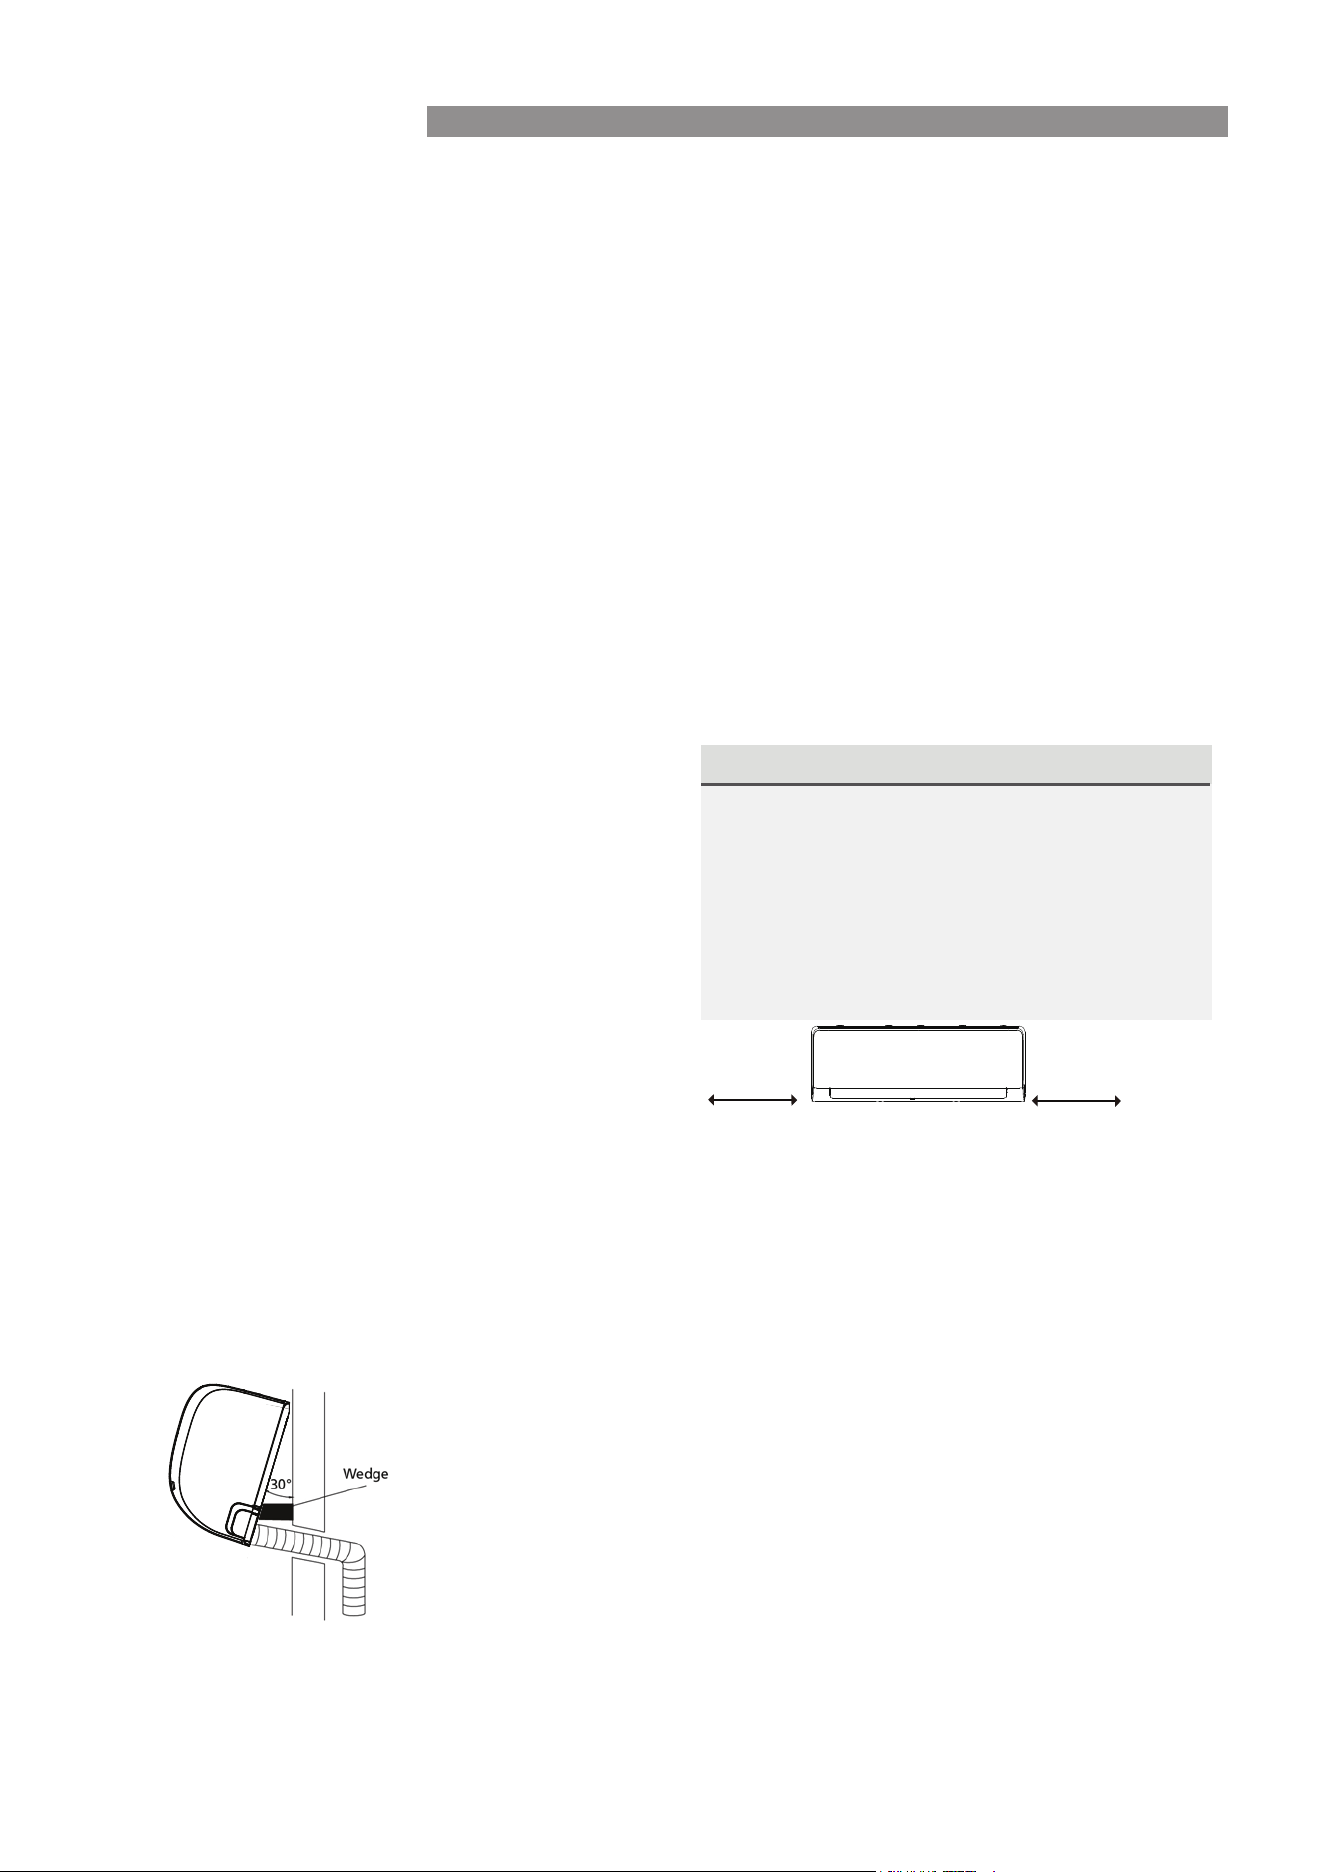
2.
Use a bracket or wedge to prop up the unit,
giving you enough room to connect the
refrigerant piping, signal cable, and drain
hose.
3.
Connect drain hose and refrigerant piping
(refer to Refrigerant Piping Connection
section of this manual for instructions).
4.
Keep pipe connection point exposed to
perform the leak test (refer to Electrical
Checks and Leak Checks section of this
manual).
5.
After the leak test, wrap the connection point
with insulation tape.
6.
Remove the bracket or wedge that is pr
opping
up the unit.
7.
Using even pressure, push down on the
bottom half of the unit. Keep pushing down
until the unit snaps onto the hooks along the
bottom of the mounting plate.
INSTALLATIONINDOOR INSTALLATION
Rinnai 19 TX Series Split AC IM
INSTALLATION INSTRUCTIONS
0cm above6
50cm on right
30cm on left
65cm in front
10cm from back wall
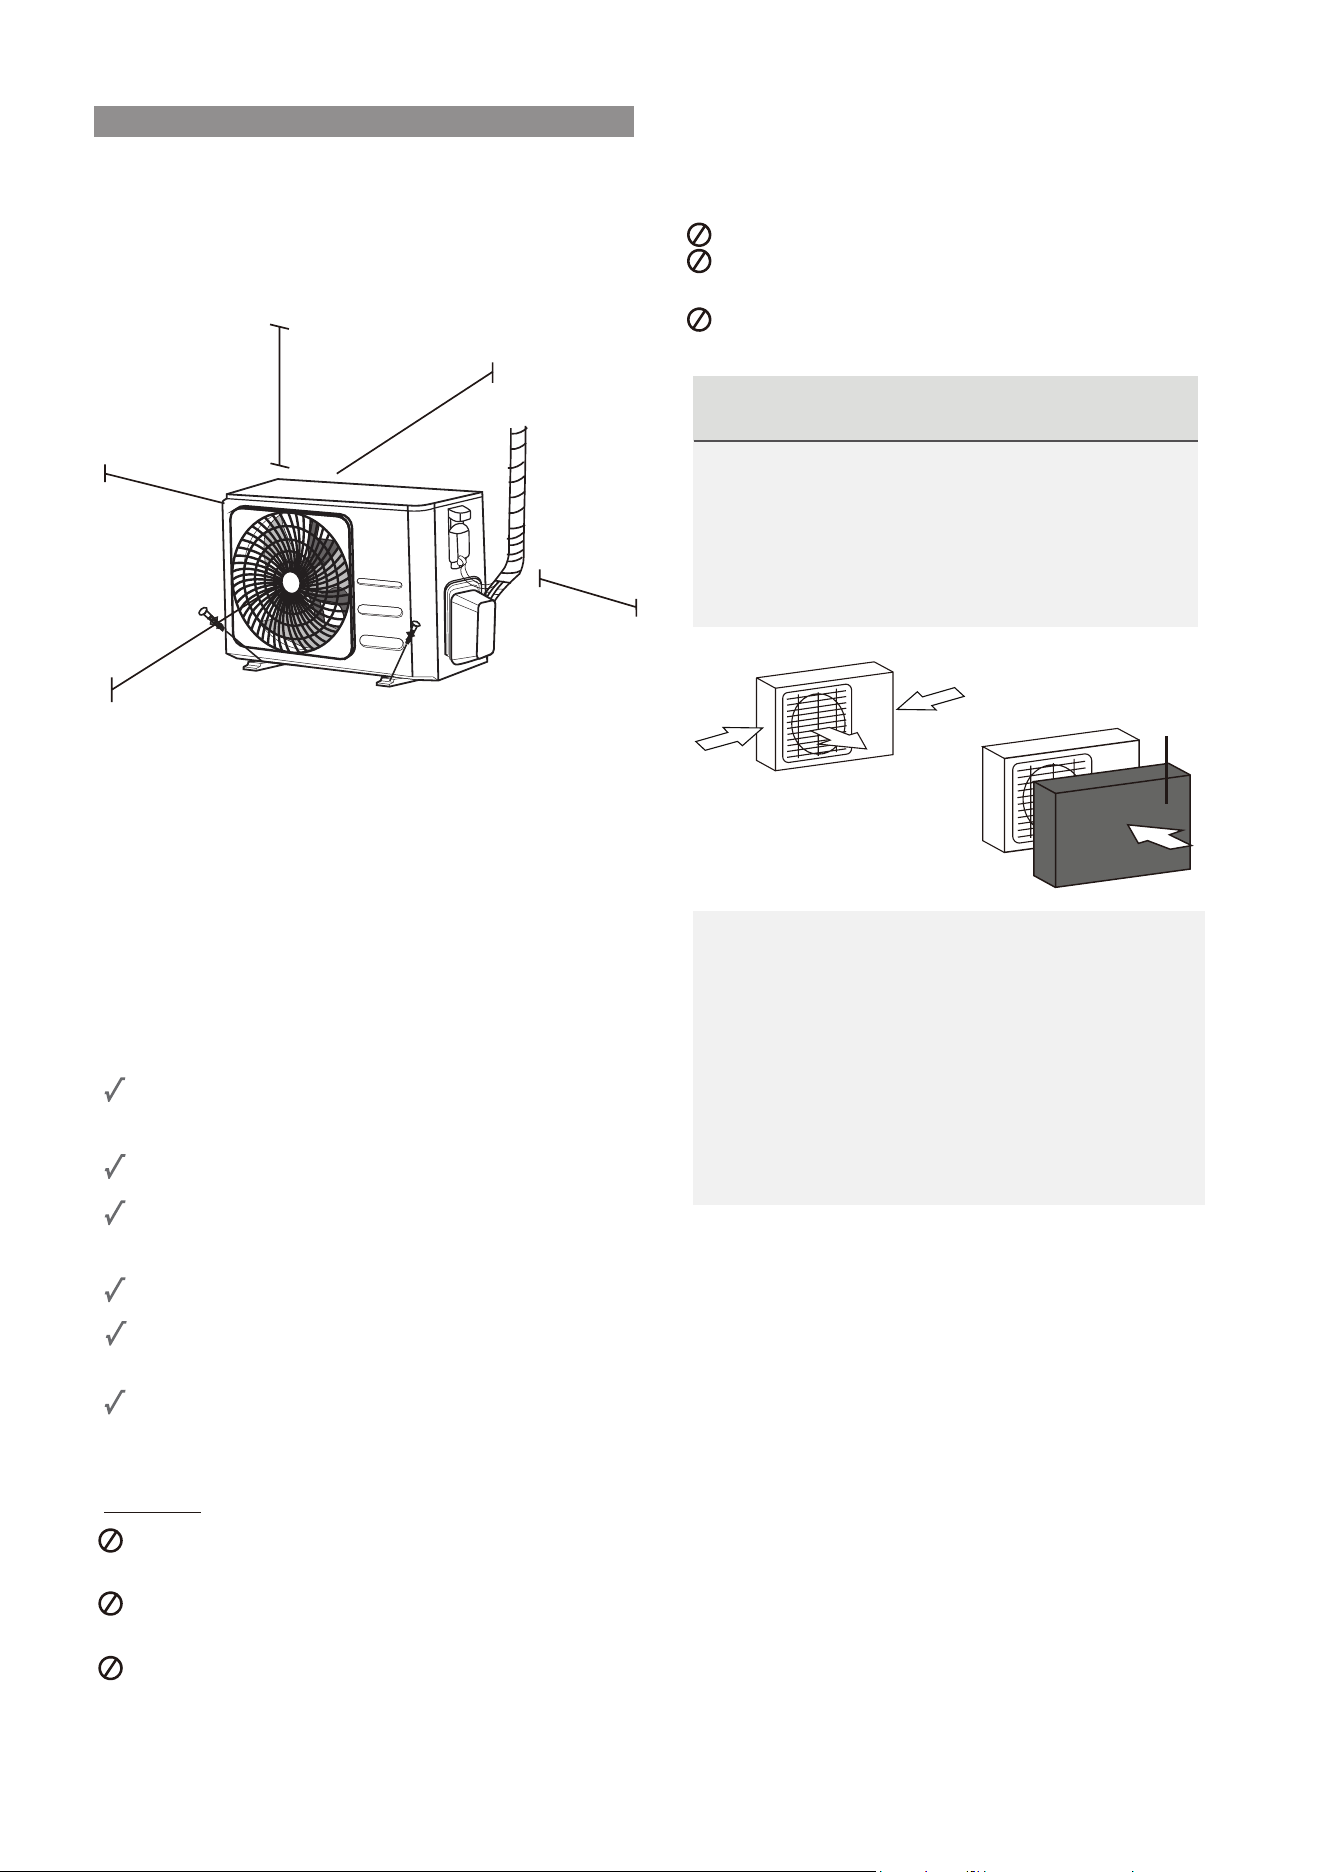
Step 1: Select installation location
Before installing the outdoor unit, you must
choose an appropriate location. The following are
standards that will help you choose an appropriate
location for the unit.
Proper installation locations meet the
following standards:
Meets all spatial requirements shown in
Installation Space Requirements above.
Good air circulation and ventilation
Firm and solid—the location can support the
unit and will not vibrate
Noise from the unit will not disturb others
Install the unit by following local codes and
regulations , there may be dier slightly
between dierent regions.
SPECIAL CONSIDERATIONS FOR EXTREME
WEATHER
If the unit is exposed to heavy wind:
Install unit so that air outlet fan is at a 90°
angle to the direction of the wind. If needed,
build a barrier in front of the unit to protect it
from extremely heavy winds.
See Figures below.
Strong
wind
Strong wind
Strong wind
If the unit is frequently exposed to heavy
rain or snow:
Build a shelter above the unit to protect
it from the rain or snow. Be careful not to
obstruct air flow around the unit.
If the unit is frequently exposed to salty air
(seaside):
Use outdoor unit that is specially designed to
resist corrosion.
Wind Baffle
Protected from prolonged periods of direct
sunlight or rain
DO NOT
install unit in the following locations:
Near an obstacle that will block air inlets
and outlets
Near a public street, crowded areas, or
where noise from the unit will disturb others
Near animals or plants that will be harmed
by hot air discharge
Near any source of combustible gas
In a location that is exposed to large
amounts of dust
In a location exposed to a excessive amounts
of salty air
Where snowfall is anticipated, take
appropriate measures to prevent ice
buildup and coil damage.
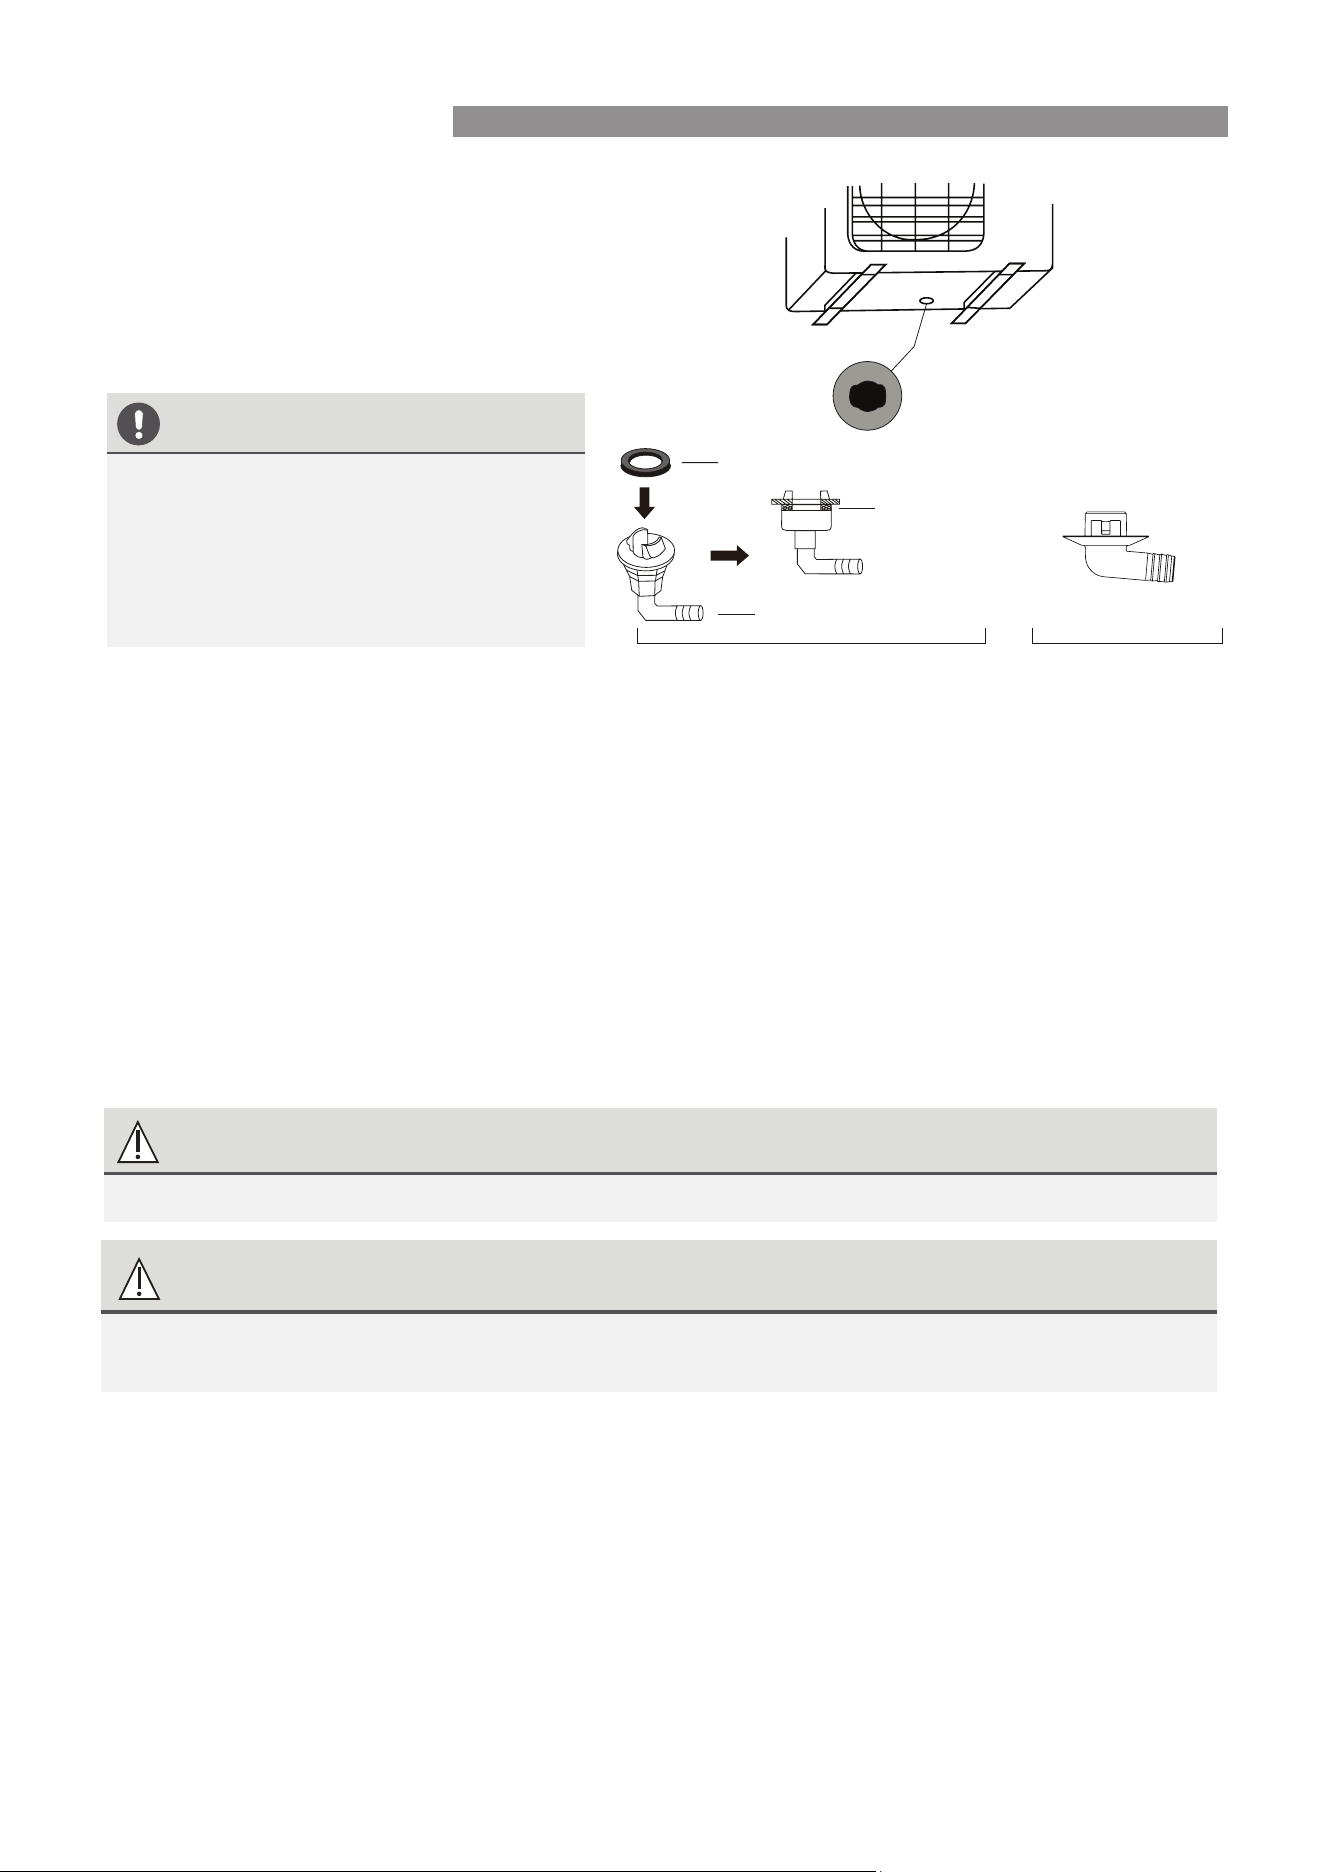
Step 2: Install drain joint(Heat pump unit only)
Before bolting the outdoor unit in place, you must
install the drain joint at the bottom of the unit.
Note that there are two dierent types of drain
joints depending on the type of outdoor unit.
If the drain joint comes with a rubber seal
(see Fig. A ), do the following:
1.
Fit the rubber seal on the end of the drain joint
that will connect to the outdoor unit.
2.
Insert the drain joint into the hole in the base
pan of the unit.
3.
Rotate the drain joint 90° until it clicks in place
facing the front of the unit.
4.
Connect a drain hose extension (not included)
to the drain joint to redirect water from the
unit during heating mode.
OUTDOOR UNIT LOCATION
OUTDOOR INSTALLATION
Rinnai 20 TX Series Split AC IM
Seal
Drain joint
(A) (B)
Base pan hole of
outdoor unit
Seal
IN COLD CLIMATES
The outdoor unit can be anchored to the ground or to a wall-mounted bracket with bolt(M10). Prepare the
installation base of the unit according to the dimensions below.
Step 3: Anchor outdoor unit
Wall Mounting
1.
Mark the position of bracket holes based on dimensions chart.
2.
Pre-drill the holes for the expansion bolts.
3.
Place a washer and nut on the end of each expansion bolt.
4.
Thread expansion bolts through holes in mounting brackets, put mounting brackets in
position, and hammer expansion bolts into
the wall.
5.
Check that the mounting brackets are level.
6.
Carefully lift unit and place its mounting feet on brackets.
7.
Bolt the unit firmly to the brackets.
8. If allowed, install the unit with rubber gaskets to reduce vibrations and noise.
WARNING
WHEN DRILLING INTO CONCRETE, USE EYE PROTECTION AT ALL TIMES.
CAUTION
Make sure that the wall is made of solid brick, concrete, or of similarly strong material. The wall must
be able to support at least four times the weight of the unit.
If the drain joint does not come with a rubber seal:
1. Insert the drain joint into the hole in the base
pan of the unit. The joint will click into place.
2. Connect a drain hose extension (not
included) to the drain joint to redirect water
from during heating mode.
In cold climates, make sure that the drain
hose is as vertical as possible to ensure swift
water drainage. If water drains too slowly, it
can freeze in the hose and flood the unit.
Ground Mounting
1. Mark the positions for four expansion bolts based on dimensions chart.
2. Pre-drill holes for expansion bolts.
3. Place a nut on the end of each expansion bolt.
4. Hammer expansion bolts into pre-drilled holes.
5. Remove the nuts from expansion bolts, and place outdoor unit on bolts.
6. Put washer on each expansion bolt, then replace the nuts.
7. Using a wrench, tighten each nut until snug.
OUTDOOR INSTALLATION
Rinnai 21 TX Series Split AC IM
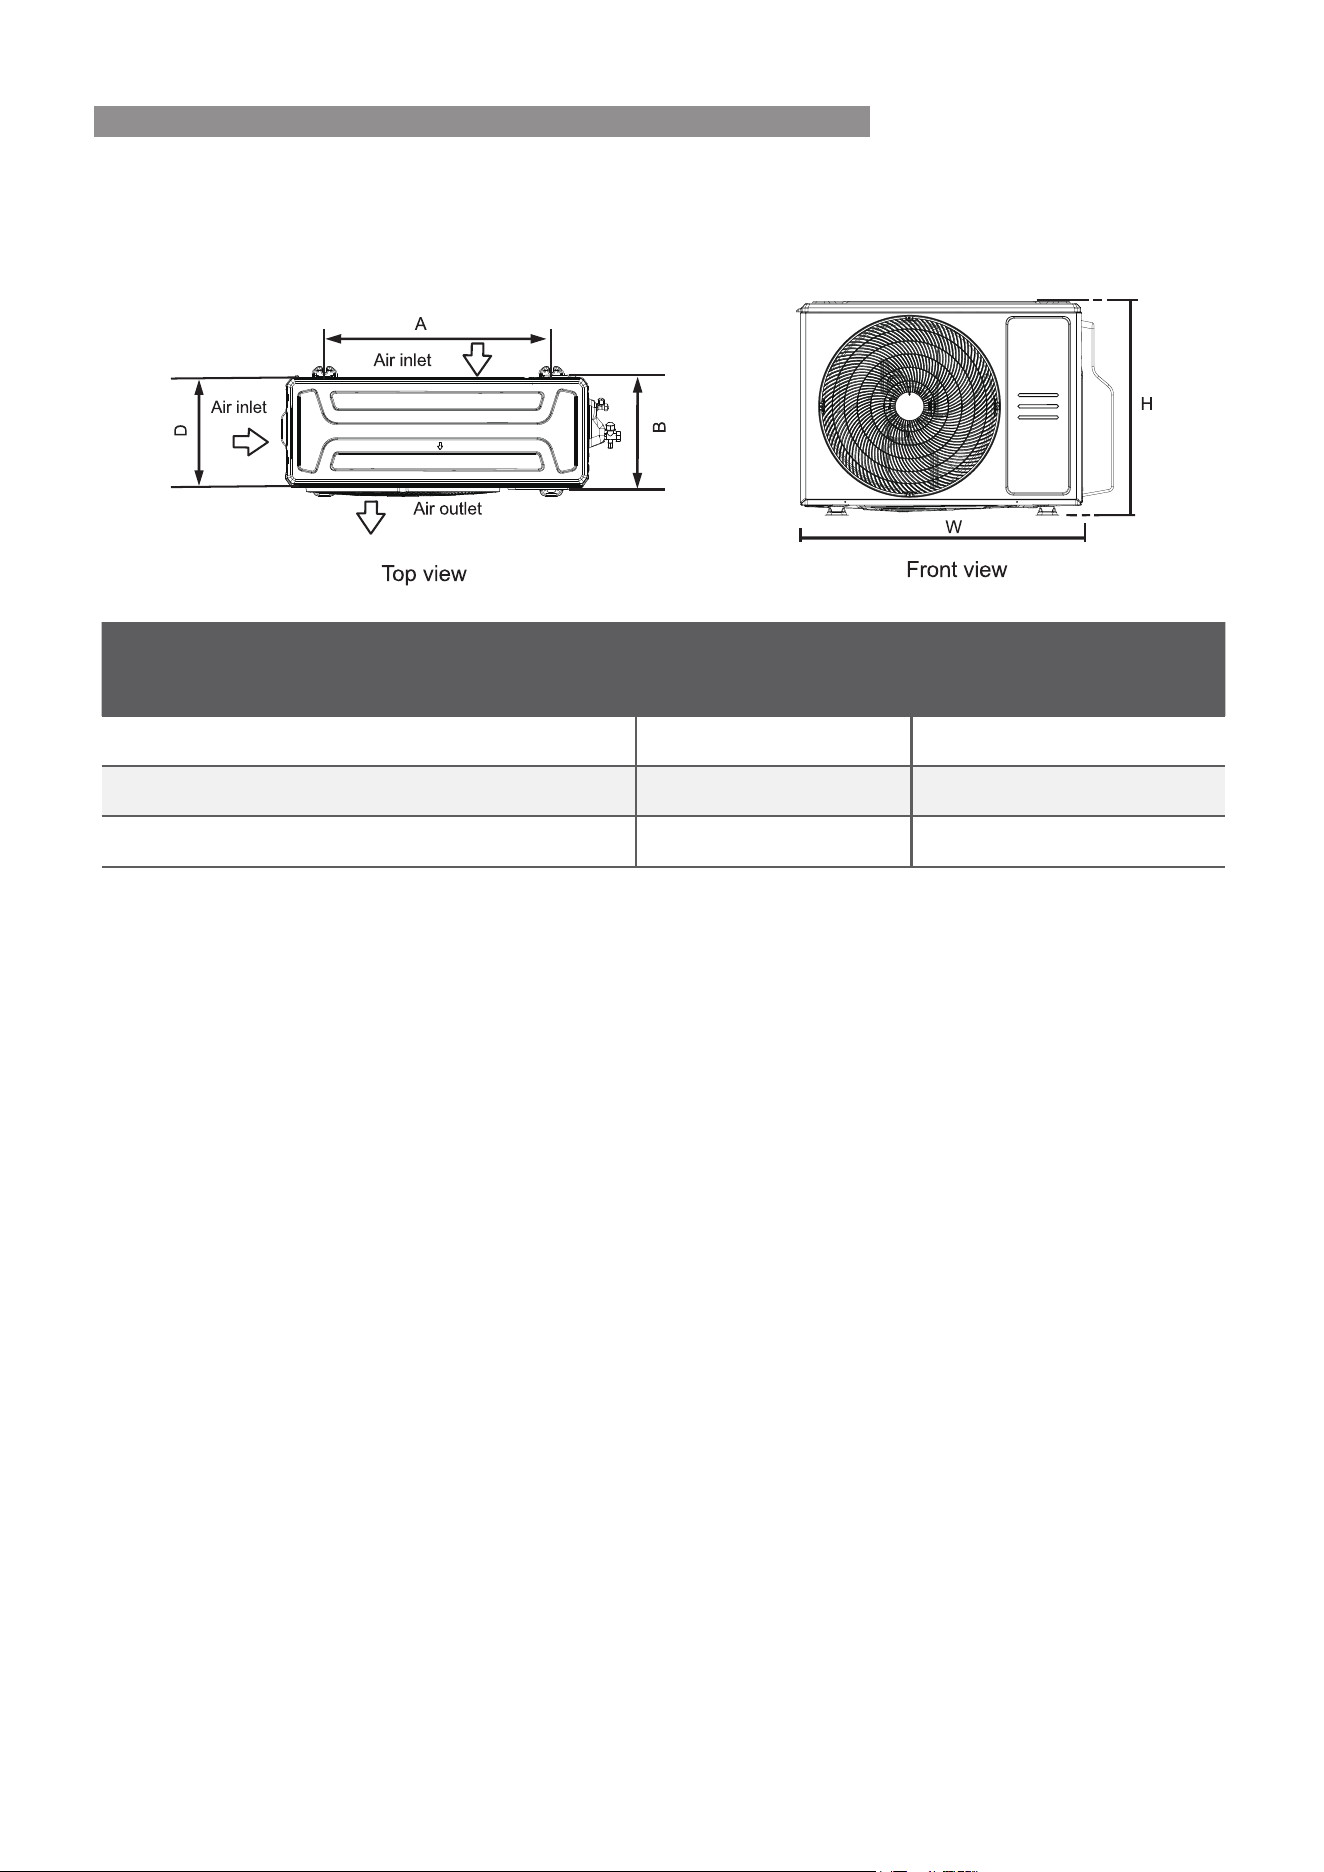
OUTDOOR UNIT MOUNTING DIMENSIONS
Outdoor Unit Dimensions (mm)
W x H x D
Mounting Dimensions
Distance A (mm) Distance B (mm)
765x555x303
452
286
890x673x342
663
354
946x810x410 673 403
The following is a list of different outdoor unit sizes and the distance between their mounting feet. Prepare
the installation base of the unit according to the dimensions below.
OUTDOOR INSTALLATION
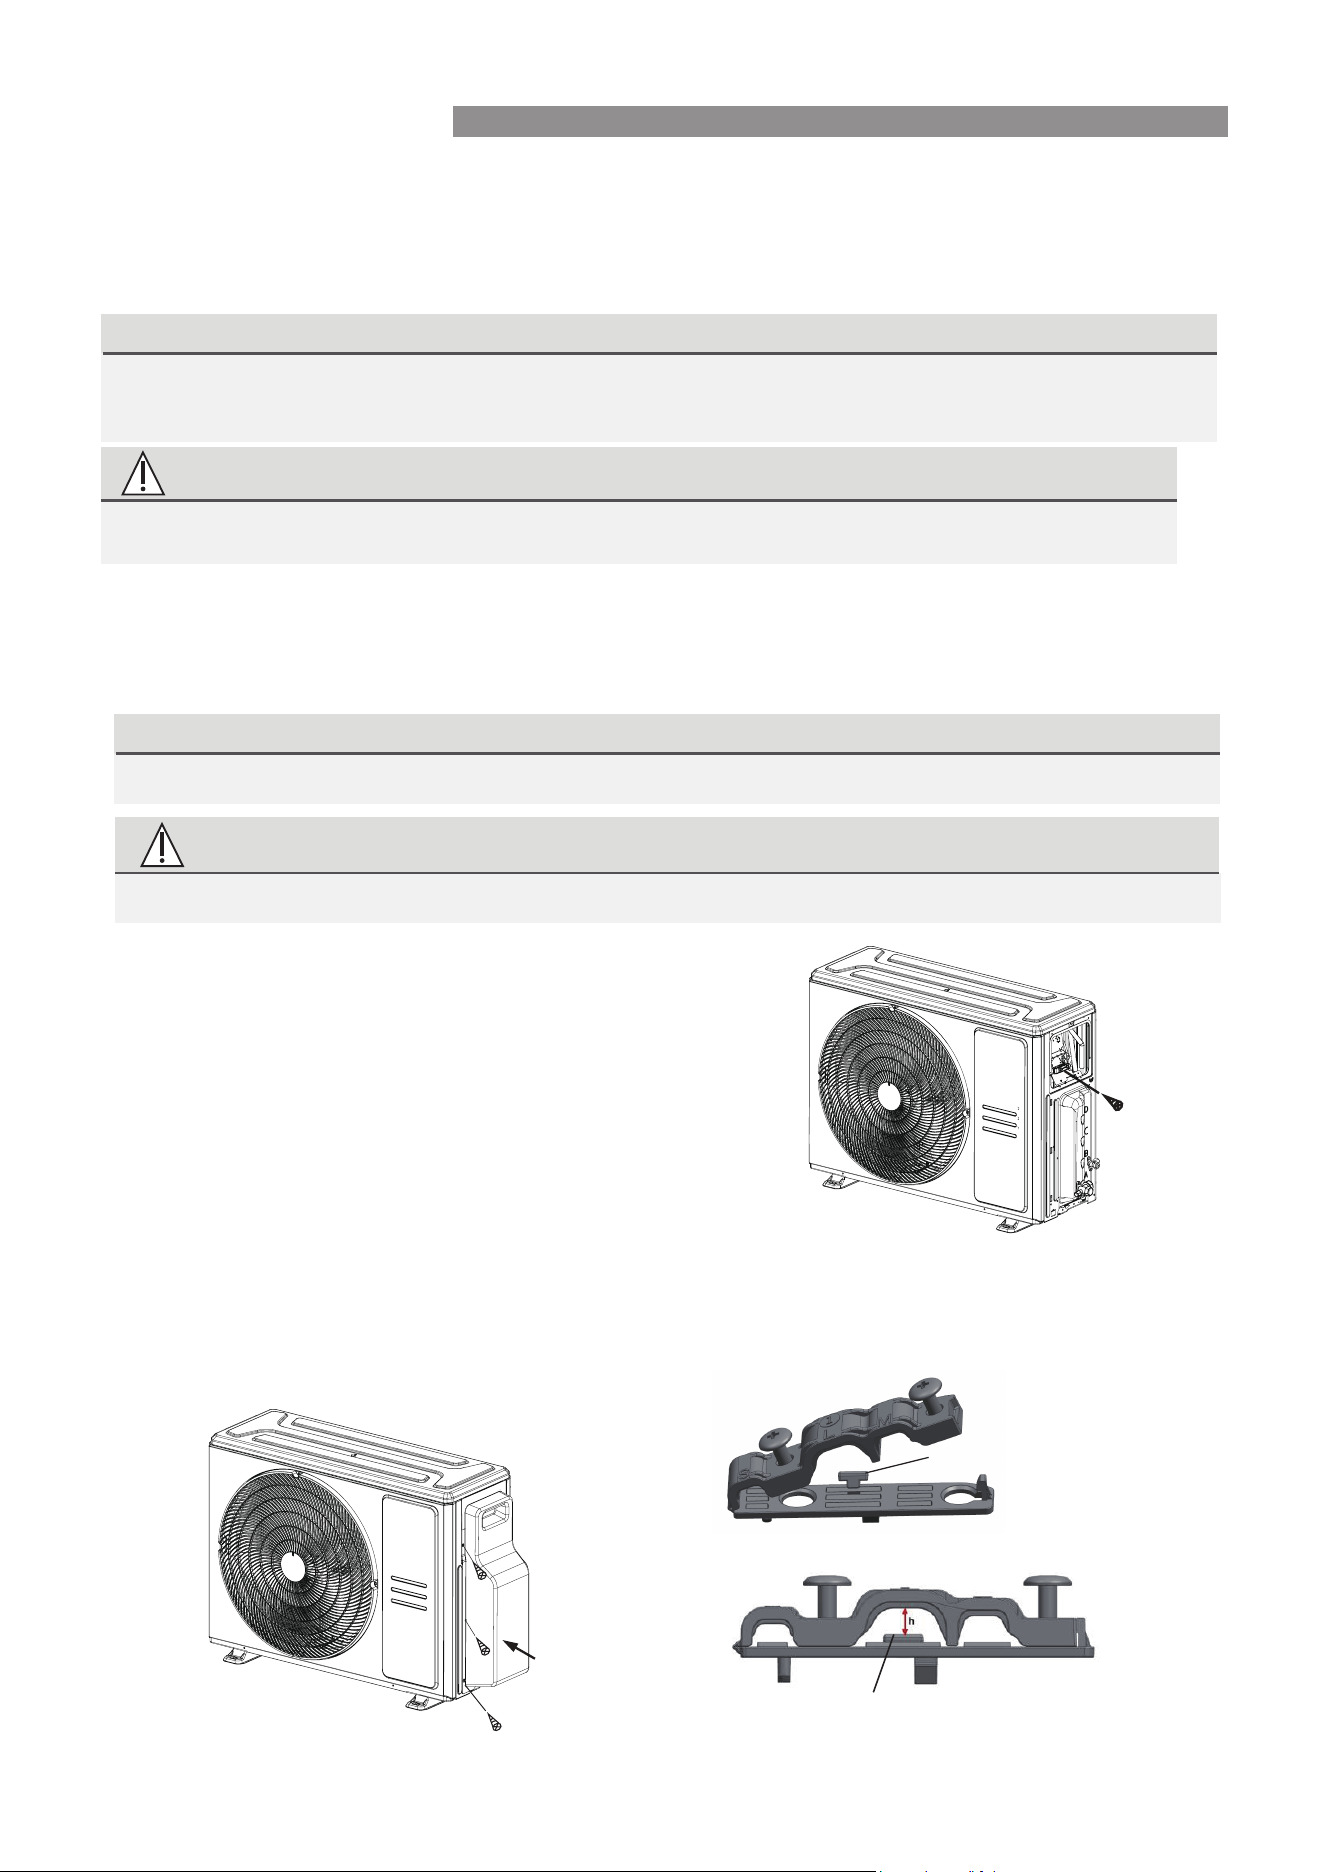
Rinnai 22 TX Series Split AC IM
SIGNAL AND POWER CABLES
PA Y ATTENTION TO LIVE WIRE
2. Unscrew the electrical wiring cover and remove it.
3. Unscrew the cable clamp below the terminal block and
place it to the side.
4. Connect the wire according to the wiring diagram, and
screw the u-lug of each wire to its terminal.
5. Checking each connection is secure, loop the wires
around to prevent water entering the terminal.
6. Using the cable clamp, fasten the cable to the unit. Screw
the cable clamp down tightly.
7. Insulate unused wires with PVC electrical tape. Ensure
they do not touch electrical or metal parts.
8. Replace the wire cover on the side of the unit, and secure
WARNING
ALL WIRING WORK MUST BE PERFORMED IN ACCORDANCE WITH THE WIRING DIAGRAM.
NOTE:
The unit you purchased may be slightly
different. The illustrations below are for explanatory
purposes. The actual shape shall prevail.
Three size holes: Small, Large, Medium
When the cable is not tight enough, use the
buckle to prop it up , so it can be clamped tightly.
Buckle
NOTE: If the cable clamp looks like the
following,
select the appropriate through-hole
for the diameter of the wire.
Step 4: Connect signal and power cables
The outside unit’s terminal block is protected by an electrical wiring cover on the side of the unit. A
comprehensive wiring diagram is printed on the inside of the wiring cover.
WARNING
1. Prepare the cable for connection:
BEFORE PERFORMING ANY ELECTRICAL OR WIRING WORK, TURN OFF POWER TO THE SYSTEM.
CHOOSE THE RIGHT CABLE SIZE
The size of the power supply cable, signal cable, fuse, and switch needed is determined by the maximum
current of the unit. The maximum current is indicated on the nameplate located on the side of the unit.
a. Using wire strippers, strip the insulation from both ends of cable to reveal about 40mm of the wire.
b. Strip the insulation from the ends of the wires.
c. Using a wire crimper, crimp u-lugs on the ends of the wires.
While crimping wires, clearly distinguish the Live (“L”) Wire from other wires.
Screw
Cover
Remove
four
screws
OUTDOOR INSTALLATION
Rinnai 23 TX Series Split AC IM
Note on Pipe Length
Refer to the table below for specifications on the maximum length and drop height of piping.
When connecting refrigerant piping, do not
let substances or gases other than the specified
refrigerant enter the unit. The presence of other gases or substances will lower the unit’s capacity,
and can cause abnormally high pressure in the refrigeration cycle. This can cause explosion and
injury.
Maximum Length and Drop Height of Refrigerant Piping per Unit Model
The length of refrigerant piping will affect the performance and energy efficiency of the unit. Nominal
Step 1: Cut pipes
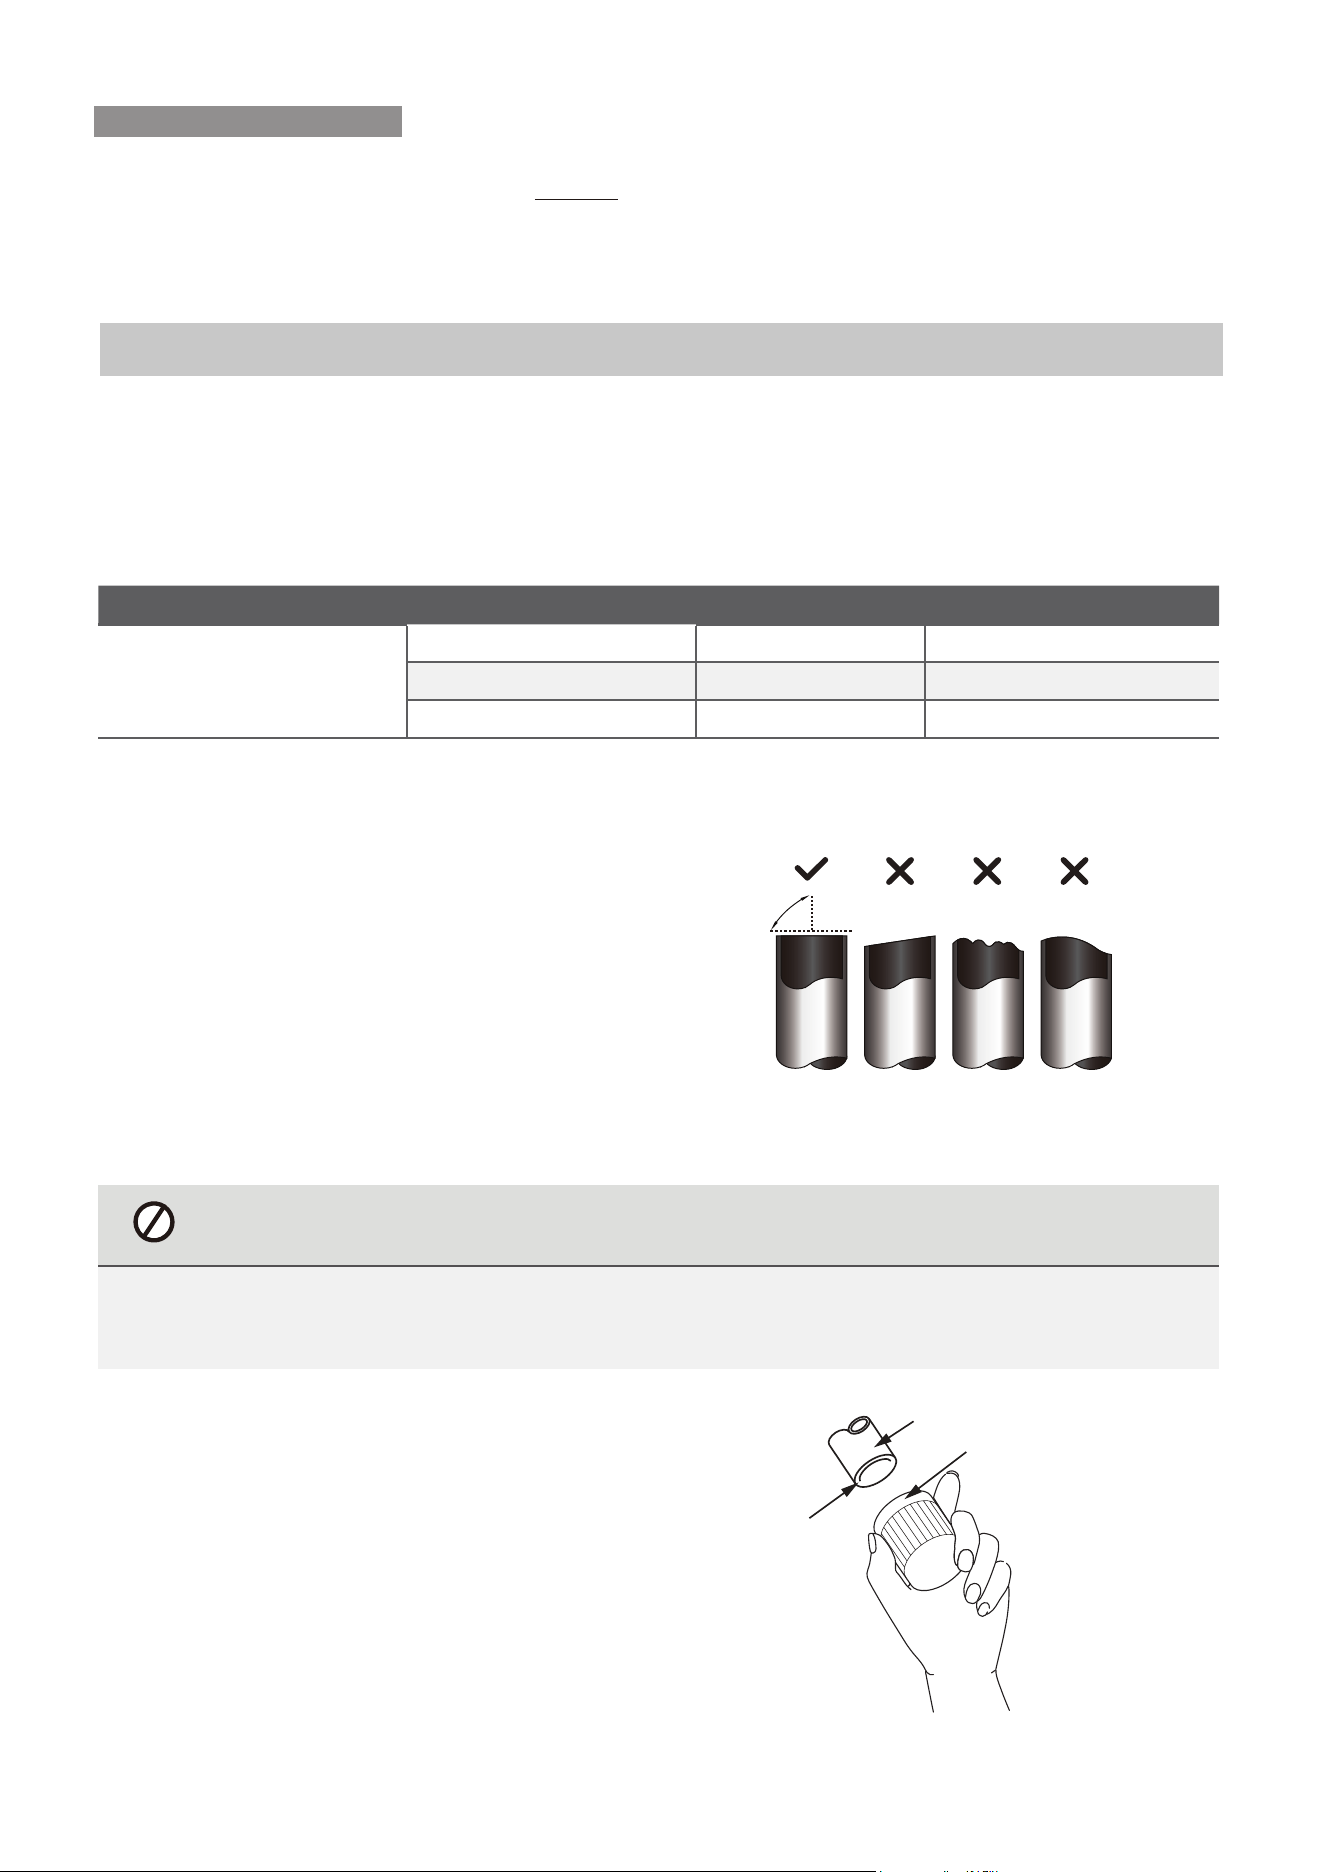
Oblique Rough Warped
90°
DO NOT DEFORM PIPE WHILE CUTTING
Model Capacity (kW) Max. Length (m) Max. Drop Height (m)
R32 Inverter Split Air
Conditioner
2.5 and 3.5 25 10
5.0 and 6.0
30 20
7.0, 8.0 and 9.0 50 25
efficiency is tested on units with a pipe length of 5 metersA minimum pipe run of 3 metres is required to
minimise vibration & excessive noise.
When preparing refrigerant pipes, take extra
care to cut and flare them properly. This will
ensure efficient operation and minimize the
need for future maintenance.
1. Measure the distance between the indoor
and outdoor units.
2. Using a pipe cutter, cut the pipe a little
longer than the measured distance.
3. Make sure that the pipe is cut at a 90° angle
Be extra careful not to damage, dent, or deform the pipe while cutting. This will
drastically reduce the heating efficiency of the unit.
Step 2: Remove burrs
Burrs can affect the air-tight seal of refrigerant
piping connection. They must be completely
removed.
1.
Hold the pipe at a downward angle to prevent
burrs from falling into the pipe.
2.
Using a reamer or deburring tool, remove all
burrs from the cut section of the pipe.
Pipe
Reamer
Point down
CUTTING AND PREPARING PIPING
REFRIGERANT PIPING CONNECTION
Rinnai 24 TX Series Split AC IM
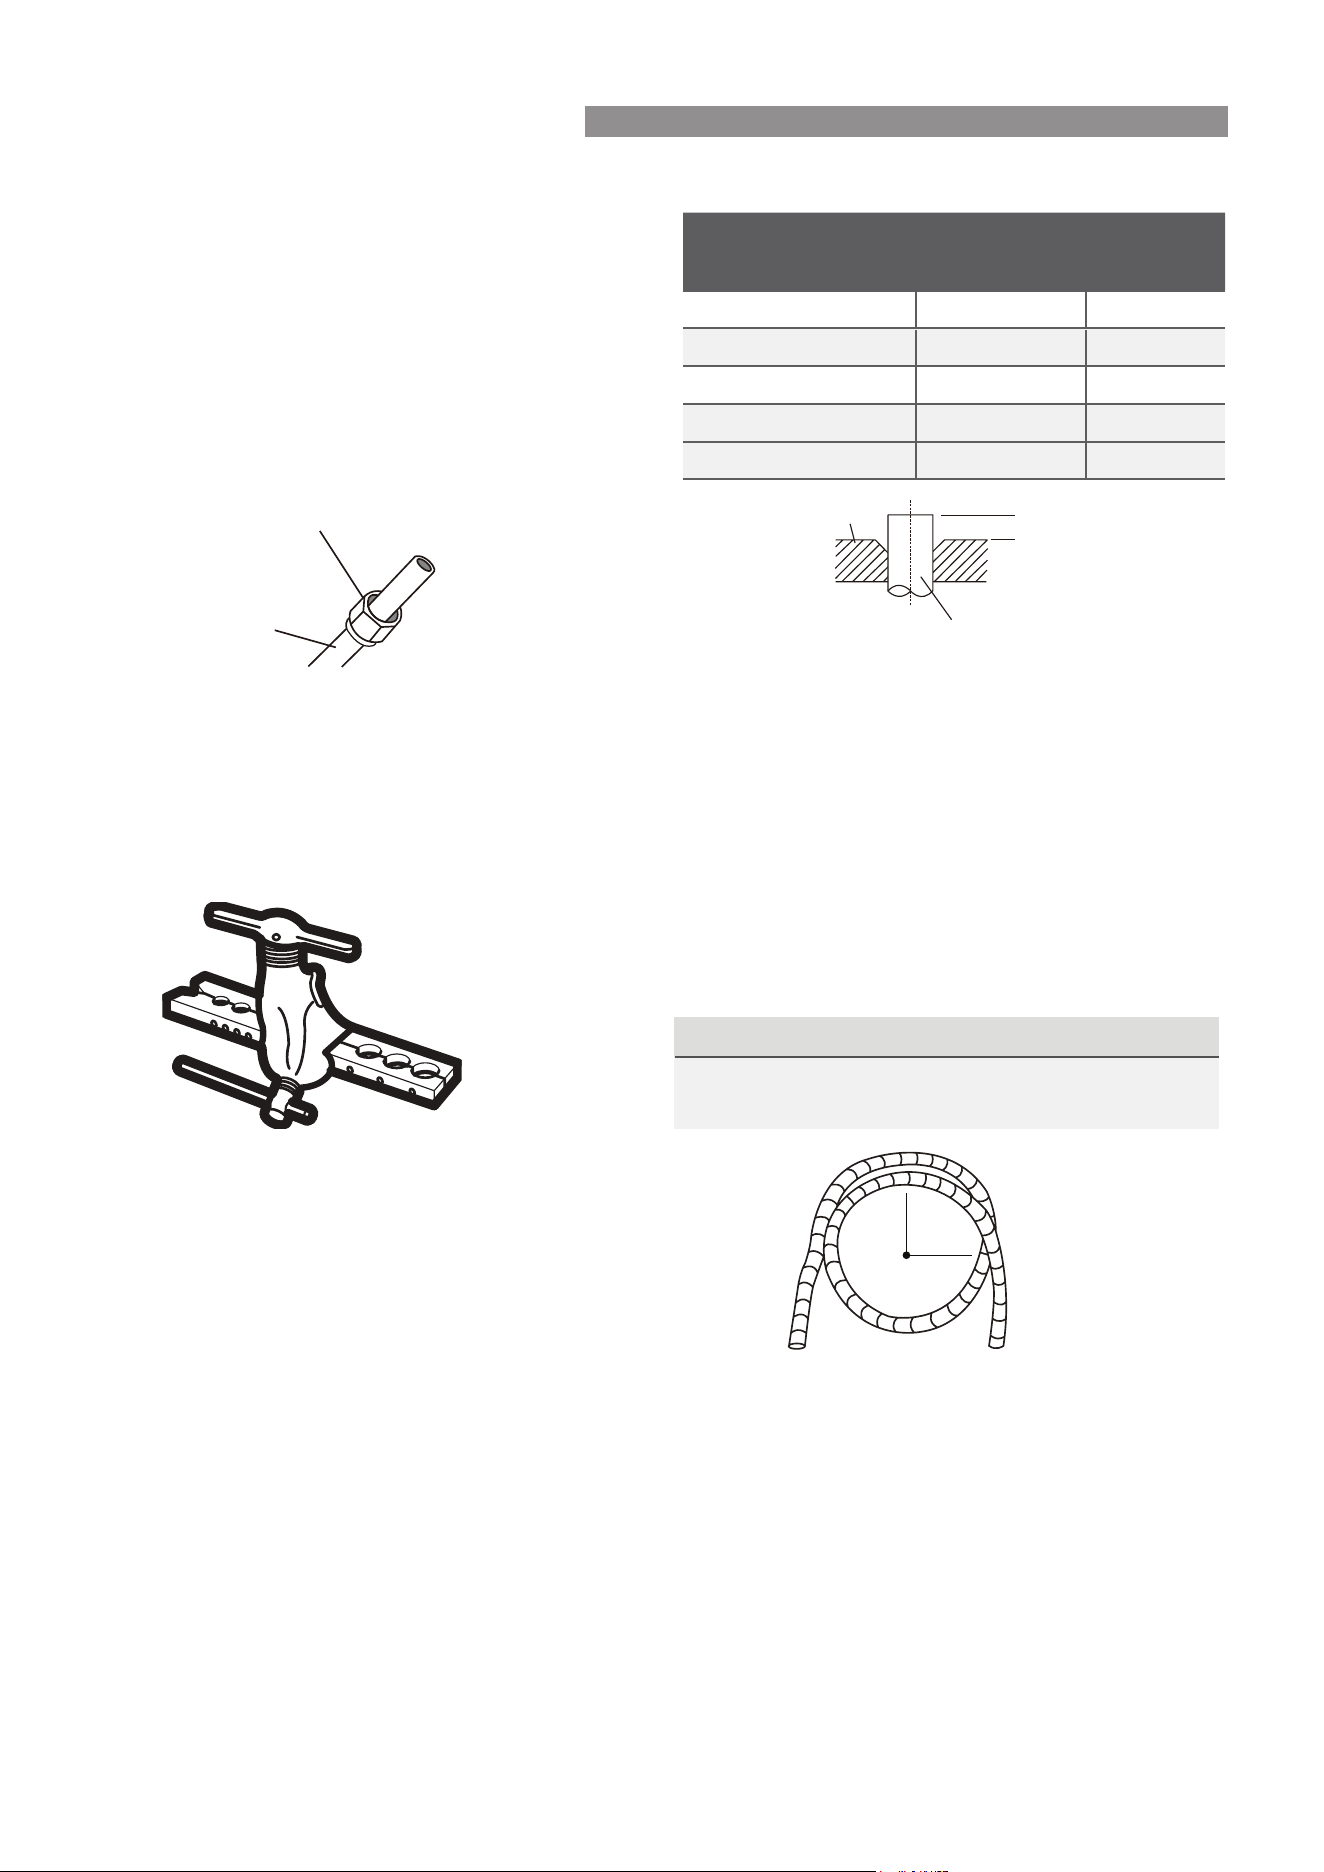
6.
Place flaring tool onto the form.
7.
Turn the handle of the flaring tool clockwise
until the pipe is fully flared.
8.
Remove the flaring tool and flare form, then
inspect the end of the pipe for cracks and
even flaring.
Step 4: Connect pipes
When connecting refrigerant pipes, be careful
not to use excessive torque or to deform the
piping in any way. You should first connect the
low-pressure pipe, then the high-pressure pipe.
MINIMUM BEND RADIUS
When bending connective refrigerant piping,
the minimum bending radius is 100mm.
≥100mm
Radius
Max.
Step 3: Flare pipe ends
Proper flaring is essential to achieve an airtight
seal.
1.
After removing burrs from cut pipe, seal
the ends with PVC tape to prevent foreign
materials from entering the pipe.
2.
Sheath the pipe with insulating material.
3.
Place flare nuts on both ends of pipe. Make
sure they are facing in the right direction,
because you can’t put them on or change
their direction after flaring.
Flare nut
Copper pipe
4.
Remove PVC tape from ends of pipe when
ready to perform flaring work.
5.
Clamp flare form on the end of the pipe.
The end of the pipe must extend beyond the
edge of the flare form in accordance with the
dimensions shown in the table below.
PIPING EXTENSION BEYOND FLARE FORM
Outer Diameter of
Pipe (mm)
A (mm)
Min. Max.
Ø 6.35
0.7 1.3
Ø 9.52
1.0
1.6
Ø12.7
1.0 1.8
Ø 16
Ø 19
2.0 2.2
2.0 2.4
Flare form
Pipe
A
REFRIGERANT PIPING CONNECTION
Rinnai 25 TX Series Split AC IM
CONNECTING PIPING
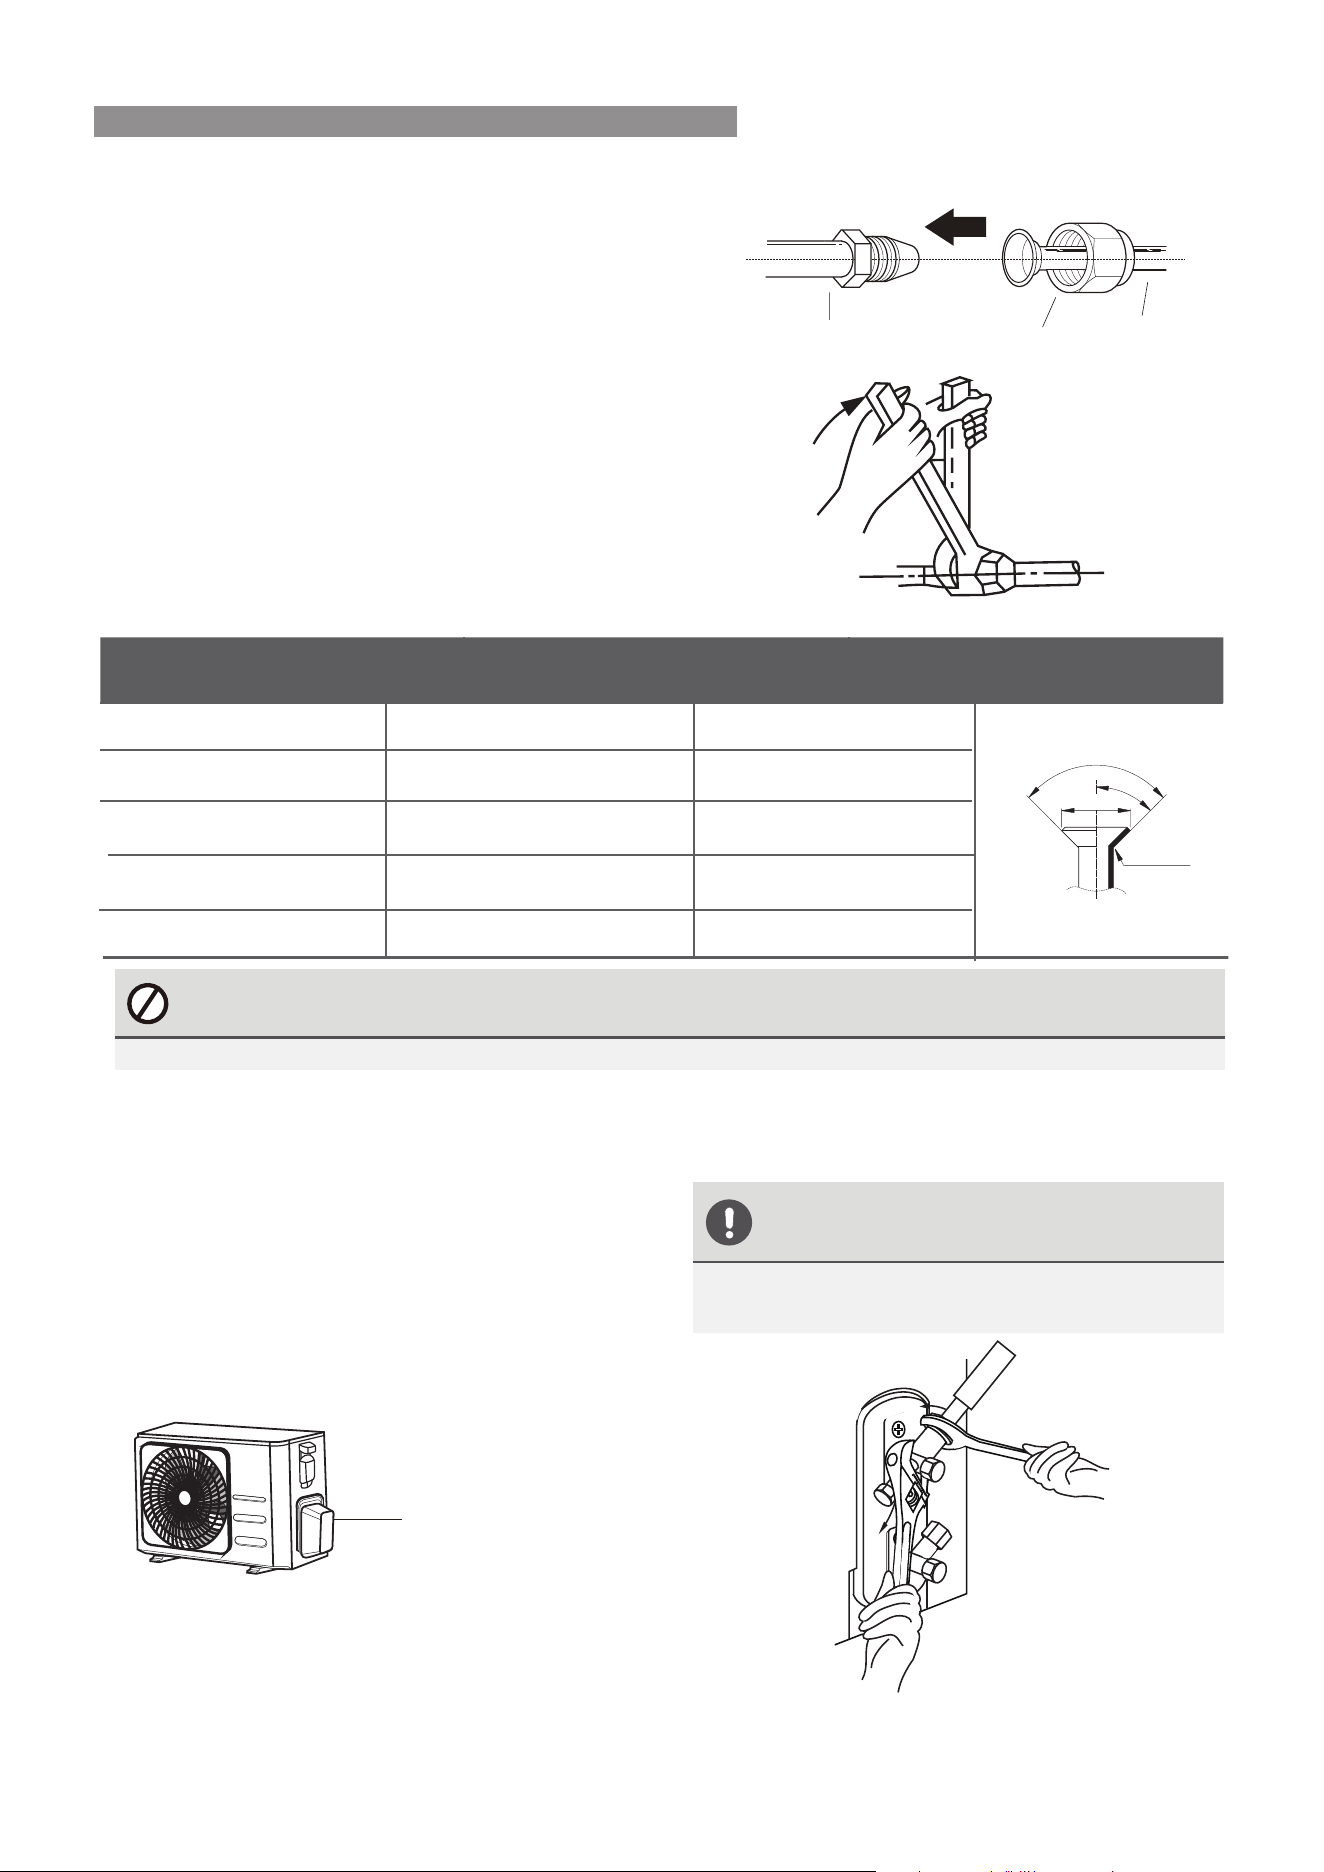
1.
Align the center of the two pipes that you will
Indoor unit tubing Flare nut Pipe
2.
Hand tighten the flare nut.
3.
Using a spanner, grip the nut on the unit
tubing.
4.
While firmly gripping the nut on the unit
tubing, use a torque wrench to tighten the
flare nut according to the torque values in the
Torque Requirements table below. Loosen
the flaring nut slightly, then tighten again.
USE SPANNER TO GRIP MAIN BODY
OF VALVE
Torque from tightening the flare nut can snap
off other parts of valve.
TORQUE REQUIREMENTS
Outer Diameter of Pipe
(mm)
Tightening Torque
(N•m)
Flare dimension(B)
(mm)
Flare shape
Ø 6.35
8.4-8.7
13.2-13.5
16.2-16.5
19.2-19.7
23.2-23.7
18-20
32-39
49-59
57-71
67-101
Ø 9.52
Ø 12.7
Ø 16
Ø 19
5.
While firmly gripping the body of the valve,
use a torque wrench to tighten the flare nut
according to the correct torque values.
6.
Loosen the flaring nut slightly, then tighten
again.
7.
Repeat Steps 3 to 6 for the remaining pipe.
DO NOT USE EXCESSIVE TORQUE
You must not exceed torque requirements shown in the table above.
Valve cover
R0.4±0.8
45
°
±
2
90
°
±
4
B
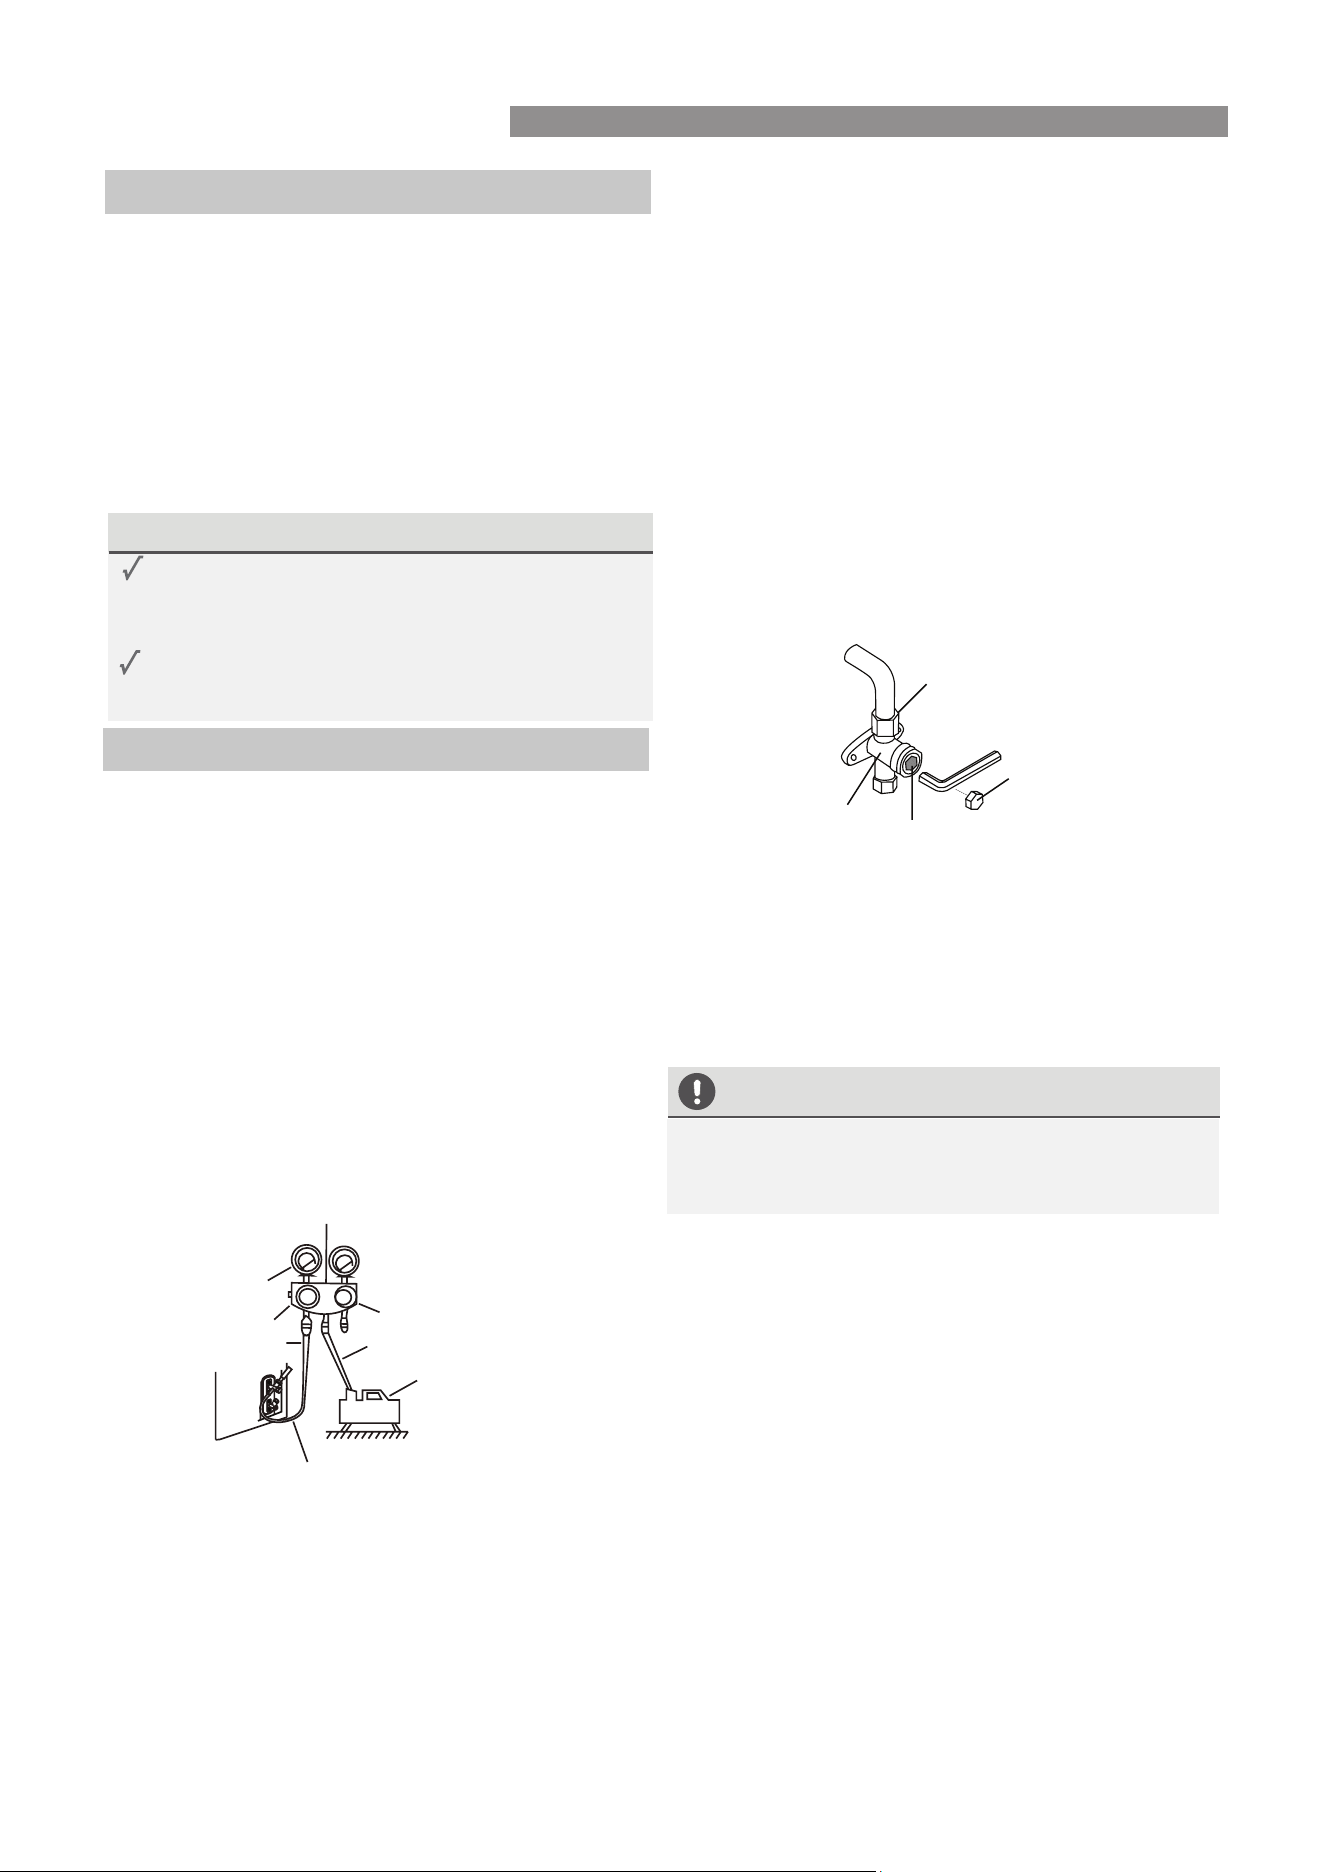
1. Unscrew the cover from the packed
valve on the side of the outdoor unit.
2. Remove protective caps from ends of
valves.
3. Align flared pipe end with each valve,
and hand tighten the flare nut.
4. Use a spanner, to grip the body of the
valve. Do not grip the nut.
REFRIGERANT PIPING CONNECTION
Rinnai 26 TX Series Split AC IM
Preparations and Precautions
Air and foreign matter in the refrigerant circuit can
cause abnormal rises in pressure, which can damage
the air conditioner, reduce its efficiency, and cause
injury. Use a vacuum pump and manifold gauge to
evacuate the refrigerant circuit, removing any
non-condensable gas and moisture from the system.
Evacuation should be performed upon initial
installation and when unit is relocated.
BEFORE PERFORMING EVACUATION
Check to make sure the connective pipes
between the indoor and outdoor units
are connected properly .
Check to make sure all wiring is connected
properly.
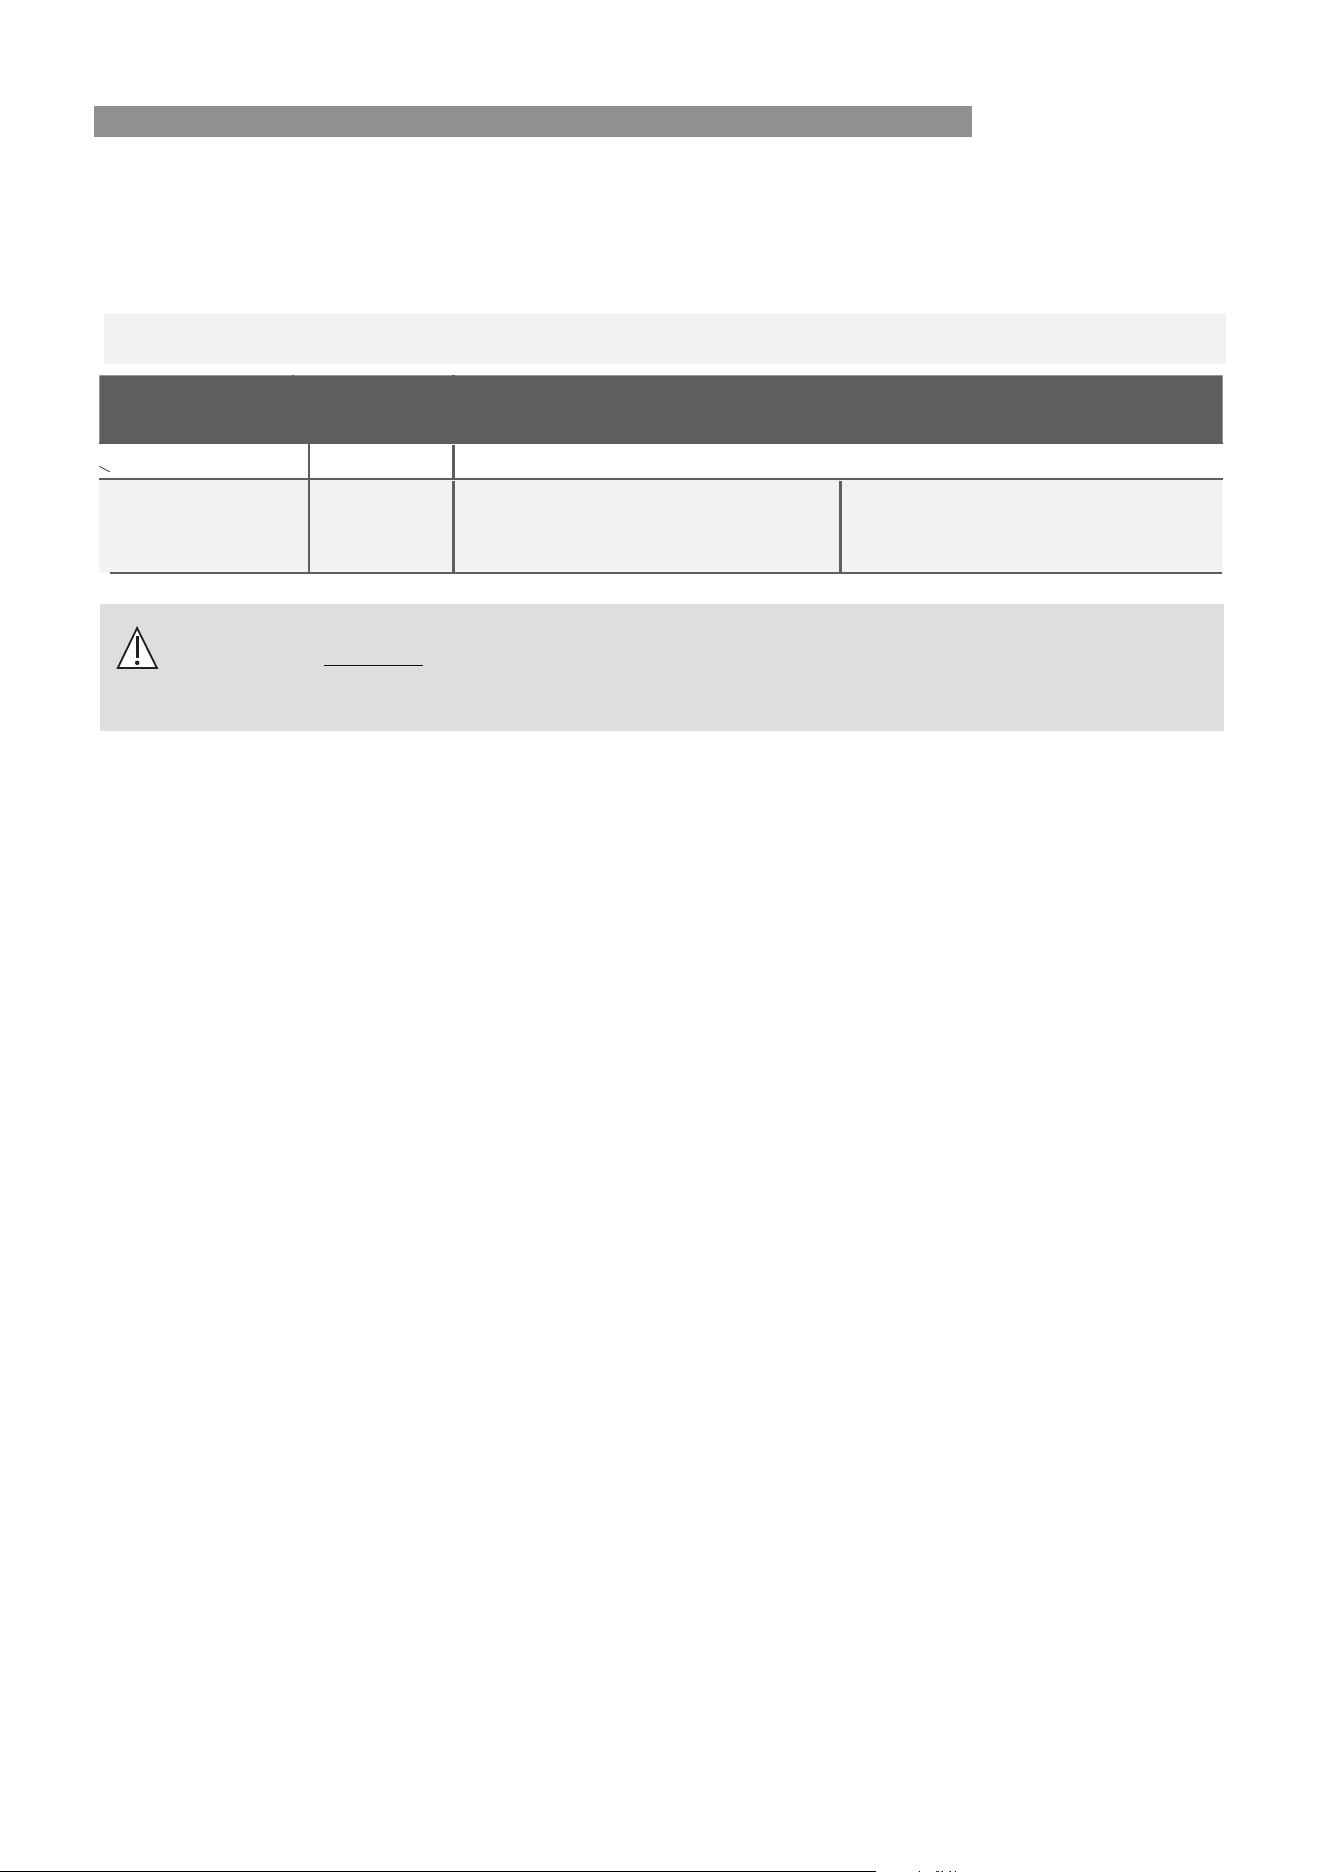
Evacuation Instructions
Manifold Gauge
Compound
gauge
-76cmHg
Low pressure
valve
High pressure
valve
Pressure hose /
Charge hose
Charge hose
V
acuum
pump
Pressure gauge
Low pressure valve
1.
Connect the charge hose of the manifold
gauge to service port on the outdoor unit’s
low pressure valve.
Connect another charge hose from the
manifold gauge to the vacuum pump.
Open the Low Pressure side of the manifold
gauge. Keep the High Pressure side closed.
Turn on the vacuum pump to evacuate the
system.
Run the vacuum for at least 15 minutes, or
until the Compound Meter reads -76cmHG
2.
3.
4.
5.
6.
Close the Low Pressure side of the manifold
gauge, and turn off the vacuum pump.
7.
Wait for 5 minutes, then check that there
has been no change in system pressure.
8.
If there is a change in system pressure, refer
to Gas Leak Check section for information
on how to check for leaks. If there is no
change in system pressure, unscrew the cap
from the packed valve (high pressure valve).
9.
Insert hexagonal wrench into the packed valve
(high pressure valve) and open the valve by
turning the wrench in a 1/4 counter
clockwise
turn. Listen for gas to exit the system, then
close the valve after 5 seconds.
10.
Watch the Pressure Gauge for one minute
to make sure that there is no change in
pressure. The Pressure Gauge should read
slightly higher than atmospheric pressure.
Flare nut
Cap
valve body
valve stem
11.
Remove the charge hose from the service port.
12.
Using hexagonal wrench, fully open both the
high pressure and low pressure valves.
13.
Tighten valve caps on all three valves (service
port, high pressure, low pressure) by hand.
You may tighten it further using a torque
wrench if needed.
OPEN VALVE STEMS GENTLY
When opening valve stems, turn the hexagonal
wrench until it hits against the stopper. Do not
try to force the valve to open further.
AIR EVACUATION
Rinnai 27 TX Series Split AC IM
CALCULATING ADDITIONAL REFRIGERANT REQUIREMENTS
Note on Adding Refrigerant
Some systems require additional charging depending on pipe lengths. The standard pipe length varies
according to local regulations. The refrigerant should be charged from the service port
on the outdoor unit
low
pressure valve.
The additional refrigerant to be charged can be calculated using the following formula:
ADDITIONAL REFRIGERANT PER PIPE LENGTH
Connective Pipe
Length (m)
Air Purging
Method
Additional Refrigerant
< Standard pipe length Vacuum Pump N/A
> Standard pipe
length
Vacuum Pump
Liquid Side: Ø 6.35
R32:
(Pipe length – standard length) x 12g/m
Liquid Side: Ø 9.52
R32:
(Pipe length – standard length) x 24g/m
CAUTION
DO NOT mix refrigerant types.
Always wear work gloves and goggles when handling refrigerant.
AIR EVACUATION
Rinnai 28 TX Series Split AC IM
Electrical Safety Checks
After installation, confirm that all electrical wiring
is installed in accordance with local and national
regulations, and according to the Installation
Manual.
BEFORE TEST RUN
Check Grounding Work
Measure grounding resistance by visual detection
and with grounding resistance tester. Grounding
resistance must be less than 0.1Ω.
DURING TEST RUN
Check for Electrical Leakage
During the Test Run, use an electroprobe and
multimeter to perform a comprehensive electrical
leakage test.
If electrical leakage is detected, turn off the unit
immediately and call a licensed electrician to find
and resolve the cause of the leakage.
Gas Leak Checks
There are two different methods to check for gas
leaks.
Soap and Water Method
Using a soft brush, apply soapy water or liquid
detergent to all pipe connection points on the
indoor unit and outdoor unit. The presence of
bubbles indicates a leak.
Leak Detector Method
If using leak detector, refer to the device’s
operation manual for proper usage instructions.
AFTER PERFORMING GAS LEAK CHECKS
After confirming that the all pipe connection
points DO NOT leak, replace the valve cover on
the outside unit.
WARNING – RISK OF
ELECTRIC SHOCK
ALL WIRING MUST COMPLY WITH LOCAL
AND NATIONAL ELECTRICAL CODES,
AND MUST BE INSTALLED BY A LICENSED
ELECTRICIAN.
Before Test Run
Only perform test run after you have completed
the following steps:
•
Electrical Safety Checks – Confirm that
the unit’s electrical system is safe and
operating properly
•
Gas Leak Checks – Check all flare nut
connections and confirm that the system is
not leaking
•
Confirm that gas and liquid (high and low
pressure) valves are fully open
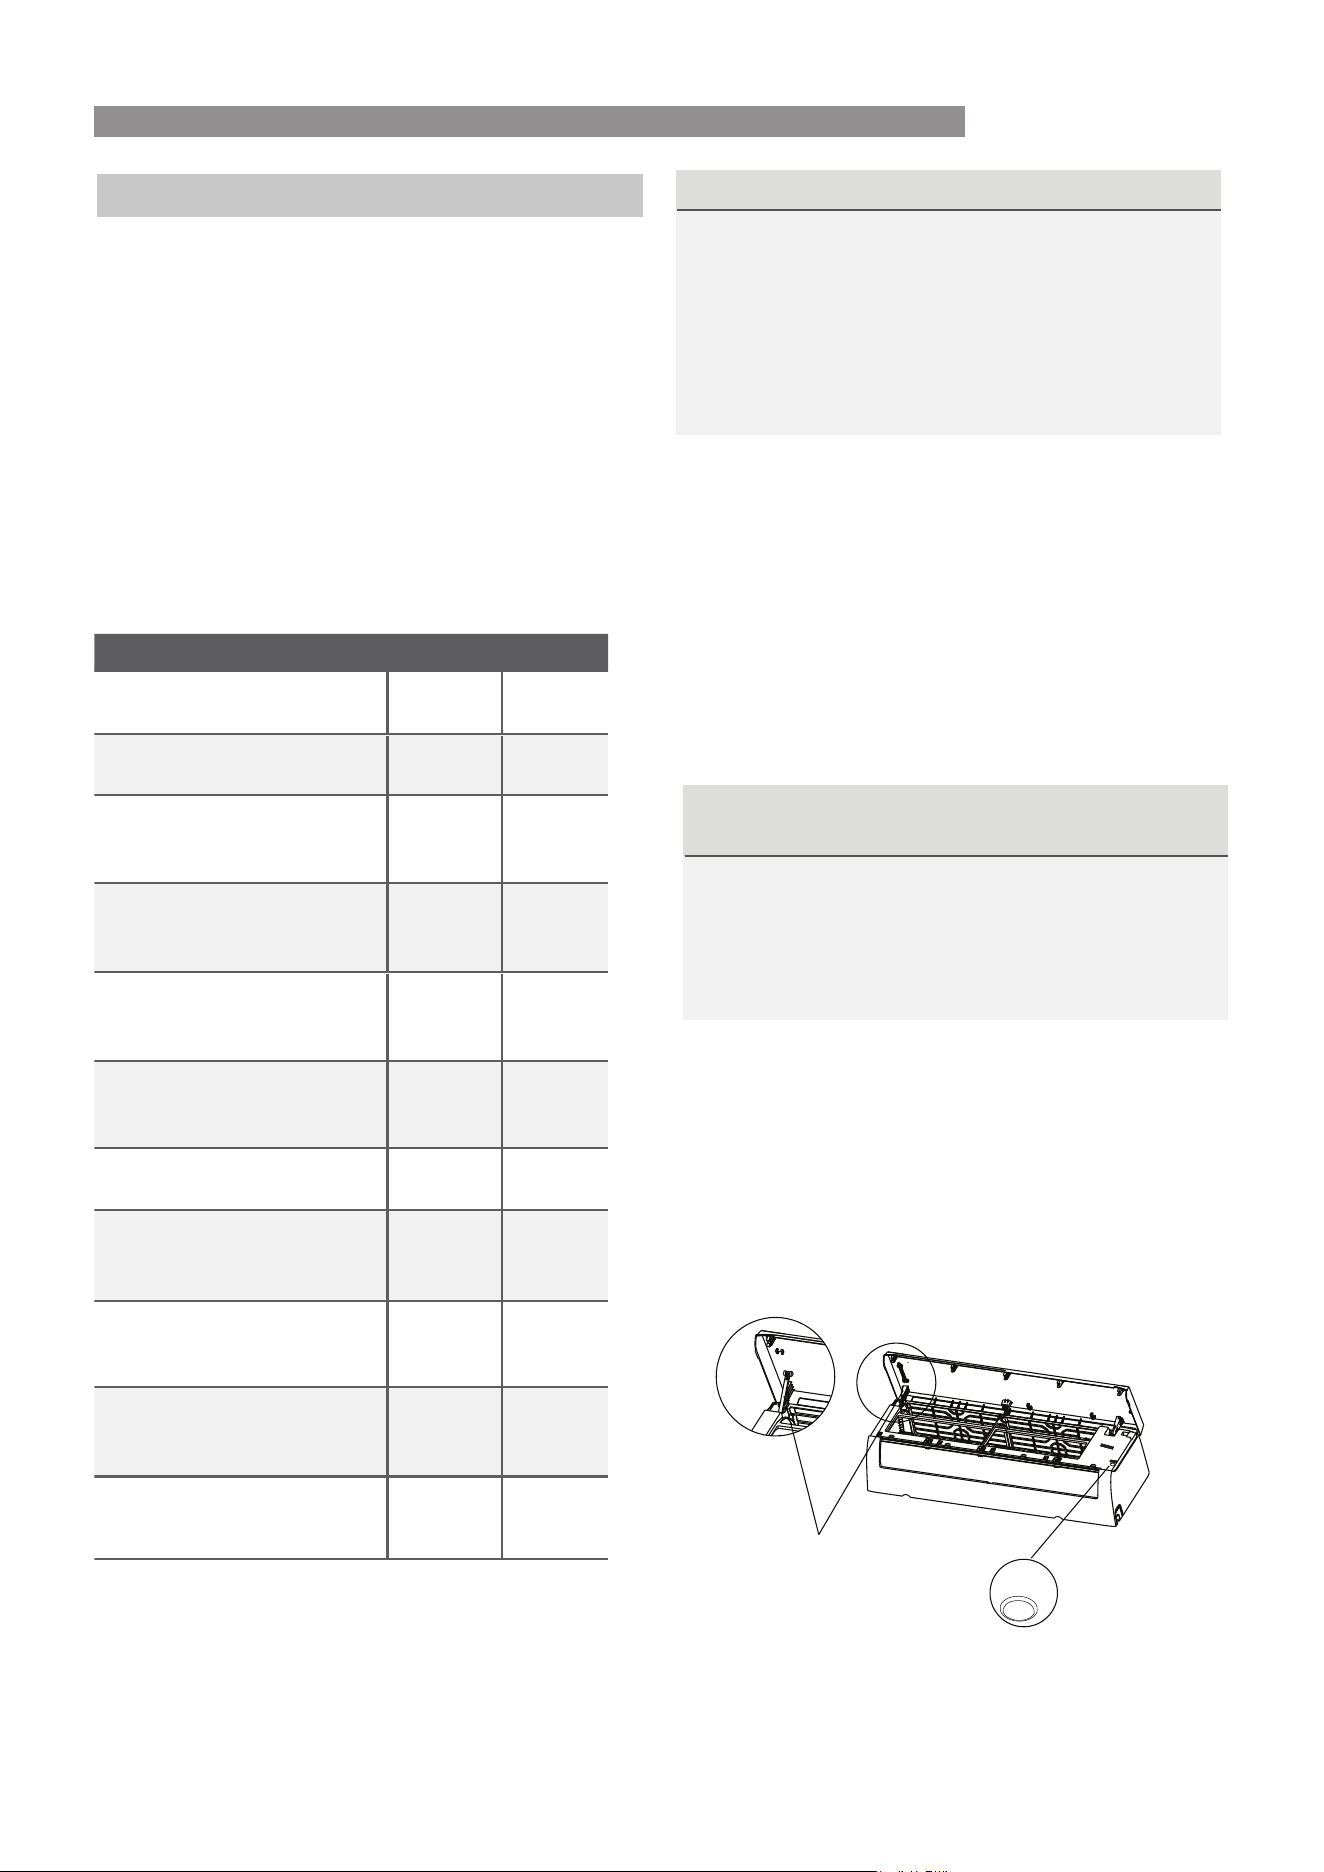
A: Low pressure stop valve
B: High pressure stop valve
C& D: Indoor unit flare nuts
Check-point of indoor unit
Check-point of outdoor unit
A
B
C
D
ELECTRICAL AND GAS LEAK CHECKS
Rinnai 29 TX Series Split AC IM
Test Run Instructions
You should perform the Test Run for at least 30
minutes.
1.
Connect power to the unit.
2.
Press the ON/OFF button on the remote
controller to turn it on.
3.
Press the MODE button to scroll through the
following functions, one at a time:
•
COOL – Select lowest possible temperature
•
HEAT – Select highest possible temperature
4.
Let each function run for 5 minutes, and
perform the following checks:
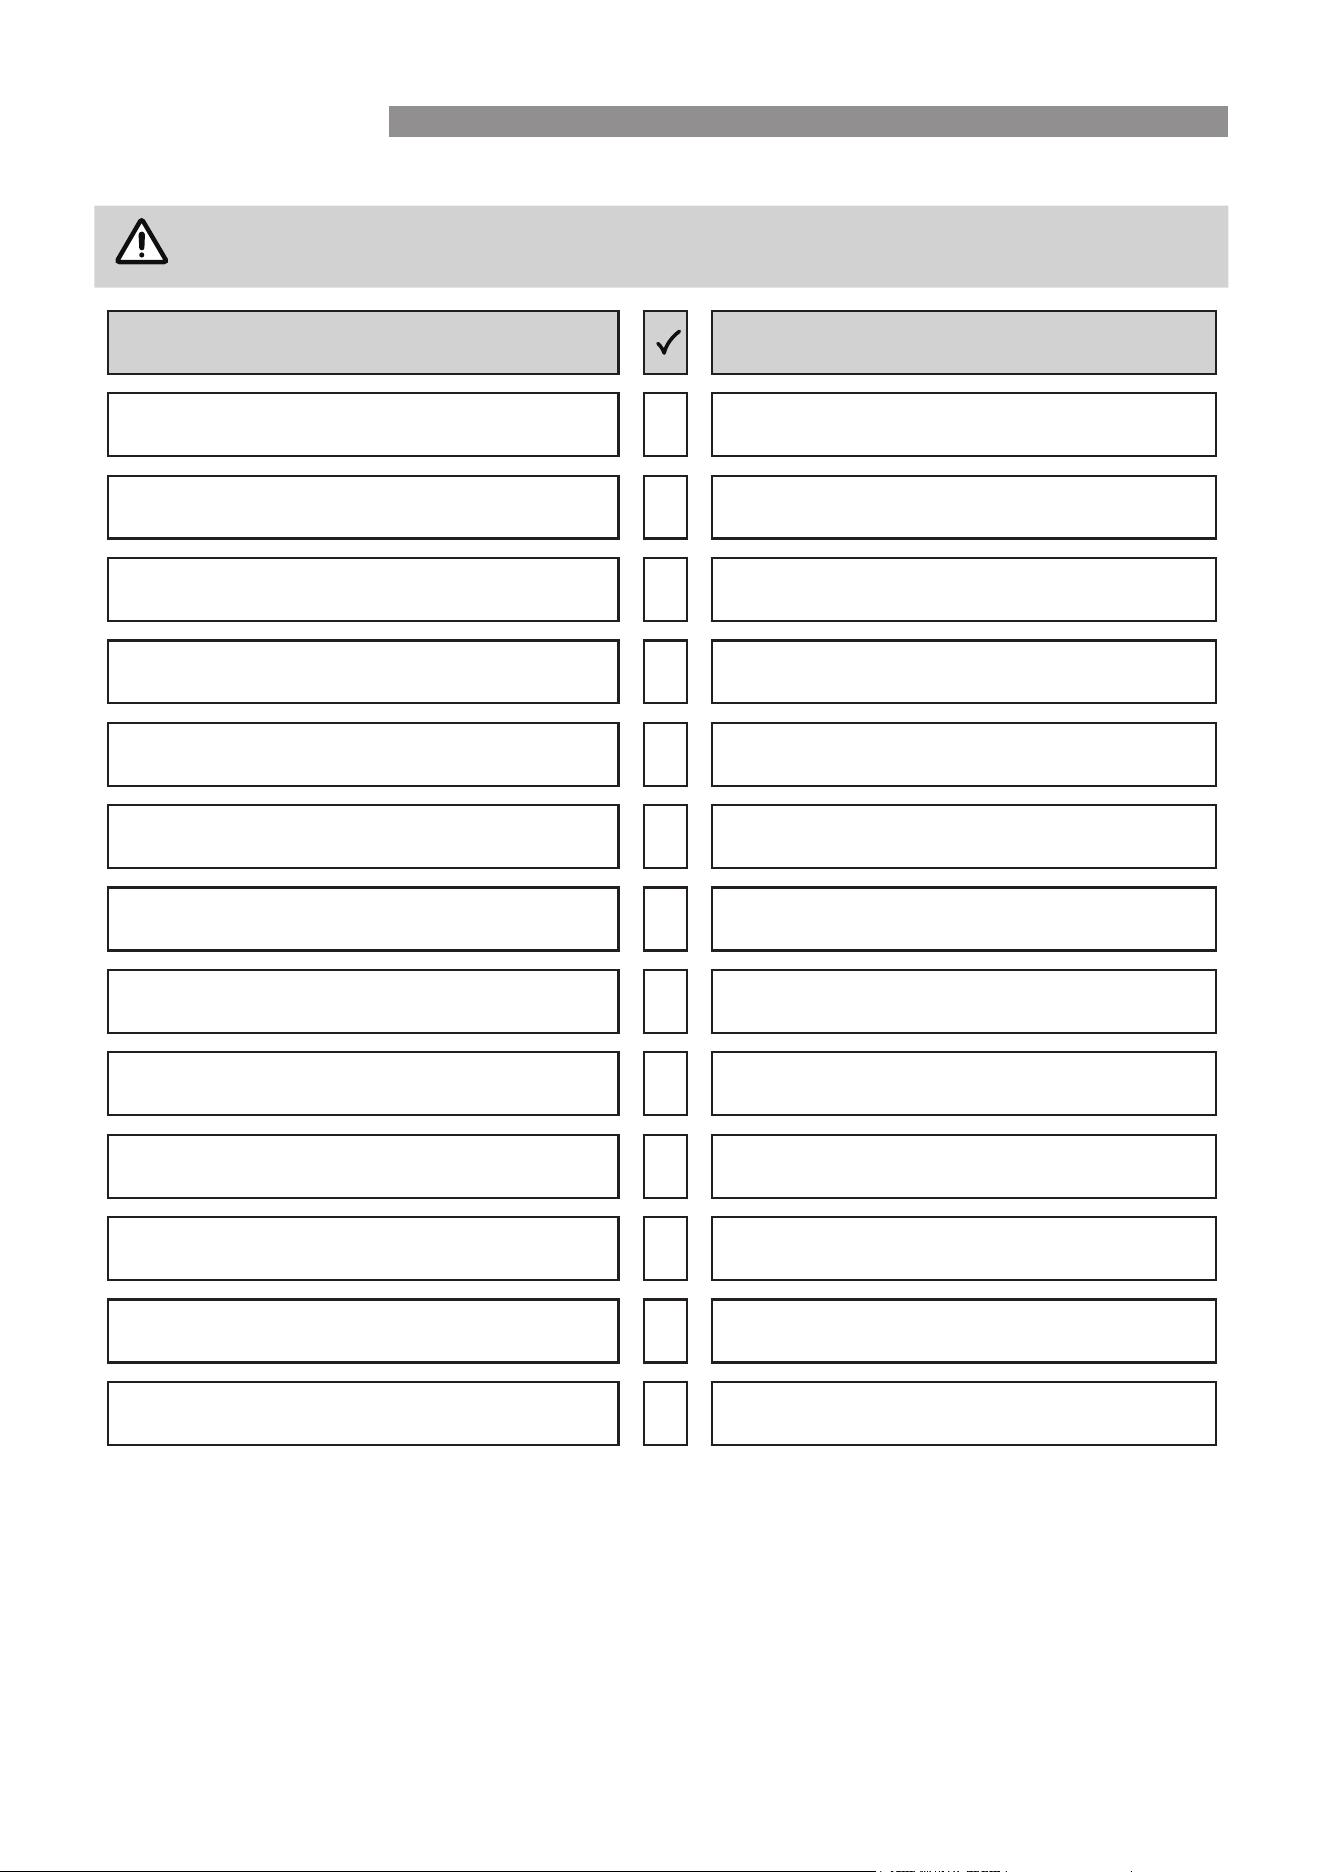
List of Checks to Perform PASS/FAIL
No electrical leakage
Unit is properly grounded
All electrical terminals
properly covered
Indoor and outdoor units
are solidly installed
All pipe connection
points do not leak
Outdoor
(2):
Indoor
(2):
Water drains properly
from drain hose
All piping is properly
insulated
Unit performs COOL
function properly
Unit performs HEAT
function properly
Indoor unit louvers
rotate properly
Indoor unit responds to
remote controller
DOUBLE-CHECK PIPE CONNECTIONS
During operation, the pressure of the
refrigerant circuit will increase. This may
reveal leaks that were not present during your
initial leak check. Take time during the Test
Run to double-check that all refrigerant pipe
connection points do not have leaks. Refer to
Gas Leak Check section for instructions.
5.
After the Test Run is successfully completed,
and you confirm that all checks points in List
of Checks to Perform have PASSED, do the
following:
a.
Using remote control, return unit to
normal operating temperature.
b.
Using insulation tape, wrap the indoor
refrigerant pipe connections that you
left uncovered during the indoor unit
installation process.
IF AMBIENT TEMPERATURE IS BELOW 16°C
You can’t use the remote controller to turn
on the COOL function when the ambient
temperature is below 16°C. In this instance,
you can use the MANUAL CONTROL button
to test the COOL function.
1.
2.
The MANUAL CONTROL button is located
on the right-hand side of the unit. Press it 2
times to select the COOL function.
3.
Perform Test Run as normal.
Manual control
button
Supporting rod
(located on the
left or right�
model dependent )
AU�O�COO�
Lift the front panel of the indoor unit.
NOTE: For some units, there is a supporting
rod located on the left or right side. Please
use it to prop up the panel.
TEST RUN
Rinnai 30 TX Series Split AC IM
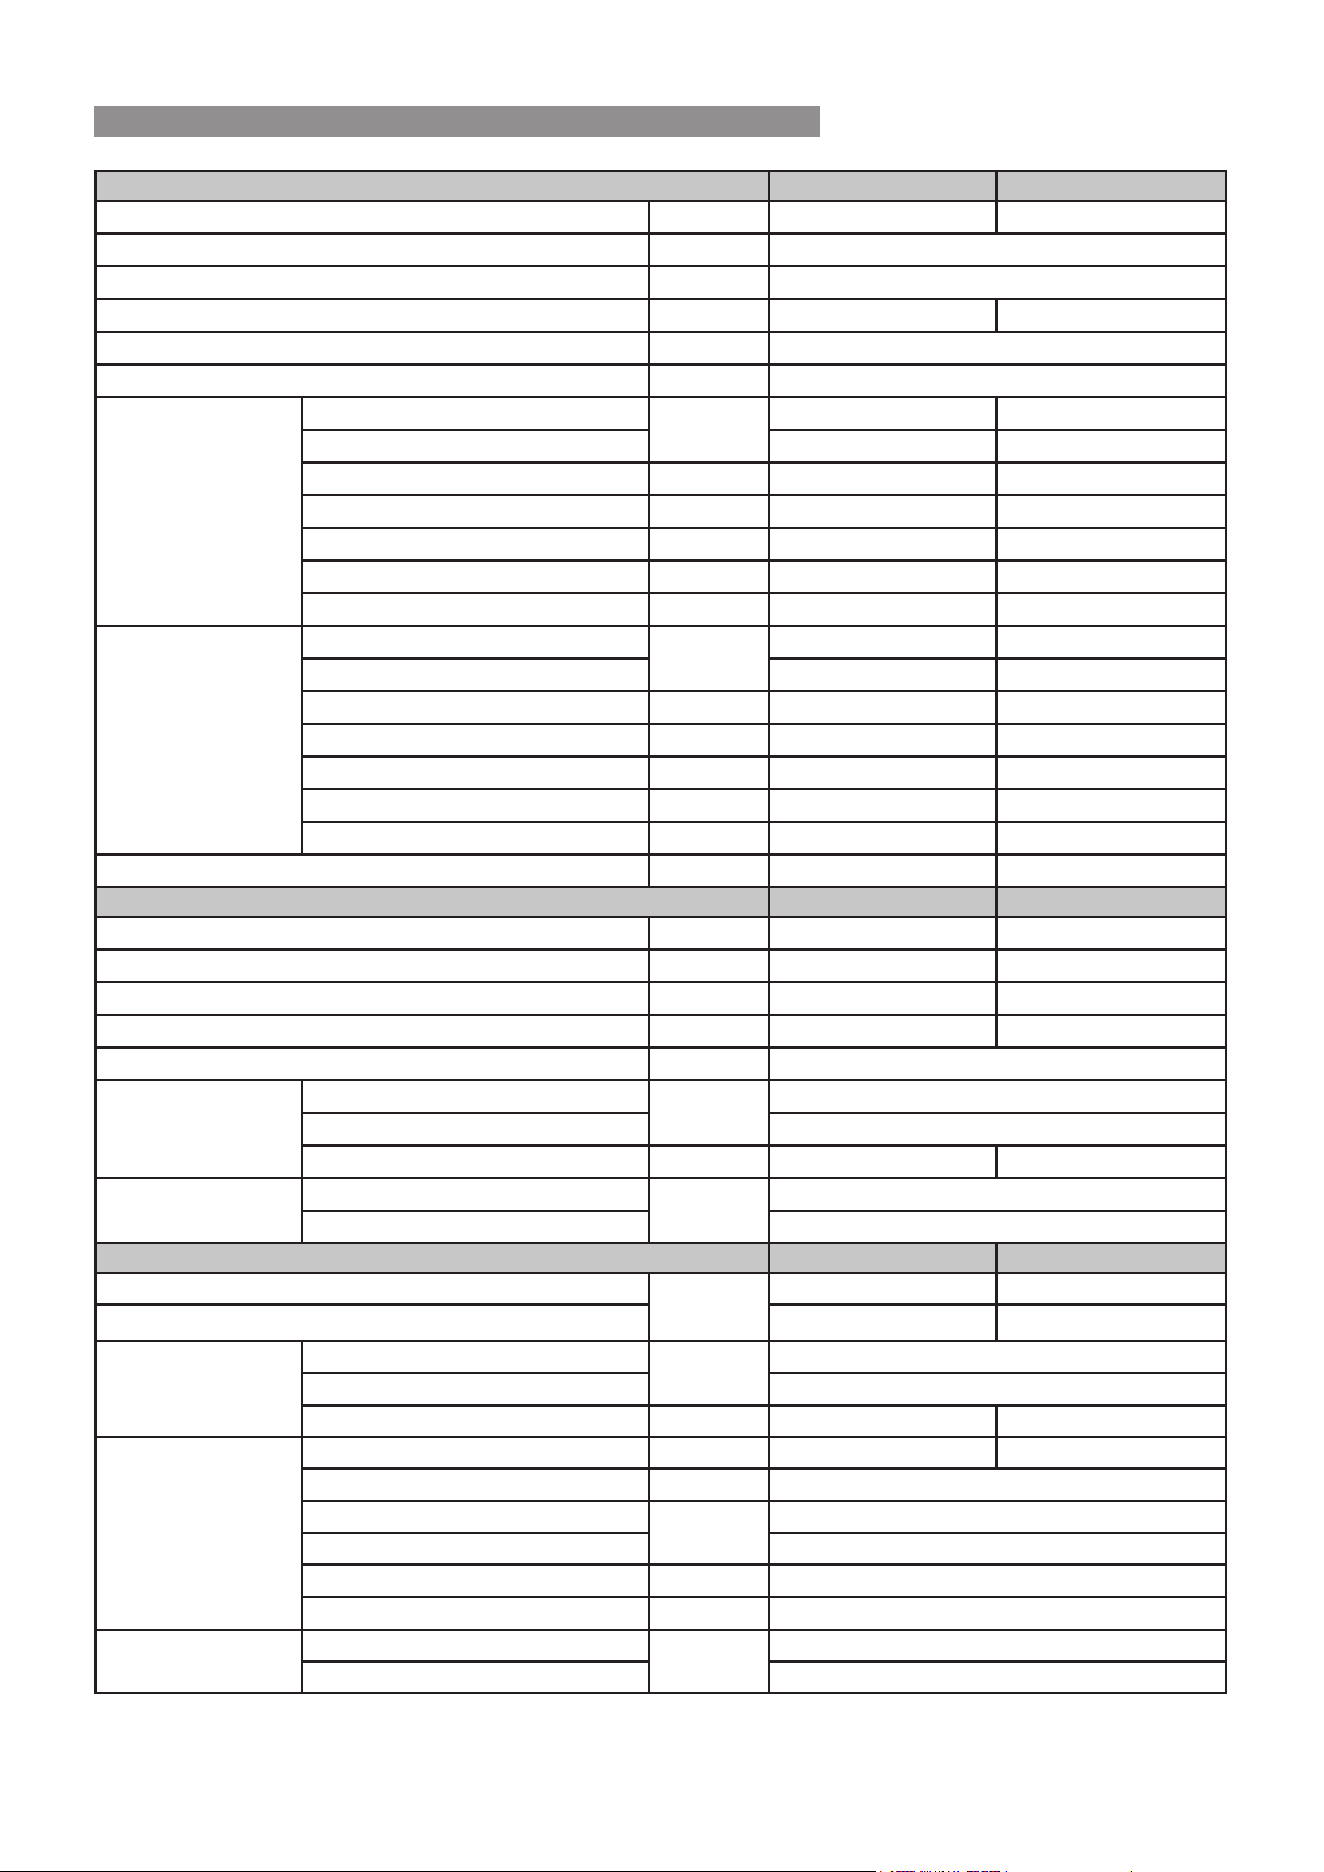
FINAL CHECKLIST
IMPORTANT
The checklist is ONLY to be completed by an Authorised Person.
Check Item What can happen if not checked
Is the indoor unit installed securely? Falling, vibration, noise
Has an inspection been made to check for gas leakage? No cooling or heating
Has all thermal insulation been completed (vapour pipes,
liquid pipes, indoor portions of the drain hose extension)?
Condensation
Is the drainage secure? Water leakage
Are the electric wires installed correctly?
No cooling or heating, may cause electrical shock or
electrical re.
Is the wiring in accordance within the specications? Operation failure, electrical re
Are all inlets / outlets of the indoor and outdoor units free of
any obstructions?
No cooling or heating
Are the stop valves open? No cooling or heating
Are the pipes designed for use with R32? Pipe or pipe connection leakage
Has a leak test been carried out for the pipe connections? Pipe connection leakage
Has air purging been carried out? No cooling or heating
Has the appliance been tested for correct operation? No cooling or heating
Is the end user fully aware of the operating procedure? Incorrect operation
Ifyouhaveanswerednotoanyoftheabove,youmustcheckandcorrectbeforeappliancehand-overtocustomer.
CHECKLIST
Rinnai 31 TX Series Split AC IM
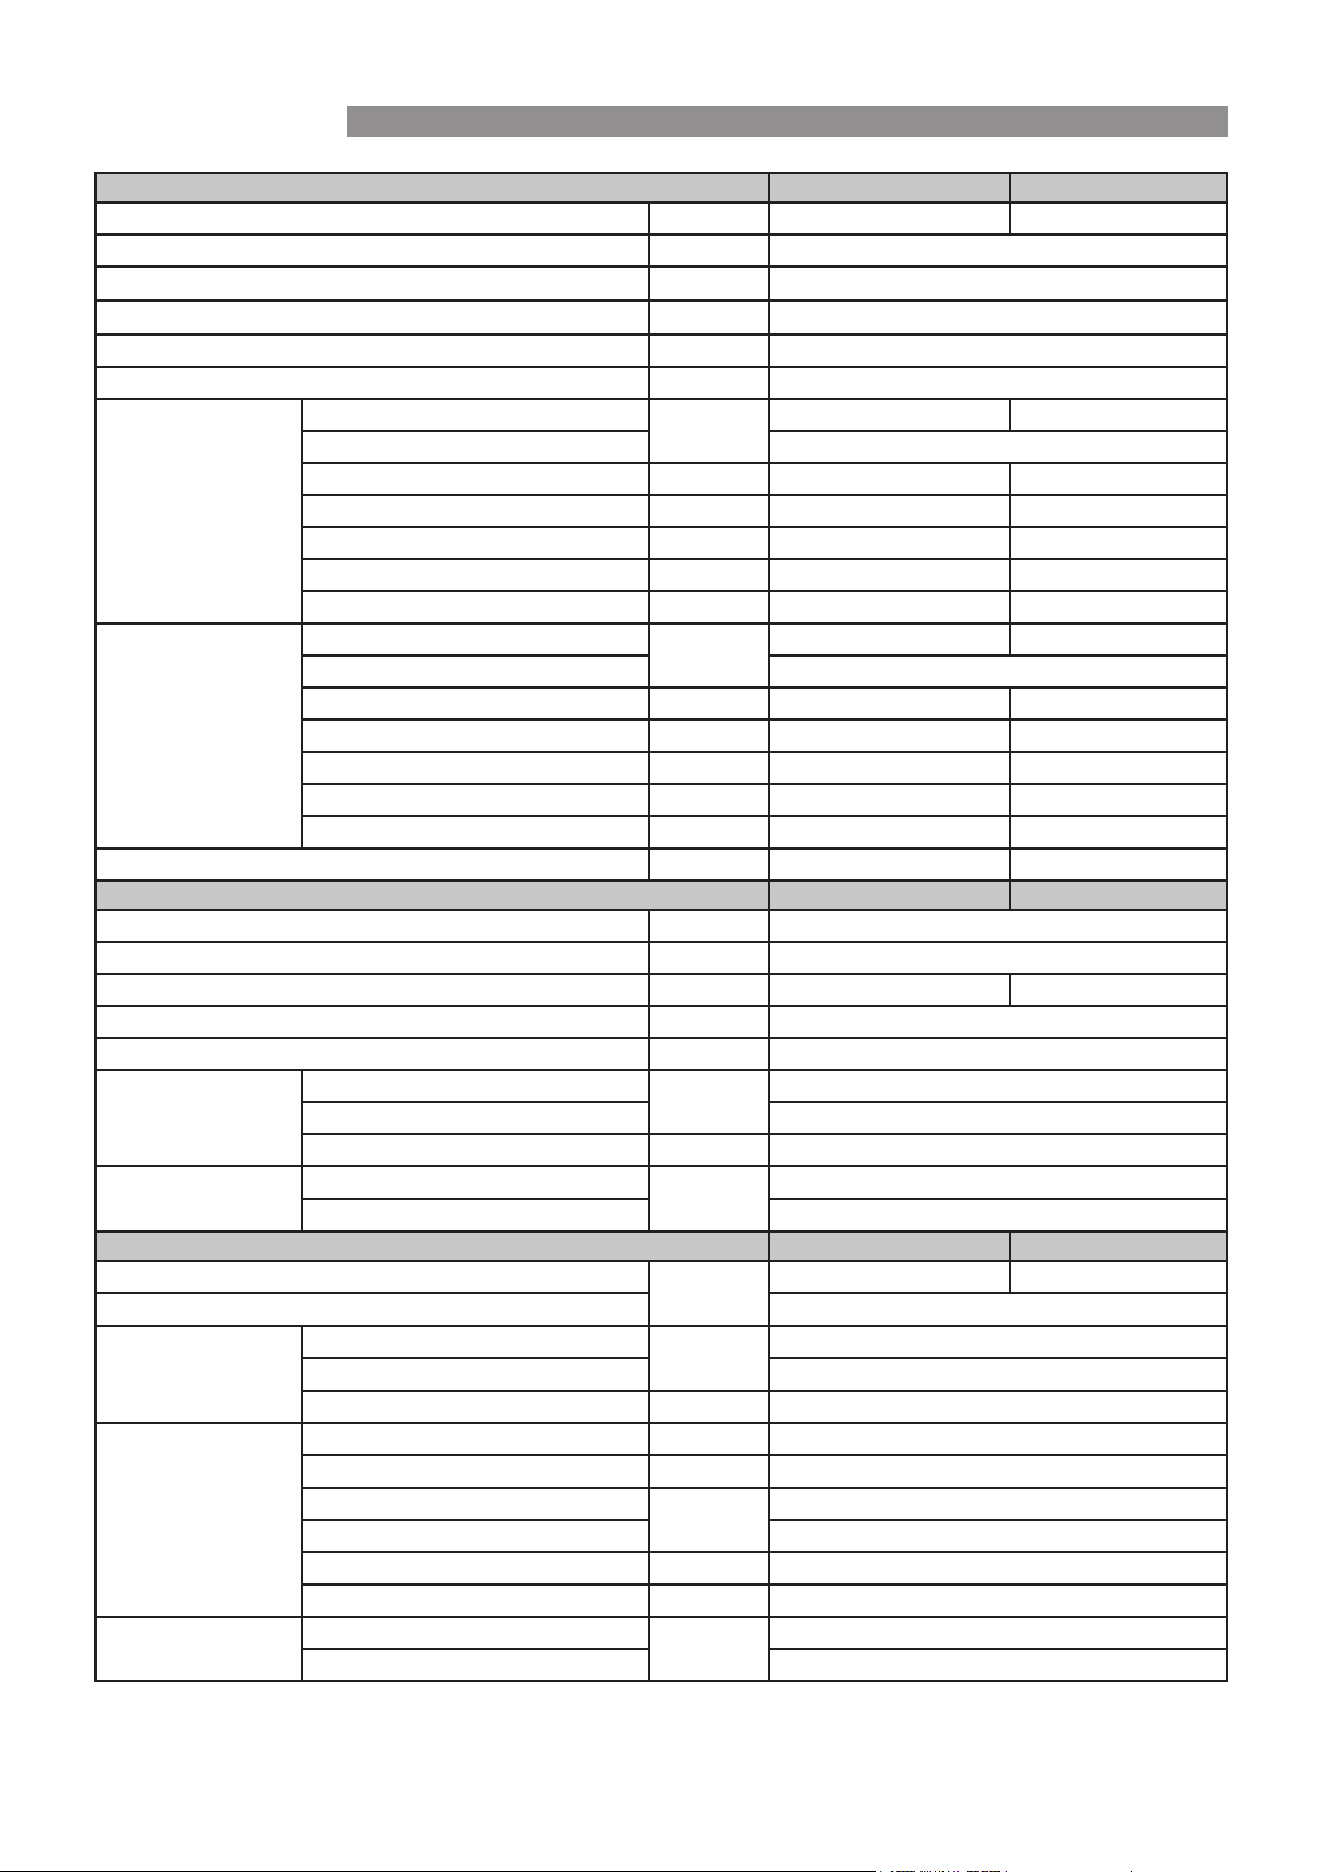
RINNAI-TXSeriesHi-WallSplitSystem HSNRTX25 HSNRTX35
Nominal Capacity kW 2.5 3.5
Power Supply to Outdoor Unit V - Ph - Hz 220~240 - 1 - 50
Maximum Input Power (Cooling / Heating) W 2300
Maximum Input Current (Cooling / Heating) A 10.5 10
Connectivity - Wi-Fi Enabled
Demand Response Enabling Device - DRED Enabled
Cooling Rated Capacity
kW
2.5 3.5
Capacity Range 0.90-3.45 1.05-3.90
Rated Power Input W 540 850
Rated Current A 2.42 3.8
AEER W/W 4.606 4.1
TCSPF (Hot/Average/Cold) - 7.065/6.586/6.891 6.526/6.192/6.509
Star Rating (Hot / Average / Cold)
-
5.5/5/5 5/4.5/5
Heating Rated Capacity
kW
2.795 4.0
Capacity Range 1.10-3.75 1.20-4.10
Rated Power Input W 571 930
Rated Current A 2.56 4.1
ACOP W/W 4.871 4.29
HSPF (Hot/Average/Cold) 5.439/5.013/4.588 5.381/4.693/4.2
Star Rating (Hot / Average / Cold)
-
3.5/3.5/3 3.5/3/2.5
Suitable Area Coverage (up to 2.6m insulated ceiling) m² 11-17 16-23
Indoor Unit Model No. HINRTX25 HINRTX35
Air Flow (Turbo / Hi / Med / Lo / Min) L/s 175/139/100/83/50 183/147/106/86/56
Moisture Removal L/h 1.3 1.7
Sound Power Level dB(A) 57 59
Sound Pressure Level @ 1m (Turbo / Hi / Med / Lo / Min) dB(A) 45.50/39/32/25/20 45/39.5/33/26/19.5
Air Swing Louvres Direction Vertical and Horizontal
Dimensions Dimension (W x D x H)
mm
802x200x295
Packing (W x D x H) 875x288x375
Net / Gross Weight kg 8.6/11.1 8.5/11.1
Operating Range Cooling
°C
16 ~ 32
Heating 0 ~ 30
Outdoor Unit Model No. HONRTX25 HONRTX35
Sound Power Level
dB(A)
59 62.9
Sound Pressure Level @ 1m 54 56
Dimensions Dimension (W x D x H)
mm
765x303x555
Packing (W x D x H) 887x337x610
Net / Gross Weight kg 24.7/27.0 25.8/28
Refrigerant (R32) Charged Volume kg 0.62 0.85
Pipe Size: Liquid / Gas mm 6.35mm/9.52mm
Maximum Pipe Length m 25
Chargeless Length 15
Extra Charge for Lengths >15m g/m 12
Maximum Vertical Separation m 10
Ambient Temperature
Limits
Cooling
°C
-15 - 50
Heating -15 - 24
Capacities tested in accordance with AS/NZS 3823.2, with 5m interconnecting pipe length. With our policy of continuous improvement, we reserve the right to
change, or discontinue at any time, specications or designs without notice.
SPECIFICATIONS
Rinnai 32 TX Series Split AC IM
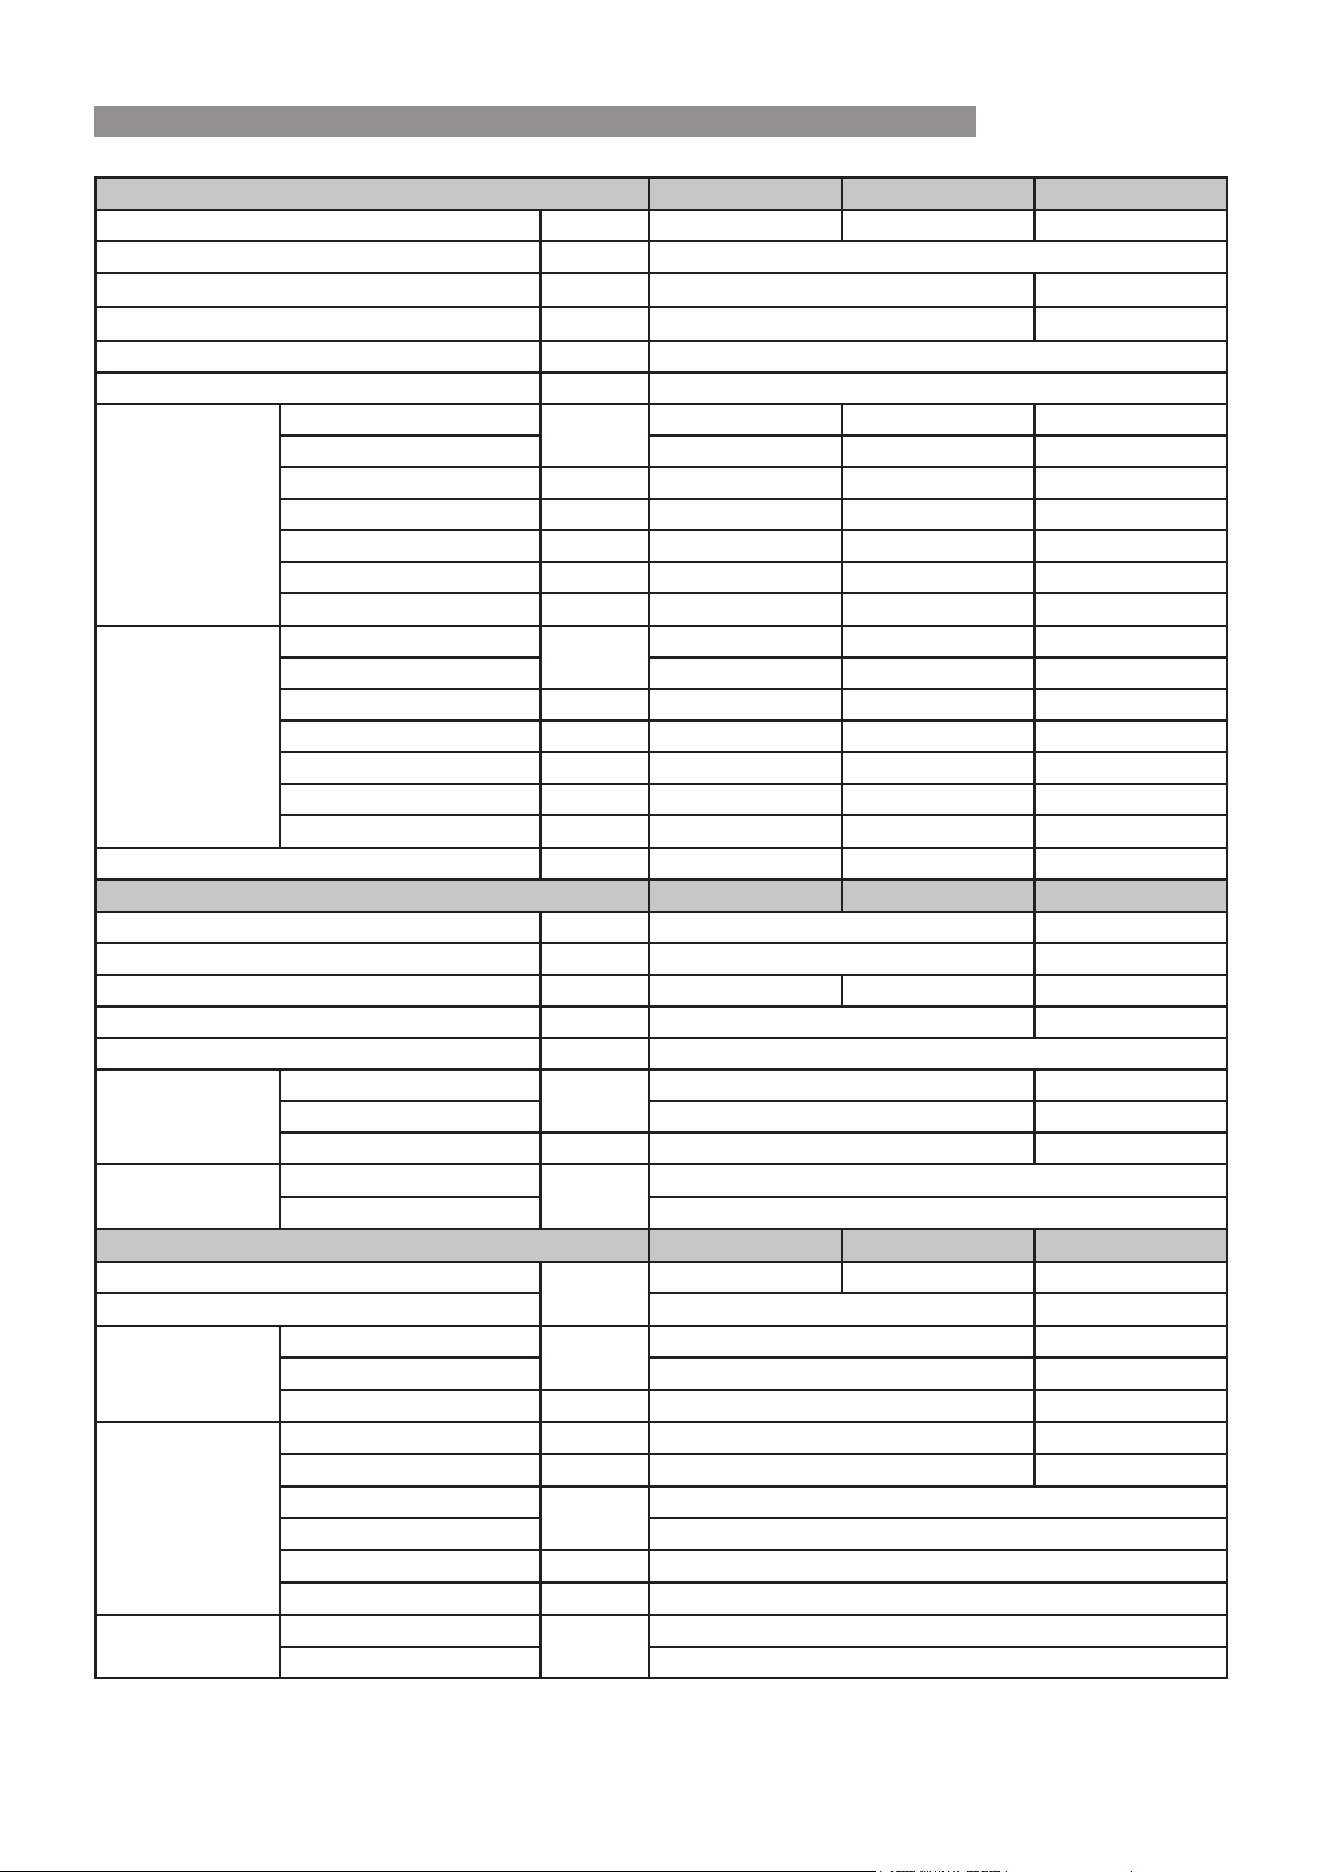
RINNAI-TXSeriesHi-WallSplitSystem HSNRTX50 HSNRTX60
Nominal Capacity kW 5.0 6.0
Power Supply to Outdoor Unit V - Ph - Hz 220~240 - 1 - 50
Maximum Input Power (Cooling / Heating) W
3400
Maximum Input Current (Cooling / Heating) A 15.5
Connectivity - Wi-Fi Enabled
Demand Response Enabling Device - DRED Enabled
Cooling Rated Capacity
kW
5.0 6.0
Capacity Range 2.30-6.20
Rated Power Input W 1338 1735
Rated Current A 5.92 7.73
AEER W/W 3.729 3.453
TCSPF (Hot/Average/Cold) - 6.002/5.682/6.011 5.509/5.310/5.616
Star Rating (Hot / Average / Cold) - 4.5/4/4.5 4/3.5/4
Heating Rated Capacity
kW
5.54 6.5
Capacity Range 2.40-6.40
Rated Power Input W 1314 1702
Rated Current A 5.79 7.43
ACOP W/W 4.207 3.813
HSPF (Hot/Average/Cold) 4.862/4.370/3.815 4.895/4.091/3.446
Star Rating (Hot / Average / Cold) - 3/2.5/2 3/2.5/1.5
Suitable Area Coverage (up to 2.6m insulated ceiling) m² 23-33 27-40
Indoor Unit Model No. HINRTX50 HINRTX60
Air Flow (Turbo / Hi / Med / Lo / Min) L/s 264/222/167/139/125
Moisture Removal L/h 2.5
Sound Power Level dB(A) 60.5 59.6
Sound Pressure Level @ 1m (Turbo / Hi / Med / Lo / Min) dB(A) 48.50/45.5/38.0/30.5/20.0
Air Swing Louvres Direction Vertical and Horizontal
Dimensions Dimension (W x D x H)
mm
971x228x321
Packing (W x D x H) 1045x308x405
Net / Gross Weight kg 11.0/14.6
Operating Range Cooling
°C
16 ~ 32
Heating
0 ~ 30
Outdoor Unit Model No. HONRTX50 HONRTX60
Sound Power Level
dB(A)
67.4 67.1
Sound Pressure Level @ 1m 58.0
Dimensions Dimension (W x D x H)
mm
890x342x673
Packing (W x D x H) 1030x438x750
Net / Gross Weight kg 38.6/42.1
Refrigerant Charged Volume kg 1.26
Pipe Size: Liquid / Gas mm 6.35mm / 12.7mm
Maximum Pipe Length
m
30
Chargeless Length 15
Extra Charge for Lengths >15m g/m 12
Maximum Vertical Separation m 20
Ambient Temperature
Limits
Cooling
°C
-15 - 50
Heating -15 ~ 24
Capacities tested in accordance with AS/NZS 3823.2, with 5m interconnecting pipe length. With our policy of continuous improvement, we reserve the right to
change, or discontinue at any time, specications or designs without notice.
SPECIFICATIONS
Rinnai 33 TX Series Split AC IM
RINNAI-TXSeriesHi-WallSplitSystem HSNRTX70 HSNRTX80 HSNRTX90
Nominal Capacity kW 7 7.65 9.0
Power Supply to Outdoor Unit V - Ph - Hz 220~240 - 1 - 50
Maximum Input Power (Cooling / Heating)
W
4050 4100
Maximum Input Current (Cooling / Heating)
A
17.5 18
Connectivity - Wi-Fi Enabled
Demand Response Enabling Device - DRED Enabled
Cooling Rated Capacity
kW
7 7.65 9.0
Capacity Range 2.91-8.23 3.03-8.23 3.22-9.38
Rated Power Input W 2010 2274 2568
Rated Current A 9.10 10.3 11.6
AEER W/W 3.48 3.36 3.5
TCSPF (Hot/Average/Cold) 5.614/5.339/5.647 5.233/5.032/5.329 5.758/5.504/5.903
Star Rating (Hot / Average / Cold)
-
4/3.5/4 3.5/3.5/3.5 4.0/4.0/4.0
Heating Rated Capacity
kW
7.5 8.2 9.5
Capacity Range 2.38-8.86 2.40-8.86 2..78-9.96
Rated Power Input W 1945 2285 2464
Rated Current A 8.7 10.20 11.2
ACOP W/W 3.85 3.58 3.84
HSPF (Hot/Average/Cold) 4.879/4.258/3.764 4.909/4.138/3.602 5.239/4.328/3.600
Star Rating (Hot / Average / Cold)
-
3/2.5/2 3/2.5/2 3.5/2.5/2.0
Suitable Area Coverage (up to 2.6m insulated ceiling) m² 32-47 36-53 36 ~ 53
Indoor Unit Model No. HINRTX70 HINRTX80 HINRTX90
Air Flow (Turbo / Hi / Med / Lo / Min) L/s 337/293/190/140/137 375/308/211/156/97
Moisture Removal L/h 3.4 3.2
Sound Power Level dB(A) 65.1 64.8 65.2
Sound Pressure Level @ 1m (Turbo / Hi / Med / Lo / Min) dB(A) 52/50/41.5/27/21 54.5/52.0/45.5/34.5/22.5
Air Swing Louvres Direction Vertical and Horizontal
Dimensions Dimension (W x D x H)
mm
1082x234x337 1259x283x362
Packing (W x D x H) 1155x415x318 1340x450x383
Net / Gross Weight kg 13.2/17.1 19.0/24.7
Operating Range Cooling
°C
16 ~ 32
Heating
0 ~ 30
Outdoor Unit Model No. HONRTX70 HONRTX80 HONRTX90
Sound Power Level
dB(A)
69.6 69.1 68.3
Sound Pressure Level @ 1m 61 59.5
Dimensions Dimension (W x D x H)
mm
890x342x673 946x410x810
Packing (W x D x H) 1030x438x750 1090x500x965
Net / Gross Weight kg 43.8/47.2 60.3/64.6
Refrigerant (R32) Charged Volume
kg
1.4 2.20
Pipe Size: Liquid / Gas
mm
6.35mm / 15.9mm 9.52mm/15.9mm
Maximum Pipe Length
m
50
Chargeless Length 15
Extra Charge for Lengths >15m
g/m
12
Maximum Vertical Separation
m
25
Ambient Temperature
Limits
Cooling
°C
-15 ~ 50
Heating -15 - 24
Capacities tested in accordance with AS/NZS 3823.2, with 5m interconnecting pipe length. With our policy of continuous improvement, we reserve the right to
change, or discontinue at any time, specications or designs without notice.
SPECIFICATIONS

Rinnai 34 TX Series Split AC IM
NOTES

Rinnai 35 TX Series Split AC IM
NOTES

Rinnai 36 TX Series Split AC – IM – Issue 3 – May 2026
CONTACTS
Rinnai Australia Pty Ltd
ABN 74 005 138 769 | AU45204
82-88 Mills Road, Braeside, Victoria, 3195
P.O. Box 460, Braeside, Victoria, 3195
Tel: (03) 9271 6625
Customer Support
Tel: 1300 555 545*
Monday to Friday, 8.00 am to 5.00 pm EST.
*Cost of a local call may be higher from a mobile phone.
(National calls from public phones in Australia are free.)
For further information visit www.rinnai.com.au
or email [email protected]
Rinnai has a Service and Spare Parts network with
personnel who are fully trained and equipped to give
the best service on your Rinnai appliance. If your
appliance requires service, please call Customer
Support. Rinnai recommends that this appliance be
serviced once a year.
With our policy of continuous improvement, we
reserve the right to change, or discontinue at any time,
specifications or designs without notice.