Health & Safety, Use & Care, Installation Guide and
Online Warranty Registration Information
Model :
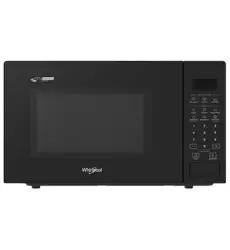
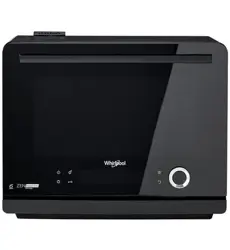
MWP329TBA, MWP329TSA, MWP329TMA
www.whirlpool.com.au
www.whirlpool.co.nz

Troubleshooting 55-56
Product Specications 57
Page
Page
Table of Contents
General Preparation and Advice
before Use
Operation Instructions
■
■
Cleaning and Maintenance
■
Others
■
Important Safety Information 1
Precautions before First Use 1
Precautions and Advice 1-2
Mounting the Appliance 3
Earthing Instructions 3
Appliance and Accessories Chart 4-5
Water tank and drip tray 6
Control Panel 6
Control Panel – Basic Functions 7
Control Panel – Major Features 8
Control Panel – Description of Major Features 9-11
Use and Cooking Tips 12
Recommended Recipes 13-14
Setting the Clock 15
Microwave Mode 16
Steam Mode 17
Steam + Microwave Mode 18
Upper Grill Mode 19
Upper Grill + Microwave Mode 20
Bottom Grill Mode 21
Conventional Bake Mode 22
Conventional Bake + Microwave Mode 23
Convection Mode 24
Turbo Convection Mode 25
Turbo Convection + Microwave Mode 26
Convection + Steam Mode 27
Convection + Steam + Microwave Mode 28
Page
Page
Keep Warm Mode 29
Drying Fruit Mode 30
Slow Cook Mode 31
Proving Mode 32
Bread Reheat Mode 33
Defrost Mode 34
Preheat Mode 35-36
Air Fry Mode 37
Cavity Drying Mode 38
Descaling Mode 39-40
DIY Cooking 41-42
Adjust or Increase the Cooking Time 43-44
during / After Cooking is Completed
Preset Function 45-46
Auto Menu 47-50
Residual Heat Indicator 51
Child Lock 51
Page
Cleaning and Maintenance 52-54

1
General Preparation and Advice
Before Use
1. Stop using the steam microwave oven and contact
Whirlpool Customer Service immediately if the
door or door seal is damaged.
2. If the power cord is damaged, it must be replaced
by the manufacturer, its service agent or similarly
qualified persons in order to avoid a hazard.
3. To avoid fire hazard or explosion, do not heat or
use flammable materials in or near the appliance.
4. To avoid fire hazard, do not use the appliance to
dry cloth, paper, spices, herbs, wood, flowers or
other flammable objects.
5. Overcooking food poses a fire hazard.
6. Never leave the appliance unattended during use,
particularly when cooking with paper, plastic or
other flammable materials. Paper may catch fire
or get burned and some plastic materials may
melt when heating up food with the appliance.
If any object inside or outside the appliance is
ignited or emits smoke, close the appliance door
and switch off the combi steamer. Disconnect the
power supply and the socket with circuit leakage
breaker.
7. This steam microwave oven is specically designed
to heat or cook food. It is not designed for industrial
or laboratory used.
8. Children should be supervised to ensure that they
do not play with the appliance.
9. This steam microwave oven is not intended for
use by persons (including children) with reduced
physical, sensory or mental capabilities, or lack of
experience and knowledge, unless under supervision
or instruction of a person responsible for their
safety.
12. Use heat resistant utensils for cooking, such as heat
resistant glass and heat resistant plastic. Non-heat
resistant containers should not be used with steam
microwave oven. For steaming functions, container
with heat resistant > 120°C should be used. For
convection functions, container with heat resistant
> 250°C should be used.
13. Odour will be emitted from the cavity when using
dierent baking functions for the rst time. It is normal.
This manual contains important information on safety,
use and maintenance of the product. Please read the
manual carefully and keep it in an easily accessible
place for future reference.
1. Two or more people are required to install or move
this appliance as it is heavy. It must be securely
placed on a rm and level surface. Failure to do so
can cause physical injuries or damage to the appliance.
2. This appliance is designed solely for indoor and
domestic use. Follow the cooking instructions
indicated in the manual. Do not use this appliance
for outdoor, commercial or any other purposes.
3. Check that the voltage on the rating label corresponds
to the voltage in your home.
4. Ensure that the appliance is not damaged. Do not
operate the appliance if it has a damaged mains
cord or plug. If it is not working properly, or it has
been damaged or dropped. Please contact Whirlpool
Customer Services.
5. Do not immense the power cord or plug in water.
Keep the power cord away from hot surfaces to
avoid electrical shock, fire or other accidents.
6. This steam microwave oven is designed for free
standing installation. Do not install as a built-in
appliance.
7. Allow adequate ventilation space on all sides and
do not place any object on top. Keep a minimum
distance of 5cm between the steam microwave
oven and any overhead wall cabinet; and a minimum
distance of 1cm between both sides of the appliance
and the walls.
8. To avoid damage to the appliance, do not block the
ventilation vent.
9. Run the “Steam mode” at 110°C for 30 minutes to
clean and sterilize the combi steamer before rst use.
10. The manufacturer disclaims all liability for faults
arising from improper use of this appliance.
11. Steam is emitted from the top ventilation vent.
Blocking the outlets will result in damage to the
steam microwave oven.
Important Safety Information
■
Precautions and Advice
■
Precautions before First Use
■

2
General Preparation and Advice
Before Use
24. If it is necessary to open the oven door to turn the
food or for other purposes during cooking, keep a
distance from the oven door (particularly the face)
to prevent scalding.
25. All maintenance and repairs should be carried out
by similarly qualified person. It is dangerous to fix
the appliance by anyone except similarly qualified
person. Never dismantle, repair or modify the appliance
by yourself.
26. Accessible parts of the appliance may become hot
during use. Young children should be kept away.
27. When steam microwave oven is plugged, never touch
the appliance, the power cord or plug with wet hands
or other wet body parts.
28. Do not place or hang any objects on the oven door or
the door handle. It may aect door’s opening and
closing or damage the door hinges.
29. After cooking ends, the electric fan will continue running
for a certain period of time to cool down the cavity.
30. The steam microwave oven and its parts should be
kept clean. Failure to do so will result in deterioration
of the appliance surface and aect its life cycle. It may
also cause danger.
31. Remove the power supply plug before cleaning. Do
not use corrosive cleaners as they may cause damage
or corrosion.
32. Water in the water tank will be heated up and
discharged to the drip tray during “Descaling Mode”.
Do not allow children to touch or go near the combi
steamer.
33. Clean dust from the power supply plug on a regular
basis. If the product will not be used for a long time,
remove the power supply cord. Do not pull the power
supply cord but hold the plug to remove it.
34. Never leave the steam microwave oven in operation
unattended.
35. Overheated fat and oil catch re easily. Except grilling
meat, heating oil during cooking is dangerous. Such
practice should never be allowed.
36. Maximum load for the oven door is 7kg. To avoid
damaging the steam microwave oven, do not place
food or heavy objects on the oven door.
10. After cooking, clean the steam microwave oven
only when it has completely cooled down. Wipe
away any food debris or waste inside the oven.
Top of the oven cavity gets burned easily and care
should be taken to keep it clean. For best cooking
results, keep the combi steamer completely dry by
opening the door every time after cooking.
11. Use oven gloves to take food and containers out of
the appliance to avoid burning.
12. To avoid a hazard, do not touch the upper heater in
the oven when using the appliance.
13. Do not use the steam microwave oven for storage.
14. After heating food or beverages in nursing bottles
or infant food cans, always stir and check the
temperature before serving. This will ensure that
heat is evenly distributed and the risk of scalding or
burns can be avoided.
15. Wait 10-15 minutes after each program before
continuing to another mode.
16. Steam will be rapid evaporated and not easily be
seen if the oven cavity at the high temperature or
just finished all convection modes. It is normal.
17. Do not touch the door and door frame when using
the appliance.
18. Fill the water tank with tap water, drinking water
or distilled water up to the MAX mark (maximum
level). Insert the water tank into the appliance
completely.
19. If the water tank is cracked or damaged, stop using it
to avoid power leakage or electrical shock caused
by water leakage.
20. For hygienic reasons and prevent condensation
inside the combi steamer. Empty the water tank
and keep the combi steamer completely dry every
time after cooking.
21. If the water tank is cracked or damaged, stop using it
to avoid power leakage or electrical shock caused
by water leakage.
22. Do not fill the water tank with any liquids other than
water (except descaler).
23. To avoid condensation and oven temperature
drops, do not open the oven door when cooking
with “Steam” mode unless it is absolutely necessary.
If you have opened the oven door, extend the cooking
time accordingly.
3
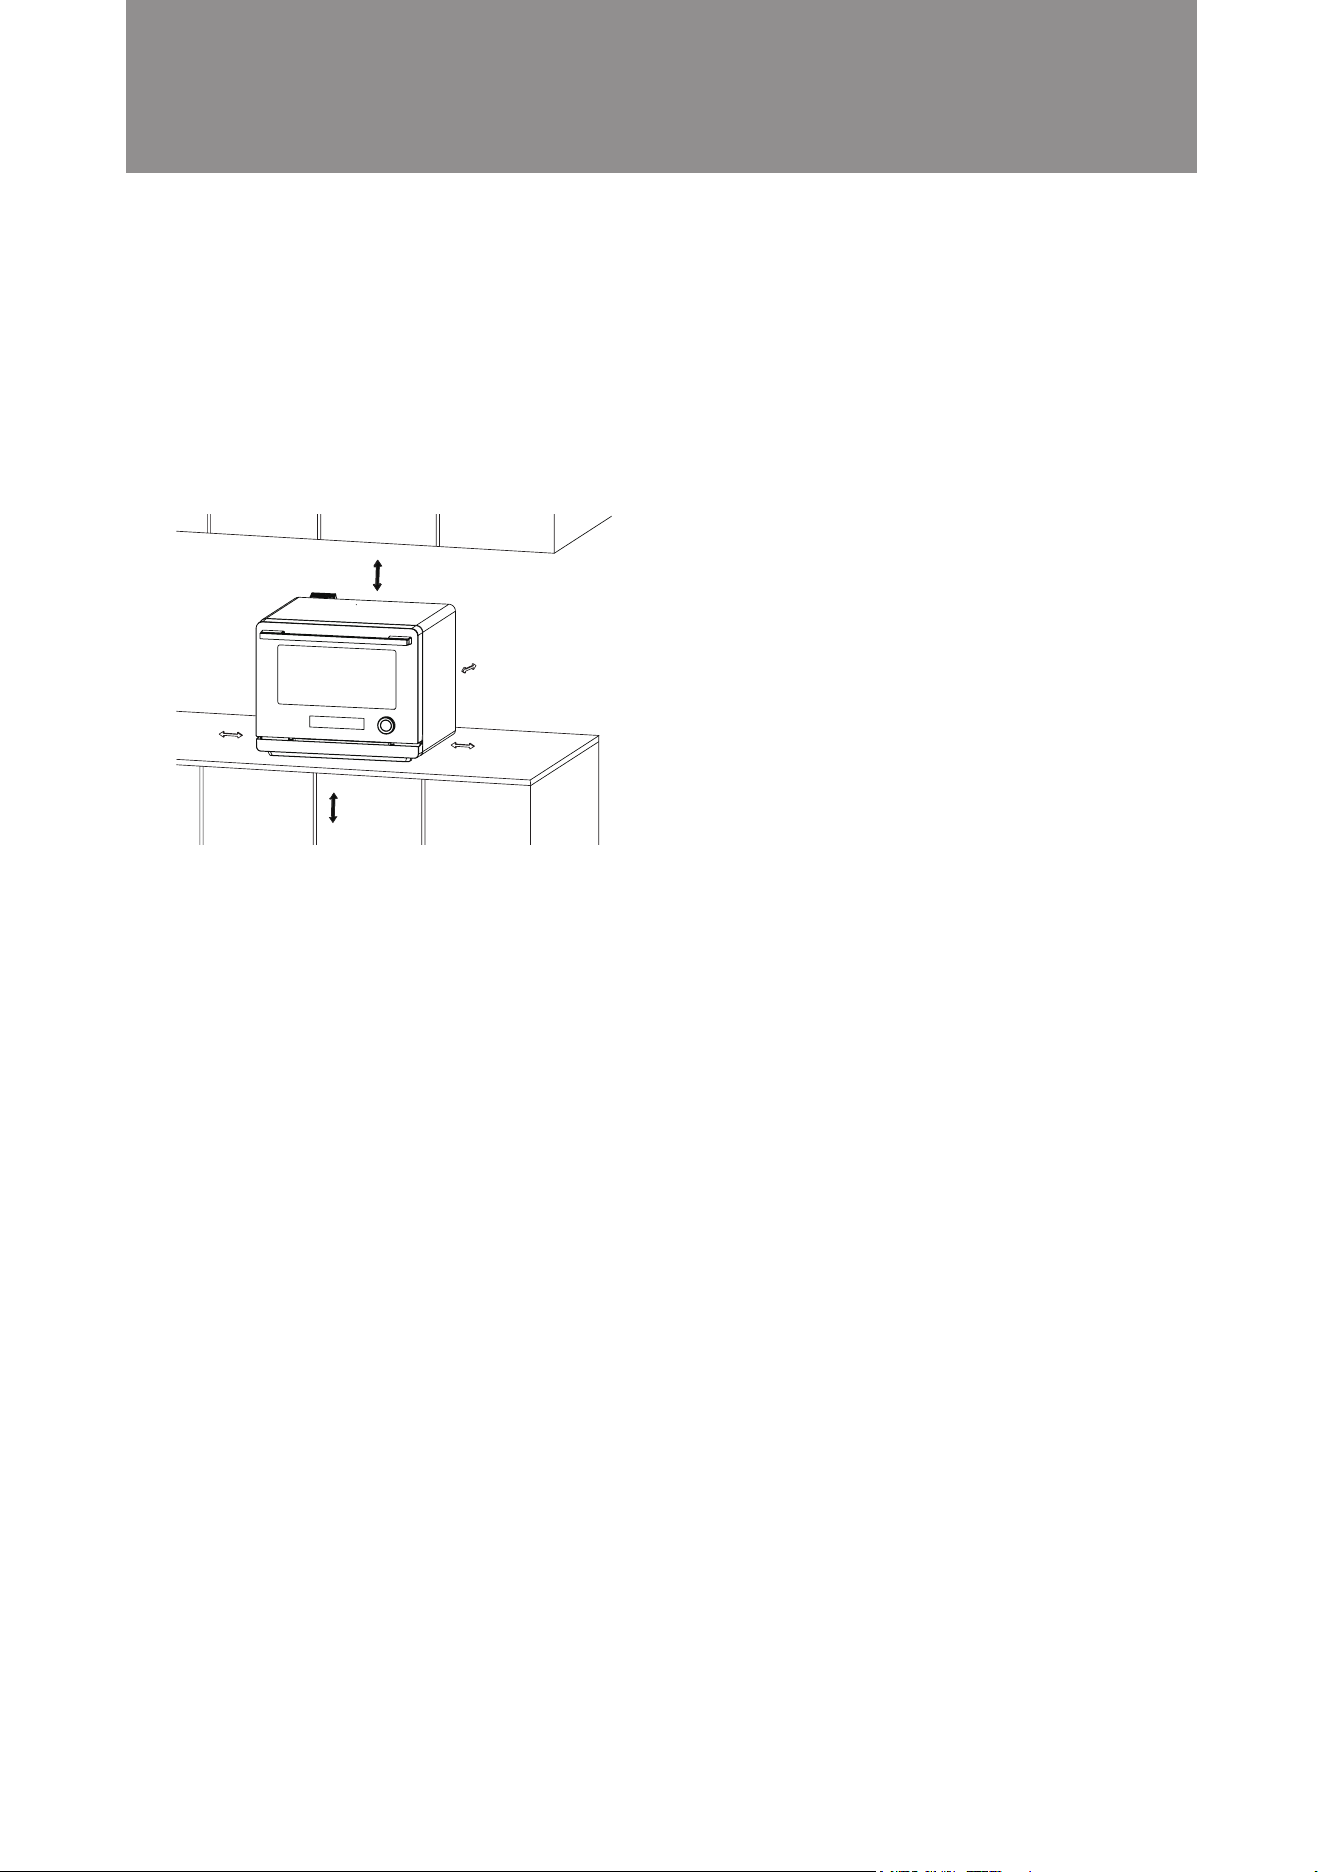
General Preparation and Advice
Before Use
1. Good ventilation must be ensured around the steam
microwave oven. Do not place any objects on top
of the appliance and allow a minimum distance of
30 cm between the microwave steam oven and any
overhead wall cabinet. Keep a minimum distance of
5 cm between both sides of the appliance and walls.
Appliance back can be closed to the wall.
2. To prevent fire, do not block the air outlet and steam
outlet. Maintain the product regularly and prevent
foreign matter and dust from blocking the air outlet
and steam outlet.
3. Do not put the appliance in a hot or humid place, such
as gas stove, electrified areas or sink.
4. This appliance must be placed on a firm and stable
surface.
This appliance must be earthed. In case of electric
leakage, the ground can provide a current loop to avoid
electric shock. Thepower supply plug that comes with
this appliance must be inserted into a single-phase-
bipolar socket with grounding.
Mounting the Appliance
■
Earthing Instructions
■
30cm
0cm
5cm
85cm
or above
5cm
4
General Preparation and Advice
Before Use
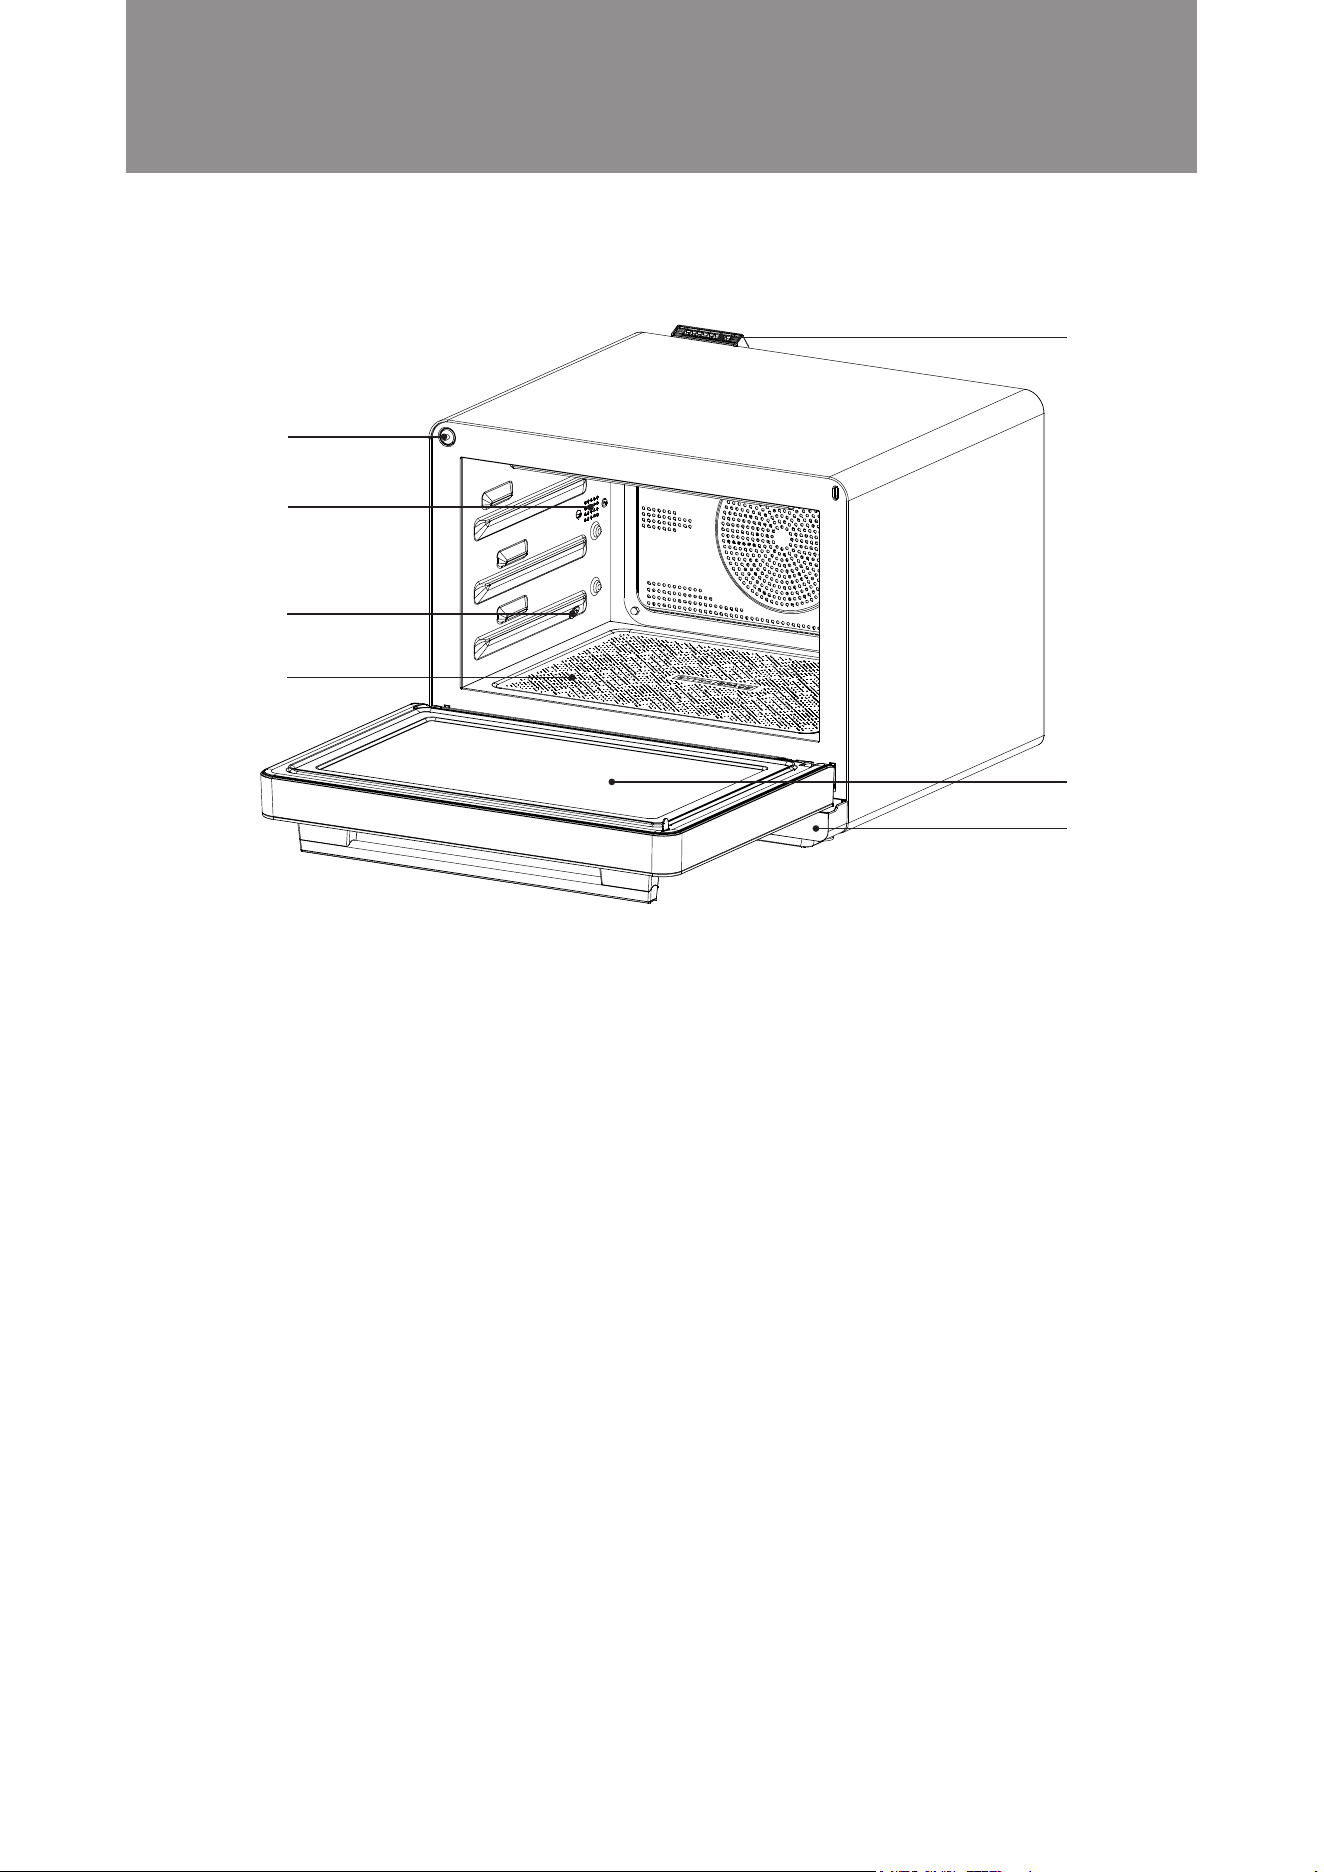
● Air Outlet: To exhaust excessive steam from the cavity
● Steam Exhaust: To discharge excess steam from the cavity
● Steam Inlet: To release steam into the cavity
● Oven Door:
1. Make sure the door is closed before starting to cook.
2. The microwave steam oven will pause if you open the oven door during cooking.
The selected mode will continue automatically once the door is closed.
● Drip Tray: To collect excess water when the door is open.
● Door Sensor: To sense the door closed.
● Glass bottom: Place the container with food on the glass bottom directly when
using microwave function to cook.
Door Sensor
Steam Exhaust
Steam Inlet
Glass bottom
Oven Door
Drip Tray
Air Outlet
Appliance and Accessories Chart
■
5
General Preparation and Advice
Before Use
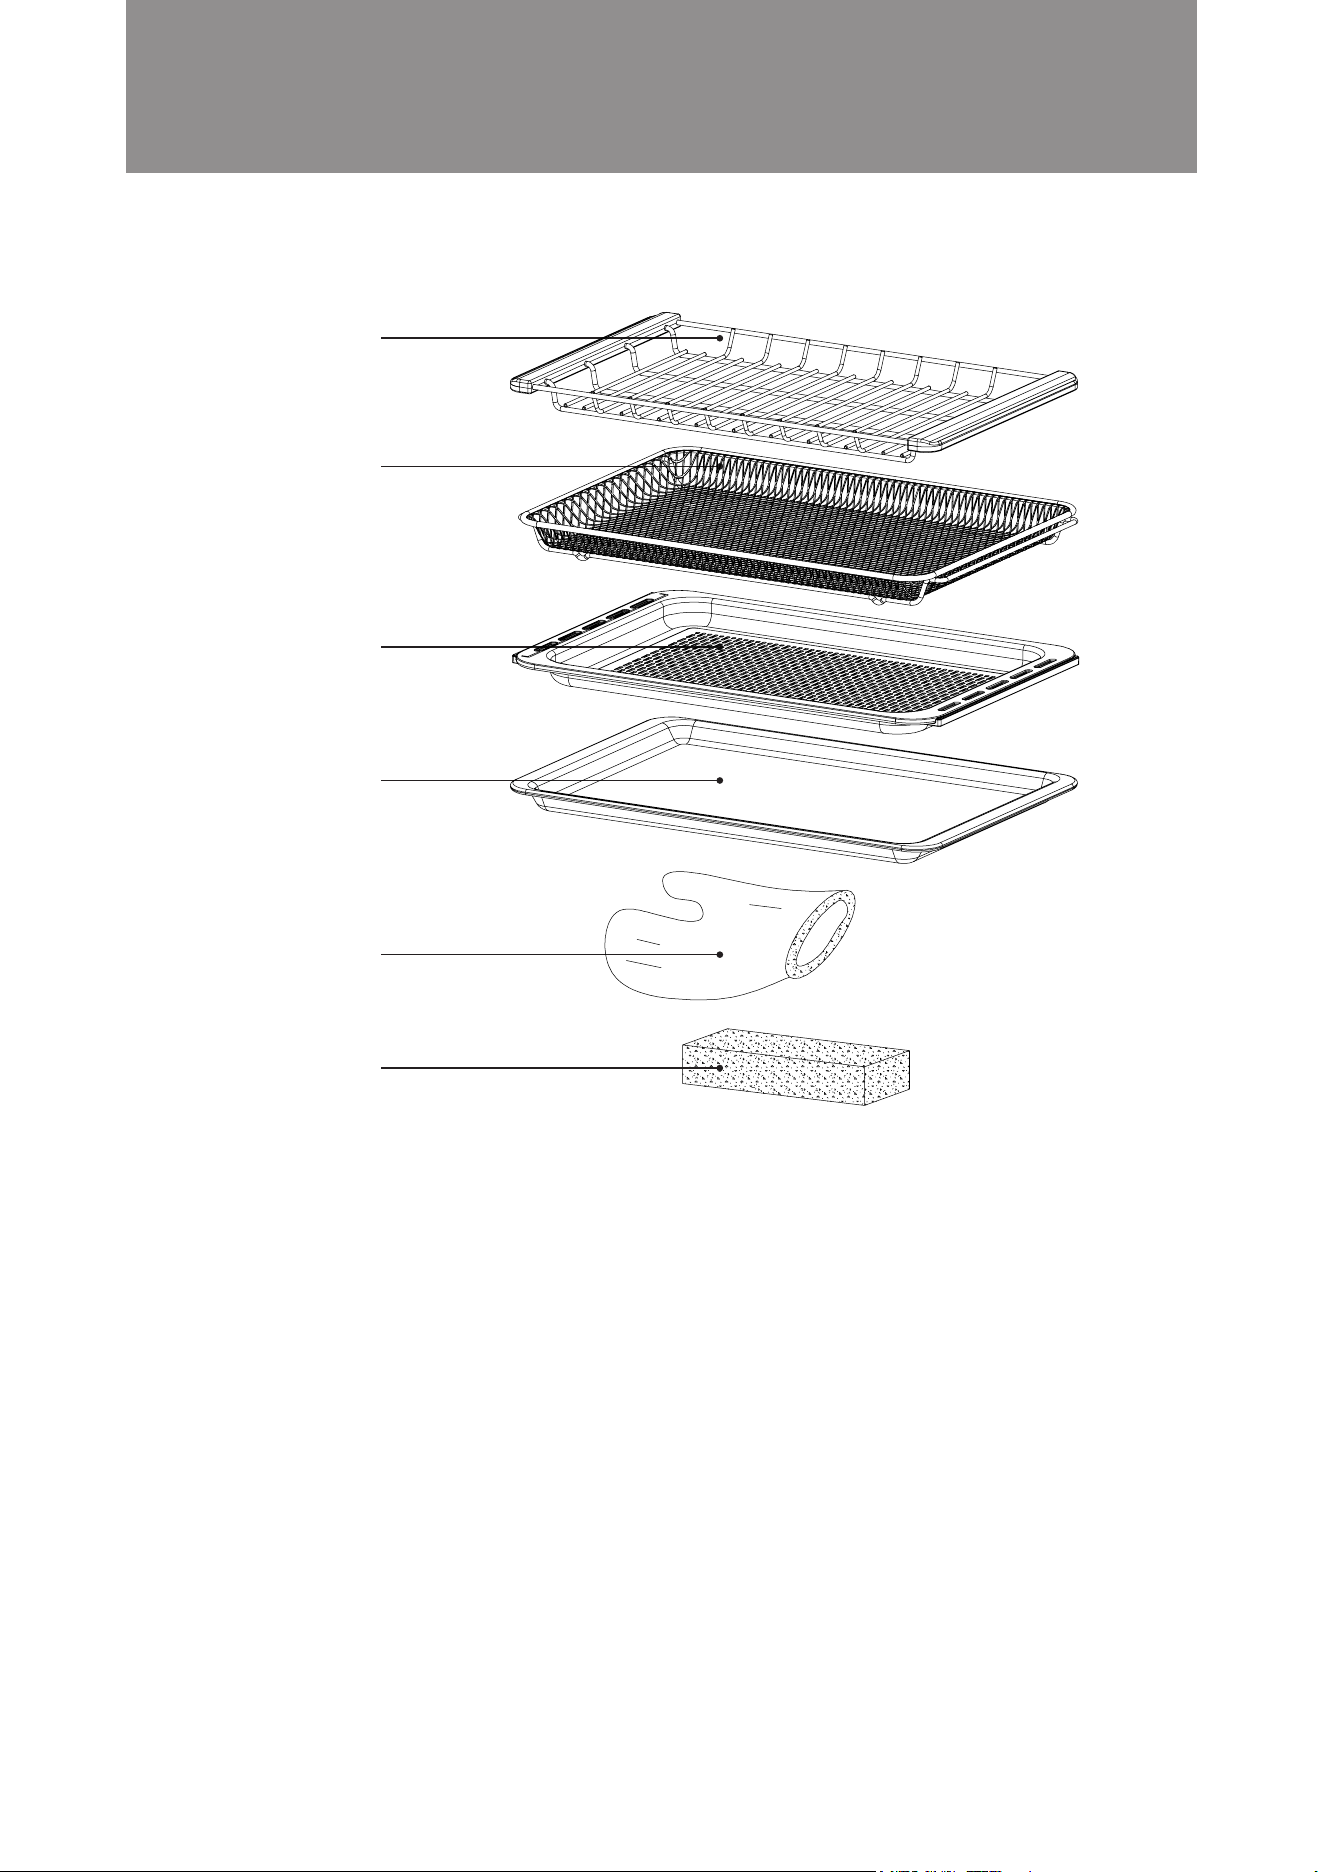
Grill Rack
Air Fry Basket
Steam Tray
(with holes)
Baking Tray
(oil collector)
Insulated gloves
Sponge
1. Grill Rack
Mainly for modes that cook with the heater, such as “Grill”, “Convection” or “Forced Air” modes.
2. Air Fry Basket
For use under “Air Fry” mode. Do not use it for cooking mode with microwave.
3. Steam Tray (with holes)
Mainly for the “Steam” mode. Designed with vent holes, it can also be used for other cooking
modes.
4. Baking Tray (oil collector)
Mainly for the “Forced Air + Steam”, “Convection + Steam” or “Forced Air” mode. It can also be
placed at the bottom level to collect dripping oil when cooking meat.
5. Insulated gloves
To take food or rack out from the microwave steam oven.
6. Sponge
To remove condensation inside the oven.
6
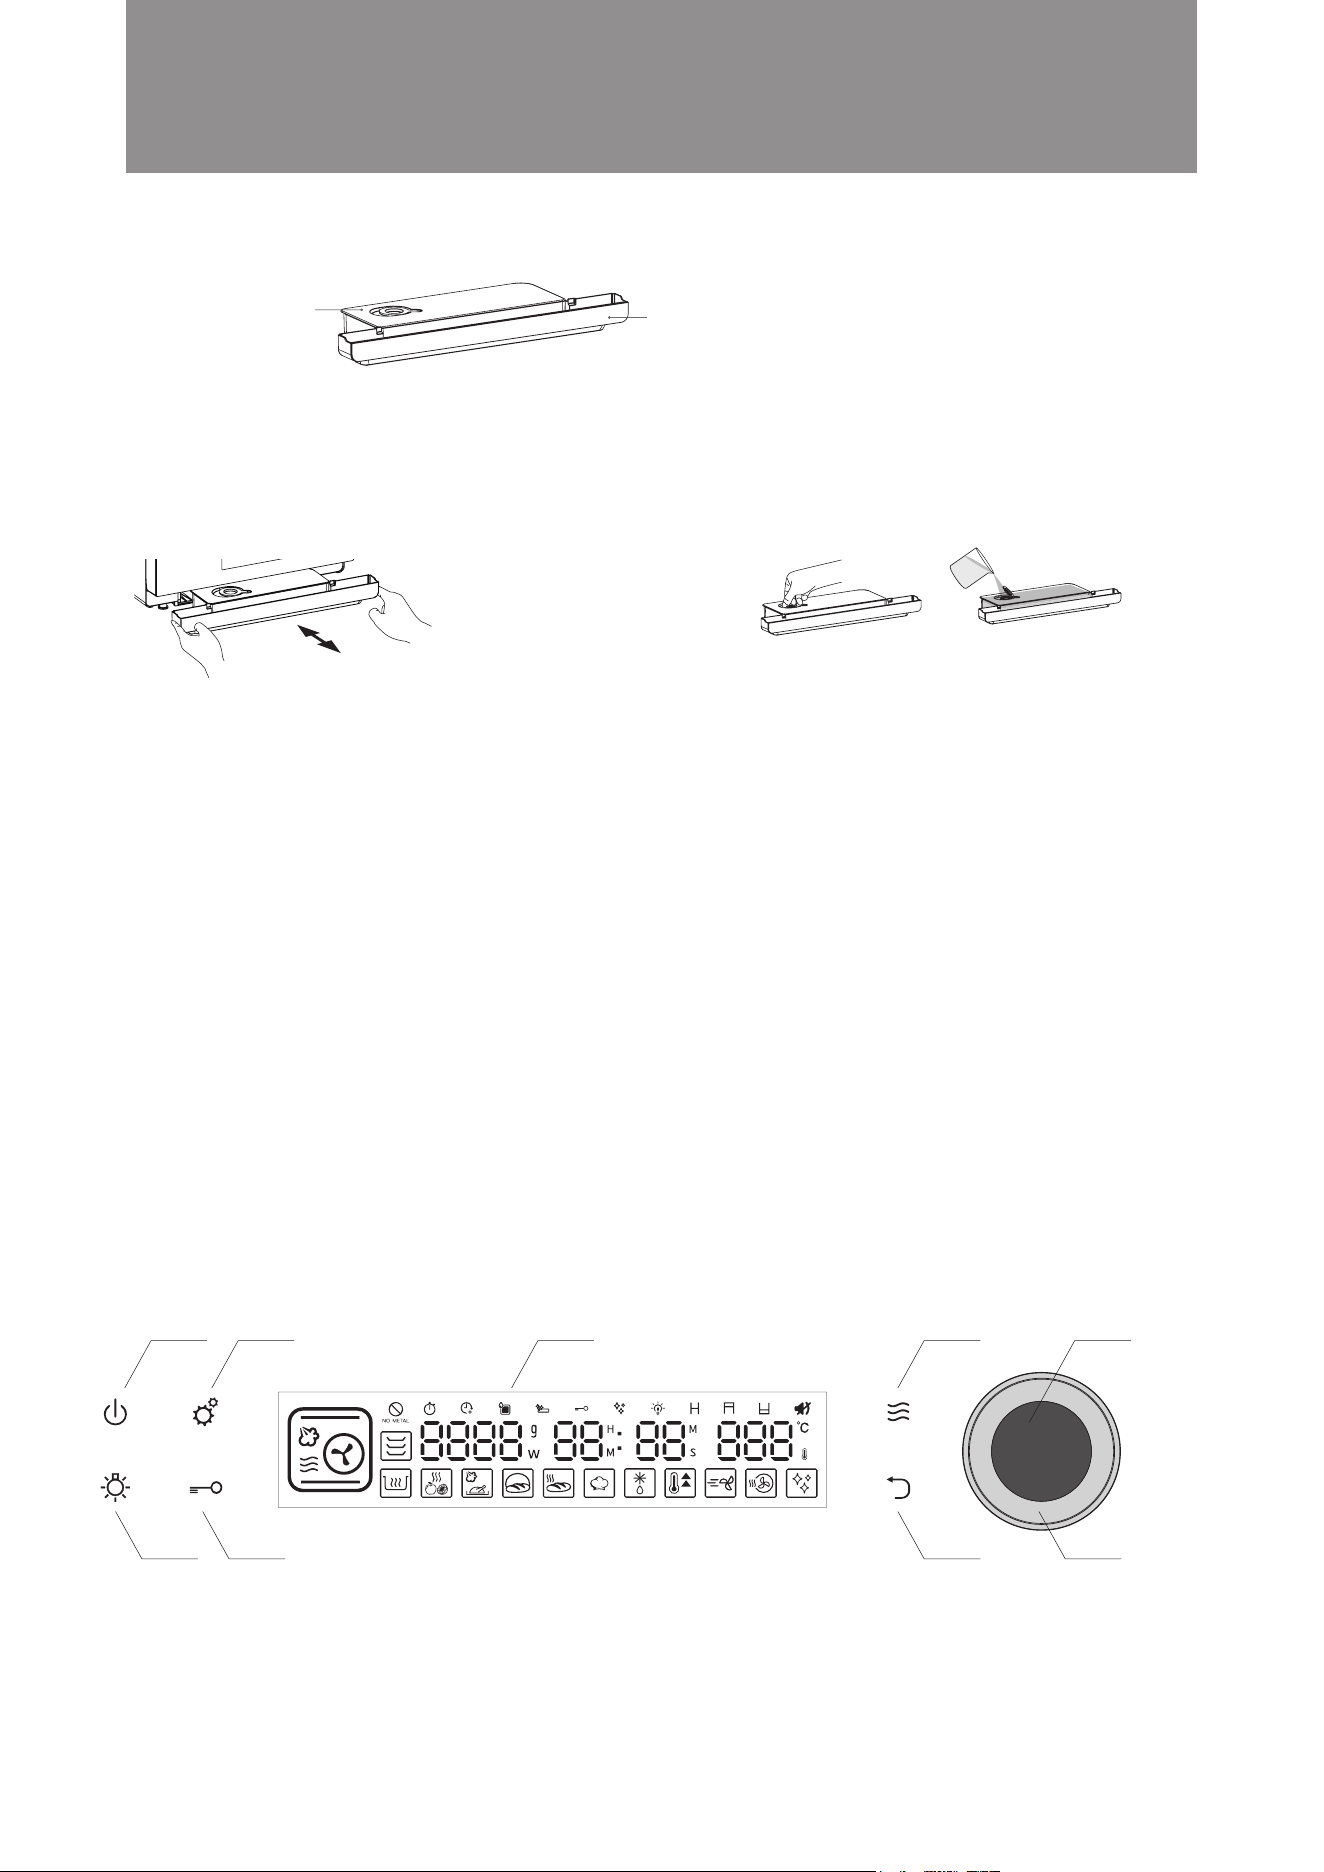
Water tank:
holds clean water
to produce steam
Drip tray: collect excess water
when the door is open.
Installation:
Removing / installation method
Water tank may contain remaining water, please
be careful when taking it out.
When installing, make sure the water tank cover
is closed tightly, push the water tank all the way
in, and ensure the water tank is installed in place;
Tilt may cause water to overow, please keep it
horizontal at all times.
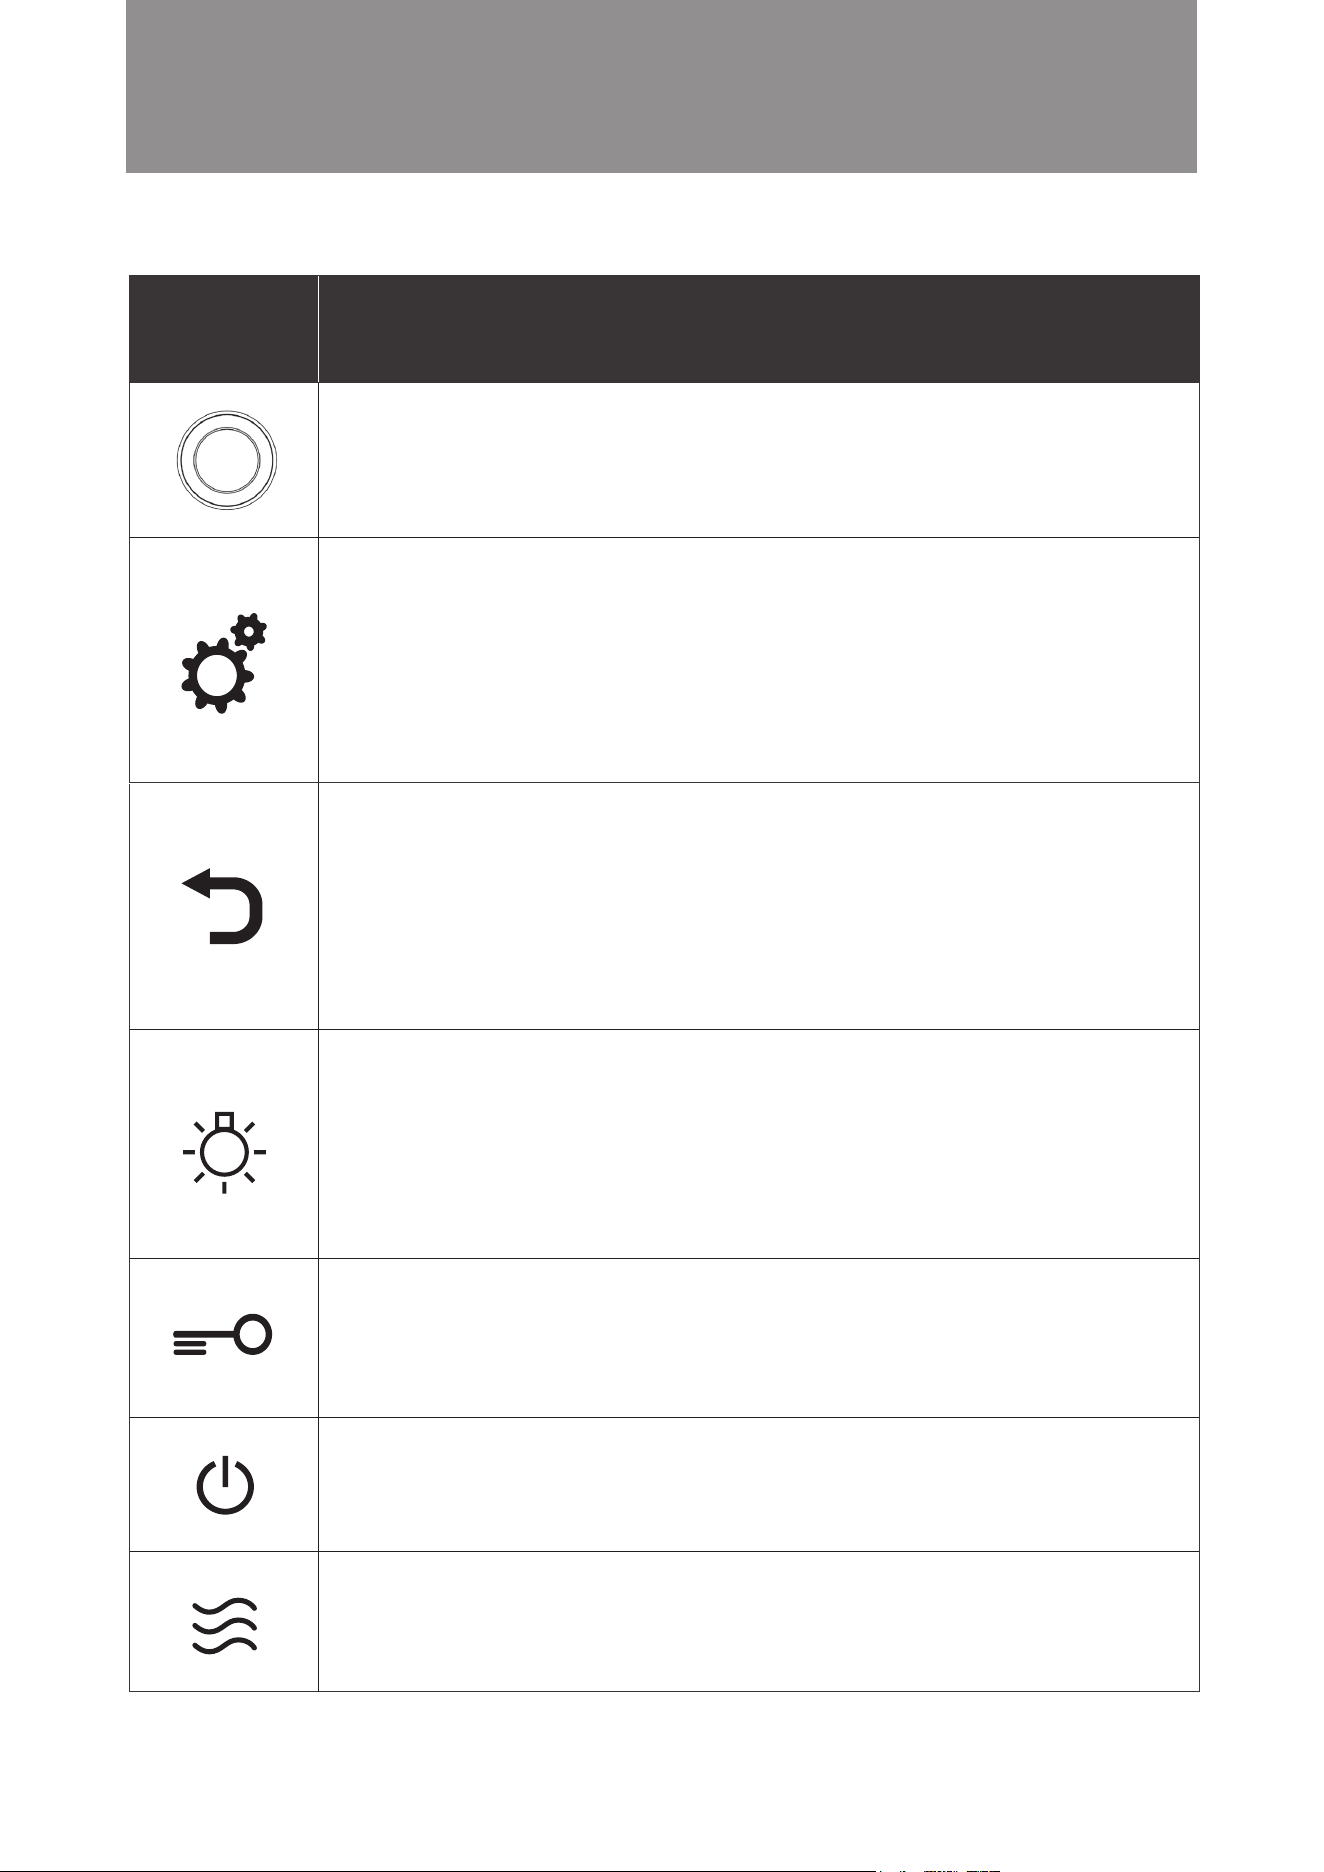
LED Display Panel
Microwave Function
Shortcut Button
Return Button
Power Button Setting Button
Notice!
● For rst time use or when you have not use steam function to cook for a long time, please clean by
running the steam mode (110°C) before cooking;
● Please clean the water tank and drip tray from time to time;
● Please use pure water or distilled water for cooking, otherwise scale deposit may occur;
● When using steam function to cook, be sure to ll the water tank with water and ensure the water
tank is properly installed. If there is too little water or the water tank is not installed properly, “please
add water” icon will appear and prompt during steam cooking and cooking will be suspended.
How to ll water:
Before using steam cooking, please
open the round silicone lid and pour
clean water or distilled water until the
water tank is full.
Oven Light
Button
Child Lock Button
Rotary Knob
Function / Time /
Temperature Settings
Rotary Knob Button
Confirm / Start /
Pause Settings
General Preparation and Advice
Before Use
Water tank and drip tray
Control Panel
■
■
7
General Preparation and Advice
Before Use
Icon Function Descriptions
Setting/ Auto Menu Button
1. Under Standby mode, press once to enter auto menu function and select recipe;
2. Under Standby mode, hold the setting button for 3 seconds to enter clock setting;
3. Under “DIY function”, press setting button to enter next cooking function setting;
4. While setting cooking time/ temperature, hold the setting button for 3 seconds to enter “Preset
function”
5. When cooking in progress, hold the setting button for 3 seconds to check cavity actual temperature
6. In pause mode, press setting button to adjust cooking time and temperature
Return Button
1. Return / Reset;
2. Press the return button during setting to go back to the previous screen or reset cooking modes or
cooking time.
3. Mute Mode
To activate mute mode: In standby mode, press and hold the button for 3 seconds to activate the
mute mode. The mute icon lights up on the display panel.
To release mute mode: In standby mode, press and hold the return button for 3 seconds while it is
activated.
Oven Light Button
1. Touch once to switch the light on for 3 minutes. The oven light icon will not light up on the display
panel.
2. During cooking in process, press and hold for 3 seconds, the oven light will stay on. The oven light
icon will light up on the display panel. Press and hold for 3 seconds again to switch o the oven light.
3. At standby mode, press and hold for 3 seconds, the oven light will stay on for 5 minutes. The oven
light icon will light up on the display panel. If there is no operation in 5 minutes, the oven will switch
to standby mode, oven light will be switched o automatically.
4. The oven light will light up for 3 minutes when the door is open.
Child Lock Button
Press and hold the button for 3 seconds to activate / release the child lock.
To activate child lock: Press and hold the button for 3 seconds. The control panel will be locked and no
operation is possible. The child lock icon lights up on the display panel.
To release child lock: To release, press and hold the child lock button for 3 seconds while it is activated.
Microwave Shortcut Button
1. Press the microwave shortcut button to enter microwave function setting under standby mode or
other setting mode
2. Press and hold the microwave shortcut button for 3 seconds for Jet Start function ( cook 30 seconds
with full power microwave)
Power Button
After 5 minutes without operation after activate the combi steamer, including opening or closing the
oven door. Combi steamer will automatically enter to power-saving mode, display panel goes out. In
power-saving mode, only power button is operable.To release child lock: To release, press and hold
the child lock button for 3 seconds while it is activated.
Control Panel – Basic Functions
■
Rotary Knob
Function / Time / Temperature Settings
Rotary Knob Button
Conrm / Start / Pause Settings
8
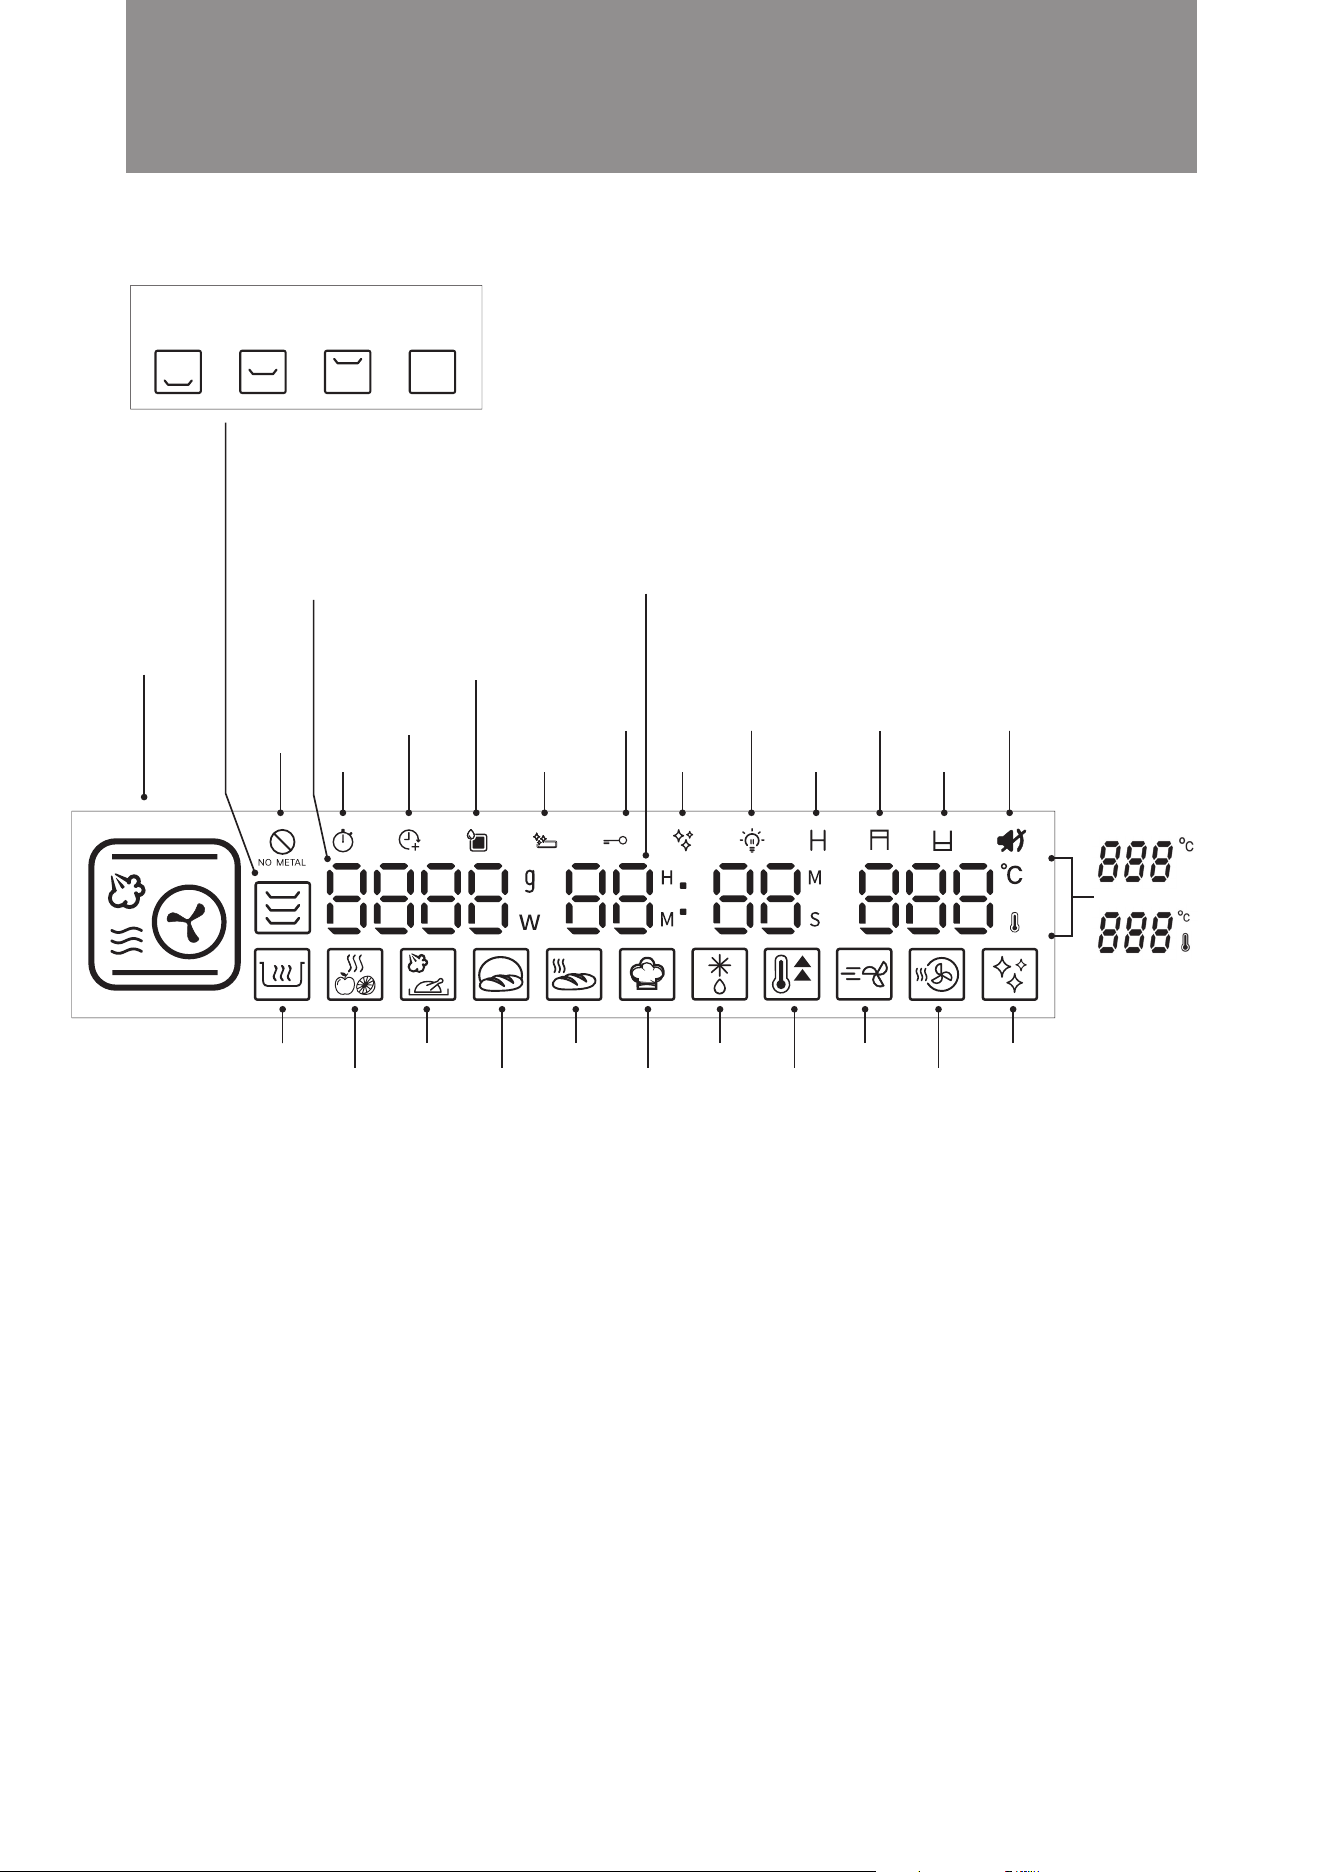
General Preparation and Advice
Before Use
Microwave Power/ Auto Menu/
Defrost food weight
Clock and Time
Clock: Clock is displayed in
standby: 24-hour clock
Display range: 00:00–23:59
Time: The duration of cooking time
Adjustable range: 00:05–12:59
12 Mainly Cooking
Modes
(For details see full
instructions in the
“Control Panel –
Description of Major
Features” section)
Water Tank Icon
This icon lights up when there
is water in the water tank.
Flashing icon indicates that
water tank is empty.
Temperature Setting
Adjustment range:
30°C - 230°C
Actual Temperature
Setting
This indicates the
actual oven temperature
during cooking.
When changed to this
temperature display,
the thermostat icon
lights up.
Preset
Function
Drip Tray Cleaning
Reminder
Descaling
Reminder
Residual Heat
Warning
Child Lock Oven Light
Extended
Cooking
Time
Do not use
metal
containers
Upper Grill Mute Mode
Bottom Grill
Proving
Mode
Defrost
Mode
Bread
Reheat
Mode
Drying
Fruit
Mode
Preheat
Mode
Cavity
Drying
Mode
DIY
Cooking
Mode
Keep Warm
Mode
Slow Cook
Mode
Air Fry
Mode
Descaling
Mode
Accessory location:
bottom layer middle layer top layer cavity bottom
Control Panel – Major Features
■
9
General Preparation and Advice
Before Use
Steam +
Microwave
Turbo Convection
Turbo Convection
+ Microwave
Upper Grill
Bottom Grill
Upper Grill +
Microwave
Conventional
Bake
Conventional Bake
+ Microwave
Convection
Steam cooking preserves the
original taste, nutrients and color
of food cooked. Adding microwave
to cooking process can shorten
cooking time. It is suitable for
long hour steaming food, such as,
braising soup and meat.
Suitable for roasting baking - food
or at a final stage of roasting or
baking. It helps browning the surface
of your dish.
Suitable for roasting baking food,
cooking time can be shorten with
microwave.
Suitable for baking the final stage
or for food that needs to be cooked
from the bottom periodically during
cooking. e.g. pizzas, macaroon.
Traditional single-level baking and
grilling mode. Heat is released
from the top and bottom to get
food baked evenly. Suitable for
cooking meat, fish, bread and
cookies, pastries and desserts
etc., and particularly suitable for
cakes with moist ingredients at
the top.
Traditional single-level baking and
grilling mode. Heat is released from
the top and bottom to get food
baked evenly and quickly with
microwave. Suitable for cooking
meat, bread, pastries and desserts
etc.
The upper and bottom heater and
rear fan operate simultaneously in
this mode. Suitable for all baking
dishes, such as meat, seafood,
pizzas, bread and cookies, pastries
and desserts.
Cooking time is shortened in this
mode to bake and roast food quickly.
It is suitable for baking large meat
and cakes.
With microwave support, cooking
time can be shortened further in
this mode to bake and roast food
quickly.
It is suitable for baking large meat.
15 mins / 100°C
25 mins / 110°C
20 mins / 100°C
20 mins / 100°C
30 mins / 180°C
25 mins / 180°C
20 mins / 160°C
25 mins / 180°C
15 mins / 180°C
Time: 5-419 mins
(maximum 6 hours
59 mins)
Temperature:
50-110°C
Time: 5-239 mins
(maximum 3 hours
59 mins)
Temperature:
50-230°C
Time: 5-239 mins
(maximum 3 hours
59 mins)
Temperature:
50-230°C
Time: 5-239 mins
(maximum 3 hours
59 mins)
Temperature:
50-230°C
Time: 5-239 mins
(maximum 3 hours
59 mins)
Temperature:
80-230°C
Time: 5-239 mins
(maximum 3 hours
59 mins)
Temperature:
50-230°C
Time: 5-239 mins
(maximum 3 hours
59 mins)
Temperature: 50-230°C
Time: 5-239 mins
(maximum 3 hours
59 mins)
Temperature: 50-230°C
Time: 5-239 mins
(maximum 3 hours
59 mins)
Temperature: 80-230°C
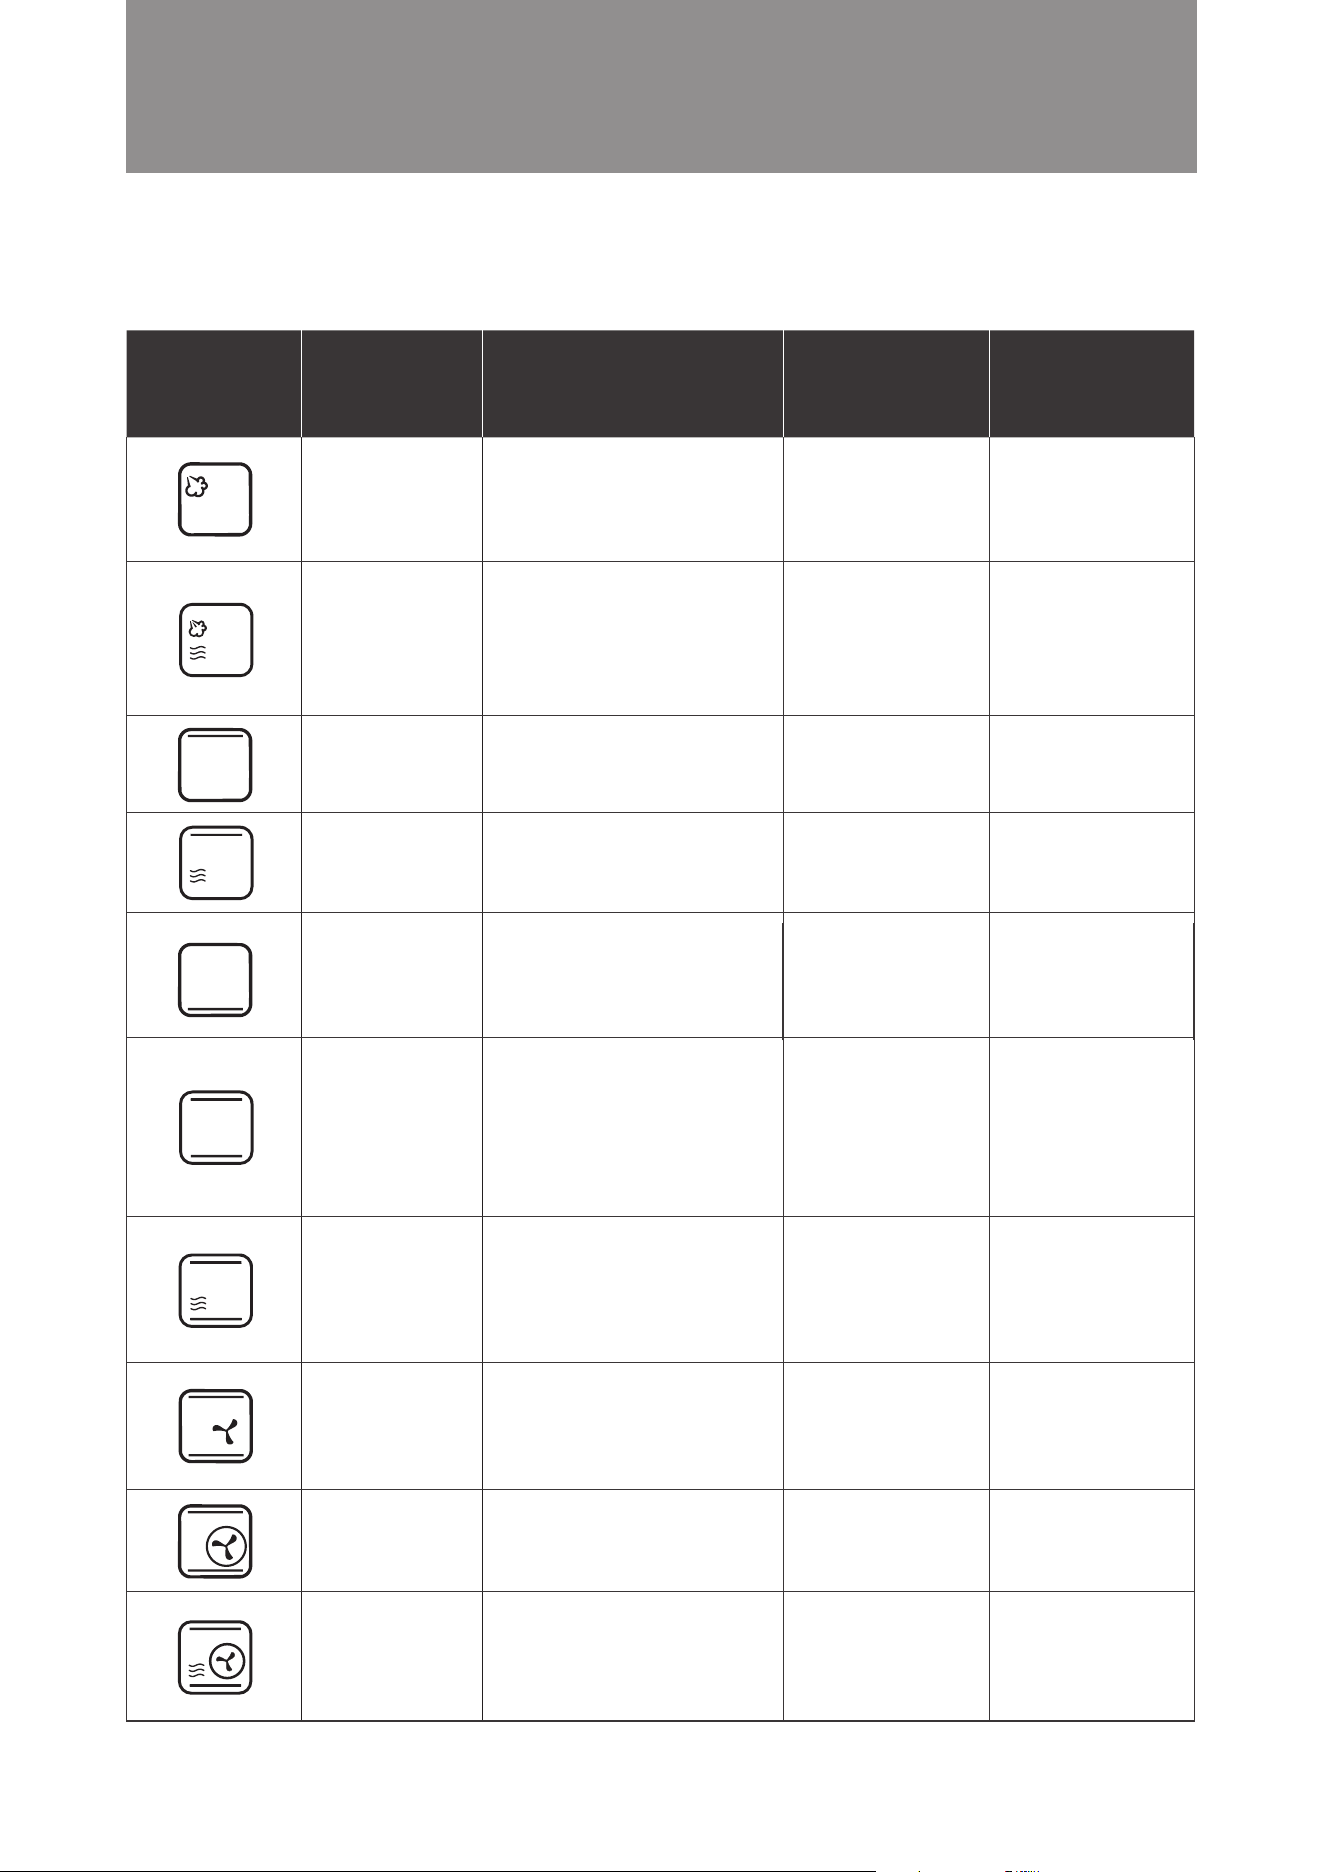
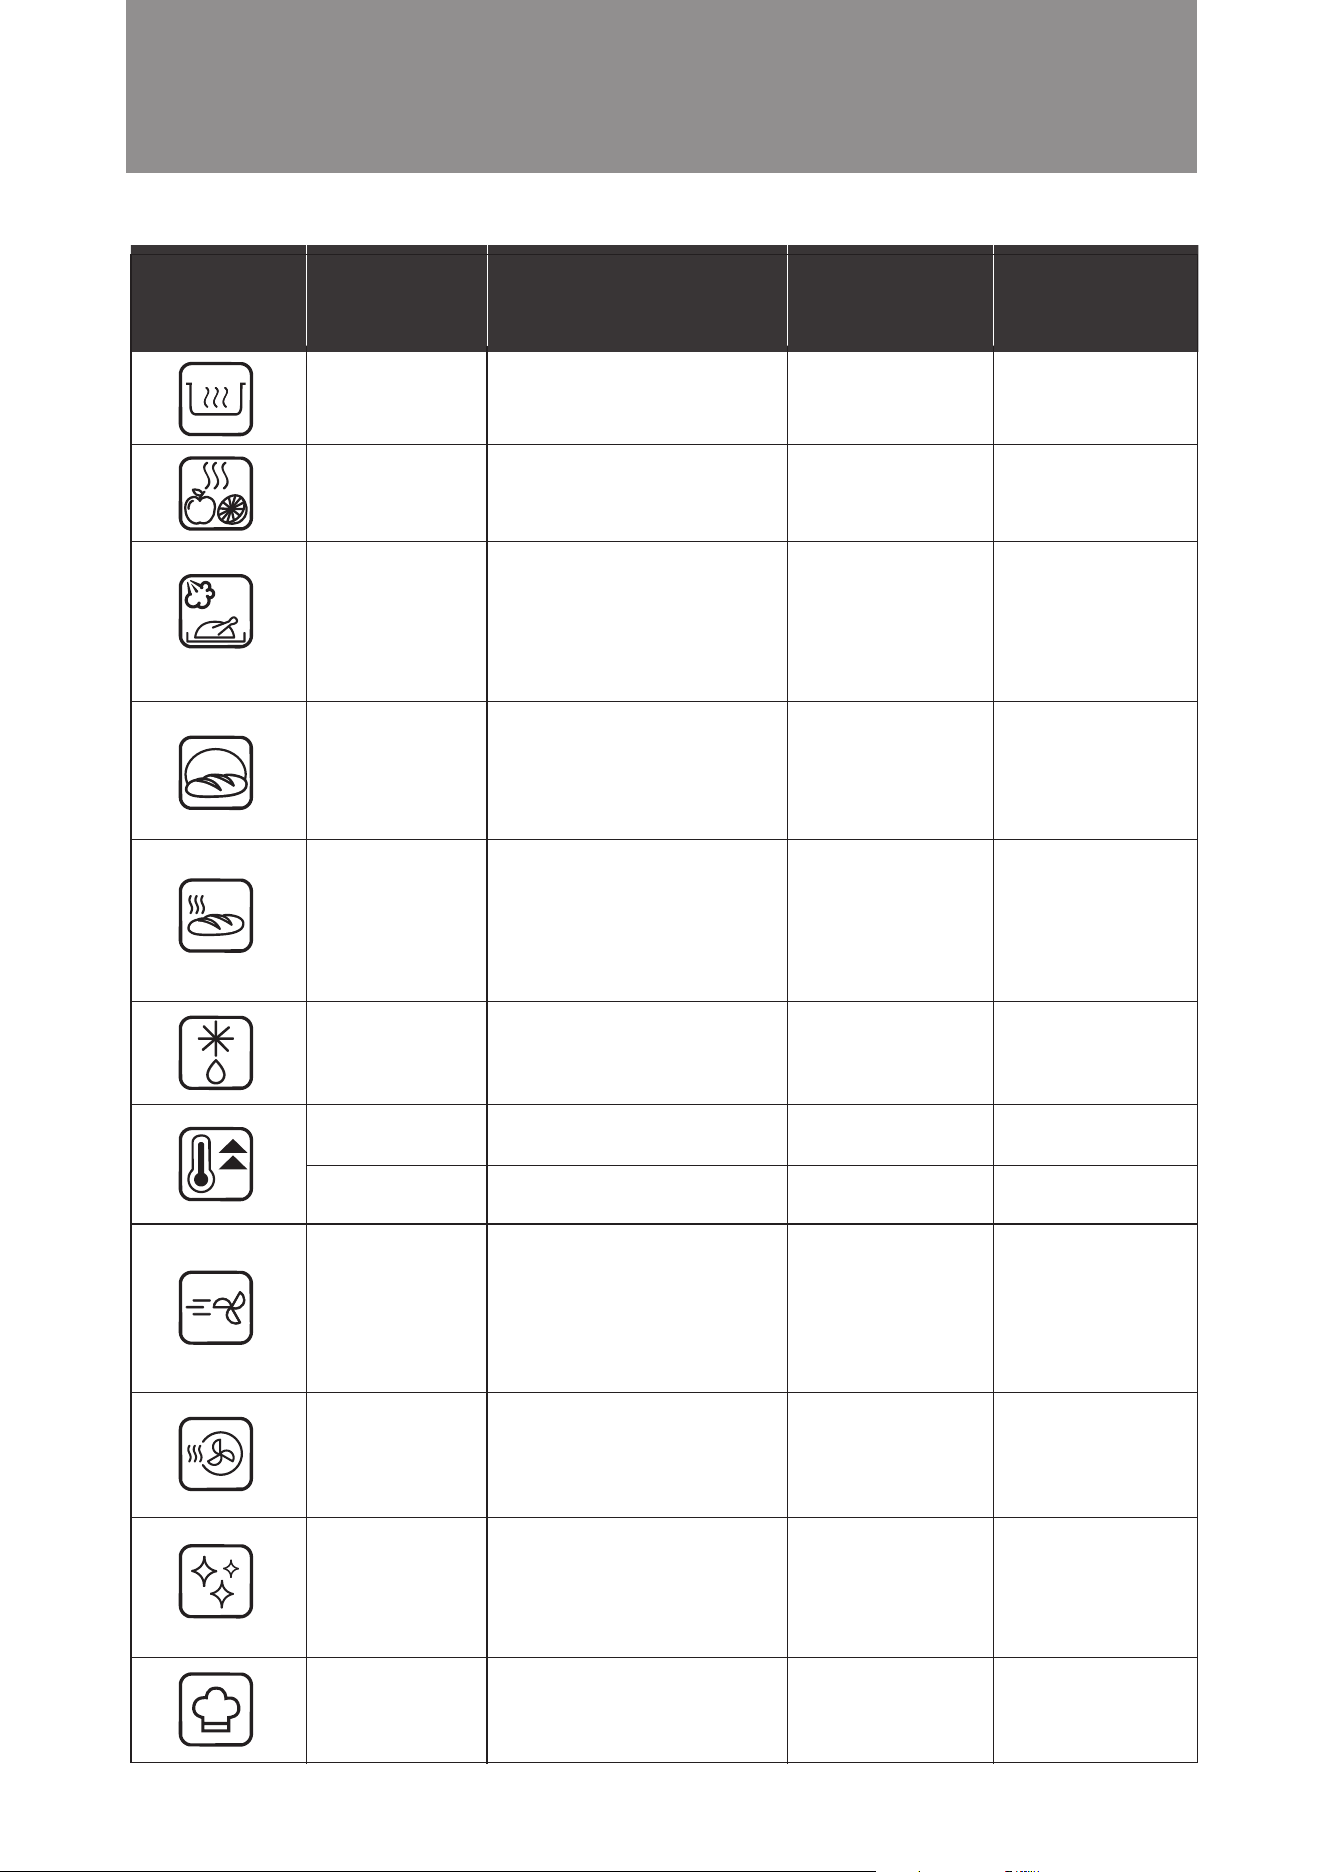
Major Cooking Mode
Control Panel – Description of Major Features
■
Icon Mode
Function
Descriptions
Default Time/
Temperature
Time/
Temperature
Selection
Range
Steam
Steam cooking preserves the
original taste, nutrients and color
of food cooked. It is suitable for
steaming vegetables, meat and
seafood or braising soup.
20 mins / 100°C
Time: 5-419 mins
(maximum 6 hours
59 mins)
Temperature:
50-110°C

10
Convection +
Steam + Microwave
Convection +
Steam
Microwave
This mode combines upper, lower
heat, hot air, steam and microwave
cooking. It is a perfect all-in-one
combination cooking. Adding steam
during the cooking process can
prevent moisture loss during
high temperature cooking, while
microwave can shorten the total
cooking time. Especially suitable
for cooking large portion of food,
such as large cuts of meat.
This mode combines upper, lower
heat, hot air and steam cooking.
It is a perfect all-in-one combination
cooking. Adding steam during
the cooking process can prevent
moisture loss during high temperature
cooking. Suitable for cooking all
types of food, such as large cuts of
meat or baking moist cakes.
Microwaves can heat food quickly
and are suitable for reheating food.
15 mins / 180°C
20 mins / 180°C
30 sec / 900W
Time: 5-239 mins
(maximum 3 hours
59 mins)
Temperature:
80-230°C
Time: 5-419 mins
(maximum 6 hours
59 mins)
Temperature:
100-230°C
10 sec - 90 mins 55 sec
100 W - 900 W
Icon Mode
Function
Descriptions
Default Time/
Temperature
Time/
Temperature
Selection
Range
General Preparation and Advice
Before Use
11
Preheat – Steam
Preheat – Baking
Keep Warm
Slow Cook
Drying Fruit
Proving
Bread Reheat
Defrost
Keeping food warm with hot air.
Suitable for keeping cooked dishes
warm.
Food is dehydrated with hot air in
low heat. Suitable for preparing
dried fruit and sliced vegetable or
meat jerkies.
Steam is injected to maintain
temperature inside the oven for slow
cooking. Low temperature is used,
meat and seafood can be preserved
the original avor without overcooking.
Food can be placed in vacuum
bags for this mode.
This mode works with steam to
ensure stable and humidity inside
the oven. It allows doughs (for
pizzas or bread) to rise quicker in
a stable environment, and it used
for fermenting pizzas or bread.
Bread is reheated at a regulated
temperature and steam is added
to reheat bread that tastes just
like freshly-baked. Two heating
modes are available: Room
temperature bread and refrigerated
bread.
Defrost chilled or frozen food.
Oven is heated to preset temperature
by steam.
Oven is heated to preset temperature
by baking function.
20 minutes / 55°C
20 mins / 60°C
60 mins / 60°C
40 mins / 35°C
10 mins / 180°C
7 mins 40 sec / 500g
Present time / 100°C
Present time / 180°C
Time: 5-419 mins
(maximum 6 hours
59 mins)
Temperature: 50-110°C
Time: 5-779 mins
(maximum 12 hours
59 mins)
Temperature: 40-90°C
Time: 60-779 mins
(maximum 12 hours
59 mins)
Temperature: 50-90°C
Time: 5-779 mins
(maximum 12 hours
59 mins)
Temperature: 25-50°C
Time: 5-59 mins
Temperature:
Cannot be adjusted
100g - 2000g
Temperature: 50-110°C
Temperature: 100-230°C
Icon Mode
Function
Descriptions
Default Time/
Temperature
Time/
Temperature
Selection
Range
General Preparation and Advice
Before Use
Air Fry
Cavity Drying
Descaling
DIY Cooking
A fan is used to circulate heat
in the oven cavity to create con-
vection, allowing the food to be
baked in a shorter time to create a
crispy effect. It is suitable for food
that needs to be air-fried or for
baking larger meats and pastries.
In this mode, the oven is heated
to a high temperature so any
excessive moisture and steam
are evaporated. This function is
used for drying the oven after any
steam cooking modes.
Descaling icon will be on once
combi steamer has reached 100
hours steam related cooking time
to remind the user to run descaling
programme mode. A descaler is
required.
Complete a variety of different
cooking function combination at
one time automatically.
25 mins / 180°C
15 mins / 180°C
60 mins
Time: 5-239 mins
(maximum 3 hours
59 mins)
Temperature:
80-230°C
Time:
Cannot be adjusted
Temperature:
Cannot be adjusted
Time:
Cannot be adjusted
Temperature:
Cannot be adjusted
Cooking Functions

12
General Preparation and Advice
Before Use
Use and Cooking Tips
■
5. Only use a thermometer designed for ovens to
check food temperature during cooking, if
necessary. If longer cooking time is required, put
the food back into the combi steamer to continue
cooking.
6. To avoid overheating or over-browning, it is
recommended to take the food out when roasting
or steaming is finished.
7. To maintain constant temperature during cooking,
do not open the oven door unless it is necessary.
To avoid affecting oven temperature, do not open
the oven door to check food during cooking. If you
have opened the oven door, extend the cooking
time accordingly.
8. To ensure even browning and cooking, adjust or
turn the food’s position or direction of the steam or
grill plate halfway during heating.
1. Minimum time setting is 5 minutes for all cooking
modes (Except the “Increase the Cooking Time after
Cooking is Completed” function).
2. After cooking is done, the fan will continue to work
for 3 minutes for cool down purpose. This is normal.
3. The combi steamer will pause automatically if you
open the oven door during cooking. Cooking will
continue automatically at the set time and temperature
once the door is closed.
4. Take extra care when removing container from the
oven after heating, like soup, sauce or beverage. To
prevent over boiling, following steps should be taken
in cooking liquid.
(a) Do not over-heat liquid food. Boiling liquid may
splash out and cause scalding when you remove
it from the combi steamer.
(b) When heating up liquid food, make sure the
container is at most 80% full because a small
amount of liquid may splash out suddenly when
boiled.
(c) Stir the liquid before and during heating.
(d) Allow the food to stand inside the combi steamer
for a while when heating is done. Stir it gently
before removing.
(e) When using a feeding bottle or heating baby
food, stir or shake the food and check the
temperature before feeding to avoid burning.
13
General Preparation and Advice
Before Use
Type of
container
Heat-resistant
glass container
Non heat-resistant
glass container
Heat-resistant
plastic container
Non heat-resistant
plastic container
Ceramic and
porcelain
Lacquerware
Microwave
Combi
(with steam,
microwave or grill)
Steam Grill/ Convection
When cooking food
which will produce high
temperatures, e.g. jam,
please use super heat-
resistant glass containers
that are resistant to sudden
cold and sudden heat.
When cooking food
which will produce high
temperatures, e.g. jam,
please use super heat-
resistant glass containers
that are resistant to sudden
cold and sudden heat.
Cut glass and tempered
glass cannot be
used either.
Cut glass and tempered
glass cannot be
used either.
Please use containers
marked with “Suitable for
Microwave”.
Note 1: Please note that
some container lids have
poor heat resistance.
Note 2: It is prohibited to
use lids with strong
sealing properties.
Note 3: Foods containing
high amounts of oil and
sugar are prone to high
heat, so heat-resistant
plastic containers cannot
be used.
Containers made of
materials (such as
polyethylene, melamine,
phenol, urea resin, etc.)
are easily affected
by microwaves and
deteriorate, so containers
made of these materials
cannot be used.
Containers made of
materials (such as
polyethylene, melamine,
phenol, urea resin, etc.)
are easily affected
by microwaves and
deteriorate, so containers
made of these materials
cannot be used.
Please use containers
marked with “Suitable for
Microwave”.
Note 1: Please note that
some container lids have
poor heat resistance.
Note 2: It is prohibited to
use lids with strong
sealing properties.
Note 3: Foods containing
high amounts of oil and
sugar are prone to high
heat, so heat-resistant
plastic containers cannot
be used.
Note: Containers decorated
with gold, silver or color
painting may cause
color peeling, sparking,
etc.
Note: Containers decorated
with gold, silver or color
painting may cause
color peeling, sparking,
etc.
Paint may peel off or
break.
Paint may peel off or
break.
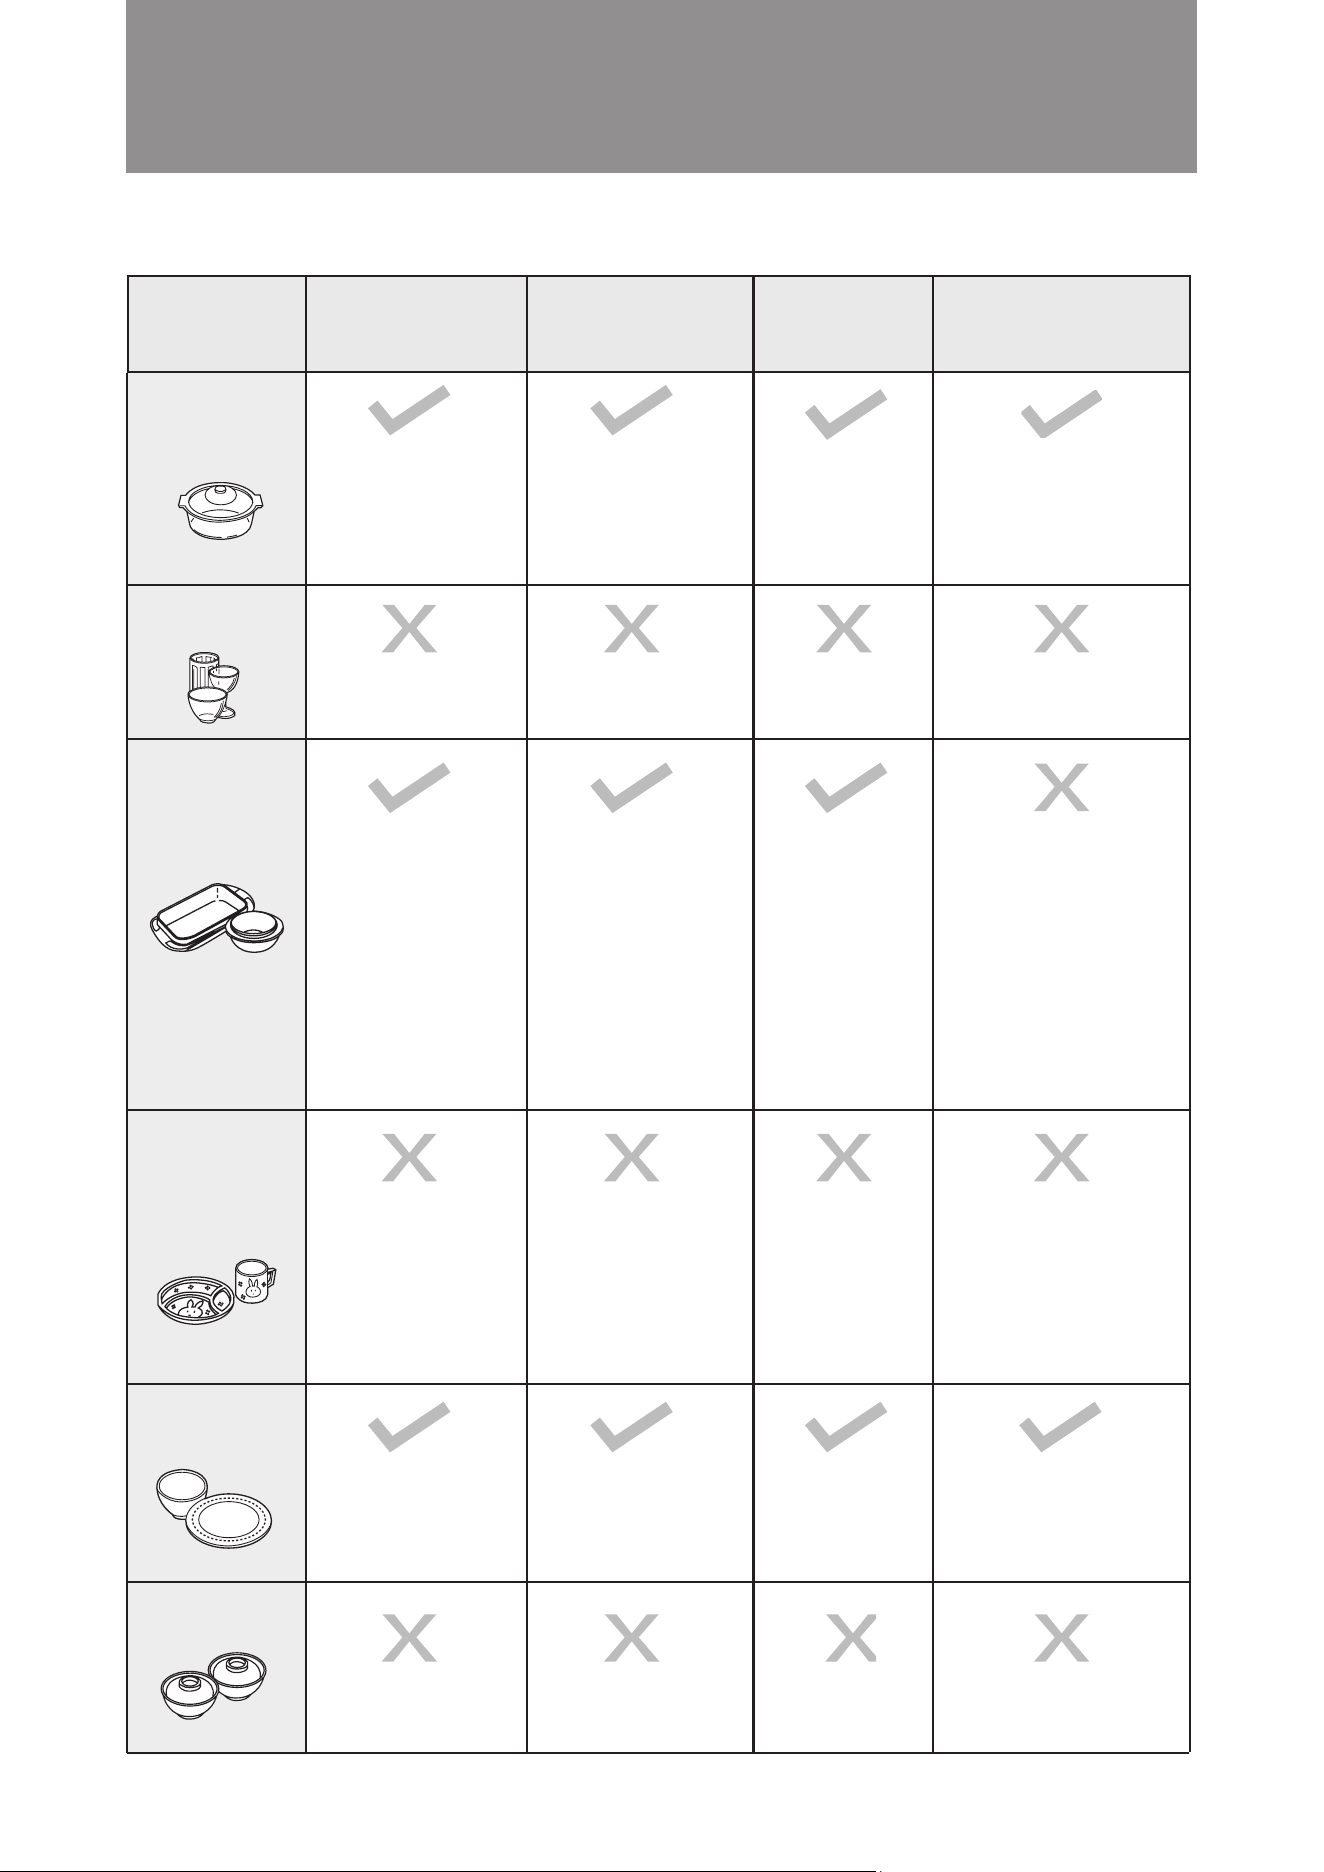
Recommended Recipes
■
14
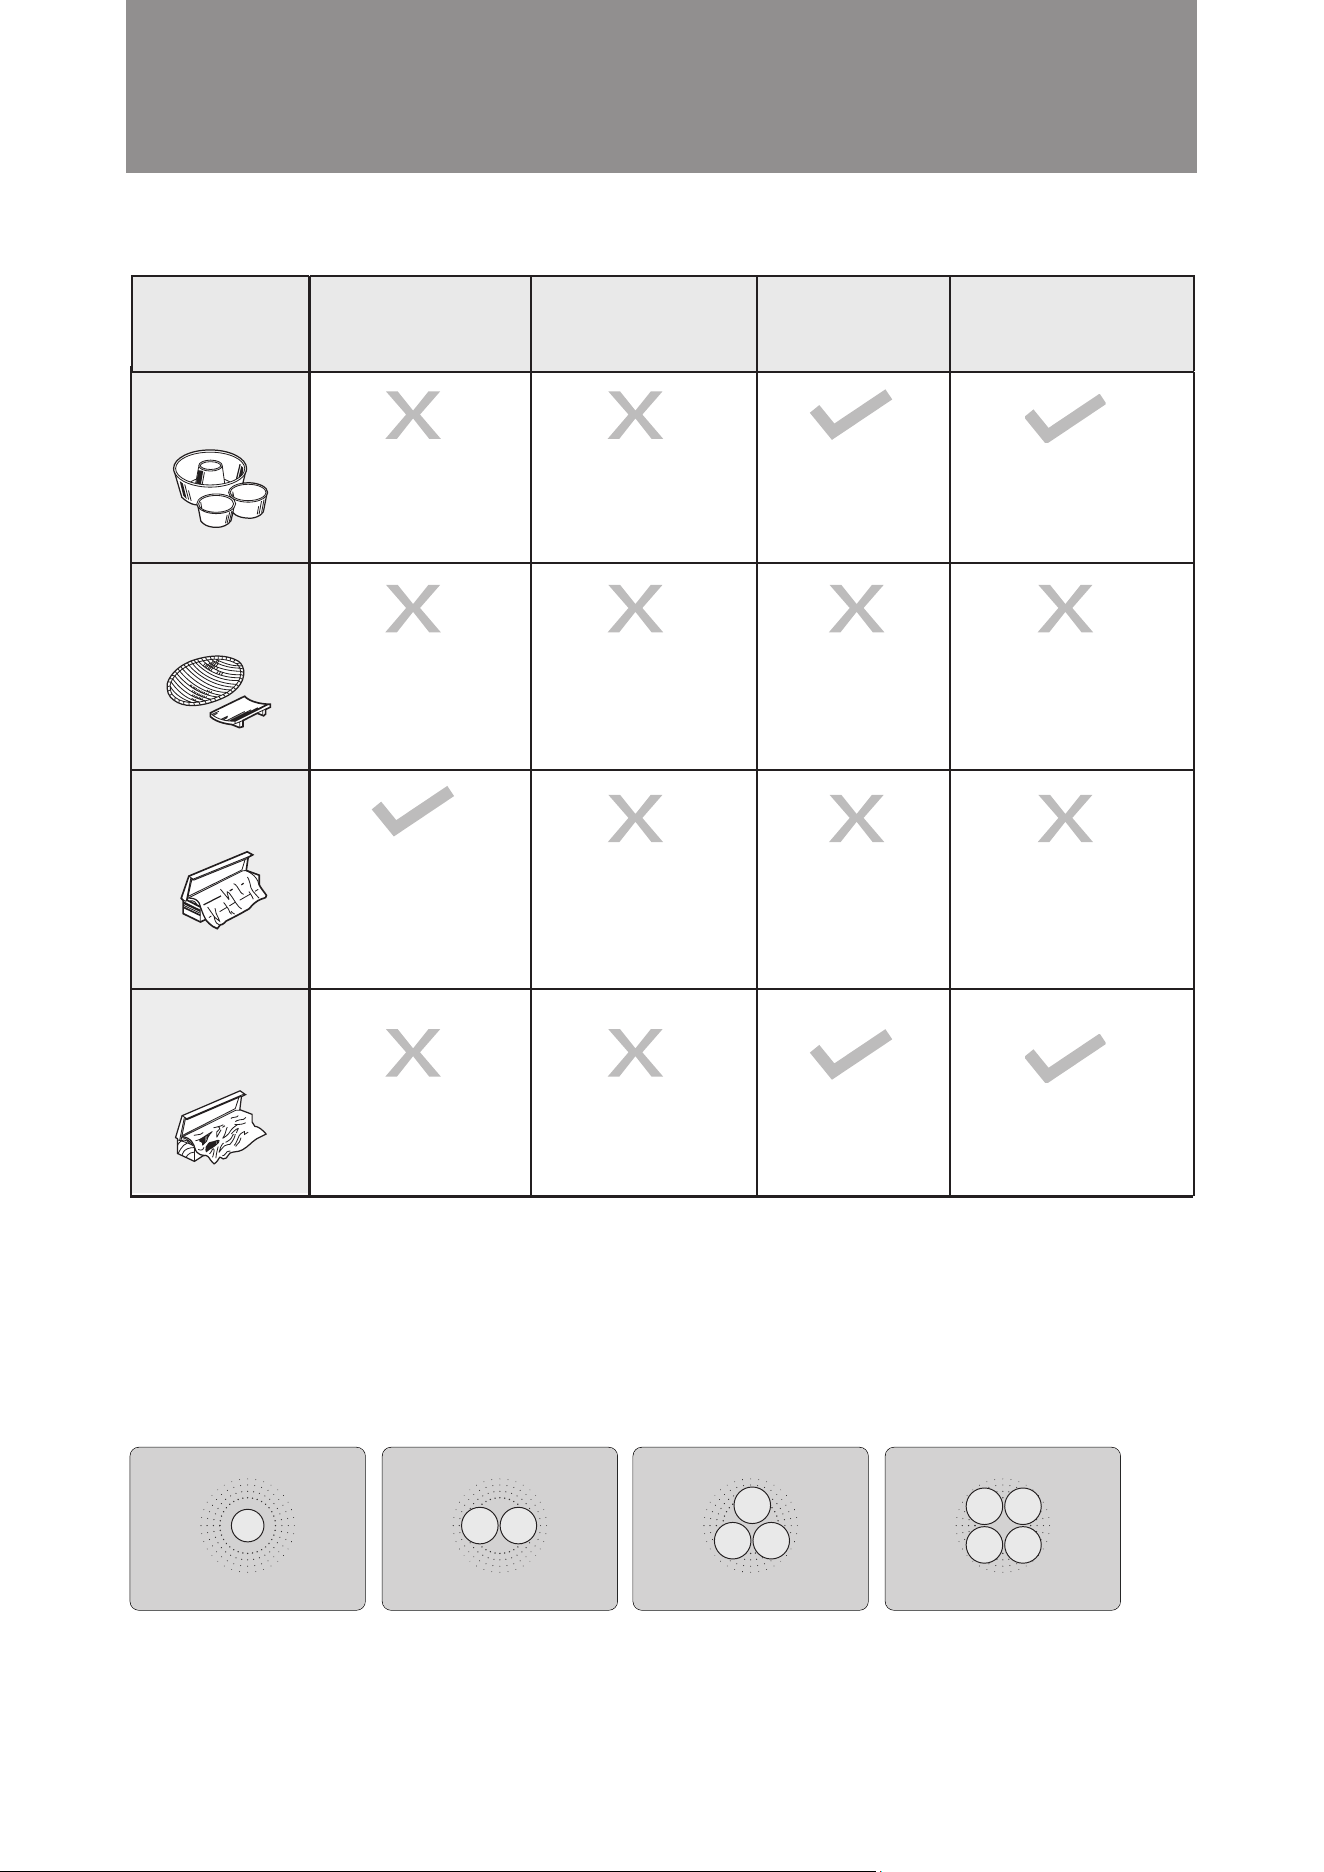
When using the microwave function, you can use a microwave - safe container and place it directly on the
cavity glass bottom for cooking.
※ It is prohibited to use metal utensils, otherwise sparks may be generated and cause malfunction.
※ Place the food directly in the center of the oven cavity. If there is more than one plate of food, please refer
to the following placement method for optimal result (the food is concentrated in the center)
Metal containers,
such as aluminum
Wood / bamboo /
paper containers
Microwave cling lm
Aluminum foil
(household tin foil)
Prone to burning.
It is recommended to
use plastic wrap with a
heat resistance of 140°C.
Note: Cannot be used
for cooking oily foods.
Note: If the handle of a
metal container is made of
resin material, it cannot be
used.
Plastic wrap will melt
when exposed to high
temperatures.
Prone to burning. Note: When the cooking
temperature is 230 °C or
below, paper containers
with heat-resistant processing
can be used.
Note: Wooden, bamboo
containers and thermal
processed paper
products can be used.
General Preparation and Advice
Before Use
Type of
container
Microwave
Combi
(with steam,
microwave or grill)
Steam Grill/ Convection
15
When the appliance is first powered on, it will beep and returned to standby mode. The default clock display is
12:00. The display panel lights up completely.
The steam microwave oven returned to energy saving mode if no button is pressed or door is opened for 5 min-
utes. Under energy saving mode, display will be turned off, only the power button can be used. Press the power
button to exit the energy saving mode and back to the startup screen.
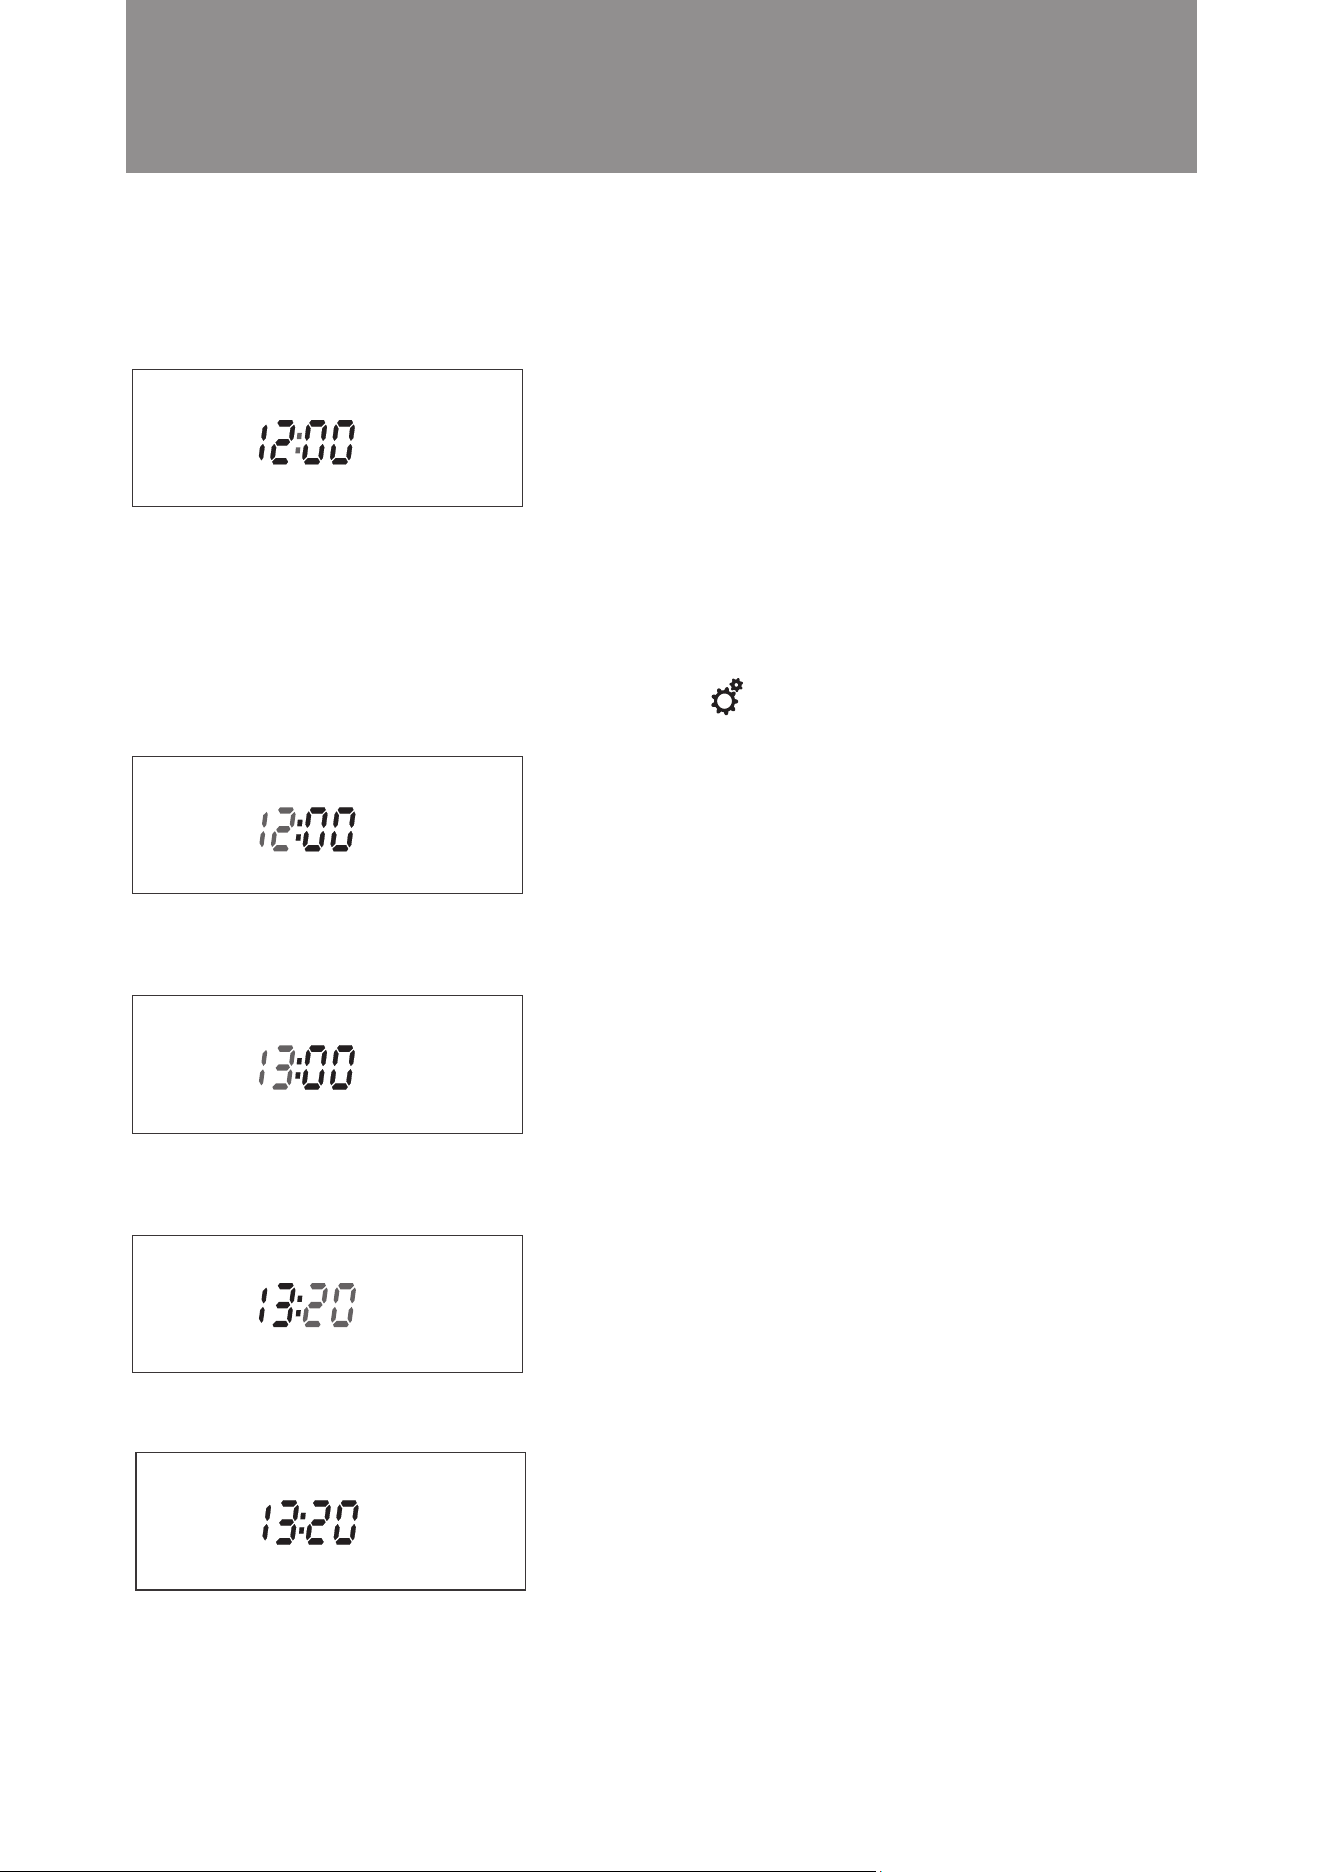
Example: Set the clock to the current time 13:20.
Steps:
1. On the standby screen, press and hold the setting button for 3 seconds. The hour digits flash. (as shown
in the diagram below)
2. Set the hour by turning the knob. When the hour reaches 13, press the knob to confirm. (as shown in the dia
gram below) The display will change to the minute setting automatically. The minute digits flash.
3. Set the minute by turning the knob. When the minute reaches 20, press the knob to confirm. (as shown in the
diagram below)
4. Time setting is complete. (as shown in the diagram below)
Important: If no action is taken within 5 minutes during the setting process, all settings will be cancelled and the
display will return to the standby screen. The steam microwave oven is in standby.
Operation Instructions
Setting the Clock
■

16
Example: Set the cooking time to 2 minutes; microwave power is 900W.
Steps:
1. In standby mode, press button on control panel or turn the knob to microwave mode then press the knob
to enter microwave function setting. Microwave Power will flash, turn the knob until display shows 900. Press
the knob to confirm ( as shown in the diagram below). The display will jump to minute setting automatically.
2. Turn the knob until the minute display shows 02. Press the knob to confirm ( as shown in the diagram below).
The display will jump to second setting automatically.
3. Press the knob to confirm 00 setting in second ( as shown in the diagram below).
4. Setting is completed, microwave steam oven will start cooking.
Operation Instructions
Attention! Do not use metal utensils (except our suggested accessory) to cook under
this cooking function, otherwise sparks may be generated and cause malfunction.
Suggested Accessory: Accessories Location:
Baking Tray Cavity Bottom
Microwaves can heat food quickly and are suitable for reheating food.
Microwave Mode
■
TimeMicrowave Power
Default Setting
Setting Range
900W
100W - 900W
30 sec
10 sec - 59 mins and 55 sec

17
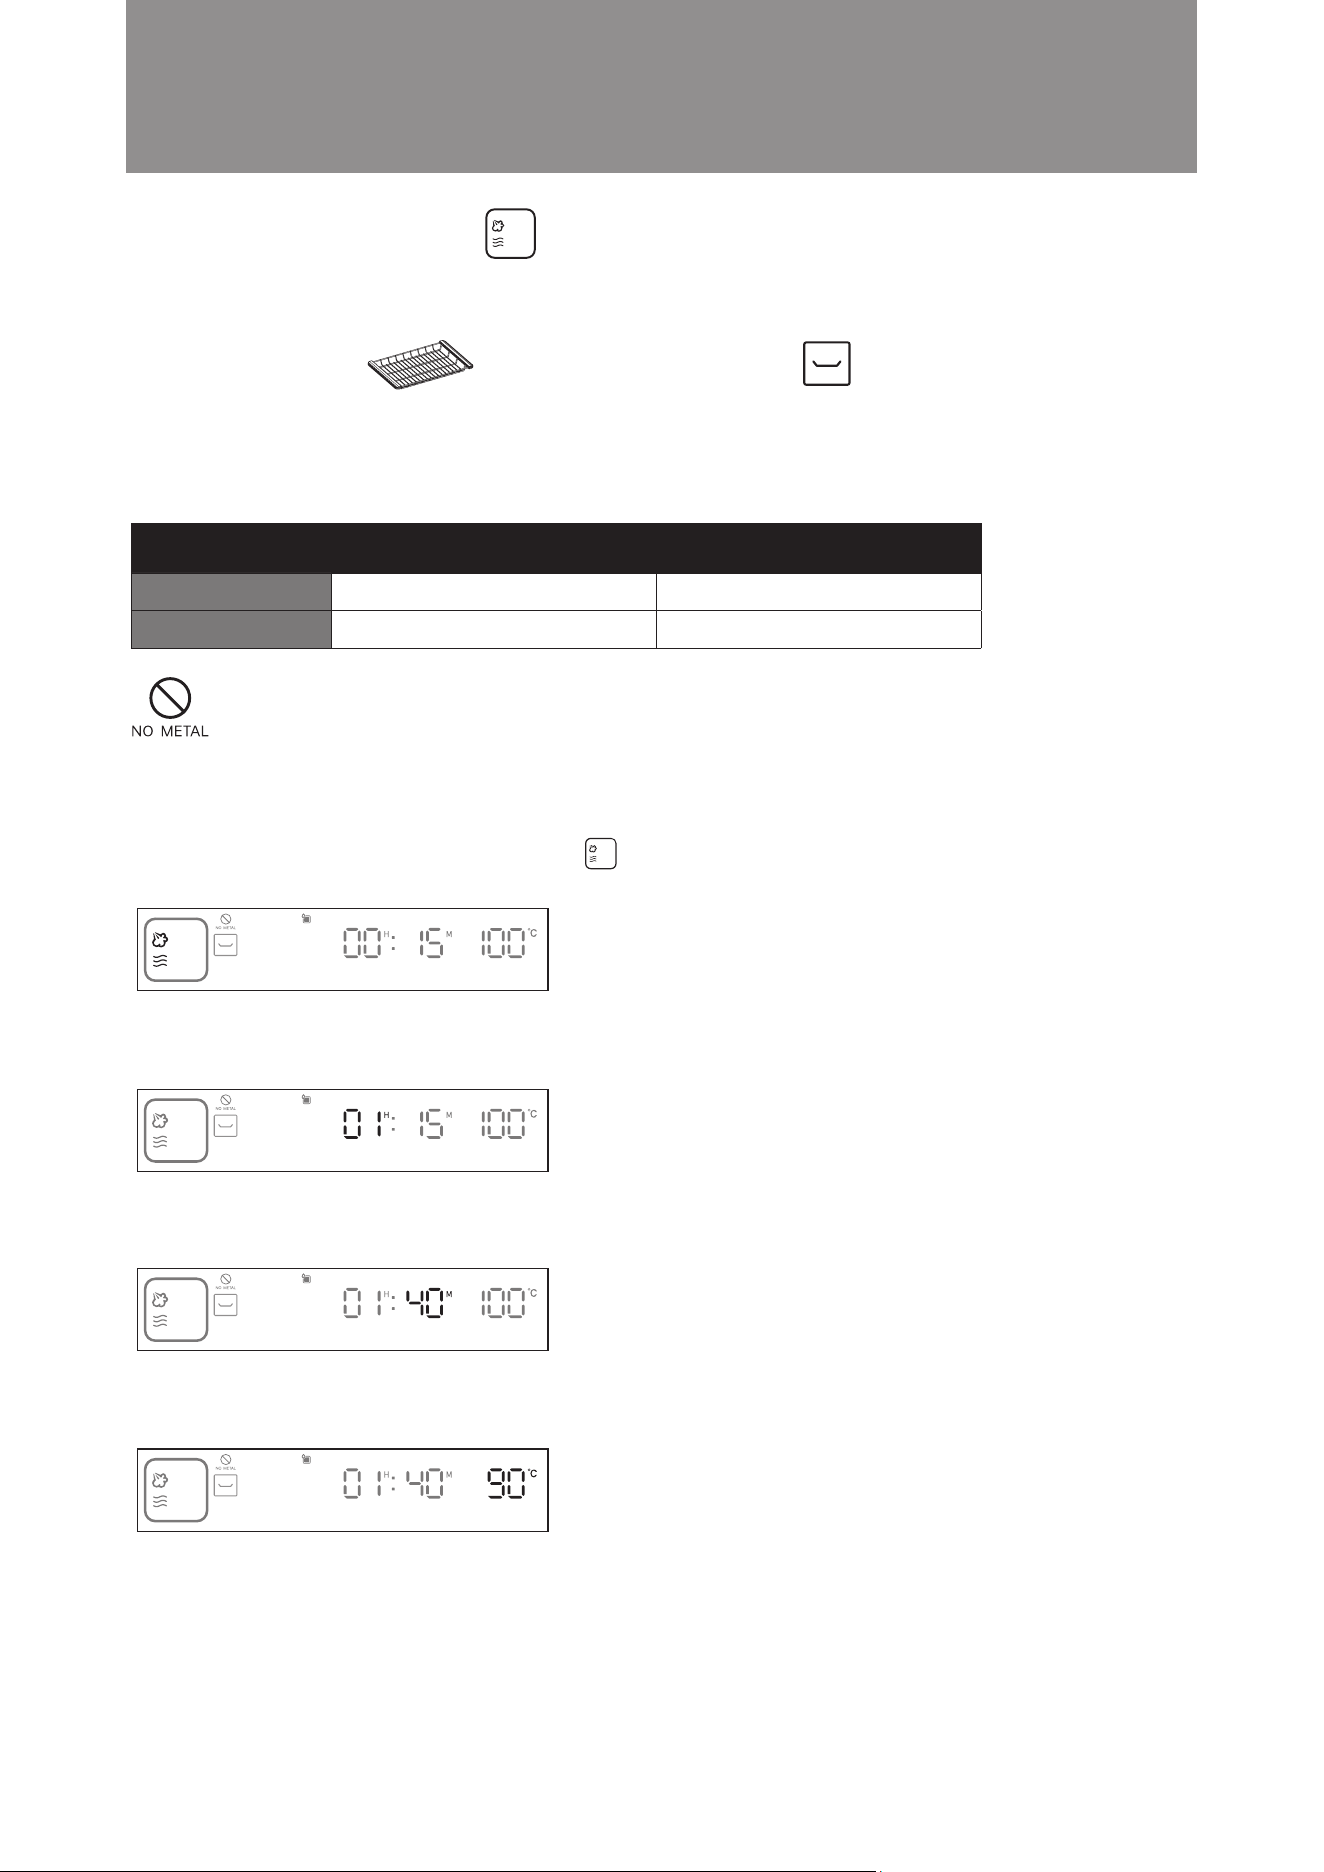
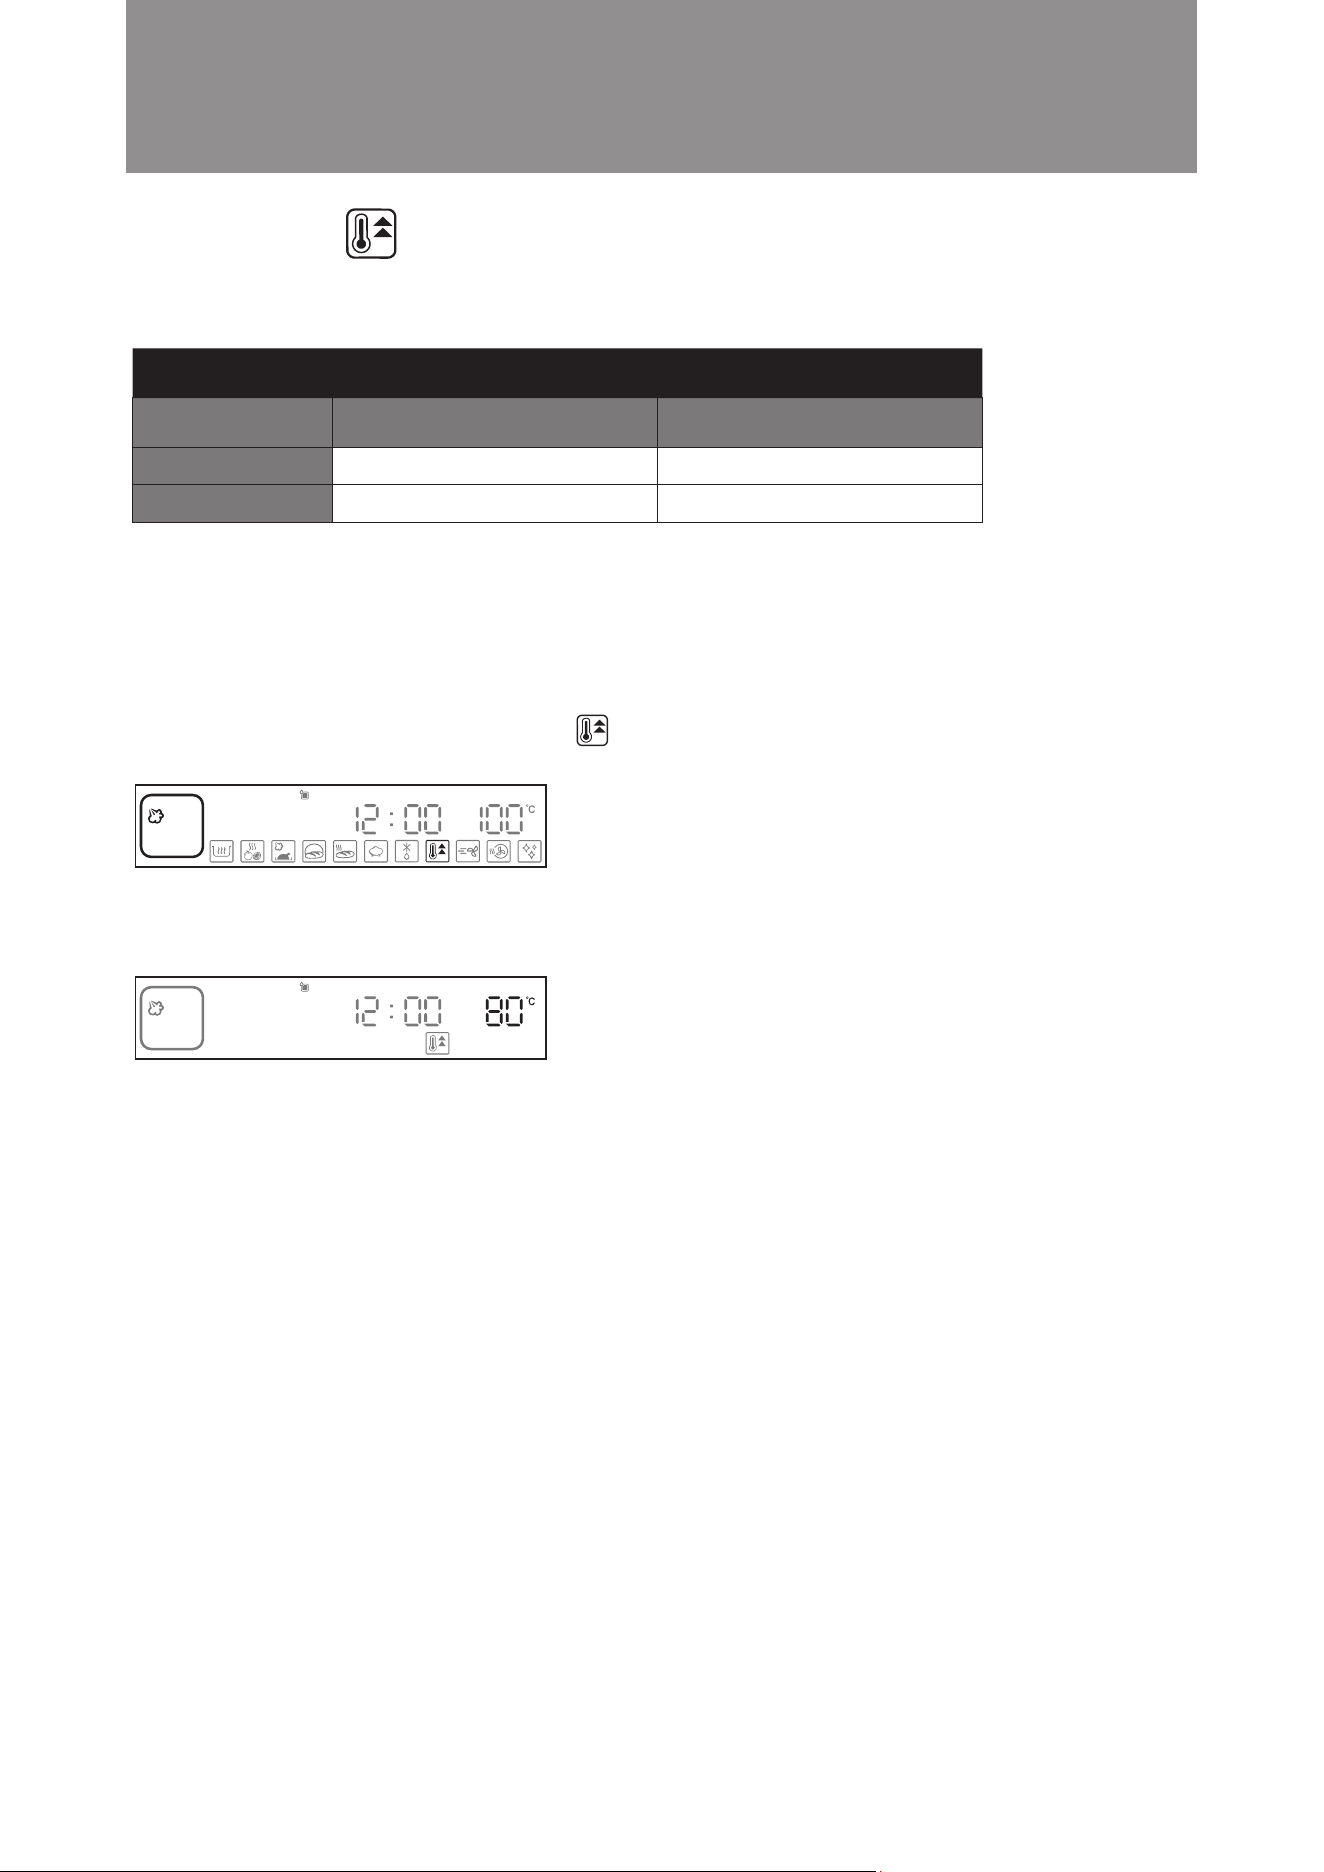
Example: Set the cooking time to 1 hour and 40 minutes; cooking temperature is 110°C.
Steps:
1. In standby mode, turn the knob clockwise to Steam Mode. The icon will flash. Press the knob to confirm
(as shown in the diagram below). The display will jump to hour setting automatically.
2. Turn the knob until the hour display shows 01. Press the knob to confirm (as shown in the diagram below). The
display will jump to minute setting automatically.
3. Turn the knob until the minute display shows 40. Press the knob to confirm (as shown in the diagram below).
The display will jump to temperature setting automatically.
4. Turn the knob until the temperature display shows 90°C. Press the knob to confirm (as shown in the diagram
below).
5. Setting is complete. The steam microwave oven will start cooking.
Operation Instructions
Steam Mode
■
Steam cooking preserves the original taste, nutrients and color of food. It is suitable for steaming vegetables, meat
and seafood or braising soup. Always ensure the water tank is lled before using this mode.
Time Temperature
Default Setting
Setting Range
100°C
50°C - 110°C
20 mins
5 mins - 6 hours and 59 mins
Suggested Accessory: Accessories Location:
Steam Tray Middle Layer
18
Example: Set the cooking time to 1 hour and 40 minutes; cooking temperature is 90°C.
Steps:
1. In standby mode, turn the knob clockwise to Steam + Microwave Mode. The icon will flash. Press the knob
to confirm (as shown in the diagram below). The display will jump to hour setting automatically.
2. Turn the knob until the hour display shows 01. Press the knob to confirm (as shown in the diagram below). The
display will jump to minute setting automatically.
3. Turn the knob until the minute display shows 40. Press the knob to confirm (as shown in the diagram below).
The display will jump to temperature setting automatically.
4. Turn the knob until the temperature display shows 90°C. Press the knob to confirm (as shown in the diagram
below).
5. Setting is complete. The steam microwave oven will start cooking.
Operation Instructions
Steam + Microwave Mode
■
Steam cooking preserves the original taste, nutrients and color of food. It is suitable for steaming vegetables, meat
and seafood or braising soup. Always ensure the water tank is lled before using this mode.
Time Temperature
Default Setting
Setting Range
100°C
50°C - 110°C
15 mins
5 mins - 6 hours and 59 mins
Suggested Accessory: Accessories Location:
Grill Rack Middle Layer
Attention! Do not use metal utensils (except our suggested accessory) to cook under
this cooking function, otherwise sparks may be generated and cause malfunction.
19
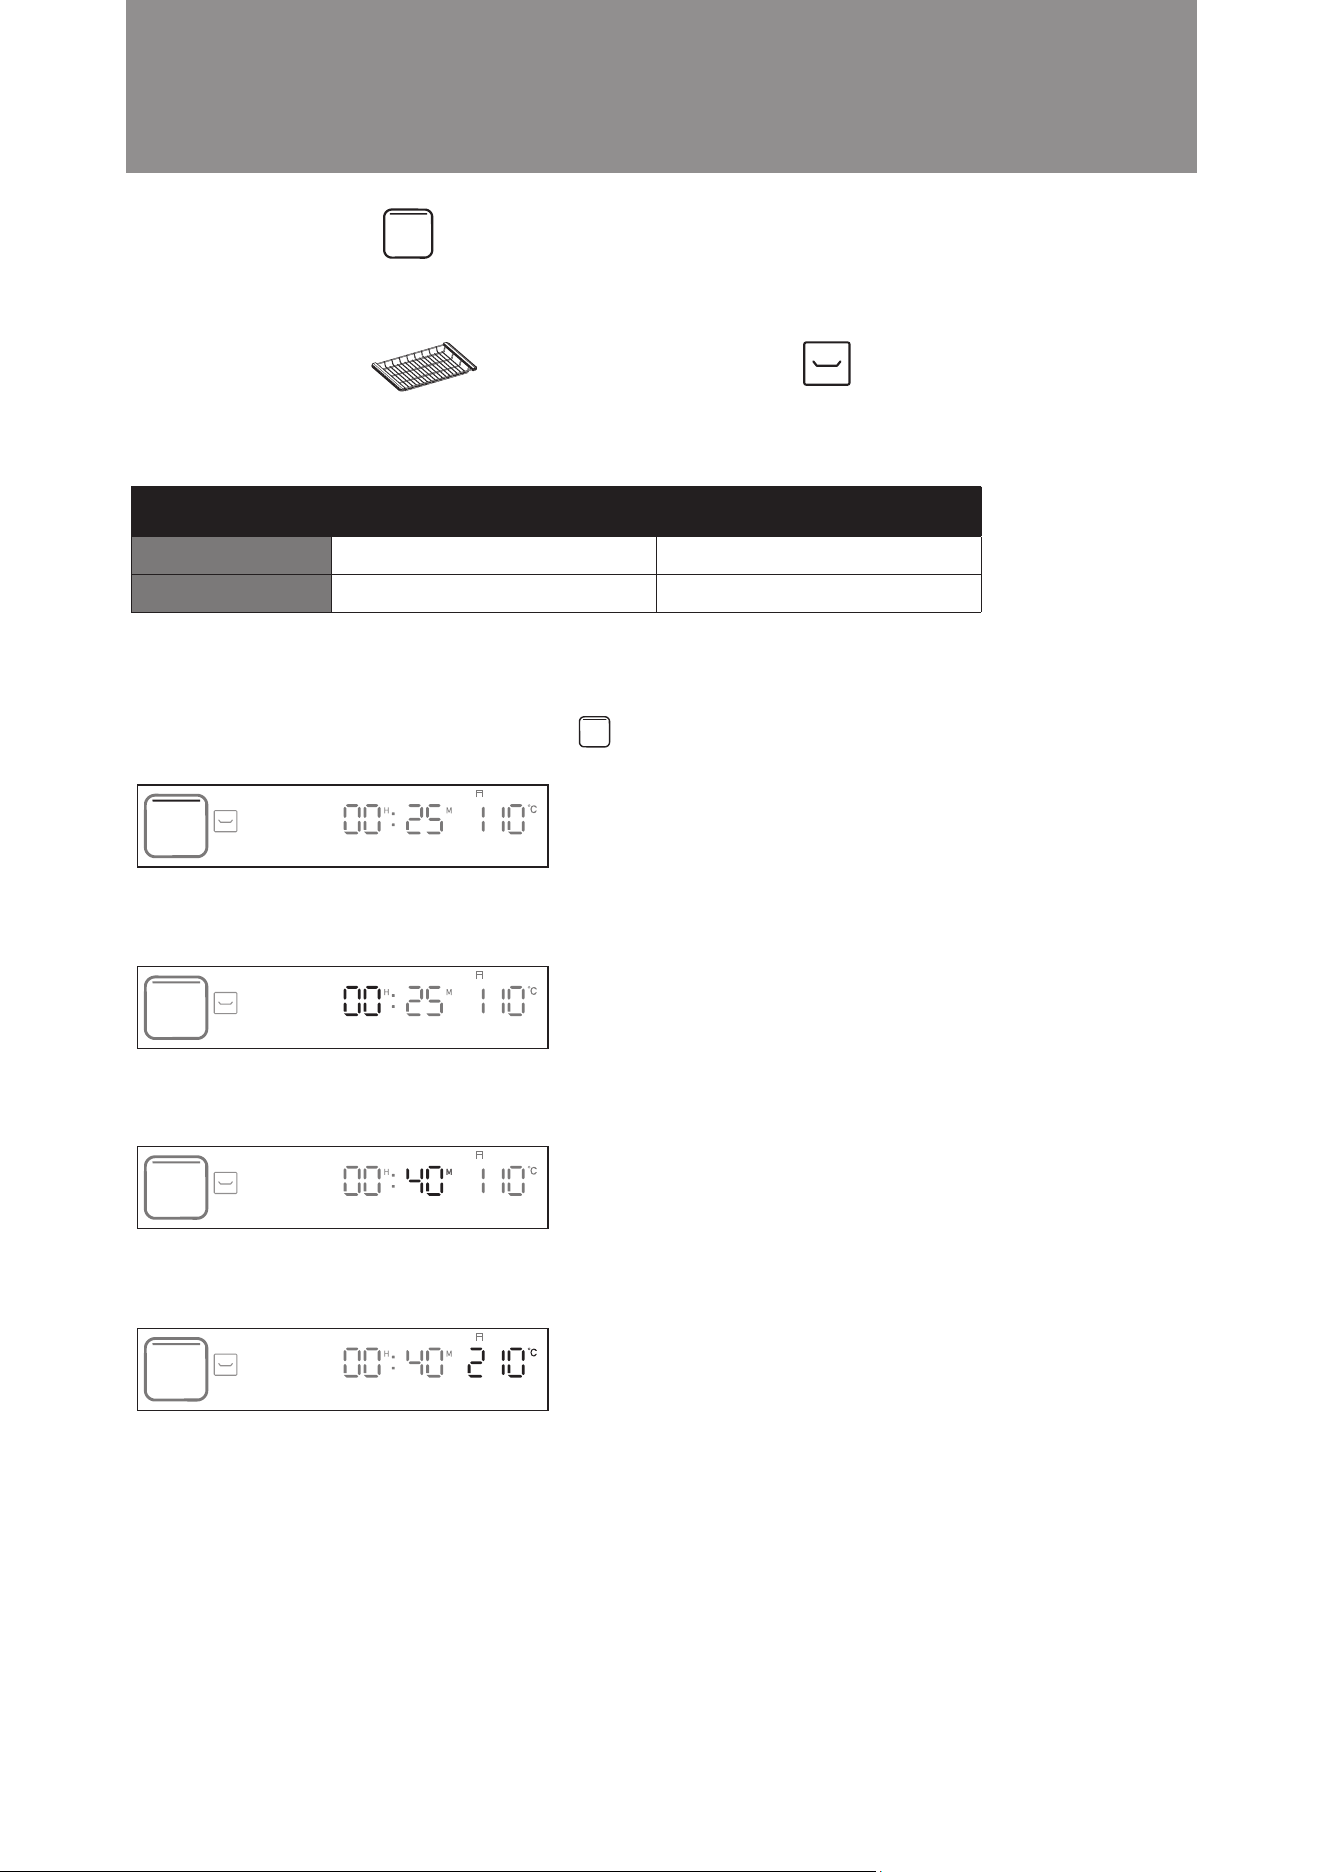
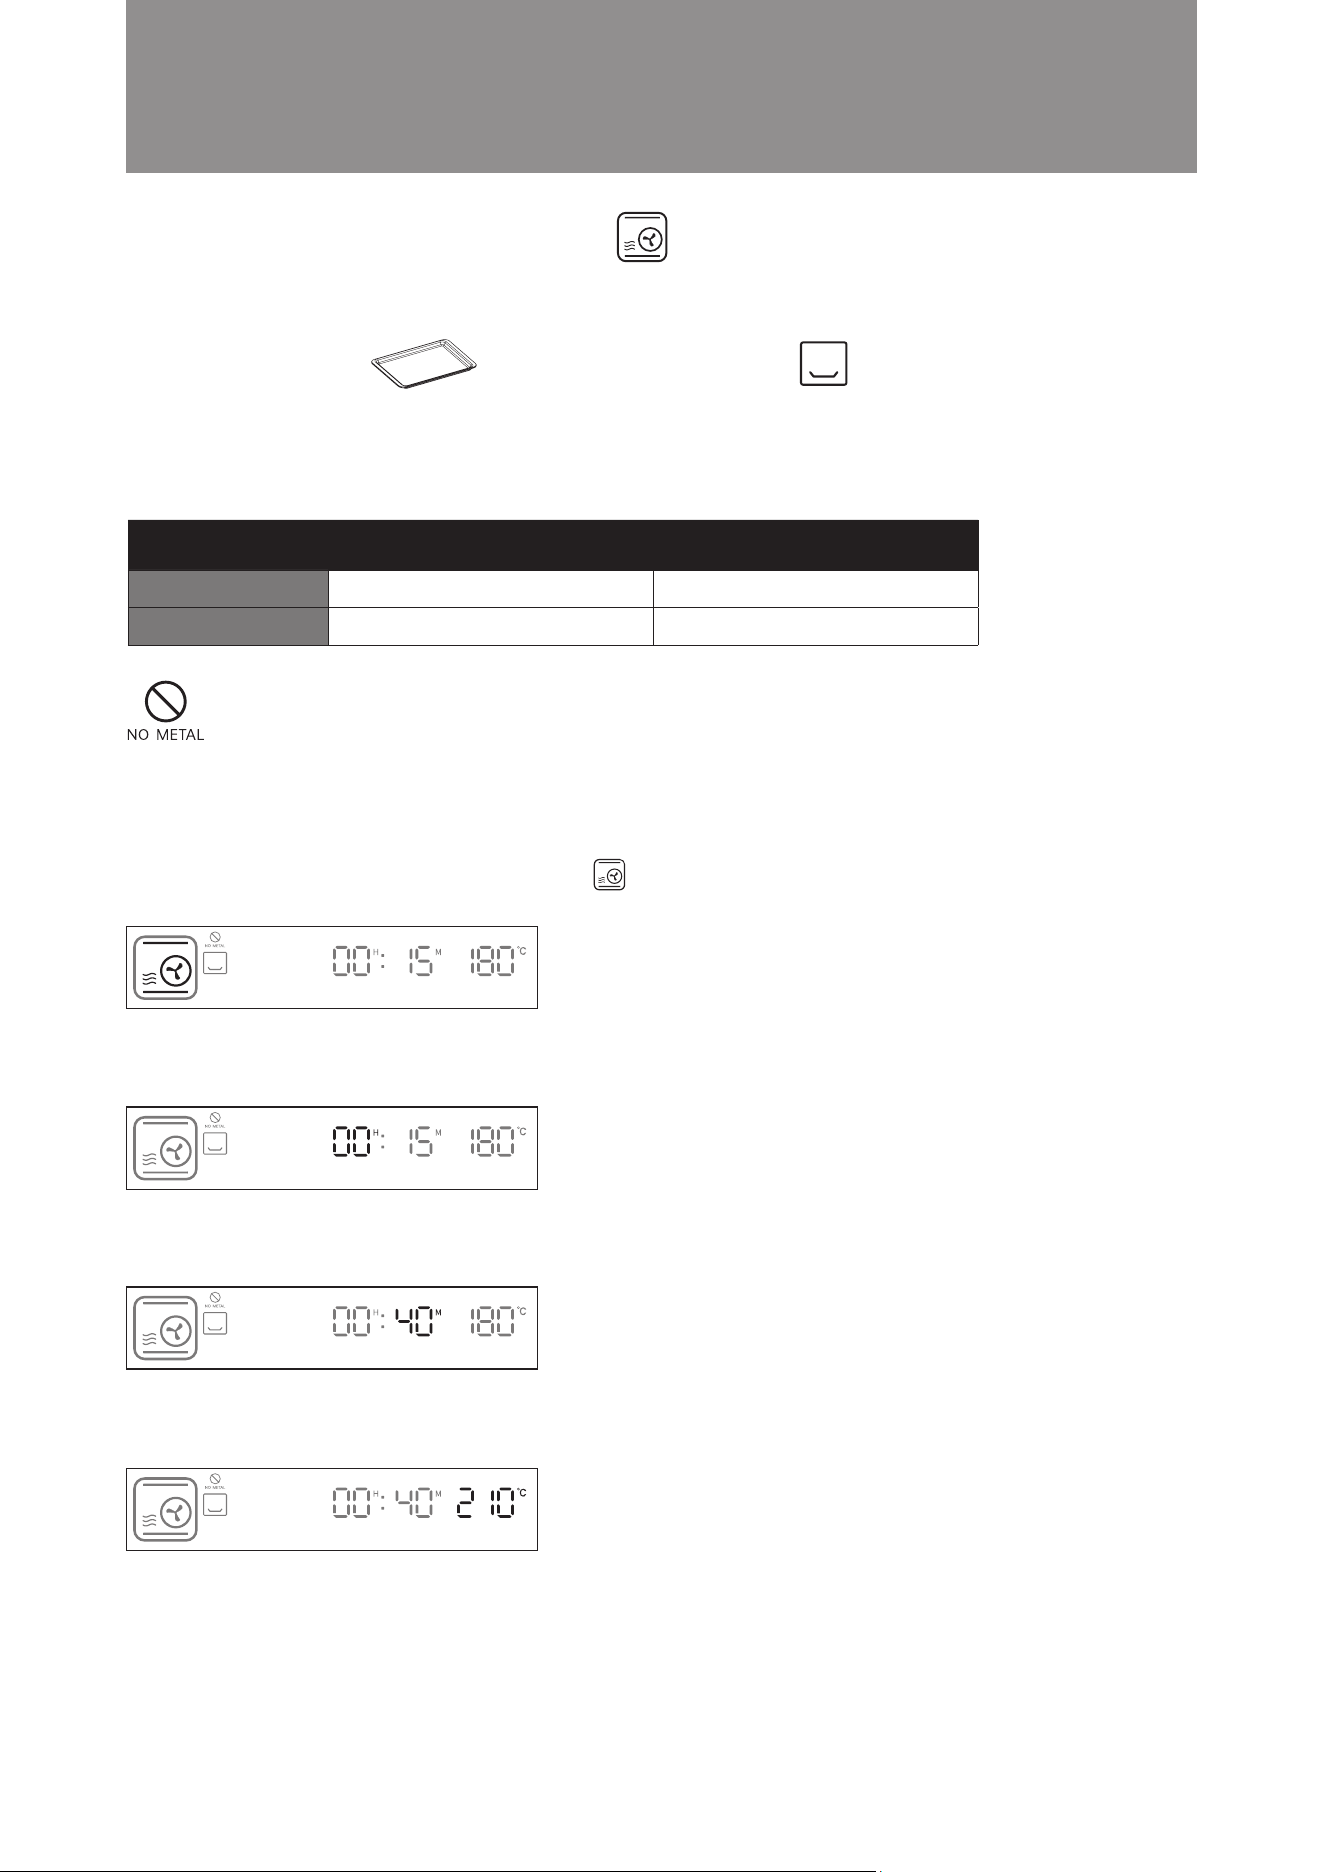
Example: Set the cooking time to 40 minutes; temperature is 210°C.
Steps:
1. In standby mode, turn the knob clockwise to Upper Grill mode. The icon will ash. Press the knob to conrm
(as shown in the diagram below). The display will jump to hour setting automatically.
2. Press the knob to confirm 00 hour setting ( as shown in the diagram below). The display will jump to minute
setting automatically.
3. Turn the knob until the minute display shows 40. Press the knob to confirm( as shown in the diagram below).
The display will jump to temperature setting automatically.
4. Turn the knob until temperature display shows 210°C. Press knob to confirm the upper grill temperature (as
shown in the diagram below).
5. Setting is complete. The microwave steam oven will start cooking.
Operation Instructions
Upper Grill Mode
■
Suitable for roasting baking - food or at a nal stage of roasting or baking. It helps browning the surface of your dish.
Time Temperature
Default Setting
Setting Range
110°C
50°C - 230°C
25 mins
5 mins - 3 hours and 59 mins
Suggested Accessory: Accessories Location:
Grill Rack Middle Layer

20
Accessories Location:
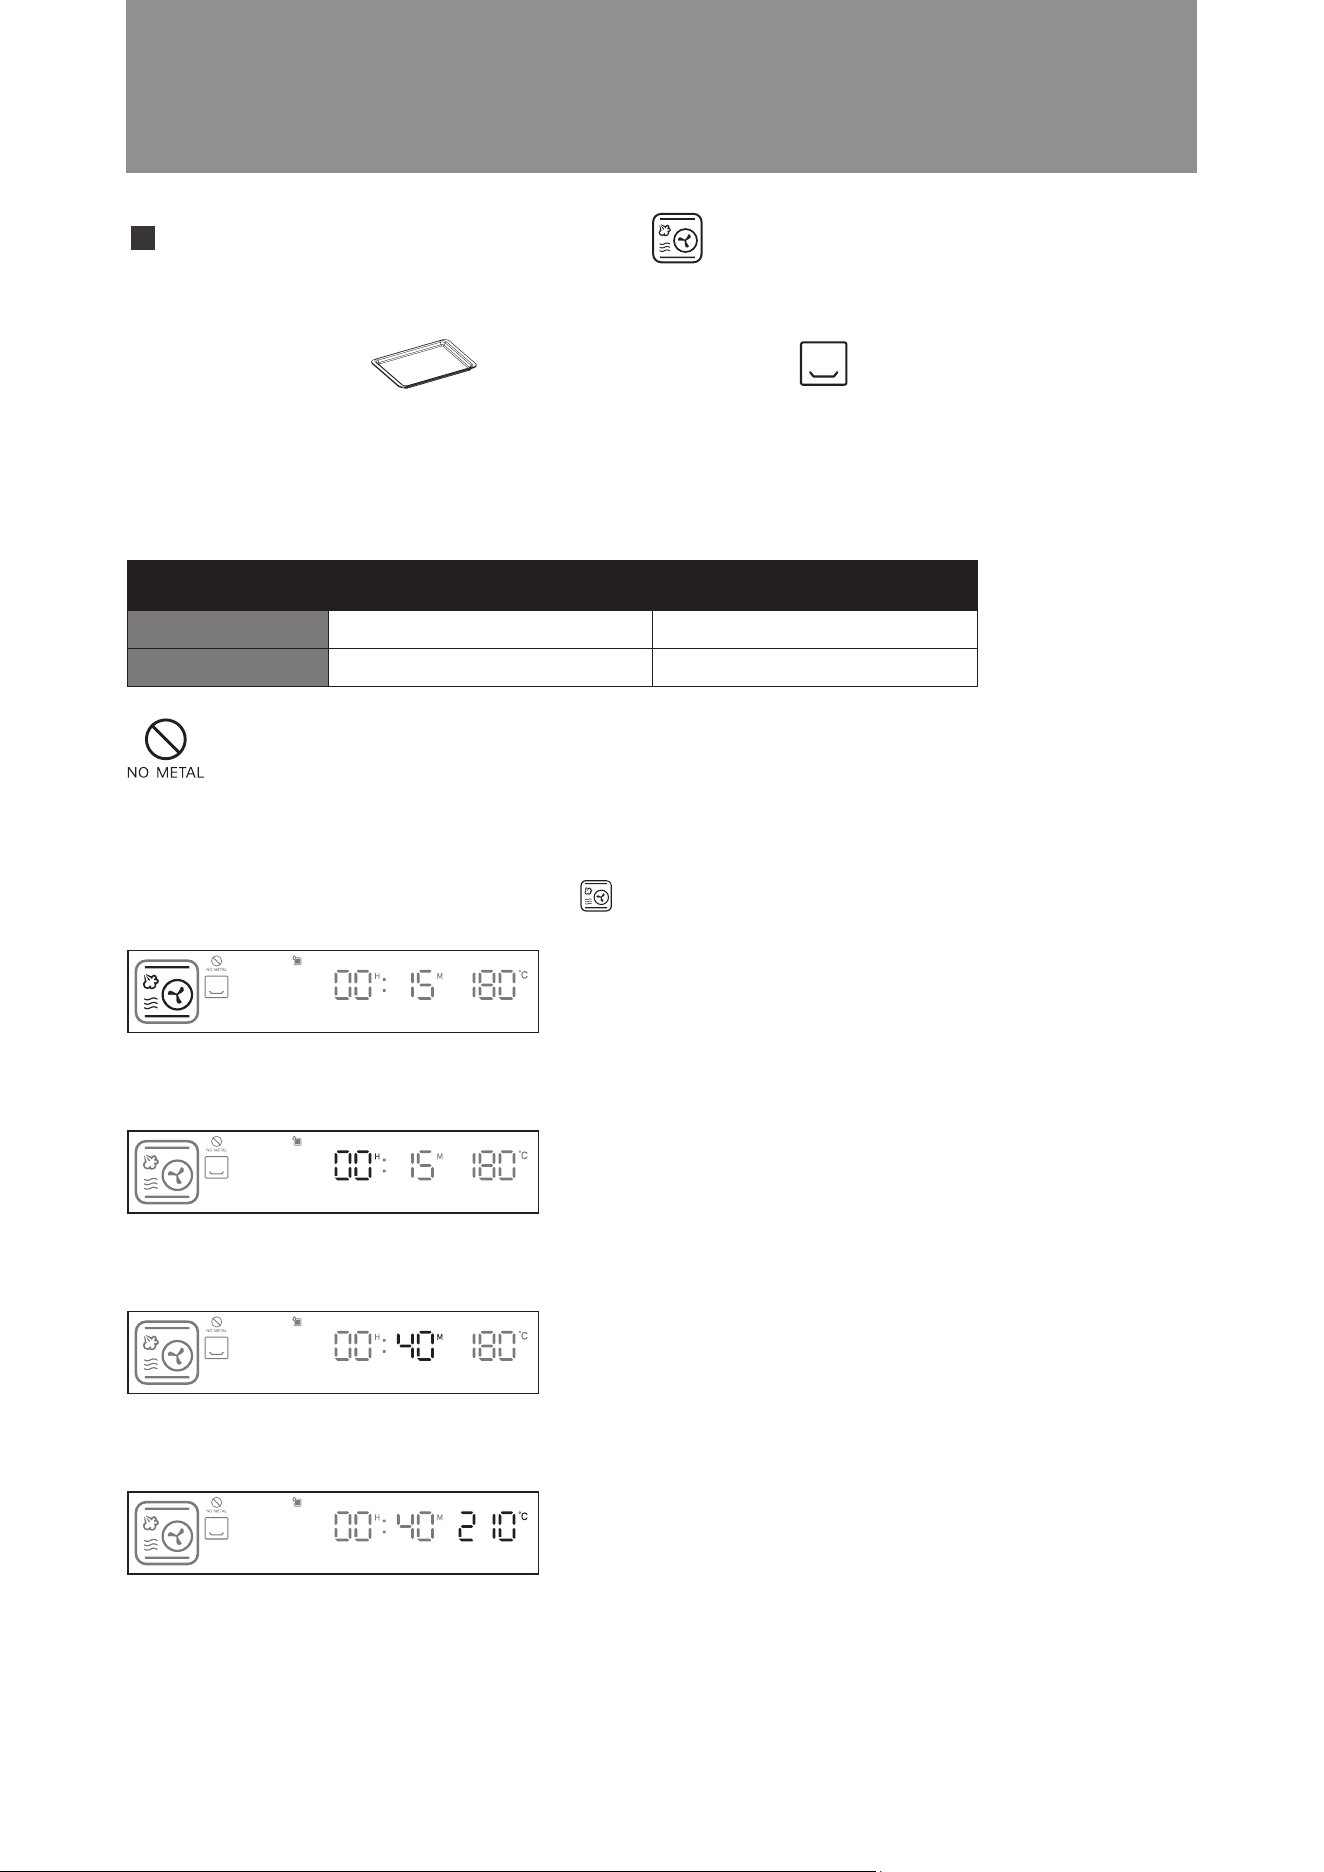
Example: Set the cooking time to 40 minutes; temperature is 210°C.
Steps:
1. In standby mode, turn the knob clockwise to Upper Grill + Microwave mode. The icon will flash. Press the
knob to confirm ( as shown in the diagram below). The display will jump to hour setting automatically.
2. Press the knob to confirm 00 hour setting ( as shown in the diagram below). The display will jump to minute
setting automatically.
3. Turn the knob until the minute display shows 40. Press the knob to confirm( as shown in the diagram below).
The display will jump to temperature setting automatically.
4. Turn the knob until temperature display shows 210°C. Press knob to confirm the upper grill temperature (as
shown in the diagram below).
5. Setting is complete. The microwave steam oven will start cooking.
Operation Instructions
Suitable for roasting baking food, cooking time can be shorten with microwave.
Upper Grill + Microwave Mode
■
Time Temperature
Default Setting
Setting Range
100°C
50°C - 230°C
20 mins
5 mins - 3 hours and 59 mins
Middle Layer
Suggested Accessory:
Grill Rack
Attention! Do not use metal utensils (except our suggested accessory) to cook under
this cooking function, otherwise sparks may be generated and cause malfunction.

21
Example: Set the cooking time to 40 minutes; temperature is 210°C.
Steps:
1. In standby mode, turn the knob clockwise to Bottom Grill mode. The icon will flash. Press the knob to
confirm (as shown in the diagram below). The display will jump to hour setting automatically.
2. Press the knob to confirm 00 hour setting (as shown in the diagram below). The display will jump to minute
setting automatically.
3. Turn the knob until the minute display shows 40. Press the knob to confirm( as shown in the diagram below).
The display will jump to temperature setting automatically.
4. Turn the knob until temperature display shows 210°C. Press knob to confirm the bottom grill temperature (as
shown in the diagram below).
5. Setting is complete. The microwave steam oven will start cooking.
Bottom Grill Mode
Operation Instructions
■
Suitable for baking the final stage or for food that needs to be cooked from the bottom periodically during cooking.
e.g. pizzas, macaroon.
Time Temperature
Default Setting
Setting Range
100°C
50°C - 230°C
20 mins
5 mins - 3 hours and 59 mins
Suggested Accessory: Accessories Location:
Grill Rack Bottom Layer
22
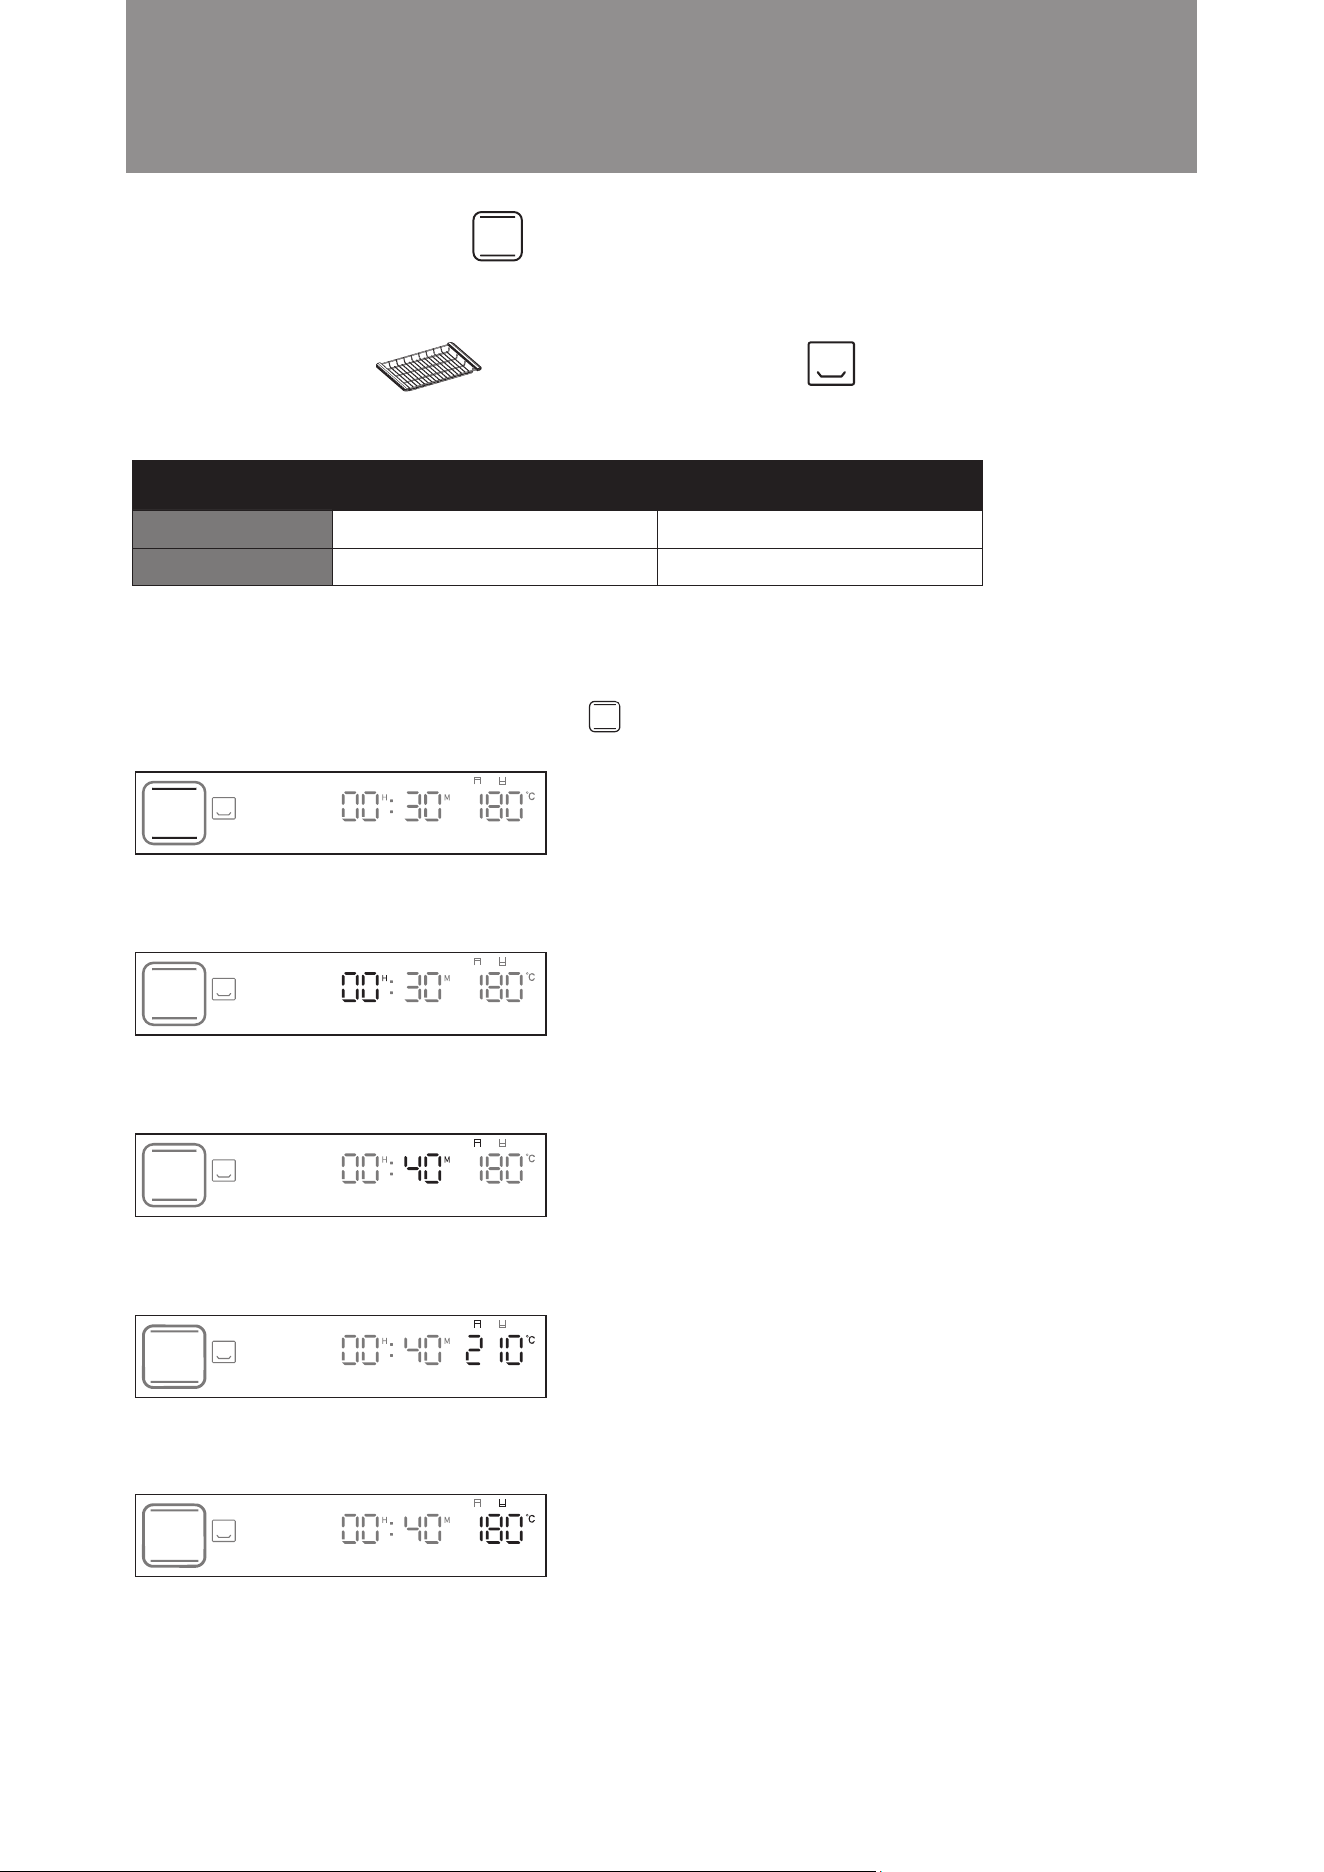
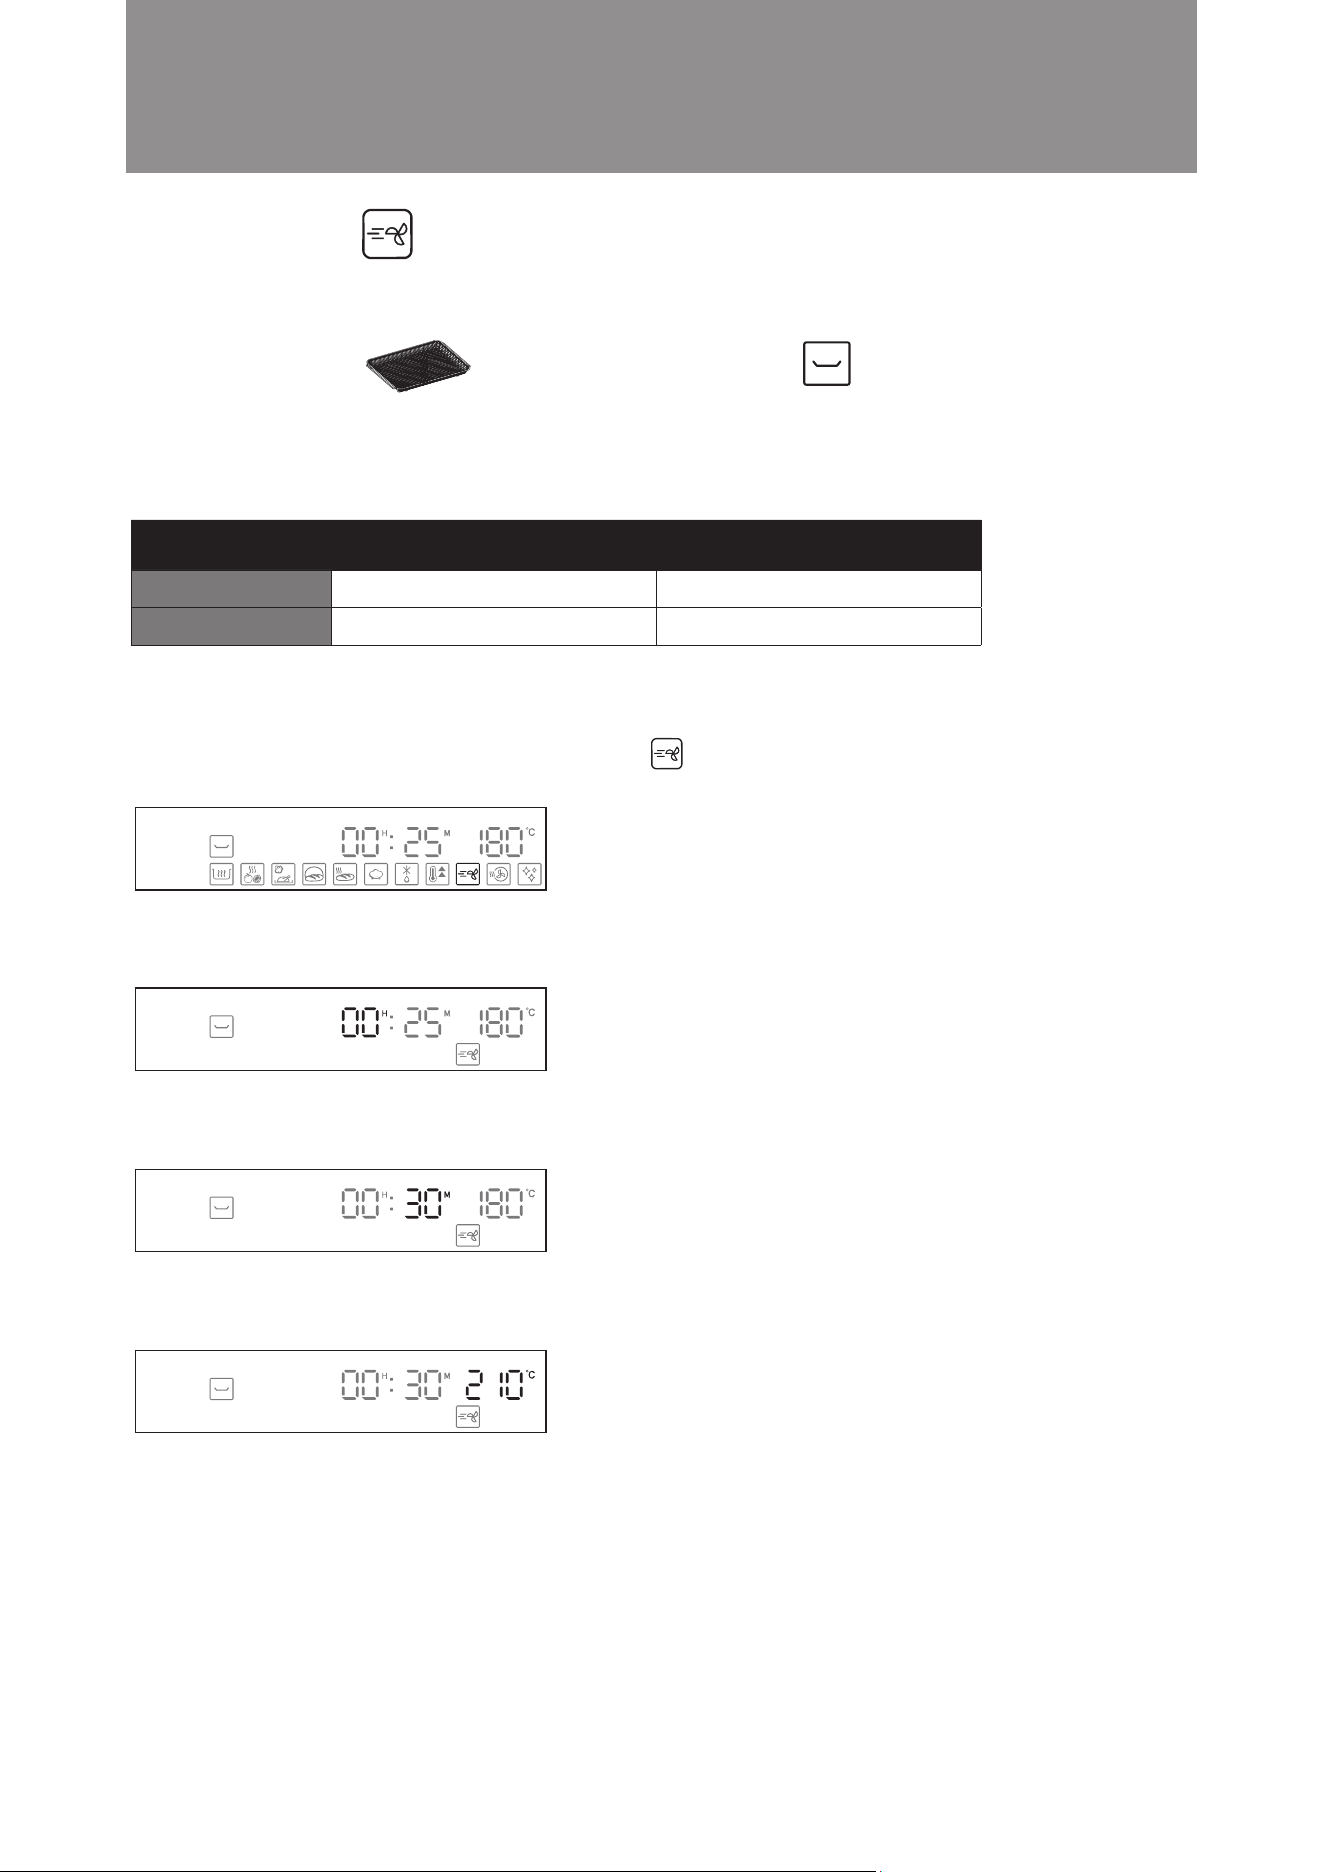
Example: Set the cooking time to 40 minutes; upper grill temperature is 210°C, bottom grill temperature is 180°C.
Steps:
1. In standby mode, turn the knob clockwise to Conventional Bake mode. The icon will flash. Press the knob
to confirm ( as shown in the diagram below). The display will jump to hour setting automatically.
2. Press the knob to confirm 00 hour setting ( as shown in the diagram below). The display will jump to minute
setting automatically.
3. Turn the knob until the minute display shows 40. Press the knob to confirm( as shown in the diagram below).
The display will jump to upper grill temperature setting automatically.
4. Turn the knob until temperature display shows 210°C. Press knob to confirm the bottom upper grill temperature
(as shown in the diagram below). The display will jump to bottom grill temperature setting automatically.
5. Turn the knob until temperature display shows 180°C. Press knob to confirm the bottom grill temperature (as
shown in the diagram below).
6. Setting is complete. The microwave steam oven will start cooking.
Operation Instructions
Conventional Bake Mode
■
Time Temperature
Default Setting
Setting Range
180°C
50°C - 230°C
30 mins
5 mins - 3 hours and 59 mins
Suggested Accessory: Accessories Location:
Grill Rack Bottom Layer

23
Example: Set the cooking time to 40 minutes; upper grill temperature is 180°C, bottom grill temperature is 160°C.
Steps:
1. In standby mode, turn the knob clockwise to Conventional Bake + Microwave mode. The icon will flash.
Press the knob to confirm ( as shown in the diagram below). The display will jump to hour setting automatically.
2. Press the knob to confirm 00 hour setting ( as shown in the diagram below). The display will jump to minute
setting automatically.
3. Turn the knob until the minute display shows 40. Press the knob to confirm( as shown in the diagram below).
The display will jump to upper grill temperature setting automatically.
4. Turn the knob until temperature display shows 160°C. Press knob to confirm the bottom grill temperature (as
shown in the diagram below).
5. Setting is complete. The microwave steam oven will start cooking.
Operation Instructions
Conventional Bake + Microwave Mode
■
Traditional single-level baking and grilling mode. Heat is released from the top and bottom to get food baked
evenly and quickly with microwave. Suitable for cooking meat, bread, pastries and desserts etc.
Time Temperature
Default Setting
Setting Range
180°C
50°C - 230°C
25 mins
5 mins - 3 hours and 59 mins
Suggested Accessory: Accessories Location:
Grill Rack Bottom Layer
Attention! Do not use metal utensils (except our suggested accessory) to cook under
this cooking function, otherwise sparks may be generated and cause malfunction.
24
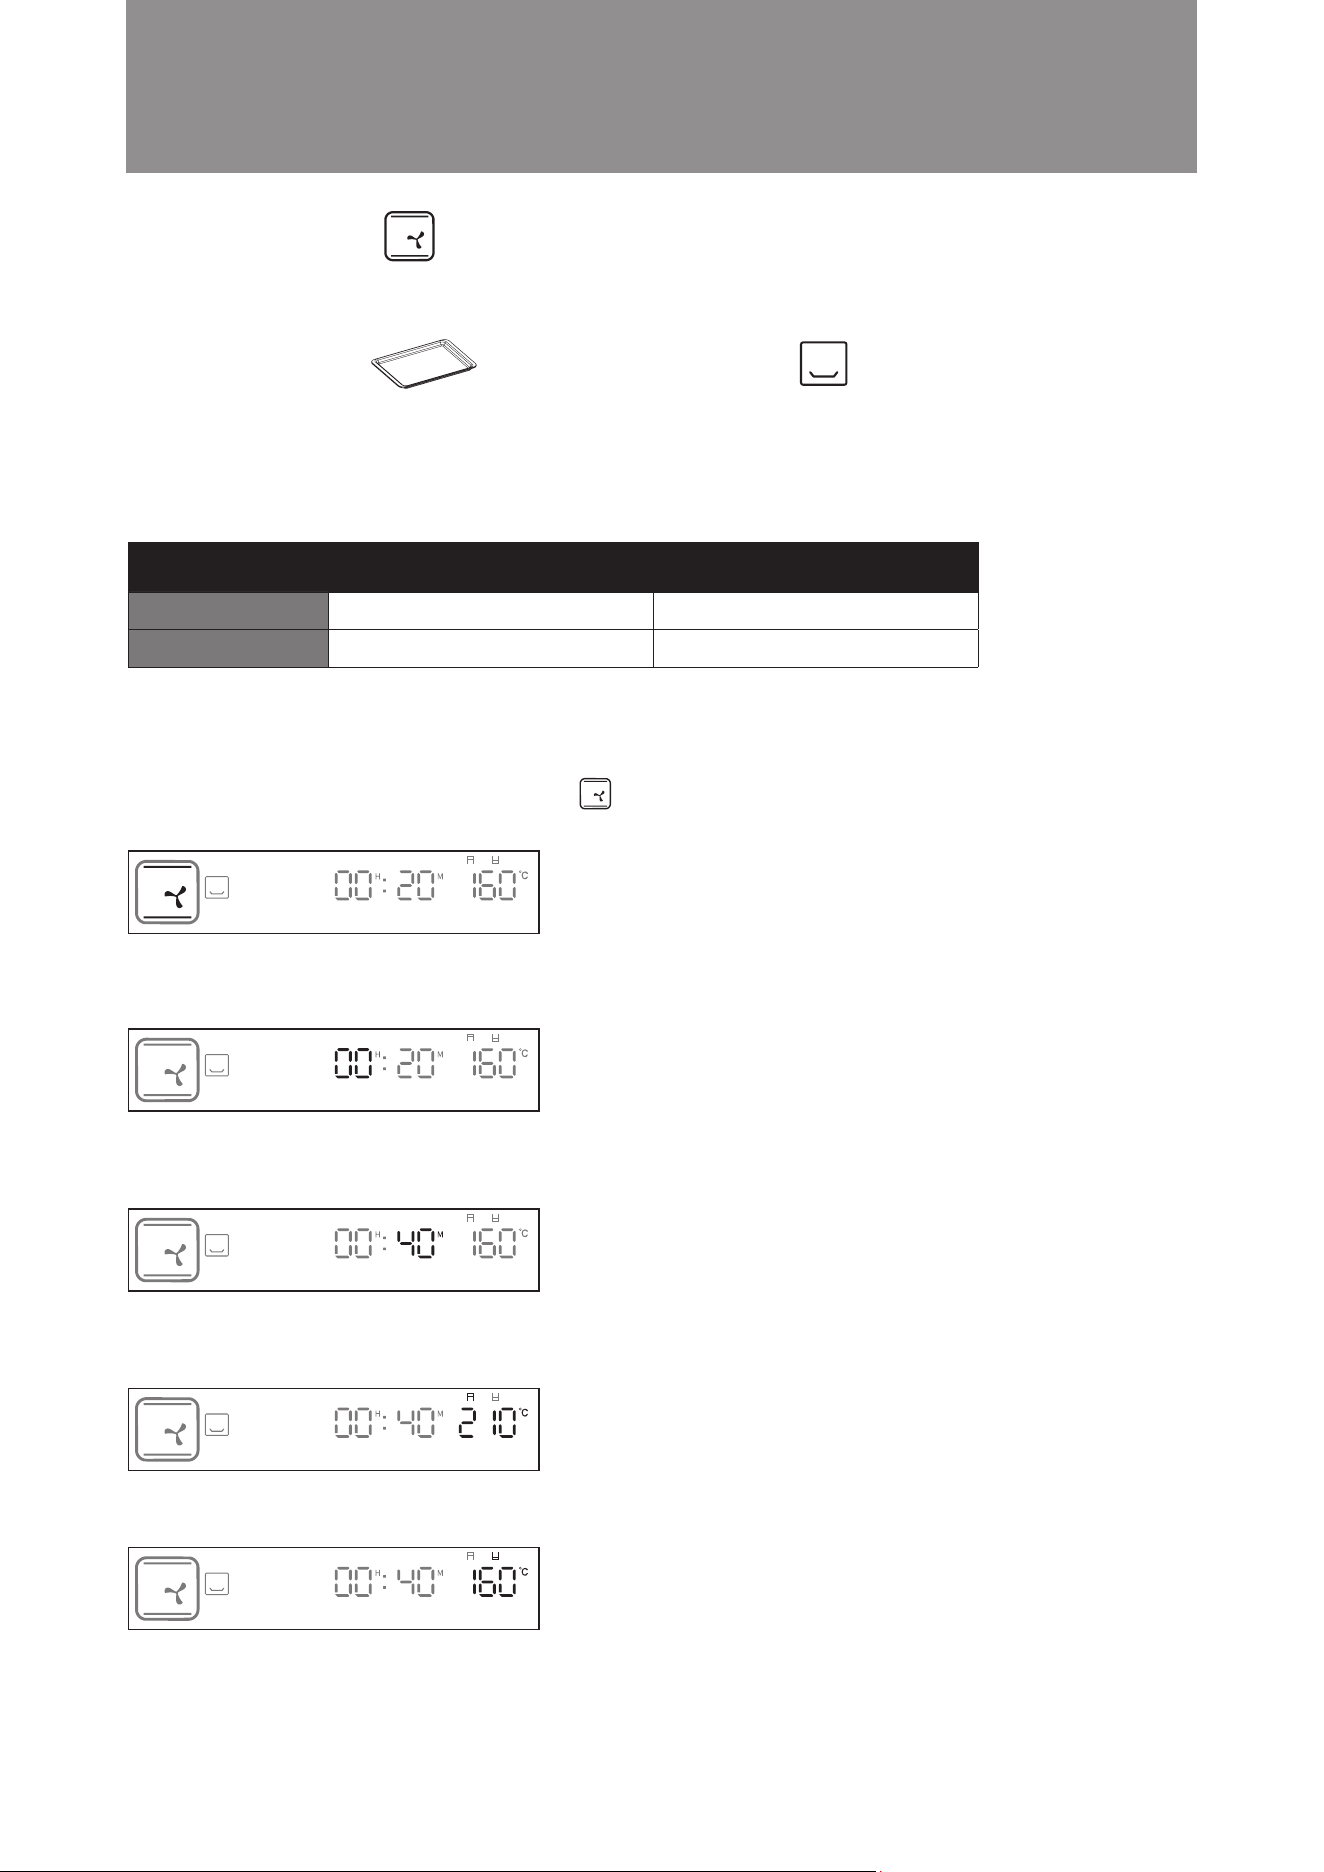
Example: Set the cooking time to 40 minutes; cooking temperature is 210°C.
Steps:
1. In standby mode, turn the knob clockwise to Convection Mode. The icon will flash. Press the knob to con-
firm (as shown in the diagram below). The display will jump to hour setting automatically.
2. Press the knob to confirm the 00 hour setting (as shown in the diagram below). The display will jump to minute
setting automatically.
3. Turn the knob until the minute display shows 40. Press the knob to confirm (as shown in the diagram below).
The display will jump to temperature setting automatically.
4. Turn the knob until the temperature display shows 210°C. Press the knob to confirm (as shown in the diagram
below).
5. Setting is complete. The combi steamer will start cooking.
Operation Instructions
The upper and lower heaters and rear fan operate simultaneously in this mode. Suitable for all baking dishes,
such as meat, seafood, pizzas, bread and cookies, pastries and desserts. It is recommended to place alumi-
num foil or baking paper onto the baking tray before cooking.
Convection Mode
■
Time Temperature
Default Setting
Setting Range
160°C
80°C - 230°C
20 mins
5 mins - 3 hours and 59 mins
Suggested Accessory: Accessories Location:
Baking Tray Bottom layer

25
Example: Set the cooking time to 40 minutes; cooking temperature is 210°C.
Steps:
1. In standby mode, turn the knob clockwise to Turbo Convection Mode. The icon will flash. Press the knob
to confirm (as shown in the diagram below). The display will jump to hour setting automatically.
2. Press the knob to confirm the 00 hour setting. (as shown in the diagram below). The display will jump to minute
setting automatically.
3. Turn the knob until the minute display shows 40. Press the knob to confirm (as shown in the diagram below).
The display will jump to temperature setting automatically.
4. Turn the knob until the temperature display shows 210°C. Press the knob to confirm (as shown in the diagram
below).
5. Setting is complete. The combi steamer will start cooking.
Operation Instructions
Cooking time is shortened in this mode to bake and roast food quickly. It is suitable for baking large meat and
cakes. It is recommended to place aluminum foil or baking paper onto the baking tray before cooking.
Turbo Convection Mode
■
Time Temperature
Default Setting
Setting Range
180°C
50°C - 230°C
25 mins
5 mins - 3 hours and 59 mins
Suggested Accessory: Accessories Location:
Baking Tray Bottom layer
26
Example: Set the cooking time to 40 minutes; cooking temperature is 210°C.
Steps:
1. In standby mode, turn the knob clockwise to Turbo Convection + Microwave Mode. The icon will flash.
Press the knob to confirm (as shown in the diagram below). The display will jump to hour setting automatically.
2. Press the knob to confirm the 00 hour setting. (as shown in the diagram below). The display will jump to minute
setting automatically.
3. Turn the knob until the minute display shows 40. Press the knob to confirm (as shown in the diagram below).
The display will jump to temperature setting automatically.
4. Turn the knob until the temperature display shows 210°C. Press the knob to confirm (as shown in the diagram
below).
5. Setting is complete. The steam microwave oven will start cooking.
Operation Instructions
Traditional single-level baking and grilling mode. Heat is released from the top and bottom to get food baked
evenly and quickly with microwave. Suitable for cooking meat, bread, pastries and desserts etc.
Turbo Convection + Microwave Mode
■
Time Temperature
Default Setting
Setting Range
180°C
50°C - 230°C
15 mins
5 mins - 3 hours and 59 mins
Suggested Accessory: Accessories Location:
Baking Tray Bottom layer
Attention! Do not use metal utensils (except our suggested accessory) to cook under
this cooking function, otherwise sparks may be generated and cause malfunction.

27
Example: Set the cooking time to 40 minutes; cooking temperature is 210°C.
Steps:
1. In standby mode, turn the knob clockwise to Convection + Steam Mode. The icon will flash. Press the
knob to confirm (as shown in the diagram below). The display will jump to hour setting automatically.
2. Press the knob to confirm the 00 hour setting (as shown in the diagram below). The display will jump to minute
setting automatically.
3. Turn the knob until the minute display shows 40. Press the knob to confirm (as shown in the diagram below).
The display will jump to temperature setting automatically.
4. Turn the knob until the temperature display shows 210°C. Press the knob to conrm (as shown in the diagram below).
5. Setting is complete. The combi steamer will start cooking.
Operation Instructions
Convection + Steam Mode
■
This mode combines upper, lower heat, hot air and steam cooking. It is a perfect all-in-one combination cooking.
Adding steam during the cooking process can prevent moisture loss during high temperature cooking. Suitable
for cooking all types of food, such as large cuts of meat or baking moist cakes.
Time Temperature
Default Setting
Setting Range
180°C
80°C - 230°C
20 mins
5 mins - 3 hours and 59 mins
Suggested Accessory: Accessories Location:
Baking Tray Bottom layer
28
Example: Set the cooking time to 40 minutes; cooking temperature is 210°C.
Steps:
1. In standby mode, turn the knob clockwise to Convection + Steam + Microwave mode. The icon will flash.
Press the knob to confirm (as shown in the diagram below). The display will jump to hour setting automatically.
2. Press the knob to confirm 00 hour setting ( as shown in the diagram below). The display will jump to minute
setting automatically.
3. Turn the knob until the minute display shows 40. Press the knob to confirm( as shown in the diagram below).
The display will jump to temperature setting automatically.
4. Turn the knob until temperature display shows 210°C. Press knob to confirm the bottom grill temperature (as
shown in the diagram below).
5. Setting is complete. The microwave steam oven will start cooking.
Convection + Steam + Microwave Mode
This mode combines upper, lower heat, hot air, steam and microwave cooking. It is a perfect all-in-one combination
cooking. Adding steam during the cooking process can prevent moisture loss during high temperature cooking,
while microwave can shorten the total cooking time. Especially suitable for cooking large portion of food, such as
large cuts of meat.
Temperature Time
Default Setting
Setting Range
180°C
80°C - 230°C
15 mins
5 mins - 3 hours and 59 mins
Operation Instructions
Suggested Accessory: Accessories Location:
Baking Tray Bottom layer
Attention! Do not use metal utensils (except our suggested accessory) to cook under
this cooking function, otherwise sparks may be generated and cause malfunction.

29
Example: Set the cooking time to 1 hours and 30 minutes; cooking temperature is 60°C.
Steps:
1. In standby mode, turn the knob clockwise to Keep Warm Mode. The icon will flash. Press the knob to
confirm (as shown in the diagram below). The display will jump to hour setting automatically.
2. Turn the knob until the hour display shows 01. Press the knob to confirm (as shown in the diagram below). The
display will jump to minute setting automatically.
3. Press the knob to confirm the “30” minute setting (as shown in the diagram below). The display will jump to
temperature setting automatically.
4. Turn the knob until the temperature display shows 60°C. Press the knob to confirm (as shown in the diagram
below).
5. Setting is complete. The steam microwave oven will start cooking.
Operation Instructions
Keep Warm Mode
■
Keeping food warm with hot air. Suitable for keeping cooked dishes warm.
Time Temperature
Default Setting
Setting Range
55°C
50°C - 110°C
20 mins
5 mins - 6 hours and 59 mins
Suggested Accessory: Accessories Location:
Baking Tray Middle layer

30
Example: Set the cooking time to 2 hours; cooking temperature is 60°C.
Steps:
1. In standby mode, turn the knob clockwise to Drying Fruit Mode. The icon will flash. Press the knob to
confirm (as shown in the diagram below). The display will jump to hour setting automatically.
2. Turn the knob until the hour display shows 02. Press the knob to confirm (as shown in the diagram below). The
display will jump to minute setting automatically.
3. Press the knob to confirm the 00 minute setting (as shown in the diagram below). The display will jump to
temperature setting automatically.
4. Turn the knob until the temperature display shows 90°C. Press the knob to confirm (as shown in the diagram
below).
5. Setting is complete. The steam microwave oven will start.
Operation Instructions
Drying Fruit Mode
■
Food is dehydrated with hot air in low heat. Suitable for preparing dried fruit and vegetable slices or meat jerkies.
Time Temperature
Default Setting
Setting Range
60°C
40°C - 90°C
20 mins
5 mins - 12 hours and 59 mins
Suggested Accessory: Accessories Location:
Baking Tray Middle Layer

31
Example: Set the cooking time to 1 hour 40 minutes; cooking temperature is 60°C.
Steps:
1. In standby mode, turn the knob clockwise to Slow Cook Mode. The icon will flash. Press the knob to confirm
(as shown in the diagram below). The display will jump to hour setting automatically.
2. Press knob to conrm hour 01 (as shown in the diagram below). The display will jump to minute setting automatically.
3. Turn the knob until the minute display shows 40. Press the knob to confirm (as shown in the diagram below).
The display will jump to temperature setting automatically.
4. Press the knob to confirm 60°C temperature setting. (as shown in the diagram below).
5. Setting is complete. The steam microwave ovenr will start cooking.
Operation Instructions
Slow Cook Mode
■
Steam is injected to maintain temperature inside the oven for slow cooking. Low temperature is used, meat and
seafood can be preserved the original flavor without overcooking. Food can be placed in vacuum bags. Always
ensure that the water tank is filled before using this mode.
Time Temperature
Default Setting
Setting Range
60°C
50°C - 90°C
60 mins
60 mins - 12 hours and 59 mins
Suggested Accessory: Accessories Location:
Baking Tray Middle layer

32
Operation Instructions
Example: Set the cooking time to 40 minutes; cooking temperature is 35°C.
Steps:
1. In standby mode, turn the knob clockwise to Proving Mode. The icon will flash. Press the knob to confirm
(as shown in the diagram below). The display will jump to hour setting automatically.
2. Press the knob to confirm the 00 hour setting (as shown in the diagram below). The display will jump to minute
setting automatically.
3. Turn the knob until the minute display shows 40. Press the knob to confirm (as shown in the diagram below).
The display will jump to temperature setting automatically.
4. Turn the knob to confirm the 35°C temperature setting (as shown in the diagram below).
5. Setting is complete. The steam microwave oven will start cooking.
Proving Mode
■
This mode works with steam to ensure stable high temperature and humidity inside the oven. It allows dough (for
pizza or bread) to rise quicker in a stable environment, and is used for fermenting dough for pizzas or bread. Always
ensure that the water tank is lled before using this mode.
Time Temperature
Default Setting
Setting Range
35°C
25°C - 50°C
40 mins
5 mins - 12 hours and 59 mins
Suggested Accessory: Accessories Location:
Steam Tray Bottom layer
33
Operation Instructions
Suggested Accessory: Accessories Location:
Baking Tray Middle Layer
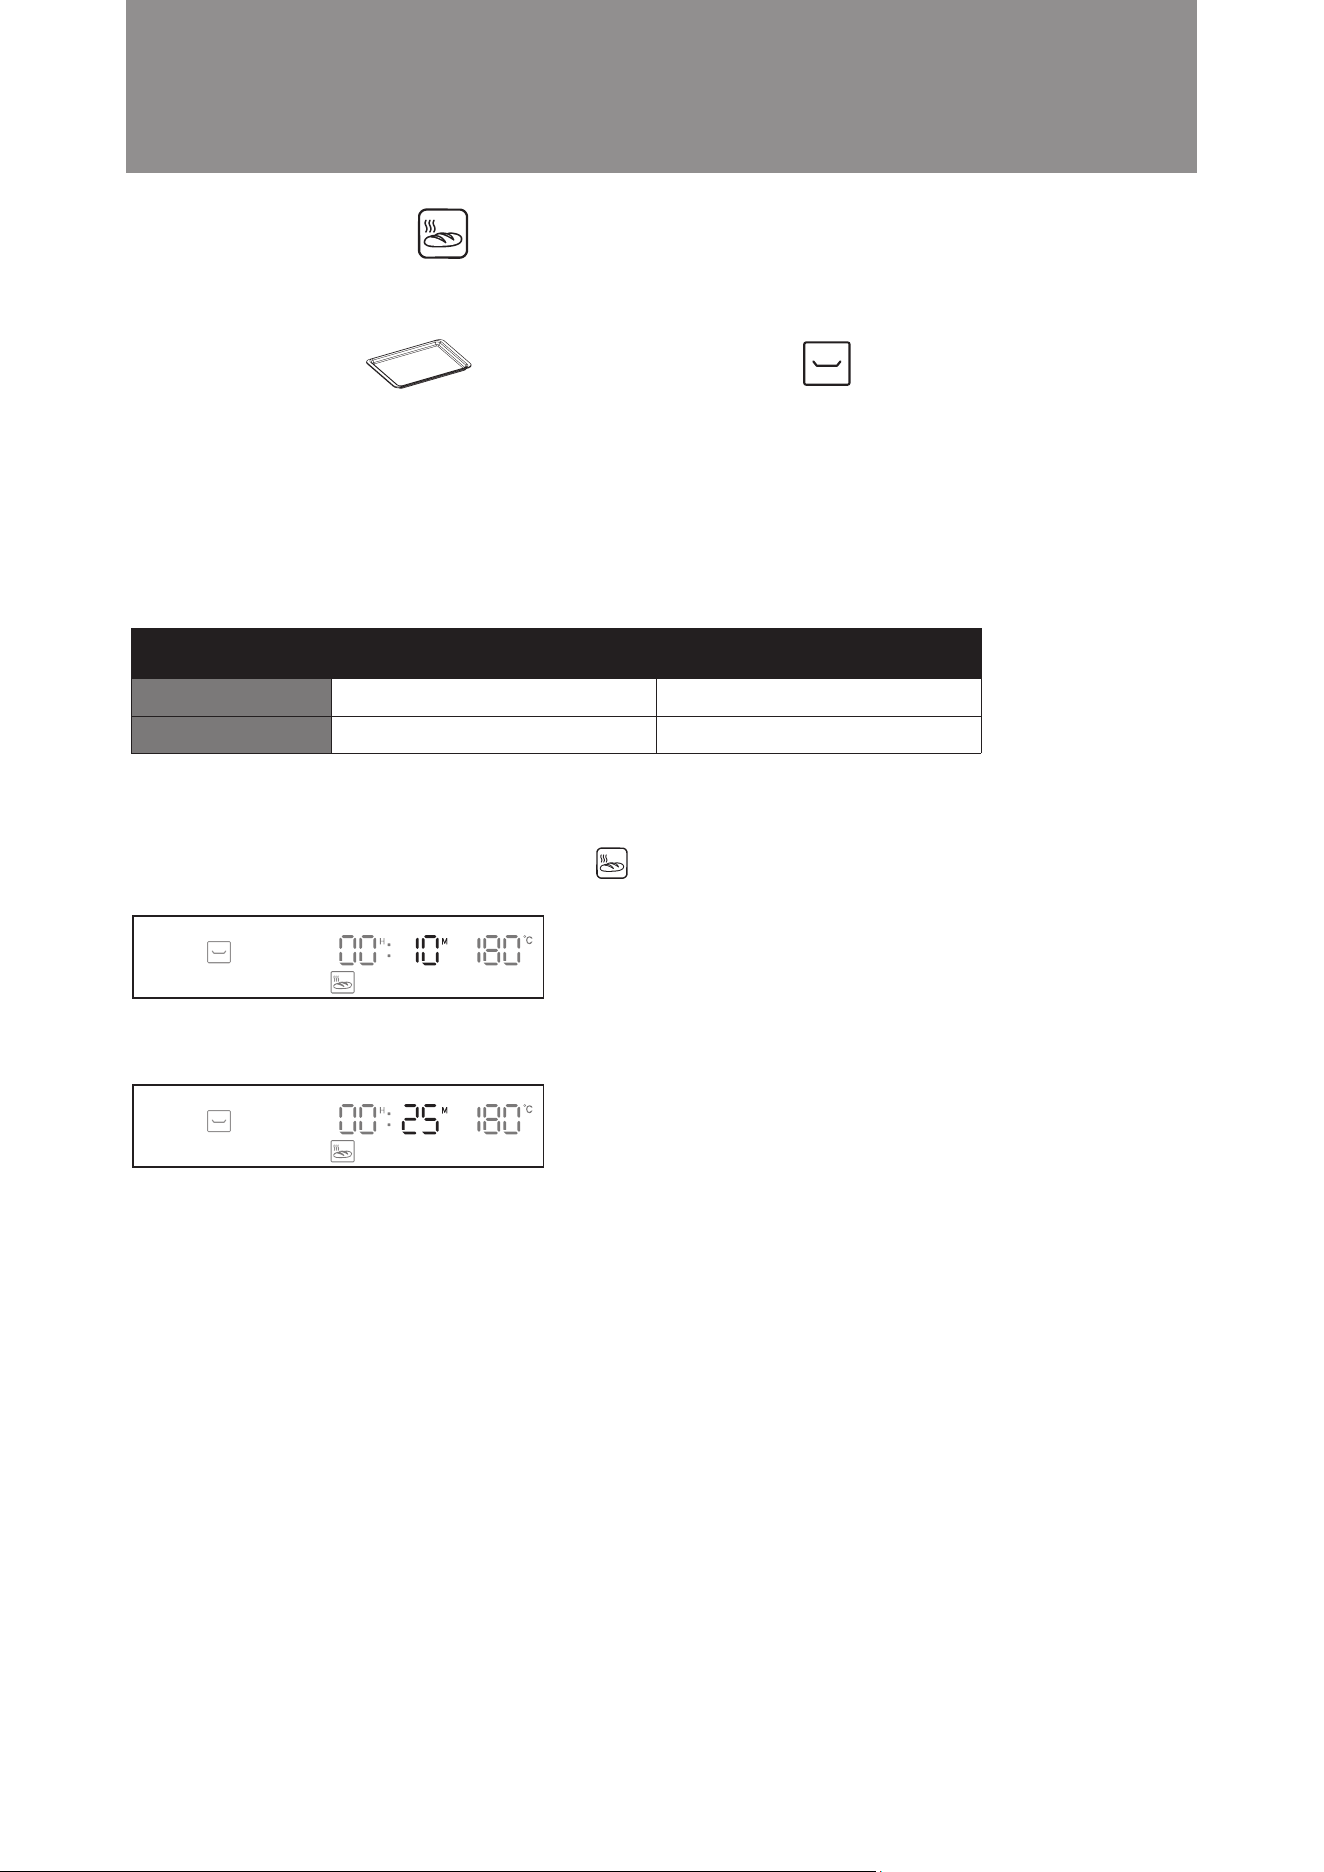
Example: Cooking bread that has been refrigerated. Set the cooking time to 25 minutes
Steps:
1. In standby mode, turn the knob clockwise to Bread Reheat Mode. The icon will flash. Press the knob to
confirm (as shown in the diagram below). The display will jump to minute setting automatically.
2. Turn the knob until the minute display shows 25. Press the knob to confirm (as shown in the diagram below).
3. Setting is complete.
Bread Reheat Mode
■
Bread is reheated at a regulated temperature and steam is added to reheat bread that tastes just like freshly-baked.
Two heating modes are available: Room temperature bread and refrigerated bread. Always ensure that the water
tank is filled before using this mode.
Suggested cooking time: Reheating time for frozen bread: about 10-15 minutes; Reheating time for room temperate
bread: about 8-13 minutes. It is recommended to add 5-10 minutes for bread with fillings. This suggested cooking
time is solely for reference. Cooking time is affected by the bread’s quantity, size, type and personal taste.
TimeTemperature
Default Setting
Setting Range
180°C
xed
10 mins
5 mins - 59 mins
34
Operation Instructions
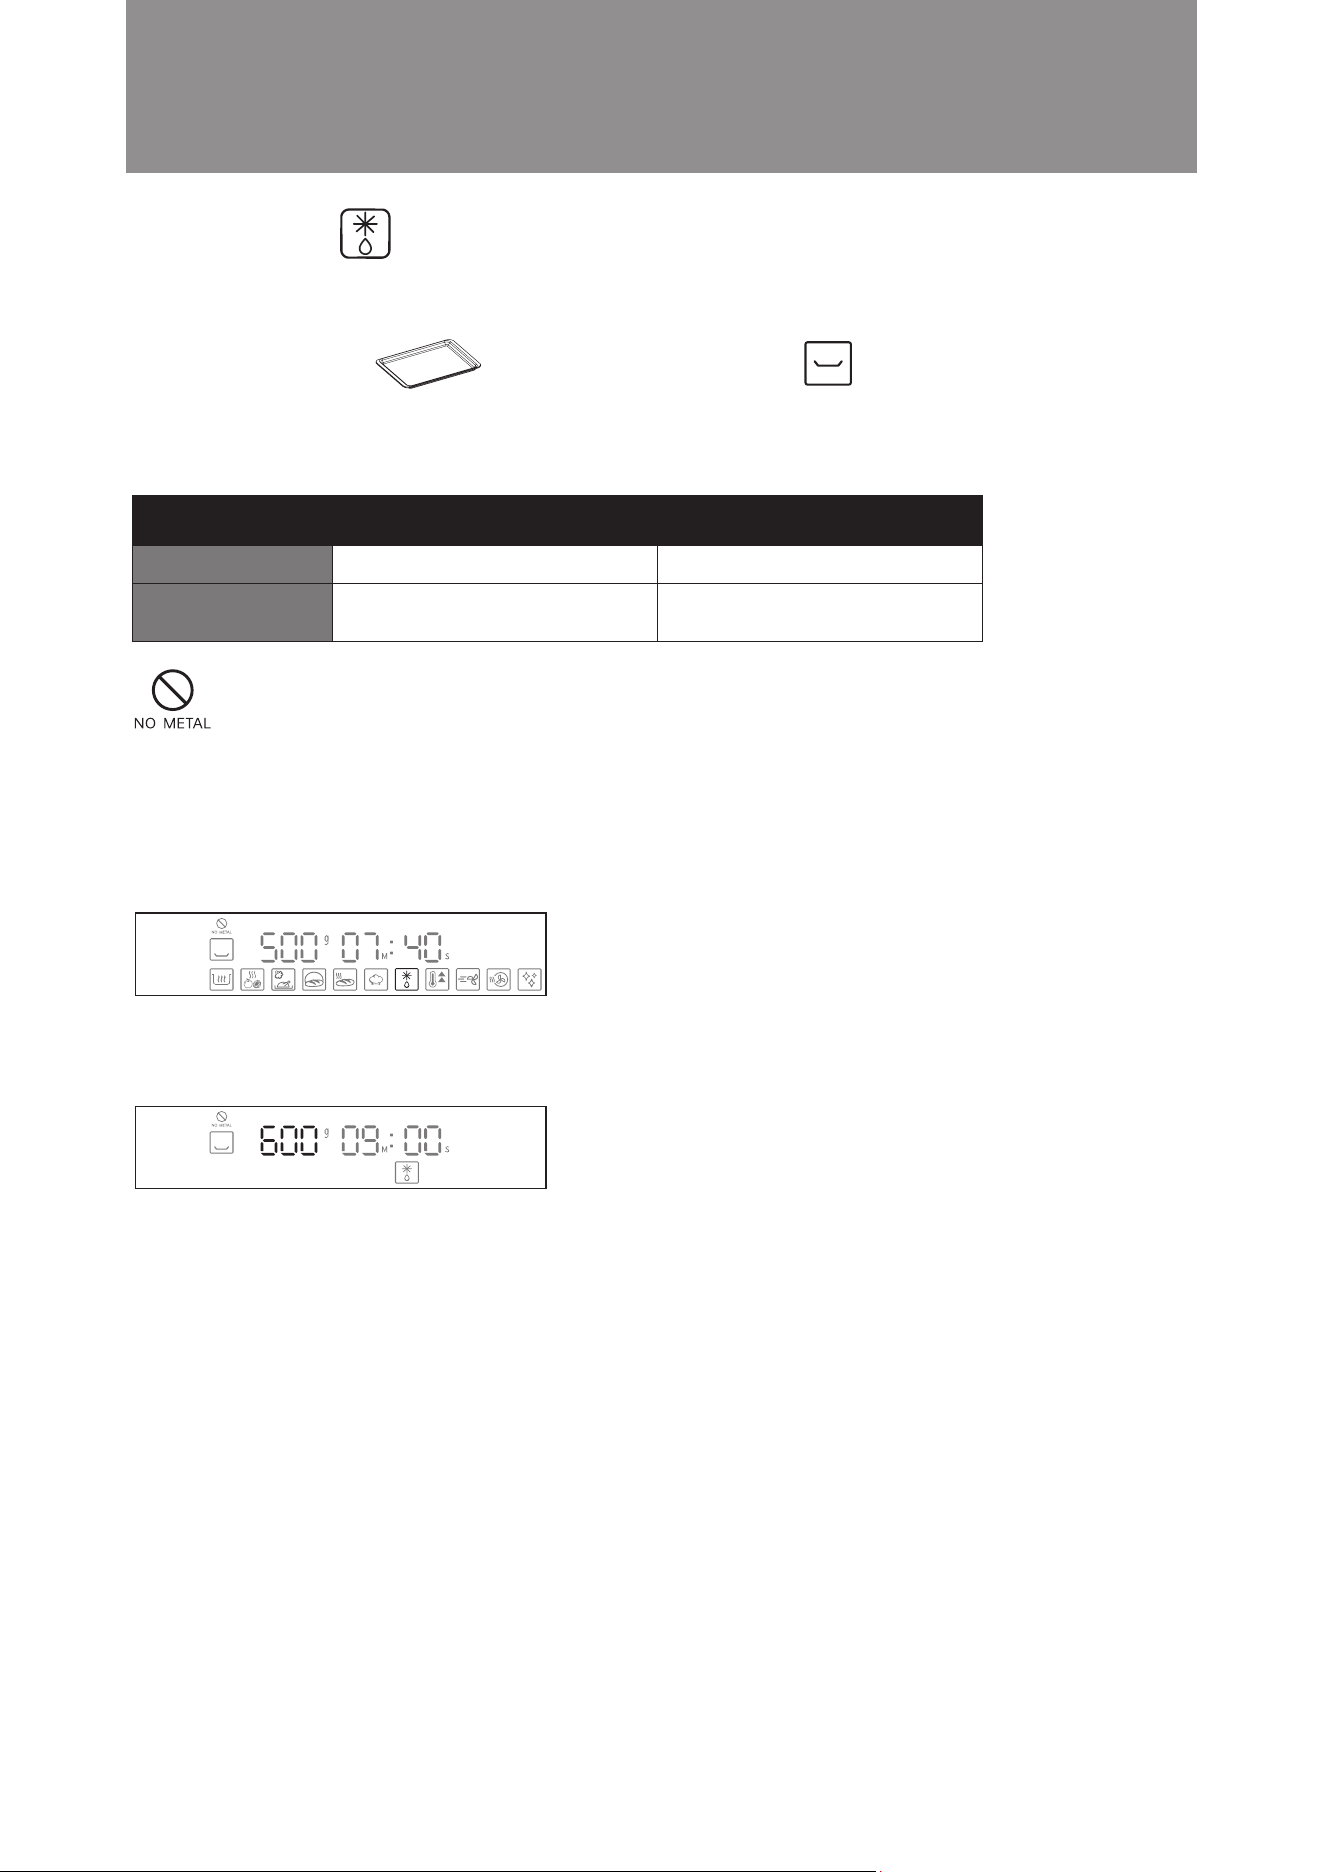
Defrost Mode
■
Defrost chilled or frozen food with Microwave.
TimeFood Weight
Default Setting
Setting Range
500g
100g - 2000g
7 mins 40 sec
Automatically adjusted based
on entered food weight
Example: Defrost 600g food
Steps:
1. In standby mode, turn the knob anti-clockwise to Defrost mode. The icon will flash. Press the knob to confirm
(as shown in the diagram below). The display will jump to hour setting automatically.
2. Turn the knob until the weight value display shows 600. Press the knob to confirm( as shown in the diagram
below).
3. Setting is complete. The microwave steam oven will start cooking.
Suggested Accessory: Accessories Location:
Baking Tray Middle layer
Attention! Do not use metal utensils (except our suggested accessory) to cook under
this cooking function, otherwise sparks may be generated and cause malfunction.
35
Operation Instructions
Preheat Mode
■
Oven will automatically adjust the cooking time according to set temperature. “END” will be displayed and an
audio tone will be heard when the temperature reaches the preset temperature. Current time is displayed during
preheating. Always ensure that the water tank is filled before using steam preheating.
Example: Set the steam preheating temperature to 80°C.
Steps:
1. In standby mode, turn the knob clockwise to Preheat Mode. The icon will ash. Steam is the default setting.
Press the knob to confirm (as shown in the diagram below).
2. The display will jump to temperature setting automatically. Turn the knob until temperature display shows
100°C. Press knob to confirm the bottom grill temperature (as shown in the diagram below).
3. Setting is complete. The steam microwave oven will start preheating.
The Preheat Mode can be operated with steam or baking mode. The oven will be heated to preset temperature.
Default Setting
Setting Range
Temperature
100°C
50°C - 110°C
Steam Preheating
Temperature
180°C
100°C - 230°C
Baking Preheating

36
Example: Set the baking preheating temperature to 200°C.
Steps:
1. In standby mode, turn the knob clockwise to Preheating Mode. The icon will flash. Steam is the default setting.
Turn the knob to select the baking preheating mode, and then press the knob to conrm (as shown in the diagram
below).
2. The display will jump to temperature setting automatically. Turn the knob until the display shows 200°C. Press
the knob to confirm (as shown in the diagram below).
3. Setting is complete. The steam microwave oven will start preheating.
When preheating is complete, the display will show “END” and an audio tone will be heard. After preheating the
combi steamer, you can select other cooking modes to continue your cooking as required.
Important: The function of “Adjust or Increase the Cooking Time during/after Cooking is Completed” is not available in
this mode.
Operation Instructions
37
Example: Set the cooking time to 30 minutes; temperature is 210°C
Steps:
1. In standby mode, turn the knob anti-clockwise to Air Fry mode. The icon will flash. Press the knob to
confirm (as shown in the diagram below). The display will jump to hour setting automatically.
2. Press the knob to confirm 00 hour setting (as shown in the diagram below). The display will jump to minute
setting automatically.
3. Turn the knob until the minute display shows 30. Press the knob to confirm (as shown in the diagram below).
The display will jump to temperature setting automatically.
4. Turn the knob until temperature display shows 210°C. Press knob to confirm the temperature (as shown in the
diagram below).
5. Setting is complete. The microwave steam oven will start cooking.
A fan is used to circulate heat in the oven cavity to create convection, allowing the food to be baked in a shorter
time to create a crispy eect. It is suitable for food that needs to be air-fried or for baking larger meats and pastries.
Air frying Mode
■
Time Temperature
Default Setting
Setting Range
180°C
80°C - 230°C
25 mins
5 mins - 3 hours and 59 mins
Operation Instructions
Suggested Accessory: Accessories Location:
Air Fry Basket Middle Layer

38
In this mode, the oven is heated to a high temperature so any excessive moisture and steam are evaporated. This
function is used for drying the oven after any steam cooking modes.
Steps:
1. In standby mode, turn the knob anti-clockwise to Cavity Drying Mode. The icon will flash. (as shown in the
diagram below).
2. Press the knob to confirm. The steam microwave oven will start cooking (as shown in the diagram below).
Operation Instructions
Cavity Drying Mode
■
Time Temperature
Default Setting
Setting Range
180°C
Cannot be adjusted
15 mins
Cannot be adjusted
39
Steps:
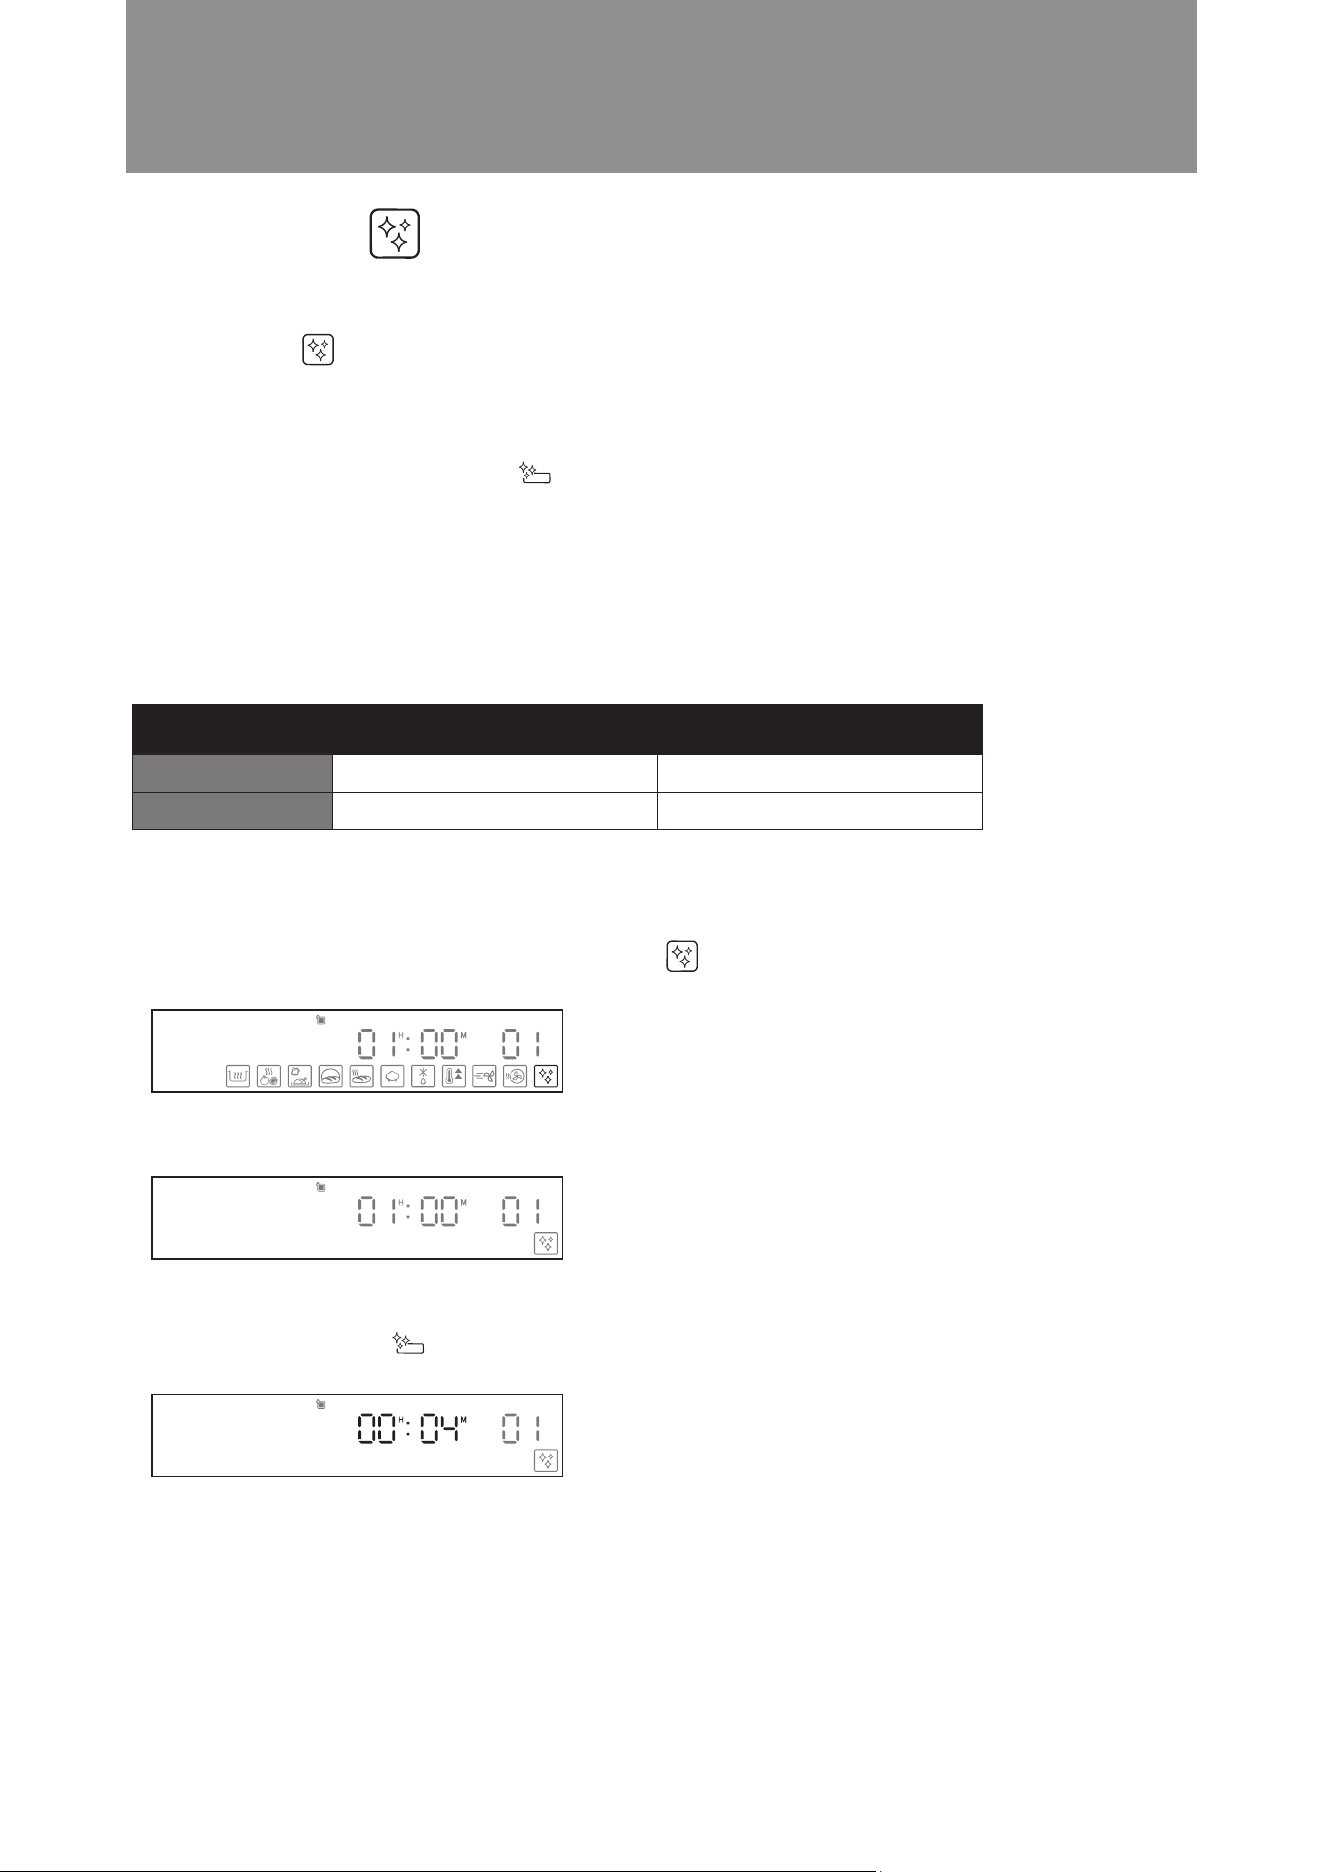
1. Stage 1: Descaling
A. Add 30ml descaler and 300ml water into water tank.
B. In standby mode, turn the knob anti-clockwise to Descaling Mode. The icon will flash. Press the knob
to confirm (as shown in the diagram below).
C. The descaling mode will start (as shown in the diagram below).
D. Stage 1 takes 56 minutes. When done, the time display digits will ash and an audio tone will sound to indicate
stage 1 is complete. Drip tray cleaning reminder icon will light up on the display panel to remind the
user to empty the drip tray.
E. Pour out the dirty liquid and put the drip tray back into place.
Water used in steaming mode may result in scale accumulated inside cavity and water pipe.
“Descaling” icon will be on once combi steamer has reached 100hrs steam related cooking time to remind
the user to run the descaling programme mode. The light will stay on until the descaling is performed.
Descaling is carried out in three stages that involve one descaling process and two descaling and cleaning processes.
The user has to change the liquid in the tank 3 times during the entire cleaning process. It is also necessary to
empty the drip tray by cleaning up. Icon will be lighted to remind cleaning up the drip tray is needed.
Also, descaler is required for this mode. Customer can select the Wpro descaler under Whirlpool brand. This
product can be used in steamer for cleaning limescale deposits effectively, optimizing machine performance and
prolonging the lifespan of the appliance. For more details, please visit our website: www.whirlpool.com.hk
For satisfactory results, follow the suggested dosage for descaler and water below:
Stage 1: Descaling. Running time is 56 minutes. Suggested dosage: 30ml descaling agent and 300ml pure water.
Stage 2: Descaling and cleaning process. Running time is 4 minutes. Suggested dosage: 300ml pure water.
Operation Instructions
Time Temperature
Default Setting
Setting Range
Cannot be adjusted
Cannot be adjusted
60 mins
Cannot be adjusted
Descaling Mode
■

40
2. Stage 2: Descaling and cleaning process
A. Open the oven door, add 300ml clean water into water tank.
B. Put the water tank back into place and close the oven door. Press knob to conrm and resume descaling and
cleaning process.
C. When done, the time display digits will ash and an audio tone will sound to indicate descaling is complete.
Drip tray cleaning reminder icon will light up on the display panel to remind the user to empty the drip tray.
D. Pour out the dirty liquid and put the drip tray back into place.
3. Descaling process is completed
Important:
1. The function of “Combination Button: Cavity temperature display” is not available in this mode.
2. The function of “Adjust or Increase the Cooking Time during/after Cooking is Completed” is not available in
this mode.
3. Descaling mode will be interrupted if the steps of descaling mode is taken in the wrong way (including pause
during the descaling process or open and close the oven door not following instructions etc). Please restart
descaling mode and follow the instructions in the manual.
Operation Instructions

41
Operation Instructions
It is used to complete a variety of different cooking function combination at one time automatically, make cooking
more diverse and convenient.
For example, first cook with Steam Mode at 110°C for 1 hour 20 minutes, then cook with Turbo Convection +
Microwave mode at 190°C for 1 hour 30 minutes, and then cook for 1 hour 30 minutes at 190°C with Turbo Con-
vection mode.
Steps:
1. In standby mode, turn knob to DIY Cooking mode. The icon will flash. Press to confirm the function.
(As shown in the diagram below). The display will jump to cooking mode setting automatically.
2. Turn knob to Steam mode. The icon will ash. Press knob to conrm cooking mode (as shown in the diagram
below). The display will jump to hour setting automatically.
3. Turn knob until the hour display shows 01. Press knob to confirm (as shown in the diagram below). The display
will jump to minute setting automatically.
4. Turn knob until the minute display shows 20. Press knob to confirm (as shown in the diagram below). The
display will jump to temperature setting automatically.
5. Turn knob until the temperature display shows 110°C. Press to confirm the 1st cooking function setting
and jump to next cooking function setup. ( as shown in the diagram below).
6. Turn knob to Turbo Convection + Microwave mode. The icon will ash. Press knob to conrm cooking mode
(as shown in the diagram below). The display will jump to hour setting automatically.
DIY Cooking Mode
■

42
Operation Instructions
7. Turn knob until the hour display shows 01. Press knob to confirm (as shown in the diagram below). The
display will jump to minute setting automatically.
8. Turn knob until the minute display shows 30. Press knob to confirm (as shown in the diagram below).
The display will jump to temperature setting automatically.
9. Turn knob until the temperature display shows 190°C. Press to confirm the 2nd cooking function
setting and jump to next cooking function setup. ( as shown in the diagram below).
10. Turn knob to Turbo Convection mode. The icon will flash. Press knob to confirm cooking mode
(as shown in the diagram below). The display will jump to hour setting automatically.
11. Turn knob until the hour display shows 01. Press knob to confirm (as shown in the diagram below).
The display will jump to minute setting automatically.
12. Turn knob until the minute display shows 30. Press knob to confirm (as shown in the diagram below).
The display will jump to temperature setting automatically.
13. Turn knob until the temperature display shows 190°C. Press to conrm the 3rd cooking function setting
14. Setting is completed. The microwave steam oven will start cooking.
43
A. Adjust the cooking time during cooking process
You can extend or shorten the cooking time and the temperature as required during the cooking process.
Example: Change the cooking time and temperature settings from 01:40 and 90°C to 02:00 and 100°C.
Steps:
1. During cooking, press the knob to interrupt and pause the cooking. The time display will flash (as shown in the
diagram below).
2. Press the setting button . The display will go to the reset cooking time screen automatically. The hour
digit flashes, and the “Extended Cooking Time” icon lights up on the display (as shown in the diagram
below).
3. Turn the knob until the hour display shows 02. Press the setting button to confirm (as shown in the
diagram below). The display will jump to minute setting automatically.
4. Turn the knob until the minute display shows 00. Press the setting button to confirm (as shown in the
diagram below). The display will jump to temperature setting automatically.
5. Turn the knob until the temperature display shows 100°C. Press the knob to conrm (as shown in the diagram below).
6. Setting is complete. Cooking will be resumed with new settings.
Operation Instructions
Adjust or Increase the Cooking Time during/after Cooking is Completed
■

44
B. Increase the cooking time after cooking is completed
You can increase the cooking time after cooking is completed. Temperature cannot be adjusted.
When cooking is completed, the “END” Will be shown on display and an audio tone sounds. The “Extended
Cooking Time” icon will light up on the display (As shown in the diagram below).
To increase the cooking time, follow the steps below:
Example: Cooking is completed and need to increase the cooking time by 3 minutes.
Steps:
1. Press the knob to confirm to increase the cooking time, the display will jump to minute setting automatically.
2. Turn the knob until the minute display shows 03. Press the knob to confirm (as shown in the diagram below).
3. Setting is complete. Cooking will resume with added cooking time under previous settings (as shown in the
diagram below).
Note: If no action is taken within 5 minutes after cooking is completed, the combi steamer will return to standby
mode.
Operation Instructions
Time Temperature
Setting Range Cannot be adjusted 1 min to 59 mins
45
You must set the clock before using the preset function. For instructions on clock setting, please see “Setting the
Clock” on page 73 of this instruction manual.
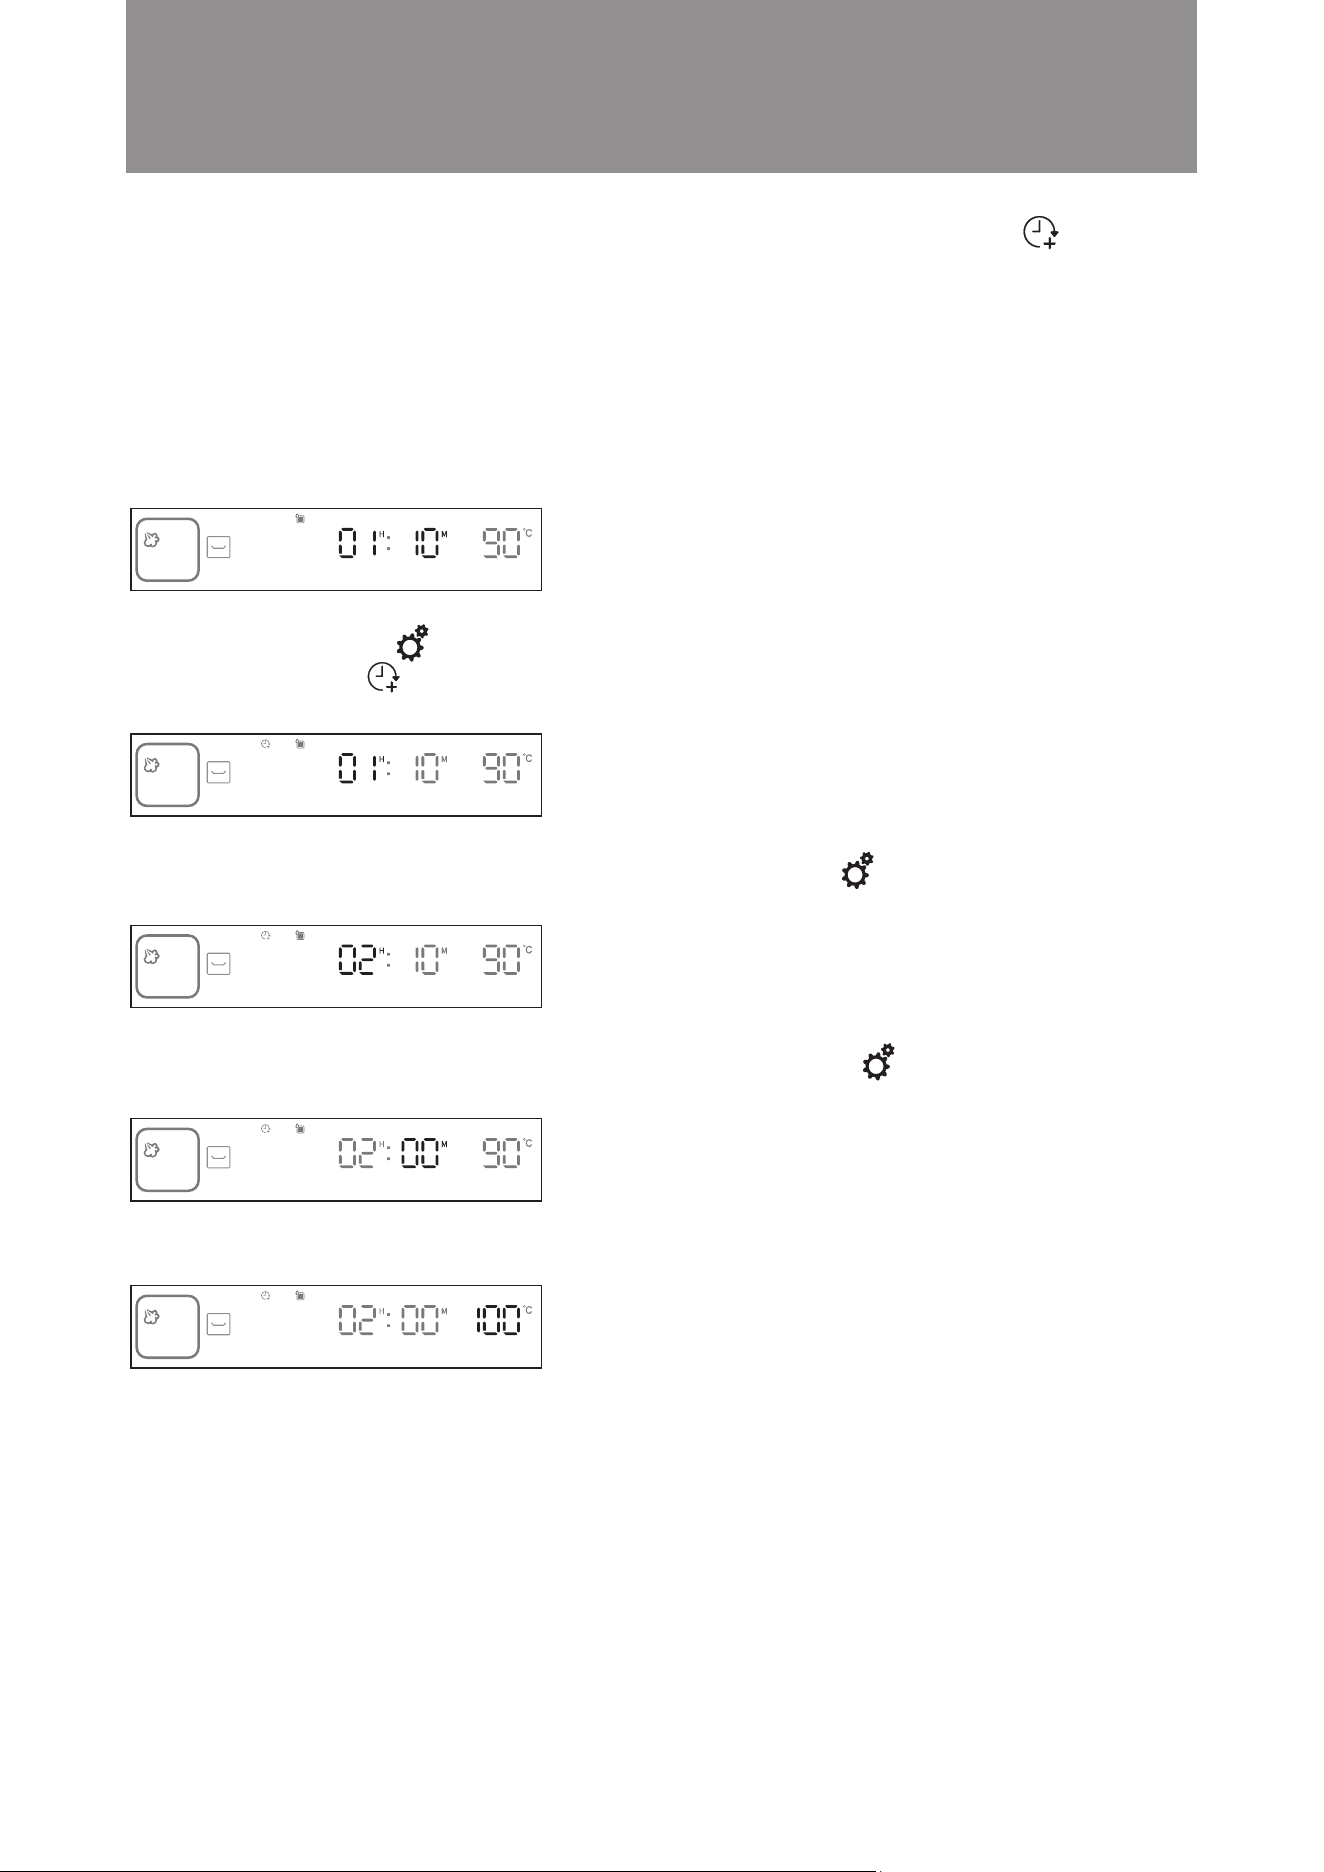
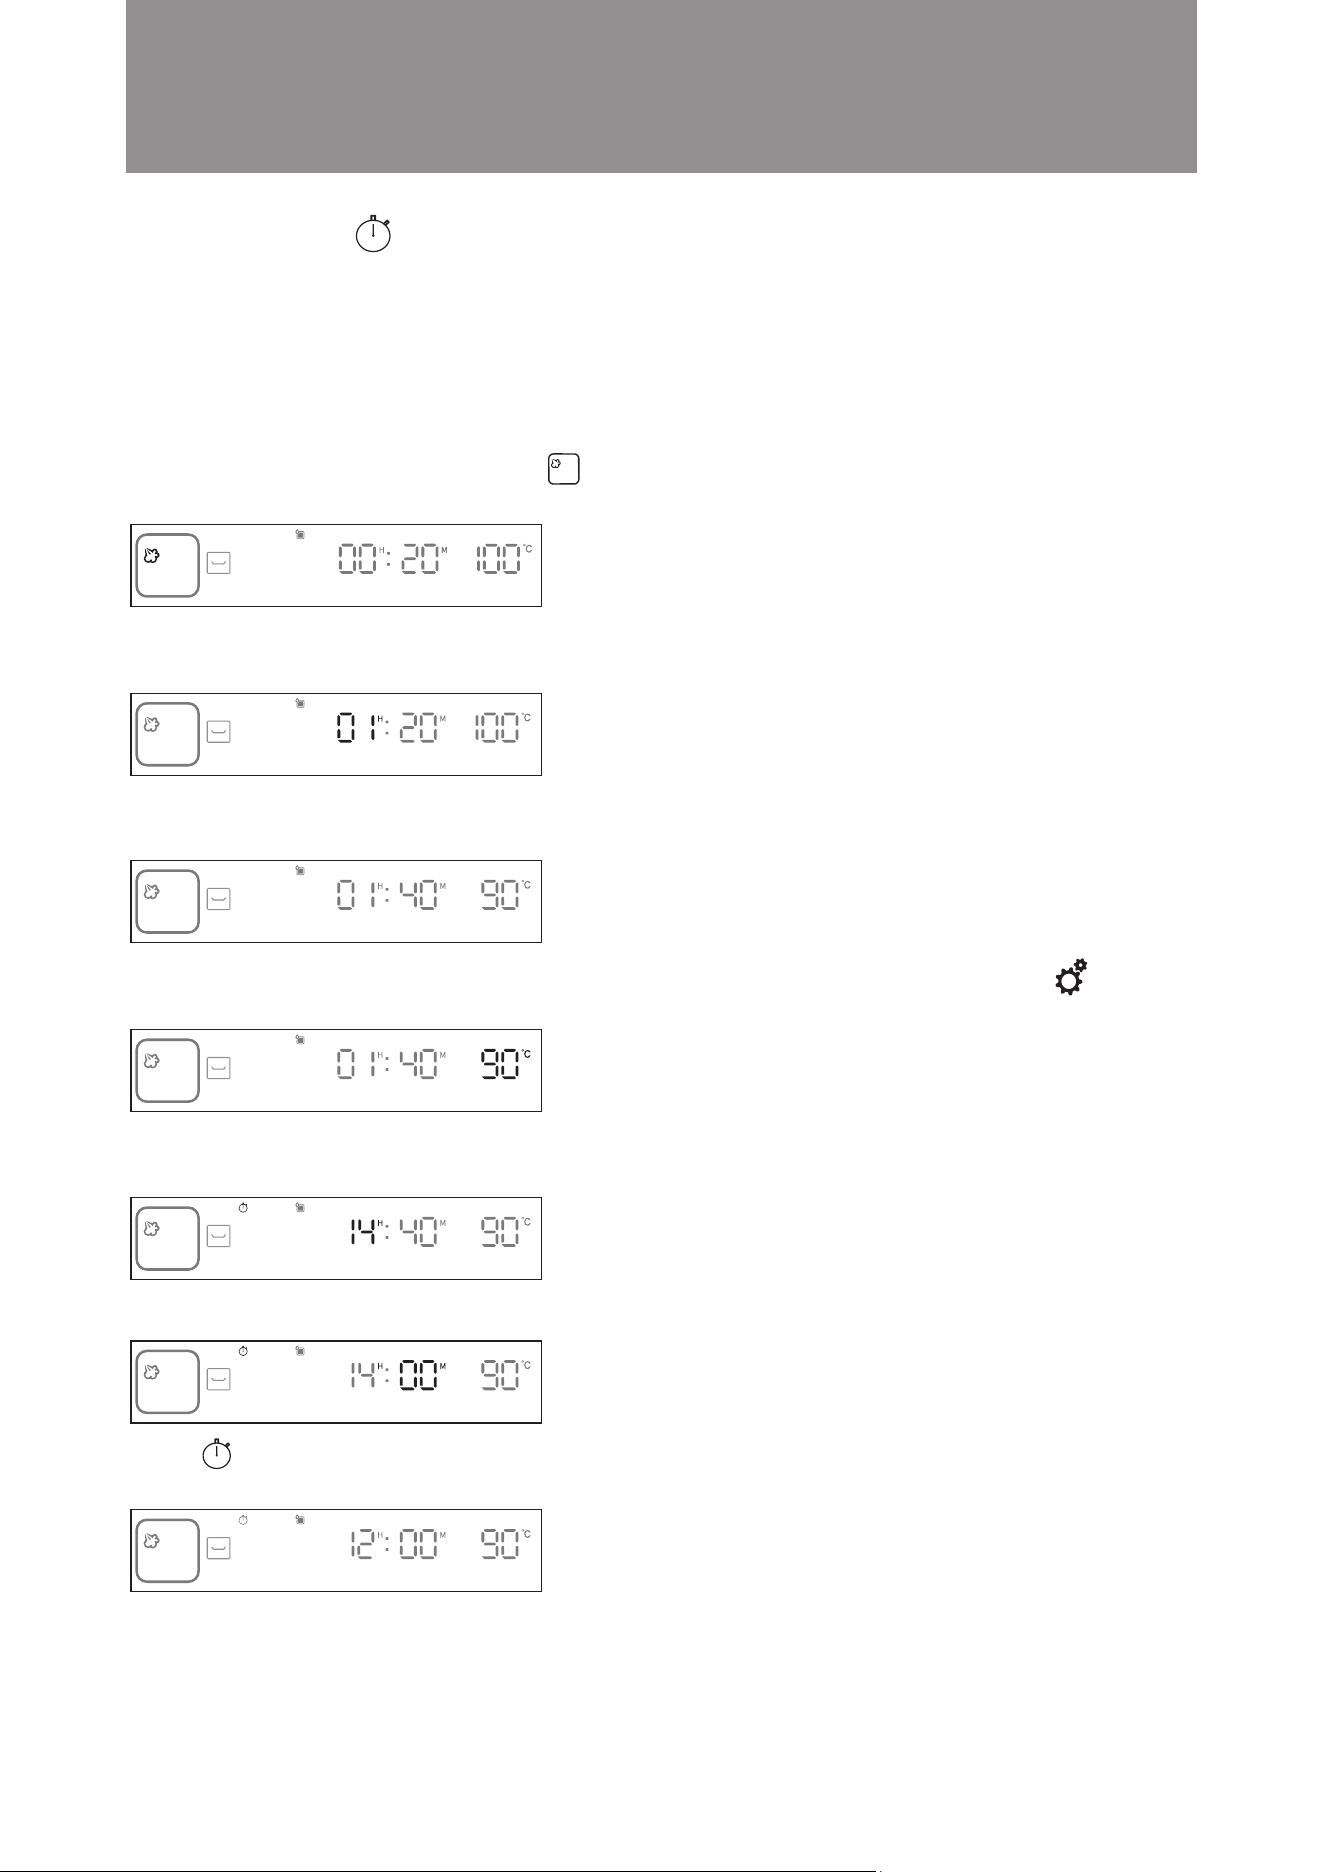
Example: The current time is 12:00. You want to preset cooking time for the Bottom Grill Mode. Cooking time is
1 hour and 30 minutes and temperature is 90°C. Cooking will stop at 14:00.
Steps:
1. In standby mode, turn the knob clockwis Bottom Grill Mode. The icon will ash. Press the knob to conrm
(as shown in the diagram below). The display will jump to hour setting automatically.
2. Press the knob to conrm the 01 hour setting (as shown in the diagram below). The display will jump to minute
setting automatically.
3. Turn the knob until the minute display shows 30. Press the knob to confirm (as shown in the diagram below).
The display will jump to temperature setting automatically.
4. Turn the knob until the temperature display shows 90°C. Press the setting button for 3 seconds to confirm
(as shown in the diagram below).
5. Turn the knob until the hour display shows 14. Press the knob to conrm (as shown in the diagram below). The
display will jump to minute setting automatically.
6. Turn the knob until the minute display shows 40. Press the knob to confirm. (as shown in the diagram below).
7. The preset function icon of the display panel will flash. Display will change from operating time back to
the current time 16:30, indicating preset setting is complete (as shown in the diagram below).
Operation Instructions
Preset Function
■

46
A. Checking Preset Function Status
Press and hold the setting button for 3 seconds to check the preset stop time. The preset function icon will
flash. Press and hold the setting button for 3 seconds again to return to the preset function screen.
B. Cancelling Preset Function:
To cancel any preset function setting, press the power button directly. The combi steamer will return to the
standby screen automatically.
Important: Preset Function is available in 12 Mainly Cooking Modes, Bread Reheat Mode, Slow Cook Mode
and Drying Fruit Mode. (See “Control Panel – Major Features/ Description of Major Features on P.65-69 for
details) Suggestion: Preset cooking operation may be cancelled if children touch the screen accidentally. To
avoid this, activate the child lock function after setting the preset function. For instructions on setting the
child lock, please see “Control Panel – Basic Functions” on page 65 of this instruction manual. The child lock
will not affect cooking. The steam microwave oven will start cooking normally at the preset time.
Operation Instructions

47
P01 Steam Seabass middle layer
P02 Baby Cabbage middle layer
with Garlic
P03
White clam
middle layer
steamed egg
P04 Steam Rice middle layer
P05 Crispy Pork middle layer
500g sea bass, 6 slices ginger, 6 green onions, 20ml soy
sauce, 50ml oil
1. After cleaning the seabass, marinate it with oil and black pepper
for half an hour;
2. Place ginger and green onion at the bottom of the dish, and put
the seabass onto the dish;
3. Place in the middle layer of the microwave steam oven and select
P01;
4. After taking it out of the oven, pour out the sauce on the plate,
add in soy sauce and hot oil.
400g baby cabbage, garlic, 30ml soy sauce, 1 teaspoon salt,
70g oil, 10g oyster sauce
1. Cut the baby cabbage in half then cut each into 6 small
pieces, and lay them flat on a plate;
2. Chop the garlic into minced garlic, add seasonings, pour
hot oil to make garlic sauce;
3. Pour the sauce over the baby cabbage;
4. Place in middle layer of the of the microwave steam oven and
select P02.
2 eggs, 200ml room temperature water, 16 pieces white clam,
ginger slices, rice wine, salt, soy sauce, Appropriate amount of oil.
1. Soak the white clams in salt water, add appropriate amount
of oil, and soak for 1 hour;
2. Heat hot water in a pot, add ginger slices and rice wine,
pour in the white clams, when shells slightly open take
them all out from the water;
3. Add an appropriate amount of salt to the eggs and stir evenly,
then pour in room temperature water and stir again evenly;
4. Place the white clams in the bottom of a shallow dish, with
the opening facing up, and pour in the egg liquid;
5. Put in the middle layer of microwave steam oven and select P03;
6. Take it out of the oven and sprinkle with chopped spring
onion, pour soy sauce and hot oil.
700g pork belly, 2 tbsp salt, 2 tbsp five-spice powder, 1 tbsp
white vinegar, 1 tbsp baking soda
1. Use a fire lance to burn the pork hair on the pork belly skin,
and scrape with a knife to clean it;
2. Make a deep groove on the meat surface and sprinkle with
five-spice powder and salt on all sides, except the pork
skin, evenly.
3. Place the pork in a pot with cold water, cook until foam
forms, take out the pork and clean withe cold water;
4. Clean the pig skin, use a small sharp knife to poke holes,
and penetrate the skin layer densely;
5. Pour an appropriate amount of white vinegar into the bot-
tom of the plate and soak the pork skin side down for 5
minutes;
6. Pork skin side up, wrap the other sides with tin foil, and
put it in the refrigerator overnight until the surface of the
pig skin is dry;
7. Place in the middle layer of microwave steam oven and
select P05.
50g rice, 370ml water
1. Wash the rice, pour it into a baking pan, and pour in water;
2. Place in the middle layer of the microwave steam oven and
select P04;
Recipe no. Dish Recipe
Accessory
location
In Standby mode, press setting button to enter into Auto Menu to select recipe (P01 to P21), press knob to
confirm the recipe.
Operation Instructions
Auto Menu
■

48
Others
P06
Honey
middle layer
Chicken Wings
P07
Roasted Rack
middle layer
of Lamb
P08 Hamburger Steak middle layer
P09 BBQ Pork middle layer
P10 Boiled Eggs bottom layer
P11
Roasted
middle layer
Sweet Corns
12 pieces chicken wing, 70g marinated chicken wing powder,
20g minced garlic, 30g corn starch, appropriate amount of honey,
appropriate amount of oil
1. Wash the chicken wings, soak in water for 20 minutes, and
drain;
2. Pour in the corn starch, then the seasonings, mix well, and
marinate for 1 hour;
3. Lay the chicken wings on a baking tray, place them in the
middle layer of the microwave steam oven, and select P06.
200g minced beef, 150g minced pork, half onion (chopped), 1 egg
1. Mix all burger ingredients and marinade evenly and press
into a patty shape.
2. Place the burger steak on the baking tray, place it in the
middle layer of microwave steam oven, and select P08.
4 eggs
1. Place the eggs on steam tray, place the tray in the bottom
layer of microwave steam oven and select P10.
2 sweet corns
Seasonings: 2 tbsp olive oil, 2 tsp cumin powder, 1 tsp
cheese powder,1 tsp salt, 1 tsp black pepper
1. Divide the corn into 3 sections and cut each section into
4 pieces;
2. Mix the seasonings and set aside;
3. Lay the corns flat on baking tray and apply seasonings;
4. Place in the middle layer of the microwave steam oven and
select P11.
400-500g Pork scotch fillet
Seasonings: 1 tbsp salt, 4 tbsp sugar, 1/4 tsp chicken powder,
1 egg, 2 dried onions, 2 cloves of garlic, 1 stalk
of coriander, 1 tablespoon of preserved beans
(chopped), 1/2 tsp of rose wine, 4 tbsp of maltose,
a small amount of ginger paste.
1. Prepare marinade seasoning. First saute the dried onions,
minced garlic, coriander and preserved beans until fragrant.
Then add sugar, salt, natural chicken powder and eggs.
Mix well and ferment at room temperature for 6 hours.
2. The next day, mix the rose wine into the fermented seasonings
and marinate for half an hour or above. Cut the pork into
long pieces.
3. Add seasonings to pork and marinate for 45 minutes to 1 hour.
4. Place the marinated pork on the baking tray, place it in the
middle layer of microwave steam oven, and select P06.
5. After baking is completed, take out the barbecued pork
and apply the maltose that has been boiled and dissolved
in water on the barbecued pork.
6. Place it in the microwave steam oven and bake in the “upper
and lower grill” mode for 15 minutes. Take it out again.
Coat the other side with maltose and continue baking for
15 minutes.
5 pieces of lamb chops, 1 onion, 3 green onions, 6 slices of
ginger, 1 teaspoon of salt, 2 tbsp of light soy sauce, 1 tsp rice
wine, 1 tsp honey, 4 tsp cumin powder, 2 tsp garlic powder,
white pepper 1 tsp, red chili powder 1 tsp
1. Marinate the lamb chops with onions, ginger, salt, light soy
sauce, rice wine, and honey for 2 hours;
2. Mix the powdery seasonings evenly to make a marinade;
3. Cut the onions into sections and place them on the bottom,
then put the lamb chops on top;
4. Evenly coat both sides of the lamb chops with marinade;
5. Place in the middle layer of the microwave steam oven and
select P07;
6. For the remaining 10 minutes, turn the lamb chops over and
continue grilling.
Recipe no. Dish Recipe
Accessory
location

49
P12
Roasted
middle layer
Sweet Potatoes
P13 French Fries middle layer
P14 Small Buns bottom layer
P15 Pizza bottom layer
P16 Yogurt bottom layer
P17 Blueberry Cream bottom layer
Cheese Cake
Others
3 sweet potatoes (about 100g each)
1. Clean the sweet potatoes and place them on baking tray;
2. Place the tray into the middle layer of microwave steam
oven and select P12.
250g Bread flour, 3g Instant yeast, 5g salt, 18g sugar, 30g
unsalted butter, 220ml milk
1. Soften unsalted butter at room temperature.
2. Mix bread flour, instant yeast, salt, sugar and milk to the
mixer and mix for 20 minutes.
3. Add softened unsalted butter to the dough, and keep mix
for about 15 minutes.
4. Cut the dough into 12 equal parts.
5. Put baking paper on bake tray and put 6 dough on the
tray then put it in the bottom layer of the microwave steam
oven and select P14.
250g High-gluten flour, 150ml water, 4g salt, 1/2g Instant
yeast, red peppers, basil, cheese, grilled chicken
1. Dissolve salt in water, add 10% flour and mix well, then
add Instant yeast and mix well.
2. Add the remaining flour in batches and knead into a round
dough with your hands.
3. Cover the dough with a semi-dry wet cloth and let it rest
for a while.
4. Deflate and roll it into a round shape, then place it in the
refrigerator to let it ferment and double in size. 5. After taking
the dough out of the refrigerator, it needs to be warmed for
one hour.
6. Form into a 12-inch pizza shape, add red pepper, basil,
cheese and grilled chicken.
7. Place the pizza on the baking tray, place it in the bottom
layer of microwave steam oven, and select P15;
750ml Pure milk, 50ml plain yogurt, 40g sugar
1. The cheese-making utensils must be scalded in boiling
water and air-dried to ensure there is no oil or water;
2. Heat the pure milk to about 40 degrees, turn off the heat,
heat the sugar and stir evenly;
3. When the temperature of the milk is lower than 40 degrees,
add yogurt to make yeast and stir evenly;
4. Place the yogurt into a container for fermentation and seal
with plastic wrap or lid;
5. Place it on the bottom layer of microwave steam oven and
select P16.
120g Blueberries, 2 eggs, 150g sugar, 50g vegetable oil, 1/2
tsp vanilla oil, 220g sour cream, 250g low-gluten flour, 1/2 tsp
salt, 1/2 tsp soda powder, little cream cheese
1. Wash blueberries and set aside.
2. First put the eggs and sugar into a large bowl and beat
with an electric egg beater until light yellow. Add vegetable
oil and vanilla oil and mix well. Finally, add sour cream and
mix into egg liquid.
3. Sift the cake flour, salt and baking powder through a sieve.
4. Add the sifted our to the egg mixture, then add the blueberries.
5. Pour the egg mixture into the waffle mold, fill it to about
70% full, and add cream cheese.
6. Place the baking tray into the bottom layer of the microwave
steam oven and select P17.
Frozen French fries 200g
1. Frozen French fries do not need to be defrosted and poured
into air fry basket. Lay the fries flat on the basket and try to
avoid stacking;
2. Place the tray in the middle layer of microwave steam oven
and select P13.
Recipe no. Dish Recipe
Accessory
location

50
Others
P18 Apple Pie middle layer
P19
Defrost chilled food
bottom cavity
(500g)
P20
Semi-defrost
bottom cavity
thawed meat (500g)
P21
Defrost
bottom cavity
thawed meat (500g)
Ingredients for the dough: 90g unsalted butter, 1 tsp sugar , 3g salt,
180g all-purpose our, 2 egg yolks, 2 tbsp ice water, 1 egg white.
Filling: red & green apples 6 each, 1 tsp lemon juice, half lemon
(in slice), nutmeg powder, 1 tsp golden cane sugar, a little walnut
or almond slices, little dried cherries.
1. To make the pie, mix unsalted butter, sugar and salt until
soft. Add all-purpose flour, mix briefly and add egg yolks
and ice water.
2. After kneading into a smooth dough, use rolling pin to gently
flatten it into a square shape. Wrap with plastic cling and
put into refrigerator for at least 1 hour.
3. Take out the dough and let it sit at room temperature for 30
minutes. Then place the dough between 2 pieces of butter
paper, roll it to 5 cm thick and tear off the butter paper.
4. Place the dough into a 10-inch mold, prick holes with a
fork, and apply white egg around the dough. Place the
dough back in the refrigerator.
5. To make the filling, wash and slice the red apples and
green apples, add lemon juice,mix lemon juice, cardamom
powder and golden cane sugar together, then cook over
low heat until soft. Use a strainer to drain away the water
and let cool.
6. Use a rolling pin to crush the walnuts or almond slices
lightly, then add the dried cherries; then pour into the filling
and mix well.
7. Take out the pie from the refrigerator, pour the filling evenly
into pie, and wipe a little egg paste. Place the apple pie on
baking tray and put it into the middle layer of microwave
steam oven and select P18.
Recipe no. Dish Recipe
Accessory
location

51
In standby or energy-saving mode the “Residual Heat Indicator” icon will be shown to warn that cavity ex-
ceed 50°C and is not suitable for cleaning. The icon will be off until cavity drops below 50°C. Users should not
clean the appliance until the icon is off.
Steamer is equipped with child lock so that children cannot switch on or change any setting accidentally.
A. Activating the Child Lock:
Press and hold the “Child Lock” button for 3 seconds. Child lock is enabled. The “Child Lock” icon
lights up (as shown in the diagram below).
B. Cancelling the Child Lock:
Press and hold the “Child Lock” button for 3 seconds to disable the child lock function. The “Child Lock”
icon goes off.
Residual Heat Indicator
■
Child Lock
■
Operation Instructions

52
8. If the oven is very dirty, run the Steam mode (110°C)
to remove grease and dirt with steam for 30 minutes
before cleaning. Do not start cleaning until the
appliance has cooled down. For stubborn grease
stains, repeat these steps several times. Never use
any cleaning cloth that contains metal, scrubbing
cleaners, steel brush or cloth with a rough surface
for cleaning.
9. It is suggested to run the Descaling Mode at least
once a month or when the descaling icon lights up.
10. Tap water, drinking water or distilled water is suggested
for steaming function. Avoid using mineral water.
11. The water tank must be checked at least once a
month. Clean it if necessary and put it back correctly.
12. Disconnect the main power if the appliance will not
be used for a long period. Keep the oven clean and
put the appliance in a dry place away from corrosive
gases.
13. After every use, clean and air dry the oven (including
the top, sides and bottom). If discoloration is detected
at the bottom or inside the oven, remove the stains
with a stainless steel cleaner (e.g. Wpro Steel
Cleaner).
1. Under normal circumstances, cleaning is the only
maintenance required.
2. Cleaning and maintenance should only be carried
out when the combi steamer is cool and the
Residual Heat Indicator icon disappeared. Disconnect
the power plug from the main power supply before
cleaning. Do not use any steam cleaner to clean
this appliance.
3. To avoid corrosion which would shorten the useful
life of your combi steamer, always keep it clean.
Always clean the appliance after use.
4. To avoid damage to the steam microwave oven body,
control panel, oven walls and accessories, do
not use any cleaning cloth that contains metal,
scrubbing cleaners, steel brush or cloth with a
rough surface for cleaning. Use a sponge or cloth
soaked in gentle detergent or kitchen towel paper
sprayed with glass cleaner to clean the appliance.
Always make sure the cavity (including the bottom)
is completely dried after use.
5. Salt is a corrosive substance that would result in
rust stains if left to build up inside the oven. Acidic
sauces, such as ketchup, mustard and preserves,
contain chemicals like chlorine and acids which
would damage the stainless steel surface.
6. Do not allow grease and food debris to remain
on the oven door and door seal. If the door seal
is not kept clean, the oven door may fail to close
when the appliance is in operation. This would
cause damage to the front and sides of the combi
steamer.
7. After each use:
i) Empty the drip tray under the oven dooto prevent
overflow, splash and soiling of the worktop. (The
drip tray can be removed. It collects condensation
water every time after use when door is opened
ii) Empty the water tank.
iii) Always leave the door opened for 15-30 minutes
or run the Cavity Drying Mode to dry the oven
and door frame.
Cleaning and Maintenance
Cleaning and Maintenance
■
53
Cleaning and Maintenance
Oven maintenance should only be
carried out after unplugging the
power plug, wait for the cavity cool
down thoroughly.
Failure to do so may result in electric
shock, injury or burns.
Attention
Do Not
Do Not
Do Not
Do Not
Do not plug or unplug the power plug with wet hands Failure
to do so may result in electric shock.
Failure to do so may result in electric shock.
It is strictly prohibited to
immerse the microwave
steam oven in water or
other in liquid
Failure to do so may result
in electric shock or injury.
Do not heat the oven
if there is oil or food
residue inside or on the
door.
Microwaves will concentrate on dirty
parts, which may cause dangers such
as sparks, smoke, and re. Additionally,
rust will occur.
● If there is dirt on it, be sure to clean it
every time after the oven cavity cools
down.
Do not use household detergents (alkaline, acidic, etc.), oven cleaners,
powdered cleaners, styrene, diluent, bleach, hot water, flammable
gas (LPG, etc.) spray cleaners, scouring pads, sponges Hard parts,
metal cleaners, etc.
Sponge scouring pad
Do not use hard rough
part to clean the appliance
(Non-woven fabric with
rough surface)
Rough surface
scouring pad
Do not use this type
of scouring pad for
cleaning. Please use
cleaning products
with non-abrasive
surfaces
Please use the soft sponge
part for cleaning
WARNING
CAUTION
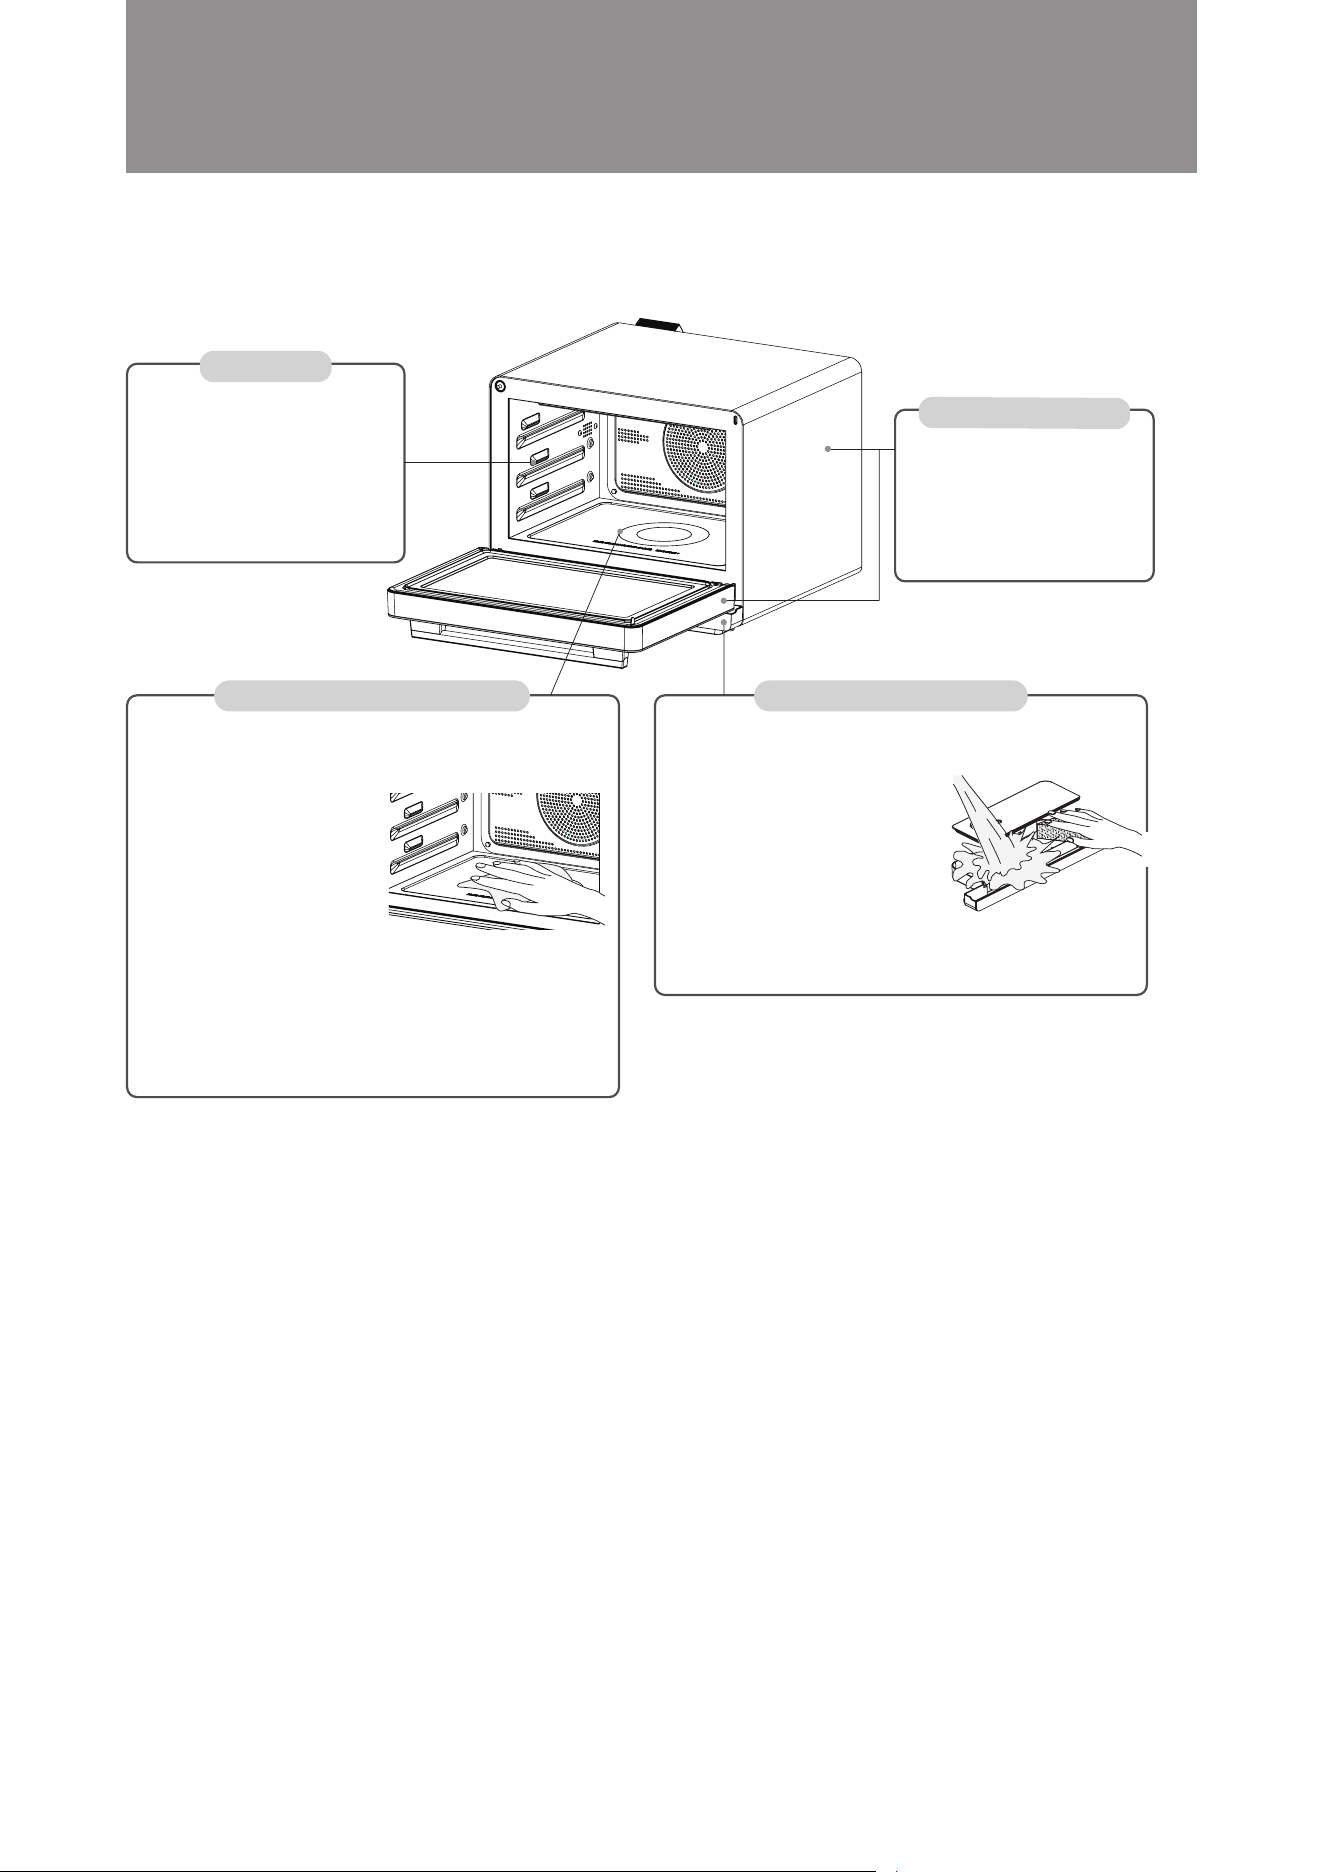
54
Cleaning and Maintenance
Cavity
Body and oven door
Drip tray and water tank
Wipe with a damp towel that has
been wrung dry.
※ For dirt that is difficult to remove,
please place a wet towel on the dirt
for about 30 minutes and wait until
the dirt softens before wiping;
After steam cooking, please wait
for the moisture condensed to cool
down before wiping it with a towel;
Wipe with a damp towel that has
been wrung dry.
※ When there is serious dirt,
please use a towel with diluted
kitchen detergent (neutral) to
remove the dirt, and be sure to wipe
the detergent away thoroughly.
Wipe the dirt on the bottom of
the oven cavity immediately
with a damp cloth.
The dirt caused by using
microwaves may become
burnt when baked. When
the dirt is difficult to remove,
please run the steam mode at
100°C for 20 minutes, and then
wipe it off with a damp cloth.
The steam can penetrate into
the underlying soil, making it
easier to remove.
Do not use sharp objects, such
as, steel brushes or forks to
remove dirt, otherwise it may
cause damage or cracks to the
appliances.
Wash with water and a soft
sponge to remove dirt and dry
thoroughly. If there is serious
dirt, please clean it with diluted
neutral detergent. Do not put
it in a dishwasher, tableware
dryer, or place it directly in the
sun for drying, otherwise the
water tank and drain plate may
be deformed or damaged.
Cleaning and Maintenance
■
Cavity bottom (ceramic glass)

55
A. Possible Problems
Problem Cause Solution
1
2
3
4
5
6
7
8
9
No Display
Steam microwave oven
is not working
Display is not working properly
Lots of Water or steam can be
found during cooking
Oven light is not working
Fan motor fails to work properly
Control panel is not working
properly
No steam
Water leakage
Steam microwave oven is not
connected to power supply
Malfunction of power socket
Power cords is not working
Power supply plug is not
connected correctly
Oven door is not closed properly
Water tank is not in a correct
position
Circuit board is damaged
Child lock is enabled
Display is damaged
Circuit board is damaged
Oven door is not closed tightly
Door seal is damaged
Light is damaged
Control board is damaged
Fan motor is damaged
Control board is damaged
Control panel is out of order
Control board is damaged
Water tube is damaged
Water pump is damaged
Water tank is empty or not in place
The water tank is not in a correct
position
Ensure it is connected to power
supply
Check if other electrical
appliances work normally
Contact after-sales service
Try to plug in the power supply
again
Close the oven door again
Put the water tank back correctly
Contact after-sales service
Disable the child lock
Contact after-sales service
Close the oven door tightly again
Contact after-sales service
Contact after-sales service
Contact after-sales service
Contact after-sales service
Contact after-sales service
Fill the water tank and put it back
correctly
Others
Troubleshooting
■

56
Others
1
2
3
4
5
6
7
B. Following conditions are normal
Condition Cause
Fame and smell can be detected during the rst
time of use
Noise can be heard using any steam related mode
Water condensation can be found around the
ventilation vent or door
The fan continues to work after cooking is nished
White powder can be found around the air inlet
Bottom and cavity of oven’s color has yellowing.
Voltage uctuations will aect the cooking eect
These are emitted by the protective oil and it is
normal.
This is normal during water pumping into machine
for steaming.
The steam microwave oven produces a large amount
of steam under steam cooking mode. Most of the
steam will be vented from the frontal ventilation and
some condensation water will be found around the
ventilation vent.
The fan will continue to run for 3 minutes after each
cooking mode for cooling purpose to discharge oven
heat completely. It is normal.
This is water scale. It is normal. If white powder
(water scale) is detected, it is recommended to run
the Descaling Mode for cleaning purpose.
Stainless steel will generate yellow marks when
heated and not kept clean. It is recommended to
clean the combi steamer after each use to avoid
the yellowing issue caused.
When the voltage uctuates in the range of -10% to
+5%, the microwave steam oven still can operate.
However, aected by low or high voltage, the output
power will decrease or increase relatively and aects
the cooking eect, which is normal.
ENVIRONMENTAL HINTS
* The packing box may be fully recycled as confirmed by the recycling symbol. Follow local disposal regulations.
Keep potentially hazardous packaging (plastic bags, etc.) out of the reach of children.
* This appliance is marked according to the European directive 2012/19/ EU on Waste Electrical and
Electronic Equipment (WEEE). By ensuring this product is disposed of correctly, you will help prevent
potential negative consequences for the environment and human health, which could otherwise be
caused by inappropriate waste handling of this product.
* The symbol on the product, or on the documents accompanying the product, indicates that this appliance may
not be treated as household waste. Instead it shall be handed over to the applicable collection point for the recycling
of electrical and electronic equipment.
* Disposal must be carried out in accordance with local environmental regulations for waste disposal.
* For more detailed information about treatment, recovery and recycling of this product, please contact
your local city office, your household waste disposal service or the shop where you purchased the
product.
* Before scrapping, cut off the mains cord so that the appliance cannot be connected to the mains.

57
Product Specications
Model
Rated Voltage and Frequency
Rated Input Power
Microwave Input Power
Microwave Operating frequency
Product Dimension (H x W x D)
Cavity Dimension (H x W x D)
Oven Capacity
Net Weight
MWP329TBA, MWP329TSA, MWP329TMA
220-240V~ 50/60Hz
2100W
1500W
2450 MHz
382 x 487 x 493mm
240 x 415 x 301.5mm
32L
Approximately 23.8kg
■
Others

REGISTER YOUR PRODUCT ONLINE
EN
For Australia Market For New Zealand Market
Scan QR Code to visit
www.whirlpool.com.au
to register your product warranty online.
Scan QR Code to visit
www.whirlpool.co.nz
to register your product warranty online.
This QR Code is only applicable to Australia.
You can download the user manual by
Visiting our website www.whirlpool.com.au
Contacting our Customer Service Center at 1300 363 344
This QR Code is only applicable to New Zealand.
You can download the user manual by
Visiting our website www.whirlpool.co.nz
Contacting our Customer Service Center at 0800 442 584
Whirlpool
®
Registered Trademark/TM Trademark of Whirlpool group of companies
All rights reserved - http://www.whirlpool.com.au
- http://www.whirlpool.co.nz