©2026 BARSKA® | Pomona, CA 91767
www.barska.com
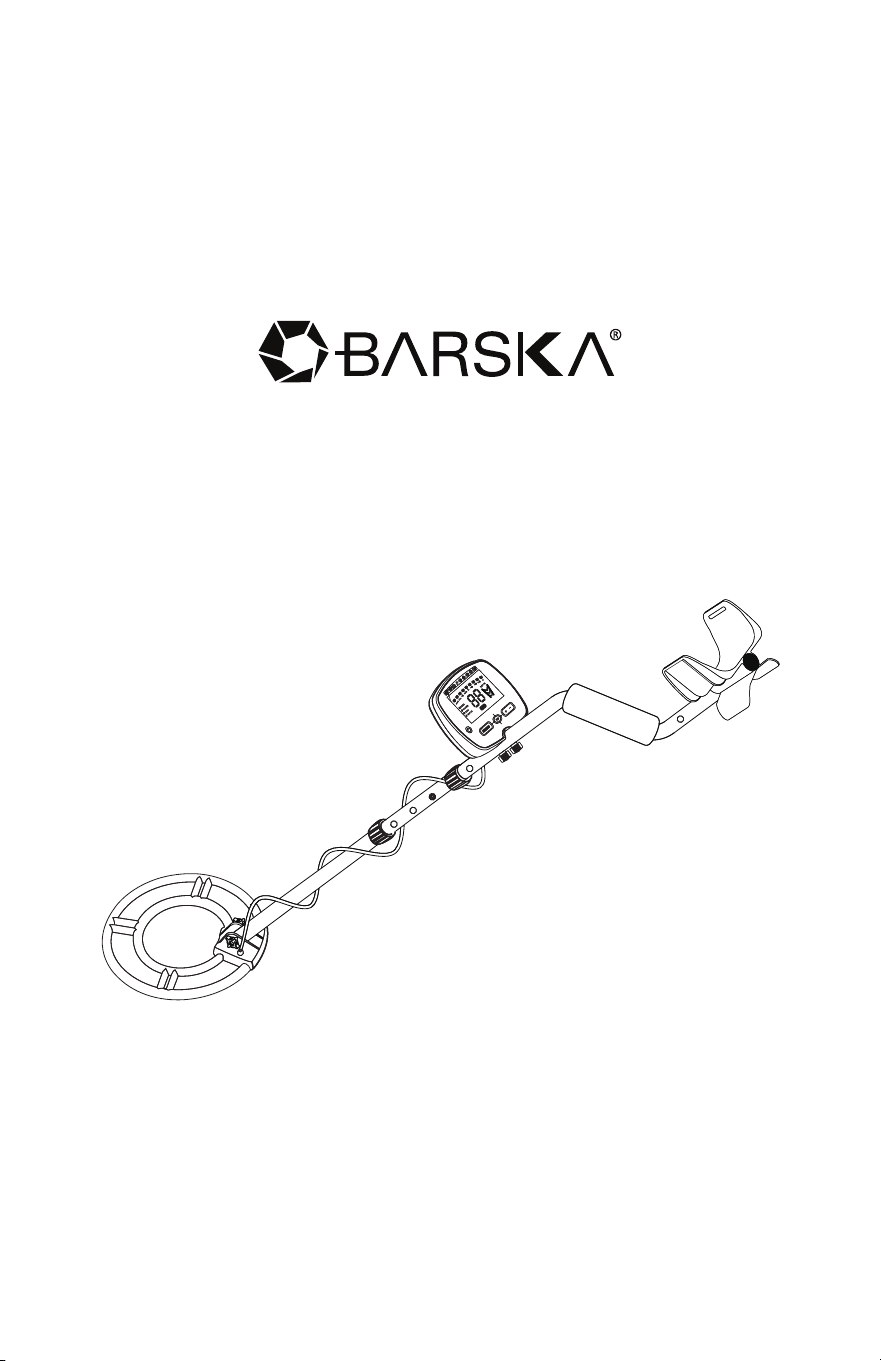
Master-300
Metal Detector
3/26
BC828

www.barska.com www.barska.com2 3
Note: All information, feature, and specication displayed herein are based on the data
available at the time of publishing, thus they are subject to change without notice. All
product pictures displayed herein are for illustration purposes only. The actual product may
vary due to different circumstances.
Table Of Contents
Features 4
Assembling the Detector 4
Installing the Batteries 5
Using Headphones 6
Layout of the Control Panel 6
LCD Display 7
Control Buttons 7
Testing and Using the Detector 9
Overload Warning 10
Target Indications 11
Outdoor Detecting 11
Detecting with Pinpoint 12
Troubleshooting Guide 13
Warranty 14
www.barska.com www.barska.com4 5
Features
LCD Display
Shows the probable type of metal, the depth of the target, range of DISC, NOTCH, the level
of SENS, VOLUME and battery condition. It also has digital display for target ID.
Three Tone Audio Discrimination
Sounds three distinctive tones (high, medium and low) for different types of metal.
Five Controls
- POWER Turns on or off the power.
- MENU Press it to select desired operation mode and the setting of SENS
and VOLUME.
- INCREASE (+) Increase the level of sensitivity or volume and the range of DISC
(discrimination) or NOTCH.
- DECREASE (-) Decrease the level of sensitivity or volume and the range of
discrimination or NOTCH.
- PP Pinpoints the location of the target accurately.
Headphone Jack
3.5mm port for audio connection.
240mm Waterproof Search Coil
Submersible for shallow water use.
Adjustable Shaft
Customizable length to t users height.
Power
The detector requires two 9-volt alkaline batteries (not included).
Backlight
For better use in dark areas.
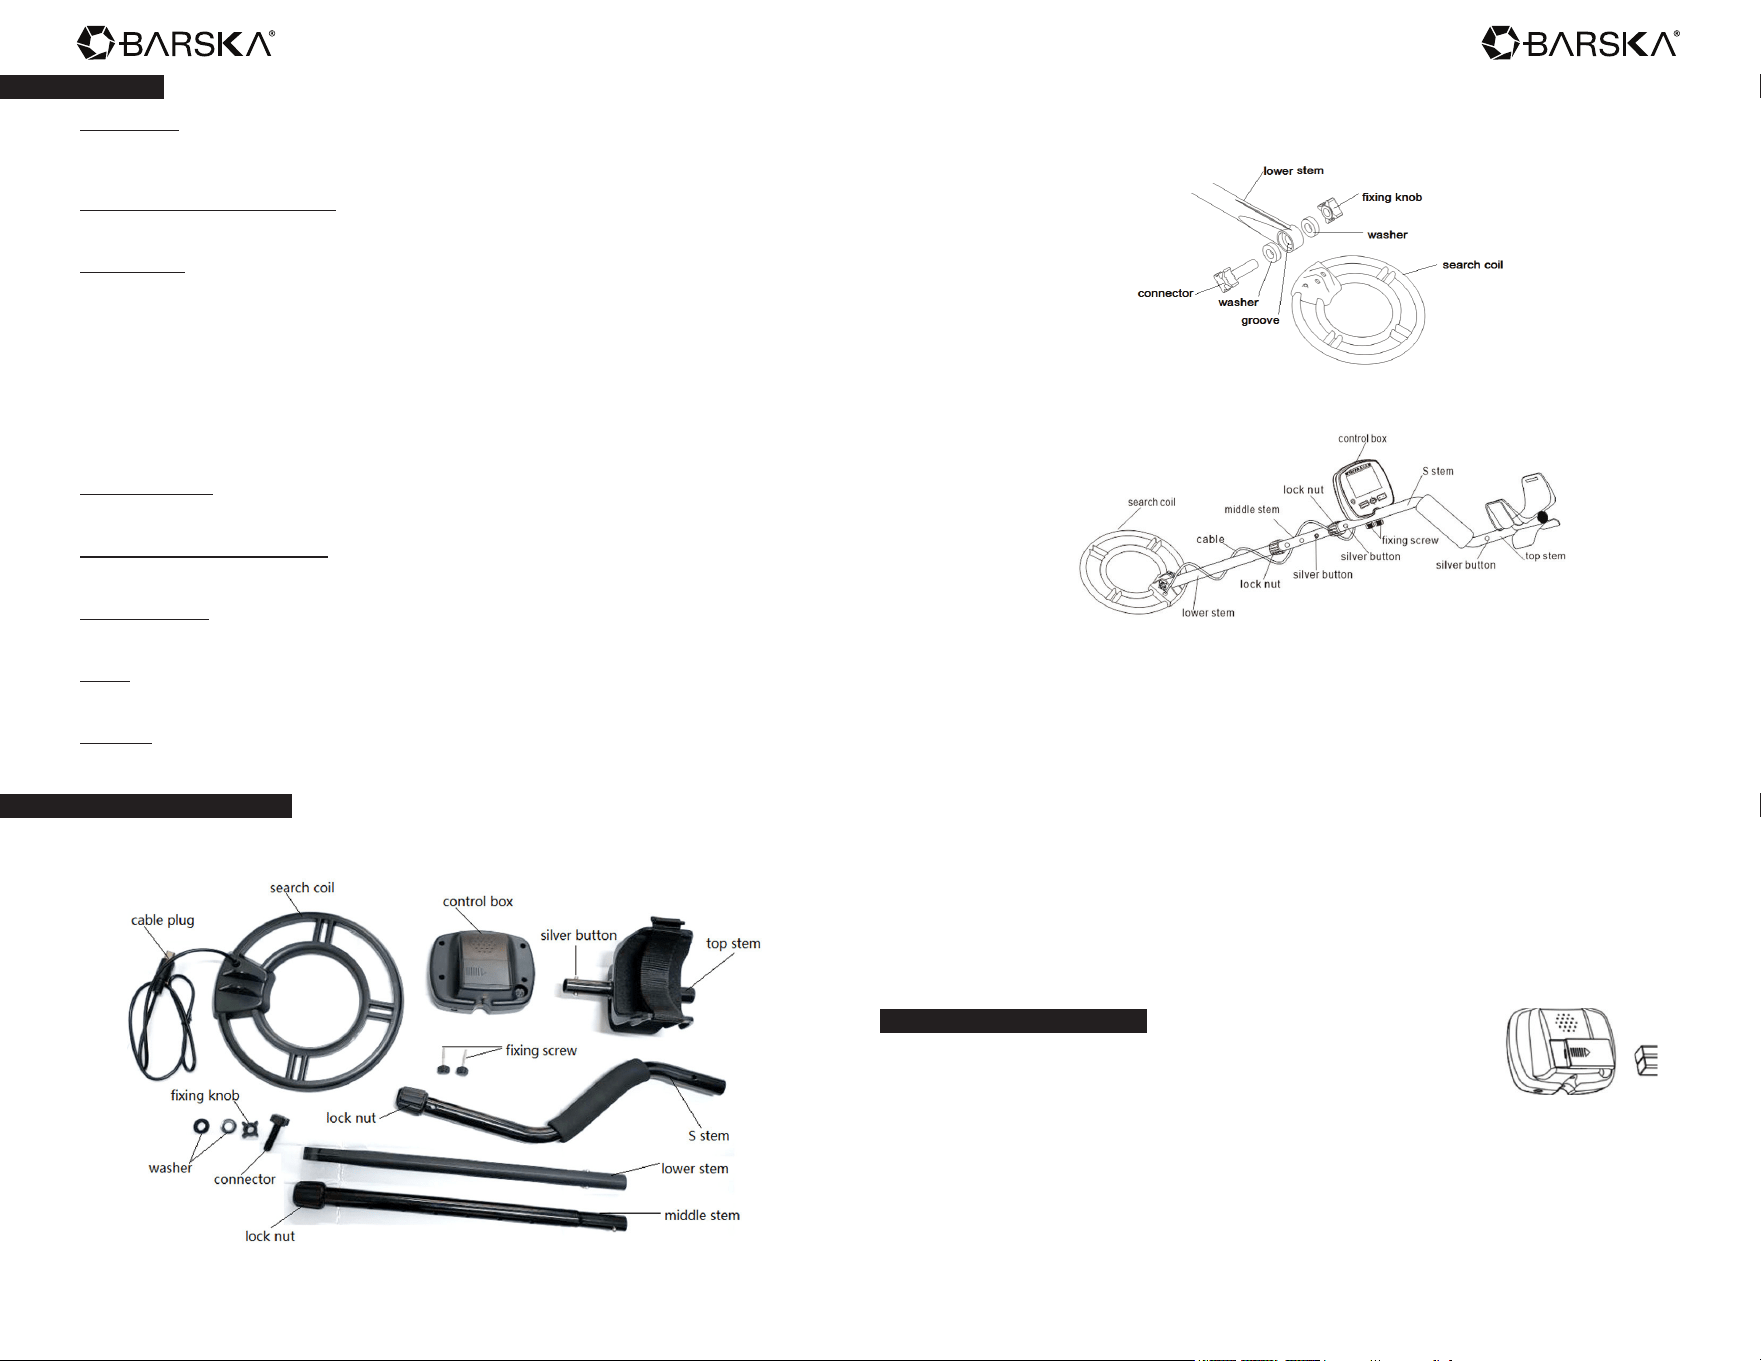
Assembling The Detector
Assembling your detector is easy and requires no special tools. Just follow these steps
1. Unscrew the xing knob on the search coil and remove the knob connector. Place the
washers into the groove of the lower stem. Then insert the stem and align the holes on
the search coil bracket and the stem. Push the connector through the holes and tighten
the knob.
2. Press the silver button in the lower stem, and slide the stem into the middle stem.
3. Press the silver button in the middle stem, and slide the stem into the S stem. Tighten
the lock nut on the S stem.
4. Press the silver button in the top stem, and slide the top stem into the S stem.
5. Adjust the stem to a length that you feel comfortable when you stand upright with the
detector in your hand, and the search coil is level with the ground with your arm relaxed
at your side. Then counter-clockwise rotate to tighten the lock nut on the middle stem.
6. Fix the control box on the S stem and tighten the xing screw properly. Wind the search
coil cable around the stem. Insert the search coil’s cable plug into the ve-pin jack at the
back of the control box.
Caution
- Do not over-tighten the search coil or use tools such as pliers to tighten it.
- The search coil’s plug ts into the connector only in one way. Do not force the plug and
do not pull on the cable or you could damage it.
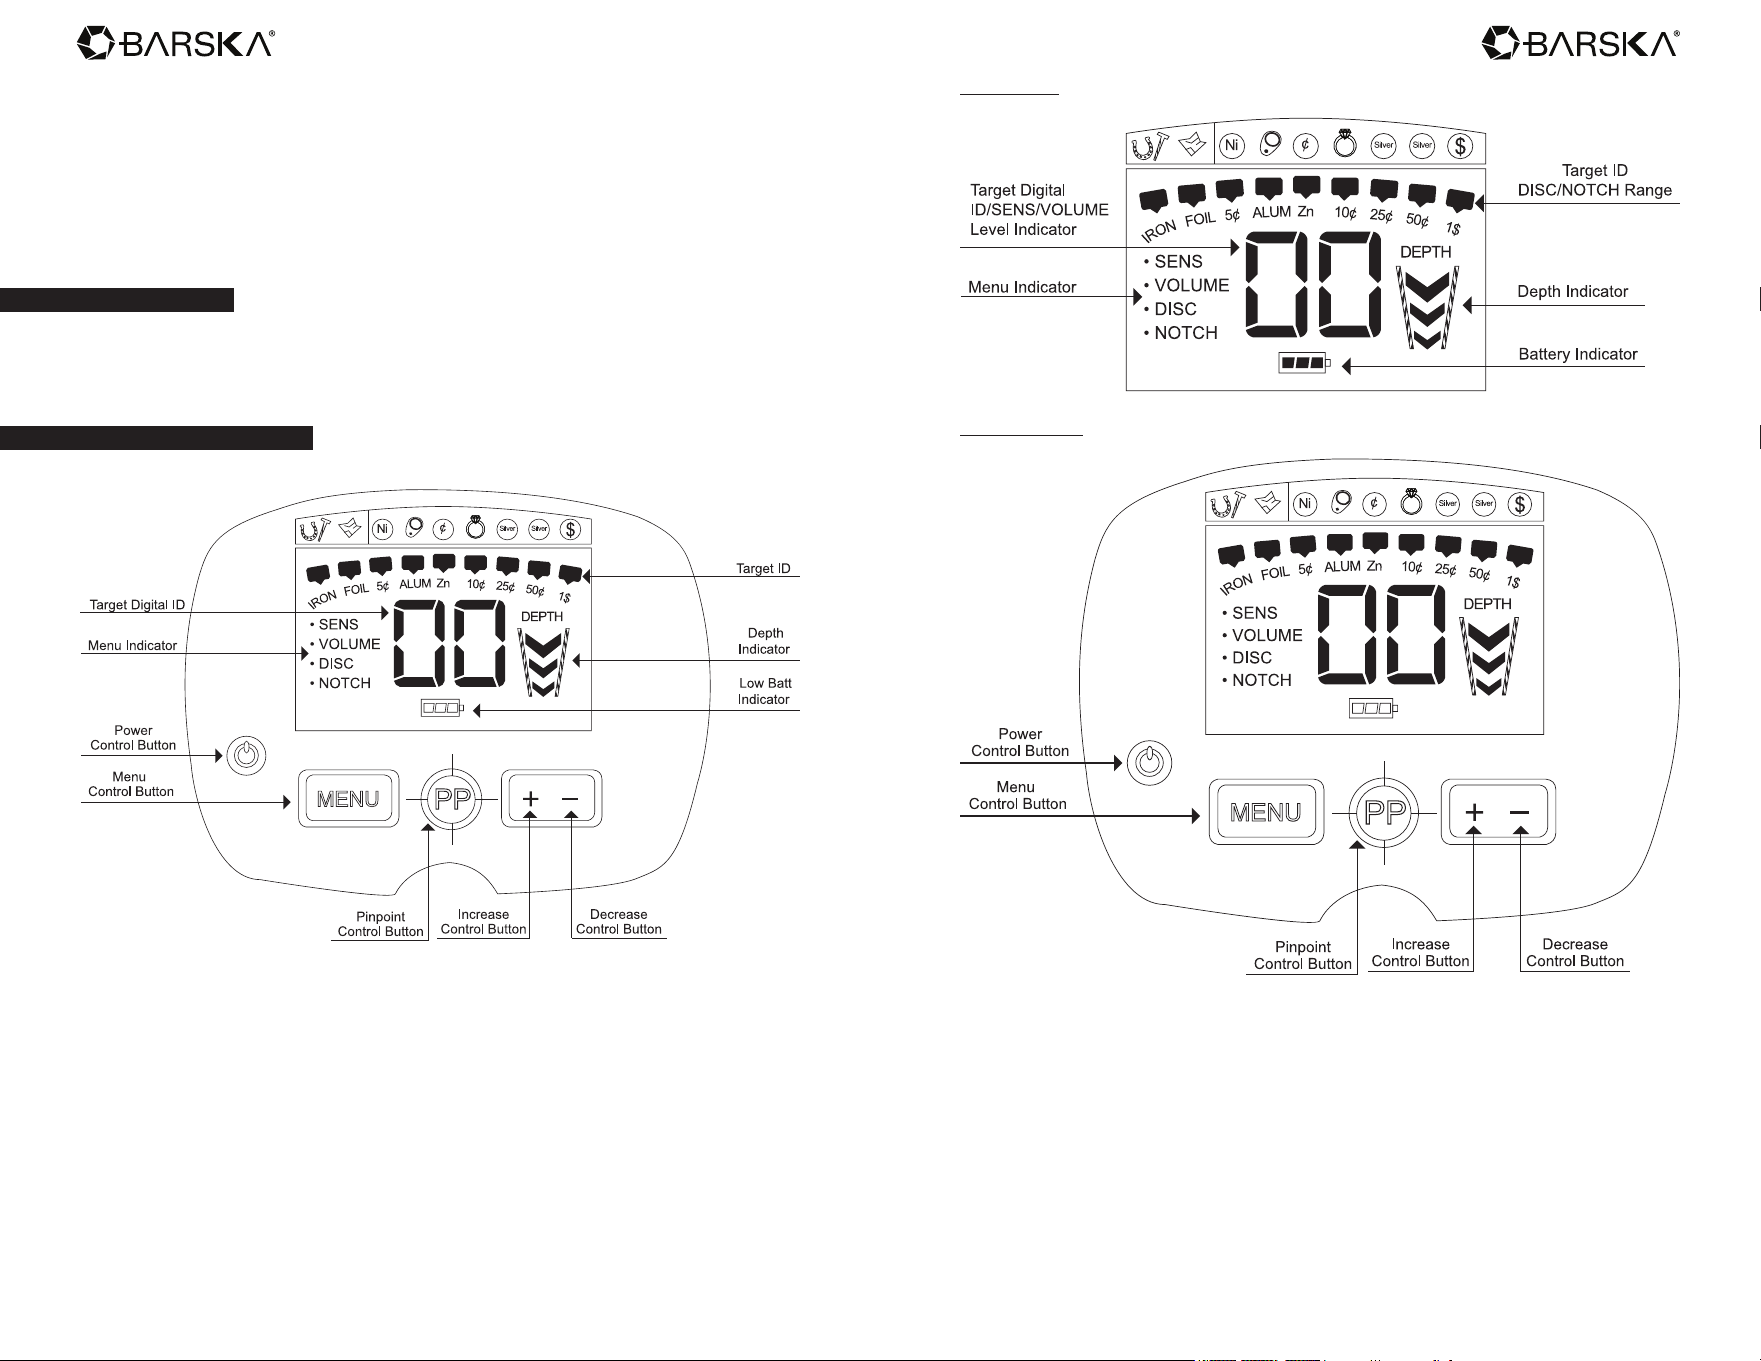
Installing The Batteries
1. Turn off the power before installing the batteries.
2. Slide the battery cover off in the direction of the arrow.
3. Place two 9V alkaline batteries into the battery compartment matching
the polarity symbols (+ and -) marked inside.
Note
The detector will maintain full performance until the batteries need to be replaced. Replace
batteries when there is no segment remaining on battery level indicator. Alkaline batteries
should be used.
www.barska.com www.barska.com6 7
Cautions
- Use only fresh alkaline batteries of required size.
- Use 9-volt ALKALINE batteries.
- Do not use “Heavy Duty” batteries.
- Do not use ordinary “Zinc Carbon” batteries.
- Do not mix the old and new batteries or different types of batteries.
- If you don’t plan to use the detector for a week or more time, remove the batteries.
Batteries can leak chemicals that can destroy electronic parts.
- Dispose of old batteries properly. Never bury or burn them.
Using Headphones
1. It is recommended to choose the headphones with volume control.
2. Insert the headphones’ 3.5mm plug into the headphone jack at the bottom of the control
box. At this time the internal speaker disconnects.
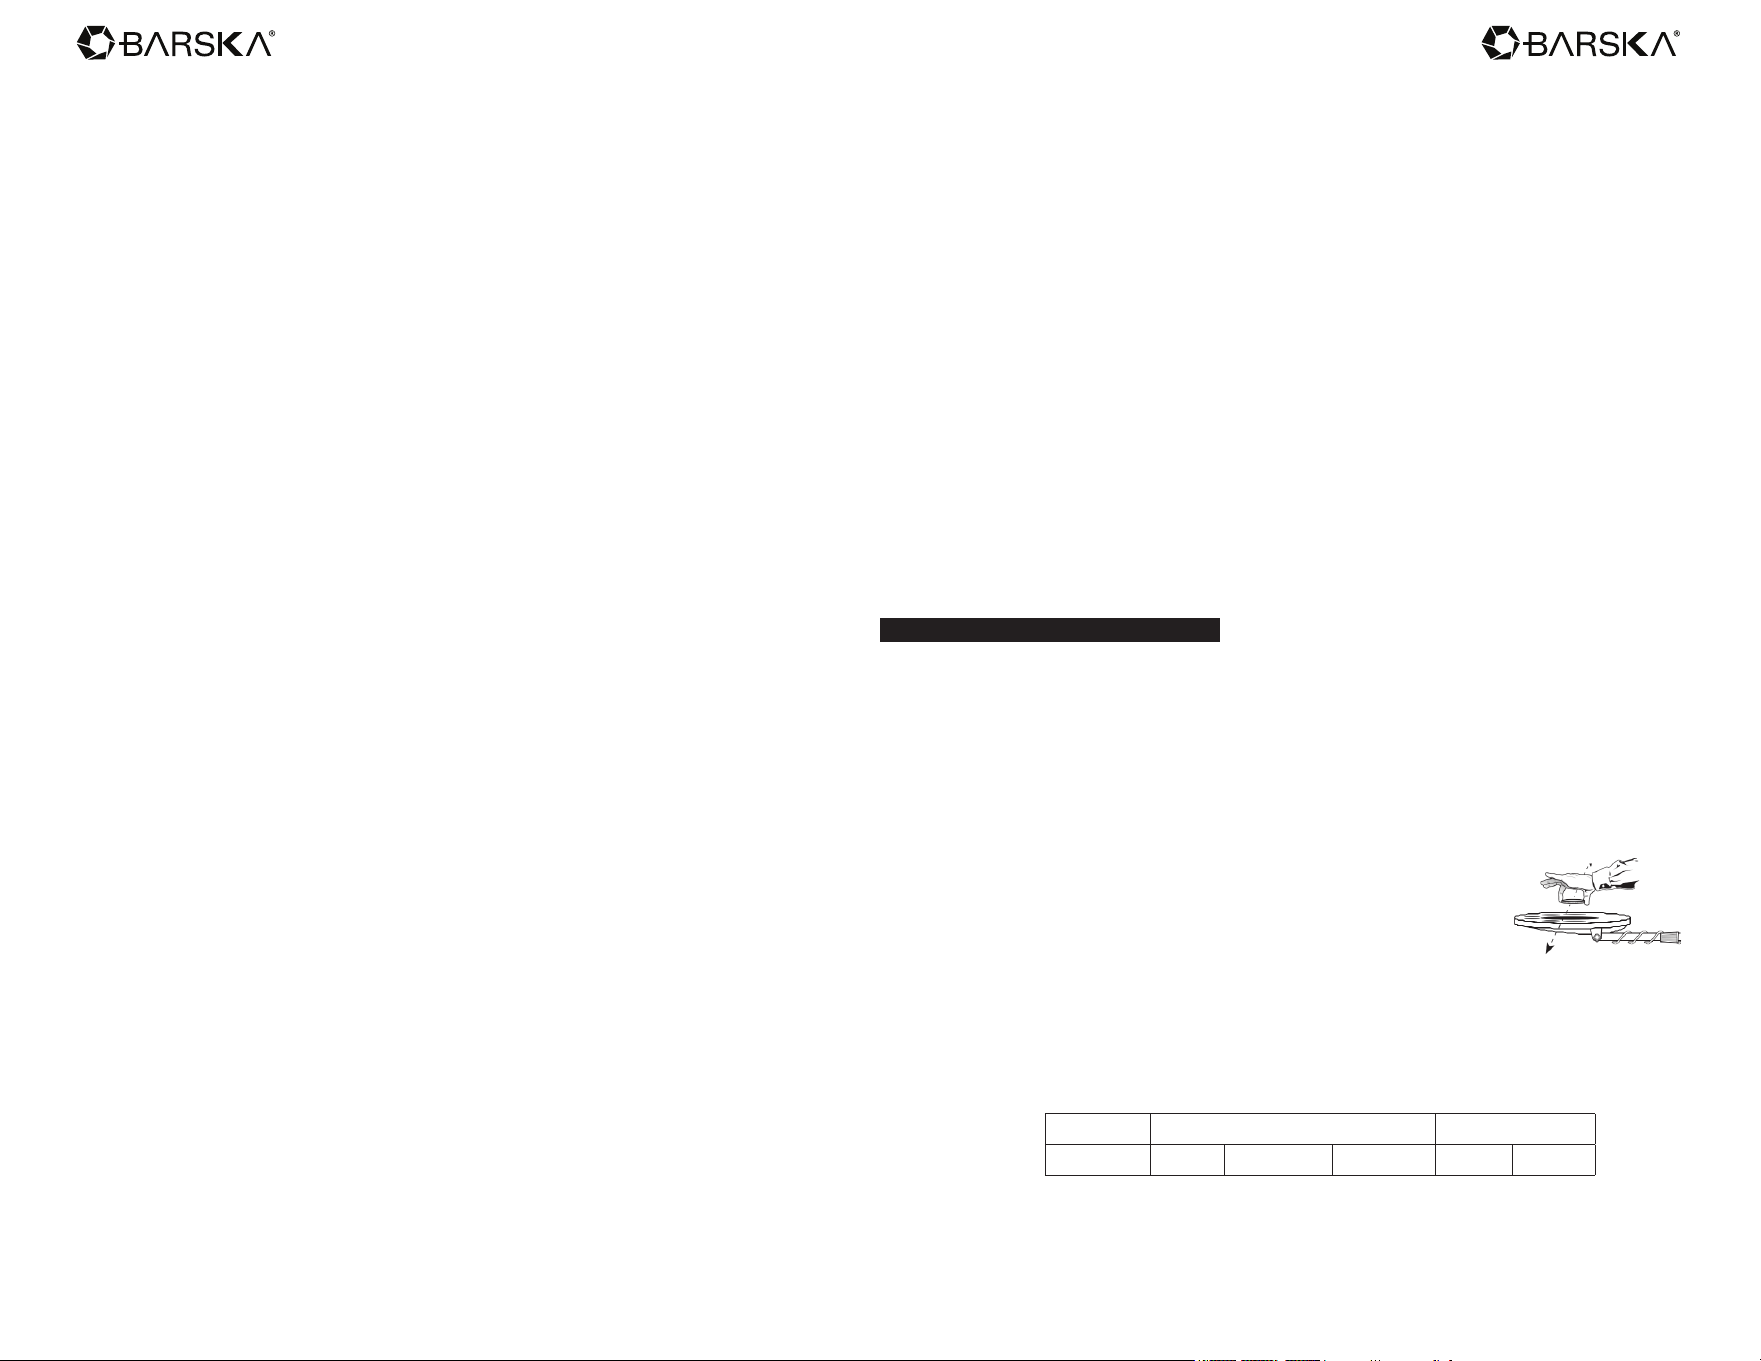
Layout Of The Control Panel
LCD Display
Control Buttons
POWER
Press the button to power on the detector. Press it again to power off the detector.
www.barska.com www.barska.com8 9
MENU
Press MENU to make it active and to select desired operation mode, the setting of SENS or
VOLUME.
There are two modes (DISC & NOTCH) to be selected from the MENU indicator. For
example, if you want to select DISC or NOTCH mode, press MENU several times until
DISC or NOTCH is displayed on the MENU indicator. When DISC or NOTCH appears on
LCD, you can set the desired target range for operation. If you want to adjust the level of
sensitivity or volume, press MENU until SENS or VOLUME appears on LCD. Then press
“+” or “-” to set the desired level.
INCREASE (+)
Increase the level of sensitivity or volume and the range of DISC (discrimination) or
NOTCH.
DECREASE (-)
Decrease the level of sensitivity or volume and the range of
discrimination or NOTCH.
PP
Press and hold for precision target pinpoint at any time.
Search coil motion is not required; a motionless search coil over a metal target will
induce sound.
MENU
The Menu is located on the left side of the screen. During normal operation the Menu is
inactive and faded. Press the MENU button to cycle through the Menu. Each press of the
Menu button moves to the next Menu item.
The option selected is marked by “ • ”. Once a menu option is selected, the setting can be
changed using “+” and “-”. Here is a description of the Menu options:
SENS (Sensitivity)
Adjust the sensitivity from 1 to 10. The higher the number, the more sensitive the detector.
This sensitivity control does not affect Pinpoint sensitivity.
If the detector beeps erratically or beeps when there are no metal objects being detected,
reduce the sensitivity.
Note
Cell phones, cell phone towers, etc. all produce interference signals and will cause the
detector to beep when no metal is present, and sometimes to beep erratically.
VOLUME
Adjust the volume level from 0 to 10.
DISC (Discrimination)
Discrimination is an important feature of professional metal detectors. It allows user to
ignore trash and undesirable objects.
The DISC controls the detector’s Discrimination function. In its default setting all metals
are detected. Use this DISC control in order to eliminate unwanted types of metals from
detection. Targets are eliminated from detection from left to right.
Each time you press “+” button, a target category icon will disappear. When an icon
disappears, that category is eliminated from detection.
Notice that the 4 right-most categories cannot be eliminated.
These 4 right-most categories represent silver or other high-value targets, which are
generally desirable; therefore the detector does not allow them to be discriminated out.
To pick up the eliminated target category, press “-” and categories will be accepted back for
detection from right to left.
NOTCH
The NOTCH control is similar to Discrimination. It allows you to accept or reject different
types of metals. While DISC works left to right, the NOTCH control allows you to accept or
reject individual categories.
Categories eligible for NOTCH are FOIL, 5¢, ALUM, Zn.
Press “+” or “-” to program the NOTCH feature. Each press of “+” or “-” cycles to a new
category and that category icon will ash for 3 seconds. Then the category will reverse
status. Alternatively, press MENU while the icon is ashing to accept the Notch. If the
icon had previously been illuminated it will now disappear indicating that the category has
been eliminated from detection. Likewise, an icon that is not visible on the display will re-
illuminate, indicating that category is now notched in (i.e. detected).
Any of the 4 eligible categories can be “Notched” in or out.
Testing And Using The Detector
1. Supplies Needed
- a Nail (made of iron) - a U.S. Quarter (or silver coin)
- a U.S. Nickel - a Gold Ring
- a U.S. Dime - a U.S. Penny made of Zinc (dated after 1982)
2. Position the Detector
a. Place the detector on a table with the search coil hanging over the edge.
Or better, hold the detector with the search coil off the ground.
b. Keep the search coil away from walls, oors and metal objects.
c. Remove watches, rings and jewelry.
d. Turn off lights or appliances whose electromagnetic emissions
may cause interference.
e. Pivot the search coil back.
f. Press POWER to power on.
3. Using DISC (Discrimination) Feature
a. Pass all objects over the search coil and notice the different tones.
Low Tone Medium Tone High Tone
Nail Nickel Zinc Penny Gold Ring Dime Quarter
b. Press MENU until DISC is displayed on LCD.
c. Press “+” once. The iron indicator on the display will disappear.
d. Wave the nail. It will not be detected because it has been “discriminated out.”
www.barska.com www.barska.com10 11
4. Using NOTCH Feature
a. Press MENU until NOTCH is displayed on LCD.
b. Press “+” twice. The 5 cent icon will ash for 3 seconds and then disappear. That
means 5 cent is “notch out” (eliminated). The detector will have no response to 5cent.
To eliminate “ZN”, press “+” four times. The “Zn” icon will ash and then disappear.
c. Wave a 5 cent coin or Zinc Penny over the search coil. They will not be detected
because they have been “notched out”(eliminated). Notice the target categories not
displayed on LCD can not be detected.
For fast proceeding, press MENU while the icon is ashing to accept the Notch.
To pick up the target eliminated, press “+” or “-” to have the target icon ash and then
press MENU.
5. Using PINPOINT Feature
a. Press and hold PP. “PP” momentarily appears on the LCD.
b. Hold a coin motionless over the search coil.
c. Lower coin toward search coil and then raise coin away from search coil.
d. Notice that the sound changes as the coin moves closer and farther.
e. Notice that the depth indicator changes as the coin moves up and down.
6. Adjusting SENS(SENSITIVITY)
a. Press MENU until SENS is displayed on LCD.
b. Press “+” or “-” to set the desired level. Sensitivity level can be set from 1-10. The
relative digital value will be displayed on LCD when “+” or “-” is pressed.
7. Adjusting VOLUME
a. Press MENU until VOLUME is displayed on LCD.
b. Press “+” or “-” to set the desired level. VOLUME level can be set from 0-10. The
relative digital value will be displayed on LCD when “+” or “-” is pressed.
Overload Warning
If a metal object or highly magnetic soil are too close to the search coil, the detector will
overload and “- - ” will appear on LCD. The detector will make a rapid, repeating mid-tone
warning sound. Overload will not harm the detector, but the detector will not function under
these conditions. If overload occurs, raise the search coil to detect the target from a greater
distance, or move to a different location.
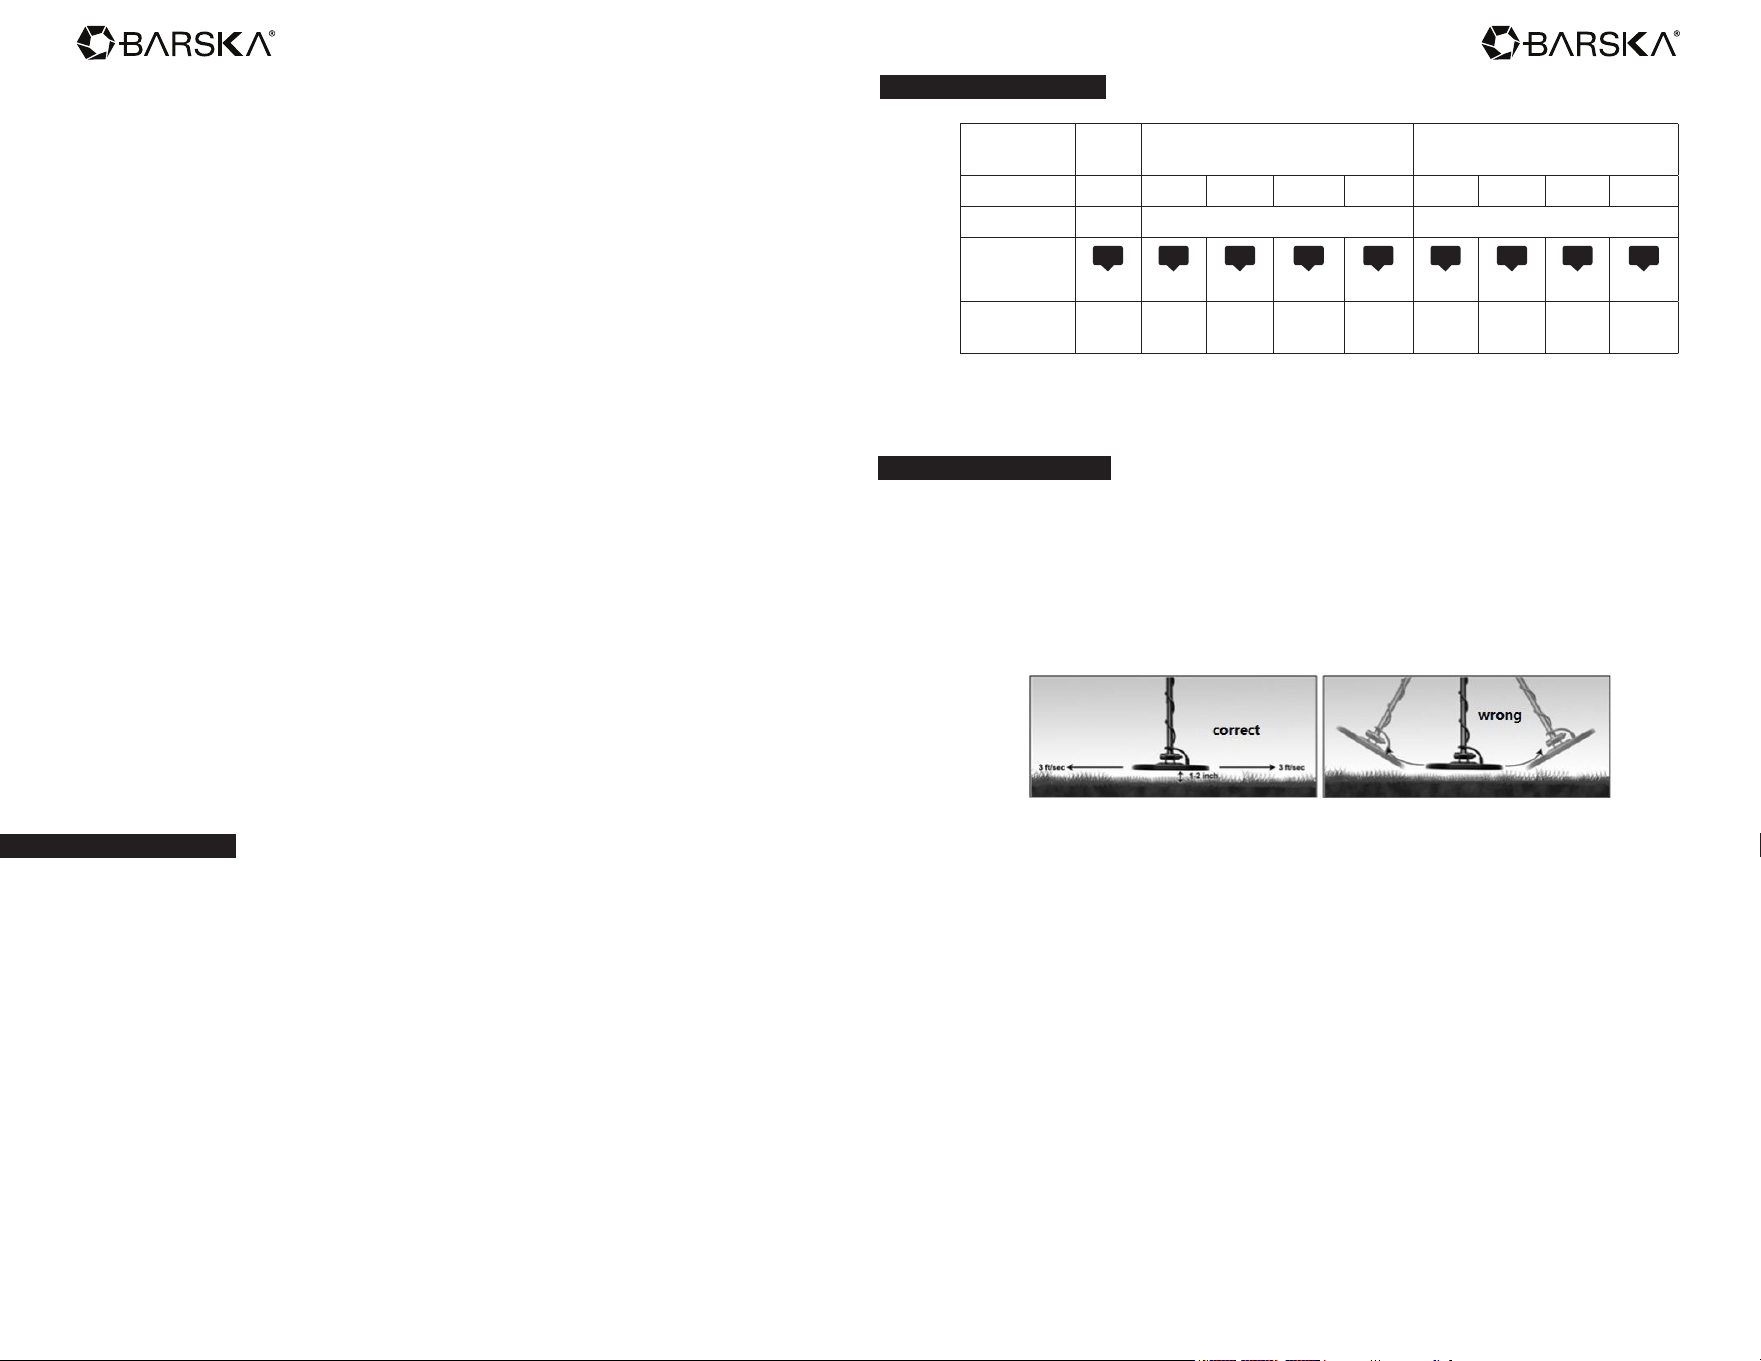
Target Indications
Metal
Range
IRON GOLD RANGE SILVER RANGE
Target Iron Foil 5¢ ALUM ZN 10¢ 25¢ 50¢ 1$
Tone Low Medium High
ID
Display
IRON FOIL 5¢ ALUM ZN 10¢ 25¢ 50¢ 1$
Digital
Value
1-19 20-29 30-39 40-49 50-59 60-69 70-79 80-89 90-99
Note
There is a wide variety of metals and no target can be identied for certain until unearthed.
This table is for general reference only.
Outdoor Detecting
1. Find a place outside where there is no metal.
2. Place a sample you want to nd on the ground.
3. Press POWER to power on the detector.
4. Hold the search coil level to the ground about 1~2 inches above the surface, slowly
move the search coil over the area where you placed the sample, sweeping the search
coil in a side-to-side motion.
- Never sweep the search coil as if it were a pendulum. Raising the search coil while
sweeping or at the end of a sweep will cause false readings.
- Sweep slowly, hurrying will cause you to miss targets.
- It’s better you sweep the search coil from side to side in an arc line of 3 inches motion and
keep the search coil parallel with the ground
If the detector detects the item, it sounds a tone, and an arrow above the target icon
appears. Also LCD displays the digital value of target as well as the depth.
If the detector does not detect the item, make sure that the mode is set correctly for the
type of metal you’re searching for. Also make sure that you’re moving the search coil
correctly.
Notes
- The detector responds with a signal when it detects most valuable metal objects. If a
signal does not repeat after you sweep the search coil over the target a few times, the
target is probably junk metal.
- False signals can be caused by trashy ground, electrical interference, or large irregular
piece of junk metal.
- False signals are usually broken or non-repeatable.
www.barska.com www.barska.com12 13
Detecting With Pinpoint
After you nd a target, you can use PP (Pinpoint) to nd the exact location of the target as
follows
1. Press and hold PP to activate the Pinpoint feature.
2. Position the search coil just barely off the ground, and to the side of the target.
3. Move the search coil slowly across the target, and you can locate it by the sound.
The target is located directly under where the sound is loudest.
Narrow it Down
1. To narrow the response further, position the center of the search coil near the center of
response pattern, but not directly over the center.
2. Release PP.
3. Immediately press and hold PP again.
4. Repeat this narrowing procedure to narrow the eld of detection further.
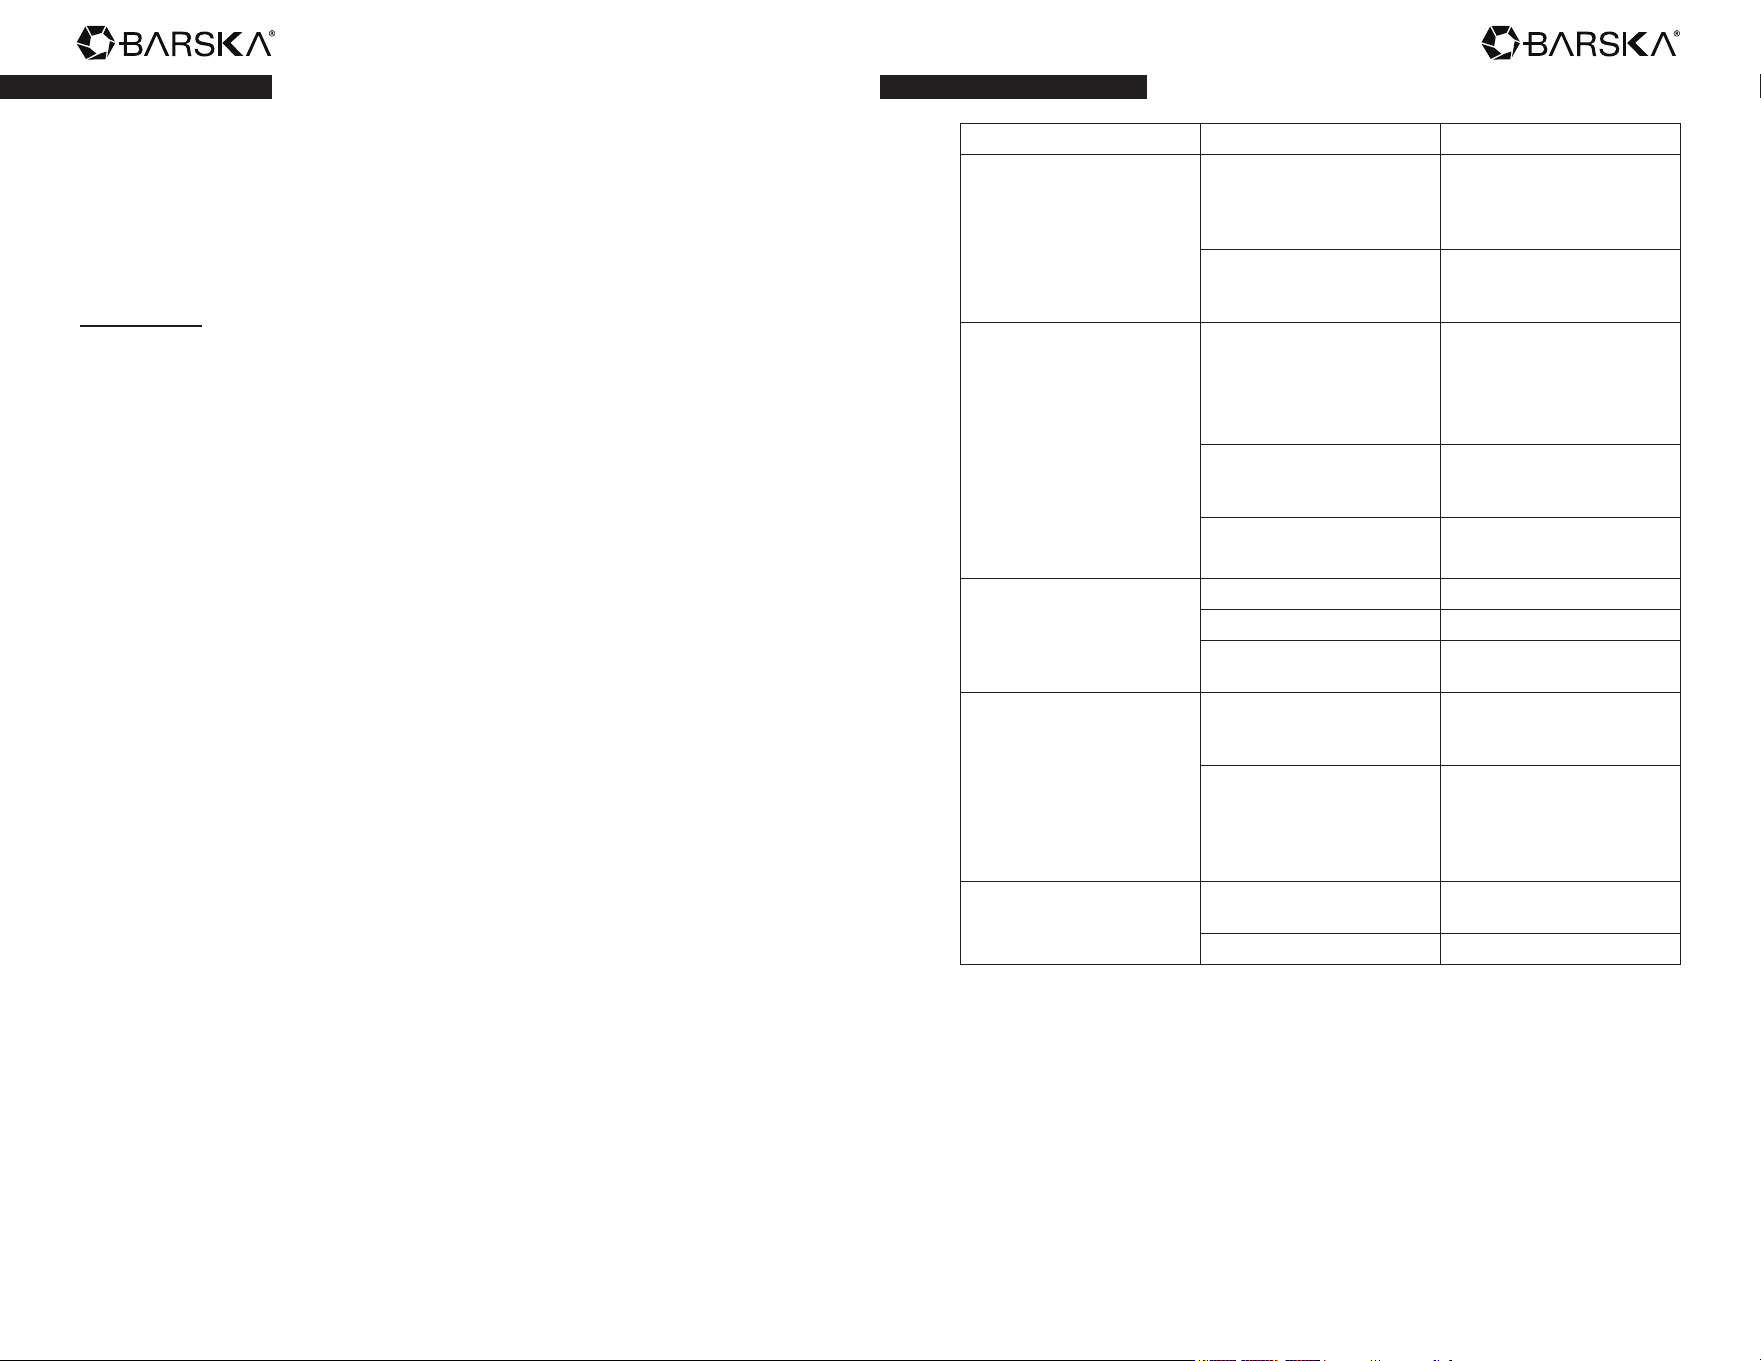
Troubleshooting Guide
Problem Reason Suggestion
The detector displays or
sounds without detecting
any target
The detector may receive
interference and false signal
from broadcast antenna and
other electronic lines
Change searching place
The humidity of
environment may be
extremely high
Wait for some time to check
again
The detector sounds false
signals
Sensitivity set too
high/ environmental
electromagnetic
interference
Reduce sensitivity
Sweeping the detector’s
search coil too fast or at
wrong angle
Sweep the search coil more
slowly and hold the detector
correctly
Using 2 detectors in close
proximity
Keep two detectors at least
6 meters(20’) apart
The detector does not
detect anything
Sensitivity set too low Increase sensitivity
Target range is eliminated Recover all target range
Search coil is not parallel to
the ground
Adjust the search coil angel
to be parallel to the ground
LCD display multiple target
categories or emits several
sounds at once
There may be over one kind
of metal targets
Reduce the sensitivity to
eliminate the detection of
the deeper target
The detector can’t identify
the target. Sometimes,
oxidized metal also causes
the excursion of target
arrow and tone
Sweep the search coil with
different angles
No power, no sound
Five-pin cable not
connected well
Re-plug it properly
Dead battery Replace batteries

www.barska.com www.barska.com14 15
by
1 YEAR LIMITED WARRANTY
Metal Detector
WINBEST® by BARSKA®, as manufacturer, warrants this new product to be
free of original defects in materials and/or workmanship for the length of time
specied by this warranty. This warranty does not include damage caused by
abuse, improper handling, installation, maintenance, normal wear-and-tear,
unauthorized repairs or modications and tampering in anyway.
This warranty is limited to the original purchaser and is not transferable. This
warranty applies only to products purchased in the United States of America,
excludes the Hawaiian Island and all U.S. territories in the Caribbean, Alaska
and the Pacic
In the event of a defect within 30 days, the consumer must return the
defective unit to the WINBEST® by BARSKA® dealer (the place of purchase)
at his/her own expense.
Beyond 30 days, WINBEST® by BARSKA® products should be sent to the
following address for warranty repairs. Products must be packed carefully and
sturdily to prevent damage in transit, and returned freight prepaid to:
WINBEST® by BARSKA®
855 Towne Center Drive
Pomona, CA 91767
For additional and updated information
please visit www.barska.com
Please email [email protected] or call 1.909.445.8168 for Return
Merchandise Number (RMA#) before any returns.
NOTE: All merchandise received without a valid RMA# will be returned to
shipper at his/her own expense.
Please include all of the following when returning WINBEST® by BARSKA®
products for service and/or replacement:
1. Please write your complete details (Name, Address, Telephone #,
E-mail address, RMA#, etc.)
2. Purchase receipt or Proof of Purchase. (Original/Copy)
3. A brief explanation of the defect
4. A Check/Money Order of $20.00 to cover inspection, shipping and handling
*Please allow 6-8 weeks for delivery
This product will either be replaced or repaired at the discretion of the
warrantor. If it’s a discontinued item, we will replace the product with an
equivalent product. Should the repair not be covered by this warranty, an
estimate will be sent for your approval. Non-warranty repairs or refurbishing
are always provided at a reasonable cost.
WINBEST® by BARSKA® shall not be liable for any consequential, incidental
and/or contingent damages whatsoever. We will not pay shipping, insurance
or transportation charges from you to us, or any import fees, duties and
or taxes.This warranty supersedes all previous Winbest® by BARSKA
warranties.
©2026 BARSKA® BC7913/26