
1
User Manual
For Firmware V1.0.6
Convolution Reverb
※
In the interest of product improvement, the specifications and/or the content of products (including but not limited to appearances, packaging design, manual
content, accessories, size, parameters and display screen), are subject to change without prior notice. Please check with local supplier for exact offers. Specifications
and features (including but not limited to appearances, colors and size) may vary by model owing to environmental factors, and all images are illustrative.

Contents
Welcome ··································································································1
Safety Instructions ··············································································· 2
Precautions ····································································································· 2
Definition of intended use ·········································································· 2
Panel Introduction ················································································ 8
Front Panel Control ······················································································ 8
Connection Guide ·························································································10
Suggested Setups ················································································12
Using with Other Pedals ············································································12
Connecting to the FX Loop of Other Devices ······································13
Controls in Depth ·················································································14
Signal FLow Overview ················································································14
ALT/MENU·······································································································14
Parameter Toggle ····················································································14
MENU ···········································································································15
About IR ···········································································································16
Smart IR Sorting ·······················································································16
About Preset ·································································································· 17
Preset Main Interface ············································································17
Save and Rename ····················································································18
Footswitch Mode ·························································································19
Clone Function ·····················································································20
Expression and MIDI ··········································································· 23
EXP Setting ····································································································23
MIDI Setting ···································································································25
MIDI CC Table ····························································································25
Power Supply ······················································································· 26
Software Support ··············································································· 26
Factory IR List ······················································································ 27
Technical Specification ······································································ 32

Welcome
1
Welcome
Thank you for purchasing a Hotone product.
Please read this manual carefully to get the most out of your Verbera.
Please keep this manual in a safe place for further reference.

Safety Instructions
2
Safety Instructions
Precautions
PLEASE READ CAREFULLY BEFORE OPERATING THE DEVICE.
Please keep this manual in a safe place for future reference.
Please always follow the basic precautions listed below.
These precautions include, but are not limited to, the following:
Definition of intended use
Power supply & power cord
Please check the voltage specification on the device or device power
adaptor match your power supply network.
Please be sure to use the device just with an adequate power supply,
such as original supplied power adaptor.
When using a 3rd party power adapter, please make sure the power
adapter fits the device’s power requirement. Use of an adapter other
than that specified could damage the unit or cause malfunction and pose
a safety hazard, such as incorrect polarity would cause the fire hazard.
Hotone will not be responsible for physical injury to you or others, or
damage to the device or other property.
When disconnecting the adapter from an outlet, please always pull the
connector itself. Pulling the cord will cause damage to the unit.
Make sure to separate the power adapter and store in a safe place.
Please remove the electric plug from the outlet when the device is not to
be used for extended periods of time, or during electrical storms.
Please be sure to connect to an appropriate outlet with a protective
grounding connection.

Safety Instructions
3
Do not open
This device contains no user-serviceable parts. Do not open the device or
attempt to disassemble the internal parts or modify them in any way.
Opening the case may expose you to dangerous voltages, or other
hazards.
Opening the casing or performing self-repairs on this device will result in
the loss of the warranty eligibility for this device.
If it should appear to be malfunctioning, please discontinue use
immediately and contact our service team.
Water warning
Do not expose the device to rain, use it near water or in damp or
wet conditions, or place on it any containers (such as vases, bottles
or glasses) containing liquids which might spill into any openings. If
any liquid such as water seeps into the device, turn off the power
immediately and unplug the power cord from the AC outlet.
Please never insert or remove an electric plug with wet hands.
Fire warning
Please do not place any burning items or open flames near the device,
since they may cause a fire hazard.
Electromagnetic fields warning
Please avoid operating the device within significant electromagnetic
fields. Failing to do so may result in noise, device malfunction, or even
loss of data etc.
Hearing loss
Please avoid setting all volume levels to their maximum, specially with
using headphones. Depending on the condition of the connected devices,
doing so may result in feedback that can cause hearing loss and damage

Safety Instructions
4
the speakers or headphones.
Before connecting the device to other devices, please turn off the power
for all devices. Also, before turning the power of all devices on or off,
please make sure that all volume levels are set to the minimum. Failing
to do so may result in hearing loss, electric shock, or device damage.
Location
Please keep away form children, or be accompanied by an adult. The
following may cause choking hazard.
- Swallowing of small parts.
- Plastic covers and other packaging material.
While using, please do not cover the device with any cloth, or block any
jack of the device.
The device and power supply will become warm with extended use.
Please avoid using the device in any of the following conditions that
could cause malfunction:
- Extremely hot or cold places
- Sandy or dusty places
- Contact with corrosive gases or salt air
- Places with extreme vibrations
Before moving the device, please be sure to remove all connected cables,
and power adaptor.
Depending on the material and temperature of the surface on which you
place the device, its rubber feet may discolor or mar the surface.
Maintenance
Please remove the power plug from the AC outlet while cleaning the
device.
Please use a soft cloth to clean the panels if they become dirty. If

Safety Instructions
5
necessary, slightly moisten the cloth.
Never use cleansers, wax, or solvents such as paint thinner, benzene or
alcohol.
Operation
Please do not apply excessive force to the knobs, switches, jacks, and
other controls.
Please do not apply excessive force to the screen (if applicable) or casing,
which may cause malfunction.
Please do not expose the unit to strong impact or drop it.
Please do not place foreign objects (liquid or solid) into the device.
Malfunction
If any of the following problems occur, immediately turn off the device
and disconnect the electric plug from the outlet.
- The device is dropped or damaged.
- The power cord or plug becomes frayed or damaged.
- The power adaptor malfunction.
- Unusual smells or smoke are emitted.
- Some object has been dropped into the device.
- There is a sudden loss of sound during use of the device.
- Cracks or other visible damage appear on the device.
- The device has other obvious signs of malfunction (e.g. can not turn on,
knobs can not work, volume is too low, etc.)
Then please contact our service team.
About disposal
While disposing of this product, please take them to applicable collection
Safety Instructions
6
points, for proper treatment, in accordance with your national legislation.
Disposal of the packaging material
For the transport and protective packaging, environmentally
friendly materials have been chosen that can be supplied to
normal recycling.
Ensure that plastic bags, packaging, etc. are properly disposed of.
Please do not just dispose of these materials with your normal household
waste, but make sure that they are collected for recycling.
Disposal of your old device
This symbol on the products, packaging, and/or accompanying
documents means that used electrical and electronic products
should not be mixed with general household waste.
By disposing of these products correctly, you will help to save valuable
resources and prevent any potential negative effects on human health
and the environment which could otherwise arise from inappropriate
waste handling.
For more information about collection and recycling of old products,
please contact your local municipality, your waste disposal service or the
point of sale where you purchased the items.
This product is subject to the European Waste Electrical and Electronic
Equipment Directive (WEEE Directive - Waste Electrical and Electronic
Equipment) as amended from time to time version.
Observe the disposal note for documentation in France.
Disposal of batteries
Batteries must not be discarded or incinerated, but disposed
of in accordance with local hazardous waste disposal
regulations.

Safety Instructions
7
Service Contact
Please prepare information including the model name, serial number,
specific symptoms related to the malfunction, your name, address and
telephone number, etc.
You can contact the store where you bought the device, or contact
Hotone support (service@hotoneaudio.com)
Please use this device according to the manual provided. Any other use,
as well as use under other operating conditions, is considered improper
use.
Hotone cannot be held responsible for damage caused by improper use
or modifications to the device.
Panel Introduction
8
Panel Introduction
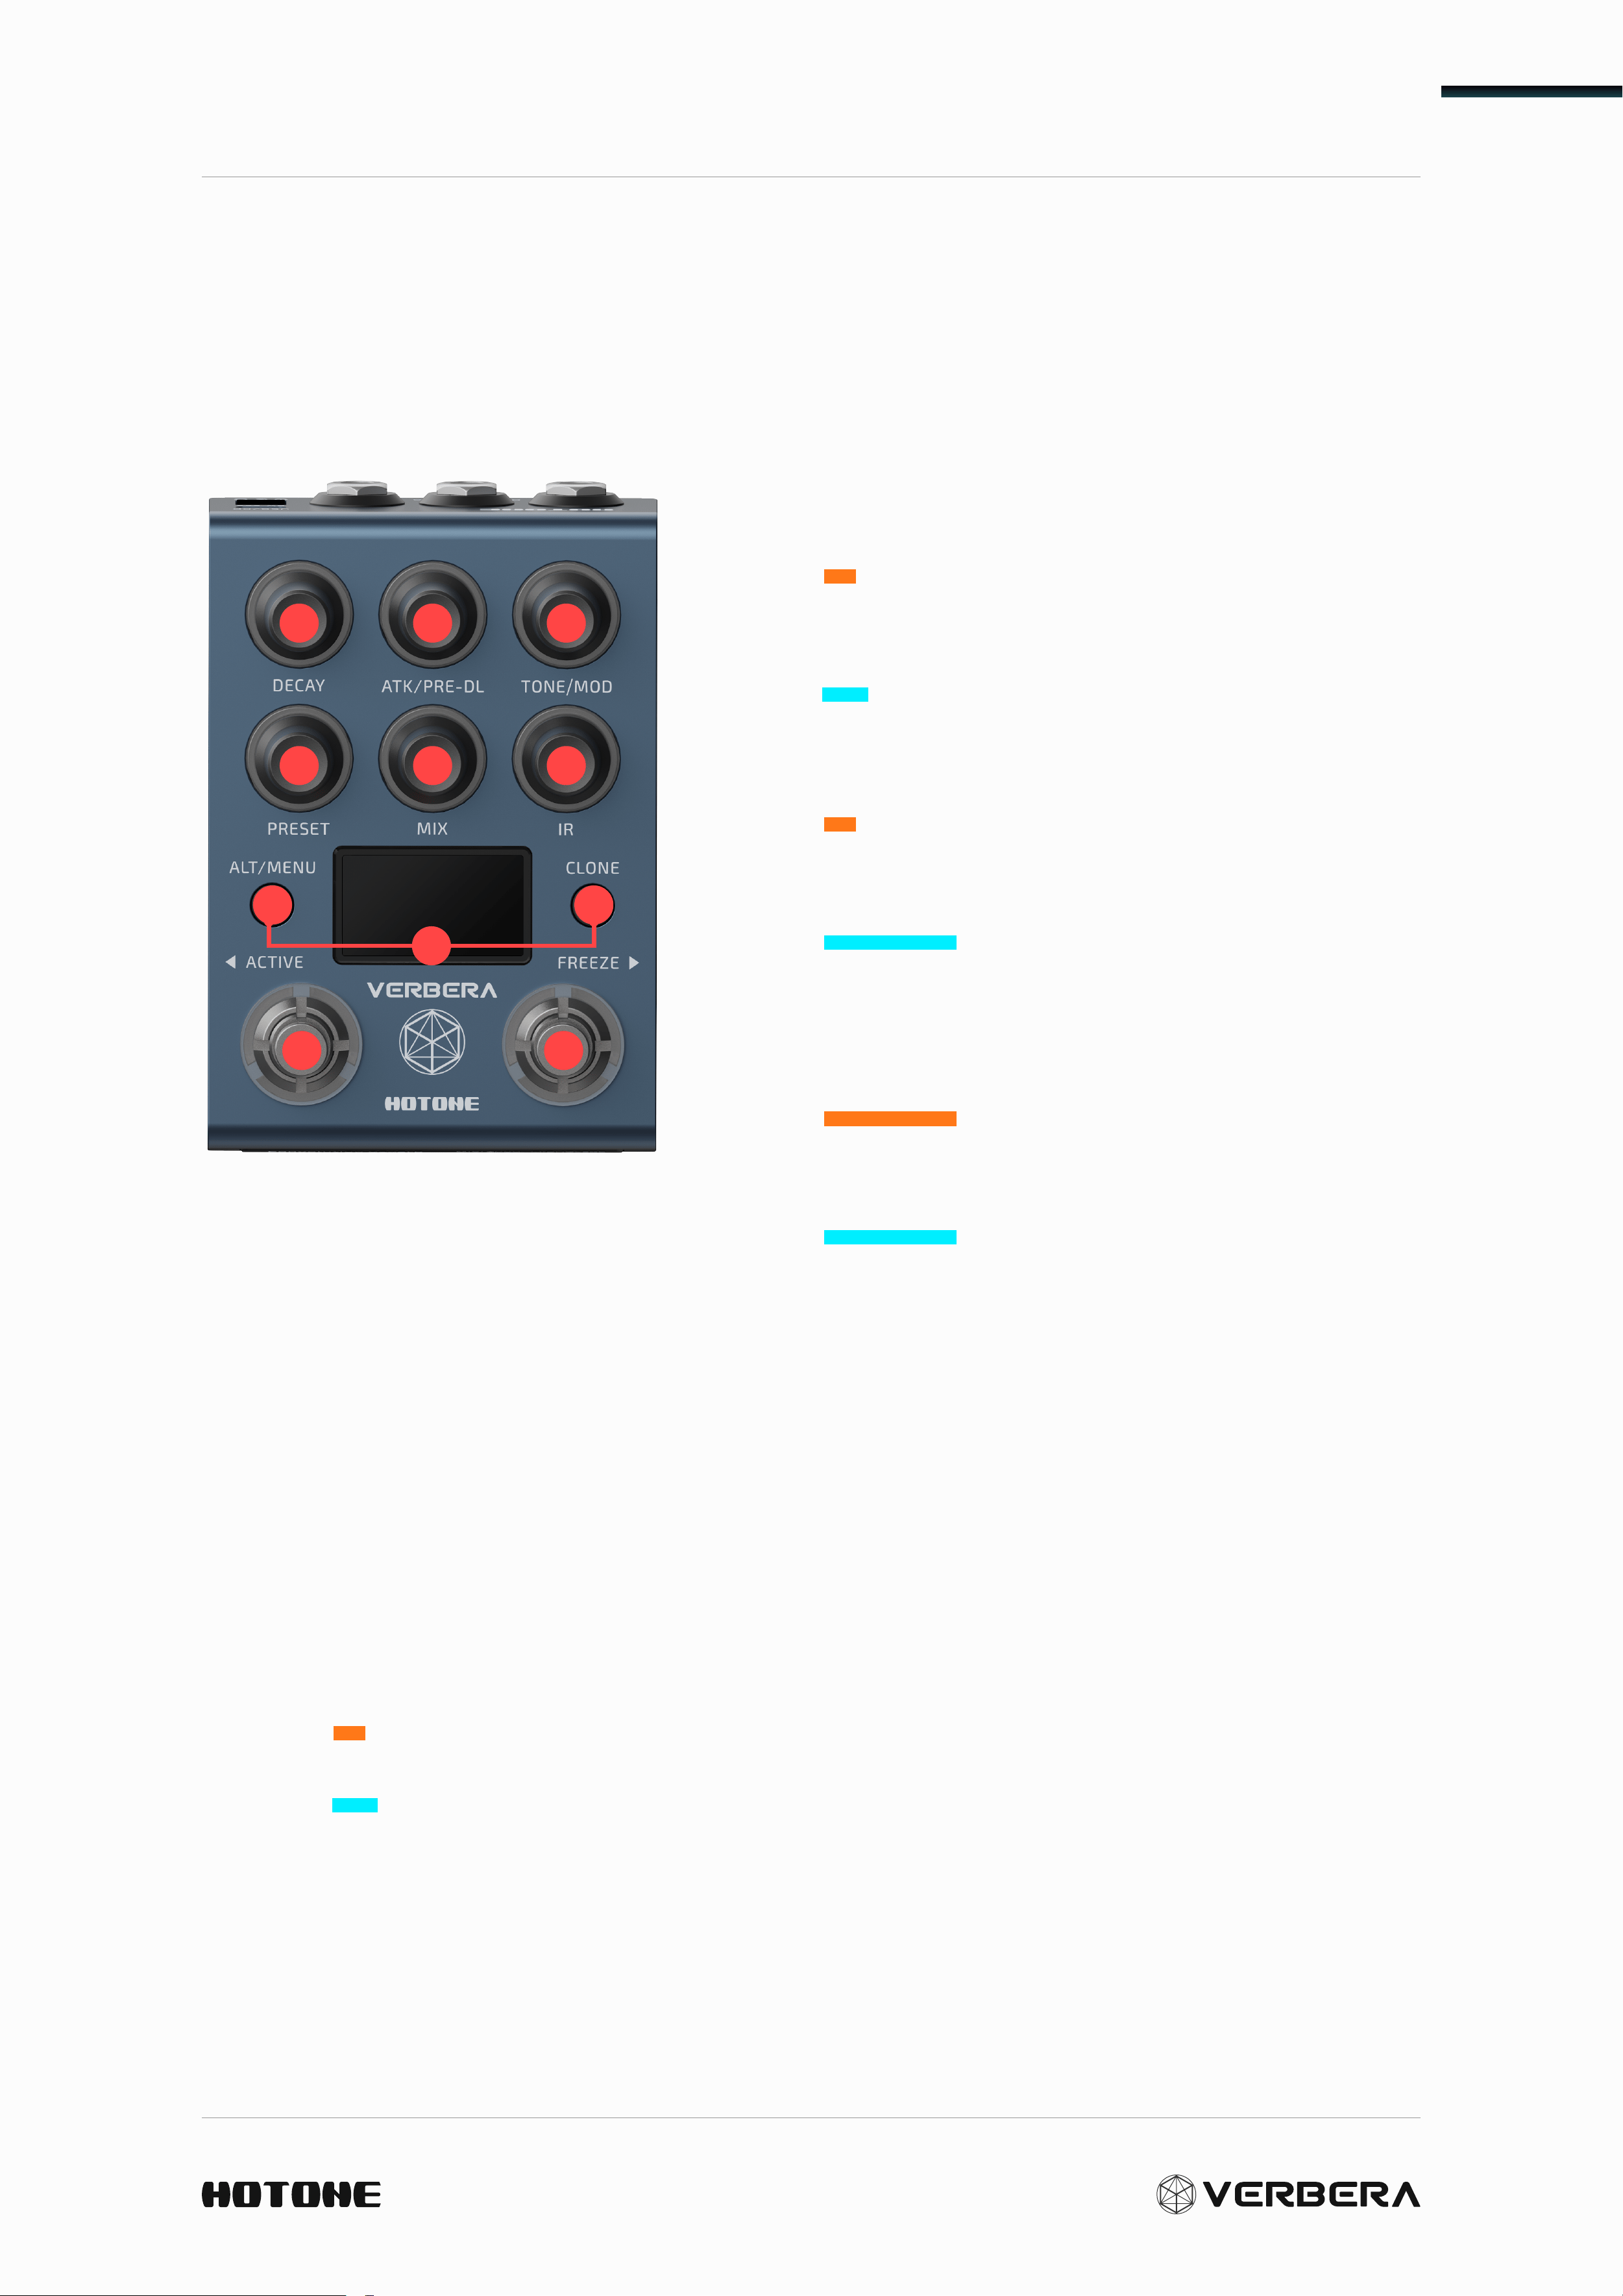
Front Panel Control
1 2 3
4 5 6
7
10 10
8
9
1. DECAY
ALT-IR: Adjust convolution reverb (IR)
Decay.
ALT-XR: Adjust Extra Reverb (XR) Decay.
2. ATK /PRE-DL
ALT-IR: Adjust convolution reverb (IR)
Attack.
ALT-GLOBAL: Adjust the overall wet
signal Pre-Delay.
3. TONE /MOD
ALT-GLOBAL: Adjust the brightness of
the wet signal.
ALT-GLOBAL: Adjust the MOD depth of
the wet signal.
4. PRESET
Rotate: Switch between stored presets.
Push: Save/Rename the current preset to the specified preset
location.
Hold: Save the preset directly to the current location.
5. MIX
ALT-IR: Adjust the dry/wet mix of the convolution reverb.
ALT-XR: Adjust the dry/wet mix of the extra reverb (XR).
6. IR
Rotate: Switch between stored IRs.
Push: Sort all IRs sequentially according to different rules.
Panel Introduction
9
7. ALT/MENU
Push: Switch between two different functions of the knob. Each knob
may have the following functions:
ALT-IR: Adjust the IR parameters.
ALT-XR: Adjust the extra reverb parameters.
ALT-GLOBAL: Adjust the overall wet signal parameters.
Hold: Enter the MENU interface.
8. CLONE
Hold: Enter the IR cloning process.
9. ALT+CLONE
Enter the EXP settings interface of the current preset.
10. ACTIVE +FREEZE
Switch stomp mode: Control Mode/Preset Mode
• Control Mode:
ACTIVE: Turn on/off the reverb.
FREEZE: Turn on/off the reverb freeze function.
• Preset Mode:
ACTIVE: Switch to the previous preset.
FREEZE: Switch to the next preset.
Panel Introduction
10
Connection Guide
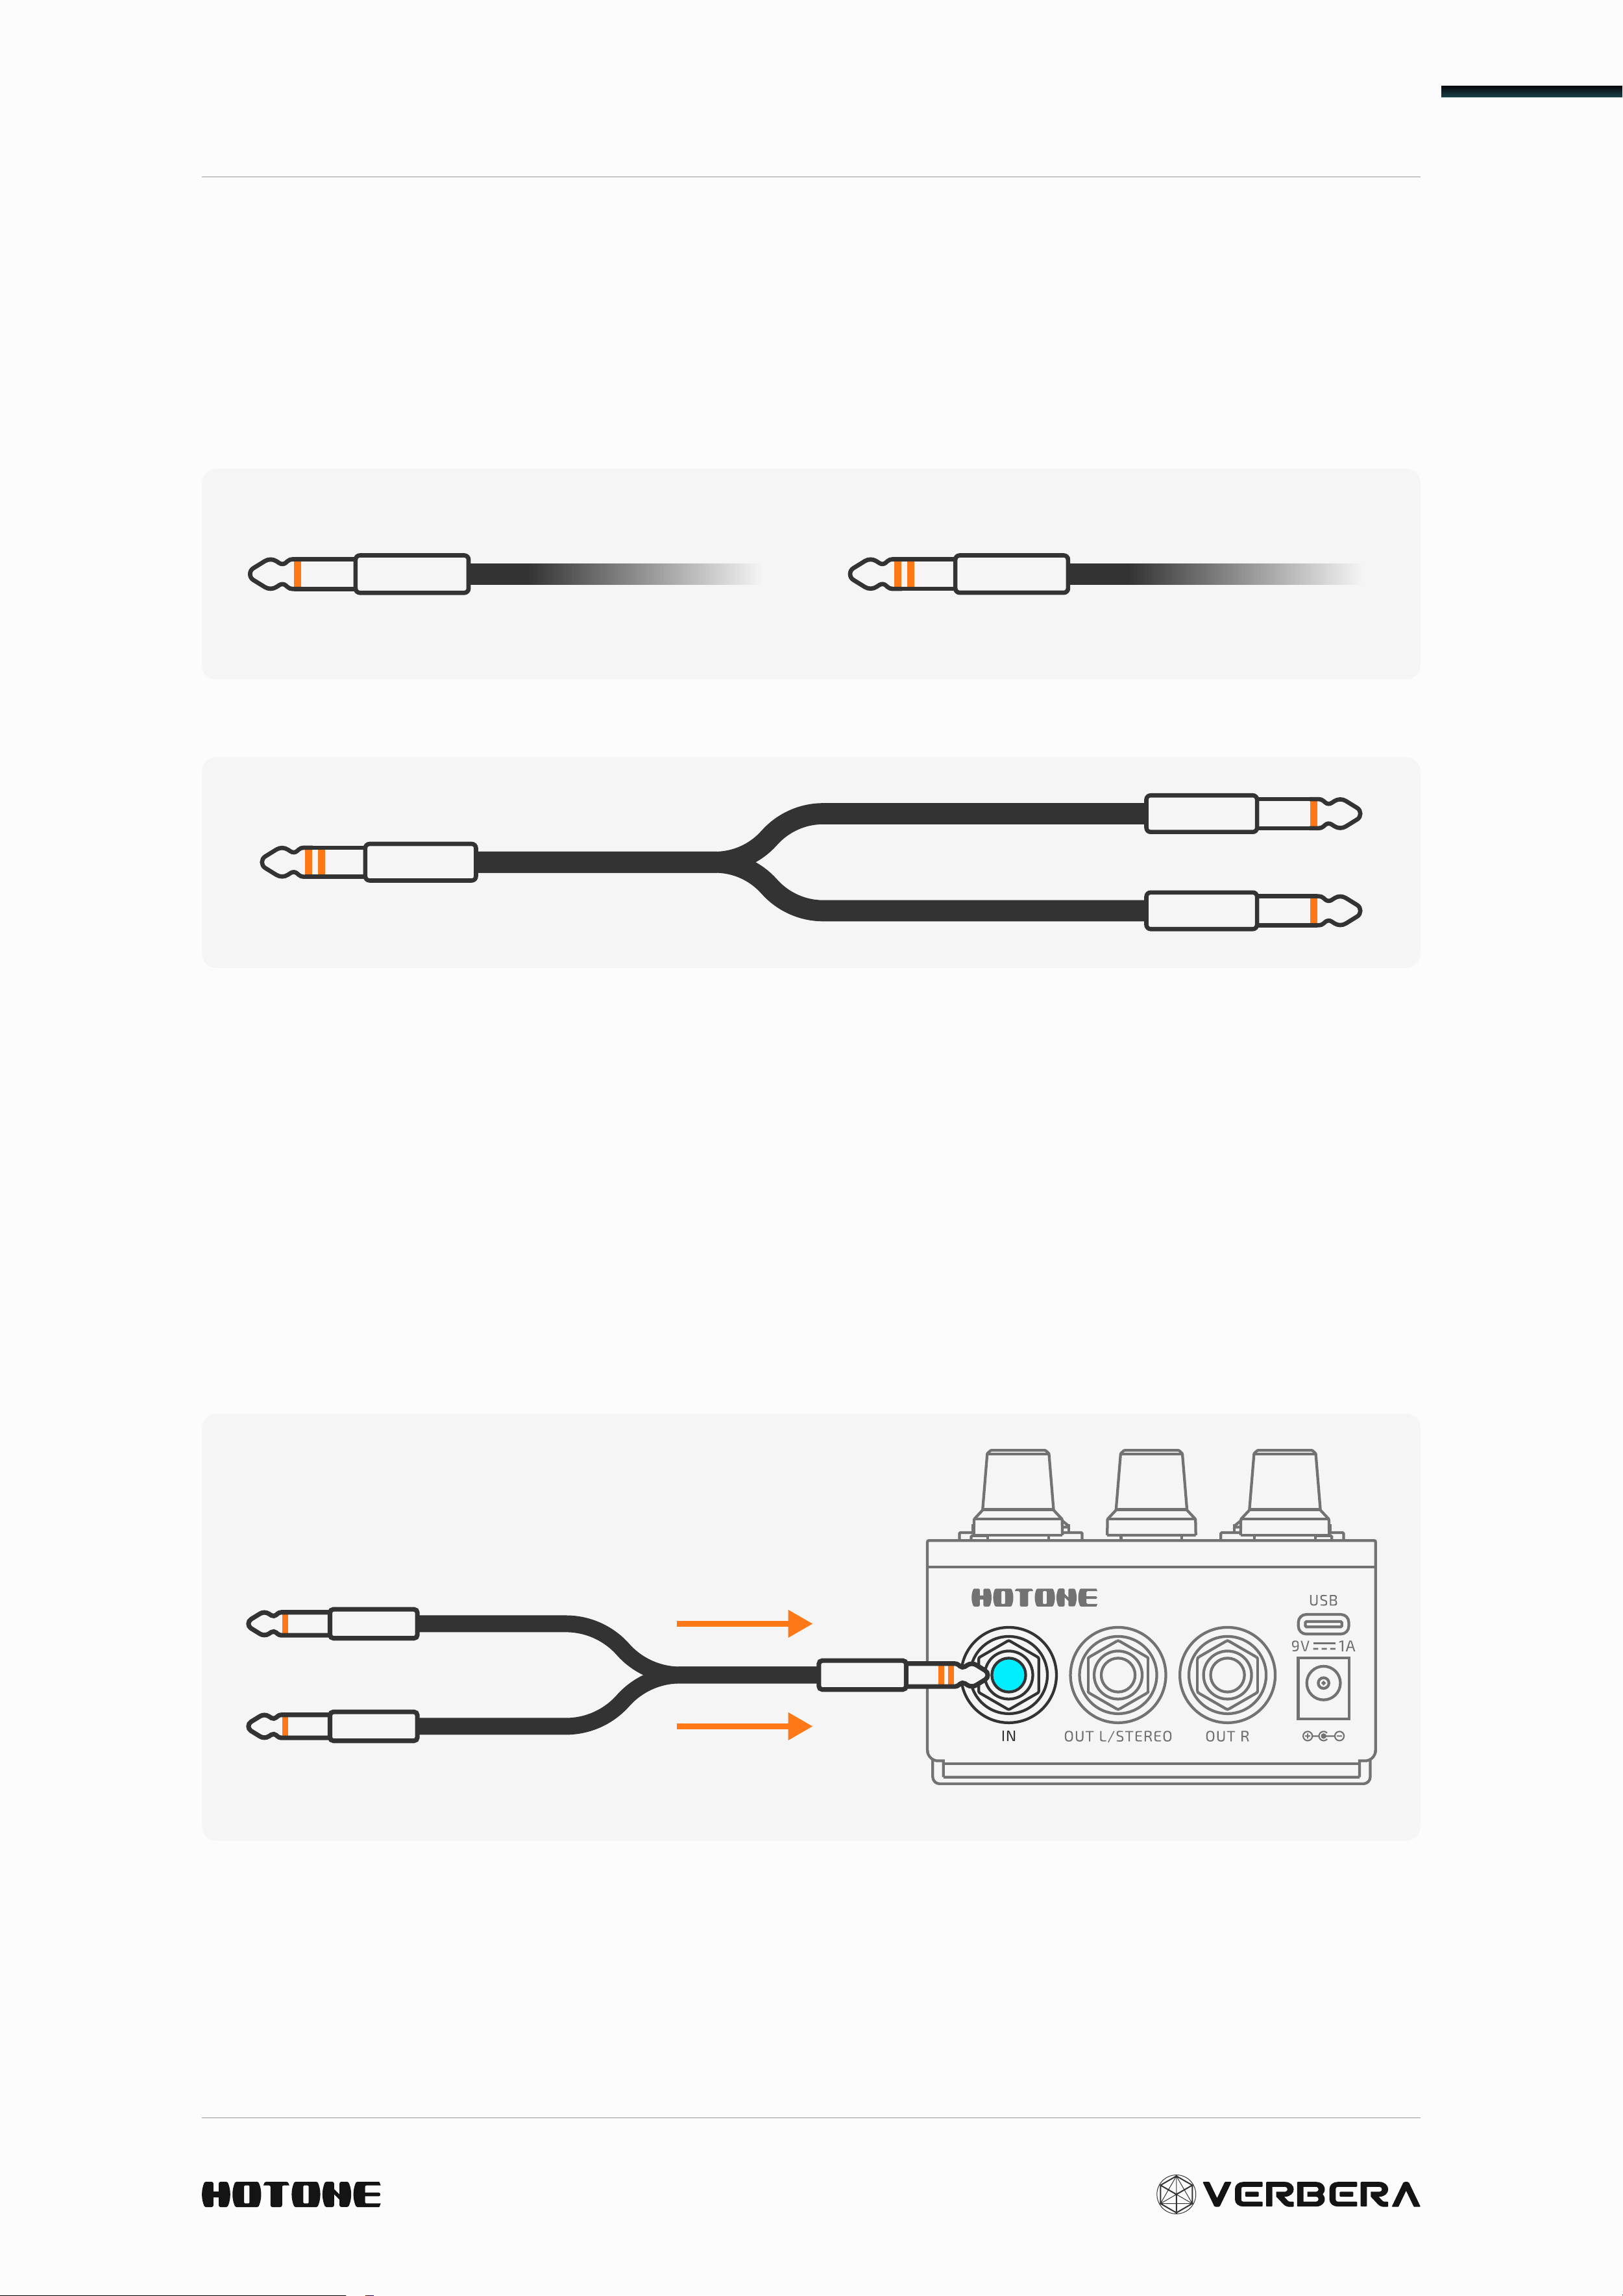
Verbera can be used in both mono and stereo scenarios. By adjusting
the input type settings, it is compatible with either mono or stereo input
environments:
Mono in, mono out
TS Cable
Stereo in, stereo out
TRS Cable
In a stereo input scenario, you may need a TRS to dual TS Y-cable:
INPUT
In the MENU settings, select the input mode: Mono/Stereo/Auto (see
section MENU).
Mono Input Scenario: Use a 1/4" TS cable to connect a mono instrument.
Stereo Input Scenario: Use a 1/4" TRS cable to connect a stereo
instrument.
L Channel
R Channel
Panel Introduction
11
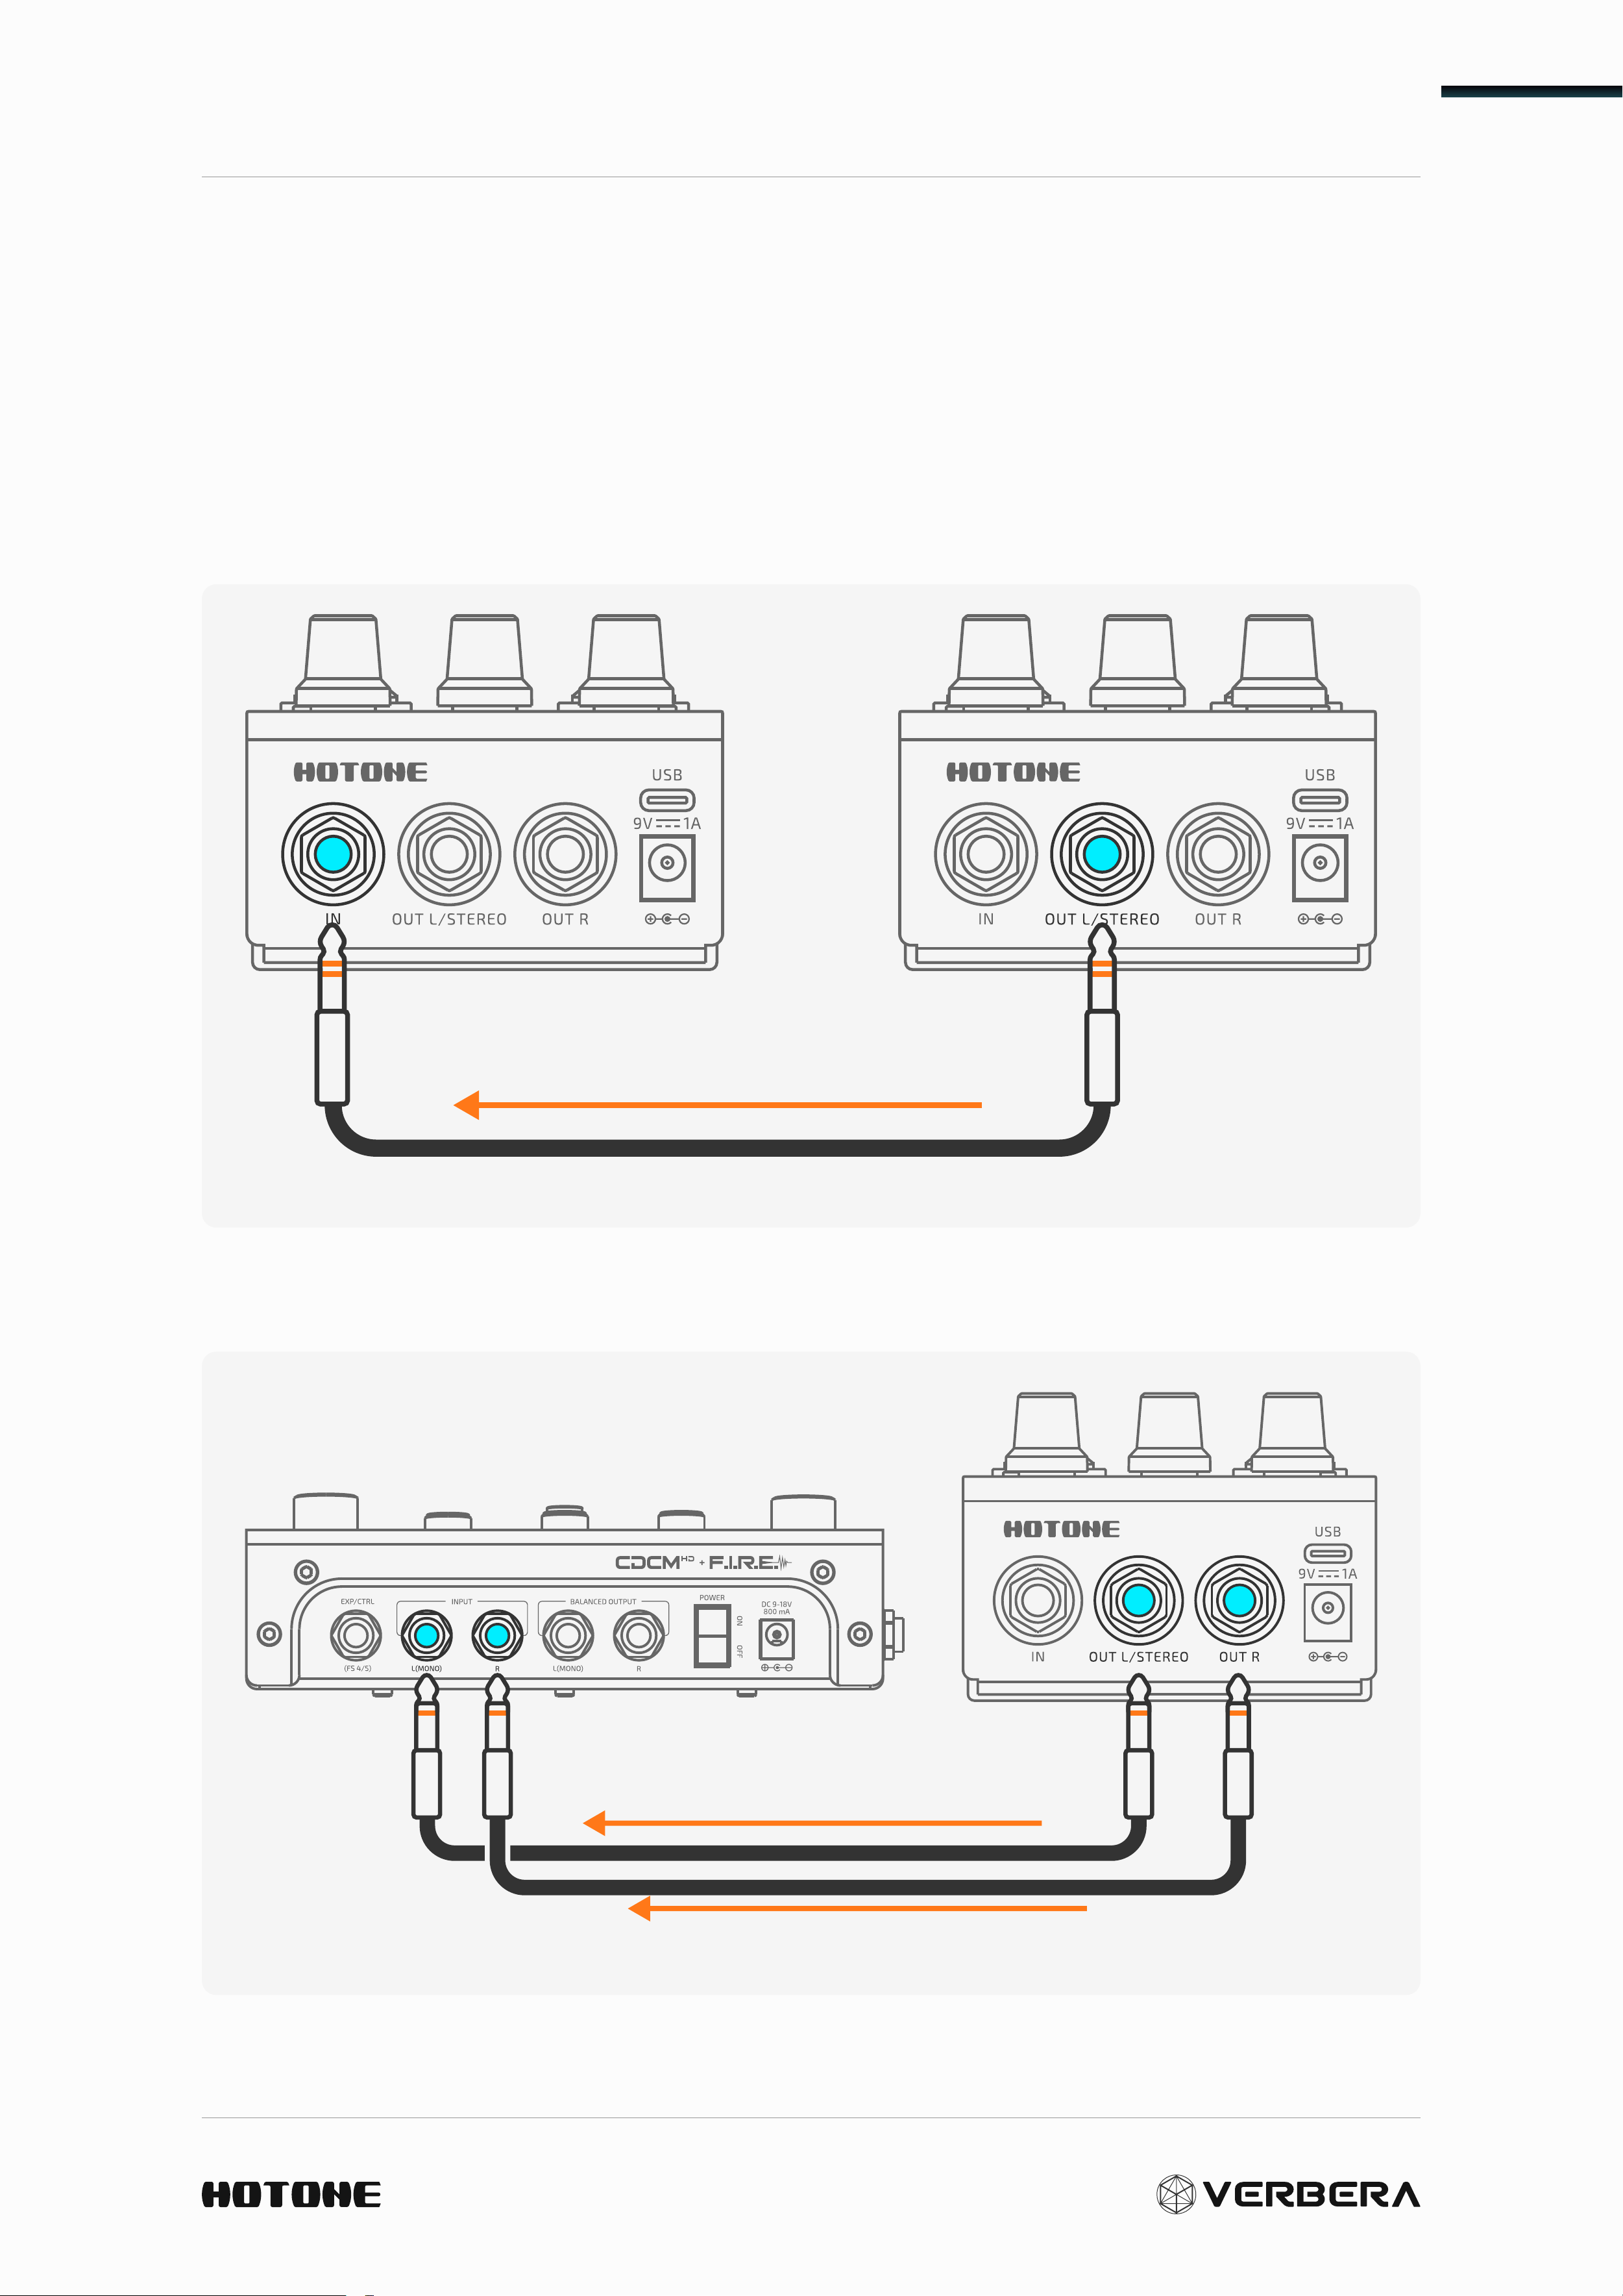
OUTPUT
Mono Output Scenario: Use a 1/4" TS audio cable to connect the OUT L/
STEREO channel to a mono input device.
Stereo Output Scenario:
1. Use a 1/4" TRS audio cable to connect the OUT L/STEREO channel to a
stereo input device.
TRS Cable
Stereo Signal
2. Use two 1/4" TS audio cables to connect the OUT L/STEREO and OUT
R channels to a stereo input device.
TS Cable
TS Cable
L Channel
R Channel
Suggested Setups
12
Suggested Setups
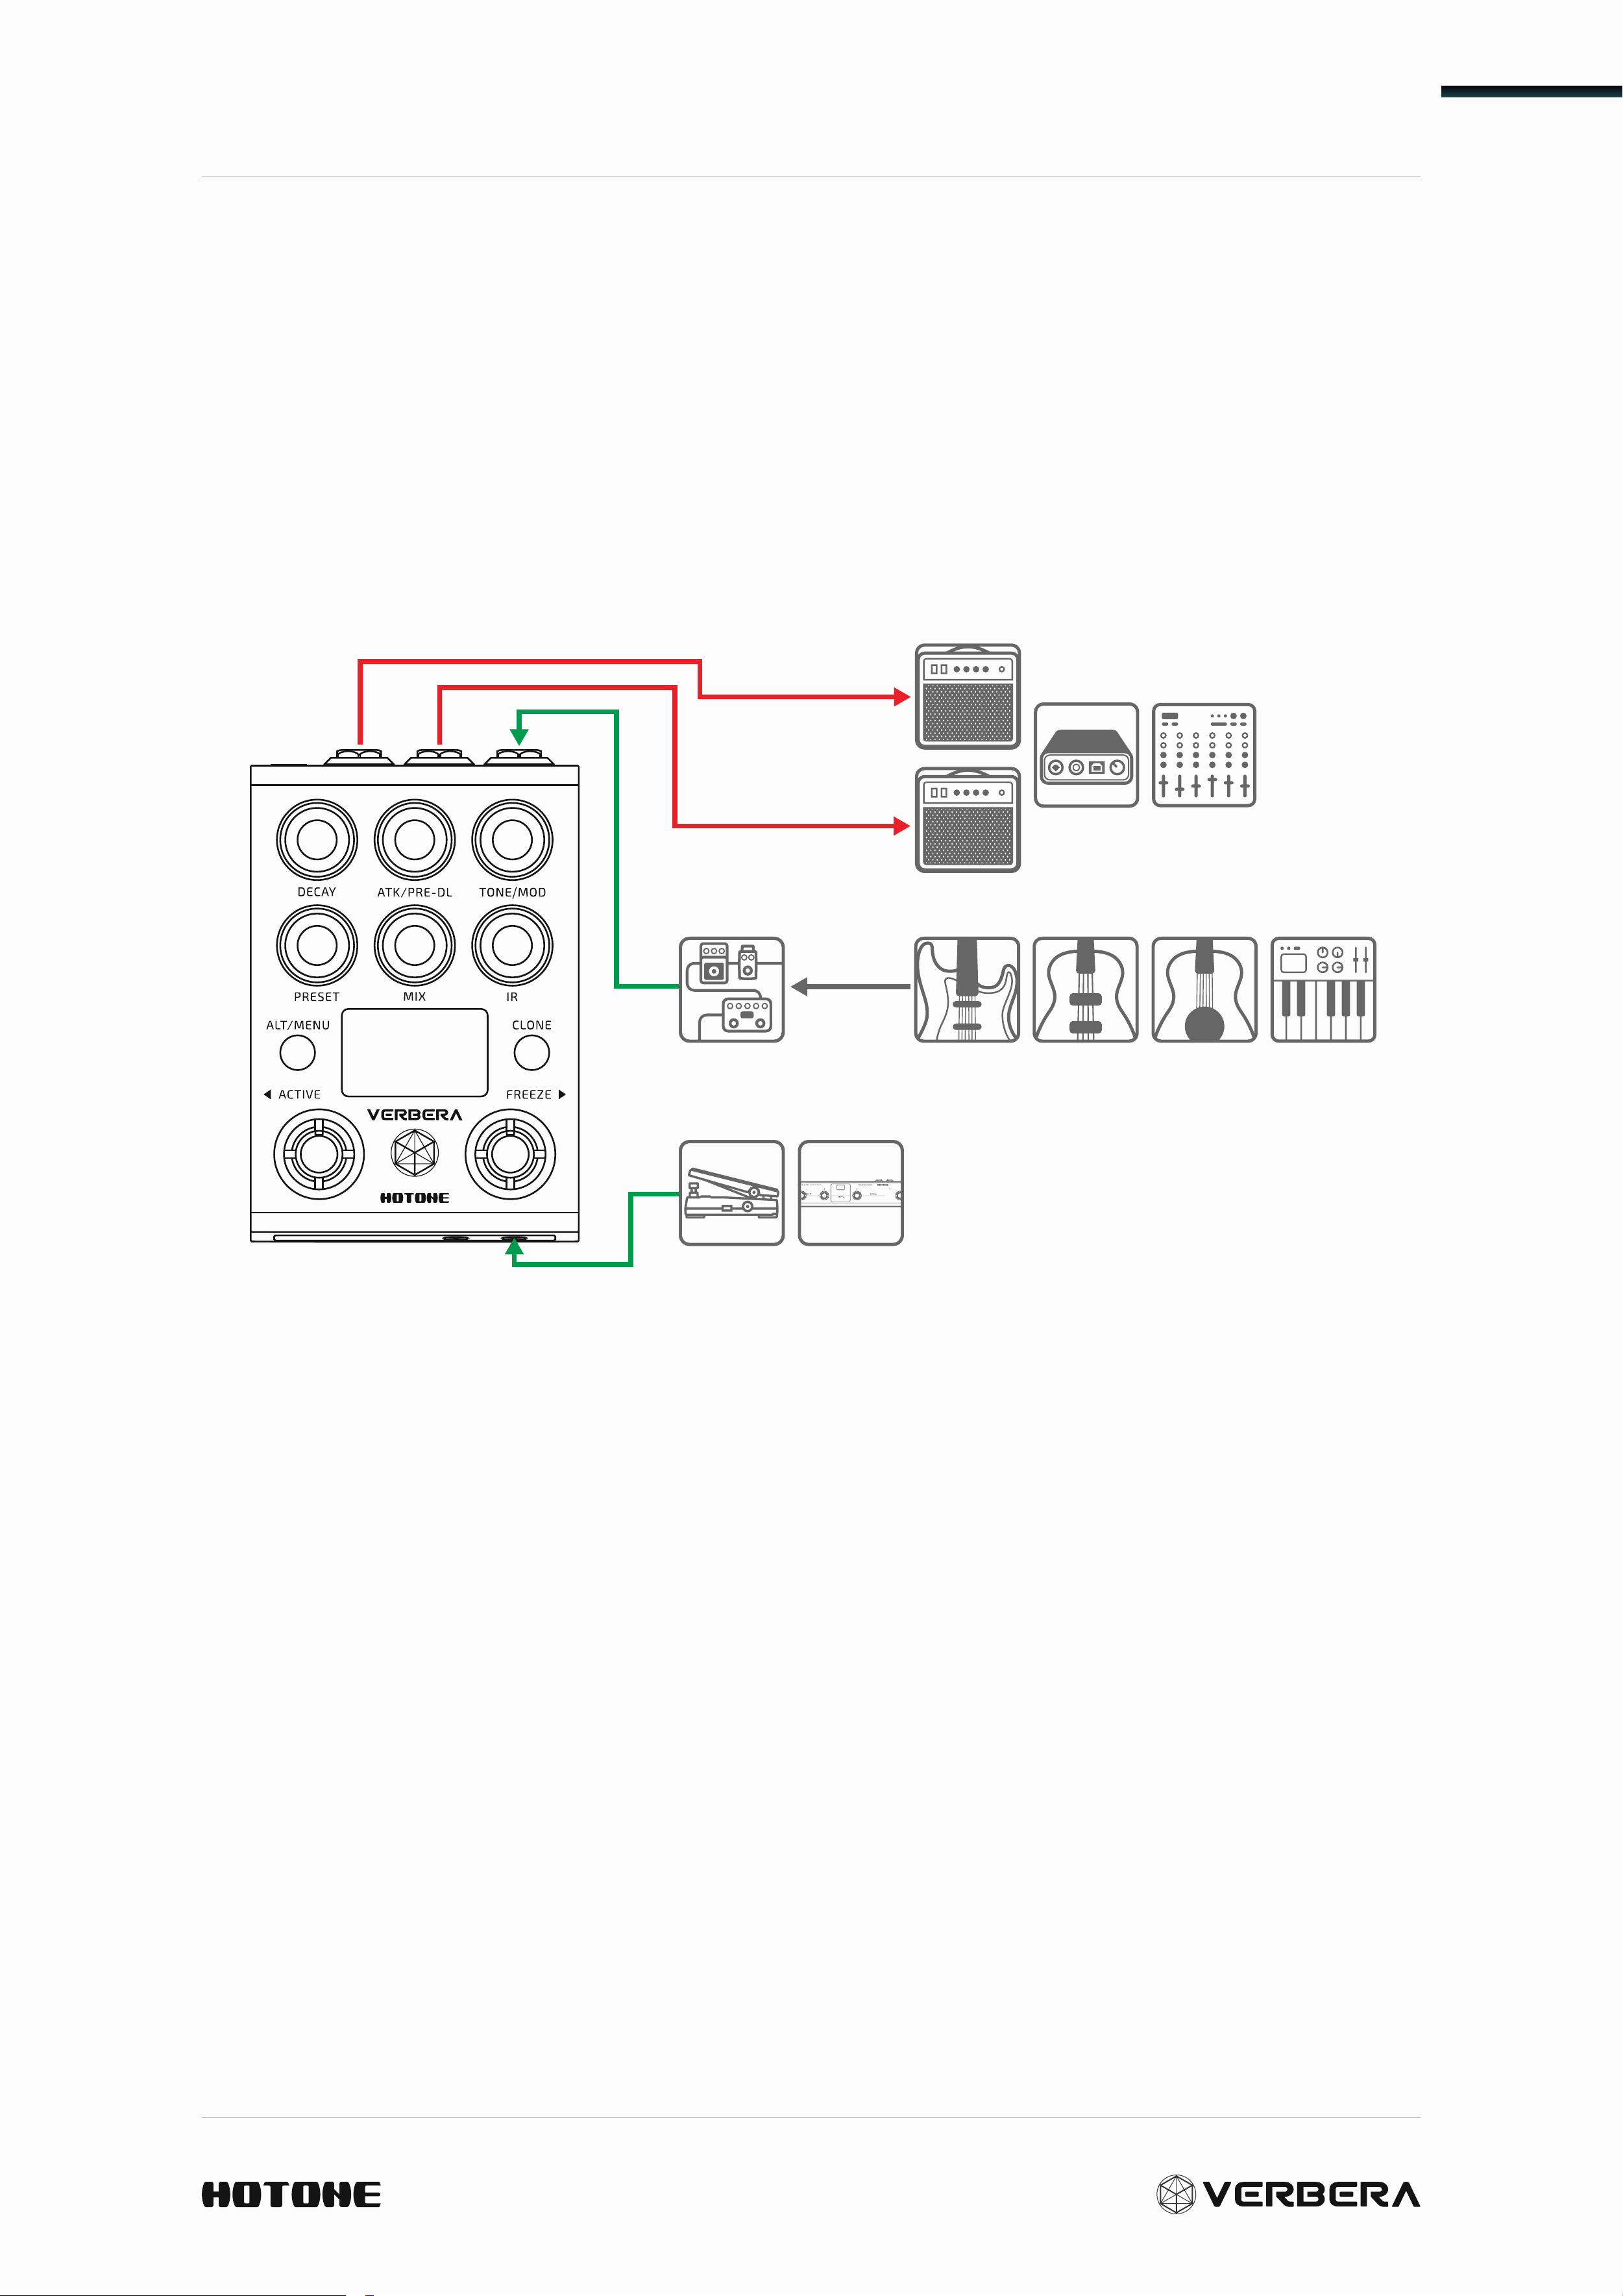
Using with Other Pedals
When using Verbera with other effect pedals, you can connect its output
to an amp or a full-range system input, depending on your needs. If
additional control is required, an external expression pedal or MIDI
controller can be used.
Suggested Setups
13
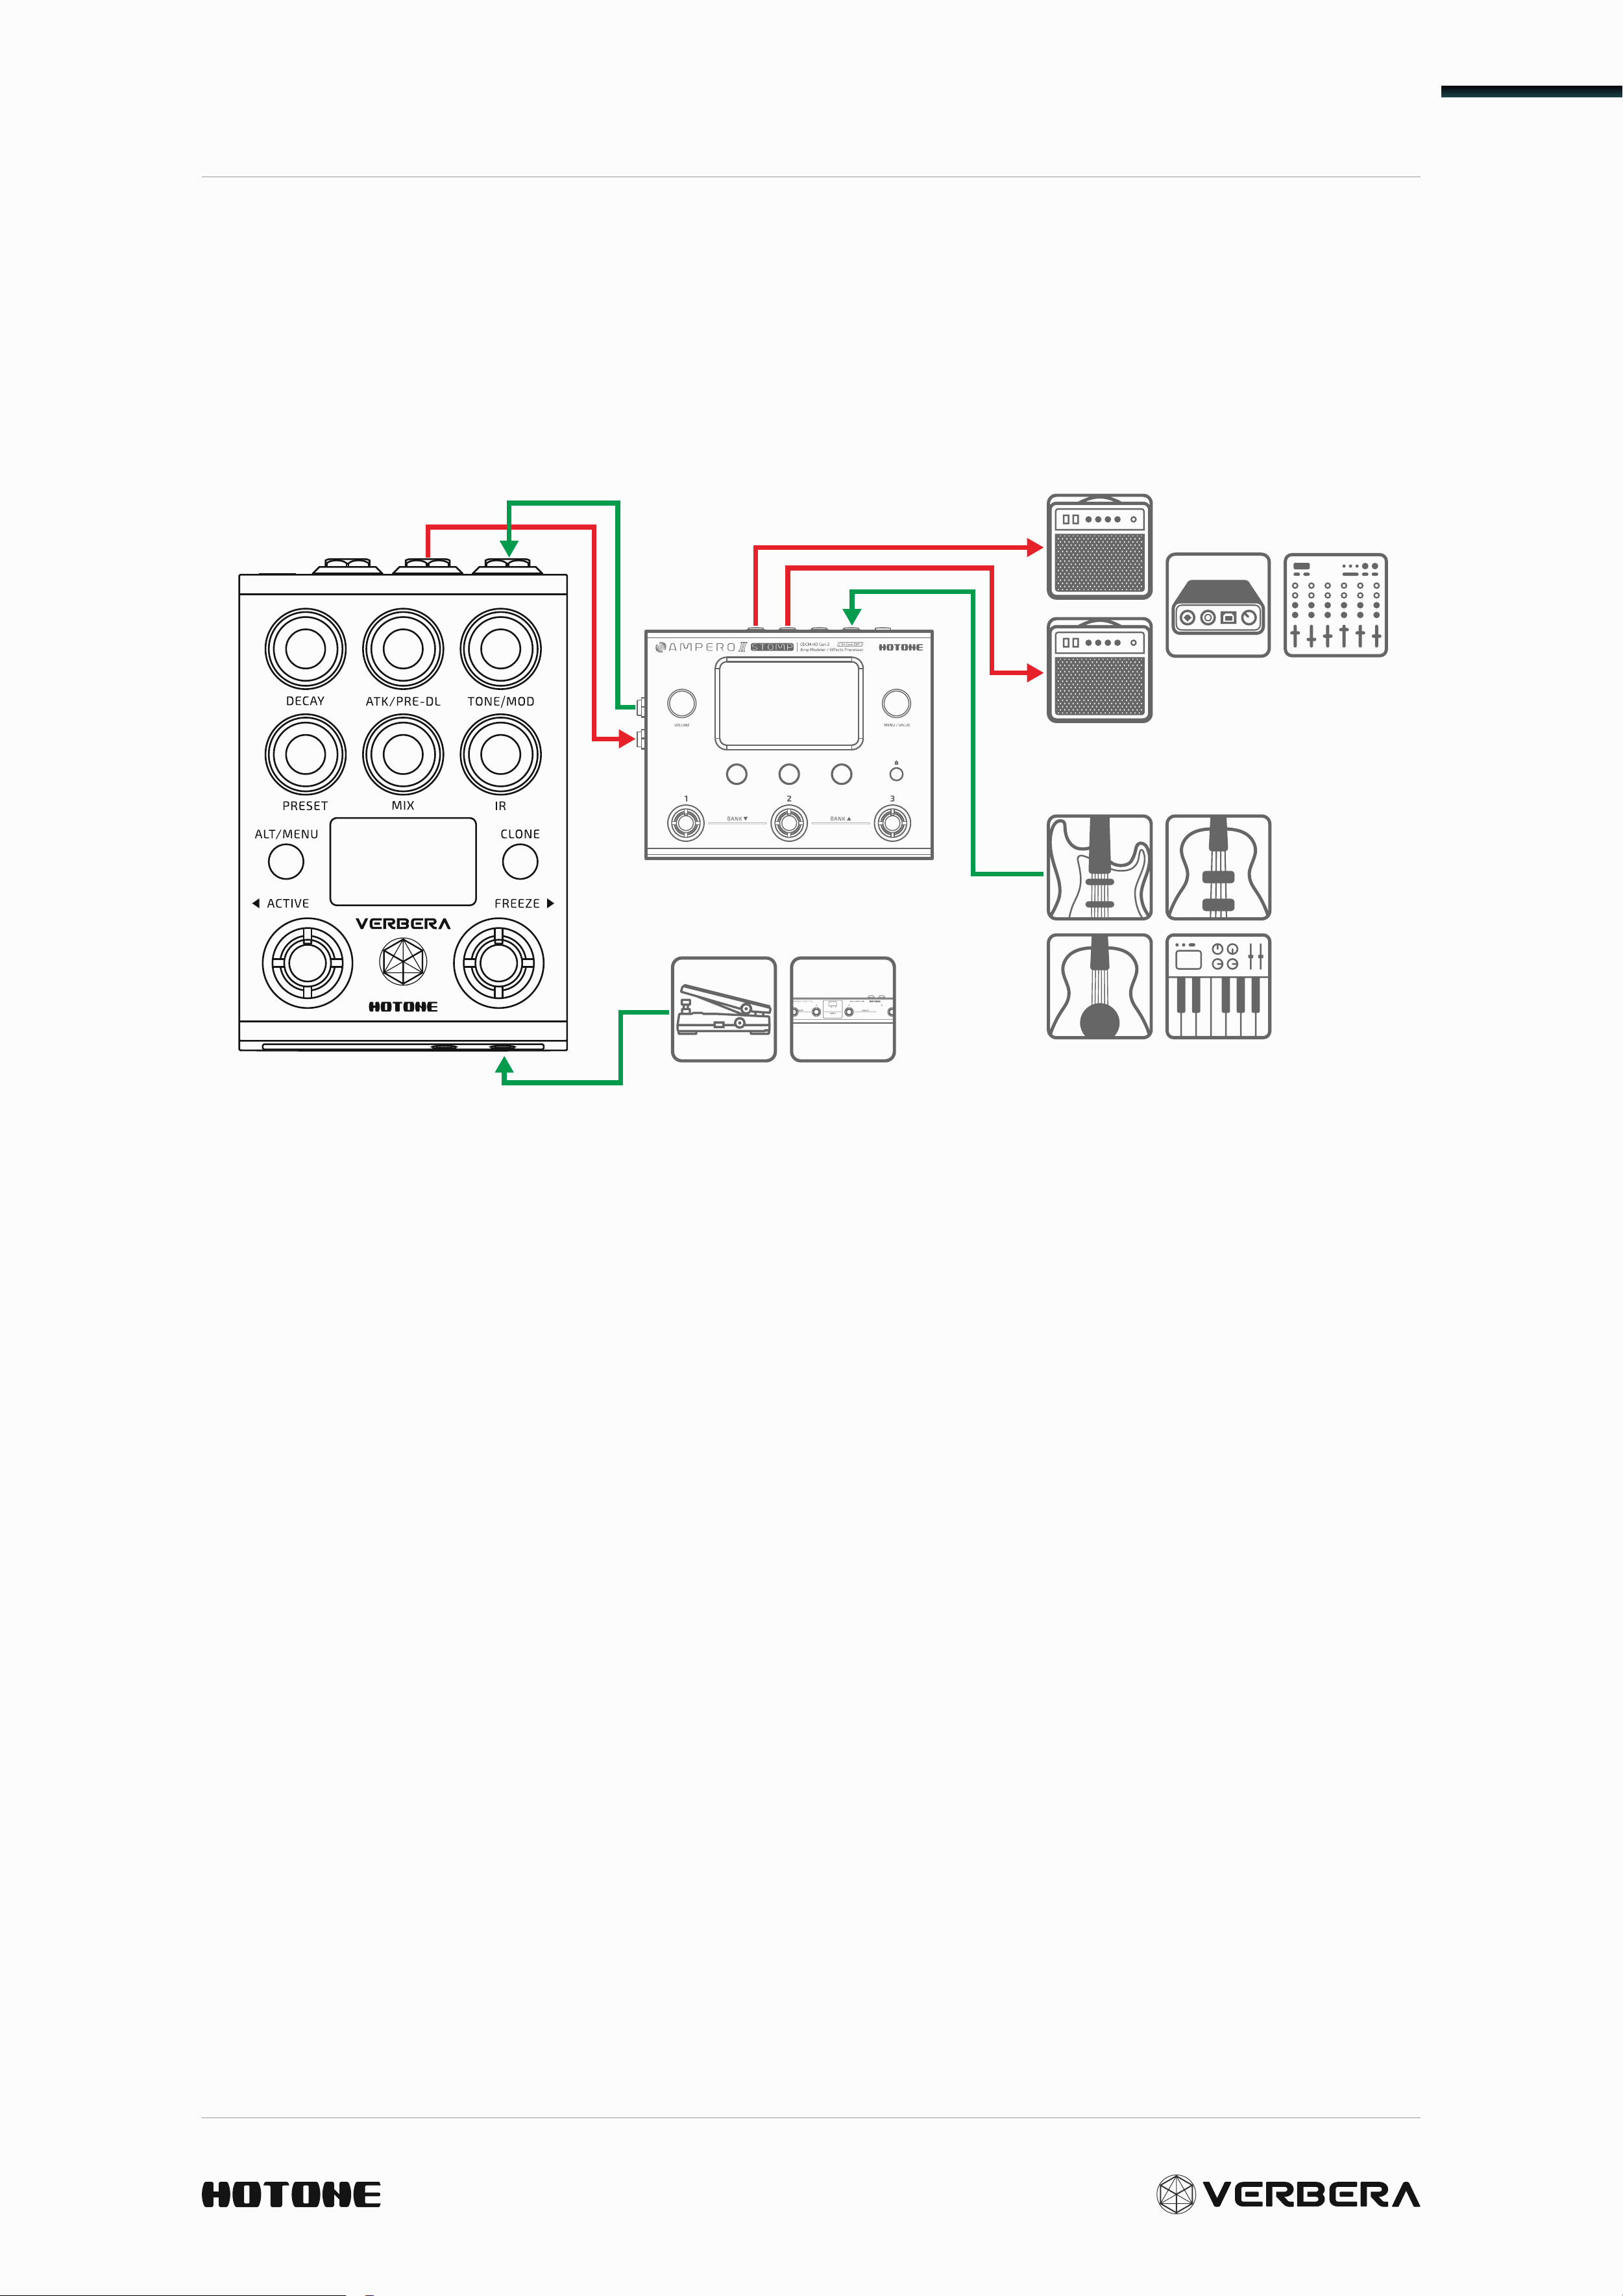
Connecting to the FX Loop of Other Devices
When using Verbera with other effect units or amp modelers that have
an FX Loop, ensure that the device supports the appropriate channel
configuration and use the corresponding audio cables for connection.
Controls in Depth
14
Controls in Depth
Signal FLow Overview
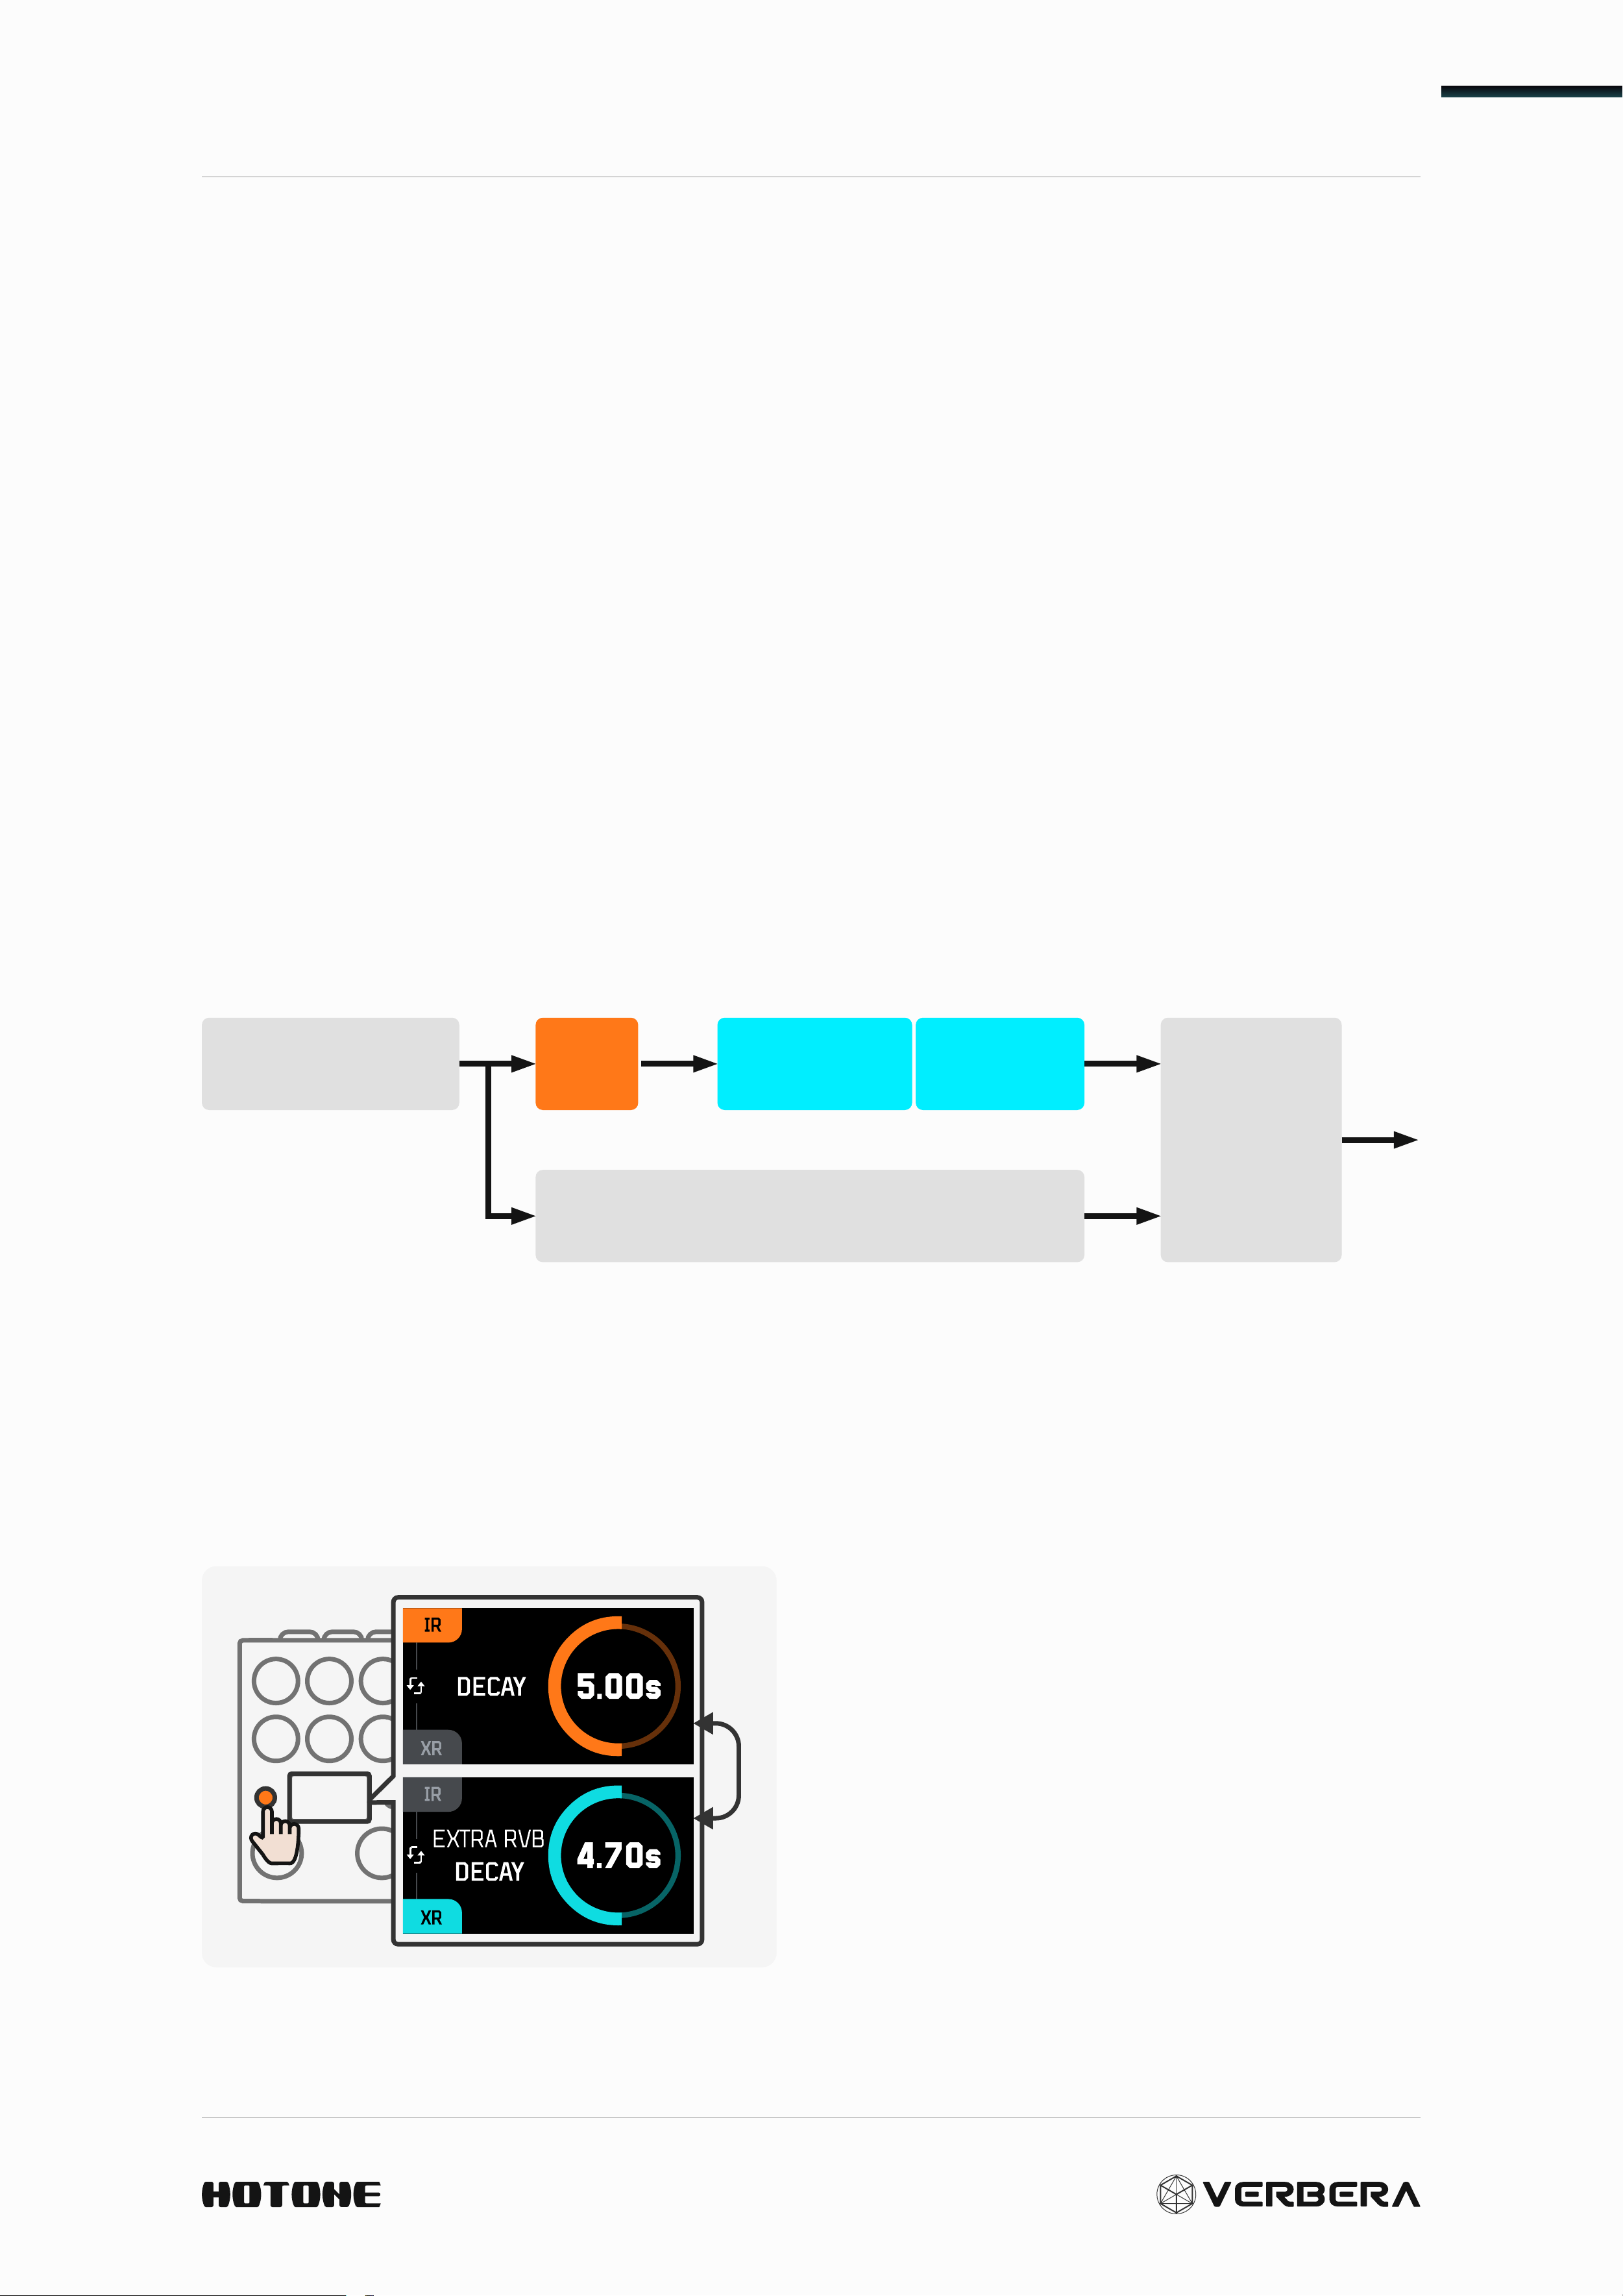
Verbera includes two types of reverb that work together: one is an IR-
based convolution reverb designed to replicate the intricate reverb
details of real spaces and equipment, while the other is a carefully
crafted extra algorithmic reverb (XR). If you're aiming for an otherworldly
sense of space, you can use it in combination with the IR reverb to create
more layered and immersive virtual reverb tones, and you can also use
the Freeze function in real-time to "freeze" the XR's tail. The Freeze
sustain function is an independent feature of XR and can be controlled
by adjusting the XR's MIX parameter to set the sustain volume. The
instrument's dry signal is a pure analog thru design (Analog Dry Thru),
ensuring the dynamic range and details of the original signal are fully
preserved.
DRY SIGNAL
ANALOG DRY THRU
OUTPUT
IR
XR
(Extra RVB)
Freeze
ALT/MENU
Parameter Toggle
Pressing
the ALT button allows the
knob to toggle between two
parameters. When the color of the
knob's LED ring changes, it indicates
that you've switched the control
object of the knob. The screen will
display the name of the currently
adjusted parameter along with its
specific value. Switching presets will
not change the state of the ALT
button.
Controls in Depth
15
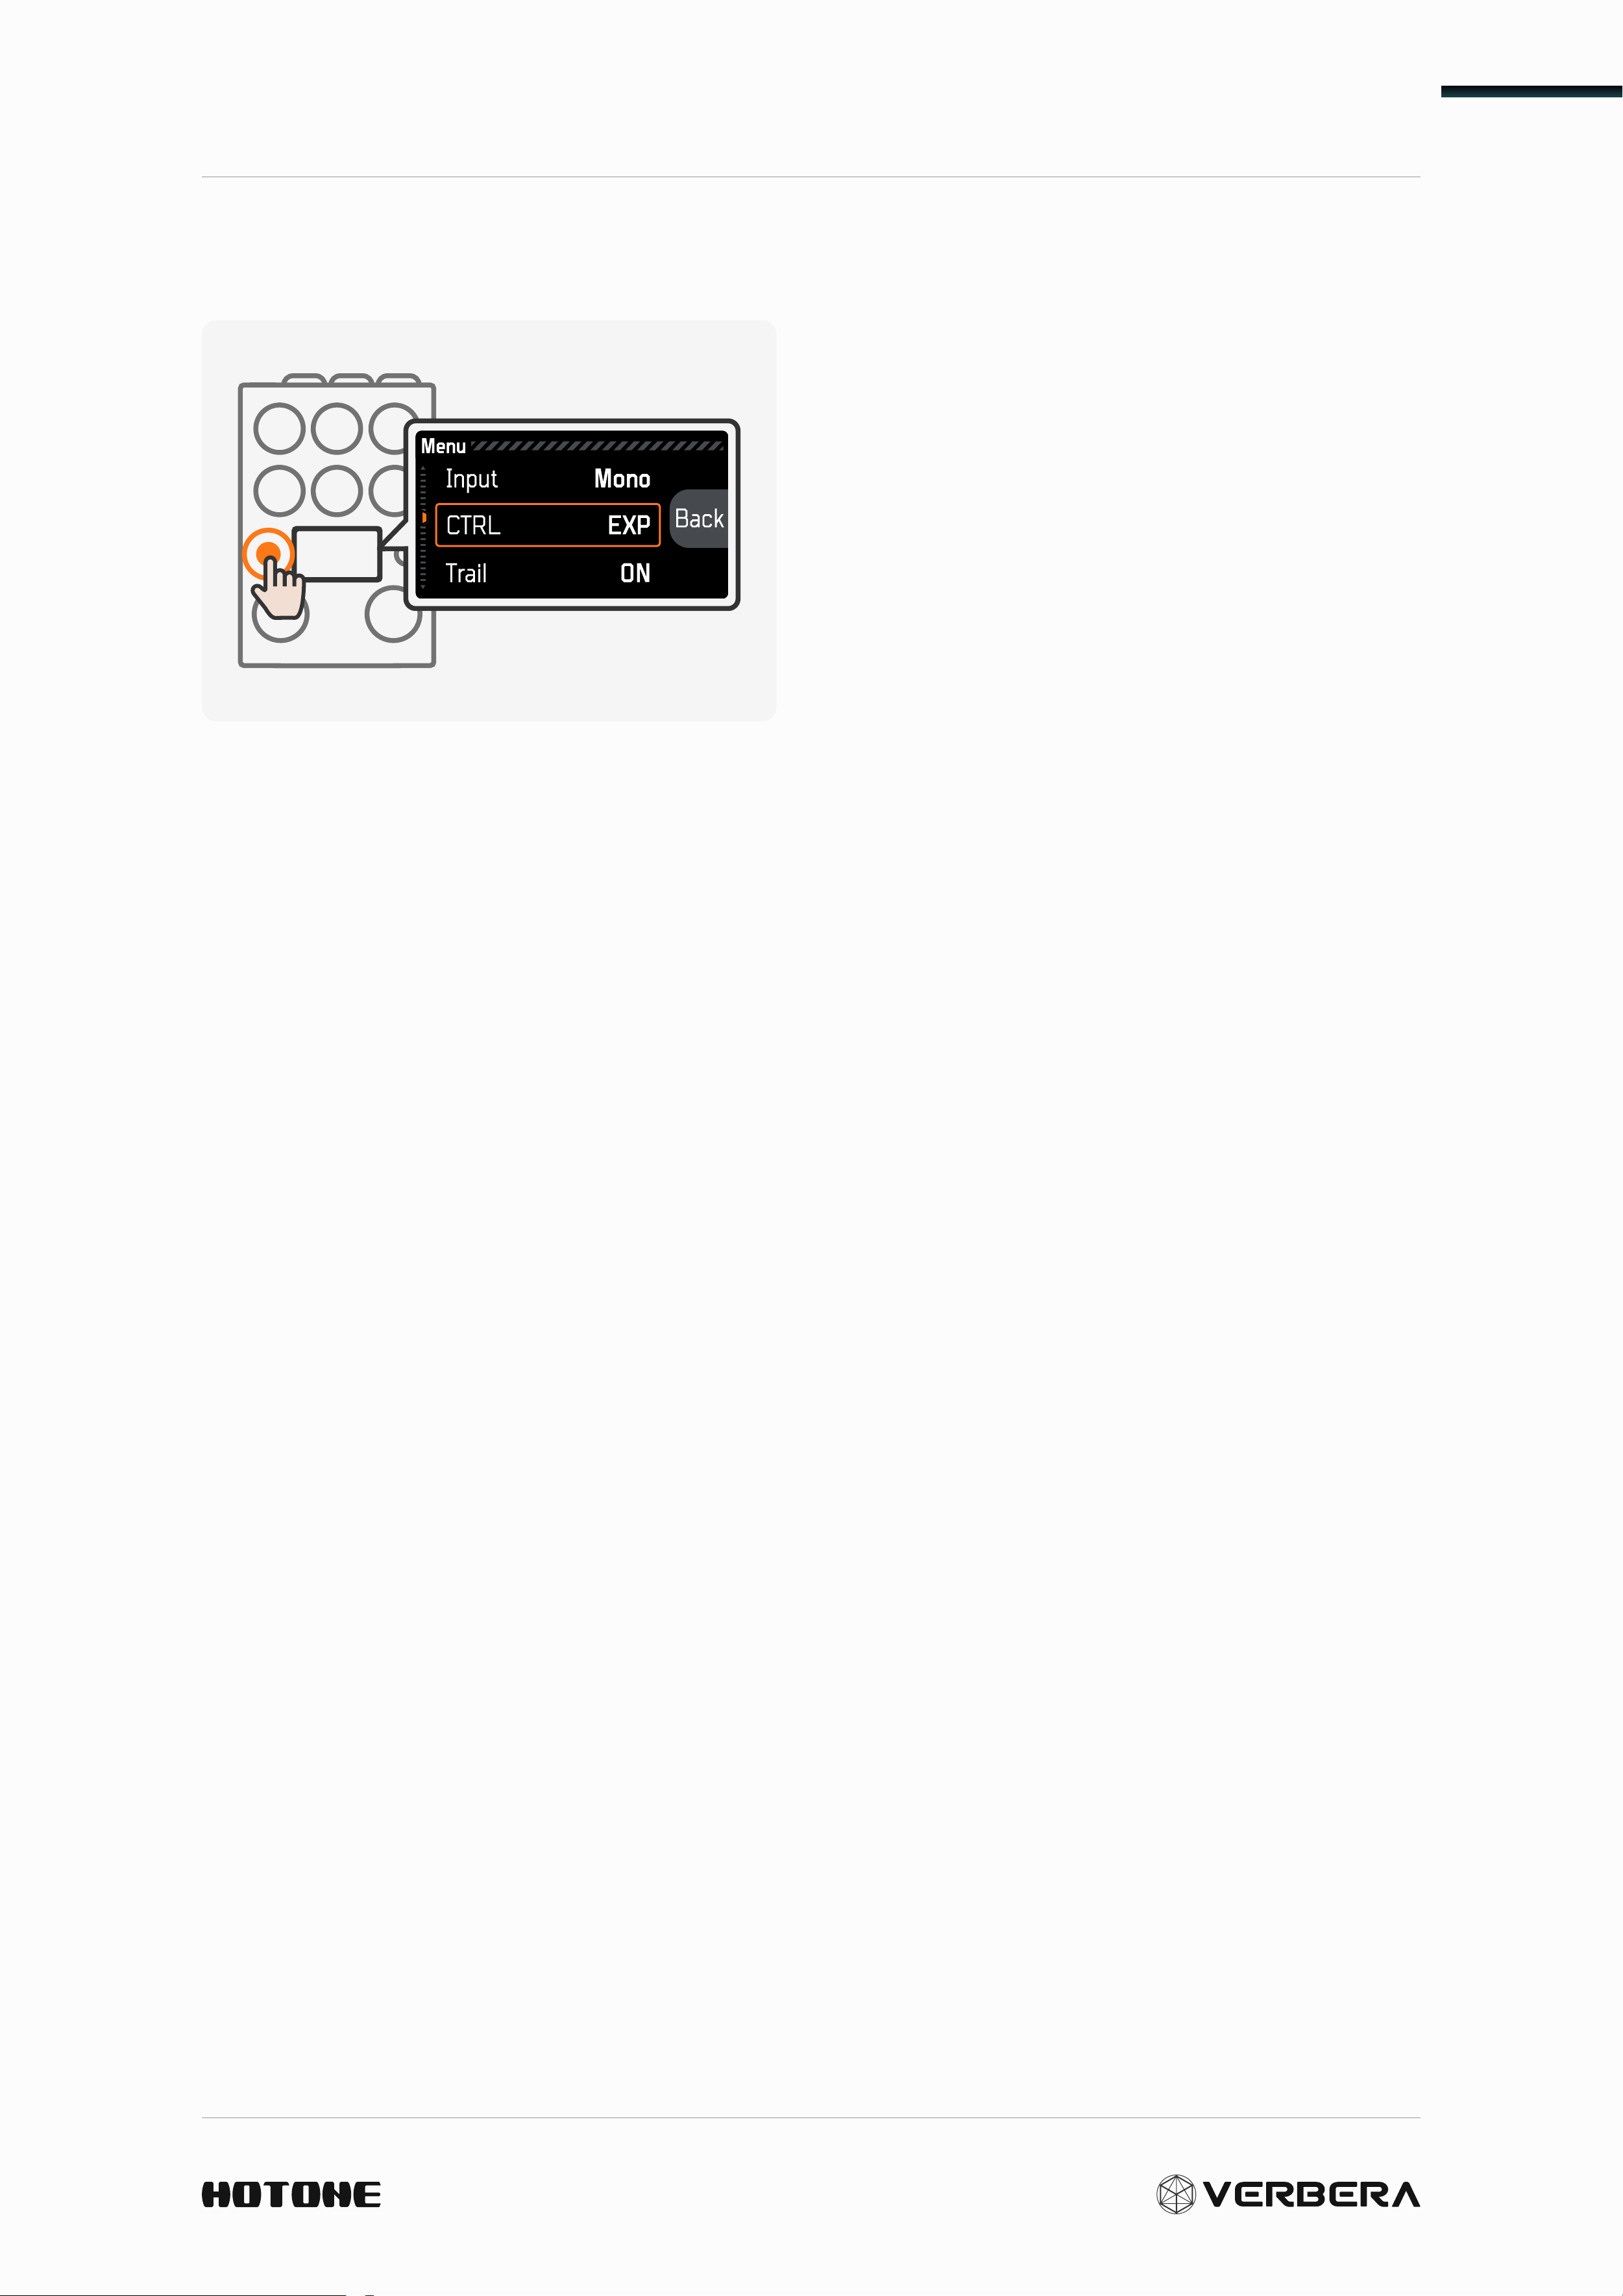
MENU
Press and hold the ALT button to
open the MENU interface. Use the
IR/Preset knob to navigate and press
to select, allowing you to adjust
global settings. Use the Clone button
to save and exit.
• Input: Mono/Stereo/Auto — Choose the input mode as Mono or
Stereo. Please use the appropriate audio cables for the corresponding
input connection (refer to section Connection Guide).
• CTRL: MIDI/EXP — Select the control interface's working mode (for
detailed usage, refer to Section Expression and MIDI).
• Trail: Enable/Disable the global Trail function. When Trail is enabled,
the reverb tail will remain after the reverb effect is turned off until it
naturally decays.
• USB/TRS MIDI Channel: Select the USB MIDI and TRS MIDI channel
for the device. The default MIDI channel is Channel 1 (for MIDI-related
functions, refer to Section MIDI CC Table).
You can view the current firmware version of the device in the About
section.
Controls in Depth
16
About IR
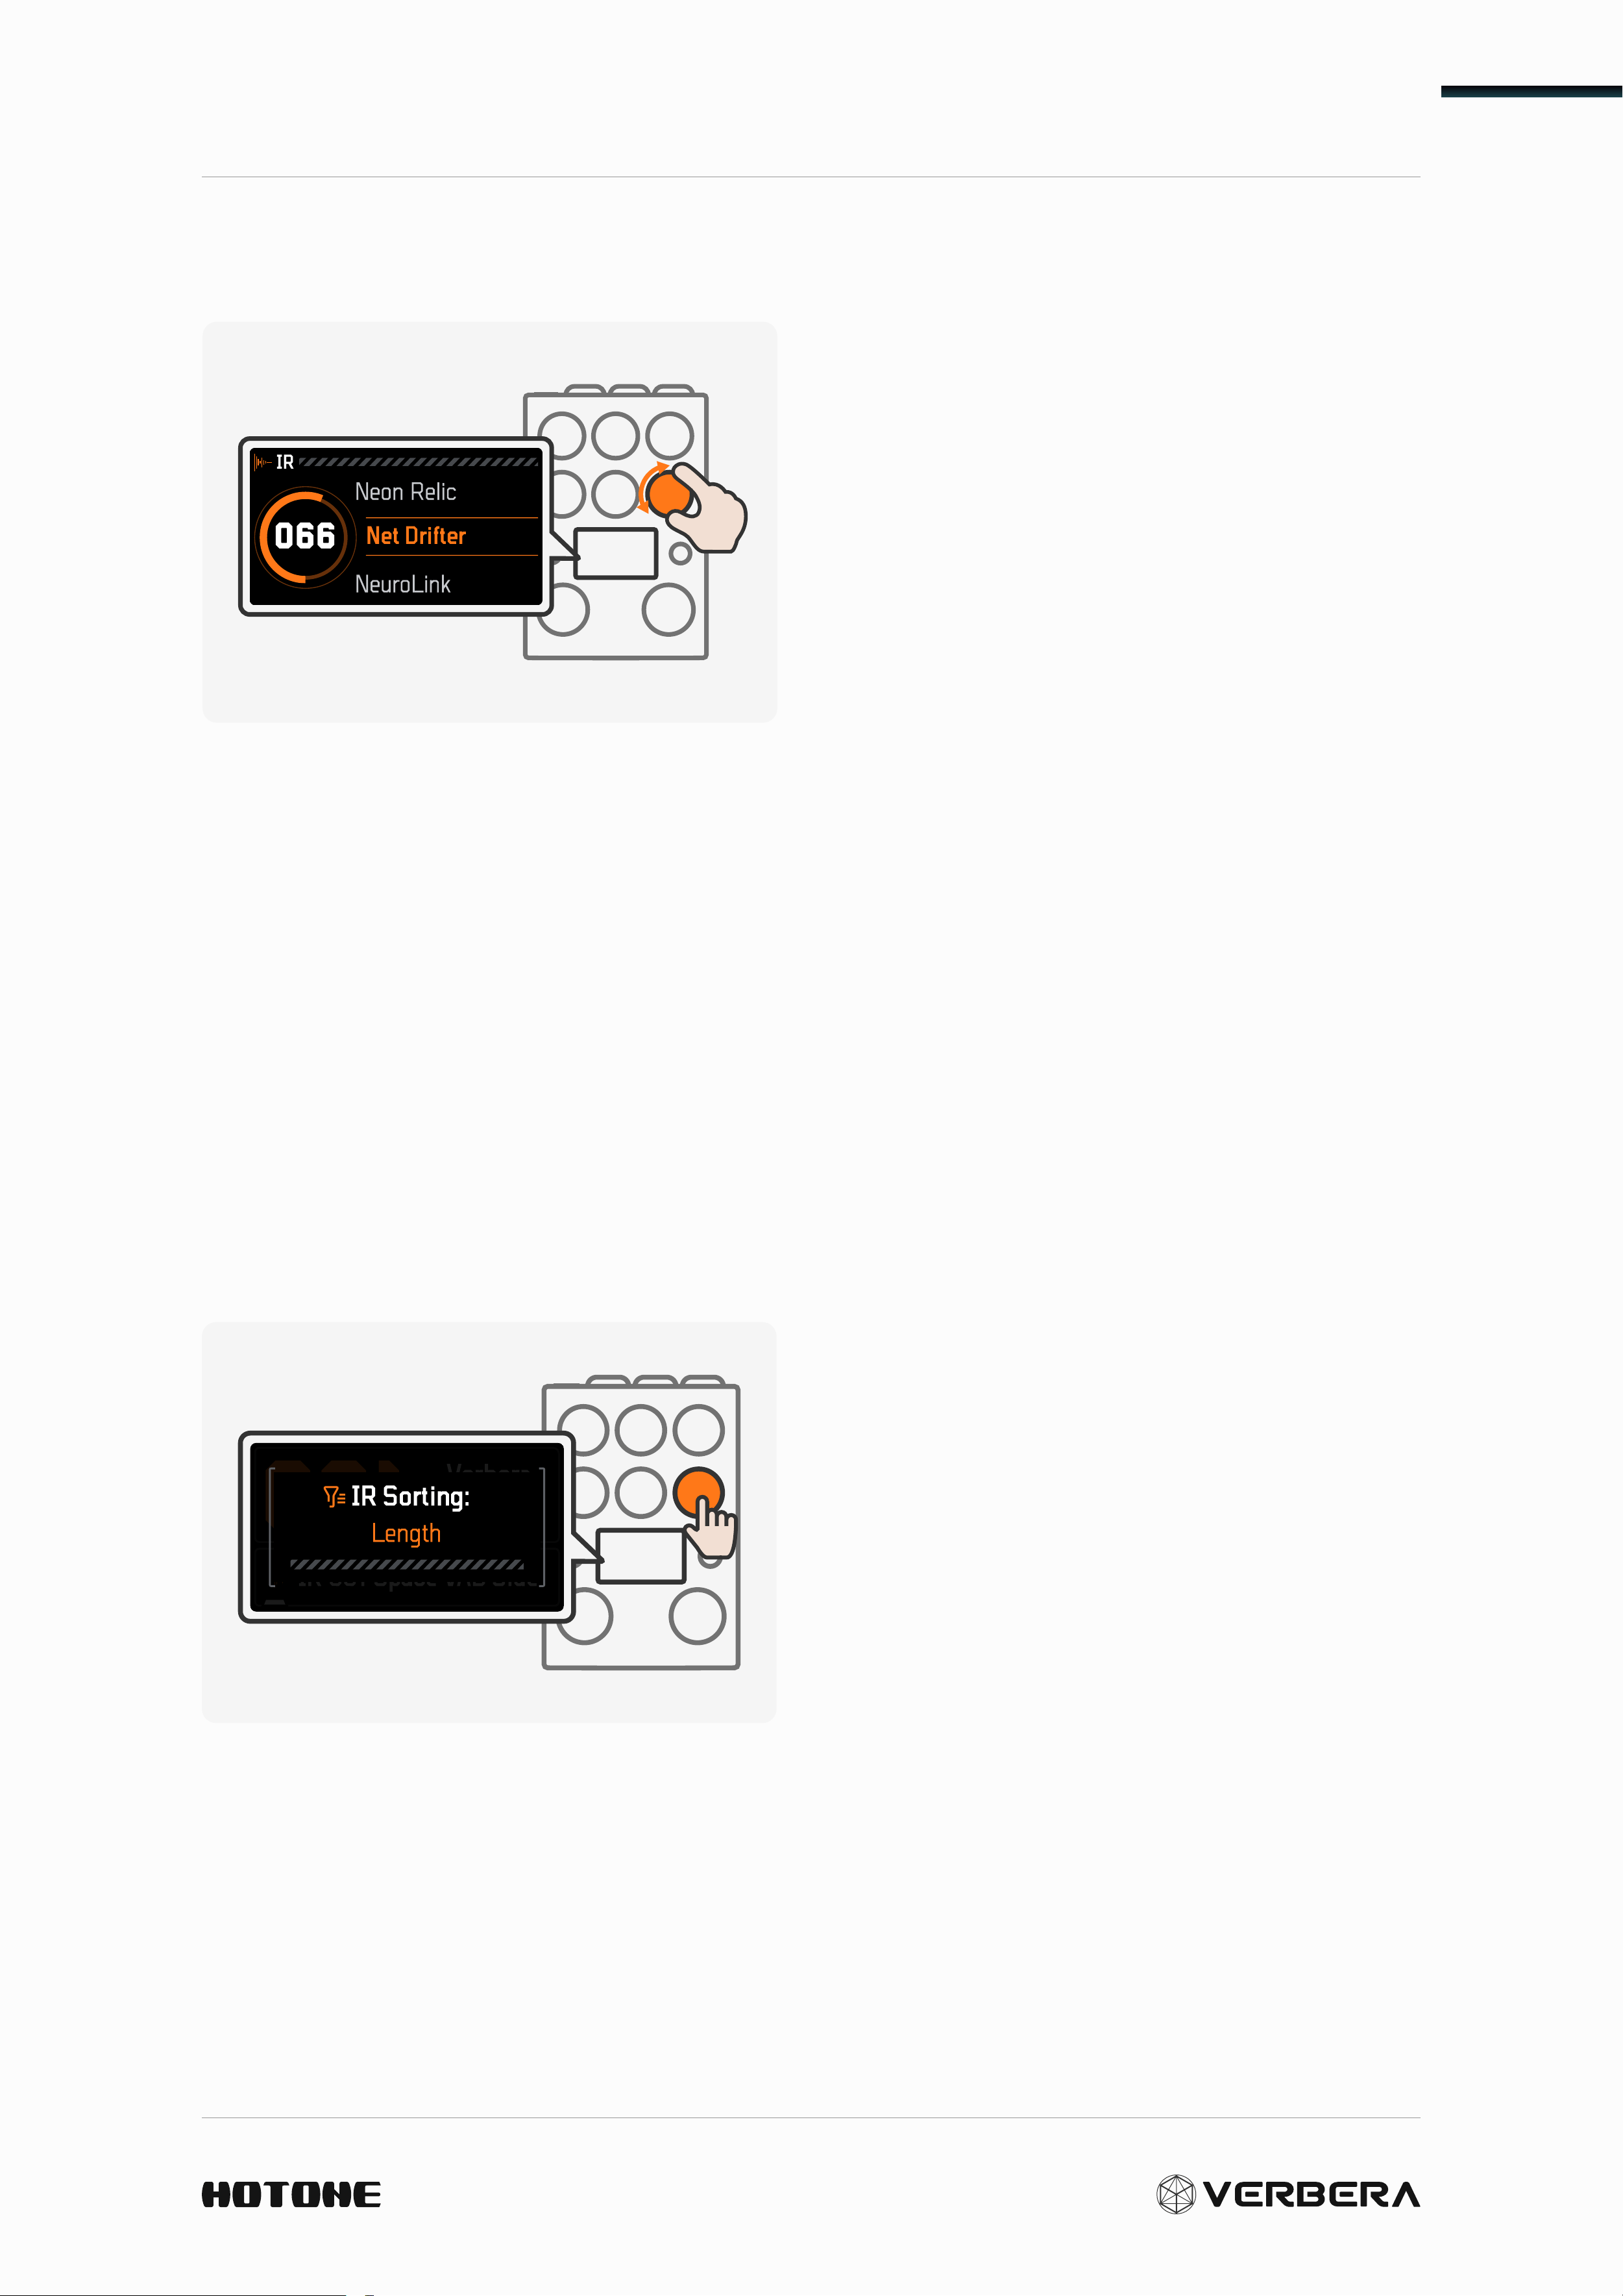
By rotating the IR knob, you can
smoothly switch and preview IR
reverb within any preset. Verbera
comes with 120 factory-provided
IRs, each uniquely sampled from
around the world. These include
iconic spaces such as European
churches and aerospace facilities, as
well as replicated IRs from classic
analog equipment, such as various classic spring reverb and plate reverb
units. Additionally, some of the original IRs included are designed to open
the door to new sonic possibilities.
Verbera allows you to store a vast number of IR files. You can import
and export IRs using the accompanying software (refer to the software
manual for details), or you can clone the sounds of other devices into IRs
and store them in Verbera using the Clone function (see Section Clone
Function). It can store up to 1024 IR files.
Smart IR Sorting
By pressing the IR knob, you can sort
all IRs according to different criteria.
Pressing the IR knob repeatedly will
cycle through the following sorting
options:
• Name: Sorted alphabetically.
• Length: Sorted from longest to
shortest reverb decay.
• Smooth: Sorted by the smoothness of IR decay, from high to low.
• Diffusion: Sorted by the stereo spread of the IR, from high to low.
• Brightness: Sorted by the brightness level of the IR, from high to low.
• Attack: Sorted by the attack speed of the IR, from fast to slow.
Controls in Depth
17
Tip:
1. Selecting favorite (Fav) IRs in the Neon Collector software will place them at the top by
default when sorting by name, making it easier to browse your favorite IRs.
2. When an IR used in a preset is deleted (via the companion software Neon Collector), Verbera
will display a missing IR warning and automatically load the first IR in the list sorted by
name.
About Preset
By rotating the PRESET knob, you
can directly switch between presets
on the device. It supports up to 200
preset slots, including 100 editable
factory presets and 100 default
presets. Each preset includes the
following information:
• Preset Name
• Preset Slot
• One IR file and its corresponding parameters
• An extra reverb (XR) and its corresponding parameters
• EXP settings for the preset
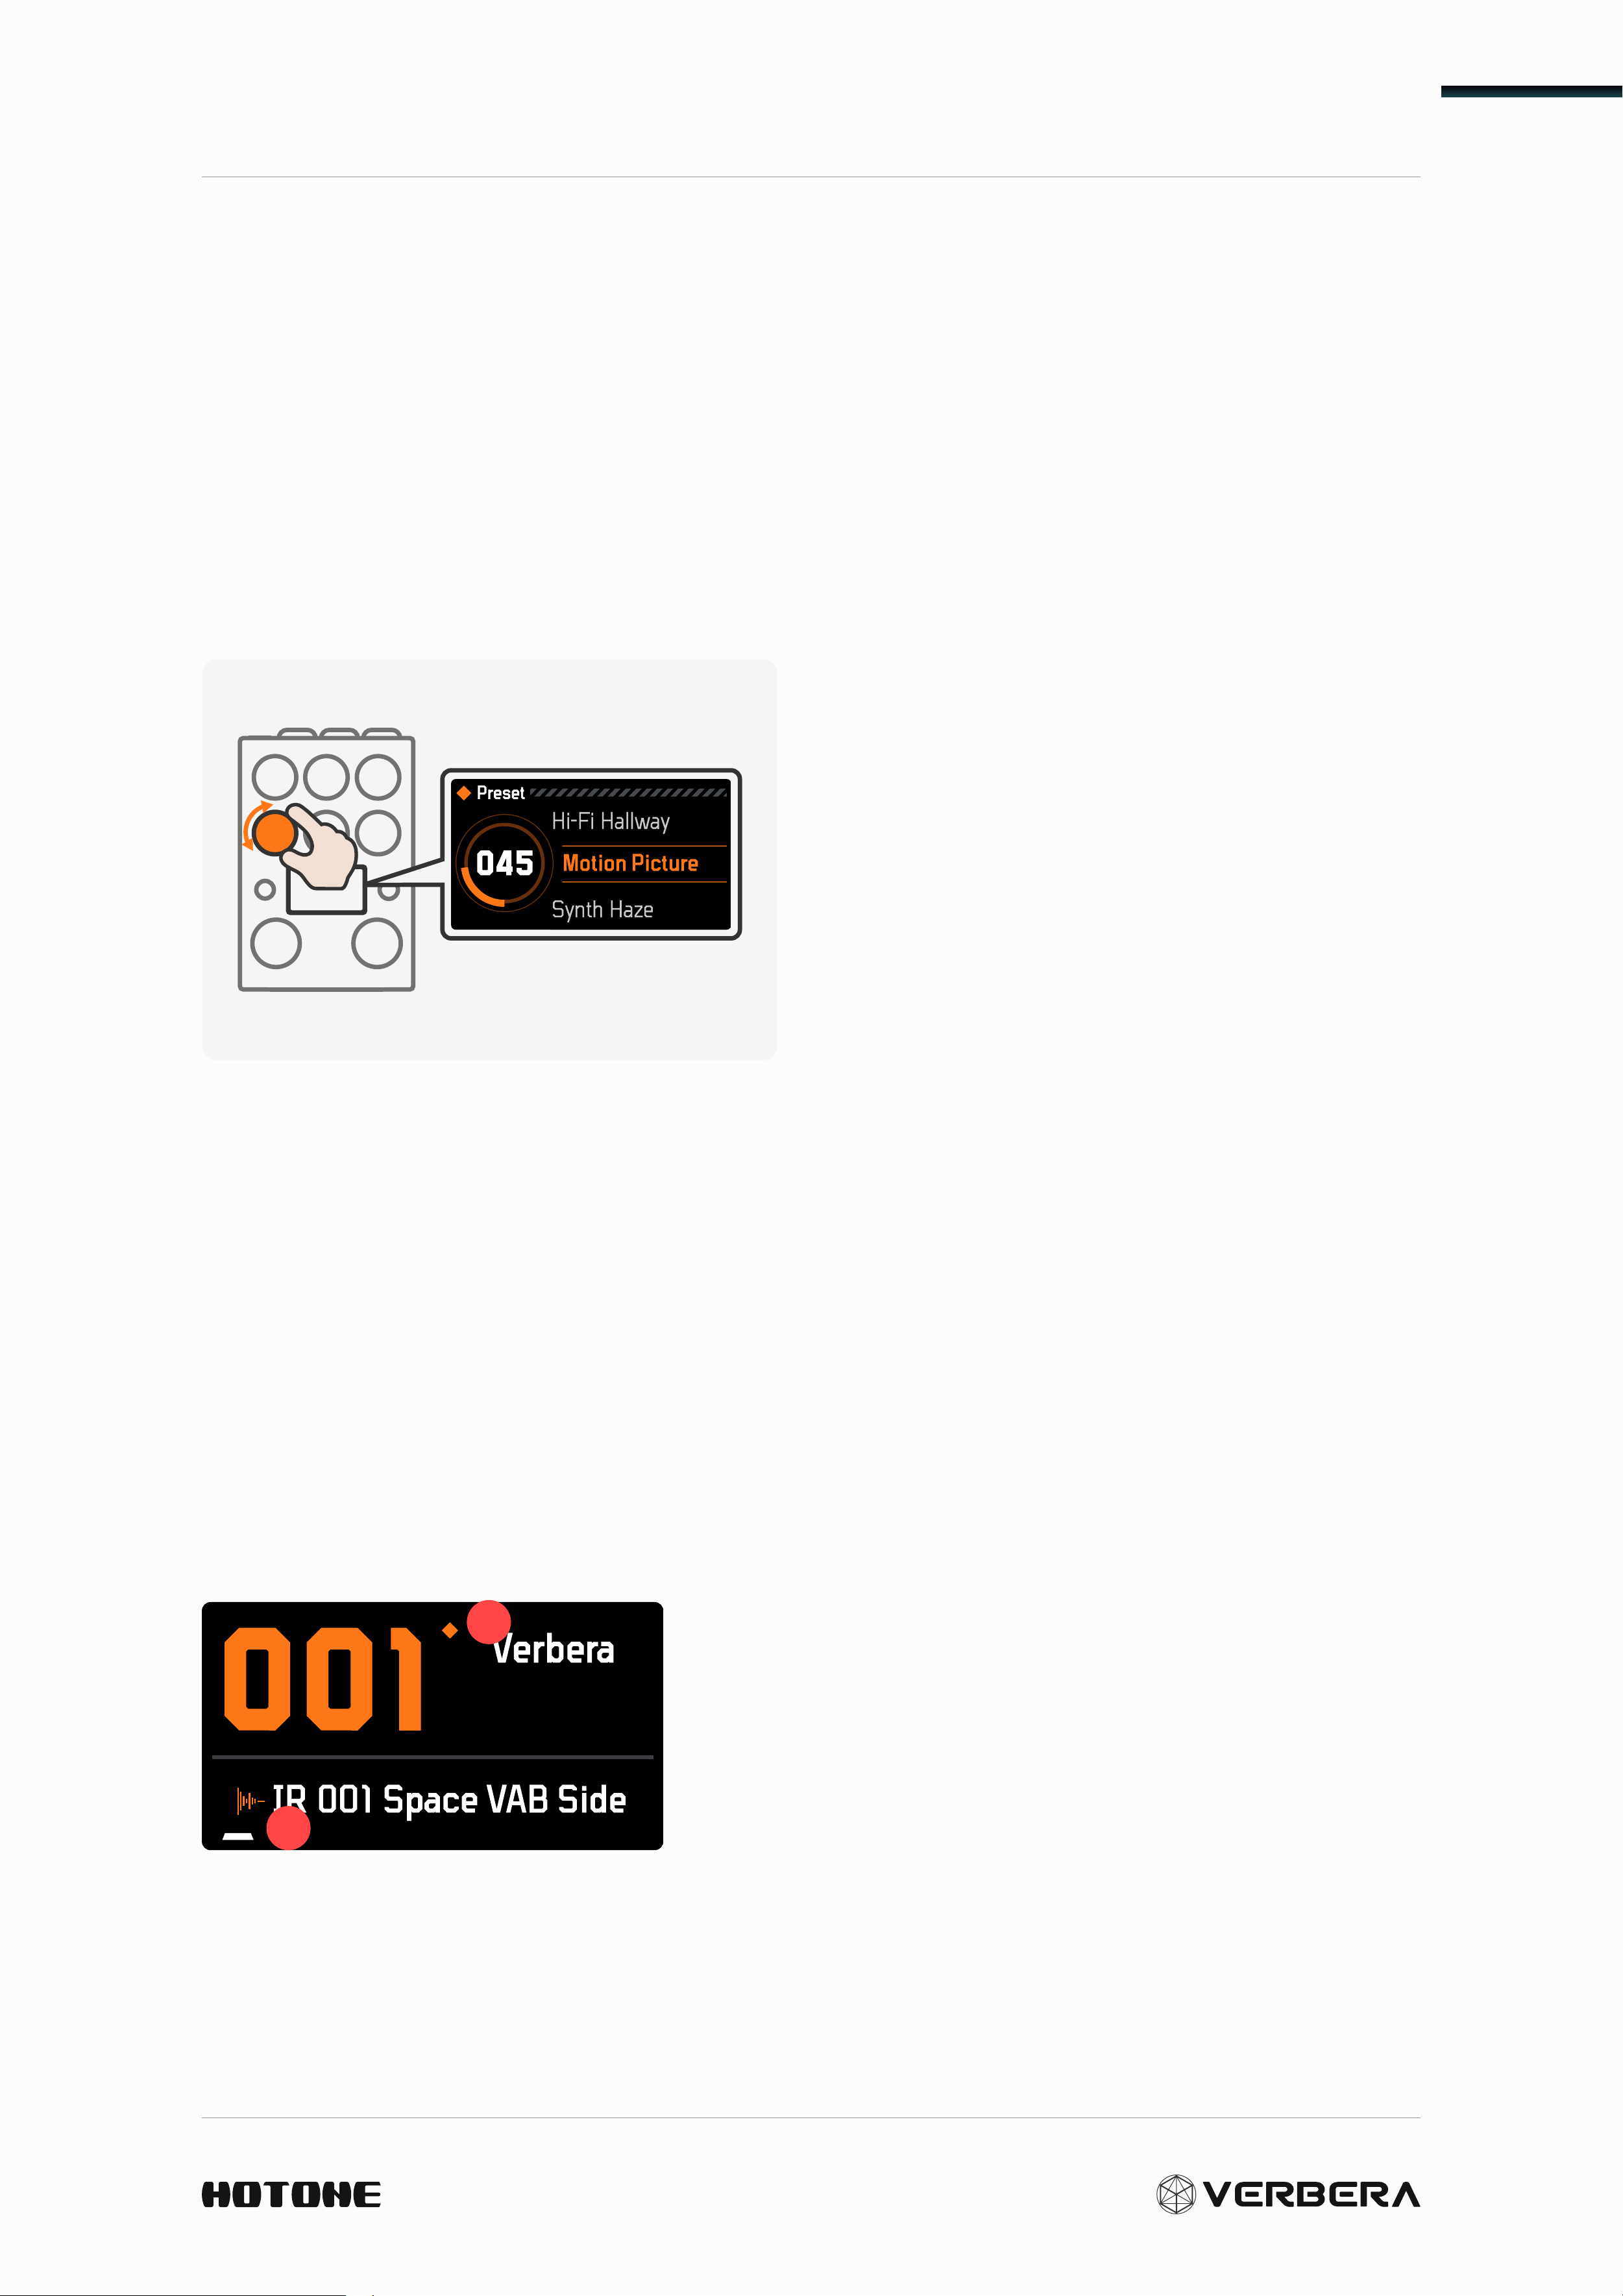
Preset Main Interface
2
1
1. When the IR or parameters within
a preset are changed, causing a
modification in the preset information, a
dot will appear here to indicate that the
preset information has been altered.
2. This section displays the name of the IR used in the current preset
and indicates its relative position in the current IR sorting order.
Controls in Depth
18
Save and Rename
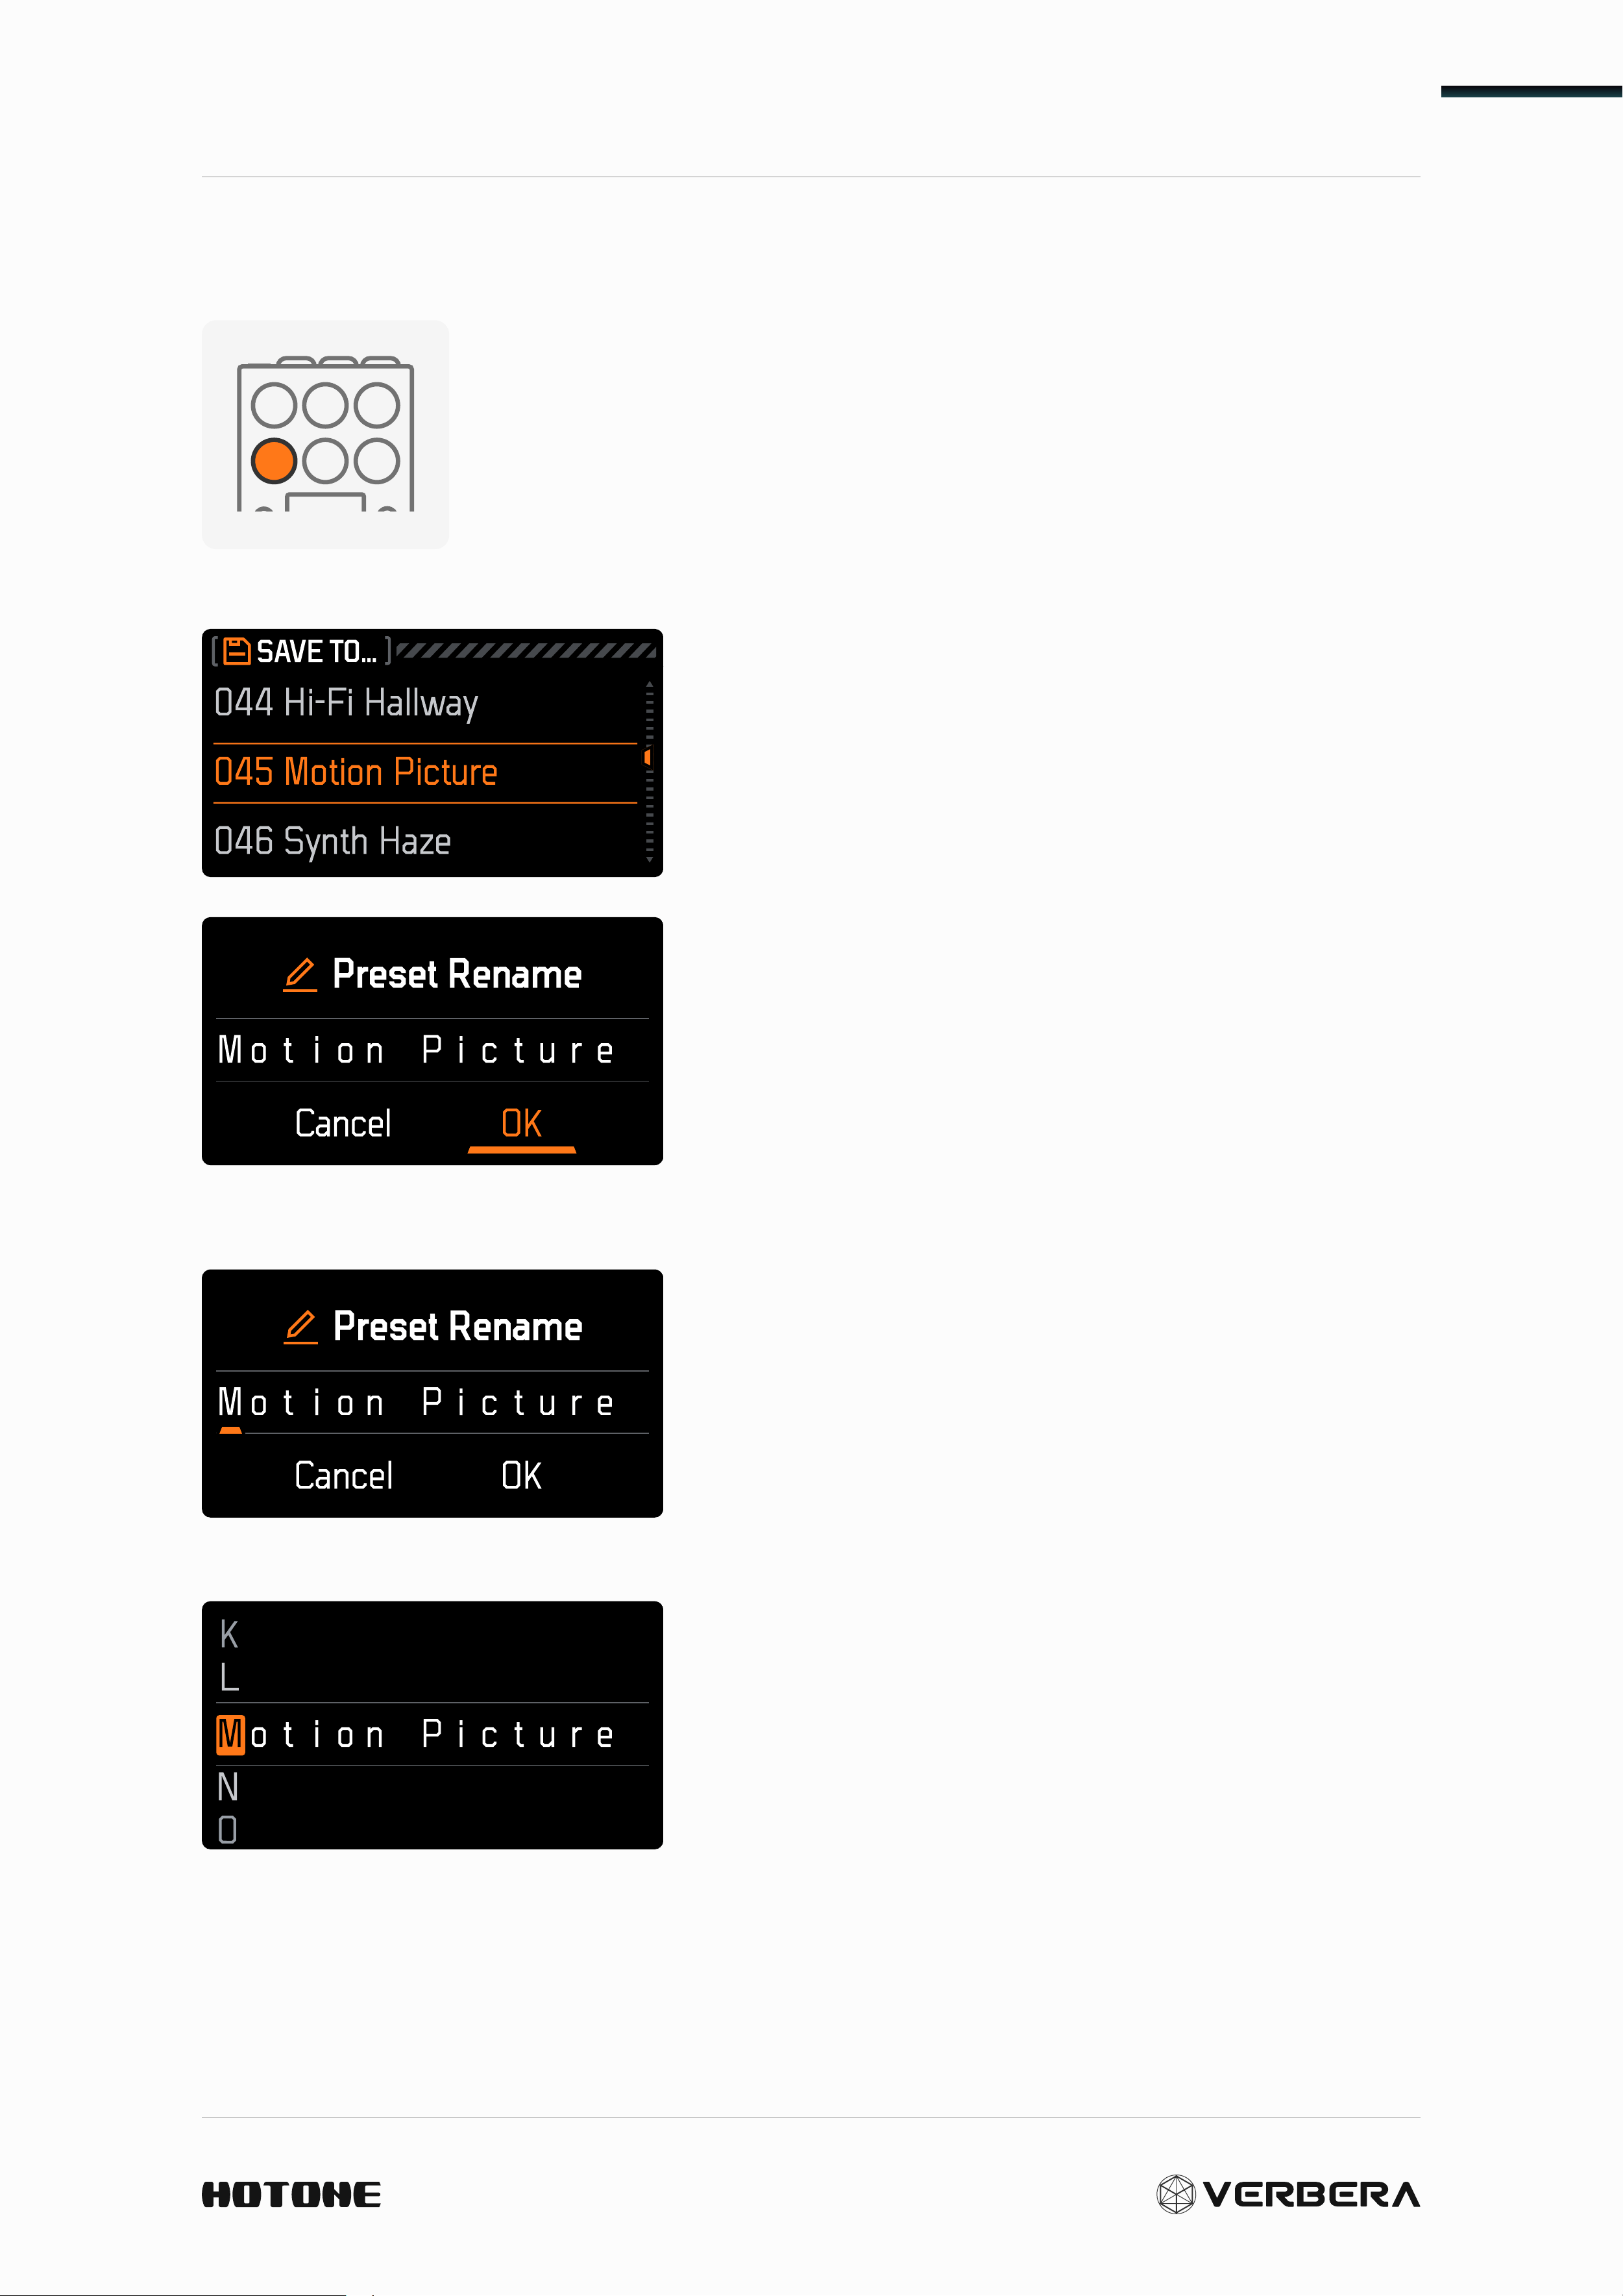
Press the Preset knob to enter the preset save interface.
Rotate to select the preset slot for saving. Press and
hold the knob to save directly to the current slot.
Press the Preset knob to save a custom
preset to the current slot or overwrite
another preset, and enter the rename
interface.
Use the CLONE or ALT button to save the
current name or cancel the save. You can
also use the Preset/ IR knob to select and
rename the preset.
Rotate the Preset/ IR knob to select the
position of each letter to be modified.
Press the knob to modify the selected
letter.
Controls in Depth
19
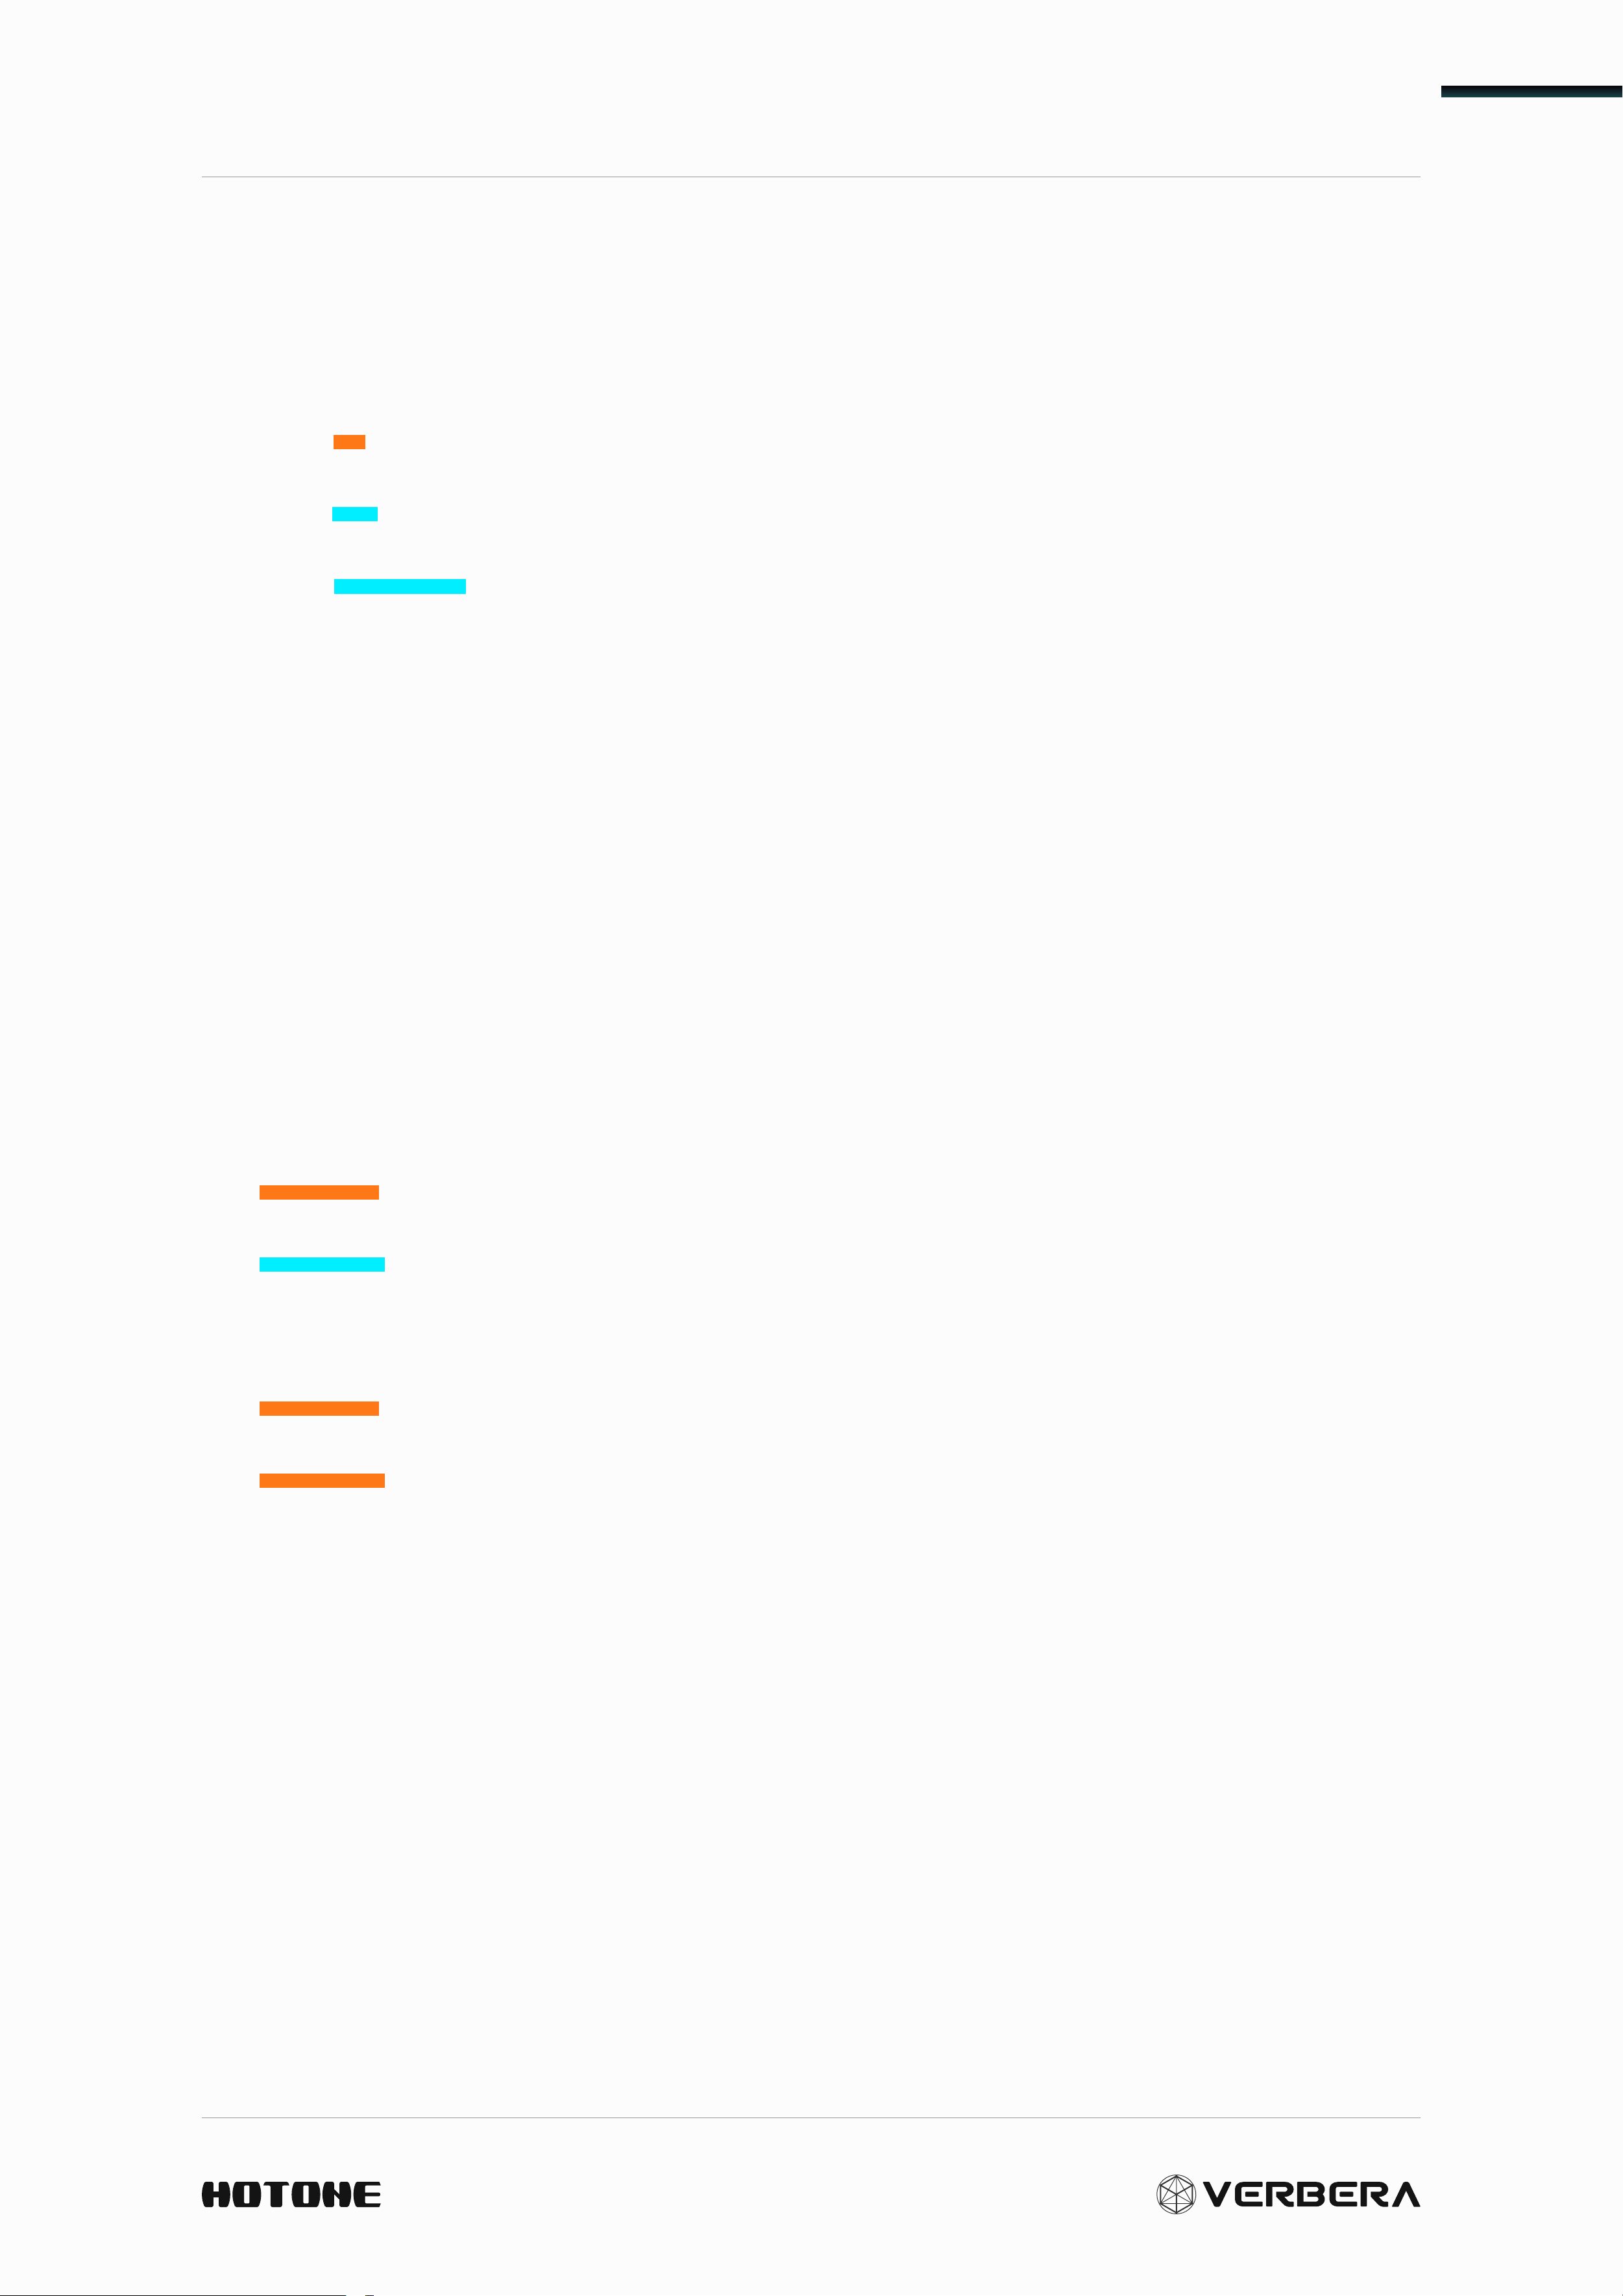
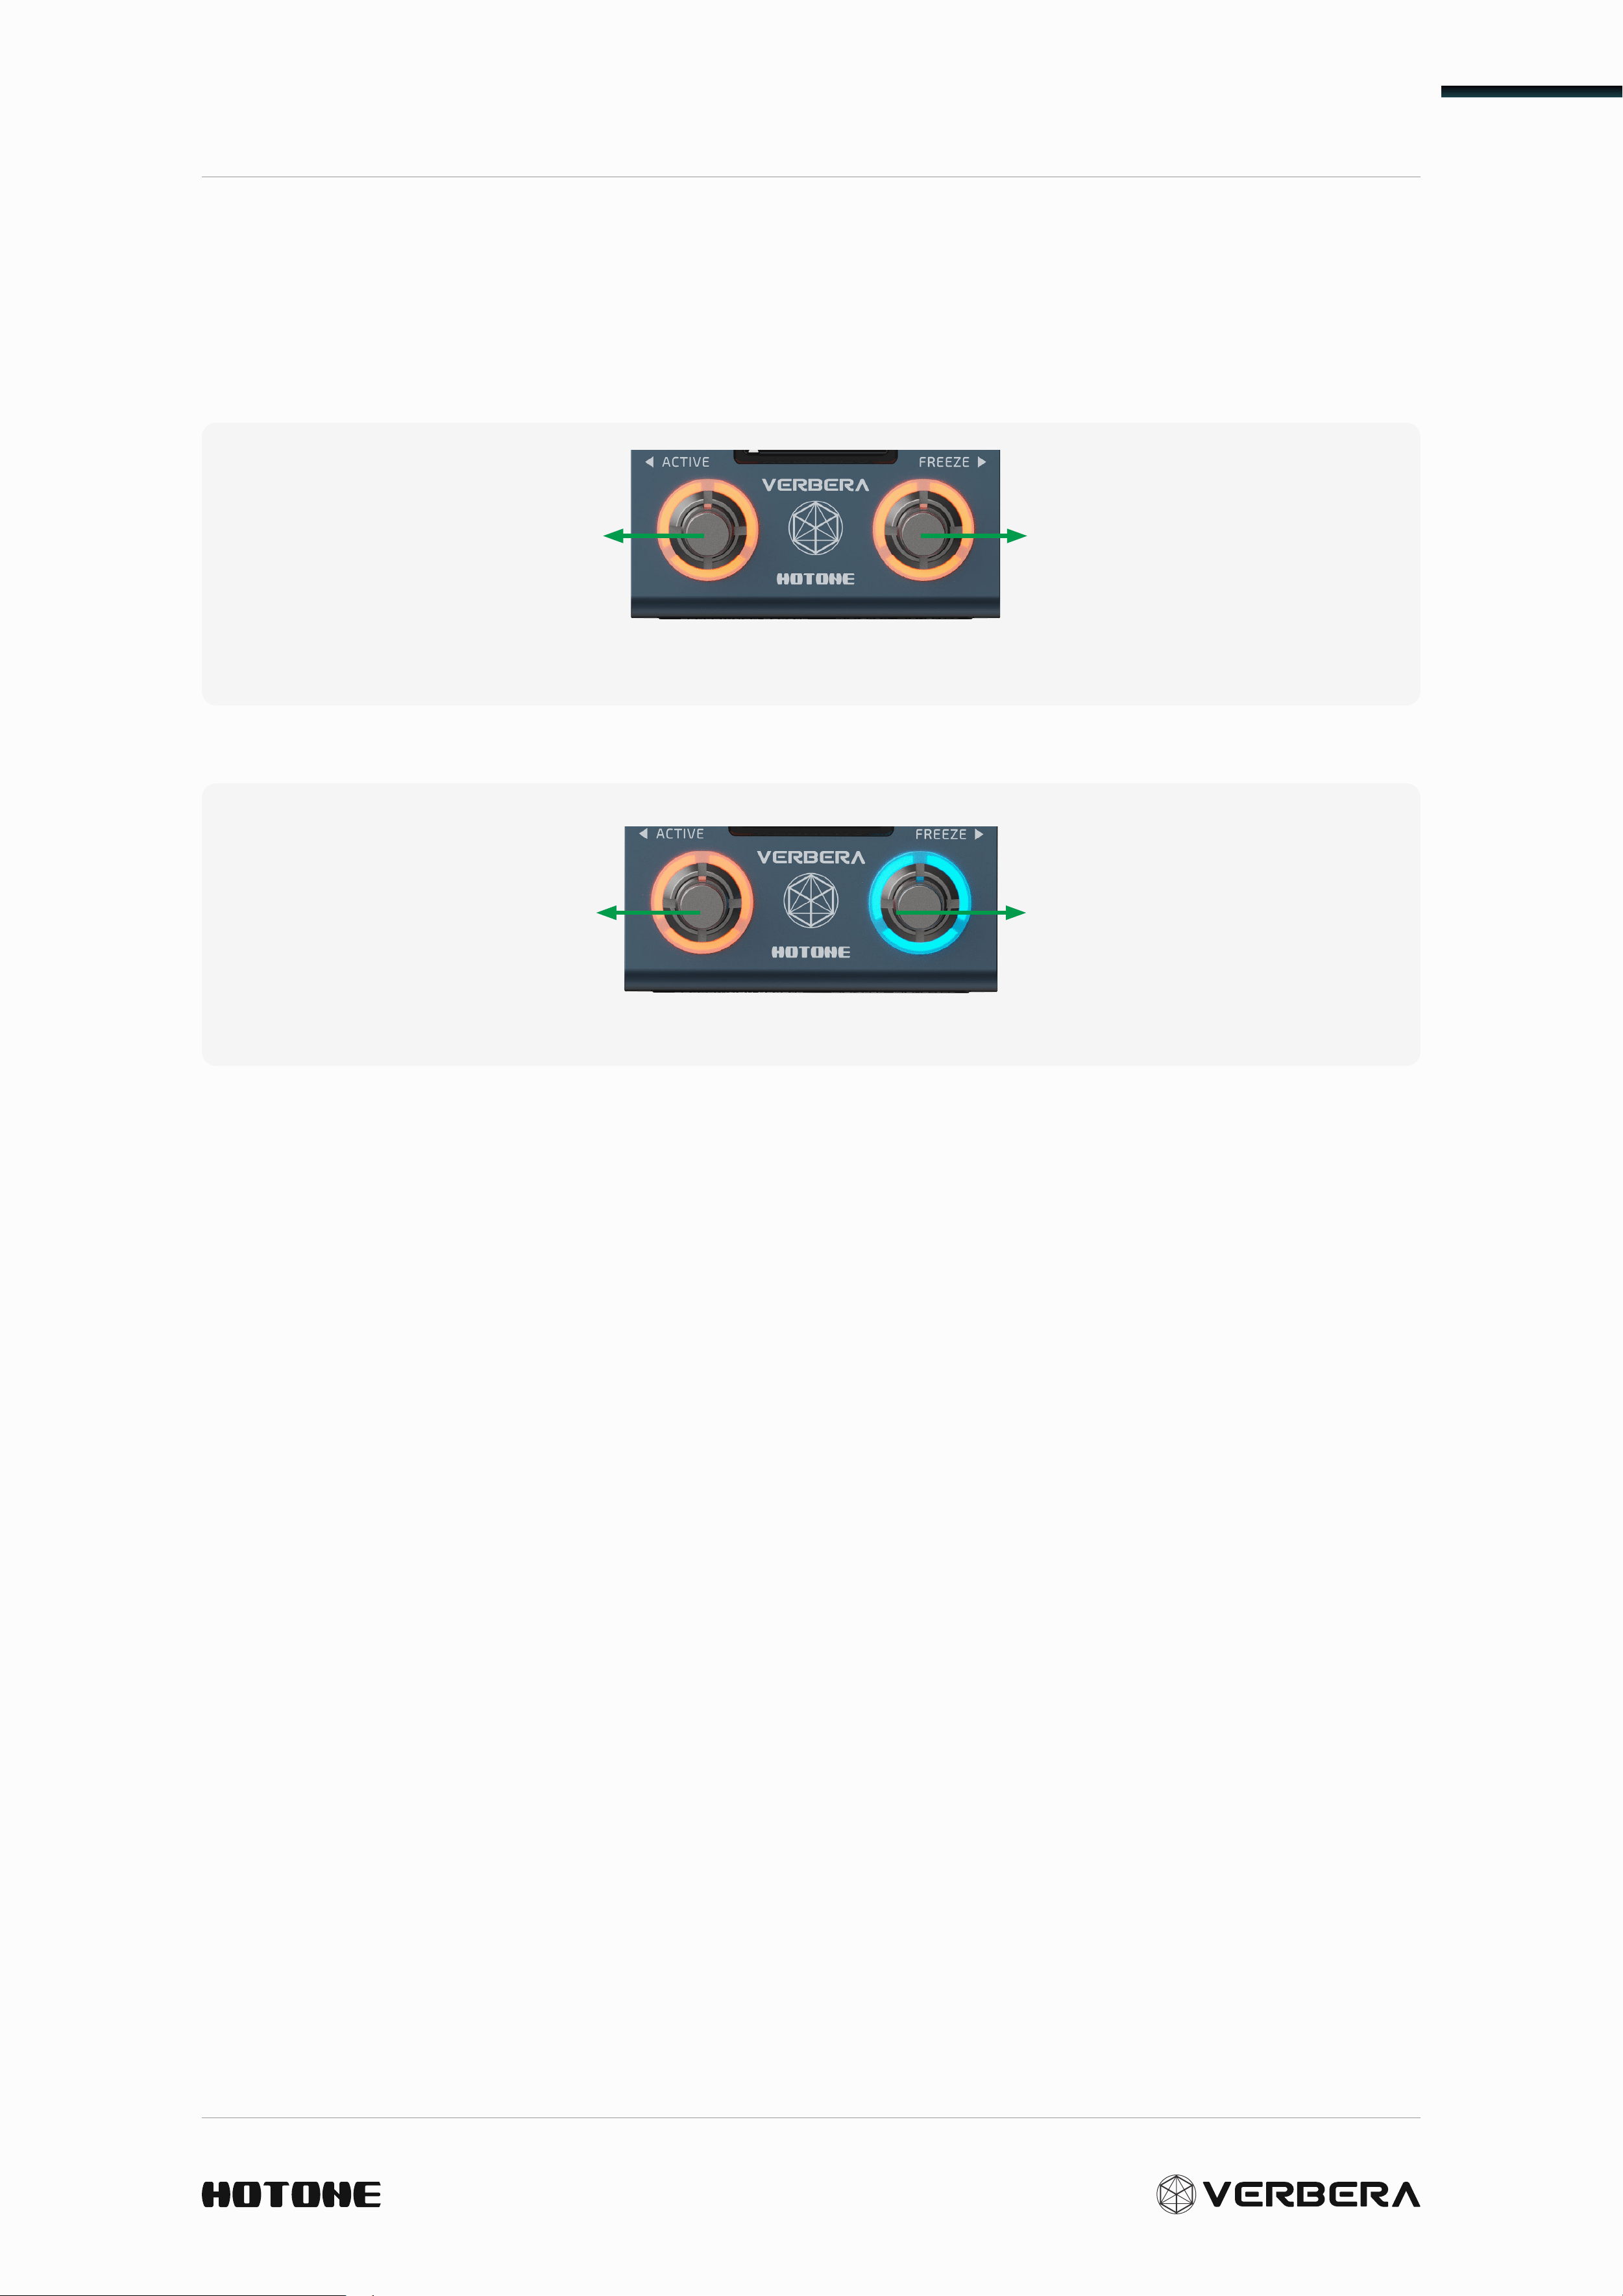
Footswitch Mode
Verbera features two built-in footswitch modes, which can be switched
at any time by pressing both ACTIVE and FREEZE simultaneously.
Switch to the previous preset.
The footswitch indicator will
remain orange.
Preset Mode
Switch to the next preset.
The footswitch indicator will
remain orange.
Activate/Deactivate reverb
effect.
The orange footswitch
indicator will light up or turn
off accordingly.
Control Mode
Activate/Deactivate Freeze
effect.
The blue footswitch indicator
will light up or turn off
accordingly.
Clone Function
20
Clone Function
Want to capture the reverb from other devices? Verbera's built-in IR
cloning function allows you to clone the signature reverb from any device
with input/output interfaces, saving them as IRs in your Verbera. These
cloned IRs can then be freely adjusted just like any other IR.
What is Cloning, Anyway?
Cloning in the Verbera means it captures the “feel” or space of another
reverb device — kind of like taking an audio snapshot of how it sounds.
It’s based on IR (Impulse Response) tech, so it works best with clean,
simple reverb tones (not stuff with shimmer, modulation, or other funky
effects). Make sure your other pedal is set to basic reverb before cloning.
▶
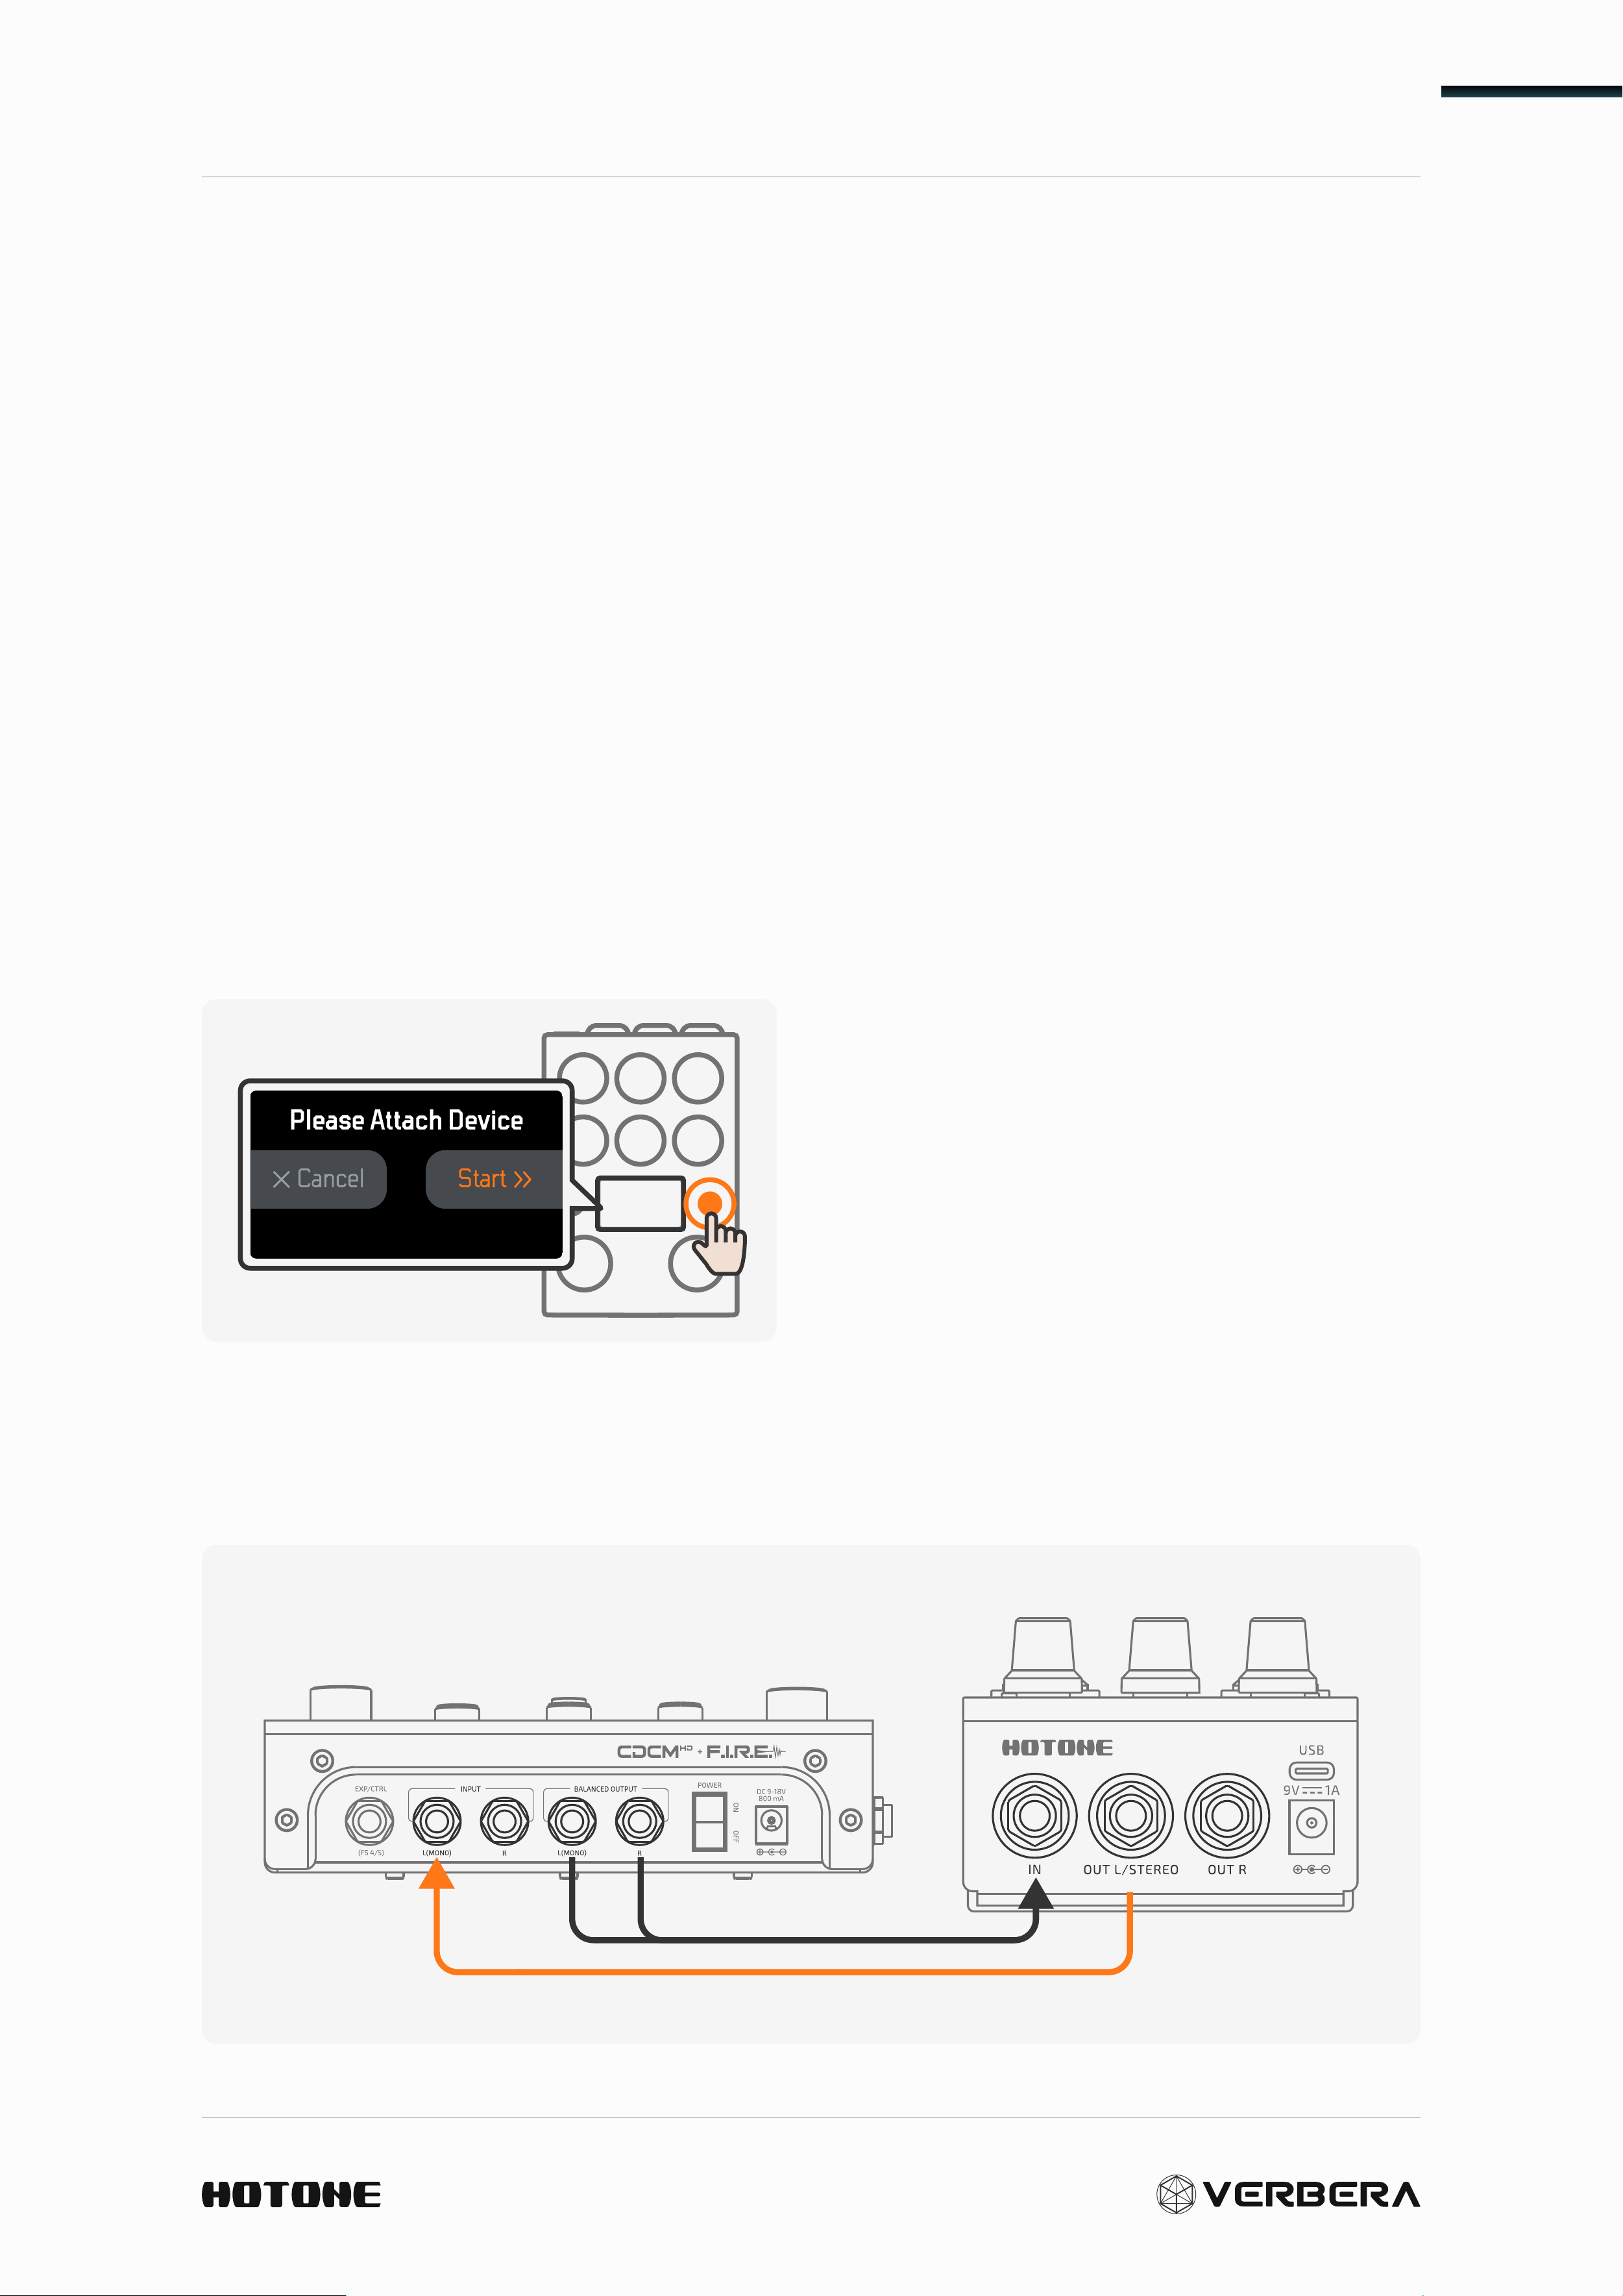
Step 1:
Before you plug anything in, press
and hold the Clone button on your
Verbera. This puts it into “Clone Prep
Mode,” which stops nasty feedback
or howling sounds from happening
when you hook up other gear.
Do this before connecting any
cables.
▶
Step 2: Hook It All Up
Clone Function
21
Verbera
→
Target Pedal
Use a TS (mono) cable to go from the Left Output of the Verbera to the
Input of the pedal you want to clone.
Target Pedal
→
Verbera
Now take the output of your reverb pedal and connect it to the Input of
the Verbera.
• For stereo pedals: Use a TRS-to-dual-TS splitter cable to send both Left
and Right outputs into the Verbera.
• For mono pedals: A regular TS cable is fine.
▶
Step 3: Set Up Your Reverb Pedal
To get the cleanest clone:
Set your pedal to 100% wet (only reverb, no dry signal).
If your pedal doesn’t have a full wet option, no worries — the Verbera will
still capture it, but it’ll include some dry tone too. Later on, you can tweak
the Attack setting on the Verbera to reduce that if needed.
And again:
1. turn off modulation or shimmer on the reverb pedal — the Verbera doesn’t clone those. You
can always add modulation later using the Verbera’s built-in Mod control.
2. The maximum reverb length that can be cloned: 20 seconds (mono) or 10 seconds (stereo).
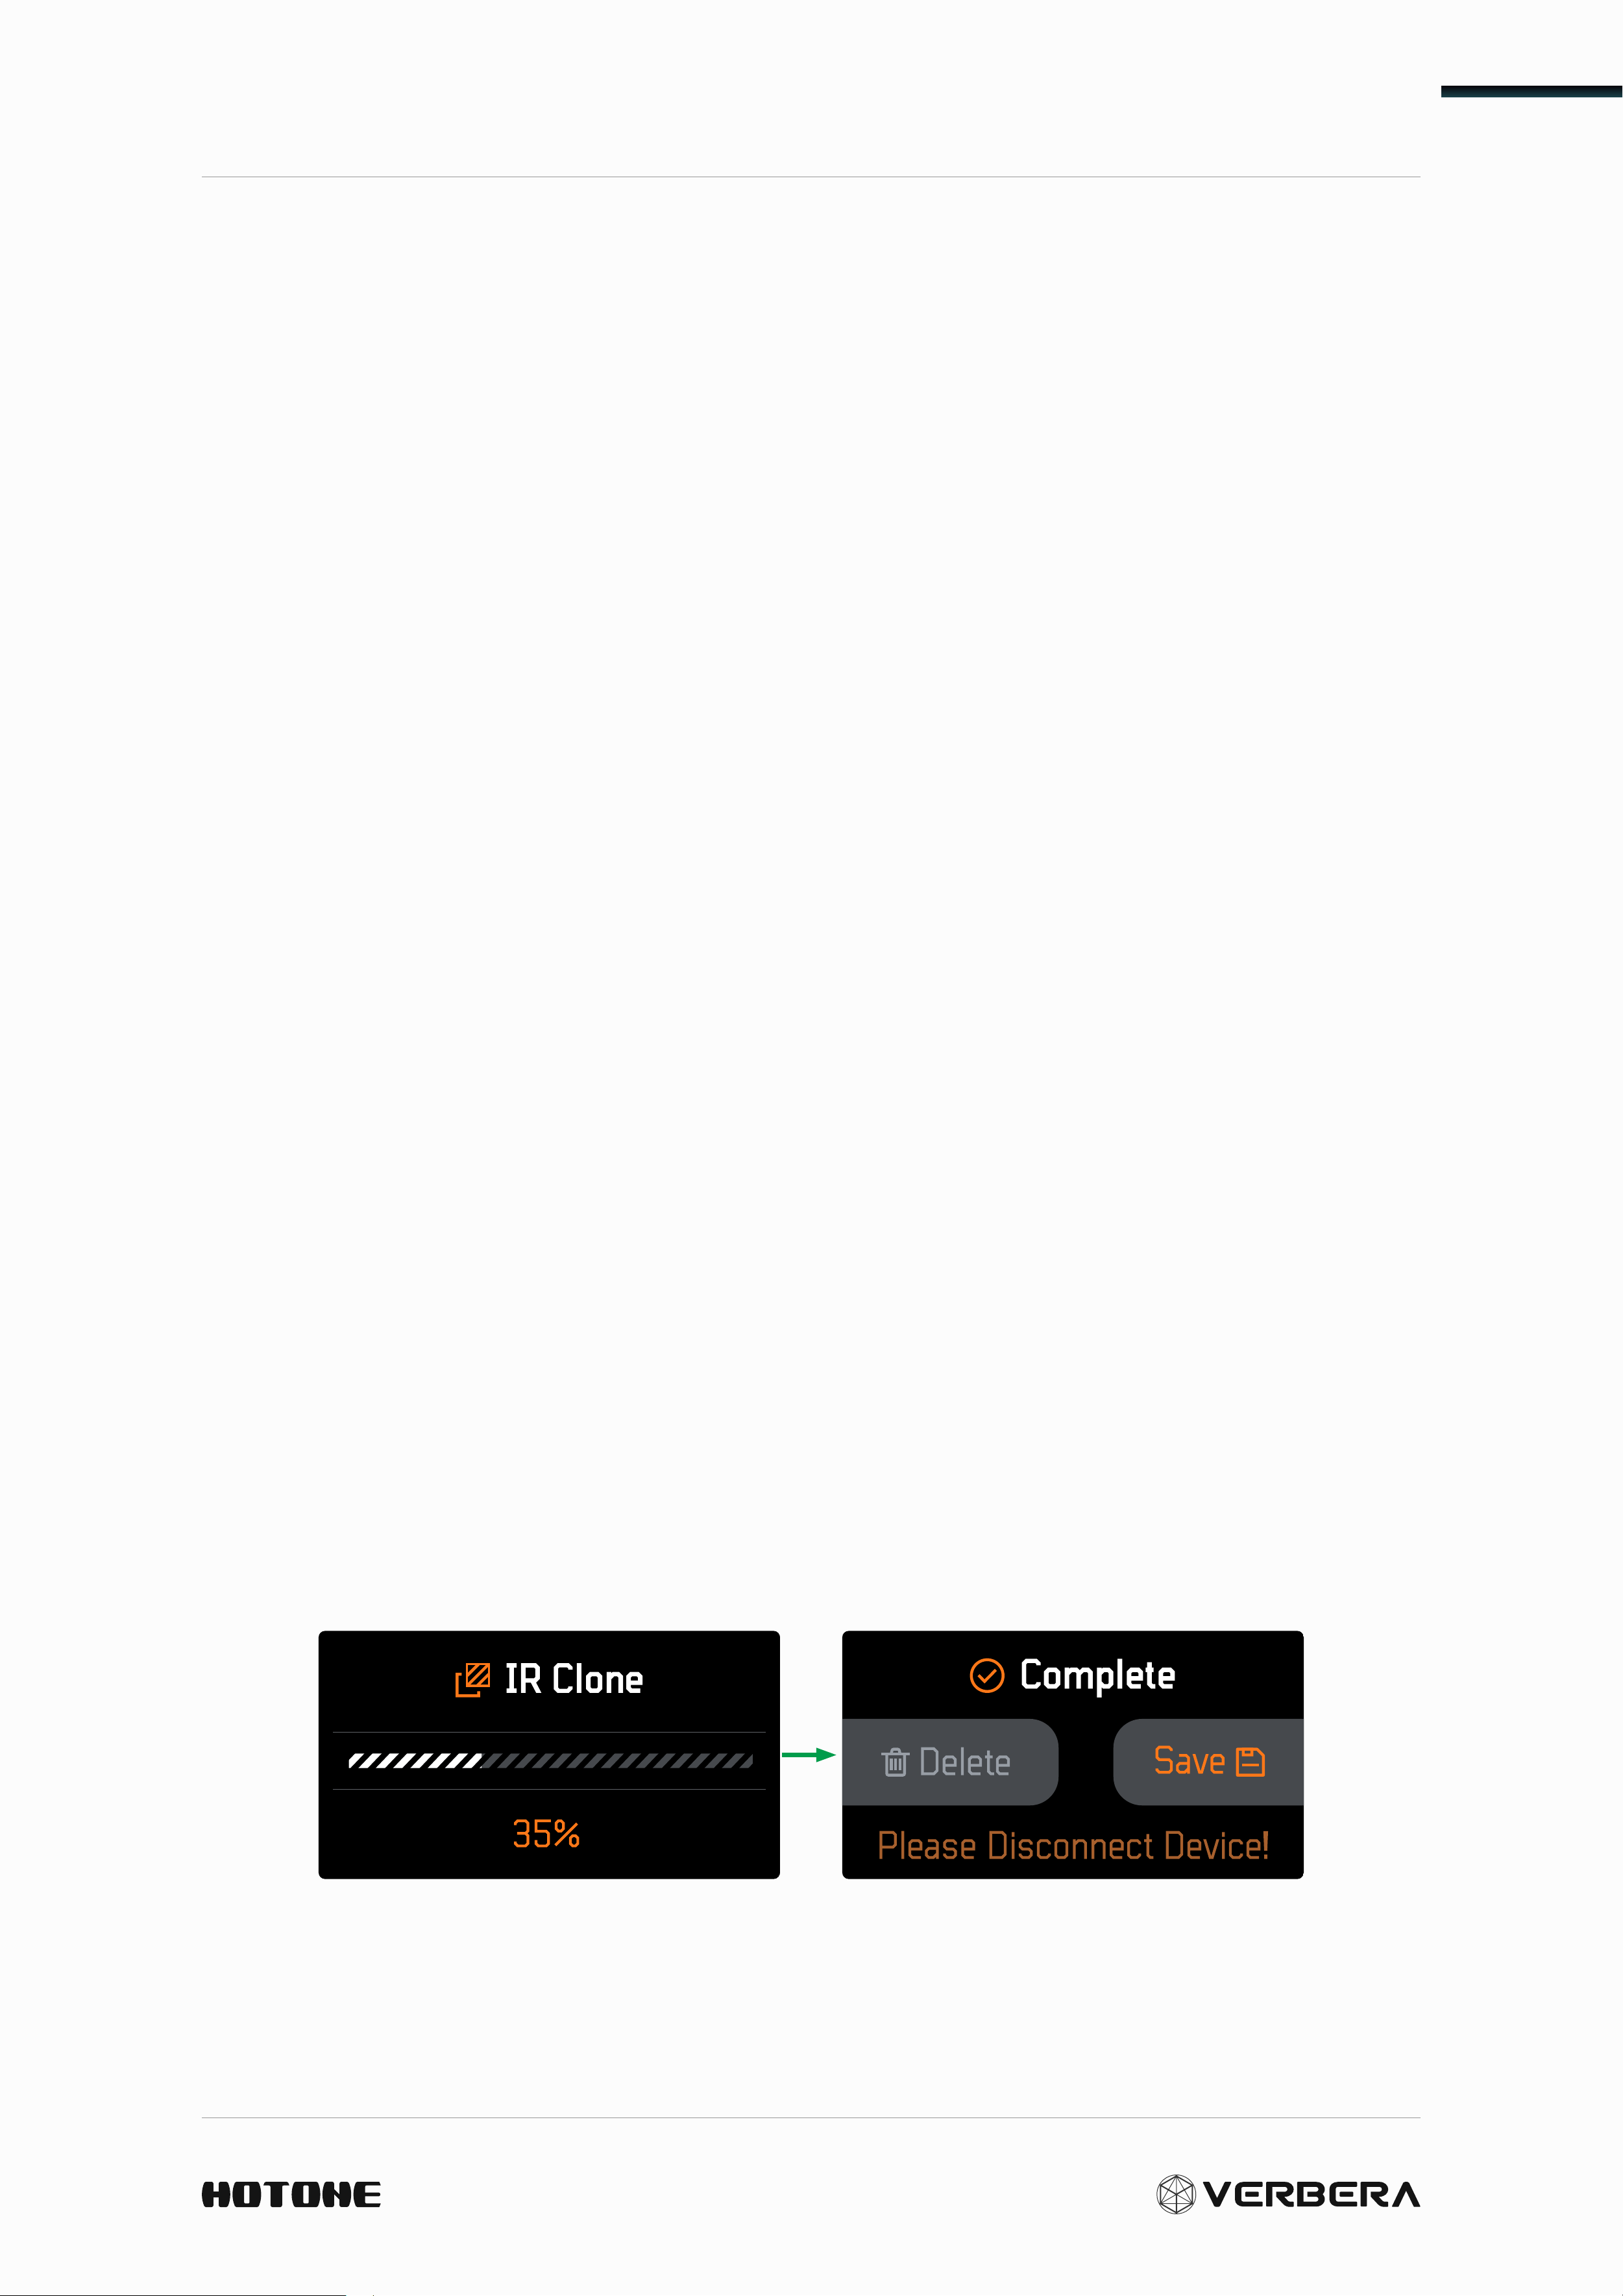
Once the device loop is connected, click Start to begin cloning. Wait for
the progress bar to complete, then disconnect from the cloning device.
You can now choose to save or delete the cloned IR.
Clone Function
22
Verbera will intelligently analyze the
characteristics of the cloned IR and
automatically assign a name.Use the CLONE
or ALT button to save the current name or
cancel the save. You can also use the
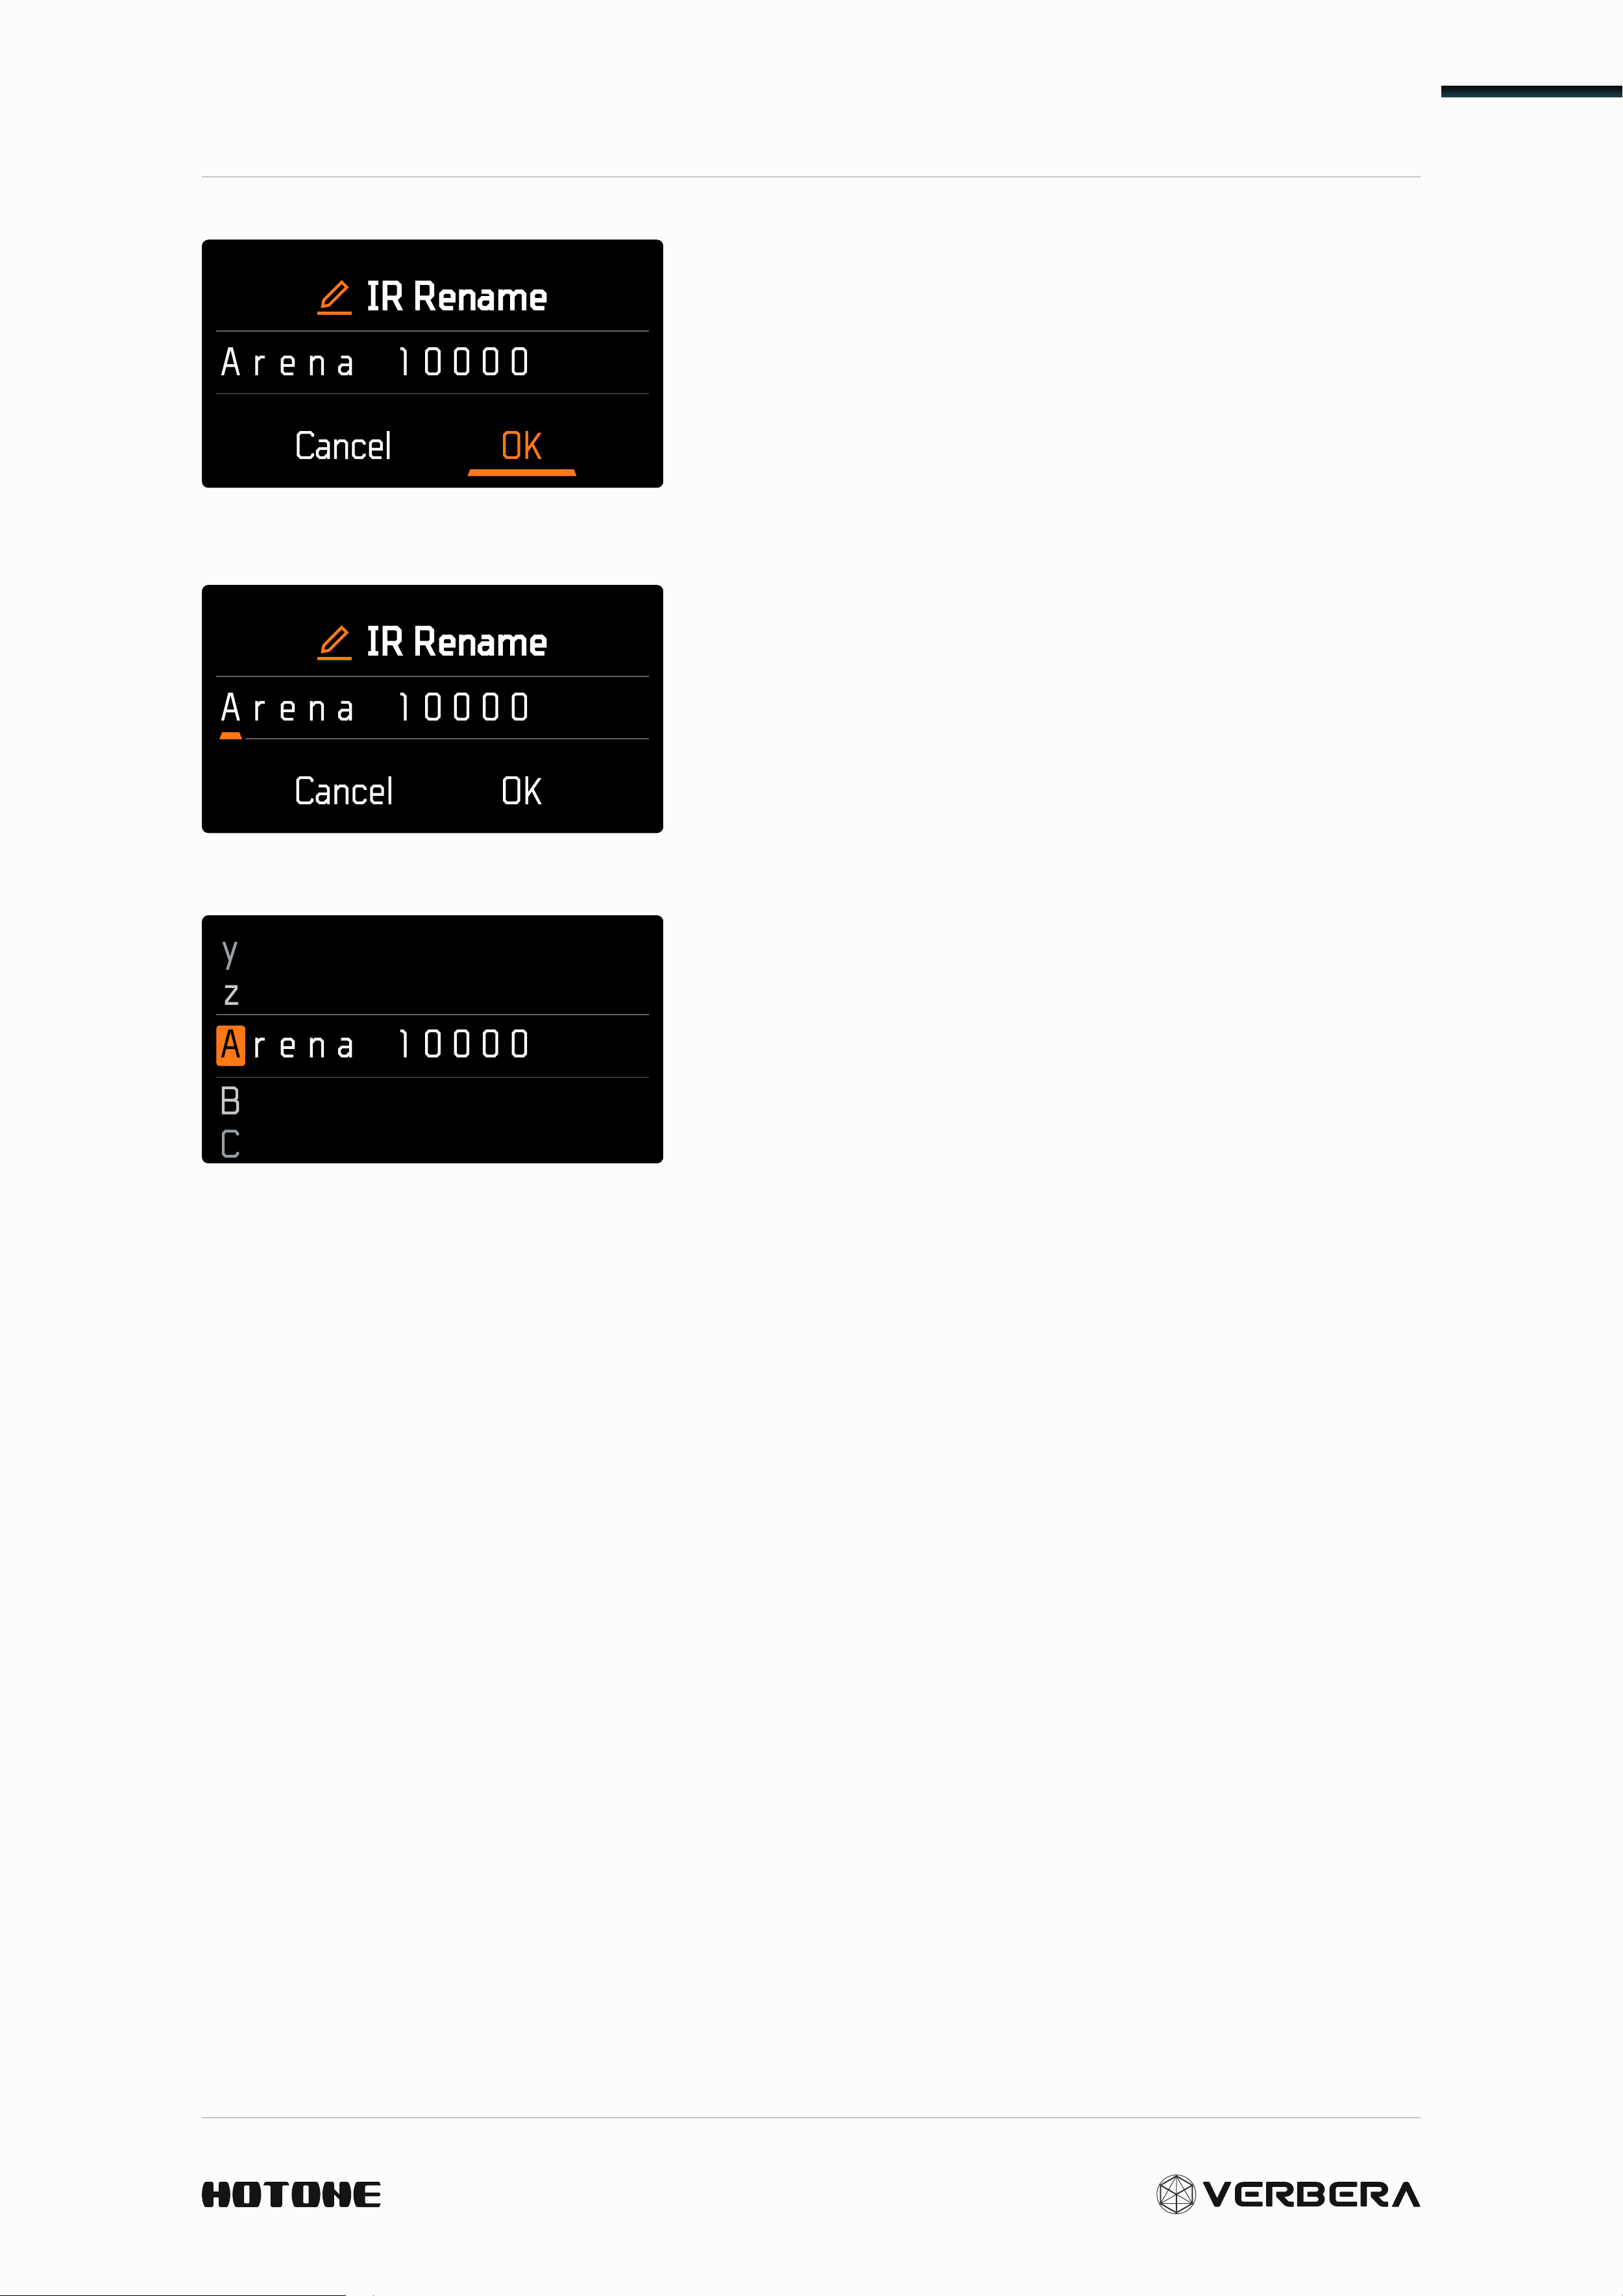
Preset/ IR knob to select and rename the
IR.
Rotate the Preset/ IR knob to select the
position of each letter to be modified.
Press the knob to modify the selected
letter.
For the Best Sound
To get your clone sounding exactly right, set your Verbera like this:
• Tone: 12 o’clock (Without additional tone shaping)
• Decay: Max (Ensuring a complete capture of the reverb decay)
• Mod / Attack / XR Mix / Predelay: All the way down (Parameters other
than the cloned tone can be adjusted as needed.)
Expression and MIDI
23
Expression and MIDI
1 2
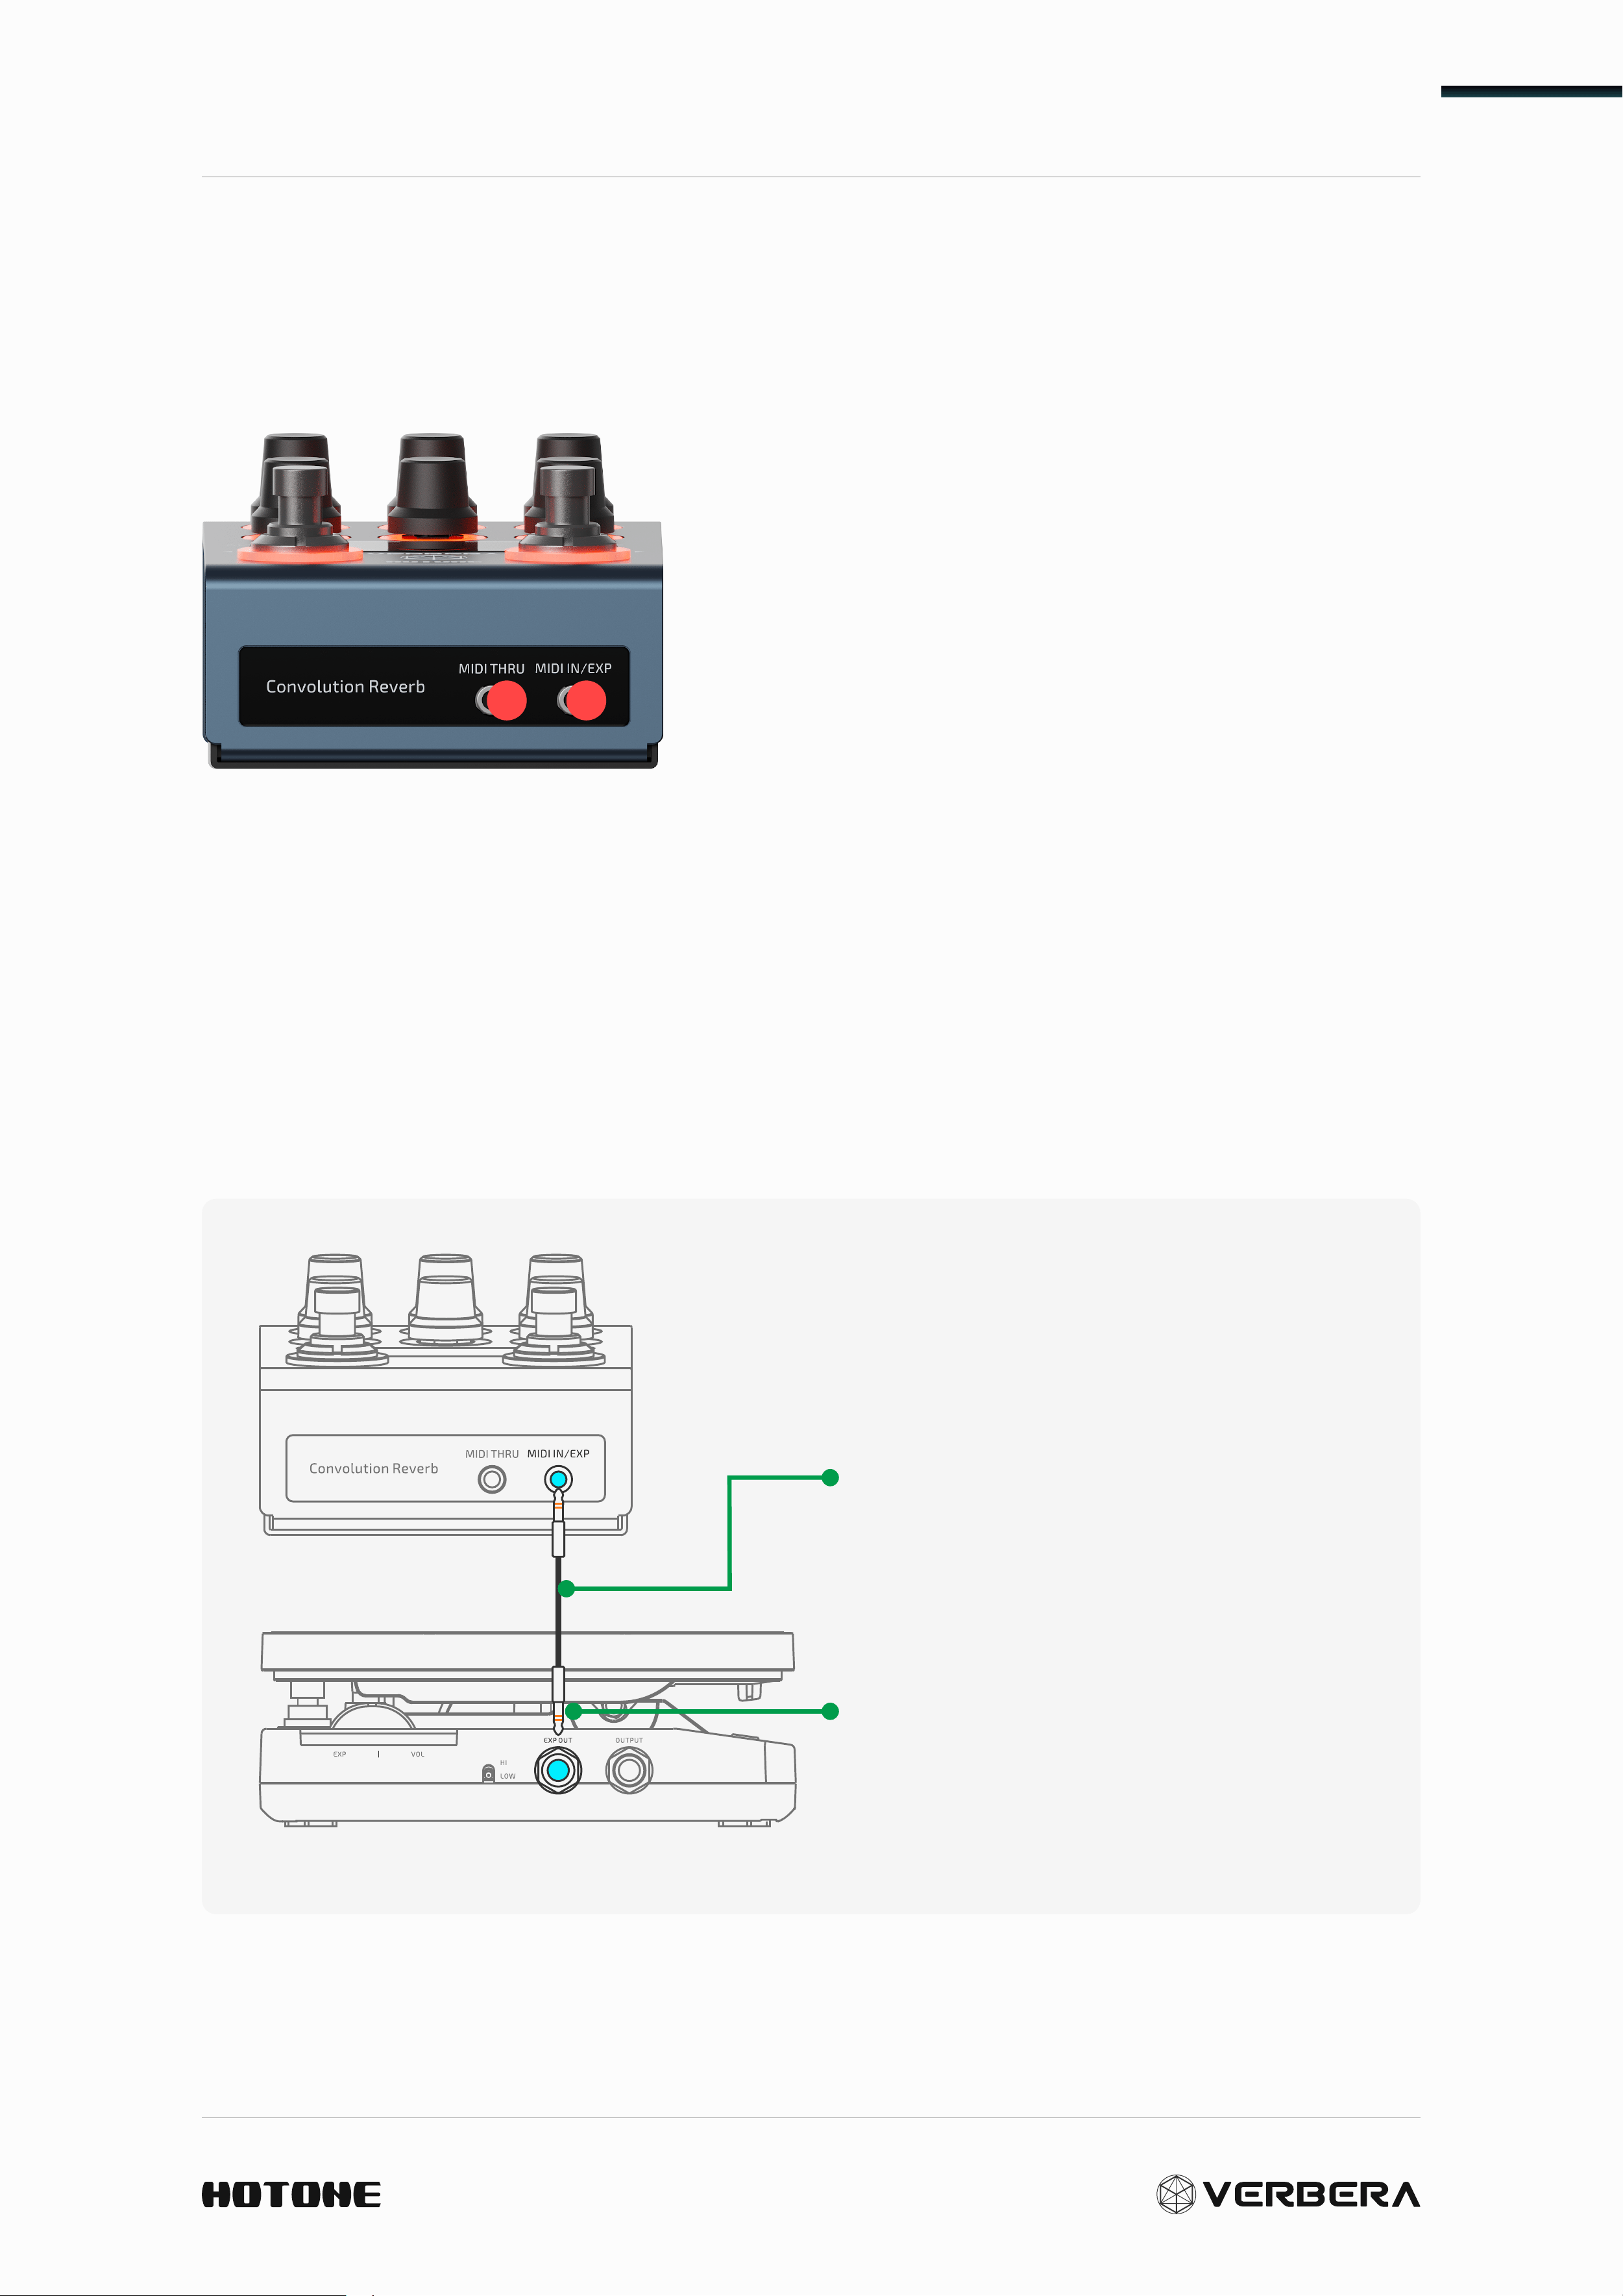
1. MIDI THRU: Standard MIDI Thru
interface, use a 1/8" TRS cable to
output to other devices, forwarding the
received MIDI data in real time.
2. MIDI IN/EXP: A compatible interface for
both MIDI IN and EXP. In the MENU, you
can switch the operation mode of the
EXP/MIDI interface (see section Menu).
Use a 1/8" TRS cable to connect MIDI
devices or expression pedal.
EXP Setting
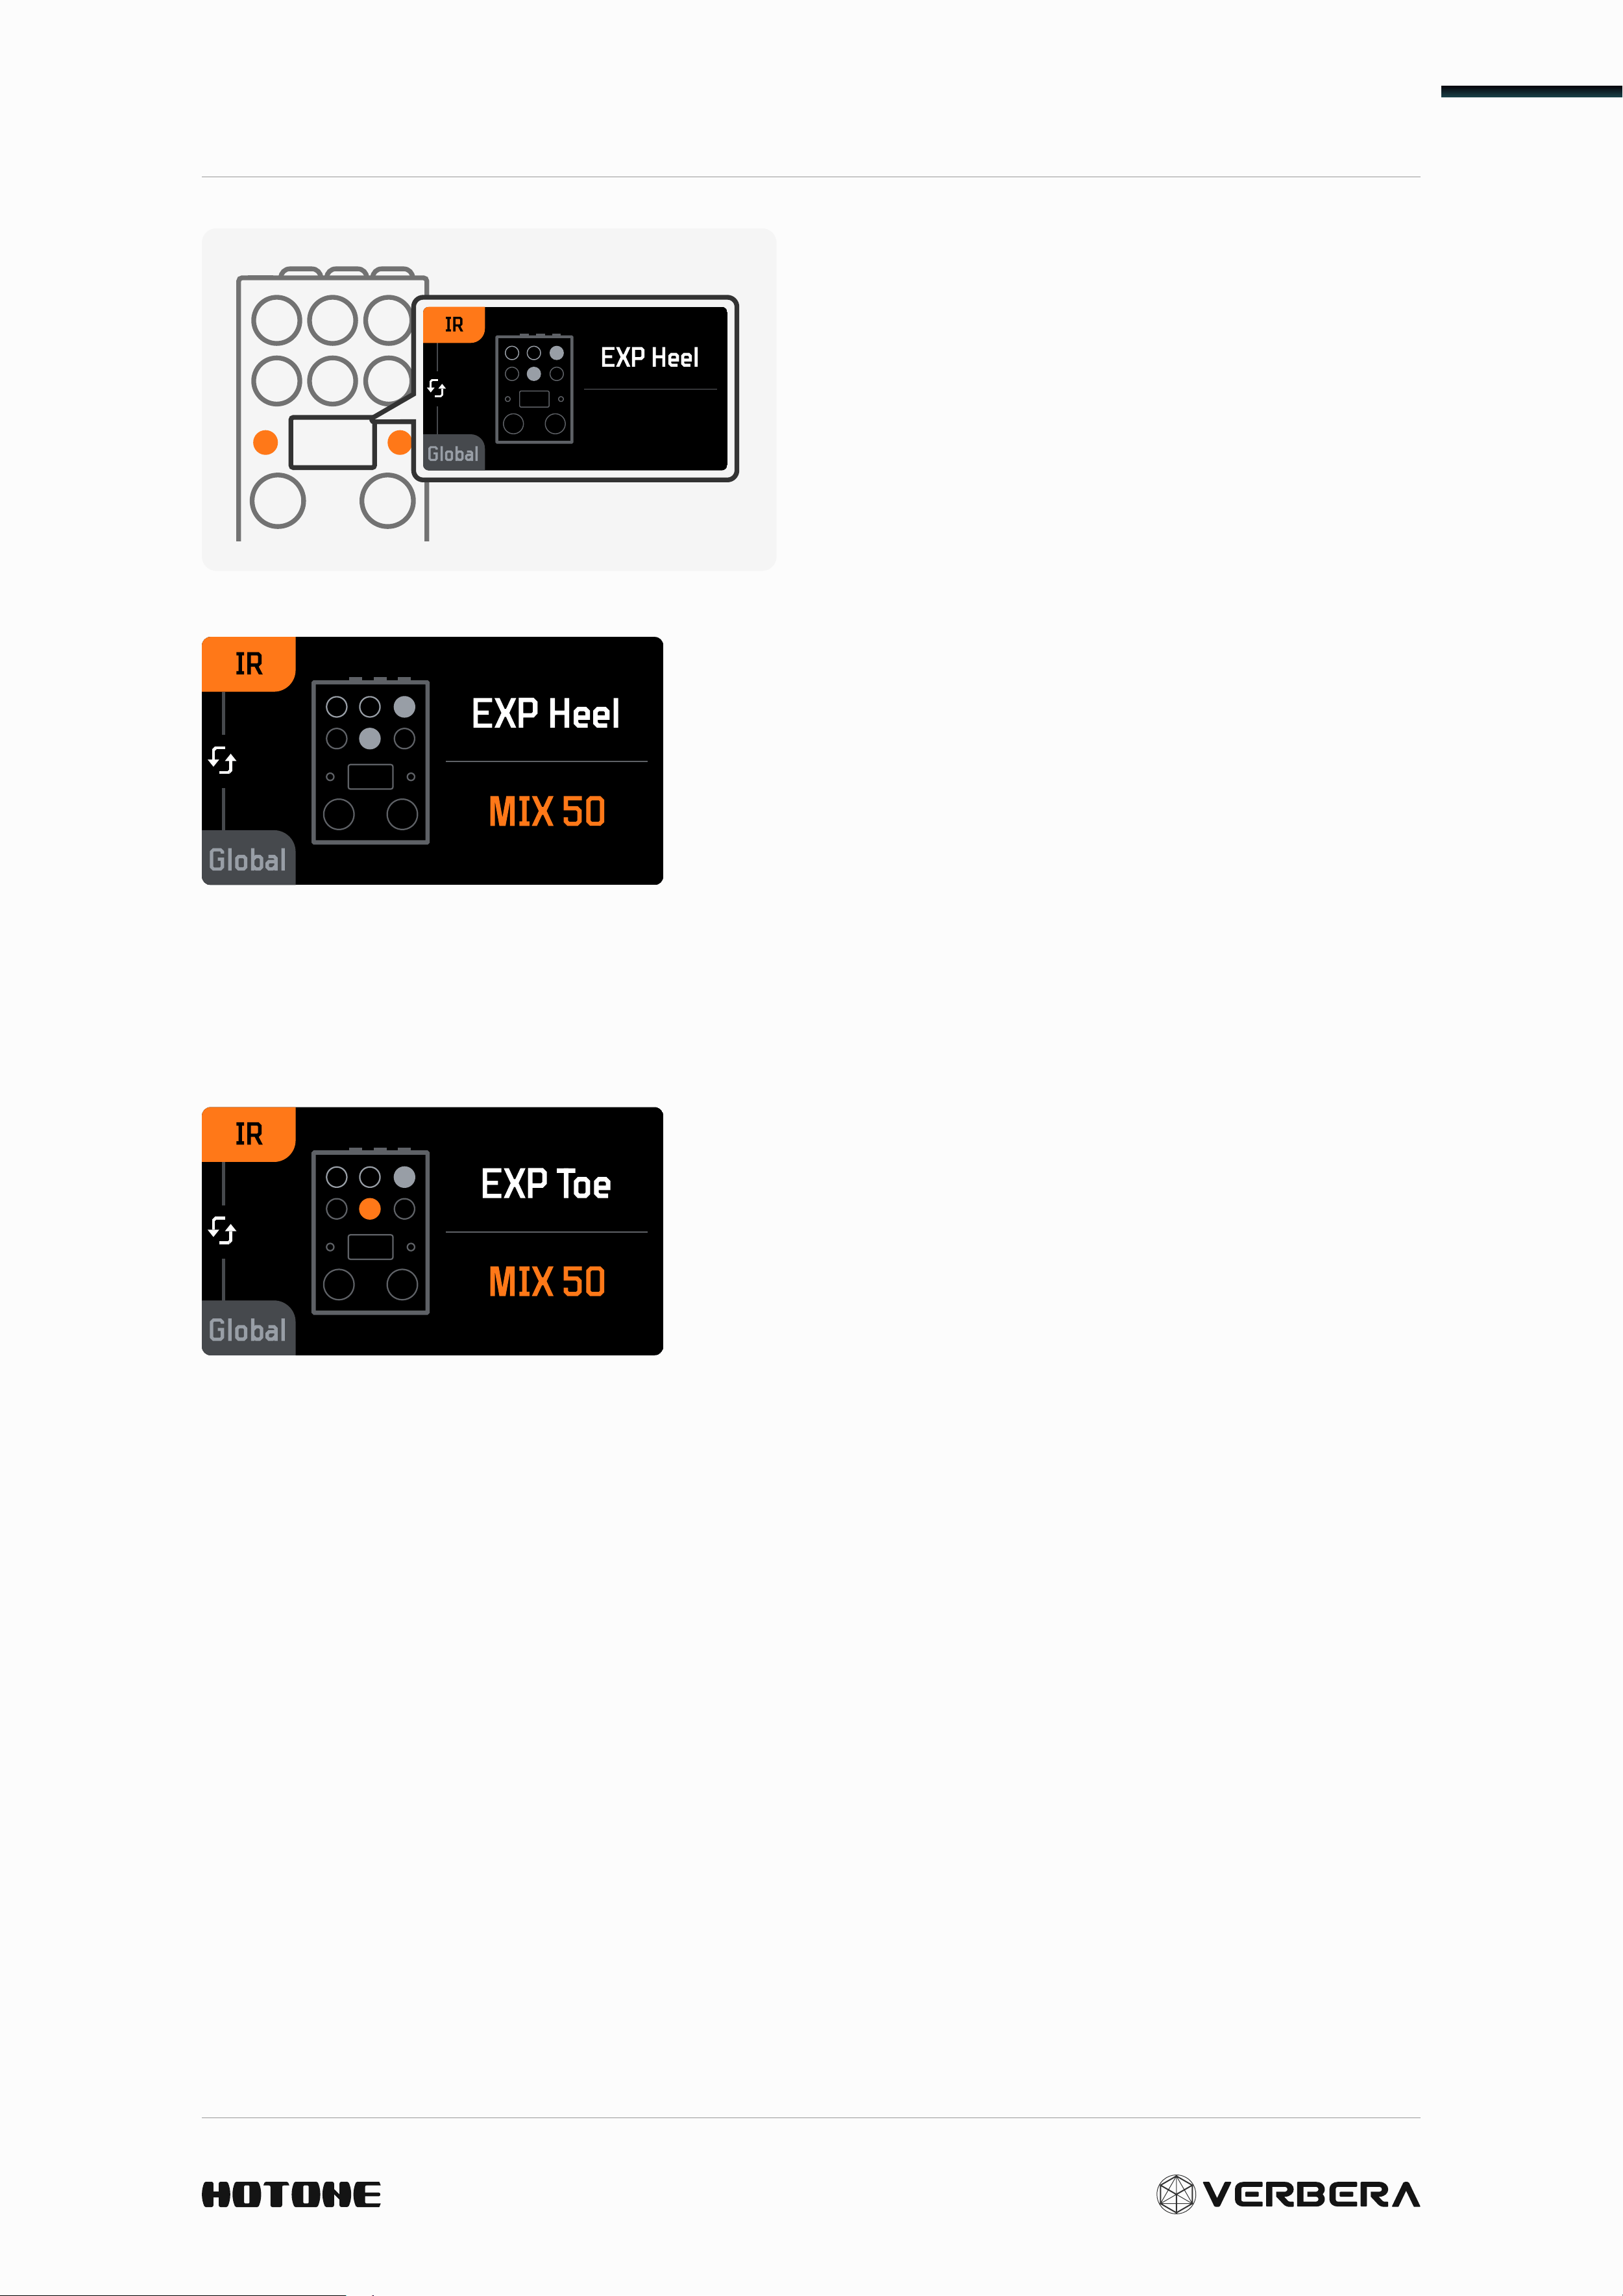
After switching to EXP mode, connect Verbera to an external expression
pedal to enable real-time control of additional parameters.
Use a 1/8" (3.5mm) TRS cable
to connect the expression
pedal.
It usually needs to be
converted to a 1/4" (6.35mm)
TRS plug.
Expression and MIDI
24
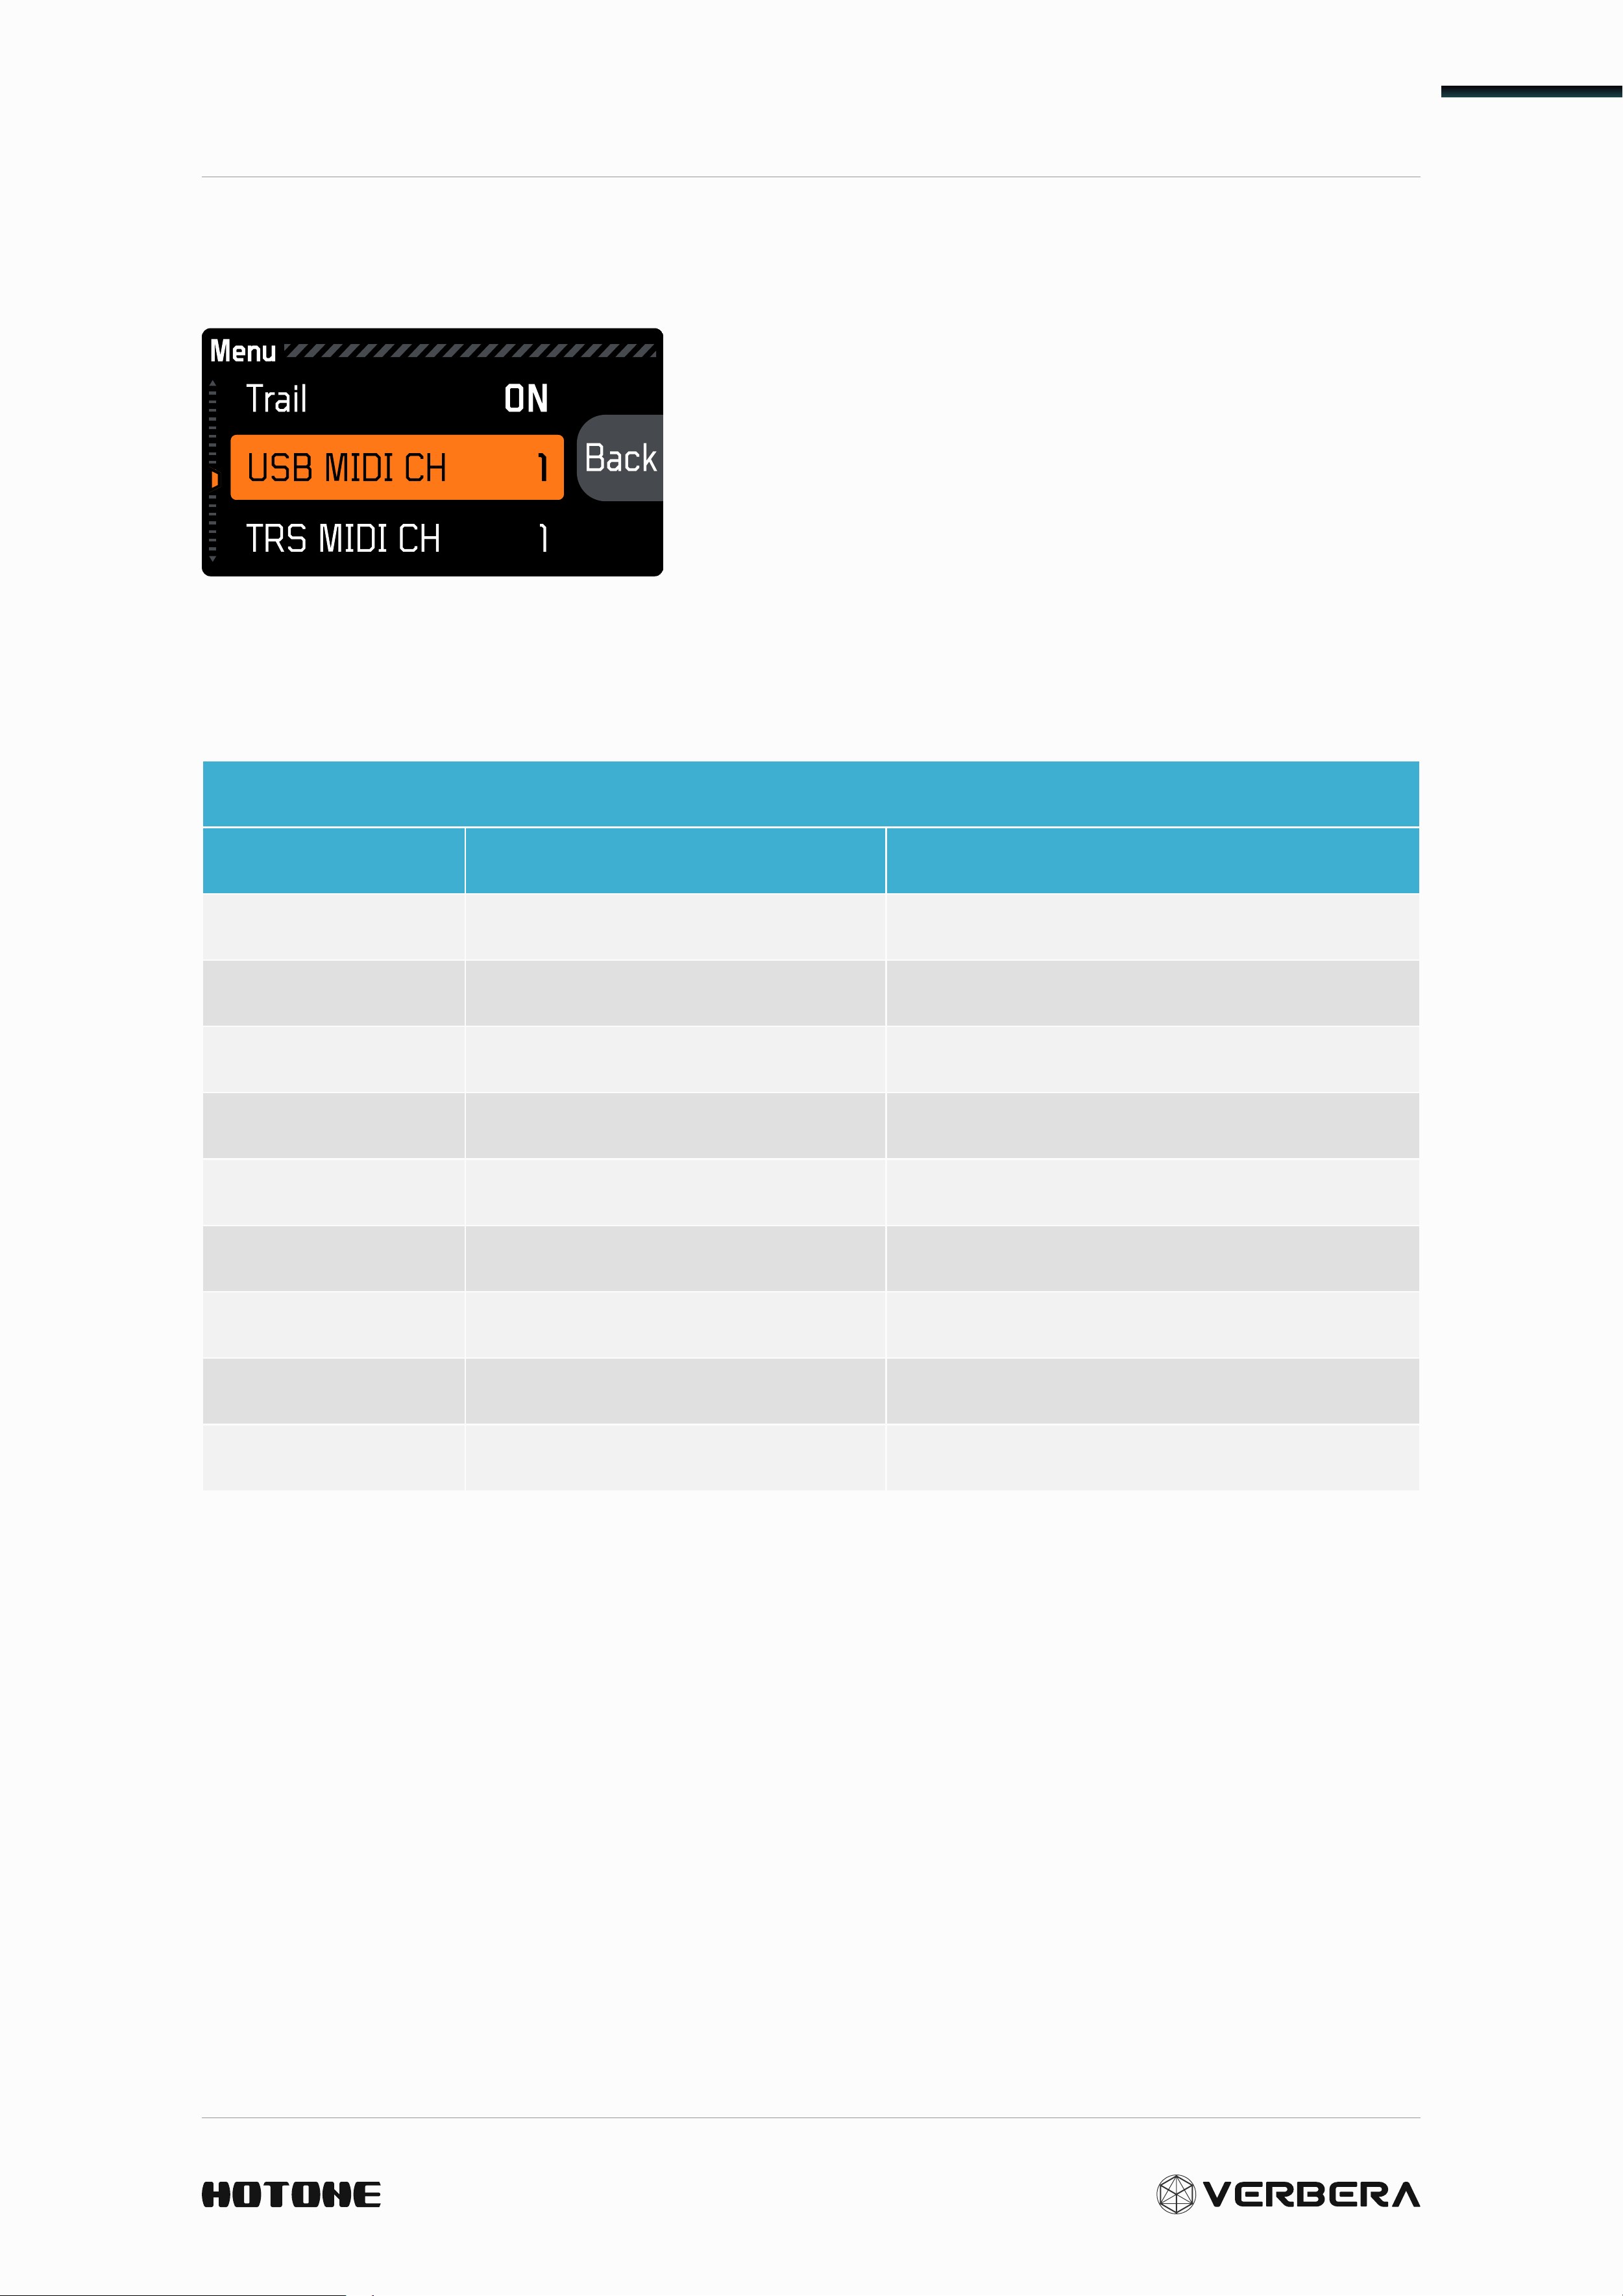
After connecting the pedal, press
both the ALT and CLONE buttons
simultaneously to enter the EXP
settings interface for the current
preset.
The screen will display EXP Heel, indicating
the parameter settings for when the pedal
is fully raised:
First, lift the pedal completely (or to the
maximum position where you want the
parameter to stop changing).
Rotate the desired parameter knob to set the corresponding value.
Press the CLONE button to switch to the EXP Heel/Toe settings interface.
The screen will display EXP Toe, indicating
the parameter settings for when the pedal
is fully pressed down:
First, press the pedal completely (or to the
maximum position where you want the
parameter to stop changing).
Rotate the desired parameter knob to set the corresponding value.
Once both EXP Heel and EXP Toe values are set for a parameter, the
corresponding knob on the screen will light up, indicating that the
parameter has been successfully configured.
During the setup, the ALT button's toggle function remains active.
Once the settings are complete, press both the ALT and CLONE buttons
simultaneously to exit the EXP settings interface.
Setting the EXP Heel and EXP Toe of a parameter to the same value can
disable control over that parameter.
(If you wish to save the EXP settings to the current preset, you will need
to manually save the preset information.)
Expression and MIDI
25
MIDI Setting
After switching the CTRL setting to MIDI
mode, you can connect Verbera to other
MIDI devices for additional control. In the
MENU, you can set different MIDI channels
for the device's USB and TRS interfaces (the
default is MIDI Channel 1).
MIDI CC Table
MIDI Control: Variable Parameters
CC# Data (Range) Parameter
1 0~10 Actions(See the table below)
2 0~127 IR Mix
3 0~127 IR Decay
4 0~127 IR Attack
5 0~127 XR Mix
6 0~127 XR Decay
7 0~127 Global Tone
8 0~127 Global Pre-delay
9 0~127 Global Mod Depth
Power Supply
26
MIDI Control: Actions(CC#1)
Data Parameter
0 IR on/off
1 XR on/off
2 IR&XR on/off (Bypass)
3 Freeze on/off
4 FS Mode change (Preset or Control)
5 Next preset
6 Previous preset
7 Next IR
8 Previous IR
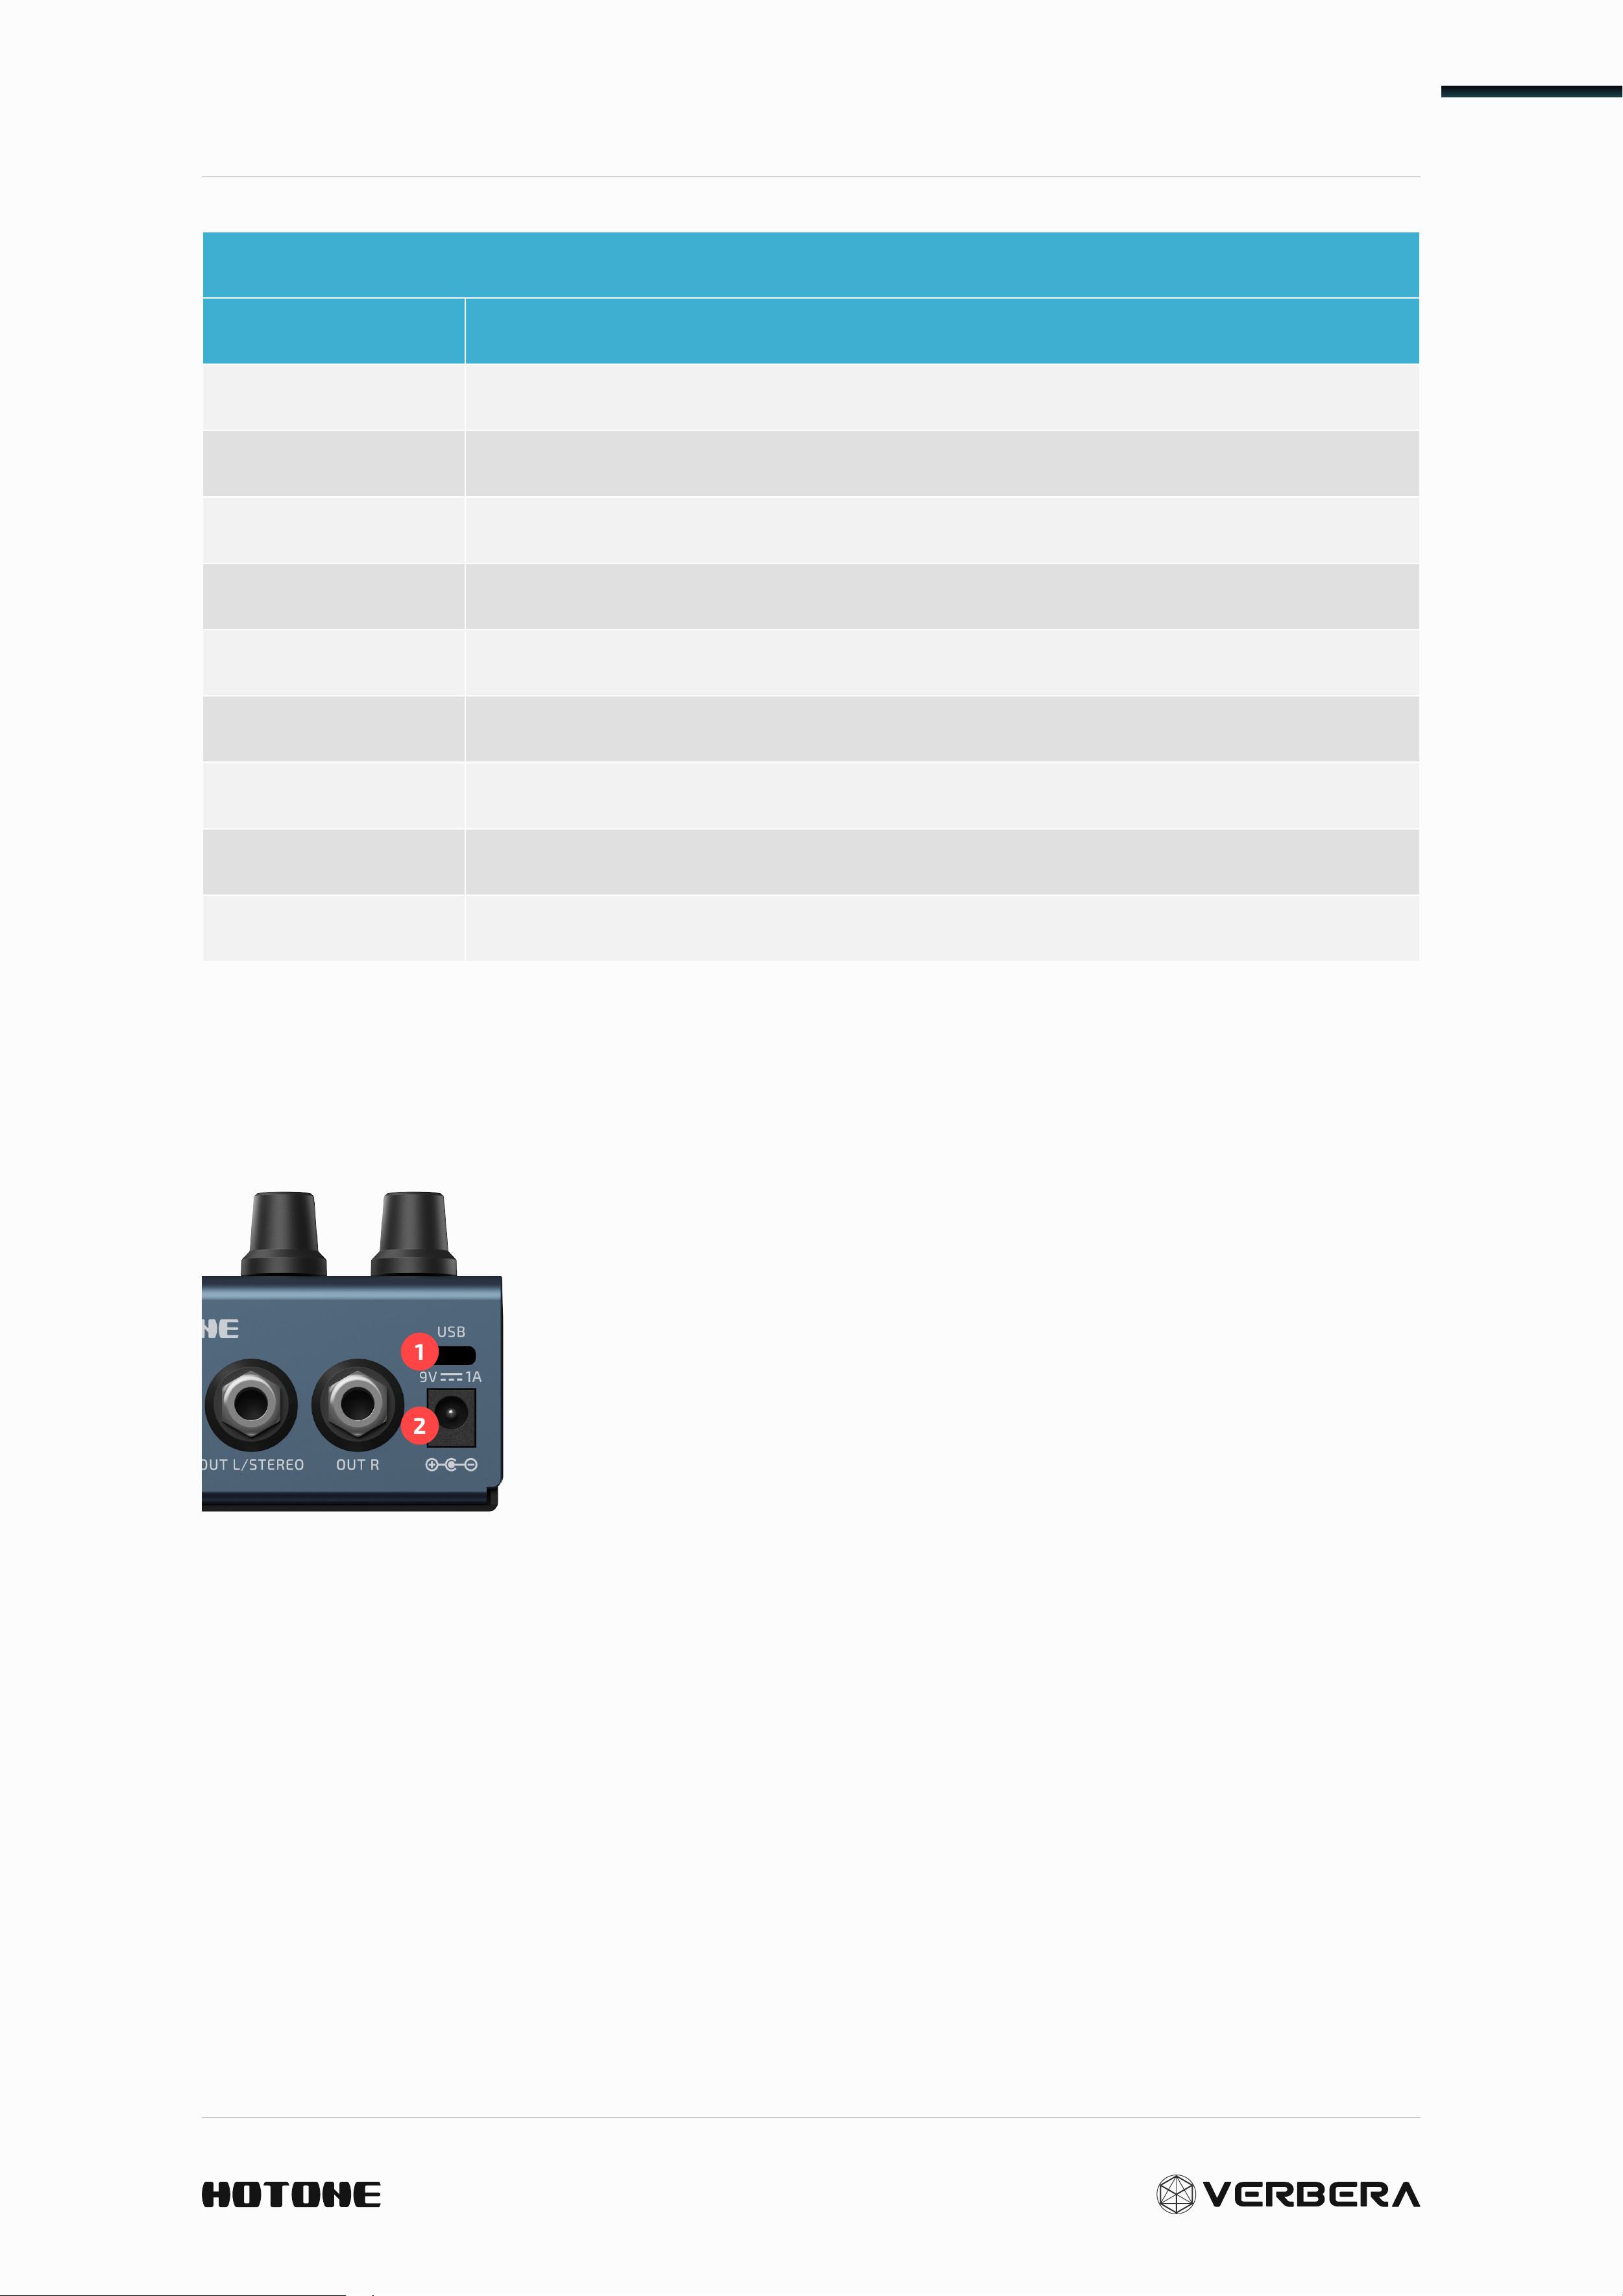
Power Supply
1
2
To ensure the device fully performs its audio
capabilities and functional parameters, please use
the following two power supply methods:
1. It is recommended to use the factory 9V DC 1A
power supply (center-negative).
2. The device is also compatible with USB power
supply (5V 2A).
Software Support
The included software, Neon Collector, allows for preset and IR file
management for Verbera. The software supports both Windows and
macOS versions. After downloading and installing the appropriate version
from the provided link, connect Verbera to the software via USB-C, and
Neon Collector will automatically recognize the Verbera device. (www.
hotone.com/support/3)
Factory IR List
27
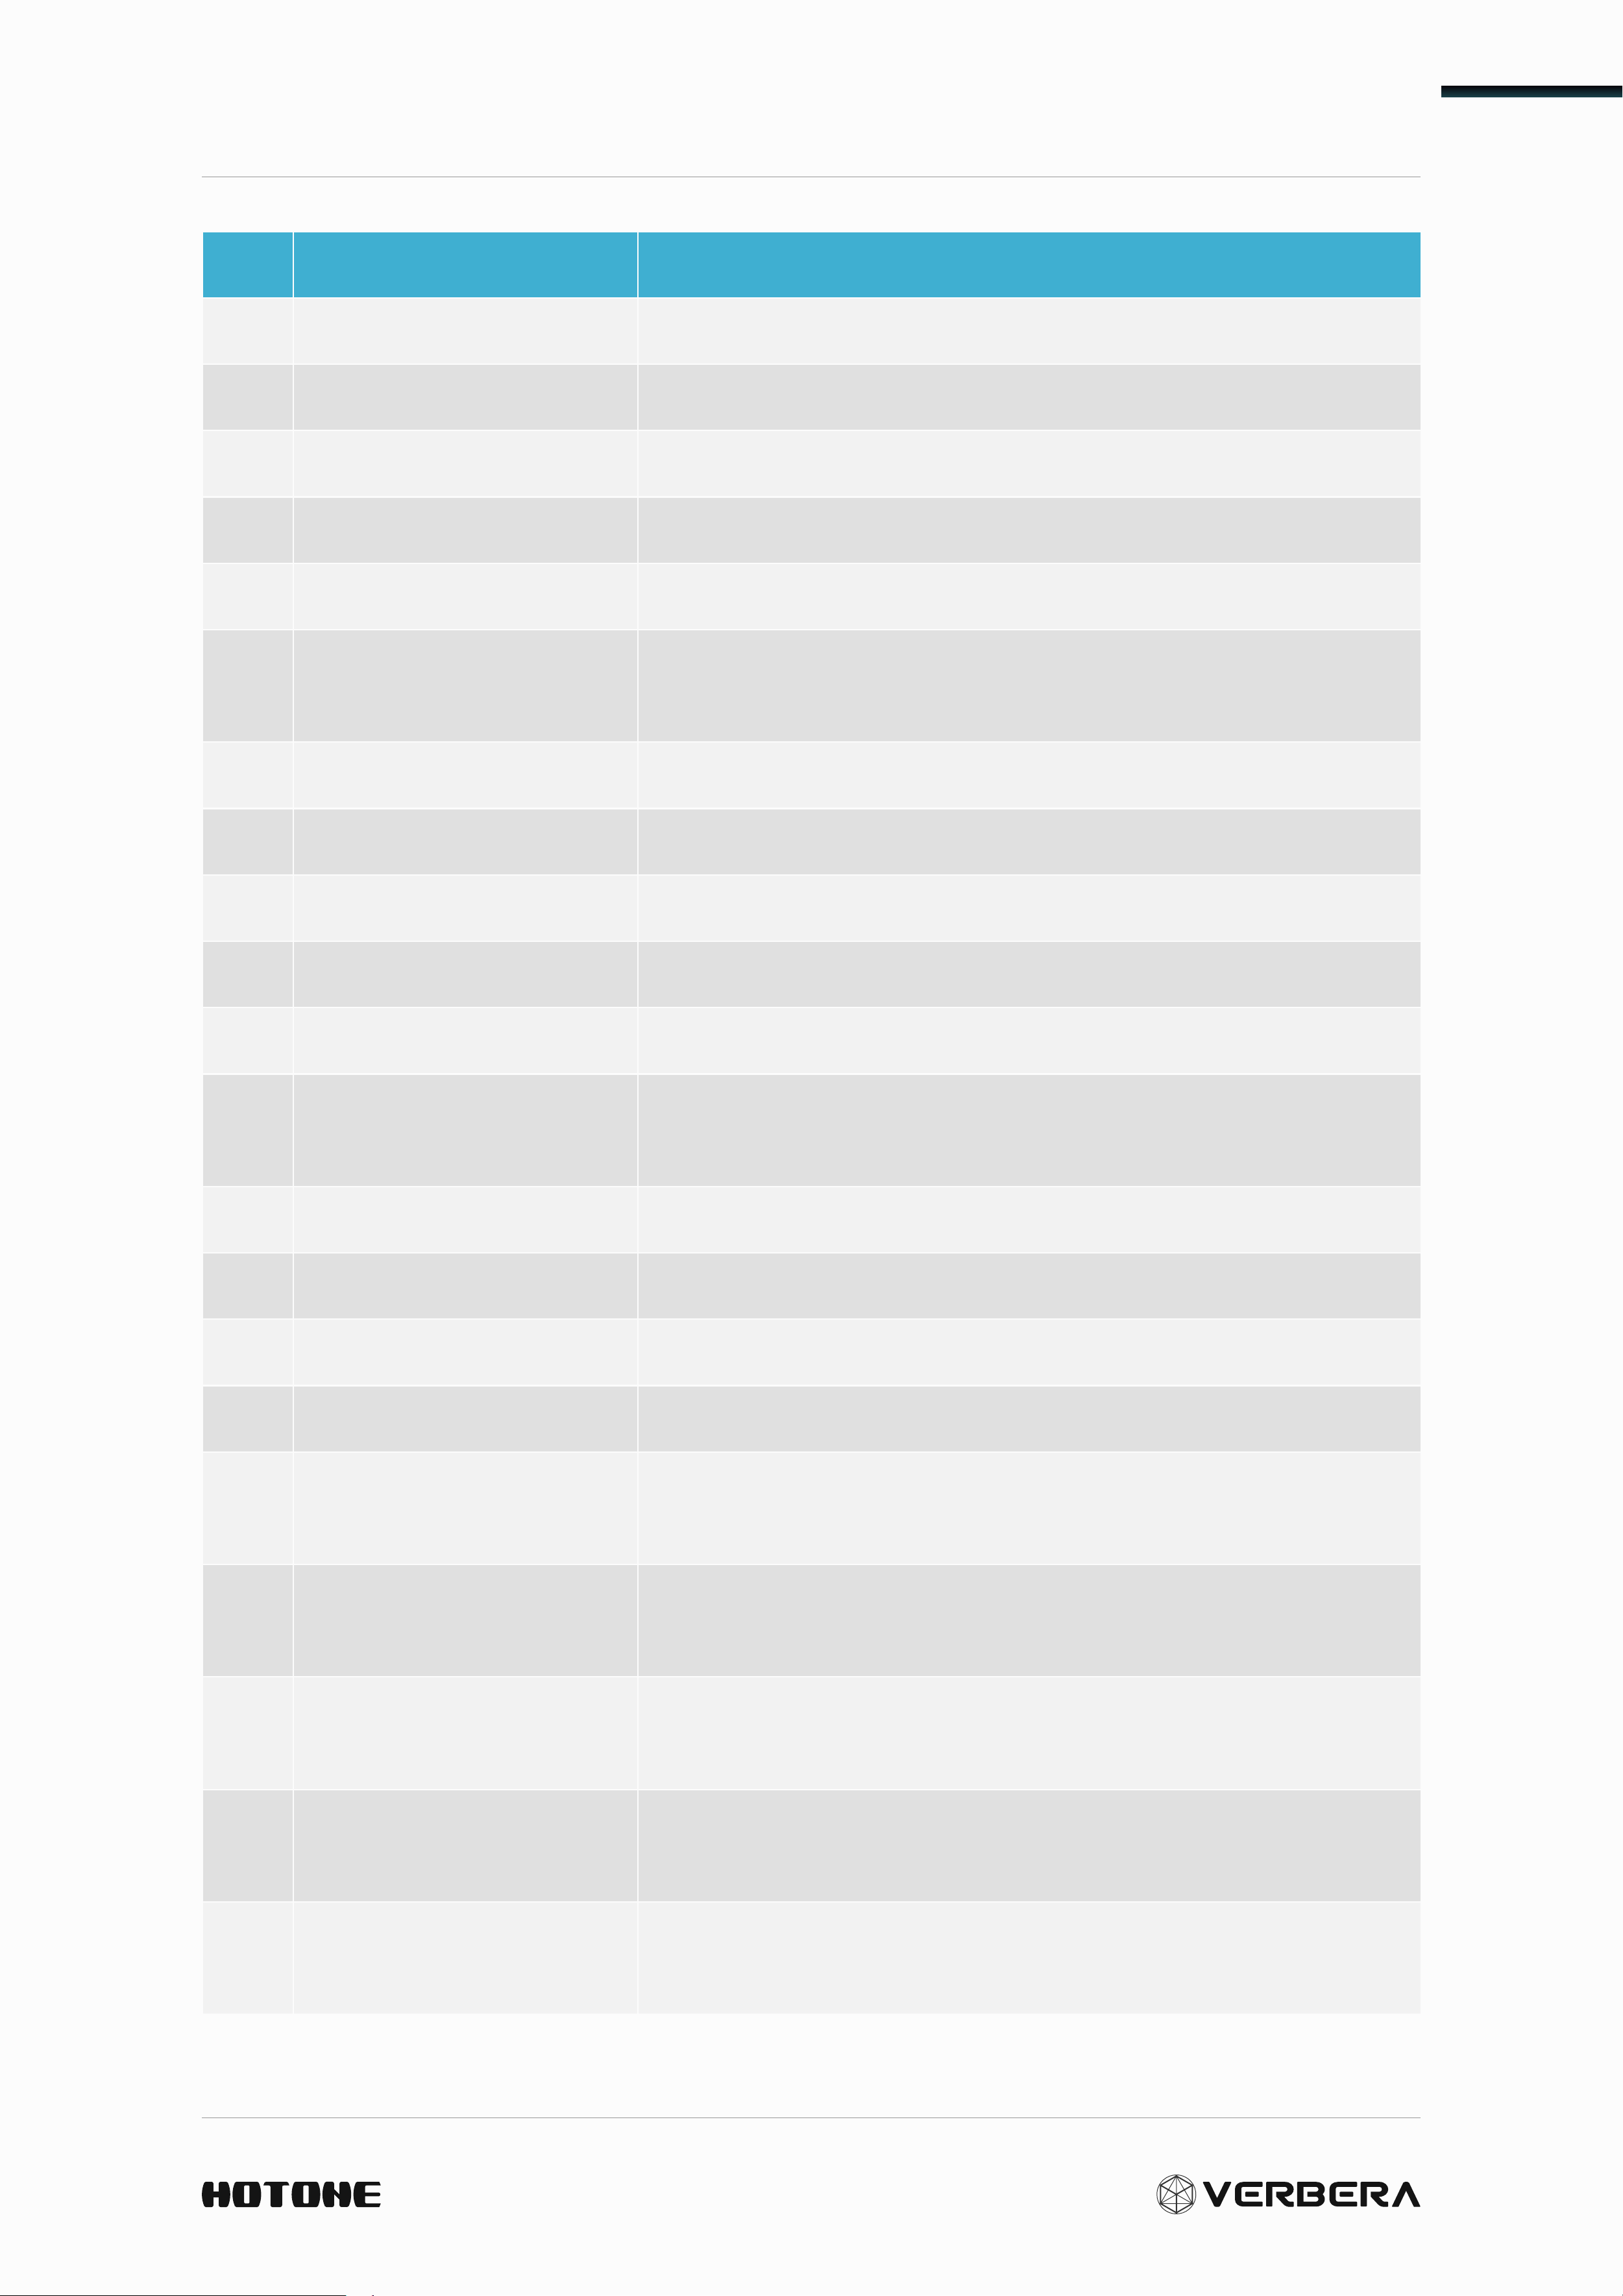
Factory IR List
No. IR (Sort by Name) Collection Source
1 1985 Hall Factory Original IR
2 80 Foot Drain Captured from a drain
3 Abyss Vibe Factory Original IR
4 Arena 10000 1 Captured from a 1000-seat Arena
5 Arena 10000 2 Captured from a 1000-seat Arena
6 Arena 3800 1 Captured from a 3800-seat Arena
7 Arena 3800 2 Captured from a 3800-seat Arena
8 Arena 5000 Captured from a 5000-seat Arena
9 Art Exhibit Captured from a exhibit room
10 Astral Shimmy Factory Original IR
11 Atrium 54 Ft Captured from a Atrium
12 Auditorium 400 Captured from a 400-seat auditorium
13 Auditorium 500 Captured from a 500-seat auditorium
14 Bed Room Captured from a Nashville room
15 Belle Church Captured from the Belle Church
16 Blooming Factory Original IR
17 Break Beat 130 Factory Original IR
18 Brent Church Captured from the Brent Church
19 Brent Heaven Captured from the Brent Church
20 Bri Plate Captured from the Brick Plate Reverb
21 Brit Spring
Captured from the Bandive Great British
Spring
22 Carpet Tube Captured from a carpet tube
23 Cathedral Captured from a cathedral
24 Cave 1 Captured from a cave
Factory IR List
28
No. IR (Sort by Name) Collection Source
25 Cave 2 Captured from a cave
26 Cloudy Tail Factory Original IR
27 Concrete Room Captured from a concrete cavern
28 Control Room Captured from a controling room
29 Cross Freq Factory Original IR
30 Cryo Circuit Factory Original IR
31 CTKCC Side Captured from a Catholic Church
32 Cyber Wave Factory Original IR
33 Dance Studio Captured from a studio room
34 David‘s Church Captured from the St David’s Church
35 Destin Office Captured from a office
36 Dome 50 Captured from a 50-feet Dome
37 Dome 50 Turf Captured from a 50-feet Dome
38 Dream Hall Factory Original IR
39 Echo Shift 1 Factory Original IR
40 Echo Shift 2 Factory Original IR
41 Echo Space Factory Original IR
42 Echo String Factory Original IR
43 Echoing Hall Factory Original IR
44 Episco Church Captured from a Episcopal Church
45 Ether Hallway Factory Original IR
46 Fat Plate Captured from the Lexicon 480L
47 Flat Land Factory Original IR
48 Fort Hallway Captured from the Fort Barr Hallway
49 Fort Outside Captured from the Fort Barr Hallway
50 Future Impact Factory Original IR
Factory IR List
29
No. IR (Sort by Name) Collection Source
51 Garage 1 Captured from a parking garage
52 Garage 2 Captured from a parking garage
53 GMC Truck Captured from a GMC Truck
54 Hallway Slap Factory Original IR
55 Heavenly Space Factory Original IR
56 Hudson Hall Captured from the Hudson Hall
57 Illusion Echo Factory Original IR
58 Ivy League Hall Captured from the Ivy League Hall
59 Joseph Church Captured from the St Joseph Church
60 Kaleidoscope Factory Original IR
61 Lake Slapback 1 Captured from the State Park Tennessee
62 Lake Slapback 2 Captured from the State Park Tennessee
63 Leaf Bedroom Captured from a Nashville room
64 Luth Church 1 Captured from the Luth Church
65 Luth Church 2 Captured from the Luth Church
66 Meeting Room Captured from a conference room
67 Metal Surface Factory Original IR
68 MetroSync Factory Original IR
69 Multi Echo Factory Original IR
70 Nash Aud Side Captured from a Nashville auditorium
71 Neon Relic Factory Original IR
72 Net Drifter Factory Original IR
73 Neuro Link Factory Original IR
74 Oil Can
Captured from the Gibson A-4RE Oil Can (Tel
Ray)
75 Out Ambient 1 Captured from a open architectural complex
76 Out Ambient 2 Captured from a open architectural complex
Factory IR List
30
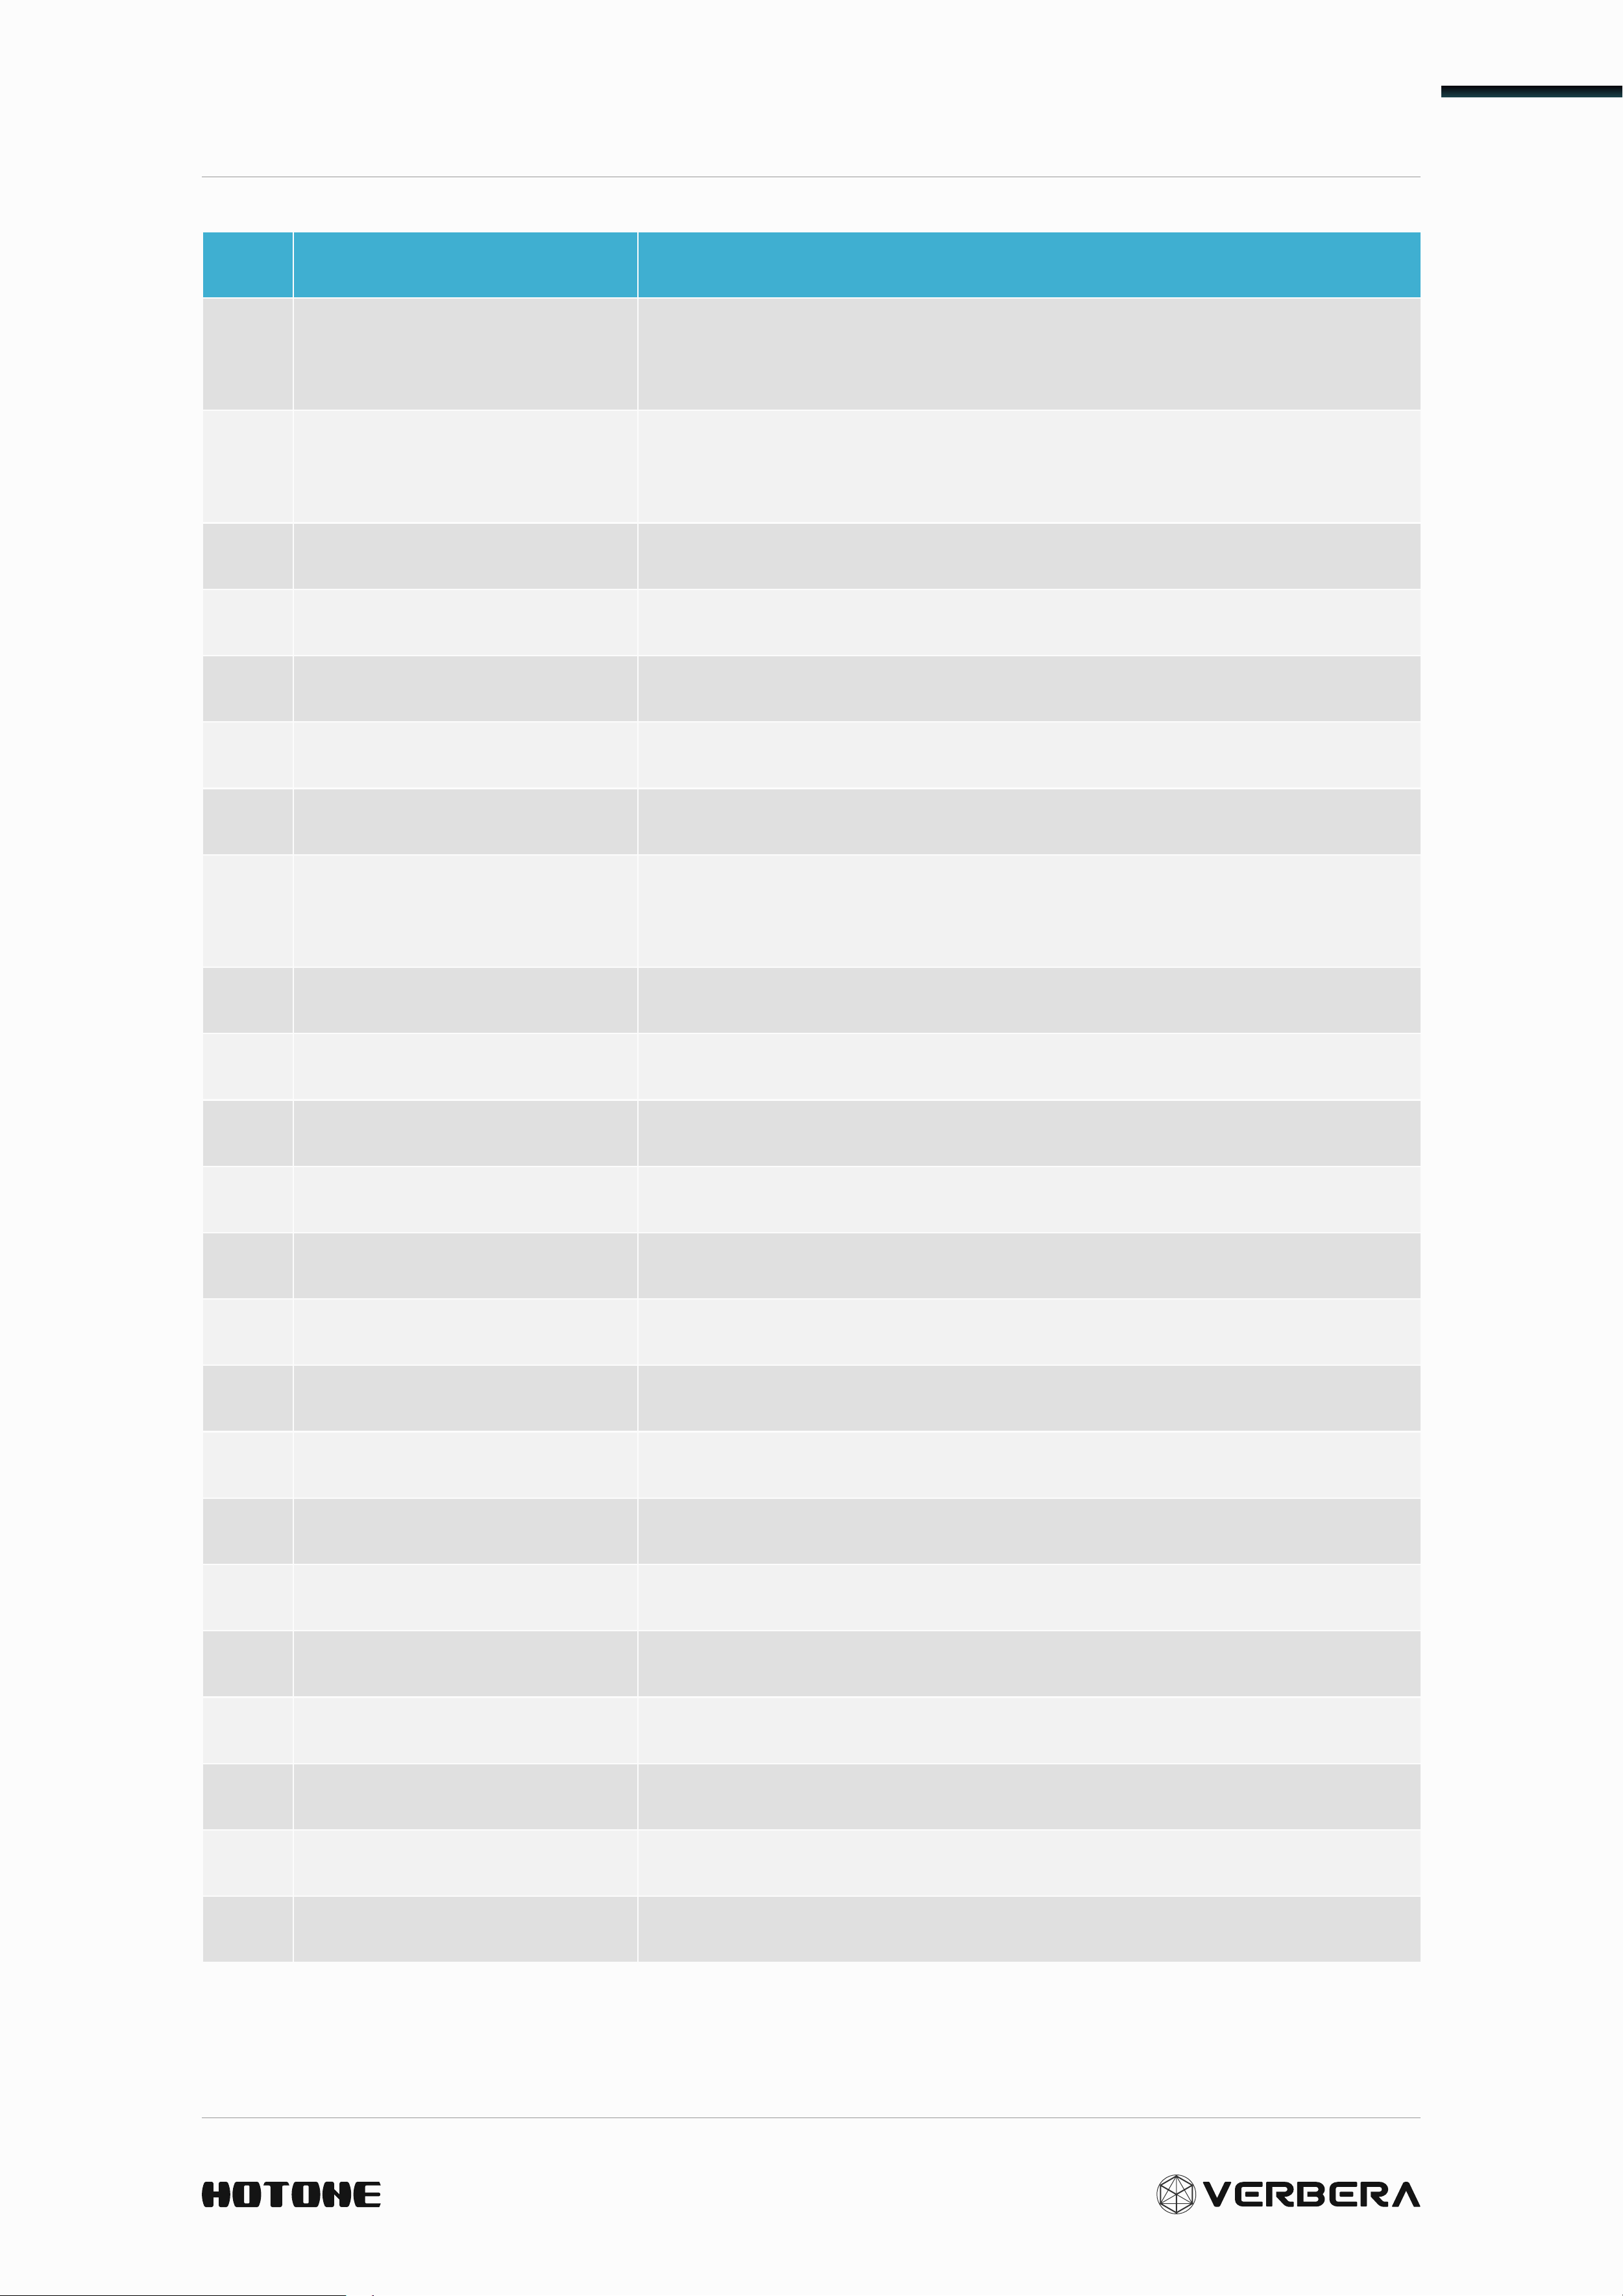
No. IR (Sort by Name) Collection Source
77 Out Ambient 3 Captured from a open architectural complex
78 Out Ambient 4 Captured from a open architectural complex
79 Pan Gate Factory Original IR
80 Peach Church Captured from the Peach Church
81 Phantom Loop Factory Original IR
82 Ping Pong Fun
Captured from the Peavey Dual DeltaFex
Multi Effects processor
83 Plate Unit 140 Captured from the EMT 140
84 Prayer Room Captured from a cathedral’s prayer room
85 R-1 Spring Captured from the Vesta-Fire RV-1
86 Regen Field Factory Original IR
87 Reverse Echo Factory Original IR
88 Rotary Records
Captured from the Rotary Records Main
Studio Room
89 Shatter Pulse Factory Original IR
90 Small Barn Captured from a small barn
91 Small Orch Hall Captured from a Orchestra Hall
92 Smooth Cloud Factory Original IR
93 Space Facility 1
Captured from the Space Station Processing
Facility
94 Space Facility 2
Captured from the Space Station Processing
Facility
95 Space Facility 3
Captured from the Space Station Processing
Facility
96 Space VAB Ctr
Captured from the Vehicle Assembly Building
of a Space Center
97 Space VAB Frt
Captured from the Vehicle Assembly Building
of a Space Center
Factory IR List
31
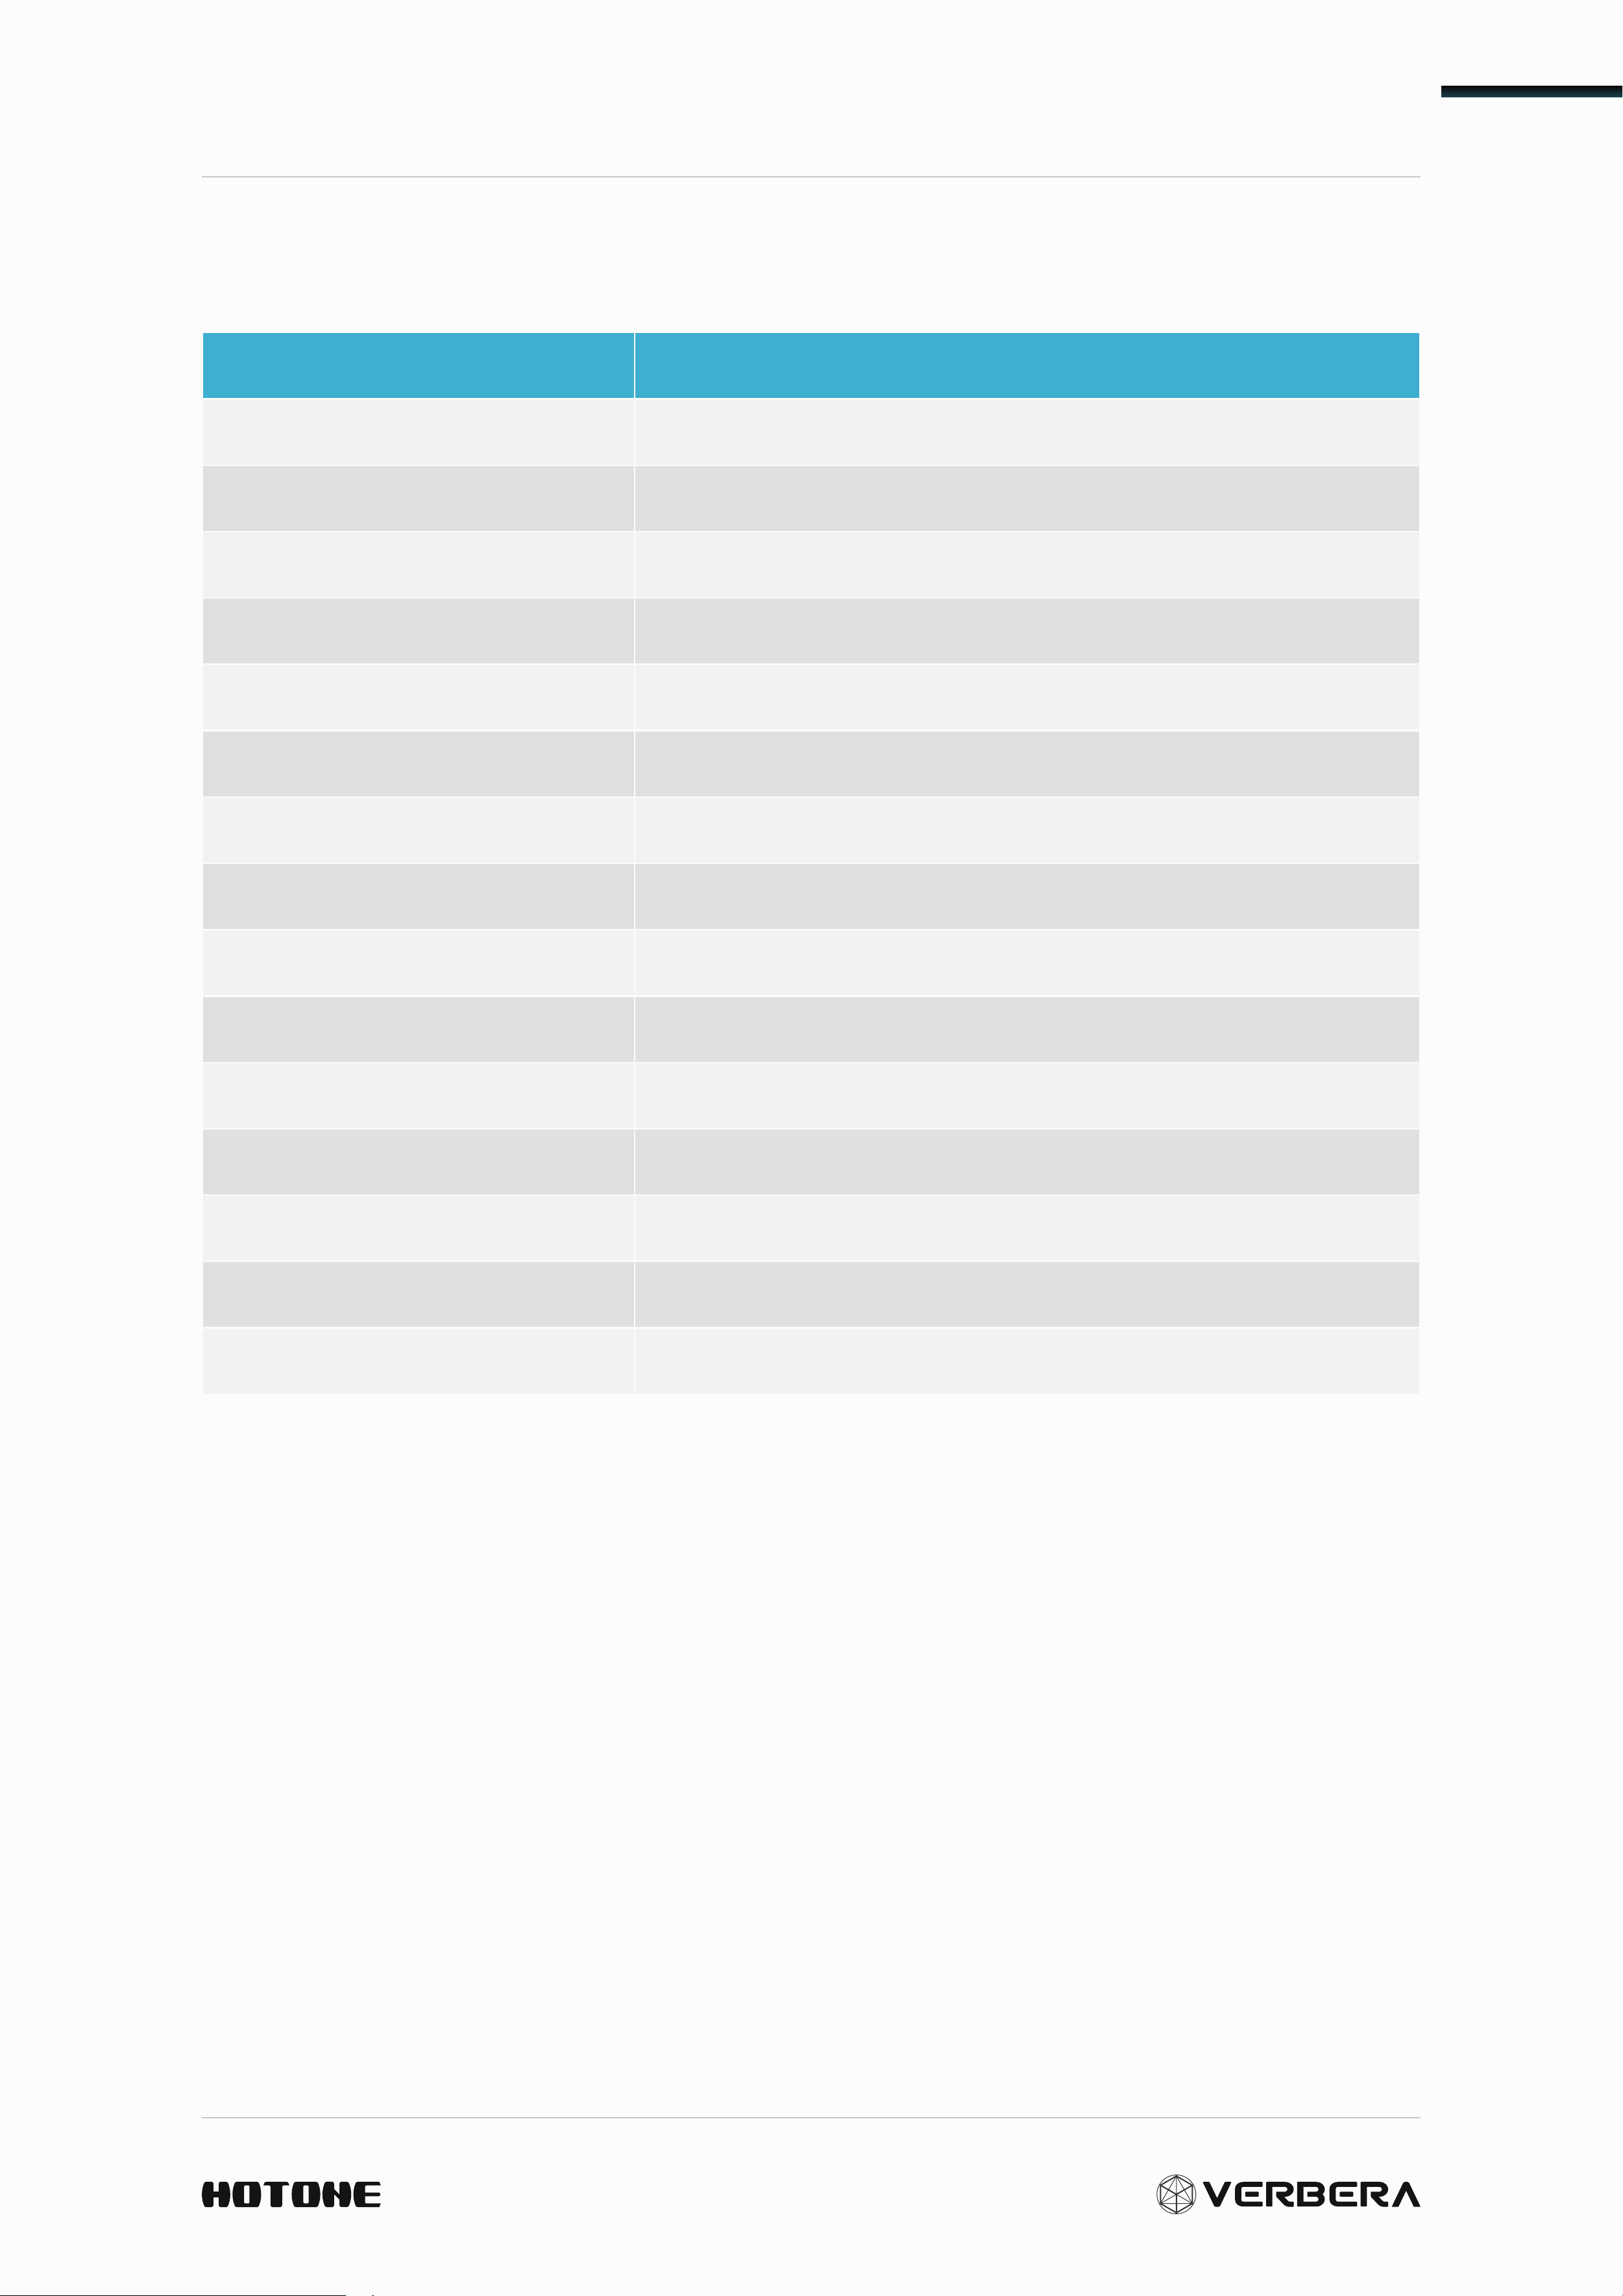
No. IR (Sort by Name) Collection Source
98 Space VAB Rer
Captured from the Vehicle Assembly Building
of a Space Center
99 Space VAB Sd
Captured from the Vehicle Assembly Building
of a Space Center
100 Specter Echo Factory Original IR
101 Speed Up Factory Original IR
102 Spiral Descent Factory Original IR
103 Spring 100 Captured from the Unicord Univerb
104 Spring 2600 Captured from the ARP 2600
105 Spring 636
Captured from the Soundgas Type 636
Grampian
106 Spring 844 Captured from the Olson RA-844
107 Spring Box 10 Captured from the Vintage Kay Model 710
108 Spring Plus Captured from the Alamo Fiesta 2573
109 Spring Pro V Captured from the Univox U3R Proverb
110 St Hen Bapt Captured from the St Hen Baptistry
111 Synth Haze Factory Original IR
112 Time Slip Factory Original IR
113 Tunnel Flash Factory Original IR
114 Underwater Captured from a underwater
115 Warm Spring Captured from the Orban 111-b
116 West Cylinder Captured from the Middle School Nashville
117 Whiring In Rags Factory Original IR
118 Whisper Room Captured from a Nashville room
119 White Hole Factory Original IR
120 Wils Hall 66 Ft Captured from the Wils Hall
Technical Specification
32
Technical Specification
Featrue Specification
Input jack 1×6.35mm (1/4") TRS Jack
Output jack 2×6.35mm (1/4") TRS Jack
MIDI/EXP jack 2×3.5mm (1/8") TRS Jack
USB jack USB 2.0 Type-C
Input impedance 1MegOhm
Output impedance 1KOhm
A/D&D/A High-performance 32-bit
DSP 32-bitprocessing
SNR 115dB
Frequency response ±0.1dB,20Hz~20kHz
Max input level +13dBu
Bypass AnalogDryThru+Buffer
Power supply 9VDC, 1A (CenterNegative)
Dimensions 125.5mm(W)×84mm(D)×62.5mm(H)
Weight 485g

