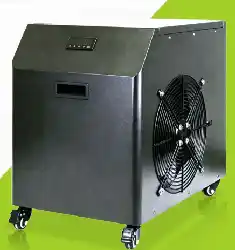
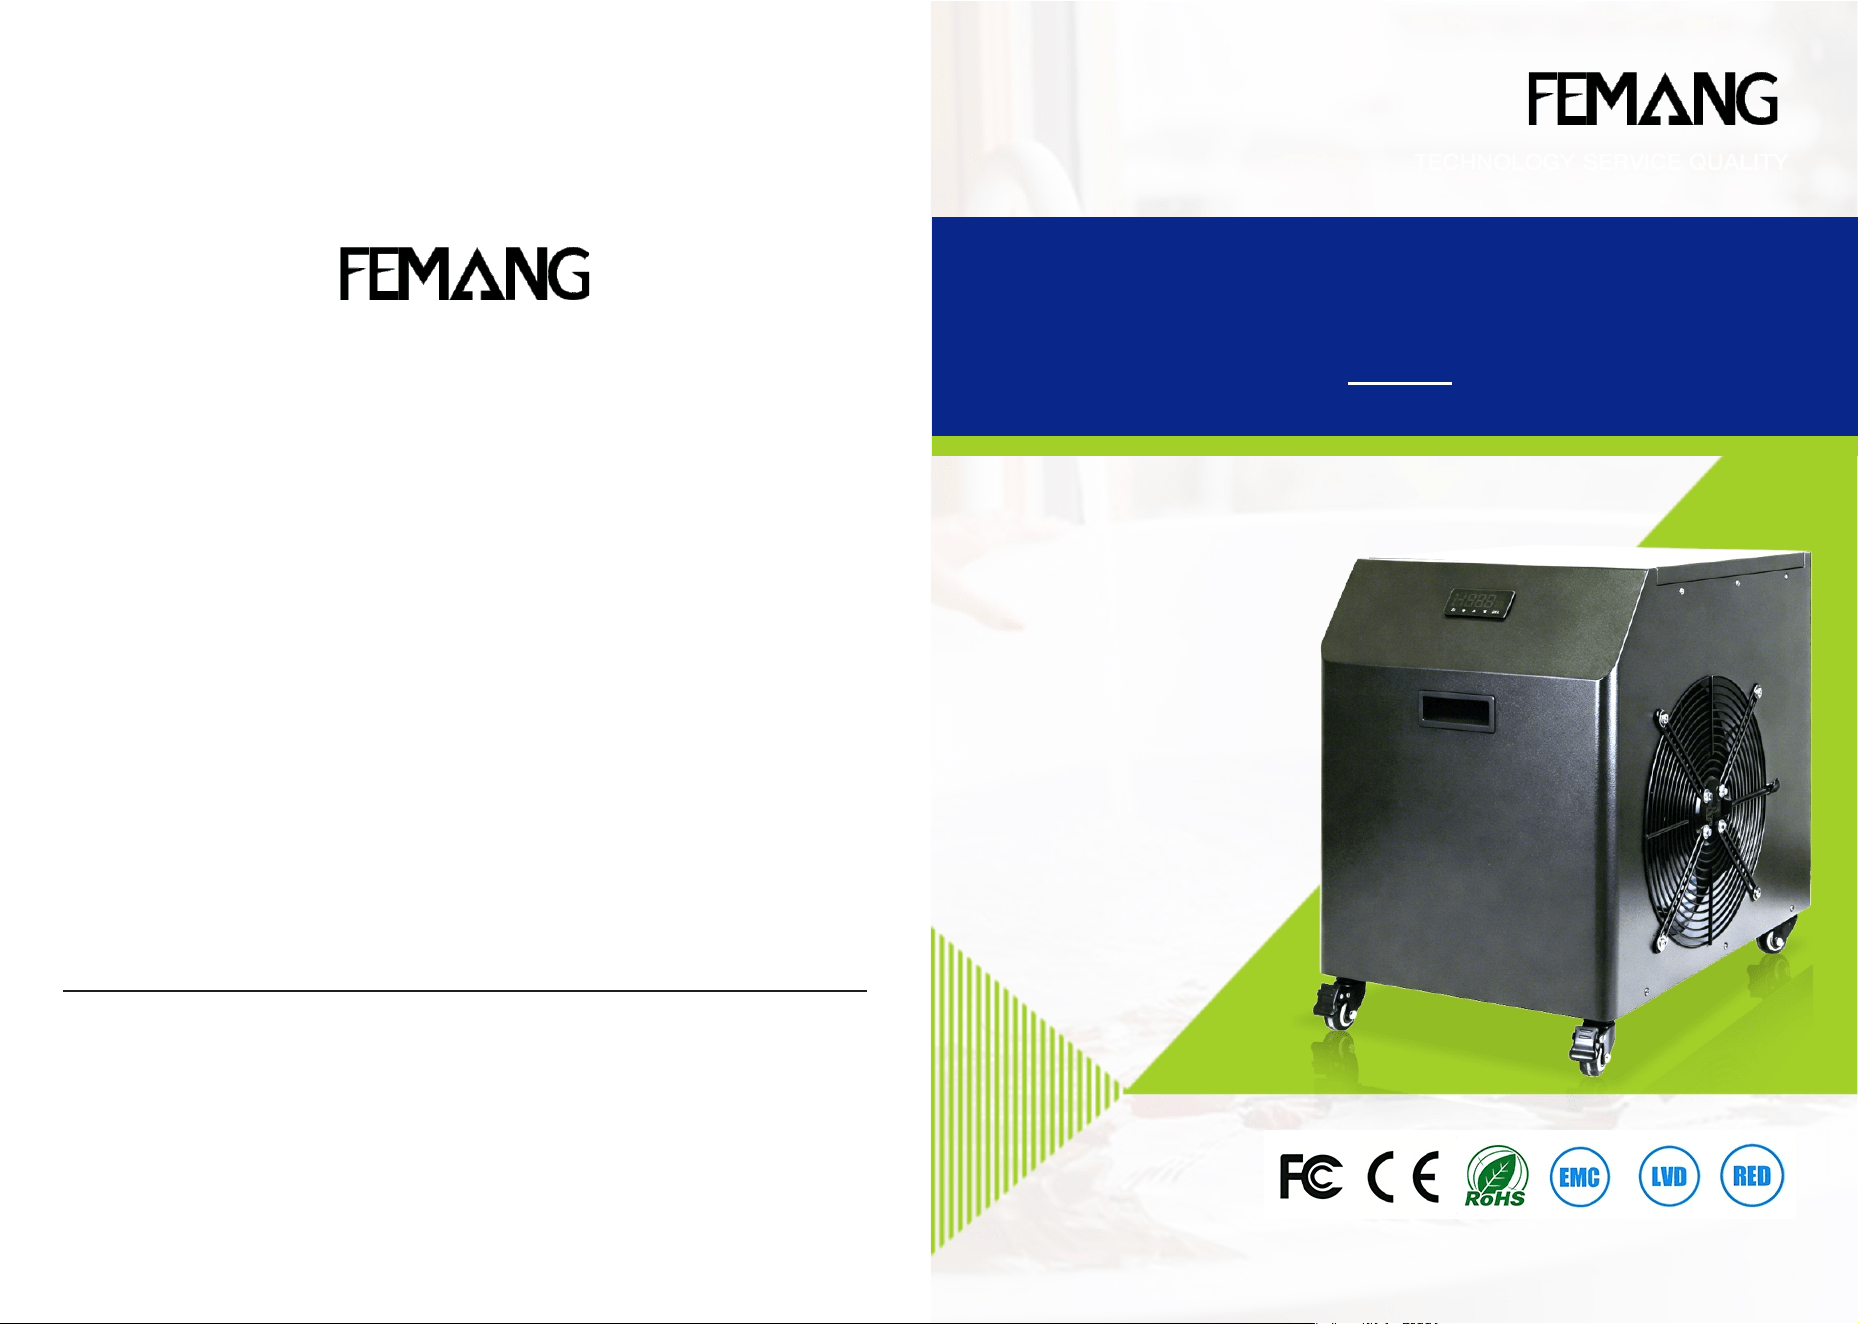
Icebathchiller
UserManual
GuangzhouFemangTechnologyCo.,Ltd.
TechnologyServiceQuality
GuangzhouFemangTechnologyCo.,Ltd.GuangzhouFemangTechnologyCo.,Ltd.
ADD:Room301,No.9,EastSheng3rdCrossRoad,DalongStreet,
PanyuDistrict,GuangzhouCity,GuangdongProvince,P.R.China
E-MAIL:13725465300@139.COM
TEL:400-880-1031
(Dual temperatu r e )
Product Manual
Dear Customer:
Thank you for purchasing products from Guangzhou
F en g m an g T e ch n o l o g y C o . , L t d . P l e a s e r e a d t h e
instruction manual carefully before use and keep it safe.
This instruction manual is not a warranty. Corrections to
printing errors, errata regarding stated information, and
p r o d u c t i m p r o v e m e n t s a r e t h e r e s p o n s i b i l i t y o f
Guangzhou Fengmang Technology Co., Ltd., and will be
explained at any time without prior notice. Revised
content will be included in subsequent editions of the
i n s t r u c t i o n m a n u a l . C o p y r i g h t r e s e r v e d . A l l r i g h t s
reserved. Content subject to change without notice.
Use safely and in accordance with regulations.
To prevent personal injury and product damage, please strictly
adhere to safety regulations.Improper operation due to neglecting
safety regulations will result in personal injury and product damage.
Please refer to the following instructions:
1
Safety Precautions
Product Manual
Please ensure that the power outlet has good contact and that
the ground wire is reliably grounded!
Do not use outside of the technical requirements;
Its use in explosive gases is strictly prohibited.
The machine contains compressed gas, which poses an
explosion hazard. Do not attempt to disassemble it yourself.
Relevant laws and regulations must be complied with;
In case of a refrigerant leak:1. Ensure good ventilation (risk of
suffocation);2. Avoid skin contact (risk of frostbite);
If an abnormality occurs, stop operation immediately,
investigate the cause, and take appropriate action.
It is prohibited to use in high temperature (ambient temperature
above 45℃), humid (with condensation), extremely dusty, large
amounts of water vapor, liquid mist and special gases;
Do not place heavy objects on the product;
Do not splash water or get wet in the rain;
Do not put your fingers or foreign objects inside the machine;
It contains electrically charged, moving, and high-temperature
components; disassembly of the outer casing for operation is
prohibited.
Table of contents
2
Operating Precautions
3
Operation, maintenance and upkeep matters
I.Component Introduction...............................................1
II. Installation Instructions..........................................2-3
III. Operating Status and Parameter Adjustment.........3-5
IV. Control and Wireless Connection.........................6-11
V. Technical Parameters...............................................12
VI. Basic Fault Handling..........................................13-14
Product Manual Product Manual
Please use clean water/purified water/food-grade antifreeze.
Do not add salt, seawater, or chlorine-containing liquids.
Please ensure that the operating voltage of the chiller is stable
and normal!
A mismatch in power frequency can damage the machine! Please
use it safely according to the actual situation.
Please ensure that the air intake and exhaust channels of the
chiller are unobstructed!The air outlet at the rear of the chiller
should be at least 80cm away from any obstructions, and the air
inlet at the front should be at least 20cm away from any
obstructions.
Operating without water is strictly prohibited, as it will damage
the machine.
Because the machine has a built-in frequent start protection,
there will be a delay when the compressor restarts after it has
stopped for a period of time.
The dust filter must be removed and cleaned regularly; severe
blockage can cause chiller malfunctions.Regular cleaning helps
maintain the chiller's heat dissipation capacity and saves
energy.
Please be aware of the impact of condensation!When the water
temperature is lower than the ambient temperature and the
ambient humidity is high, condensation will form on the
circulating water pipes and the surfaces of the devices being
cooled. In such cases, ensure proper insulation of the
connecting pipes.
FCC Warning Statement..........................................15-16
1
Component Introduction
2
Installation Instructions
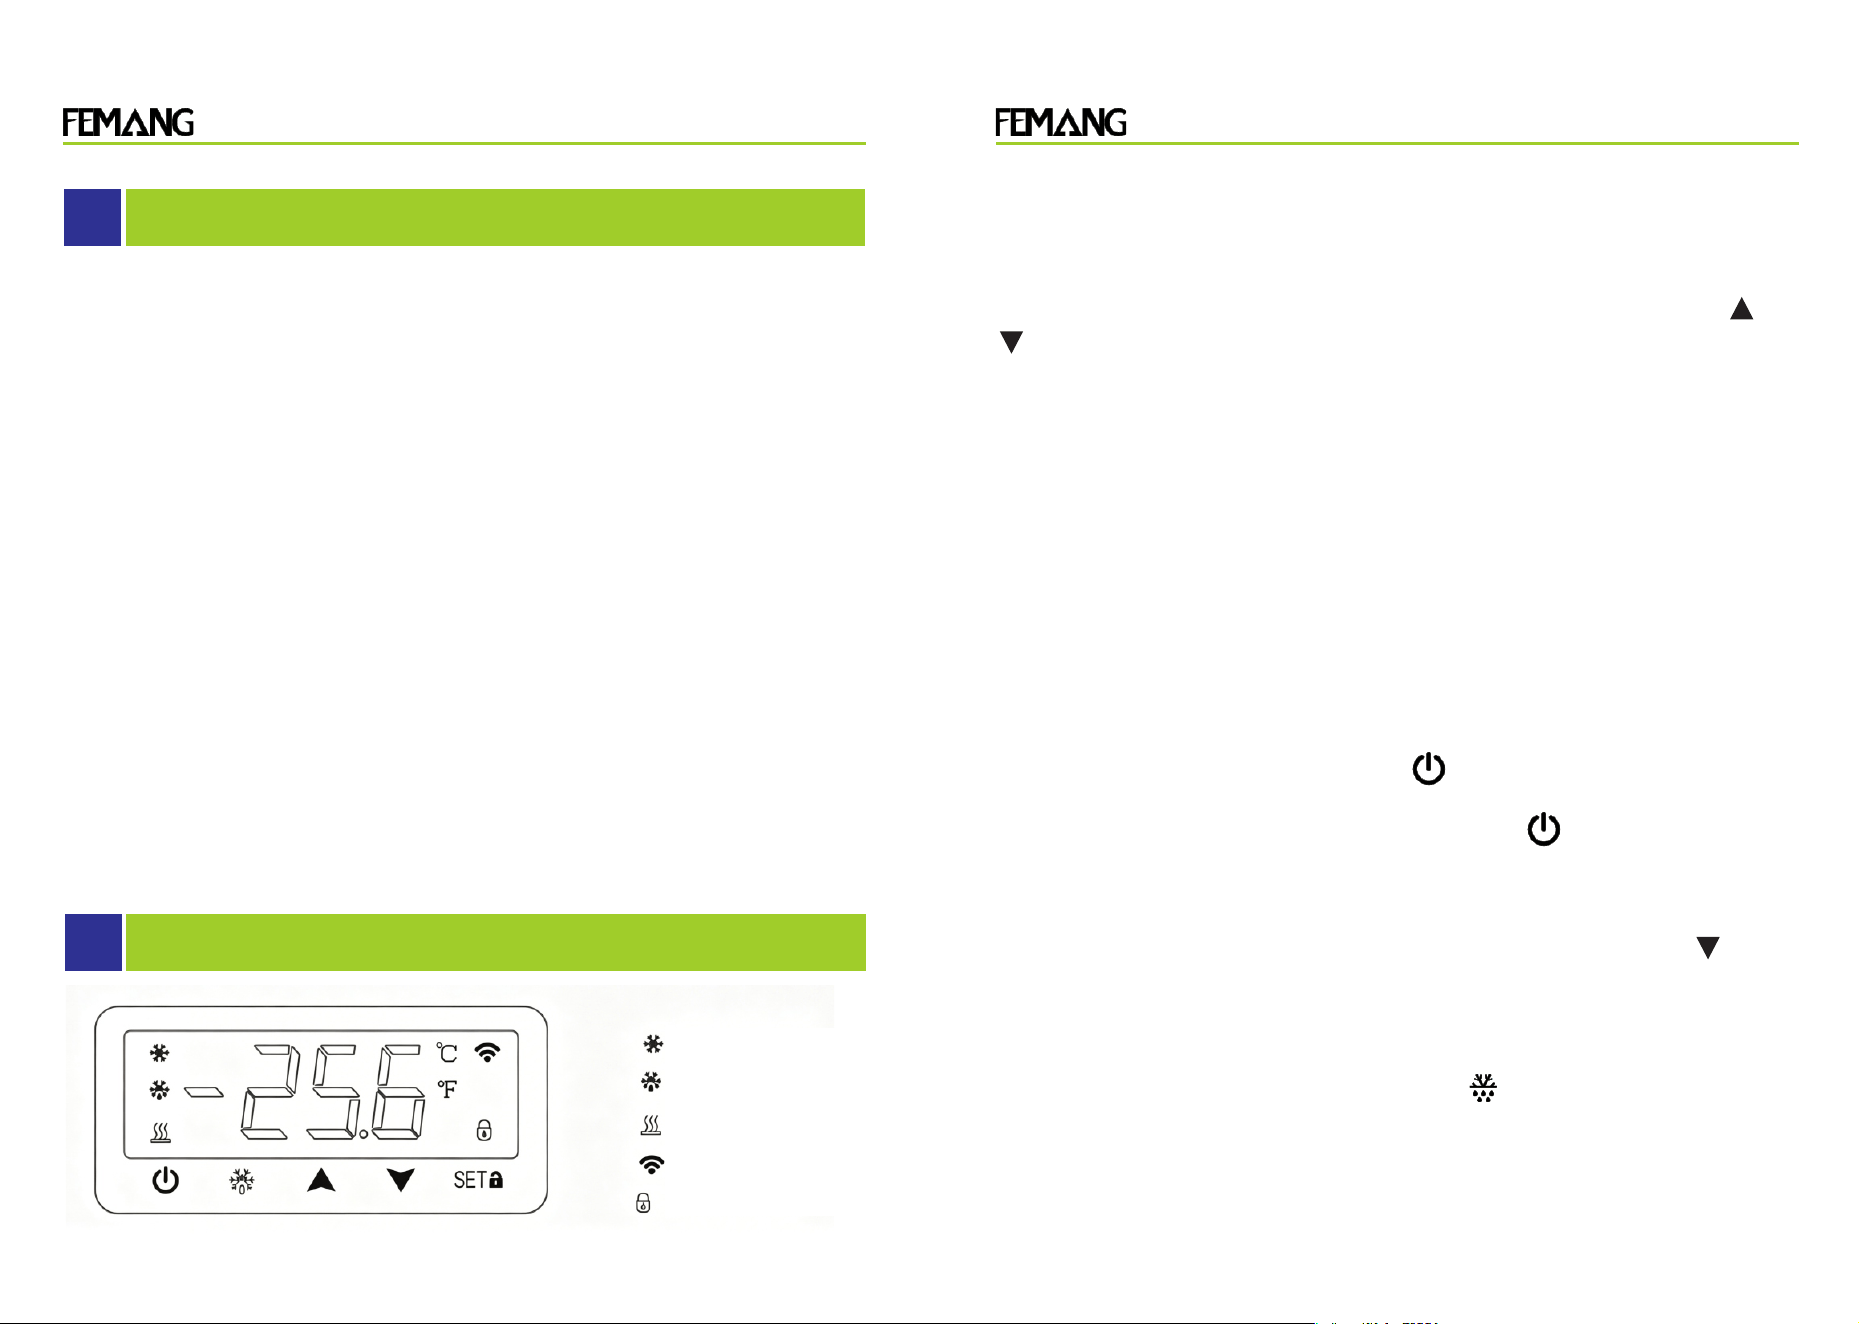
Thermostat
Power button
Inlet
1
2
Outlet
Filter
Product Manual Product Manual
The ice bath chiller is easy to install and use. For first-time use of a
new machine, please follow these steps: 1. Open the packaging and
check if the machine is intact and if all accessories are included. 2.
Install the filter onto the ice bath chiller's water inlet (use Teflon
tape to seal the connection, paying attention to the arrow direction
on the filter body).
Precautions for use:
(1) The water level in the bathtub must be higher than the
equipment's inlet, and the equipment must not be placed higher than
the bathtub.
(2) The water inlet pipe of the ice bath machine must be placed close
to the ground and must not be raised, otherwise it will prevent
normal water intake.
4. Connect the water inlet and outlet pipes according to the
equipment specifications. Connect the power supply and turn on the
power switch.(Never turn on the machine without water.)
2
Installation Instructions
3
Operating status and parameter adjustment
3
4
Product Manual Product Manual
(1) After turning on the power switch, the chiller's circulating pump
will start working. When a new machine is started for the first time,
there will be a lot of air bubbles in the pipeline, which may cause the
machine to occasionally alarm for flow. After running for a few
minutes, it will return to normal.
(2) After the first power-on, you must immediately check the water
pipes for leaks.
(3) After turning on the power, if the water temperature is lower than
the set temperature, the machine's fan and other components will
not work, which is normal. The thermostat will automatically control
the working status of the compressor, fan, and other components
according to the set control parameters.
(4) Because the compressor and other components have a relatively
long start-up process, ranging from tens of seconds to several
minutes depending on different working conditions, to protect the
lifespan of electrical appliances, do not frequently turn the machine
on and off.
5. Adjust the thermostat parameters. The ice bath chiller uses a WIFI
digital display thermostat, which supports operation via the display
screen and mobile APP operation (WIFI required).
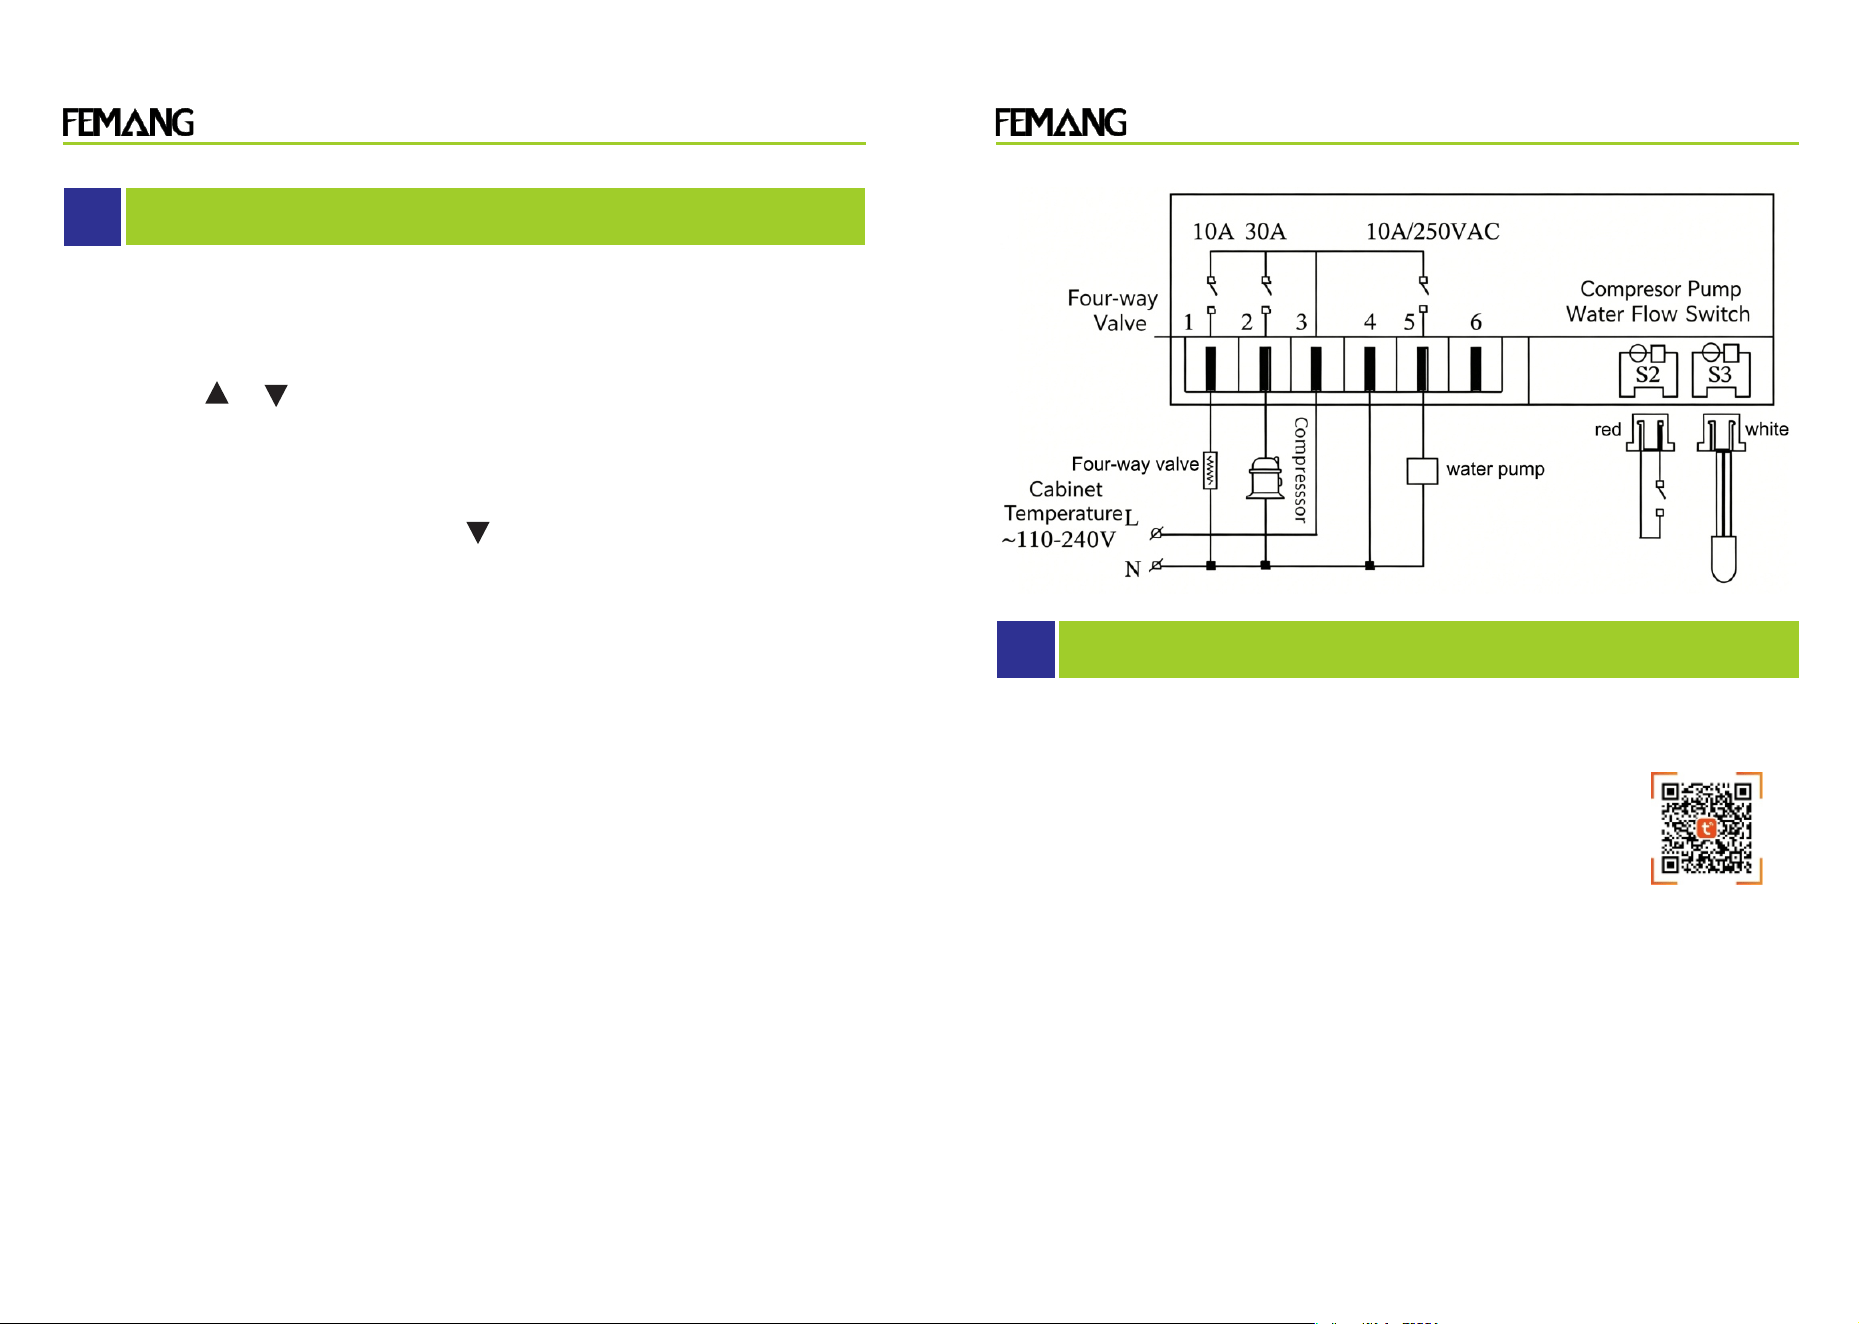
Cooling indicator light
Defrosting indicator light
Heating indicator light
WiFi indicator light
Button lock light
1. Button Lock: The button will lock after 15 seconds of inactivity.
To unlock the button: Press the SET button for 2 seconds.
2. Temperature Control (Stop Temperature) Adjustment: Press the
SET button to flash the control temperature display, then press or
The key changes the value and remembers it.
Press the SET button to exit the adjustment mode and display the
measured temperature; if no button is pressed, the measured
temperature will resume display after six seconds. (Temperature
adjustment range: parameter E1~E2)
3. Cooling indicator light: The cooling indicator light is on during the
cooling process; the cooling indicator light is off when the
temperature is constant; the cooling indicator light flashes during
the delay process.
4. Heating indicator light: When the compressor is off, the heating
light goes out; when the compressor is on and the four-way valve is
on, the heating light illuminates and flashes during the delay.
5. Power On/Off: Press and hold the button for three seconds to
turn off the cooling mode, turn off the temperature display, display
"---", and stop all control outputs. Press the button again to
display the measured temperature, and after a delay, start the
cooling mode again.
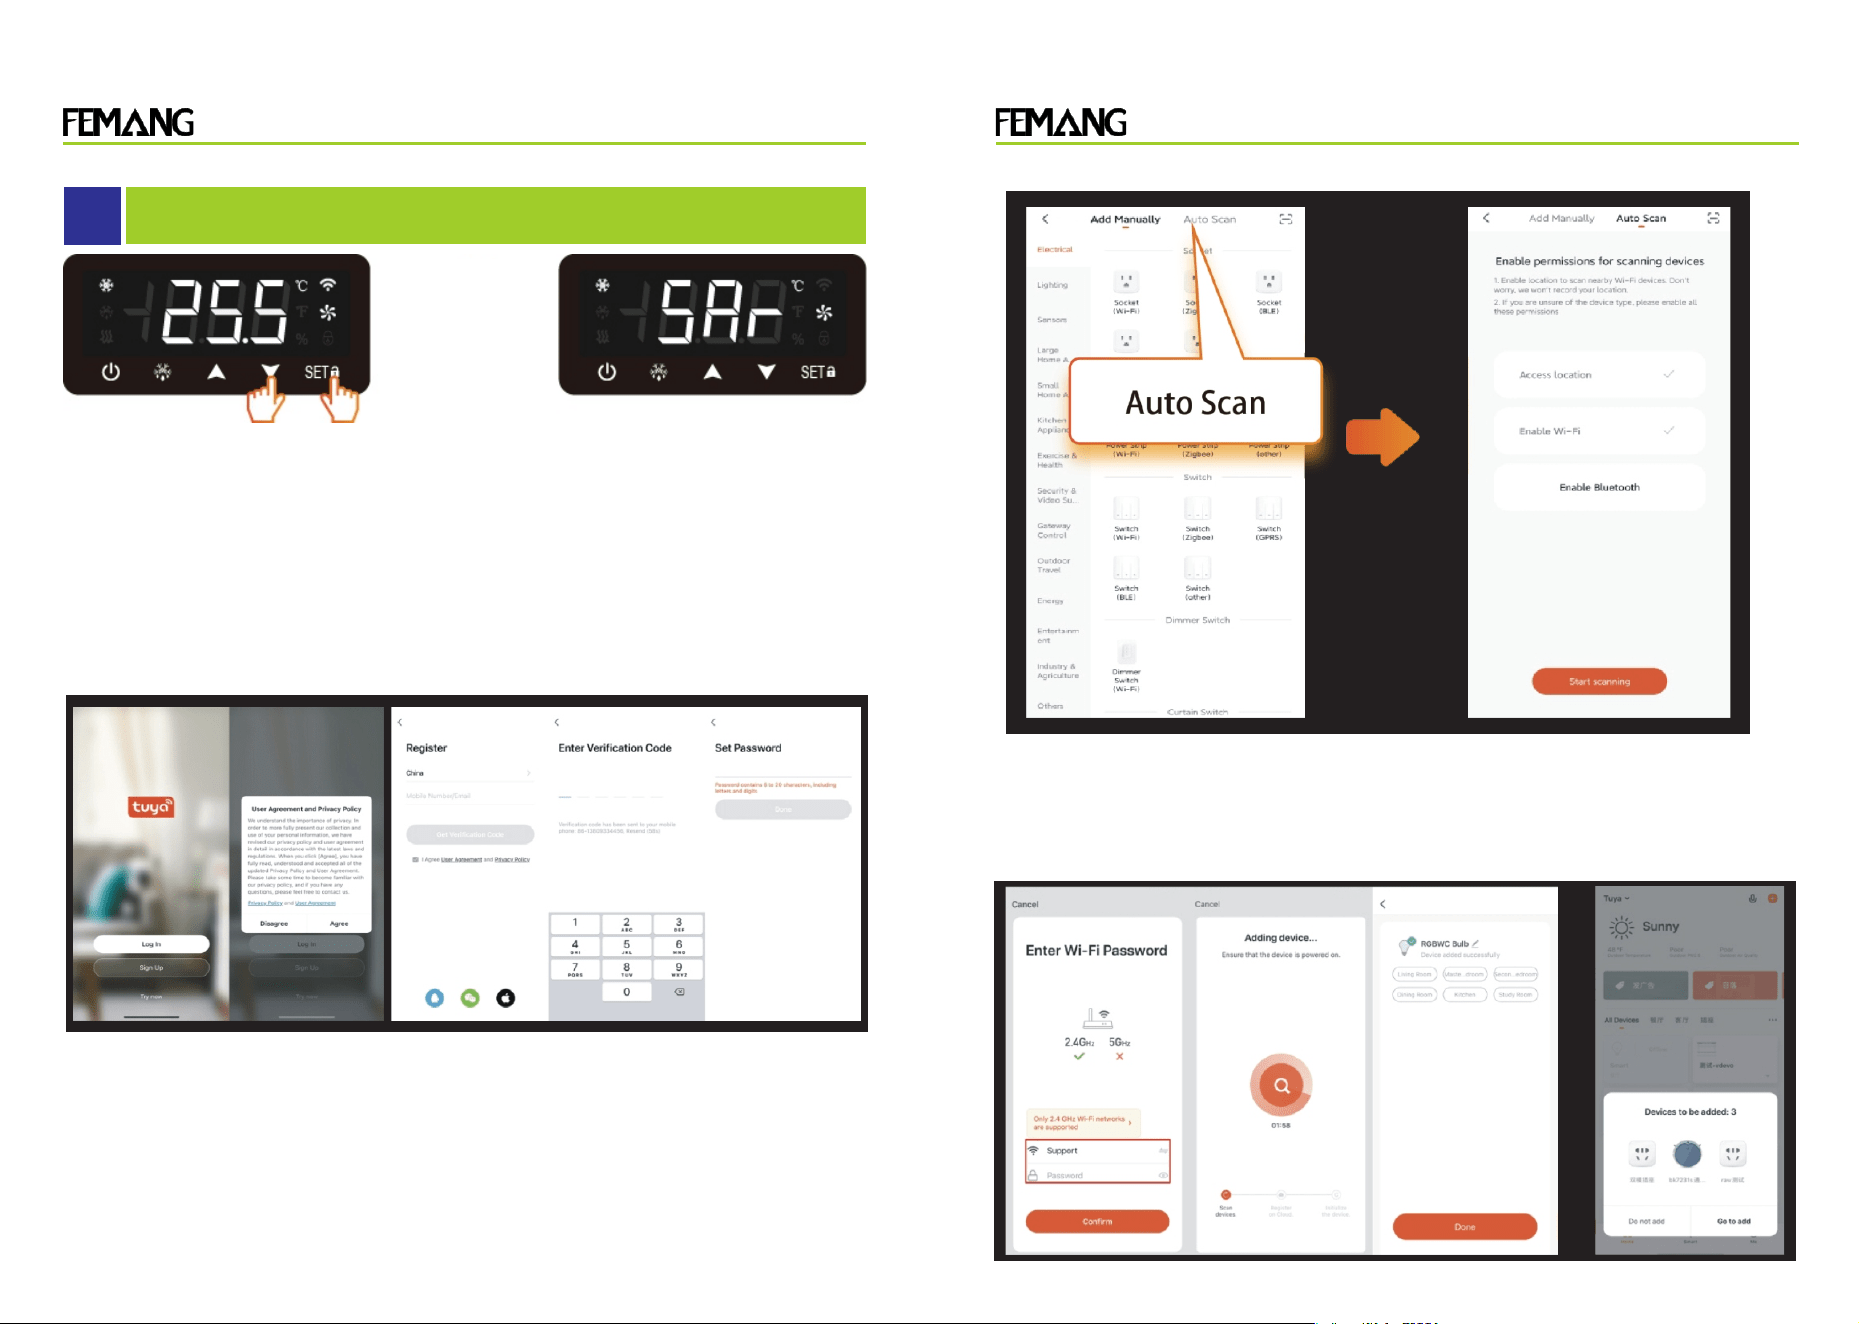
6. Network Configuration Mode: Press and hold the SET and Ctrl
keys simultaneously for three seconds. The display "SAr" will
appear, allowing you to enter the automatic configuration mode for
the wireless router's name and password.
7. Manual defrosting: Press and hold the button for six seconds to
manually enter or exit defrosting mode (effective in heating
mode).guration mode for the wireless router's name and password.
8. Parameter Setting:
a. Press and hold the SET button for six seconds to enter parameter
3
Operating status and parameter adjustment
6
Product Manual Product Manual
4
Control and wireless connectivity
Please scan the QR code to download the Tuya Smart APP before
network configuration.Alternatively, you can search for "Tuya
Smart" in major mobile app stores to download it.
Network Configuration Flowchart:
Step 1: Enter Network Configuration Mode
Note: The key combination for entering network configuration mode
may vary depending on the model of the Wi-Fi
thermostat.Commonly, it's SET (Settings button) + Up or Down
button for 6 seconds. Displaying SAR indicates successful entry into
network configuration mode. Please refer to the instruction manual
for your specific model for detailed instructions.(Taking SF-126W
as an example: With the device unlocked, press and hold the SET
button + Down button until SAR is displayed, indicating entry into
network configuration mode.)
5
2. Temperature Control: (Press the button once upon initial power-
on to cancel the delay and quickly start the compressor; one-time
activation only.)
2.1 After a delay following parameter E42 (press E41 when powering
on after a power outage or powering on after power off), when the
cabinet temperature ≥ (control temperature + cooling temperature
hysteresis E3), the fan is activated, and the compressor is activated
after a 10-second delay; when the cabinet temperature ≤ control
temperature, the compressor is stopped, and the fan is stopped after
a 5-second delay. To prevent frequent starts, the relay output must
stop for more than the delay time (parameter E42) before restarting.
3. Water Shortage Alarm: After power-on, the water shortage alarm
is activated after a delay of L1 and when L0=1. The alarm is
triggered when the water flow switch is disconnected, all outputs are
shut down, the display shows "NFL" and the cabinet temperature,
and a buzzer sounds. Press any key to silence the buzzer. The alarm
is deactivated after power-off.
4. Abnormal Operating Mode: If the cabinet temperature probe is
short-circuited or the high temperature exceeds the limit (greater
than 120℃/248℉), the display will flash "HH"; if the cabinet
temperature probe is open-circuited or the low temperature exceeds
the limit (less than -45℃/-49℉), the display will flash "LL". The
compressor will operate for 30 minutes and then stop for 15 minutes.
5. Wiring Diagram
adjustment mode, while E1 will flash.
b. Press the SET button again to change the parameter selection,
displaying E2, E3, E4, E5~L1, E1 in sequence, cycling through the
options.
c. Press the or key to display the parameter value, modify it, or
save the data.
d. If no key is pressed within six seconds, the system returns to
normal operation.
7
8
Product Manual Product Manual
4
Control and wireless connectivity
The device displays "SAr" indicating successful entry into network
distribution mode.
Press and
hold for 3
seconds
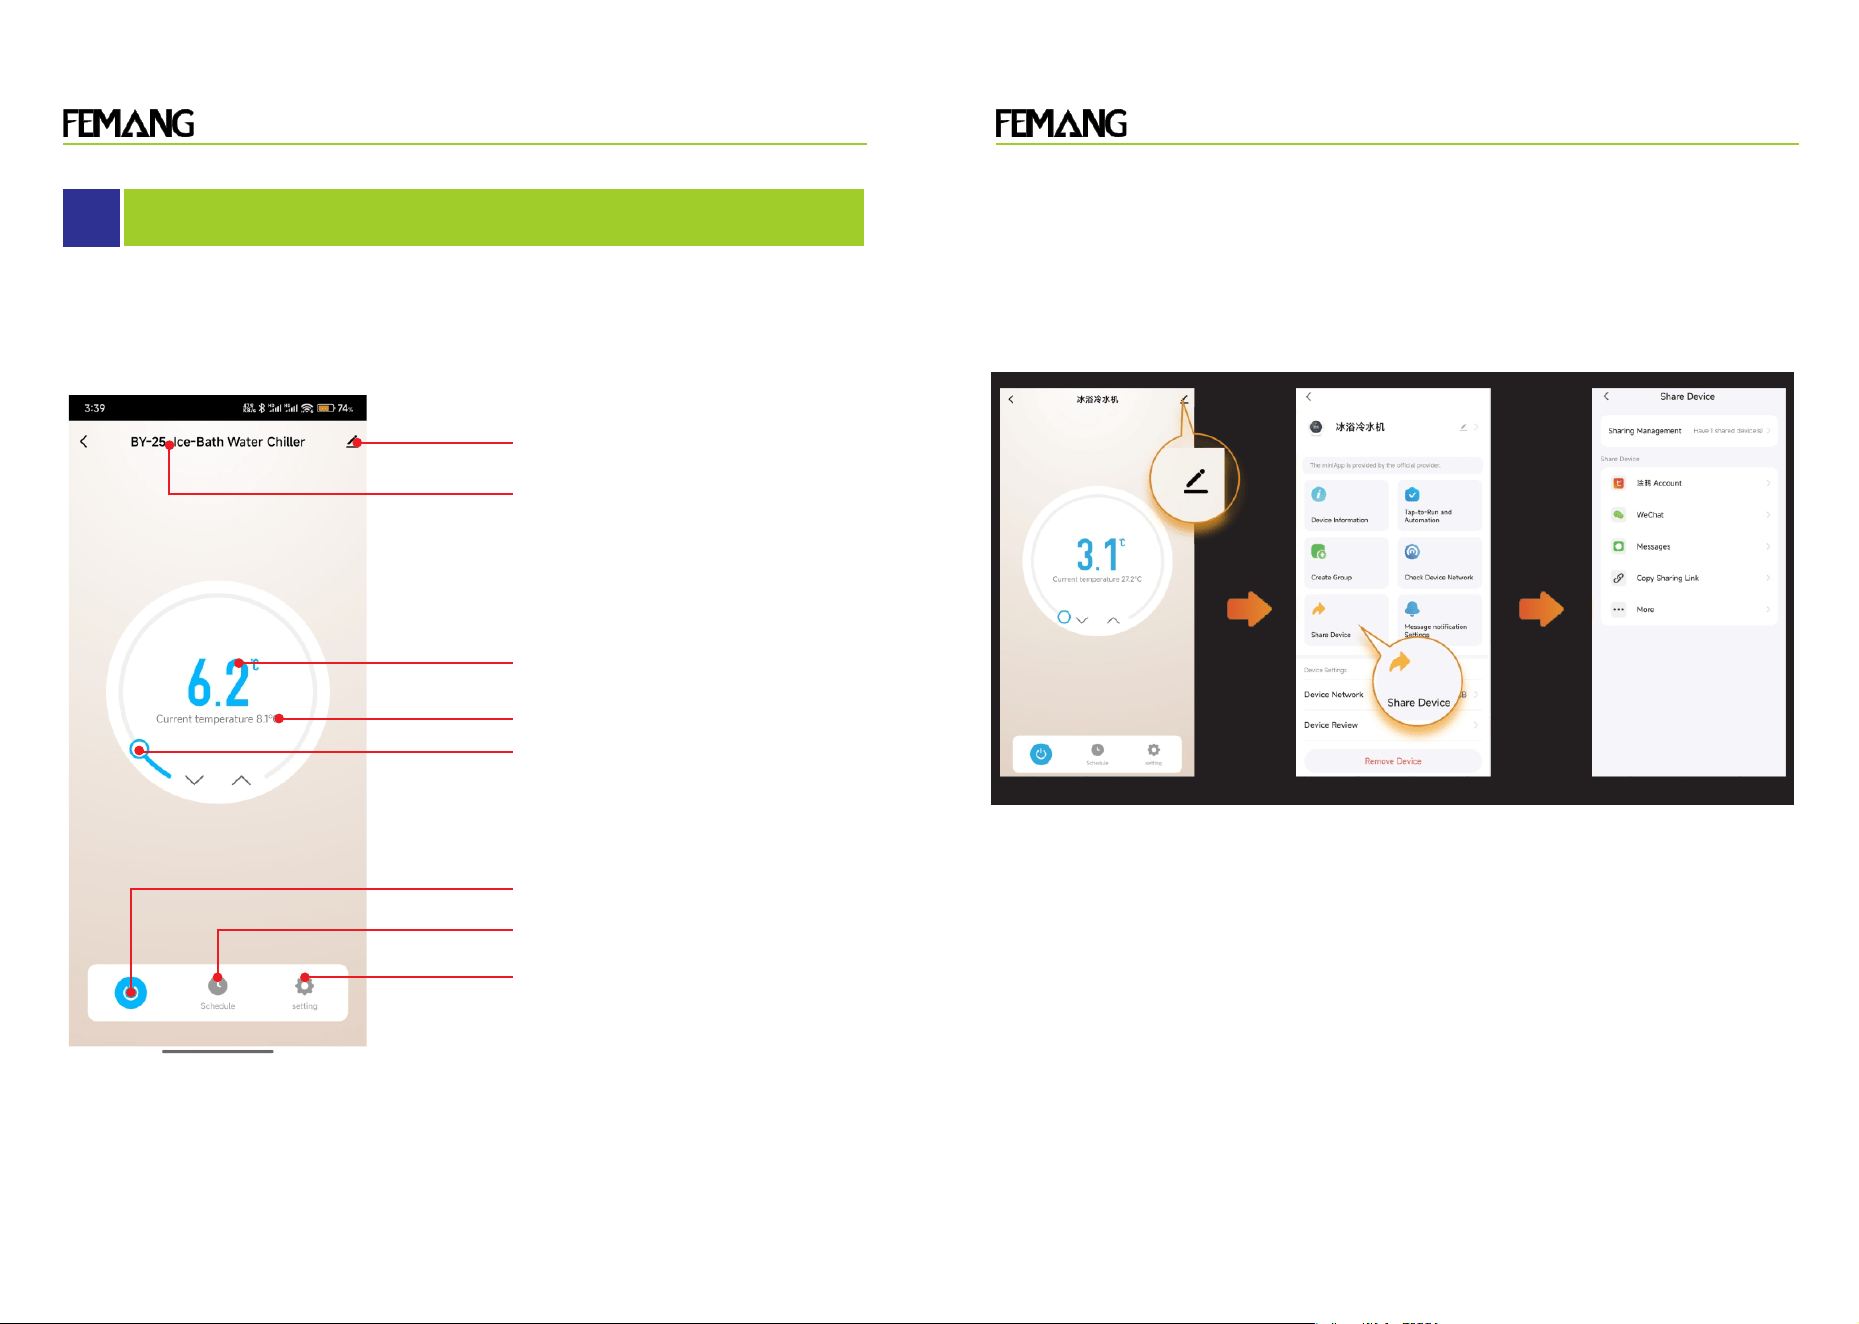
Step 2: Open the "Tuya Smart" APP. First-time users need to
register or authorize login using their WeChat or QQ accounts.
Step 3: Click "Add Device," then click "Auto Discover" in the upper
right corner, turn on Bluetooth authorization, and search for devices.
Step 4: Discover the device, click Add, enter the Wi-Fi username and
password, and click Connect.
*Only supports 2.4GHz Wi-Fi networks, and the phone and device
must be in the same Wi-Fi environment.
Product Manual Product Manual
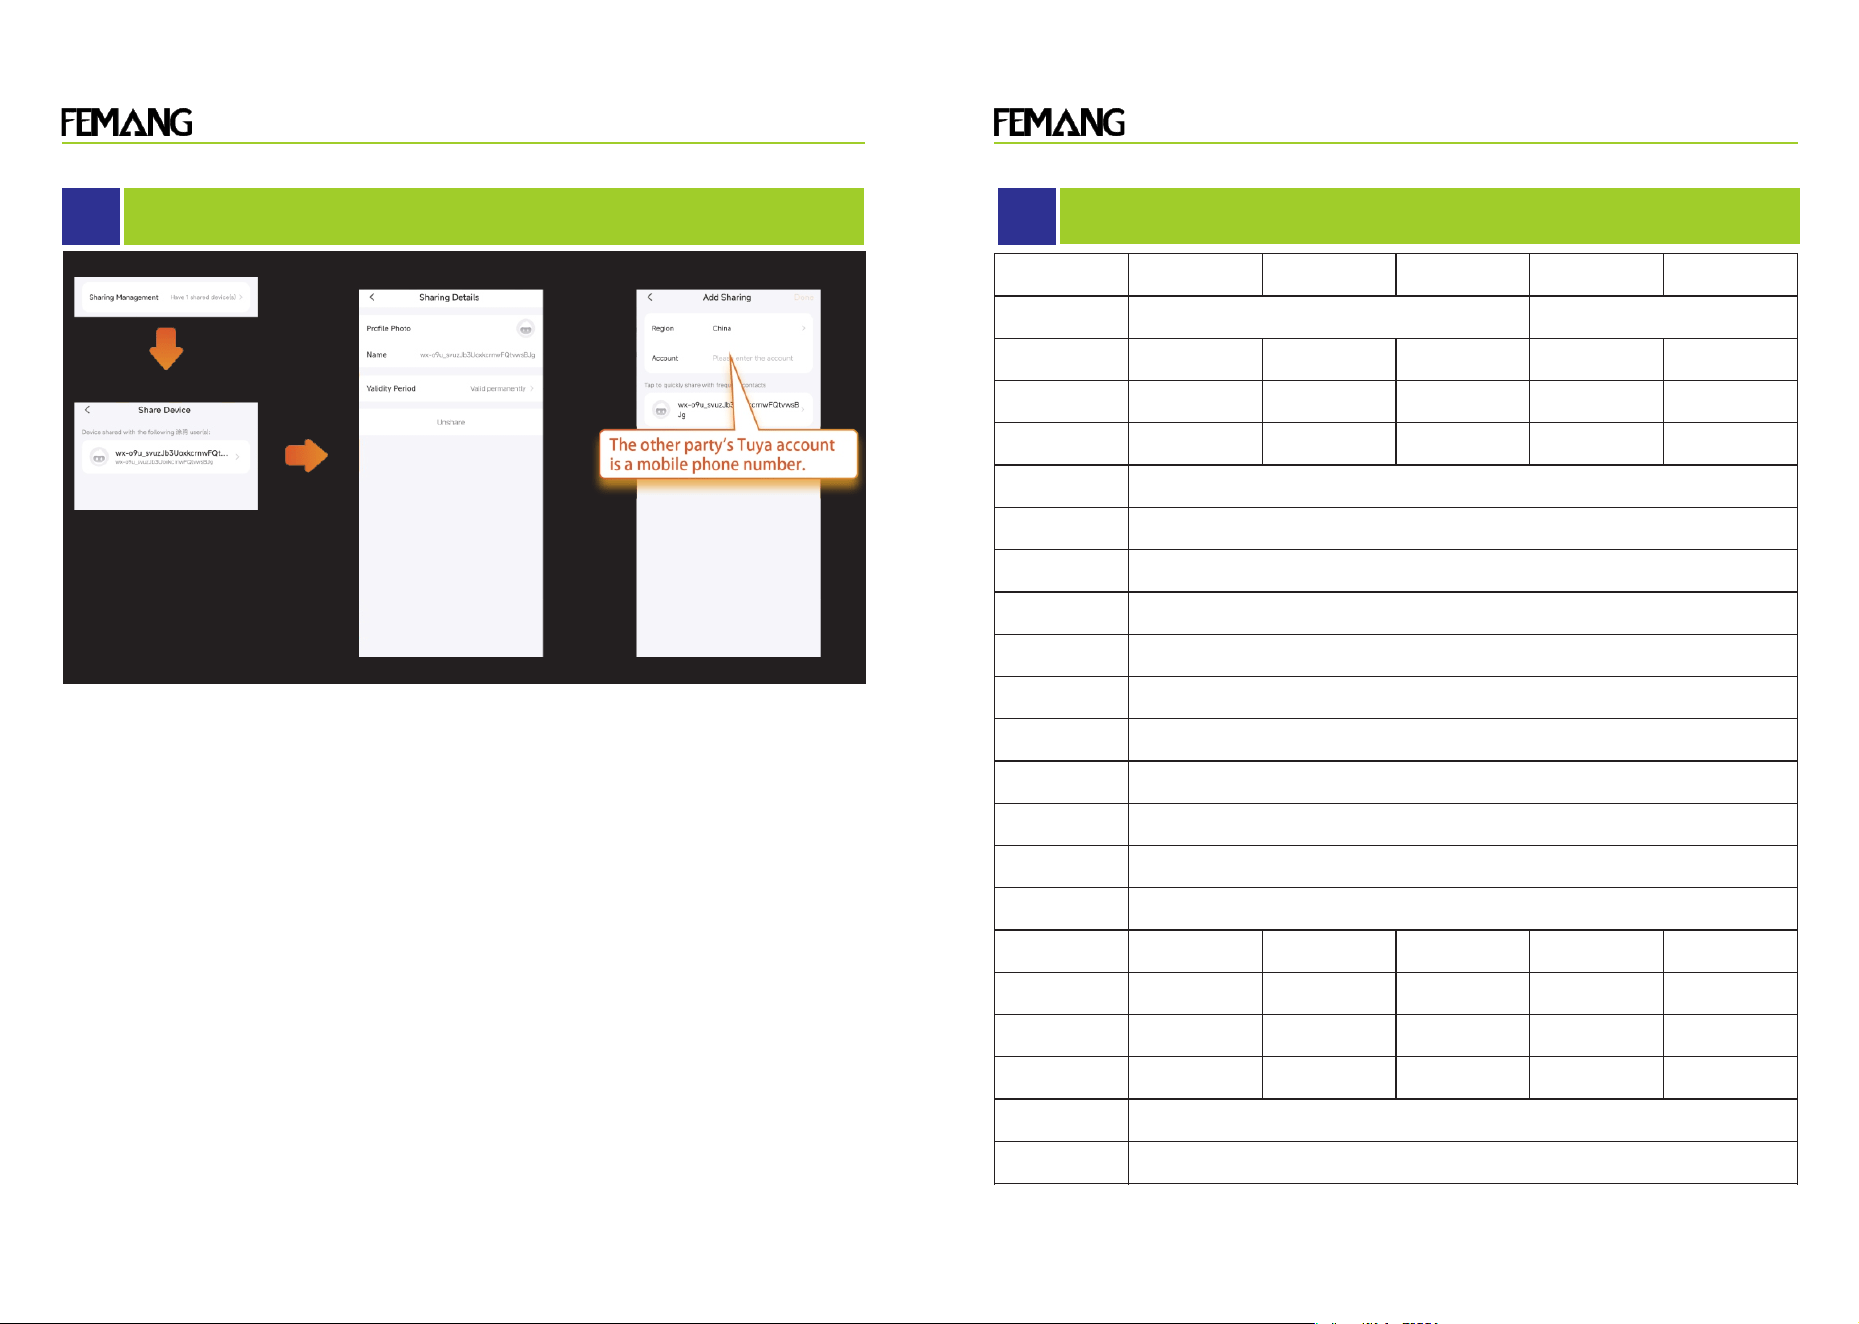
Interface introduction:
Click to share / rename device
Device Name
Set Temperature
Current Temperature
Temperature Slider
Power On/Off
Timer Page
Settings page
4
Control and wireless connectivity
Device Sharing: After the main account connects to a Wi-Fi device
via network configuration, it can share the device with other users
(sub-accounts). The main account can then remove the shared
device from the network or set the sharing time.
Click the "Device
Information" icon
in the upper right
corner of the main
device
information
interface;
After entering the
device
information page,
click "Share
Device" to be
redirected to the
sharing page;
You can choose
the sharing
method as needed
and follow the
prompts.
9
10
Product Manual Product Manual
Click "Share
Management" on
the "Shared
Devices" page to
see which devices
have been shared
with. Click on a
device to enter
the "Share
Details" page.
The "Shared
Details" page
allows you to
manage the
shared devices.
Note: When
sharing with other
graffiti users, the
recipient must
have a graffiti
account
registered using a
mobile phone
number.
4
Control and wireless connectivity
model
BY-15-H
powered by
120V,60Hz
Input power
720W 1050W 1550W 1750W 3600W
Cooling capacity
1500W 2500W 3500W 5000W
8000W
Note: Operating current, nominal cooling capacity, and dimensions may vary depending on
different configurations and operating conditions. The above information is for reference only;
please refer to the nameplate on the actual delivered machine for accurate specifications.
5
Technical parameters
Usage
Environment
0~45℃
refrigerant
R32
temperature
Adjustable temperature from 3 to 42℃
Circulating pump
electric pump
Filter
Primary filter + Secondary filter
Remote control
Local control panel or smart app
Moving wheel
Yes
handle
quick connector
Waterproof
rating
IPX4
noise
≤60 ≤62 ≤62 ≤65 ≤70
net weight 36kg 38kg 47kg 58kg 90kg
Product
Dimensions
60x39x54cm
(L x W x H)
US / UK / EU / AU / ITA / IN / SA / TH
Additional
services
Accept OEM and ODM
Yes
Yes
Water pipe
interface type
1/2 inch
60x39x54cm
(L x W x H)
65x44x60cm
(L x W x H)
70x49x65cm
(L x W x H)
85x59x70cm
(L x W x H)
Water volume
and cooling time
100L≥ 1.4H 200L≥ 1.7H 200L≥ 1.2H 400L≥1.7H 570L≥ 1.5H
Optional
power plug
11
12
BY-25-H BY-35-H BY-50-H BY-80-H
120V,60Hz
Heating capacity
2000W 3300W 4600W 6500W 9900W

Product Manual Product Manual
6
Basic troubleshooting
Fault
phenomenon
Cause of the fault
processing method
The device
won't turn on
(no display on
the screen).
Power cord not plugged in
properly, power cord not turned
on, voltage mismatch
Check the power interface and
ensure the power cord plug is
properly connected, then restart.
No water
circulation or
slow water
flow
Pipe dirt, clogged filters, bent
water pipes, insufficient circulating
water volume, and insufficient flow
protection cause the water pump
to stop working.
Inspect the water circulation
pipeline and clean the pipeline
filter screen regularly; straighten
the water pipes to ensure
unobstructed flow and sufficient
circulating water volume.
No cooling or slow
cooling
Ambient temperature too high,
set temperature too high,
compressor not working,
excessive water flow, insufficient
heat dissipation
Regularly remove and clean the
dust filter, then store the container
in a cool, shaded environment,
away from direct sunlight; lower
the set temperature; control the
water volume; and ensure adequate
space for heat dissipation.
The app cannot be
downloaded or
cannot be used
after download.
Network error, phone
incompatible with the app, app
failed to obtain permissions.
Check and restart the network,
and open the app to obtain
permissions on your phone.
The app cannot
find the device or
cannot connect.
Network error, device not
configured for network settings.
Restart the software, devices,
and refrigerator, and reconfigure
the network. (Refer to Section IV.
Control and Wireless Connection
in this document)
6
Basic troubleshooting
13
Fault
phenomenon
Cause of the fault processing method
The display shows "HH" in a
flashing manner.
If the water temperature probe is
short-circuited or exceeds the
high temperature limit, check the
water temperature, reset the
control parameters, or restore
factory settings.
The "LL" indicator is flashing. If the water temperature probe is
open-circuited or the low
temperature exceeds the limit,
check the water temperature probe
connection and control
parameters.
The screen flashes to display
"NFL" and water temperature.
Water shortage alarm: Check water
pipe circulation status and confirm
whether the inlet and outlet are
blocked.
*Incorrect thermostat settings Reset control parameters or
restore factory settings
*Water temperature sensor
malfunction
Check and replace the water
temperature sensor
Display
alarm fault
codes
14

Product Manual Product Manual
FCC Warning Statement
Changes or modifications not expressly approved by the party
responsible for compliance could void the user’s authority to
operate the equipment. This equipment has been tested and found
to comply with the limits for a Class B digital device, pursuant to
Part 15 of the FCC Rules. These limits are designed to provide
reasonable protection against harmful interference in a residential
installation. This equipment generates uses and can radiate radio
frequency energy and, if not installed and used in accordance with
th e ins t ru c tio ns, m a y ca use h arm f ul i n te r fer e nc e t o ra dio
communications. However, there is no guarantee that interference
will not occur in a particular installation. If this equipment does
cause harmful interference to radio or television reception, which
can be determined by turning the equipment off and on, the user is
encouraged to try to correct the interference by one or more of the
following measures:
‐‐ Reorient or relocate the receiving antenna.
‐‐ Increase the separation between the equipment and receiver.
‐‐ Connect the equipment into an outlet on a circuit different from
that to which the receiver is connected.
‐‐ Consult the dealer or an experienced radio/TV technician for help.
FCC Radiation Exposure Statement
The antennas used for this transmitter must be installed to provide a
separation distance of at least 20 cm from all persons and must not
be co‐located for operating in conjunction with any other antenna or
transmitter.
This device complies with Part 15 of the FCC Rules. Operation is
subject to the following two conditions:
(1)This device may not cause harmful interference.
(2)This device must accept any interference received, including
interference that may cause undesired operation.
15 16