PowerSurvivor
TM
40E
12-Volt
Watermaker
OWNER`S MANUAL

2
Thank you…
…for purchasing a Katadyn PowerSurvivor 40E watermaker. It was built to rigorous
specifications and designed to produce potable freshwater from clean seawater using
minimal power. It is simple to install and operate and, with reasonable care and
maintenance, can be expected to provide years of useful service.
Please…
…before installing or operating your watermaker, take the short time needed to read
this User’s Manual in its entirety. That small investment of time will help assure many years
of trouble-free operation from your system. We’ve worked hard to provide you with a
reliable product that is affordable, compact, simple to operate and easy to maintain—
the rest is up to you.
Contact us:
For information about this and other products from Katadyn, please visit our website at
www.katadyngroup.com. Make sure to register your product on the same site. For
customer service, the website provides a contact form.
Katadyn Desalination LLC
2220 S. McDowell Blvd Ext
Petaluma, CA 94954 U.S.A.
Phone: +1 415 526-2780
Fax: +1 415 526-2787
Website: www.katadyngroup.com
Customer Service / Technical Support:
+1 415 526-2780 (International Collect Calls Accepted)
Contact: https://www.katadyngroup.com/int/en/about-us/Contact
Support & Knowledge: https://support.katadyngroup.com/
We suggest you keep a record of your Katadyn dealer’s name, contact information, and the serial
number of your watermaker in the space below:
Dealer Name: _________________________________________________________________
Address: _________________________________________________________________
Phone/Fax/Website:_________________________________________________________________
Serial Number: _________________________________________________________________

3
Table of Contents
Table of Contents .......................................................................................................... 3
A-System Description ................................................................................................... 4
B-Product Specifications .............................................................................................. 5
C-Energy Recovery ...................................................................................................... 6
D-Installation ................................................................................................................. 7
D1-Installation DOs ............................................................................................................... 7
D2-Installation DON’Ts .......................................................................................................... 7
D3-Plan Ahead for Manual Operation ................................................................................ 8
D4-Installation Procedures ................................................................................................... 8
E-Using your Watermaker .......................................................................................... 11
E1-Powered Operation ....................................................................................................... 11
E2-Manual Operation ......................................................................................................... 13
E3-Special Conditions ........................................................................................................ 14
F-Maintenance and Service ...................................................................................... 15
F1-Pump Maintenance ...................................................................................................... 15
F2-Prefilter Maintenance .................................................................................................... 16
F3-Membrane Storage, Preserving & Cleaning ............................................................... 17
F4-Seal Replacement ......................................................................................................... 20
F5-Drive Maintenance........................................................................................................ 26
F6-Troubleshooting Flowchart ............................................................................................ 28
G-Appendix ................................................................................................................ 29
G1-Glossary ........................................................................................................................ 29
G2-Diagrams ...................................................................................................................... 30
G3-Kits & Accessories ........................................................................................................ 34
G4-Service Log ................................................................................................................... 35
G5-WARRANTY .................................................................................................................... 36

4
A-System Description
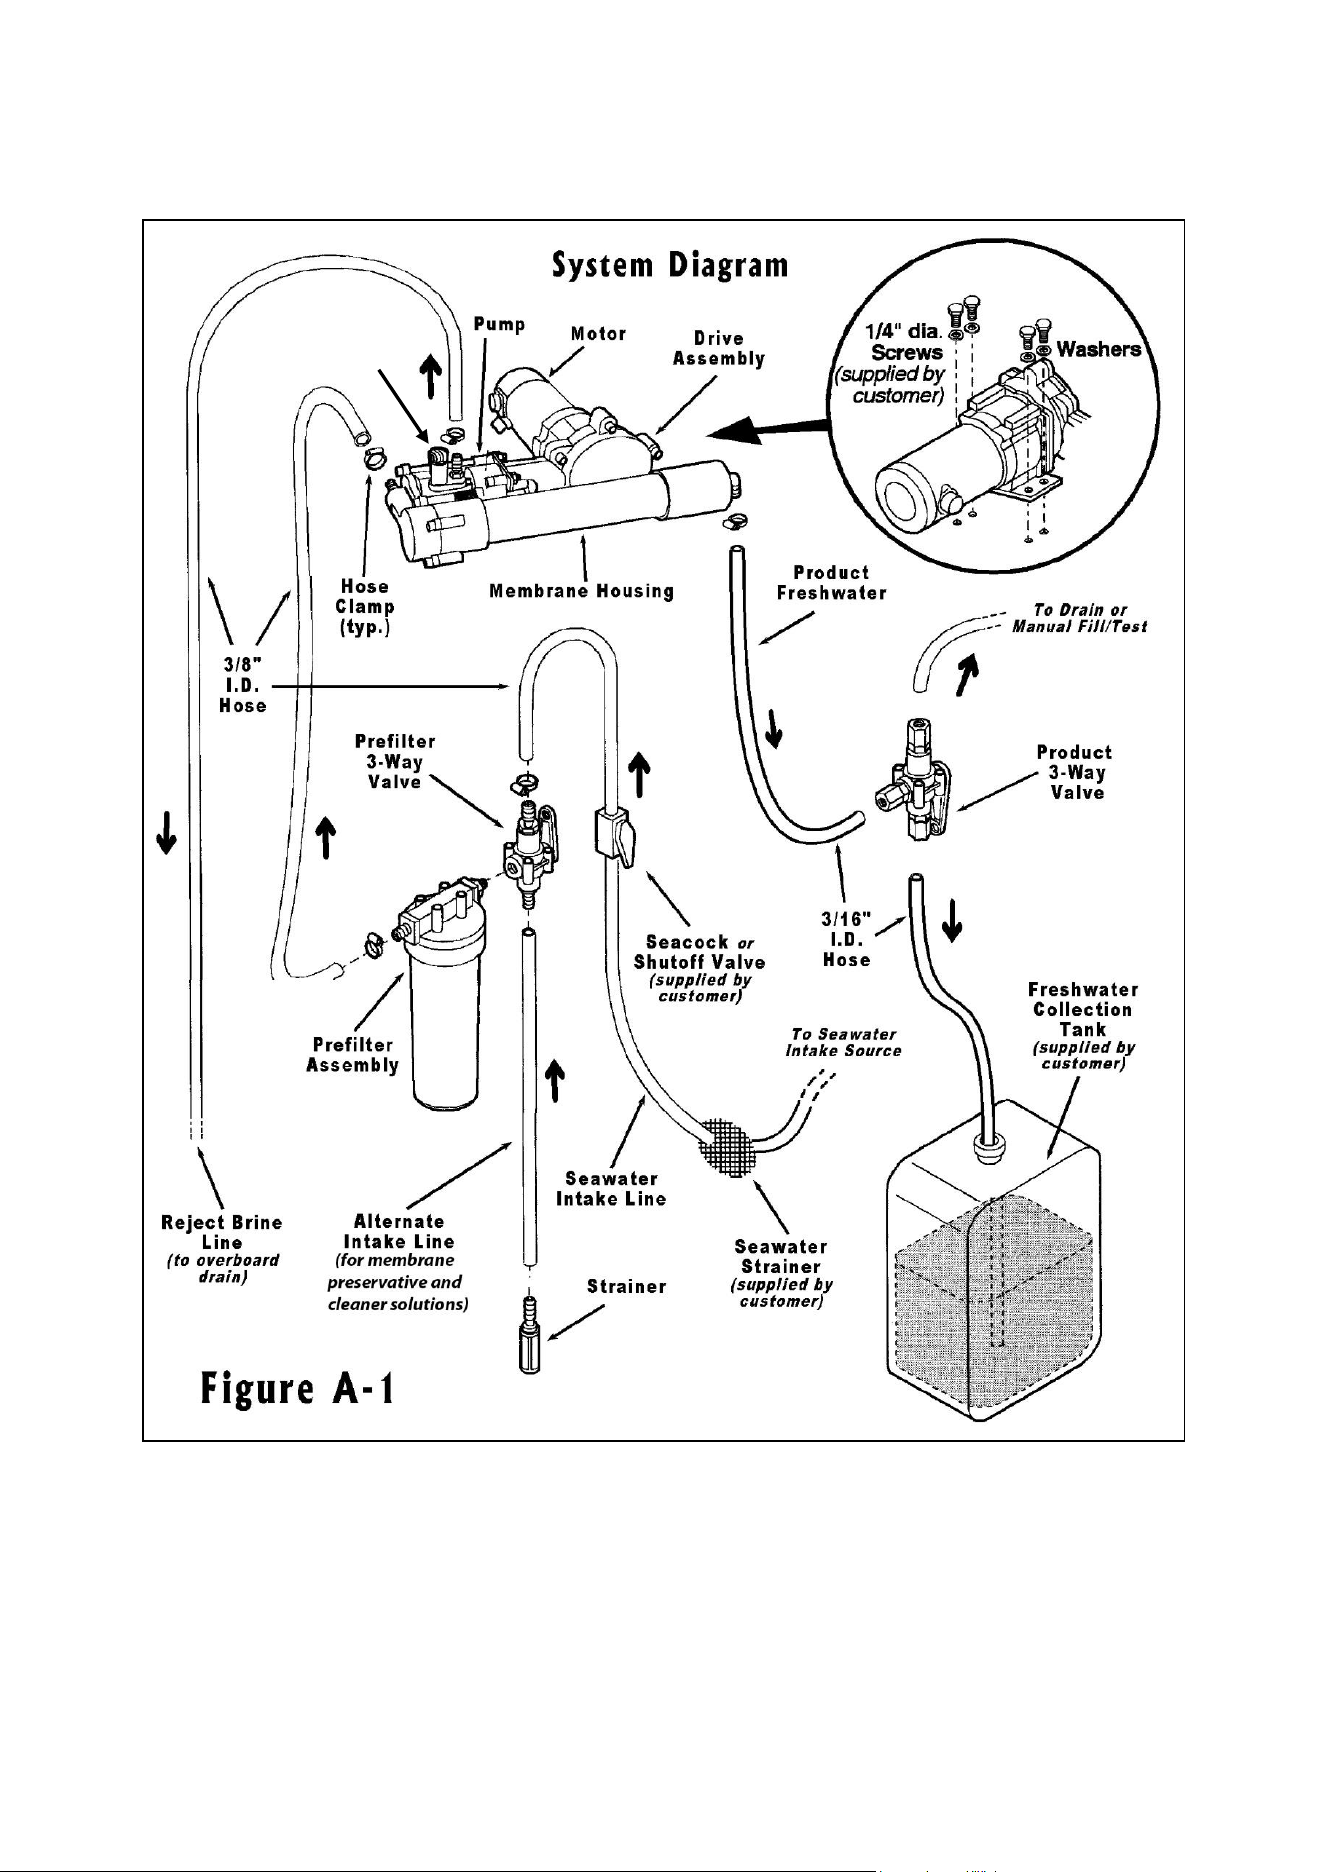
The Katadyn PowerSurvivor 40E watermaker system has several components. Refer to the
System Diagram (Figure A-1) in the Appendix for an overview of the components (G2) and
accessories (G3) of the system and their interconnections.
Motor/Drive/Pump/Membrane Assembly: At the heart of the watermaker system
is a high-pressure, positive-displacement pump. The pump is powered by a reliable 12 VDC
electric motor. A grease lubricated gearbox (drive assembly) converts the rotary motion of
the electric motor to a powerful, reciprocating, linear motion for driving the pump piston.
The pump pressurizes input seawater to approximately 800 psi (55 bar). The high-pressure
forces product freshwater through a semipermeable membrane located in the membrane
housing. All these main components have been integrated into a single, compact piece of
equipment — with low power consumption, quiet operation, and a small footprint.
Prefilter Assembly: The prefilter assembly consists of one prefilter housing and a
standard 30-micron prefilter element constructed of polyester fibers. Two standard elements
are included with each system. In some exceptional circumstances, an optional second
prefilter assembly with a 5-micron prefilter element may be needed (see Kits & Accessories).
The prefilter assembly is separate from the pump, which allows it to be installed in a
convenient and accessible location.
Valves: Two high-quality plastic 3-way valves are supplied. The prefilter 3-way valve selects
between two input sources for the prefilter assembly (and pump):
• Clean seawater during normal
operation
• An alternate intake line for inputting
membrane preservative or a cleaning
solution with fresh water
The product 3-way valve allows easy selection between the two required destinations for
the product freshwater:
• A freshwater collection tank for normal operation
• A convenient drain location for testing and discarding product freshwater,
membrane preservative and cleaners
Note: If you collect and discard the product freshwater at the same location, manually
directing the output from the product freshwater hose may be the most practical
approach. In this case, the product 3-way valve doesn`t need to be installed.
Hoses and Hardware: Each PowerSurvivor 40E watermaker is shipped with hardware
sufficient to perform a normal installation. The 3/8" I.D. reinforced plastic hose is used for
seawater intake and reject brine. The smaller, 3/16" I.D. clear plastic hose is for routing
product freshwater. There are also hose clamps and mounting bracket hardware for the
prefilter assembly.
Customer-supplied Equipment: Every installation represents a unique challenge.
You or your installer will have to provide:
• a reliable source of clean seawater for input to the prefilter 3-way valve
• plumbing to an appropriate drain location for the reject brine water
(retentate)
• a plumbing solution for your freshwater (permeate) collection tank
• thread sealant Loctite 5331 (recommended)
• blocking valve for the seawater inlet installation (recommended)
Note: Clean seawater means to use
only the cleanest seawater around
you. No oily, no muddy and no
chlorinated water should be used.
5
B-Product Specifications
Power Requirements: 4 ampere @ 12 VDC *
Construction: 316 Stainless Steel Pump Housing
Rate of Water Production: 1.5 U.S. gal/h (5.7 liters/h)
±15% @ 13.5 VDC
Feed Water Flow Rate: 15 U.S. gal/h (57 liters/h)
Pump Weight: 25 lbs. (11.3 kg)
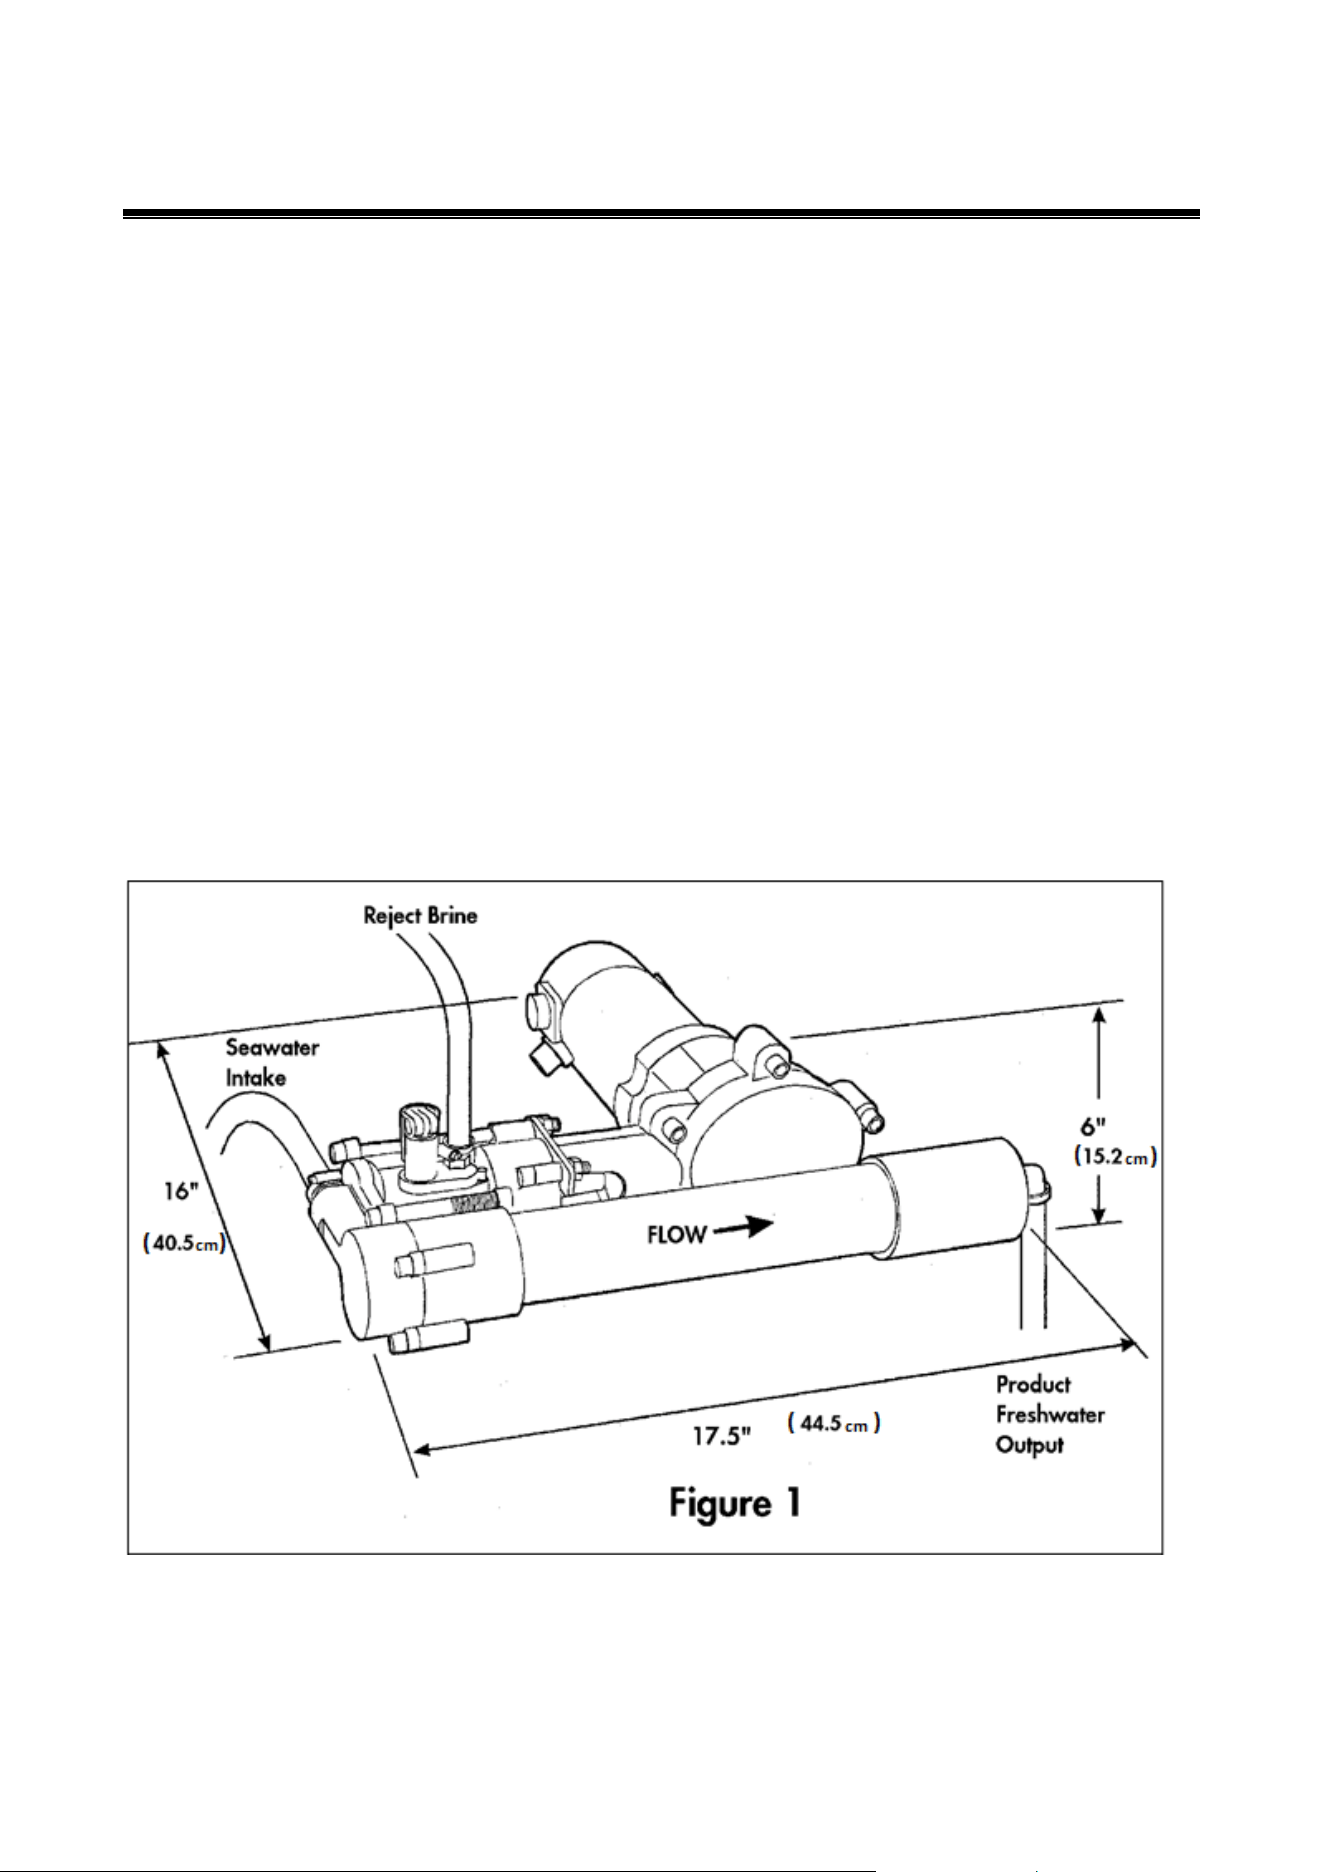
Pump Height: 6" (15.2 cm)
Pump Length: 17.5" (44.5 cm)
Pump Width: 16" (40.5 cm)
Prefilter Housing Dimensions: 12" x 6" (30 cm x 15 cm)
* The electric current requirement is an average figure. Instantaneous current will vary during
a complete cycle of the pump and is dependent on voltage. Also, upon initial installation,
you may experience modestly higher current draw. Within a matter of hours, the average
current draw should settle at the above specification. With an interconnected DC/DC
Converter also other power sources can be used.
Our Promise: Every Katadyn PowerSurvivor 40E watermaker includes a two-year factory
warranty and a long history of outstanding customer support. Our reputation for providing
a quality product along with service when and where you need it is unequaled in the
industry. Of course, you may never need us but, if you do, we’ll be there.
6
C-Energy Recovery
The technology behind Katadyn reverse osmosis watermakers
Reverse osmosis desalination was first developed in the mid 1950’s. It was a major break-
through in desalting technology, but the original process required a lot of power. By
recovering 90% of the energy lost in conventional reverse osmosis systems, we’ve made
small desalinators practical, so you can have freshwater when and where you need it.
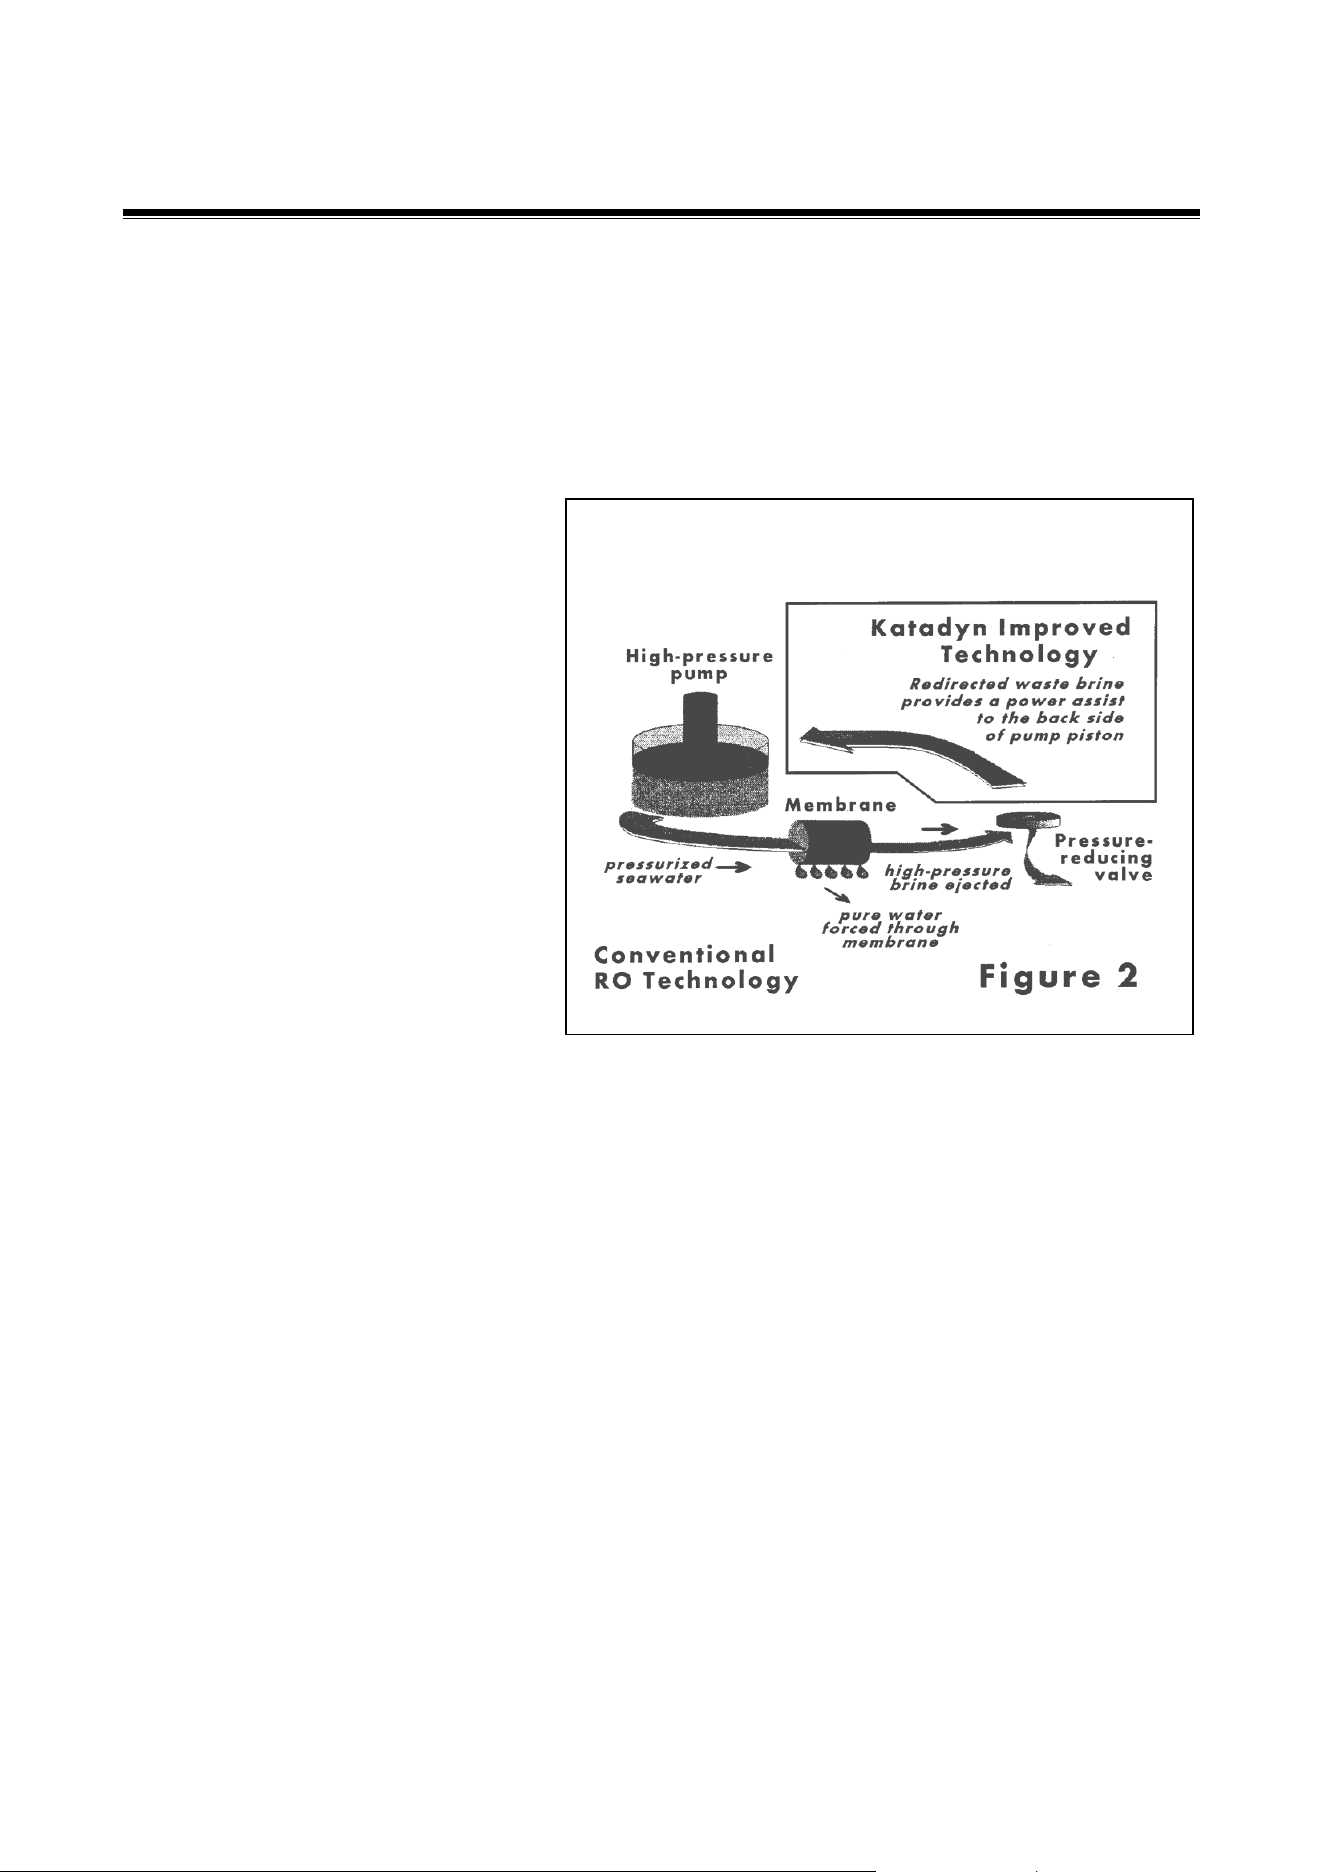
Conventional Reverse Osmosis Desalination
Figure 2 shows the basic principle of
reverse osmosis desalination. When
saltwater is forced through a
semipermeable membrane at high
enough pressure (typically 800 psi)
pure water will pass through the
membrane, but salts will not. The
membrane acts as a barrier to
contaminants such as salts, viruses,
and bacteria, separating them
from the pure water.
When seawater is forced against a
membrane, only 10% passes
through as pure water. In a
conventional system, the remaining
waste brine stream, still under high
pressure, passes through a pressure-
reducing valve and is discharged
overboard. For every gallon of pure
water made, up to ten gallons of seawater must be pressurized!
Energy Recovery Makes It Possible The upper right portion of Figure 2 illustrates
how Katadyn systems are configured to recover and effectively re-use the energy wasted
in conventional reverse osmosis. The waste brine stream contains up to 90% of the energy
expended. By recovering this energy, we can dramatically reduce the power needed to
desalt seawater.
To do this, we developed and patented a high pressure energy recovery pump. It recycles
the high-pressure brine by redirecting it to the backside of the pump’s piston. By balancing
the opposing force on the piston’s front side, the brine provides a power assist to the
pumping operation. Seawater can then be pressurized with much less effort.
Katadyn Watermakers Katadyn watermakers are simple, affordable, energy efficient
and easy to use and maintain. The PowerSurvivor 40E represents the latest advancements
in watermaker technology, featuring an improved grease lubricated drive assembly, an all-
316 stainless steel pump body, and simplified construction for easier and less frequent
maintenance.
Reverse Osmosis Technology
7
D-Installation
Do it right the first time and reap the rewards
The PowerSurvivor 40E watermaker utilizes a low-volume, high-pressure, positive
displacement pump. Unlike the centrifugal pumps found in some systems, a positive
displacement pump is self-priming. This pump’s powerful performance enables the delivery
of seawater even if the desalinator is mounted several feet above waterline. We still
however recommend the use of an additional pump (available in the “silt reduction kit”)
for assembly and use of the desalinator above waterline or when a longer hose is required.
The most important part of a good installation is proper planning. Although the design and
operating requirements of the PowerSurvivor 40E allow much latitude for equipment
location, there are several cautions and suggestions you should consider before
proceeding with an installation.
D1-Installation DOs
When choosing a location for the watermaker drive/pump/membrane assembly:
Avoid areas with excessive heat. Ambient temperatures above 105° F (40°
C) exceed the ratings for the electric motor, and excessive heat can
damage or destroy the membrane.(Note: Most engine rooms get hotter
than 105° F (40° C)!)
Choose a dry area. The motor/drive assembly is not waterproof and can
corrode.
Choose an area free of fuel vapors. The electric motor is not vapor-proof
and should not be operated if explosive or flammable materials are present!
Find a location which allows comfortable access for routine inspection and servicing.
In addition, you should:
Install the pre filter assembly in an easily accessible location. It needs regular
(sometimes daily) inspection and maintenance. For ease of routine
maintenance, the choice for this location is probably the single most
important decision you will make — plan it carefully!
Provide a shutoff valve or seacock in the seawater intake line.
Install a coarse strainer in the seawater intake line.
We recommend using properly sized ring terminals and a terminal strip near
the pump to connect electric power. This allows for easy testing, removal
and servicing when required.
D2-Installation DON’Ts
Don’t use a thru-hull installed high on your vessel’s hull for your source of
seawater intake. This is especially important for sailboats. Even a normal
amount of heel when under sail can cause the thru-hull to be out of the water,
allowing air into the intake system. A rolling anchorage can do the same.
Don’t locate the pump assembly above gear or materials that could be
damaged if it leaked.
Don’t locate the pump assembly near to sleeping quarters, bunks, or other
areas that are normally “quiet” areas for you or crew members.
8
D3-Plan Ahead for Manual Operation
The PowerSurvivor 40E watermaker was never intended to be part of a vessel’s “Abandon
Ship” equipment. Its capability for manual operation (Section E2) is useful when normal
ship’s power is unavailable. If you perform a typical installation, it is unlikely that you would
have time to remove the watermaker when abandoning ship. Katadyn produces other
desalinators that are specifically designed to be part of your survival equipment. Please visit
our website for information on the Survivor 35 and Survivor 06 watermakers, both of which
are intended for inclusion in survival kits.
Before finalizing your installation plans, consider how you would manually operate your
watermaker, should the need arise. You will require a source of seawater input and a place
to drain the reject brine, as well as a product freshwater collection container. Typically, the
watermaker will have to be moved to a location convenient for manual pumping. There
are two common approaches to implementing such an arrangement:
• During your installation, leave adequate service loops in the three hoses to
allow the watermaker to be moved to a nearby location convenient for
manual operation. This arrangement eliminates the need to disconnect any
of the hoses.
• Prepare a separate set of hoses to be used during manual operation
(recommended). This approach allows the watermaker to be moved to any
location for manual operation.
More than likely, the plan you choose will be dictated by the location of the space
available. In any case, consider how you would manually operate your watermaker before
finalizing your installation plans. (More details, see Section E2-Manual Operation.)
D4-Installation Procedures
Although every installation has custom as-
pects, the following general instructions should
be useful to the typical installer. Refer to Figure
A-1 (in the Appendix) for information on parts
identification and system connections.
1. Install Pump: After reading the
comments on the preceding pages, decide on
a location for the main pump/drive assembly.
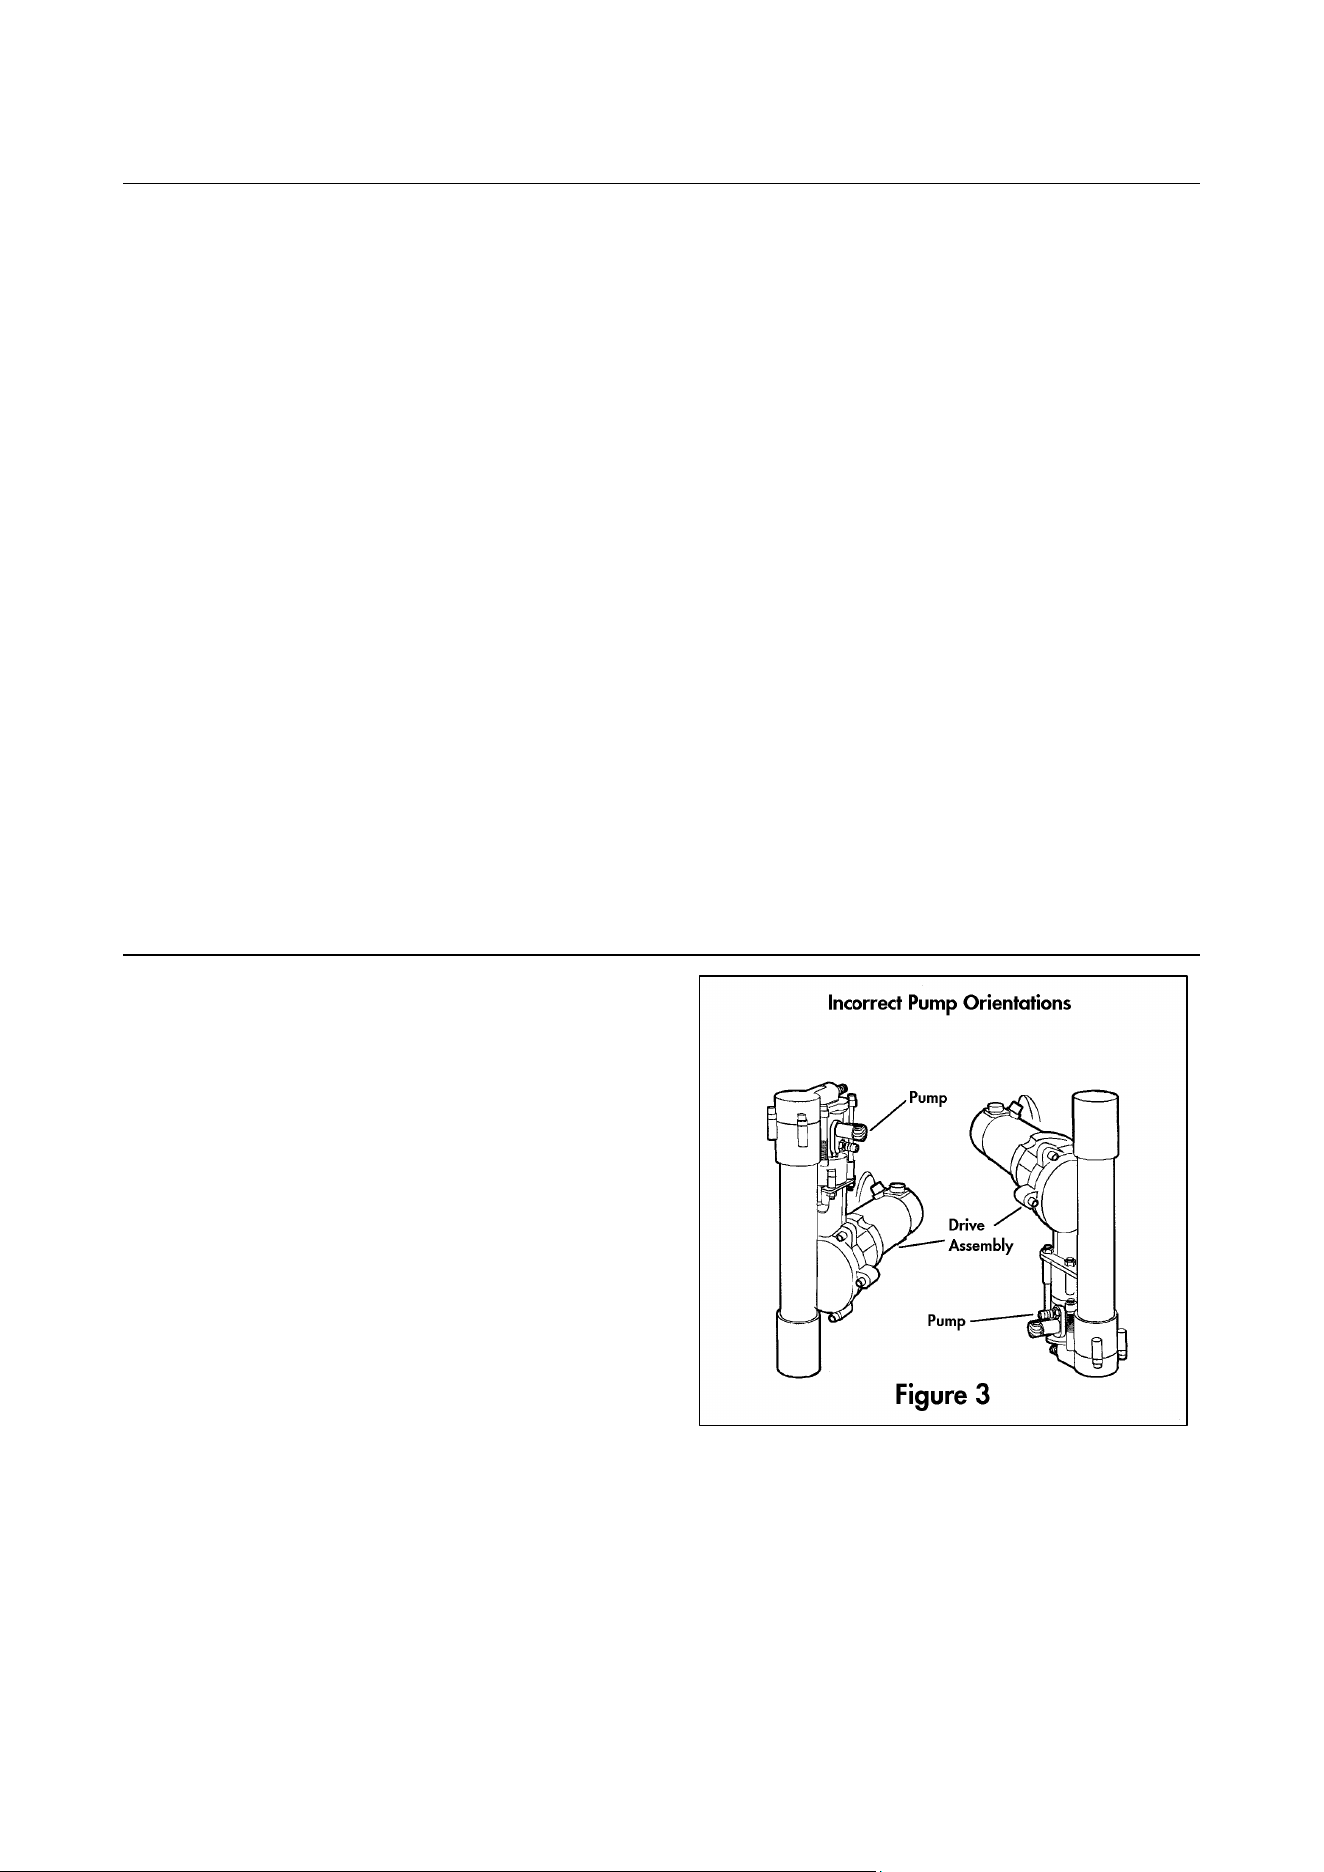
It should be mounted with the long axis of the
membrane housing in a horizontal position. The
purpose of this requirement is to avoid two
problems:
• If the pump develops a seawater leak
and is located directly above the
drive assembly, the drive assembly
and/or electric motor may be damaged (Figure 3, left).
• If the drive assembly develops an oil leak (units produced from 06/2014 are
lubricated with grease, no leak possibility) and is located directly above the
pump, oil may find its way into the pumping system and damage the
membrane (Figure 3, right).
We recommend securely thru-bolting the pump/drive assembly to a sturdy bulkhead or
platform, using corrosion-resistant 1/4" fasteners with flat washers (See Figure A-1). Pick a
location that allows ample space for routing the required hoses and electrical wires to the
pump and motor.
9
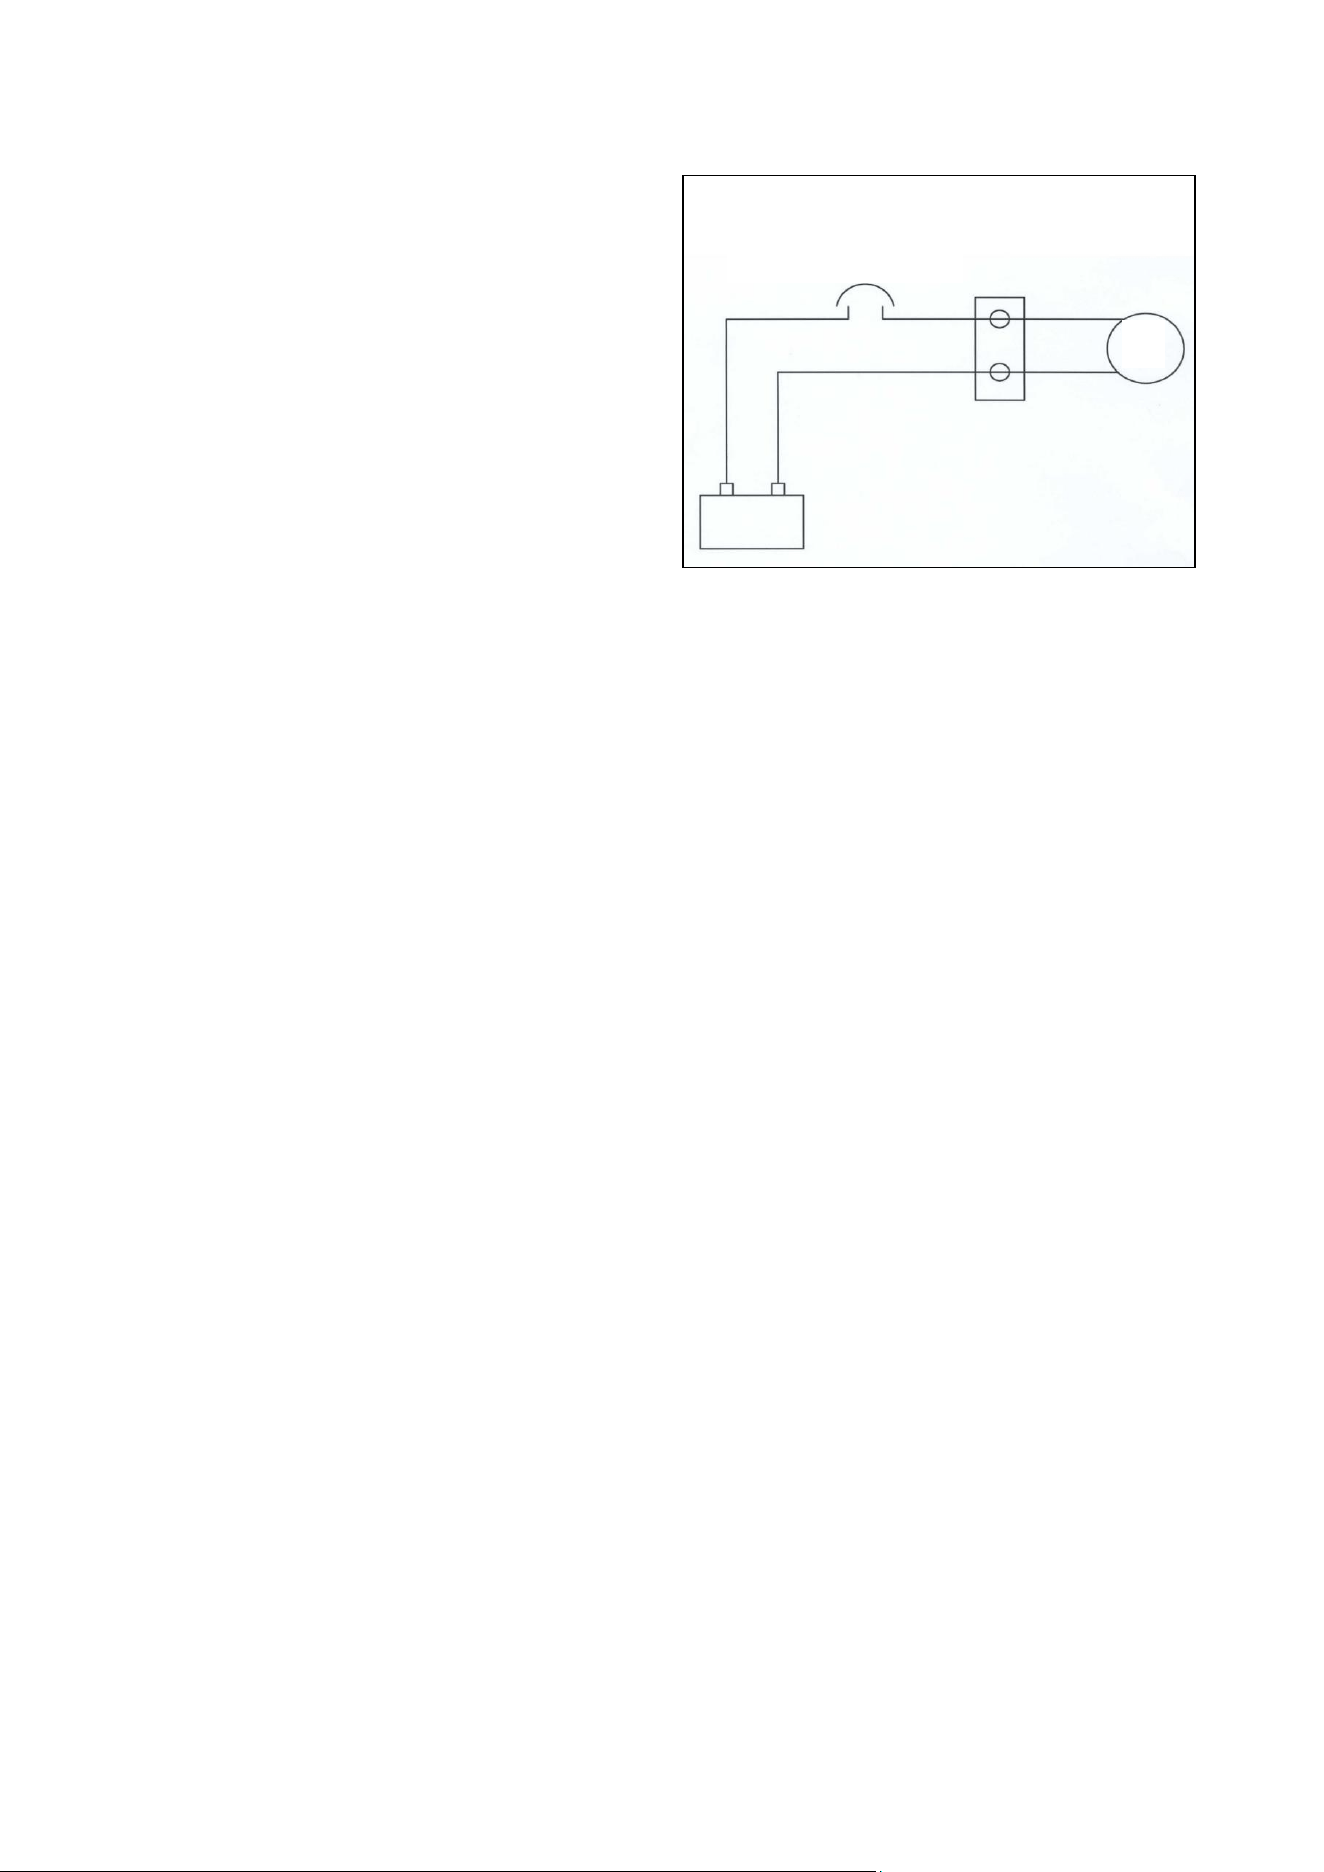
2. Connect Electrical Power to Pump: To provide 12 VDC electric power to the
motor, use a minimum of 16 gauge
(1.5 mm
2
) stranded copper wire. We
recommend 14 gauge (2.5 mm
2
) (or larger)
wire for distances over 20 feet (6 m). Tinned,
stranded copper wire is preferred for marine
installations and is available in most marine
hardware stores. Figure 4 shows a typical
electrical power configuration.
3. Mount Pre filter Assembly and 3-
Way Valve: Lightly coat the male threads
of the middle port of the pre filter 3-way valve
with a non-hardening, paste-type thread
sealant (e.g. Loctite 5331, Permatex) to assure
an airtight seal. (Note: Teflon tape is not recommended due to risk of clogging.)
1. Carefully thread the middle port of the prefilter 3-way valve into the “IN” port of
the pre filter housing. Do not over tighten this connection. When assembled
correctly, the long axis of the 3-way valve should be vertical (See Figure A-1).
2. Fasten the supplied right-angled mounting bracket for the pre filter assembly to a
bulkhead. Ideally, it should be lower than the pump intake to allow air bubbles to
pass easily. Orient it so the pre filter assembly will be vertical, with the bowl
underneath. We recommend that it be thru-bolted with corrosion-resistant
hardware. (See Figure A-1)
3. Screw the top of the pre filter housing to the bracket with the supplied screws. One
port of the pre filter 3-way valve should project above the housing through the
notch in the mounting bracket.
4. Install Seawater Intake Plumbing: There are two common approaches to
providing the seawater intake circuit:
• Tee into an existing seawater intake (e.g., engine cooling water or manual
seawater pump inlet).
• Install a dedicated thru-hull for the watermaker.
Either of these configurations should meet the following criteria:
• It should be at a low point on the vessel’s hull, to minimize the chance of air intake
during heeling or rough conditions.
• The thru-hull should be a minimum of 1/2" (13mm) I.D., and possibly larger if it is a
shared inlet. (Note: If you will want to upgrade to a higher capacity unit in the
future or perhaps a second PowerSurvivor 40E for redundant safety you should
consider bigger hoses and hose fittings during your initial installation).
• An easy-to-reach seacock should be installed on the thru-hull immediately inside
the hull.
• A coarse seawater strainer is strongly recommended. It should be easy to reach
and clean.
• Keep the length of the hose as small as possible to reduce pressure drop.
Otherwise there might be a need of a supporting pump (see G2 – Accessories).
The easiest and most used approach is to tee into an existing seawater intake system. Be-
cause the flow rate and volume of seawater intake for the PowerSurvivor 40E are both
extremely low, the pump can be adequately supplied by most pre-existing intakes — even
inlets that operate at modest negative pressures, such as the cooling water inlet for an
engine or generator. When teeing into an existing seawater supply, we recommend
installing a separate seacock or valve (in addition to the one at the thru-hull) to
independently control the supply to the watermaker.
Basic Electrical Diagram
Fuse and Circuit Breaker:
12 V = 10 A
Terminal
Strip
Dimension of the cable:
16 gauge (1.5 mm
2
) / 12 V
Figure 4
+
-
black
red
12 V Battery or
Power Source /
DC Converter
black
white
M

10
5. Install Reject Brine Plumbing: The reject brine water can be teed into an existing
scupper or sink drain hose for draining overboard. Use the 3/8" reinforced hose and supplied
hose clamps. A tee of the correct size will have to be purchased for your customized
installation. Alternatively, a dedicated thru-hull may be installed at a convenient location.
In this case, we recommend that a seacock be installed at the thru-hull.
6. Install Product Freshwater Plumbing: Your product freshwater plumbing design
should allow for both saving and discarding of product freshwater. This normally requires (1)
a drain location and (2) a container for collecting good product freshwater.
In no case should the product freshwater hose be permanently plumbed into the ship’s
potable water storage tank(s), without providing a way to reject the product freshwater
when necessary. Note that product freshwater should always be rejected during the first
few minutes after startup, and especially after treating with membrane preservative or
chemical cleaners. For that reason alone, a means must be provided for disposing of
unwanted product freshwater.
In general, we do not recommend that the output of product freshwater be routed directly
into a vessel’s freshwater storage tank(s). If for any reason the watermaker should fail during
operation, there is a good chance that the entire supply of freshwater in the storage tank
could become contaminated by unpurified seawater. This is especially important if:
• you have only a single tank for storing potable water.
• you will be making extended offshore passages and depending on your
watermaker for your potable water supply.
The preferred method for collecting product freshwater is to use portable 5- or 6-gallon jerry
jugs or a separate “day tank,” which is isolated from the main storage tank. Some method
should be devised for testing the product freshwater quality at the beginning and at the
end of each operation. When you are certain that the quality of the collected product
freshwater is acceptable, it can be transferred to the main storage tank.
Note: The important concept is to have always a minimum quantity of known-good
potable water available at all times, either in your main storage tank or in the collection
container(s). The length of your expected voyage and maximum distance from a source
of potable water will determine the size of the adequate minimum amount. Arrange your
water making schedule to assure that you always have the minimum of known-good
potable water on board in one or both of your containers.
To route the product freshwater output of their watermakers, many users simply run a
single 3/16" I.D. hose directly from the output hose barb on the membrane housing to a
single location, where the water is tested and either discarded or run into a collection
container.
Should you prefer to have your product freshwater output routed to two separate
locations for testing/discarding and collection, the watermaker system includes a product
3-way valve for use in your output plumbing. Refer to Figure A-1 for a routing diagram.

11
E-Using your Watermaker
Watermakers like to be run often
The PowerSurvivor 40E watermaker can be operated in either manual or powered mode.
This dual-purpose feature of the watermaker has its roots in our original products, which were
designed as military-quality survival equipment. Our deep experience in this technology,
combined with many years of active user feedback, allowed us to design a watermaker
that is easy to operate with little or no technical knowledge. There are no complicated
adjustments to make or gauges to monitor. By following the instructions below and paying
attention to system maintenance, you can expect years of trouble-free operation.
E1-Powered Operation
Pre-Run Checklist: Before running your watermaker, always check the following:
Check for bad (“rotten egg”) smell from the water in the prefilter assembly.
Replace the element and clean the housing, as required. Also check for foul water
in any in-line coarse strainer.
Any valves in the seawater intake, reject brine and product freshwater lines should
be open.
The prefilter 3-way valve should be in the position to intake seawater.
Assure that the product freshwater output is routed for 5-10 minutes to a drain for
testing/discarding.
Make sure the cleaning valve lever on the pump is in the “down,” or “run,” position.
Check battery or power supply voltage. Operating your watermaker below about
11 VDC is hard on the electric motor and dramatically reduces the output of
product freshwater.
Observe the seawater around your vessel. Is it clean enough to use for your
seawater intake? There are several things to avoid feeding to your watermaker:
• petroleum products, such as oil, fuel, thinners, paints, paint removers, etc.
• chlorine-treated water harm the membrane; e.g., most “dock” water
• silty water — water contaminated by fine, hard, suspended particulates
• putrid water, “red tides”, any seawater that smells or looks contaminated
It is important to remember that the watermaker is designed to process clean, open-ocean
seawater. Any departure from that standard for your seawater intake runs the risk of causing
excessive wear or damage to internal pump parts and/or the vulnerable reverse osmosis
membrane, or producing contaminated product freshwater.
Note: Judging the quality of seawater input always involves a certain calculated risk.
We know of watermaker systems that have been destroyed far offshore by intaking fresh
whale excrement or oil contaminants from natural seepages — still, the chance of such
things happening is normally small. On the other hand, regularly running a watermaker in
an enclosed marina or harbor runs a much higher risk of harmful contamination. If you
need to test a new installation while in a marina or harbor, monitor the water quality
around your vessel carefully while testing. Most of the time you should be able to run the
watermaker safely for enough time to check out the system. Don’t sail away without
testing a new installation or repair!

12
Startup: Turn on the electric power to the watermaker. If there is air in the seawater intake
plumbing, the pump may require several minutes to draw up enough water to fill the hoses,
prefilter housing, pump and membrane housing. Since the pump is self-priming, there is no
need to prime the system prior to running. Shortly after the hoses and prefilter housing have
filled with seawater, reject brine water should start discharging from the pump.
Test and Run: When all air have been forced out of the system (which may take several
minutes more), product freshwater should begin to flow from the hose barb at the end of
the membrane housing. It is normal for product water to be unpotable for a short time after
startup. Reject the initial product water and taste test to monitor the quality until it is
acceptable. This will usually take about 5–10 minutes. Keep this produced medium quality
water for flushing before storage. When good quality water is flowing continuously, direct
the product freshwater output to your freshwater collection tank. Continue to run until the
desired quantity of water has been produced.
Shutdown and Storage: When the desired amount of water has been produced, the
product freshwater quality should be checked again. If water quality is good at both the
beginning and end of the run, it is likely that the collected water is good and can be safely
transferred to the ship’s potable water storage tank.
If you plan to run the watermaker again within three days, it can simply be turned off. For
better preserving of the membrane, it is recommended to do a freshwater flush before any
storage period. The kept medium quality water from startup is determined for the flush.
If you do not intend to use your watermaker again within a week, it should be treated with
membrane preservative to prevent organic growth on the membrane. See Section F3
Note: Organic growth is much more rapid in warm or tropical climates. If using the
watermaker in a tropical environment, we recommend a membrane preservative
treatment if the watermaker will not be run again within the next three days! Before doing
repairs or maintenance work on a PowerSurvivor, close the seawater inlet valve after
turning off the system. Otherwise, the possibility exists that hose failure, for example, could
cause the boat to sink.
At the end of a watermaker run, check the condition of water in the prefilter housing. If
there is evidence of trapped material, clean the prefilter housing and install a clean prefilter
element.
13
E2-Manual Operation
Manual operation of the PowerSurvivor 40E is useful if the ship’s electric power supply fails.
Use the following instructions to convert your watermaker to manual operation:
1. Jog run the watermaker and stop it when the
piston has traveled the maximum distance
away from the pump, toward the drive
assembly.
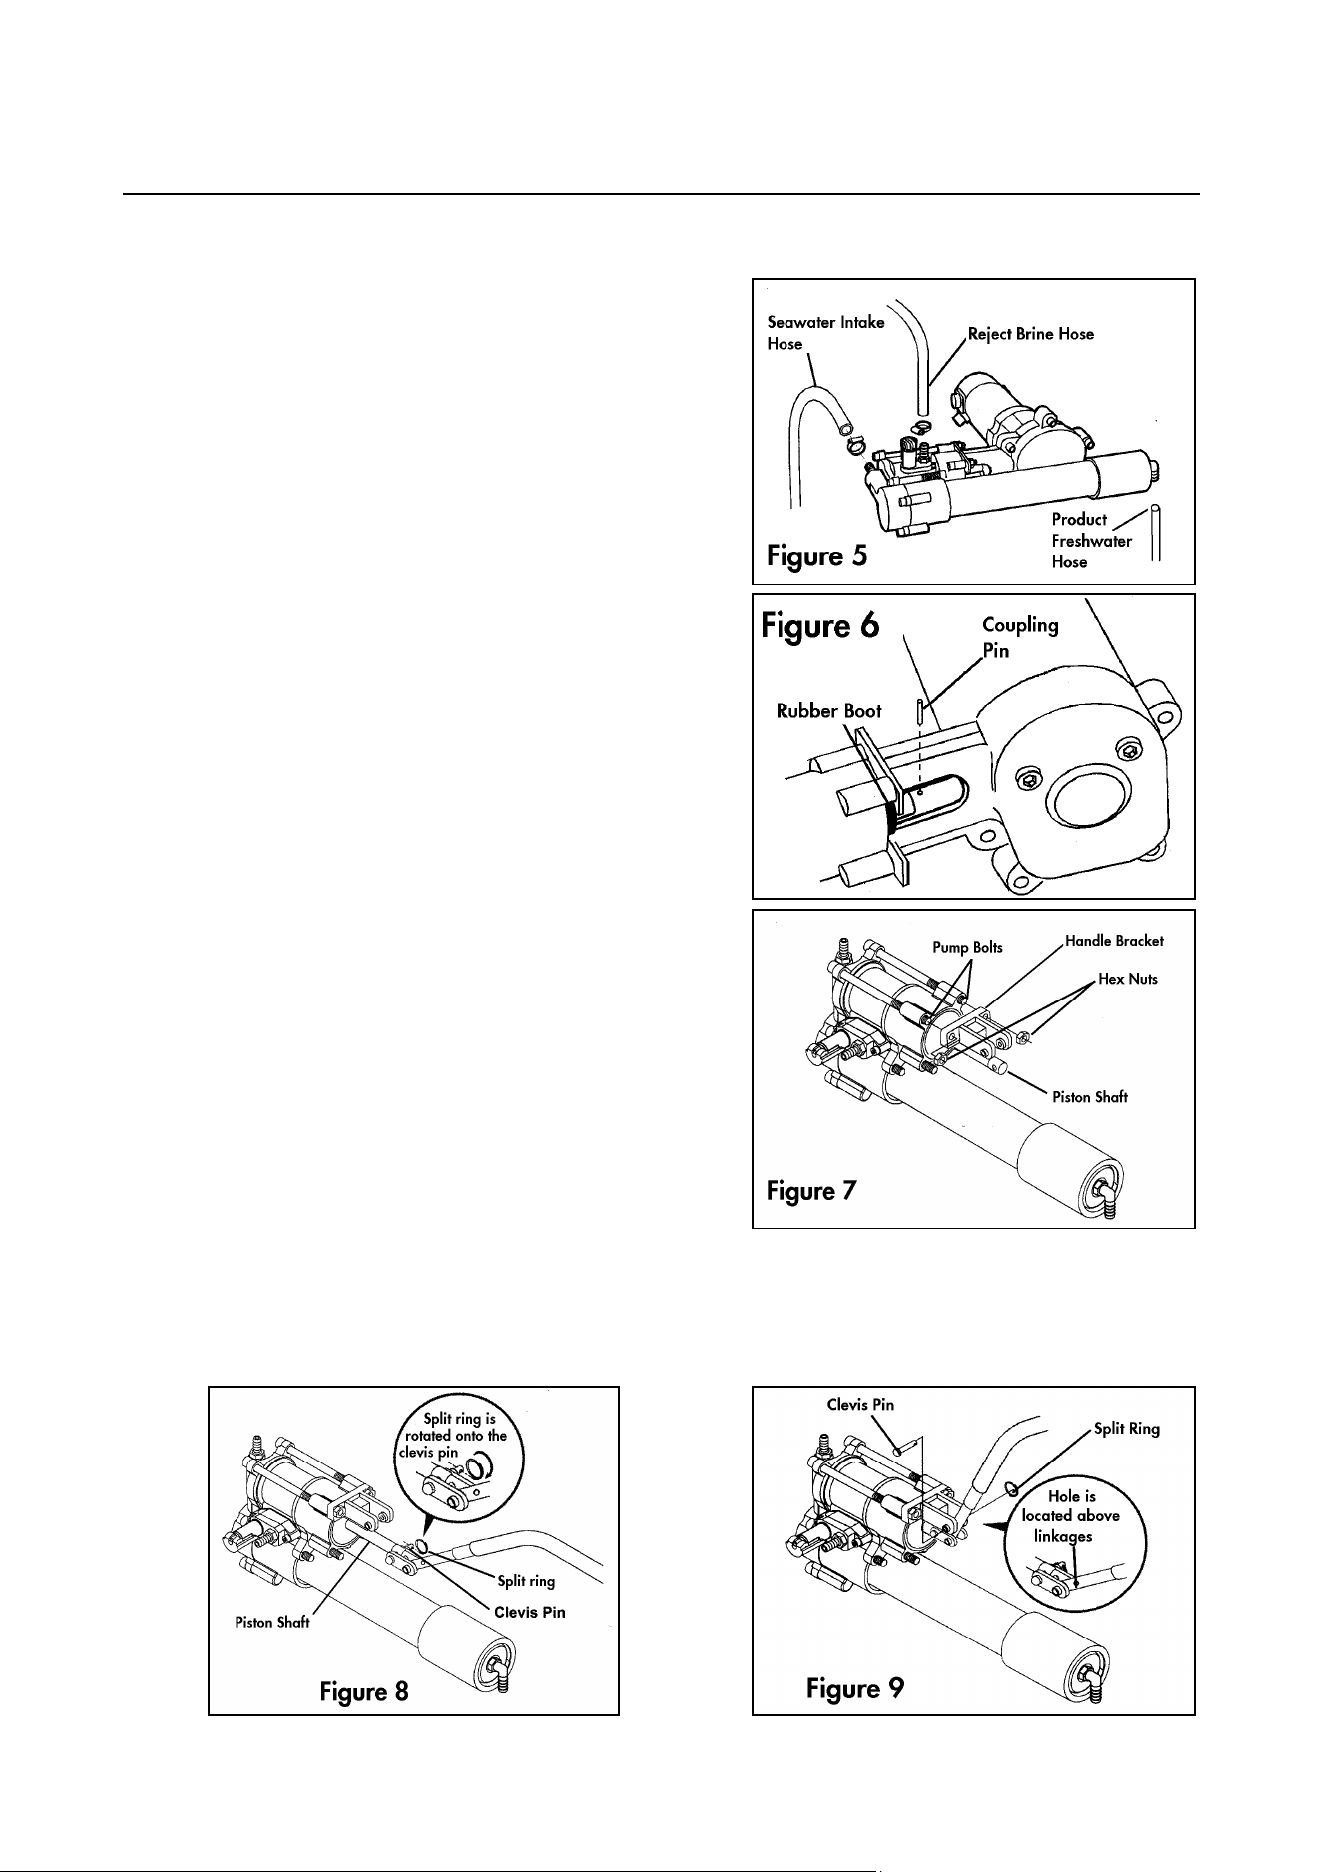
2. If necessary, disconnect the seawater
intake, reject brine, and product freshwater
hoses (Figure 5) and move the watermaker
to a location convenient for manual
operation.
3. Slide the black rubber boot on the piston
shaft toward the pump to expose the
coupling pin. Pull or tap out the coupling pin
which connects the pump piston shaft to the
drive slider shaft (Figure 6). The pin is a fairly
loose fit and should come out easily. Be
careful not to lose it!
4. Using a 1/2" wrench, remove the four hex
nuts holding the pump body to the drive
assembly. Separate the drive assembly from
the pump body and set the drive unit aside.
Remove the black rubber boot from the
piston shaft.
5. Align the holes in the handle bracket with the
two pump bolts that are located above the
piston shaft (Figure 7). Slide the bracket over
the bolts and secure it with two of the hex
nuts that held the drive assembly to the
pump body. Do not over tighten these nuts.
6. Remove the clevis pin from the free end of
the linkage attached to the handle
assembly. Line up the holes in the handle
linkage with the hole in the piston shaft (90°).
Insert the clevis pin through the linkage and the piston shaft and secure with a split
ring (Figure 8).
7. Orient the hole in the handle (located above the linkages) between the holes in the
handle bracket. Insert the second clevis pin through the holes and secure with the
split ring (Figure 9).
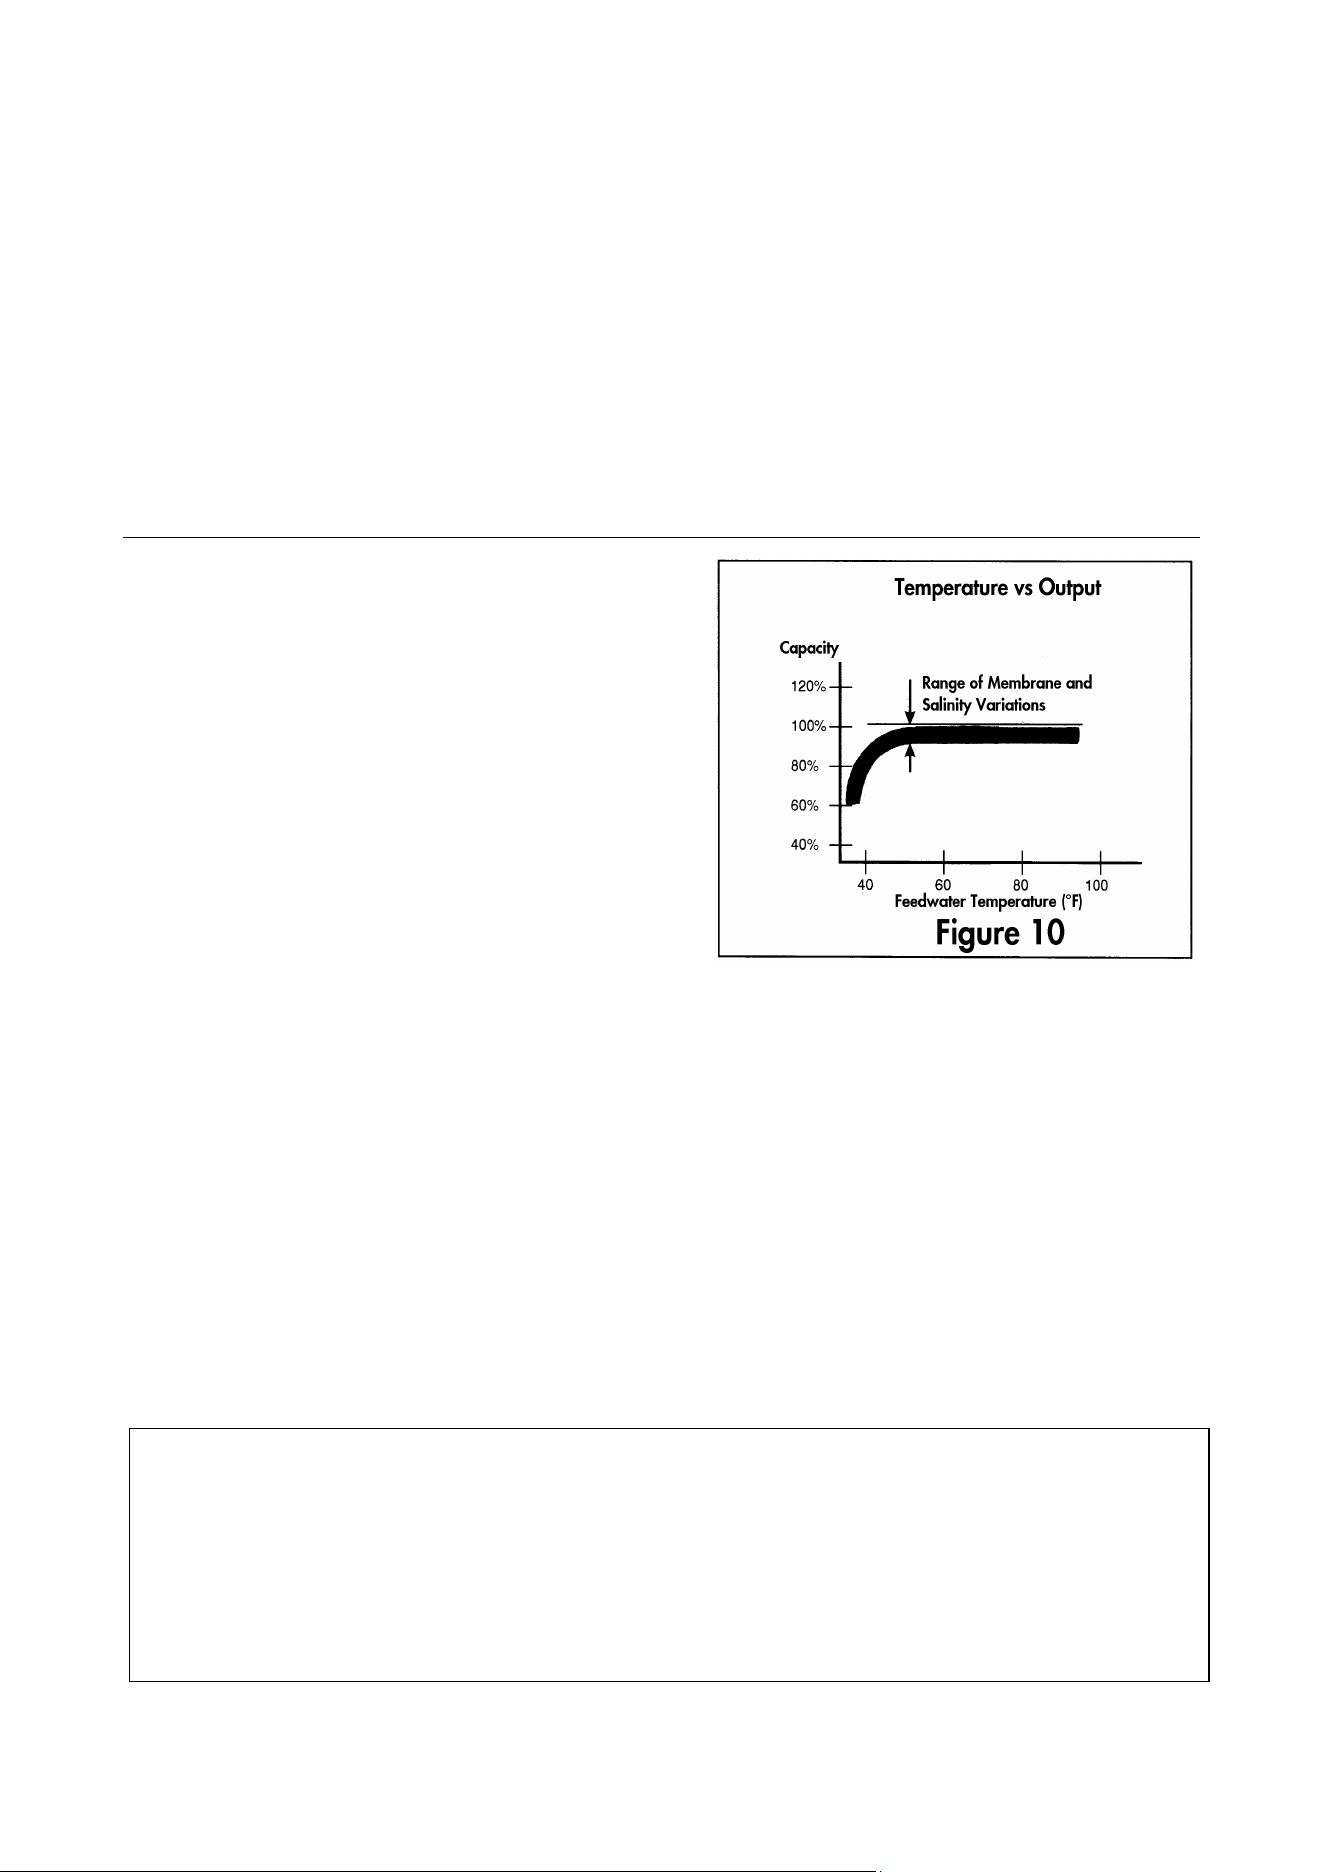
14
8. If not already attached, connect seawater intake, reject brine, and product
freshwater hoses to be used for manual operation.
9. Operate the pump handle back and forth through its full range of travel in both
directions. Pump at a rate of approx. one complete cycle every 2 seconds (one
second in each direction). This is about the same rate at which the pump is driven by
the motor during powered operation for keeping the pressure. Do not pump too fast!
10. To return the watermaker to powered operation, reverse the above procedure.
When coupling the pump piston shaft to the drive shaft, align the hole in the piston
shaft with the mating hole in the drive shaft (0°), insert the coupling pin, slide the
rubber boot over the pin to hold it in place. Secure the drive assembly to the pump
with the four hex nuts. Tighten the nuts evenly. Do not over tighten.
E3-Special Conditions
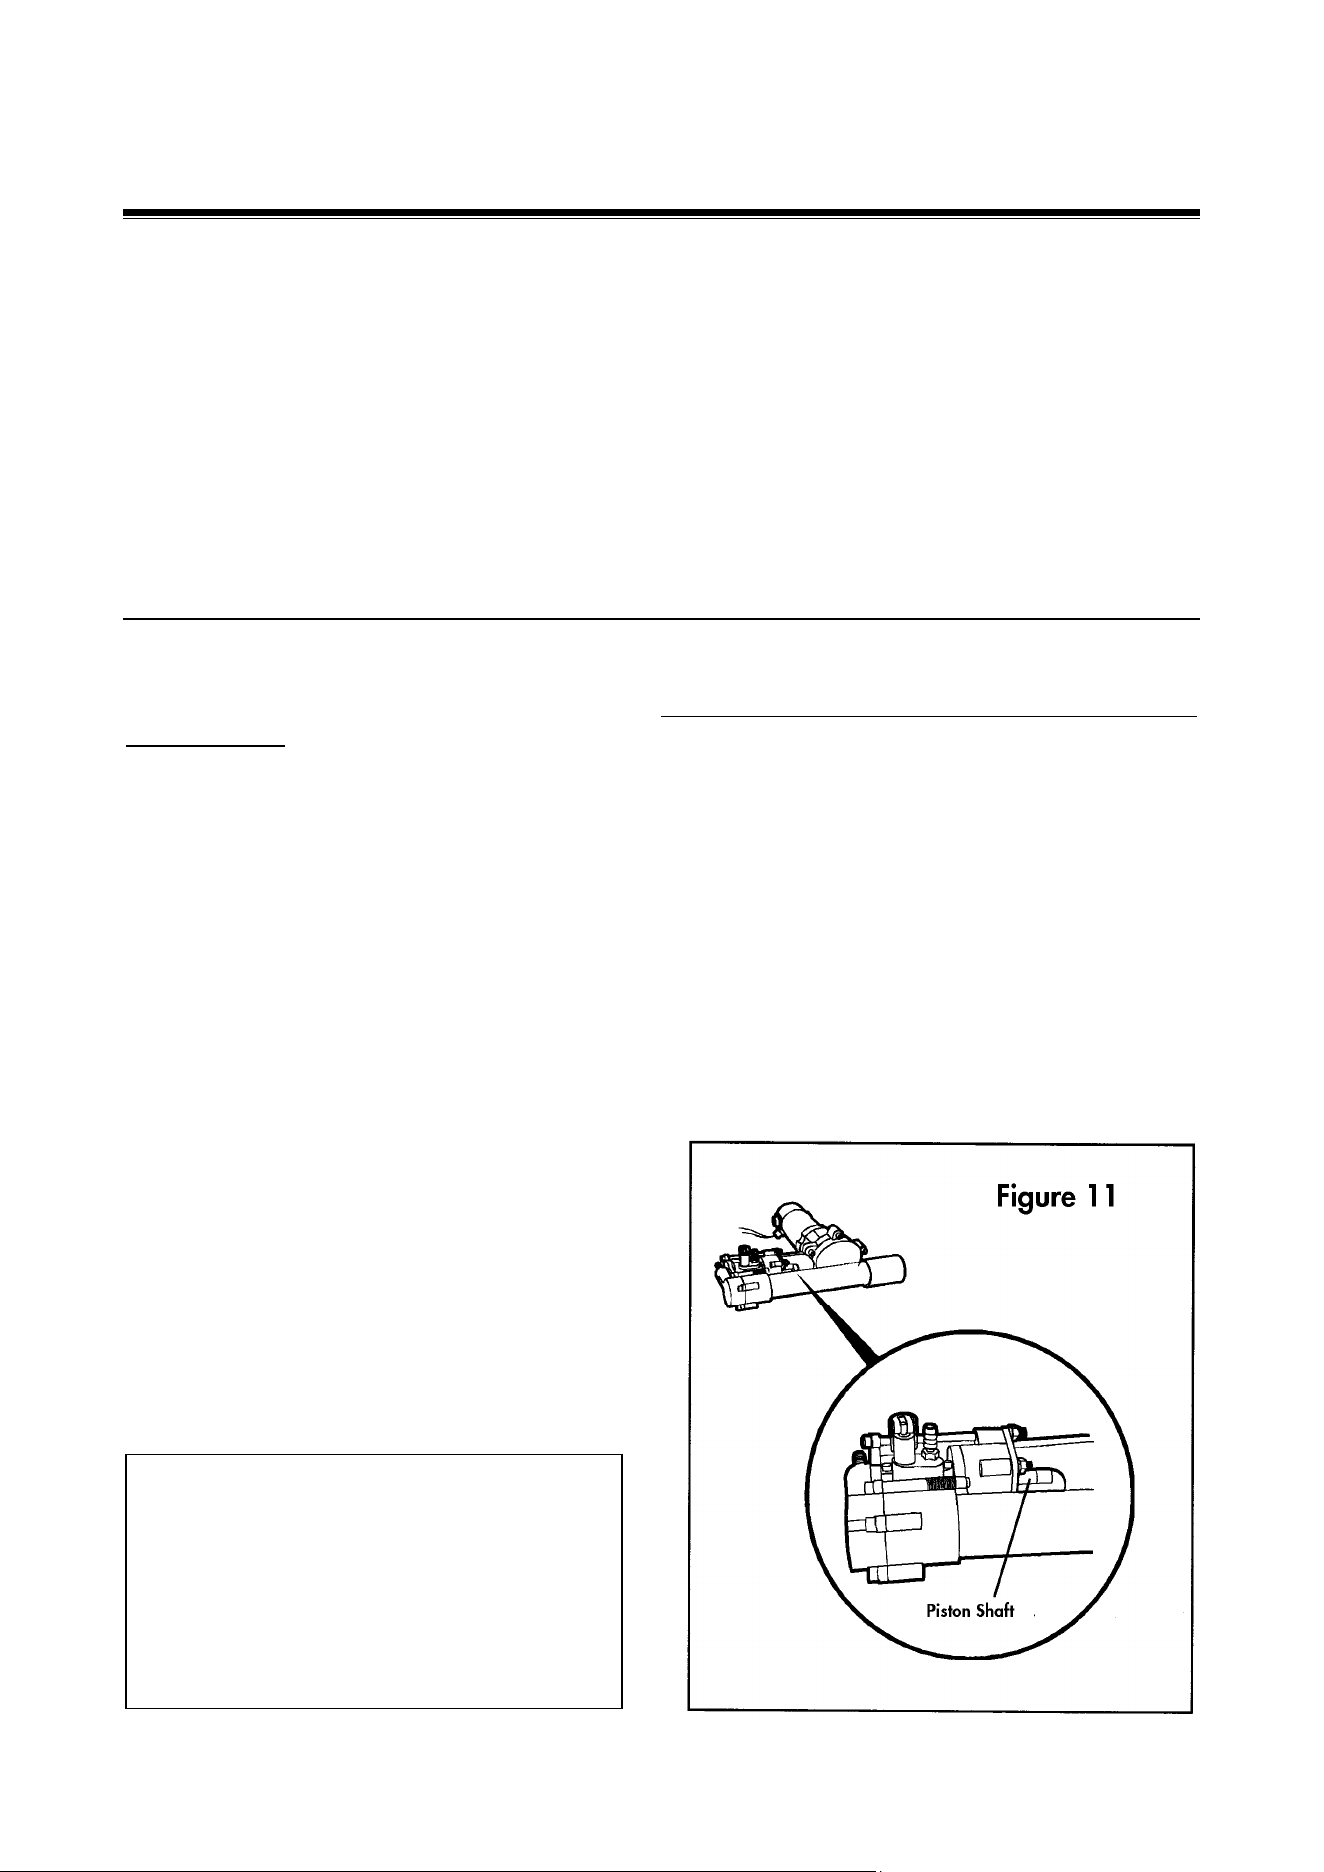
Product freshwater output volume will vary
somewhat, depending on the salinity and
temperature of the seawater being processed.
Figure 10 illustrates the relationship between
feed water temperature and the quantity of
product water. Factors which are known to
affect output or performance include:
• High Salinity will decrease output slightly
and lead to a modest increase in current
draw. Effectively, the pump must work
harder to remove a larger percentage of
dissolved solids from the seawater.
• Cold Water has a higher viscosity than
warm water, which will result in an
increase in current draw. The salinity rate will be slightly lower due to the
membrane properties (the opposite will happen with warmer water).
• Silt or Sand can damage the membrane and internal pump components if not
removed during pre-filtration. If you must regularly process such water, consider
installing a Silt Reduction Kit (see Section G3 Kits & Accessories).
• Foul Intake Seawater can seriously affect the quality of the product freshwater. The
watermaker membrane is designed to remove the impurities found in clean, open
ocean seawater. Processing of seawater with other kinds of impurities (1) may not
remove those impurities and (2) may damage or destroy the membrane. See
Maintenance and Service: Prefilter Maintenance below for more information on
typical problems associated with foul water intake.
• Low Battery Voltage will dramatically reduce the volume of seawater throughput and
product freshwater output. We recommend not operating the watermaker if battery
voltage is below 11 VDC. The specified output is at ~13.5V (generator).
Note on Red Tides: In many areas of the ocean, a phenomenon generally known as
a “red tide” can occur. This generic name is used to describe an invasion of local waters
by huge populations of micro-organisms, which turns the seawater red. Occasionally, a
red tide is accompanied by the death of local fish and other sea life, which can cause
serious local pollution of the seawater. Although the watermaker membrane can remove
the microorganisms that cause the red tide, it cannot remove all the chemical pollutants
caused by large-scale biological decomposition. Therefore, we do not recommend
using the watermaker to process seawater when a red tide is present.
15
F-Maintenance and Service
A little love goes a long way
We’ve worked hard to design a product that is simple to operate and maintain. However,
regular attention to the few maintenance requirements of this equipment is critically
important. This section of the Owner’s Manual describes the maintenance requirements of
the PowerSurvivor 40E.
Much of our knowledge of maintenance requirements, watermaker performance, and
potential problems is a result of experience with actual users over many years. Following
these instructions will help keeping your product freshwater quality on top level and your
watermaker running trouble-free.
F1-Pump Maintenance
Once properly installed, the main watermaker pump and drive assembly requires little
attention. You should regularly inspect the equipment and check for any leakage of
seawater, or oil leaks from the drive assembly. Any leakage is a sign of a problem and should
be corrected.
Make certain that the watermaker remains dry. Exposure to saltwater can cause rapid
corrosion of the drive assembly and/or damage to the electric motor. Keep all electrical
connections clean, dry, and tight.
After approx. every 1000 hours of use, replace the seals in the pump (See Seal Replacement
below). After approx. every 1000 hours of use, grease and inspect the eccentric drive parts.
(Note: From the eccentric into axial translation is a bronze slide bearing which don’t need
to be greased!) After approx. every 5000 hours of use, have the electric motor inspected
for brush wear and commutator condition.
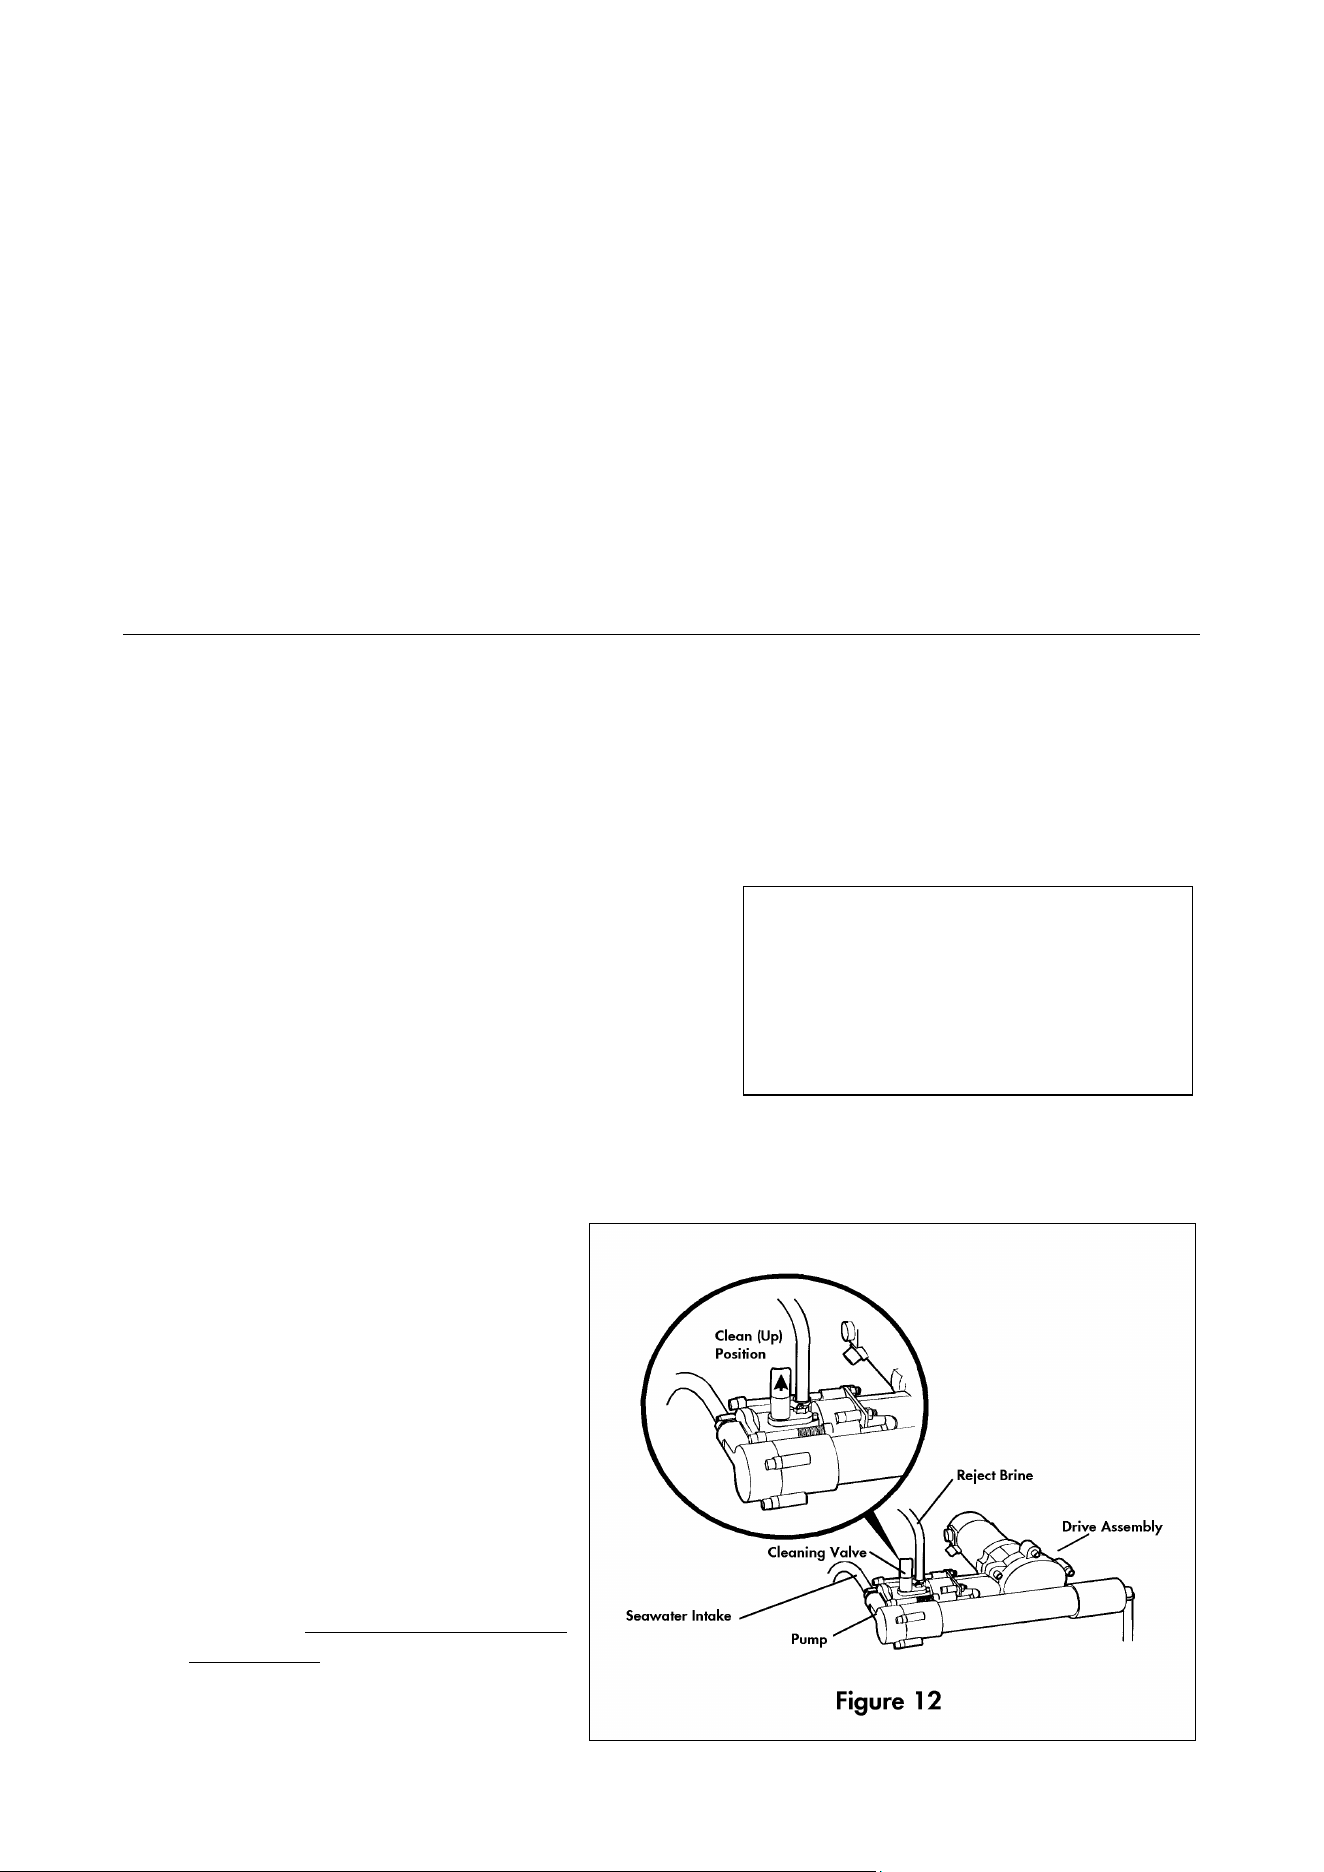
Pump Piston Shaft Lubrication: It is extremely important to lubricate the pump piston
shaft periodically, especially after cleaning the membrane. The piston shaft is visible at the
side of the drive assembly, where the pump
connects to the drive (see Figure 11). Jog run
the watermaker and stop it when the piston
shaft is at its point of farthest travel away from
the pump (i.e., towards the drive assembly).
Assure that the watermaker is off and can not
be started accidentally while you work. Clean
the exposed piston shaft with a clean rag and
lubricate the shaft with non-petroleum
silicone lubricant (grease).
Warning: The PowerSurvivor 40E
motor should be turned off and
disconnected from its source of power
before attempting to lubricate the
piston shaft. Never put your fingers into
the area of the piston shaft while the
motor is running. This could result in
serious injury.

16
F2-Prefilter Maintenance
Background: Maintaining a healthy watermaker largely involves taking proper care of
the prefilter assembly and seawater intake plumbing. Failure to do so is the most common
cause of the two most frequent types of watermaker “failure” we hear about: (1) producing
diminished or no freshwater output, or (2) producing “bad-smelling” product freshwater.
Here is what happens:
Air in the system: The most common cause of diminished or no product freshwater
output is air entering the seawater intake system at some point. The pump volume is small,
and the pressure required to press water through the membrane is rather high (about 800
psi). Since air is highly compressible, a very small amount of air can keep the pump from
producing enough pressure to produce product freshwater. Periodically inspect and test
the entire seawater intake system to assure that all joints and fittings are airtight, especially
the connections at the prefilter assembly. (Note: Be aware that a stable air gap at the top
of the prefilter housing is not uncommon and doesn’t necessarily mean that air is getting to
the pump itself.)
Bad-smelling Product Freshwater: The purpose of the prefilter assembly is to trap
any particulates in the intake seawater that are larger than 30 microns. A coarse strainer (if
installed) performs the same chore for contaminants of larger size. In each case, trapped
material remains in the prefilter housing (or strainer bowl) until removed.
Much of the trapped material is organic: plankton, seaweeds and flotsam of all types. After
a watermaker has been turned off, this material soon begins to decompose. As it does, it
breaks down into a number of chemicals composed of smaller molecules. Some of these
molecules are small enough to pass through the watermaker membrane along with the
product freshwater. Perhaps the best-known example of such a chemical is hydrogen
sulfide, a gas which (in small concentrations) smells like “rotten eggs.”
Two main factors affect the speed with which these products of organic decomposition will
contaminate a watermaker system: (1) the ambient temperature and (2) the quantity of
trapped material. We realize that many users of our equipment run their watermakers in
near-shore situations while anchored. The amount of trapped material is usually high in such
locations, and the prefilter assembly will require more frequent attention. Moreover, the high
ambient temperatures in tropical locations greatly accelerate the rate of such
decomposition. Users in temperate climate areas or users processing open-ocean seawater
during offshore passages are less likely to require the same diligence.
Prefilter Maintenance: At the end of each run of your watermaker, examine the
prefilter assembly (and the coarse strainer, if installed) for trapped material. If anything is
visible, perform the following procedure:
1. Unscrew the prefilter housing, remove the
dirty prefilter element, and discard the water
in the bowl. Do not lose the large O-ring at
the top of the bowl.
2. Clean the inside surface of the prefilter bowl.
Inspect and clean the O-ring at the top of
the bowl. Lubricate the O-ring and the
threads of the prefilter housing with a light
coat of silicone grease.
3. Install a clean filter element and screw the
prefilter bowl back on securely.
Warning: If you purchase after-
market filter elements, be certain
they are made from polyester
fibers. In particular, be wary of
elements made of paper materials.
They look very similar, but are
designed for use and are harmful to
the membranes and high pressure
pumps used in reverse osmosis
watermakers. Be certain you
purchase only polyester filters of 30-
micron (or finer) size, with 2.5-inch
diameter and 9.75-inch length.
17
4. If the watermaker will not be used within the next three days, treat it with
membrane preservative (see Membrane Storage below).
5. Tie a line through the center of the dirty filter element and, if underway, tow it
behind the vessel for a few minutes. If the vessel is anchored, hang the dirty filter
over the side of the boat so that it is underwater, and jerk it up and down a few
times to dislodge the contaminants.
6. Dry the filter element thoroughly, preferably in the sun. Then store it for use as a
clean filter the next time the prefilter assembly is serviced.
We do not recommend scrubbing filter elements with brushes or other abrasive tools or
materials, as such treatment is unnecessary and greatly shortens the life of the filter element.
If filter elements are cleaned regularly as directed, and not allowed to become extremely
dirty, they can be expected to last for many months of service with nothing more than the
gentle cleaning described above. Clean filter elements also help assure unrestricted flow
of intake seawater to the pump. Regular replacement depending on use is recommended.
F3-Membrane Storage, Preserving & Cleaning
The reverse osmosis membrane inside the membrane housing is an expensive and delicate
component of your system. When properly cared for, it can be expected to last for several
thousand hours of use. Improper use, maintenance or handling can damage or destroy the
membrane very quickly.
Membrane Preservative Treatment: The primary purpose of a membrane
preservative treatment is to keep membrane moist and reduce biological growth on the
membrane surface. Over time, biological matter can adhere to the membrane surface,
thus gradually decreasing its effectiveness. When
the watermaker is not to be used for an extended
period of time, you should preserve the membrane.
A membrane preservative treatment is effective for
approximately one year (storage temperature <
25°C/77°F). If longer storage is required, the
membrane preservative treatment should be
repeated every year.
In temperate climates, the maximum period of time the watermaker should be stored
without preserving the membrane is approximately one week. In hot or tropical climates,
the watermaker membrane should be preserved if it will not be used within the next three
days. Follow these directions to
preserve the membrane of your
watermaker:
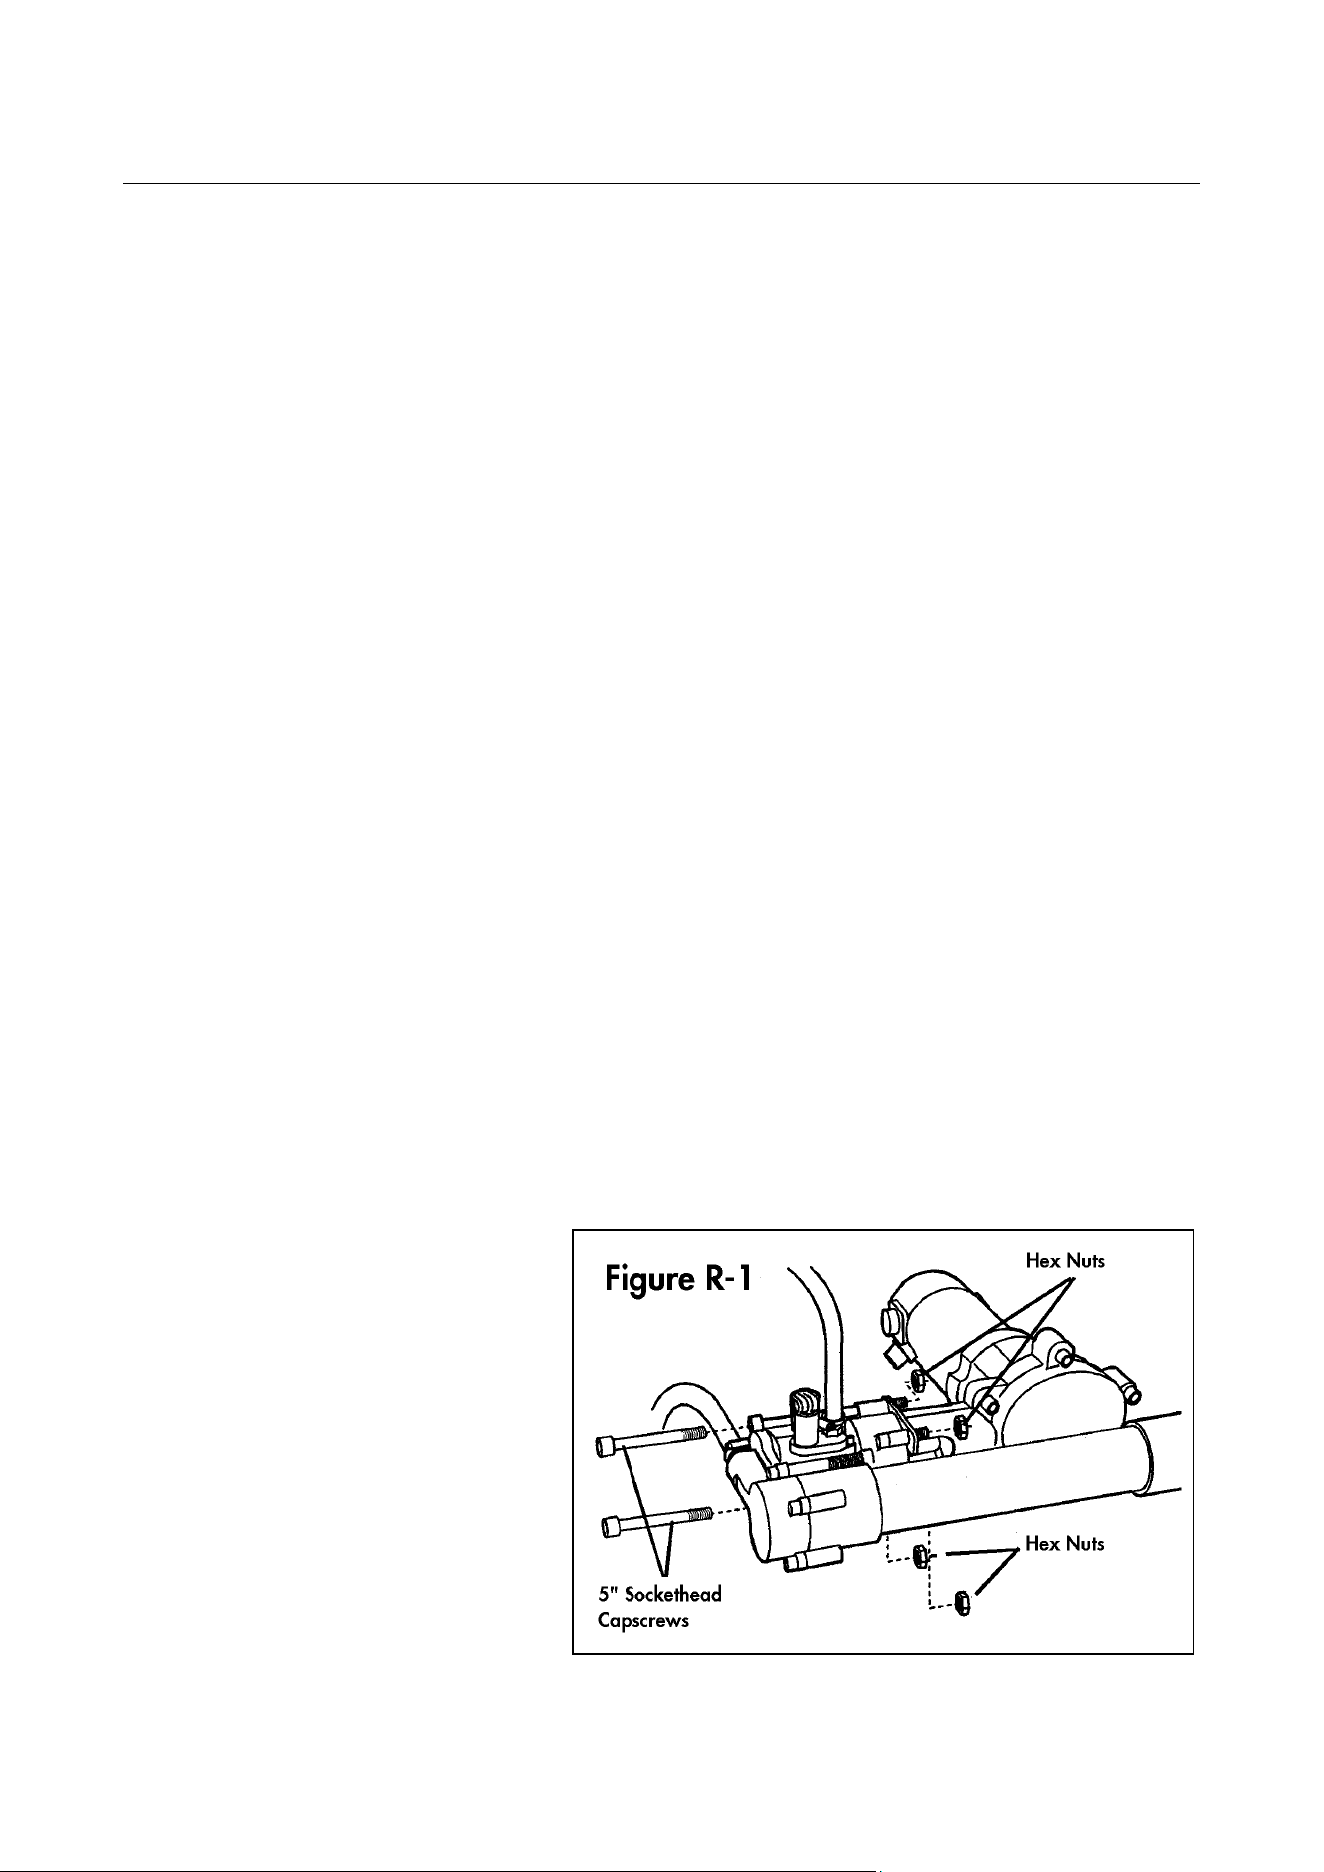
1. Lift the lever on the cleaning
valve on the pump to place it in
its “clean” or “up” position (see
Figure 12).
2. Fill a clean plastic container or
bucket with two quarts
(approximately 2 liters) of clean
water, preferably freshwater
from the PowerSurvivor.
(Caution: Never use chlorinated
freshwater. This may damage
the membrane.)
Warning: Be sure to follow the
flushing procedures described
below to ensure that the
membrane preservative solution
does not get into the freshwater
supply.

18
3. Prepare the membrane preservative solution according to the instruction on the
Membrane Preservative container (max 2% concentration).
4. Use your product 3-way valve (or move the product water output hose) to be sure
that any water flowing from the product freshwater output is properly discarded.
5. Turn the lever on the prefilter 3-way valve to the alternate intake position. Run the
3/16" alternate intake hose with the strainer attached into the container of
membrane preservative solution.
6. Turn on the watermaker and run it until almost all of the
membrane preservative has been drawn from the
container and foamy membrane preservative solution is
ejecting from the reject brine hose. If there is a chance
that the watermaker will be subjected to freezing
conditions, continue to run until air is being ejected from
the reject brine hose. (Note: If the membrane freezes, it
must be slowly and completely thawed to increase the
chance to may use it again.)
7. Turn off the watermaker. It is now ready for storage for up to one year.
If seawater was used instead of freshwater, repeat the membrane preservative procedure
with freshwater as soon as possible. Repeat the above procedure at least once a year if
the watermaker is not being operated.
Cleaning the Membrane: We do not recommend casual or regular cleaning of the
reverse osmosis membrane in the watermaker — it should only be done when needed.
Under normal use conditions, when only open-ocean
seawater is being processed, cleaning the membrane should
rarely (or never) be necessary. Proper membrane preservative
treatments prior to extended periods of non-use will reduce
biological growth on the membrane surface. Under these
conditions and with proper care, a membrane can be used
for years without requiring a cleaning.
Cleaning the membrane is only necessary if contaminants are
deposited on, and adhere to, the membrane surface in
sufficient amounts to affect the output of product freshwater.
Usually, this condition also causes battery current to increase.
There are two main types of such deposits, and a different
chemical cleaner is needed for each type:
• Organic Growth — usually caused by processing brackish water or failure to
properly store a membrane during extended periods of non-use. Use Alkaline
Cleaner.
• Mineral Scale — caused by mineral impurities in the intake water supply. Use
Acid Cleaner.
The only indication that a membrane might benefit from cleaning is a substantial reduction
in the quantity of product freshwater output, all other factors being normal (e.g., battery
voltage, salinity, seawater temperature). The best way to detect such a problem is by
keeping an accurate log of product freshwater output at known battery voltages. Such a
practice is highly recommended.
If you have determined that your membrane needs cleaning and you know the type of
deposits (mineral or organic), use the appropriate cleaner. If you do not know the nature of
the deposits, try cleaning first with the Alkaline Cleaner and check for improvement in
product freshwater output. If output remains poor, repeat the cleaning process using the
Warning: Freezing of
the membrane may
occur damage. Mix
food grade propylene
glycol (>25% concen-
tration) together with
the preservative-water
to avoid freezing.
Note: Buildup of
deposits and reduction
in product freshwater
flow usually take place
gradually over
extended periods of
time. Sudden reduction
or stopping of product
water output is rarely
caused by a dirty
membrane.

19
Acid Cleaner. Never mix the two types of cleaners! Always flush well with clean water
between processes if performing both alkaline and acid cleaning. The following directions
apply for both types of membrane cleaners:
1. Lift the lever on the cleaning valve on the pump to place it in its “clean” or “up”
position (see Figure 12).
2. Discard any dirty seawater in the prefilter assembly. Clean the housing and install
a clean filter.
3. Fill a clean plastic container or bucket with one gallon (approximately 4 liters) of
clean water. Freshwater is preferable, but clean seawater may be used if
freshwater is not available. (Caution: Never use chlorinated freshwater. This may
damage the membrane.)
4. Prepare the cleaning solution according to the instruction on the cleaner
container. Do not mix Acid Cleaner and Alkaline Cleaner. Stir until the cleaner is
completely dissolved. The water should be warm, but not over 120° F (49° C).
5. Turn the lever on the prefilter 3-way valve to the alternate intake position. Run the
3/16" alternate intake hose with the strainer attached into the container of
cleaning solution.
6. Disconnect the reject brine water hose from its drain (or use a separate length of
hose) to route the reject brine water back into the container of cleaning solution
during the following procedure.
7. Turn on the watermaker. Discard any solution coming from the reject brine hose
for about 30 seconds. Then run the reject brine water hose back into the container
of cleaning solution to allow recirculation of the cleaner.
8. Continue to run the watermaker for about 15 minutes, to assure that the cleaning
solution is well circulated through the pump and membrane.
9. Turn off the watermaker and allow the membrane to soak in the cleaning solution
for 5 to 10 hours, or overnight. For severe fouling, repeat steps 8 and 9 of this
procedure.
10. When the soaking is finished, remove the reject brine hose from the cleaning
solution container and run the watermaker again. Discard the first pulses of the
reject brine water. When the reject brine flow becomes cleaner, return the reject
brine hose to the cleaning solution container for recirculation.
11. Continue to run the watermaker and recirculate the cleaning solution for another
30 to 60 minutes
12. When cleaning is complete, turn off the watermaker. Reconnect the reject brine
hose to its normal drain location.
13. Remove the alternate intake hose and strainer from the cleaning solution and
place them into a container of clean, warm (non-chlorinated) freshwater. If
freshwater is not available, clean seawater may be used if its temperature is
above 68° F (20° C).
14. Turn on the watermaker and flush warm water through the system for 5 minutes.
If the watermaker will be stored for more than a week (three days in warm climates), it
should be treated with the membrane preservative solution.
20
F4-Seal Replacement
After approximately every 1000 hours of use, the watermaker should be partially
disassembled, cleaned, and lubricated with non-petroleum silicone grease. At that time,
the seals should be inspected and replaced, as required. The standard Repair Seal Kit is
available from Katadyn and most marine retail stores. It includes a complete kit of
replacement seals and other components for all user-serviceable parts of the watermaker.
It is recommended to replace all the seals contained in the kit at every servicing. This
prevents additional seal replacement between the 1000-hour preventive service intervals.
Nevertheless, the dynamic seals work harder and wear faster than others and will need to
be replaced at a certain point. We recommend that you keep a complete kit of
replacement seals for emergency repairs.
Preparation: Before beginning to disassemble the watermaker, read the following
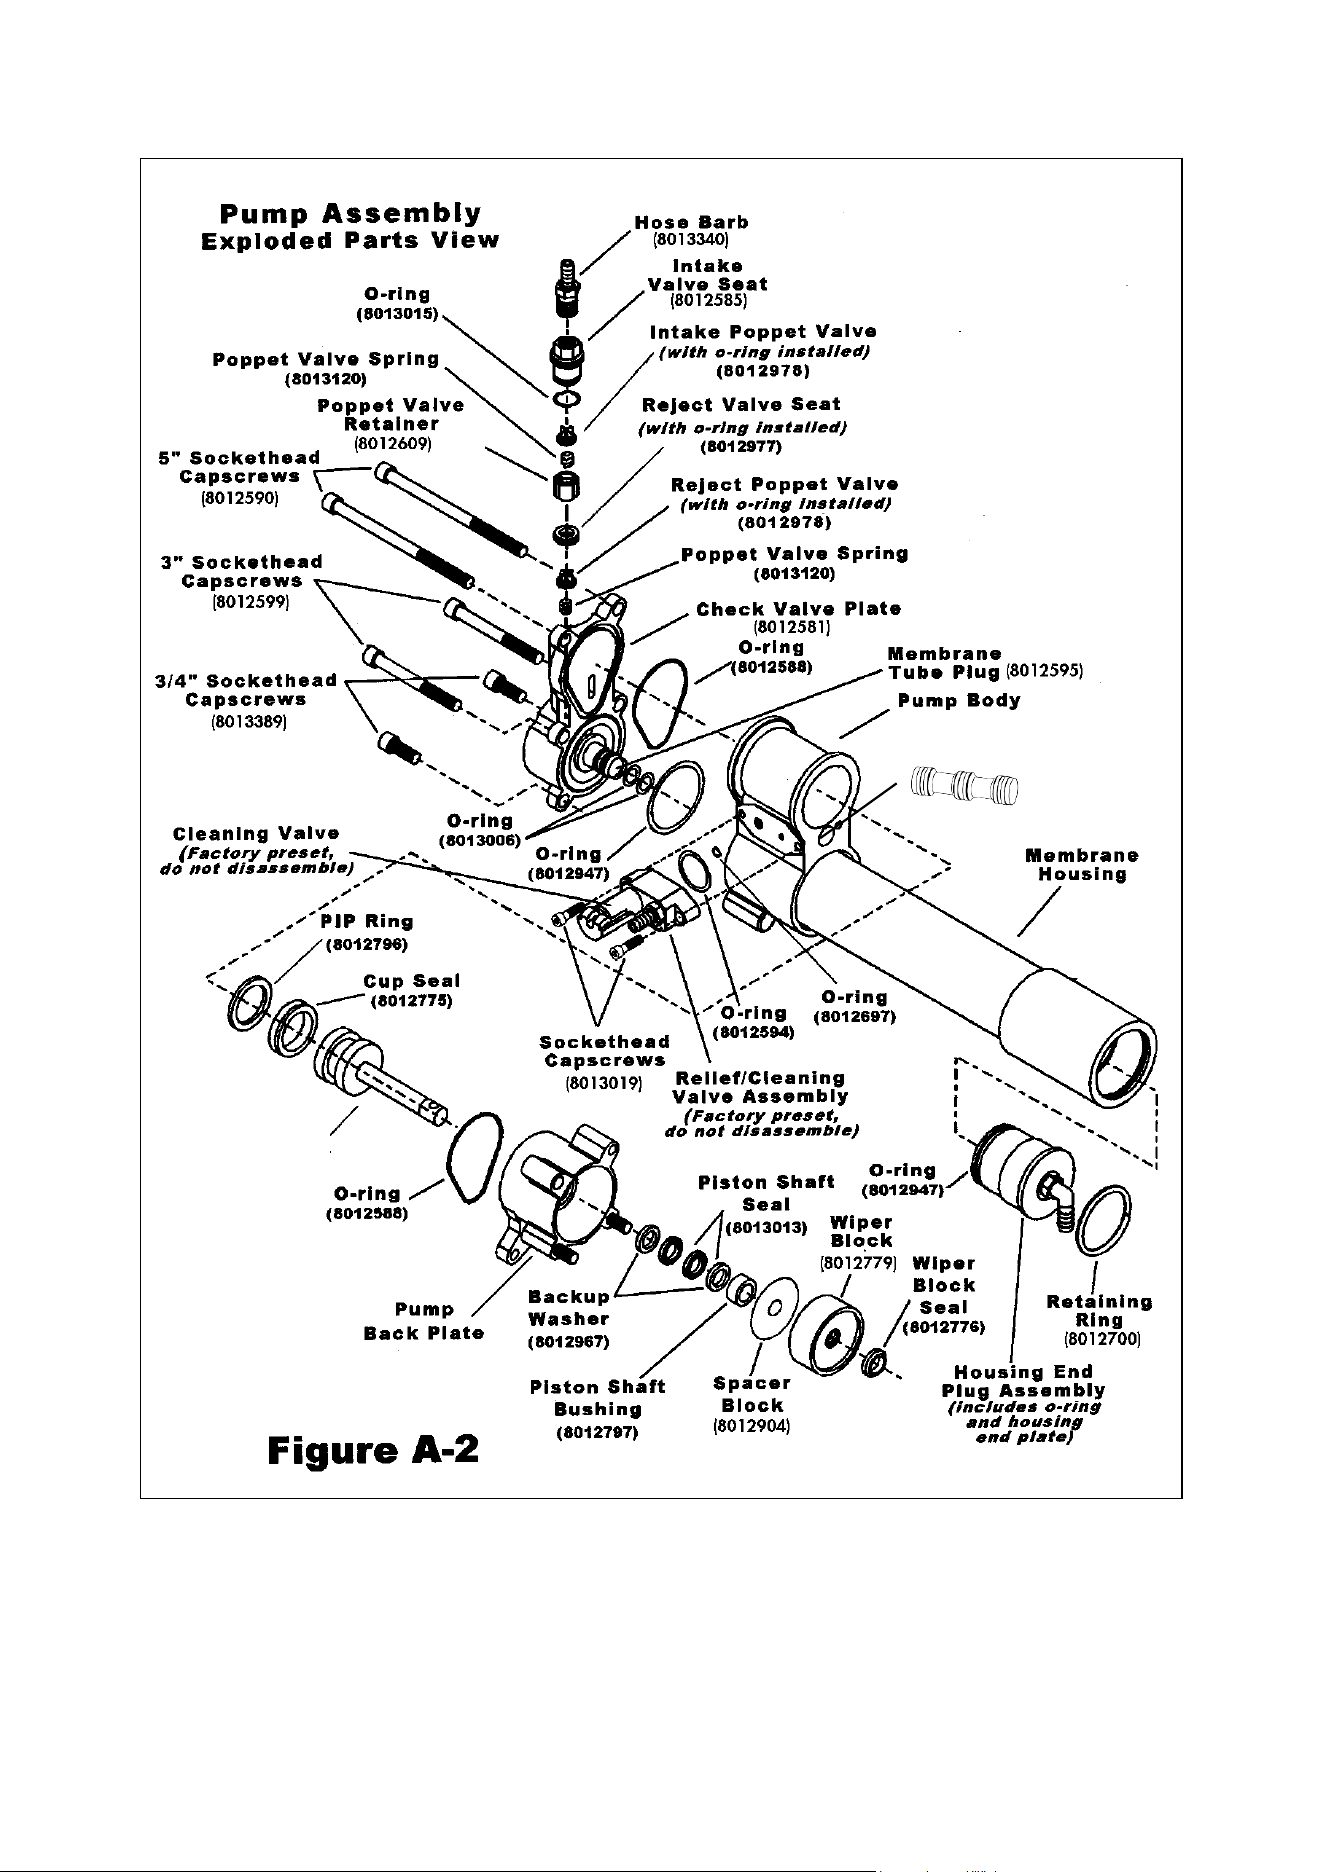
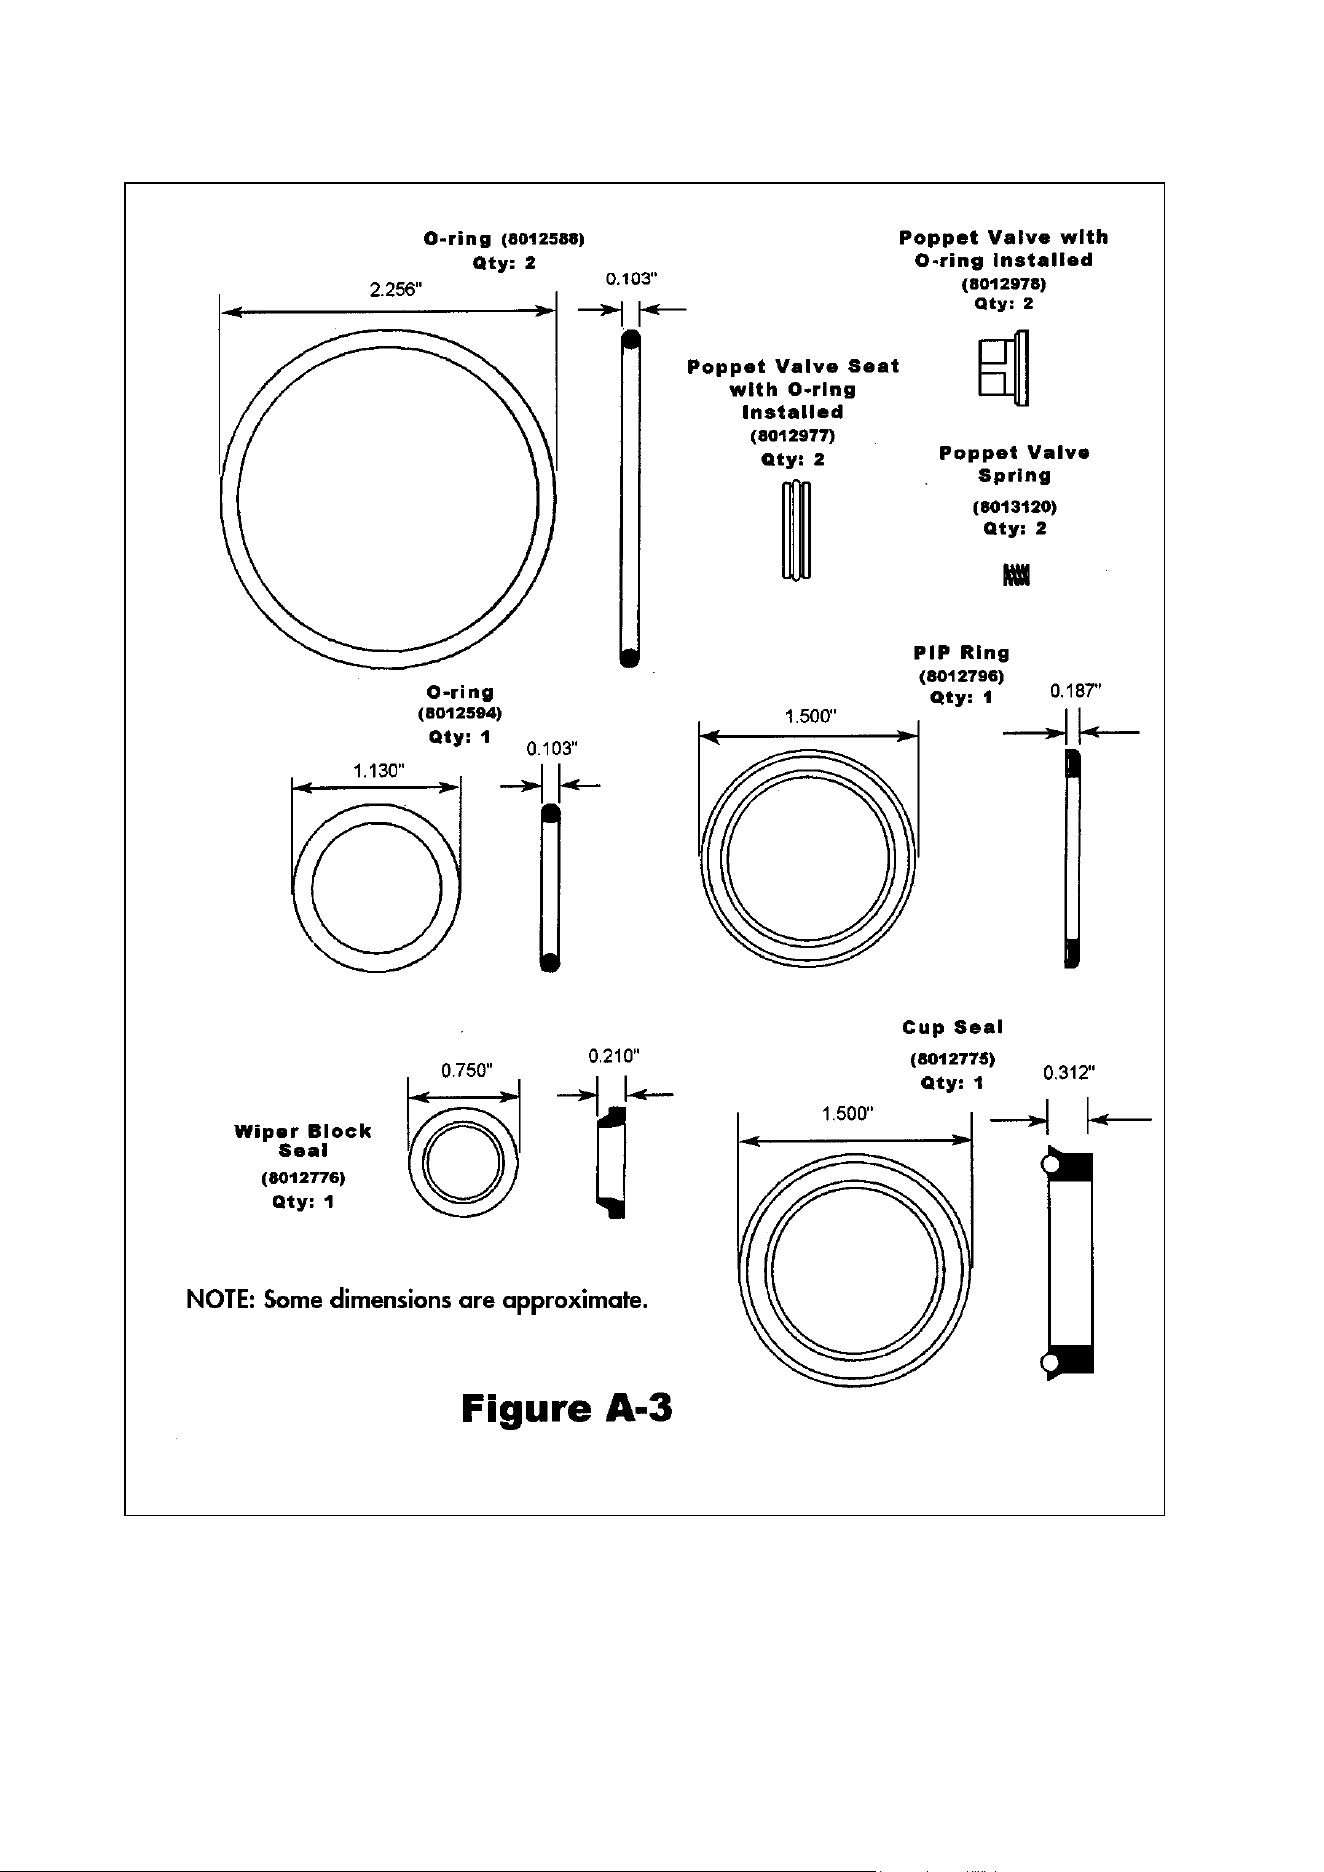
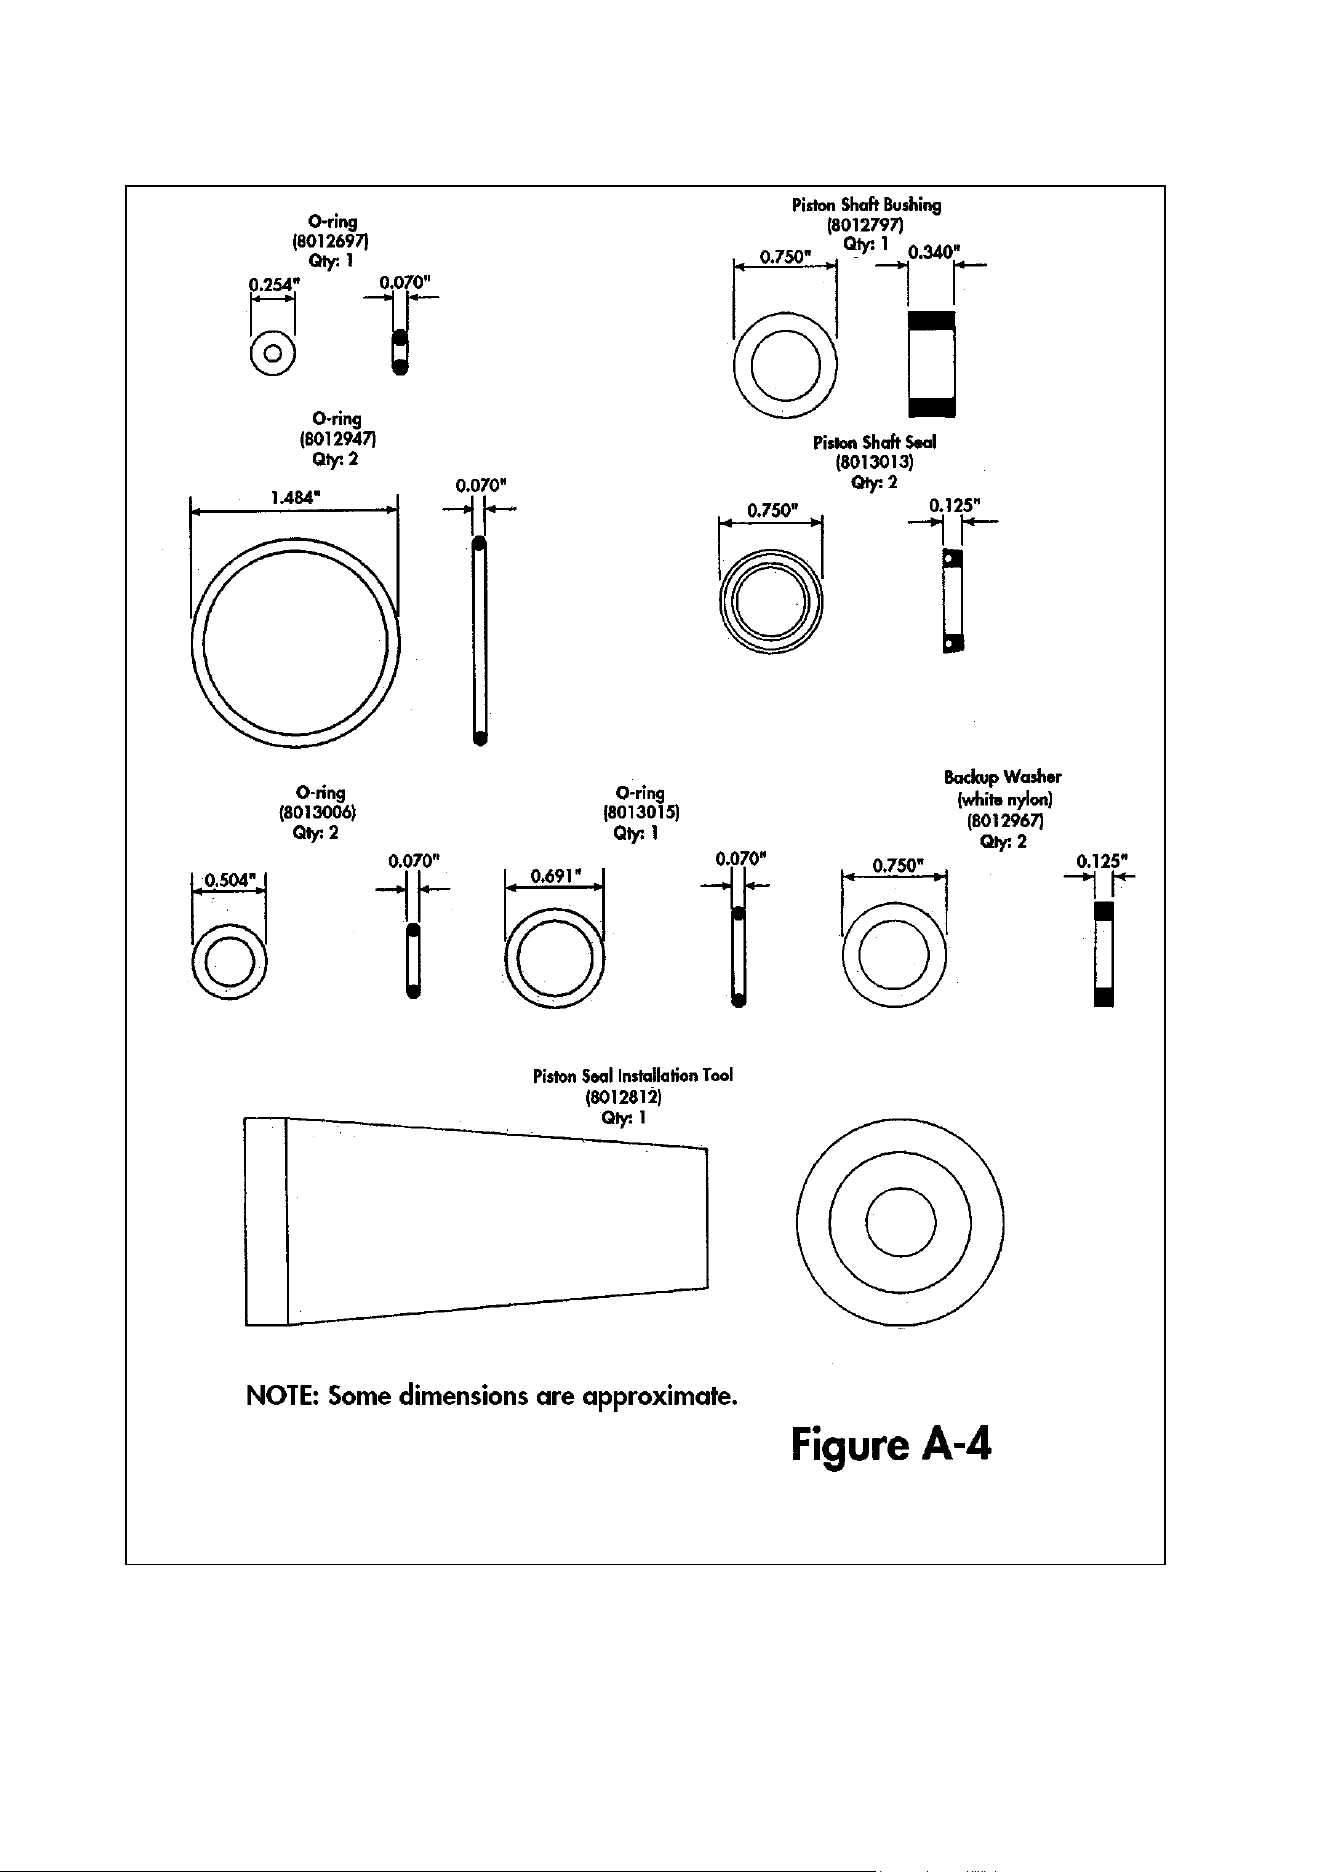
instructions completely. Have a Repair Seal Kit on hand. Refer to the drawings in Figures A-
2, A-3 and A-4 in the Appendix to identify the major components of the pump and the parts
contained in the kit to make sure none are missing. Prepare a clean flat workspace with
good lighting. Have the following tools and materials available for a complete rebuild:
Tools Needed:
piston seal installation tool (included*) small scissors
1/2 “ open-end wrench 10x loupe or magnifier
5/8 “ open-end wrench silicone grease (included in *Repair Seal Kit)
1/4 “ Allen wrench clean rags
medium flat blade screwdriver small standard pliers
Disassembly:
1. Before beginning disassembly, run the watermaker and stop it when the piston shaft
is at its farthest point of travel away from the pump (i.e., towards the drive assembly).
This provides enough room for sliding the rubber boot towards the pump in Step 3.
2. Disconnect the pump from the drive assembly by first removing the two hex nuts and
5" socket head cap screws from the check valve plate, using the 1/2" open-end
wrench and 1/4" Allen wrench. Also remove the two hex nuts securing the pump
back plate to the drive assembly. See Figure R-1.
3. Slide the black rubber boot
on the piston shaft toward
the pump to expose the drive
shaft coupling pin. Use a
small AAllen wrench or similar
tool to push the coupling pin
out of the drive shaft (see
Figure 8). Be aware that the
coupling pin fits loosely in the
drive shaft and may fall out
when the rubber boot is
removed. Be careful not to
lose it. Separate the drive
assembly from the pump and
set the drive assembly aside.
21
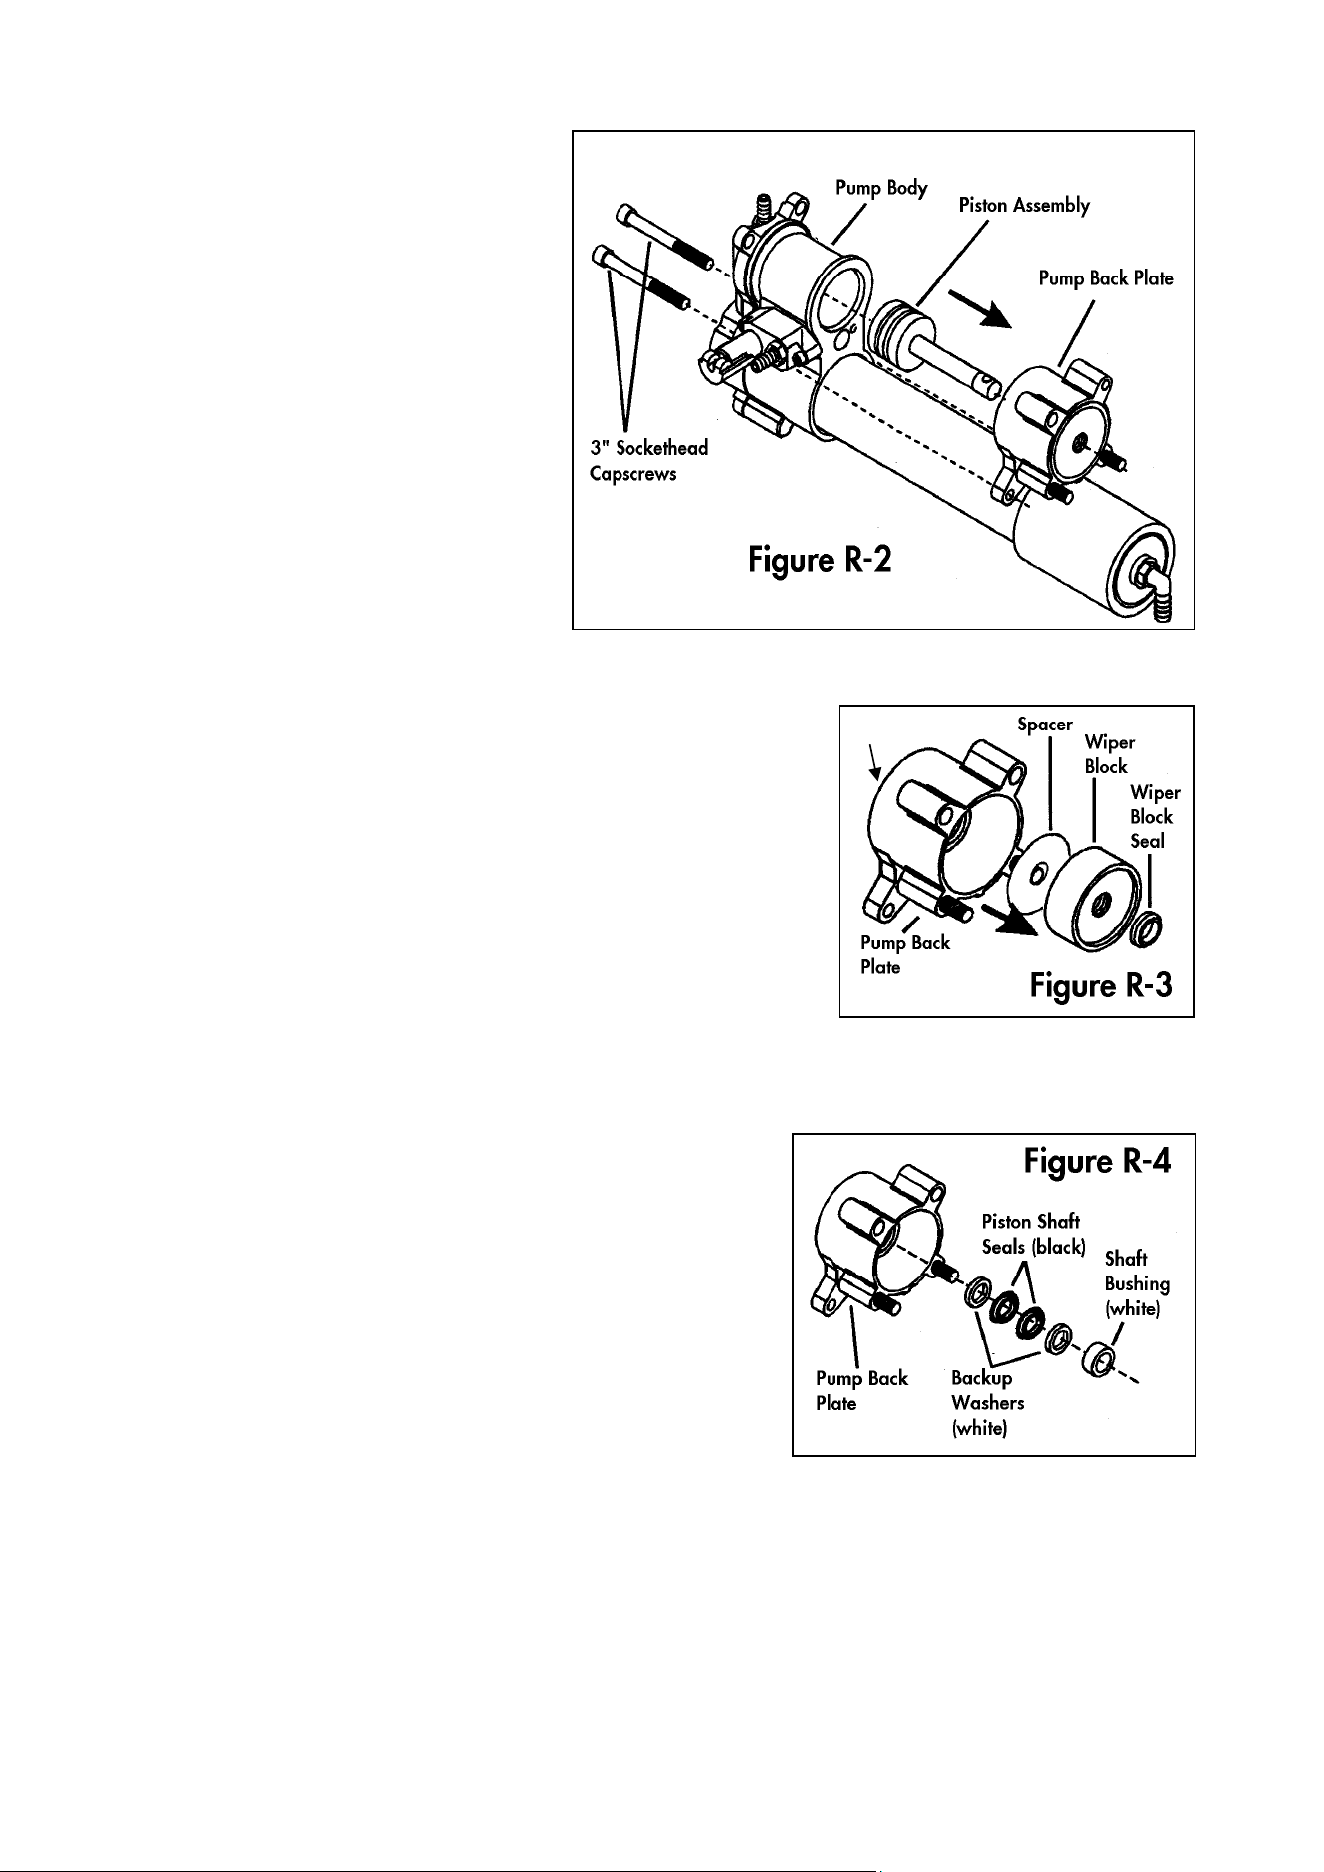
4. Remove the two 3" socket
head cap screws using a 1/4"
AAllen wrench. Separate the
pump back plate and piston
assembly from the pump
body (see Figure R-2).
5. If the piston assembly
remained with the pump
back plate when it was
removed, pull the piston out
of the back plate and set it
aside. If the piston stayed in
the main pump body, pull it
out of the cylinder. If the
piston assembly is difficult to
remove from the pump body,
insert a small Allen wrench or
Phillips screwdriver through the coupling pin hole. This will provide a “t-handle” with
a better grip for extracting the piston assembly. Be aware not to damage the surface
of the piston shaft.
6. Remove the large O-ring (8012588) from the groove
on the side of the pump back plate that faces the
pump body. Remove the wiper block and spacer (if
present) from the pump back plate. Use needle-
nosed pliers to pull the old wiper block seal out of
the wiper block. See Figure R-3. (Note: This seal is
usually damaged during removal. Be sure you have
a replacement on hand before removing it.)
7. From the side of the pump back plate that
contained the large O-ring, insert a round drift of
slightly smaller diameter than the hole for the piston shaft. (Note: a small socket on
an extension or a wooden dowel makes a suitable drift). Tap the drift with a mallet to
drive the two backup washers, two piston shaft seals and the piston shaft bushing out
of the pump back body. See Figure R-4.
8. Remove the remaining two 3/4" socket head
cap screws from the check valve plate using a
1/4" Allen wrench. Separate the check valve
plate from the pump body. If it is difficult to
remove, try rotating the check valve plate 90°.
This provides a better grip for pulling the check
valve plate from the pump body.
9. After the check valve plate has been separated
from the pump body, the membrane tube plug
will remain in either the check valve plate or the
pump end of the membrane housing. Use one
of the following procedures to remove it:
A. If the membrane tube plug remains in the membrane housing, insert a hard,
thin edge (e.g., a dull pocketknife) between the tube plug and the fiberglass
molding of the membrane housing. Work the blade sideways to pry the tube
plug out slightly, until there is enough of a gap between the tube plug body
and the membrane housing to insert a flat blade screwdriver. Then use two
screwdrivers on opposite sides of the tube plug to carefully work it out of the
8012588
22
membrane housing. Avoid gouging or damaging the membrane housing or
the tube plug.
B. If the membrane tube plug remains in the check valve plate, use a thin edge
and/or flat blade screwdrivers, on opposite sides of the membrane tube plug,
to carefully pry the plug out of the check valve plate. Avoid damaging the
membrane tube plug.
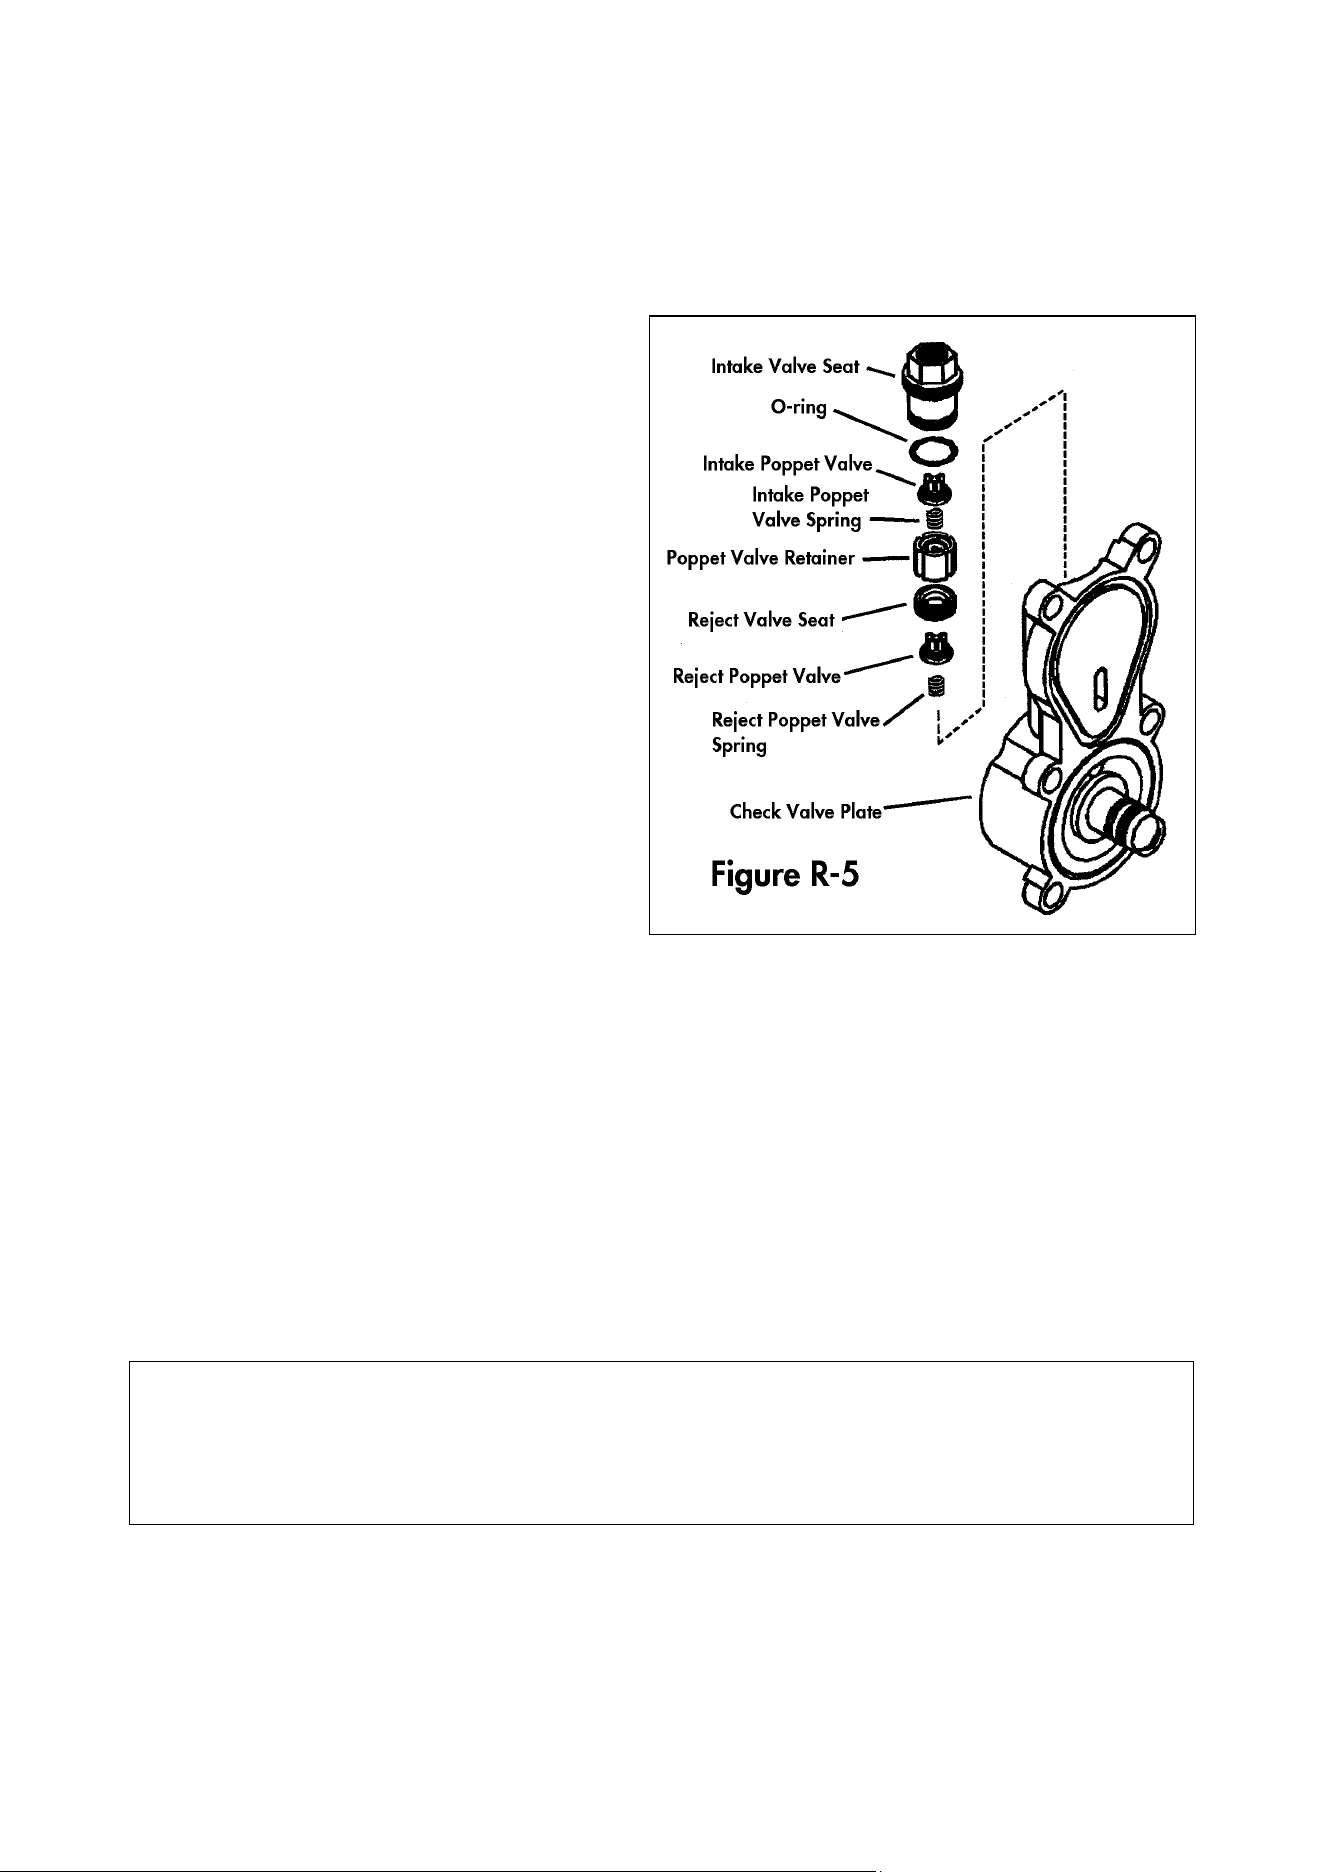
10. Disassemble the valves in the check
valve plate (see Figure R-5.) Use a
5/8" open end wrench to unscrew
the intake valve seat. Remove the
intake poppet valve and its spring. If
necessary, use needle-nosed pliers
to remove the poppet valve
retainer. Then use the pliers to lift out
the reject poppet valve and its seat.
Grip the x-shaped ribs of the reject
poppet valve and pull straight up.
The seat will be pulled out along
with the valve. After the reject
poppet valve and its seat have
been removed, retrieve the reject
poppet valve spring from the
bottom of the check valve plate
cavity.
This completes the disassembly of all user-
serviceable parts of the Katadyn
PowerSurvivor 40E watermaker.
Reassembly: Before you begin reassembly of the watermaker, clean all parts using
clean, lint-free rags. At this time, all parts should be carefully inspected for wear or damage.
Use a 10x magnifier or loupe to examine the seals, O-rings and other small parts. Stubborn
rust stains and other deposits on metal parts can be cleaned with a soft-metal wire brush
(e.g., stainless steel or brass). Do not use polishes, cleaning compounds containing abrasive
materials, or regular steel wire brushes. During reassembly, refer to Figures A-3 and A-4 in
the Appendix for full-size drawings and identification of the components included in the
Repair Seal Kit.
In the following procedure for reassembling the watermaker, it is assumed that all parts have
been cleaned and that all O-rings, seals, and mating surfaces have been lightly lubricated
with non-petroleum silicone grease (supplied with the Repair Seal Kit). References to the
Repair Seal Kit will be abbreviated to “RSK.”
Warning: Use only non-petroleum silicone grease to lubricate your watermaker.
Lubricants with a petroleum base will damage several watermaker components,
including the reverse osmosis membrane. Be especially cautious of lubricants that
“contain” Teflon, silicone, etc. — such products could also contain petroleum-based
components. An ample supply of silicone grease is included with each RSK.
1. Make a note of the correct orientation of the old cup ring and PIP seal and then
remove them from the piston assembly. Since these components are made of rather
stiff rubber, it is usually easier to cut them off. Use a small screwdriver to wedge under
the cup seal and pry it up. While holding it up, cut it with a small pair of scissors.
Repeat this process for the PIP ring.
23
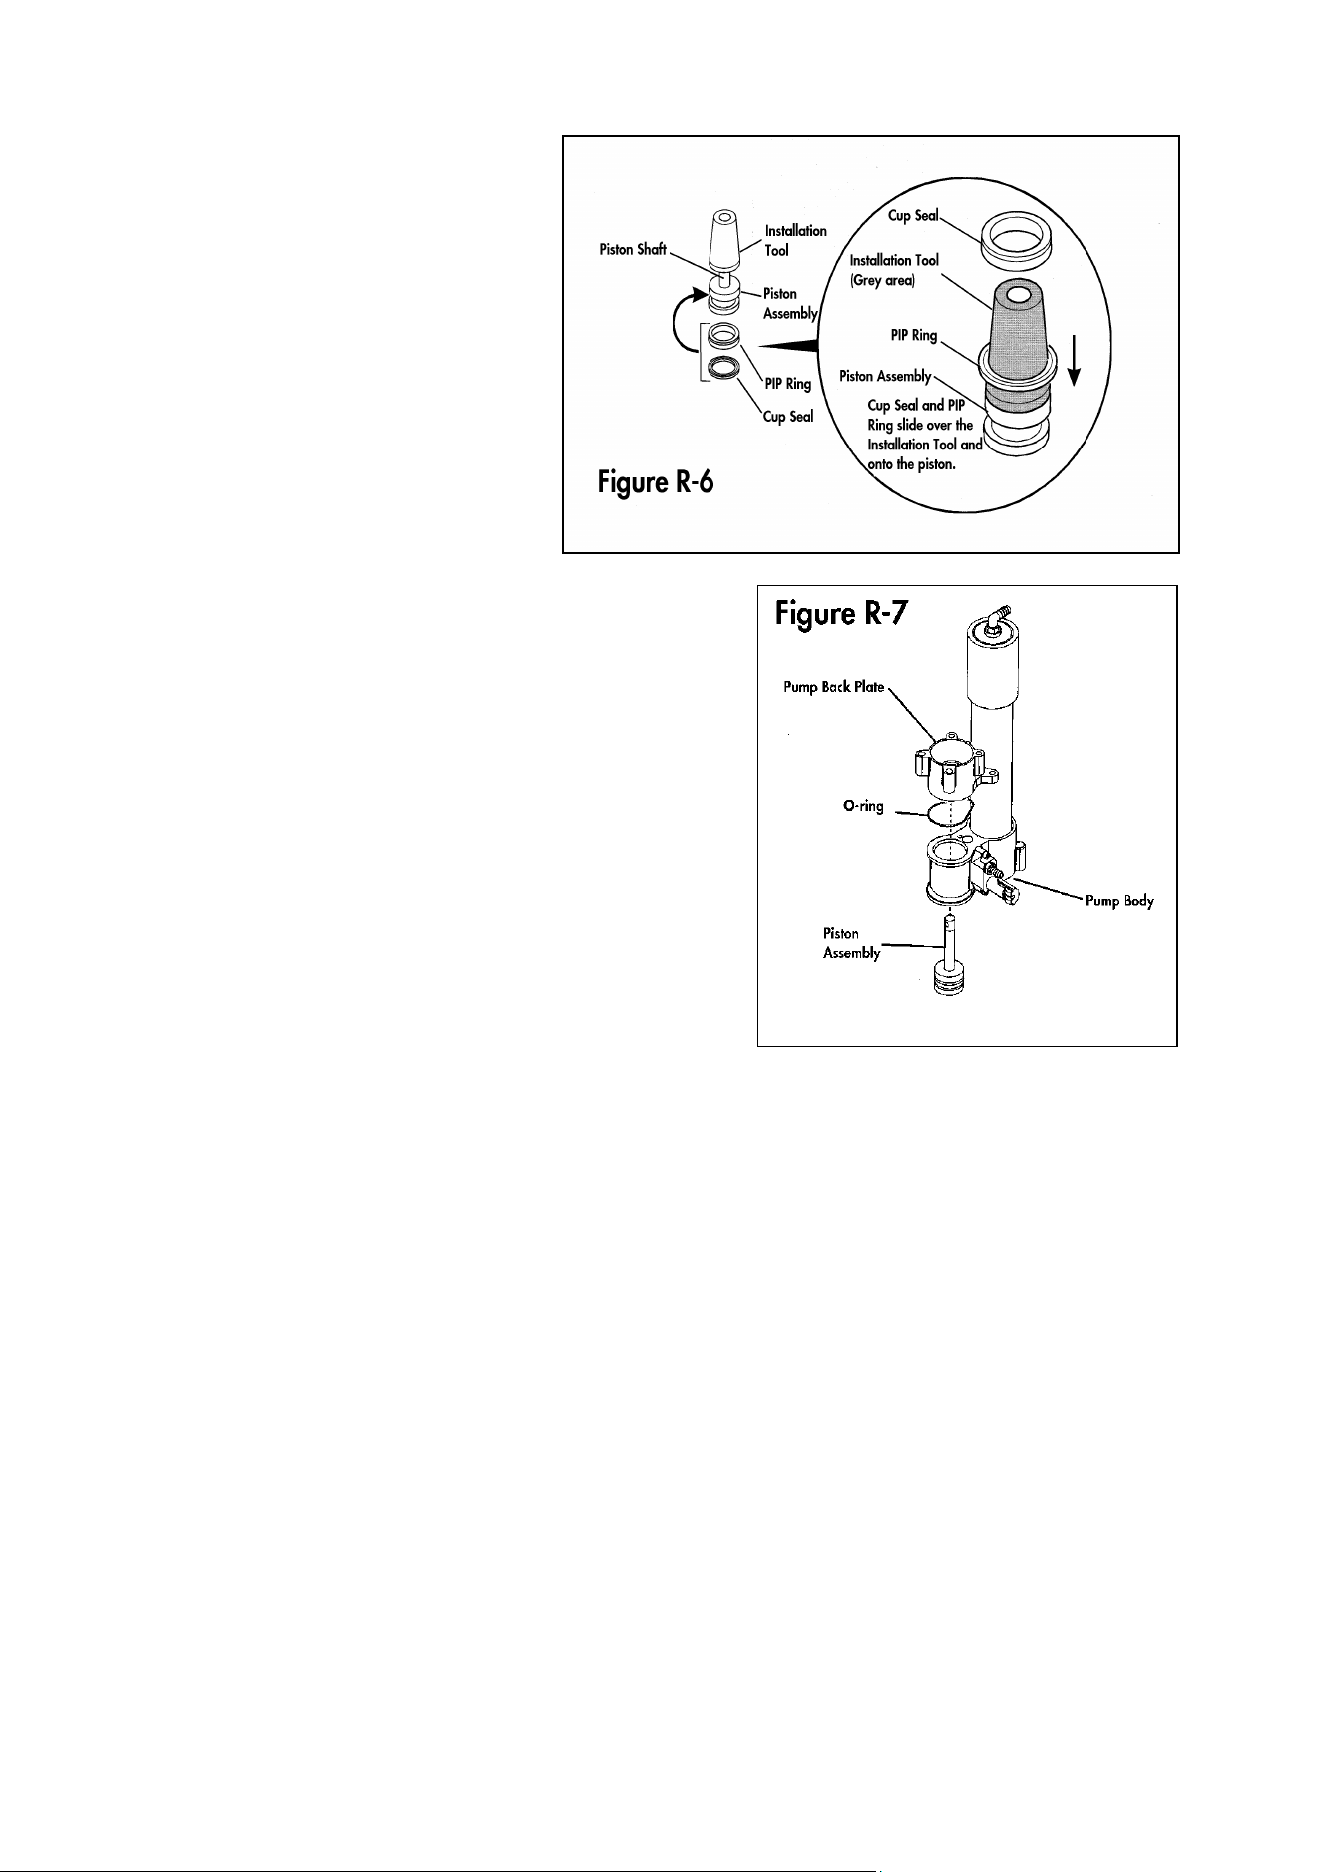
2. Refer to Figure R-6 during the
following procedure. Place
the piston assembly on a flat,
stable surface with the shaft
pointing up. Slide the
installation tool (provided in
the RSK) over the piston shaft
with the wide end down.
Lubricate the new PIP ring,
cup seal and the installation
tool with silicone grease.
With the grooved side
facing up, slide the PIP ring
down the installation tool
and onto the piston. Repeat
this process for the cup seal. Note that the
grooved side of the cup seal should be
facing down; i.e., the grooved sides of the PIP
ring and the cup seal should be facing each
other. When finished with the installation,
remove the installation tool from the piston
shaft.
Note: This is a very tight fit by design and will
require a fair amount of force to push the PIP
ring down the installation tool. You may use
an object to help push the pip ring evenly
down the tool. Please make sure not to
damage the PIP ring.
3. Lightly lubricate the cylinder in the pump
body with silicone grease. Slide the finished
piston assembly, shaft first, into the pump
body from the side of the pump body that faces the check valve plate. Install the
large O-ring (8012588) into the groove in the pump back plate and lower the pump
back plate over the piston shaft. The side of the back plate with the large O-ring
should be facing the pump body. See Figure R-7.
4. Refer to Figure R-4. Slide one of the white backup washers over the piston shaft and
press it into its bore in the pump back plate. Next, slide one of the two black rubber
piston shaft seals over the piston shaft and work it into the bore on top of the backup
washer. Note that the shaft seals are flared out on one side. It is important that the
flared (wider) side should be down, facing the shaft bore. Install the second piston
shaft seal in the same way. It too should be installed with its flared side facing down.
Next, install the second white backup washer and, finally, the white bushing. Slide the
installation tool (used in Step 2 above) over the piston shaft with the narrow end
facing the white bushing. Use the installation tool to press the shaft washers, seals and
bushing all the way into the bore. When finished, the outside end of the bushing
should be flush with the bore opening.
5. Install a new wiper block seal into the wiper block. The seal must be pressed into a
groove inside the bore in the middle of the wiper block with the narrower side of the
seal facing outwards. Form the seal into an oval shape by squeezing it between your
fingers and press one side of the seal into the groove in the wiper block. Once an
edge of the seal is started into the groove, carefully work the rest of the seal into
place. After the seal has been installed, slide the spacer (if present) and wiper block
onto the piston shaft. The side of the wiper block from which the seal was installed
should be facing outward. Refer to Figure R-3.

24
6. Prepare the check valve plate for reassembly by installing the new poppet valves.
Note that both the intake and reject poppet valves and valve springs are identical.
Refer to Figure R-5 during the following procedure:
A. Lower a new poppet valve spring into the bottom of the bore in the check
valve plate. Use your little finger or the eraser end of a pencil to press it into its
seat. It is designed to be a light press fit and, when installed correctly, it should
stay vertical in place during the next step.
B. Use needle-nosed pliers to carefully lower one of the new poppet valves into
the bore. The poppet valve should rest on top of the spring with the poppet’s
cross side facing up.
C. Lower the new reject valve seat into the bore and use a finger to press it down
as far as it will go. Note that the hole in the middle of the valve seat has a
beveled edge on one side. The side with the beveled edge must face
downward; i.e., it must face the poppet valve. When properly installed, the
valve seat should fit neatly over the poppet valve. Test the poppet valve by
pressing it with the eraser end of a pencil. It should move up and down slightly
and seat squarely in the valve seat.
D. Locate the small depression in the center of one end of the poppet valve
retainer and press the second valve spring into the depression. It was designed
as a light press fit and should stay in place after being installed. Then lower the
poppet valve retainer into the bore in the check valve plate with the spring
facing upward.
E. Lower the second poppet valve into the bore in the check valve plate and
rest it carefully on top of the valve spring.
F. Remove the old O-ring (8013015) from the intake valve seat and replace it
with the new one from the RSK. Carefully screw the intake valve seat into the
check valve plate and tighten with a 5/8" open end wrench. Use the eraser
end of a pencil or a small Allen wrench to test the operation of the intake
poppet valve. The poppet valve should move down slightly and then spring
back up against its seat.
7. Replace the two large O-rings (8012947) and the two smaller O-rings (8013006) on
the membrane tube plug with new O-rings from the RSK. Insert the small end of the
membrane tube plug into the exposed hole in the membrane element (which should
have been left installed in the membrane housing) and press the tube plug into the
membrane housing as far as it will go. The ridge on the outside of the tube plug should
be flush against the end of the membrane housing.
8. Press the piston as far as it will go toward the pump back plate. Install a new O-ring
(8012588) into the groove of the check valve plate.
9. Press the check valve plate over the exposed end of the membrane tube plug. If
necessary, rotate the check valve plate to align it accurately with the pump body
and install the 3/4" and the 3" socket head cap screws. Check that the two large O-
rings (8012588) in the check valve plate and the pump back plate are still seated in
their grooves and then tighten the four cap-screws evenly with a 1/4" Allen wrench.
25
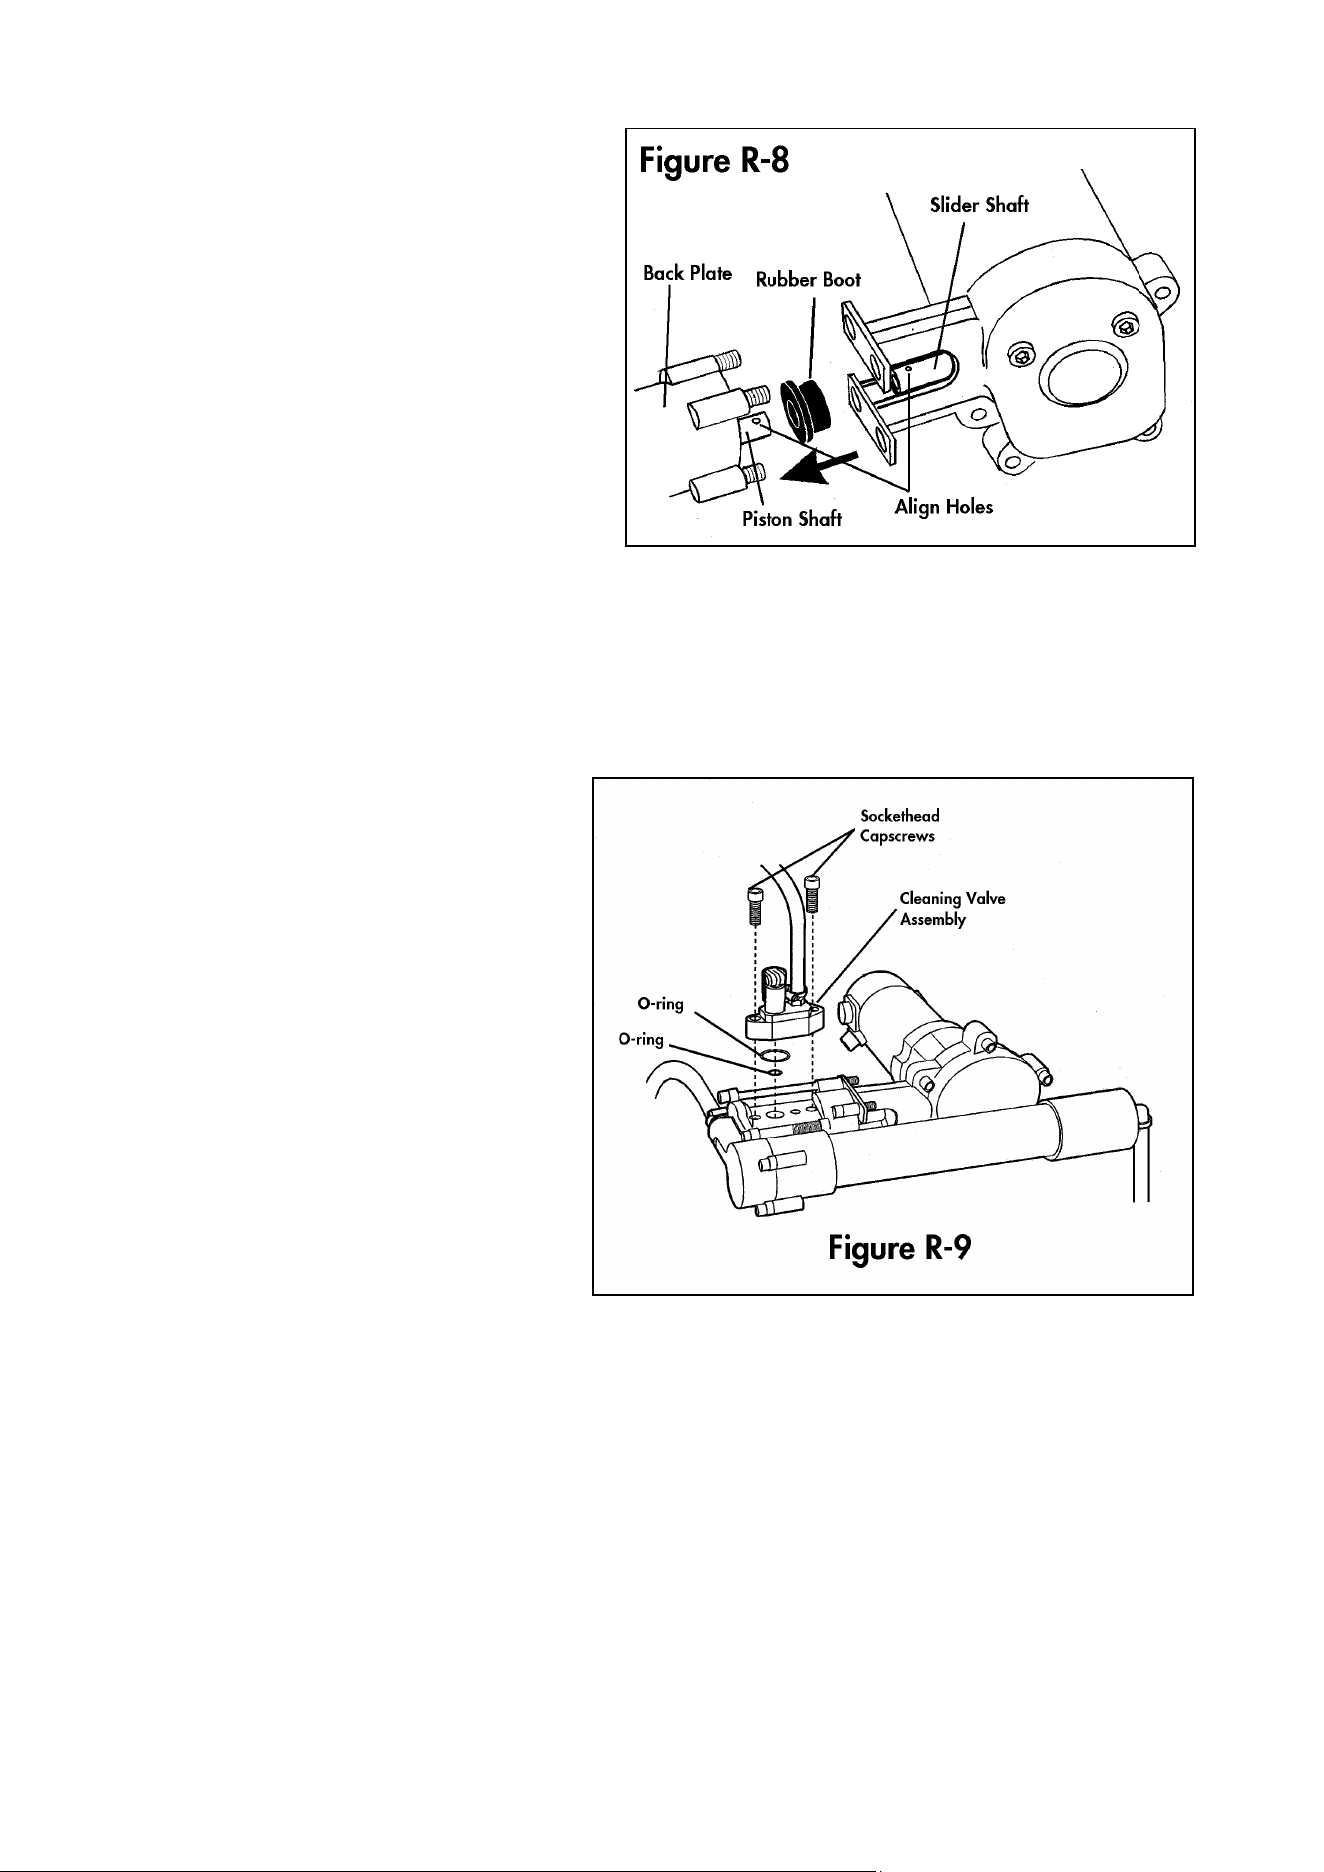
10. Slide the two 5" socket head cap
screws through the holes in the
check valve plate and the back
plate. Slide the rubber boot onto
the piston shaft. See Figure R-8.
11. Insert a small screwdriver or an
Allen wrench through the hole in
the piston shaft and rotate the
shaft to align its hole with the hole
in the slider shaft of the drive
assembly. When they are aligned,
slide the holes in the drive
assembly bracket over the studs
projecting from the pump back
plate. Insert the coupling pin
through the aligned holes in the slider shaft and piston shaft. Push the rubber boot
over the coupling pin to hold it in place.
12. Install the four hex nuts on the studs projecting from the pump back plate through
the drive assembly bracket and tighten evenly with a 1/2" open-end wrench and 1/4"
Allen wrench. Do not over tighten these fasteners!
13. To replace the O-rings beneath the cleaning valve assembly, refer to Figure R-9.
Unscrew the two socket head
cap screws using a 5/32" Allen
wrench and remove the
assembly from the pump body.
Remove old O-rings (8012594)
and (8012697) and replace
them with new O-rings from the
RSK. Replace the cleaning
valve assembly on the pump
body and install the two cap
screws. This completes the
procedure for reassembly of
the watermaker. When opera-
tion is commenced again,
carefully inspect the
watermaker for proper
operation and any leaks or
other signs of incorrect
assembly.
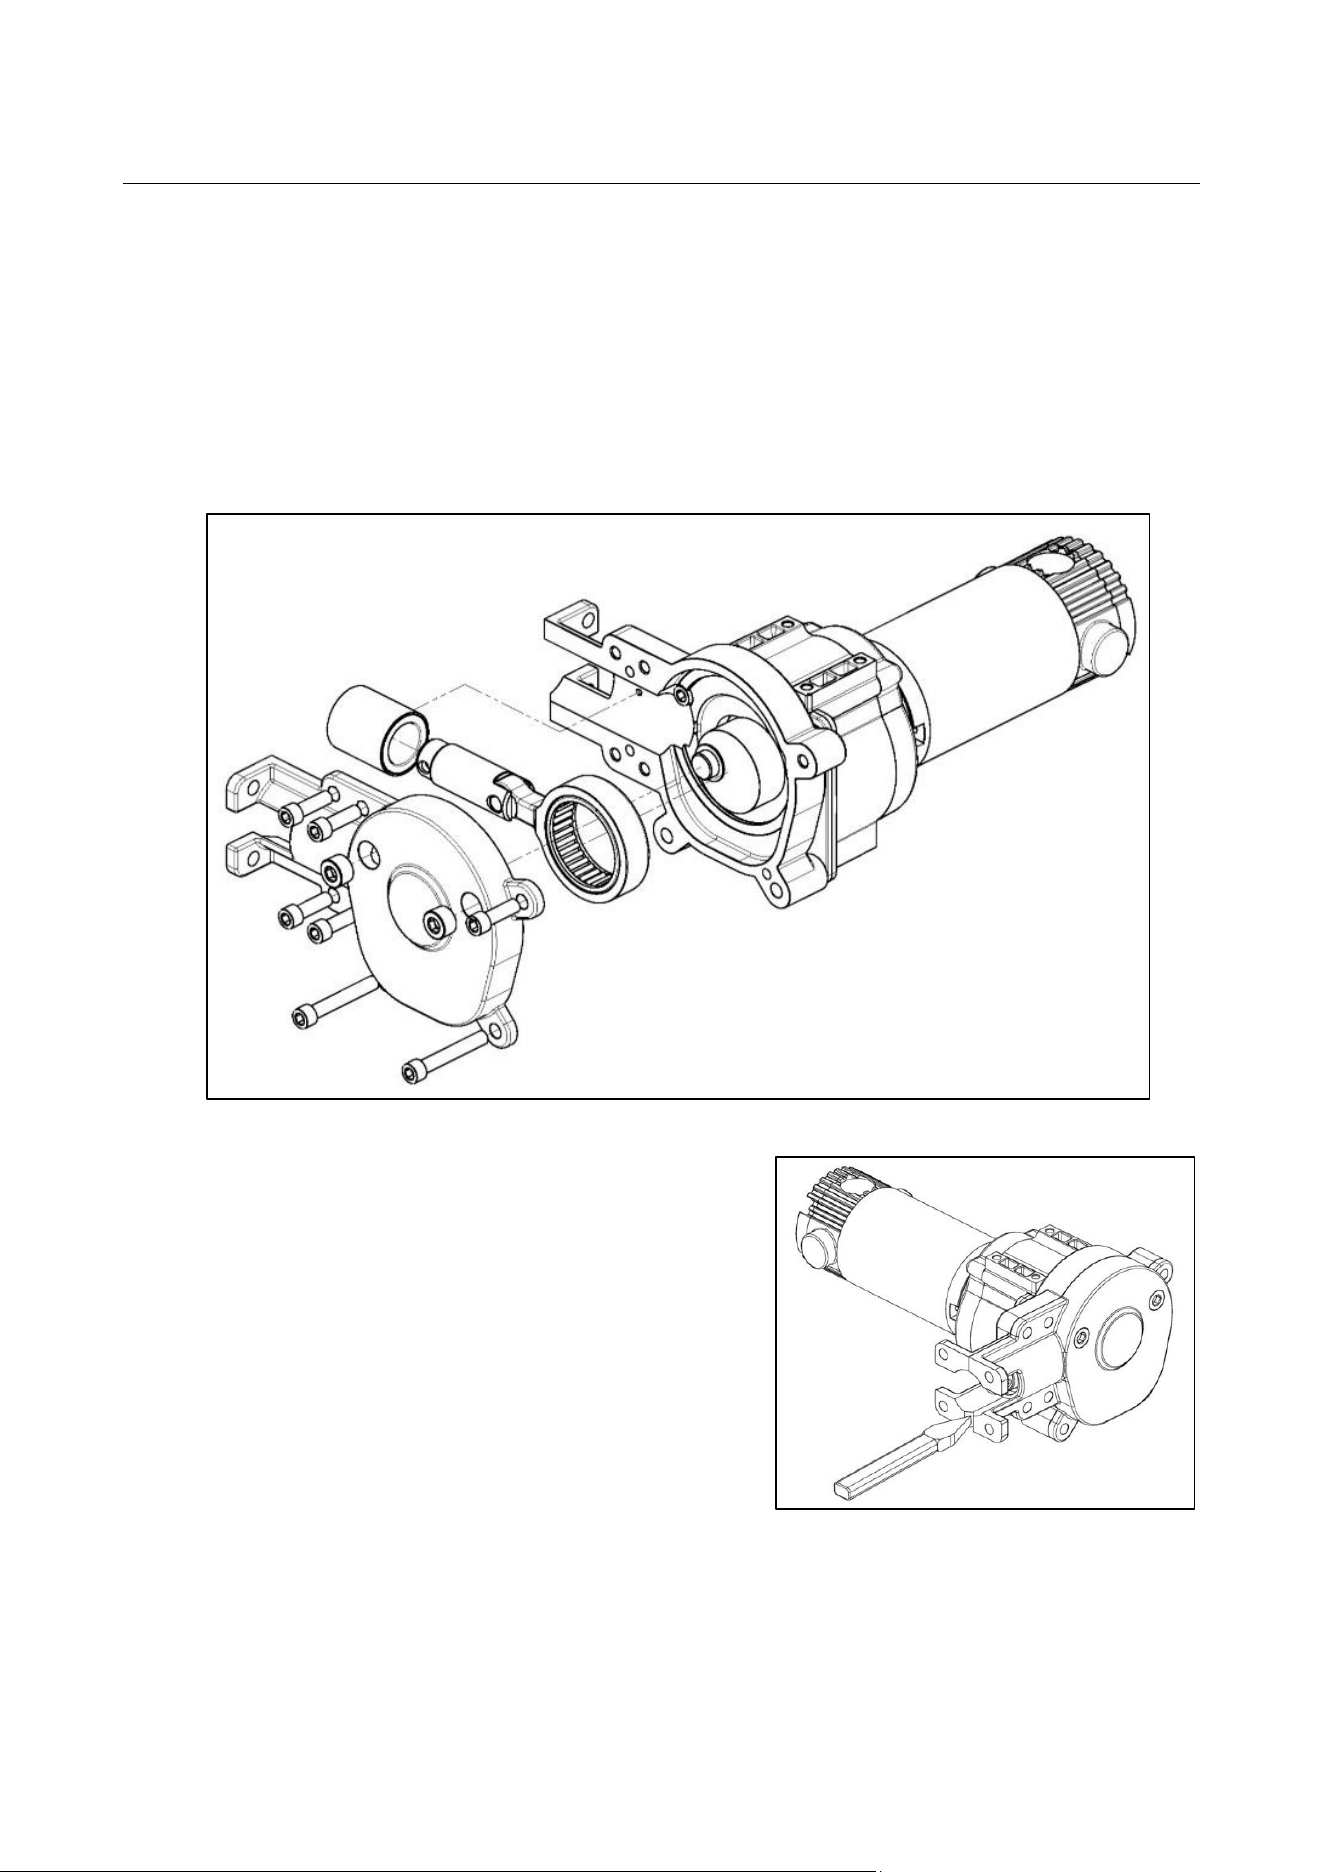
26
F5-Drive Maintenance
After approximately every 1000 hours of use or when there is a suspect that salt water has
entered the housing, the eccentric drive should be opened for inspection, cleaning, and
lubrication.
Tools Needed:
¼” Allen wrench (Torque wrench if available)
Hammer
Cape chisel
Flat chisel or medium flat blade screwdriver
Grease
Disassembly:
1. Disconnect the drive assembly from the pump
according to the instruction in section “Seal
Replacement, Disassembly”
2. Remove the seven ¼” hex bolts from the
eccentric drive assembly
3. Remove the housing front from the drive
assembly. You can use a cape chisel and a
hammer to hit from the pump flange side into
the groove.
4. Remove the connecting rod with slider
assembly from the eccentric. Use a flat chisel to lift the connecting rod
5. Slide the slider out of the sleeve
6. Clean the parts with dry cloth. The slider can be cleaned with a soft scotch brite that
does not scratch the surface.
7. Inspect the parts for any damage and wear. In case of damage or excessive wear
install a new drive service kit (Art no 8019114).
Figure R-11
Figure R-10
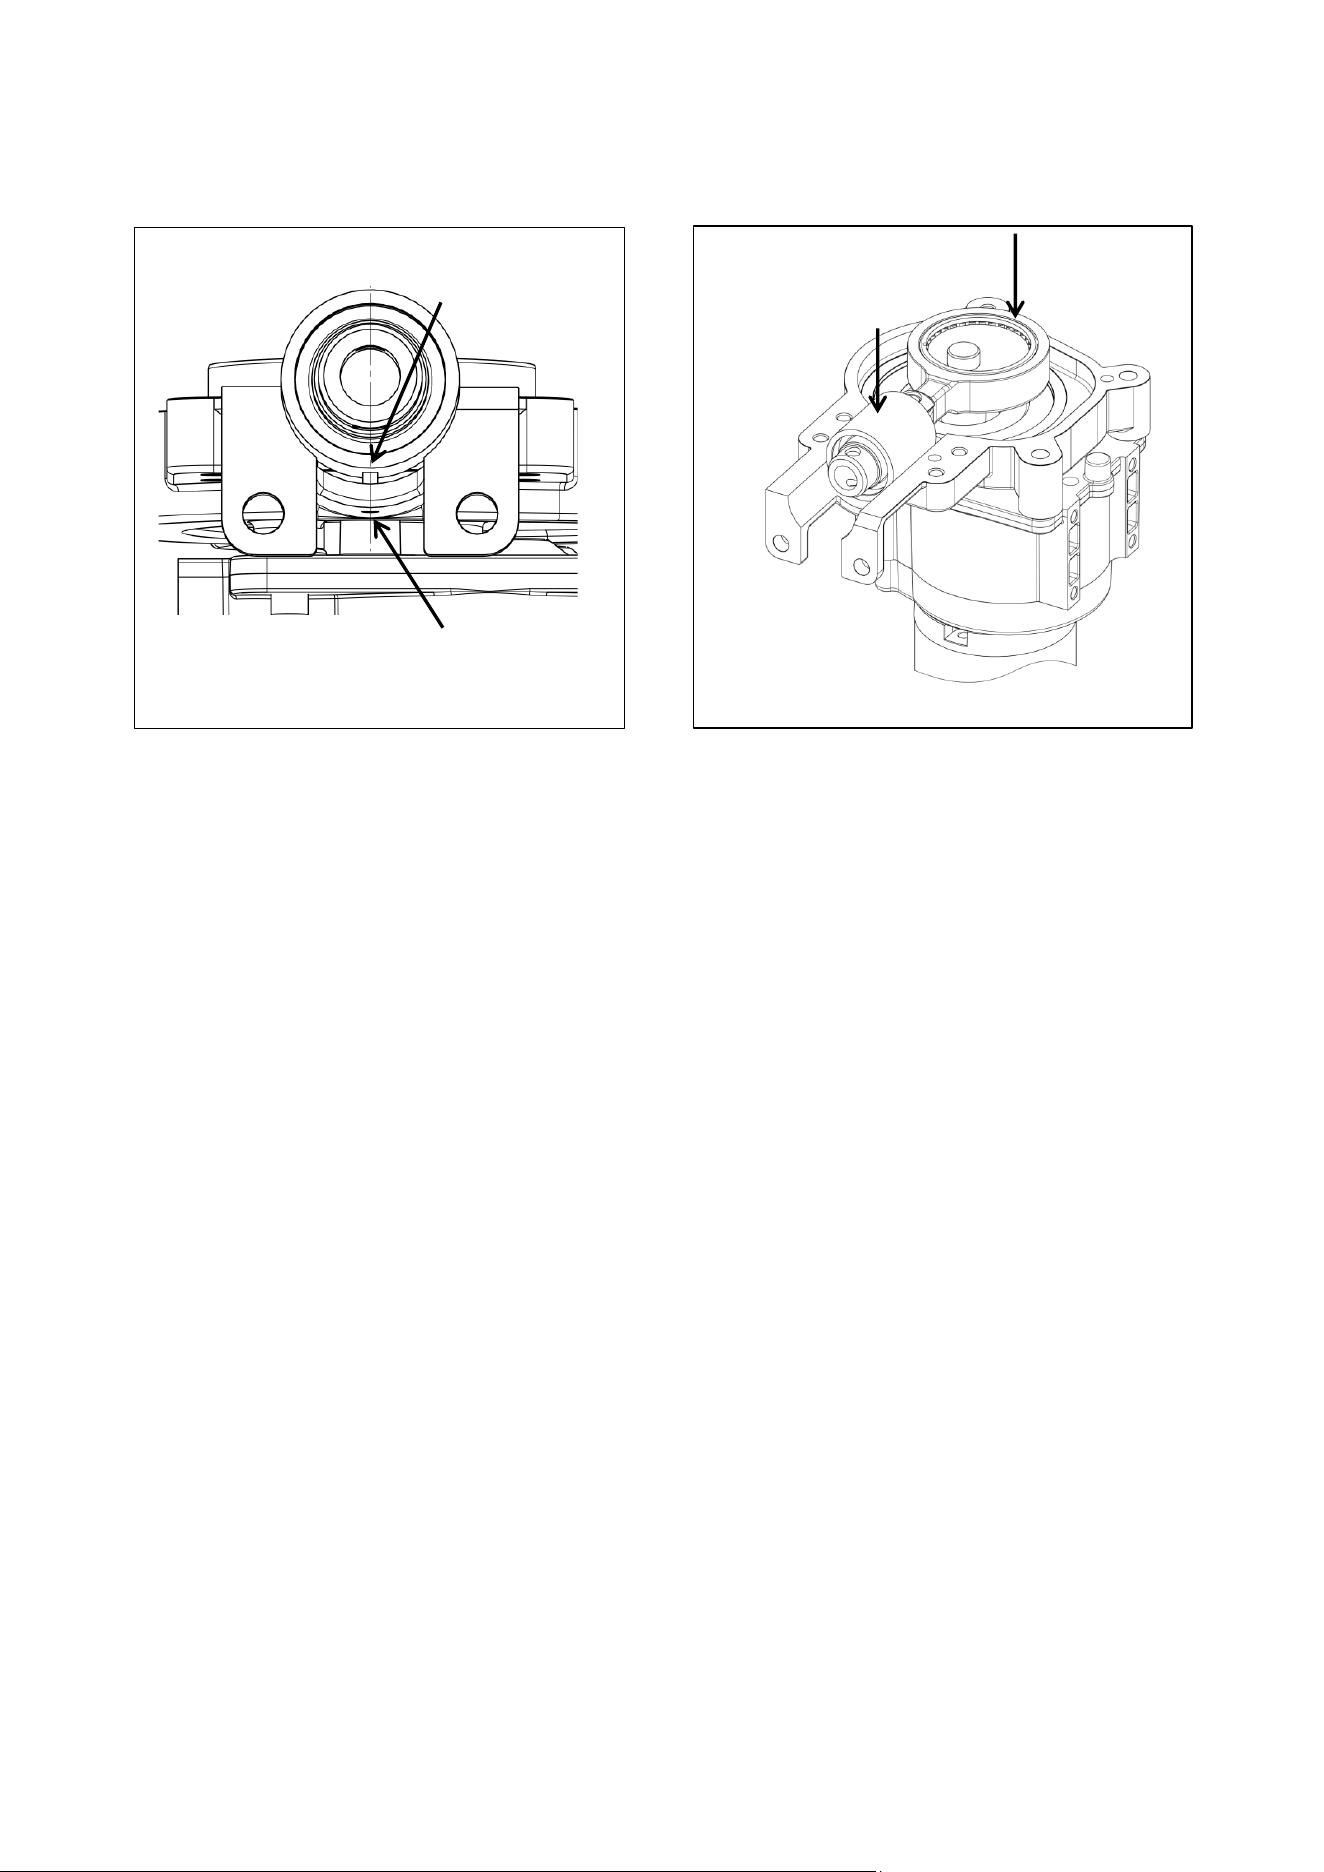
27
Reassembly:
Push the small pin in the housing until it is flush with the outer side.
1. Lubricate the needles of the needle bearing with grease.
2. Put the sleeve with the bronze bushing first onto the slider. It is not necessary to
lubricate as the bronze bushing is oil impregnated. Push the wiper over the edge
while turning the sleeve. Turn the hole of the sleeve to the side where the needle
bearing is not flush with the connection rod. Align it with the cross holes of the slider.
3. Place the needle bearing of the connection rod with the jutting side first onto the
eccentric. Align the hole in the sleeve with the pin in the housing and push it back to
the housing.
4. Place the housing front back to the drive assembly. Insert the bolts and tighten it with
25 Nm.
5. Connect the drive to the power source and check if the drive runs smooth. If it does
not run smooth disassemble the drive again and correct the fault.
6. Assemble the drive unit to the pump according to the instruction in section “Seal
Replacement, Reassembly”.
flush
Figure R-12
aligned
push
Figure R-13
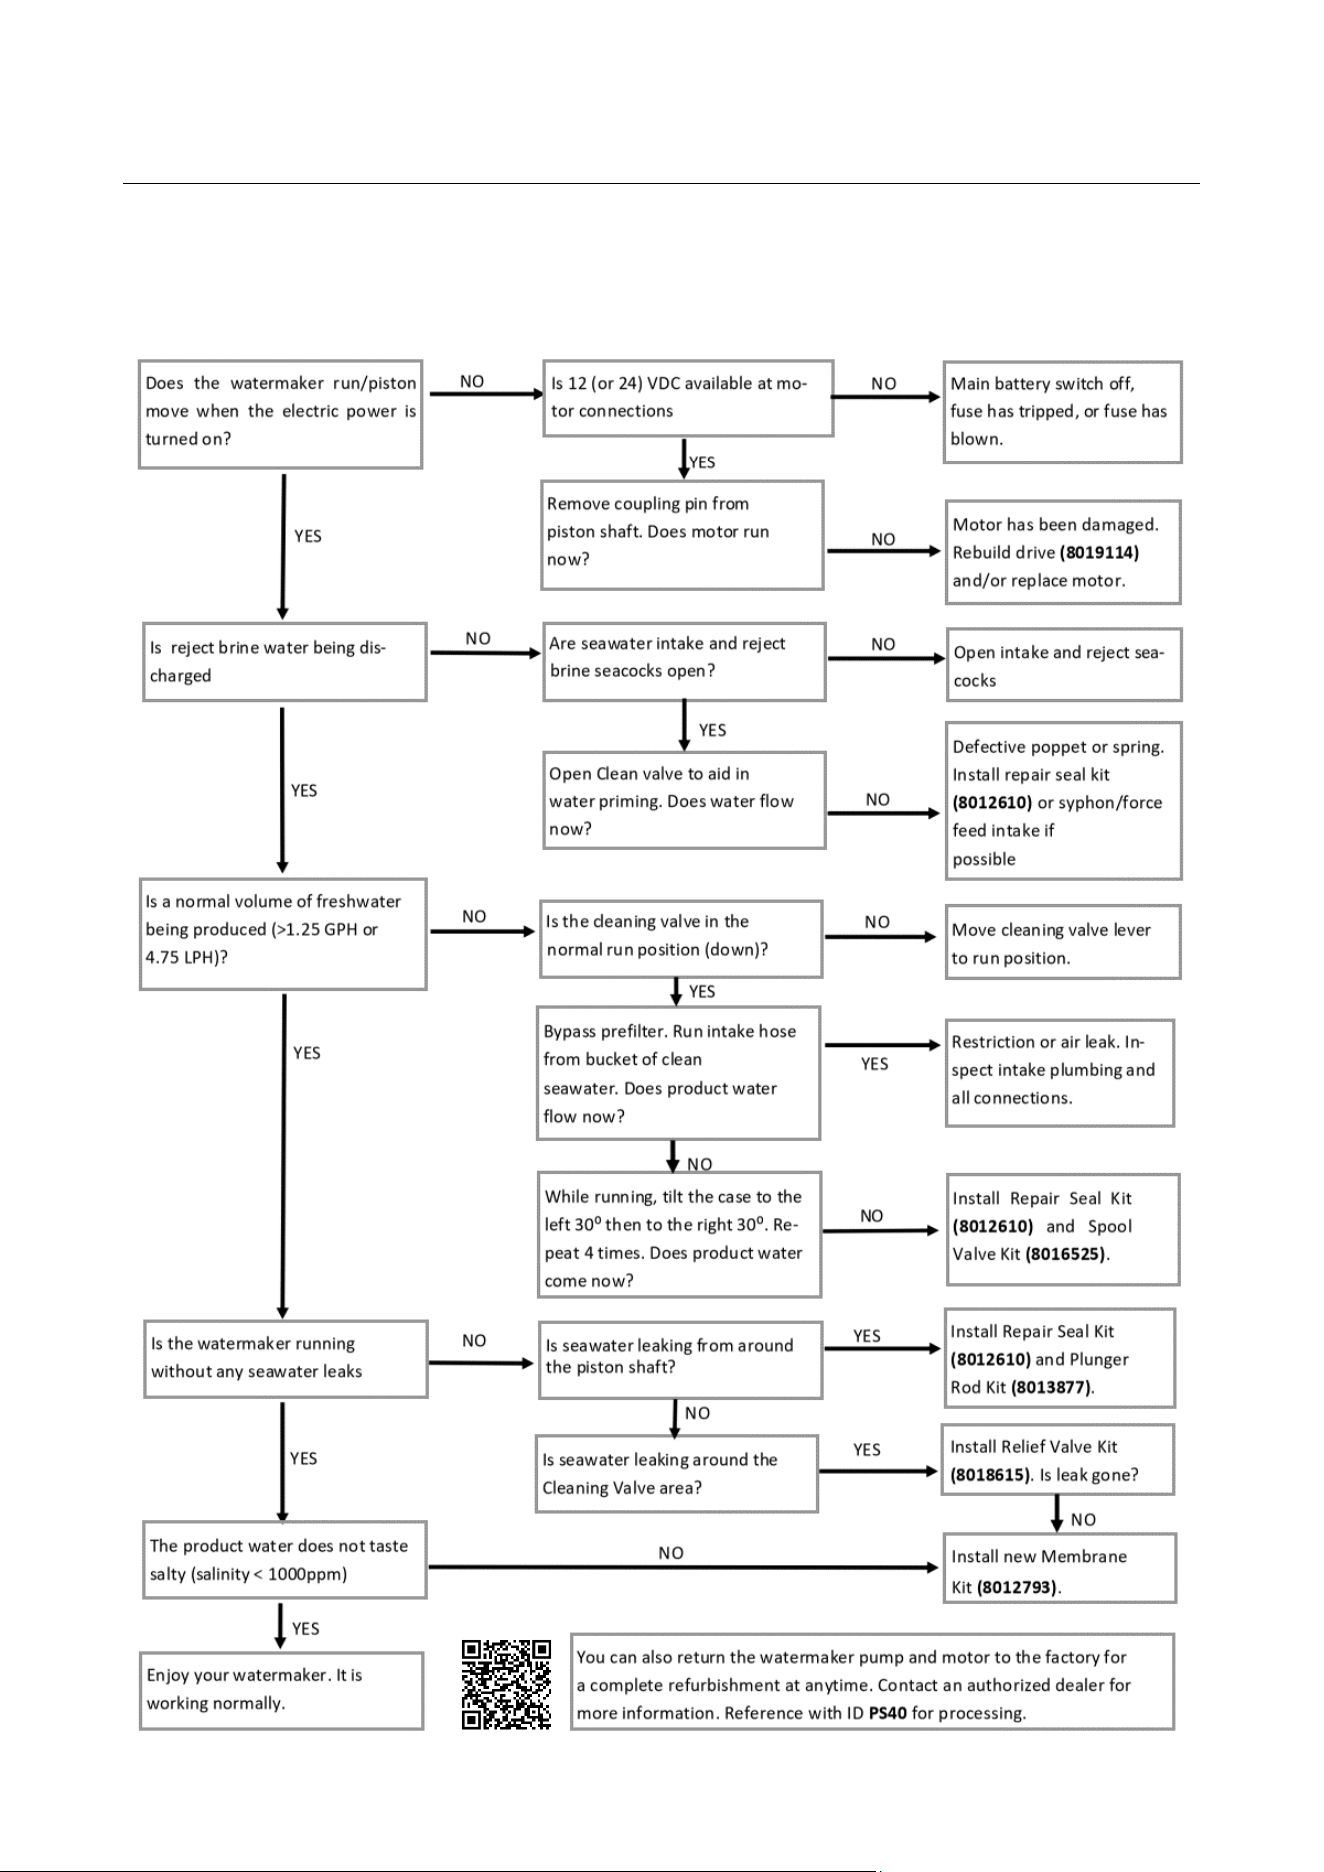
28
F6-Troubleshooting Flowchart
Use the flow chart below to diagnose and solve the most common problems associated
with use of the PowerSurvivor 40E watermaker. The information in this chart is a distillation of
the experience of many users, our field representatives, and customer support staff. Use it
first if you encounter a problem. If the problem persists, our Customer Support department
is ready to help.
Contact:

29
G-Appendix
A collection of useful information for the Katadyn watermaker owner
G1-Glossary
Membrane Preservative a chemical used to inhibit biological growth in the reverse
osmosis membrane during storage or extended periods of non-use.
Filter a device which removes suspended solids from a fluid stream. A filter is not the same as
a reverse osmosis membrane.
Micron a metric unit of measurement equal to one thousandth of a millimeter, or one millionth
of a meter.
Osmosis the process of diffusion between two water sources through a semipermeable
membrane, resulting in both water sources striving to reach an equilibrium in the concentrations
of dissolved substances.
Pickling a slang term for the process of flushing the membrane with membrane preservative
(see Membrane Preservative).
Potable suitable for drinking, especially water. With regard to a desalinator, it is generally
defined as water with 1500 ppm or lower of dissolved solids that is relatively free of harmful
microorganisms.
PPM parts per million. Used as a measure of the quantities of substances dissolved in water.
Prefilter a filter placed in a desalinator system to remove suspended solids from the feed
water before it reaches the high pressure pump and reverse osmosis membrane.
Pressure Relief Valve a valve that relieves pressure in a system to prevent damage to
system components. In the PowerSurvivor 40E, the relief valve is set to open at 1000 psi, to
prevent damage to the pump and membrane.
Product Freshwater potable water produced by the reverse osmosis process.
PSI pounds per square inch — a unit for measuring pressure.
Reverse Osmosis (RO) a reversal of the natural osmosis process between two fluids which
occurs when water is forced under pressure through a semipermeable membrane. It produces
potable water.
Salinity a measure of the amount of salts, minerals, and other dissolved solids contained in a
water source. Salinity (see TDS) is measured in ppm.
Salt the common name for the chemical sodium chloride. Open-ocean seawater is about 3.3
% dissolved salt, or about 33,000 ppm of sodium chloride.
Seal a device (such as an o-ring) used to prevent fluid leakage between two system
components.
Semipermeable the characteristic of some materials (e.g., a reverse osmosis membrane)
that makes them relatively porous to some substances while blocking the passage of others.
Unlike normal filters, semipermeable membranes usually operate at the molecular or atomic
level, allowing much finer “filtering” than simple mechanical filters.
TDS Total Dissolved Solids — a type of measure commonly used to indicate the purity of water,
usually expressed in ppm. A standard TDS meter measures only the electrical conductivity of the
water being tested. Therefore, it is only able to measure dissolved substances that are ionized in
solution (e.g., sea salt). In particular, they do not indicate the presence of non-ionized
substances, such as bacteria, viruses and many other soluble chemicals.
30
G2-Diagrams
Cleaning
valve
(8018663)
(8018662)
(8018660)
Hose Kit with strainer
(8013989)
31
(8018615)
Plunger Rod Kit
with Seals
(8013877)
(8013986)
(8018673)
(8012583)
(8018615)
Kit, Spool Valve
(8016525)
32
33

34
G3-Kits & Accessories
Silt Reduction Kit (Prefilter for improved protection and long service life)
Part # 8012859
This kit is intended to protect the high pressure pump and reverse osmosis membrane from
excessive exposure to silt and other suspended particulates. It should be used in brackish
water, shallow water, inland waterways, areas of glacial runoff and other similar situations.
The Silt Reduction Kit includes a 5-micron prefilter (Part # 8012858) which follows the
standard 30 micron filter supplied with the watermaker. The included 1 amp boost pump
ensures adequate intake flow to the watermaker.
Spare Filter Cartridge (30 Micron) (Keep always a spare filter ready)
Part # 8013323
Repair Seal Kit (Recommended for long distance routes and self repair)
Part # 8012610
A kit of all user-serviceable seals and parts for the high pressure pump. This kit also includes
replacement gear oil for the drive assembly (if needed). A Repair Seal Kit should be installed
after each approximately 1000 hours of use.
Plunger Rod Kit with Seals (Self repair)
Part # 8013877
Needed in case of leaking and/or pressurizing issues.
Membrane Kit with Seals (Self repair)
Part # 8012793
Needed in case of bad membrane shown as high salinity rate after seal change.
Spool Valve Kit (Self repair)
Part # 8016525
Needed in case of malfunction in correlation to flow or salinity rate.
Relief Valve Kit with Socket and O-Rings (Self repair)
Part # 8018615
Needed in case of pressure relief malfunction or leaking.
Eccentric Drive (Self repair)
Part # 8019114
Needed in case of an update from oil lubricated to grease lubricated drive or malfunction.
Check Valve Kit (Self repair)
Part # 8012665
Needed in case of intake and/ or pressurizing problems.
Drive Kit 12V (Self repair)
Part # 8013994
Gearmotor 12 VDC and eccentric drive for a general overhaul. For a replacement of the
brush inside the electric motor, please refer to the Brush Kit (Part # 8012649).
Cleaning & Storage Chemicals
Acid Cleaner (8 oz.) Part # 8013608 (1)
Alkaline Cleaner (8 oz.) Part # 8013615 (1)
Membrane Preservative (8 oz.) Part # 8013609 (1)
Propylene Glycol (106 oz.) Part # 8021285 (1)
Check out
our
Website:

35
G4-Service Log
Use this log to track your service and repair by yourself or a service mechanic.
Date
Preserved
Membrane
Cleaned Membrane
Other Service

36
G5-WARRANTY
LIMITED WARRANTY FOR POWERSURVIVOR™ 40E WATERMAKER
THIS LIMITED WARRANTY AND THE REMEDY PROVIDED HEREIN ARE EXCLUSIVE AND IN LIEU OF
ALL OTHER EXPRESS WARRANTIES AND, UNLESS STATED HEREIN, ANY STATEMENTS OR
REPRESENTATIONS MADE BY OTHER PERSON OR FIRM ARE VOID. THE DURATION OF ANY
IMPLIED WARRANTIES OF MERCHANTABILITY OR FITNESS FOR A PARTICULAR PURPOSE SHALL BE
LIMITED TO THE DURATION OF THE EXPRESS LIMITED WARRANTY. NEITHER KATADYN PRODUCTS
INC. (KATADYN) NOR ITS AFFILIATES SHALL BE LIABLE FOR ANY INCIDENTAL, CONSEQUENTIAL
OR SPECIAL LOSSES OR DAMAGES, RESULTING FROM THE USE OR INABILITY TO USE THE
POWERSURVIVOR 40E WATERMAKER, WHETHER RESULTING FROM BREACH OF WARRANTY OR
ANY OTHER LEGAL THEORY.
This Limited Warranty gives you specific legal rights, and you may also have other rights
which vary from State to State. Some States do not allow limitations on how long an implied
warranty lasts, or do not allow the exclusion or limitation of incidental or consequential
damages, so the above limitations or exclusions may not apply to you.
What Is Covered: KATADYN warrants to the original purchaser that the PowerSurvivor 40E
Watermaker enclosed with this Limited Warranty conforms to the manufacturer’s
specifications and is free from defects in workmanship and material for a period of two years
from the date of original purchase. If the original purchaser transfers the PowerSurvivor 40E
Watermaker to another person, this Limited Warranty will not be enforceable by the person
to whom the product is transferred.
What We Will Do To Correct Problems: Should your PowerSurvivor 40E Watermaker prove
defective during this period, you must notify KATADYN, or your authorized distributor or
dealer of KATADYN. You must permit KATADYN or its representatives to make such
investigation, examination, and tests as KATADYN deems appropriate and, if requested to
do so, you will return the product to the factory (contact & address see below). KATADYN’s
sole obligation under this Limited Warranty is, at its option, to repair or replace the defective
unit, without charge for parts or labor. Postage, insurance or shipping costs incurred in
presenting your PowerSurvivor 40E Watermaker product for warranty service are your
responsibility.
What Is Not Covered: This Limited Warranty is contingent upon proper use and maintenance
of the product; it does not cover products that have been improperly shipped or improperly
installed, or that have been misused, abused, neglected, or improperly maintained,
cleaned or stored, or that have been serviced other than by an authorized KATADYN
distributor or dealer. The PowerSurvivor 40E Watermaker can be damaged by oil, grease,
chlorine and certain other organic or inorganic substances. It must be cleaned carefully
after use, and requires periodic maintenance. Failure to observe the precautions listed in
the User’s Manual may constitute improper use or maintenance of the product and causes
this Limited Warranty not to apply. This Limited Warranty does not cover products from which
the KATADYN label or logo or the rating label or serial number has been removed. This
Warranty does not extend to normal wear or to replacement items, including but not limited
to filter cartridges, pump seals, membrane, O-rings and other consumables.

37

38
Contact us:
Importer USA:
Katadyn Desalination LLC
2220 S. McDowell Blvd Ext
Petaluma, CA 94954 U.S.A.
Tel: +1 415 526-2780
Fax: +1 415 526-2787
www.katadyngroup.com
customerservice@spectrawatermakers.com
Manufacturer:
Katadyn Products Inc.
Pfäffikerstrasse 37
8310 Kemptthal
Switzerland
Tel: +41 44 839 21 11
Fax: +41 44 839 21 99
www.katadyngroup.com
customerservice@katadyn.ch
Print No: 8012602/9