
User Guide
User Guide
User Guide
User Guide

2
(1.0) Introduction ......................... 3
(1.1) Box Contents ..................................... 3
(1.2) Support .............................................. 3
(1.3) Setup ................................................... 3
(1.3.1) Connection Diagram .......................... 4
(2.0) Features ............................... 5
(2.1) Top Panel ........................................... 5
(2.2) Rear Panel ........................................ 7
(2.3) Bottom Panel ................................... 7
(3.0) Basic Operation .................. 8
(3.1) Voices ................................................. 8
(3.2) Metronome ....................................... 8
(3.3) Split Mode ........................................ 9
(3.4) Layer Mode ...................................... 9
(3.5) Rhythm Mode ................................ 10
(3.6) Song Mode ....................................... 11
(3.7) Skoove Setup ................................. 12
(4.0) Advanced Operation......... 13
(4.1) Keybed Functions.......................... 13
(4.1.1) Transpose ............................................. 13
(4.1.2) Sustain ................................................... 13
(4.1.3) Vibrato .................................................. 14
(4.1.4) Song Mode .......................................... 14
(4.1.5) MIDI Channel ....................................... 14
(4.1.6) Local MIDI ............................................ 14
(4.1.7) Click ........................................................ 14
(4.1.8) Eco Mode ............................................. 15
(4.1.9) Factory Reset ..................................... 15
(5.0) Troubleshooting ................ 15
(6.0) Appendix ............................ 16
(6.1) Sound
s ............................................... 16
(6
.2) Rhythms ........................................... 16
(6.3) Technical Specificat
ions ............. 17
(6
.4) Trademarks & Licenses ............... 17
TABLE OF CONTENTS
3
(1.0) Introduction
(1.1) Box Contents
Teacher’s Choice 61 Portable Keyboard
Power Adapter
USB-C® Cable
Music Rest
Quickstart Guide
Safety & Warranty Manual
(1.2) Support
For the latest information about this product (system requirements, compatibility information, etc.) and
product registration, visit a
lesis.com.
For additional product support, visit a
lesis.com/support.
(1.3) Setup
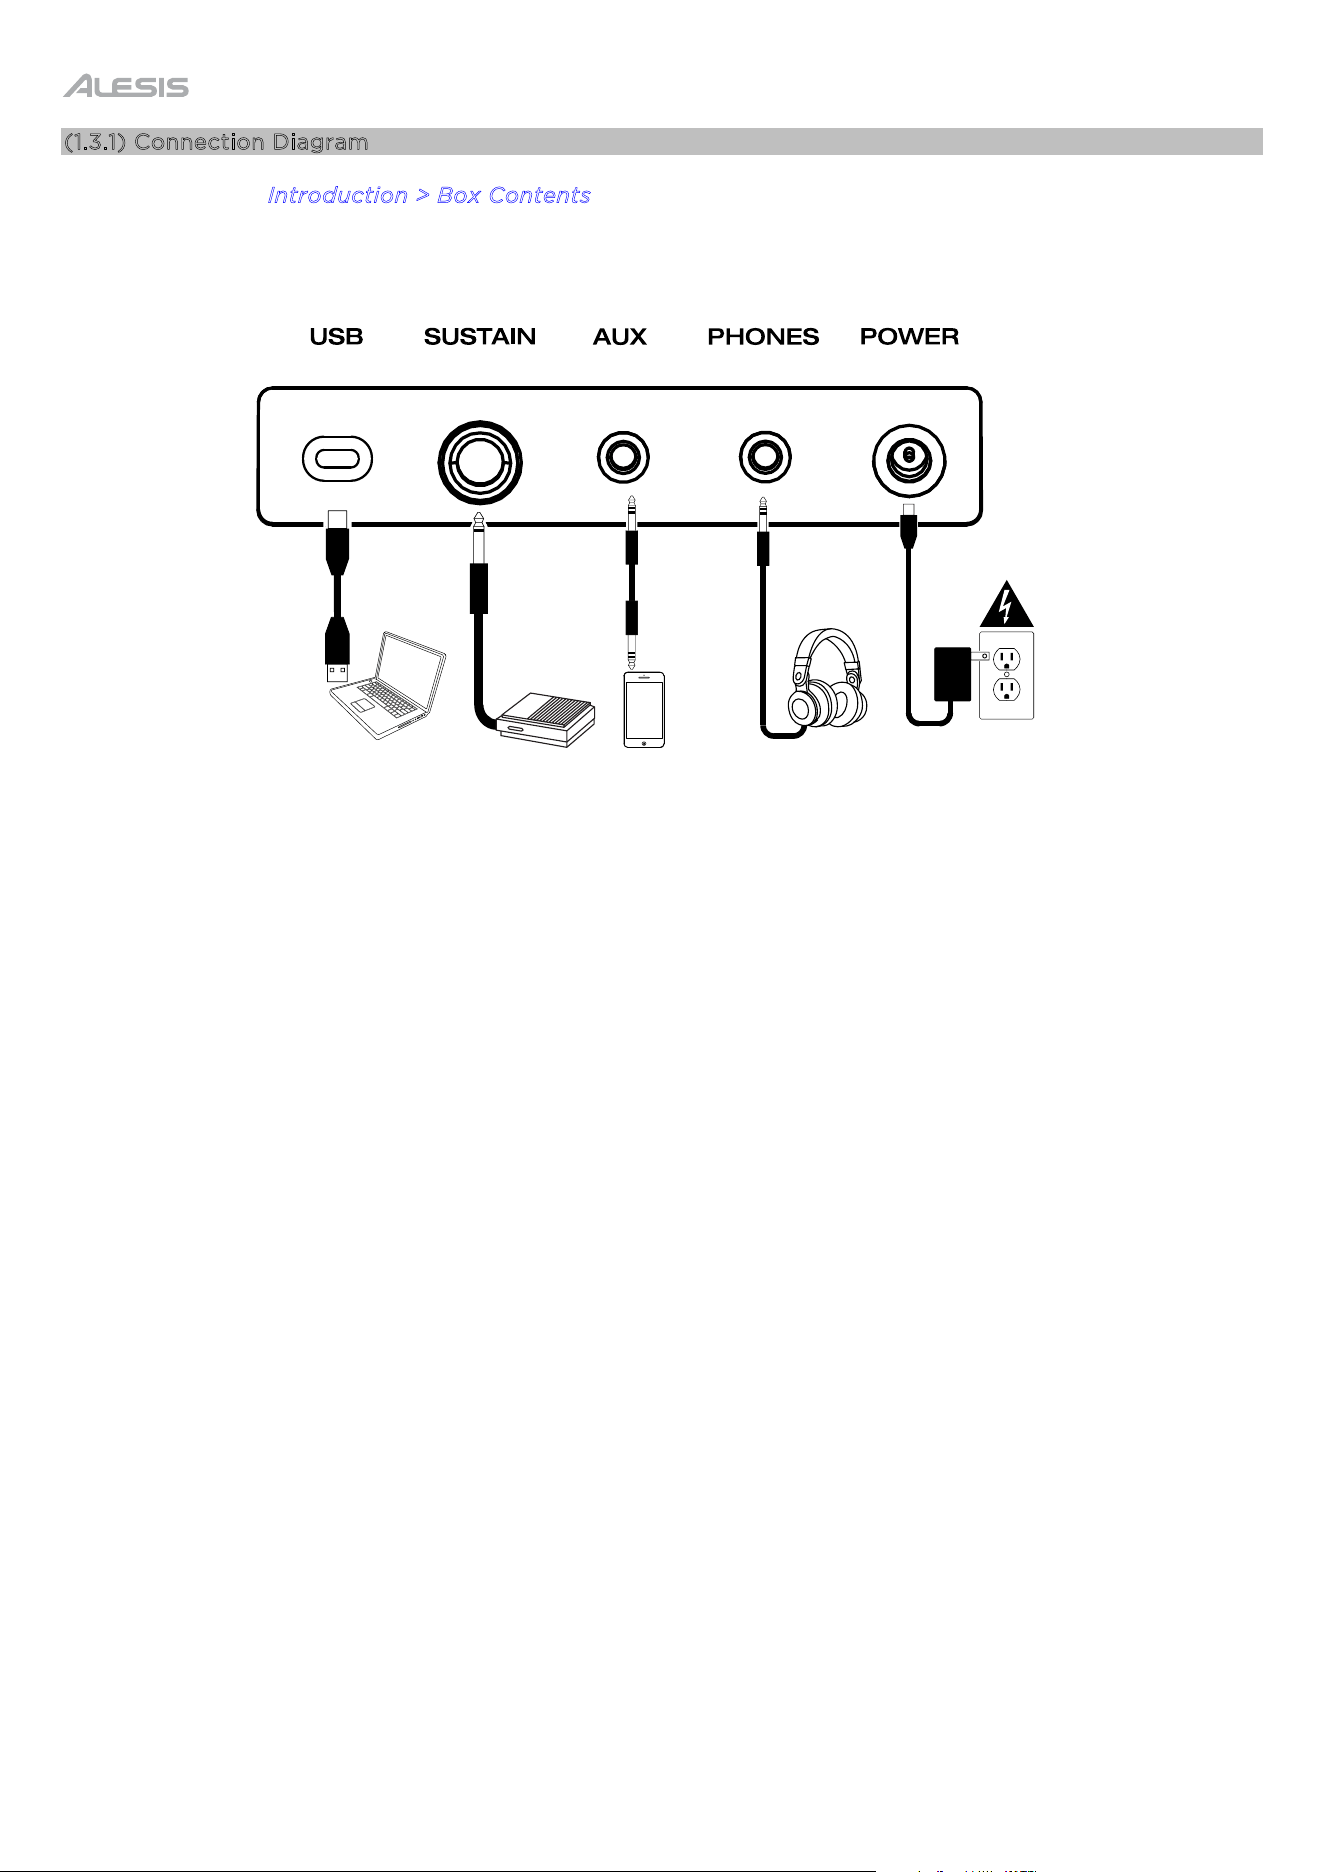
Music Rest:
Insert the music rest’s tabs into the top of Teacher’s Choice 61 until they fit securely, as seen in the images
below:
5
(2.0) Features
(2.1) Top Panel
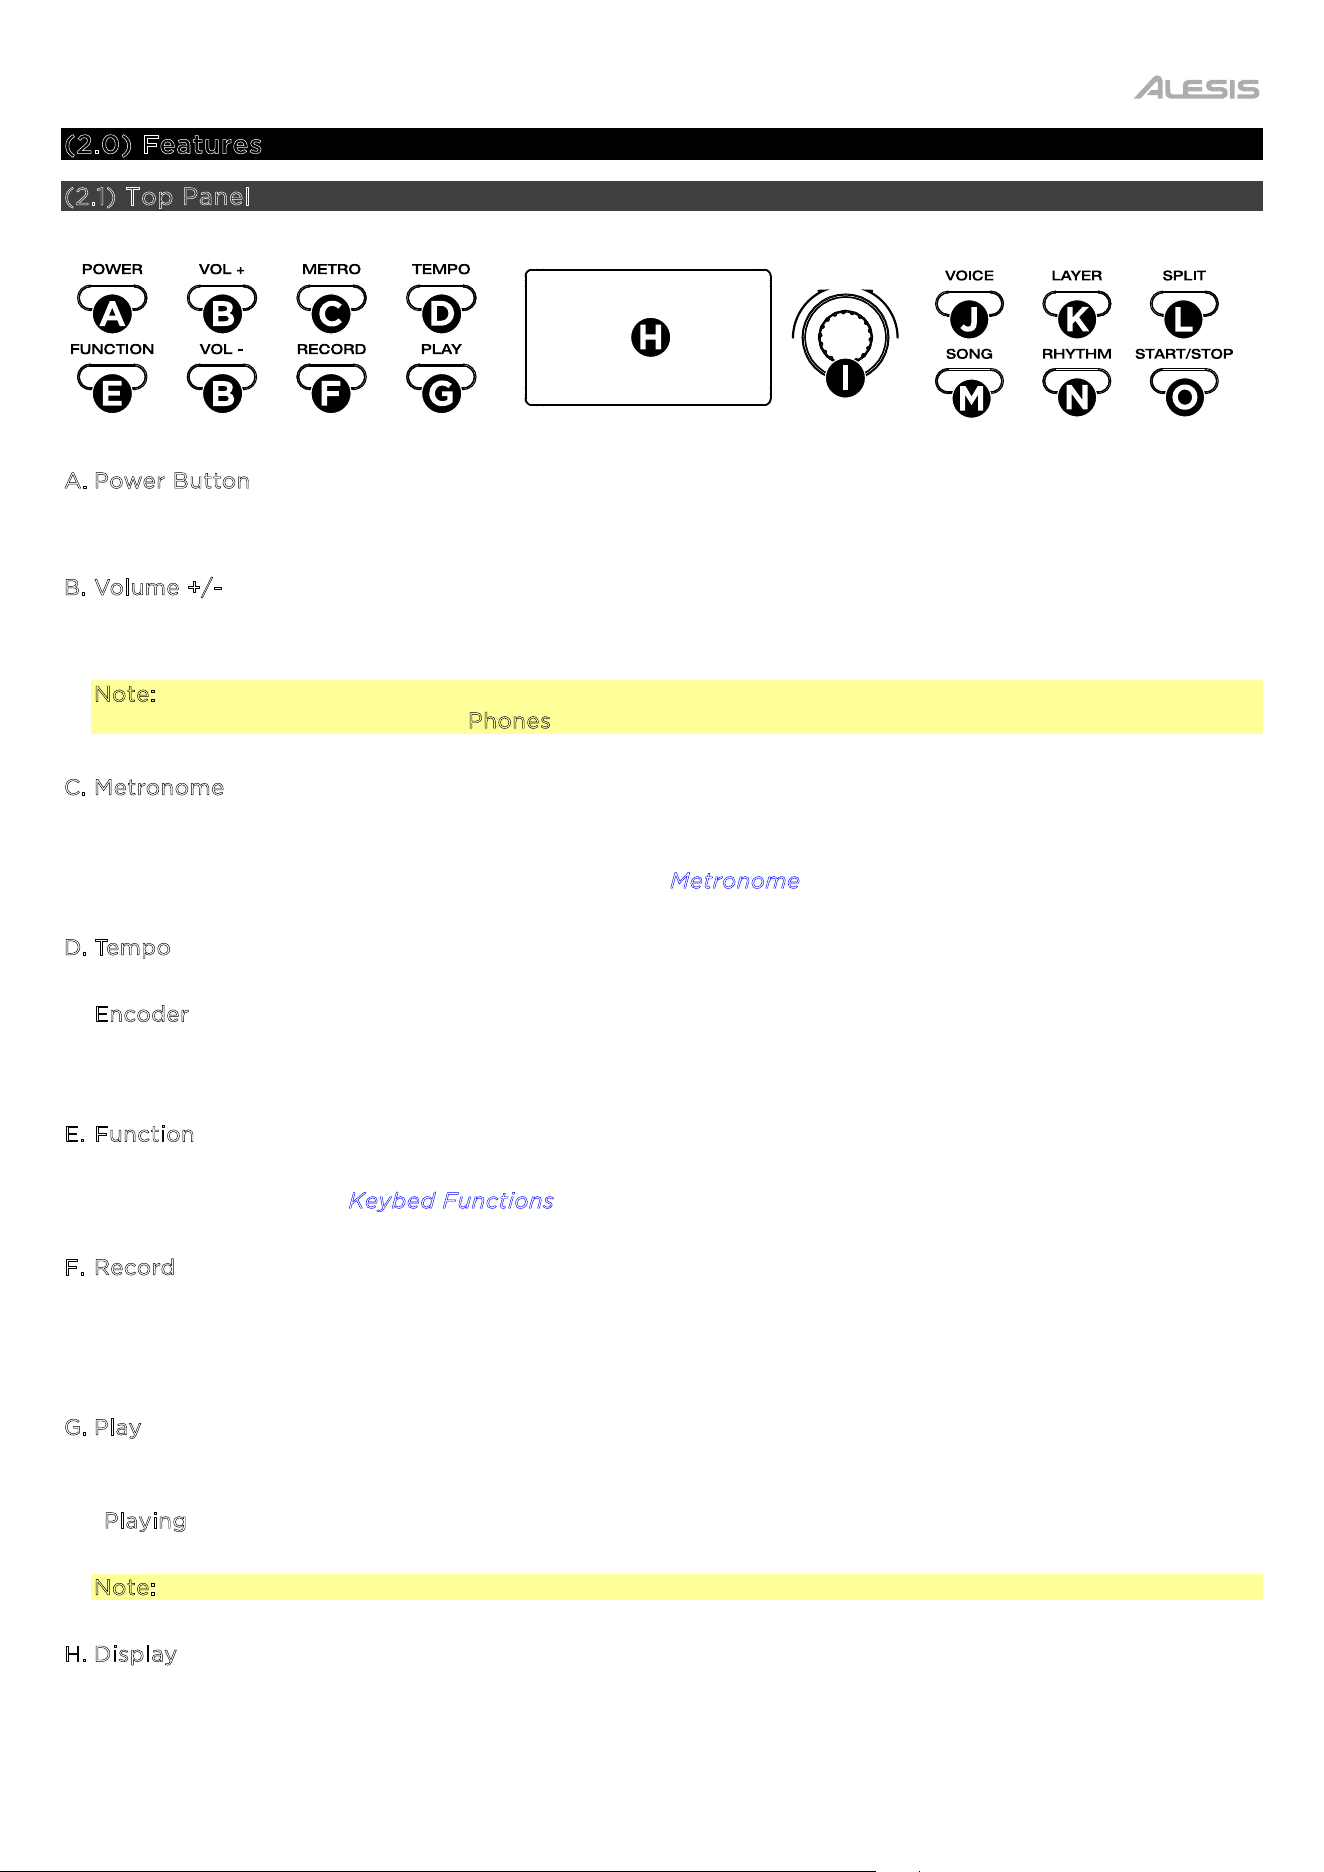
A. Power Button
Press this button to turn the piano’s power on or o.
B
. Volume +/-
Press these buttons to increase or decrease the main volume, including the voices, songs, and rhythms
(0-10). When the main volume is changed, “Main Volume” will be shown on the screen for 1.5 seconds.
Note: If the internal speakers do not produce any sound, check that the volume is not set too low. Also, if
headphones are plugged into the Phones output, the speakers will be muted.
C
. Metronome
Press this button to turn the metronome on or o. Press and hold this button, and then turn the Encoder
to adjust the volume level of the metronome.
When the metronome volume is changed, “Metro Volume”
will be shown on the screen for 1.5 seconds. See the M
etronome section for more details.
D
. Tempo
Press this button to show the current internal tempo setting on the display (040 - 280 BPM). Turn the
E
ncoder to adjust the internal tempo used for the metronome, song, and accompaniment rhythm
features. Press this button several times at a consistent pace to set the tempo via tap. When the tempo is
changed, “Tempo” will be shown on the screen for 1.5 seconds.
E
. Function
Press and hold this button and then press a labeled key on the keybed to perform a function, such as
Transpose -/+. See the K
eybed Functions
section for more details.
F
. Record
Press this button to record a user song, then press it again to stop recording. If a user song already exists,
it will be deleted. When the keyboard is ready to record a user song, the screen will show “Ready…”. Once
a key is pressed to start recording a user song, the screen will show “Recording”.
G
. Play
Press this button to play back a user song. If this button is pressed during recording, recording will stop
and the user song will start playback. When the keyboard is playing a user song, the screen will show
“P
laying”. After the keyboard has finished playing the song, it will return to the previous screen after 1.5
seconds.
Note: The user song will be cleared after powering o Teacher’s Choice 61.
H
. Display
This display screen shows relevant info for settings while they are being changed.
6
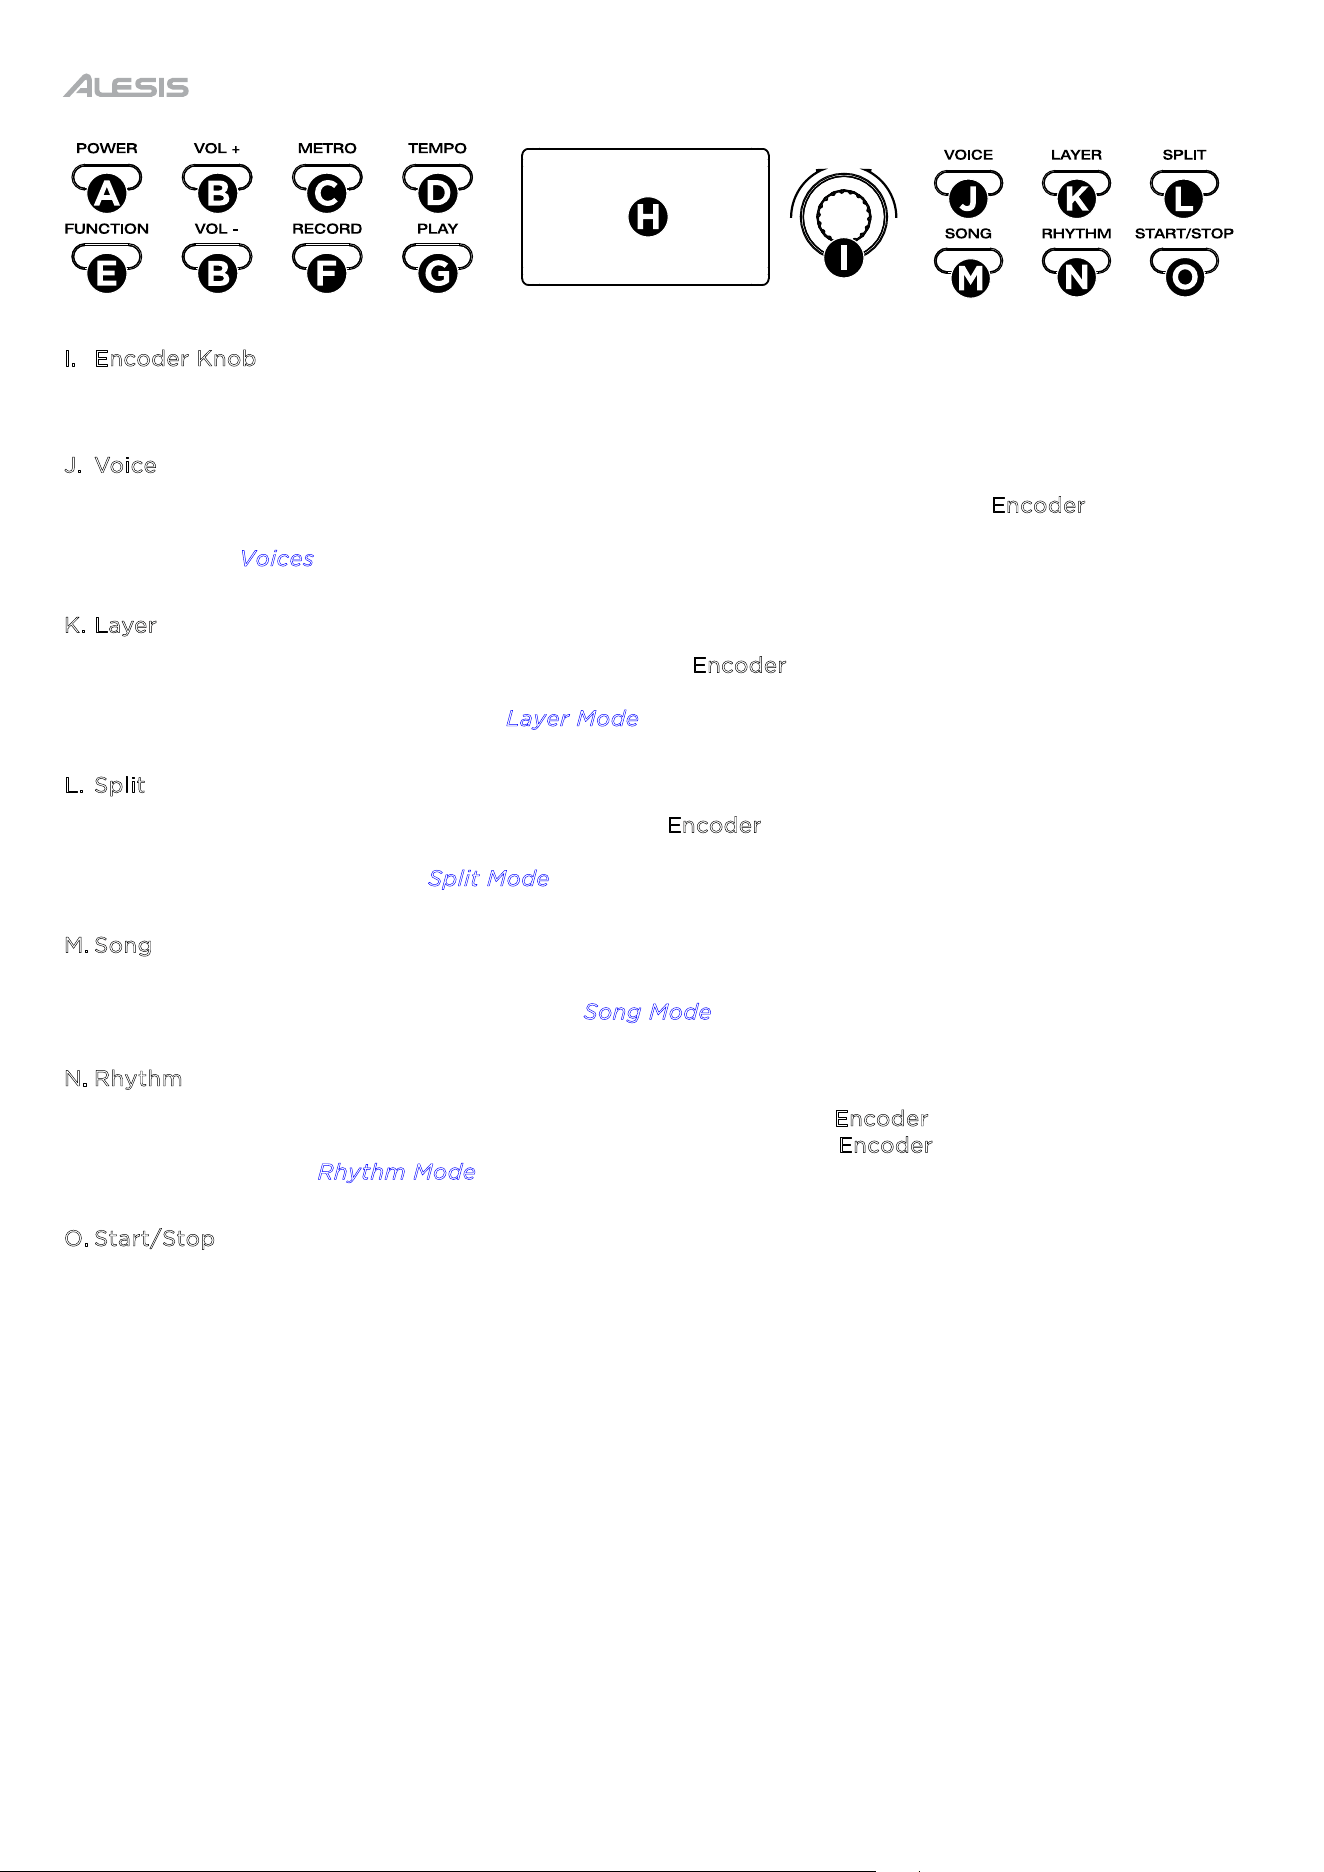
I. Encoder Knob
Turn this to adjust settings.
J
. Voice
Press this button to show the currently selected Main Voice (sound) and turn the E
ncoder to select a new
voice. Press and hold this button and then turn the Encoder to adjust the volume level of the Main Voice
(R1). See the V
oices section for more information.
K
. Layer
Press this button to enable Layer Mode and use the E
ncoder to select the Layer Voice. Press and hold
this button and then turn the Encoder to adjust the volume level of the Layer Voice (R2). Press the button
again to disable Layer Mode. See the L
ayer Mode section for more information.
L
. Split
Press this button to enable Split Mode and use the E
ncoder to select the Split Voice. Press and hold this
button and then turn the Encoder to adjust the volume level of the Split Voice (L1). Press the button again
to disable Split Mode. See the S
plit Mode section for more information.
M
. Song
Press this button to access Song Mode. Press and hold this button and then turn the Encoder to adjust
the volume level of the Demo Song. See the S
ong Mode section for more details on this function.
N
. Rhythm
Press this button to enable the Rhythm Mode and then turn the E
ncoder to select an accompaniment
rhythm for playback. Press and hold this button and then turn the E
ncoder to adjust the volume level of
the rhythm. See the R
hythm Mode section for more information.
O
. Start/Stop
Press this button to start and stop an accompaniment rhythm in Rhythm Mode, or start and stop a song
in Song Mode. You can also press this button to stop a currently playing metronome or user song.
7
(2.2) Rear Panel
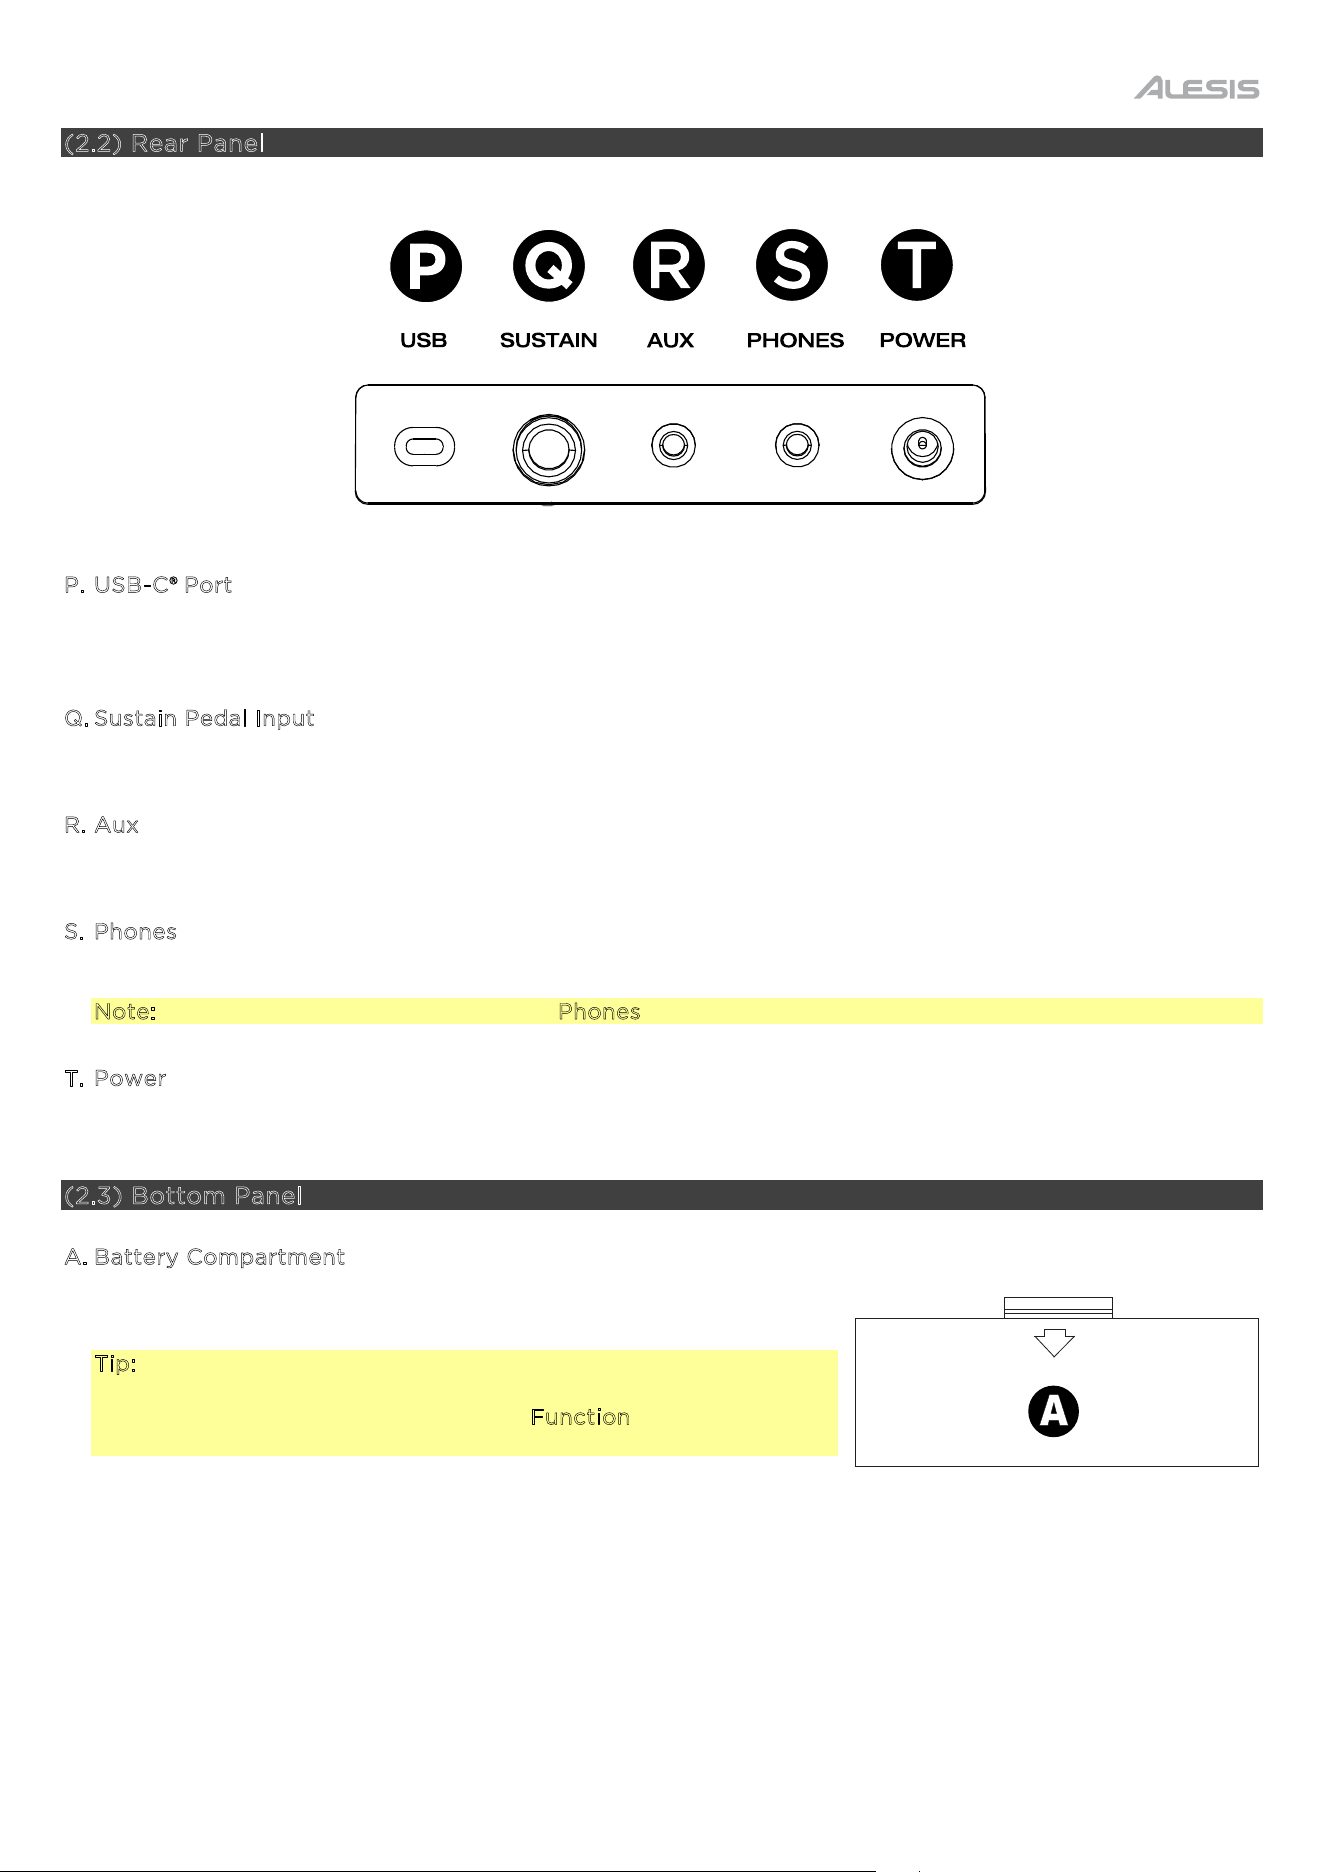
P. USB-C® Port
Use the included USB-C® cable to connect this port to a computer or mobile device to send and receive
MIDI data or apply firmware updates.
Q
. Sustain Pedal Input
Connect a standard 1/4” (6.35 mm) sustain pedal here (not included).
R
. Aux
Connect an auxiliary device (such as a smartphone or MP3 player) to this 1/8” (3.5 mm) stereo input.
S
. Phones
Connect headphones to this 1/8” stereo output.
Note: If headphones are plugged into the Phones output, the speakers will be muted.
T
. Power
Use the included power adapter to connect this input to a power outlet.
(2.3) Bottom Panel
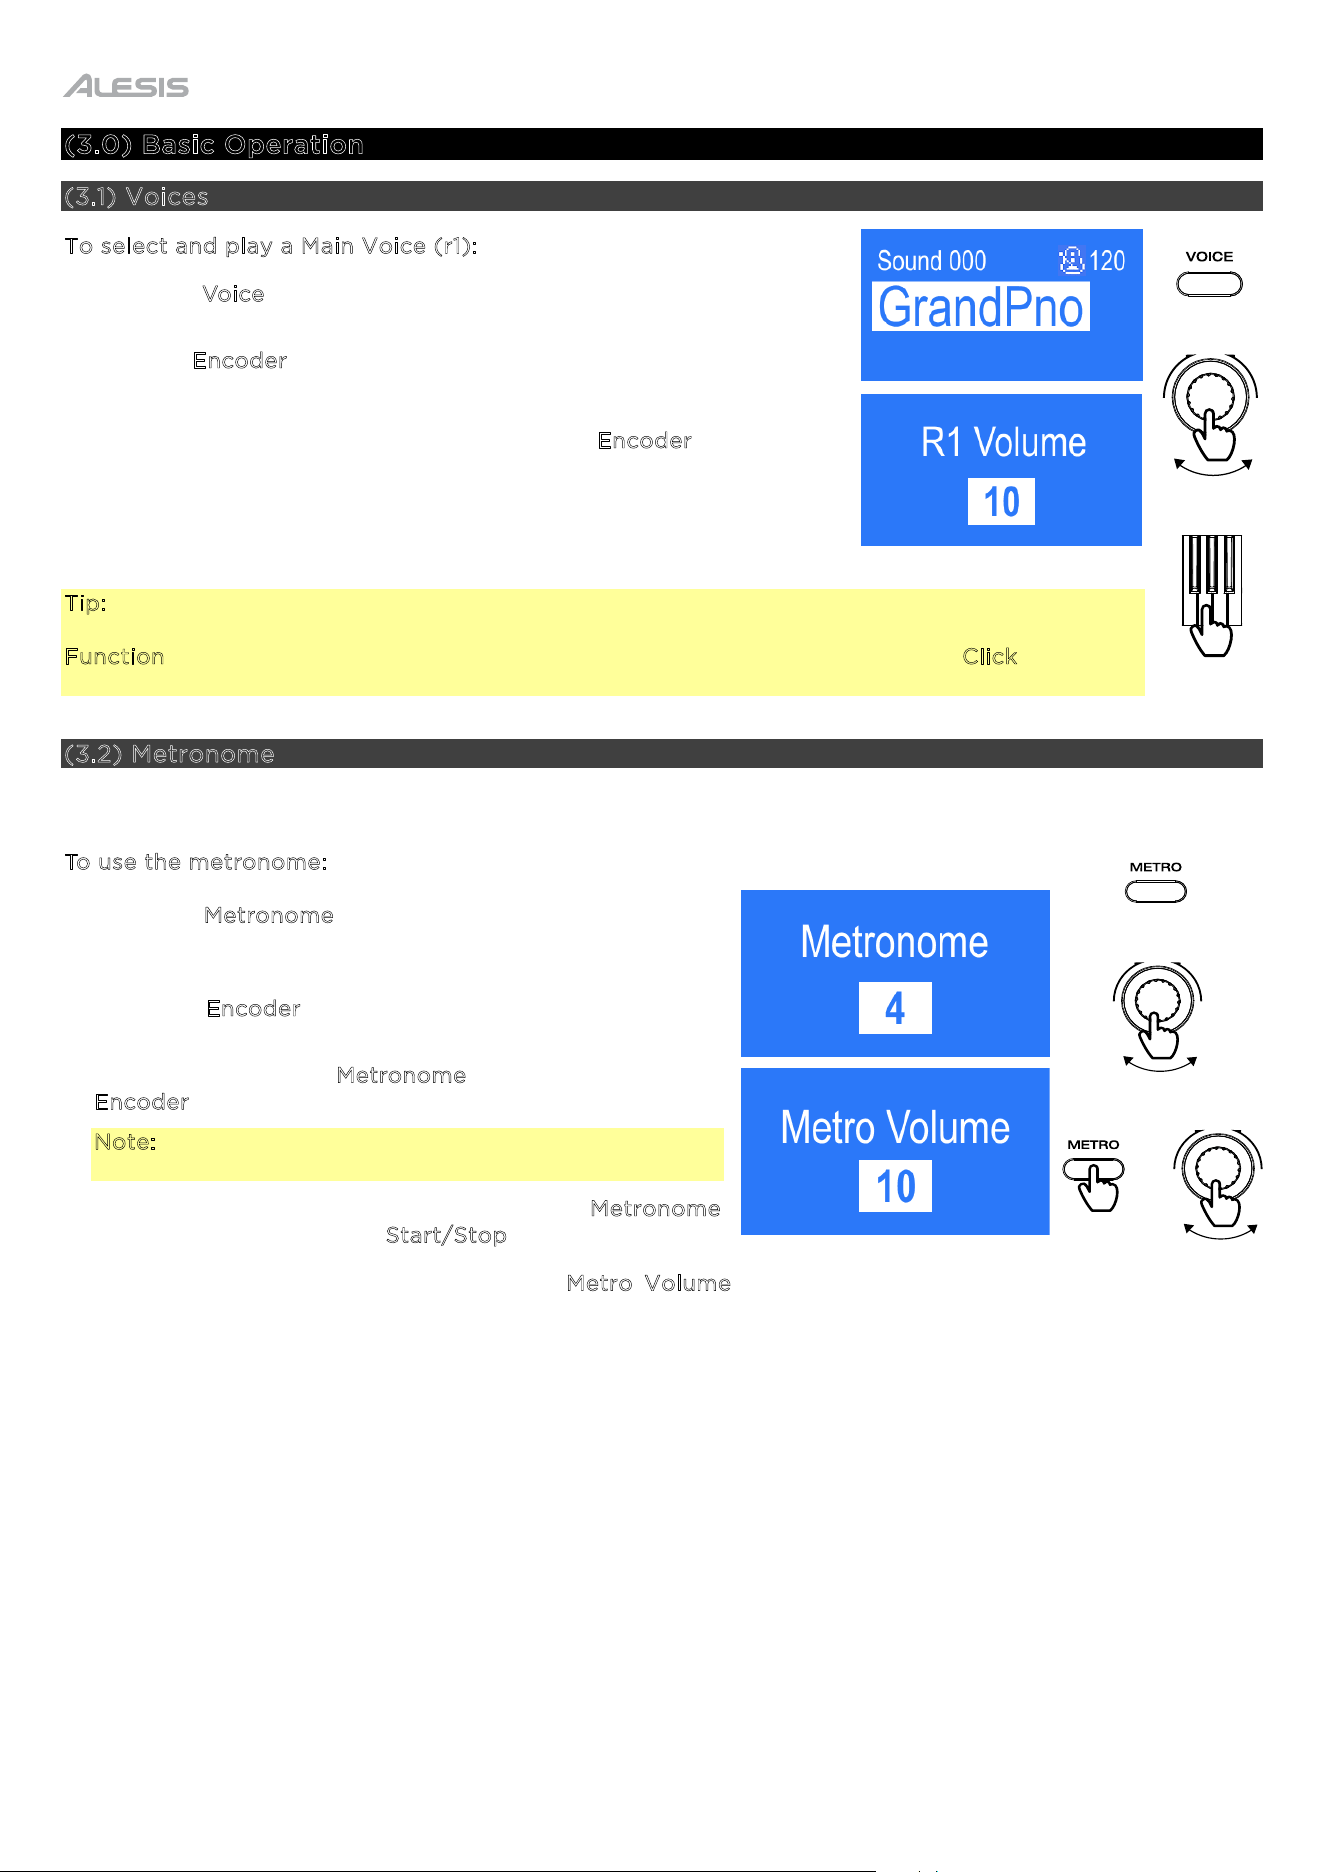
A
. Battery Compartment
Install 6 “AA” batteries (not included) here to power Teacher’s
Choice 61 if you are not using the power adapter.
Tip: To help save battery life, use the Eco Mode feature to
automatically turn o the keyboard after 20 minutes of inactivity.
To turn this feature on or o, hold the Function button, and press
the key labeled “Eco”.
8
(3.0) Basic Operation
(3.1) Voices
To select and play a Main Voice (r1):
1. Press the Voice button. The currently selected voice (ex. GrandPno)
will be shown on the screen.
2. Turn the E
ncoder to select a voice (000 - 299).
3. Play the keys to hear the voice.
4. Press and hold this button and then turn the E
ncoder to adjust the
volume level of the Main Voice.
When this volume is changed, “R1 Volume” will be shown on the
screen for 1.5 seconds before returning to the previous screen.
Tip: Teacher’s Choice 61’s keyboard features LEDs that will light up red when you press a key, or
when a demo song is playing. You can customize the color, or turn the lights o, by holding the
Function button, and then pressing the left-most key of the keyboard labeled “Click”. Continue
to press this button repeatedly to select from the available options (Red, Green, Amber, or O).
(3.2) Metronome
The metronome feature provides a steady beat to aid in practicing at a consistent tempo.
T
o use the metronome:
1. Press the M
etronome button to turn the metronome on.
The time signature (beat) will be shown on the display
screen (0, 2 - 9).
2. Turn the E
ncoder to select the time signature to be
played (0, 2 - 9).
3. Press and hold the M
etronome button and turn the
E
ncoder to adjust the volume level of the metronome.
Note: The metronome cannot be used during Rhythm,
Demo Song, or User Song playback.
4. To turn o the metronome, press the M
etronome
button again, or press the S
tart/Stop button.
When the metronome volume is changed, “Metro Volume” will be shown on the screen for 1.5 seconds
before returning to the previous UI screen.
PRESS
TURN
PLAY
PRESS
HOLD
+
TURN
TURN
9
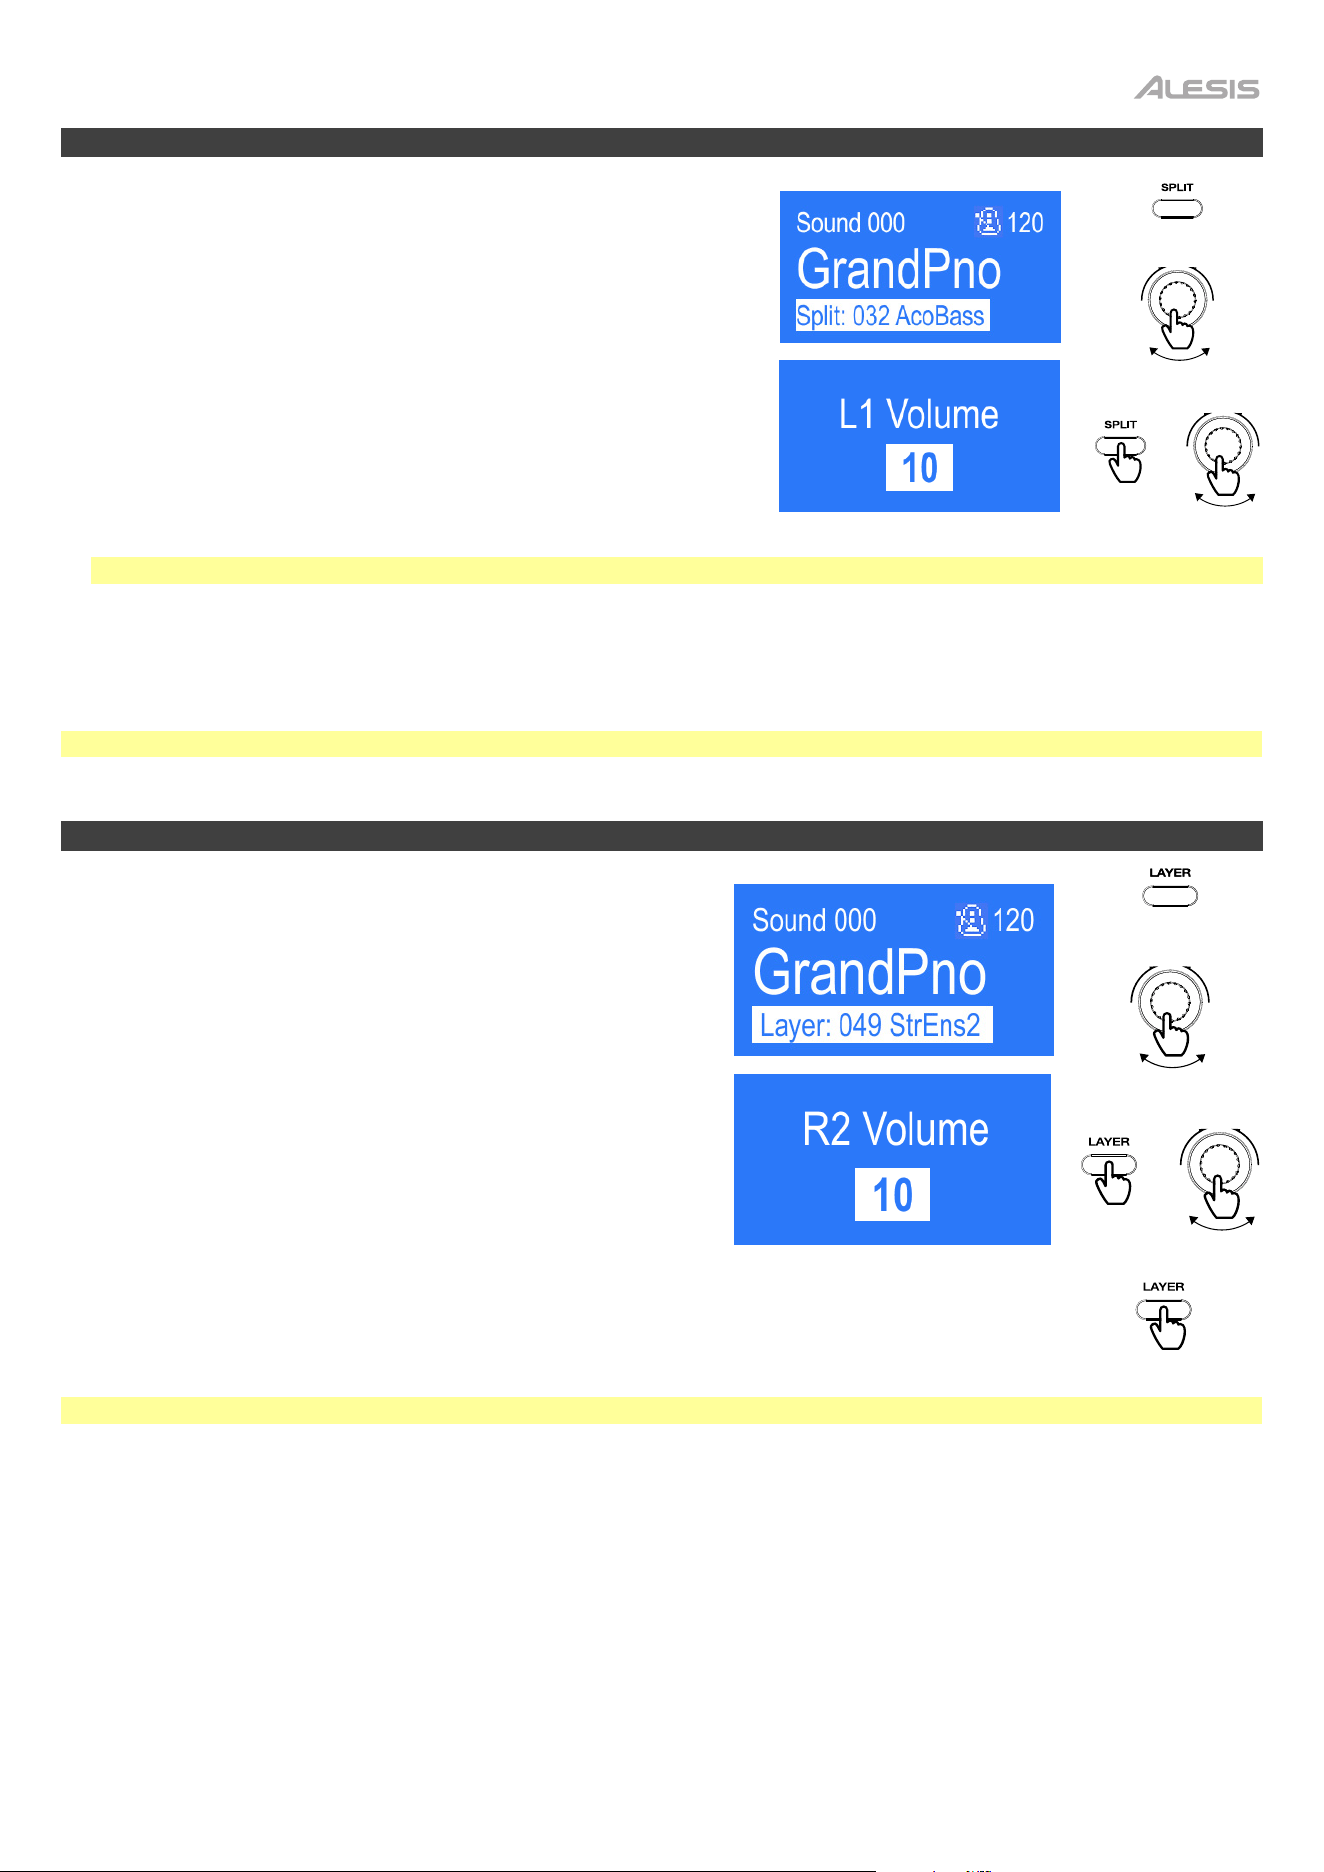
(3.3) Split Mode
Split Mode allows you to separate the 61 keys into two zones
so that you can have two different voices for each of your
hands. For example, you may want the Piano voice for your
right hand, and the Bass voice for your left hand. When Split
Mode is enabled, the left-hand voice is referred to as the Split
voice.
The left-hand voice will be heard when playing the
lowest 2 octaves of the keyboard.
To split the keyboard into 2 zones:
1. Press the Split button.
2. Turn the Encoder to select the split voice (000 - 299) to be
played.
Note: The split point cannot be adjusted.
3. Press and hold the Split button and then turn the Encoder to adjust the volume level of the split voice.
When the volume is changed, “L1 Volume” will be shown on the screen for 1.5 seconds.
To enable/disable Split Mode, press the Split button. The Split voice will disappear from the main screen,
and the main voice will then be able to be selected again using the encoder.
Note: Split Mode cannot be enabled at the same time as Layer Mode.
(3.4) Layer Mode
Layer Mode allows for two different voices to be mixed
together for a more full and rich sound.
To layer two voices:
1. Press the Layer button. The Layer (ex. "Layer:049
StrEns") will appear on the main screen along with the
currently selected layer voice.
2. Turn the Encoder to select the layer voice (000 - 299)
to be played.
3. Press and hold the Layer button and then turn the
Encoder to adjust the volume level of the layer voice.
“R2 Volume” will be shown on the screen for 1.5
seconds.
To enable/disable Layer Mode, press the Layer button. The “Layer:” voice will disappear
from the main screen, and the main voice will then be able to be selected again using the
encoder.
Note: Layer Mode cannot be enabled at the same time as Split Mode.
HOLD
+
PRESS
TURN
TURN
PRESS
HOLD
+
TURN
TURN
HOLD
10
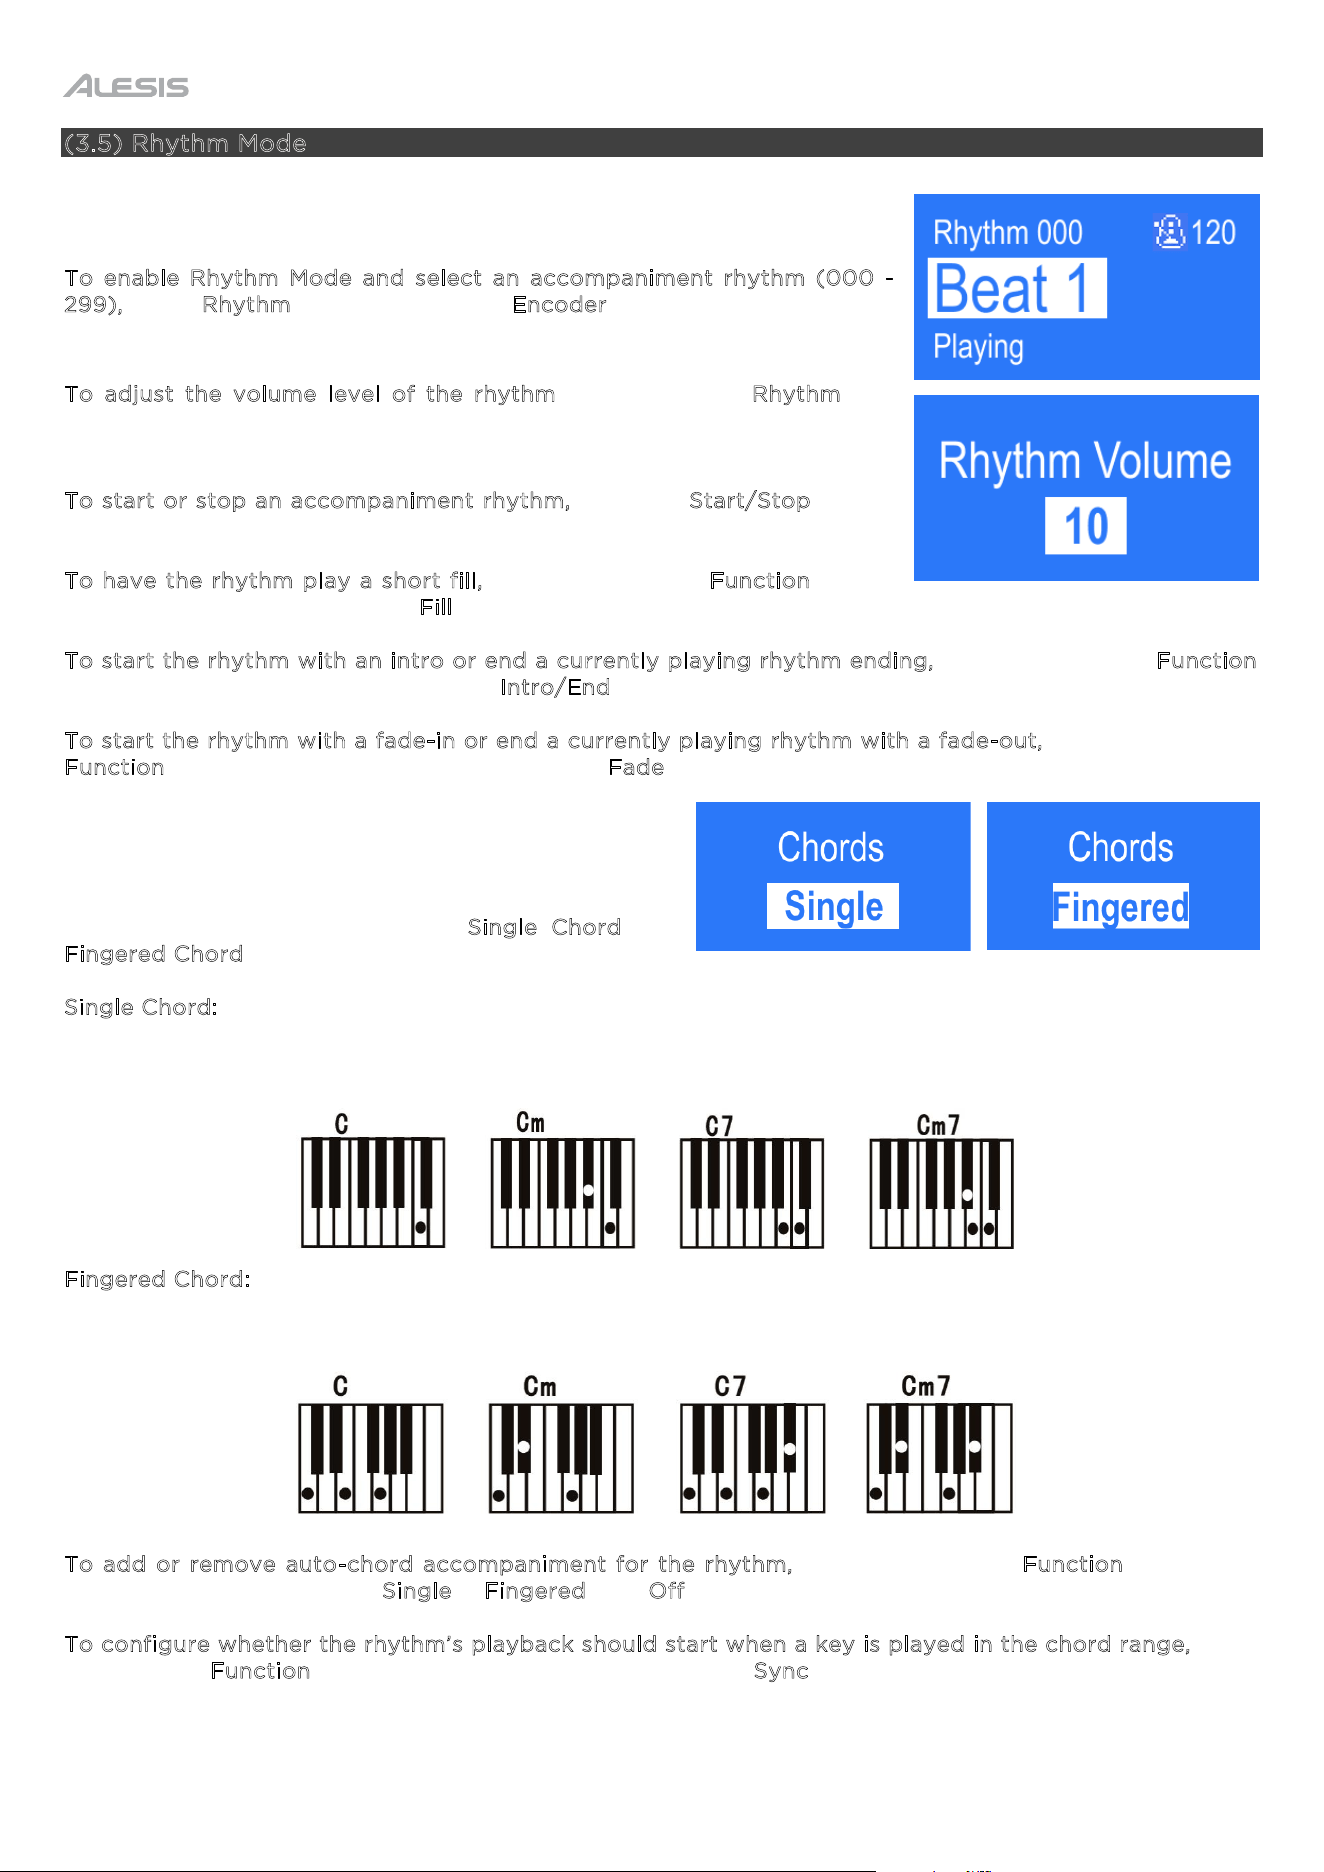
(3.5) Rhythm Mode
Teacher’s Choice 61 features 300 accompaniment rhythms that you can
play along with and create your own songs.
To enable Rhythm Mode and select an accompaniment rhythm (000 -
299), press Rhythm and then turn the Encoder. “Rhythm” will be shown
on the screen.
To adjust the volume level of the rhythm, press and hold Rhythm and
then turn the encoder. When the volume is changed, “Rhythm Volume” will
be shown on the screen for 1.5 seconds.
To start or stop an accompaniment rhythm, press the Start/Stop button
while in Rhythm Mode.
To have the rhythm play a short fill, press and hold the Function button
and then press the key labeled “Fill”.
To start the rhythm with an intro or end a currently playing rhythm ending, press and hold the Function
button and then press the key labeled “Intro/End”.
To start the rhythm with a fade-in or end a currently playing rhythm with a fade-out, press and hold the
Function button and then press the key labeled “Fade”.
The Rhythm Mode feature also features auto-chord
accompaniment that can be triggered by playing the
“Auto Bass” keys in the lower range (the second
lowest F# key or lower) of the keyboard. There are two
dierent settings for this feature, Single Chord and
Fingered Chord.
S
ingle Chord:
When using the Single Chord feature you can use the abbreviated chord shapes shown below starting on
any note to play major, minor, seventh, or minor seventh chords.
Fingered Chord:
When using the Fingered Chord feature you can use the full chord shapes shown below starting on any
note to play major, minor, seventh, or minor seventh chords.
To add or remove auto-chord accompaniment for the rhythm, press and hold the Function button and
then press the keys labeled “Single”, “Fingered”, or “Off” accordingly.
To configure whether the rhythm’s playback should start when a key is played in the chord range, press
and hold the Function button and then press the key labeled “Sync”.
11
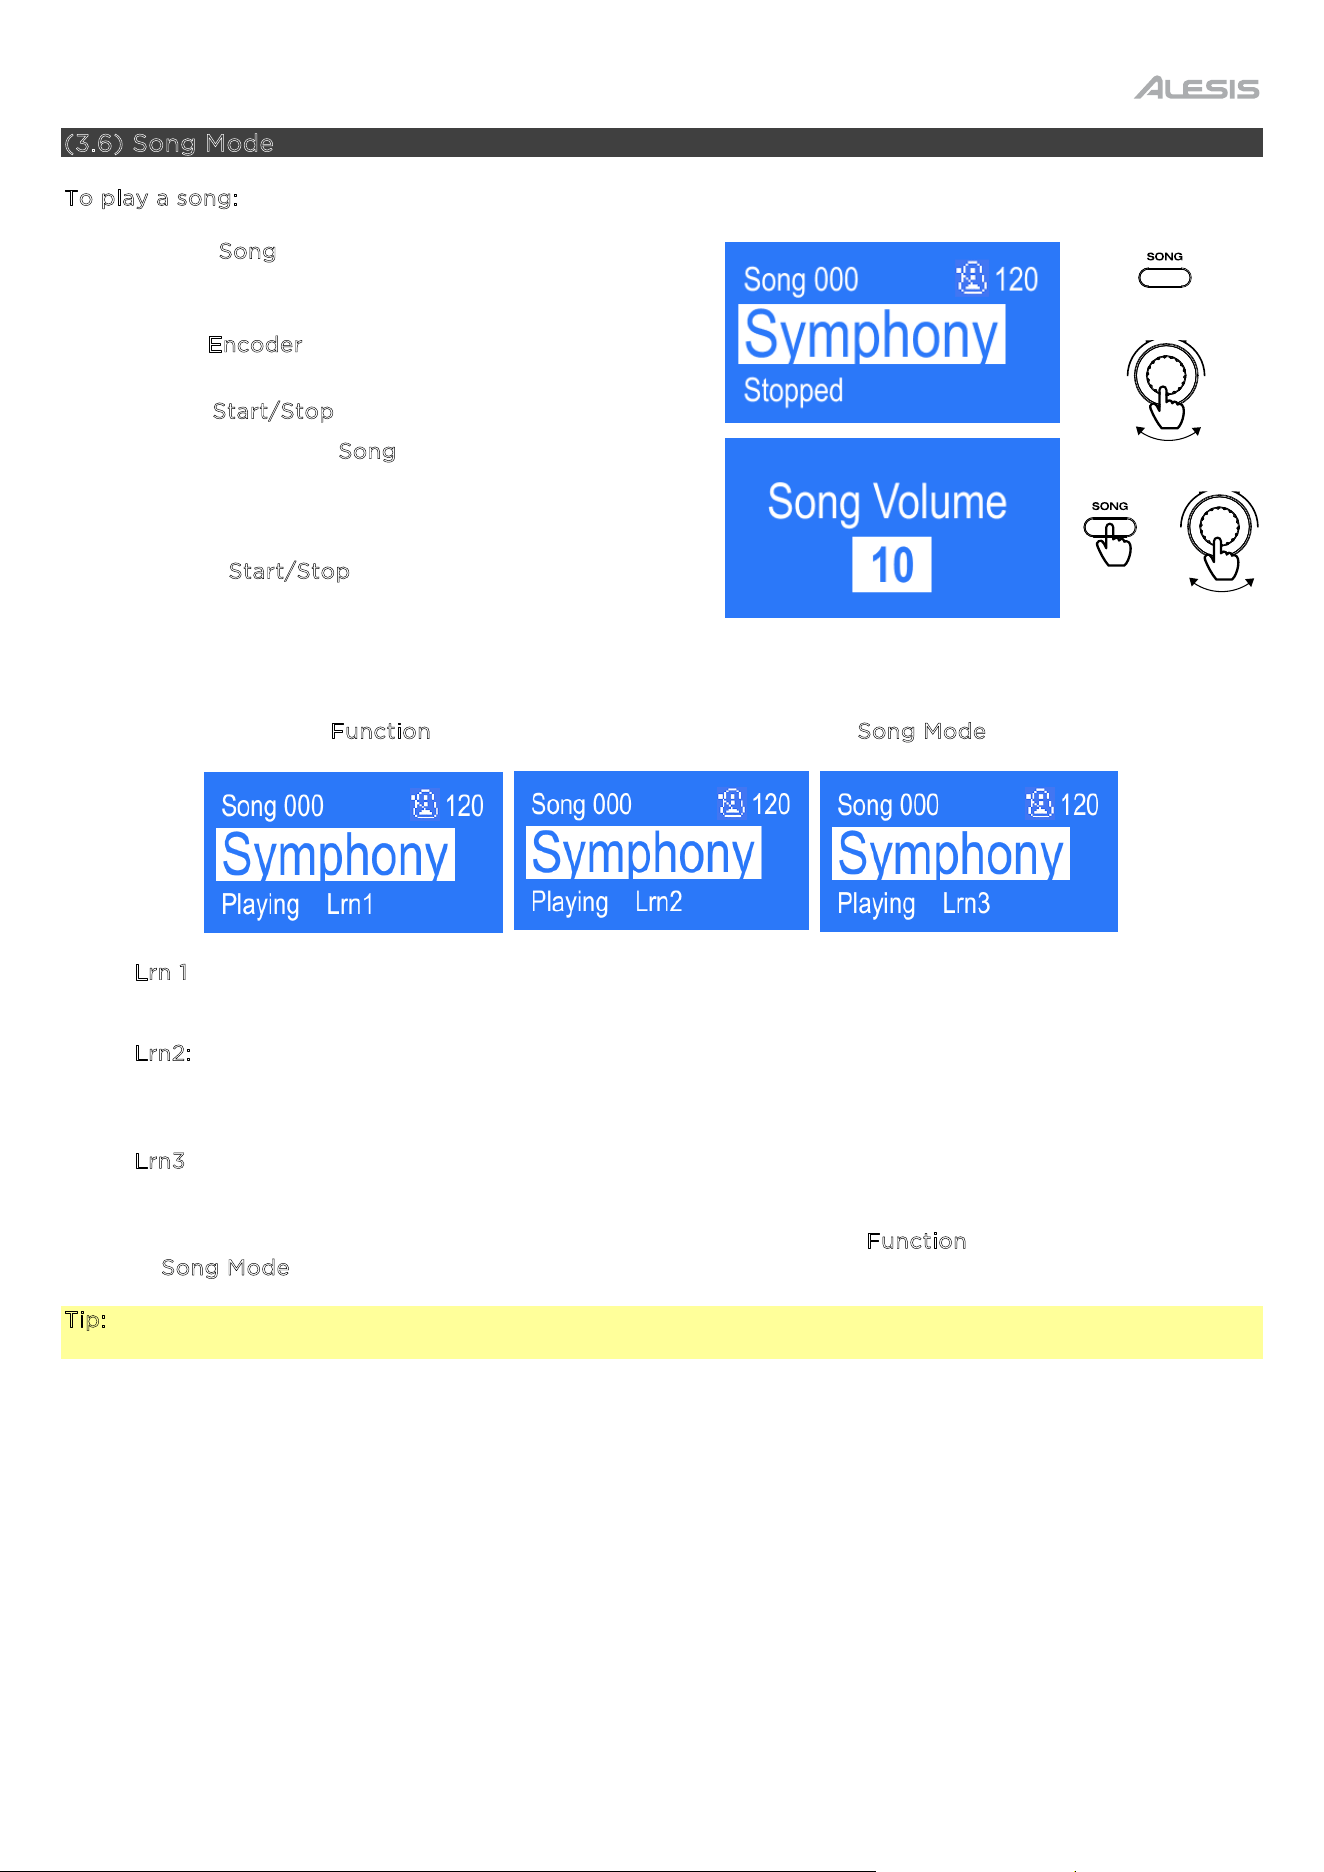
(3.6) Song Mode
T
o play a song:
1. Press the S
ong button. The “Song Mode” screen will
be shown where the current selected song number
and name is displayed.
2. Turn the E
ncoder to select a song for playback (000
– 029).
3. Press the S
tart/Stop button to start the song.
4. Press and hold the S
ong button and then turn the
Encoder to adjust the volume level of the song. When
the volume is changed, “Song Volume” will be shown
on the screen for 1.5 seconds.
5. Press the S
tart/Stop button to again to stop the
song.
When a song is playing, each note of the melody (normally played with the right hand) will light its
respective key’s LED. There are three dierent key light modes (“Lrn1”, “Lrn2”, and “Lrn3”) that can be
selected by holding the F
unction button, and pressing the key labeled “Song Mode”.
• L
rn 1: In this mode, the song will wait for you to press a key to continue the song. This mode is useful
for practicing rhythmic timing, as the key does not need to be correct for the song to proceed.
• L
rn2: In this mode, the song will wait for you to press each key to continue the song. The song will
not proceed until you press the correct key. If press an incorrect key, the wrong note will sound, and
the song will not continue until the correct key is pressed.
• L
rn3: In this mode, the song will continue to play regardless of any key presses. However, the melody
will be muted, and you will need to press the correct keys to hear the melody.
To return to the original key light functionality for Song mode, hold the F
unction button, and press the key
labeled “S
ong Mode” until “Lrn1”, “Lrn2”, or “Lrn3” is no longer shown.
Tip: When you are first learning a song, it’s very useful to use the Tempo function to slow down the song,
and speed it up gradually as you become more comfortable.
PRESS
HOLD
+
TURN
TURN
12
(3.7) Skoove Setup
Teacher’s Choice 61 features 61 keys with built-in LED lights that are tightly integrated with Skoove’s
premium all-in-one learning method featuring over 1000+ lessons and songs. This Skoove premium
subscription is for 3 months.
When a lesson is playing in the Skoove app, key LEDs will light in an a
mber color to show which keys to
press. If the correct key is pressed, it will turn g
reen. If an incorrect key is pressed, it will turn red.
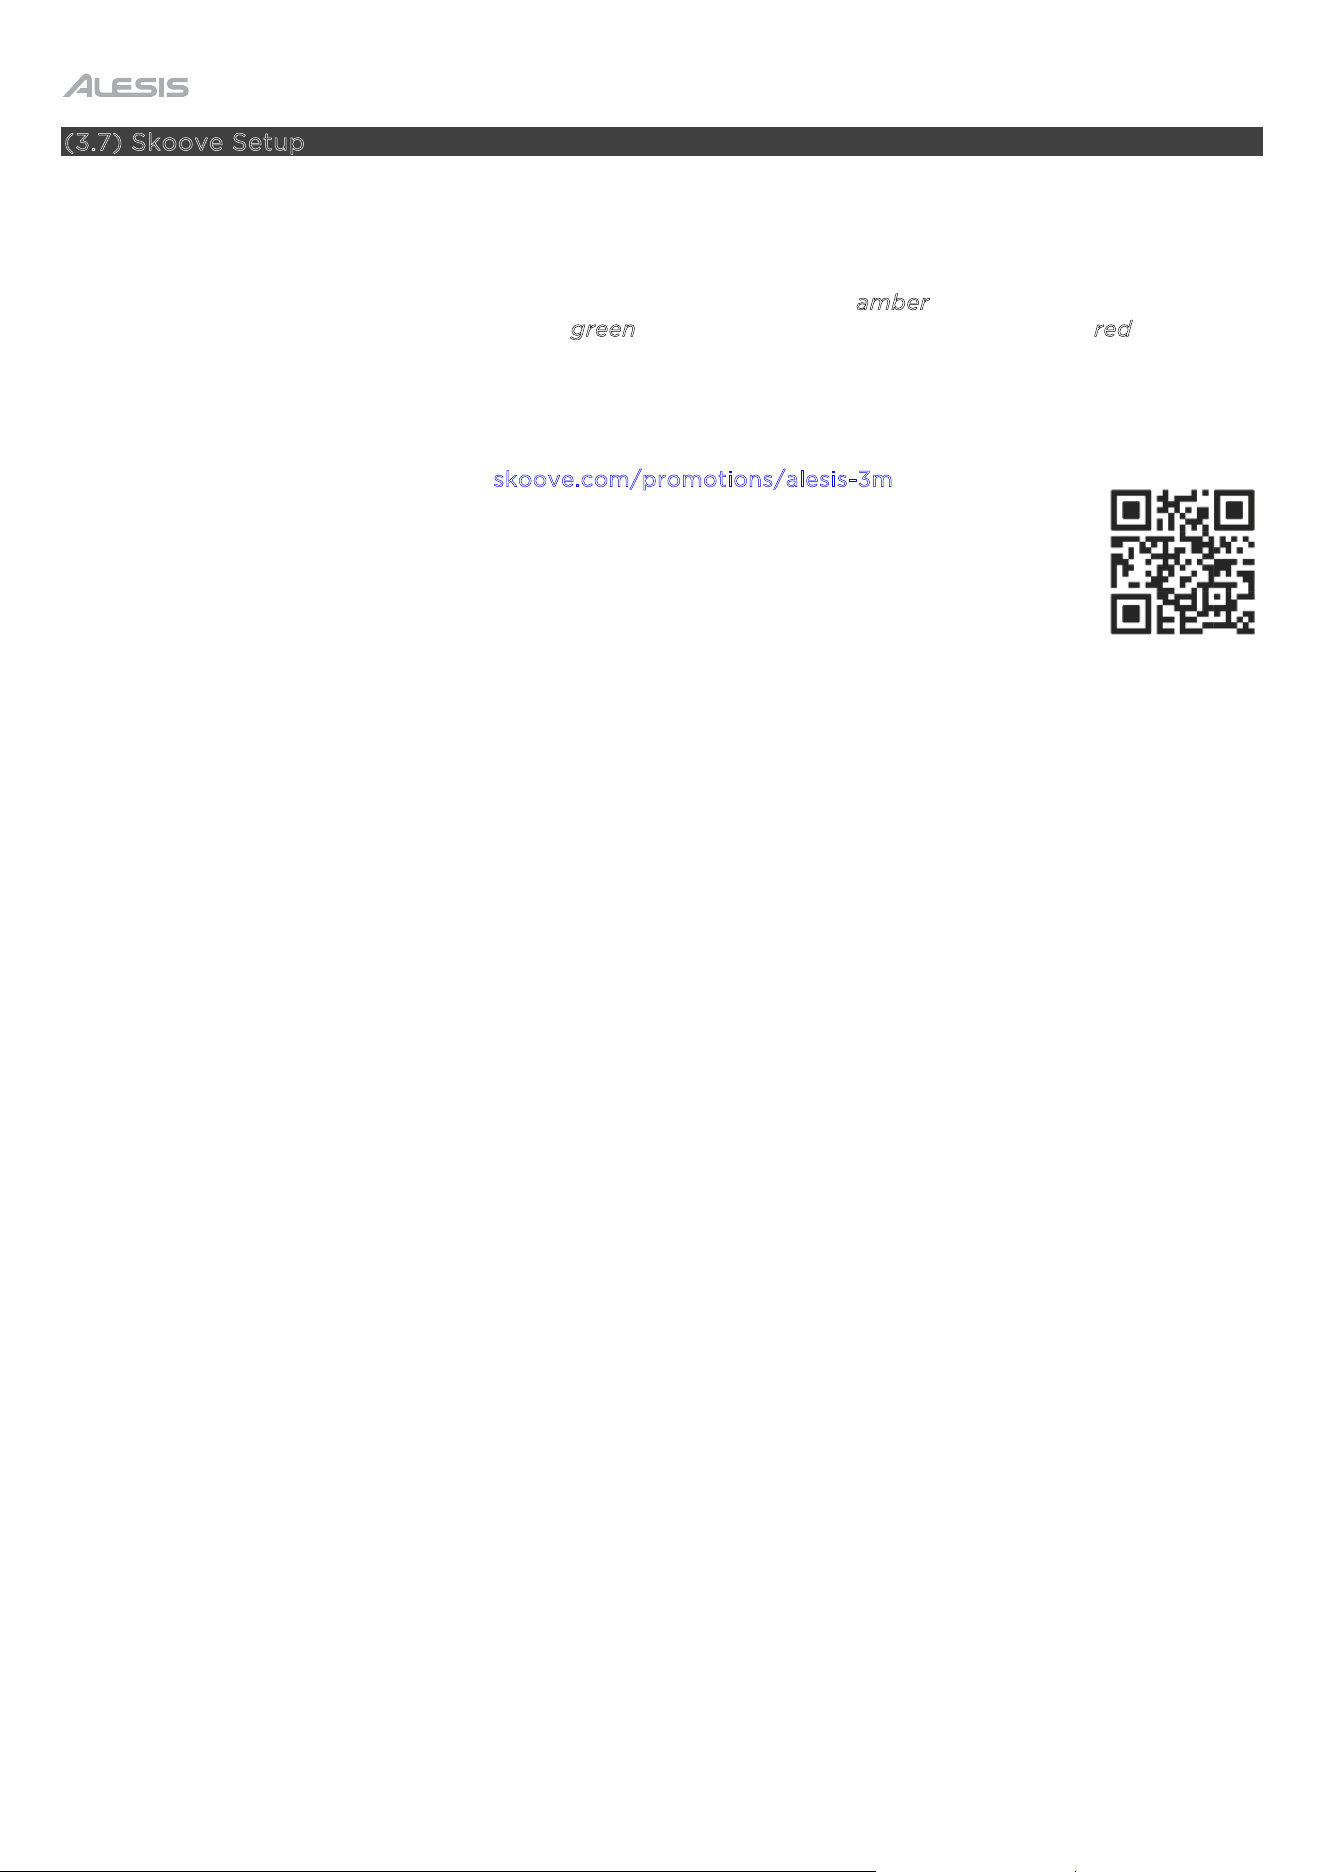
To get started with Skoove and redeem your 3-months free oer:
1. Use the QR Code or navigate to s
koove.com/promotions/alesis-3m to redeem your
oer.
2. Download the Skoove app on your Android or Apple mobile device.
3. Connect Teacher’s Choice 61 to your device using the included USB-C cable.
4. Open the Skoove app and login to start learning!
13
(4.0) Advanced Operation
(4.1) Keybed Functions
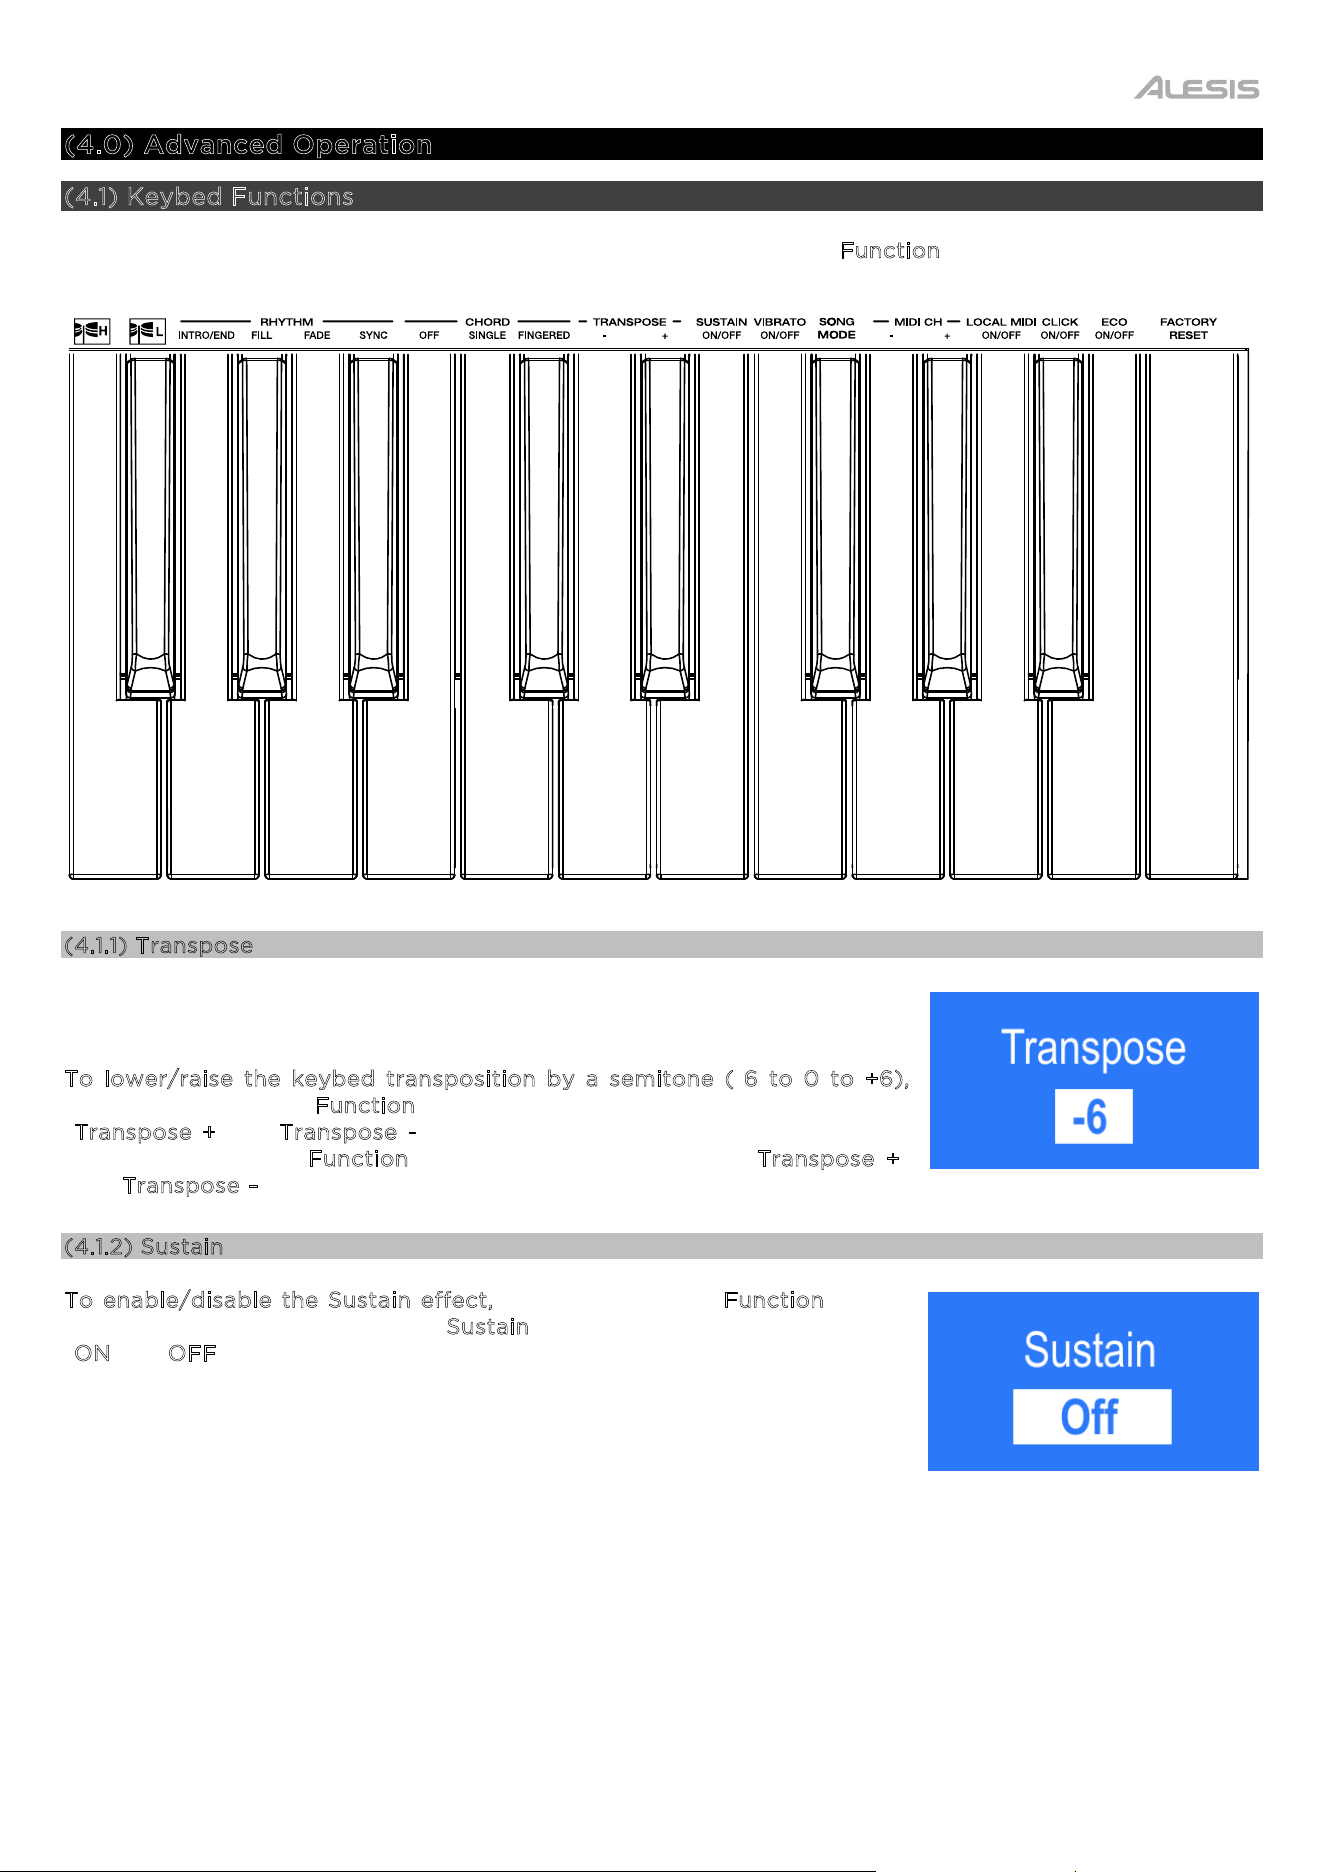
You can change more advanced settings by pressing and holding the F
unction button and then press a key
that corresponds to the graphic below to change your desired setting.
(4.1.1) Transpose
This function allows the overall pitch of the piano to be transposed up or
down by a maximum of six semitones.
To lower/raise the keybed transposition by a semitone (-6 to 0 to +6),
press and hold the Function button and then press the key labeled
“Transpose +” or “Transpose -” respectively. To reset the transposition to
default (0), hold the Function button and then press both “Transpose +”
and “Transpose –” buttons at the same time.
(4.1.2) Sustain
T
o enable/disable the Sustain effect, press and hold the Function button
and then press the key labeled “S
ustain”. The display screen will display
“O
N” or “OFF” accordingly.
14
(4.1.3) Vibrato
T
o enable/disable the Vibrato effect, press and hold the Function button and
then press the key labeled “V
ibrato”. The display screen will display “ON” or
“O
FF” accordingly.
(4.1.4) Song Mode
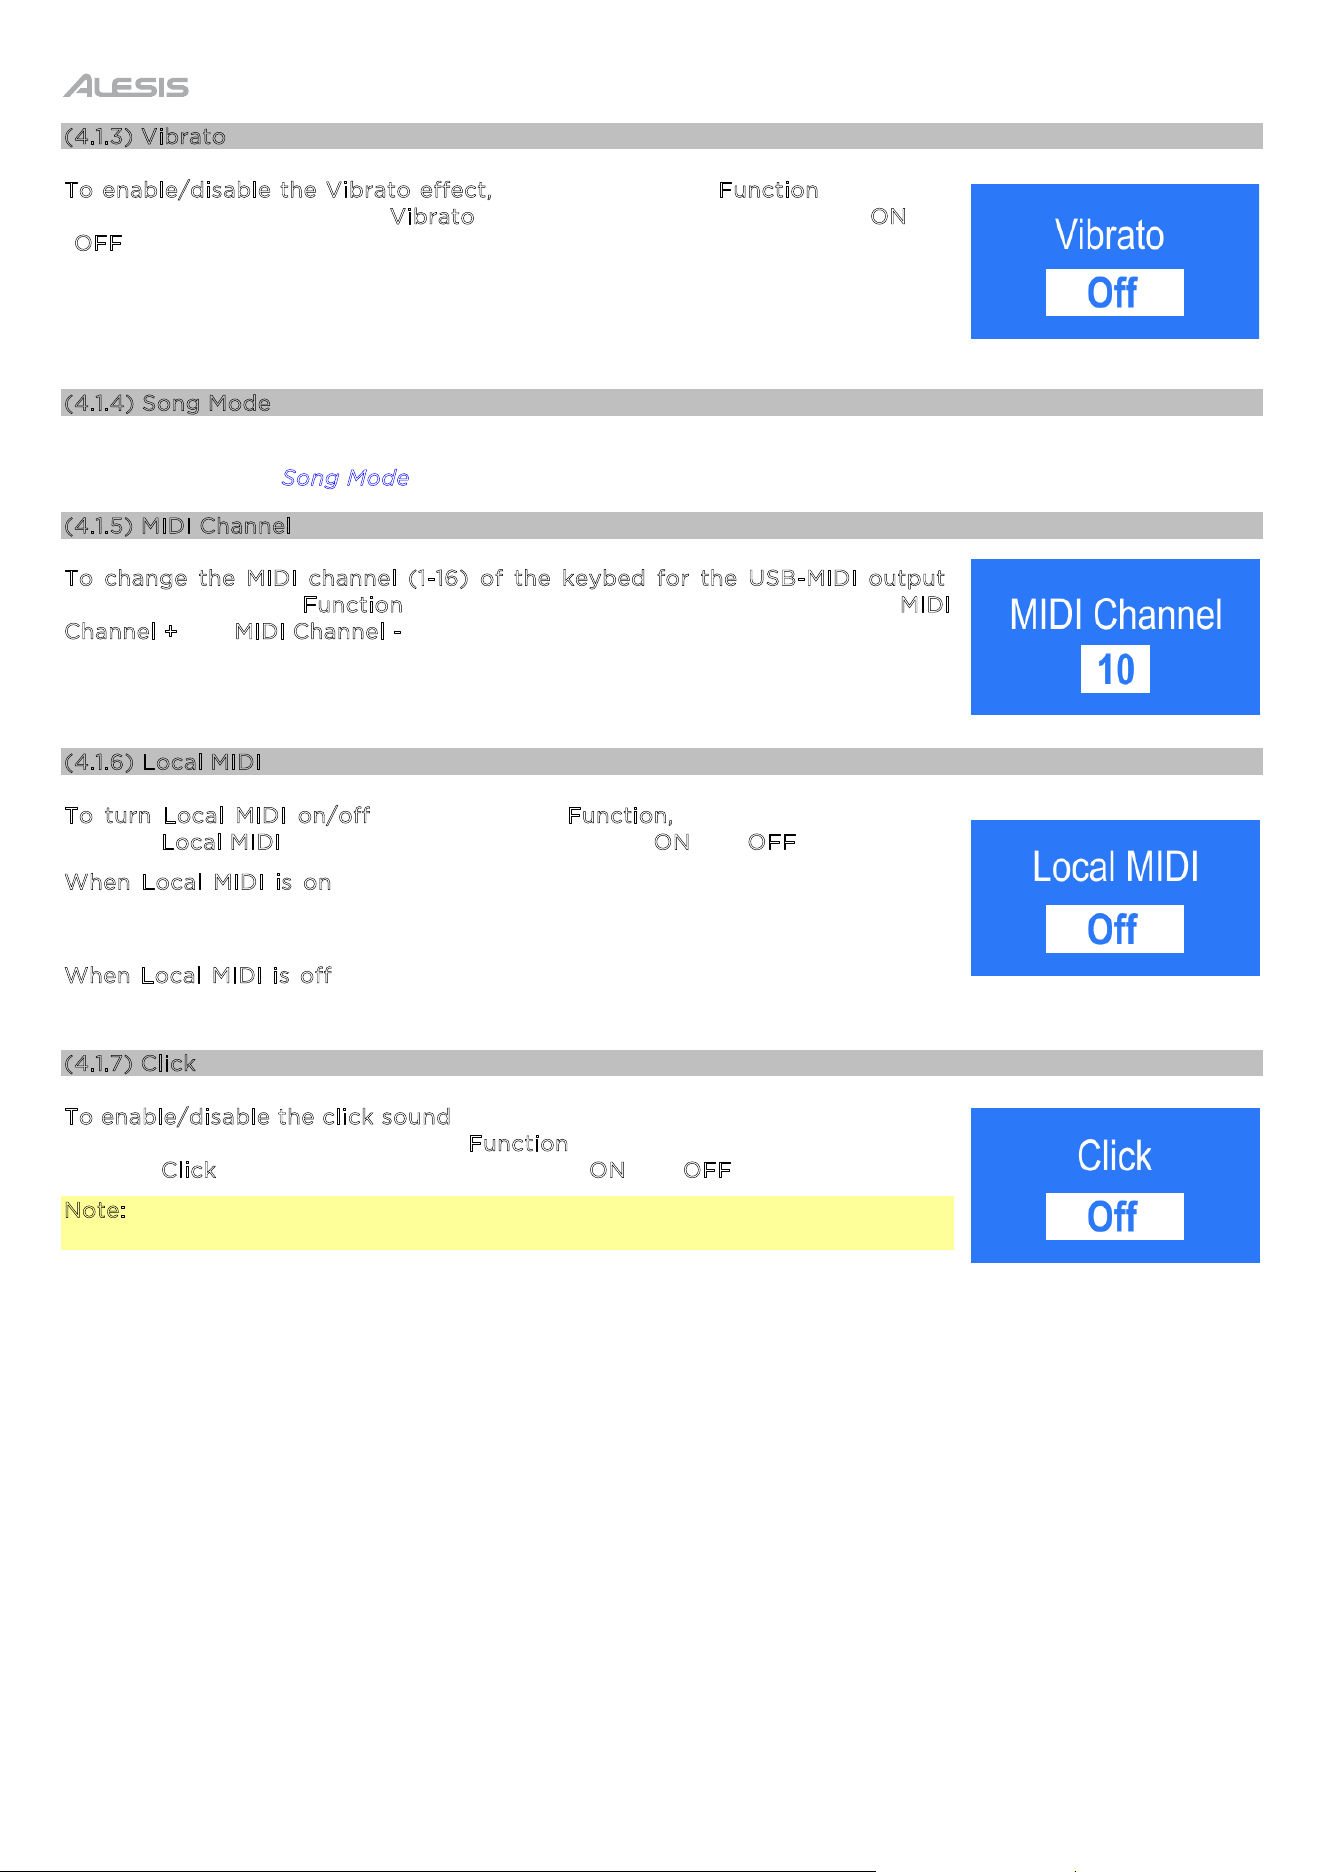
Use the Song Mode key to configure how the LED key lights will function when using the Song mode. To
learn more, see the Song Mode section for more details.
(4.1.5) MIDI Channel
To change the MIDI channel (1-16) of the keybed for the USB-MIDI output,
press and hold the Function button and then press the key labeled “MIDI
Channel +” or “MIDI Channel -”, repeatedly if needed.
(4.1.6) Local MIDI
T
o turn Local MIDI on/off, press and hold Function, and then press the key
labeled “L
ocal MIDI”. The display screen will display “ON” or “OFF” accordingly.
W
hen Local MIDI is on (default), sound will be generated and heard through
the speaker, and MIDI messages will be sent to the USB-MIDI output when keys
are played.
W
hen Local MIDI is off, sound will not be generated, however MIDI messages
will still be sent to the USB-MIDI output when keys are played.
(4.1.7) Click
T
o enable/disable the click sound that is heard when the Function key settings
are changed, press and hold the F
unction button and then press the key
labeled “C
lick”. The display screen will display “ON” or “OFF” accordingly.
Note: The “click” sound will not play when pressing the Rhythm Intro/End or
Fade keys, regardless of this setting.
15
(4.1.8) Eco Mode
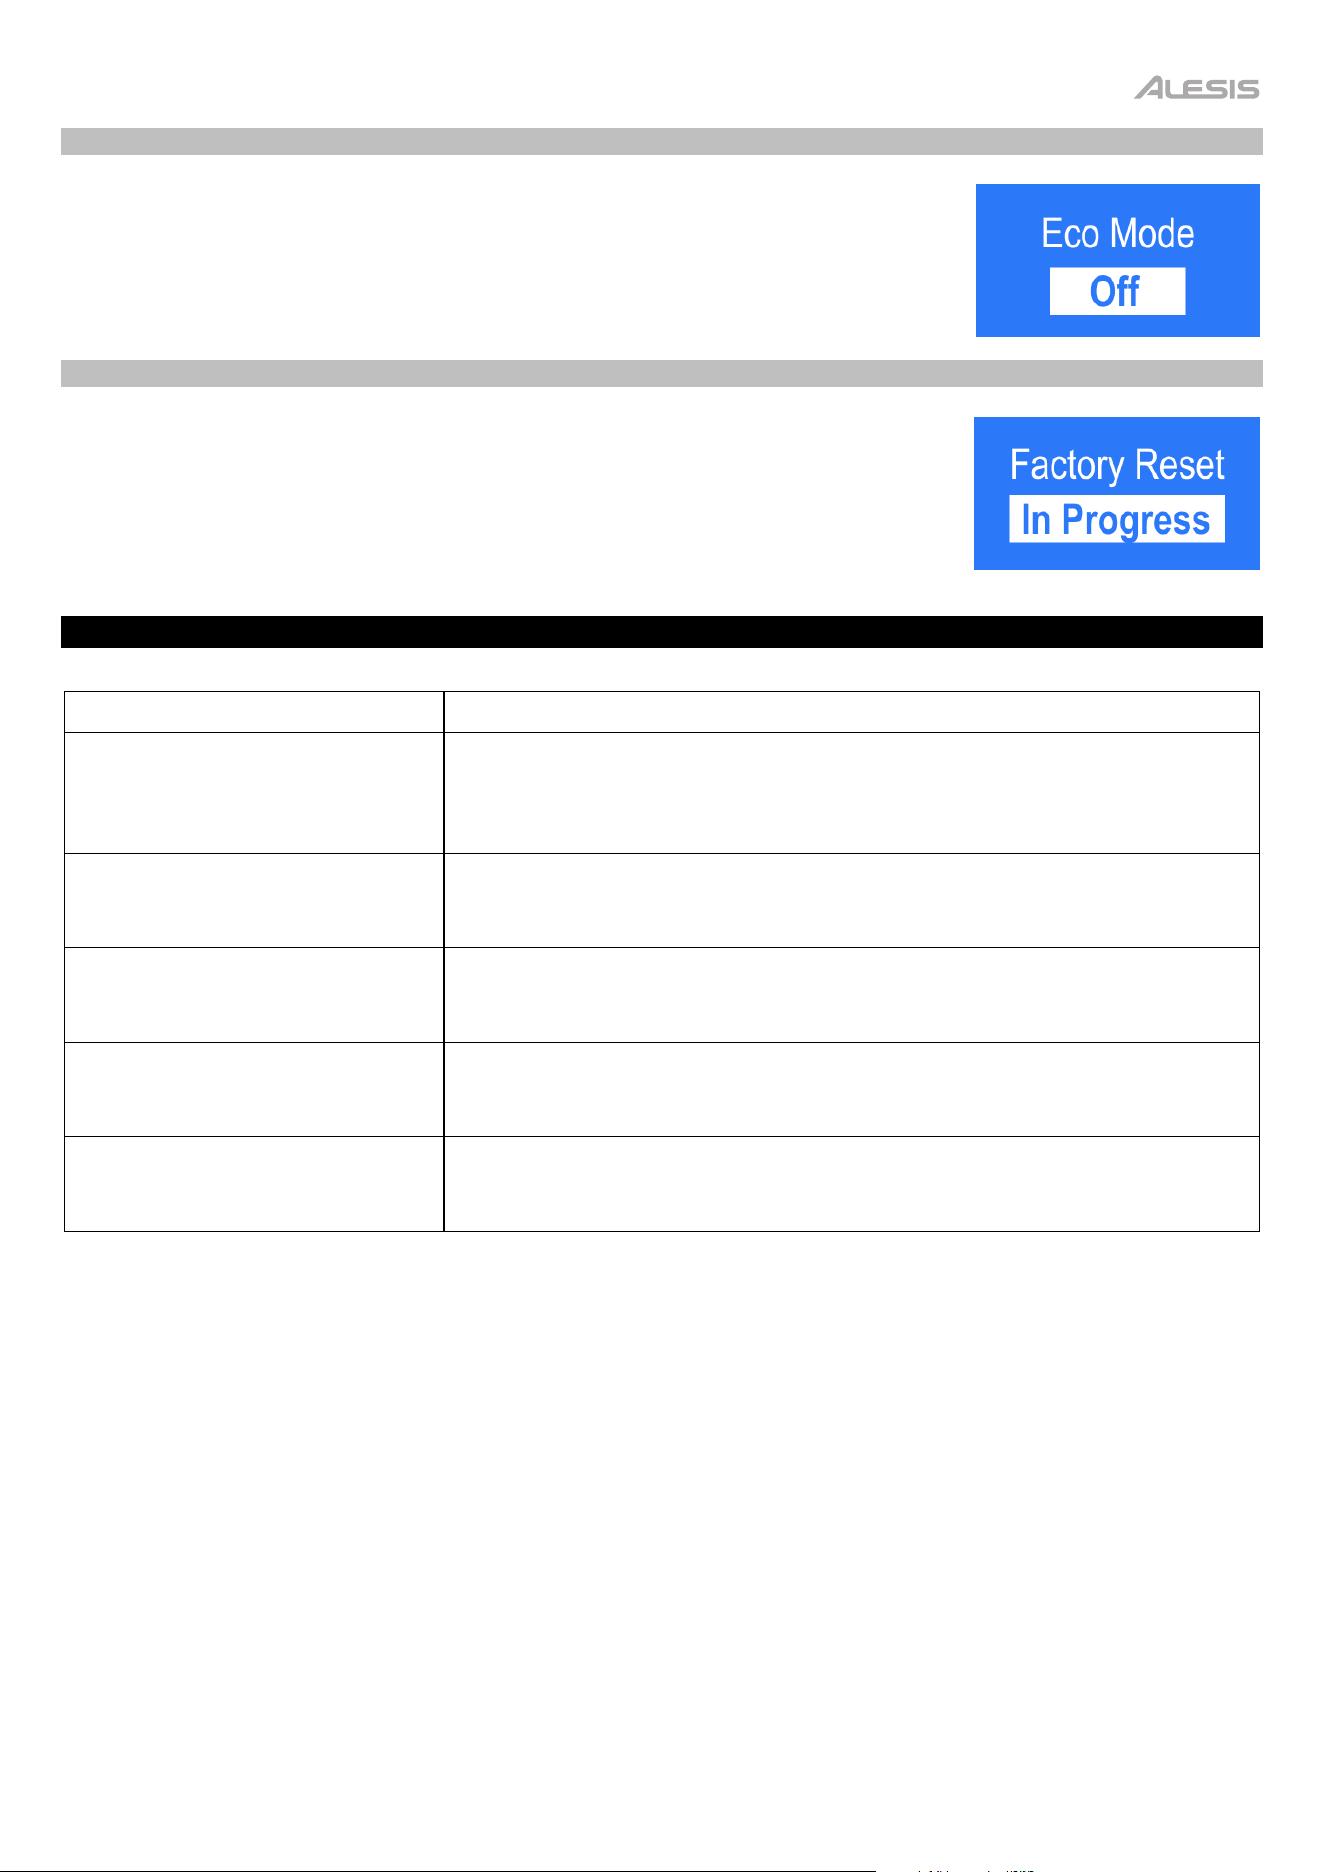
The Eco Mode feature will automatically turn off the keyboard after 20 minutes
of inactivity. To turn this feature on or off, press and hold the Function button
and press the key labeled “Eco”.
(4.1.9) Factory Reset
To return the keyboard to factory default settings (including the default
volume settings), press and hold the Function button and then press the key
labeled “Factory Reset”. When the keyboard is being reset, the display screen
will show “Factory Reset In Progress” and when completed, the keyboard will
return to the Main screen.
(5.0) Troubleshooting
Problem Possible Cause and Solution
The LED screen is intermittent
or not turning on and/or the
speakers are making a
humming noise.
The batteries may be low or depleted. Change to a new set of batteries
or use the power adapter connected to a power outlet.
The speakers produce a pop
sound whenever the power is
turned on/off.
This is normal and is no cause for alarm.
The speakers do not produce
sound when the keys are
played.
Check if the main volume is set too low or if headphones are plugged
into the Phones. The speakers will be muted if there are headphones
plugged into the Phones.
The speakers are producing
noise or interference.
Using a mobile phone in close proximity to Teacher’s Choice 61 may
produce interference. To prevent this, put the mobile phone in airplane
mode, turn off the mobile phone, or keep it away from the piano.
Certain notes produce the
wrong pitch.
Make sure that the transpose value is set to 0. If that does not work,
then hold the Function button and press the Factory Reset key (C7) to
restore the factory default settings.
16
(6.0) Appendix
(6.1) Sounds
000–015 Piano/Mallet 104–119 World
016–023 Organ 120–127 SFX
024–039 Guitar/Bass 128 Drumset
040–055 Strings/Ensemble 129–138 World 2
056–079 Brass/Woodwind 139–239 Instrument FX
080–103 Synth 240–299 Synth FX
(6.2) Rhythms
000–045 Rock/Dance 125–143 Pop
046–064 Soul/Funk 144–170 World
065–077 Jazz/Swing 171–218 Rock/Dance 2
078–092 Country 219–246 Blues/R&B
093–109 Latin 247–284 World 2
110–124 Traditional 285–299 Electronic

17
(6.3) Technical Specifications
Key Type
61
Compact Non-Weighted Keys with Red/Green/Amber LEDs
Touch Response
No
Display
Backlit LCD
Max Polyphony
32
Sounds 300
Rhythms 300
Songs
30
Keyboard Modes
Split, Layer, Rhythm, Song, Record Mode
Built-in Effects
Sustain, Vibrato
Transpose Feature
-6 to +6 semitones
Metronome Tempo Range 040 - 280 BPM
Speakers 5W (2.5 x 2)
Headphone Output 1/8” (3.5 mm) stereo output
Aux In 1/8” (3.5 mm) stereo input
Sustain Input 1/4” (6.35 mm) input
USB-MIDI Port USB-C® port
Power Input 12V DC, 1A, Center-Positive (adapter included)
Battery Power (optional) 6 AA batteries (not included)
Keyboard Dimensions
(with music rest)
(width x depth x height)
35.9” x 9.1” x 9.1” / 91.3 x 23.1 x 23.1 cm
Keyboard Weight 7.3 lbs. / 3.3 kg
Specifications are subject to change without notice.
(6.4) Trademarks & Licenses
Alesis is a trademark of inMusic Brands, Inc., registered in the U.S. and other countries. All other product names, company names,
trademarks, or trade names are those of their respective owners.