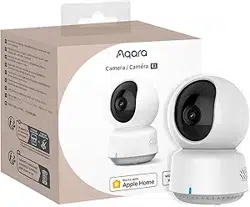

Camera Hub G350 User Manual
EN
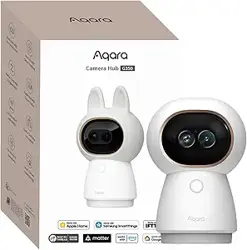
Product Introduction
What is in the Box
1
Illumination Sensor
2
MicrophoneI
3
Telephoto Lens
4
Wide-Angle Lens
5
Function Button
6
Status Indicator
7
MicroSD Card Slot
8
Vertical PT Mechanism
9
Horizontal PT Mechanism
10
Type-C Power Port
11
Speaker
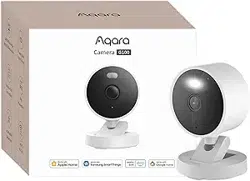
Powered by dual lenses and pan-tilt-zoom, and dual-band Wi-Fi 6, the Camera Hub G350 captures
ultra-clear 4K detail, tracks people and pets, and boasts visual and sound detection—covering both
close-ups and wide areas with no blind spots.It can serve as the central node in your smart home,
acting asMatter controller and Zigbee and Thread hub, alsoseamlessly integrating with popular
smart home platforms such as Apple Home (including HomeKit Secure Video), Google Home, and
Amazon Alexa.
Front view
On a Table or Shelf
Telephoto Lens Focusing Distance
On the Wall
Rear view of the product
PT and microSD card slot
Camera Hub G350 × 1 Power cable × 1 User manual × 2
8
9
7
10
11
Button description:
1. Long press for 10 seconds: Reset the network and unbind the device
2. Press 10 times quickly: Restore the factory settings
3. Press 3 times quickly: Enter sub-device pairing mode
4. Press 1 time: Exit sub-device pairing mode during pairing mode
Stop voice broadcast during announcement
Clear alarm during alert status
To ensure an optimal zoom experience from the telephoto lens, place the camera at least 10 (3 m)
away from the area to be monitored.
Product installation
1. The packaging box of this product does not contain a bracket, but does support a 1/4-inch threaded
screw. If wall mounting or liing is required, the bracket or any other threaded screw-compatible
mount shall be purchased separately.
2. Please ensure that the camera is successfully added to the app before mounting it on the wall.
3. The camera can be placed on a writing desk, dining room table, bookcase, coffee table or other
horizontal surfaces for use.
4. Aer mounting the camera in the liing position, the image needs to be flipped in the Aqara Home
app to be viewed normally.
Warning
1. This product is NOT a toy. Please keep children away from this product.
2. This product is designed for indoor use only. Do NOT use in humid Environments or outdoors.
3. Beware of moisture, do NOT spill water or other liquids onto the product.
4. Do NOT place this product near a heat source. Do NOT place it in an Enclosure unless there is
normal ventilation.
5. Do NOT attempt to repair this product by yourself. All repairs should be Performed by an authorized
professional.
6. Please select an adapter with a minimum output parameter of 5V⎓2A to use with the product.
Online Customer Service: www.aqara.com/support
Manufacturer: Lumi United Technology Co., Ltd.
Address: Room 801-804, Building 1, Chongwen Park, Nanshan iPark, No. 3370, Liuxian Avenue,
Fuguang Community, Taoyuan Residential District, Nanshan District,Shenzhen, China.
Email: [email protected]
Made in China
Specifications
Device Binding& Initialization
Search for "Aqara Home" in the Apple App Store, Google Play, or scan the following QR code to
download the Aqara Home app.
Telephoto Lens in Focus
3m
2.8m
3m
1.7m
On the Ceiling
Connect to Aqara Home
Camera Hub G350
1. Download App
Description of Indicator Lights
3.2m
1.8m
* The camera should be placed within the range of wireless Wi-Fi signal coverage.
* Do not place it near a strong electromagnetic interference source.
* Avoid a direct light source to camera lens at close range.
* Make sure there are no obstructions around the device.
* This product is only for indoor use.
*The camera can be placed on a table or shelf, or can be installed on a wall or ceiling. Select a location
and height that achieves your desired view and is within reach of a power outlet.
*Keep the camera at least 0.7/0.2m away from any objects or walls to avoid infrared reflection, which
may impact night vision performance.
* If the indicator is not yellow and does not flash quickly, please try to press the function button
rapidly 10 times to restore the factory settings.
The above diagram shows the installation methods. In case of using a bracket/mount purchased
separately, please refer to its installation guide.
Locate the power interface at the bottom of the product and plug the Type-C power cord to connect
the power adapter. When the camera is started, the status indicator will turn yellow and flash quickly.
2. Power up and turn on the camera
3. Add camera
When the status indicator light is flashing yellow, open the Aqara Home App and the camera should be
automatically discovered and displayed on the app. Click on the discovered camera and follow the
app prompts to connect it. Or click on the "+" in the upper right corner of the app's homepage, select
"Camera Hub G350. If successfully connected, the status indicator light will change to a solid blue
light.
• If the indicator light is not flashing yellow aer powering on, please long press the function button
for 10seconds or quickly press the function button 10 times to reset the device.
• During network setup, make sure that your mobile phone is connected to the Wi-fi network in the
same LAN as the camera.
• During network setup, it may be necessary to scan the Aqara pairing OR code on the product, manual
cover, or enter the 8-digit pairing code. Please follow the prompts on the app to complete the
necessary steps.
Connect to Apple Homekit
Open the Apple "Home" app, click "+" in the upper right corner to enter the Add Accessories page,
scan or manually input the HomeKit setup code (HomeKit OR code) on the product or the user
manual, and connect the device to HomeKit.
The following are common troubleshooting steps for HomeKit addition failures:
1. Prompt "Unable to add accessory": Repeated connection failures have le unresolved error
information in the iOS cache. Please restart the iOS device (iPhone or iPad). reset the camera and try
again.
2. Prompt "Accessory added" but still not working: Please restart the iOS device and reset the camera,
then manually enter the HomeKit setup code to add the camera.
3. Prompt "Accessory not found". Please reset the camera, wait for 3 mins, and add it again by
manually entering the HomeKit setup code.
Note: Please do not throw away the OR code on the product or User Manual. If unable to add device,
please press and hold the function button for 10s to reset the network, and then try again.
Bind child Device
This product is a Zigbee hub, and also can connect with Thread child devices, pleasebind child devices
according to the child device's user manual.
Other Functions
For more device functions, please log in to the Aqara Home app to explore.
Indicator Light Status
Solid Yellow Light
Flashing Yellow Light
Flashing Blue Light
Device Status
Starting Up
Waiting to Connect
Network Connecting
Slow Flashing Blue Light Connection Successful and Account Binding
Solid Blue Light Functioning Normally
Solid white Light On for 10 mins With No Network Configured
Flashing Purple Light Allows Adding Child Devices
Slow Flashing Yellow Light Firmware Upgrading
Light off Indicator Light Turned Off/Power off/Sleep Mode
App Function Introduction
8
Pause: Pause the current live video
9
Full screen: Tap to enter full screen
10
Mute: Tap to mute the live stream
11
Floating window: Tap for pop-out playback
12
Quality: Tap to switch
13
Zoom Selection: Aer enabling, click or draw
a box on the screen, and the camera will
automatically point to that area and zoom in
14
Zoom Shortcut: Click or slide to adjust the
zoom level
Model: CH-C14E/ CH-C14D
Wide-Angle Lens Video Resolution: 3840×2160
Wide-Angle Lens Angle: 133°(diagonal)
Wide-Angle Lens Focal Length: 2.8 mm
Telephoto Lens Video Resolution: 2560×1440
Telephoto Lens Angle: 43°(diagonal)
Telephoto Lens Focal Length: 8 mm
Aperature: f/1.6
Frame Rate: 20 fps
Aspect Ratio: 16:9
Video Codec: H.264
Wireless Protocols: Wi-Fi IEEE 802.11 b/g/n/ac/ax 2.4/5 GHz, Zigbee/Thread IEEE 802.15.4, Bluetooth
Power Input: 5V⎓2A
Local Storage: MicroSD card (not included). CLASS 10 or above is supported, up to 512GB storage.
OperatingTemperature: -10°C~40°C (14°F~ 104°F)
Operating Humidity: 0~95% RH, no condensation
Dimensions: 124×85×65mm (4.88×3.35×2.56in)
User Information
Use of the Works with Apple badge means that an accessory has been designed to work specifically
with the technology identified
in the badge and has been certified by the developer to meet Apple performance standards. Apple is
not responsible for the operation of this device or its compliance with safety and regulatory
standards.
A 10-day recording history from your Camera Hub G350is securely stored in iCloud and available to
view in the Apple Home app on your iPhone, iPad, or Mac. You can add one camera to a 50GB plan, up
to five cameras to a 200GB plan, or up to an unlimited number of cameras to a 2TB plan at no
additional cost. Camera recordings don’ t count against your iCloud storage limit.
Communication between iPhone, iPad, Apple Watch, HomePod, HomePod mini, or Macand the
HomeKit- enabled Camera Hub G350is secured by HomeKit technology.
Apple, Apple Watch, HomeKit, HomePod, HomePod mini, Siri, iPad, iPad Air, and iPhone are
trademarks of Apple Inc., registered in the U.S. and other countries.
1
Back: Tap to exit the current page
2
Device Name
3
Settings: Tap to enter the device settings
page
4
Sleep: Tap to put the device into sleep
mode (privacy mode)
5
Screenshot: Capture the current live view
6
Record: Record the current live video
7
Call: Tap to initiate a call with the camera
• PTZ Calibration: Click to automatically calibrate the PTZ position once.
• PTZ Control: Click to control the direction of the PTZ.
• Preset Angles: Modify or set camera preset positions.
• Pan-Tilt: Click to turn PTZ-related functions on/off.
• Integrated Events: The camera can link with other Aqara smart devices. When these devices
trigger an event, the camera will start recording and the video can be played back.
• Albums: Access screenshots and videos captured by the camera.
• Cruise: Set and activate the cruise function. The camera will automatically rotate to preset
positions in sequence.
• Panoramic Viewfinder: Set and activate panoramic positioning. Tap on the panoramic map to
make the device point to the corresponding location.
• Person Tracking: When enabled, the PTZ will automatically track a detected human shape.
• Animal Tracking: When enabled, the device will track detected animals.
• Close-Up Tracking: When enabled, the device will track and zoom in on detected humans,
cats, or dogs.
• Home Live view: Click to enter the live view interface of all cameras.
• Video Event History: Click to access the recorded event videos from all cameras.
• Live View: The live view interface of the current device.
• Playback: The playback interface for the current device.
• AI Video Search: Click to enter the smart video search interface.
• AI Features: The control interface for the camera's intelligent algorithms.
1
3
2
4
5
6
1m
1m
1.7m
Telephoto Field of View
2025-12-12 17:53:23
Smooth
9KB/s
1
4 5 6 7 8
2 3
9
13
10
11
12
14
USER MANUAL