
TM-U590-2xx series User’s Manual
Modèles TM-U590-2xx Manuel d’utilisation
M10000700
©Seiko Epson Corporation 2025
2
English
TM-U590-2xx series User’s Manual
Key to Symbols
The symbols in this manual are identified by their level of importance, as defined
below. Read the following carefully before handling the product.
WARNING:
Warnings must be followed carefully to avoid serious bodily injury.
CAUTION:
Cautions must be observed to avoid minor injury to yourself or damage to your
equipment.
Restriction of Use
When this product is used for applications requiring high reliability/safety, such as
transportation devices related to aviation, rail, marine, automotive, etc.; disaster
prevention devices; various safety devices, etc.; or functional/precision devices, etc.;
you should use this product only after giving consideration to including fail-safes and
redundancies into your design to maintain safety and total system reliability. Because
this product was not intended for use in applications requiring extremely high
reliability/safety, such as aerospace equipment, main communication equipment,
nuclear power control equipment, or medical equipment related to direct medical care,
etc., please make your own judgment on this product’s suitability after a full
evaluation.
Downloading Drivers, Utilities, and Manuals
Drivers, utilities, and manuals can be downloaded from the following URL:
https://www.epson.com/support/
Unpacking
The following items are included with the standard specification printer. If any item is
damaged, contact your dealer.
O Printer
O Power switch cover
O Ribbon cassette
Note:
When you lift the printer, be sure to hold the bottom of the printer to prevent damage.
3
English
Printer Parts
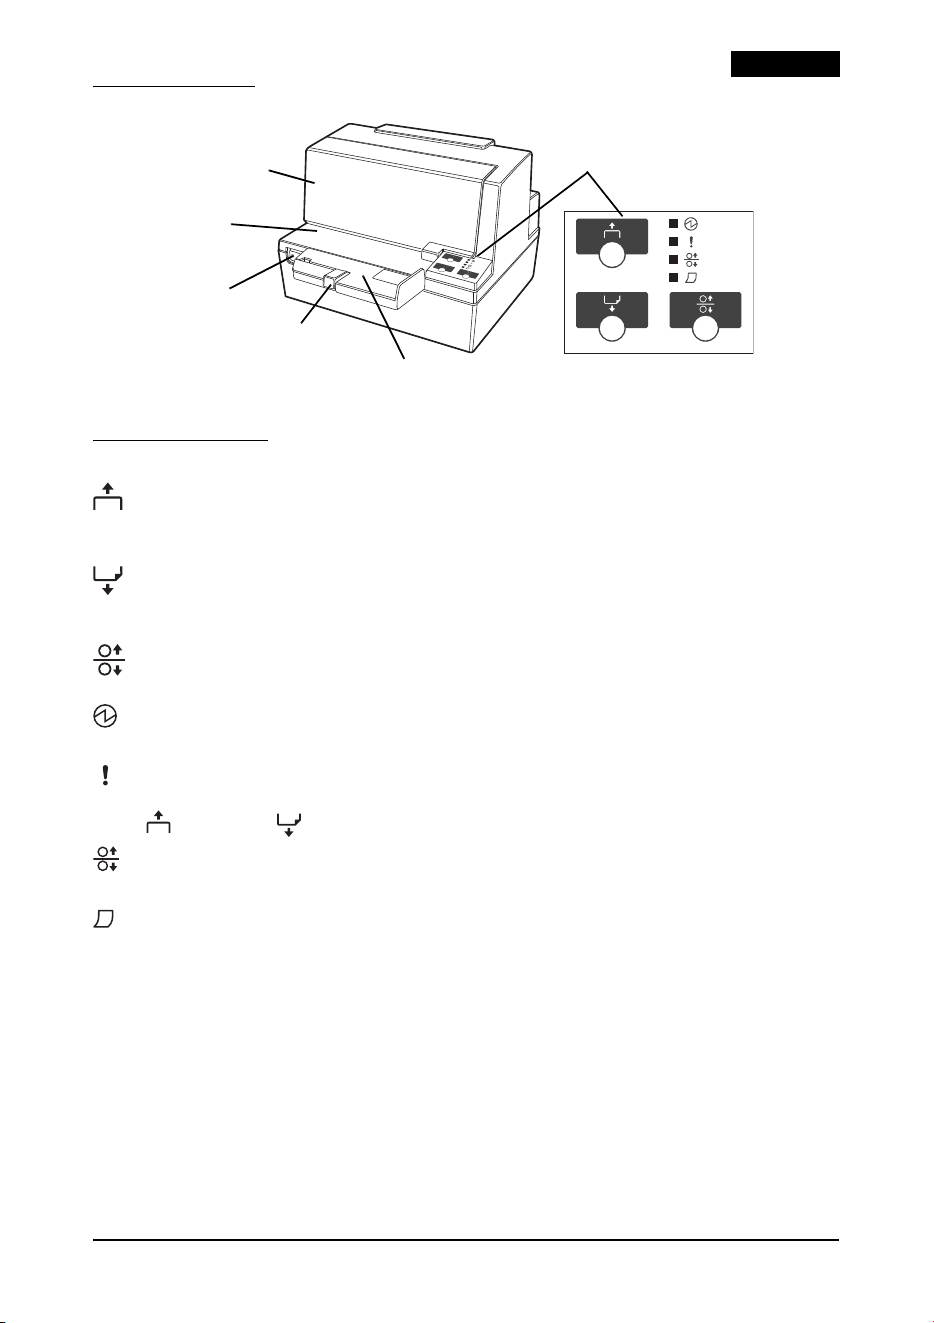
Control Panel
(Forward) button
Press to feed slip paper forward one line; hold down to feed slip paper forward
continuously.
(Reverse) button
Press to feed slip paper in reverse one line; hold down to feed slip paper in reverse
continuously.
(Release) button
Press to release slip paper.
(Power) LED
Lights when the printer is on.
(Error) LED
Lights to indicate that the printer is offline, except when feeding paper using the
(Forward) or (Reverse) buttons, and during a self test. Flashes to indicate an error.
(Release) LED
Lights to indicate that you can insert slip paper.
(Slip) LED
Lights after power on. Flashes while waiting for slip insertion and removal. Off while
the printer is ejecting a slip.
front cover
table
on/off switch
paper guide
document table
control pane
l
4
English
Removing the Damper
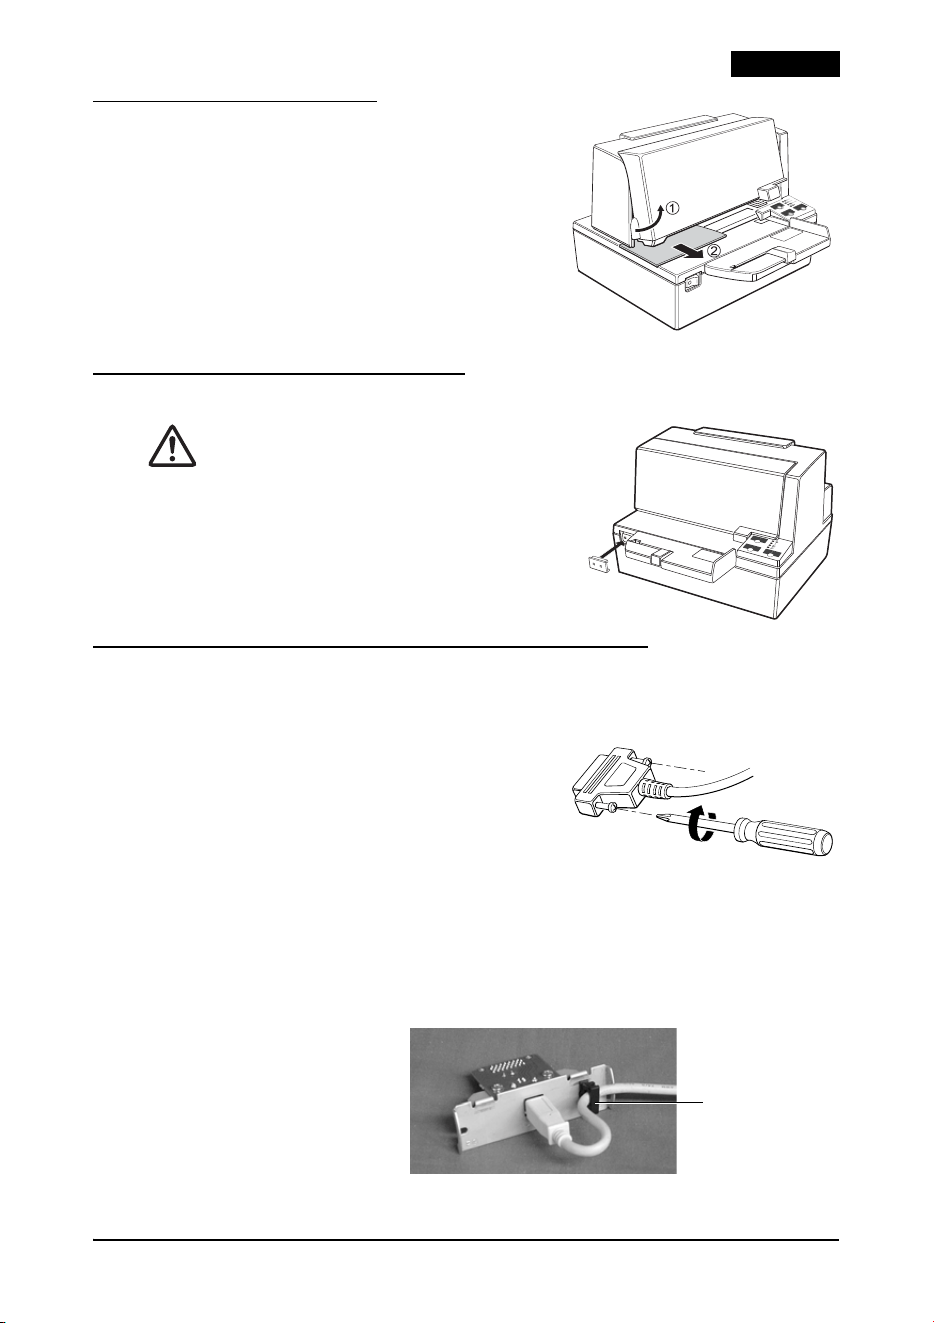
The printer is protected for shipping by a
transportation damper that you must remove before
you turn on the printer.
Open the printer by pulling the tab on the front
cover, and remove the damper shown in illustration
1.
Note:
Reinstall the damper before shipping.
Using the Power Switch Cover
WARNING:
If an accident occurs with the power switch cover
attached, unplug the power cord immediately.
Continued use may cause fire.
The enclosed power switch cover keeps the power
switch from being pressed accidentally. To use the
cover, install it as shown in illustration
2.
Connecting the Printer to the Host Computer
1. Insert the interface cable connector firmly into the interface connector on the
connector panel.
2. When using connectors equipped with
screws, tighten them to secure the
connectors firmly as shown in illustration
3.
3. When using interface cables equipped with a
grounding line, attach the ground line to the
screw hole marked “FG” on the printer.
4. Connect the other end of the interface cable
to the host computer.
When using USB cable, install the wire saddle in the position shown in illustration
4,
and hook the cable through the wire saddle to keep it from falling out.
1
2
3
Wire saddle
4
5
English
Installing the Ribbon Cassette
Use the EPSON ERC-31 ribbon cassette. The use of any ribbon cassettes other than
those approved by Epson may damage the printer and will void the warranty.
CAUTION:
Never turn the ribbon cassette’s feed knob in the opposite direction of the arrow marked
on the cassette; otherwise the ribbon cassette may be damaged.
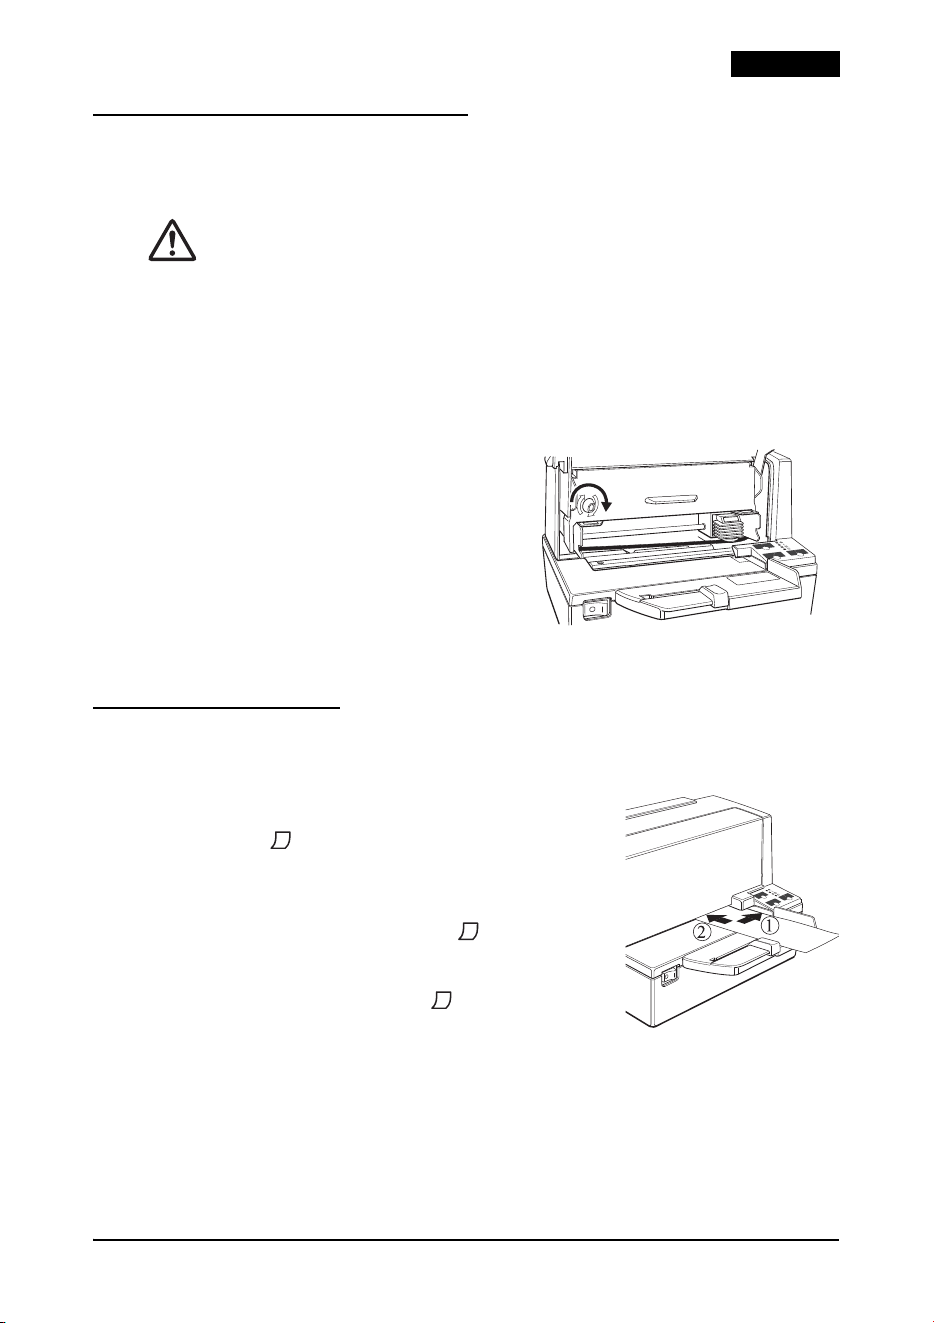
1. Turn the printer on, and open the front cover by pulling up the tab on the left
side.
2. Be sure the print head is on the right side.
3. If a ribbon is already installed, remove it by grasping the end of the tab and
removing it from the printer.
4. Turn the cassette knob on the cartridge in
the direction of the arrow 2 or 3 times to
remove any slack.
5. Insert the ribbon, and rotate the cassette
knob 2 or 3 more times, as shown in
illustration
5.
6. Make sure the ribbon has no wrinkles or
creases and is installed below the print
head as shown on the label inside the
printer.
Inserting Slip Paper
Note:
Use only slip paper that matches the specification. Do not
use wrinkled or curled paper.
1. When the (Slip) LED flashes, insert slip paper,
using the right edge of the slip paper inlet as a guide
(see illustration 6).
2. When you insert the slip into the inlet as far as it will
go, the sensor detects the slip, the
(Slip) LED
changes from flashing to on, and the printer draws
the paper in and prints it.
3. After printing is complete, the
(Slip) LED goes off,
and you can remove the slip.
5
6
6
English
Troubleshooting
No lights on the control panel
Check that power supply cables are plugged into the printer, the power unit, and power
outlet correctly.
The printer sounds like it is printing, but nothing is printing
Check that the ribbon cassette is installed correctly.
Replace the ribbon cassette.
The (Error) LED is flashing, and nothing is printing
Turn the printer off, and check for a paper jam.
If the printer has been printing for awhile, the print head may be too hot. This corrects
itself when the print head cools down.
Turn the printer off, and after 10 seconds, turn it back on. If there is still a problem,
contact a qualified servicer.
A line of dots is missing in the printout
The print head may be damaged. Contact a qualified service person for repair.
Removing Jammed Paper
CAUTION:
Do not touch the print head because it can be very hot after printing.
Do not move the print head carriage.
1. Turn the printer off and open the front cover.
2. Open the front cover and remove the jammed paper.
7
English
Appendix
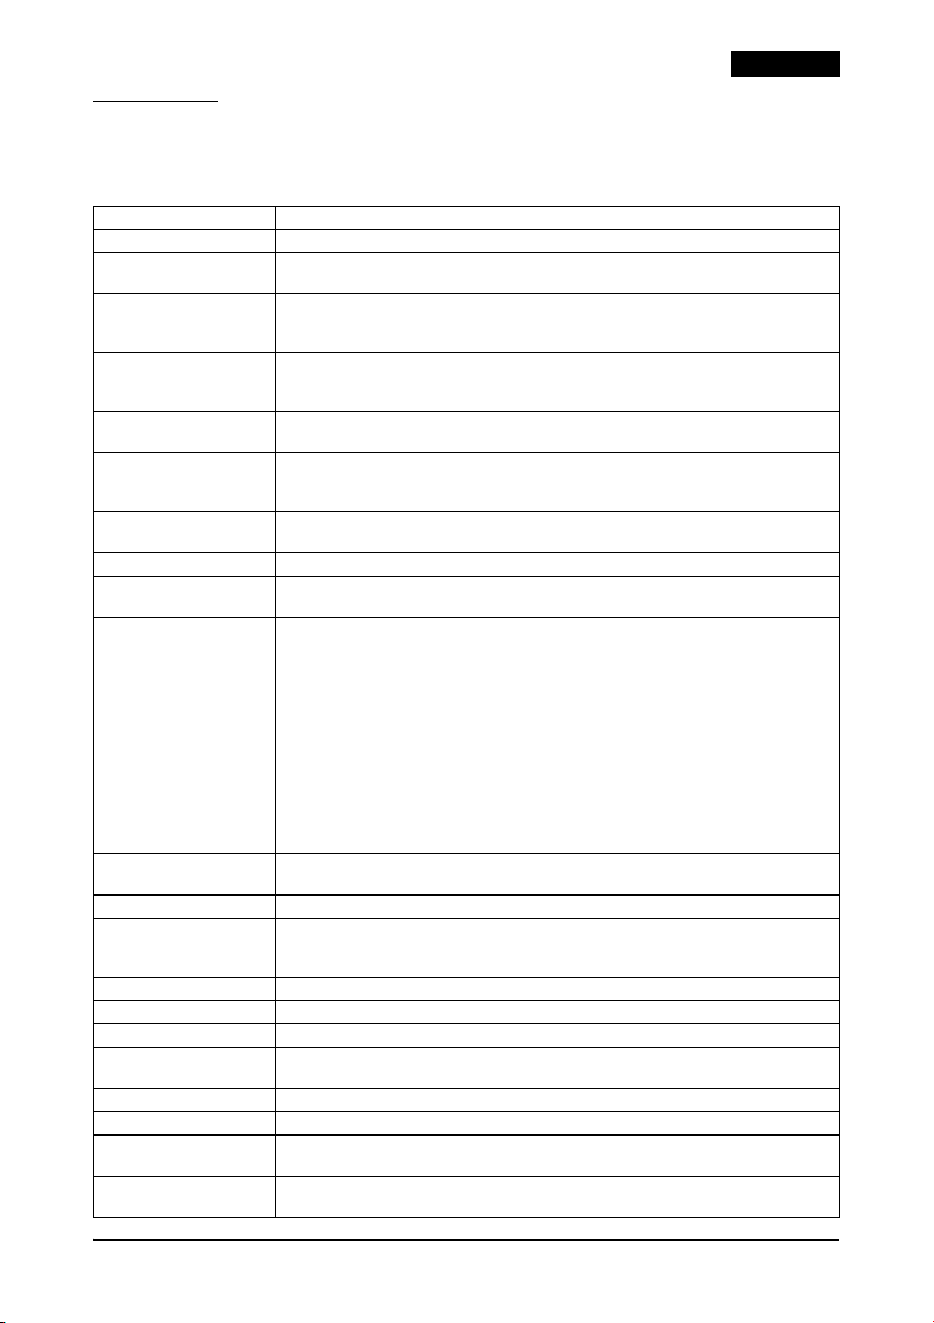
Specifications
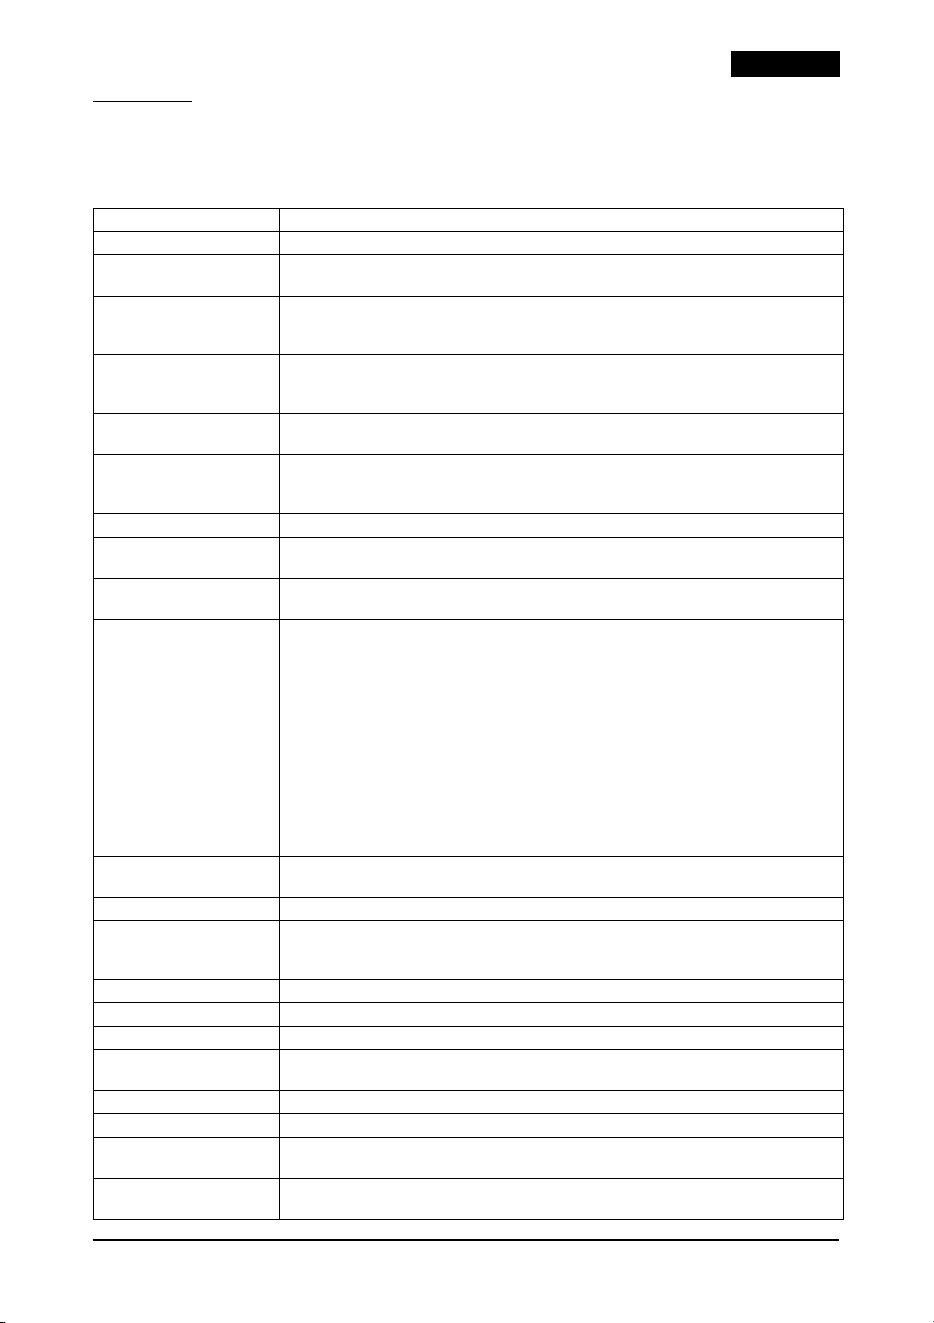
Printing method Serial impact dot matrix, 9-pin vertical line, wire pitch 0.353 mm {1/72 "}
Printing direction Bidirectional, minimum distance printing
Characters per line
(default)
9 × 9 font: 66; 7 × 9 font: 88; 5 × 9 font: 66
Character structure Font A: 9 × 9, 3-dot spacing (half dots)
Font B: 7 × 9, 2-dot spacing (half dots)
Font C: 5 × 9, 1-dot spacing (normal dots)
Character size Font A: (9 × 9) 1.6 × 3.1 mm {0.06 × 0.12"}
Font B: (7 × 9) 1.3 × 3.1 mm {0.05 × 0.12"}
Font C: (5 × 9) 1.6 × 3.1 mm {0.06 × 0.12"}
Number of characters Alphanumeric characters: 95; International characters: 14 sets;
Extended graphics: 128 × 9 (with one space page)
Print speed Font A: (9 × 9) = 233 characters/second
Font B: (7 × 9) = 311 characters/second
Font C: (5 × 9) = 233 characters/second
Paper feed speed Approximately 60.3 ms/line, 4.23 mm {1/6" } feed; 86.4 mm/s, {approximately 3.4"/s}
(continuous feeding)
Line spacing (default) 4.23 mm {1/6"}
Paper specifications Paper types: Normal, carbon-copy, and pressure-sensitive
Paper sizes: 70 × 70 to 210 × 297 mm {2.76 × 2.76" to 8.27 × 11.69"}
Paper thickness Single-ply: 0.09 to 0.2 mm {0.0035 to 0.0079"}
Copy paper: Maximum 5 sheets (original + 4 copies)
Backing paper: 0.06 to 0.15 mm {0.0023 to 0.0059"}
Copy and original: 0.04 to 0.07 mm {0.0015 to 0.0028"}
Carbon paper: Approximately 0.035 mm {0.0014"}
Total thickness: 0.30 mm {0.0118"} or less (for any combination from a single original
to an original + 3 copies); 0.36 mm {0.0141"} or less (for any combination from a
single original to an original + 4 copies)
Pressure-sensitive paper: Maximum 5 sheets (original + 4 copies)
Backing paper: 0.06 to 0.15 mm {0.0023 to 0.0059"}
Copy and original: 0.06 to 0.075 mm {0.0023 to 0.003"}
Total thickness: 0.24 mm {0.0094"} or less (original to original + 3 copies);
0.30 mm {0.0118"} or less (original + 4 copies)
Number of copies Original + 4 copies at 20 to 45°C {68 to 113°F}
Original + 1 to 3 copies at 5 to 45°C {41 to 113°F}
Ribbon cassettes ERC-31
Interfaces (compatible)
*1
Serial: RS-232
Parallel: IEEE 1284
USB: USB 2.0 Full-speed (12 Mbps)
Receive buffer 69 bytes or 4 KB
DKD function 2 drives
Power supply
*2
+24 VDC ±10%
Current consumption
(at 24V)
Operating: Mean: Approximately 1.9 A Peak: Approximately 8 A
Standby: Mean: Approximately 0.3 A
MTBF 180,000 hours
MCBF 29 million lines
Temperature Operating: 5 to 45°C {41 to 113°F}
Storage: –10 to 50°C {14 to 122°F}, except paper
Humidity Operating: 10 to 90% RH
Storage: 10 to 90% RH, except paper
8
English
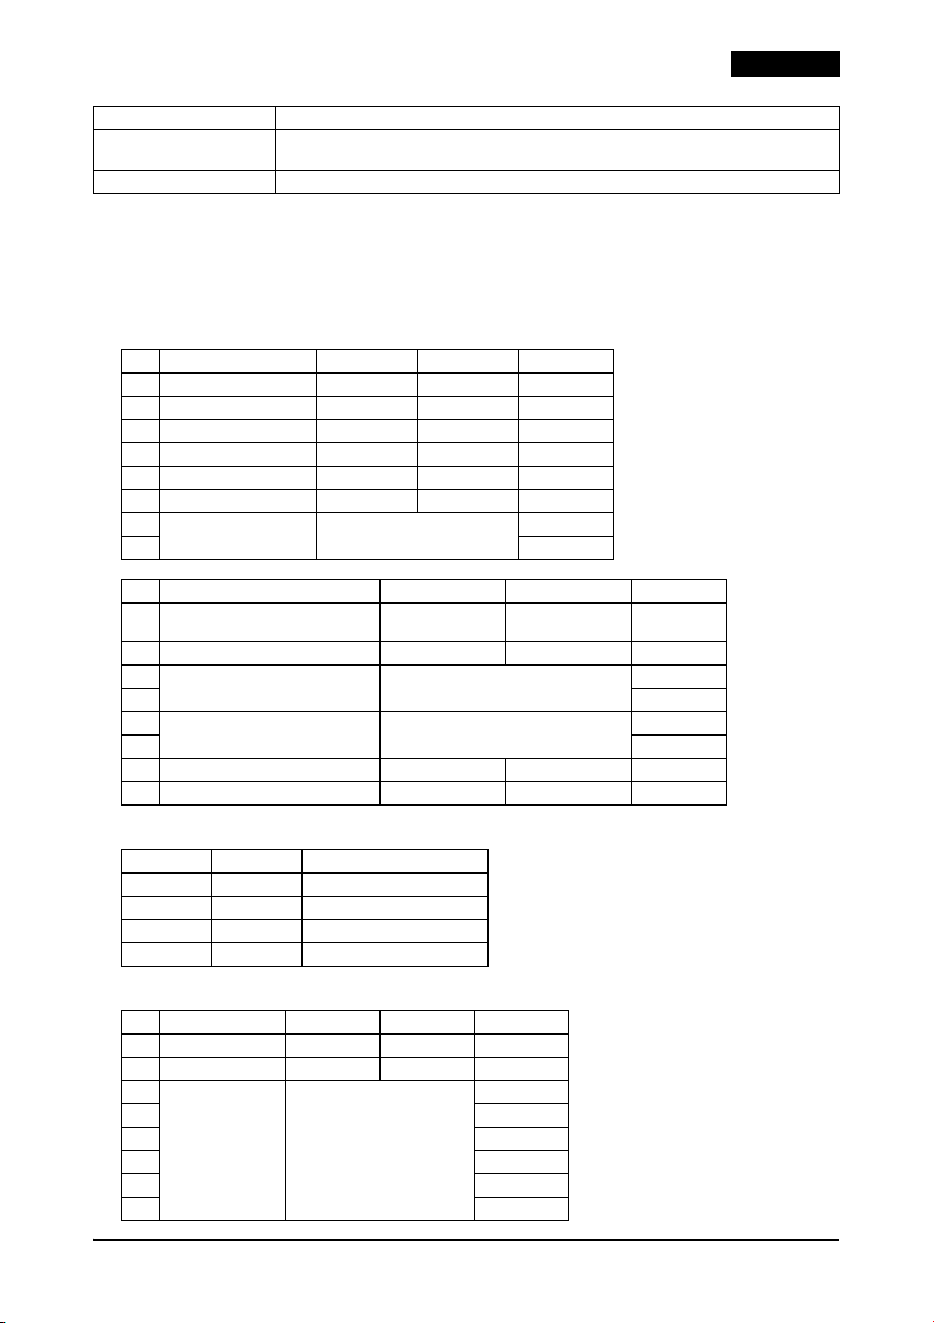
*1: The interface provided varies by model.
*2: Be sure to use a safety-standards-applied power source that meets the following specifications.
Rated output: 24 V/1.9 to 10.0 A, Maximum output: 240 VA or less
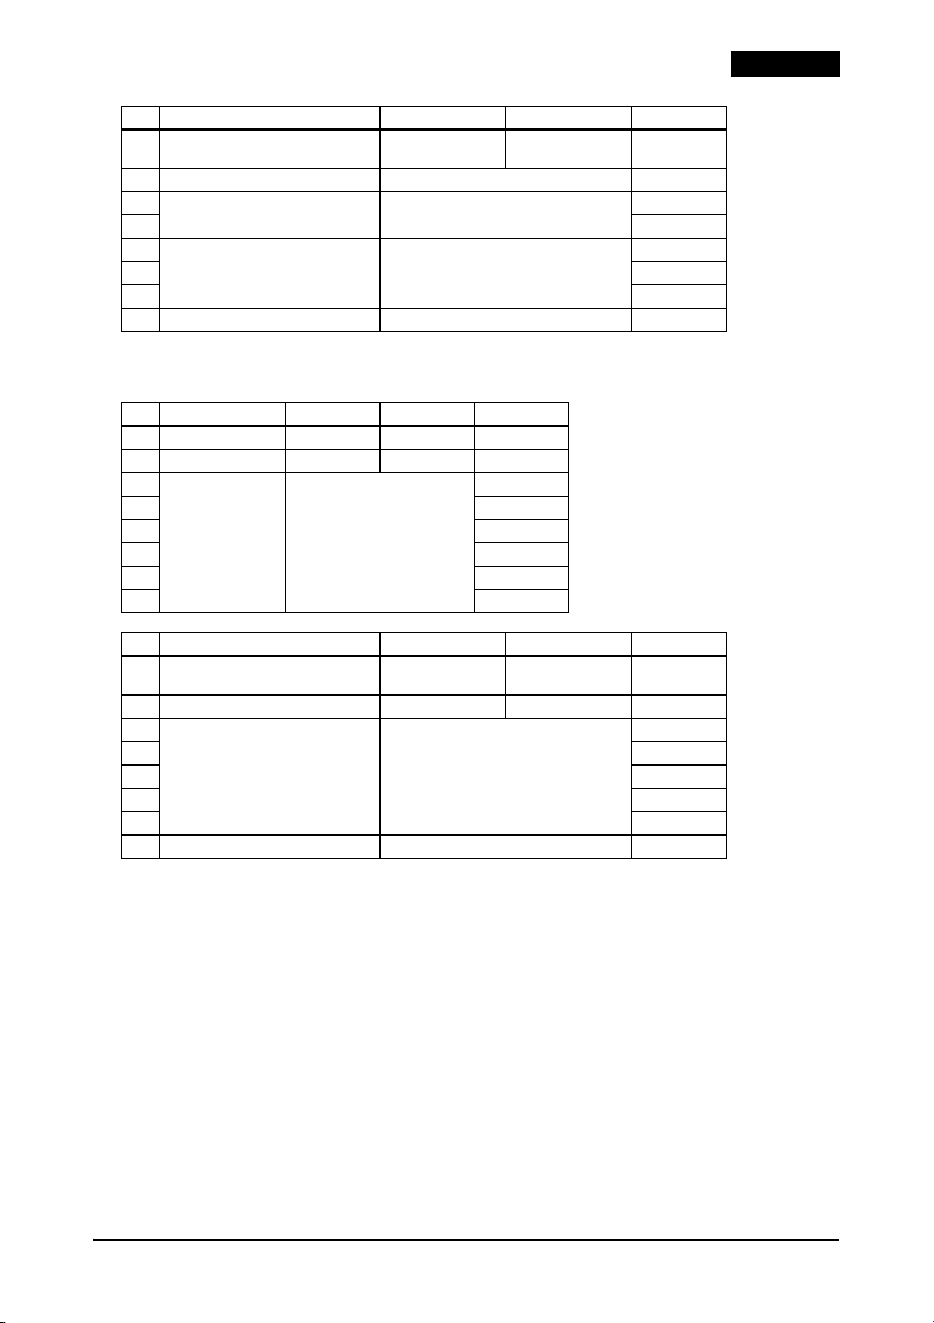
DIP switch tables
Altitude 3,000 m or less
Overall dimensions 185 × 252 × 266 (including a document table) mm {7.28 × 9.92 × 10.47"}
(H × W × D)
Weight (mass) Approximately 5 kg {11 lb}
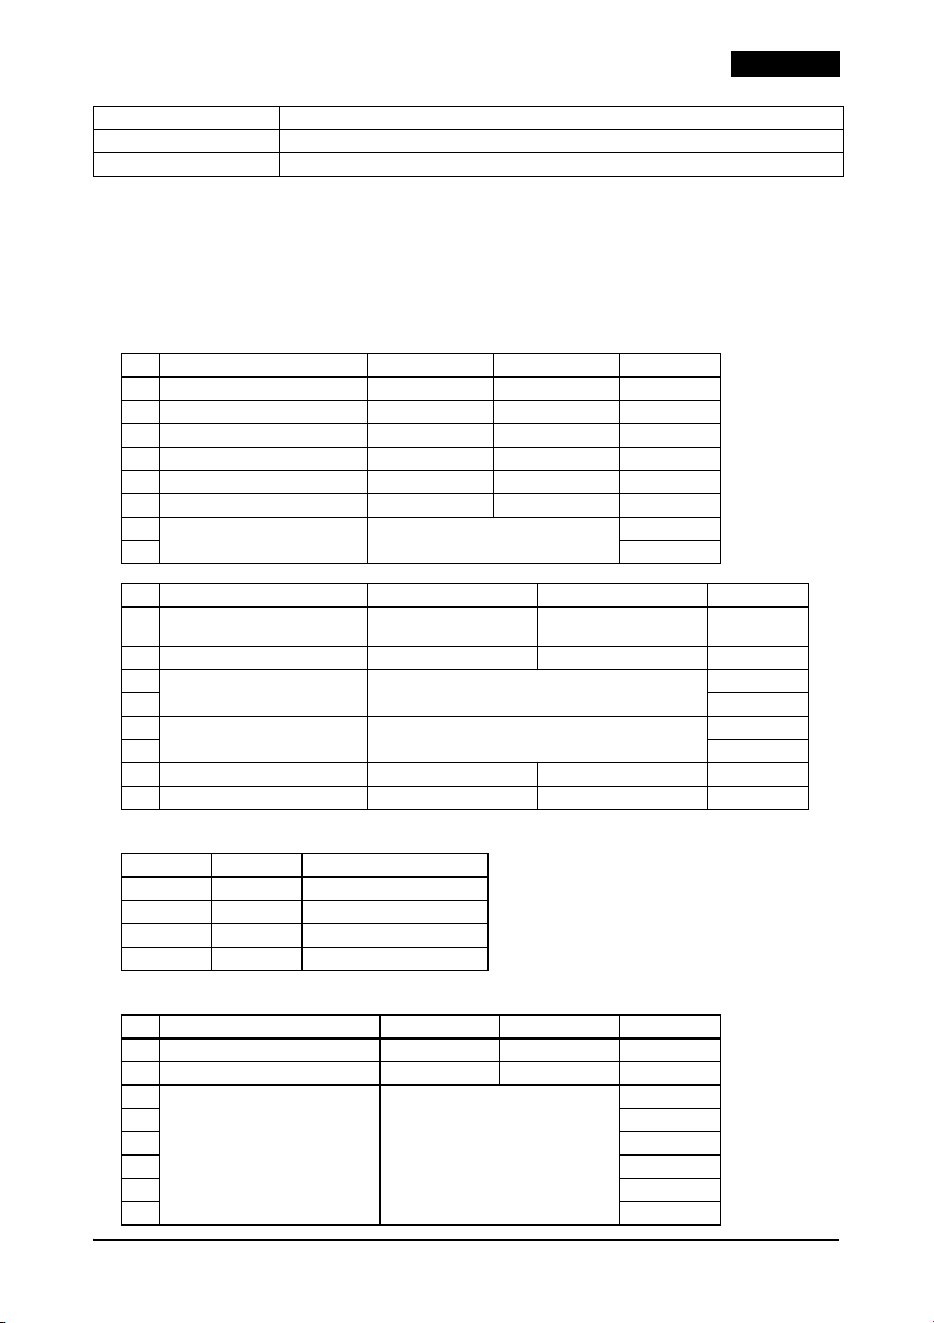
Serial interface
SW Function ON OFF Initial setting
1-1 Data receive error Ignored Prints “?” OFF
1-2 Receive buffer 69 bytes 4 KB OFF
1-3 Handshaking XON/XOFF DTR/DSR OFF
1-4 Data word length 7 bits 8 bits OFF
1-5 Parity check Enabled Disabled OFF
1-6 Parity selection Even Odd OFF
1-7
Transmission speed See “Transmission speed” table.
ON
1-8 OFF
SW Function ON OFF Initial setting
2-1 Handshaking (BUSY condition) Receive buffer full
Offline or
receive buffer full
OFF
2-2 Customer display Connected Not connected OFF
2-3
Undefined —
OFF
2-4 OFF
2-5
Reserved Fixed to OFF. Do not change.
OFF
2-6 OFF
2-7 I/F Pin 6 reset Enabled Disabled OFF
2-8 I/F Pin 25 reset Enabled Disabled OFF
Transmission speed [bps: bits per second]
1-7 1-8 Speed
ON ON 2400 bps
OFF ON 4800 bps
ON OFF 9600 bps
OFF OFF 19200 bps
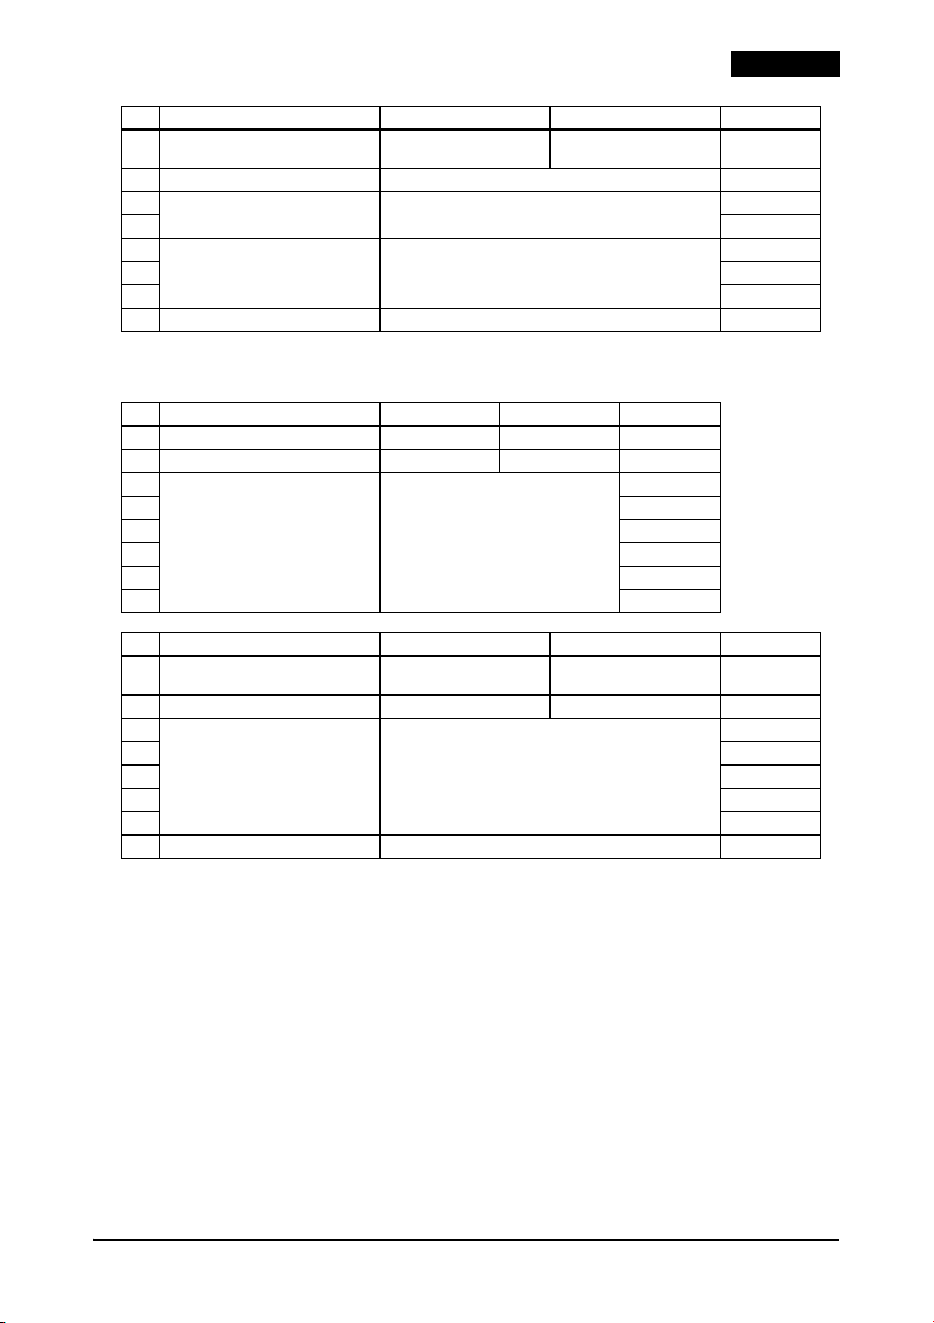
Parallel interface
SW Function ON OFF Initial setting
1-1 Auto line feed Enabled Disabled OFF
1-2 Receive buffer 69 bytes 4 KB OFF
1-3
Undefined —
OFF
1-4 OFF
1-5 OFF
1-6 OFF
1-7 OFF
1-8 OFF
9
English
Position of nameplate
The nameplate is located on the bottom of the product.
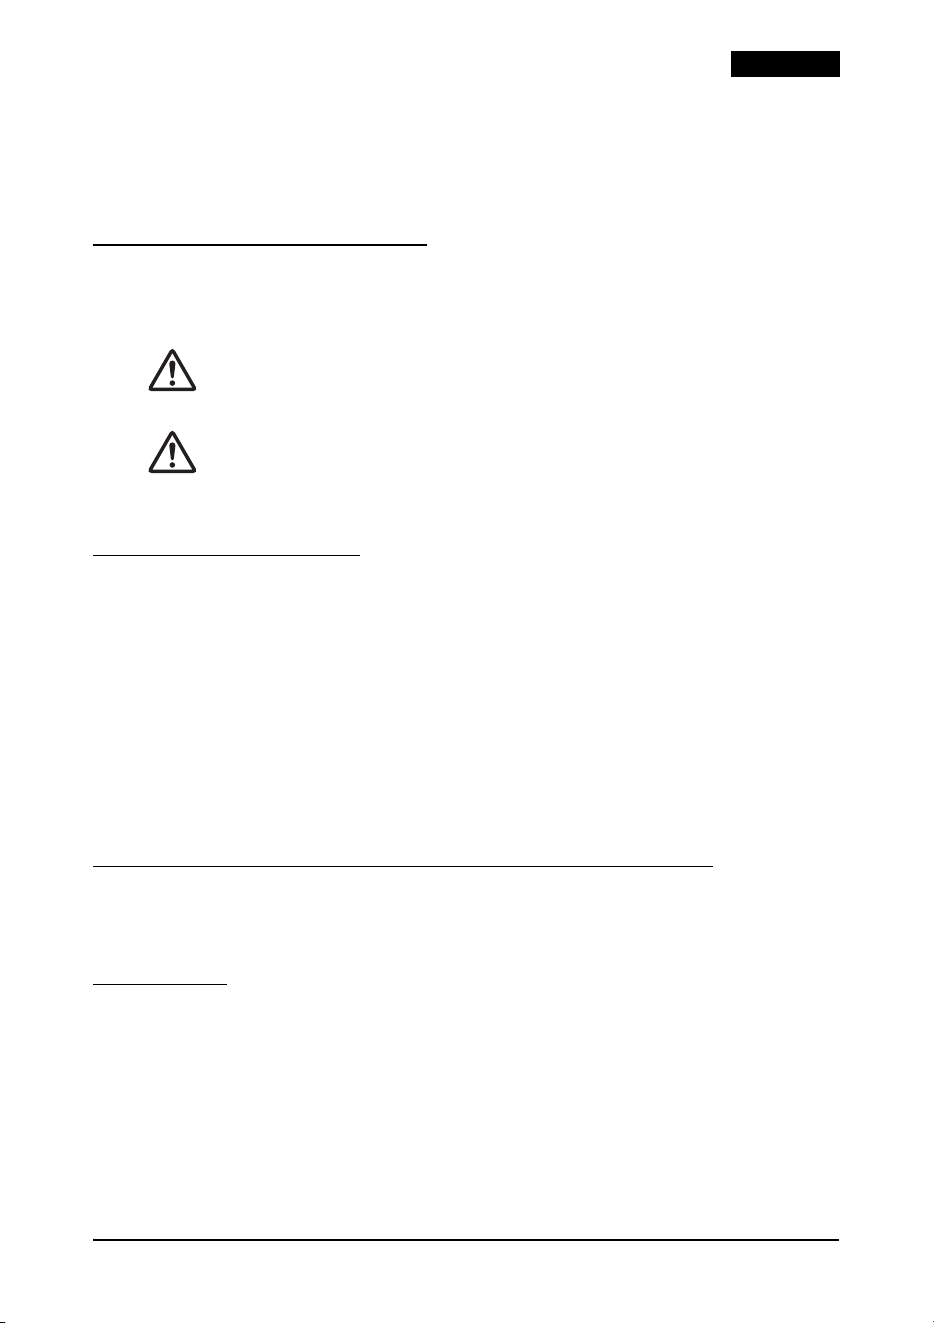
SW Function ON OFF Initial setting
2-1 Handshaking (BUSY condition) Receive buffer full
Offline or
receive buffer full
OFF
2-2 Reserved Fixed to OFF. Do not change. OFF
2-3
Undefined —
OFF
2-4 OFF
2-5
Reserved Fixed to OFF. Do not change.
OFF
2-6 OFF
2-7 OFF
2-8 I/F Pin 31 reset Fixed to ON. Do not change. ON
USB interface
SW Function ON OFF Initial setting
1-1 Auto line feed Enabled Disabled OFF
1-2 Receive buffer 69 bytes 4 KB OFF
1-3
Undefined —
OFF
1-4 OFF
1-5 OFF
1-6 OFF
1-7 OFF
1-8 OFF
SW Function ON OFF Initial setting
2-1 Handshaking (BUSY condition) Receive buffer full
Offline or
receive buffer full
OFF
2-2 Customer display Connected Not connected OFF
2-3
Reserved Fixed to OFF. Do not change.
OFF
2-4 OFF
2-5 OFF
2-6 OFF
2-7 OFF
2-8 Reserved Fixed to ON. Do not change. ON

10
English
All rights reserved. No part of this publication may be reproduced, stored in a retrieval system, or transmitted in any form or by
any means, electronic, mechanical, photocopying, recording, or otherwise, without the prior written permission of Seiko Epson
Corporation. No patent liability is assumed with respect to the use of the information contained herein. While every precaution
has been taken in the preparation of this book, Seiko Epson Corporation assumes no responsibility for errors or omissions.
Neither is any liability assumed for damages resulting from the use of the information contained herein.
Neither Seiko Epson Corporation nor its affiliates shall be liable to the purchaser of this product or third parties for damages,
losses, costs, or expenses incurred by purchaser or third parties as a result of: accident, misuse, or abuse of this product or
unauthorized modifications, repairs, or alterations to this product, or (excluding the U.S.) failure to strictly comply with Seiko
Epson Corporation’s operating and maintenance instructions.
Seiko Epson Corporation shall not be liable against any damages or problems arising from the use of any options or any
consumable products other than those designated as Original Epson Products or Epson Approved Products by Seiko Epson
Corporation.
Product names used herein are for identification purposes only and may be trademarks of their respective owners.
NOTICE: The contents of this manual are subject to change without notice.
11
Français
Modèles TM-U590-2xx Manuel d’utilisation
Signification des symboles
Dans ce manuel, les symboles sont identifiés par ordre d’importance de la manière
indiquée ci-après. Lisez attentivement ce qui suit avant de manipuler le produit.
AVERTISSEMENT :
Respectez strictement les avertissements afin d’éviter tout risque de blessure grave.
ATTENTION :
Ces mises en garde doivent être respectées afin d’éviter les risques de blessure légère ou
de dégâts matériels.
Restrictions d’emploi
En cas d’utilisation de ce produit pour des applications exigeant une grande fiabilité/
sécurité, telles que les appareils employés en transport aérien, ferroviaire, maritime,
automobile, etc., les appareils de prévention des catastrophes, tous les appareils de
sécurité, etc., ou les appareils de haute précision/performance, vous devrez, avant
d’utiliser ce produit, considérer l’incorporation à votre système de dispositifs de
sécurité positive et de moyens redondants assurant la sécurité et la fiabilité de
l’ensemble du système. Étant donné que ce produit n’est pas destiné aux applications
exigeant une fiabilité/sécurité extrême, telles que les équipements utilisés dans
l’aérospatiale, dans les systèmes de communication, dans les systèmes de commande
nucléaire ou dans les soins médicaux, etc., vous devrez, après une évaluation complète,
décider si ce produit convient.
Téléchargement des pilotes, utilitaires et manuels
Les pilotes, utilitaires et manuels peuvent être téléchargés à partir de l’URL suivante :
https://www.epson.com/support/
Déballage
Les éléments suivants sont fournis avec l’imprimante standard. Contacter le revendeur
si l’un d’entre eux est endommagé.
O Imprimante
O Cache d’interrupteur
O Cartouche de ruban
Remarque :
Lorsque vous soulevez l’imprimante, veiller à la tenir par le dessous afin de ne pas
endommager l’appareil.
12
Français
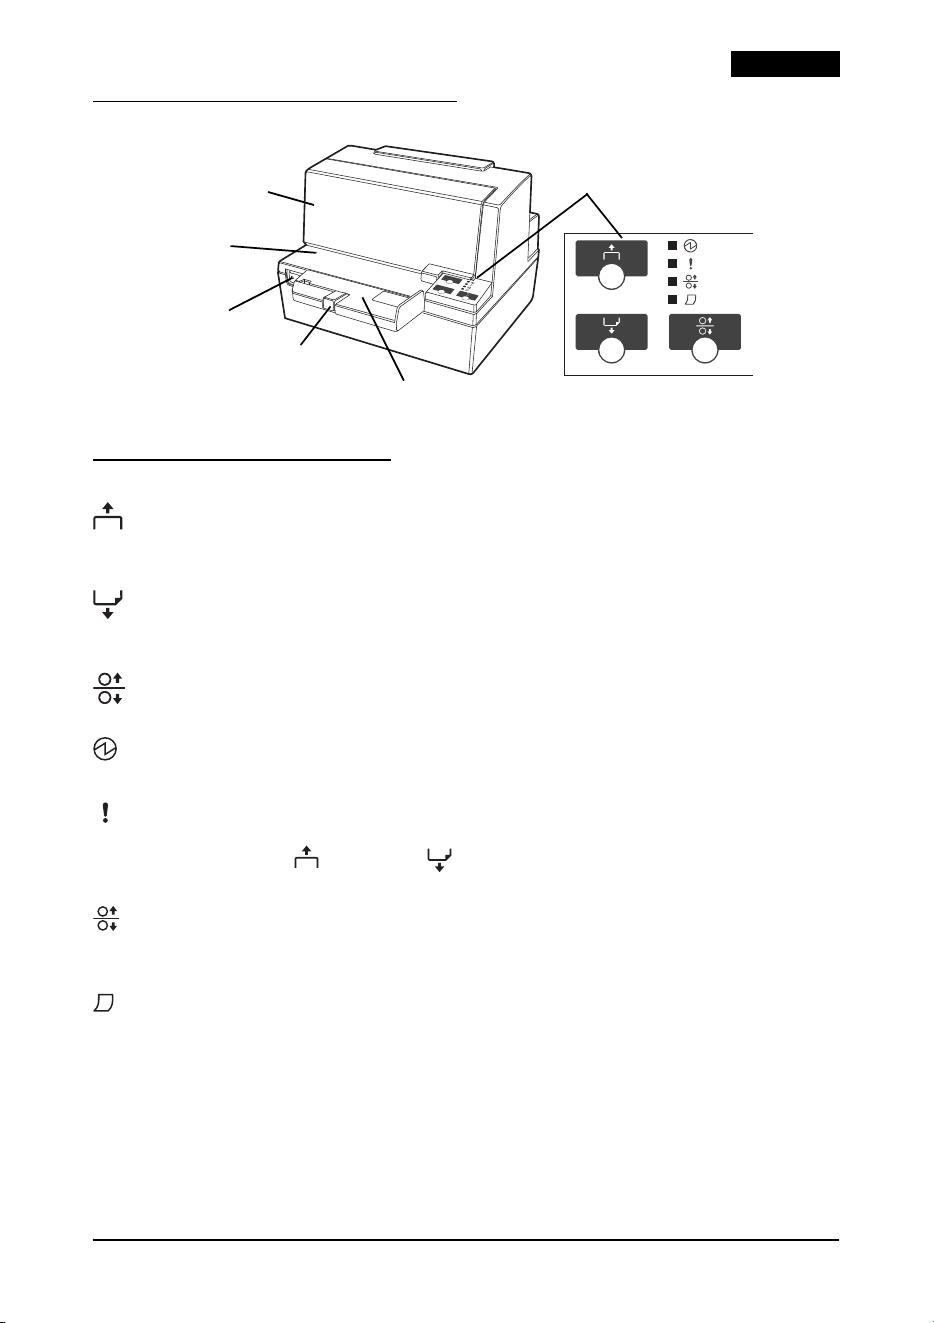
Composants de l’imprimante
Panneau de commande
Bouton (Avancer)
Appuyer sur ce bouton pour faire avancer le papier bordereau d’une ligne ; le
maintenir enfoncé pour commander l’avance continue.
Bouton (Reculer)
Appuyer sur ce bouton pour faire reculer le papier d’une ligne ; le maintenir enfoncé
pour commander le recul continu.
Bouton (Libérer)
Appuyer sur ce bouton pour Libérer le papier bordereau.
Voyant DEL (Alimentation)
Ce voyant s’allume lorsque l’imprimante est en marche.
Voyant DEL (Erreur)
Ce voyant s’allume pour indiquer une erreur, sauf en cas d’alimentation papier au
moyen du bouton
(Avancer) ou (Reculer), et au cours d’un auto-test. Il clignote
pour indiquer une erreur.
Voyant DEL (Libérer)
Ce voyant s’allume pour indiquer que l’imprimante est prête à recevoir le papier
bordereau.
Voyant DEL (Bordereaux)
Ce voyant s’allume après la mise sous tension. Il clignote pour indiquer que
l’imprimante est prête pour l’insertion ou le retrait du papier bordereau. Il s’éteint
pendant l’éjection du papier bordereau.
capot avant
tablette
panneau de commande
tablette à documents
interrupteur
marche-arrêt
guide de papier
13
Français
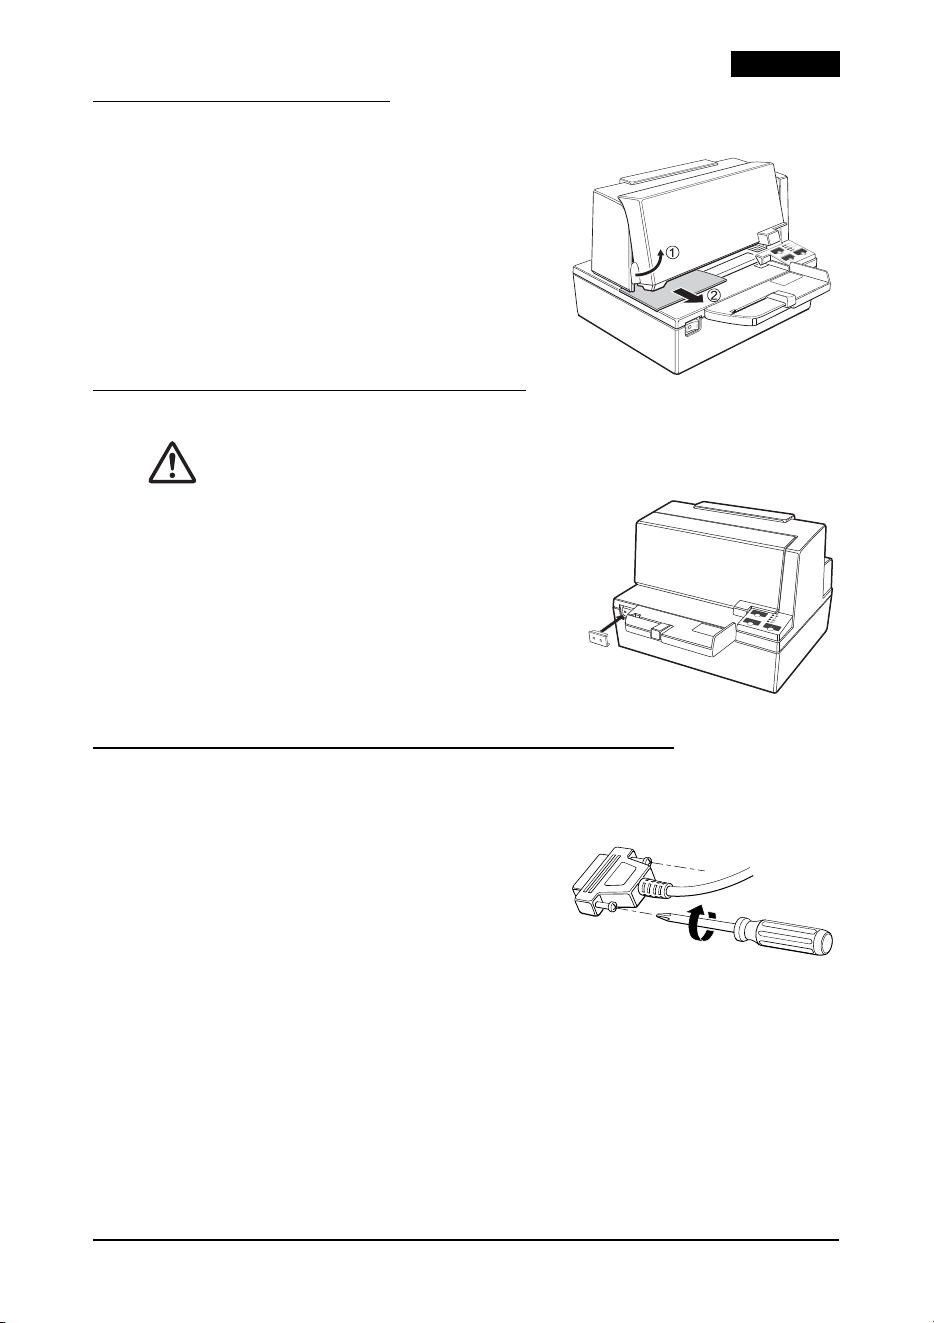
Retrait de l’amortisseur
En cours d’expédition, l’imprimante est protégée
par un amortisseur de transport, qu’il convient de
retirer avant de la mettre sous tension.
Ouvrir l’imprimante en tirant sur la languette du
capot avant et retirer l’amortisseur montré dans la
figure 1.
Remarque :
Réinstaller l’amortisseur avant toute nouvelle
expédition de l’imprimante.
Utilisation du cache d’interrupteur
AVERTISSEMENT :
Si un accident se produit alors que le cache
d’interrupteur est en place, débrancher
immédiatement le cordon d’alimentation : tout
fonctionnement de l’imprimante dans ces
circonstances présente un risque d’incendie.
Le cache d’interrupteur fourni empêche tout
actionnement accidentel de l’interrupteur marche-
arrêt. Pour l’utiliser, l’installer comme l’indique la
figure 2.
Connexion de l’imprimante à l’ordinateur hôte
1. Insérez fermement le connecteur du câble d’interface dans le connecteur
d’interface du panneau de connexion.
2. Lorsque vous utilisez des connecteurs
équipés de vis, serrez-les pour fixer
fermement les connecteurs comme indiqué
dans l’illustration
3.
3. Lorsque vous utilisez des câbles d’interface
équipés d’une ligne de mise à la terre, fixez la
ligne de mise à la terre au trou de vis marqué
« FG » sur l’imprimante.
4. Connectez l’autre extrémité du câble d’interface à l’ordinateur hôte.
1
2
3
14
Français
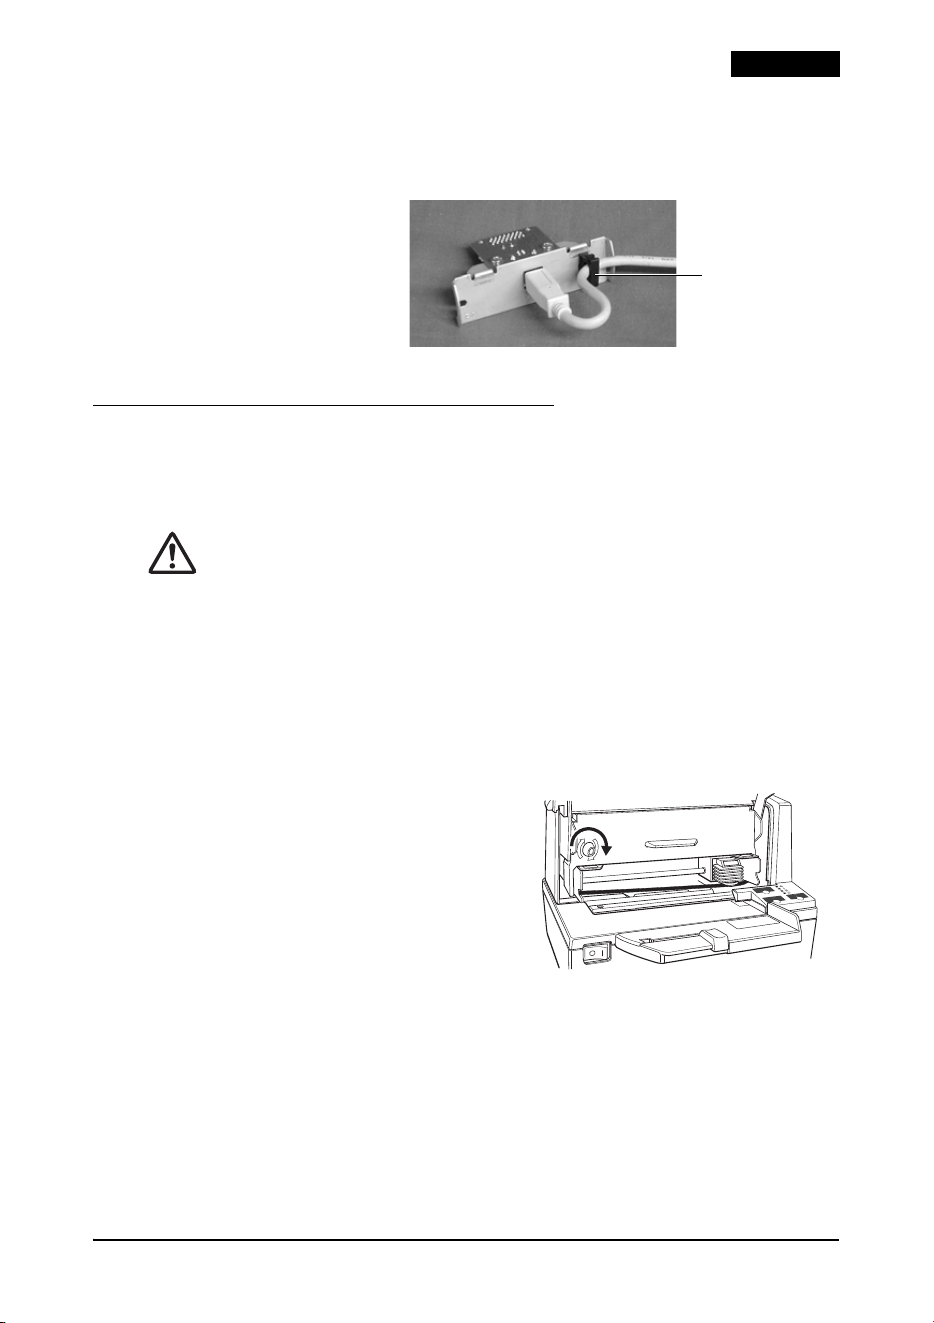
Lorsque vous utilisez un câble USB, installez le guide de câble dans la position indiquée
dans l’illustration
4 et accrochez le câble à travers le support de fil pour l’empêcher de
tomber.
Installation de la cartouche de ruban
Utiliser la cartouche de ruban EPSON ERC-31. L’utilisation de cartouches de ruban
non approuvées par Epson peut endommager l’imprimante et entraîne l’annulation de
la garantie.
ATTENTION :
Ne jamais tourner le bouton d’alimentation du ruban dans le sens opposé à celui de la
flèche de la cartouche : cela risquerait d’endommager le ruban.
1. Mettre l’imprimante sous tension et ouvrir le capot en tirant sur la languette
située sur le côté gauche.
2. Vérifier que la tête d’impression est positionnée à droite.
3. Si un ruban est déjà installé, l’enlever de l’imprimante en le tirant par la languette.
4. Afin de tendre le ruban, tourner le bouton de la cartouche de deux ou trois tours
dans le sens de la flèche.
5. Insérer le ruban et tourner le bouton de la
cartouche de deux ou trois tours
supplémentaires, comme l’indique la
figure 5.
6. Vérifier que le ruban n’est ni froissé, ni
plié, et qu’il est installé en dessous de la
tête d’impression, comme l’illustre
l’étiquette apposée à l’intérieur de
l’imprimante.
Guide de câble
4
5
15
Français
Insertion d’une feuille de papier
Remarque :
Toujours utiliser du papier conforme aux spécifications. Ne jamais utiliser de papier
froissé ou gondolé.
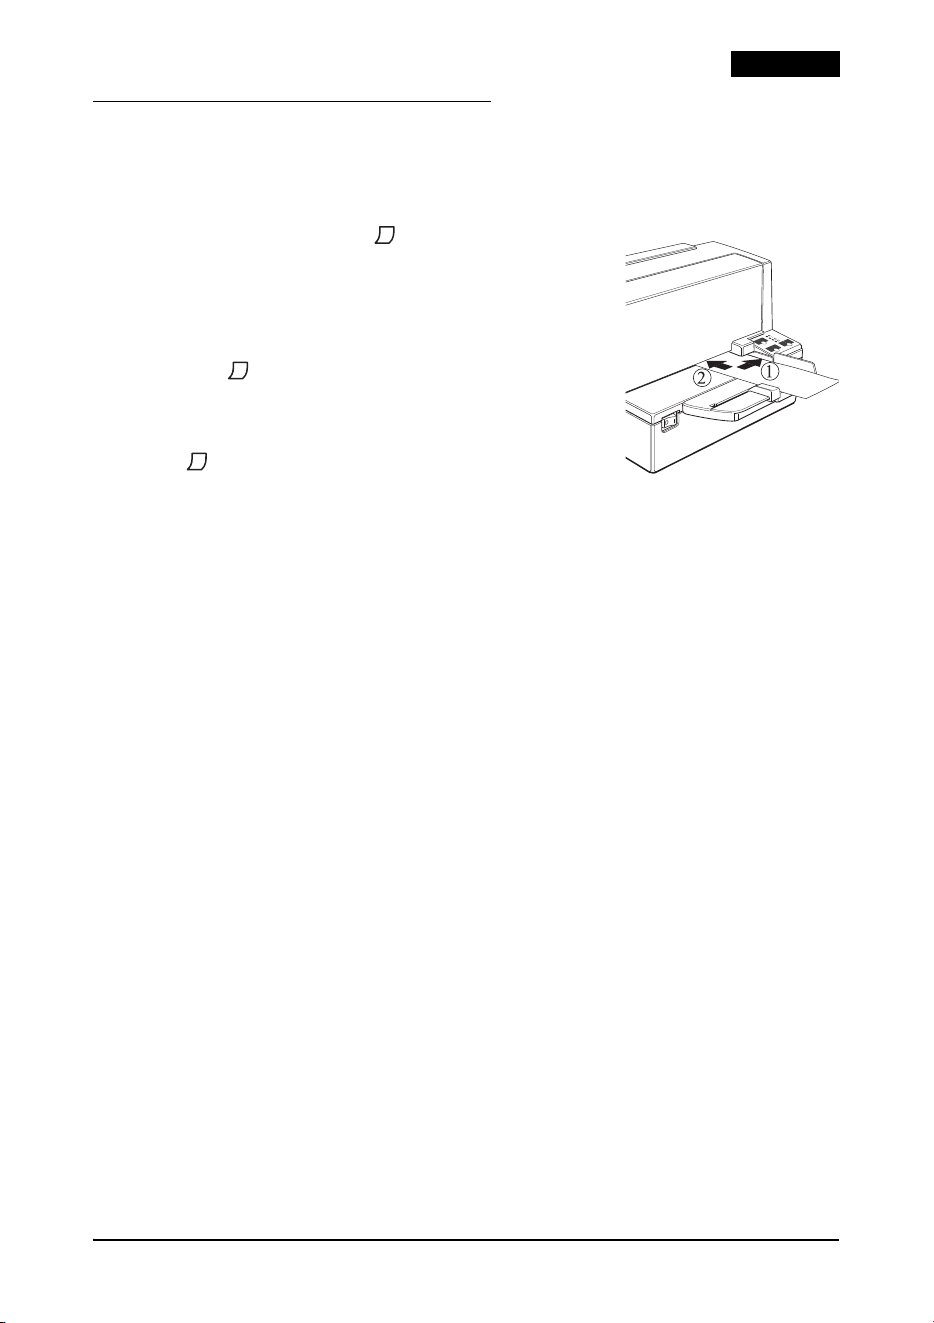
1. Lorsque le voyant DEL (Bordereaux) clignote,
insérez le papier en se servant du bord droit du guide
d’alimentation pour l’orienter correctement (voir la
figure 6).
2. Une fois le papier bordereau inséré à fond dans le
guide d’alimentation, le capteur les détecte, le voyant
DEL (Bordereaux) s’arrête de clignoter et reste
allumé, puis l’imprimante saisit le papier et y
imprime les données.
3. Une fois l’impression terminée, le voyant DEL
(Bordereaux) s’éteint et vous pouvez retirer le
papier.
6
16
Français
Dépannage
Aucun témoin du panneau de commande ne s’allume
Vérifier la bonne connexion des câbles d’alimentation au niveau de l’imprimante, du
bloc d’alimentation et de la prise.
L’imprimante semble fonctionner (bruit normal), mais n’imprime rien
Vérifier que la cartouche de ruban est bien installée.
Changer la cartouche de ruban.
Le Voyant DEL (Erreur) clignote et rien n’est imprimé
Eteindre l’imprimante et vérifier qu’il n’y a pas de bourrage de papier.
Si l’imprimante fonctionne depuis un certain temps, il se peut que la tête d’impression
ait surchauffé. Ce problème se corrige de lui-même une fois la tête refroidie.
Eteindre l’imprimante, attendre 10 secondes, puis la rallumer.
Si le problème persiste, contacter un réparateur qualifié.
L’imprimante n’imprime pas une ligne de points.
Il se peut que la tête d’impression soit endommagée. Contacter un réparateur qualifié.
Dégagement d’un bourrage de papier
ATTENTION :
Veiller à ne pas toucher la tête d’impression, qui peut être brûlante après le
fonctionnement de l’appareil.
Ne pas déplacer le chariot de la tête d’impression.
1. Eteindre l’imprimante et ouvrir le capot avant.
2. Ouvrir le capot avant et retirer le papier bourré.
17
Français
Annexe
Spécifications
.
Méthode d’impression Impression matricielle à impact en série, ligne verticale 9 broches, pas fil 0,353 mm
Sens d’impression Bidirectionnel, à une distance minimum
Caractères/ligne
(par défaut)
Police 9 × 9 : 66 ; police 7 × 9 : 88 ; police 5 × 9 : 66
Structure des caractères Police A : 9 × 9, espacement à 3 points (demi-points)
Police B : 7 × 9, espacement à 2 points (demi-points)
Police C : 5 × 9, espacement à 1 point (points normaux)
Taille des caractères Police A : (9 × 9) 1,6 × 3,1 mm
Police B : (7 × 9) 1,3 × 3,1 mm
Police C : (5 × 9) 1,6 × 3,1 mm
Nombre de caractères Alphanumériques : 95 ; internationaux : 14 jeux
Graphiques étendus : 128 × 9 (page espace comprise)
Vitesse d’impression Police A : (9 × 9) = 233 caractères/s
Police B : (7 × 9) = 311 caractères/s
Police C : (5 × 9) = 233 caractères/s
Vitesse d’avance papier Approx. 60,3 ms/ligne (avance de 4,23 mm) ; 86,4 mm/s (alimentation continue)
Espace interligne
(par défaut)
4,23 mm
Caractéristiques du
papier
Types de papier : Normal, copie carbone et autoadhésif
Formats papier : 70 × 70 à 210 × 297 mm
Épaisseur du papier Simplex : 0,09 à 0,2 mm
Papier copie : 5 feuilles maximum (original + 4 copies)
Feuille support : 0,06 à 0,15 mm
Copie et original : 0,04 à 0,07 mm
Papier carbone : approx. 0,035 mm
Épaisseur totale : 0,30 mm max. (pour toutes combinaisons allant d’un seul original
à un original + 3 copies) ; 0,36 mm max. (pour toutes combinaisons allant d’un seul
original à un original + 4 copies)
Papier auto-adhésif : 5 feuilles max. (original + 4 copies)
Papier support : 0,06 à 0,15 mm
Copie et original : 0,06 à 0,075 mm
Épaisseur totale : 0,24 mm max. (d’un original à un original + 3 copies) ;
0,30 mm max. (original + 4 copies)
Nombre d’exemplaires Original + 4 copies entre 20 et 45 °C
Original + 1 à 3 copies entre 5 et 45 °C
Cartouches de ruban ERC-31
Interfaces
(compatibles)
*1
série : RS-232
parallèle : IEEE 1284
USB : USB 2.0 pleine vitesse (12 Mbps)
Tampon de réception 69 octets ou 4 Ko
Fonction DKD 2 unités
Alimentation électrique
*2
+24 Vc.c. ±10%
Consommation
électrique (à 24 V)
En fonctionnement : Moyenne : approx. 1,9 A Pointe : approx. 8 A
En veille : Moyenne : approx. 0,3 A
MTBF 180 000 heures
MCBF 29 millions de lignes
Température De service : 5 à 45 °C
De stockage : -10 à 50 °C, sauf papier
Humidité De service : 10 à 90 % HR
De stockage : 10 à 90 % HR, sauf papier
18
Français
*1: L’interface fournie varie selon le modèle.
*2: Veillez à utiliser une source d’alimentation conforme aux normes de sécurité et qui répond aux spécifications
suivantes.
Puissance nominale : 24 V/1,9 à 10,0 A, Puissance maximale : 240 VA ou inférieure
Tableaux des micro-interrupteurs DIP
Altitude 3 000 m ou moins
Dimensions globales H/L/P :185 × 252 × 266 mm (y compris tablette à documents)
Poids (masse) 5 kg environ
Interface série
SW Fonction Allumée (ON) Éteinte (OFF) Réglage initial
1-1 Erreur de réception de données Ignoré Imprime “?” OFF
1-2 Capacité tampon de réception 69 octets 4 Ko OFF
1-3 Établissement de liaison XON/XOFF DTR/DSR OFF
1-4 Longueur de mot 7 bits 8 bits OFF
1-5 Contrôle de parité Oui Non OFF
1-6 Sélection de parité Pair Impair OFF
1-7
Vitesse de transmission voir le tableau «Vitesse de transmission»
ON
1-8 OFF
SW Fonction Allumée (ON) Éteinte (OFF) Réglage initial
2-1 État BUSY Tampon de réception plein
Tampon de réception plein
ou hors ligne
OFF
2-2 Écran client Connecté Non connecté OFF
2-3
Non défini —
OFF
2-4 OFF
2-5
Réservé Fixé sur OFF. Pas de changement de paramètres.
OFF
2-6 OFF
2-7 Réinitialisation interface 6 broches Activé Désactivé OFF
2-8 Réinitialisation interface 25 broches Activé Désactivé OFF
Vitesse de transmission [bps : bits par seconde]
1-7 1-8 Vitesse
ON ON 2 400 bps
OFF ON 4 800 bps
ON OFF 9 600 bps
OFF OFF 19 200 bps
Interface parallèle
SW Fonction Allumée (ON) Éteinte (OFF) Réglage initial
1-1 Saut de ligne automatique Activé Désactivé OFF
1-2 Capacité tampon de réception 69 octets 4 Ko OFF
1-3
Non défini —
OFF
1-4 OFF
1-5 OFF
1-6 OFF
1-7 OFF
1-8 OFF
19
Français
Emplacement de la plaque signalétique
La plaque signalétique se trouve sur le dessous du produit.
SW Fonction Allumée (ON) Éteinte (OFF) Réglage initial
2-1 État BUSY Tampon de réception plein
Tampon de réception plein
ou hors ligne
OFF
2-2 Réservé Fixé sur OFF. Pas de changement de paramètre. OFF
2-3
Non défini —
OFF
2-4 OFF
2-5
Réservé Fixé sur OFF. Pas de changement de paramètres.
OFF
2-6 OFF
2-7 OFF
2-8 Réinitialisation interface 31 broches Fixé sur ON. Pas de changement de paramètre. ON
Interface USB
SW Fonction Allumée (ON) Éteinte (OFF) Réglage initial
1-1 Saut de ligne automatique Activé Désactivé OFF
1-2 Capacité tampon de réception 69 octets 4 Ko OFF
1-3
Non défini —
OFF
1-4 OFF
1-5 OFF
1-6 OFF
1-7 OFF
1-8 OFF
SW Fonction Allumée (ON) Éteinte (OFF) Réglage initial
2-1 État BUSY Tampon de réception plein
Tampon de réception plein
ou hors ligne
OFF
2-2 Écran client Connecté Non connecté OFF
2-3
Réservé Fixé sur OFF. Pas de changement de paramètres.
OFF
2-4 OFF
2-5 OFF
2-6 OFF
2-7 OFF
2-8 Réservé Fixé sur ON. Pas de changement de paramètre. ON

20
Français
Tous droits réservés. Sauf autorisation écrite préalable de Seiko Epson Corporation, la reproduction, le stockage dans un
système de recherche de données et la transmission sous quelque forme ou par quelque moyen que ce soit (électronique,
mécanique, par photocopie, enregistrement, etc.) d’une partie quelconque de la présente publication sont interdits. La
société décline toute responsabilité relative à l’exploitation des informations contenues dans le présent document. Cet
ouvrage a été rédigé avec le plus grand soin ; toutefois, Seiko Epson décline toute responsabilité pour les erreurs et
omissions qu’il pourrait contenir, ainsi que pour tous dommages résultant de l’exploitation des informations qu’il
contient.
La responsabilité de Seiko Epson Corporation ou de ses filiales ne saurait être engagée envers l’acheteur de ce produit ou envers
des tiers pour dommages, pertes, frais ou débours subis par ceux-ci par suite d’accident ou d’utilisation erronée ou abusive de ce
produit, de modification, réparation ou transformation non autorisées de celui-ci, ou (à l’exclusion des Etats-Unis), de toute
utilisation du produit qui n’est pas strictement conforme aux instructions d’utilisation et de maintenance de Seiko Epson
Corporation.
Seiko Epson Corporation décline toute responsabilité pour dommages ou problèmes découlant de l’utilisation de toutes options
ou de toutes fournitures consommables autres que celles désignées produit d’origine Epson ou produit approuvé Epson par Seiko
Epson Corporation.
Les noms de produits utilisés ici sont uniquement à des fins d’identification et peuvent être des marques commerciales de leurs
propriétaires respectifs.
REMARQUE : Les informations contenues dans ce manuel sont susceptibles d’être modifiées sans préavis.