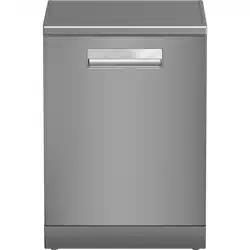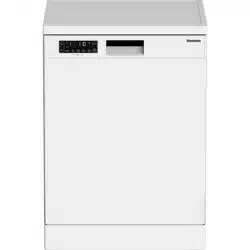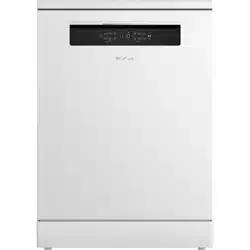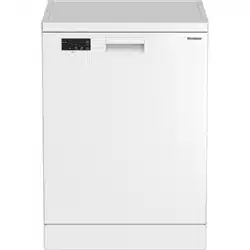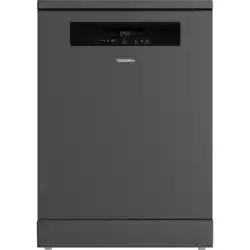
Dishwasher
User Manual
LDF53400W,LDF53400G
16 5189 0100/ EN/ AA/ 21.05.2026 17:21
7676093877,7675192077
EN / 2
Please read this user manual first!
Dear customer,
Thank you for choosing Blomberg. We want you to get the best results from your high-qual-
ity, high-tech product. To ensure this, please read this entire manual and the other docu-
mentation provided carefully before using the product.
Please follow all the warnings and information in the user manual to protect yourself and
your product from potential dangers.
Keep the user manual. If you give the product to someone else, give the user manual along
with it. The warranty terms, usage and troubleshooting methods for your product are in-
cluded in the manual.
Description of the Symbols
The following symbols appear in the user manual:
Hazard that could result in death or injury.
Important information or useful tips for use.
Read the user manual.
NOTICE Hazard that may result in material damage to the product or its surroundings.

EN / 3
1 Safety Instructions......................... 5
1.1 Intended Use.................................. 5
1.2 Child, vulnerable person and pet
safety..............................................
5
1.3 Electrical safety ............................. 6
1.4 Transportation Safety ................... 7
1.5 Installation Safety.......................... 7
1.6 Operation Safety............................ 8
1.7 Maintenance and Cleaning Safety 9
1.8 Interior Lighting Bulb Replace-
ment ...............................................
9
2 Environmental Instructions ............ 9
2.1 Compliance with WEEE Regula-
tion and Disposal of Waste
Products.........................................
10
2.2 Package Information..................... 10
2.3 Compliance with WEEE Directive
and Disposing of the Waste
Product...........................................
10
2.4 Note for Test Institutes................. 10
2.5 Standard conformity and test in-
formation / EC declaration of
conformity......................................
11
2.6 This section applies for products
with Wifi feature. ...........................
11
2.7 Energy Label .................................. 11
2.8 Comformity Declaration for UKCA 11
3 Technical Specifications ................ 12
4 General View.................................. 13
5 Installation..................................... 13
5.1 Correct location for installation.... 14
5.2 Connecting to the water supply.... 14
5.3 Connecting to the water drain ...... 15
5.4 Adjusting the feet .......................... 15
5.5 Electricity connection.................... 15
5.6 Fitting a Different Plug .................. 15
6 Preliminary .................................... 16
6.1 What to do to save energy ............ 16
6.2 Water softening system................ 16
6.3 Adjusting the water softener sys-
tem test strip .................................
17
6.4 Adjusting the Water Softening
System ...........................................
17
6.5 Filling the salt ................................ 18
6.6 Detergent........................................ 19
6.7 Polisher........................................... 22
6.8 Parts that are not suitable for
washing in the dishwasher............
23
6.9 Placing the dishes in the machine 23
6.10 Lower Propeller.............................. 24
6.11 Upper Propeller .............................. 24
6.12 Cutlery basket ................................ 24
6.13 Cutlery basket ................................ 25
6.14 Foldable lower basket wires ......... 25
6.15 Tray Washing Support Piece......... 26
6.16 Height Adjustable Upper Basket
Shelf................................................
26
6.17 Bottom basket bottle wire............. 26
6.18 Foldable upper basket wires......... 27
6.19 Upper basket multi-purpose ser-
vice shelf ........................................
27
6.20 Adjusting the height of the upper
basket.............................................
28
6.21 Adjusting the height of the upper
basket.............................................
29
6.22 Ceiling cutlery basket .................... 29
6.23 Ceiling cutlery basket [Soft Spike] 29
7 Operating the product .................... 30
7.1 Operating the product.................... 30
7.2 Table of program information
and average consumption values.
31
7.3 Additional functions ...................... 32
7.4 Functions........................................ 34
7.5 Warning Sound Level..................... 35
7.6 Program launch ............................. 35
7.7 Program Cancellation.................... 35
7.8 Polishing Agent Deficiency Warn-
ing Indicator ...................................
36
7.9 Salt Deficiency Warning Indicator. 36
7.10 End of program .............................. 36
8 Maintenance and Cleaning............. 36
8.1 Maintenance and cleaning............ 36
8.2 Cleaning the filters......................... 37
8.3 Micro Filter Cleaning Mechanism. 37
8.4 Cleaning the hose filter.................. 38
8.5 Cleaning the propellers.................. 38
8.6 Cleaning the Propellers ................. 39
9 Troubleshooting ............................ 41
9.1 Error Codes, Causes, and Solu-
tions................................................
41

EN / 5
1 Safety Instructions
This section contains safety in-
structions that will help protect
from risk of personal injury or
property damage.
Our company shall not be held
responsible for any damages
that may arise in case of non-
compliance with these instruc-
tions.
• Installation and repair proced-
ures must always be per-
formed by Authorised Service
Agents.
• Use only original spare parts
and accessories.
• Do not repair or replace any
component of the product un-
less it is clearly specified in the
user manual.
• Do not make technical modific-
ations to the product.
1.1 Intended Use
This product is intended for use
in homes and in the following
types of enclosed spaces: For
example;
- Staff kitchens of shops, offices
and other working environments;
- Farm houses;
- Areas for the use of guests of
hotels, motels and other accom-
modation facilities;
- Places serving bed and break-
fast, hostel-like environments.
- The product should only be
used for household dish wash-
ing.
• The product is not suitable for
commercial or public use.
• The lifetime of the product you
have purchased is 10 years.
This is the period for which the
spare parts required for the op-
eration of this product as
defined.
• This product is intended for
use in the home and under
counter.
1.2 Child, vulnerable
person and pet safety
• 8 years and older children and
people with reduced physical,
sensory, and mental abilities
as well as unskilled or inexperi-
enced persons can use this ap-
pliance provided that they are
supervised and instructed on
safe use of the appliance as
well as to the related dangers.
• Children under 3 years of age
should be kept away from the
product unless constantly su-
pervised.
• Children should not play with
the appliance.

EN / 6
• Electrical products are danger-
ous for children and pets. Chil-
dren and pets must not play
with, climb on or enter into the
product.
• Remember to close the door of
the product when leaving the
room where the product is loc-
ated. Children and pets can be
locked inside the product and
suffocate.
• Cleaning and user mainten-
ance must not be made by
children without supervision.
• Keep the packing materials
away from the children. Risk of
injury and suffocation.
• Keep all detergents and addit-
ives used in the product out of
the reach of children.
• For the safety of children, dis-
connect the power plug and
break the locking mechanism
before disposing of the
product.
1.3 Electrical safety
• The product must not be
plugged in during installation,
maintenance, cleaning, repair
and transport.
• If the power cord is damaged,
it must be replaced by an au-
thorised service centre to pre-
vent possible hazards.
• Do not pinch the power cord
under or behind the product.
Do not place a heavy object on
the power cord. The power
cord must not be excessively
bent or crushed, and must not
come into contact with any
heat source.
• Do not use an extension cord,
multiple power outlets, or ad-
apters to operate the product.
• Portable multiple power out-
lets or portable power supplies
can overheat and cause a fire.
Therefore, do not keep multiple
power outlets behind and near
the product.
• The plug must be within easy
reach. If this is not possible,
the electrical installation to
which the product is connec-
ted must be equipped with a
device (fuse, switch, circuit
breaker, etc.) that complies
with electrical regulations and
disconnects all poles from the
mains.
• Do not touch the plug with wet
hands.
• When removing the plug from
the socket, pull it by the plug,
not by the cable.
EN / 7
1.4 Transportation
Safety
• Before transporting the
product, unplug the plug and
disconnect the drain and water
supply connections. Drain the
water remaining inside the
product completely.
• Do not carry the product alone
as it is heavy.
NOTICE Do not hold the door or
panel to move the product.
NOTICE If you have to move the
product, move it in an upright
position and hold it by the back.
Tilting the product towards the
front may cause the electronic
parts inside to get wet and dam-
aged.
NOTICE When putting the
product in place after installa-
tion or cleaning, take care not to
fold, pinch or break the hoses.
1.5 Installation Safety
• To make the product ready for
use, check the information in
the manual and installation in-
structions to make sure that
the electrical installation, clean
water installation and drainage
are appropriate. Otherwise, call
a qualified electrician and
plumber to make the neces-
sary arrangements. These pro-
cesses are at the customer's
expense.
• Before installing the product,
inspect the product for any
damage. Do not install the
product if it is damaged.
• Do not install the product in
places where the temperature
drops below 0 ºC.
• Do not place the product on a
carpet or similar surface. It
causes fire risk since it cannot
get air from the bottom.
• Place the product on a clean,
flat and hard floor and balance
it with the help of adjustable
feet. If the feet are not adjus-
ted properly, the door may not
close completely and hot va-
pour may escape. It may cause
serious burns and injuries and
may also damage your fur-
niture.
• Do not install the product near
heat sources (radiators,
stoves, etc.) and do not install
it under the cooking area of a
hob.
• If the product is intended to be
used in a cupboard/cabinet/
module, keep the cupboard
doors open during operation if
there are no gaps to ensure
sufficient air circulation.

EN / 8
• Connect the product to an
earth-grounded socket protec-
ted by a fuse rated in accord-
ance with the current ratings
indicated on the rating plate.
Have the earthing installation
done by a qualified electrician.
Do not use the product without
earthing in accordance with
local/national regulations.
• Plug the product into an outlet
complying with the voltage and
frequency values indicated on
the rating plate.
• Do not plug the product into
sockets that are loose, out of
the socket, broken, dirty,
greasy, at risk of contact with
water (e.g. water that may leak
from the workbench).
NOTICE The new hose sets sup-
plied with the product must be
used. Do not reuse old hose as-
semblies. Do not splice the
hoses.
NOTICE Connect the water inlet
hose directly to the water tap.
The pressure supplied from the
tap must be at least 0.05 MPa
(0.5 bar) and no more than 1
MPa (10 bar). If the water pres-
sure exceeds 1 MPa (10 Bar), a
pressure reducing valve must be
installed. Maximum allowable
water temperature is 25°C.
• Position the power cable and
hoses so that there is no risk
of tripping.
1.6 Operation Safety
Only detergents, rinse agents
and additives intended for dish-
washers should be used.
Never use chemical solvents in
the product. These substances
pose a risk of explosion.
Do not drink the wash water in
your product.
Dishwasher detergents contain
strong alkali, which can be ex-
tremely dangerous if swallowed.
Avoid contact with skin and eyes
and do not allow children near
the product when the lid is open.
Check that the detergent tank is
empty after the wash cycle is
completed.
When you pull out the upper and
lower baskets completely, the
door of the product takes the en-
tire load of the baskets. Do not
sit or place other loads on the
door, otherwise the product may
tip over.
Product's Maximum Washing capa-
city: Indicated on the Energy Label
and Quick Use Card under Cycle
Table.
To avoid possible injury, always
place long and pointed dishes
such as serving forks, bread
EN / 9
knives, etc. in the cutlery basket
with the pointed end downwards
or horizontally on the dishwash-
ing baskets.
If you need to open the door
while the product is running,
open it carefully. Be careful of
hot steam and splashes of hot
water.
The door must not be left open
as this carries tripping hazard
risk.
Do not operate a faulty or dam-
aged product. Unplug the
product (or switch off the fuse
to which it is connected), turn
off the water tap and call for au-
thorised service.
Do not place a flame source
(burning candle, cigarette, etc.)
on or near the product. Do not
place flammable/explosive ma-
terials near the product.
Do not climb on the product.
Unplug the product and switch
off the tap when you will not use
the product for a long time.
This product is designed to op-
erate up to 2000 m. above sea
level.
1.7 Maintenance and
Cleaning Safety
Do not wash the product by spray-
ing or pouring water on it.
Do not use sharp or abrasive tools
to clean the product. Do not use
materials such as household clean-
ing agents, detergents, gas, gasol-
ine, alcohol, wax, etc.
Wear gloves worn when cleaning
the product.
Be careful of possible injuries when
cleaning sharp surfaces on the
back of the product!
NOTICE!Remember to install
the filter of your machine back
after cleaning it. Otherwise,
the pumps may get clogged
and the product may get dam-
aged.
Interior Lighting
Contact a service when you need to
replace the LED/bulb used for light-
ing according to the model of your
machine.
1.8 Interior Lighting
Bulb Replacement
If the LED / bulb used for light-
ing in your machine needs to be
replaced, depending on the
model, call the authorized ser-
vice.
2 Environmental Instructions
Frequency Band : 2.400-2.484 Ghz
Max. Transmission Power : < 100mWCon-
formity declaration for UKCA
Blomberg hereby declares that this appli-
ance complies with The Radio Equipment
Regulations 2017.
EN / 10
The complete text of the UK declaration of
conformity is available in the following in-
ternet address:
support.blombergappliances.com
2.1 Compliance with WEEE Regula-
tion and Disposal of Waste
Products
This product does not contain harmful and
prohibited substances specified in the
"Regulation on the Control of Waste Elec-
trical and Electronic Equipment" published
by the Ministry of Environment and Urban-
isation of the Republic of Turkey. It com-
plies with WEEE Regulation.
This product is manufactured
from high quality parts and ma-
terials that are recyclable and
reusable. Therefore, do not dis-
pose of the product with
household or other waste at
the end of its service life. Take it to a col-
lection point for recycling electrical and
electronic equipment. Ask the local author-
ity in your area for these collection points.
Help protect the environment and natural
resources by recycling used products. Be-
fore disposing of the product, disconnect
the power plug for the safety of children
and break the locking mechanism of the
loading door to render it inoperable.
2.2 Package Information
The packaging of the product is made of re-
cyclable materials in accordance with our
National Legislation. Do not dispose of
packaging waste with household or other
waste, dispose of it at the packaging collec-
tion points specified by the local authorit-
ies.
2.3 Compliance with WEEE Direct-
ive and Disposing of the Waste
Product
This product complies with EU
WEEE Directive (2012/19/EU).
This product bears a classifica-
tion symbol for waste electrical
and electronic equipment
(WEEE).
This symbol indicates that this product
shall not be disposed with other household
wastes at the end of its service life. Used
device must be returned to official collec-
tion point for recycling of electrical and
electronic devices. To find these collection
systems please contact to your local au-
thorities or retailer where the product was
purchased. Each household performs im-
portant role in recovering and recycling of
old appliance. Appropriate disposal of used
appliance helps prevent potential negative
consequences for the environment and hu-
man health.
Compliance with RoHS Directive:
The product you have purchased complies
with EU RoHS Directive (2011/65/EU). It
does not contain harmful and prohibited
materials specified in the Directive.
2.4 Note for Test Institutes
The information required for performance
tests is available on request.
You can send your request via the e-mail
address below:
In your enquiry e-mail, be sure to include
your contact details as well as the code,
stock number and serial number of the
product to be tested. The product code,
stock number and serial number can be
found on the type label attached to the side
of the door
EN / 11
2.5 Standard conformity and test in-
formation / EC declaration of
conformity
The development, production and
sale of this product are carried out
in accordance with the safety regu-
lations of all relevant directives of
the European Community.
2014/35/EU, 2014/30/EU, 93/68/
EC, IEC 60436 / EN 60436
2.6 This section applies for
products with Wifi feature.
Frequency Band 2.4Ghz
Max. Conduction Power : < 100mW
Declaration of conformity for CE BEKO A.Ş.
hereby declares that this appliance com-
plies with Directive 2014/53/EU.
The full text of EU Conformity Declaration
is on the web site:
Products, address
support.blombergappliances.com
2.7 Energy Label
You can access technical informa-
tion about the product by scanning
the QR code on the energy label
with a mobile device connected to
the internet.
2.8 Comformity Declaration for
UKCA
Frequency Band : 2.400-2.484 Ghz
Max. Transmission Power : < 100mW
ARÇELİK hereby declares that this appli-
ance complies with The Radio Equipment
Regulations 2017. The complete text of the
UK declaration of conformity is available in
the following internet address: sup-
port.blombergappliances.com
EN / 12
3 Technical Specifications
Maximum washing capacity: Indicated on the Energy Label and Quick Use Card under Cycle Table.
Height: See the installation manual for the height.
Width: 60
Depth:55-60
Electricity input:220-240 V, 50 Hz
Total power:1800-2100 W
Heater power:1800 W
Total current: 10 A *
Pump power:90 W
Drain pump power: 30 W *
* For detailed electrical values see the type label on the dishwasher's door.
Water Pressure 0.5 -10 bar
(= 3 – 100 N/cm² = 0.05-1.0 Mpa)
Technical specifications may be amended without prior notice to improve product
quality.
The figures in the manual are schematic and may not be in exact harmony with the
product.
The values provided with the appliance or its accompanying documents are labor-
atory readings in accordance with the respective standards. These values may dif-
fer depending on the use and ambient conditions.
EN / 13
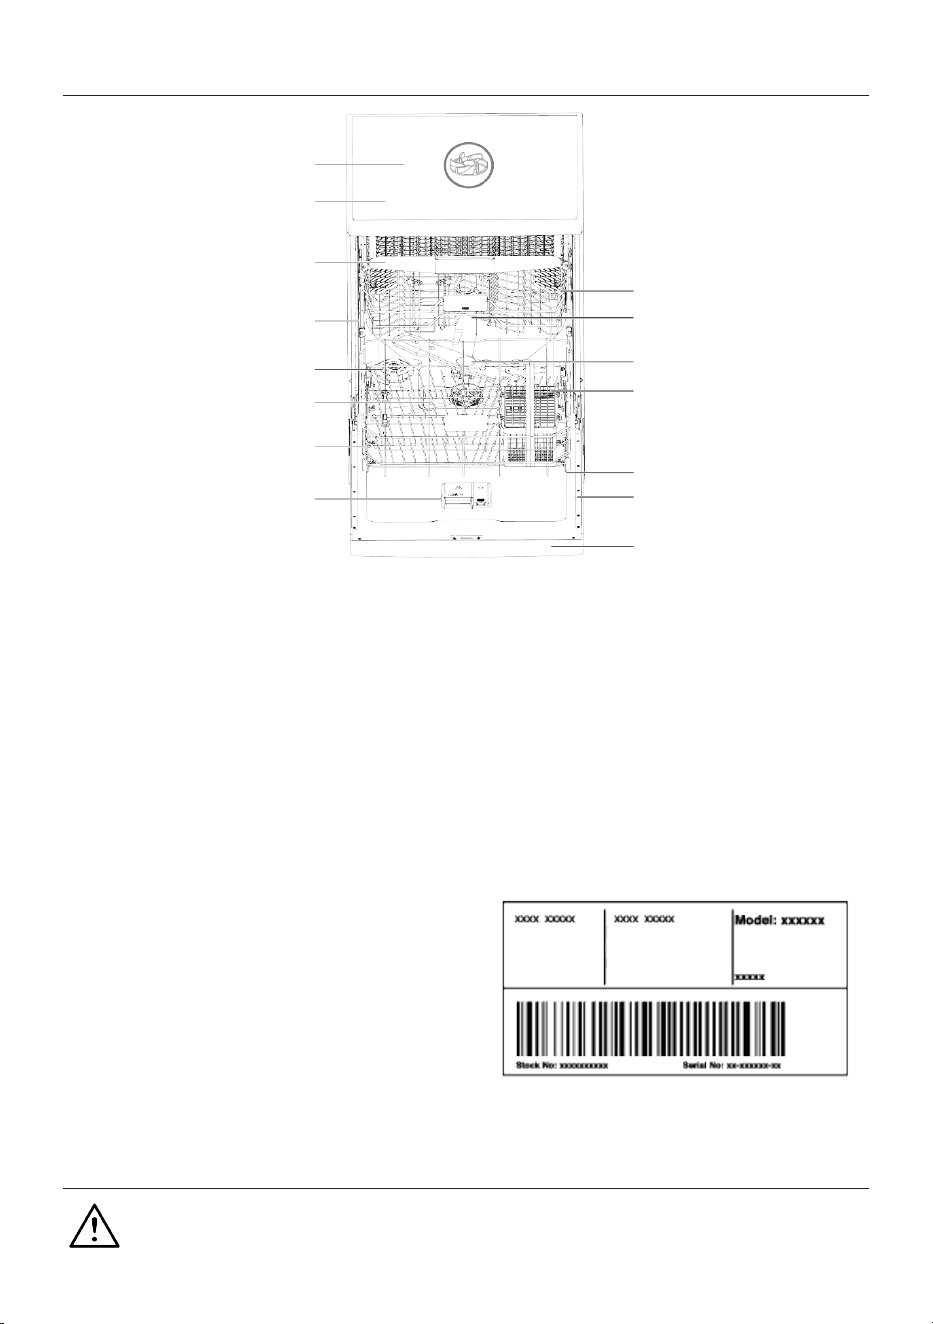
4 General View
1
2
3
4
5
6
7
8
9
10
11
12
13
14
15
1 Upper Basket 2 Upper Spray Arm
3 Lower Spray Arm 4 Cutlery Basket (depends on model)
5 Door 6 Type Label
7 Control Panel 8 Detergent Zone
9 Lower Basket 10 Filters
11 Salt Compartment Cover 12 Upper Basket Rail
13 Ceiling Cutlery Basket (depends on
model)
14 Top Plate (depends on model)
15 Ceiling Fan (depends on model)
Type label varies depends on model
Illustration1:
5 Installation
Read the ‘Safety Instructions’ sec-
tion first!
EN / 14
The preparation of the electrical, clean wa-
ter and waste water installation of the
place where the product will be placed is
under the responsibility of the customer.
Before calling the authorised service to
make the product ready for use, if the elec-
trical installation, clean water installation
and water drainage are not suitable, call a
qualified electrician and plumber to make
the necessary arrangements.
Installation and electrical connec-
tions must be carried out by the au-
thorised service. The manufacturer
cannot be held responsible for any
damages that may arise from the
operations performed by unauthor-
ised persons.
Before installing the product, in-
spect the product for any damage.
Do not install the product if it is
damaged. Damaged products pose
a danger to your safety.
For free-standing and under-
counter models, do not remove the
kick plate of the appliance. This will
void the warranty.
• When placing the product in place after
installation or cleaning, make sure that
the water inlet and drain hoses are not
folded, pinched or broken.
• Be careful not to damage the floor, wall,
pipes, etc. when placing the product. Do
not hold the door or panel to move the
product.
5.1 Correct location for installation
• There must not be any lockable, sliding or
hinged doors in the place where the
product is installed, which would restrict
the full opening of the door.
• Place the product on a solid and level
surface with sufficient load-bearing capa-
city! Placing the dishwasher on a level
surface is essential for the door to close
properly and tightly.
• Do not install the product in places where
the temperature drops below 0 ºC.
• Place the product on a hard floor. Do not
place it on a long-pile carpet or similar
surface.
• Choose a place where you can load and
unload the dishes easily and quickly.
• Place the product close to the tap and
drain. Choose the location of the product
in such a way that you do not change it
after it has been connected.
Do not place the product on the
power cable. The cable may be
damaged, causing a risk of electric
shock or fire.
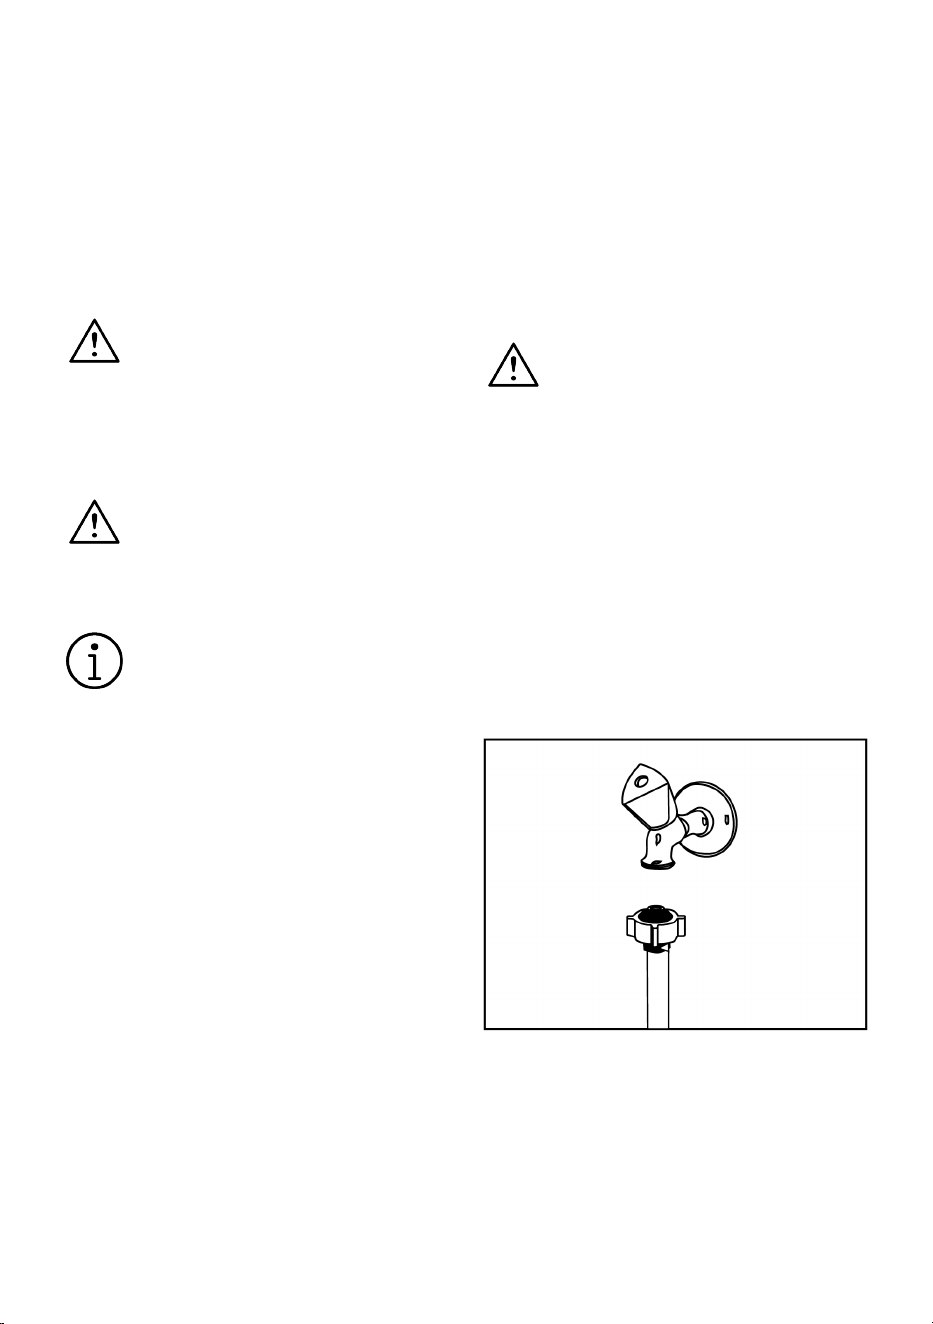
5.2 Connecting to the water supply
To prevent dirt (sand, clay, rust, etc.) from
the city network or your water supply sys-
tem from damaging the dishwasher and
your dishes, we recommend installing a fil-
ter on the water inlet.
Maximum allowable water inlet temperat-
ure:
• With AquAvoid feature containing mod-
els, it is 60 °C.
• Up to 25 °C for other models.
The dishwasher must not be connected to
warm water appliances or running water
heaters.
EN / 15
NOTICE Do not use an old or used water in-
let hose on a new product. Use the new wa-
ter inlet hose supplied with the dishwasher.
Do not splice the hoses.
NOTICE Connect the water inlet hose dir-
ectly to the water tap. The pressure sup-
plied from the tap must be at least 0.3 and
no more than 10 bar. If the water pressure
exceeds 10 Bar, a pressure reducing valve
must be installed.
NOTICE The water supply and drain hose
must be securely fastened and undam-
aged.
NOTE After making the connections, open
the tap fully and check for water leaks.
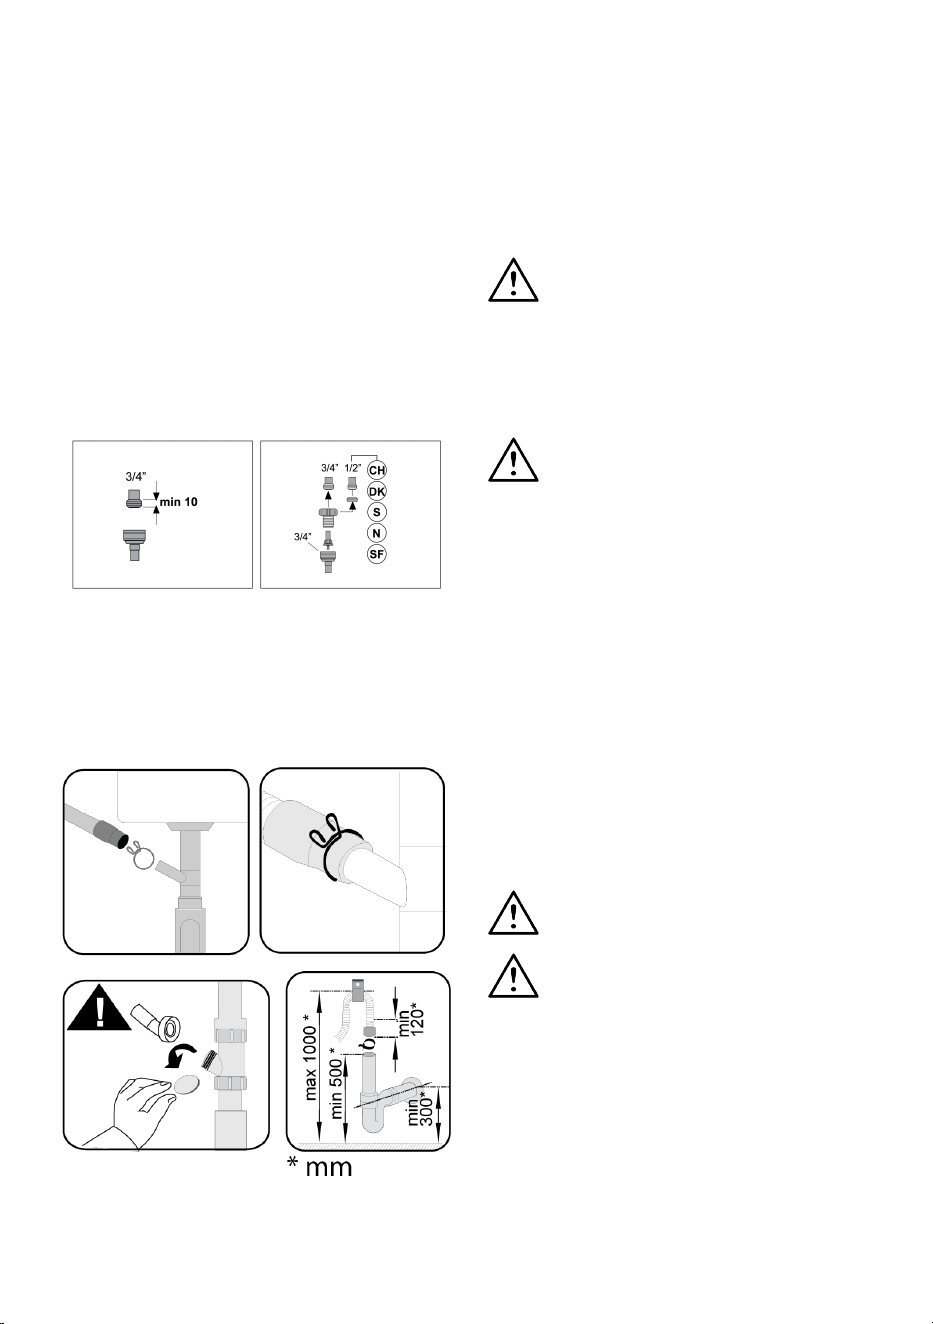
5.3 Connecting to the water drain
The water drain hose can be connected dir-
ectly to the waste water drain or to the
drain of the sink. For more detailed inform-
ation, refer to the installation instructions
supplied with your dishwasher.
The waste water drain must be connected
to the sewer and must not be connected to
surface water.
5.4 Adjusting the feet
If the door of the product does not close
properly or shakes when you push it gently
with your hand, this means that the feet are
not adjusted. Adjust the feet of the product
as shown in the installation manual sup-
plied with the product.
Hot steam may escape if the dish-
washer door is not adjusted prop-
erly. Serious burns can cause injury
and damage your furniture.
5.5 Electricity connection
Connect the product to a grounded
socket protected by a fuse in ac-
cordance with the values in the
"Technical specifications" table.
Our company shall not be respons-
ible for any damages that may oc-
cur if the product is used without
grounding in accordance with local
regulations.
• The connection must comply with na-
tional regulations.
• The plug of the power cord must be eas-
ily accessible following the installation.
• Connect the product to a grounded
socket protected by a 16 ampere fuse.
• The specified voltage must be equivalent
to your mains voltage.
Do not connect with extension
cords or multiple sockets.
A damaged power cord must be re-
placed by authorised service.
5.6 Fitting a Different Plug
As the colours of the wires in the mains
lead of this appliance may not correspond
with the coloured markings identifying the
terminals on your plug, proceed as follows:
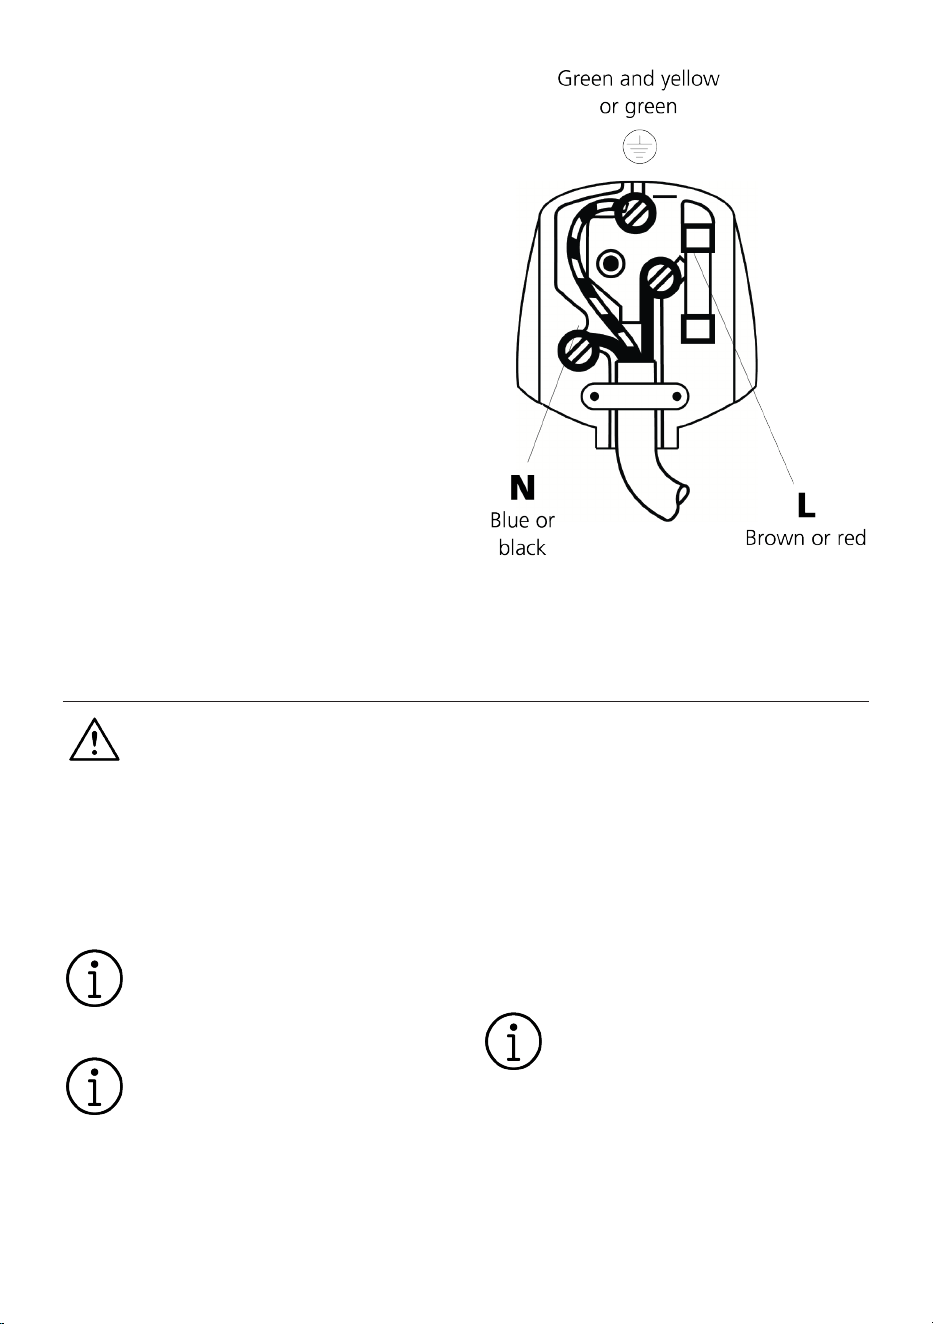
1.Connect the green - yellow or green
(earth) wire to the terminal in the plug
marked ‘E’ or with the symbol or coloured
green and yellow or green.
EN / 16
2.Connect the blue (neutral) wire to the ter-
minal in the plug marked ‘N’ or coloured
black.
3.Connect the brown (live) wire to the ter-
minal in the plug marked ‘L’ or coloured red.
With the alternative plugs a 13A fuse must
be fitted either in the plug or adaptor or in
the main fuse box. If in doubt contact a
qualified electrician.
6 Preliminary
Read the “Safety Instructions” sec-
tion first!
6.1 What to do to save energy
The following information will help you use
the product in an ecological and energy-
saving way.
Clean all the coarse waste on the dishes
before placing them in the machine.
It is not recommended to pre-clean
the dishes before loading them into
the machine as this will cause en-
ergy and water consumption.
Washing dishes with a dishwasher
consumes less energy and water
than washing them by hand.
After the machine is fully filled, start it.
When choosing a program, pay attention to
the “Program Information and Average
Consumption Values Table”.
Do not use more detergent than recom-
mended on the detergent packaging.
6.2 Water softening system
The machine has a special water softening
system that reduces the hardness of the
mains water. This system softens the water
to the required level to wash the dishes to
the desired quality.
If the tap water hardness is over
7°dH, it should be softened. Other-
wise, hardness ions will accumu-
late on the washed items and may
affect the washing, polishing and
drying performance of the machine.
EN / 17
Adjusting the water softener system
When the water softening system is adjus-
ted correctly, washing efficiency will in-
crease.
Read the section on adjusting the water
softener system first.
The regeneration of the water softening
system can be carried out in all programs
during the drying step. When the regenera-
tion process is performed, the duration, en-
ergy and water consumption of the pro-
gram increase. For the regeneration pro-
cess; when the dishwasher is operated with
a water supply of 14 dH under standard
conditions in the Eco 50°C program, the fre-
quency of the regeneration process, max-
imum additional time, water and energy
consumption depending on the water con-
sumption of the Eco 50°C program are
given in the table below.
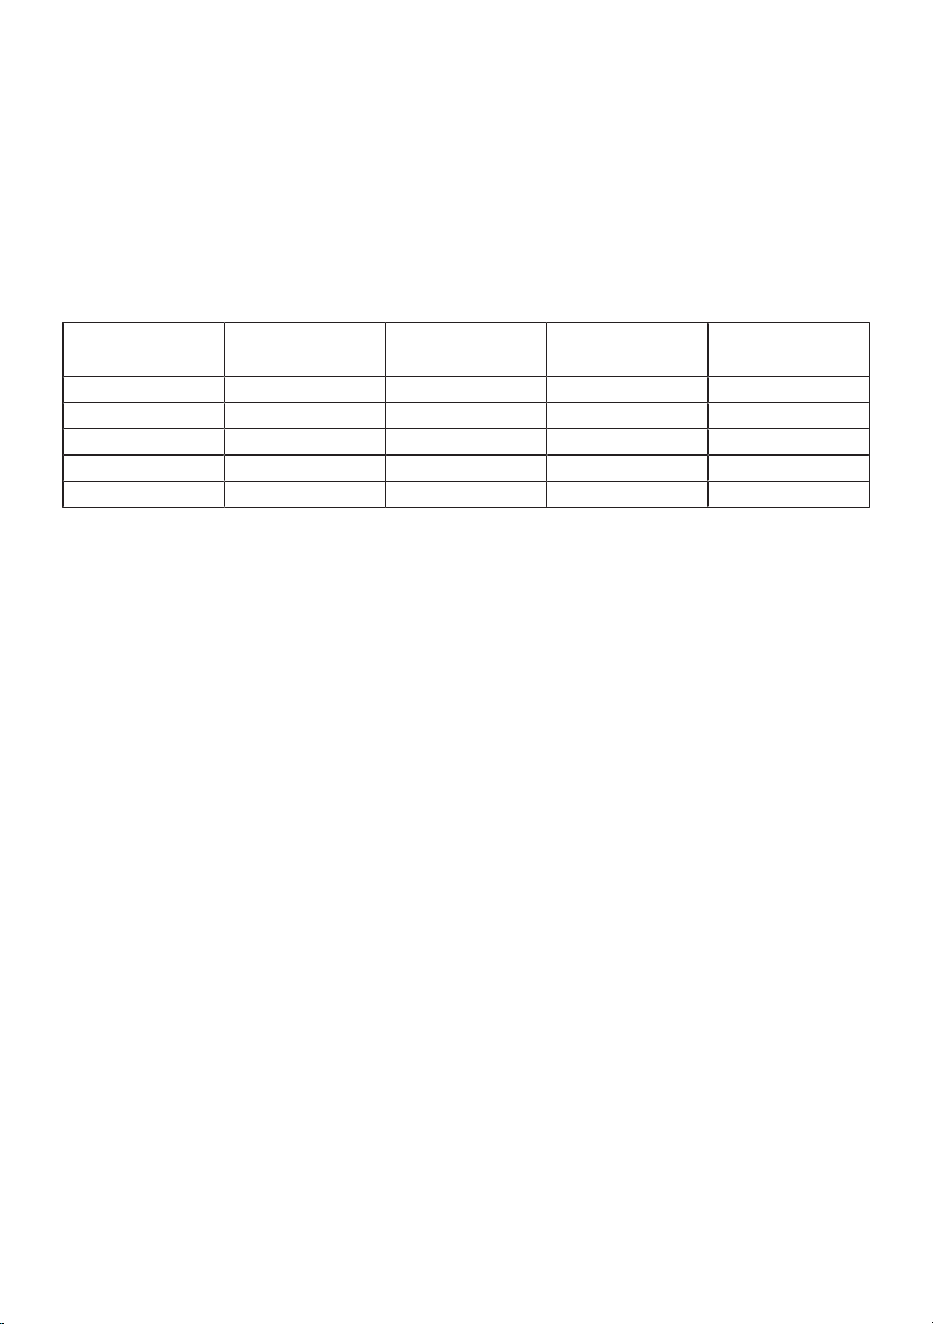
Eco 50°C
water consumption (l)
…. cycle then renewal Additional time (min)
Additional water con-
sumption (l)
Additional energy
consumption (kWh)
12.3-14.7 5 5 3.0 0.05
9.6-12.2 6 5 3.0 0.05
9.0-9.5 7 5 3.0 0.05
8.0-9.0 8 5 3.0 0.05
7.0-7.9 9 5 3.0 0.05
For water consumption in the Eco 50°C pro-
gram of your dishwasher, please refer to
the Program Information and Average Con-
sumption Values Table given in the Pro-
gram Table.
6.3 Adjusting the water softener
system test strip
When the water softening system is adjus-
ted correctly, the washing, rinsing and dry-
ing performance of your dishwasher will in-
crease.
To adjust the system, first find out the wa-
ter hardness in your area and adjust as in-
dicated below.
• Remove the test strip from its packaging.
• Turn on the tap and let the water run for
about 1 minute.
• Dip the test strip in water for 1 second.
• Remove the strip from the water and
shake it. Wait 1 minute.
• Make the necessary adjustments based
on the test strip.
6.4 Adjusting the Water Softening
System
When the water softening system is adjus-
ted correctly, the washing, rinsing and dry-
ing performance of your dishwasher will in-
crease.
NOTICE!To adjust the system, first learn
your water hardness level from the au-
thorised service in your area and adjust
it as follows.
After determining the water hardness:
1. With the door closed, turn on your ma-
chine using the On/Off button, then press
the Program3 (AI) button for 3 seconds to
enter the submenu.
2. Press the P3 program button to navigate
to the “r” position on the screen.
3. Adjust the playback level to the appropri-
ate level by selecting one of the positions
“r:1”, “r:2”, “r:3”, “r:4”, or “r:5” using the Play/
Pause button.
4.Exit the settings menu by pressing the
On/Off button for 3 seconds. Your settings
will be saved automatically.
EN / 18
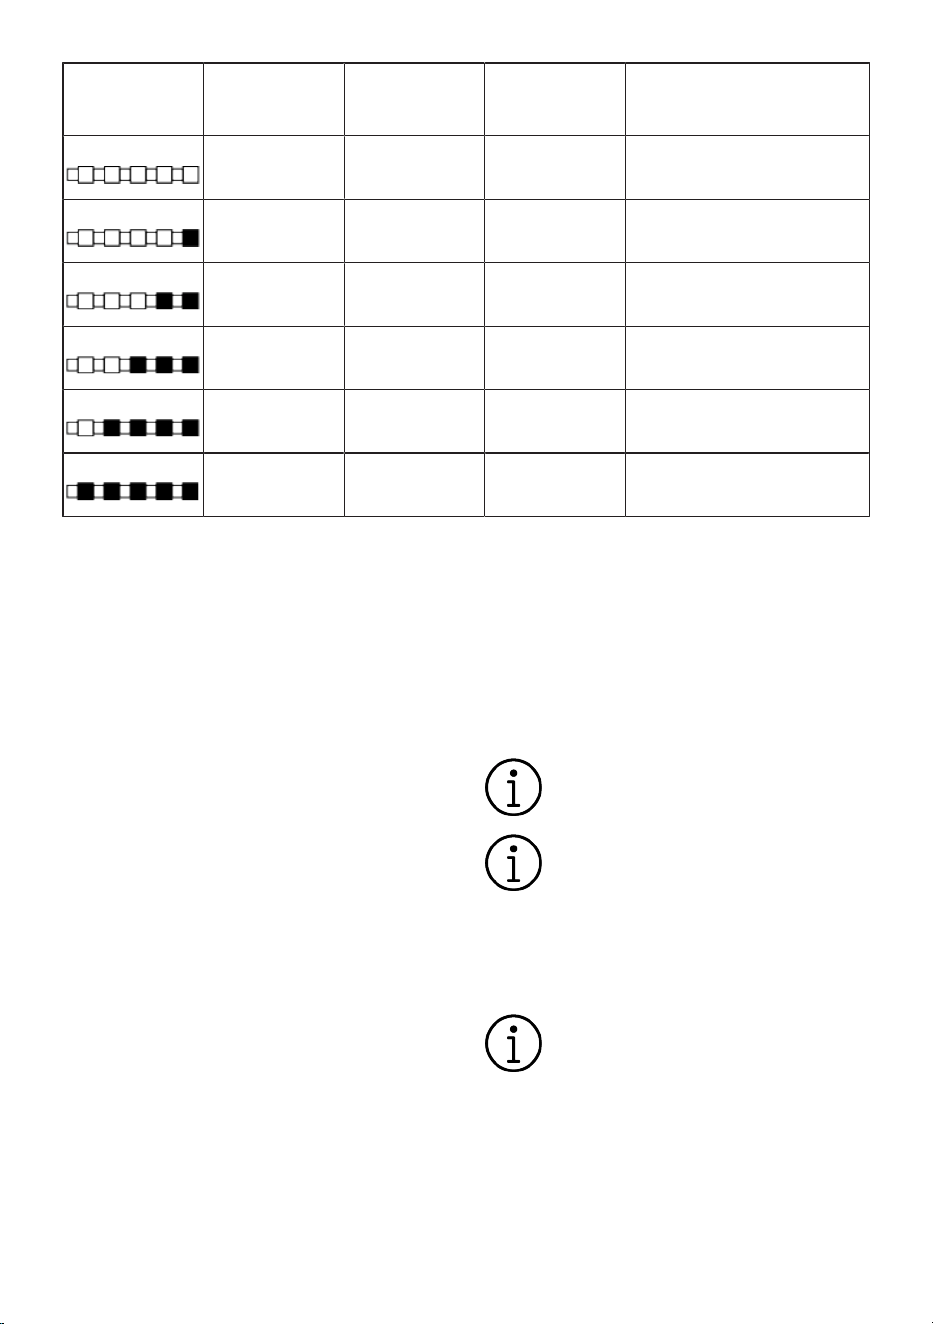
Hardness Level
English Hardness
°dE
German Hardness
°dH
French* Hardness
°dF
Water Hardness Level Indicator
Level 0
0-5 0-4 0-8
Press the selection key to set the
water hardness setting to position
1. (r1)
Level 1
6-9 5-7 9-13
Press the selection key to set the
water hardness setting to position
1. (r1)
Level 2
10-15 8-12 14-22
Press the selection key to set the
water hardness setting to position
2. (r2)
Level 3
16-19 13-15 23-27
Press the selection key to set the
water hardness setting to position
3. (r3)
Level 4
20-24 16-19 28-34
Press the selection key to set the
water hardness setting to position
4. (r4)
Level 5
25-62 20-50 35-90
Press the selection key to set the
water hardness setting to position
5. (r5)
Table1: Water Hardness Level Adjustment
Table
• If the hardness of the water you use is
above 50° dH (French hardness) or if you
use well water, it is recommended that
you use filters and water purification
devices.
• If the hardness of the water you use is
below 7°dH, you do not need to use salt
in your dishwasher. In this case, the "Salt
Deficiency Warning Indicator" on the con-
trol panel of your machine will be con-
stantly lit.
• If your water hardness setting is at level
1, the “Salt Deficiency Warning Indicator”
will remain on continuously even though
you do not need to use salt. If you use
salt in this position, salt will not be con-
sumed and the lamp will not light up.
NOTICE!In case of moving, you need to
re-adjust the water hardness setting of
your machine according to the water
hardness of the place you are moving to,
taking into account the information
given above. If the water hardness set-
ting has been made in your machine be-
fore, the last water hardness setting will
be shown on your machine's screen.
6.5 Filling the salt
In order for the machine to operate at the
same performance continuously, the water
softening system needs to be renewed.
Dishwasher salt is used for this purpose.
Use only special softening salt pro-
duced for use in dishwashers.
It is recommended to use granu-
lated or powdered softening salts in
the water softening system. Do not
use table salt, rock salt, etc. that do
not fully dissolve in water. Other-
wise, the performance of the sys-
tem may deteriorate over time.
The salt compartment fills with wa-
ter when you turn the machine on,
so fill the salt compartment before
starting the machine.
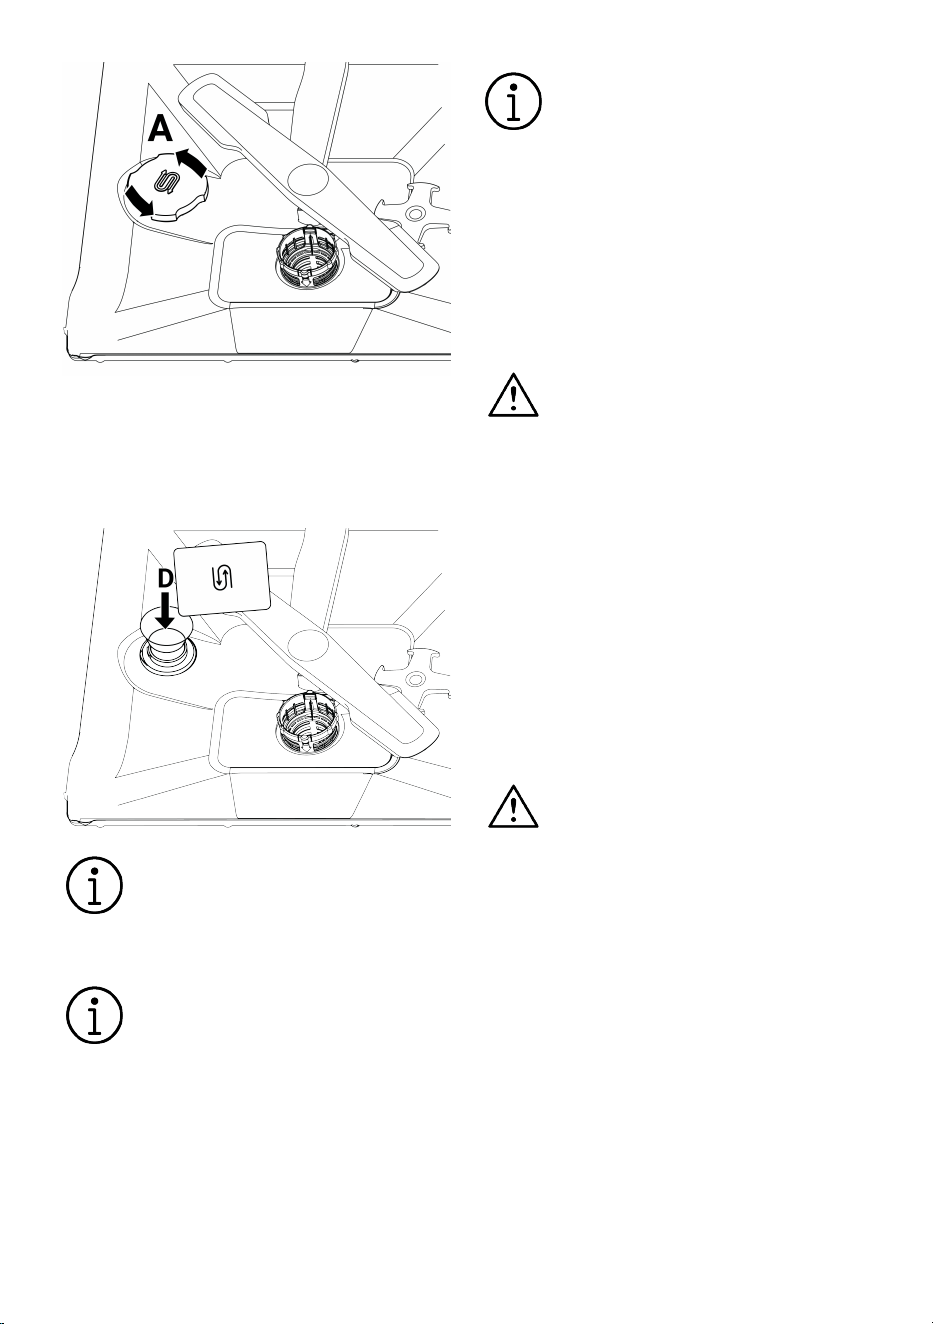
1. To add softening salt, first remove the
lower basket.
2. Open the salt compartment cover by
turning it counterclockwise (A).
EN / 19
3. Add 1 litre of water to the salt compart-
ment only when using your machine for
the first time.
4. Fill the salt container with salt (D). Stir
with a spoon to speed up the dissolu-
tion of the salt in the water.
You can put about 2 kg of softening
salt into the salt compartment.
5. Once the compartment is full, replace
the cap and turn it.
Salt should be added just before
starting the machine. In this way,
the overflowing salt water is
cleaned immediately and the risk of
corrosion inside the machine is pre-
vented. If you are not going to wash
immediately, run your machine
empty and without detergent in the
shortest program.
Depending on the different brands
of salt in the market and the water
hardness, it may take several hours
for the salt to dissolve in water.
Therefore, after the salt is filled into
the machine, the “Salt Deficiency
Warning Indicator” will continue to
light for a certain period of time.
6.6 Detergent
You can use powder, liquid/gel and tablet
detergent in the dishwasher.
Use only detergents designed for
use in dishwashers. We recom-
mend that you do not use deter-
gents containing chlorine or phos-
phates, as they are harmful to the
environment.
• Do not use expired detergents.
• Do not use other cleaning materials other
than powder/liquid or tablet detergent
types.
Filling the detergent
To obtain good washing and drying results,
pay attention to the warnings given on the
detergent packaging. For additional ques-
tions, please contact the detergent manu-
facturer.
Do not put solvents in the detergent
compartment. There is a risk of ex-
plosion!
Put the detergent into the detergent com-
partment just before starting the machine
as follows.
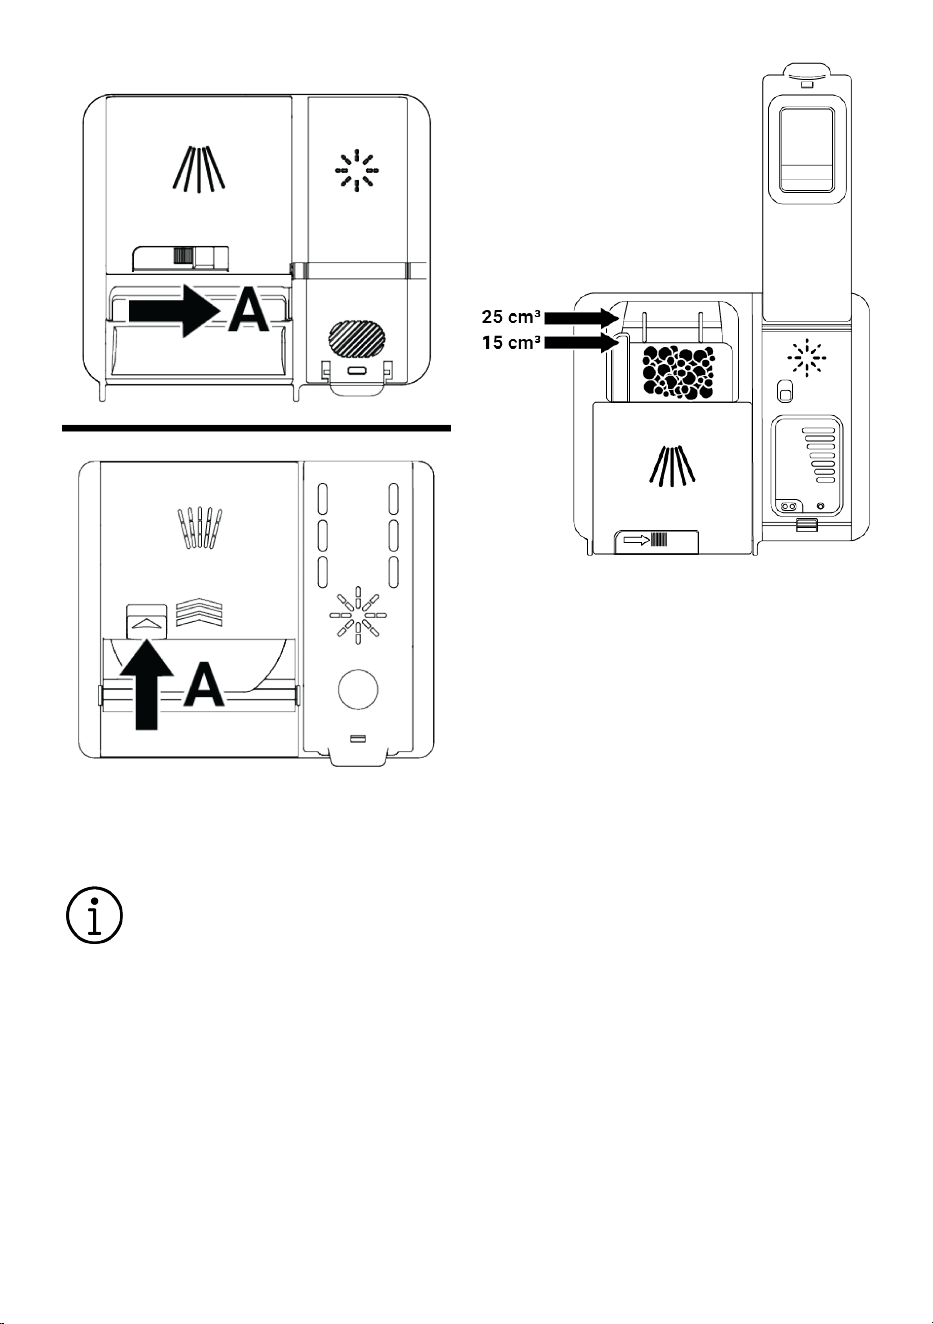
1. Open the detergent compartment cover
by pushing the latch to the right (A).
(depends on model)
EN / 20
2. Put the specified amount of powder, li-
quid/gel or tablet detergent into the
compartment.
There are level lines inside the de-
tergent compartment to help you
use the right amount of powder de-
tergent. When the detergent com-
partment is full, it takes 45 cm³ of
detergent. Depending on the filling
level of the machine and / or the
dirtiness of your dishes, fill the de-
tergent compartment up to the 15
cm³ or 25 cm³ level lines. In case of
tablet detergent, one tablet is suffi-
cient.
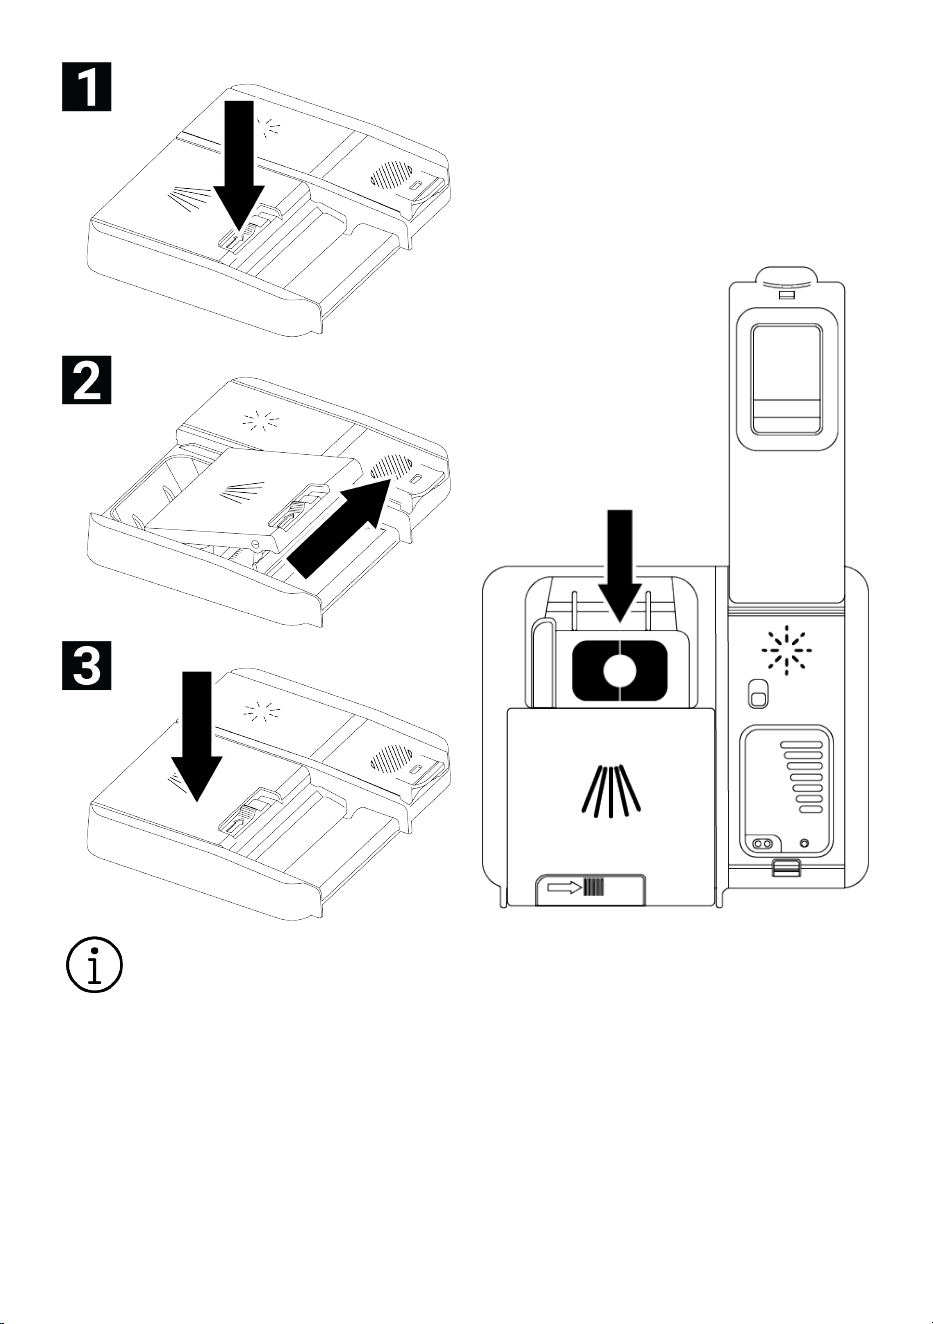
3. Close the detergent compartment
cover by pushing it in the direction of
the arrow. A “click” sound will be heard
when the cover is closed.
EN / 21
Since the solubility of tablet deter-
gents varies depending on temper-
ature and time, be sure to use
powder or liquid/gel detergent in
short programmes without pre-
washing.
Tablet Detergents
In addition to classic tablet detergents,
there are also tablet detergents on the mar-
ket that contain water softening salt and/or
rinse aid. Some also contain special com-
ponents such as glass protector and stain-
less steel protector. These tablets work up
to a certain water hardness level (21°dH).
Above this level, water softening salt and
rinse aid should be used together with the
tablet detergent.
The best washing performance in dish-
washers is achieved by using detergent,
rinse aid and water softening salt separ-
ately.
When using tablet detergents, follow the
manufacturer's instructions on the deter-
gent packaging.
If your dishes are wet when the wash cycle
ends and/or you see limescale stains, espe-
cially on your glasses, contact the deter-
gent manufacturer.
When you switch from tablet detergent
to powder detergent:
• Make sure the salt and rinse aid compart-
ments are full.
• Set the water hardness setting to the
highest position and run a wash program
with the machine empty.
EN / 22
• After an empty wash, readjust the water
hardness setting appropriate for your tap
water by referring to the user manual.
• Adjust the rinse aid setting appropriately.
6.7 Polisher
The rinse aid used in dishwashers is a spe-
cial compound designed to increase drying
efficiency and prevent water or limescale
residues from remaining on the washed
items. Therefore, care should be taken to
ensure that there is rinse aid in the rinse aid
compartment and that only rinse aids pro-
duced for use in dishwashers should be
used.
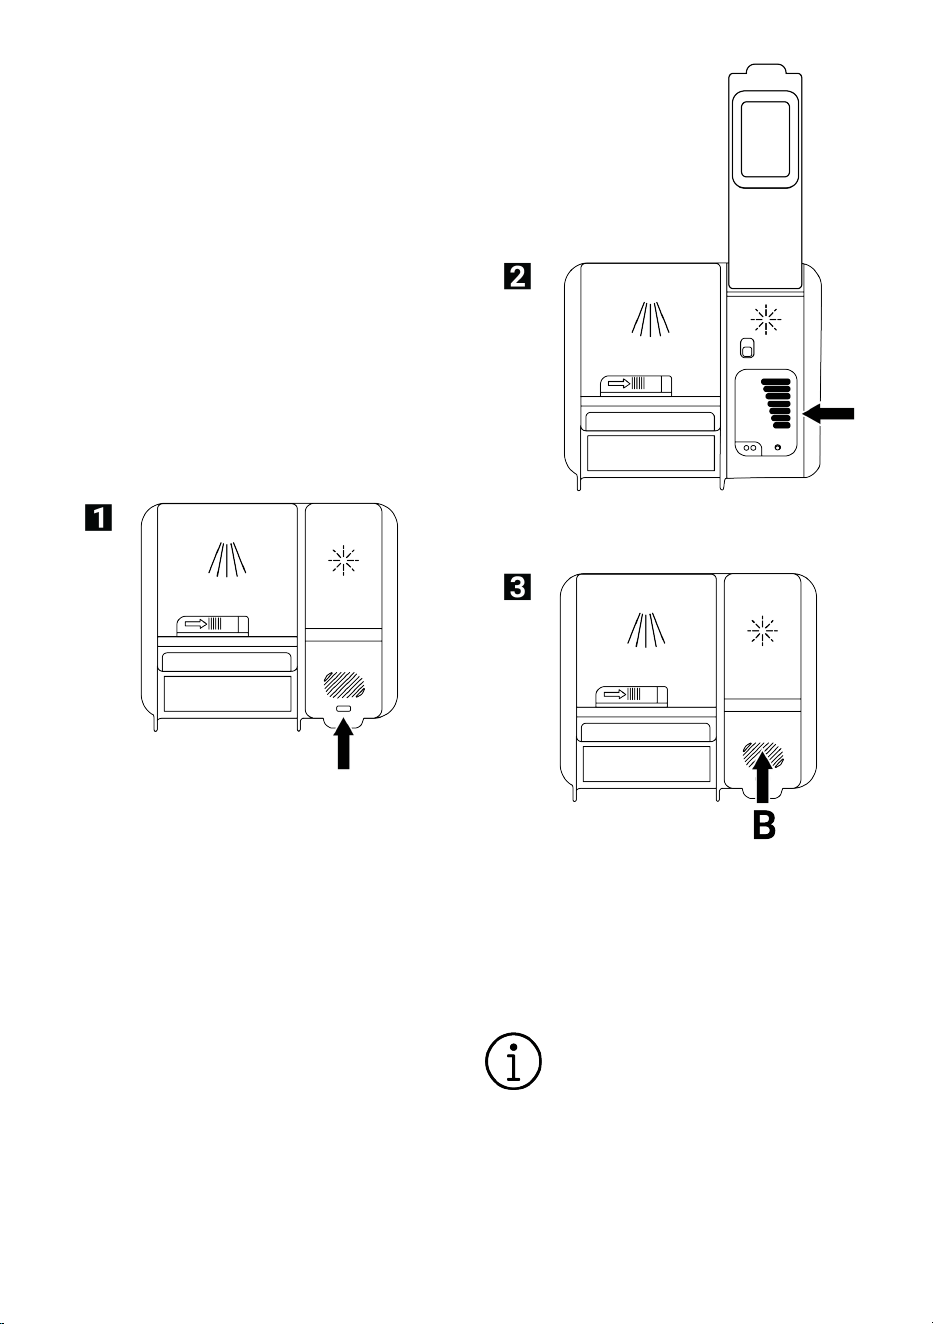
Filling the rinse aid
1. Open the rinse aid lid using the latch.
2. Fill the compartment to the MAX level.
3. Close the compartment lid by pressing
it gently.
4. If there are water marks on the dinner-
ware after washing, it is necessary to
increase the degree of the adjuster,
and if a blue mark remains when wiped
by hand, it is necessary to decrease it.
This setting is set to position 3 when
leaving the factory.
Rinse aid settings are explained un-
der the heading "Adjusting the
amount of rinse aid" in the operat-
ing section of the machine.
EN / 23
Wipe off any rinse aid that spills
outside the compartment. Rinse aid
accidentally spilled will cause
foaming and reduce washing per-
formance.
6.8 Parts that are not suitable for
washing in the dishwasher
• Never wash dishes contaminated with ci-
garette ash, candle residue, polish, paint,
chemicals, etc. in the machine.
• Do not wash forks, spoons and knives
with wooden or bone handles, glued
parts, plastic parts that are not heat-res-
istant, copper and tin containers in the
machine.
Dishwasher-safe, as with hand
washing, can cause discoloration
and tarnishing of decorative prints
on porcelain, aluminum, and silver.
Some delicate glass and crystal
types can lose their transparency
over time. We recommend that you
pay particular attention to whether
the new tableware you purchase is
dishwasher-safe.
6.9 Placing the dishes in the ma-
chine
If you place the dishes correctly in accord-
ance with the washing capacity of your
dishwasher, you will use the machine in the
best way in terms of energy consumption,
washing and drying performance.
• Before placing your dishes in the ma-
chine, scrape off any food residue
(bones, fruit seeds, etc.) on them.
• If possible, place thin, narrow-bodied
pieces in the middle compartments of
the baskets.
• Place very dirty and large items in the
lower basket and small, delicate and light
items in the upper basket.
• Place deep containers such as bowls,
glasses, and pots with their mouths fa-
cing downwards. This will prevent water
from accumulating in them.
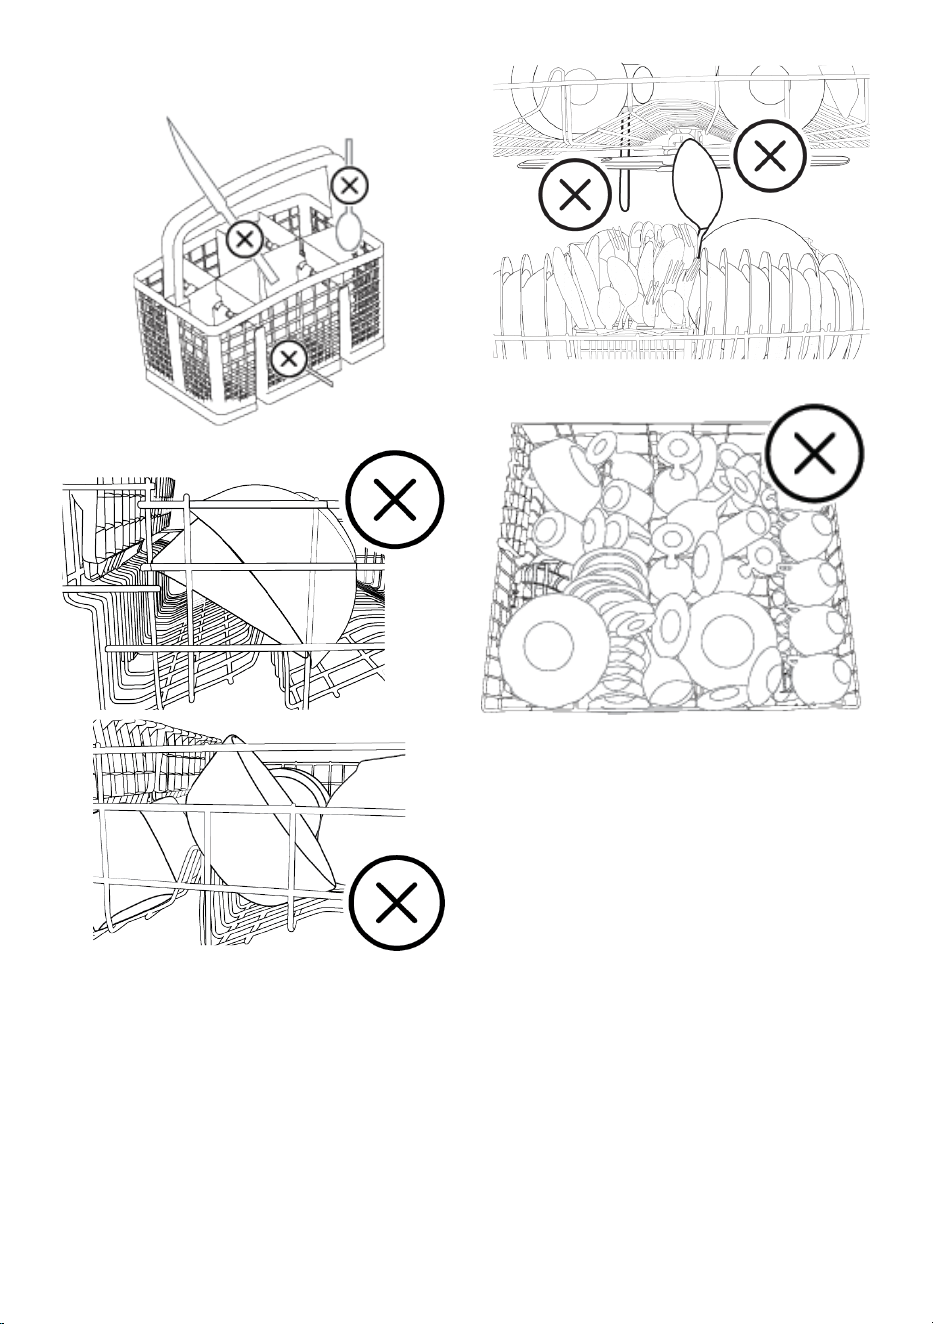
To prevent possible injuries, always
place long and sharp dishes such
as serving forks, bread knives, etc.
in the cutlery basket with their
sharp points facing downwards or
horizontally on the dish baskets.
First empty the dishes in the lower basket,
then the dishes in the upper basket.
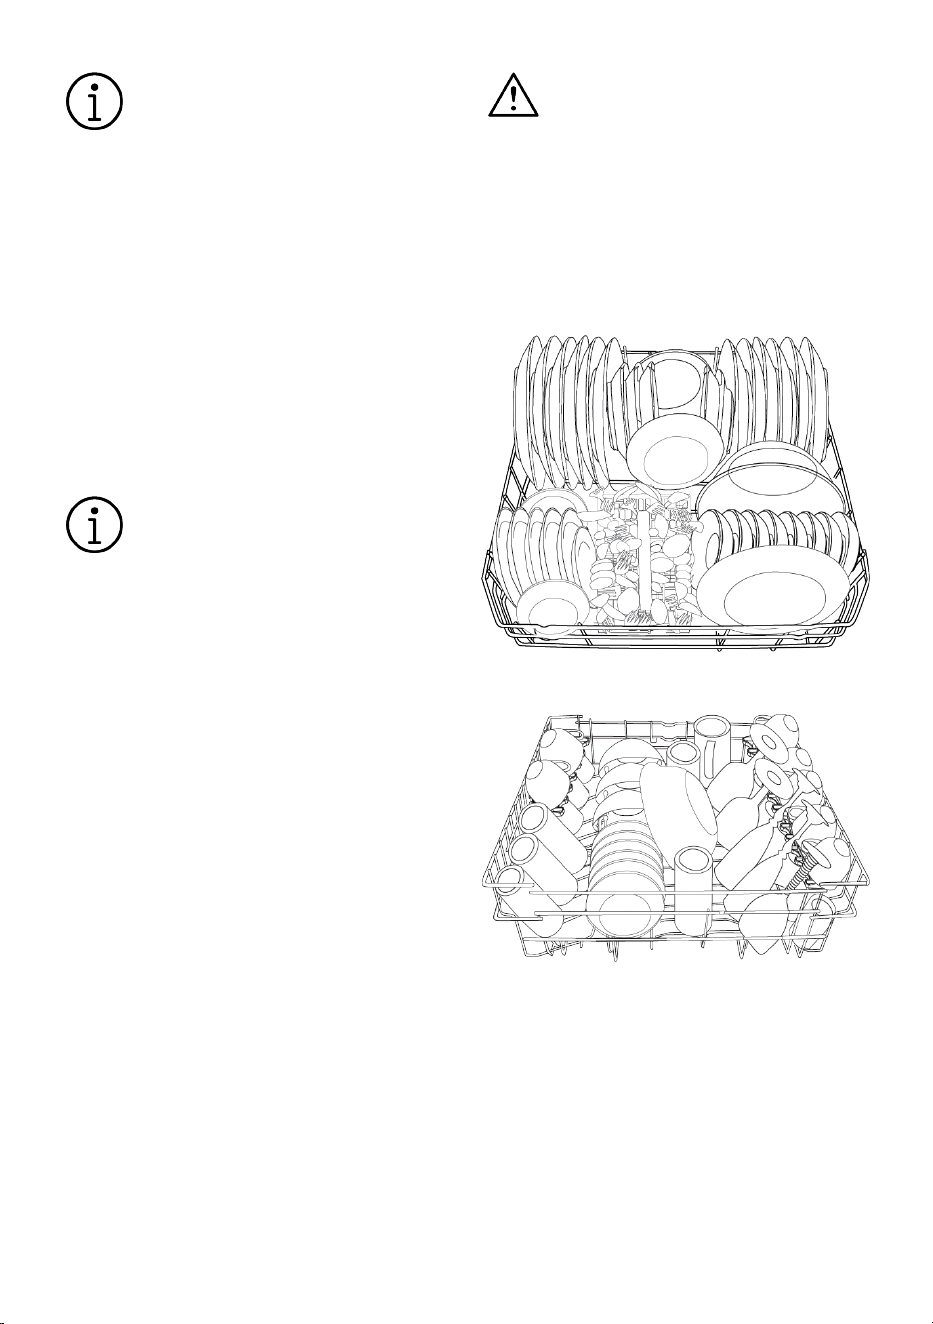
Alternative Basket Layout Examples
Lower Basket
Upper Basket
EN / 24
Incorrect Placements
6.10 Lower Propeller
The lower impeller washes the dishes in the
lower basket.
6.11 Upper Propeller
The upper fan washes the dishes in the up-
per basket.
6.12 Cutlery basket
(depends on model)
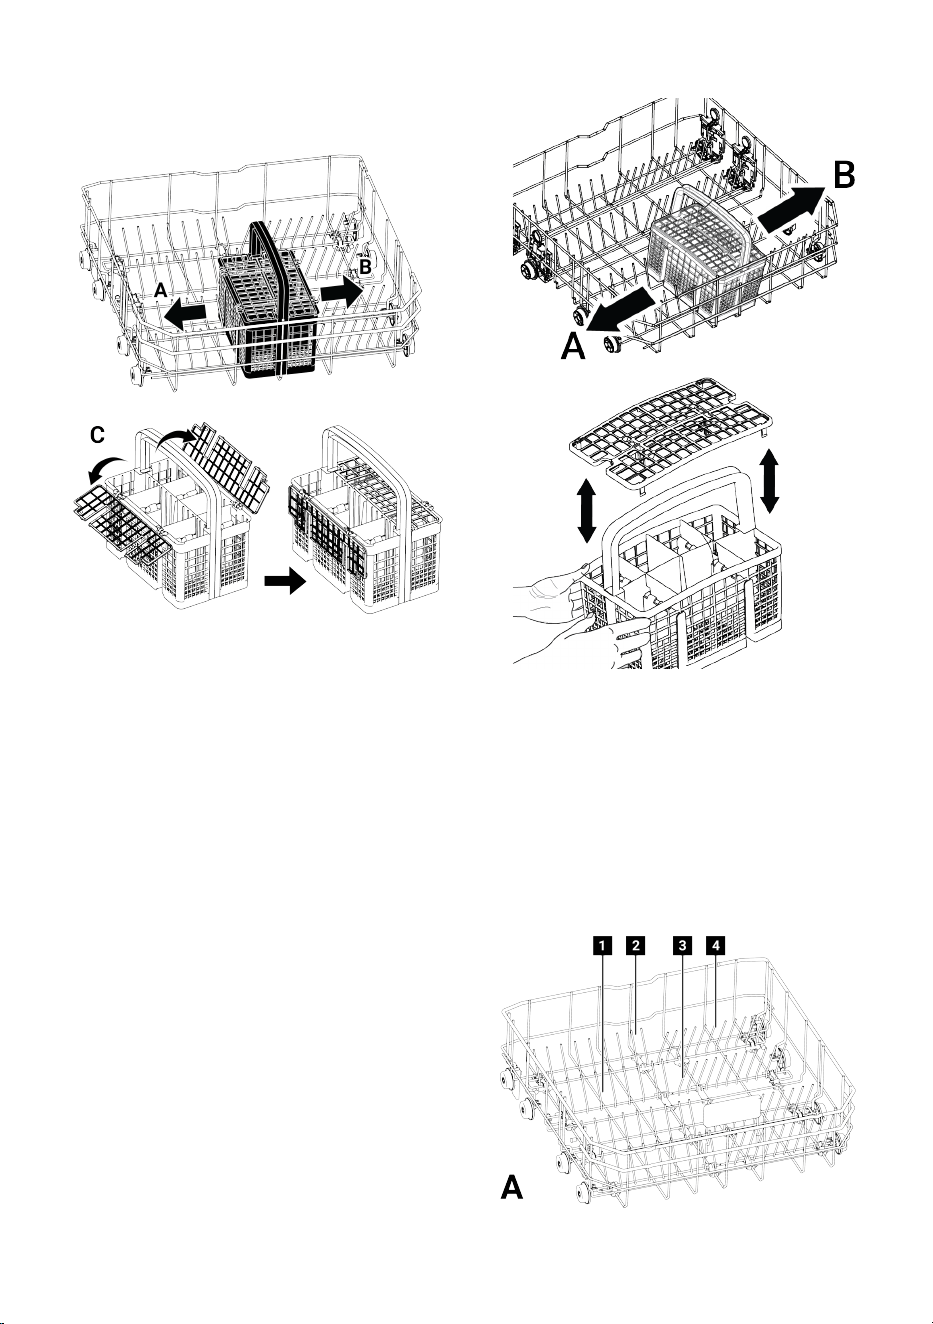
The cutlery basket is specially designed to
wash your dishes such as knives, forks,
spoons, etc. more cleanly.
Thanks to the movable feature of the cut-
lery basket (A, B), you can create larger
areas when placing your dishes in the lower
basket and make room for your dishes of
EN / 25
different sizes. If you want to place more
cutlery, you can fold the separators to the
side. (C)
6.13 Cutlery basket
(depends on model)
The cutlery basket is specially designed to
wash your dishes such as knives, forks,
spoons, etc. more cleanly.
Thanks to the movable (A, B) feature of the
cutlery basket, you can create larger areas
and make room for dishes of different
sizes when placing your dishes in the lower
basket.
6.14 Foldable lower basket wires
(depends on model)
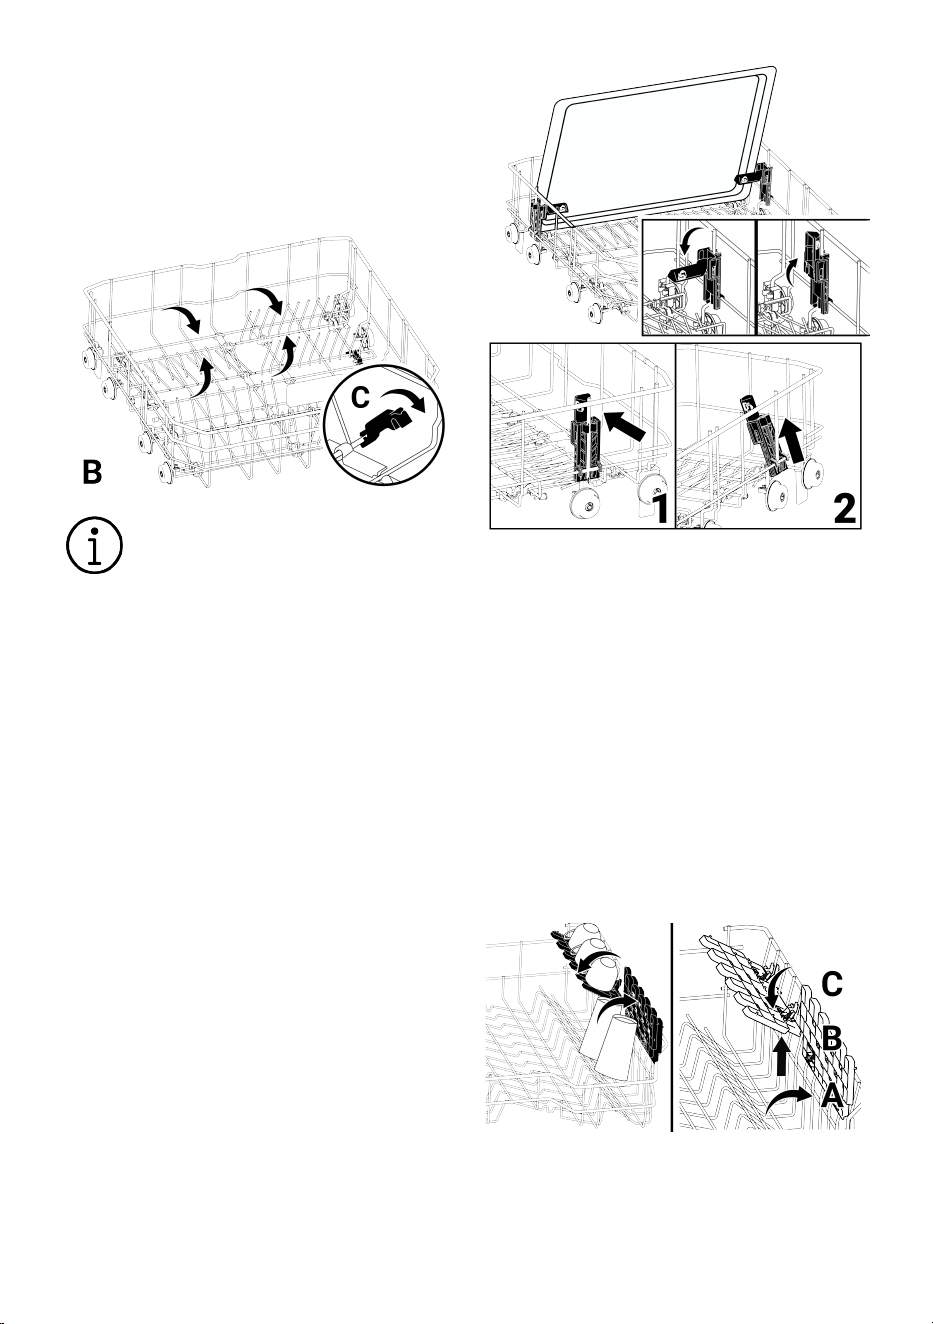
The six-piece (A) folding wires located in
the lower basket of the machine are de-
signed to allow you to place large items
such as pots, bowls, etc. more easily. If you
wish, you can create larger areas by folding
each piece individually or all at once.
EN / 26
To put the foldable wires in a horizontal po-
sition, hold the wires in the middle and
push them in the direction of the arrows
(B). To put the wires back in an upright pos-
ition, lift them up. The foldable wires will fit
back into the latch (C).
Holding the wires from the ends
and placing them in a horizontal po-
sition may cause them to bend. For
this reason, hold the wires in the
middle from their bases and push
them in the direction of the arrow,
placing them in a horizontal or ver-
tical position.
6.15 Tray Washing Support Piece
(Depending on the model)
If you want to wash trays in your lower bas-
ket, you can use tray washing support
parts.
For appropriate program and function se-
lection, see the Additional functions sec-
tion.
When you are not using the piece, you can
fold it to place your dishes easily.
If necessary, you can remove the part as
shown in pictures 1 and 2.
In the performance control tests to be car-
ried out according to the standards, the tray
washing support parts must be removed as
indicated in pictures 1 and 2.
6.16 Height Adjustable Upper Bas-
ket Shelf
(depends on model)
You can use the height-adjustable shelves
in the upper basket of the machine as you
wish by moving the lower and upper parts
up or down according to the height of the
glasses, cups, etc. (A, B, C).
6.17 Bottom basket bottle wire
(depends on model)
EN / 27
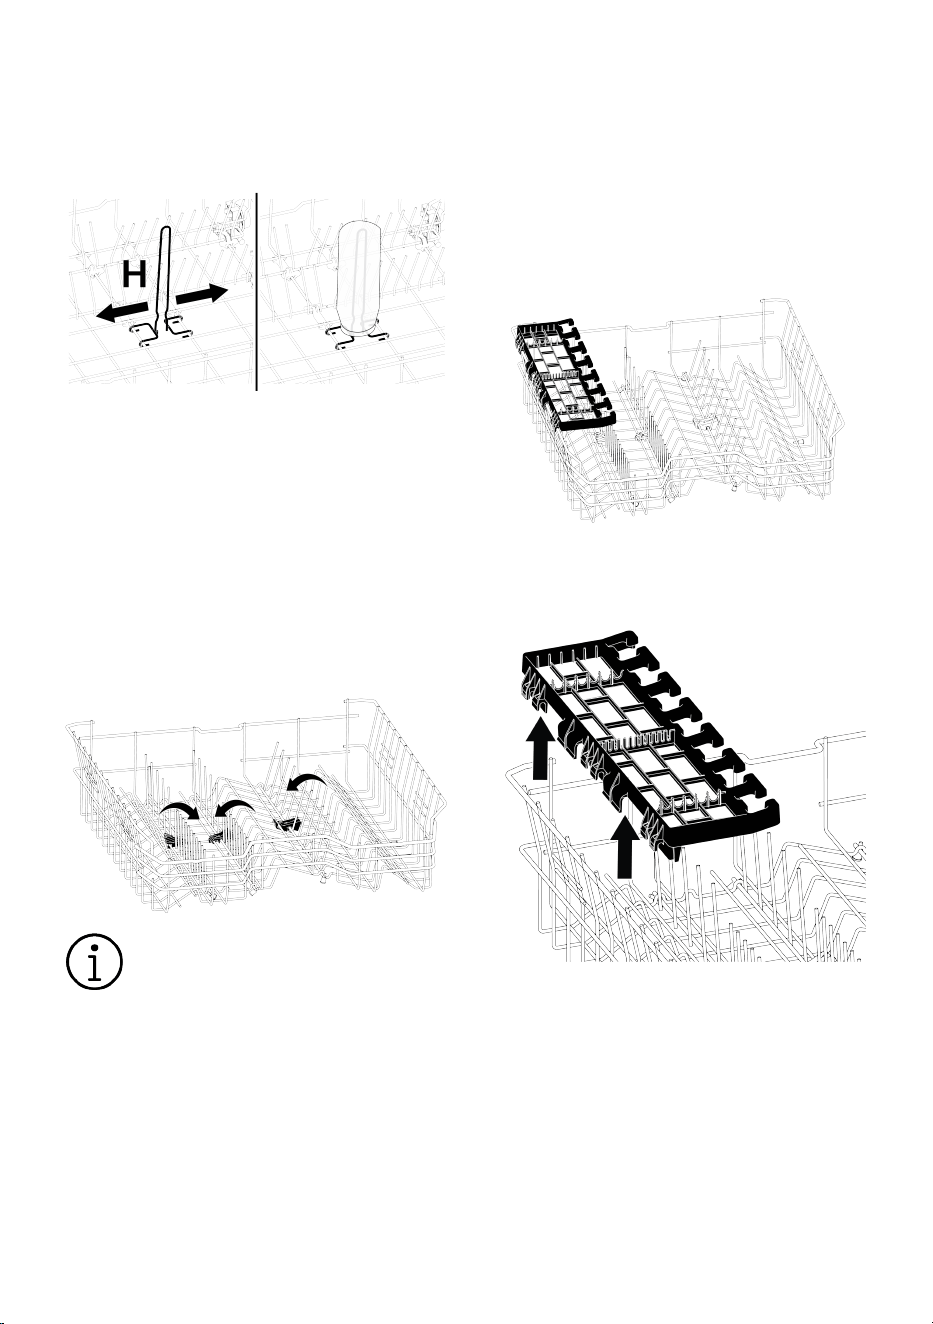
The bottle wire is designed to help you
wash wide-mouthed and tall items more
easily. When you are not using the bottle
wire, you can remove it from your basket by
pulling it outwards from both sides (H).
6.18 Foldable upper basket wires
(Depends on model)
When you need ample space for your large
dishes in the upper basket of the machine,
you can use the foldable wires.
To bring the foldable wires to a horizontal
position, hold the wires in the middle and
push them in the direction of the arrow in
the picture. Place your large dishes in the
area that will be created. Lift the wires up
to bring them back to an upright position.
Holding the wires from the ends
and placing them in a horizontal po-
sition may cause them to bend. For
this reason, hold the wires in the
middle from their bases and push
them in the direction of the arrow,
placing them in a horizontal or ver-
tical position.
6.19 Upper basket multi-purpose
service shelf
(depends on model)
Thanks to the multi-purpose service shelf in
the upper basket of your machine, long ser-
vice and kitchen utensils can be easily
loaded and washed. In addition, the glass
foot fixing sections located at the front of
this accessory help to place glasses of ap-
propriate size in the upper basket more
easily.
When you do not want to use it, you can re-
move the upper basket multi-purpose ser-
vice shelf by lifting it up.
You can easily attach the upper basket
multi-purpose serving shelf to the edge of
your upper basket for reuse.
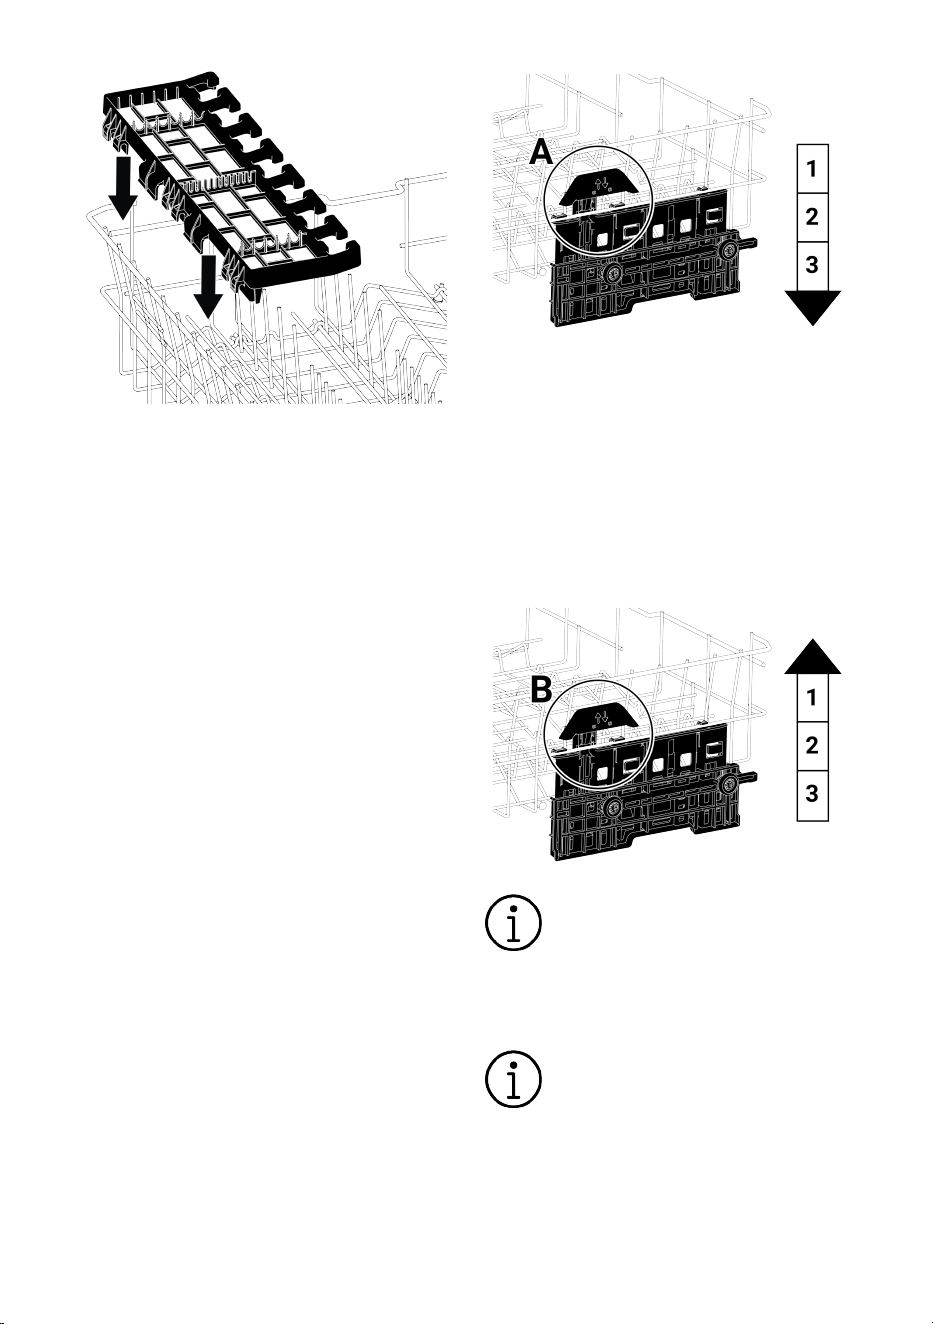
EN / 28
Illustration2:
6.20 Adjusting the height of the up-
per basket
(Depends on model)
The upper basket height adjustment mech-
anism is designed to create large areas in
the upper or lower areas of the machine ac-
cording to your needs by adjusting the
height up or down when your basket is
empty or full.
With this mechanism, you can use your
basket in three different positions: bottom,
middle and top.
To lower the basket while it is in the top po-
sition;
1. Hold the upper basket wires with both
hands and lift the handle on the mech-
anism upwards as shown in the figure
(A).
2. Lower the basket from its current posi-
tion to the lower position.
3. Once your basket reaches the lower
level, release the basket.
If the height is not sufficient, repeat the
same process.
1. To raise your basket, hold the upper
basket wires with both hands and pull
upwards while the basket is in its low-
est position (B).
2. When the basket reaches the upper
level with a "Click" sound coming from
the right and left mechanisms, release
the basket.
If the height is not sufficient, repeat the
same process.
The movement mechanism may
not work properly if the upper bas-
ket is overloaded or the weight dis-
tribution is not balanced. In heavier
conditions, there is a risk of falling
to the lower level.
Make sure that the adjustment
mechanism is in the same position
on the right and left of the upper
basket.
EN / 29
6.21 Adjusting the height of the up-
per basket
(Depends on model)
Place large items such as pots etc. in the
lower basket. You can adjust the height of
the upper basket according to the size of
the dishes you will wash. To change the
height of the basket, use the basket wheels,
turn the holders at the end of the upper
basket rails to the sides and open them,
take the basket out. Change the position of
the wheels, place the basket back on the
rail and close the holders.
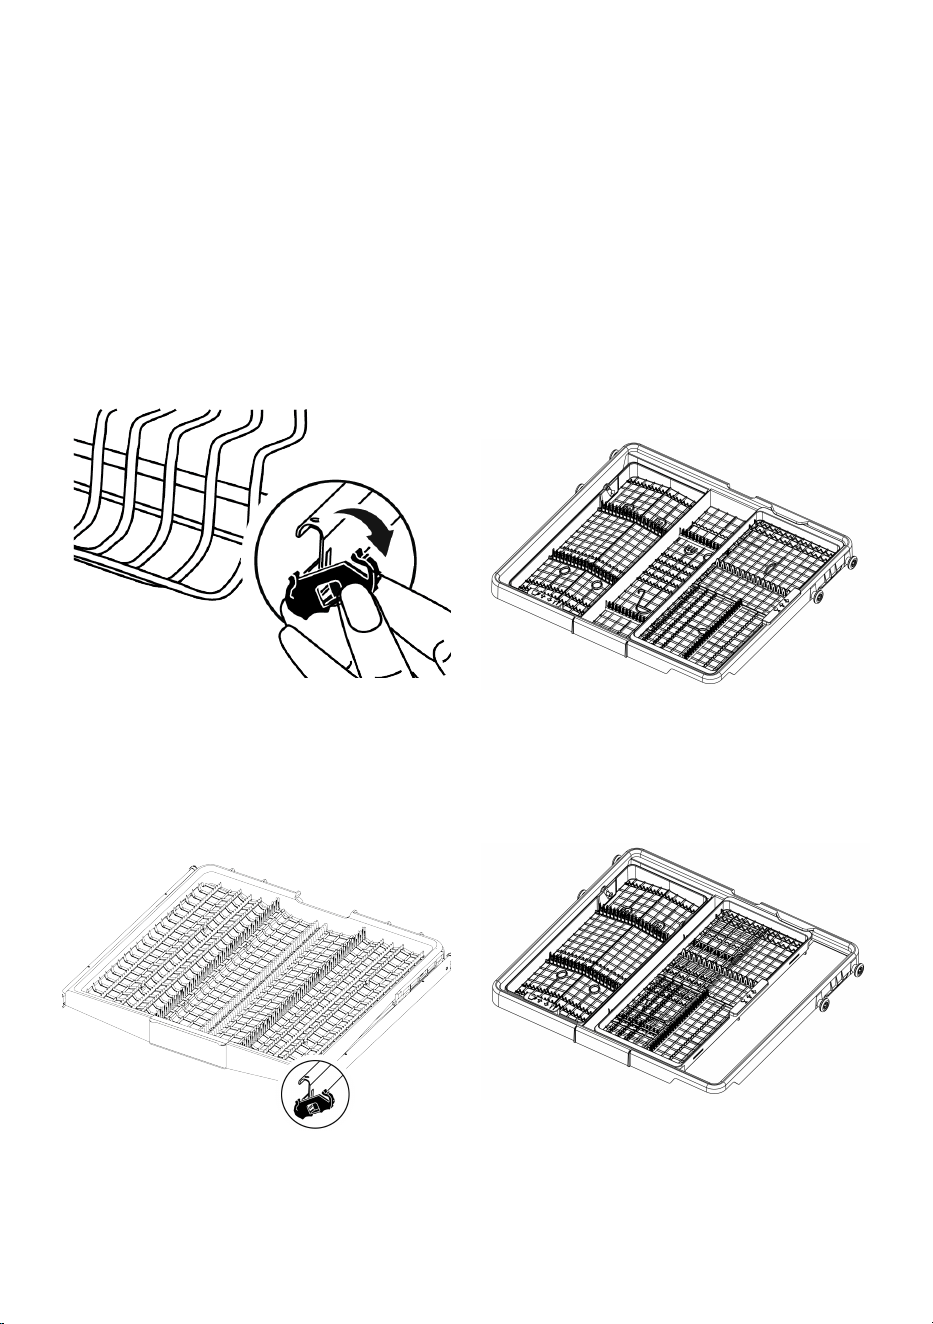
6.22 Ceiling cutlery basket
(Depends on model)
The ceiling cutlery basket is designed for
you to wash your dishes such as forks,
spoons, etc. by placing them between the
combs on the tray.
6.23 Ceiling cutlery basket [Soft
Spike]
(Depends on model)
The combs are optimized on the cutlery
tray to specifically support forks, spoons
and knives, with symbols indicating which
type should ideally be placed in which part
of the tray.
The left tray can be moved up and down by
pulling or pushing down on the handle.
When in the lower position, cups can be
placed on this tray for added flexibility.
Illustration3: The right tray is free to move
laterally. When the right tray is moved to
the left, it creates extra space underneath
to allow larger glasses to be placed in the
upper basket and is supported by a soft
spike.
EN / 30
7 Operating the product
7.1 Operating the product
Please read the "Safety Warnings" section
first!
1
8
7
5
2
6
3
4
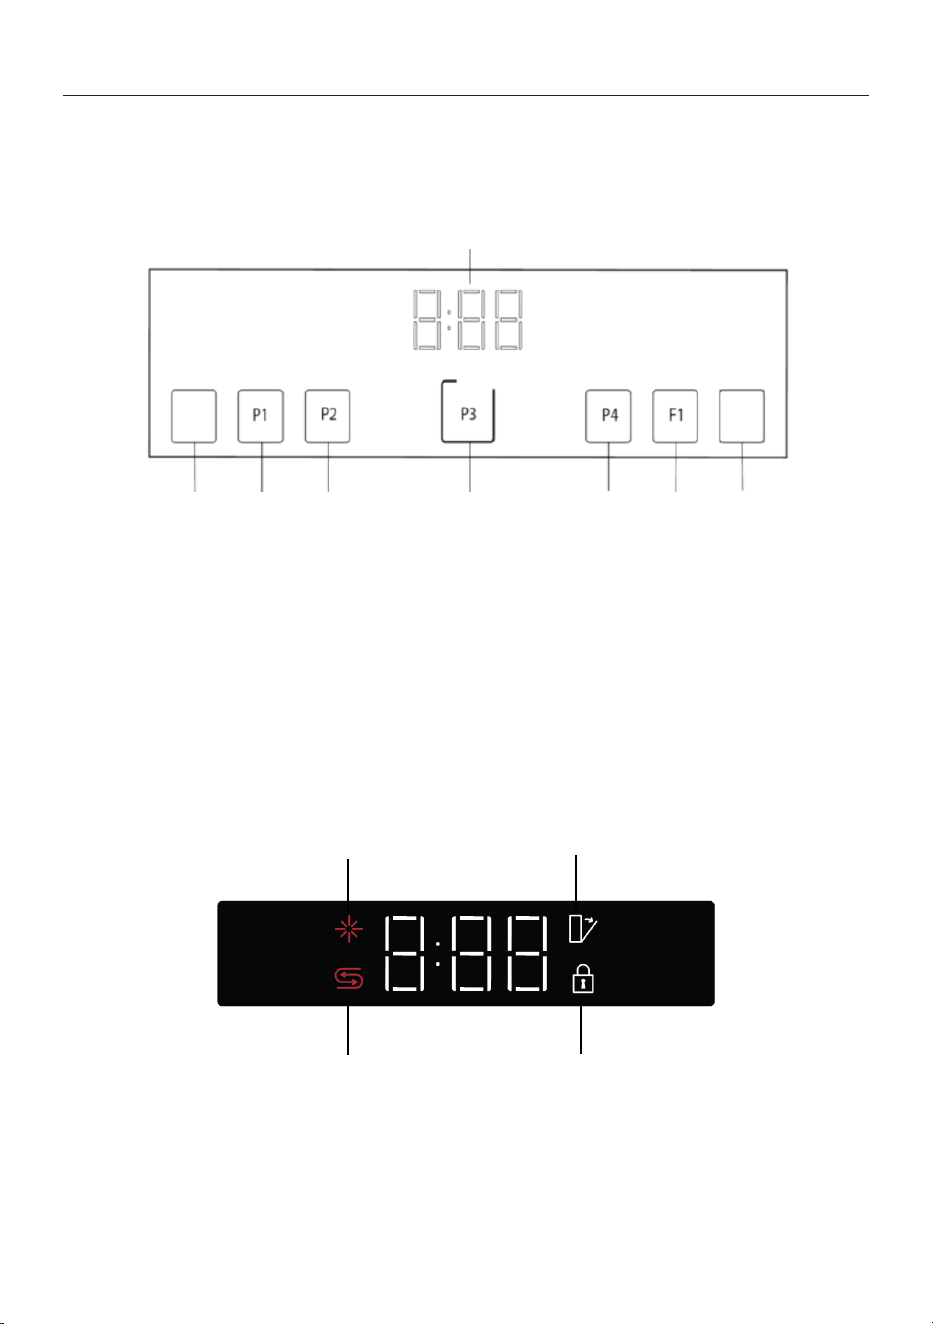
1 On/Off Switch 2 Program Selection Button
3 Program Selection Button / Auto-
matic Door Opening Function (3 sec.)
4 Program Selection Button / Sub-set-
tings Menu Button / Artificial Intelli-
gence (3 sec.)
5 Screen 6 Program Selection Key / Child (Key)
Lock Function (3 sec.)
7 Function Key / Half Load 8 Start / Pause / Cancel Button
1
2
3
4
1 Polishing Agent Deficiency Warning
Indicator
2 Salt Deficiency Warning Indicator
3 Automatic Door Opening (depending
on the model)
4 Child Lock

EN / 31
Do not touch the machine screen with wet
hands.
On/Off Switch
When you press the On/Off button, the in-
dicator lights on the screen will illuminate
in the On position. They will turn off in the
Off position.
Program Selection / Program Cancellation
Button
Select the program you want to run from
the "program selection keys" section and
press the button.
To cancel a running program, press and
hold the Start/Pause/Cancel button for 3
seconds.
After a countdown of 3-2-1 on the screen,
0:01 is displayed and the draining process
begins. The draining process is completed
within 2 minutes, and your machine will
emit an audible alert when finished.
Function Keys
When you press the Function Keys during
program selection or delay selection, a pos-
itive key sound will be heard if the selected
program supports the selected function.
The function is selected when the indicator
light for the selected function illuminates.
To cancel the function selection, press the
function key again until the function indic-
ator turns off.
Preparing the machine
1. Open the dishwasher door.
2. Load your dishes according to the in-
structions in the user manual.
3. Ensure that the upper and lower pro-
pellers rotate freely.
4. Put a sufficient amount of detergent in
the detergent compartment.
Program selection
1. Turn on your machine by pressing the
On/Off button.
2. Check the Salt and Rinse Aid Defi-
ciency warning indicators and add salt
and/or rinse aid if necessary.
3. Choose the appropriate washing pro-
gram for your dishes by referring to the
program information and average con-
sumption values table.
4. Pressing the Start/Pause/Cancel but-
ton on your machine will start the se-
lected program.
7.2 Table of program information
and average consumption val-
ues.
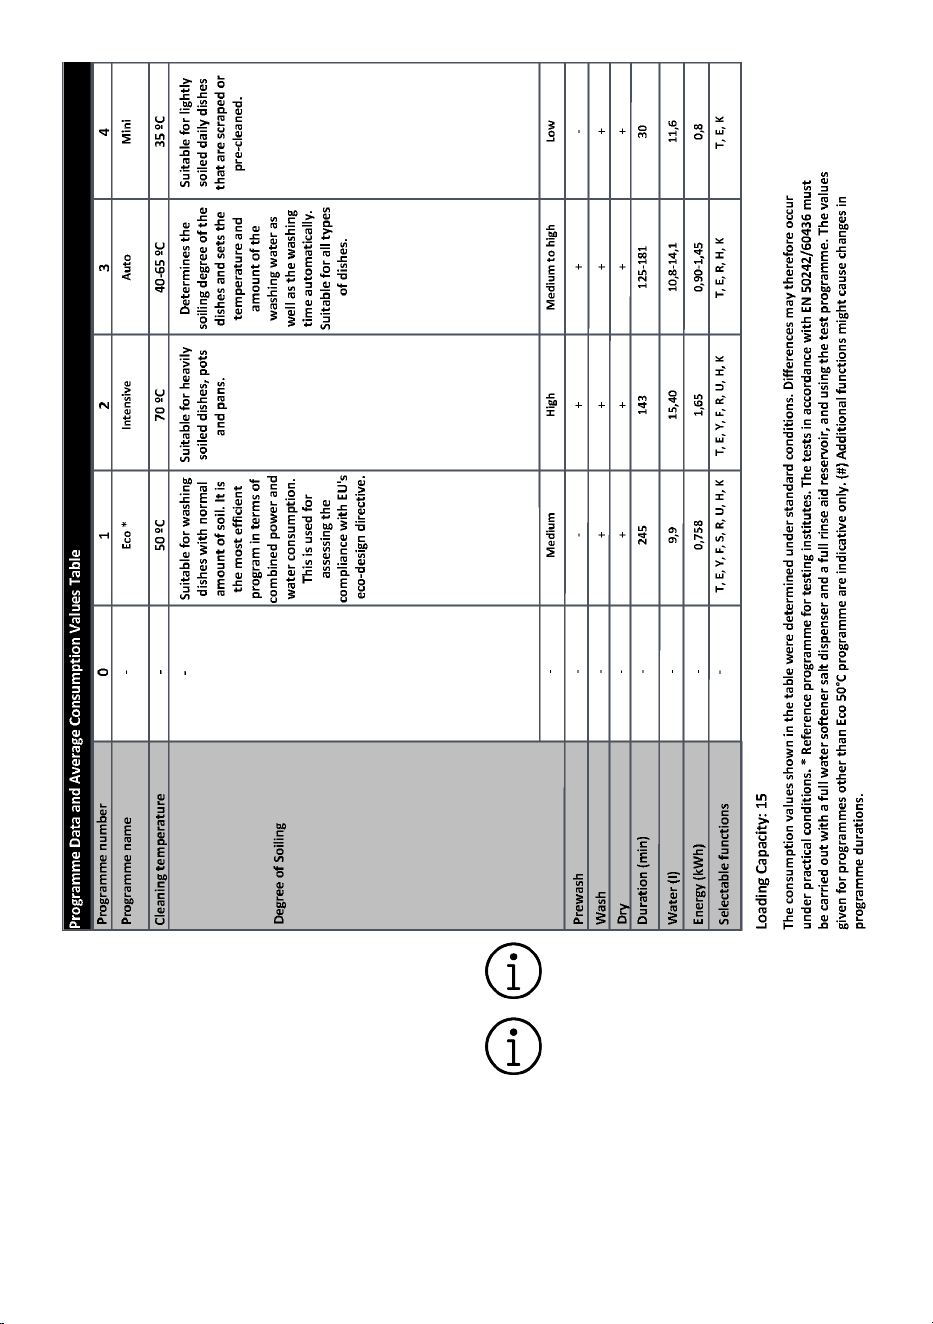
EN / 32
7.3 Additional functions
The machine's washing programs are de-
signed to achieve the best cleanliness, tak-
ing into account the type of dirt, the amount
of dirt and the characteristics of the dish-
ware to be washed.
Additional functions have been created to
help you save time, water and energy and
ensure a more hygienic and comfortable
wash, thanks to your specific conditions.
Additional functions may cause a
change in program duration.
Additional functions are not suit-
able for all wash programs. The dis-
play of the function not suitable for
the program will not be active.
EN / 33
The functions that can be used in
the washing programs are indic-
ated by letters such as "A, B, D, E, G,
F, F, K..." in the "Program informa-
tion and average consumption val-
ues table". You can find instruc-
tions on how to use these functions
in the "Additional functions" section
of the user manual.
Some auxiliary functions cannot be
used together. If the function you
have selected is not active even
though it appears in the "Program
information and average consump-
tion values table", you can activate
it after turning off the other auxili-
ary functions.
To add additional functions to the pro-
gram:
1. Select the desired wash program.
2. Additional functions can only be activ-
ated or deactivated via the Homewhiz
app.
If your machine has submenu functions de-
pending on the model, please refer to the
instructions in the Additional Functions
section for how to use them.
"Not all of the functions indicated
with letters such as "A,B,D,E,G,F,K..."
in the program information and av-
erage consumption values table
can be used in your machine, the
functions that can be used in your
machine are described in the addi-
tional functions section of this
manual.
Function Auto Door Opening (K)
(Model Dependent)
Thanks to the “Auto Door Opening” feature
on your machine, the drying efficiency of
your machine is increased and energy is
saved.
When you activate this function, the door of
your machine opens automatically at the
end of the wash cycle.
The function can extend the dura-
tion of the selected program by up
to 35 minutes.
The Auto Door Opening feature
opens the door at the end of the
wash cycle thanks to the “door
opening shafts”. This process takes
approximately 2 minutes. If the
power is interrupted while the
shafts are extending, do not force
the door to close. When the power
returns, the process will be com-
plete and the shafts will retract.
If feature Auto Door Opening is act-
ive, the door can be automatically
opened during the drying step and
the program flow can continue. If
the product has a display, the door
will remain open and the count-
down timer will continue until the
drying is complete and the program
ends.
Function Auto Door Opening
To enable function Auto Door Opening:
1- With the machine on and the door
closed, press and hold the P2 button for 3
seconds to activate the Auto Door Opening
function.
2-Indicator {23} lights up and Auto Door
Opening becomes active.
The Auto Door Opening function
can be activated or deactivated in
Program Selection mode.
To cancel the Auto Door Opening func-
tion:
1- To cancel function Auto Door Opening,
press and hold the P2 button for 3 seconds
while the machine is in the ON position and
the door is closed.
2- The Auto Door Opening indicator turns
off and the function becomes deactivated.
Delay function
(Model dependent)
EN / 34
If an economical electricity tariff is applied
in your area, you can use the delay function
to wash your dishes during the relevant
hours.
You can postpone the start time of your
chosen program by up to 24 hours.
1. With the door closed, press the delay
button after selecting the washing pro-
gram and other additional functions.
2. When you press the delay button, “1h”
will appear on the Display Information
Line and the delay indicator will start
flashing.
3. Press the delay button to set the de-
sired time. Each time you press the
button, the time increases in 1-hour in-
crements up to 24 hours. Pressing the
delay button for a long time will con-
tinuously increase the time.
4. Press the Start/Pause/Cancel button.
The program will start automatically
when the delay is over.
Changing settings while the delay function
is enabled
While the delay function is active, you can-
not make changes to the washing pro-
gramme, additional functions or the delay
time.
Once the program has started, the
program and its auxiliary functions
cannot be adjusted or modified.
To cancel the delay function:
With the door closed and the machine on,
press the Start/Pause/Cancel button for 3
seconds. When the delay function is can-
celed, the machine returns to program se-
lection mode.
In some models, the delay function
is performed via the Homewhiz ap-
plication. After selecting the pro-
gram via the application, you can
adjust the delay time by clicking on
the delay time icon at the bottom.
Child (Key) Lock Function
(Model Dependent)
You can prevent anyone other than yourself
from affecting or changing the program
flow and delay time while the machine is
running.
To activate the child lock:
1. With the machine switched on and the
door closed, press and hold the P4 pro-
gram button for 3 seconds to activate
the Child (Key) Lock function.
2. The child (key) lock indicator lights up
and the key lock is activated.
The child lock prevents changing
selected functions and disables the
Start/Pause/Cancel button.
The child lock does not lock the
machine door.
The child lock will automatically de-
activate if you switch the machine
off using the On/Off button.
To disable the child lock:
1. To deactivate the Child (Key) Lock
function while the machine is switched
on and the door is closed, press and
hold the P4 program button for 3
seconds.
2. The child (key) lock indicator goes off
and the key lock is cancelled.
7.4 Functions
Half Load function (Y)
(Model dependent)
This is used when you want to run your ma-
chine without fully loading it.
1. Load your dishes into the dishwasher as
desired.
2.Turn the machine on using the On/Off
button.
3. After selecting your desired program,
press the Half Load button.
When this function is enabled, the function
key indicator lights up.
Thanks to the half-load function, you can
save water and energy by using both the
upper and lower baskets of the machine
simultaneously.
EN / 35
4.Run the program by pressing Start /
Wait / Cancel.
Corner Washing Mode Warning
(Model Dependent)
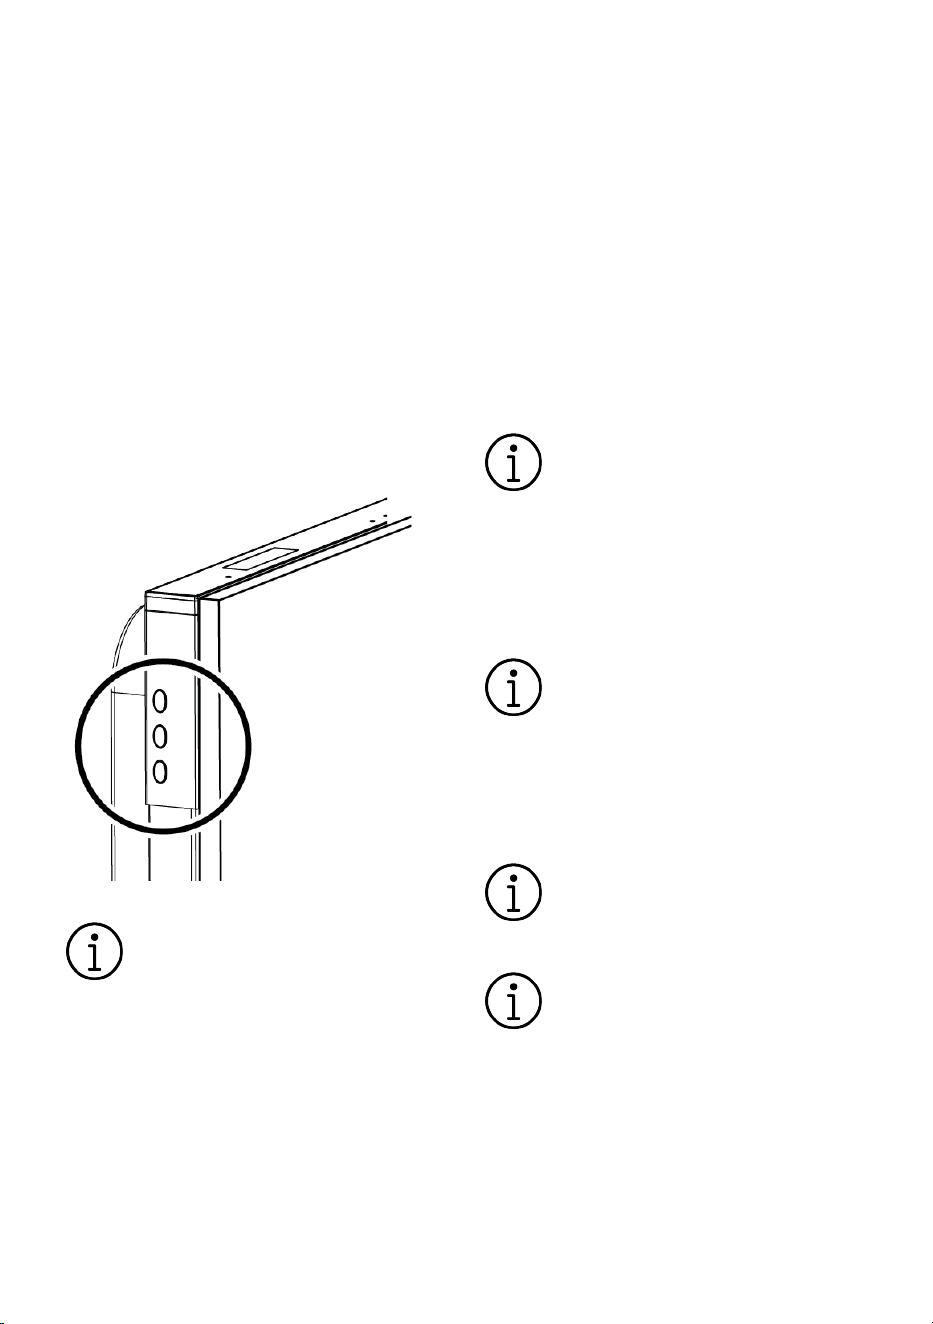
It is possible to check the program status
from the module in the upper left corner of
the machine while the program is running
and after it has finished. After the selected
program has started, the blue indicator in-
dicates that the program is in the washing
phase, and the red indicator indicates that
it is in the drying phase. The green indicator
means the program has finished. The mod-
ule indicators turn off if the door is opened
while the program is running or after the
program has finished.
In models with corner wash indicat-
ors and automatic door opening,
the red LED (drying step in pro-
gress) remains lit after the door is
opened.
Blue: Washing
Red: Drying
Green: The program is complete.
7.5 Warning Sound Level
1. With the door closed, turn on your ma-
chine using the On/Off button, then press
the Program3 (AI) button for 3 seconds to
enter the submenu.
2. Press the P3 button to navigate to the
“S:” position on the screen.
3. Each time you press the play/pause but-
ton, the alert sound level changes from
“S:0” off, “S:1” medium, and “S:2” high.
4. Press and hold the power button for 3
seconds to exit the settings menu; your set-
tings will be saved automatically.
Your machine is set to level “S:2” at
the factory.
7.6 Program launch
After selecting the program and additional
functions, close the door to start your ma-
chine.
Depending on the hardness of the
tap water, the machine performs a
water softening process. The wash-
ing time may vary while the pro-
gram is running depending on the
room temperature where the ma-
chine is located, the tap water tem-
perature, and the amount of dishes.
Avoid opening the machine door
while it is running. Opening the door
may cause steam to escape, so be
careful.
After rinsing, the machine remains
silent for a while in standby mode
to allow all the water remaining on
the dishes and inside the machine
to drain completely and for the wa-
ter softener to be cleaned, before
continuing with the drying step.
7.7 Program Cancellation
With the door closed, press the Start/
Pause/Cancel button for 3 seconds. A
countdown of 3-2-1 will appear on the
EN / 36
screen, followed by 0:01. Wait for the drain-
ing process to complete. The draining pro-
cess will be completed within 2 minutes,
and your machine will emit an audible alert
when finished.
Some models do not have an aud-
ible warning.
Depending on the step where your
canceled program was left off, de-
tergent or rinse aid may remain in
the machine and/or on the washed
items.
7.8 Polishing Agent Deficiency
Warning Indicator
To check if your machine has enough rinse
aid, look for the rinse aid low warning indic-
ator on your machine's display. When the
rinse aid low warning indicator on your ma-
chine's display starts to light up, you need
to refill the rinse aid compartment.
Adjusting the Amount of Rinse Aid
1. With the door closed, turn on your ma-
chine using the On/Off button, then press
the Program3 (AI) button for 3 seconds to
enter the submenu.
2. Press and hold the P3 button until the
screen shows "P".
3. Adjust the level to the appropriate level
by selecting one of the positions “P:0”,
“P:1”, “P:2”, “P:3” or “P:4” using the Play/
Pause button.
4. To save, press and hold the power button
on your machine for 3 seconds to exit the
settings menu. Your settings will be saved
automatically.
In the P:0 setting, no rinse aid is added dur-
ing the washing program.
At position P:1, 1 dose of polishing com-
pound is dispensed.
At position P:2, 2 doses of polishing com-
pound are dispensed.
At position P:3, 3 doses of polishing com-
pound are dispensed.
At position P:4, 5 doses of polishing com-
pound are dispensed.
7.9 Salt Deficiency Warning Indic-
ator
To check if your machine has enough
softening salt, look for the low salt warning
indicator on your machine's display. Once
the low salt warning indicator lights up, you
need to refill the salt compartment.
Adjusting the water hardness level
is explained in the Water Softening
System section.
7.10 End of program
To save energy, your machine will
automatically switch off after a cer-
tain period of time, either when a
program is finished or when no pro-
gram is started.
After washing your dishes, let them
cool in the dishwasher for about 15
minutes. Leaving the dishwasher
door slightly ajar during this time
will help them dry faster. This pro-
cess will increase the drying effi-
ciency of the machine.
8 Maintenance and Cleaning
8.1 Maintenance and cleaning
Read “Safety Instructions” section
first!
Before cleaning the machine, un-
plug it and turn off the tap.
Do not use abrasive materials when
cleaning.
For the machine to work efficiently,
clean the filters and impellers at
least once a week.
EN / 37
If cleaned at regular intervals, the life of the
product will be extended and frequently en-
countered problems will be reduced.
Cleaning the exterior of the machine
Gently wipe the exterior of your machine
and the door seals with a delicate cleaning
agent and a damp cloth. Wipe the "control
panel" only with a slightly damp cloth.
Cleaning the inside of the machine
Clean the machine monthly by running it at
the highest possible temperature with de-
tergent or special machine cleaning agents.
This will help to remove residues and limes-
cale from the inside of the machine.
If there is water left in the machine, drain
the water in the machine by following the
procedures in the “Cancelling the program”
section. If the water cannot be drained, re-
move the filters as indicated in the “Clean-
ing the filters” section and check if there
are any dirt particles that have accumu-
lated at the bottom of the machine and
blocked the water path, and clean them if
necessary.
8.2 Cleaning the filters
(Depends on model)
For the machine to work efficiently, clean
the filters at least once a week. Check if
there is any food residue on the filters. If
there is food residue, remove the filters and
clean them thoroughly under the tap.
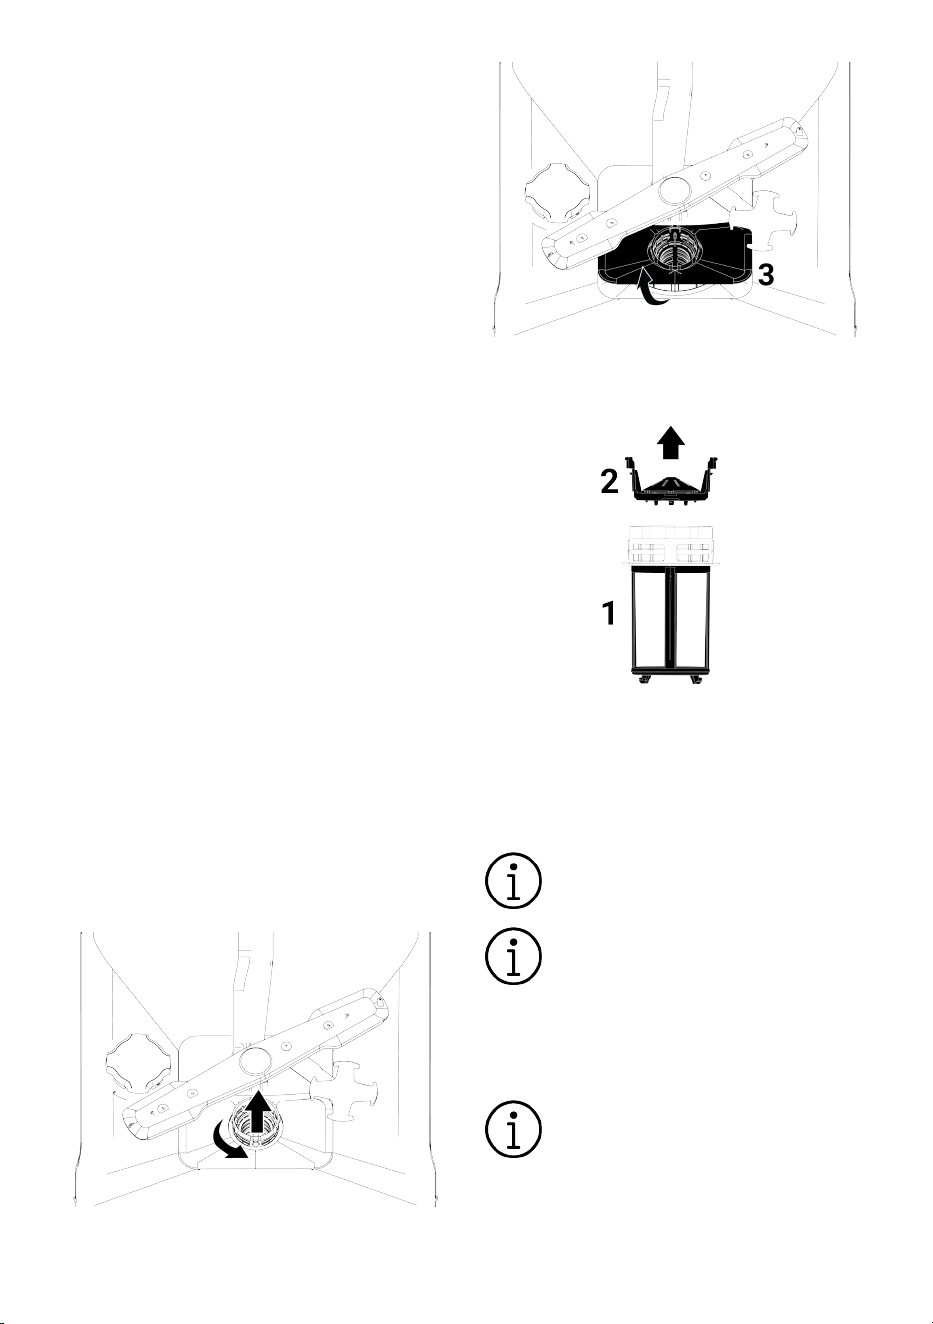
1. Remove the micro filter and coarse fil-
ter group by turning it counterclock-
wise and pulling it out.
2. Pull the metal/plastic filter (3) out of its
place.
3. Press the two tabs on the coarse filter
inwards to separate the coarse filter
from the assembly.
4. Clean all three filters under the tap with
a brush.
5. Replace the metal/plastic filter.
6. Place the coarse filter into the micro fil-
ter. Make sure it is properly seated.
Turn clockwise until you hear a click.
The machine should not be used
without a filter.
Failure to install the filters correctly
will reduce washing effectiveness.
8.3 Micro Filter Cleaning Mechan-
ism
(depends on model)
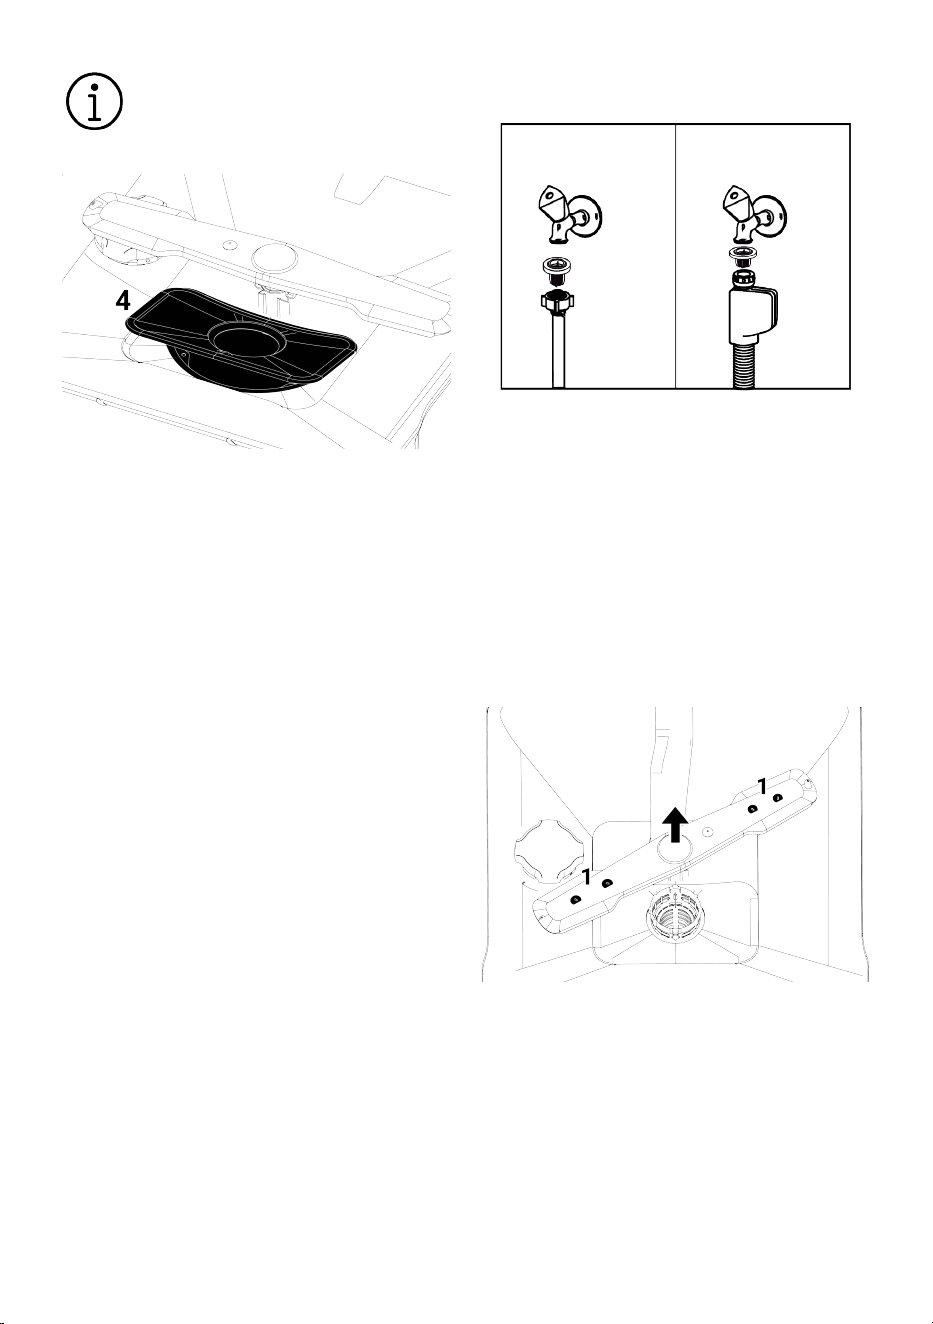
Filter cleanliness is increased by
80% with the micro filter cleaning
system available on your machine.
EN / 38
If your machine has auto filter
cleaning feature do not remove the
micro filter cleaning mechanism (4)
for cleaning.
8.4 Cleaning the hose filter
The filter on the water inlet hose prevents
dirt (sand, clay, rust, etc.) that may come
from the city network or your water system
from damaging the machine. Check the fil-
ter and hose from time to time and clean
them if necessary.
1. Turn off the tap and remove the hose.
2. After removing the filter from the hose,
clean it under the tap.
3. Place the cleaned filter back into its
place inside the hose.
4. Attach the hose to the faucet.
(Depends on model)
8.5 Cleaning the propellers
Clean the impellers at least once a week to
ensure efficient operation of the machine.
Lower propeller
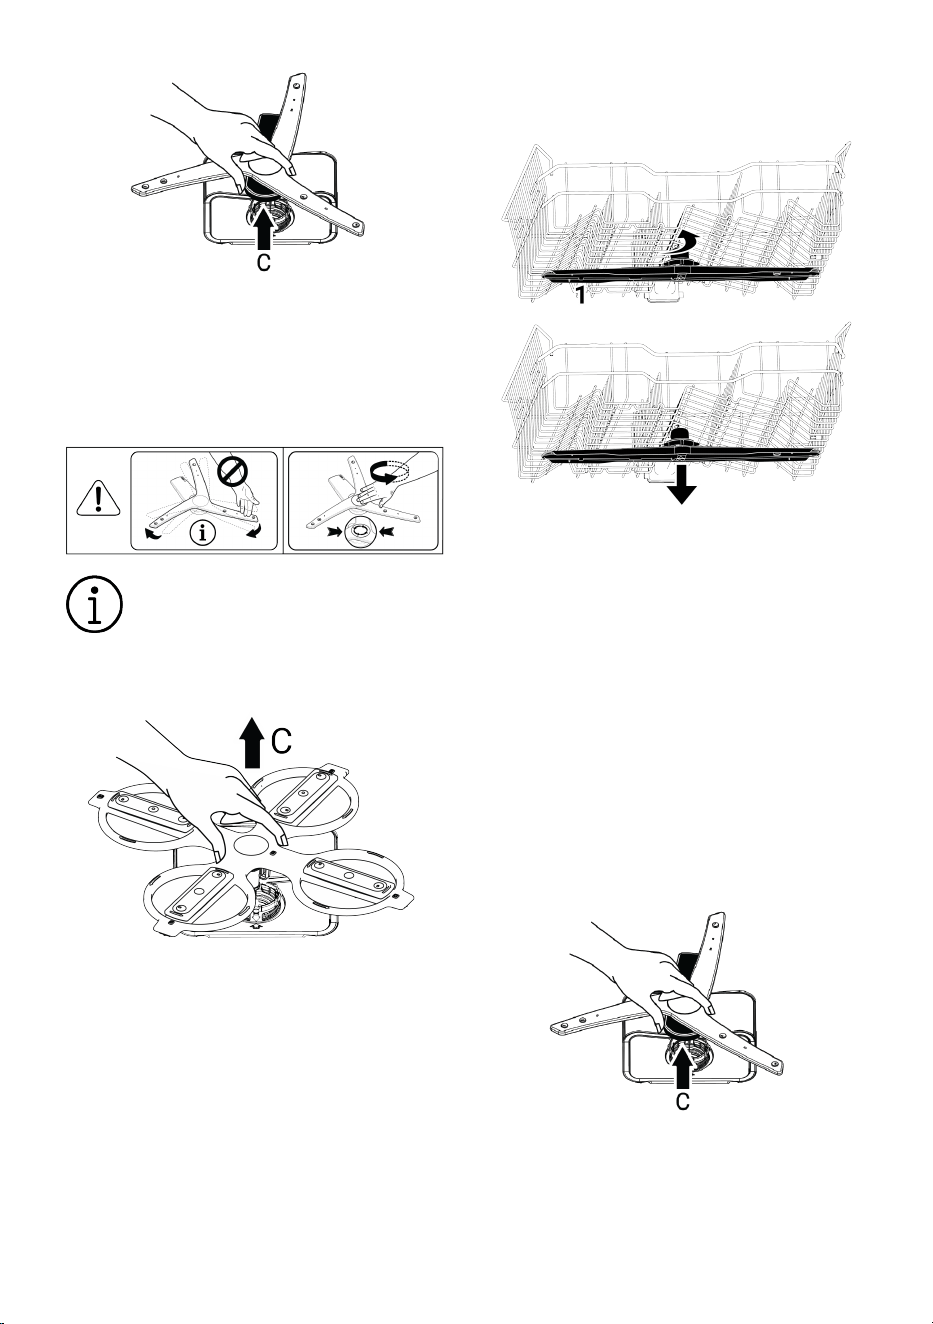
Check if the lower impeller (1) holes are
clogged. If there is a blockage, remove the
impeller and clean it. You can remove the
lower impeller by pulling it upwards (De-
pends on model)
Check if the holes of the impeller assembly
are clogged. If there is a blockage, remove
the impeller assembly and clean it. (De-
pends on model)
EN / 39
To remove and clean the lower propeller
group, hold it with one hand from the points
(C) shown in the figure and pull it upwards.
After cleaning, reattach the propeller group
by following the same steps in reverse. (De-
pends on model)
Do not attempt to turn the propeller
by holding the ends. Trying to turn it
by the ends may cause the gear
system inside the propeller to
break.
To remove and clean the lower propeller
group, hold it with one hand from the points
(C) shown in the figure and pull it upwards.
After cleaning, reattach the propeller group
by following the same steps in reverse. (De-
pends on model)
Upper propeller
Check if the upper impeller (1) holes are
clogged. If there is a blockage, remove the
impeller and clean it. You can remove the
upper impeller by turning its nut to the left.
When reattaching the upper propeller, be
sure to tighten the nut fully.
8.6 Cleaning the Propellers
Clean the impellers at least once a week to
ensure efficient operation of the machine.
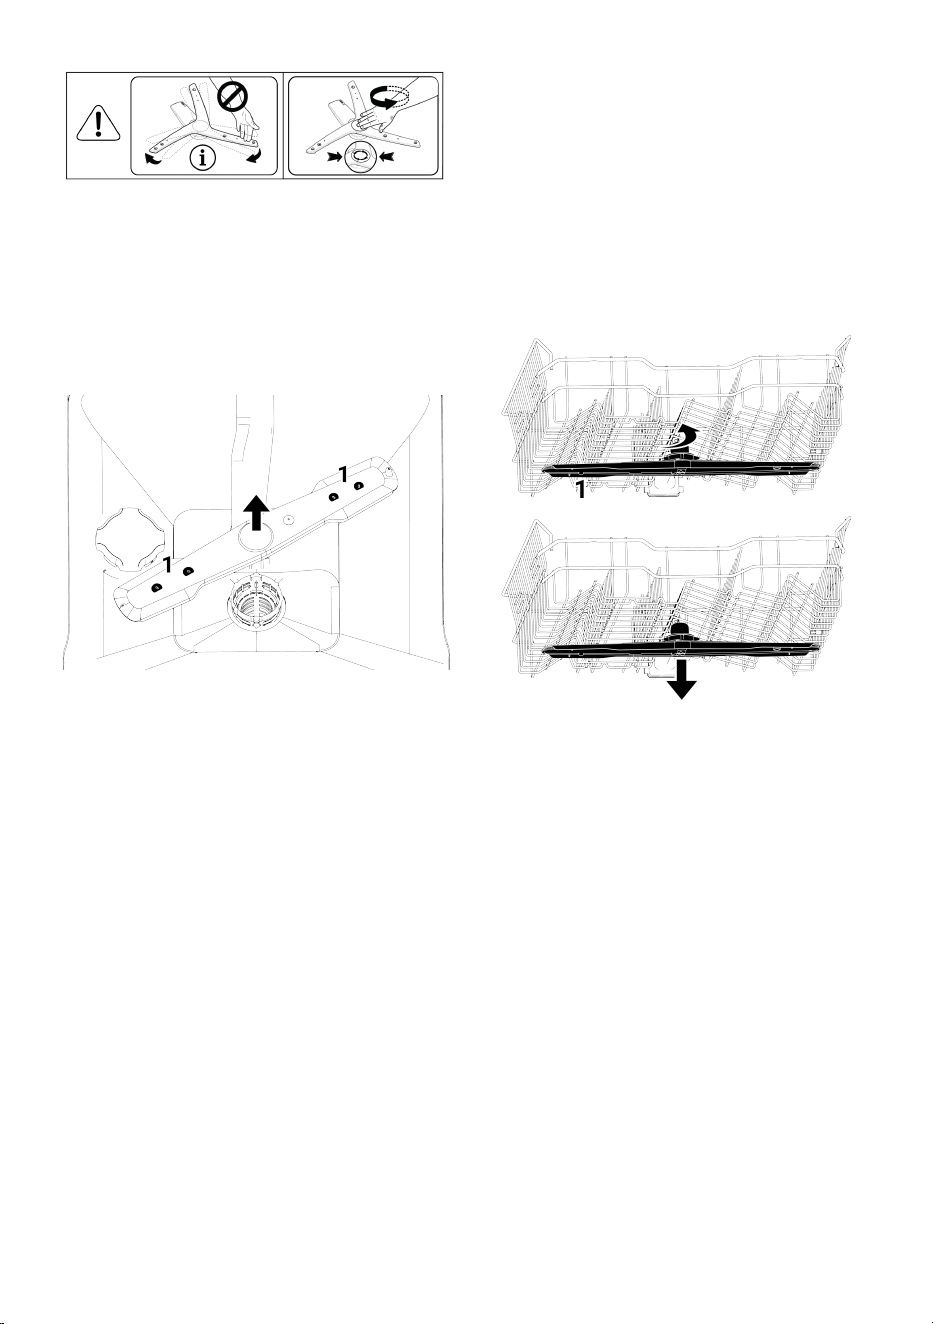
Lower Propeller
Washes the dishes in the lower basket.
Check if the lower impeller holes are
clogged. If there is a clog, remove the im-
peller and clean it. To remove and clean the
lower impeller group together, hold it with
one hand from the point (C) shown in the
figure and pull it upwards. After cleaning,
replace the impeller group by applying the
same procedures in reverse.
Do not attempt to turn the propeller by
holding the ends. Trying to turn it by the
ends may cause the gear system inside the
propeller to break.
EN / 40
Lower Propeller
Washes the dishes in the lower basket.
Check if the lower impeller holes are
clogged. If there is a blockage, remove the
impeller and clean it. To clean the lower im-
peller group, pull it up and remove it. After
cleaning, replace the impeller group by ap-
plying the same steps in reverse.
Upper propeller
Washes the dishes in the upper basket.
Check if the upper impeller holes are
clogged. If there is a blockage, remove the
impeller and clean it. You can remove the
nut on the upper impeller by turning it to the
left.
When reattaching the upper impeller, turn
the nut to the right. Make sure to tighten it
completely
EN / 41
9 Troubleshooting
9.1 Error Codes, Causes, and Solutions
Error Code Reason Solution
E01 Warning
P1 Blinks
The power LED blinks.
Water ingress into the chassis error
1- The error detection algorithm is ac-
tivated.
2- The program ends.
If you keep seeing the mistake,
1-Turn off the electricity.
2. Close the valve.
3. Contact an authorized service cen-
ter.
E02 Warning
P2 Blinks
The water cut-off icon lights up.
The washing machine LED lights up.
Water outage error Check the network.
The filter is clogged.
1-Disconnect the power supply.
2. Disconnect the water supply.
3. Remove the water inlet hose.
4. Check and clean the filter.
5. Connect the water supply.
6. Connect the electricity.
Other
If the error persists,
1- Turn off your machine.
2. Contact an authorized service cen-
ter.
E06 Warning
P2 blinks
P6 blinks
The temperature sensor inside the
machine is faulty.
If you keep seeing this error and your
washing performance has decreased,
1- Turn off your machine.
2. Contact an authorized service cen-
ter.
E07 Warning
F2 blinks
F1 and F2 blink
The water meter is faulty.
1- The error detection algorithm is ac-
tivated.
2- The program ends.
If you keep seeing the mistake,
1-Turn off the electricity.
2. Close the valve.
3. Contact an authorized service cen-
ter.
Error codes may vary depending on
the model.
9.2 Troubleshooting
The machine is not working.
• The power plug may not be plugged in.
>>> Check if the power plug is plugged in.
• The fuse may have blown. >>> Check the
fuses in your house.
• There might not be any water. >>> Make
sure the water inlet tap is open.
• The machine door may be open. >>>
Make sure you close the machine door.
• The "On/Off button" may not have been
pressed. >>> Make sure you have turned
on the machine by pressing the "On/Off
button".

EN / 42
The dishes are not being washed prop-
erly.
• The dishes are placed haphazardly. >>>
Place the dishes as directed in the in-
struction manual.
• The wrong program has been selected.
>>> Please choose a program that
washes at a higher temperature and for a
longer duration.
• The dishes are very dirty >>> Remove
coarse dirt from your dishes with a nap-
kin before placing them in the dish-
washer.
• The propellers are jammed. >>> Before
starting the program, manually rotate
both the upper and lower propellers to
ensure they rotate freely.
• The propeller vents are clogged. >>> The
bottom or top propeller vents may be
clogged with food debris such as lemon
seeds. Clean the propellers at regular in-
tervals as shown in the “Cleaning and
Maintenance” section.
• The filters are clogged. >>> Check if the
filter system is clean. Clean the filter sys-
tem at regular intervals as shown in the
“Cleaning and maintenance” section.
• The filters are not installed correctly. >>>
Check the filter system and make sure
they are installed correctly.
• The baskets are overloaded. >>> Do not
overload the baskets beyond their capa-
city.
• The detergent has been stored under un-
suitable conditions. >>> If you are using
powder detergent, do not store the deter-
gent package in damp places. If possible,
store it in a container with a lid. We re-
commend using tablet detergent for ease
of storage.
• Not enough detergent has been added.
>>> If you are using powder detergent,
add the appropriate amount according to
the level of soiling of your dishes and the
program instructions. We recommend us-
ing tablet detergent for best results.
• Rinse aid is insufficient. >>> Check the
rinse aid low warning indicator and add
rinse aid if necessary. If there is enough
rinse aid in the machine, increase the
rinse aid setting.
• The detergent compartment lid is not
closed. >>> After filling with detergent, be
sure to close the detergent compartment
lid.
The dishes are not being dried.
• The dishes are placed haphazardly. >>>
Place your dishes so that water does not
accumulate inside them during washing.
• Rinse aid is insufficient. >>> Check the
rinse aid low warning indicator and add
rinse aid if necessary. If there is enough
rinse aid in the machine, increase the
rinse aid setting.
• The machine was emptied immediately
after the wash cycle was finished. >>> Do
not empty your machine immediately
after the wash cycle is complete. Allow
the steam to escape by opening the door
slightly, and empty the machine when the
dishes have cooled down to a touchable
level. Begin emptying from the bottom
basket. This prevents any water remain-
ing on items in the upper basket from
dripping onto items in the lower basket.
• The wrong program has been selected.
>>> Short-duration programs have low
rinsing temperatures, resulting in poor
drying performance. For better drying
performance, choose longer programs.
• Tablet detergent has been used, but the
tablet button has not been pressed >>> If
your machine has a "tablet detergent"
function when using multi-purpose deter-
gent, activate it.
• The surface quality of the kitchenware is
poor. >>> Kitchenware with damaged sur-
faces cannot provide the expected wash-
ing performance and is not hygienically
safe to use. Furthermore, water is diffi-
cult to drain from damaged surfaces.
Washing such kitchenware in a dish-
washer is not recommended.

EN / 43
• It's natural to experience drying problems
with Teflon cookware. This is related to
the nature of Teflon. Because Teflon and
water have different surface tensions,
water droplets remain on the Teflon sur-
face like beads.
Tea, coffee, or lipstick stains remain on
the dishes.
• The wrong program has been selected.
>>> Please choose a program that
washes at a higher temperature and for a
longer duration.
• The surface quality of the kitchenware is
deteriorated. >>> Tea, coffee stains, and
other painted stains have seeped into the
damaged surfaces, making them unsuit-
able for dishwasher use. Expected wash-
ing performance cannot be achieved with
kitchenware of damaged surfaces, and
their use is not hygienic. Washing such
kitchenware in a dishwasher is not re-
commended.
• The detergent has been stored under un-
suitable conditions. >>> If you are using
powder detergent, do not store the deter-
gent package in damp places. If possible,
store it in a container with a lid. We re-
commend using tablet detergent for ease
of storage.
Dishes are left with limescale stains,
and glassware takes on a cloudy ap-
pearance.
• Rinse aid is insufficient. >>> Check the
rinse aid low warning indicator and add
rinse aid if necessary. If there is enough
rinse aid in the machine, increase the
rinse aid setting.
• The water hardness setting is too low or
the salt level is insufficient. >>> Check
the water hardness setting by accurately
measuring the hardness of the tap water.
• There is a salt leak. >>> When filling with
salt, be careful not to spill it around the
filling opening. After filling with salt,
make sure the salt reservoir lid is closed.
Run the pre-wash program to clean any
spilled salt from inside the machine.
Check the lid again at the end of the pro-
gram, as any salt particles remaining un-
der the lid will dissolve during the pre-
wash step and may therefore loosen.
There's a strange smell inside the ma-
chine.
• A new washing machine has its own
characteristic smell. This smell will dis-
appear after a few washes.
• The filters are clogged. >>> Check if the
filter system is clean. Clean the filter sys-
tem at regular intervals as shown in the
“Cleaning and maintenance” section.
• The rinse aid dispenser contains chemic-
als that can cause odors. >>> Do not use
chemicals such as vinegar, hand washing
detergent, or descaler.
• Dirty dishes have been left in the dish-
washer for 2-3 days. >>> If you are not
going to start the machine immediately
after putting the dishes in, remove the
dirt from the dishes and run the deter-
gent-free pre-wash program every two
days. In such cases, do not close the ma-
chine door completely to prevent odor
formation inside the machine. You can
also use odor removers and machine
cleaners available on the market.
Rust stains, discoloration, and surface
deterioration on dishes.
• There is a salt leak. >>> Salt can cause
deterioration and rust on metal surfaces.
When filling with salt, be careful not to
spill it around the filling opening. After
filling with salt, make sure the salt reser-
voir lid is closed. Clean any spilled salt
from inside the machine by running the
pre-wash program. Check the lid again at
the end of the program, as any salt
particles remaining under the lid will dis-
solve during the pre-wash step and may
therefore loosen.
• Salty food residue has remained on the
dishes for a long time. >>> If cutlery con-
taminated with such food is to be left in
the dishwasher, it should be pre-washed
to remove the dirt from the surface, or
the dishes should be washed immedi-
ately.

EN / 44
• The electrical installation does not have a
grounding line. >>> Check if your ma-
chine is connected to a proper ground
line. Otherwise, static electricity gener-
ated inside the machine will cause arcs
and pitting on the surface of metal ob-
jects, removing the protective layer and
causing discoloration.
• Strong cleaning agents such as bleach
have been used. >>> The protective layer
on metal surfaces is damaged when it
comes into contact with cleaners like
bleach and loses its effectiveness over
time. Do not wash your dishes with
bleach.
• Metal utensils, especially knives, have
been used for purposes other than their
intended use. >>> Using knives for pur-
poses such as opening cans damages
the protective coating on the tips. Do not
use metal kitchen utensils for purposes
other than their intended use.
• The cutlery is made of low-quality stain-
less steel. >>> Rusting is inevitable for
such items and they should not be
washed in dishwashers.
• Previously rusted kitchen utensils were
washed in the dishwasher. >>> During
washing, rust from a rusty item can mi-
grate to other stainless steel surfaces,
causing rust to form on those surfaces
as well. Such items should not be
washed in dishwashers.
There is detergent residue on the deter-
gent dispenser.
• The detergent was added a long time be-
fore the washing cycle began. >>> Make
sure to add the detergent just before
starting the wash.
• The detergent dispenser lid is prevented
from opening during washing. >>> Place
the dishes in a way that does not ob-
struct the opening of the detergent dis-
penser lid and the flow of water from the
impellers into the dispenser.
• The detergent has been stored under un-
suitable conditions. >>> If you are using
powder detergent, do not store the deter-
gent package in damp places. If possible,
store it in a container with a lid. We re-
commend using tablet detergent for ease
of storage.
• The propeller vents are clogged. >>> The
bottom or top propeller vents may be
clogged with food debris such as lemon
seeds. Clean the propellers at regular in-
tervals as shown in the “Cleaning and
Maintenance” section.
The patterns and decorations on the kit-
chenware are fading.
• Patterned glasses and porcelain with
overglaze patterns are not suitable for
washing in a dishwasher. Manufacturers
of glass and porcelain tableware do not
recommend washing these types of
cookware in a dishwasher.
The dishes are getting scratched.
• Kitchen utensils and accessories made
of or containing aluminum should not be
washed in a dishwasher.
• There is a salt leak. >>> When filling with
salt, be careful not to spill it around the
filling opening. Spilled salt can cause
scratches. After filling with salt, make
sure the salt reservoir lid is closed. Run
the pre-wash program to clean any
spilled salt from inside the machine.
Check the lid again at the end of the pro-
gram, as any salt particles remaining un-
der the lid will dissolve during the pre-
wash step and may therefore loosen.
• The water hardness setting is too low or
the salt level is insufficient. >>> Check
the water hardness setting by accurately
measuring the hardness of the tap water.
• Improper placement of dishes. >>> When
placing glasses and other glass kitchen-
ware in the baskets, rest them against
the edge, shelves, or glass support wire
of the basket, not on other dishes. During
washing, the impact of water causing
two glasses or other dishes to bump into
each other can cause scratches/break-
age on the surfaces.

EN / 45
• The glass cups are left with a hazy, milk-
stain-like mark that doesn't come off
when wiped by hand. When held up to the
light, a bluish/rainbow-colored appear-
ance emerges.
• Too much rinse aid has been used. >>>
Lower the rinse aid setting. Be sure to
clean up any rinse aid that spills when re-
filling.
• Corrosion has occurred on the glass due
to soft water. >>> Check the water hard-
ness setting by accurately measuring the
hardness of your tap water. If your tap
water is soft (<5 dH), do not use salt. Use
washing programs that wash at higher
temperatures (such as 60-65 degrees).
You can also use commercially available
glass-protecting detergents.
Foam is forming in the machine.
• The dishes were hand-washed with dish
soap before being placed in the dish-
washer, and then put in the machine
without rinsing. >>> Hand-washing dish
soaps do not have foam control. There is
no need to hand-wash the dishes with de-
tergent before putting them in the dish-
washer. Simply rinse off any coarse dirt
from the surface of the dishes with water
or scrape it off with a paper towel or fork.
• Rinse aid was spilled inside the machine
while refilling. >>> Be careful not to spill
rinse aid inside the machine while re-
filling. Clean up any spilled rinse aid with
a paper towel or napkin.
• The rinse aid compartment lid was left
open. >>> Make sure to close the rinse
aid compartment lid after filling it with
rinse aid.
• The detergent may have expired or may
not have been stored under appropriate
conditions. >>> Check the information on
the detergent packaging.
Foam is leaking out of the dishwasher.
• The machine may not be level, or the feet
may not be properly adjusted. >>> Ensure
the machine is level.
• It might be due to the detergent you're us-
ing. >>>Change the detergent.
Kitchen utensils are breaking.
• The dishes are placed haphazardly. >>>
Place the dishes as directed in the in-
struction manual.
• The baskets are overloaded. >>> Do not
overload the baskets beyond their capa-
city.
• Water remains in the dishwasher after
the program finishes.
• The filters are clogged. >>> Check if the
filter system is clean. Clean the filter sys-
tem at regular intervals as shown in the
“Cleaning and maintenance” section.
• The drain hose is clogged/blocked. >>>
Check the drain hose. If necessary, re-
move it, clear the blockage, and reinstall
it as directed in the installation instruc-
tions.
10 DISCLAIMER / WARNING
Some (simple) failures can be adequately
handled by the end-user without any safety
issue or unsafe use arising, provided that
they are carried out within the limits and in
accordance with the following instructions
(see the “Self-Repair” section).
Therefore, unless otherwise authorized in
the “Self-Repair” section below, repairs
shall be addressed to registered profes-
sional repairers in order to avoid safety is-
sues. A registered professional repairer is a
professional repairer that has been granted
access to the instructions and spare parts
list of this product by the manufacturer ac-
cording to the methods described in legis-
lative acts pursuant to Directive 2009/125/
EC.
However, only the service agent (i.e. au-
thorized professional repairers) that you
can reach through the phone number given
in the user manual/warranty card or
through your authorized dealer may
provide service under the guarantee terms.
Therefore, please be advised that repairs

EN / 46
by professional repairers (who are not au-
thorized by Blomberg ) shall void the guar-
antee.
Self-Repair
Self-repair can be done by the end-user
with regard to the following spare parts:
Gaskets, filters, door hinge, baskets, pro-
pellers, plastic accessories etc. (an up-
dated list is also available in sup-
port.blombergappliances.com as of 1st of
March 2021).
Moreover, to ensure product safety and to
prevent risk of serious injury, the mentioned
self-repair shall be done following the in-
structions in the user manual for self-repair
or which are available in support.blomber-
gappliances.com For your safety, unplug
the product before attempting any self-re-
pair.
Repair and repair attempts by end-users for
parts not included in such list and/or not
following the instructions in the user manu-
als for self-repair or which are available in
support.blombergappliances.com , might
give raise to safety issues not attributable
to Blomberg , and will void the warranty of
the product.
Therefore, it is highly recommended that
end-users refrain from the attempt to carry
out repairs falling outside the mentioned
list of spare parts, contacting in such cases
authorized professional repairers or re-
gistered professional repairers. On the con-
trary, such attempts by end-users may
cause safety issues and damage the
product and subsequently cause fire, flood,
electrocution and serious personal injury to
occur.
By way of example, but not limited to, the
following repairs must be addressed to au-
thorized professional repairers or re-
gistered professional repairers: motor, cir-
culation pump, drain pump, heat pump,
heaters, piping, hoses, clamps, valve filters,
aqua stop, door, panel, electronic cards,
display cards, water level switch, flow
meter, thermostat, temperature sensors
etc.
The manufacturer/seller cannot be held li-
able in any case where end-users do not
comply with the above.
The spare part availability of the dish-
washer that you purchased is 10 years. Dur-
ing this period, original spare parts will be
available to operate the dishwasher prop-
erly.
11 Guarantee Details
Your new Blomberg product is guaran-
teed against faulty materials, defective
components or manufacturing defects.
The guarantee starts from the date of
original purchase of the product for a
period of three (3) years, unless Beko
plc (the “Manufacturer”) agrees to ex-
tend the guarantee for the product in
writing.
If you have any questions about the
guarantee on your product (including
how long it is valid), please contact your
retailer or our Call Centre on 0333 207
9870. This guarantee does not in any
way diminish or affect your statutory
rights in connection with the product.
This guarantee is in addition to your
statutory rights as a consumer. If you
have any questions about these rights,
please contact the retailer from which
you purchased the product. In certain
circumstances, it is possible that your
statutory rights may offer additional or
higher levels of protection than those
offered under the terms of this guaran-
tee.
What is covered by this guarantee?
•Repairs to the product required as a result
of faulty materials, defective components
or manufacturing defects.
•Functional replacement parts to repair a
product.
•The costs of a Blomberg Approved Engin-
eer to carry out the repair.

EN / 47
What is not covered?
•Transit and delivery damage
•Cabinet or appearance parts, including but
not limited to control knobs, flaps and
handles.
•Accessories and/or consumable items in-
cluding but not limited to ice trays,
scrapers, cutlery baskets, filters and light
bulbs.
•Repairs necessary as a direct or indirect
result of:
-Accidental damage, misuse or abuse of a
product.
-An attempted repair of a product by any-
one other than a Blomberg Approved Engin-
eer (the “Engineer”).
-Installation or use of a product where such
installation or use fails to meet the require-
ments contained in this guarantee or the
User Instructions Booklet.
•Repairs to a product operated at any time
on commercial or non-residential house-
hold premises (unless we have previously
agreed to the installation environment).
This guarantee is limited to the cost of re-
pairing the product. To the extent permitted
by law, Beko plc (the “Manufacturer”) does
not accept and will not be held liable for
any financial loss incurred in connection
with the failure of any product to operate in
accordance with the expected standards.
Such financial loss includes but is not lim-
ited to loss arising from:
•Time taken off work
•Damaged food, clothing or other items.
•Meals taken at restaurants or from
takeaways.
•General compensation for inconvenience.
Important Notes
•Your product is designed and built for do-
mestic household use only.
•The guarantee will automatically be void if
the product is installed or is used in com-
mercial or non-residential domestic house-
hold premises, unless we have previously
agreed to the installation environment.
•The product must be correctly installed,
located and operated in accordance with
the instructions contained in the User In-
structions Booklet provided with your
product.
•Professional installation by a qualified
Electrical Domestic Appliance Installer is
recommended for all Washing Machines,
Dishwashers and Electric Cookers (as in-
correct installation may result in you having
to pay for the cost of repairing the product).
•Gas Cookers must be professionally in-
stalled by a Gas Safe (or Gas Networks Ire-
land for Republic of Ireland) registered gas
installer.
•This guarantee is given in respect of
products purchased and used within the
United Kingdom and the Republic of Ire-
land.
•This guarantee is effective from the initial
date of purchase of a new product from an
authorised retailer and will be void if the
product is resold.
•This guarantee does not apply to graded
sales (where the product is purchased as a
“second”).
•Possession of a copy of these terms and
conditions does not necessarily mean that
a product has the benefit of this guarantee.
If you have any questions, please call our
Call Centre on the number set out above.
•The Manufacturer reserves the right to ter-
minate the guarantee if its staff or repres-
entatives are subjected to physical or
verbal abuse in the course of carrying out
their duties.
•Optional extras, where available (i.e. ex-
tendable feet) are supplied on a chargeable
basis only.
Does Blomberg offer replacements?
This is a repair-only guarantee. On occa-
sion the Manufacturer may at its sole dis-
cretion, replace your product with a new
product instead of carrying out a repair.
Where a replacement is offered, this would
normally be an identical model, but when
this is not possible, a model of similar spe-
cification will be provided. The Manufac-

EN / 48
turer will cover the costs and arrange for
the delivery of the new product and for the
return of the old product. Any costs related
to disconnecting the faulty product and in-
stalling the replacement product will not be
borne by the Manufacturer unless previ-
ously agreed to in writing. The original guar-
antee will continue to apply to the replace-
ment product; the new product will not
come with a new guarantee.
When will the repair take place?
Our engineers work Monday to Friday
9.00am to 5.00pm. Appointments outside
these hours may be possible at the sole
discretion of the Manufacturer but cannot
be guaranteed. Whilst our Engineers will en-
deavour to minimize inconvenience and to
meet requests for specific timed appoint-
ments, this cannot be guaranteed. The
Manufacturer will not be liable for delays or
if it is unable to carry out a repair because a
convenient appointment cannot be ar-
ranged.
Will there be any charge for the repairs?
It is your responsibility to provide evidence
to the Engineer that your product is covered
by this guarantee with a proof of purchase.
The Manufacturer reserves the right to
charge for the reasonable cost of any ser-
vice call if:
•You cannot provide evidence that your
product is covered by this guarantee.
•Where a service call has been made and
the engineer finds that there is no fault with
your product.
•That your product has not been installed or
operated in accordance with the User In-
structions Booklet.
•That the fault was caused by something
other than faulty materials, defective com-
ponents or manufacturing defects.
•For missed appointments.
Payment of these costs are due immedi-
ately upon the Engineer providing you with
an invoice. If you fail to pay the costs for
the service call in a timely manner, the
Manufacturer reserves the right to termin-
ate the guarantee. If you are a resident of
the United Kingdom, this guarantee will be
governed by English law and subject to the
English Courts, save where you live in an-
other part of the United Kingdom, in which
case the law and courts of that location will
apply. If you are resident in the Republic of
Ireland, this guarantee will be governed by
Irish law and the Irish courts will have juris-
diction.
How to obtain service
Please keep your purchase receipt or other
proof of purchase in a safe place; you will
need to have it should the product require
attention under guarantee. It will be useful
if you complete the details below, as it will
help us assist you when requesting service.
(The model number is printed on the In-
struction Booklet and the serial number is
printed on the Rating Label affixed to the
appliance). Recording of these details
alone will not count as proof of purchase. A
valid proof of purchase is required for un-
der guarantee service.
The area around the product must be easily
accessible to the Engineer without the need
for cabinets or furniture being removed. It
is your responsibility to ensure our Engin-
eers have a clean and safe environment to
carry out any repairs.
………...………………………………………………………………
……………………
Model No:
Serial No:
Retailer:
Date of purchase:
…………………………………………….……………………………
…………………..

EN / 49
For service under guarantee simply tele-
phone the appropriate number below
UK Mainland & Northern Ireland: 0333
207 9870.
Republic of Ireland: 01 691 0160
Register your appliance at www.blomber-
guk.com/register
Before requesting service please check the
troubleshooting guide in the Operating In-
structions as a charge may be levied where
no fault is found even though your product
may still be under guarantee.
Service once the manufacturers guaran-
tee has expired
If you have purchased an extended guaran-
tee please refer to the instructions con-
tained within the extended guarantee
agreement document, otherwise please call
the appropriate number above where ser-
vice can be obtained at a charge. Should
you experience any difficulty in obtaining
service contact the Blomberg Customer
Helpline on Tel: 0333 207 9870 or e-mail:
guk.com
………………………………………………...........................
......................................
This guarantee is provided by Beko plc.
Beko House, 1 Greenhill Crescent, Watford,
Herts, WD18 8QU. Beko plc is registered in
England and Wales with company registra-
tion number 02415578.