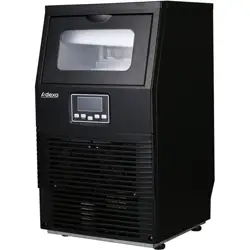
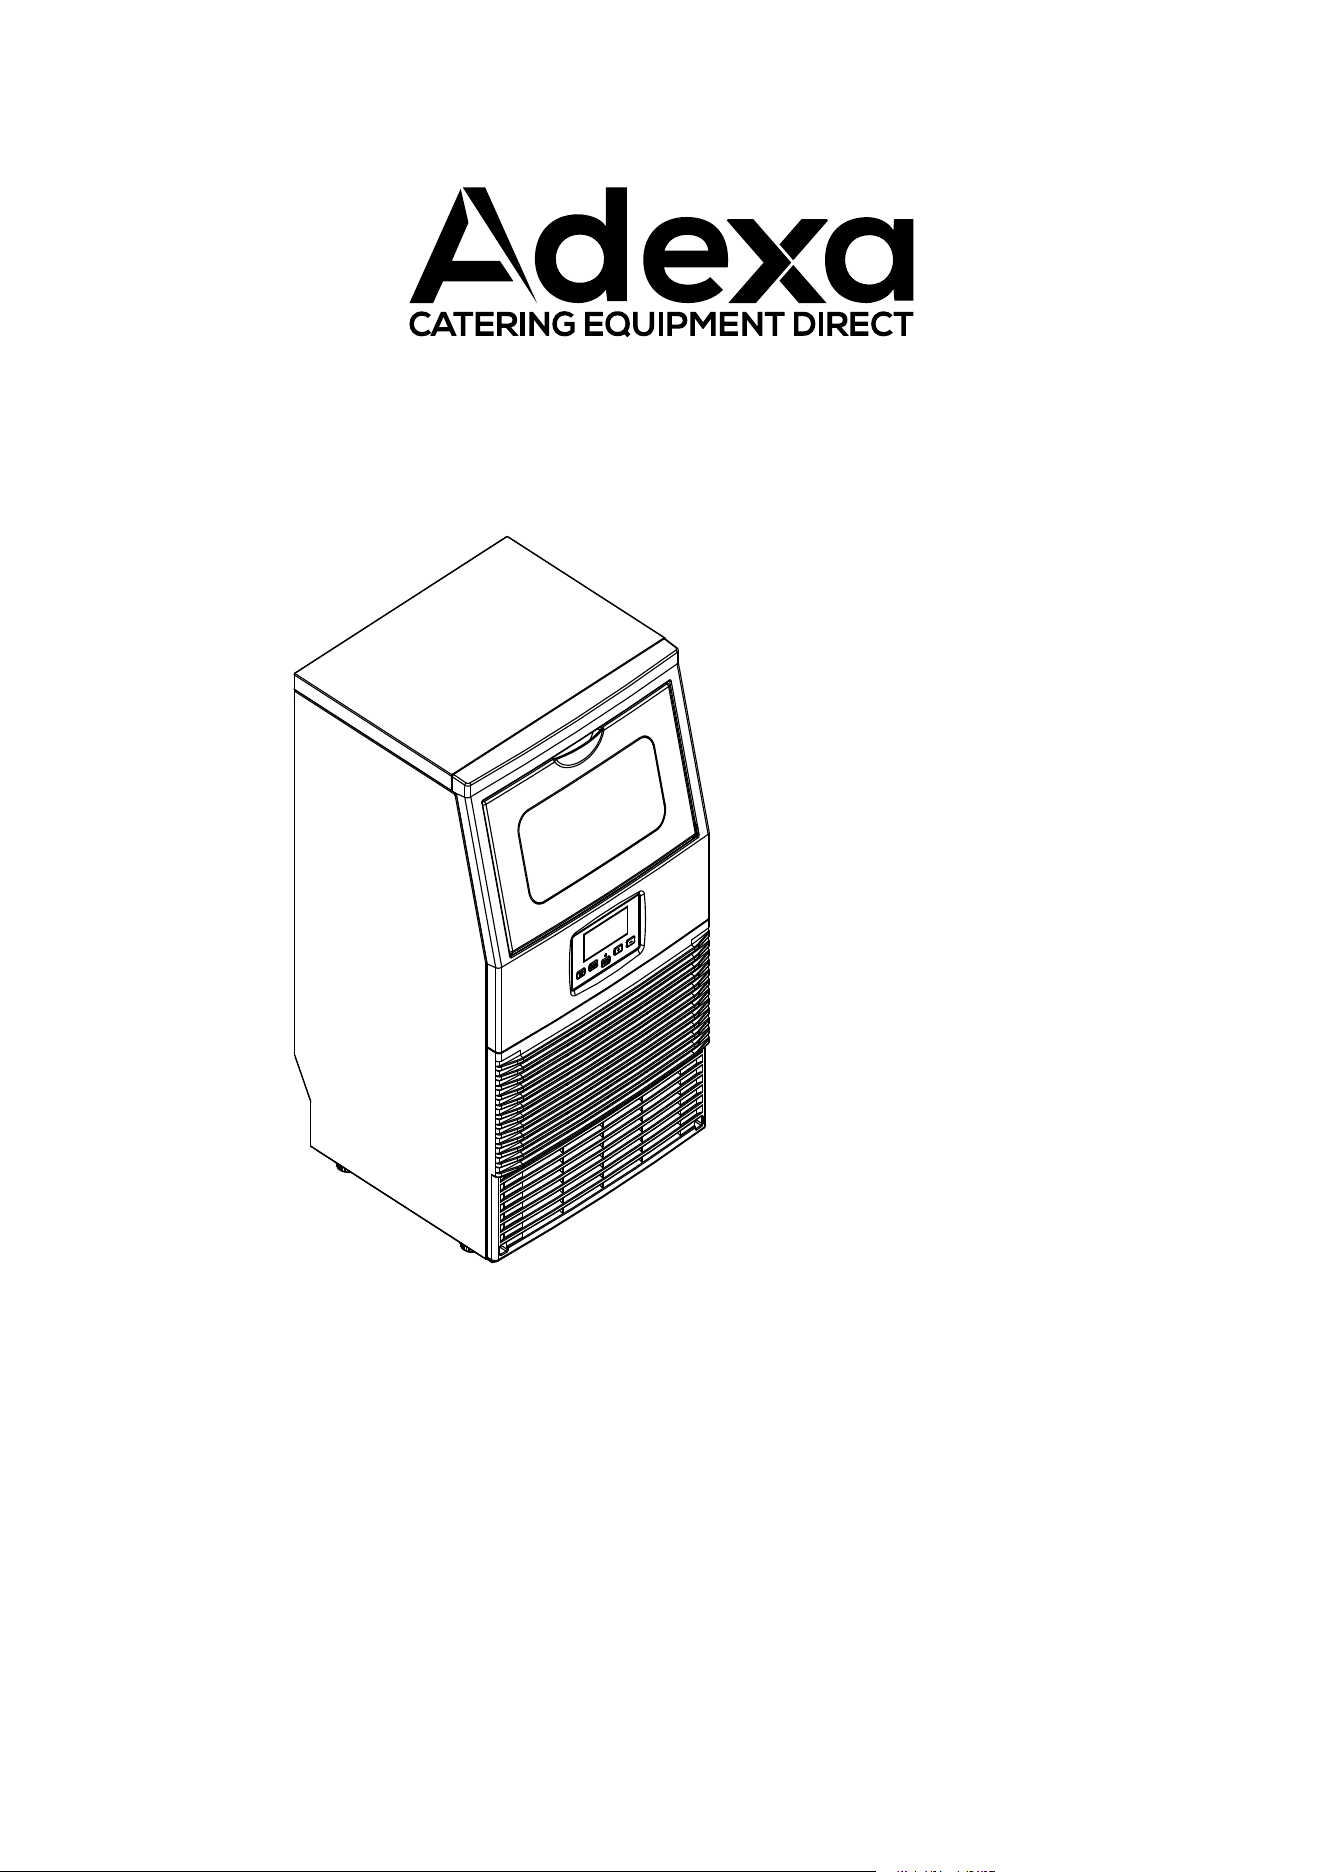
Automatic Ice Maker
--Automatic water supplying
Instruction Manua l
Model: HZB-30F
To ensure proper use of this a ppliance and your safety, please read the following
instructions carefully before operating this appliance.

2
CONTENTS
IMPORTANT SAFETY-------------------------------------------------------------------------------------3
SPECIFICATION--------------------------------------------------------------------------------------------5
DIMENSION/CONNECTION---------------------------------------------------------------------5
RATING------------------------------------------------------------------------------------------------5
GENERAL INFORMATION-------------------------------------------------------------------------------6
MAIN UNIT CONSTRUCTION--------------------------------------------------------------------6
ICE-MAKING AND ITS WATER TANK PARTS-----------------------------------------------6
OPERATION PANEL---------------------------------------------------------------------------------7
EXPLOSIVE DRAWING----------------------------------------------------------------------------8
OPERATING PROCEDURE AND MAINTENANCE------------------------------------------------11
UNPACKING YOUR ICE MAKER--------------------------------------------------------------------------11
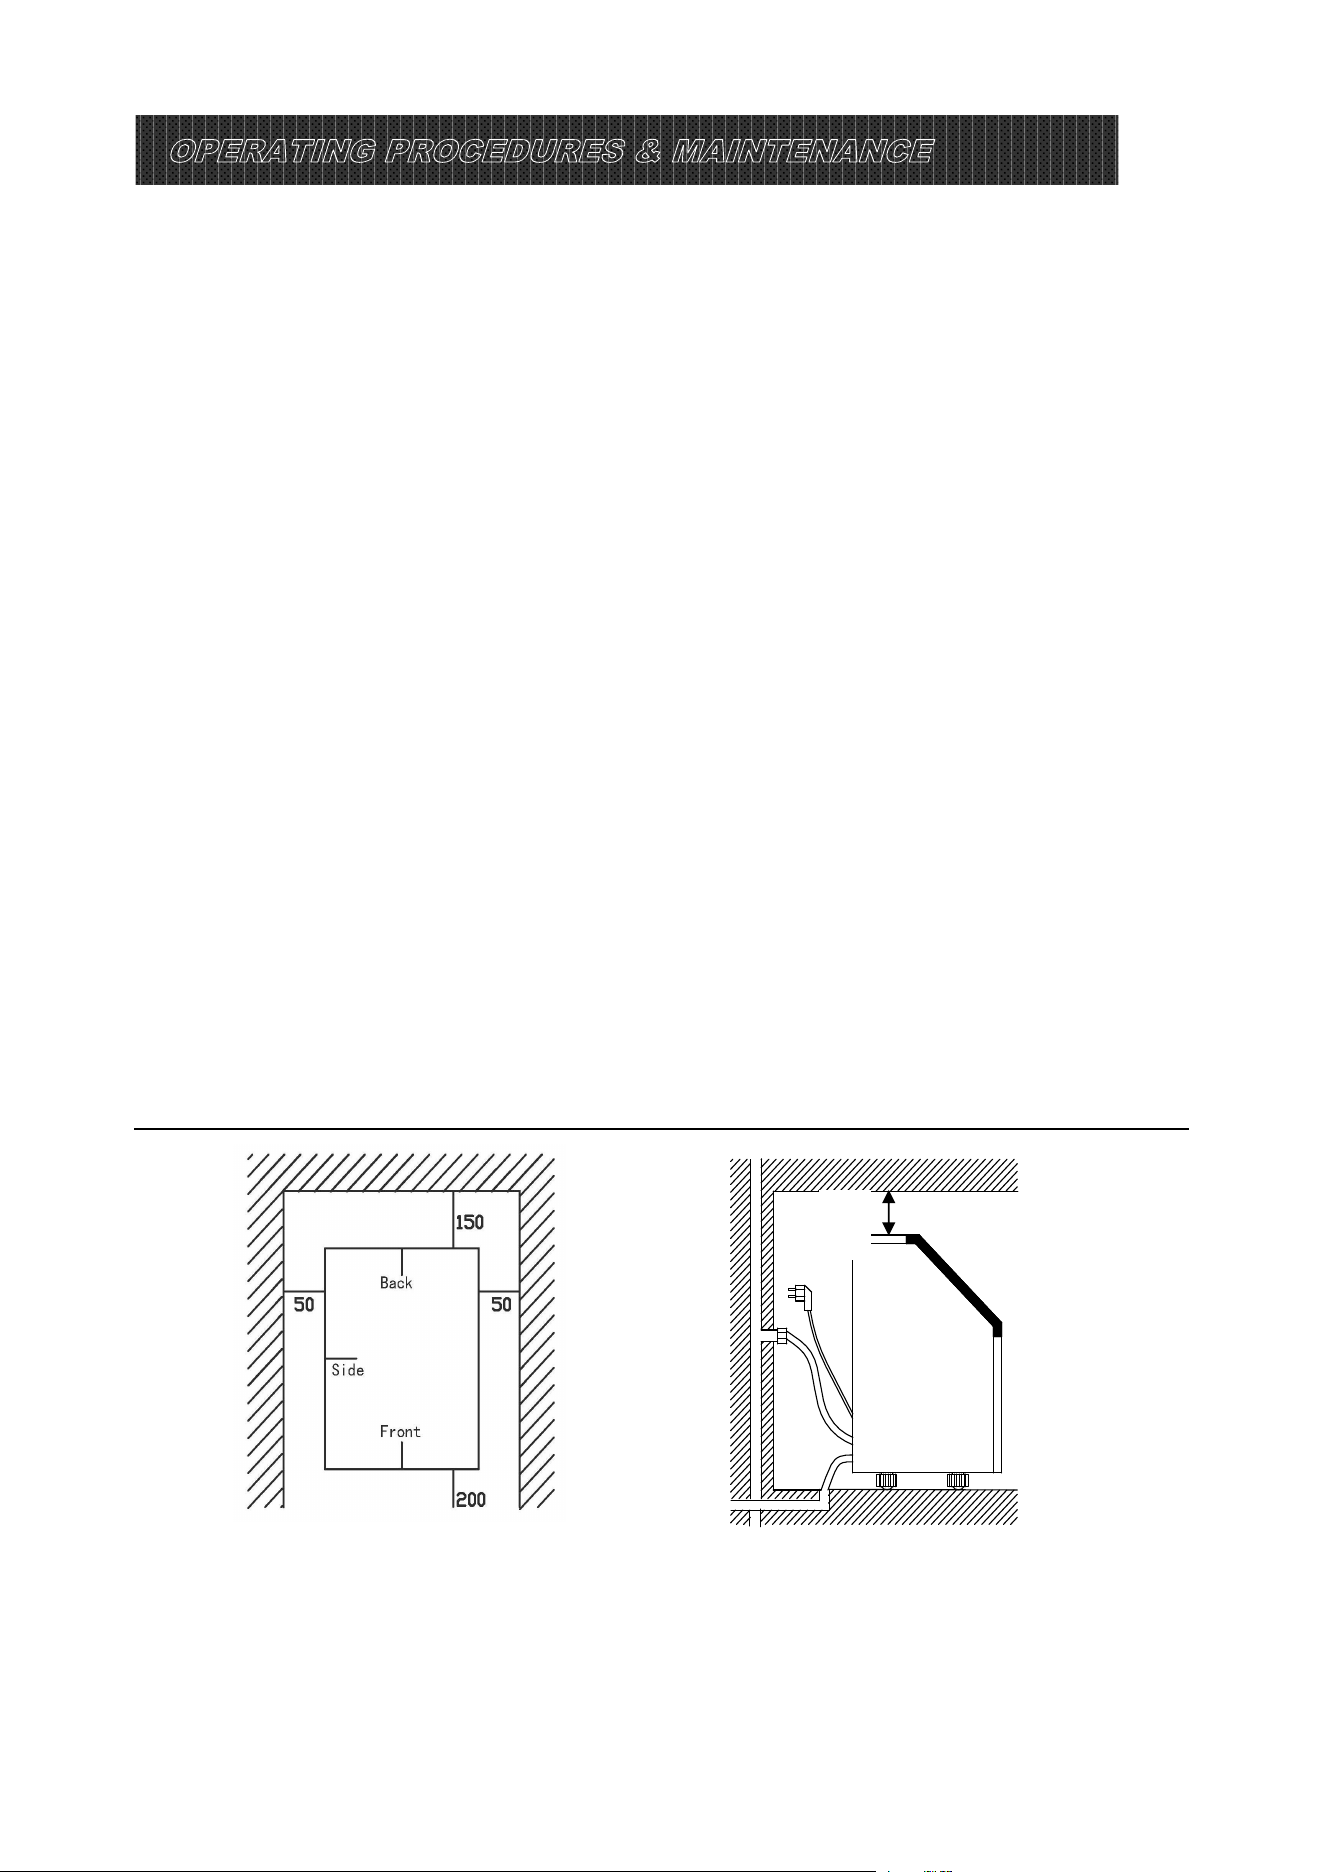
INSTALLATION LOCATION REQUIREMENT-------------------------------------------------11
ELECTRICAL REQUIREMENT & CONNECTIONS-----------------------------------------12
CLEANING YOUR ICE MAKER BEFROE FIRST USING---------------------------------12
OPERATION YOUR UNIT---------------------------------------------------------------------------------13
WATER CONNECTION FOR YOUR ICE MAKER--------------------------------------------13
OPERATION THE ICE MAKING PROCESS--------------------------------------------------14
AUTOMATIC SELF-CLEANING PROGRAM--------------------------------------------------16
TIMER SETTING OPERATION-------------------------------------------------------------------16
INTERNAL LED LIGHT OPERATION-----------------------------------------------------------17
ERROR CODE OF UNIT BREAKDOWN-------------------------------------------------------17
WATER DRAINAGE----------------------------------------------------------------------------------17
NORMAL SOUNDS----------------------------------------------------------------------------------17
PREPARING ICE MAKER FOR LONG STORAGE------------------------------------------18
CLEAND AND MAINENANCE ----------------------------------------------------------------------------18
EXTERIOR CLEANING------------------------------------------------------------------------------19
INTERIOR CLEANING-------------------------------------------------------------------------------19
ICE MAKING PARTS CLEANING-----------------------------------------------------------------------19
ICE MAKING ASSEMBLY SYSTEM CLEANING BY USING
NU-CALGON NICKLE SAFE ICE-MACHINE CLEANER -----------------------19
CLEANING SUGGESTION--------------------------------------------------------------------------------------22
WIRING DIAGRAM--------------------------------------------------------------- -----------------------------------23
NORMAL TROUBLE SHOOTING--------------------------------------------------------------------------------------24
PRODUCT WARRANTY--------------------------------------------------------------------------------------25
CORRECT DISPOSAL OF THIS PRODUCT------------------------------------------------------------25

3
IMPORTANT SAFETY
When using electrical appliances, basic safety precautions should be follow ed to
reduce the risk of fire, electric shock, and injury to persons or proper ty. Read all
instructions before using any appliance.
Use this appliance only for its intended purpose as described in this owner’s m anual.
This ice-maker m ust be properly installed in accordance with the installation instructio ns before it is
used.
This un it must be positioned so that the plug is accessible. Do not run
cord over carpeting or othe r heat
insulators. Do not cover the cord. Keep cord away from traffic areas, and do not submerge in water. No
other appliance should be plugged into the same outlet, and be sure that the plug is fully inserted into
the receptacle.
We do not recommend the use of extension cord as it may overheat and cause a risk of fire. If you must
use an extension cord, use 1.5mm
2
minimum size and rated no less than 16A/250V~ with a plug.
If the supply cord is damaged, it must
be replaced by the manufacturer or its service agent or a
similarly qualified person in order to avoid a hazard.
Disconnect the mains plug from the supply socket when not in use for a long term, where supply
connection is via mains plug.
Remove power plug or disconnect from the mains before cleaning or servicing the appl iance. NOTE: If
for any reason thi s produ ct requires service, we strongly recommend that a certified technician perform
the service.
Never unplug you unit by p
ulling on the power cord. Always grasp the plug firmly and pull straight out
from the outlet.
Do no t use your unit outdoors. Keep the unit away from direct sunlight and make sure that there is at
least 15 cm of space between the back of your unit and wall and keep the front free. Keep venti lation
opening in the appliance enclosure or in the built-in structure, clear of obstruction.
Do not tip over the unit which will cause abnormal noisy and make the ice-cube size abno rmal. And
serio
usly, it may cause water leakage from the unit.
If the unit is brought in from outside in the winter season, give it a few hours to warm up to room
temperature before plugging it in.
Do not use other liquid to make the ice-cube other than water.
Do not clean your ice maker with flammable fluids. The fumes can create a fire hazard or explosion.
4
-- WARNING: This appliance must be earthed. Use the proper power source according to the
nameplate.
– WARNING: Keep ventilation openings, in the appliance enclosure or in the built-in structure, clear
of obstruction.
– WARNING: Do not damage the refrigerant circuit.
– WARNING: This appliance is not intended for use by persons (including children) with reduced
physical, sensory or mental capabilities, or lack of experience and knowledge, unless they have
been given supervision or instruction concerning use of the appliance by a person responsible for
their safety.
– WARNING: Children should be supervised to ensure that they do not play with the appliance.
– WARNING: This appliance must be earthed. And use the 220-240V/50Hz earthed power supply.
– WARNING: Do not store explosive substances such as aerosol cans with a flammable propellant in
this appliance.
– WARNING: This appliance is intended to be used in household and similar applications such as
– staff kitchen areas in shops, offices and other working environments;
– farm houses and by clients in hotels, motels and other residential type environments;
– bed and breakfast type environments;
– catering and similar non-retail applications.
Warning: Risk of fire/flammable materials used. Please according to local
regulations regarding disposal of the appliance for its flammable blowing gas.
Warning: Risk of fire / flammable materials, taking care to avoid causing a fire by igniting flammable
material.
WARNING: Keep ventilation openings, in the appliance enclosure or in the built-in structure, clear
of obstruction.
WARNING: Do not use mechanical devices or other means to accelerate the defrosting process or
ice harvesting process, other than those recommended by the manufacturer.
WARNING: Do not use other type of electrical appliances inside the ice-maker.
WARNING: Do not locate multiple portable socket-outlets or portable power supplies at the rear of
the appliance.
IMPORTANT:
The wires in this mains lead are colored in accordance with the following code:
Green and yellow: Earth
Blue: Neutral
Brown: Live
As the color of the wires in the mains lead of the appliance may not correspond with the colored
markings identifying the terminal in your plug, proceed as follows:
The wire which is colored green-and-yellow must be connected to the terminal in the plug which is
marked with the letter E, G or by symbol or colored green or green-and-yellow.
The wire which is colored blue must be connected to the terminal which is marked with the letter N.
The wire which is colored brown must be connected to the terminal which is marked with letter L.
5
SPECIFICATIONS
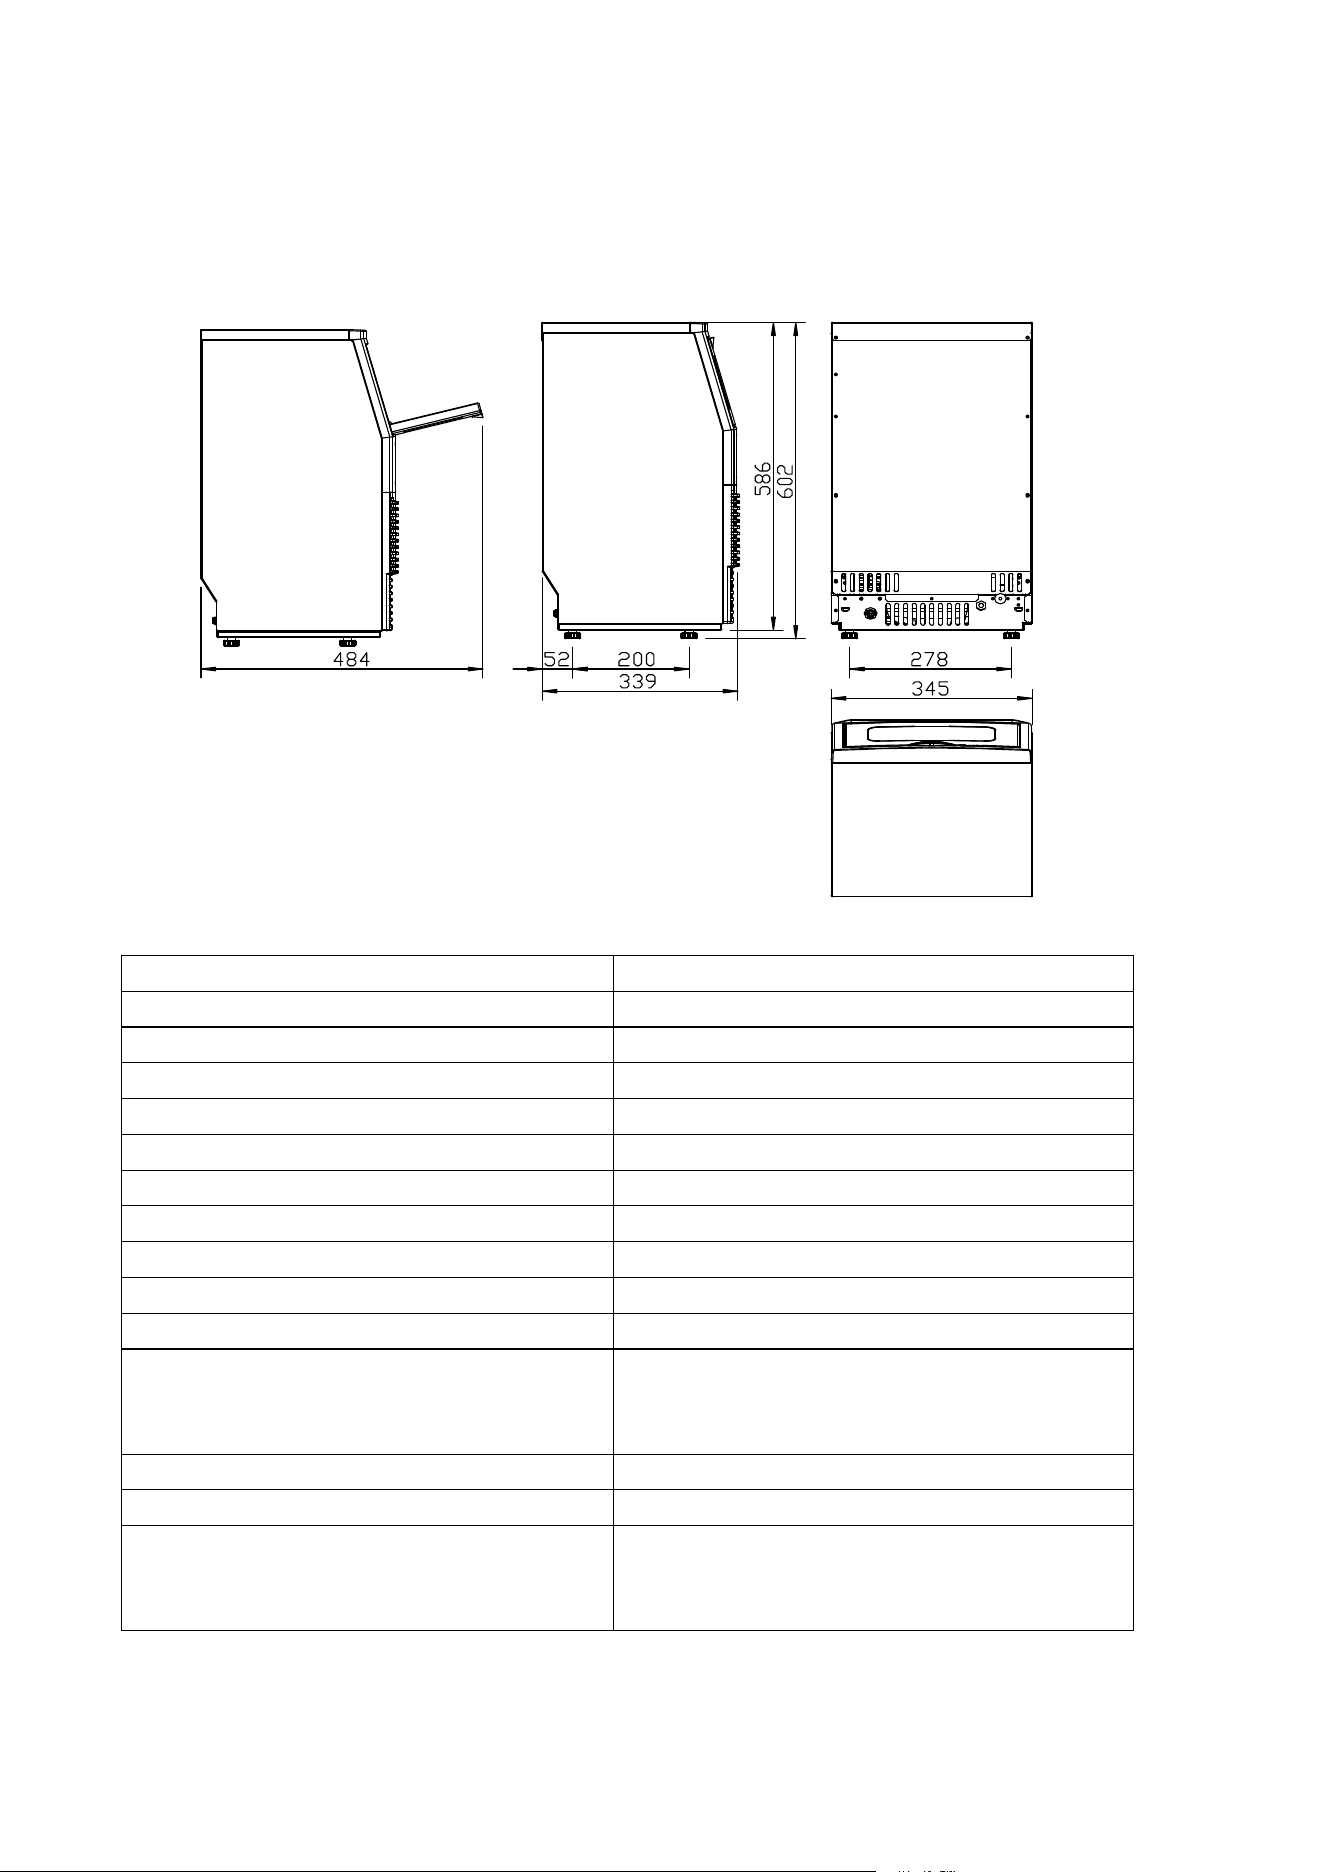
1) DIMENSIONS/CONNECTIONS
2) Rating
MODEL HZB-30F
POWER SUPPLY VOLTAGE 1Phase, 220-240/50Hz
CLAIMATE CLASS SN/N/ST/T
ELECTRICAL PROTECTIO N CLASS I
ICE MAKING RATING (Amps) 1.3Amp
ICE HARVEST RATING (Amps) 1.8 Amp
ICE MAKING CAPACITY (KG/24H) 30 kg/24Hour
*
REFRIGERANT CHARGE R290, 52g
VESICANT
C
5
H
10
UNIT DIMENSIONS(W X D X H) (mm) 345x339x602
NET W EIGHT(KG ) 15.8Kg
CONNECTION POWER CORD---- 0.75 mm
2
WATER SUPP LY----6.35mm diameter
DRAIN PIPE---
-Φ16mm SYLPHON BELLOWSS
MAX ICE STORAGE CAPACITY(KG) 4 Kg
ACCESSORIES ICE SCOOP, INSTALLATION KITS
RUNNING CONDITION S
ROOM TEMP 10-43℃
WATER SUPPLY T EMP 5-35℃
WATER SUPPLY PRESSUR E 0.04-0.6 MPa
NOTE *: TESTED AT 21 ℃ ROOM TEMPERATURE AND 10℃ WATER TEMPERATURE.
6
GENERAL INFORMATION
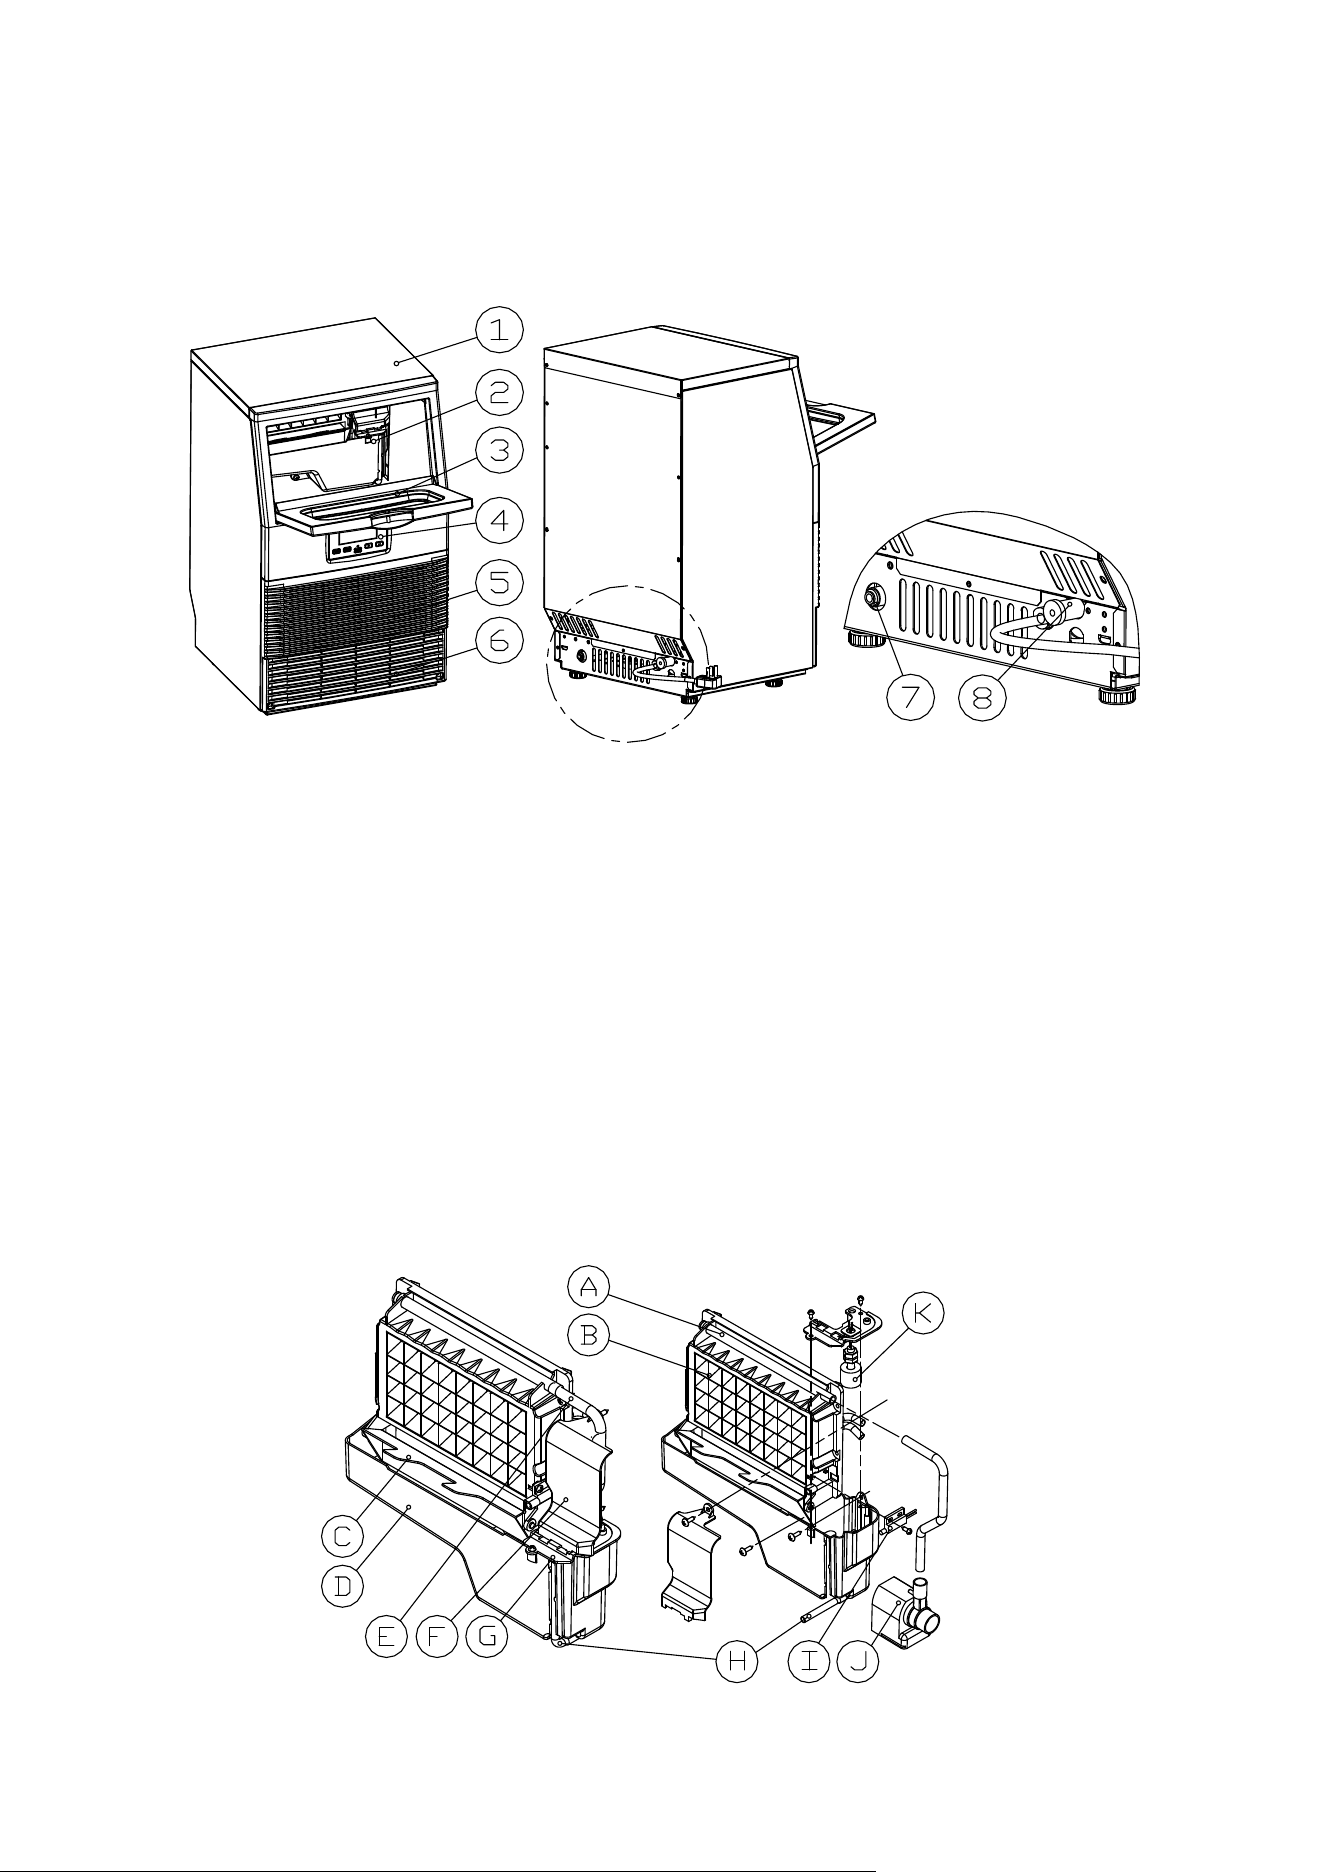
1) Main Unit Construction
1.Top cover
2. Ice-making & its water tank assembly: Including ice-making evaporator, water tank, water
charging tank, water pump an d some detecting parts
3. Doo r for ice takin g
4. O peration panel
5. Air outlet: Must keep the air circulate smoothly, hot air will blow out when unit running.
6.Air inlet
7.Main Water supplying inlet: For connecting the main water suppl ying pipe
8. Water draining port:Normal plugged with the ca
p. When need to drain the water, unplug the c ap.
And connect the whi te drain pipe.
Accessory: About 2 meters long and white color water drain pipe、
1/4 inches to 1/2 inches water quick connector of the water faucet, ice scoop
¢6.35mm diameter and white c olor water supplying hose
2) Ice-making and its water tank parts
7
1
2
3
4
5
67
8
9
LIGHT
TIMER
CLEAN
ON/OFF
A. Water dividing pipe:With eight little holes, water will flow out from these little holes. And if no
water flows out, can be disassembled and cleaned.
B. Evaporator (ice-making module)
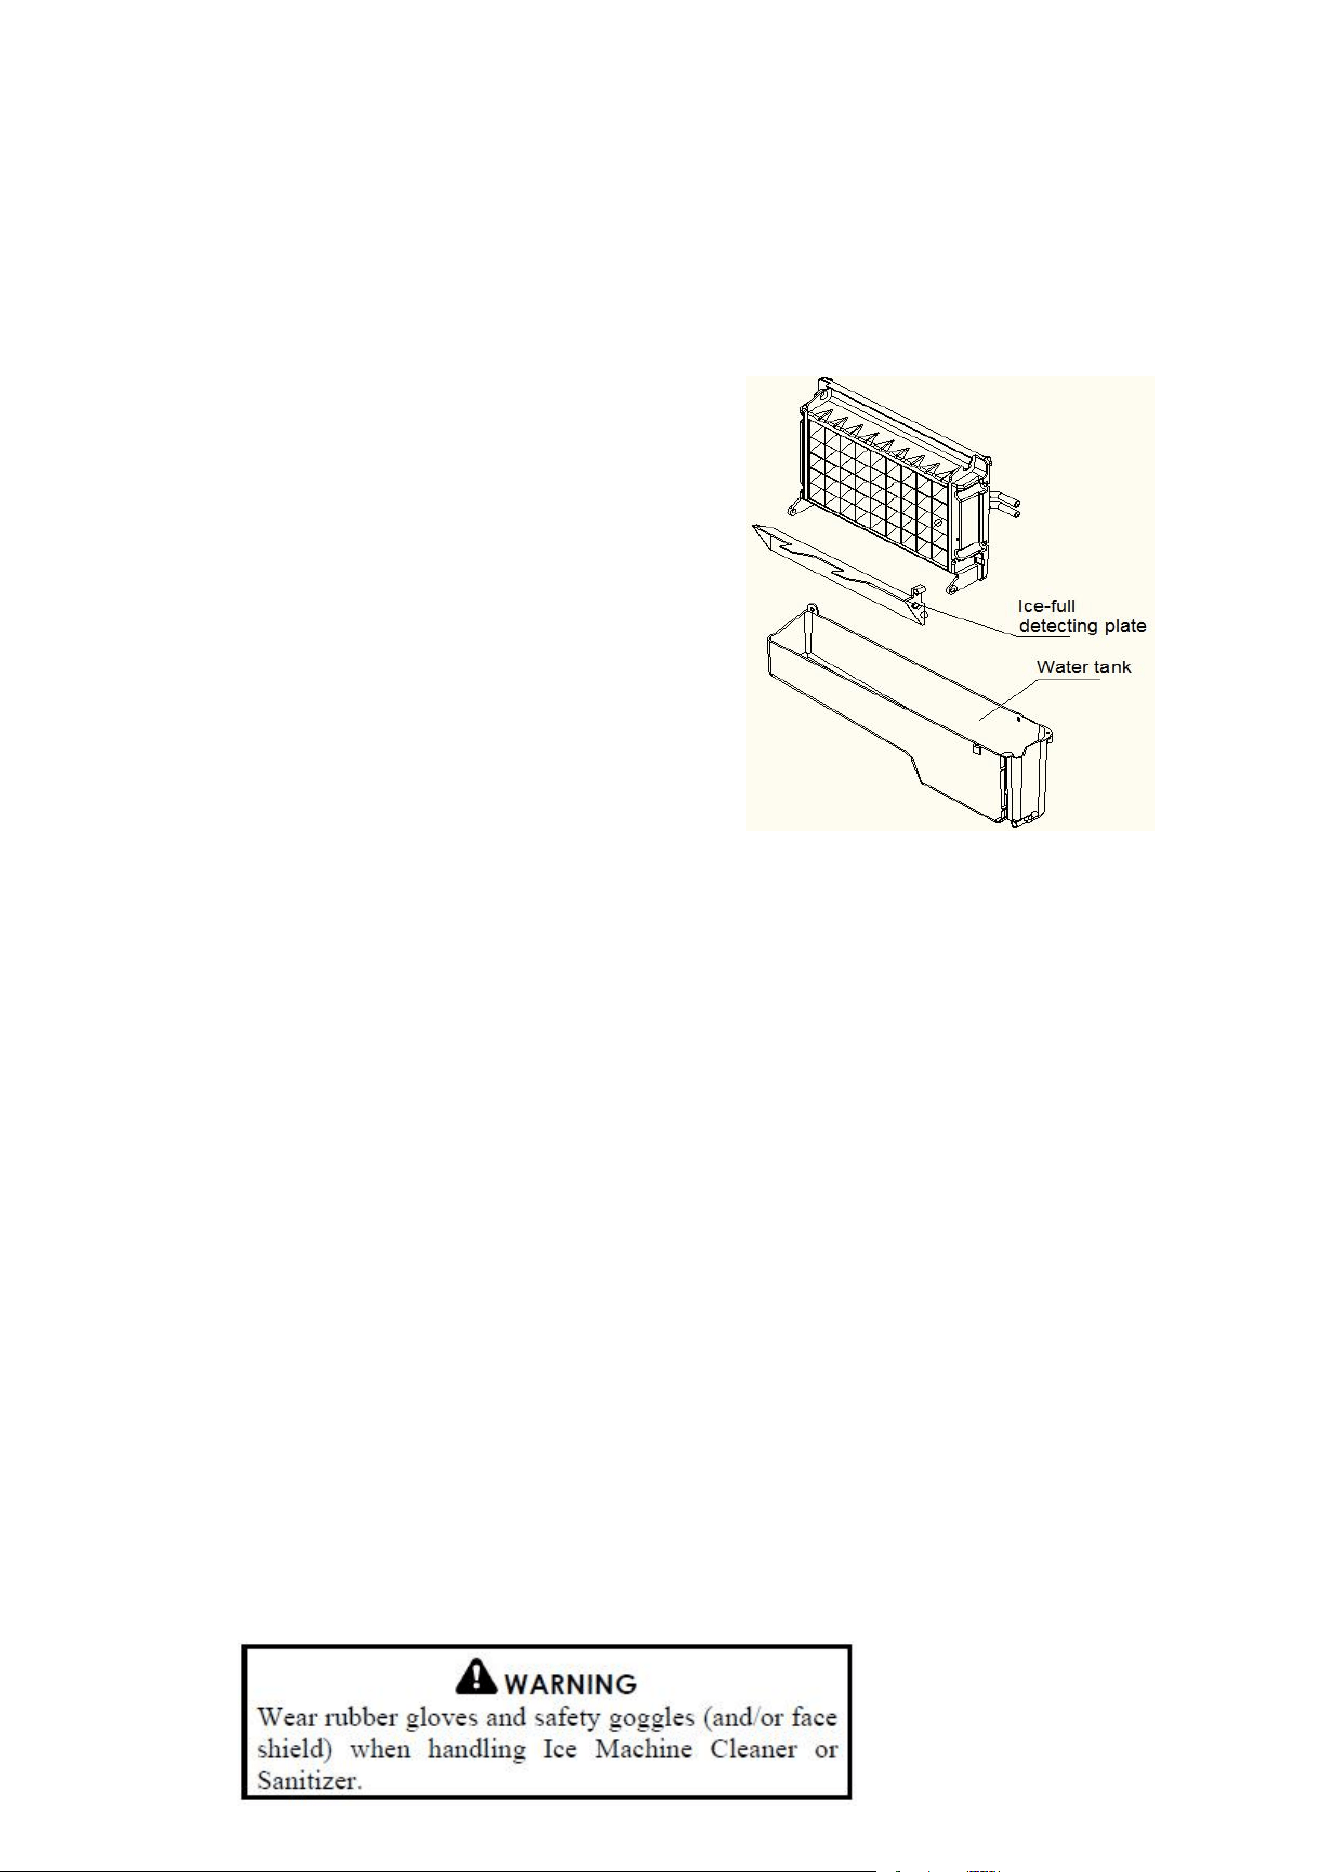
C. Ice full detecting board: Use to detect the inner cabinet is full of ice or no t, and to check the
ice-harvest process is over or not.
D. Water tank f or water circulation: Approximate 0.9 litters volum e
E. Water supplying pipe
F. Cover board on the right side of the evaporator
G. Water level sw
itch installing plate
H. Water drain pipe of the water tank:When ice-making, thi s pipe should be clamped in the s lot of
the water tank wall; And when draining, this pipe should be pulled out.
I. Ice full detec tor
J. Water circulat ion pump
K. Water level detecting switch
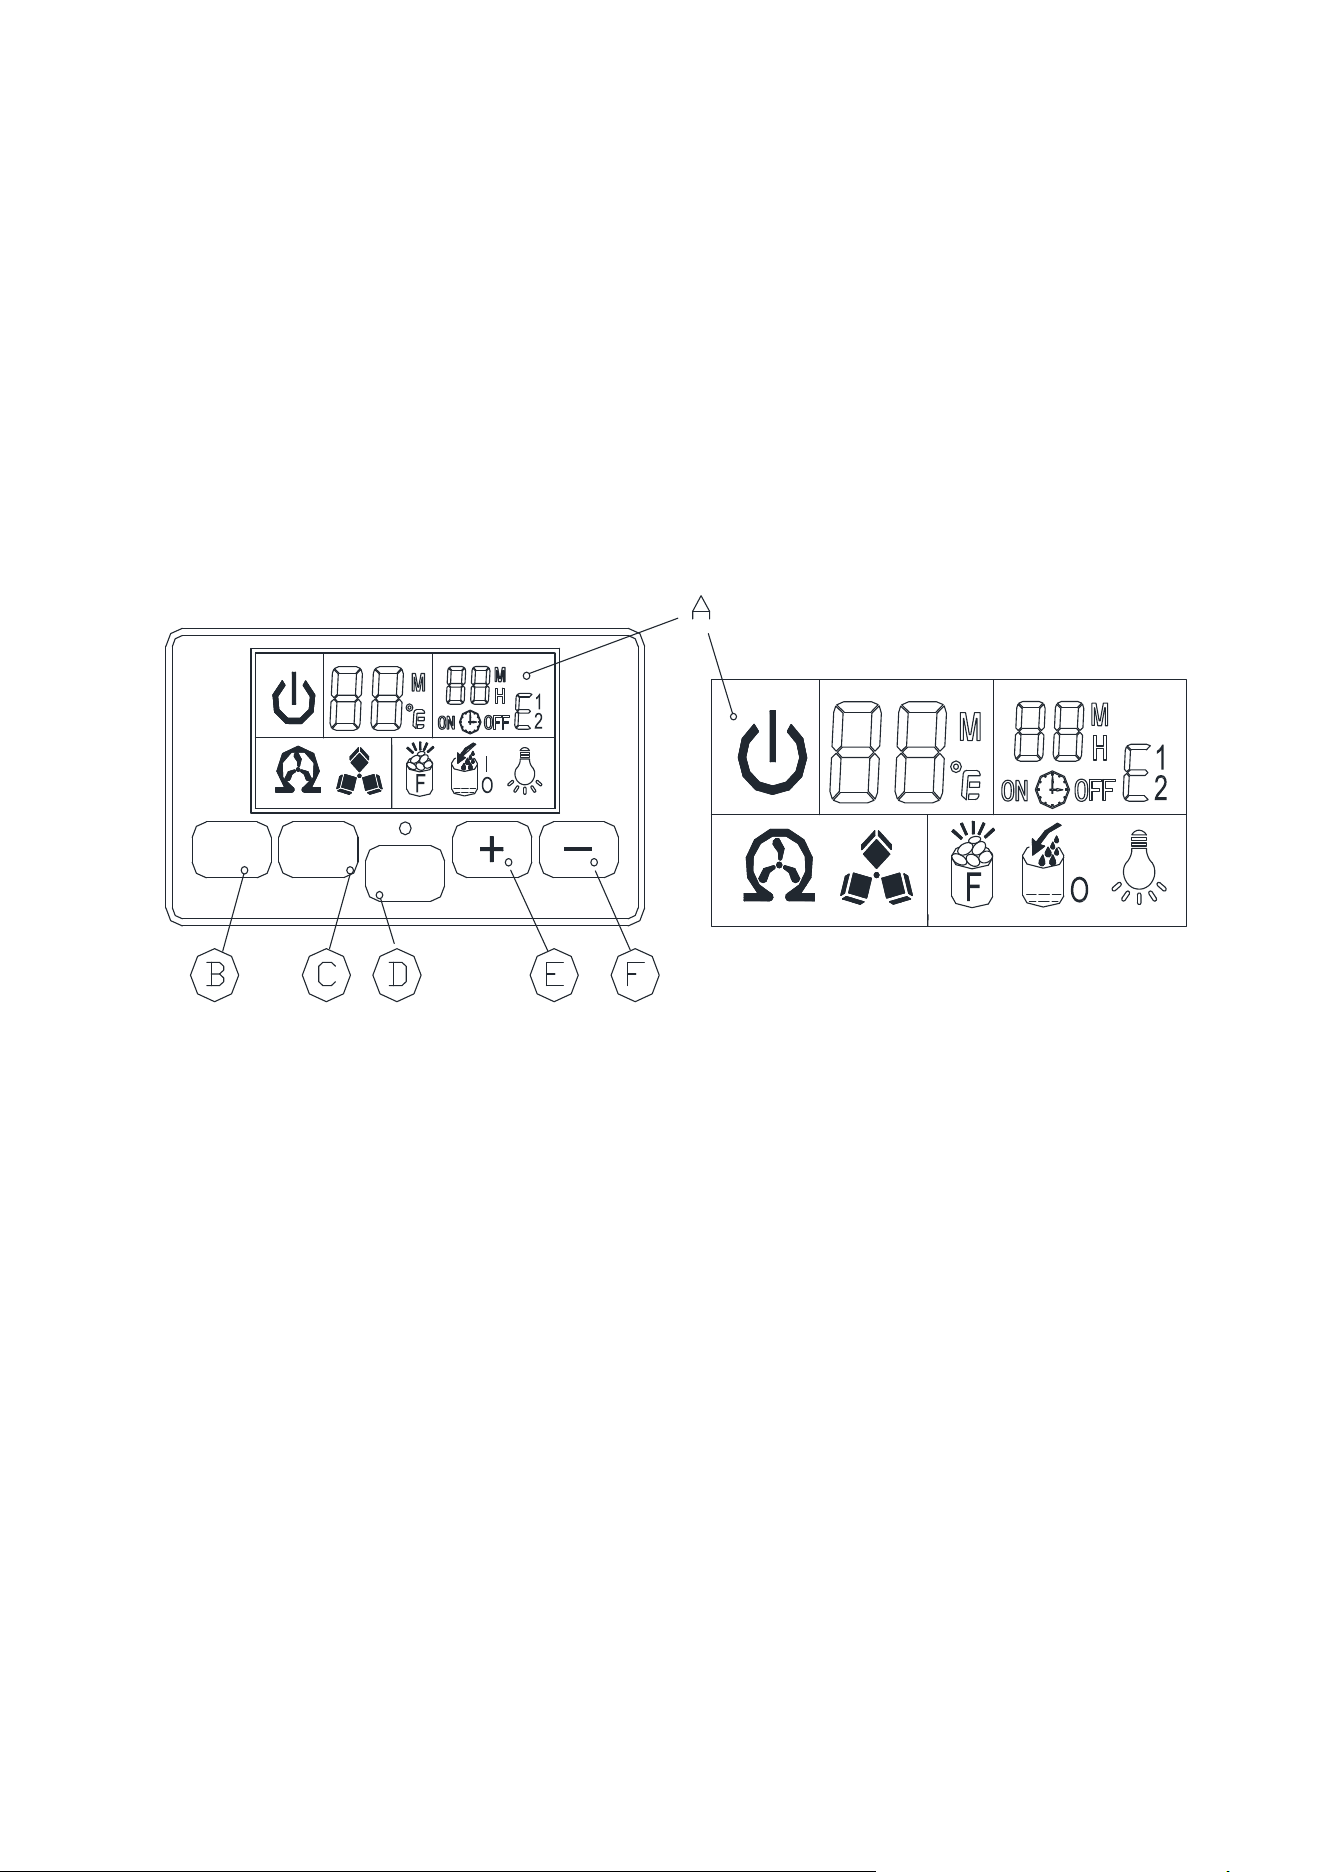
3) Operation panel
A.LCD display window
1、Unit ON or OFF state symbol: When the unit is turned off(standby mode), thi s symbol
flashes, and when the unit is working, the symbol will keep lighting on.
2、Ambient te
mperature and ice-making countdown time display
3、Ice-makin g setting and Timer setting dis play
4、Error code:E1 means that the ambient temperature sensor is f aulted
E2 means that ice-making process is abnormal;
5、Light symbol:When this symbol displays, the LED light inside the cabinet will be on;
6、Water flowing and wat er absence symbol: If the arrow of this symbol flashes, means the
water is flow in from main water supply; And if the whole symbol keeps on, mea ns there is
no
water from main water supply.
7、Ice-full display: When the ice storing cabinet is full of the ice cube, this symbol will display,
and the unit will stop ice-m aking process.
8、Ice making and harvest display:When the ice cube symbol keep rotation, means the unit
is making the ice; And if the symbol flashes, means the unit is during the ice harvest process.
9、Self-cleaning display.
B.“LED light” button : To turn on or turn off the internal LED light;
Note: Keep pressing this bu
tton for more than 5 seconds, it is to change the ambient
temperature unit between Fahrenheit degree and Centigr ade degree.
C .“Timer/Clean”button:Quickly press this button once, to enter the Timer s etting program; And
press this button for more than 5 secon ds, to let the unit enter the Self-Cleaning
program.
8
D.“ON/OFF”button:
When the unit is off, press this button to turn on the unit; And during the autom atic-cleaning
program, or normal ice-making state, press this button to turn off the unit at once;
And also if the unit is s et with the Timer, press this button to cancel the Timer
setting.
When the unit is making the ice cube, press this button for more than 5 seconds, the unit will
switch to ice harvest process by f orce.
E/F.“+”、“-”button:
Use to adjust the ice-making process dur
ation period length, the de fault setting is zero , 1
minute adding or dec reasing per each pressing of “+” or “-” button.
Also to adjust the delay time of the timer, the default setting is zero, 1 hour ad ding or
decreasing per each pressing of “+” or “-” button.
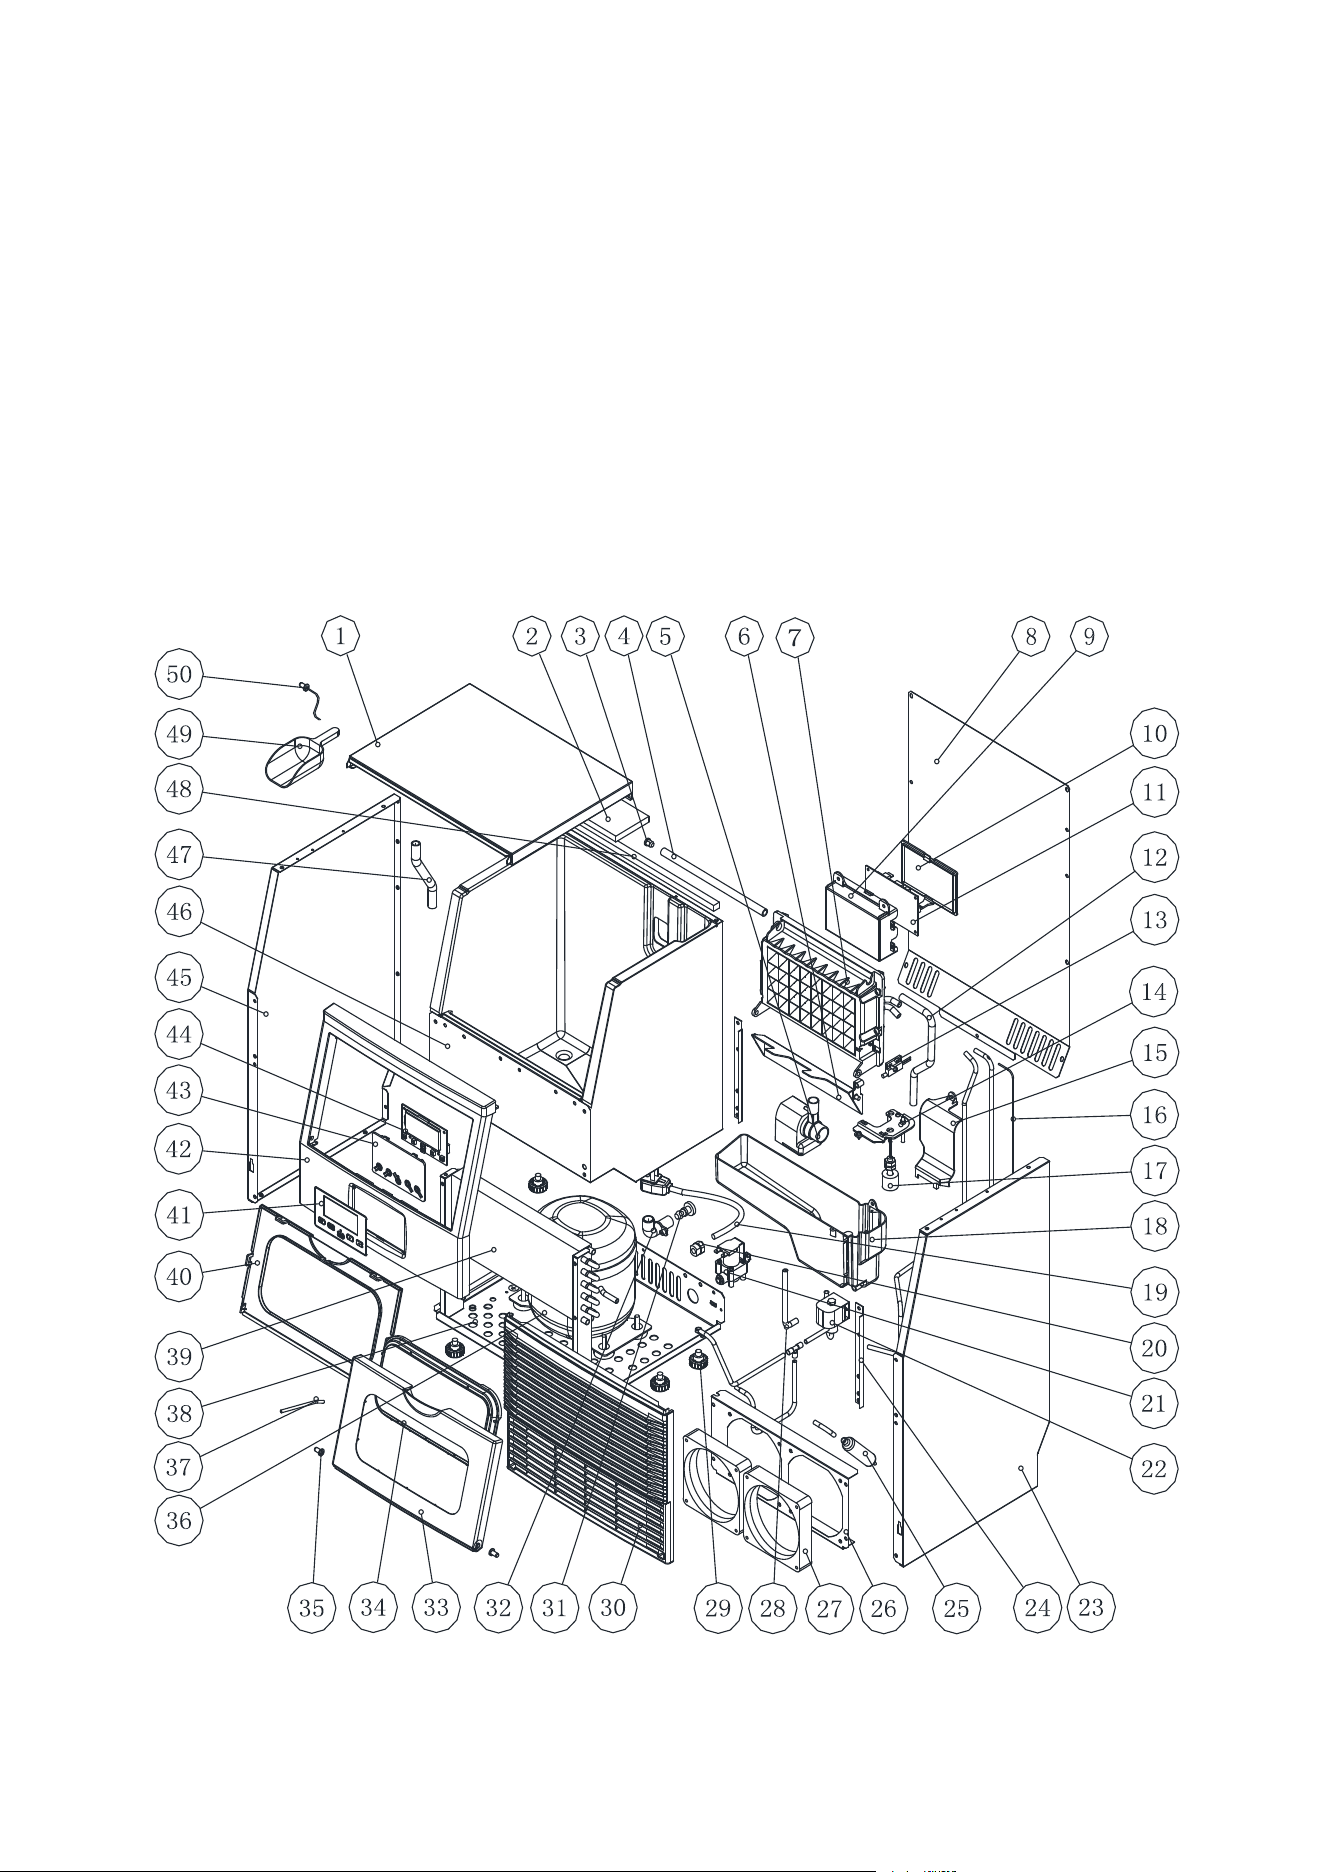
4) EXPLOSIVE DRAWINGS
9
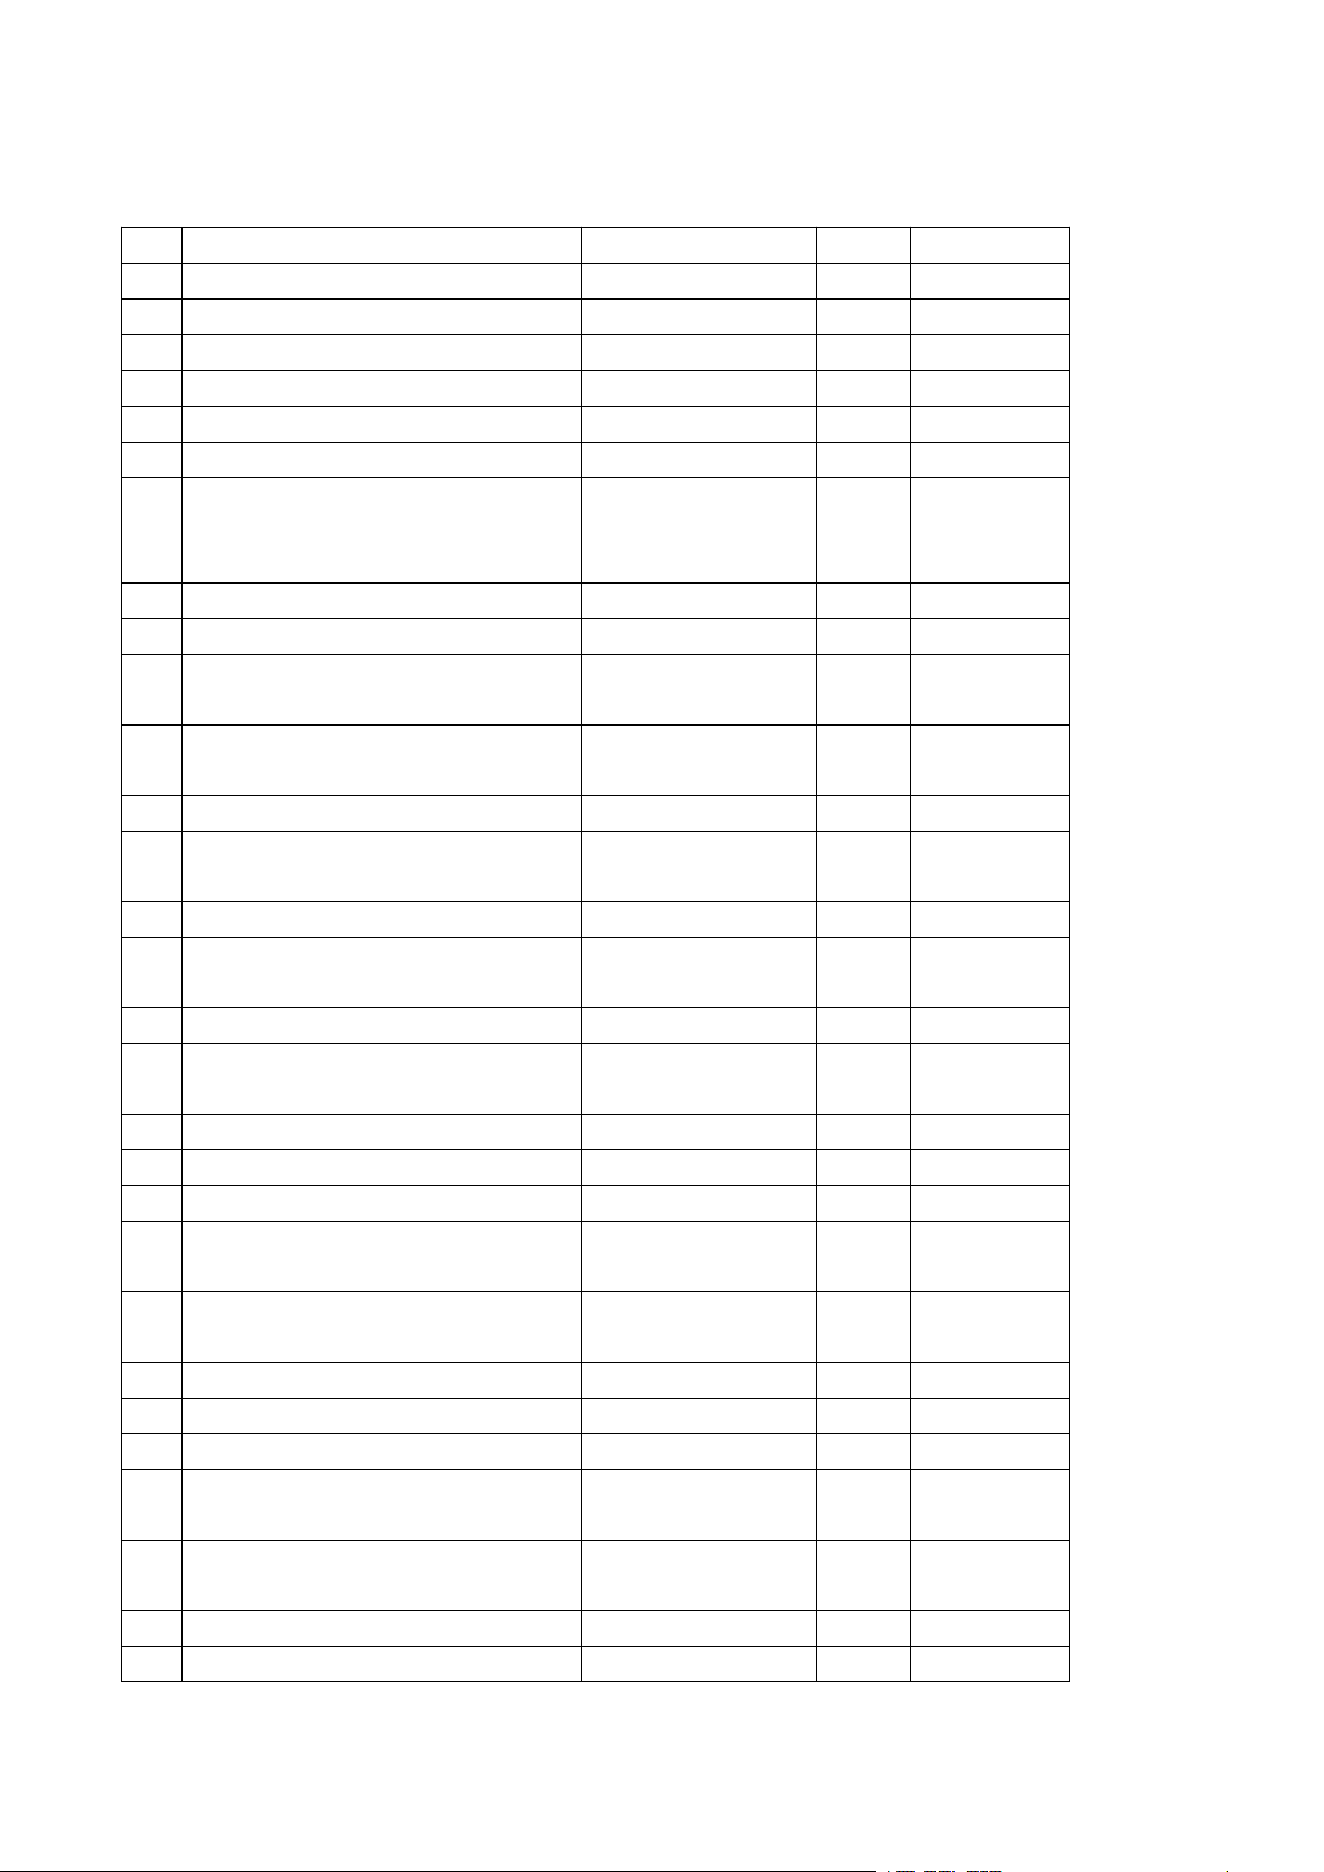
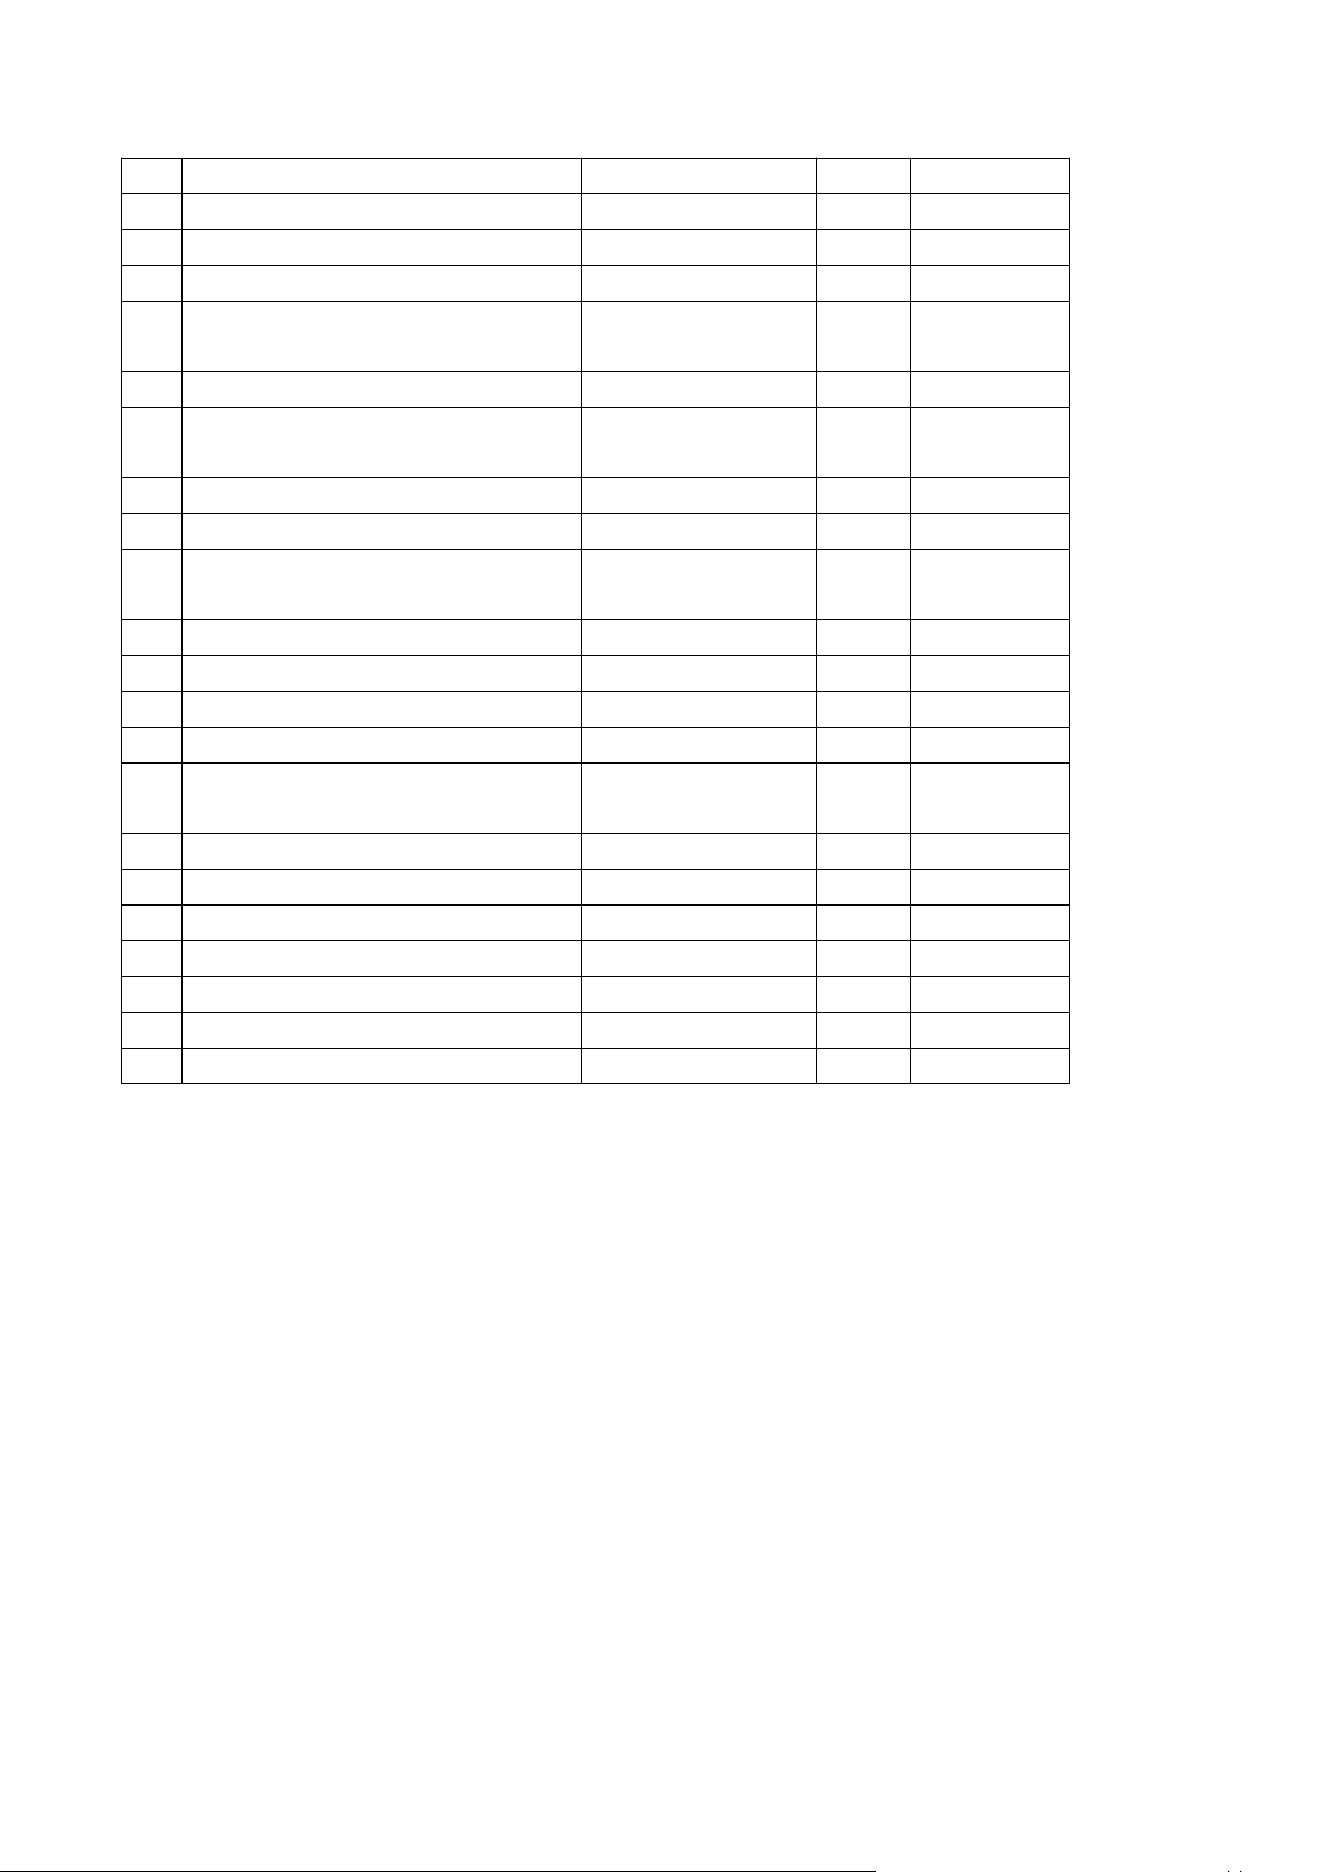
No.
Part Name
Material
Qty.
Note
1
Top cover
Steel plate
1
Without hole
2
Insulation sponge for top cover
PE
1
324x220
3
Cap of the water dividing pipe
Silicone
1
4
Water dividing pipe, eight holes
ABS
1
5
Water Circulation pump
Electrical parts
1
6
Ice full detecting plate
ABS
1
7
Evaporator & its frame
Copper plated with
nickle, and ABS
frame
1
8
Back plate
Galvanized sheet
1
9
Electrical PCB box
ABS,fire-retardant
1
10
Cover of electrical PCB box
PCB, Electrical
parts
1
11
Main control PCB
PCB, Electrical
parts
1
12
Water pipe of water pump outlet
Silicone
1
13
Magnetic control switch
DC5V, Electrical
parts
1
14
The cover of water tank
ABS
1
15
Cover board on the right side of
the evaporator
ABS
1
16
Capillary
Copper tube
1
17
Water level detecting switch
Electrical
parts,DC5V
1
18
Water tank
ABS
1
19
Power cord
Electrical parts
1
20
The clipper of power cord
PP, fire- retardant
1
21
Water inlet valve
Electrical
parts,DC12V
1
22
Ice-harvesting Electro-magnetic
valve
AC220V/50Hz,
Electrical parts
1
23
Right side plate
Steel plate
1
24
Support plate of foaming cabinet
Galvanized steel
1
25
Dry filter
Copper parts
1
26
Support flame of DC fan
Galvanized
steel,0.6mm
1
27
DC fan
Electrical
parts,DC12V
1
28
Water drain pipe of water tank
Silicone
1
29
Bottom Foot
ABS and bolts
4
10
30
Air inlet front panel
ABS
1
31
Water drainage cap
Rubber
1
32
Water drainage port
ABS
1
33
Front door panel for ice taking
ABS
1
34
Transparent window of front door
panel for ice taking
AS
1
35
Door shaft
ABS
2
36
Compressor
Electrical parts,
AC220V
1
37
Refrigerant charging valve
Copper parts
1
38
Bottom plate
Galvanize steel
1
39
Condenser
Copper and
aluminium
1
40
Inner plate of ice-taking door
ABS
1
41
Operation panel paper
PET/PVC
1
42
Door frame for ice taking
ABS
1
43
Operation panel PCB box
Transparent ABS
1
44
Operation panel PCB
Electrical and
Electronic parts
1
45
Left side plate
Steel plate
1
46
Foaming cabinet
Assembly
1
47
Water drainage pipe of cabinet
Silicone
1
48
Top sponge of cabinet
PE
1
49
Ice scoop
ABS
1
50
LED light
Electrical parts
1
51
Wiring
Electrical part
1
Not shown
11
UNPACKING YOUR ICE MAKER
1. Remove the exterior an d interior packa ging. Check if all the accessories, including instructio n
manual, ice scoop, white water supplying pipe, 1/4 inches to 1/2 inches water quick con nector and
the water draining pipe, etc. , are inside or not. If any parts are missing, please contact our
customer service.
2. Remove the tapes f or fixing the do or and inner cabinet, ice scoop, etc.. Rou ghly clean the inner
cabinet & ice scoop with wet clothe.
3. Pu
t the ice maker on a level & flat floor, without direct sunlight and other sources of heat (i.e.: stove,
furnace, radiator). Make sure that there is at least 20cm gap between the air outlet and the
obstacles, and at least 5 cm between Left/Right side an d the wall.
4. Allow 4 hours for the refrigerant fluid to settle before plugging the ice maker in if the unit m aybe fall
upside down during shipping or transportation.
5. The appliance m ust be positioned so that the plug is accessible
.
WARNING: Connect to the potable water supply only. Only use drinking water.
INSTALLATION LOCATION REQUIREMENT
a) This un it is not for outdoor use. Keep the proper roo m temperature and inlet water
temperature according to above specification table. Otherwise it will affect the ice making performance.
b) This unit should not be located near an y heat resource.
c) The unit should be located on a firm & level foundation at normal counter top height.
d) There must be at least 15C
M clearance at rear side for connection and 20 CM clearance in
front to open the do or and keep good air circulati on.
e) D o not put anything on the top of the ice maker.
To ensure proper ventilation for your ice maker, the front of the unit must be completely unobstructed
(at le ast 20CM free space). Allow at least 15 cm clearance at rear, and 5 cm sides for proper air
circulation. And allow 50 mm at top and sides for proper air circulation. The installation should allow the
ice maker to be pulled forward for servicing if necessary.
OPERATING PROCEDURES & MAINTENANCE
Side view (mm)
(mm)
Installation clearance
top view (mm)
10

12
Electrical Shock Hazard
Plug into a grounding wall outlet.
Never remove the ground prong.
Use separate power supply or receptacle.
Never use an adapter.
Never use an extension cord.
Failure to follow these instructions can result in death, fire, or
electrical shock.
When installing the ice maker under a counter, follow the recommended spacing dimensions shown
above. Place electrical and drain fixtures in the recommended locations as shown.
Choose a well-ventilated area with temperatures above 10℃ and below 32℃. This unit MUST be
installed in an area protected from some elements, such as wind, rain, water spray or drips.
The ice maker requires a continuous main water supply with pressure 1-8 Bar as required in above
specification table. The temperature of the water feeding into the ice maker should be between 5 ℃
and 25℃ for proper operation.
ELECTRICAL REQUIREMENT & CONNECTIONS
WARNING: THIS UNIT MUST BE EARTHED.
Before you move your ice maker into its final location, it is important to make sure you have the proper
electrical connection.
It is recommended that a separate circuit, serving only your ice maker, be provided. Use receptacles
that cannot be turned off by a switch or pull chain. If the supply cord or plug to be replaced, it should be
done by a qualified service engineer.
This appliance requires a standard 220-240Volt, 50Hz electrical outlet with good grounding means.
Recommended grounding method
For your personal safety, this appliance must be properly grounded. This appliance is equipped with a
power supply cord having a grounding plug. To minimize possible shock hazard, the cord must be
plugged into a mating grounding-type wall receptacle, grounded in accordance with the National
Electrical Code and local codes and ordinances. If a mating wall receptacle is not available, it is the
personal responsibility of the customer to have a properly grounding wall receptacle installed by a
qualified electrician.
CLEANING
CLEANING
YOUR
YOUR
ICE
ICE
MAKER
MAKER
BEFROE
BEFROE
FIRST
FIRST
USING
USING
Before using your ice maker, it is strongly recommended to clean it thoroughly.
1. Open the ice taking door.
2. Clean with diluted detergent, warm water and a soft cloth.
3. Repeatedly clean the water contacting inner parts, use the water or the wet clothe to scrub the
13
relevant parts, then use the dry clothe to dry them.
4. You can pull the Water drain pipe of the water tank indicating “H” in above illustration to drain out
the cleaned water in the water tank, then next to clean inner ic e-storing bin, till all of inner parts are
cleanly, then drain out all of the cleaned water from the water drain port located at unit back
indicating “8”in above illustration. And must to install back the water drain pipe of the water tank
and the cap of the unit wat
er drain port, otherwise, the unit will not make the ice normally. And
suggest that you should discard the ice-cube ma de by the first ice making cycle after
cleaning. Note: Please see the section “Water Draina ge” in this manual to dra in out the cleaned
water.
5. The outside of the ice maker should be cleaned regularly with a mild de tergent solution and warm
water.
6. Dry the interior and exterior with a clean soft cloth.
OPERATION YOUR UNIT
WATER CONNECTION FOR YOUR ICE MAKER
Important: Be sure to use the new hose-sets supplied with the appliance to
connect to water mains and that old hose-sets should not be reused.
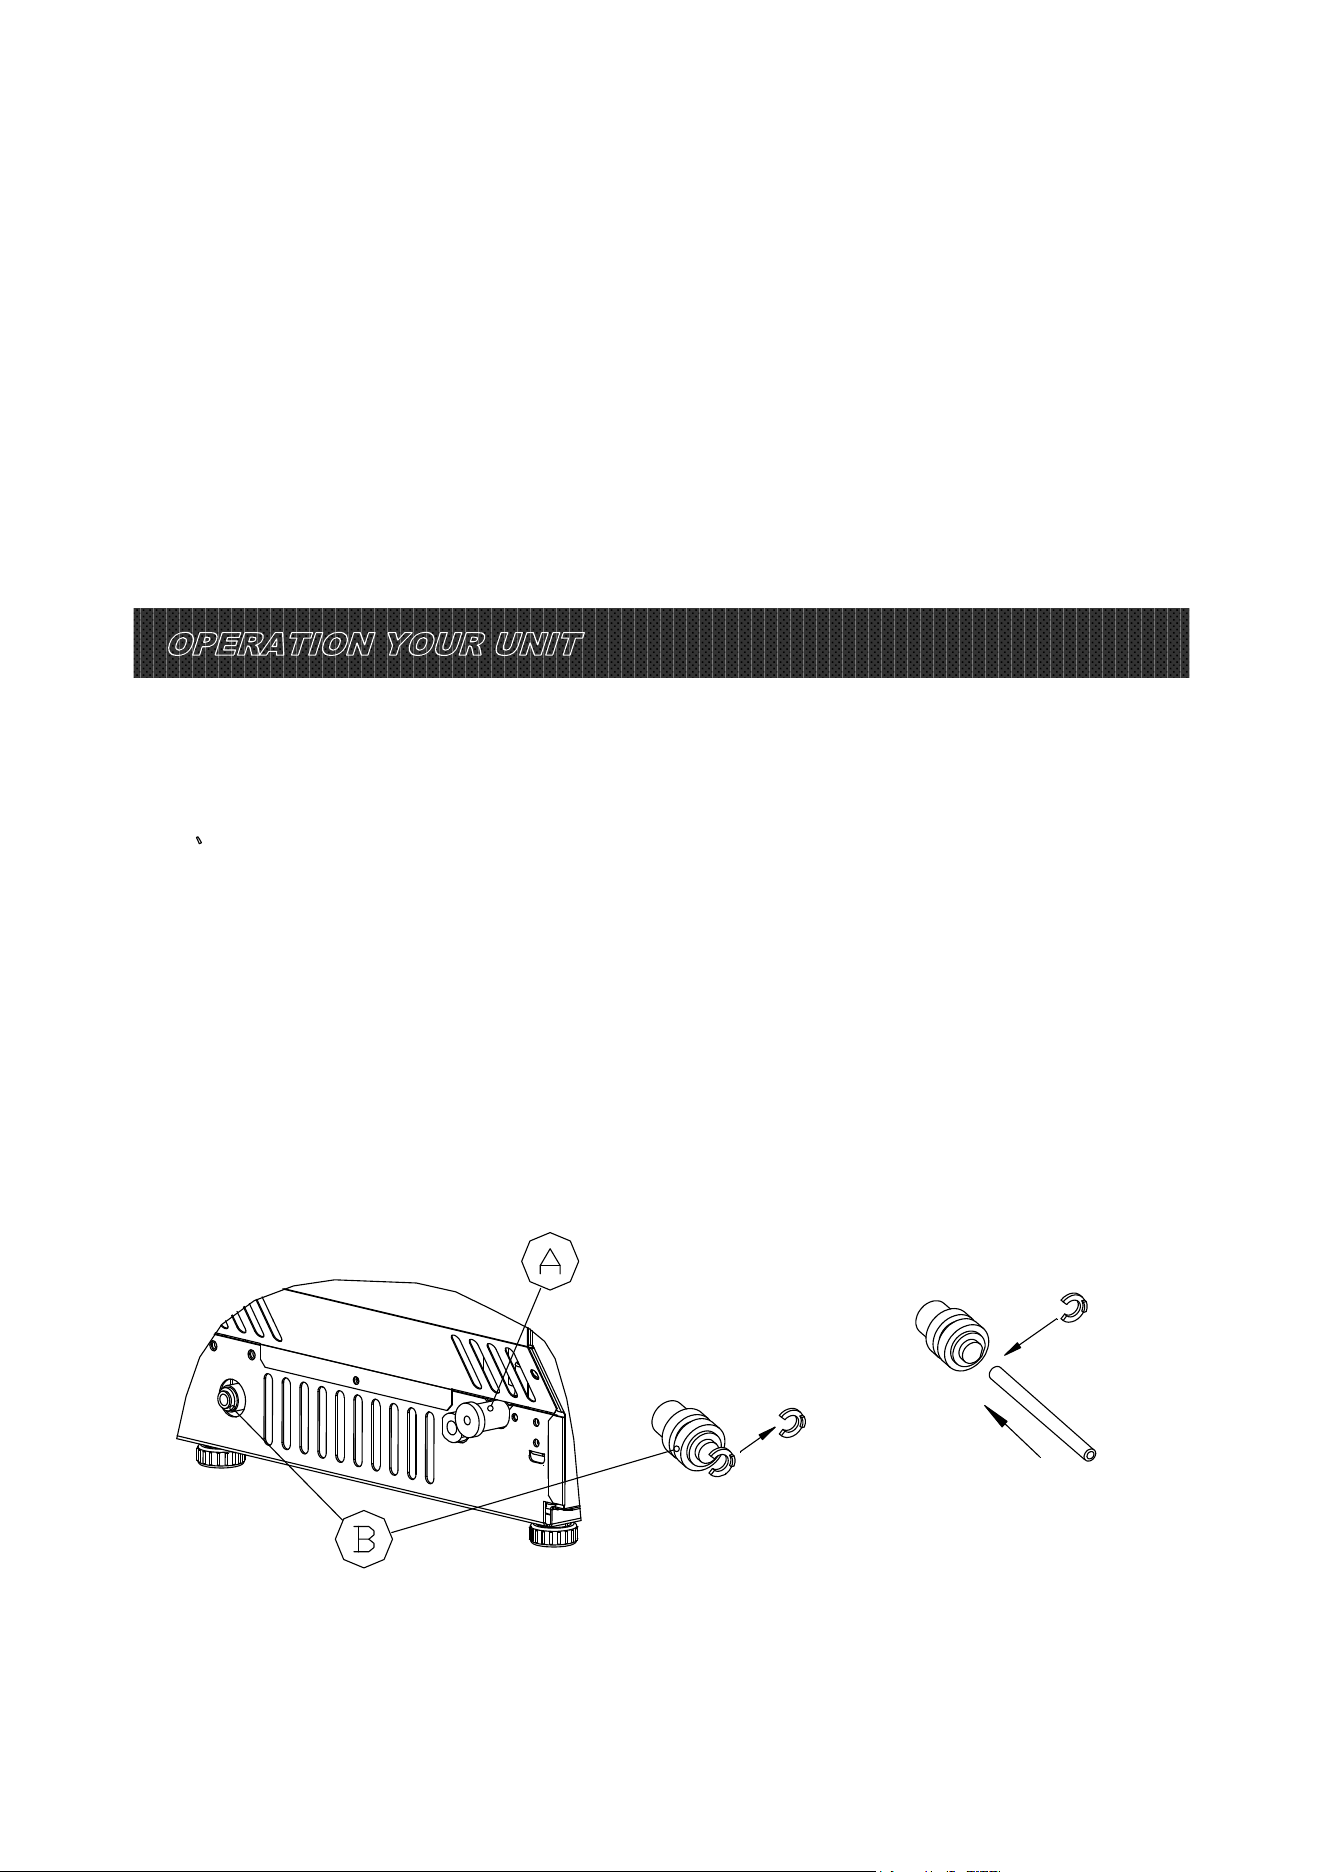
1、Connect the water supplying hose to the unit
Step 1:First remove the tape on the water inlet port for water supply
(indicated in the following illustration “B”) located at unit back, then use your
other hand’s finger to press the out circle。
Step 2: Insert the one end of the w hite water hose into the water inlet port,
and push inward completely, and install back the clipper, then water hose
connection is completed.
STEP 1: Remove the
tape first
Water inlet port on
the unit back
STEP 2: Insert the
water hose
Then install
back the clipper
White water
hose(accessory)
First insert the
water hose inward
completely
Remove the
clipper first
Unit Back View
14
2、Connecting the water drainage pip e
Pull out the water drainage cap with black color (indicated
○
A
in above illustration), then
connect the white drainage pipe included in accessory, again connect the other end of this
drainage to the main water drainage pipeline. Make sure not to set the drainage pipe too high.
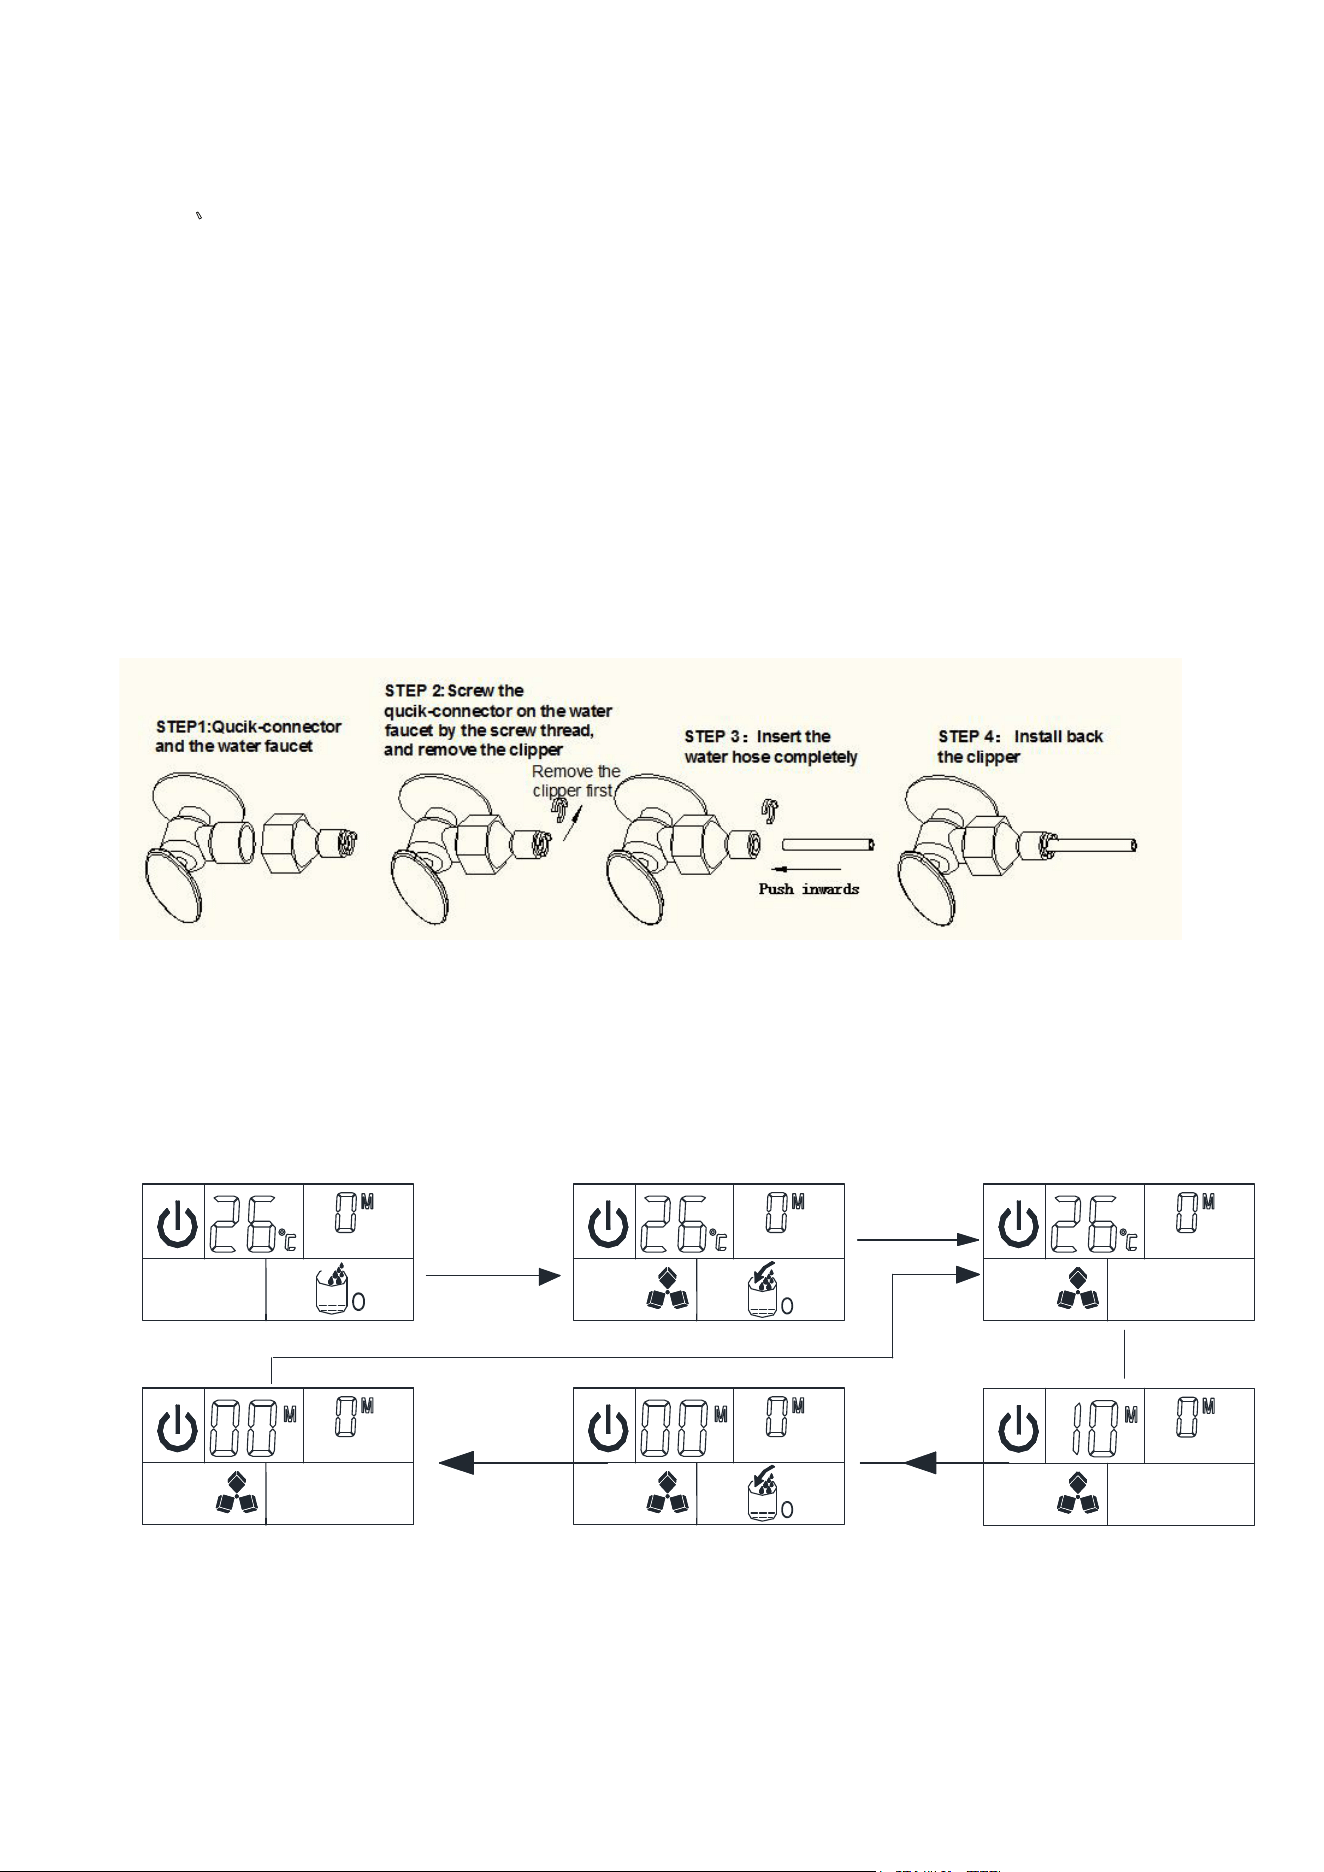
3. Connect the water hose to the water faucet of the water main supply system
First, install the supplied water quick-connector(from 1/4 to 1/2 inch, with black seali
ng circle) to
the water faucet by screw thread; Second, remove the clipper from the water quick-connector,
insert the another end of the water hose into thi s quick-connector port completely, then install back
the clipper, also this step is completed. Note: The water faucet should be supplied by the customer
himself.
Important: The water pre ssure of main water supply system must be 0.04-05 MPa at leas t and
0.6 Mpa at largest. If the pressure is too big, it should be installed w
ith pressure decreasing
valve first.
OPERATION THE ICE-MAKING PROCESS
Ice making program is explained in following chart:
Step 1: Standby state
Press
ON/FF
button to
turn on
the unit
Step 2:The arrow
flashes, water flows
in the unit
Step 3: Start to make
ice,and ice-cube symbol
rotates.
Step 4:Dispay the
countdown time of one
ice-making process
Step 5: Ice-harvest
starts,and ice-cube symbol
flashes; At same time the
arrow flashes and water
flow into the water tank
Step 6:During ice-harvest,
water-flowing process
finished to start to make
ice-cube again.
15
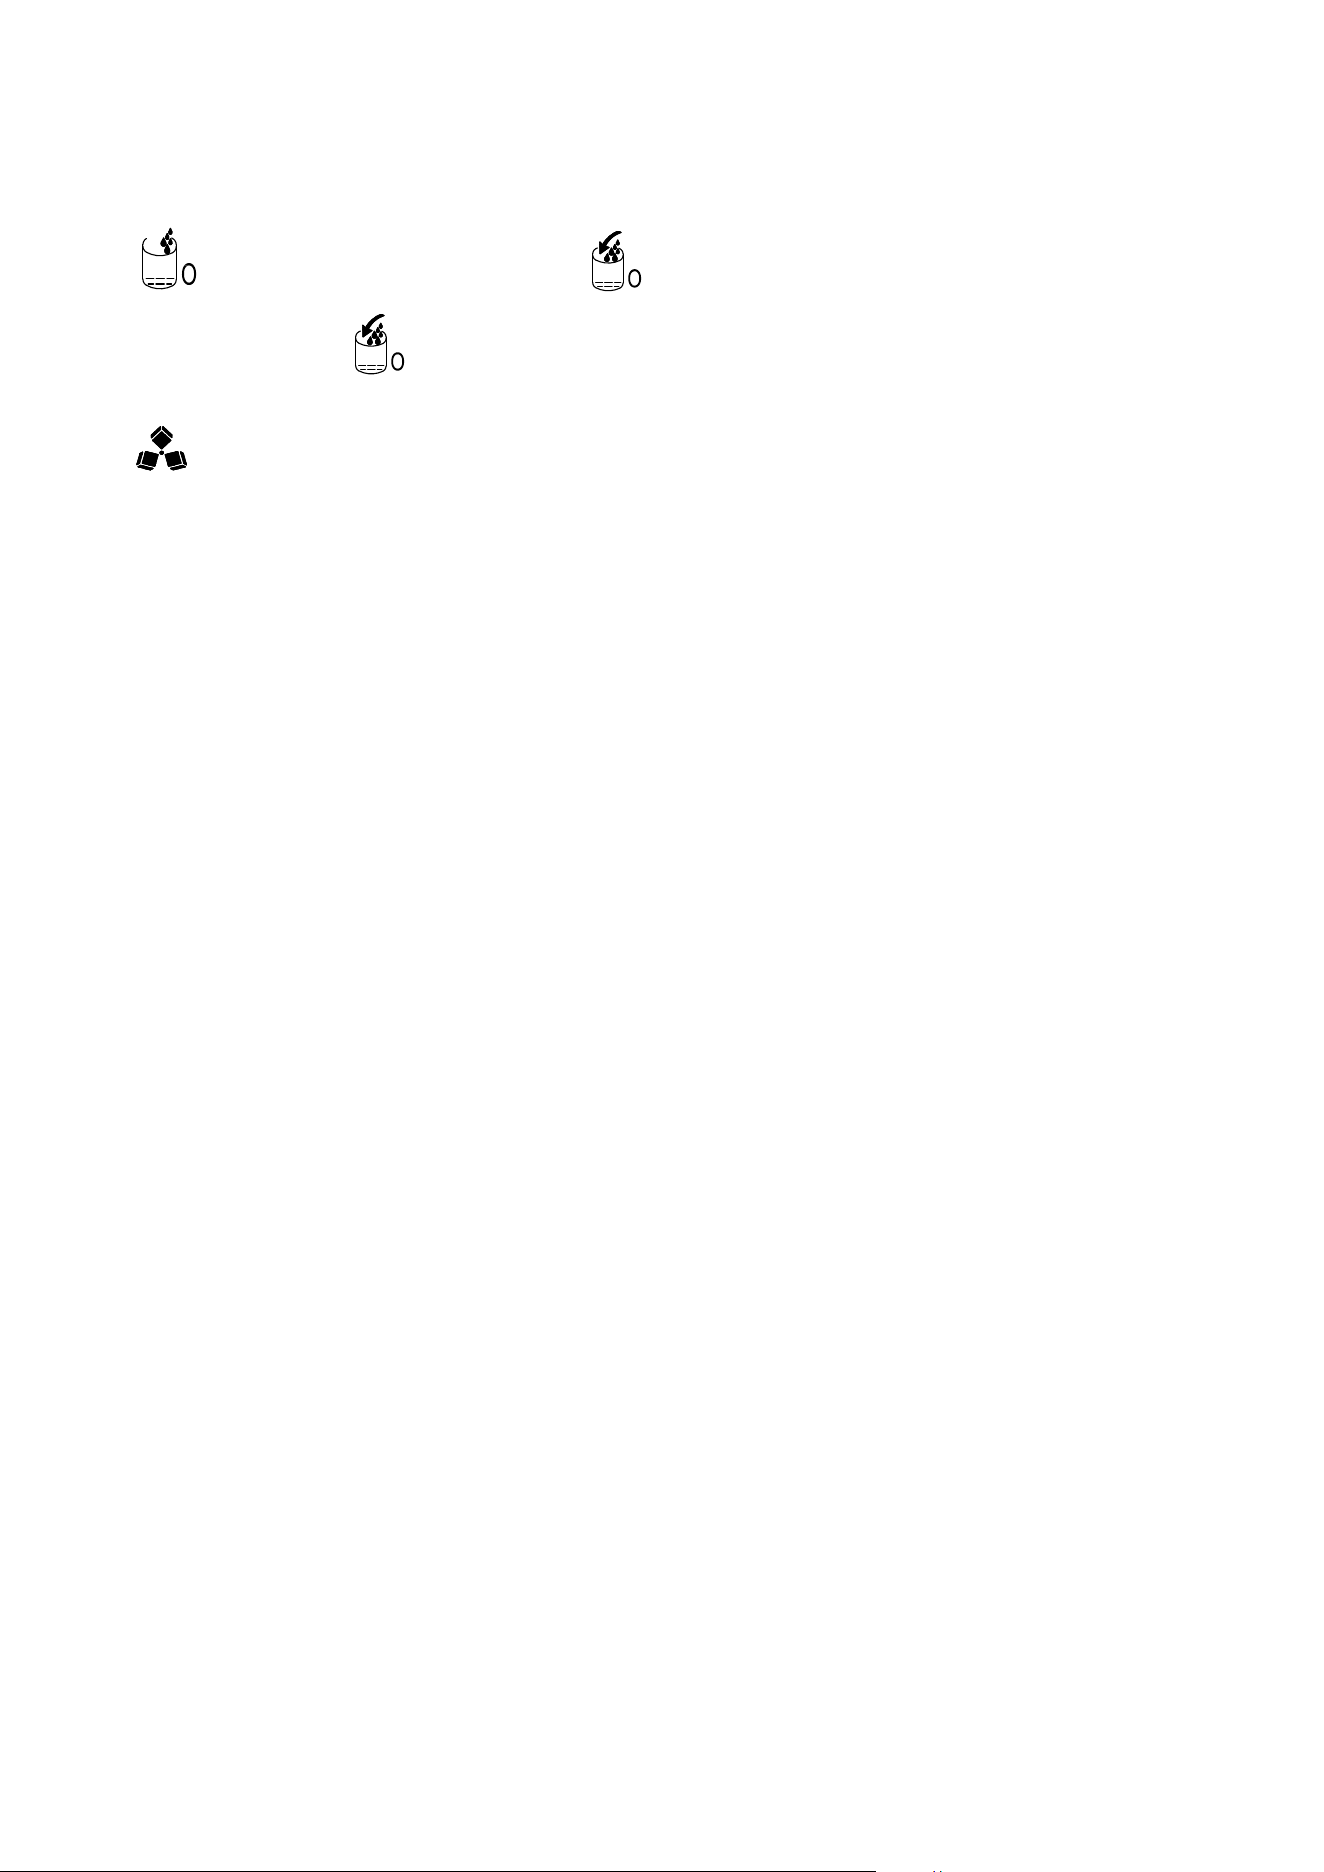
Automatic water s upplying symbol Arrow of symbol flashes, means the water is flowing
into the water tank.
If this whole symbol keeps displaying, means no main water supplying at
present.
Ice-cube symbol, when it rotate, means unit is making the ice cube; and it flashes, means the
unit is in ice harvest process.
℃ Centigrade(ambient temperature ) H unit of hour(setting the timer) M unit of minute
(ice-making setting and countdown time)
1. After completing the connectio n of the main water supplying hose with the un it, plug on the main
power supply plug. Then press “ON/OFF” button on the con trol panel to begin the ice making c ycle.
The unit ON/OFF state symbol wil
l keep lighting on, the left number in the LCD display window
displays the pre sent ambient temperature, and the right number displays the present ice-making
setting, and the ice-cube symbol rot ates. When the left number change to flash, then the number
means the countdown time to complete one ice making cycle.
2. Each ice making cycle will last about 11 to 20 minutes, depending on the ambient temperature and
the water temperature. And for the first time, according to the init
ial water temperatur e, ice-making
last time will be a little longer.
3. When the ice-making process is over, then switch to ice-harvest process. During the ice-harvest
process, the ICE cube symbol change rotating to f lash. At same time, the arrow on the manual
filling water symbol will start to flash, the water will flow into the water tank again till the floating ba ll
of water leve l switch rises up to the highest position, then the water stop flowing and the whole
manual filli
ng water symbol will di sappear.
When the ice-harvest finish, the Ice-full detecting plate will rotate downward once, then recover to
the original position and enter to the next ice-making process .
If after the rotation of the Ice-full detecting plate, it is pressed by the ice cube and can’t recover to
the original position, means the the ice storage bin is full of the ice cube and it will stop making the
ice automatically.
4. When the “ICE-FULL ” symbol display is on , the unit st
ops running. And if you move away the ice
cube, the unit will start to make the ice cube again. But it will restart only after 3 minutes interval of
compressor running.
5. During the ice-making process, press the “+” or “-” button to adjust the ice-making process duration
period length, then to chang e the thick ness of the ice cube. Press the “+” or “-” button, the right
digit will flash, the default setting is zero, 1 minute will add or decrease to each ice making
process per each pre
ssing of “+” or “-” button. After 5 second of setting, the new setting will be
remem bered by the system.
16
6. The bad water quality will cause the bad quality of ice cube, and reduce the transparency of the ice
cube.
AUTOMATIC SELF-CLEANING PROGRAM
Start the self-cleaning program : After connecting all of the water pipe, plug on the main power
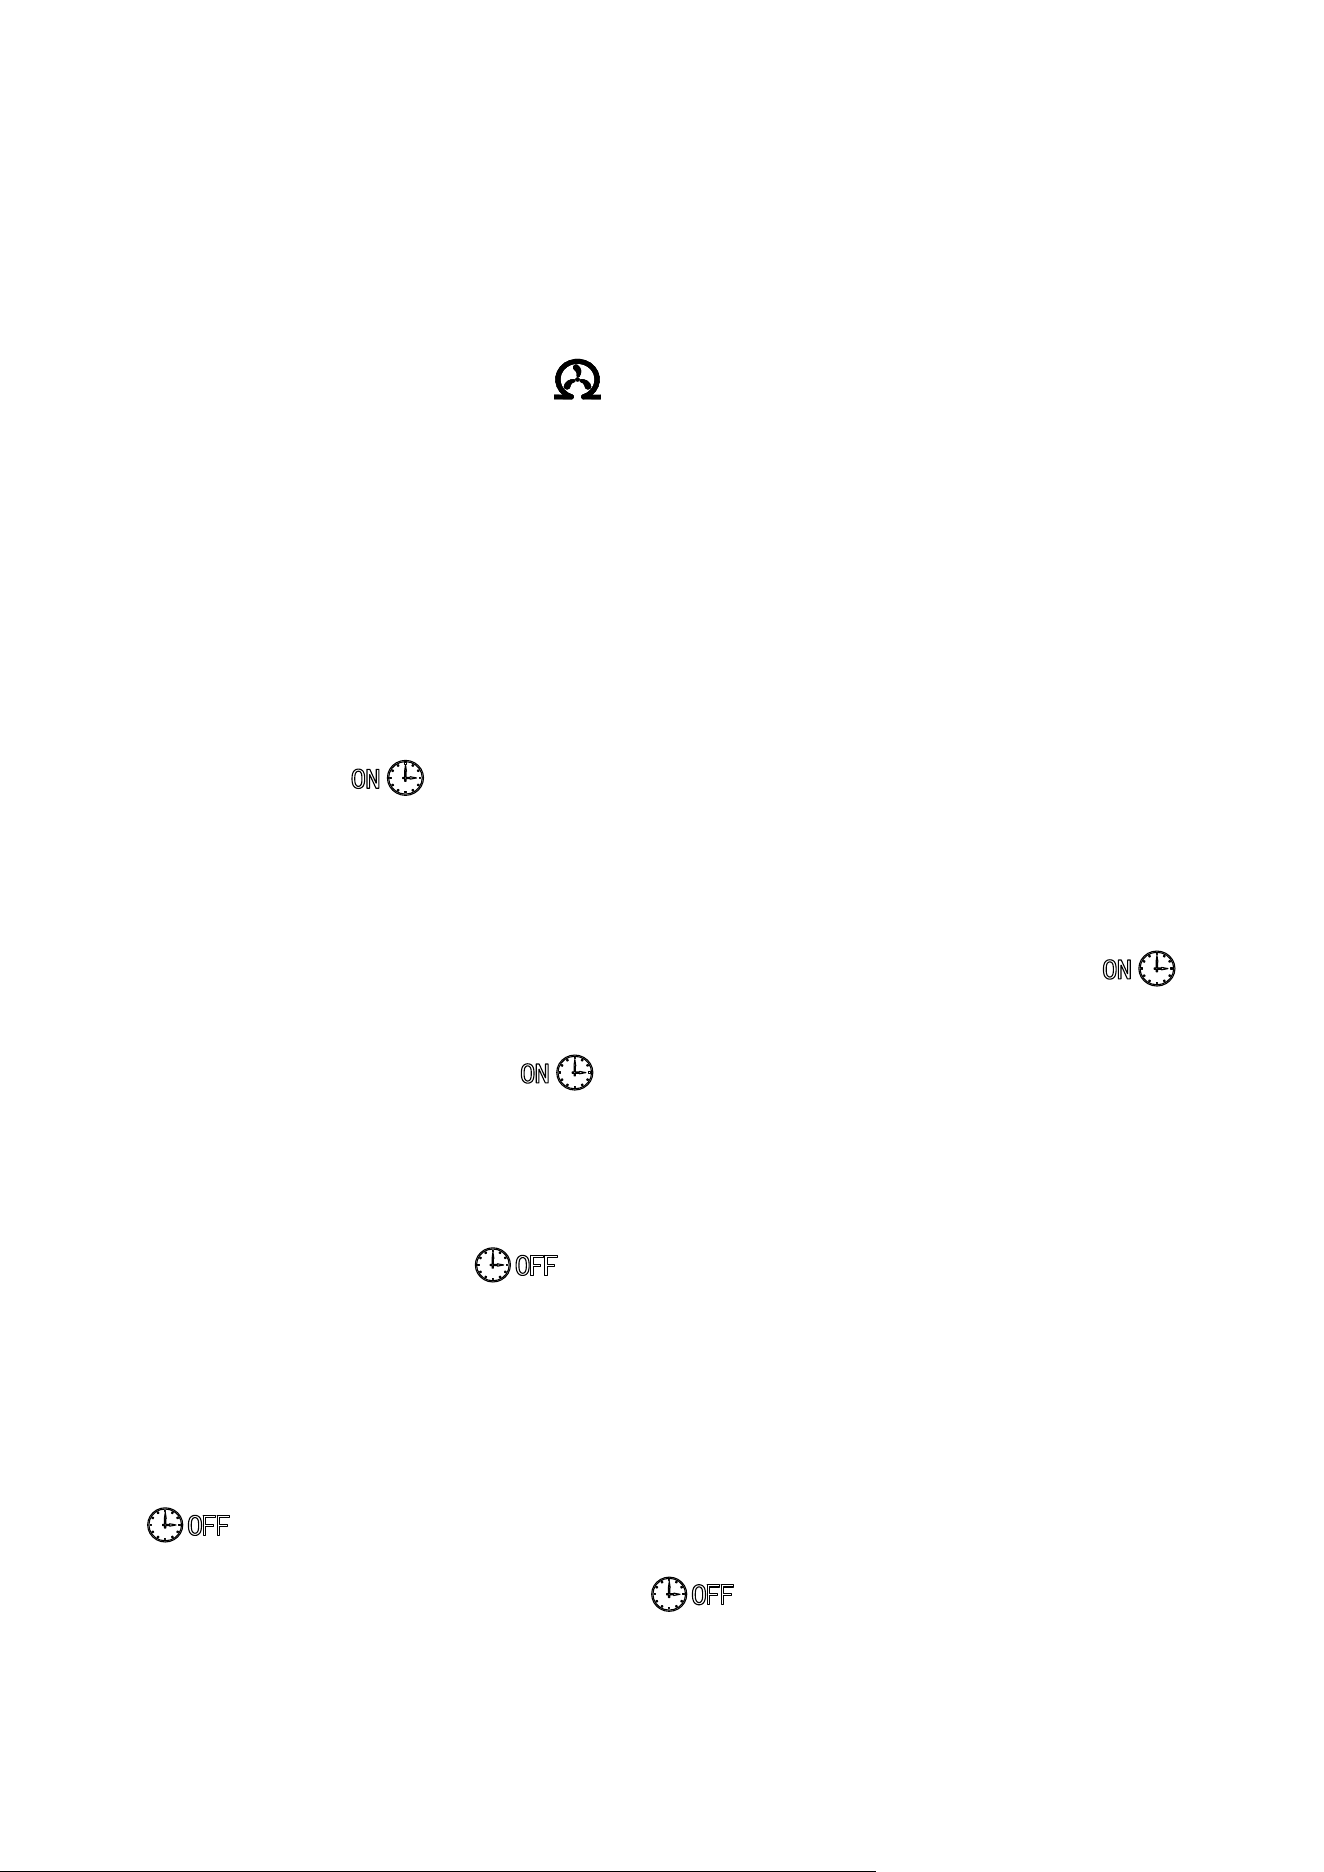
supply plug, then press “TIMER /CLEAN”button on control panel for more than 5 seconds , to en ter
the Self-Cleaning program. And the “
”symbol will always be on during this period, the left digit
will indicate the left time. The total duration time is 20 minutes for one self-cleaning program.
Cancel the self-cleaning program: It takes about 20 minutes to complete one self-cleaning
program. When the program is over, the system will be in standby mode automatically.
And also you can press the “ON/O FF” button on control panel to cancel the
self-cleaning program by force.
Timer setting operation
Delay time range: 1-24 hours, Default time: 1 hour
How to set the ON-Timer: During the un it is in standby mode, press the “TIMER/CLEAN” button to set
the ON-Timer. The “
” symbol will start to be on, the num ber “1” above the symbol will f lash to
display the set delay tim e. During the number flashing, press+”、“-”button to change the delay time of
the timer, 1 hour increasing or decreas ing per each pressing of “+” or “-” button. Five seconds after
setting, your desired setting will be remembered.
How to cancel the ON-Timer: Press the “TIMER/TIMER” button, the number above the “
”
symbol will flash to display the present delay time of your ON-Timer, and pre ss thi s button once agai n
to cancel the Timer setting, also the “
” symbol and the number will disappear. And the second
easy way to can cel the ON-Timer is to press the “ON/OFF” button, it will cancel the ON-TIMER setting
by force.
How to set the OFF-Timer:When the unit is working , press the “TIMER/CL EAN” button to set the
OFF-Timer. The “
” symbol will start to be on, the number “1” above the symbol
will flash to display the settin g delay time. During the number flashing, press+”、“-”
button to change the delay time of the timer, 1 ho ur increasing or decreasing per each
pressing of “+” or “-” button. Five seconds after setting, your desired setting will be
remem bered.
How to cancel the OFF-Timer: Press the “TIMER/TIMER” button, the number above the
“
”symbol will flas h to display the present delay time of your OFF-Timer, and press this button
once again to canc el the Timer setting, also the “
” and the above number will disap pear; And
also the second easy way to cancel the OFF-Timer is to press the “ON/OFF” button, it will cancel the
ON-TIMER setting by force, also will turn off the unit.

17
Internal LED light operation
When the unit is plugged on, press the “LIGHT” button on the operation panel once to lighten the
LED light inside the ice bin and the “
” symbol on the LCD display windo w will also be on.
Press this button once again, the LED light and the “
” symbol will be off at sam e time.
NOTE: If you press the “LIGHT” button for more than 5 seconds, the ambient can be changed
between Centigra de degree and Fahrenheit degree(between ℃ and ℉)。
ERROR code of unit breakdown
When the unit is breakdown, the error code will display in the left side of LCD display window.
E1 me ans the sensor of ambient temperature is malfunction。
E2 m eans that ice making program is abnormal, including too big ice-cube,no ice falling off, or not
making ice cube, etc.
NOTE: During the ice cube making process, press “ON/OFF” button for more than 5 second s, the
unit will jump into the ice-harvest process . After the ice harvest process is completed, the uni will
recover to ice making process.
Water Dra inage
Make sure the water drainage pipe has correctly connected at the unit back first.
A. You can drain the the water in ice storage bin through the white drainage pipe connected on the
back drainage port. Make sure not to set the white drainage pipe too high.
B. For the water in the water tank,you can pull out the silicone pipe on the right side of the water tank
indicating “H” in above illustratio n to drain out the cleaned water in the water tank, til l the silicone pipe
extend completely, the water can flow out to ice bin. Then the water can be drained out through the
the water drain port at unit back.
Remin
ding: Clean the water tank freque ntly, it can improve the ice-cube quality and the unit and
its water circulation pump can work much longer.
Normal Sounds
Your new ice maker may make sound s that are not familiar to you. Most of the new sounds are normal.
Hard surfaces like the floor, walls and cabinets can make the sounds seem louder than they actually
are. The f ollowing describes the kinds of sounds that might be new to you and what may be making
them.
You will hear a swooshi ng sou n
d when the control va lv e op ens to let water flow into the water tank
for each ice-making cycle.
Rattling noises may come from the flow of the refrigerant or the water line. Items stored on top of
the ice maker can also make noises.
The high-efficiency compressor may make a pulsating or high-pitched sound.
18
Water running from the water tank to the evaporator plate m ay make a splashing sound.
Water running from the evaporator to the water tank may make a splas hing sound.
As each cycle ends, you may he ar a gurgling s ound due to the refrigerant flowing in your ice maker.
You may hear air being forced over the condenser by the condenser fan. During the harvest cycle,
you may hear the sound of ice cubes falling into the ice storage bin.
When you first start the ice maker, you may hear water
running continuously. The ice maker is
programmed to run a rinse cycle before it begins to make ice.
Preparing the Ice Maker for Long Storage
If the ice maker will not be used for a long time, or is to be moved to another place, it will be necessary
to drain out all of the water in the system.
1. Allow all of the ice cubes have been ejected from the evaporator of ice maker.
2. Turn off the unit, and unplug the power cord.
3. Drain out all of the water inside the unit according to section “Wate
r Drainage”. When all of the
water has been drained out, to install back the water drain pipe of the water tank..
4. Disconnect the water drainage pipe to the main drain pipeline or floor drain, plug on the drain cap
again.
5. Drop the do or open to allow for circulation and prevent from molding and mildewing.
6. Leave the power cord disconnected until ready to reuse.
7. Dry the interior & wipe the outside of the unit.
8. Put a plastic bag on the unit to resist out dust & dirty.
CLEANING & MAINT ENANCE
WARNING: Before carrying out any cleaning or mainten ance operat ions, unplug the ice maker from
the main po wer supply electricity. (EXCEPTION: Ice maker self-cleaning program ).
Do not use any alcohol or fume for cleaning or sanitization of the ice maker. It may cause
cracks on the plastic parts.
Ask a trained service person to check and clean the condenser at le ast once a year, in
order to let the unit work properly.
This appliance must be cleaned by use of a water j
et.
Periodic cleaning and proper maintenance will ensure efficiency, top performance, hygie nic, and long
life. The mainten ance intervals listed are based on normal conditions. You may want to shorten the
intervals if you have pets, or the unit is used outdoors, or there are other special consideration s.
What shouldn't be done
Never keep anyt hing in the ice storage bin that is not ice: objects like wine an d beer bottles are no t only
If the ice maker has been left unused for a lon g time, before the
next use it must be thoroughly cleaned. Follow carefully any
instructions provided for cleaning or use of sa nitizing solution.
Do not leave any solution inside the ice maker after clea ning.
19
unsanitary, but also it’s labels may slip off and obstruct the drain pipe.
Exterior Cleaning
The door and cabinet may be cleaned with a mild detergent and warm water solution such as 28g of
dish washing liquid mixed with 7.5L of warm water. Do not use solvent-based or abrasive cleaners. Use
a soft sponge and rinse with clean wat er. Wipe with a soft clean towel to prevent water spotting.
The side steel plate can discolor when exposed to chlorine gas and sho uld be cleaned. Clean t
he steel
plate with a mild detergent and warm water solution and a damp cloth. Never use abrasive cleaning
agents.
Interior Cleaning
For Ice Storage Bin
The ice storage bin should be sanitized occasionally. Clean the bin before the ice maker is used for the
first time and reused after stopping for an extended perio d of time. It is usually convenient to sanitize
the bin after the ic e making system has been cleaned, and the storage bin is empty.
1. Disconnect power to the unit.
2. Op
en the door and with a clean cloth, wipe down the interior with a sanitizi ng solution made of
28g of househol d bleach or chlorine and 7.5L of hot water (35℃ to 46℃).
3. Rinse thoroughly with clear water. The waste water will be drained out through the drain pipe.
4. Reconnect power to the unit.
The ice scoop should be washed reg ularly. Wash it just like any other food container.
Ice Making Parts Cleaning
During the using, periodically to clean these main system of your ice-maker.
1\Repeat above step to clean the water tank and other inner pa rts of the unit.
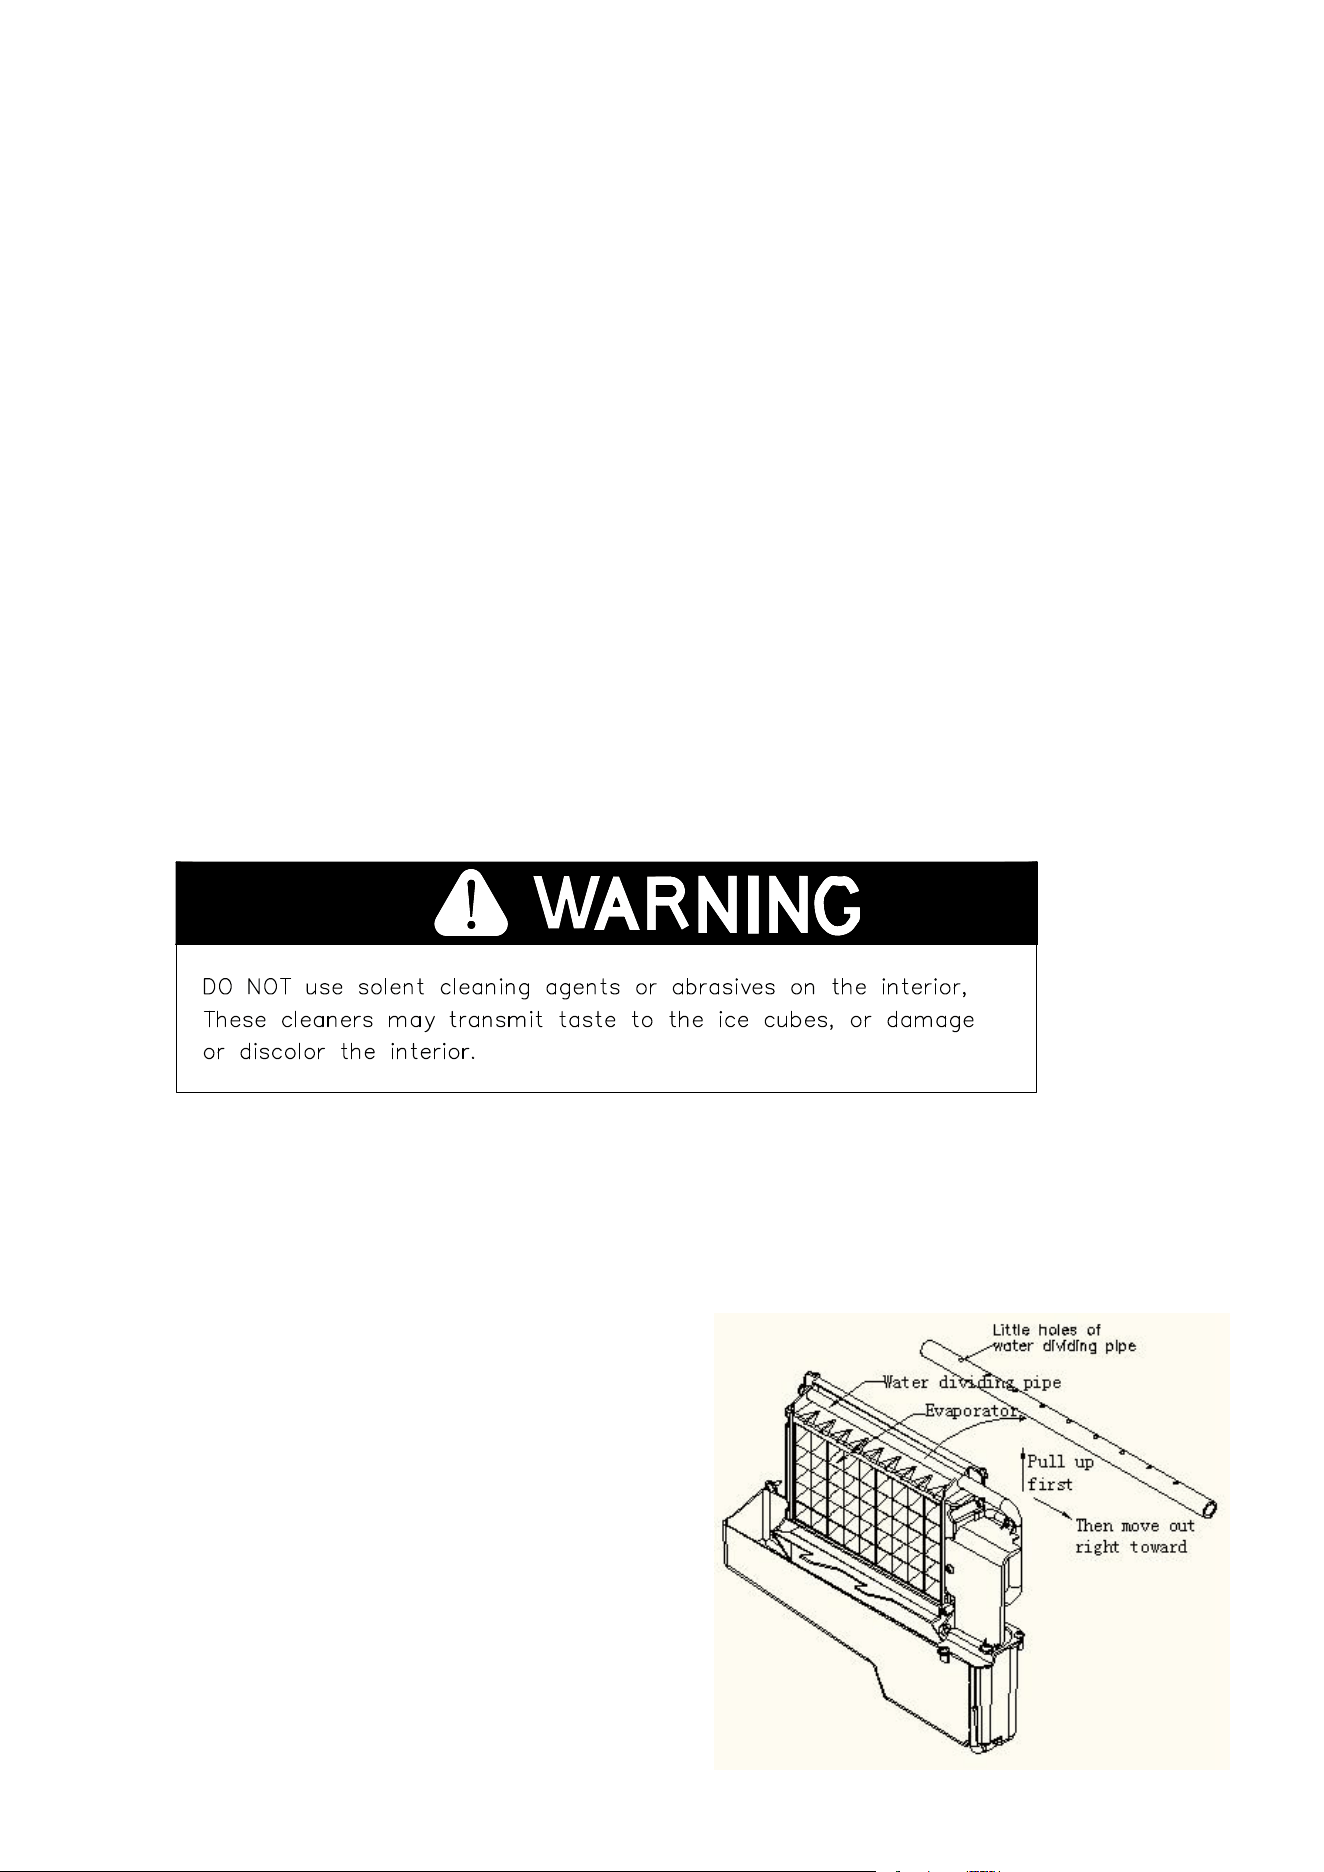
2\Especially, to the water dividing pipe on the evaporator, when the compressor and the water
pump run no rmally, but if there is no water flowing out from the water dividing pipe or the water flowing
is very small, please discharge this water dividing pipe to clean carefully. Clean each little holes on the
water dividing pipe dis played in the following illustrat ion, make sure each hole is not clogged b
y
something, then install back to the original location.
20
3\The length of cleaning period is related to your water quality. And drain the water more frequently,
the unit and its water pump can work much longer.
4\When there are ice cubes on the surface of the evaporator, but can’t fall off easily, do not use the
mechanical substance to remove it by force; Only press the “ON/FF” button for more than 5 seconds,
the unit will enter the ice melting process, after some while, the big ice-cubes will fall down, then turn off
the unit and unplug the power cord to clean the surface of the evaporator.
5\ For the water tank and ice-full detecting plate
Also the water tank and the ice-full detecting plate is very important to keep your ice cube hygienic.
Put mixture of neutral cleaner & water into a clean water jet, then spray to all the inner surface of tank &
the ice detecting plate. Wipe these surfaces as far as possible with a clean cloth. And then, spray the
surfaces with clean water, wiping with a dry clean cloth. Then drain out the cleaned water in the water
tank by pulling out the Water drain pipe of the water tank indicating “H” in above illustration. When all of
the cleaned water has been drained out, to install back the water drain pipe of the water tank.
Suggestion: After cleaning the interior parts and install back to its respective
position, and return machine to work, discard first batch of ice.
Ice Making Assembly System Cleaning by Using Nu-Calgon Nickle Safe
Ice-machine Cleaner
Minerals that are removed from water during the freezing cycle will eventually form a hard
scaly deposit in the water system. Cleaning the system regularly helps remove the mineral
scale buildup. How often you need to clean the system depends upon how hard your
water is. With hard water of 4 to 5 grains/liter, you may need to clean the system as often
as every 6 months.
1. Turn off the ice maker. Keep the ice maker connect to the water supply and
drainpipe. But shut off the water faucet of main water supply.
2. Open the door and scoop out all of the ice cubes. Either discard them or save them
in an ice chest or cooler.
3. Making the cleaning solution. Please mix the Nu-Calgon Nickle Safe Ice Machine
Cleaner with water to make the cleaning solution.
21
The ice machine cleaner contains acids.
DO NOT use or m ix with any other so lvent-based cleaner
products.
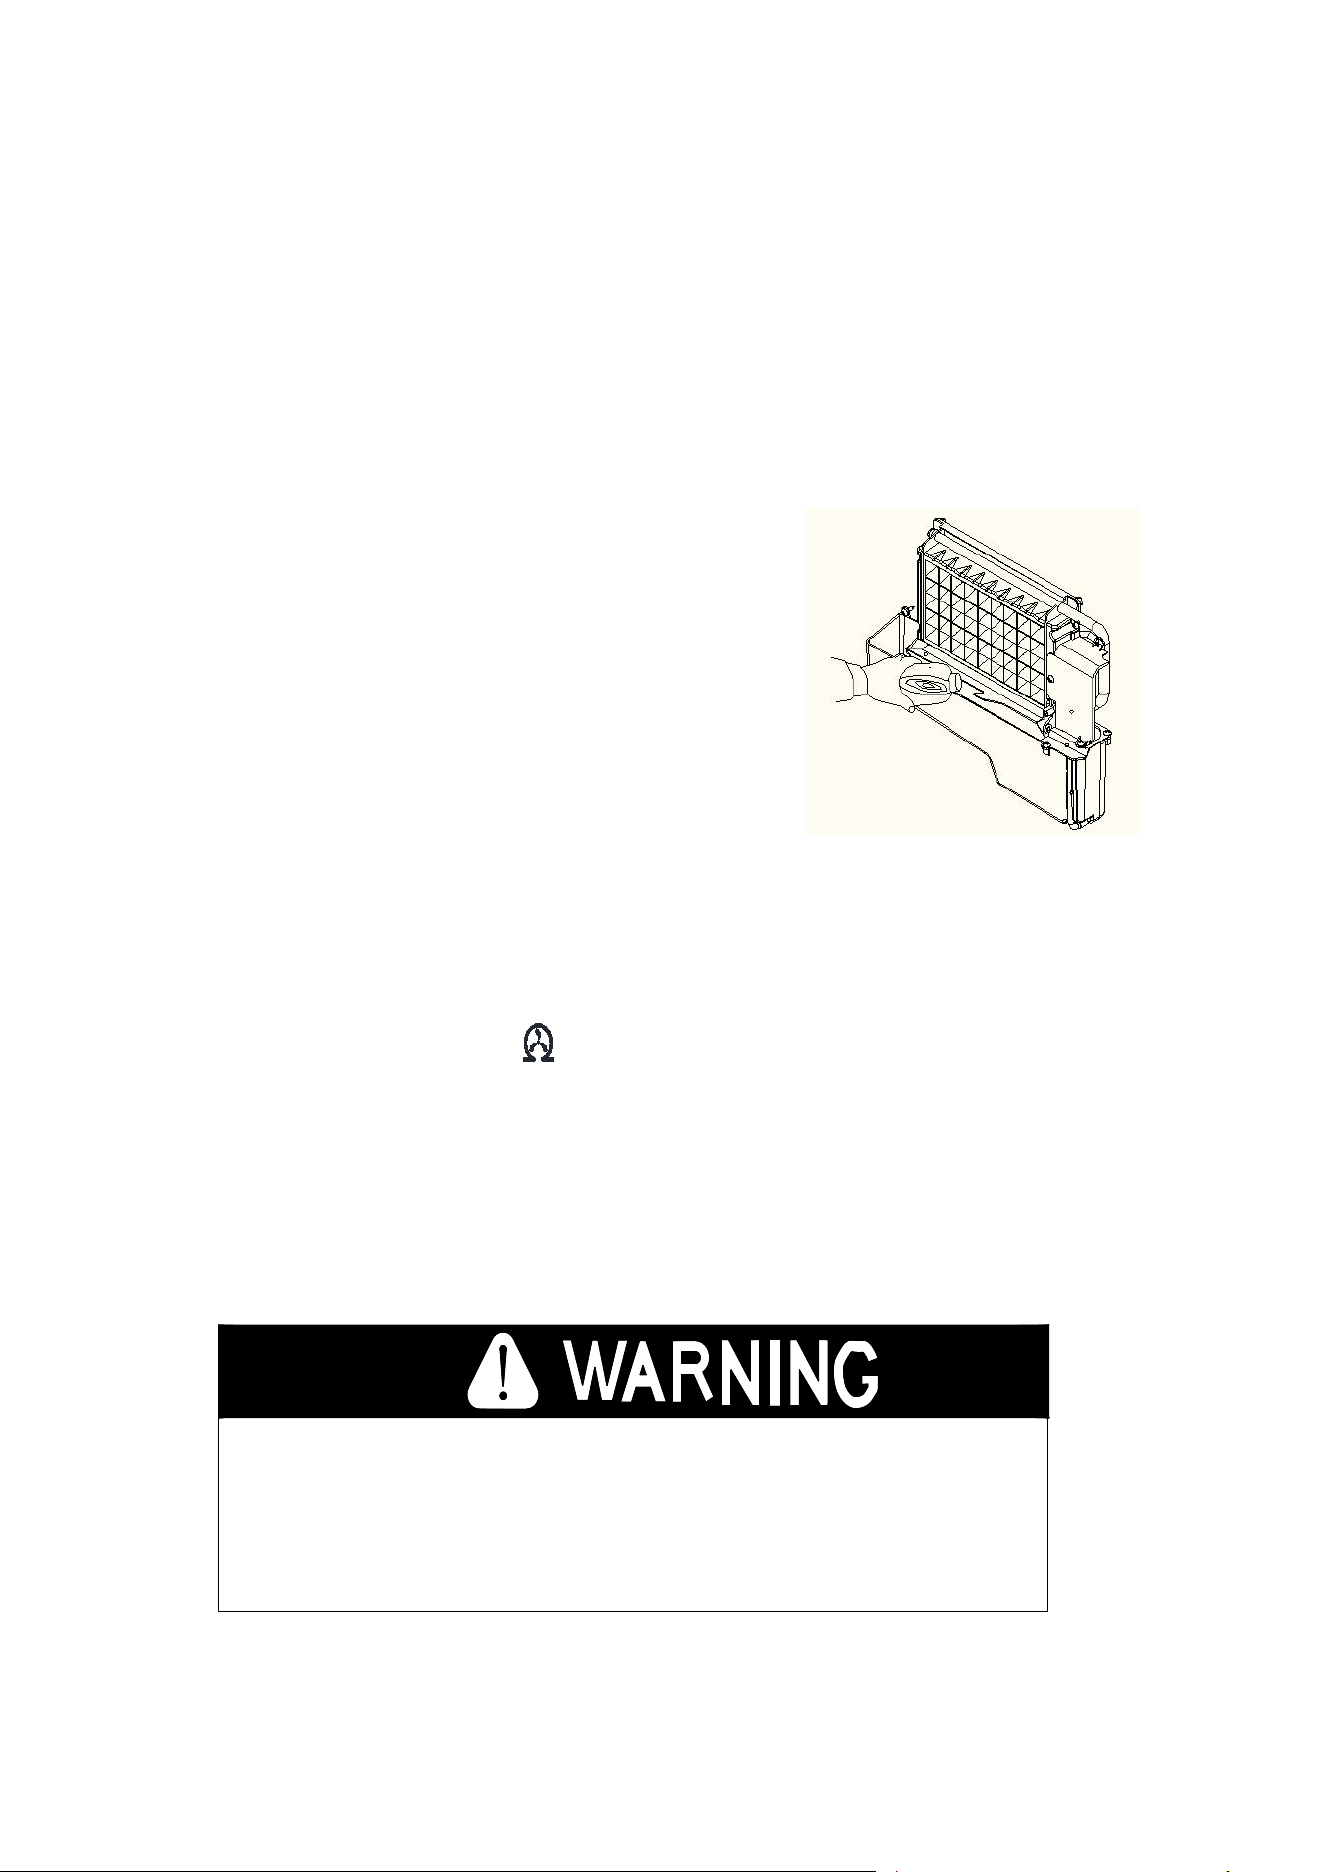
Use rub ber gloves to protect hands. Carefully read the material
safety instructions on the container of the ice machine cleaner.
DISCARD the first batch of ice troduced after cleaning.
Use a plastic or stainless container with more than 4 liters capacity, mix 300 ml
Nu-Calgon Nickle Safe Ice-machine Cleaner with 2.8 liters warm water about 50-60 ℃,
Then divide them for 2 shares equally in 2 cups. It is b etter to keep the temperature o f
each cup of the cleaning solution.
4. Check to be sure that the water drain pipe of the water tank has been installed
properly in th e slot of the tank wall. Then Pour one cup of Nickel-Safe Ice Maker
Cleaning Solution into the water tank. Wait a bout for 5 minutes.
5. Turn on the power to the ice maker, then press
“
TIMER/ CLEA N
”
button on control
panel for more than 5 seconds, to enter the self-Cleaning program. Same as above
explanation, the water pump runs for 8 minutes and stops for 3 minutes, one cycle,
again one cycle. The total duration time is 20 minutes for one self-cleaning
program.
During this process, the “
”
symbol will always be on during this pe riod, and the
digit window will indicate the left time,
6. After 20 minutes of one se lf-cleaning program completing, pull out the drain pipe of
the water tank, drain the cleaning solution down to the lower ice storage bin. Shake
the unit slightly to drain out all of the cleaning solution completely. Then install back
the drain pipe to the slot of the water tank.
7. Repeat steps 4--6 to clean the ice making assembly system again.
8. Then open the water faucet of the main water supply, Let the water flow in the unit.
And press the“TIMER/CLE
AN”button on control p anel for more t han 5 seconds, to

22
enter the self-Cleaning program
9. Same as above explanation, the water pump runs for 8 minutes and stops for 3
minutes, one cycle, again one cycle. The total duration time is 20 minutes for one
self-cleaning program.
During this process, the “
”
symbol will always be on during this period, and
the digit window will indicate the left time. Through this process, It will rinse the
water dividing pipe, evaporator, water pump, silicone pipe, and water tank, etc..
10. After one self-cleaning program complete, then pull out the drain pipe of the water
tank, drain the cleaning solution down to the lower ice storage bin, also shake the
unit slightly to drain out all of the water completely. Then install back the drain pipe
to the water tank slot tightly.
11. Repeat the step 8-9 again for 2 times.
12. Following the above program to clean the ice storage bin .
13. Then this special cleaning program finish, you can return to the regular ice making
mode. And suggest to discard the first batch of ice cube.
Cleaning Suggestion
1) DAILY CLEANING
The ice shovel, door and the water dividing pipe should be cleaned by yourself per each day. At
the end of every day, rinse the ice shovel and wipe the both sides of the door with a clean cloth.
2) SEMI-MONTHLY CLEANING
The ice shovel, ice bin, water tank, the ice-full detecting plate and the surface of the evaporator
are to be cleaned by yourself semi-monthly according to interior cleaning program.
3) SEMI-ANNUAL CLEANING
All the components & surfaces exposed to water or ice cubes, like ice storage bin, water tank, door,
evaporator, water pump, silicone tube, water dividing pipe, etc. should be cleaned
by Using
Nu-Calgon Nickle Safe Ice-machine Cleaner per each 6 months. They should be
cleaned by the serviceman according to ice making assembly system cleaning program.
23
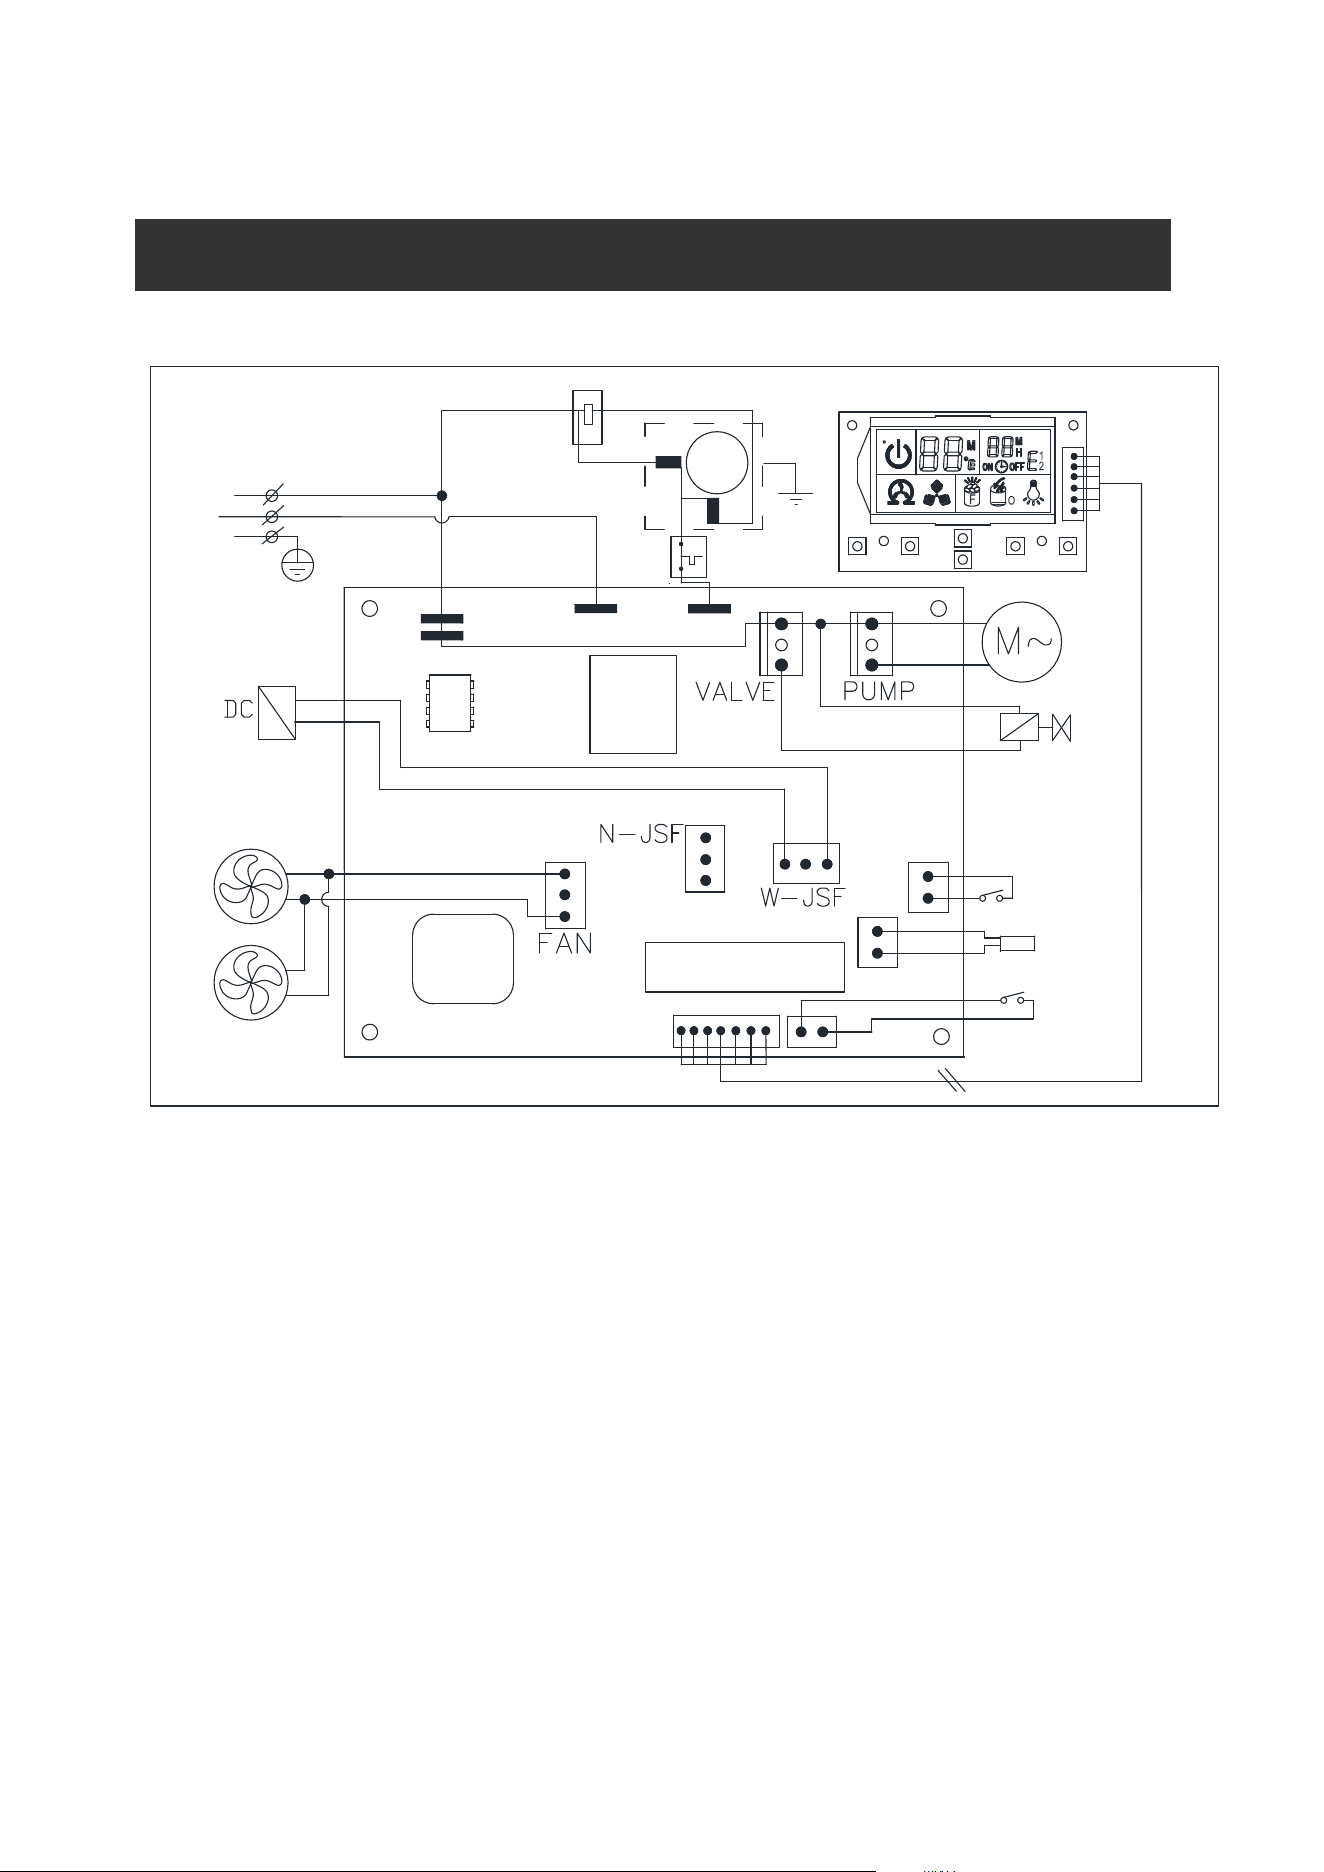
MCU
Room Temp
Sensor
T1
Water Level
Switch
RELAY
COMP
AC-L
N
Power Supply
L
G
AC-N
Ice-harvest
Solenoid Valve
6C
Electrical Diagram
for Ice-maker
T1
Ice-Full
Detecting Switch
DC Fan for
Condenser
RT
WATER
ICE
AC Pump
Starting
Relay
M
~
AW
MW
Overload
Protector
COMPRSSOR
Main PCB
Control panel PCB
Main Water Supply
Control Valve
W
IRING DIAGRAM
24
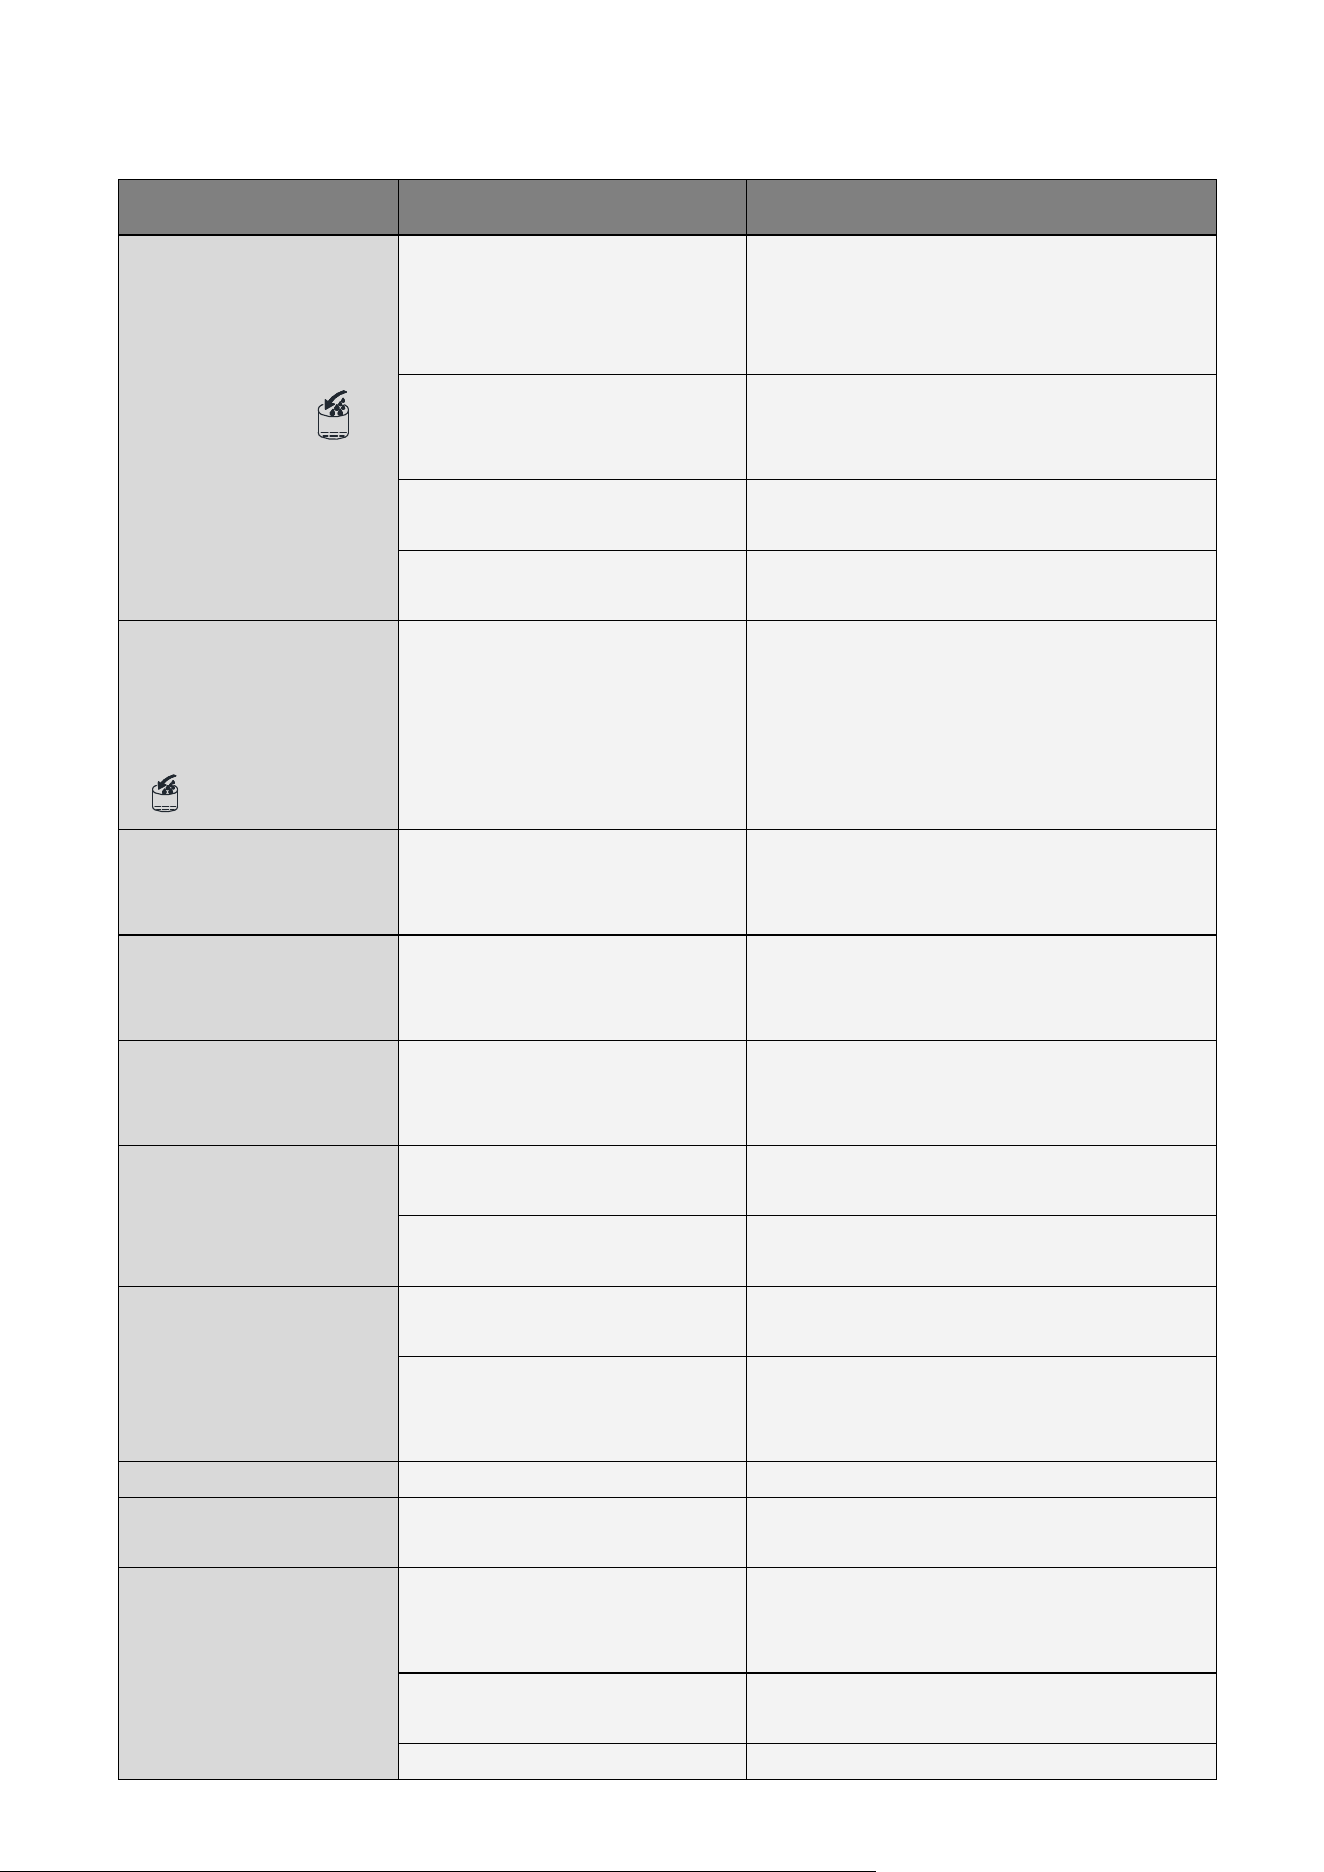
Problem
Possible Cause Solution
The whole “ ”
symbol is always on.
No water in unit
The main water pressure is too low or the
water supplying hose is blocked. Check
them and increasing the water pressure
and clean the supplying hose.
Floating ball of the water level
detecting switch is blocked,
can’t be raised up
Clean the water tank and the water level
detecting switch 。
Water flows out from the side of
the water tank
Place the unit on the level position, not on
the slope。
Water flows out from the water
drain pi pe of the water tank.
Pull out the pipe and install back to the right
side s lot of the water tank properly.
The unit enter the ice
making process, but
no water flowing in
the unit, and the whole
“
” symbol is on.
No wat er in water chargi ng
tank, or the water supplying
problem , or the silicone pipe
of water tank isn’t on the
correct position.
The main water pressure is too low or the
water supplying hose is blocked. Check
them and increasing the water pressure
and clean the supplying hose。
The silicone pipe of water tank should be
clamped in the slot of the water tank side.
Water pump work, but
no water flow out from
the water dividing pipe
The little holes on the water
dividing pipe is blocked.
Clean these little holes.
Water circulation
pump doesn’t work
Some special substance in
water tank block the pump
blade.
Clean the water tank and the water pump
The transparency of
the ice cube is not very
good
Water quality is bad
Use the water filter or water purifier to
soften or filter the water.
Ice cube shape is
irregular
Water quality is not good or the
water tank is ve ry dirty
Clean the water tank, and change with new
water.
。
The little holes on the water
dividing pipe is some blocked
Clean the water dividing pipe, make sure
all nine holes are unclogged
Ice cube is very thin
Ambient temperature is too
high
Move the unit to low temperature space, or
lengthen the time of each ice making cycle.
Air circulation around the unit is
not goog
Make sure there is more than 20CM s pace
between the unit back & front and the
obstacle
Ice cube is too thick
Ambient temperature is too low
Reduce the time of each ice making cycle.
“ICE-FULL” symbol is
on
The ice storage bin is full of the
ice cube.
Take out some ice c ube
Ice making cycle is
normal, but there is no
ice cube produced
The temperature of ambient, or
water in water tank is too high
Move to the plac e with temperature lower
than 32 centigrade, and change to the low
temperature water
Refrigerant leakage, E2 error
code display
Need the technical serviceman to maintain
Cooling system tube is clogged Need the technical serviceman to maintain
NORMAL TROUBLE SHOOTING
25
Product Warranty
The manufacturer provides warranty in accordance with the legislation of the customer's own country
of residence, with a minimum of 1 year (Germany: 2 years), starting from the date on which the
appliance is sold to the end user.
The warranty only covers defects in material or workmanship.
The repairs under warranty may only be carried out by an authorized service centre. When making a
claim under the warranty, the original bill of purchase (with purchase date) must be submitted.
The warranty will not apply in cases of:
- Normal wear and tear
- Incorrect use, e.g. overloading of the appliance, use of non-approved accessories
- Use of force, damage caused by external influences
- Damage caused by non-observance of the user manual, e.g. connection to an unsuitable mains
supply or non-compliance with the installation instructions
- Partially or completely dismantled appliances
Correct Disposal of this product
This marking indicates that this product should not be disposed with
other household wastes throughout the EU. To prevent possible harm to
the environment or human health from uncontrolled waste disposal,
recycle it responsibly to promote the sustainable reuse of material
resources. To return your used device, please use the return and
collection systems or contact the retailer where the product was
purchased. They can take this product for environmental safe recycling.

