
E S S E N T I A L S FOR LIFE
User
Manual
MODEL
GGSBC131B
V1.3 | 0526
131L Capacity
Beverage Chiller
2
Purchase Details
For future reference, please record the following information which can be found on the rating plate
and the date of purchase which can be found on your sales invoice.
STORE DETAILS
STORE NAME
|
ADDRESS
|
TELEPHONE
|
PURCHASE DATE
|
PRODUCT DETAILS
MODEL NO.
|
SERIAL NO.*
|
Attach your receipt
to this page

Contents 2 Purchase Details
5 Welcome
6 Safety Instructions
10 Installation
12 Your Beverage Chiller
13 Operational Instructions
14 Storage Arrangement
15 Cleaning & Maintenance
16 FAQ's & Troubleshooting
17 Technical Specifications
18 Warranty Information
Customer Care
Sôlt recommends the use of original spare parts. When contacting our customer service team, please ensure
that you have the following information at hand (which can be found on your appliances’ rating plate).
— Model Number
— Serial Number
T . 1300 11 4357 | E. support@residentiagroup.com.au

4
This page
is intentionally
left blank

5
Welcome Congratulations on purchasing
your new Beverage Chiller!
The Sôlt brand is proudly
distributed within Australia
by Residentia Group Pty Ltd.
Please refer to the warranty card at the rear of this manual
for information regarding your product’s parts and labour
warranty, or visit us online at www.residentia.group
At Residentia Group, we are customer obsessed and our
Support Team are there to ensure you get the most out of
your appliance. Should you want to learn more about your
appliance features, and importantly taking care of your
appliance when cleaning, our Support Team are here
to help.
You can use our online Support Centre at anytime by
visiting http://support.residentiagroup.com.au, or you can
contact us via calling us on 1300 11 HELP (4357).
It is important that you read through the following use and
care manual thoroughly to familiarise yourself with the
installation and operation requirements of your appliance
to ensure optimum performance.
Again, thank you for choosing an Sôlt appliance and we
look forward to being of service to you.
Kind Regards,
The Residentia Team
Residentia Group
—
Head Office.
165 Barkly Ave
Burnley
Victoria 3121
Australia
—
ACN.
600 546 656
—
Online.
residentia.group
Sôlt
—
Online.
www.Sôlt.house
—
Instagram.
/Sôlt.house
—
Facebook.
/Sôlt.appliances
6
IMPORTANT INFORMATION THAT MAY IMPACT YOUR
MANUFACTURER’S WARRANTY
Adherence to the directions for use and installation
guidelines within this manual is extremely important for
both your health and safety. Failure to strictly adhere
to the requirements within this manual may result in
personal injury, property damage and affect your ability
to make a claim under the Sôlt manufacturer’s warranty
provided with your product. Products must be used,
installed and operated in accordance with this manual.
You may not be able to claim on the Sôlt manufacturer’s
warranty in the event that your product fault is due to
failure to adhere to this manual.
IMPORTANT SAFETY INSTRUCTIONS
READ CAREFULLY AND KEEP FOR FUTURE REFERENCE
Read this manual thoroughly before first use, even if
you are familiar with this type of product. The safety
precautions enclosed herein reduce the risk of fire,
electric shock and injury when correctly adhered to.
Make sure you understand all instructions and warnings.
Keep the manual in a safe place for future reference,
along with the completed warranty card and purchase
receipt. If you sell or transfer ownership of this product,
pass on these instructions to the new owner.
Always follow basic safety precautions and accident
prevention measures when using an electrical appliance,
including the following:
IMPORTANT: Pay particular attention to messages that
contain the words DANGER, WARNING or CAUTION.
These words are used to alert you to a potential hazard
that can seriously injure you and others. The instructions
will tell you how to reduce the chance of injury and let
you know what can happen if the instructions are not
followed.
The refrigerant isobutane (R600a) is contained within
the refrigerant circuit of the appliance, a gas with a
high level of environmental compatibility, which is
nevertheless flammable. During transportation and
installation of the appliance, ensure that none of the
components of the refrigerant circuit become damaged.
WARNING: Do not damage the refrigerant circuit!
Never use an appliance with a damaged refrigerant
circuit! If the refrigerant circuit becomes damaged, avoid
proximity to open fires and all types of heat and ignition
sources. Thoroughly ventilate the room in which the
appliance is located.
DANGER: It is hazardous for anyone other than an
authorised service person to service this appliance.
In Queensland, the authorised service person MUST hold
a Gas Work Authorisation for hydrocarbon refrigerants
to carry out servicing or repairs which involve the
removal of covers.
The room for installing the appliance must be at
least 1m. per 8g of refrigerant. The amount and type
of refrigerant in the appliance can be found in the
Technical Specifications section of this user manual and
on the rating plate, found on the rear of the appliance.
The information in this user manual is subject to
modification without any prior notice. Updated manuals
will be made available online via the Sôlt website.
Sôlt offers no guarantee for our Beverage Chiller if it is
being used for any purpose other than that for which it
was specifically designed.
Sôlt cannot be held responsible for any error in this
manual.
USAGE CONDITIONS AND RESTRICTIONS
• Domestic use only: This appliance is intended
for indoor household use only. It is not intended
for commercial, industrial or outdoor use. It is not
intended for use in a recreational vehicle.
• Purpose: Do not use this appliance for anything
other than its intended purpose. Other uses are not
recommended and may cause fire, electric shock or
personal injury.
• Attachments: The use of attachments is not
recommended by the appliance manufacturer and
distributor as they may be hazardous.
• Improper use: Damage due to improper use, or
repairs made by unqualified personnel will void your
warranty. We assume no liability for any eventual
damages caused by misuse of the product or
noncompliance with these instructions.
Safety Instructions
This symbol alerts you to
take care as this appliance
contains a flammable
refrigerant (isobutane)
and insulation blowing gas
(cyclopentane).
Do not expose it to high heat,
sparks and open flames.

7
• WARNING: Do not use mechanical devices or other
means to accelerate the defrosting process, other
than those recommended by the manufacturer.
• Usage restriction: This appliance is not intended for
use by persons (including children) with reduced
physical, sensory or mental capabilities, or lack of
experience and knowledge, unless they have been
given supervision or instructions concerning use of the
appliance by a person responsible for their safety.
• Children: Supervise young children to ensure they do
not play with the appliance. Never allow children to
operate, play with or crawl inside the appliance.
• WARNING: Do not use electrical appliances inside the
appliance, unless they are of the type recommended
by the manufacturer.
• Explosive or flammable substances: Do not store
explosive substances such as aerosol cans with a
flammable propellant in this appliance. Do not store
or use petrol or any other flammable vapours and
liquids in the vicinity of this or any other appliance. Do
not use such substances for cleaning the appliance.
The fumes can create a fire hazard or an explosion.
• Damage: Do not use the appliance if the power cord,
plug or the appliance itself is damaged. If the cord
is damaged, contact the after sales support line and
have the cord replaced by qualified personnel in
order to avoid a hazard.
• WARNING: Do not damage the refrigerant circuit.
• Do not modify: Do not attempt to alter or modify this
appliance in any way.
• Repair: Do not attempt to repair or replace any part
of this appliance unless it is specifically recommended
in this manual. All other servicing should be referred
to a qualified technician. Contact the after sales
support line for advice.
• WARNING: Do not locate multiple portable socket-
outlets or portable power supplies at the rear of the
appliance.
• Usage: The gaps between cooler door and cooler
body are small, because not to jam your fingers in
these areas. Please be gentle when close or open the
cooler door to avoid falling objects.
• Care: Do not use cooler body, cooler door, etc. as
pedal or support
ELECTRICAL SAFETY
• Voltage: Before connecting and turning on the
appliance, ensure the electrical voltage and circuit
frequency correspond to that indicated on the
appliance rating label.
• Earthing: This appliance should be properly earthed
for your safety. The power cord of this appliance is
equipped with a three-prong plug for use in standard
wall outlets to minimise the possibility of electrical
shock. Do not modify the cord and/or plug provided
with the appliance. Improper use of the earthed plug
can result in the risk of electric shock.
• Connection: This appliance requires a standard
220-240 V AC 50Hz electrical outlet. Do not overload
the electrical circuit.
• Power cord: Do not kink or damage the power cord;
do not leave it exposed or dangling. Secure it at the
back of the appliance so no one steps on or places
anything on the cord or against it. Keep the cord out
of reach of children. When moving the appliance,
make sure not to damage the power cord. When
removing the power cord, firmly grasp the plug and
pull out it from the socket directly.
• Auxiliary Items: Do not use an inverter, adaptor or
extension cord with this appliance. If the cord is too
short, have a qualified electrician install an outlet
near the appliance. Use of an extension cord and an
inverter can negatively affect the performance of the
unit.
• Protect from moisture: To protect against the risk of
electric shock, do not immerse the unit, cord or plug in
water or spray it with any other liquid. Do not connect
or disconnect the electric plug when your hands are
wet. Turn the power switch off before removing the
plug from the socket.
• WARNING: Disconnect! To reduce the risk of fire,
electric shock or personal injury, always unplug the
appliance from the socket when not in use, when
moving and before cleaning or servicing. Never
unplug the unit by pulling the power cord. Always grip
the plug firmly and pull straight out from the power
point.
• Electrical work: Any electrical work required for the
installation of this appliance should be carried out by
a qualified electrician.
• Never use this appliance with a damaged refrigerant
circuit! If the coolant circuit becomes damaged, avoid
proximity to open fires and all types of heat sources.
The room in which the appliance is located should be
ventilated for a few minutes.
• WARNING: Leaking Gas: In the case of leaking gas,
turn off the valve of the leaking gas, open the doors
and windows in case of leakage of gas and other
flammable gases. Do not unplug the cooler and other
electrical appliances considering that spark may
cause a fire.

8
INSTALLATION
Damage: When unpacking, check the appliance
carefully for damage. If it is damaged, do not install the
appliance. Contact our after sales support centre on
1300 11 4357 for advice on examination or return of the
damaged appliance.
Protect from moisture: Install the appliance in an indoor
area protected from wind, rain, water spray or drips.
Protect from heat: Do not install the appliance next to
an oven, grill or other source of high heat, or where it will
be exposed to direct sunlight.
WARNING: Ventilation: To ensure proper ventilation,
keep any ventilation openings, in the appliance
enclosure or in the built-in structure, clear of
obstructions. Ensure adequate air circulation around the
appliance to prevent overheating. This is a freestanding
model which can be built-in providing the ventilation
requirements are followed within this manual.
Level: Install the appliance level in order to ensure
proper operation.
Location: To ensure safety, the location
of your Beverage Chiller should:
• be unencumbered and well ventilated;
• be well away from any heat source
and direct sunlight;
• be well ventilated and not too damp
(i.e. avoid laundries, bathrooms, etc);
• be indoors (avoid outdoor environments such as
garages, even where they are roofed);
• have a flat, solid and level floor;
• have a standard and reliable electricity supply
(including normal power outlet which is earthed);
Note! It’s not recommended connecting your
beverage centre to a power-board or extension lead.
• have a surge protector fitted to the electrical outlet;
• be away from any microwave ovens. Certain
microwave ovens do not have wave interference
shields and when placed within 1 meter of your
beverage chiller, they may affect its operation.
• be located where the ambient temperature is
between 5° C and 35° C. If the ambient temperature is
outside (above or below) this range, the performance
of your appliance may be affected.
Children: Do not give packaging and other
components to children to play with. The bending
board and plastic film may lead to suffocation!
Children should be supervised to ensure that they
do not play with the appliance.
CLEANING AND MAINTENANCE
Disconnect: Unplug the appliance before cleaning or
servicing. Failure to do so can result in electric shock,
injury or death. Do not connect or disconnect the plug
when your hands are wet.
Flames: Do not let open flames or ignition sources enter
the appliance.
Flammable/explosive substances: Never clean this
appliance with flammable fluids. Do not store or use
volatile, flammable or explosive propellants or liquids
in or close to this or any other appliance. The fumes can
create a fire hazard or explosion.
Washing: Do not spray or wash the appliance; do not
put the beverage chiller in moist places that could allow
the appliance to be easily splashed with water so as not
to affect the electrical insulation properties of the cooler.
Solvents: Do not use solvent based cleaning agents
or abrasives on the interior as these may damage or
discolour the surfaces of the appliances.
WARNING! Do not use mechanical devices or other
means to accelerate the defrosting process. Never use
a sharp or metal instrument to remove frost or clean the
appliance. Use a plastic scraper, if necessary.
Service: Do not attempt to repair, modify or replace any
part of the appliance unless specifically recommended
in this manual. Refer all other servicing to a qualified
technician, or contact the after sales support line for
advice on examination or repair of the appliance.
Safety Instructions (Continued)

9
WARNINGS RELATED TO PLACING ITEMS
• Objects: Do not place heavy objects on the top of
the beverage chiller considering that objects may fall
when opening or closing the door, and accidental
injuries might be caused.
• To ensure safety, do not store electrical appliances
(such as toasters, rice cookers, microwave ovens on
the top of the beverage cooler.
• Do not use electrical appliances in the food pantry.
• Items in the cooler: Do not put flammable, explosive,
volatile and highly corrosive items in the cooler to
prevent damages to the product or fire accidents.
• Flammable items: Do not place flammable items near
the cooler to avoid fires.
• Usage: This product is a household beverage chiller
and this equipment can only be used for the storage
of beverages (such as canned or bottled drinks).
According to the standard requirements, household
beverage chillers shall not be used for other purposes,
such as storage of blood, drugs, food or biological
products.
• For those models with door locks fitted, please ensure
the keys are kept out of the reach of children and not
in the vicinity of the appliance, in order to prevent
children from accidentally accessing.
ENERGY WARNINGS
• Your beverage chiller might not operate consistently
when used for an extended period of time below the
cold end of the range of temperatures for which the
appliance is designed.
• Do not exceed the recommended storage period
recommended by the beverage manufacturers for
any kind of product.
• Take necessary precautions to prevent an undue rise
in the temperature of the beverage while defrosting
the beverage cooler.
• A rise in temperature of a beverage during manual
defrosting, maintenance or cleaning could shorten
the storage life.
RESPONSIBLE DISPOSAL
Note: At the end of its working life, do not throw this
appliance out with your household rubbish. Electrical
and electronic products contain substances that can
have a detrimental effect on the environment and
human health if disposed of inappropriately. Observe
any local regulations regarding the disposal of electrical
consumer goods and dispose of it appropriately for
recycling and recovery of the refrigerant and blowing
agent. Contact your local council for advice on recycling
facilities in your area. When the beverage chiller is
scrapped, disassemble the doors, and remove gasket of
door and shelves; put the doors and shelves in a proper
place, so as to prevent entrapment.
WARNING! This refrigeration appliance contains
flammable refrigerants and insulation blowing gases,
which must be removed before disposal. Contact your
municipal authorities for any codes or regulations
concerning the disposal of such materials.
For more detailed information about treatment,
recovery and recycling of this product, please contact
your local city office, your household waste disposal
service or the shop where you purchased the product.
UNPACKING
• Packaging materials: This appliance has been
packaged to protect it against transportation
damage.
Remove all packaging materials from around and
inside the appliance including the bottom cushions,
foam pads, tapes inside the cooler, tear off the
protective film on the door and the cooler body. Keep
the original packaging carton and materials in a safe
place. It will help prevent any damage if the product
needs to be transported in the future, and you can
use it to store the appliance when it is not in use.
In the event the carton is to be disposed of, please
recycle all packaging materials where possible.
• Check: to see if all items are present.
• Inspect: the equipment and accessories for transport
damage. In case of complaints, the supplier is to be
informed immediately.
• Suffocation risk: Plastic wrapping can be a
suffocation hazard for babies and young children, so
ensure all packaging materials are out of their reach
and disposed of safely.
• Power cord: Unwind the power cord to its full length
and inspect it for damage. Do not use the appliance if
it or its cord have been damaged or are not working
properly. In case of damage, contact our after sales
support line for advice on examination, repair or
return of the damaged product.
• Read the manual: Read this manual to familiarise
yourself with the appliance. Pay particular attention
to the safety instructions in this section.
• Clean: To remove any dust from transit and storage,
clean the interior and exterior surfaces of the
appliance with lukewarm water and a soft cloth.
Dry thoroughly. Important! Do not use harsh or
abrasive detergents or powders as these will damage
the finish.
10
Installation
Floor surface: This appliance must be properly
positioned on a dry, sturdy, level surface that is strong
enough to support it when it is fully loaded. Rotate left
or right to adjust the levelling feet if unstable. If it is to
be placed on carpet, support it with a wooden board
underneath. Please use a spirit level to ensure your
beverage chiller is level on both the side and front.
Clearances: Ensure that air can circulate freely around
the back of the cabinet, which is necessary to cool
the compressor and condenser. Allow at least 10cm
clear space at the back and the sides of the appliance
and 30cm clear space at the top. Failure to do so will
increase compressor’s power and further increase power
consumption.
It is also necessary to maintain distance for doors to
open at least 90 degrees.
Important! Failure to allow for these clearances with
the positioning of your beverage chiller will void your
Manufacturer’s Warranty.
DO NOT install/use the appliance in the following
locations/situations:
• In moist areas or areas of high humidity (i.e. laundries,
bathrooms, etc).
• In a recreational vehicle, or for use with an inverter.
• In direct sunlight, near heat sources, next to an open
flame, cooking or heating appliance, or near any
other source of high heat.
• Direct sunlight may affect the acrylic coating
and heat sources may increase the unit’s power
consumption.
For best energy efficiency install the appliance in the
coolest area of the room.
• In an area with extreme cold ambient temperatures.
Never install your beverage chiller in enclosed
outdoor environments including garages.
• In an area with excessive moisture and high humidity.
Make sure it is protected from elements such as wind,
rain, water spray or drips.
• In an area where petrol or other explosive and/or
flammable liquids or fumes are used or stored.
The fumes can create a fire hazard or explosion.
ENERGY SAVING TIPS
The appliance should be placed in the coolest area
of the room, away from heat producing appliances
or heating ducts. A suitable insulation board shall be
applied if necessary.
Please avoid placement in direct sunlight.
Try to shorten opening time of cooler’s door. Regular
opening of your Beverage Chiller door may lead to
condensation on the glass door, particularly if the
external air is humid. This is completely normal with all
beverage chillers.
REVERSING THE DOOR
Preparation: Before starting, ensure the cabinet is
unplugged and empty. You will need a small flat-head
screwdriver (or a thin blade), a Phillips-head screwdriver,
and potentially a socket wrench for the bolts.
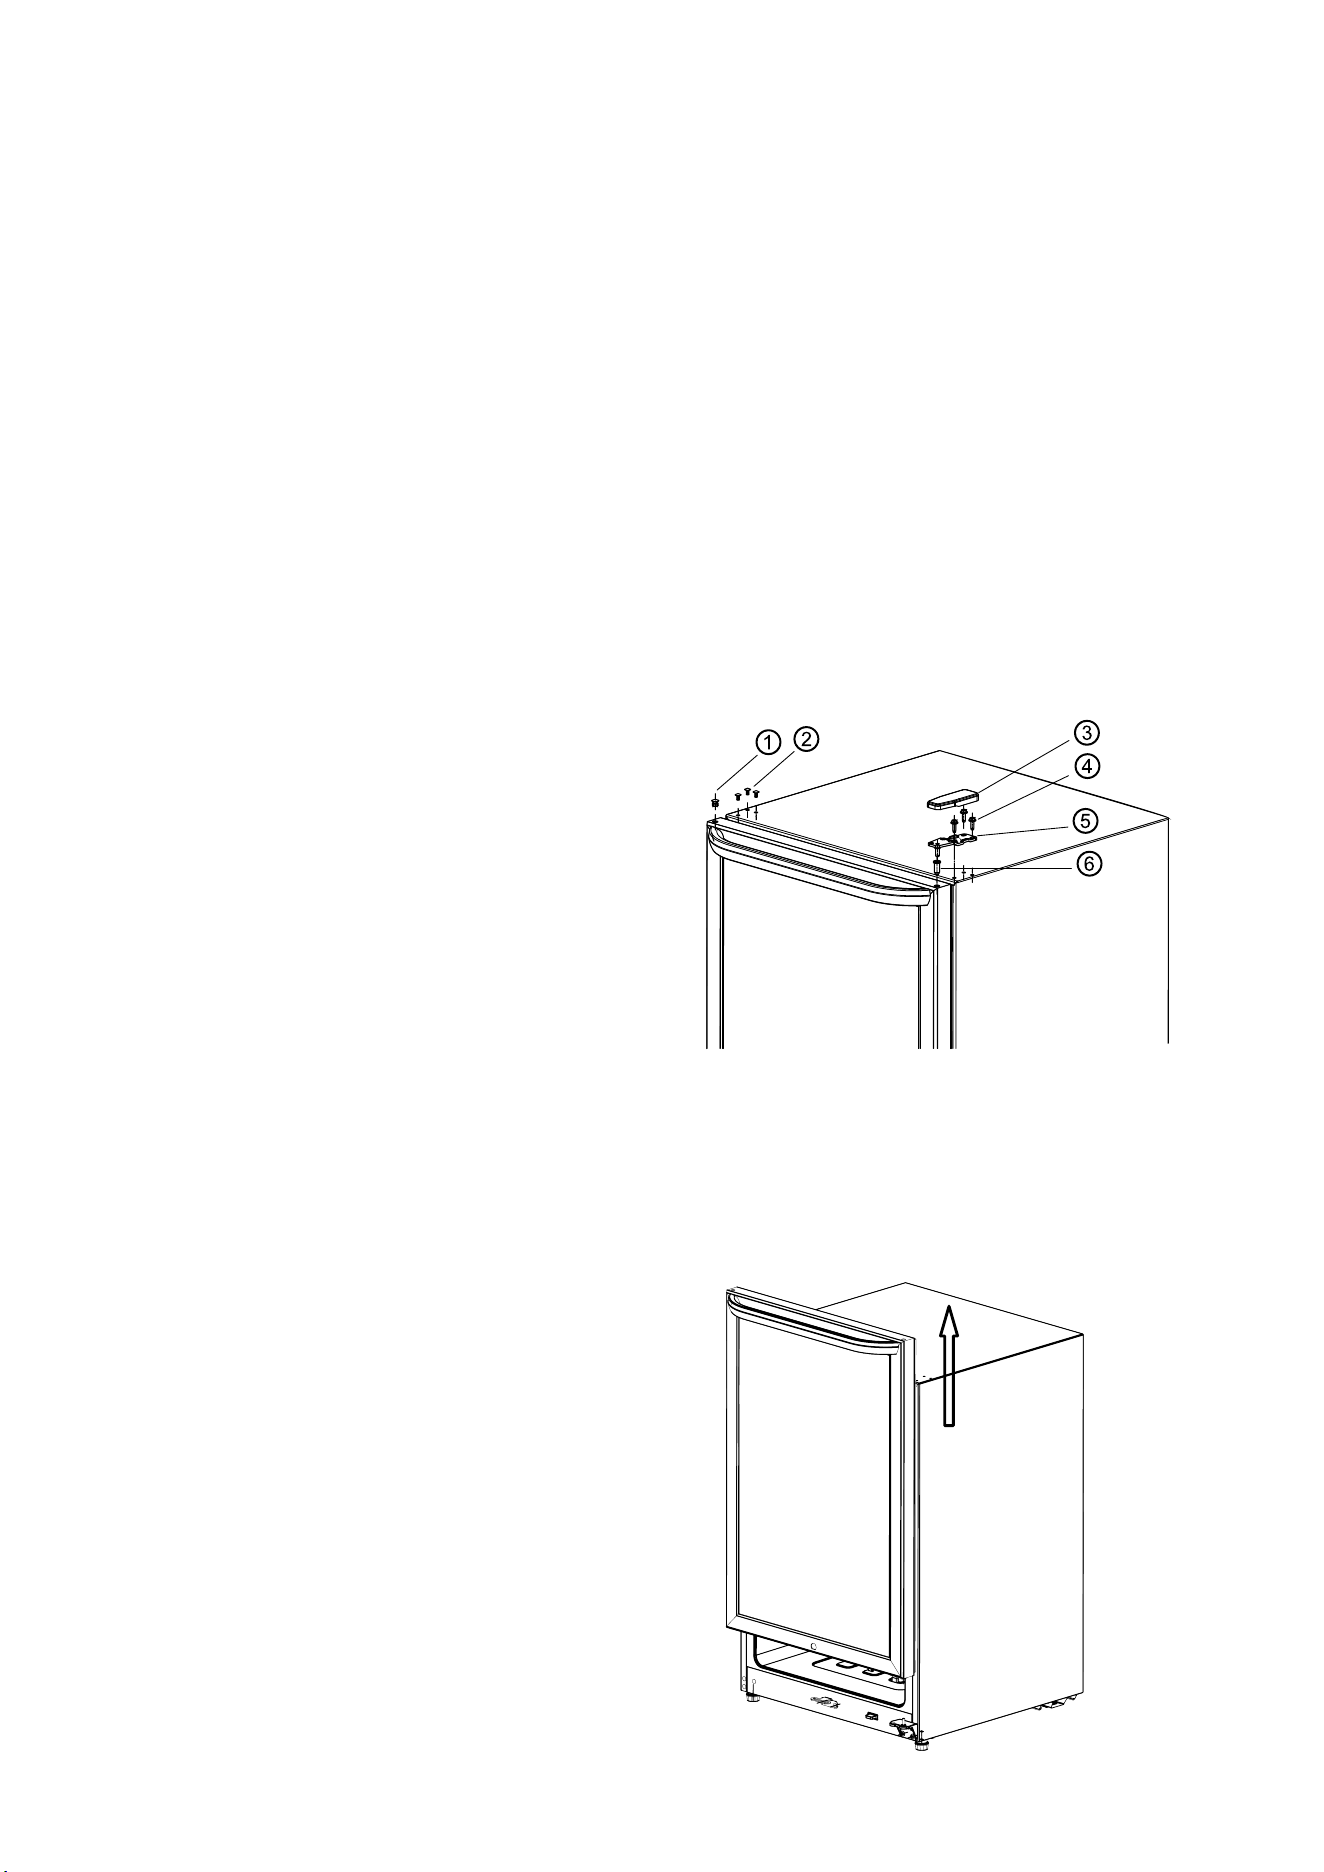
1. Remove the Top Hinge
Pop the covers: Use a thin blade to carefully pry off
the plastic screw hole covers (1 & 2) on the top-left of
the cabinet.
Remove the hinge cover: Lift off the plastic cover (3)
protecting the main hinge on the top-right.
Unbolt the hinge: Unscrew the three positioning
bolts (4) to release the upper hinge (5) and the axle
sleeve (6). Keep these parts together.
2. Remove the Glass Door
Carefully lift the glass door straight up and out of the
bottom hinge.
Note: The door is heavy and made of glass, so hold it
firmly or have someone help you steady it as you lift.
11
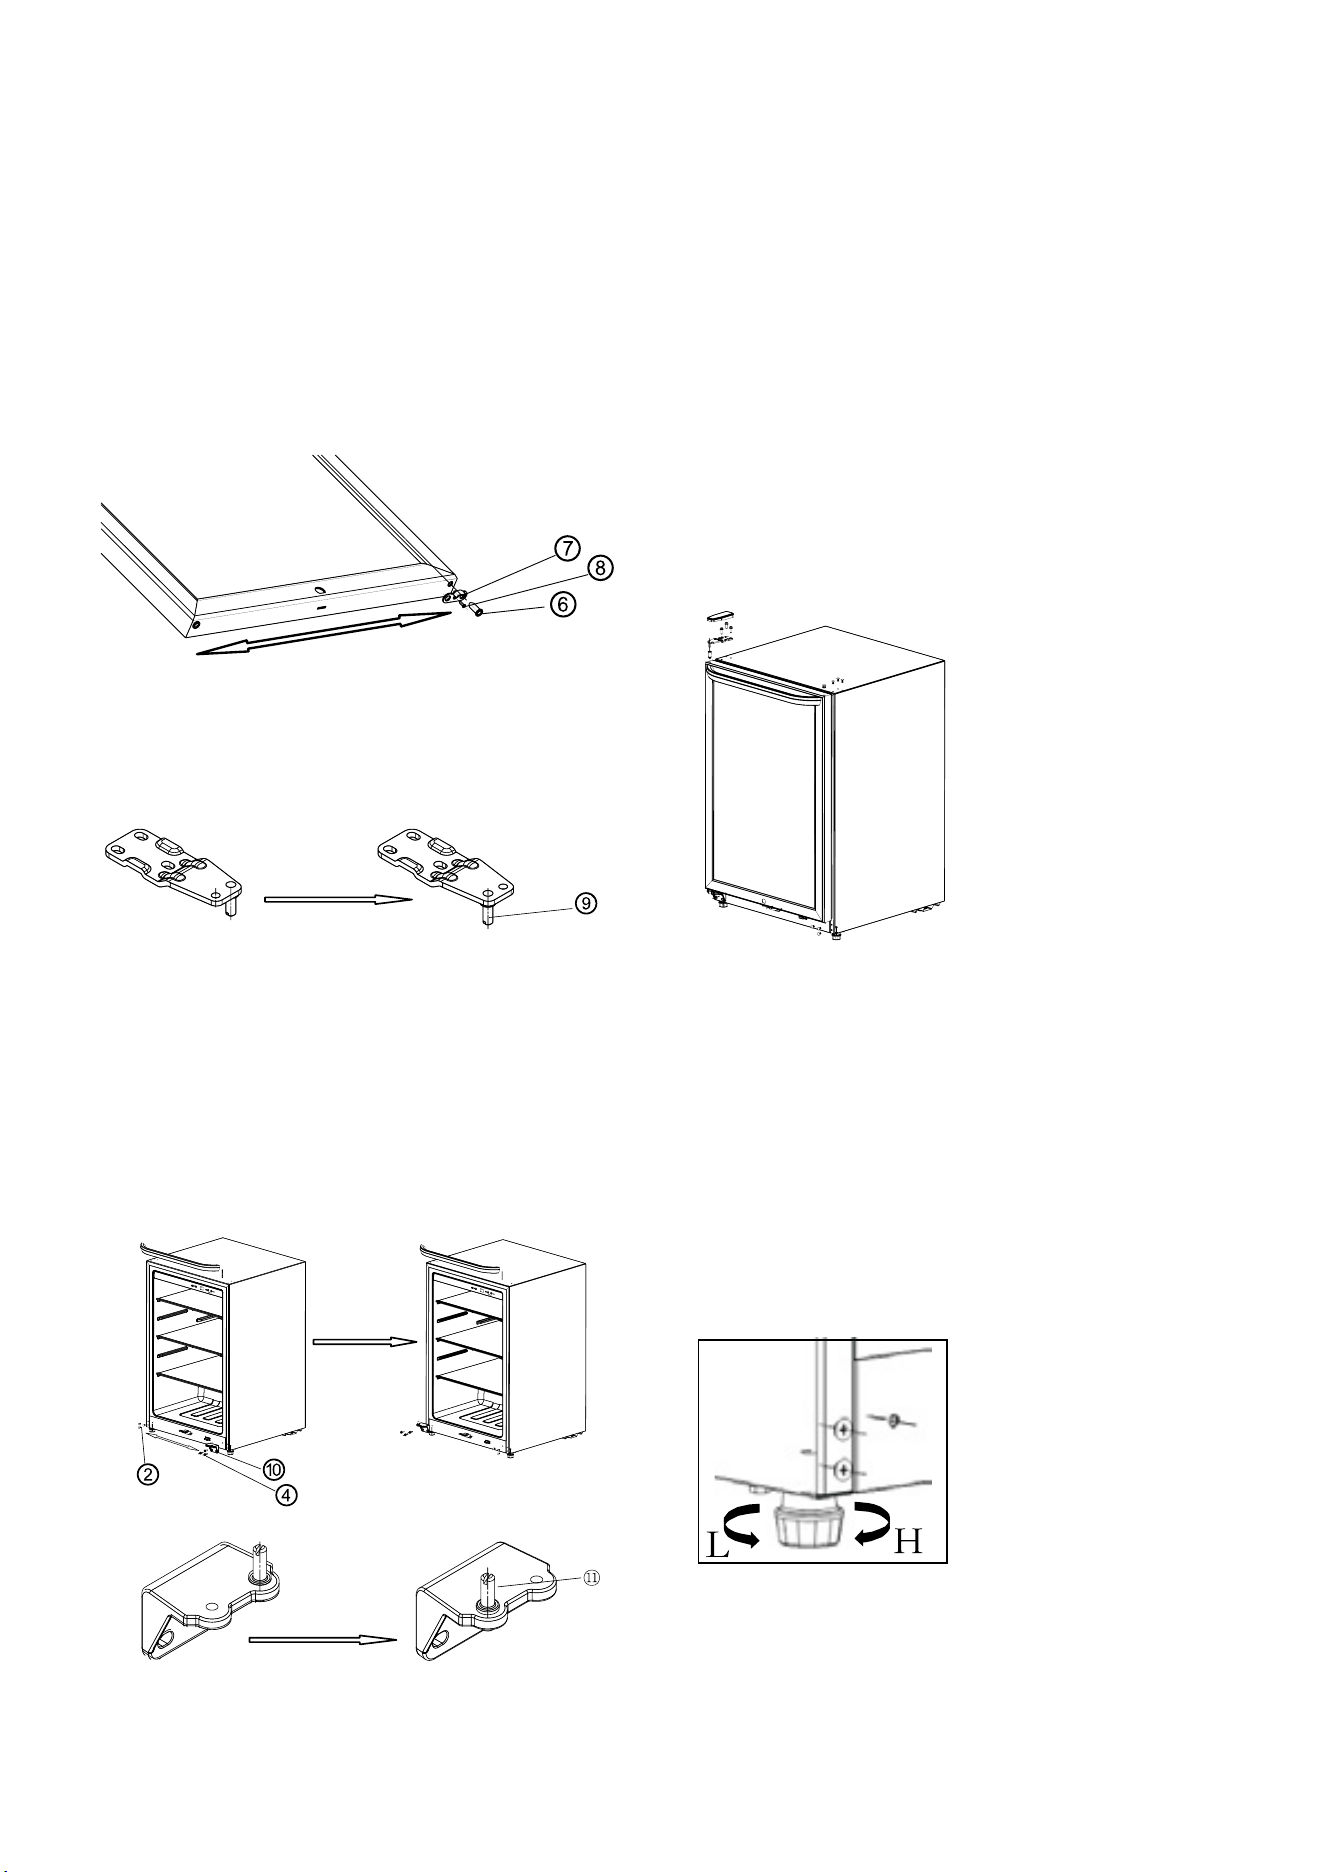
3. Swap the Door Components
Lay the door down on a soft surface (like a towel or
carpet) to avoid scratching the frame. At the bottom
of the door, unscrew the door stopper (7) and the
stopper block screws (8). Move the door axle sleeve (6)
and the stopper assembly to the left-hand side and
fix them into place.
4. Adjust the Top Hinge Pin
Take the top hinge (5) you removed earlier. Unscrew
the hinge shaft (9) and reinstall it on the opposite side
of the hinge plate, as shown in the diagram.
5. Swap the Bottom Hinge
Access the bottom: At the base of the cabinet, pry off
the decorative covers (2).
Move the hinge: Unscrew the positioning bolts (4) to
remove the lower hinge (10).
Swap the shaft: Unscrew the lower hinge shaft (11)
and move it to the left-hand side of the hinge bracket.
Reinstall: Secure the lower hinge onto the bottom-left
of the cabinet and replace the decorative covers on
the right-hand side.
6. Reassemble the Unit
Seat the door: Slot the bottom of the glass door onto
the lower hinge shaft.
Secure the top: Place the upper hinge (5) into the top-
left axle sleeve of the door. Bolt it into the pre-drilled
holes on the top-left of the cabinet.
Final Alignment: Before tightening the bolts fully,
ensure the door is level and the rubber gasket seals
firmly all the way around.
7. Finishing touches: Clip the hinge cover (3) back on
and pop the screw hole covers (1 & 2) into the empty
holes on the right.
Tip: Give the door a few test swings to make sure it
closes smoothly and the seal is airtight before you
restock your drinks.
Levelling the Beverage Chiller
The front levelling foot is adjustable. You can use it to
compensate for any unevenness in your floor and ensure
the door remains perfectly aligned.
• To Raise the unit: Turn the feet clockwise
• To Lower the unit: Turn the feet anti-clockwise
• Find the balance: Adjust the height until the cabinet
sits firmly on all four points without any wobbling.
Tip: Use a spirit level on the top of the cabinet to check
your work.
12
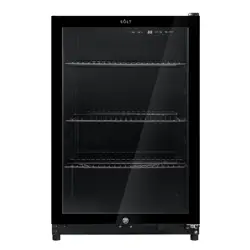
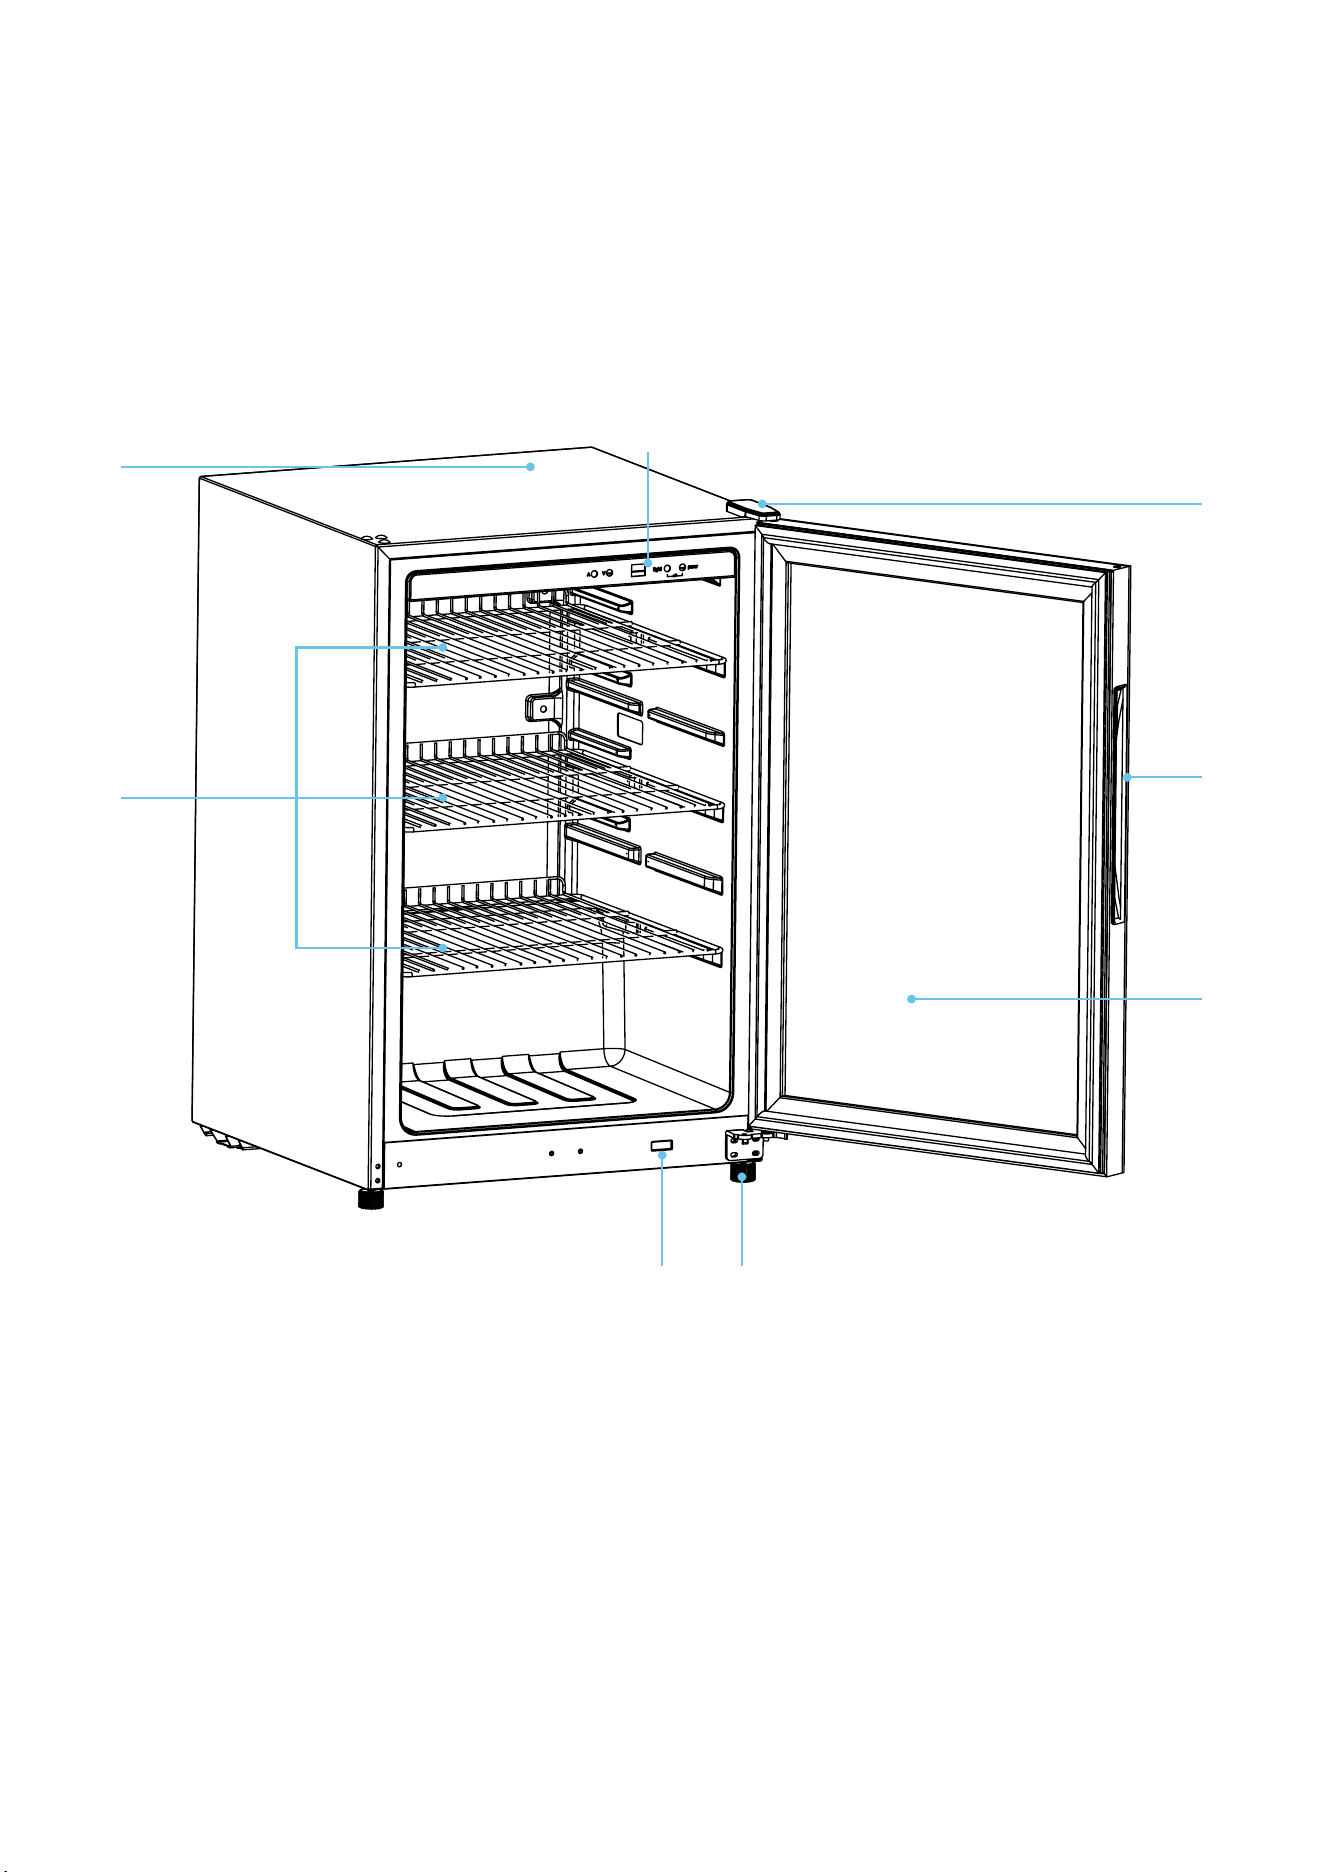
PRODUCT OVERVIEW
Your Beverage Chiller
Key
1. Control Panel
2. Wire shelves (×3)
3. Reversible door hinge
4. Recessed Door handle
5. Double-glazed, Low-E, UV-protected glass door
6. Power Switch
7. Levelling foot
Note:
• The images in this user manual are for demonstration purposes only.
Your beverage chiller may appear differently.
• Important! Never place food within the beverage chiller, in order to prevent bacterial contamination.
3
2
1
6 7
3
5
4
13
FIRST USE
Before turning on your Beverage Chiller for the first time:
• The Beverage Chiller must be rested for at least 2
hours in its location, before connecting to power and
switching on. Fail to do so can lead to a decrease in
cooling capacity or a damage to the Beverage Chiller.
• Clean the inner chamber and leave the door open
during this 2 hour resting period to allow any residual
odours to clear.
• Run the Beverage Chiller for half an hour without any
contents when connecting power for the first time.
• Do not connect Beverage Chiller to electronic energy
saving plug or converter that can convert DC into AC
(E.g.: solar energy system. ship grid).
• Water drop or frost will be generated on back side of
Beverage Chiller when compressor is running. This is a
normal function of Beverage Chillers, wiping out frost
or water drop is not required as they will evaporate
automatically. The defrosted water will be collected
into a drain tank and then inflow into water disposal
pan above the compressor and vaporised.
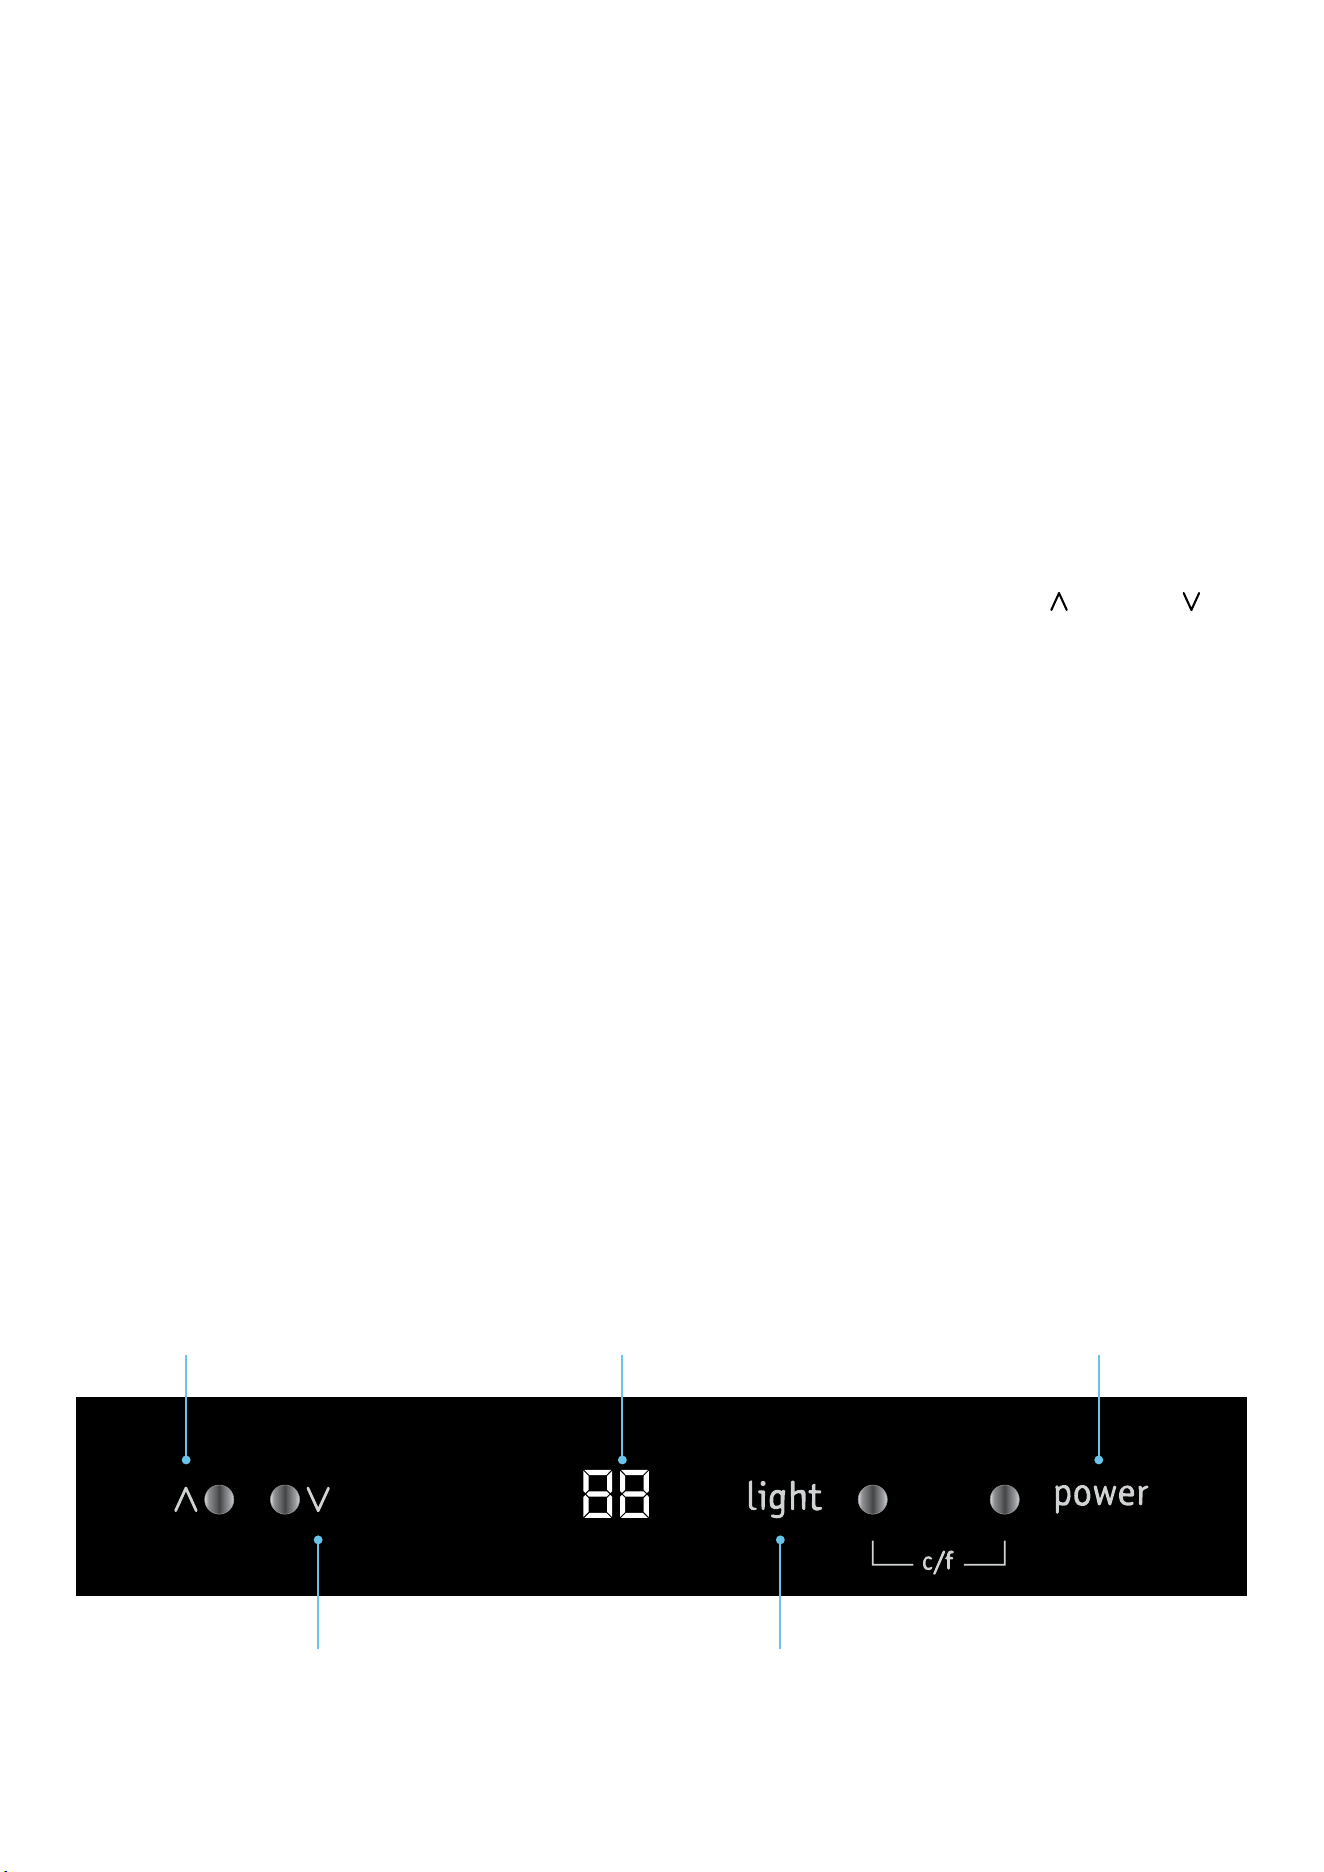
CONTROL PANEL
The control panel allows you to manage the
temperature and lighting.
• Power On/Off: Press the Power button to turn the
Beverage Chiller on or off.
• Standby Mode: Press and hold the Power button for
3 seconds to enter or exit standby mode.
Note: That the unit will stop cooling while in standby.
TEMPERATURE SETTINGS
The Beverage Chiller is designed to operate between
5°C and 18°C.
• Adjusting the Temp: Press the Up ( ) or Down ( )
arrows once to change the target temperature in
1-degree increments.
• Switching between Celsius and Fahrenheit: If you
need to swap the display units, press the Light and
Power buttons at the same time.
LIGHTING CONTROL
The internal LED light is designed to be automatic but
can be overridden manually.
• Automatic Mode: The light will automatically
switch on when you open the door and turn off when
it’s closed.
• Manual Override: Press the Light button to manually
toggle the lamp on or off.
Note: If you turn the light on manually while the door is
open, it will stay on even after the door is closed.
Operational Instructions
Press this button
to increase the
temperature by
1-degree increments
Press this button to turn
the unit on or offTemperature Display
Press this button
to decrease the
temperature by
1-degree increments
Press this button to
manually toggle the
map on or off
14
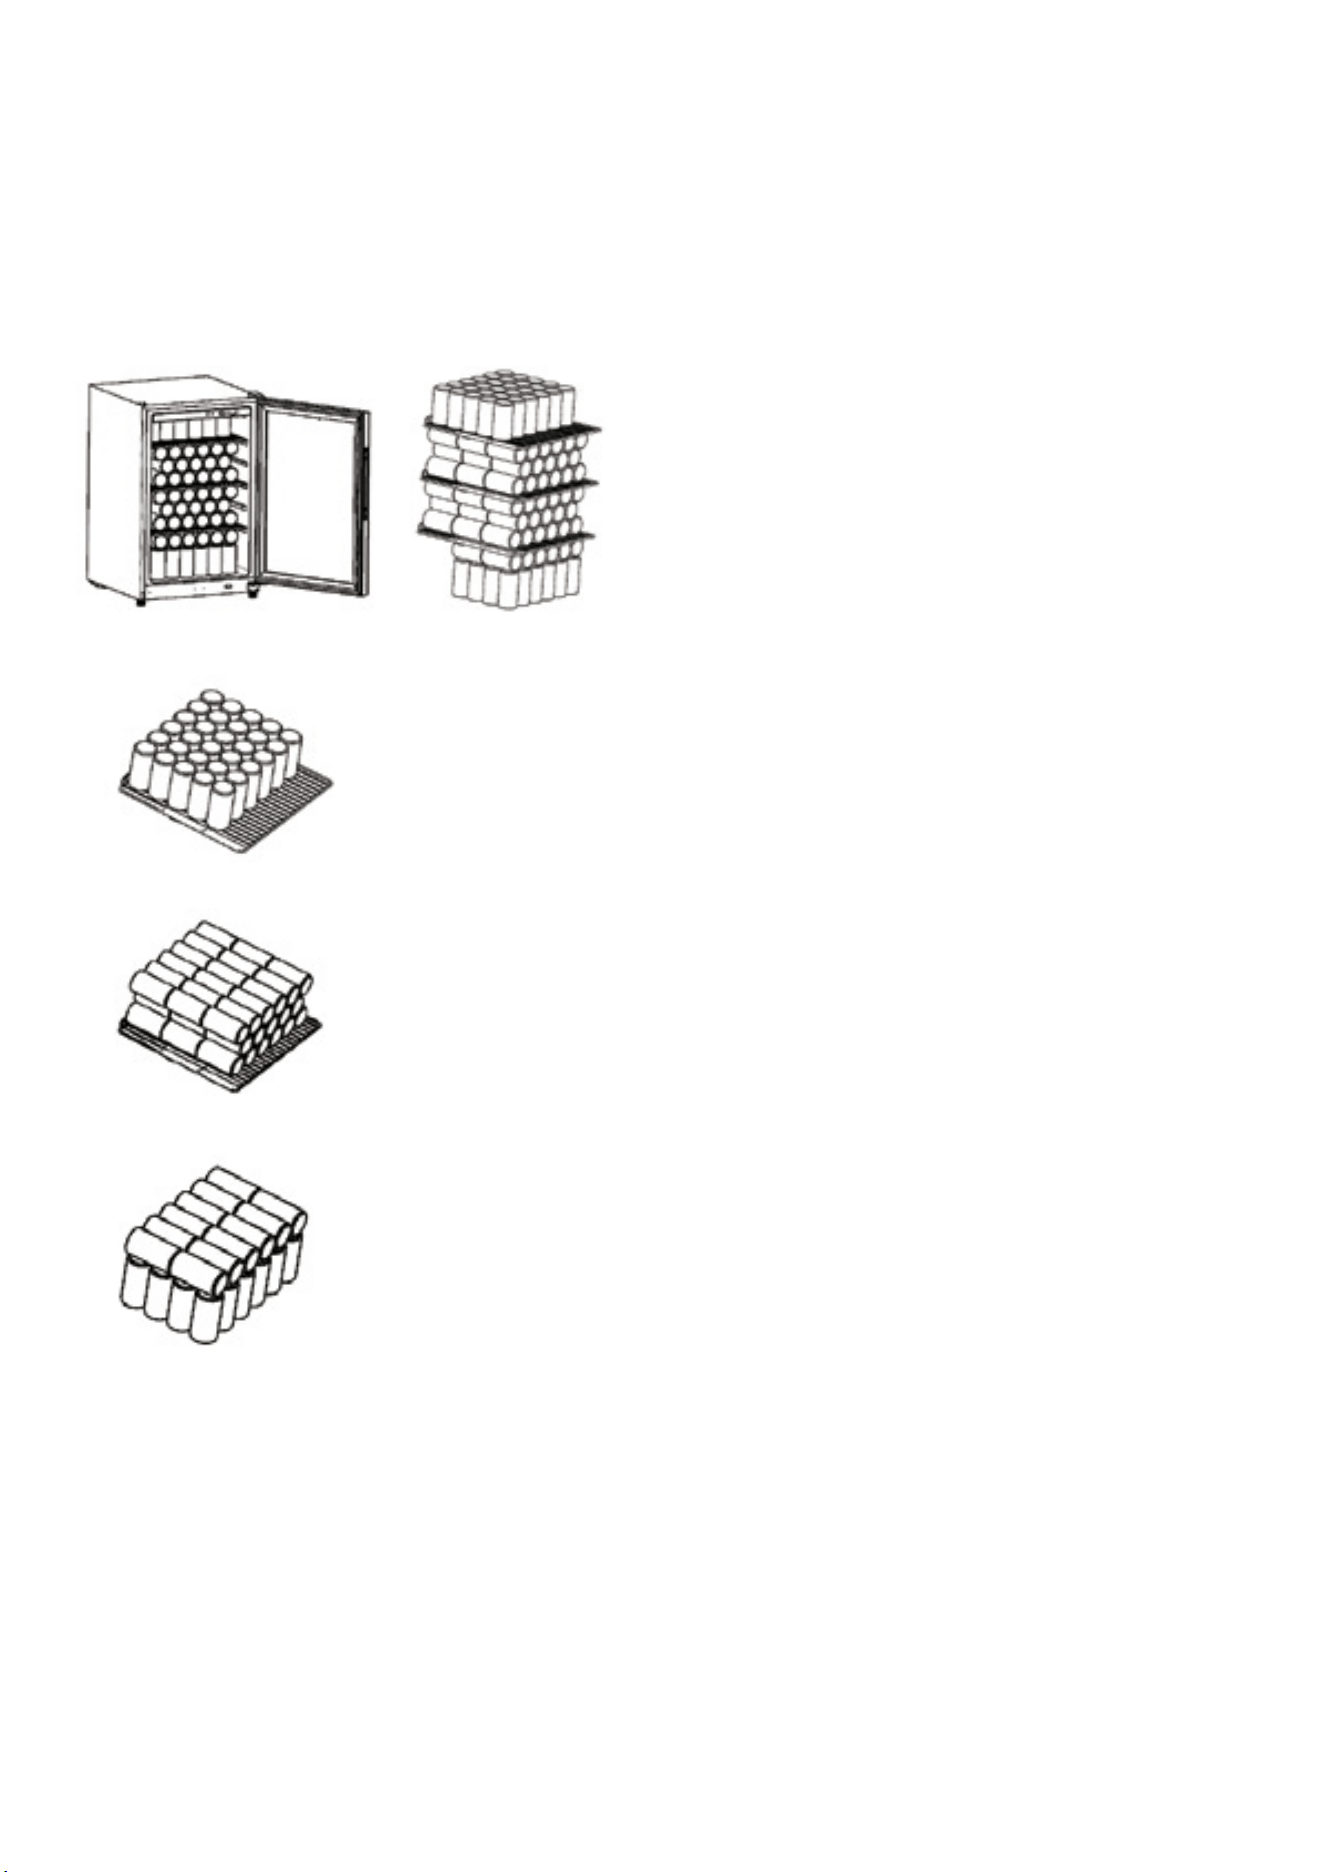
RECOMMENDED CAN ARRANGEMENT
The Beverage Chilleris designed to hold up to 168 × 355ml cans.
Keep in mind that using larger cans or bottles will reduce the total number you can fit inside.
• Top Shelf: Arrange cans standing upright.
• Middle Shelves: To maximise space, stack cans horizontally (on their sides).
• Bottom Zone: Place cans standing upright on the base of the unit.
Maintain Airflow: It is vital that you do not let cans touch the back wall of the cooler. Leaving a small gap ensures
the air can circulate properly, keeping everything consistently chilled.
Temperature Zones
Because of how air circulates inside the cabinet, the temperature isn't perfectly uniform.
• The Top: This area will be slightly warmer than the bottom.
• The Bottom: This is the coldest area of the chiller.
Tip: If you have specific drinks that you prefer extra cold, keep them on the lower shelves.
Energy Saving Tips
• Location Matters: Keep the cooler in a dry, well-ventilated spot. Avoid placing it in direct sunlight or right next to
heat-producing appliances like ovens or radiators.
• Keep it Shut: Try to minimise how often you open the door and how long you leave it open.
• Pre-Cooling: For better efficiency, let room-temperature drinks cool down a bit before stocking them in the chiller,
rather than loading it with warm cans all at once.
Storage Arrangement

15
DISCONNECTING THE BEVERAGE CHILLER
• Unplug power plug to disconnect the appliance.
WHEN NOT USING YOUR BEVERAGE CHILLER FOR A SHORT PERIOD OF TIME (14 DAYS)
• Simply unplug the unit.
WHEN NOT USING YOUR BEVERAGE CHILLER FOR A LONG PERIOD OF TIME (IE. IN STORAGE)
• Unplug the appliance.
• Clean the appliance with warm soapy water and thoroughly dry.
• Keep the appliance door open.
CLEANING
WARNING: Before cleaning the appliance, make sure it is switched off and disconnected from the power supply.
Failure to do so can result in electric shock or injury.
We recommend to clean dust behind the cooler and on the ground regularly to improve the cooling effect and save
energy. The interior of the appliance should be cleaned regularly to avoid odour.
Cleaning procedure is below:
• Unplug power plug.
• Clean door seal with only clear water and give thorough wipe.
• Remove the wire shelf.
• Use slightly warm water and a little dish soap to clean cooler and chrome shelf. Do not let water spill onto any
operation control elements or illuminator on glazed door.
• Reconnect and power cooler when cleaning is completed.
WARNING
• Do not use hard brushes, steel wool, wire brushes, abrasives such as toothpastes, organic solvents (such as
alcohol, acetone, banana oil, etc.), boiling water, acid or alkaline items to clean the cooler considering that this
may damage the cooler surface and interior.
• Do not rinse with water so as not to affect the electrical insulation properties.
• Do not use detergent and solvent with sand or acid properties.
Cleaning & Maintenance
16
FAQ's & Troubleshooting
If your Beverage Chiller is not operating as expected, please refer to the guide below before contacting customer
service. These common issues and solutions may help you quickly identify and resolve the problem.
For further assistance, please contact our Customer Support Team:
Phone: 1300 11 4357
Email: support@residentiagroup.com.au
Issue Possible Cause Solution / Explanation
Beverage Chiller does not
work
• Not plugged in
• Low voltage
• Temperature control knob not in
working range
• Power failure or tripped circuit
Ensure the chiller is properly plugged
into a working power outlet. Check your
home's voltage and confirm that the
temperature knob is correctly set. Inspect
for any tripped circuit breakers.
Compressor runs
continuously
• High ambient temperature
(e.g. in summer)
• Chiller is overfilled
• Door opened frequently
This is normal during warm weather.
Avoid overloading the chiller and limit
the frequency of door openings to
maintain efficiency.
Interior light does not
work
• Power not connected
• Damaged indicator light
Confirm the unit is receiving power. If
the issue persists, the indicator light may
need to be replaced.
Loud noises • Chiller is placed on an uneven surface
• Accessories not properly positioned
Ensure the chiller is placed on a flat,
stable surface. Check that all internal
components and accessories are
properly secured.
Sidewall feels hot /
condensation appears
• Heat emission from condenser (normal
in summer)
• High ambient humidity causing
condensation
It is normal for the sidewalls to emit heat
during operation, especially in warm
conditions. If condensation appears
on external surfaces or door seals,
wipe it dry and consider adjusting the
temperature setting.
Buzzing, airflow sound, or
clattering noises
• Normal operation of compressor
and valves
These sounds are part of regular
operation. The refrigerant may produce
soft grunts or bubbling sounds, and the
solenoid or electric switch valves may
clatter when the compressor starts or
stops. These do not affect performance.
TROUBLESHOOTING (ERROR CODES)
Error Code Description
E1 Temperature sensor fault (within the refrigeration cabinet)
E6 Communication failure between components.
Note: If you’ve just fully stocked the fridge with room-temperature cans or bottles, the internal temperature will rise
temporarily. Give it a few hours to settle back down to your set point.

17
Technical Specifications
Model Code GGSBC131B
Capacity 131L
Dimensions (W × D × H) 545 × 565 × 855mm
Weight (Net) 33kg
Climate Classes T
Features 38dB Max Noise Level
5–18˚C Temperature Range
Door Lock
Double-glazed, Low-E, UV-protected Glass Door
CLIMATE CLASSES TABLE
Class Symbol Ambient Temperature Rating (°C)
Extended Temperature SN +10 to +32
Temperate N +16 to +32
Subtropical ST +16 to +38
Tropical T +16 to +43
Extended temperate
This refrigerating appliance is intended to be used at ambient temperatures ranging from 10 °C to 32 °C
Temperate
This refrigerating appliance is intended to be used at ambient temperatures ranging from 16 °C to 32 °C
Subtropical
This refrigerating appliance is intended to be used at ambient temperatures ranging from 16 °C to 38 °C
Tropical
This refrigerating appliance is intended to be used at ambient temperatures ranging from 16 °C to 43 °C
If the Beverage Chiller operates outside the climate class (ambient temperature range) for which it is rated
then it may not be able to maintain satisfactory internal temperatures.

18
WARRANTY TERMS & CONDITIONS
This document sets out the terms and conditions of the
product warranties for Residentia Group Appliances. It is
an important document. Please keep it with your proof of
purchase documents in a safe place for future reference
should you require service for your Appliance.
1. IN THIS WARRANTY
(a) ‘acceptable quality’ as referred to in clause 10
of this warranty has the same meaning referred
to in the ACL;
(b) ‘ACL’ means Trade Practices Amendment
(Australian Consumer Law) Act (No.2) 2010;
(c) ‘Appliance’ means any Residentia Group product
purchased by you accompanied by this document;
(d) ‘ASR’ means Residentia Group authorised service
representative;
(e) ‘Residentia Group’ means Residentia Group Pty Ltd
of 165 Barkly Ave, Burnley VIC 3121, ACN 600 546 656
in respect of Appliances purchased in Australia;
(f ) ‘major failure’ as referred to in clause 10 of this
warranty has the same meaning referred to in the
ACL and includes a situation when an Appliance
cannot be repaired or it is uneconomic for Residentia
Group, at its discretion, to repair an Appliance
during the Warranty Period;
(g) ‘Warranty Period’ means:
(i) where the Appliance is used for personal,
domestic or household use (i.e. normal
single family use) as set out in the instruction
manual, the Appliance is warranted against
manufacturing defects for 24 months, following
the date of original purchase of the Appliance;
(h) ‘you’ means the purchaser of the Appliance not
having purchased the Appliance for re-sale, and
‘your’ has a corresponding meaning.
2. This warranty only applies to Appliances purchased
and used in Australia and is in addition to (and does
not exclude, restrict, or modify in any way) any
non-excludable statutory warranties in Australia.
3. During the Warranty Period Residentia Group or
its ASR will, at no extra charge if your Appliance
is readily accessible for service, without special
equipment and subject to these terms and
conditions, repair or replace any parts which it
considers to be defective. Residentia Group or its
ASR may use remanufactured parts to repair your
Appliance. You agree that any replaced Appliances
or parts become the property of Residentia Group.
This warranty does not apply to light globes,
batteries, filters, seals or similar perishable parts.
4. Parts and Appliances not supplied by Residentia
Group are not covered by this warranty.
Warranty Information

19
Our goods come with guarantees that cannot be excluded under the Australian Consumer Law. You are
entitled to a replacement or refund for a major failure and for compensation for any other reasonably
foreseeable loss or damage. You are also entitled to have the goods repaired or replaced if the goods
fail to be of acceptable quality and the failure does not amount to a major failure.
The Australian Consumer Law requires
the inclusion of the following statement
with this warranty:
5. You will bear the cost of transportation, travel and
delivery of the Appliance to and from Residentia
Group or its ASR. If you reside outside of the service
area, you will bear the cost of:
(a) travel of an authorised representative;
(b) transportation and delivery of the Appliance to and
from Residentia Group or its ASR, in all instances,
unless the Appliance is transported by Residentia
Group or its ASR, the Appliance is transported at
the owner’s cost and risk while in transit to and from
Residentia Group or its ASR.
6. Proof of purchase is required before you can make a
claim under this warranty.
7. You may not make a claim under this warranty
unless the defect claimed is due to faulty or
defective parts or workmanship.
Residentia Group is not liable in the following
situations (which are not exhaustive):
(a) the Appliance is damaged by:
(i) accident
(ii) misuse or abuse, including failure to properly
maintain or service
(iii) normal wear and tear
(iv) power surges, electrical storm damage or
incorrect power supply
(v) incomplete or improper installation
(vi) incorrect, improper or inappropriate operation
(vii) insect or vermin infestation
(viii) failure to comply with any additional
instructions supplied with the Appliance;
(b) the Appliance is modified without authority from
Residentia Group in writing;
(c) the Appliance’s serial number or warranty seal has
been removed or defaced;
(d) the Appliance was serviced or repaired by anyone
other than Residentia Group, an authorised repairer
or ASR.
8. This warranty, the contract to which it relates and
the relationship between you and Residentia Group
are governed by the law applicable where the
Appliance was purchased.
9. To the extent permitted by law, Residentia Group
excludes all warranties and liabilities (other than
as contained in this document) including liability
for any loss or damage whether direct or indirect
arising from your purchase, use or non use of the
Appliance.
10. For Appliances and services provided by Residentia
Group in Australia, the Appliances come with a
guarantee by Residentia Group that cannot be
excluded under the Australian Consumer Law.
You are entitled to a replacement or refund for a
major failure and for compensation for any other
reasonably foreseeable loss or damage. You are
also entitled to have the Appliance repaired or
replaced if the Appliance fails to be of acceptable
quality and the failure does not amount to a major
failure. The benefits to you given by this warranty
are in addition to your other rights and remedies
under a law in relation to the Appliances or services
to which the warranty relates.
11. At all times during the Warranty Period, Residentia
Group shall, at its discretion, determine whether
repair, replacement or refund will apply if an
Appliance has a valid warranty claim applicable
to it.
12. Missing parts are not covered by warranty.
Residentia Group reserves the right to assess each
request for missing parts in a case by case basis.
Any parts that are not reported missing in the first
week after purchase will not provide free of charge.
13. To enquire about claiming under this warranty,
please follow these steps:
(a) carefully check the operating instructions,
user manual and the terms of this warranty;
(b) have the model and serial number of the
Appliance available;
(c) have the proof of purchase (e.g. an invoice)
available;
(d) telephone the numbers shown below.
14. You accept that if you make a warranty claim,
Residentia Group and its ASR may exchange
information in relation to you to enable Residentia
Group to meet its obligations under this warranty.
IMPORTANT
Before calling for service, please ensure that the steps in
point 13 have been followed.
Telephone contacts
► Service: Please call 1300 11 HELP (4357)
► Spare Parts: Please call 1300 11 SPARE (7727)
T. 1300 11 4357
E. support@residentiagroup.com.au
E S S E N T I A L S FOR LIFE
An initiative by
Residentia Group
www.Sôlt.house