RESET
ACCESSORY
24VAC
SENS C M 1 2 3 4 5 6 7 8
RESET
ACCESSORY
24VAC
Mor
Infp
SENS C M 1 2 3 4
AUTO OFF MANUAL NEXT
STATUS
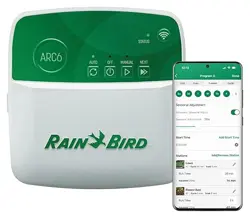
ARC6
ENGLISH
Feature
Station count
Automatic programs
Start times per program
Custom run days
Master valve control
Rain delay
Rain/freeze sensor control
Seasonal adjust
Manual station run
Manual program run
Manual test all stations
Station advance
Built-in WiFi
Guest mode (AP Hotspot)
EN ES FR
LED ACTION
STATUS ashing blue
STATUS alternating red and green
STATUS solid green
STATUS ashing red
AUTO solid green
OFF solid red
MANUAL ashing green
LED ACCIÓN
LED ACTION
Description
4, 6, 8
3
4
Yes
Yes
Yes
Yes
Yes
Yes
Yes
Yes
Yes
Yes
Yes
RESET
ACCESSORY
24VAC
SENS C M 1 2 3 4 5 6 7 8
AUTO OFF MANUAL NEXT
STATUS
RESET
ACCESSORY
24VAC
SENS C M 1 2 3 4
MASTER
VALVE
MV
1
2
S
C
RESET
ACCESSORY
24VAC
SENS C M 1 2 3 4 5 6 7 8
C M 1 2 3 4 5 6
ACTIVE TERMINAL
JUMPER WIRES
AUTO OFF MANUAL NEXT
STATUS
RESET
ACCESSORY
24VAC
SENS C M 1 2 3 4 5 6 7 8
RESET
ACCESSORY
24VAC
SENS C M
AUTO OFF MANUAL NEXT
STATUS
RESET
ACCESSORY
24VAC
SENS C M 1 2 3 4 5 6 7 8
RESET
ACCESSORY
24VAC
SENS C M 1 2
AUTO OFF MANUAL NEXT
STATUS
RESET
ACCESSORY
24VAC
SENS C M 1 2 3 4 5 6 7 8
RESET
ACCESSORY
24VAC
Mor
Infp
SENS C M 1 2 3 4
AUTO OFF MANUAL NEXT
STATUS
2
1
RESET
ACCESSORY
24VAC
SENS C M 1 2 3 4 5 6 7 8
24VAC
SENS C M
AUTO OFF MANUAL NEXT
STATUS
• Slide the bar to the desired number of days to
delay automatic watering.
• Select “Done” to store the setting.
NOTICE
The maximum numbers of days to delay watering is
14. After the days expire, automatic irrigation will
begin again according to the programmed schedule.
Manual Watering
ON THE CONTROLLER
• To start manual watering, press the button.
• As a default, each station will run for 10 minutes;
you can choose to retain or change the watering
duration in the Rain Bird App.
• The blinking LED will give indication for which
station is active.
• To advance to the next station, press the button.
• To stop manual watering, press the button.
IN RAIN BIRD APP
• To start manual watering, select the icon and
manual watering preferences.
• To advance to the next station, select the icon.
• To stop manual watering, select theicon.
Automatic Watering
ON THE CONTROLLER
NOTICE
When operating in automatic mode, each program
will run according to the start times, run days, and run
times for each station in sequence until all scheduled
watering has been run.
• Press to start automatic watering according to
scheduled program(s).
• The blinking LED will give indication for which
station is active.
• To advance to the next station, press the button.
• To stop automatic watering, press thebutton.
IN RAIN BIRD APP
The Rain Bird App oers a toggle to switch between
automatic watering and o status.
Technical Support
For help setting up or operating
the Rain Bird WiFi Smart
Controller, please call Rain Bird
toll-free Technical Support at:
1-800-RAIN BIRD (800-724-6247)
or visit www.rainbird.com.
For more information, including
troubleshooting, scan the QR
code.
Outdoor controller:
1. Must be plugged into a weatherproof outlet
when installing outdoors.
2. If desired, the provided power cord can be
removed and replaced with custom wiring.
3. Remove the wire bay cover on the lower part of
the controller.
4. Locate the transformer box in the left-hand
corner of the wire bay and unscrew the wiring
compartment cover.
5. Unscrew the terminal block connecting the AC
power cord and the transformer wires. Remove
the power cord wires from the transformer box.
6. Remove the factory installed power cord by
loosening the liquid tight cord connector.
7. Route the three wires from an external power
source into the wiring compartment.
8. Connect the external power supply wires using
the terminal block and resecure the liquid tight
cord connector or a means of strain-relief of
connections.
• Black supply wire (live) to the black transformer
wire.
• White supply wire (neutral) to the white
transformer wire.
• Green supply wire (ground) to green
transformer wire.
9. Resecure the wiring compartment cover.
Programming
Add a New Controller to the
Rain Bird App
1. Before mounting new controller, check the WiFi
signal at controller.
• Verify minimum signal strength of two bars in
your phone at controller.
• Mount controller closer to router or add signal
booster if needed.
2. Download and launch the Rain Bird App.
WiFi Smart Controller
User Manual
READ AND SAVE THESE INSTRUCTIONS
Installation
If You’re Replacing an Existing
Controller
1. Take a photo of the wiring details, which will be
useful to reference when installing the new
controller.
2. Unplug the power cord from the AC power outlet
and disconnect wires from the controller.
Mount New Controller
WARNING
• Install the controller with the power supply cord exit
side pointing downwards and through the leftmost
opening at the bottom of the controller to avoid
ingress of water.
• DO NOT apply power until you have completed and
checked all wiring connections.
• DO NOT attempt to link two or more controllers
together using a single transformer.
1. Unless installing with custom wiring, choose a
mounting location on a wall within six feet of an
AC power outlet and at least 15 feet away from
major appliances or air conditioners.
2. Drive a mounting screw into the wall, leaving an
1/8-inch gap between the screw head and the
wall surface (use supplied wall anchors if
necessary).
3. Locate the keyhole slot on back of the controller
and hang it securely on the mounting screw.
4. Remove the wire bay cover on the lower part of
the controller and drive a second screw through
the open hole and into the wall (use supplied wall
anchors if necessary).
Connect Valve Wiring
NOTICE
• DO NOT route valve wires through the same opening
as power wires.
• DO NOT connect more than one valve to the same
station terminal (1–8).
1. With the wire bay cover removed, route all eld
wires through the rightmost opening at the
bottom of the controller and into the wiring
compartment.
2. Connect one wire from each valve to one of the
numbered station terminals (1–8) on the
controller.
3. Connect a eld common wire to the common
terminal (C) on the controller.
Connect Master Valve (optional)
NOTICE
• DO NOT route the master valve wires through the
same opening as the power wires.
• DO NOT connect more than one valve to the master
valve terminal (M).
1. Using a direct burial cable, connect one of the
wires from the master valve to the master valve
terminal (M).
2. Connect the remaining wire from the master
valve to the common terminal (C).
Connect Rain/Freeze Sensor
(optional)
NOTICE
• DO NOT remove the jumper wire unless connecting
a rain or rain/freeze sensor. The controller will not
function if the jumper wire is removed and a rain or
rain/freeze sensor is not connected.
• Rain Bird controllers are only compatible with
normally closed rain or rain/freeze sensors.
• Check local and/or state regulations to determine
if a rain or rain/freeze sensor is required.
1. Remove the yellow jumper wire from the SENS
terminals on the controller.
NOTICE
• DO NOT route the pump start relay valve wires
through the same opening as the power wires.
• A pump start relay connects to the controller in the
same way as a master valve, but connects dierently
at the water source.
• This controller DOES NOT provide power for a pump.
A relay must be wired according to pump
manufacturer’s installation instructions.
1. Using a direct burial cable, connect one of the
wires from the pump start relay to the master
valve terminal (M).
2. Connect the remaining wire from the pump start
relay to the common terminal (C).
3. To avoid possible pump damage in the event run
times are assigned to unused stations, connect a
short jumper wire from all unused station
terminals to the nearest station terminal in use.
Connect Pump Start Relay
(optional)
S
U
P
P
L
I
E
R
’
S
D
E
C
L
A
R
A
T
I
O
N
O
F
C
O
N
F
O
R
M
I
T
Y
4
7
C
F
R
§
2
.
1
0
7
7
C
o
m
p
l
i
a
n
c
e
I
n
f
o
r
m
a
t
i
o
n
U
n
i
q
u
e
i
d
e
n
t
i
f
i
e
r
:
A
R
C
4
I
,
A
R
C
6
I
,
A
R
C
8
R
e
s
p
o
n
s
i
b
l
e
P
a
r
t
y
:
R
a
i
n
B
i
r
d
C
o
r
p
o
r
a
t
i
o
n
,
6
9
9
1
E
a
s
t
S
o
u
t
h
p
o
i
n
t
R
o
a
d
,
T
u
c
s
o
n
,
A
Z
8
5
7
5
6
,
U
S
A
,
w
w
w
.
r
a
i
n
b
i
r
d
.
c
o
m
N
o
t
e
:
T
h
i
s
e
q
u
i
p
m
e
n
t
h
a
s
b
e
e
n
t
e
s
t
e
d
a
n
d
f
o
u
n
d
t
o
c
o
m
p
l
y
w
i
t
h
t
h
e
l
i
m
i
t
s
f
o
r
a
C
l
a
s
s
B
d
i
g
i
t
a
l
d
e
v
i
c
e
,
p
u
r
s
u
a
n
t
t
o
p
a
r
t
1
5
o
f
t
h
e
F
C
C
R
u
l
e
s
.
T
h
e
s
e
l
i
m
i
t
s
a
r
e
d
e
s
i
g
n
e
d
t
o
p
r
o
v
i
d
e
r
e
a
s
o
n
a
b
l
e
p
r
o
t
e
c
t
i
o
n
a
g
a
i
n
s
t
h
a
r
m
f
u
l
i
n
t
e
r
f
e
r
e
n
c
e
i
n
a
r
e
s
i
d
e
n
t
i
a
l
i
n
s
t
a
l
l
a
t
i
o
n
.
T
h
i
s
e
q
u
i
p
m
e
n
t
g
e
n
e
r
a
t
e
s
,
u
s
e
s
a
n
d
c
a
n
r
a
d
i
a
t
e
r
a
d
i
o
f
r
e
q
u
e
n
c
y
e
n
e
r
g
y
a
n
d
,
i
f
n
o
t
i
n
s
t
a
l
l
e
d
a
n
d
u
s
e
d
i
n
a
c
c
o
r
d
a
n
c
e
w
i
t
h
t
h
e
i
n
s
t
r
u
c
t
i
o
n
s
,
m
a
y
c
a
u
s
e
h
a
r
m
f
u
l
i
n
t
e
r
f
e
r
e
n
c
e
t
o
r
a
d
i
o
c
o
m
m
u
n
i
c
a
t
i
o
n
s
.
H
o
w
e
v
e
r
,
t
h
e
r
e
i
s
n
o
g
u
a
r
a
n
t
e
e
t
h
a
t
i
n
t
e
r
f
e
r
e
n
c
e
w
i
l
l
n
o
t
o
c
c
u
r
i
n
a
p
a
r
t
i
c
u
l
a
r
i
n
s
t
a
l
l
a
t
i
o
n
.
I
f
t
h
i
s
e
q
u
i
p
m
e
n
t
d
o
e
s
c
a
u
s
e
h
a
r
m
f
u
l
i
n
t
e
r
f
e
r
e
n
c
e
t
o
r
a
d
i
o
o
r
t
e
l
e
v
i
s
i
o
n
r
e
c
e
p
t
i
o
n
,
w
h
i
c
h
c
a
n
b
e
d
e
t
e
r
m
i
n
e
d
b
y
t
u
r
n
i
n
g
t
h
e
e
q
u
i
p
m
e
n
t
o
f
f
a
n
d
o
n
,
t
h
e
u
s
e
r
i
s
e
n
c
o
u
r
a
g
e
d
t
o
t
r
y
t
o
c
o
r
r
e
c
t
t
h
e
i
n
t
e
r
f
e
r
e
n
c
e
b
y
o
n
e
o
r
m
o
r
e
o
f
t
h
e
f
o
l
l
o
w
i
n
g
m
e
a
s
u
r
e
s
:
•
R
e
o
r
i
e
n
t
o
r
r
e
l
o
c
a
t
e
t
h
e
r
e
c
e
i
v
i
n
g
a
n
t
e
n
n
a
.
•
I
n
c
r
e
a
s
e
t
h
e
s
e
p
a
r
a
t
i
o
n
b
e
t
w
e
e
n
t
h
e
e
q
u
i
p
m
e
n
t
a
n
d
r
e
c
e
i
v
e
r
.
•
C
o
n
n
e
c
t
t
h
e
e
q
u
i
p
m
e
n
t
i
n
t
o
a
n
o
u
t
l
e
t
o
n
a
c
i
r
c
u
i
t
d
i
f
f
e
r
e
n
t
f
r
o
m
t
h
a
t
t
o
w
h
i
c
h
t
h
e
r
e
c
e
i
v
e
r
i
s
c
o
n
n
e
c
t
e
d
.
•
C
o
n
s
u
l
t
t
h
e
d
e
a
l
e
r
o
r
a
n
e
x
p
e
r
i
e
n
c
e
d
r
a
d
i
o
/
T
V
t
e
c
h
n
i
c
i
a
n
f
o
r
h
e
l
p
.
3. Select “Add Controller” to begin the set-up wizard.
• The Rain Bird App will prompt you to create an
account.
• Choose Permanent Access (if local WiFi network
is available) or Guest mode (if local WiFi network
is not available).
• Have the SSID and network password ready
when connecting in Permanent Access mode.
Set Date and Time
• When the controller is connected to WiFi, it will
automatically set the date and time according to
the local WiFi network settings. In the event of a
power outage, the date and time will default to the
local WiFi network settings.
• If a local WiFi network is not available at setup and
the controller is connected to the Rain Bird App in
Guest mode (AP Hotspot), the controller will
default to the date and time in the mobile device
settings. In the event of a power outage, the date
and time will need to be manually reset by
reconnecting the controller to your mobile device
through Guest mode (AP Hotspot).
Create a Watering Schedule
1. ADD PROGRAM(S): This controller is scheduled
using up to three programs (A, B and C). Basic
programs include instructions on watering days,
start times and durations.
In the Rain Bird App, add a new program by
selecting “Add Program.”
NOTICE
• The rst time you connect to the controller, the Rain
Bird App will reect the default program assigned to
the controller. You can choose to retain, change, or
set up a new program.
• Programming is stored in non-volatile memory and
will remain in the controller in the event of a power
outage.
2. SET PROGRAM START TIME(S): This controller
is scheduled using up to four independent start
times per program. The start time(s) is the time
of day at which the program will begin. Each start
time will run every station for its scheduled
duration within that program.
• In the Rain Bird App, add a program start time by
selecting “Add Start Time.”
• Set the station(s) and watering duration(s)
associated with the start time by selecting
“Add/Remove Station.”
NOTICE
Start times apply to the entire program, not individual
stations. Depending on landscaping needs, multiple
start times may be assigned for that program. Once
the start time is set, the controller begins the watering
cycle with the rst station; the other stations in the
program follow in sequence.
3. SET PROGRAM RUN DAY(S): Run days are the
specic days of the week in which watering
occurs.
In the Rain Bird App, set the watering frequency
by selecting Odd (days of the week), Even (days
of the week), Custom (days of week) or Cyclic
(specic intervals).
NOTICE
Watering days apply to the entire program, not the
individual stations.
4. SEASONAL ADJUST changes the watering
duration (as a percent) for all stations associated
with run times in an individual program. This may
be manually adjusted in the Rain Bird App using
the slider in the program settings.
NOTICE
• The controller must be connected to WiFi to make
automatic adjustments.
• An adjustment value of 100% is representative of
irrigation during the average hottest time of year, so
even if you’re experiencing warm weather on a summer
day, you may not see an adjustment above 100%.
5. RAIN DELAY: In the Rain Bird App, manually turn
o automatic watering for a xed number of days
when it rains even without a rain sensor.
• Suspend watering for up to 14 days by selecting
the icon.
Apple and the Apple logo are trademarks of Apple Inc., registered in
the U.S. and other countries. App Store is a service mark of Apple Inc.
Google Play is a trademark of Google Inc. Bluetooth® is a registered
trademark of Bluetooth SIG, Inc.
Rain Bird Corporation
6991 East Southpoint Road
Tucson, AZ 85756, USA
www.rainbird.com
® Registered trademark of the Rain Bird Corporation
© 2025 Rain Bird Corporation
S
a
f
e
t
y
I
n
s
t
r
u
c
t
i
o
n
s
W
A
R
N
I
N
G
T
h
i
s
a
p
p
l
i
a
n
c
e
i
s
n
o
t
i
n
t
e
n
d
e
d
f
o
r
u
s
e
b
y
p
e
r
s
o
n
s
(
i
n
c
l
u
d
i
n
g
c
h
i
l
d
r
e
n
)
w
i
t
h
r
e
d
u
c
e
d
p
h
y
s
i
c
a
l
,
s
e
n
s
o
r
y
o
r
m
e
n
t
a
l
c
a
p
a
c
i
t
y
,
o
r
l
a
c
k
o
f
e
x
p
e
r
i
e
n
c
e
a
n
d
k
n
o
w
l
e
d
g
e
u
n
l
e
s
s
t
h
e
y
h
a
v
e
b
e
e
n
g
i
v
e
n
s
u
p
e
r
v
i
s
i
o
n
o
r
i
n
s
t
r
u
c
t
i
o
n
c
o
n
c
e
r
n
i
n
g
u
s
e
o
f
t
h
e
a
p
p
l
i
a
n
c
e
b
y
a
p
e
r
s
o
n
r
e
s
p
o
n
s
i
b
l
e
f
o
r
t
h
e
i
r
s
a
f
e
t
y
.
C
h
i
l
d
r
e
n
s
h
o
u
l
d
b
e
s
u
p
e
r
v
i
s
e
d
t
o
e
n
s
u
r
e
t
h
a
t
t
h
e
y
d
o
n
o
t
p
l
a
y
w
i
t
h
t
h
e
a
p
p
l
i
a
n
c
e
.
O
u
t
d
o
o
r
c
o
n
t
r
o
l
l
e
r
:
I
f
t
h
e
s
u
p
p
l
y
c
o
r
d
i
s
d
a
m
a
g
e
d
,
i
t
m
u
s
t
b
e
r
e
p
l
a
c
e
d
b
y
t
h
e
m
a
n
u
f
a
c
t
u
r
e
r
,
i
t
s
s
e
r
v
i
c
e
a
g
e
n
t
,
o
r
s
i
m
i
l
a
r
l
y
q
u
a
l
i
f
i
e
d
p
e
r
s
o
n
s
i
n
o
r
d
e
r
t
o
a
v
o
i
d
a
h
a
z
a
r
d
.
I
n
d
o
o
r
c
o
n
t
r
o
l
l
e
r
:
I
f
t
h
e
p
o
w
e
r
s
u
p
p
l
y
u
n
i
t
i
s
d
a
m
a
g
e
d
,
i
t
m
u
s
t
b
e
r
e
p
l
a
c
e
d
b
y
t
h
e
p
o
w
e
r
s
u
p
p
l
y
u
n
i
t
a
v
a
i
l
a
b
l
e
f
r
o
m
t
h
e
m
a
n
u
f
a
c
t
u
r
e
r
o
r
i
t
s
s
e
r
v
i
c
e
a
g
e
n
t
.
S
p
e
c
i
a
l
p
r
e
c
a
u
t
i
o
n
s
m
u
s
t
b
e
t
a
k
e
n
w
h
e
n
v
a
l
v
e
w
i
r
e
s
a
r
e
l
o
c
a
t
e
d
a
d
j
a
c
e
n
t
t
o
,
o
r
s
h
a
r
e
a
c
o
n
d
u
i
t
w
i
t
h
o
t
h
e
r
w
i
r
e
s
,
s
u
c
h
a
s
t
h
o
s
e
u
s
e
d
f
o
r
l
a
n
d
s
c
a
p
e
l
i
g
h
t
i
n
g
o
r
o
t
h
e
r
e
l
e
c
t
r
i
c
a
l
s
y
s
t
e
m
s
.
S
e
p
a
r
a
t
e
a
n
d
i
n
s
u
l
a
t
e
a
l
l
c
o
n
d
u
c
t
o
r
s
c
a
r
e
f
u
l
l
y
,
t
a
k
i
n
g
c
a
r
e
n
o
t
t
o
d
a
m
a
g
e
w
i
r
e
i
n
s
u
l
a
t
i
o
n
d
u
r
i
n
g
i
n
s
t
a
l
l
a
t
i
o
n
.
A
n
e
l
e
c
t
r
i
c
a
l
“
s
h
o
r
t
”
(
c
o
n
t
a
c
t
)
b
e
t
w
e
e
n
t
h
e
v
a
l
v
e
w
i
r
e
s
a
n
d
a
n
o
t
h
e
r
p
o
w
e
r
s
o
u
r
c
e
c
a
n
d
a
m
a
g
e
t
h
e
c
o
n
t
r
o
l
l
e
r
a
n
d
c
r
e
a
t
e
a
f
i
r
e
h
a
z
a
r
d
.
D
O
N
O
T
a
p
p
l
y
p
o
w
e
r
u
n
t
i
l
y
o
u
h
a
v
e
c
o
m
p
l
e
t
e
d
a
n
d
c
h
e
c
k
e
d
a
l
l
w
i
r
i
n
g
c
o
n
n
e
c
t
i
o
n
s
.
D
O
N
O
T
a
t
t
e
m
p
t
t
o
l
i
n
k
t
w
o
o
r
m
o
r
e
c
o
n
t
r
o
l
l
e
r
s
t
o
g
e
t
h
e
r
u
s
i
n
g
a
s
i
n
g
l
e
t
r
a
n
s
f
o
r
m
e
r
.
C
A
U
T
I
O
N
T
h
i
s
d
e
v
i
c
e
m
u
s
t
b
e
i
n
s
t
a
l
l
e
d
t
o
p
r
o
v
i
d
e
a
s
e
p
a
r
a
t
i
o
n
d
i
s
t
a
n
c
e
o
f
a
t
l
e
a
s
t
7
.
8
7
i
n
c
h
e
s
f
r
o
m
a
l
l
p
e
r
s
o
n
s
a
n
d
m
u
s
t
n
o
t
b
e
c
o
-
l
o
c
a
t
e
d
o
r
o
p
e
r
a
t
i
n
g
i
n
c
o
n
j
u
n
c
t
i
o
n
w
i
t
h
a
n
y
o
t
h
e
r
a
n
t
e
n
n
a
o
r
t
r
a
n
s
m
i
t
t
e
r
.
I
n
d
o
o
r
c
o
n
t
r
o
l
l
e
r
:
O
n
l
y
u
s
e
t
h
e
p
r
o
v
i
d
e
d
p
o
w
e
r
s
u
p
p
l
y
u
n
i
t
.
I
t
p
r
o
v
i
d
e
s
t
h
e
v
o
l
t
a
g
e
r
e
q
u
i
r
e
d
b
y
t
h
e
c
o
n
t
r
o
l
l
e
r
.
A
l
l
e
l
e
c
t
r
i
c
a
l
c
o
n
n
e
c
t
i
o
n
s
a
n
d
w
i
r
i
n
g
r
u
n
s
m
u
s
t
c
o
m
p
l
y
w
i
t
h
l
o
c
a
l
b
u
i
l
d
i
n
g
c
o
d
e
s
.
S
o
m
e
l
o
c
a
l
c
o
d
e
s
r
e
q
u
i
r
e
t
h
a
t
o
n
l
y
a
l
i
c
e
n
s
e
d
o
r
c
e
r
t
i
f
i
e
d
e
l
e
c
t
r
i
c
i
a
n
c
a
n
i
n
s
t
a
l
l
p
o
w
e
r
.
O
n
l
y
p
r
o
f
e
s
s
i
o
n
a
l
p
e
r
s
o
n
n
e
l
s
h
o
u
l
d
i
n
s
t
a
l
l
t
h
e
c
o
n
t
r
o
l
l
e
r
.
C
h
e
c
k
y
o
u
r
l
o
c
a
l
b
u
i
l
d
i
n
g
c
o
d
e
s
f
o
r
g
u
i
d
a
n
c
e
.
N
O
T
I
C
E
C
h
a
n
g
e
s
o
r
m
o
d
i
f
i
c
a
t
i
o
n
s
n
o
t
e
x
p
r
e
s
s
l
y
a
p
p
r
o
v
e
d
b
y
R
a
i
n
B
i
r
d
c
o
u
l
d
v
o
i
d
t
h
e
u
s
e
r
’
s
a
u
t
h
o
r
i
t
y
t
o
o
p
e
r
a
t
e
t
h
e
e
q
u
i
p
m
e
n
t
.
U
s
e
o
n
l
y
R
a
i
n
B
i
r
d
a
p
p
r
o
v
e
d
a
c
c
e
s
s
o
r
y
d
e
v
i
c
e
s
.
U
n
a
p
p
r
o
v
e
d
d
e
v
i
c
e
s
m
a
y
d
a
m
a
g
e
t
h
e
c
o
n
t
r
o
l
l
e
r
a
n
d
v
o
i
d
w
a
r
r
a
n
t
y
.
I
S
E
D
N
O
T
I
C
E
T
h
i
s
d
e
v
i
c
e
c
o
n
t
a
i
n
s
l
i
c
e
n
c
e
-
e
x
e
m
p
t
t
r
a
n
s
m
i
t
t
e
r
(
s
)
/
r
e
c
e
i
v
e
r
(
s
)
t
h
a
t
c
o
m
p
l
y
w
i
t
h
I
n
n
o
v
a
t
i
o
n
,
S
c
i
e
n
c
e
a
n
d
E
c
o
n
o
m
i
c
D
e
v
e
l
o
p
m
e
n
t
C
a
n
a
d
a
’
s
l
i
c
e
n
c
e
-
e
x
e
m
p
t
R
S
S
(
s
)
.
O
p
e
r
a
t
i
o
n
i
s
s
u
b
j
e
c
t
t
o
t
h
e
f
o
l
l
o
w
i
n
g
t
w
o
c
o
n
d
i
t
i
o
n
s
:
1
.
T
h
i
s
d
e
v
i
c
e
m
a
y
n
o
t
c
a
u
s
e
i
n
t
e
r
f
e
r
e
n
c
e
.
2
.
T
h
i
s
d
e
v
i
c
e
m
u
s
t
a
c
c
e
p
t
a
n
y
i
n
t
e
r
f
e
r
e
n
c
e
,
i
n
c
l
u
d
i
n
g
i
n
t
e
r
f
e
r
e
n
c
e
t
h
a
t
m
a
y
c
a
u
s
e
u
n
d
e
s
i
r
e
d
o
p
e
r
a
t
i
o
n
o
f
t
h
e
d
e
v
i
c
e
.
Instrucciones de seguridad
ADVERTENCIA
Este electrodoméstico no está diseñado para que lo usen personas
(incluidos los niños) con capacidad física, sensorial o mental
reducida, o falta de experiencia y conocimiento, a menos que una
persona responsable de su seguridad los supervise o les dé
instrucciones sobre el uso del electrodoméstico. Los niños deben
ser supervisados para asegurarse de que no jueguen con el aparato.
C
o
n
t
r
o
l
a
d
o
r
p
a
r
a
e
x
t
e
r
i
o
r
e
s
:
Si el cable de alimentación está dañado,
debe ser reemplazado por el fabricante, su agente de servicio o
personas calicadas de manera similar para evitar un peligro.
Controlador para interiores: Si la unidad de fuente de alimentación
se daña, debe ser reemplazada con una unidad de fuente de
alimentación obtenida del fabricante o su agente de servicio.
Se deben tomar precauciones especiales cuando los cables de las
válvulas están ubicados junto a, o comparten un conducto con
otros cables, como los que se usan para la iluminación de jardines,
u otros sistemas eléctricos.
Separe y aísle todos los conductores con cuidado, teniendo cuidado
de no dañar el aislamiento de los cables durante la instalación. Un
“corto” (contacto) eléctrico entre los cables de la válvula y otra
fuente de alimentación puede dañar el controlador y crear un
riesgo de incendio.
N
O
s
u
m
i
n
i
s
t
r
e
c
o
r
r
i
e
n
t
e
e
l
é
c
t
r
i
c
a
h
a
s
t
a
q
u
e
h
a
y
a
c
o
m
p
l
e
t
a
d
o
y
v
e
r
i
f
i
c
a
d
o
t
o
d
a
s
l
a
s
c
o
n
e
x
i
o
n
e
s
d
e
l
o
s
c
a
b
l
e
s
.
N
O
i
n
t
e
n
t
e
c
o
n
e
c
t
a
r
d
o
s
o
m
á
s
c
o
n
t
r
o
l
a
d
o
r
e
s
u
t
i
l
i
z
a
n
d
o
u
n
s
o
l
o
t
r
a
n
s
f
o
r
m
a
d
o
r
.
ATENCIÓN
Este dispositivo debe ser instalado manteniendo una distancia de
separación de por lo menos 20 cm de toda persona, y no debe ser
co-ubicado u operar en conjunto con cualquier otra antena o
transmisor.
C
o
n
t
r
o
l
a
d
o
r
p
a
r
a
i
n
t
e
r
i
o
r
e
s
:
U
t
i
l
i
c
e
ú
n
i
c
a
m
e
n
t
e
l
a
f
u
e
n
t
e
d
e
a
l
i
m
e
n
t
a
c
i
ó
n
s
u
m
i
n
i
s
t
r
a
d
a
.
E
s
t
a
p
r
o
p
o
r
c
i
o
n
a
e
l
v
o
l
t
a
j
e
q
u
e
r
e
q
u
i
e
r
e
e
l
c
o
n
t
r
o
l
a
d
o
r
.
Todas las conexiones eléctricas y los tendidos de cableado deben
cumplir con los códigos de construcción locales. Algunos códigos
locales requieren que solo un electricista autorizado o certicado
pueda instalar energía. Solo personal profesional debe instalar el
controlador. Consulte los códigos de construcción locales para
obtener orientación.
AVISO
Los cambios o modicaciones no aprobados expresamente por Rain
Bird podrían anular la autoridad del usuario para operar el equipo.
Utilice únicamente dispositivos accesorios aprobados por Rain Bird.
Los dispositivos no aprobados pueden dañar el controlador y anular
la garantía.
Consignes de sécurité
AVERTISSEMENT
Cet appareil n’est pas destiné à être utilisé par des personnes (y
compris des enfants) ayant des capacités physiques, sensorielles ou
mentales réduites, ou un manque d’expérience et de connaissances,
à moins qu’elles n’aient reçu une supervision ou des instructions
concernant l’utilisation de l’appareil par une personne responsable
de leur sécurité. Les enfants doivent être surveillés pour s’assurer
qu’ils ne jouent pas avec l’appareil.
P
r
o
g
r
a
m
m
a
t
e
u
r
d
’
e
x
t
é
r
i
e
u
r
:
Si le cordon d’alimentation est
endommagé, il doit être remplacé par le fabricant, son agent de service
ou des personnes de qualication similaire an d’éviter tout danger.
Programmateur d’intérieur : Si le bloc d’alimentation est
endommagé, il doit être remplacé par un bloc d’alimentation
disponible auprès du fabricant ou de son agent de service.
Des précautions particulières doivent être prises lorsque les ls de
vannes sont situés à côté ou partagent un conduit avec d’autres ls,
tels que ceux utilisés pour l’éclairage paysager ou d’autres systèmes
électriques.
Séparez et isolez soigneusement tous les conducteurs, en prenant
soin de ne pas endommager l’isolation des ls lors de l’installation.
Un «court» (contact) électrique entre les ls de la vanne et une autre
source d’alimentation peut endommager le contrôleur et créer un
risque d’incendie.
N
E
M
E
T
T
E
Z
P
A
S
l
'
a
p
p
a
r
e
i
l
s
o
u
s
t
e
n
s
i
o
n
a
v
a
n
t
d
'
a
v
o
i
r
e
f
f
e
c
t
u
é
e
t
v
é
r
i
f
i
é
t
o
u
s
l
e
s
b
r
a
n
c
h
e
m
e
n
t
s
.
N
'
E
S
S
A
Y
E
Z
P
A
S
d
e
r
e
l
i
e
r
d
e
u
x
p
r
o
g
r
a
m
m
a
t
e
u
r
s
o
u
p
l
u
s
à
l
'
a
i
d
e
d
'
u
n
m
ê
m
e
t
r
a
n
s
f
o
r
m
a
t
e
u
r
.
ATTENTION
Cet appareil doit être installé pour fournir une distance de
séparation d'au moins 20 cm de toutes les personnes, et ne doit pas
être colocalisé ou fonctionner en conjonction avec une autre
antenne ou émetteur.
P
r
o
g
r
a
m
m
a
t
e
u
r
d
’
i
n
t
é
r
i
e
u
r
:
u
t
i
l
i
s
e
z
u
n
i
q
u
e
m
e
n
t
l
e
b
l
o
c
d
'
a
l
i
m
e
n
t
a
t
i
o
n
f
o
u
r
n
i
.
I
l
e
n
v
o
i
e
l
a
t
e
n
s
i
o
n
n
é
c
e
s
s
a
i
r
e
a
u
p
r
o
g
r
a
m
m
a
t
e
u
r
.
Toutes les connexions électriques et les chemins de câblage doivent
être conformes aux codes du bâtiment locaux. Certains codes
locaux exigent que seul un électricien agréé ou certié puisse
installer l’alimentation. Seul le personnel professionnel doit installer
le contrôleur. Vériez vos codes du bâtiment locaux pour obtenir
des conseils.
AVIS
Les changements ou modications non expressément approuvés
par Rain Bird peuvent annuler le droit de l’utilisateur à faire
fonctionner l’équipement.
Utilisez uniquement des appareils accessoires approuvés par
Rain Bird. Les appareils non approuvés peuvent endommager
le contrôleur et annuler la garantie.
AVIS ISDE
L’émetteur/récepteur exempt de licence contenu dans le présent
appareil est conforme aux CNR d’Innovation, Sciences et
Développement économique Canada applicables aux appareils
radio exempts de licence. L’exploitation est autorisée aux deux
conditions suivantes:
1. L’appareil ne doit pas produire de brouillage
2. L’appareil doit accepter tout brouillage radioélectrique subi,
même si le brouillage est susceptible d’en compromettre le
fonctionnement.
2. Connect both rain or rain/freeze sensor wires to
the SENS terminals.
4. For detailed installation and operation of
pump start relay, refer to pump manufacturer’s
installation instructions.
Connect Power
Indoor controller: With the wire bay cover
removed, connect the power wires to the 24VAC
terminals prior to plugging the transformer into a
power outlet.
3. For detailed installation and operation of rain or
rain/freeze sensor, refer to sensor manufacturer’s
installation instructions.
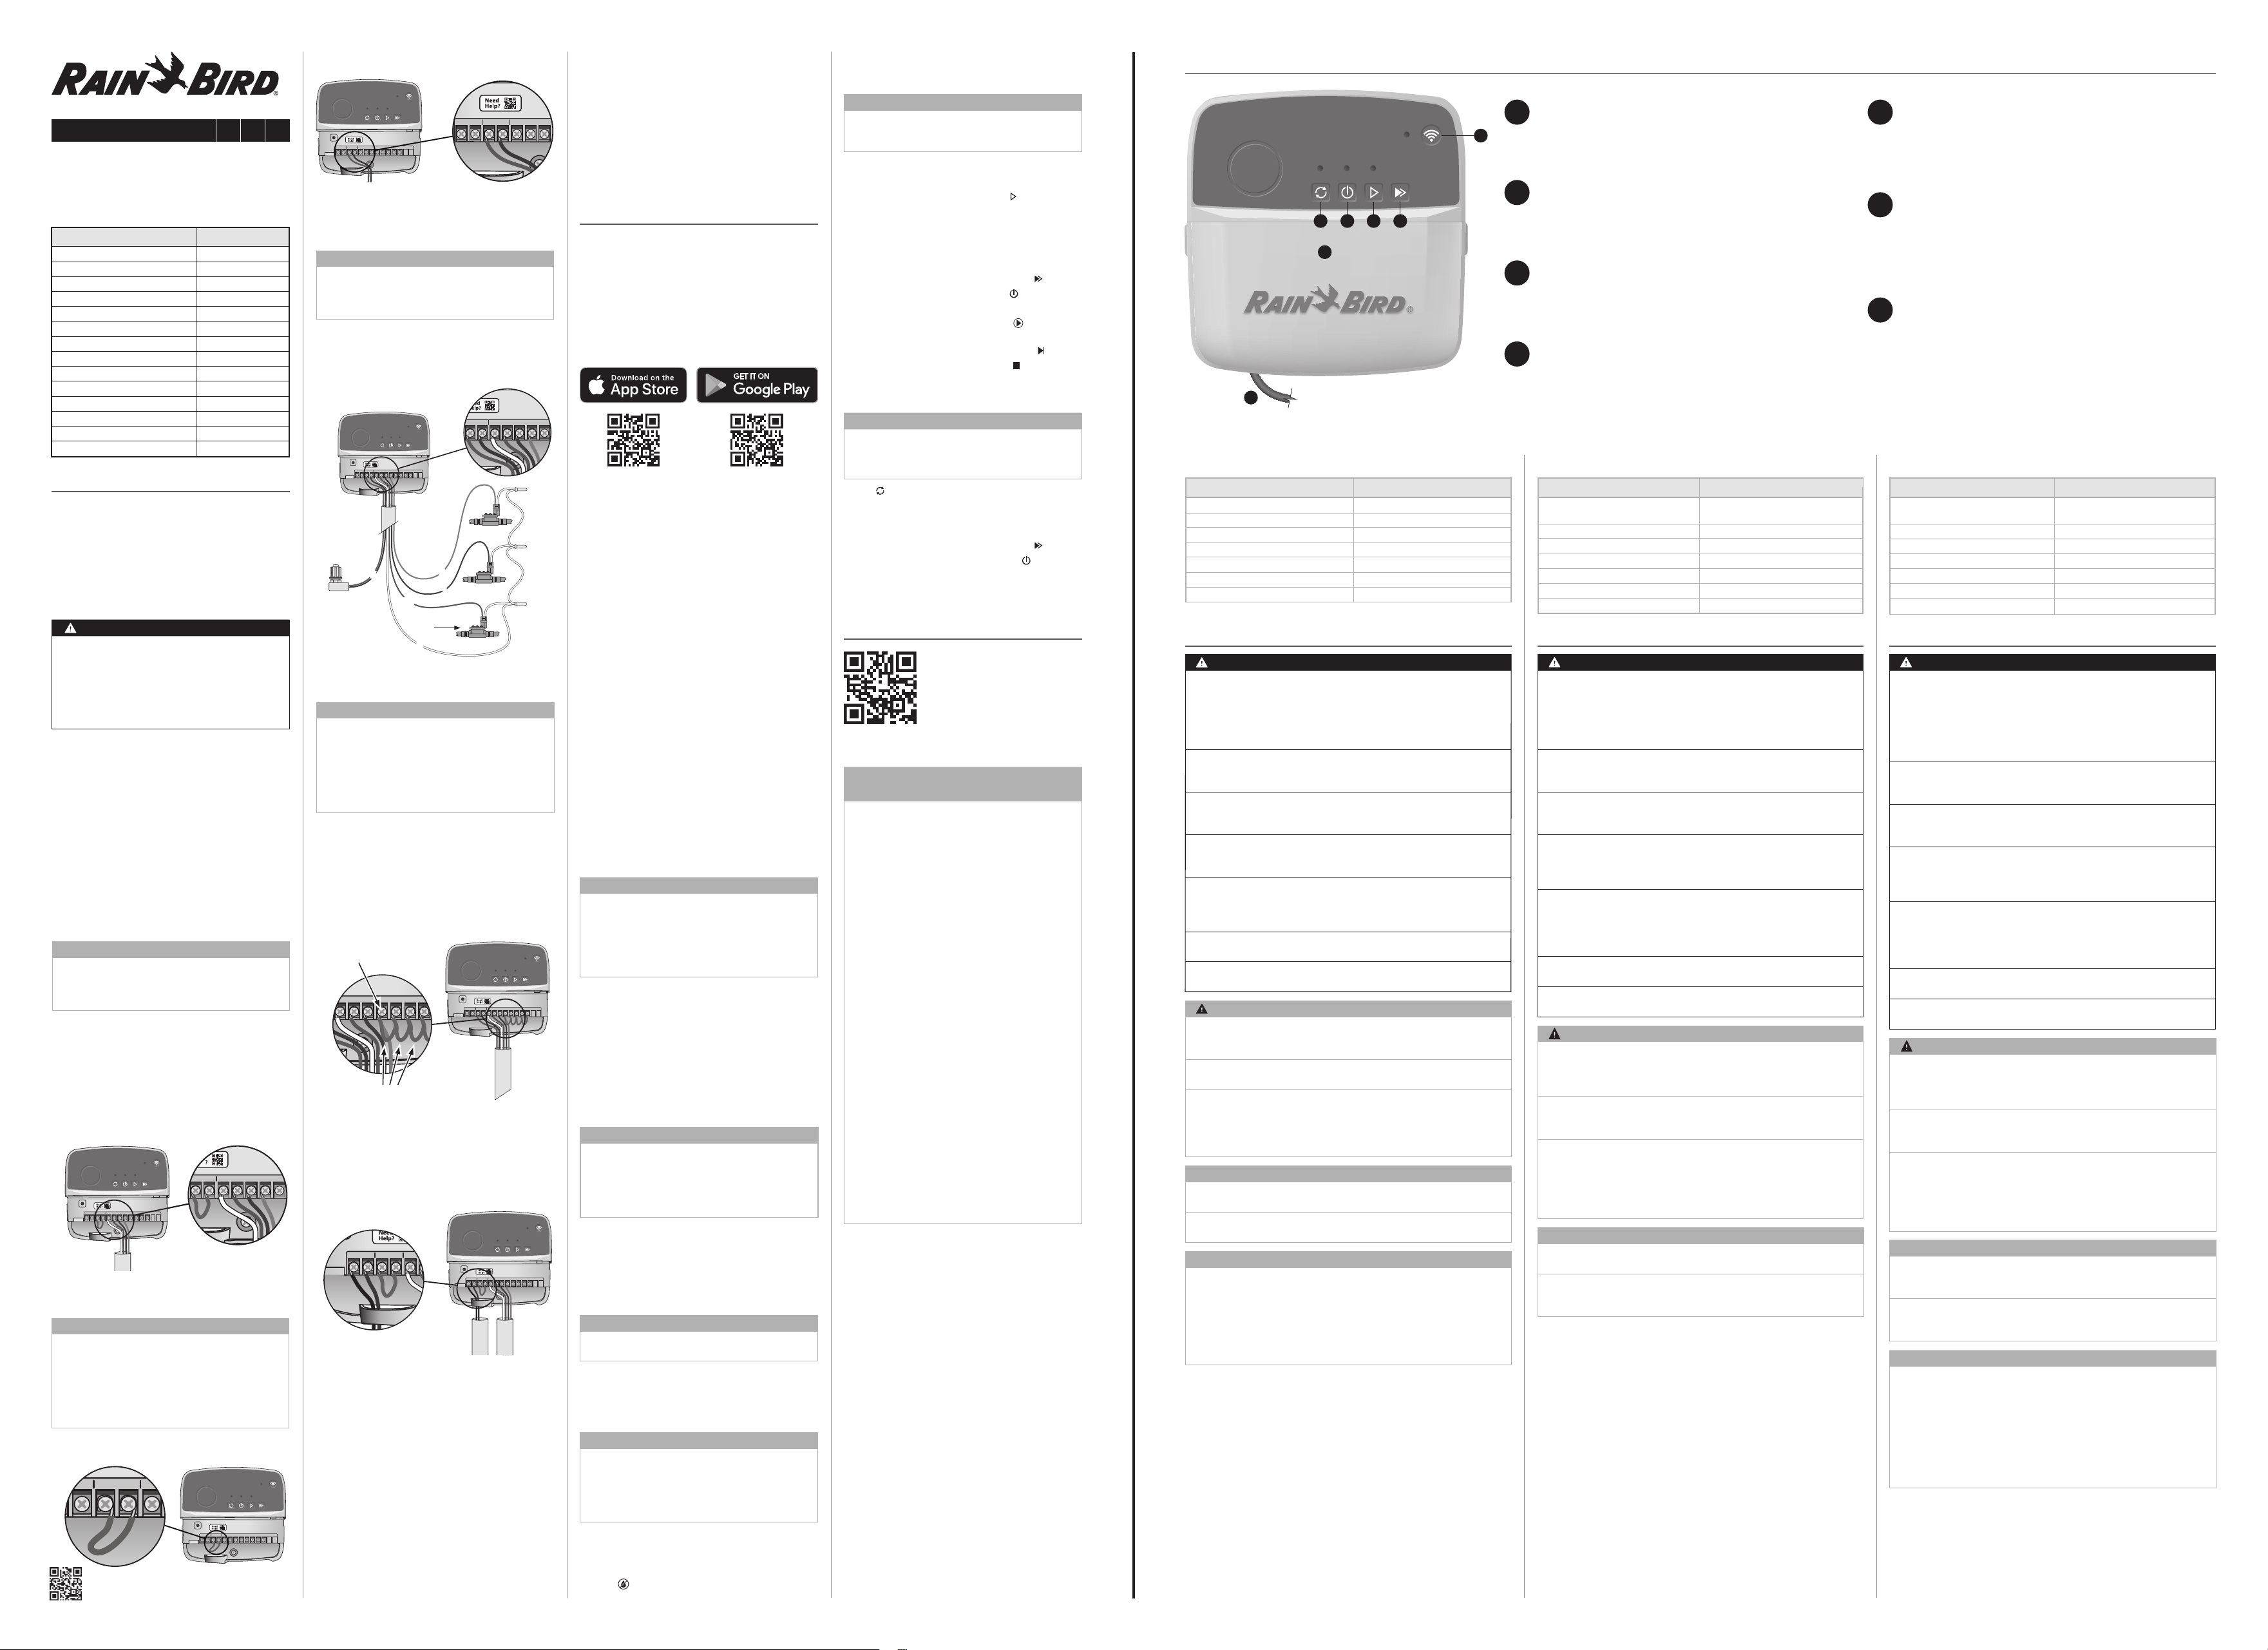
2
1
AUTOMATIC WATERING: Watering occurs automatically according
to programmed schedules
RIEGO AUTOMÁTICO: El riego ocurre automáticamente de acuerdo
con los horarios programados
ARROSAGE AUTOMATIQUE : L’arrosage se produit
automatiquement selon les horaires programmés
OFF: Cancel all active watering immediately and disable automatic
irrigation
APAGADO: Cancela todo el riego activo de inmediato y deshabilita
el riego automático
DÉSACTIVÉ : Annule immédiatement tous les arrosages actifs et
désactive l’arrosage automatique
MANUAL WATERING: Start watering immediately for all stations in
sequence
RIEGO MANUAL: Inicie el riego inmediatamente para todas las
estaciones en secuencia
ARROSAGE MANUEL : Lancez immédiatement l'arrosage pour
toutes les stations programmées
ADVANCE TO NEXT STATION: Advance to the next station in
sequence
AVANZAR A LA SIGUIENTE ESTACIÓN: Avanzar a la siguiente
estación en secuencia
PASSER À LA STATION SUIVANTE : Passer à la station suivante dans
l'ordre
1
2
3
4
PAIRING MODES: Toggles between AP Hotspot and WiFi pairing
modes
MODOS DE EMPAREJAMIENTO: Alterna entre modos de
emparejamiento de punto de acceso
ina va lámbrico y WiFi
MODES D’APPARIEMENT : Bascule entre les modes d’appariement
Point d’accès AP et WiFi
WIRING BAY WITH REMOVABLE COVER: Contains terminal block to
connect valve stations and optional accessories
BAHÍA DE CABLEADO CON CUBIERTA REMOVIBLE: Contiene un
bloque de terminales para conectar estaciones de válvulas y
accesorios opcionales
BAIE DE CÂBLAGE AVEC COUVERCLE AMOVIBLE : Contient un
bornier pour connecter les stations de vannes et les accessoires
optionnels
POWER CORD: Six-foot power cord
CABLE DE ALIMENTACIÓN: Cable de alimentación CA de seis pies
CORDON D’ALIMENTATION : Cordon d’alimentation CA de six pieds
CONTROLLER CASE (outdoor model): Controller case with
removable door for protection against inclement weather
CAJA DEL CONTROLADOR (modelo de exterior): Caja del
controlador con puerta extraíble para protegerlo de las inclemencias
del tiempo
BOÎTIER DU PROGRAMMATEUR (modèle extérieur) : Boîtier du
programmateur avec porte amovible pour la protection contre les
intempéries
5
6
7
AUTO OFF MANUAL NEXT
STATUS
1 2 3
6
7
5
4
LED Status on Controller
Estado del LED en el controlador
État de la LED sur le contrôleur
Bluetooth®; ready-to-pair mode
Guest mode (AP Hotspot)
WiFi broadcast mode
Not connected
Automatic watering active
Controller o
Manual watering active
ESTADO azul intermitente
ESTADO alternando rojo y verde
ESTADO verde continuo
ESTADO rojo intermitente
AUTOMÁTICO verde continuo
APAGADO rojo continuo
MANUAL verde intermitente
Bluetooth®; modo listo para
emparejar
Modo invitado (punto de acceso AP)
Modo de transmisión WiFi
No conectado
Riego automático activo
Controlador apagado
Riego manual activo
ÉTAT bleu clignotant
ÉTAT rouge et vert en alternance
ÉTAT vert continu
ÉTAT rouge clignotant
AUTO vert continu
DÉSACTIVÉ rouge continu
MANUEL vert clignotant
Bluetooth®; mode prêt à
jumeler
Mode invité (point d’accès)
Mode de diusion WiFi
Non connecté
Arrosage automatique actif
Programmateur désactivé
Arrosage manuel activé
640433-01 Rev. 05/25
Lawn Sprinkler Control
|
Control de aspersores de jardín
|
Contrôle de l’arrosage des pelouses
Loading page 2...