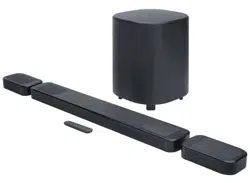
USER GUIDE
USER GUIDE

Contents & Information
Features
• 6 Internal speakers + 2 true wireless satellite
speakers + 1 wireless subwoofer
CONTENTS & INFORMATION
OVERVIEW
WHAT'S IN THE BOX?
WALL MOUNTING SETUP (OPTIONAL)
ASSEMBLY
FIRST TIME SETUP
OPERATION
CLEANING & CARE
SPECIFICATIONS
TROUBLESHOOTING
.......................................................................................
..........................................................................
...................................................
.........................................................................................
.............................................................................
.....................................................................................
............................................................................
..............................................................................
.........................................................................
1
5
6
7
10
13
19
19
20
• 1 x HDMI® IN
• 1 x HDMI® OUT (eARC)
• 1 x Optical
• 5.1.2 Channels
• Dolby Atmos®
• DTS:X® + DTS® Virtual:X™
• Roku TV Ready®
• Bluetooth®
• 1 x AUX
• 1 x USB
Connections
1
Overview
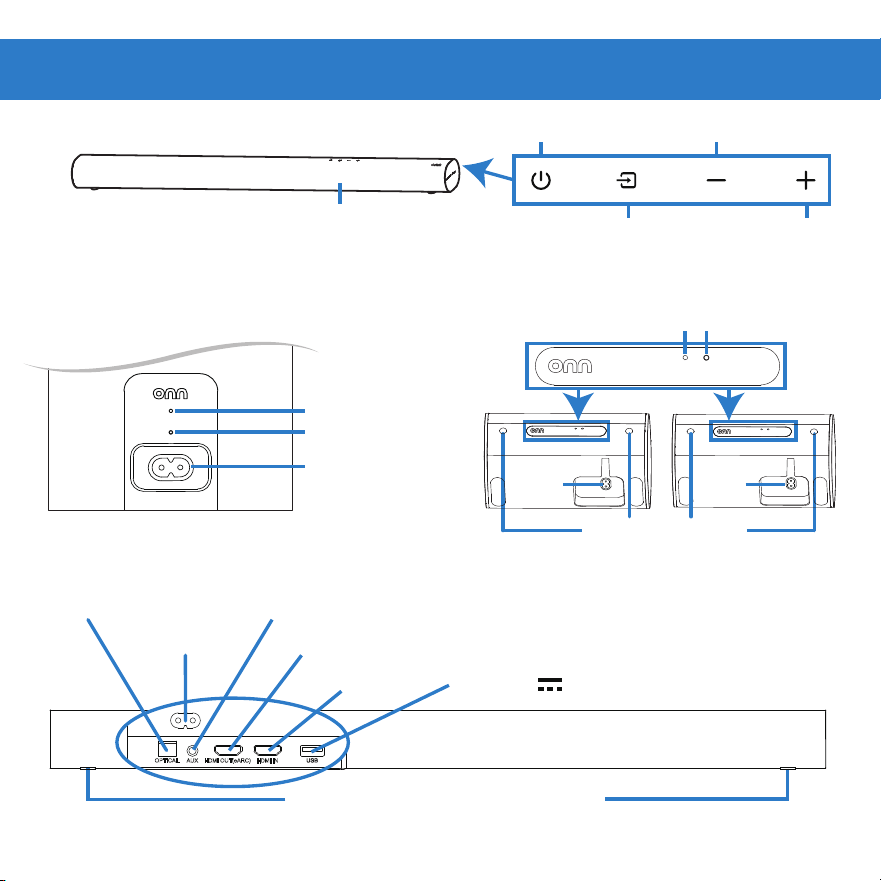
SOUNDBAR
VOLUME UP
VOLUME DOWN
SOURCE
DISPLAY PANEL
ON/OFF
SUBWOOFER
RESET
LED INDICATOR
POWER
WALL-MOUNT SCREW HOLES
USB (5V 1A)
HDMI OUT (eARC)
OPTICAL AUDIO IN
AUX AUDIO IN (STEREO 3.5MM)
POWER
SOUNDBAR BACK
HDMI IN
Figure 4
Figure 2
SATELLITE SPEAKERS
POWER
RESET
LED
INDICATOR
WALL MOUNTS
Figure 3
Figure 1
POWER
HELLO
HDMI IN
HDMI OUT(eARC)
AUX
OPTICAL
RESET
RESET
RESET
RESET
AC IN
2
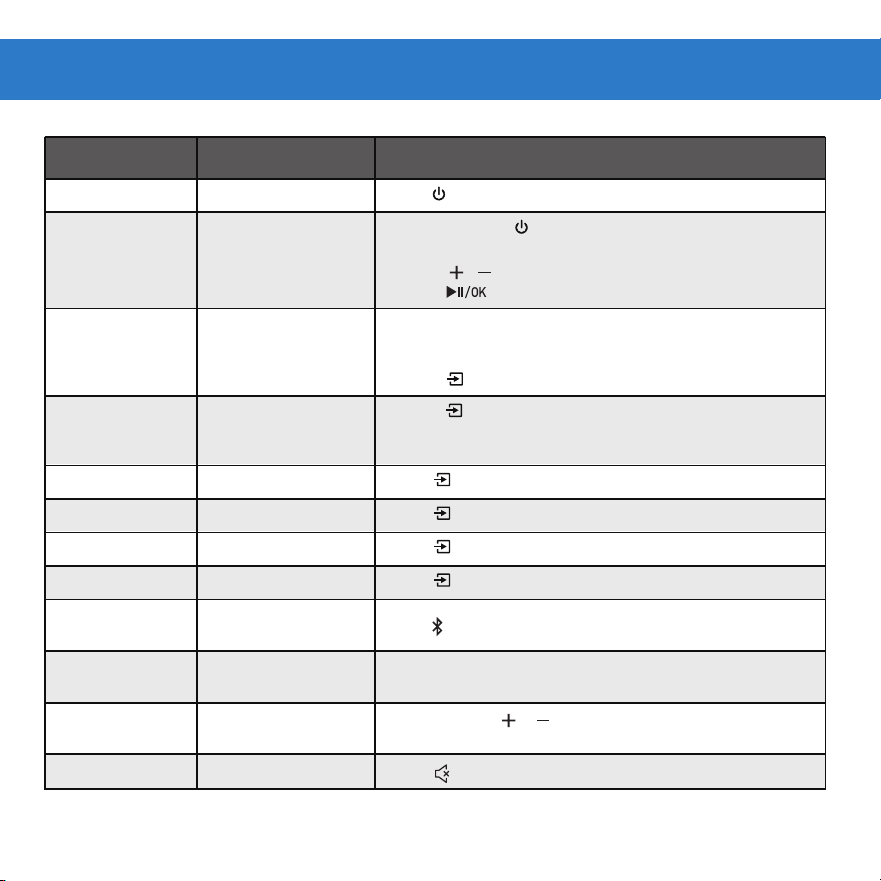
Table 1
Press to quit input source scanning
Press / to switch auto standby on / off
Display Action & Result
HELLO
/
BYE
Press x 1 to power on / off the soundbar
AUTO 5TANDBY ON
/
Press and hold for 3 seconds to go to auto standby
setting after powered on
•
•
•
Press to confirm your selection
5CAN
•
Soundbar will search for the latest input source after
powered on. If there's no input in 3 seconds, it will
start to scan other wired input sources
•
eARC
/
ARC
•
Press
to switch to HDMI(eARC/ARC)
Connect the soundbar to TV’s HDMI(eARC) /ARC,
and set the TV’s source to HDMI(eARC/ARC)
•
HDMI
Press repeatedly to switch to HDMI IN
OPT
Press repeatedly to switch to Optical
AUX
Press repeatedly to switch to AUX
U5B
Press repeatedly to switch to USB
BT PAIRING
Press
x 1
to trigger Bluetooth pairing
BT
Successfully connected your Bluetooth device to the
Soundbar
V MAX
/
V MIN
Press and hold or to set the sound level to maximum
or minimum
Function
Power on / off
Auto standby
Input source
scanning
HDMI (eARC/
ARC)
HDMI IN
Optical
Aux in
USB
Bluetooth pairing
/disconnect
Bluetooth device
connected
Maximum/
minimum volume
Mute
MUTE
Press x 1 to mute or unmute
AUTO 5TANDBY OFF
3
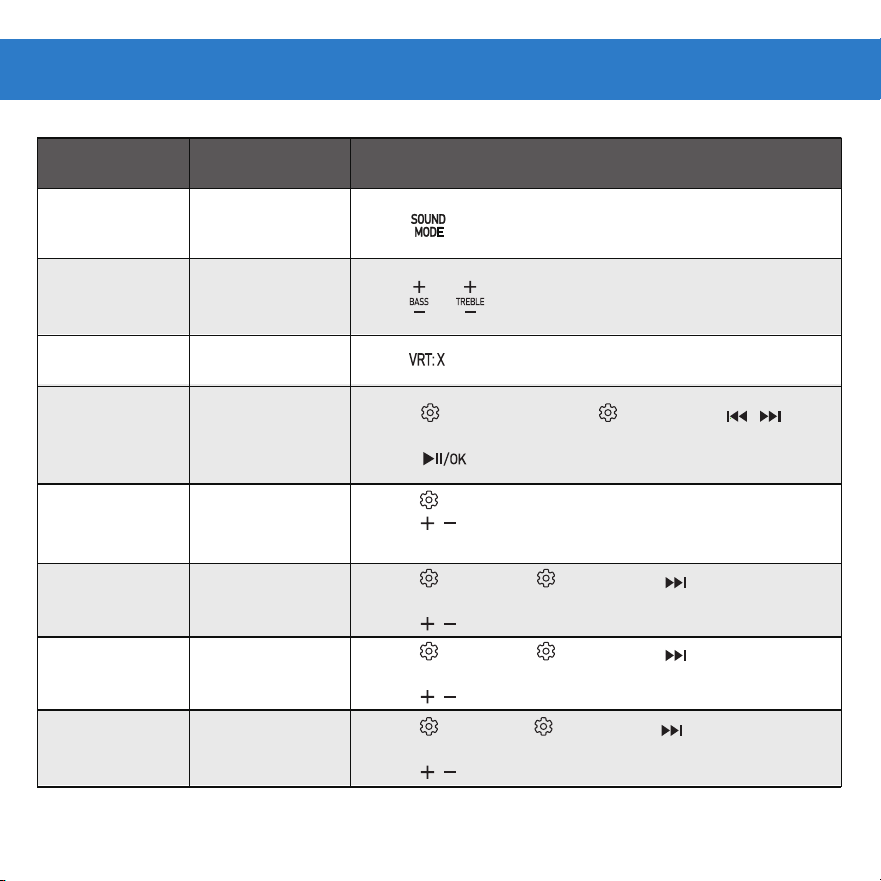
Table 2
Display
TALK
/
MU5IC
/
MOVIE
BA5+5
~
BA5-5
/
TRE+5
~
TRE-5
VTR X ON
/
VTR X OFF
CEN+5
~
-5
>
5RR+5
~
-5
>
5RL+5
~
-5
>
HGT+5
~
-5
CEN+5
~
-5
5RR+5
~
-5
5RL+5
~
-5
Function
Sound mode
Bass / Treble + / -
DTS Virtual:X ON
Setting
Center + / -
Surround
right level
Surround
left level
Height Level
HGT+5
~
-5
Press x 1 to enter the center level setting
Press / to increase
/
decrease loudness of center
speaker
Press repeatedly or press x1 then press / to
select different channels
Press to quit the setting
Press to switch DTS Virtual:X on / off
Action & Result
Press or to increase/decrease the bass/treble level
•
•
•
•
•
•
Press repeatedly to switch between Talk/Music/Movie
Press x 2 or Press x 1 then press x1 to enter the
surround level setting
Press / to increase
/
decrease loudness of right surround
•
•
Press x 3 or Press x 1 then press x2 to enter the
surround level setting
Press / to increase
/
decrease loudness of left surround
•
•
Press x 4 or Press x 1 then press x3 to
enter
the
height level setting
Press / to increase/decrease loudness of upfiring speakers
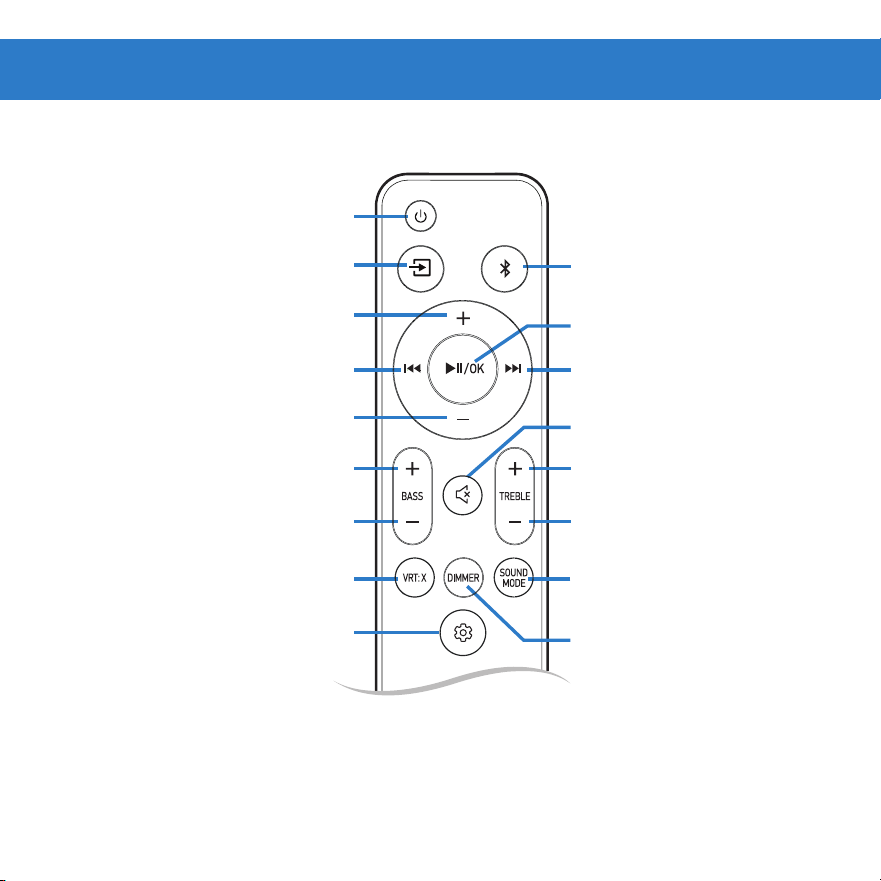
REMOTE CONTROL
BLUETOOTH
BASS DOWN
TREBLE DOWN
SOUND MODE
(MUSIC/MOVIE/TALK)
BASS UP
TREBLE UP
NEXT TRACK
PLAY/PAUSE/OK
SOURCE
POWER
ON/OFF
VOLUME UP
VOLUME DOWN
PREVIOUS TRACK
MUTE/UNMUTE
SETTING
DTS® Virtual:X™
DISPLAY BRIGHTNESS
(High/Medium/Low/Off)
Figure 5
*Press "VRT:X" to enable/disable Virtual:X. When enabled (On), all inputs will produce
a virtual sound technology that simulates the effect of having overhead sound.
When disabled (Off), all sources will playback without virtualization.
(Center Level/Surround Right
Level/Surround Left Level/
Height Level)
4
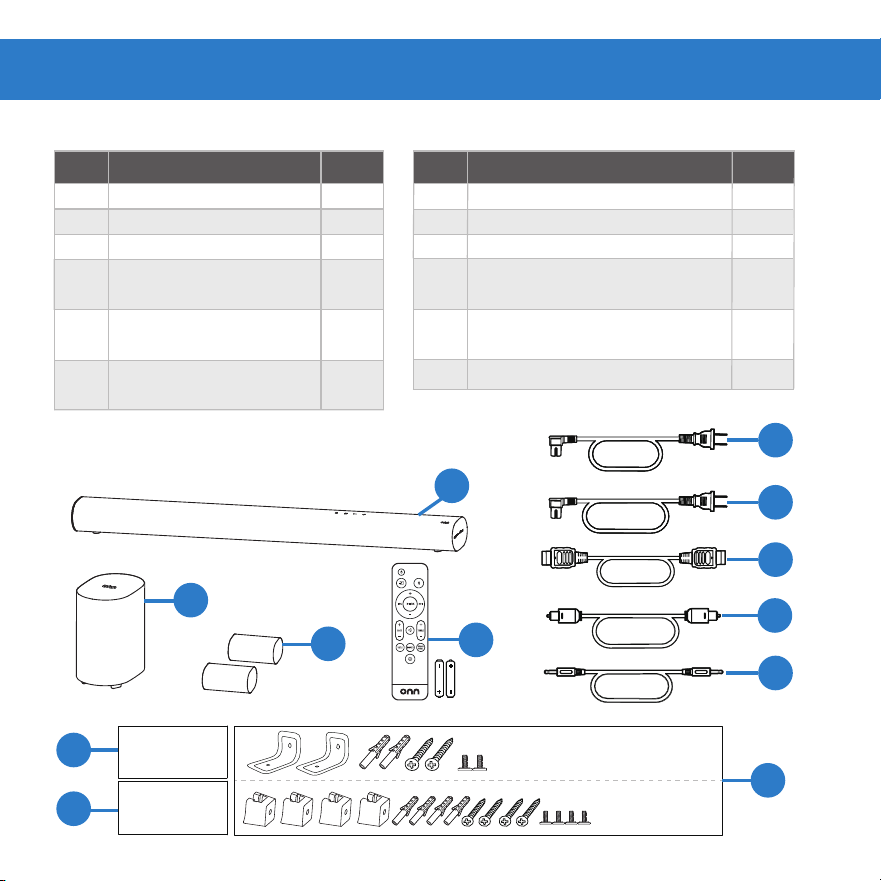
DescriptionPart QtyDescription Qty
PARTS
PARTS DIAGRAM
1
2
3
4
5
6
Soundbar
Wireless subwoofer
Satellite speaker
Power cable (4.92 ft)
(for Soundbar and Subwoofer)
Remote control
(2 AAA batteries)
2
2
1
1
1
2
2
1
1
1 HDMI cable7
Wall mounting template
(for Satellite Speaker)
Wall mounting kit
Wall mounting template
(for Soundbar)
12
10
11
Part
8
1
1
Optical cable
9
3.5 mm AUX cable
1
2
3
4
6
7
9
12
8
10
11
5
Table 3
Figure 6
(For Soundbar)
(For Satellite
Speaker)
5
What's in the Box?
WALL MOUNTING TEMPLATE
- SOUNDBAR
WALL MOUNTING TEMPLATE
- SATELLITE SPEAKER
Power cable (6.56 ft)
(for Satellite Speaker)
What's in the Box?
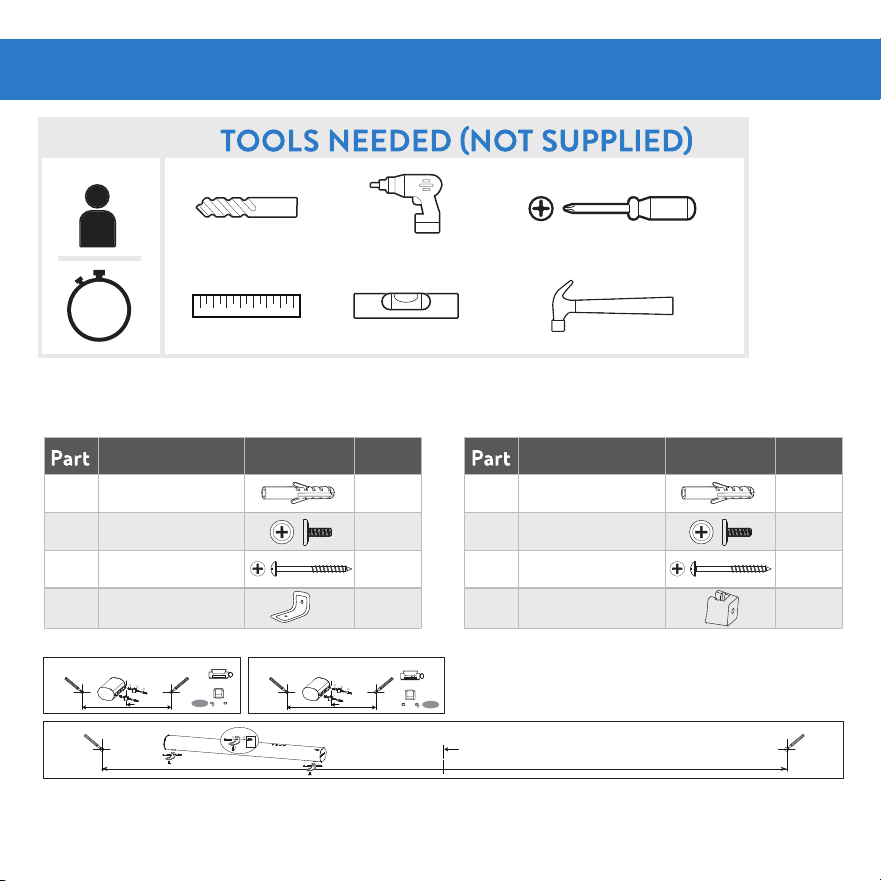
(Wall mounting, optional)
Figure 7
Table 4
Table 6Table 5
6
25
min
Description Picture Qty
A Anchors
2
B
C
D
Description Picture Qty
A Anchors
4
B Short Screws
4
C Long Screws
4
D Brackets 4
#1 Phillips Screwdriver
Drill bit
Ruler Level Hammer
Drill
SETUP
Wall Mounting Setup (Optional)
Long Screws 2
Short Screws 2
Brackets 2
SATELLITE SPEAKERS
ACCESSORIES NEEDED (SUPPLIED)
SOUNDBAR
MARK HERE MARK HERE
- SOUNDBAR
WALL MOUNTING TEMPLATE
37.80 in./960mm
Center Line
WALL
2
3
1
Wall mounting template (For Satellite Speakers)
Wall mounting template (For Soundbar)
1
2
3
- SATELLITE SPEAKER
WALL MOUNTING TEMPLATE
Center Line
MARK HERE MARK HERE
5.04in./128mm
REAR RIGHT
REAR RIGHT
1
2
3
- SATELLITE SPEAKER
WALL MOUNTING TEMPLATE
Center Line
MARK HERE MARK HERE
5.04in./128mm
REAR LEFT
REAR LEFT
7
Figure 9
Figure 8
MARK HERE MARK HERE
- SOUNDBAR
WALL MOUNTING TEMPLATE
37.80 in./960mm
Center Line
WALL
2
3
1
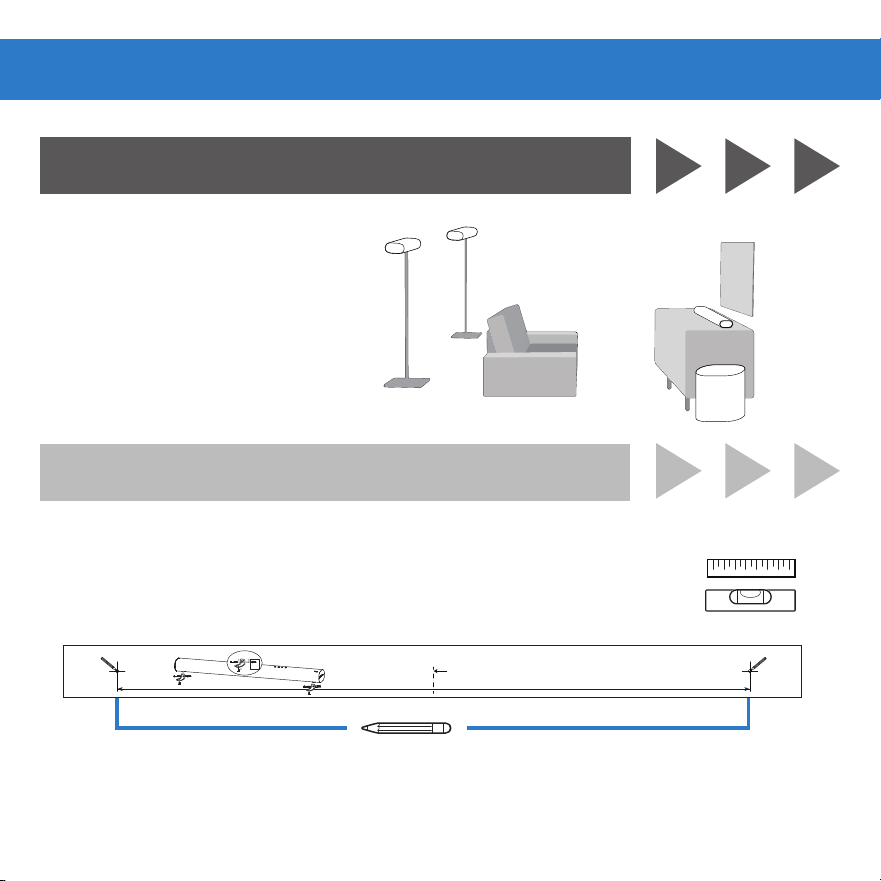
• Be sure screws will be attached to wood studs or use anchors
for drywall, or anchors for concrete or brick walls.
1A. CENTER
1. Place wall mounting template on wall under TV.
2. Mark Bracket holes (Ensure enough space between
Soundbar and TV) See 3B. HANG.
1. Center the soundbar below
the TV, close to ear level.
2. Go to First Time Setup
for further instructions.
Assembly
ON A SURFACE
ON A WALL(SOUNDBAR)
1B. PLACE
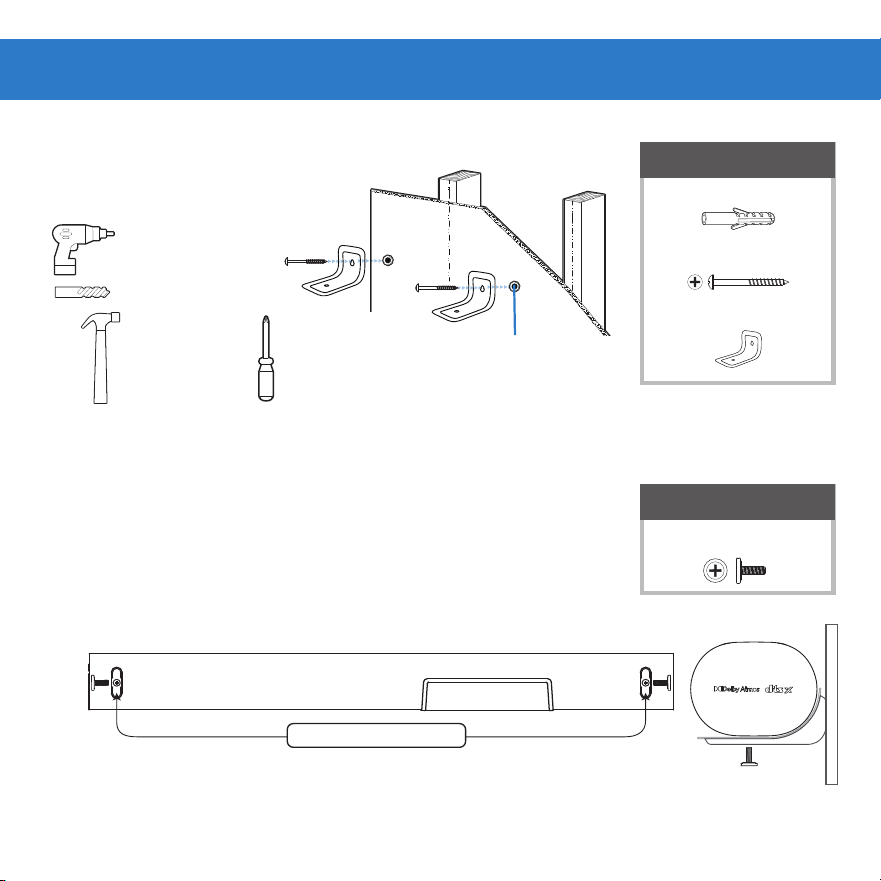
Table 7
Table 8
8
Figure 10
1. Go to First Time Setup to connect the cables.
2. Place soundbar onto the L-shaped bracket holder
and use the included short screws to attach.
3B. HANG
Wall-mount Screw Holes
Bottom of Soundbar
Figure 11
2B. INSTALL
1. Drill
holes
2. Hammer
in anchors
3. Fix the shorter
side of the
brackets and
screws into
anchors
Anchors not
needed if screwed
into Studs
REQUIRED
(A) Anchors x2
(D) Brackets x2
(C) Long Screws x2
REQUIRED
(B) Short Screws x2
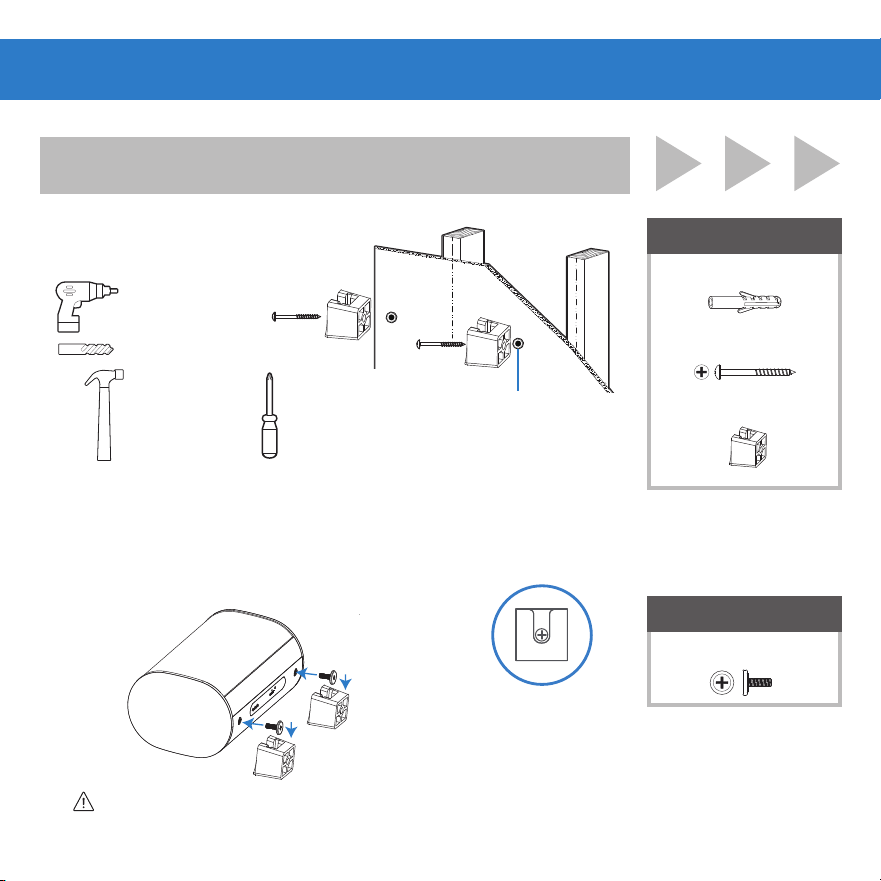
Table 9
Table 10
9
1. Go to First Time Setup to connect the cable.
2. Attach the wall mount screw to the back of the satellite speakers.
3. Slide the speakers on to the wall brackets. Ensure the wall mount screw is
secured within the bracket grooves.
2B. HANG
Figure 12
Figure 13
If you are unfamilar with power tools or layout of electrical
wiring in the walls of your home, consult a professional installer.
CAUTION:
1B. INSTALL
1. Drill
holes
REQUIRED
(A) Anchors x4
(D) Brackets x4
(C) Long Screws x4
2. Hammer
in anchors
3. Fix the brackets
and screws into
anchors
Anchors not
needed if screwed
into Studs
Note: Make sure wall
mount orientation
matches example
ON A WALL(SATELLITE SPEAKER)
REQUIRED
(B) Short Screws x4
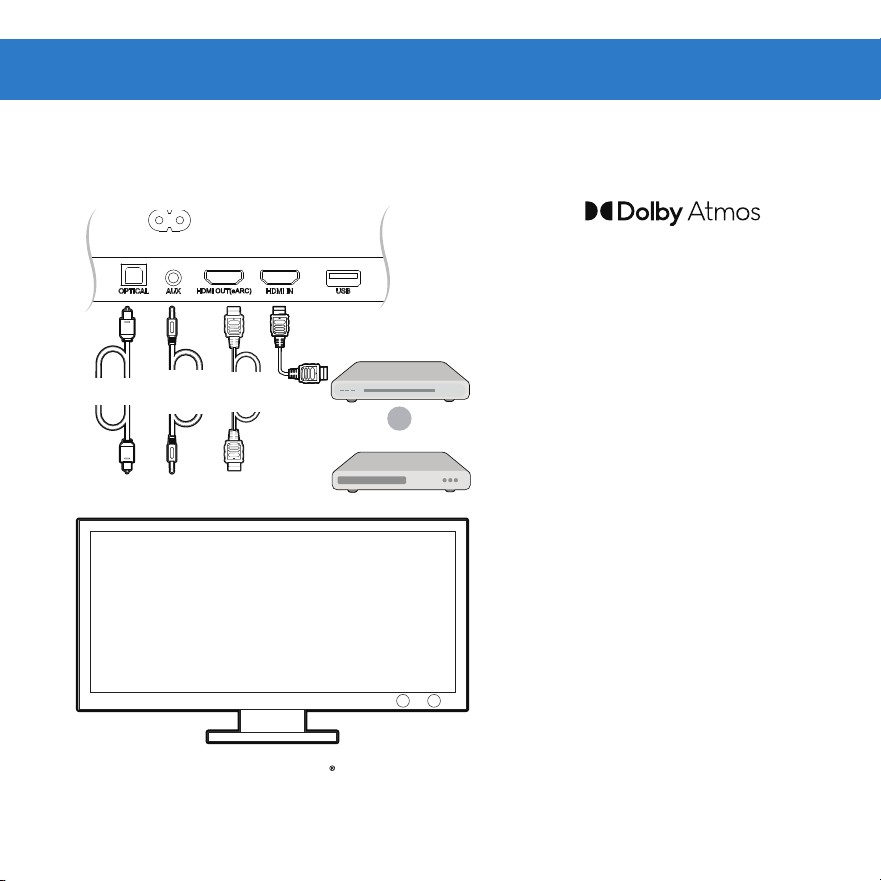
1. CHOOSE A CABLE
Connect one cable to Soundbar and TV
OPTICAL
HDMI
(eARC)
3.5MM
AUX
•To Enjoy or DTS:X®
content, your TV must support
HDMI-CEC and enhanced Audio
Return Channel (eARC) function.
• Enable CEC and ARC/eARC on TV
• Settings for CEC and ARC/eARC
may differ by TV manufacturer. See
TV’s user guide for more.
• To control soundbar volume on
TV remote, enable System Audio
Control in CEC menu.
• CEC Function naming may differ
by TV Manufacturer. See TV’s user
guide for more.
• Only HDMI 2.0 cables (and higher)
support eARC.
* If no Audio using Digital
Inputs see troubleshooting.
Best
Good
Better
Tips: If you have a Roku TV , setup will be easy. Just use the included HDMI cable
to connect your
soundbar to the HDMI (ARC/eARC) port on your TV and follow the
on-screen instructions.
Cable/ Satellite Box
Blu-ray Player
OR
Figure 14
10
First Time Setup
11
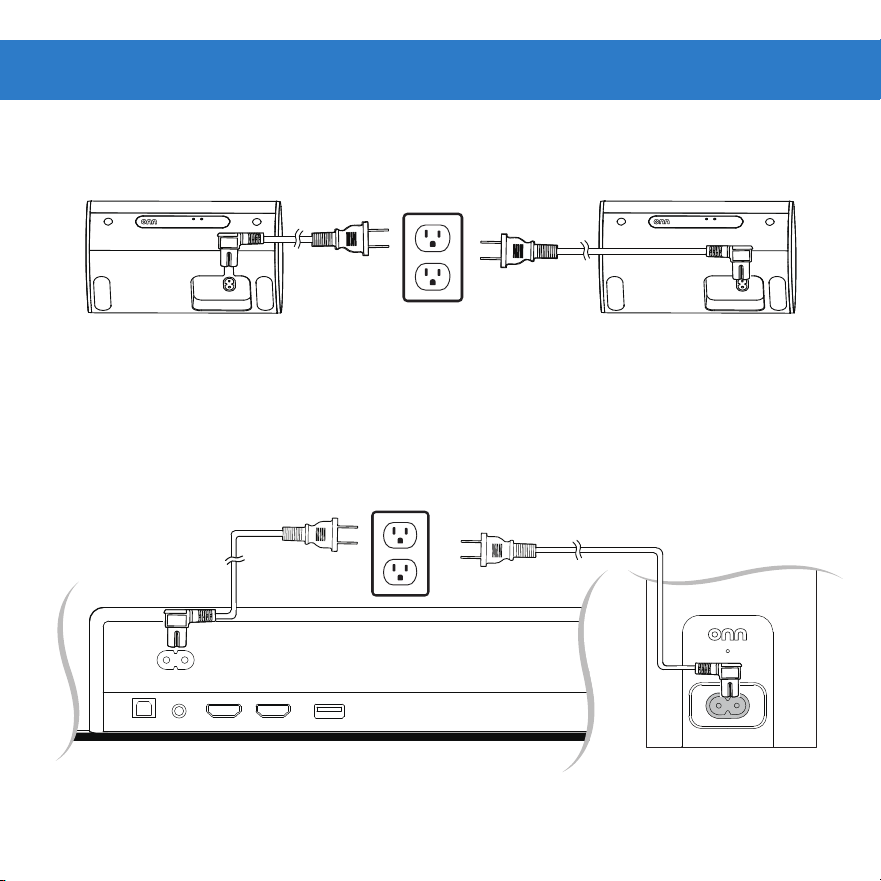
2. CONNECT SATELLITE SPEAKERS
3. CONNECT SOUNDBAR & SUBWOOFER
Figure 16
4.92 ft
4.92 ft
Figure 15
6.56 ft
6.56 ft
RESET
RESET
OPTICAL AUX
HDMI OUT(eARC)
HDMI IN
USB
AC IN
RESET
12
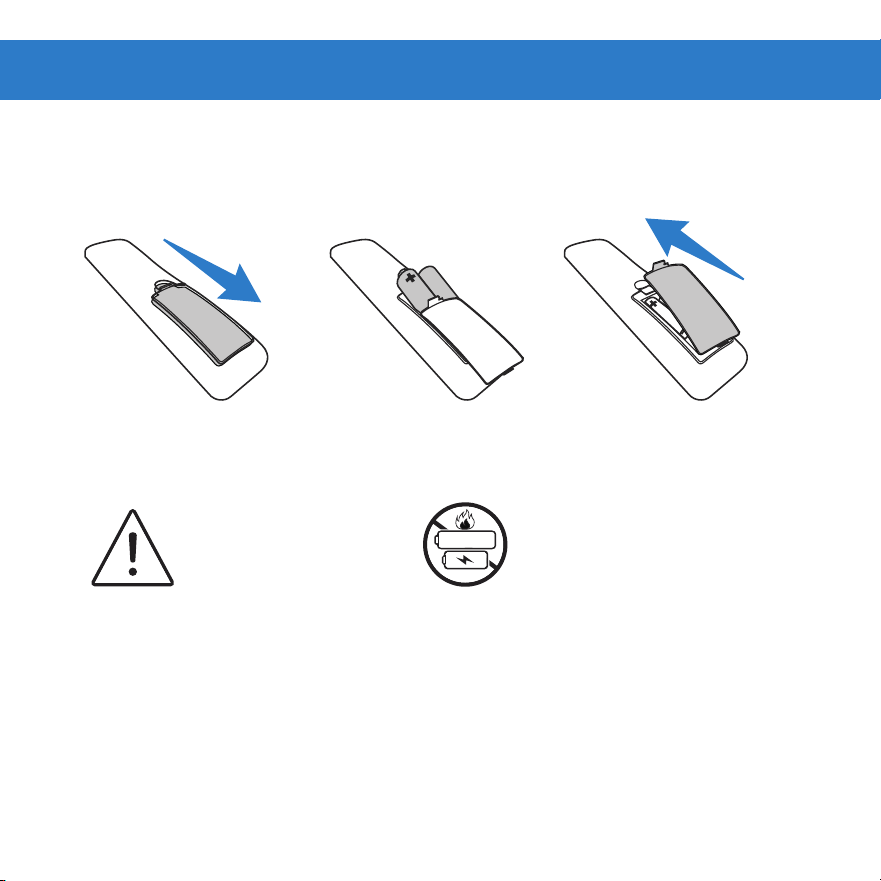
WARNING
Do not mix old and
new batteries.
WARNING
Do not mix alkaline, standard
(carbon-zinc) or rechargeable
(ni-cad, ni-mh, etc.) batteries.
Alk/Zinc/Ni-Mh
4. INSTALL BATTERIES
Remove battery door Close battery door
Figure 17
In remote control
Insert batteries
Operation
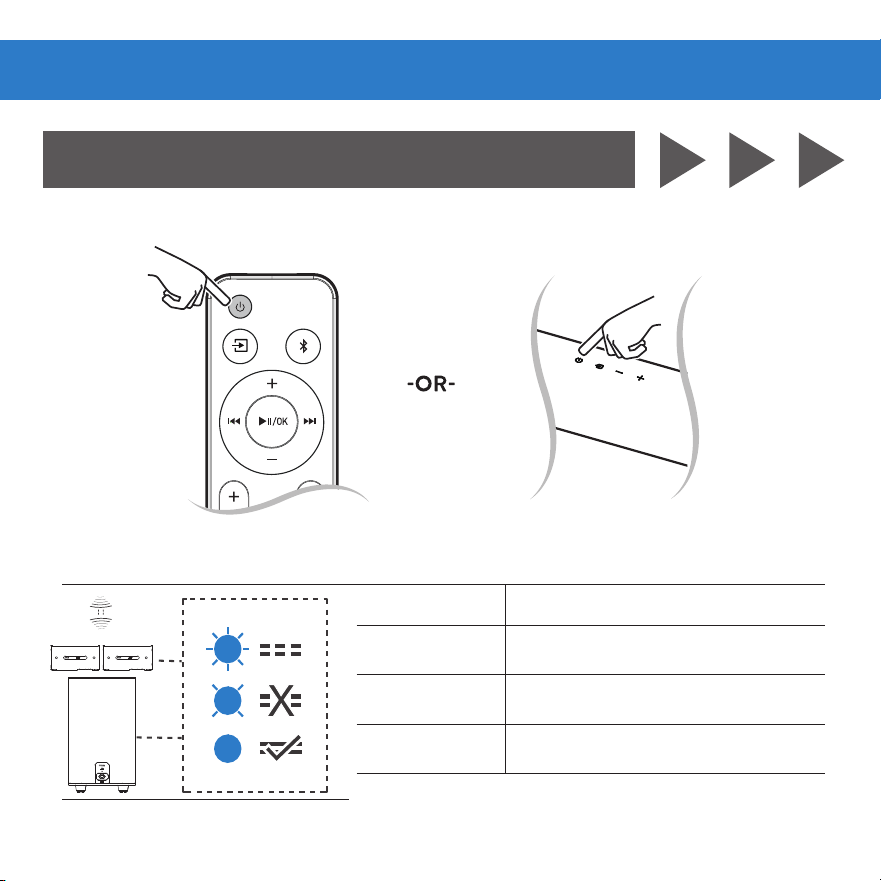
LED State Status
Flashing blue In pairing mode
Breathing blue Connection/Pairing Failed
Solid blue Connected/Pairing successful
1A. AUTOMATIC PAIRING
CONNECT SUBWOOFER & SATELLITES
Table 11
Figure 18
13
Operation
Power on the Soundbar, then it will pair with Subwoofer and Satellites
automatically within 3-5 seconds.
*Remark: If the pairing is not successful, please unplug and plug them again into the power supply.
14
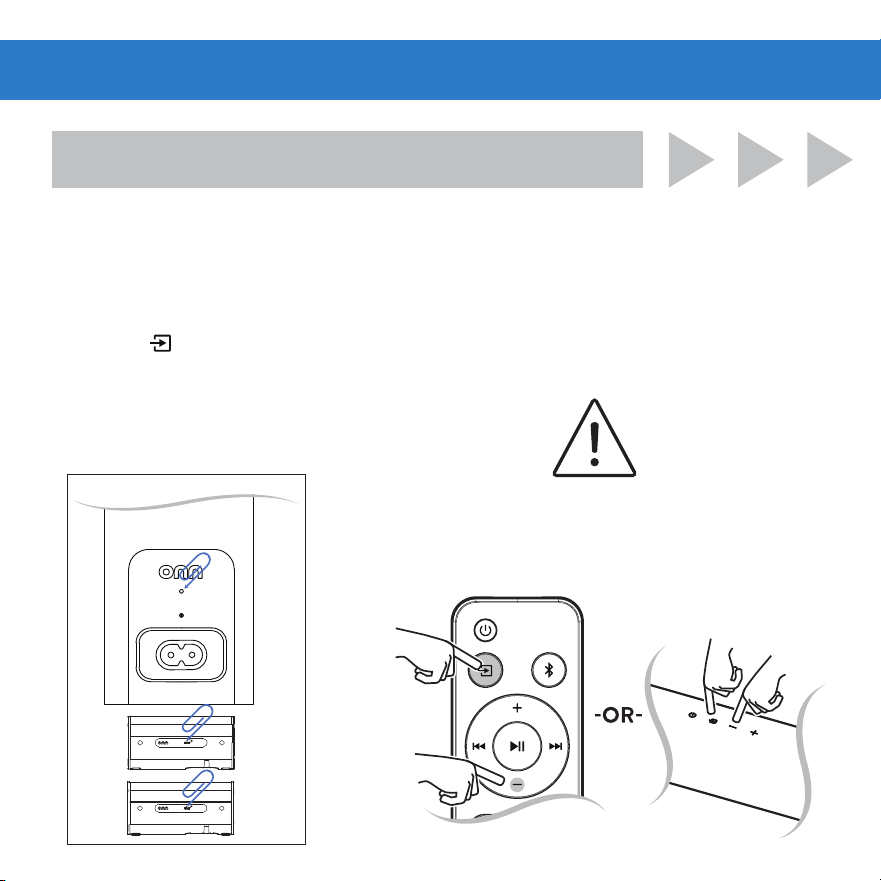
1B. MANUAL PAIRING (IF AUTOMATIC PAIRING FAILED)
1. Plug into the power supply.
2. Press and hold the reset hole of the subwoofer and satellite speakers for 1 second
with a pin.
3. Press " " and "-" simultaneously for 3 seconds on the soundbar or remote control.
4. When wireless connection is successful, the indicator will be solid blue.
Press & hold 3 sec
simultaneously
The indicators will
flash rapidly when pairing
WARNING
Place the subwoofer and satellite
speakers within 8m range of the soundbar.
CONNECT SUBWOOFER & SATELLITES
Figure 19
RESET
AC IN
BLUETOOTH® OPERATION
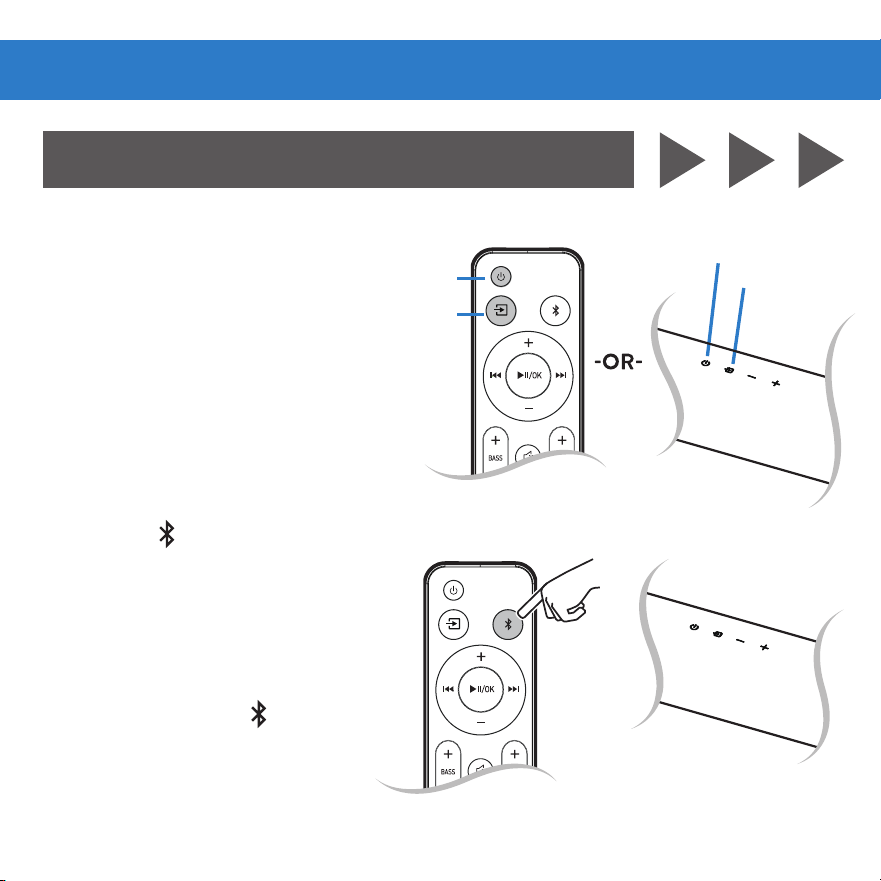
15
ON/OFF
1. POWER ON/OFF
Soundbar
(Remote Control or Soundbar)
2. SELECT SOURCE
To switch between audio sources
(Remote Control or Soundbar)
Or press x1 on the remote
control to go to the Bluetooth
source directly
3. PAIR DEVICE
Press and hold the button
on remote control
SOURCE
SOURCE
ON/OFF
Press and hold
Figure 20
Figure 21
BT PAIRING
Display will show
BT PAIRING
16
WARNING
High volume levels can
damage your hearing.
Reduce the volume levels
before pressing Play.
IMPORTANT
Soundbar does not
include microphone
and cannot operate as
hands-free device.
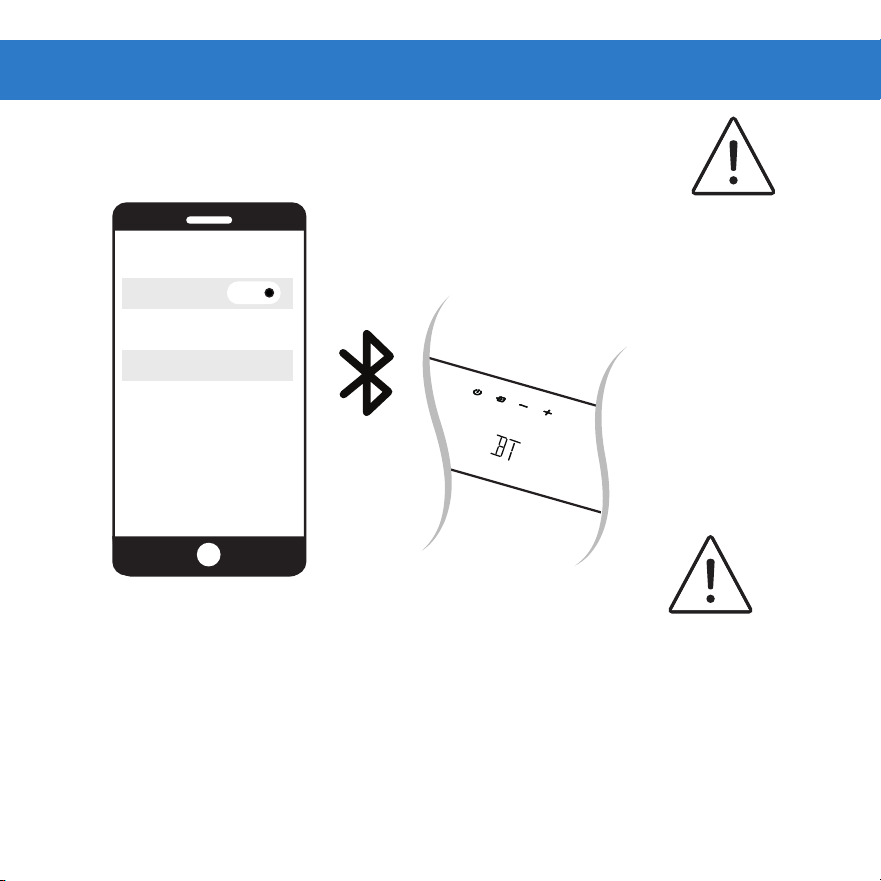
BLUETOOTH
onn 5.1.2 Soundbar
DEVICES
Bluetooth
ON
4. SEARCH ON DEVICE
Select "onn 5.1.2 Soundbar" on device
5. PLAY AUDIO
From device
6. VOLUME
Controlled by Device, Remote Control or Soundbar
Figure 22
Device is connected
when display shows BT

17
Bluetooth use
Bluetooth capability.
Device compatibility will vary, see your device’s documentation for more information. Once
you have paired your source device to the Soundbar, as long as you stay within range of the
Soundbar, your device should remain paired.
If the input is changed, the Bluetooth device will disconnect. If the source is changed back to
Bluetooth, any paired Bluetooth device will reconnect automatically.
A Bluetooth signal has a range of up to 30 feet. Keep in mind that Blueto
oth is a compressed
audio format, so streamed music may lose some integrity when compared to a wired
connection.
18
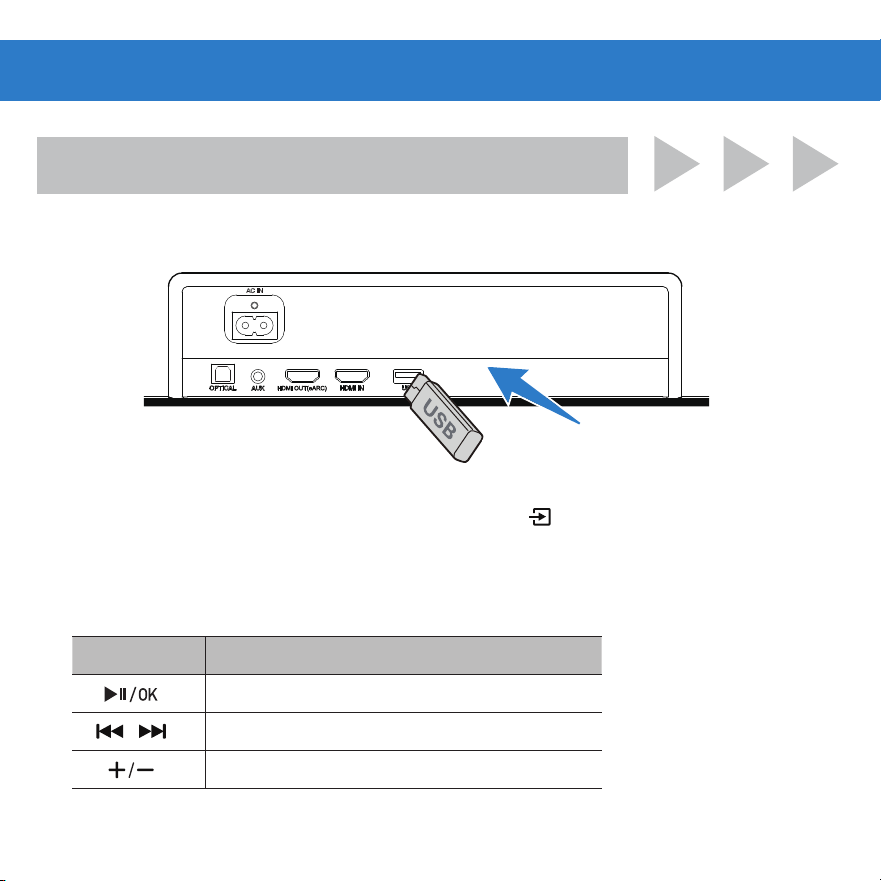
2. SELECT SOURCE
3. PLAY AUDIO
Button Action
Play, pause or resume play.
/
Skip to the previous or next track.
Increase/decrease the volume.
Select USB Mode(Remote Control or Soundbar
Tips: Support USB music of MP3 format.
button)
1. INSERT THE USB DEVICE
USB OPERATION
Table 12
Figure 23

CAUTION
Ensure the unit is fully unplugged from
the power supply before cleaning.
Specifications
•
•
Never use abrasive pads to clean device.
Wipe down surfaces with a light cloth.
• Avoid using liquids to clean device.
CLEANING
Assembled LxWxH
Soundbar: 42 x 4.3 x 3.2 Inches
Subwoofer: 8.2 x 11.8 x 13.9 Inches
Satellite Speaker: 6.5 x 4.3 x 3.2 Inches
Specifications
•
•
•
Cleaning & Care
19
Problem Cause Solution
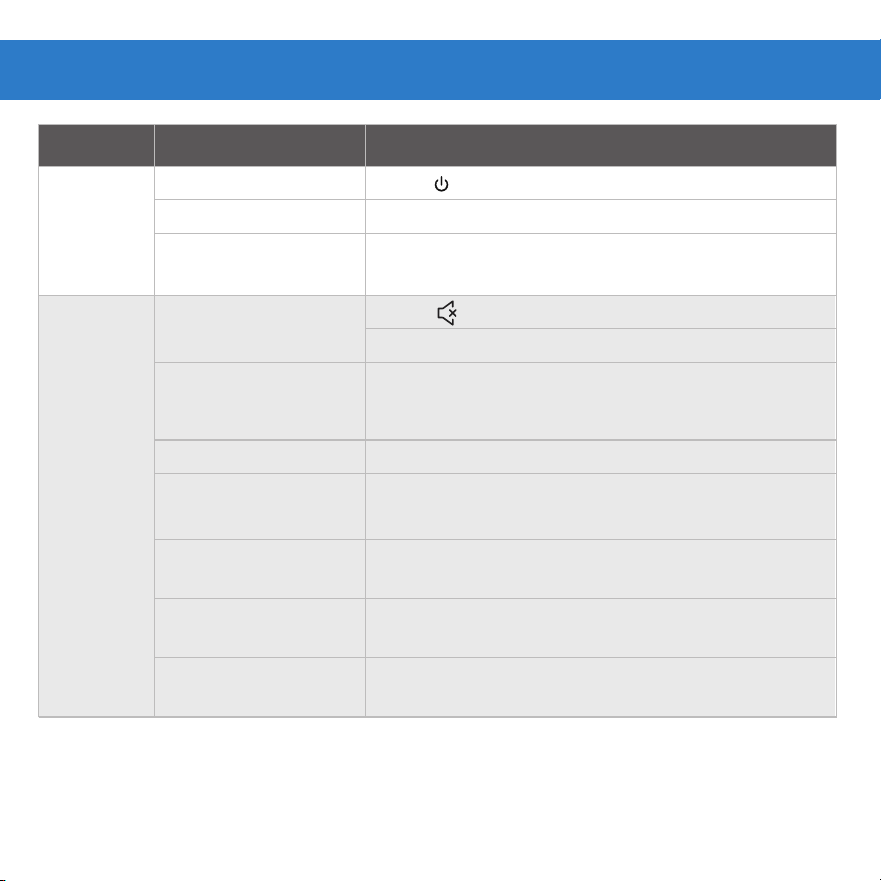
No power
Power off
Ensure the power cord is securely connected
Plug a different device into the electrical outlet
to verify that the outlet is working correctly
Change TV output to PCM
Select different Input source
Connect directly to another device (Blu-Ray,
Game System, etc.)
Set audio output to fixed or standard, NOT
variable
Increase volume / unmute source device
Switch to a stereo or multi-channel audio source
Bluetooth source
device
Audio source is
mono**
Loose power cord
Faulty outlet
Low Volume / Mute
Input source
Not All TVs have
Audio outputs listed
TV set to variable
audio output
Some TVs do not Pass
through Digital Audio*
No audio
Press
Increase volume
" "
Troubleshooting
Press " " button on remote control or Soundbar
Table 13
20
*Consult your TV’s user manual for more detailed information.
**When the audio source is mono, it cannot get through to upfiring speakers.

Problem Cause Solution
The subwoofer is out of range, please move the
subwoofer closer to the soundbar. Make sure the
subwoofer is within 8m range of the soundbar
Move the source device closer to soundbar
Source too far
Subwoofer is too
distant from
Soundbar
Solid obstruction
Other wireless
devices
Move source device into line-of-site of soundbar
Turn off / move devices away (wireless security
cameras,wireless video baby monitors, cordless
phones, and microwave ovens
Bluetooth
breakup or
disconnect
Table 14
21

1-888-516-2630
SAVE THIS USER GUIDE
For product assistance &
WE CAN HELP
PLEASE READ AND KEEP
FOR FUTURE REFERENCE.
7 DAYS/WEEK 7:00am- 9:00pm CST
Find more at