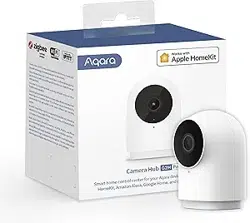
Camera Hub G5 Pro (PoE) User Manual
EN
Camera Hub G5 Pro (PoE) supports 24/7 comprehensive use. Featuring a video
resolution exceeding 4 million pixels, a 133° diagonal field of view (FOV) lens, a large
F1.0 aperture, and a 1/1.8” large-image sensor, this device delivers vibrant color
imaging even in extremely low-light conditions. The G5 camera also supports PIR
motion detection, which can detect whether there are people gathering or lingering
within its’ detection range. It features a 3000K color temperature spotlight that
provides bright yet comfortable illumination. When activated, it enhances the
accuracy of AI identification. The G5 camera enjoys a variety of AI functions such as
person detection, pet detection, package detection, lens occlusion detection, face
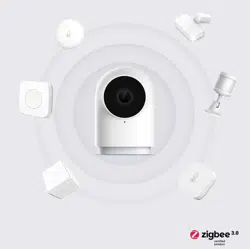
recognition, vehicle recognition, etc. It also boasts a Zigbee and Thread hub, for
connecting to Aqara and Third Party Matter devices. This product is has obtained an
IP65 dust and water resistant rating, suitable for use in environments from -30°C to
+50°C(-22°F ~ 122°F), making it a versatile monitoring camera.
Product Introduction
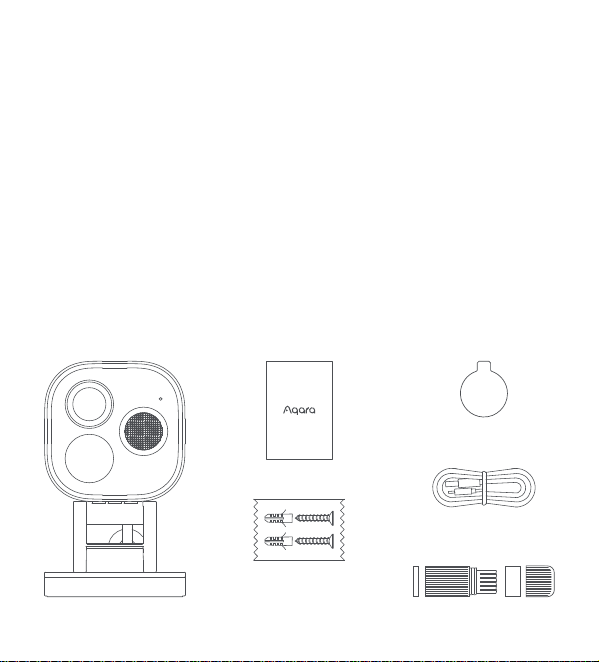
What is in the Box
Camera Hub G5 Pro (PoE)×1
RJ45 Waterproof Kit × 1
Power cable × 1
User manual × 1
Rear lid opener × 1
Wall Screws
(M3 × 20mm, self-tapping) &
Anchors Kit (32mm)× 1
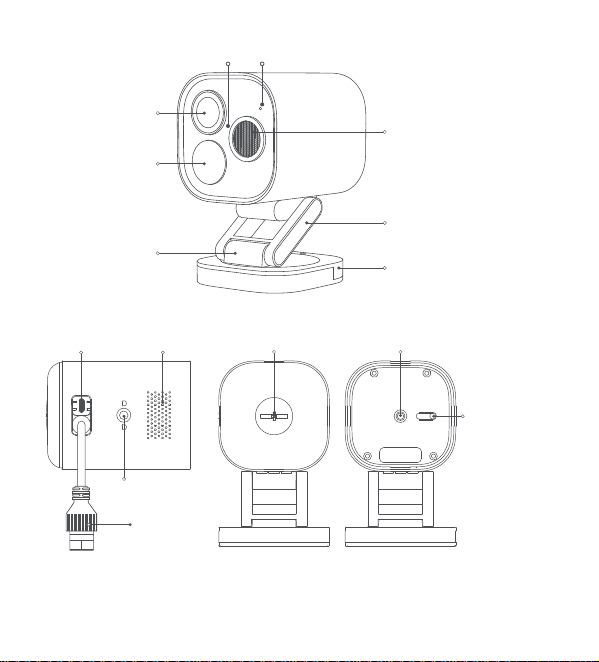
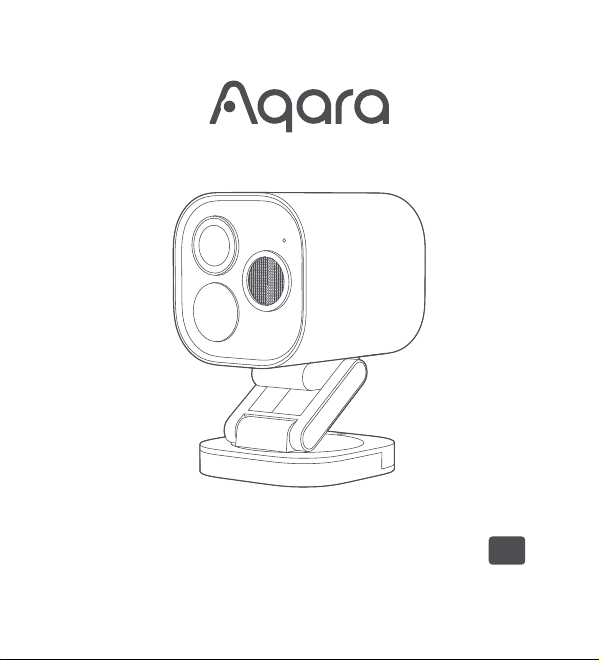
Indicator Light
Lens
PIR Sensor
Adjustable Bracket
Wall Mounted Bracket
Fastening Screws
Tightening Adjustment Screw
Spotlight
Microphone
Rear Cover Removal Screw Rear Cover Screw Hole
Reset Button
Ethernet Cable
USB-C Power Port
1/4 "Bracket
Screw Hole
Speaker
Press and Hold for 10s:
Reset the Network and
Unbind the Device
Quick Press 10 Times:
Restore Factory Settings
This product can be mounted on a wall, ceiling, or placed on a flat surface, and the
instructions are as follows:
The camera can be placed on a flat surface. Aer the product is successfully connected
to the app, its tilt angle and le/right rotation angle can be manually adjusted based
on real-time streaming, aiming the lens at whatever needs to be filmed.
Device Installation
1.It is recommended to install this camera at a height of 2-3 meters above the ground.
If you wish to use the vehicle recognition function, please install the camera on the
le/right side of the garage door, or one the le/right side of the driveway. It is not
recommended to install the camera in a center position, as vehicle recognition
requires the camera to capture a sufficiently large area of the target vehicle.
Wall Mounting and Ceiling Mounting (Take wall mounting as an example):
Select the installation Position
Flat Surface Placement:
Press and Hold for 10s:
Reset the Network and
Unbind the Device
Quick Press 10 Times:
Restore Factory Settings
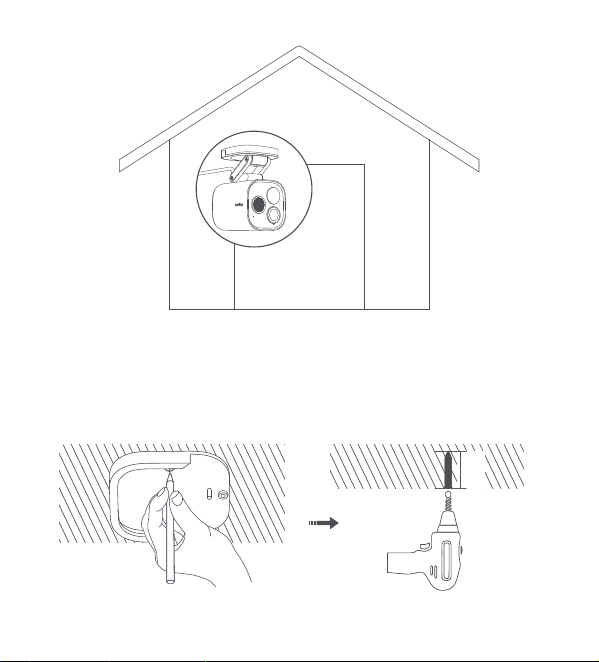
2.Loosen the fastening screws of the wall mounted bracket, take out the bracket, attach
it to the selected installation position on the wall, and mark the punching points.
3. Use a Ø6 mm drill bit to drill holes according to the marked positions, with a hole
drilling depth ≥ 32 mm.
≥32mm
Ø6mm
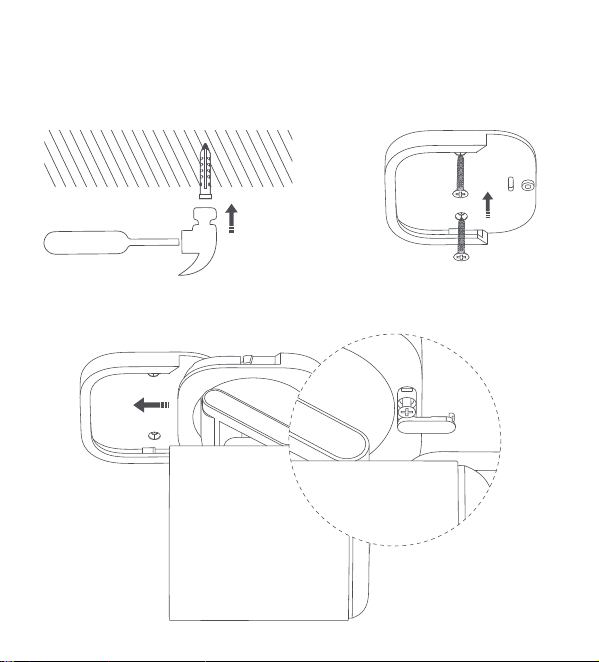
4. Use the tool to hammer the 4 expansion plugs into the drilled holes, ensuring a flat
surface.
5. Use the self-tapping screws from the accessory pack to secure the bracket to the
wall.
6. Insert the camera along with the other parts of the bracket from top to bottom into
the groove of the wall mount bracket as shown below, then tighten the screws to
secure it.
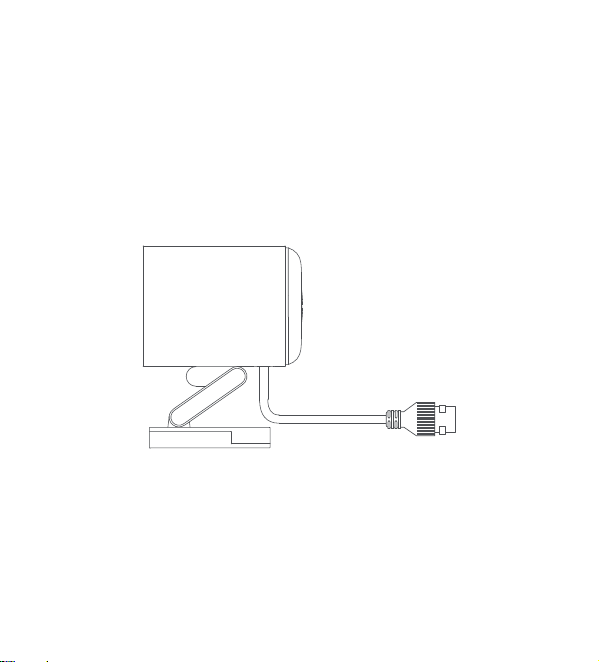
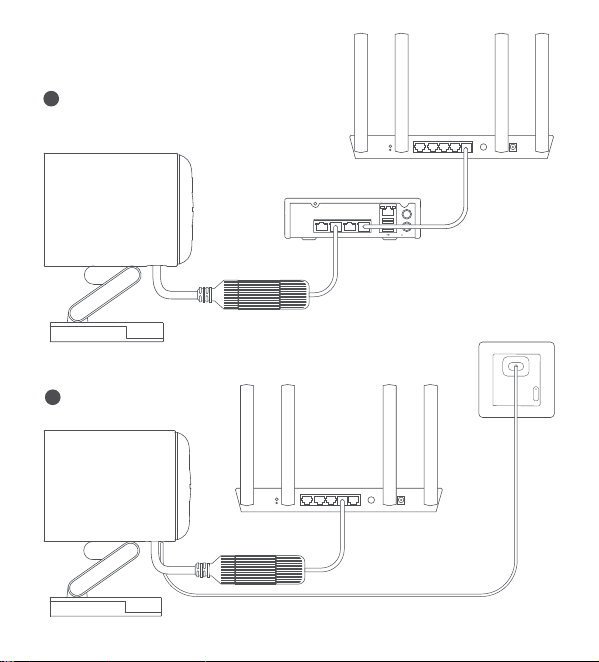
Choose power supply mode and connect to the network
1. This product can be powered by an external power adaptor through its’ USB-C port
or by PoE through its’RJ45 port, please select the method according to the actual
installation position.
2. This product can only be connected to the network through an RJ45 Ethernet port
with a network cable, and does not support Wi-Fi connection. Please refer to the
following diagram to connect to the network.
* Attention: When the camera is both plugged into an external power and connected by PoE,
the device will prioritize power from the PoE port.
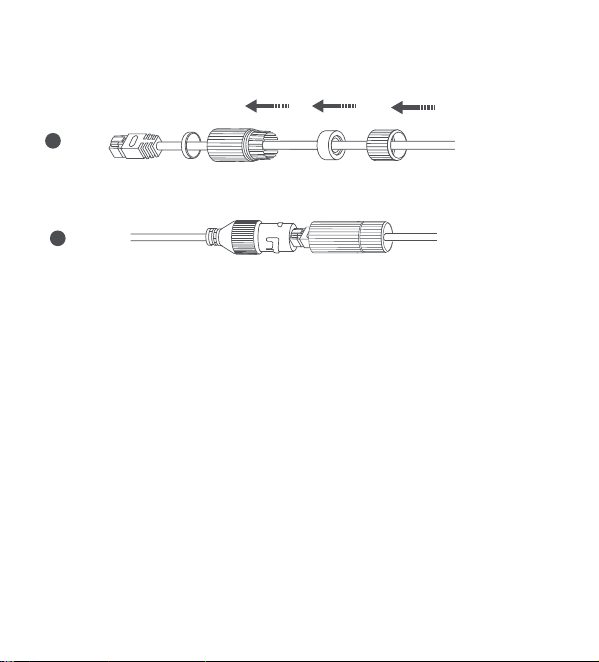
7.Take out the waterproof accessory RJ45 from the box and connect the network
cable according to steps ① and ② as follows.
8. Aer successfully adding the camera on the APP, manually adjust the pitch angle or
le/right rotation angle of the bracket based on real-time streaming, and aim the
lens at the position that needs to be filmed.
1
2
1
2
Router
Router
PoE Network Switch
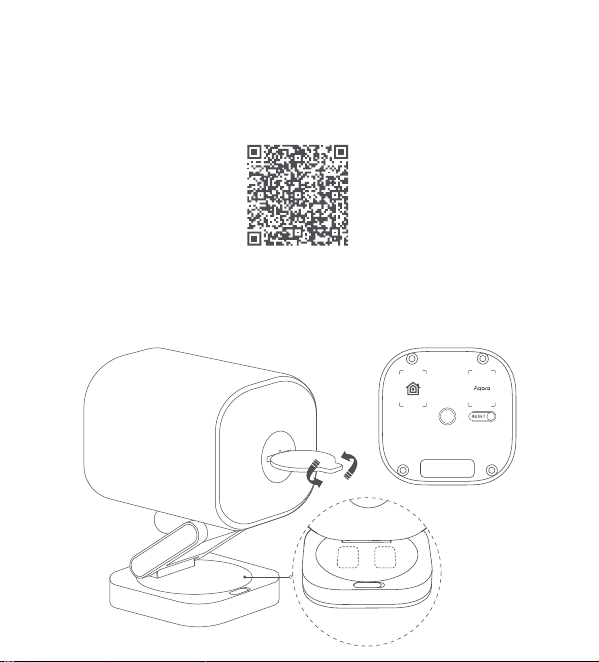
Search for "Aqara Home" in the Apple App Store, Google Play, Xiaomi GetApps,
Huawei App Gallery, or scan the following QR code to download the Aqara Home app.
Please connect the camera to Aqara Home or HomeKit before installing it. Refer to
the image below to open the camera back cover with the rear lid opener.
Device Binding & Initialization
1. Download App
2. Add Product to Aqara Home

Connect the camera to the network with an Ethernet cable and power it on. When the
status indicator light is flashing yellow, open the Aqara Home App and the camera
should be automatically discovered and displayed on the app. Click on the discovered
camera and follow the instructions on the app to bind it. Or click on the "+" in the
upper right corner of the app’s homepage, select "Camera Hub G5 Pro (PoE). If
successfully connected, the status indicator light will remain solidly blue.
Open the Apple "Home" app, click "+" in the upper right corner to enter the Add
Accessories page, scan or manually input the HomeKit setup code (HomeKit QR
code) on the product or the user manual, and connect the device to HomeKit.
3. Add Product to HomeKit
• If the indicator light is not flashing yellow aer powering on, please use the tools in the
accessory pack to open the rear cover of the camera, long press the function button for 10
seconds or quickly press the function button 10 times to reset the device.
• During the network setup, make sure that the mobile phone is connected to the Wi-Fi
network in the same LAN as the camera.
• During the network setup, it may be necessary to scan the Aqara pairing QR code on the
product or manual cover, or enter an 8-digit pairing code. Please follow the instructions on
the app to complete the necessary steps.
1. Prompt "Unable to add accessory": Repeated connection failures have le unresolved
error information in the iOS cache. Please restart the iOS device (iPhone or iPad), reset the
camera and try again.
2. Prompt "Accessory added" but still not working: Please restart the iOS device and reset
the camera, then manually enter the HomeKit setup code to add the camera.
3. Prompt "Accessory not found". Please reset the camera, wait for 3 mins, and add it again
by manually entering the HomeKit setup code.
The following are common troubleshooting steps for HomeKit addition failures:
Note: Please do not throw away the QR code on the product or User Manual. If unable to add
device, please press and hold the function button for 10s to reset the network, and then try
again.

This product is a Zigbee hub, and also can connect with Thread child devices, please
bind child devices according to the child device’s user manual.
4.Bind Child Device
For more device functions, please log in to the Aqara Home app to explore.
5.Other Functions
Product Specifications
Model: CH-C03E/CH-C03D
Resolution: 2688×1520
Image Sensor Size: 1/1.8"
FOV: 133°(Diagonal)
Aperture: f1.0
Encode: H.264
Wired Input: 5V 2A
PoE Input: 48V 0.27A
PIR Detection Angle: Horizontal 100°, Vertical 65°
Spotlight: Rated Power 3W, Luminous Angle 120 °, Color Temperature Value 3000K
Wireless Protocol: Zigbee IEEE 802.15.4
Operating Temperature: -30°C ~ +50°C (-22°F ~ 122°F)
Operating Humidity: 0 ~ 95% RH, No Condensation
Description of Indicator Lights
Indicator Light Status
Solid Yellow Light
Flashing Yellow Light
Flashing Blue Light
Slow Flashing Blue Light
Solid Blue Light
Solid White Light
Flashing Purple Light
Slow Flashing Yellow Light
Light Off
Starting up
Waiting to Connect
Network Connecting
Connection Successful and Account Binding
Functioning Normally
Start for 10 mins with No Network Configured
Allows Adding Child Devices
Firmware Upgrading
Indicator Light Turned Off/Power Off/Sleep Mode
Device Status
User Information
Use of the Works with Apple badge means that the accessory has been designed to
work specifically with the technology marked in the badge and has been certified by
the developer to meet Apple performance standards. Apple is not responsible for the
operation of this device or its compliant safety and regulatory standards.
A 10-day recording history from yourCamera Hub G5 Pro (PoE)is securely stored in
iCloud and available to view in the Apple Home app on your iPhone, iPad, or Mac. You
can add one camera to a 50GB plan, up to five cameras to a 200GB plan, or up to an
unlimited number of cameras to a 2TB plan at no additional cost. Camera recordings
don’t count against your iCloud storage limit.
Communication between iPhone, iPad, Apple Watch, HomePod, HomePod mini, or
Macand the HomeKit- enabledCamera Hub G5 Pro (PoE)is secured by HomeKit
technology.
Apple, Apple Watch, HomeKit, HomePod, HomePod
mini, Siri, iPad, iPad Air, and iPhone are trademarks of
Apple Inc., registered in the U.S. and other countries.
Warning
1. This product is not a toy, please keep this product away from children.
2. Avoid installing the product in any position that may obstruct the lens, PIR, or
spotlight. When adjusting the lens orientation, please avoid aiming in the direction of
direct sunlight to avoid irreversible hardware damage to the image sensor.
3. When the spotlight is turned on and adjusted to maximum brightness, do not stare at
the light for a long time to avoid damage to the eyes.
4. This product does not support infrared light to generate black and white images in
night vision mode. When using this product in a completely dark environment,
please turn on spotlight.

5. Please do not attempt to repair this product on your own, otherwise you may not be
able to enjoy normal aer-sales warranty services.
6. Please select an adapter with a minimum output parameter of 5V 2A to use with
the product.
Online Customer Service: www.aqara.com/support
Manufacturer: Lumi United Technology Co., Ltd.
Address: Room 801-804, Building 1, Chongwen Park, Nanshan iPark, No. 3370, Liuxian
Avenue, Fuguang Community, Taoyuan Residential District, Nanshan District,
Shenzhen, China.
Email: [email protected]om
Made in China