ES
EN
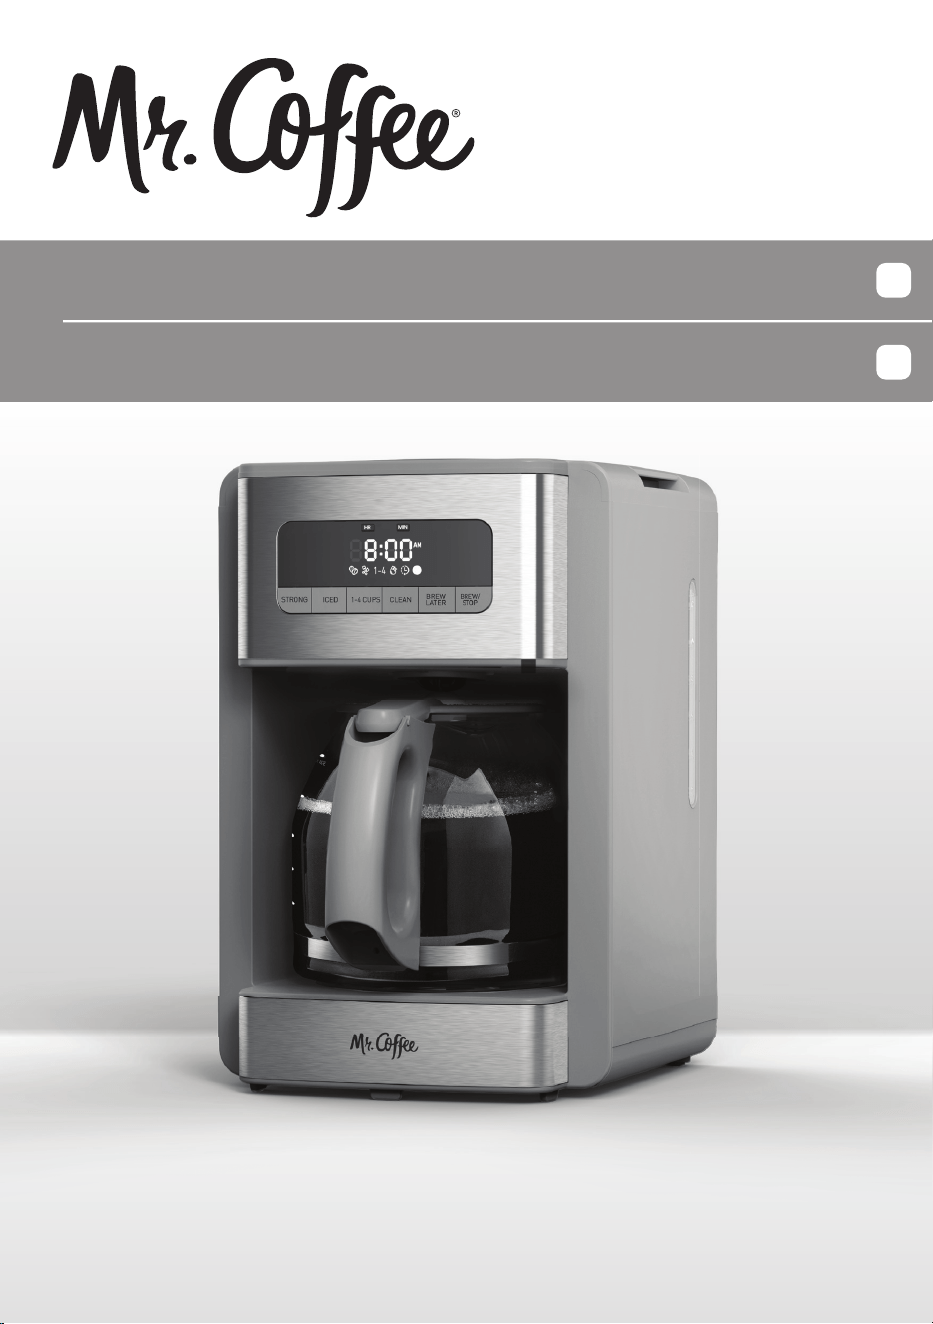
Cafetera programable Mr. Coffee
®
de 12 tazas
Caliente y helado
Mr. Coffee
®
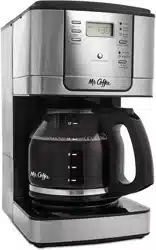
12-Cup Programmable Coffeemaker
Hot & Iced
Instruction
Manual
Manual de
instrucciones
Models / Modelos:
BVMC-AEJ5102
BVMC-AEJ5103
BVMC-AEJ5105
2
Contenido
CONTENTS
Important Safeguards 3
Medidas de seguridad importantes
Getting to Know Your Coffeemaker 5
Conozca su cafetera
Unpack and Clean Before Use 6
Desempaque y limpie antes de usarla
Setting the Clock 8
Configuración del reloj
Making Hot Coffee 9
Cómo preparar café caliente
Making Iced Coffee 11
Cómo preparar café helado
Strong Brew / 1-4 Cups 13
Preparación intensa / 1 a 4 tazas
Setting Your Coffeemaker to Brew Later 14
Cómo programar la cafetera para preparar café más tarde
Tips for Brewing the Perfect Cup 15
Consejos para preparar la taza perfecta
Using the Clean Function to Decalcify 16
Your Coffeemaker
Utilizar la función de limpieza para descalcificar su cafetera
Maintenance & Care 19
Mantenimiento y cuidado
Troubleshooting Your Coffeemaker 20
Solución de problemas de su cafetera
Gracias por elegir Mr. Coffee
®
. Su nueva cafetera
está diseñada para preparar un café delicioso y
constante en cada uso.
Esta guía le orientará sobre la instalación, la
preparación, la limpieza y el mantenimiento para
que pueda disfrutar de un café excelente desde el
primer día. Si necesita ayuda, visite
www.mrcoffee.com o llame al 1-800-672-6333.
¡Bienvenido!
Thank you for choosing Mr. Coffee
®
. Your new
coffeemaker is designed to deliver consistently
delicious coffee with every brew.
This guide will walk you through setup, brewing,
cleaning, and care so you can enjoy great coffee
from day one. If you need assistance, visit
www.mrcoffee.com or call 1-800-672-6333.
Welcome!
3
IMPORTANT SAFEGUARDS
When using electrical appliances, basic
safety precautions should always be followed
to reduce the risk of fire, electric shock, and/
or injury to persons including the following:
1. Read all instructions.
2. Do not touch hot surfaces. Use handles
or knobs.
3. To protect against electric shock, do not
place or immerse cord, plugs, or appliance
in water or other liquid.
4. This appliance is not intended for use
by children or by persons with reduced
physical, sensory, or mental capabilities,
or lack of experience and knowledge.
Close supervision is necessary when any
appliance is used near children. Children
should be supervised to ensure that they
do not play with the appliance. Keep the
appliance and its cord out of reach of
children.
5. Unplug from outlet when either the
appliance or display clock (if provided) is
not in use, and before cleaning. Allow to
cool before putting on or taking off parts,
and before cleaning the appliance.
6. Do not operate any appliance with
a damaged cord or plug or after the
appliance malfunctions, or has been
damaged in any manner. Return appliance
to an Authorized Service Center for
examination, repair or adjustment. Do not
attempt to replace or splice a damaged
cord.
7. The use of an accessory not recommended
by the appliance manufacturer for use
with this appliance may result in fire,
electric shock or injury to persons.
8. Do not use outdoors.
9. Do not let cord hang over edge of table or
counter, or touch hot surfaces.
10. Do not place on or near a hot gas or
electric burner, or in a heated oven.
11. Always attach plug to appliance first, then
plug cord into the wall outlet (for appliances
with detachable cords). To disconnect,
turn any control to the off position, then
remove plug from wall outlet.
12. Do not use appliance for other than
intended use.
13. All lids should be closed during use.
14. Scalding may occur if the lid is removed
or brew basket door is opened during
or immediately after the brewing cycles.
Contents may be hot. Allow to cool before
opening the lid.
For appliances with glass containers:
15. The container is designed for use with
this appliance. It must never be used on
a range top.
16. Do not set a hot container on a wet or cold
surface.
17. Avoid sudden temperature changes, such
as rinsing, washing, filling, or immersing a
hot container with cold liquids.
18. Do not use a cracked or chipped container
or a container having a loose or weakened
handle.
19. Do not clean container with cleansers,
steel wool pads, or other abrasive material.
For appliances with service panels:
20. WARNING: TO REDUCE THE RISK OF
FIRE OR ELECTRIC SHOCK, DO NOT
REMOVE THIS COVER. NO USER–
SERVICEABLE PARTS INSIDE. REPAIR
SHOULD BE DONE BY AUTHORIZED
SERVICE PERSONNEL ONLY.
EN
POWER CORD
INSTRUCTIONS
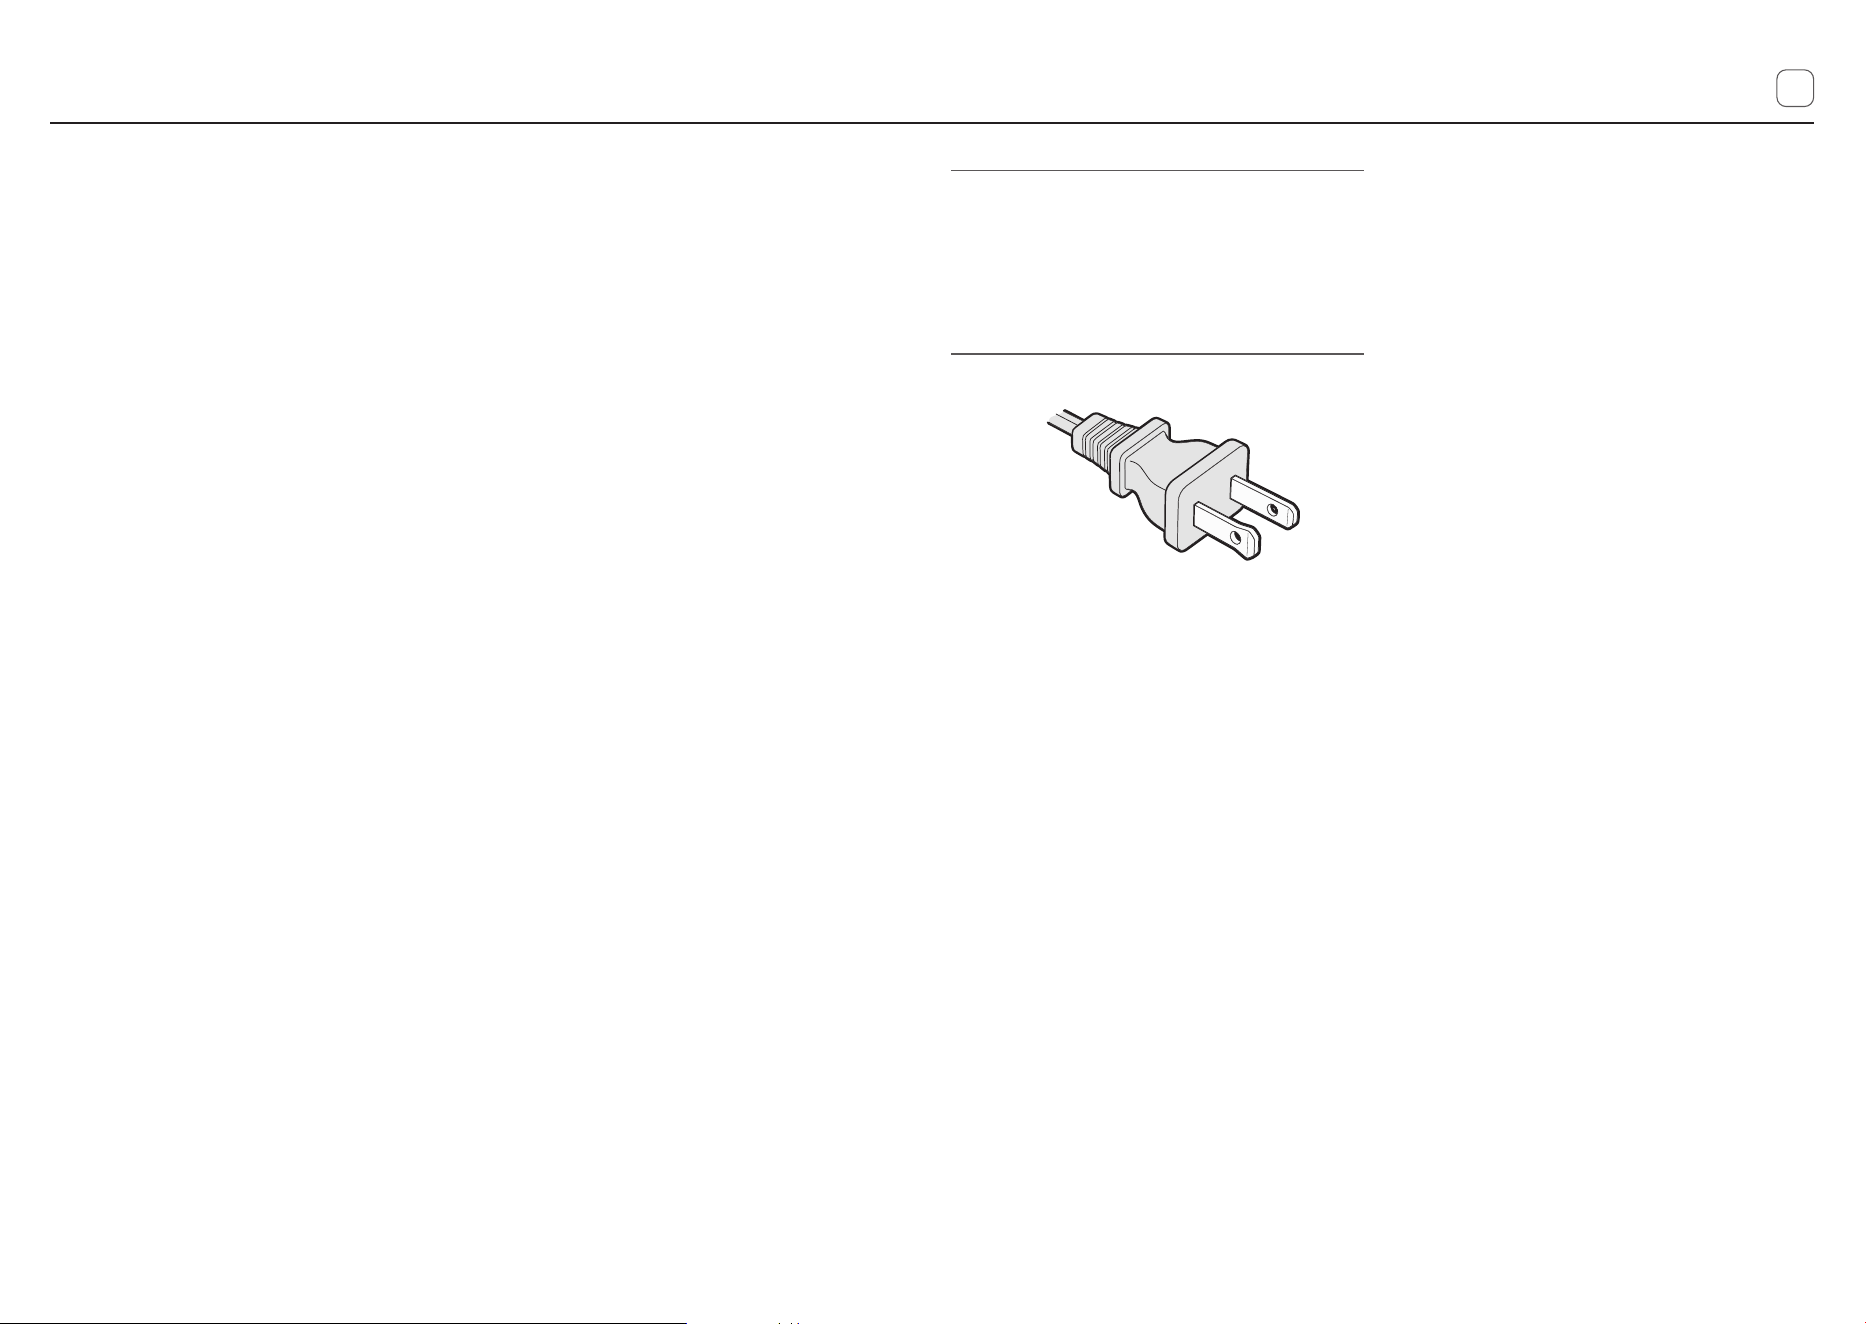
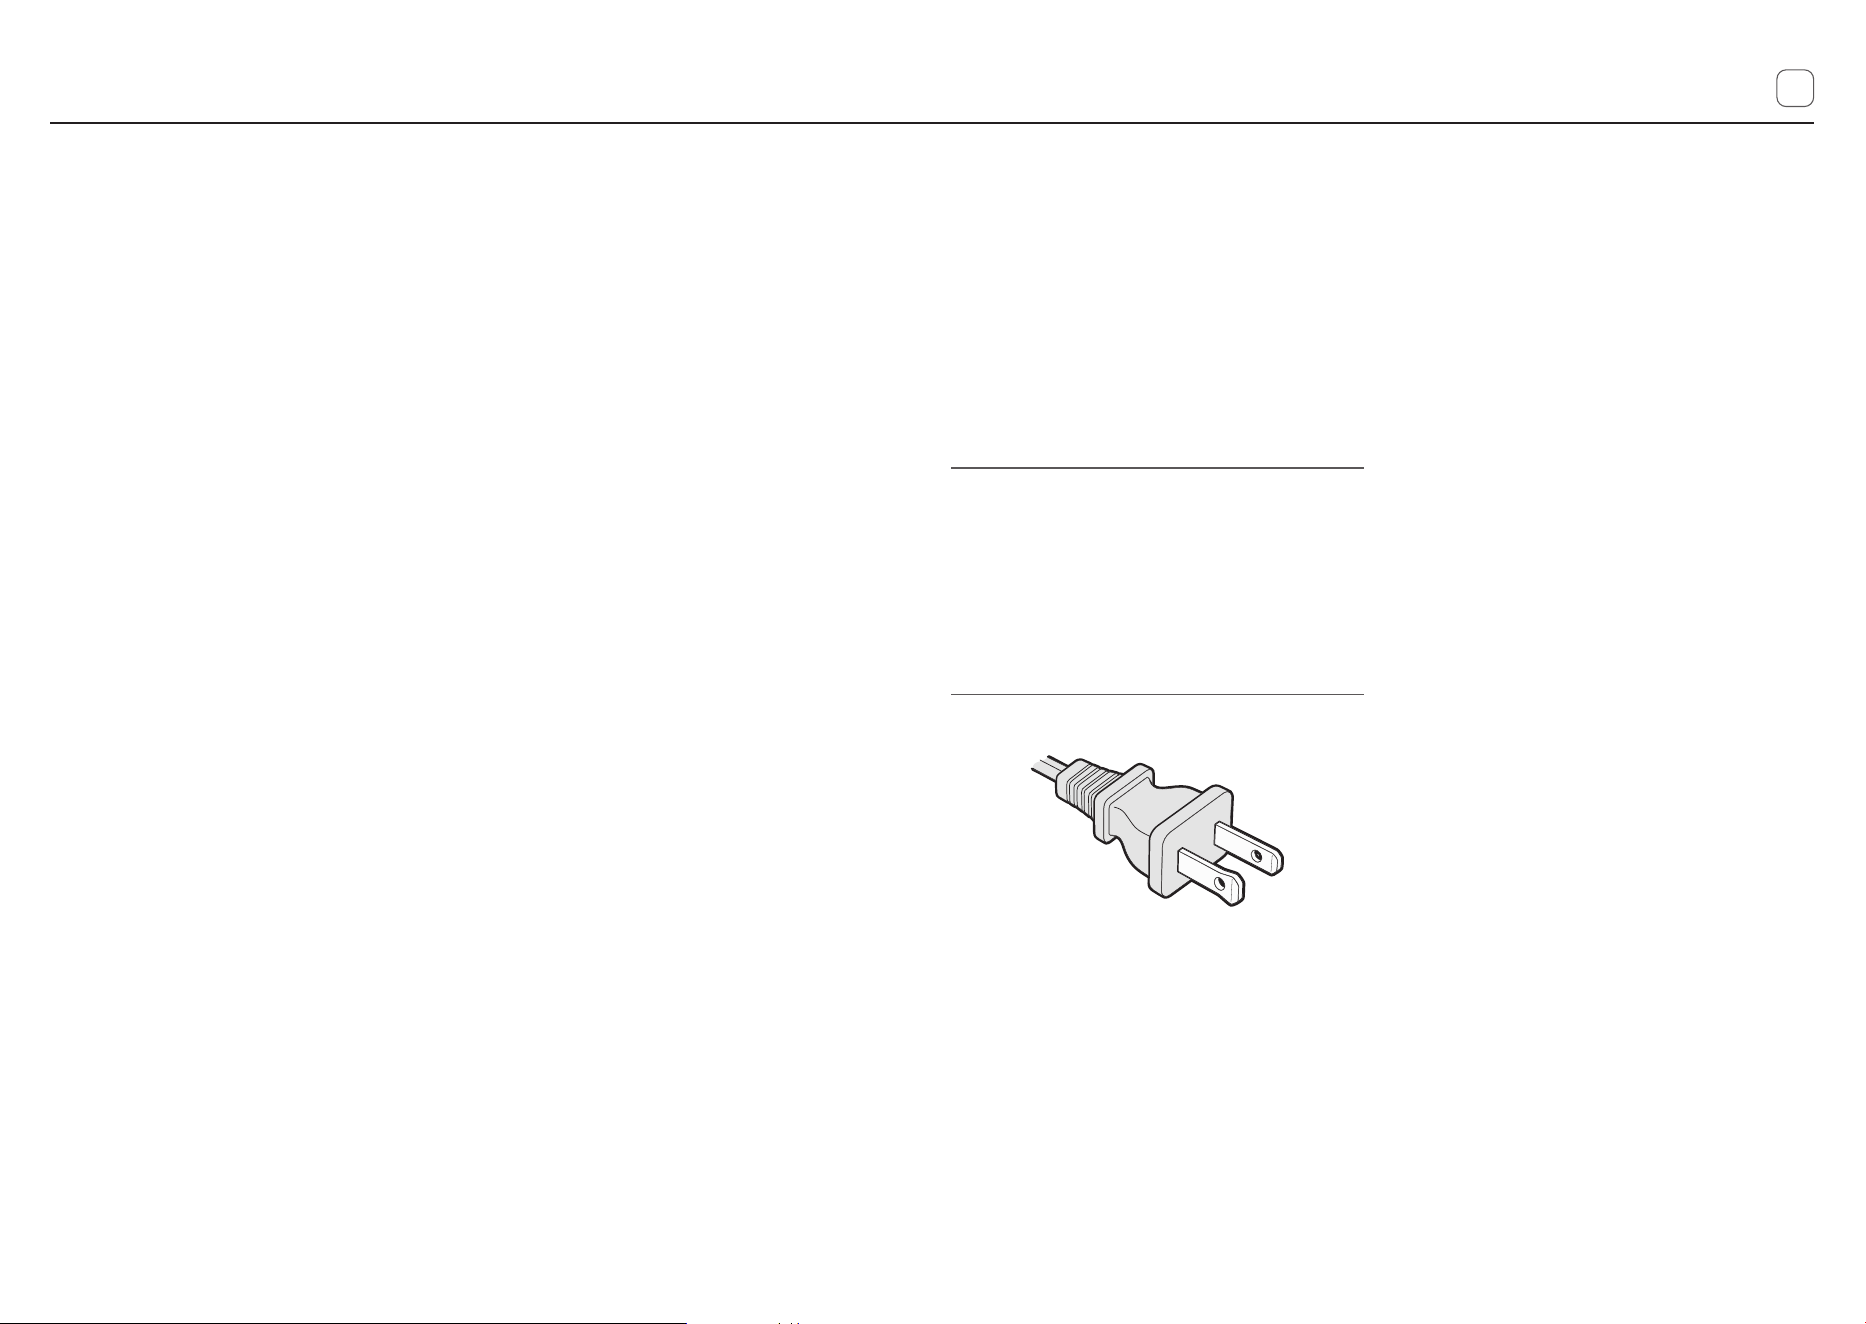
A short power supply cord (or detachable
power-supply cord) may be provided to
reduce risks resulting from becoming
entangled in or tripping over a longer cord.
Longer detachable power-supply cords or
extension cords are available and may be
used if care is exercised in their use. If
a long detachable power-supply cord or
extension cord is used:
a. The marked electrical rating of the
detachable power-supply cord or
extension cord should be at least as
great as the electrical rating of the
appliance;
b. If the appliance is of the grounded
type, the extension cord should be a
grounding type 3-wire cord; and
SAVE THESE
INSTRUCTIONS
HOUSEHOLD USE ONLY
c. The longer cord should be arranged so
that it will not drape over the counter
top or table where it can be pulled on by
children or tripped over unintentionally.
Do not pull, twist or otherwise abuse
the power cord.
PRODUCT NOTICES
1. Place the appliance on a hard, flat, level
surface to avoid interruption of airflow
underneath the coffeemaker.
2. Glass decanters only: Discard the
decanter immediately if it is ever boiled
dry.
3. Glass decanters only: Protect the
decanter from sharp blows, scratches
or rough handling.
4. Do not operate the appliance with an
empty water tank.
5. Keep the area above the appliance clear
during use, as hot steam will escape the
appliance.
4
MEDIDAS DE SEGURIDAD IMPORTANTES
Al utilizar aparatos eléctricos, siempre se
deben tomar las precauciones básicas de
seguridad para reducir el riesgo de incendio,
descarga eléctrica y/o lesiones a las
personas, incluyendo las siguientes:
1. Lea todas las instrucciones.
2. No toque las superficies calientes. Utilice
las asas o los pomos.
3. Para protegerse contra descargas
eléctricas, no coloque ni sumerja el cable,
los enchufes o el aparato en agua u otro
líquido.
4. Este aparato no está diseñado para que lo
usen niños ni personas con capacidades
físicas, sensoriales o mentales reducidas,
o con falta de experiencia y conocimientos.
Es necesaria una supervisión estricta
cuando cualquier aparato se utilice cerca
de niños. Los niños deben ser supervisados
para asegurarse de que no jueguen con el
aparato. Mantenga el aparato y su cable
fuera del alcance de los niños.
5. Desconecte el aparato del tomacorriente
cuando este o el reloj de la pantalla (si
lo incluye) no estén en uso, y antes de
limpiarlo. Deje que se enfríe antes de
colocar o retirar piezas, y antes de limpiar
el aparato.
6. No utilice el aparato si tiene el cable o
el enchufe dañados, o si presenta fallas
de funcionamiento o ha sufrido daños de
cualquier tipo. Devuelva el aparato a un
Centro de Servicio Autorizado para su
revisión, reparación o ajuste. No intente
reemplazar ni empalmar un cable dañado.
7. El uso de accesorios no recomendados por
el fabricante con este dispositivo puede
provocar incendios, descargas eléctricas
o lesiones a las personas.
8. No lo utilice al aire libre.
9. No permita que el cable cuelgue del borde
de una mesa o encimera, ni que toque
superficies calientes.
10. No lo coloque sobre un quemador de gas
o eléctrico caliente, ni cerca de estos, ni
tampoco dentro de un horno caliente.
11. Siempre conecte primero el enchufe
al aparato y luego conecte el cable al
tomacorriente de pared (para aparatos con
cables desmontables). Para desconectar,
coloque el control en la posición de
apagado y, a continuación, retire el enchufe
del tomacorriente de pared.
12. No utilice el aparato para fines distintos a
los previstos.
13. Todas las tapas deben permanecer
cerradas durante el uso.
14. Pueden producirse quemaduras si se
retira la tapa o se abre la puerta de la cesta
de preparación durante o inmediatamente
después de los ciclos de preparación. El
contenido puede estar caliente. Deje que
se enfríe antes de abrir la tapa.
Para aparatos con recipientes de vidrio:
15. El recipiente está diseñado para usar con
este aparato. Nunca debe utilizarse sobre
la superficie de una cocina (estufa).
16. No coloque un recipiente caliente sobre
una superficie fría o mojada.
17. Evite los cambios bruscos de temperatura,
tales como enjuagar, lavar, llenar o
sumergir un recipiente caliente en líquidos
fríos.
18. No utilice un recipiente agrietado o
astillado, ni un recipiente que tenga un
asa suelta o floja.
19. No limpie el recipiente con limpiadores
químicos fuertes, estropajos de lana de
acero u otros materiales abrasivos.
ES
Para aparatos con paneles de acceso para
mantenimiento:
20. ADVERTENCIA: PARA REDUCIR EL
RIESGO DE INCENDIO O DESCARGA
ELÉCTRICA, NO RETIRE ESTA
CUBIERTA. EN EL INTERIOR NO HAY
PIEZAS QUE PUEDA REPARAR EL
USUARIO. LAS REPARACIONES DEBEN
SER REALIZADAS ÚNICAMENTE POR
PERSONAL DE SERVICIO AUTORIZADO.
CONSERVE ESTAS
INSTRUCCIONES
SOLO PARA USO
EN EL HOGAR
INSTRUCCIONES SOBRE EL
CABLE DE ALIMENTACIÓN
Se puede suministrar un cable de
alimentación corto (o un cable de
alimentación desmontable) para reducir los
riesgos de tropiezos o enredos relacionados
con cables largos. Existen disponibles
cables de alimentación desmontables más
largos o cables de extensión, siempre que
se tomen las debidas precauciones. Si se
utiliza alguno de estos cables:
a. La clasificación eléctrica marcada en el
cable de alimentación desmontable o
en el cable de extensión debe ser, como
mínimo, igual a la clasificación eléctrica
del aparato;
b. Si el aparato es del tipo con conexión a
tierra, el cable de extensión debe ser un
cable de 3 hilos con conexión a tierra; y
c. El cable más largo debe colocarse de tal
manera que no cuelgue sobre la encimera
o la mesa, donde podría ser tirado por
niños o causar tropiezos involuntarios.
No tire, retuerza ni maltrate de ninguna
otra forma el cable de alimentación.
AVISOS SOBRE EL
PRODUCTO
1. Coloque el aparato sobre una superficie
dura, plana y nivelada para evitar
interrupciones en el flujo de aire por
debajo de la cafetera.
2. Solo para jarras de vidrio. Deseche la
jarra inmediatamente si alguna vez se
hierve estando vacía (sin líquido).
3. Solo para jarras de vidrio: Proteja la
jarra de golpes fuertes, rayones o
manipulación brusca.
4. No utilice el aparato con el tanque de
agua vacío.
5. Mantenga despejada el área por encima
del aparato durante su uso, ya que saldrá
vapor caliente de este.
5
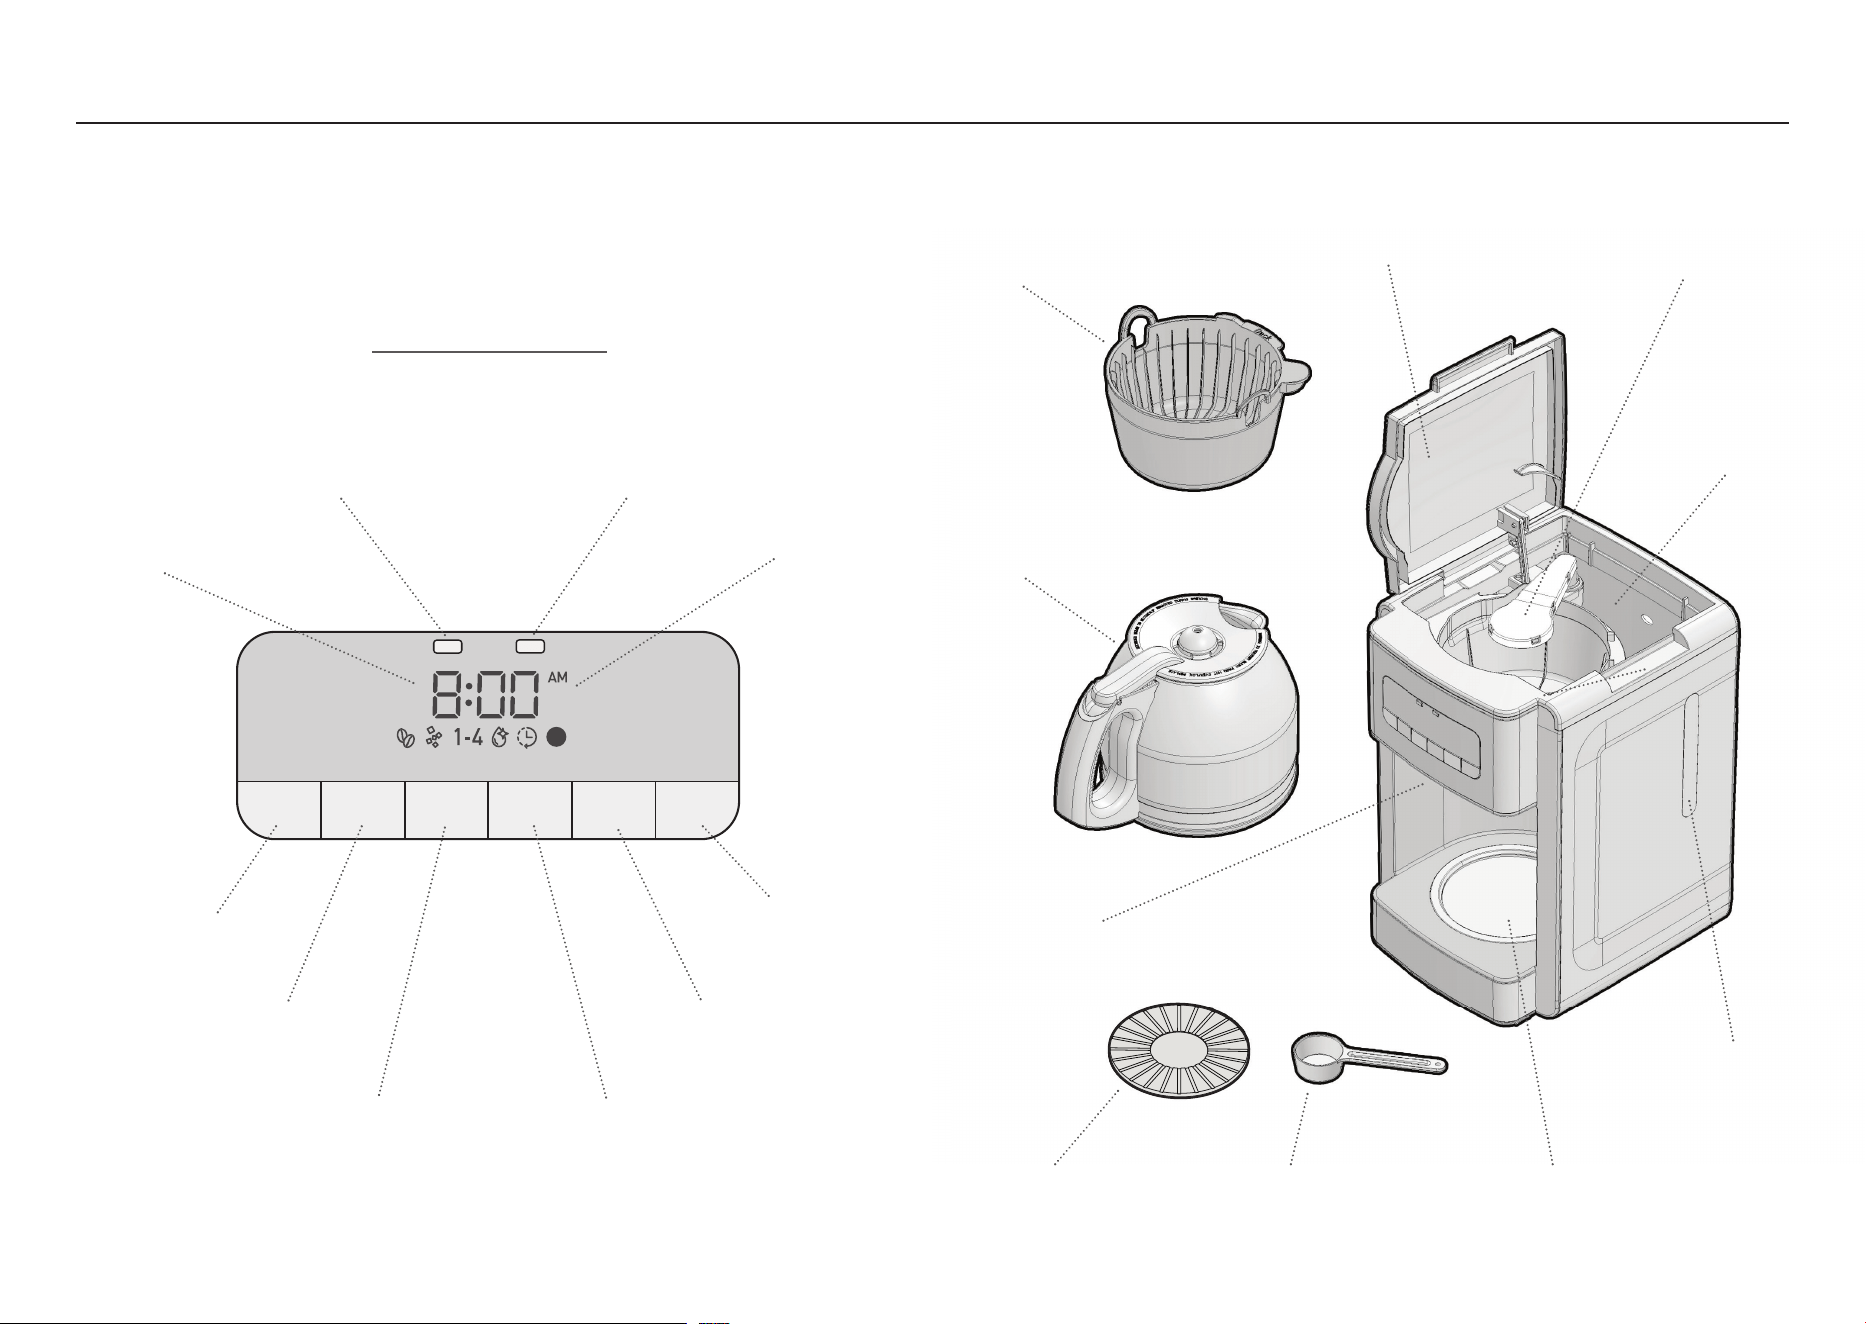
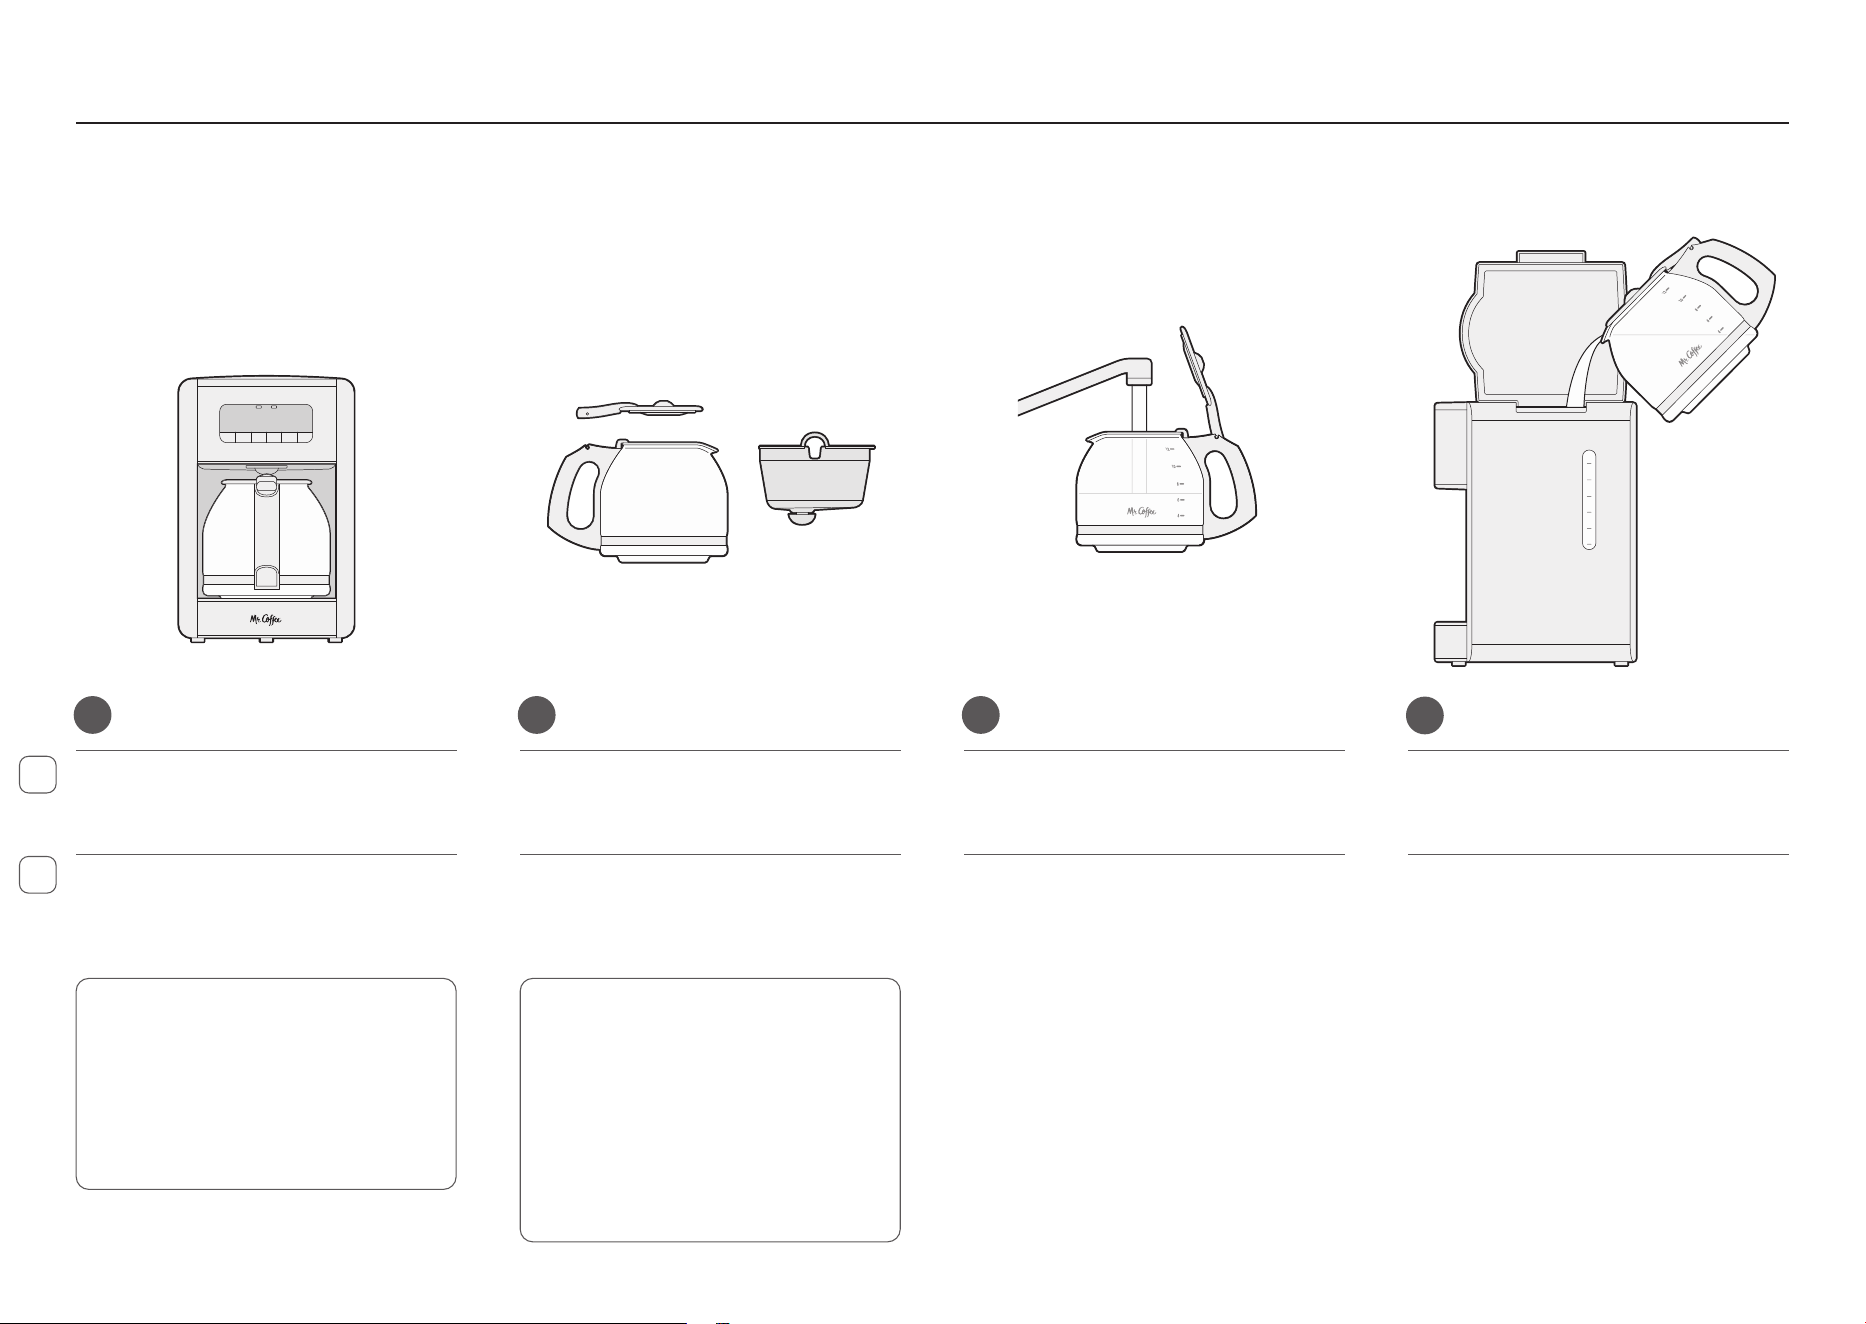
Conozca su cafetera
Get to Know Your Coffeemaker
BREW/
STOP
BREW
LATER
CLEAN1-4 CUPSICEDSTRONG
MIN
HR
Warming Plate
Placa térmica
Brew Basket Lid
Tapa de la cesta
de preparación
Grab-a-Cup
Auto Pause
Grab-a-Cup
Pausa automática
12 Cup Glass
Carafe (60 oz)
Jarra de vidrio
12 tazas (60 oz)
Water Reservoir
Depósito de agua
Water Window
Ventana de agua
Coffee Scoop
Cuchara medidora
de café
Cool Brew Cover
Cubierta de
preparación frío
Clock Display
Visualización
del reloj
Brew/Stop Button
Botón de
Preparar/parar
Strong Button
Botón de intensa
AM/PM Indicator
Indicador de
AM/PM
Iced Coffee Button
Botón de café
helado
1-4 Cups Button
Botón de 1 a 4 tazas
Clean Button
Botón de limpieza
Brew Later Button
Botón de Preparar
más tarde
Minute Button
Botón de minutos
Hour Button
Botón de hora
Shower Head
Cabezal difusor
Brew Basket
Cesta de
preparación
Control Panel
Panel de control
6
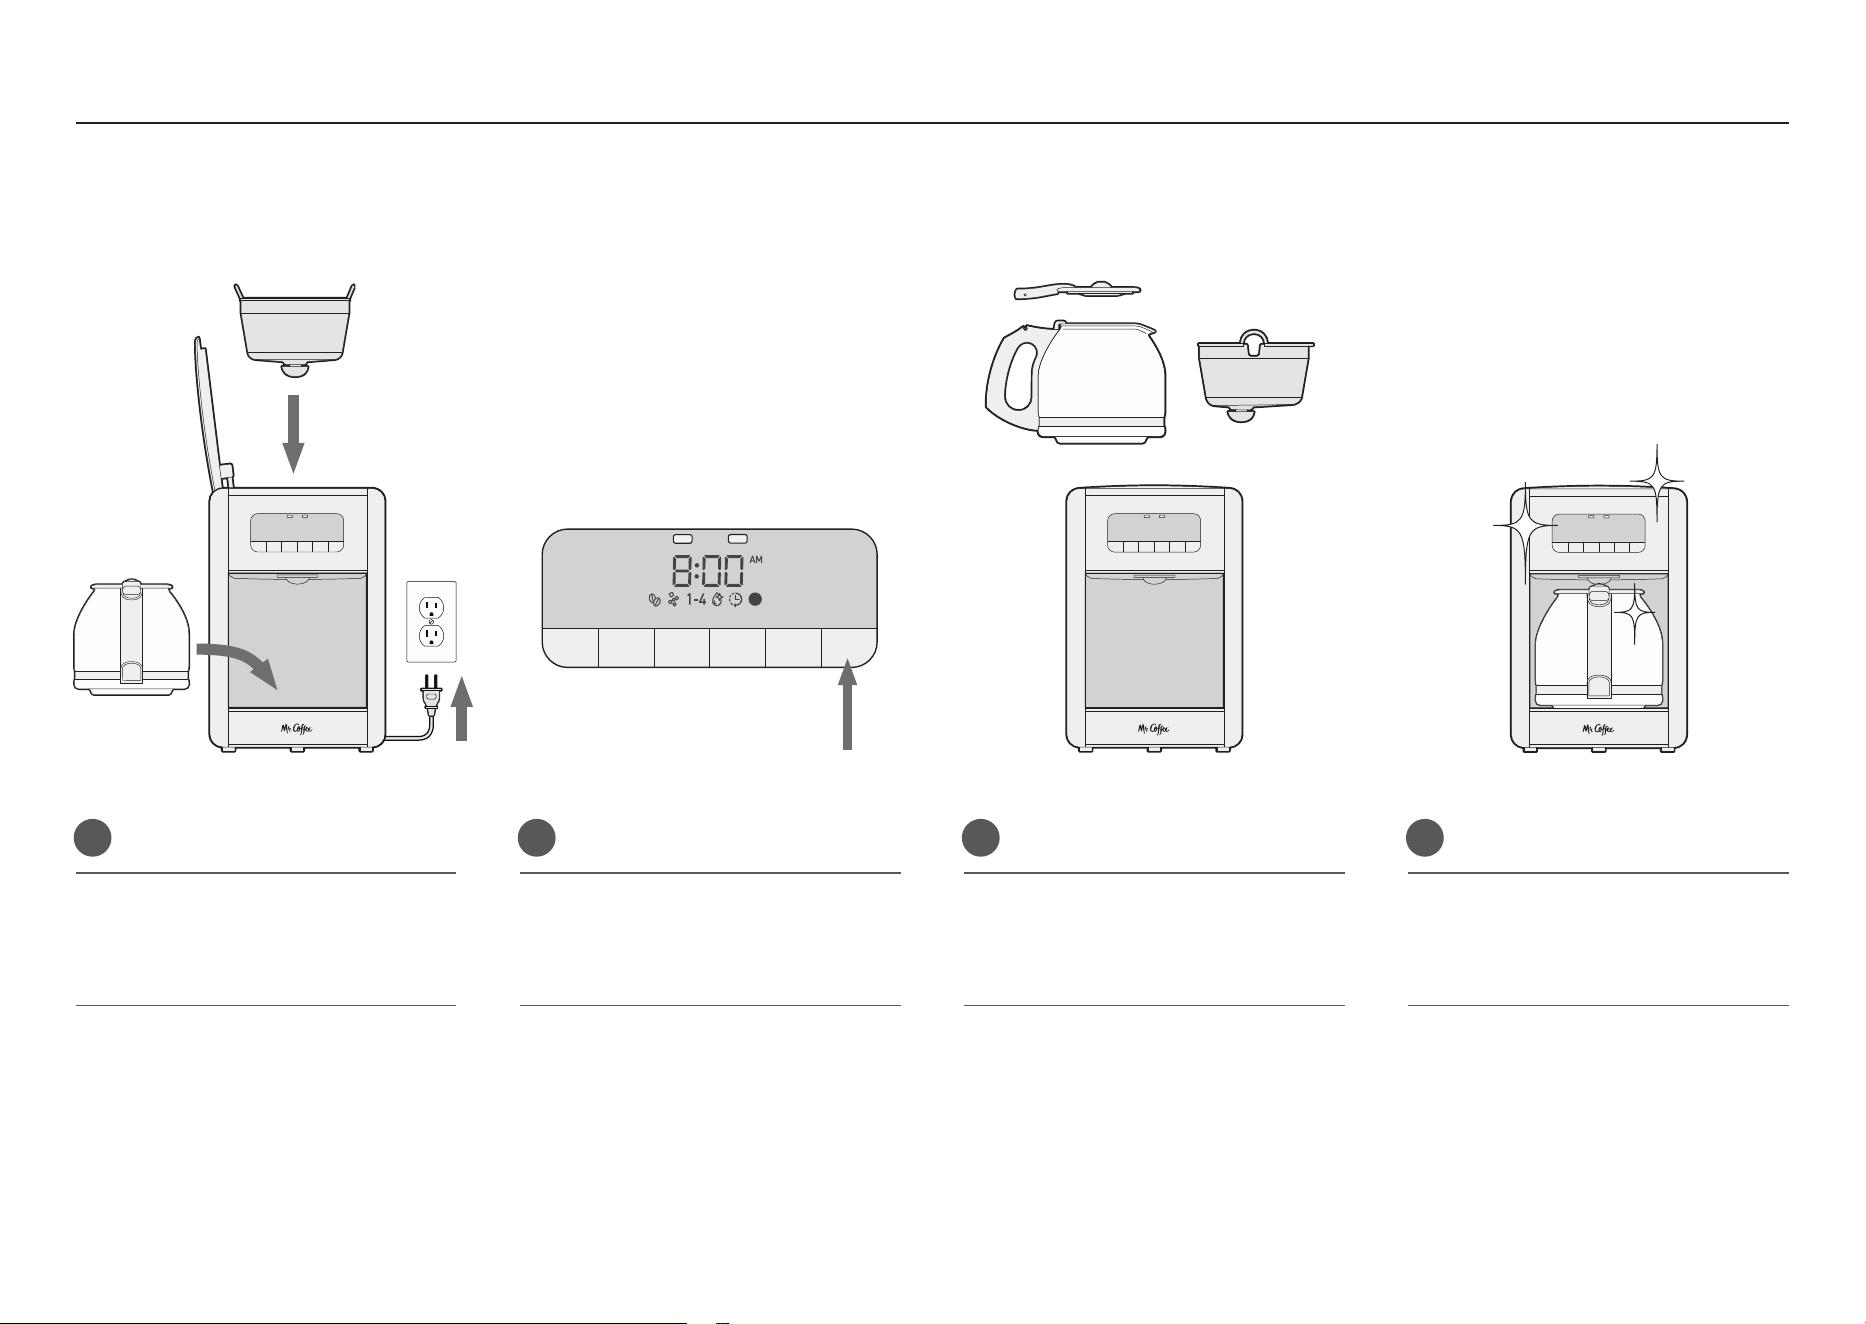
Desempaque y limpie antes de usarla
Unpack and Clean Your Coffeemaker Before Use
1 2
3
4
Take the Coffeemaker out of the box,
removing all plastic bags, cardboard,
and tape.
Saque la cafetera de la caja, retirando
todas las bolsas de plástico, el cartón y
la cinta adhesiva.
Lave la jarra, la tapa de la jarra y la
cesta de preparación con agua tibia y
enjuague bien.
WARNING: KEEP PLASTIC BAGS
AWAY FROM CHILDREN.
ADVERTENCIA: MANTENGA LAS
BOLSAS DE PLÁSTICO FUERA DEL
ALCANCE DE LOS NIÑOS.
NOTE: The Carafe, Carafe Lid, and
Brew Basket are also dishwasher
safe (top rack only).
NOTA: la jarra, la tapa de la jarra
y la cesta de preparación también
son aptas para el lavavajillas (solo
en la rejilla superior).
EN
ES
2
4
6
8
10
12
MAX
ICED
MAX
HOT
Wash the Carafe, Carafe Lid, and Brew
Basket in warm, soapy water. Rinse well.
Use the Carafe to fill the water
reservoir with WATER only.
Pour the Carafe into the water
reservoir.
Vierta el contenido de la jarra en el
depósito de agua.
Utilice la jarra para llenar el depósito
de agua únicamente con AGUA.
7
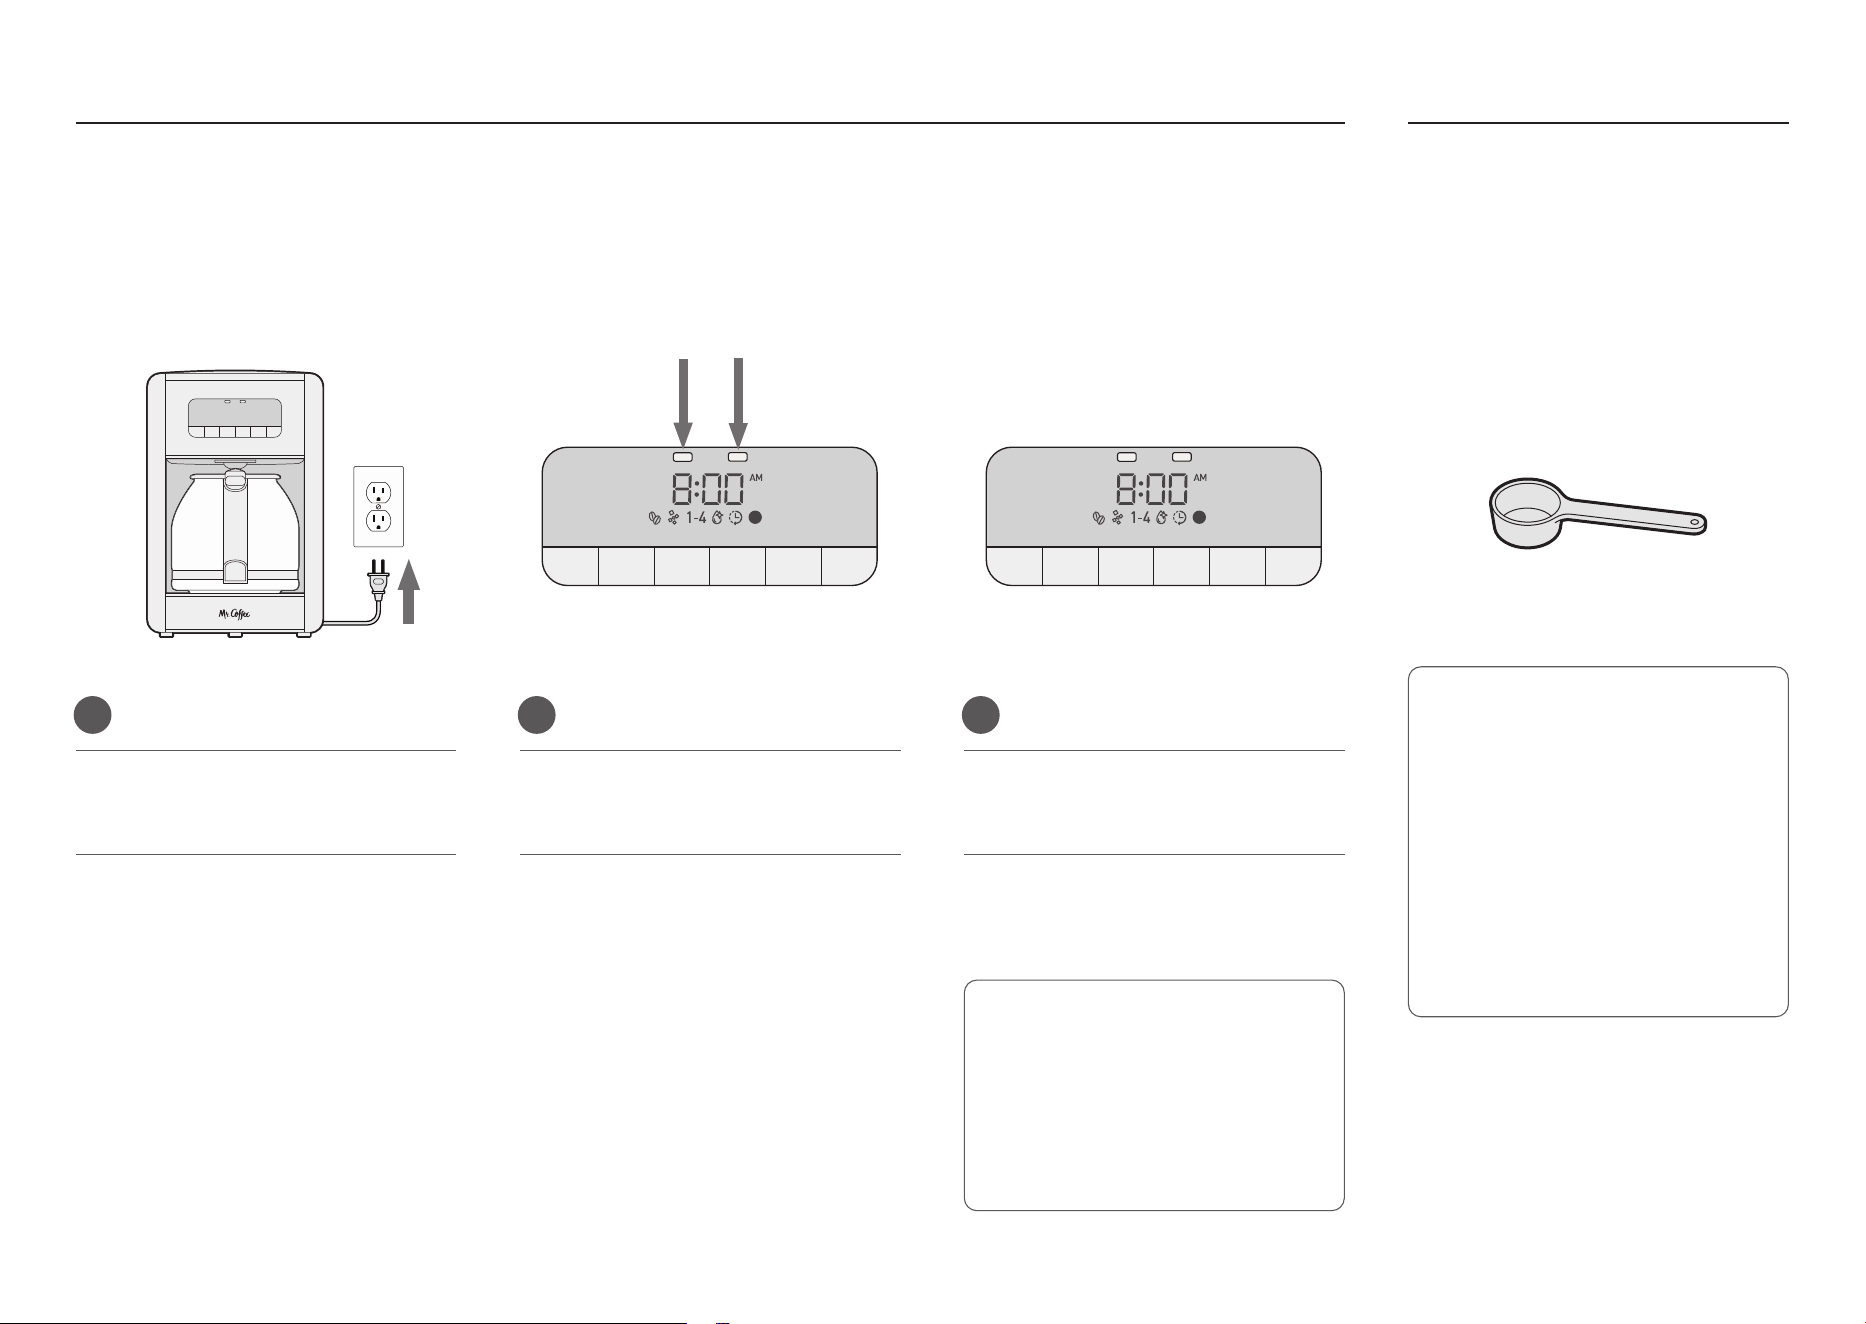
You’re all ready to brew!
6 7 8
Reassemble the Coffeemaker and make
sure it is plugged in.
Vuelva a armar la cafetera y asegúrese
de que esté enchufada.
5
Desempaque y limpie antes de usarla
Unpack and Clean Your Coffeemaker Before Use
Press the BREW/STOP button and let
the Coffeemaker run for one brew cycle.
When finished, press BREW/STOP
again to turn off the Coffeemaker.
Discard the water, and rinse the Carafe,
Carafe lid, and Brew Basket. Return
them to the Coffeemaker.
Presione el botón BREW/STOP y deje
que la cafetera active un ciclo de
preparación. Al finalizar, presione
BREW/STOP nuevamente para apagar
la cafetera.
Deseche el agua y enjuague la jarra, la
tapa de la jarra y la cesta de preparación.
Vuélvalos a colocar en la cafetera.
¡Ya está listo para preparar su bebida!
BREW/
STOP
BREW
LATER
CLEAN1-4 CUPSICEDSTRONG
MIN
HR
8
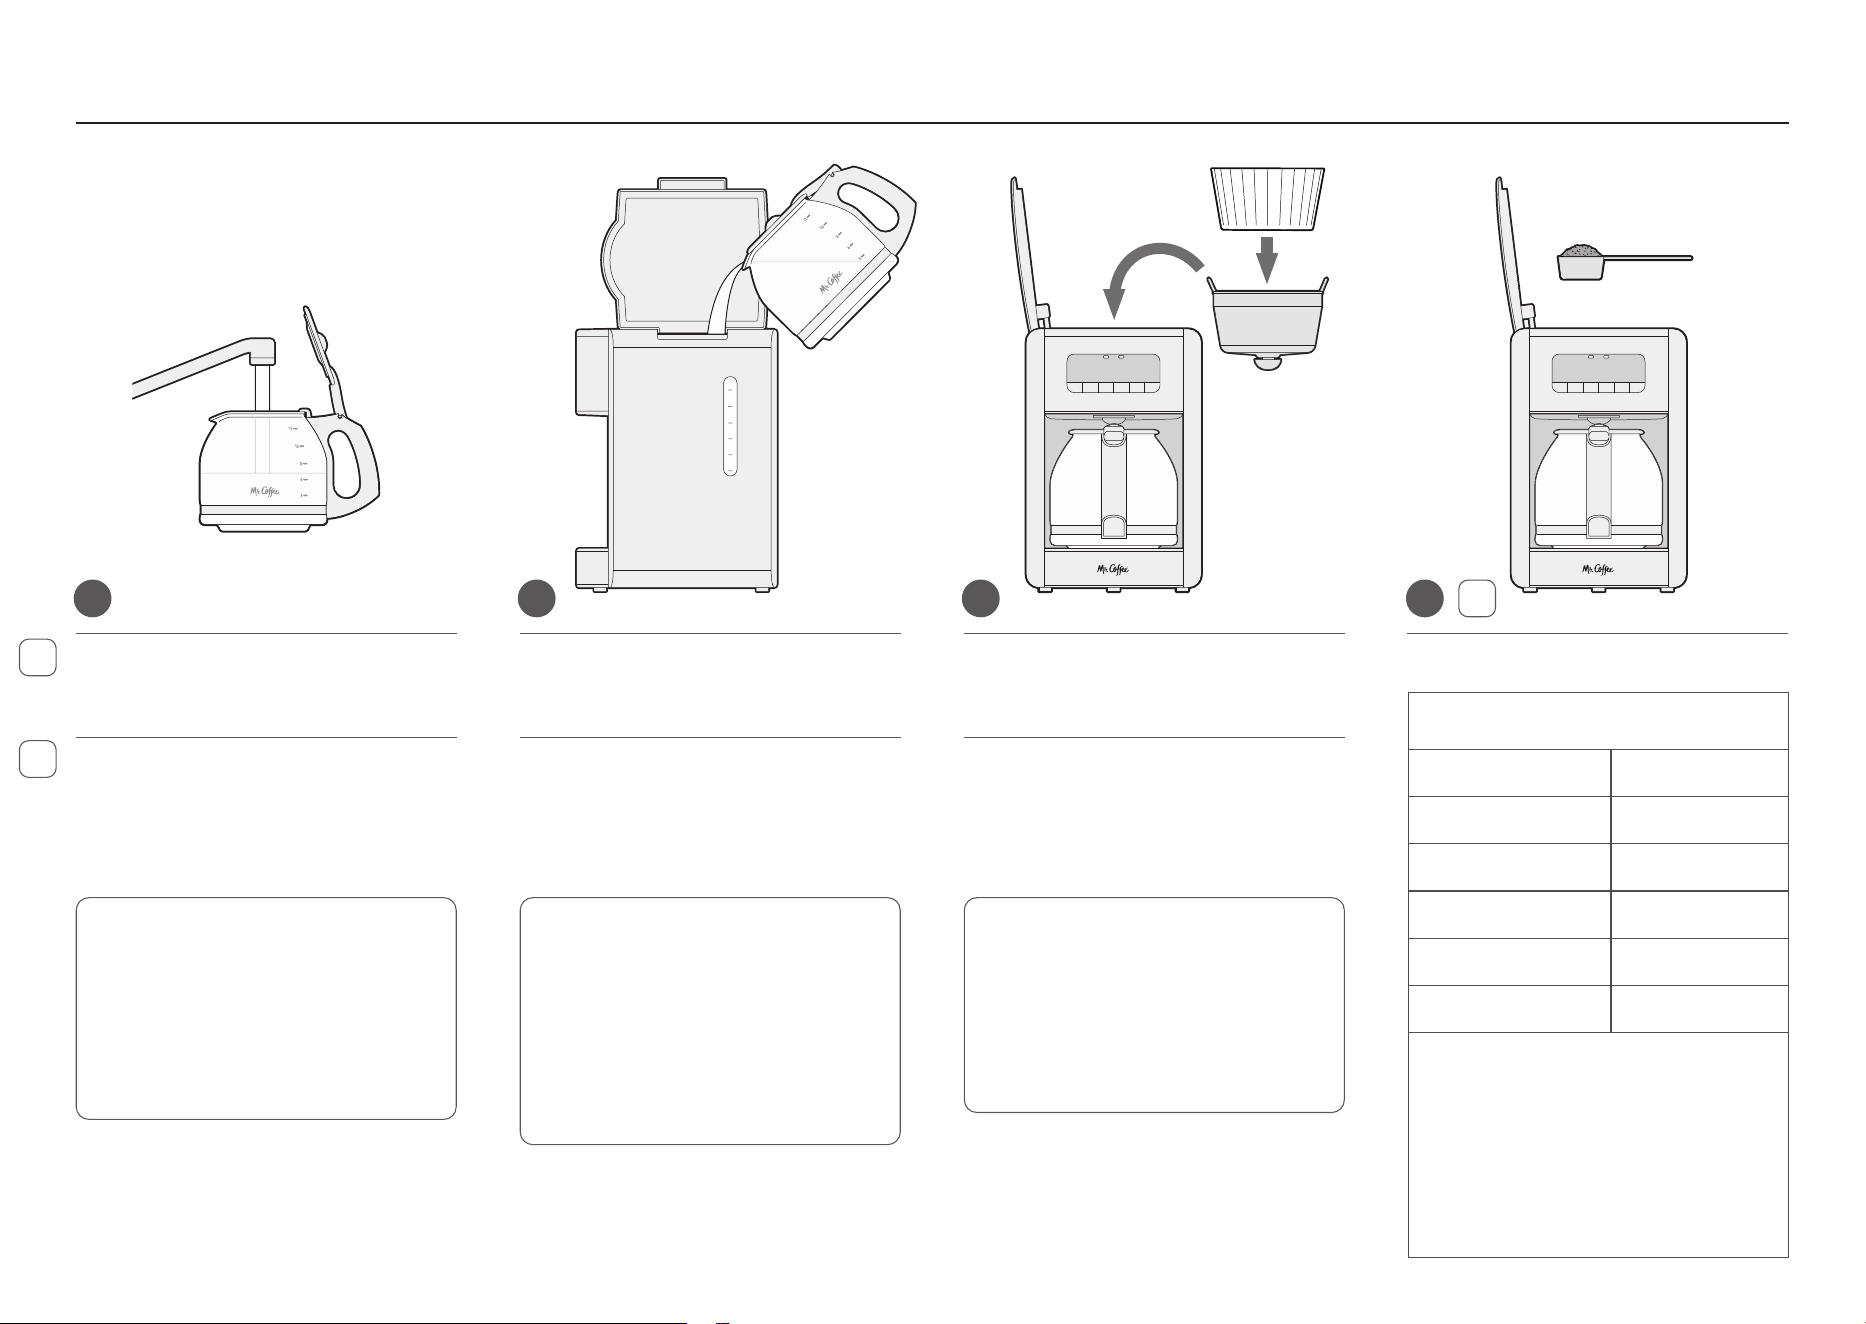
Press the HR (Hour) and MIN (Minute)
buttons to set the current time.
Presione los botones HR (Hora) y MIN
(Minutos) para ajustar la hora actual.
2 3
BREW/
STOP
BREW
LATER
CLEAN1-4 CUPSICEDSTRONG
MIN
HR
BREW/
STOP
BREW
LATER
CLEAN1-4 CUPSICEDSTRONG
MIN
HR
Ensure the Coffeemaker is plugged in.
Asegúrese de que la cafetera esté
enchufada.
1
Confi guración del reloj
Setting the Clock Preparing for Use
NOTE: You must set the clock if you
want to use the Brew Later feature.
NOTA: Debe ajustar el reloj si desea
utilizar la función Brew Later
(Preparar más tarde).
After 5 seconds without pressing a
button, the clock will automatically
save.
Tras 5 segundos sin presionar ningún
botón, el reloj guardará los datos
automáticamente.
For optimal brewing results,
measure medium-ground coffee
using the included scoop or a level
tablespoon.
Para obtener resultados óptimos
en la preparación, mida el café
de molienda media utilizando la
cuchara dosificadora incluida o una
cucharada rasa.
9
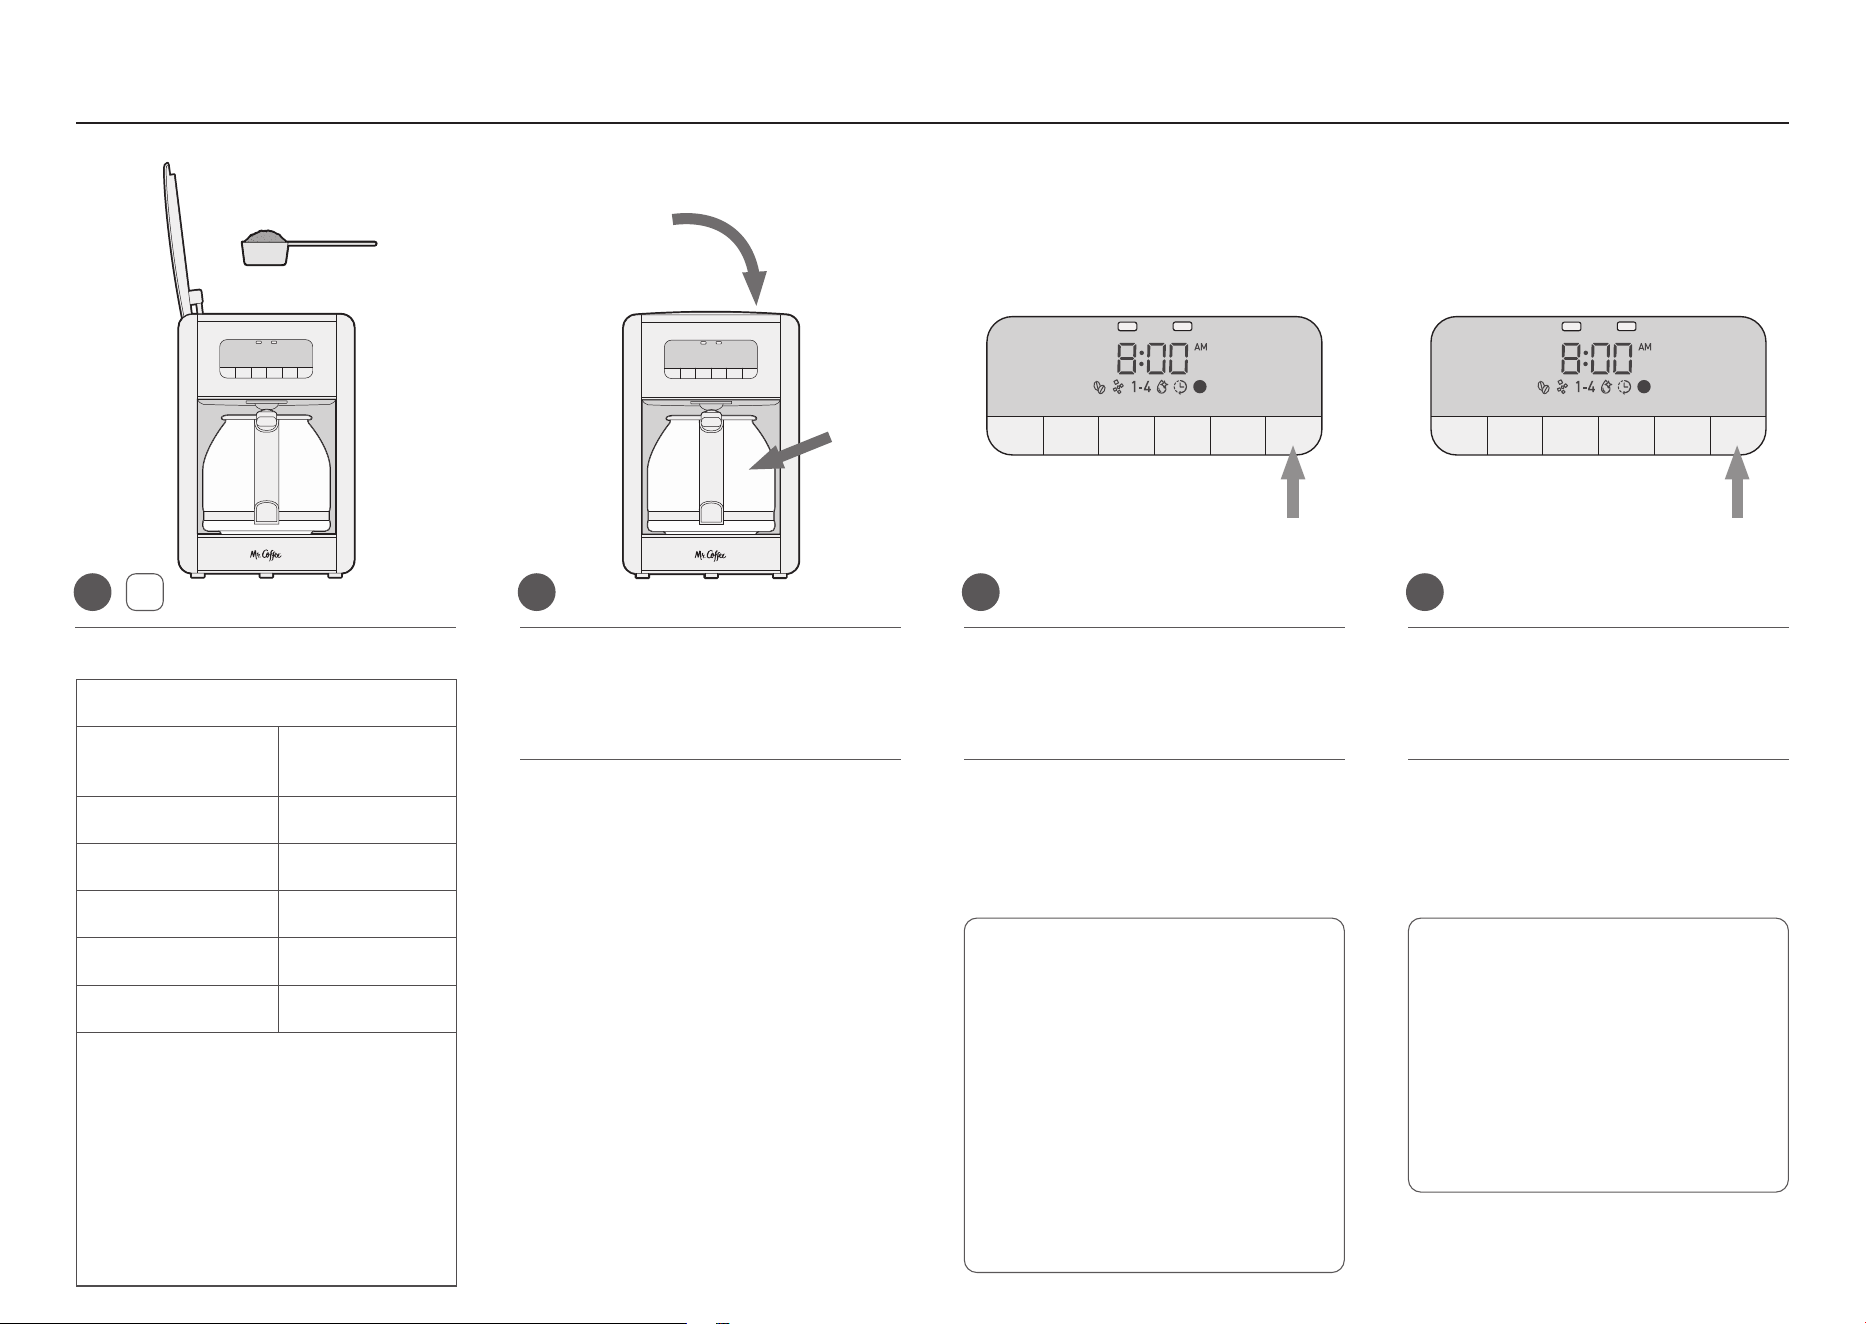
Making Hot Coffee
1
Vierta el agua en el depósito de agua.
Utilice la ventana de agua para
comprobar el nivel del agua.
2 3
EN
EN
ES
Add coffee grounds using this chart:
4
Suggested Coffee Measurement
Brew Size Ground Coffee
12 cups = 60 oz. 12 tbsp
10 cups = 50 oz. 10 tbsp
8 cups = 40 oz. 8 tbsp
6 cups = 30 oz. 6 tbsp
4 cups = 20 oz. 4 tbsp
1 level tablespoon = 5g / 0.17 oz.
1 cup = 5 fl. oz. of brewed coffee
Use more or less coffee to suit your
taste.
TIP: For a BOLDER cup, use a heaping
tablespoon.
Cómo preparar café caliente
Llene la jarra con agua potable y fría
hasta el nivel deseado.
NOTE: Some of this water will be
absorbed by the coffee grounds
during the brewing process.
NOTA: parte del agua será absorbida
por el café molido durante el proceso
de preparación.
CAUTION: Fine or decaf coffee may
cause overflow.
PRECAUCIÓN: el café molido
fino o descafeinado puede causar
desbordamiento.
2
4
6
8
10
12
MAX
ICED
MAX
HOT
Pour the water into the water reservoir.
Use the water window to check the water
level.
Fill the carafe with fresh, cold water to
the desired level.
Insert a standard basket-style paper
coffee filter (sold separately) into the
brew basket.
TIP: One (1) Mr. Coffee
®
“cup” is
equivalent to 5 fluid ounces.
CONSEJO: una (1) «taza» de
Mr. Coffee
®
equivale a 5 onzas
líquidas.
Inserte un filtro de café de papel estándar
tipo cesta (se vende por separado) en la
cesta de preparación.
10
Making Hot Coffee
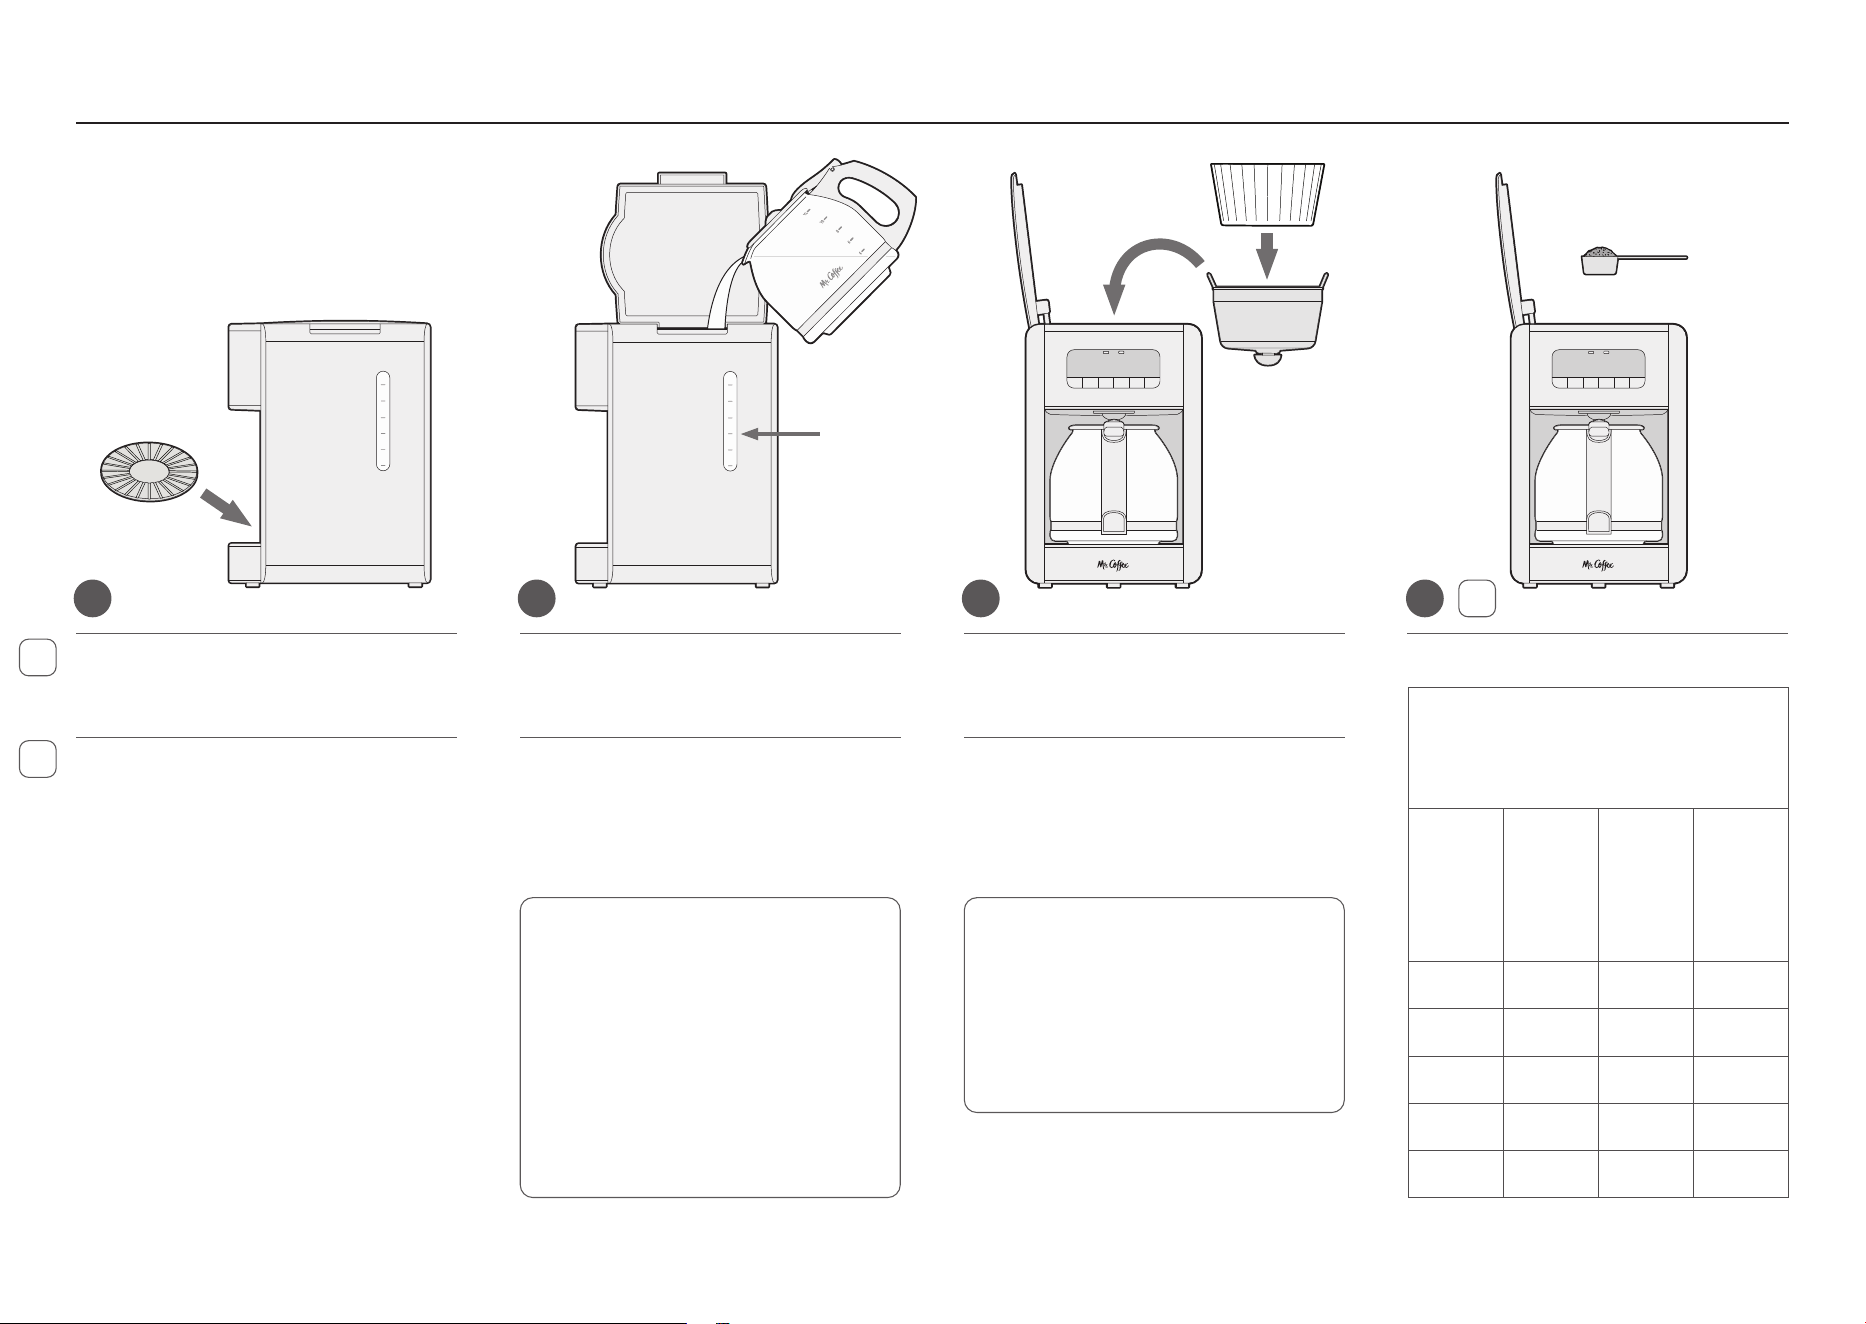
Press the BREW/STOP button. This
will run the brew cycle and heat the
Warming Plate, keeping the coffee hot
in the carafe.
Close the Brew Basket lid and place the
Carafe on the Warming Plate.
The Warming Plate and the Brew Now
Indicator will remain on for up to 2 hours
and then will automatically shut off.
65 7
ES
Añada café molido utilizando esta tabla:
4
Medición de café sugerida
Tamaño de
preparación
Cantidad de
café molido
12 tazas = 60 oz. 12 cucharadas
10 tazas = 50 oz. 10 cucharadas
8 tazas = 40 oz. 8 cucharadas
6 tazas = 30 oz. 6 cucharadas
4 tazas = 20 oz. 4 cucharadas
1 cucharada rasa = 5 g / 0.17 oz.
1 taza = 5 onzas líquidas de café preparado
Utilice más o menos cantidad de café
según su preferencia.
CONSEJO: para una taza con un sabor
MÁS INTENSO, utilice una cucharada
colmada.
Presione el botón BREW/STOP. Esto
activará el ciclo de preparación y
calentará la placa térmica, manteniendo
el café caliente en la jarra.
Cierre la tapa de la cesta de preparación
y coloque la jarra sobre la placa térmica.
La placa térmica y el indicador Brew Now
(Preparar ahora) preparación permanecerán
encendidos hasta 2 horas y, luego, se
apagarán automáticamente.
NOTE: Push the BREW/STOP
button again prior to 2 hours to
turn the Warming Plate off early.
NOTA: presione nuevamente el
botón BREW/STOP antes de que
transcurran 2 horas para apagar la
placa térmica anticipadamente.
CAUTION: To reduce the risk
of damaging the carafe and/or
personal injury, do not add cold
water to the carafe if it is already
hot. Allow to cool before using.
PRECAUCIÓN: Para reducir el riesgo
de dañar la jarra y/o sufrir lesiones
personales, no añada agua fría a la
jarra si esta ya está caliente. Deje
que se enfríe antes de usarla.
BREW/
STOP
BREW
LATER
CLEAN1-4 CUPSICEDSTRONG
MIN
HR
BREW/
STOP
BREW
LATER
CLEAN1-4 CUPSICEDSTRONG
MIN
HR
Cómo preparar café caliente
11
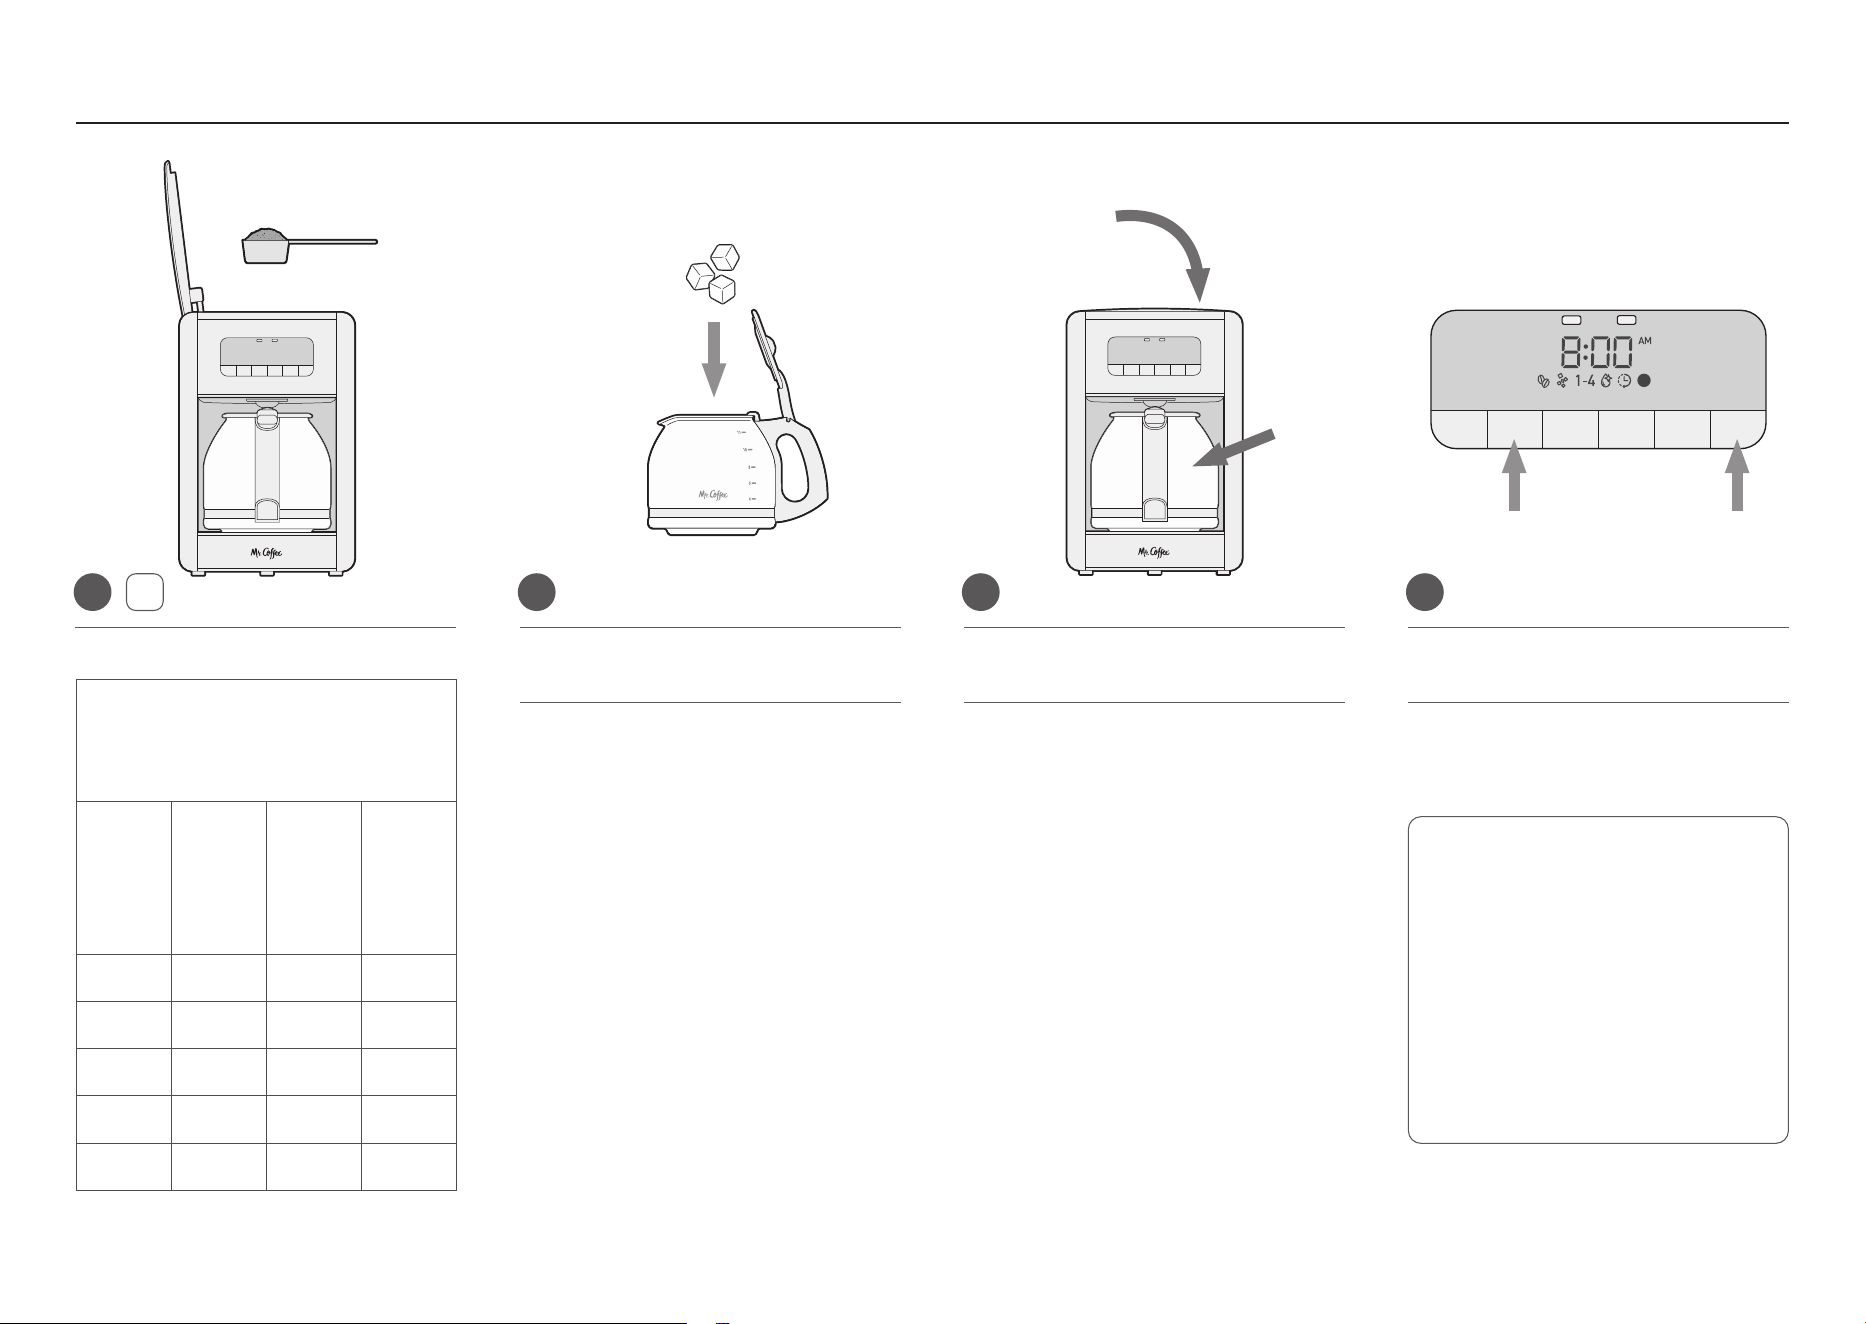
Place the Cool Brew Cover on the
warming plate.
1
Fill the Water Reservoir with fresh water
to the desired amount. Use the Water
Window to check the water level.
Insert and line the Brew Basket with a
standard basket-style paper coffee filter
(sold separately).
Llene el depósito de agua con agua
potable hasta la cantidad deseada. Utilice
la ventana de agua para comprobar el
nivel del agua.
2 3
EN
EN
ES
Add coffee grounds using this chart:
4
Suggested Coffee &
Water Measurement
for Iced Coffee
Brew
Size
Fill
Reservoir
with
Water to:
Fill
Carafe
with
Ice to:
Ground
Coffee
Amount
12 cups 6 mark 12 mark 12 tbsp
10 cups 5 mark 10 mark 10 tbsp
8 cups 4 mark 8 mark 8 tbsp
6 cups 3 mark 6 mark 6 tbsp
4 cups 2 mark 4 mark 4 tbsp
2
4
6
8
10
12
MAX
ICED
MAX
HOT
Coloque la cubierta de preparación frío
sobre la placa térmica.
Coloque la cesta de preparación y cúbrala
con un filtro de papel estándar (se vende
por separado).
IMPORTANT: DO NOT fill water
above the MAX ICED Coffee Line.
Overflow may occur.
IMPORTANTE: No llene con agua
por encima de la línea de nivel
máximo para café helado (MAX
ICED); podría producirse un
desbordamiento.
CAUTION: Fine or decaf coffee may
cause overflow.
PRECAUCIÓN: el café molido
fino o descafeinado puede causar
desbordamiento.
Making Iced Coffee
Cómo preparar café helado
2
4
6
8
10
12
MAX
ICED
MAX
HOT
12
Making Iced Coffee
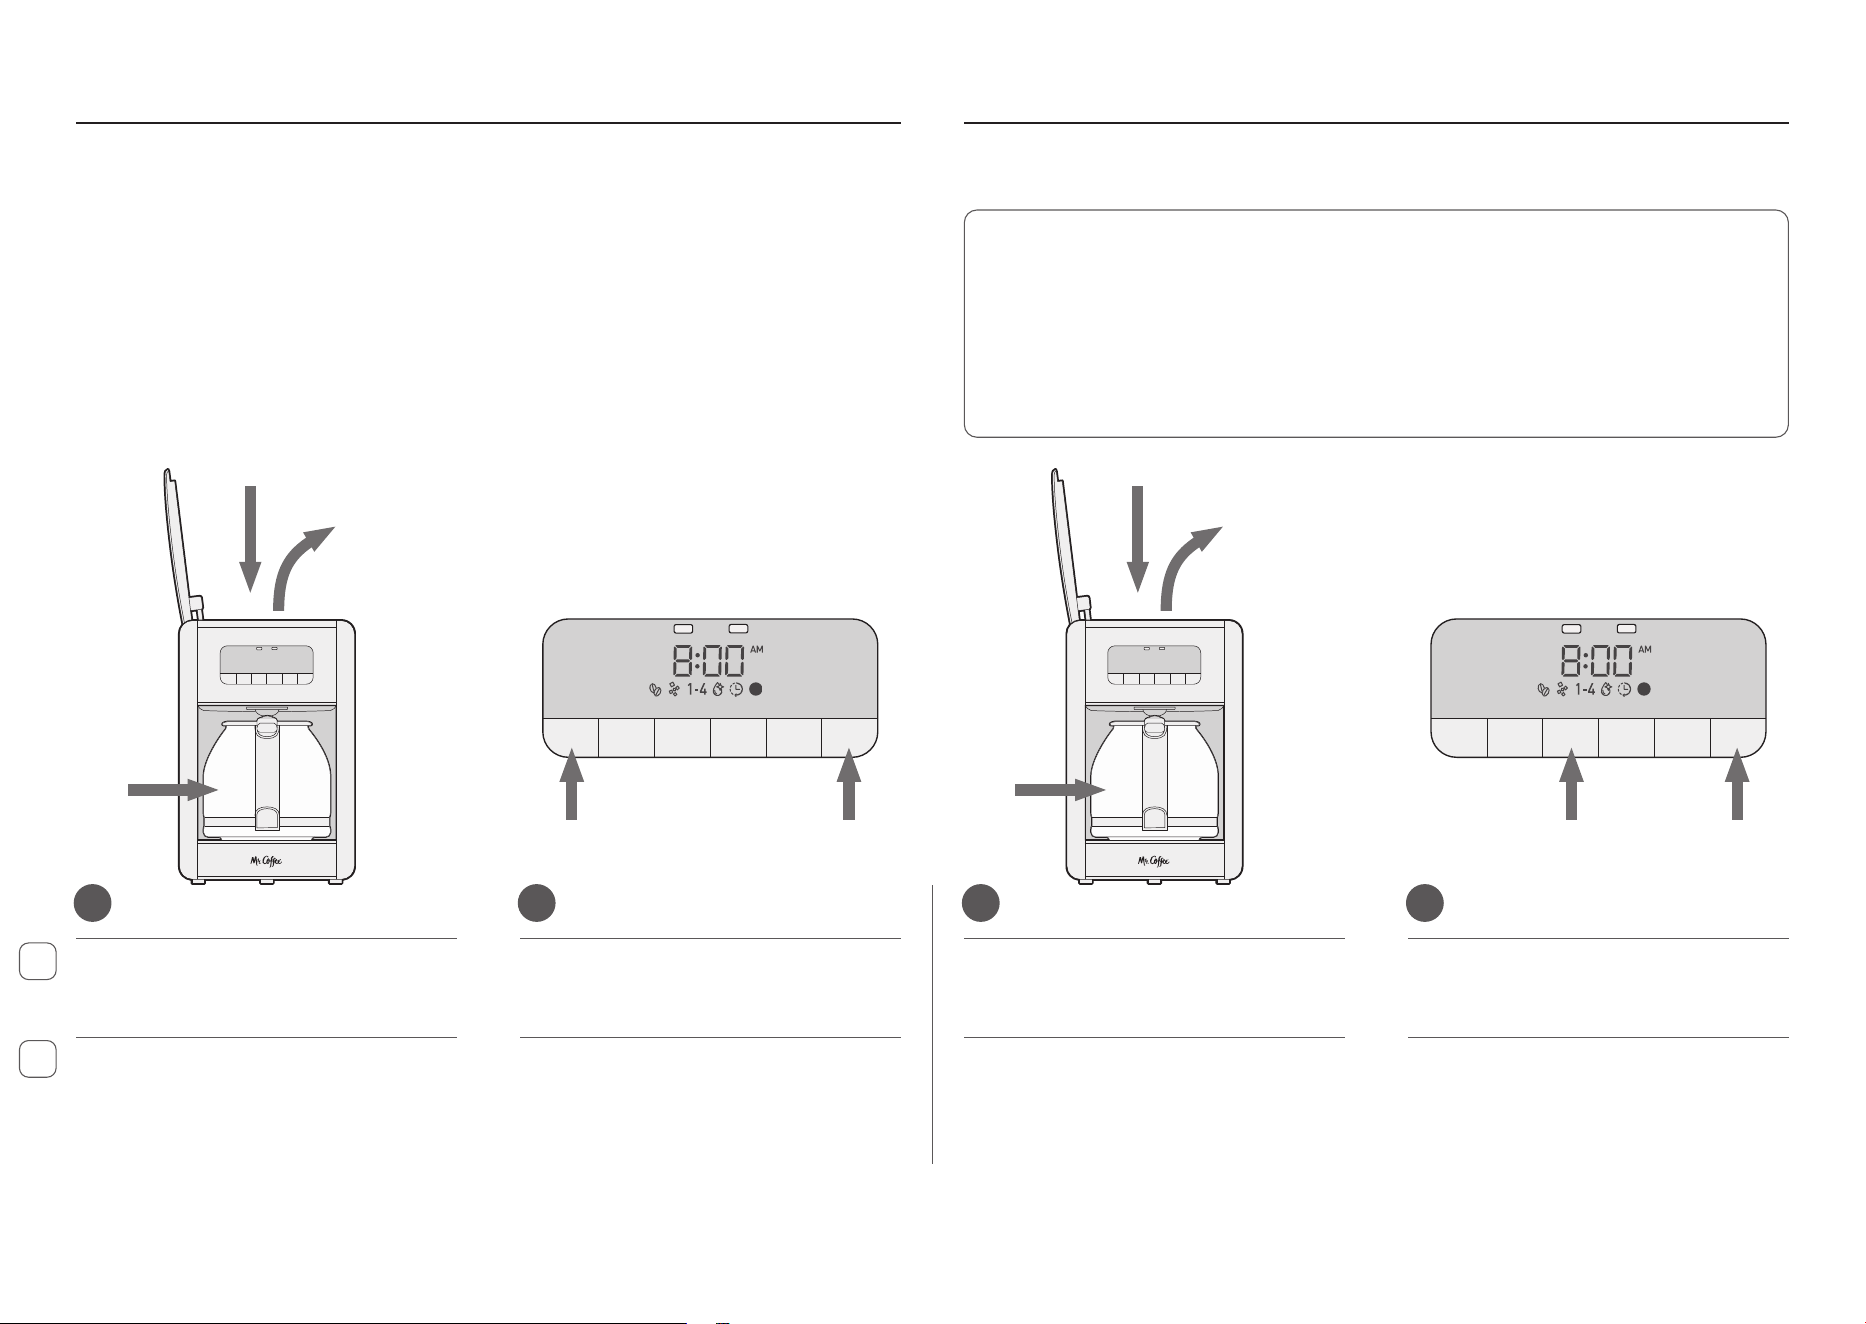
Press the ICED button and then press
the BREW/STOP button.
Close the Brew Basket lid and place the
Carafe on the Cool Brew Cover.
Fill the Carafe with ice to the desired
fill line.
765
ES
Añada café molido utilizando esta tabla:
4
Presione el botón ICED y luego presione
el botón BREW/STOP.
Cierre la tapa de la cesta de preparación
y coloque la jarra sobre la cubierta de
preparación frío .
Llene la jarra con hielo hasta la línea de
llenado deseada.
NOTE: During the ICED function, the
Warming Plate heater turns off after
the brew is complete to minimize
the amount of ice that melts.
NOTA: durante la función ICED, el
calentador de la placa se apaga
una vez finalizada la preparación
para minimizar la cantidad de hielo
que se derrite.
BREW/
STOP
BREW
LATER
CLEAN1-4 CUPSICEDSTRONG
MIN
HR
Cómo preparar café helado
Mediciónes sugeridas
de café y agua
para café helado
Tamaño
de prep-
aración
Llene el
depósito
con agua
hasta:
Llene el
depósito
con hielo
hasta:
Cantidad
de café
molido
12 tzas 6 marca 12 marca 12 cdas
10 tzas 5 marca 10 marca 10 cdas
8 tzas 4 marca 8 marca 8 cdas
6 tzas 3 marca 6 marca 6 cdas
4 tzas 2 marca 4 marca 4 cdas
13
Strong Brew 1-4 Cups
Preparación intensa 1 a 4 tazas
EN
ES
To brew a richer and bolder cup of
coffee, follow steps 1-5 in the “Making
Hot Coffee” section (page 8).
To set the 1-4 Cup Function, follow
steps 1-5 in the “Making Hot Coffee”
section (page 9).
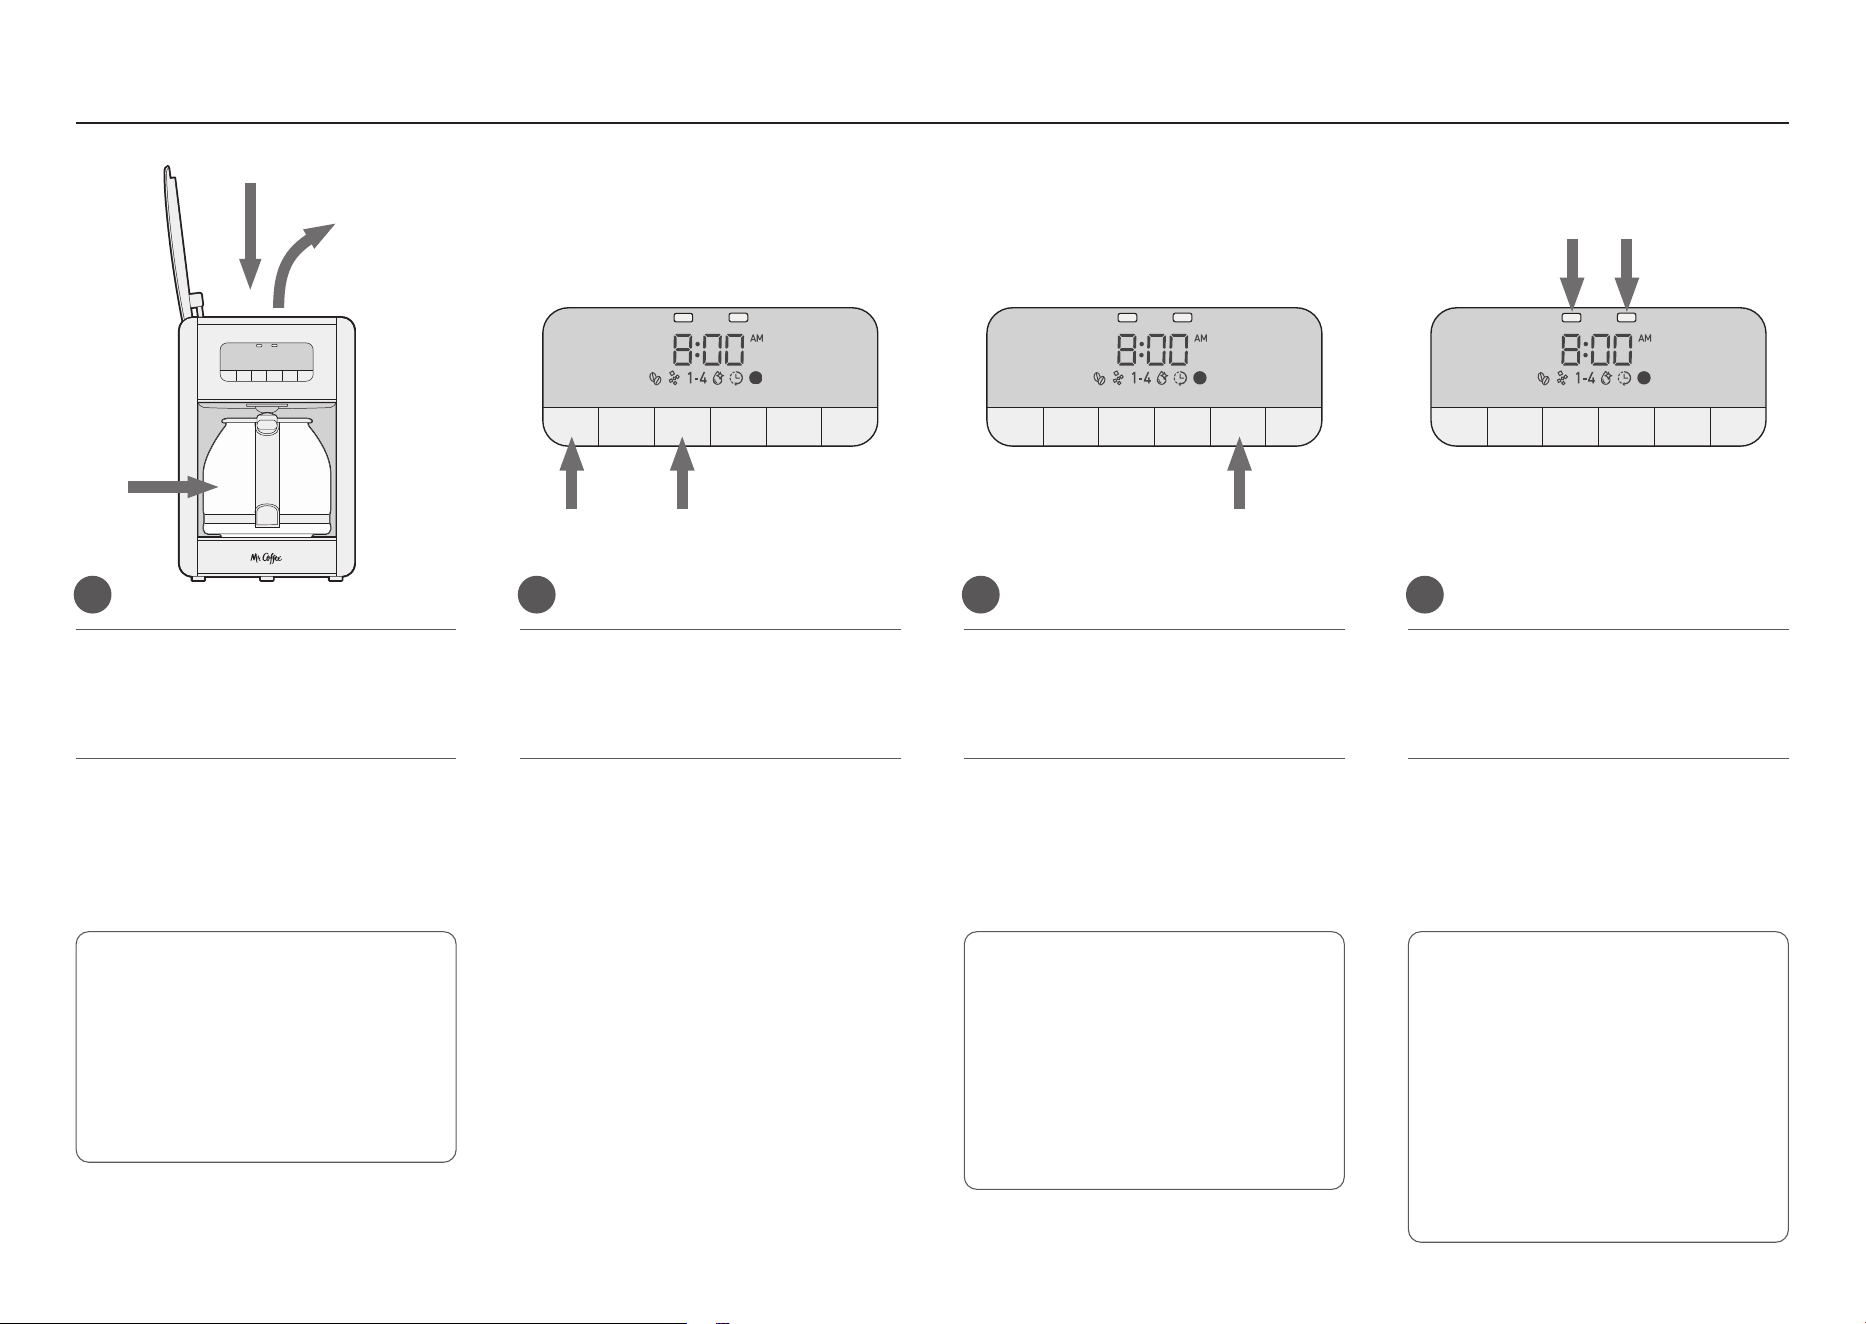
Press the STRONG button, then press
the BREW/STOP button.
Press the 1-4 CUPS button, then press
the BREW/STOP button.
1 12 2
Para preparar una taza de café con un
sabor más intenso y con más cuerpo,
siga los pasos del 1 al 5 de la sección
«Cómo preparar café caliente» (página 8).
Para preparar café descafeinado,
siga los pasos del 1 al 5 de la sección
«Cómo preparar café caliente» (página 9).
Presione el botón STRONG y, a
continuación, presione el botón
BREW/STOP.
Presione el botón 1-4 CUPS y, a
continuación, presione el botón
BREW/STOP.
For smaller batches of coffee, the 1-4 Cup Function slows down the brewing process
to allow the hot water to fully saturate the grounds, extracting their full flavor.
Para cantidades menores de café, la función de 1 a 4 tazas ralentiza el proceso
de preparación para permitir que el agua caliente sature completamente el café
molido, extrayendo todo su sabor.
BREW/
STOP
BREW
LATER
CLEAN1-4 CUPSICEDSTRONG
MIN
HR
BREW/
STOP
BREW
LATER
CLEAN1-4 CUPSICEDSTRONG
MIN
HR
14
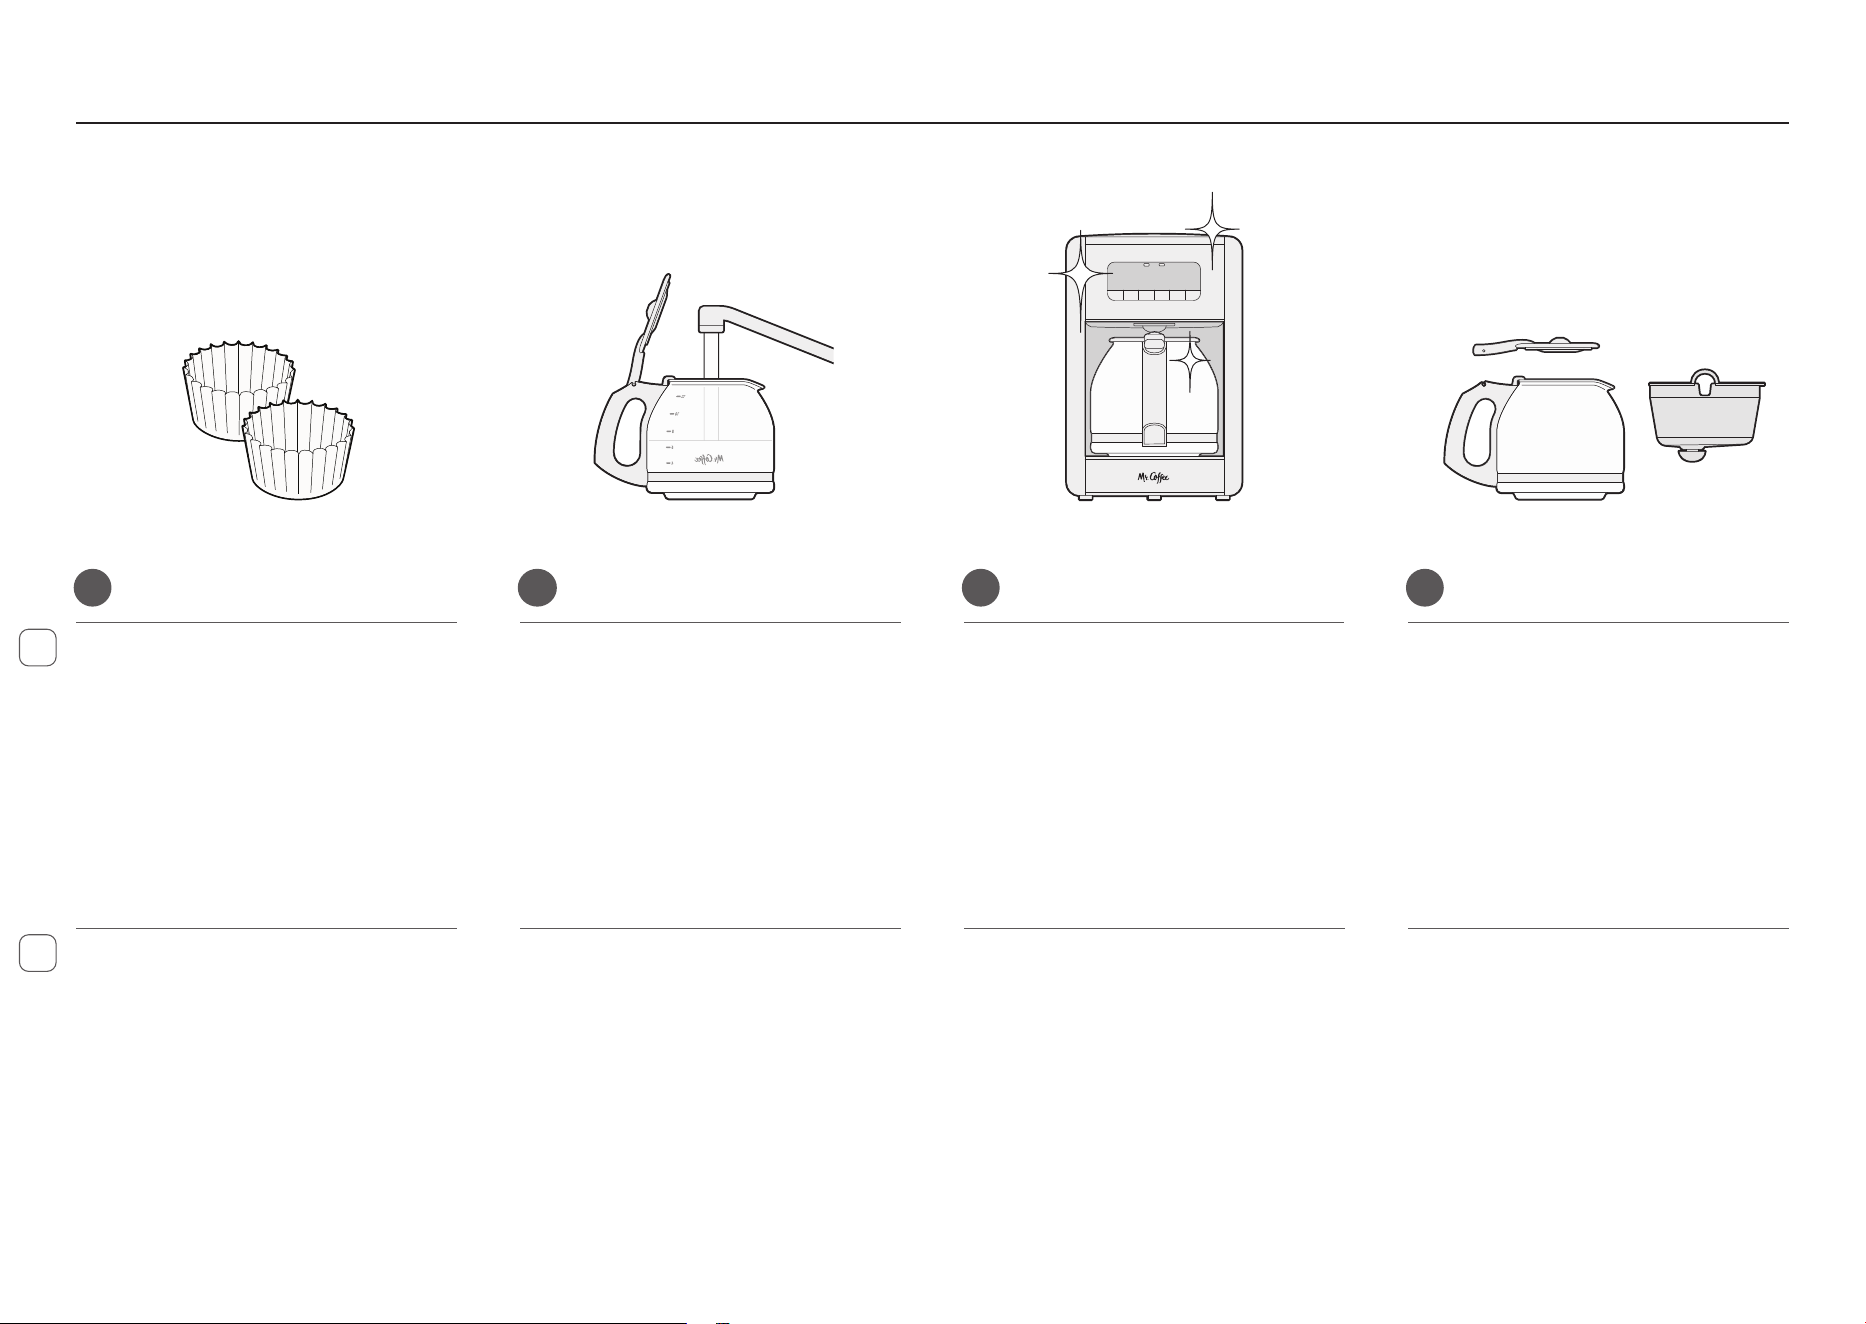
If desired, press STRONG or 1-4 CUPS. Press the BREW LATER button. Press the HR and MIN buttons to the
desired brew time. The Brew Later
icon will remain on to indicate that the
function is set.
Si lo desea, presione STRONG o 1-4 CUPS. Presione el botón BREW LATER. Presione los botones HR y MIN para
ajustar el tiempo de preparación
deseado. El símbolo de Preparar más
tarde permanecerá encendida para
indicar que la función está activada.
2 3 4
To set the Brew Later Function, follow
steps 1-5 in the “Making Hot Coffee”
section (page 9).
Para configurar la función Brew Later
(Preparar más tarde), siga los pasos 1 a 5
de la sección «Cómo preparar café
caliente» (página 9).
1
Cómo programar la cafetera para preparar café más tarde
Setting Your Coffeemaker to Brew Later
IMPORTANT: You must set the
clock before using this feature.
(See page 8).
IMPORTANTE: Debe ajustar el
reloj antes de utilizar esta función.
(Consulte la página 8).
NOTE: You may turn off the Brew Later
Function at any time by pressing the
BREW LATER button again.
NOTA: puede desactivar la función
Preparar más tarde en cualquier
momento volviendo a pulsar el botón
BREW LATER.
NOTE: Once the Brew Later time is
set, the coffeemaker will automatically
remember that time until you change
it or unplug the machine.
NOTA: Una vez configurada la hora
de Preparar más tarde, la cafetera
recordará automáticamente dicha
hora hasta que usted la cambie o
desconecte la máquina.
BREW/
STOP
BREW
LATER
CLEAN1-4 CUPSICEDSTRONG
MIN
HR
BREW/
STOP
BREW
LATER
CLEAN1-4 CUPSICEDSTRONG
MIN
HR
BREW/
STOP
BREW
LATER
CLEAN1-4 CUPSICEDSTRONG
MIN
HR
15
Tips for Brewing the Perfect Cup
Consejos para preparar la taza perfecta
EN
ES
Paper Filters
To achieve a smoother, less bitter
cup of coffee, use a paper filter. It will
be most effective in trapping bitter
sediments. Discard after each use.
Water
While it may not seem like an
important ingredient, coffee is 98%
water. The type of water that you brew
with greatly affects the final taste.
Always use clean, fresh water that is
filtered and free of impurities – avoid
soft water or well water.
* * * *
Cleanliness
A clean Coffeemaker is essential to
brewing great-tasting coffee each and
every time.
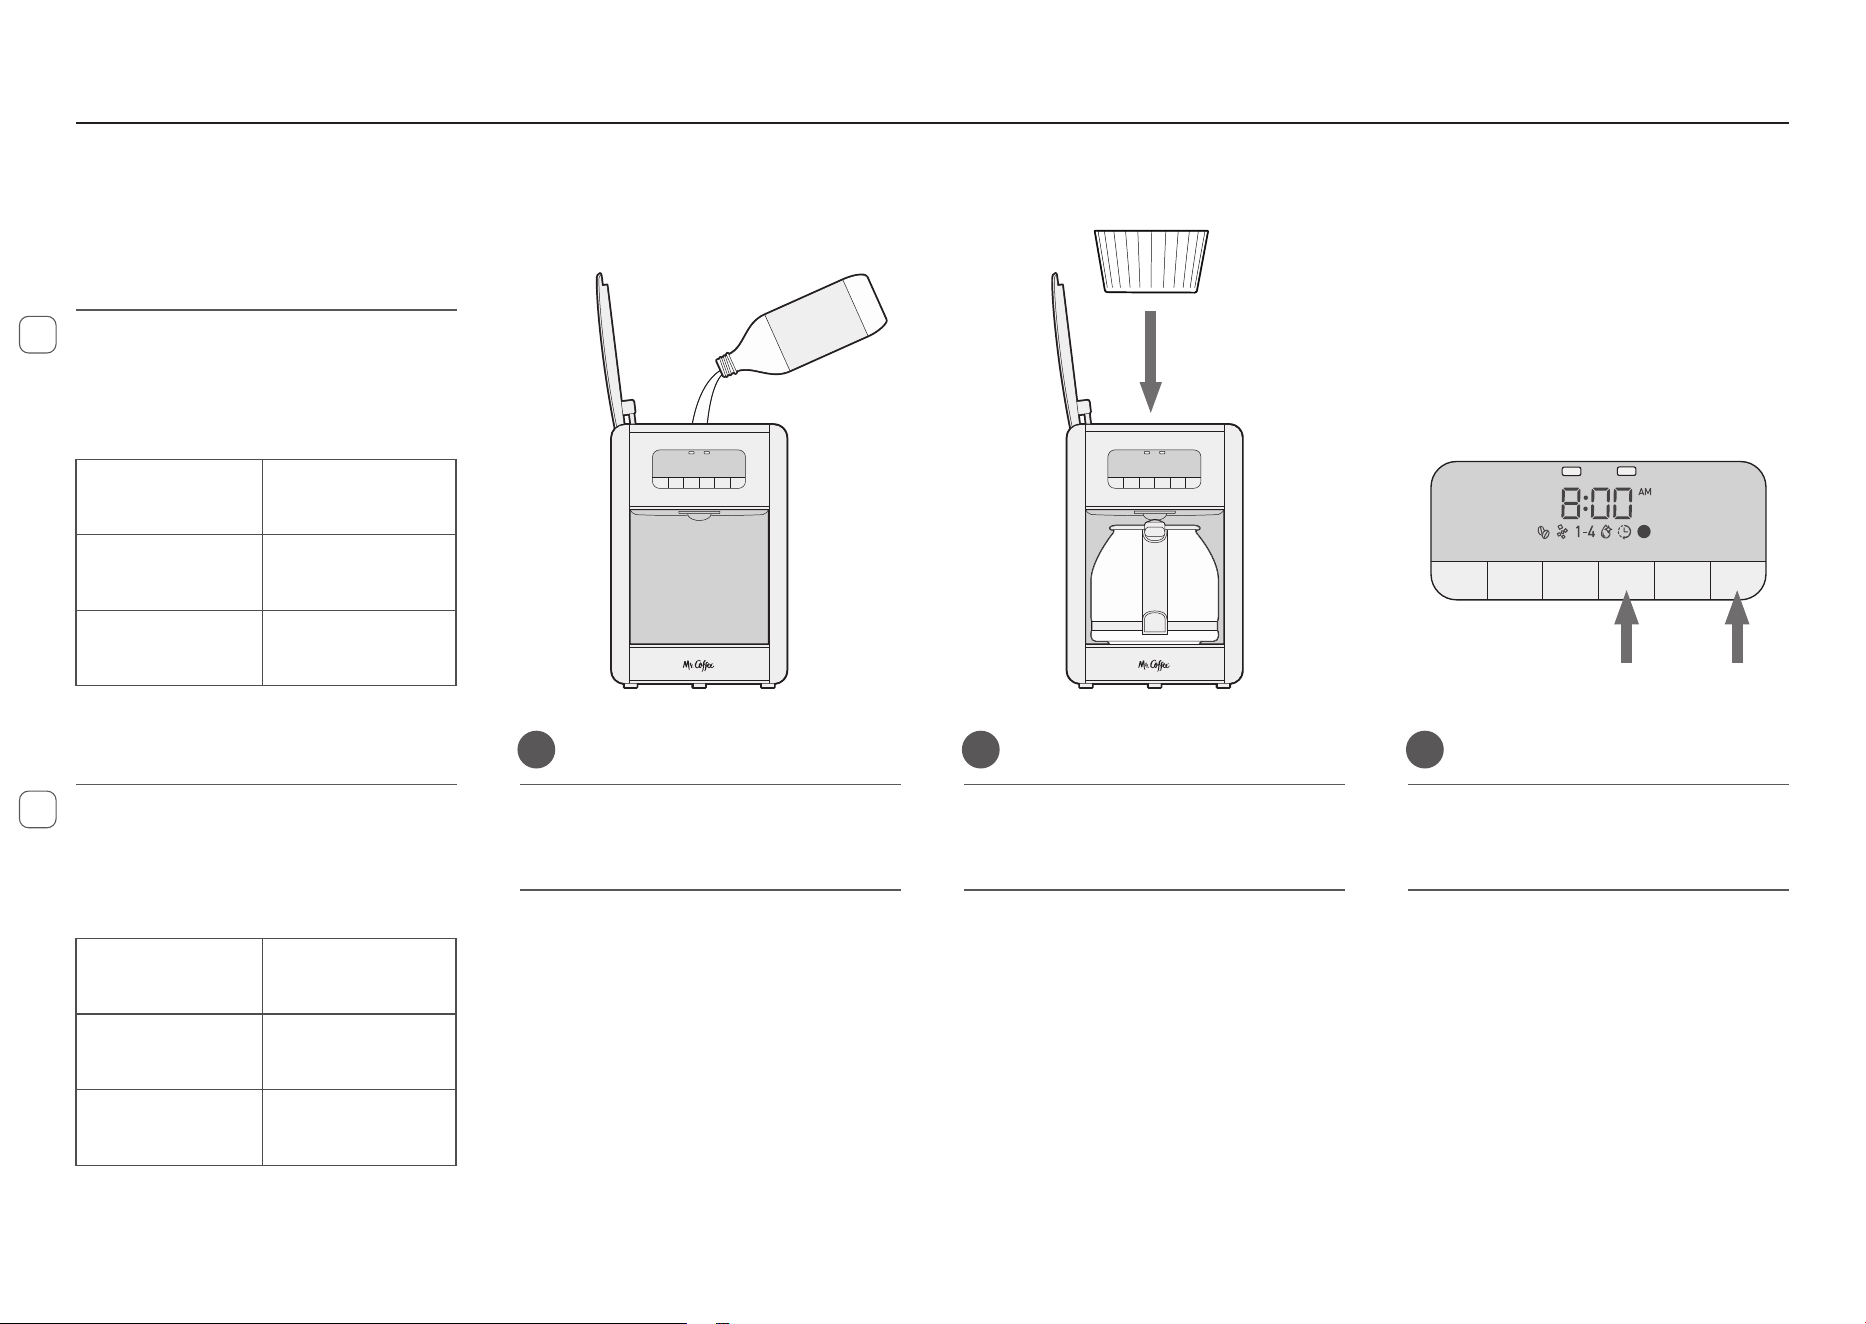
Daily Cleaning
CAUTION: Make sure your Coffeemaker
is unplugged and has cooled completely
before cleaning.
• Remove the Brew Basket, Carafe,
Carafe Lid, and wash them in a
solution of hot water and mild liquid
soap, and dry thoroughly. You can
also place in the dishwasher; top
rack only.
Filtros de papel
Para preparar una taza de café más
suave y menos amarga, utilice un filtro
de papel. Resultará sumamente eficaz
para retener los sedimentos amargos.
Deséchelo después de cada uso.
Agua
Aunque no parezca un ingrediente
importante, el café se compone de
un 98 % de agua. El tipo de agua que
utilice para la preparación influye
enormemente en el sabor final. Utilice
siempre agua potable limpia, que esté
filtrada y libre de impurezas; evite el
agua blanda o el agua de pozo.
Limpieza
Una cafetera limpia es esencial para
preparar un café de excelente sabor,
siempre.
Limpieza diaria
PRECAUCIÓN: asegúrese de que
su cafetera esté desenchufada y se
haya enfriado por completo antes de
limpiarla.
• Retire la cesta de preparación, la
jarra y la tapa de la jarra; lávelas
en agua caliente con jabón líquido
suave, y séquelas bien. También
puede lavarlas en el lavavajillas
(solo en la rejilla superior).
16
EN
ES
Using the Clean Function to Decalcify Your Coffeemaker
Minerals (calcium/limestone) can build
up inside your coffeemaker and affect
performance.
NOTE: Clean with vinegar every 30 days.
1
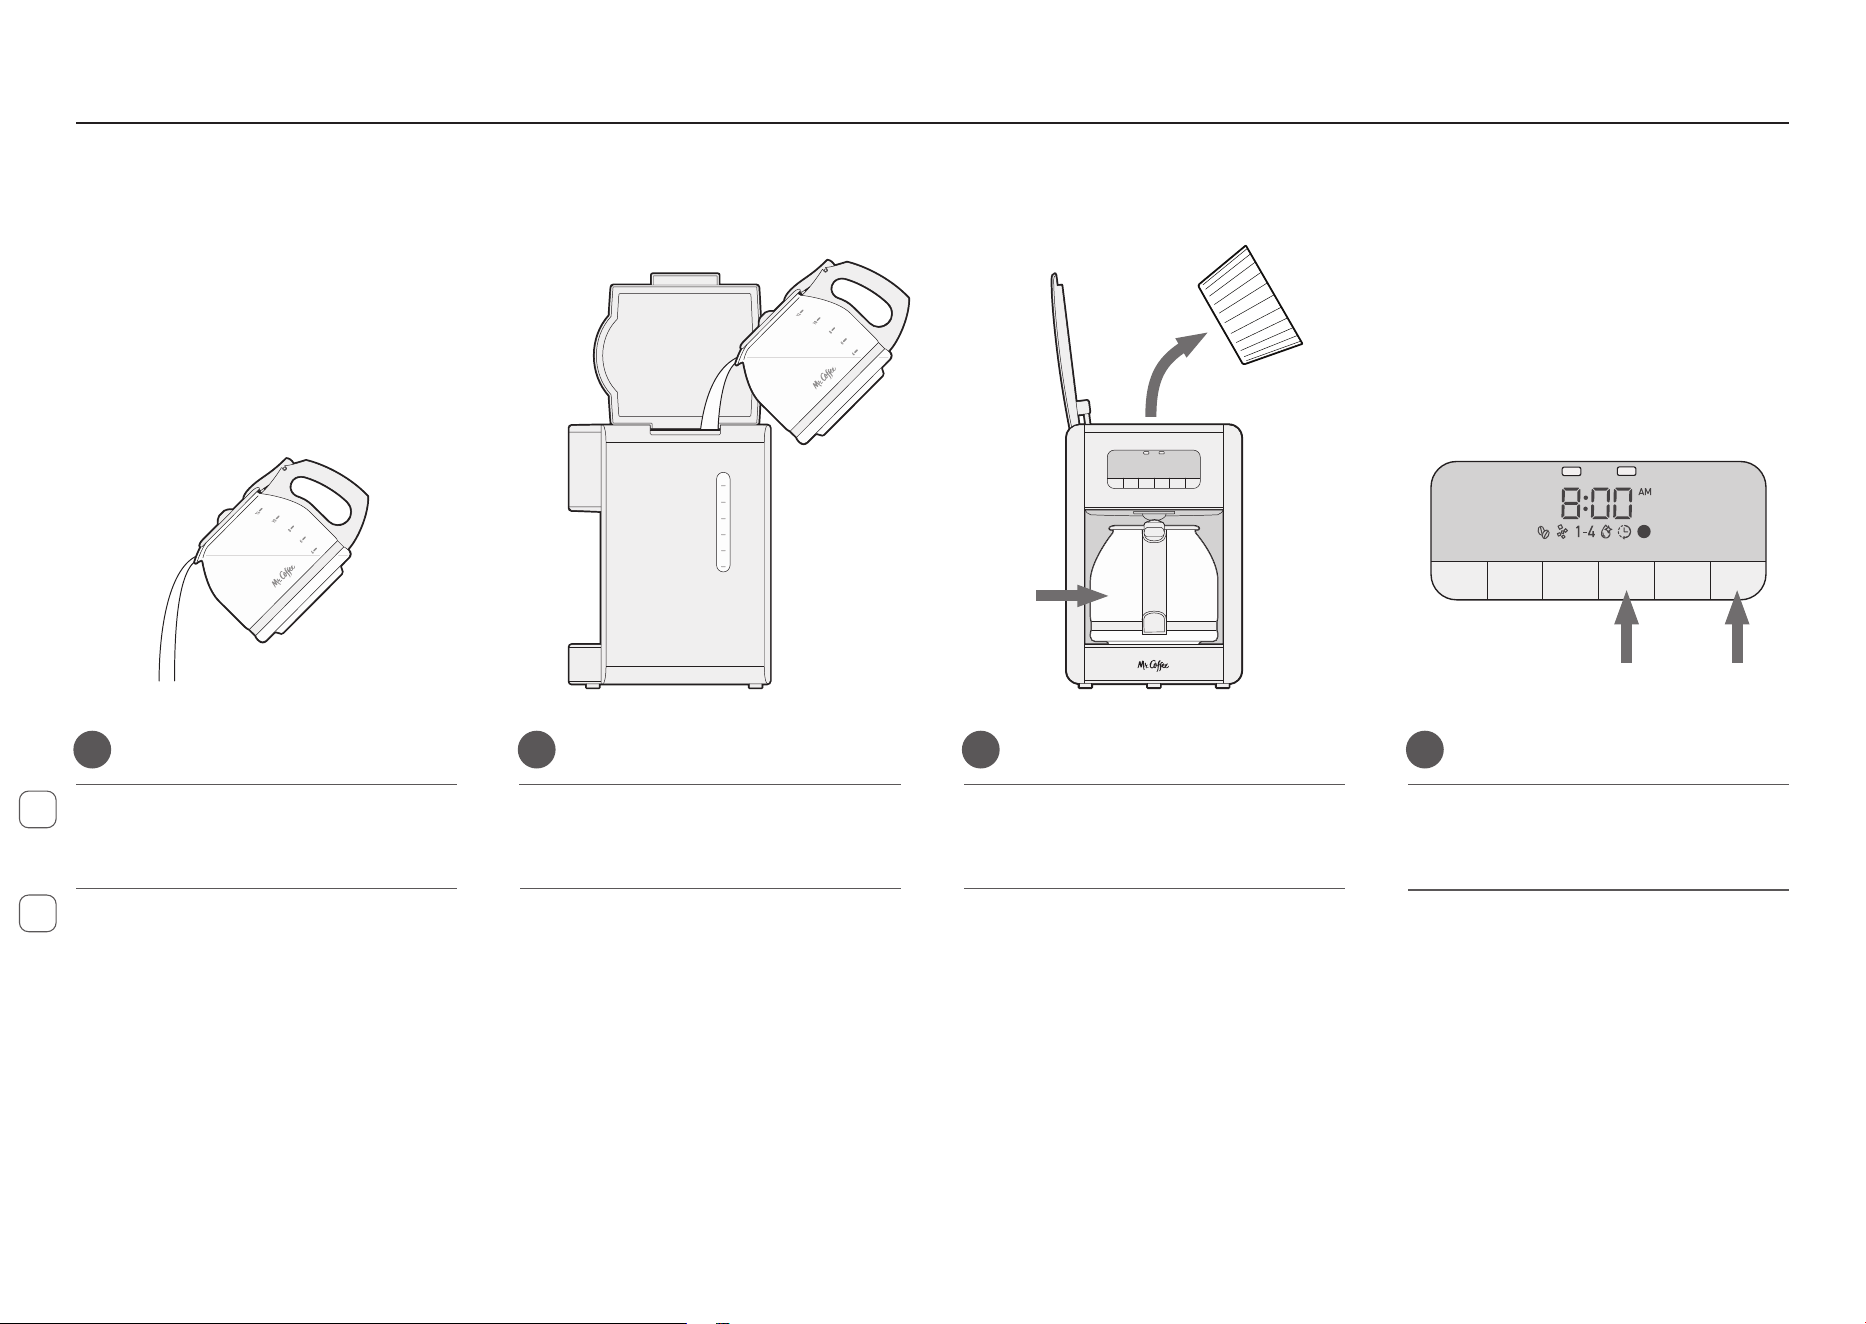
Coloque un filtro de papel nuevo en la
cesta de preparación y la jarra vacía en
la placa térmica.
2 3
TYPE OF WATER
CLEANING
FREQUENCY
Soft Water
Every 80
Brew Cycles
Hard Water
Every 40
Brew Cycles
Vierta 4 tazas o 20 onzas líquidas (592 ml)
de vinagre blanco doméstico sin diluir
en el depósito de agua.
Place a fresh paper filter in the Brew
Basket and the emptied Carafe on the
Warming Plate.
Press the CLEAN button, then press the
BREW/STOP button. The Clean Indicator
will turn off when the cycle is complete.
Pour 4 cups or 20 fl. oz. / 592 ml of
undiluted, white household vinegar into
the Water Reservoir.
Presione el botón CLEAN y, a continuación,
presione el botón BREW/STOP.
El indicador de limpieza se apagará
cuando el ciclo haya finalizado.
Utilizar la función de limpieza para descalcifi car su cafetera
Los minerales (calcio/caliza) pueden
acumularse en el interior de su
cafetera y afectar el rendimiento.
NOTA: limpie con vinagre cada 30 días.
TIPO DE AGUA
FRECUENCIA DE
LIMPIEZA
Agua blanda
Cada 80
ciclos de preparación
Agua dura
Cada 40
ciclos de preparación
BREW/
STOP
BREW
LATER
CLEAN1-4 CUPSICEDSTRONG
MIN
HR
17
EN
ES
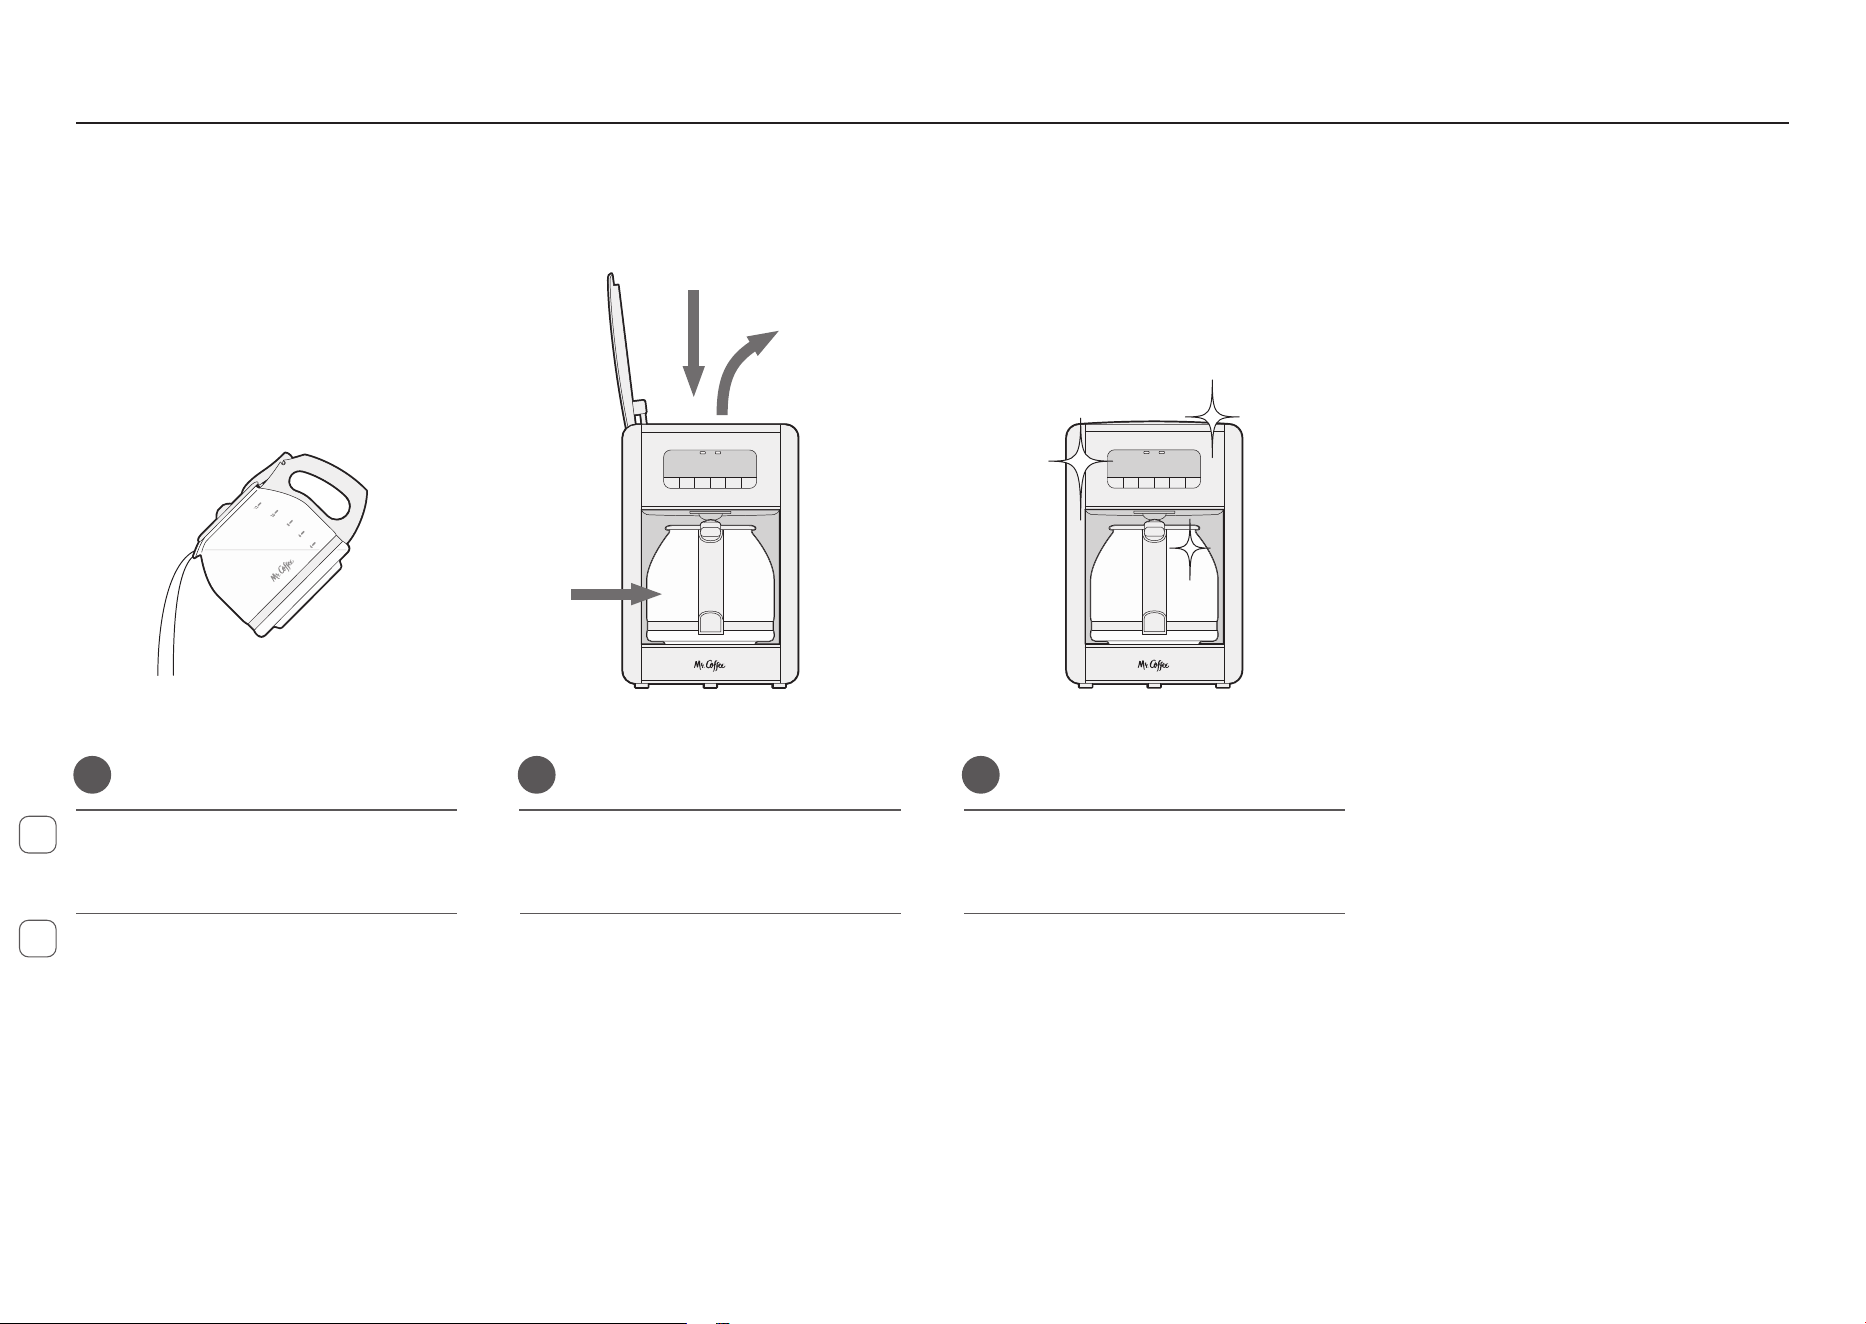
Vierta la solución de limpieza y enjuague
la jarra.
4 5 6
Fill the Water Reservoir with 12 cups of
clean, fresh water.
Pour out the cleaning solution and
rinse the Carafe.
Remove and discard the paper filter used
during the cleaning cycle, and place the
empty Carafe on the Warming Plate.
Llene el depósito de agua con 12 tazas
de agua potable limpia.
Retire y deseche el filtro de papel
utilizado durante el ciclo de limpieza,
y coloque la jarra vacía sobre la placa
térmica.
Using the Clean Function to Decalcify Your Coffeemaker
Utilizar la función de limpieza para descalcifi car su cafetera
7
Press the CLEAN button, then press the
BREW/STOP button. The Clean Indicator
will turn off when the cycle is complete.
Presione el botón CLEAN y, a continuación,
presione el botón BREW/STOP.
El indicador de limpieza se apagará
cuando el ciclo haya finalizado.
BREW/
STOP
BREW
LATER
CLEAN1-4 CUPSICEDSTRONG
MIN
HR
2
4
6
8
10
12
MAX
ICED
MAX
HOT
18
EN
ES
8
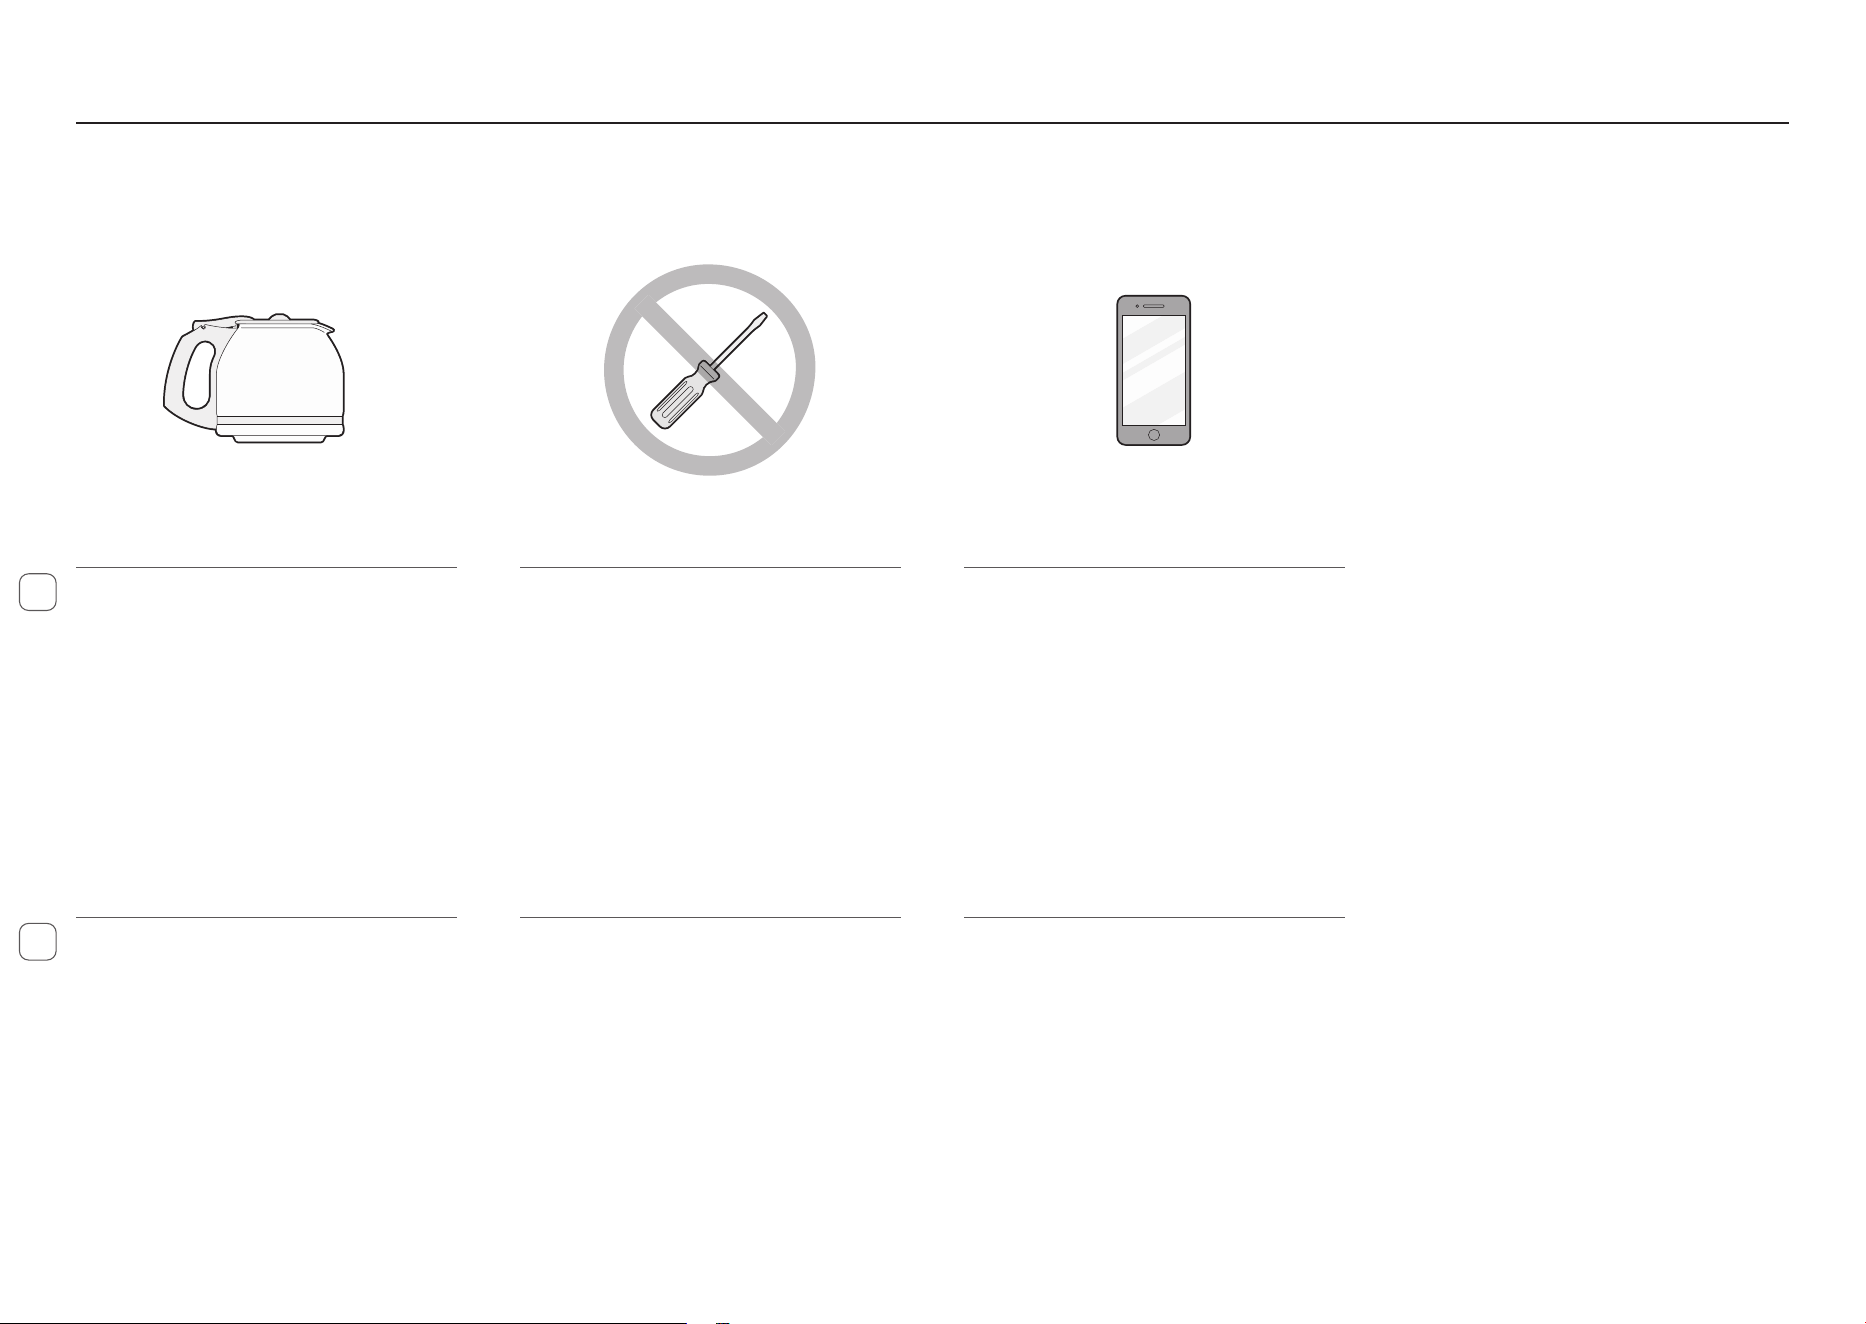
Repeat steps 5–8 one more time.
Repita los pasos 5 a 8 una vez más.
9 10
Discard the water and rinse the Carafe
thoroughly with clean water.
Your Coffeemaker is now clean and
ready to brew the next pot of delicious
coffee!
Deseche el agua y enjuague muy bien la
jarra con agua limpia.
¡Su cafetera ya está limpia y lista para
preparar la próxima jarra de delicioso
café!
Using the Clean Function to Decalcify Your Coffeemaker
Utilizar la función de limpieza para descalcifi car su cafetera
19
Mantenimiento y cuidado
Maintenance & Care
EN
ES
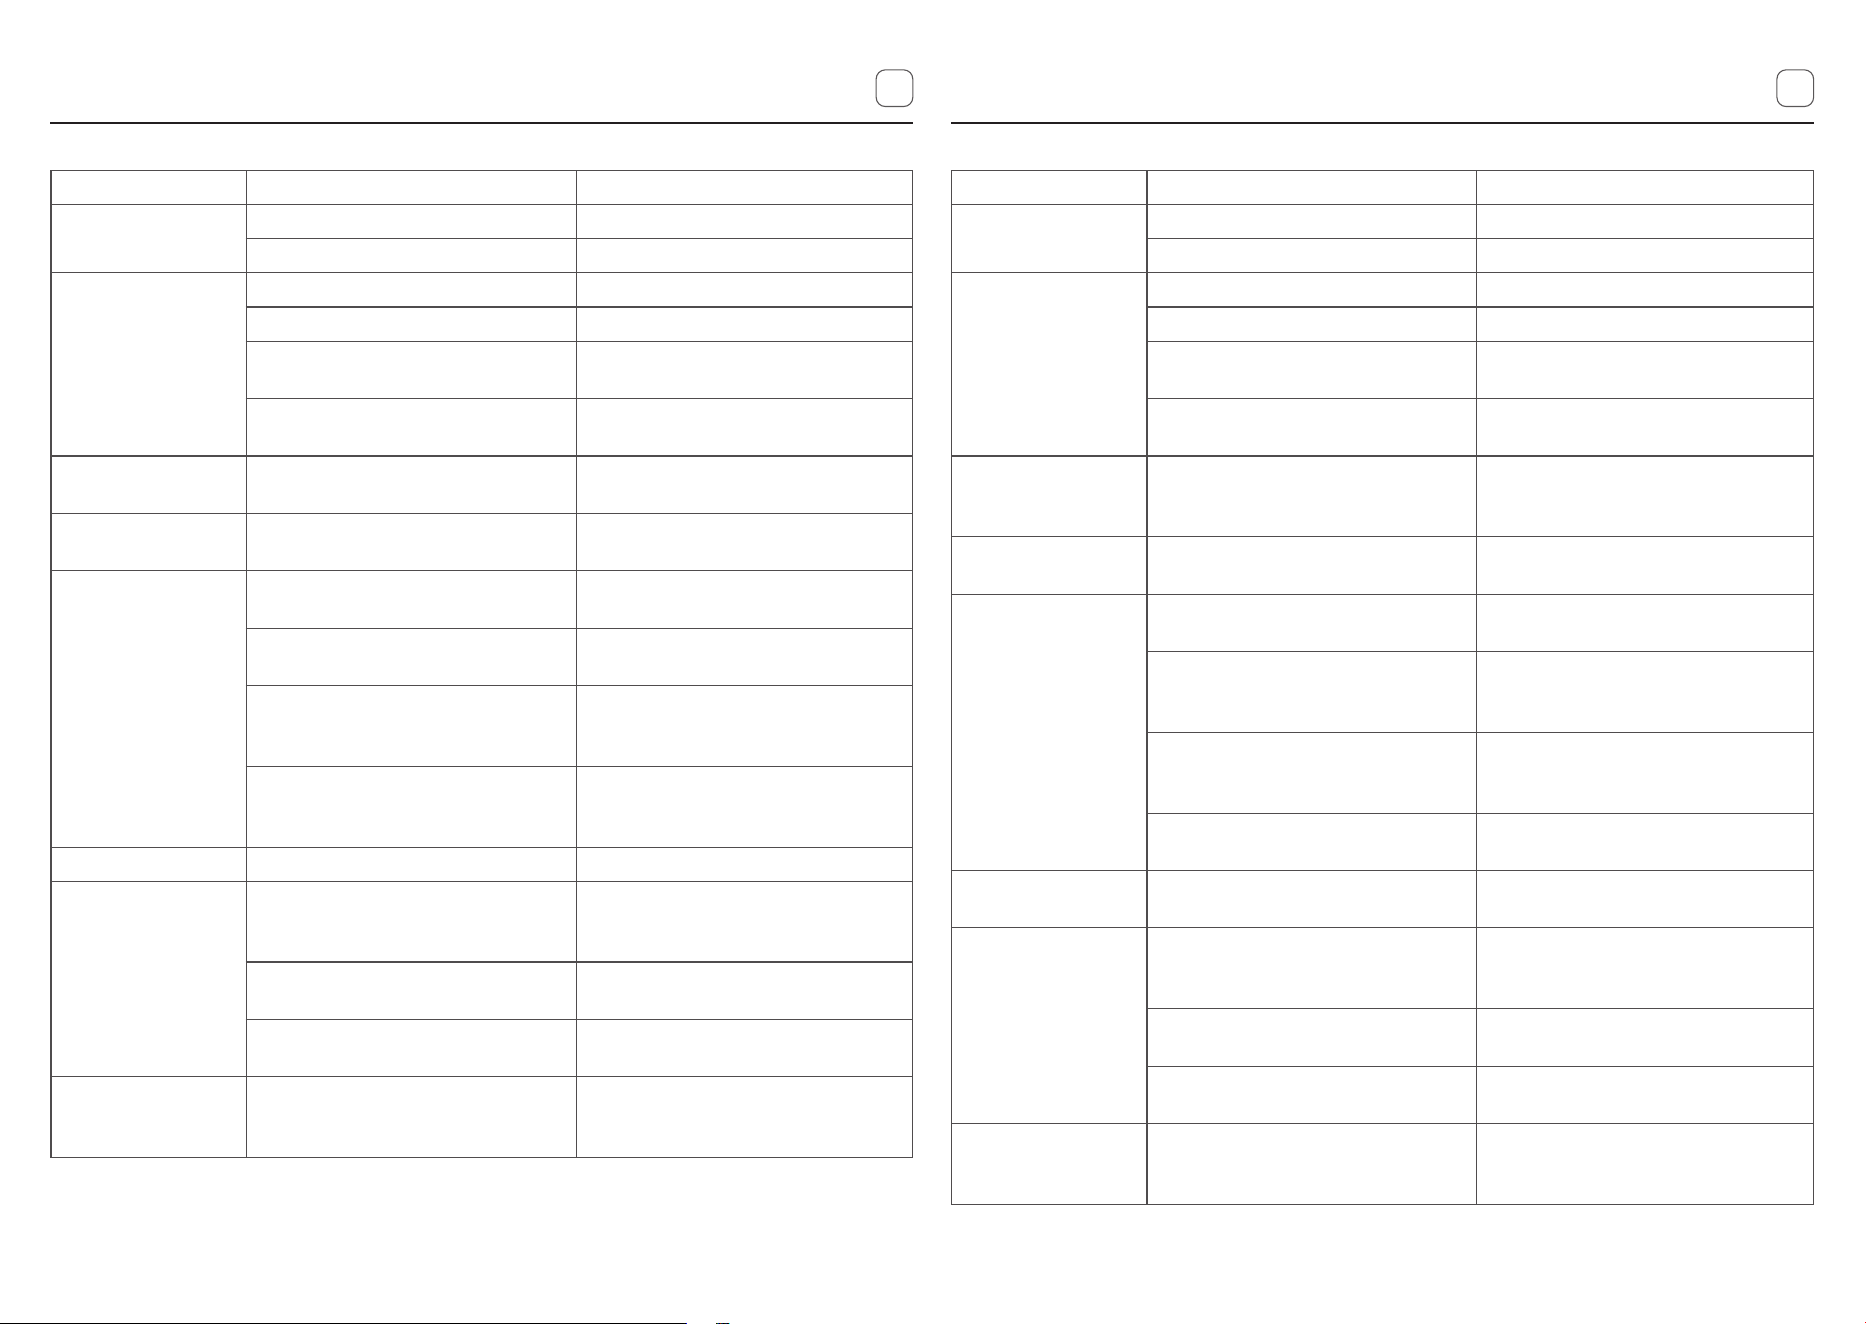
USO Y CUIDADO DE LA JARRA
Para reducir o eliminar el riesgo de
rotura de la jarra de vidrio:
• Deseche la jarra de inmediato si
presenta alguna grieta.
• Proteja la jarra de golpes fuertes,
rayones o manipulación brusca.
• No utilice limpiadores abrasivos
fuertes que puedan rayar la jarra.
• Los rayones pueden provocar la
rotura de la jarra.
USER MAINTENANCE
This appliance has no user serviceable
parts. Any servicing beyond that
described in the Cleaning Section
should be performed by an Authorized
Service Representative only. See
warranty available online.
SERVICE MAINTENANCE AND
WARRANTY
Service Maintenance and Warranty can
be found online at:
www.mrcoffee.com
or call us toll-free at the
Consumer Service Department:
1-800-MR COFFEE (1-800-672-6333).
SERVICIO, MANTENIMIENTO Y
GARANTÍA
La información sobre servicio,
mantenimiento y garantía se
encuentra en línea en:
www.mrcoffee.com
o llámenos a nuestra línea gratuita al
Departamento de Atención al
Consumidor:
1-800-MR COFFEE (1-800-672-6333).
CARAFE USE AND CARE
To reduce or eliminate the chance of
breaking the glass Carafe:
• Discard the Carafe immediately if it
is ever cracked.
• Protect the Carafe from sharp
blows, scratches or rough handling.
• Do not use harsh abrasive cleaners
that may scratch the Carafe.
• Scratches may cause the Carafe to
break.
MANTENIMIENTO DEL USUARIO
Este aparato no contiene piezas que
el usuario pueda reparar. Cualquier
servicio técnico que exceda lo descrito
en la sección de Limpieza debe
ser realizado únicamente por un
representante de servicio autorizado.
Consulte la garantía disponible en
línea.
20
Solución de problemas de su cafetera . Troubleshooting Your Coffeemaker
EN ES
Consejo Posible causa Solución
La luz de encendido
no se ilumina.
El aparato está desenchufado. Enchúfelo.
Hay un corte de luz. Espere a que se restablezca la energía.
El café no se está
preparando.
El aparato está desenchufado. Enchúfelo.
Hay un corte de luz. Espere a que se restablezca la energía.
No hay agua en el depósito de agua.
Llene el depósito de agua por encima
de la marca del nivel mínimo.
La cesta de preparación no está
insertada correctamente.
Inserte correctamente la cesta de
preparación.
La cafetera solo
hierve agua.
No hay café en la cesta de filtrado.
Añada el filtro de papel con la
cantidad deseada de café a la cesta de
preparación.
La cafetera prepara
el café lentamente.
La cafetera necesita limpieza.
Limpie la cafetera tal como se describe
en la sección «Limpieza mensual».
La cesta del filtro se
desborda.
La cesta del filtro no está insertada
correctamente.
Inserte la cesta del filtro
correctamente.
La jarra no está colocada
completamente sobre la placa
térmica.
Coloque la jarra correctamente sobre
la placa térmica.
Se puso demasiado café molido en el
filtro.
Retire el filtro y deseche el café.
Coloque un filtro de papel nuevo.
Reinicie el proceso de preparación.
La jarra fue retirada de la placa
térmica durante más de 30 segundos.
Apague y desenchufe la unidad. Deje
que se enfríe. Limpie el derrame.
El café no está
caliente.
Hay un corte de luz. Espere a que se restablezca la energía.
El café no tiene buen
sabor.
Se utilizó café molido distinto al
recomendado para una cafetera de
goteo automático.
Utilice café molido fresco recomendado
para cafeteras de goteo automático.
La proporción entre el café molido y el
agua no era correcta.
Utilice la proporción correcta de café
y agua.
La cafetera necesita limpieza.
Limpie la cafetera tal como se describe
en la sección «Limpieza mensual».
La unidad dejó
de preparar café
repentinamente.
No hay agua en el depósito de agua.
Llene el depósito con agua potable fría
hasta el nivel deseado, hasta la línea
MAX.
Tip Possible Cause Solution
The ON light does
not light up.
The appliance is unplugged. Plug it in.
There’s a power outage. Wait for power to be restored.
The coffee is not
brewing.
The appliance is unplugged. Plug unit in.
There’s a power outage. Wait for power to be restored.
No water in the water reservoir.
Fill water reservoir above minimum
level marking.
The Brew Basket is not properly
inserted.
Insert Brew Basket correctly.
The Coffeemaker
only brews water.
There are no coffee grounds in the
Brew Basket.
Add the paper filter with the desired
amount of coffee to the Brew Basket.
The Coffeemaker
brews slowly.
The coffeemaker needs cleaning.
Clean coffeemaker as described in
“Monthly Cleaning” section.
The Brew Basket
overflows.
The Brew Basket is not properly
inserted.
Insert the Brew Basket correctly.
The Carafe is not placed all the way
on the Warming Plate.
Place the Carafe correctly on the
Warming Plate.
Too many coffee grounds were placed
in the filter.
Remove filter and discard grounds.
Replace paper filter. Begin brewing
process again.
The Carafe was removed from the
Warming Plate for more than 30
seconds.
Turn off and unplug the unit. Allow to
cool. Wipe up the spill.
The coffee is not hot. There’s a power outage. Wait for power to be restored.
The coffee tastes
bad.
Coffee grounds other than for an
automatic drip coffeemaker were
used.
Use fresh coffee grounds
recommended for automatic drip
coffeemakers.
The ground coffee-to-water ratio was
unbalanced.
Use the correct coffee-to-water ratio.
The Coffeemaker needs cleaning.
Clean Coffeemaker as described in
“Monthly Cleaning” section.
The unit suddenly
stopped brewing.
There is no water in the Water
Reservoir.
Fill the Water Reservoir with the fresh
cold water to the desired water level,
up to the MAX line.