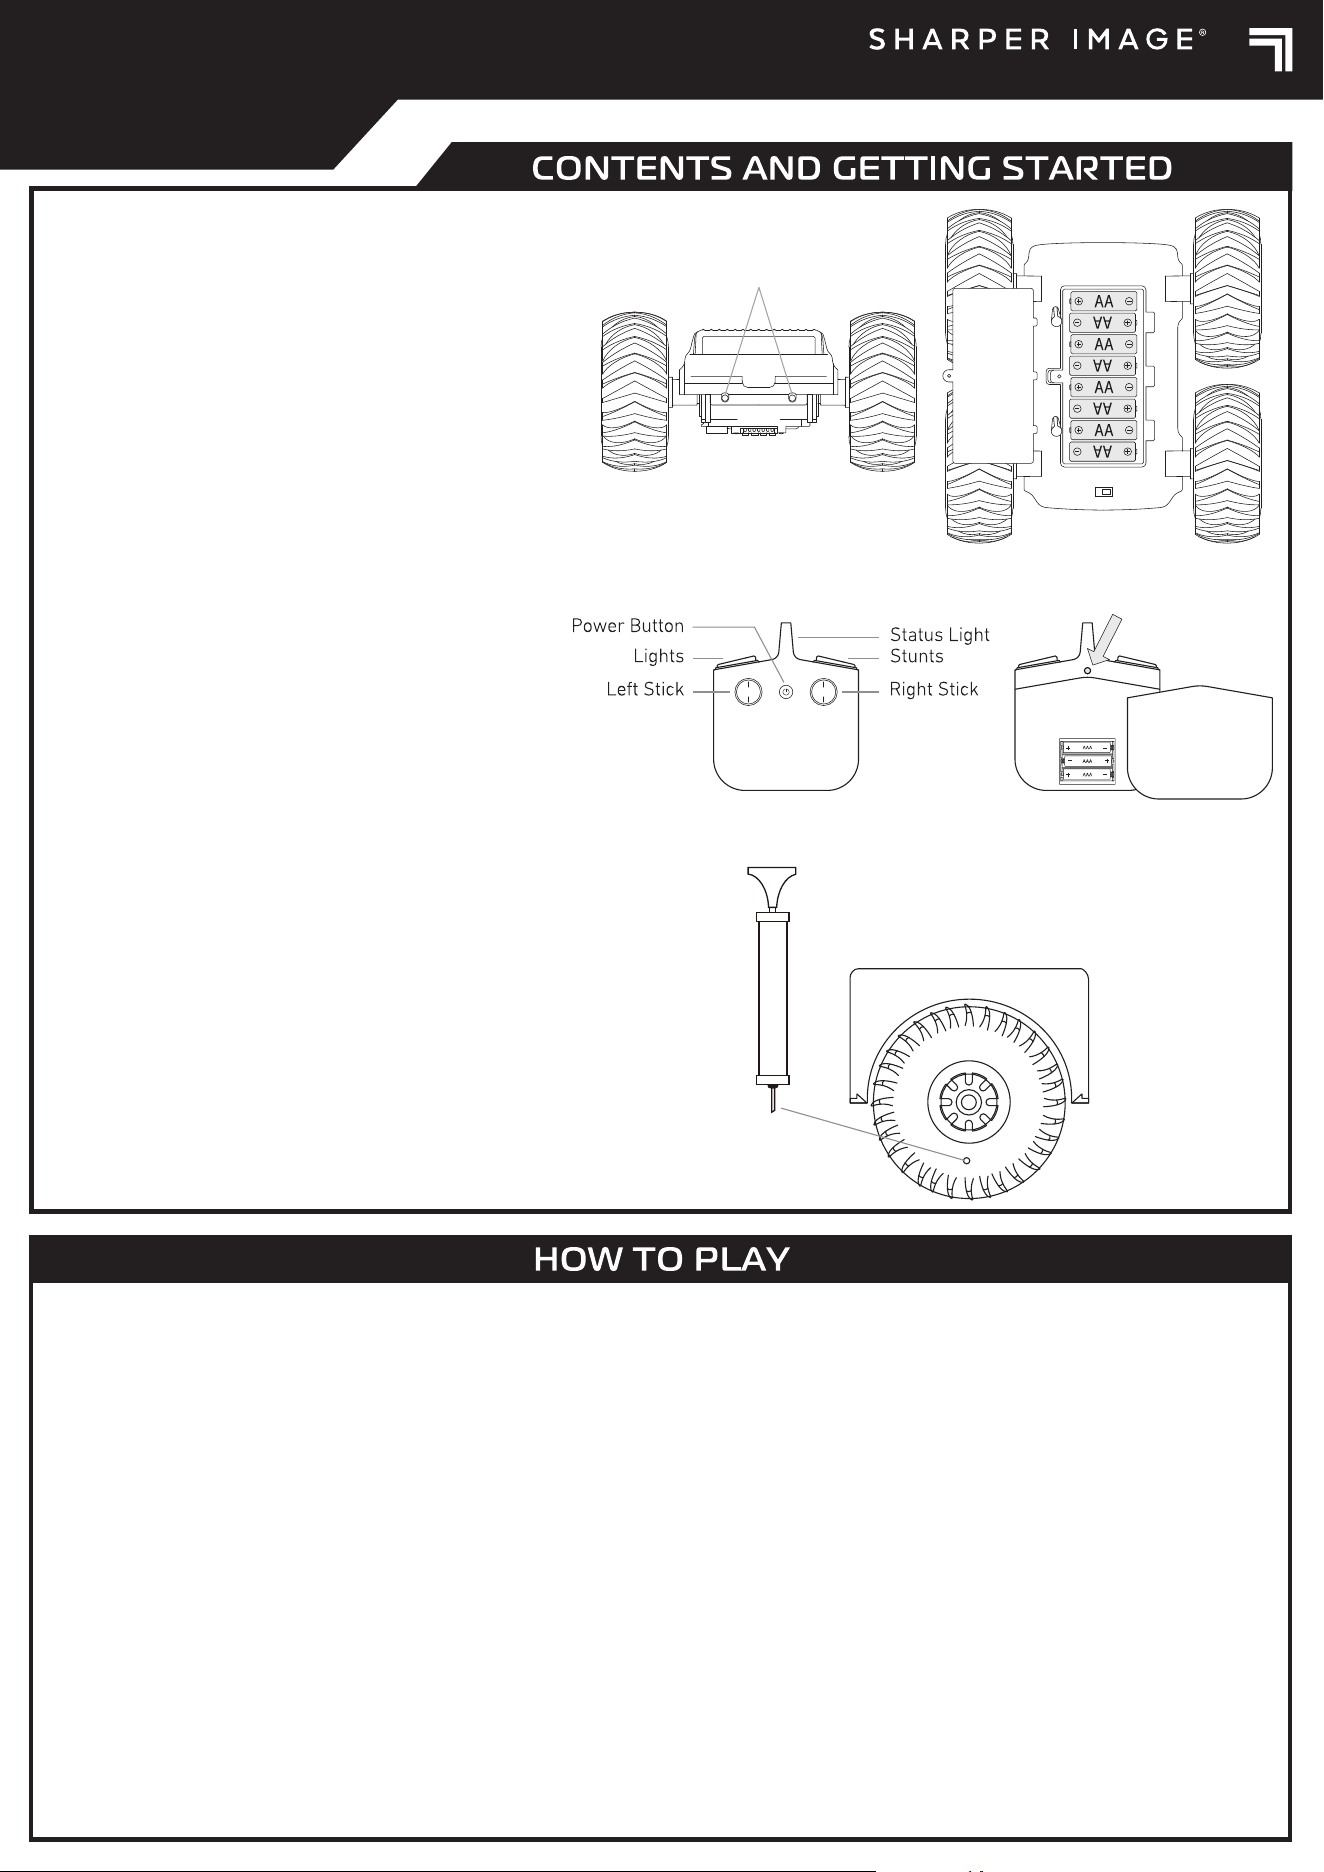
Vehicle
1. Make sure the power switch on the bottom of the vehicle is on
the o position.
2. Use a Phillips-head screwdriver to release the screw on the
battery cover and turn the lockers then remove the battery cover.
3. Insert 8 AA 1.5V batteries (not included) into the battery
compartment according to the battery diagram.
4. Replace the battery cover and securely tighten the screw.
5. Use the tire pump (included) to inflate the inflatable tires.
Remote control
1. Use a tool to press and hold the battery cover release on the
back of the remote control and then slide down the battery cover.
2. Insert 3 AAA 1.5V batteries (not included) into the battery
compartment according to the battery diagram.
3. Slide the battery cover back into place securely.
Tires
IMPORTANT: Adult supervision required. Keep tire pump and
inflation needle out of reach of children when they are not being
supervised by an adult.
1. Insert the inflation needle into the inflation hole in a tire.
2. Inflate the tire until it is the same size as the diagram on the tire
measure card.
3. Repeat steps 3 and 4 for the remaining tires.
IMPORTANT: Do not overinflate the tires. If the tire is overinflated,
remove the needle from the pump and insert it into the air hole to
release some air until it is the same size as the measure card.
Never drive the vehicle with overinflated or underinflated tires. The
tires may deflate during shipping or when stored and will
periodically require inflation. Save the tire measure card in a safe
place for future reference.
BOUNCE BRAWLER
6+
1 Bounce Brawler
1 Remote Control
1 Tire Pump
1 Tire Measure Card
Contents
Getting Started
Power and Pairing
1. Make sure both the remote control and vehicle are powered o.
2. Press the power button on the remote control to power on the remote control. The status light will glow and begin fading on and o to indicate the remote
control is in pairing mode and ready to pair with the vehicle.
3. Slide the switch on the bottom of the vehicle to the on position to power on the vehicle. The rear lights will glow and begin fading on and o to indicate the
vehicle is in pairing mode. The vehicle will automatically pair with the remote control.
4. Wait for the status light on the remote control to quit fading on and o. It will stay solidly lit when pairing is successful.
5. If pairing is unsuccessful within 60 seconds, power o both the remote control and vehicle and then repeat steps 2 through 4.
6. Start driving!
7. If pairing is interrupted or out of range, the remote control and vehicle will both enter pairing mode and attempt to reconnect. Move the remote control and
vehicle closer together. If pairing is unsuccessful within 60 seconds, power o both the remote control and vehicle and then repeat steps 2 through 4.
8. When finished driving, press the power button on the remote control to power o the remote control and flip the switch on the bottom of the vehicle to the o
position to power o the vehicle.
Note: To save battery life, the remote control and vehicle automatically enter sleep mode after 5 minutes of inactivity. To wake from sleep mode, power o and
then power on the remote control and vehicle.
IMPORTANT: If the vehicle stops suddenly while there is beep sound, power o the vehicle and wait at least 30 minutes for the battery to cool before continuing
to drive.
Multiple Drivers
The remote control connects to the vehicle using 2.4GHz digital channel selection that allows up to 16 drivers to race side by side in the same wireless range
without interference. Pair each vehicle and remote separately.
LED Lights
Battery Cover
Release Button
OFFON
BOUNCE BRAWLER
6+
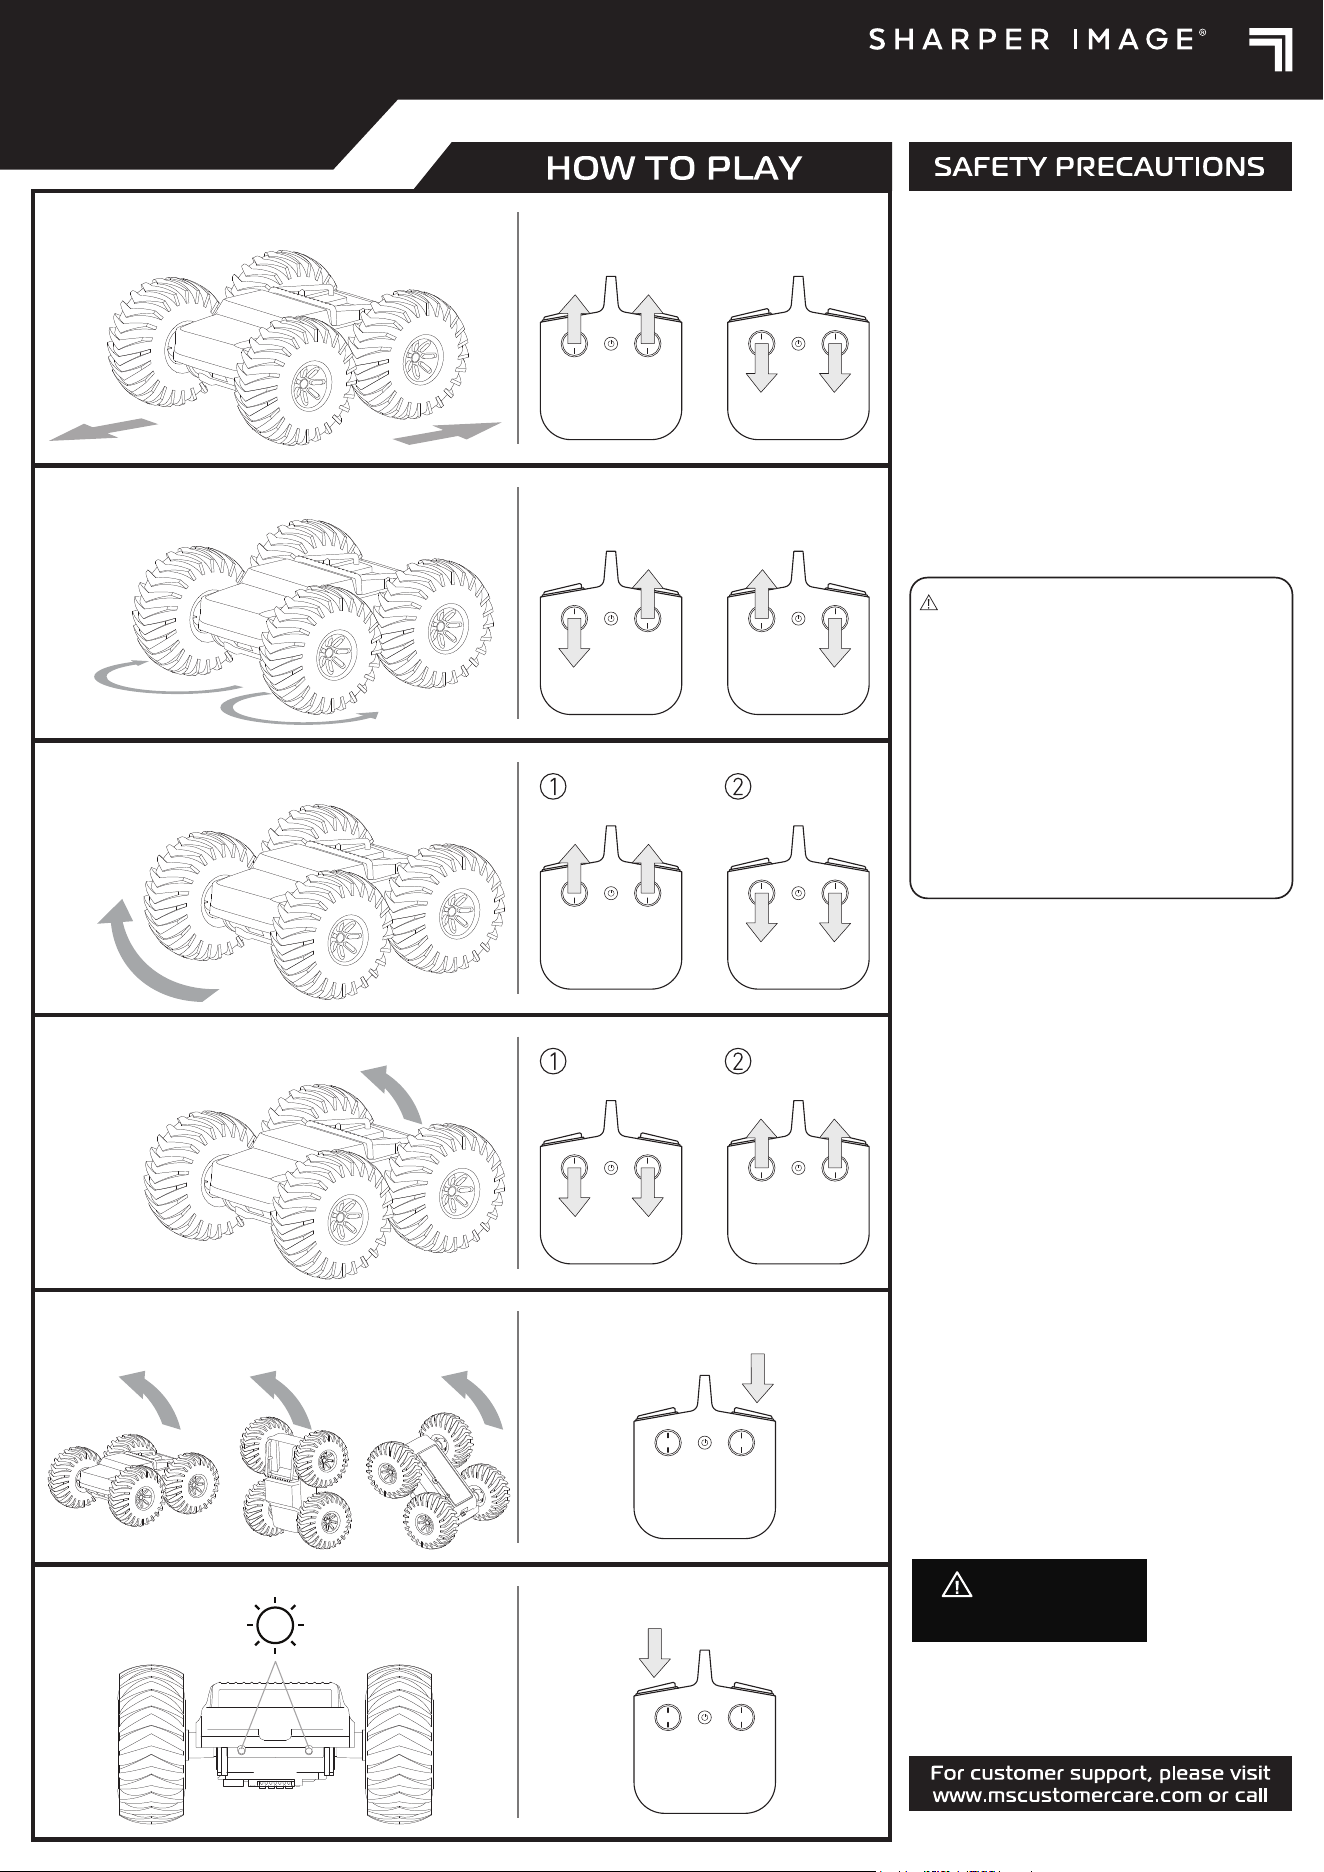
Drive forwards and then reverse quickly.
Forward or Reverse
Left or Right Spin
Back Flip
Auto Stunt
Lights
Front Flip
This device complies with Part 15 of the FCC Rules. Operation is
subject to the following two conditions: (1) this device may not
cause harmful interference, and (2) this device must accept any
interference received, including interference that may cause
undesired operation.
Note: This equipment has been tested and found to comply with
the limits for a Class B digital device, pursuant to Part 15 of the
FCC Rules. These limits are designed to provide reasonable
protection against harmful interference in a residential
installation. This equipment generates, uses and can radiate
radio frequency energy and, if not installed and used in
accordance with the instructions, may cause harmful
interference to radio communications.
However, there is no guarantee that interference will not occur
in a particular installation. If this equipment does cause
harmful interference to radio or television reception, which can
be determined by turning the equipment o and on, the user is
encouraged to try to correct the interference by one or more of
the following measures:
— Reorient or relocate the receiving antenna.
— Increase the separation between the equipment and
receiver.
— Connect the equipment into an outlet on a circuit dierent
from that to which the receiver is connected.
— Consult the dealer or an experienced radio/TV technician for
help.
Warning: Changes or modifications to this unit not expressly
approved by the party responsible for compliance could void
the user's authority to operate the equipment.
Sharper Image® name and logos (including the 77 logo) are
trademarks or registered trademarks. Distributed by and © 2025
MerchSource, LLC. Irvine, CA 92618. All rights reserved.
Model No.: 1020185
• Adult supervision is recommended when operating the
vehicle.
• Always drive responsibly and make sure driving paths are
clear. Never drive towards or in close proximity to people or
animals. Never drive on streets or roadways to avoid trac
hazards.
• Keep fingers, hair, and loose clothing away from tires and all
moving parts while the vehicle is in motion.
• Avoid exposing the vehicle and remote control to water. Avoid
driving through water. Never drive outdoors in rain or snow.
Never leave the vehicle or remote control outdoors overnight.
• Do not expose the vehicle or remote control to extreme
temperatures.
• Do not leave the vehicle or remote control near sources of
heat or under direct sunlight for extended periods.
• Do not sit, step, stand, or place objects on the vehicle. It is not
designed to support extra weight.
• Do not disassemble or modify the vehicle or remote control.
• Thoroughly inspect the vehicle and remote control before
every use. If the vehicle or remote control appears worn,
frayed, splintered, cracked, or broken in any manner,
discontinue use and discard immediately.
ALKALINE BATTERY WARNINGS
• Do not mix old and new batteries.
• Do not mix alkaline, standard (carbon-zinc), or
rechargeable batteries.
• Alkaline batteries are recommended. Use only the
specified voltage.
• Insert batteries using the correct polarity. Always use,
replace, and recharge (if applicable) batteries under adult
supervision.
• Do not attempt to charge non-rechargeable batteries.
• Do not short-circuit the battery supply terminals.
• Do not dispose of batteries in fire: batteries may explode
or leak.
• Remove batteries before storing.
• Recycle or dispose of batteries according to federal, state,
and local laws.
• Keep these instructions for future reference.
Printed in China
WARNING:
CHOKING HAZARD –
Small Parts.
Not for children under 3 years of age.
Forward Reverse
Left Spin Right Spin
Reverse and then drive forward quickly.
1-800-374-2744
KEEP THIS INSTRUCTION MANUAL AS IT CONTAINS IMPORTANT
INFORMATION FOR FUTURE REFERENCE.
Due to continuous product improvements, the pictures on this
manual may dier slightly from the actual product.

