
Poly Studio X32 User Guide
SUMMARY
This guide provides task-based user information for the named product.

Legal information
Copyright and license
© 2024, 2024, HP Development Company,
L.P. The information contained herein is
subject to change without notice. The only
warranties for HP products and services are
set forth in the express warranty statements
accompanying such products and services.
Nothing herein should be construed as
constituting an additional warranty. HP shall
not be liable for technical or editorial errors
or omissions contained herein.
Trademark credits
All third-party trademarks are the property
of their respective owners.
Privacy policy
HP complies with applicable data privacy
and protection laws and regulations. HP
products and services process customer
data in a manner consistent with the HP
Privacy Policy. Please refer to
HP Privacy
Statement.
Open source software used in this product
This product contains open source
software. You may receive the open source
software from HP up to three (3) years
after the distribution date of the applicable
product or software at a charge not
greater than the cost to HP of shipping
or distributing the software to you. To
receive software information, as well as
the open source software code used in
this product, contact HP by email at

Table of contents
1About this guide.................................................................................................................................................. 1
Audience, purpose, and required skills ........................................................................................................... 1
Icons used in Poly documentation .................................................................................................................. 1
2Getting Started ................................................................................................................................................... 2
Poly Studio X32 features and capabilities....................................................................................................... 2
Poly Studio X32 hardware............................................................................................................................... 3
Poly Studio X32 system ports ......................................................................................................................... 3
Poly Studio X32 privacy cover ........................................................................................................................ 4
Locate the serial number label on your Poly Studio X32 system .................................................................... 4
Accessibility features....................................................................................................................................... 5
Users Who Are Deaf or Hard of Hearing ................................................................................................. 5
Users Who Are Blind, Have Low Vision, or Have Limited Vision............................................................. 5
Users with Limited Mobility ...................................................................................................................... 5
3Hardware installation.......................................................................................................................................... 7
What's included ............................................................................................................................................... 7
Required components ..................................................................................................................................... 7
Mounting your Poly Studio X32 system .......................................................................................................... 7
Connect monitors to the Poly Studio X32 system ........................................................................................... 7
Connect the system to your network............................................................................................................... 8
Connecting a system controller....................................................................................................................... 9
Connecting Poly TC10 or Poly TC8 as a system controller ..................................................................... 9
Connecting a Poly Bluetooth remote control to the system ..................................................................... 9
Powering the system on and off...................................................................................................................... 9
4System setup.................................................................................................................................................... 10
Set up your system using a Poly touch controller ......................................................................................... 10
Complete setup with the system web interface............................................................................................. 11
Configuring your system ............................................................................................................................... 13
Access the system web interface........................................................................................................... 13
Registering the system with Poly Lens .................................................................................................. 13
5Using the system.............................................................................................................................................. 14
iii

LED status indicators for Poly Studio X32 systems ...................................................................................... 14
Navigating the Poly Studio X32 system interface ......................................................................................... 14
Using Device Mode ....................................................................................................................................... 15
6System Maintenance........................................................................................................................................ 16
Locate the system IP address using the system monitor and a USB mouse................................................ 16
Locate the system IP address using a paired Poly touch controller.............................................................. 16
Factory restore the system............................................................................................................................ 16
Reset System Settings.................................................................................................................................. 17
Restart the System........................................................................................................................................ 18
Updating the system software....................................................................................................................... 19
Automatically Update Software.............................................................................................................. 19
Manually Update Software..................................................................................................................... 19
Update your system using a USB flash drive......................................................................................... 19
7Getting help ...................................................................................................................................................... 21
HP Inc. addresses......................................................................................................................................... 21
Document information ................................................................................................................................... 22
iv
About this guide1
This guide describes how to use the Poly Studio X32 system.
Audience, purpose, and required skills
This guide is intended for beginning users, as well as intermediate and advanced users, who want to
learn more about the features available with the Poly Studio X32 system.
Icons used in Poly documentation
This section describes the icons used in Poly Documentation and what they mean.
WARNING! Indicates a hazardous situation that, if not avoided, could result in serious injury or
death.
CAUTION: Indicates a hazardous situation that, if not avoided, could result in minor or moderate
injury.
IMPORTANT: Indicates information considered important but not hazard-related (for example,
messages related to property damage). Warns the user that failure to follow a procedure exactly as
described could result in loss of data or in damage to hardware or software. Also contains essential
information to explain a concept or to complete a task.
NOTE: Contains additional information to emphasize or supplement important points of the main
text.
TIP: Provides helpful hints for completing a task.
About this guide
1

Getting Started2
This user guide provides information on hardware installation, set up, and connecting peripherals to
the Poly Studio X32 system.
The Poly Studio X32 system enables you to set up a small video conferencing room with flexibility and
options depending on the type of facility.
For more information on configuring specific system settings, review the Poly Video Mode
Administrator Guide.
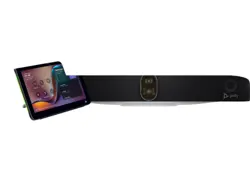
Poly Studio X32 features and capabilities
Poly Studio X32 video bars support the following features.
● All-in-one collaboration system for small conference rooms
● Video conferencing apps built in—no need for a separate PC, laptop, or video conferencing
system
● 4K, 20 megapixels, 120°, 5× zoom camera
● Poly DirectorAI smart camera framing technology
● Beamforming microphone array and dual speakers
● Poly NoiseBlockAI removes distracting noises and reverberation
● 2× HDMI output for dual display support
● Content sharing using HDMI
Wireless content sharing using AirPlay or Miracast (Poly Video mode)
● Display clamp included (other mounting options are available, including wall mount and table
mount)
You can mount a Poly Studio X32 video bar above or below a display and power the system with
PoE++ (65W). For information on mounting your Poly Studio X32, refer to the Poly Studio X32
Quick Start Guide.
2
Chapter 2Getting Started
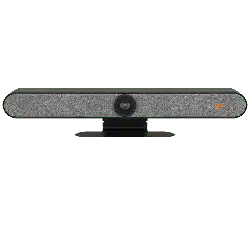
Poly Studio X32 hardware
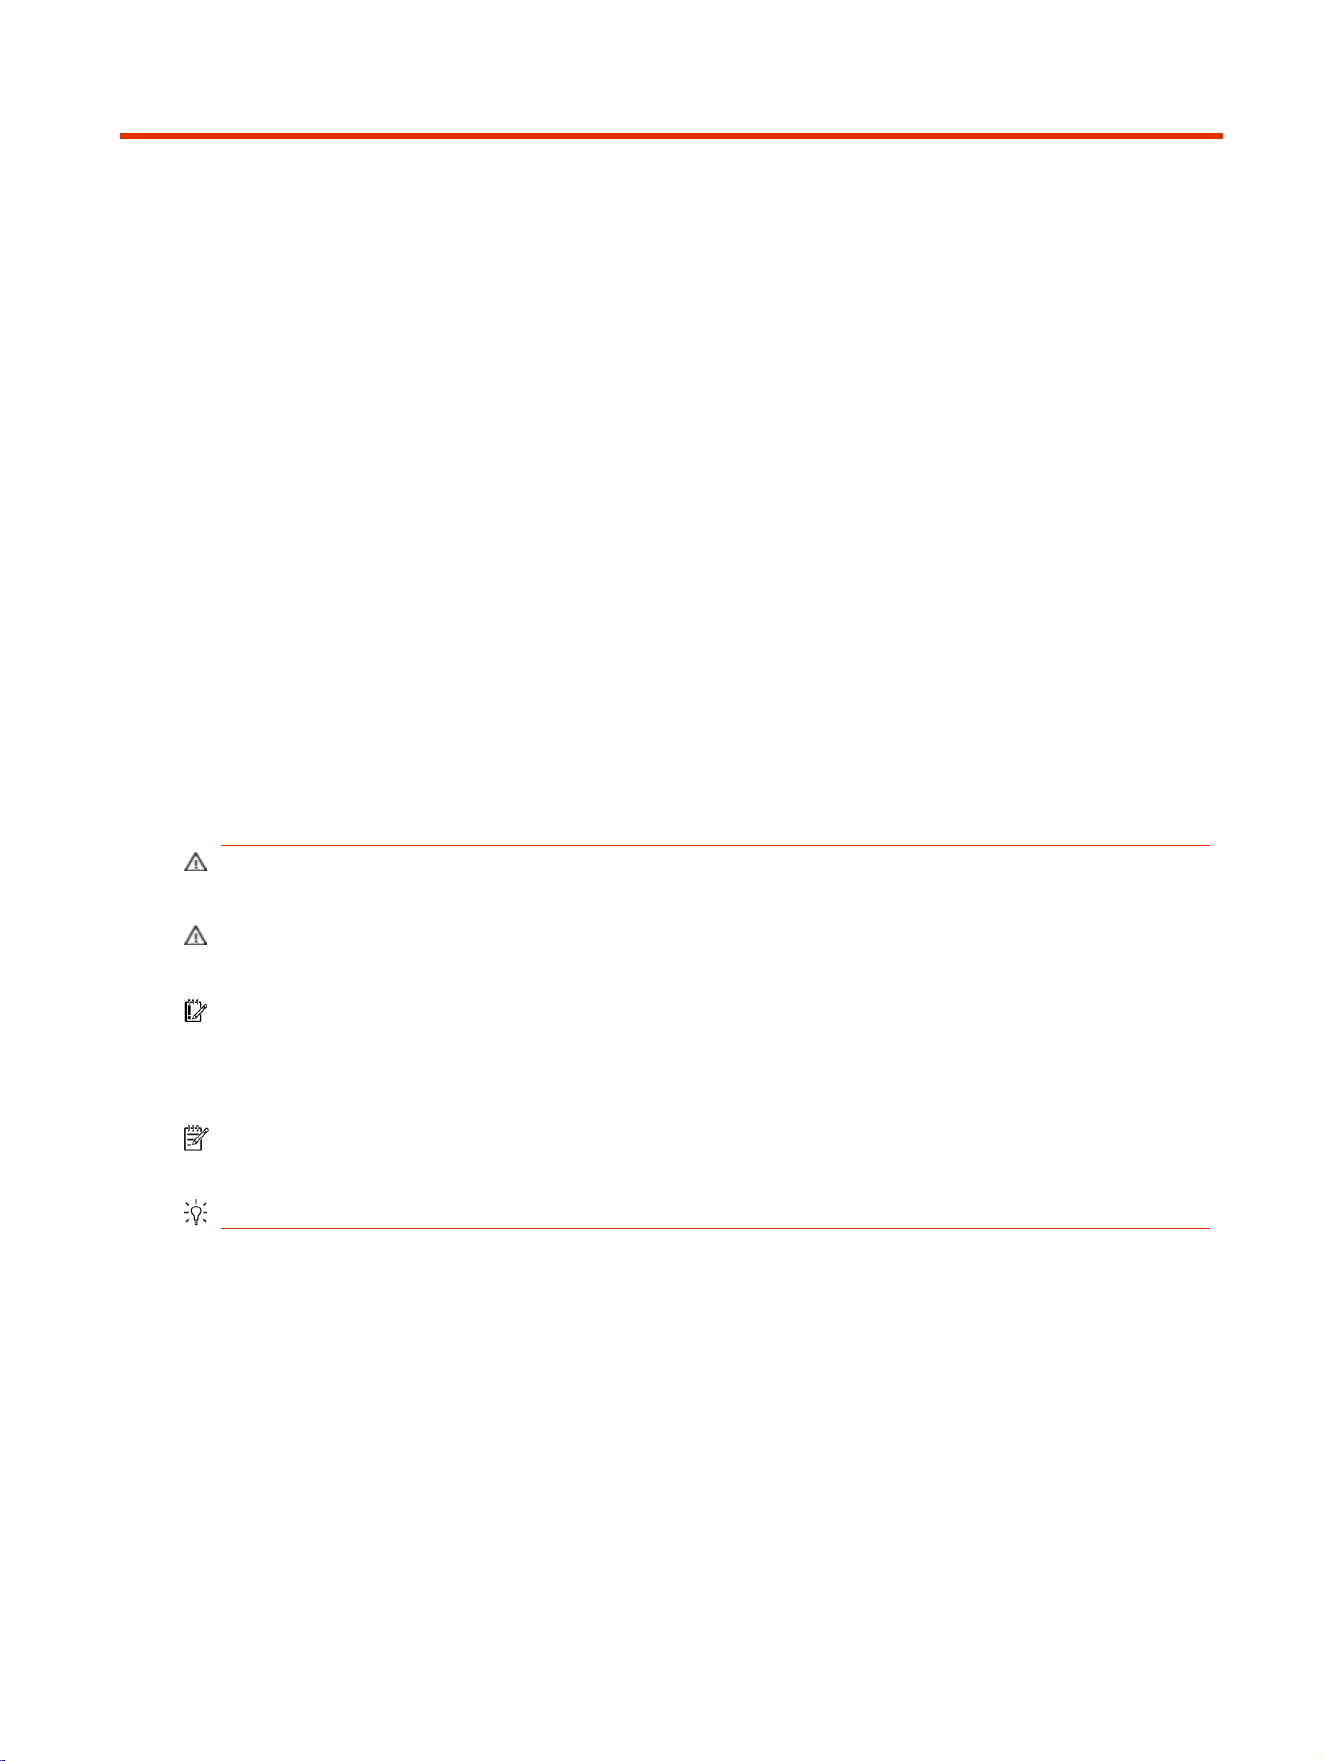
The following figure displays the hardware features on the Poly Studio X32 system. The table lists
each feature numbered in the figure.
Table 2-1 Poly Studio X32 feature descriptions
Ref. Number Feature Feature Description
1 Speakers Dual speaker audio output
2 Microphones Microphone array that captures audio
3 Camera Camera with a privacy cover that you can place over the
camera lens to protect your privacy
4 LED Indicates the system status
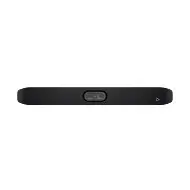
Poly Studio X32 system ports
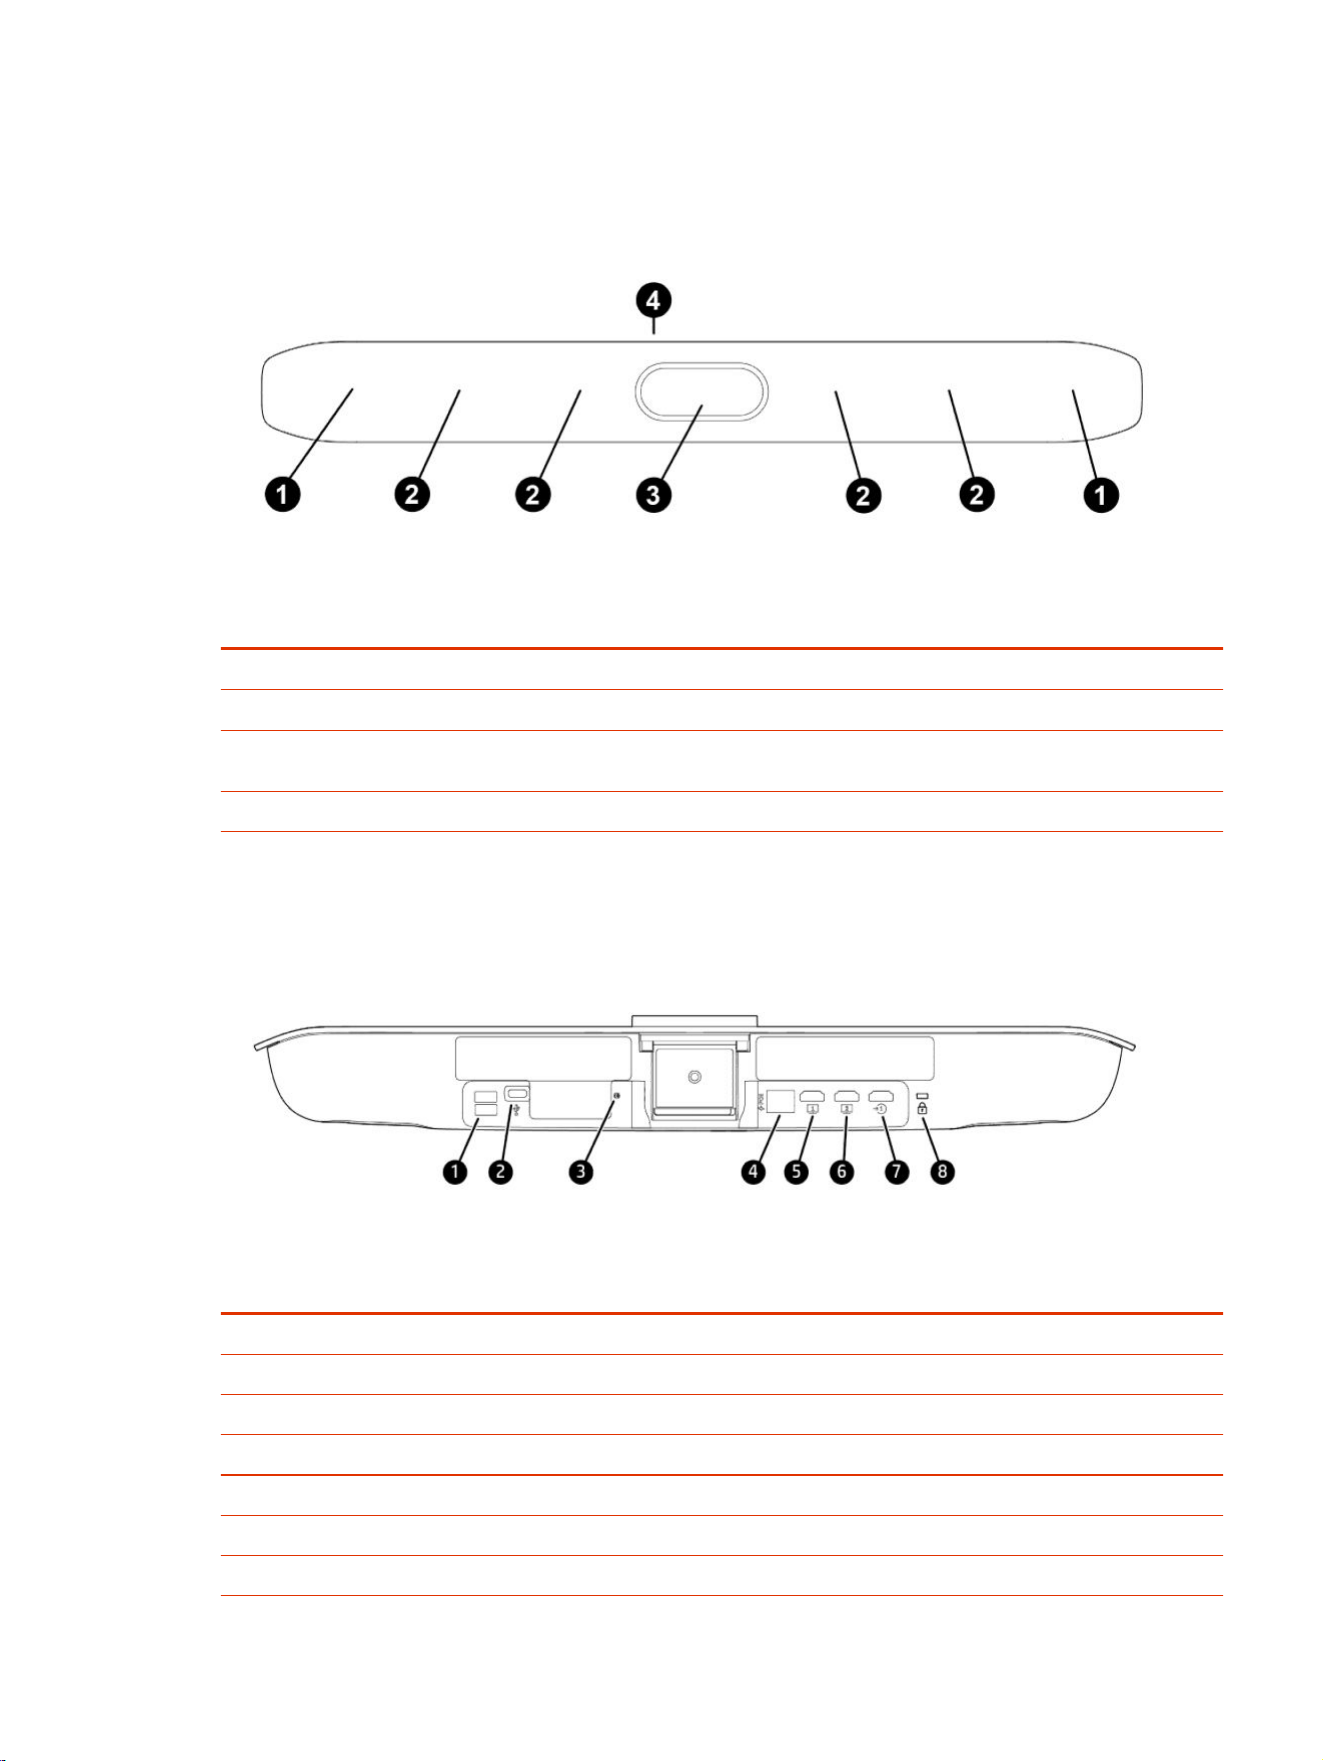
The following illustration and table explain the ports on your Poly Studio X32 system.
Table 2-2
Poly Studio X32 system port descriptions
Ref. number Port description
1 2× USB Type-A ports for accessories
2 USB Type-C port for Poly Device Mode
3 Pinhole reset
4 LAN connection and system power using PoE++ (65W)
5 HDMI output for the primary display
6 HDMI output for the secondary display
7 HDMI input for Poly Device Mode and content sharing
Poly Studio X32 hardware 3

Table 2-2 Poly Studio X32 system port descriptions (continued)
Ref. number Port description
8 Security lock
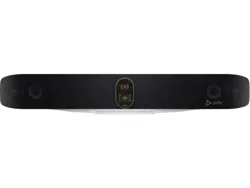
Poly Studio X32 privacy cover
Poly Studio X32 includes a physical cover that you can place over the camera lens to protect your
privacy.
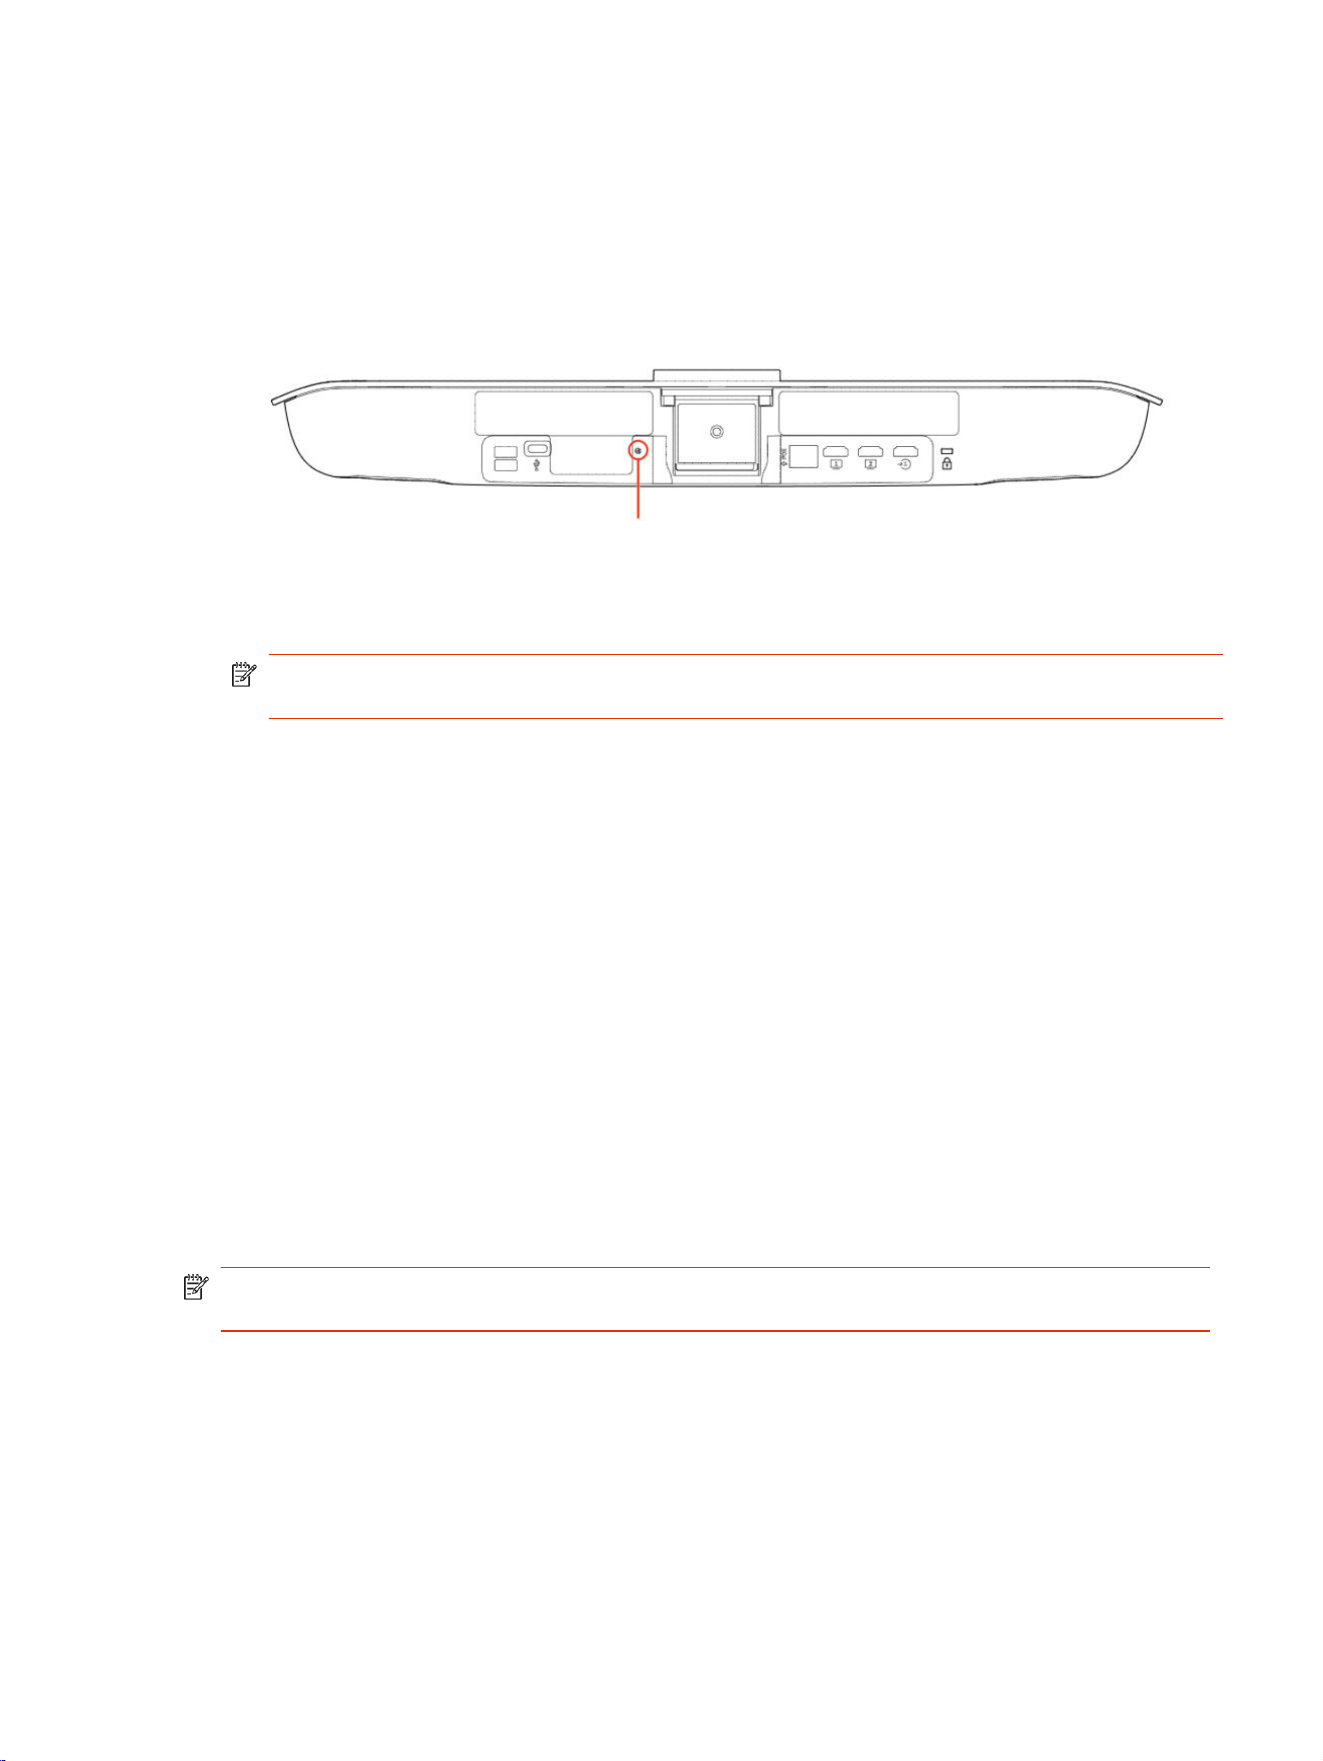
Locate the serial number label on your Poly Studio X32
system
Find your system serial number located on the system label.
1. Find the serial number tag as shown in the following illustration:
2. Write down the entire serial number. The serial number is the longer number (typically 14
characters) on the label.
4
Chapter 2Getting Started

Accessibility features
Poly products include a number of features to accommodate users with disabilities.
Users Who Are Deaf or Hard of Hearing
Your system includes accessibility features so that users who are deaf or hard of hearing can use the
system.
The following table lists the accessibility features for users who are deaf or hard of hearing.
Table 2-3 Accessibility Features for Users Who Are Deaf or Hard of Hearing
Accessibility Feature Description
Visual notifications Status and icon indicators let you know when you have incoming, outgoing,
active, or held calls. Indicators also alert you of the device’s status and when
features are enabled.
Status indicator lights
The system and its microphones use LEDs to indicate some statuses, including
if your microphones are muted.
Adjustable call volume While in a call, you can raise or lower the volume of the device.
Auto-answering You can enable the system to auto-answer calls.
Users Who Are Blind, Have Low Vision, or Have Limited Vision
Your system includes accessibility features so that users who are blind, have low vision, or have
limited vision can use the system.
The following table lists the accessibility features for users who are blind, have low vision, or have
limited vision.
Table 2-4
Accessibility Features for Users Who Are Blind, Have Low Vision, or Have Limited Vision
Accessibility Feature Description
Auto-answering You can enable the system to auto-answer calls.
Ringtones An audible tone plays for incoming calls.
Visual notifications Status and icon indicators let you know when you have incoming, outgoing,
active, or held calls. Indicators also alert you of the device’s status and when
features are enabled.
Join and leave tones
The system plays a tone when someone joins or leaves a conference call.
Embossed buttons The remote control (sold separately) has embossed push buttons for performing
common tasks with the system, such as dialing a number.
Users with Limited Mobility
Your system includes accessibility features so that users with limited mobility can use various system
features.
The following table lists the accessibility features for users with limited mobility.
Accessibility features
5

Table 2-5 Accessibility Features for Users with Limited Mobility
Accessibility Feature Description
Remote control
(sold separately)
The Bluetooth remote control enables you to control the system and to perform
tasks such as placing calls, starting a sharing session, and configuring some
settings.
Poly TC10 or Poly TC8
(sold separately)
The Poly TC10 or Poly TC8 enables you to control the system and to perform
tasks such as placing calls.
Auto-answering You can enable the system to auto-answer calls.
Calling from a personal device With administrator credentials, you can wirelessly access the system web
interface from your own device to make calls and manage contacts and
favorites.
Touch-capable monitor support
If you have a touch-capable monitor connected to the system, you can select,
swipe, and press the screen to perform functions and activate features.
6 Chapter 2Getting Started

Hardware installation3
Mount your Poly Studio X32 system and connect required peripherals and any optional peripherals.
What's included
The Poly Studio X32 system ships with installation cables and mounting hardware.
NOTE: The Poly Studio X32 system powers using PoE++ (65W). The system doesn't ship with a
power adapter. To power the system, use a PoE++ power injector or Ethernet switch rated for 65W.
● Quick Start Guide
● Display clamp
● HDMI cable (2m / 6.6 ft)
● STP Cat 6a Ethernet cable (3.66 m / 12 ft)
Required components
Your system requires the following components to function properly.
● PoE++ adapter (B5NH6AA) or PoE++ Ethernet switch capable of supplying 65W
● An active network connection
● A monitor connected to HDMI port 1
● A system controller such as Poly TC10, Poly TC8, remote control, or touch monitor
Mounting your Poly Studio X32 system
Mount the Poly Studio X32 system using the included display clamp. Additional mounting options
include a wall mount, VESA mount kit, and a table stand (sold separately).
For more information on mounting your Poly Studio X32 system, review the Poly Studio X32 quick
start guides at HP Support.
Connect monitors to the Poly Studio X32 system
Connect one or two monitors to the system to display people and content.
Hardware installation
7

Poly Studio X32 supports connecting two 4K monitors. However, support for 4K output depends on
the supported output resolution of the provider you choose.
NOTE: While video output can go to both monitors, audio output only routes to the monitor
connected to HDMI 1 when you select TV Speakers as the output.
1. Connect one end of the HDMI cable to HDMI port 1 on the primary monitor.
2. Connect the other end of the HDMI cable to the HDMI 1 port on the system.
3. To connect a second monitor, connect an HDMI cable from the HDMI 2 port on the system to the
HDMI 1 port on the secondary monitor.
Connect the system to your network
To pair the system with a Poly TC10 or Poly TC8 device, connect the system to your network. To
connect to Poly Lens, access the system web interface, or receive updates from the Poly update
server, your system must have access to the internet.
NOTE: The Poly Studio X32 system powers using PoE++ (65W). The system doesn't ship with a
power adapter. To power the system, use a PoE++ power adapter or Ethernet switch rated for 65W.
After initial setup, you can configure you system to use Wi-Fi as a secondary or primary network.
Using Wi-Fi as the primary network isn't supported in all provider modes. For more information, see
the Poly Video Mode Administrator Guide or the Poly Partner Mode Administrator Guide.
■
Choose one of the following:
● Connect the Poly Studio X32 PoE++ (65W) power adapter to your network.
● Connect the Poly Studio X32 PoE++ LAN port to a PoE++ (65W) port on your Ethernet switch.
The system supports Cat5e and above cables up to 100 m (328 ft).
8
Chapter 3Hardware installation

Connecting a system controller
Connect a system controller to navigate the conferencing application user interface.
NOTE: Poly recommends using the out-of-box setup process on a Poly TC10 or Poly TC8 device
to set up your system.
To connect a Poly TC10 or Poly TC8 touch controller to the system, use the out-of-box setup
instructions on the touch controller. Alternatively, you can pair a touch controller to the system using
the system web interface.
For instructions on connecting a Poly Bluetooth remote or touch monitor, see the Poly Video Mode
Administrator Guide or the Poly Partner Mode Administrator Guide.
Connecting Poly TC10 or Poly TC8 as a system controller
Connect one or more Poly TC10 or Poly TC8 controllers to your system, depending on the provider
you choose.
NOTE: Poly recommends using the out-of-box setup process on a Poly TC10 or Poly TC8 device
to set up your system.
When you first power on your Poly TC10 or Poly TC8 touch controller and your Poly Studio X system,
you can use the touch controller to set up both devices. If necessary, reset your Poly TC10 or Poly
TC8 device to revert it to the out-of-box state.
To pair a Poly TC10 or Poly TC8 controller to the system without using the out-of-box process, refer
to the Poly TC10 Administrator Guide.
Connecting a Poly Bluetooth remote control to the system
Use a Poly Bluetooth remote control to navigate the Poly VideoOS or Poly Device Mode user
interface.
In provider modes other than Poly Video mode or Device Mode, the remote control offers limited
functionality and isn't supported.
For information on connecting a remote to your system, review the Poly Video Mode Administrator
Guide.
Powering the system on and off
The system powers on when you plug it in to a power source.
NOTE: The Poly Studio X32 system powers using PoE++ (65W). To power the system, use a
PoE++ power injector or Ethernet switch rated for 65W.
Poly recommends the following when powering off or restarting your system:
● Don’t restart or power off the system during maintenance activities (for example, while a software
update is in progress).
Connecting a system controller
9

System setup4
After connecting the peripherals and configuring power, set up your system.
Set up the system using one of the following methods:
● Use the out-of-box setup on a Poly TC10 or Poly TC8 touch controller.
The Poly TC10 or Poly TC8 device must run TCOS 6.0 or later and be connected to the same
subnet as the Poly Studio X32 system.
● Access the system web interface.
● Onboard the system to Poly Lens Cloud.
Set up your system using a Poly touch controller
Power on the system and complete the out-of-box setup on a connected Poly TC10 or Poly TC8
touch controller.
Make sure that both the touch controller and your system are in an out-of-box state. If necessary,
factory reset your Poly TC10 or Poly TC8 device to return it to an out-of-box state.
The following instructions use a Poly TC10 device to set up the system. You can use either a Poly
TC10 or Poly TC8 device to set up your system.
IMPORTANT: Poly strongly recommends that you update your system to the latest supported Poly
VideoOS version for your system. Updating your system ensures that you have access to the latest
system features and functionality.
1. Connect the Poly TC10 device to a PoE-enabled Ethernet port on the same subnet as the
system.
The Poly TC10 device powers on and displays the out-of-box screen.
2. Power on the system using a PoE++ (65W) power adapter
3. Connect the Poly Studio X32 PoE++ (65W) power adapter to the same subnet as the Poly TC10
device.
4. On the Poly TC10 device, select Get Started.
5. Review the network and regional details, and then select the right arrow.
10
Chapter 4System setup

6. Select Room Controller and select the right arrow.
The Poly TC10 device searches for the system in the out-of-box state and displays the results.
7. Do one of the following:
● Use the system IP address to select your system from the results, and then select the right
arrow.
● Select Manually Connect to a Room and enter the system IP address.
8. If the room requires further authentication, the system display shows a collection of shapes.
Select the sequence of shapes on the Poly TC10 device that matches the sequence of shapes
on the system display and select Confirm.
9. Depending on the system configuration, the Poly TC10 device displays some of the following
screens:
● Poly Lens registration
● Provider selection
● Option to update software if a software update is available
The Poly TC10 device and the system both restart into the chosen partner application.
Complete setup with the system web interface
To finish setting up your system, manually configure the system’s local administrator password,
country, and timezone.
After completing setup in the system web interface, you can pair a Poly TC10 or Poly TC8 touch
controller.
1. Power on the system and follow the onscreen instructions.
2. Log in to the system web interface.
3. Go to Security > Local Accounts to change the local administrator password from the default
value (the last six characters of your system’s serial number).
4. Go to General Settings > My Information > Location to specify the country where your system is
located.
Your system typically defaults to the correct power-line frequency based on the video standard
used in the country where it's located. To avoid power frequency issues with your system,
choose a location.
5. Go to General Settings > Date and Time to set the timezone for your system.
6. Connect your TC10 or TC8 device to a PoE powered Ethernet port connected to the same
subnet as your system.
7. In the system web interface, go to General Settings > Device Management.
8. Under Available Devices, find the device by its MAC address (such as 00e0db4cf0be) and select
Pair.
The device displays under Connected Devices with a Connected status.
Complete setup with the system web interface
11

Initial system setup is complete. You can start using the system.
12 Chapter 4System setup
Configuring your system
After you complete setup, configure your Poly Studio X32 system’s camera, audio, network, and
security settings using multiple options.
To configure the system, use one of the following methods:
● System web interface
● Poly Lens Cloud
For advanced configuration information, including network setup and security settings, review the Poly
Video Mode Administrator Guide and the Poly Partner Mode Administrator Guide.
Access the system web interface
Access the system web interface to perform administrative tasks.
IMPORTANT: If not prompted to do so during setup, Poly recommends changing the administrator
password in the system web interface.
The system web interface enables you to do the following actions:
● Finish setting up your system.
● Remotely configure and manage your system. Unlike the local interface, you can configure every
setting through the system web interface. Local interface is intended only for the initial setup.
● Control certain user functions of the system, such as placing calls and ending content sessions.
● Manage contacts.
1. Open a web browser and enter the system’s IP address.
When setting up your system, the onscreen instructions display the IP address to use.
2. Enter the user name (the default is admin).
3. Enter the password (the default is the last six characters of your system’s serial number).
NOTE: The user name and password are case sensitive.
Registering the system with Poly Lens
Poly Lens provides cloud-based management and insights for your system.
Register your system with Poly Lens during system setup or on the Poly Lens registration page. For
more information on onboarding your system to Poly Lens, visit Poly Lens Help.
Configuring your system
13

Using the system5
After connecting peripherals and powering on your system, begin using your Poly Studio X32 system
with the conferencing provider you selected.
For instructions on using Poly Video mode, refer to the Poly Video Mode User Guide.
For instructions on using partner applications such as Microsoft Teams Rooms or Zoom Rooms visit
the partner application website.
LED status indicators for Poly Studio X32 systems
Use the LED on the front of the system to help you understand the system's behaviors.
Table 5-1
Poly Studio X32 indicators and status
Indicator Status
Solid white Device is idle and standing by
Pulsing white Start initiation in progress
Pulsing amber Firmware update or factory restore in progress
Blinking blue and white Bluetooth pairing
Solid blue Bluetooth paired
Solid green Active call in progress
Solid red Audio muted
Navigating the Poly Studio X32 system interface
After setting up your system, navigate the system using different controller options. The conferencing
provider that you choose determines the options for navigating the system.
In Poly Video mode and Poly Device Mode:
● Poly TC10 or Poly TC8 touch controller
● Poly Bluetooth remote control
● Touch monitor
14
Chapter 5Using the system

In partner provider modes:
● Poly TC10 or Poly TC8 touch controller
● Touch monitor (not supported in all provider modes)
Using Device Mode
Connect your computer to the Poly Studio X32 system’s USB Type-C and HDMI input ports to use the
system camera, speakers, microphone, and displays from your computer.
For more information on using Device Mode, refer to the Poly Video Mode Administrator Guide and
the Poly Partner Mode Administrator Guide.
Using Device Mode
15

System Maintenance6
You can perform several functions to keep your Poly Studio X32 system running properly.
Locate the system IP address using the system monitor and a
USB mouse
If you don't have a touch monitor, remote control, Poly TC8 or Poly TC10 touch controller paired to
your system, you can use a USB mouse to identify the system IP address.
1. Connect a USB mouse to an available USB-A port on the back of the system.
A cursor appears.
2. Move the mouse to the right side of the screen.
3. Press the left mouse button and swipe left to reveal the Poly menu.
The IP address displays at the top of the menu.
Locate the system IP address using a paired Poly touch
controller
You can view the system IP address on a paired Poly TC10 or Poly TC8 touch controller.
1. On the Poly TC10 or Poly TC8 user interface, swipe left from the right side of the screen.
2. Select Settings.
System information, including the system IP address, displays.
Factory restore the system
Factory restore your system to completely erases the system’s flash memory and restore it to the
software version stored on the factory restore partition..
The system doesn’t save the following data with a factory restore:
● Current software version
● Logs
● User-installed PKI certificates
16
Chapter 6System Maintenance
● Local directory entries
● Call detail record (CDR)
1. Disconnect the power supply to turn off the system.
2. On the bottom of the Poly Studio X32 system, insert a straightened paper clip through the factory
restore pinhole.
3. While continuing to hold the restore button, reconnect the power supply to turn the system on.
4. When the system LED indicator light turns amber, stop pressing the restore button.
NOTE: You can only view the restore progress on a display connected to the secondary
monitor HDMI output port.
Reset System Settings
You can reset your Poly Studio X32 system to its default configuration settings.
You may need to perform a system reset for a variety of reasons, for example, when moving a device
to a new location.
Resetting your system deletes all but the following data:
● Current software version
● User-installed PKI certificates
● Local directory entries
● Logs
● Call detail record (CDR)
You also can choose not to retain some of this data after the system resets.
NOTE: A system reset restores your system to its original mode of operation. For example, Poly
Video Mode or Poly Partner Mode.
1. In the system web interface, go to Diagnostics > System Reset.
2. Select Reset All System Configurations.
3. Optional: Clear any of the following check boxes for data you want to delete as part of the reset:
● Keep installed certificates.
● Keep the directory entries.
Reset System Settings
17

● Keep the system logs.
● Keep the system call detail reports.
4. Select Reset.
Restart the System
If you encounter issues, try restarting your system.
1. In the system web interface, go to Diagnostics > System Reset.
2. Select Restart.
18
Chapter 6System Maintenance
Updating the system software
You have multiple options for updating the system software.
NOTE: Software updates through the Poly update server are only available to supported systems.
For information on hardware that supports each Poly VideoOS version and the included peripheral
software versions, review the
Poly VideoOS Release Notes
on the Poly Documentation Library.
Automatically Update Software
Automatically update the software for your system and some of its paired devices.
NOTE: If your system is onboarded through Poly Lens Room, the system will automatically update
overnight when new software is available. On Microsoft Teams Rooms on Windows and Zoom
Rooms on Windows systems, it's recommended to allow the system to update automatically as part
of overall conferencing PC scheduled updates.
If your system is onboarded to Poly Lens Cloud, you can configure updates in Poly Lens.
1. In the system web interface, go to General Settings > Device Management.
2. Select Enable Automatic Updates.
Unless you specify a maintenance window, your system tries to update 1 minute after you enable
this setting. If an update isn’t available at the time, the system tries again every 4 hours.
3. Optional: Select Only Check for Updates During Maintenance Hours to specify a range of time to
automatically update the software.
4. Optional: Choose times for Maintenance Hours Begin and Maintenance Hours End.
The system calculates a random time within the defined maintenance window to check for
updates.
NOTE: If these settings are provisioned, the provisioning profile defines the polling interval. The
default interval is 1 hour.
Manually Update Software
Manually update the software for your system and some of its paired devices.
1. In the system web interface, go to General Settings > Device Management.
2. Select Check for Updates.
3. If the system finds updates, select Update All.
Update your system using a USB flash drive
Update the software for your system and some of its paired devices using a USB flash drive.
1. Log in to http://lens.poly.com and go to Manage > Software Versions.
If you don't have a Lens Cloud account, you can sign up for an account.
2. In the Search Device Model / Lens App drop down, type in the name of the device or search.
Updating the system software
19

3. Select your device from the list.
The latest software version displays.
4. Select the software version you want to download and then select Download.
5. Extract the files to a folder on your computer and move the content to the root directory of a
FAT32 formatted USB flash drive.
The root directory of your USB flash drive should contain the file titled "softwareupdate.cfg" along
with the individual folders for each product. The extracted files provide the required structure for
the system to recognize the update package.
6. Connect the USB flash drive to a USB port on the back of the system.
When the system detects the USB flash drive, a prompt displays on the monitor to confirm that
you want to update the software. If there’s no input to the system, it automatically starts the
update after a short delay.
20
Chapter 6System Maintenance

Getting help7
Poly is now a part of HP. The joining of Poly and HP paves the way for us to create the hybrid work
experiences of the future. Information about Poly products has transitioned from the Poly Support site
to the HP Support site.
The Poly Documentation Library is continuing to host the installation, configuration/administration, and
user guides for Poly products in HTML and PDF format. In addition, the Poly Documentation Library
provides Poly customers with information about the transition of Poly content from Poly Support to HP
Support.
The HP Community provides additional tips and solutions from other HP product users.
HP Inc. addresses
Contact HP at the following office locations.
HP US
HP Inc.
1501 Page Mill Road
Palo Alto, CA 94304
United States
Phone:+ 1 650-857-1501
HP Germany
HP Deutschland GmbH
HP HQ-TRE
71025 Boeblingen, Germany
HP Spain
HP Printing and Computing Solutions, S.L.U.
Cami de Can Graells 1-21 (Bldg BCN01)
Sant Cugat del Valles
Spain, 08174
902 02 70 20
HP UK
HP Inc UK Ltd
Regulatory Enquiries, Earley West
300 Thames Valley Park Drive
Reading, RG6 1PT
United Kingdom
Getting help
21

Document information
Review the following document information.
Model ID: Poly Studio X32 (Model: PATX-STX-32R / PATX-STX-32N)
Document part number: P43443-001A
Last update: February 2025
Email us at [email protected] with queries or suggestions related to this document.
22 Chapter 7Getting help