
Poly Studio V72 Hardware User Guide
SUMMARY
This guide provides administrators with information about configuring, maintaining, and troubleshooting the
featured product.

Legal information
Copyright and license
© 2024, 2024, HP Development Company,
L.P. The information contained herein is
subject to change without notice. The only
warranties for HP products and services are
set forth in the express warranty statements
accompanying such products and services.
Nothing herein should be construed as
constituting an additional warranty. HP shall
not be liable for technical or editorial errors
or omissions contained herein.
Trademark credits
All third-party trademarks are the property
of their respective owners.
Privacy policy
HP complies with applicable data privacy
and protection laws and regulations. HP
products and services process customer
data in a manner consistent with the HP
Privacy Policy. Please refer to
HP Privacy
Statement.
Open source software used in this product
This product contains open source
software. You may receive the open source
software from HP up to three (3) years
after the distribution date of the applicable
product or software at a charge not
greater than the cost to HP of shipping
or distributing the software to you. To
receive software information, as well as
the open source software code used in
this product, contact HP by email at

Table of contents
1About this guide.................................................................................................................................................. 1
Audience, purpose, and required skills ........................................................................................................... 1
2Getting Started ................................................................................................................................................... 2
Poly Studio V72 hardware............................................................................................................................... 2
Poly Studio V72 System Hardware Ports........................................................................................................ 2
Poly Studio V72 Privacy Shutter Behavior ...................................................................................................... 3
Locating the system serial number ................................................................................................................. 5
Locate the serial number label on your Poly Studio V72 ........................................................................ 5
Accessibility Features ..................................................................................................................................... 6
Users Who Are Deaf or Hard of Hearing ................................................................................................. 6
Users Who Are Blind, Have Low Vision, or Have Limited Vision............................................................. 6
Users with Limited Mobility ...................................................................................................................... 6
3Hardware installation.......................................................................................................................................... 7
Mounting the Poly Studio V72......................................................................................................................... 7
Connect the system to your computer ............................................................................................................ 7
Connect the system to your network............................................................................................................... 7
Powering the System On and Off.................................................................................................................... 7
4Supported peripherals ........................................................................................................................................ 9
Connect a Poly Expansion microphone to the system.................................................................................... 9
Pair a Poly Bluetooth remote control with your system................................................................................... 9
5Setting up the system....................................................................................................................................... 11
Set up your system ....................................................................................................................................... 11
Access the System Web Interface ................................................................................................................ 11
Change Administrator Credentials ................................................................................................................ 12
Registering the System with Poly Lens......................................................................................................... 12
6Using the USB video bar .................................................................................................................................. 13
Use the USB video bar as the default audio and video device on your computer ........................................ 13
Using the USB video bar with a conferencing PC......................................................................................... 13
Poly Studio V72 LED status indicators.......................................................................................................... 14
iii

Using the Remote Control............................................................................................................................. 15
Poly Bluetooth remote control features.................................................................................................. 15
Saving Shortcuts for Your Favorite Camera Angles .............................................................................. 16
Save a Camera Preset ................................................................................................................... 16
Load a Camera Preset.................................................................................................................... 16
7System Maintenance........................................................................................................................................ 17
Locate the system IP address using a monitor ............................................................................................. 17
Updating Software in the System Web Interface .......................................................................................... 18
Automatically Update Software.............................................................................................................. 18
Manually Update Software..................................................................................................................... 18
Update your system using a USB flash drive......................................................................................... 18
Reset System Settings.................................................................................................................................. 19
Factory Restore the System.......................................................................................................................... 19
8Getting help ...................................................................................................................................................... 21
HP Inc. addresses......................................................................................................................................... 21
Document information ................................................................................................................................... 21
iv

About this guide1
This guide describes how to set up and use the Poly Studio V72 system.
Audience, purpose, and required skills
This guide is intended for beginning users, as well as intermediate and advanced users, who want to
learn more about the features available with the Poly Studio V72 system.
About this guide
1
Getting Started2
Poly Studio V72 provides a premium USB video bar with advanced features for the most immersive
hybrid meetings in small rooms.
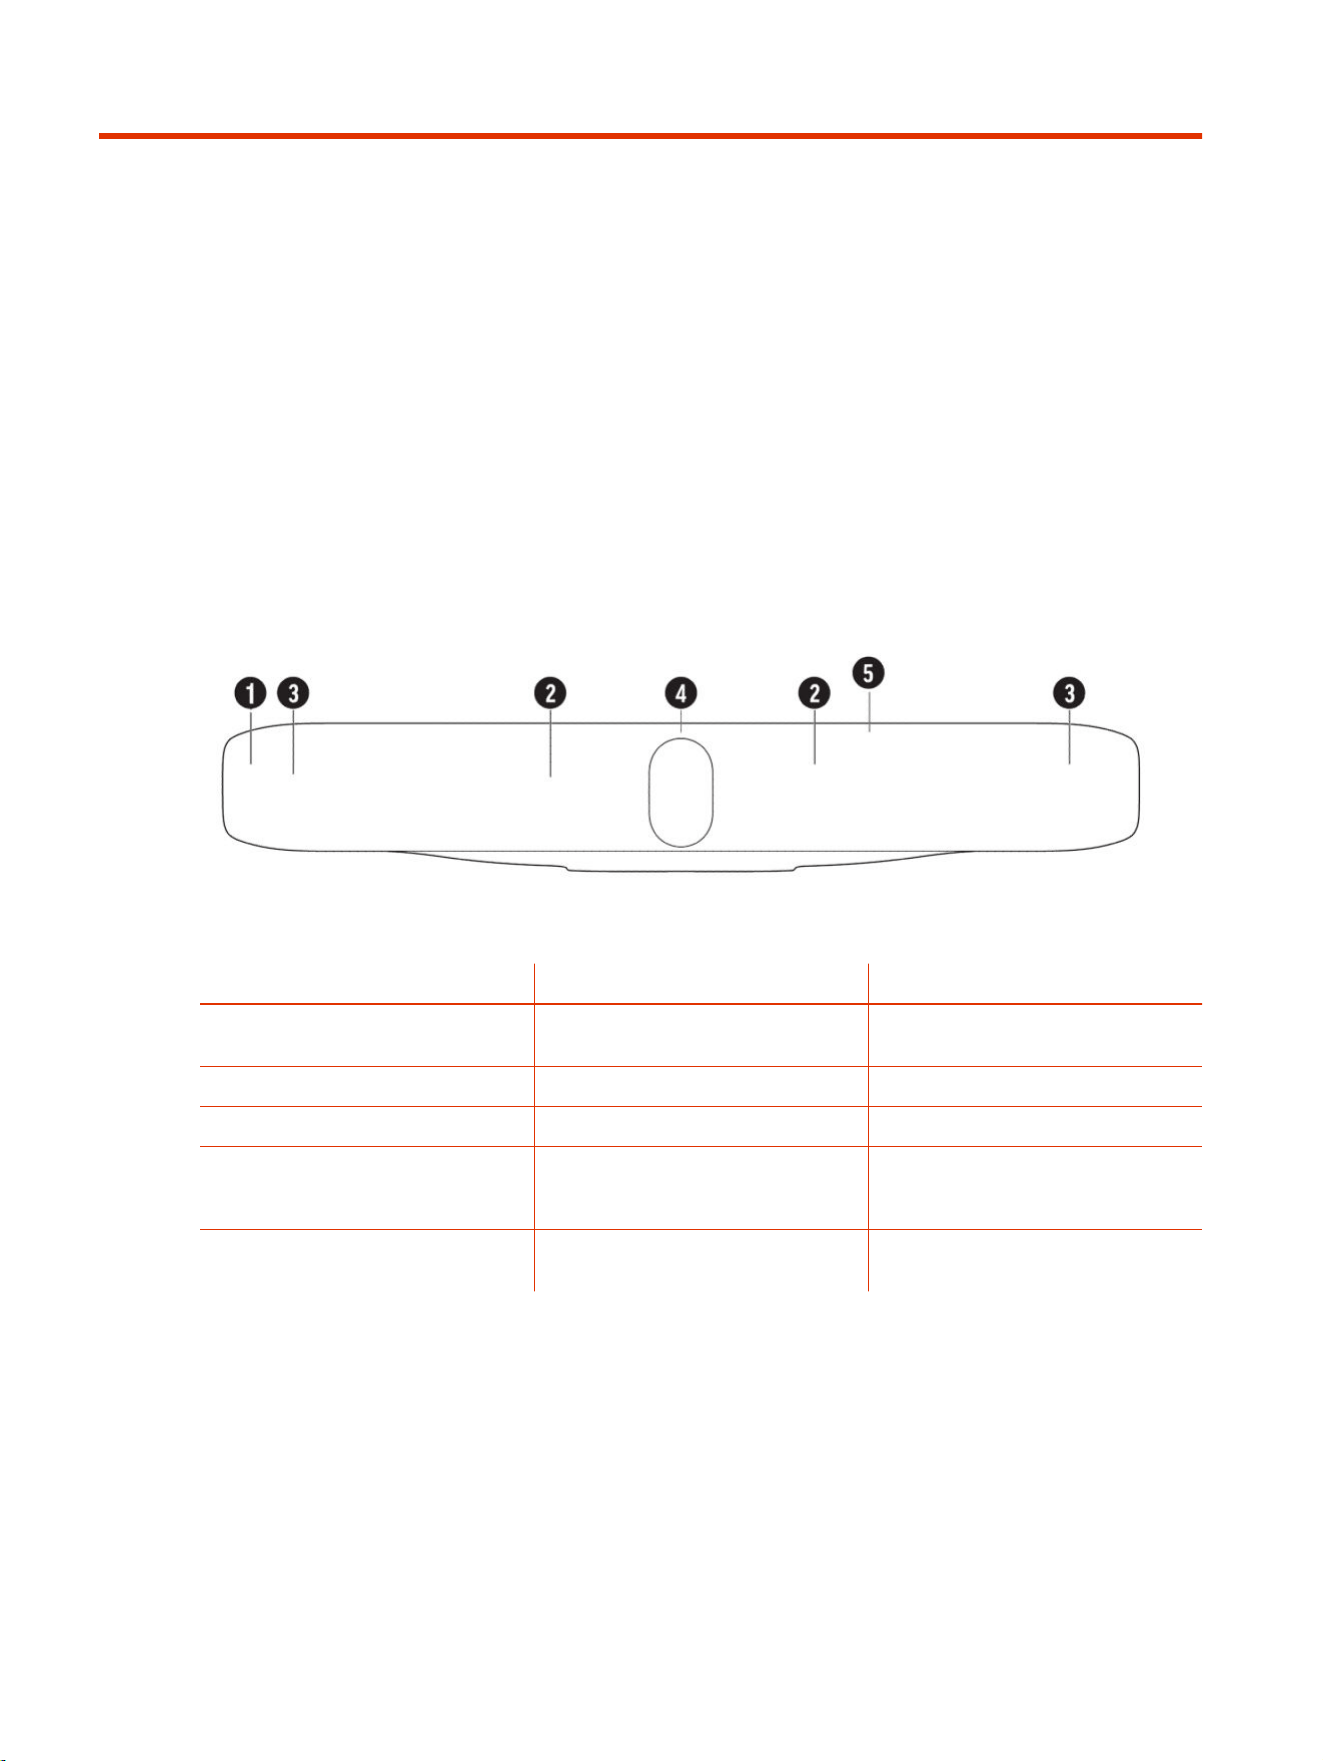
Poly Studio V72 hardware
Table 2-1
Ref. Number Feature Description
1 Screen Protective screen that covers the front
of the system
2 Microphone array Microphone array that captures audio
3 Speakers Speakers for audio output
4 Dual cameras Camera array with a privacy shutter
that automatically opens or closes,
depending on the camera state
5
LED indicators Indicates the system status and
information on the tracked speaker
Poly Studio V72 System Hardware Ports
The following illustration and table explain the hardware ports on your Poly Studio V72 system.
2
Chapter 2Getting Started
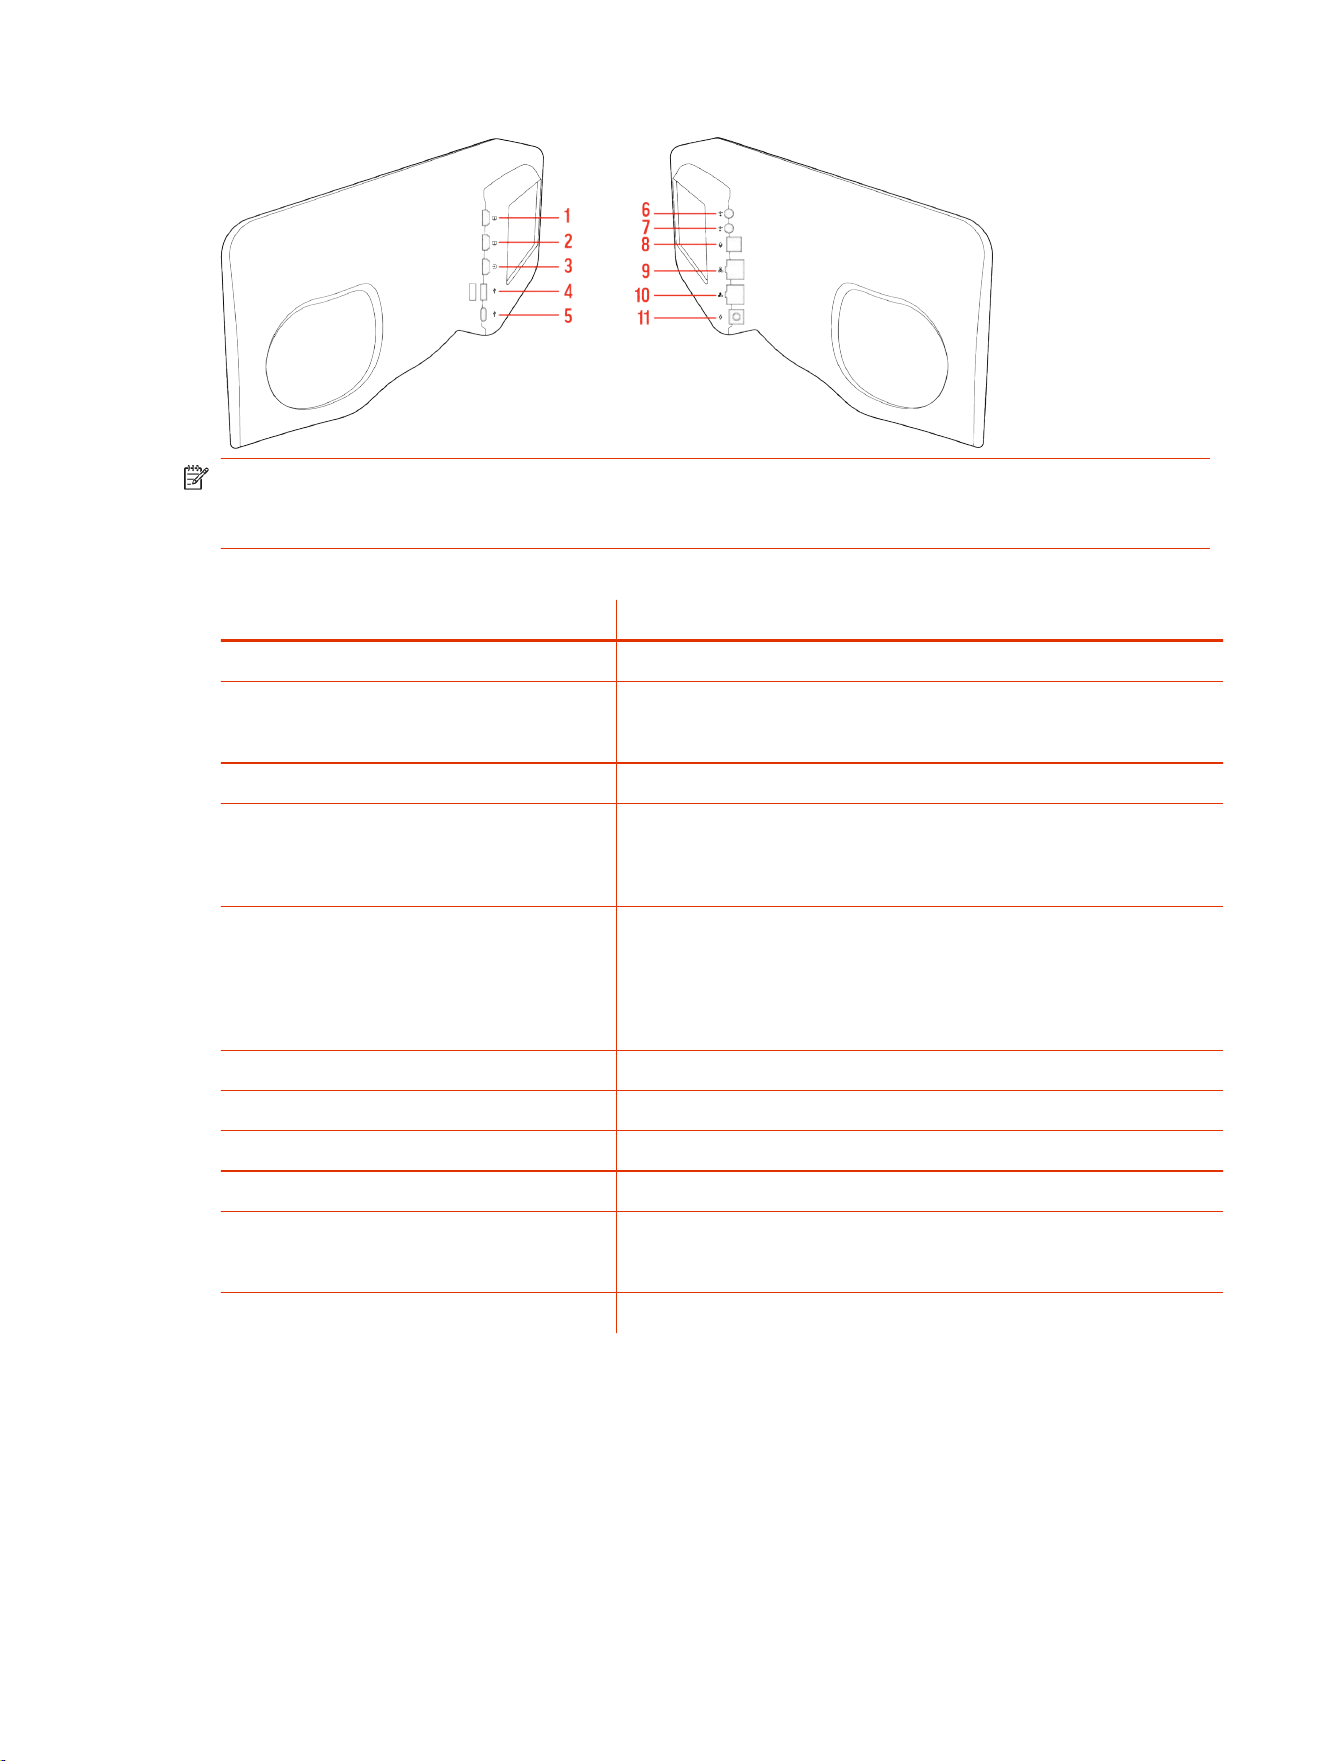
NOTE: The Poly Studio V72 USB Type-A ports are disabled by default. Use the system web
interface to enable the USB Type-A ports before connecting supported or compatible devices to the
system.
Table 2-2
Poly Studio V72 System Hardware Port Descriptions
Ref. Number Port Description
1 N/A
2 HDMI output
View the system IP address. Not for screen mirroring or content sharing.
3
N/A
4 USB Type-A ports
Disabled by default. Use the system web interface to enable the USB
Type-A ports.
5
USB Type-C port
Connect the USB video bar to a computer
NOTE: The USB Type-C port is used for service,installation, and Poly
Device mode only
6
3.5 mm audio line in (disabled)
7 3.5 mm audio line out (disabled)
8 Expansion microphone connection
9 LAN port for connecting the system to a network
10 LLN port
(Reserved for future use)
11
Power cord port
Poly Studio V72 Privacy Shutter Behavior
The privacy shutter automatically opens and closes depending on the state of the connected video
system.
Poly Studio V72 Privacy Shutter Behavior
3
Poly Studio V72 Privacy Shutter Behavior
NOTE: Shutter behavior may vary depending on the partner application.
System Event
Shutter Behavior
The system powers on Shutters open
The system powers off Shutters close
NOTE: If you disconnect the system from power with the
shutters open, the shutters don't close.
You wake the system
Shutters open
The system is sending video Shutters are open
The system is in an active call and the video is muted Shutters are open
4 Chapter 2Getting Started
Locating the system serial number
Use the system serial number to sign in to your system for the first time or if you need to call support.
You need the system serial number to sign in to the system web interface for the first time. The last
six digits of the serial number are the default password.
To set up your system, locate the system serial number in one of the following locations:
● On the back of the system
● On the system packaging
After your setup the system and you have access to the system web interface, locate the serial
number in one of the following locations:
● On the first page of the system web interface.
● In Poly Lens after you onboard the system to Lens.
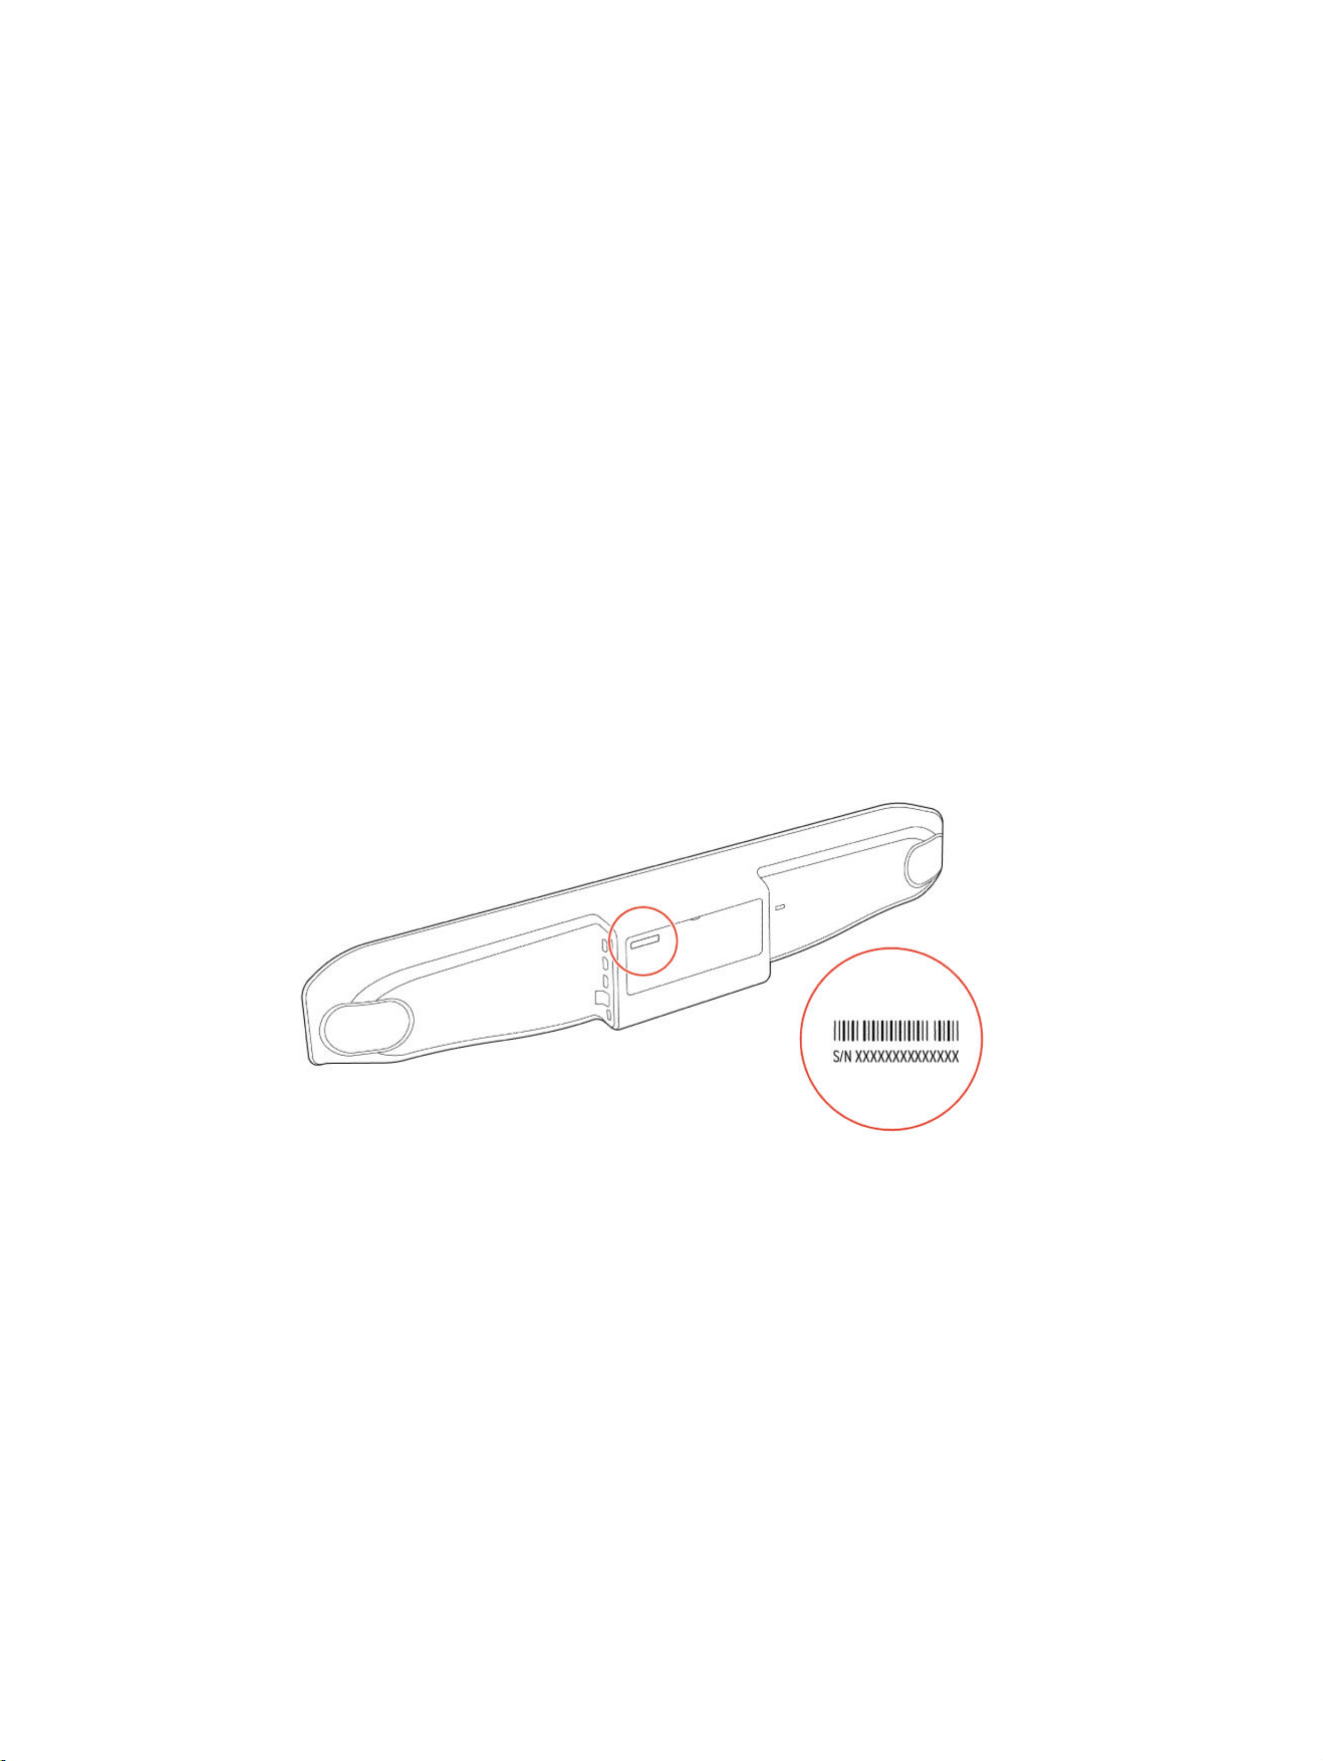
Locate the serial number label on your Poly Studio V72
Find your system serial number located on the system label.
1. Find the serial number tag as shown in the illustration:
2. Write down the entire serial number (typically 14 characters), not the shorter number on the
label.
Locating the system serial number
5

Accessibility Features
Poly products include a number of features to accommodate users with disabilities.
Users Who Are Deaf or Hard of Hearing
Your system includes accessibility features so that users who are deaf or hard of hearing can use the
system.
The following table lists the accessibility features for users who are deaf or hard of hearing.
Table 2-3 Accessibility Features for Users Who Are Deaf or Hard of Hearing
Accessibility Feature Description
Visual notifications Indicators alert you of the device's status and when features are enabled.
Status indicator lights The system and its microphones use LEDs to indicate some statuses, including
if your microphones are muted.
Adjustable call volume While in a call, you can raise or lower the volume of the device.
Users Who Are Blind, Have Low Vision, or Have Limited Vision
Your system includes accessibility features so that users who are blind, have low vision, or have
limited vision can use the system.
The following table lists the accessibility features for users who are blind, have low vision, or have
limited vision.
Table 2-4
Accessibility Features for Users Who Are Blind, Have Low Vision, or Have Limited Vision
Accessibility Feature Description
Ringtones When the device is configured as the default audio output for your computer, an
audible tone plays for incoming calls.
Status indicator lights The system and its microphones use LEDs to indicate some statuses, including
if your microphones are muted.
Users with Limited Mobility
Your system includes accessibility features so that users with limited mobility can use various system
features.
The following table lists the accessibility features for users with limited mobility.
Table 2-5
Accessibility Features for Users with Limited Mobility
Accessibility Feature Description
Remote control The Bluetooth remote control enables you to control the system and to perform
tasks such as placing calls, starting a sharing session, and configuring some
settings.
Remote control
The Bluetooth remote control enables you to control the system and to perform
tasks such as controlling the camera, adjusting the system volume, and muting
the microphones.
6 Chapter 2Getting Started

Hardware installation3
Mount your Poly Studio V72 system and connect supported peripherals.
Mounting the Poly Studio V72
You can mount the Poly Studio V72 system using the included wall mount. Additional mounting
options include a VESA mount and a table stand sold separately.
For information on mounting your Poly Studio V72 system, see the Poly Studio V72 quick start guides
on the HP Support site.
For recommended mounting heights including above or below the display configurations, see the Poly
Video Room Preparation Guide.
Connect the system to your computer
To use your system with a Windows conferencing PC or another supported computer, use the USB
cable that ships with the system.
Once you connect the system to your computer, the computer recognizes the system. You can select
the camera, microphone, and speakers from your system settings.
■
Connect the USB cable from the USB Type-C port on the system to a USB Type-C port on your
computer.
Connect the system to your network
To access the system web interface, connect your system to your network.
To sign in to the system web interface for system configuration, you need to connect the system to
your network.
■
Connect an Ethernet cable from the system LAN port to your network.
The system supports Cat5e and above cables up to 100 meters (328 feet).
Powering the System On and Off
The system powers on when you plug it in to a power source.
Poly recommends the following when powering off or restarting your system:
Hardware installation
7

● Don’t restart or power off the system during maintenance activities (for example, while a software
update is in progress).
8 Chapter 3Hardware installation
Supported peripherals4
Connect supported and compatible peripherals to your Poly Studio V72 system before powering on
the system.
Your Poly Studio V72 system supports connecting the following peripherals:
● Poly Expansion Table microphone connected to the expansion microphone port
● Poly Bluetooth remote control (BW7640UN))
Connect a Poly Expansion microphone to the system
Expand the microphone reach of your system by connecting an optional Poly Expansion microphone.
NOTE: The system supports connecting one Poly Expansion microphone. The Poly Expansion
microphone can't be combined with other external microphones.
■
Connect the Poly Expansion microphone cable from the Poly Expansion microphone to the system
Poly Expansion microphone port on the system.
Pair a Poly Bluetooth remote control with your system
Use the system web interface to pair the Poly Bluetooth remote control (BW7640UN) to your USB
video bar.
The system is connected to your network and you have access to the system web interface.
1. In the system web interface, go to General Settings > Remote Control and select Start Discovery
Mode.
The USB video bar LED blinks blue.
2. On your remote control, press Mute until the remote control discovery stops and reports the
remote control is paired.
The blue LED indicator stops blinking blue and returns to white and the Remote Control page
reports that the remote control is paired.
3. Depending on the pairing result, do one of the following:
● Successful pairing: The remote control is ready to use. You can view the remote control
name, battery level, and status of the device in the system web interface.
● Unsuccessful pairing: Try the following solutions:
Supported peripherals
9

– Remove the batteries from the remote control and reinsert after 5 seconds.
– Move your remote control closer to the system than other remote controls and try to pair
again.
10 Chapter 4Supported peripherals
Setting up the system5
You can use your system as an external video device on your computer or connect it to a
conferencing system that supports USB cameras.
NOTE: Connect all cables before powering on the system.
Set up your system
Connect the system to your computer or conferencing PC.
On Microsoft Teams Rooms on Windows and Zoom Rooms on Windows PCs, install Poly Lens Room
to onboard the system to Lens Cloud for system management and updates. For more information,
see the Poly Lens Room User Guide.
To manage your system on other computers such as macOS and ChromeOS PCs connect the
system to your network and access the system web interface using the system IP address.
NOTE: Once you connect the system to your computer using the supplied USB cable, it will appear
as a camera, speaker, and microphone option on your computer.
1. Connect the supplied USB Type-C cable from the USB-C port on the system to your computer.
2. Optional: To configure system settings and onboard the system to Poly Lens, connect the
system Ethernet port to your network using the supplied Ethernet cable.
On Microsoft Teams Rooms or Zoom Rooms on Windows conferencing PCs, install Poly Lens
Room.
3. Connect the system to power.
The system powers on. If you have a monitor connected to the system and you connect the
system to your network, the system IP address displays on the monitor.
4. Use the system web interface to configure system settings..
Access the System Web Interface
Access the system web interface to perform administrative tasks.
NOTE: If you onboard your system to Poly Lens Cloud, you can manage, monitor, and configure
your system in Poly Lens Cloud.
The system web interface enables you to do the following actions:
Setting up the system
11

● Finish setting up your system.
● Remotely configure and manage your system.
1. Open a web browser and enter the system IP address.
2. Enter the username (the default is admin).
3. Enter the password (the default is the last six characters of your system’s serial number).
The password is case-sensitive.
Change Administrator Credentials
You can change the administrator username and password to access the system web interface and
administrator sections of the local interface.
NOTE: Depending on your system and software version, you may be prompted to change the
admin password the first time you sign in to the system.
The default username is admin and the default password is the last six characters of the system’s
serial number.
1. In the system web interface, go to Security > Local Accounts.
2. Enter the new administrator username in the Admin ID field.
3. Select Change Password.
4. Enter the current password and then the new password.
Entering an incorrect current password too many times causes the system to automatically log
out and close the session.
5. Select Save.
Registering the System with Poly Lens
Poly Lens provides cloud-based management and insights for your system.
Register your system with Poly Lens during system setup or on the Poly Lens registration page. For
more information on onboarding your system to Poly Lens, see Poly Lens Help.
On Microsoft Teams Rooms on Windows or Zoom Rooms on Windows conferencing PCs, install Poly
Lens Room to onboard your system to Poly Lens. For information on installing Poly Lens Room, see
the The Poly Lens Room User Guide.
12
Chapter 5Setting up the system

Using the USB video bar6
After connecting and powering on your USB video bar, you can begin using your USB video bar with
your chosen conferencing provider.
Use your USB video bar in the following ways:
● As a conferencing peripheral on a Microsoft Teams Rooms on Windows or Zoom Rooms on
Windows conferencing PC.
● As an external camera, microphone, and speaker on a supported Windows, macOS, or
ChromeOS computer.
Use the USB video bar as the default audio and video device
on your computer
When you connect the USB video bar to your computer, you may need to set the device as the
default audio and video device for your conferencing application.
The following is a general procedure that you can refer to. Your application may use different terms or
categories.
1. Go to your conferencing application’s Settings.
2. Find Audio Device and Video Device.
3. Choose your Poly Studio V72 video bar as the device for each category.
IMPORTANT:
● If you only use the microphone and not the speaker, Active Echo Cancelation (AEC) may not
work.
● If you only use the speaker and not the microphone, the LED indicator can't show the mute
status of your meeting.
Using the USB video bar with a conferencing PC
Connect your USB video bar to a Microsoft Teams Rooms on Windows or Zoom Rooms on Windows
conferencing PC to use the camera, microphone, and speakers with your conferencing PC.
When you connect the USB video bar to a conferencing PC, you control the USB video bar using the
conferencing application. For example, in Zoom Rooms on Windows or Microsoft Teams Rooms on
Using the USB video bar
13

Windows use the conferencing application to mute the audio or video or change the USB video bar
volume.
Poly Studio V72 LED status indicators
Use the LED on the right side of the system to help you understand the system's behaviors.
Table 6-1 Poly Studio V72 LED Indicators and Status
Indicator Status
Solid white Device is idle and standing by
Pulsing white Boot initiation in progress
Pulsing amber Firmware update or factor restore in progress
Blinking blue and white Bluetooth remote control pairing
Solid blue Bluetooth remote control paired
Solid green Microphone or video is active
Solid red Audio mute
14 Chapter 6Using the USB video bar
Using the Remote Control
With the optional Poly Bluetooth remote control, adjust the Poly Studio V72 camera and manage
other features.
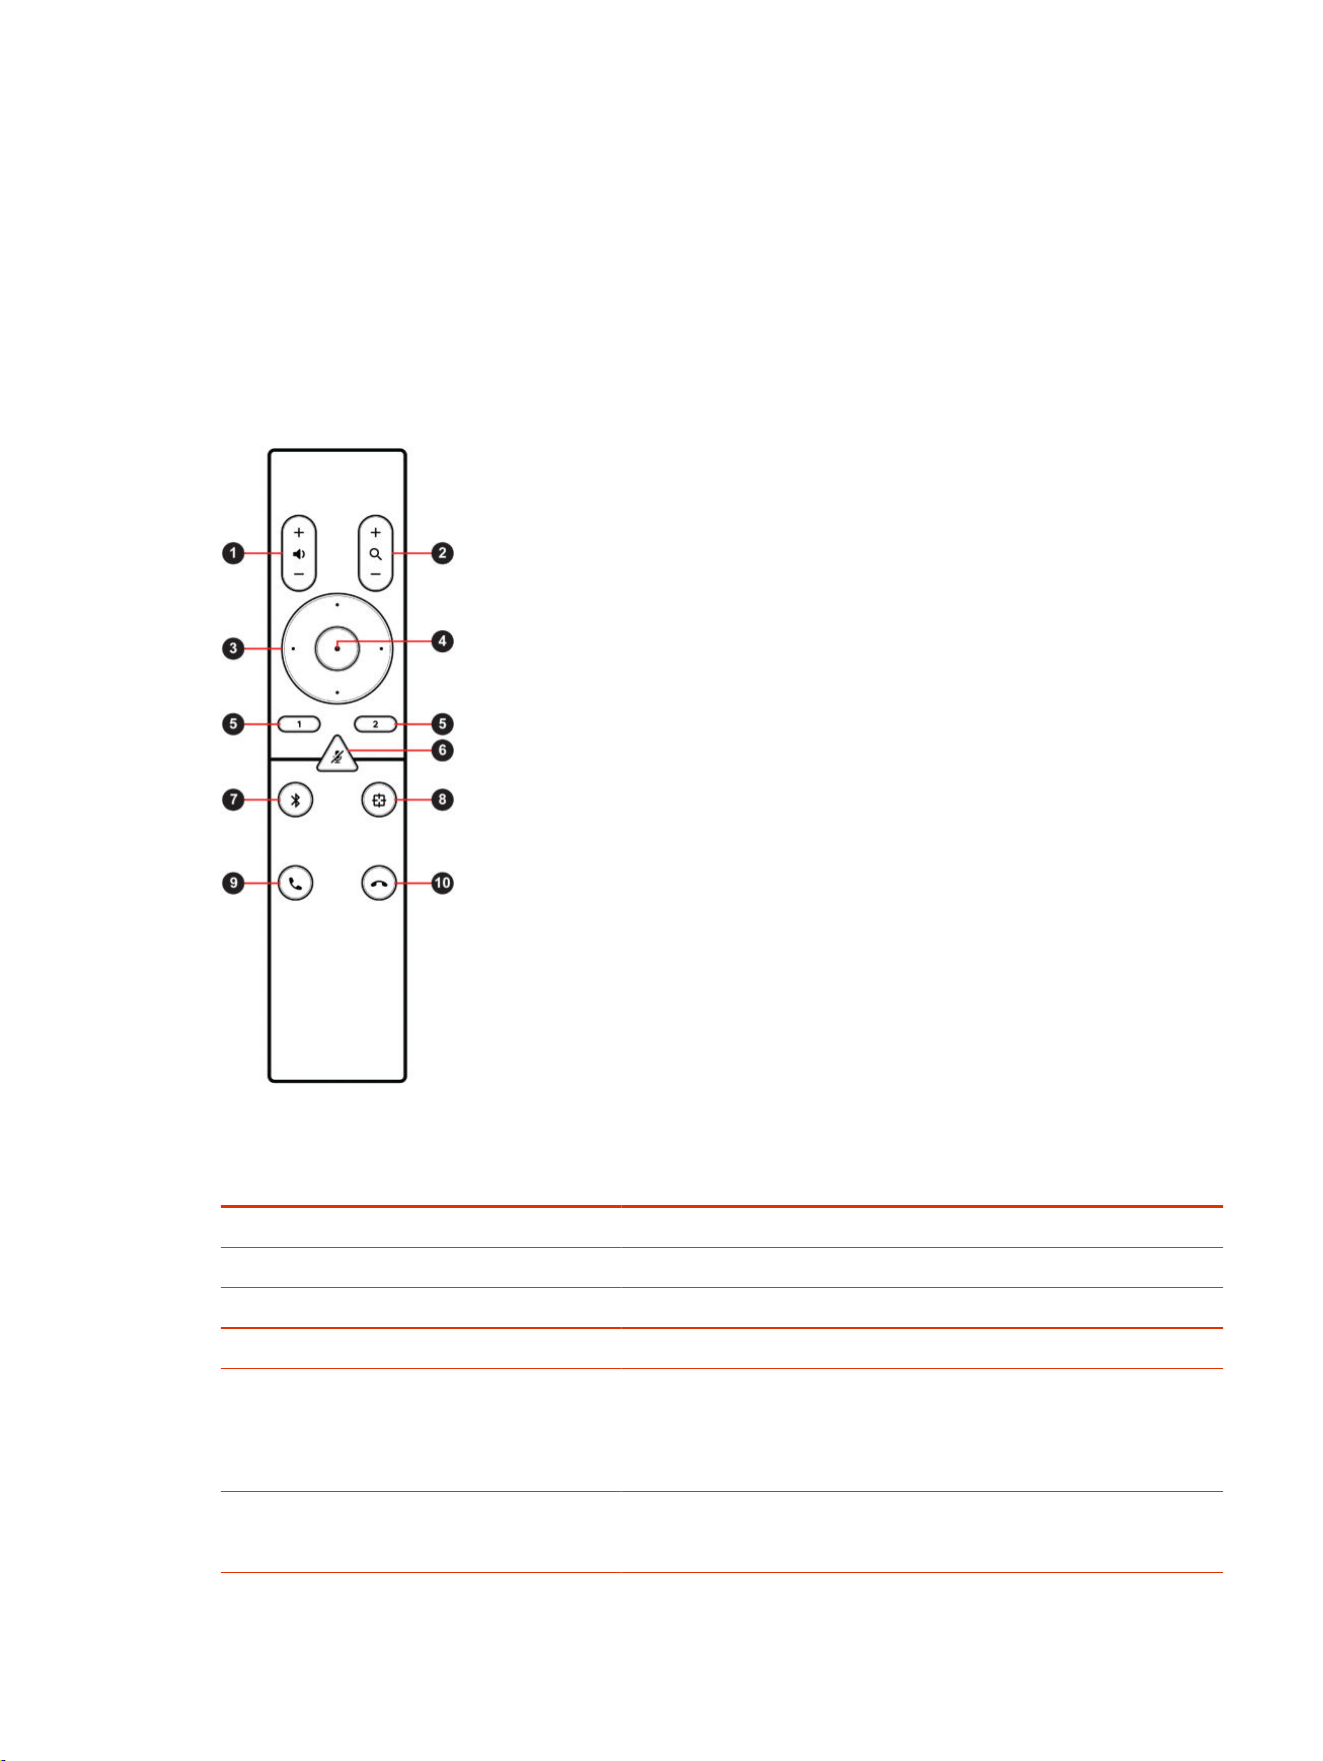
Poly Bluetooth remote control features
By default, the system enables the tracking function, which provides a hands-free experience except
for basic buttons like volume, mute, answer, and hang-up.
The remote control sleeps if it’s inactive for 30 seconds. Press any key or move it to wake it up.
Table 6-2
Button
Icon
Button Name Description
1 Volume Up/Down Adjust speaker volume.
2 Zoom In/Out Adjust camera zoom in/out when the tracking mode is off.
3 Camera Directions Adjust the direction of camera when the tracking mode is off.
4 Home Resets the camera to its original status when the tracking mode is off.
5 Preset 1/2 ● Long press to store a camera setting.
● Short press to load a camera setting.
The buttons only work when the tracking mode is off.
6
Mute/Unmute Mutes or unmutes the microphone.
Long press the button to set the remote control ready for pairing.
Using the Remote Control 15
Table 6-2 (continued)
Button
Icon
Button Name Description
7 Bluetooth NA
8 Tracking Mode Enables or disables the tracking mode when a tracking mode is set.
9 Answer Answers an incoming call or holds/resumes a Microsoft Skype for
Business or Teams call.
10 Hang Up Hangs up a call.
Saving Shortcuts for Your Favorite Camera Angles
Save multiple settings for pan, tilt, and zoom for the Poly Studio V72 camera.
The optional Poly remote control can save two presets to adjust the camera to your saved angle
directly when the tracking mode is off.
Save a Camera Preset
The two numbered buttons on the Poly remote control serve as preset shortcuts.
Turn off tracking mode before you use camera presets.
1. Adjust the camera to the desired position.
2. Press the 1 or 2 button on the remote control until you hear a brief tone.
IMPORTANT: If the button already has a saved setting, your new setting overwrites it.
Load a Camera Preset
If your camera doesn’t track the speaker, use the preset buttons on the remote control to adjust the
camera angle.
Turn off the tracking mode before you use camera presets.
■
Press the 1 or 2 button on the remote control to load the camera preset for the corresponding
button.
16
Chapter 6Using the USB video bar

System Maintenance7
You can perform several functions to keep your Poly Studio V72 system running properly.
Locate the system IP address using a monitor
To view your system IP address, connect the system to a monitor.
The HDMI output port is only for viewing the system IP address as part of system setup.
● Use an HDMI cable to connect the HDMI 1 out port of your system to a monitor.
The system IP address displays on the monitor.
If configured, the Wi-Fi IP address will also display.
System Maintenance
17
Updating Software in the System Web Interface
You can manually update software or set up automatic updates in the system web interface.
Automatically Update Software
Automatically update the software for your system and some of its paired devices.
NOTE: If your system is onboarded through Poly Lens Room, the system will automatically update
overnight when new software is available. On Microsoft Teams Rooms on Windows and Zoom
Rooms on Windows systems, it's recommended to allow the system to update automatically as part
of overall conferencing PC scheduled updates.
If your system is onboarded to Poly Lens Cloud, you can configure updates in Poly Lens.
1. In the system web interface, go to General Settings > Device Management.
2. Select Enable Automatic Updates.
Unless you specify a maintenance window, your system tries to update 1 minute after you enable
this setting. If an update isn’t available at the time, the system tries again every 4 hours.
3. Optional: Select Only Check for Updates During Maintenance Hours to specify a range of time to
automatically update the software.
4. Optional: Choose times for Maintenance Hours Begin and Maintenance Hours End.
The system calculates a random time within the defined maintenance window to check for
updates.
NOTE: If these settings are provisioned, the provisioning profile defines the polling interval. The
default interval is 1 hour.
Manually Update Software
Manually update the software for your system and some of its paired devices.
1. In the system web interface, go to General Settings > Device Management.
2. Select Check for Updates.
3. If the system finds updates, select Update All.
Update your system using a USB flash drive
Update the software for your system and some of its paired devices using a USB flash drive.
1. Log in to http://lens.poly.com and go to Manage > Software Versions.
If you don't have a Lens Cloud account, you can sign up for an account.
2. In the Search Device Model / Lens App drop down, type in the name of the device or search.
3. Select your device from the list.
The latest software version displays.
4. Select the software version you want to download and then select Download.
18
Chapter 7System Maintenance

5. Extract the files to a folder on your computer and move the content to the root directory of a
FAT32 formatted USB flash drive.
The root directory of your USB flash drive should contain the file titled "softwareupdate.cfg" along
with the individual folders for each product. The extracted files provide the required structure for
the system to recognize the update package.
6. Connect the USB flash drive to a USB port on the back of the system.
When the system detects the USB flash drive, a prompt displays on the monitor to confirm that
you want to update the software. If there’s no input to the system, it automatically starts the
update after a short delay.
Reset System Settings
You can reset your Poly Studio V72 system to its default configuration settings.
You may need to perform a system reset for a variety of reasons, for example, when moving a device
to a new location.
Resetting your system deletes all but the following data:
● Current software version
● User-installed PKI certificates
● Local directory entries
● Logs
● Call detail record (CDR)
You also can choose not to retain some of this data after the system resets.
NOTE: A system reset restores your system to its original mode of operation. For example, Poly
Video Mode or Poly Partner Mode.
1. In the system web interface, go to Diagnostics > System Reset.
2. Select Reset All System Configurations.
3. Optional: Clear any of the following check boxes for data you want to delete as part of the reset:
● Keep installed certificates.
● Keep the directory entries.
● Keep the system logs.
● Keep the system call detail reports.
4. Select Reset.
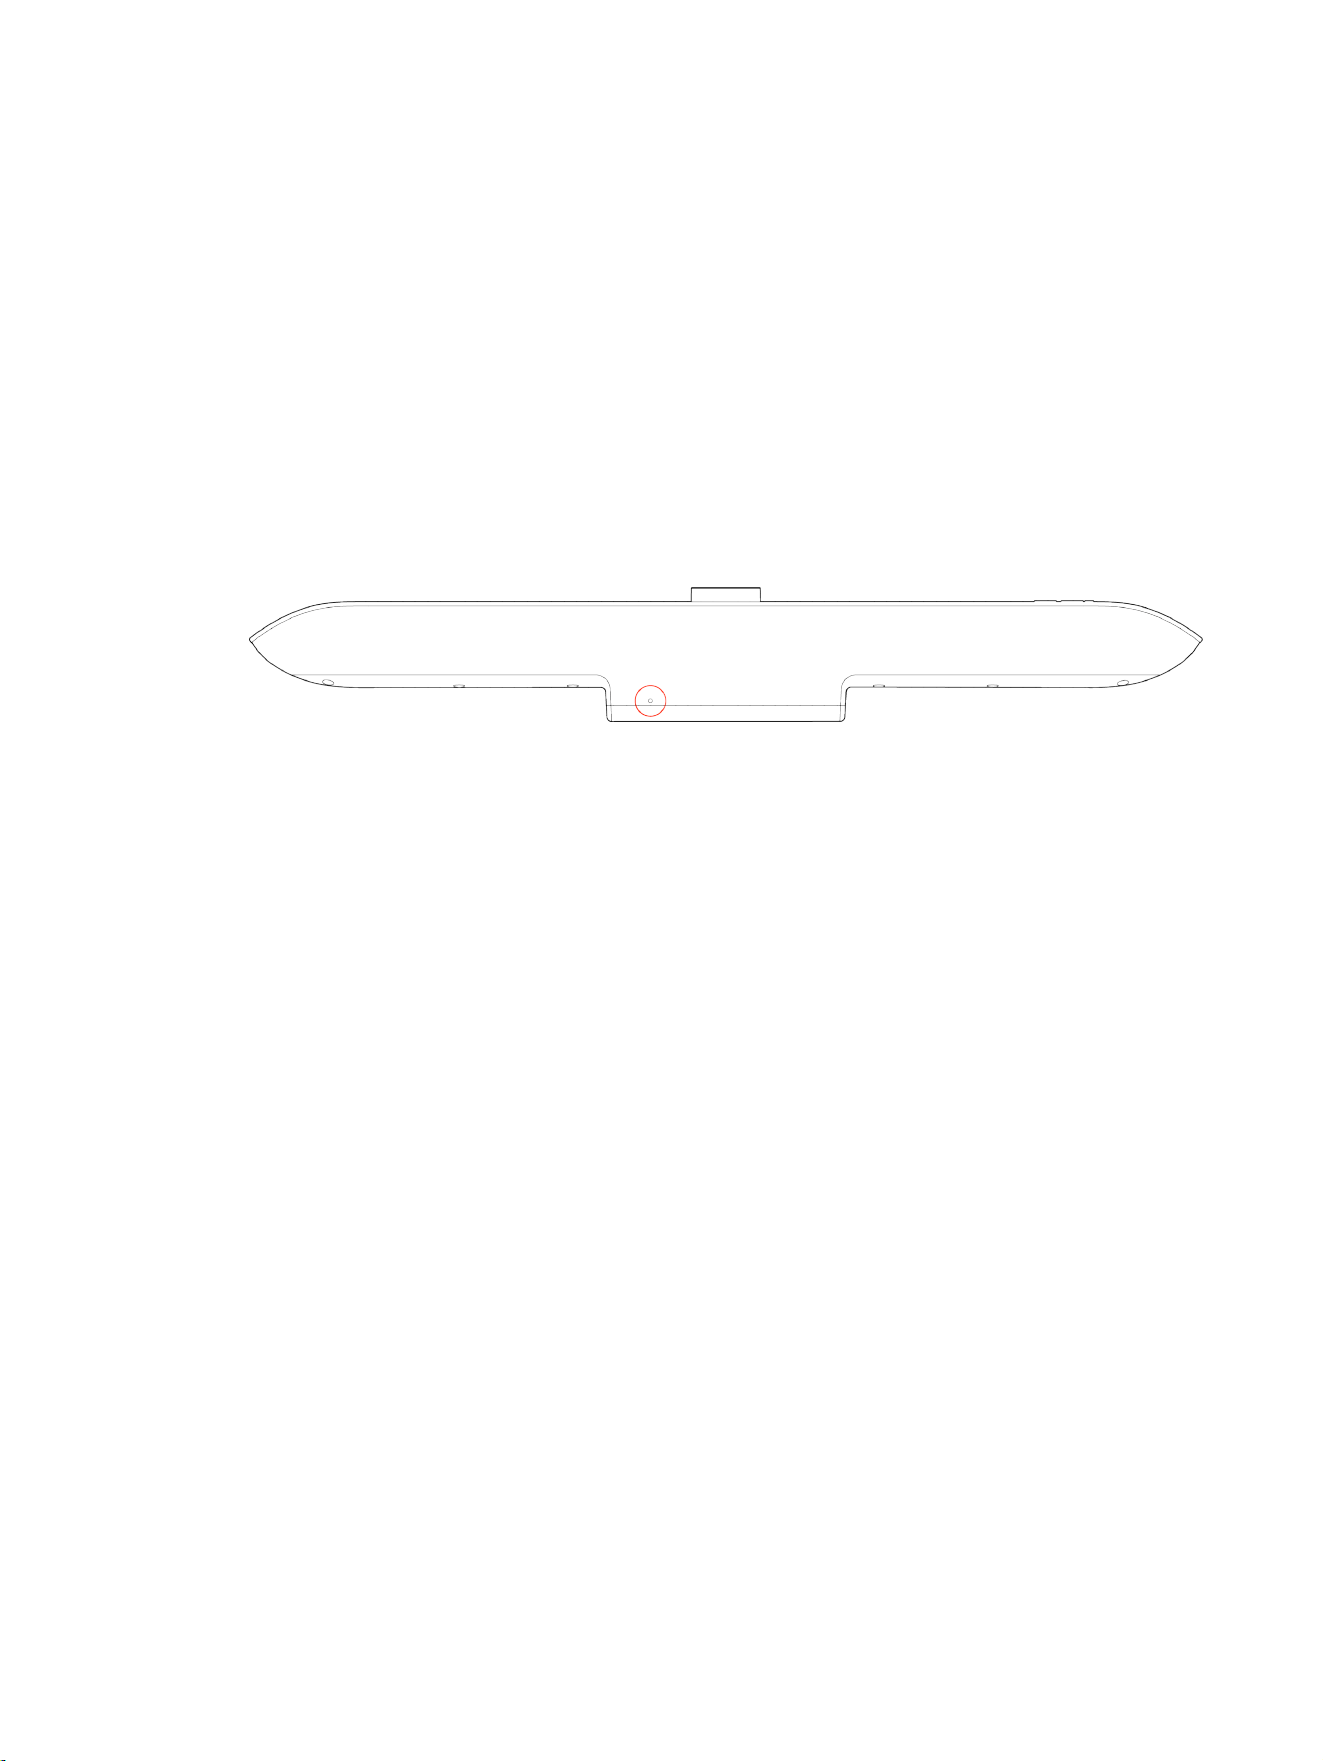
Factory Restore the System
A factory restore completely erases the system’s flash memory and restores it to a stable software
version.
Reset System Settings
19
See the
Poly VideoOS Release Notes
, Version History section, for the current factory restore version.
The system doesn’t save the following data with a factory restore:
● Current software version
● Logs
● User-installed PKI certificates
● Local directory entries
● Call detail record (CDR)
1. Disconnect the power supply to turn off the system.
2. On the bottom of the Poly Studio V72 , insert a straightened paper clip through the factory
restore pinhole.
3. While continuing to hold the restore button, reconnect the power supply to turn the system on.
4. When the system LED indicator light turns amber, stop pressing the restore button.
You can only view the restore progress on a display connected to the secondary monitor HDMI
output port.
20
Chapter 7System Maintenance

Getting help8
Poly is now a part of HP. The joining of Poly and HP paves the way for us to create the hybrid work
experiences of the future. Information about Poly products has transitioned from the Poly Support site
to the HP Support site.
The Poly Documentation Library is continuing to host the installation, configuration/administration, and
user guides for Poly products in HTML and PDF format. In addition, the Poly Documentation Library
provides Poly customers with information about the transition of Poly content from Poly Support to HP
Support.
The HP Community provides additional tips and solutions from other HP product users.
HP Inc. addresses
HP US
HP Inc.
1501 Page Mill Road
Palo Alto 94304, U.S.A.
650-857-1501
HP Germany
HP Deutschland GmbH
HP HQ-TRE
71025 Boeblingen, Germany
HP UK
HP Inc UK Ltd
Regulatory Enquiries, Earley West
300 Thames Valley Park Drive
Reading, RG6 1PT
United Kingdom
HP Spain
Cami de Can Graells 1-21
Bldg BCN01)
Sant Cugat del Valles
Spain, 08174
902 02 70 20
Document information
Model ID: Poly Studio V72
Getting help
21

Document part number: P01288-001
Last update: March 2024
Email us at [email protected] with queries or suggestions related to this document.
22 Chapter 8Getting help