
User Manual
Instructional Audio System
®

2
Table of Contents
MAINTENANCE & TROUBLESHOOTING
32 Clearmike Battery Replacement
33 Sharemike Battery Replacement
34 Redcat Battery Replacement
34 Remplacement de la batterie Redcat
35 Troubleshooting
WARRANTY & SAFETY
36 Five-Year Limited Warranty
37 Safety Warnings and Certifications
43 System Components
44 System Specifications
OVERVIEW
3 Important Safety Instructions
4 System Components and Unpacking
5 Optional Accessories
6 Controls and Connections
8 Clearmike Controls and Connections
SET-UP & OPERATION
12 Determine Set-Up Location
13 Install Wall-Mounted Security Bracket
14 Connecting the Power Supply
15 Audio Integration
16 Setting Up the Clearmike
17 Charging the Clearmike
18 Daily Use of the Clearmike
19 Pairing your Clearmike
20 Output to Assistive Listening Device (ALD)
21 Using Your Microphone as a Wireless Audio Link
OPTIONAL ACCESSORIES
22 Sharemike Controls and Connections
25 Media Connector Controls and Indicators
27 Media Connector Set Up and Operation
28 Connecting Media Connector to Audio
29 Pairing Redcat to Media Connector
31 Battery Pack for Redcat

3
OVERVIEW
Important Safety Instructions
OVERVIEW
1. Do not use the apparatus near water.
2. Clean only with dry cloth.
3. Do not block any ventilation openings.
4. Do not install near any heat sources such as radiators, heat
registers, stoves, or other apparatus (including amplifiers) that
produce heat.
5. Do not defeat the safety purpose of the polarized or
grounding-type plug. A polarized plug has two blades with one
wider than the other. A grounding- type plug has two blades
and a third grounding prong. The wide blade or the third prong
is provided for your safety. If the provided plug does not fit
into your outlet, consult an electrician for replacement of the
outlet.
6. Protect the power cord from being walked on or pinched
particularly at plugs, convenience receptacles, and the point
where they exit from the apparatus.
7. Unplug this apparatus during lightning storms or when unused
for long periods of time.
8. Refer all servicing to qualified service personnel. Servicing is
required when the apparatus has been damaged in any way,
such as power-supply cord or plug is damaged, liquid has been
spilled or objects have fallen into the apparatus, the apparatus
has been exposed to rain or moisture, does not operate
normally, or has been dropped.
9. When the mains plug or appliance coupler is used as the
disconnect device, it shall remain readily operable.
10. Please keep the unit in a good ventilation environment.
11. WARNING: To reduce the risk of fire or electric shock, do not
expose this apparatus to rain or moisture.
12. Apparatus shall not be exposed to dripping or splashing and no
objects filled with liquids, such as vases, shall be placed on the
apparatus.
13. WARNING: Battery pack shall not be exposed to excessive heat
such as sunshine, fire or the like. (1) The battery pack is not
serviceable. Do not open, disassemble, or service any battery
pack. (2) Do not crush or cut or puncture the internal battery cell.
(3) Do not short-circuit the battery, or expose it to water or other
liquids. (4) Do not touch the internal battery cell for any reason.
(5) Keep the battery away from fire or a hot oven. Do not dispose
of the battery into fire or a hot oven. (6) Keep the product with
battery away from extremely low air pressure or high temperature
surrounding environment. Battery subjected to extremely low air
pressure may result in an explosion or the leakage of flammable
liquid or gas. (7) Stop using the battery pack if it is damaged, or
if you notice any discharge or the buildup of foreign materials
on the battery contacts. (8) Do not put the battery in trash that
is disposed of in landfills. When disposing of the battery pack,
comply with local ordinances or regulations.
14. CAUTION: Risk of explosion if battery is replaced by any battery
other than Lightspeed Part # L3.7V

4
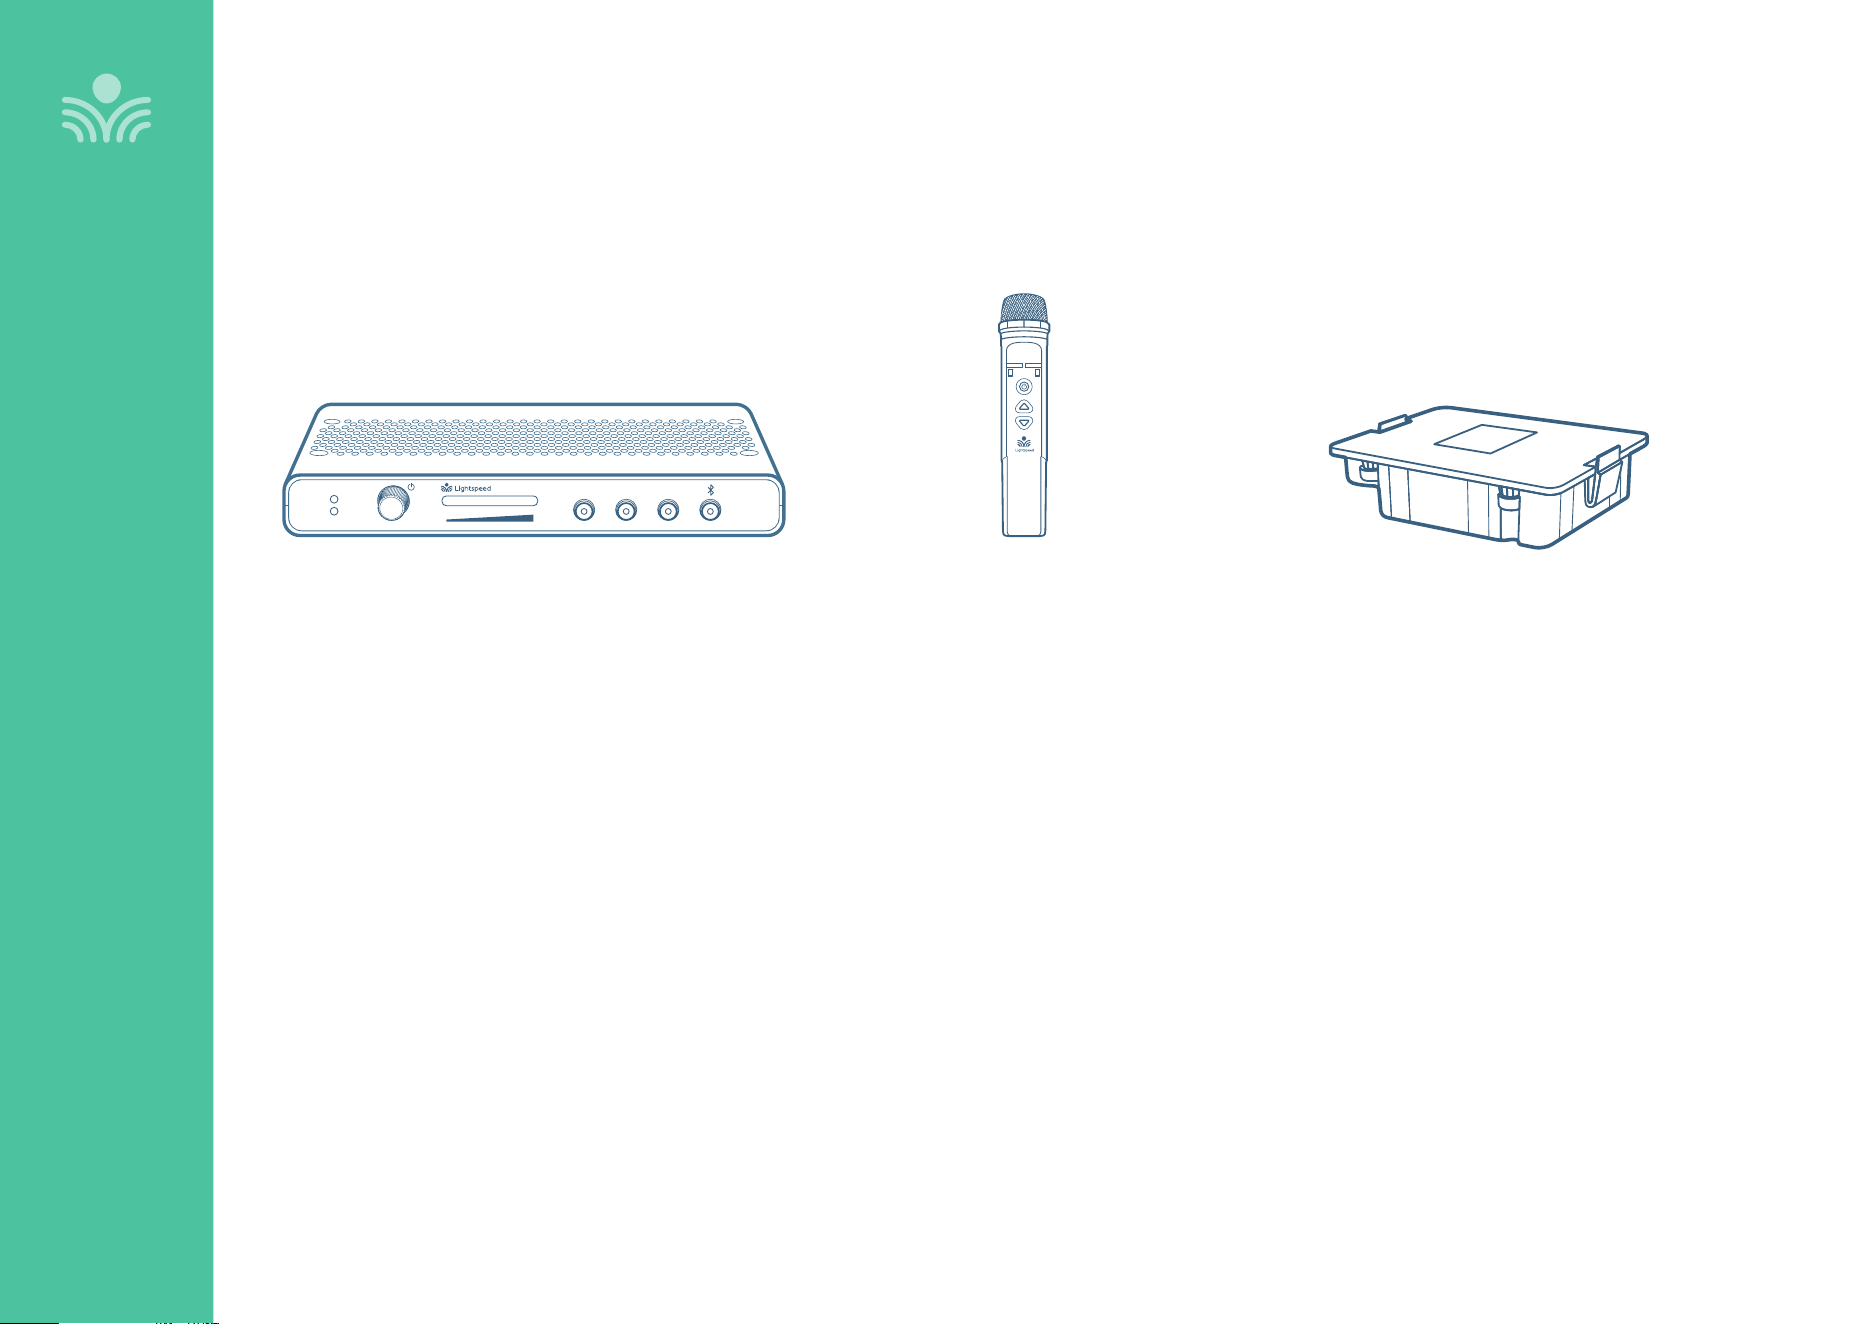
System Components and Unpacking
The standard configuration of Redcat will contain:
Redcat
Receiver/Amplifier and Power Supply
OVERVIEW
PLEASE NOTE: Redcat and any wireless components (microphones, Media Connector) are paired together at the factory. Please keep all components together as a
system. Moving them from one system or room to another will result in the need to re-pair them.
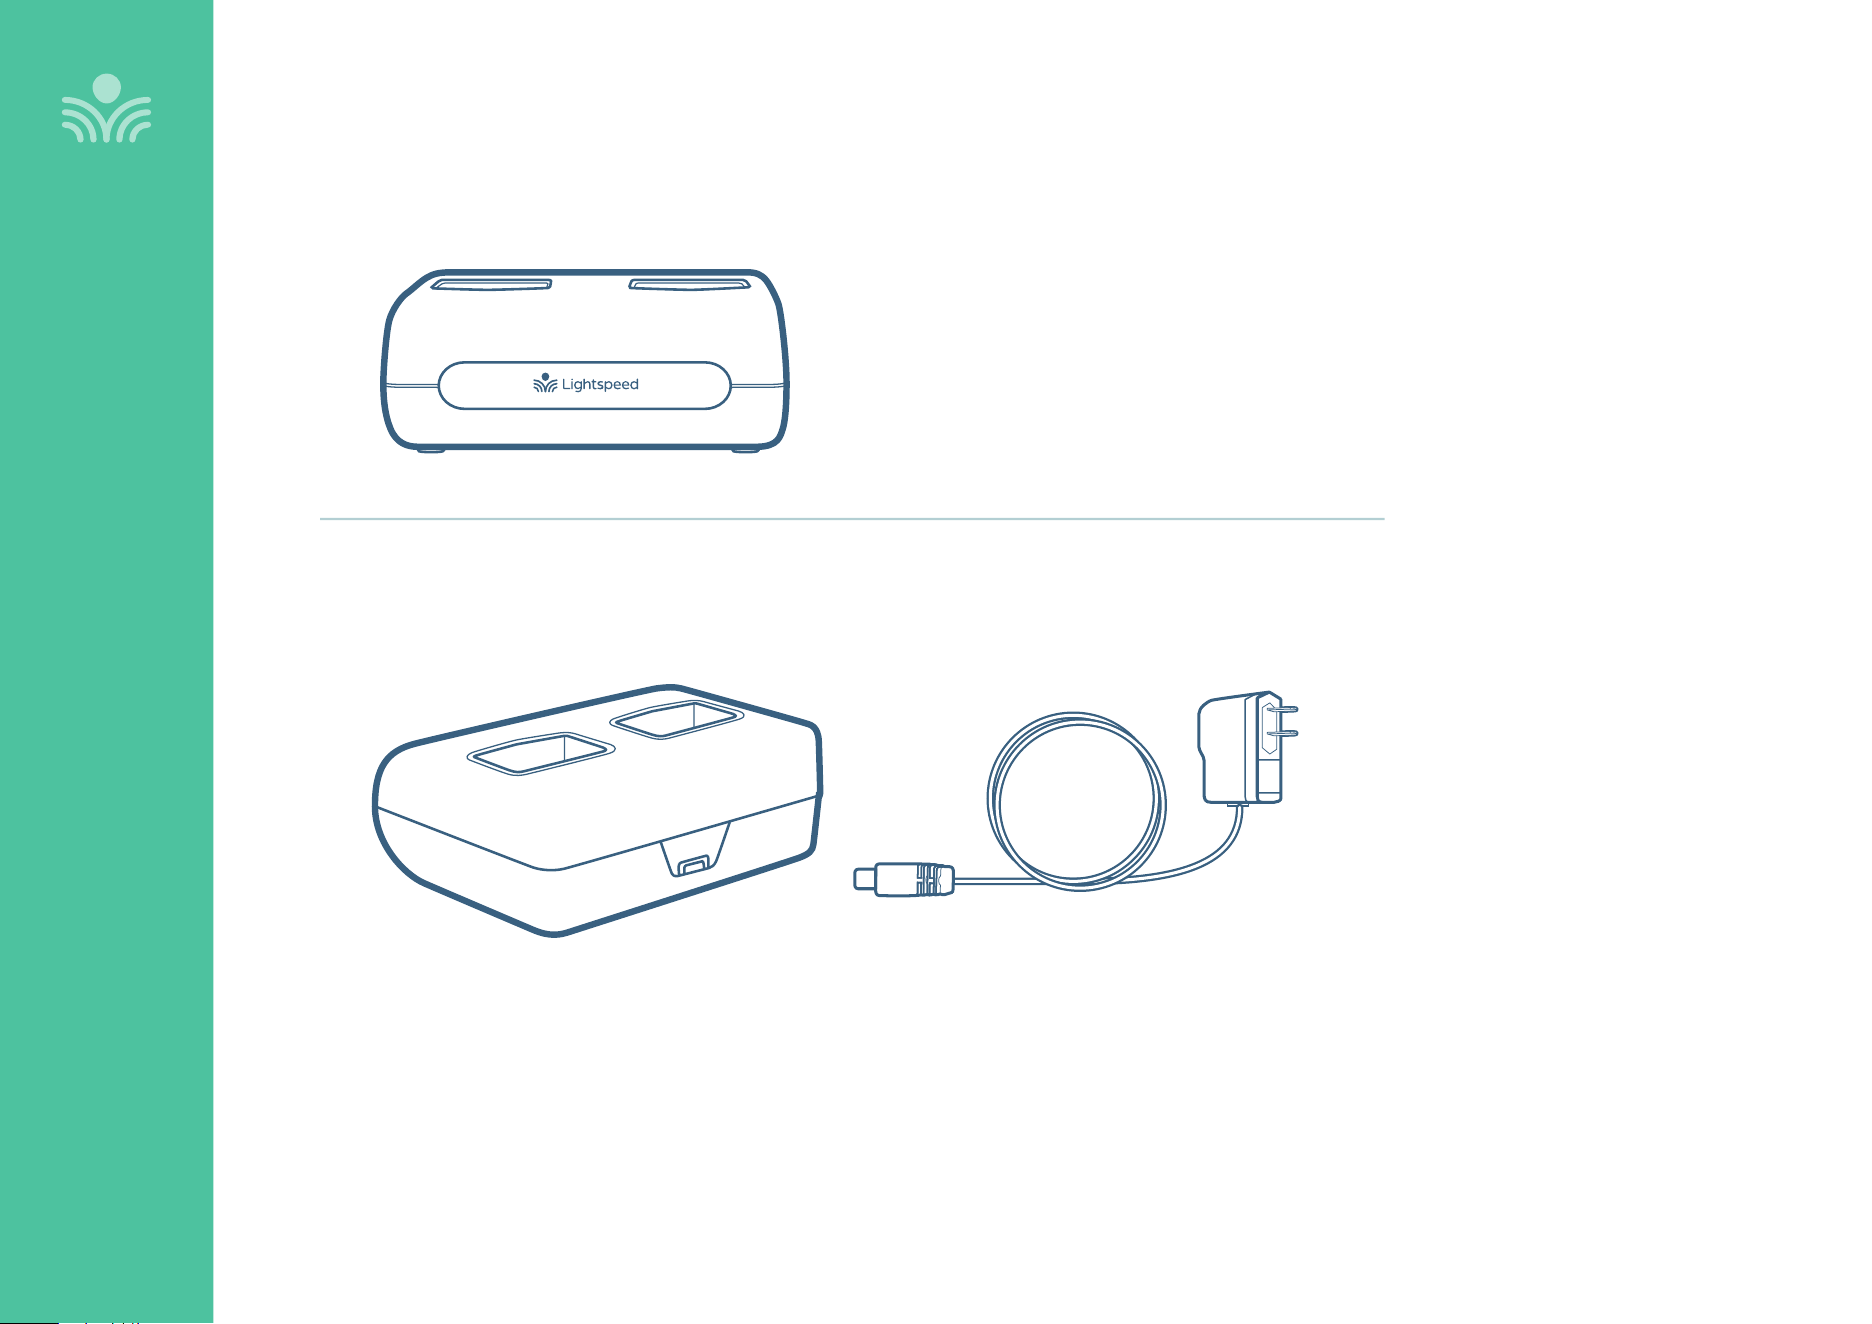
Redcat
Microphone Cradle Charger
and Power Supply
Clearmike
Teacher Microphone
5
Optional Accessories
OVERVIEW
Media Connector
with power adapter and cable
Sharemike
Handheld Microphone
Input
Power
Status
Output Tone
Level
Push
Redcat Battery Pack
6
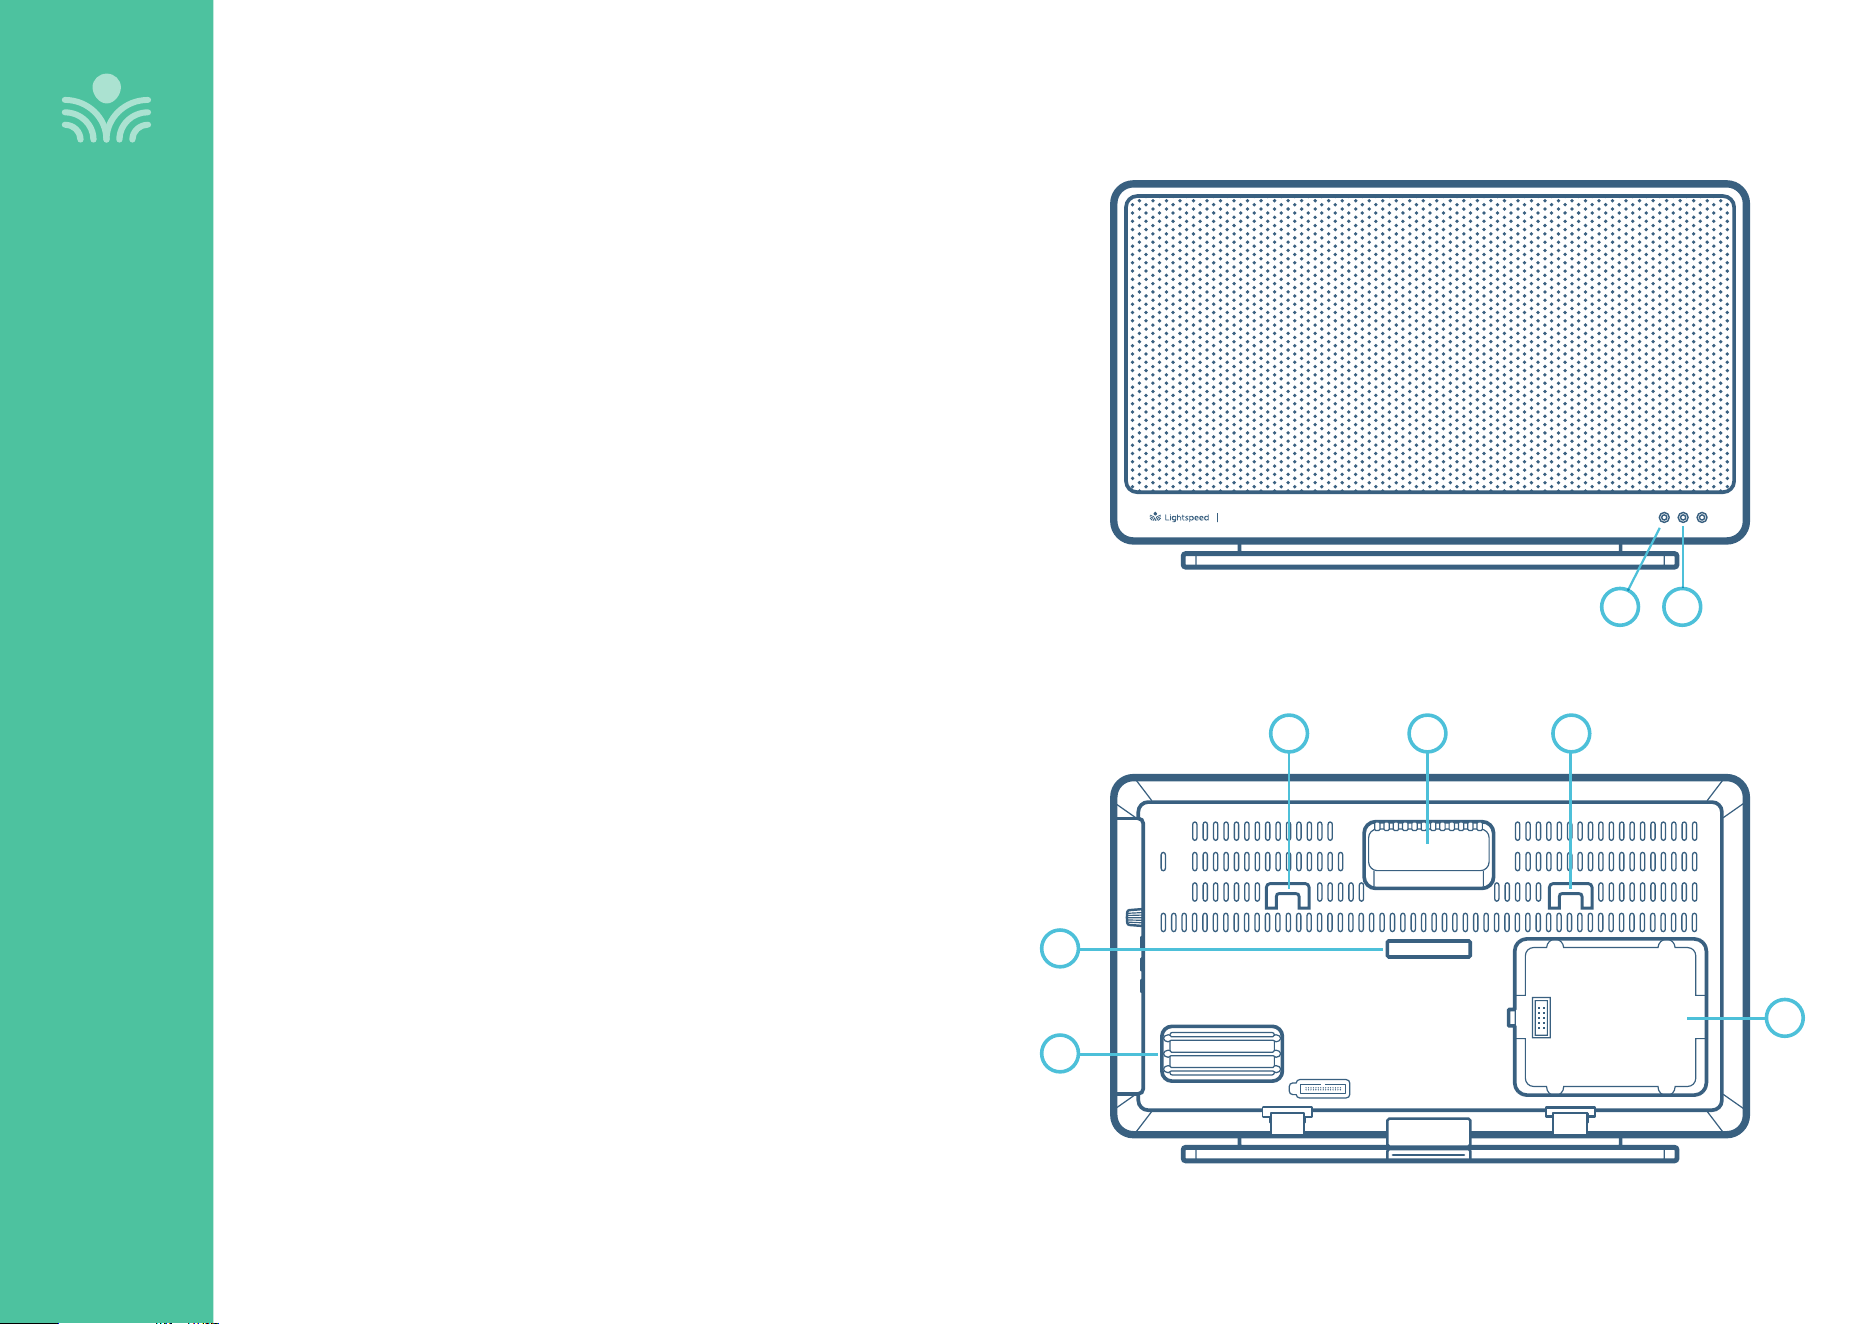
Controls and Connections
OVERVIEW
Redcat
REAR PANEL
FRONT PANEL
1. CARRYING HANDLE INSET
2. WALL MOUNTING SLOTS
3. SECURITY BRACKET SLOT
4. CABLE MANAGEMENT AND STRAIN RELIEF
5. COMPARTMENT FOR OPTIONAL BATTERY PACK
1. STATUS LIGHT: Microphone link and pair indicators
Solid blue: Audio link has been established
Alternating blue/white: Pairing in process
O: Unpaired or nothing linked
2. POWER LIGHT
Solid white: Indicates power on
21
1
4
5
3
2 2
7
Input
Output
Tone
Push
Level
Power
24V/1.75A
Input
Output
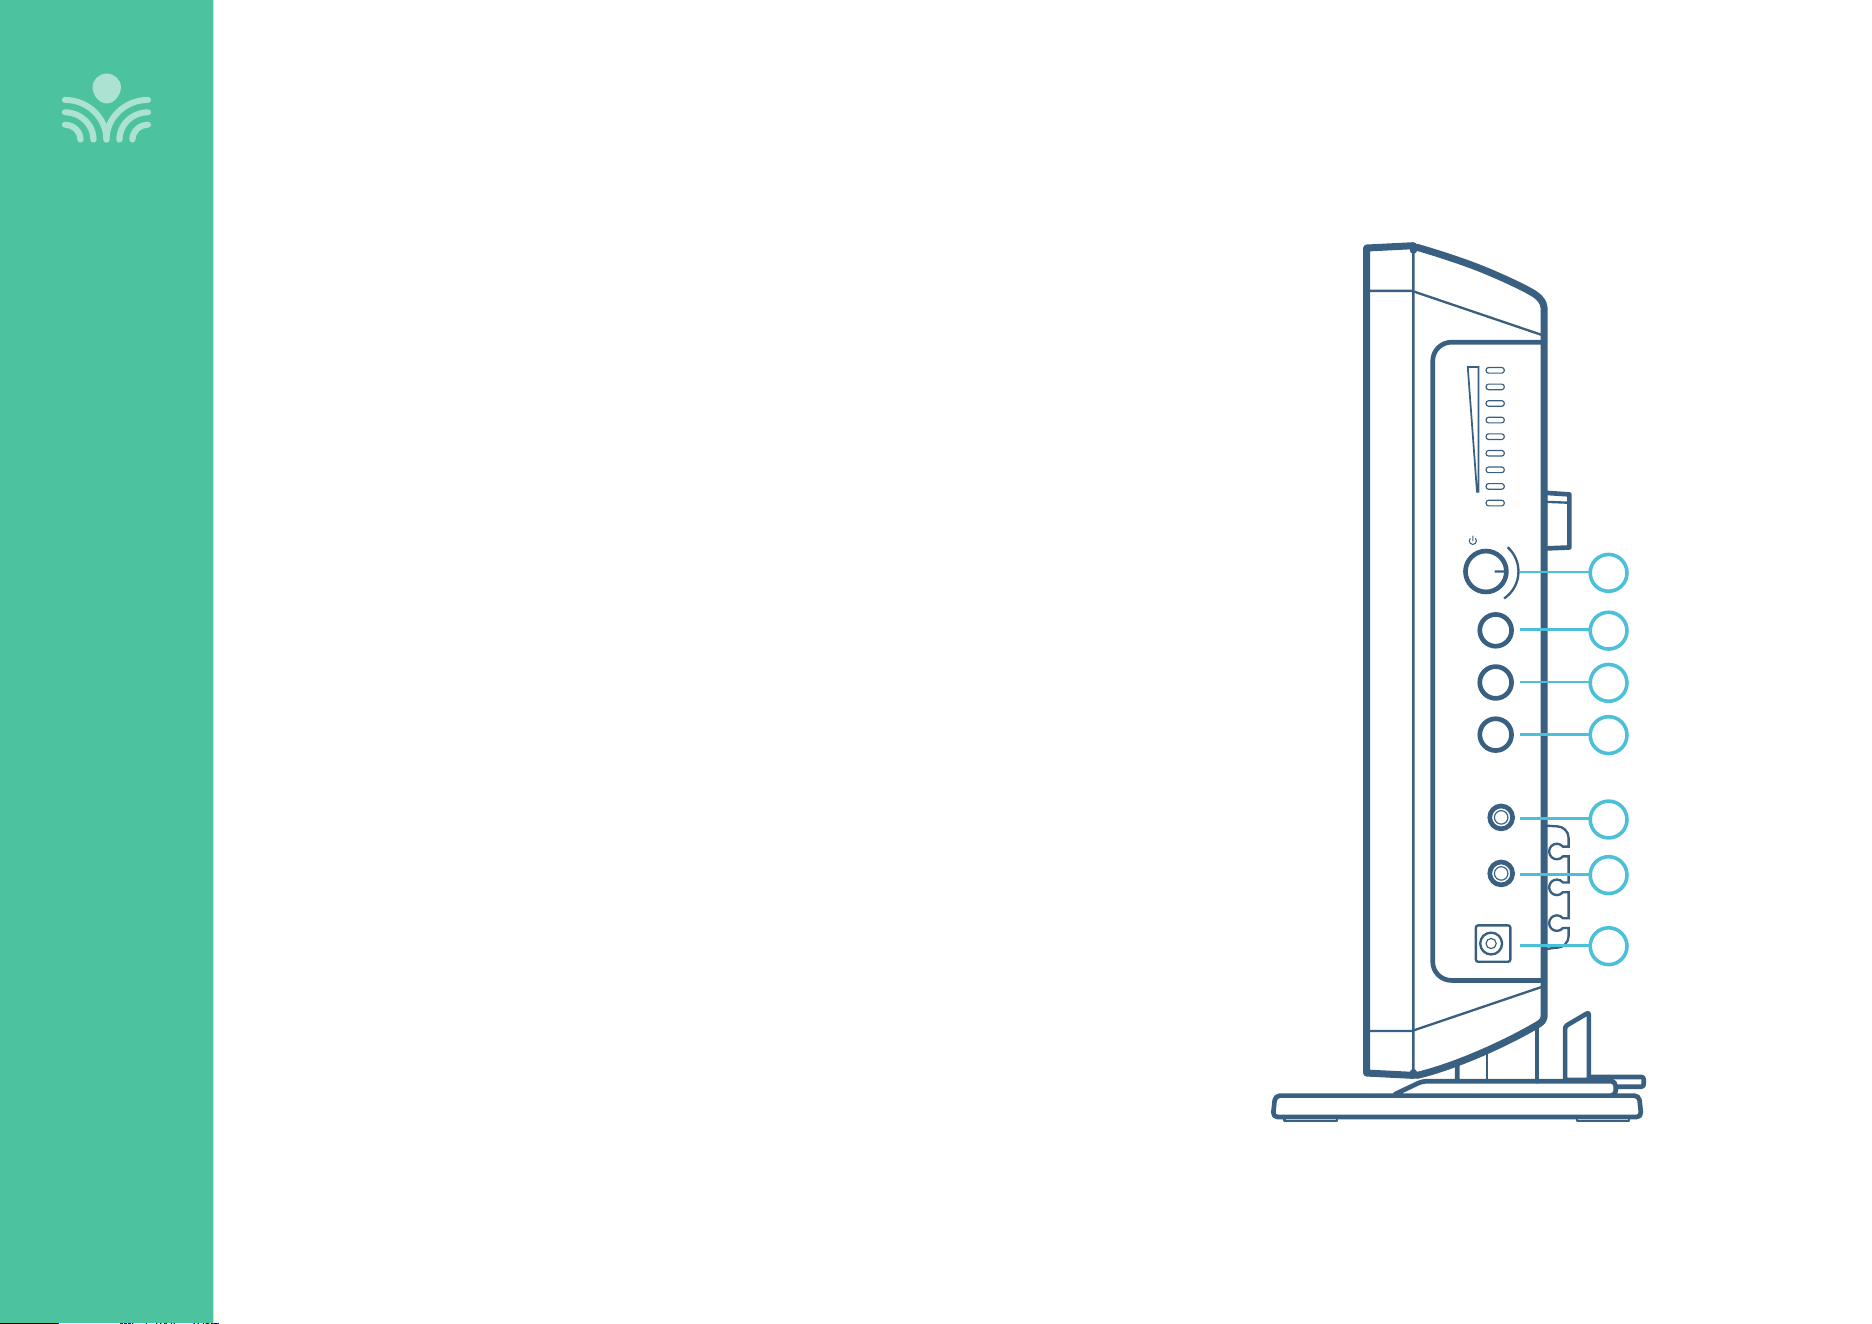
Side Panel Controls and Connections
OVERVIEW
1. POWER BUTTON / LEVELS ADJUSTMENT: Press this button to turn the system power on
or o. This also functions as an adjustment knob for the volume and tone depending on the
mode selected (see 2, 3, 5 below).
2. AUDIO INPUT VOLUME SELECTOR: Selects Volume as the mode for the adjustment knob (1)
for the audio sources connected to the audio input jack below.
3. AUDIO OUTPUT VOLUME SELECTOR: Selects Volume as the mode for the adjustment knob
(1) for the audio device connected to the audio output jack below.
4. TONE SELECTOR: Selects tone as the mode for the adjustment knob (1) that adjusts the
bass or treble that is heard through the Redcat.
5. AUDIO INPUT JACK: 3.5mm stereo connector for connecting to a computer or mobile device
as an audio source.
6. AUDIO OUTPUT JACK: 3.5mm stereo connector for connecting to an assisted listening
device (ALD) or to a computer for recording.
7. POWER: Plug the power supply (24V/1.75A) into this jack.
1
2
3
4
6
5
7
8
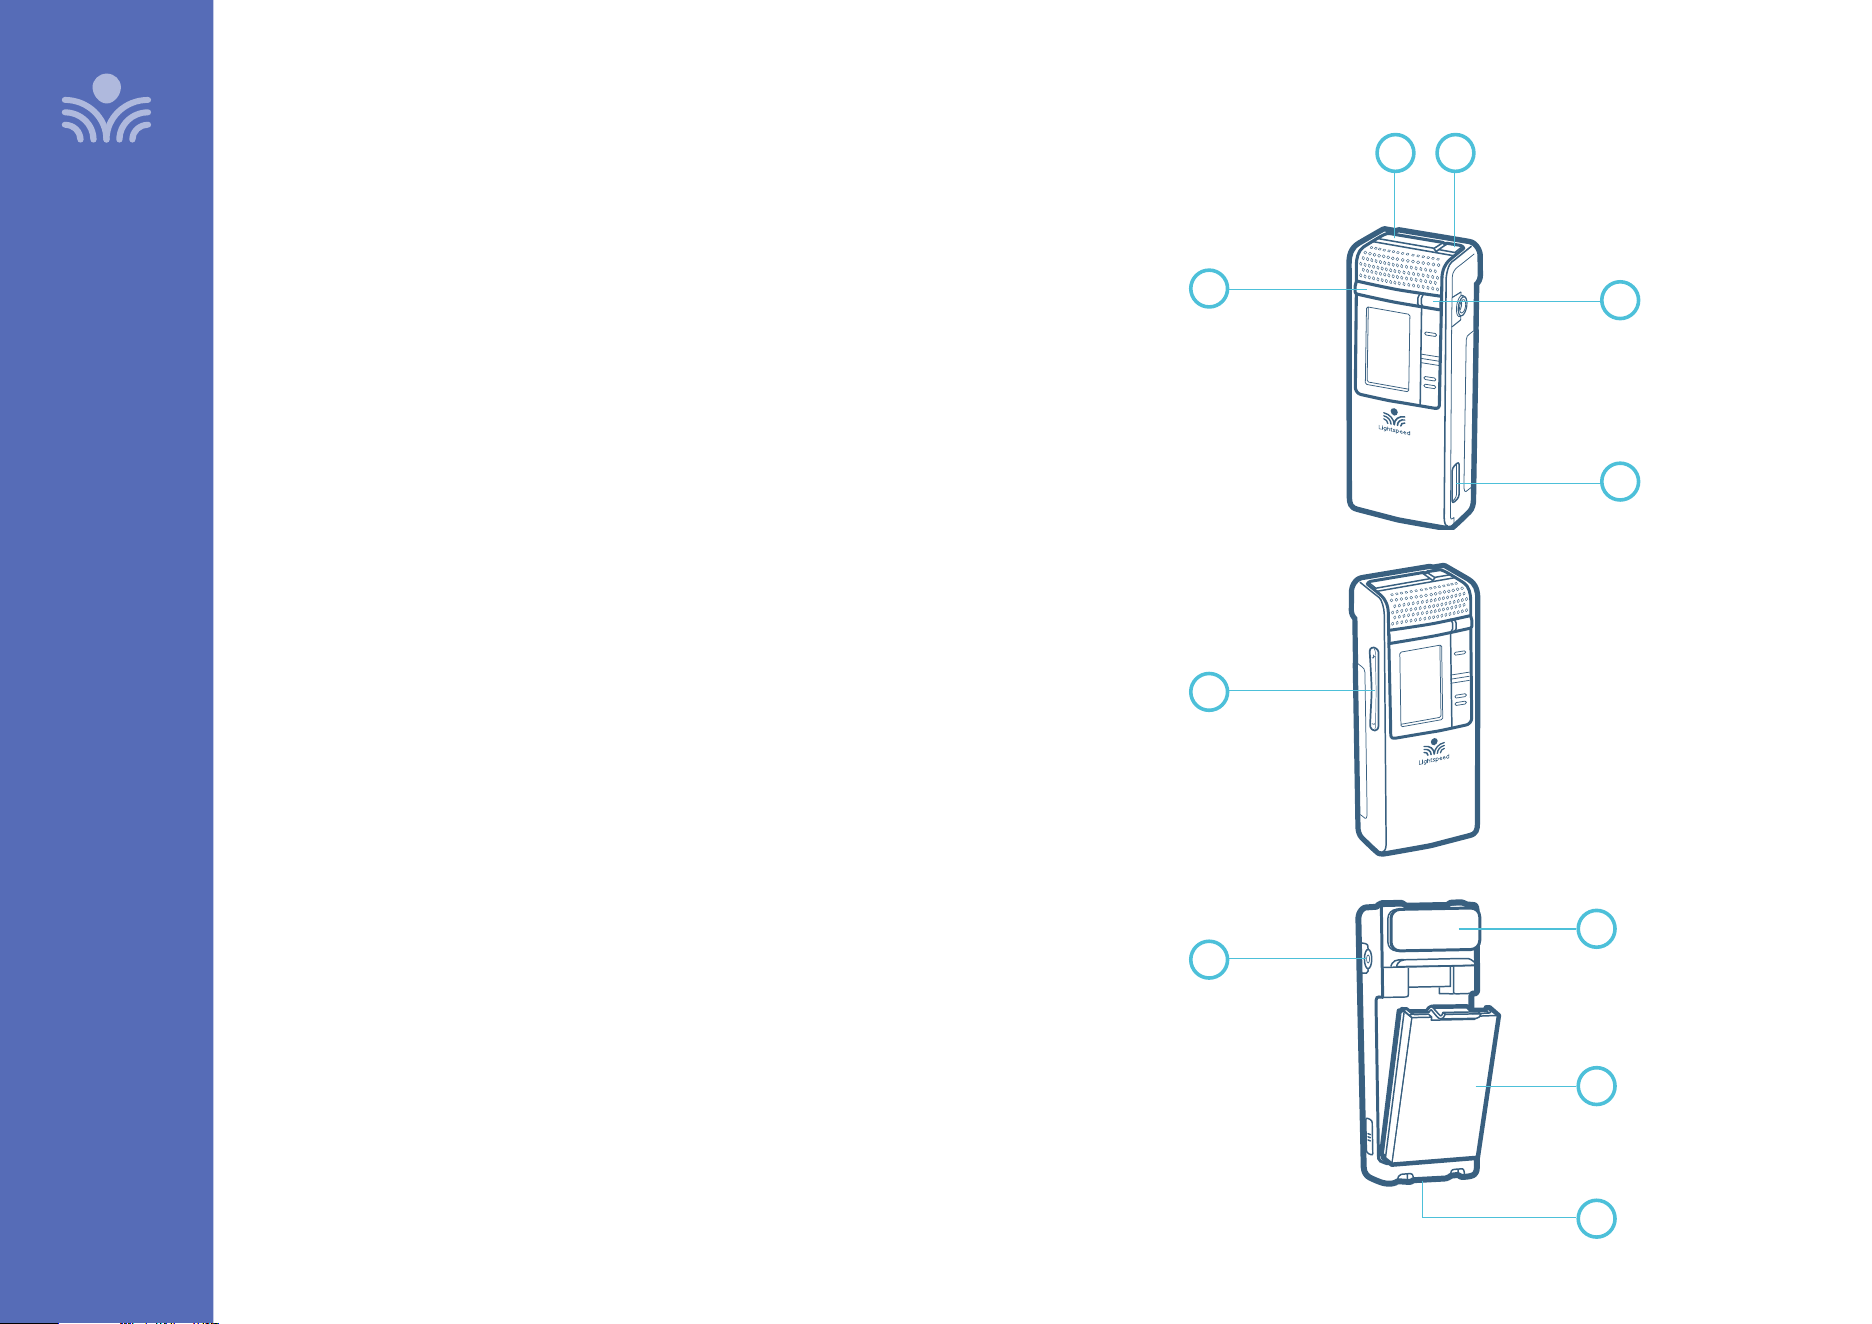
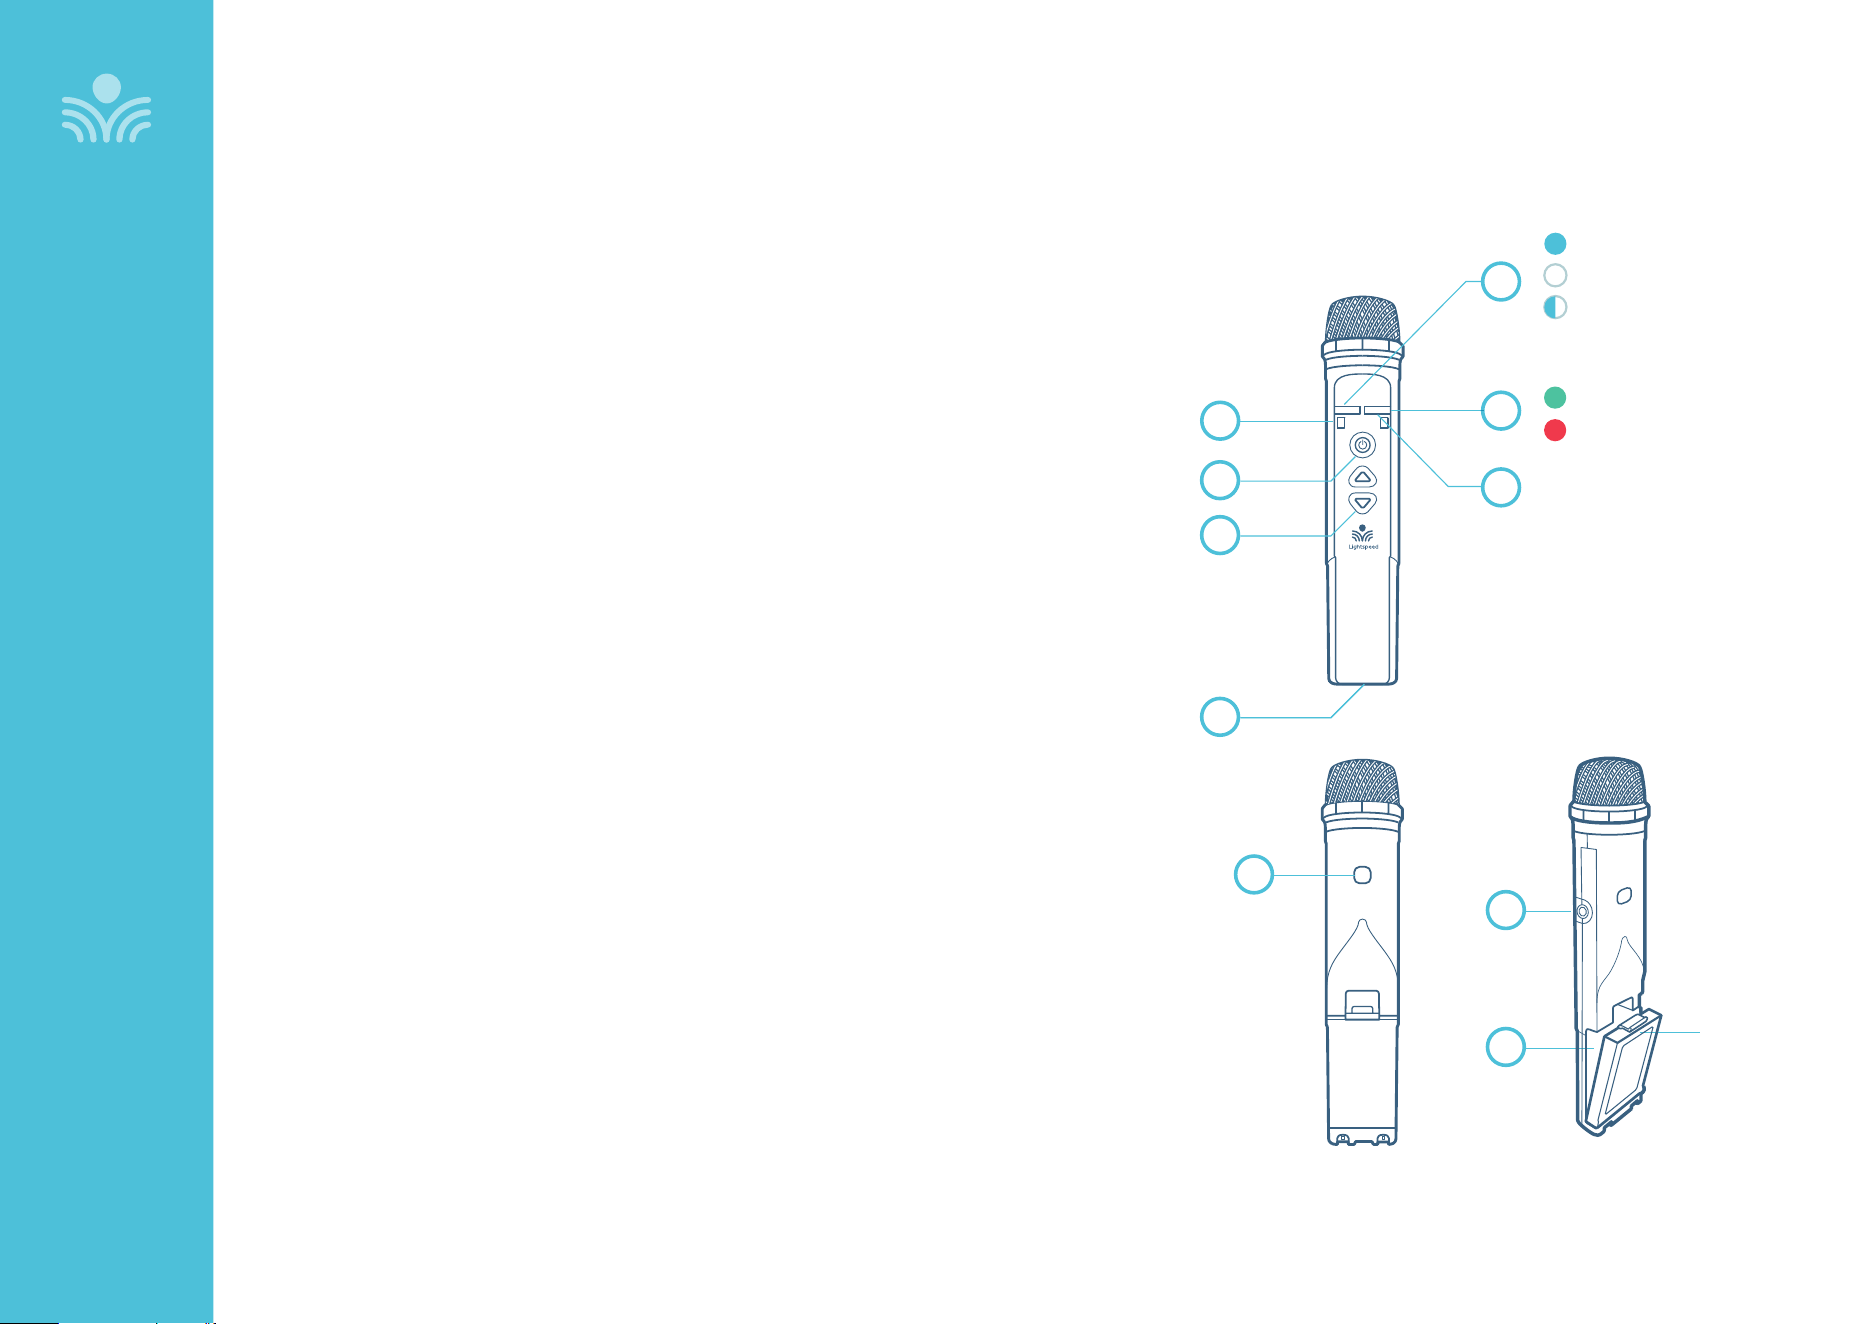
Clearmike Controls and Connections
1. POWER/MUTE BUTTON: Press and hold 1 second to power on.
Press and hold for 2 seconds to power o. Tap to mute or talk.
Press and hold for 5 seconds to initiate pairing.
2. IR TRANSMITTER: For pairing to base unit.
3. TALK/MUTE LIGHT: See page 10 for light color descriptions.
4. POWER STATUS LIGHT: See page 10 for light color descriptions.
5. EMERGENCY ALERT BUTTON: Press and hold 2 seconds to
activate alert.
6. MICROPHONE VOLUME UP/DOWN
7. EARBUD/MIC CONNECTION: For use with optional EMA (earset)
or LMA (lapel) microphones..
8. LANYARD INTERFACE: Insert the lanyard into this hook to wear
the Clearmike.
9. BATTERY: Rechargeable battery pack can be replaced by the user.
10. USB INPUT: Connect audio source to send to Redcat. USB input
can also be used for charging.
OVERVIEW
1 2
3
7
6
4
8
9
10
5
9
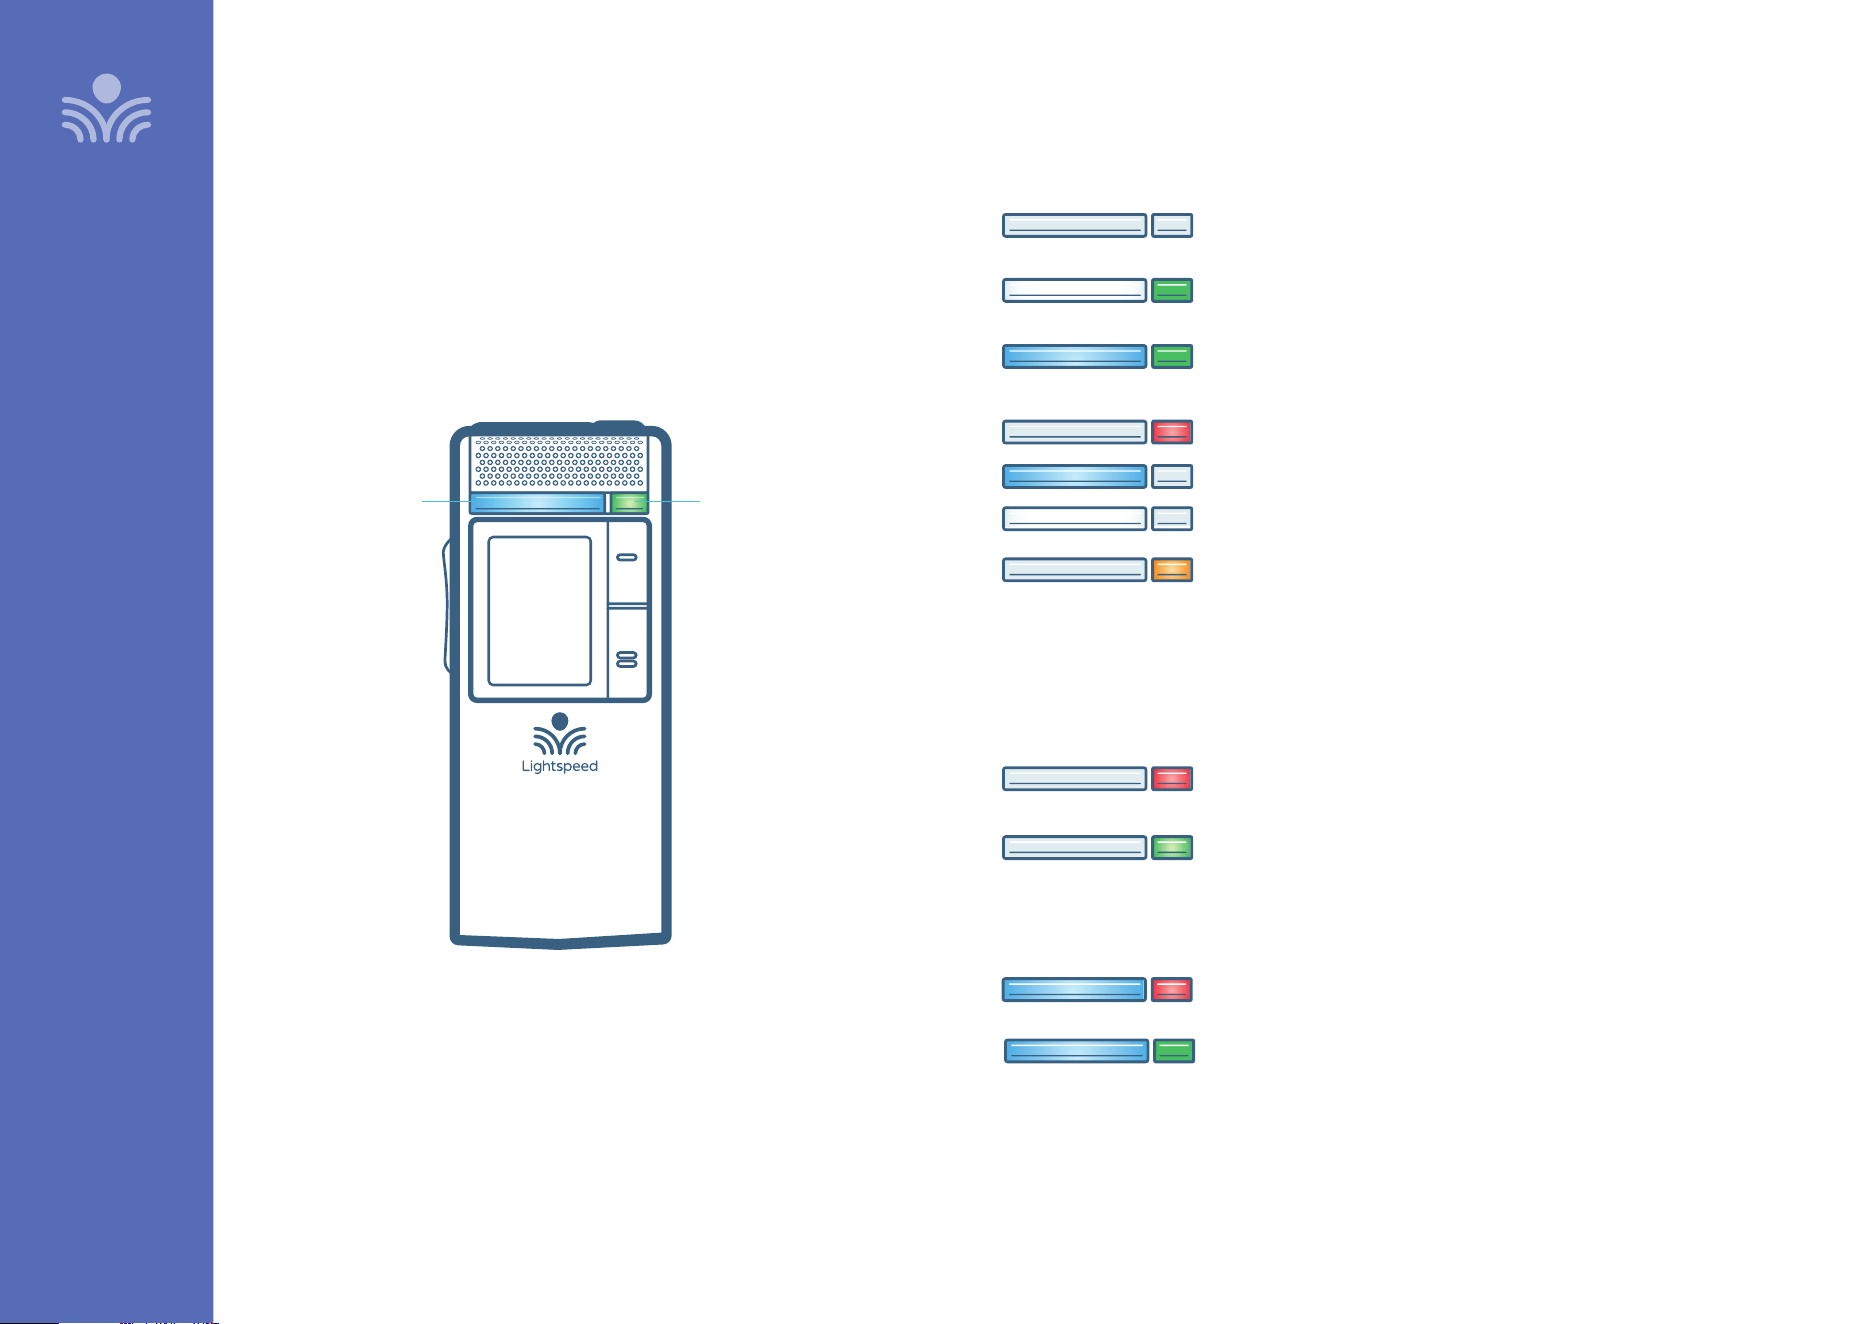
Microphone Lights
OVERVIEW
OFF: Mic o
SOLID WHITE / SOLID GREEN: Mute, live link with base
SOLID BLUE / SOLID GREEN: Talk
ANY COLOR / BLINKING RED: Low Battery
BLUE/WHITE ALTERNATING / OFF: Pairing
OFF / BLINKING ORANGE: Firmware update in progress
OFF / SOLID RED: Charging
OFF / SOLID GREEN: Charged
SOLID BLUE / SOLID RED: Charging
SOLID BLUE / SOLID GREEN: Charged
POWER STATUS LIGHTTALK/MUTE LIGHT
In Charger:
LEFT LIGHT / RIGHT LIGHT
Plugged into USB:
10
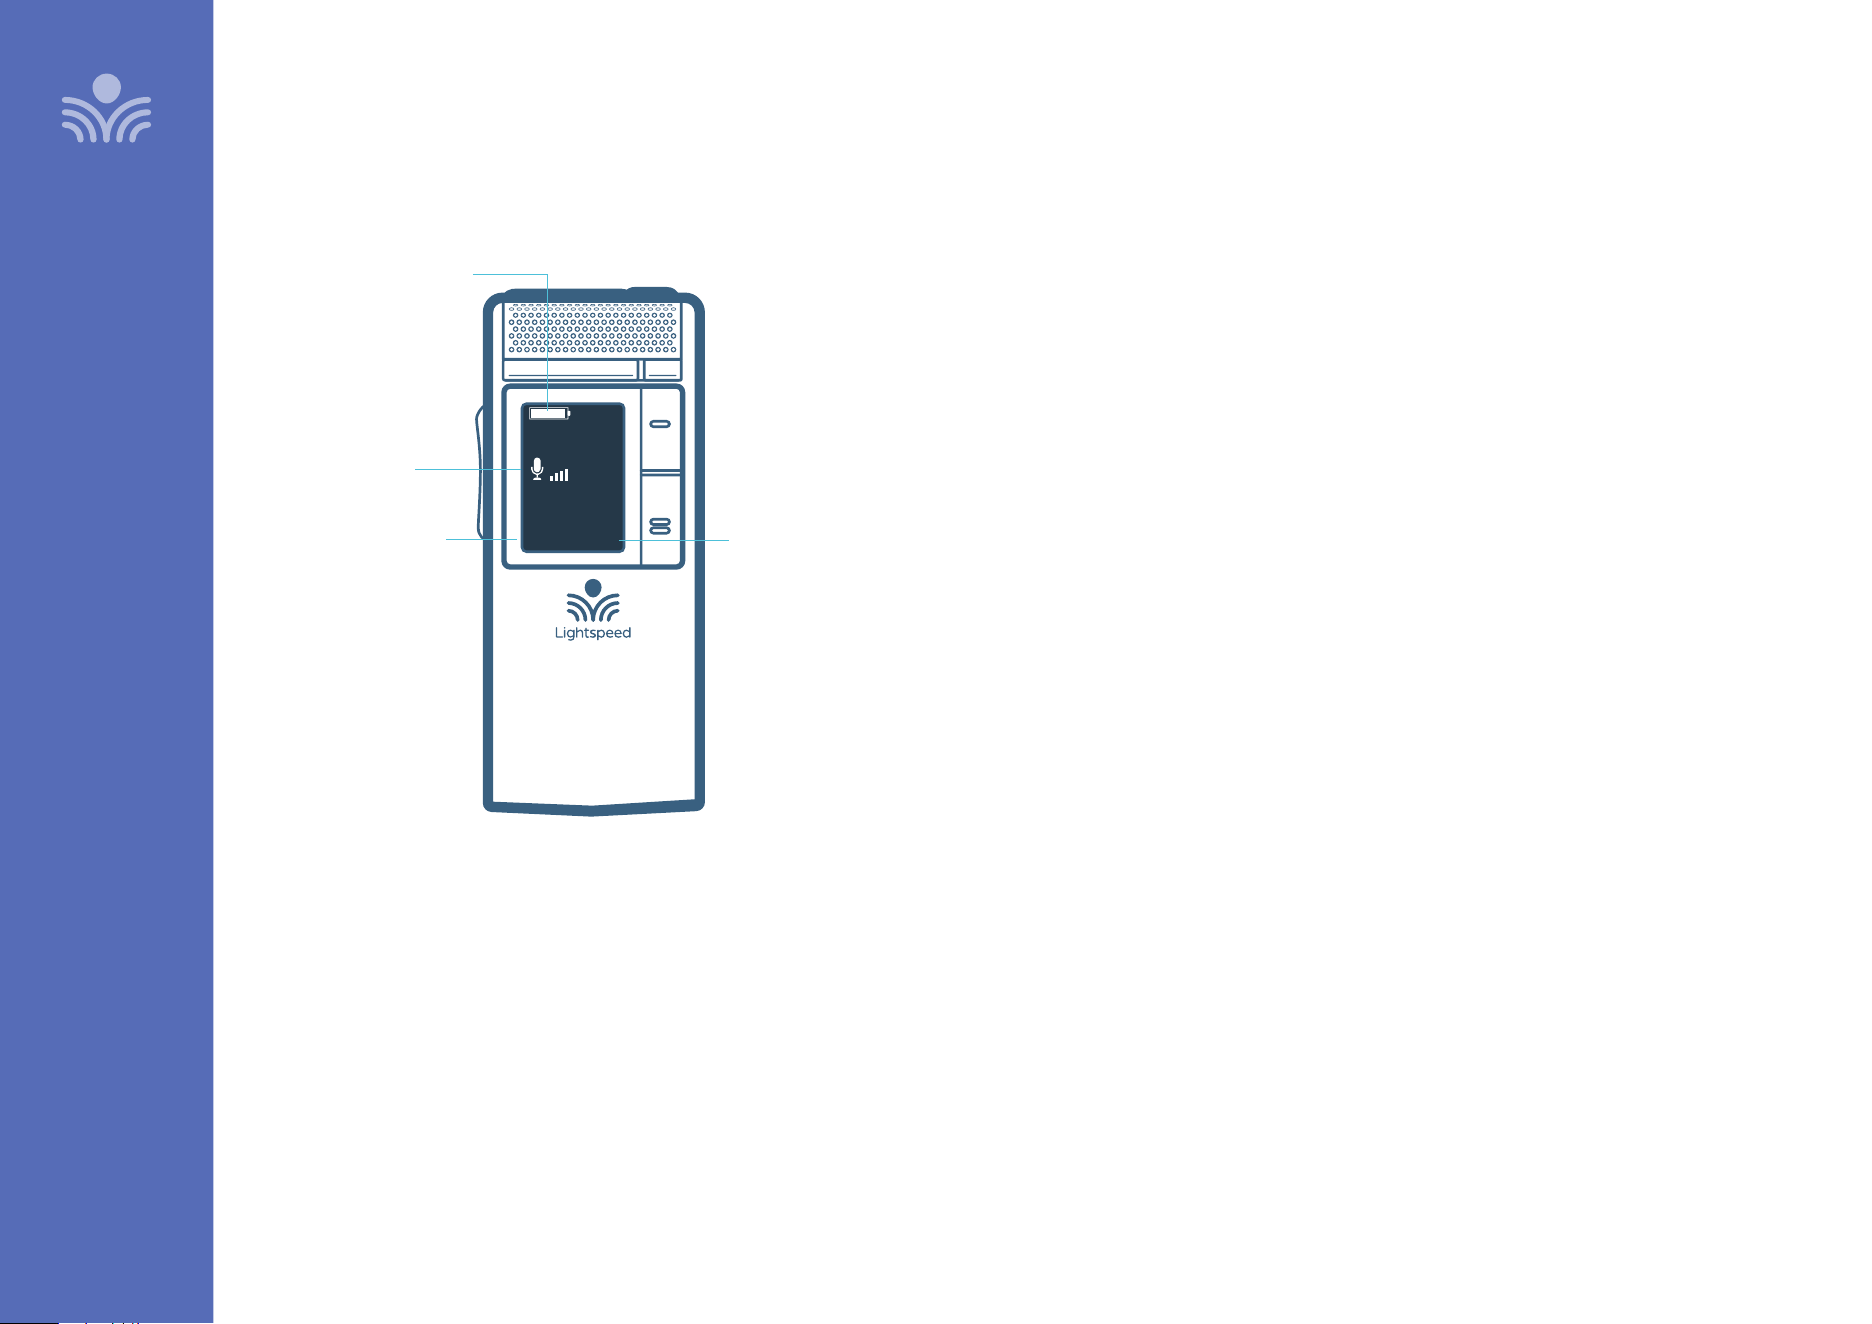
Clearmike Display
OVERVIEW
DEFAULT
SCREEN
EXTM1
MUTE
INDICATOR/
VOLUME
BATTERY INDICATOR
(Full, half, empty)
MIC NUMBER
(M1 OR M2)
EXTERNAL MIC
DETECTION
The 3.5mm audio jack on the
microphone can be used with an
earbud or an external microphone.
Plugging in an external mic will
disable the internal microphone on
the Clearmike
11
Clearmike/Sharemike Cradle Charger
OVERVIEW
DC POWER PORT: Connect the 5V/1.0A DC power cord

12
Determine Set-Up Location
SET-UP & OPERATION
Redcat is shipped with an installed base to stand on a cabinet or
tabletop. Alternatively, the base can be used as a wall-mount bracket
• Redcat should be placed within 7 feet of an electrical outlet and on
a surface about 6 feet o the ground.
• Find a location as far away as possible from the teacher who will be
using the mic.
• The best place is against the wall opposite where the teacher will be
speaking.
• If this is not possible, other good locations are along either wall next
to the teacher or in a corner.
• Avoid placing Redcat next to where the teacher instructs.
Putting Redcat in close proximity to the teacher’s mic can result in
feedback.
A. TABLE-TOP SET-UP (RECOMMENDED)
Virtually no setup time, greater flexibility to change locations
B. MOUNTED ON A WALL
More permanent setup, greater security
AVOID!
A. BEST PLACEMENT
B. GOOD PLACEMENT
13
SET-UP & USE / OPERATION
1
ATTACH SECURITY BRACKET TO WALL
1. Determine location and attach security
bracket to the wall
Déterminez l’emplacement et fixez le
support de sécurité au mur
2. Level bracket and mark position of drill
holes
Placez le support de niveau sur le mur
et marquez l’emplacement des trous de
perçage.
3. Drill holes and insert wall anchors
appropriate for the mounting surface
Percez des trous et insérez des chevilles
murales adaptées à la surface de montage
4. Secure to wall with screws
Fixez-le au mur à l’aide de vis
1
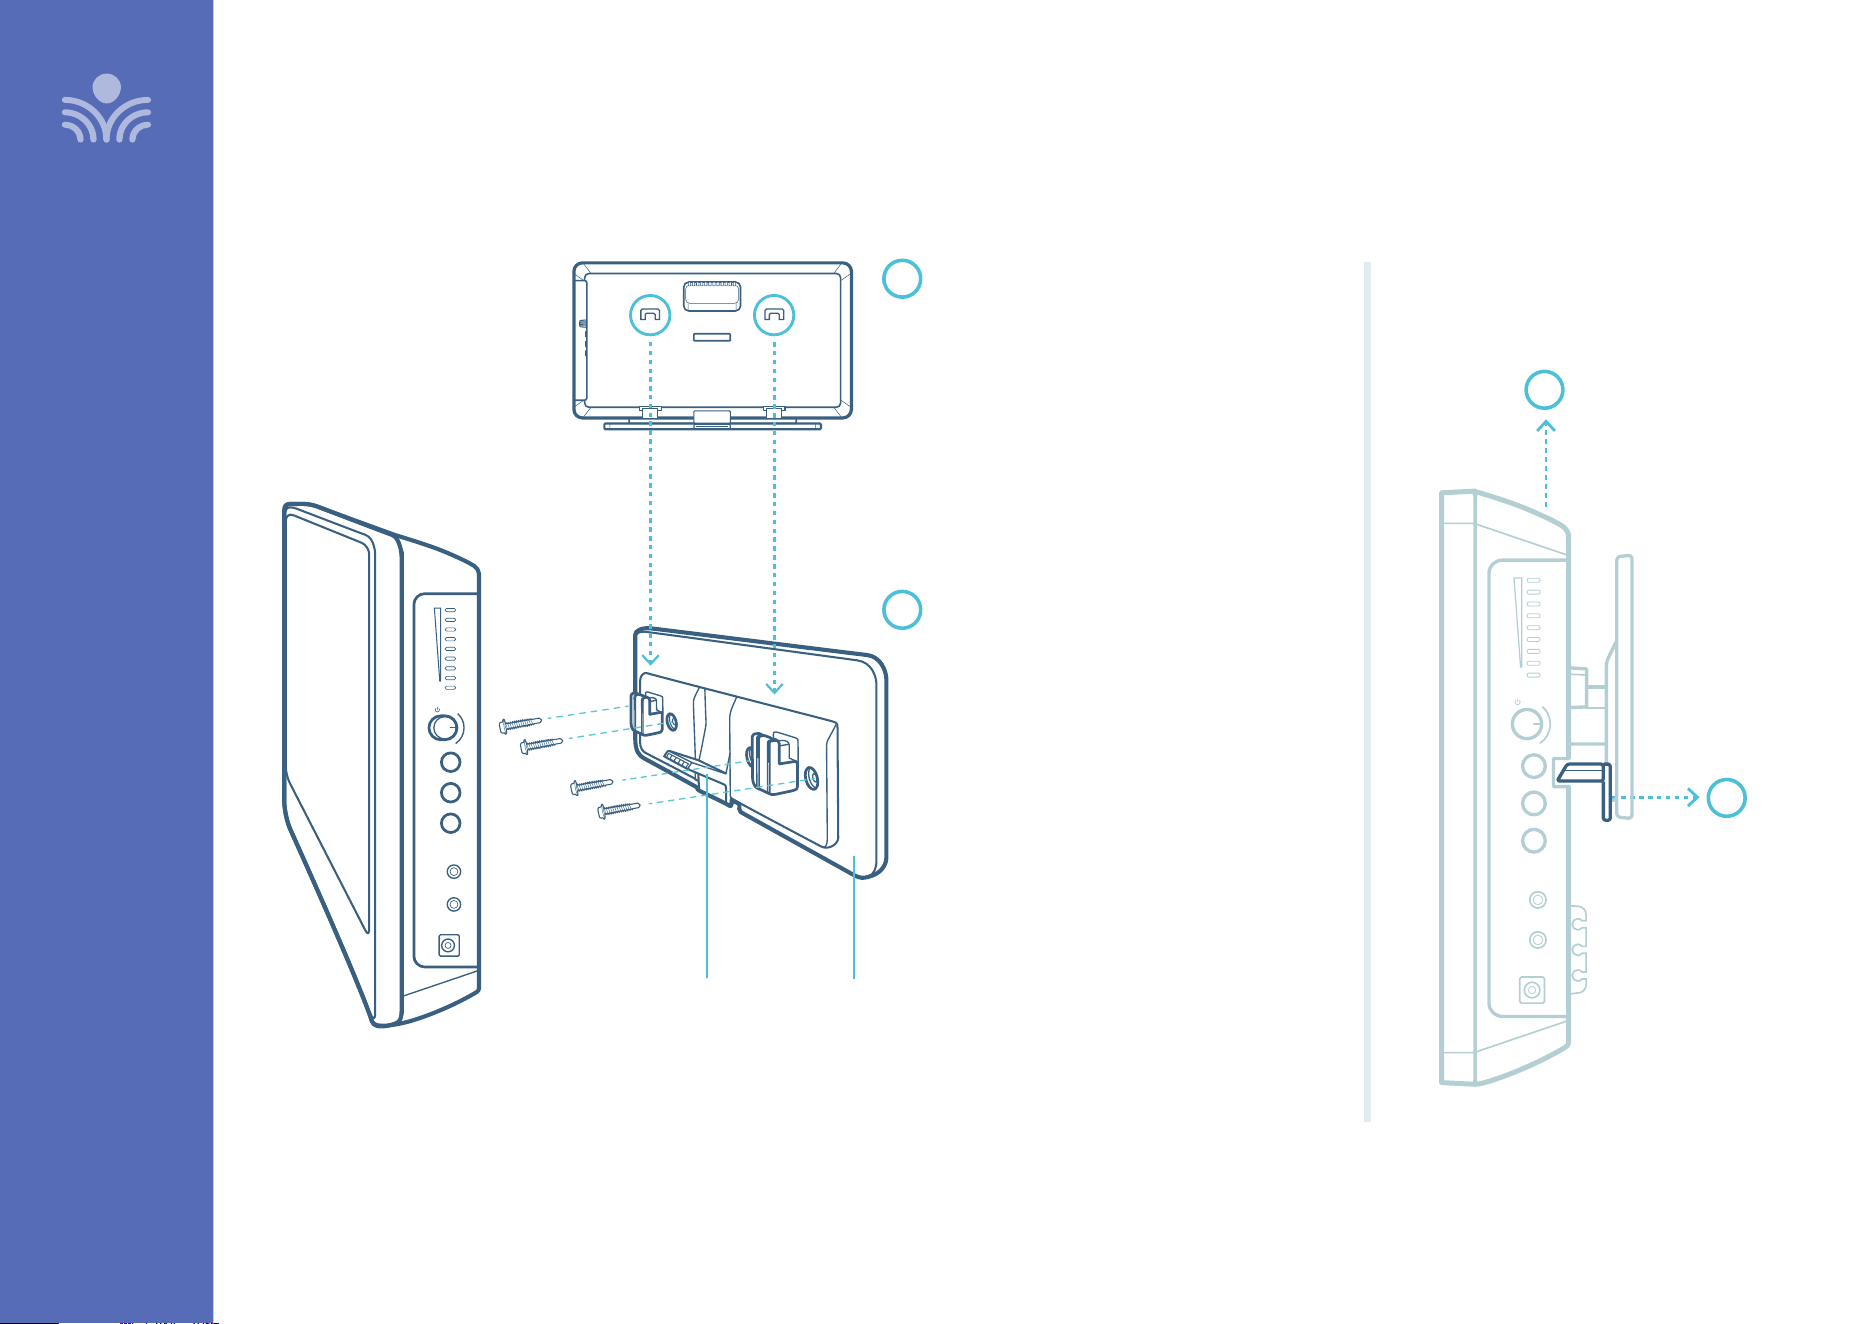
ATTACH REDCAT TO BRACKET
Slide the back of Redcat onto the security
bracket mounting points until the tabs on the
back are firmly seated and the security latch is
snapped into the back of the Redcat
Faites glisser le Redcat sur les points de
fixation jusqu’à ce que les languettes à
l’arrière soient fermement en place et que le
loquet de sécurité s’enclenche à l’arrière du
Redcat
RELEASE THE SECURITY LATCH
Reach behind
the Redcat
and press the
security latch
lever toward the
wall
Passez la
main derrière
le Redcat et
appuyez sur
le levier de
verrouillage
de sécurité en
direction du
mur
Slide the Redcat up
Faites glisser le
Redcat vers le haut
2
2
Install Wall-Mounted Security Bracket
Input
Input
Output
Output
Tone
Tone
Push
Push
Level
Level
Power
Power
24V/1.75A
24V/1.75A
Input
Input
Output
Output
Input
Output
Tone
Push
Level
Power
24V/1.75A
Input
Output
SECURITY
LATCH
VERROU DE
SÉCURITÉ
SECURITY
BRACKET
SUPPORT
DE
SÉCURITÉ
14
SET-UP & USE / OPERATION
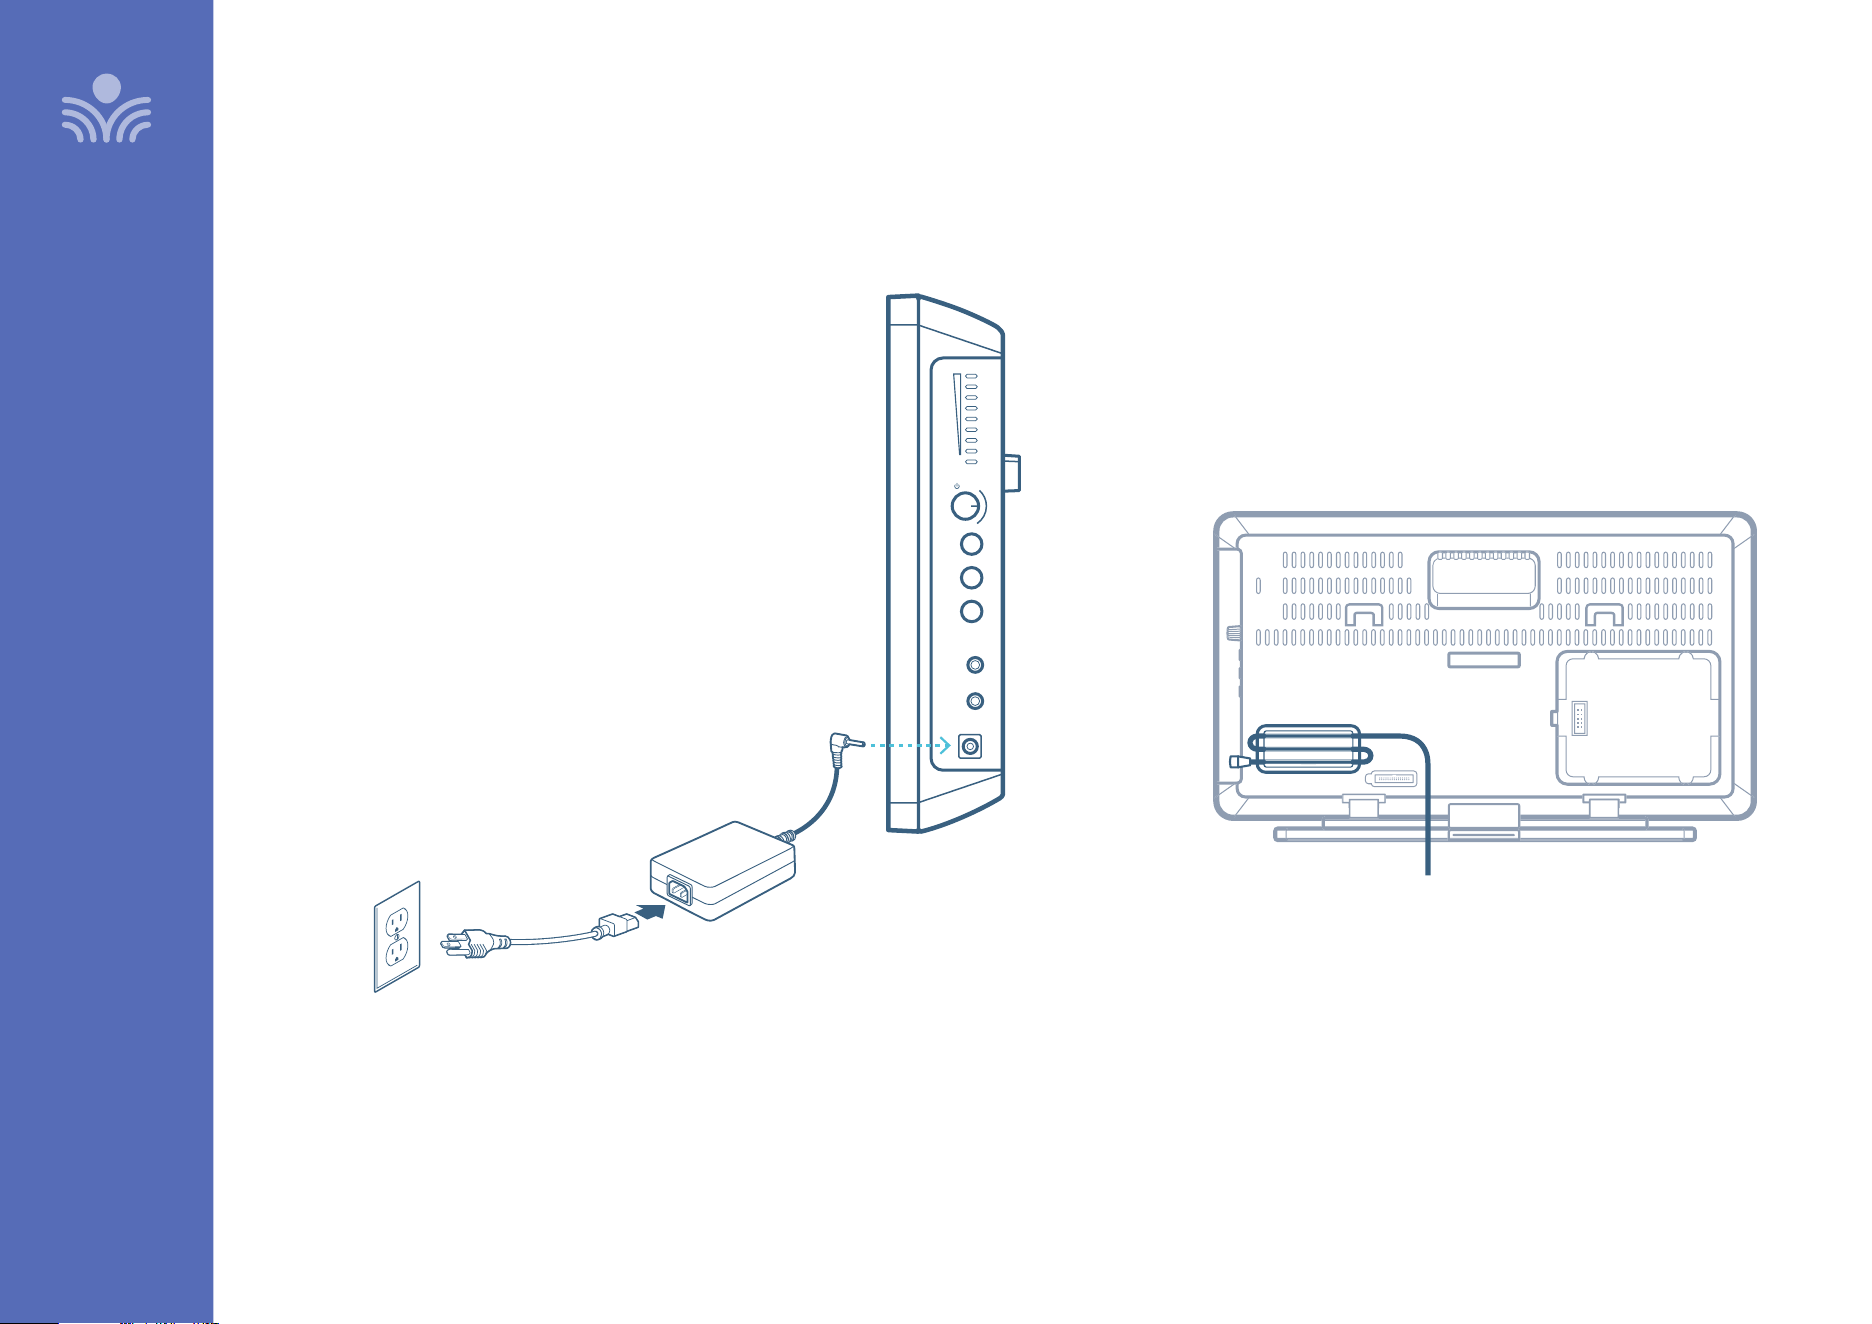
CABLE MANAGEMENT
Use the slots on the back of Redcat for
cable management and strain relief.
Connecting the Power Supply
LOCATE THE DC POWER SUPPLY AND AC POWER CORD
• Connect the AC power cord into the DC power supply.
• Insert the DC connector into the “Power” on Redcat and plug
the other end to an electrical outlet.
• Redcat automatically powers on and the white Power light
on the front panel will appear.
NOTE: For operation instructions when the L14V battery
pack is installed, see page 31.
Input
Output
Tone
Push
Level
Power
24V/1.75A
Input
Output
15
SET-UP & USE / OPERATION
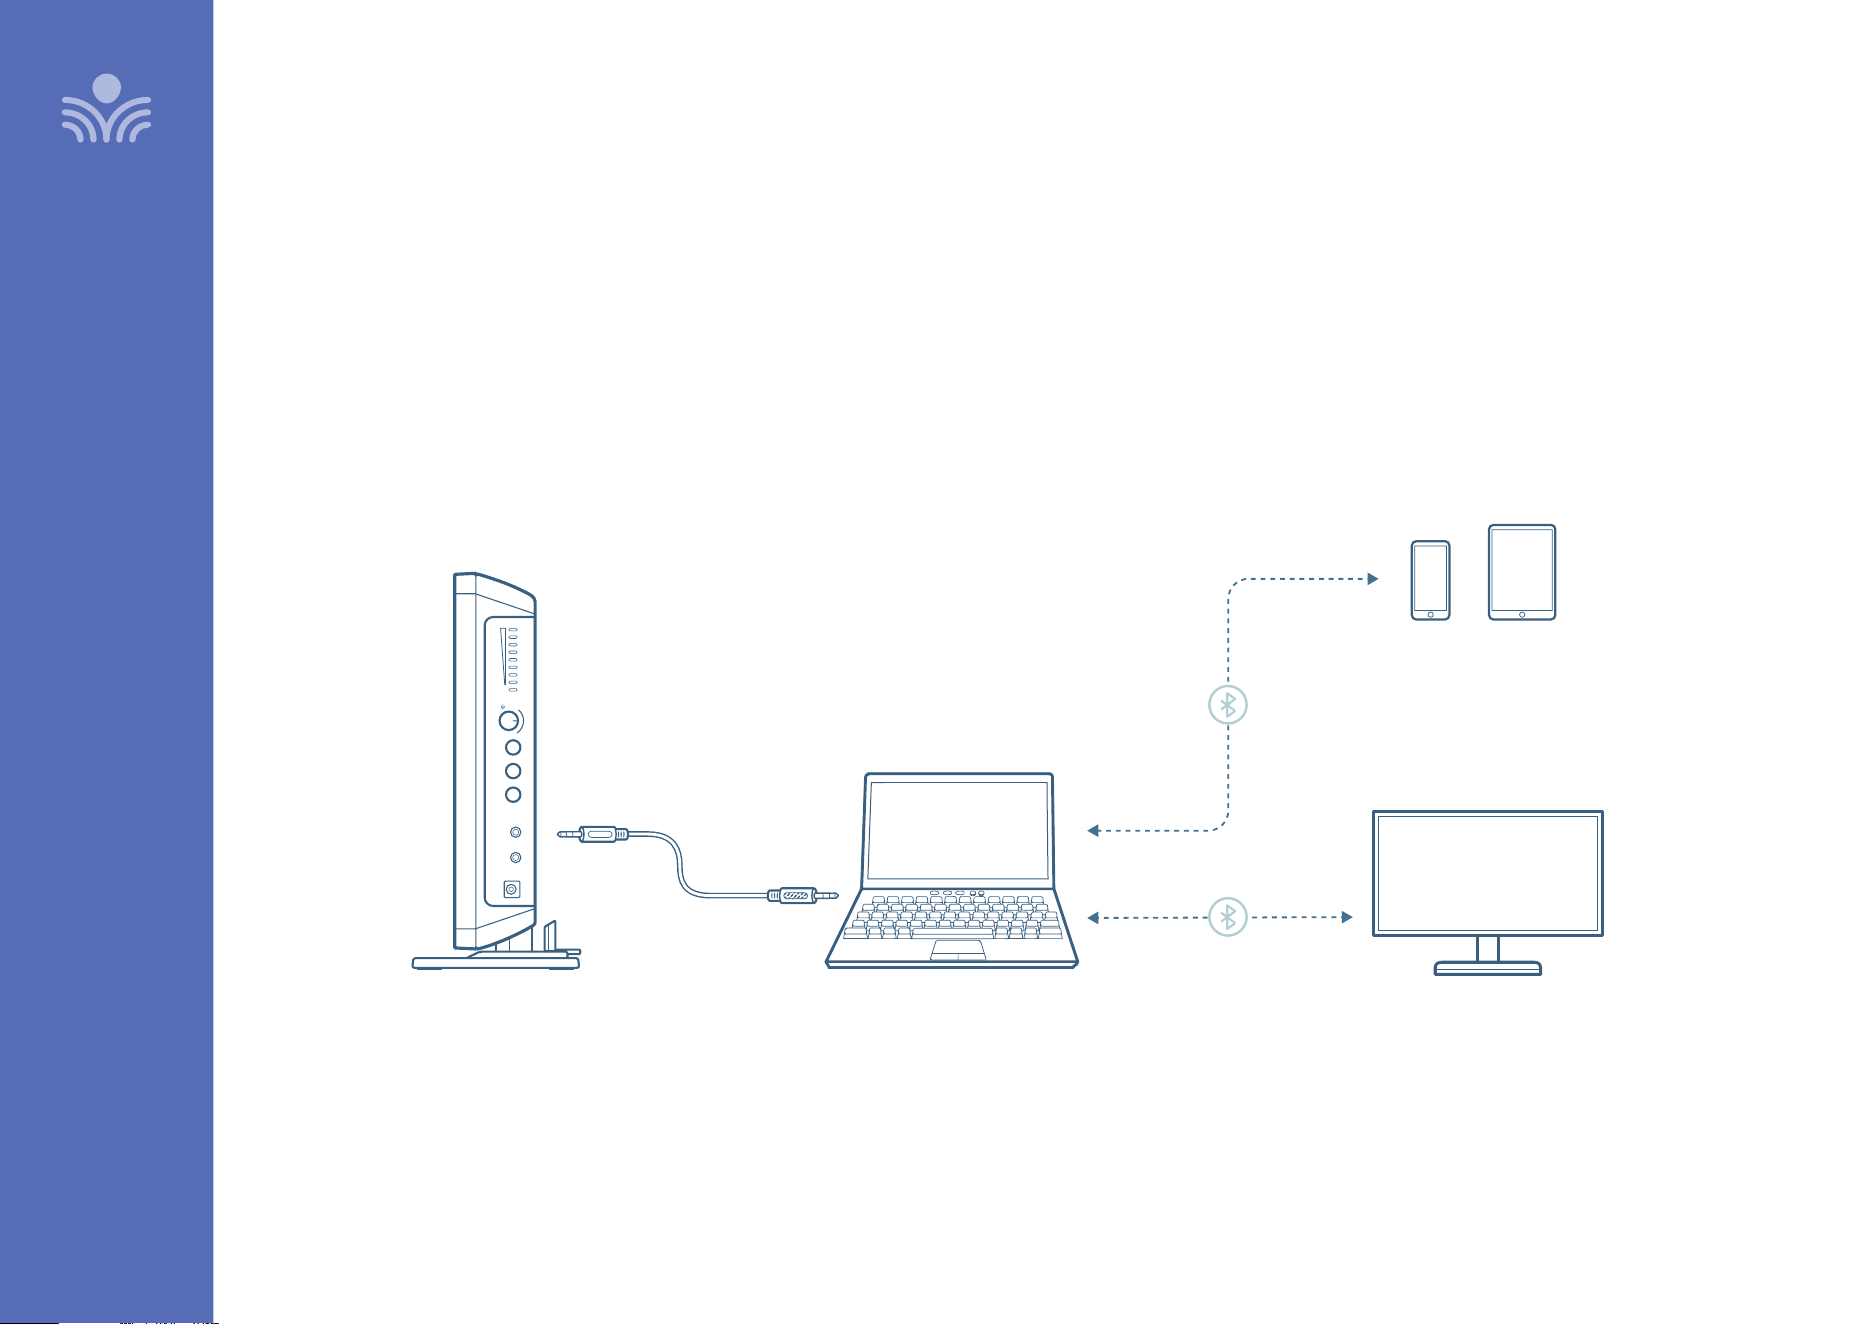
Audio Integration
In this section you will find instructions on how to connect an external audio
device like a TV, interactive display or computer directly into Redcat.
AUDIO INPUT
Redcat has one AUDIO INPUT with volume control for connecting to classroom
audio sources. Use a patch cable (not included) to connect a computer, phone,
tablet, or other audio source.
Input
Output
Tone
Push
Level
Power
24V/1.75A
Input
Output
REDCAT
AUDIO INPUT
AUDIO OUTPUT
BLUETOOTH
INTERACTIVE DISPLAY
PHONE / TABLET
LAPTOP

16
SET-UP & OPERATION
Once the Clearmike is charged, follow these steps for use.
1. Remove the Clearmike from the charger and put it on by connecting the
magnetic clasps behind your neck. Adjust the lanyard so that the top of the
Clearmike aligns with the collarbone.
2. The Clearmike will automatically power on and mute when it is removed from
the charger.
3. The microphone volume on the Clearmike is set at the factory to the
midpoint. It is adjusted by the up/ down buttons on the side of the mic. The
volume can only be adjusted while the microphone is in talk mode.
4. While speaking in a normal voice, fine tune the microphone volume. Proper
volume level should be as follows:
• Your voice should be clearly heard by another person on the other side of
the room.
• You should barely be able to hear your own voice.
• There should not be any audio “feedback” or squealing unless you are too
close to a speaker (2-3 feet). If there is, turn the volume down slightly.
REMEMBER: This equipment supplements the user’s voice so they are able
to speak in a conversational tone. Having the volume set too high will result in
feedback and listener fatigue.
• Once initial volume level is set, walk around the room and listen for overall
audio quality.
• If further fine tuning is required, you may need to adjust the Tone Control on the
side of the Redcat.
Setting Up the Clearmike
ALIGN WITH
COLLARBONE
TALK / MUTE LIGHT
ADJUST
VOLUME
POWER STATUS LIGHTPOWER/MUTE BUTTON
Solid White
Green
MUTE
Solid blue
Green
TALK

17
SET-UP & OPERATION
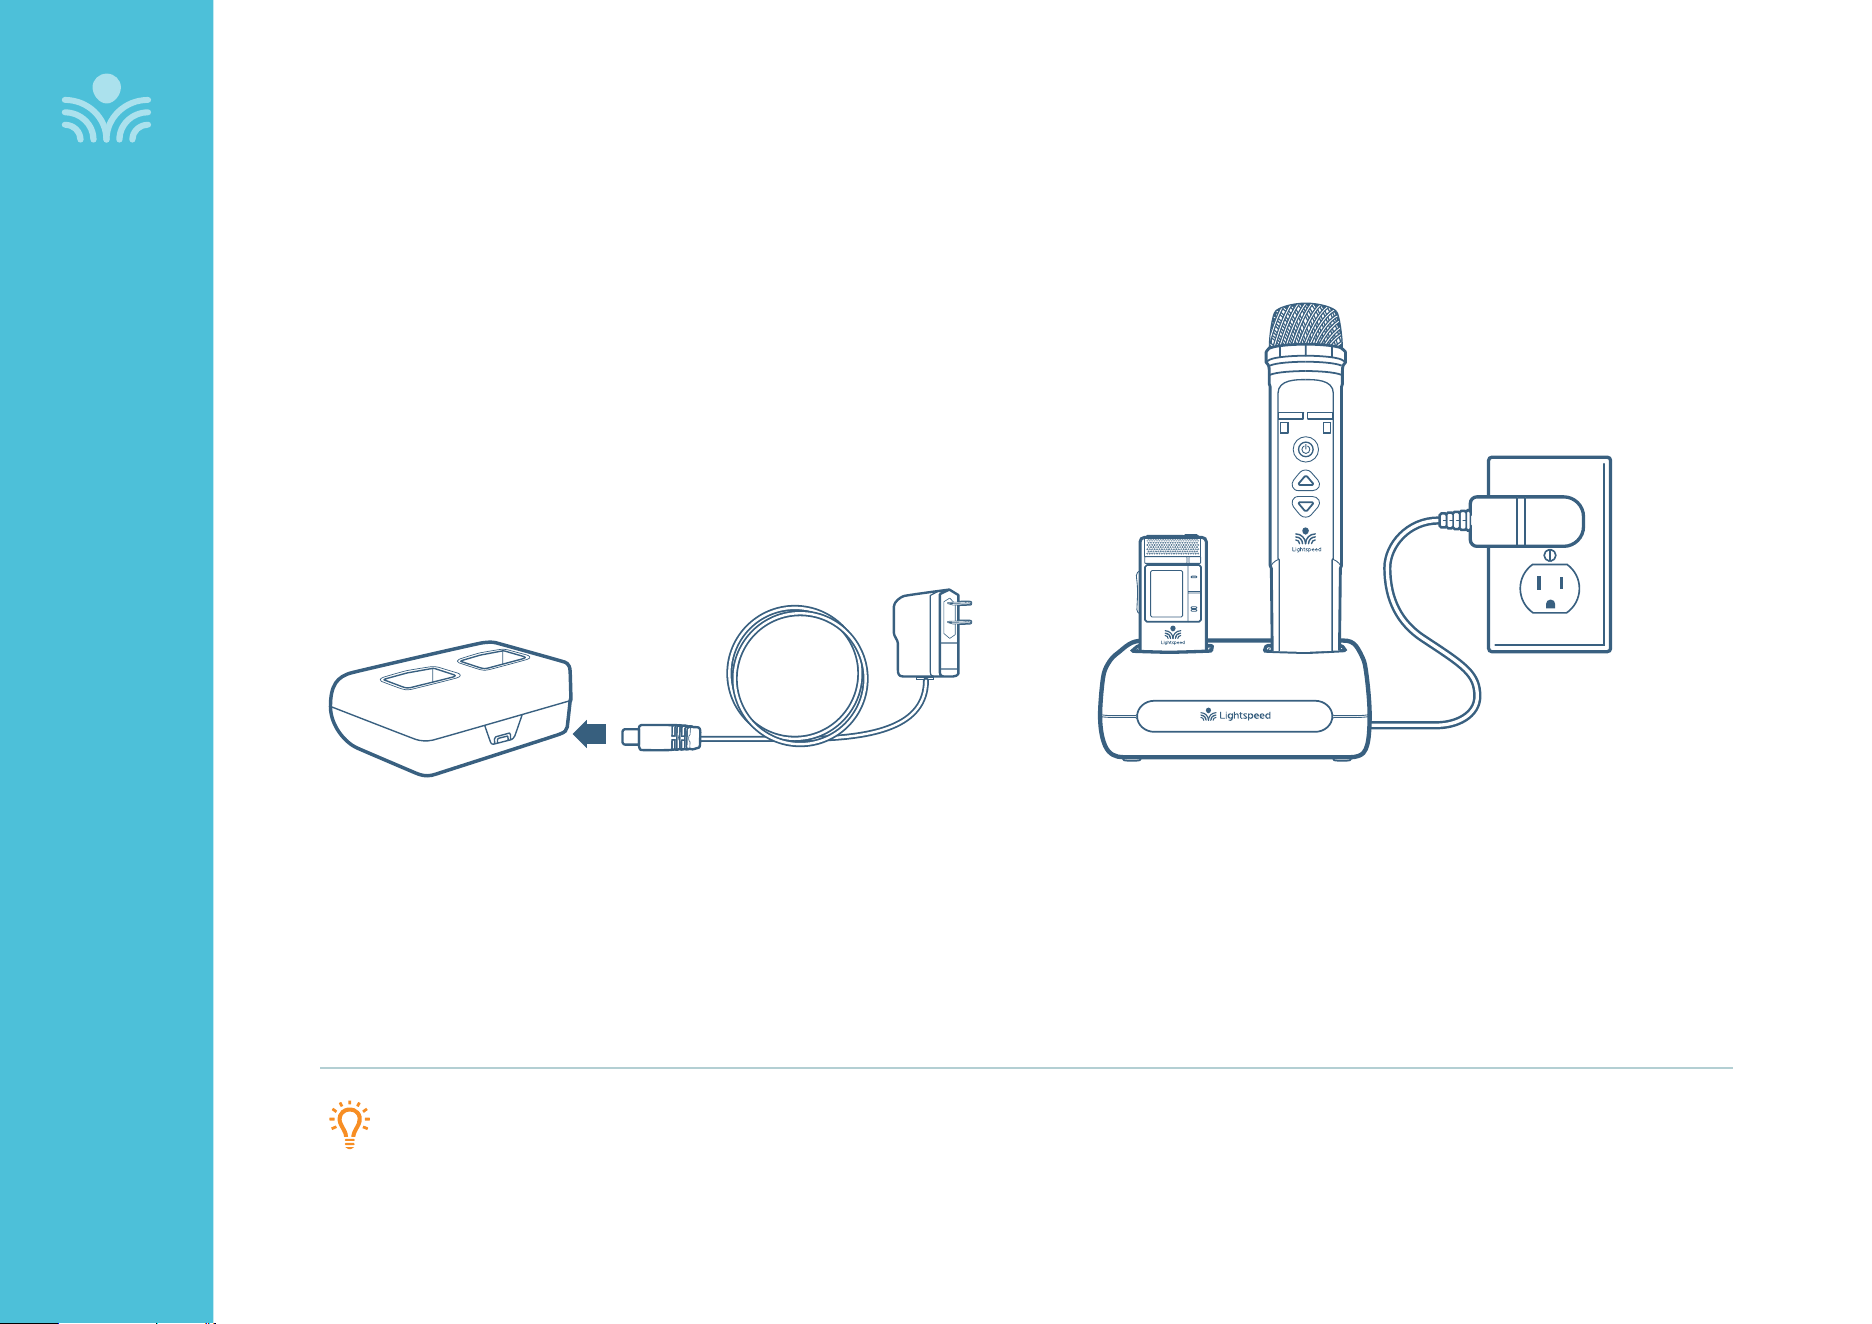
Charging the Clearmike
BEFORE USE, THE CLEARMIKE SHOULD BE CHARGED
It will take 5-6 hours for the Clearmike to obtain a full charge. A fully
charged Clearmike will last for up to 8 hours of use. If microphones are
used daily, they should be charged each night.
Replacement lithium polymer battery packs may only be purchased
through Lightspeed (part # L3.7V).
ATTACH LANYARD
Hang the Clearmike on the lanyard opposite
the magnetic clasp.
CONNECT CRADLE CHARGER
Plug power cord into the cradle charger and
then plug the AC end into an electrical outlet.
CHARGE CLEARMIKE
Place the microphones into the cradle
charger. The power status light will glow
red when it is charging.
When charging is complete, the power
status light will glow green.
It takes about 5-6 hours to fully charge the
microphone battery.
Charging complete
Charging in progress
18
SET-UP & OPERATION
Daily Use of the Clearmike
1. AT THE START OF THE DAY, REMOVE CLEARMIKE FROM THE CHARGER
• The microphone will default to the Mute position, the status light will turn to white.
• Place the microphone around your neck.
• Press the power/mute button. The light will turn blue, indicating the
microphone is active and ready to use.
• Adjust volume with the UP/DOWN buttons if necessary.
• If Clearmike needs to be powered down for some time, press and hold
the power button. To power Clearmike again, press and hold the power
button until the LED lights.
2. PRIVATE CONVERSATIONS
• Mute the Clearmike during private conversations by momentarily pressing
the power button. When muted, the blue light turns white.
• When conversation is over, momentarily press the power button again to
unmute the Clearmike.
3. END OF DAY
• Place the Clearmike into the cradle charger and make sure the Power Supply is
plugged in to an electrical outlet.
• The Clearmike will stay powered on during charging, but will automatically be
muted.
• It is not necessary to turn o Redcat at end of day, but you may do so by pressing
the power button on the side panel.
• If you do want to power it down, when Clearmike is removed from charging the
next day, it will automatically power Redcat on.
TIPS TO OBTAIN OPTIMUM AUDIO PERFORMANCE
• Speak in a natural voice. A normal conversational speech level will provide an adequate signal. It is not necessary
to increase the intensity of your voice—the audio system provides adequate amplification (approximately 5 – 10 dB)
above ambient room noises.
• Avoid wearing jewelry that may rub or bump against the microphone.
• Mute the Clearmike, with a momentary press of the power button, during private conversations with a student,
parent, or other classroom visitor. An additional momentary press of the power button will unmute the Clearmike.
• Recharge microphone(s) each night. When recharged nightly, the microphone will last through a typical school day.
19
SET-UP & OPERATION
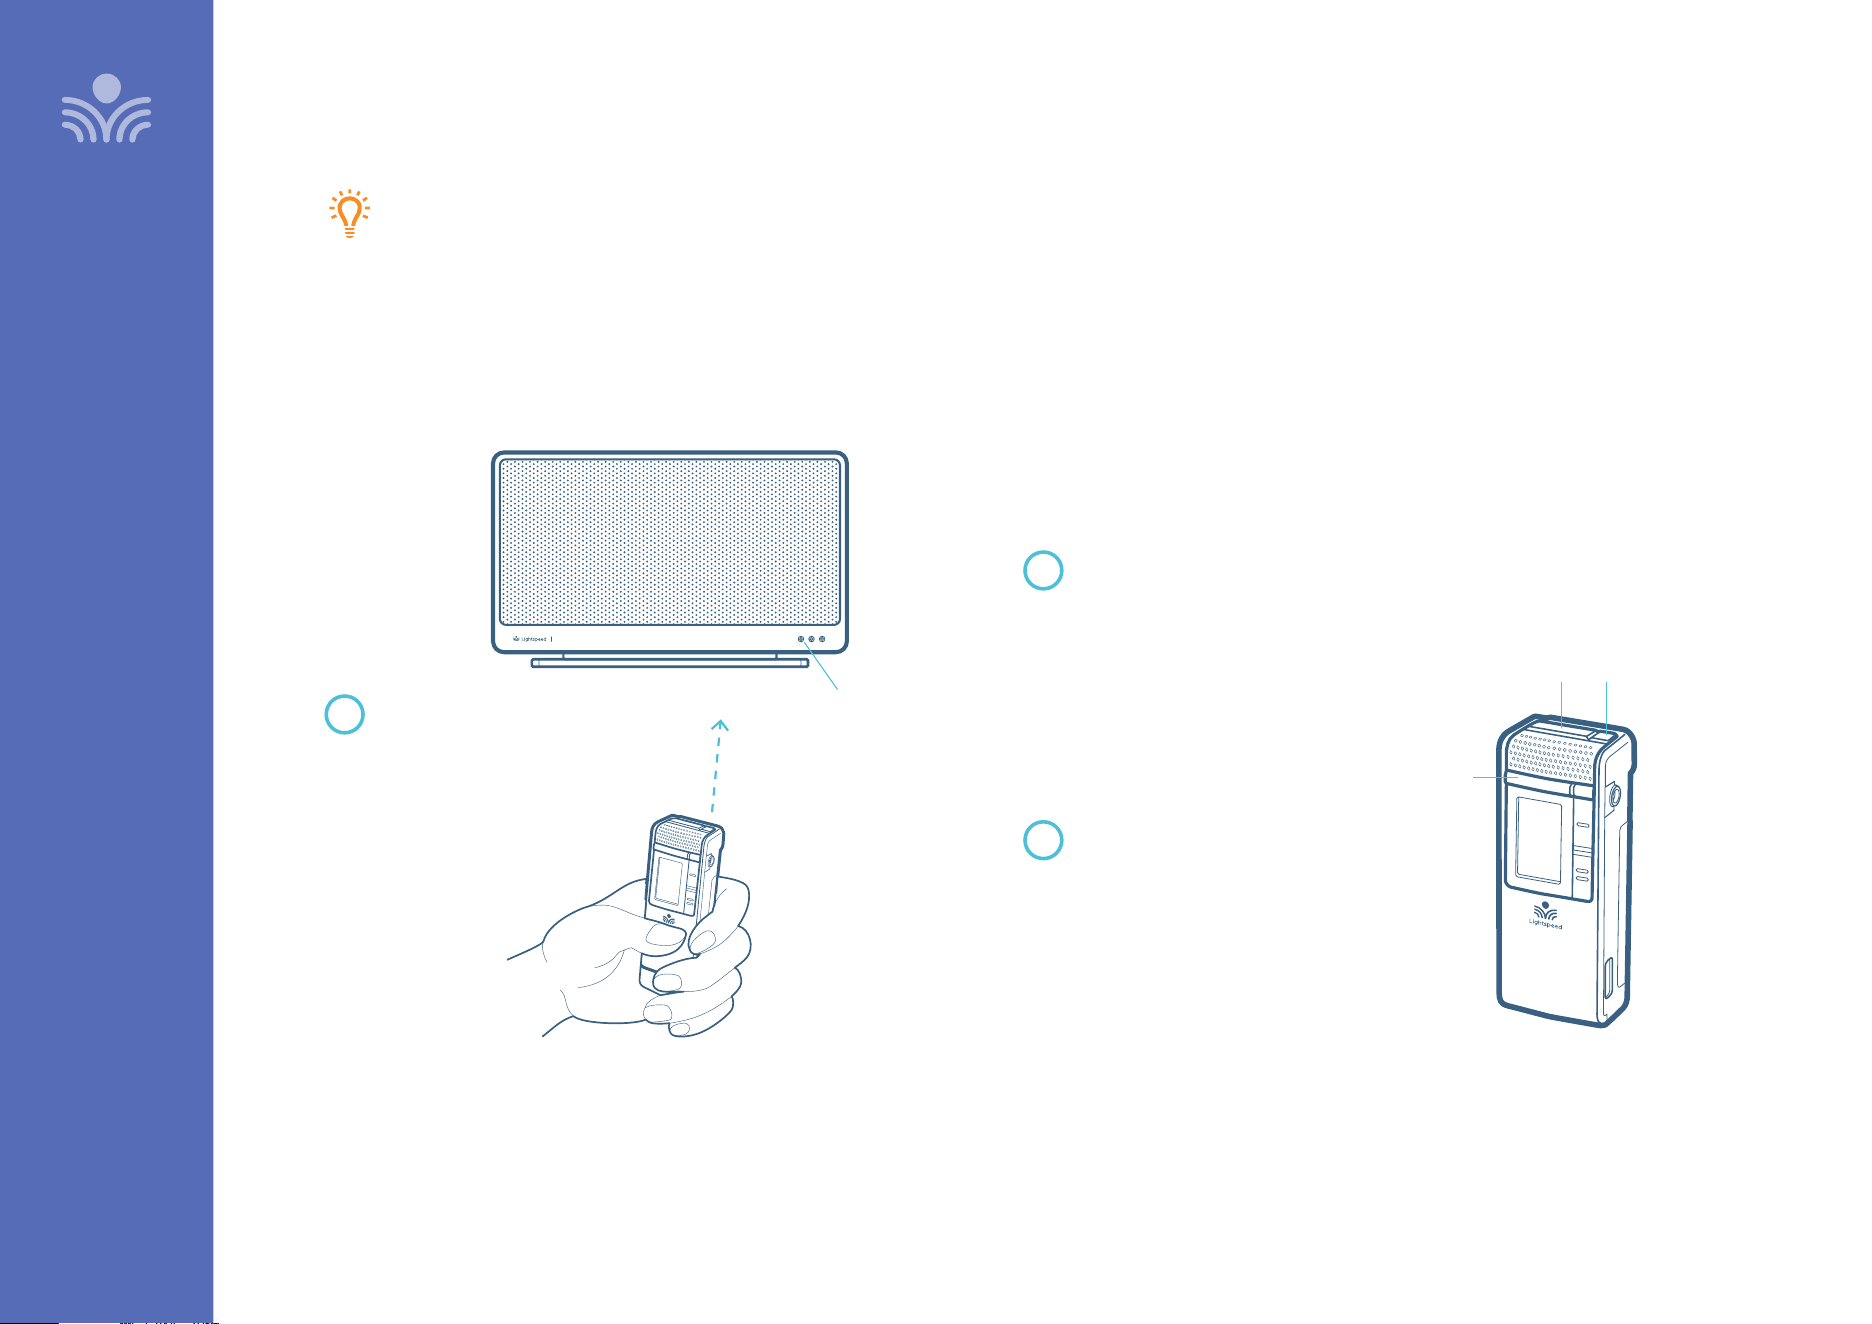
Pairing your Clearmike
Your system is shipped with microphones and base units pre-paired for quick and easy use.
If for any reason you need to pair new components, follow this pairing process:
PLEASE NOTE: All microphones must be out of the charger while pairing.
Press and hold the Power/Mute
button for 5 seconds until the
Talk/Mute light starts flashing blue
and white. The Status light on the
Redcat will also start flashing blue
and white.
When complete, the Status light on
the Redcat will turn blue, the Talk/
Mute light on the microphone will
be white, and the display on the
microphone will say “Pair Success”.
With the Clearmike
powered o, point
the IR transmitter
lens toward the
Redcat.
1
2
3
POWER / MUTE BUTTON IR TRANSMITTER
TALK / MUTE LIGHT
Redcat
STATUS LIGHT
20
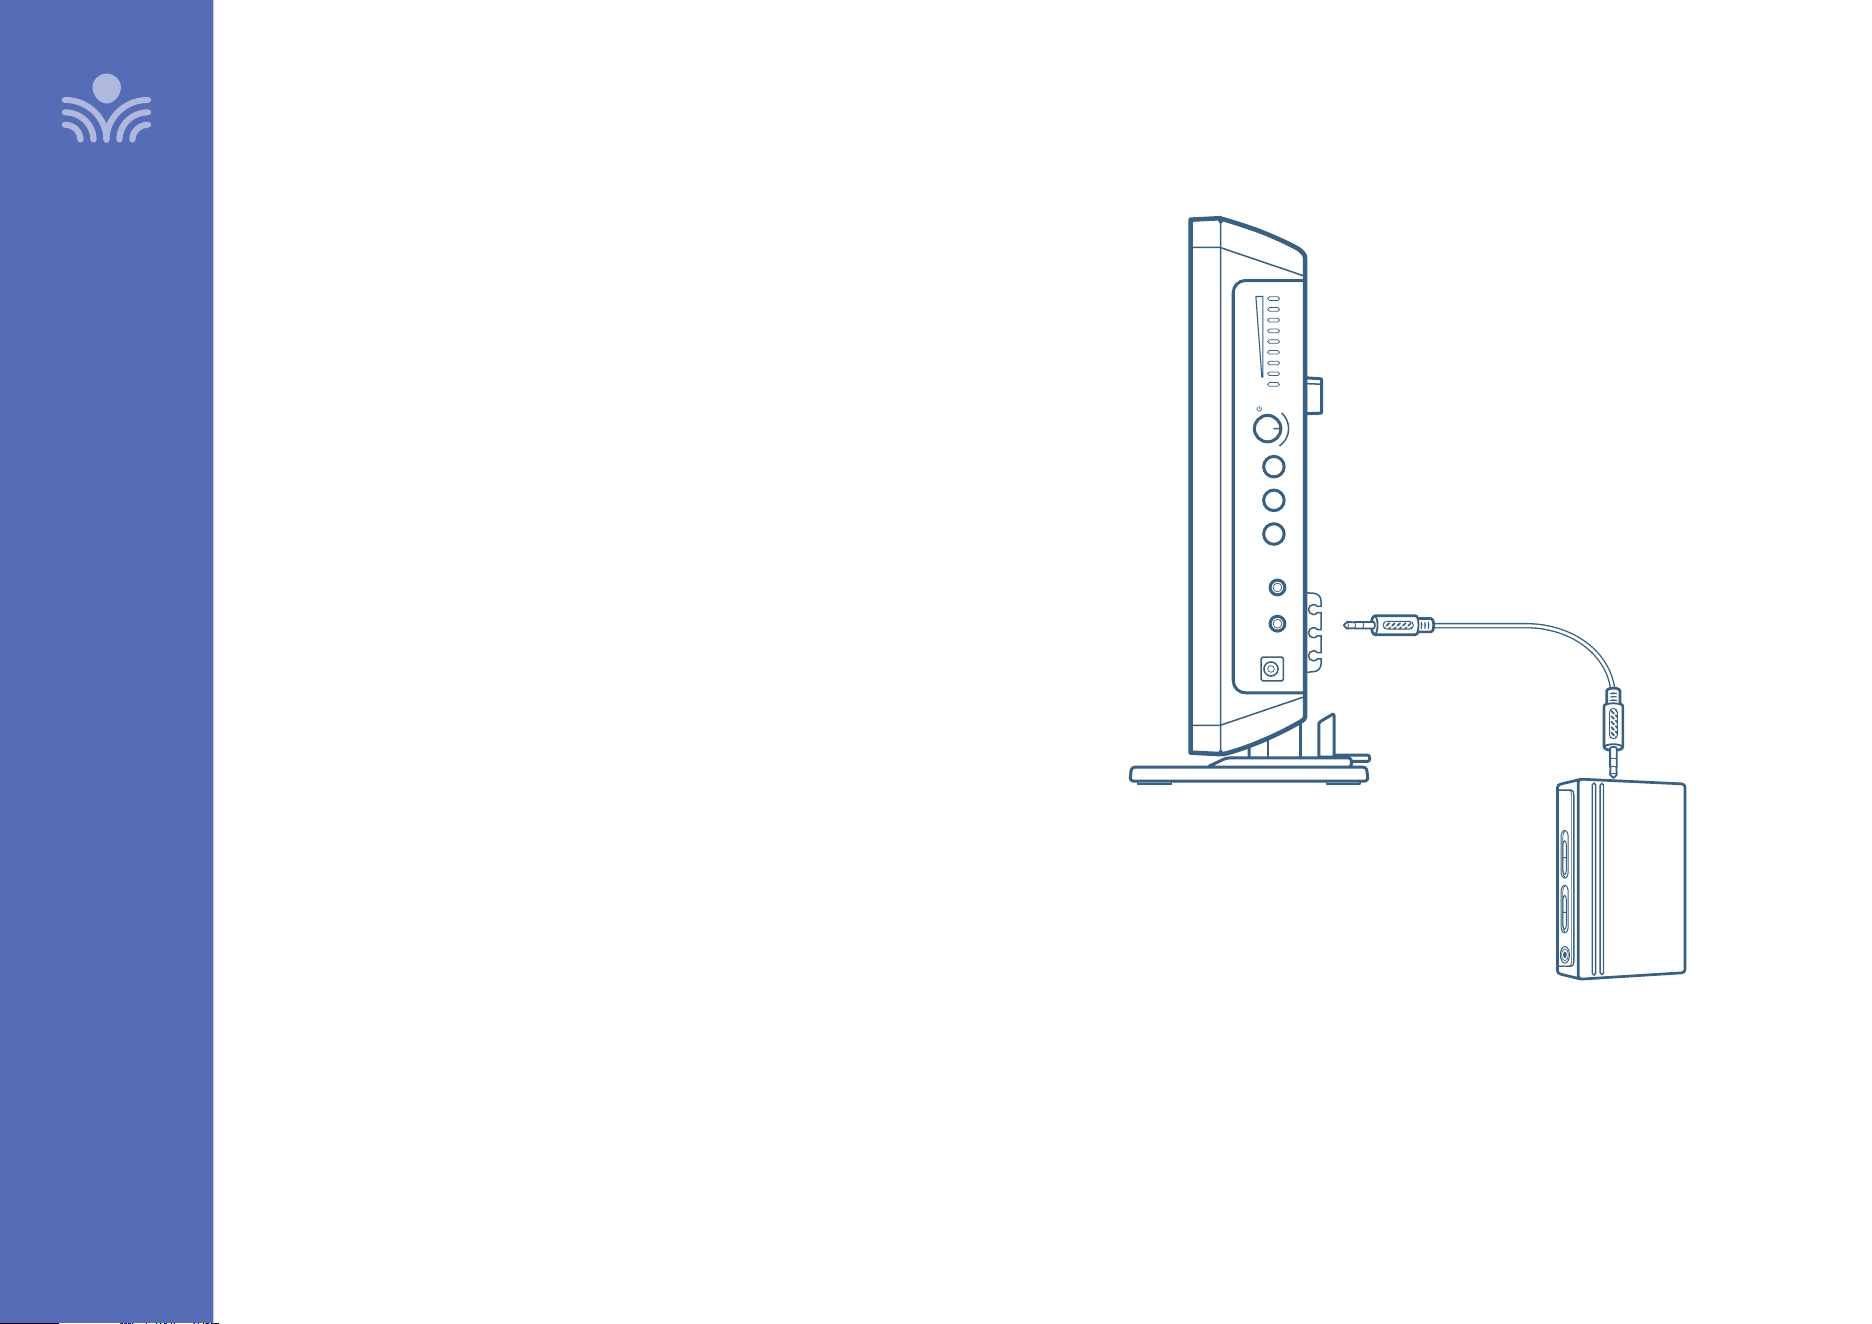
Output to Assistive Listening Device (ALD)
1. Turn the ALD (Assistive Listening Device) volume control on Redcat side
panel counterclockwise all way the down.
2. Determine the size and type of audio input jack on the device as many
manufacturers’ products dier in connector size and shape. Many personal
FM transmitters require a 3.5mm to 3.5mm patch cable (part# MSC3535, not
included).
3. Connect a patch cable from the ALD’s microphone jack or AUX input to the
3.5mm audio jack labeled “ALD OUT” on the side of Redcat.
4. With Redcat and ALD turned on, speak into the Clearmike and slowly adjust
the ALD volume control until the appropriate audio level is attained in the
ALD’s receiver headphones.
5. It may be necessary to also adjust the volume on the Personal FM receiver to
achieve appropriate volume level.
SET-UP & OPERATION
Input
Output
Tone
Push
Level
Power
24V/1.75A
Input
Output
AUDIO OUTPUT
21
SET-UP & OPERATION
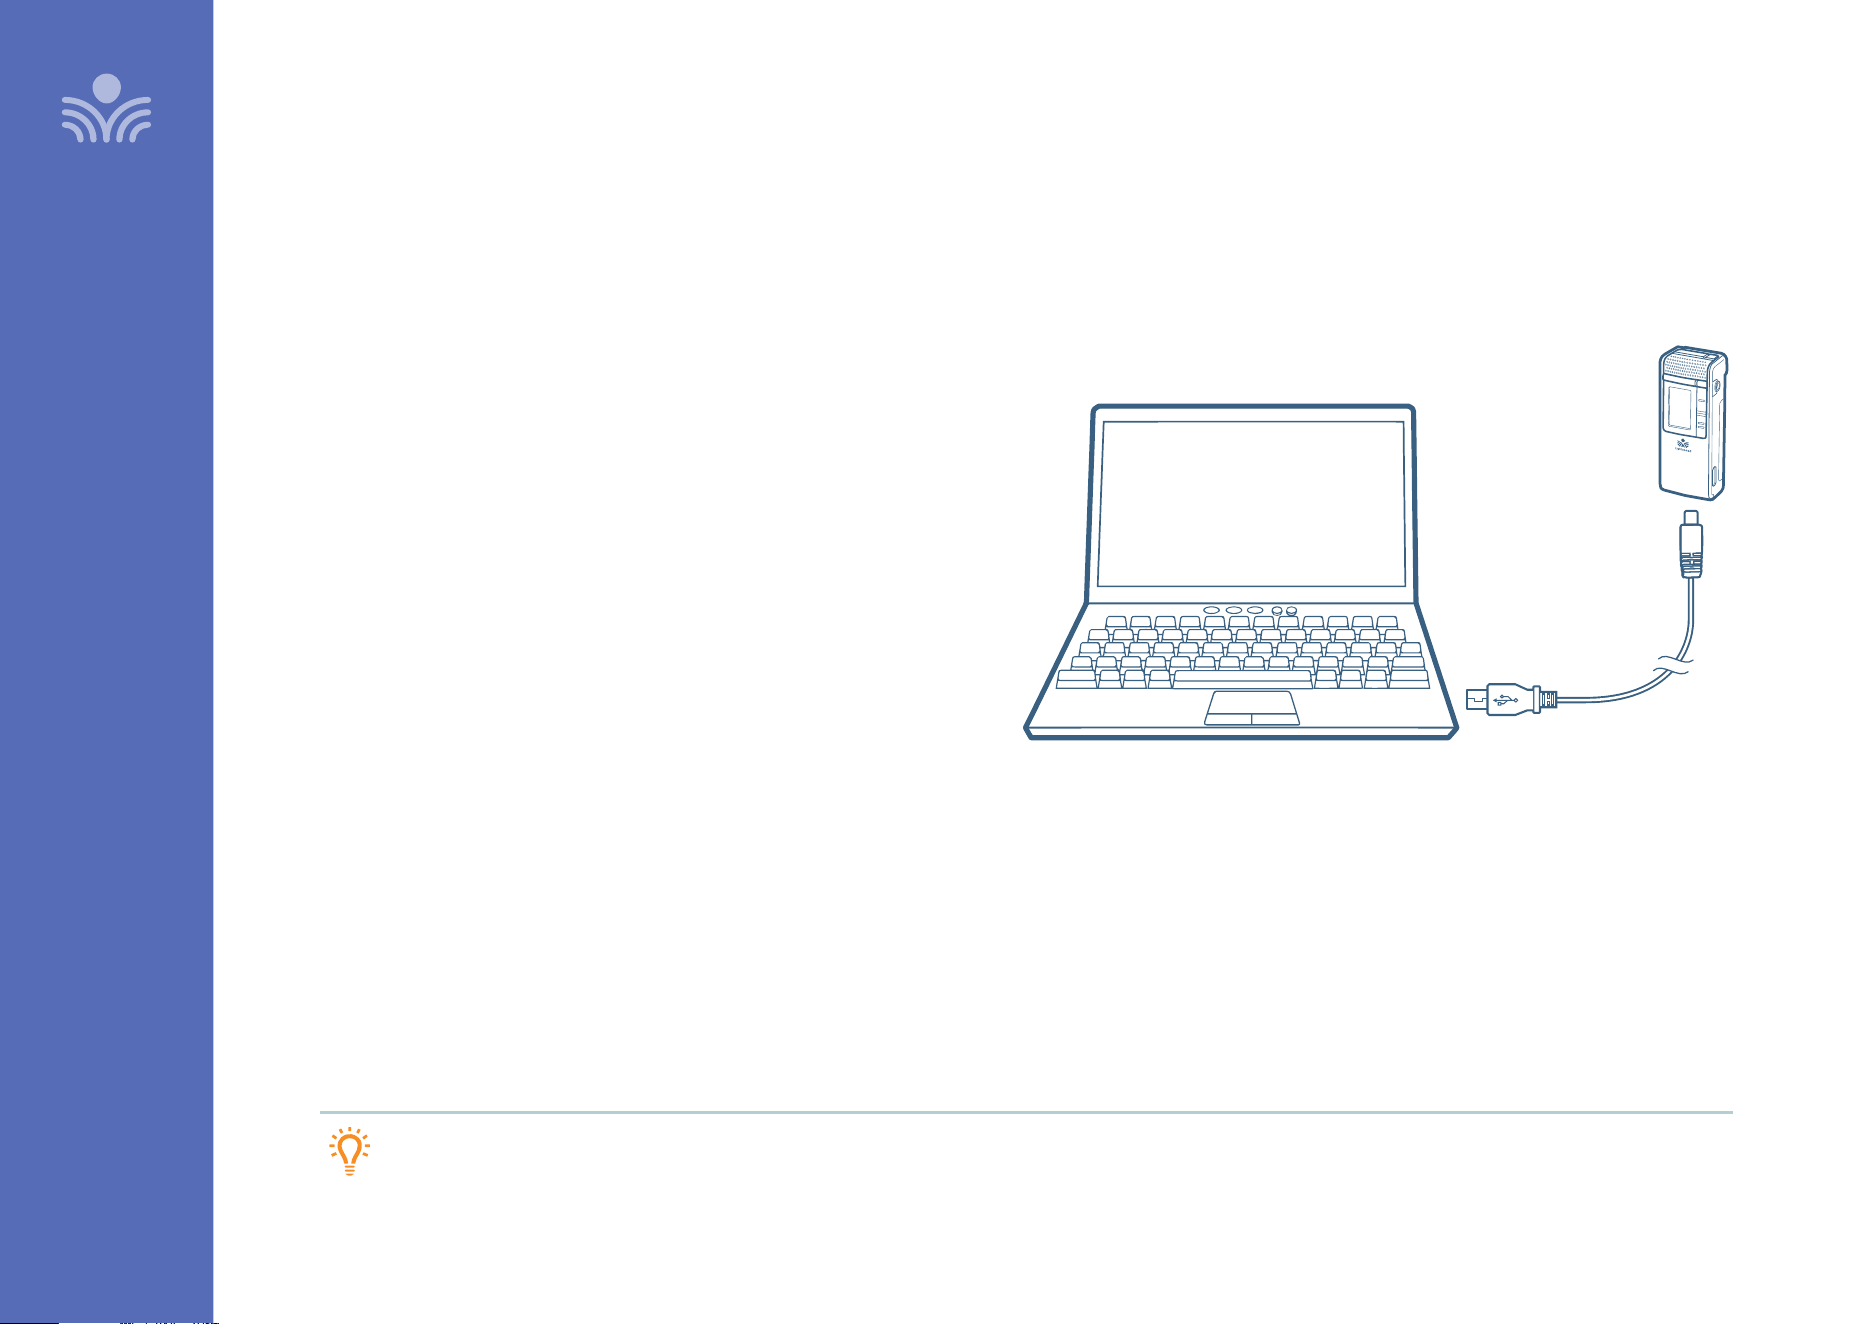
Using Your Microphone as a Wireless Audio Link
You can connect your 2nd (or 3rd) microphone to your computer’s USB
port to enable a wireless 2-way audio link.
SEND AUDIO FROM THE COMPUTER to Redcat to ensure all audio from
the computer (videos, video conferencing, audio books, music, etc.) can
be played.
SEND AUDIO TO THE COMPUTER from Redcat to ensure the teacher’s
Clearmike and any student microphones are clearly picked up by a video
conferencing solution.
1. With the appropriate USB cable (USB-C for Clearmike/Sharemike)
connect your microphone to your computer’s USB port.
This will also power/charge your microphone.
2. Open sound settings on your computer:
• Select Lightspeed Audio as the Output source to send all
computer audio to Redcat system
• Select Lightspeed Audio as the Input source to use the Lightspeed
microphones as the computer microphone audio for video
conferencing and recording applications.
3. You may also need to select Lightspeed Audio as the speaker and
microphone audio in your video conferencing application the first
time you use it.
TIP: If your system includes two Clearmikes, you can use one mic for
instruction and the second mic to transmit audio through the system.
Plug your external
audio equipment,
such as a computer,
into the USB input
on the bottom of
the Clearmike
USB cable sold separately.
Lightspeed oers a USB-A
to USB-C cable for sale
(part #USBC)
2-WAY USB
2-WAY USB
AUDIO OUTPUT
22
Sharemike Controls and Connections
1. MUTE/TALK STATUS LIGHT
Blue: solid = Talk
White: solid = Mute
Blue/White alternating = Pairing in process
2. POWER STATUS LIGHT
Blinking red light: During operation, turns red to indicate low battery.
Green light: Normal operation, microphone is powered on.
Amber light: Paired as a T3 Microphone, microphone is powered on.
WHEN CHARGING IN CRADLE CHARGER:
Red light: Charging
Green light: Charging complete
3. MIC 1 STATUS: Lighted to indicate microphone is registered as Mic 1
4. MIC 2 STATUS: Lighted to indicate microphone is registered as Mic 2
Mic 1 / Mic 2 both white: Microphone is registered as Mic 3
5. POWER BUTTON
6. MICROPHONE VOLUME UP/DOWN
7. USB INPUT: Connect audio source to send to Redcat.
USB input can also be used for charging.
8. IR TRANSMITTER: For pairing to base unit
9. AUDIO INPUT: Plug a laptop or other audio device into this jack to
wirelessly transmit the audio signal to be played through the system.
10. VOLUME LOCK: Disables volume controls.
5
6
3
4
7
8
9
10
Input
BATTERY
REMOVAL
LATCH
UNDER
BATTERY
PACK
2
1
Charging complete
Charging in progress
OPTIONAL ACCESSORIES
TALK
Mute
Pairing in progress (alternating)
23
OPTIONAL ACCESSORIES
Sharemike: Charging
PLEASE NOTE: The Redcat and microphone(s) are paired together at
the factory and all components should be kept together as a system.
Moving them from one system, or room, to another will result in the
need to re-pair.
1. Make sure the charger is plugged into a wall outlet.
2. The power status light on the microphone will glow red to
indicate charging.
3. Leave the Sharemike in the charger overnight to obtain a full
charge. It takes about 5-6 hours to fully charge the battery.
The light will turn green when charging is complete.

24
Redcat
OPTIONAL ACCESSORIES
Sharemike: Initial Set-Up
1. Ensure Redcat is on. The white power light will glow.
2. Turn on the Sharemike by pressing and holding the power button
until the LED lights.
3. While speaking in a normal voice, increase the volume with the
Sharemike until your voice is barely audible.
POWER LIGHT
POWER BUTTON
VOLUME CONTROL
PLEASE NOTE: This equipment is designed to supplement and distribute
the user’s voice so they are able to speak in a conversational tone. Having
the volume set too high will result in feedback and listener fatigue.
25
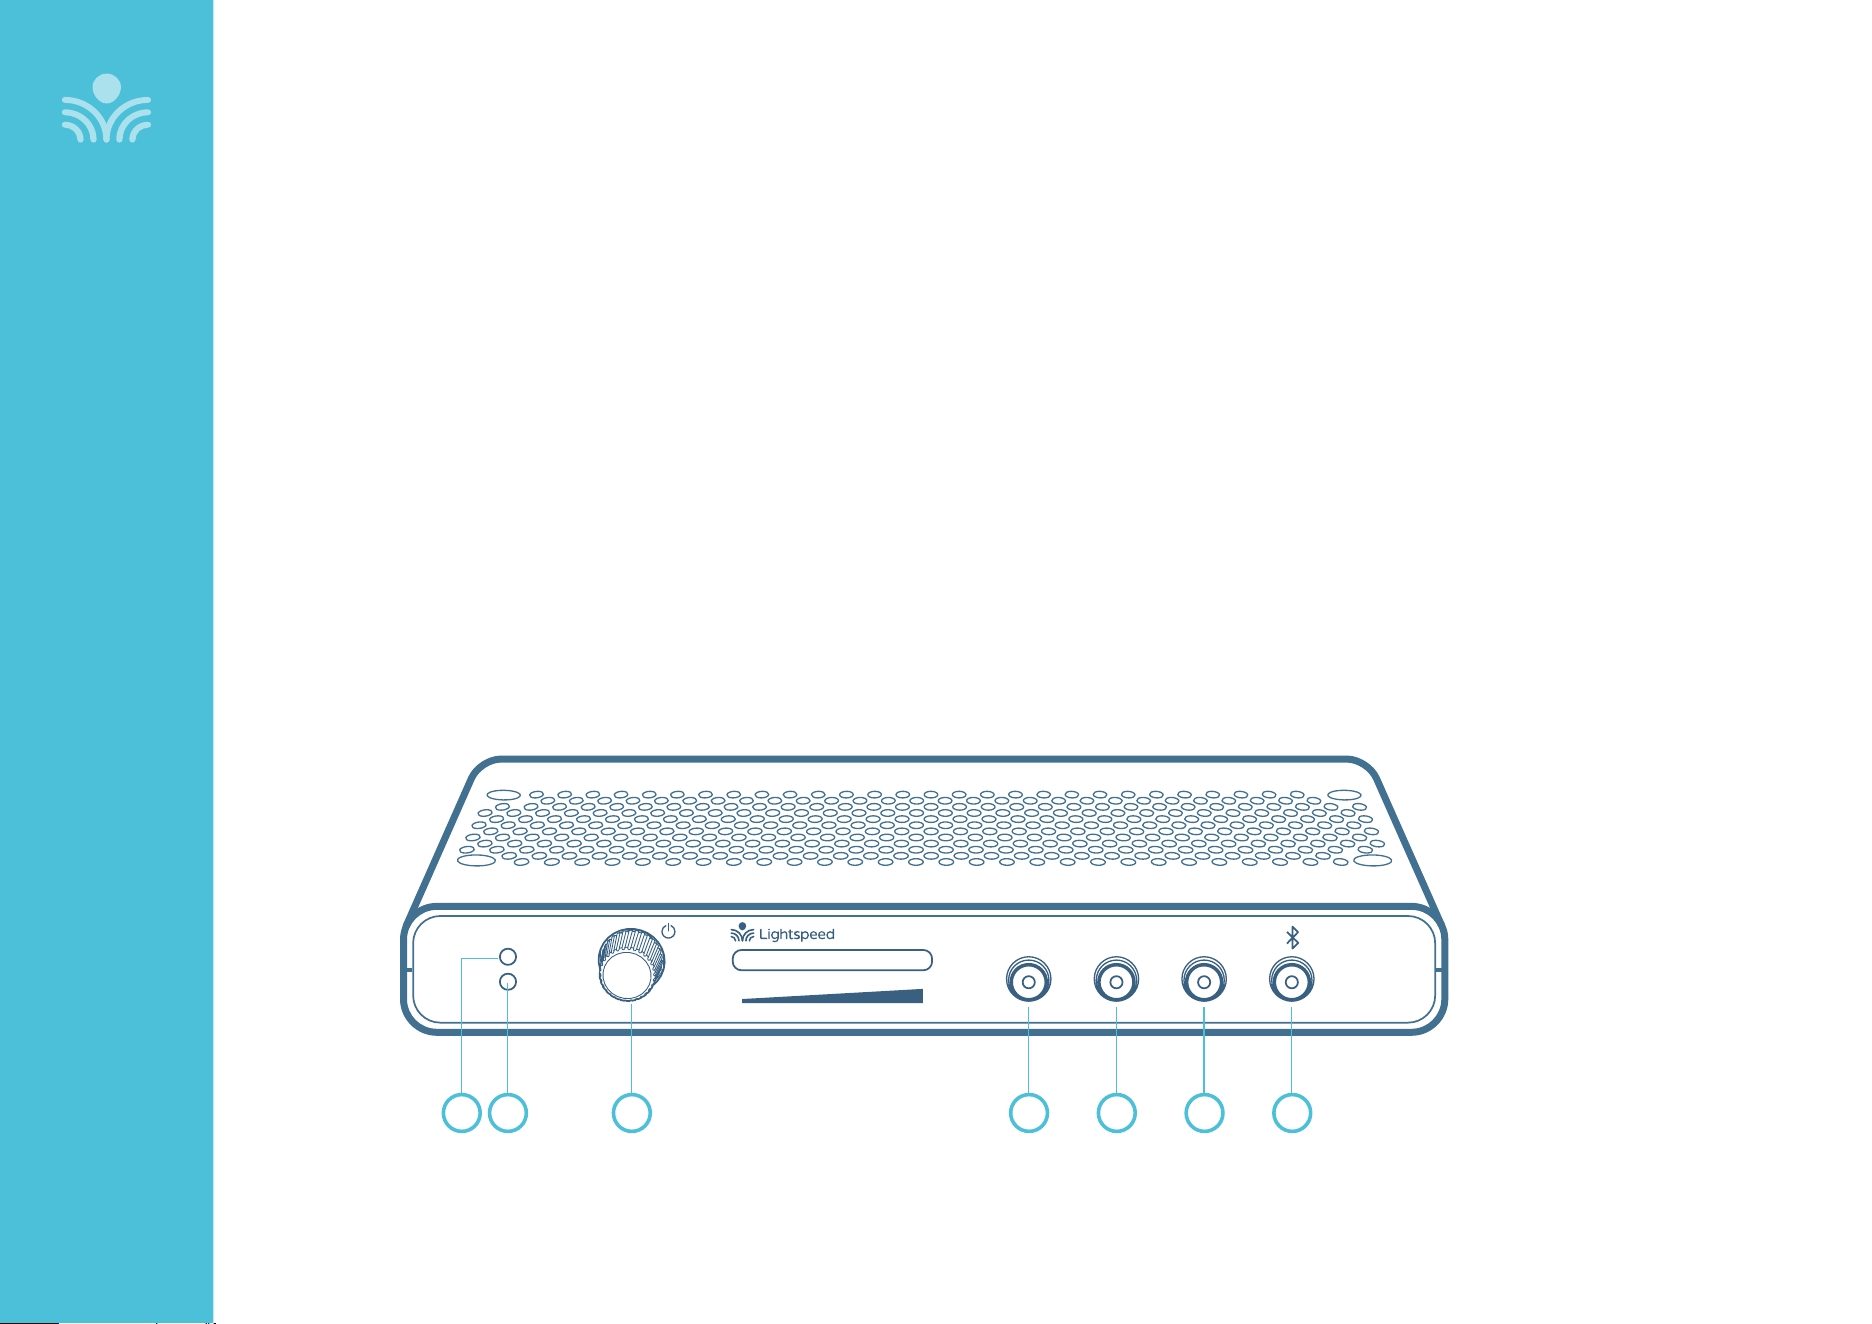
OPTIONAL ACCESSORIES
Media Connector Controls and Indicators
Input
Power
Status
Output Tone
Level
Push
1 2 3 4 75
1. POWER LIGHT
White light: Power on
2. STATUS LIGHT: Media Connector link and pair indicators.
Solid white: Media Connector is paired to the system
O: Media Connector is not paired to the system
3. POWER BUTTON / VOLUME ADJUSTMENT: Press and hold this
button to turn the system power on or o. This also functions as
an adjustment knob for the volume and tone of the paired Redcat
depending on the mode selected (see 4, 5, 6 below)
4. AUDIO INPUT VOLUME SELECTOR: Selects Audio Input as the
mode for the adjustment knob (2) for the audio sources connected
to the audio inputs on the back of the Media Connector.
5. AUDIO OUTPUT VOLUME SELECTOR: Selects Audio Output
as the mode for the adjustment knob (3) for the audio devices
connected to the audio outputs on the back of the Media
Connector.
6. TONE SELECTOR: Selects Tone as the mode for the adjustment
knob (2) for the microphone. This adjusts the bass or treble that is
heard through the classroom speaker.
7. BLUETOOTH: Press and hold button for 5 seconds to initiate
Bluetooth pairing. While paired, the button light will glow blue.
FRONT PANEL
6