封面
尺寸:100*120mm 材质:128克铜版纸
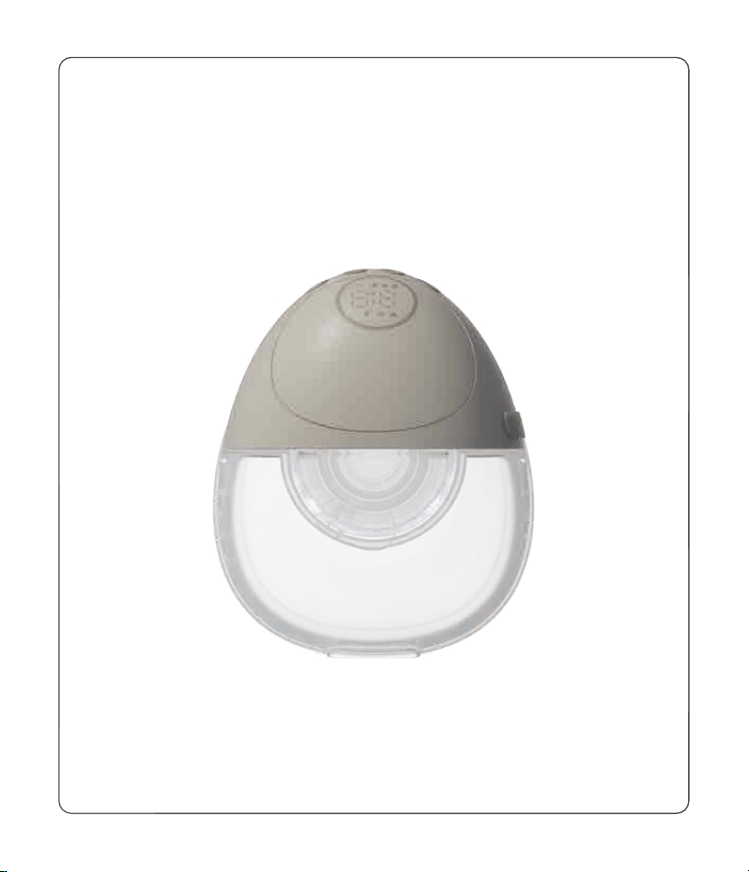
Electric Breast Pump
Instruction for use
Model: H11Pro

01
DIRECTORY
1. Specifications
2. Intended Purpose
3. Product Description
4. Getting Started
4.1 Assembling your Breast Pump
4.2 Disassembling your Breast Pump
4.3 Wearing your Breast Pump
4.4 Operating your Breast Pump
4.5 Cleaning and Disinfecting your Breast Pump
5. APP Usage
5.1 Download APP
5.2 Bluetooth Connection
5.3 APP Operation Instructions
5.4 Troubleshooting
6. Handling your Milk
7. Troubleshooting
8. Battery
9. Warranty
10. Safety
11. Caution
12. EMC
13. FCC Statement
02
03
03
04
04
05
06
07
08
09
09
09
11
12
13
14
14
15
16
19
20
27
Thank you for purchasing the Electric Breast Pump.For the best user experience
and securitypurposes,please read this usemanual carefuly before use and keep
it properly for reference.
02
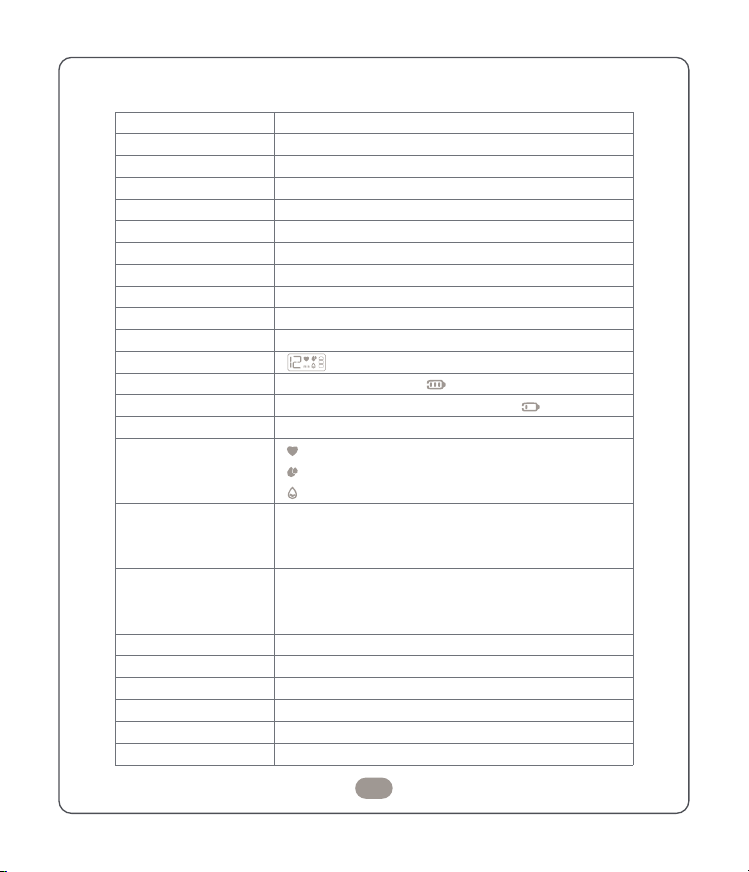
H11Pro
DC3.7V/1000mAh
DC3.7V
≤1000mA
DC 5V/2A
5W
2.0+0.5Hours
800+50mA
≥60kPa
≥1.8LPM
≤40dB
Animated Battery Symbol
Battery Symbol Flashing, 10s Auto Shutdown
LED Display
Stimulation Mode :P1-P12
Expression Mode:P1-P12
Depth Mode:P1-P12
Temperature -10C~+55'C,
Humidity ≤93%RH, Atmospheric Pressure
500hPa~1060hPa
Temperature -10C~+55'C,
Humidity ≤93%RH, Atmospheric Pressure
500hPa~1060hPa
≤50uA
No Operation for 20s, Screen Turns Off
3.1V+0.2V
20 min
2402-2480MHz
RADIATED POWER:≤0dBm
Model
Battery
Working Voltage
Working Current
Rated Voltage
Rated Power
Charging Time
Charging Current
Negative Pressure
Flow
Noise
Display
Charging indicator
Low Voltage Warning
Working Indicator
Mode
Working Environment
Storage Environment
Static Curent
Screen Off
Low Voltage Reminder
Timed Shutdown
Bluetooth Frequency
Bluetooth Max
1. SPECIFICATIONSE
03
3. PRODUCT DESCRIPTION
2. INTENDED PURPOSE
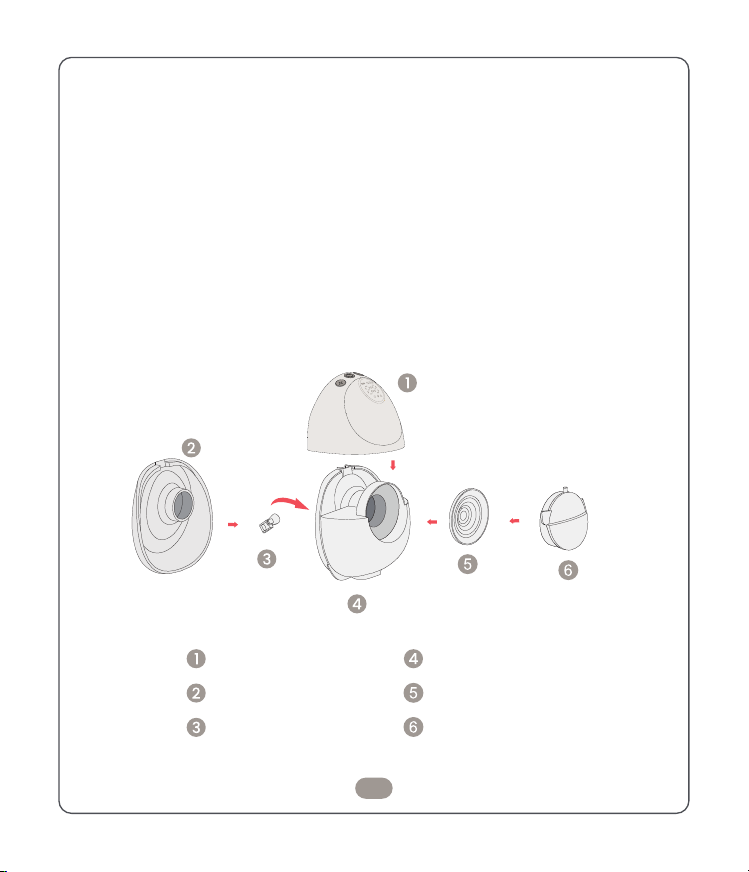
Components:
Pump Control Unit
Flange
Check Valve
Collection Cup
Silicone Membrane
Air Chamber Cover
This electric breast pump is designed just for you, the fabulous lactating woman
ready to express and collect milk. lt's your personal device in the breastfeeding
journey, meant solely for your use.
This electric breast pump comes with 3 modes and 12 levels (450 mmHg) letting
you find your perfect comfort setting. lt mimics your baby's natural feeding rhythm,
creating a harmonious experience.And with 275 hours of operating life, it's your trusty
companion, ready to dance through countless feeding sessions.
1
3
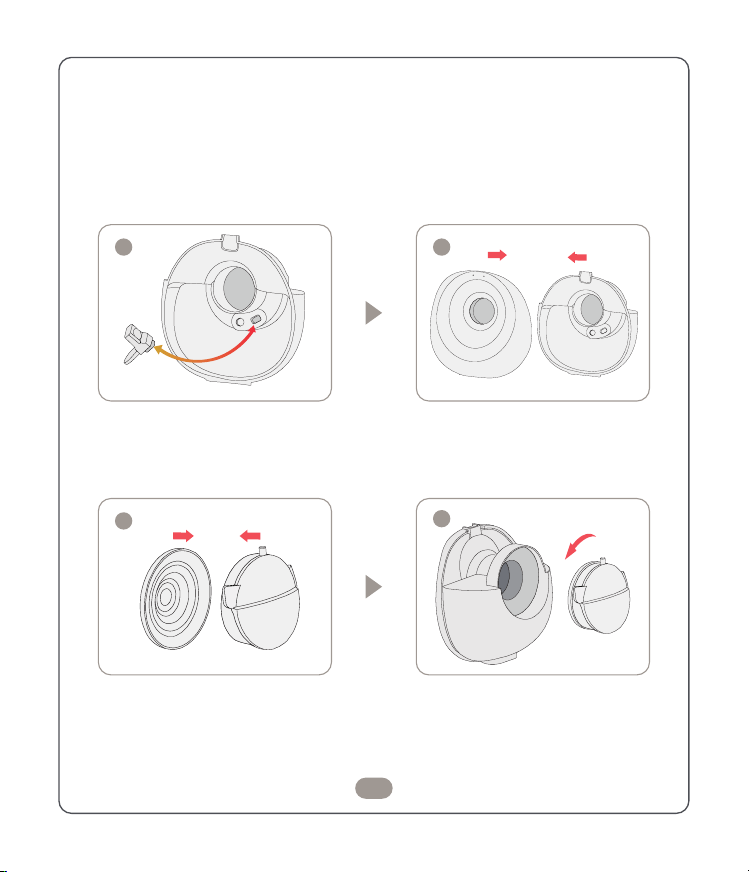
Step4:Place the air chamber
intothe hole of the collection cup.
Step1: Install check valve
intothe collection cup front.
Step2:Snap the collection cup
frontto the collection cup rear.
Step3:Snap the air chamber
tothe silicone membrane
04
4.1. Assembling your Breast Pump
4. GETTING STARTED
Inspect all accessories for damage before use. Replace any damaged parts as needed
2
4
4.2. Disassembling your Breast Pump
To disassemble the breast pump, simply follow the assembly steps in reverse.After
completing step 1, pour out the breastmilk and disassemble the breast pump in turn.
05
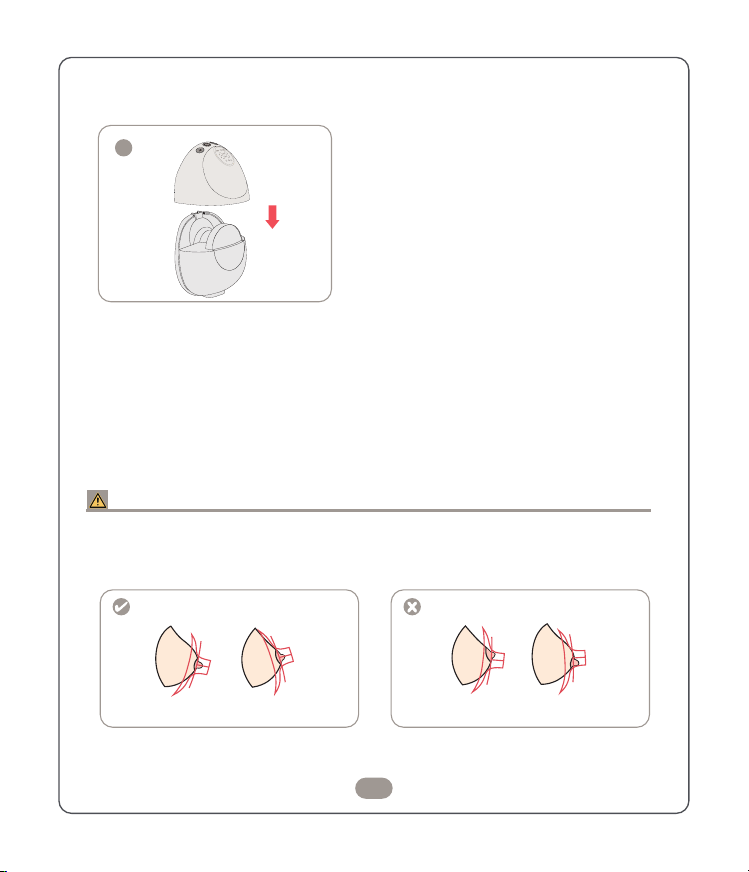
Step5: The pump control unit snaps
perfectly to the collectioncup and
the breast pump is assembled.
5
Position the wearable breast pump correctly in the nursing bra with the nipple centered
in the flange to prevent compression. Misalignment may cause redness, areola suction
into the milk channel, reduced milk flow, or whitening and swelling of the nipple.
Correct Alignment
Centered · Comfortably Positioned
Incorrect Alignment
Misaligned · Pressed Against The Fange
Tips
4.3. Wearing your Breast Pump
Note:Wearing a nursing bra or breast pump for an extended period may cause
discomfort, so please be mindful of the duration of wear and use.
06
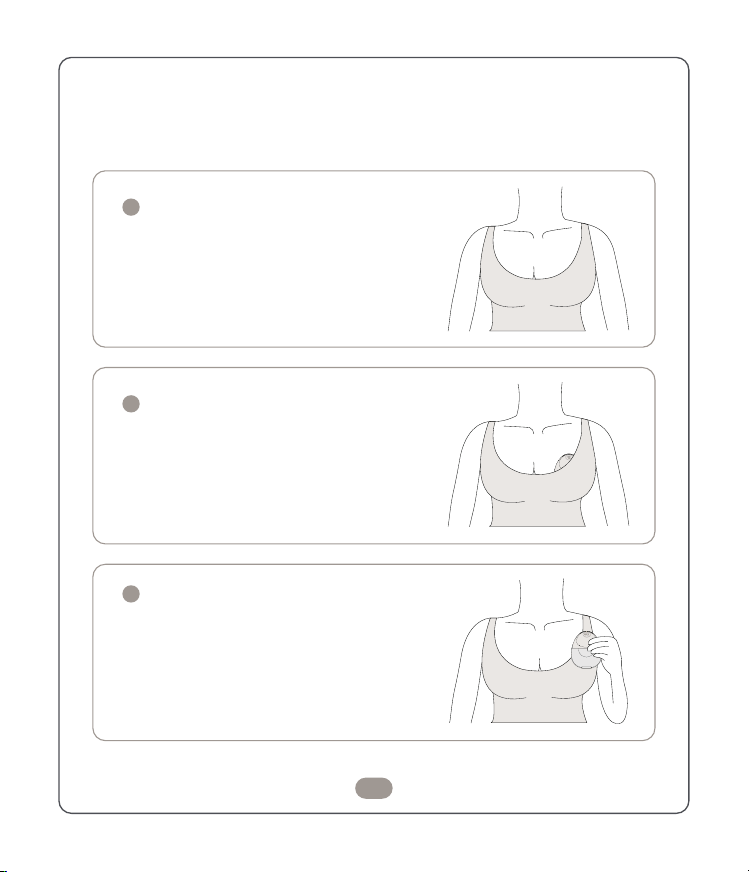
Choose The Right Size
Select a comfortabel,well-fitting nusing bra
A bra that is too loose or too tight may cause
discomfort or injury.
1
Removing After Use
Once finished pumping, unfasten the nursing
bra and gently remove the breast pump. Be
careful not to tilt the breast pump during
this process.
3
Assemble and Position
After properly assembling the breast pump
and adjusting it to the correct position, turn it
on to begin pumping.
2
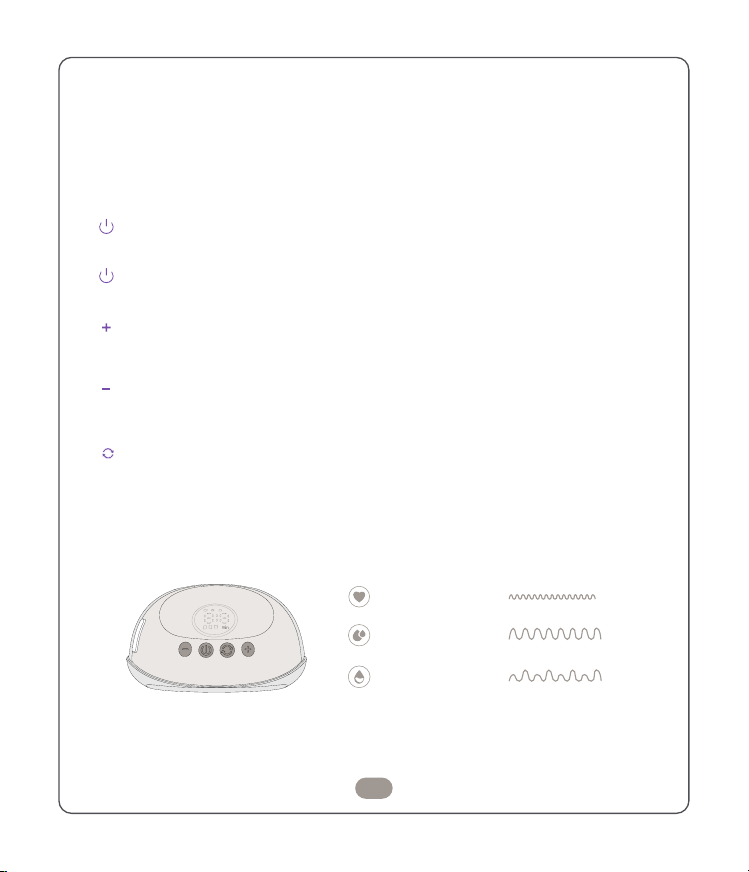
Key Operation:
Display:
4.4. Operating your Breast Pump
Note:Wearing a nursing bra or breast pump for an extended period may cause
discomfort, so please be mindful of the duration of wear and use.
07
Power On/Off:
A quick press of the power button turns it on, a long press 1.5 seconds shuts it down.
Start/Pause:
A short press of the power button will pause or restart the operation.
Suction Level Increase:
While in working mode, a brief press increases the suctionlevel. Each press adds
one level, ranging from P1 to P12
Suction Level Dncrease:
In working mode, a short press decreases the suction level. Eachpress reduces by
one gear, with levels from P12 down to P1.
Mode Button:
A quick press of the mode button switches between modes during operation,
rotating through them in a circular manner.
Massage Mode
Suction Mode
Stimulation Mode
4.5. Cleaning and Disinfecting your Breast Pump
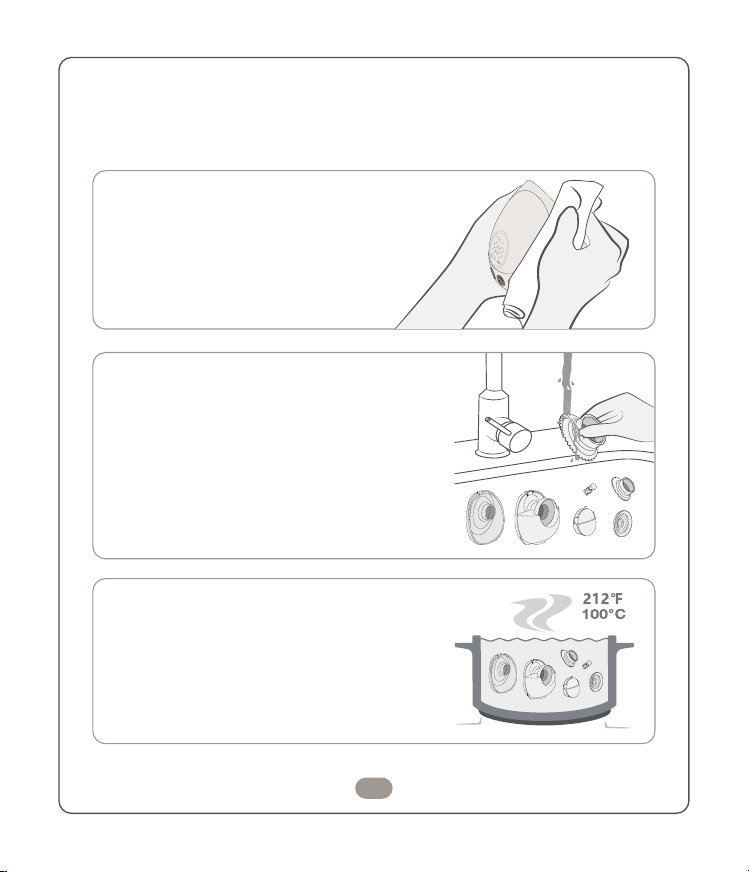
Before use: Clean all parts that contact breast milk.
After use: Clean and sterilize all parts that contact breast milk.
08
Wipe the pump control unit
The pump control unit is not waterproof.
Clean only by wiping the shell with a damp
cloth, using drinking water and mild
non-abrasive detergents.
Cleaning 3 parts that contact breast milk
1. Rinse all parts with drinking water (≈ 20°C / 68°F).
2. Wash thoroughly in warm soapy water.
(≈ 30°C / 86°F) using a pH-neutral detergent
preferably without fragrances or colors.
3. Rinse again with drinking water (≈ 20°C / 68°F)
for 10–15 seconds, then dry.
Disinfecting 3 parts that contact breast milk
1. Completely immerse all accessories in water
and boil for ≤5 minutes to sterilize, then dry.
2. When using a UV disinfection dryer, follow the
instructions to disinfect and dry at
temperatures ≤100°C (212°F).
Note :During use, the app will ask you for Bluetooth, GPS positioning accesses when
necessary. To ensure normal use, it is need you enable the above accesses.
09
5.1. Download APP
5.2. Bluetooth Connection
5. APP USAGE
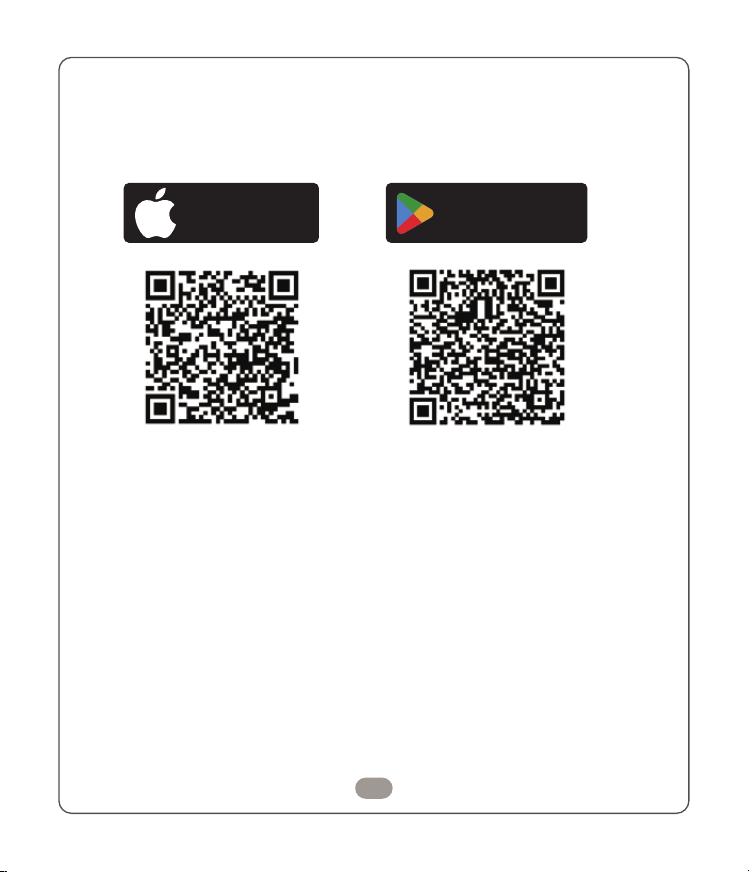
Please scan the QR code to download the Lawnmower app.
Alternatively go to the Google Play Store(Android) or Apple App
Store (OS) and search for ‘Delight smart app’
Download on the
APP Store
GET TI ON
Google Play
Preparations
· Turn on the breast pump; its indicator light flashes to enter Bluetooth pairing mode.
· Enable Bluetooth on your phone. Android users must turn on Location Services;
iOS users only need Bluetooth enabled.
· Disconnect other paired Bluetooth devices to avoid signal conflicts.
10
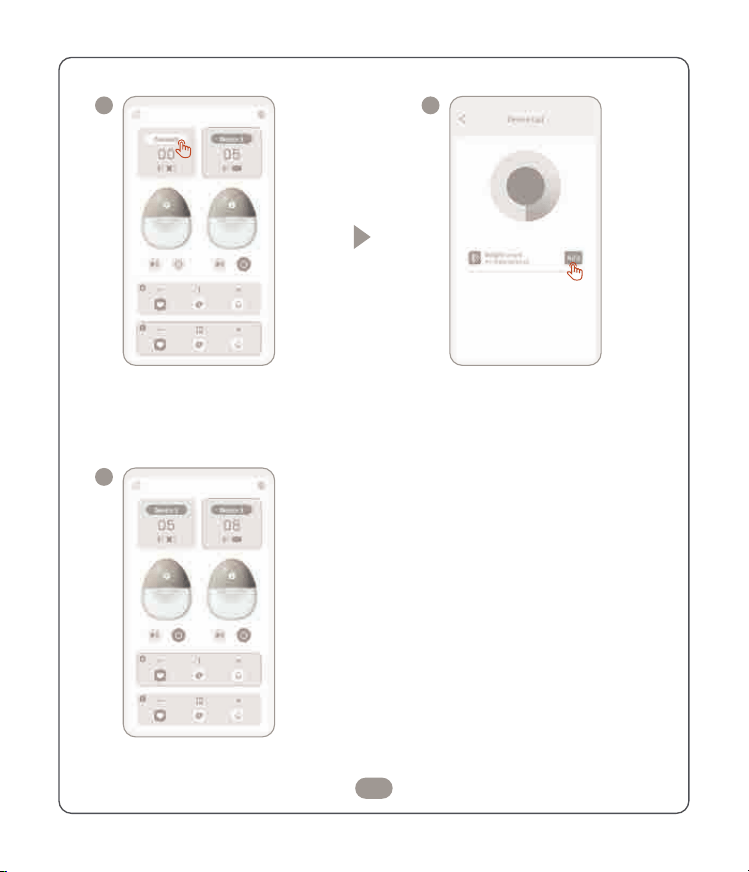
Step1: Launch the app and
click【Connect】
Step2: Redirect to device list, wait
for auto-refresh to show breast
pump, then tap to【Add】
1
2
Step3: Device 1 / Device 2 shown on the app
means connection succeeded
3
11
5.3. App Operation Instructions
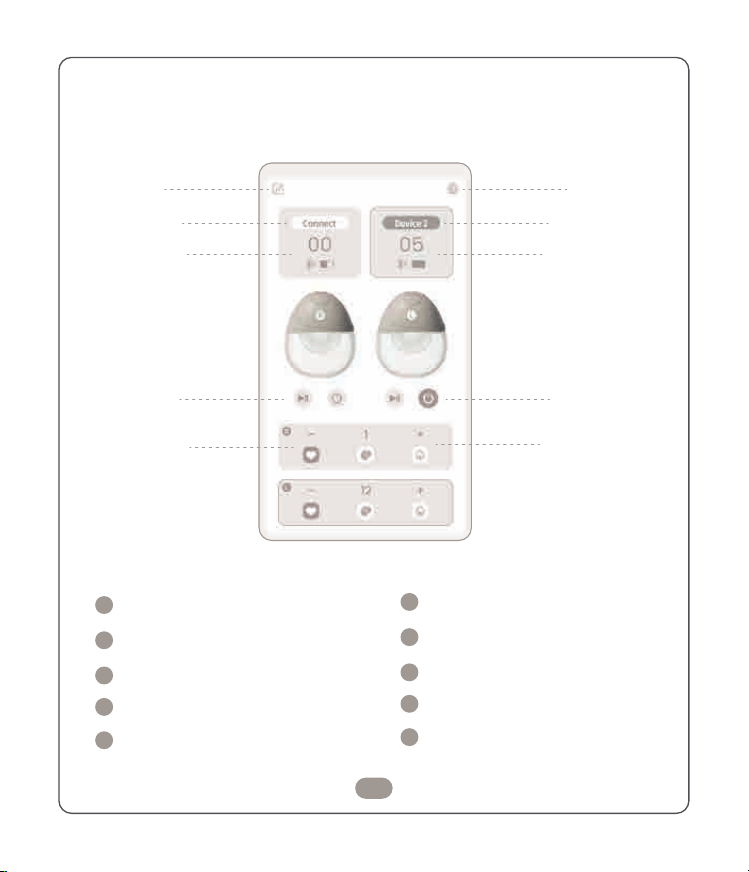
Main operation interface
➀
➁
➂
➃
➄
➈
➆
➇
➅
➉
Data Records
Connect (R)
Time/Bluetooth/Battery Display (R)
Pause/Power Off (R)
Level/Mode Switch (R)
1
2
3
4
5
Language Switch
Connect (L)
Time/Bluetooth/Battery Display (L)
Pause/Power Off (L)
Level/Mode Switch (L)
6
7
8
9
10
12
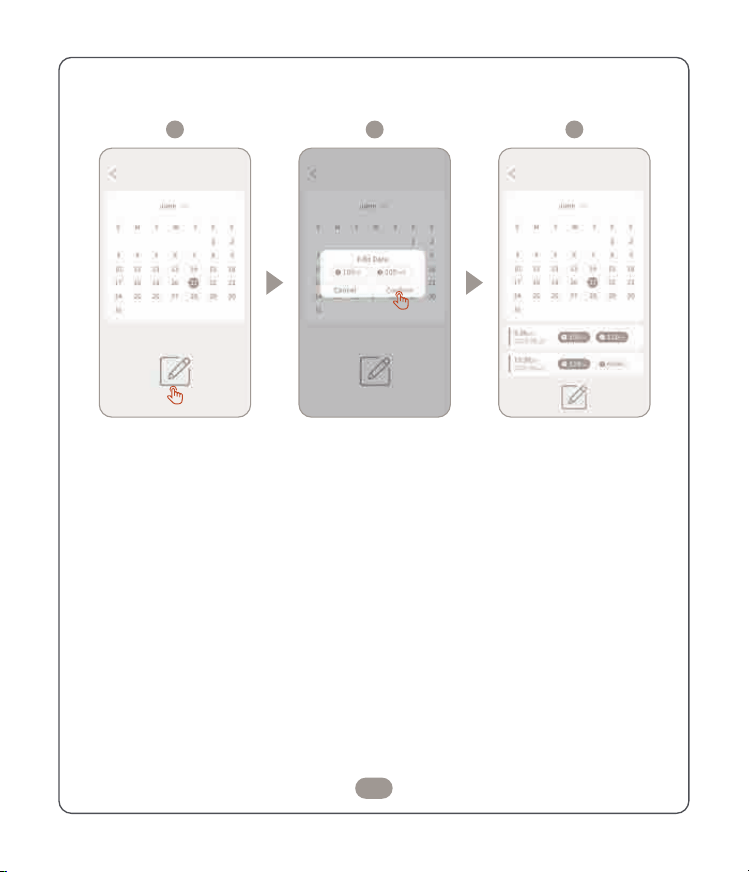
Click the record icon Record current data
1
2
Data recorded
successfully
3
Data Records
5.4. Troubleshooting
· Ensure the breast pump is powered on.
· Turn on Bluetooth & Location on your phone; grant all app permissions.
· Stay within 1 meter, away from routers, wireless headsets and other Bluetooth
interference sources.
· Restart the app and phone Bluetooth, then retry pairing.
· Connection drops if over 3 meters or blocked by walls.
· Low battery on pump: charge or replace batteries promptly.
Before Expressing
· Wash hands thoroughly with soap and water or sanitizer.
· Ensure pump parts, bottles, and pumping area are clean.
· No need to wash breasts or nipples beforehand.
Storage Guidelines
· Use PPSU bottles or breast milk storage bags.
· Fill only ¾ full to allow expansion during freezing.
· Label clearly with date and volume.
· Refrigerate in the coldest area of the fridge (e.g., behind the glass shelf).
· Frozen PPSU containers may become brittle — handle with care.
Thawing & Warming
· Never use a microwave or boiling water to thaw or heat milk.
· Thaw slowly:Overnight in the refrigerat; In warm water ≤ 37°C (98.6°F).
· Gently swirl the container to mix the layers — do not shake vigorously.
These are general guidelines. For individual advice, consult a lactation specialist.
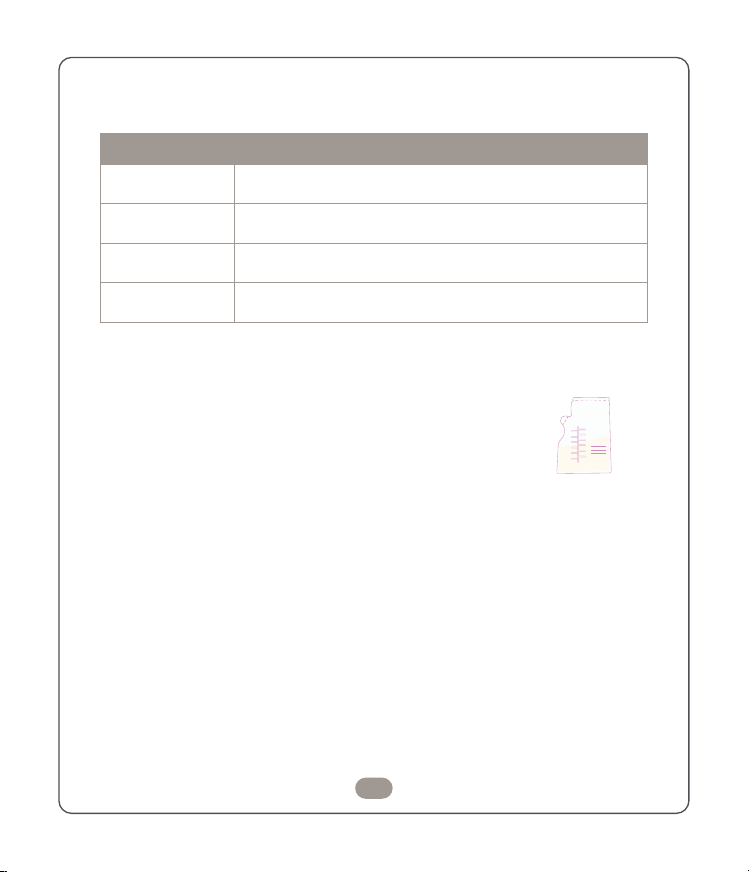
Room Temperature
(16°C-25°C/66-77°F)
Maximum of 2 hours is best, but up to 6 hoursin very clean conditions.
Up to 3 days is pre-ferred, or 5 days invery clean conditions.
Up to 6 months, or 9months in very cleanconditions
Up to 6 months, or 9 months invery clean conditions. Refrigerator
(after defrosting): Up to 24 hours.
Refrigerator
(4°C/39°F or colder)
Freezer
(-18°C / 0°F or colder)
Defrosting Breast Milk
in the Refrigerator
6. HANDLING YOUR MILK
13
Storage Information
Name:
Date:
Time:
40
60
80
120
160
190
220
100
140
180
200
Unit:ml
240
Do not use microwave oven or boiling water to heat
Your breast pump is powered by a built-in, non-replaceable lithium-polymer battery.
As its primary power source, proper care will ensure its longevity.
From Empty to Ready:
If the battery is completely depleted, charge it for at least 20 minutes before using the pump.
Perfect Match:
Always use a power adapter that matches the specified requirements (e.g., 5V/1A or 5V/2A).
Avoid Short Circuits:
Protect the USB-C port from contact with metal objects or liquids.
Cool & Collected:
Keep the pump unit in a cool and dry location.
7. TROUBLESHOOTING
8. BATTERY
14
Low or No Suction
· Try a different flange size for better fit.
· Check that the air chamber is clean and sealed properly.
· Make sure the silicone flange fits snugly against the breast.
Pump Does
Not Turn On
· Ensure the pump is charged or connected to power.
· If wet, turn off immediately and let dry completely for 24 hours in a
warm dry place. Avoid sunlight or heaters.
Leaking or Not
Expressing Milk
General Maintenance
· Check that all parts are connected, clean, and undamaged.
· Reassemble correctly according to instructions.
· If still not expressing, pause, relax, and consult a lactation specialist or
doctor ifneeded.
· Wipe the pump with a soft damp cloth after use and ensure it’s dry
before reassembly.
· Regularly inspect parts for damage and replace if necessary.
Problem Solution
Please get in touch with the retailer for warranty claims. lf sending the unit,
includea copy of the receipt and a clear description of the defect.
The warranty terms are as follows.
Charge Before Empty:
Replenish the battery power regularly and avoid complete depletion.
Warranty Period
· One year from the date of purchase. Proof of purchase must be
provided via sales receipior invoice
Repairs
· Repairs under warranty do not extend the device's or replacement
parts' warranty period.
· No liability for direct or indirect losses, even if the damage is
accepted as a warranty claim
Exclusions
Liability
· Damages due to improper treatment, such as non-compliance
with user instructions.
· Damages from unauthorized repairs or tampering
· Damages during transport to the consumer or service center
· Normal wear and tear on accessories
· Damage from private disassembly
Full Charge Before Storing:
If you plan to store the pump unused, fully charge the battery beforehand.
Hot Spot Handling:
If the pump has been exposed to high temperatures, let it cool down for one hour before
use or charging.
9. WARRANTY
15
Warning:
Not following certain instructions could result in
major harm or even a life-threatening situation
Caution:
Other instructions might lead
to a small injury if ignored.
Damage:
Some guidelines are aboutpreventing
damage to the pump, not you
Tips:
Look out for extra information to make your
experience smoother, though it's not safety-related.
Heat Warning:
Feel free to boil the accessories for sterilization, but the motor dislikes heat. Keep it away from hot
surfaces or open flames.
Flammable Materials:
Don't use the breast pump near anything that might catch fire. Safety first!
Supervise When On:
If the pump's powered on, keep an eye on it. We know you've got this!
Damaged Parts:
If you notice anything amiss, like a damaged cable or plug, stop using the pump immediately
and contact your retailer.
Water & Liquids:
Keep the pump dry. That means no baths or showers with it, and don't drop or pour water on it.
We want you and your breast pump to have a happy and safe relationship.
Here's how to make sure that happens.
Check the Power:
Ensure your local power adapter matches the breast pump's specifications. A mismatch can
cause problems, so let's start on the right foot.!
Unplug After Use:
Always unplug the electric breast pump right after using it (except when charging, of course)
Safe Storage:
Keep the pump in a spot where it won't tumble into sinks or bathtubs. Nobody wants
a surprise splash!
10. SAFETY
16

17
Extreme Heat:
Stay away from really hot places. The battery doesn't like to sweat!
Short Circuit Warning:
The USB-Type-C port and the battery could risk metal or liquid short circuits, so please
handle them with care.
No DIY Repairs:
If something's not working, please don't try to fix it yourself. We've got professionals for that!
Replace Damaged Parts:
If something looks worn or damaged, please contact your retailer to replace it. Safety comes first.
Purposeful Use:
Use the breast pump as described in this manual. I's designed to do one thing well, so let's stick to that.
Stay Alert:
Don't use the pump while sleepy or driving. We know parenting is tiring, but safety first!
Check Before Each Use:
Give the pump a quick check before each use. You're in good hands if everything's in order.
Pregnancy & Health Conditions:
Talk to a doctor if you're pregnant or have Hepatitis B, C, or HIV. Let's make sure everything's safe.
Heating Breast Milk:
Microwaving or boiling breast milk can cause burns or change its composition. Let's keep it natural!
Clean & Sterilize:
Microwaving or boiling breast milk can cause burns or change its composition. Let's keep it natural!
Only Original Components:
Always use recommended parts for your breast pump. It’s like wine pairing, for breast pumps.
Kids & Supervision:
If little ones are around, keep an eye on them around the pump and accessories.mps.
Age & Ability Considerations:
If little ones are around, keep an eye on them around the pump and accessories.mps.
Keep Parts Away from Children:
Don't let little ones get ahold of unused parts. Theyre not toys and could be harmful if swallowed.

18
A Gentle Caution About Milk Collection Cups & Accessories:
Your milk collection cups are there to help you on this incredible journey.Show
them some love, and they'll do the same for you.
Freezing Fragility:
Plastic milk collection cups can become delicate if frozen. Imagine them as precious glass
slippers - handle them with care!
Proper Handling is Key:
If mishandled (like dropping, screwing too tighty, or knocking over), the cups and components could get
damaged. Treat them like the treasures they are.
Be Careful:
Think of the milk collection cup and components as your best china. Handle with love and attention.
Skip Damaged Goods:
If something's cracked or damaged, dont use it. Better safe than sory. especially when it comes to
feeding your litle one.
19
11. CAUTION
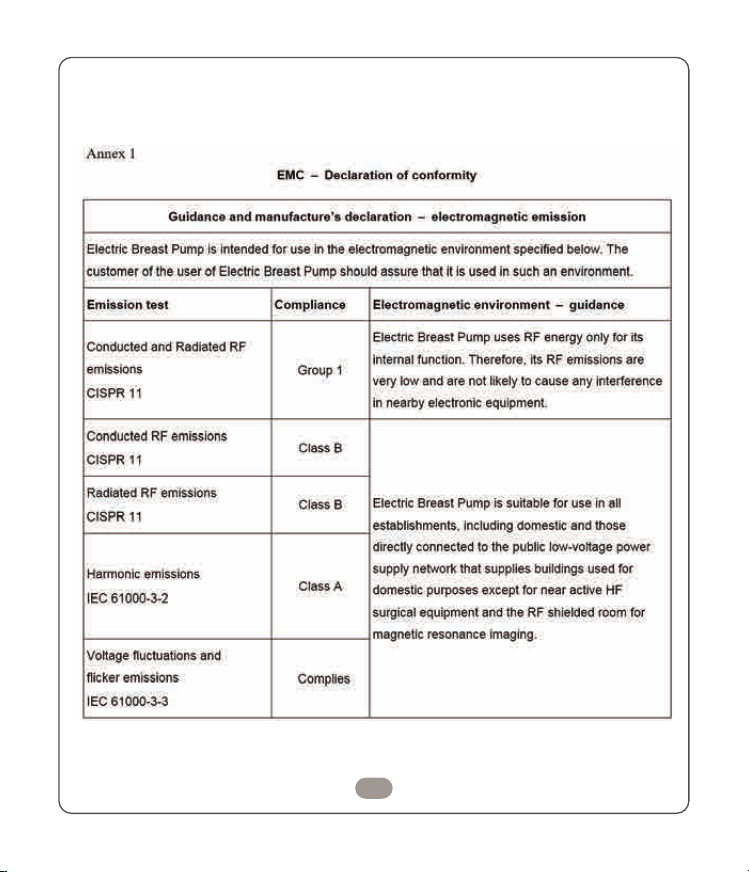
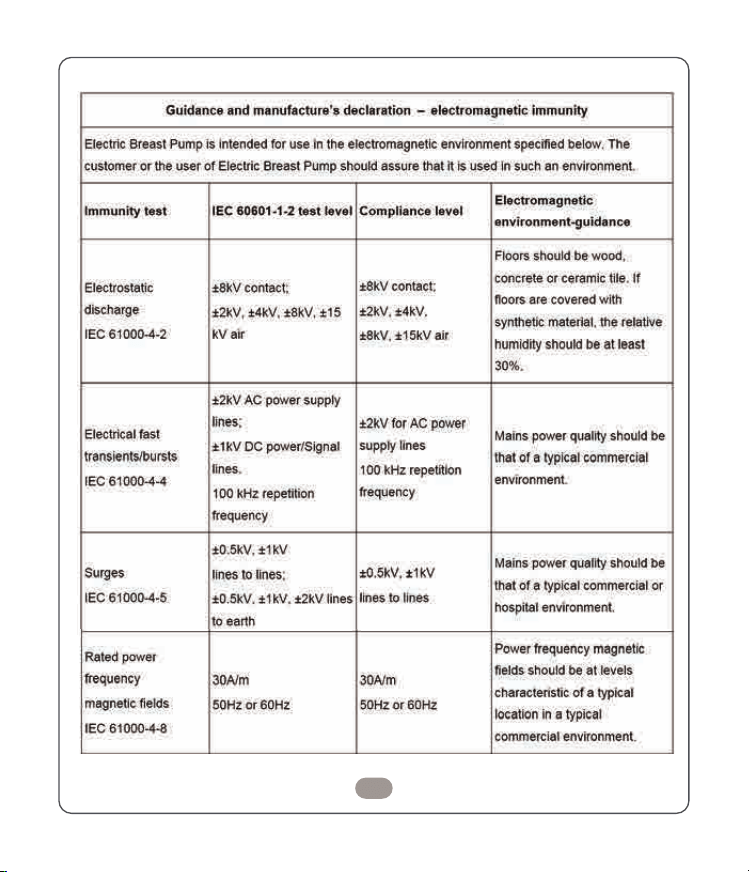
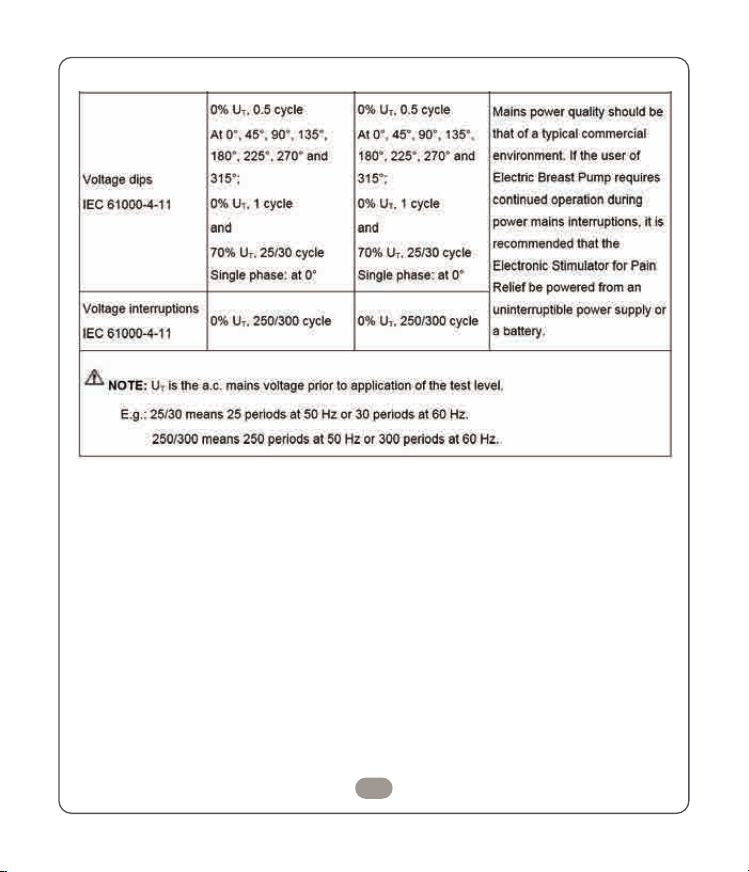
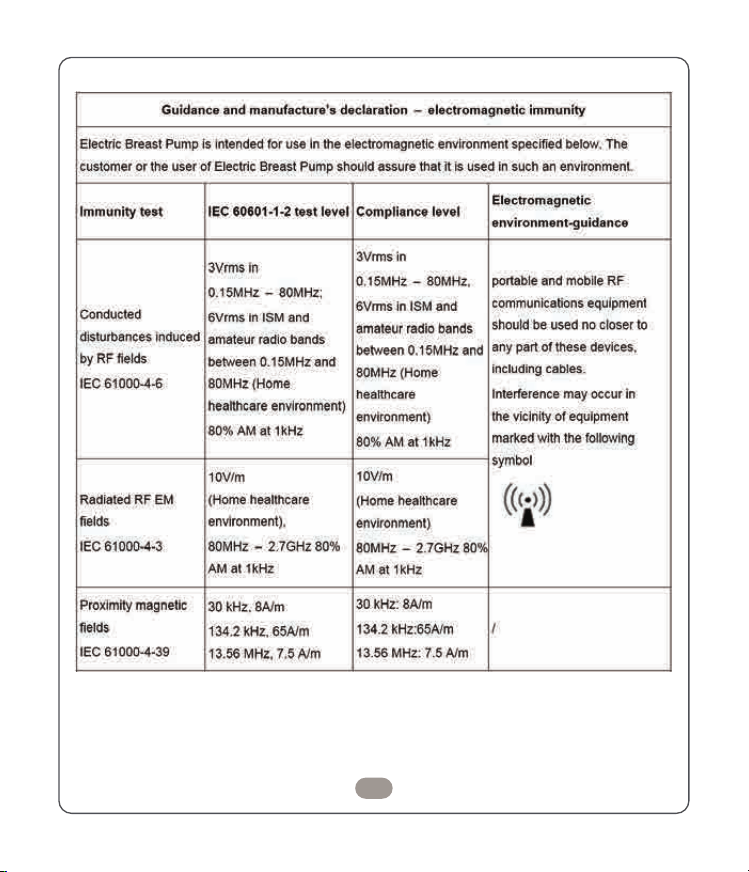
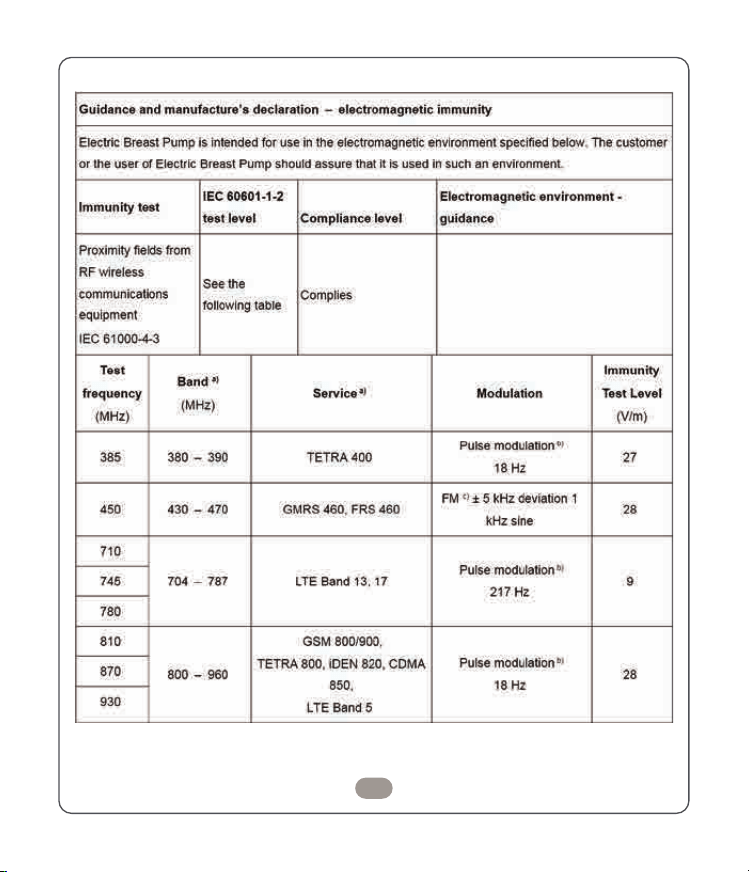
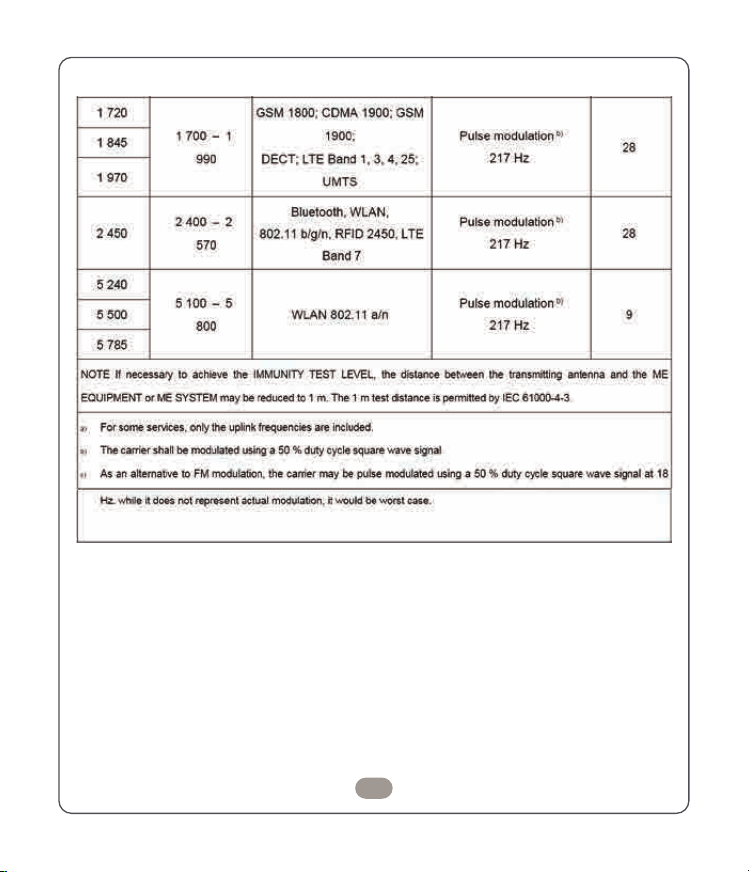
[Electric Breast Pump] meets the requirements of IEC 60601-1-2 standard for
electromagnetic compatibility.
The user shall install and use the electromagnetic compatibility information
provided by the random files.
Portable and mobile RF communications devices may affect the performance of
the [Electric Breast Pump] and avoid strong electromagnetic interference such
as near mobile phones and microwave ovens;
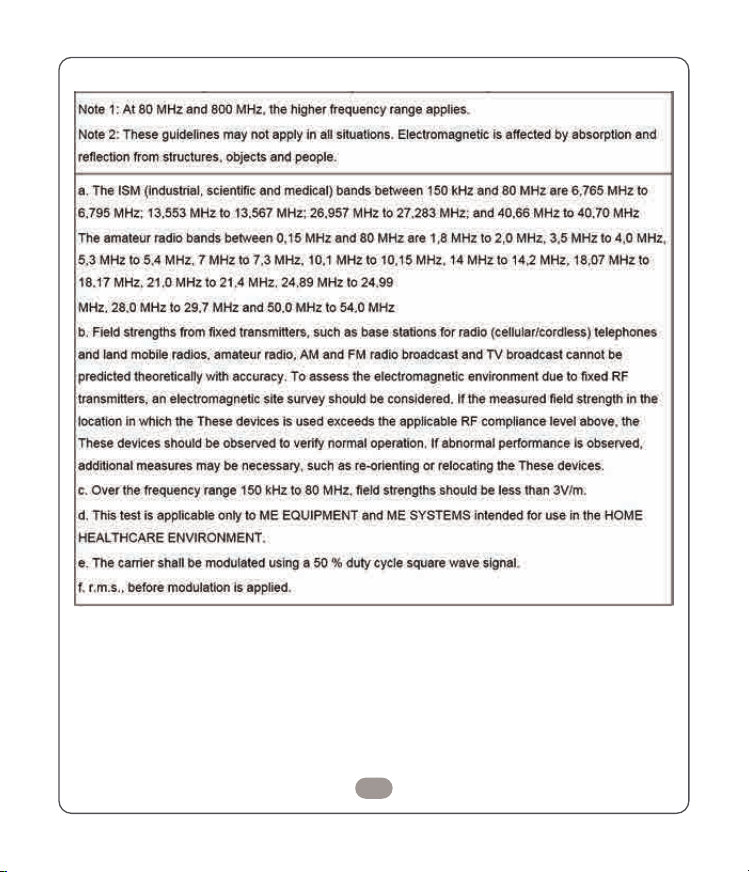
The guidelines and manufacturer's declarations are detailed in the annex
WARNING: Use of this equipment adjacent to or stacked with other equipment
should be avoided because it could result in improper operation. If such use is
necessary, this equipment and the other equipment should be observed to verify
that they are operating normally
WARNING: Use of accessories, transducers and cables other than those specified
or provided by the manufacturer of this equipment could result in increased
electromagnetic emissions or decreased electromagnetic immunity of this
equipment and result in improper operation
Components Length of cable (m) Shield layer provision (Yes/No)
USB cable 1.8 YES
WARNING: Portable RF communications equipment (including peripherals such
as antenna cables and external antennas) should be used no closer than 30 cm
(12 inches) to any part of the [Electric Breast Pump], including cables specified
by the manufacturer. Otherwise, degradation of the performance of this
equipment could result.
20
12. EMC
21
22
23
24
25
26

13. FCC STATEMENT
This device complies with part 15 of the FCC Rules. Operation is subject to the
following two conditions: (1) this device may not cause harmful interference,
and (2) this device must accept any interference received, including interfer-
ence that may cause undesired operation.
Changes or Modifications not expressly approved by the party responsible could
void the user’s authority to operate this device.
NOTE: This equipment has been tested and found to comply with the limits for a
Class B digital device, pursuant to Part 15 of the FCC Rules. These limits are
designed to provide reasonable protection against harmful interference in a
residential installation. This equipment generates, uses and can radiate radio
frequency energy and, if not installed and used in accordance with the
instructions, may cause harmful interference to radio communications. However,
there is no guarantee that interference will not occur in a particular installation.
If this equipment does cause harmful interference to radio or television
reception, which can be determined by turning the equipment off and on, the
user is encouraged to try to correct the interference by one or more of the
following measures:
-- Reorient or relocate the receiving antenna.
-- Increase the separation between the equipment and receiver.
-- Connect the equipment into an outlet on a circuit different from that to which
the receiver is connected.
-- Consult the dealer or an experienced radio/TV technician for help.
RF Exposure statement:
This equipment complies with FCC radiation exposure limits set forth for an
uncontrolled environment.
27
Made in China
Download on the
APP Store
GET TI ON
Google Play
Guangdong Xibei Medical Technology Co., Ltd.
Add: Room 701, Building 1, No. 762 Xiecao Road, XiegangTown,
Dongguan City, Guangdong Province, 523590, China
MedPath GmbH
Add: Mies-van-der-Rohe-Strasse 8, 80807 Munich, Germany
E-mail: [email protected]