200MM
390MM
正面
反面
1
2
3
正面
正面
正面
200X455MM 四色印刷
80g哑光纸 风琴折
Locate your circuit breaker panel and turn off the power
to each switch you are replacing.
Remove the switch and pull it away from the wall.
1
2
STEP 2
STEP 1
Circuit breaker panel
Turn Off Power
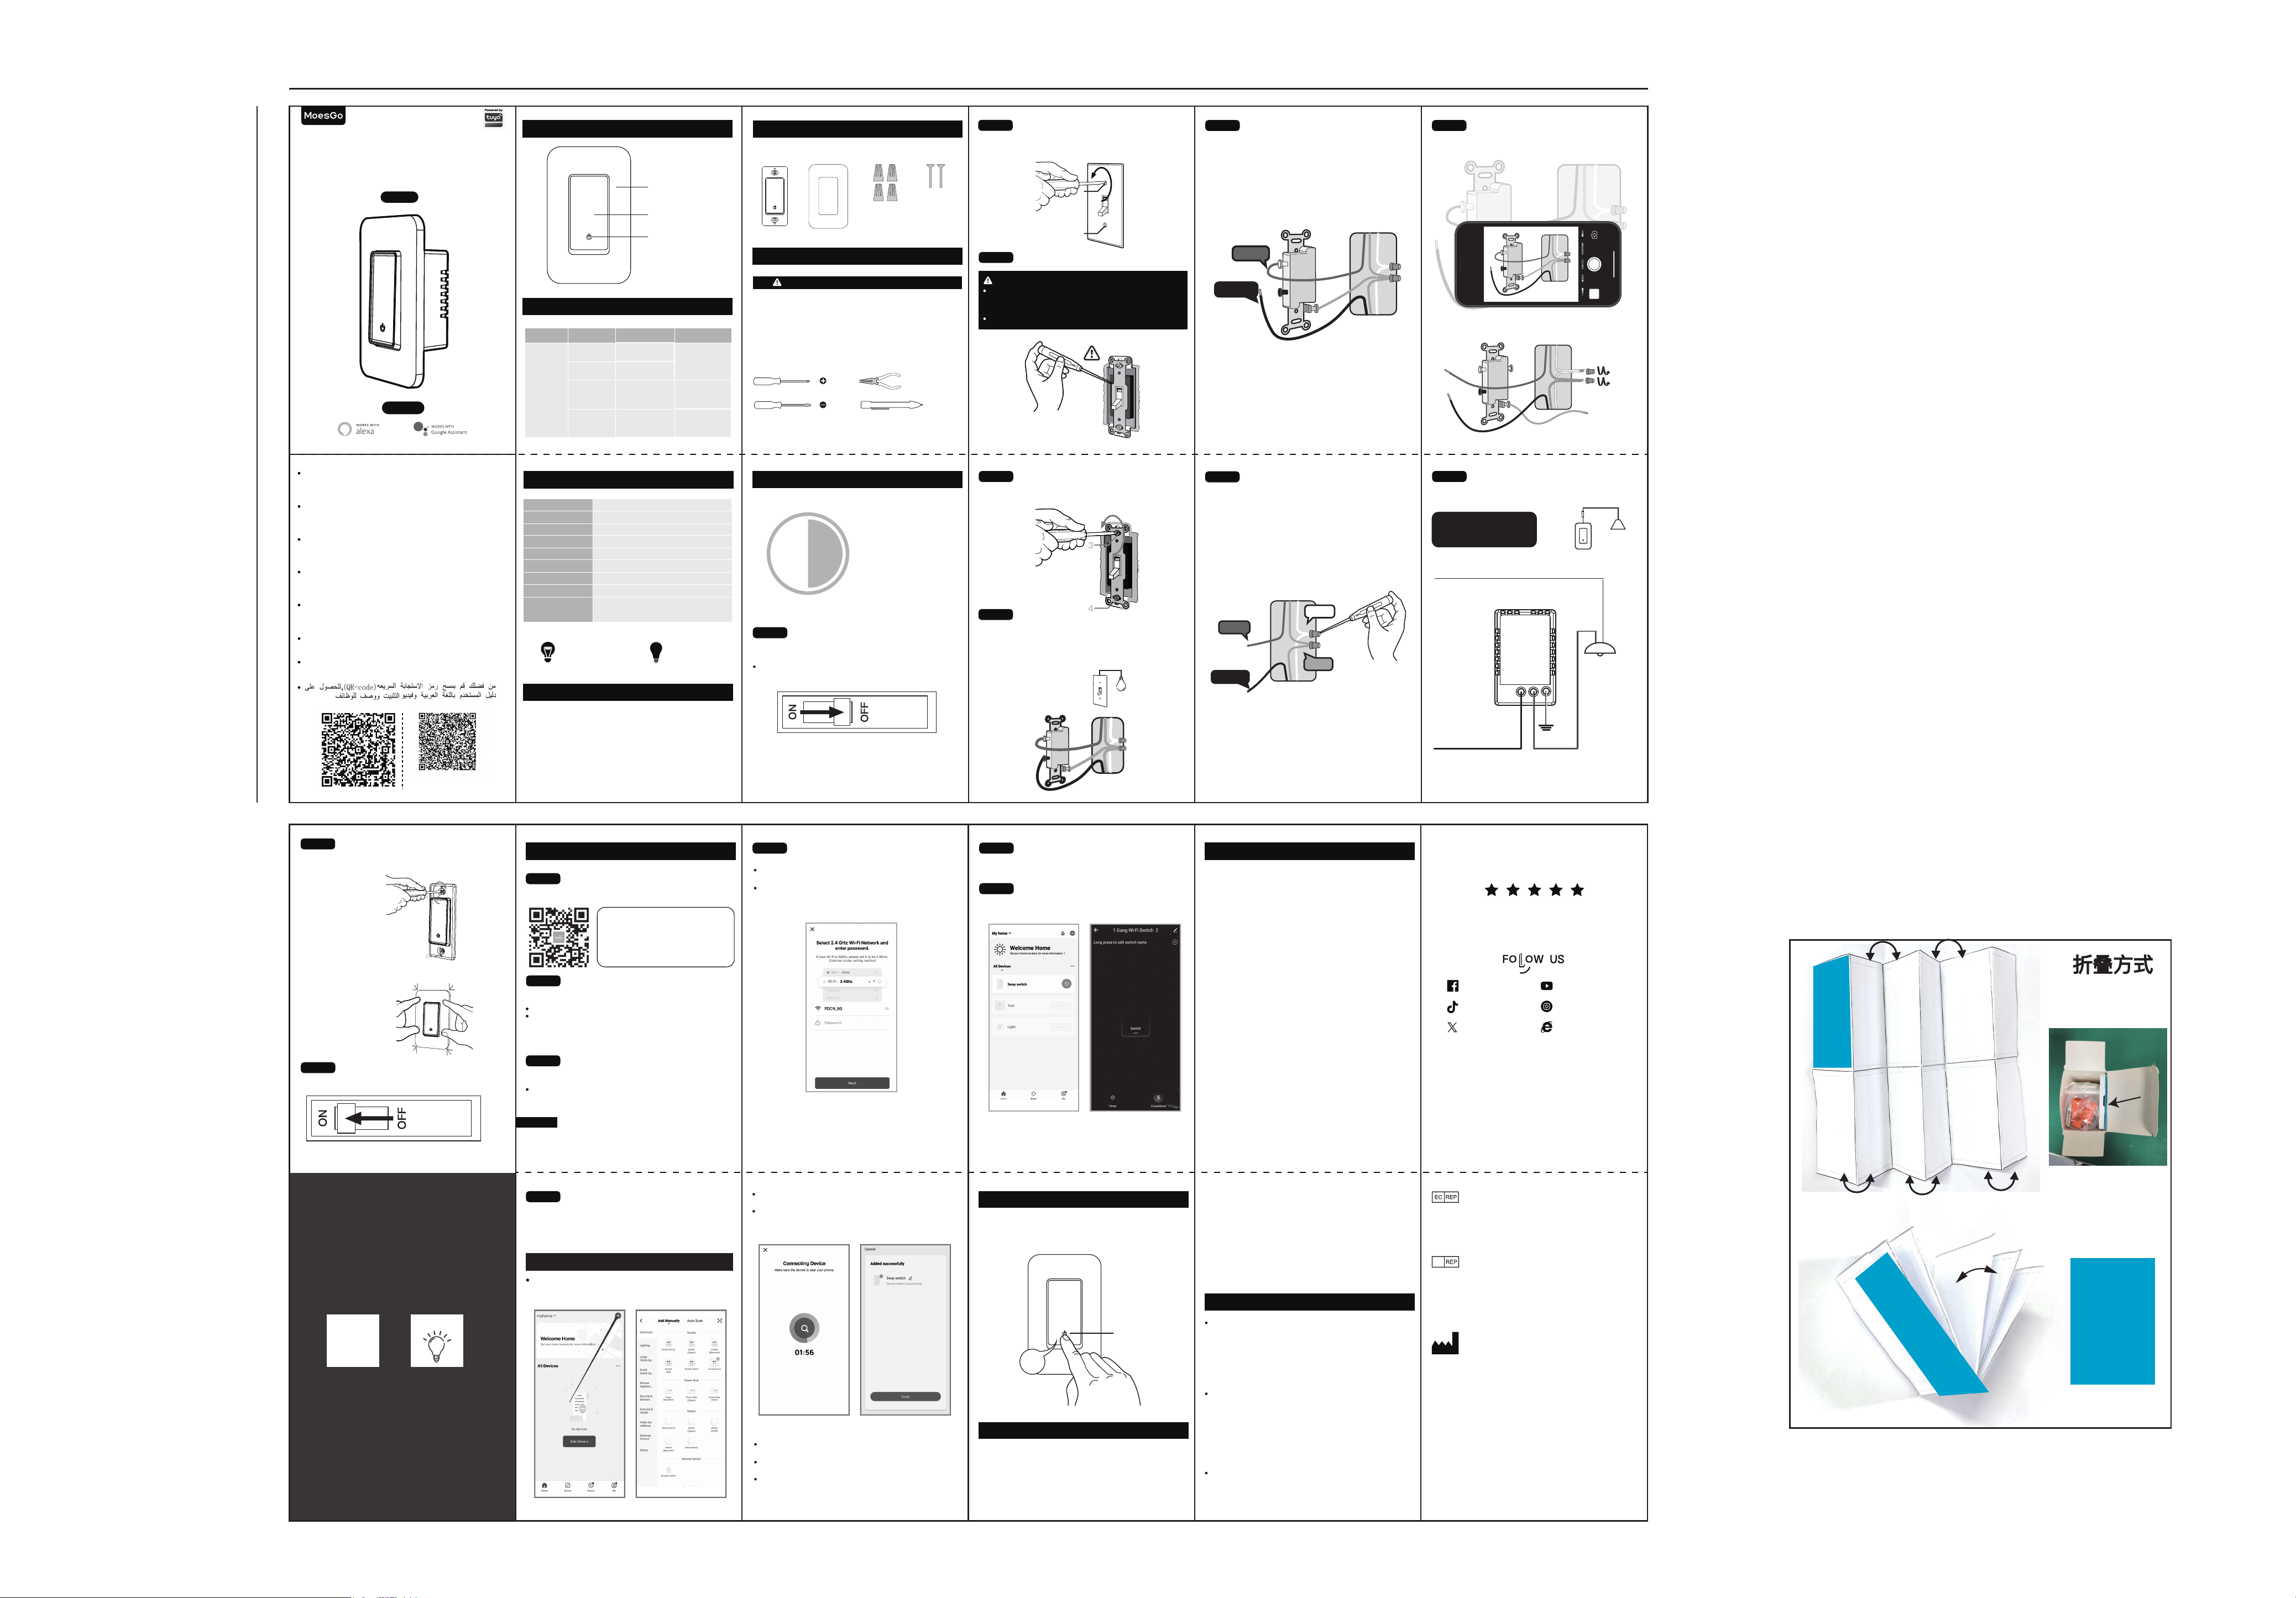
Instruction Manual
Smart Switch (Single Pole)
English
Wi-Fi
ON/OFF
LED Indicator
Cover Panel
02 Indicator Light Status
Switch Status RemarksLight StatusLight Color
Green
OFF
ON
Power OFF(Default)
Support Self-
definition on APP
Power ON(Default)
Blink Quickly
(0.5s )
Blink Slowly
(1s )
Ready for AP
(Access Point)
configuration mode
Ready for default
configuration mode
01 Product Outline
05 Contents Supplied
Switch Panel Wire Caps Screws
LED/halogen
7W ~ 450 W
Incandescent
7W ~ 800W
Tools you’ll need
Flat-head screwdriver
Phillips-head screwdriver Pliers
07 Installation
06 Safety Information
Electricity can cause personal injury and property damage
if handled improperly.If you are not sure about any part of
these instructions, please seek professional assistance
from a qualified electrician.
Ensure all wark meets applicable local and national codes.
WARNING: RISK OF ELECTRIC SHOCK
Voltage tester
08 Add Devices
This device complies with Industry Canada licence-
exempt RSS standard(s).
Operation is subject to the following two conditions:
(1) This device may not cause interference, and
(2) This device must accept any interference, including
interference that may cause undesired operation of the
device.
Le présent appareil est conforme aux CNR d'Industrie
Canada applicables aux appareils radio exempts de
licence. L'exploitation est autorisée aux deux conditions
suivantes:
(1) l'appareil ne doit pas produire de brouillage, et
(2) l'utilisateur de l'appareil doit accepter tout brouillage
radioélectrique subi, même si le brouillage est susceptible
d'en compromettre le fonctionnement.
This equipment complies with IC radiation exposure limits
set forth for an uncontrolled environment. This equipment
should be installed and operated with minimum distance
20cm between the radiator & your body.
IC Caution
1 3 5
42
7 9
86
13
10
12
22
23
20
21
18
19
16
17
14
15
Approximately
30 minutes to install
and setup the switch
30min
3
4
3
4
STEP 3
STEP 4
Verify Power is Off
Pull Out Old Switch
You may need to turn off more than on circuit breaker.
We recommend you to remove the faceplate from the old switch
and use an electrical tester to test all wires connected to the switch
to ensure there is no voltage in the circuit.
Connection Diagram
—Single Pole
L L1 G
Neutral(White)
Smart Switch
NL
Line /Hot(black) Load(red)
Ground
(Green)
Wire the Smart Switch
STEP 5
Identify The Old Switch
Single Pole Switch
Single Pole
Only one switch control one light or a bundle of lights.
11
Single Pole Switch
Test NEUTRAL and GROUND Wires
Make sure there is no power on the neutral wires from
neighboringcircuit. lf necessary, shut off additional
circuits until no voltage is found.
GROUND wires are usually BARE COPPER or GREEN.
STEP 7
Neutral
Ground
Load
Line /Hot
STEP 6
ldentify Line/Load Wire
Note:The color of your wire may be different from
the color shown on the manual.
LINE/LOAD wire (usually BLACK, attached with a black
screw)
Line /Hot
Load
STEP 8
Take Pictures of the Wiring
Loosen the screw terminals and remove the old switch.
.
Wait system to search the device,connect and configure
the device will takes up to 3min.
Once the device configure successfully, please also input
preferred name and select location.
Control switch with APP
All added devices can be viewed in the main menu
of the APP
STEP 6
STEP 7
09 Reset
Press and hold Switch button for 8s to reset the
Switch and get into quick configure mode
8s
LED Flashing
Add the Switch to APP
Preparation: Ensure the switch has connected with
electricity; ensure your phone has connected to Wifi
router and is able to connect to the internet.
After the user login,Tap the “+” icon on the top right
conner to add device; slect the “switch”menu and choose
the switch device icon.
Note: The switch supports 2.4G Wi-Fi network only
STEP 4
Quick Configuration Mode
Remark:
Press and hold Switch button for 8s to reset the Switch
and get into quick configure mode
Select the Wi-Fi and enter the password then click Next
Wait for completing the connection.
Smart phone and device must connect to same Wi-Fi
during setup mode The device must be added to the
account before it can be controlled remotely After the
device is successfully accessed, other users can obtain
control of the product through the sharing function.
Make sure you have good WI-FI singal strength at the
location of the switch
Metal box and MATEL Surface-wall board may block
Wi-Fi signal
Make sure input correct Wi-Fi password
Troubleshooting
IMPORTANT
Mount the switch
1
2
1
2
STEP 10
STEP 11
Turn on the power
This product needs to charge the
supercapacitor at the first time
power-on. The charging time will take
about 5~7 minutes, It will be slightly
different depending on the load power
and type.
The light may turn on or flicker during
the charging process, this is normal
situation, and the light will automati-
cally go off after the charge is
completed, the switch needs about 1
more minute to initialize, and then it
will enter the normal working state.
7
Charge time
mins
Flicker dure
charging
Thank you for your support and purchase at we MoesGo ,we
are always here for your complete satisfaction,just feel free
to share your great shopping experience with us.
If you have any other need,please do not hesitate to contact
us first,we will try to meet your demand.
STEP 9
Bitte scannen Sie den QR-Code, um das deutsche
Handbuch, das Installationsvideo und die Funktion
seinführung zu erhalten
Escanee el código QR para obtener el manual en
español, el video de instalación y la introducción de la
función
Veuillez scanner le code QR pour obtenir le manuel en
français, la vidéo d'installation et l'introduction des
fonctions
Отсканируйте QR-код, чтобы получить руководство
на русском языке, видео по установке и описание
функций
Scansionare il codice QR per ottenere il manuale in
italiano, il video di installazione e la guida alle
funzionalita. Video di installazione e funzionalita
Leia o código QR para obter o manual em português,
o vídeo de instalação e a introdução das funções
Zeskanuj kod QR, aby uzyskać instrukcje, filmy
instalacyjne i funkcje
请扫描二维码获取中文的说
明书、安装视频及功能介绍
Note:
Registration or Log in
Download “MOES”Application
Enter the Register/Login interface;tap “Register” to
create an account by entering your phone number
to get verification code and “Set password”.Choose
“Log in” if you already have a Smart Life account.
Configure the APP to the switch
Preparation: Ensure the switch has been connected
with electricity;ensure your phone has been connected
to Wi-Fi and is able to connect to the Internet.
The switch only supports 2.4G network.If you have
connected 5G network,please disconnect 5G network
firstly and connect 2.4G network.
Download MOES App
MOES App is upgraded as much more
compatibility than Tuya Smart/Smart Life
App,functional well for scene controlled by
Siri,widget and scene recommendations as
the fully new customized service.
(Note: Tuya Smart/Smart Life App still
works,but MOES App is highly recommended)
STEP 1
STEP 2
STEP 3
STEP 5
03 Specification
Input Power:
Control:
Communication:
Max Current:
Standby Power:
Button Life:
Dimension:
100~120V AC 60Hz
Relay
WiFi 802.11 b/g/n 2.4GHz
8A
≤0.5W
50K times
105*45*42.5 mmDimension:
2.4GHzFrequencyBand:
<+19dBm
MaximumRadio
TransmitPower:
04 Product Description
A WIFI smart switch is a switchgear that can be controlled
through a Wi-Fi connection, usually embedded in a wall or
electrical appliance to achieve remote control, timing
switch, voice control and other functions. This kind of
switch usually consists of a power processing part, a signal
control part, an input signal part, and an output signal part.
FCC Caution
10 Controlyourhomewithyourvoice
Controlyourhomewithyourvoice Devicesarecompatible
withAmazonAlexaandGoogleHomesupportedfunctional-
ities.
Pleaseseeourstep-by-stepguideon:
https://www.moestech.com/blogs/news/smart-de-
vice-linked-voice-speaker
FCC Compliance Statement for WS-SY-US-L110
This device complies with Part 15 of the FCC Rules.
Operation is subject to the following two conditions: (1)
This device may not cause harmful interference, and (2)
this device must accept any interference received,
including interference that may cause undesired operation.
Note: This equipment has been tested and found to comply
with the limits for a Class B digital device, pursuant to Part
15 of the FCC Rules. These limits are designed to provide
reasonable protection against harmful interference in a
residential installation. This equipment generates, uses, and
can radiate radio frequency energy and, if not installed and
used in accordance with the instructions, may cause
harmful interference to radio communications. However,
there is no guarantee that interference will not occur in a
particular installation. If this equipment does cause harmful
interference to radio or television reception, which can be
determined by turning the equipment off and on, the user
is encouraged to try to correct the interference by one or
more of the following measures:- Reorient or relocate the
receiving antenna.
- Increase the separation between the equipment and
receiver.
- Connect the equipment into an outlet on a circuit
different from that to which the receiver is connected.
- Consult the dealer or an experienced radio/TV technician
for help.
This device complies with Part 15 of the FCC Rules.
Operation is subject to the following two conditions: (1)
This device may not cause harmful interference, and (2)
this device must accept any interference received,
including interference that may cause undesired operation.
Changes or modifications not expressly approved by the
party responsible for compliance could void the user's
authority to operate the equipment.
FCC Radiation Exposure Statement:
This equipment complies with FCC radiation exposure
limits set forth for an uncontrolled environment. End users
must follow the specific operating instructions for
satisfying RF exposure compliance. This transmitter must
not be co-located or operating in conjunction with any
other antenna or transmitter.
MOES.Official
@moes_smart
@moessmart
@moes_smart
@moes_smart www.moes.net
WENZHOU NOVA NEW ENERGY CO.,LTD
Address: Power Science and Technology
Innovation Center, NO.238, Wei 11 Road,
Yueqing Economic Development Zone,
Yueqing, Zhejiang, China
Tel: +86-577-57186815
Email: [email protected]
E‐CrossStu‐GmbH
MainzerLandstr.69,60329FrankfurtamMain
Email:[email protected]
Tel:+4969332967674
Made in China
UK
EVATOST CONSULTING LTD
Address: Suite 11, First Floor, Moy Road
Business Centre, Taffs Well, Cardiff,
Wales, CF15 7QR
Tel: +442921680945
Email: [email protected]
WS-SY-US-L110-MG-DB22
Smart life,Smart future