SHARE3DCAM S30 SE
User Manual
V1.0
2026.04
SHARE3DCAM LIMITED

Disclaimer and Warning
The copyright of this document and all other
collateral documents belong to SHARE3DCAM
LIMITED (abbreviated as “SHARE3DCAM ”).
SHARE3DCAM has the final interpretation right of
this document and all other collateral documents.
By using SHARE3DCAM products, user agree to
SHARE3DCAM 's relevant disclaimer terms
SHARE3DCAM has right to update, modify or
terminate the content of this document without
prior notice. For update information, visit website
“www.SHARE3DCAM.com” and click on the
product page for this product.
This product is not a toy. Do not allow people
under the age of 18 to touch or use the
SHARE3DCAM S30 PRO handheld LiDAR device .
Do not modify or disassemble the SHARE3DCAM
S30 PRO handheld LiDAR device. The user shall
bear full responsibility for any product
malfunctions, safety incidents, or economic losses
resulting from self-disassembly, modification, or
alteration of the product.
Please read and understand the operating
documents and precautions carefully before
installing, setting up and using this product, and
understand user's legal rights, responsibilities and
safety instructions; otherwise, SHARE3DCAM has
the right to exempt itself from any responsibility
and incidental liability for safety issues and
property losses caused by failure to accurately

understand the product safety use rules. Before
using the product, users have promised to be
responsible for their own actions and all
consequences arising therefrom.
The user agrees to use this product for legitimate
purposes and accepts these terms and all
applicable laws and regulations established by
national authorities pertaining to this product.
To the maximum extent permitted by law, in no
case shall SHARE3DCAM be liable for any indirect,
consequential, punitive, incidental, special or
punitive damages, including liability for losses
suffered due to user's purchase, use or inability to
use this product (even if SHARE3DCAM has been
informed of the possibility of such loss).
Please use this product in compliance with the
relevant national laws and regulations on drones
and related products. SHARE3DCAM does not
assume any responsibility for any consequences of
using this product in violation of relevant national
laws and regulations, including but not limited to
legal disputes, civil liability, criminal liability,
economic losses, etc.

Catalog
1 Product Overview .................................................................... 1
1.1 Product Introduction .......................................................... 1
1.2 Features ............................................................................. 1
1.3 In the Box ........................................................................... 2
1.4 Product Parameter ............................................................. 3
2 Installation ............................................................................... 6
2.1 Device Components ........................................................... 6
2.2 Installation ......................................................................... 6
2.3 Disassembly ........................................................................ 8
2.4 Charge ................................................................................ 9
3 Scanning Operation ............................................................... 10
3.1 Power On ......................................................................... 12
3.2 Device Starting Up ............................................................ 13
3.3 Device Connect Mobile APP ............................................. 13
3.4 Start Scanning .................................................................. 16
3.5 Parameter Setting ............................................................ 16
3.6 New Project ...................................................................... 17
3.7 Control Point Collection ................................................... 20

3.8 Data Collection ................................................................. 22
3.9 Data Saving ....................................................................... 24
3.10 Power Off ....................................................................... 25
4 SHARE Capture Data Manager ............................................... 26
4.1 Data Storage ..................................................................... 26
4.2 Local ................................................................................. 28
4.3 Review Data ..................................................................... 29
5 SHARE PointClouds Studio ..................................................... 30
5.1 Software Configuration Requirements ............................ 30
5.2 Data Processing ................................................................ 31
6 Device Maintenance .............................................................. 34
6.1 Precaution ........................................................................ 34
7 After Sales .............................................................................. 36
7.1 Shipment .......................................................................... 36
7.2 After-sales Service ............................................................ 37

1
1 Product Overview
1.1 Product Introduction
SHARE3DCAM S30 SE is a handheld 3D LiDAR scanner designed
and developed by SHARE3DCAM. It integrates high-precision
LiDAR, surveying and mapping wide-angle camera. It deeply
integrates LiDAR and image, and cooperates with self-
developed point cloud algorithm. Single person operation can
obtain accurate color point cloud data by scanning with a
SHARE3DCAM S30 SE, which complete spatial mapping in a
short time. Whether they are architectural designers,
construction workers or surveying professionals, they can
quickly obtain real-scene 3D information by using
SHARE3DCAM S30 SE.
1.2 Features
* Supports real-time calculation and post-processing
calculation, and adds color to point clouds in real time. The
appearance of color point cloud is industry-leading.
* The point cloud thickness is within 1 cm, and relative accuracy
can reach 1 cm.

2
* Two 1/2-inch ultra-wide-angle cameras with electronic
shutter, totaling 16 megapixels.
* The quick-release structure of the battery makes the
installation more secure.Easy and quick to operate
* Standard “SHARE Capture” APP, real-time feedback on data
collection status, real-time preview of color point cloud.
* Standard SHARE PointClouds Studio software can generate
color point clouds with one- click and the results could be
generated in a variety of common formats.
* Standard magnetic mobile phone holder, mobile phones
could be more firmly adsorbed and more convenient to use.
* Connect to WiFi with one-click encryption via Bluetooth,
making the WiFi connection more stable.
1.3 In the Box
Item
Main
Unit
Grip
Battery
Charger
Position
Plate
Card
Reader
QTY
1PC
1 PC
1 PC
1 PC
1 PC
Item
Wipe
Cloth
Warrant
y Card
User
Manual
Data
Cable
Phone
Holder
QTY
1PC
1 PC
1 PC
1 PC
1 PC

3
1.4 Product Parameter
SHARE3DCAM S30 SE Parameter
Basics
Weight
Main Unit
:
870g
Grip Battery
:
390g
Overall
:
1260g
Protection
Class
IP5X
Working
Temperature
-20
℃
~+50
℃
Storage
Temperature
-20
℃
~+60
℃
WIFI
WIFI 6, Support 2.4G/5G
802.11 a/b/g/n/ac/ax Wi-Fi
2.4G
:
2.400 ~ 2.4835 GHz
5G
:
5.15 ~ 5.25GHz
、
5.725 ~ 5.85GHz
WIFI Distance
20 m
Bluetooth
Support
Overall
Dimensions
107*118*274mm
Main Unit
107*118*112mm

4
Dimensions
Storage
Capacity
256 G(Support memory expansion)
Supply Voltage
20 V
Working Power
<
30 W
Interface
TF Card / Type-C/Battery Handle
Interface
Processor
Performance
8-core 64-bit processor, clock speed
2.4 GHz
LiDAR
LiDAR Class
Class 1 / 905 nm
Point Cloud
Number
1152000 points/s
Point Cloud
Frequency
10 Hz (Typical Value)
Scanning
Range
0.1 ~ 60 m; 40 m @ 10% reflectivity
LiDAR FOV
Horizontal 95°; Vertical 360°
LiDAR
Installation
Horizontal forward
Camera
Sensor Size
7.504*5.659mm
;
1/2 inch
Pixel Size
1.6μm*1.6μm
Image Size
2832*2832

5
Effective Pixels
Single lens 8 million
Shutter Type
Electronic shutter
Aperture
Fixed F2.25
Focal Length
1.4 mm
Lens FOV
200°
Battery&
Software
Battery
Capacity
45.36wh
(
3150mAh
)
Supply Voltage
14.4V
Working Time
100min
Charging Port
TYPE-C
Charging
Power
PD 30W
Charging Time
120min
Point Cloud
Thickness
≤ 1cm
Relative
Accuracy
≤ 1cm
Absolute
Accuracy
≤ 5cm
6
2 Installation
2.1 Device Components
The SHARE3DCAM S30 SE device is divided into two parts, main
body and the grip(Includes battery and positioning board). The
handle serves to power the main unit and support it during
scanning; the main body includes LiDAR, lens, storage module,
etc.
2.2 Installation
2.2.1 Install Position Plate
Align the handle buttons with the rear end of the positioning
plate. Insert the bottom of the handle into the positioning
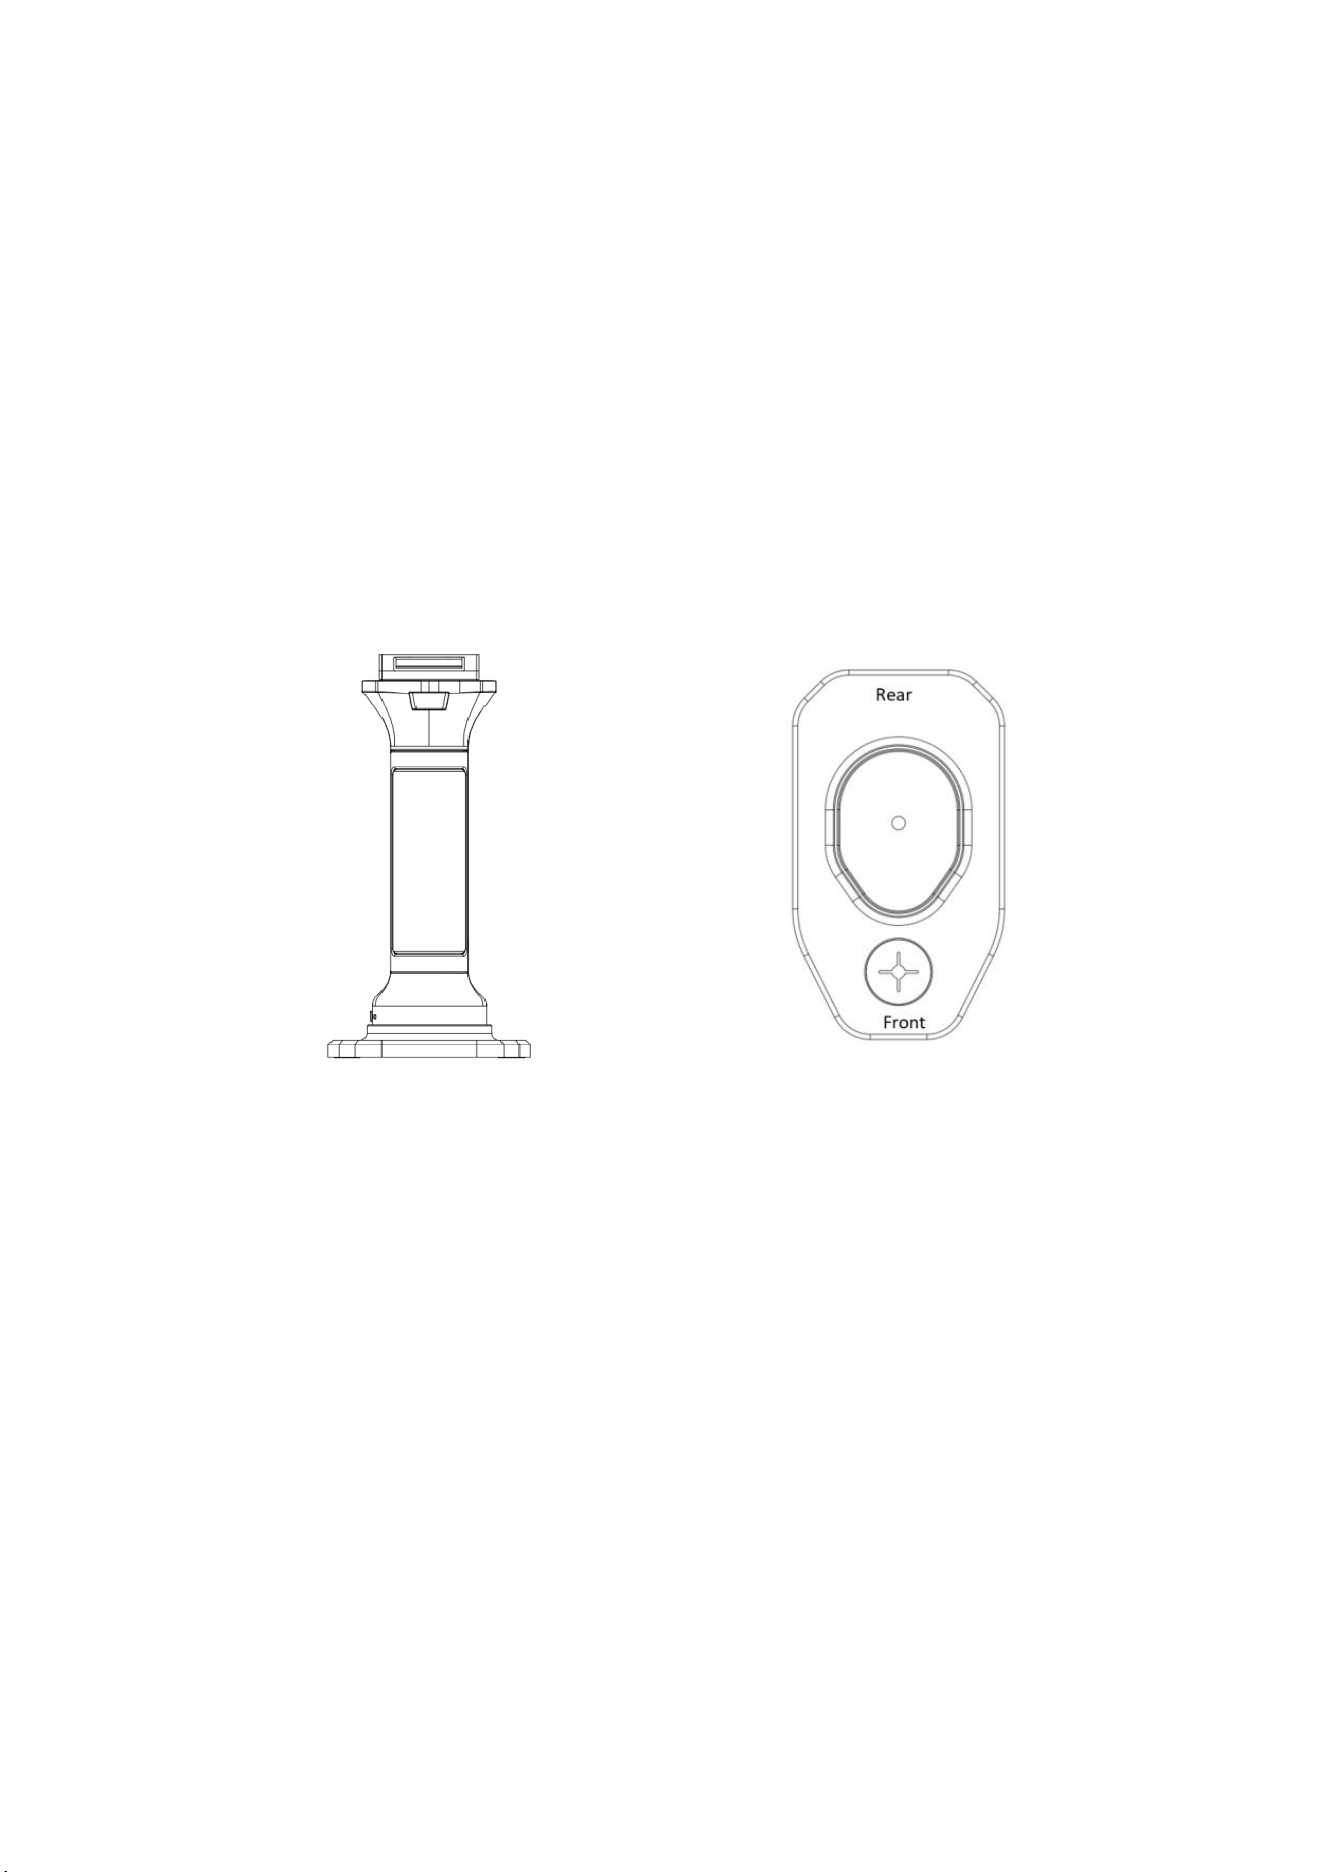
7
plate's retaining slot. Align the screw holes at the bottom of
the grip with the 1/4 foot screws at the bottom of the
positioning plate. Turn the screws to the clockwise until they
are tightened. Shake slightly to confirm that the grip and
position plate are secure. In order to facilitate users to measure
control points, an acrylic cross transparent hole is set at the
front end of the positioning plate.
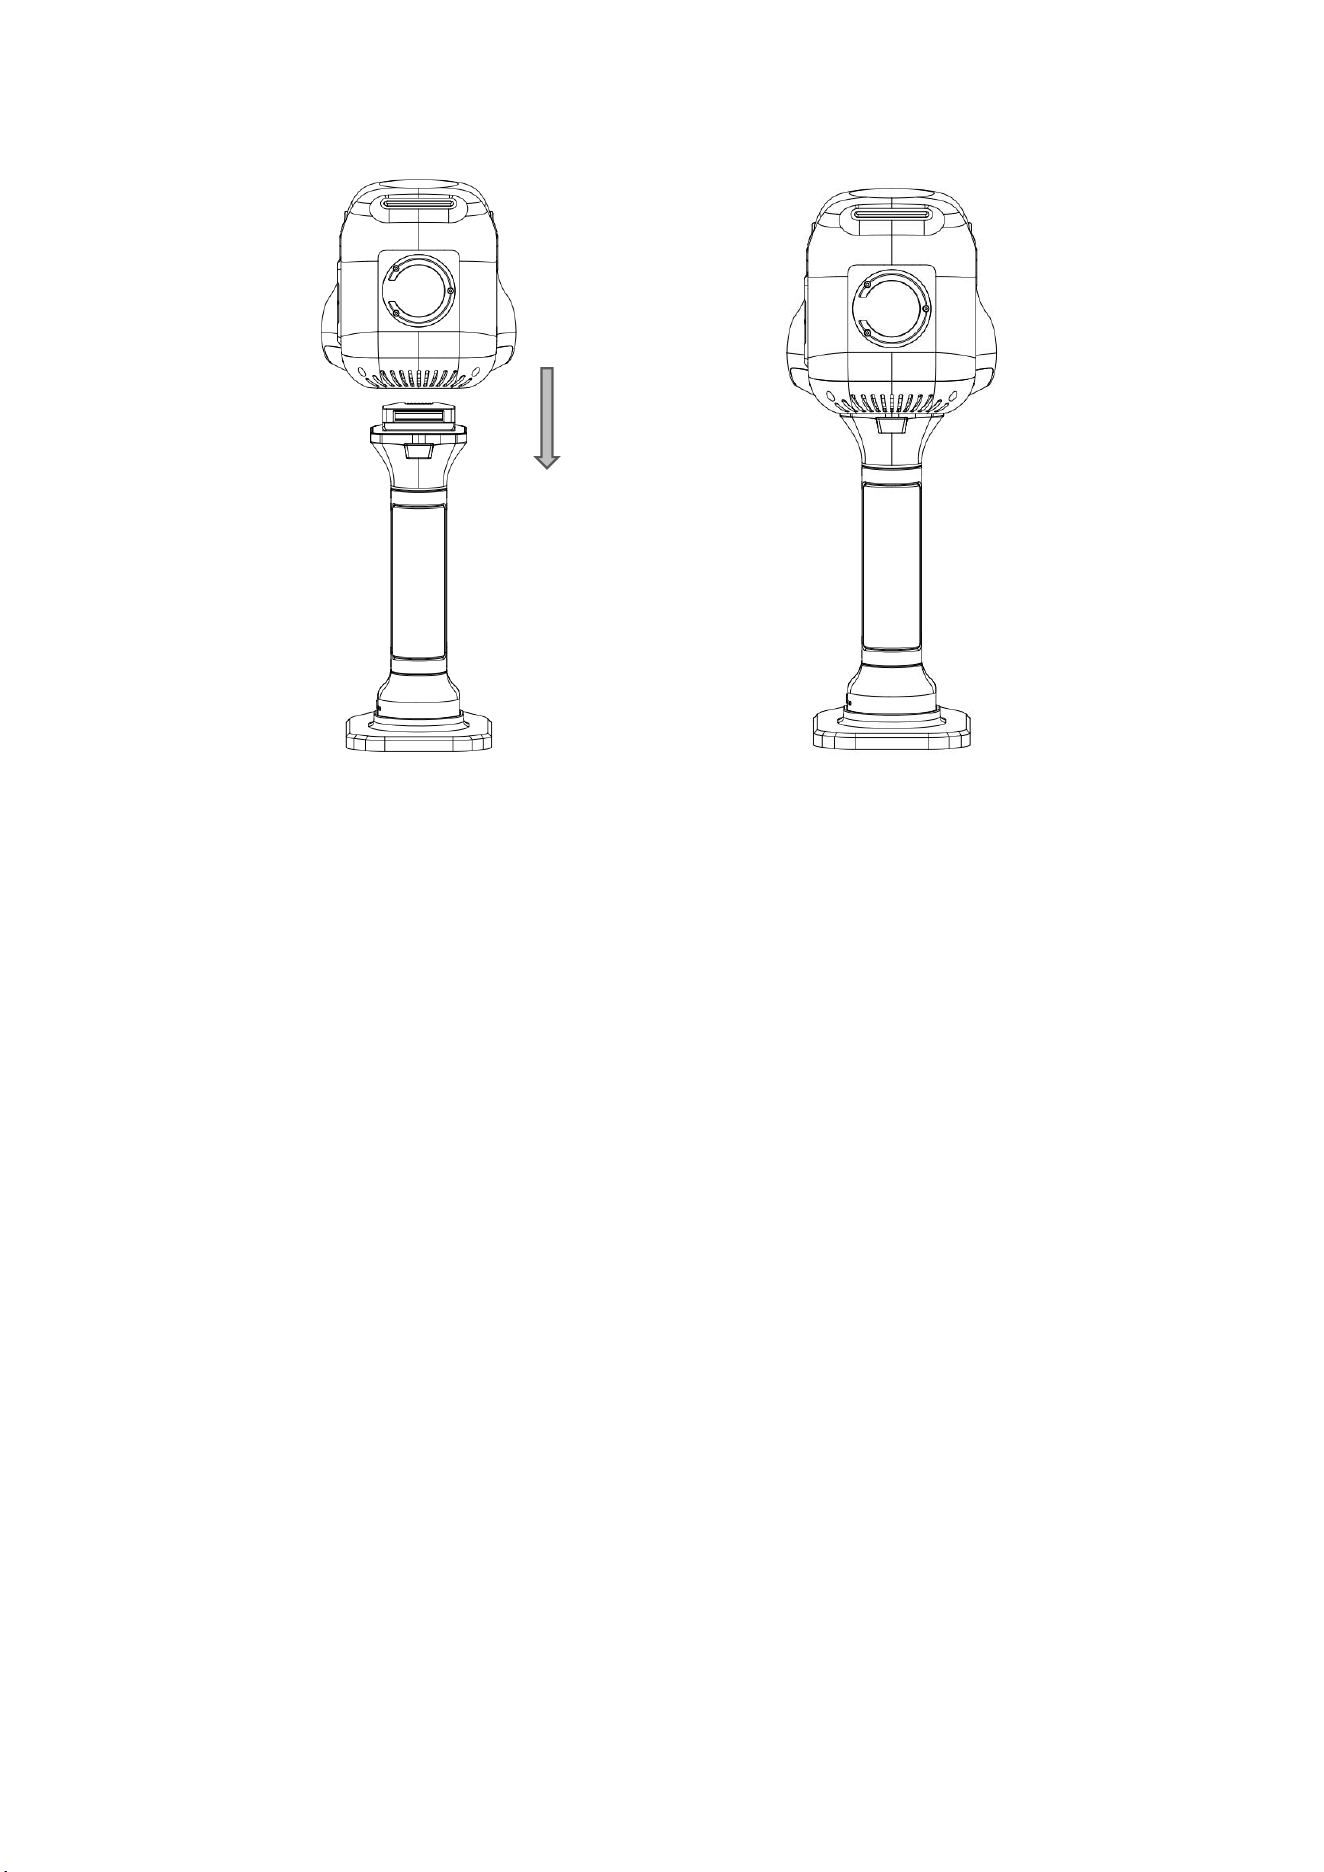
2.2.2 Install Scanner Module
Align power interface on the top of the grip battery with the
power interface on the bottom of the scanner, with the
magnetic ring of the scanner facing user. Gently press down on
the scanner and insert it directly. A click sound indicates
installation is complete.The battery grip's unlock button will
eject completely once installation is complete.
8
2.3 Disassembly
2.3.1 Main Unit Disassembly
Hold the handle with your left hand and the scanner with your
right hand. Press the unlock button on the handle, hold the
button down, and pull the scanner upward. At this time, be
careful not to use excessive force to avoid bumping the device.
2.3.2 Positioning Plate Disassembly
First, make sure the grip battery and scanner have been
disassembled, then pull up the 1/4 foot screws pull ring at the
bottom of the positioning plate and rotate it counterclockwise

9
until the positioning plate and grip battery can be easily
separated. This completes the disassembly.
2.4 Charge
When charging the device, it is necessary to remove the
scanning module from the entire device.Take out the charging
device provided in the box and insert it into the TYPE-C
charging port at the bottom of the grip. Wait until the power
indicator lights light up one by one, which indicates that the
grip battery is charging. To protect battery life and ensure safe
use, please charge the handle battery within a temperature
range of 0°C to 45°C.
2.5 Check battery level
In the off state, briefly press the battery button to check the
number of indicator lights that turn on. Different numbers of
lights indicate different remaining battery levels. The
correspondence between the number of indicator lights and
battery level is shown in the table below:
10
Light Number
Power
Red
15%
1
15%-25%
2
25%-50%
3
50%-75%
4
75%-100%
3 Scanning Operation
When starting the scan, use the SHARE Capture App to control
and monitor the device. Through this app, user can control the
device to new scanning project, start scanning, end scanning,
manage data, check device status and do other operations.
There is an indicator light above the scanner, which can check
the working status.
The color and corresponding status of the indicator light are as
shown in the table below.
11
Device Status
Left
Right
Display
POST
-
-
chaser lights
Booting
-
-
rapid blue flash
Boot Completed
-
-
solid blue light
Firmware
Upgrading
-
-
solid yellow light
Data Saving
-
-
slow yellow
flash
Powering off
-
-
rapid yellow
flash
Device
Abnormality
-
-
solid red light
Starting
Operation
-
-
rapid green
flash
Scanning
-
-
slow green flash
(Breathing Light)
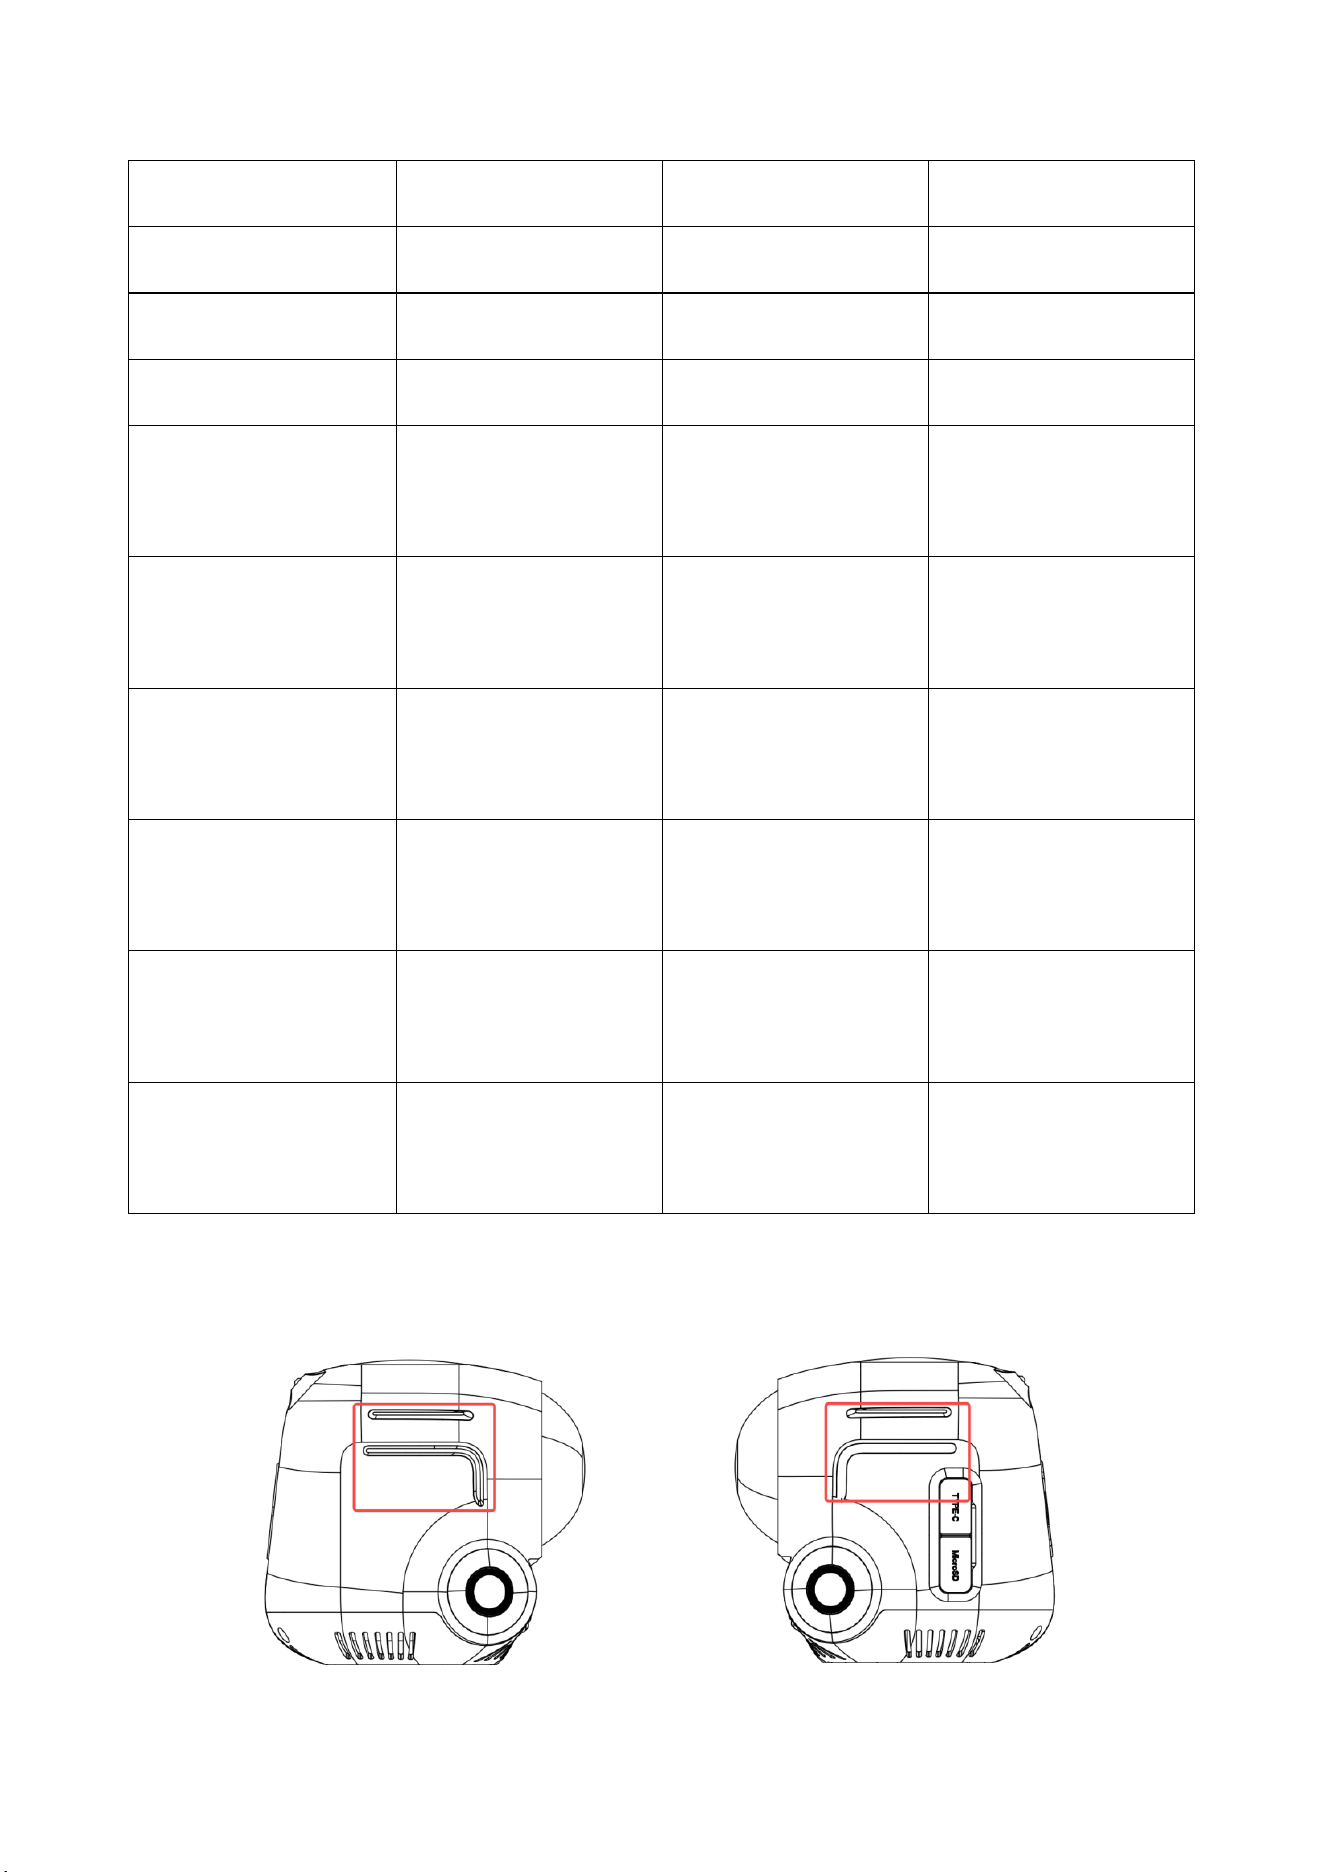
The light strips on both sides of the device display when
synchronously powered on.

12
Status indication for light strips on both sides of the device:
Device Status
Light strip display
POST&Booting
Start: Light blue - Blue-white
gradient - Red-white gradient -
Red; End: Timed refresh
The device has been
successfully powered
on and is in idle state
(no operation).
Front: Light blue - Blue-white
gradient - Red-white gradient -
Red;
Back: Breathing Light
Equipment in
operation
White light, steady on
3.1 Power On
Briefly press and then hold the button at the bottom of the
battery. The battery indicator lights will turn on sequentially
from the first to the fourth light, indicating that the device is
powered on. The handle powers the device when it is turned
on. When the main body is powered on, the battery indicator
displays the remaining charge in real time. As the battery drains,
the number of indicator lights decreases sequentially. When
the battery is critically low, the first indicator light turns red.
13
3.2 Device Starting Up
After turning on SHARE3DCAM S30 SE, wait for about a minute
for the device to start up in order to prepare for subsequent
scanning. A steady blue light indicates that the device has
successfully started.
3.3 Device Connect Mobile APP
Find the “SHARE Capture” app on the official website and install
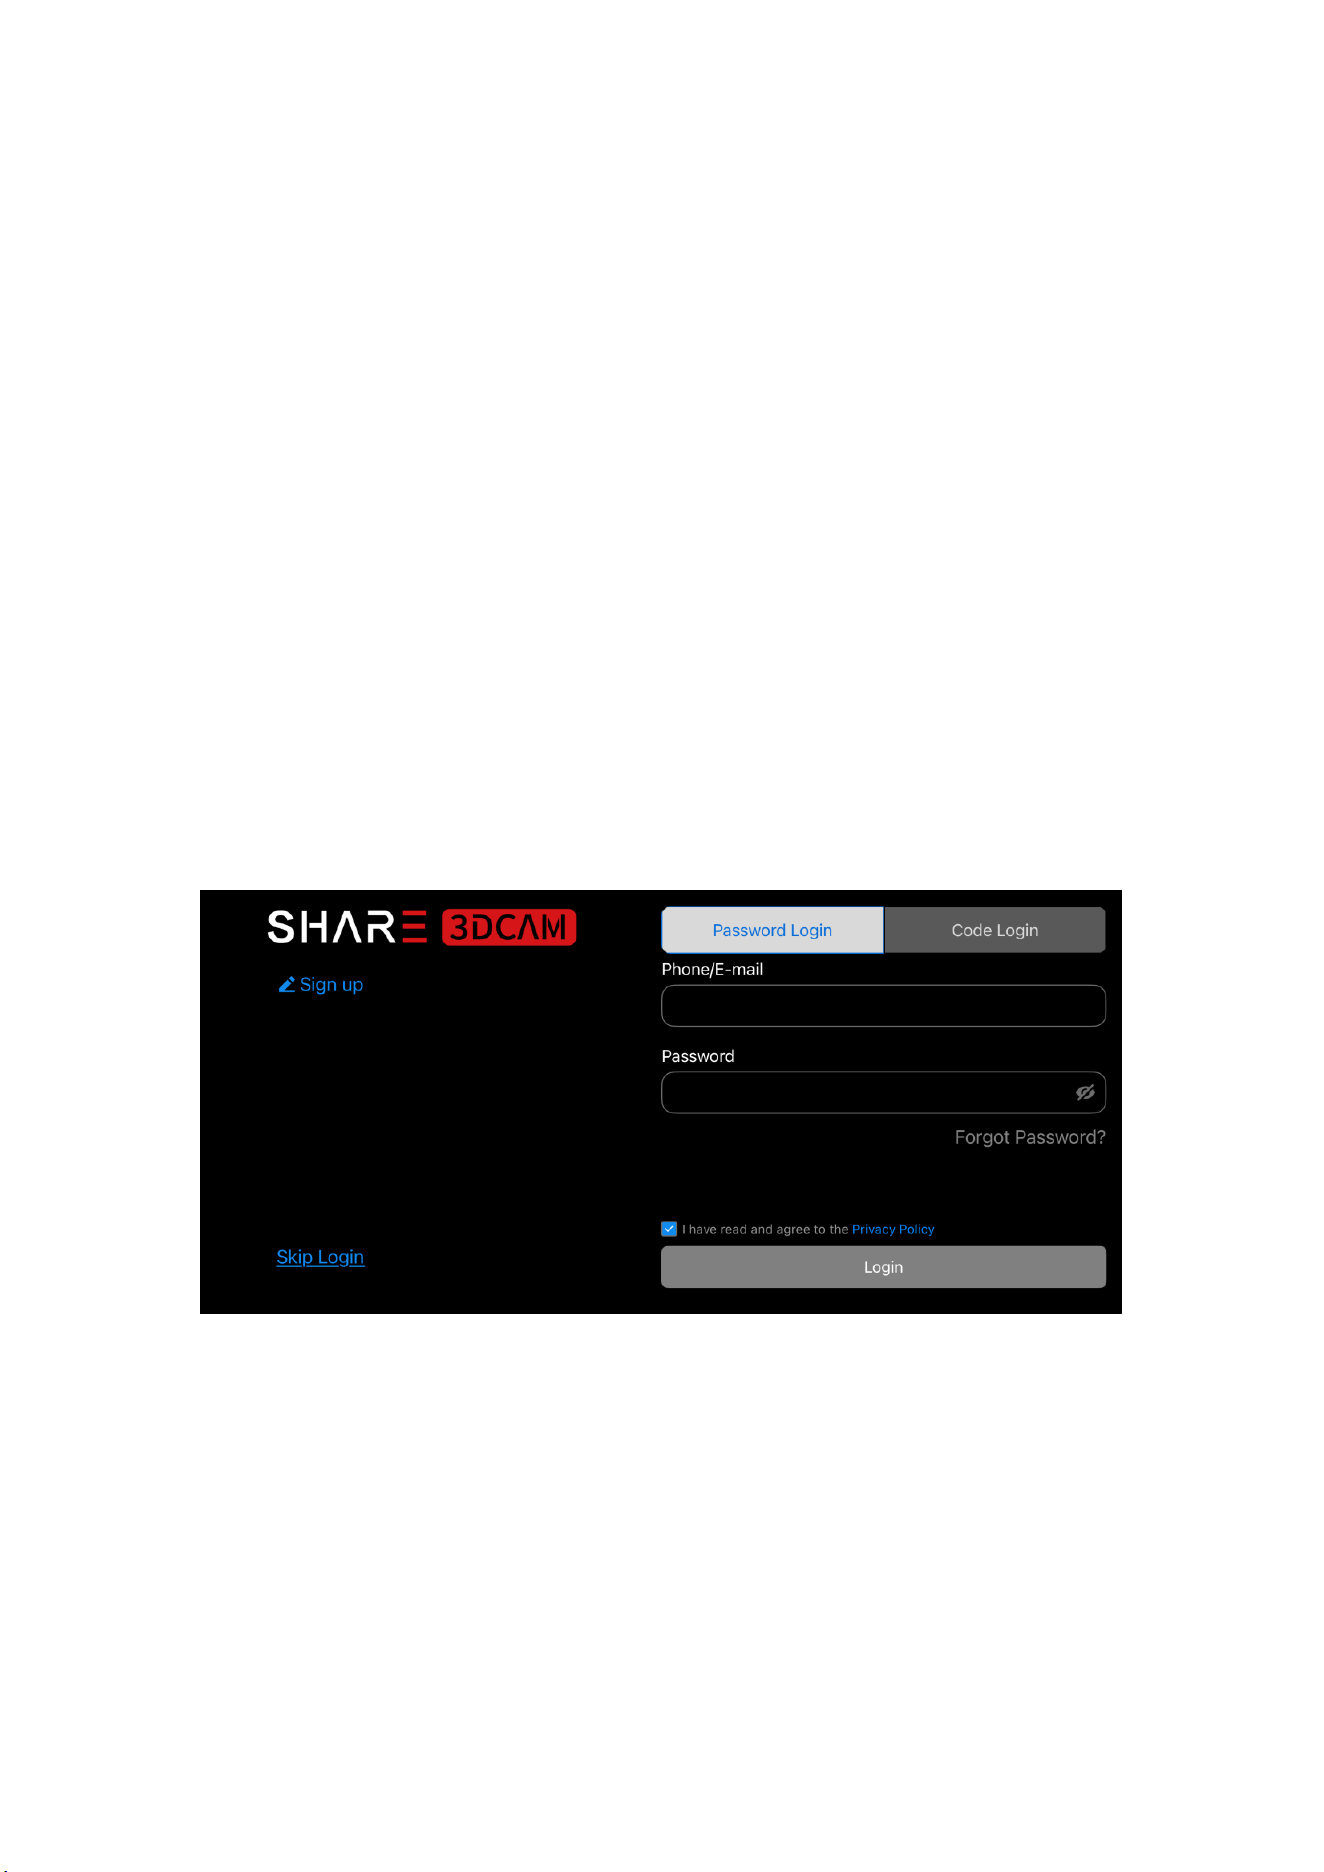
it. Enter the main interface of the software, enter your account
and password to log in, or register and then log in.
3.3.1 First Time Connecting to the APP
Enter the main interface of the app. As shown in the figure
below, it means that the device is not connected.

14
Tap
“
Connect Device,
”
then select the corresponding device
SN in the pop-up device search bar and tap Connect.
(Note: When connecting a device for the first time, ensure both
Wi-Fi and Bluetooth are enabled on your phone.)
15
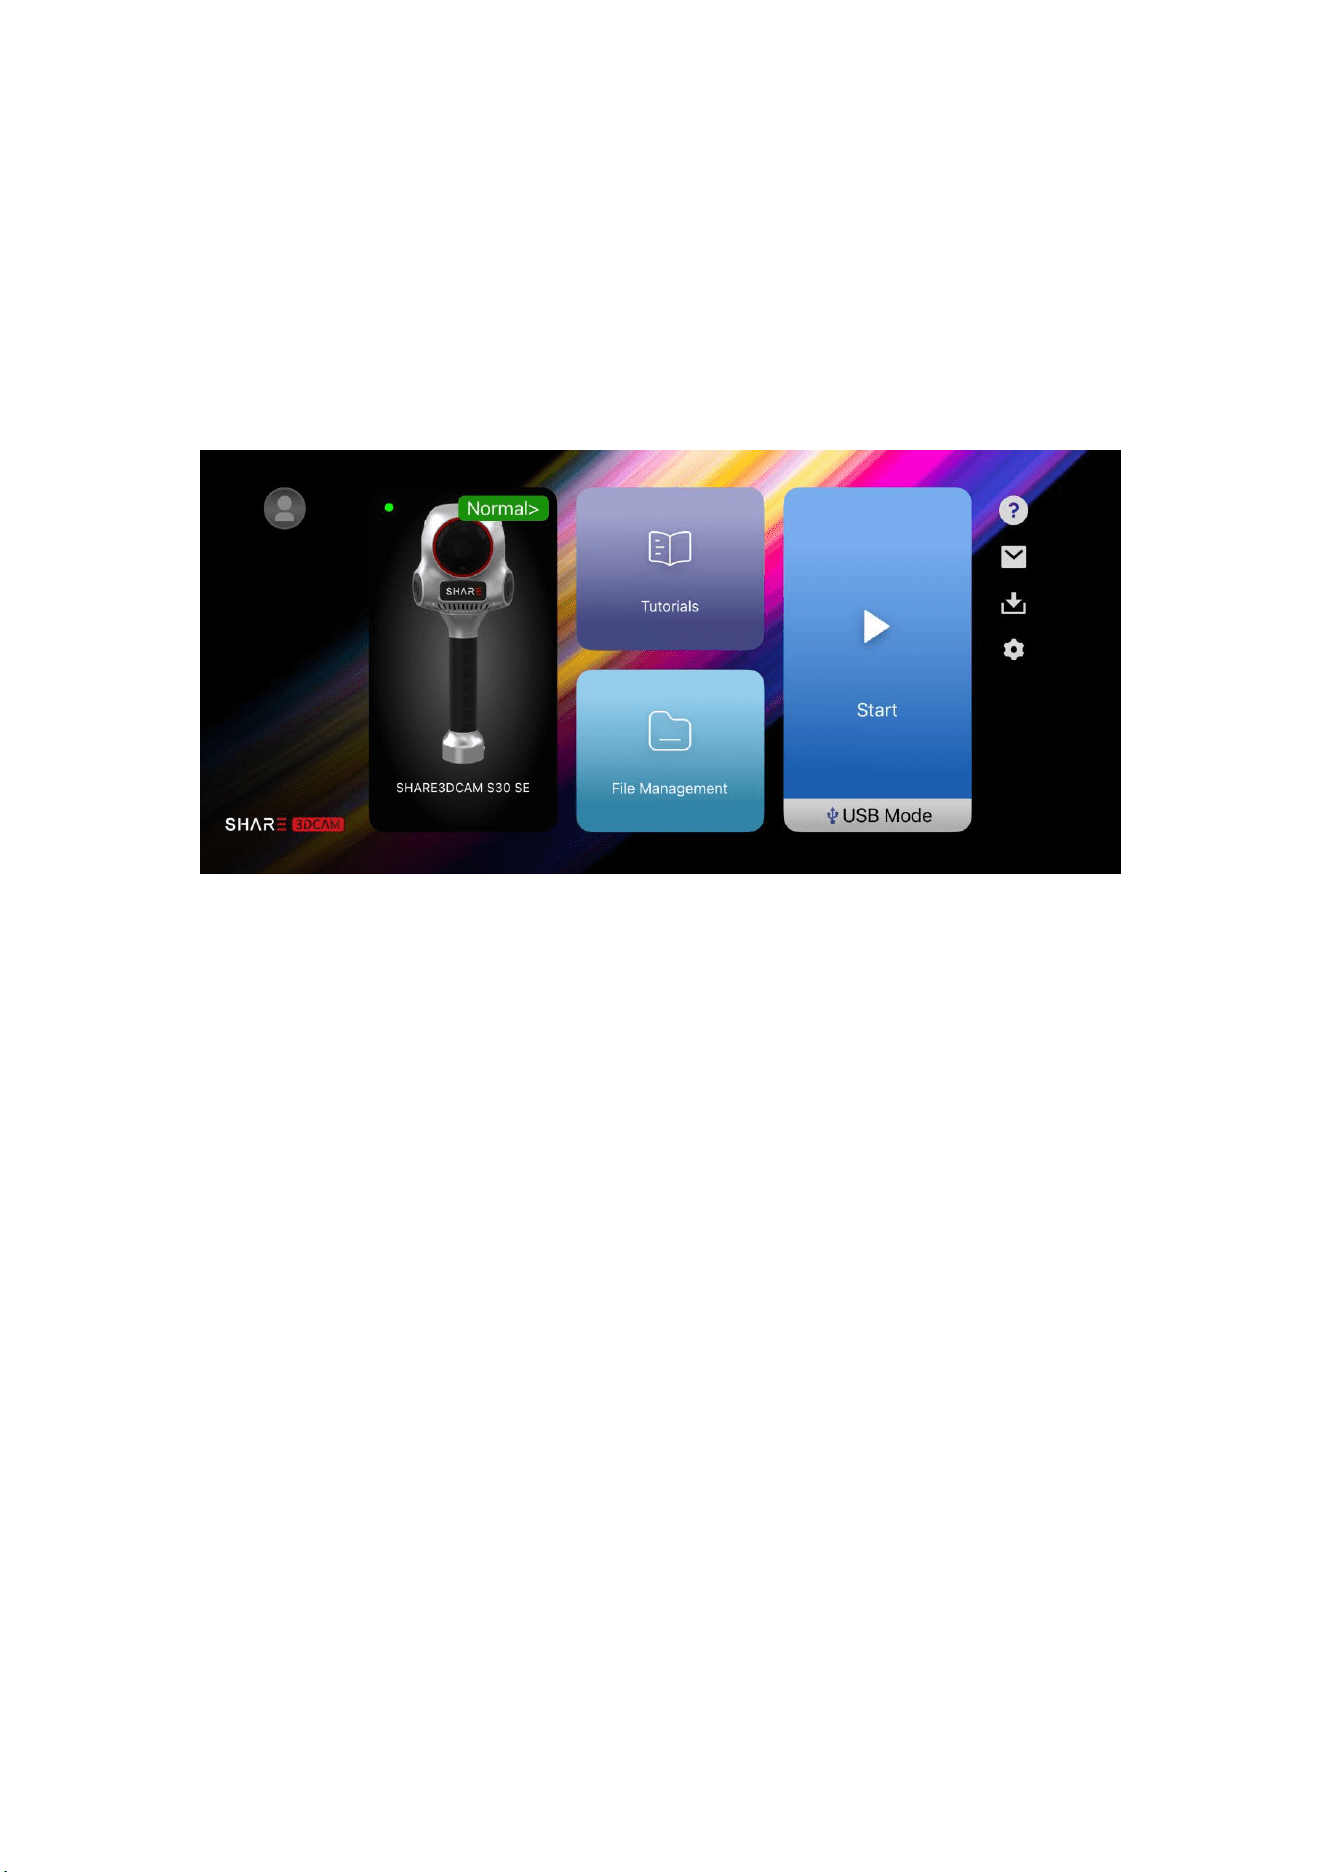
The app will then enter device connection mode. Upon
successful connection, the screen will display the connected
device model: SHARE3DCAM S30 SE, along with the current
health status of the connected device. As shown below:
3.3.2 Device Repeatedly Connects to APP
After the device is connected to the app for the first time, the
app will record the device's WIFI information. When the device
needs to connect to the app next time, just click "Quick
Connection" and the app will automatically connect to the
device with the last SN, without having to repeatedly select the
device model and SN.
Note: The device that can be repeatedly connected can only be
the device that was disconnected last time.
16
3.4 Start Scanning
After the device is connected, click "Start " to enter the
scanning interface. Users can set relevant parameters such as
point cloud display, RTK, and device lighting according to their
own needs before starting scanning.
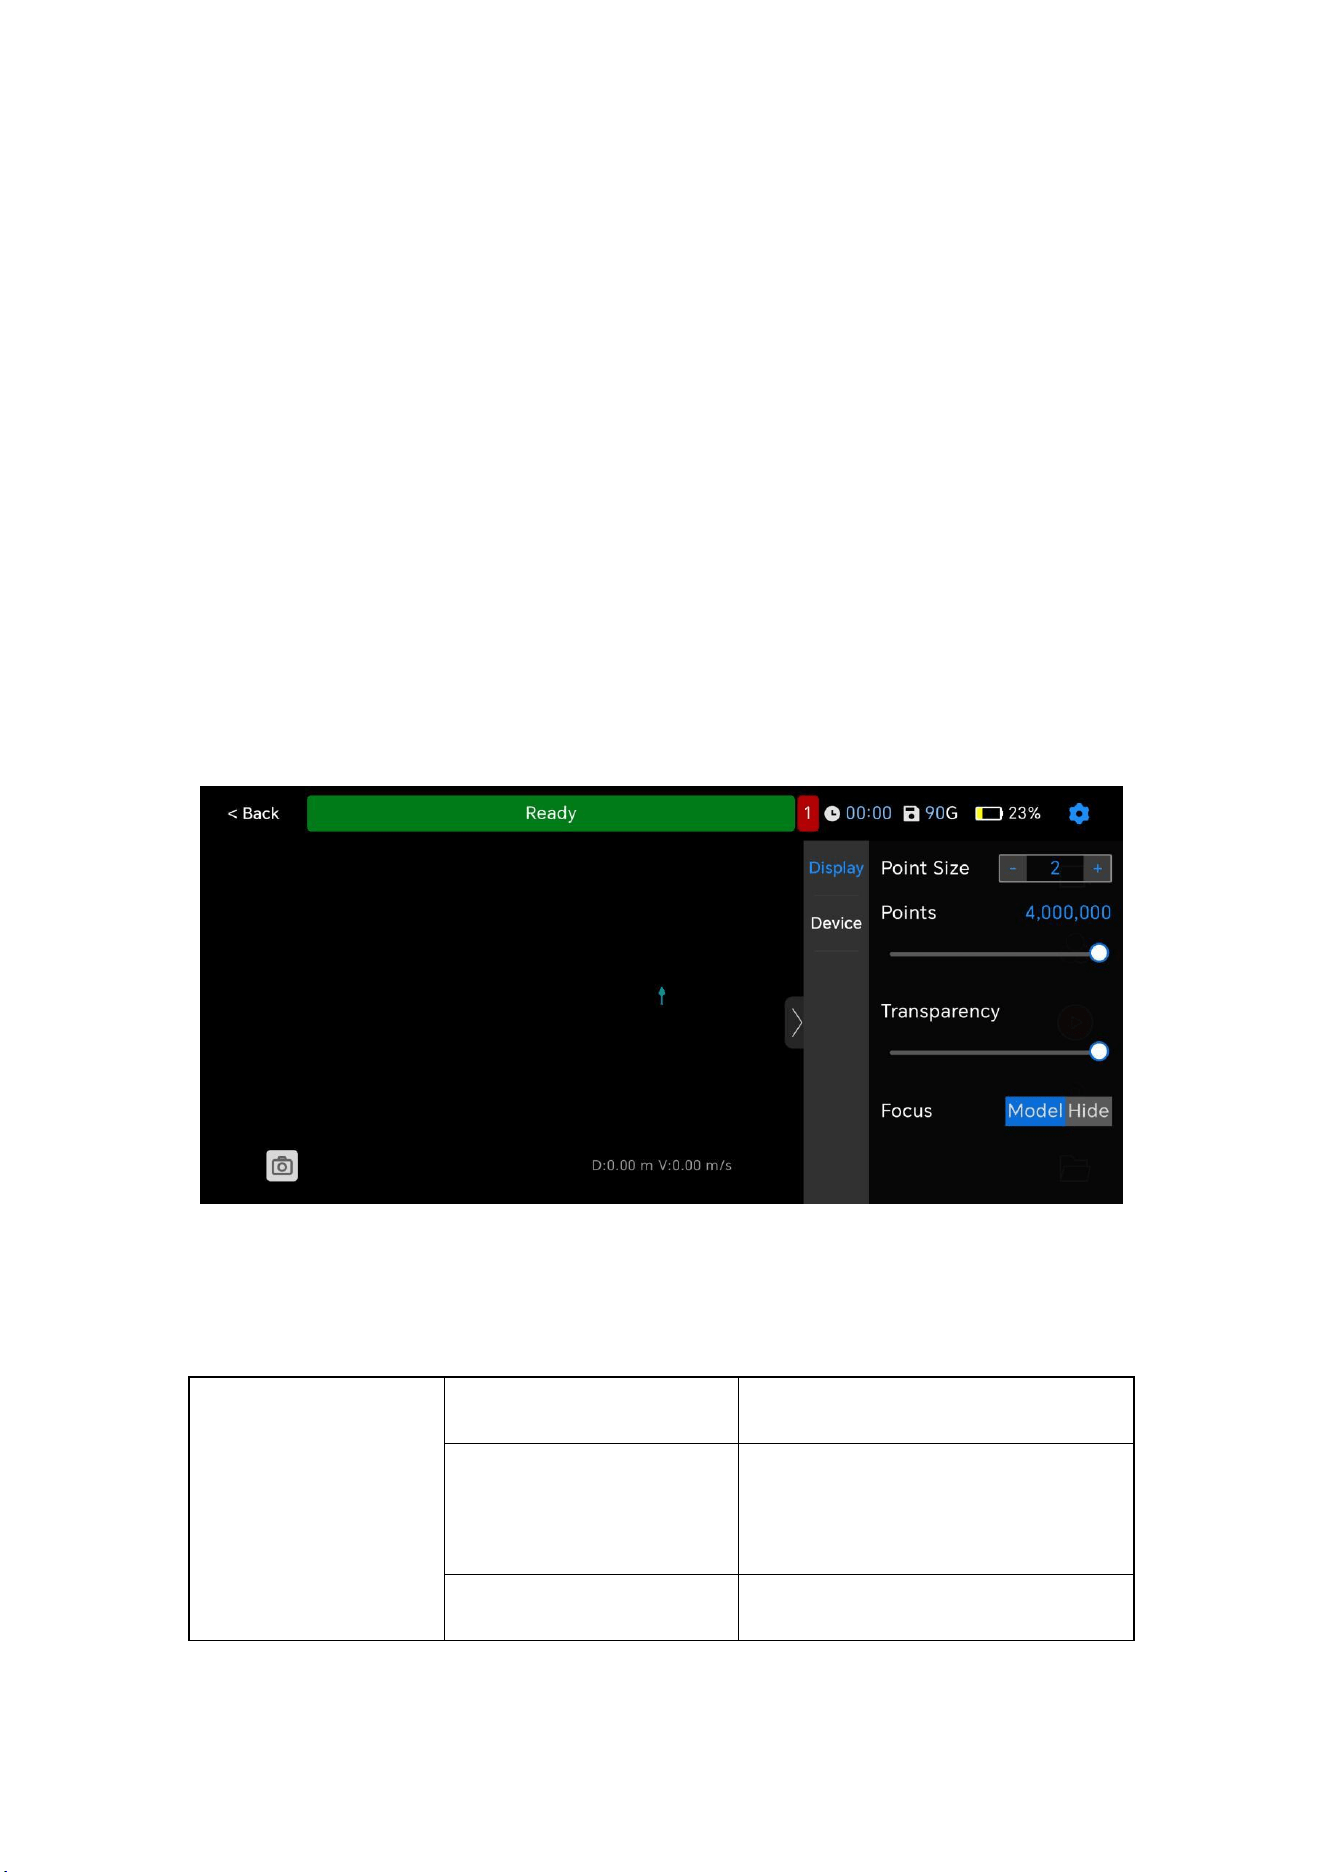
3.5 Parameter Setting
3.5.1 Point Cloud Display Settings
Click the setting button in the upper right corner of the APP
interface to set point cloud display .
Display
Point Size
Range 1-10
Point Number
The maximum value can
be set to 4 million
Transparency
0-100 Transparency
17
Focus
Users can switch
handheld device Model
or Hide, Can display the
current device location
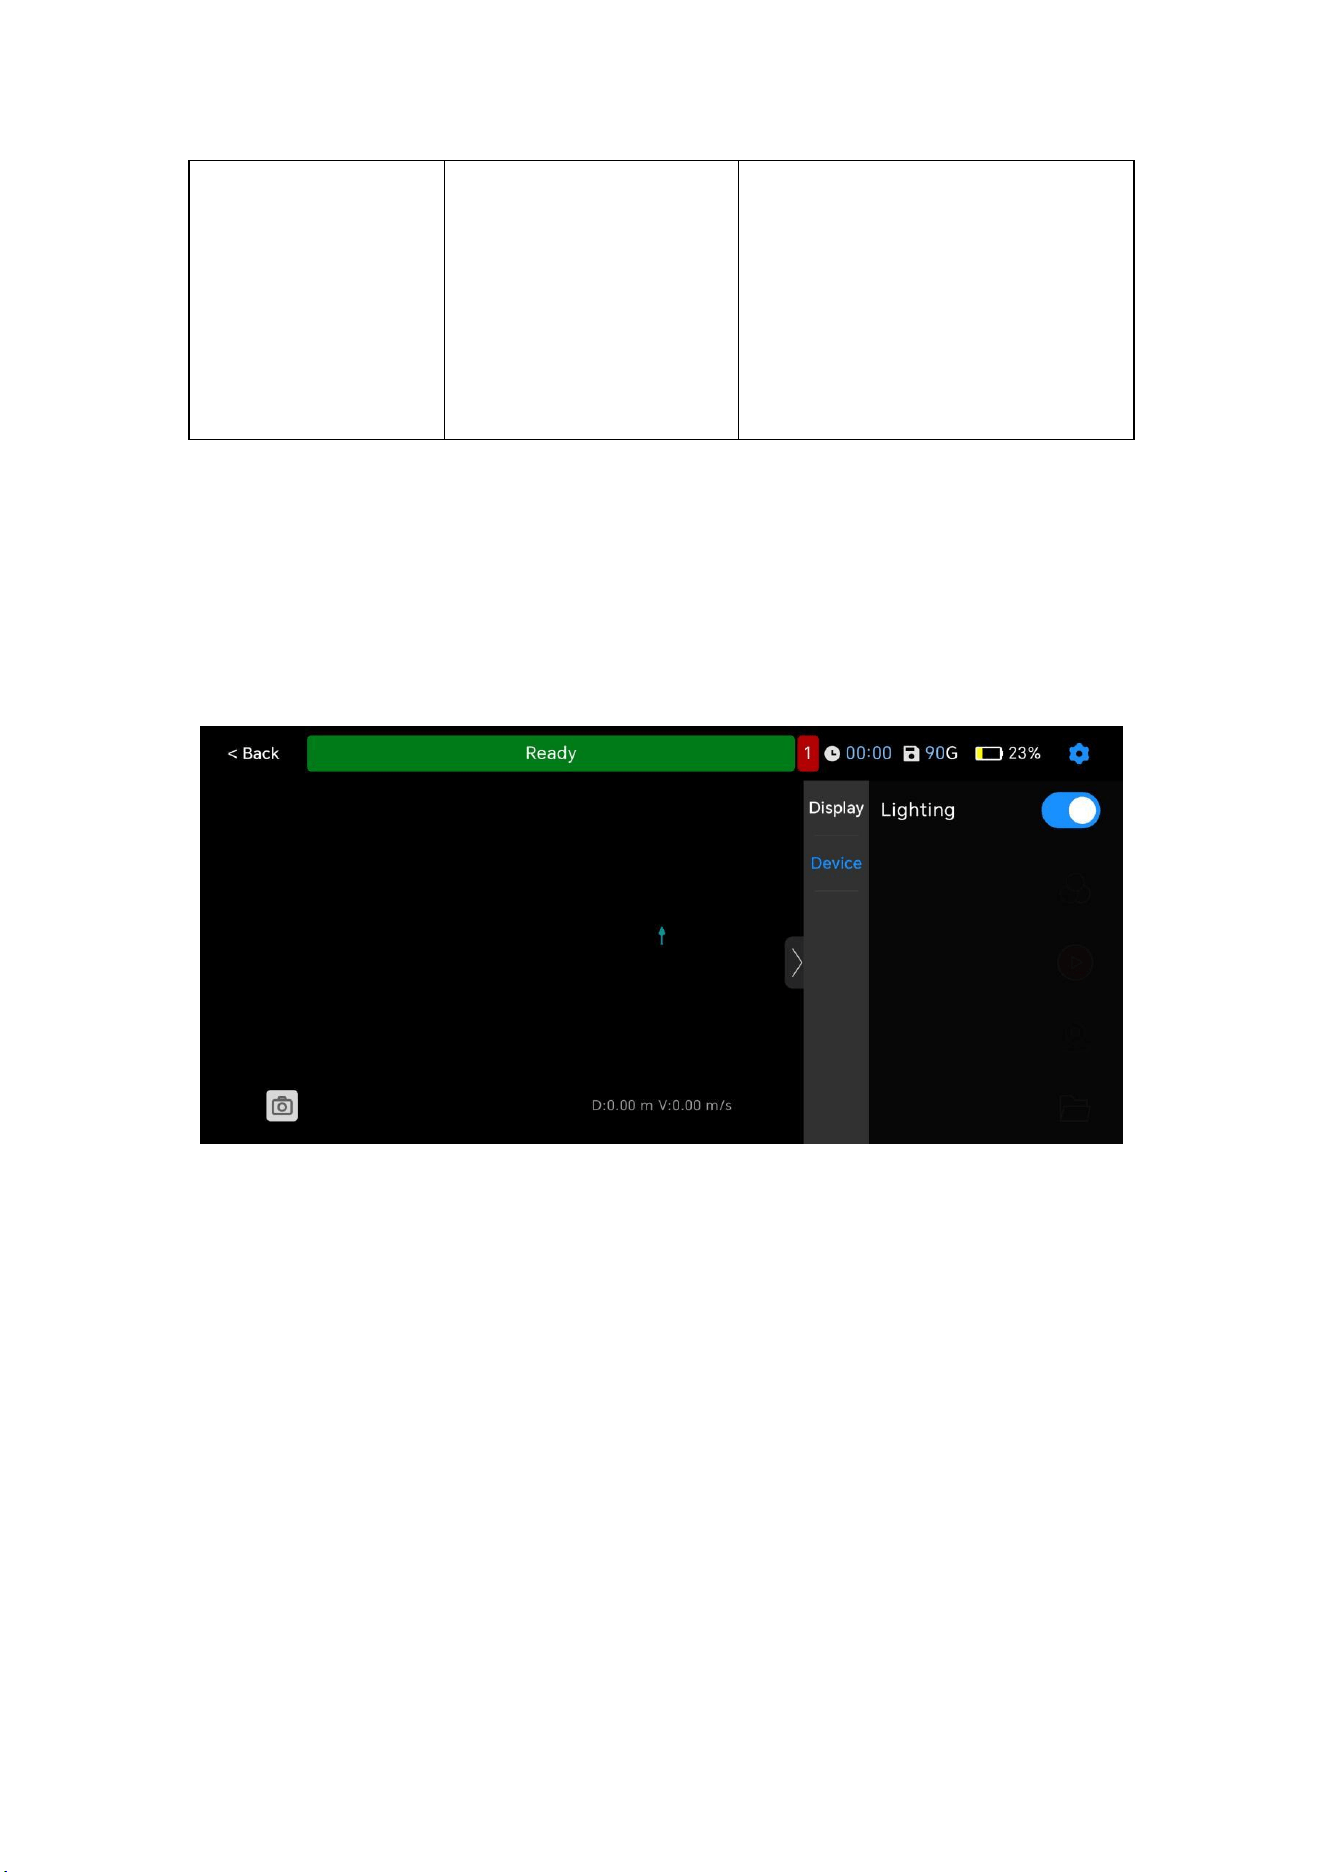
3.5.2 Device Settings
By toggling the lighting switch on the device, you can control
the illumination of the light strips on both sides of the device.
3.6 New Project
When the device status shows "Ready", user can click the
"Start" button on the right to start the project.A pop-up
window will appear. On the left side of the pop-up window is
"Pre-Work Inspection", which includes HMS(Health
Management System), RTK status, battery status, and storage
left. On the right side of the pop-up window is "Create New
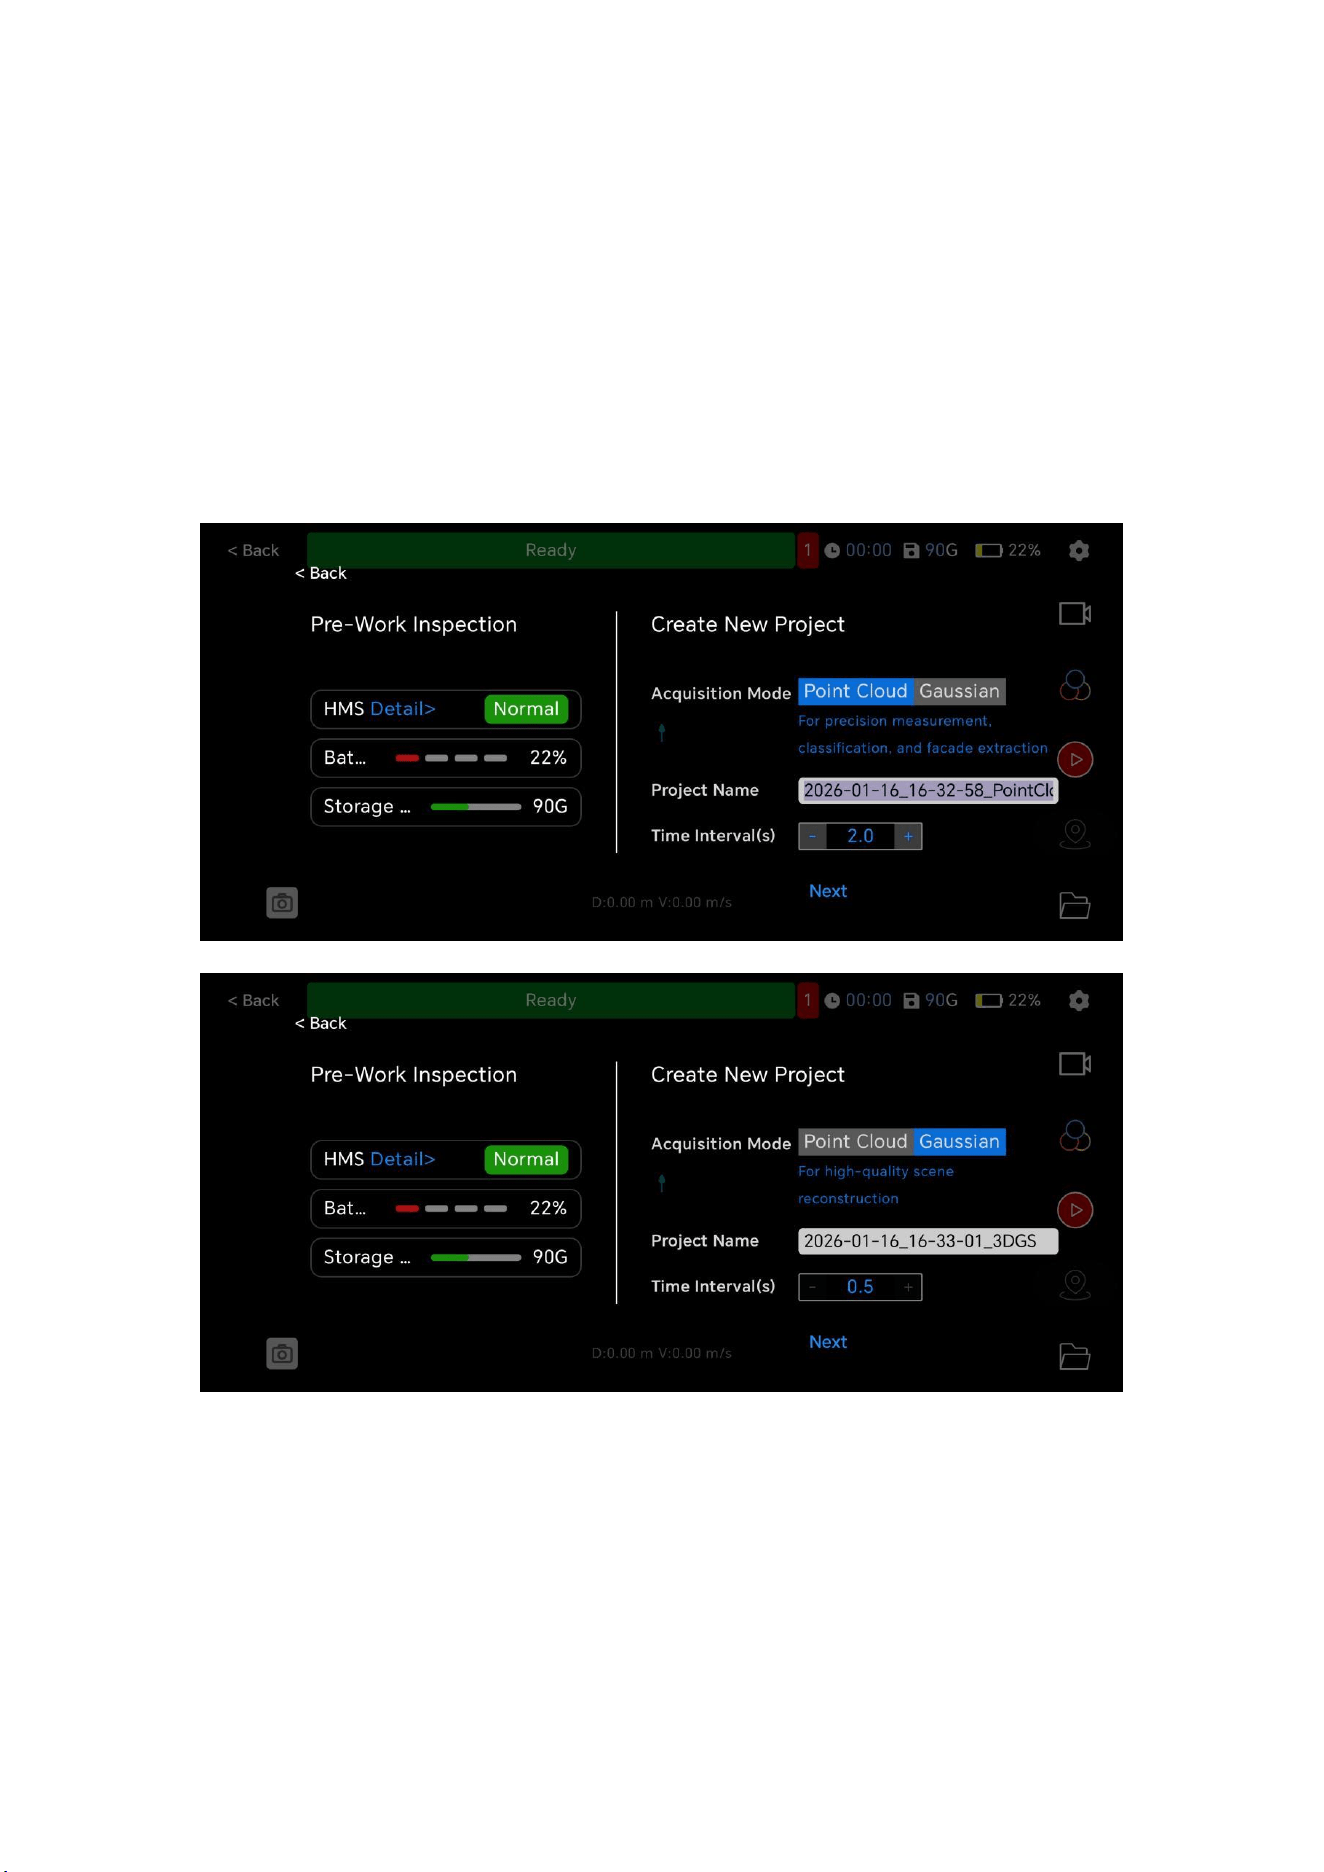
18
Project". It includes two acquisition modes: point cloud and
Gaussian. Before starting the operation, user can set the
project name and the camera shooting time interval. The
Gaussian sampling mode does not allow for setting the time
interval. Click "Next" and the device will start working.
3.6.1 HMS(Health Management System)
Before creating a new project, user can view the details of the
HMS. Click on the "Detail" to see the status of each part. It is
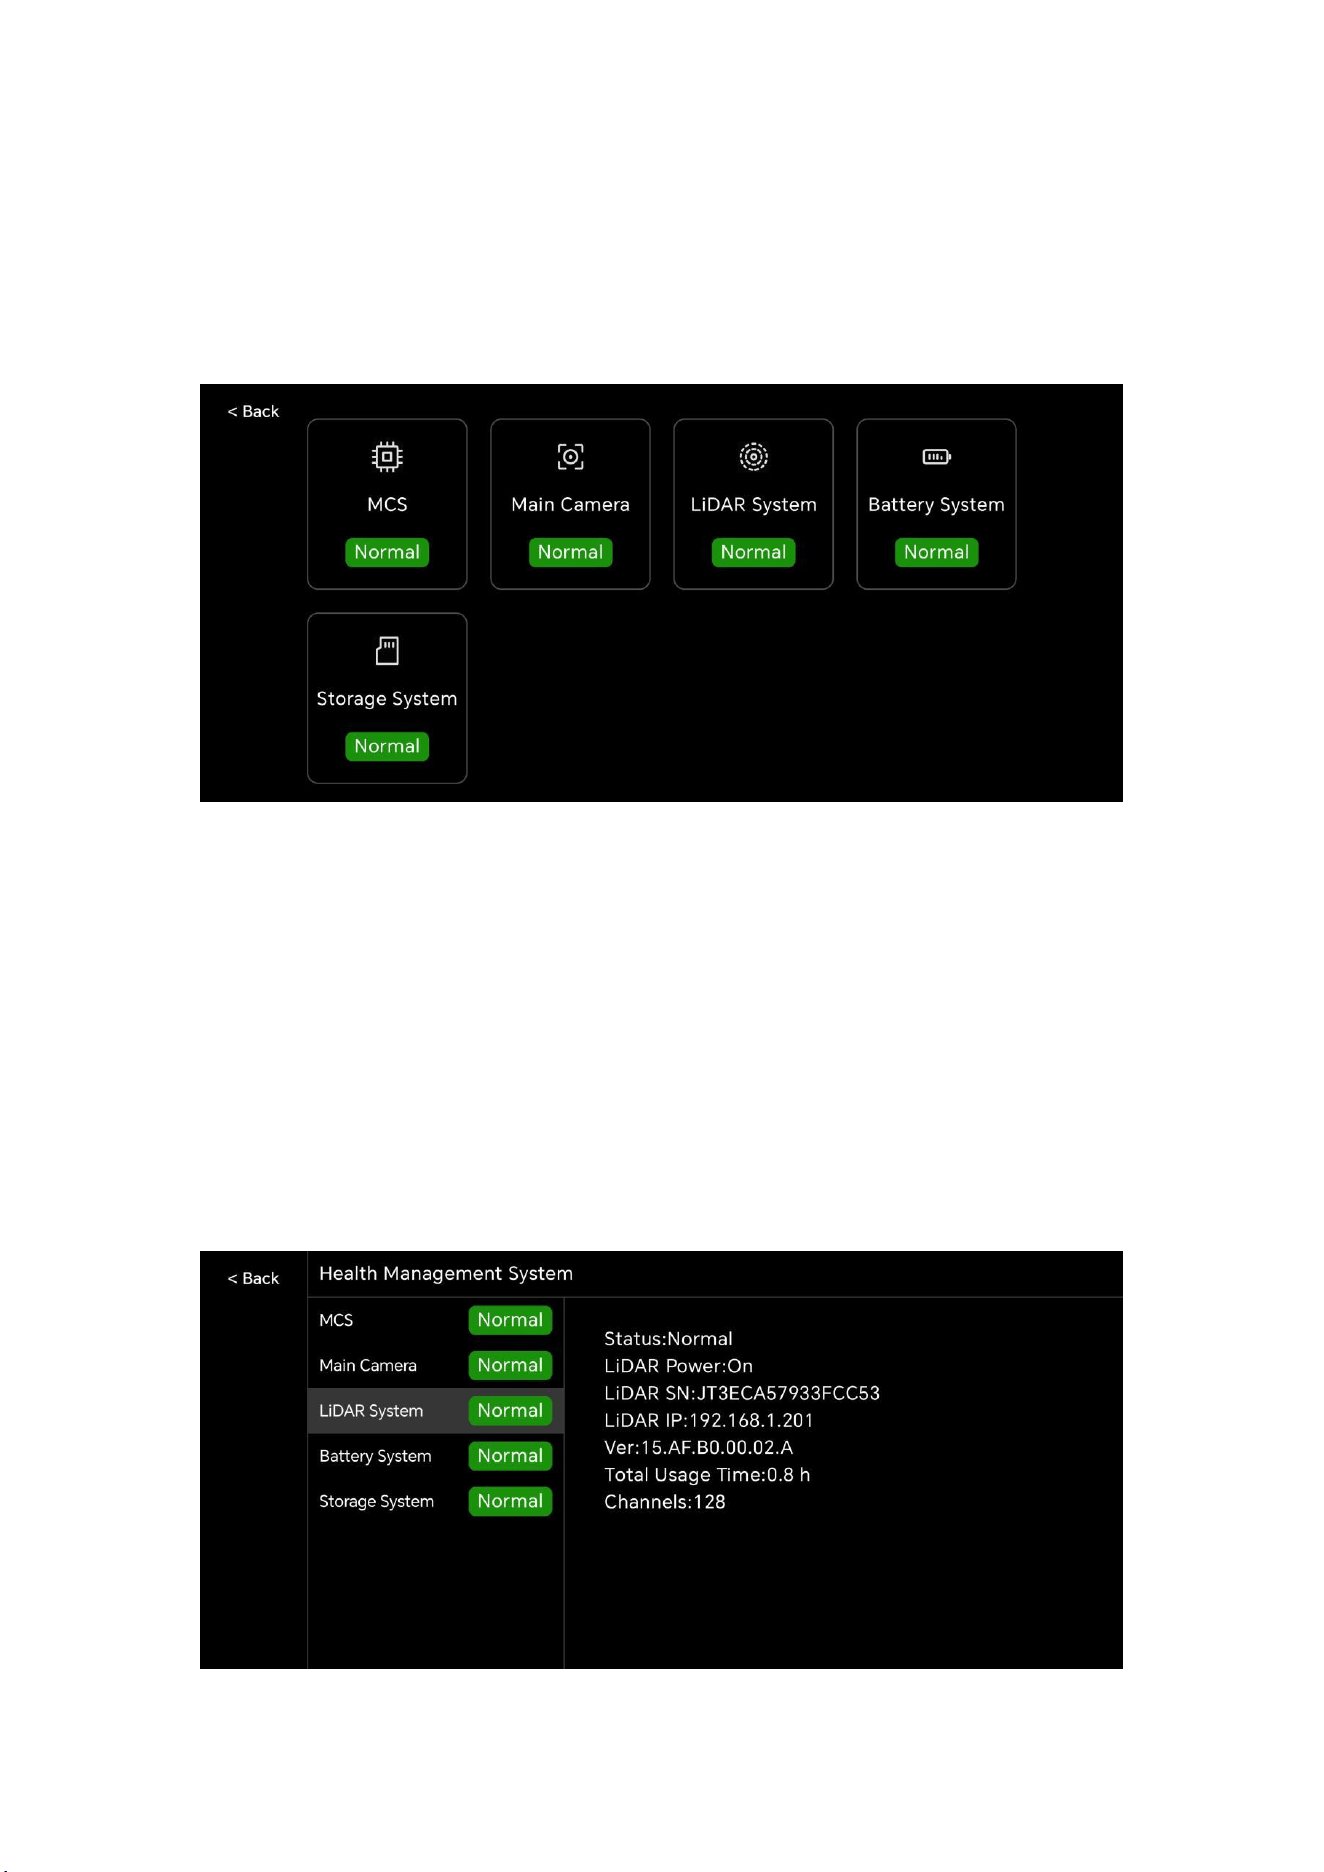
19
divided into 6 major parts, including the MCS (main control
system), Main Camera, LiDAR System, Battery System, and
Storage System.
Click the "MCS" to view it, and the following interface will pop
up. The left side shows each module and its corresponding
status, and the right side shows the relevant information of the
corresponding module. If user switch to other modules on this
page, the information on the right side will also be updated
accordingly.
20
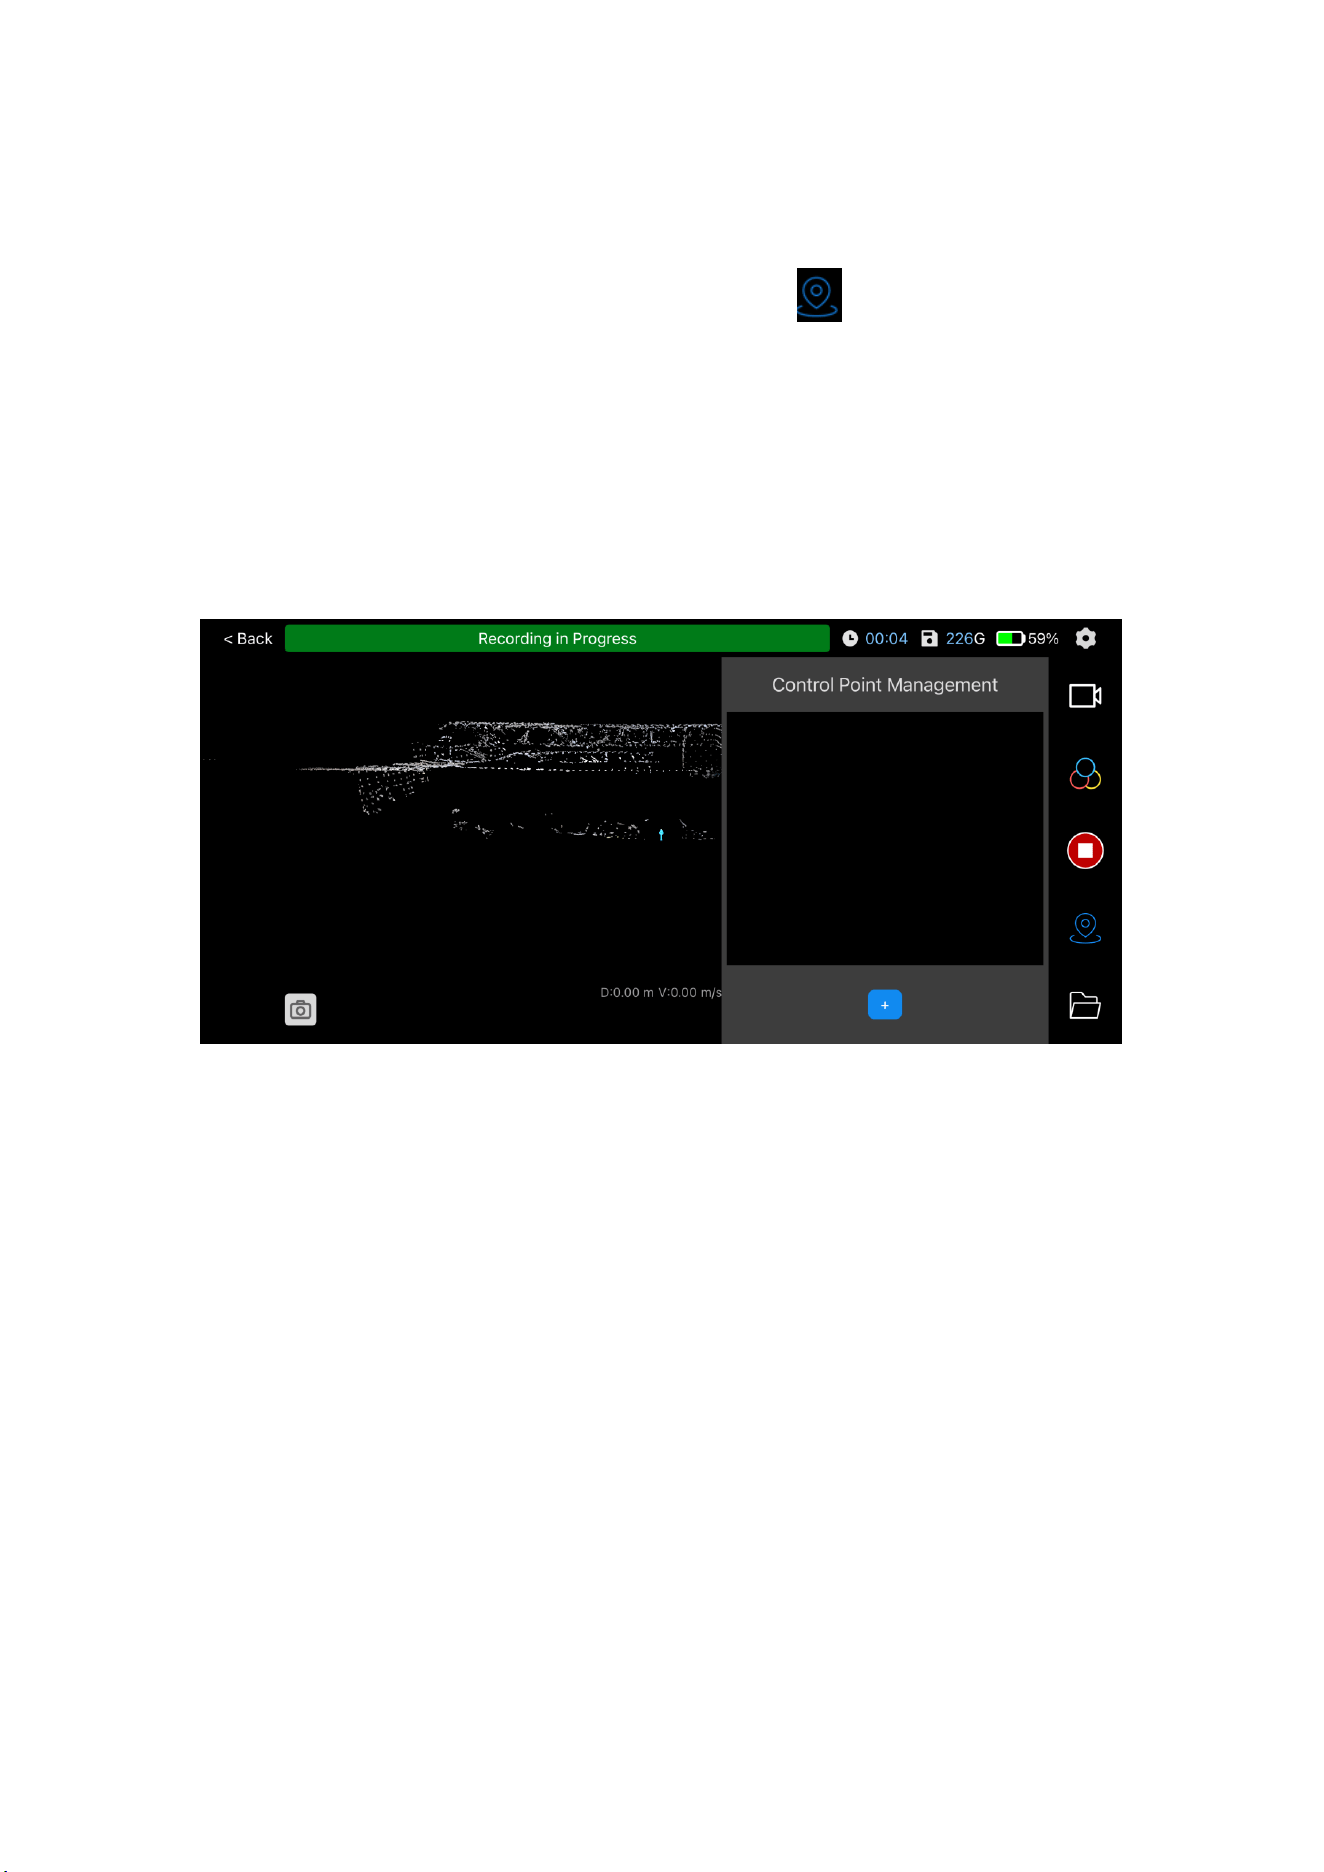
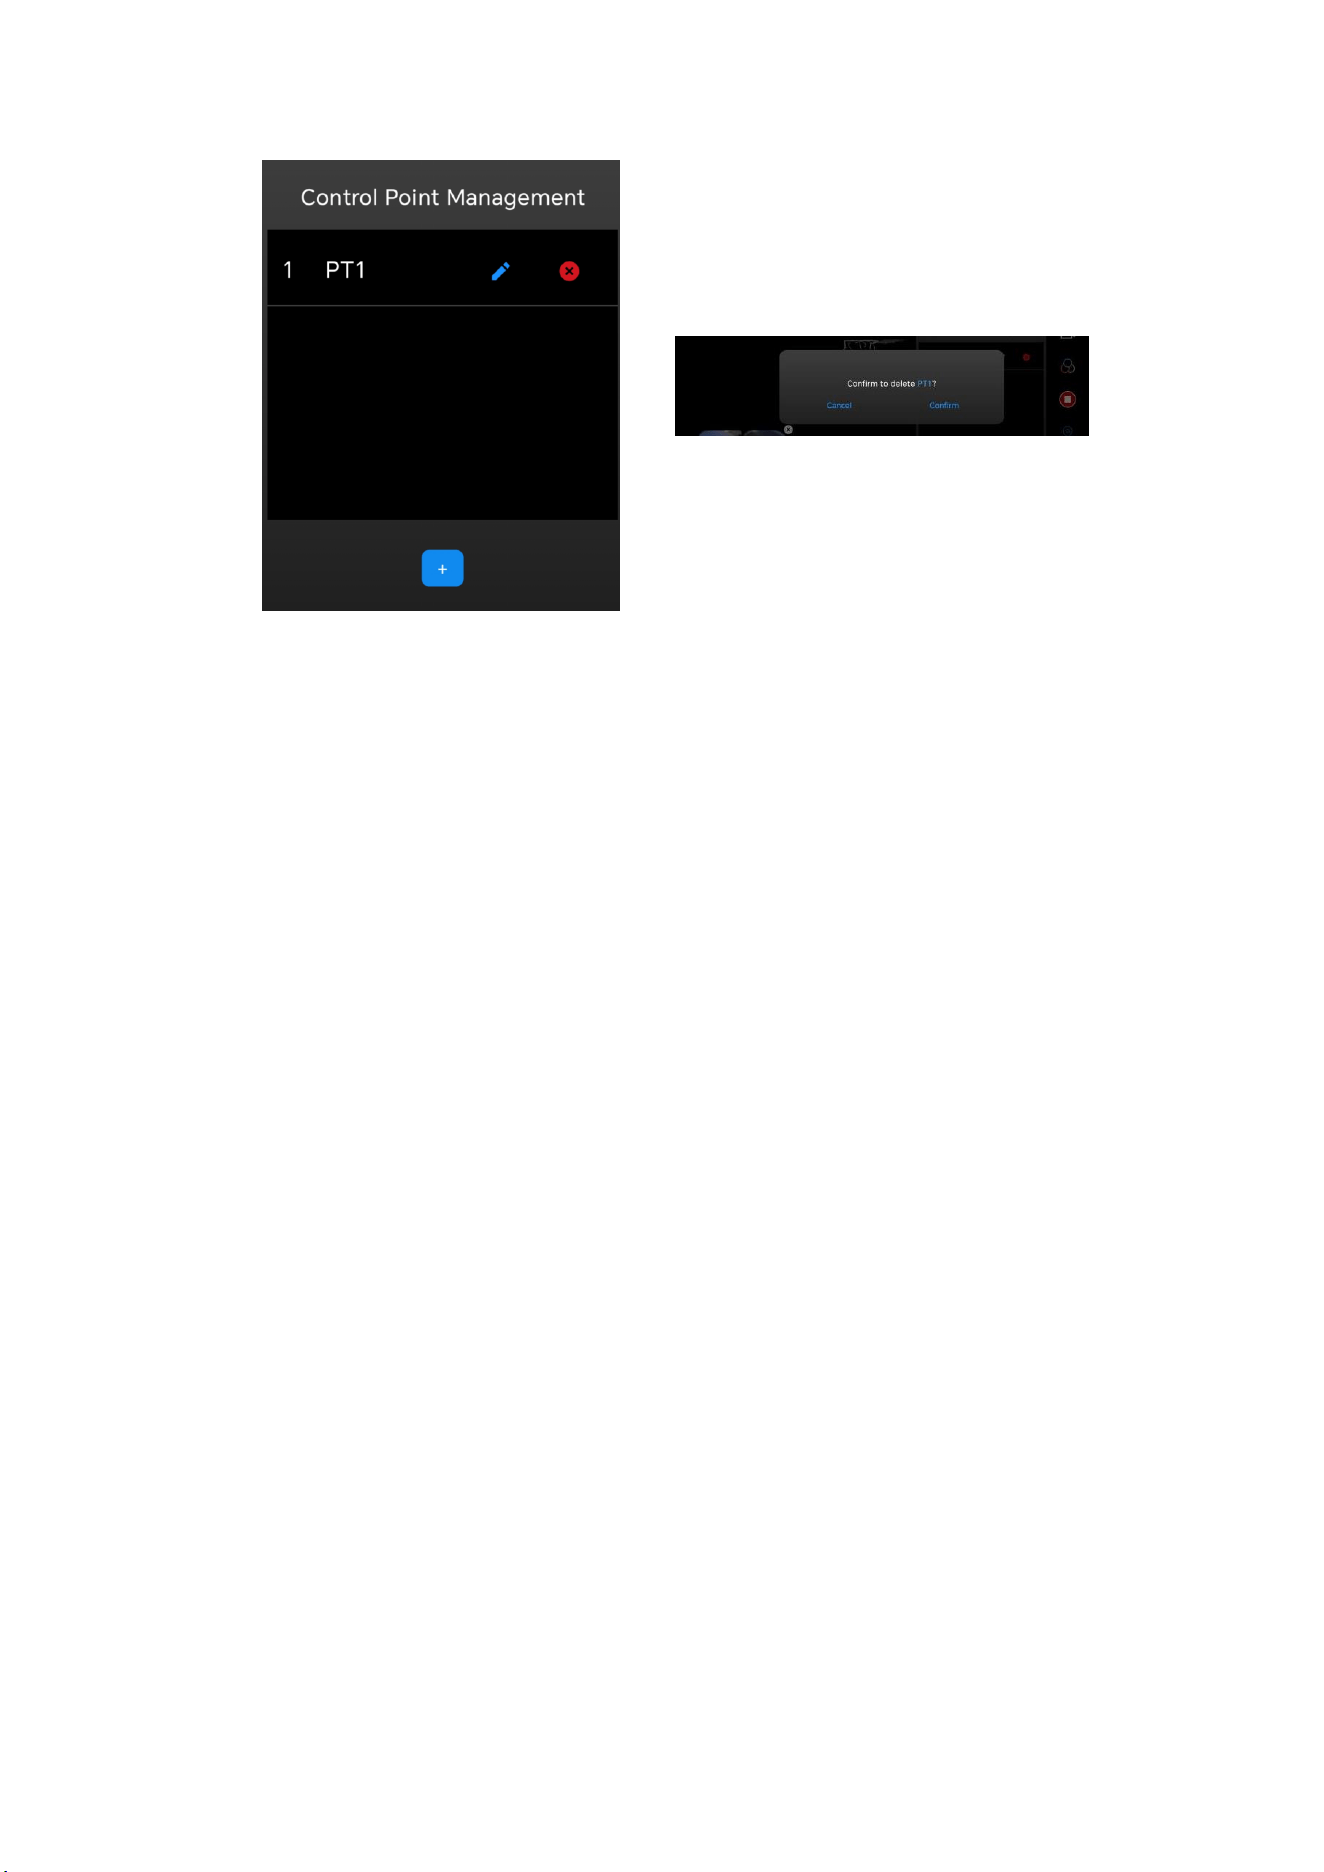
3.7 Control Point Collection
When starting the project, user can click button on the
right side of the interface to add or delete control points. After
the control points participate in the point cloud processing, the
point cloud results can be converted into the coordinate
system of the control points.
When collecting control points, user needs to align the center
of the acrylic plate of the positioning plate with the control
point position, and then click “Add Control Point”. Keep the
device stableand complete the collection according to system
prompts.
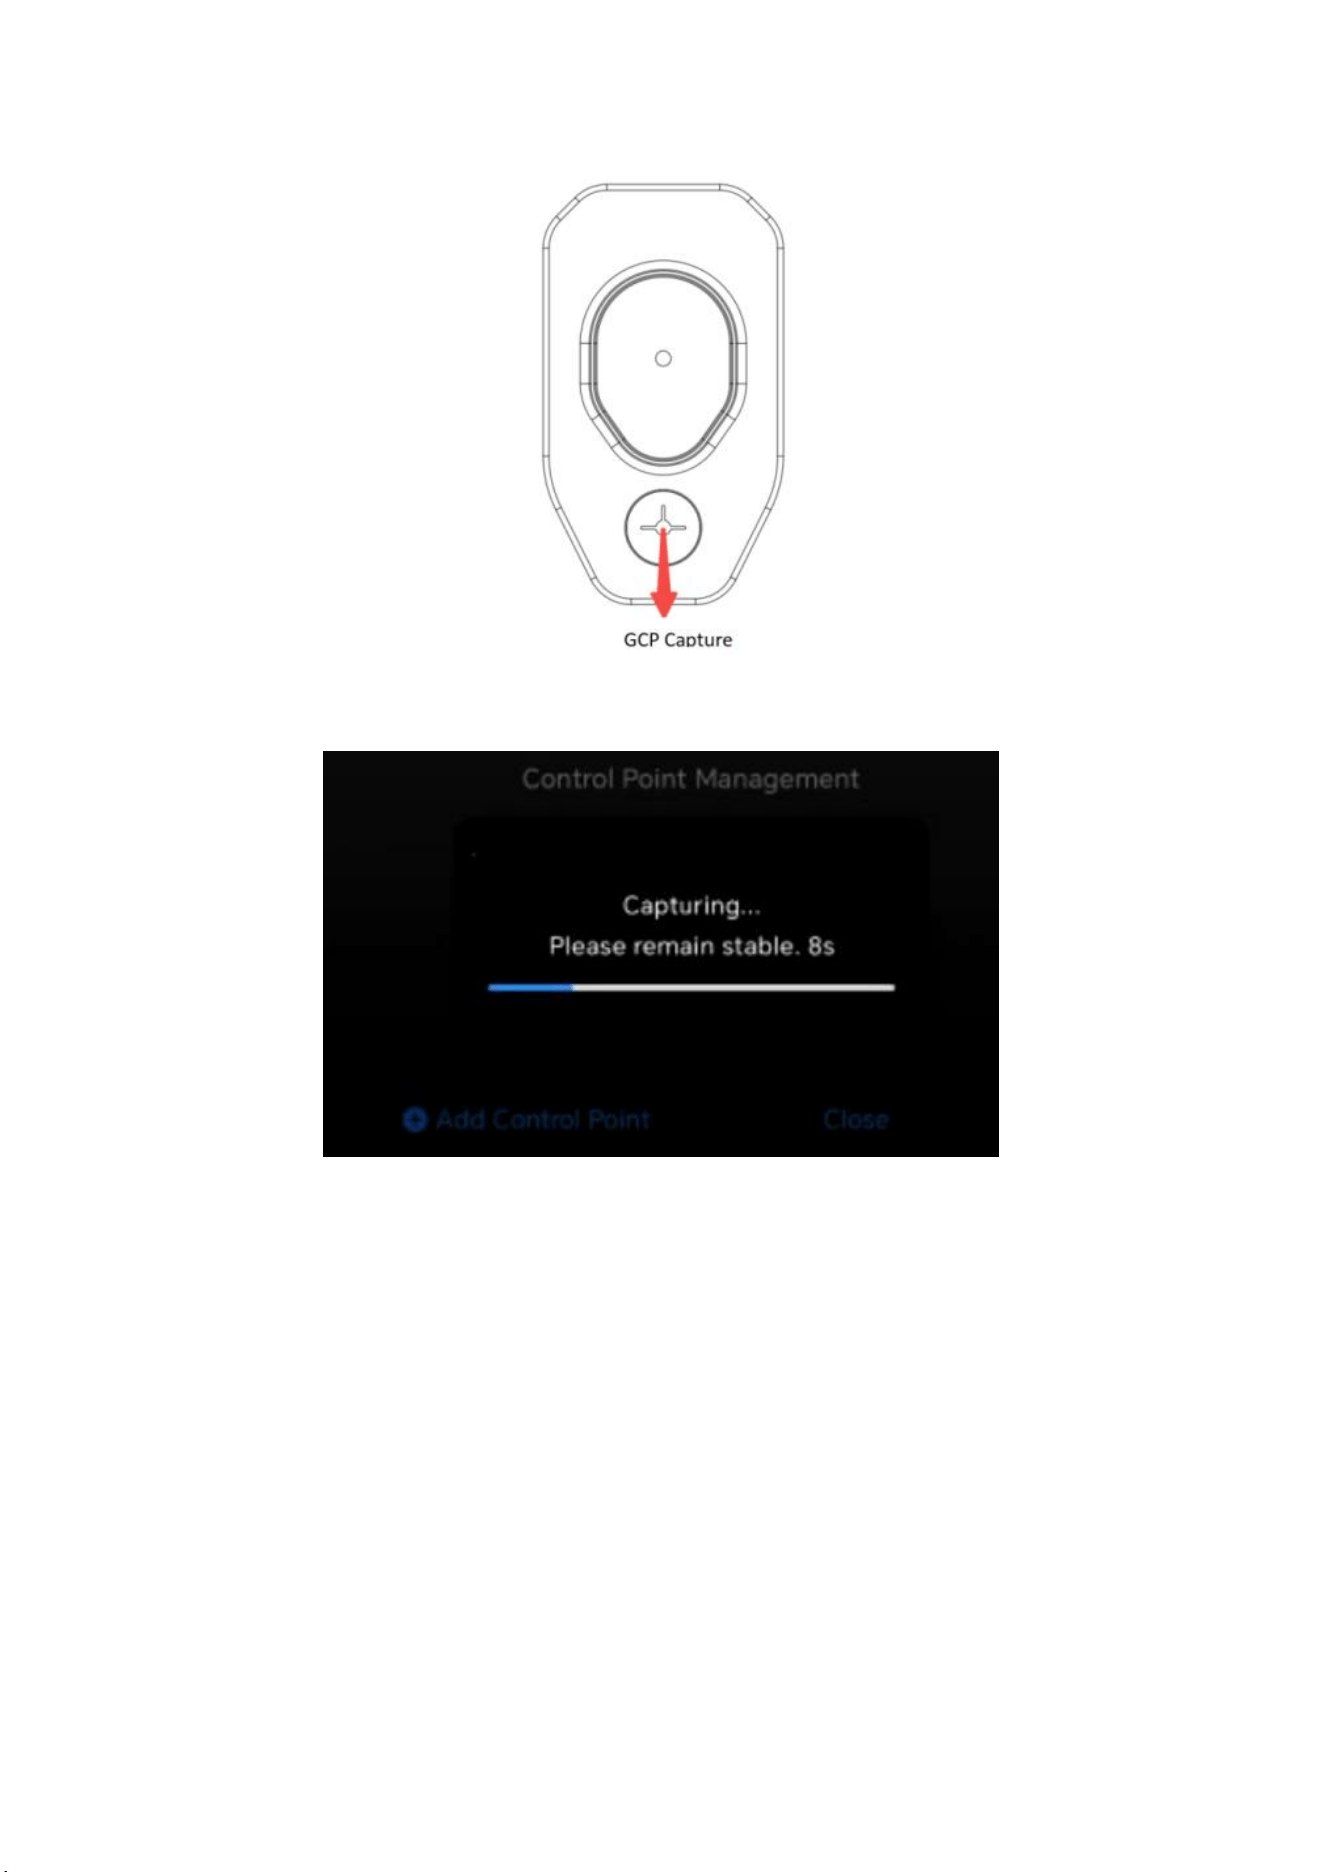
21
For the collected control points, users can overwrite or delete
them according to their needs.
22
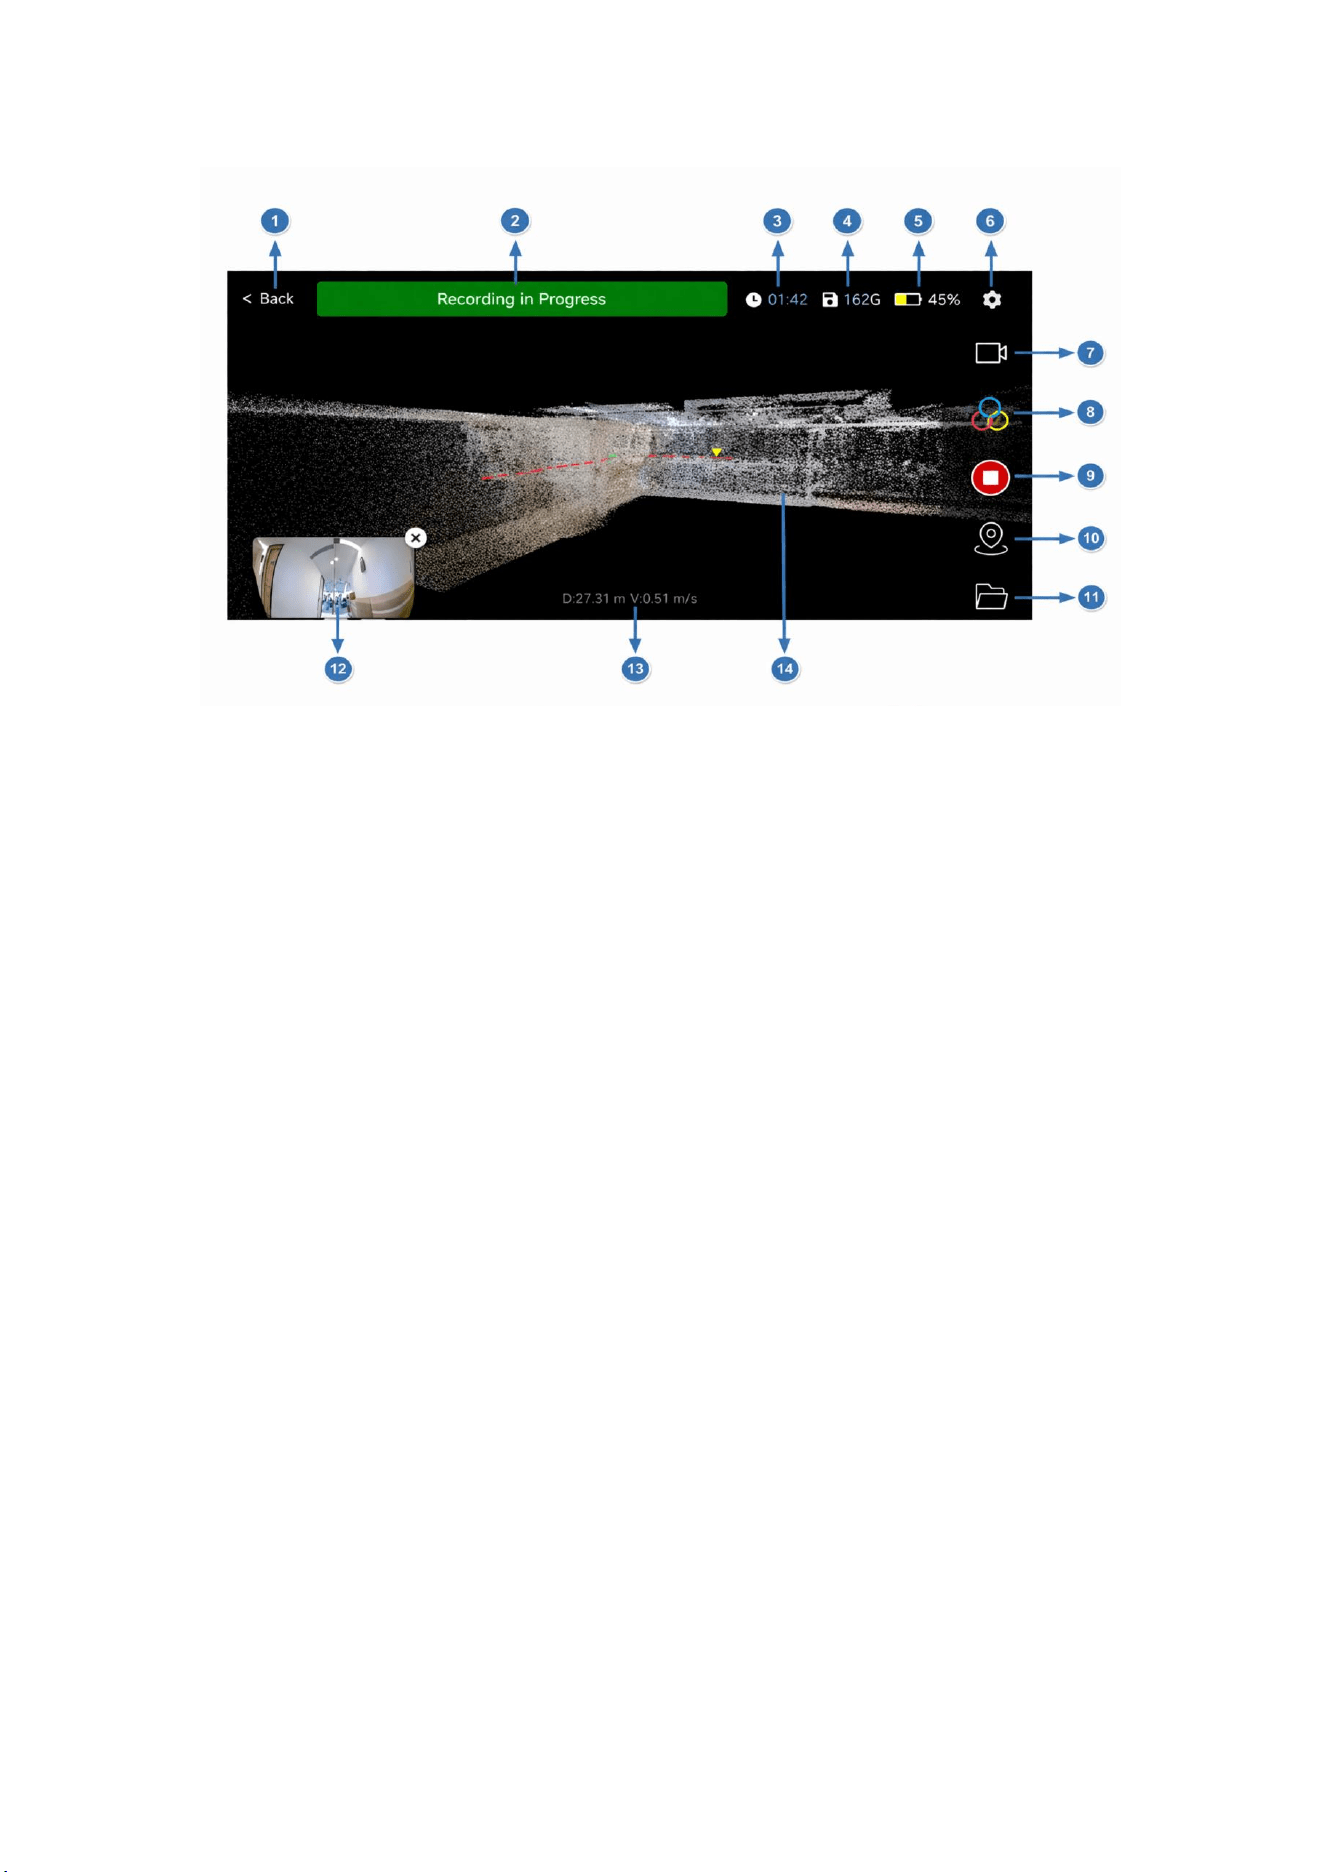
3.8 Data Collection
When the device status shows "Ready", the scanning operation
can begin. The APP displays the reconstructed three-
dimensional space point cloud information and collection
trajectory in real time, and user can manually view the spatial
three-dimensional color point cloud.
23
The operation interface function description is as follows:
①
Back : Click to return to the main interface of the
software;
②
Status Description: Prompts the current status of the
project;
③
Working Time: Prompts the working time of the
current project;
④
Remaining Storage Space: Prompts the memory card
remaining space;
⑤
Power: Device power description;
⑥
Setting: Project parameter setting, click to set
relevant parameters;
⑦
Roaming Mode: Switch roaming modes, including
free roaming and third-person;

24
⑧
Point Cloud Mode: Switch the display mode of point
cloud in the three-dimensional scene, supports three modes:
color point cloud, intensity coloring and elevation gradient;
⑨
ON/OFF: Control the start and end of project;
⑩
Control Point Management: Operations such as
adding, deleting and covering control points of the project;
11
File Management: Jump to the file management page,
where user can manage, delete, view and do other operations
on local (save in mobile) or device project data;
12
Image: View image information taken by the device;
13
Cumulative distance/travel speed: Displays the
accumulated length of data collected in the current project and
the current travel speed;
14
Three-dimensional Scene: Display point cloud and
trajectory lines, and can be manually operated to view details.
3.9 Data Saving
To end the scan, click the red button on the right side of the
screen. After clicking the button, a message saying
“
Saved
successfully
”
will appear in about 15 seconds. To continue
scanning, please wait for the message to appear and wait for 1
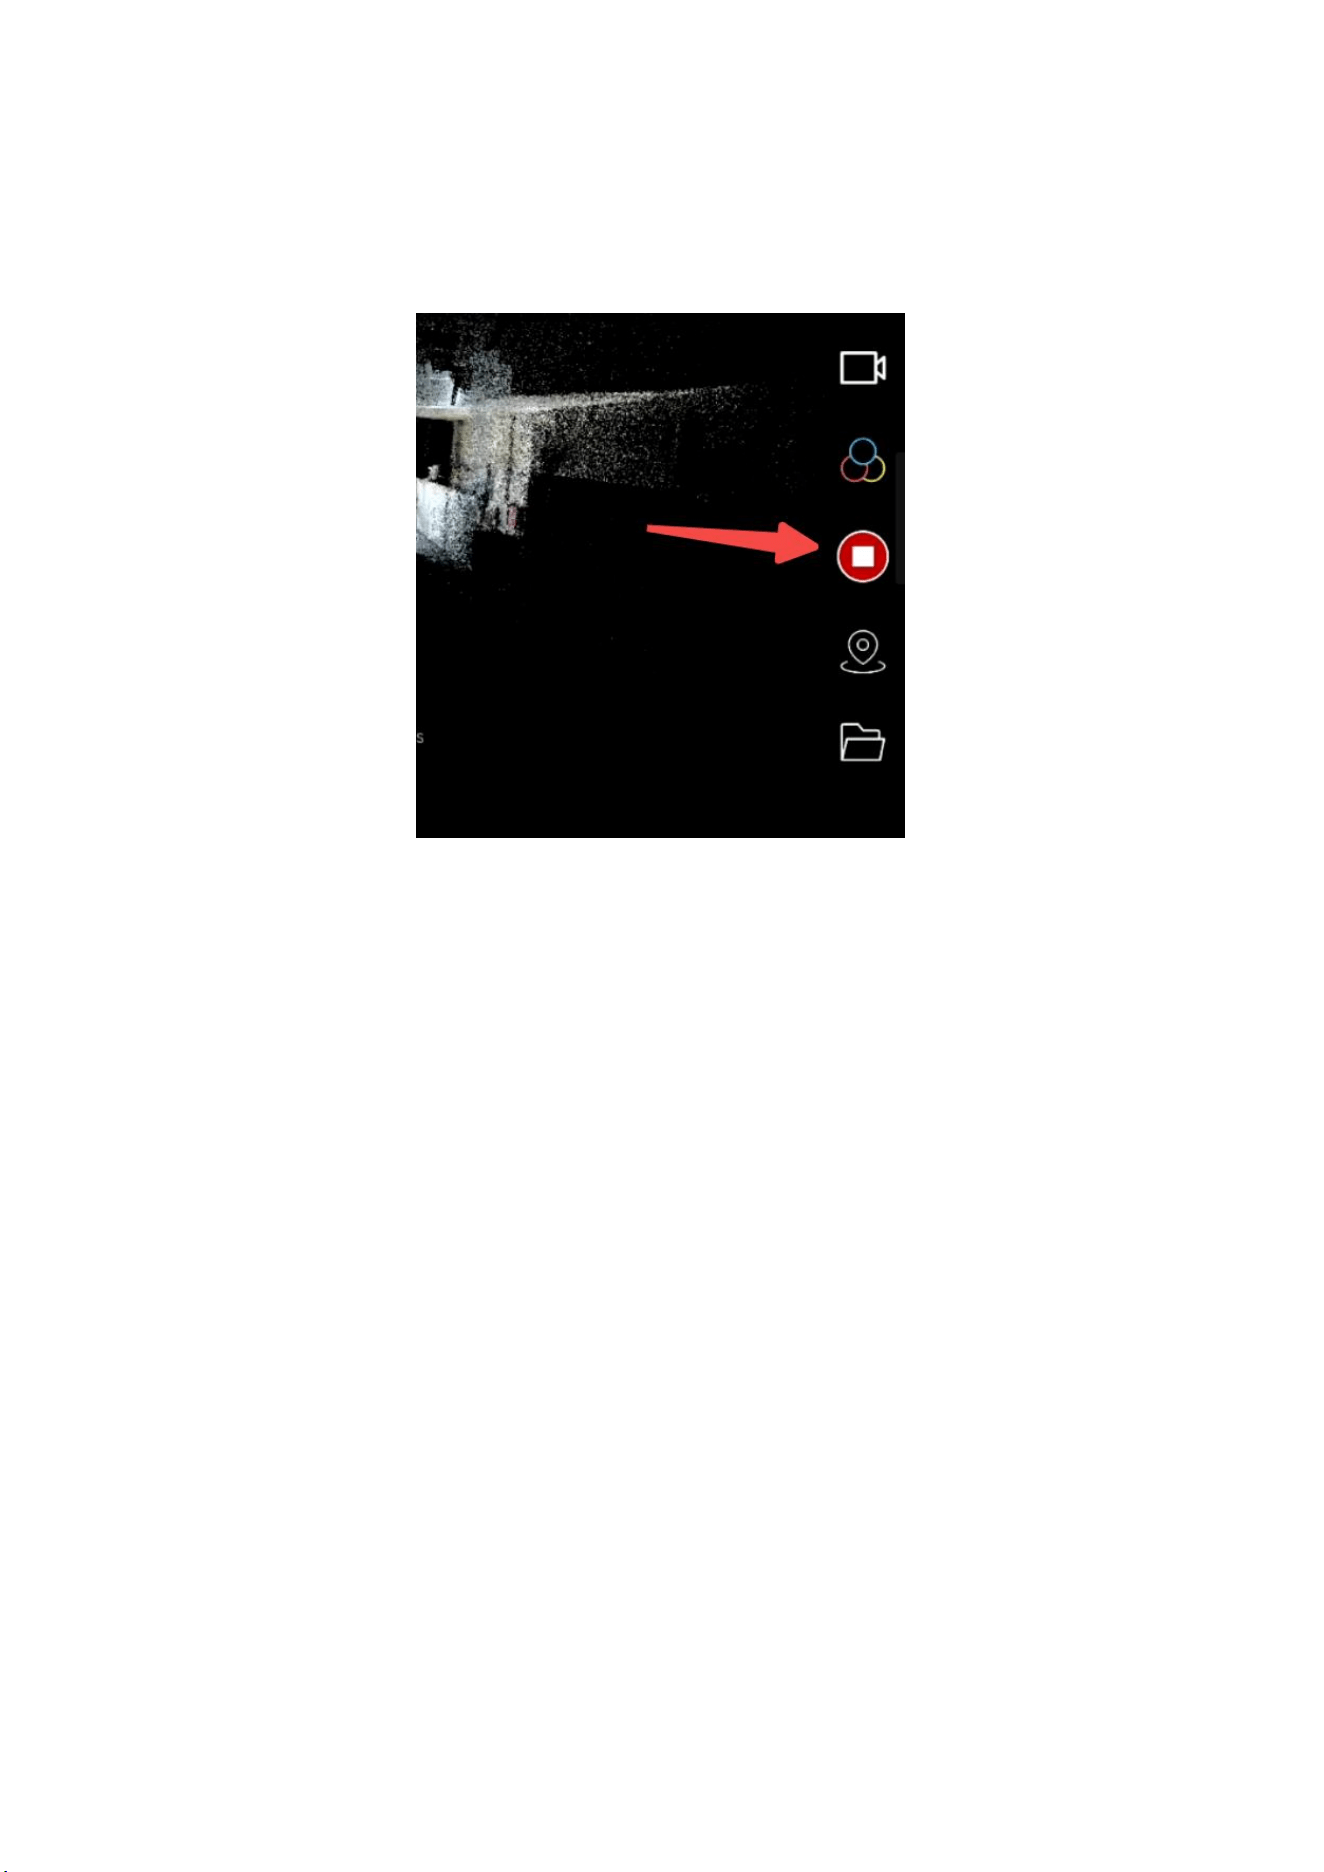
25
minute after the message appears before performing the next
scan.
3.10 Power Off
First, make sure that the device has completed collecting data
and saved it, which means the device is in a stopped working
state. Short press and long press the power button on the grip
battery. After about 5 seconds, the indicator light goes out,
which means the device has been turned off.

26
4 SHARE Capture Data Manager
SHARE Capture provides various functions for data
management. Users can upload, download, rename, delete and
operate other functions of files through the "File Management"
page. If users download data from the device to their mobile
phones, they can view the data on their mobile phones.
4.1 Data Storage
Please note that although user can view the entire process of
scanning data on mobile phone, after each project is done, the
project data is saved in the TF card of SHARE3DCAM S30 SE. So
user can find data which just scanned in the " File
Management" by clicking "Device" option. The default file
name is the time when scanning started.
The default preview cover is the first image when recording is
started. It is recommended to use the "Rename" function to
change each project to a name specified by user, so that the file
can be found again later easily. The function buttons in the
upper right corner are "Download", "Delete" and “Sort” from
left to right. The "Sort" menu can help user sort the project by
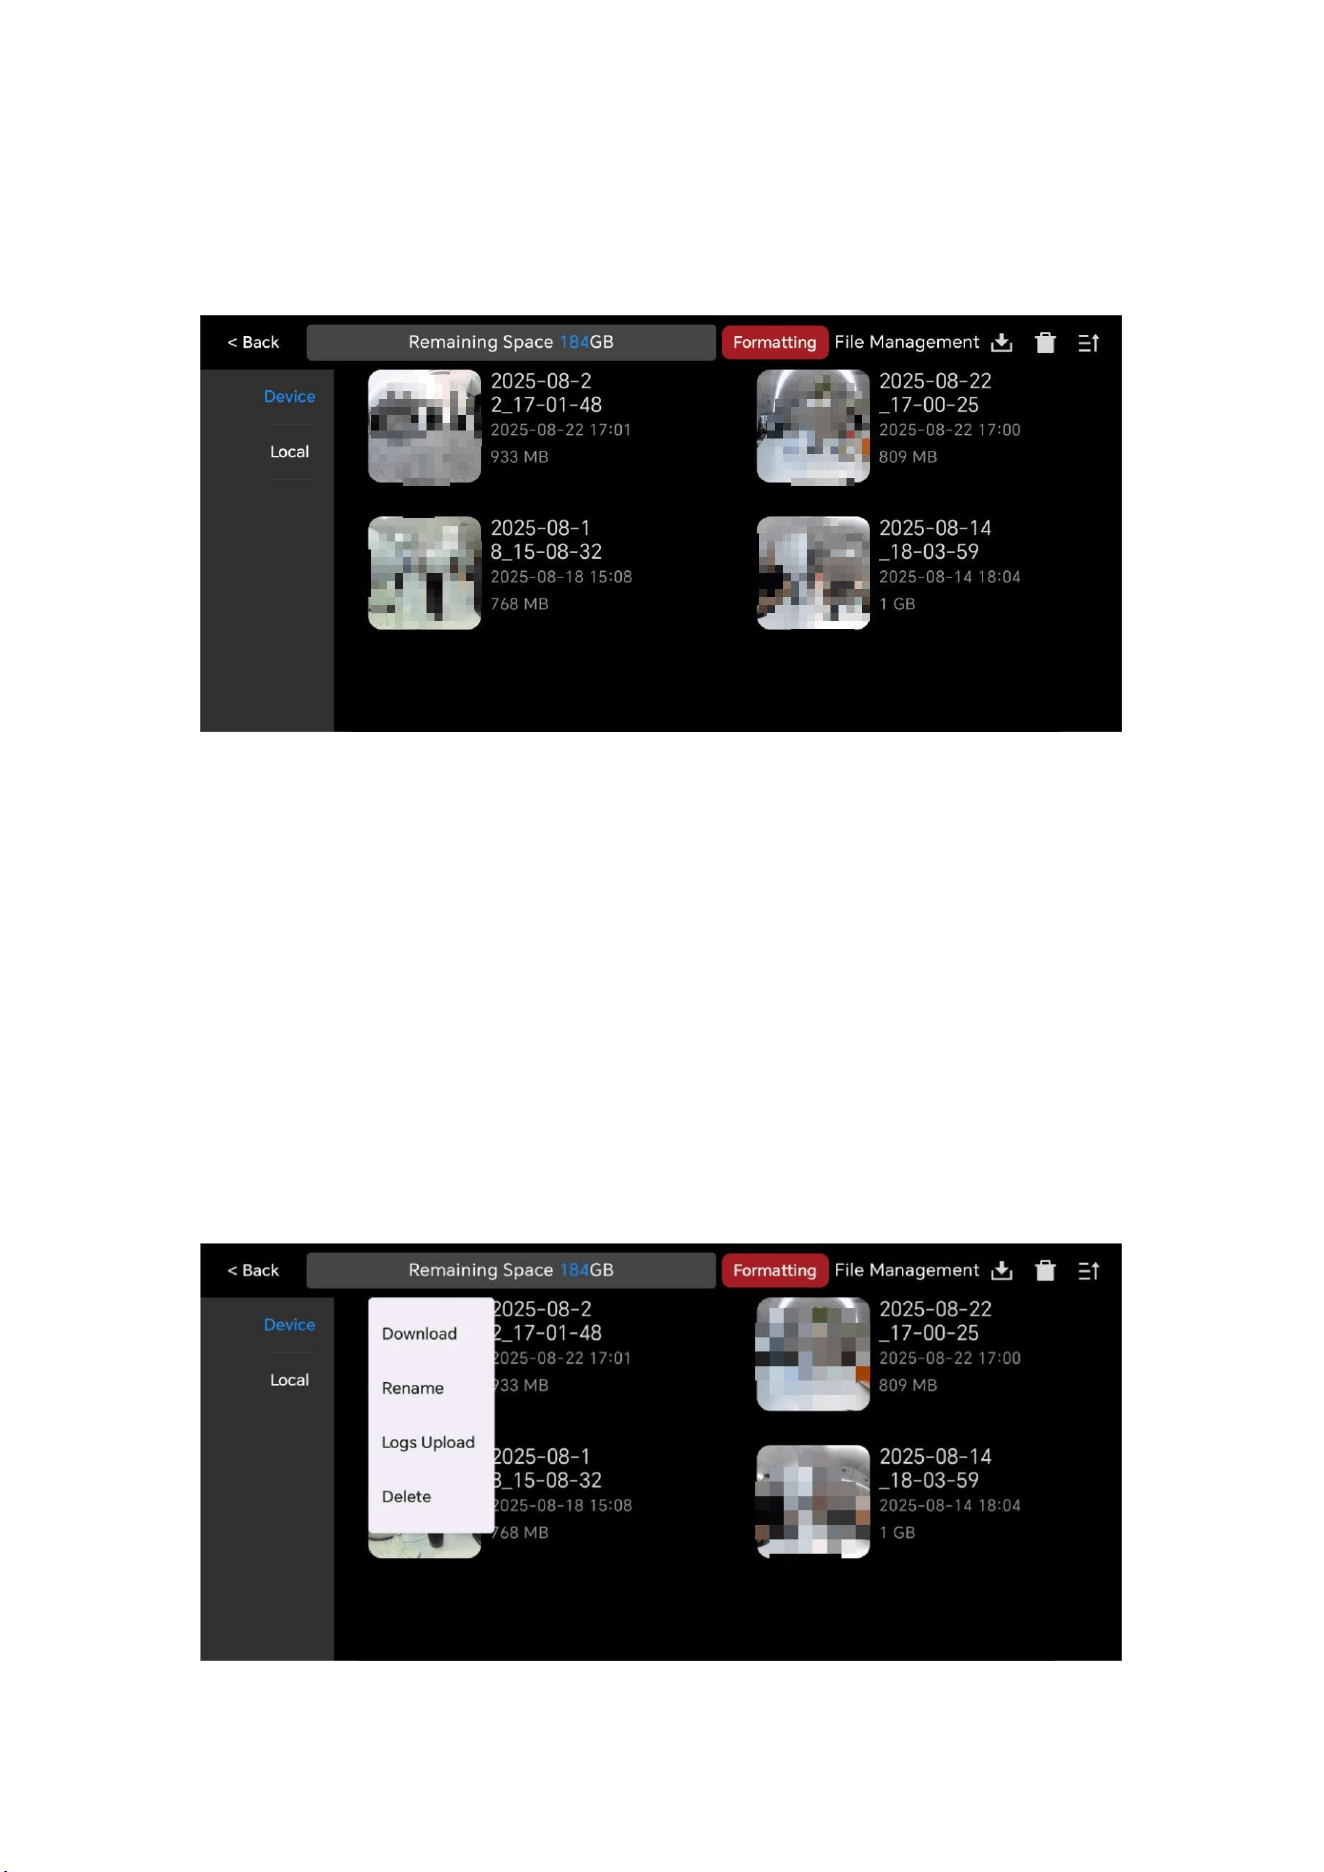
27
name or size. Please note that once deleted, project data
cannot be retrieved.
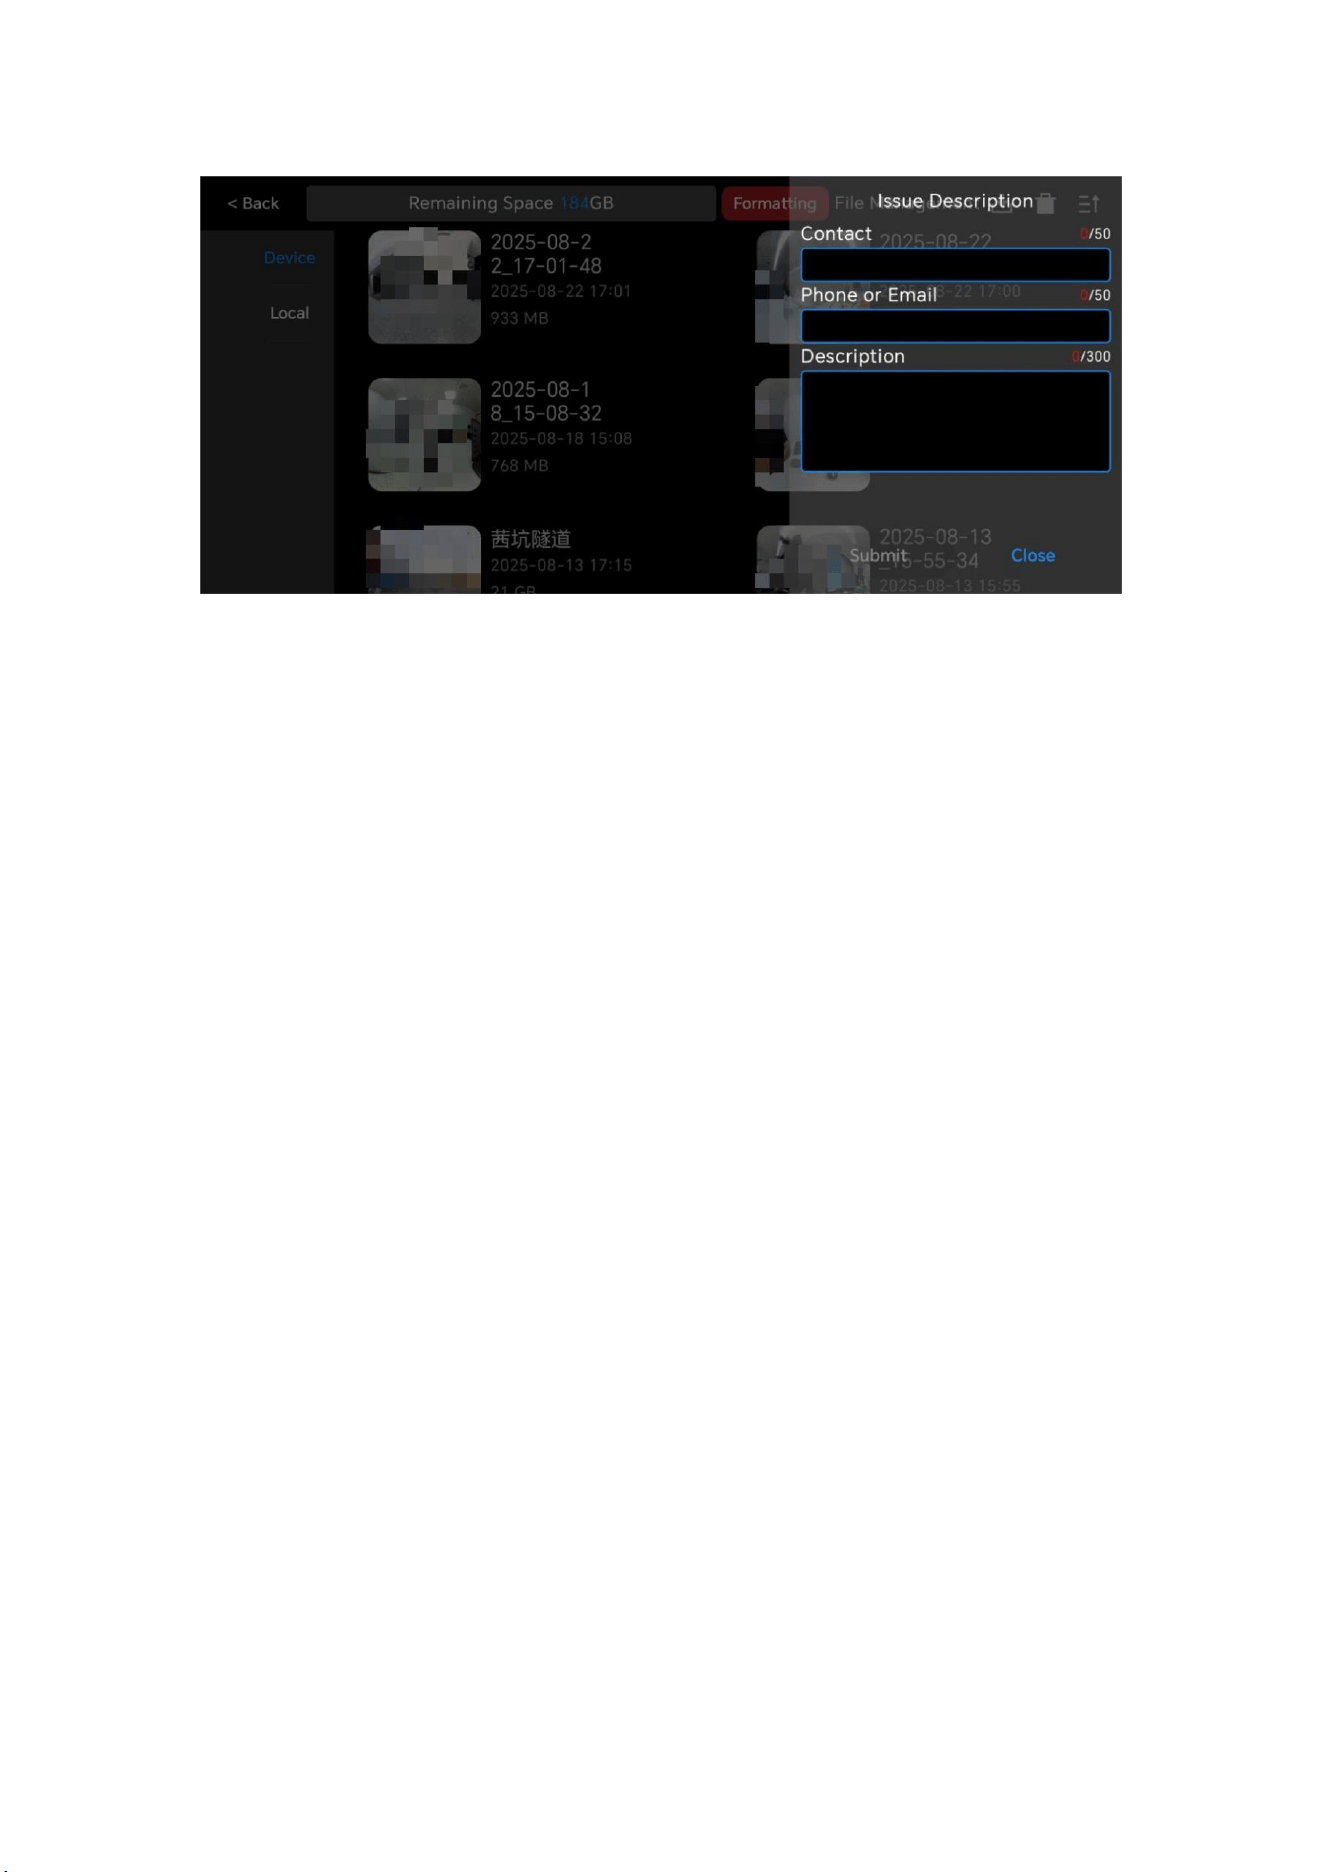
4.1.1 File Operation and Log Upload
Select a file and press 1-2 seconds to download, rename,
upload logs, delete, etc. If user needs to upload the log of the
corresponding project, user can click
“
Logs Upload
”
and
describe the issue and the phenomenon that occurred during
scanning to SHARE3DCAM.
28
Fill in the relevant information in the "Issue Description"
window and click the "Submit" button to upload the log file
corresponding to the project.
Note: Only supports uploading SHARE3DCAM S30 SE device log
files.
4.2 Local
If user wants to download the scanned project data to user's
mobile phone, user can first click on the file user wants to
download on the "Device" page, click "Download". Once the
transfer reaches 100%, user can find the downloaded file in
"Local" later.

29
From the "Local" interface user can control movement to view
the scanned area. Please note that due to the limited
computing power of mobile phones, the point clouds seen in
"Review" are thinned out point cloud data and are only used to
help user check the area user have traveled. If user needs to
see a better complete effect, user needs to post-process data in
SHARE PointClouds Studio.
4.3 Review Data
Switch to “Local” file management, click on the corresponding
project, and in the "Review" interface, user can rotate/zoom
and pan point cloud.

30
5 SHARE PointClouds Studio
SHARE PointClouds Studio software is a data processing tool
software designed for the SSHARE3DCAM handheld series of
products.The software provides functions such as original data
analysis, 3D point cloud viewing, and measurement analysis.
When matched with handheld LiDAR device, it can completely
cover the entire process of data collection, data processing and
data analysis, and fully supports the application of 3D LiDAR
point cloud.
5.1 Software Configuration Requirements
To ensure that the software uses smoothly, the recommended
configuration is as follows
:

31
CPU
GPU
GeForce RTX2060 4GB
RAM
32GB
Hard Drive
Capacity
64G capacity available
Operating
System
Windows 10 and above series
5.2 Data Processing
Remove TF card from device, insert it into the card reader,
connect it to the computer to read the data, and copy project
file (such as 2025-08-26_xxx) to the computer local disk.
Open the SHARE PointClouds Studio software, select the files to
be copied from your computer, and click “OK” to begin data
processing.
Set the project name, storage path, and raw data, click the
“
confirm
”
button to create the project, and enter the "Point
Cloud Mapping" process for the project.

32
Add the original data and set the mapping parameters. After
the settings are completed,
click "Start the calculation" to perform the "Point Cloud
Mapping" process for the project.
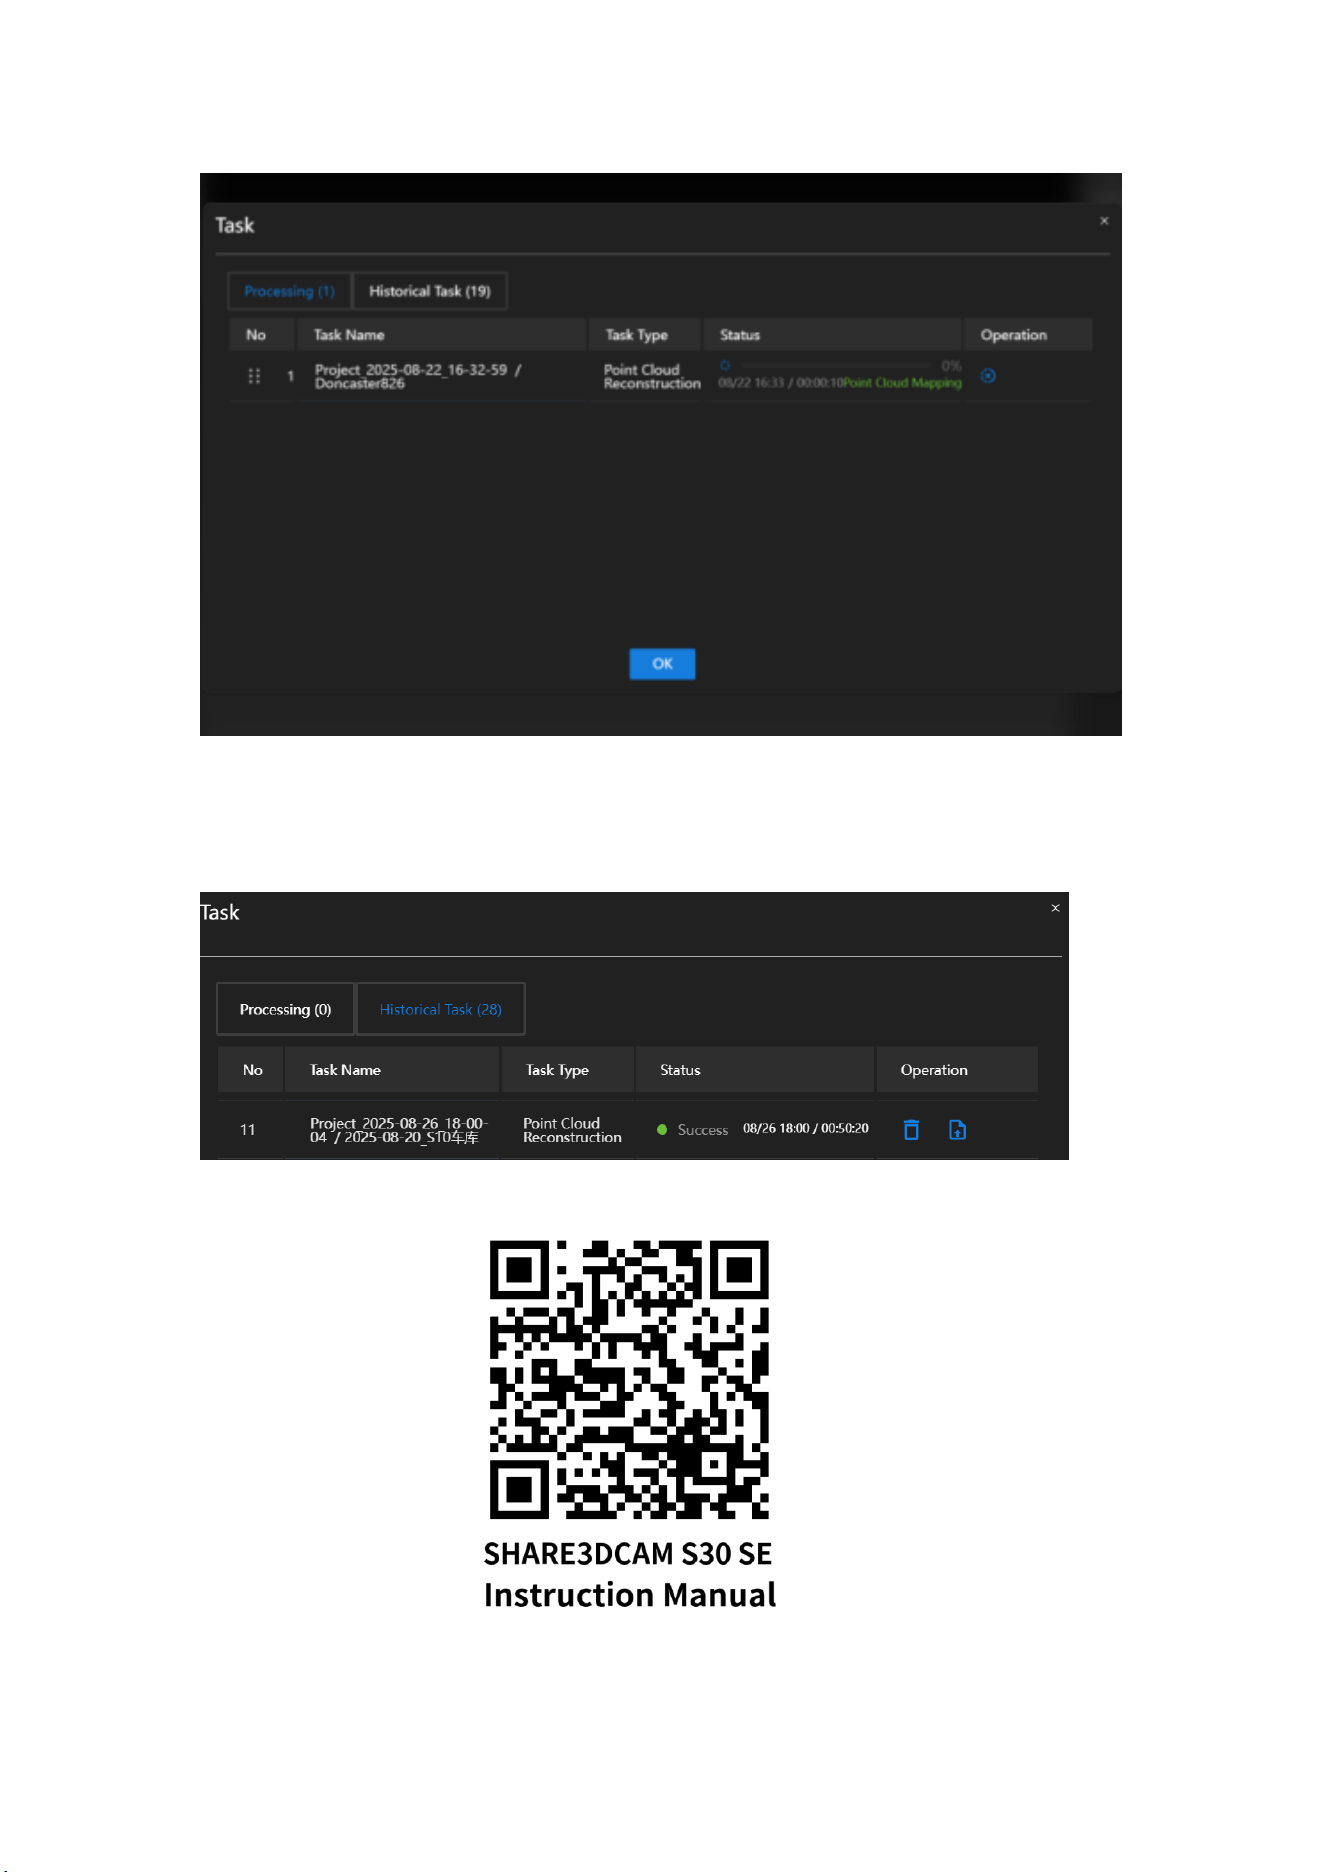
The software automatically pops up the "Task " pop-up window
to view the progress of the point cloud mapping of the project.
33
After the processing is completed, the status of the
corresponding project is displayed as "Success".

34
Please scan the QR code on the right for detailed product
operation instructions, including detailed software operation
instructions.
6 Device Maintenance
Do not disassemble the device without permission
.
Handheld LiDAR device checking and debugging have been
completed before delivery. Please do not alter or dismantle the
device by yourself. The consequences caused by users'
unauthorized modification of the camera shall be borne by
users. If user needs to design or modify the camera to install
and load, please contact SHARE3DCAM technical support staff.
6.1 Precaution
1.
Please store the handheld LiDAR device in a dry and
ventilated place at normal temperature to avoid lens fogging
caused by excessive humidity. The recommended storage
environment temperature is from -20
℃
to 60
℃
. If the lens
fogs up, water vapor will dissipate automatically after the
handheld LiDAR Device is turned on and heat up for a period of
time.

35
2.
Avoid storing the handheld LiDAR device in a place of strong
vibration and strong magnetic.
3.
Avoid bringing the equipment directly from cold places to
warm places to prevent moisture condensation.
4.
Do not place the handheld LiDAR device in strong light for a
long time.
5.
Avoid scratching the lens & LiDAR surface coating by hand or
hard objects.
6.
Keep the handheld LiDAR device interface clean and dry.
7.
When cleaning the lens, please use a soft and dry cleaning
cloth to wipe. Please do not use a cleaner containing organic
solvents such as thinner or gasoline to clean the UV lens.
8.
Do not use unstable power supply or power supply that
exceeds the voltage range of the handheld LiDAR device.
9.
Do not turn on or turn off the camera frequently. Please wait
for more than 60s at the interval of continuous power on or off,
otherwise it will affect the life of the camera mechanism..
10.
The handheld LiDAR device is kind of a precise equipment,
please keep it stored in the shipping box during transportation
process.
36
11.
When the device is not in use for extended periods, it is
recommended to perform regular maintenance on the battery
to prevent damage caused by prolonged storage.
7 After Sales
7.1 Shipment
All equipment delivered by SHARE3DCAM shall be packed in
accordance with the standard protective measures for
packaging and transportation. Such packaging shall meet the
requirements according to the specific properties of the
equipment for long-distance transportation, moisture
resistance, shock resistance, rust prevention, etc. to ensure
that the equipment could be arrived safely at the place of
delivery.

37
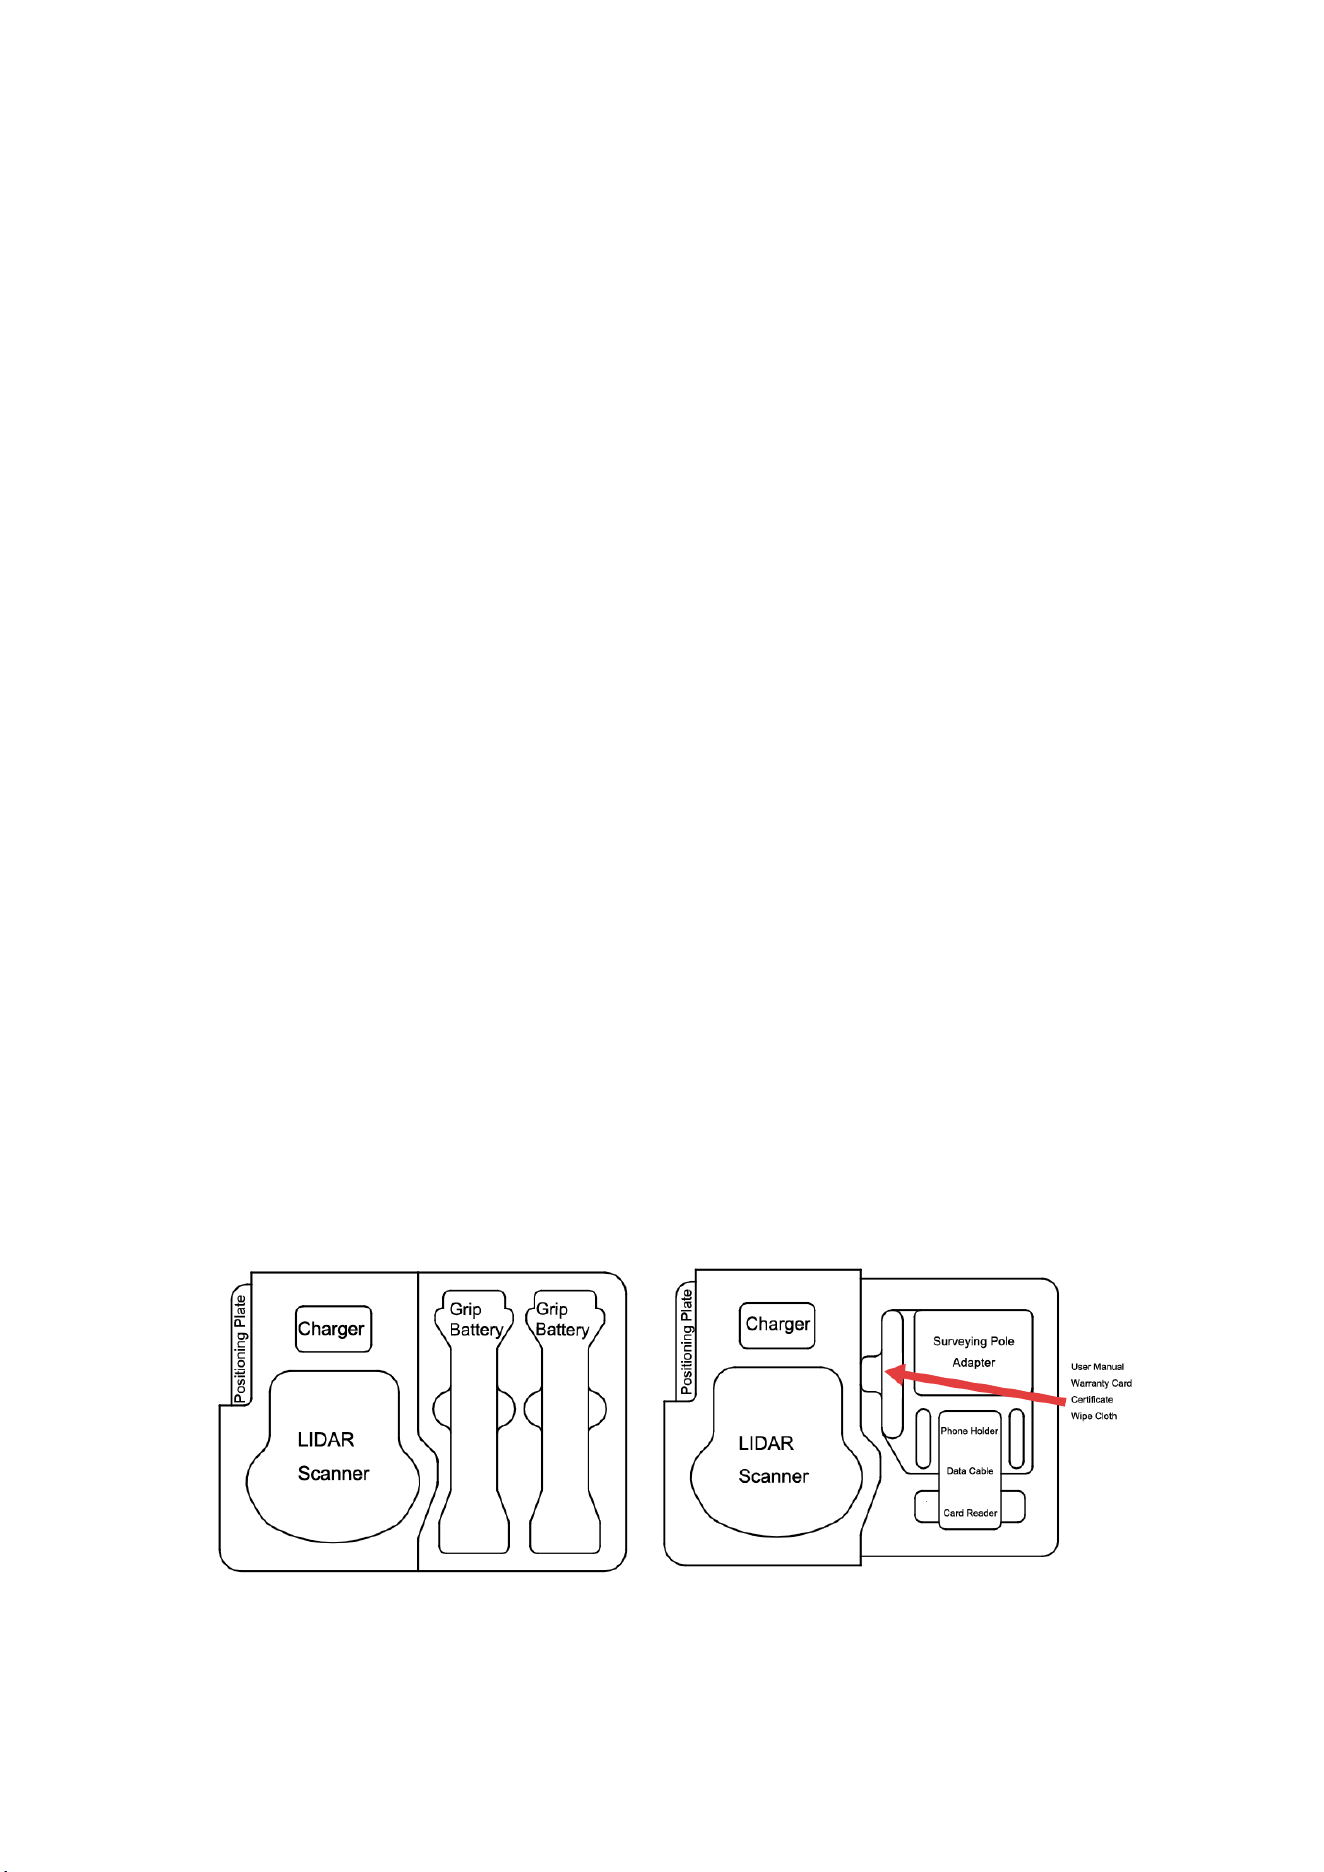
Shipping Box Content
The lining of the handheld LiDAR device shipping box adopts a
two-layer design. The left side of the lining is fixed with the
main unit and charger. The upper layer on the right side of the
lining can hold two grip battery , and the lower layer can hold
accessories such as mobile phone holder, card readers, data
cables, surveying adapter, manual, etc. The shipping box is
manufactured using industrial-grade box manufacturing
techniques, with a folding snap-on lid and a convenient and
durable handle design, providing high structural strength and
durability.Keep the cover of the shipping box upward, and do
not place it upside down. Avoid severe vibration and
turbulence during transportation.
7.2 After-sales Service
1)
Hardware warranty terms: 1 year warranty since delivery.
During the warranty period, Party B shall only undertake the
delivery, maintenance and quality guarantee of Party A's
goods within the territory of the People's Republic of China.
2)
Warranty service: Regulations on after-sales service of
SHARE3DCAM
3)
Party A: Buyer of Products Party B: SHARE3DCAM LIMITED

38
4)
The after-sales service content shall refer to the after-sales
service regulations of SHARE3DCAM.
5)
During the warranty period, Party B will provide Party A with
regular technical support free of charge, and bear the related
costs of repair and replacement caused by product quality
problems. Devices with below conditions will be out of
warranty even if within warranty time: water damaged, for
damage caused by non-quality problems, Party B will provide
repairing service and charge to Party A. The warranty label
shall not be opened, torn or destroyed privately, otherwise
the warranty will be invalid.
6)
If user have any questions, please contact SHARE3DCAM
LIMITED
7)
After-sales service and technical support tel: +86-755-
23216686 (working days 9:00-18:00 Beijing time)
Official Website
LinkedIn
YouTube
Facebook
If you have any questions about the product Please contact us via
below email: technical.s[email protected]
SHARE3DCAM LIMITED

FCC Warnning:
This equipment has been tested and found to comply with the limits for a Class B digital device,
pursuan t to part 15 of the FCC Rules. These limits are designed to provide reasonable
protection againstharmful interference in a residential installation. This equipment generates,
uses and can radiateradio frequency energy and, if not installed and used in accordance with
the instructions, maycause harmful interference to radio communications. However, there
is no guarantee thatinterference will not occur in a particular installation. If this
equipment does cause harmfulinterferenc e to radio or television reception, which can be
determined by turning the equipmentoff and on, the user is encouraged to try to correct the
interference by one or more of thefollowing measures:
• Reorient or reloca
te the receiving antenna.
• Increase the separation between the equi pment and receiver.
• Connect the equipment into an outlet on a circuit different f
rom that to which the receiver is
c
onnected.
• Consult the dealer or an experienced radio/TV technician for help.
Caution: Any changes or modifications to this device not explicitly approved by manufacturer
could void your authority to operate this equipment.
This device complies with part 15 of the FCC Rules. Operation is subject to the following two
conditions:
(1)This device may not cause harmful interference, and (2) this device must accept any
interference
received, including interference that may cause undesired operation.
This equipment complies with FCC radiation exposure limits set forth for an uncontrolled
environment. This equipment should be installed and operated with minimum distance 20cm
between the radiator and your body.