Rev.6 EM19XS4130F
EPSON RC+ 7.0
User's Guide
Project Management and Development
Ver.7.4

EPSON RC+ 7.0 (Ver.7.4) User's Guide Project Management and Development Rev.6

EPSON RC+ 7.0 (Ver.7.4) User's Guide Rev.6
i
EPSON RC+ 7.0 (Ver.7.4)
Users Guide
Rev.6
Copyright 2012-2019 SEIKO EPSON CORPORATION. All rights reserved.

ii EPSON RC+ 7.0 (Ver.7.4) User's Guide Rev.6
FOREWORD
Thank you for purchasing our robot products.
This manual contains the information necessary for the correct use of the Manipulator.
Please carefully read this manual and other related manuals before installing the robot
system.
Keep this manual handy for easy access at all times.
WARRANTY
The robot and its optional parts are shipped to our customers only after being subjected to
the strictest quality controls, tests, and inspections to certify its compliance with our high
performance standards.
Product malfunctions resulting from normal handling or operation will be repaired free of
charge during the normal warranty period. (Please contact the supplier of your region for
warranty period information.)
However, customers will be charged for repairs in the following cases (even if they occur
during the warranty period):
1.
Damage or malfunction caused by improper use which is not described in the manual, or
careless use.
2.
Malfunctions caused by customers’ unauthorized disassembly.
3.
Damage due to improper adjustments or unauthorized repair attempts.
4.
Damage caused by natural disasters such as earthquake, flood, etc.
Warnings, Cautions, Usage:
1.
If the robot or associated equipment is used outside of the usage conditions and product
specifications described in the manuals, this warranty is void.
2.
If you do not follow the WARNINGS and CAUTIONS in this manual, we cannot be
responsible for any malfunction or accident, even if the result is injury or
death.
3.
We cannot foresee all possible dangers and consequences. Therefore, this manual cannot
warn the user of all possible hazards.

EPSON RC+ 7.0 (Ver.7.4) User's Guide Rev.6
iii
TRADEMARKS
Microsoft, Windows, Windows logo, Visual Basic, and Visual C++ are either registered
trademarks or trademarks of Microsoft Corporation in the United States and/or other
countries. Pentium is a trademark of Intel Corporation.
XVL is a registered trademark of Lattice Technology, Co., Ltd.
Other brand and product names are trademarks or registered trademarks of the respective
holders.
TRADEMARK NOTATION IN THIS MANUAL
Microsoft® Windows® 7 Operating system
Microsoft® Windows® 8 Operating system
Microsoft® Windows® 10 Operating system
Throughout this manual, Windows 7, Windows 8, and Windows 10 refer to above
respective operating systems. In some cases, Windows refers generically to Windows 7,
Windows 8, and Windows 10.
NOTICE
No part of this manual may be copied or reproduced without authorization.
The contents of this manual are subject to change without notice.
Please notify us if you should find any errors in this manual or if you have any comments
regarding its contents.
MANUFACTURER
CONTACT INFORMATION
Contact information is described in “SUPPLIERS” in the first pages of the following
manual:
Robot System Safety and Installation Read this manual first

iv EPSON RC+ 7.0 (Ver.7.4) User's Guide Rev.6

Table of Contents
EPSON RC+ 7.0 (Ver.7.4) User's Guide Rev.6 v
1. Introduction 1
1.1 Welcome to EPSON RC+ 7.0 ..................................................................1
1.2 System Overview .....................................................................................2
1.2.1 Controller .....................................................................................2
1.2.2 Software ......................................................................................4
1.2.3 Simulator .....................................................................................4
1.2.4 System Block Diagram ................................................................5
1.3 Options .....................................................................................................6
1.4 Precautions When Using Windows 7 ......................................................6
1.5 EPSON RC+ 5.x and 6.x Users ...............................................................6
1.6 EPSON RC+ 3.x and 4.x Users ...............................................................6
1.7 SPEL for Windows Users .........................................................................6
1.8 Manuals ....................................................................................................7
2. Safety 8
2.1 Overview ..................................................................................................8
2.2 Definitions ................................................................................................8
2.2.1 Robot Power ................................................................................8
2.2.2 Safeguard ....................................................................................9
2.2.3 Operation Modes .........................................................................9
2.2.4 Start Mode ...................................................................................9
2.2.5 Changing Operation Mode ........................................................10
2.2.6 Emergency Stop ........................................................................10
2.2.7 Teach Pendant ..........................................................................10
2.3 Safety-related Requirements ................................................................. 11
2.4 Installation and Design Precautions ......................................................12
2.4.1 Designing a Safe Robot System ...............................................12
2.4.2 Robot System Installation, Start-up, and Testing ......................15
2.5 Precautions regarding Robot Operation ................................................17
2.5.1 General Precautions .................................................................17
2.5.2 Automatic Operation..................................................................17
2.5.3 Teaching Robot Points ..............................................................17
2.5.4 Return to Automatic Operation .................................................18
2.5.5 Program Verification ..................................................................18
2.5.6 Troubleshooting .........................................................................18
2.5.7 Maintenance ..............................................................................18
2.5.8 Backup of Projects and Controller ............................................19
2.6 End User Instruction Manual .................................................................20
2.7 End User Training ..................................................................................20

Table of Contents
vi EPSON RC+ 7.0 (Ver.7.4) User's Guide Rev.6
3. Getting Started 21
3.1 Hardware Installation ............................................................................. 21
3.2 Software Installation .............................................................................. 21
3.3 Windows Security Administration .......................................................... 21
4. Operation 22
4.1 System Power Up Procedure ................................................................ 22
4.2 Starting EPSON RC+ 7.0 ...................................................................... 22
4.2.1 Startup Sequence ..................................................................... 22
4.2.2 Startup Configuration ................................................................ 25
4.2.3 Start Mode ................................................................................ 25
4.2.4 Start Mode Dialog ..................................................................... 26
4.2.5 Start Mode: Program ................................................................ 26
4.2.6 Start Mode: Auto ....................................................................... 27
4.2.7 Auto Start .................................................................................. 27
4.2.8 Using Monitor Mode .................................................................. 28
4.2.9 Windows Login .......................................................................... 28
4.2.10 Command Line Options .......................................................... 29
4.2.11 Using Command Line Options ................................................ 30
4.3 Communications with Controller ............................................................ 31
4.3.1 Configuring Communications with the Controller ..................... 31
4.3.2 USB Communications ............................................................... 31
4.3.3 Ethernet Communications ........................................................ 32
4.3.4 Connecting When Control Device is not PC ............................. 32
4.4 Writing your first Program ...................................................................... 34
5. The EPSON RC+ 7.0 GUI 39
5.1 GUI Overview ........................................................................................ 39
5.2 Project Explorer Pane ............................................................................ 40
5.3 Status Window Pane ............................................................................. 40
5.4 Status Bar .............................................................................................. 41
5.5 Online Help ............................................................................................ 42
5.6 [File] Menu ............................................................................................. 43
5.6.1 New Command (File Menu) ...................................................... 43
5.6.2 Open Command (File Menu) .................................................... 44
5.6.3 Close Command (File Menu) .................................................... 44
5.6.4 Save Command (File Menu) ..................................................... 45
5.6.5 Save As Command (File Menu) ................................................ 45
5.6.6 Restore Command (File Menu) ................................................ 45
5.6.7 Rename Command (File Menu) ............................................... 45
5.6.8 Delete Command (File Menu) .................................................. 46
5.6.9 Import Command (File Menu) ................................................... 47

Table of Contents
EPSON RC+ 7.0 (Ver.7.4) User's Guide Rev.6 vii
5.6.10 Print Command (File Menu) ....................................................48
5.6.11 Exit Command (File Menu) .....................................................49
5.7 [Edit] Menu .............................................................................................50
5.7.1 [Undo] Command (Edit Menu) ..................................................50
5.7.2 [Redo] Command (Edit Menu) ..................................................50
5.7.3 [Cut] Command (Edit Menu) .....................................................50
5.7.4 [Copy] Command (Edit Menu) ..................................................50
5.7.5 [Paste] Command (Edit Menu)..................................................50
5.7.6 [Find] Command (Edit Menu) ....................................................51
5.7.7 [Find Next] Command (Edit Menu) ...........................................51
5.7.8 [Replace] Command (Edit Menu) .............................................52
5.7.9 [Select All] Command (Edit Menu) ............................................52
5.7.10 [Indent] Command (Edit Menu) ...............................................52
5.7.11 [Outdent] Command (Edit Menu) ............................................53
5.7.12 [Comment Block] Command (Edit Menu) ...............................53
5.7.13 [Uncomment Block] Command (Edit Menu) ...........................53
5.7.14 [Go To Definition] Command (Edit Menu) ...............................53
5.8 [View] Menu ...........................................................................................54
5.8.1 [Project Explorer] Command (View Menu) ...............................54
5.8.2 Status Window Command (View Menu) ...................................54
5.8.3 System History Command (View Menu) ...................................55
5.9 [Project] Menu ........................................................................................56
5.9.1 [New] Command (Project Menu) ..............................................56
5.9.2 [Open] Command (Project Menu) .............................................57
5.9.3 Recent Projects Submenu (Project Menu) ...............................58
5.9.4 [Close] Command (Project Menu) ............................................58
5.9.5 [Edit] Command (Project Menu) ...............................................58
5.9.6 [Save] Command (Project Menu) .............................................60
5.9.7 [Save As] Command (Project Menu) ........................................60
5.9.8 [Rename] Command (Project Menu) ........................................61
5.9.9 [Import] Command (Project Menu) ...........................................62
5.9.10 [Export] Command (Project Menu) .........................................66
5.9.11 [Copy] Command (Project Menu) ...........................................68
5.9.12 [Delete] Command (Project Menu) .........................................69
5.9.13 [Build] Command (Project Menu) ............................................69
5.9.14 [Rebuild] Command (Project Menu) .......................................69
5.9.15 [Properties] Command (Project Menu) ...................................70
5.10 [Run] Menu ...........................................................................................80
5.10.1 [Run Window] Command (Run Menu) ....................................80
5.10.2 [Operator Window] Command (Run Menu) ............................80
5.10.3 [Step Into] Command (Run Menu) ..........................................80
5.10.4 [Step Over] Command (Run Menu) ........................................80
5.10.5 [Walk] Command (Run Menu) ................................................81
5.10.6 [Resume] Command (Run Menu) ...........................................81
5.10.7 [Stop] Command (Run Menu) .................................................81

Table of Contents
viii EPSON RC+ 7.0 (Ver.7.4) User's Guide Rev.6
5.10.8 [Toggle Breakpoint] Command (Run Menu) ........................... 81
5.10.9 [Clear All Breakpoints] Command (Run Menu) ...................... 82
5.10.10 [Display Variables] Command (Run Menu) .......................... 82
5.10.11 [Call Stack] Command (Run Menu) ...................................... 83
5.11 [Tools] Menu ......................................................................................... 84
5.11.1 [Robot Manager] Command (Tools Menu) ............................. 84
5.11.2 [Command Window] Command (Tools Menu) ...................... 128
5.11.3 [I/O Monitor] Command (Tools Menu) ................................... 130
5.11.4 Task Manager Command (Tools Menu) ................................ 132
5.11.5 Macros Command (Tools Menu) ........................................... 135
5.11.6 [I/O Label Editor] Command (Tools Menu) ........................... 136
5.11.7 User Error Editor Command (Tools Menu) ........................... 138
5.11.8 [Controller] Command (Tools Menu) ..................................... 139
5.12 [Setup] Menu ..................................................................................... 143
5.12.1 [PC to Controller Communications] Command (Setup Menu)143
5.12.2 [System Configuration] Command (Setup Menu) ................ 144
5.12.3 [Preferences] Command (Setup Menu) ................................ 161
5.12.4 [Options] Command (Setup Menu) ....................................... 168
5.13 [Window] Menu .................................................................................. 169
5.13.1 [Cascade] Command (Window Menu) ................................. 169
5.13.2 [Tile Vertical] Command (Window Menu) ............................. 169
5.13.3 [Tile Horizontal] Command (Window Menu) ......................... 170
5.13.4 [Arrange Icons] Command (Window Menu) ......................... 170
5.13.5 [Close All] Command (Window Menu) .................................. 171
5.13.6 1, 2, 3 Command (Window Menu) ........................................ 171
5.13.7 [Windows] Command (Window Menu) ................................. 171
5.14 [Help] Menu ....................................................................................... 172
5.14.1 [How Do I] Command (Help Menu) ...................................... 172
5.14.2 [Contents] Command (Help Menu) ....................................... 172
5.14.3 [Index] Command (Help Menu) ............................................ 173
5.14.4 [Search] Command (Help Menu) .......................................... 173
5.14.5 [Manuals] Submenu (Help Menu) ......................................... 174
5.14.6 [About EPSON RC+ 7.0] Command (Help Menu) ................ 174

Table of Contents
EPSON RC+ 7.0 (Ver.7.4) User's Guide Rev.6 ix
6. The SPEL+ Language 175
6.1 Overview ............................................................................................. 176
6.2 Program Structure ............................................................................... 176
6.2.1 What is a SPEL+ program? ................................................... 176
6.2.2 Calling functions ..................................................................... 176
6.3 Commands and Statements ............................................................... 177
6.4 Function and Variable Names (Naming restriction) ............................ 177
6.5 Data Types .......................................................................................... 178
6.6 Operators ............................................................................................ 178
6.7 Working with Variables ........................................................................ 179
6.7.1 Variable scopes ...................................................................... 179
6.7.2 Local variables ....................................................................... 179
6.7.3 Module variables .................................................................... 179
6.7.4 Global variables ..................................................................... 180
6.7.5 Global Preserve variables ...................................................... 180
6.7.6 Arrays ..................................................................................... 181
6.7.7 Initial values ........................................................................... 181
6.7.8 Clearing arrays ....................................................................... 181
6.8 Working with Strings ........................................................................... 182
6.9 Working with Files ............................................................................... 183
6.10 Multi-statements ................................................................................ 185
6.11 Labels ................................................................................................ 185
6.12 Comments ......................................................................................... 185
6.13 Error Handling ................................................................................... 186
6.14 Multi-tasking ...................................................................................... 188
6.15 Using Multiple Robots ....................................................................... 189
6.16 Coordinate Systems .......................................................................... 190
6.16.1 Overview .............................................................................. 190
6.16.2 Robot Coordinate Systems .................................................. 191
6.16.3 Local Coordinate Systems ................................................... 194
6.16.4 Tool Coordinate Systems ..................................................... 195
6.16.5 ECP Coordinate Systems (Option) ...................................... 198
6.17 Robot Arm Orientations..................................................................... 201
6.17.1 SCARA robot arm orientations ............................................. 201
6.17.2 6-axis robot arm orientations ............................................... 202
6.17.3 RS series arm orientations ................................................... 206
6.17.4 N series arm orientations ...................................................... 210
6.18 Robot Motion Commands ................................................................. 216
6.18.1 Homing the robot .................................................................. 216
6.18.2 Point to point motion ............................................................ 216
6.18.3 Linear motion ....................................................................... 216
6.18.4 Curves .................................................................................. 217
6.18.5 Joint motion .......................................................................... 217

Table of Contents
x EPSON RC+ 7.0 (Ver.7.4) User's Guide Rev.6
6.18.6 Controlling position accuracy ................................................ 217
6.18.7 CP Motion Speed / Acceleration and Tool Orientation ......... 218
6.18.8 PTP Speed / Acceleration for Small Distances .................... 218
6.18.9 Pressing Motion .................................................................... 218
6.18.10 Collision Detection Function (Detection Function of Robot
Motion Error) ........................................................................... 219
6.18.11 Torque Restriction Function ................................................ 221
6.19 Working with Robot Points ................................................................ 223
6.19.1 Defining points ...................................................................... 224
6.19.2 Referencing points by point label ......................................... 224
6.19.3 Referencing points with variables ......................................... 225
6.19.4 Using points in a program ..................................................... 225
6.19.5 Importing points into program ............................................... 225
6.19.6 Saving and loading points..................................................... 225
6.19.7 Point attributes ...................................................................... 226
6.19.8 Extracting and setting point coordinates .............................. 227
6.19.9 Alteration of points ................................................................ 227
6.20 Input and output control ..................................................................... 228
6.20.1 Hardware I/O ......................................................................... 228
6.20.2 Memory I/O ........................................................................... 228
6.20.3 I/O Commands ...................................................................... 228
6.21 Using Traps ........................................................................................ 229
6.21.1 Cautions of Trap when it triggers the system condition ........ 230
6.22 Special Tasks ..................................................................................... 231
6.22.1 Precautions to Use the Special Tasks .................................. 231
6.22.2 NoPause/NoEmgAbort task specification ............................. 233
6.22.3 NoPause/NoEmgAbort task example ................................... 234
6.23 Background Task ............................................................................... 235
6.23.1 Primary features of background task .................................... 235
6.23.2 Setup and start the background task .................................... 235
6.23.3 Holding background task (from being activated) .................. 236
6.23.4 Commands that will cause error in background task ........... 238
6.23.5 Background task and Remote control .................................. 238
6.24 Predefined Constants ........................................................................ 239
6.25 Calling Native Functions in Dynamic Link Libraries .......................... 244

Table of Contents
EPSON RC+ 7.0 (Ver.7.4) User's Guide Rev.6 xi
7. Building SPEL+ Applications 250
7.1 Designing Applications ........................................................................ 250
7.1.1 Creating the simplest application ........................................... 250
7.1.2 Application layout ................................................................... 250
7.1.3 Auto start at power up ............................................................ 252
7.2 Managing Projects .............................................................................. 253
7.2.1 Overview ................................................................................ 253
7.2.2 Creating a new project ........................................................... 254
7.2.3 Configuring a project .............................................................. 254
7.2.4 Building a project .................................................................... 255
7.2.5 Backing up a project............................................................... 255
7.3 Editing Programs ................................................................................ 256
7.3.1 Program rules ......................................................................... 256
7.3.2 Typing in program code.......................................................... 256
7.3.3 Syntax Help ............................................................................ 257
7.3.4 Syntax Errors ......................................................................... 258
7.4 Editing Points ...................................................................................... 259
7.5 Running and Debugging Programs .................................................... 261
7.5.1 The Run window .................................................................... 261
7.5.2 Debugging .............................................................................. 263
7.6 The Operator Window ......................................................................... 267
7.6.1 Operator window configuration .............................................. 268
7.6.2 Auto start configuration .......................................................... 268
7.7 Using Remote Control ......................................................................... 268
7.8 Using Encrypt Files ............................................................................. 269
8. Simulator 271
8.1 Simulator Functions ............................................................................ 271
8.1.1 Overview ................................................................................ 271
8.1.2 System Requirements ............................................................ 272
8.2 Using the Simulator ............................................................................. 273
8.2.1 Working with the samples ...................................................... 273
8.2.2 Working with the user created system ................................... 275
8.3 Description of Functions ..................................................................... 283
8.3.1 [Robot Simulator] window layout ........................................... 283
8.3.2 Simulator Settings .................................................................. 309
8.3.3 Part/Mounted Device Settings ................................................ 317
8.3.4 Collision detection .................................................................. 318
8.3.5 CAD To Point .......................................................................... 320
8.3.6 CAD to Point for ECP ............................................................. 328
8.3.7 Virtual controller ..................................................................... 334
8.3.8 Connection with controller ...................................................... 335

Table of Contents
xii EPSON RC+ 7.0 (Ver.7.4) User's Guide Rev.6
8.3.9 Virtual Camera Settings and Camera View Display ............... 337
8.3.10 Motion restriction by BOX ..................................................... 338
8.4 Simulator Specifications and Restrictions ........................................... 339
8.4.1 EPSON RC+ 7.0 package ...................................................... 339
8.4.2 Specifications and precautions for the 3D display ................. 339
8.4.3 Specifications and precautions for Simulation (program execution
on PC) ..................................................................................... 340
8.4.4 Specifications and precautions of EPSON RC+ ..................... 342
8.4.5 Restriction on SPEL+ command execution ............................ 343
8.4.6 Specifications and precautions of EPSON RC+ 7.0 Trial ....... 346
9. Motion System 347
9.1 Standard Motion System ..................................................................... 347
9.2 Drive Module Software Configuration .................................................. 347
9.3 PG Motion System ............................................................................... 347
10. Robot Configuration 348
10.1 Setting the Robot Model .................................................................... 348
10.1.1 Adding a standard robot ........................................................ 348
10.1.2 Calibrating a standard robot ................................................. 349
10.1.3 Changing robot system parameters ..................................... 349
10.1.4 Deleting a standard robot ..................................................... 350
10.1.5 Changing the Robot .............................................................. 351
10.2 Configuration of Additional Axes ........................................................ 352
10.2.1 Adding the additional S axis ................................................. 352
10.2.2 Adding the additional T axis .................................................. 352
10.2.3 Changing the parameters of robot with additional axes installed
................................................................................................. 352
10.2.4 Differences of the standard robot and robot with additional axes
................................................................................................. 353
10.2.5 Deleting the additional axes ................................................. 355
11. Inputs and Outputs 356
11.1 Overview ............................................................................................ 356
11.2 I/O Commands ................................................................................... 356
11.3 I/O Configuration ................................................................................ 357
11.4 Monitoring I/O..................................................................................... 357
11.5 Virtual I/O ........................................................................................... 357
11.6 Fieldbus Master I/O ............................................................................ 357
11.7 Fieldbus Slave I/O .............................................................................. 358
11.7.1. ModBus Slave ...................................................................... 358
11.7.2. Supported Functions ............................................................ 358

Table of Contents
EPSON RC+ 7.0 (Ver.7.4) User's Guide Rev.6 xiii
11.7.3. Address map........................................................................ 359
11.7.4. ModBus RTU ....................................................................... 360
11.7.5. ModBus TCP ....................................................................... 360
11.7.6. How to Configure ModBus .................................................. 360
12. Remote Control 363
12.1 Remote I/O ........................................................................................ 363
12.1.1 Remote Control Input Output Configuration ........................ 364
12.1.2 Control Device Configuration ............................................... 364
12.1.3 Auto Mode with Remote Control .......................................... 365
12.1.4 Teach Mode with Remote Control ........................................ 365
12.1.5 Debugging Remote Control ................................................. 365
12.1.6 Remote Inputs ...................................................................... 366
12.1.7 Remote Outputs ................................................................... 370
12.1.8 Remote Input Handshake Timing ........................................ 373
12.2 Remote Ethernet ............................................................................... 376
12.2.1 Remote Ethernet Configuration ........................................... 376
12.2.2 Control Device Configuration ............................................... 376
12.2.3 Remote Ethernet Control Execution .................................... 377
12.2.4 Debugging Remote Ethernet Control ................................... 377
12.2.5 Remote Ethernet Command ................................................ 378
12.2.6 Monitoring command ........................................................... 381
12.2.7 Response ............................................................................. 382
12.2.8 Response timing of Remote Ethernet control ...................... 384
12.3 Remote RS232 ................................................................................. 384
12.3.1 Remote RS232 setting ......................................................... 384
12.3.2 Control device setting .......................................................... 385
12.3.3 Execution of remote RS232 control ..................................... 385
12.3.4 Debugging remote RS232 control ....................................... 386
12.3.5 Remote RS232 Command ................................................... 386
12.3.6 Monitoring command ........................................................... 392
12.3.7 Response ............................................................................. 392
12.3.8 Response timing of Remote Ethernet control ...................... 395
12.4 User-defined Remote Output I/O ...................................................... 395
12.4.1 What is user-defined remote output I/O? ............................. 395
12.4.2 Output conditions ................................................................. 395
12.4.3 Output ................................................................................... 396
12.4.4 Restrictions .......................................................................... 398
12.4.5 How to set the user-defined output remote I/O.................... 399
12.4.6 Usage example .................................................................... 401
13. RS-232C Communications 403
13.1 RS-232C Software Configuration ..................................................... 403

Table of Contents
xiv EPSON RC+ 7.0 (Ver.7.4) User's Guide Rev.6
13.2 RS-232C Commands ........................................................................ 405
14. TCP/IP Communications 406
14.1 TCP/IP Setup ..................................................................................... 406
14.1.1 Ethernet Hardware ................................................................ 406
14.1.2 IP Addresses ......................................................................... 406
14.1.3 IP Gateway ........................................................................... 407
14.1.4 Testing Windows TCP/IP setup ............................................ 407
14.2 TCP/IP Software Configuration ......................................................... 408
14.3 TCP/IP Commands ............................................................................ 408
15. Security 409
15.1 Overview ............................................................................................ 409
15.2 Security Configuration ....................................................................... 409
15.3 Security Audit Viewer ......................................................................... 413
15.4 SPEL+ Security Command ................................................................ 413
16. Conveyor Tracking 414
16.1 Overview ............................................................................................ 414
16.2 Conveyor Tracking Processes ........................................................... 416
16.3 System Structure ............................................................................... 417
16.4 Hardware Installation ......................................................................... 419
16.5 Wiring example of Vision Conveyor Tracking System....................... 427
16.6 Conveyor Encoder Configuration ..................................................... 428
16.7 Verifying Encoder Operation .............................................................. 429
16.8 Verifying Hardware Conveyor Trigger / Vision Trigger ...................... 430
16.9 Key Terms .......................................................................................... 431
16.10 Conveyor Tracking Commands ....................................................... 432
16.11 Creating Conveyors in a Project ...................................................... 434
16.12 Configuring Conveyors .................................................................... 435
16.13 Vision Conveyors ............................................................................. 437
16.14 Sensor Conveyors ........................................................................... 458
16.15 Pickup Area ...................................................................................... 474
16.16 Adjusting the Z value ....................................................................... 482
16.17 Queue Sorting .................................................................................. 484
16.18 Cnv_QueReject ............................................................................... 485
16.19 Sample Program .............................................................................. 486
16.20 Multiple Conveyors .......................................................................... 492
16.21 Multi-robot Conveyor ....................................................................... 497
16.22 Abort Tracking .................................................................................. 502

Table of Contents
EPSON RC+ 7.0 (Ver.7.4) User's Guide Rev.6 xv
16.23 Conveyor Tracking with 6-Axis Robot ............................................. 502
16.24 Tracking Mode ................................................................................ 502
16.25 How to shorten the picking cycle time ............................................ 503
16.26 Manipulator Posture ........................................................................ 503
16.27 Tracking Abort Line ......................................................................... 504
16.28 Tips for Accuracy Improvement of Conveyor Tracking ................... 509
16.28.1 Overview ............................................................................ 509
16.28.2 Tips for System Construction ............................................. 509
16.28.3 Tips for Vision Calibration ................................................... 511
16.28.4 Tips for Conveyor Calibration ............................................ 512
16.28.5 Troubleshooting for Work Piece Detection ........................ 513
16.28.6 Offset .................................................................................. 516
17. ECP Motion 518
17.1 Overview ........................................................................................... 518
18. Force Sensing 520
18.1 Overview ........................................................................................... 520
18.2 Specifications .................................................................................... 520
18.3 Installation ......................................................................................... 521
18.4 Force Sensing Commands ............................................................... 526
18.5 Using the Force Sensing Trigger ...................................................... 527
19. Distance Tracking Function 528
19.1 Overview ........................................................................................... 528
19.1.1 Distance Tracking Accuracy ................................................. 528
19.2 Connection Example ......................................................................... 530
19.2.1 Basic Connection Example .................................................. 530
19.2.2 Connection Example for Dispense Application .................... 530
19.3 Commands ........................................................................................ 531
19.4 Steps to adjust parameters ............................................................... 531
19.4.1 Check Motions of Analog I/O Board ..................................... 533
19.4.2 Teaching a Robot ................................................................. 533
19.4.3 Create a Motion Program ..................................................... 534
19.4.4 Add a Program for Distance Sensor Logging ...................... 535
19.4.5 ProportionalGain Setting ...................................................... 537
19.4.6 IntegralGain Setting ............................................................. 539
19.4.7 DifferentialGain Setting ........................................................ 540
19.5 Example of Dispense Application ..................................................... 541
19.5.1 Basic Example ..................................................................... 541
19.5.2 Example with Application Amount Control ........................... 542

Table of Contents
xvi EPSON RC+ 7.0 (Ver.7.4) User's Guide Rev.6
20. Real-Time I/O 543
20.1 Overview ............................................................................................ 543
20.2 Specifications ..................................................................................... 543
20.3 Usage ................................................................................................. 545
21. Additional Axis 548
21.1 Overview ............................................................................................ 548
21.2 Specifications ..................................................................................... 548
21.3 Usage ................................................................................................. 550
22. Calibration of Commercial Vision Sensor and Robot 552
22.1 Overview ............................................................................................ 552
22.2 Specifications ..................................................................................... 553
22.3 Camera Installation ............................................................................ 554
22.4 Reference Points ............................................................................... 555
22.5 Reference Points for Mobile Camera ................................................ 555
22.6 Reference Points for Fixed Camera .................................................. 555
22.7 Command List .................................................................................... 556
23. Installing Controller Options 557
24. Software License Agreement 558
Appendix A: Automatic Processing of Project Import A-1
Project Import for EPSON RC+ 6.* ............................................................. A-1
Project Import for EPSON RC+ 5.* ............................................................. A-1
Project Import for EPSON RC+ 3.* / 4.* ..................................................... A-1
Project Import for SPEL for Windows 2.* .................................................... A-3
Appendix B: EPSON RC+ 7.0 Software B-1
Before Installing EPSON RC+ 7.0 Software .............................................. B-1
When the computer can be connected to the Internet ............................... B-1
When the computer cannot be connected to the Internet .......................... B-2
EPSON RC+ 7.0 Software Installation ....................................................... B-3
To install the service pack ........................................................................... B-5
After Installing EPSON RC+ 7.0 Software ................................................. B-5
EPSON RC+ 7.0 Software Update ............................................................. B-5

Table of Contents
EPSON RC+ 7.0 (Ver.7.4) User's Guide Rev.6 xvii
Appendix C: Simulator Functions List of Unsupported Manipulator
Models C-1
X5 series Manipulators ............................................................................... C-1
G6 series Manipulators ............................................................................... C-1
G10 series Manipulators ............................................................................. C-2
G20 series Manipulators ............................................................................. C-2

Table of Contents
xviii EPSON RC+ 7.0 (Ver.7.4) User's Guide Rev.6

1. Introduction
EPSON RC+ 7.0 (Ver.7.4) User's Guide Rev.6 1
1. Introduction
1.1 Welcome to EPSON RC+ 7.0
Welcome to the EPSON RC+ 7.0 Project Management and Development Environment.
EPSON RC+ 7.0 is used to develop application software for the Robot Controller.
EPSON RC+ 7.0 features
Operable on Windows
Integrated application development environment
Communicates with the Controller by USB or Ethernet
Allows you to connect one computer with multiple Controllers
Multi simultaneous session
SPEL+ programming language
A powerful, easy to use BASIC-like programming language that supports multi-
tasking, robot motion control, I/O control, and networking.
I/O systems including Digital I/O boards and Fieldbus I/O
TCP/IP and RS-232 communications
Background task
Controls entire system
Database access
Vision Guide option
Integrated vision robot guidance
RC+ API option
Enables you to control the system using standard Microsoft .NET programming
environments including Microsoft Visual Basic and Microsoft Visual C++.
Security option
Allows you to administrate all EPSON RC+ users on your system. It also includes
usage auditing, so you can track how many hours are spent using the system, and if
changes were made.
Conveyor Tracking option
Enables one or more robots to pick parts from moving conveyors using vision or
sensors.
PG Motion System option
Allows you to use third party motors and drivers to control auxiliary equipment such
as XY tables, slides, etc.
ECP option
Supports CP motion relative to a fixed point.
GUI Builder option
Integrated GUI development tool
Force Guide option
Allows a robot to use torque/force sensing and measurement
Force Control
Force is controlled or measured by force sensor.

1. Introduction
2 EPSON RC+ 7.0 (Ver.7.4) User's Guide Rev.6
1.2 System Overview
EPSON RC+ 7.0 software, which is installed to the computer connected to the robot
controller, contains several components that enable you to control an entire robotic work
cell. EPSON RC+ 7.0 communicates with the controller using USB or Ethernet.
EPSON RC+ 7.0 and the Controller can be used in following environments:
Slave system
The Controller is PLC or PC cell slave.
Application is developed with EPSON RC+ 7.0.
After saving the object code to the Controller, it does not need
to be connected to the computer.
The Controller is controlled by I/O or fieldbus.
Standalone system
Controls the robot and peripheral equipment as the robot
controller.
EPSON RC+ 7.0 displays the simple operator window in
AUTO mode.
By using RC+ API option, .NET application can be controlled.
Offline development
system
Program edition and project build can be checked on the offline
PC.
Simulation system
EPSON RC+ 7.0 on the PC which is connected to the
Controller can execute the program without the actual I/O or
robot by using the virtual I/O and dry run.
1.2.1 Controller
RC700
The RC700 Controller is a powerful robotic work cell controller that controls our SCARA
robots and 6-axis robots.
Controller features
Sophisticated yet achieving reliability and stability
Built in Motion System
The motion drive system can control up to 6 axes simultaneously and 1 robot,
and can add up to three drive units
Includes standard I/O
Wide variety of options
For detailed information on the Controller, refer to the controller manual.

1. Introduction
EPSON RC+ 7.0 (Ver.7.4) User's Guide Rev.6 3
RC90
The RC90 Controller with the following label attached can be used in combination with
EPSON RC+ 7.0.
EPSON RC+ 7.0
RC90 Controller firmware
Ver.7.0.2.0
Before Ver.7.0.1 !!!
Ver.7.0.2 or later OK
OK : Compatible
All functions of the EPSON RC+ 7.0 and the Controller are available.
!!! : Compatible
Connection is OK. We recommend using EPSON RC+7.0 Ver. 7.0.2 or later.
This option is not available for Robot Controller RC90 (EPSON RC+ 5.0) without the
label.
Manual PDF for this robot system is available from EPSON RC+ 7.0 Ver. 7.0.2
The RC90 Controller is a robot controller that can drive LS series manipulators.
Features:
Built in motion drive system. The motion drive system can control one robot.
Standard I/O
Optional digital I/O expansion boards
Optional Fieldbus slave support for DeviceNet, PROFIBUS-DP, CC-Link Ethernet/IP,
PROFINET, and EtherCat.
RS232 ports (standard + optional)
For details on the Controller, refer to the RC90 controller manual.
NOTE

1. Introduction
4 EPSON RC+ 7.0 (Ver.7.4) User's Guide Rev.6
RC90-B
EPSON RC+ 7.0
RC90-B controller firmware
Ver.7.4.2.0 or later
Before Ver.7.4.1
!!!
Ver.7.4.2 or later
OK
OK : Compatible
All functions of the EPSON RC+ 7.0 and the Controller are available.
!!! : Compatible
Connection is OK. We recommend using EPSON RC+7.0 Ver. 7.4.2 or later.
There is no label on RC90-B
The RC90-B Controller is a robot controller that can drive LS-B series manipulators.
Features:
Built in motion drive system. The motion drive system can control one robot.
Standard I/O
Optional digital I/O expansion boards
Optional Fieldbus slave support for DeviceNet, PROFIBUS-DP, CC-Link Ethernet/IP,
PROFINET, and EtherCat.
RS232 ports (standard + optional)
For details on the Controller, refer to the RC90 controller manual.
T series Manipulator
The T series Manipulators are Controller integrated SCARA robot.
For more details on Controller part, refer to T series Manipulator manual.
VT series Manipulator
The VT series Manipulators are Controller integrated 6-axis robot.
For more details on Controller part, refer to VT series Manipulator manual.
1.2.2 Software
EPSON RC+ 7.0 needs to be installed to your development PC. To communicate with the
Controller, the computer should support USB 1.1 / 2.0 or Ethernet communication.
You can purchase options with the product or add them later.
Using EPSON RC+ 7.0, you can develop application software for the SPEL+ language
that runs in the RC700 controller.
1.2.3 Simulator
Simulator functions enable easy robot motion check on your PC, which gives you
flexibility to consider the system layout, measure the operation time, and create the robot
programs.
They are useful in all the way from introduction stage of robot automation to launch of
robot system.
Simulator is supported by EPSON RC+ 7.0 Ver.7.0.0 or later as standard.
For details, refer to 8. Simulator.
NOTE
1. Introduction
EPSON RC+ 7.0 (Ver.7.4) User's Guide Rev.6 5
1.2.4 System Block Diagram
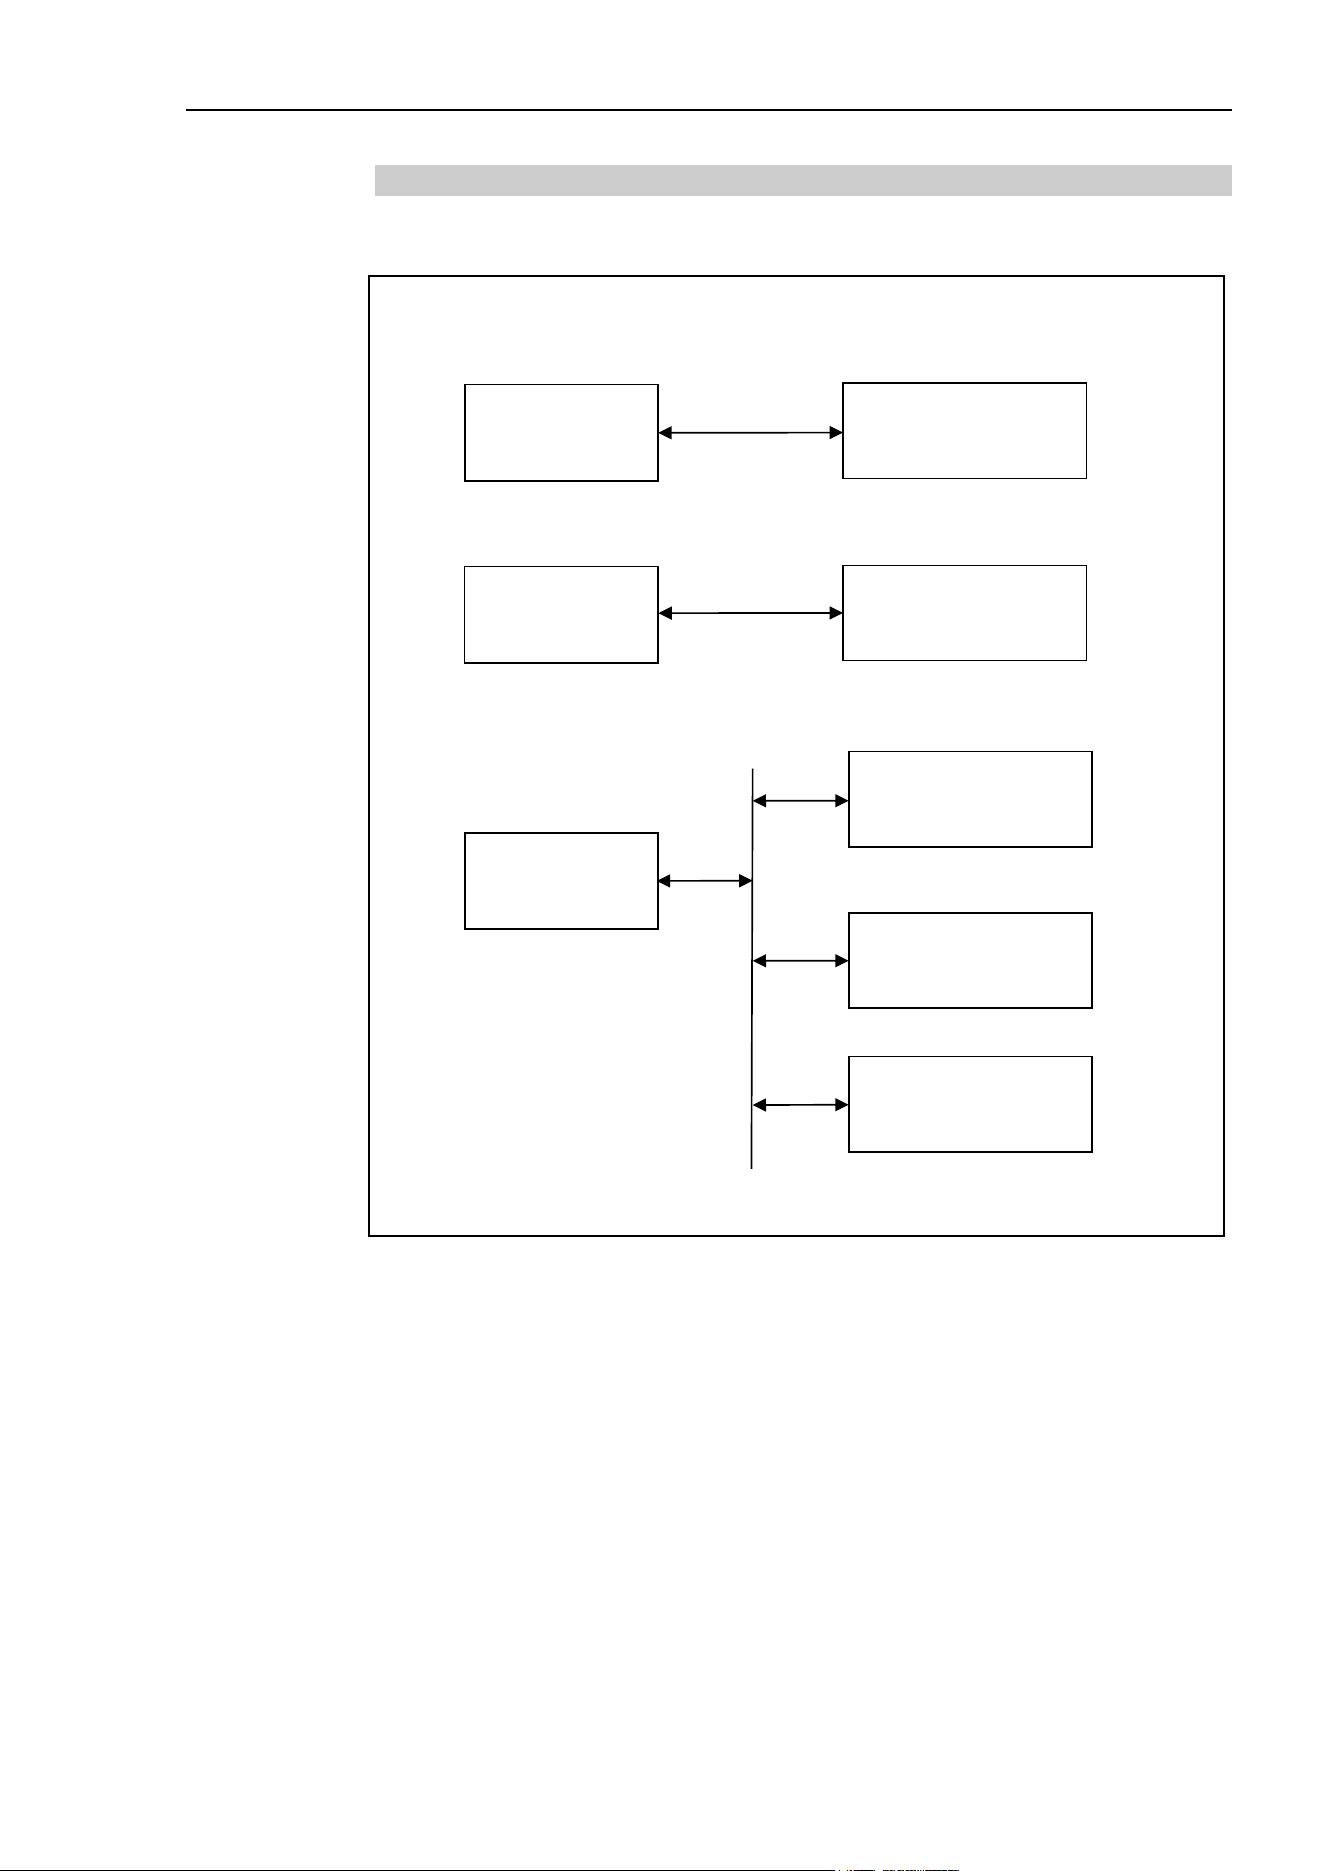
The following system block diagram shows methods for connecting a PC running EPSON
RC+ 7.0 to one or more controllers.
Ethernet
PC
Robot Controller
USB
PC
Robot Controller
System 1: Connects the PC with one Controller using USB 1.1 or USB 2.0
System 2: Connects the PC with one Controller using Ethernet
PC
Robot Controller 1
System 3: Connects the PC with multiple Controllers using Ethernet
Robot Controller 2
Robot Controller 3
Ethernet

1. Introduction
6 EPSON RC+ 7.0 (Ver.7.4) User's Guide Rev.6
1.3 Options
EPSON RC+ 7.0 enables the purchased Controller options.
Refer to 22. Installing Controller Options for details.
1.4 Precautions When Using Windows 7
Connecting development PC to Robot Controller using Ethernet
The robot controller does not support internet protocol version 6 (TCP/IPv6). When
connecting the development PC to the robot controller using the Ethernet, be sure to use
the internet protocol version 4 (TCP/IPv4).
1.5 EPSON RC+ 5.x and 6.x Users
EPSON RC+ 7.0 is compatible with EPSON RC+ 5.x and 6.x for the operation and
language.
For EPSON RC+ 7.0, you can use all commands of EPSON RC+ 5.x and 6.x.
You can use the current numbers for the I/O and communication port.
To enable the EPSON RC+ 5.x and 6.x project in EPSON RC+ 7.0 environment, convert
the project using [Project] menu-[Import].
With above conversion, the entire project will be copied by EPSON RC+ 7.0.
\EPSONRC50\Project directory → \EpsonRC70\Project directory
\EPSONRC60\Project directory → \EpsonRC70\Project directory
1.6 EPSON RC+ 3.x and 4.x Users
EPSON RC+ 7.0 is compatible with EPSON RC+ 3.x and 4.x for the operation.
For EPSON RC+ 7.0, there are new commands added to SPEL
+
language. Though there
are also some commands deleted or amended, most commands are available.
To enable the project of EPSON RC+ 3.x or 4.x in EPSON RC+ 7.0 environment, convert
the project using [Project] menu-[Import].
With above conversion, the entire project will be copied by EPSON RC+ 7.0.
\EPSONRC\Project directory → \EpsonRC70\Project directory
Refer to Appendix A: Automatic Processing of Project Import for the details.
1.7 SPEL for Windows Users
EPSON RC+ 7.0 is compatible with SPEL for Windows 1.x and 2.x for the operation.
For EPSON RC+ 7.0, there are many new commands added to SPEL
+
language, which
replaces SPEL. Also there are some commands deleted or amended.
To enable the project of SPEL for Windows 2.x in EPSON RC+ 7.0 environment, convert
the project using [Project] menu-[Import].
With above conversion, the file will be copied to a new directory or the program will
optionally be converted by EPSON RC+ 7.0.
Refer to Appendix A: Automatic Processing of Project Import for the details.

1. Introduction
EPSON RC+ 7.0 (Ver.7.4) User's Guide Rev.6 7
1.8 Manuals
All documentation is installed on the PC in PDF format.
To view manuals on the PC:
Select [Manuals] from the [Help] menu in EPSON RC+ 7.0
From Windows desktop, click <Start>-[Programs]-[EPSON RC+ 7.0]
Available manuals are shown in the table below.
Title
Contents
EPSON RC+ 7.0 Users Guide
Information for the entire system
SPEL
+
Language Reference
Information for the SPEL+ Language
Vision Guide 7.0 Hardware
Information for options
Vision Guide 7.0 Software
Vision Guide 7.0 Reference
Force Guide 7.0
Force Guide 7.0 Reference
RC+ API 7.0
GUI Builder 7.0
Fieldbus IO
PG Motion System
TP1
TP2
TP3
Remote Control Reference
Information for Remote I/O control extended
function
Manipulator manual
Information for the purchased robot
Each series has its own manual
Controller manual
Information for the purchased robot
Safety & Installation
Information for installing the robot system safely
Paper manual will come with the product
The “NOTE” sections describe important information to be
followed for operating the Robot system.
The “TIP” sections describe hints for easier or alternative
operations.
NOTE
TIP
2. Safety
8 EPSON RC+ 7.0 (Ver.7.4) User's Guide Rev.6
2. Safety
2.1 Overview
This chapter describes the important safety requirements for robotic systems using EPSON
RC+ 7.0 and the Controller.
Installation of robots and robotic equipment should only be performed by qualified
personnel in accordance with national and local codes. Please read and understand this
entire chapter before using your EPSON RC+ 7.0 system.
Safety is the most important consideration when designing and operating any robotic
system.
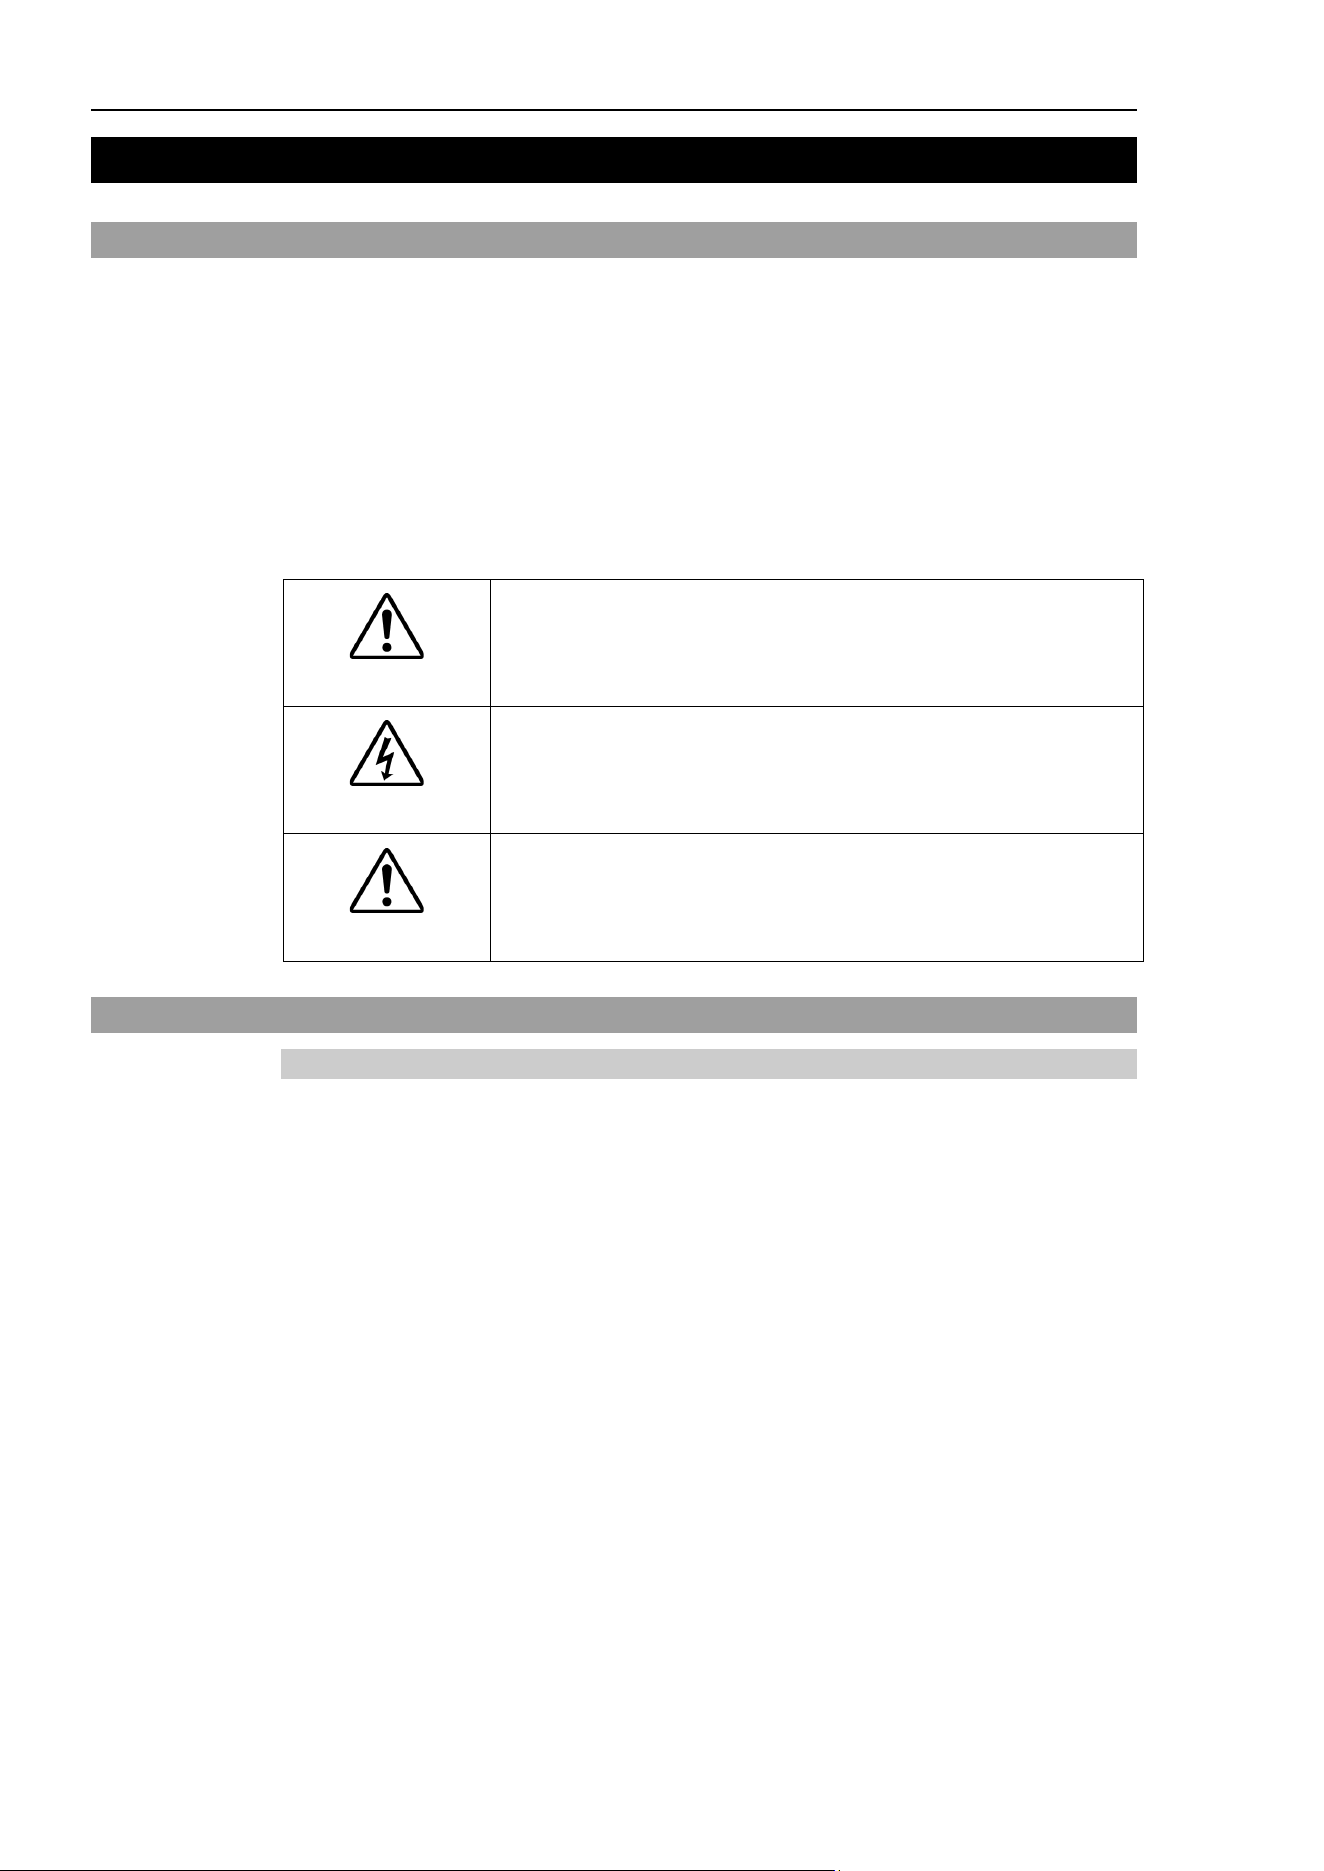
In this manual, important matters are shown with the symbols below.
Each symbol has following meanings.
WARNING
This symbol indicates that a danger of possible serious injury or
death exists if the associated instructions are not followed
properly.
WARNING
This symbol indicates that a danger of possible harm to people
caused by electric shock exists if the associated instructions are
not followed properly.
CAUTION
This symbol indicates that a danger of possible harm to people or
physical damage to equipment and facilities exists if the
associated instructions are not followed properly.
2.2 Definitions
2.2.1 Robot Power
The status of robot power is explained below in terms of restriction to operation:
Operation-prohibited status: Robot cannot be operated.
Restricted (low power) status: Robot can operate at low speed and low torque.
Unrestricted (high power) status: Robot can operate without restriction.
The robot will not operate regardless of the control actions taken by the operator when in
the operation-prohibited state. During operation, when the safeguard circuit opens, the
system will switch to operation-prohibited state.
The robot will operate at low speed and torque in the restricted state (low power). In the
unrestricted state (high power), the robot will operate at the programmed speed and torque.
In the event that the robot should make an unexpected movement, the restricted state (low
power) decreases operating speed allowing the operator to avoid danger. The torque is
also decreased to minimize serious injury to the operator should one be struck by the robot.
The maximum values of the decreased speed and torque are set according to the robot used
and cannot be changed by the user.
As a safety precaution the initial power state of the robot will be set to either the restricted
(low power) state or the operation-prohibited state. The system will not change to the
unrestricted (high power) state if the appropriate procedures are not followed.
When the system is in restricted (low power) state or operation-prohibited state, a single
failure will not cause a runaway action that surpasses the assigned speed or torque
decrease. This is due to the multi-protect circuit and mutual monitoring circuit in the
control system.

2. Safety
EPSON RC+ 7.0 (Ver.7.4) User's Guide Rev.6 9
2.2.2 Safeguard
To ensure safe operation, install a safety system using safety doors, light curtains, safety
floor mats, etc.
WARNING
■
The EMERGENCY connector on the controller has a safeguard input
circuit to connect
the safety device interlock switch. To protect operators working near the robot, be sure to
connect the interlock switch and make sure that it works properly.
Safeguard open:
:
The safeguard input is turned OFF, and the interlock
function
operates.
Safeguard closed:
:
The safeguard input is turned ON.
If a closed safeguard is open during robot motion, the safeguard interlock function
operates. The robot stops immediately and enters into pause state. Then, all robot motors
are turned OFF. The descriptions below explain how the safeguard input works.
Safeguard open:
: The robot stops immediately, motors are turned OFF, and further
operation is impossible until either the safeguard is closed or Teach
or TEST mode is turned ON and the enable circuit is engaged.
Safeguard closed:
:
The r
obot can automatically operate in unrestricted (high power)
state.
For further details on the safeguard and interlock, refer to 2.4 Installation and Design
Precautions later in this chapter. For detailed wiring instructions, refer to the Robot
Controller manual, Setup & Operation: 9. EMERGENCY.
2.2.3 Operation Modes
The operation mode is defined as the single control point for the controller, therefore you
cannot use more than one operation mode at the same time.
There are four operation modes for the controller: AUTO, PROGRAM, TEACH, and
TEST.
AUTO operation modes allow you to execute programs in the controller when the
safeguard is closed.
PROGRAM operation mode allows you to execute and debug programs when the
safeguard is closed.
TEACH operation mode allows you to jog and teach the robot at slow speed while
inside the safeguarded area.
TEST operation mode allows you to execute a program at slow speed while the
safeguard is opened.
2.2.4 Start Mode
The Start mode specifies the operation mode for EPSON RC+ 7.0 when it starts.
You can set the EPSON RC+ 7.0 to start in AUTO or PROGRAM mode.
For information on how to change the start mode, refer to 4. Operation.
2. Safety
10 EPSON RC+ 7.0 (Ver.7.4) User's Guide Rev.6
2.2.5 Changing Operation Mode
You can change from AUTO operation mode or PROGRAM operation mode to TEACH
mode by setting the mode selector key switch on the Teach Pendant to the TEACH
position.
TP1, TP2: Teach
TP3: TEACH/T1, TEACH/T2
When the mode selector key switch is changed back to Auto (TP1, TP2) or AUTO (TP3),
the operation mode is returned to previous operation mode (AUTO or PROGRAM).
The AUTO operation mode can be changed to PROGRAM mode during the EPSON RC+
7.0 startup sequence. A password can be used to allow only certain personnel to change
the startup operation mode.
When EPSON RC+ 7.0 starts in AUTO operation mode, the AUTO operation mode
cannot be changed to PROGRAM operation mode after the system has started. To change
the operation mode, restart the system and log into PROGRAM mode, then set the start
mode again and restart EPSON RC+ 7.0.
For more information, refer to 4. Operation.
To change to TEST operation mode:
TP1: Switch the mode selector key switch on the Teach Pendant to Teach, and then
select Function key F1: Test Mode.
TP3: Switch the mode selector key switch on the Teach Pendant to TEACH/T1 or
TEACH/T2, and then tap the [Test] tab.
For more information, refer to the following manuals.
Robot Controller option Teach Pendant TP1 or TP3 manual, 4. Operation Mode
(TEACH/AUTO/TEST).
Robot Controller option Teach Pendant TP2 manual, 4. Operation Mode (TEACH/AUTO).
T2 mode cannot be used on RC700-A for complying with the UL standard.
2.2.6 Emergency Stop
The controller is equipped with an emergency stop input terminal. If the normally closed
emergency stop circuit is broken, the power supplied to all motors will be shut off (and
enter servo-free status) and the robot will be stopped by dynamic braking.
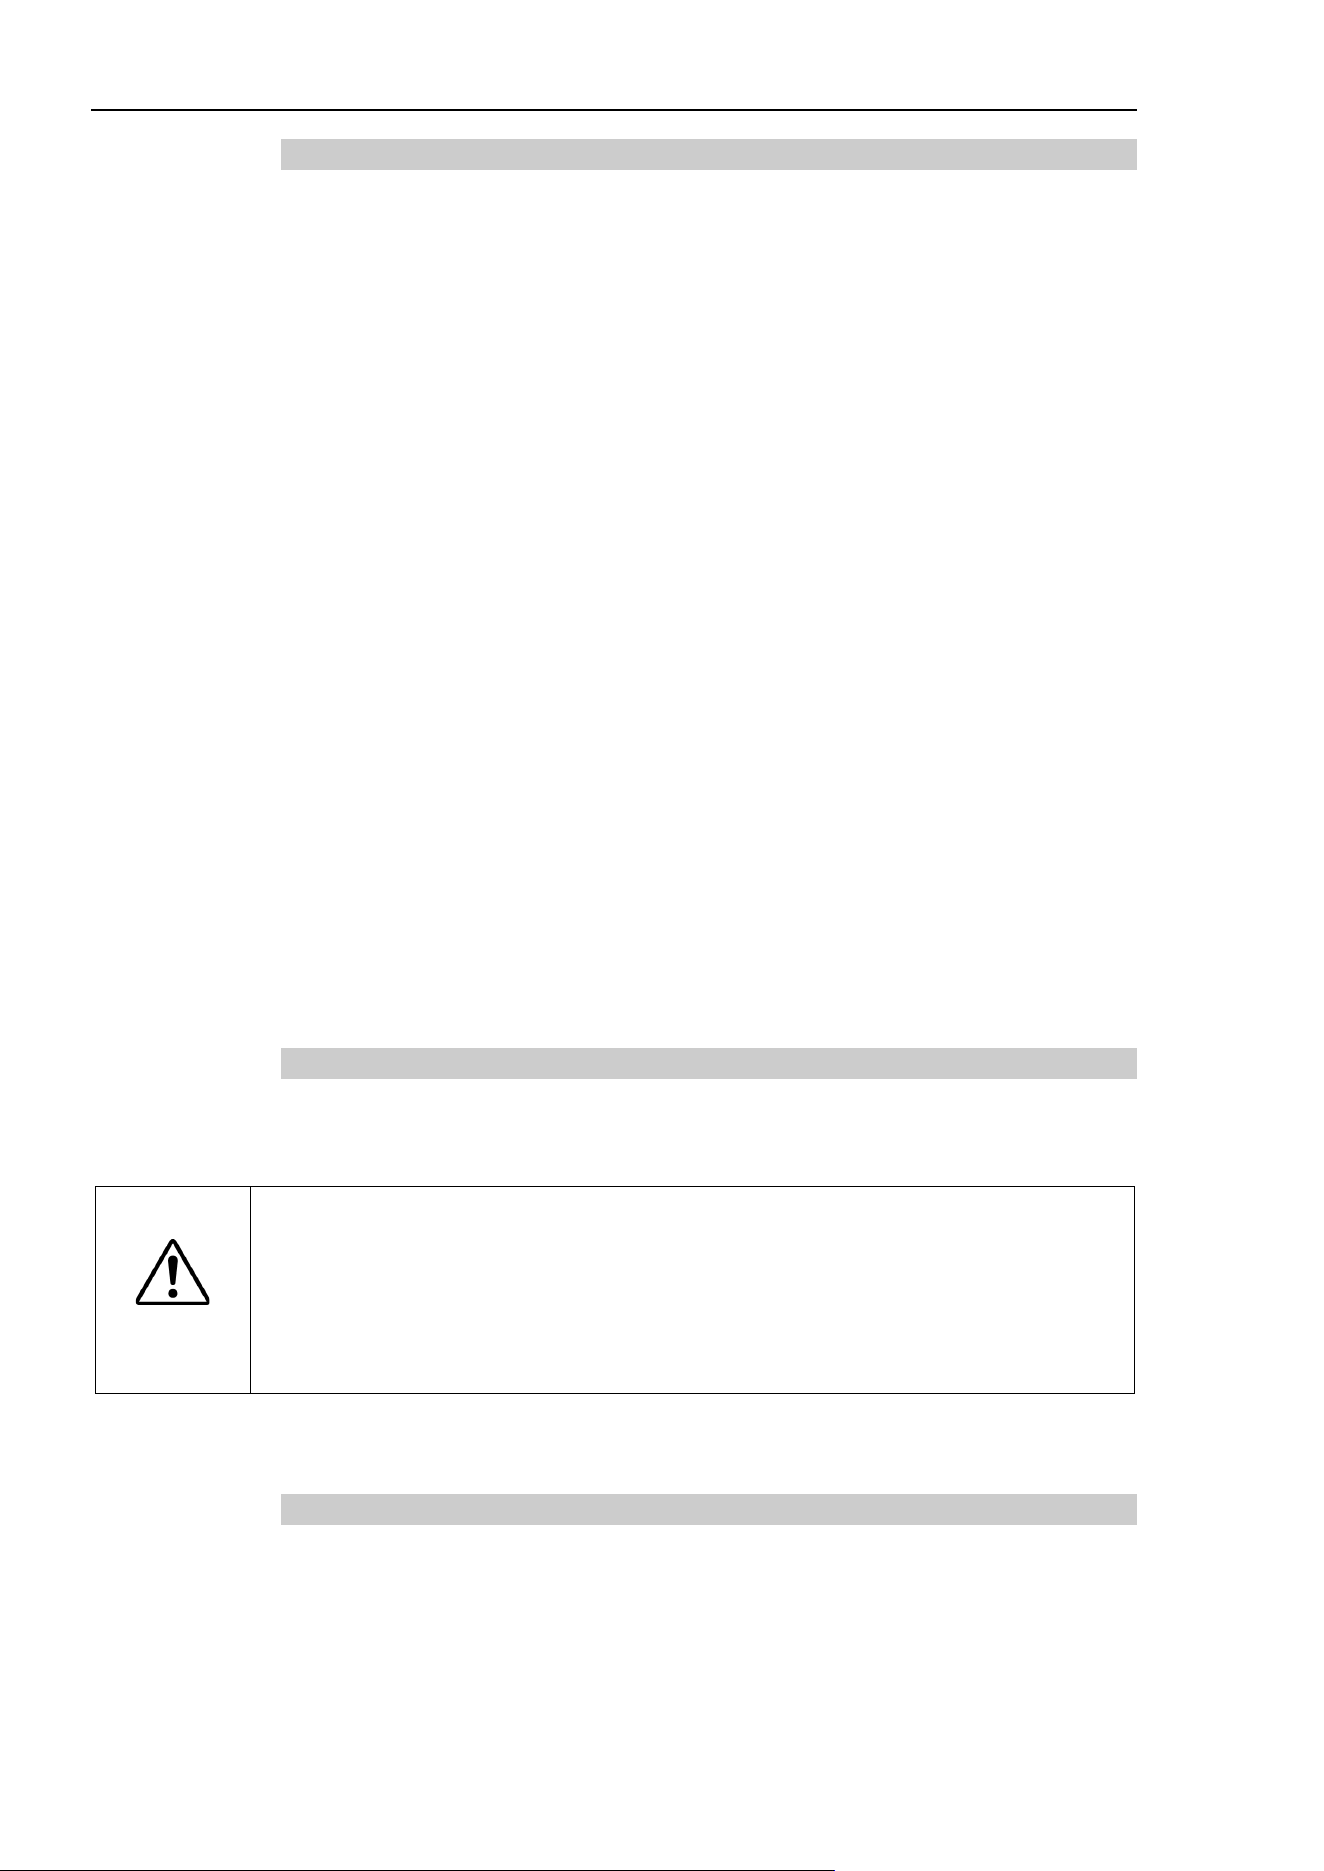
CAUTION
■
The path that the robot will follow from the time the emergency stop switch is pressed
until the device stops, as well as the stop position itself, cannot be positively determined.
In many cases, the stop position will not
exceed the target position for the operation prior
the emergency stop. Depending on the robot
’s loading condition and operation speed,
overruns are inevitable. Taking this into consideration, be sure the layout for the
peripheral equipment includes extra
space.
For detailed wiring instructions, refer to the Robot Controller manual, Setup & Operation:
9. EMERGENCY.
2.2.7 Teach Pendant
Operators can use the teach pendant to operate the robot in the TEACH or TEST operation
mode.
For operation instructions, refer to the following manuals.
Robot Controller option Teach Pendant TP1, TP2, or TP3 manual.
NOTE

2. Safety
EPSON RC+ 7.0 (Ver.7.4) User's Guide Rev.6 11
2.3 Safety-related Requirements
Specific tolerances and operating conditions for safety are contained in the manuals for the
robot, controller and other devices. Be sure to read those manuals as well.
For the installation and operation of the robot system, be sure to comply with the
applicable local and national regulations.
Robot systems safety standards and other examples are given in this chapter. Therefore, to
ensure that safety measures are complete, please refer to the other standards listed as well.
(Note: The following is only a partial list of the necessary safety standards.)
EN ISO 10218-1
Robots and robotic devices -- Safety requirements for industrial
robots
-- Part 1: Robots
EN ISO 10218-2
Robots and robotic devices -- Safety requirements for industrial
robots
-- Part 2: Robot systems and integration
ANSI/RIA R15.06
American National Standard for Industrial Robots and Robot
Systems
-- Safety Requirements
EN ISO 12100
Safety of machinery -- General principles for design -- Risk
assessment and risk reduction
EN ISO 13849-1
Safety of machinery -- Safety-related parts of control systems -- Part
1: General principles for design
EN ISO 13850
Safety of machinery -- Emergency stop function-- Principles for
design
EN ISO 13855
Safety of machinery -- Positioning of safeguards with respect to the
approach speeds of parts of the human body.
EN ISO 13857
Safety of machinery -- Safety distances to prevent hazard zones
being reached by upper and lower limbs
.
EN ISO 14120
Safety of machinery -- Guards -- General requirements for the design
and construction of fixed and movable guards
IEC 60204-1
EN 60204
-1
Safety of machinery -- Electrical equipment of machines -- Part 1:
General requirements
CISPR11
EN
55011
Industrial, scientific and medical (ISM) radio-frequency equipment -
-
Electromagnetic disturbance characteristics --
Limits and methods
of measurement
IEC 61000-6-2
EN 61000
-6-2
Electromagnetic compatibility (EMC) -- Part 6-2: Generic standards
-
- Immunity for industrial environments

2. Safety
12 EPSON RC+ 7.0 (Ver.7.4) User's Guide Rev.6
2.4 Installation and Design Precautions
2.4.1 Designing a Safe Robot System
It is important to operate robots safely. It is also important for robot users to give careful
consideration to the safety of the overall robot system design.
This section summarizes the minimum conditions that should be observed when using
EPSON robots in your robot systems.
Please design and manufacture robot systems in accordance with the principles described
in this and the following sections.
Environmental Conditions
Carefully observe the conditions for installing robots and robot systems that are listed in
the “Environmental Conditions” tables included in the manuals for all equipment used in
the system.
System Layout
When designing the layout for a robot system, carefully consider the possibility of error
between robots and peripheral equipment. Emergency stops require particular attention,
since a robot will stop after following a path that is different from its normal movement
path. The layout design should provide enough margins for safety. Refer to the manuals
for each robot, and ensure that the layout secures ample space for maintenance and
inspection work.
When designing a robot system to restrict the area of motion of the robots, do so in
accordance with the methods described in each manipulator manual. Utilize both software
and mechanical stops as measures to restrict motion.
Install the emergency stop switch at a location near the operation unit for the robot system
where the operator can easily press and hold it in an emergency.
Do not install the controller at a location where water or other liquids can leak inside the
controller. In addition, never use liquids to clean the controller.
Disabling Power to the System using lock out / tag out
The power connection for the robot controller should be such that it can be locked and
tagged in the off position to prevent anyone from turning on power while someone else is
in the safeguarded area. For further details, refer to the section Procedure of
Lockout/Tagout in the chapter Safety Precautions in the controller manual.
End Effector Design
Provide wiring and piping that will prevent the robot end effector from releasing the object
held (the work piece) when the robot system power is shut off.
Design the robot end effector such that its weight and moment of inertia do not exceed the
allowable limits. Use of values that exceed the allowable limits can subject the robot to
excessive loads. This will not only shorten the service life of the robot but can lead to
unexpectedly dangerous situations due to additional external forces applied to the end
effector and the work piece.
Design the size of the end effector with care, since the robot body and robot end effector
can interfere with each other.

2. Safety
EPSON RC+ 7.0 (Ver.7.4) User's Guide Rev.6 13
Peripheral Equipment Design
When designing equipment that removes and supplies parts and materials to the robot
system, ensure that the design provides the operator with sufficient safety. If there is a
need to remove and supply materials without stopping the robot, install a shuttle device or
take other measures to ensure that the operator does not need to enter a potentially
dangerous zone.
Ensure that an interruption to the power supply (power shutoff) of peripheral equipment
does not lead to a dangerous situation. Take measures that not only prevent a work piece
held from being released as mentioned in “End effector Design” but that also ensure
peripheral equipment other than the robots can stop safely. Verify equipment safety to
ensure that, when the power shuts off, the area is safe.
Remote Control
To prevent operation by remote control from being dangerous, start signals from the
remote controller are allowed only when the control device is set to REMOTE, the
operation mode is set to AUTO or Program, and the system is configured to accept remote
signals. Also when remote is valid, motion command execution and I/O output are
available only from remote. For the safety of the overall system, however, safety
measures are needed to eliminate the risks associated with the start-up and shutdown of
peripheral equipment by remote control.
Emergency Stop
Each robot system needs equipment that will allow the operator to immediately stop the
system’s operation. Install an emergency stop device that utilizes emergency stop input
from the controller and all other equipment.
During an emergency stop, the power that is supplied to the motor driving the robot is shut
off, and the robot is stopped by dynamic braking.
The emergency stop circuit should also remove power from all external components that
must be turned off during an emergency. Do not assume that the robot controller will turn
off all outputs if configured to. For example, if an I/O card is faulty, the controller cannot
turn off a component connected to an output. The emergency stop on the controller is
hardwired to remove motor power from the robot, but not external power supplies.
Do not press the Emergency Stop switch unnecessarily while the Robot is operating.
Pressing the switch during the operation makes the brakes work. This will shorten the life
of the brakes due to the worn friction plates.
Normal brake life cycle: About 2 years (when the brakes are used 100 times/day or
1000 times of emergency stops for H8)
Do not turn OFF the Controller while the Manipulator is operating.
If you attempt to stop the Manipulator in emergency situations such as “Safeguard Open”,
make sure to stop the Manipulator using the Emergency Stop switch of the Controller.
If the Manipulator is stopped by turning OFF the Controller while it is operating,
following problems may occur.
Reduction of the life and damage of the reduction gear unit
Position gap at the joints
In addition, if the Controller was forced to be turned OFF by blackouts and the like while
the Manipulator is operating, make sure to check the following points after power
restoration.
Whether or not the reduction gear is damaged
Whether or not the joints are in their proper positions

2. Safety
14 EPSON RC+ 7.0 (Ver.7.4) User's Guide Rev.6
If there is a position gap, perform calibration by referring to the Maintenance: Calibration
in the Manipulator manual.
Following manuals contain information on the Emergency Stop.
Robot System Safety and Installation (RC700 / RC700-A, EPSON RC+7.0)
Manipulator manual
Please also read the descriptions in the manuals and use the robot system properly.
Before using the Emergency Stop switch, be aware of the followings.
- The Emergency Stop (E-STOP) switch should be used to stop the Robot only in case
of emergencies.
- To stop the Robot operating the program except in emergency, use Pause (halt) or
STOP (program stop) commands, or release the Safeguard system. Pause and STOP
commands do not turn OFF the motors. Therefore, the brake does not function.
Releasing the Safeguard system stops the Robot with a quick pause, and makes the
brakes work. Pushing the Emergency Stop switch (E-STOP) turns OFF the motors
and makes the brakes work. The brakes lock while the Robot is operating.
- For the Safeguard system, do not use the circuit for E-STOP.
For details of the Safeguard system, refer to the following manuals.
Safety and Installation 2.6 Connection to EMERGENCY Connector
To check brake problems, refer to the following manuals.
Manipulator Manual
Maintenance 2.1.2 Inspection Point
- Inspection While the Power is ON (Robot is operating)
Safety and Installation
5.1.1 Manipulator - Inspection While the Power is ON (Robot is operating)
Safeguard System
To ensure safety, a safeguard system should be installed for the robot system.
When installing the safeguard system, strictly observe the following points:
Refer to each manipulator manual, and install the safeguard system outside the maximum
space. Carefully consider the size of the end effector and the work pieces to be held so
that there will be no error between the moving parts and the safeguard system.
Manufacture the safeguard system to withstand calculated external forces (forces that will
be added during operation and forces from the surrounding environment).
When designing the safeguard system, make sure that it is free of sharp corners and
projections, and that the safeguard system itself is not a hazard.
Make sure that the safeguard system can only be removed by using a tool.
There are several types of safeguard devices, including safety doors, safety barriers, light
curtains, safety gates, and safety floor mats. Install the interlocking function in the
safeguard device. The safeguard interlock must be installed so that the safeguard interlock
is forced to work in case of a device failure or other unexpected accident. For example,
when using a door with a switch as the interlock, do not rely on the switch’s own spring
force to open the contact. The contact mechanism must open immediately in case of an
accident.
Connect the interlock switch to the safeguard input of the drive unit’s EMERGENCY
connector. The safeguard input informs the robot controller that an operator may be inside
the safeguard area. When the safeguard input is activated, the robot stops immediately and
enters pause status, as well as either operation-prohibited status or restricted status (low
power status).
Make sure not to enter the safeguarded area except through the point where the safeguard
interlock is installed.
The safeguard interlock must be installed so that it can maintain a safe condition until the
interlock is released on purpose once it initiates. The latch-release input is provided for
the EMERGENCY connector on the Controller to release the latch condition of the

2. Safety
EPSON RC+ 7.0 (Ver.7.4) User's Guide Rev.6 15
safeguard interlock. The latch release switch of the safeguard interlock must be installed
outside of the safeguarded area and wired to the latch-release input.
It is dangerous to allow someone else to release the safeguard interlock by mistake while
the operator is working inside the safeguarded area. To protect the operator working
inside the safeguarded area, take measures to lock out and tag out the latch-release switch.
Presence Sensing Device
The above mentioned safeguard interlock is a type of presence sensing device, since it
indicates the possibility of somebody being inside the safeguard system. When separately
installing a presence sensing device, however, perform a satisfactory risk assessment and
pay thorough attention to its dependability.
Here are precautions that should be noted:
Design the system so that when the presence sensing device is not activated or a
dangerous situation still exists that no personnel can go inside the safeguard area or
place their hands inside it.
Design the presence sensing device so that regardless of the situation the system
operates safely.
If the robot stops operating when the presence sensing device is activated, it is
necessary to ensure that it does not start again until the detected object has been
removed. Make sure that the robot cannot automatically restart.
Resetting the Safeguard
Ensure that the robot system can only be restarted through careful operation from outside
the safeguarded system. The robot will never restart simply by resetting the safeguard
interlock switch. Apply this concept to the interlock gates and presence sensing devices
for the entire system.
Robot Operation Panel
The robot operation panel must not be located inside of the robot work envelope / workcell.
Ensure that the robot system can be operated from outside of the safeguard.
2.4.2 Robot System Installation, Start-up, and Testing
Installation
When installing the robot and robot system, follow the instructions contained in each of
the robot and robot controller manuals.
Start-up and Functional Testing
If the safeguard system is not ready at the time of start-up and functional testing, specify
an area to install the safeguard system (as a temporary measure) and then begin.
During start-up and functional testing, do not allow workers inside the safeguarded area
until the safeguard function is activated.
Before start-up and functional testing, carefully read the related manuals and obtain a good
understanding of safety-related precautions.
Before supplying the robot and robot system with power for the first time, verify the items
listed below.
Items to check before supplying with power
Prescribed bolts are securely tightened to the robot.
Electrical connections are set up correctly, and power supply conditions (including
voltage, frequency, and error level) are within the specified range.
Compressed air source (if applicable) is properly connected.
Peripheral devices are properly connected.
Safety device is equipped with an interlock switch, and it functions properly.
Operating environment conditions conform to the conditions specified in the robot and
controller manuals.

2. Safety
16 EPSON RC+ 7.0 (Ver.7.4) User's Guide Rev.6
Items to check after supplying with power
Start/stop, mode selection, and other functions work properly.
Moving axes operate normally, and that the area of motion is limited as stipulated in
the specifications.
Emergency stop circuit functions correctly.
Power supply can be shut off.
Teach operation mode is functioning properly.
Safety device and interlock switch function correctly.
Other safeguards (if applicable) are installed correctly in their prescribed locations.
Robot operates accurately in restricted status (low power status).
Robot operates properly under rated loads and at maximum speed.
Restarting after a Change
When restarting the robot system after its hardware or software has been corrected or
serviced, strictly observe the following:
Before supplying the system with power, check the locations where the hardware was
modified.
Test the functions of the robot system to make sure that it operates correctly.

2. Safety
EPSON RC+ 7.0 (Ver.7.4) User's Guide Rev.6 17
2.5 Precautions regarding Robot Operation
2.5.1 General Precautions
Before operation, become familiar with the location of all emergency stop switches.
During an emergency, always press the nearest emergency stop switch. There should
never be any emergency stop switches in the system that do not operate.
After an emergency, do not restore the emergency stop circuit until it has been determined
that the entire system is safe to restart.
If your robot is a 6-axis type, record the pulse values of the reference points used for the
calibration. For details, refer to Setup & Operation 3.7 Checking the Basic Orientation in
the Manipulator manual.
2.5.2 Automatic Operation
Ensure that system automatic operation is enabled only while the following requirements
are being met:
Emergency stop switches are installed in the prescribed location and operate correctly.
No personnel are inside the safeguarded area of the system.
Safety procedures that are established separately for the robot system (if applicable) are
being followed.
2.5.3 Teaching Robot Points
If possible, teaching should be performed with no operator inside the safeguarded area.
TEACH mode can be used to allow the robot to be jogged or moved at slow speed when
the safeguard is open. Before the operators go inside the safeguarded area, they must
switch the mode selector key switch of the teach pendant to TEACH mode. Operators
then carry the teach pendant while inside the safeguarded area. As a result, the operation
mode cannot be changed from outside the safeguarded system while operator is inside the
safeguarded area.
AUTO Mode:
With the safeguard circuit open, the robot motors will be turned off and the robot cannot
be jogged under power. However, the robot can be moved by hand to a position with the
safeguard circuit open and the position can then be taught.
TEACH Mode:
The robot can be jogged or moved at slow speed as long as the three position enable (dead
man) switch is engaged.
Please observe the following guidelines for teaching points:
Robot operators must receive training that utilizes the same type of robot. Before
teaching, the operator should be thoroughly familiar with teaching procedures.
Before teaching, remove all errors and malfunctions.
Before the robot operator goes inside the safeguard system, confirm that the robot
motors go off when the safeguard is open and that emergency stop switches are
functioning correctly.
The robot operator should visually check the robot system and safeguard system
interior to ensure that there are no potential hazards.
Design the system in such a way that prevents the overall robot system from being
started up from any location while the operator is inside the safeguarded area.

2. Safety
18 EPSON RC+ 7.0 (Ver.7.4) User's Guide Rev.6
If there is a possibility of a dangerous situation arising from the operation of a device
other than the robot, such as an actuator, take steps to prevent such operation or ensure
that these devices can only be controlled by the teaching operator.
2.5.4 Return to Automatic Operation
If there are safety devices that have been temporarily disabled for system inspection or
other reasons, always return them to their original status before restarting automatic
operation.
2.5.5 Program Verification
If it is necessary to verify a program on the EPSON RC+ 7.0 while the system is in
unrestricted (high power) status, first make sure that no personnel are inside the
safeguarded area.
If it is necessary to verify a program on Teach Pendant TP1, TP3 (TEST operation mode),
follow the rules below.
An operator must receive training about the robot of the same type. Program
verification should be done after the operator has a thorough knowledge about the
operation procedure of TEST operation mode.
Remove all obstacles and failures before the program verification.
An operator should check that the Motor is turned OFF when the safeguard is opened,
and check if the Emergency Stop switch functions properly before entering inside the
safeguard.
An operator should check the possibility of risk by checking the robot system and
inside of the safeguard visually.
If someone is inside the safeguard, do not allow the whole robot system to be
controlled to start operation from outside.
If there is a possibility that operation of equipment other than the robot, such as an
actuator, may cause danger, do not allow the operation of equipment, or allow only the
program verifier to control the equipment.
2.5.6 Troubleshooting
Troubleshoot from outside the safeguard system. If that is not possible, strictly observe
the requirements below.
Operators responsible for troubleshooting should be trained and qualified to perform
such work.
Establish work safety procedures to minimize the danger that operators inside the
safeguard system will be exposed to.
2.5.7 Maintenance
In order to keep the robot and robot system operating safely, maintenance (and inspection)
is important. Adequately trained personnel should perform the procedures required to do
the maintenance work safely. Make sure that maintenance is performed according to the
instructions in the robot and controller manuals (maintenance editions).
2. Safety
EPSON RC+ 7.0 (Ver.7.4) User's Guide Rev.6 19
If maintenance is required inside the safeguarded area, take the following precautions:
Shut off the power supply using lockout / tagout to prevent anyone from turning ON
the robot power supply by mistake. For further details, refer to the section Procedure
of Lockout/Tagout in the chapter Safety Precautions in the controller manual.
If the robot system power supply cannot be shut off, strictly observe the following:
(1) Visually inspect the robot system to ensure that there are no conditions that could lead
to a malfunction.
(2) If it is discovered that the robot system is damaged or malfunctioning, perform the
required repairs and retest it before allowing the operator to go inside the safeguard
system.
Grant full control of the robot and robot system to those performing maintenance
and/or repairs inside the safeguard system.
Ensure that the robot system does not respond to any remote control devices.
Ensure that all emergency stop devices are functioning correctly.
Before starting the robot system in automatic operation, return all temporarily disabled
safety devices to their original enabled status.
Do not use tweezers or other metal tools to aid in battery replacement. This could
cause a battery short. Replace a battery using only the specified type and be careful to
observe the polarity of the battery.
2.5.8 Backup of Projects and Controller
After a project has been created or edited, or after system data including robot parameters
has been edited, the project and controller files should be copied and stored in media other
than the hard disk on the PC (e.g. USB memory key). Keep the backup media in a safe
place in case of damaged data on the hard disk
To backup, select [Controller] from the EPSON RC+ 7.0 [Tools] menu and execute
Backup Controller. Refer to the section 5.11.8 Controller Command.
Backup Controller is a function to backup both the project and the controller.
To backup only the project data, select [Copy] from the [Project] menu. Refer to the
section 5.9.11 Copy Command.
CAUTION
■
If your system cannot be restored
by Restore Controller,
you must restore robot
calibration parameters (Hofs, CalPls
) before operating the robot. If you fail to do so, the
robot
will move to incorrect positions.

2. Safety
20 EPSON RC+ 7.0 (Ver.7.4) User's Guide Rev.6
2.6 End User Instruction Manual
Be sure that the robot system instruction manual supplies a list of all the equipment
included in the system (such as the robots, associated equipment, and safety devices) as
well as a description of how to use each.
Be sure to provide the following in the manual:
An easy to follow explanation of the robot system and how to install it, as well as a
step by step summary of the system installation and external power supply connections.
A description of all hazards and how to avoid them.
A description (including interconnection diagrams) of the safety devices, interacting
functions, and safeguard’s interlocking function against hazardous conditions, in
particular, the safeguard’s interlocking function for devices installed to perform
interactively.
Precise instructions regarding usage of the system.
2.7 End User Training
Be sure those in charge of safety management confirm that the operators who program,
operate, and maintain the robot and robot system obtain proper training and have the
expertise to conduct the work safely.
Training should include at least the following:
Study of regulation safety procedures, and safety-related recommendations by robot
manufacturers and system designers.
Clear explanation of the work involved.
Description of all control equipment required for the work and their functions.
Explanation of potential hazards involved in the work.
Work safety procedures and specific methods of avoiding potential hazards.
Safety device and interlock function testing and confirmation methods are working
properly.

3. Getting Started
EPSON RC+ 7.0 (Ver.7.4) User's Guide Rev.6 21
3. Getting Started
This chapter contains instructions for setting up and using EPSON RC+ 7.0. It is
recommended that first time users first read the preceding Safety chapter, then read
through this chapter to get more familiar with the system.
Contents
Hardware Installation
Software Installation
Windows Security Administration
3.1 Hardware Installation
EPSON RC+ 7.0 is used with the Controller. You need to install the controller and robot
before you can use EPSON RC+ 7.0 to develop and run SPEL+ applications.
You need to prepare the PC which has Windows which can run the EPSON RC+7.0, and
which can connect with the Controller using USB or Ethernet.
The Controller comes pre-configured at the factory. For instructions on installation, refer
to the Robot Controller manual.
3.2 Software Installation
EPSON RC+ 7.0 should be installed to the PC with Windows. For details of adding the
options, version upgrade, and re-installation, refer to Appendix B: EPSON RC+ 7.0
Software.
3.3 Windows Security Administration
Users need Administrator rights to use the EPSON RC+. Other users such as Power User,
Limited User, Guest User cannot use EPSON RC+.
To provide security within the EPSON RC+ environment, a Security software option is
available. This option allows you to manage EPSON RC+ users and audit development
activity. Refer to 15. Security for details.

4. Operation
22 EPSON RC+ 7.0 (Ver.7.4) User's Guide Rev.6
4. Operation
This chapter contains instructions for operation of the EPSON RC+ 7.0 system. The main
topics are:
System Power Up Procedure
Starting EPSON RC+ 7.0
System Shutdown Procedure
Writing your first program
4.1 System Power Up Procedure
Follow this procedure to power up the system:
1. Ensure that all safeguards are in place and that all personnel are clear of the equipment.
2. Apply power to the Controller, monitor, and I/O devices.
3. Start the EPSON RC+ 7.0 software on the PC, if the PC is used in the system.
4.2 Starting EPSON RC+ 7.0
There are three ways to start EPSON RC+ 7.0. You can also configure the mode that
EPSON RC+ 7.0 starts in.
Start Method 1
1. Double click on the EPSON RC+ 7.0 robot icon located on the Windows desktop.
Start Method 2
1. Click the Windows <Start> button.
2. Select the EPSON RC+ 7.0 [Program] group.
3. Select [EPSON RC+ 7.0]-[EPSON RC+ 7.0].
Start Method 3
Configure EPSON RC+ 7.0 to start automatically after Windows starts.
For details, refer to 4.2.7 Auto Start.
When using the RC+ API option, you do not need to start EPSON RC+ 7.0. The library
provided with RC+ API will load EPSON RC+ 7.0 into your .NET application process
automatically.
4.2.1 Startup Sequence
When EPSON RC+ 7.0 starts, it reads initial settings for the current user and local system
from the Windows registry.
The startup sequence depends on the following two factors:
a. Control device
b. Independent mode
When start mode is other than Independent mode
(Any control device)
If there is no project file specified in the startup command line, the last-opened project will
be opened.
If the start mode is Auto, the [Start Mode] dialog will be displayed (see 4.2.4 Start Mode
Dialog).
If the start mode is Program, the EPSON RC+ 7.0 GUI will be displayed.
NOTE
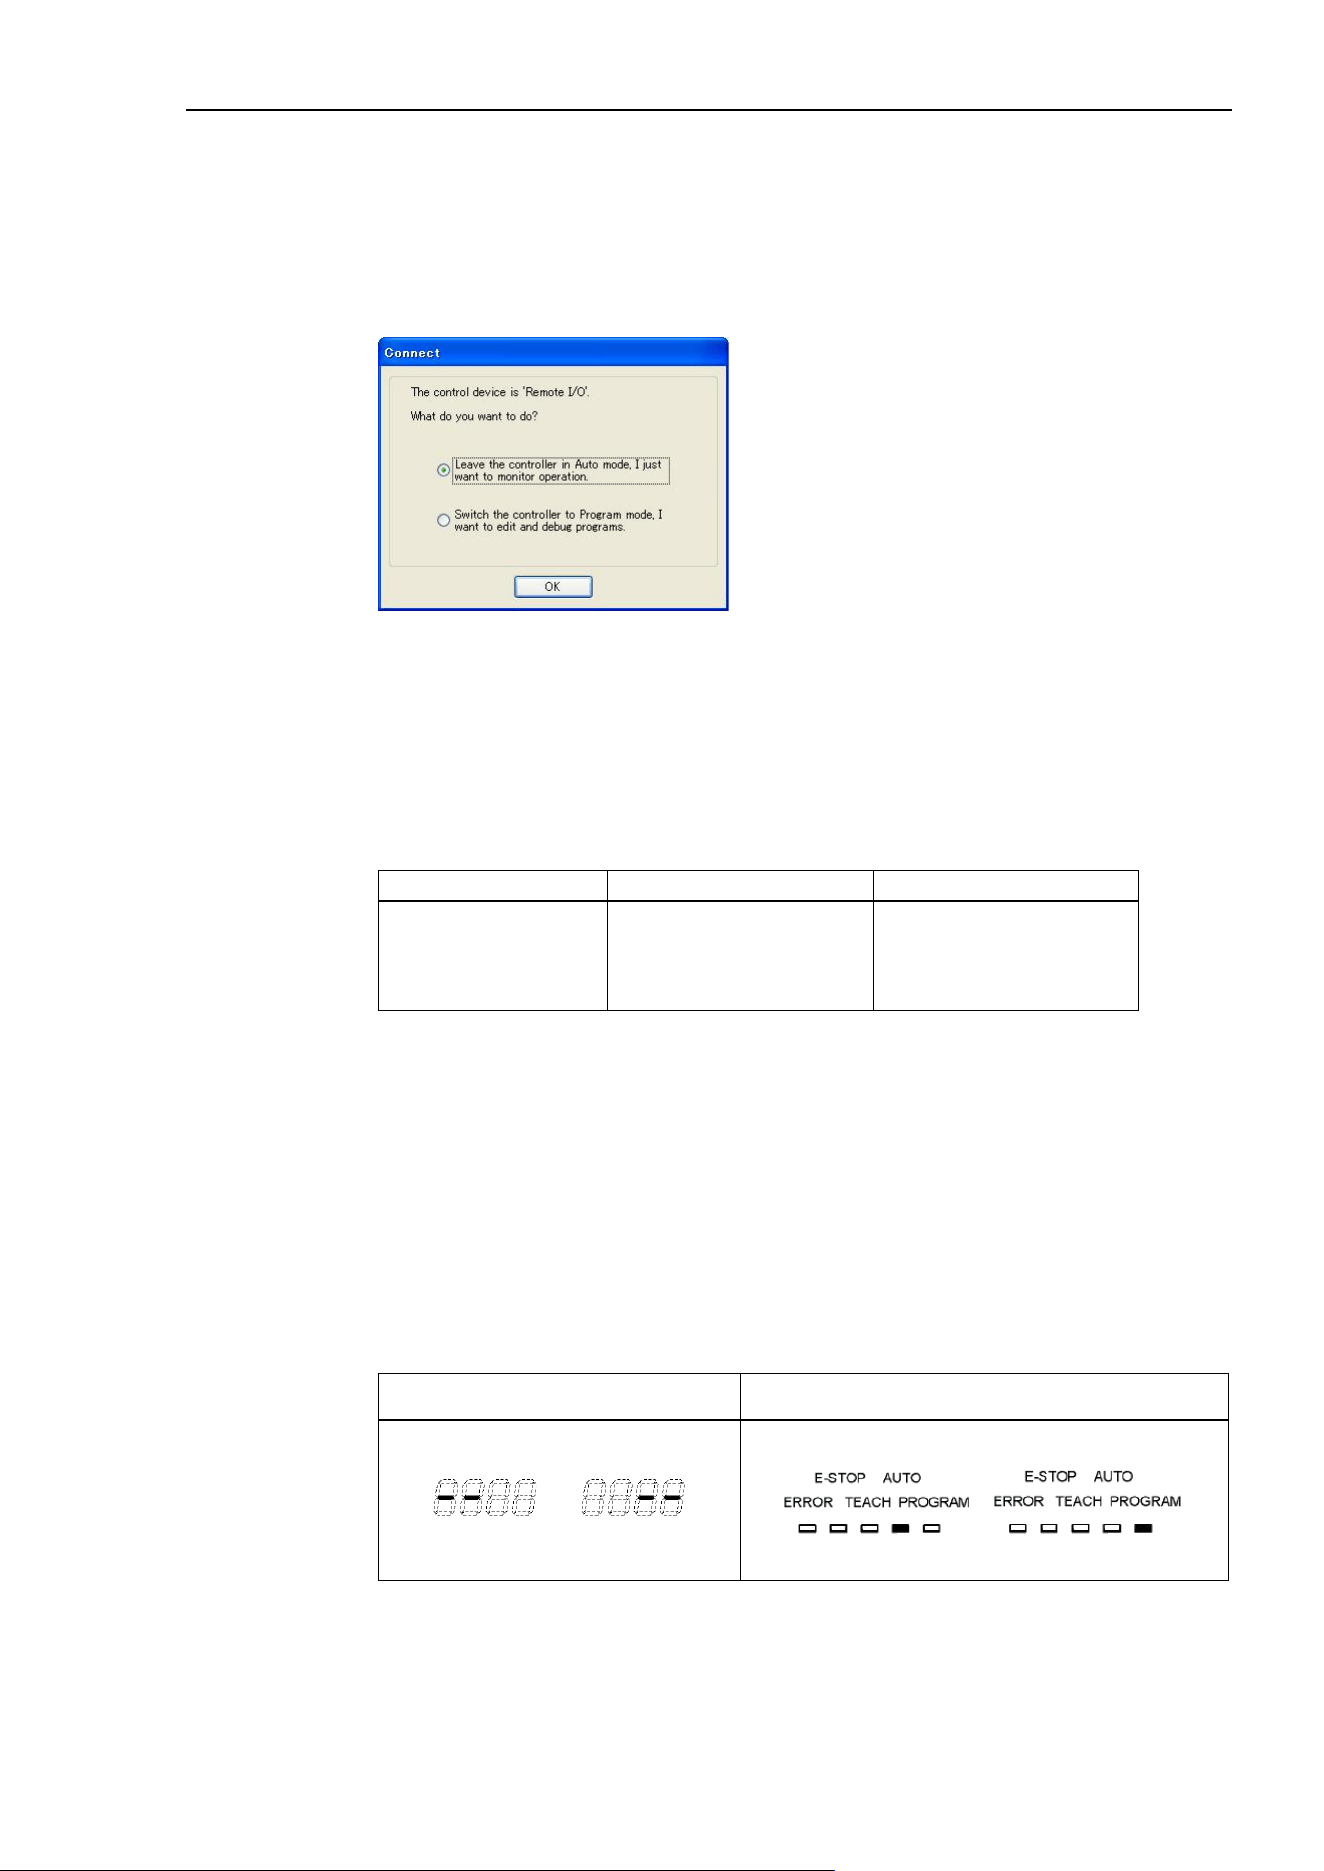
4. Operation
EPSON RC+ 7.0 (Ver.7.4) User's Guide Rev.6 23
When start mode is Independent mode
(Control device : Remote)
If there is no project file specified in the startup command line, the last-opened project will
be opened as read only.
If tasks are currently running, EPSON RC+ 7.0 will prompt to enter Monitor Mode.
If no tasks are currently running, a dialog below will be displayed.
Cooperative mode and Independent mode
The Robot Controller consists of the following two parts.
Real Part : Controls the SPEL
+
program (Specialized for the real time control)
Windows Part : Controls the Windows applications (GUI)
The main function of the robot can be run by Real Part and some functions of the
Controller uses the connected Windows Part (See below).
Function
RC+ Enabled
PC Enabled
Detail of
available function
Vision Guide (PV1)
RC+ API option
Fieldbus master
PC file
PC RS-232C
Database access
DLL calling
Real Part and connected Windows Part are started up separately at the each timing.
To operate the robot system without problem, you should synchronize these two parts. At
the shipment of the Robot Controller, the Independent mode which these parts operate
individually is applied.
According to the design of robot system, it may not need to synchronize Real Part and
connected Windows Part. In this case, change to Cooperative mode.
For the instructions of this settings, see the section below How to set the Cooperative
mode.
When the controller is in Cooperative mode, it has to wait until both of Real Part and
connected Windows Part can start up without failure.
Meanwhile, on the front surface of the controller displays as below:
RC700
Seven-segment LED
RC90
LED
Repeats
and
alternately.
Repeats
,
alternately.
Then, it also has to wait until connected Windows part is ready and RC+ 7.0 can start up
without failure.
NOTE
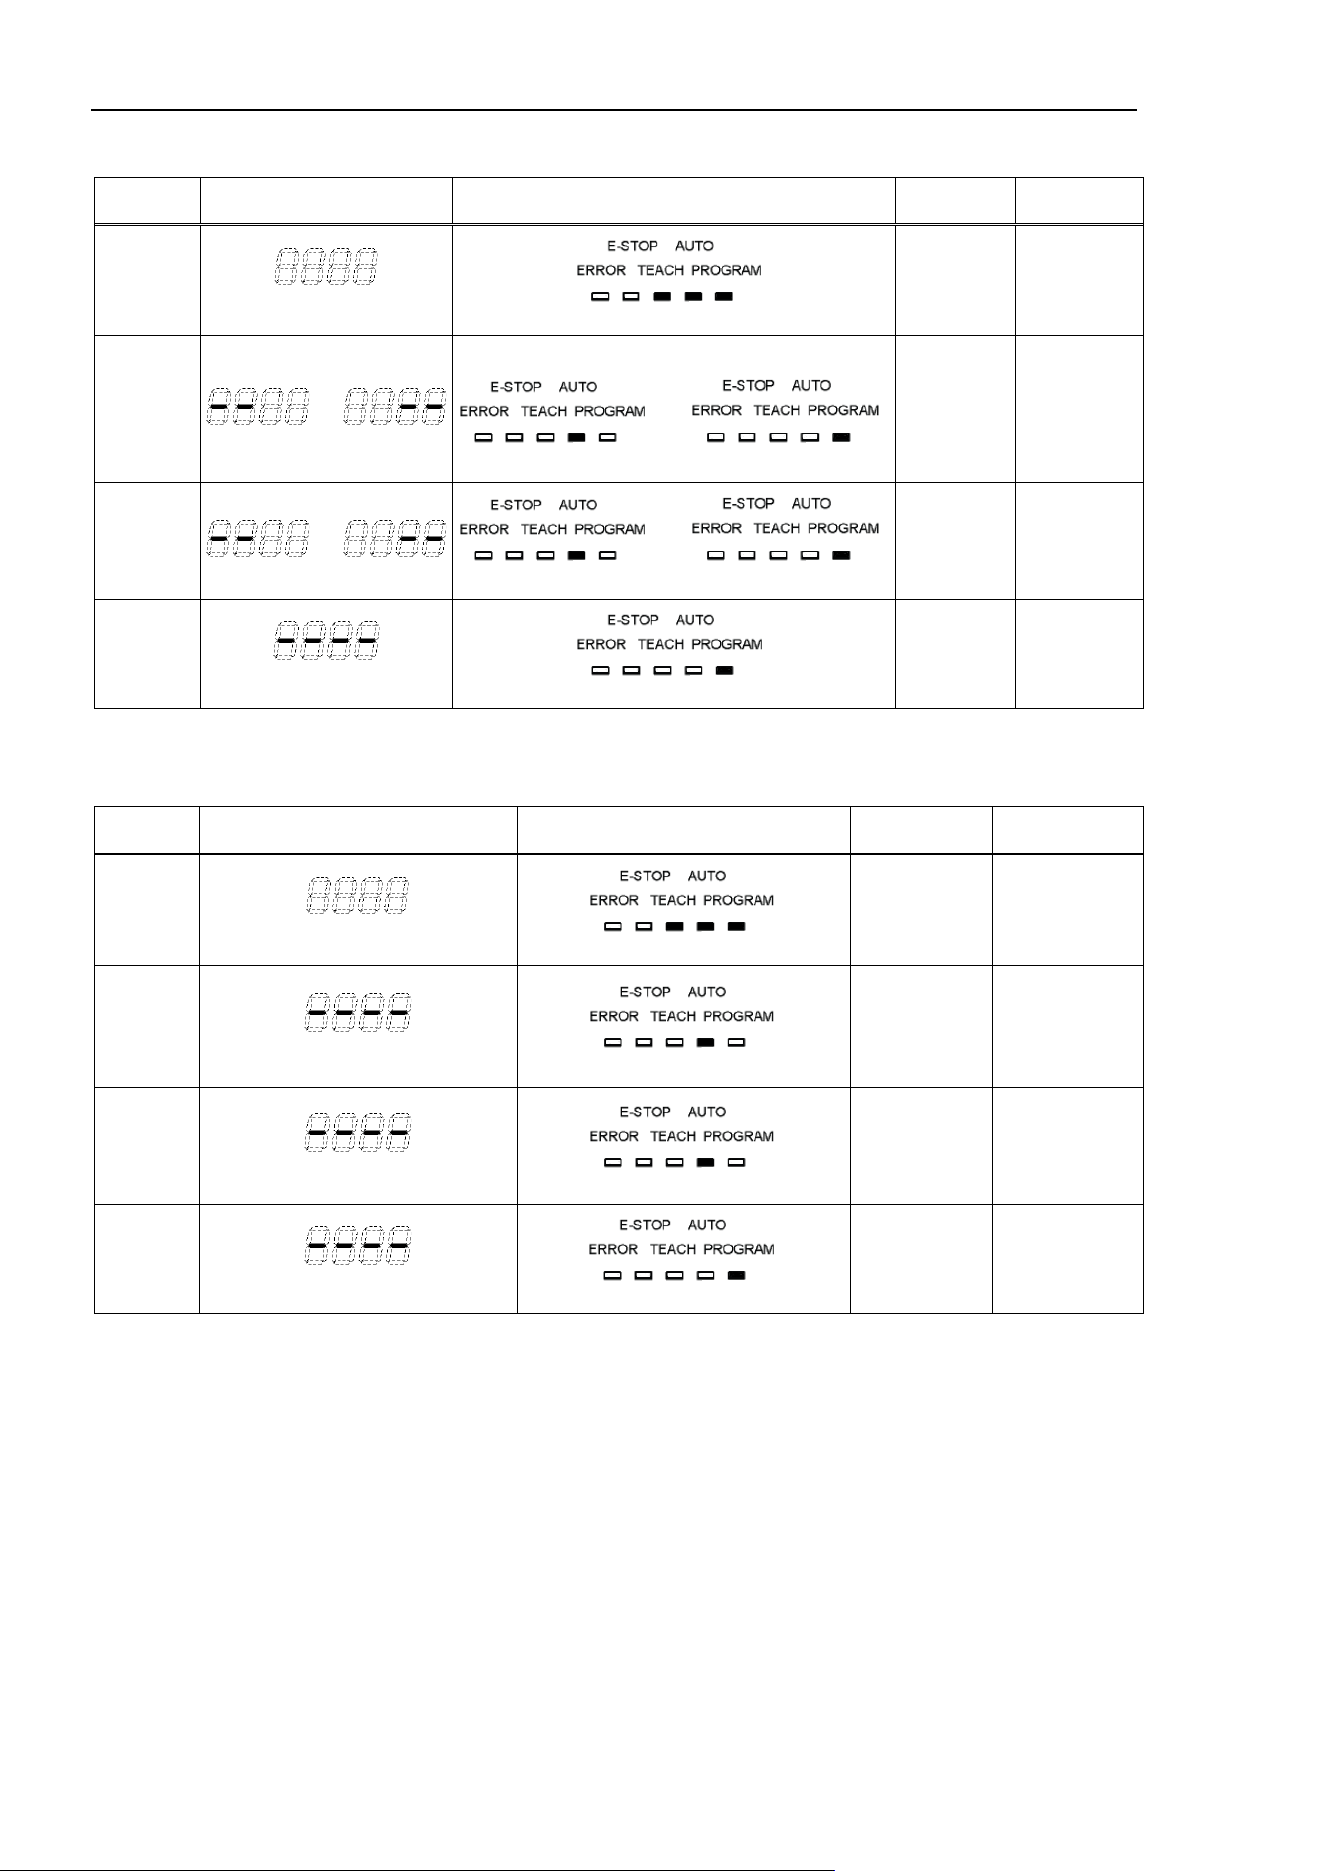
4. Operation
24 EPSON RC+ 7.0 (Ver.7.4) User's Guide Rev.6
The table below shows the startup sequence when the controller is in Cooperative mode:
RC700
Seven-segment LED
RC90
LED
Console
instruction
Background
task
(1)
Power
ON
No display
Blinking
Not
available
Not
started
yet
(2)
Real Part
starts up
Repeats
and
alternately.
Repeats
and
alternately.
Not
available
Not
started
yet
(3)
Windows
part
starts up
Repeats
and
alternately.
and
alternately.
Not
available
Not
started
yet
(4)
RC+
starts up
Blinking
Blinking
Available
Already
started
(Includes the startup of the Operator Window and RC+ API application)
The table below shows the startup sequence when the controller is in Independent mode:
RC700
Seven-segment LED
RC90
LED
Console
instruction
Background
task
(1)
Power
ON
No display
Blinking
Not
available
Not
started yet
(2)
Real Part
starts up
Blinking
Blinking
Available
*1
Already
started
(3)
Windows
part
starts up
Blinking
Blinking
Available
*1
Running
(4)
RC+
starts up
Blinking
Blinking
Available Running
*1 When the control device is “PC”:
It waits the command execution from the Operator Window or RC+ API application.
When the control device is other than “PC”:
(2) At Real Part starts up, Remote function becomes enable and starts operating.
When the controller is in Cooperative mode, the state does not back to wait for the RC+
connection even after RC+ shutdown. Also when the control device is other than “PC”,
you need to be careful during the RC+ shutdown because the remote command is still
executable.
NOTE
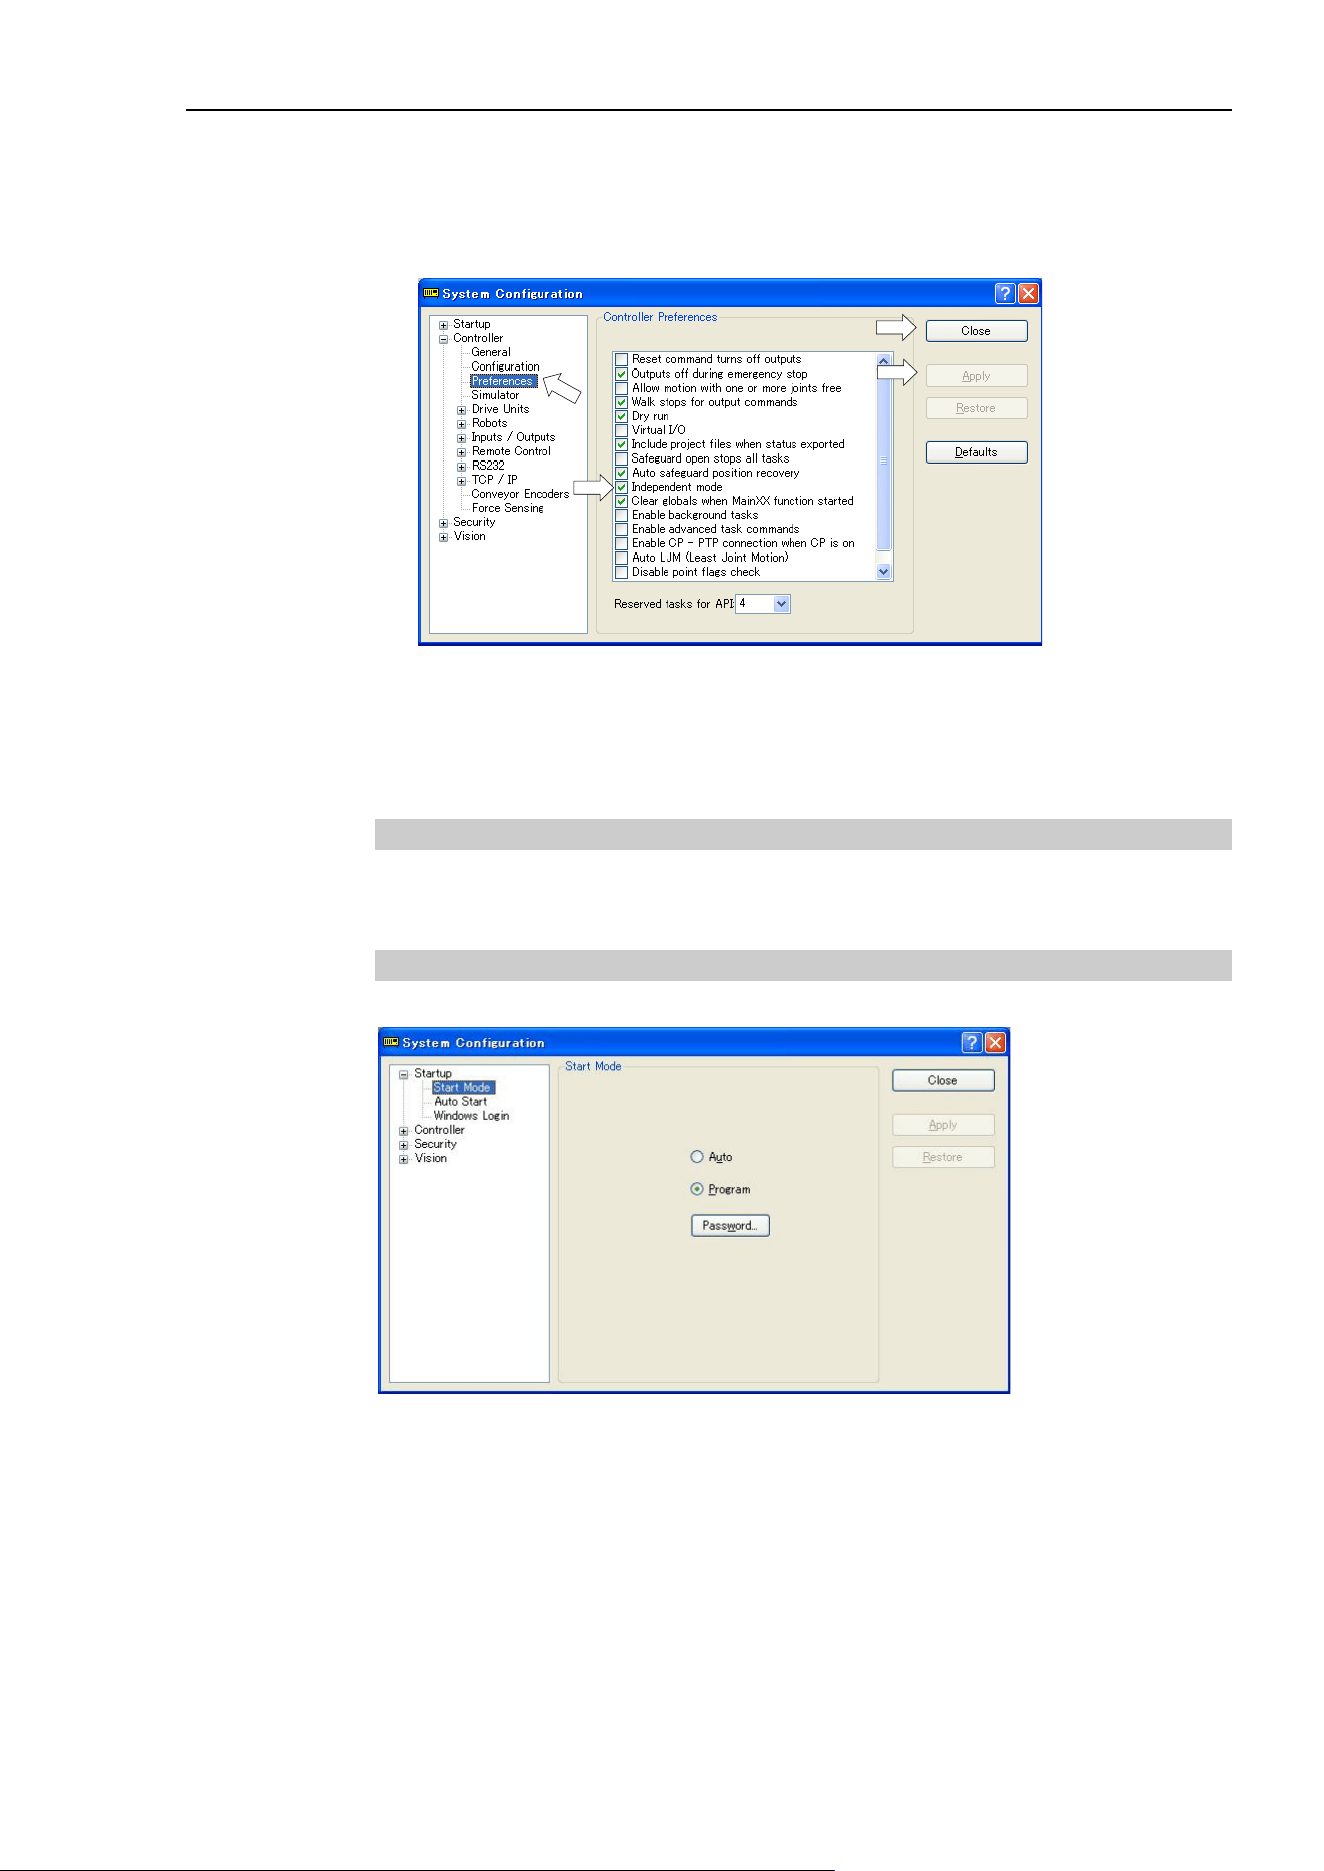
4. Operation
EPSON RC+ 7.0 (Ver.7.4) User's Guide Rev.6 25
How to set the Cooperative mode
(1) Select [Setup]-[System Configuration] from the main menu and displays the [System
Configuration] dialog box as shown below.
(2) Select [SPEL Controller Board]-[Preferences].
(2)
(5)
(3)
(4)
(3) Uncheck the [Independent mode] checkbox.
(4) Click <Apply> button.
(5) Click the <Close> button.
4.2.2 Startup Configuration
To configure startup, select [System Configuration] from the [Setup] menu. The [Startup]
section has pages for Start Mode, Auto Start, and Windows Login.
4.2.3 Start Mode
This page has settings for the EPSON RC+ 7.0 start mode.
There are two start modes:
Auto This mode starts the system and displays the Operator Window.
Program This mode allows you to develop your projects. This is the default startup
mode.
Use the <Password> button to change the start mode password.
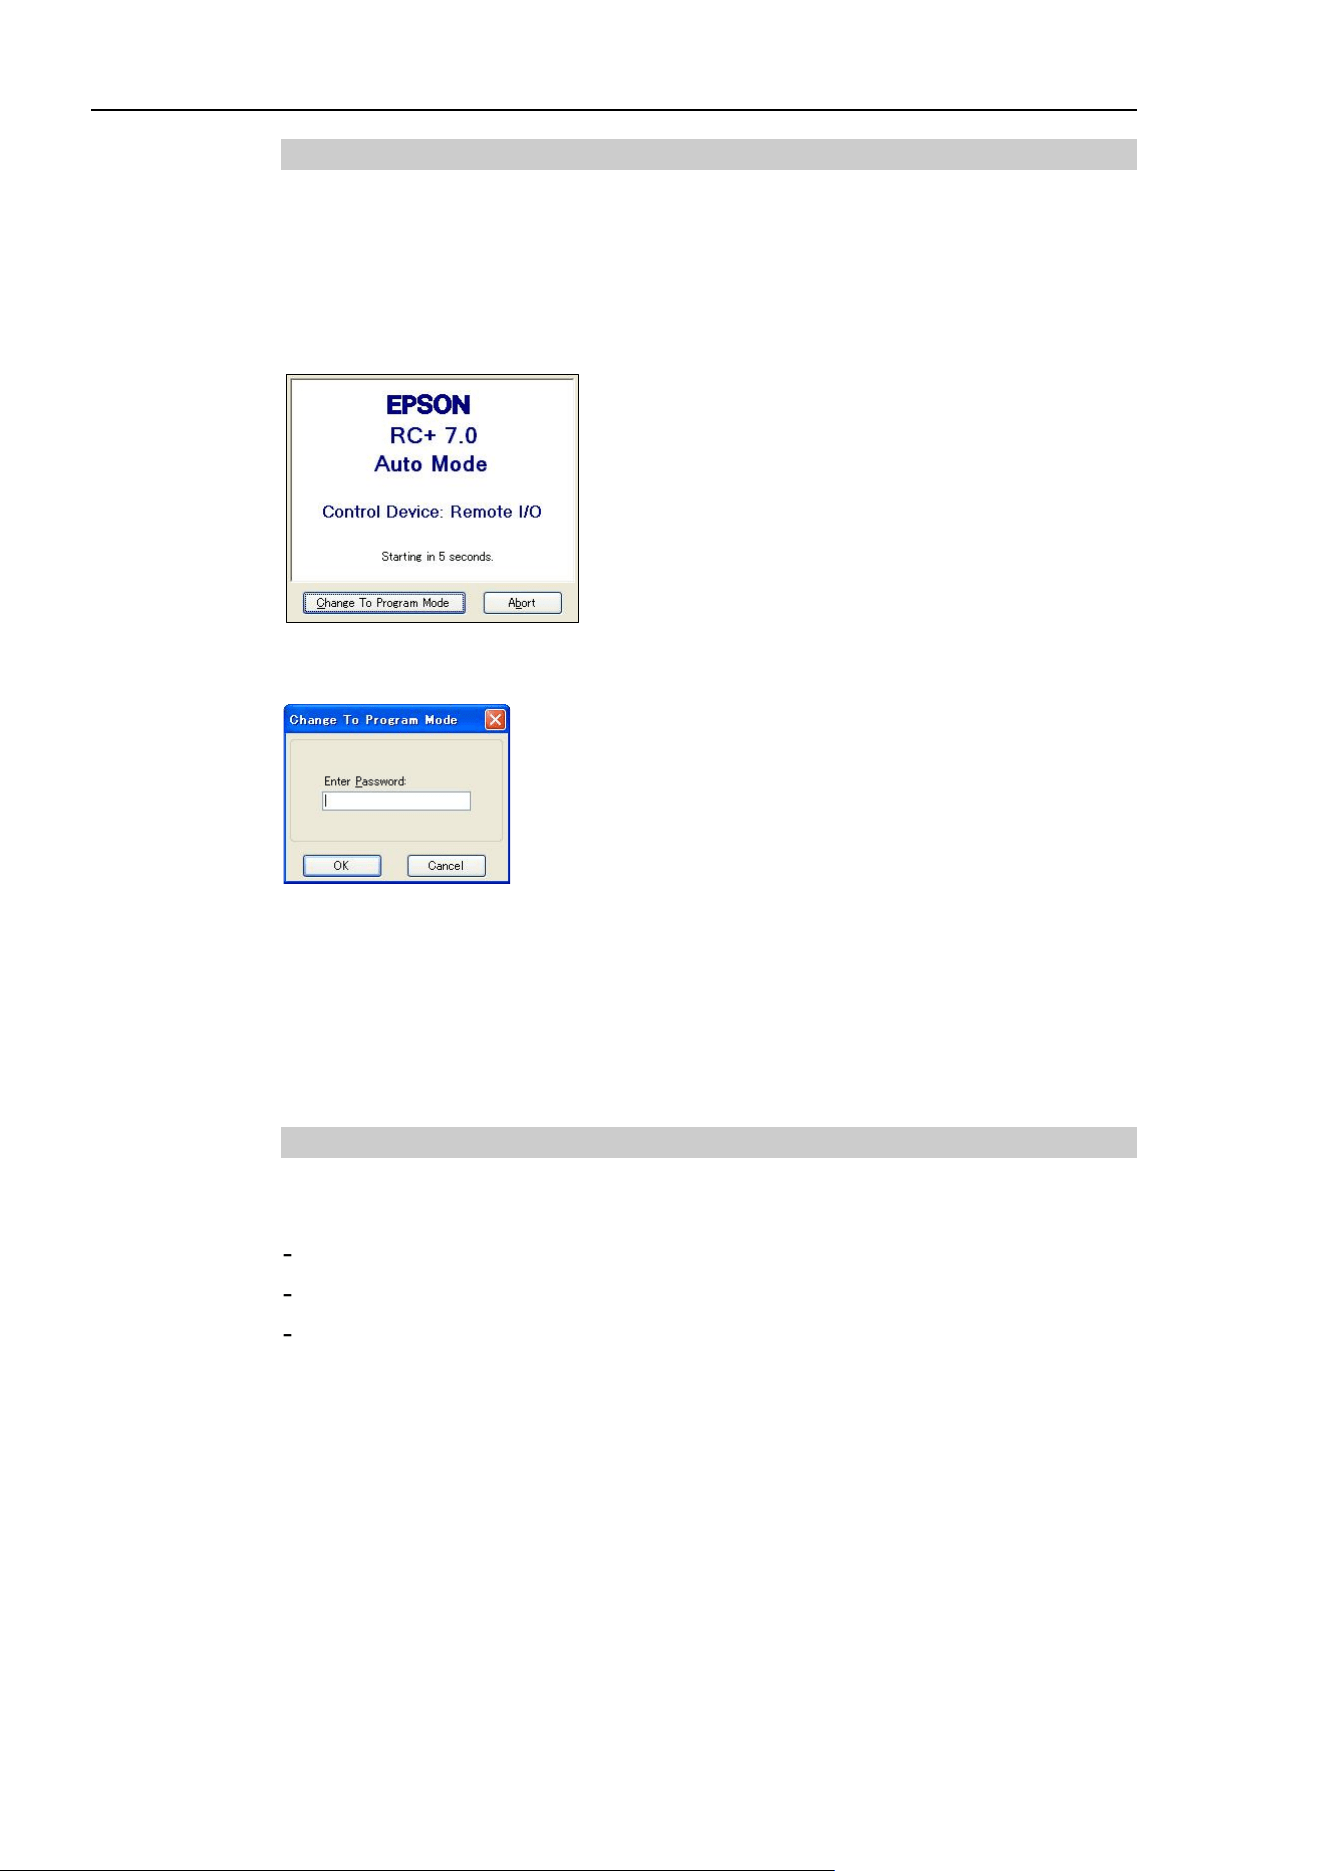
4. Operation
26 EPSON RC+ 7.0 (Ver.7.4) User's Guide Rev.6
4.2.4 Start Mode Dialog
When the start mode is set for Auto, then a dialog is displayed at start up that allows you
to change the startup mode using a password. After a few seconds, if the <Change To
Program Mode> button has not been clicked, the system will initialize and the Operator
Window will be displayed.
You can disable this startup dialog using command line options described later in this
section, 4.2.10 Command Line Options.
If you click the <Change To Program Mode> button, another dialog will be displayed, as
shown below:
To change to Program mode, you must supply the password and click <OK>, or you can
abort startup all together by clicking <Cancel>.
This allows authorized personnel to enter Program mode temporarily to make changes or
adjustments.
When you change to PROGRAM mode from this dialog, it is only temporary. The next
time EPSON RC+ 7.0 runs, the original start mode setting will be used.
4.2.5 Start Mode: Program
Program mode is the default start mode. This is the EPSON RC+ 7.0 development
environment, from which you can:
Create / edit projects.
Configure the controller and set preferences.
Run and debug programs.
NOTE
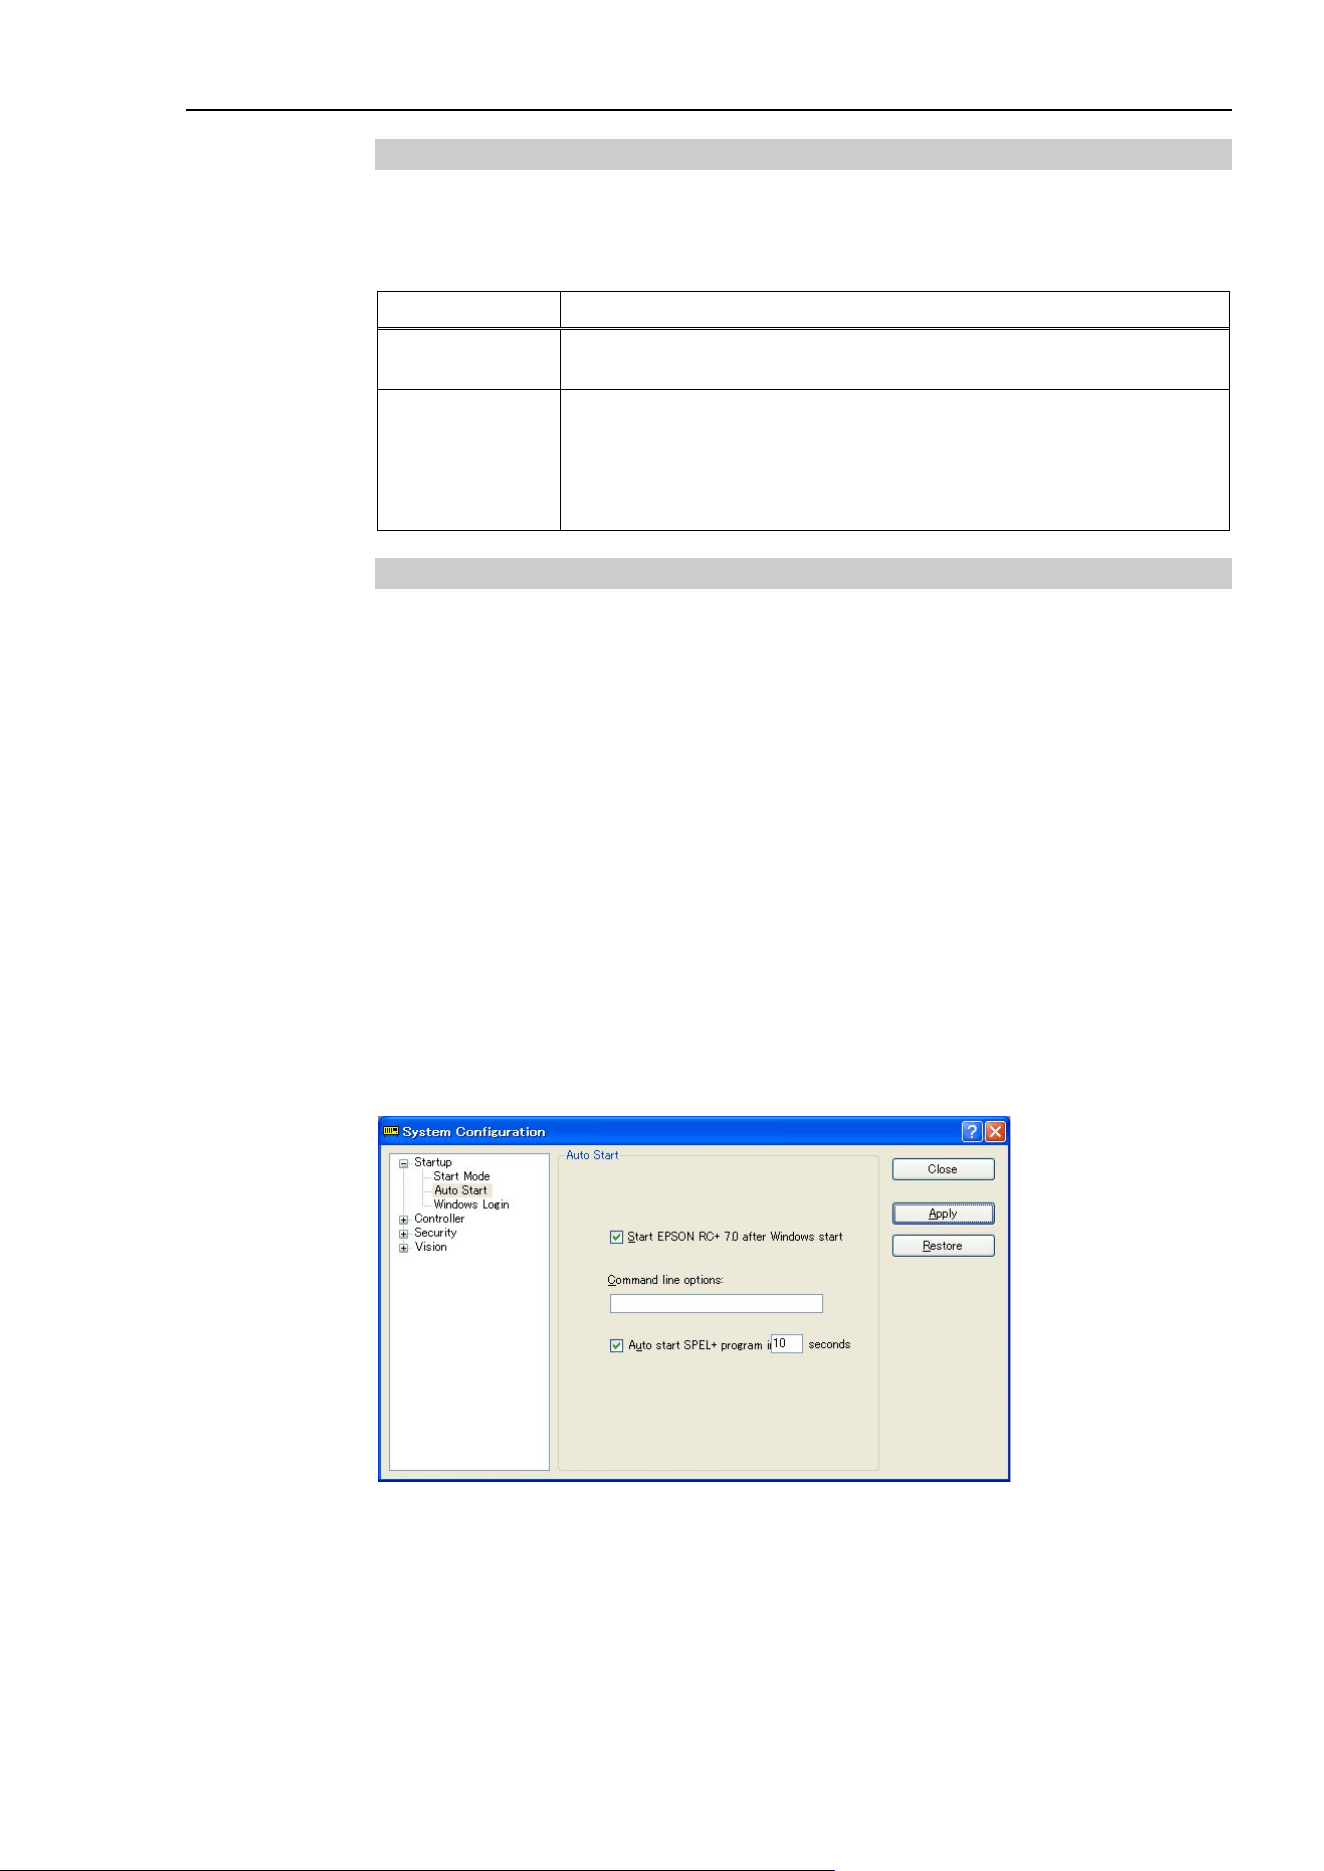
4. Operation
EPSON RC+ 7.0 (Ver.7.4) User's Guide Rev.6 27
4.2.6 Start Mode: Auto
Auto mode displays the Operator Window. The Operator Window is configured
according to the settings in [Project]-[Properties].
The Auto mode is set by the control device as follows:
Control Device Description
PC
The Operator Window can be use
d as a simple operator interface for
production.
Remote I/O
Remote Ethernet
Remote RS232
TP3
The Operator window is displayed with no operator buttons to allow any
diagnostic messages to be viewed.
4.2.7 Auto Start
You can configure EPSON RC+ 7.0 to automatically start when Windows starts.
From [Setup]-[System Configuration]-[Auto Start] page, set the [Start EPSON RC+ 7.0
after Windows start] check box.
In addition, if you set the checkbox above, you can specify EPSON RC+ 7.0 command
line options (/auto, /nosplash, etc.) in the [Command line options] text box. Refer to the
section 4.2.10 Command Line Options.
When the startup mode is Auto, a main function of the SPEL+ program can be started
automatically. Check the [Auto start SPEL+ program in ## seconds] check box. Time
from the EPSON RC+ 7.0 startup until a main function starts can be specified in the
textbox on the right. In the example below, a main function starts 10 seconds after the
EPSON RC+ 7.0 run. Startup of the main function can be aborted if it is within the
specified time.
When using auto start, ensure that your application can automatically start safely and
inform operators how to abort the startup.
When using the Windows 8, select the [Desktop] tile on the start screen and then check if
the EPSON RC+ 7.0 starts up automatically.
NOTE
NOTE
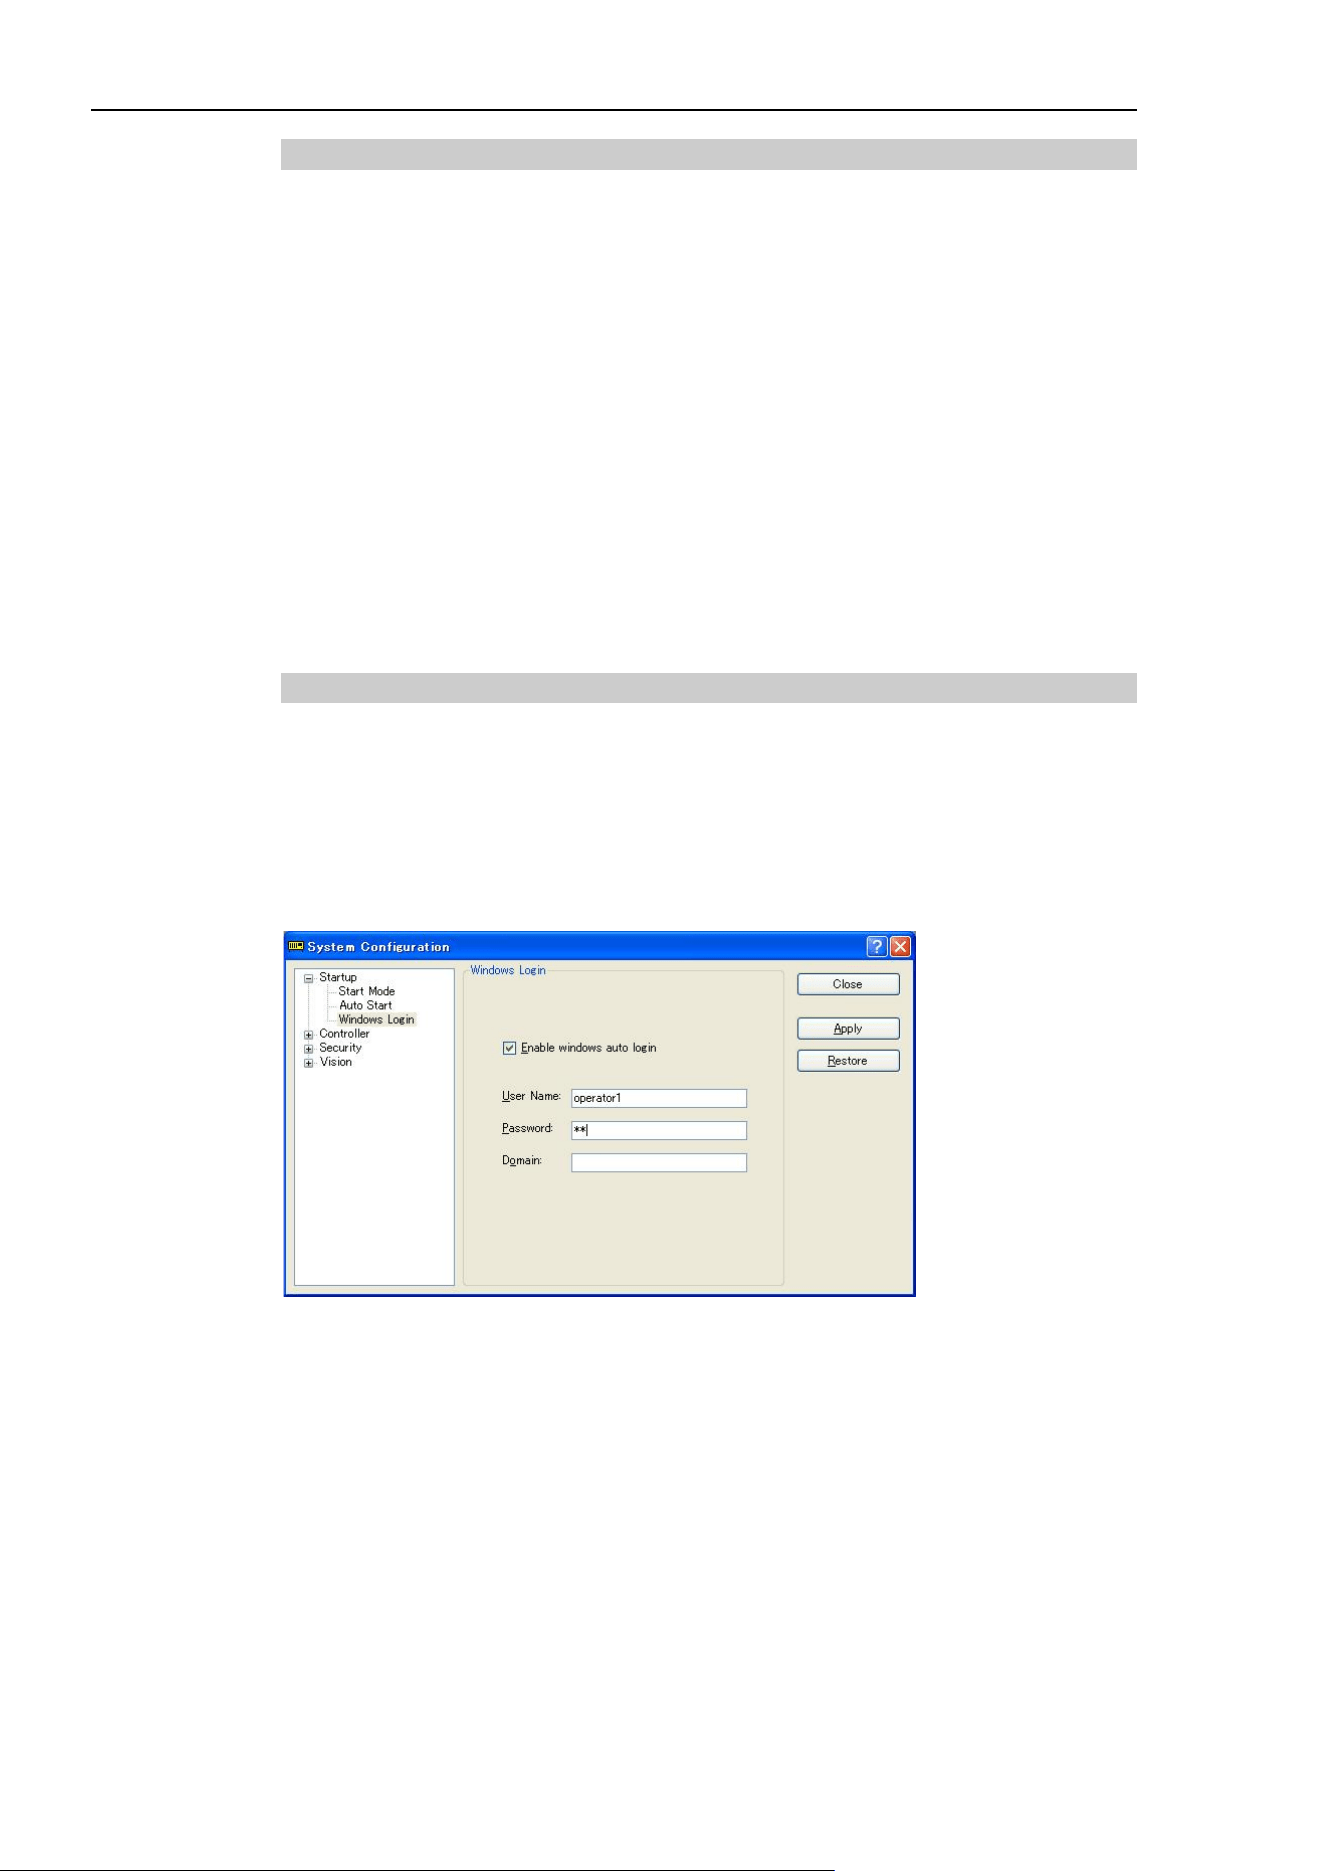
4. Operation
28 EPSON RC+ 7.0 (Ver.7.4) User's Guide Rev.6
4.2.8 Using Monitor Mode
Monitor Mode allows you to monitor operation of the controller. In Monitor Mode, you
can do the following:
- View print output on the Run window
- Monitor I/O status using the I/O Monitor.
- Monitor task status using the Task Manager.
- Monitor variable values using Display Variables.
To enter the monitor mode, follow the steps below.
When control device is remote and independent mode is on
1. Start the EPSON RC+ 7.0.
2. If tasks are running, you will be prompted to connect and monitor operation.
If tasks are not running, you will be prompted to connect in monitor mode, or switch
to the Program mode.
4.2.9 Windows Login
You can configure automatic Windows login from the EPSON RC+ 7.0. In [Setup]-
[System Configuration]-[Startup]-[Windows Login] page, check the [Enable windows
auto login] check box. Then, enter the name and password of the user logging in.
Optionally, you can supply a domain, if required.
However, you must have the authority of Windows Administrator to set login parameters.
To configure automatic Windows login from the EPSON RC+ 7.0, you must reboot the
system the first time. After the reboot, Windows login will be automatic.

4. Operation
EPSON RC+ 7.0 (Ver.7.4) User's Guide Rev.6 29
4.2.10 Command Line Options
Refer to 4.2.11 Using Command Line Options to see how to use the command line options.
There are command line options for the EPSON RC+ 7.0 that provide the following
functions:
Starting EPSON RC+ 7.0 for a specific project
When you start the EPSON RC+ 7.0, you can optionally specify a project name in the
command line.
ERC70.EXE [drive:project_name]
drive:project_name The drive letter and name of a project. The name can include a
subfolder of the \EpsonRC70\Projects directory.
Example: Open project myapp on drive C: at startup:
ERC70.EXE c:myapp
Change EPSON RC+ 7.0 startup mode
You can select the startup mode and override the startup dialog using command line
options.
To start in Program mode (no password required)
ERC70.EXE /PROG
To start in Auto mode
ERC70.EXE /AUTO
Use these command line options to override and hide the startup dialog and open the
Operator Window directly.
If only the AUTO flag is supplied and the control device is PC, EPSON RC+ 7.0 will open
the project from the last session and display the operator window. EPSON RC+ 7.0 will
only be visible in the Windows Task Manager. When the operator window is closed,
EPSON RC+ 7.0 will be terminated.
When the control device is PC, you cannot close the operator window while tasks are
running.
Example: Open project myapp on drive C and display the operator window:
ERC70.EXE c:myapp /AUTO
The Controller should be ON before starting EPSON RC+ 7.0 with the /AUTO command
line option. If EPSON RC+ 7.0 cannot communicate with the controller, then an error
message will be displayed with a retry button.
For more details, see 7.6 Operator Window.
Login
You can automatically login from the command line if you are not using the Auto Login
feature for the security Option:
ERC70.EXE /LOGIN "userID", "password"
This is especially useful when you are starting in operator mode.
If the user I/D or password is invalid, it will display an error dialog and exit the EPSON
RC+ 7.0.
NOTE
NOTE

4. Operation
30 EPSON RC+ 7.0 (Ver.7.4) User's Guide Rev.6
Starting EPSON RC+ 7.0 specifying the language
You can specify the language to use in EPSON RC+ 7.0 GUI.
Japanese : ERC70.EXE /LANG_JAPANESE
*1
English : ERC70.EXE /LANG_ENGLISH
German : ERC70.EXE /LANG_GERMAN
*2
French : ERC70.EXE /LANG_FRENCH
*2
Spanish : ERC70.EXE /LANG_SPANISH
*2
Chinese (Simplified) : ERC70.EXE /LANG_CHINESE_SIMP
*3
Chinese (Traditional) : ERC70.EXE /LANG_CHINESE_TRAD
*3
*1
Available for Japanese OS
*2
Available for English, German, French, and Spanish OS
*3
Available for Chinese OS
Disabling the EPSON RC+ 7.0 splash window
You can suppress the splash window displayed at startup using the following syntax:
ERC70.EXE /NOSPLASH
4.2.11 Using Command Line Options
Examples of command line options are:
Running from the Windows Run Box
You can specify a command from the Windows [Start] menu-[Run]-[Open] text box.
e.g. C:\EpsonRC70\exe\erc70.exe C:myapp
Making startup icons for your projects
You can create icons that automatically start EPSON RC+ 7.0 for different projects and
start Auto or Program modes.
1. Right click on your desktop and select [New]-[Shortcut].
2. Click <Browse…> in the [Create Shortcut] dialog box.
Select “C:\EpsonRC70\exe\erc70.exe” and click the <OK> button. After the dialog
changes, click the <Next> button.
3. Type a name for the shortcut and click <Finish>.
4. Right click the created icon and select [Properties]. Add an option such as “/AUTO”
or “/PROG” to [Target:].
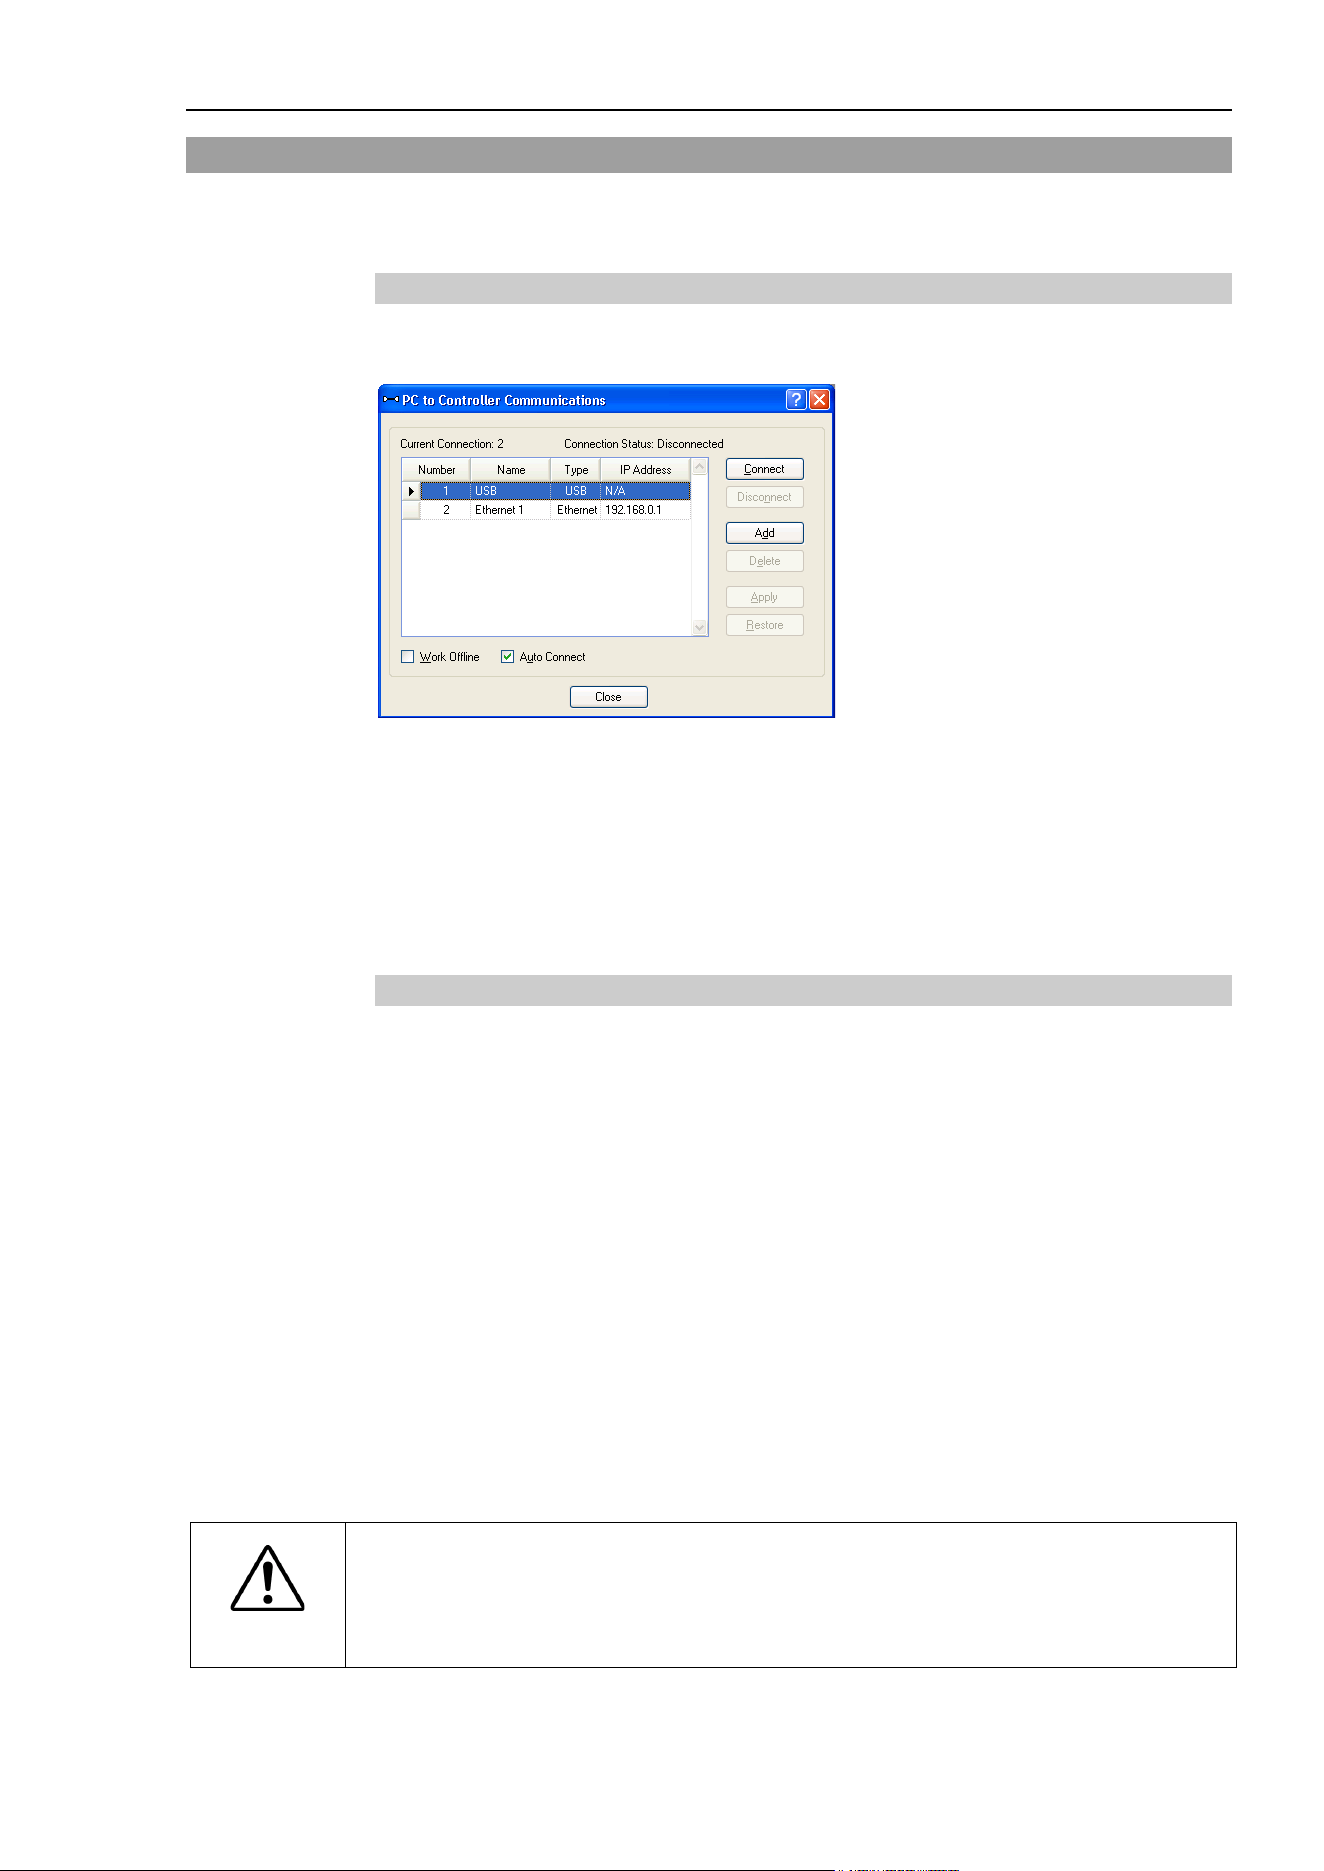
4. Operation
EPSON RC+ 7.0 (Ver.7.4) User's Guide Rev.6 31
4.3 Communications with Controller
Your PC running EPSON RC+ 7.0 can communicate with a Controller using USB or
Ethernet.
4.3.1 Configuring Communications with the Controller
To configure communications with the Controller, select [PC to Controller
Communications] from the [Setup] menu. This will open the dialog shown below:
The dialog has a list of connections. The first connection is for USB and is fixed. You
cannot delete it or rename it.
You can add one or more Ethernet connections and give each one a meaningful name.
The name for each connection is also shown in the Connections dropdown list on the main
toolbar. If no name is supplied, the Ethernet IP address is shown in the dropdown list.
For more information on PC to Controller Communications, refer to 5.12.1. PC to
Controller Communications Command.
4.3.2 USB Communications
USB 2.0 or USB 1.1 can be used to communicate with one controller. This is the default
communication method for EPSON RC+ 7.0 and requires no configuration.
To connect to a controller via USB:
1. Connect a USB cable between the PC and the controller.
2. Turn on the Controller.
3. Start EPSON RC+ 7.0.
4. Click the [PC to Controller Communications] button on the tool bar.
5. Ensure that connection #1 (USB) is selected.
6. Click <Connect> button.
7. Click <Close> button.
If the EPSON RC+ 5.0 is installed in the same computer and is performing the USB
communication, the EPSON RC+ 7.0 cannot perform the USB communication. Make
sure that the EPSON RC+ 5.0 is disconnected before connecting the EPSON RC+7.0.
When used with the Robot Controller RC620, the EPSON RC+ 7.0 cannot perform the
USB communication.
CAUTION
■
When performi
ng the USB communication using the computer with Windows 7 or
later, communication with the Controller is disconnected as the PC enters a sleep
state. Before performing the USB communication, make sure to change the PC
setting so that it will not enter th
e sleep mode.
NOTE
NOTE
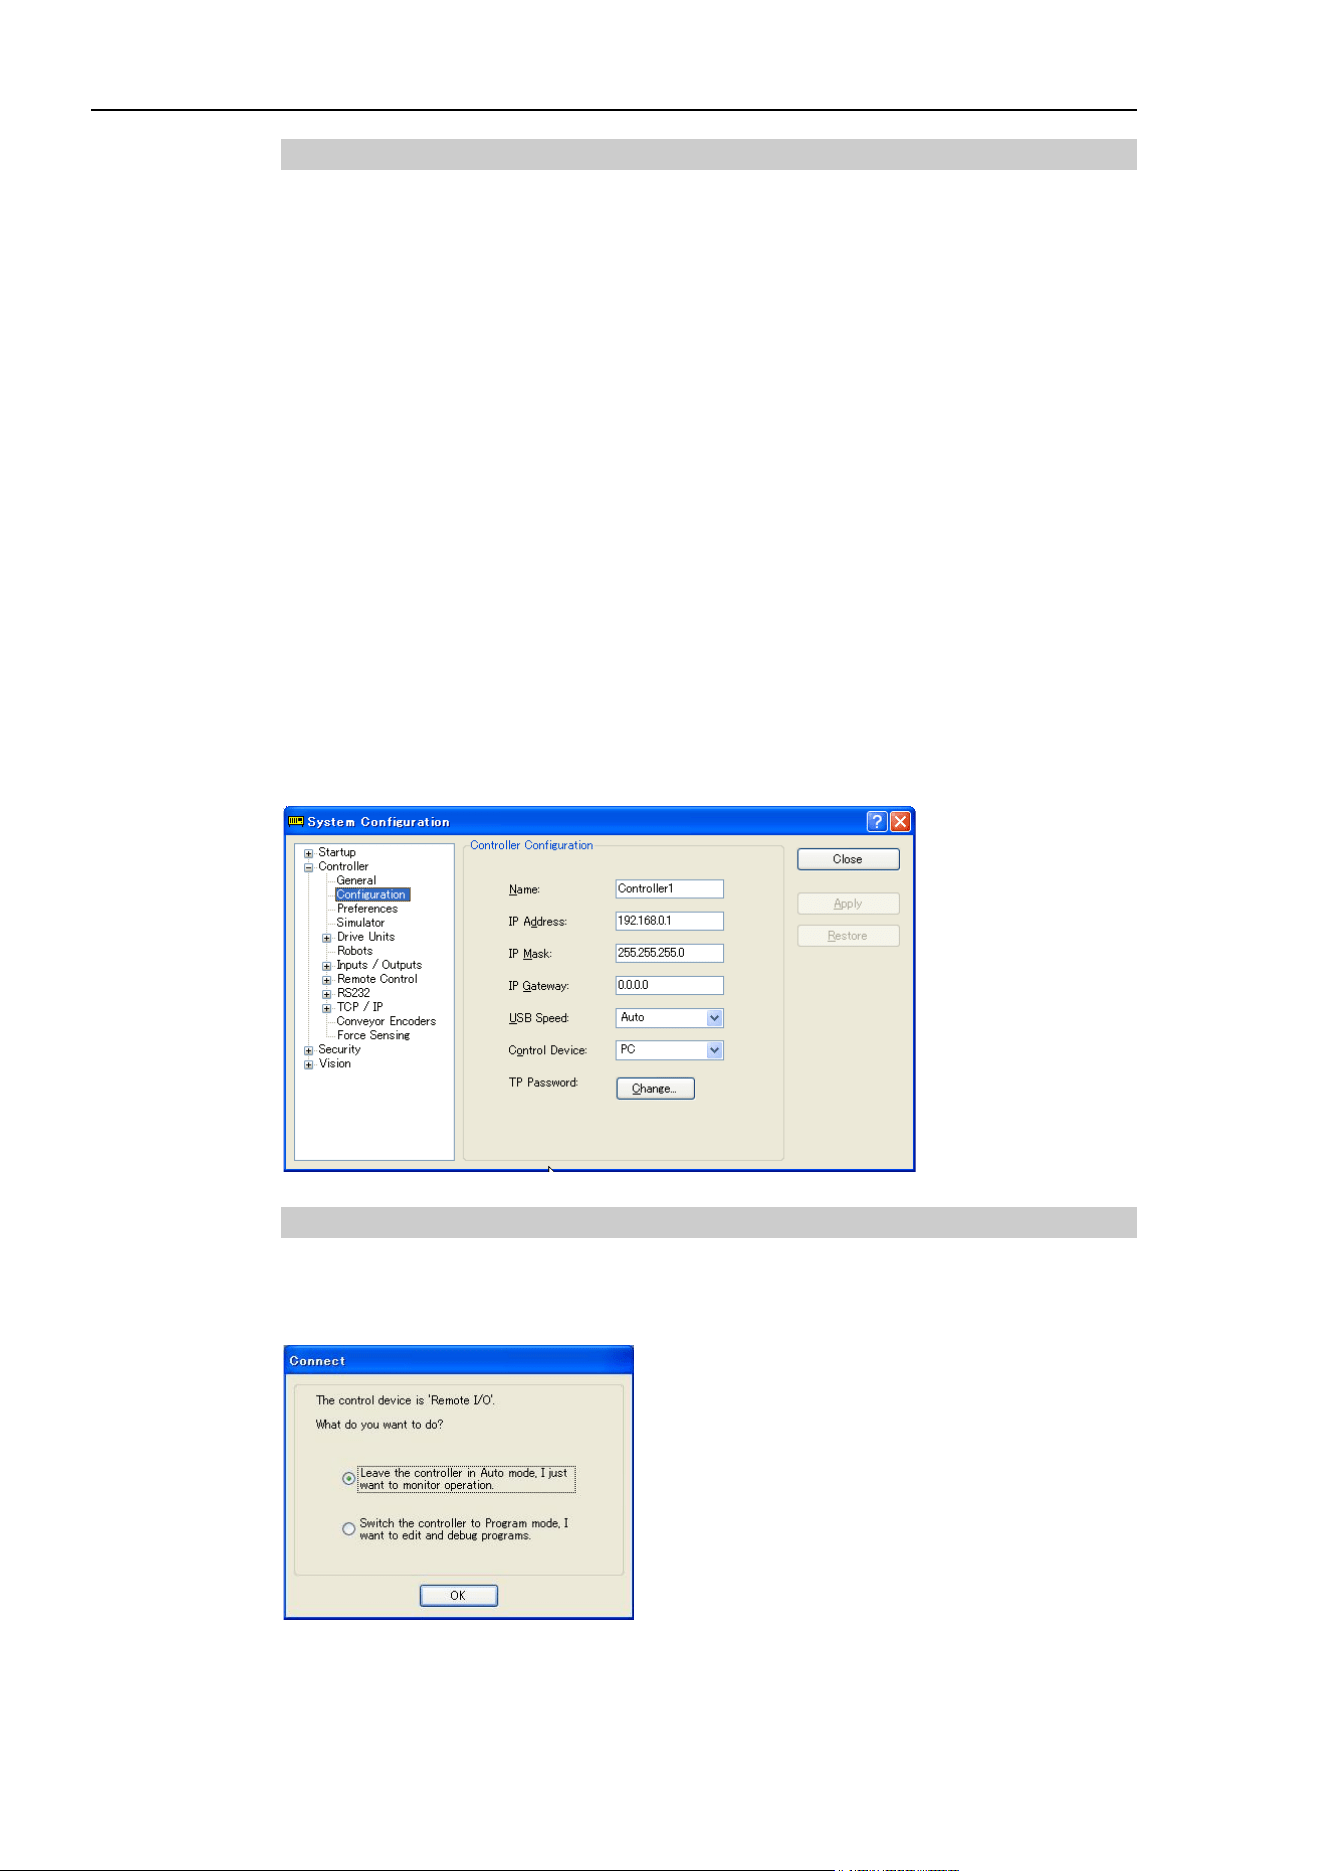
4. Operation
32 EPSON RC+ 7.0 (Ver.7.4) User's Guide Rev.6
4.3.3 Ethernet Communications
The robot controller does not support internet protocol version 6 (TCP/IPv6). When you
connect the development PC to the robot controller using the Ethernet, make sure to use
internet protocol version 4 (TCP/IPv4).
You can communicate with one or more Controllers from one PC using Ethernet. For
Ethernet communications, each Controller must have a unique IP address. You can set the
IP address, mask, and gateway for the controller from [Setup]-[System Configuration]-
[Controller]-[Configuration]. The gateway setting is only required if you will be accessing
the controller from outside of the local network.
You can connect a PC to a controller directly using an Ethernet cross-over cable, or you
can connect the PC and controller to an Ethernet switch or hub.
Before you can communicate with a controller using Ethernet, you must configure the
controller's IP address, IP mask, and IP gateway. This is accomplished by first connecting
to the controller with USB, and then from the EPSON RC+ 7.0 [Setup]-[System
Configuration]-[Controller]-[Configuration] page, set the IP address, IP mask, and IP
gateway of the controller as shown below.
The following is the configuration of the controller at the time of shipment.
IP Address : 192.168.0.1
IP Mask : 255.255.255.0
IP Gateway : 0.0.0.0
Use the USB connection to configure Ethernet communications.
4.3.4 Connecting When Control Device is not PC
Connecting while control device is not PC and tasks are not running
If your PC is not a control device and tasks are not running, you will see the following
message box:
This allows you to [Leave the controller in Auto mode] to monitor operation, or [Switch
the controller to Program mode] so you can edit and debug programs. If you choose to
[Switch to Program mode], then the remote device cannot start programs until remote
control has been enabled from the Run window.
NOTE
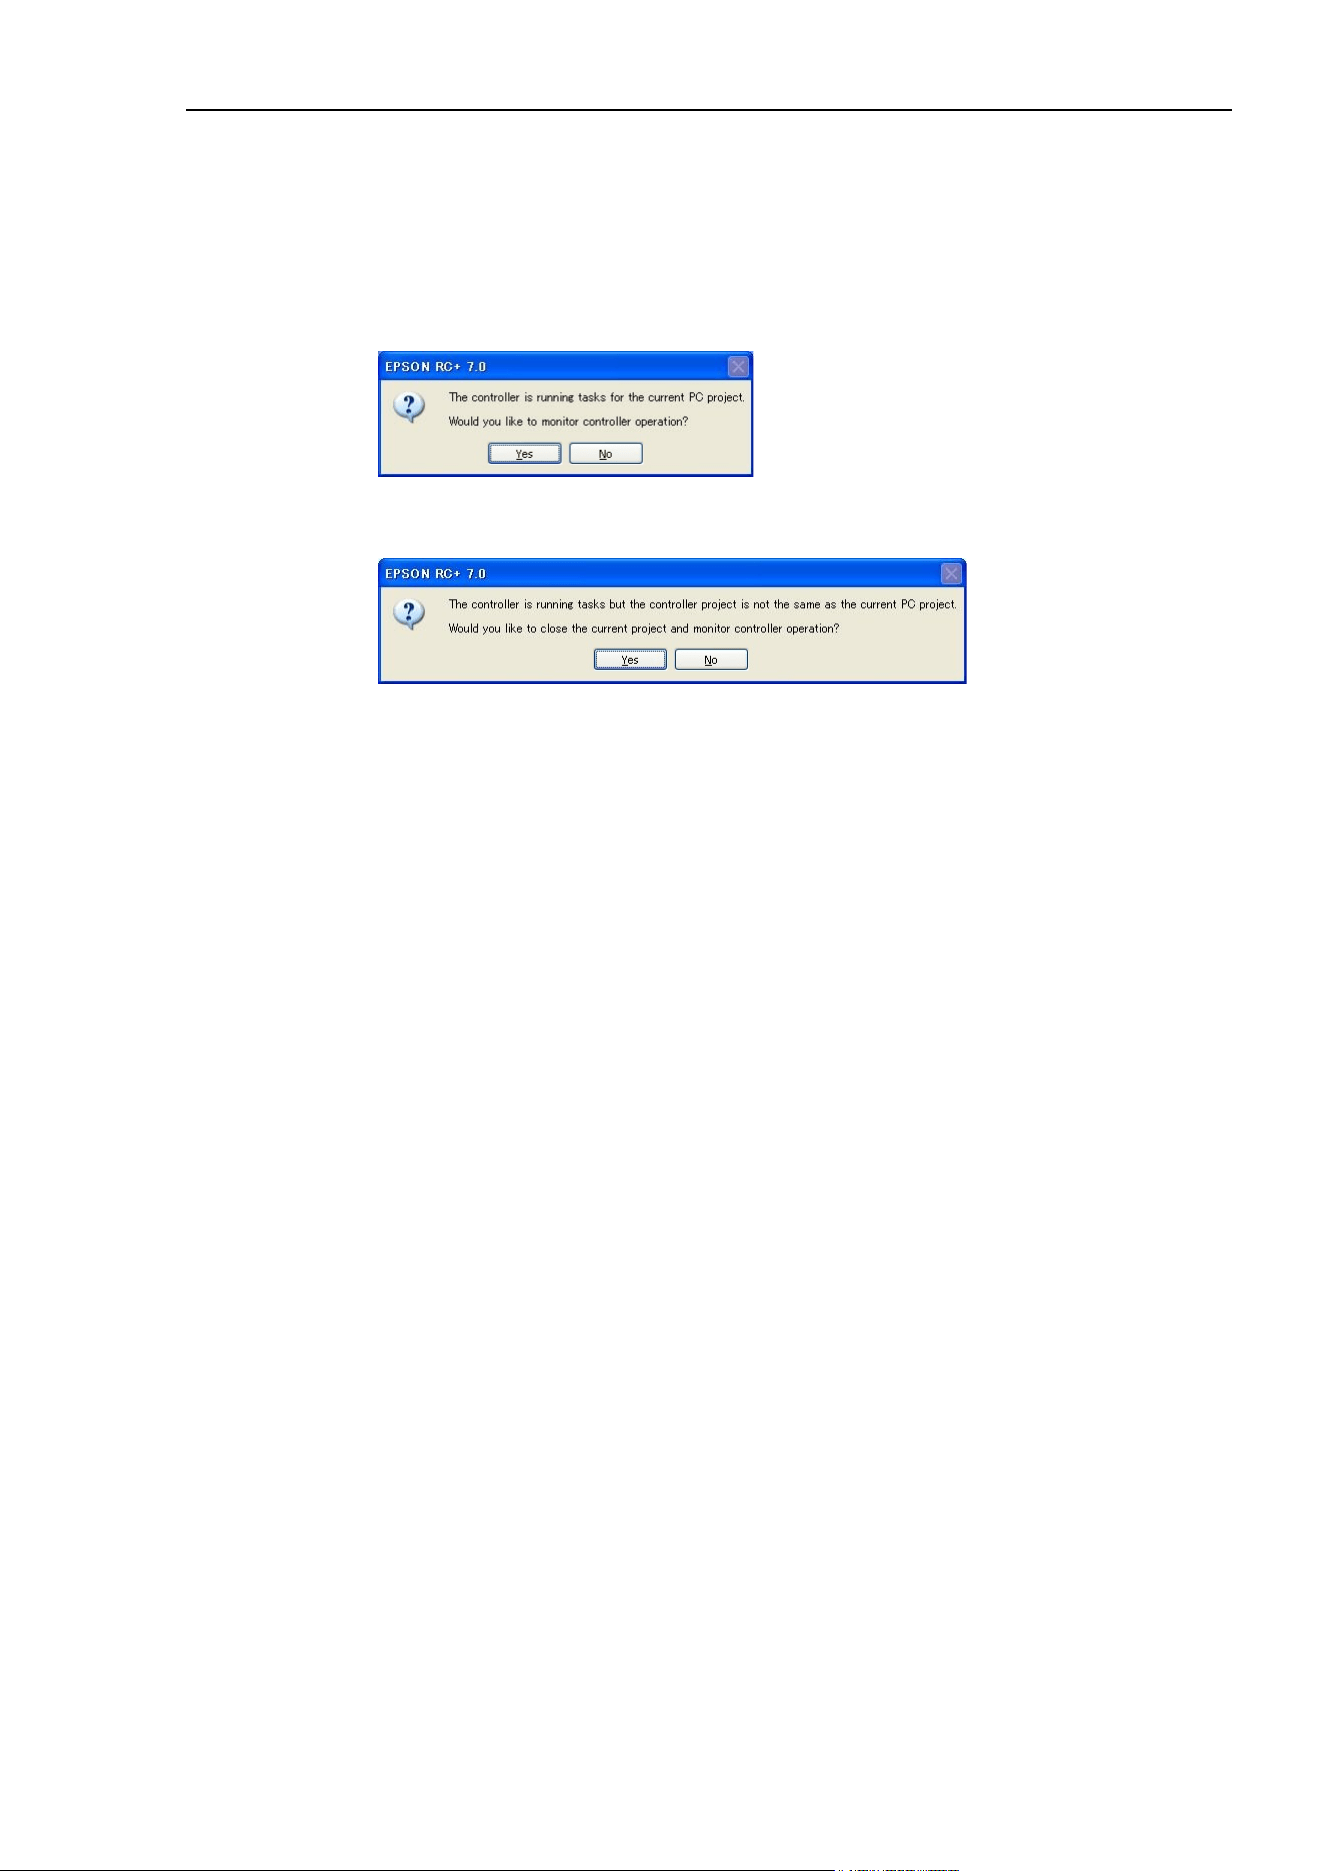
4. Operation
EPSON RC+ 7.0 (Ver.7.4) User's Guide Rev.6 33
Connecting from Remote Control while tasks are running
If the controller is running tasks with the control device set to Remote, you can connect
the PC to the controller to monitor operation. For example, you can connect to a controller
that is running tasks to temporarily monitor display output, tasks, and I/O, and then
disconnect while tasks continue to run.
If the project on the PC is the same as on the controller, you will see the following
message box when connection is established:
If the project on the PC is not the same as the project in the controller, you will see the
following message box when connection is established:
If you choose to monitor controller operation, the Run window will open if EPSON RC+
7.0 is started in Program mode. If EPSON RC+ 7.0 is started in Auto mode, the Operator
window will appear. From the Run window or Operator window, you can view display
output from Print statements executing in the application. You can also use the Task
Manager and I/O monitor.
When monitoring controller operation, the controller remains in Auto mode. You cannot
stop tasks from EPSON RC+ 7.0, because the control device is not PC. If you want to
switch the controller to Program mode, you must first stop all tasks from the current
control device, then connect to the controller from EPSON RC+ 7.0 and choose to switch
to Program mode (see the previous section Connecting while control device is not PC and
tasks are not running).
Disconnecting while tasks are running
You can only disconnect from the controller with tasks running when the control device is
set to Remote.
1. Stop communications with the controller by selecting [Offline] from the [Connection]
dropdown list on the toolbar.
2. You may now disconnect the communications cable between the PC and the controller.
Tasks will continue to run in the controller.
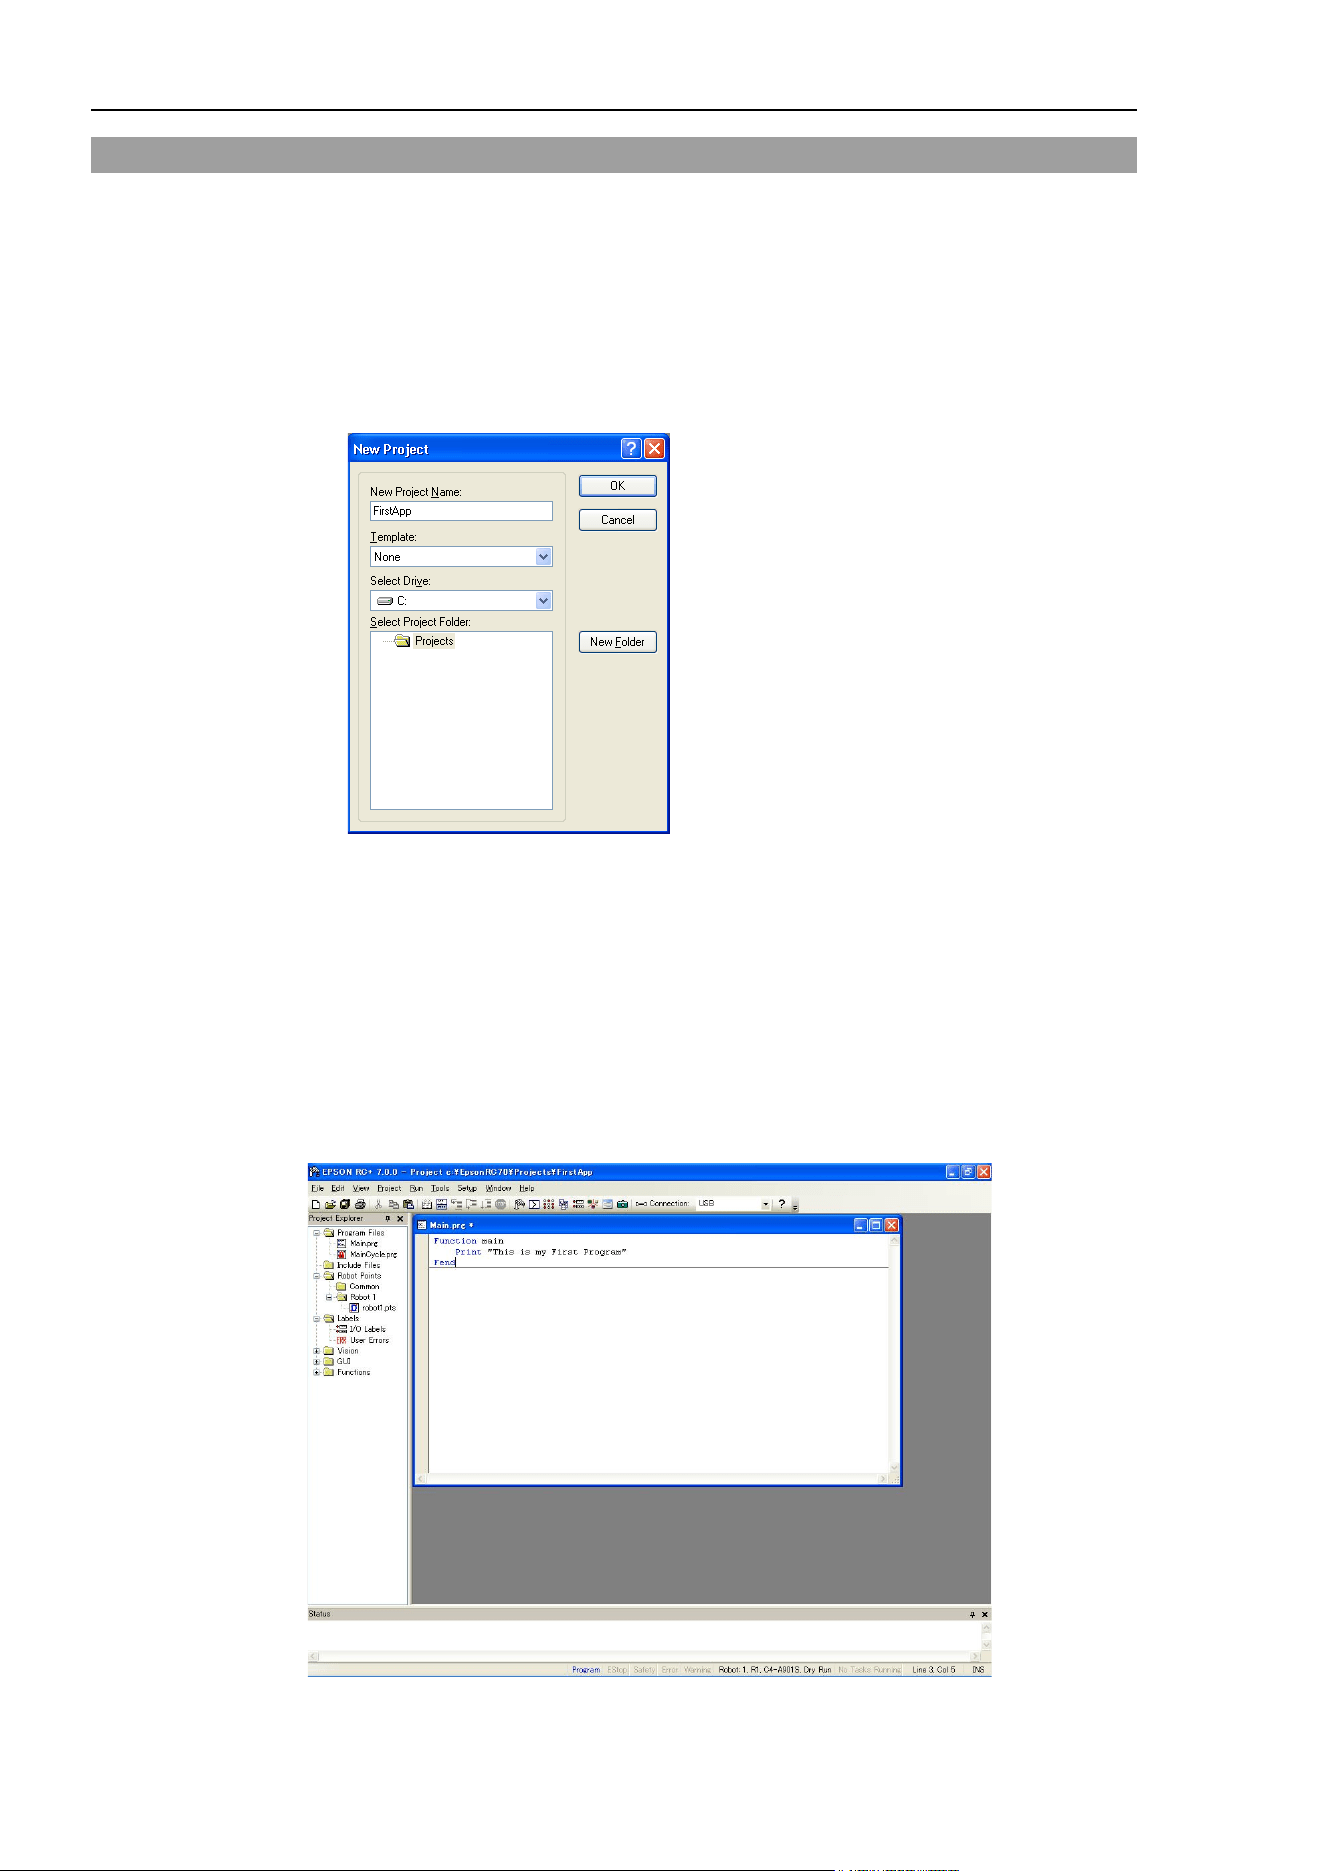
4. Operation
34 EPSON RC+ 7.0 (Ver.7.4) User's Guide Rev.6
4.4 Writing your first Program
After installing the controller, robot, and EPSON RC+ 7.0 software on the RC700 Robot
Controller, follow these instructions to create a simple application program so that you
will become more familiar with the EPSON RC+ 7.0 development environment.
1. Start EPSON RC+ 7.0
Double-click the EPSON RC+ 7.0 icon on the desktop.
2. Create a new project
(1) Select New from the Project Menu.
(2) Type in a name for a project in the [New Project Name] box. e.g. FirstApp
(3) Click OK to create the new project.
When the new project is created, a program called “Main.prg” is created. You will see
the “Main.prg” window open with a cursor flashing in the upper left corner. Now you
are ready to start entering your first program.
3. Edit the program
Type in the following program lines in the “Main.prg” edit window.
Function main
Print "This is my first program."
Fend
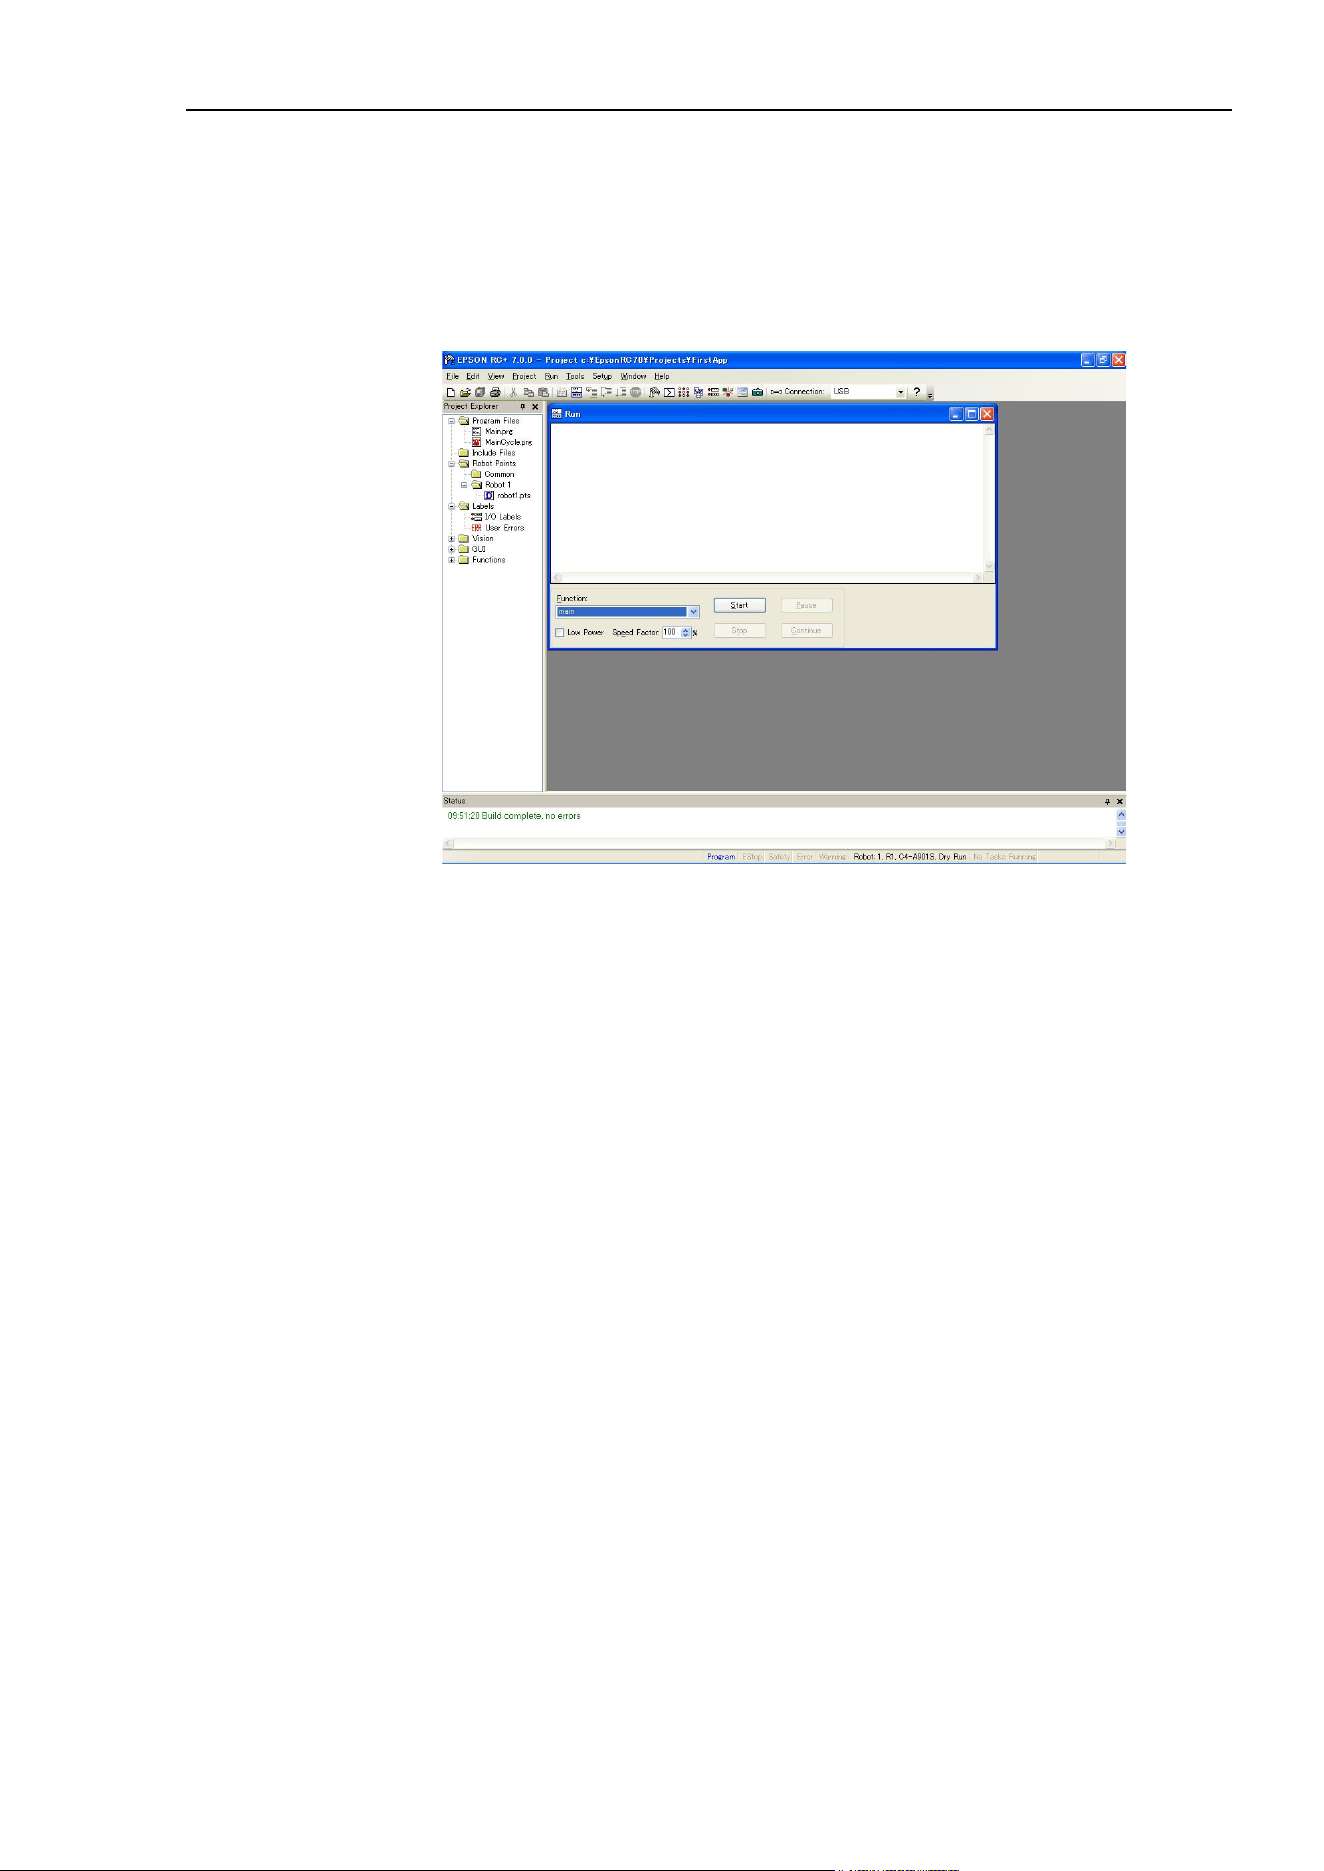
4. Operation
EPSON RC+ 7.0 (Ver.7.4) User's Guide Rev.6 35
4. Run the program
(1) Press F5 to run the program. (F5 is the hot key for the [Run Window] of the [Run]
Menu). You will see the Status window located at the bottom of the main window
showing the build operation status.
(2) During project build, your program is compiled and linked. Then communications
is established with the controller and project files are sent to the controller. If there
are no errors during build, the Run window will appear.
(3) Click the <Start> button on the [Run] window to run the program.
(4) You should see text similar to the following displayed in the [Status] window:
19:32:45 Task main started
19:32:45 All tasks stopped
On the [Run] window, you will see the output of the print statement.
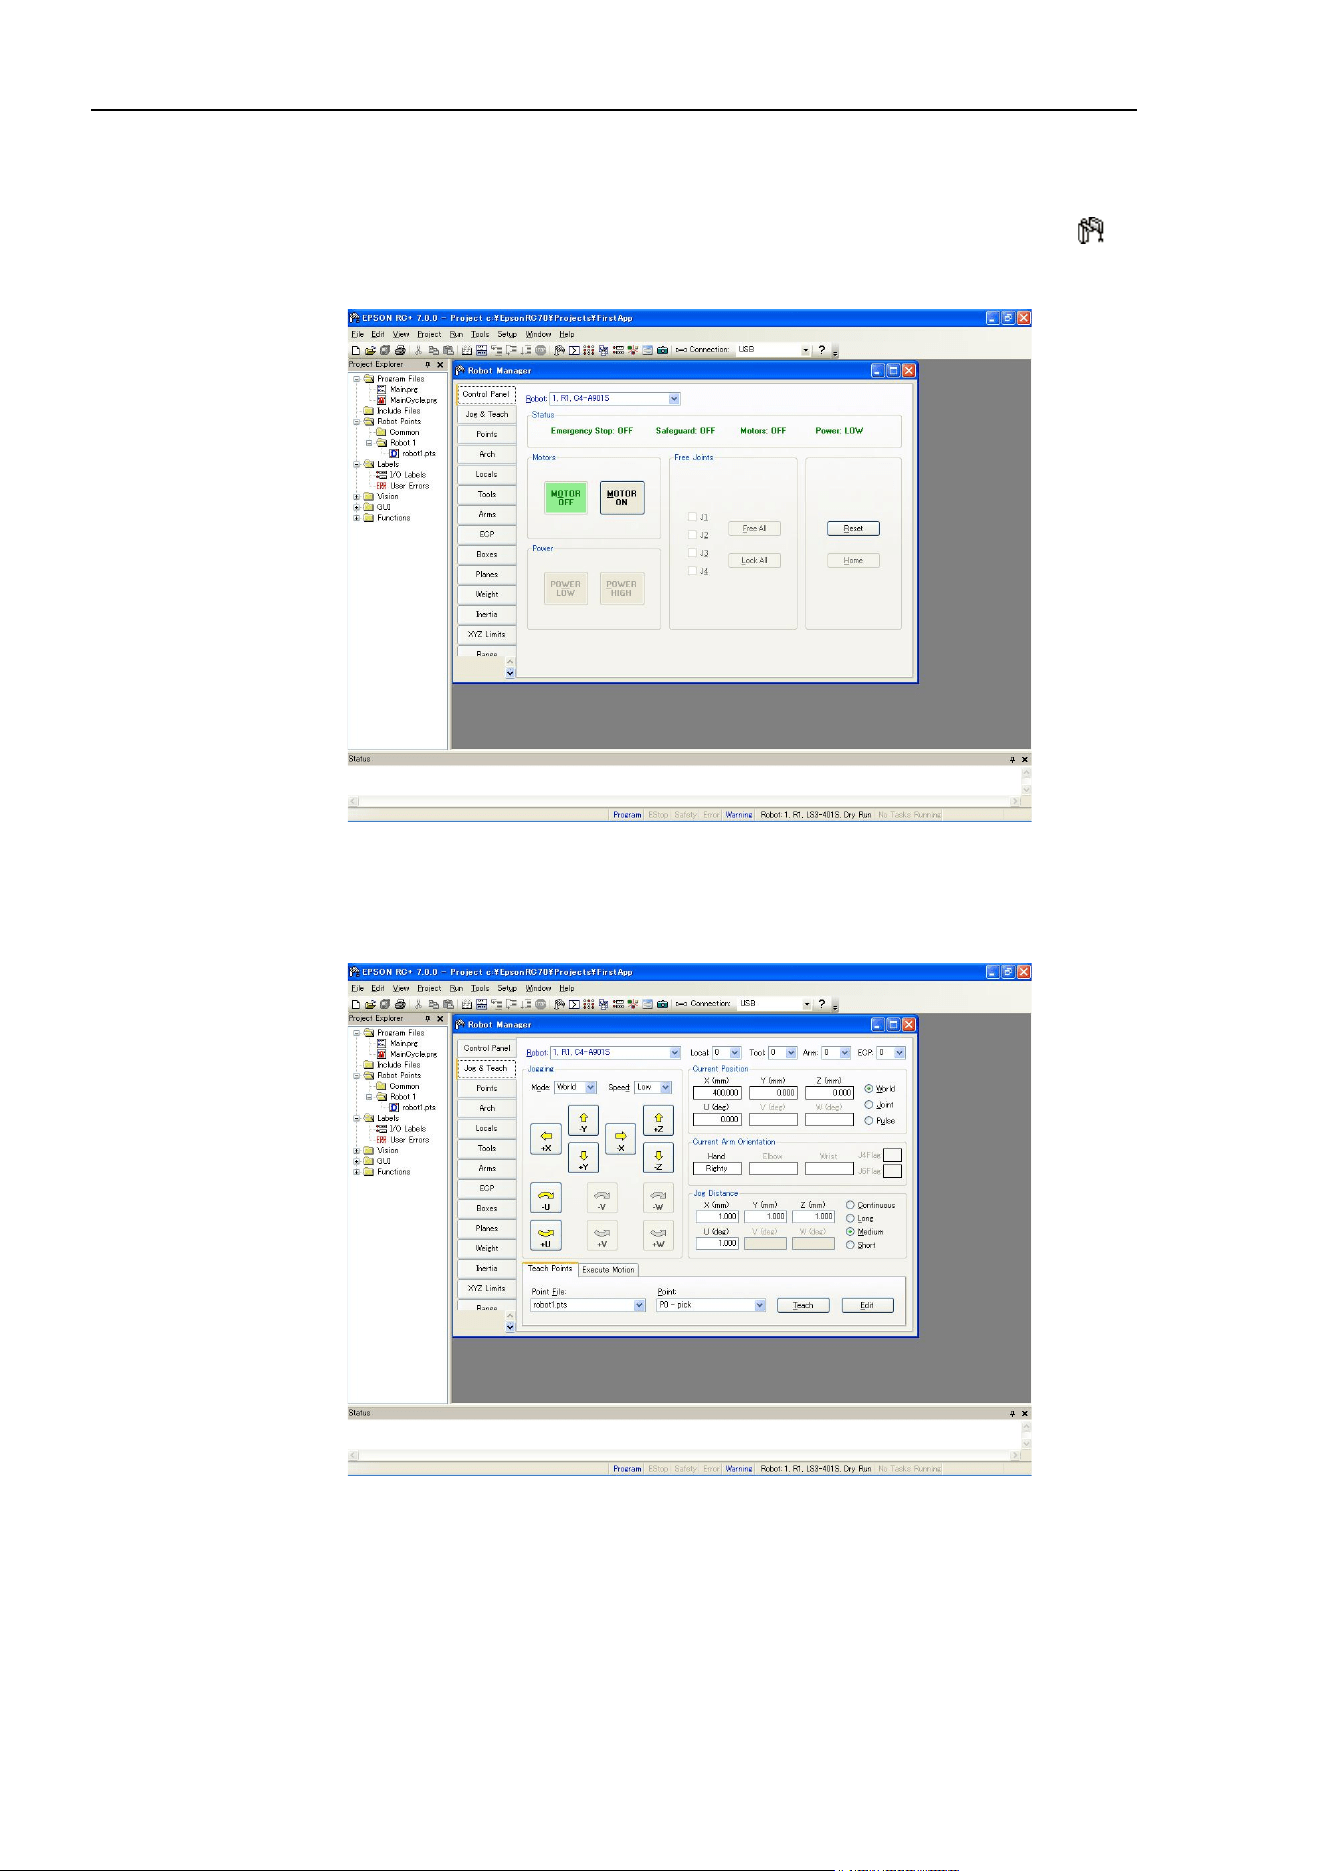
4. Operation
36 EPSON RC+ 7.0 (Ver.7.4) User's Guide Rev.6
Now let's teach some robot points and modify the program to move the robot.
5. Teach robot points
(1) Ensure that it is safe to operate the robot. Click the <Robot Manager> button on
the toolbar. You will see the [Robot Manager] window with the [Control Panel]
page displayed.
(2) Click on the <Motor On> button to turn on the robot motors. You will be prompted
to confirm the operation.
(3) Answer <Yes> to continue.
(4) Click the [Jog & Teach] tab.
(5) Click the <Teach> button in the lower right corner to teach point P0. You will be
prompted for a point label and description.
(6) Jog the robot by clicking the <+Y> jog button. Hold the button down to continue
jogging. Let go when the robot is about half way out in the work envelope.
(7) Jog the robot down by clicking the <-Z> button.
(8) Now change the current point to P1 by selecting P1 in the Point dropdown list next
to the <Teach> button.
(9) Click the <Teach> button. You will see a confirmation message to teach the point.

4. Operation
EPSON RC+ 7.0 (Ver.7.4) User's Guide Rev.6 37
(10) Answer <Yes>.
(11) Click the <+X> button to jog the robot in the +X direction.
(12) Change the current point to P2 by selecting P2 in the Point dropdown list.
(13) Click the <Teach> button. You will see a confirmation message to teach the point.
(14) Answer <Yes>.
(15) Click the <Save Project> toolbar button to save the changes.
6. Modify the program to include robot motion commands
(1) Insert three new Go statements into the Main.prg program as shown below:
Function main
Print "This is my first program."
Motor On
Go P1
Go P2
Go P0
Fend
(2) Run the program by pressing F5 and then click on the <Start> button on the Run
window.
(3) The robot should move to each of the points you taught.
7. Modify the program to change speed of robot motion commands
(1) Insert the Power, Speed, and Accel commands as shown in the program below:
Function main
Print "This is my first program."
Motor On
Power High
Speed 50
Accel 50, 50
Go P1
Go P2
Go P0
Fend
(2) Run the program by pressing F5
(3) Click on the <Start> button on the Run window.
The robot should go to each of the points you taught at 50% speed, acceleration,
and deceleration. The Power High statement enables your program to run the robot
at high (normal) power, which in turn allows the robot speed and acceleration to be
increased.

4. Operation
38 EPSON RC+ 7.0 (Ver.7.4) User's Guide Rev.6
8. Backup the project and system configuration
Even though this is only a sample project, we will backup the project and controller
configuration. This is easy to do with EPSON RC+ 7.0. It is important that you keep
regular backups of your applications on an external media such as a USB memory key.
Follow these steps to backup the project and system configuration:
(1) From the [Project] menu, select [Copy].
(2) Change the [Destination Drive] to an arbitrary drive.
(3) Click <OK>. The project will be copied to the external media.
(4) From the [Tools] menu, select [Controller].
(5) Click on the <Backup Controller> button.
(6) Select the arbitrary drive.
(7) Click <OK>. The system configuration will be backed up on the external media.
Now that you have written your first program, you should read 7.1.1 Creating the simplest
application.
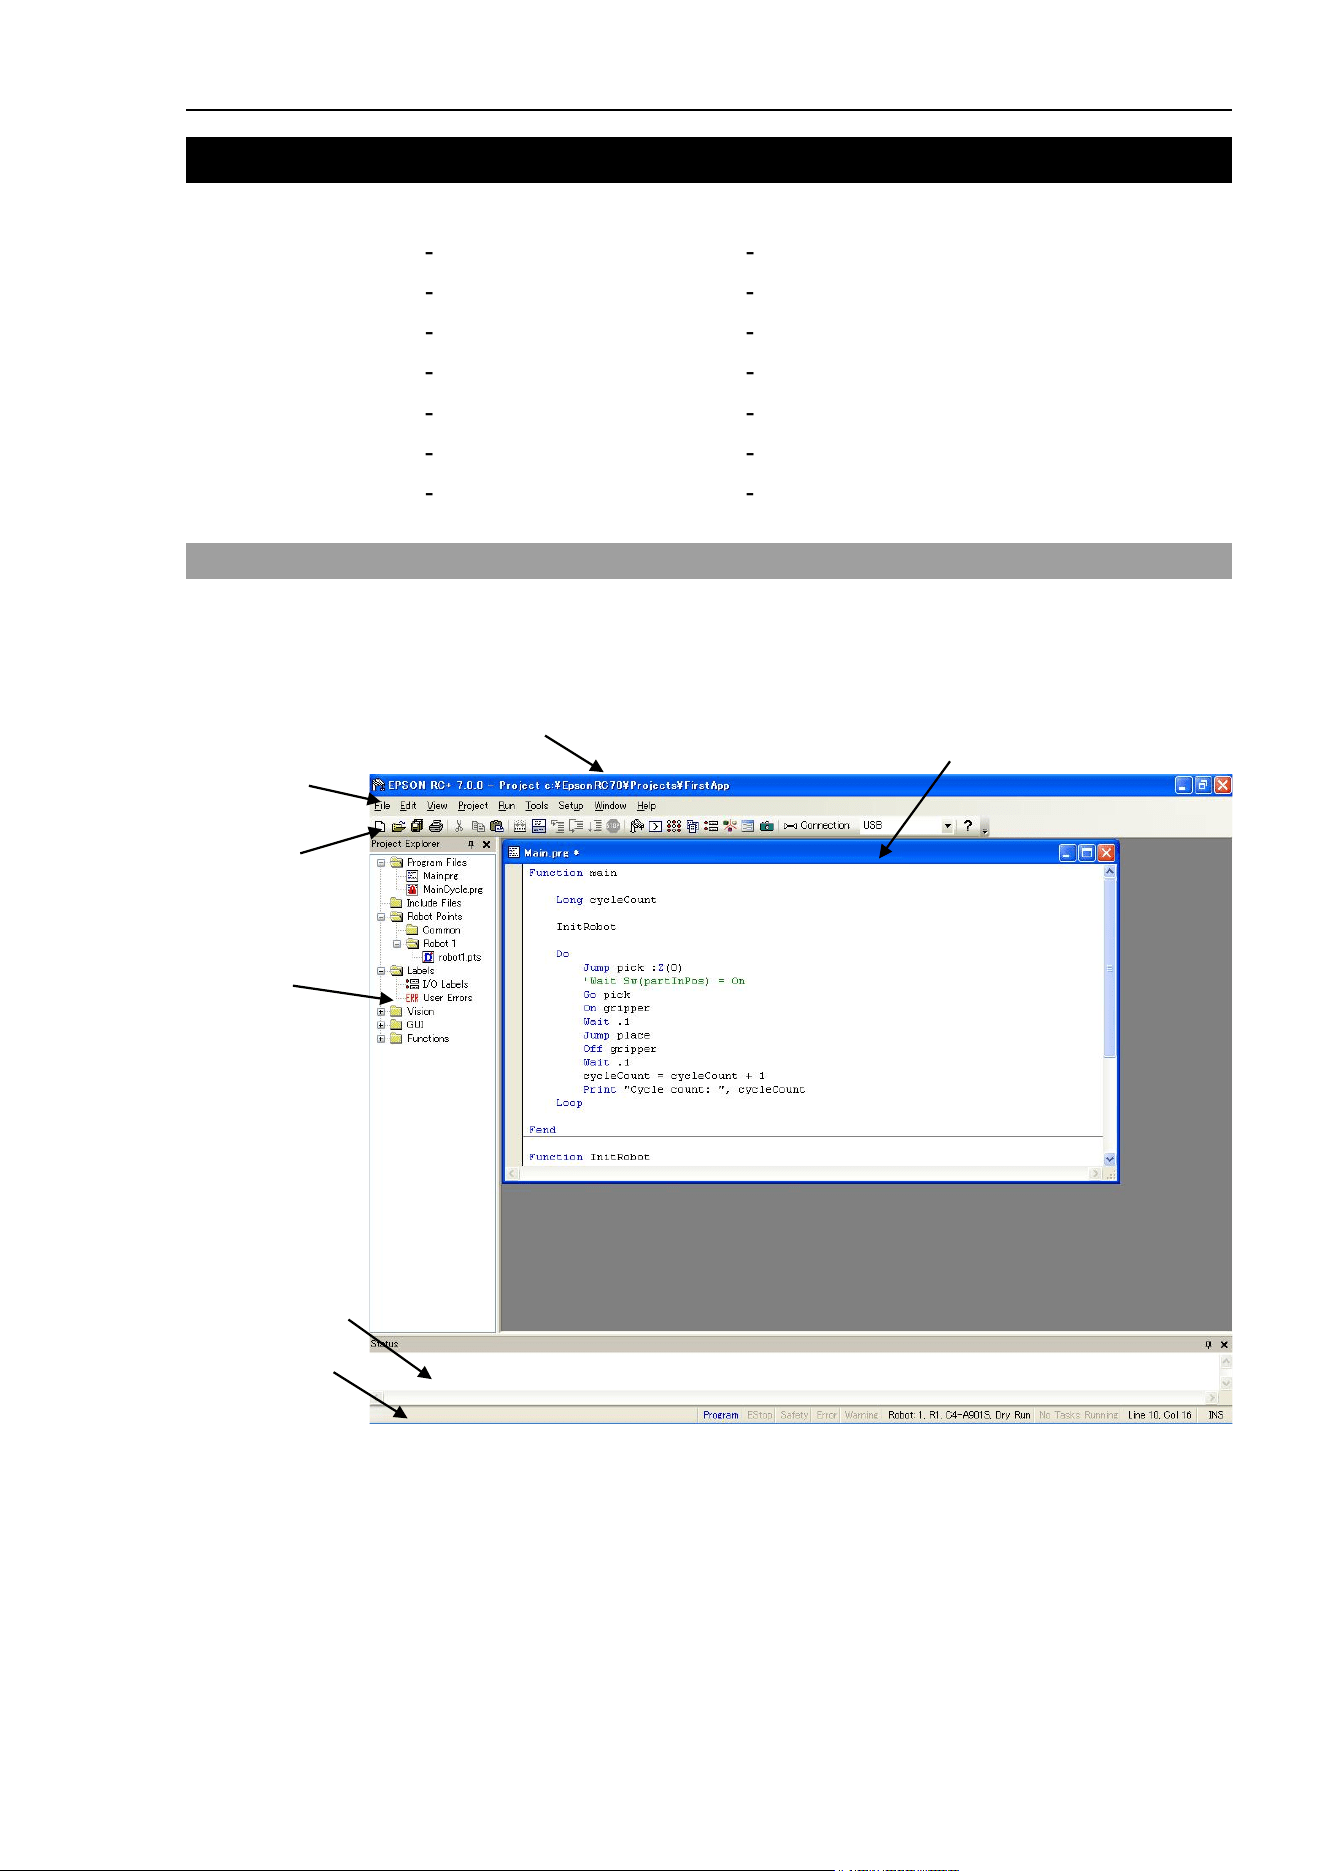
5. The EPSON RC+ 7.0 GUI
EPSON RC+ 7.0 (Ver.7.4) User's Guide Rev.6 39
5. The EPSON RC+ 7.0 GUI
The chapter contains information on the EPSON RC+ 7.0 GUI.
Overview
Display Menu
Project Explorer Pane
Project
Status Window Pane
Run
Status Bar
Tools
Online Help
Setup
File Menu
Window
Edit Menu
Help
5.1 GUI Overview
EPSON RC+ 7.0 is a multiple document interface (MDI) application. There is one main
parent window and several child windows which can be opened simultaneously. The main
window has a menu bar, tool bar, and status bar, as shown below. In addition, there is a
Project Explorer pane and Status Window pane.
Main Window
Child Window
Menu Bar
Tool Bar
Project
Explorer
Status Pane
Status Bar
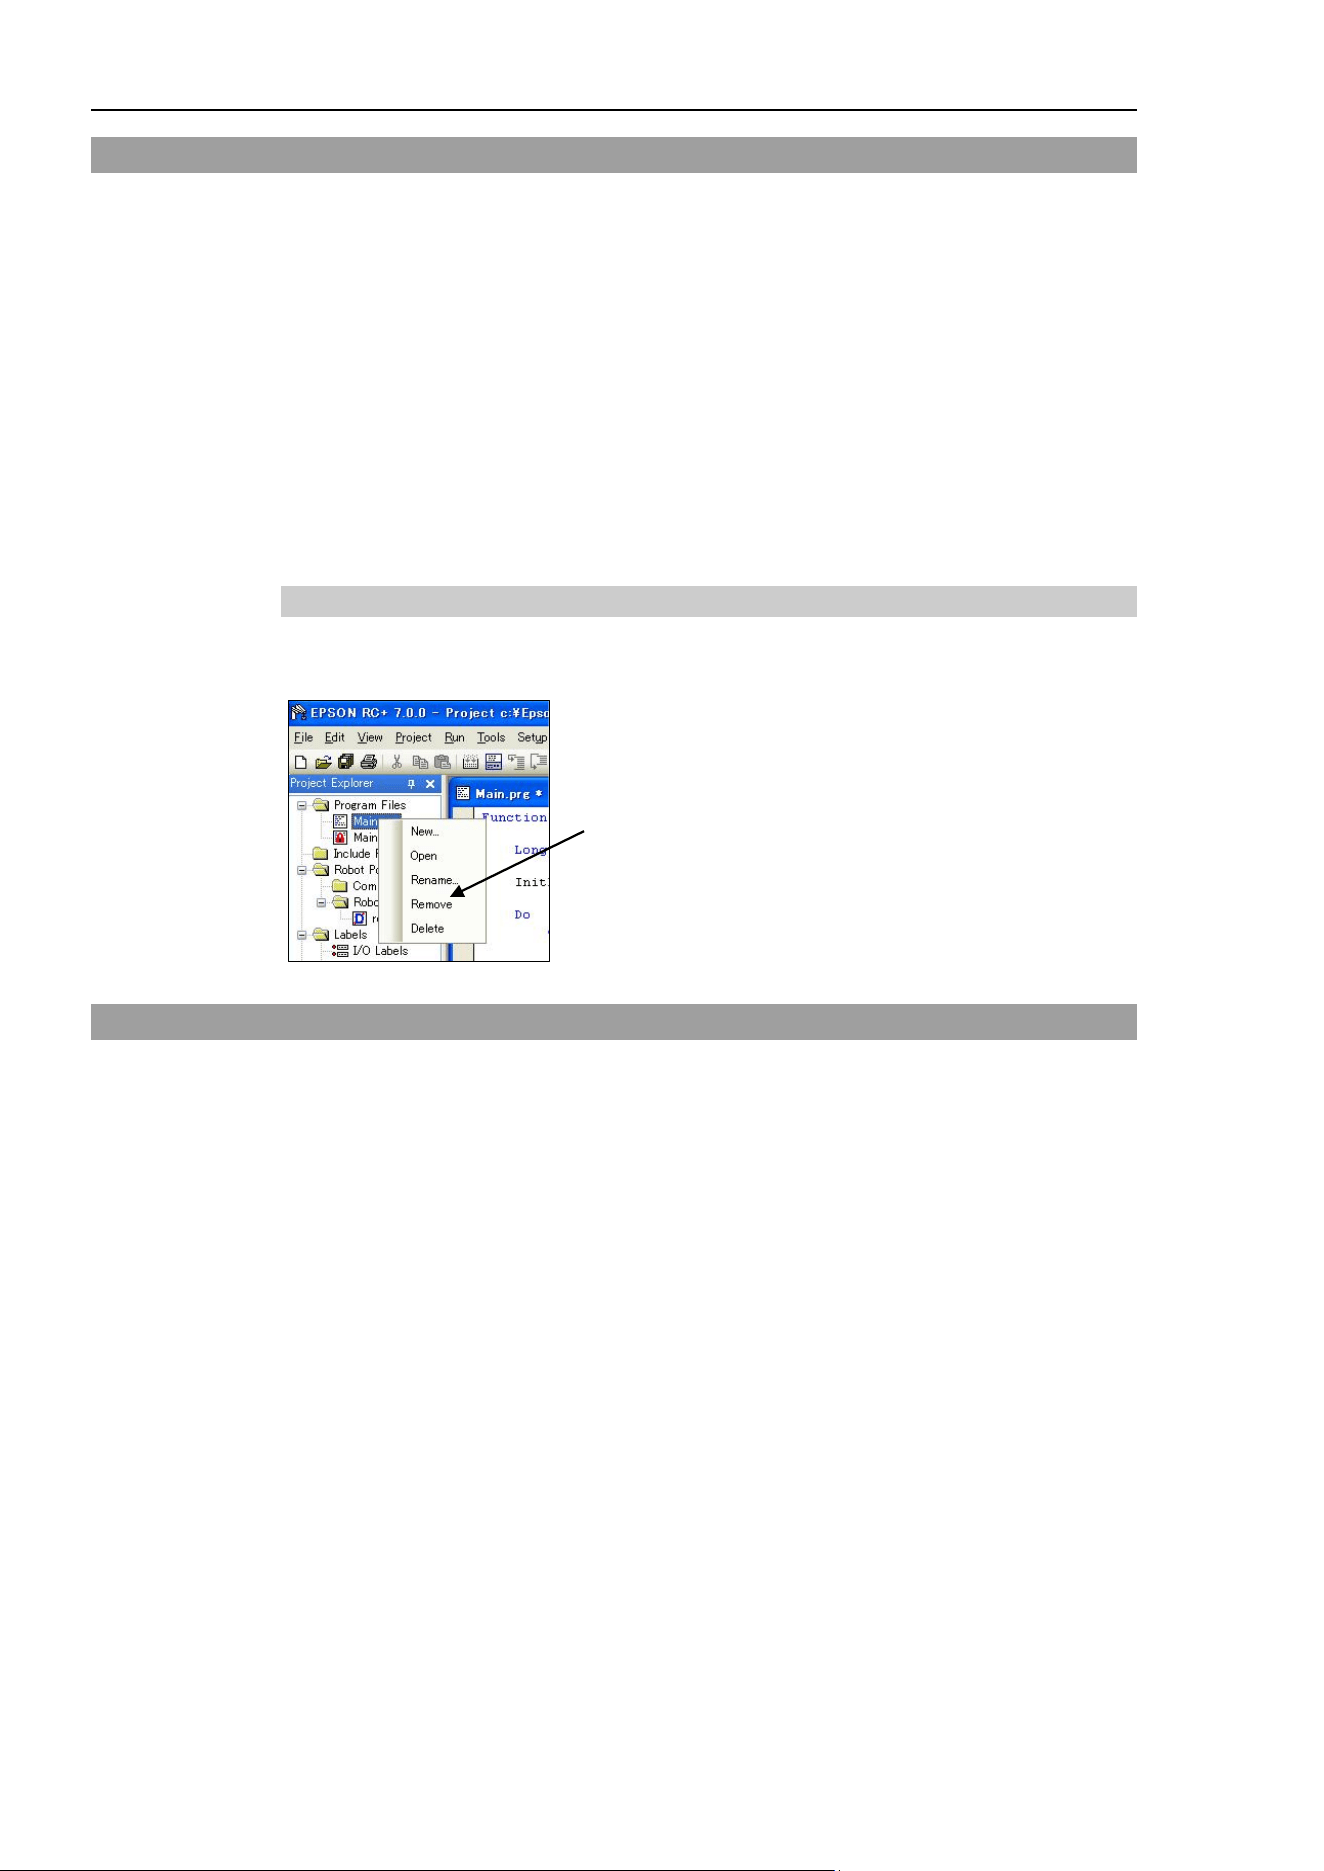
5. The EPSON RC+ 7.0 GUI
40 EPSON RC+ 7.0 (Ver.7.4) User's Guide Rev.6
5.2 Project Explorer Pane
The Project Explorer pane enables you to quickly open any file in the current project or
jump to any function. The project files and functions are organized in a sorted tree
structure.
Open a file or jump to a function : Double-click on the item.
Hide the Project Explorer : Click the X button on the bar above the pane.
Show the Project Explorer : Select Project Explorer from the View Menu.
Resize the Project Explorer : Move the mouse cursor over the right side of the pane,
then drag the pane right or left to the desired width.
You can move the Project Explorer pane to either the left or right side of the main window.
To move the pane, click down on the bar above the pane, then drag to either the left or
right side of the main window and release the mouse button.
Context Menu
The Project Explorer Pane has a context menu for various operations for elements in the
project tree. To access the context menu, right click on an item in the project tree.
Context menu
5.3 Status Window Pane
The status pane displays status messages, such as project build status, system errors and
warnings, etc.
Hide the Status pane : Click the X button on the bar above the pane.
Show the Status pane : Select Status Window from the View Menu.
Resize the Status pane : Move the mouse cursor over the top edge of the pane,
and then drag the top edge up or down.
The Status pane is always located at the bottom of the main window and cannot be moved.
If the Status pane is closed and an error message is displayed on the status pane, such as
during project build, the Status pane will automatically be opened so that the error
message can be seen.
NOTE

5. The EPSON RC+ 7.0 GUI
EPSON RC+ 7.0 (Ver.7.4) User's Guide Rev.6 41
5.4 Status Bar
The status bar located at the bottom of the main window displays the following:
Message area Displays the syntax error for the current line and system
messages.
Operation Mode status Indicates the controller operation mode.
Emergency Stop status Indicates if emergency stop is active.
Safeguard status Indicates if one or more safeguard circuits is open.
Error status Indicates if the controller is in the error state. Put the mouse
cursor over the Error status area to see the warning message.
Warning status Indicates if there is a warning. Put the mouse cursor over
the Warning status area to see the warning message.
Current robot Displays the currently selected robot number, name, type
number, and the dry run status.
Tasks running status Indicates that one or more tasks are running.
Current Line and Column When a program editor window is active, the current line
and column are displayed.
INS / OVR status Indicates insert or overtype mode.
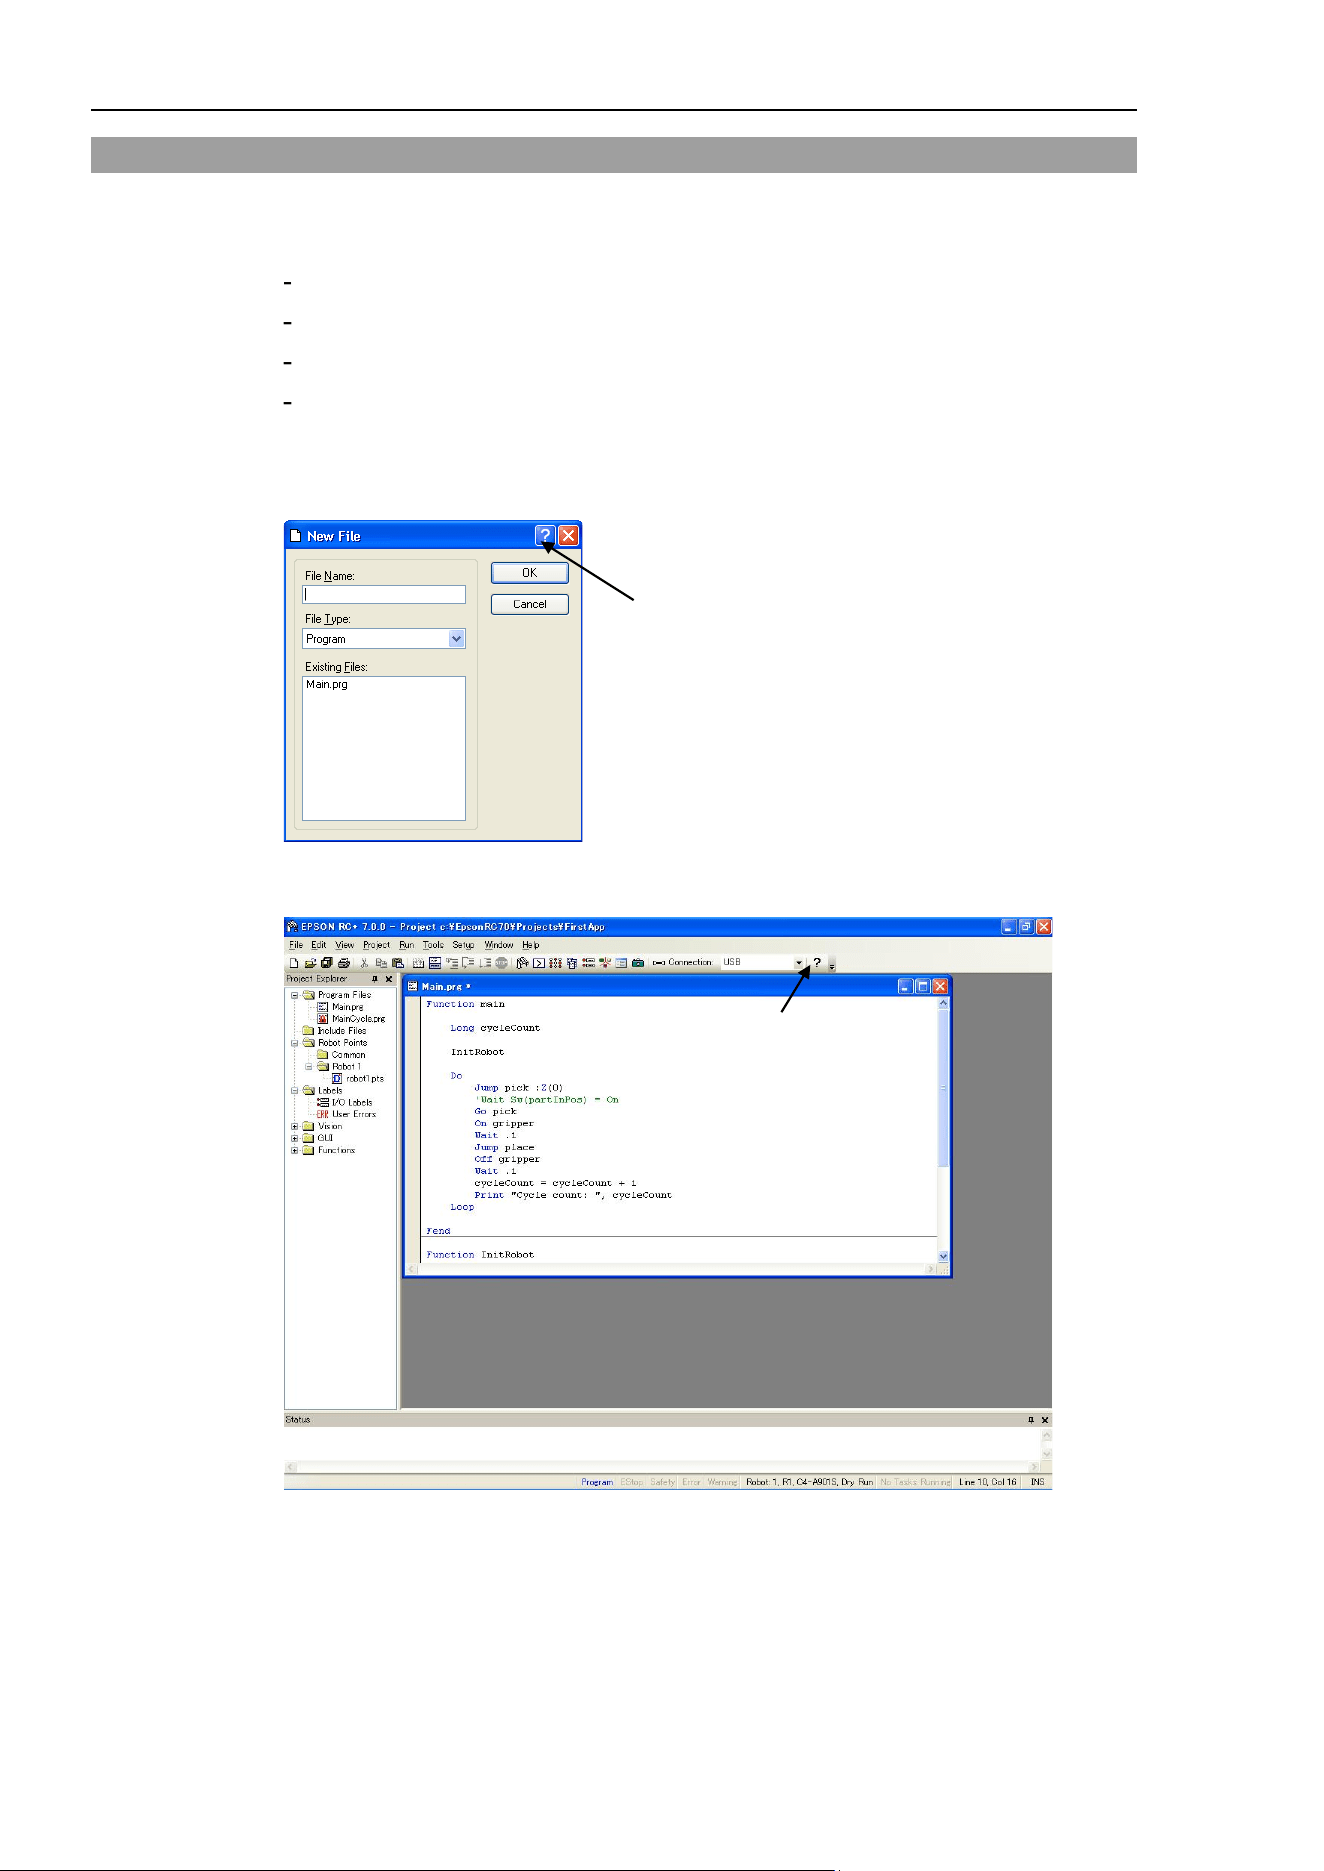
5. The EPSON RC+ 7.0 GUI
42 EPSON RC+ 7.0 (Ver.7.4) User's Guide Rev.6
5.5 Online Help
EPSON RC+ 7.0 has an extensive context sensitive help system.
There are several methods to get help.
Select [Contents] from the [Help] menu to browse help topics.
Select [Index] from the [Help] menu to enter the name of a specific topic.
Select [Search] from the Help Menu to search for a specific topic.
When editing programs, press F1 with the caret in the keyword of interest.
When a dialog is open, press F1 or click the Help button. For dialogs, the Help button is
located in the window title bar on the right side and is shown as a question mark icon as
shown below.
Help button for a dialog
For MDI child windows, the Help button is located on the main toolbar and is also shown
as a question mark icon as shown below.
Help button for the
active MDI child window
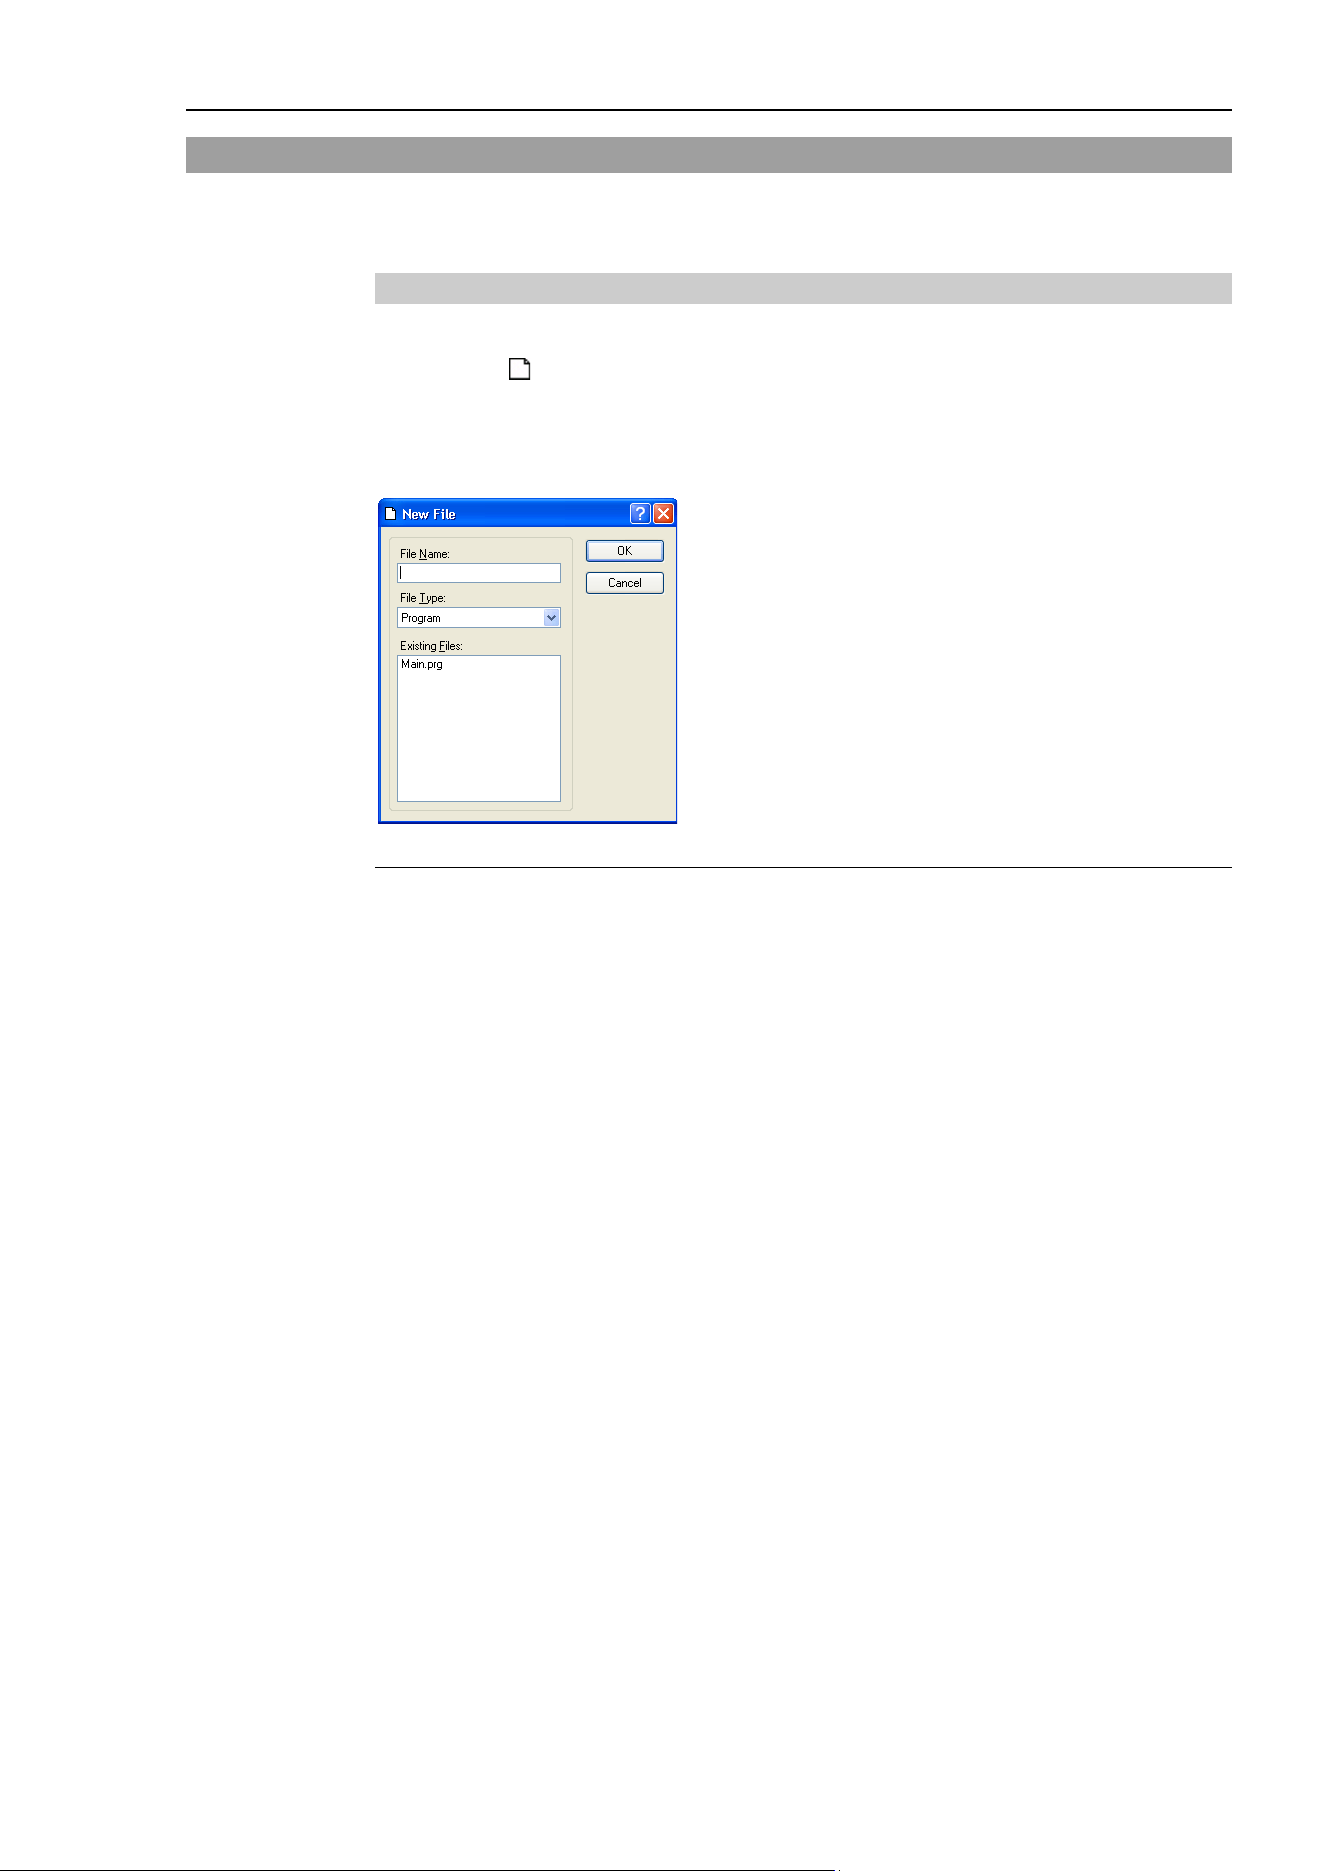
5. The EPSON RC+ 7.0 GUI
EPSON RC+ 7.0 (Ver.7.4) User's Guide Rev.6 43
5.6 [File] Menu
The EPSON RC+ 7.0 File Menu includes commands for managing and printing files in the
current project.
5.6.1 New Command (File Menu)
Shortcuts
Toolbar:
Keys: Ctrl + N
The New command is used to add new files to the current project. When the New
command is selected, the New File dialog is opened.
Item Description
File Name Enter a name for the new file in this box. If you supply a valid file
extension, the File Type selection will change to match the extension.
For a file name, two byte characters such as Japanese, Chinese
characters are not allowed.
Up to 24 characters can be input.
File Type Use this dropdown list to select Program, Include or Point file.
Existing Files Shows the files for the selected type currently in the Project folder.
OK Click OK when you are ready to create the new file.
Cancel Cancels the operation.
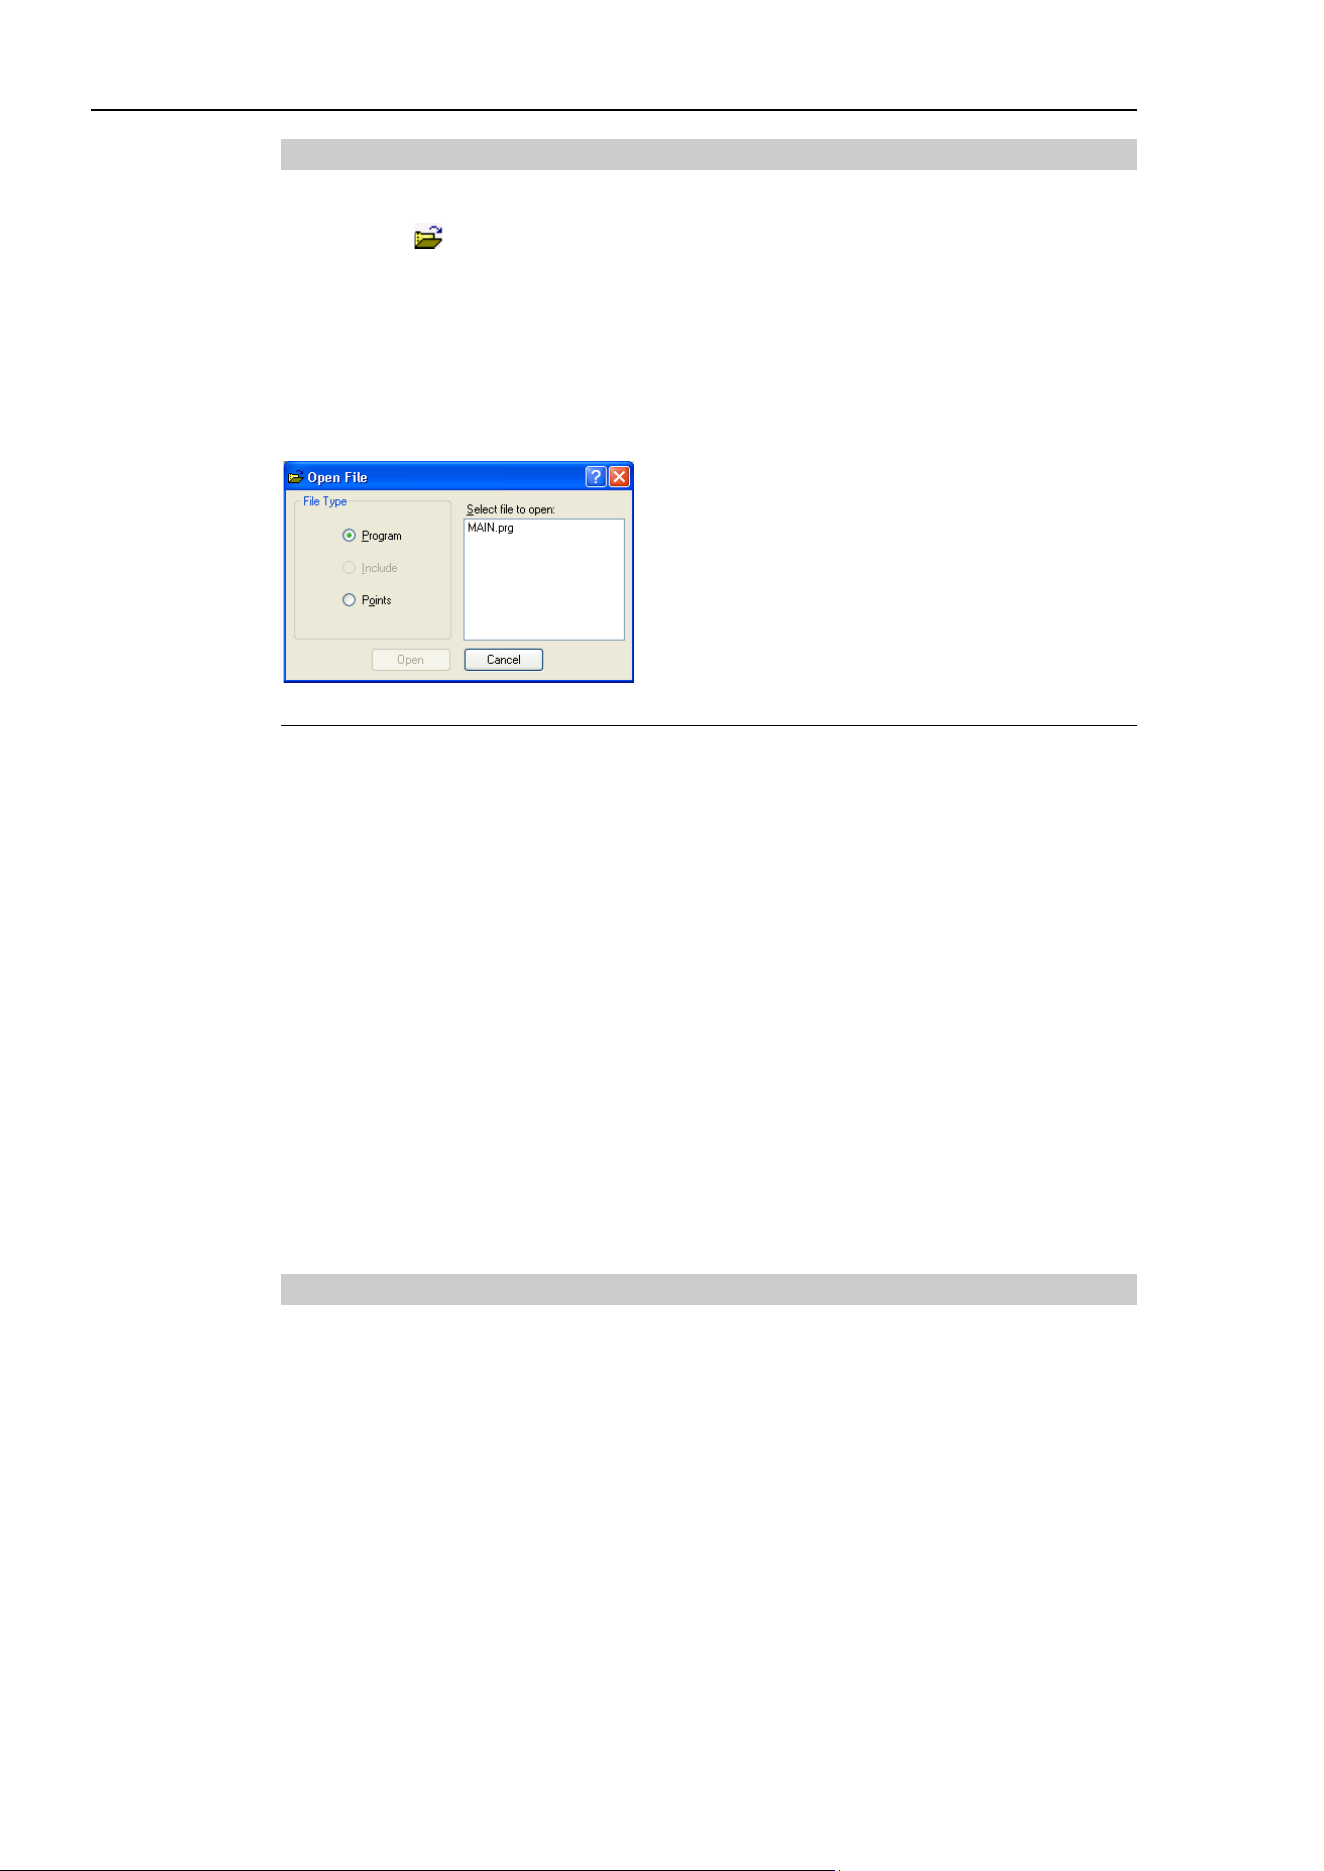
5. The EPSON RC+ 7.0 GUI
44 EPSON RC+ 7.0 (Ver.7.4) User's Guide Rev.6
5.6.2 Open Command (File Menu)
Shortcuts
Toolbar:
Keys: Ctrl + O
Open one or more files in the current project for editing. You can open program files,
include files, or point files.
If there is a file in the current project folder (as shown in the Edit Project dialog box) and
the file is not in the current project, you will not be able to open the file. You must add the
file to the project before you can open it. This also applies to include files and point files.
Item Description
Program Select this radio button to show a list of program files in the
current project.
Include Select this radio button to show a list of include files in the current
project.
Points Select this radio button to show a list of point files in the current
project.
Select file to open Click on the file name you want to open. You can select more than
one file by using the Ctrl key or Shift key. The Ctrl key allows
you to select or deselect any file. The Shift key allows you to
select a group of files.
Open Opens the selected file(s).
Cancel Cancels the open operation.
You can also double click on a file name in the [Select file to open] list box to open the
file without having to choose the <OK> button.
5.6.3 Close Command (File Menu)
Shortcuts
Keys: Ctrl + D
Close the currently active window.
Any of the windows can be closed with this command: Programs, Include files, Point files,
Command Window, Run window, I/O Label Editor, user errors.
You can also close a window or dialog box by double clicking on the control box button
located in the upper left corner of the window or dialog box.
TIP
TIP
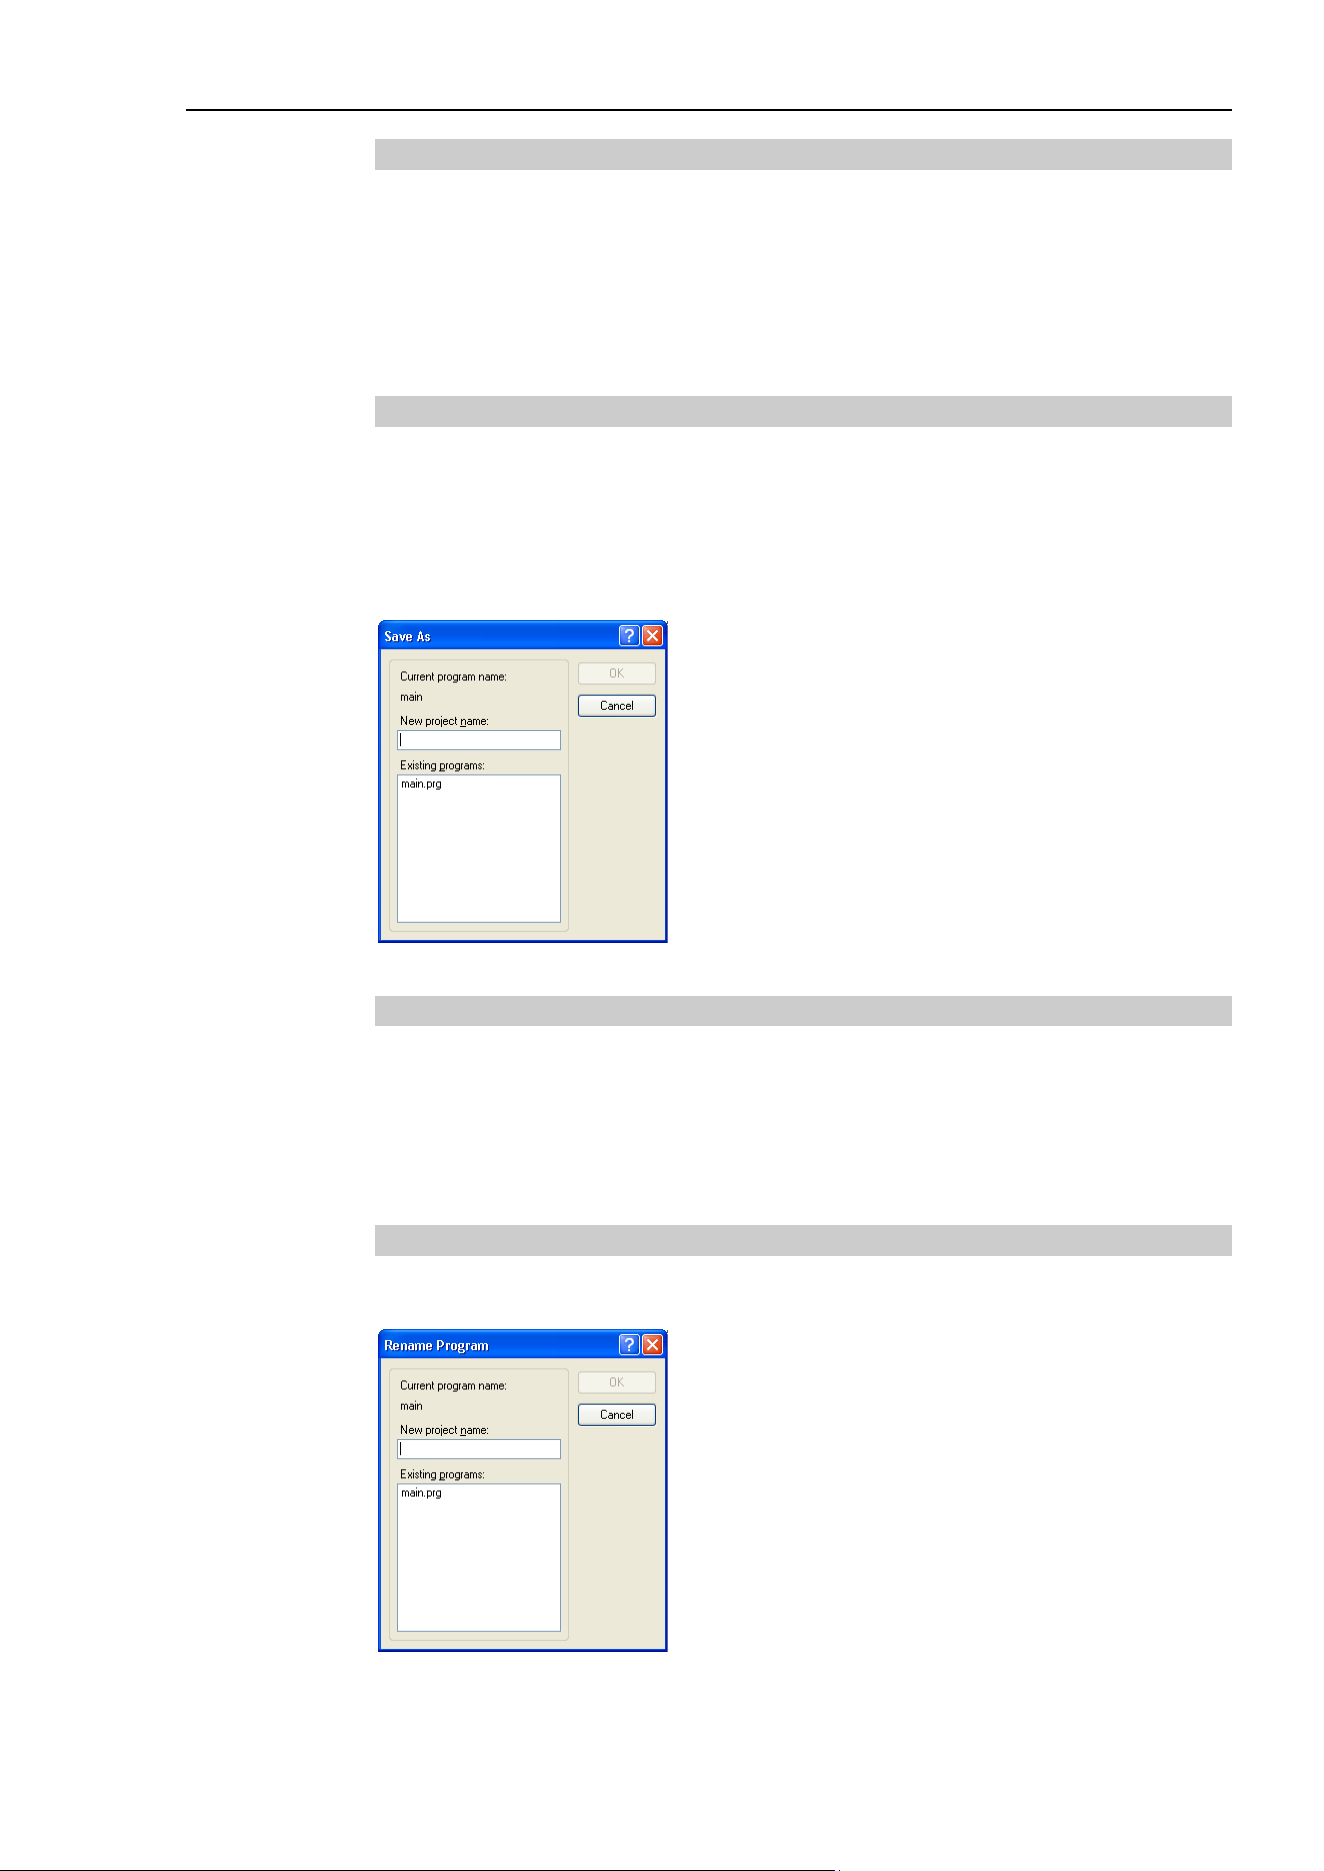
5. The EPSON RC+ 7.0 GUI
EPSON RC+ 7.0 (Ver.7.4) User's Guide Rev.6 45
5.6.4 Save Command (File Menu)
Shortcuts
Keys: Ctrl + S
The [Save] command writes the current file to disk. The current file can be a program file,
include file, points file, I/O label editor, etc. This command is disabled if the current file
does not need to be saved.
5.6.5 Save As Command (File Menu)
Save the program, include file, or point file in the currently active window with a new file
name. The original file will be removed from the project but will remain on the disk. The
new name will be used throughout the current project in place of the old name.
If you use [Save As] on an include file, you must rename the file in each of your #include
statements that refer to it. For a file name, two byte characters such as Japanese, Chinese
characters are not allowed.
5.6.6 Restore Command (File Menu)
Restores the currently active program, include file, I/O labels, user errors, or point files
from disk.
Use this function to change a document to the state it was in since last saved.
You will be prompted to confirm this operation.
5.6.7 Rename Command (File Menu)
Use [Rename] to change the name of the program, include file, or point file you are
currently editing.
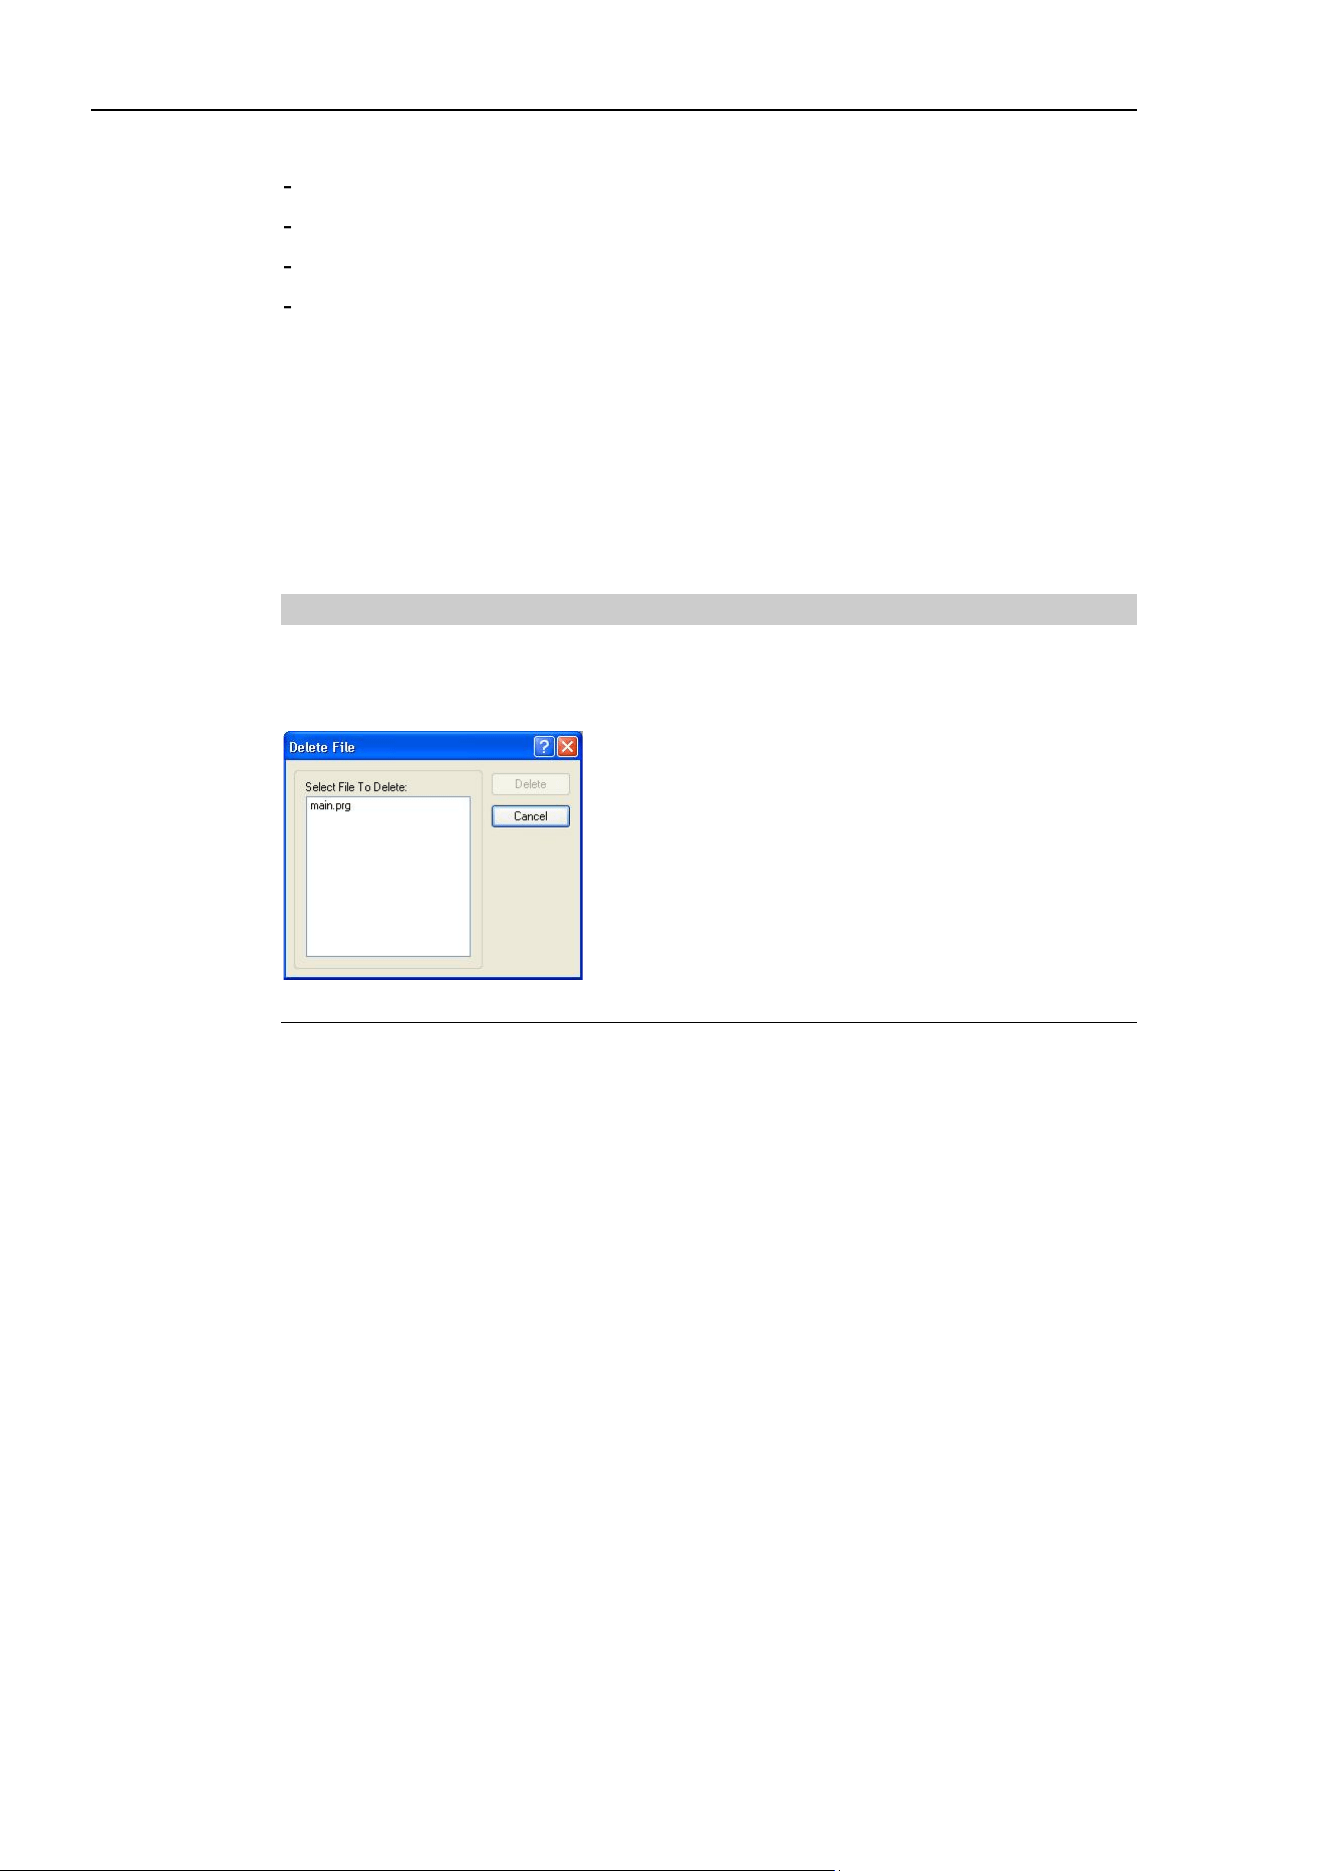
5. The EPSON RC+ 7.0 GUI
46 EPSON RC+ 7.0 (Ver.7.4) User's Guide Rev.6
To rename a file
Click anywhere on the program window
Select the Open command from the File Menu
Select the Window from the Window Menu
Select from the Window Menu list
Select Rename from the File Menu. Type in a new name for the file and click <OK>.
The new file name cannot be the same as the existing files. You will get an error message
if you enter a new name that is already being used.
If you use [Rename] on an include file, you must rename the file in each of your #include
statements that refer to it.
For a file name, two byte characters such as Japanese, Chinese characters are not allowed.
5.6.8 Delete Command (File Menu)
This command allows you to delete a file in the current project folder. You can delete
program files, include files, and point files.
The file does not have to be registered in the project to delete.
Item Description
Select file to delete Click on the file name you want to delete. This file list displays
all .PRG, .INC, and .PTS files in the current project folder.
Delete Deletes the selected file. You will be prompted with a confirmation
message before the file is deleted. If the file is currently open, it will
be closed and removed from the current project before it is deleted
from disk.
Cancel Cancels the delete operation.
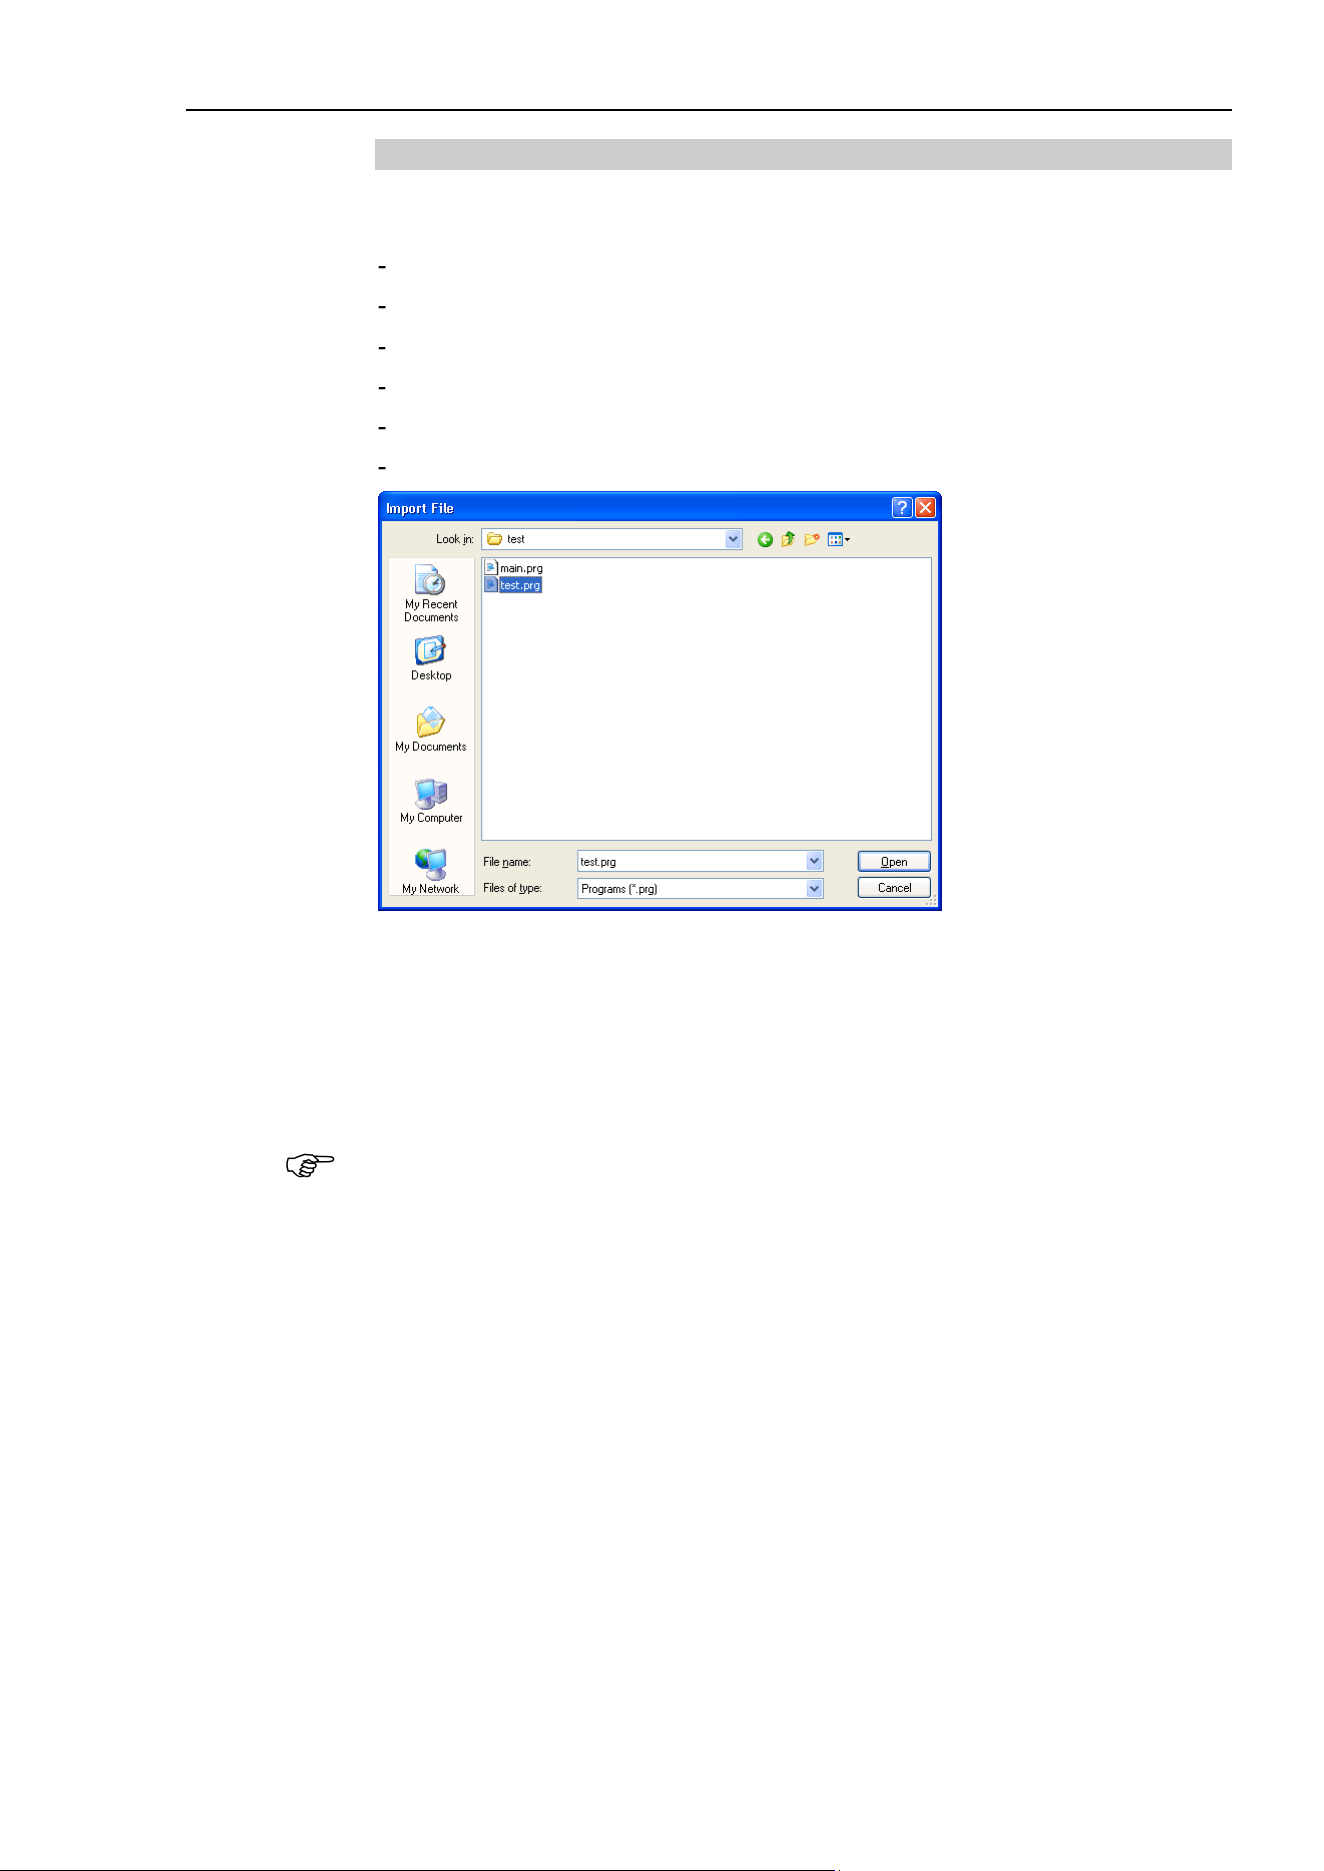
5. The EPSON RC+ 7.0 GUI
EPSON RC+ 7.0 (Ver.7.4) User's Guide Rev.6 47
5.6.9 Import Command (File Menu)
Import a file from other EPSON RC+ 7.0 projects. Use this command to import program
files, include files, point files, I/O labels, user errors, and macros.
Program file names for importing must have a .PRG extension.
Include file names for importing must have a .INC extension.
Point file names for importing must have a .PTS extension.
I/O labels must have the file name IOLABEL.DAT
User errors must have the file name USERERRORS.DAT.
Macros must have the .MAC extension.
To import a file
1. Select the file type from the [File Type] list box.
2. Navigate to the file you want to import.
3. Click <Open> to continue. If a file name is already used in the project folder, you will
be prompted to confirm overwrite. The file will then be copied to the current project's
folder.
If you need to import files from previous versions of EPSON RC+ or from SPEL for
Windows 2.0, you must first import the project using [Project]-[Import], which converts
the point files and label files into EPSON RC+ 7.0 formats. Then you can use File Import
to import the desired files.
NOTE
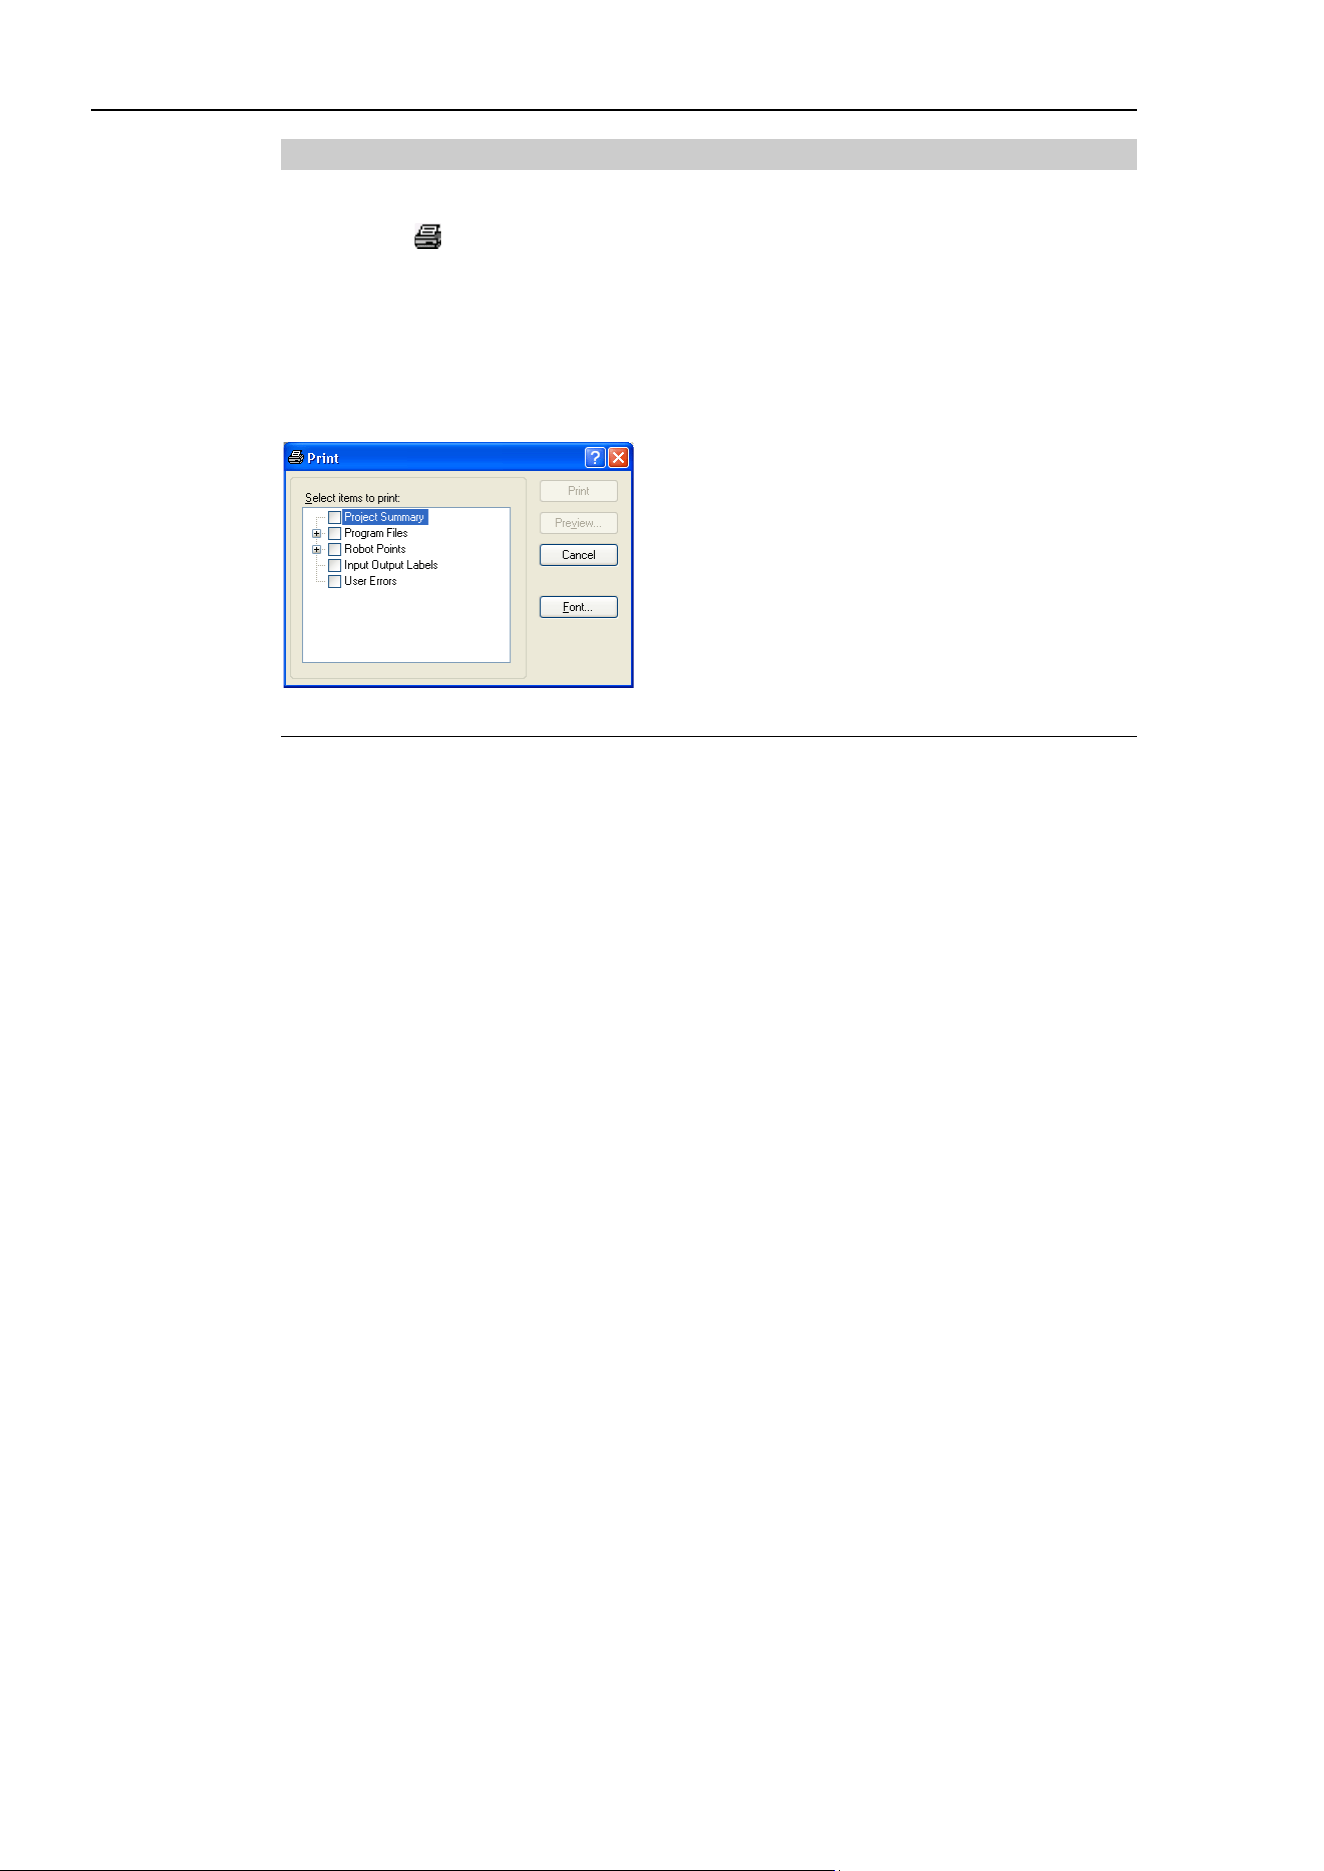
5. The EPSON RC+ 7.0 GUI
48 EPSON RC+ 7.0 (Ver.7.4) User's Guide Rev.6
5.6.10 Print Command (File Menu)
Shortcuts
Toolbar:
Keys: Ctrl + P
This command opens the Print dialog box. You can print programs, include files, point
files, I/O labels, and user errors. Also you can print out a project summary.
Each document is printed with a header that includes the project name, product name, file
name, date and time, and page number.
Item Description
Select items to print
Check the items in the tree that you would like to print out.
Project Summary
Select this check box to print a summary of the programs and
points used in the current project.
Program Files
Select this check box to print all program files, or click on the +
button to view all program files and check the ones you want
printed.
Include Files
Select this check box to print all include files, or click on the +
button to view all include files and check the ones you want
printed. This check box is not shown if there are no include files
in the current project.
Robot Points
Select this check box to print all point files, or click on the +
button to view all point files and check the ones you want printed.
Input Output Labels
Select this check box to print a listing of the all of the I/O labels
used in the project.
User Errors
Prints a listing of all user errors for the current project. If either
the label or message is non
-
blank, then the error definition will be
printed.
Print
Prints the selected files. This button will be dimmed if nothing is
selected to be printed.
Preview
Preview the selected files before printing. This button will be
dimmed if nothing is selected to be printed.
Font...
Opens a dialog for selecting the printer font. The selected font is
saved for subsequent printing.
Cancel
Closes the dialog box without printing anything.
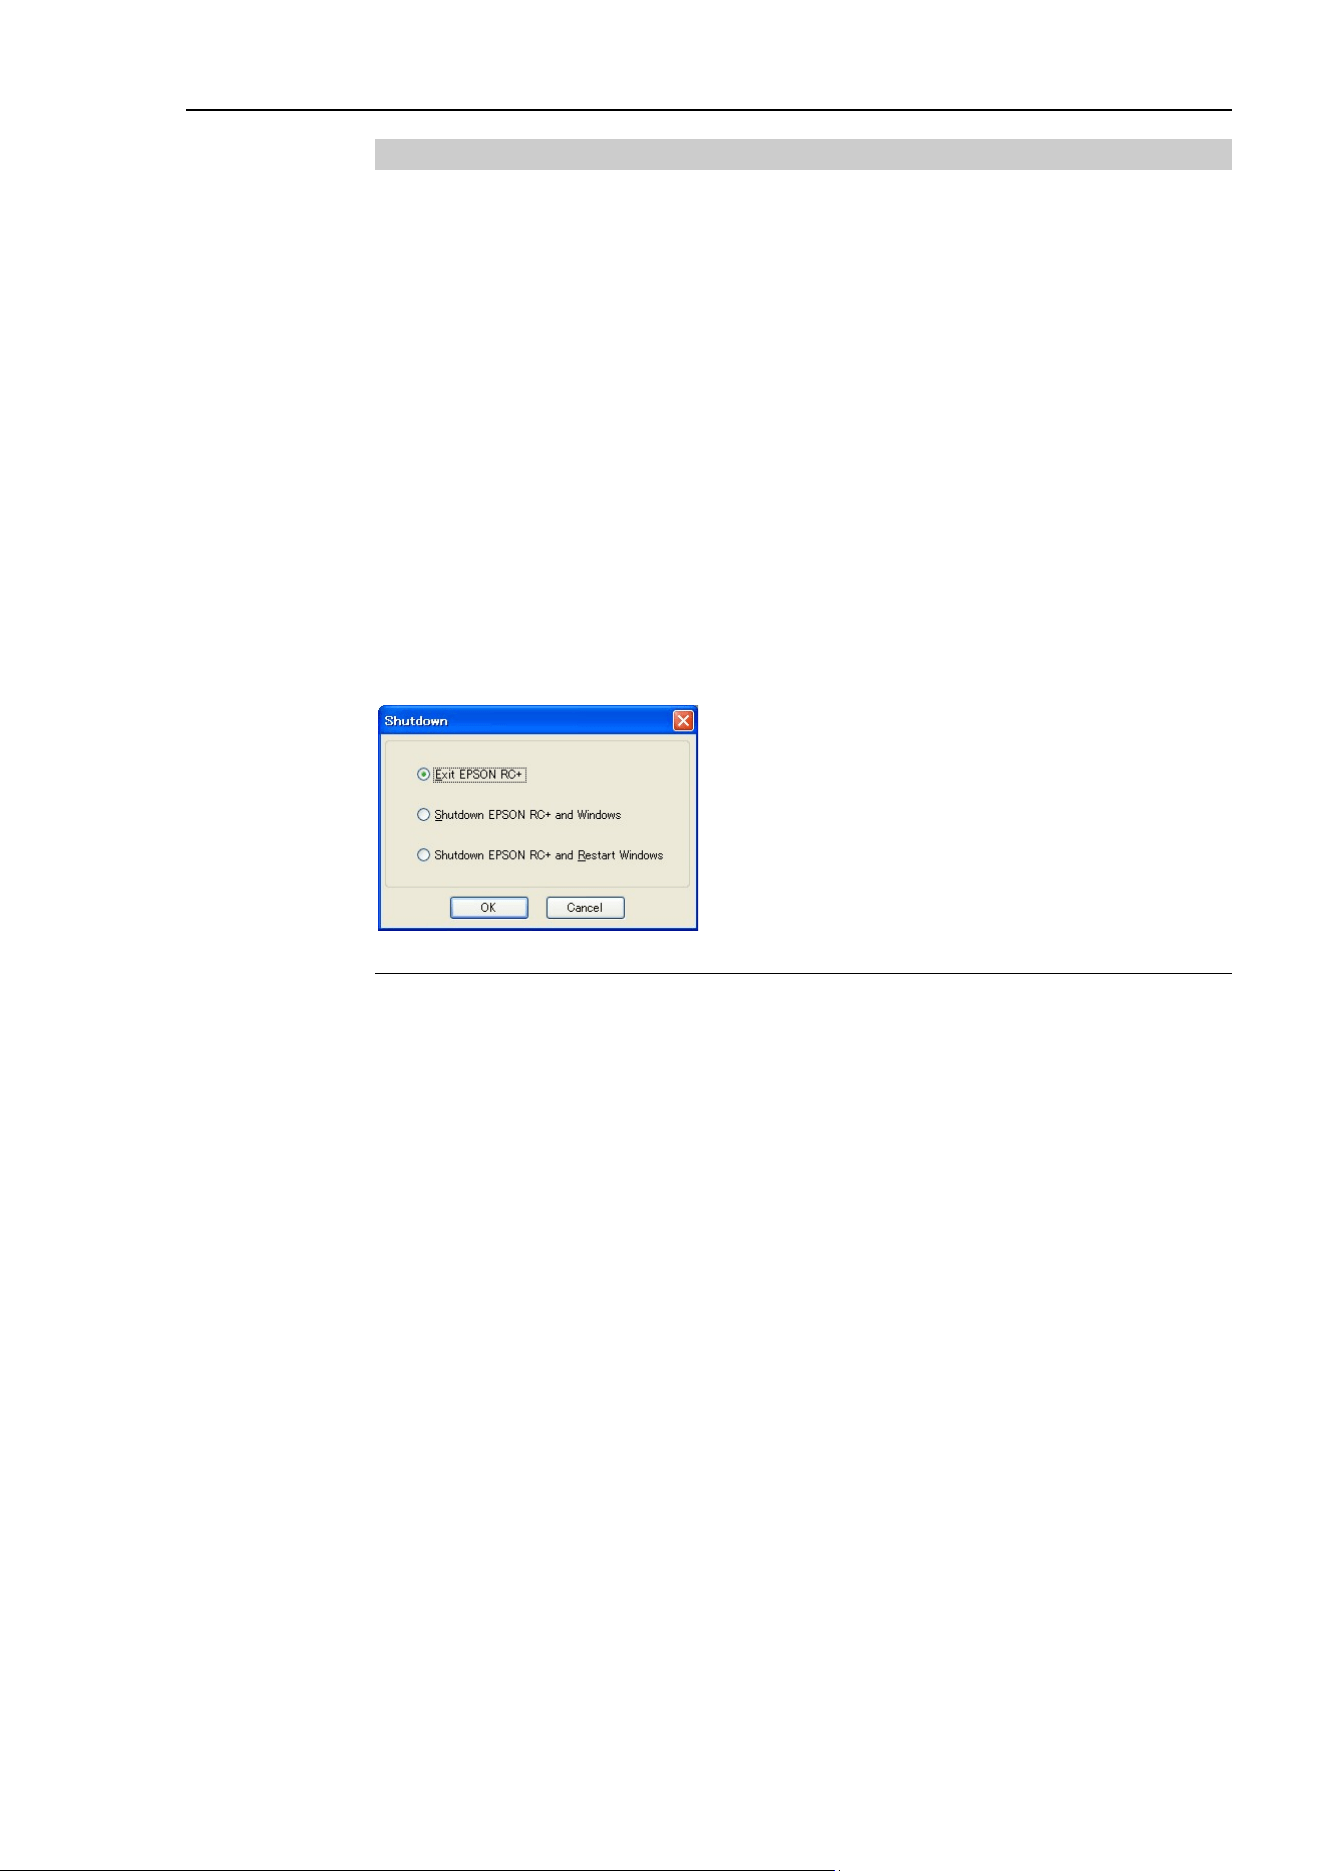
5. The EPSON RC+ 7.0 GUI
EPSON RC+ 7.0 (Ver.7.4) User's Guide Rev.6 49
5.6.11 Exit Command (File Menu)
Shortcuts
Keys: Alt + F4
Exits from EPSON RC+ 7.0.
If you are running a program from the Run Window and the control device is PC, you will
see a message that a program is running and you will not be allowed to exit. You must
stop all tasks first before you can exit.
If there are any open program files, include files, point files, I/O labels, or user point files
that have not been saved, for each file you will be prompted to save it with Yes, No, or
Cancel.
If you select <Yes>, then the file will be saved.
If you select <No>, then the program will exit without saving the files.
If you select <Cancel>, it will return to the EPSON RC+ 7.0 main window.
If the display of the dialog at EPSON RC+ 7.0 shutdown is enabled, the following dialog
will be displayed at the shutdown and you can select a termination process.
For details on the shutdown dialog, refer to 5.12.3 [Preferences] Command (Setup Menu).
Item Description
Exit EPSON RC+
Exits the EPSON RC+ 7.0.
Shutdown EPSON RC+
and Windows
Exits the EPSON RC+ 7.0 and shutdown the Windows.
Shutdown EPSON RC+
and Restart Windows
Exits the EPSON RC+ 7.0 and reboot the Windows.
OK
Executes the selected operation.
Cancel
Cancels the operation and close the dialog.

5. The EPSON RC+ 7.0 GUI
50 EPSON RC+ 7.0 (Ver.7.4) User's Guide Rev.6
5.7 [Edit] Menu
The EPSON RC+ 7.0 <Edit> menu includes commands for editing files.
You can also access the <Edit> menu by right-clicking anywhere in a program editor
window.
5.7.1 [Undo] Command (Edit Menu)
Shortcuts
Keys: Ctrl + Z
Undo the changes to the currently active program since it was open.
5.7.2 [Redo] Command (Edit Menu)
Shortcuts
Keys: Ctrl+Y
Redo the previous undo.
5.7.3 [Cut] Command (Edit Menu)
Shortcuts
Toolbar:
Keys: Ctrl + X
Copies the current selection into the Clipboard and then deletes the selection.
5.7.4 [Copy] Command (Edit Menu)
Shortcuts
Toolbar:
Keys: Ctrl + C
Copies the current selection into the Clipboard.
5.7.5 [Paste] Command (Edit Menu)
Shortcuts
Toolbar:
Keys: Ctrl + V
Puts the contents of the Clipboard into the currently active document starting at the
insertion point.
TIP
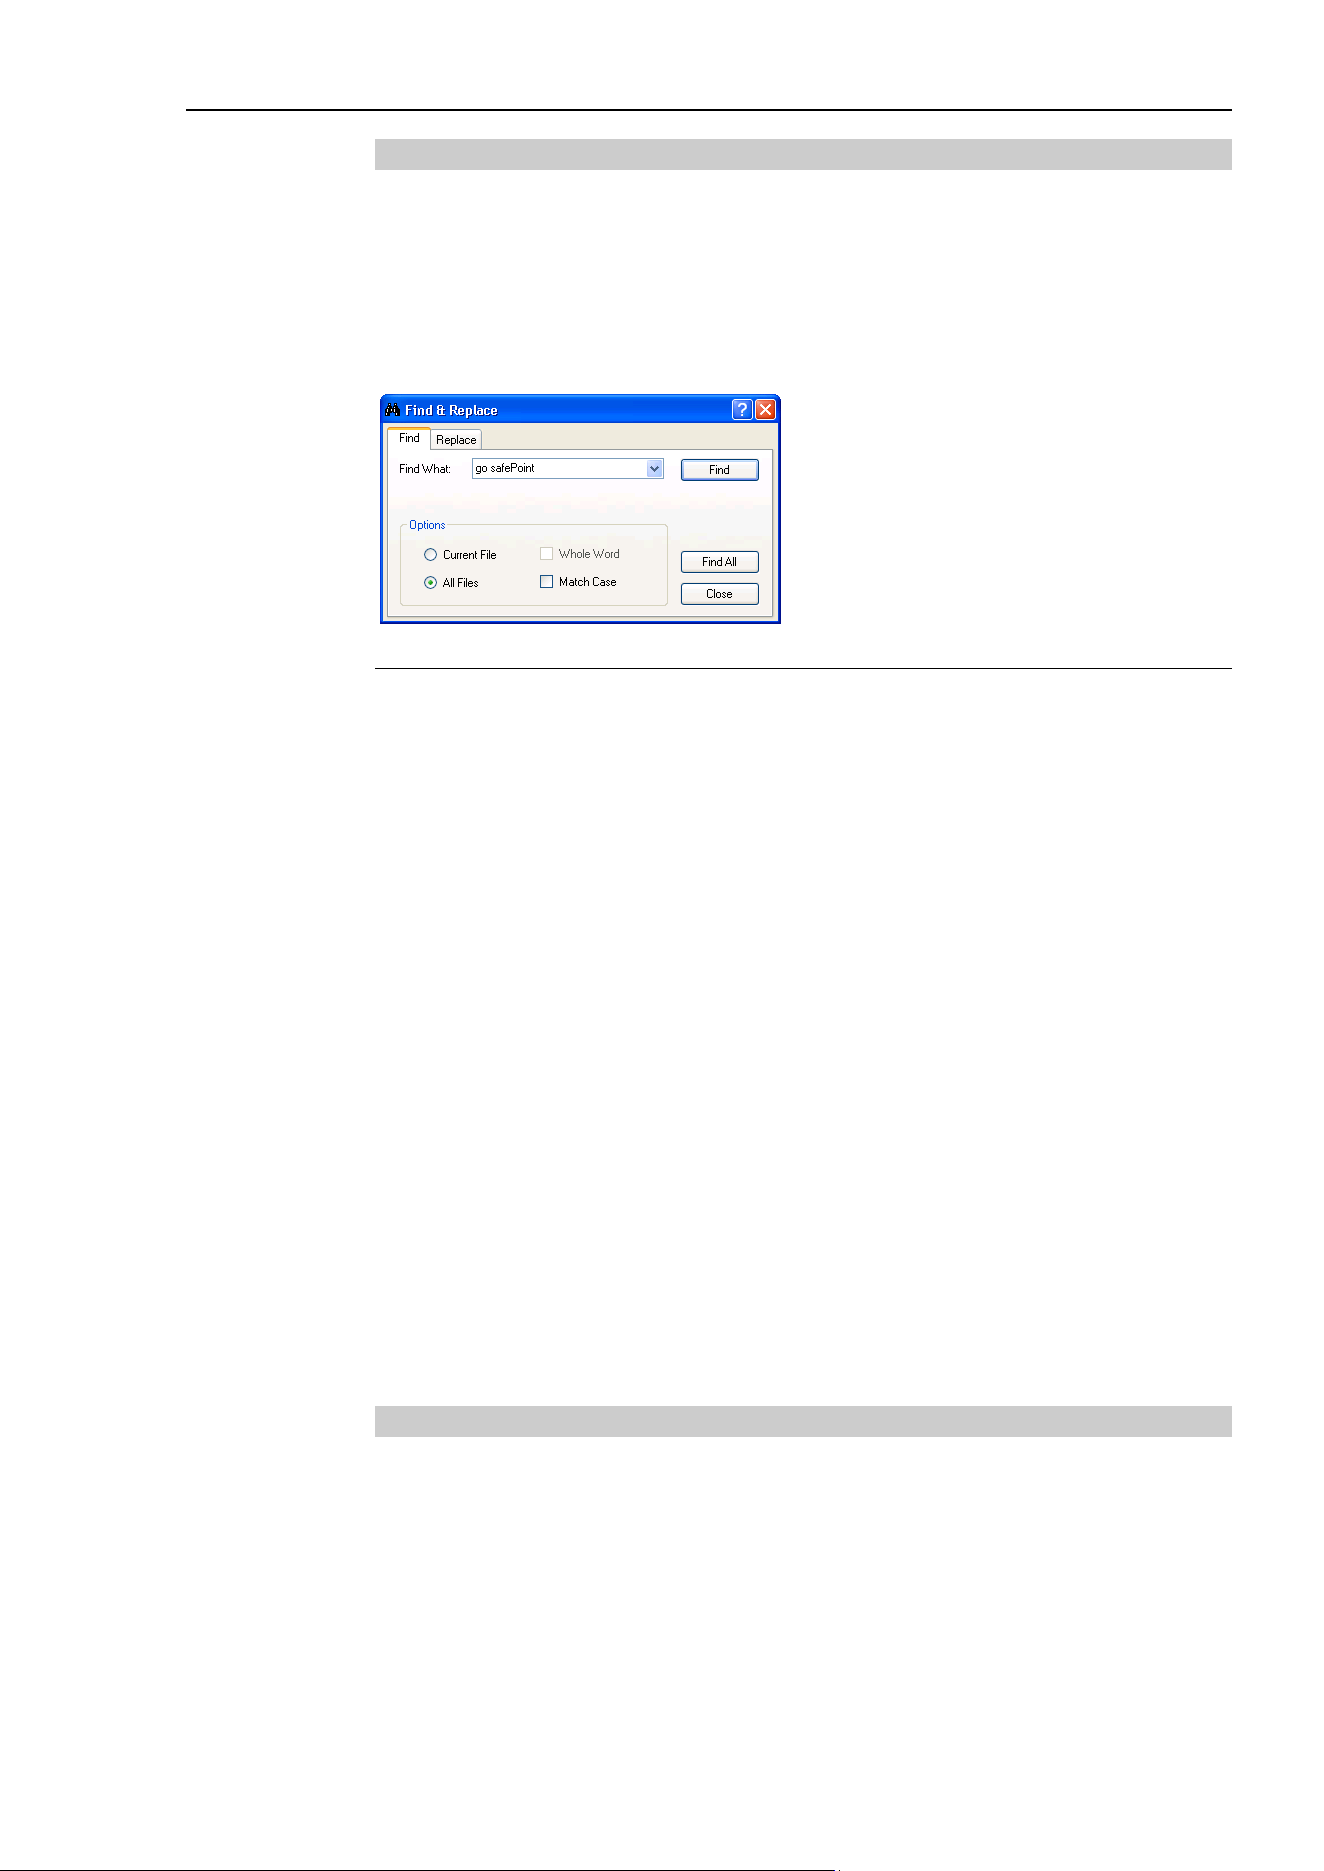
5. The EPSON RC+ 7.0 GUI
EPSON RC+ 7.0 (Ver.7.4) User's Guide Rev.6 51
5.7.6 [Find] Command (Edit Menu)
Shortcuts
Keys: Ctrl + F
Find a text string in the current program or all programs in the project.
The first time you execute this function, the dialog box will be centered over the main
window. If you reposition it, then the next time Find is executed, the dialog will appear
where you last positioned it.
Item Description
Find What
Type the text you want to search for. If any text was selected
when you
execute the Find comma
nd, it will be displayed here.
When executing the Find with a text string selected, selected text
will displayed.
If no text was selected, then the text from the last
Find will be displayed. You are limited to one line of text. If
select
ing more than one line before executing Find,
the search will
not start.
Current File
Searches only in the current program file and include file.
All Files
Searches all files in the project.
Whole Word
Searches for the full word by itself and not as part of another
word.
Match Case
Text must also match lower and upper case in order to be found.
Find
Starts the search. If the text is found in a file that is not open, then
the file
will be opened to display.
This button will be dimmed if
nothing is
entered to be searched.
Find All
Search for all occurrences and list the results in the Status pane.
Each result shows the file name, line number, and line where the
text was found. You can then double click on a result to open the
file where the text was found. The Find & Replace dialog will
close after the results are displayed.
This button will be dimmed if
nothing is
entered to be searched.
Close
Closes the dialog box.
5.7.7 [Find Next] Command (Edit Menu)
Shortcuts
Key: F3
Find the next occurrence of the search text specified in the last Find command.
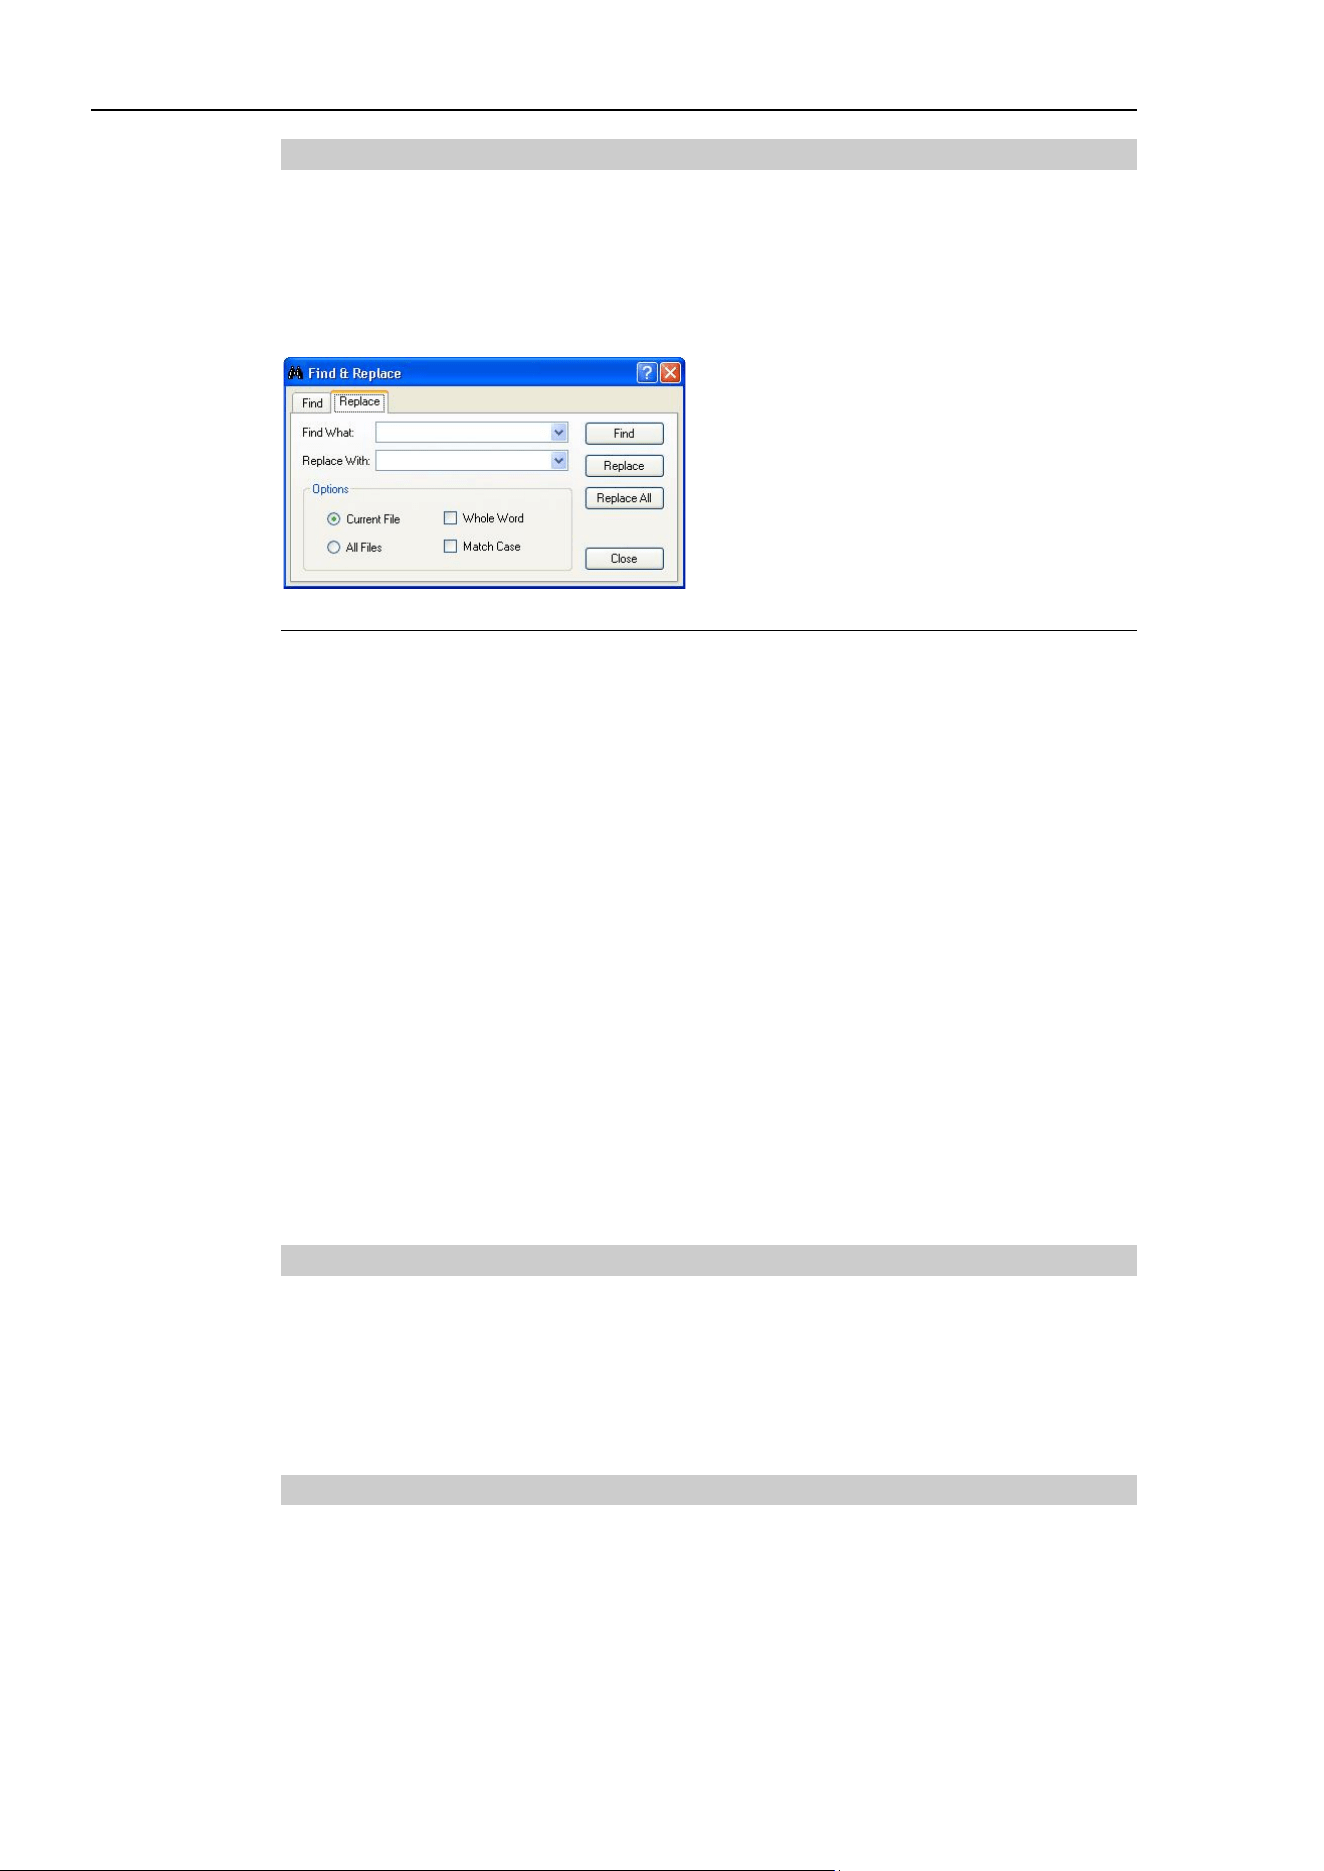
5. The EPSON RC+ 7.0 GUI
52 EPSON RC+ 7.0 (Ver.7.4) User's Guide Rev.6
5.7.8 [Replace] Command (Edit Menu)
Shortcuts
Keys: Ctrl + R
Search for a text string and replace it with new text. The first time you execute this
function, the dialog box will be centered over the main window. If you reposition it, then
the next time Replace is executed, the dialog will appear where you last positioned it.
Item Description
Find What
Type the text you want to search for. If any text was selected
when you
execute
the Replace command, it will be displayed
here. If no text was selected, then the text from the last Find will
be displayed.
Replace With
Enter the replacement text here. The replacement text can be
empty.
Current File
Searches only in the current program file and include file.
All Files
Searches all files in the project.
Whole Word
Searches for the full word by itself and not as part of another
word.
Match Case
Text must also match lower and upper case in order to be found.
Find
Finds the next occurrence.
Replace
If already found, replaces the current find, otherwise searches for
the next occurrence.
Replace All
Replaces all occurrences.
Close
Closes the dialog box.
5.7.9 [Select All] Command (Edit Menu)
Shortcuts
Keys: Ctrl + A
Selects the entire program file, include file, point file, I/O labels, or user errors. You can
then execute Cut or Copy.
5.7.10 [Indent] Command (Edit Menu)
Shortcuts
Key: Tab
Move the selected line one tab to the right.

5. The EPSON RC+ 7.0 GUI
EPSON RC+ 7.0 (Ver.7.4) User's Guide Rev.6 53
5.7.11 [Outdent] Command (Edit Menu)
Shortcuts
Keys: Shift + Tab
Move the selected line one tab to the left.
5.7.12 [Comment Block] Command (Edit Menu)
Comments out the selected block of lines by adding the comment character to the
beginning of each line.
To use, select one or more lines to be commented. Then :
Select Comment Block from the Edit Menu.
Right click and select Comment Block from the Context Menu.
A comment character will be added to the beginning of each of the selected lines.
5.7.13 [Uncomment Block] Command (Edit Menu)
Removes leading comment character from the selected block of lines.
To use, select one or more lines to be uncommented. Then:
Select Uncomment Block from the Edit Menu.
Right click and select Uncomment Block from the Context Menu.
The first comment character from each of the selected lines will be removed.
5.7.14 [Go To Definition] Command (Edit Menu)
Opens the window and sets the line where a function, variable, macro, point label, I/O
label, or user error label is defined.
To use,
Click on an identifier in a program window,
and select Go To Definition from the Edit Menu.
Right click on the identifier,
and select Go To Definition from the Context Menu.
Identifier type Display
Function name or
variable
Program window where a function name or variable is declared.
Pont label
Point file which a label is defined.
I/O label
I/O label editor which a label is defined.
User error label
User error which a label is defined.

5. The EPSON RC+ 7.0 GUI
54 EPSON RC+ 7.0 (Ver.7.4) User's Guide Rev.6
5.8 [View] Menu
The EPSON RC+ 7.0 View Menu includes commands for opening the Project Explorer
and Status window. In addition, there is a command for viewing the system history.
5.8.1 [Project Explorer] Command (View Menu)
If you have closed the [Project Explorer] pane, you can open it by using this command.
For details, refer to 5.2 Project Explorer Pane.
5.8.2 Status Window Command (View Menu)
If you have closed the [Status Window] pane, you can open it by using this command.
For details, refer to 5.3 Status Window Pane.
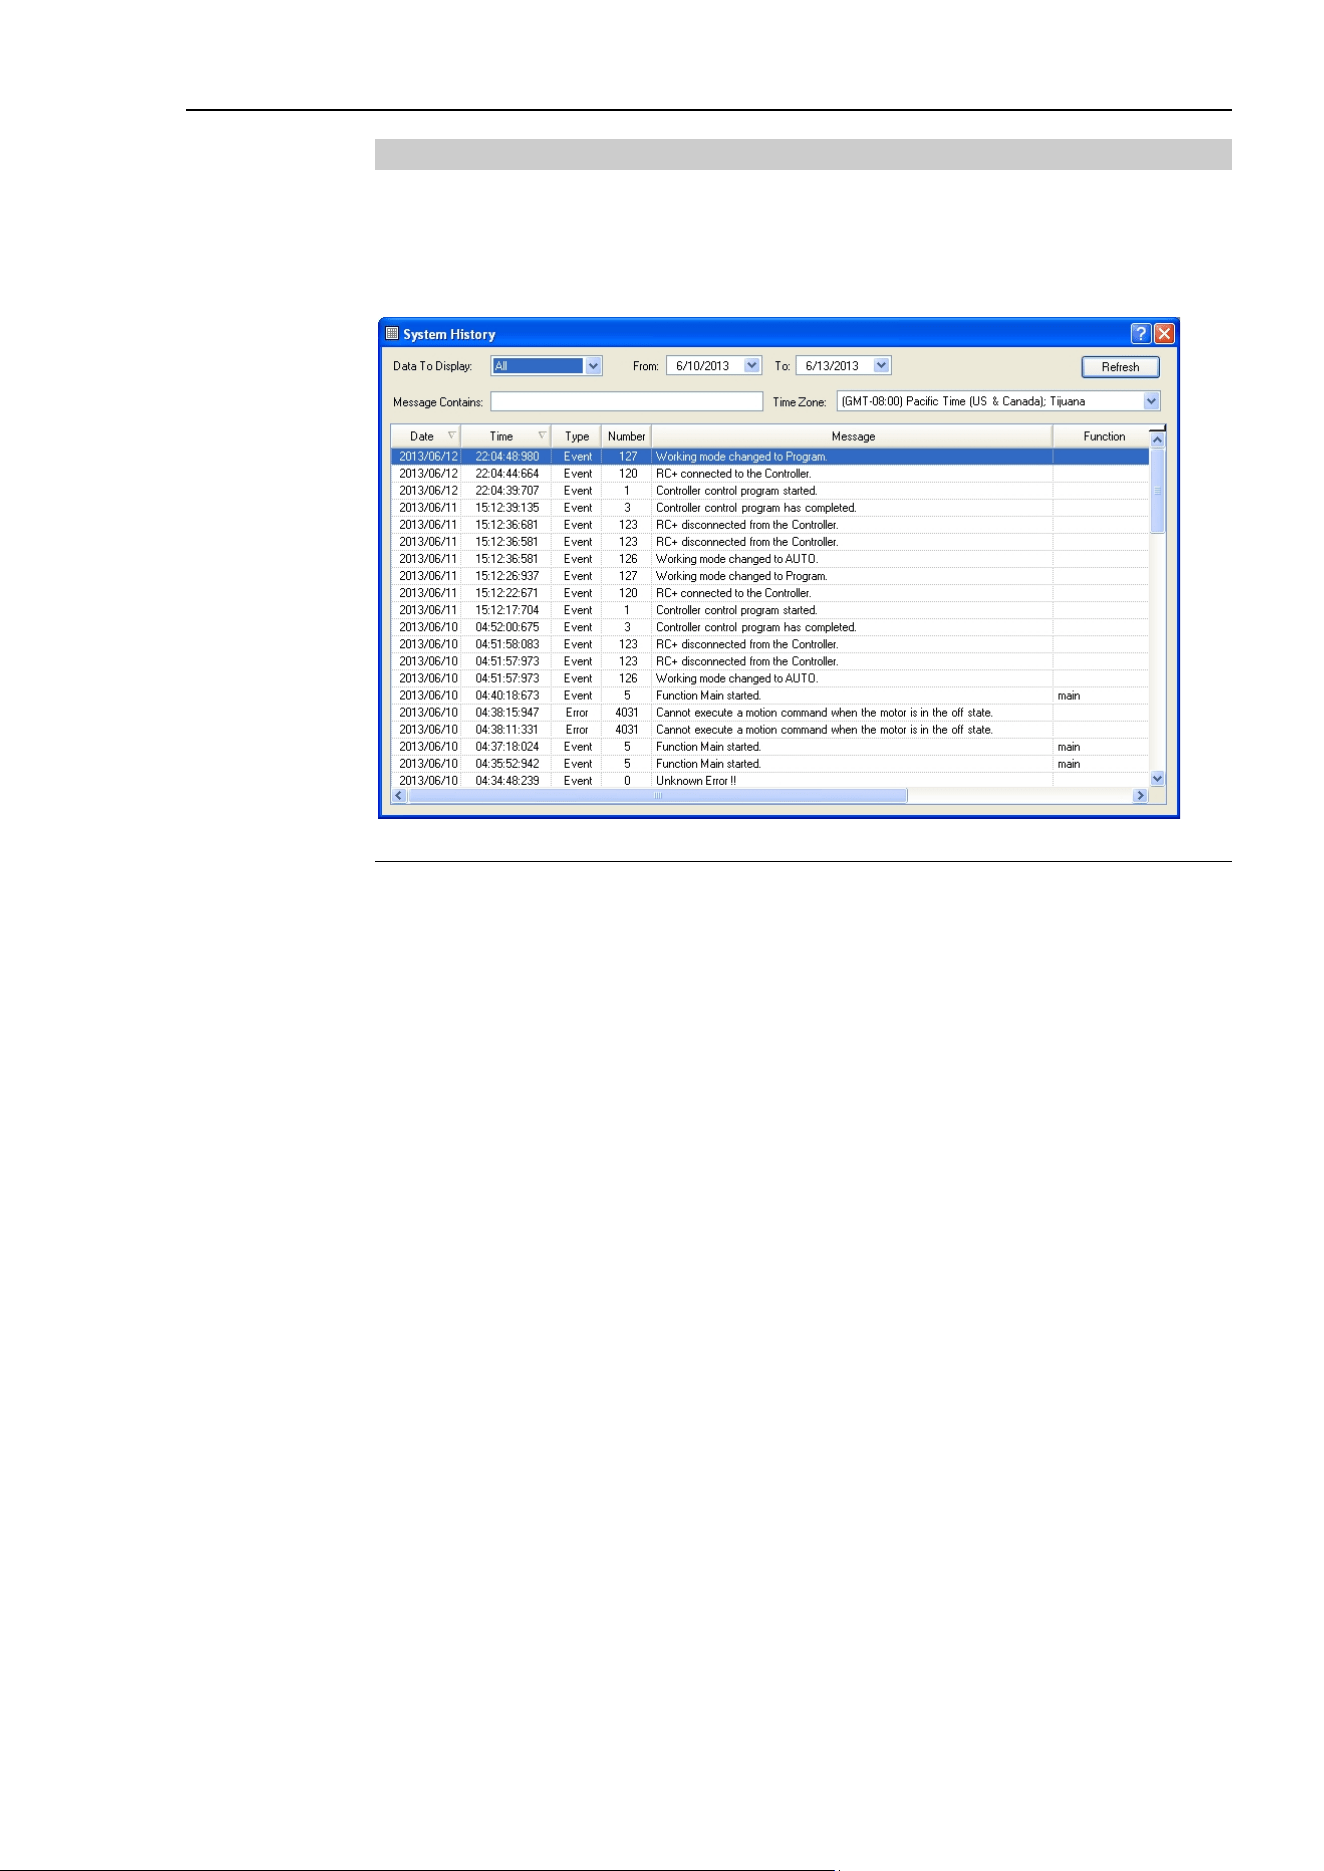
5. The EPSON RC+ 7.0 GUI
EPSON RC+ 7.0 (Ver.7.4) User's Guide Rev.6 55
5.8.3 System History Command (View Menu)
This command opens the System History window. This window shows events, errors, and
warnings that have been logged in the current controller's system history.
The data can be sorted by clicking on any column header. To sort multiple columns, hold
down the shift key and click on multiple columns headers.
Item Description
Data To Display
Select which data you would like to view.
Choices are All, Events, Errors, and Warnings.
From / To
Select the dates you want to view data from. When the window is
first opened, these are automatically set to the first and last dates in
the history data.
Message Contains
Type in text to be found in the error message. After typing in the
text, click the Refresh button.
Time Zone
Select a time zone. Time of event, warning, and error occurrences
are displayed according to the selected time zone.
Refresh
Click this button to reload the data from the controller.
Type Event
Information for operation and mode change.
Warning
Program can be executed continuously, however, needs
countermeasure.
Error
Error occurred in the program or the Robot.
Number
For details of the number, refer to SPEL
+
Error Message in the
SPEL
+
Language Reference.
Message
Function and
Line number
Function name and the line number are displayed when error
occurred while executing a program.
Robot and
axis number
Robot and the axis number are displayed when Robot error occurred.
Task number
Task number of the task with error is displayed when error occurred
while executing the program. “0” is displayed for others.
Additional
information
1 and 2
More details are displayed for some errors.
For details, refer to
SPEL+ Error Message in the SPEL
+
Language
Reference.
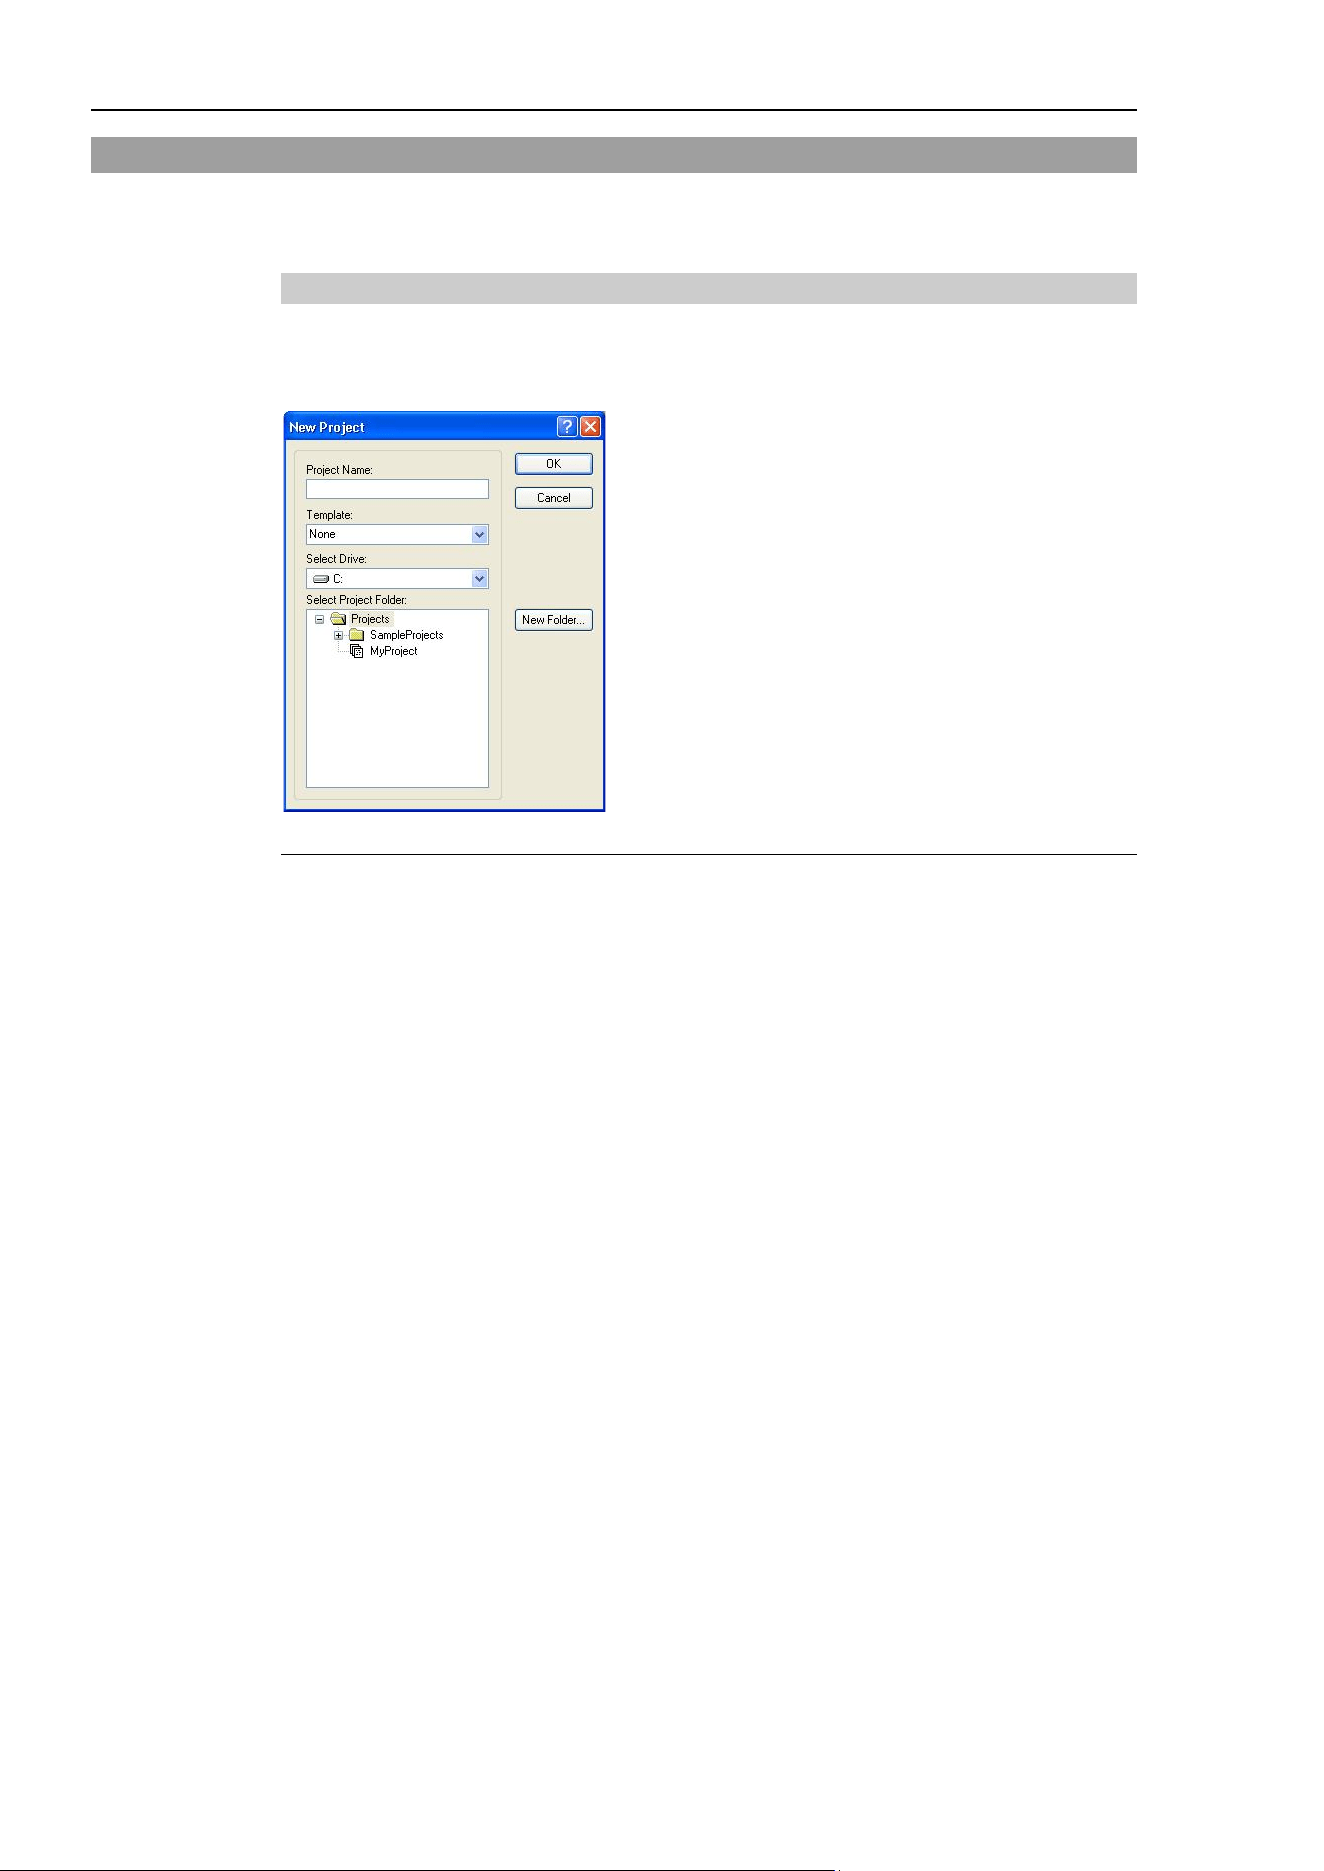
5. The EPSON RC+ 7.0 GUI
56 EPSON RC+ 7.0 (Ver.7.4) User's Guide Rev.6
5.9 [Project] Menu
The EPSON RC+ 7.0 Project Menu includes commands for managing and building
projects.
5.9.1 [New] Command (Project Menu)
The New command is used to create a new EPSON RC+ 7.0 project. Projects can be on
any disk drive on the system. They are stored in the \EpsonRC70\Projects folder on the
selected drive. Subfolder can also be created.
Item Description
Project Name
Type in a new name for the project. The name can include
alphanumeric characters along with underscores.
For a project name, two byte characters such as Japanese, Chinese
characters are not allowed.
Template
Select a project template. The new project will be a copy of the
template project.
Select Drive
Select the desired disk drive for the new project.
Select Project Folder
This is a list of folders and projects on the selected drive. If you
click on a name in this list, it will be displayed in the New Project
Name text box. You can then edit the name, or you can create a
new project with the same name
as one that has already been
created. In the later case, you will be prompted to overwrite the
old project if it is in the same folder.
New Folder
Creates a new folder in the currently selected folder.
OK
Creates the new project.
Cancel
Aborts creating a new project.
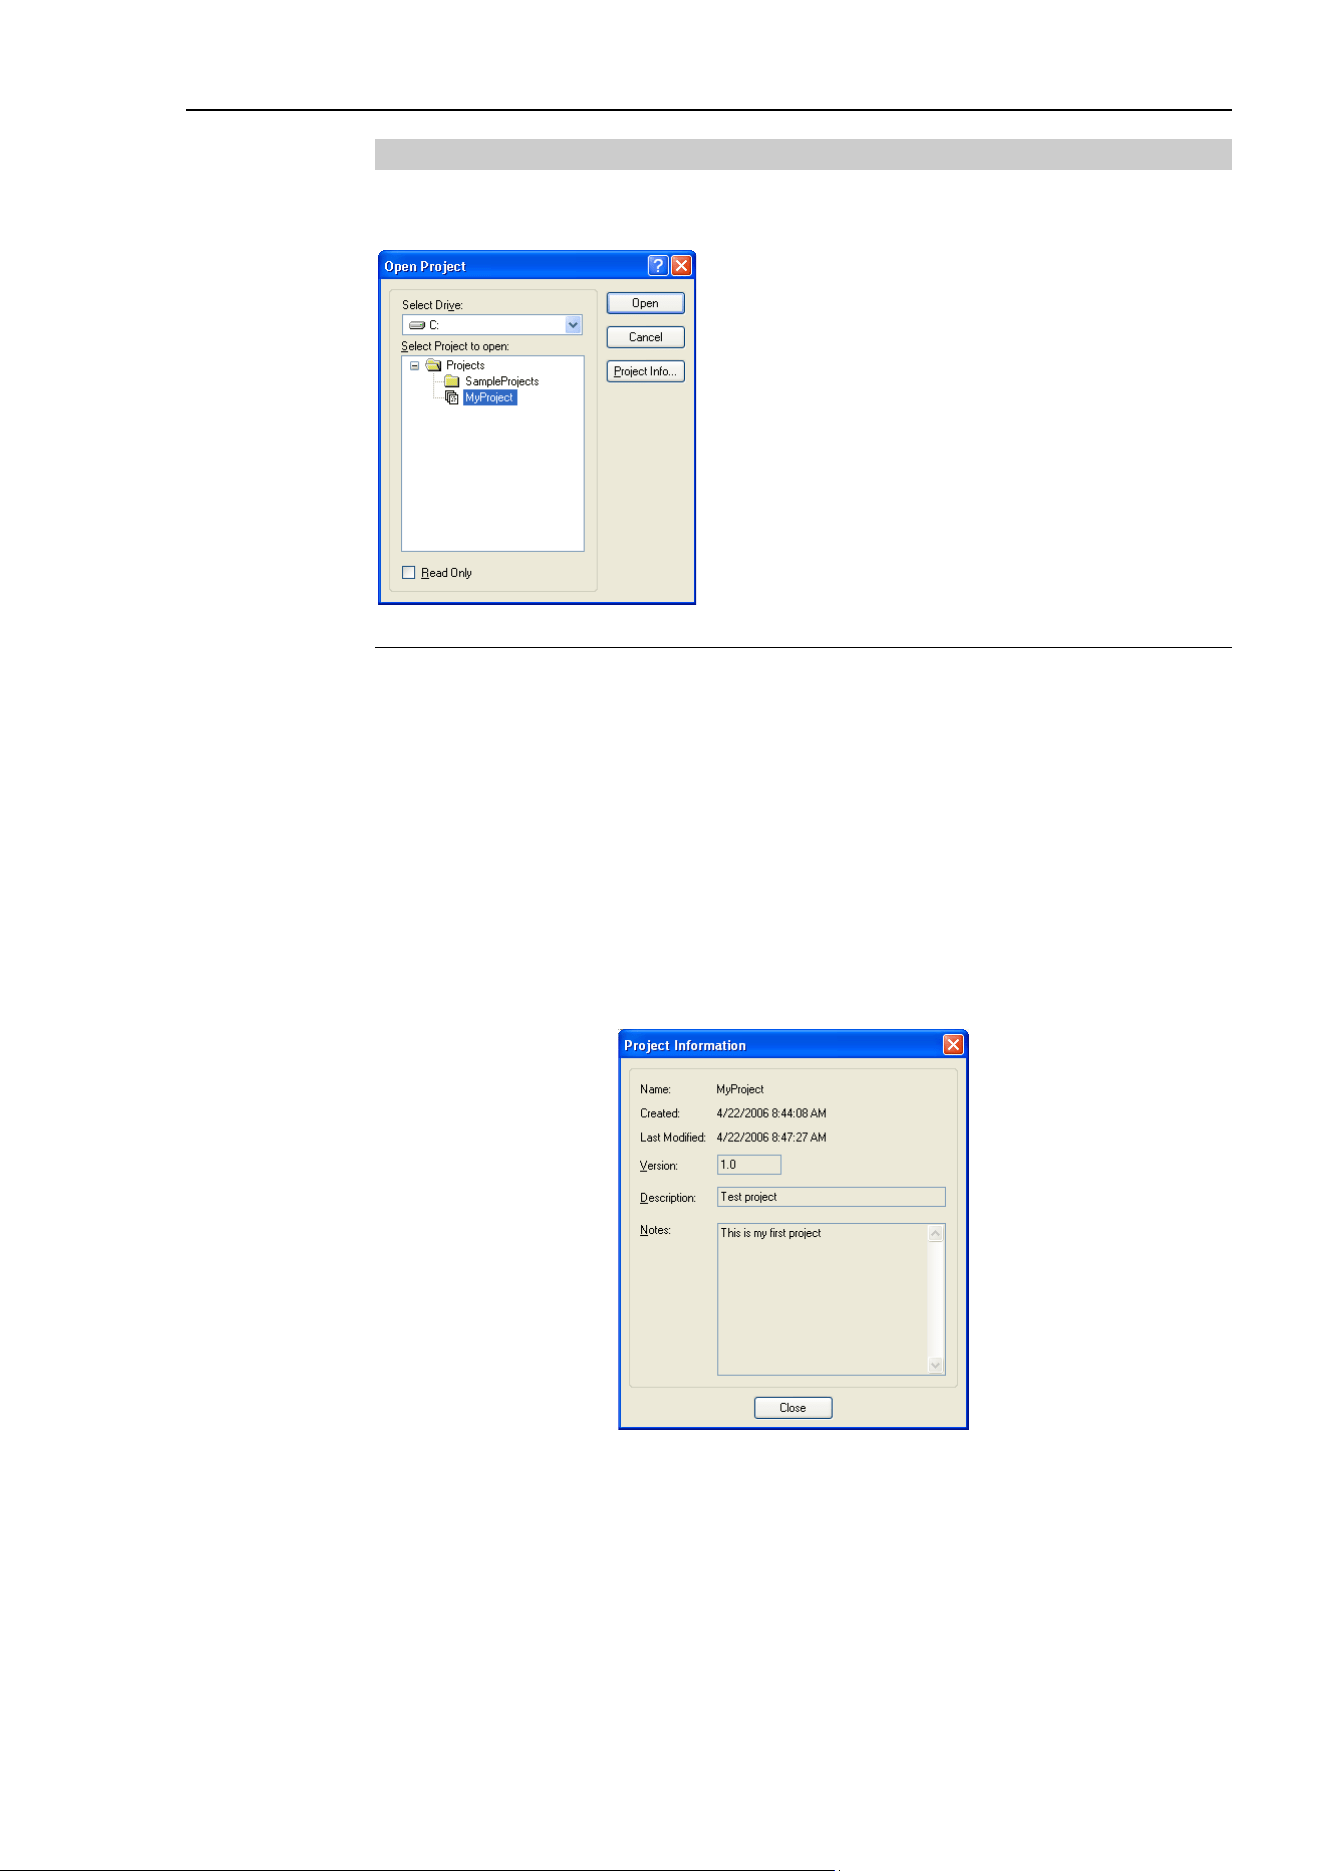
5. The EPSON RC+ 7.0 GUI
EPSON RC+ 7.0 (Ver.7.4) User's Guide Rev.6 57
5.9.2 [Open] Command (Project Menu)
Use this command to open an EPSON RC+ 7.0 project. When the project is opened, the
previous project is closed. You will be prompted to save changes.
Item Description
Select Drive Select the desired disk drive for the project you want to open.
Select Project to Open Select a project name from the list box. To open a folder, double
click on the folder or click the + box located to the left of the
folder.
Read Only If you set this check box and open a project, you cannot edit the
program file, include file, point file, I/O label, and user error.
Open Opens the selected project.
Cancel Cancels the operation.
Project Info Displays general project properties for the selected project. To
view project information, first select a project in the list, then
click the <Project Info> button.
Project information for a project can be changed by selecting [Properties] from the
[Project] menu after opening the project.
NOTE
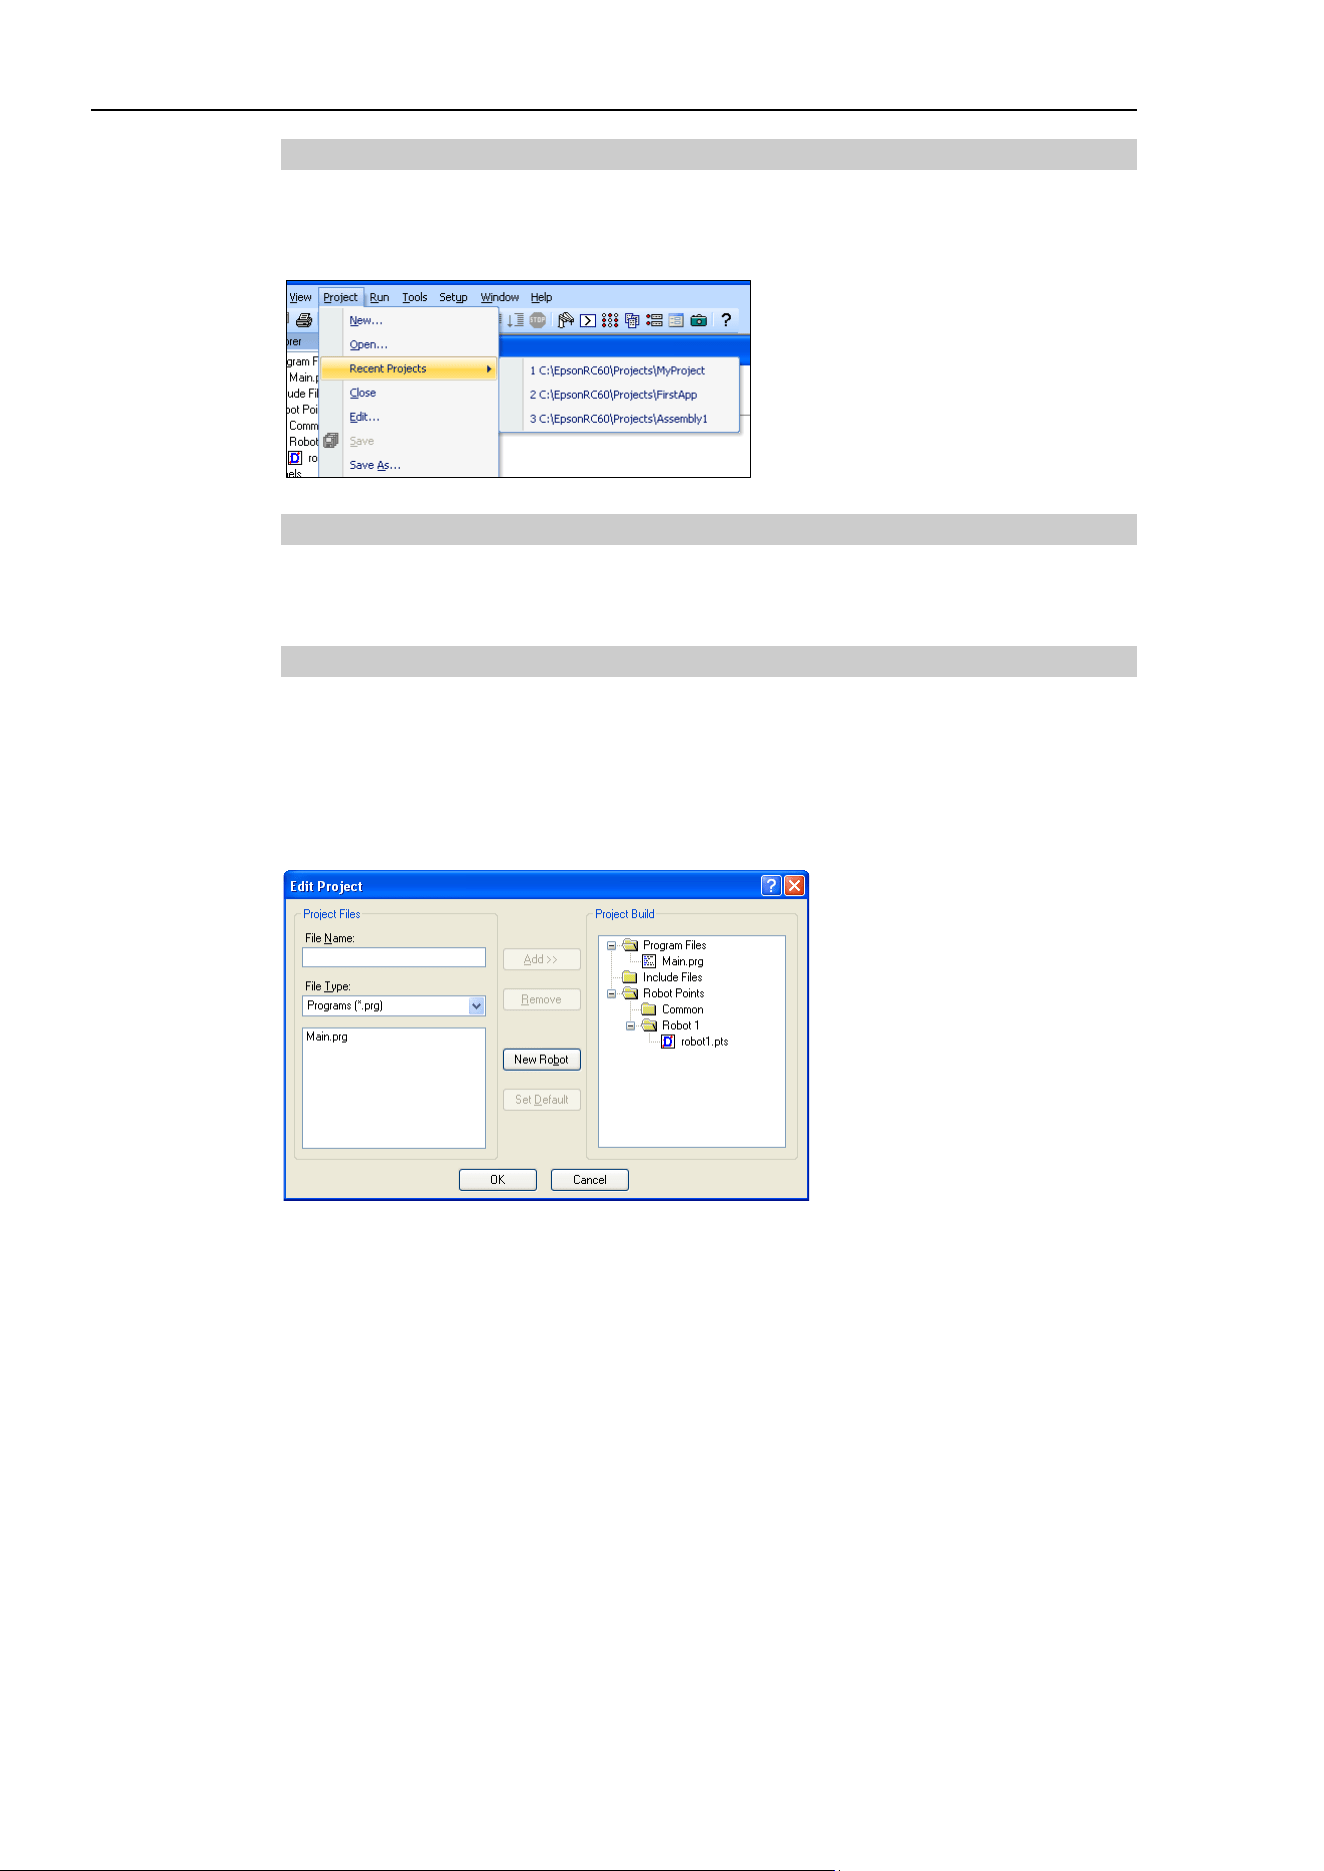
5. The EPSON RC+ 7.0 GUI
58 EPSON RC+ 7.0 (Ver.7.4) User's Guide Rev.6
5.9.3 Recent Projects Submenu (Project Menu)
The Recent Projects submenu contains up to eight of the most recently used projects.
When you select a project in the menu, the current project is closed and the selected
project is opened the same as if you used the [Open] command from the [Project] menu.
5.9.4 [Close] Command (Project Menu)
Use the [Close] command to close the current project. Several menu and toolbar
commands will be disabled after the project is closed.
5.9.5 [Edit] Command (Project Menu)
The [Edit] command is used to define which program files, include files, and point files
are to be used in the current project.
The [Project Files] contains a list of files in the current project folder. You can select
which files to view from the [File Type] list box.
The [Project Make] contains a project make tree that includes program files, include files,
and point files.
The files shown in the file list are in the current project disk directory. Before you can use
a file in the project, you must put it into the project make tree using the <Add> button.
To create a new program
1. Type the name of program file in the [File Name] text box in the Program Files section.
Add the PRG extension to the file name. For a file name, two byte characters such as
Japanese, Chinese characters are not allowed.
2. Click the <Add> button. You will be prompted to create a new file. Answer <Yes> to
create the file and put it in Program Files folder in the project make tree.
To add an existing program file
1. Select the Program in the [File Type] list box.
2. Select the program file name you want to add to the project from the list box.
3. Click the <Add> button, or
double click on the program file name in the file list box.
The file will be added to the Program Files folder in the project make tree.

5. The EPSON RC+ 7.0 GUI
EPSON RC+ 7.0 (Ver.7.4) User's Guide Rev.6 59
To create a new include file
1. Type the name of the include file in the [File Name] text box.
Add the INC extension to the file name. The name of the include file can also be the
same name as a program. For a file name, two byte characters such as Japanese,
Chinese characters are not allowed.
2. Click the <Add> button. You will get a message asking if it is okay to create the new
file. Click <Yes> to create the file and put it in the Include Files folder in the project
make tree.
To add an existing include file to the project
1. Select Include in the <File Type> list box.
2. Select the include file name you want to add to the project from the list box.
3. Click the <Add> button, or
double click on the include file name in the file list box. The file will be added to the
list of include files of [Project Build] tree.
To add a new point file
1. Type the name of the point file you want to create into the [File Name] text box.
Add the PTS extension. For a project name, two byte characters such as Japanese,
Chinese characters are not allowed.
2. Select the robot folder you want to register from the Robot Points folder in the [Project
Build] tree.
3. Click the <Add> button. You will be prompted to create a new file. Click <Yes> to
create the file and put it in the selected robot of the Robot Points folder.
To add an existing point file to the project
1. Select Points from the [File Type] list box.
2. Select the robot folder you want to register from the Robot Points folder in the [Project
Build] tree.
3. Select the point file name you want to add to the project from the list.
4. Click the <Add> button. The file will be put in the selected robot of the Robot Points
folder.
To remove a program file, include file, or point file
1. Select the file you want to remove in the [Project Build] tree.
2. Click the <Remove> button to remove the file from the [Project Build]. The file is not
deleted from the project folder, so you will still see the file in the file list.
To add a new robot
Click the <New Robot> button. A robot will be added to the Robot Points folder in the
[Project Build] tree.
To set a default point file
1. Select a point file to set as the default from each robot of Robot Points folder in the
[Project Build] tree.
2. Click the <Set as default> button. The file will be set as the default of the registered
robot.
The common point file is a point file that is available for all robots on the controller. To
use this point file, you need to load it from the SPEL
+
program to the robot using
LoadPoints command.
The default point file is a point file that is automatically loaded to a robot with the project
load. Each robot can have one point file as the default.
NOTE
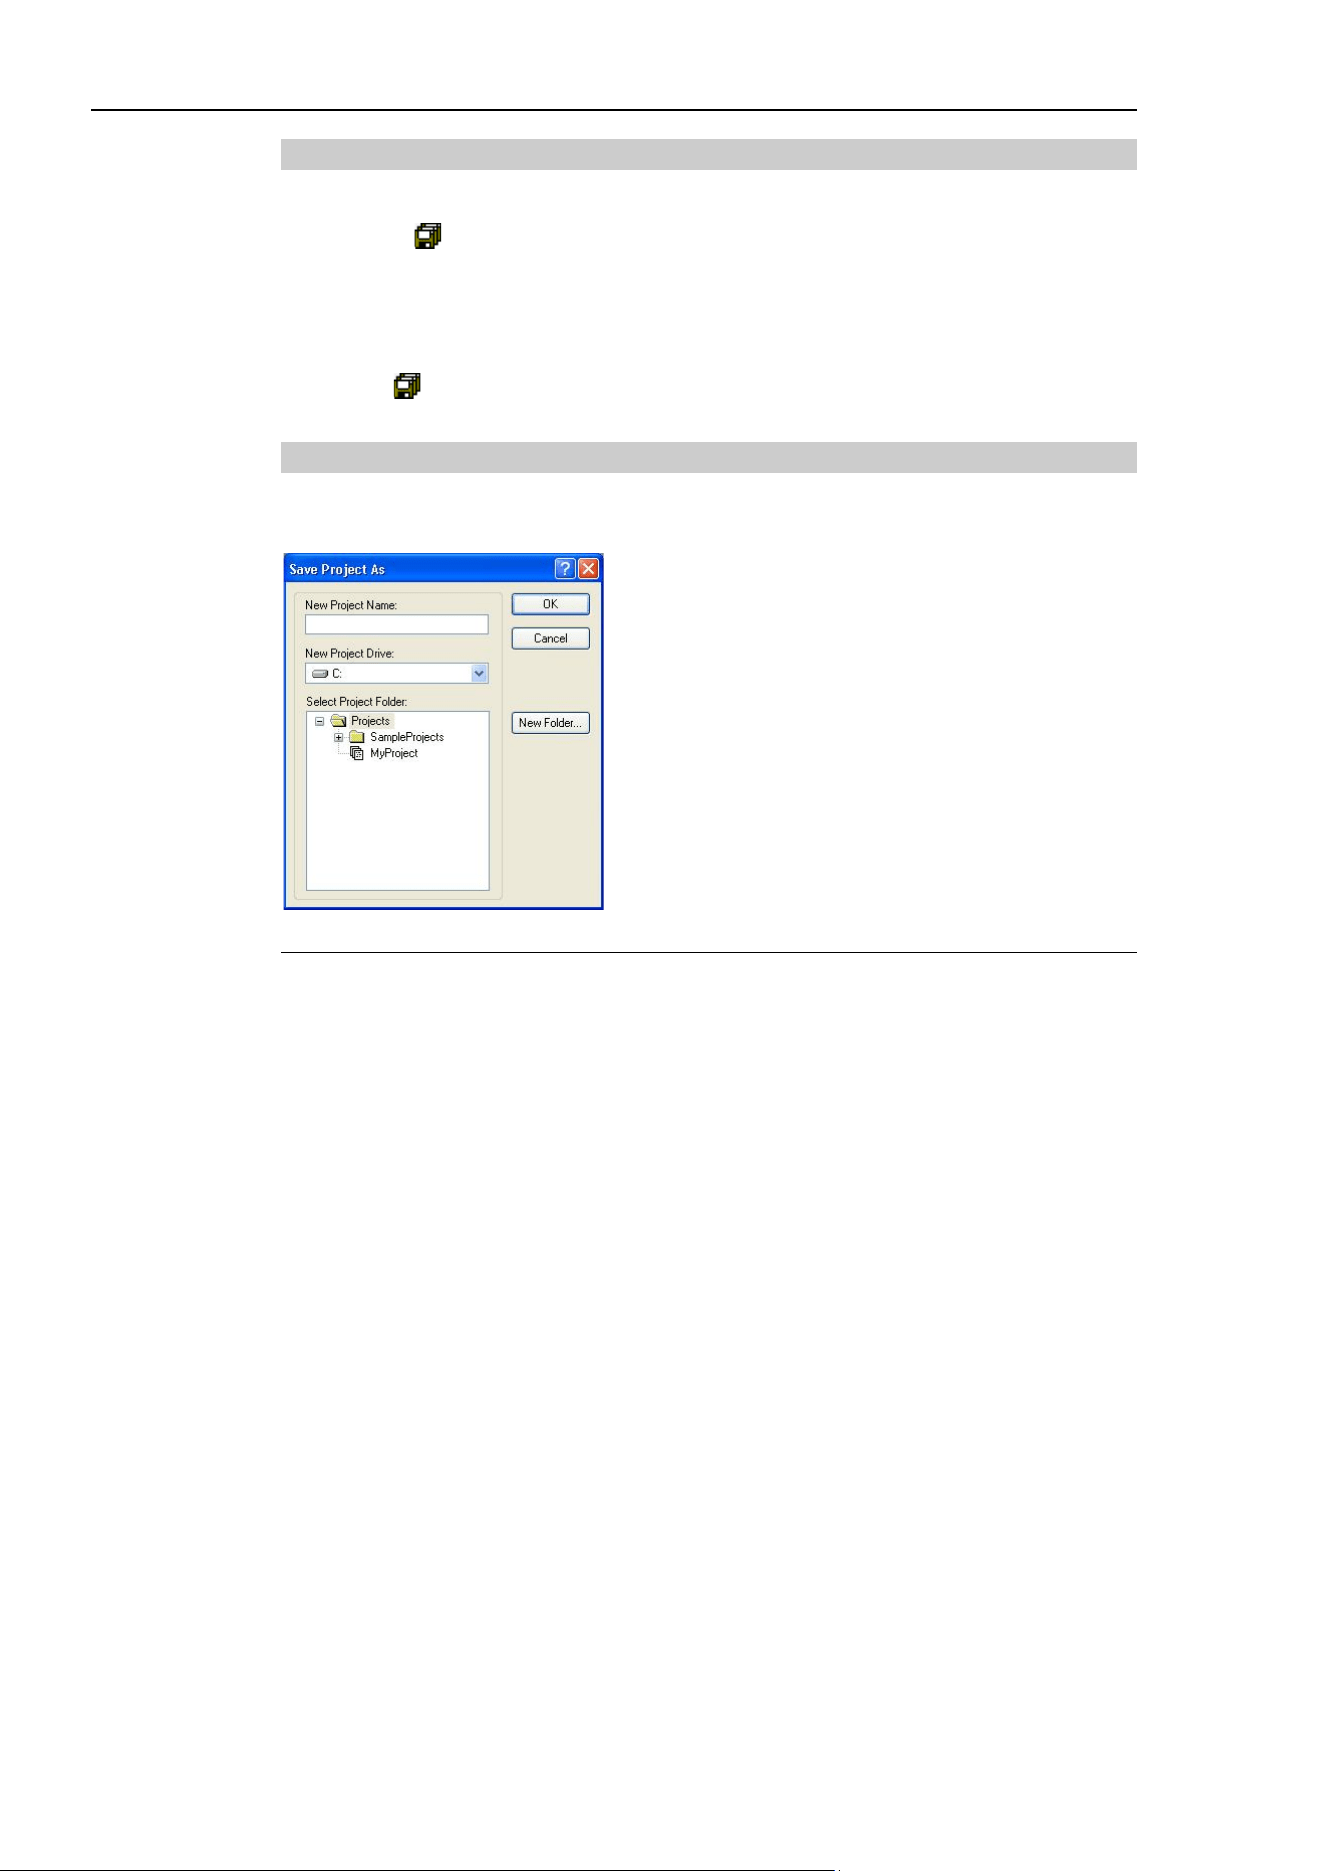
5. The EPSON RC+ 7.0 GUI
60 EPSON RC+ 7.0 (Ver.7.4) User's Guide Rev.6
5.9.6 [Save] Command (Project Menu)
Shortcuts
Toolbar:
This command saves the active program file, include file, point file, I/O labels, or user
errors. This menu selection will be dimmed if nothing needs to be saved.
It’s a good idea to save files frequently while you are editing project files. Just click the
disk button on the toolbar to save all of your files.
5.9.7 [Save As] Command (Project Menu)
Saves all files in the current project to a new drive and/or project name. The current
project will be preserved.
Item Description
New Project Name
Type in a new name for the project. The name can include
alphanumeric characters
along with underscores but cannot
include two byte characters such as Japanese, Chinese characters.
The maximum number of characters is 24. You can use the same
name as the current project if you select a drive and folder that is
not the same as the cur
rent project folder and the folder drive.
New Project Drive
Drives for the new project location.
Select Project Folder
Click on the desired folder for the project.
New Folder
Click this button to create a new folder under the Projects folder.
OK
Saves the project using the new name and location.
Cancel
Cancels the operation.
TIP
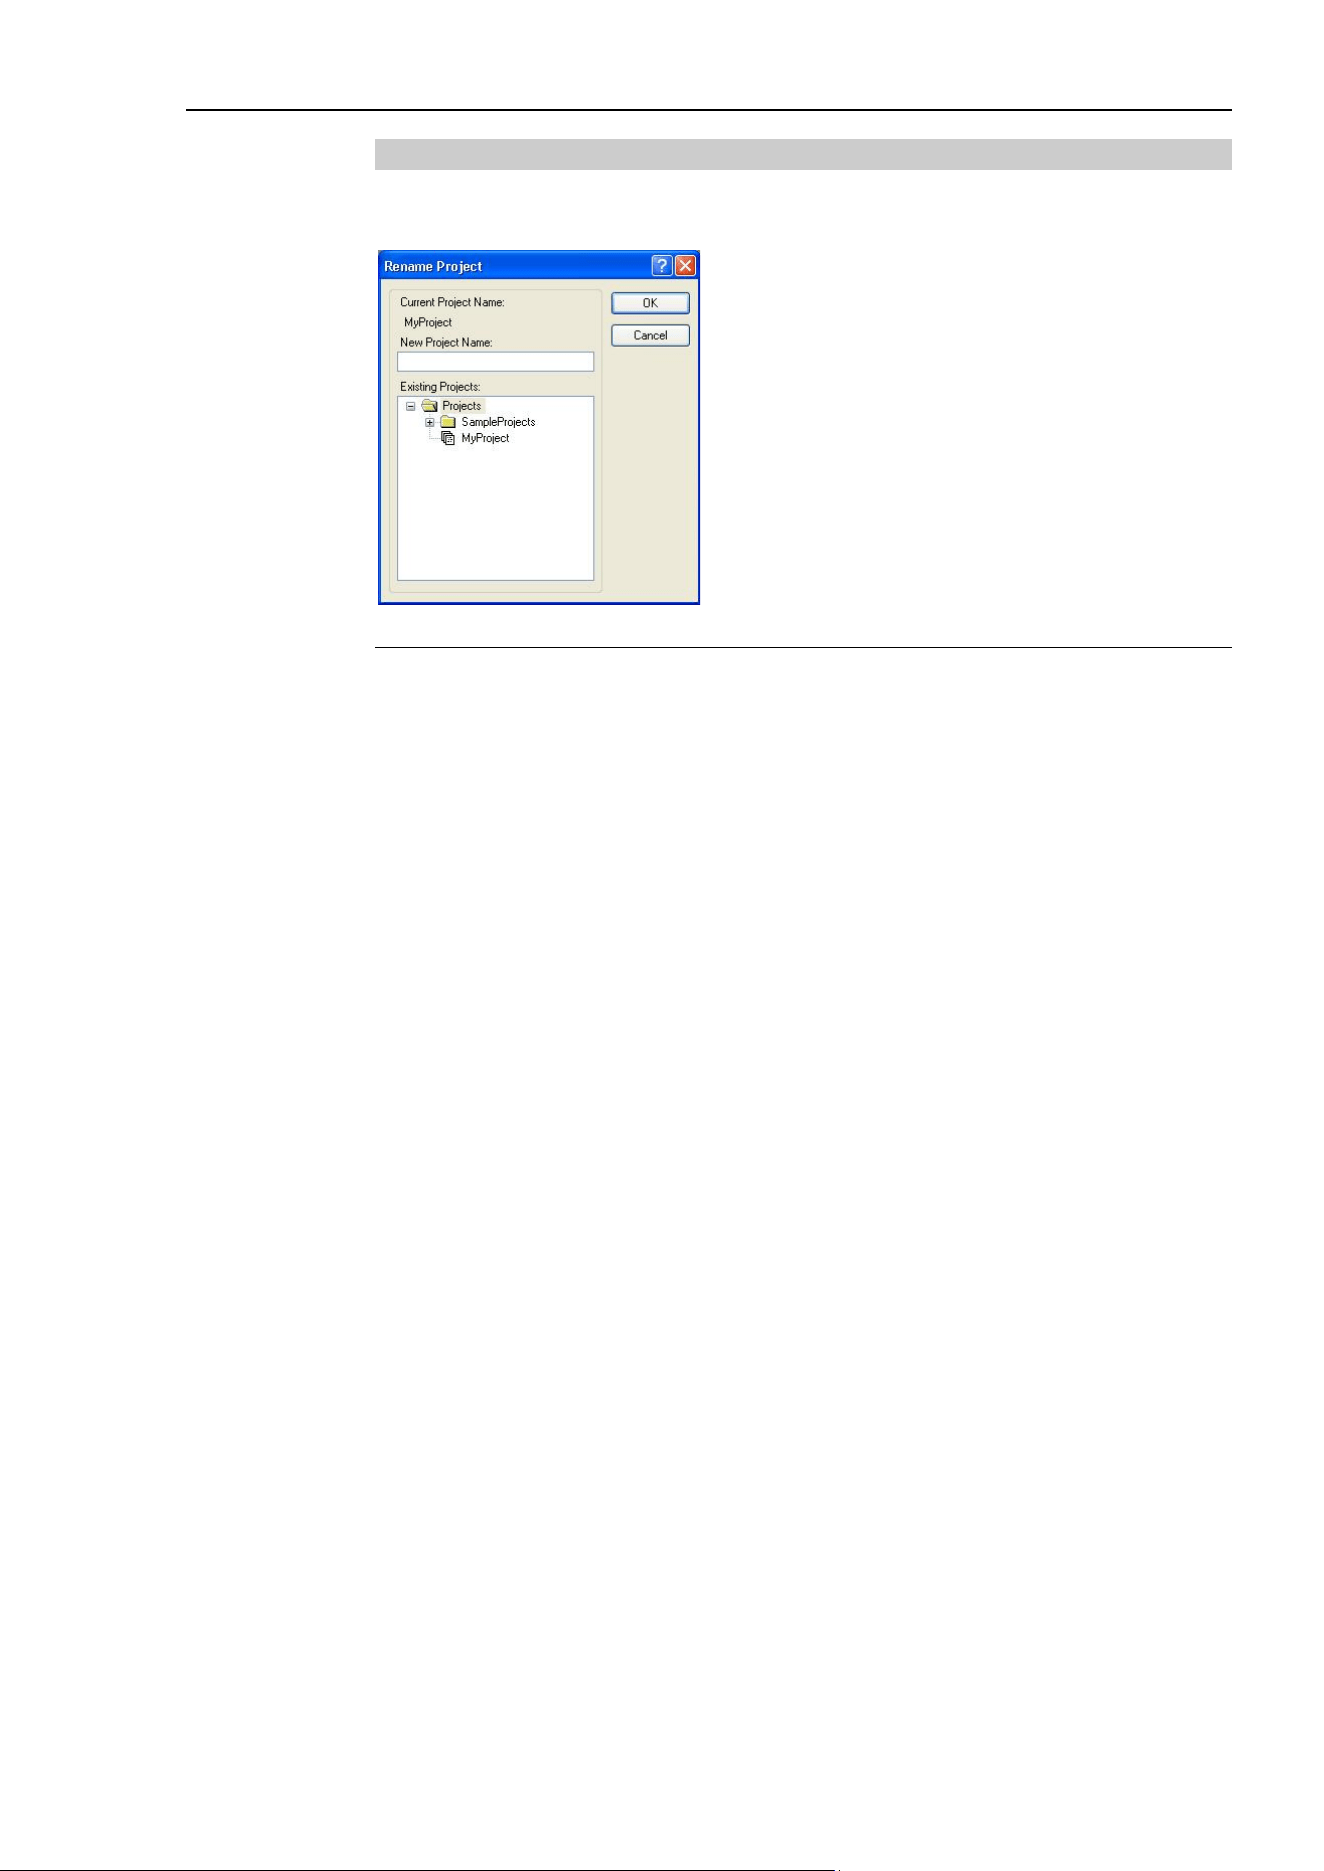
5. The EPSON RC+ 7.0 GUI
EPSON RC+ 7.0 (Ver.7.4) User's Guide Rev.6 61
5.9.8 [Rename] Command (Project Menu)
This command renames the current project. The project folder and all associated project
files are also renamed.
Item Description
New Project Name Type in a new name for the project. The name can include
alphanumeric characters along with underscores but cannot
include two byte characters such as Japanese, Chinese
characters.
Existing Project This list box shows other projects on the selected drive. The
new name you choose cannot be one of the names in this list.
OK Renames the project.
Cancel Cancels the operation.
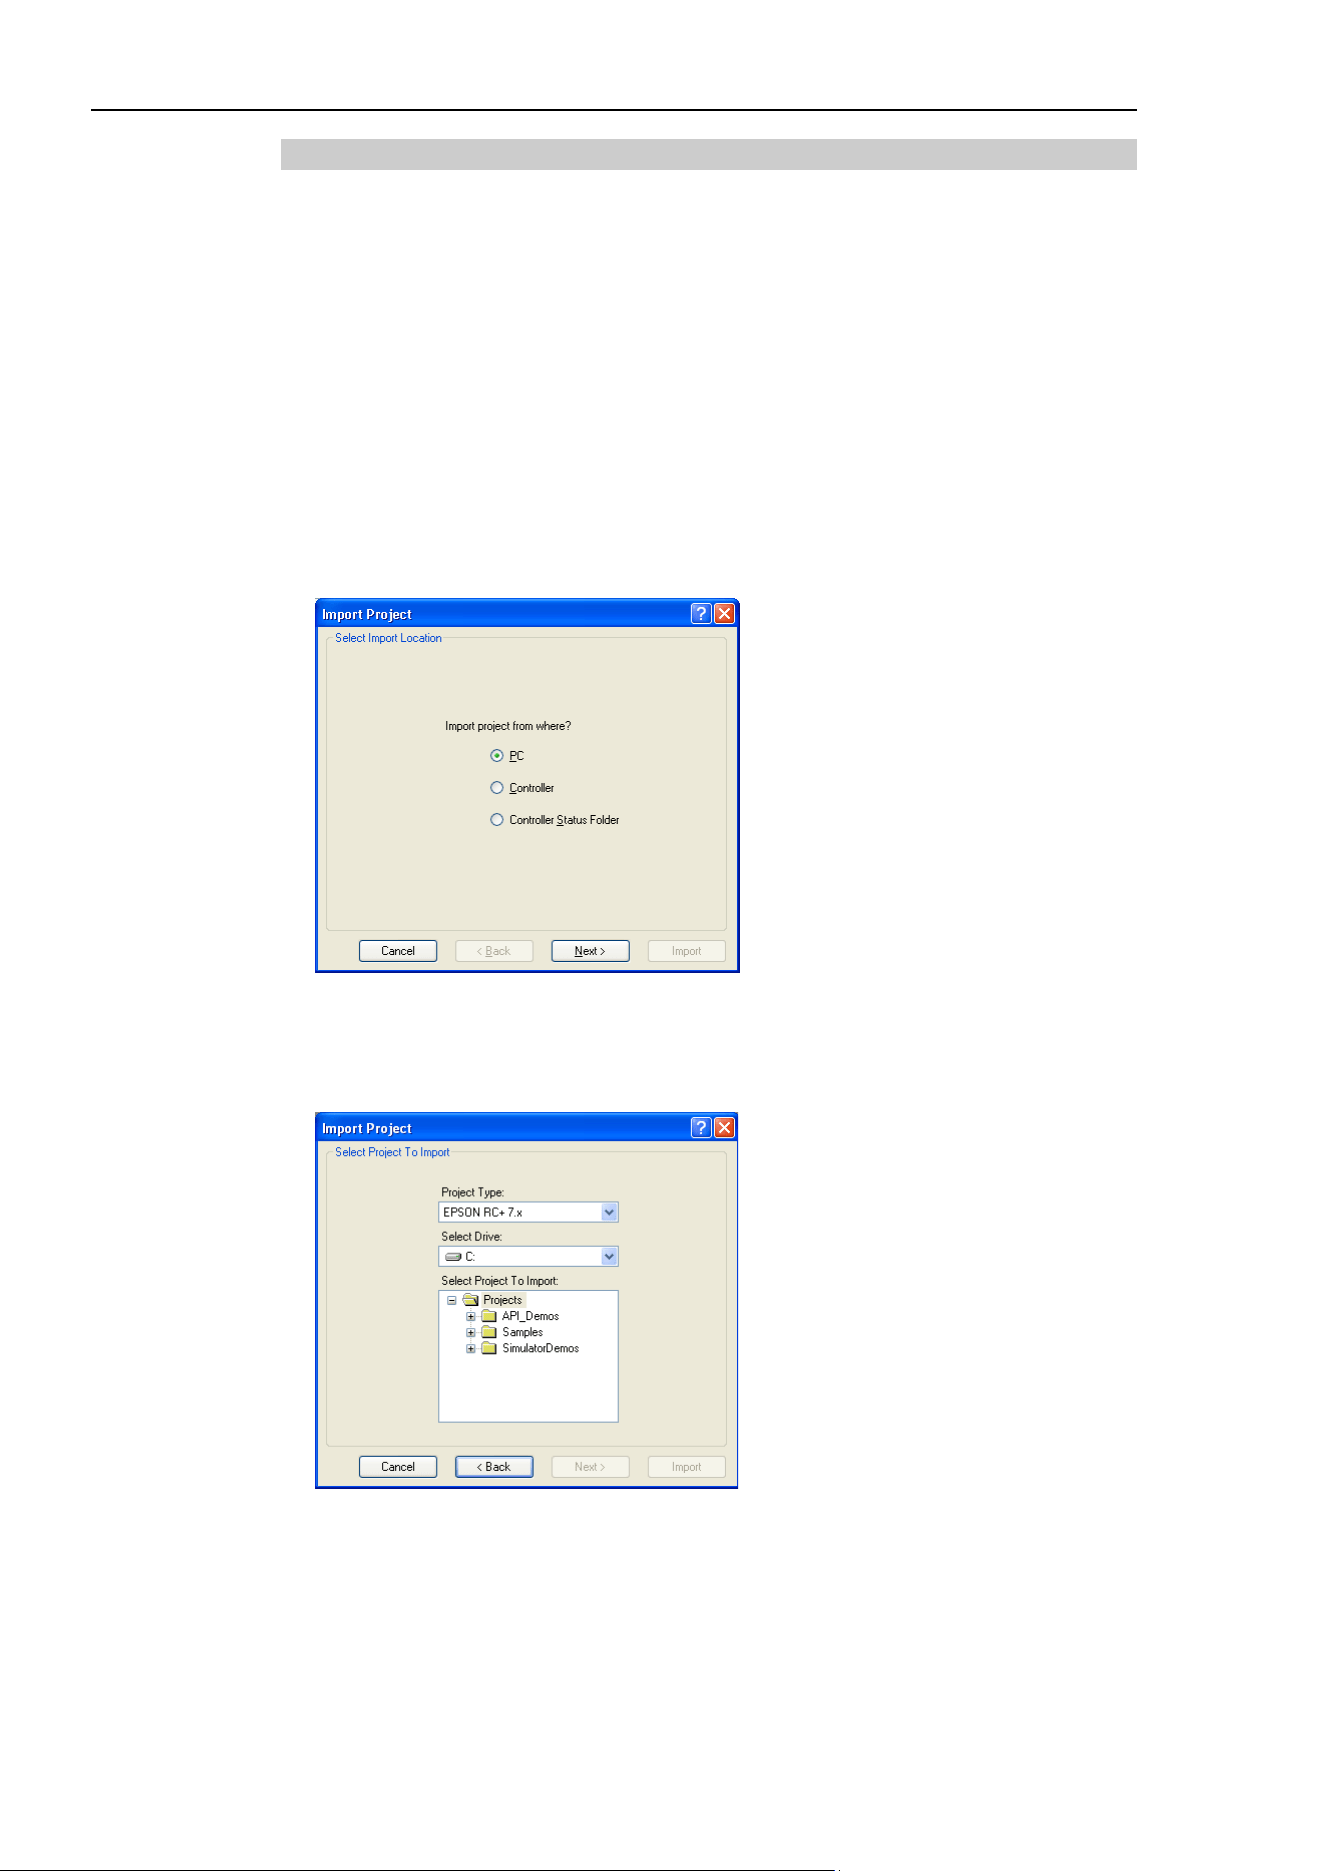
5. The EPSON RC+ 7.0 GUI
62 EPSON RC+ 7.0 (Ver.7.4) User's Guide Rev.6
5.9.9 [Import] Command (Project Menu)
The Project Menu Import Command uses a wizard to import projects from a PC, the
current controller, or a controller status folder.
When a project is imported, the files are copied to a new project folder, so the original
project is not changed.
If the project to be imported is an EPSON RC+ 3.x / 4.x / 5.x /6.x project or a SPEL for
Windows 2.0 project, the files are converted to EPSON RC+ 7.0 format.
The sections below have instructions for importing a project from each type of source
location.
Importing a PC project
Follow these steps to import a project from a PC:
1. Select Import from the [Project] menu to open the [Import Project] dialog box.
2. Select <PC> and click <Next>.
3. Select the project type. You can select from the following:
- EPSON RC+ 7.0
- EPSON RC+ 3.x / 4.x / 5.x / 6.x
- SPEL for Windows 2.0
When project for EPSON RC+ 3.x / 4.x / 5.x /6.x or SPEL for Windows 2.0 is imported,
the project is converted to project for EPSON RC+ 7.0 by automatic processing.
For details, refer to Appendix A: Automatic Processing of Project Import.
NOTE
NOTE
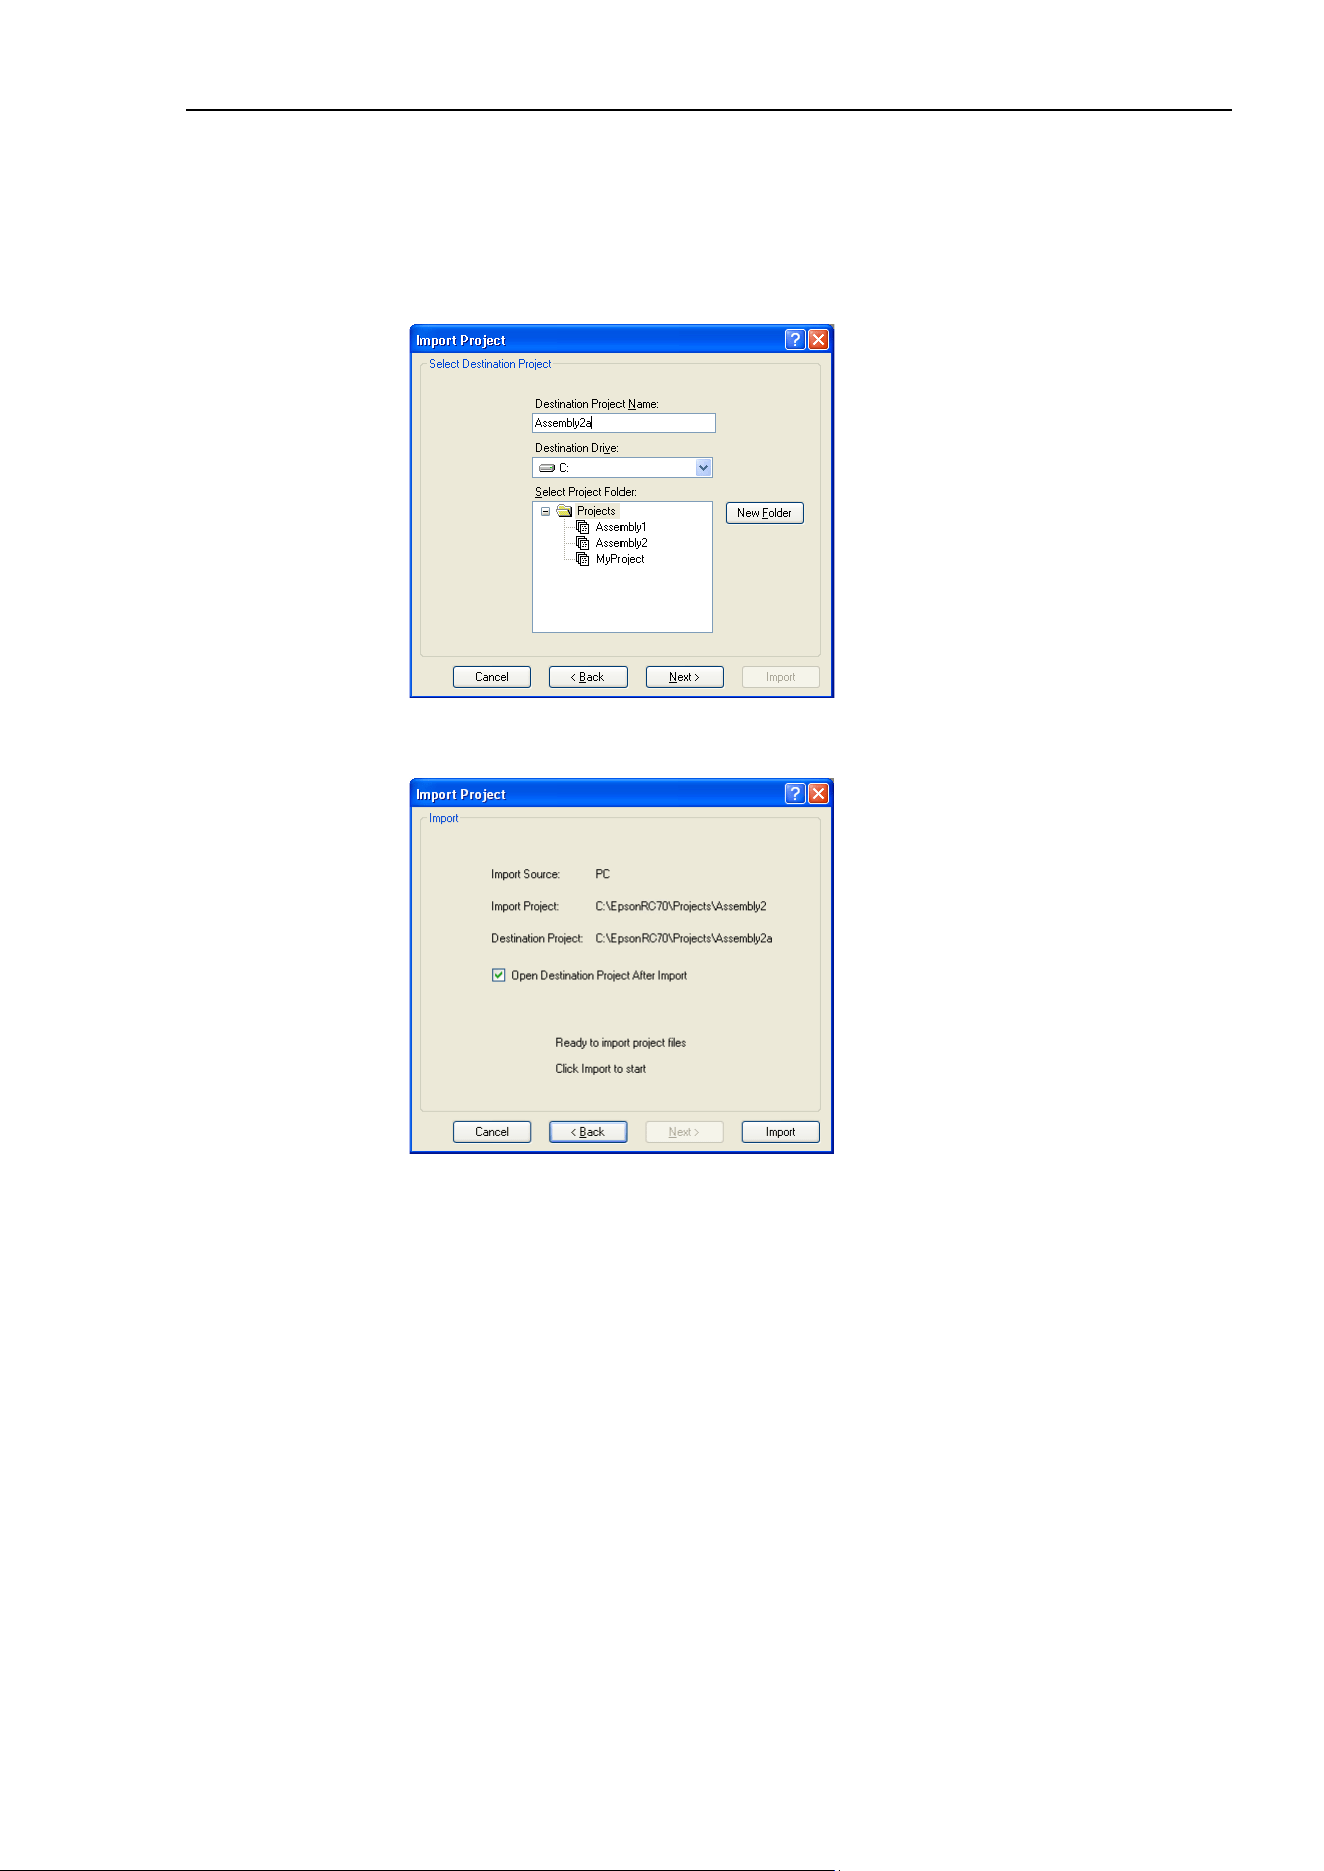
5. The EPSON RC+ 7.0 GUI
EPSON RC+ 7.0 (Ver.7.4) User's Guide Rev.6 63
4. Select the drive. After you select the project type and drive, the project list will be
updated to show the projects available for import. Select the project to import in the
list and click <Next>.
5. The new project name is set to the name of the imported project. You can modify the
destination project name if desired. Select the destination drive and project folder, then
click <Next>.
6. Verify the import source, import project, and destination project. Check [Open
Destination Project After Import] if you want the project to open after import.
7. Click the <Import> button. If the destination project already exists, you will be asked
if you want to overwrite it.
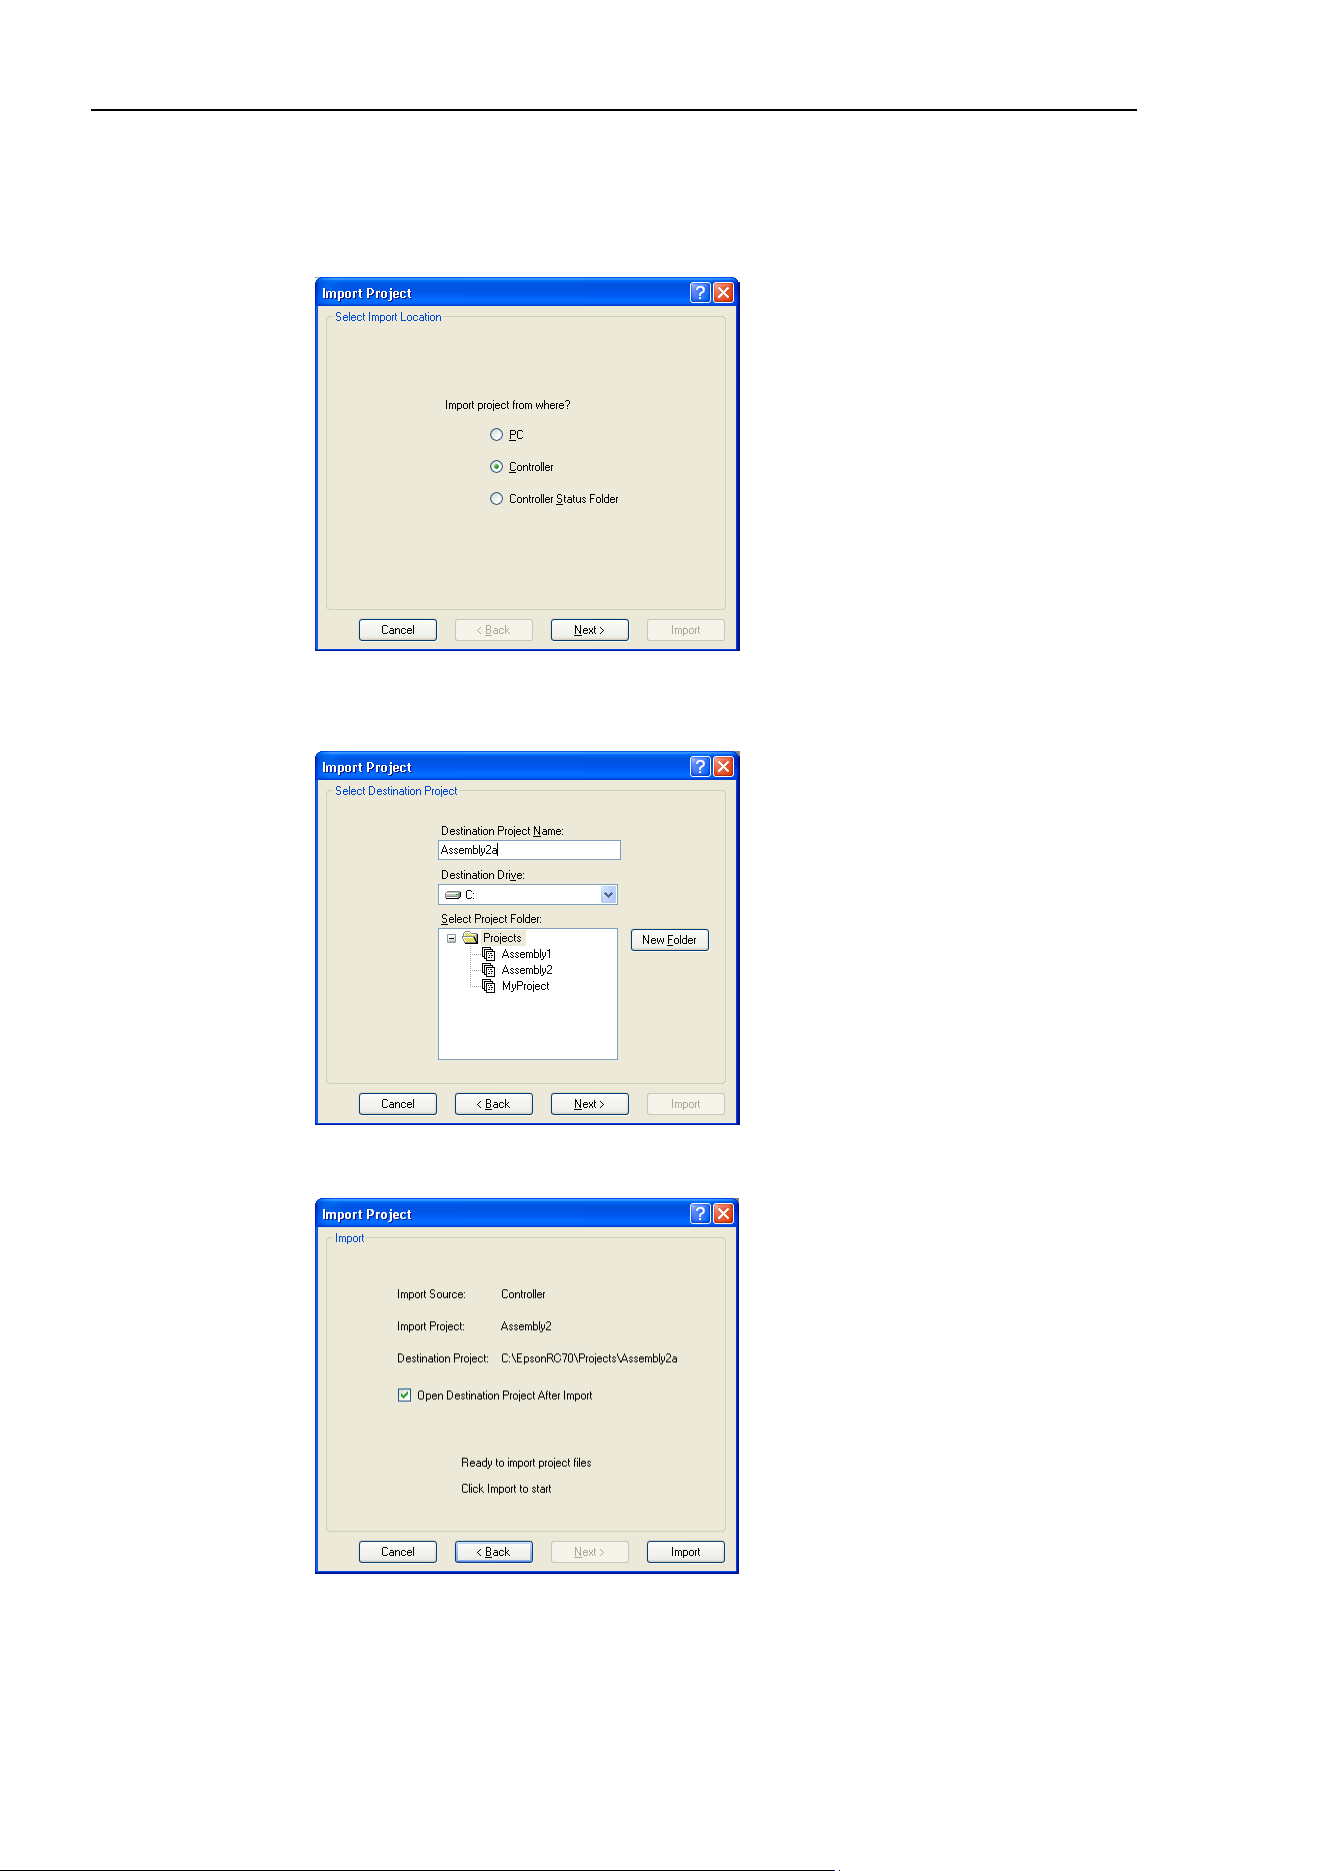
5. The EPSON RC+ 7.0 GUI
64 EPSON RC+ 7.0 (Ver.7.4) User's Guide Rev.6
Importing a Controller project
Follow these steps to import a project from a controller:
1. Select Import from the [Project] menu to open the [Import Project] dialog box.
2. Select <Controller> and click <Next>.
3. The new project name is set to the name of the current project in the controller. You
can modify the new project name if desired. Select the destination drive and project
folder, then click <Next>.
4. Verify the import source, import project, and destination project. Check [Open
Destination Project After Import] if you want the project to open after import.
5. Click the <Import> button. If the destination project already exists, you will be asked
if you want to overwrite it.
6. The project in the destination project will be built.
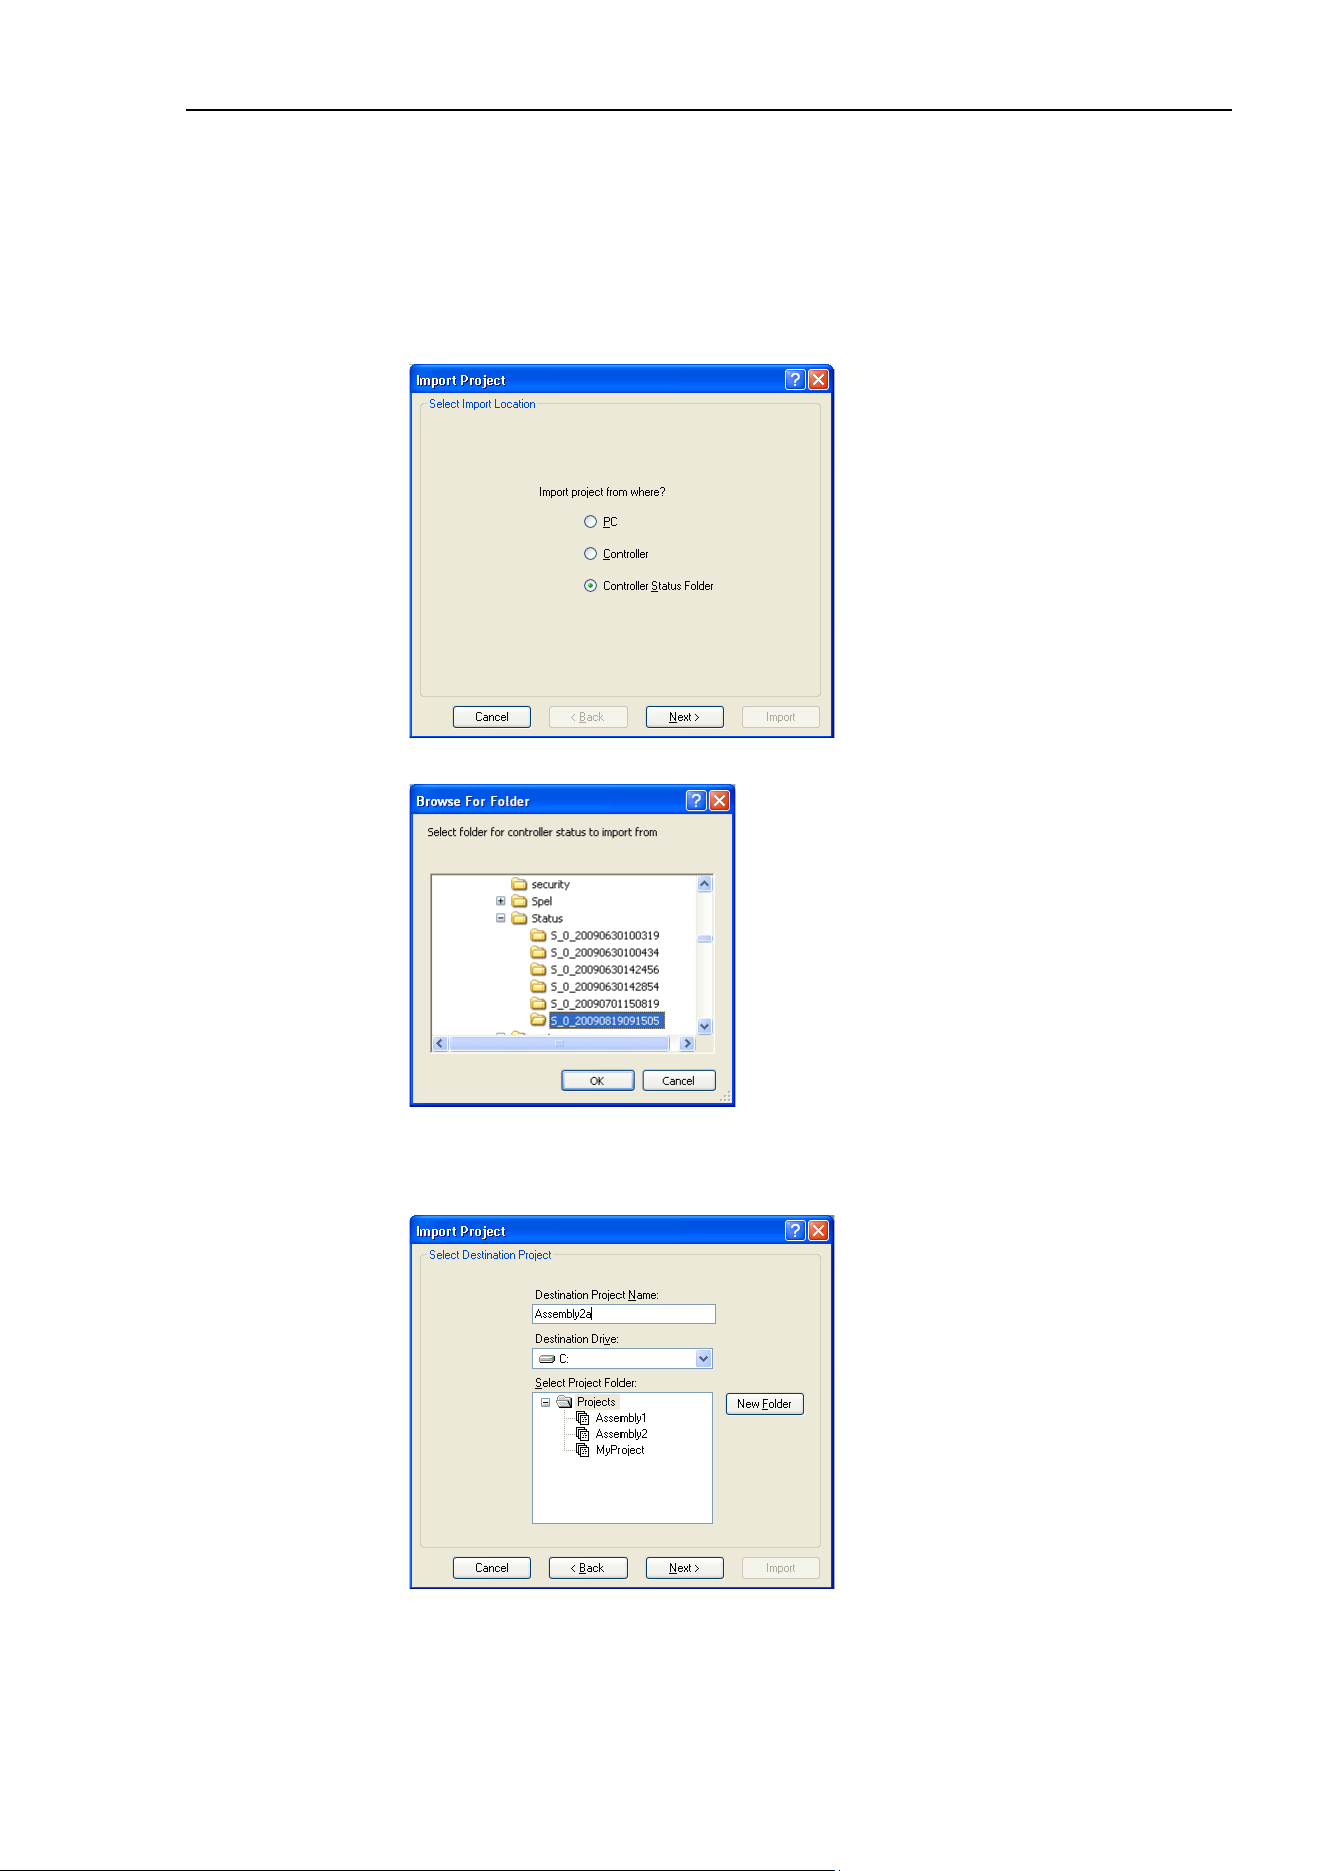
5. The EPSON RC+ 7.0 GUI
EPSON RC+ 7.0 (Ver.7.4) User's Guide Rev.6 65
Importing a Controller Status project
The projects using Vision Guide cannot be imported from the Controller Status Folder.
Follow these steps to import a project from a Controller Status Folder:
1. Select [Import] from the [Project] menu to open the [Import Project] dialog box.
2. Select <Controller Status Folder> and click [Next].
3. Select a controller status folder and click <OK>.
4. The new project name is set to the project found in the controller status folder. You
can modify the new project name if desired. Select the destination drive and folder,
then click <Next>.
NOTE
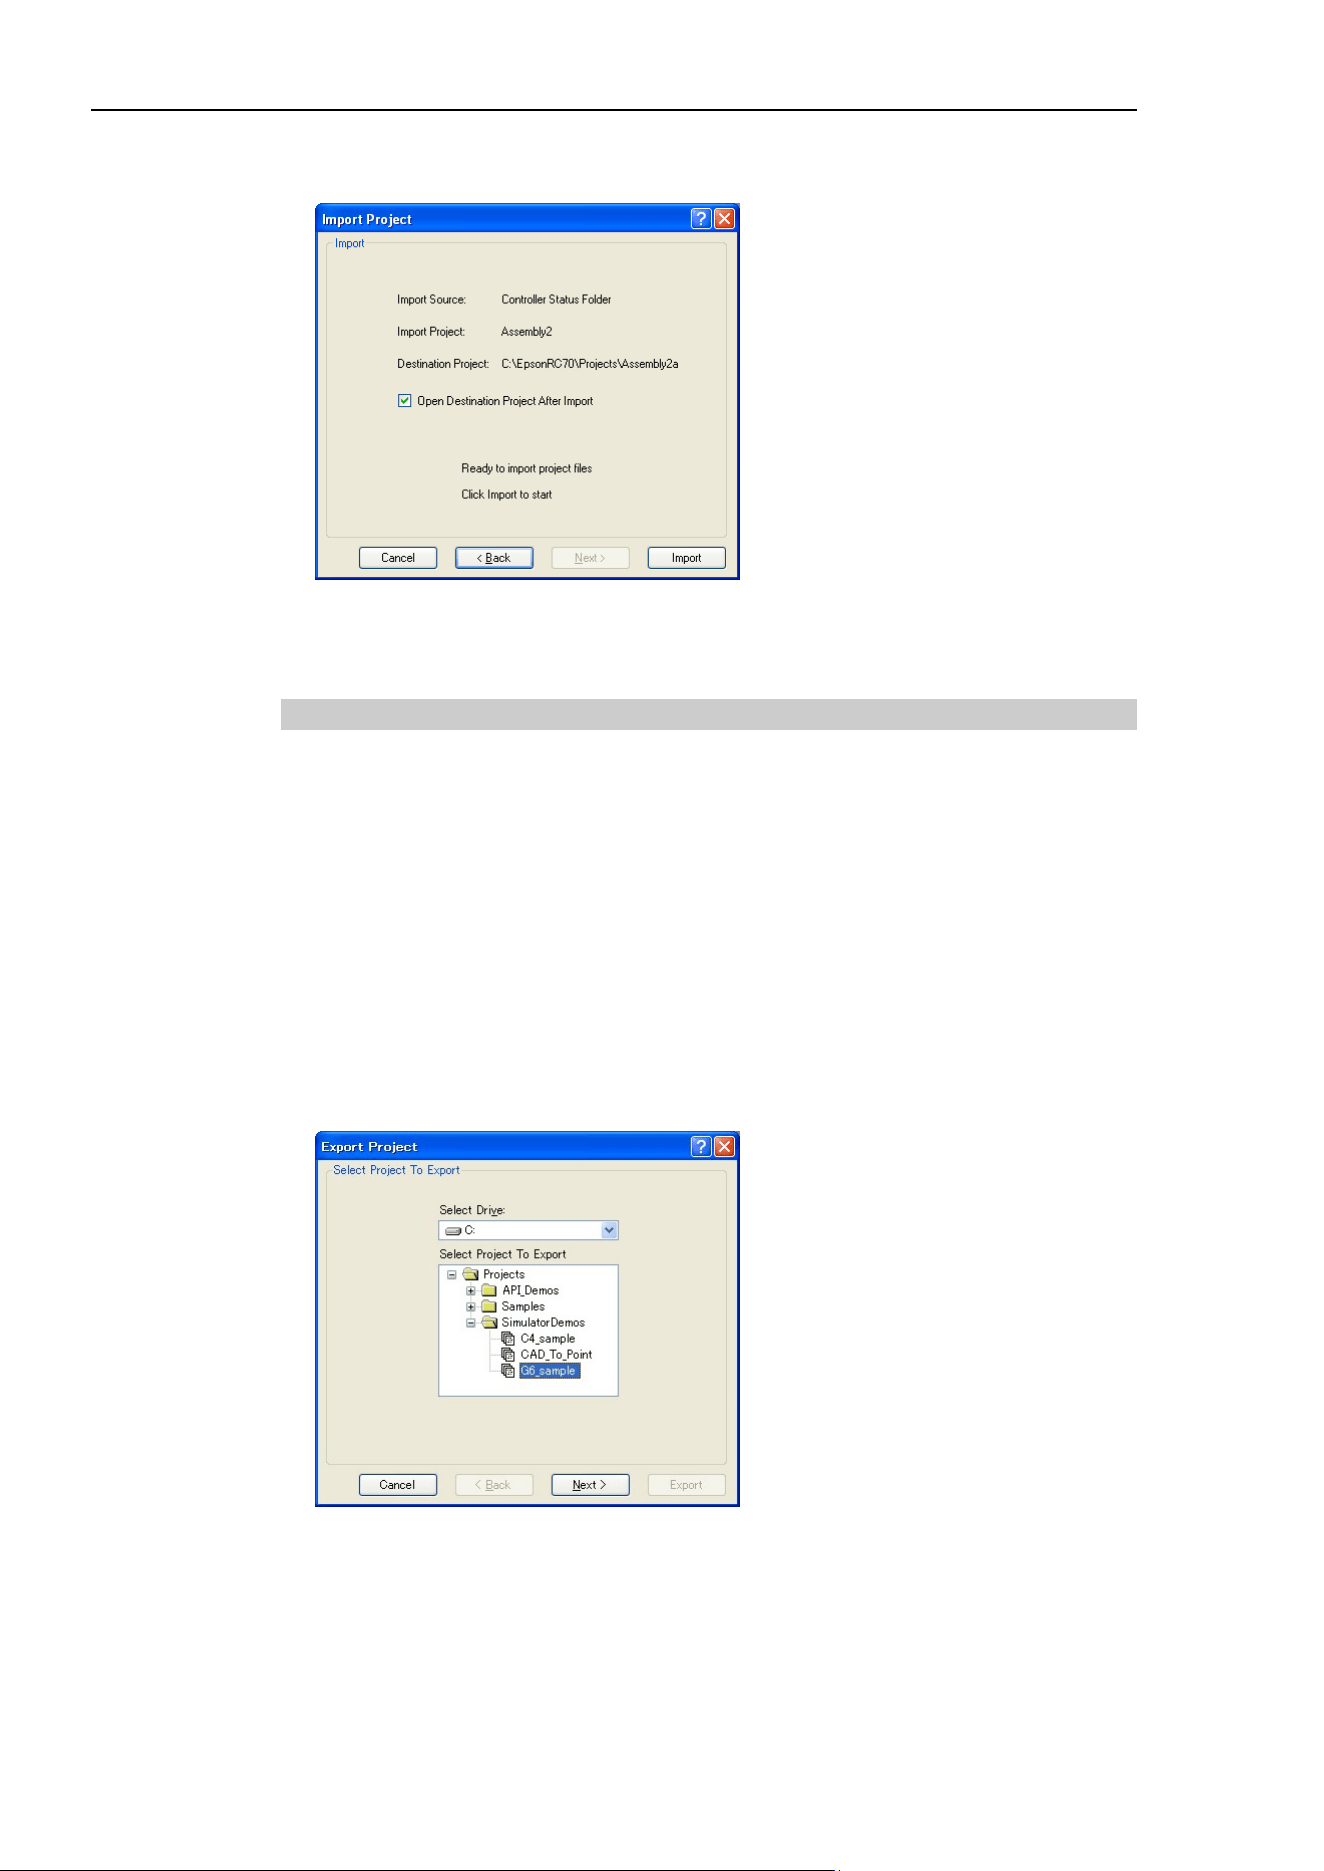
5. The EPSON RC+ 7.0 GUI
66 EPSON RC+ 7.0 (Ver.7.4) User's Guide Rev.6
5. Verify the import source, import project, and destination project. Check [Open
Destination Project After Import] if you want the project to open after import.
6. Click the <Import> button. If the destination project already exists, you will be asked
if you want to overwrite it.
5.9.10 [Export] Command (Project Menu)
The Project Menu Export Command uses a wizard to export projects to EPSON RC+ 6.0
projects.
When a project is exported, the files are copied to a new project folder, so the original
project is not changed.
SPEL+ commands and syntax added to the EPSON RC+ 7.0 are not supported by EPSON
RC+ 6.0. It is recommended to change the compiler version according to the version of
your controller and check the compatibility before exporting projects. For details, refer to
[Project]-[Properties]-[Compiler] Page in 5.9.15 [Properties] Command (Project Menu).
Follow these steps to export a project:
1. Select EPSON RC+ 7.0 menu-[Project]-[Export] to display the [Export Project] dialog.
2. Select a drive. A project list will be refreshed and exportable projects will be displayed.
Select a project you want to export from the list and click <Next> button.
NOTE
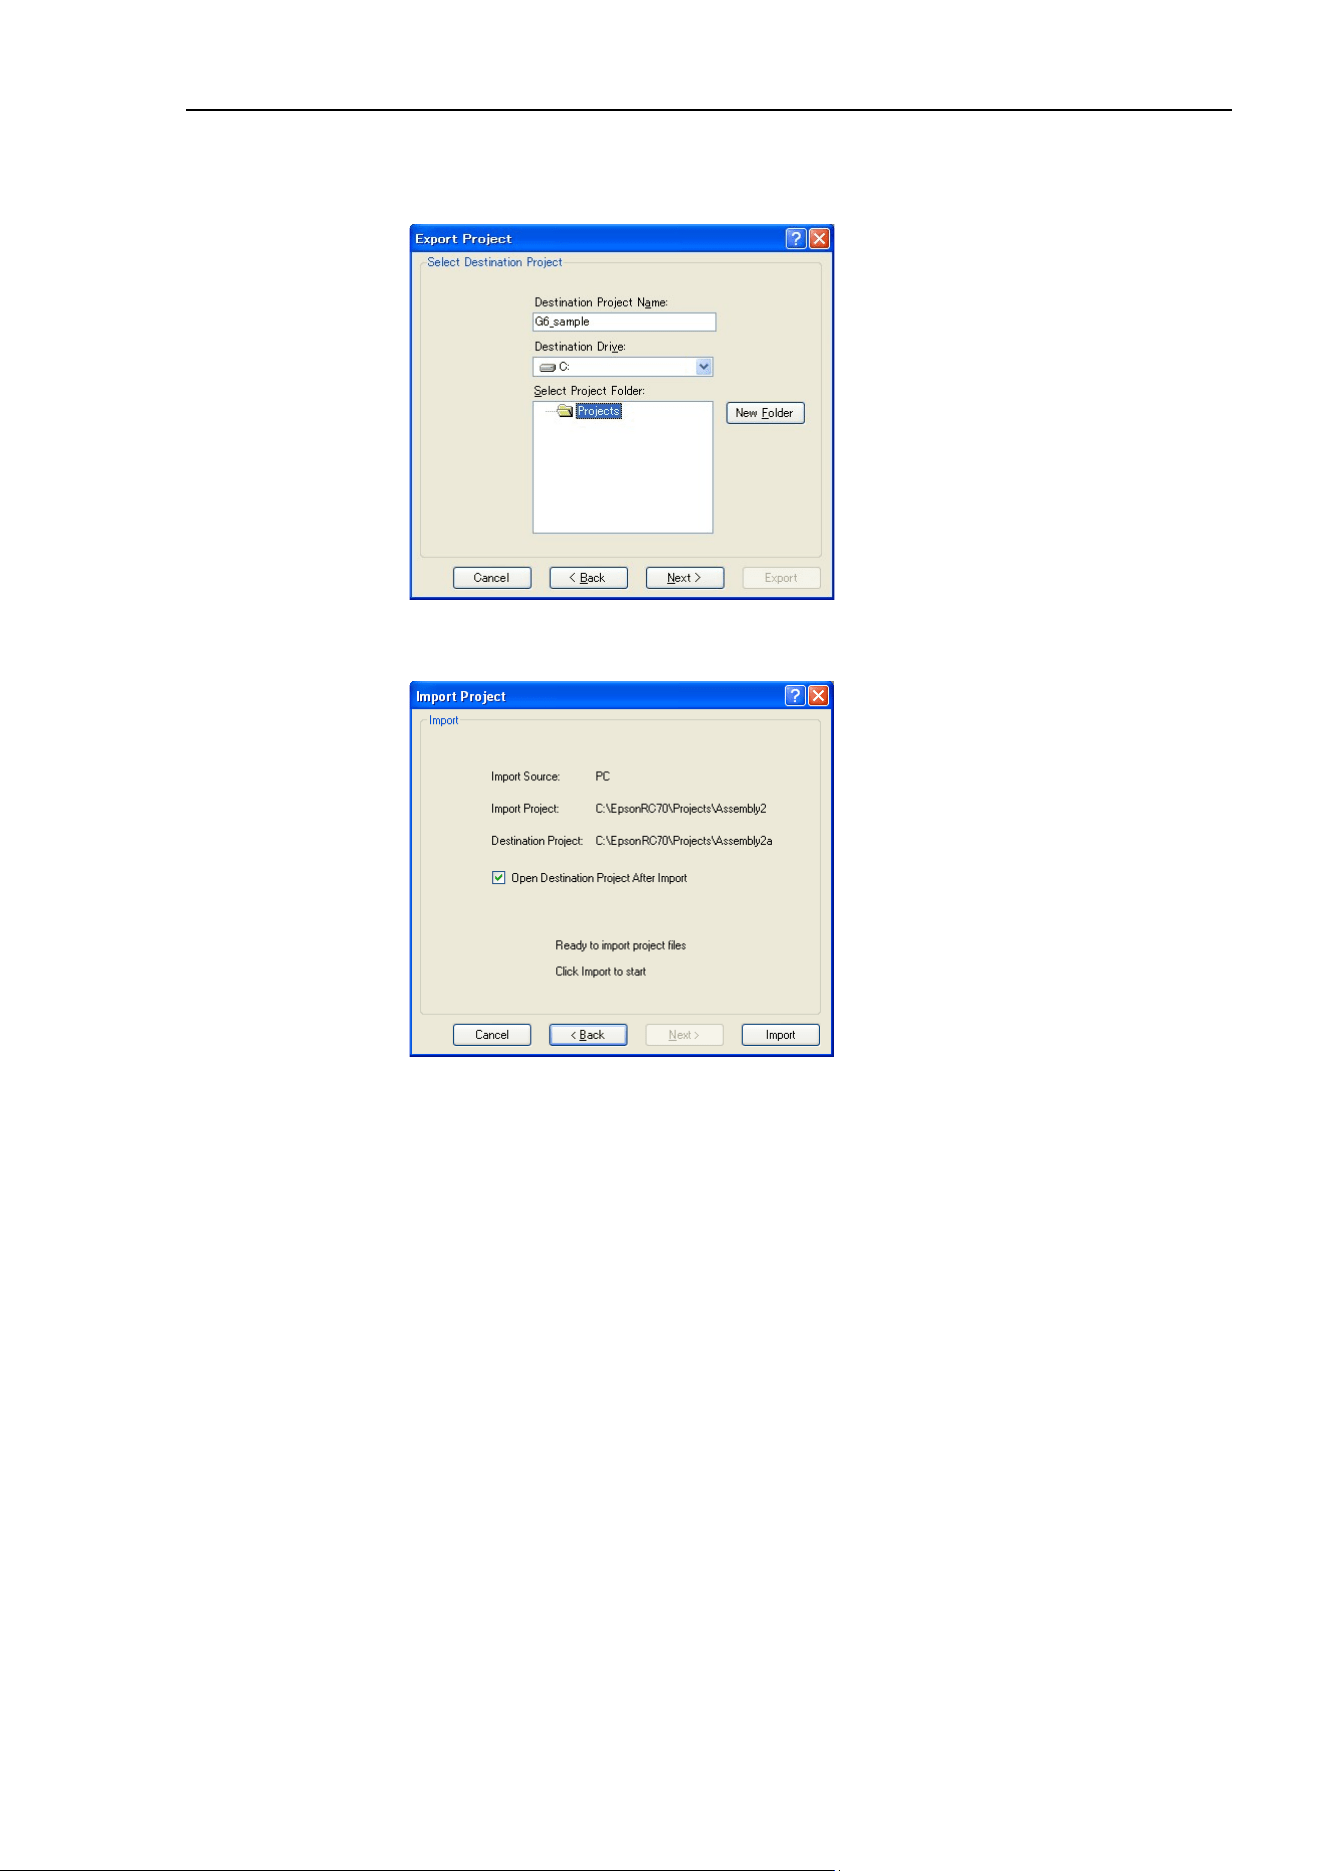
5. The EPSON RC+ 7.0 GUI
EPSON RC+ 7.0 (Ver.7.4) User's Guide Rev.6 67
3. Name of a new project is set to the name of the exported project. The name of the new
project can be changed. Select the destination drive and project folder. Then, click
<Next>.
4. Confirm the export source and destination.
5. Click <Export>. If the destination already exists, you will be asked whether or not to
overwrite the project.
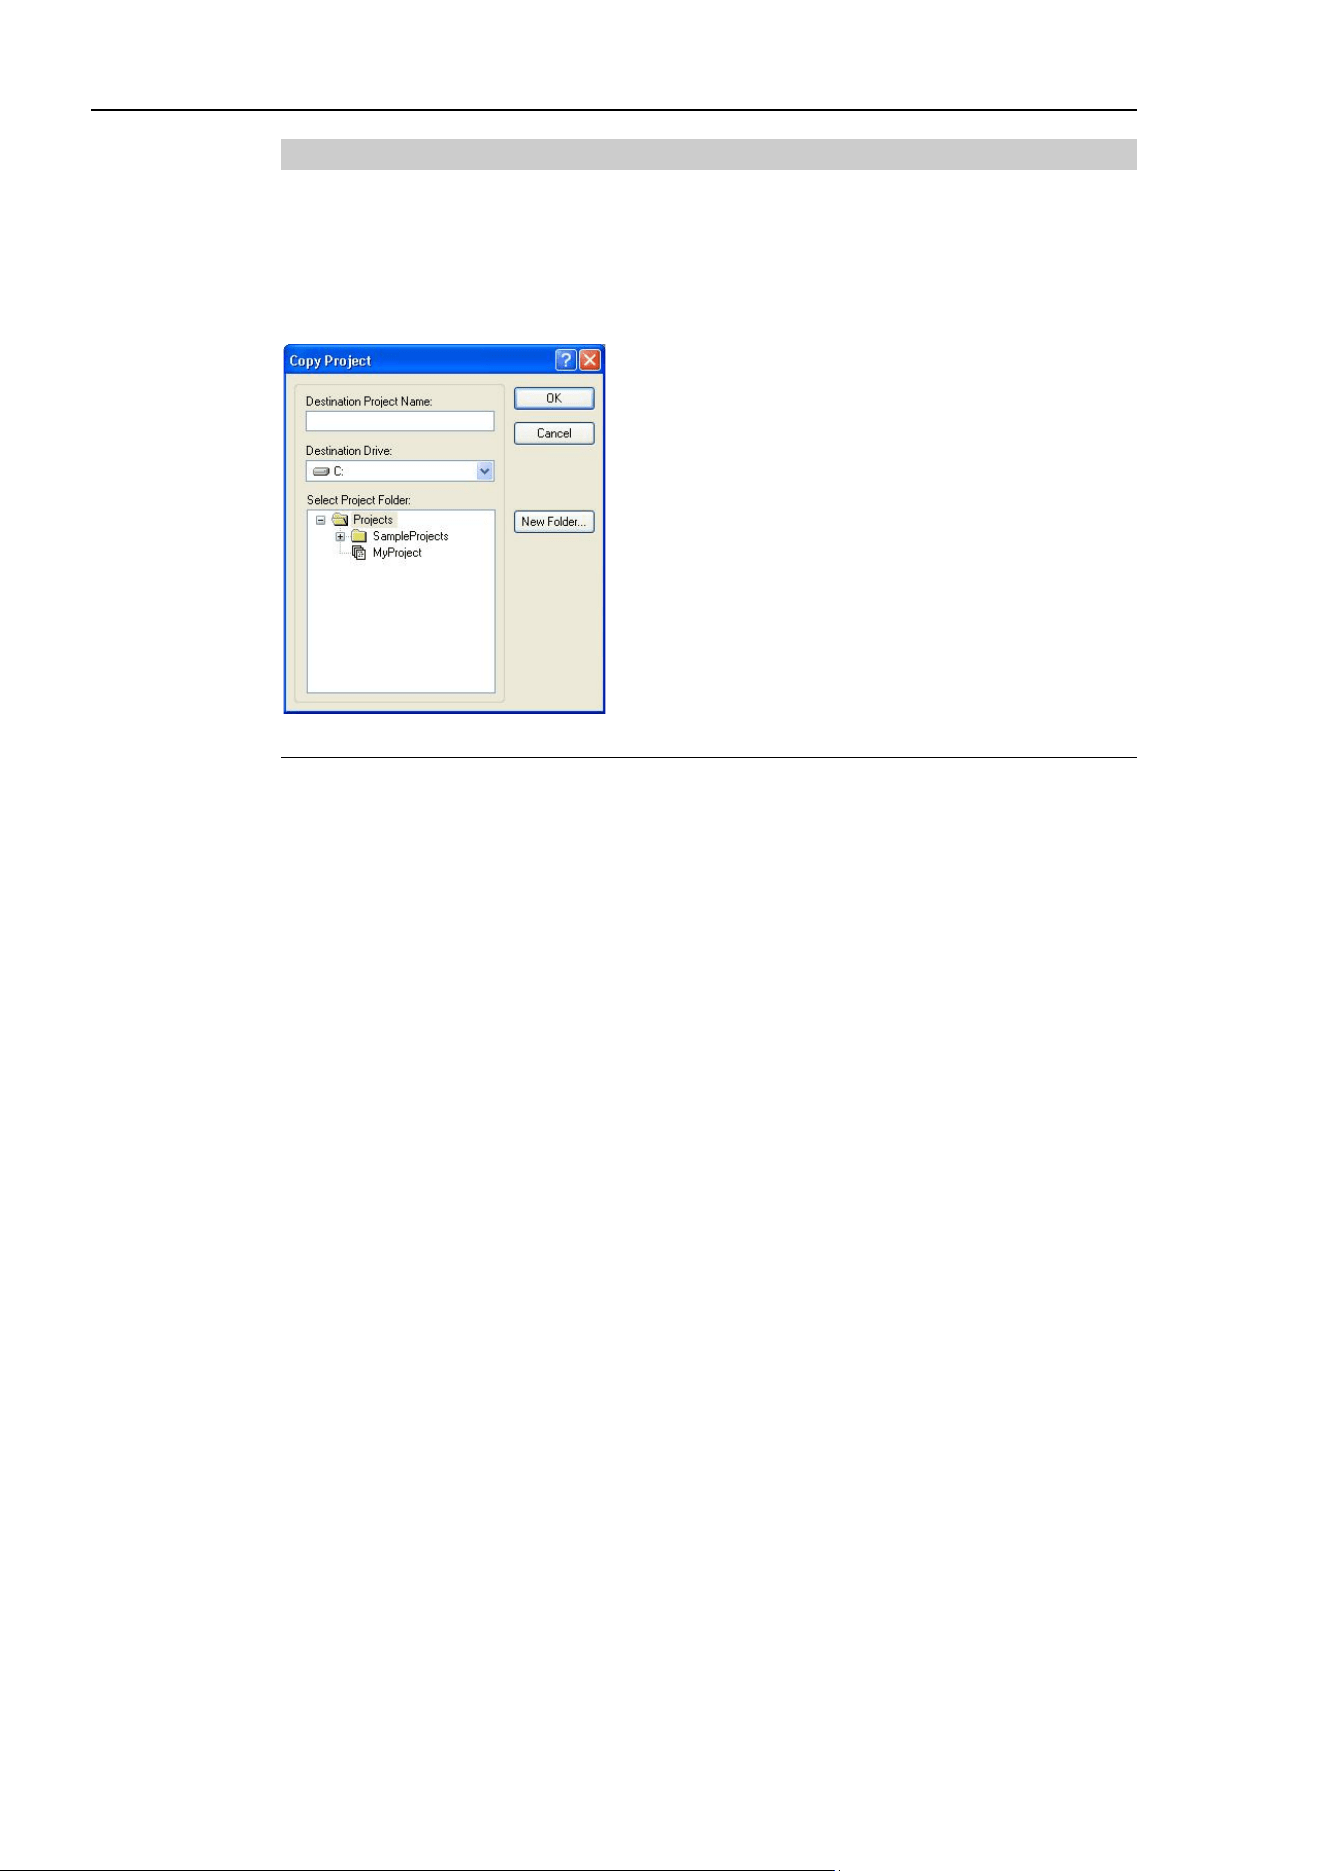
5. The EPSON RC+ 7.0 GUI
68 EPSON RC+ 7.0 (Ver.7.4) User's Guide Rev.6
5.9.11 [Copy] Command (Project Menu)
The [Copy] command copies all files in the current project to a specified drive, folder, and
project name. You can use the current project name for the destination name if you select
a new drive or folder. You can also specify a new name for the destination project.
You should use the [Copy] command to make backup copies of your project on a regular
basis.
Item Description
Destination
Project Name
Type in a name for the new copy of the project.
The name can include alphanumeric characters along with underscores
but cannot include two byte characters such as Japanese, Chinese
characters.
The maximum number of characters is 24. You can use the
same name as the current project if you select a drive and folder that is
not the same as the current project's drive and folder.
Destination Drive
Drives for the project copy.
OK
Performs the copy process.
Cancel
Cancels the operation.
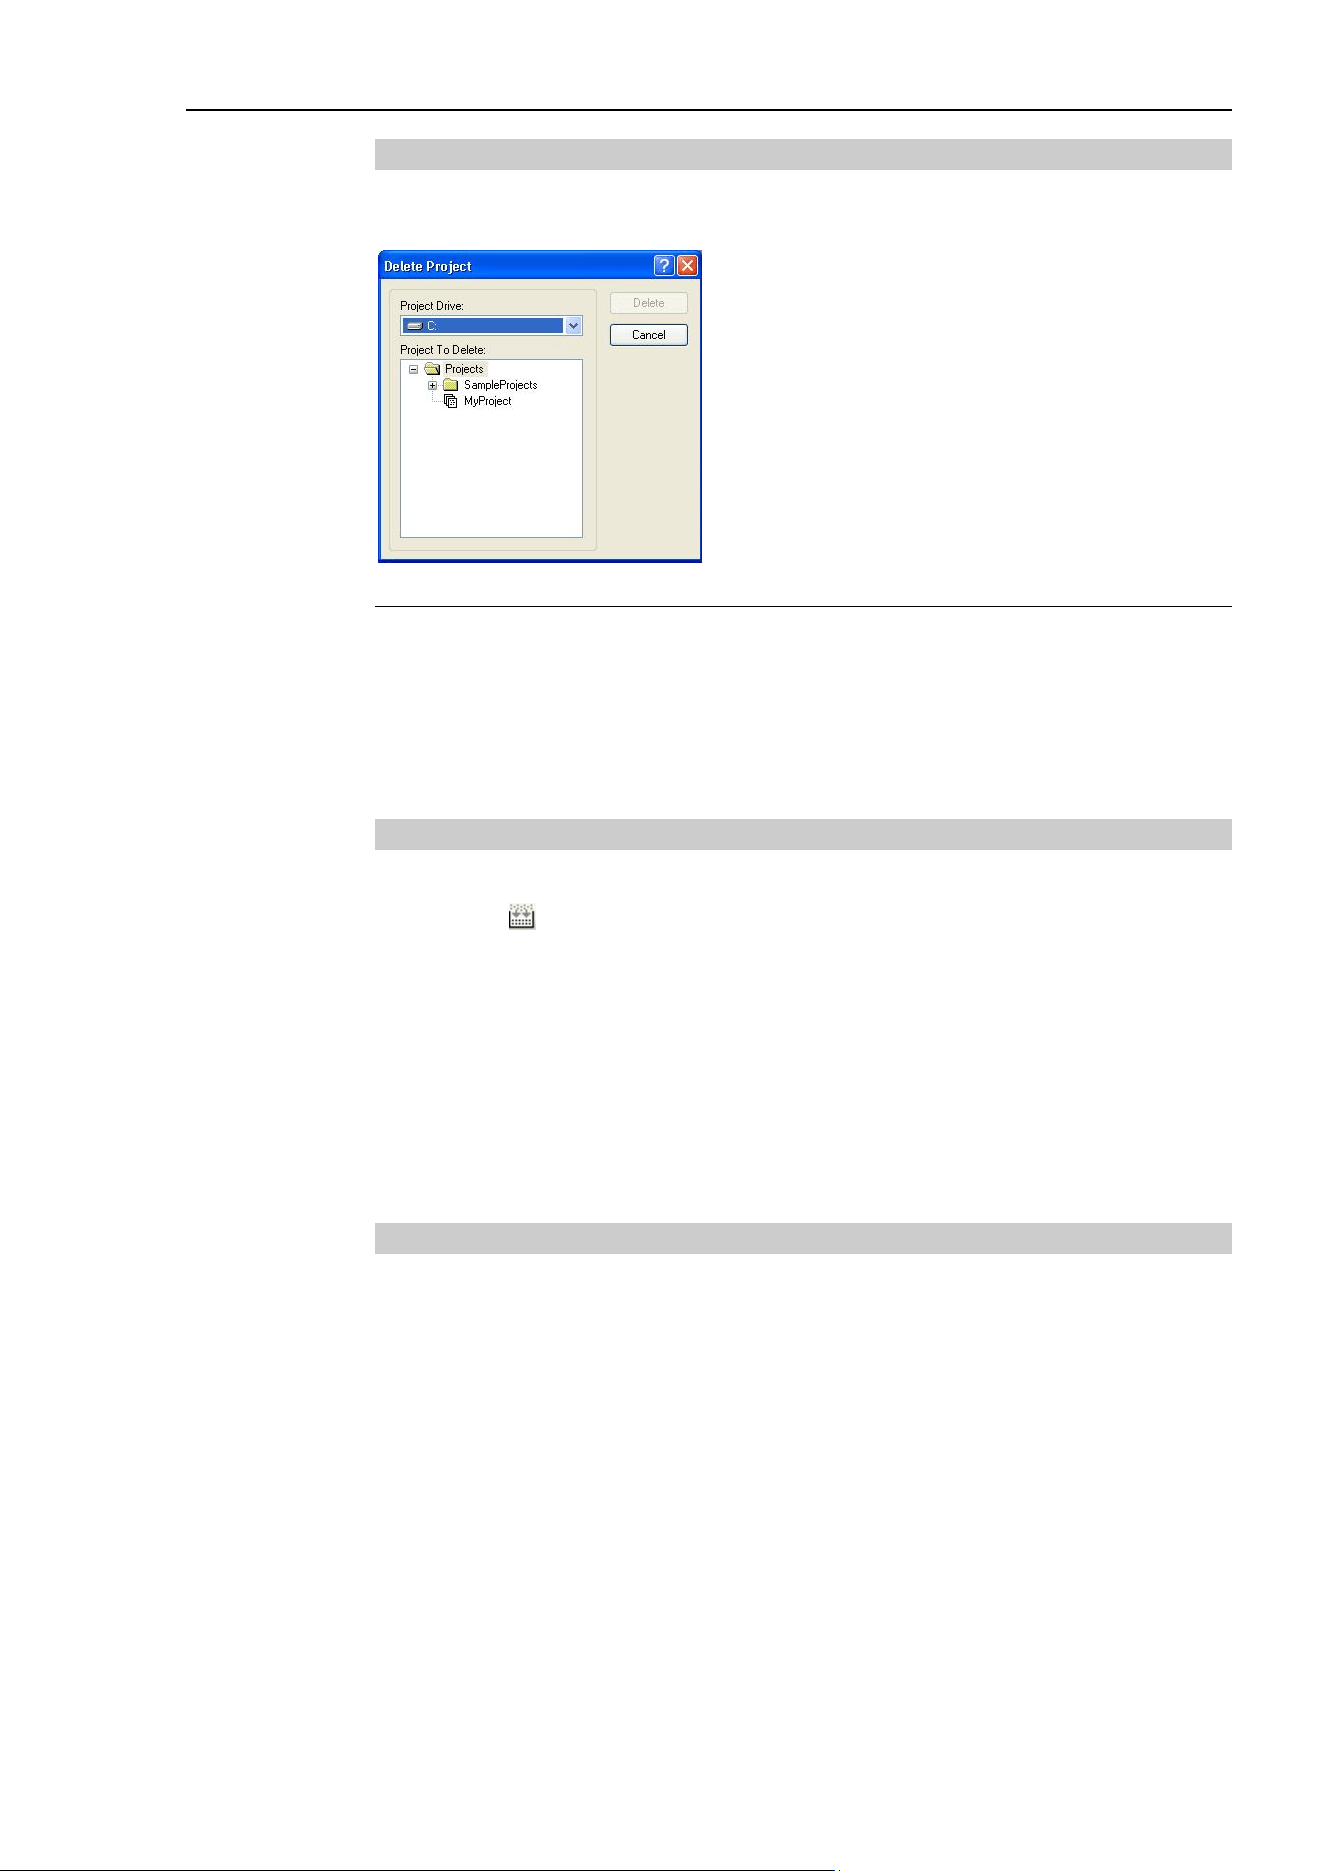
5. The EPSON RC+ 7.0 GUI
EPSON RC+ 7.0 (Ver.7.4) User's Guide Rev.6 69
5.9.12 [Delete] Command (Project Menu)
This command deletes an entire project from a PC disk. All files in the project folder will
be destroyed.
Item Description
Project Drive Select drive for the project to delete.
Project To Delete Select a project to delete from the list.
Delete Delete the project. You will be prompted to confirm the operation.
Cancel Cancel the operation.
5.9.13 [Build] Command (Project Menu)
Shortcuts
Toolbar: Keys: Ctrl + B
This command builds the current project so that it can be executed. The Build command
does the minimum amount of work required to bring the project up to date in the robot
controller. For example, if a change was made to one program file in the project, then
Build will compile the changed file, link it with the remaining object files (if they exist),
and send the new files to the controller.
When sending the required files to the compact vision, make sure to rebuild not build.
During the build process, the status window displays each step of the build. If there are
any errors, they will be displayed on the status window.
5.9.14 [Rebuild] Command (Project Menu)
Shortcuts
Keys: Ctrl + Shift + B
Rebuilds the entire current projects. All program files are re-compiled, linked, and sent to
the controller. All point files in the project are sent to the controller.
If using the camera of the compact vision, rebuild to send the required files to the compact
vision.
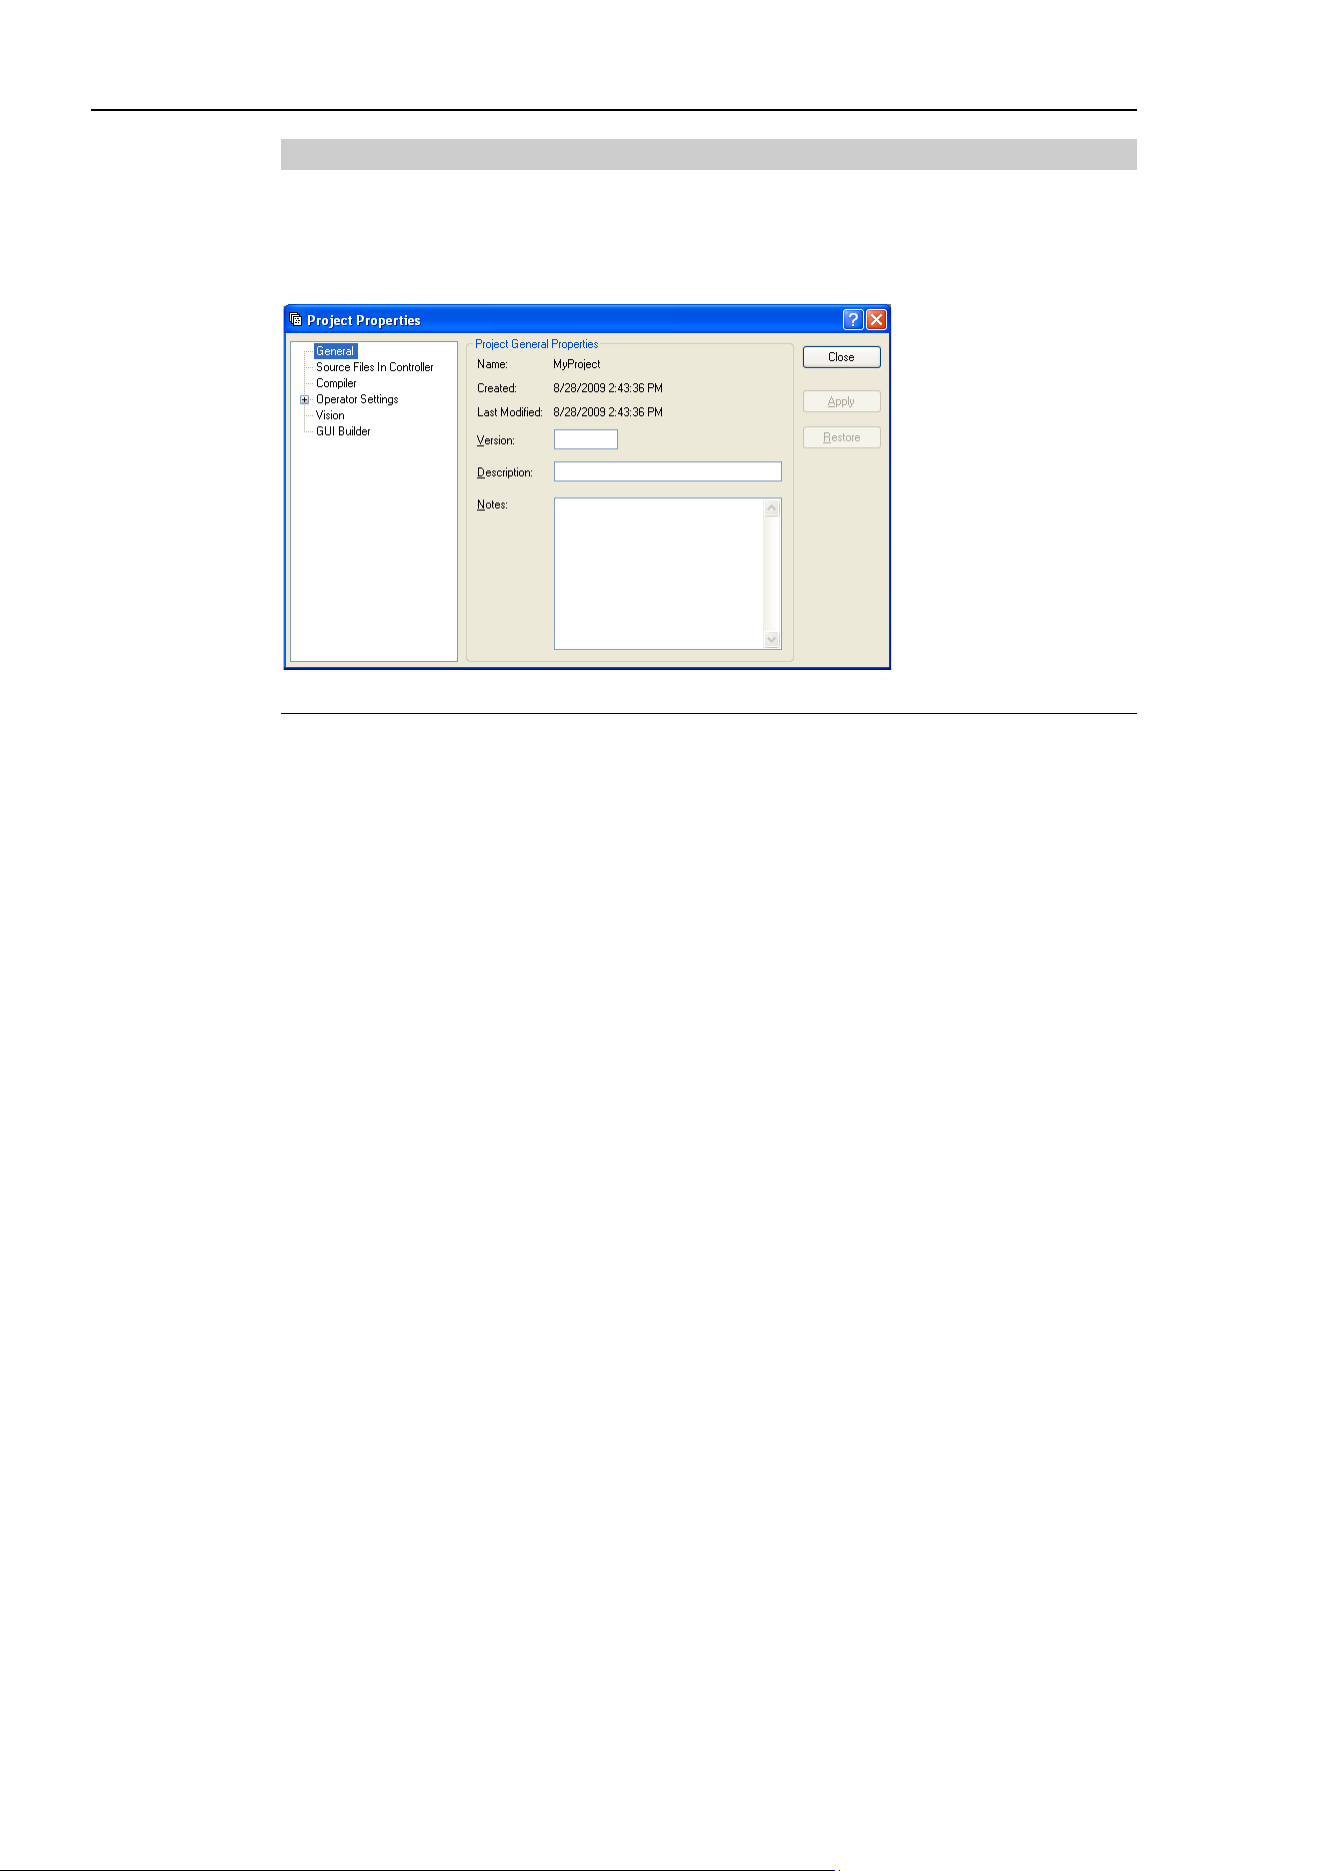
5. The EPSON RC+ 7.0 GUI
70 EPSON RC+ 7.0 (Ver.7.4) User's Guide Rev.6
5.9.15 [Properties] Command (Project Menu)
[Project]-[Properties]-[General] Page
Use this page to view and edit general properties for the current project. All project
property settings are stored in the project file, which is also stored in the controller during
project build.
Item Description
Name The name of the current project.
Created Date and time when the project was created.
Last Modified Date and time when the project was last modified.
Version User version number of the project. You can type any text here.
Description A description of the project. You can type any text here.
Notes Any project notes can be entered into this section.
Apply Set current values after changes have been made.
Restore Revert back to previous values.
Close Close the Project Properties dialog.
When the [Open Project] dialog is used, clicking the <Project Info> button will open a
dialog that contains the general project properties entered on this page.
TIP
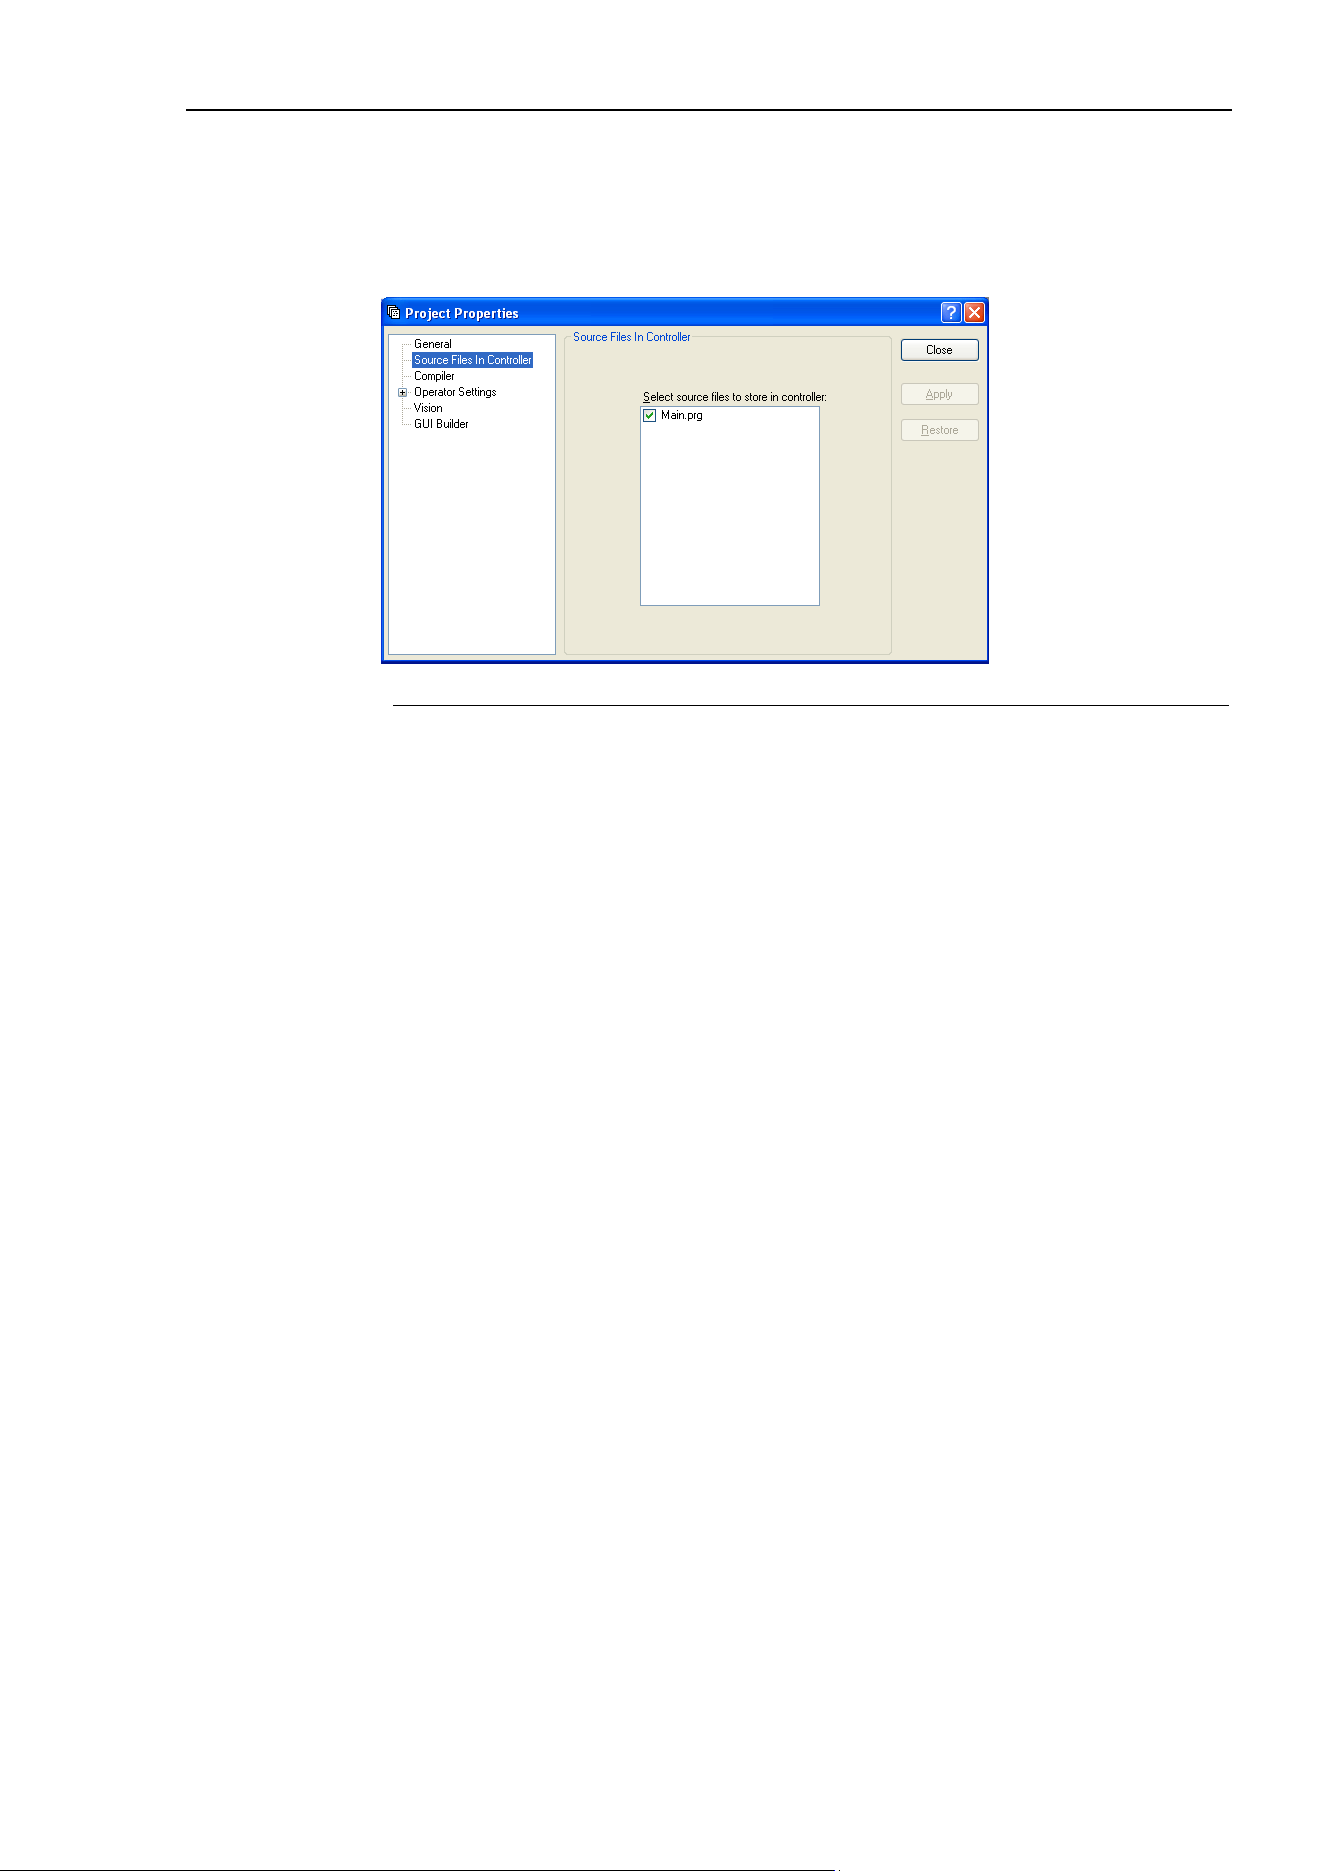
5. The EPSON RC+ 7.0 GUI
EPSON RC+ 7.0 (Ver.7.4) User's Guide Rev.6 71
[Project]-[Properties]-[Source Files In Controller] Page
This page allows you to select which source files will be stored in the controller during
project build.
After changes are applied, the next project build will clear the project in the controller and
perform a rebuild.
Item
Description
Select Source Files To
Store in Controller
This is a list of the source files in the project. Select which
source files you want to have stored in the controller.
Apply
Set current values after changes have been made.
Restore
Reverts back to the previous values.
Close
Closes the [Project Properties] dialog.
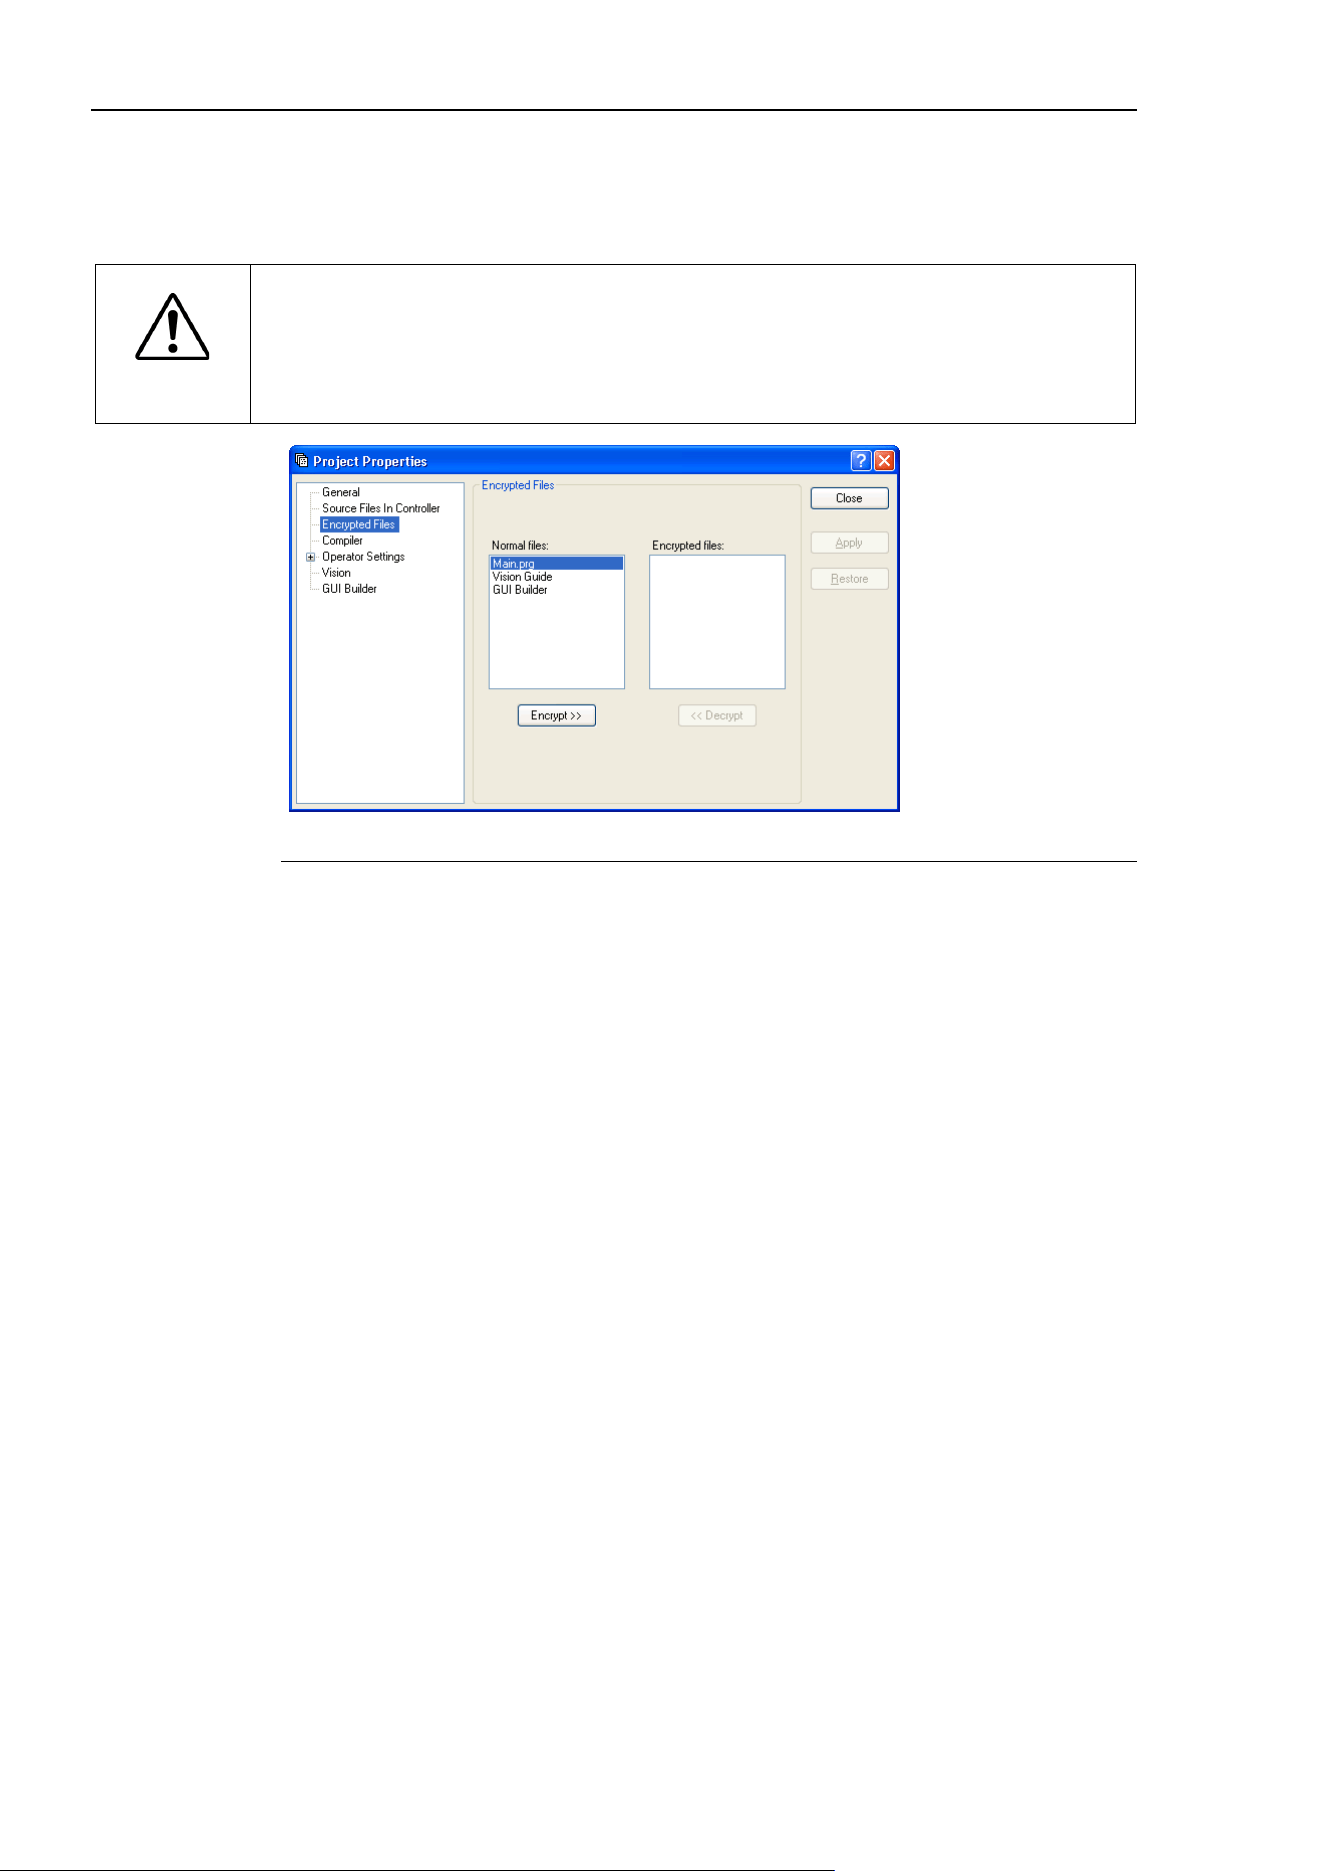
5. The EPSON RC+ 7.0 GUI
72 EPSON RC+ 7.0 (Ver.7.4) User's Guide Rev.6
[Project]-[Properties]-[Encrypted Files] Page
This page allows you to encrypt files in the current project.
For details on using encrypted files, refer to section 7.8 Using Encrypt Files.
CAUTION
■
USE EXTREME CAUTION!
Keep a record of the
password(s) used for encryption in a safe place. Once a
file is encrypted, it can only be opened with the password you enter. If you
forget the password, the file contents CANNOT BE RECOVERED
Item Description
Normal Files
This is a list of the source
files in the project that are not encrypted.
Select which source files you want to encrypt.
Encrypted Files
This is a list of the source files in the project that are encrypted.
Select which source files you want to decrypt.
Encrypt >>
Encrypts the files selected in the [Normal files] list. When this
button is clicked, you will be prompted for a password that will be
used to access these encrypted files.
<<Decrypt
Decrypts the files selected in the [Encrypted files] list. When this
button is clicked, you will be prompted for the password that was
used to encrypt the files.
Apply
Set current values after changes have been made.
Restore
Reverts back to the previous values.
Close
Closes the [Project Properties] dialog box.
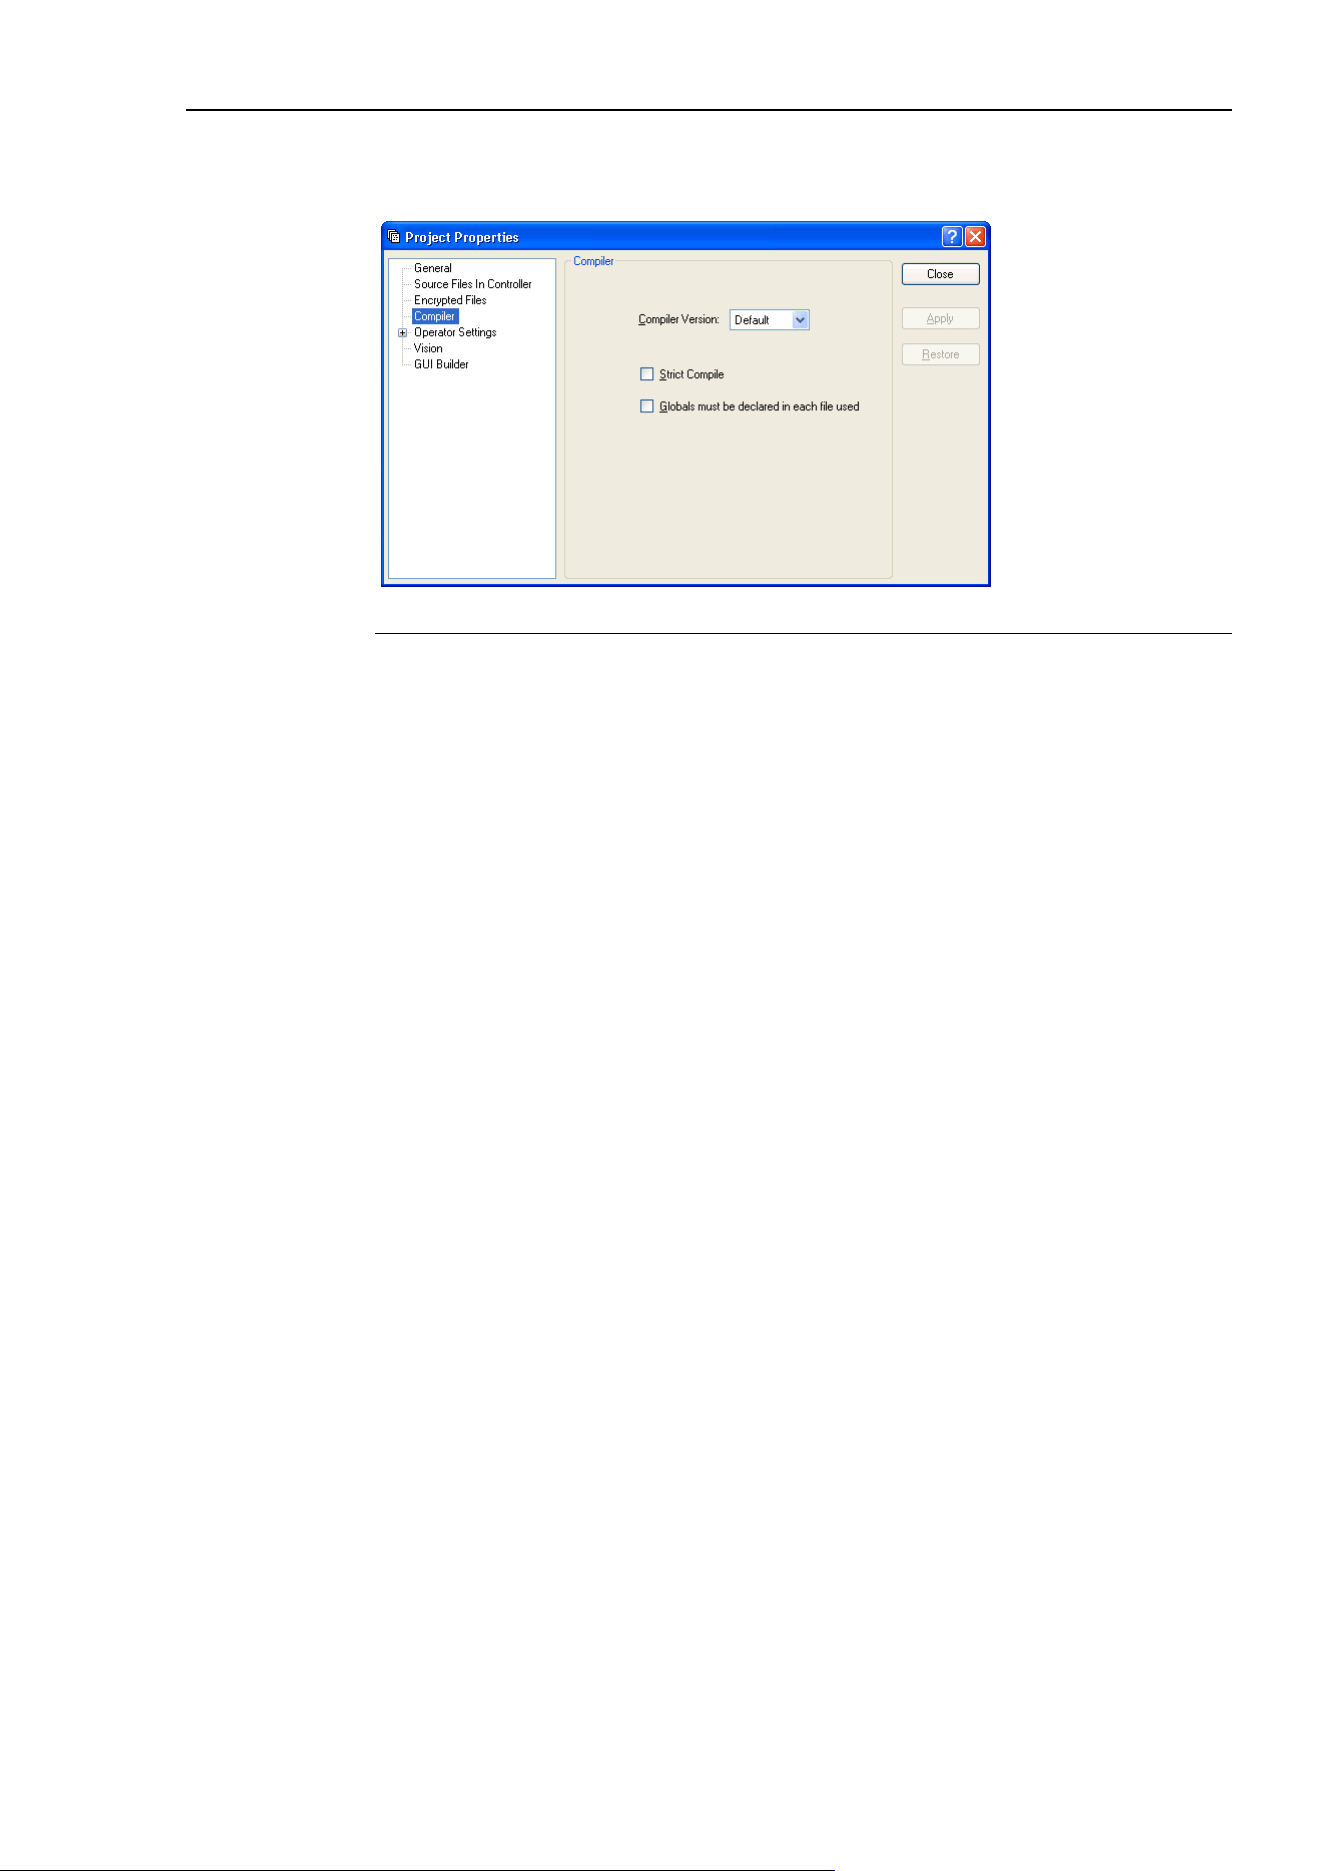
5. The EPSON RC+ 7.0 GUI
EPSON RC+ 7.0 (Ver.7.4) User's Guide Rev.6 73
[Project]-[Properties]-[Compiler] Page
This page allows you to configure the compiler settings.
Item Description
Compiler Version
[Default] is the normal setting.
When the projects cannot be built because new SPEL+ language
keywords have been added that
conflict with your variable names,
you can select
a previous
version to build the projects. Specify the
controller version that
compiles the project.
Strict Compile
Checks the Boolean type strictly.
If the program contains following descriptions, an
error will occur.
Boolean variables are assigned to other numerical types
Specifies a wait time to Wait
Compares Boolean types
Globals must be
declared in each
file used
Checks the Global variables (including Global Preserve variables)
for each file.
When this item is checked, you must declare
Global variables in
each file
in which they are used, otherwise an error will occur at
build time
.
Enabling this item reduces a build time of a project which uses
many Global variables.
Apply
Sets current values after changes have been made.
Restore
Reverts back to the previous values.
Close
Closes the [Project Properties] dialog box.
TIP
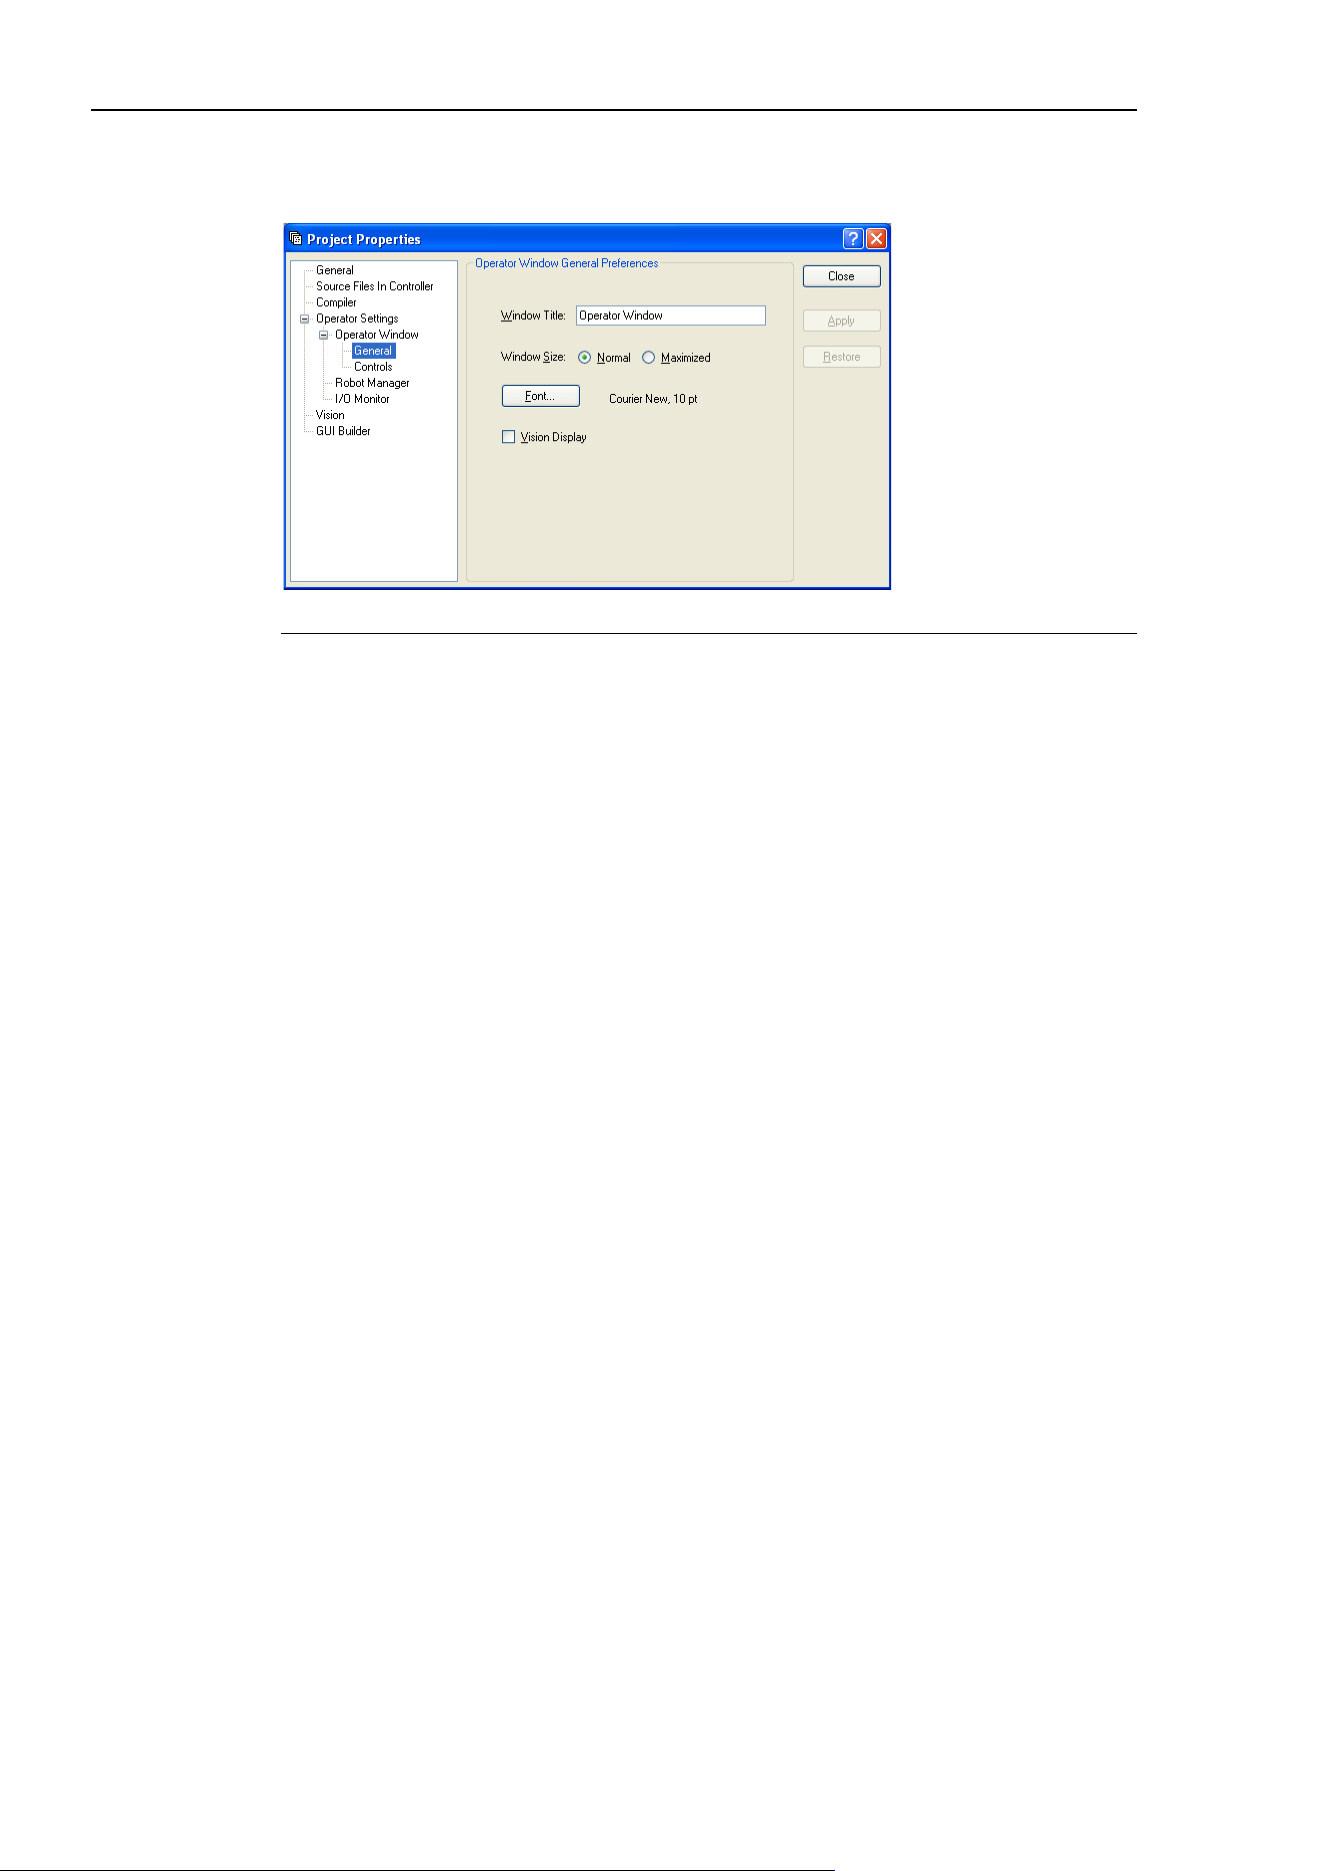
5. The EPSON RC+ 7.0 GUI
74 EPSON RC+ 7.0 (Ver.7.4) User's Guide Rev.6
[Project]-[Properties]-[Operator Settings]-[Operator Window]-[General] Page
This page allows you to configure the general settings for the Operator Window.
Item Description
Window Title
Type in the title that you want to appear at the top of the
operator window.
Window Size
Choose Normal or Maximized.
Font
Click on the <Font> button to open the fonts dialog. Choose
the font you desire for the operator window. The current font
name and size is displayed next to the <Font> button.
Vision Display
If this check box is set, the Vision Guide image will be
displayed in the operator window.
Restore
Reverts back to the previous values.
Close
Closes the [Project Properties] dialog box.
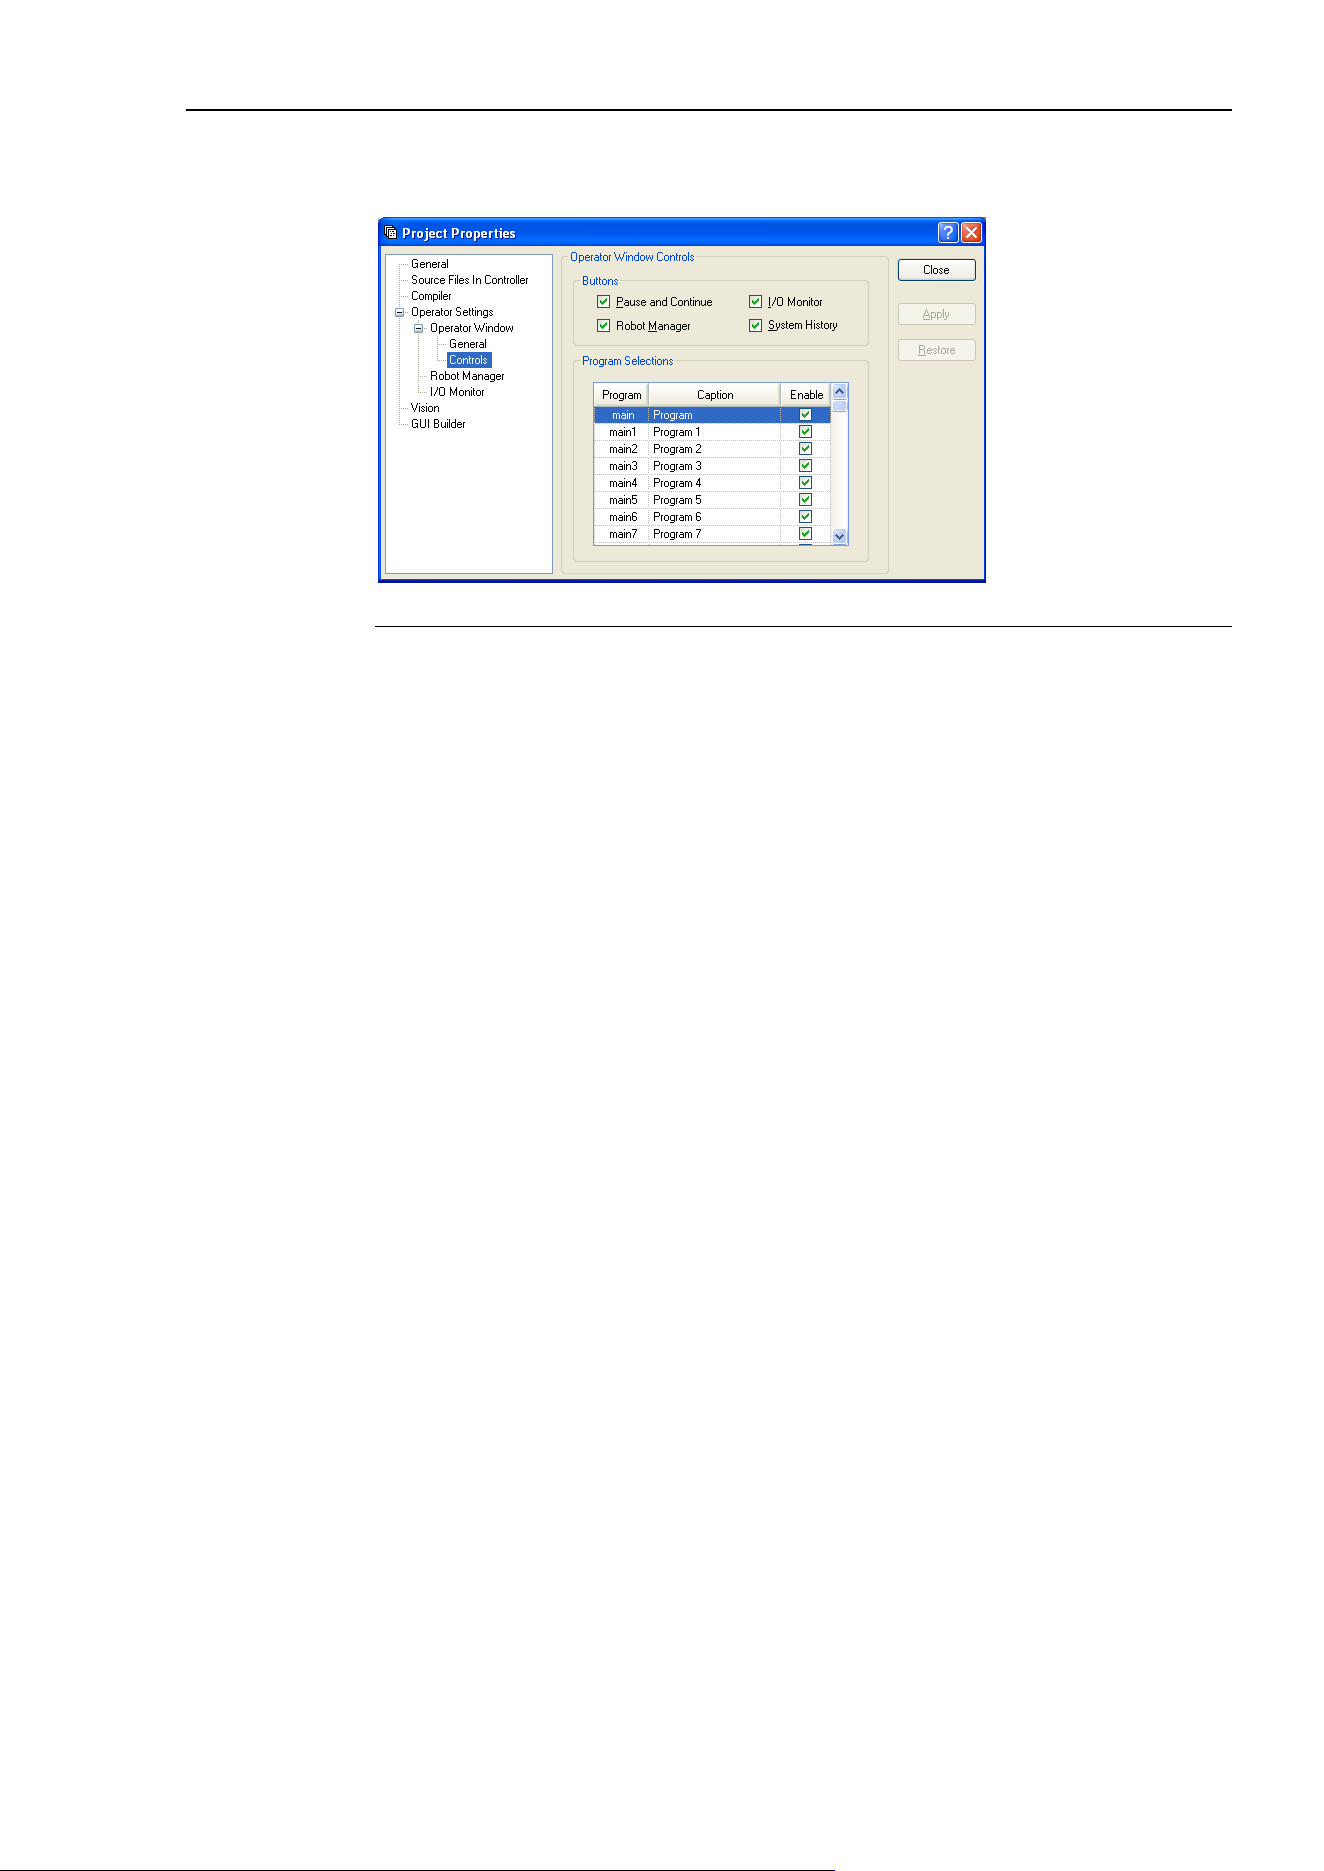
5. The EPSON RC+ 7.0 GUI
EPSON RC+ 7.0 (Ver.7.4) User's Guide Rev.6 75
[Project]-[Properties]-[Operator Settings]-[Operator Window]-[Controls] Page
This page allows you to configure the controls for the Operator Window.
Item Description
Pause and Continue
Check this box if you want the <Pause> and <Continue> buttons to
be displayed. This will allow the operator to pause and continue
from the operator window.
I/O Monitor
Check this box if you want the <I/O Monitor> button to be
displayed. This will allow the operator to view input and output
status.
Robot Manager
Check this box if you want the <Robot Manager> button to be
displayed. This will allow the operator to open the Robot Manager
from the operator
window.
System History
If this check box is set, the <System History> button will appear.
You can check the system history.
Apply
Set current values after changes have been made.
Restore
Reverts back to the previous values.
Close
Closes the [Project Properties] dialog.
Program Selections Details
Each project can have up to 64 programs that can be started from the Operator Window.
The programs are named main, main1 main2, … main63. Each program has an associated
startup function using the same name as the program (main, main1, main2…main63).
In the program selections grid, you can define a friendly name for each of the 64 programs.
You can also define which selections will be displayed in the Operator Window program
list by checking the Enable checkbox.
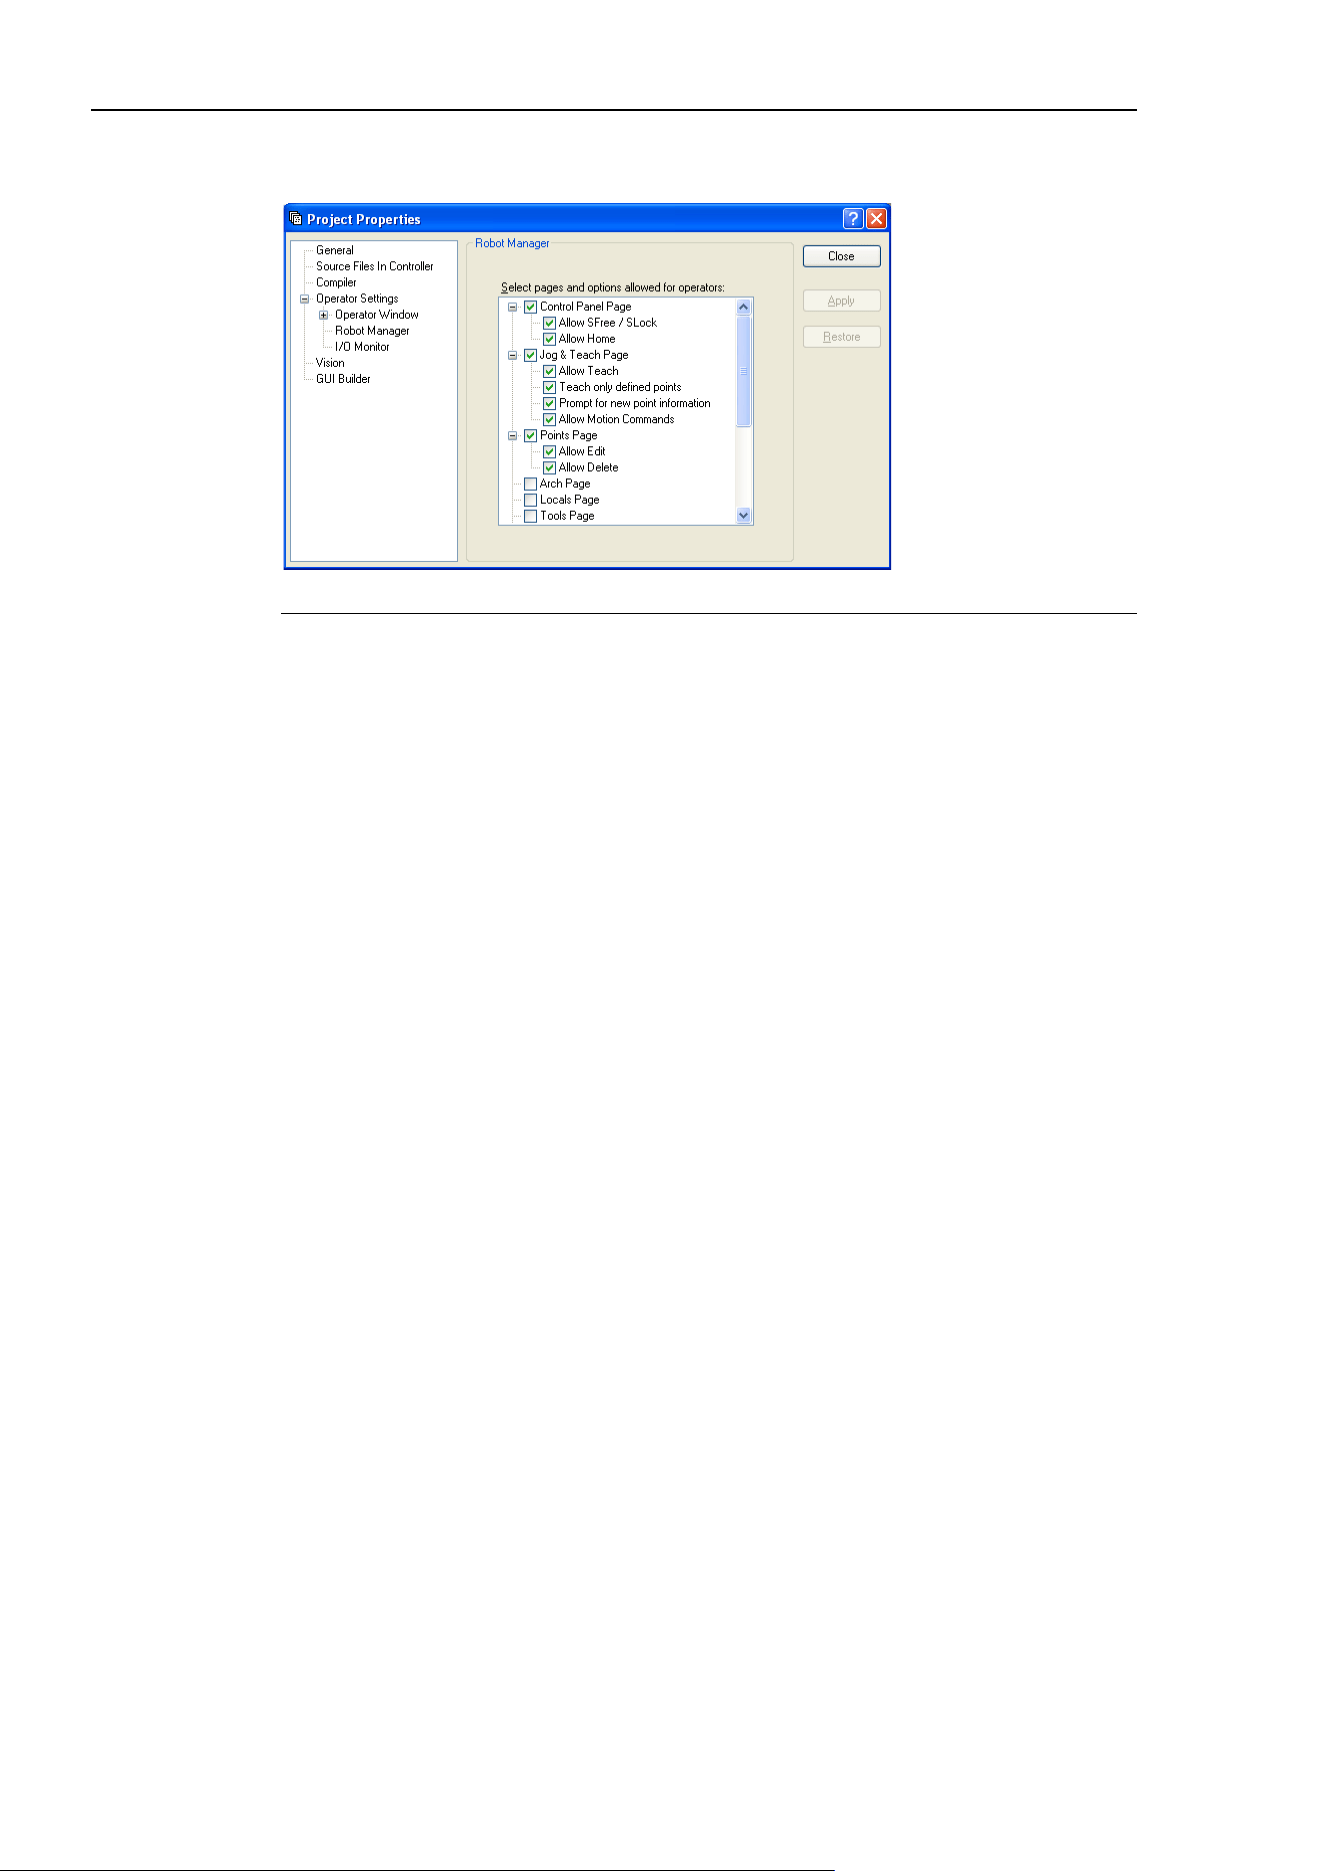
5. The EPSON RC+ 7.0 GUI
76 EPSON RC+ 7.0 (Ver.7.4) User's Guide Rev.6
[Project]-[Properties]-[Operator Settings]-[Robot Manager] Page
Use this page to configure the Robot Manager for operators.
Item Description
Page and options
enabled for operators
Check the pages that you want the operator to have access to
when
the Robot Manager is displayed from the operator window.
In some pages, there are additional options.
Allow SFree / SLock
Allows the operator to free or lock joints from the [Control
Panel] page.
Allow Home
Allows the operator to home the robot from the [Control Panel]
page.
Allow Teach
Allows the operator to teach points from the [Jog & Teach] page.
Teach only defined
points
Only defined points are shown in the point list on the [Jog &
Teach] page.
Prompt for new
point information
When the operator teaches a new point, a dialog will be
displayed for entering the point label and description.
Allow Motion
Commands
Allows the operator to execute motion commands from the [Jog
& Teach] page.
Allow Edit
Allows the operator to edit point data on the [Points] page.
Allow Delete
Allows the operator to delete points on the [Points] page.
Apply
Set current values after changes have been made.
Restore
Reverts back to the previous values.
Close
Closes the [Project Properties] dialog box.
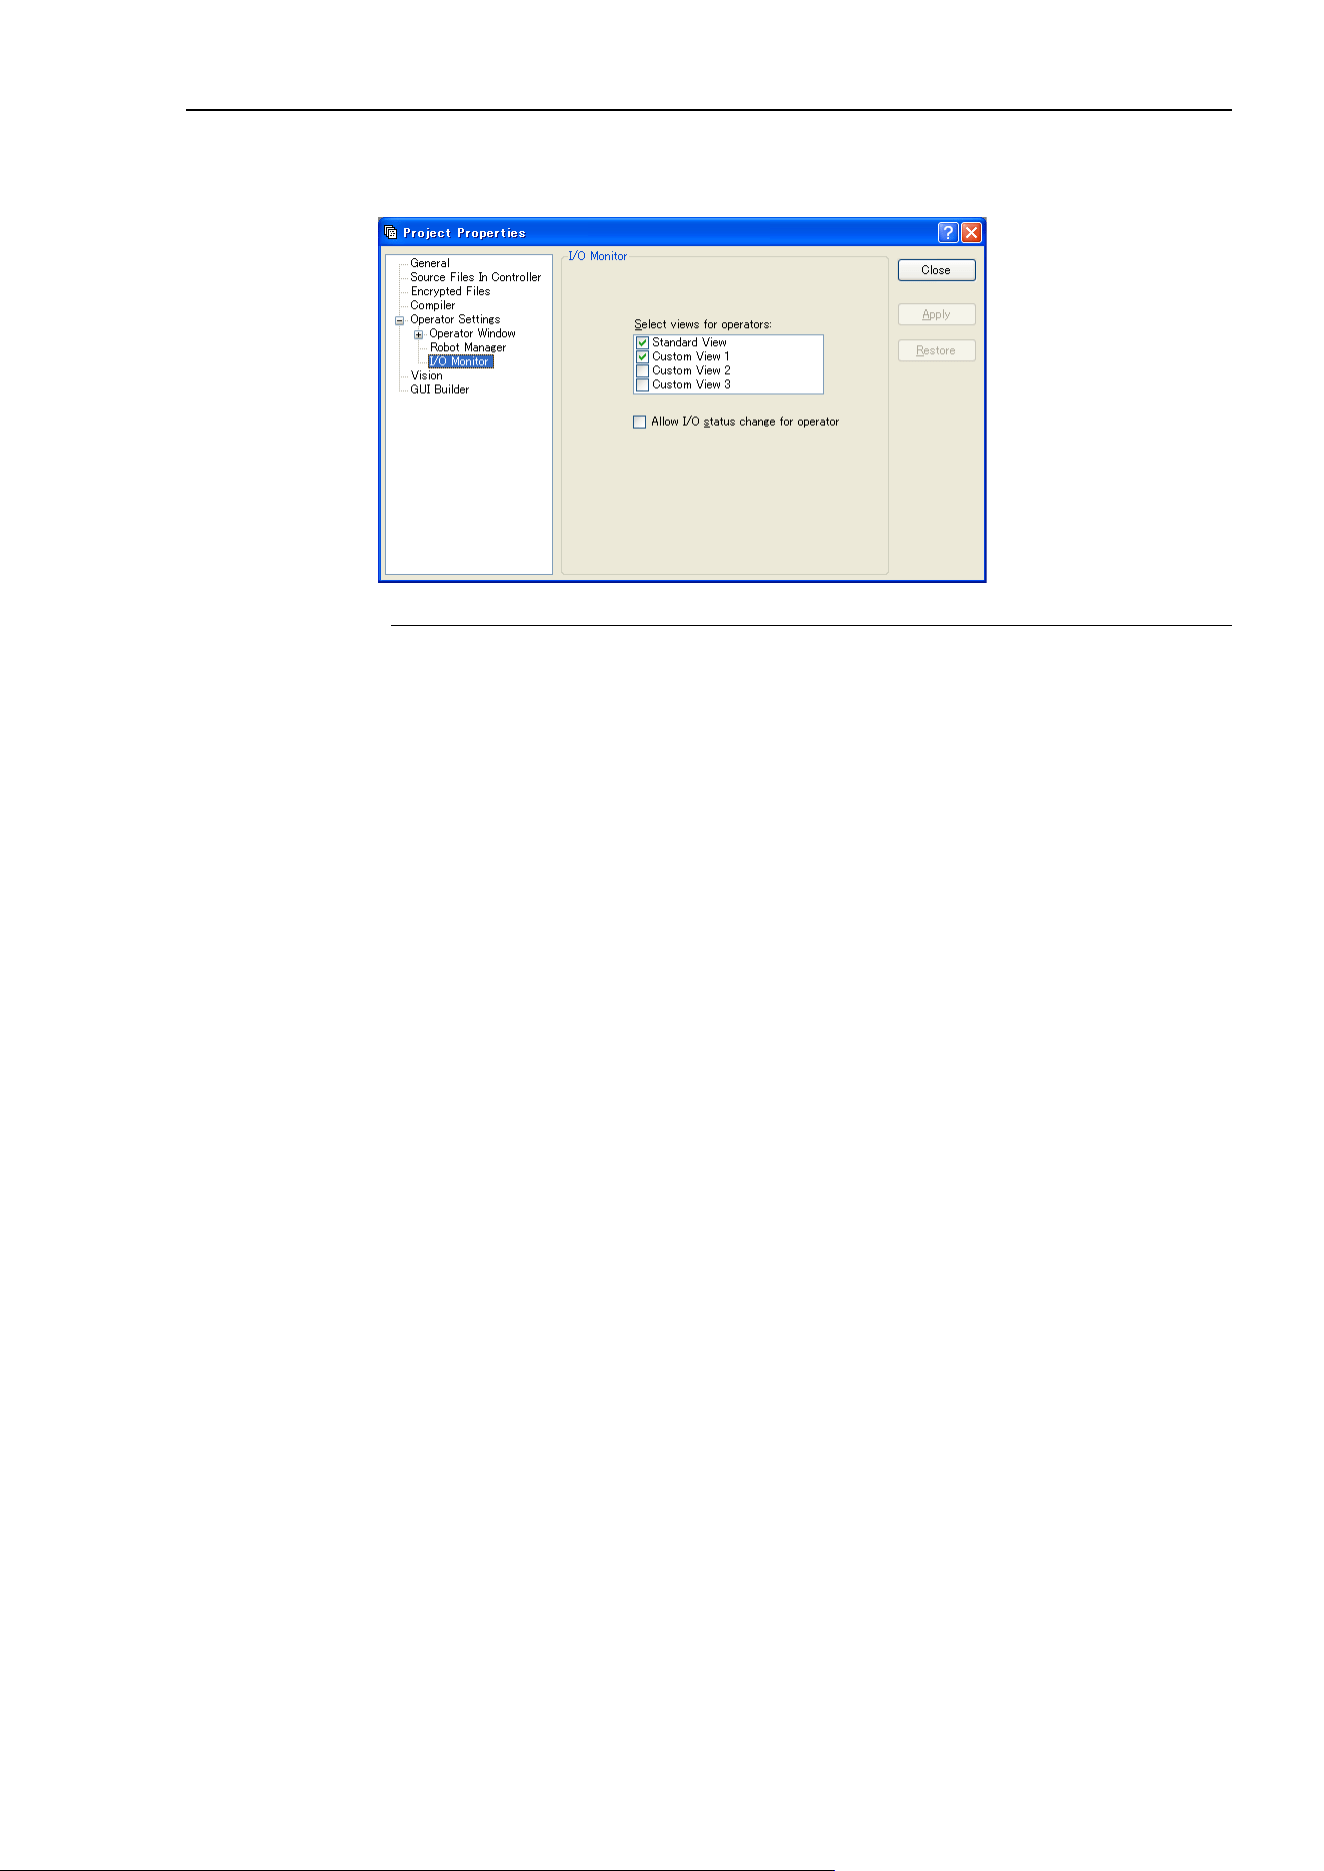
5. The EPSON RC+ 7.0 GUI
EPSON RC+ 7.0 (Ver.7.4) User's Guide Rev.6 77
[Project]-[Properties]-[Operator Settings]-[I/O Monitor] Page
Use this page to configure the I/O Monitor for operators.
Item Description
Select views for
operators
Configures the I/O views that operators use when opening the
[I/O Monitor] from the [Operator Window].
You can configure the custom views.
Allow I/O status
change for operator
Check this box if you want to allow operators to turn on or off
the inputs and outputs.
Apply
Set current values after changes have been made.
Restore
Reverts back to the previous values.
Close
Closes the [Project Properties] dialog box.
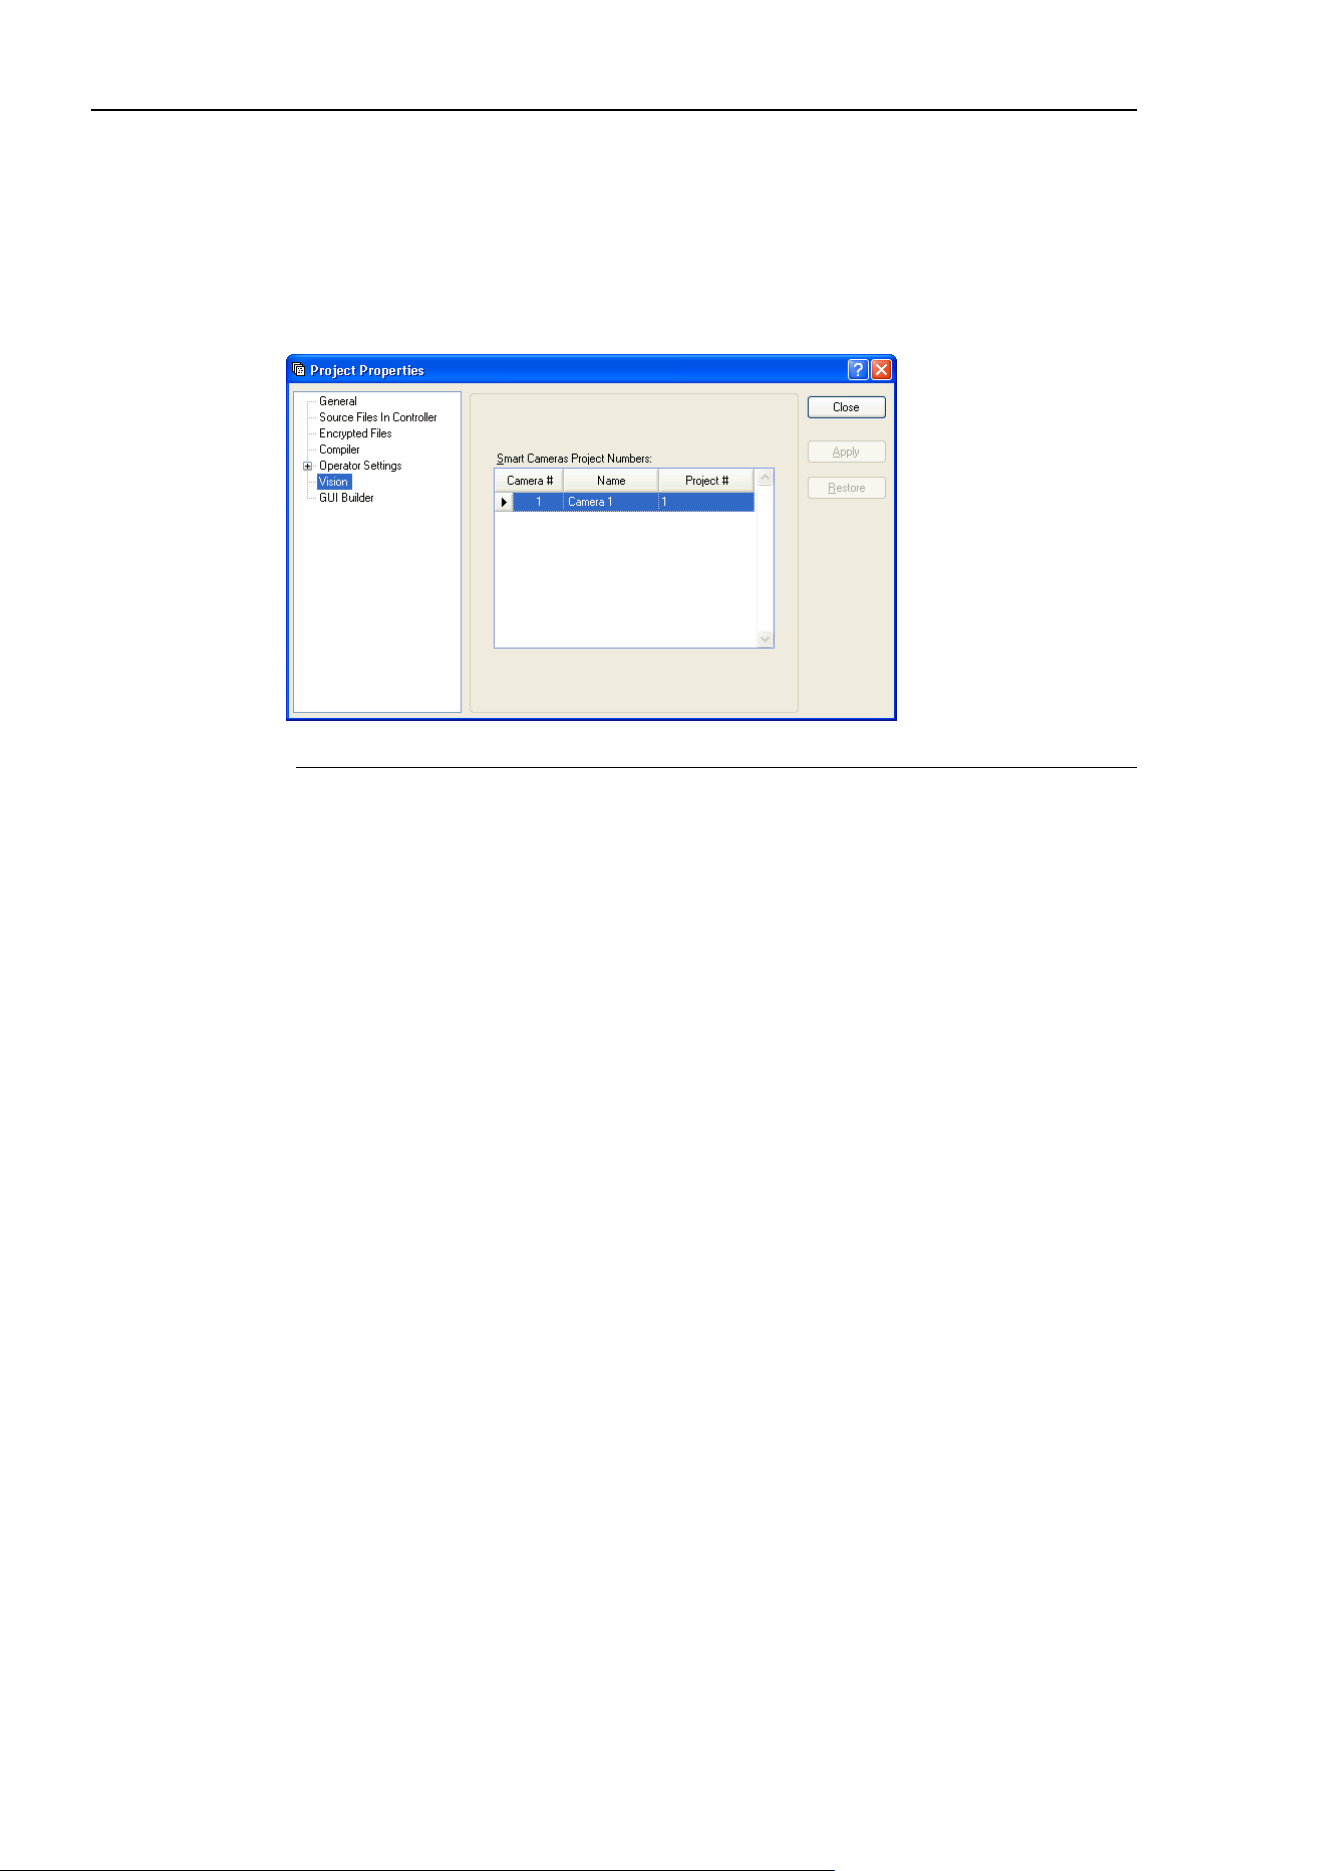
5. The EPSON RC+ 7.0 GUI
78 EPSON RC+ 7.0 (Ver.7.4) User's Guide Rev.6
[Project]-[Properties]-[Vision]
The Compact Vision can manage two vision projects simultaneously. Each vision project
can be used by one controller, so two controllers can use the same camera.
In this page, you can configure the vision project number of the Compact Vision used for
this project.
Project 1 is used by default.
Item Description
Smart Camera
Project Numbers
Select the vision project number.
Apply
Set current values after changes have been made.
Restore
Reverts back to the previous values.
Close
Closes the [Project Properties] dialog box.
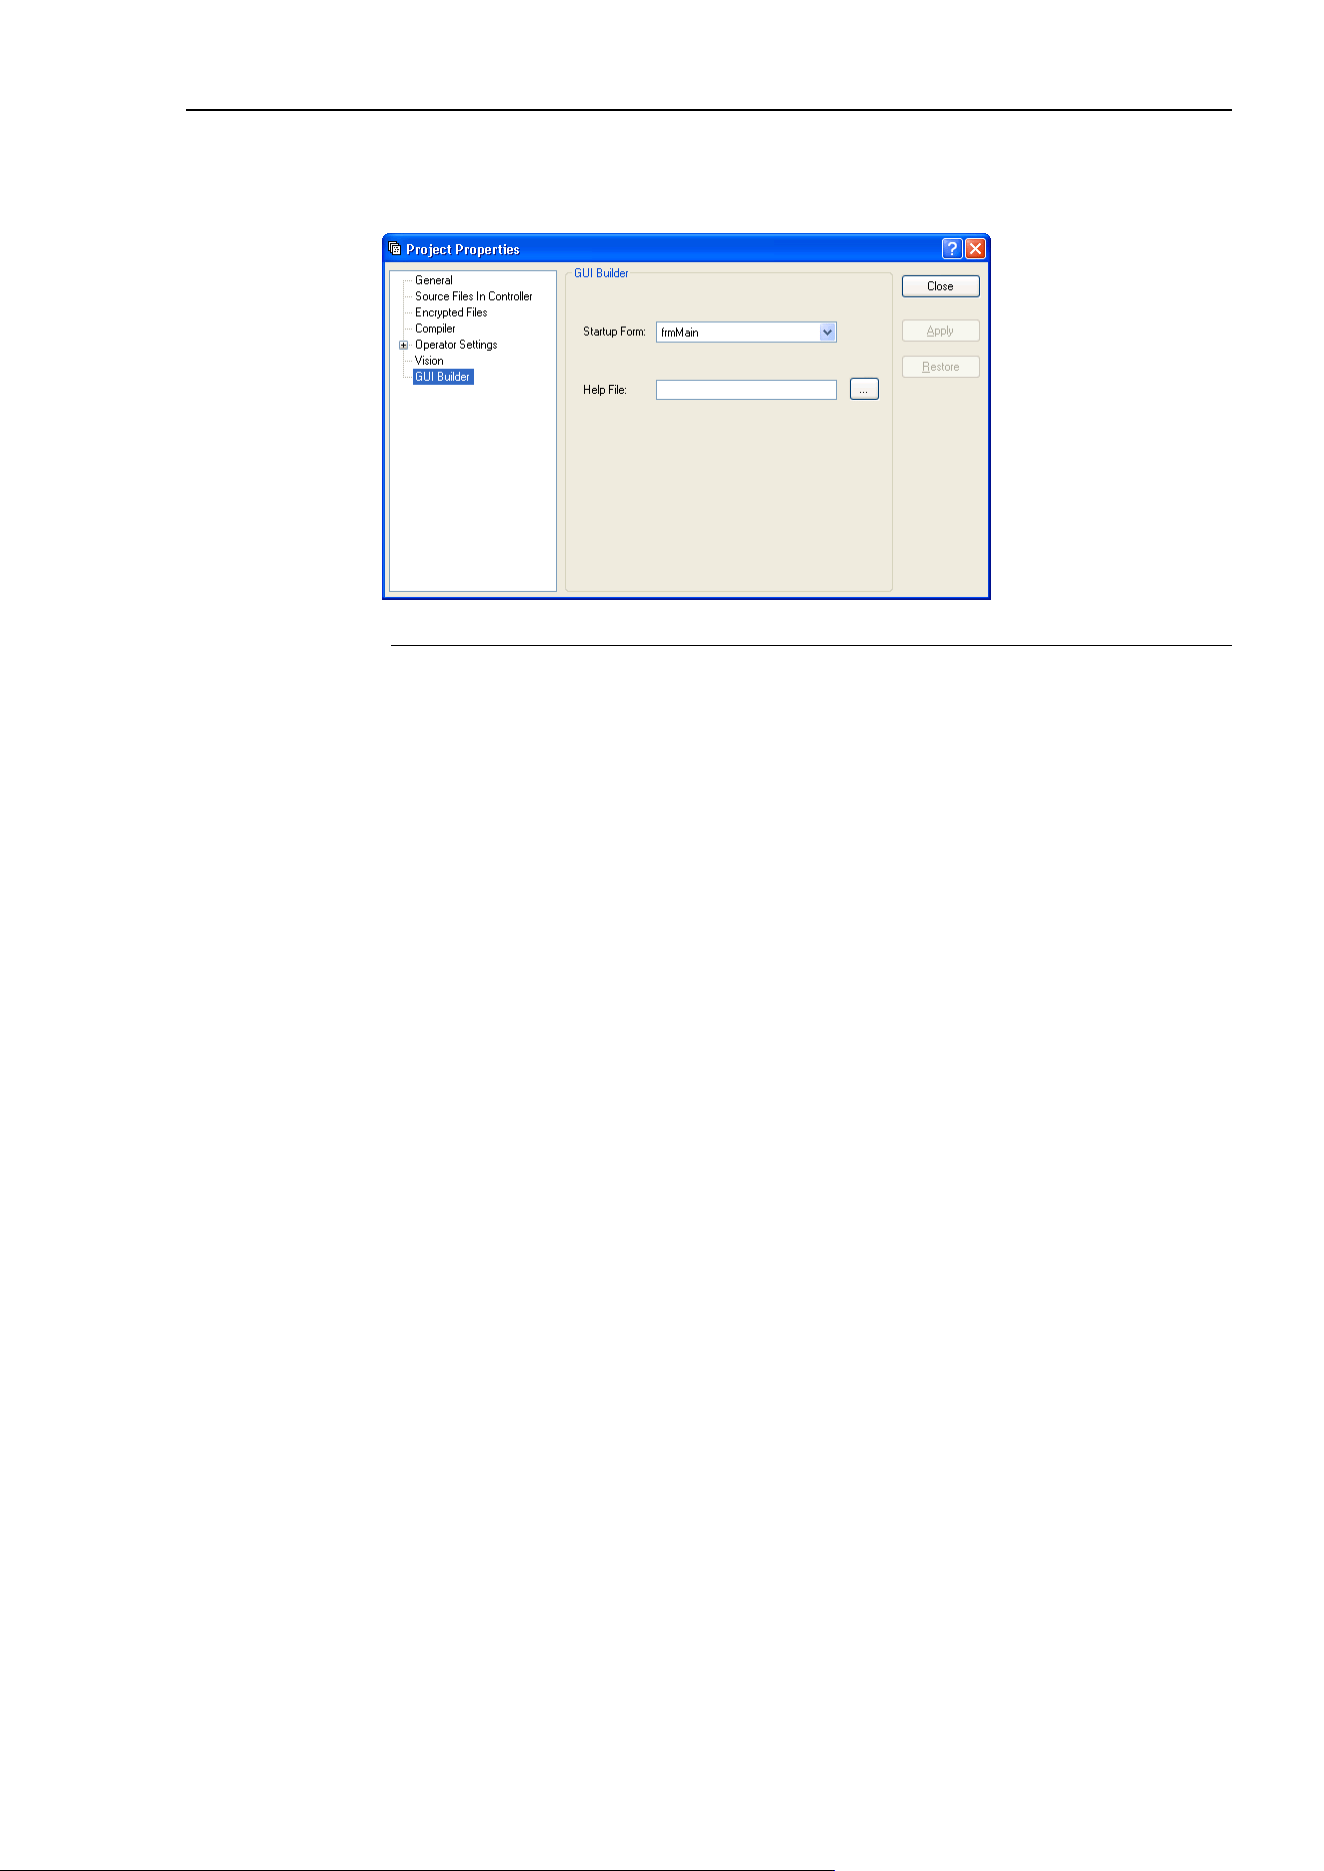
5. The EPSON RC+ 7.0 GUI
EPSON RC+ 7.0 (Ver.7.4) User's Guide Rev.6 79
[Project]-[Properties]-[GUI Builder]
On this page, you can specify the startup form for GUI Builder and also set the value of
the help file used in your project.
Item Description
Startup Form
Select the startup form for the current project. If no forms have
been created in GUI Builder, then there will be no forms in the
list.
Help File
Set help file that will be used by forms in GUI Builder.
Apply
Set current values after changes have been made.
Restore
Reverts back to the previous values.
Close
Closes the [Project Properties] dialog box.

5. The EPSON RC+ 7.0 GUI
80 EPSON RC+ 7.0 (Ver.7.4) User's Guide Rev.6
5.10 [Run] Menu
The EPSON RC+ 7.0 [Run] menu includes commands for running and debugging
programs.
5.10.1 [Run Window] Command (Run Menu)
Shortcuts
Toolbar: Key: F5
Opens the [Run] window to run a program.
Before opening the [Run] window, all files will be saved automatically if there are any
unsaved files and then the project will be built. If there are any errors during build, the
Run window will not be opened.
(If the Auto File Save preference is off in [Setup]-[Preferences]-[Workspace], you will be
prompted to save all files if there are any unsaved files.)
After the [Run] window opens, you must click the <Start> button to initialize program
execution.
For more information, see 7.5.1 Run Window.
5.10.2 [Operator Window] Command (Run Menu)
Shortcuts
Keys: Shift + F5
Opens the [Operator] window.
Before opening the [Operator] window, all files will be saved automatically
if there are
any unsaved files and then the project will be built. If there are any errors during build,
the [Operator] window will not be opened.
(If the Auto File Save preference is off in [Setup]-[Preferences]-[Workspace], you will be
prompted to save all files if there are any unsaved files.)
If the project is ready to run (last build was successful), then the [Operator] window will
be opened.
For more information, see 7.6 Operator Window.
5.10.3 [Step Into] Command (Run Menu)
Shortcuts
Toolbar: Key: F11
Execute the current source line. If the current line is a function, the next step will be the
first line in the function.
5.10.4 [Step Over] Command (Run Menu)
Shortcuts
Toolbar: Key: F10
Execute the current source line. If the current line is a function, the entire function will be
executed.
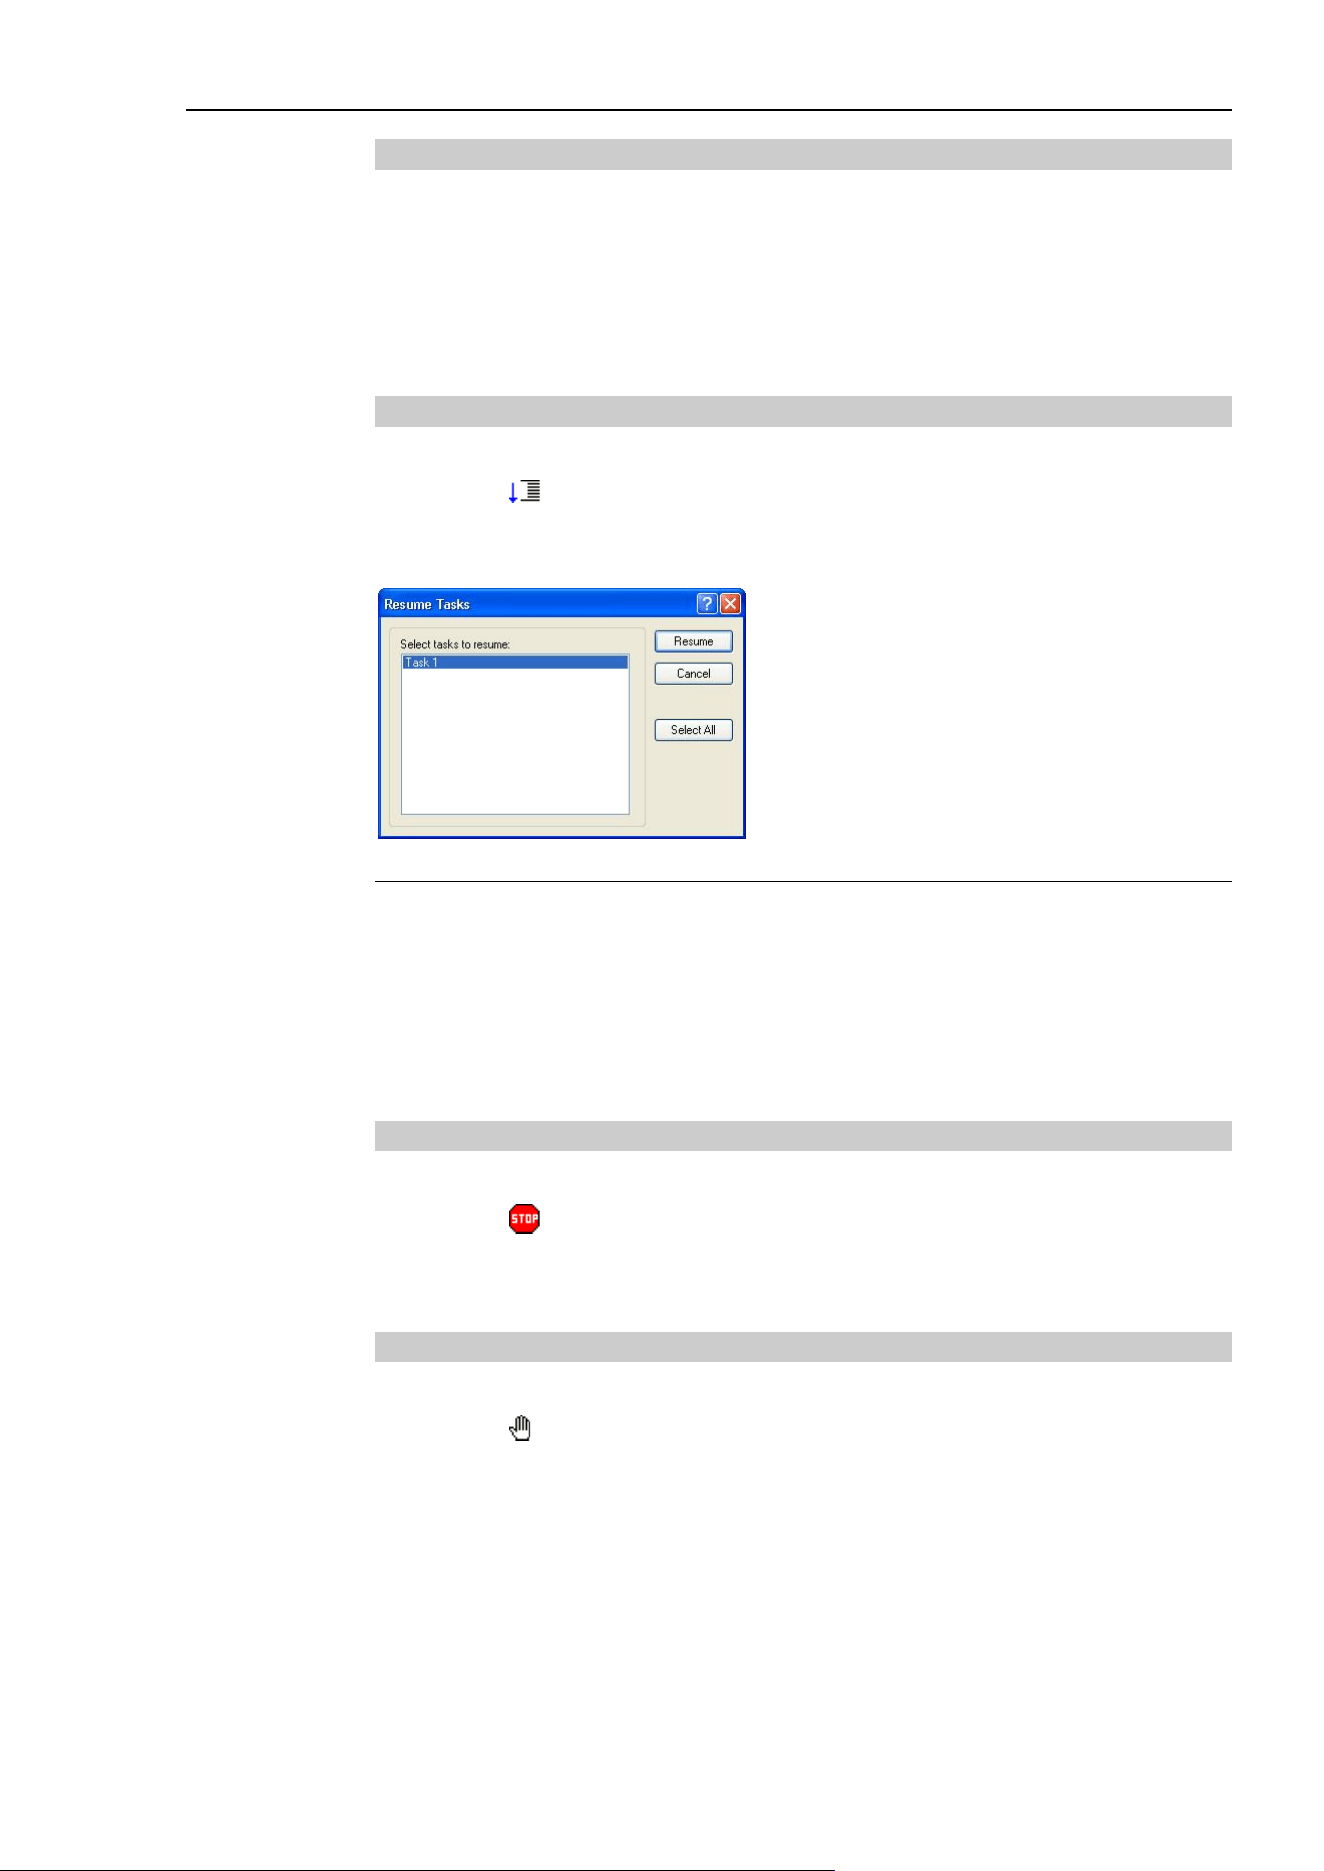
5. The EPSON RC+ 7.0 GUI
EPSON RC+ 7.0 (Ver.7.4) User's Guide Rev.6 81
5.10.5 [Walk] Command (Run Menu)
Shortcuts
Key: F12
Execute lines until after the next motion command or output command, depending on the
Walk stops for output commands preference on the [Setup]-[System Configuration]-
[Controller]-[General] page.
5.10.6 [Resume] Command (Run Menu)
Shortcuts
Toolbar: Key: F7
Opens the [Resume Tasks] dialog box. Use this command to resume one or more halted
tasks. This command is available only when one or more tasks are in halt mode.
Item Description
Select tasks to resume A list of all currently halted tasks. Click on one or more tasks
to resume.
Resume Click to resume.
Select All Click to select all of the tasks in the list.
Cancel Cancel the operation and close the dialog.
5.10.7 [Stop] Command (Run Menu)
Shortcuts
Toolbar:
Stops all tasks. This command is disabled when no tasks are running.
5.10.8 [Toggle Breakpoint] Command (Run Menu)
Shortcuts
Toolbar: Key: F9
Sets the selected line as a breakpoint or returns it to normal. When a line is a breakpoint, a
breakpoint icon is displayed in the program window left margin.
You can set breakpoints while tasks are running.
If a line cannot be a breakpoint (such as a blank line), then the breakpoint icon will not
appear for that line.
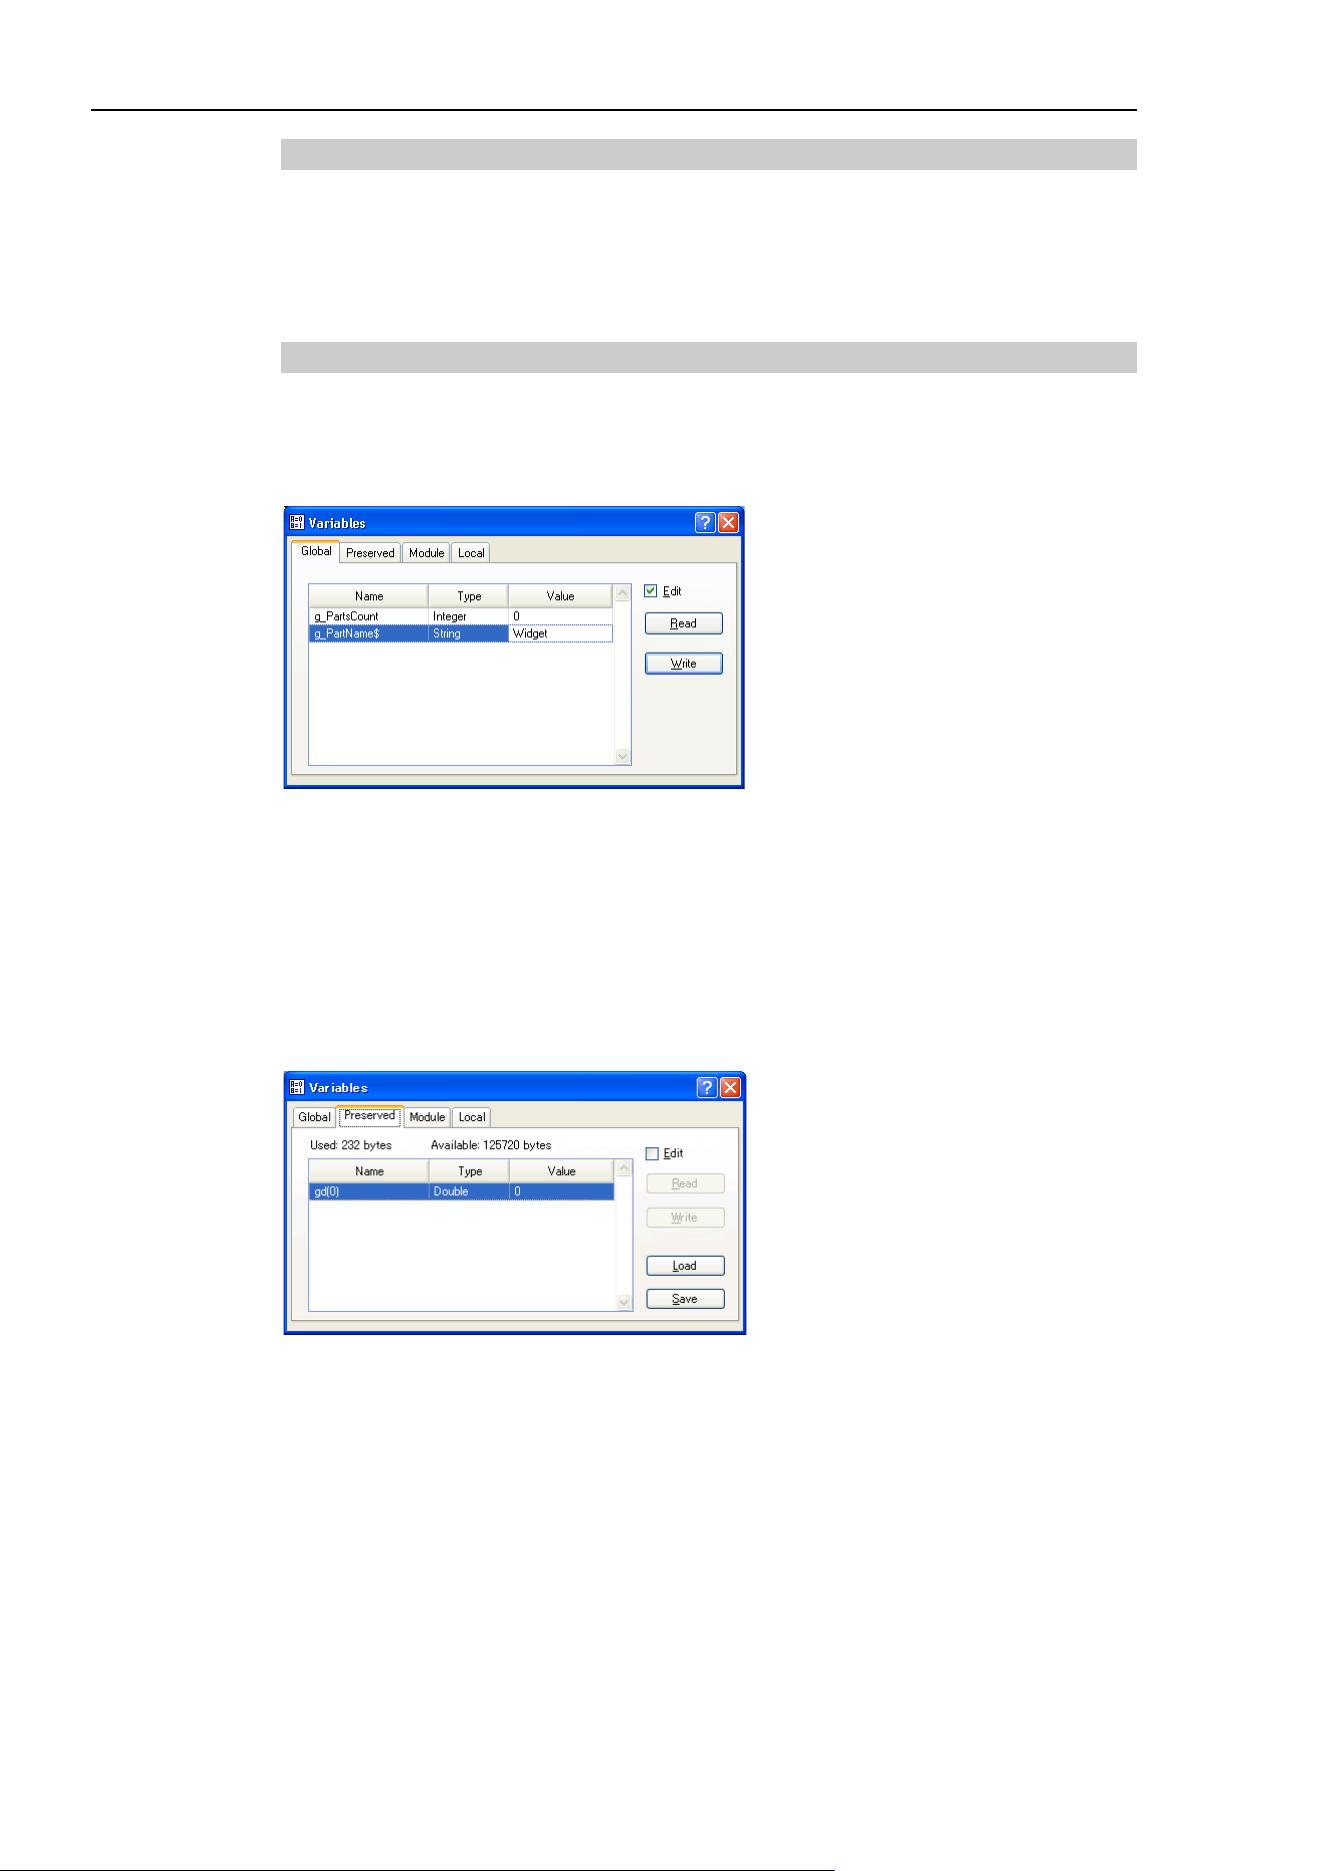
5. The EPSON RC+ 7.0 GUI
82 EPSON RC+ 7.0 (Ver.7.4) User's Guide Rev.6
5.10.9 [Clear All Breakpoints] Command (Run Menu)
Shortcuts
Keys: Ctrl + Shift + F9
Clears all breakpoints.
5.10.10 [Display Variables] Command (Run Menu)
Shortcuts
Key: F4
Displays a dialog box that shows the values for all variables in robot controller memory.
To change a variable value
1. Check the [Edit] checkbox.
2. Type the new value in the [Value] column. As you type in new values, the text color
changes to red, indicating that the value is new and as not been written.
3. Click the <Write> button to save the changes. Click <Read> or uncheck [Edit] to
cancel changes and restore the previous values.
When an array is displayed, the first element is shown. You can change which element to
view by typing in the desired array subscript and then clicking the <Read> button.
The Preserved page displays the Global Preserve variables. The numbers of used and
available bytes for preserved variables are also displayed.
You can save the values of Global Preserve variables in the controller to a file on the PC
by clicking the <Save> button. The default file name is “GlobalPreserves.dat”.
A “GlobalPreserves.dat” file is also saved by using Backup Controller from the Tools
Menu.
You can load the global preserve variables that are stored in the file on the PC by clicking
<Load> button.
For module variables, you must select the desired program.
Local variables are not displayed unless one or more tasks have reached a breakpoint or
have been halted from the Task Manager. You can view local variables for each function
in the call stack for each halted task.
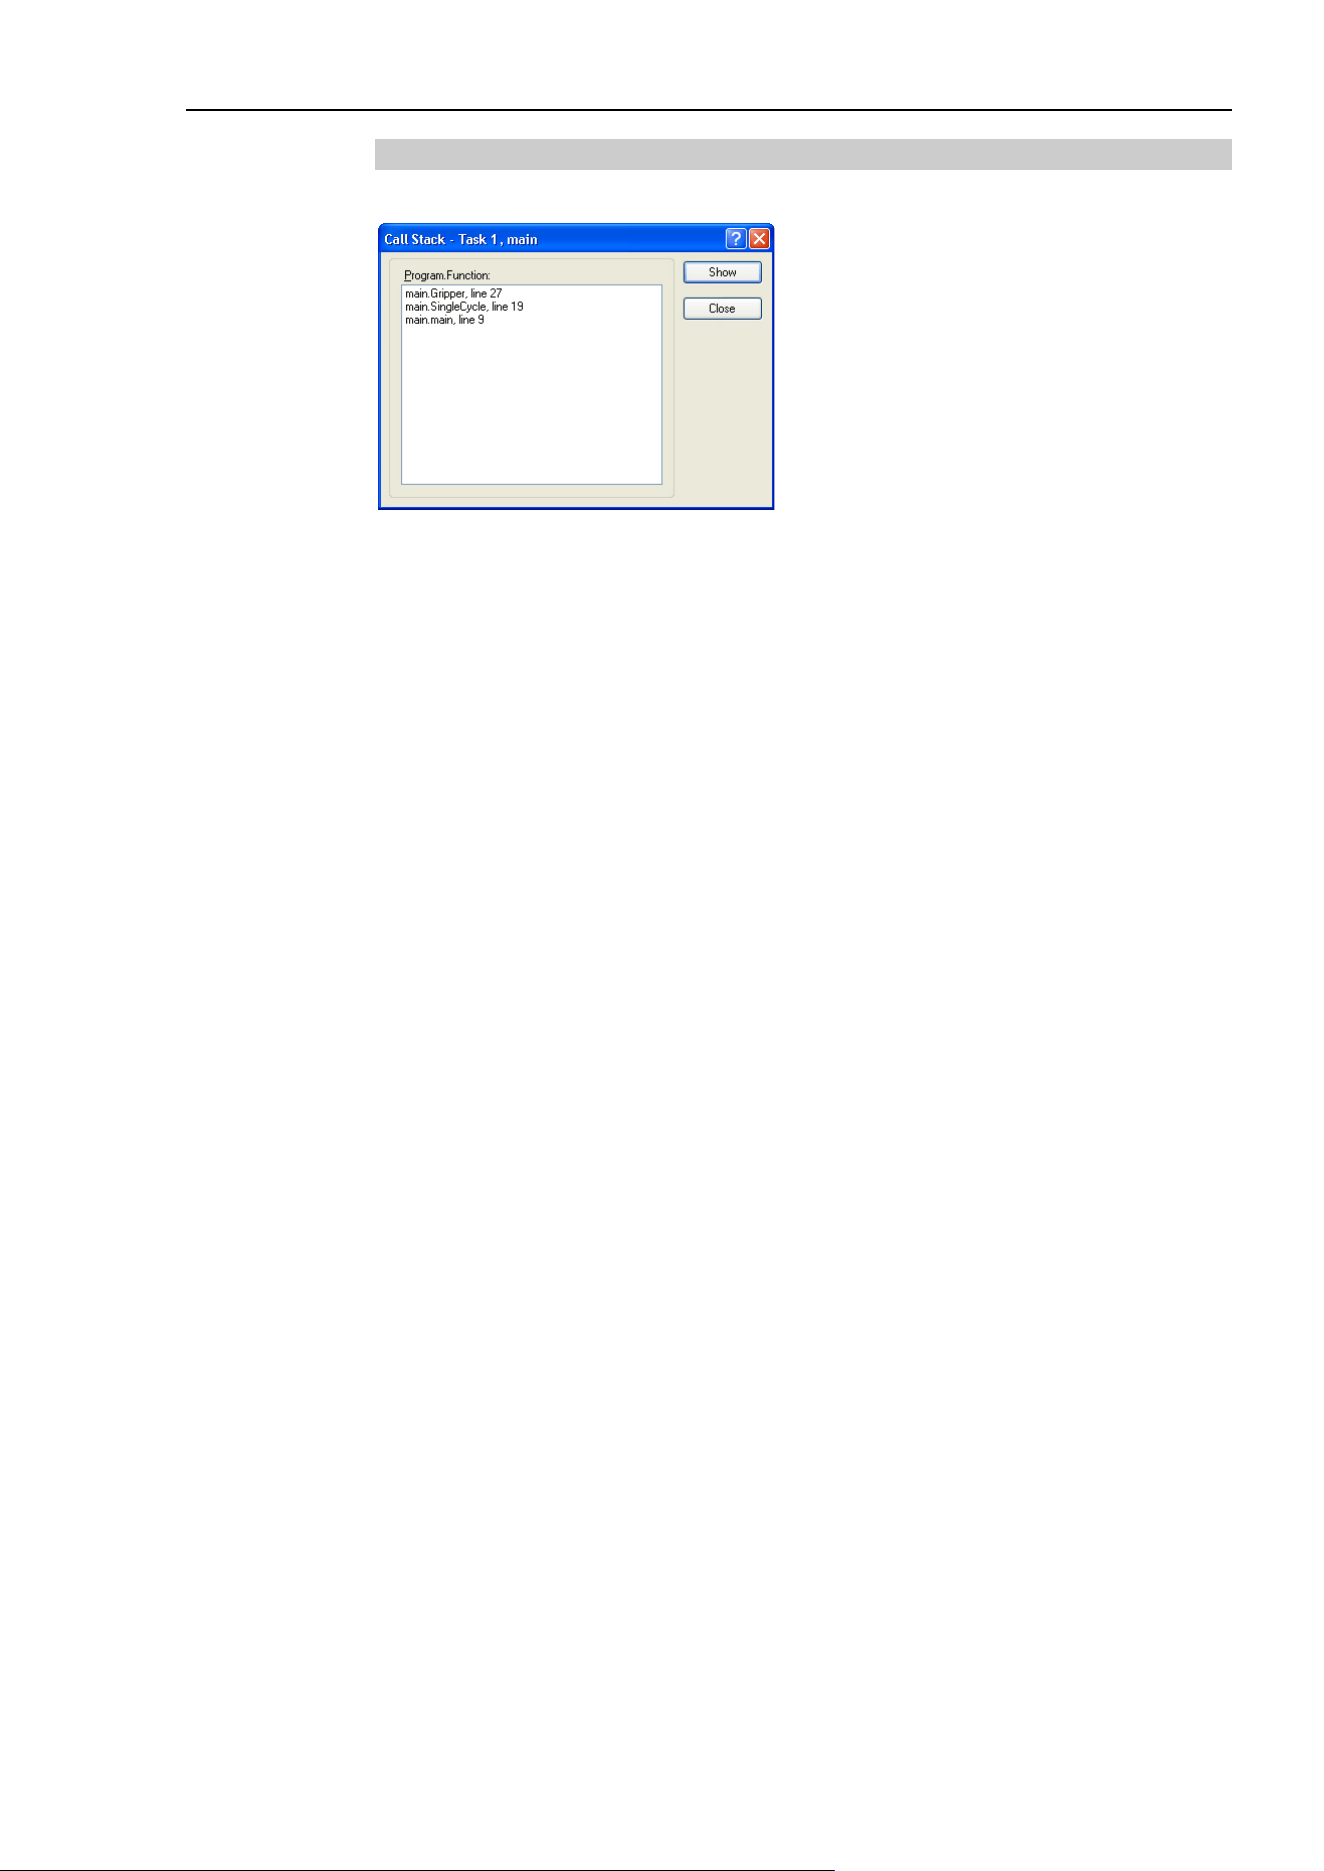
5. The EPSON RC+ 7.0 GUI
EPSON RC+ 7.0 (Ver.7.4) User's Guide Rev.6 83
5.10.11 [Call Stack] Command (Run Menu)
The Call Stack dialog displays the function call stack for one task.
The Call Stack command is available when a program window is clicked which contains a
function that is currently halted.
The most recent function is at the top of the list, and parent functions are listed afterwards
in descending order. The last function is the task function.
Each row in the list shows a program, function, and line number.
You can view the code for any of the function calls in the list by selecting a function, then
clicking <Show>. The program window for the function you selected is then displayed
and the line of the function call is marked by a yellow arrow in the editor left margin.

5. The EPSON RC+ 7.0 GUI
84 EPSON RC+ 7.0 (Ver.7.4) User's Guide Rev.6
5.11 [Tools] Menu
EPSON RC+ 7.0 has several GUI tools to support the system development. All tools can
be accessed from the [Tools] menu. Many also have tool bar buttons and hot keys.
The Tools Menu includes the following selections:
Robot Manager
Motor control, Jog & Teach, change robot parameters.
Command Window
Execute SPEL
+
commands directly.
I/O Monitor
Monitor and change I/O status.
Task Manager
Monitor and control task status.
Macros
Opens the Macro Window.
I/O Label Editor
Edit I/O labels.
User Error Editor
Edit user errors.
Controller
Do maintenance on the controller, such as backup, restore, and export status.
5.11.1 [Robot Manager] Command (Tools Menu)
Shortcuts
Toolbar: Key: F6
This command opens the [Robot Manager] window. This window contains several tabs
that are used to control the robot motors and power, jog the robot and teach points, and
view/edit several parameters for the robot.
You can configure how the Robot Manager window can be viewed in the development
environment from the [Setup]-[Preferences]-[Robot Manager]-[General] page.
MDI window The Robot Manager is displayed as a child window along
with the other child windows inside the EPSON RC+ 7.0
development environment main window.
Dialog The Robot Manager is displayed as a modal dialog which is
displayed in the foreground over the development
environment main window.
If the screen resolution is less than 1024 x 768, the Robot Manager will always be
displayed in dialog mode so it can fit on the screen.
When you switch to the [Robot Manager] window, the robot’s speed setting will be set to
the speed (high, low) on the Jog & Teach window.
Motion command after the above operation will be executed at this speed. Set the speed
again by the commands such as Motor, Speed, and Accel.
NOTE
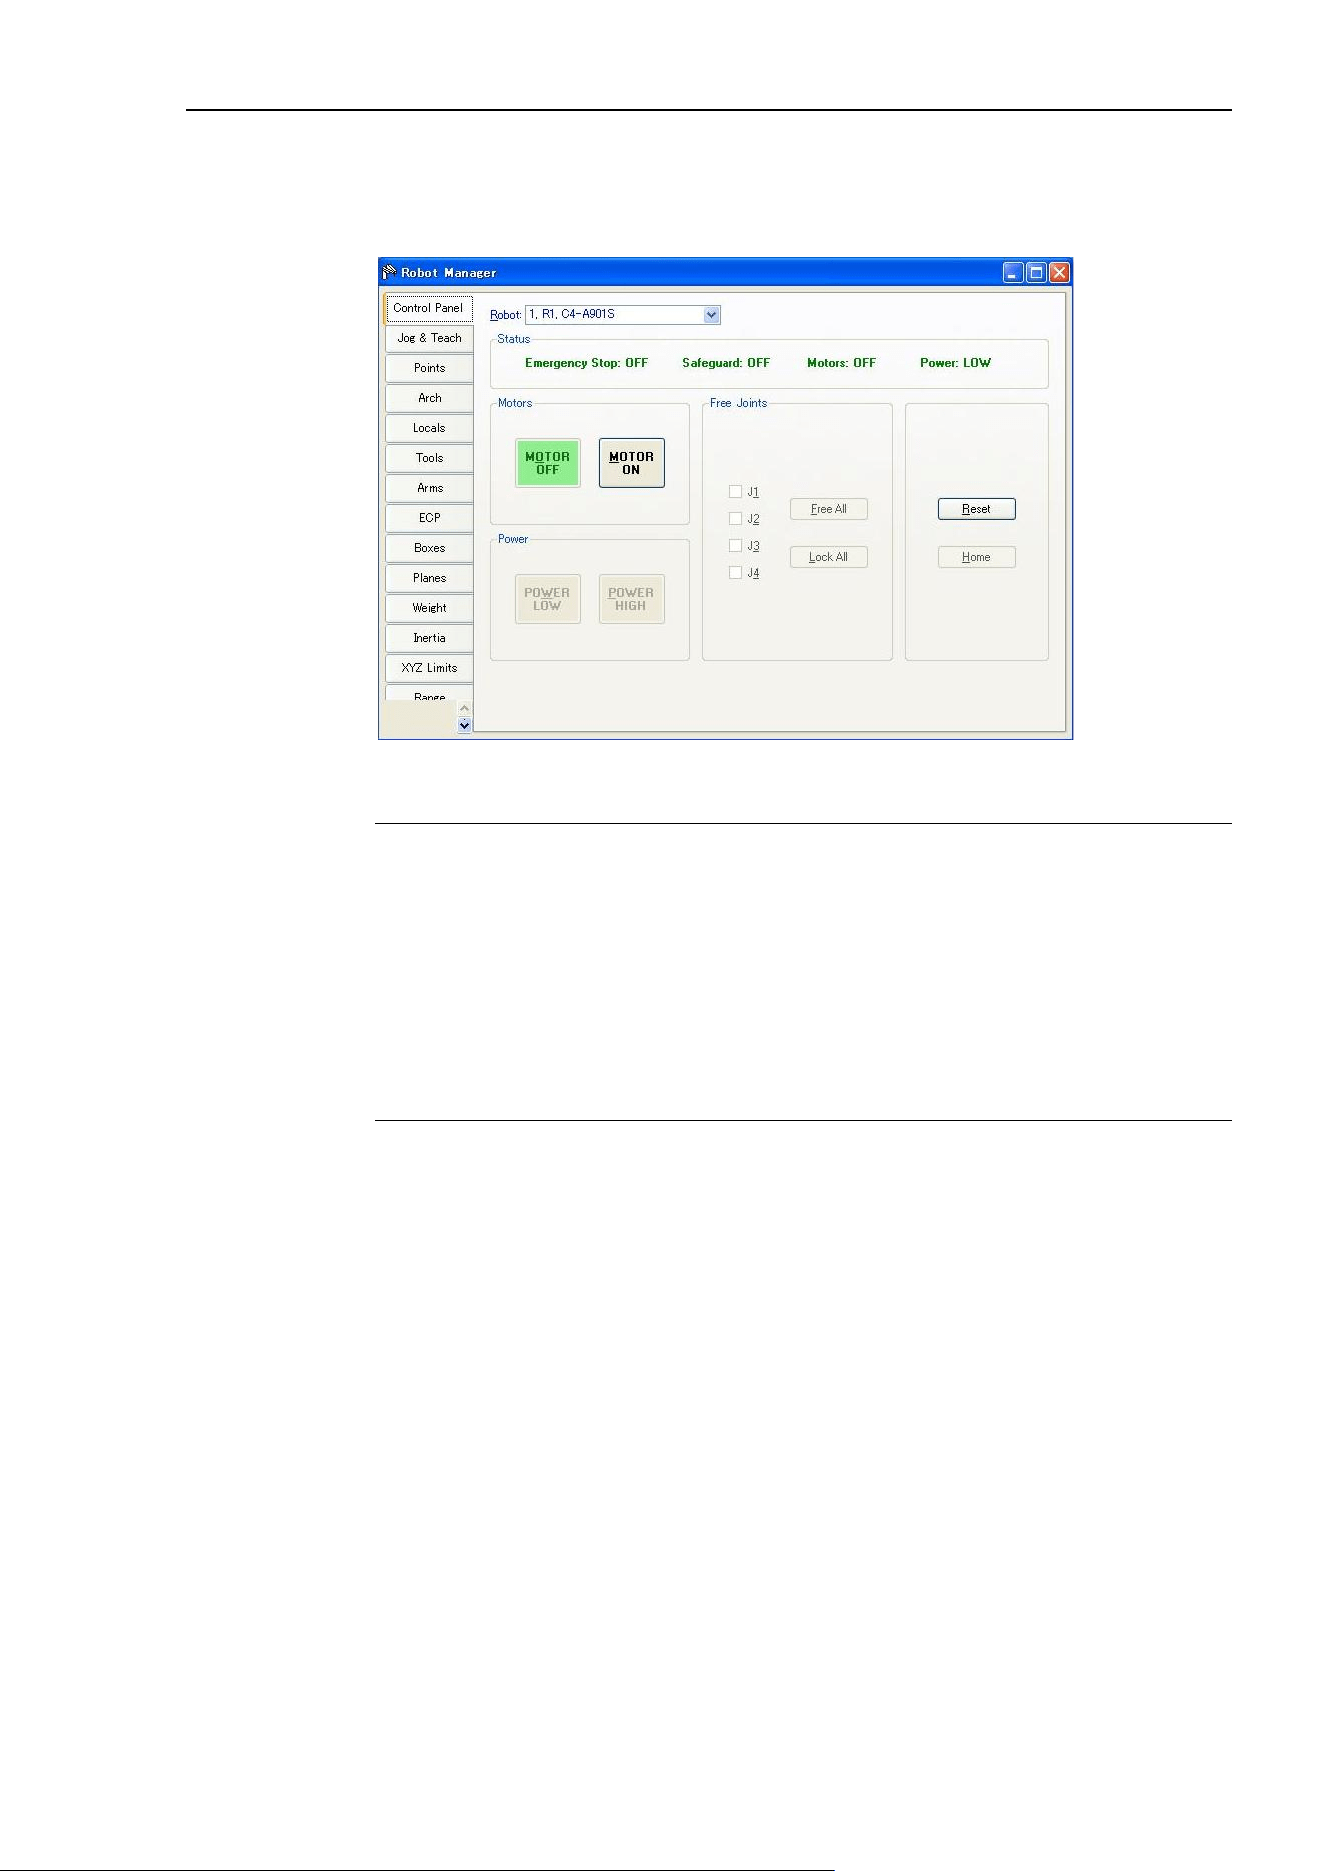
5. The EPSON RC+ 7.0 GUI
EPSON RC+ 7.0 (Ver.7.4) User's Guide Rev.6 85
[Tools]-[Robot Manager]-[Control Panel] Page
The Control Panel page contains buttons for basic robot operations, such as turning motors
on/off and homing the robot. It also shows status for Emergency Stop, Safeguard, Motors,
and Power.
Status Indicators
Indicator Description
Emergency Stop
Indicates if Emergency Stop has occurred.
To clear the Emergency Stop status, click
<Reset>.
Safeguard
Indicates whether the Safeguard input is on or off.
Motors
Indicates whether the robot motors are on or off.
Power
Indicates whether the robot motor power is high or low.
Controls Description
Robot
Select a robot.
MOTOR OFF
Turns off all robot motors of the selected robot.
MOTOR ON
Turns on all robot motors of the selected robot.
POWER LOW
Puts the robot servo system in low power mode.
POWER HIGH
Puts the robot servo system in high power mode.
J1 to J4 checkboxes
You can free one or more joints using the checkboxes.
Not available for
6-axis robots (including N series).
Free All
Click this button to free all joints from the servo control.
Lock All
Click this button to lock all joints under the servo control.
Reset
Resets the robot servo system and Emergency Stop condition.
Home
Moves the robot to the position specified by the HomeSet
command.
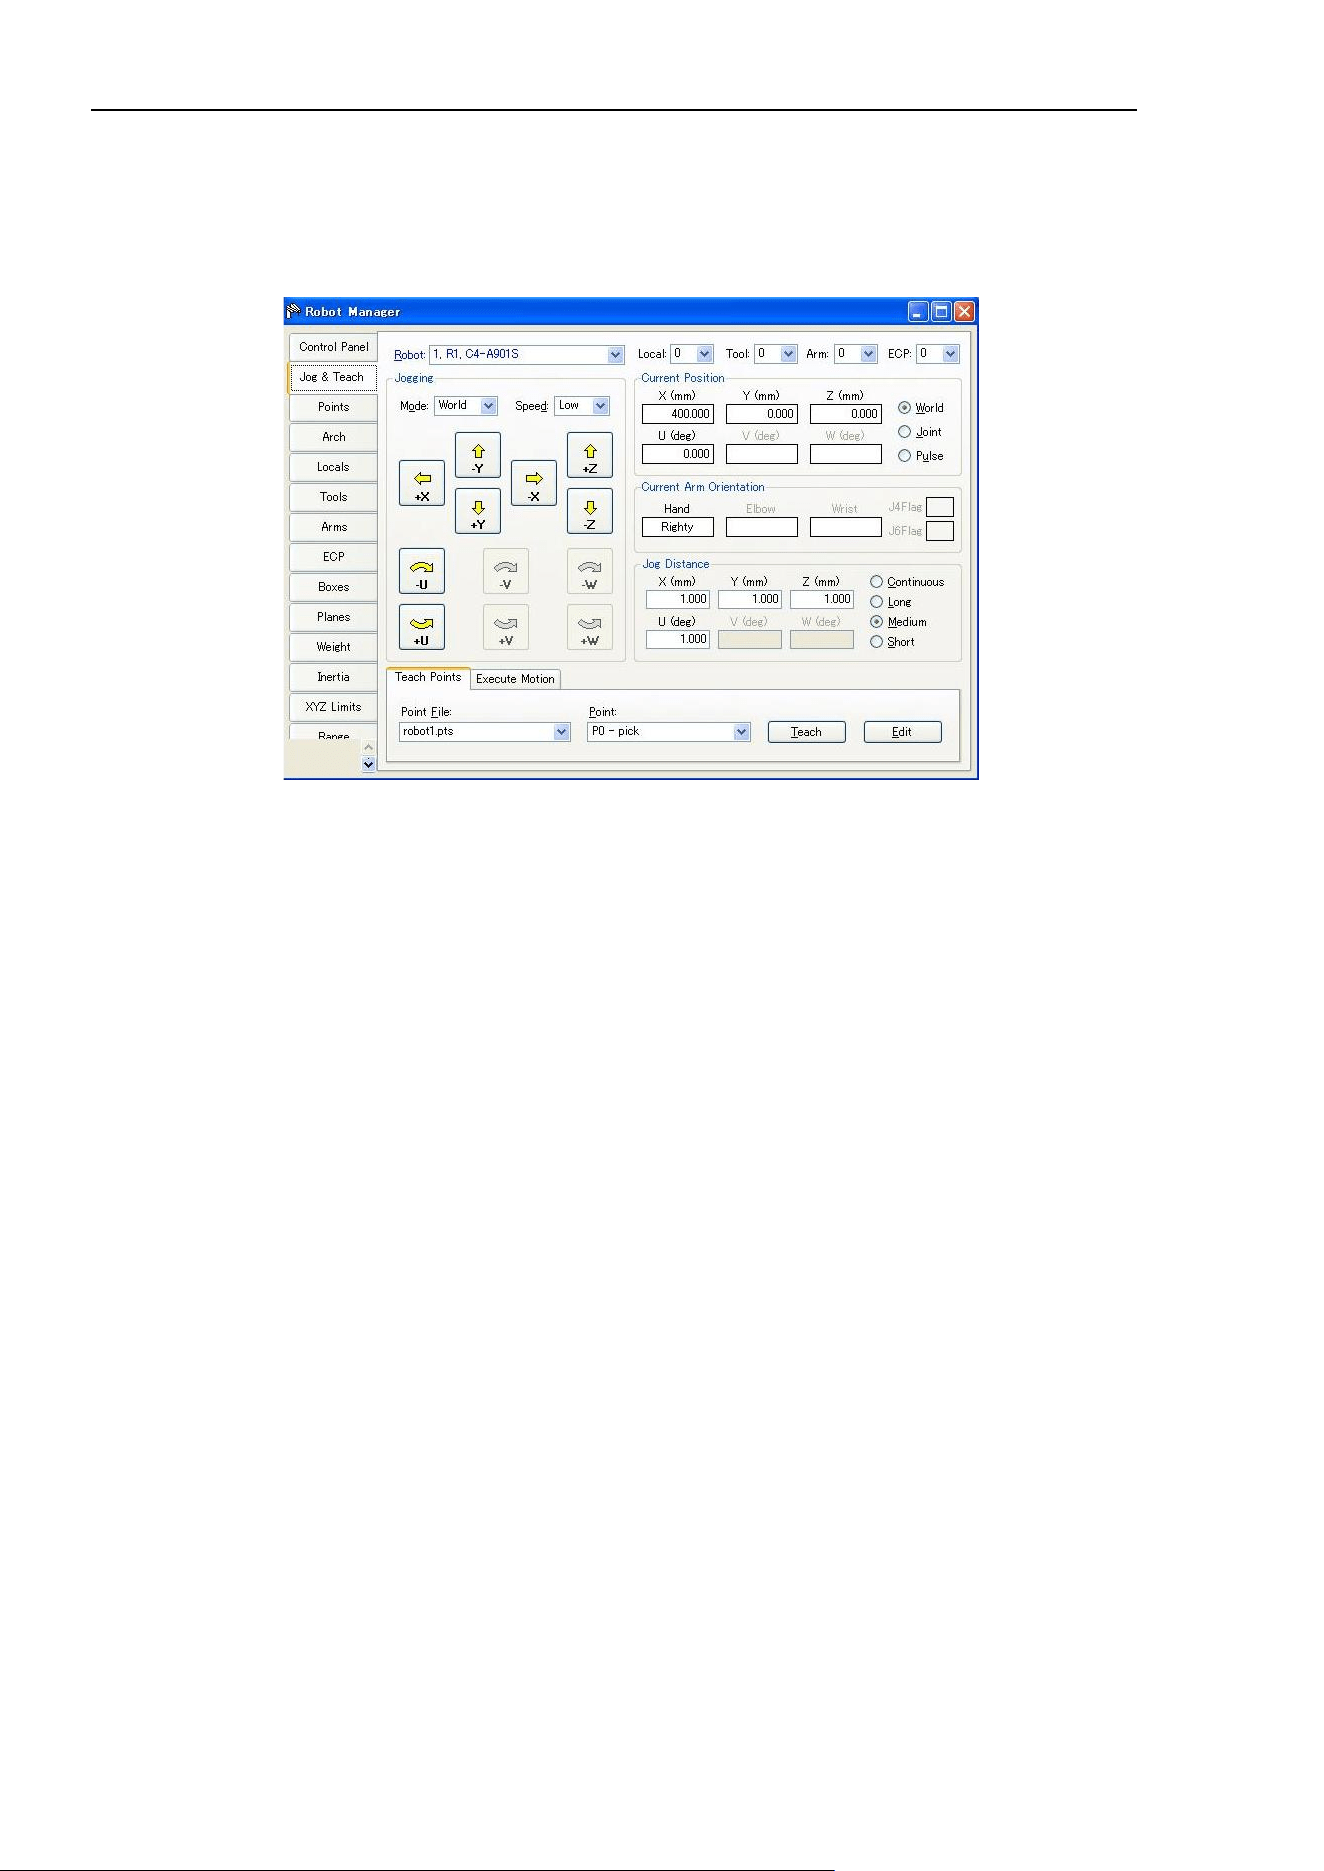
5. The EPSON RC+ 7.0 GUI
86 EPSON RC+ 7.0 (Ver.7.4) User's Guide Rev.6
[Tools]-[Robot Manager]-[Jog and Teach] Page
The [Jog & Teach] page is primarily used for jogging the robot to a desired position and
teaching a point using the current coordinates and orientation.
You can jog the robot in World, Tool, Local, Joint, or ECP modes. You can also execute
motion commands.
Jog Controls
The [Robot Manager]-[Jog & Teach] page contains several controls, described below.
[Robot]
Select a robot.
[Jogging] Group
This group contains controls for setting jog mode, speed, and jog buttons.
Mode
This dropdown list contains the following choices jog mode.
World Jogs the robot along the X, Y, Z axes in the current local, tool, arm, and
ECP. For robots with 4 DOF (Cartesian coordinate or SCARA), you can
also jog U (roll). For robots with 6 DOF (vertical 6-axis (including N
series)), you can jog U (Z axis rotation of the base coordinate system), V
(Y axis rotation of the base coordinate system), and W (X axis rotation of
the base coordinate system). This is the default setting.
Tool Jogs the robot in the coordinate system defined by the current tool.
Local Jogs the robot in the coordinate system defined by the current local.
Joint Jogs each joint of the robot. A separate set of jog buttons will appear when
using joint mode when using non-Cartesian robots.
ECP Jogs the robot along the axes of the coordinate system defined by the
current external control point. Coordinates are World coordinates.

5. The EPSON RC+ 7.0 GUI
EPSON RC+ 7.0 (Ver.7.4) User's Guide Rev.6 87
Speed
The speed for jogging and motion commands can be changed by selecting Low or High.
When you start RC+ and the [Jog & Teach] panel is displayed, the speed is set to Low.
Jogging is always in low power mode. The speeds and accelerations associated with the
jog speed settings are shown below.
SCARA robot RS series
Jog Speed
Jog Method Speed Accel Decel
Low
Continuous World/Tool/ECP XYZ 10 mm/sec 100 mm/sec
2
200 mm/sec
2
Continuous World/Tool/ECP UVW 2 deg/sec 20 deg/ sec
2
40 deg/ sec
2
Continuous Joint * 10 deg/sec
2
20 deg/sec
2
Step 1/5 of default PTP speed
Default PTP
acceleration
Default PTP
deceleration
High
Continuous World/Tool/ECP XYZ 50 mm/sec 100 mm/sec
2
200 mm/sec
2
Continuous World/Tool/ECP UVW 10 deg/sec 20 deg/ sec
2
40 deg/ sec
2
Continuous Joint * 10 deg/sec
2
20 deg/sec
2
Step Default PTP speed
Default PTP
acceleration
Default PTP
deceleration
* Speed of Continuous Joint depends on the robot model
Vertical 6-axis robot, N series
Speed
Jog Method Speed Accel Decel
Low
Continuous World/Tool/ECP XYZ 10 mm/sec 200 mm/sec
2
400 mm/sec
2
Continuous World/Tool/ECP UVW 2 deg/sec 20 deg/sec
2
40 deg/sec
2
Continuous Joint * 20 deg/sec
2
40 deg/sec
2
Step 1/5 of default PTP speed
Default PTP
acceleration
Default PTP
deceleration
High
Continuous World/Tool/ECP XYZ * 200 mm/sec
2
400 mm/sec
2
Continuous World/Tool/ECP UVW 15 deg/sec 20 deg/sec
2
40 deg/sec
2
Continuous Joint * 20 deg/sec
2
40 deg/sec
2
Step Default PTP speed
Default PTP
acceleration
Default PTP
deceleration
* Speed of Continuous Joint and High speed Continuous XYZ depends on the robot model.
Jog Buttons
Use the jog buttons to jog the robot throughout the work envelope. They can be controlled
only by the mouse.
The robot jogs one step at a time as you click the button in either “Long”, “Medium”, or
“Short” mode of the Jog Distance. The robot jogs continuously by holding the button
down.
To jog continuously without stepping, set the Jog Distance to Continuous. See How to jog
robot for details
You can change the orientation of the jog buttons to align your PC monitor with the robot
from [Setup]-[Preferences]-[Robot Manager]-[Jogging].
The jog buttons are displayed differently depending on the Jog mode. For World, Local,
Tool, and ECP jogging, the X, Y, Z, U, V, W buttons appear (V and W are only for 6-axis
robots (including N series)). For Joint jogging, the joint buttons labeled J1 - J6 appear.
The X, Y, and Z buttons jog the robot in the Cartesian axis.
The U buttons rotate the Tool coordinate system of the Z axis. (roll)

5. The EPSON RC+ 7.0 GUI
88 EPSON RC+ 7.0 (Ver.7.4) User's Guide Rev.6
For 6-axis robots (including N series), the V buttons rotate the Tool coordinate system of
the Y axis. (pitch).
The W buttons rotate the Tool coordinate system of the X axis. (yaw).
Local
This drop down list is used to select the current Local for jogging and teaching. Only
Locals that have been defined are shown in the list. When you teach a point, the Local
point attribute defaults to the current local number.
Tool
This drop down list is used to select the current Tool for jogging and teaching. Only Tools
that have been defined are shown in the list.
Arm
This drop down list is used to select the current Arm for jogging and teaching. Only Arms
that have been defined are shown in the list. Arms are not used with 6-axis robots
(including N series).
ECP
This drop down list is used to select the current ECP for jogging. Only ECPs that have
been defined are shown in the list. ECPs are only allowed if the External Control Point
option has been activated.
Current Position Group
This group displays the current position of the robot. There are three ways to display
position. World displays the current position and tool orientation in the selected local
coordinate system, Joint displays the current joint values, and Pulse displays the current
encoder pulse count for each joint.
Current Arm Orientation Group
This group displays the current arm orientation.
6-axis robot : Hand orientation, Elbow orientation, wrist orientation,
J1Flag value, J4Flag value, J6Flag value
N : Hand orientation, Elbow orientation, wrist orientation,
J4Flag value, J6Flag value
RS series : Hand orientation, J1Flag value, J2Flag value
Others : Hand orientation
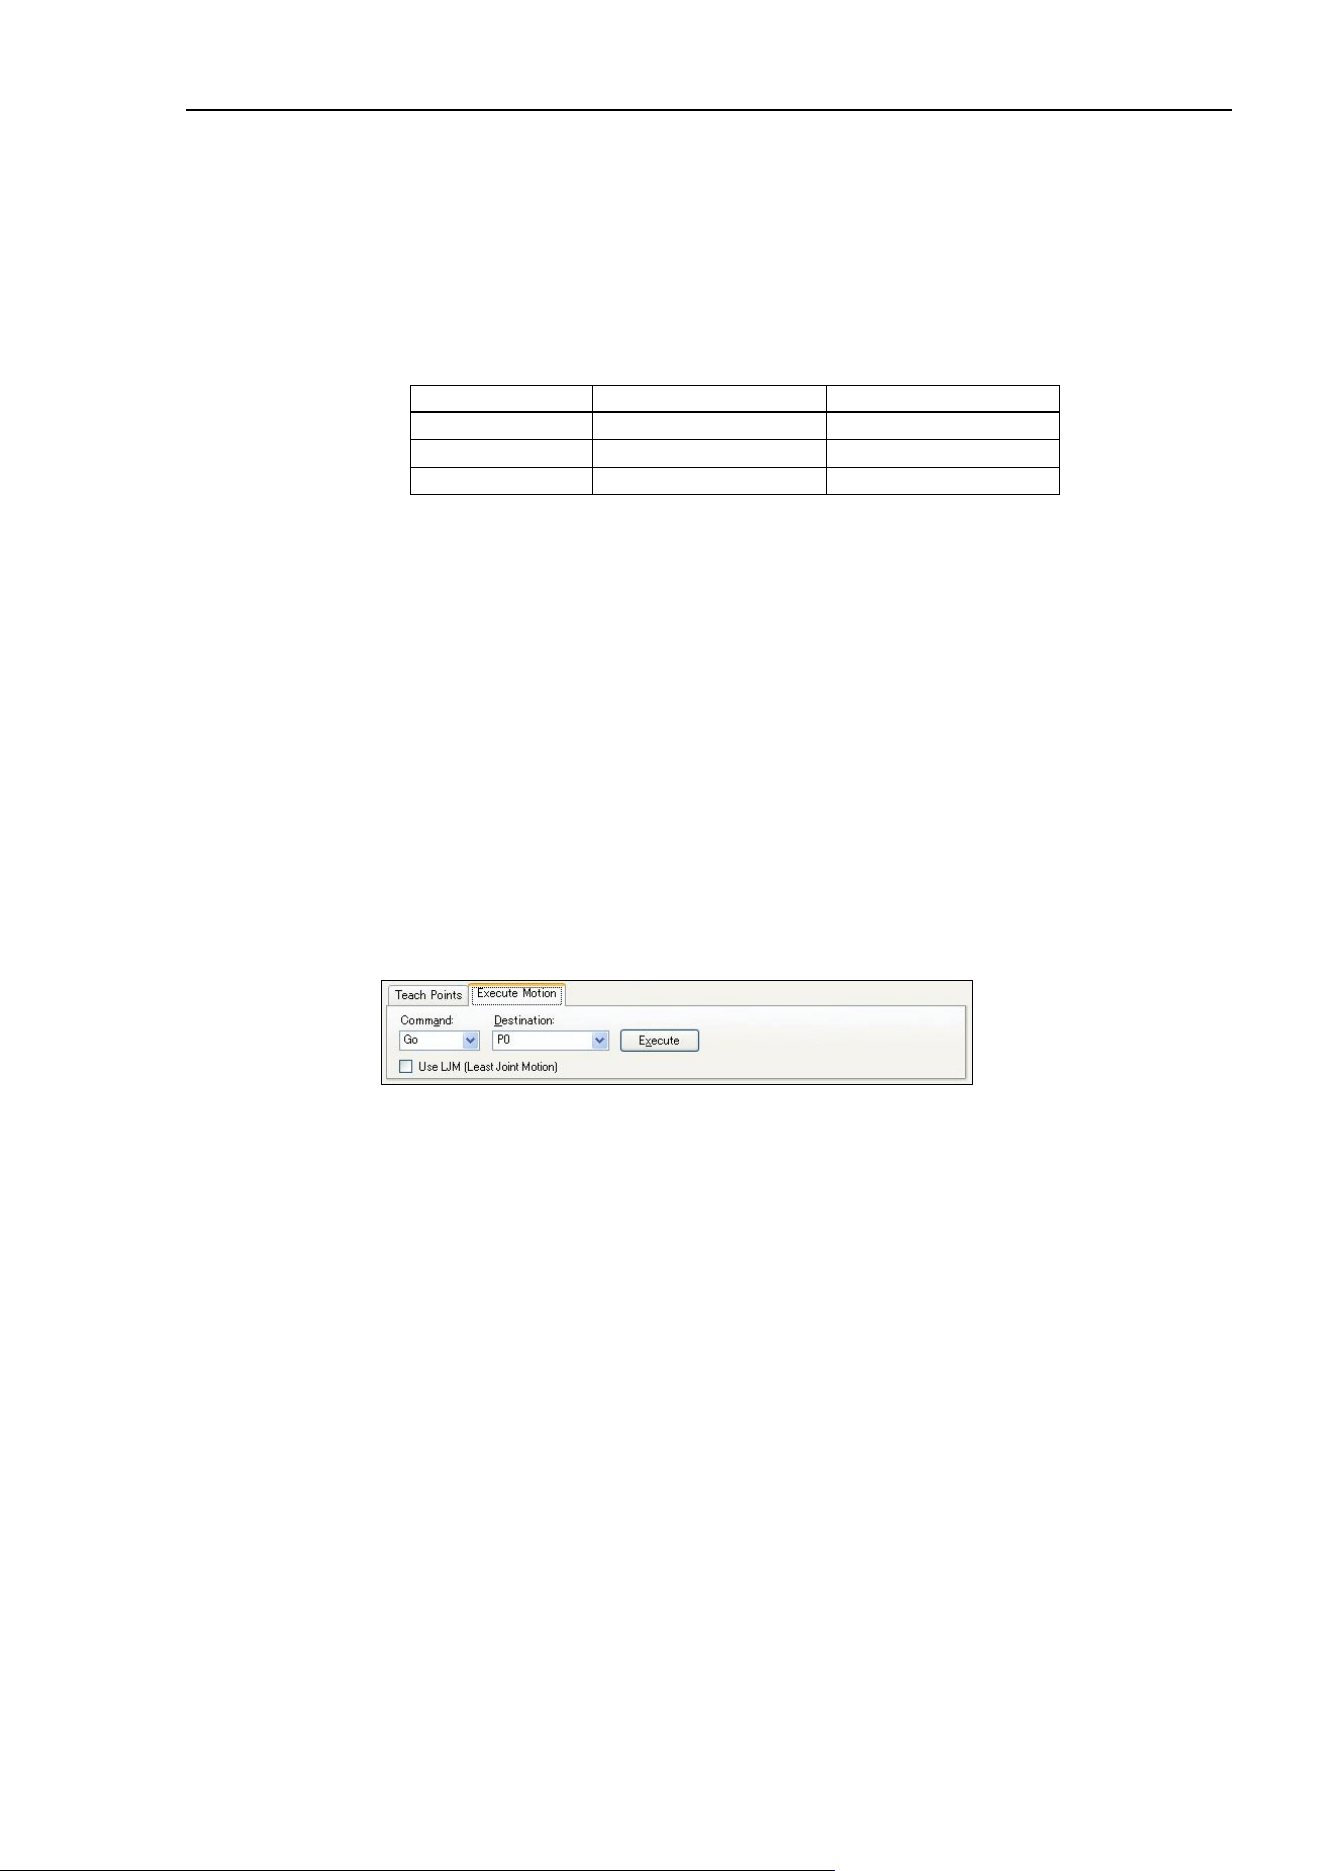
5. The EPSON RC+ 7.0 GUI
EPSON RC+ 7.0 (Ver.7.4) User's Guide Rev.6 89
Jog Distance Group
This group contains text boxes that are used to specify the distance that each axis moves
when its corresponding jog button is pressed. There are radio buttons for selecting
Continuous, Long, Medium, and Short jog distances. When “Continuous” is selected, the
robot is jogged in continuous mode and the jog distance text boxes are grayed out. When
“Long”, “Medium”, or “Short” are selected, the robot is jogged in step mode for the
distance specified in the jog distance text box for the axis being jogged.
To change a jog distance, first select the distance to be changed, then type in the new value.
Distance
Set Value *
Default Value
Short
0 to 10
0.1
Medium
0 to 30
1
Long
More than 0 to 180
10
* If you enter a too large value, an error message appears when you attempt to jog.
When the jog mode is changed, the jog distance units change appropriately between
millimeters (mm) and degrees (deg).
When the jog distance is longer than the default, jog distance is reset to default status by
rebooting the controller.
[Teach Points] Tab
This tab shows the current point file name and point number.
Use the <Teach> button to register the current robot position.
Use the <Edit> button to select and view the current point in the Points tab.
See How to teach points for more information.
Execute Motion Tab
This tab executes motion commands.
Click <Execute> from this group to execute the motion.
When [USE LJM (Least Joint Motion)] checkbox is checked, posture of the manipulator is
automatically adjusted to reduce the motion distance.
The default setting is unchecked.
The [Execute Motion] tab can be disabled from [Setup]-[Preferences]-[Robot Manager]-
[Jog & Teach].
NOTE
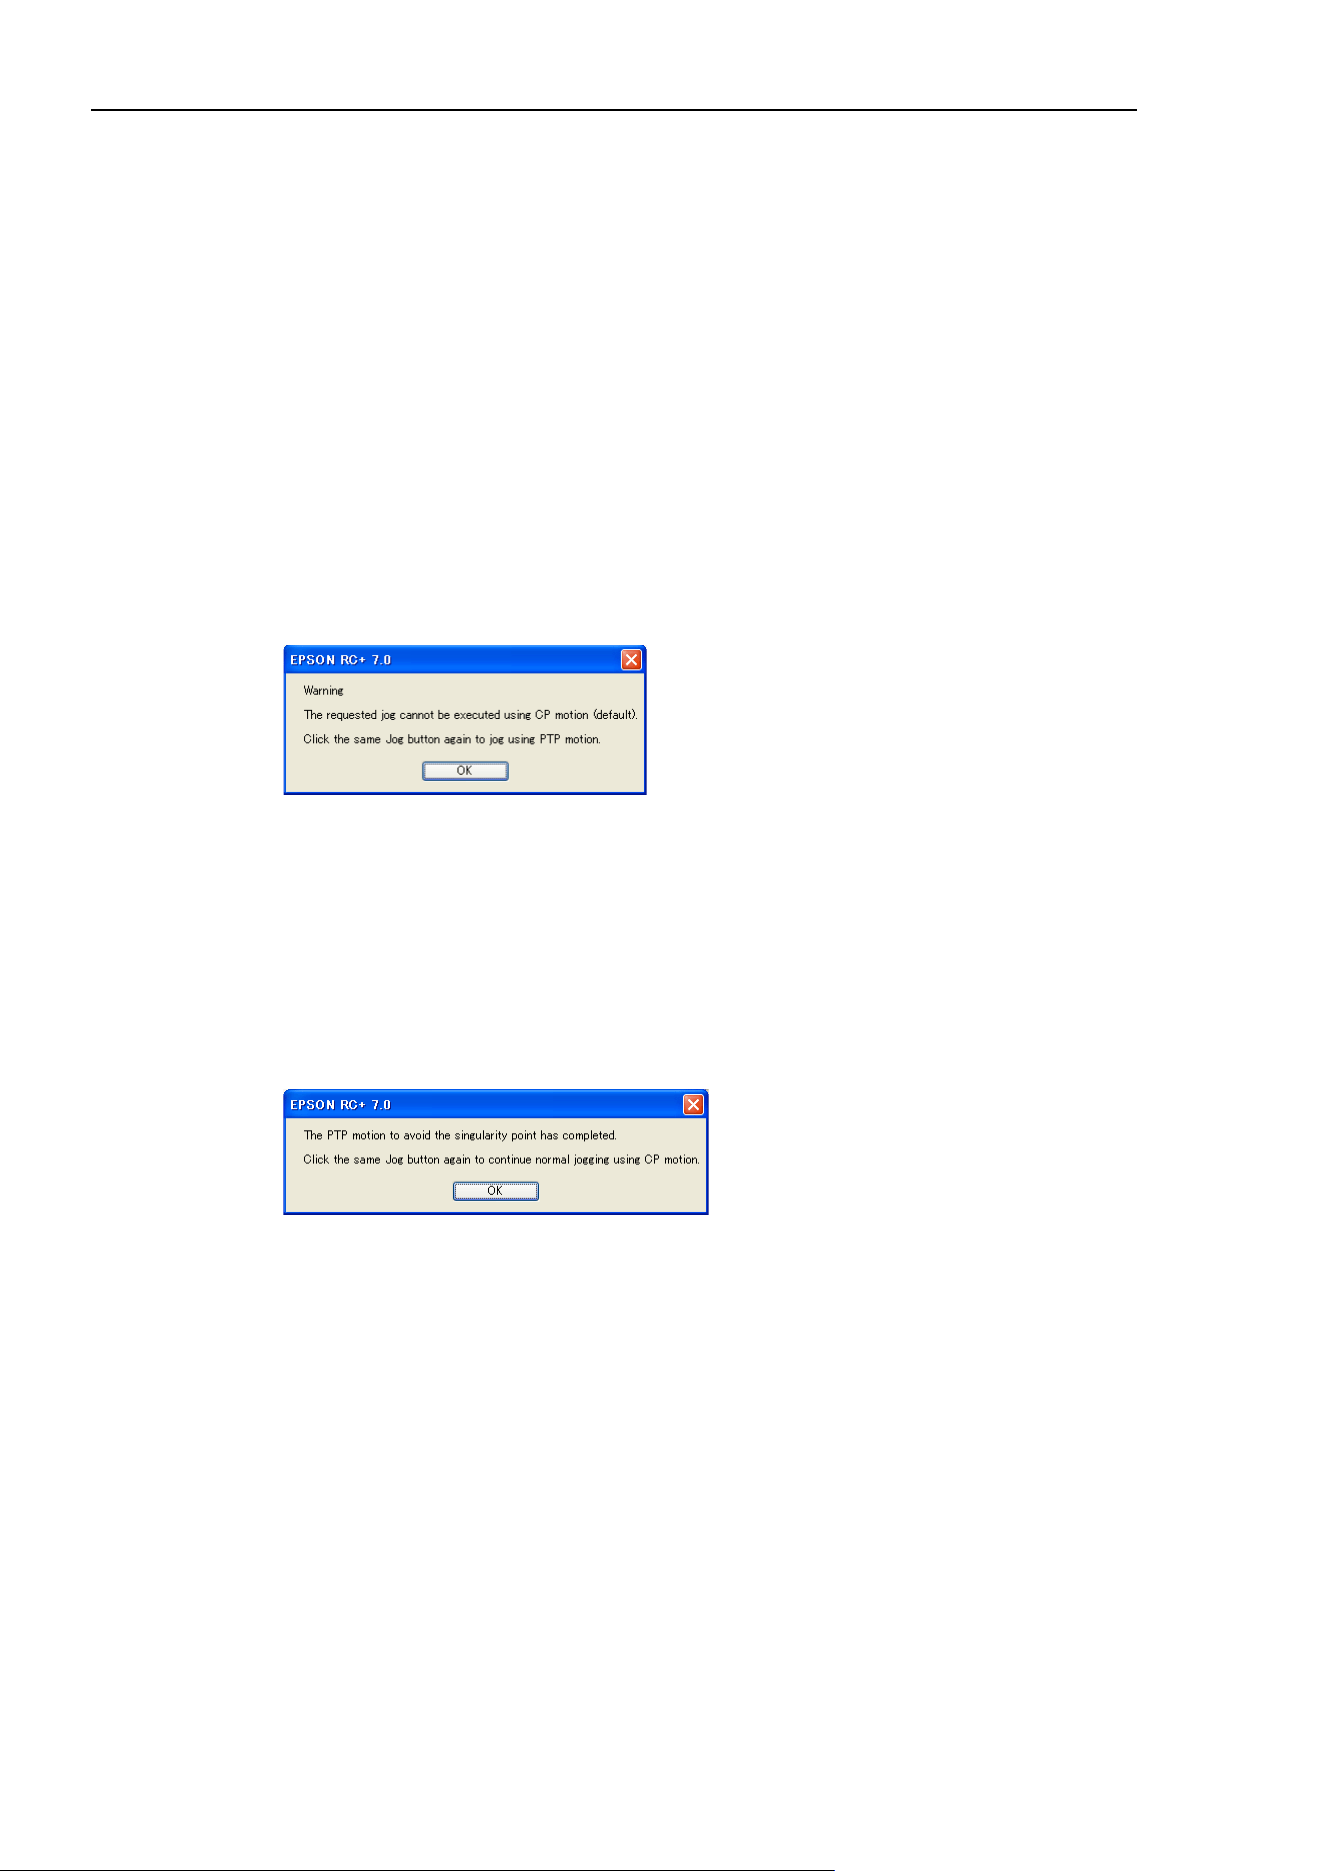
5. The EPSON RC+ 7.0 GUI
90 EPSON RC+ 7.0 (Ver.7.4) User's Guide Rev.6
How to jog
In the upper left hand corner of the [Jog & Teach] page, you will see a control group
called Jogging that contains jog buttons. In the World, Local, Tool, and ECP jog modes,
the robot is jogged in the Cartesian coordinate system (X, Y, Z). In the Joint jog mode,
each robot joint can be jogged separately.
The jog speed is determined by the Speed setting. In step mode, each time you click a jog
button, the robot moves along the appropriate axis by the amount specified in the [Jog
Distance] control group. In continuous mode, when a jog button held down, the robot
moves continuously using linear interpolated motion.
For robots other than the 6-axis robots, the jog motion in step mode is PTP (point to point)
motion. It is difficult to predict exact jog motion trajectory. Therefore, be careful that the
robot doesn't collide with peripheral equipment and that the robot arms don’t collide with
the robot itself during jogging.
For the 6-axis robots, the jog motion is CP (Continuous Path) motion. Note that when
jogging near the singularity, if you try to pass through the singularity, a warning dialog
below will appear.
Click the <OK> button and click the same Jog button again to jog using PTP motion and
pass the singularity.
It is difficult to predict exact jog motion trajectory in the PTP motion. Therefore, be
careful that the robot doesn't collide with peripheral equipment and that the robot arms
don’t collide with the robot itself during jogging. Also, if you attempt the other jogs or
operations, it cancels the switching to PTP motion. So when jogging near the singularity
again, the same warning dialog will appear.
If passing the singularity in the continuous jog motion, the following warning message
will appear.
When jogging in continuous mode, if an out of range condition occurs, the robot motors
will turn off and an error will be displayed. In this case you must execute a Reset and
Motor On from the Control Panel page to continue the jog.
To jog
Select the jog mode: World, Tool, Local, Joint, or ECP.
Select the jog speed: “Low” or “High”.
Select “Continuous”, “Long”, “Medium”, or “Short” jog distance. You can type in the
desired jog distance when “Continuous” is not selected.
Click on one of the jog buttons with the left mouse button. If you hold the mouse button
down, the robot will continue to jog.
When jogging is started, the jog button color changes from yellow to cyan. After jogging
is completed, the jog button color returns to yellow.
If you click any jog button during a step jog, the robot will stop.
NOTE
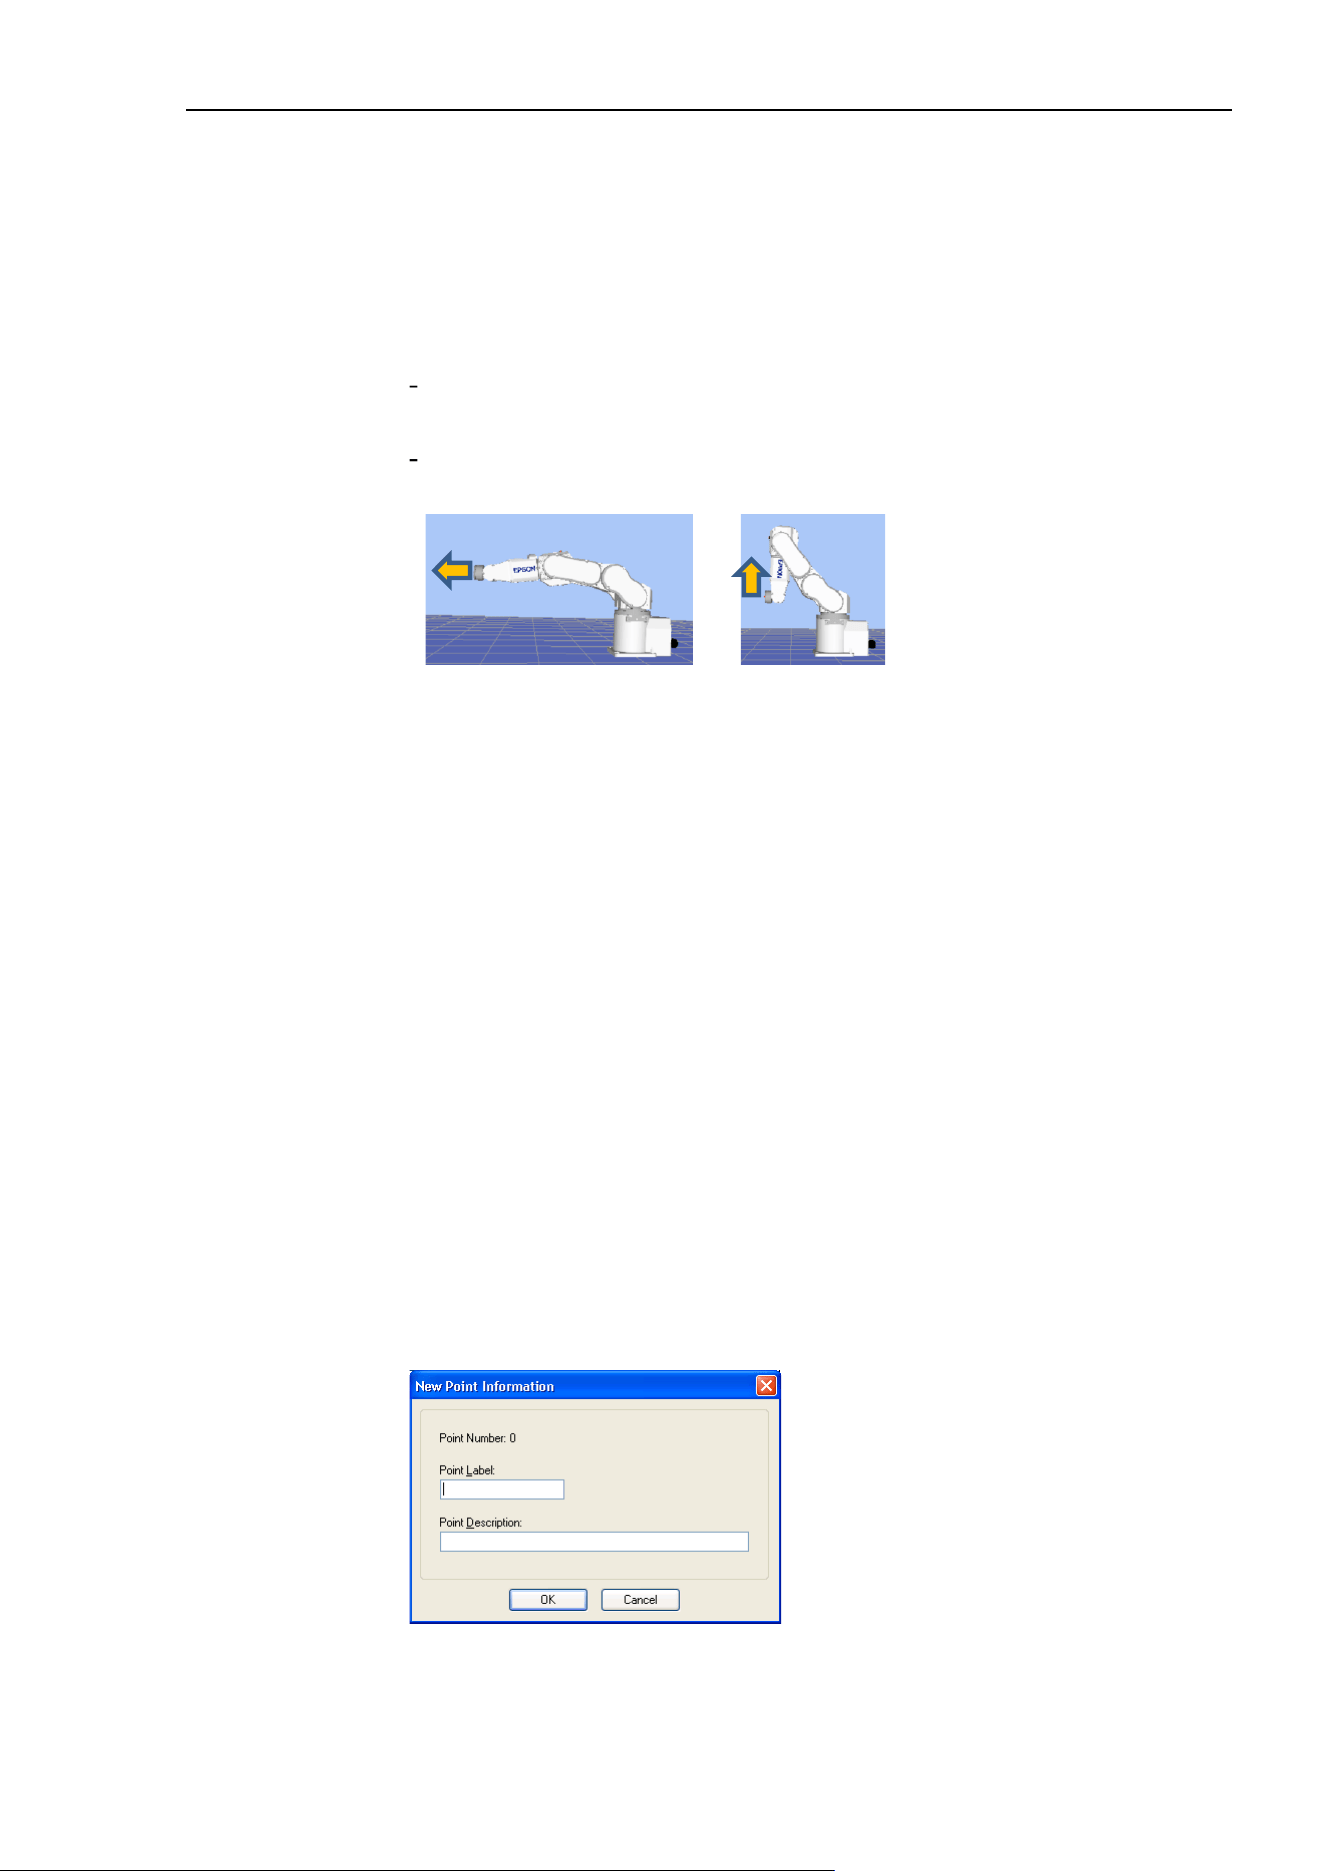
5. The EPSON RC+ 7.0 GUI
EPSON RC+ 7.0 (Ver.7.4) User's Guide Rev.6 91
You can change the orientation of the jog buttons for the robot by selecting [Preferences]-
[Robot Manager]-[Jogging] from the [Setup] menu. This allows you to align the
orientation of the jog buttons with the orientation of the robot motion.
As shown in the illustrations below, when the robot reaches to the limit of the motion
range during Continuous Jog motion, the robot stops before the limit of the motion range
Use Step Jog if you want to move the robot to the limit of the motion range. The robot
motion stops when the following two conditions are satisfied.
When the robot’s current position becomes “approx. 5 mm or less from the limit of
the motion range”.
When the robot operates Continuous Jog motion in the direction reaching to the limit
of motion range as shown in the illustrations below.
Jogging in Teach Mode
You can jog and move the robot at slow speed with the safeguard open by using the Teach
Pendant.
See the Robot Controller option: Teach Pendant TP1, TP2, or TP3 manual.
How to teach points
To move the robot to the target point, the point data indicating the robot position is
necessary.
Follow these steps to teach points from the [Robot Manager]:
1. Select the point file you are teaching points for from the [Point File] dropdown list box
on the [Teach] page.
2. Select the point number you want to teach in the [Points] box.
3. Jog the robot to the desired position or free some or all axes to manually move the
robot into position.
4. Click on the <Teach> button. This will save the robot's current position data. If the
Prompt for New Point Data preference is active, you will be prompted for a point label
and description.
Point labels can include up to 32 alphanumeric characters and underscores. Only
alphabets can be used for the first letter. Characters can be upper case or lower case.
(As an alternative to clicking the <Teach> button, on the [Points] tab you can type in
the coordinates of the point.)
NOTE
NOTE
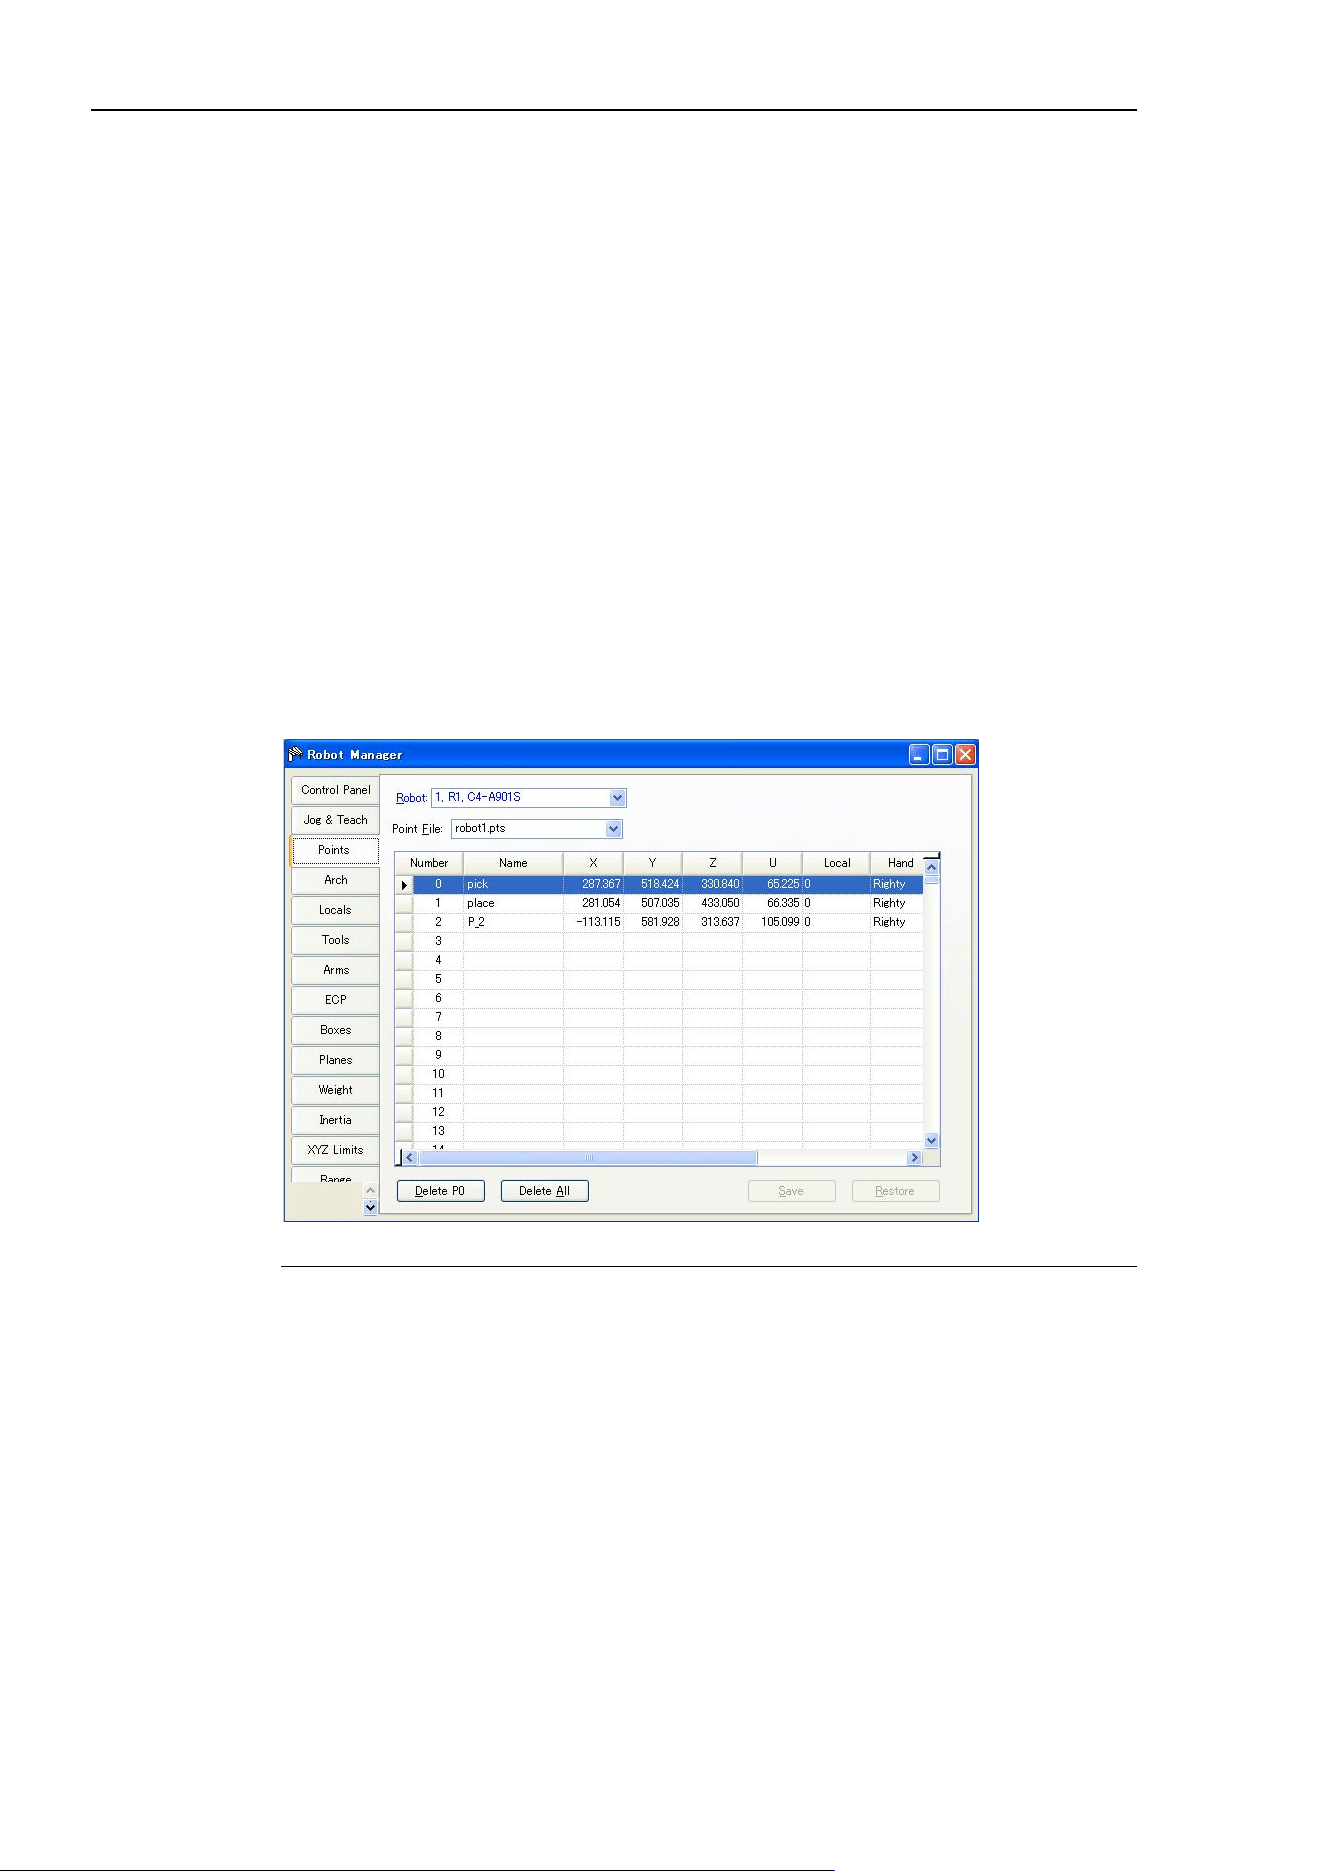
5. The EPSON RC+ 7.0 GUI
92 EPSON RC+ 7.0 (Ver.7.4) User's Guide Rev.6
Saving your work
Robot Manager MDI Child
To save your work, use the [File] menu to select [Save]. You can also execute [Project]-
[Save] or click the <Save all files> toolbar button.
When you want to restore the data without saving the point files, select [Restore] from the
[File] menu.
Robot Manager Dialog
When you close the [Robot Manager], you will be prompted if you want to save your
changes. Answer <Yes> to make your changes permanent or <No> to cancel saving of the
changes.
[Tools]-[Robot Manager]-[Points] Page
You can input/delete the point data. When a point file is selected, the robot controller
loads the file into memory.
As points are taught on the [Robot Manager]-[Jog & Teach] page, the spreadsheet on the
Points page is updated.
When the Robot Manager is used as an MDI child window, you can save the point data by
typing Ctrl + S to the point file.
Item Description
Robot Select a robot.
Point File Select a point file.
Delete Pxxx Deletes the selected point. You will be prompted to confirm the operation.
Delete All Deletes all points in the file. You will be prompted to confirm the
operation.
Save Saves the current values.
Restore Reverts back to the previous values. You will be prompted to confirm the
operation.
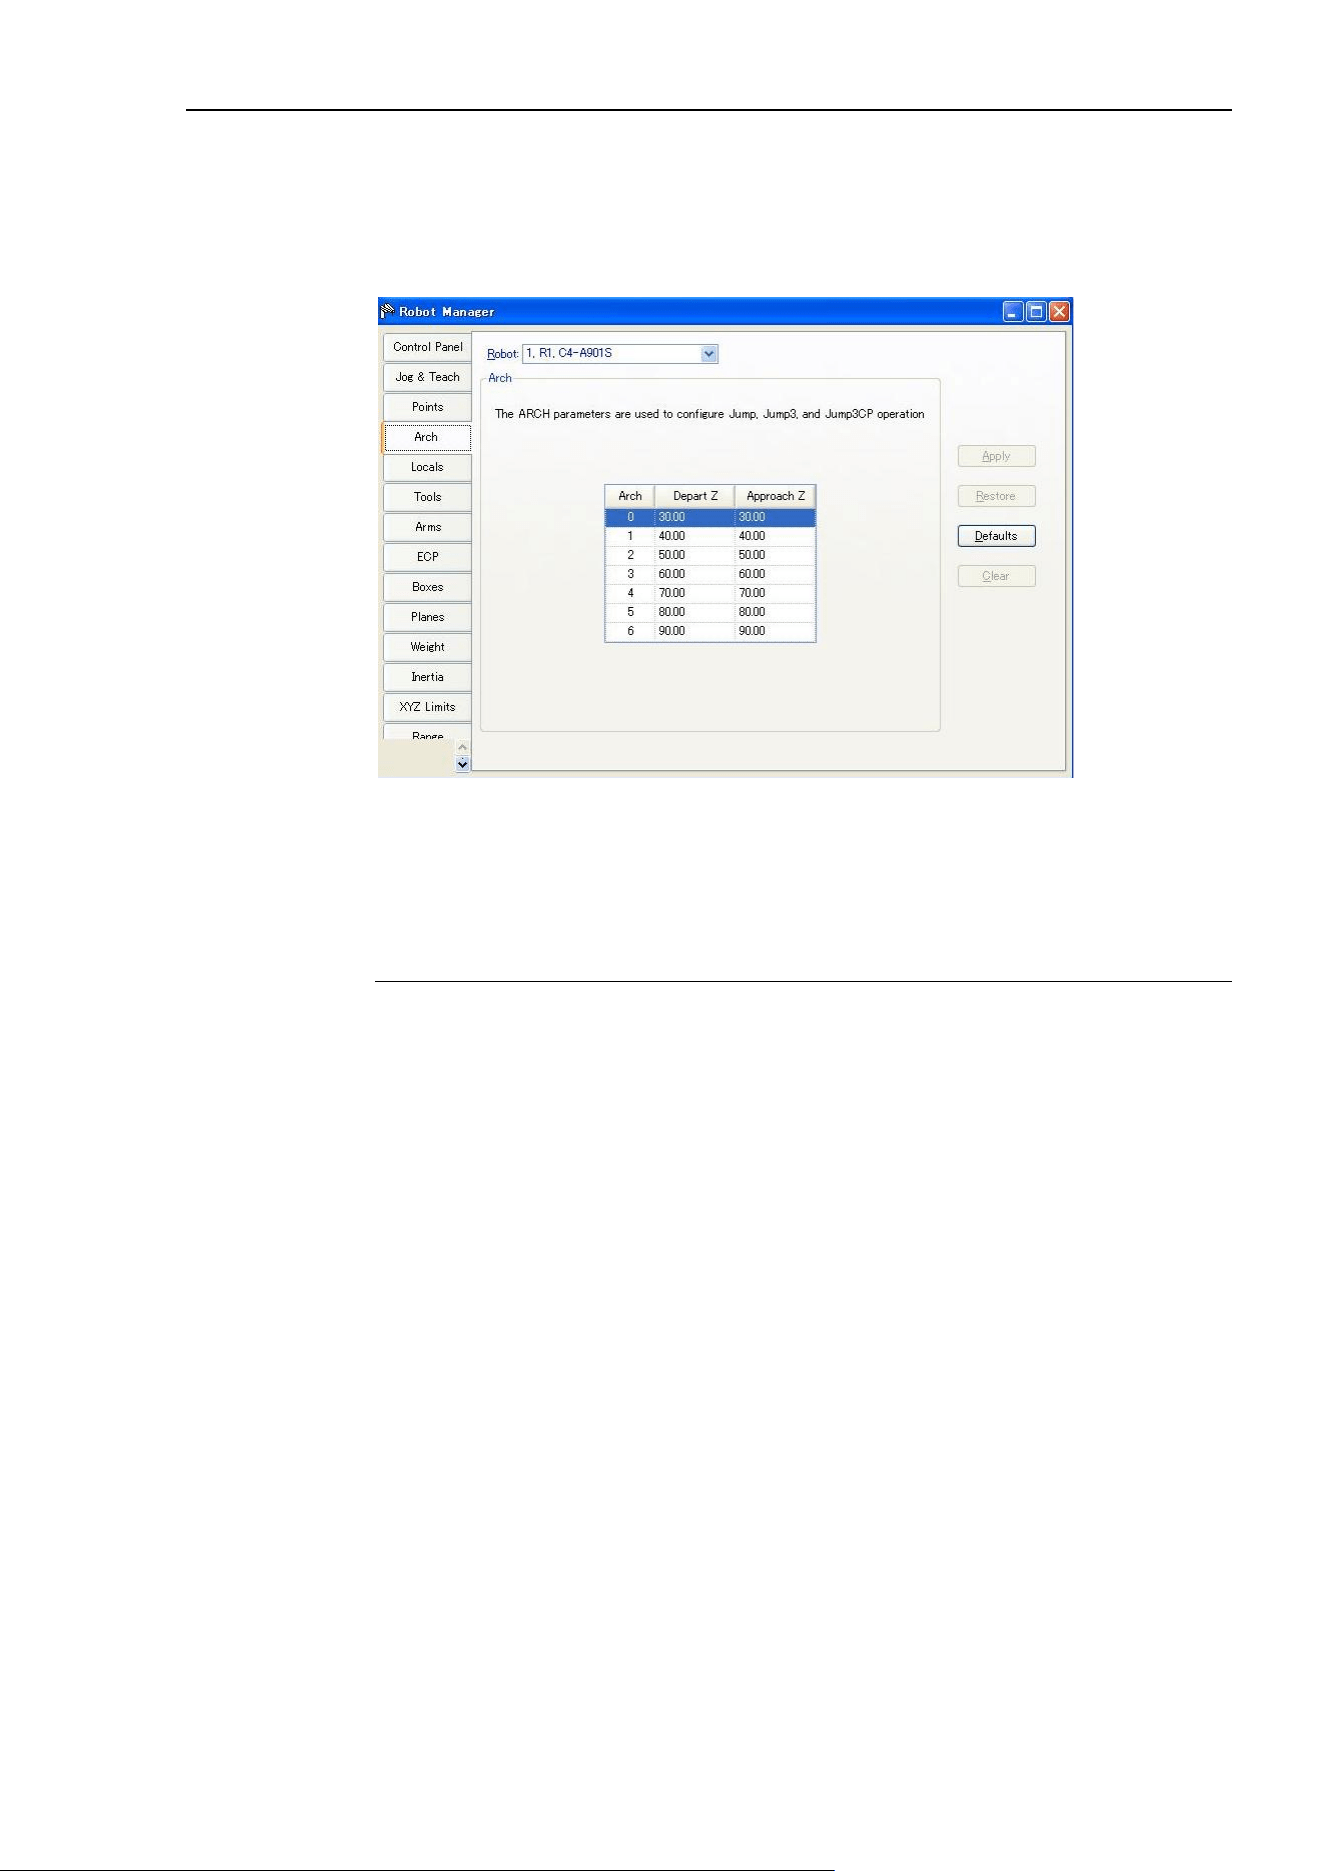
5. The EPSON RC+ 7.0 GUI
EPSON RC+ 7.0 (Ver.7.4) User's Guide Rev.6 93
[Tools]-[Robot Manager]-[Arch] Page
This page allows you to configure the depart Z and approach Z settings in the robot's Arch
table. Arch is used for the Jump, Jump3, and Jump3CP motion commands. There are
seven different setting pairs in the Arch table.
For details on using Arch, see the SPEL
+
Language Reference: Arch Statement.
To change Arch settings
1. Put the cursor in the Depart Z or Approach Z cell of the row you want to change.
2. Type in the new value.
Press the TAB key to move to the next cell.
Item Description
Robot Select a robot.
Apply Set the current values.
Restore Reverts back to the previous values.
Defaults Click the defaults button to display factory default settings.
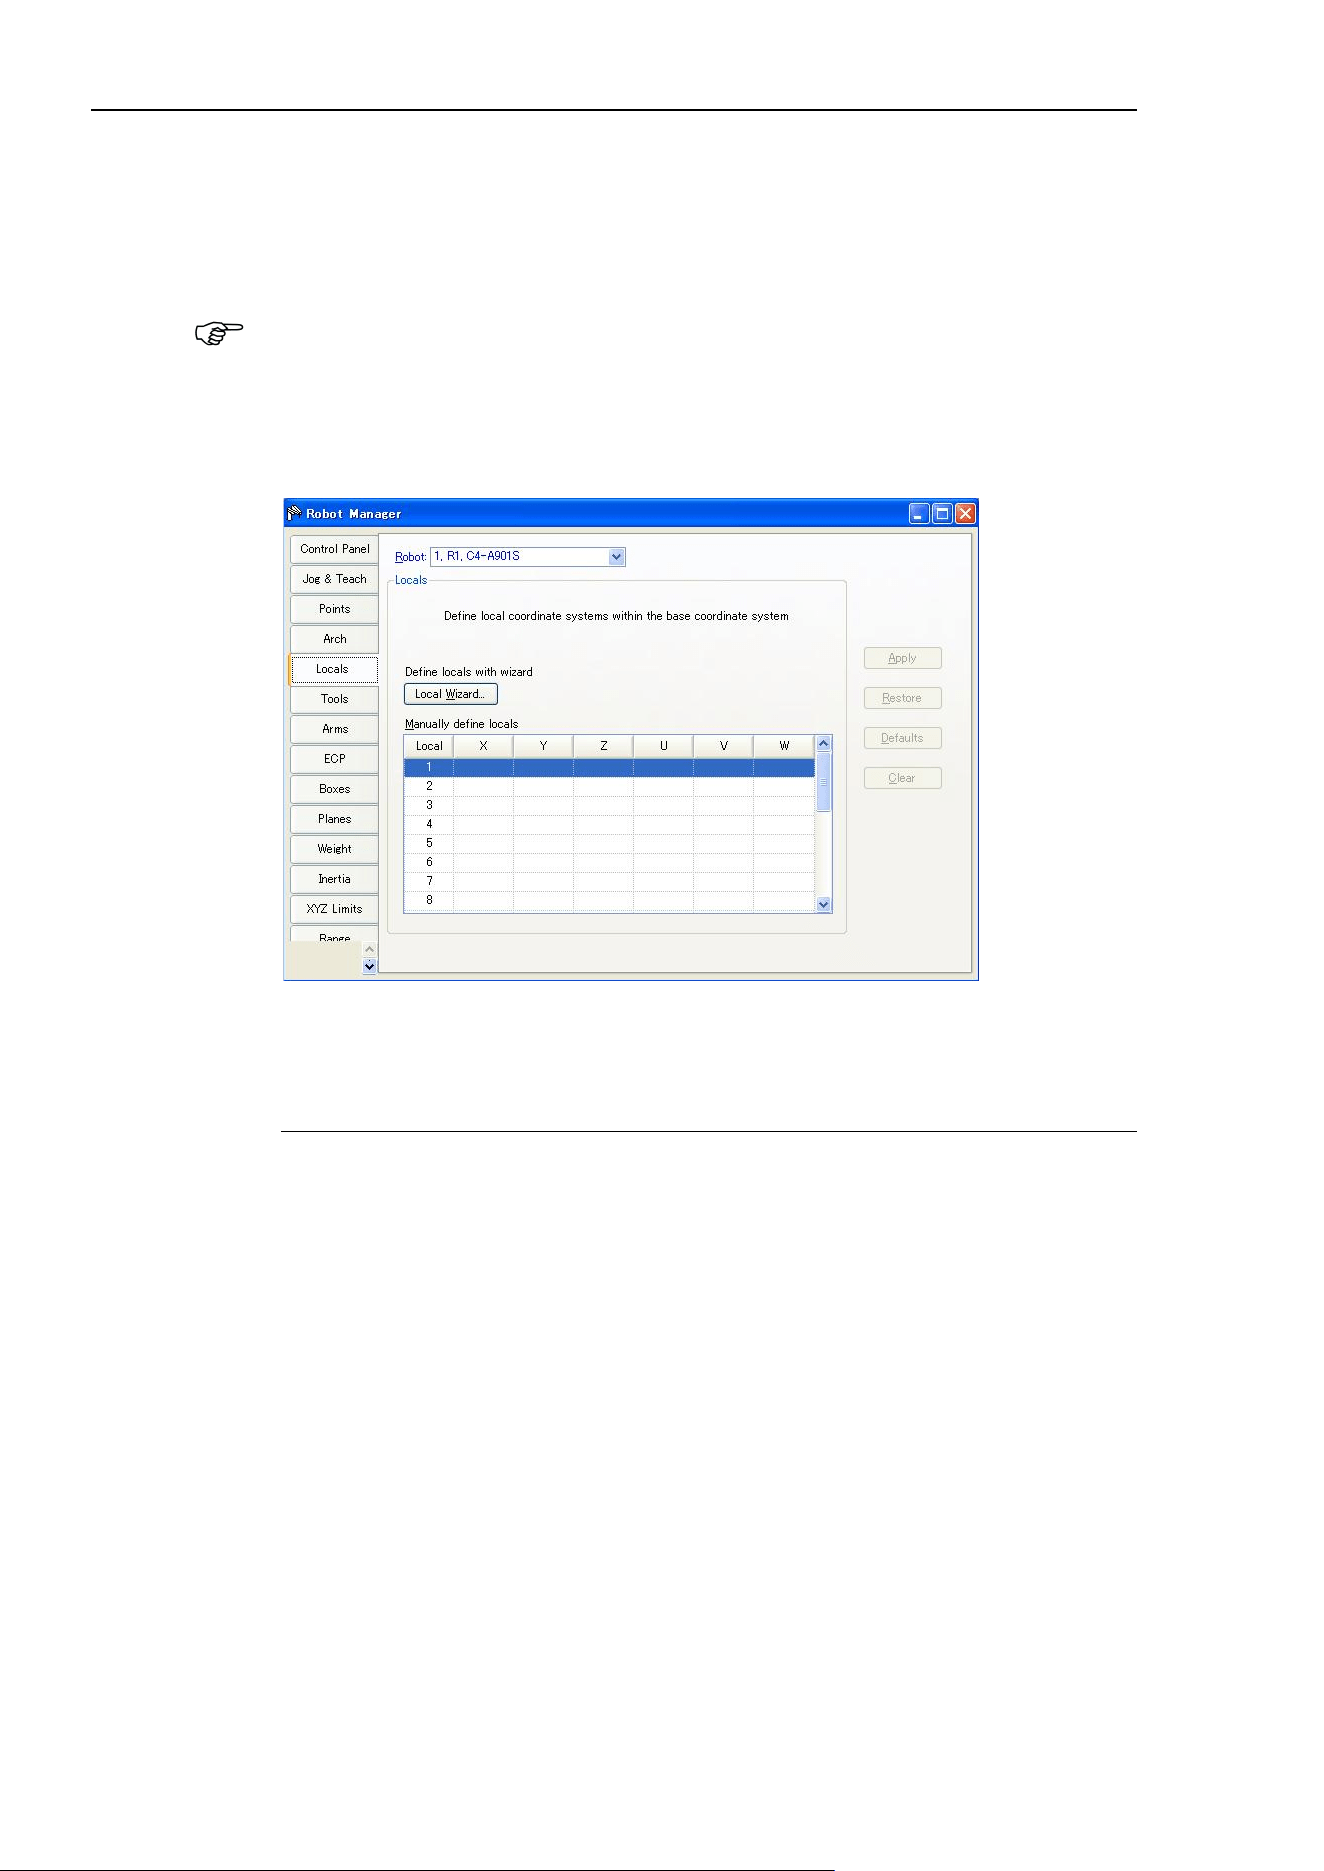
5. The EPSON RC+ 7.0 GUI
94 EPSON RC+ 7.0 (Ver.7.4) User's Guide Rev.6
[Tools]-[Robot Manager]-[Locals] Page
This page allows you to define local coordinate systems for a robot. When the page is
selected, the current values are displayed.
A grid is used to display all of the values for the locals you can define. Local “0” is the
base coordinate system and cannot be changed from this page.
To change the base coordinate system, use the Base command from the command window.
See the SPEL+ Language Reference for more information.
When a local is undefined, then all fields for that local will be blank. When you enter a
value in any of the fields for an undefined local, then the remaining fields will be set to
zero and the local will be defined when you click the <Apply> button.
For details on using Local, see the SPEL
+
Language Reference: Local Statement.
Navigating the grid
Use the TAB key to move to the next field. Use the arrow keys or the mouse to move to
any field.
Item Description
Local Wizard
Click this button to start the Local Wizard. Follow the instructions for
each step to define a local.
See details in the next section.
X
The X coordinate of the local origin in the base coordinate system.
Y
The Y coordinate of the local origin in the base coordinate system.
Z
The Z coordinate of the local origin in the base coordinate system.
U
Rotation angle of the local about the base Z axis (roll).
V
Rotation angle of the local about the base Y axis (pitch).
W
Rotation angle of the local about the base X axis (yaw).
Apply
Saves the current changes.
Restore
Reverts back to the previous values.
Clear
Clears all values for the selected local.
NOTE
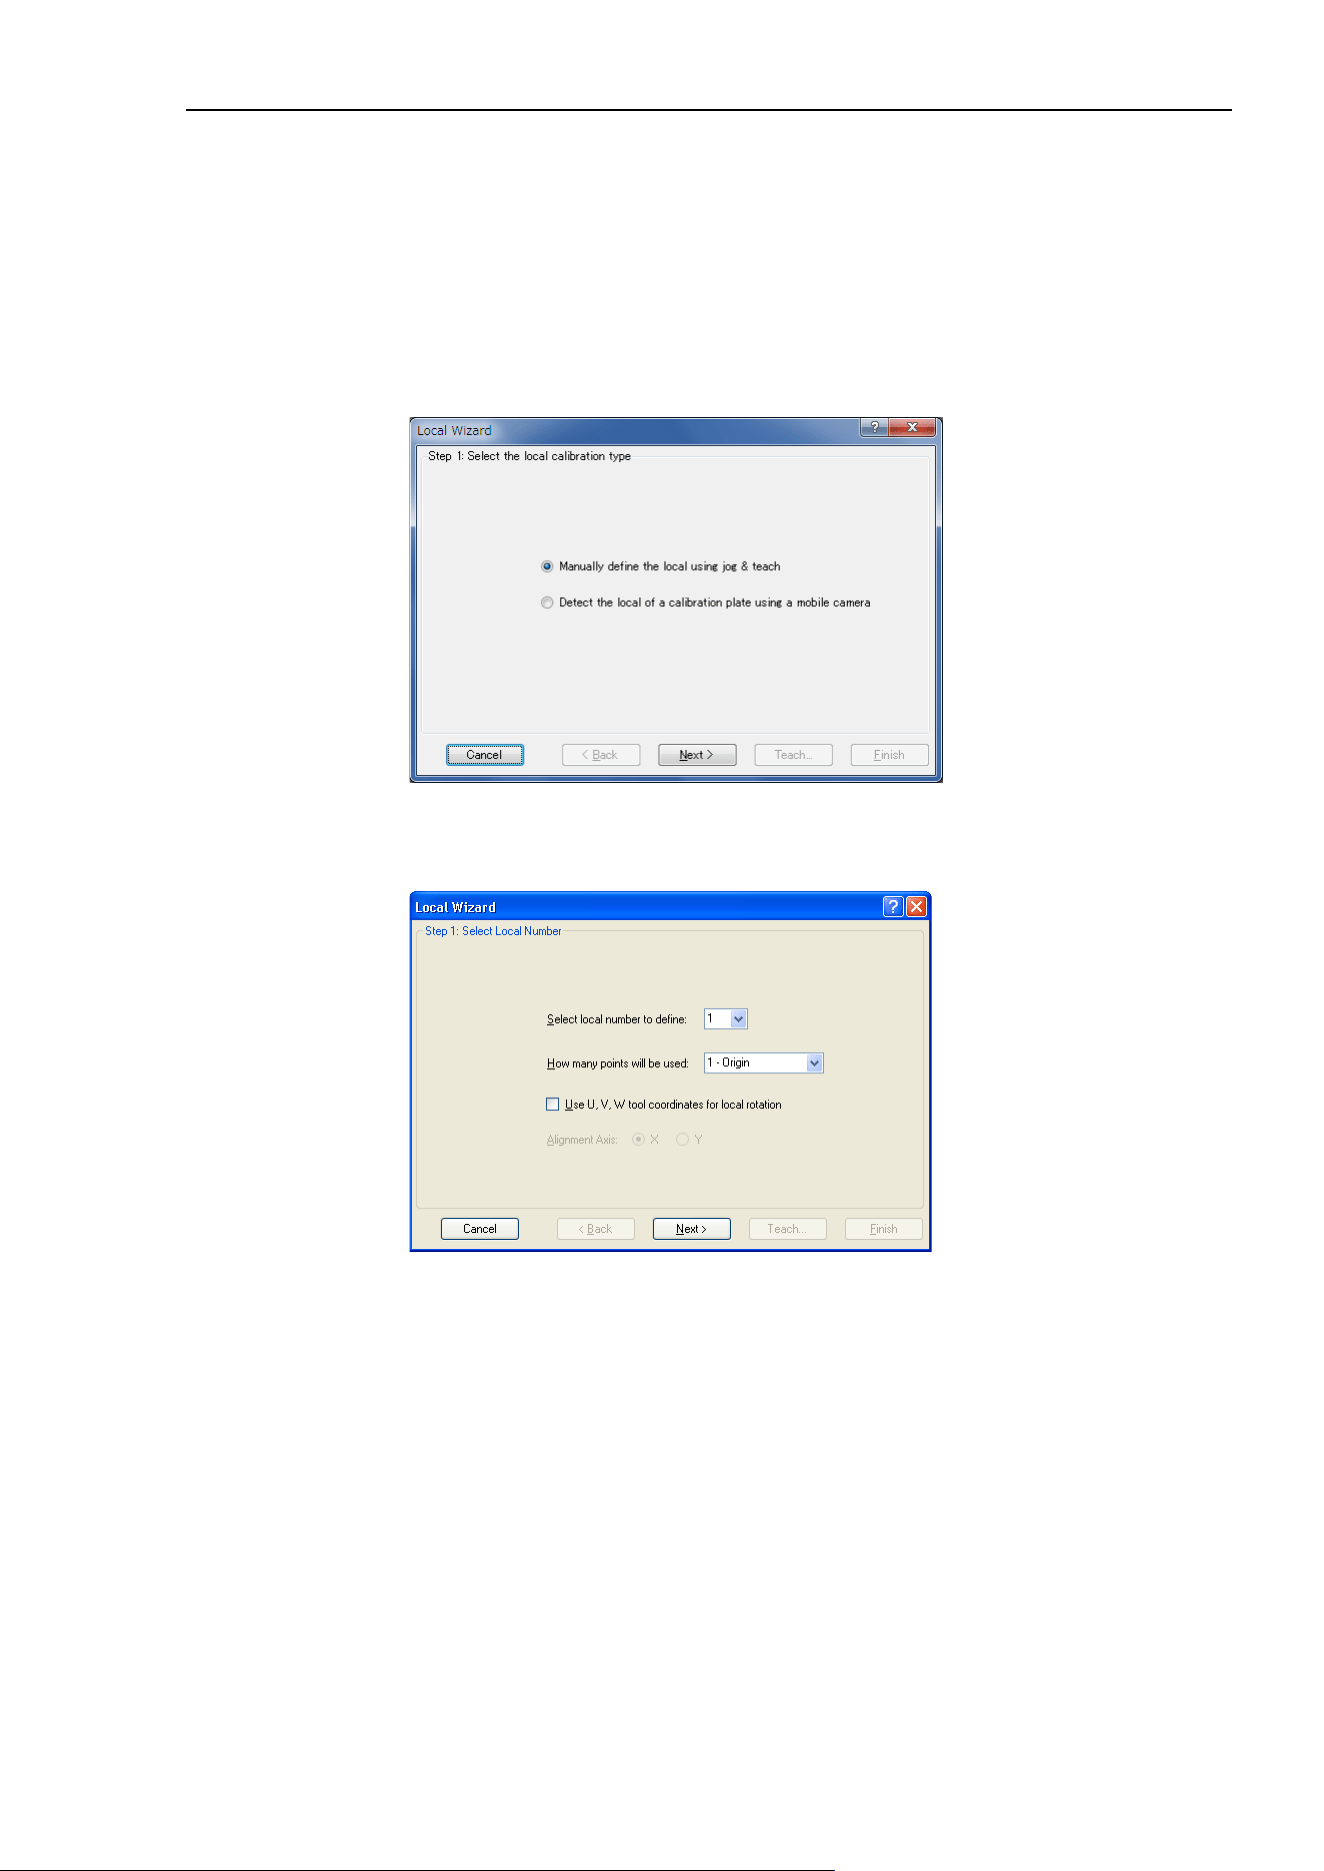
5. The EPSON RC+ 7.0 GUI
EPSON RC+ 7.0 (Ver.7.4) User's Guide Rev.6 95
Using the Local Wizard
A wizard is provided for defining a local coordinate system. You can define a local using
a single point or three points, as described in the following sections.
Using the Local Wizard to teach a single point local
1. Open the [Robot Manager] and click on [Locals] to show the [Locals] page.
2. Click the <Local Wizard> button. You will see the dialog shown below.
3. Click the <Next> button to proceed with the Local setting using the Jog & Teach.
For details of the Local setting, refer to 7. Vision Calibration in the Vision Guide 7.0
Software manual.
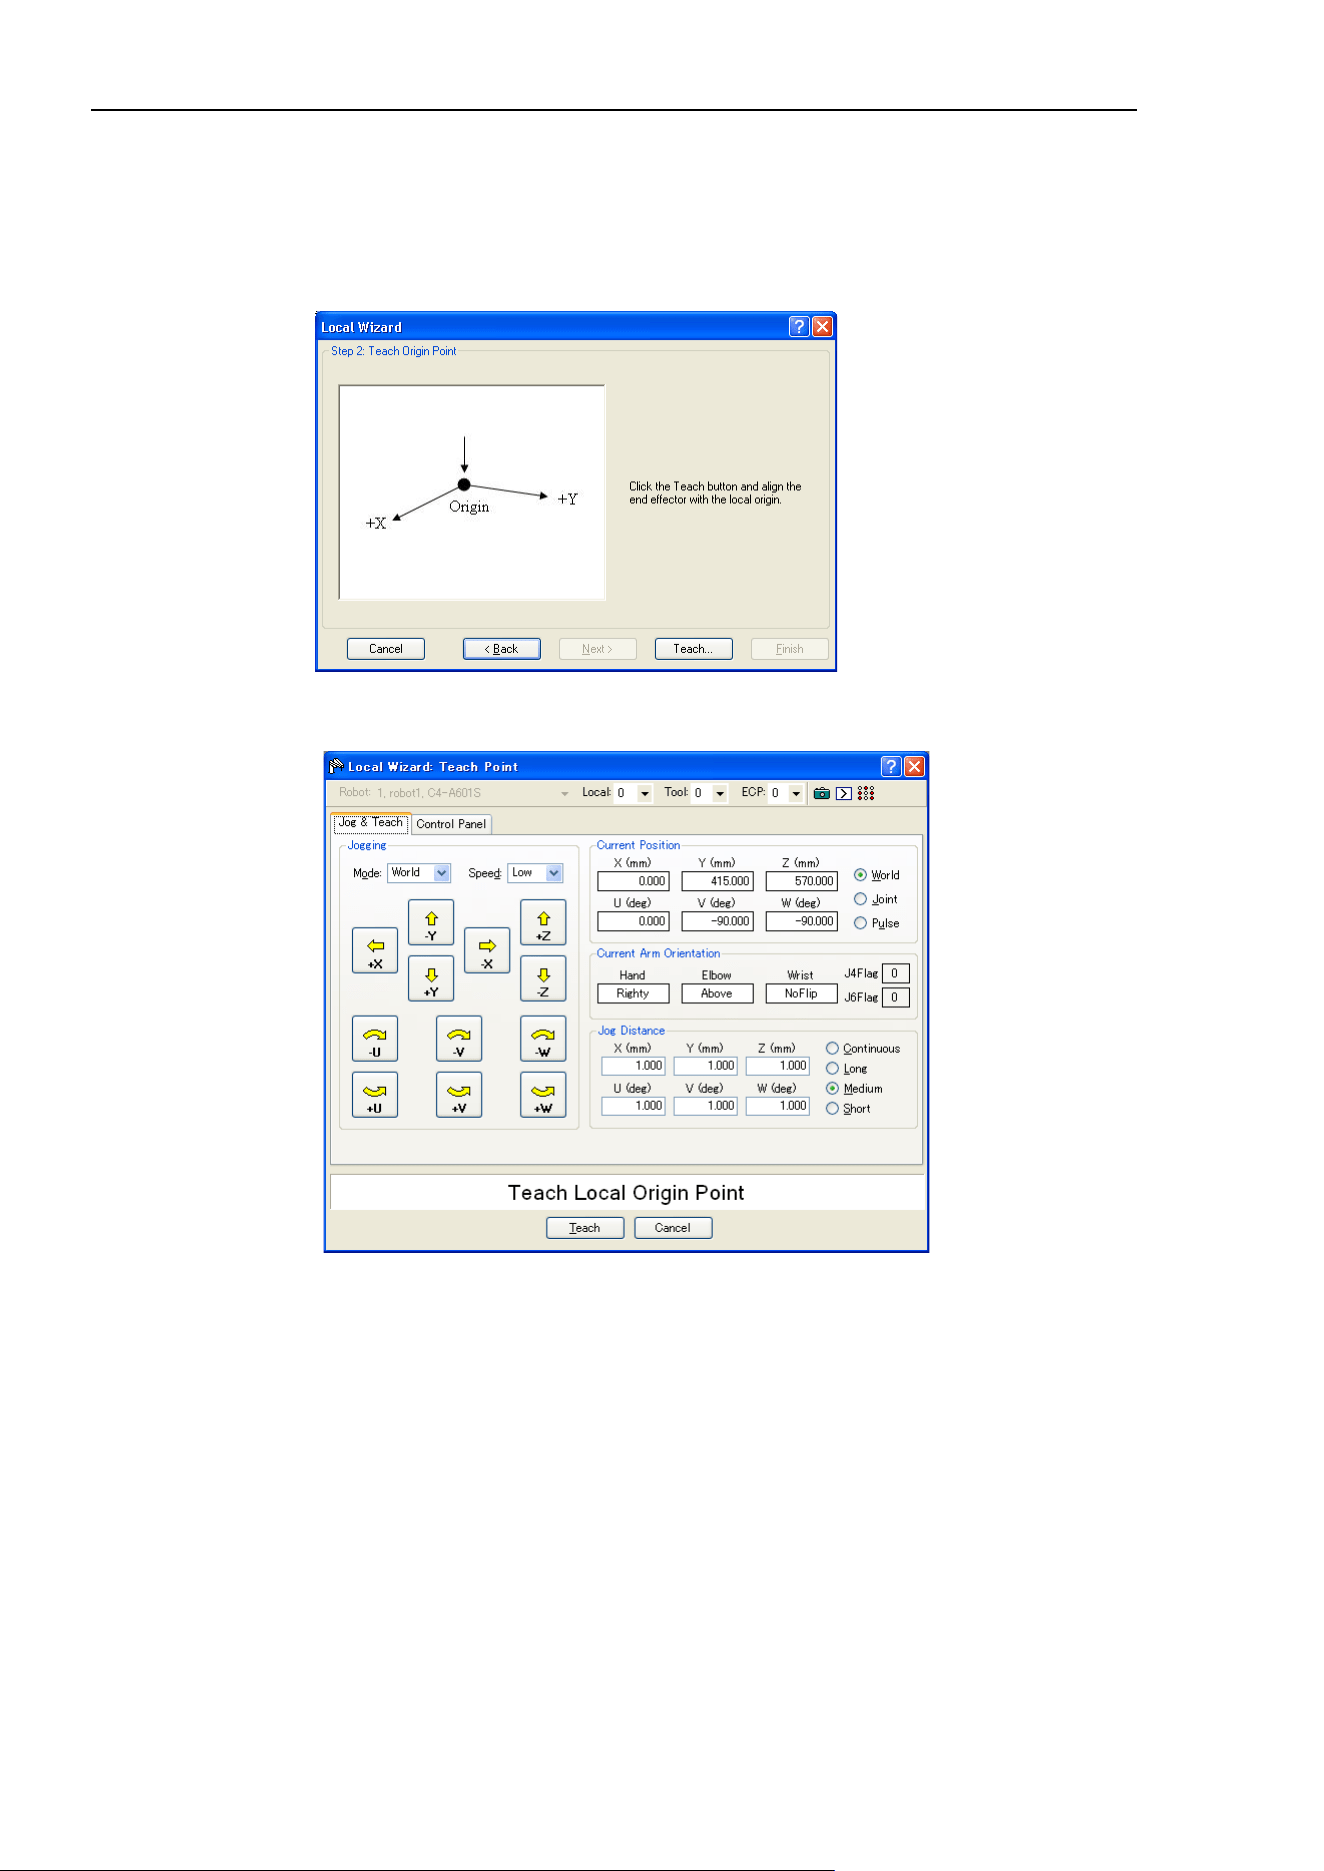
5. The EPSON RC+ 7.0 GUI
96 EPSON RC+ 7.0 (Ver.7.4) User's Guide Rev.6
4. Select the local number you want to define. For [How many points will be used],
select [1 – Origin]. Since this is a single point local, you will just teach the origin of
the new coordinate system. If you want to use the U, V, or W axes for the orientation
of the coordinate system, check the [Use U, V, W tool coordinates for local rotation]
checkbox. If this checkbox is unchecked, the new coordinate system is offset from
local 0 in X and Y, but is not rotated about any axis. Click the <Next> button.
5. We will now teach the local origin point. Click the <Teach> button to open the [Local
Wizard Teach Point] dialog box.
6. Jog the robot until the end effector is aligned with the local origin point. Then click the
<Teach> button.
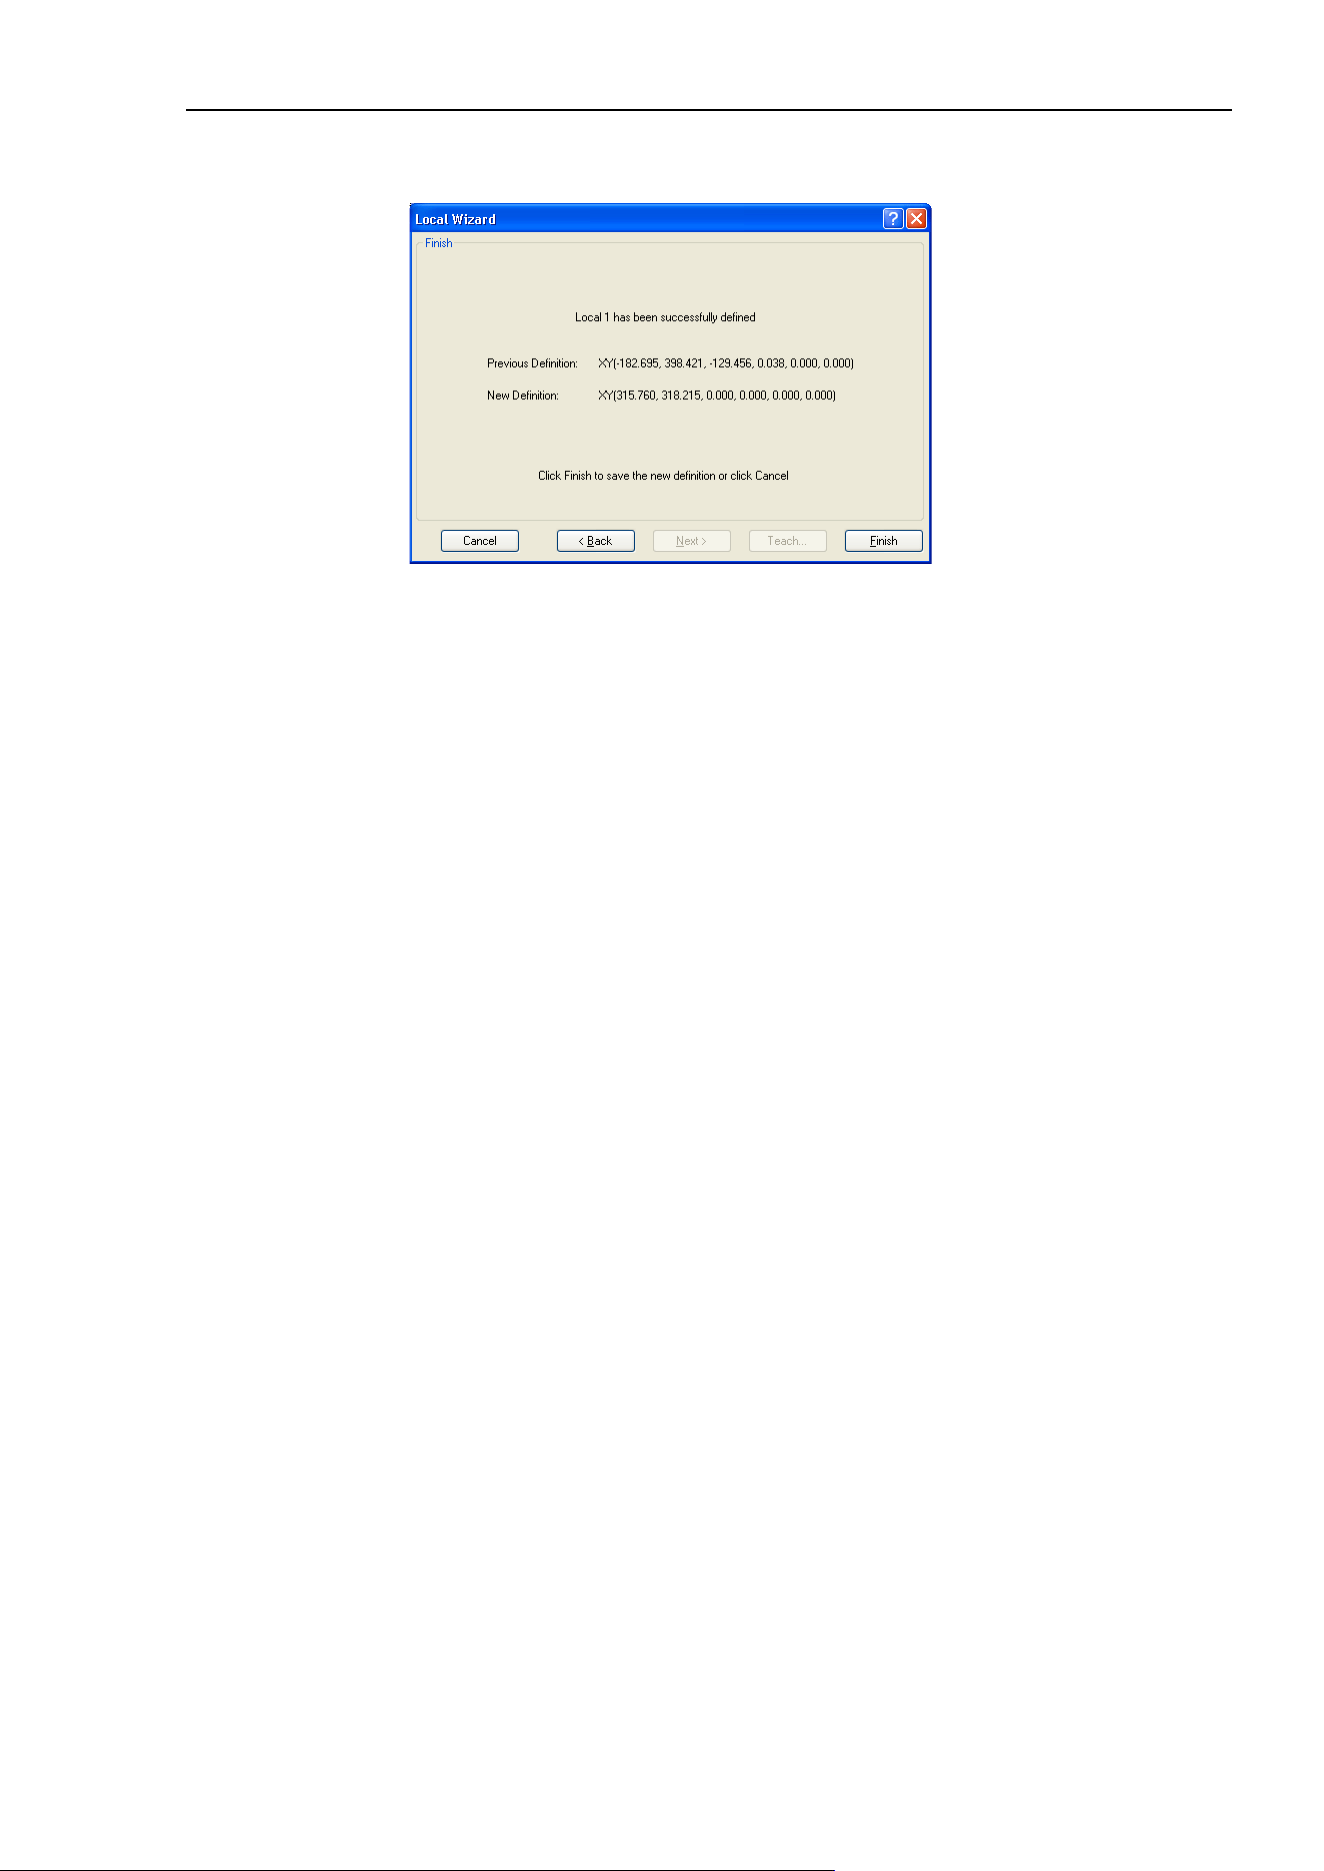
5. The EPSON RC+ 7.0 GUI
EPSON RC+ 7.0 (Ver.7.4) User's Guide Rev.6 97
7. The new local definition is displayed as shown below. Click <Finish> to accept the
new definition.
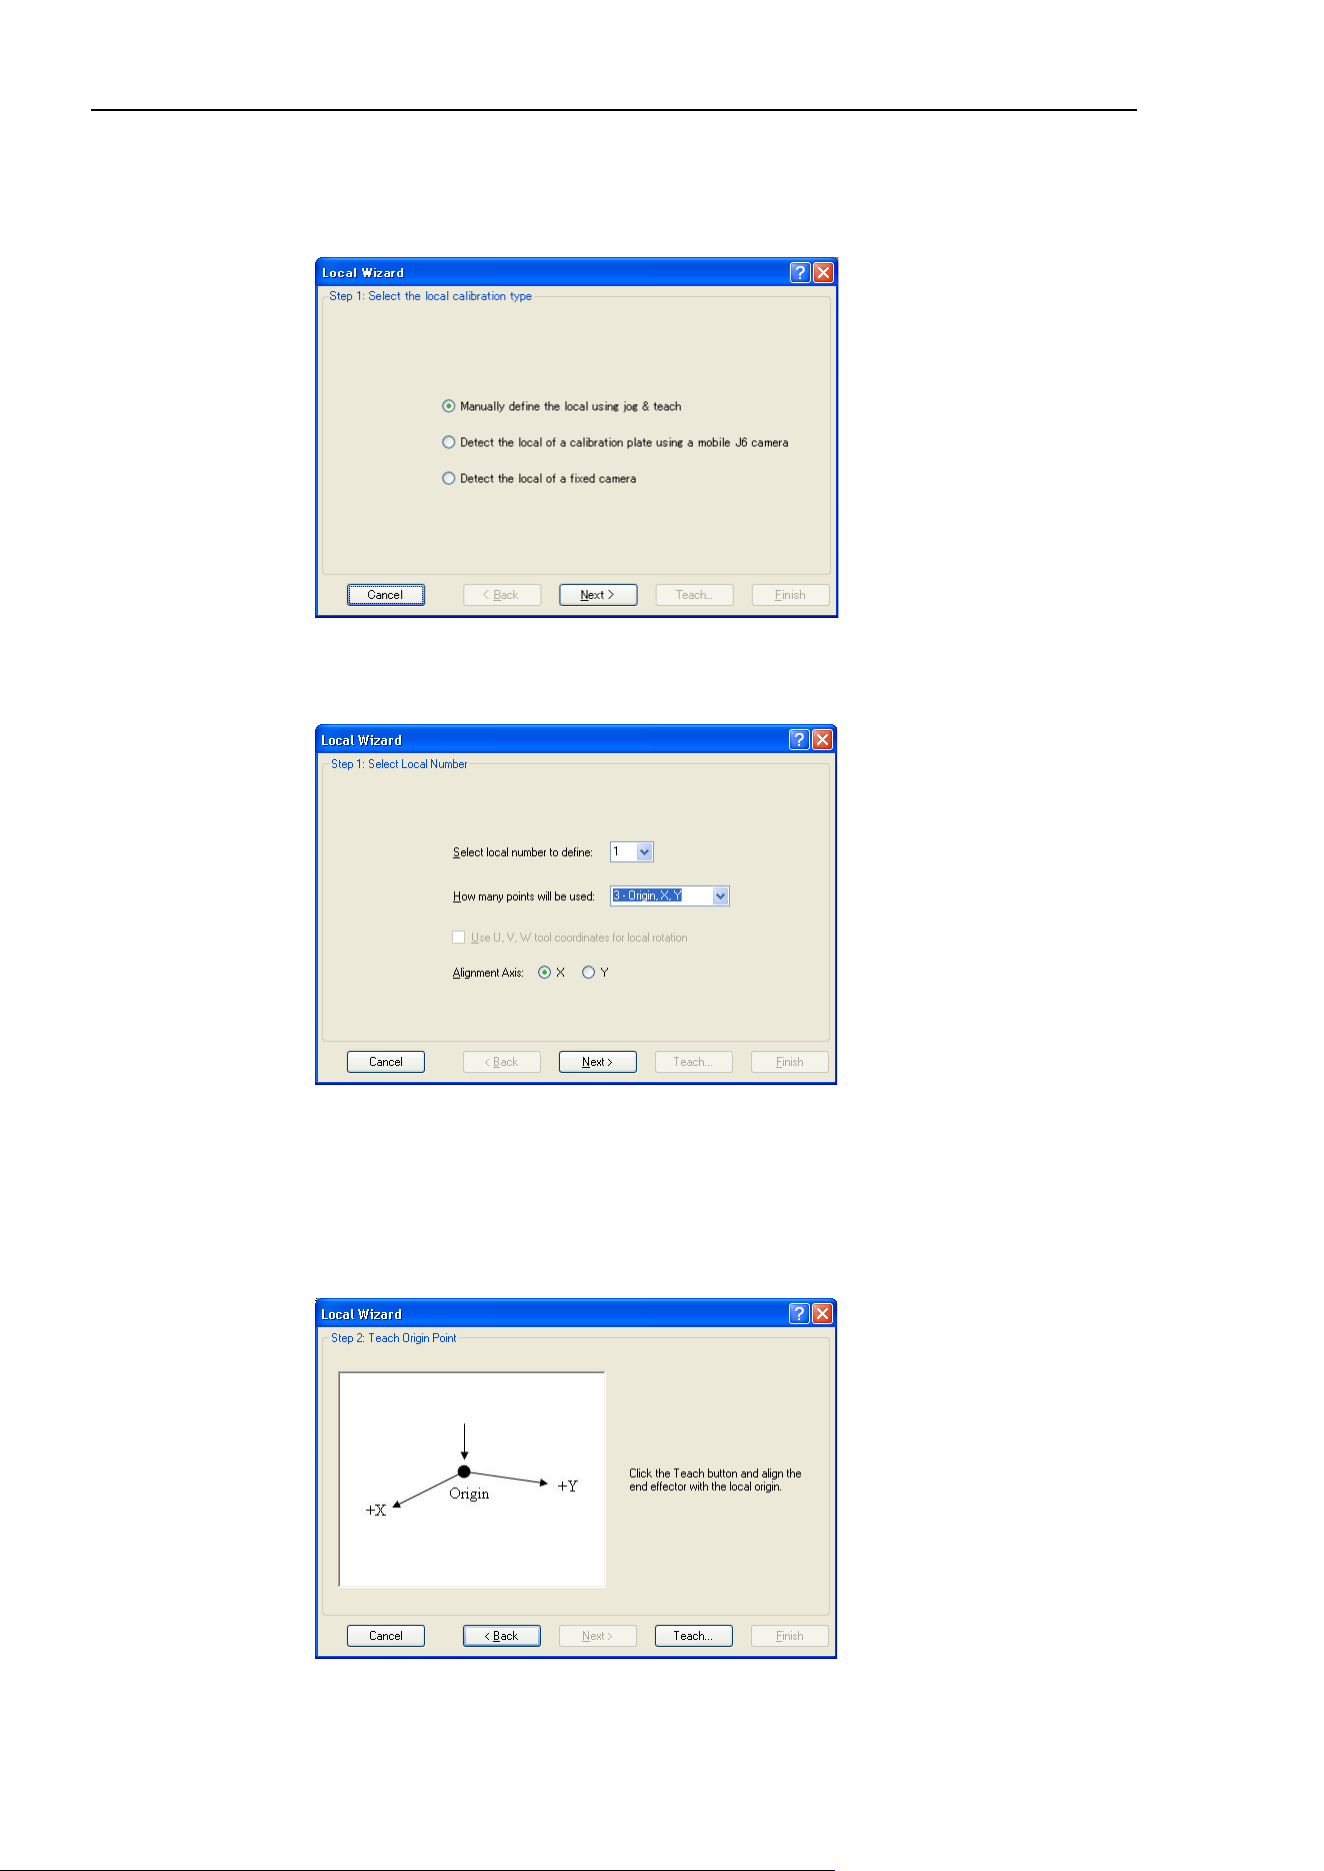
5. The EPSON RC+ 7.0 GUI
98 EPSON RC+ 7.0 (Ver.7.4) User's Guide Rev.6
Using the Local Wizard to teach a three point local
1. Open the [Robot Manager] and click on [Locals] to show the [Locals] page.
2. Click the <Local Wizard> button. You will see the dialog shown below.
3. Click the <Next> button to proceed with the Local setting using the Jog & Teach.
For details of the Local setting, refer to 7. Vision Calibration in the Vision Guide 7.0
Software manual.
4. Select the local number you want to define. For [How many points will be used],
select [3 - Origin, X, Y]. Since this is a three point local, you will teach the origin of
the new coordinate system, and then teach one point anywhere along the X axis and
one point anywhere along the Y axis. Select which axis will be used to align the
coordinate system. For example, if you select X, then the new coordinate system X
axis will be aligned to the X axis point that you will teach in a later step. The Y axis
point will be used to determine tilt. Click the <Next> button.
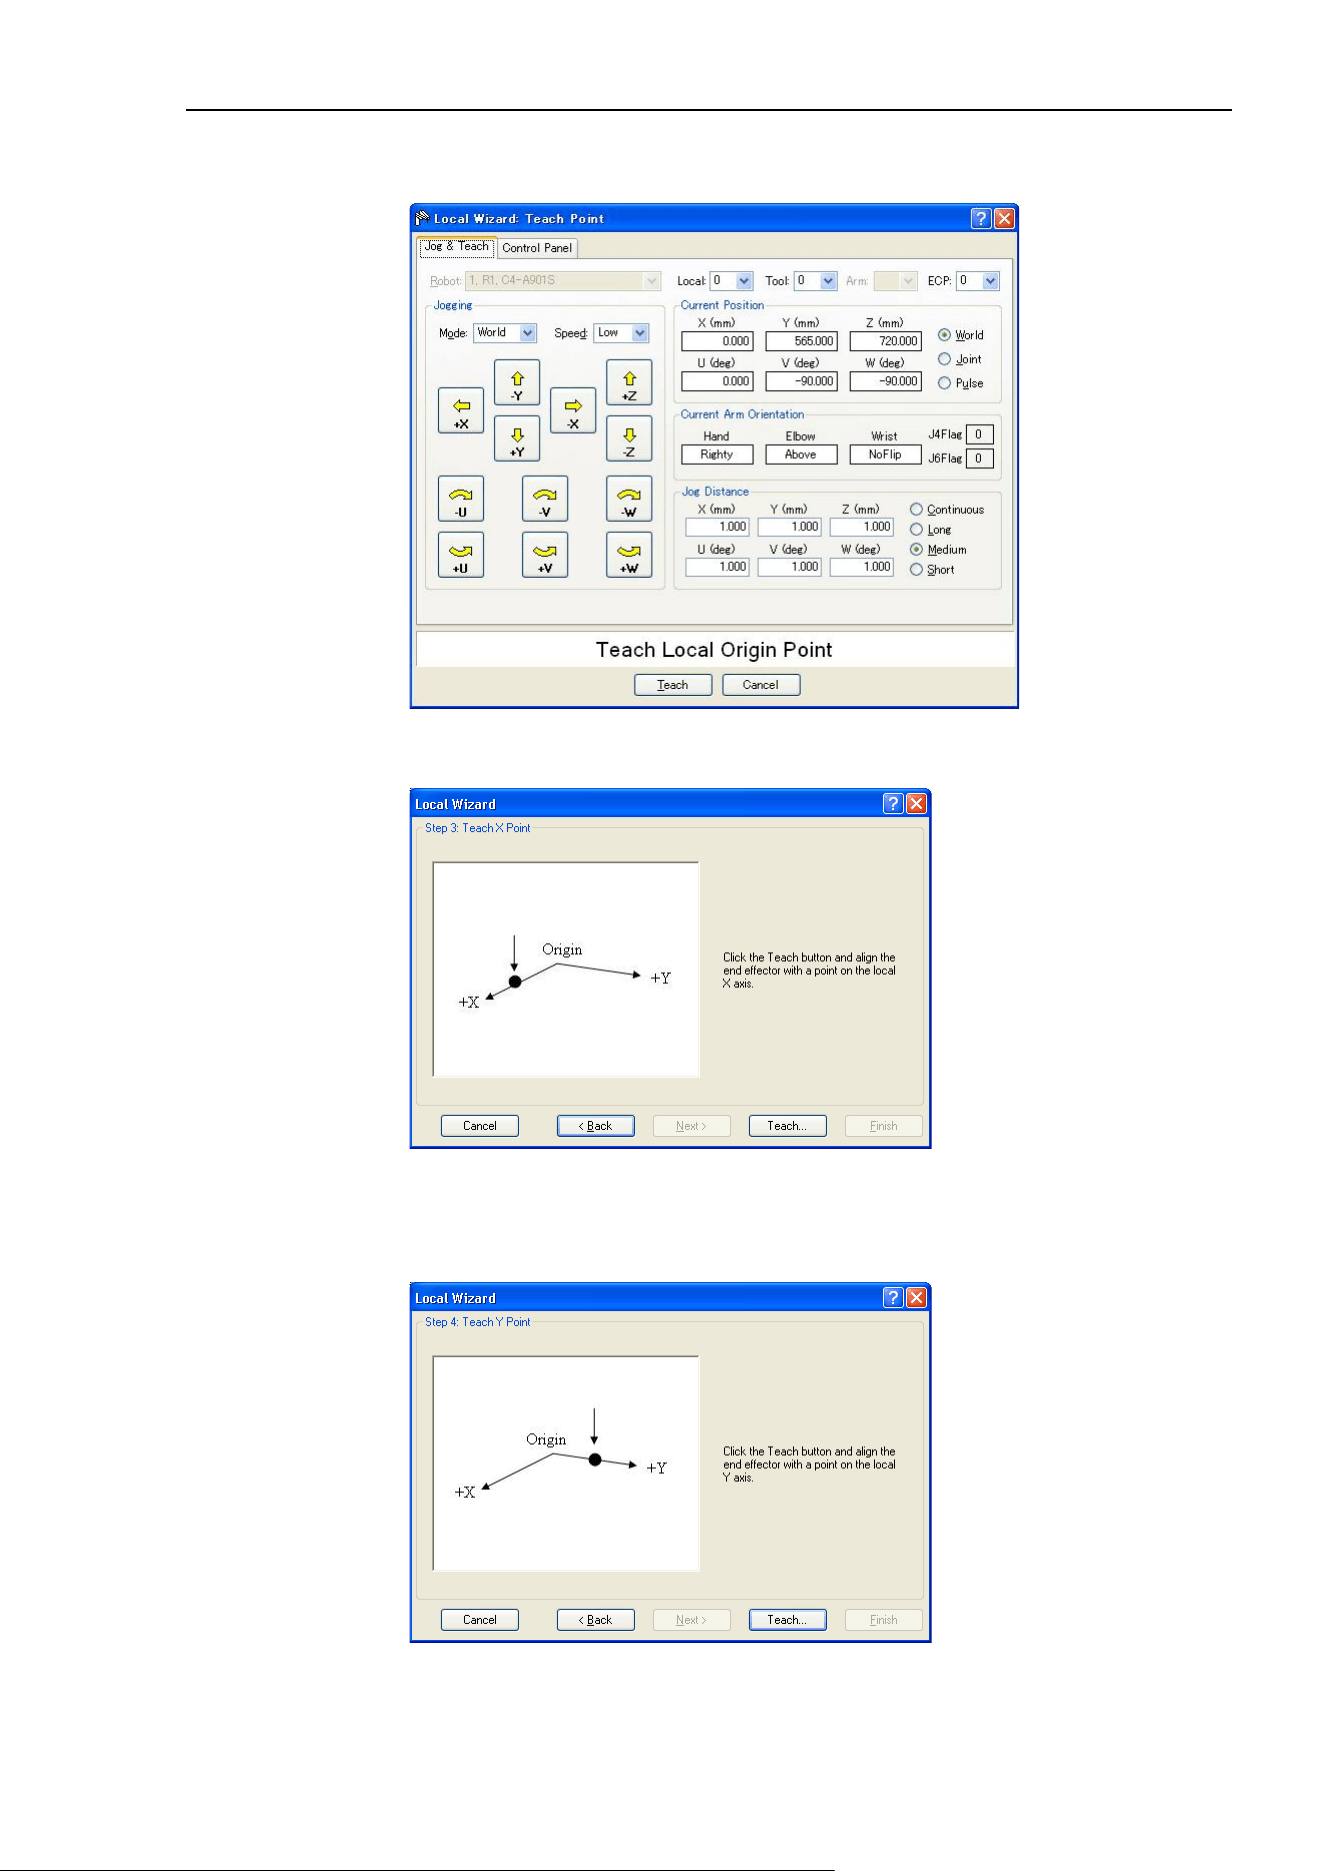
5. The EPSON RC+ 7.0 GUI
EPSON RC+ 7.0 (Ver.7.4) User's Guide Rev.6 99
5. We will now teach the local origin point. Click the <Teach> button to open the [Local
Wizard: Teach Point] dialog box.
6. Jog the robot until the end effector is aligned with the origin point. Then click the
<Teach> button. The next step will be displayed.
7. We will now teach a point on the local X axis. Click the <Teach> button and jog the
robot until the end effector is aligned with a point anywhere along the X axis of the
new coordinate system. Click the <Teach> button on the [Teach Point] dialog box to
continue.
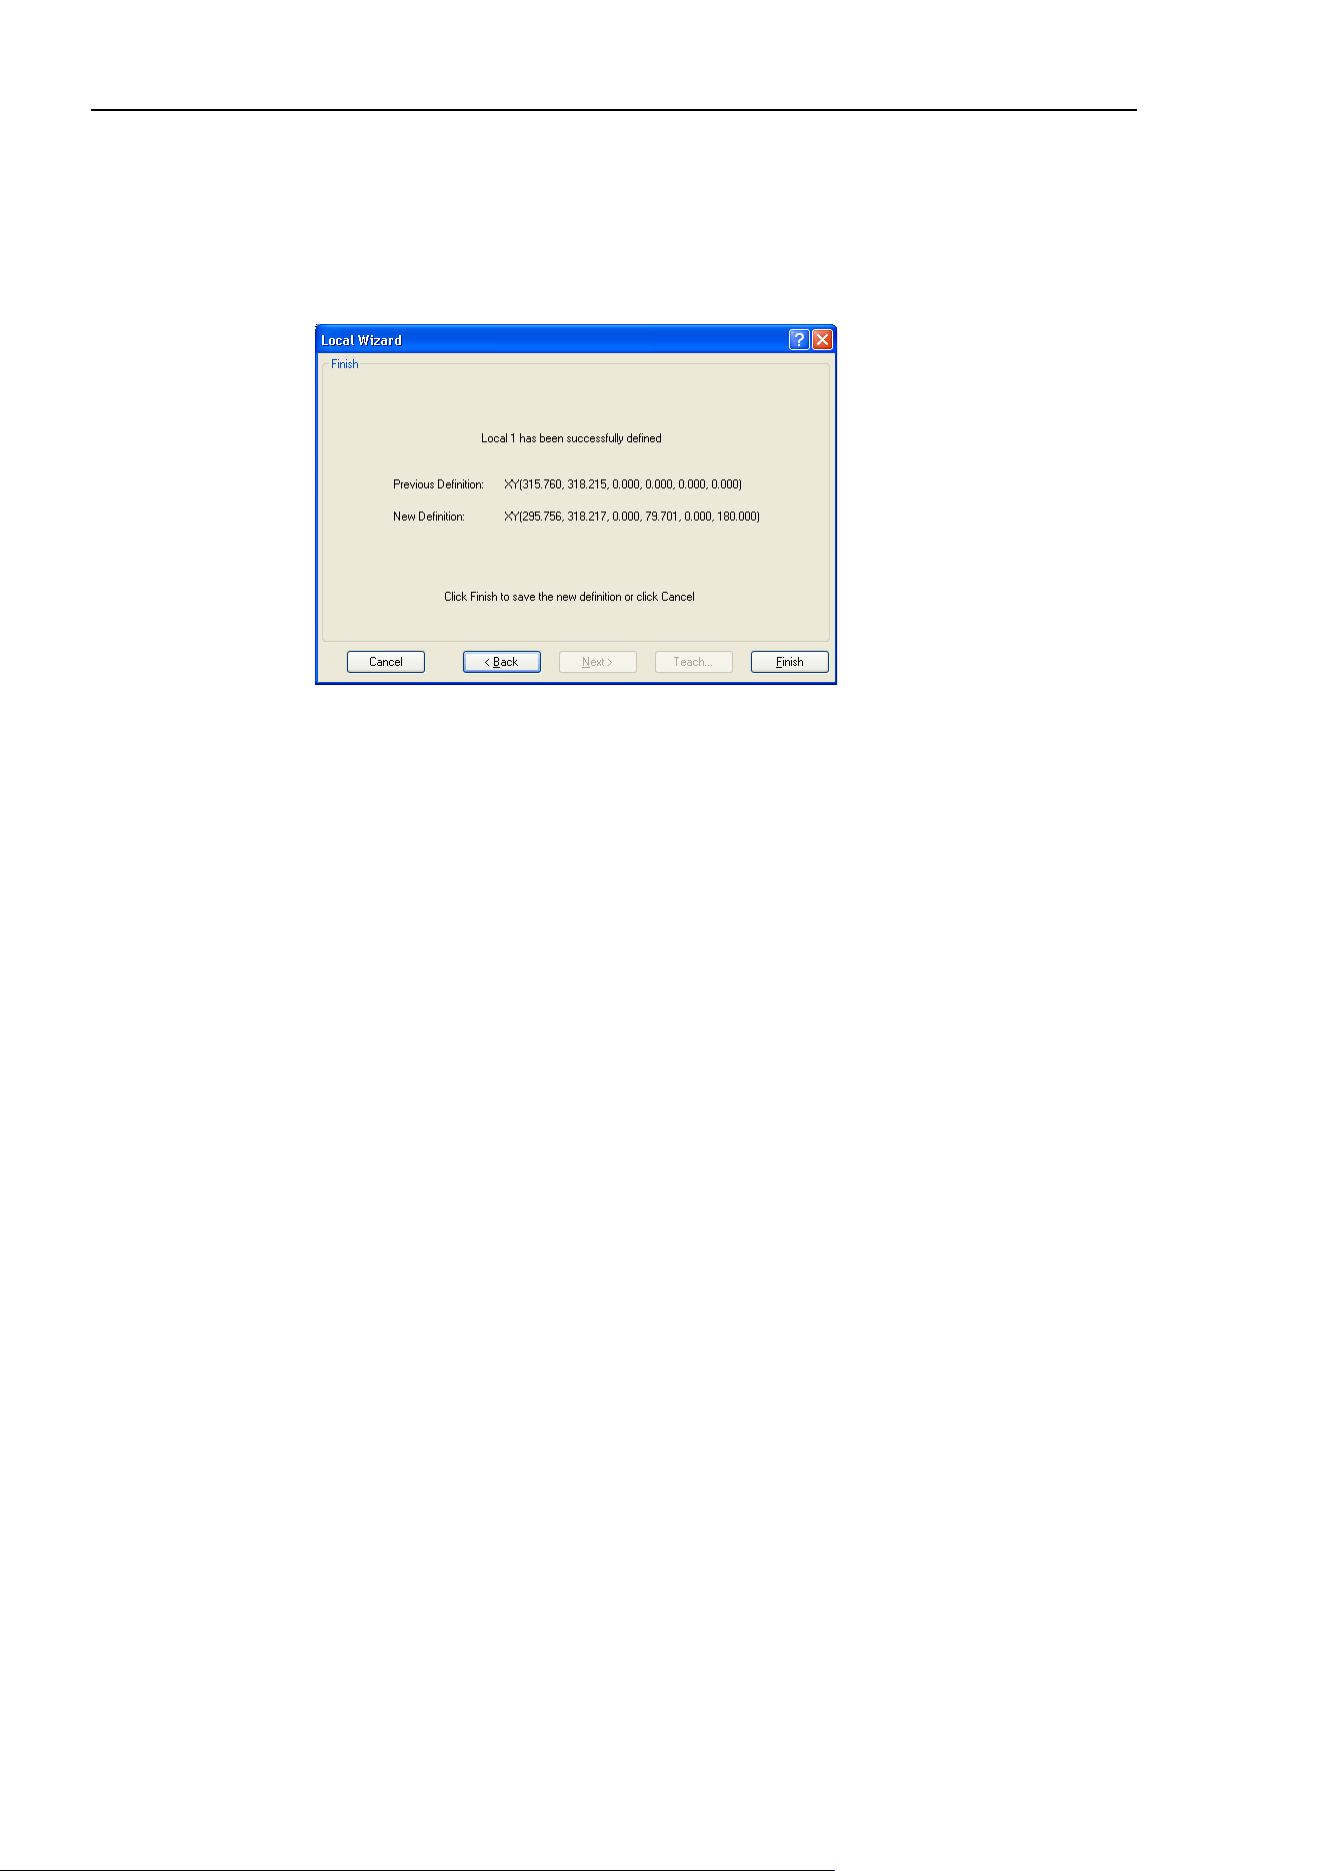
5. The EPSON RC+ 7.0 GUI
100 EPSON RC+ 7.0 (Ver.7.4) User's Guide Rev.6
8. We will now teach a point on the local Y axis. Click the <Teach> button and jog the
robot until the end effector is aligned with a point anywhere along the Y axis of the
new coordinate system. Click the <Teach> button on the [Teach Point] dialog box to
continue.
9. The new local definition is displayed as shown below. Click <Finish> to accept the
new definition.
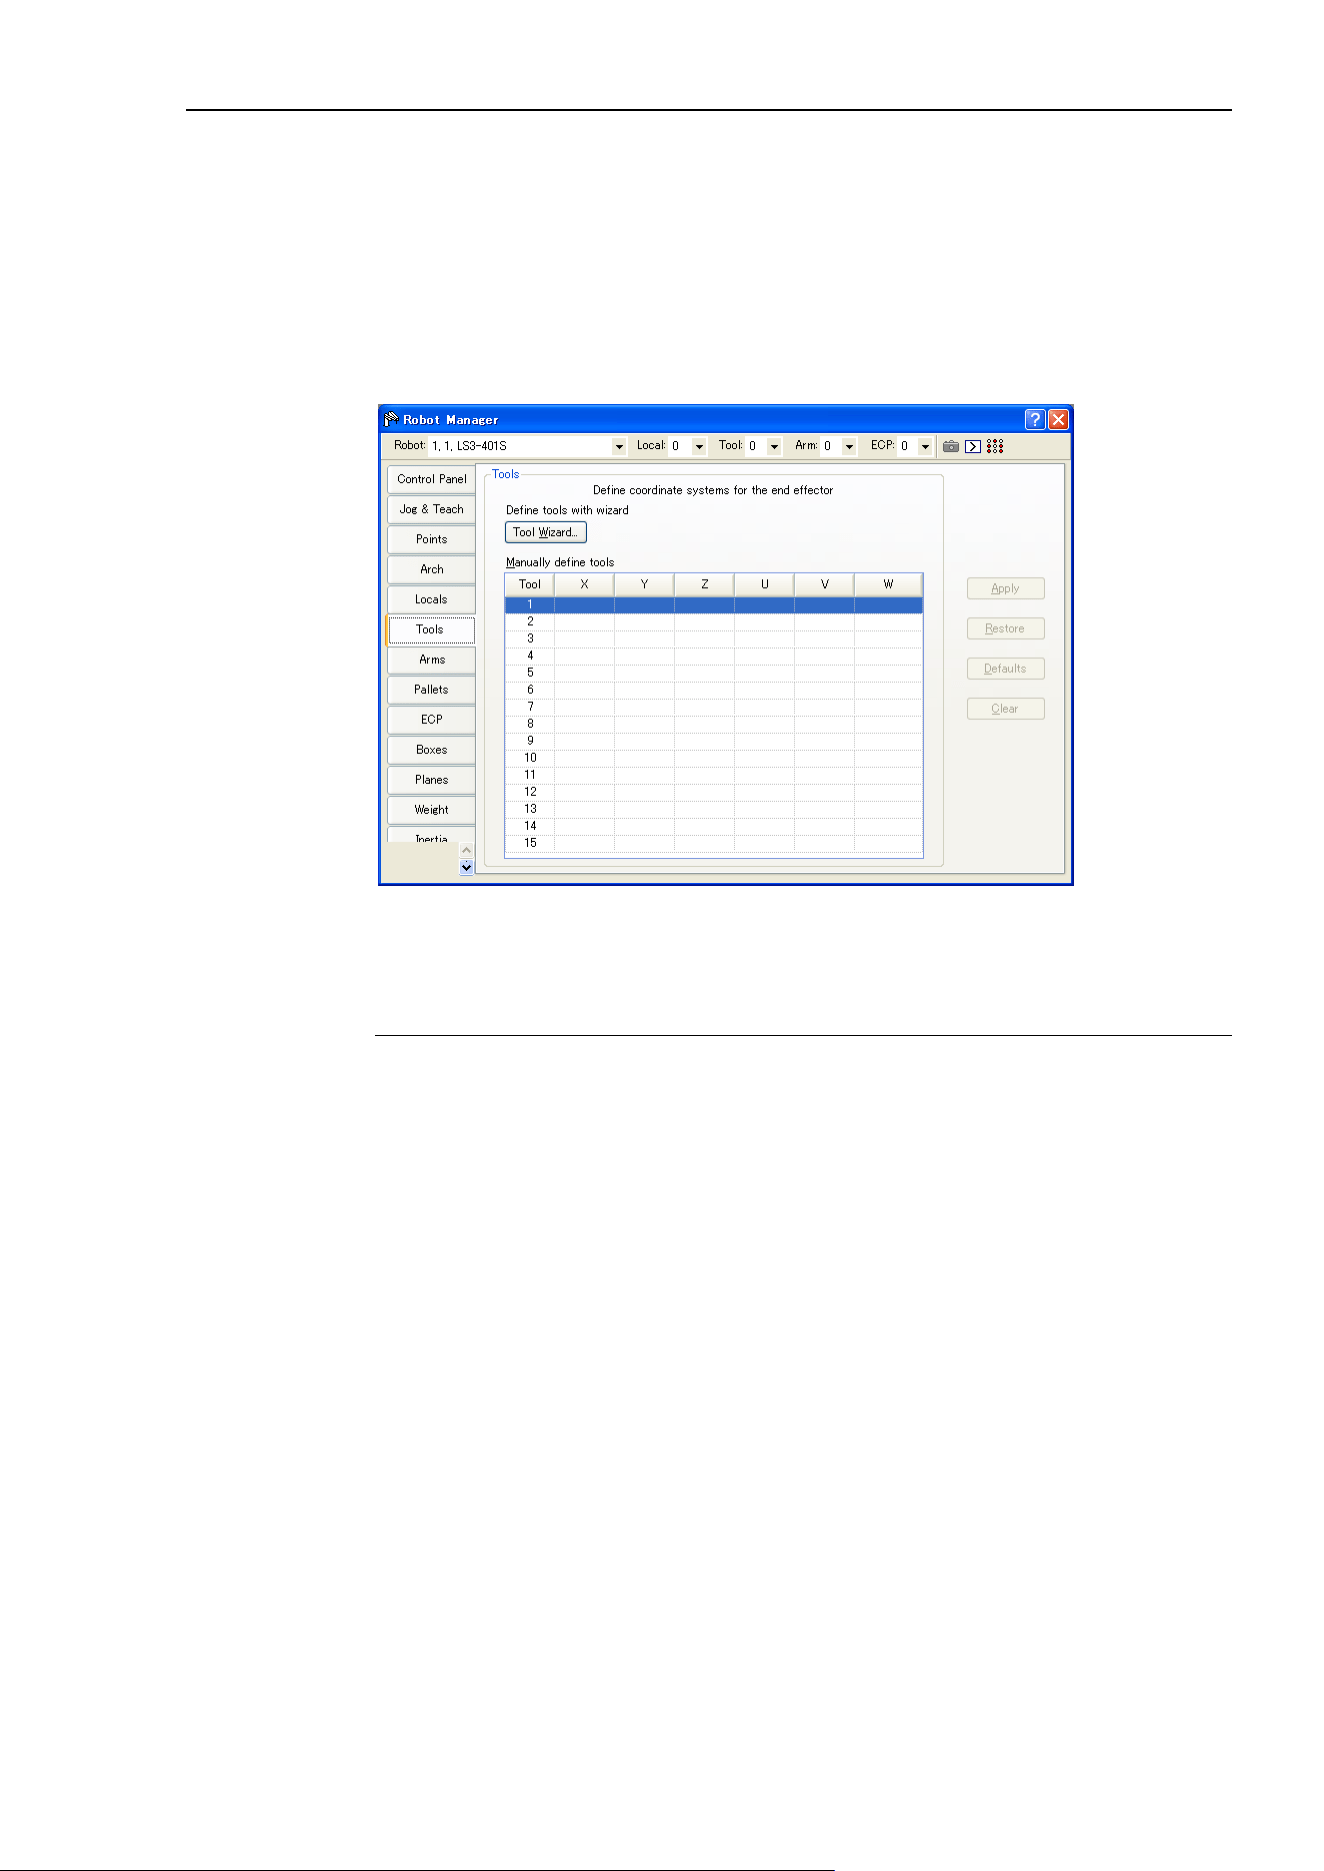
5. The EPSON RC+ 7.0 GUI
EPSON RC+ 7.0 (Ver.7.4) User's Guide Rev.6 101
[Tools]-[Robot Manager]-[Tools] Page
This page allows you to define tool settings for a robot. When the tab is selected, the
current values are displayed.
A grid is used to display all the values for all 15 tools you can define.
When a tool is undefined, then all fields for that tool will be blank. When you enter a
value in any of the fields for an undefined tool, then the remaining fields will be set to zero
and the tool will be defined when you click the <Apply> button.
For more information on tools, see the SPEL
+
Language Reference: TLSet Statement.
Navigating the grid
Use the <TAB> key to move to the next field. Use the arrow keys or the mouse to move
to any field.
Item Description
Robot
Select a robot.
Tool Wizard
This button starts the Tool Wizard. Follow the instructions for each step of
the wizard to define a tool.
See details in the next section.
X
The X coordinate of the tool.
Y
The Y coordinate of the tool.
Z
Z offset of tool.
U
Rotation angle of the tool about the Z axis (roll).
V
Rotation angle of the tool about the Y axis (pitch).
W
Rotation angle of the tool about the X axis (yaw).
Apply
Sets the current values.
Restore
Reverts back to the previous values
Clear
Clears all values for the selected tool.
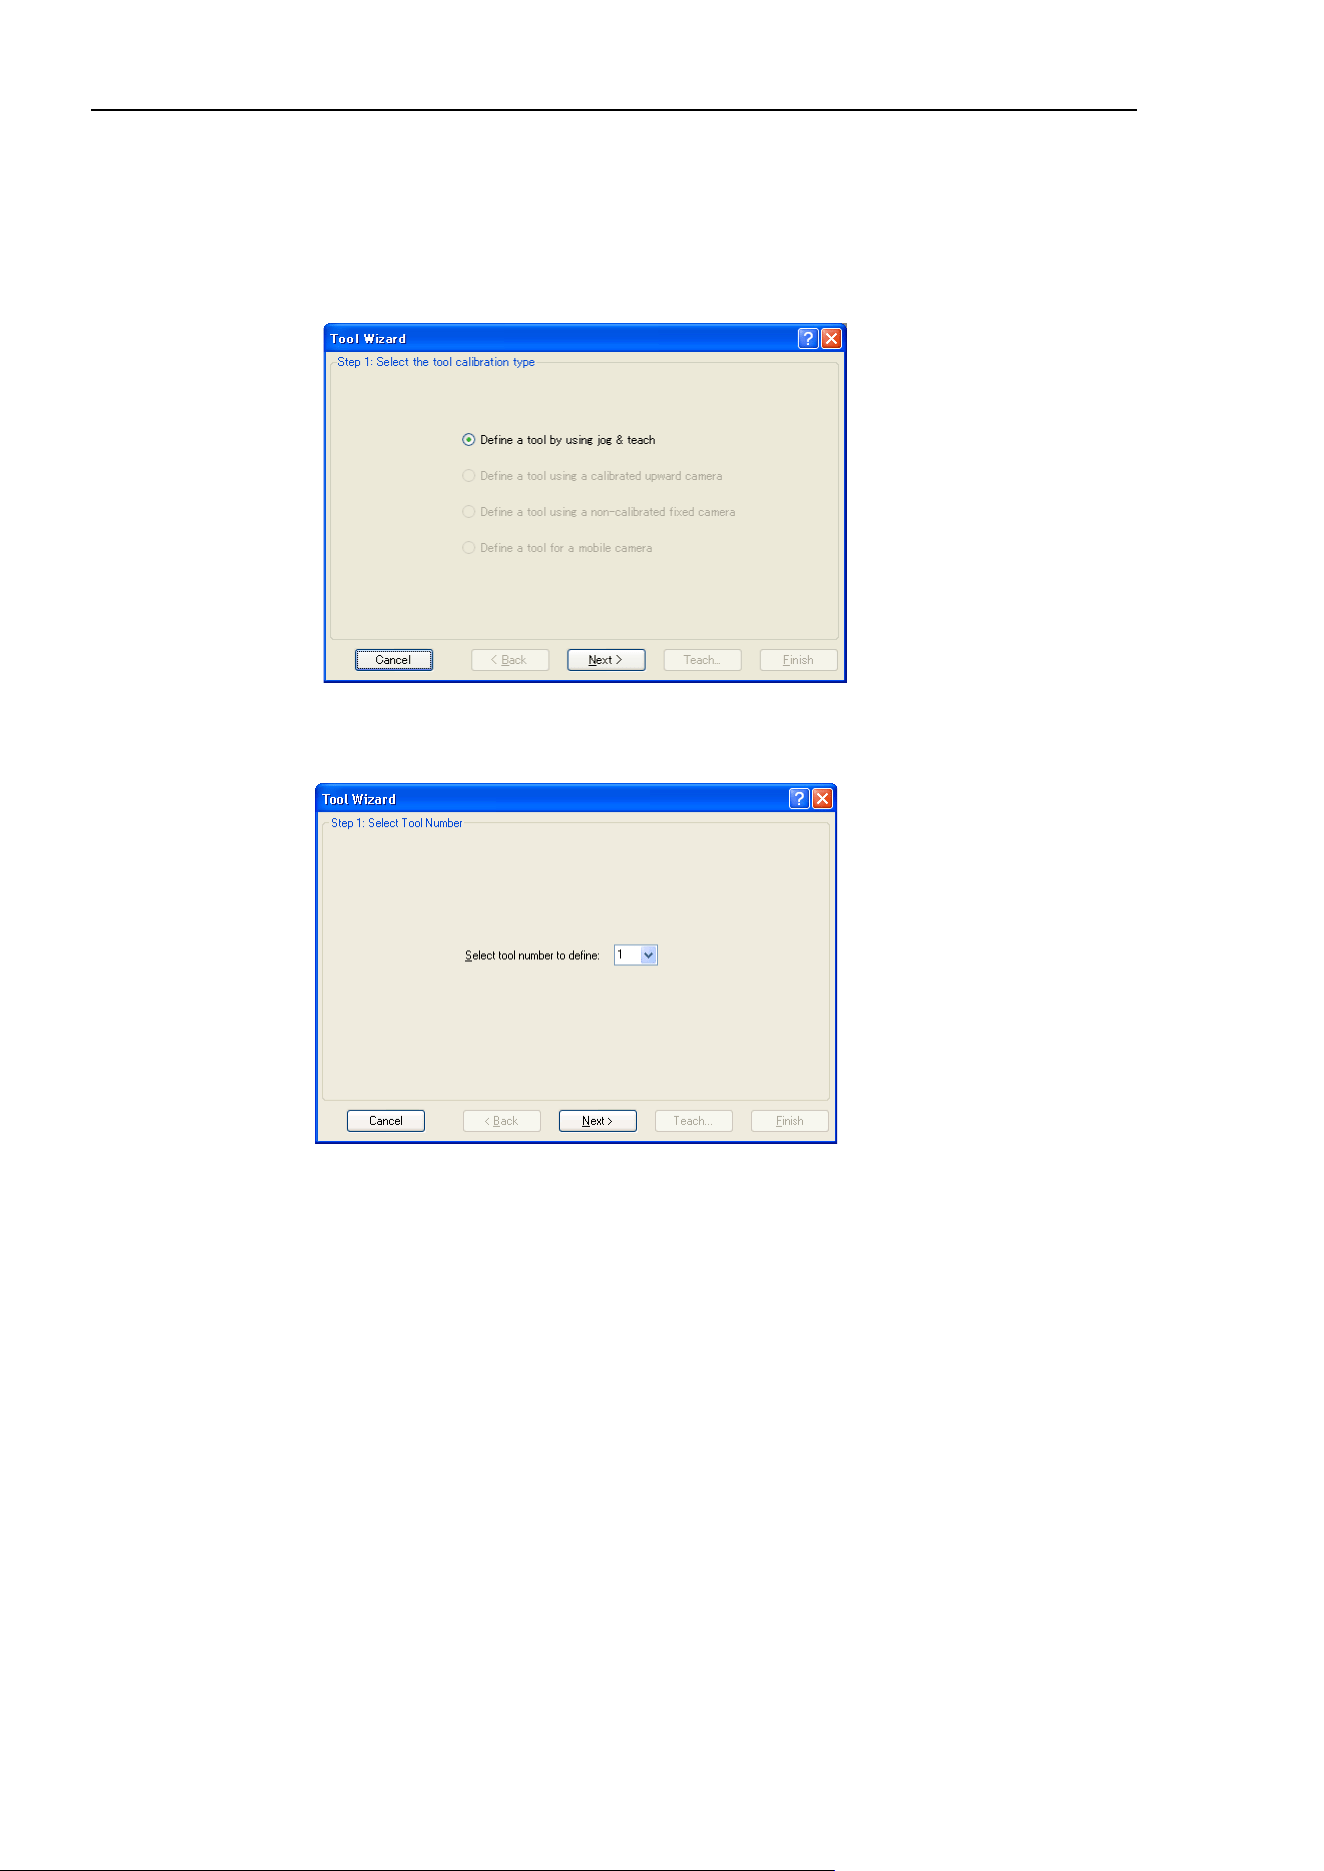
5. The EPSON RC+ 7.0 GUI
102 EPSON RC+ 7.0 (Ver.7.4) User's Guide Rev.6
Using the Tool Wizard
For SCARA Robots
1. Select [Robot Manager]-[Tools] tab to show the [Tools] page.
2. Click the <Tool Wizard> button. You will see the dialog box shown below.
Select the tool number to define and click the <Next> button.
3. Click the <Next> button to proceed with the Tool setting using the Jog & Teach.
For details of the Tool setting, refer to 7. Vision Calibration in the Vision Guide 7.0
Software manual.
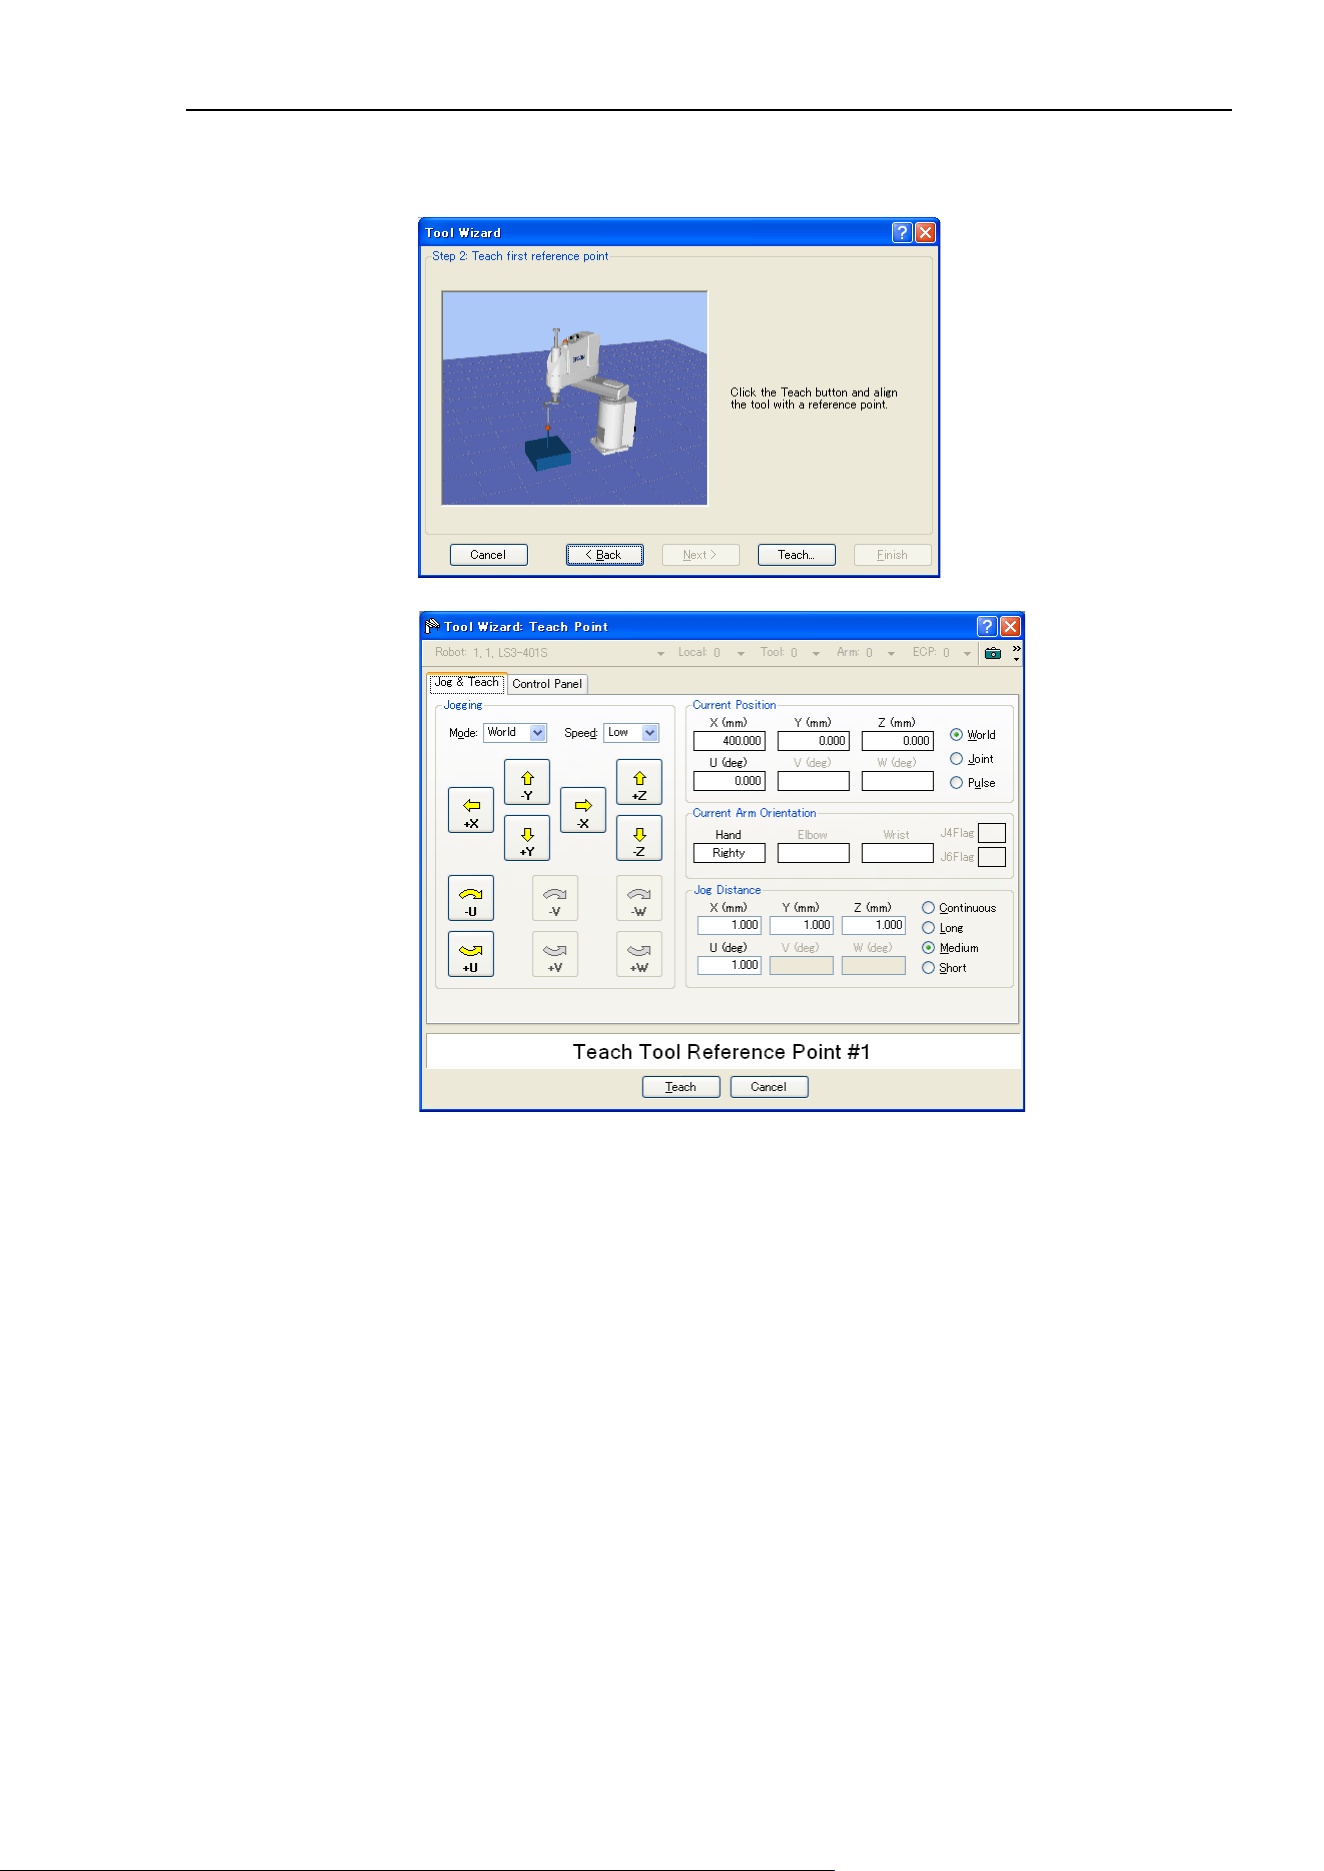
5. The EPSON RC+ 7.0 GUI
EPSON RC+ 7.0 (Ver.7.4) User's Guide Rev.6 103
4. Jog the robot until the tool is aligned with the reference point. Then click the
<Teach> button to show the [Jog & Teach] dialog box. Jog the robot so that the tool
is aligned with the reference point.
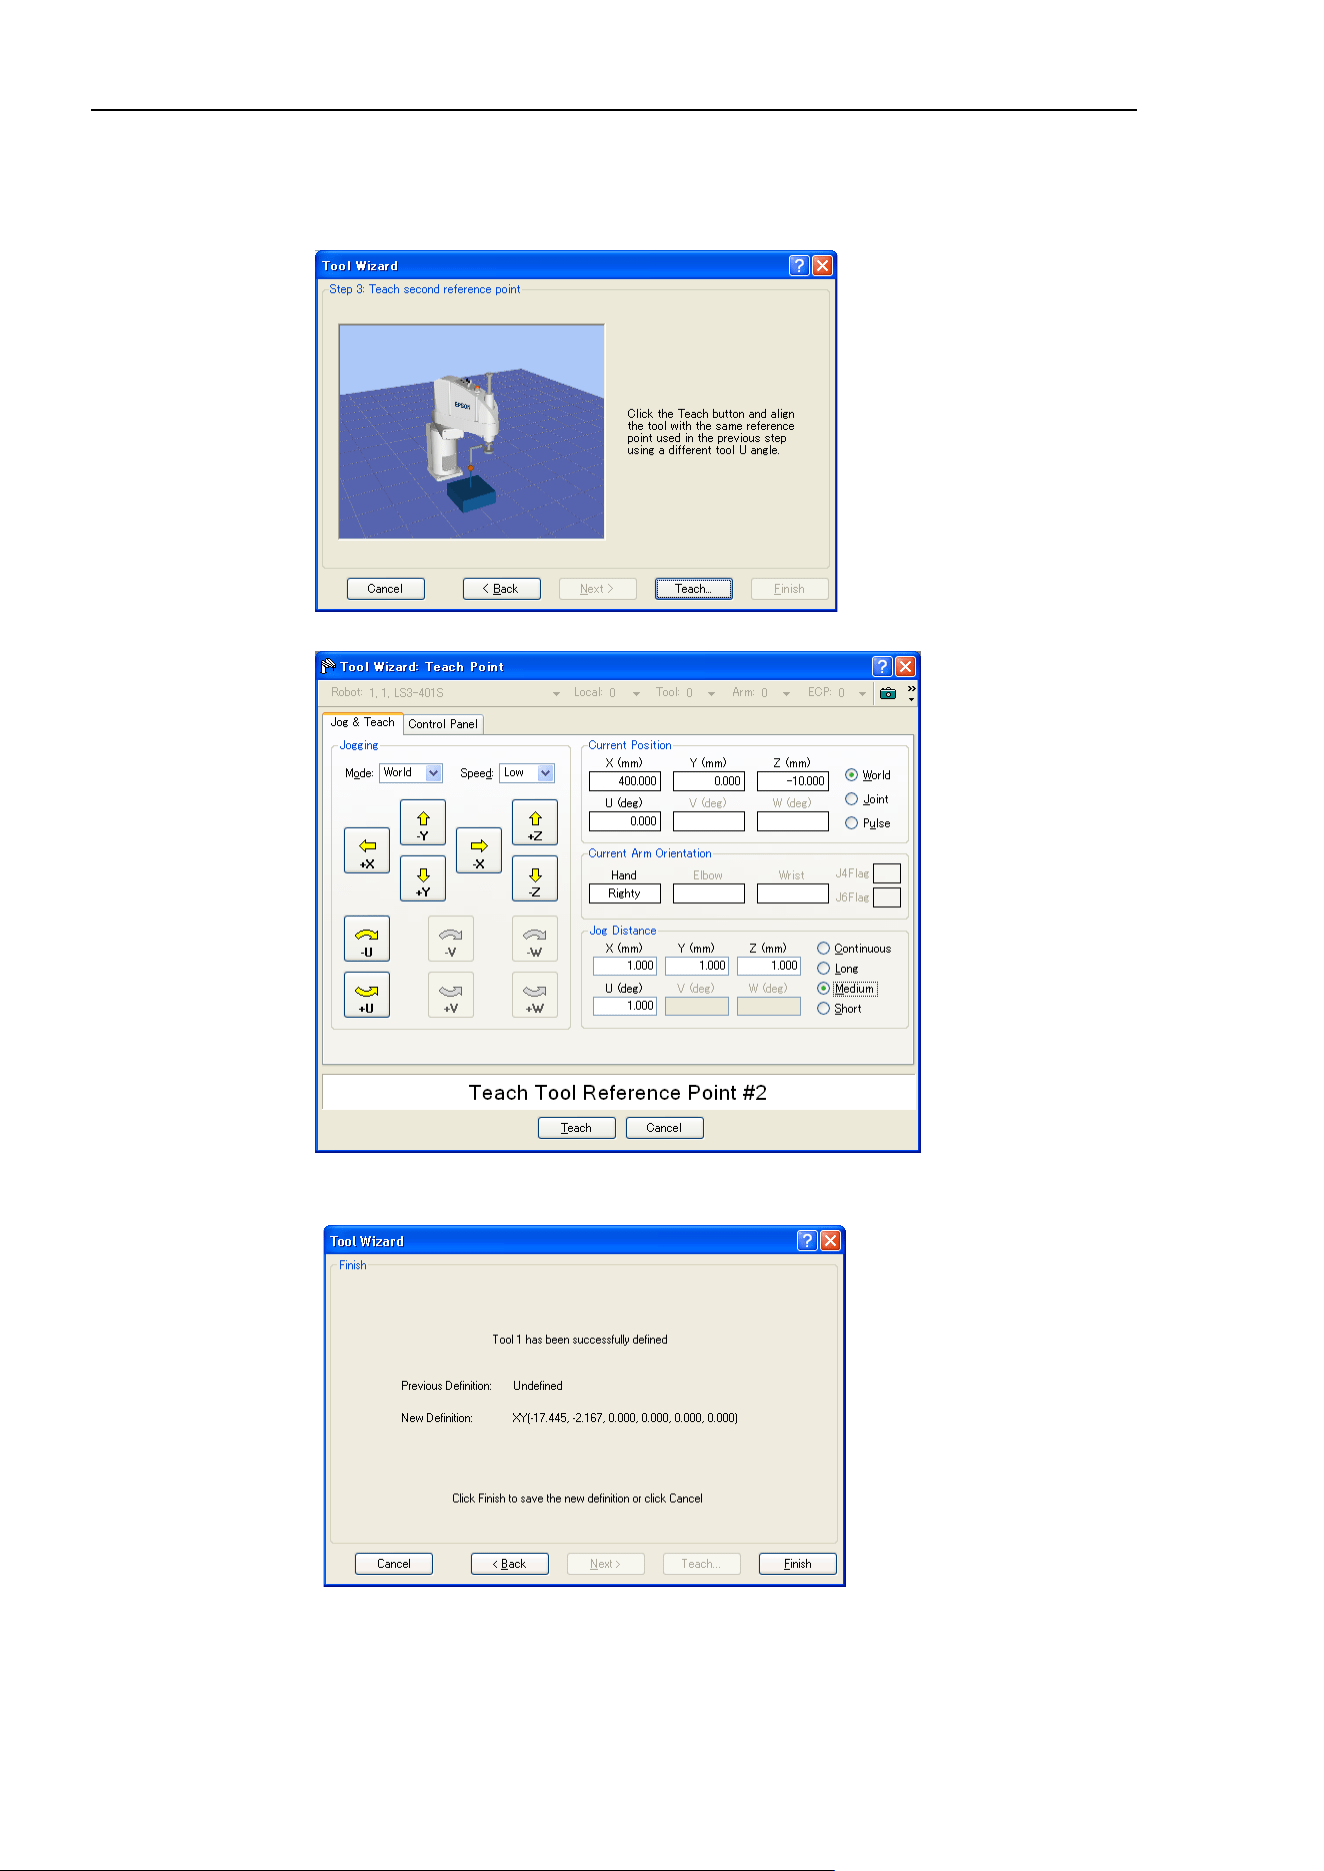
5. The EPSON RC+ 7.0 GUI
104 EPSON RC+ 7.0 (Ver.7.4) User's Guide Rev.6
5. Click the <Teach> button to display the following dialog box. After rotating the U
axis as shown below to change the angle, jog the X and Y axes until the tool is aligned
with the reference point. Click the <Teach> button to show the [Jog & Teach] dialog
box. Match the tool and the reference point.
6. Click the <Teach> button. The new tool definition is displayed as shown below.
Click <Finish> to apply the new definition.
The robot can be calibrated with a different posture from the wizard.
NOTE
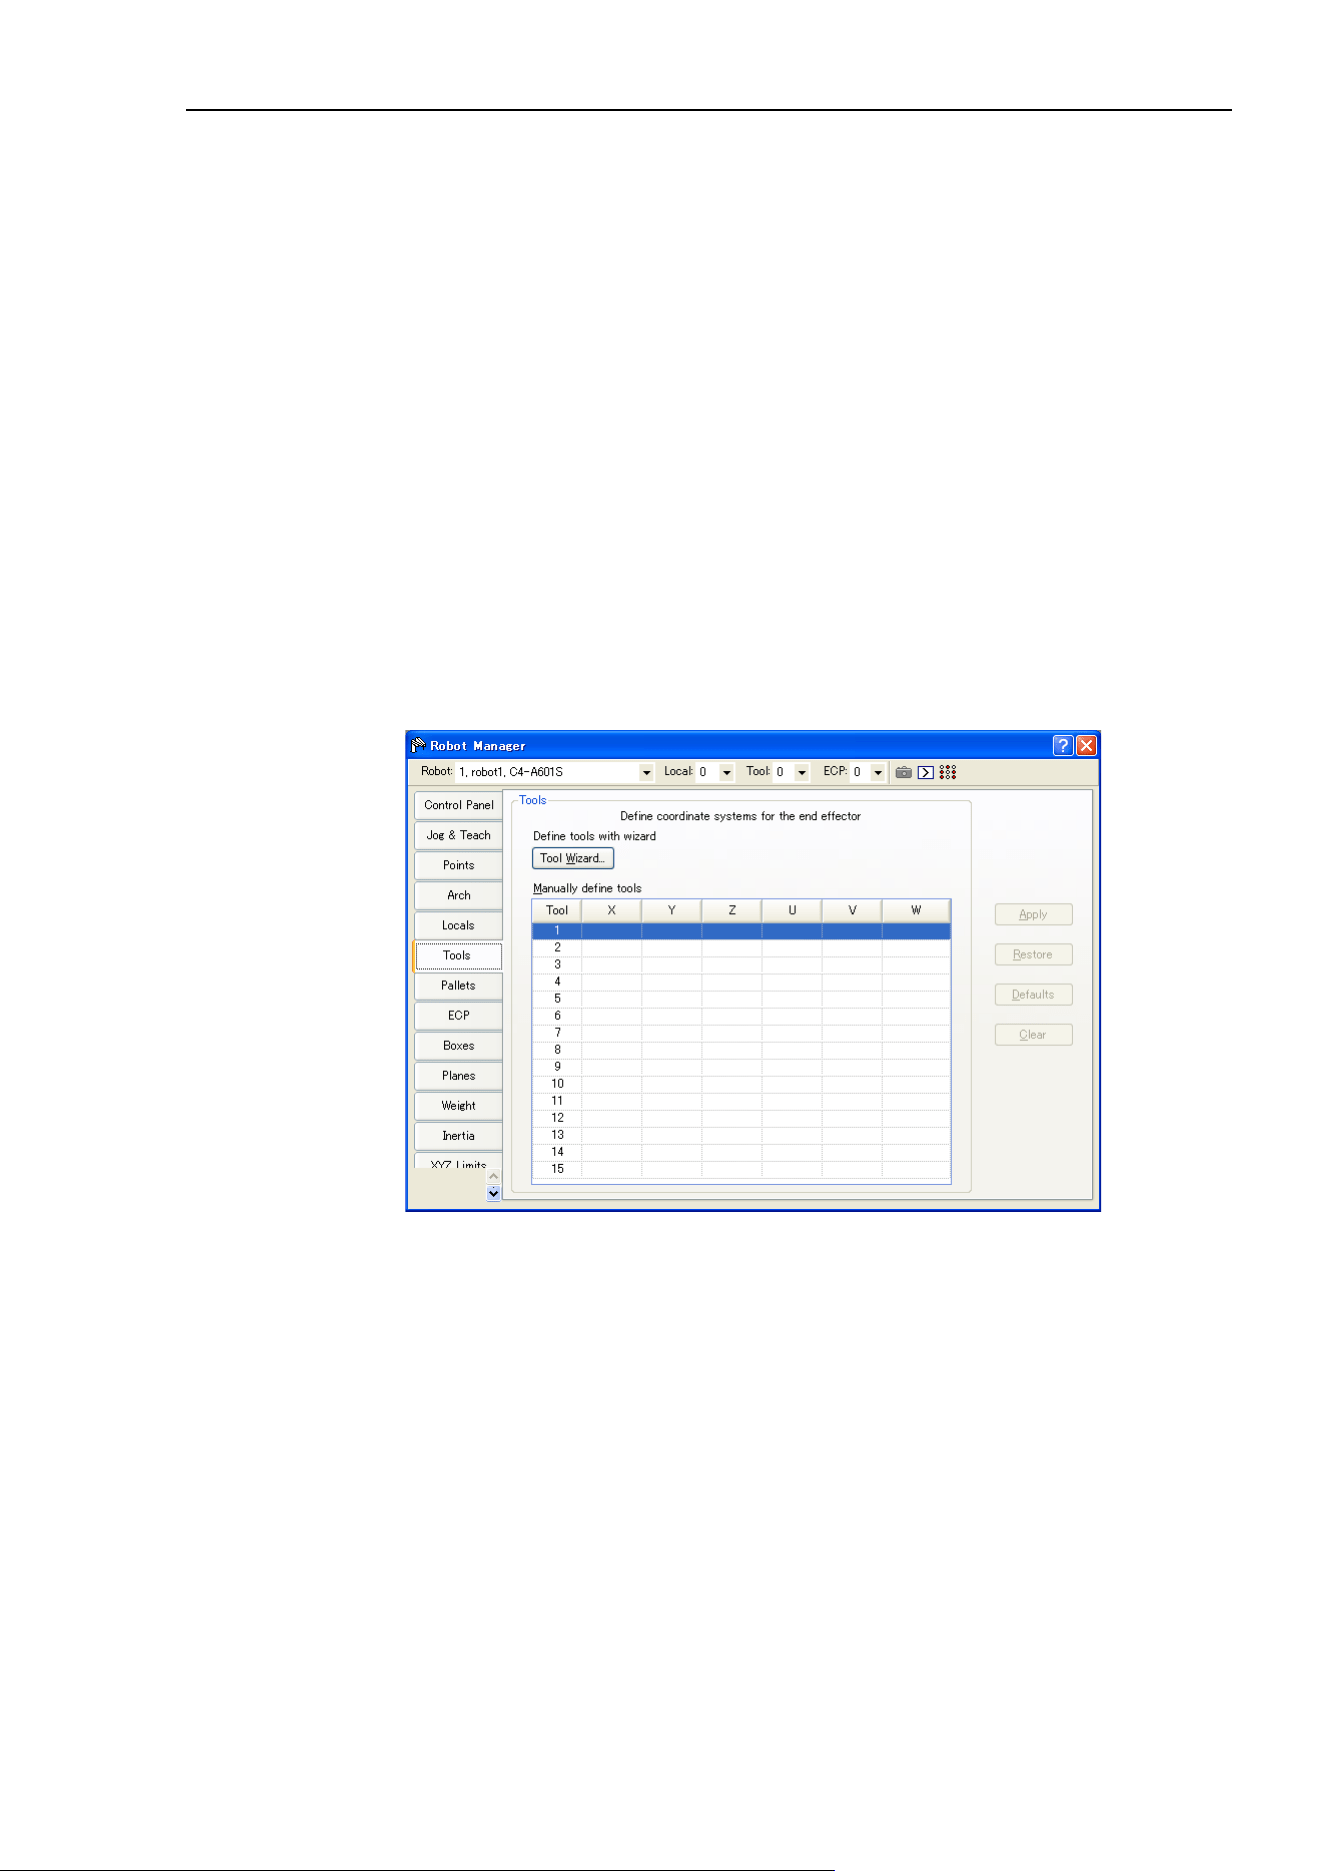
5. The EPSON RC+ 7.0 GUI
EPSON RC+ 7.0 (Ver.7.4) User's Guide Rev.6 105
For 6-axis robots (including N series)
There are two calibration methods for 6-axis robots. 3D Tool moves the robot in X, Y, Z,
U, V, and W directions to calibrate, while 2D Tool moves the robot in X, Y, Z, and U
directions. The robot can be calibrated with 2D Tool only when the robot posture is “V=0
degree, W=0 degree”, or “V=0 degree, W=180 degree (-180 degree).
When comparing 2D Tool and 3D Tool, 2D Tool has following advantages and
disadvantages. Choose the suitable method according to the intended use.
Advantages:
- Shorter calibration time than 3D Tool
- Since V and W axes are not moved, peripherals and cables are less likely to
interfere the calibration
Disadvantages:
- Calibration accuracy may be worse than 3D Tool
- The Z-axis direction offset is not performed automatically (*1)
*1: If the Z-axis direction offset is required, enter the offset value in the following dialog
box after calibration.
NOTE
NOTE
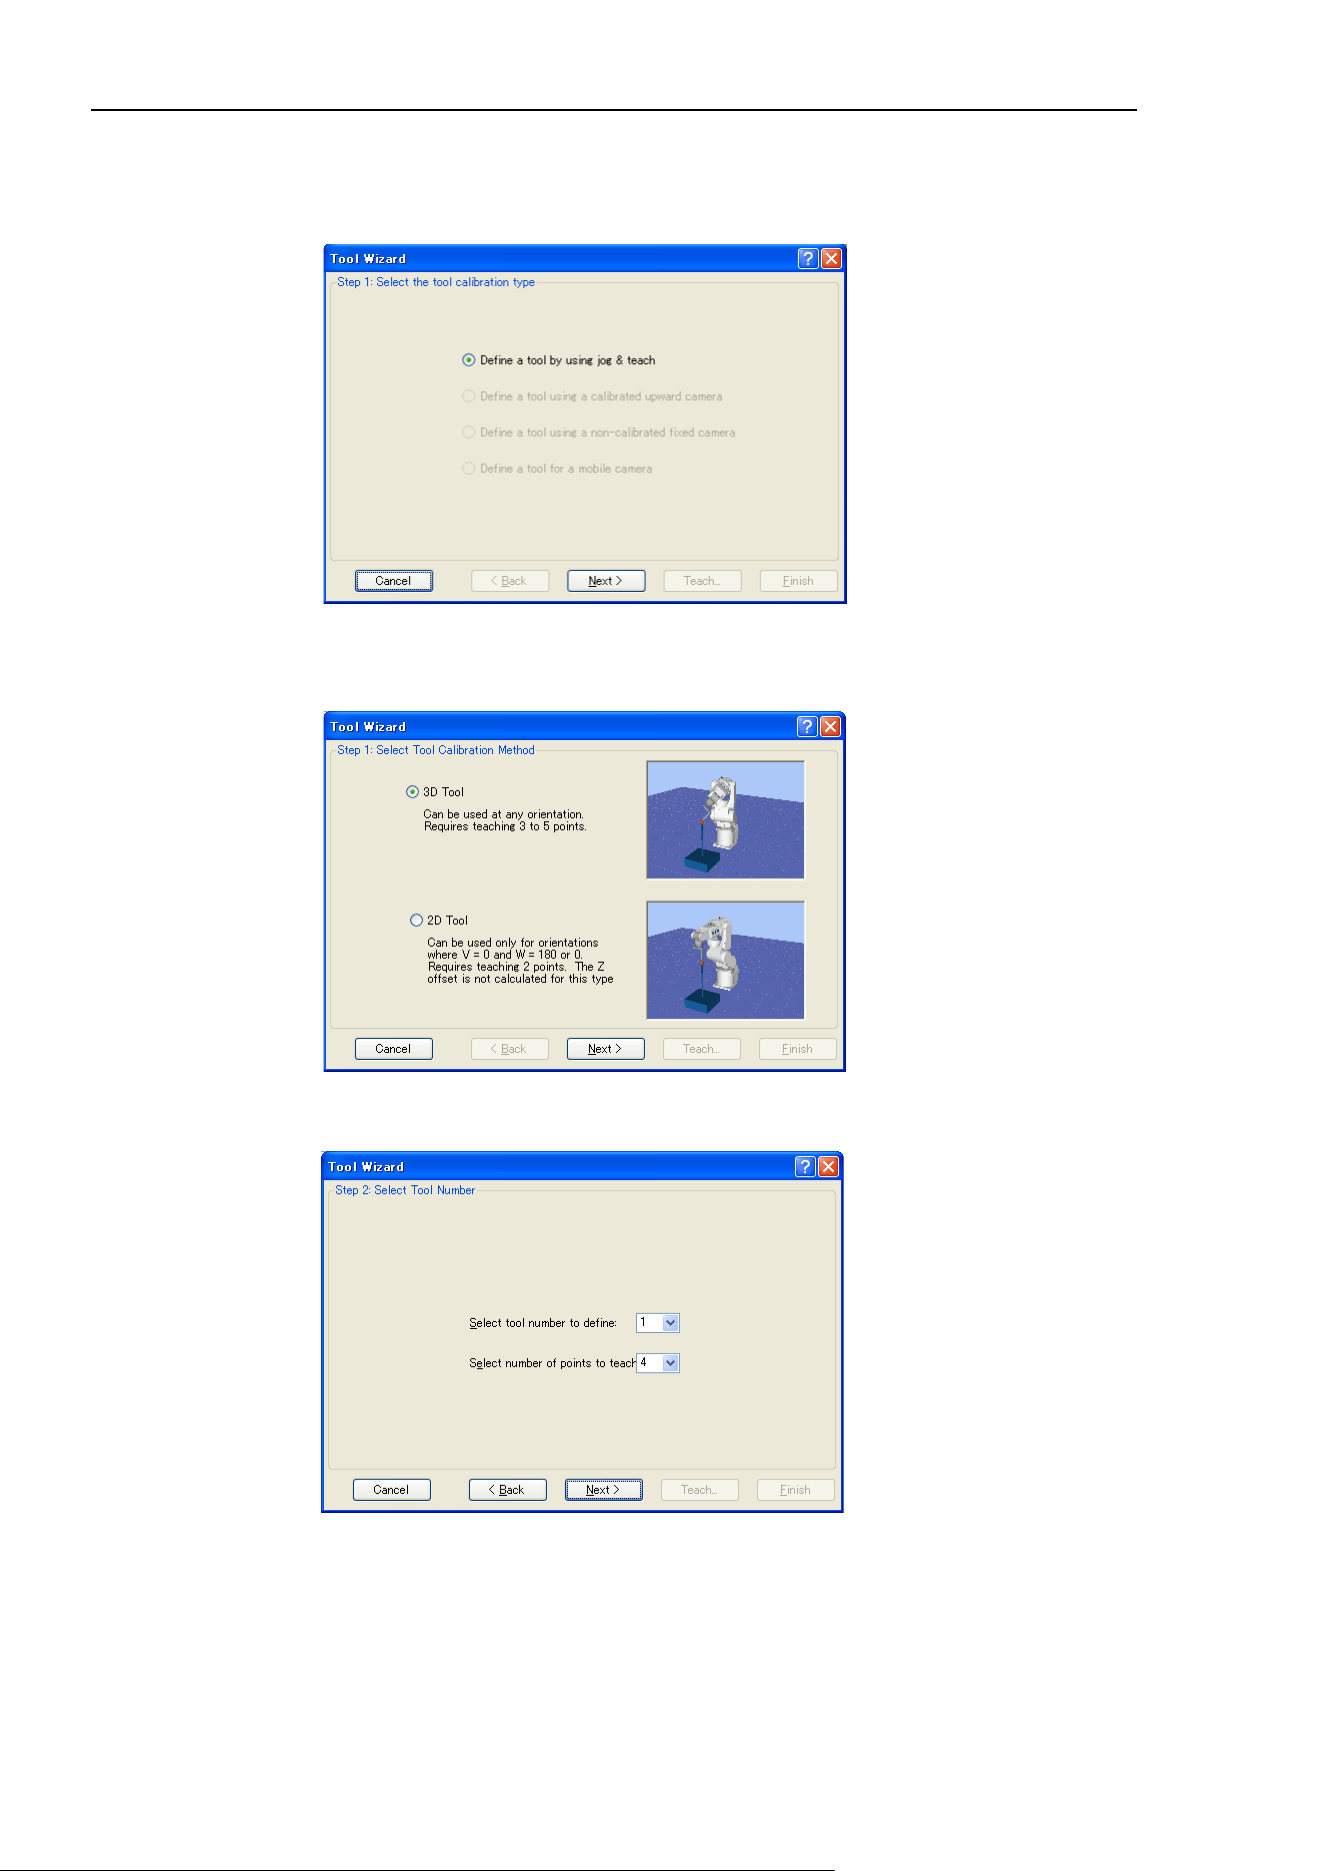
5. The EPSON RC+ 7.0 GUI
106 EPSON RC+ 7.0 (Ver.7.4) User's Guide Rev.6
1. Select [Robot Manager]-[Tools] tab to show the [Tools] page.
2. Click the <Tool Wizard> button. You will see the dialog box shown below.
Select either 3D Tool or 2D Tool.
3. Click the <Next> button to proceed with the Tool setting using the Jog & Teach.
For details of the Tool setting, refer to 7. Vision Calibration in the Vision Guide 7.0
Software manual.
4. If using 3D Tool, select the tool number to define and the number of points to teach,
and click the <Next> button.
The “number of points to teach” is the amount of times to teach the same point
(reference point) in the robot motion range while changing only the tool direction. The
number to teach should be at least three. Although it depends on the teaching accuracy
of each point, more accurate tool setting can be set by increasing the number.
To increase the tool setting accuracy, set the angle of approximately 10 degrees or
more for J5 pulse in order to avoid singularity near 0 degree when teaching the
reference point.
NOTE
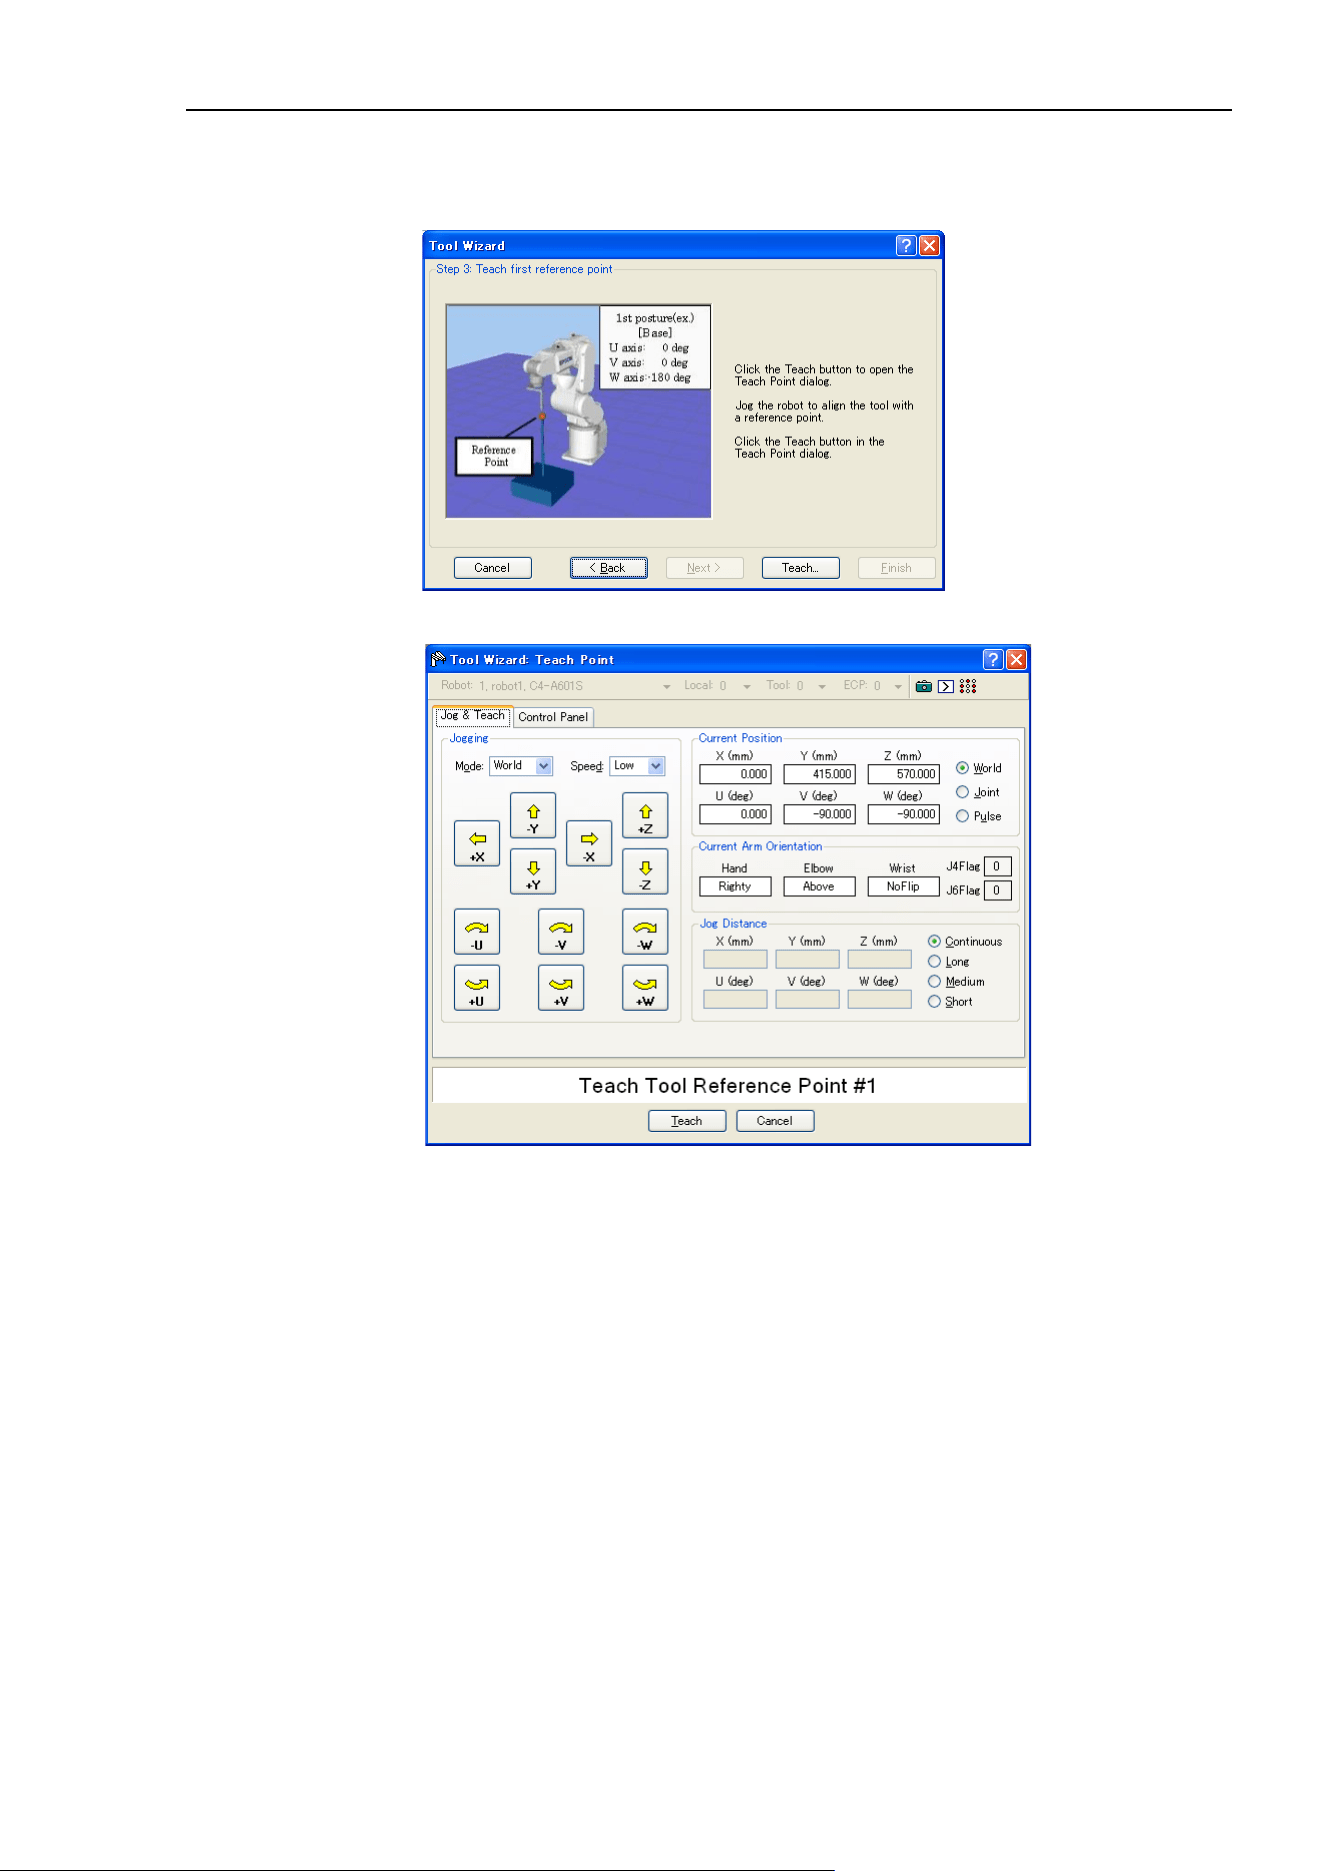
5. The EPSON RC+ 7.0 GUI
EPSON RC+ 7.0 (Ver.7.4) User's Guide Rev.6 107
5. Jog the robot until the tool is aligned with the reference point. Then click the
<Teach> button to show the [Jog & Teach] dialog box. Match the tool and the
reference point.
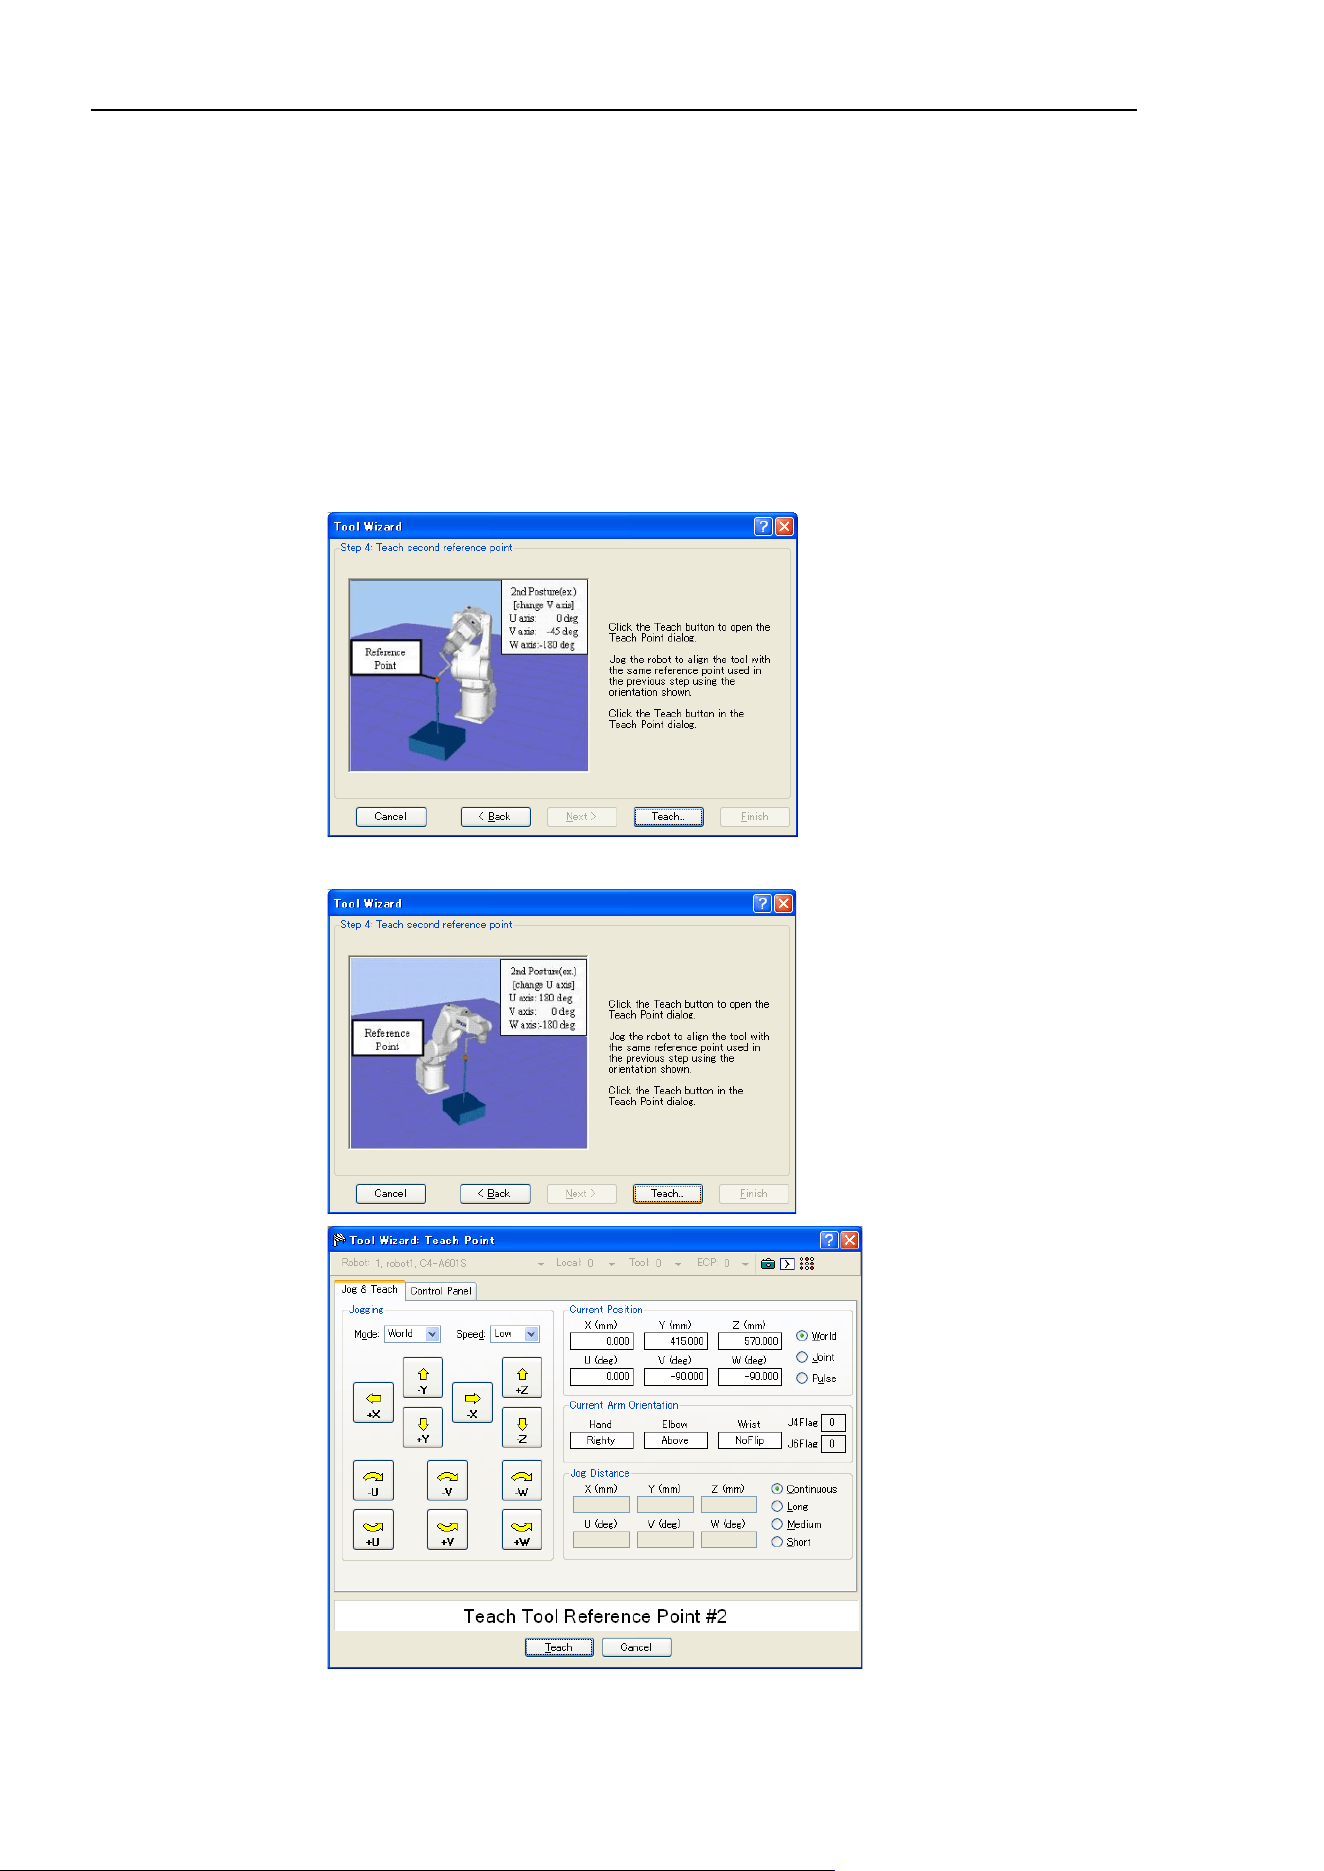
5. The EPSON RC+ 7.0 GUI
108 EPSON RC+ 7.0 (Ver.7.4) User's Guide Rev.6
6. Click the <Teach> button to show the following dialog box.
If using 3D Tool, rotate the U, V, and W axes as shown below, and then jog the X, Y,
and Z axes until the tool is aligned with the reference point. Repeat teaching until the
robot can reach the reference point from other tool orientation as often as you
specified in (3).
If using 2D Tool, rotate only the U axis as shown below, and then jog the X, Y, and Z
axes until the tool is aligned with the reference point.
Clicking the <Teach> button displays the [Jog & Teach] dialog box for both 3D Tool
and 2D Tool. Match the tool and the reference point.
When moving the U, V, and W axes, move the arm upward in order to avoid collision
of the tool and the reference point.
For 3D Tool:
For 2D Tool:
NOTE
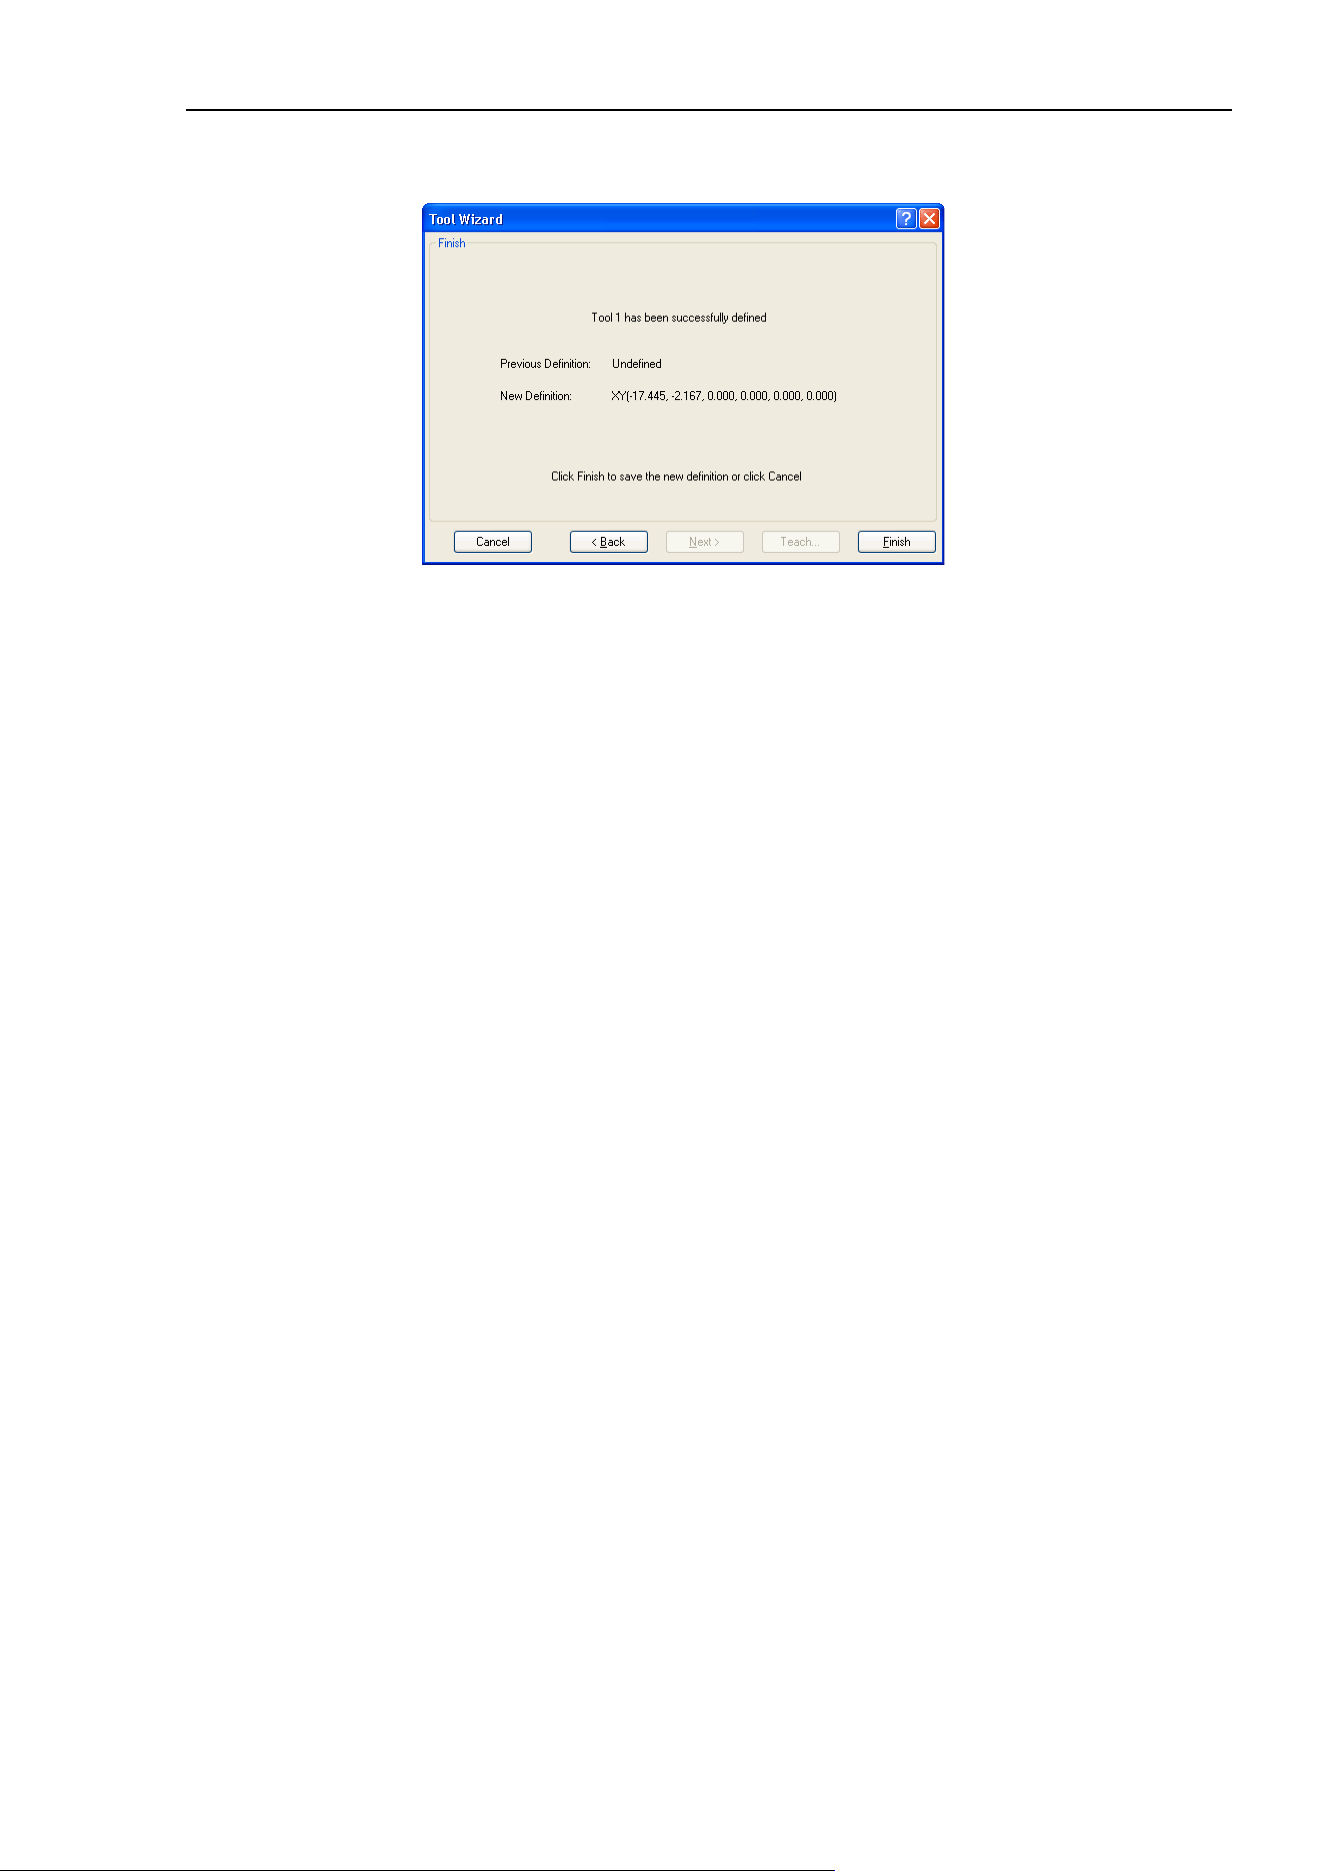
5. The EPSON RC+ 7.0 GUI
EPSON RC+ 7.0 (Ver.7.4) User's Guide Rev.6 109
7. The new tool definition is displayed as shown below. Click <Finish> to apply the
new definition.
Although it is recommended to calibrate the robot with the same posture as the wizard, it
is possible to calibrate the robot with the different robot posture from wizard.
NOTE
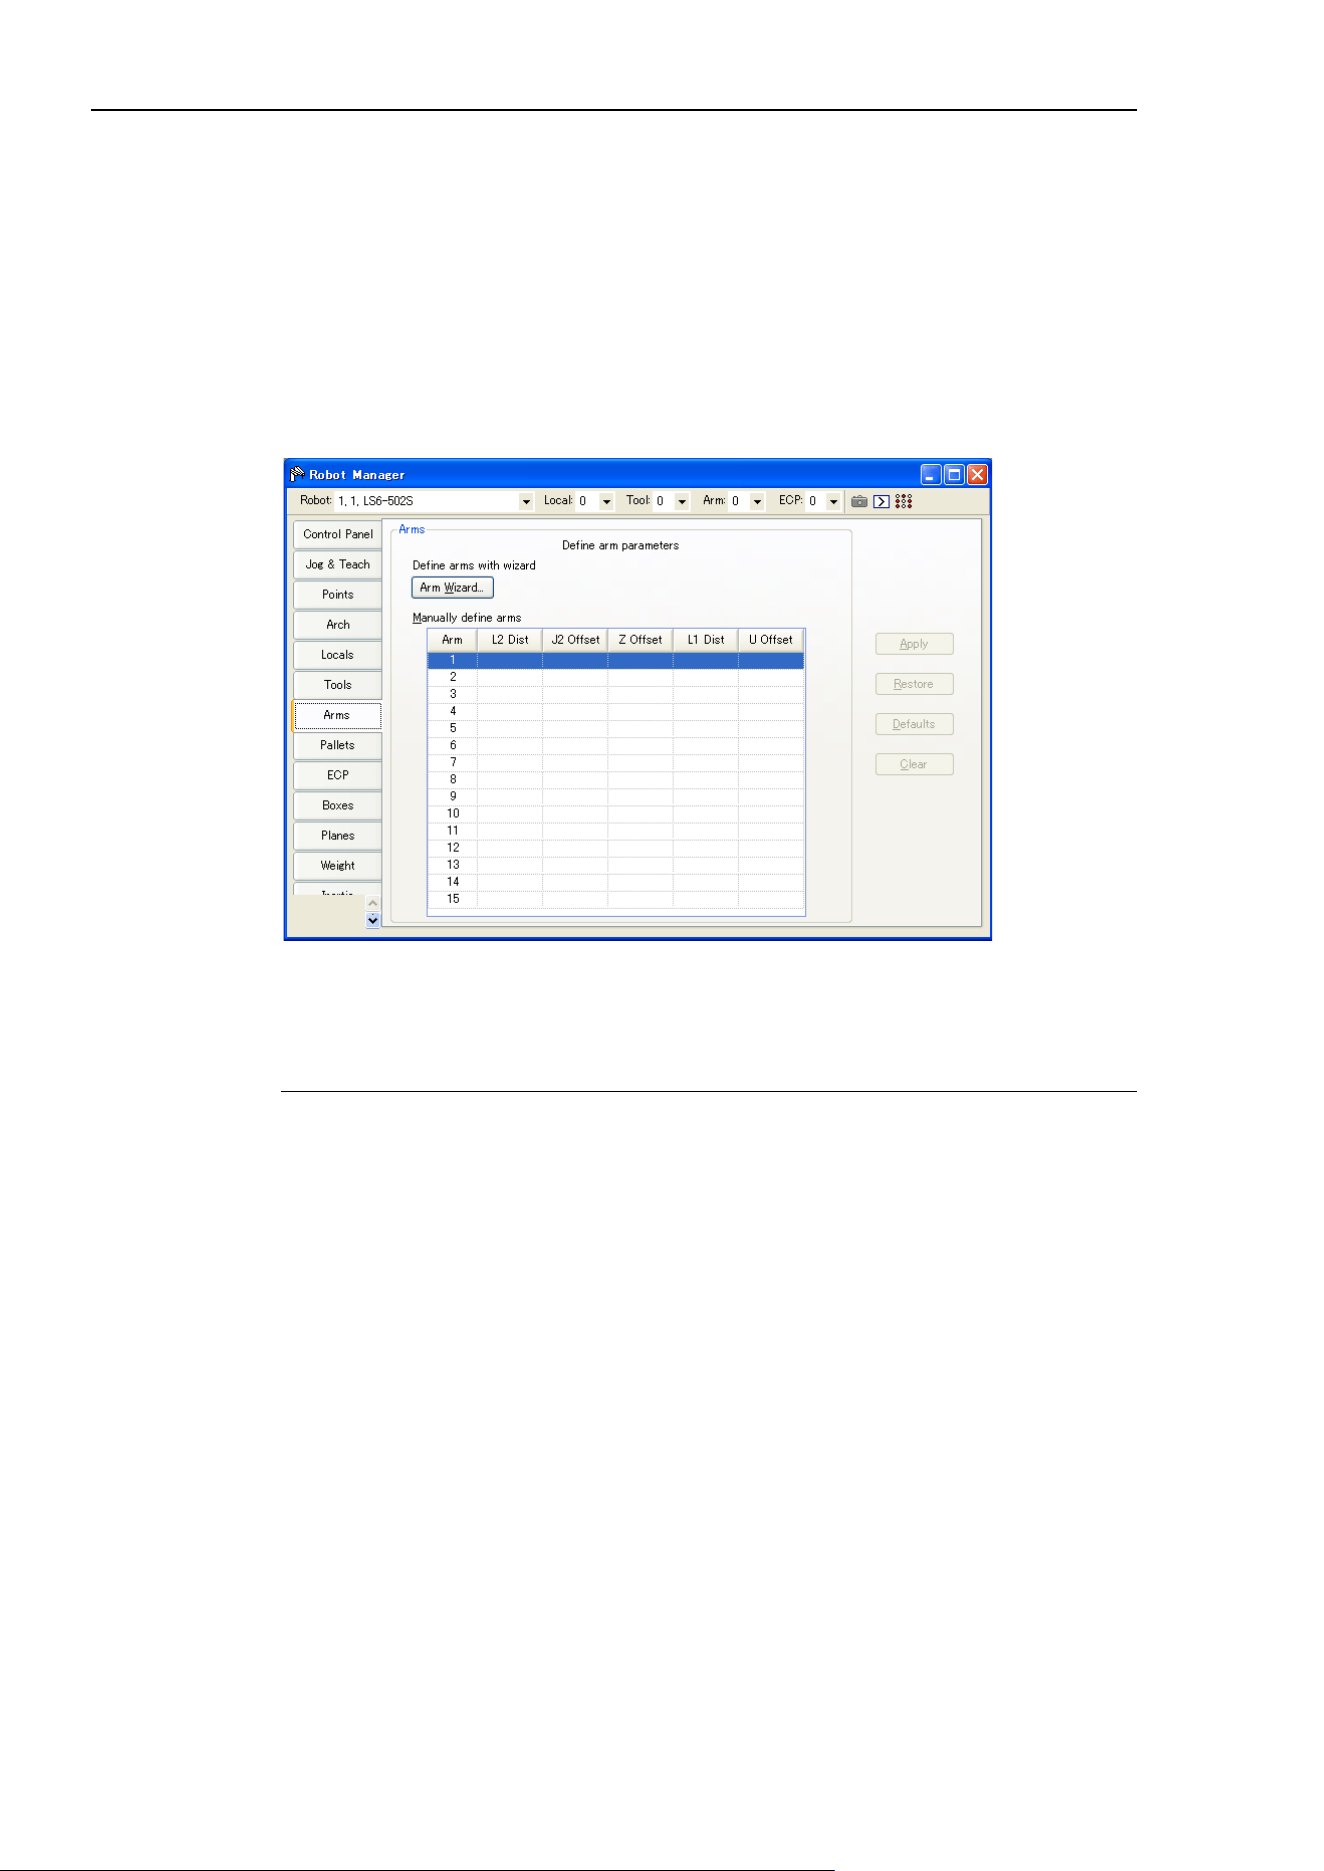
5. The EPSON RC+ 7.0 GUI
110 EPSON RC+ 7.0 (Ver.7.4) User's Guide Rev.6
[Tools]-[Robot Manager]-[Arms] Page
This page allows you to define Arm settings for a robot. When the tab is selected, the
current Arm values are displayed. The tab is disabled if the current robot does not support
the Arm command.
A grid is used to display all the values for all 15 arm configurations you can define.
When an arm is undefined, then all fields for that arm will be blank. When you enter a
value in any of the fields for an undefined arm, then the remaining fields will be set to zero
and the tool will be defined when you click the <Apply> button.
For more information on arm parameters, see the SPEL
+
Language Reference: ArmSet
Statement.
Navigating the grid
Use the <TAB> key to move to the next field. Use the arrow keys or the mouse to move
to any field.
Item Description
Robot
Select a robot.
Arm Wizard
Open the wizard for configuring the additional arm using the camera.
Define the tool by following the instructions.
For details of the Local setting, refer to
7. Vision Calibration in the
Vision
Guide 7.0 Software
manual.
L2 Dist
Distance between the center of joint 2 and the center of the orientation joint
in millimeters.
J2 Offset
Angle of the line from the center of joint 2 to the center of the orientation
joint in degrees.
Z Offset
The Z offset between the new orientation axis and the standard orientation
axis.
L1 Dist
Distance between the center of the shoulder joint and the center of the
elbow joint in millime
ters.
U Offset
The angle offset between the standard orientation zero position and the new
orientation axis zero position in degrees.
Apply
Set current values.
Restore
Revert to the previous values.
Clear
Clear all values for the selected arm
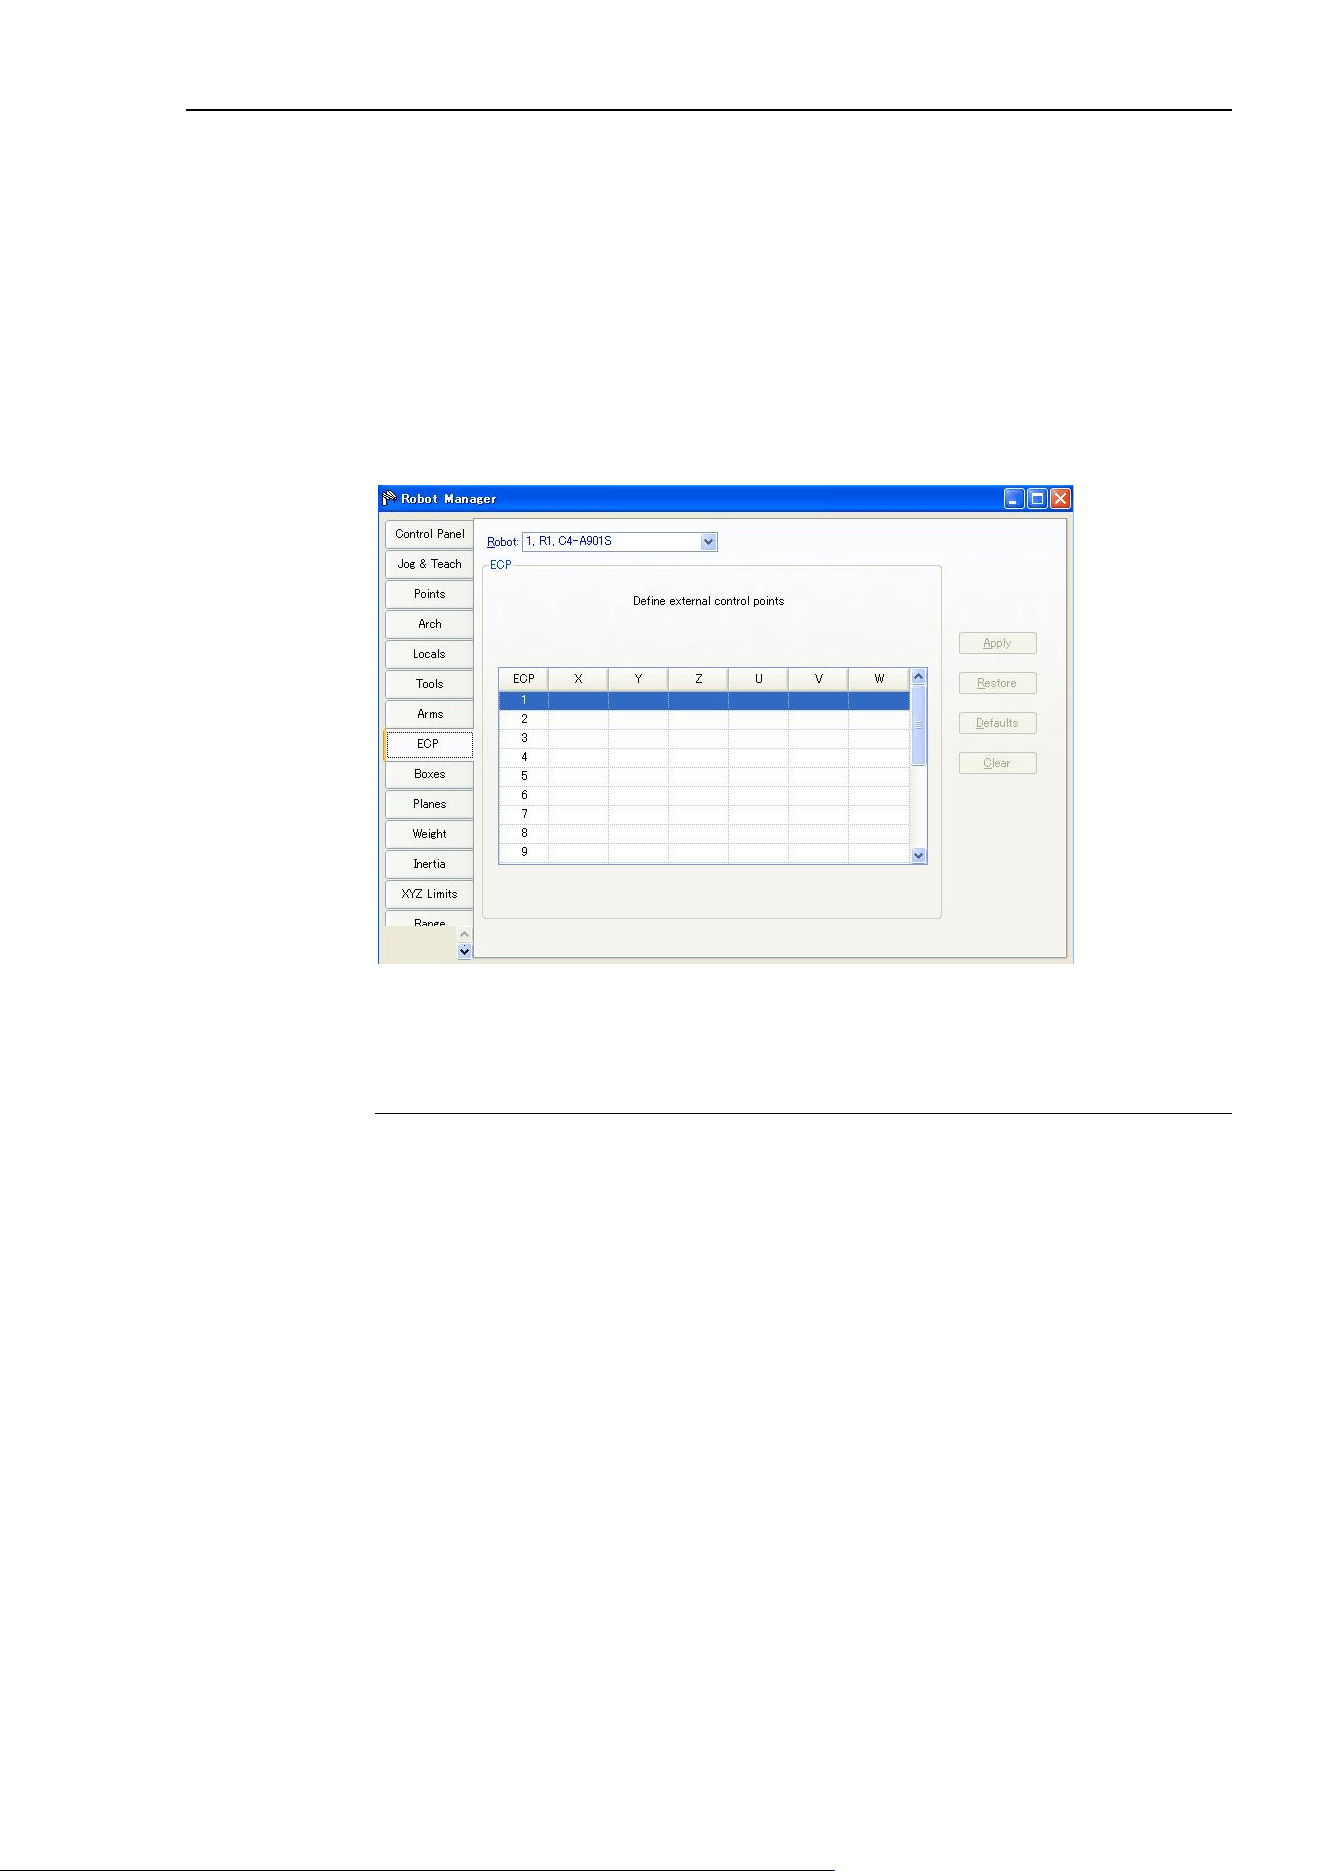
5. The EPSON RC+ 7.0 GUI
EPSON RC+ 7.0 (Ver.7.4) User's Guide Rev.6 111
[Tools]-[Robot Manager]-[ECP] Page
This page allows you to define ECP (external control point) settings for a robot. When the
page is selected, the current values are displayed.
If the ECP option is not enabled in the controller, this page will not be visible.
For detailed information on using external control points in your application, refer to
6.16.5 ECP Coordinate Systems (Option).
A grid is used to display all of the values for all ECPs you can define.
When an ECP is undefined, then all fields for that ECP will be blank. When you enter a
value in any of the fields for an undefined ECP, then the remaining fields will be set to
zero and the ECP will be defined when you press the <Apply> button.
Navigating the grid
Use the <TAB> key to move to the next field. Use the arrow keys or the mouse to move
to any field.
Item Description
Robot
Select a robot.
X
The X coordinate of the ECP.
Y
The Y coordinate of the ECP.
Z
The Z coordinate of the ECP.
U
Rotation angle of the ECP about the Z axis (roll).
V
Rotation angle of the ECP about the Y axis (pitch).
W
Rotation angle of the ECP about the X axis (yaw).
Apply
Set current values.
Restore
Revert back to the previous values.
Clear
Clear all values for the selected ECP.
NOTE
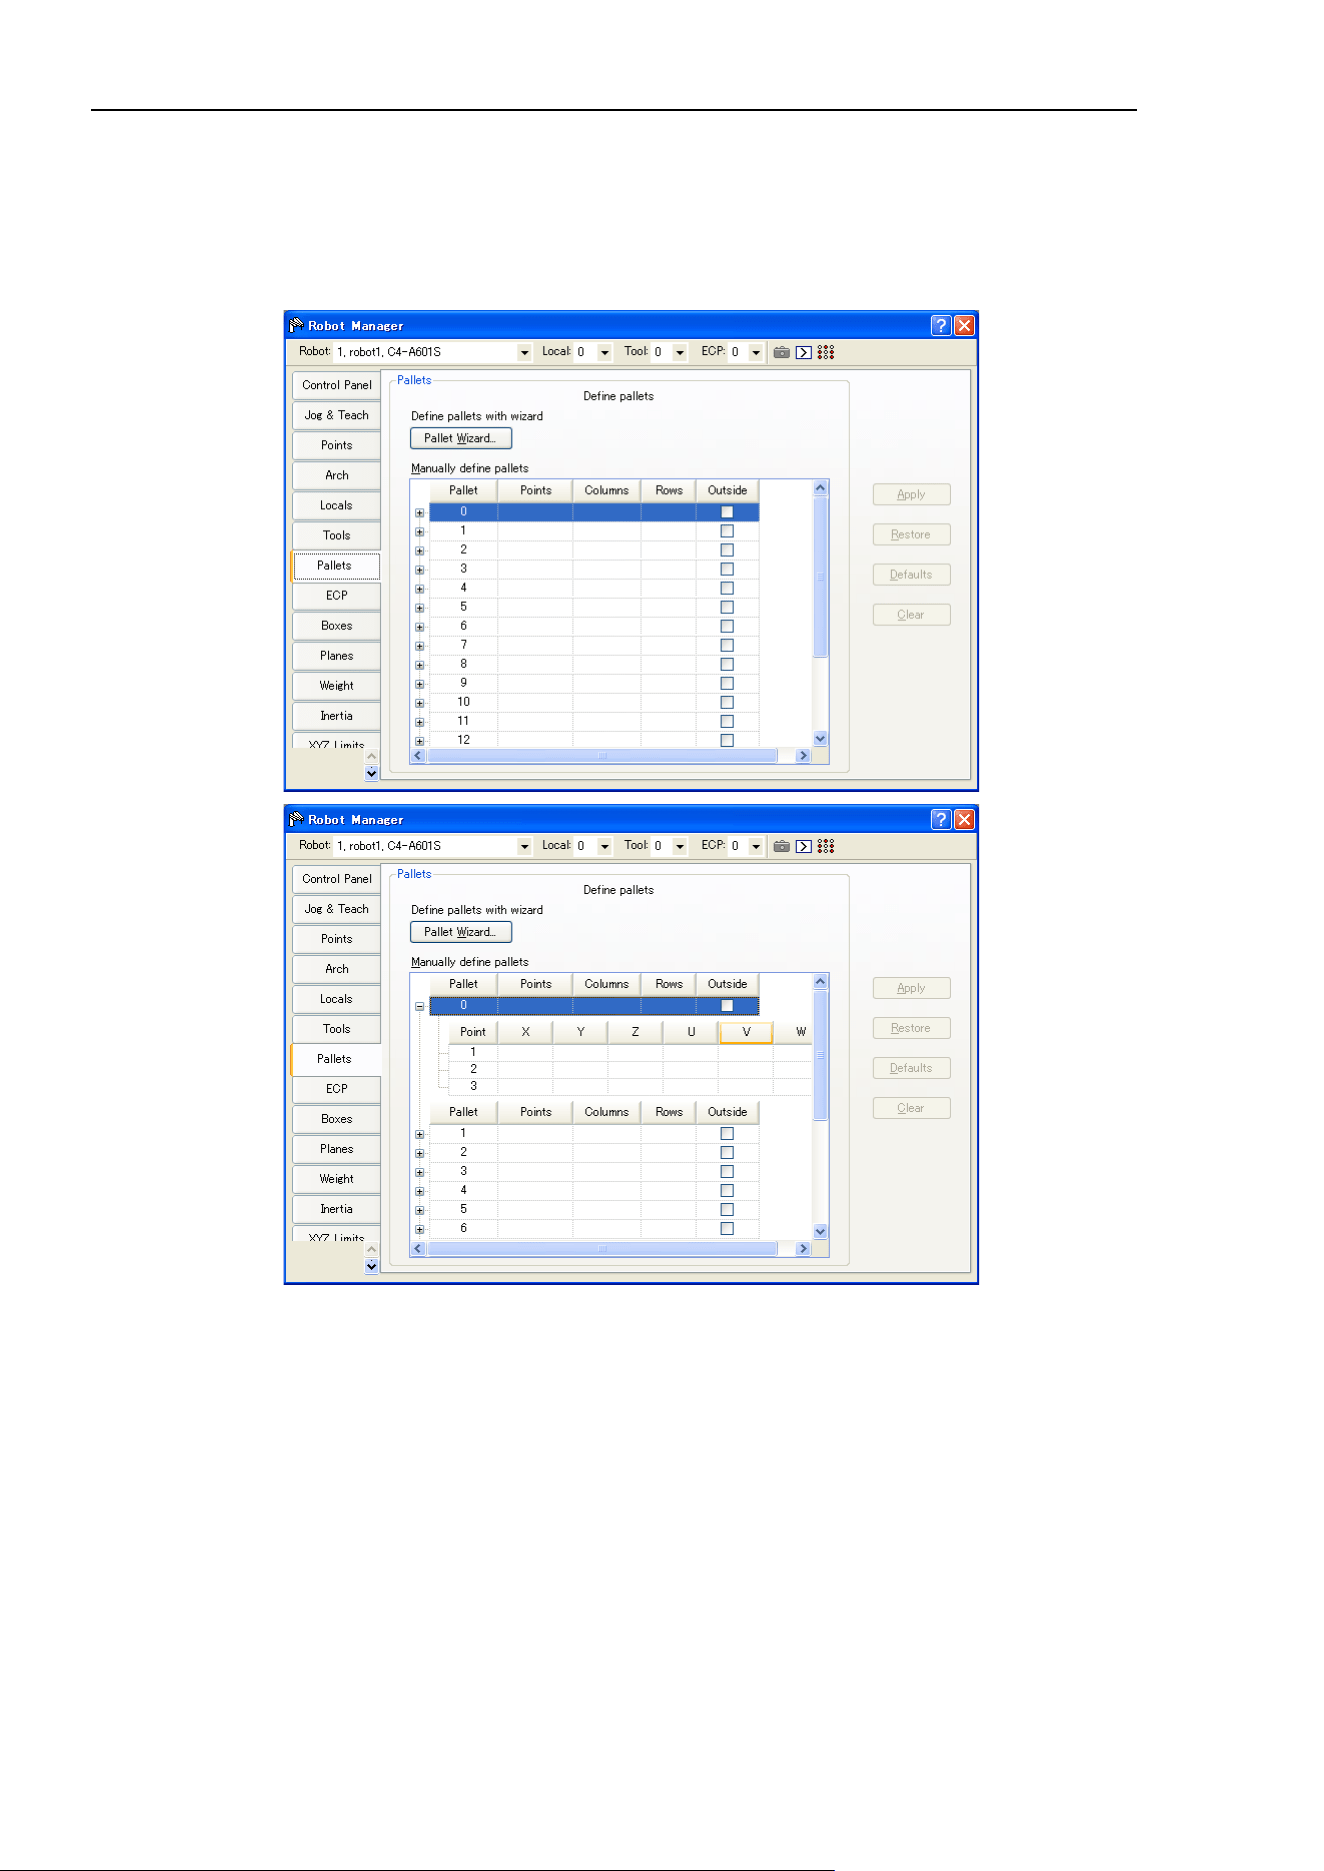
5. The EPSON RC+ 7.0 GUI
112 EPSON RC+ 7.0 (Ver.7.4) User's Guide Rev.6
[Tools]-[Robot Manager]-[Pallets] Page
This page allows you to define the pallet (Pallet). When the page is selected, values for
the available pallet are displayed. When a Pallet is undefined, then all fields for the Pallet
will be blank. The Pallet will be defined when you press the <Apply> button.
For more information on Pallet, see the SPEL
+ Language Reference: Pallet Statement.

5. The EPSON RC+ 7.0 GUI
EPSON RC+ 7.0 (Ver.7.4) User's Guide Rev.6 113
Navigating the grid
Use the <TAB> key to move to the next field. Use the arrow keys or the mouse to move
to any field.
Item Description
Robot
Select a robot.
Points
Specify the point variable to use for pallet definition.
Select either
3 or 4.
Columns
Specify the division number of Point number 1(coordinate system data 1)
and Point number
2 (coordinate system data 2) by an integer. The range is
from
1 to 32767. (Division 1 × Division 2 <32767)
Rows
Specify the division number of Point number 1(coordinate system data 1)
and Point number 3
(coordinate system data 3) by an integer. The range is
from
1 to 32767. (Division 1 × Division 3 <32767)
Outside
Optional. Creates an accessible pallet outside the specified columns and
rows
X
Set the X coordinate in millimeters.
Y
Set the Y coordinate in millimeters.
Z
Set the Z coordinate in millimeters.
U
Set the U coordinate in degrees.
V
Set the V coordinate in degrees.
W
Set the W coordinate in degrees.
Apply
Set current values.
Restore
Revert back to the previous values.
Clear
Clear all values.
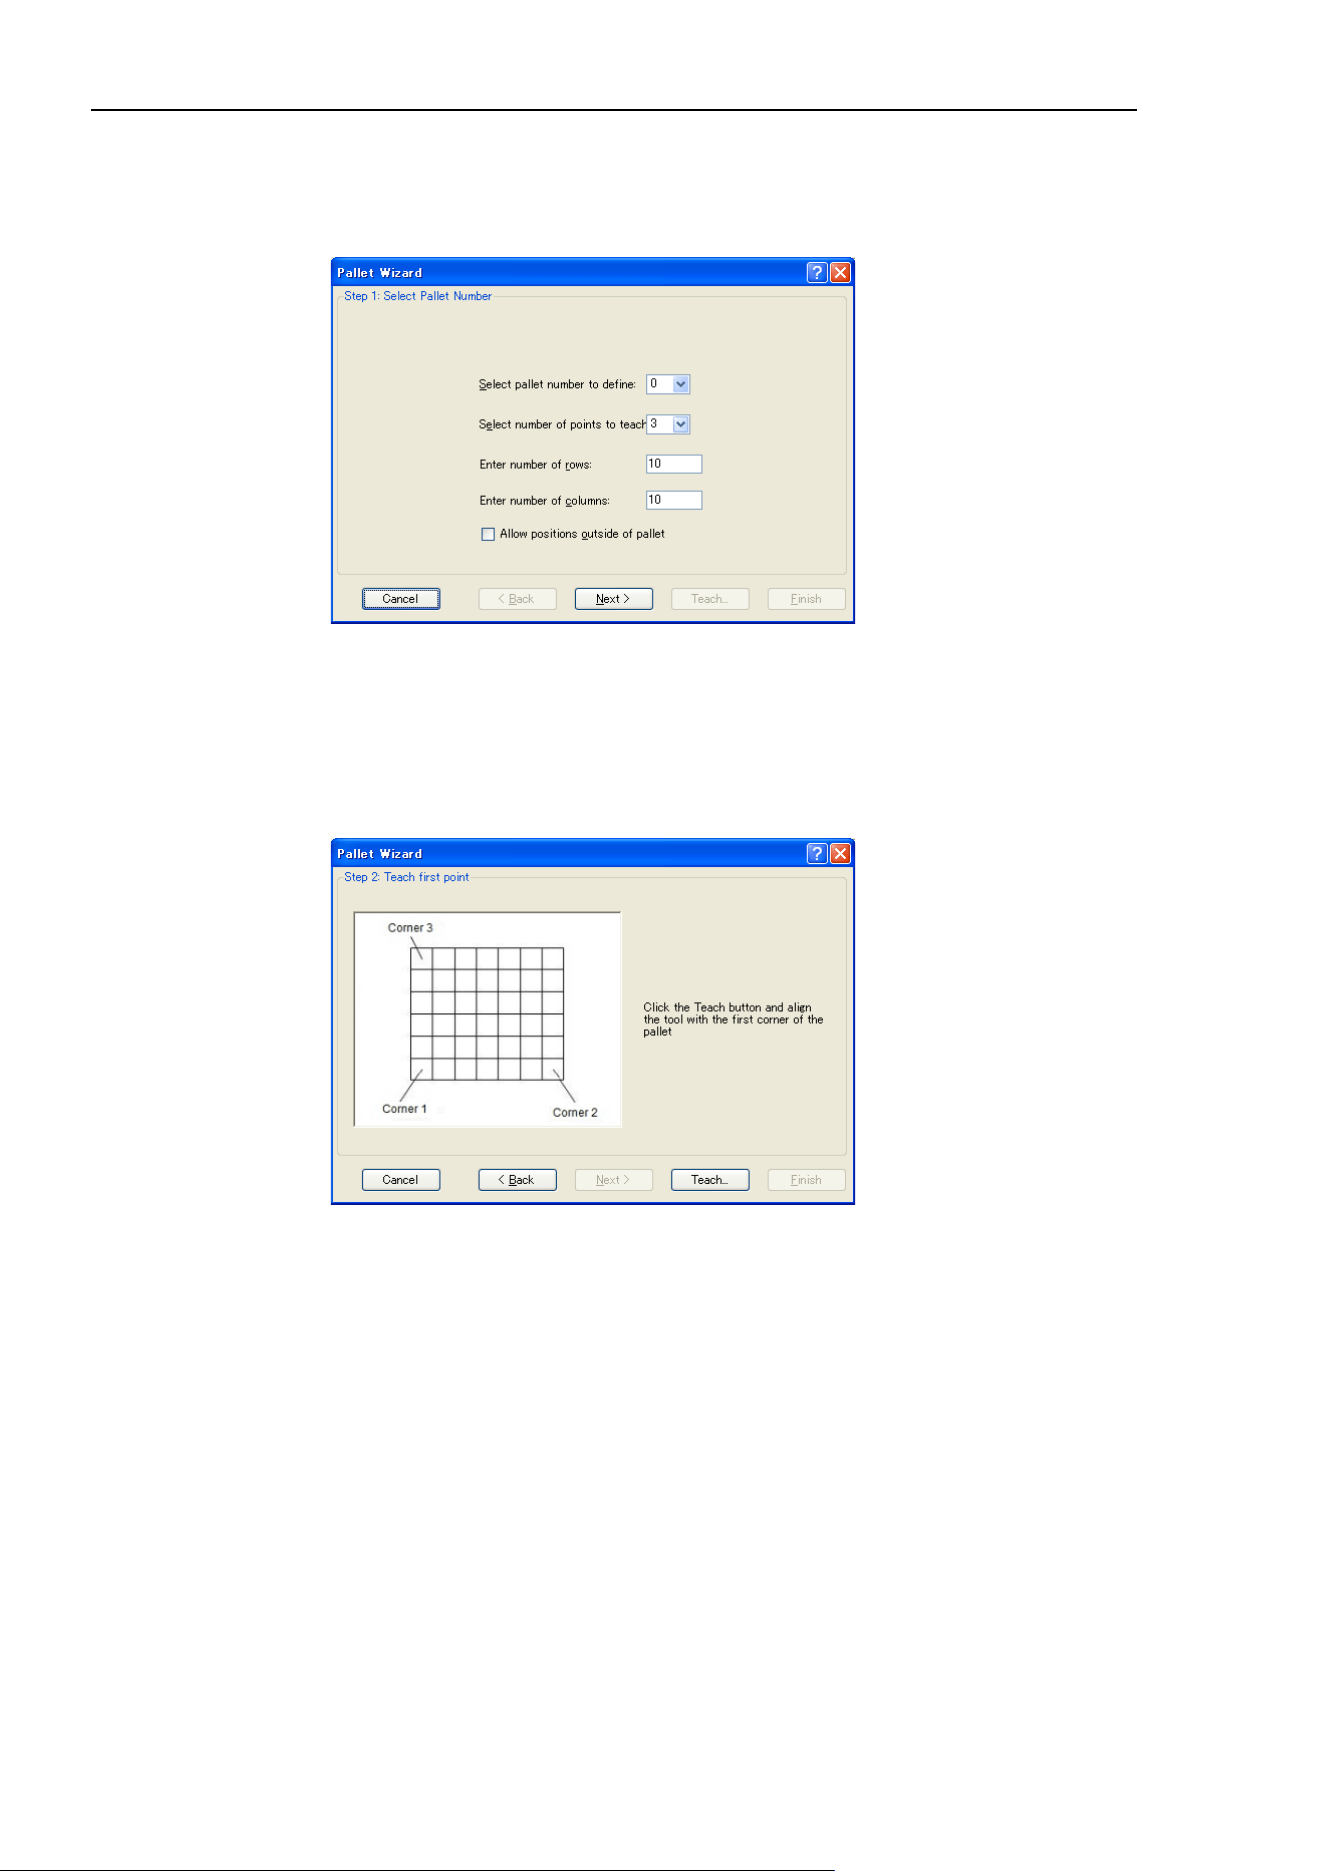
5. The EPSON RC+ 7.0 GUI
114 EPSON RC+ 7.0 (Ver.7.4) User's Guide Rev.6
Using the Pallet Wizard
1. Select [Robot Manager]-[Tools] tab to show the [Pallets] page.
2. Click the <Pallet Wizard> button. You will see the dialog box shown below.
3. Select the pallet number to define, the number of points to teach, the number of rows
and columns, and whether to use “Outside”. Then, click the <Next> button.
If a pallet is a well ordered rectangular shape, only 3 of the 4 corner points should be
specified. However, in most situations, it is recommended to use 4 corner points to
define a pallet.
4. Click the <Teach> button to show the [Teach first point] page.
NOTE
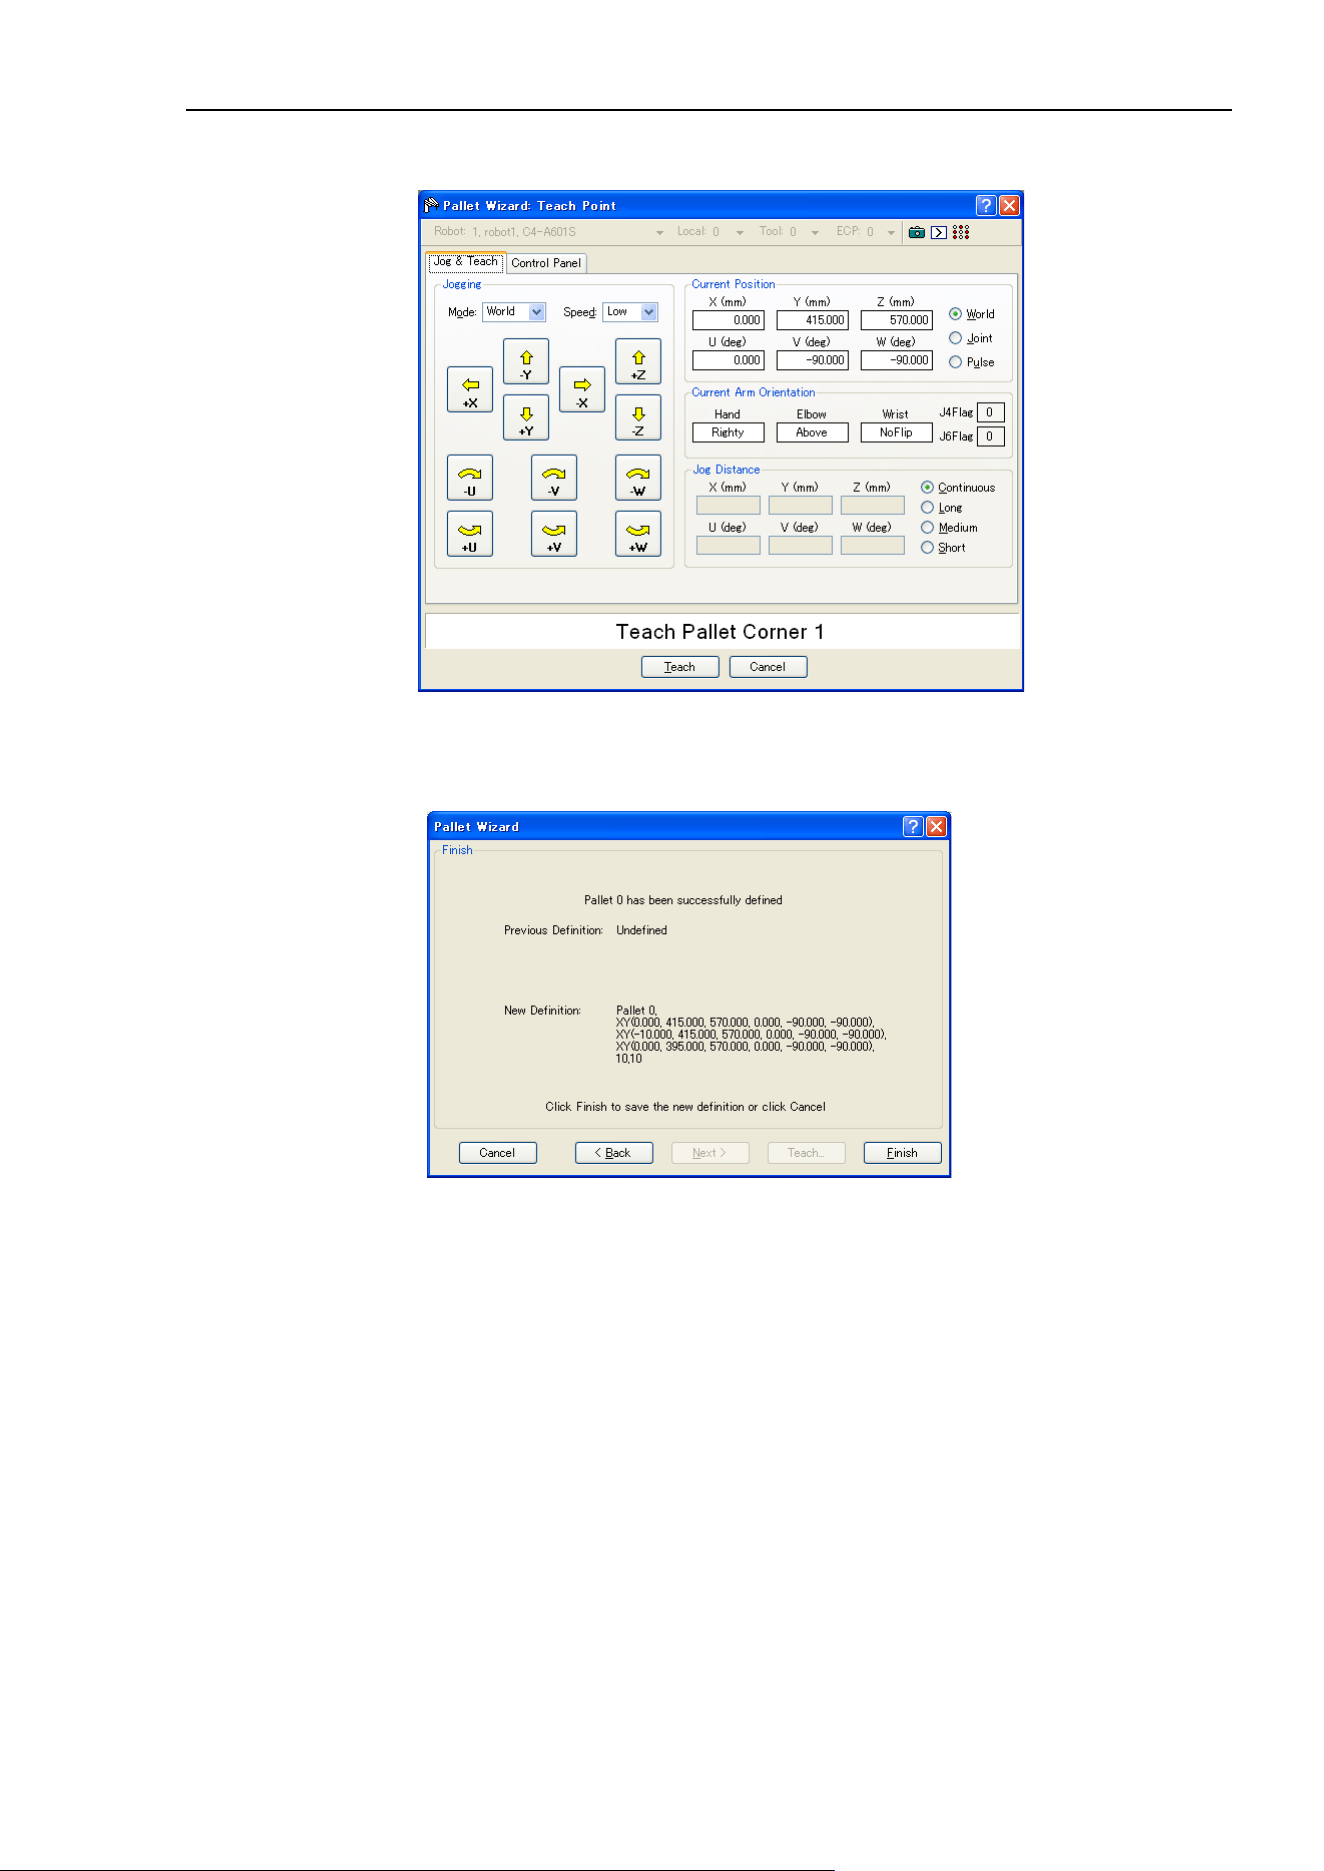
5. The EPSON RC+ 7.0 GUI
EPSON RC+ 7.0 (Ver.7.4) User's Guide Rev.6 115
5. Jog the robot to the first corner to teach the position of it. Click the <Teach> button to
show the following dialog box.
6. Teach the second to forth corners by following the steps (4) and (5).
7. The new pallet definition is displayed as shown below. Click <Finish> to apply the
new definition.
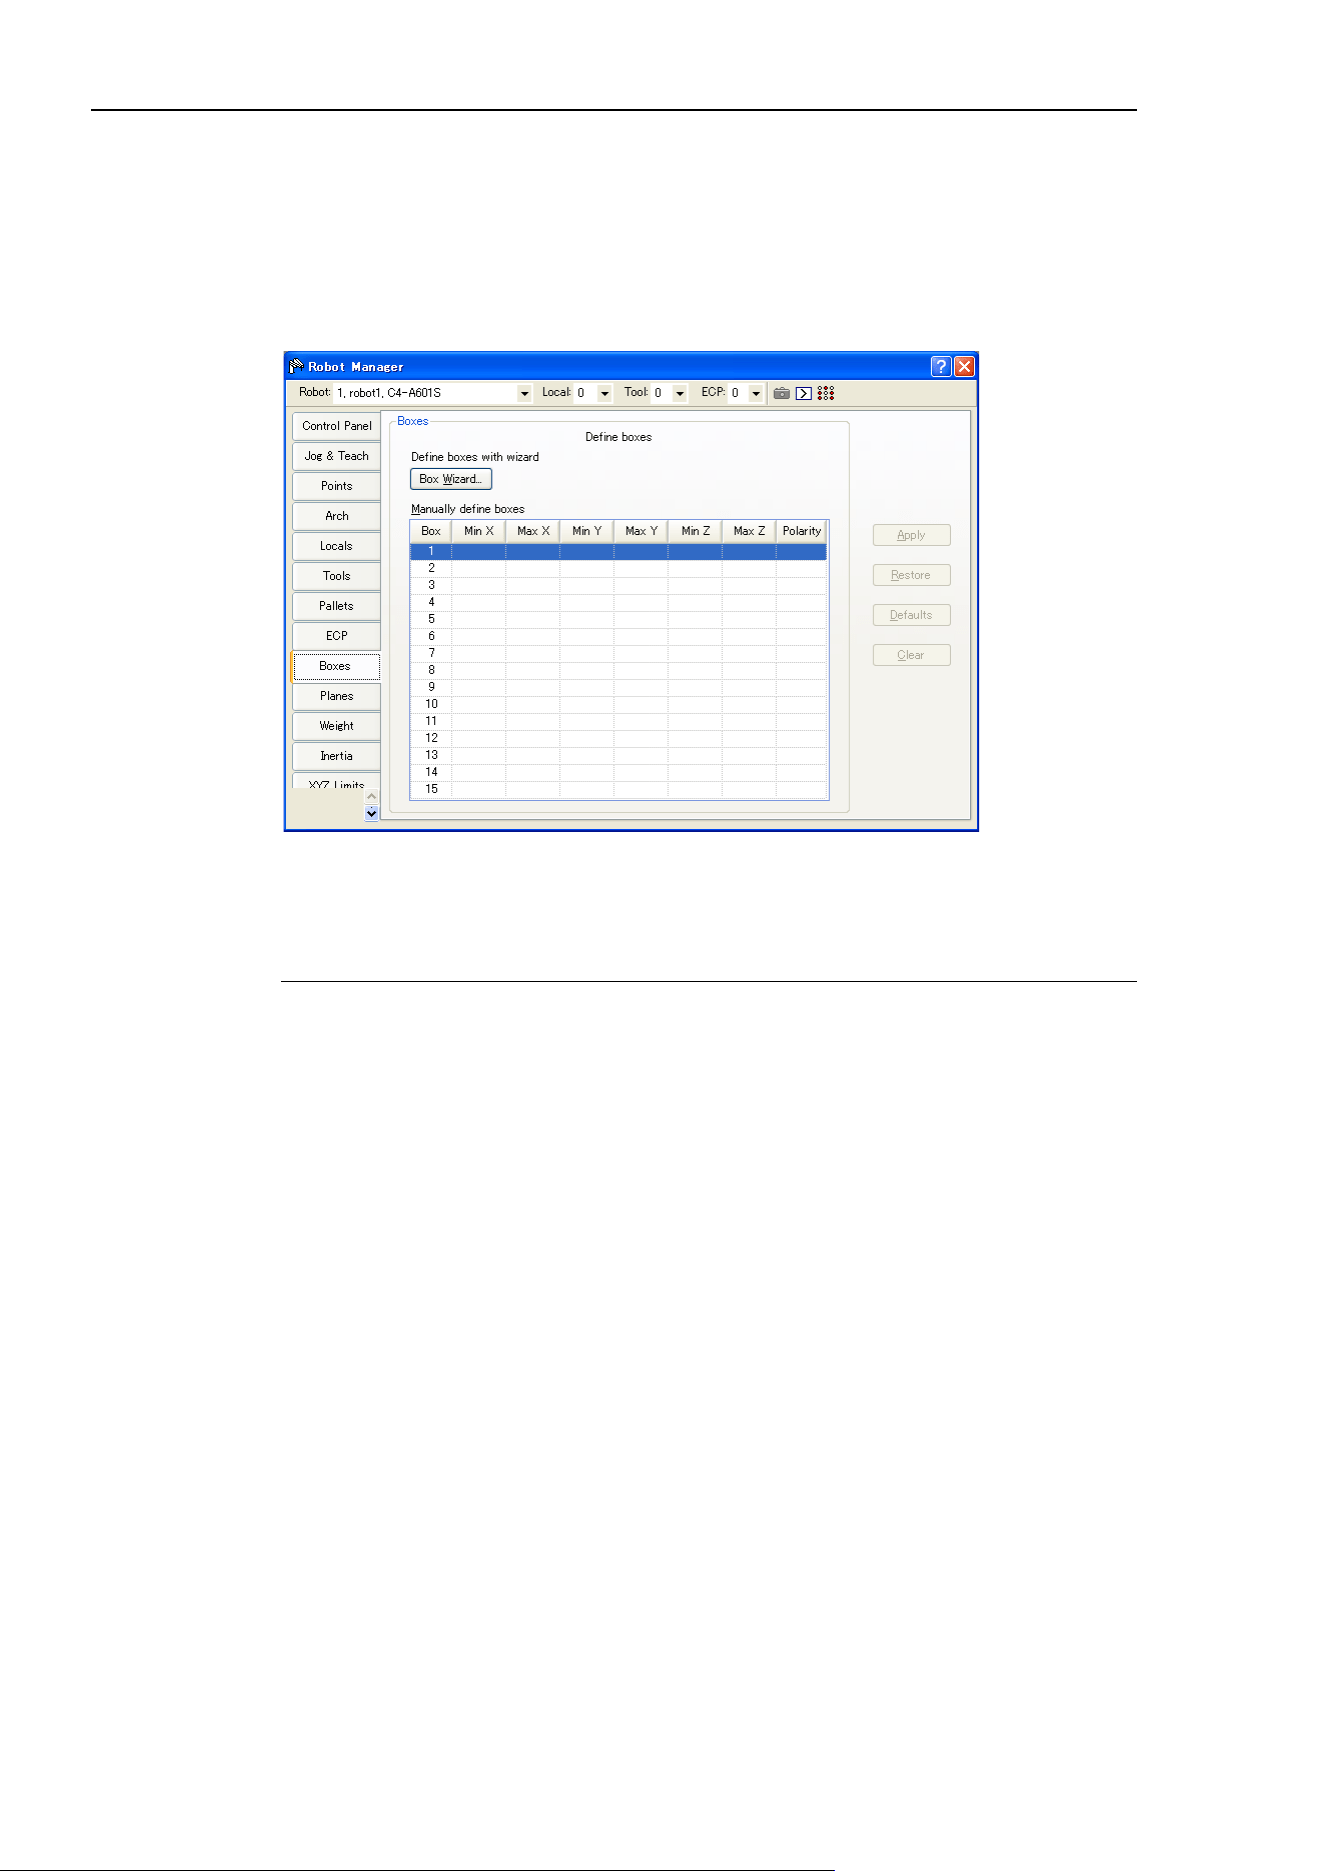
5. The EPSON RC+ 7.0 GUI
116 EPSON RC+ 7.0 (Ver.7.4) User's Guide Rev.6
[Tools]-[Robot Manager]-[Box] Page
This page allows you to define Box (approach check area) settings for a robot. When the
page is selected, the current values are displayed. When a Box is undefined, then all fields
for that Box will be blank. When you enter a value in any of the fields for an undefined
Box, then the remaining fields will be set to zero and the Box will be defined when you
press the <Apply> button.
For more information on Box, see the SPEL
+
Language Reference: Box Statement.
Navigating the grid
Use the <TAB> key to move to the next field. Use the arrow keys or the mouse to move
to any field.
Item Description
Robot
Select a robot.
Min X
Type in the minimum X limit value in millimeters.
Max X
Type in the maximum X limit value in millimeters.
Min Y
Type in the minimum Y limit value in millimeters.
Max Y
Type in the maximum Y limit value in millimeters.
Min Z
Type in the minimum Z limit value in millimeters.
Max Z
Type in the maximum Z limit value in millimeters.
Polarity
Sets the polarity to output I/O at approach check.
Apply
Sets current values.
Restore
Reverts back to the previous values.
Clear
Clears all values.
Setting both values to zero disables the limits.
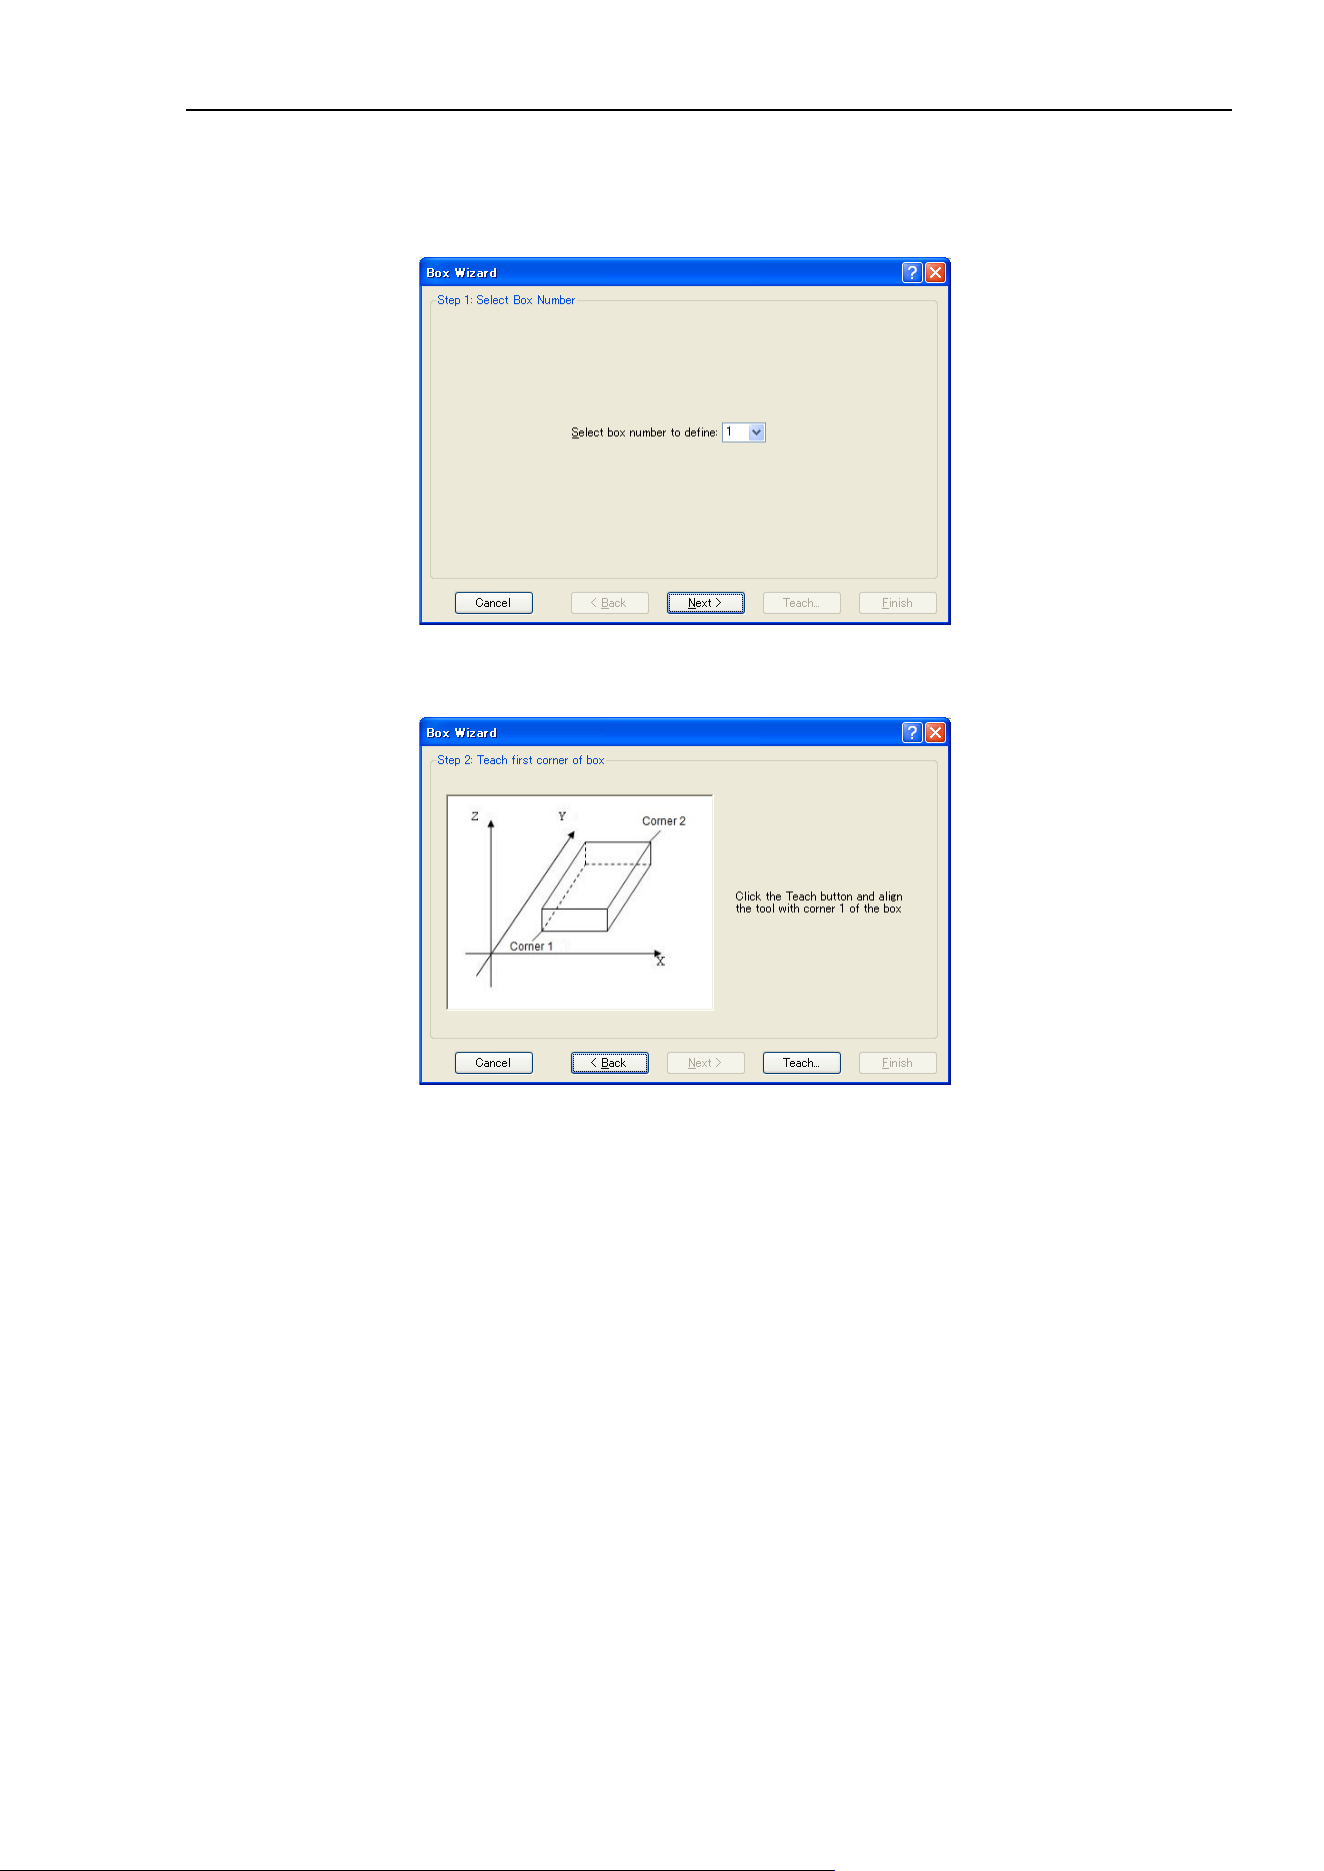
5. The EPSON RC+ 7.0 GUI
EPSON RC+ 7.0 (Ver.7.4) User's Guide Rev.6 117
Using the Box Wizard
1. Select [Robot Manager]-[Boxes] tab to show the [Boxes] page.
2. Click the <Box Wizard> button. You will see the dialog box shown below.
3. Select the Box number to define and click the <Next> button.
4. Click the <Teach> button to show the [Teach first corner of box] page.
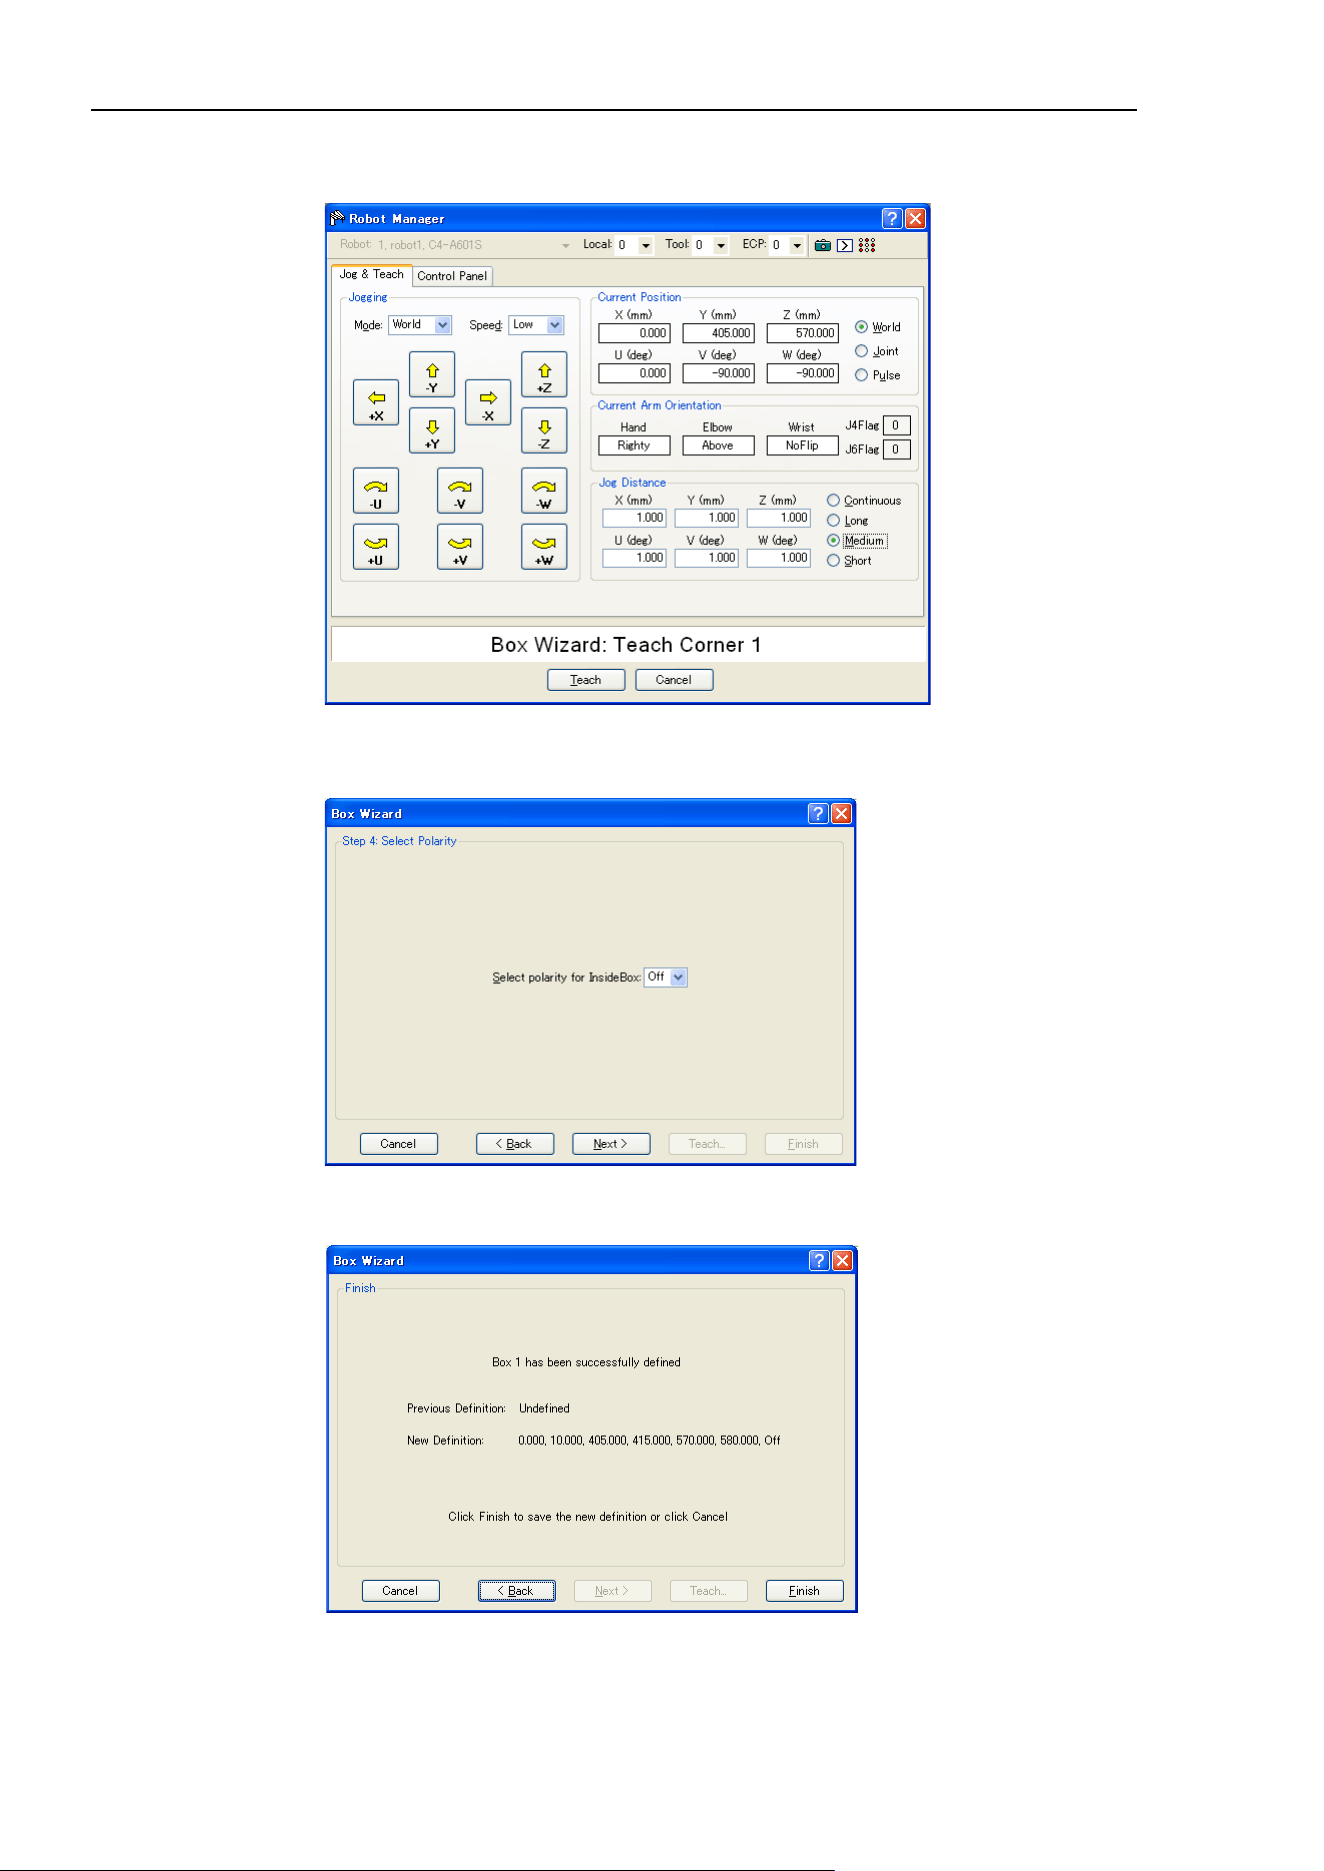
5. The EPSON RC+ 7.0 GUI
118 EPSON RC+ 7.0 (Ver.7.4) User's Guide Rev.6
5. Jog the robot to the first corner to teach the position of it. Click the <Teach> button to
show the following dialog box.
6. Teach the second to forth corners by following the steps (4) and (5).
7. Select the polarity to output the I/O
8. The new box definition is displayed as shown below. Click <Finish> to apply the new
definition.
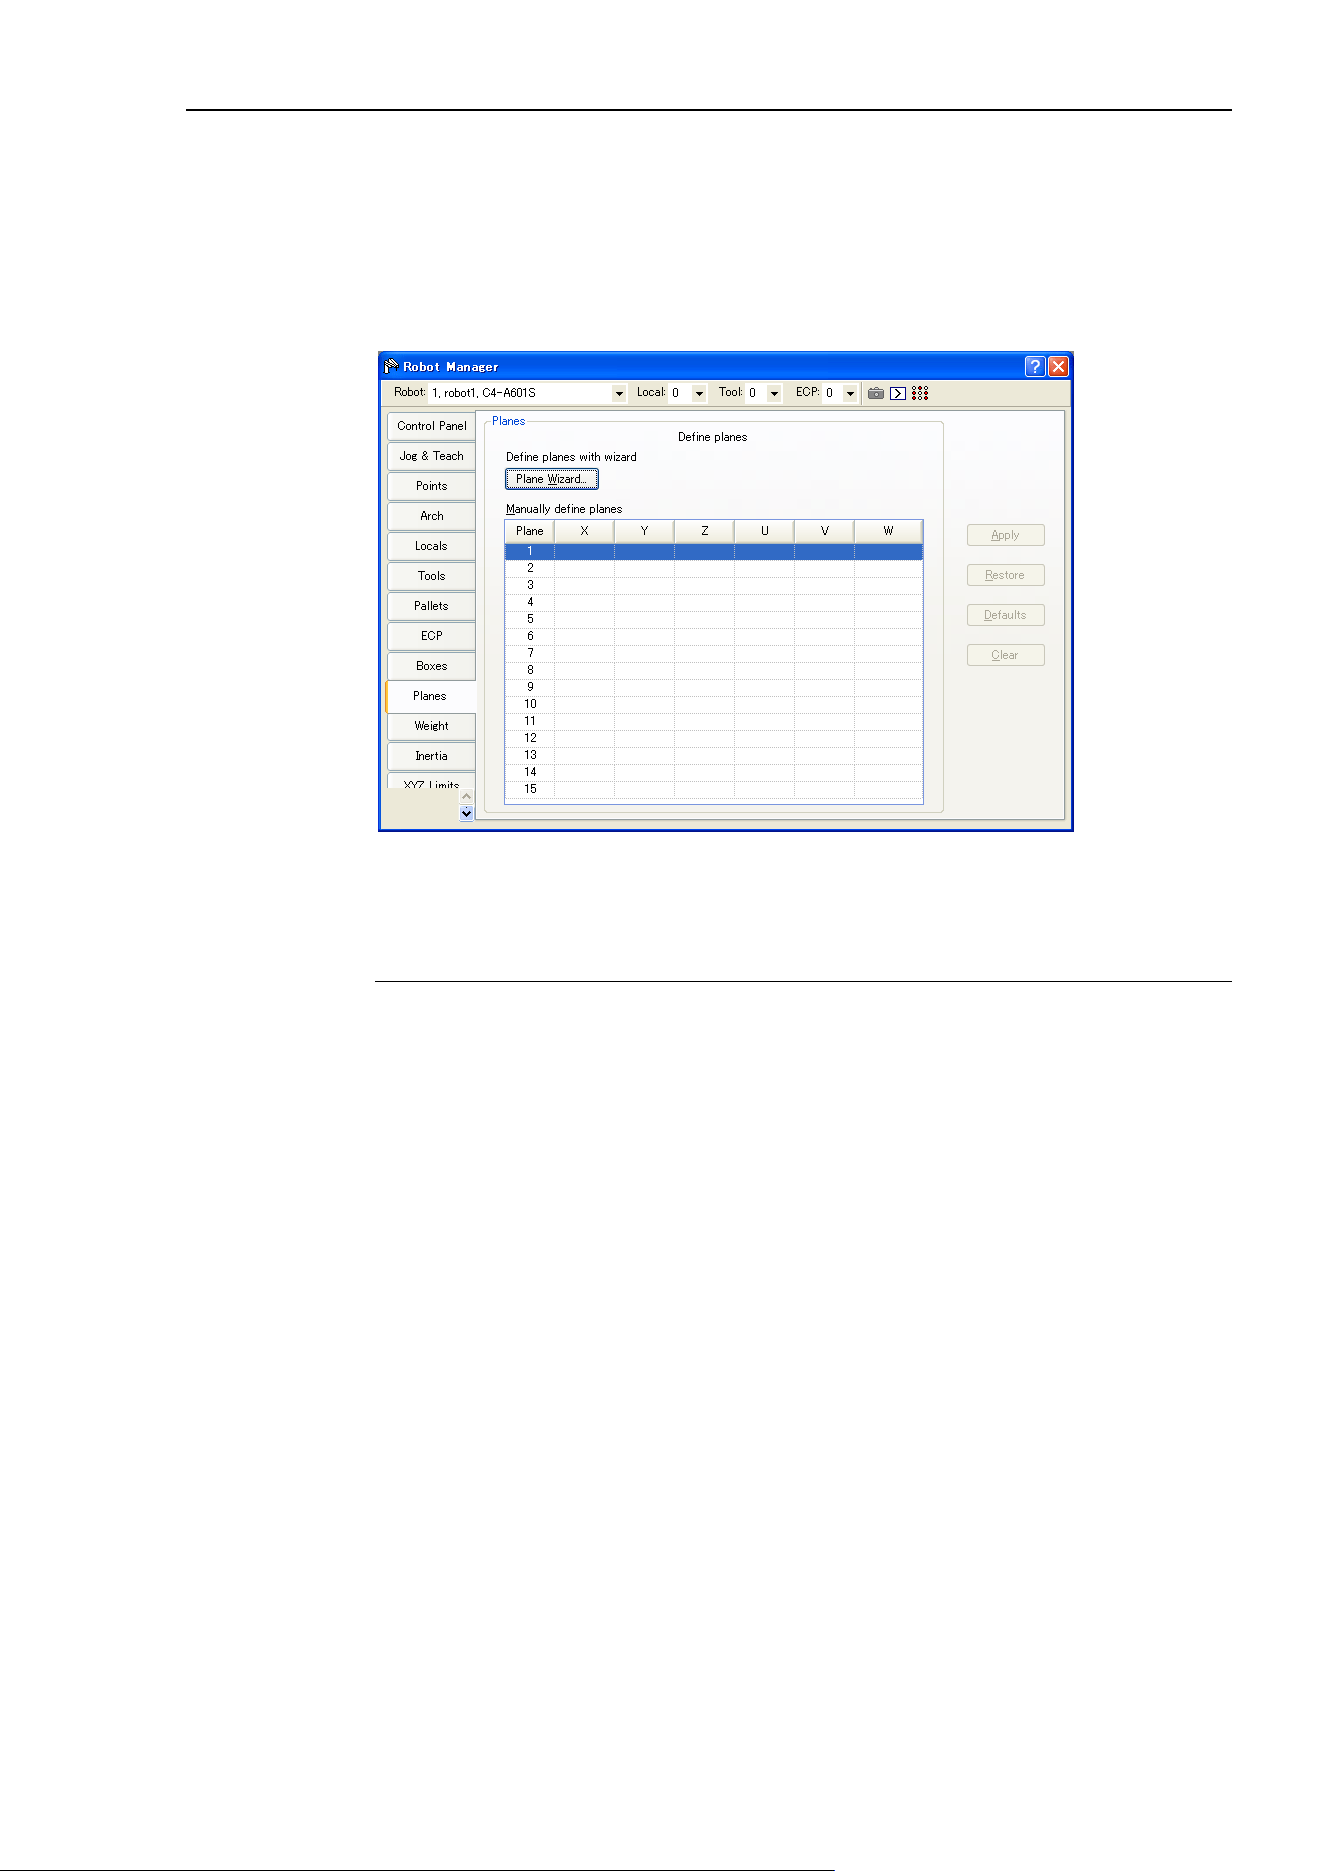
5. The EPSON RC+ 7.0 GUI
EPSON RC+ 7.0 (Ver.7.4) User's Guide Rev.6 119
[Tools]-[Robot Manager]-[Plane] Page
This page allows you to define Plane (approach check plane) settings for a robot. When
the page is selected, the current values are displayed. When a Plane is undefined, then all
fields for that Plane will be blank. When you enter a value in any of the fields for an
undefined Plane, then the remaining fields will be set to zero and the Plane will be defined
when you press the <Apply> button.
For more information on Plane, see the SPEL
+
Language Reference: Plane Statement.
Navigating the grid
Use the <TAB> key to move to the next field. Use the arrow keys or the mouse to move
to any field.
Item Description
Robot
Select a robot.
X
Sets the X origin of the coordinate for approach check plane.
Y
Sets the Y origin of the coordinate for approach check plane.
Z
Sets the Z origin of the coordinate for approach check plane.
U
Sets the U origin of the coordinate for approach check plane.
V
Sets the V origin of the coordinate for approach check plane.
W
Sets the W origin of the coordinate for approach check plane.
Apply
Set current values.
Restore
Revert back to the previous values.
Clear
Clear all values.
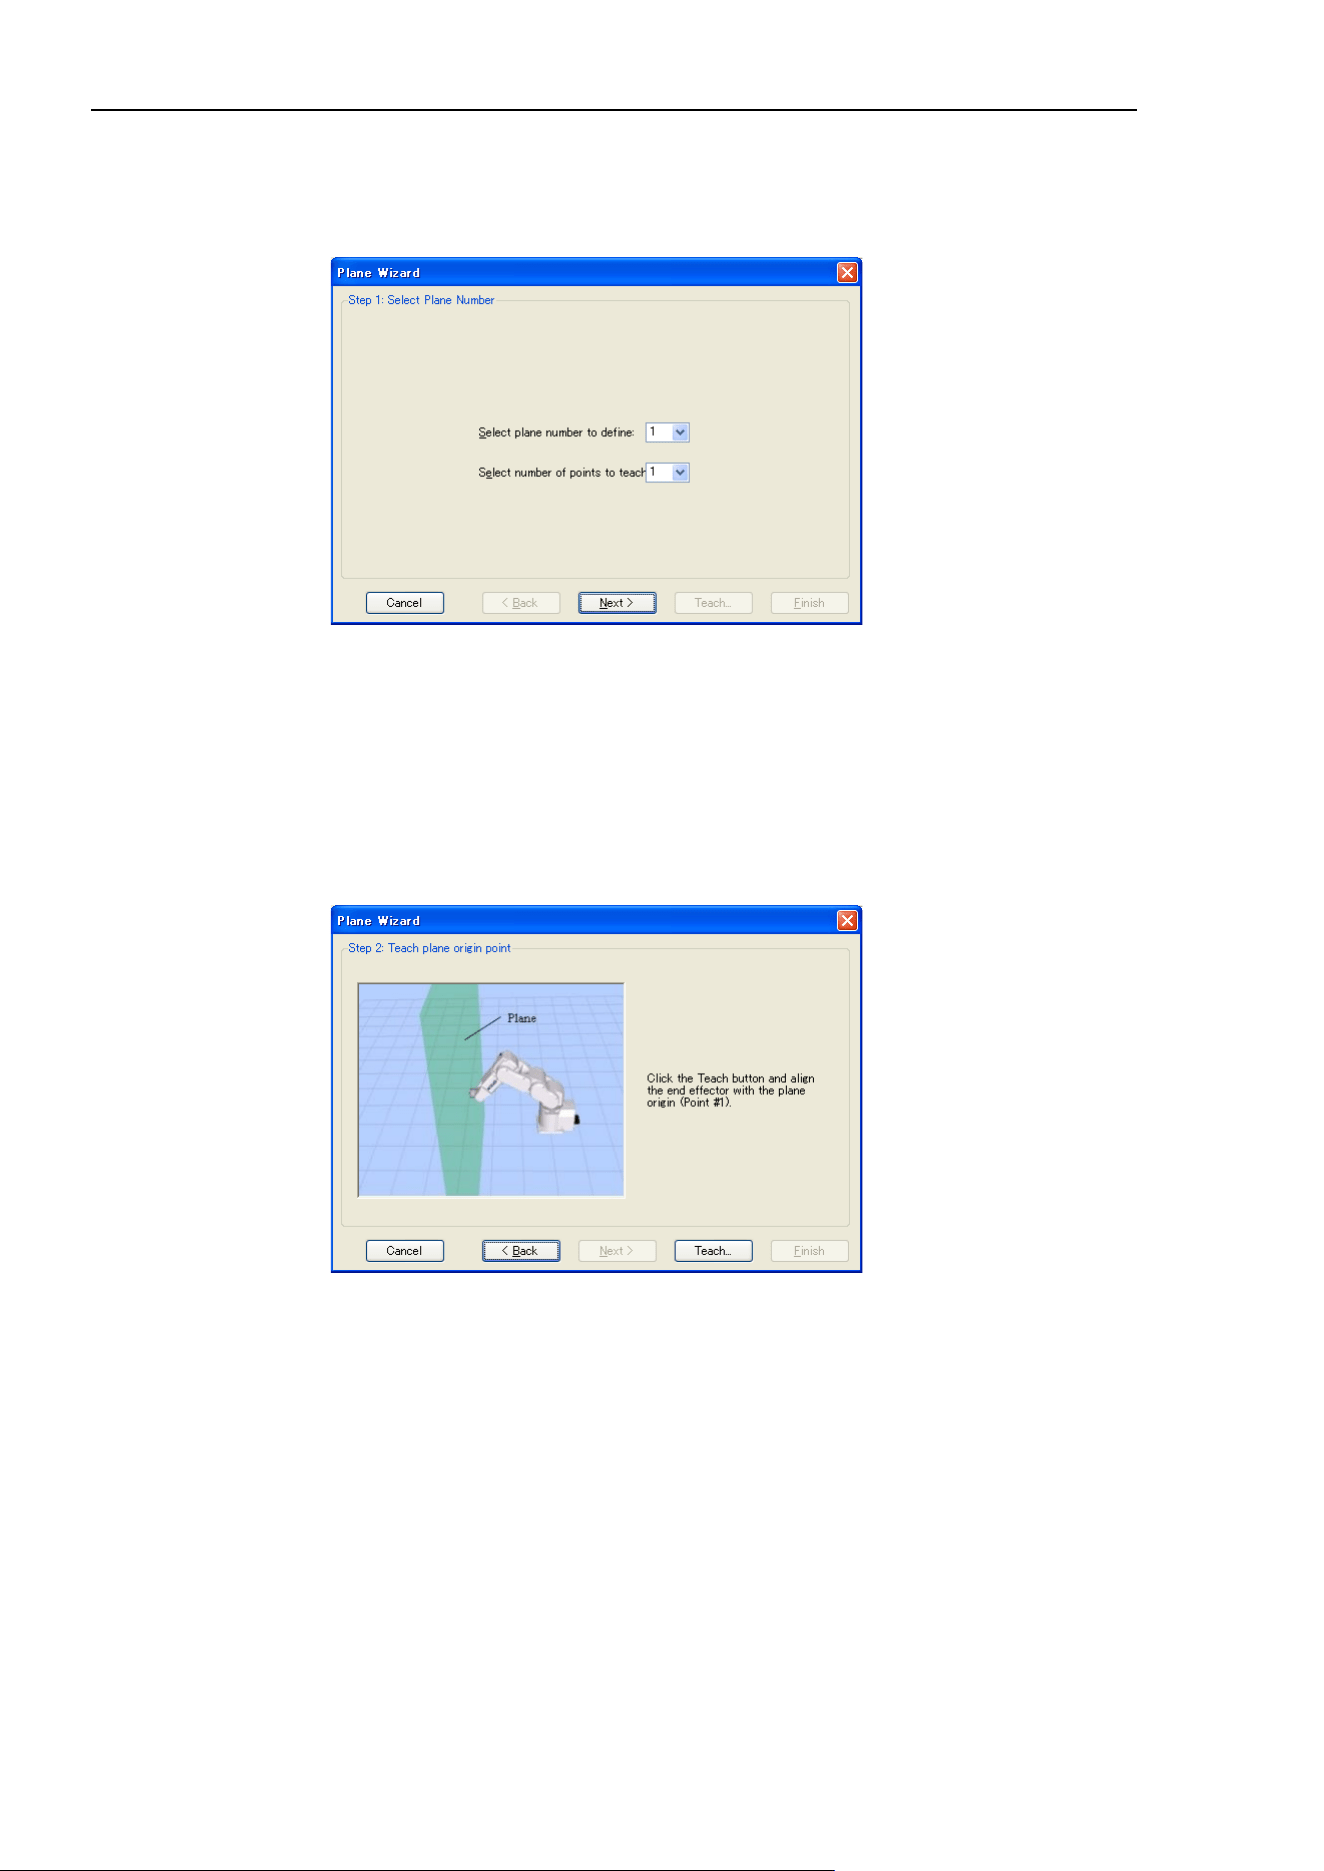
5. The EPSON RC+ 7.0 GUI
120 EPSON RC+ 7.0 (Ver.7.4) User's Guide Rev.6
Using the Plane Wizard
1. Select [Robot Manager]-[Planes] tab to show the [Planes] page.
2. Click the <Plane Wizard> button. You will see the dialog box shown below.
3. Select the plane number to define and the number of points to teach, and then click the
<Next> button.
You can select either “1” or “3” for the number of points to teach. If you select “1”,
the robot posture at teaching will be reflected. If you select “3”, the robot posture
will not be reflected. For details, refer to the SPEL
+ Language Reference: Plane
Statement.
4. Click the <Teach> button to show the [Teach plane origin point] page.
If the number of point to teach is “1”:
NOTE
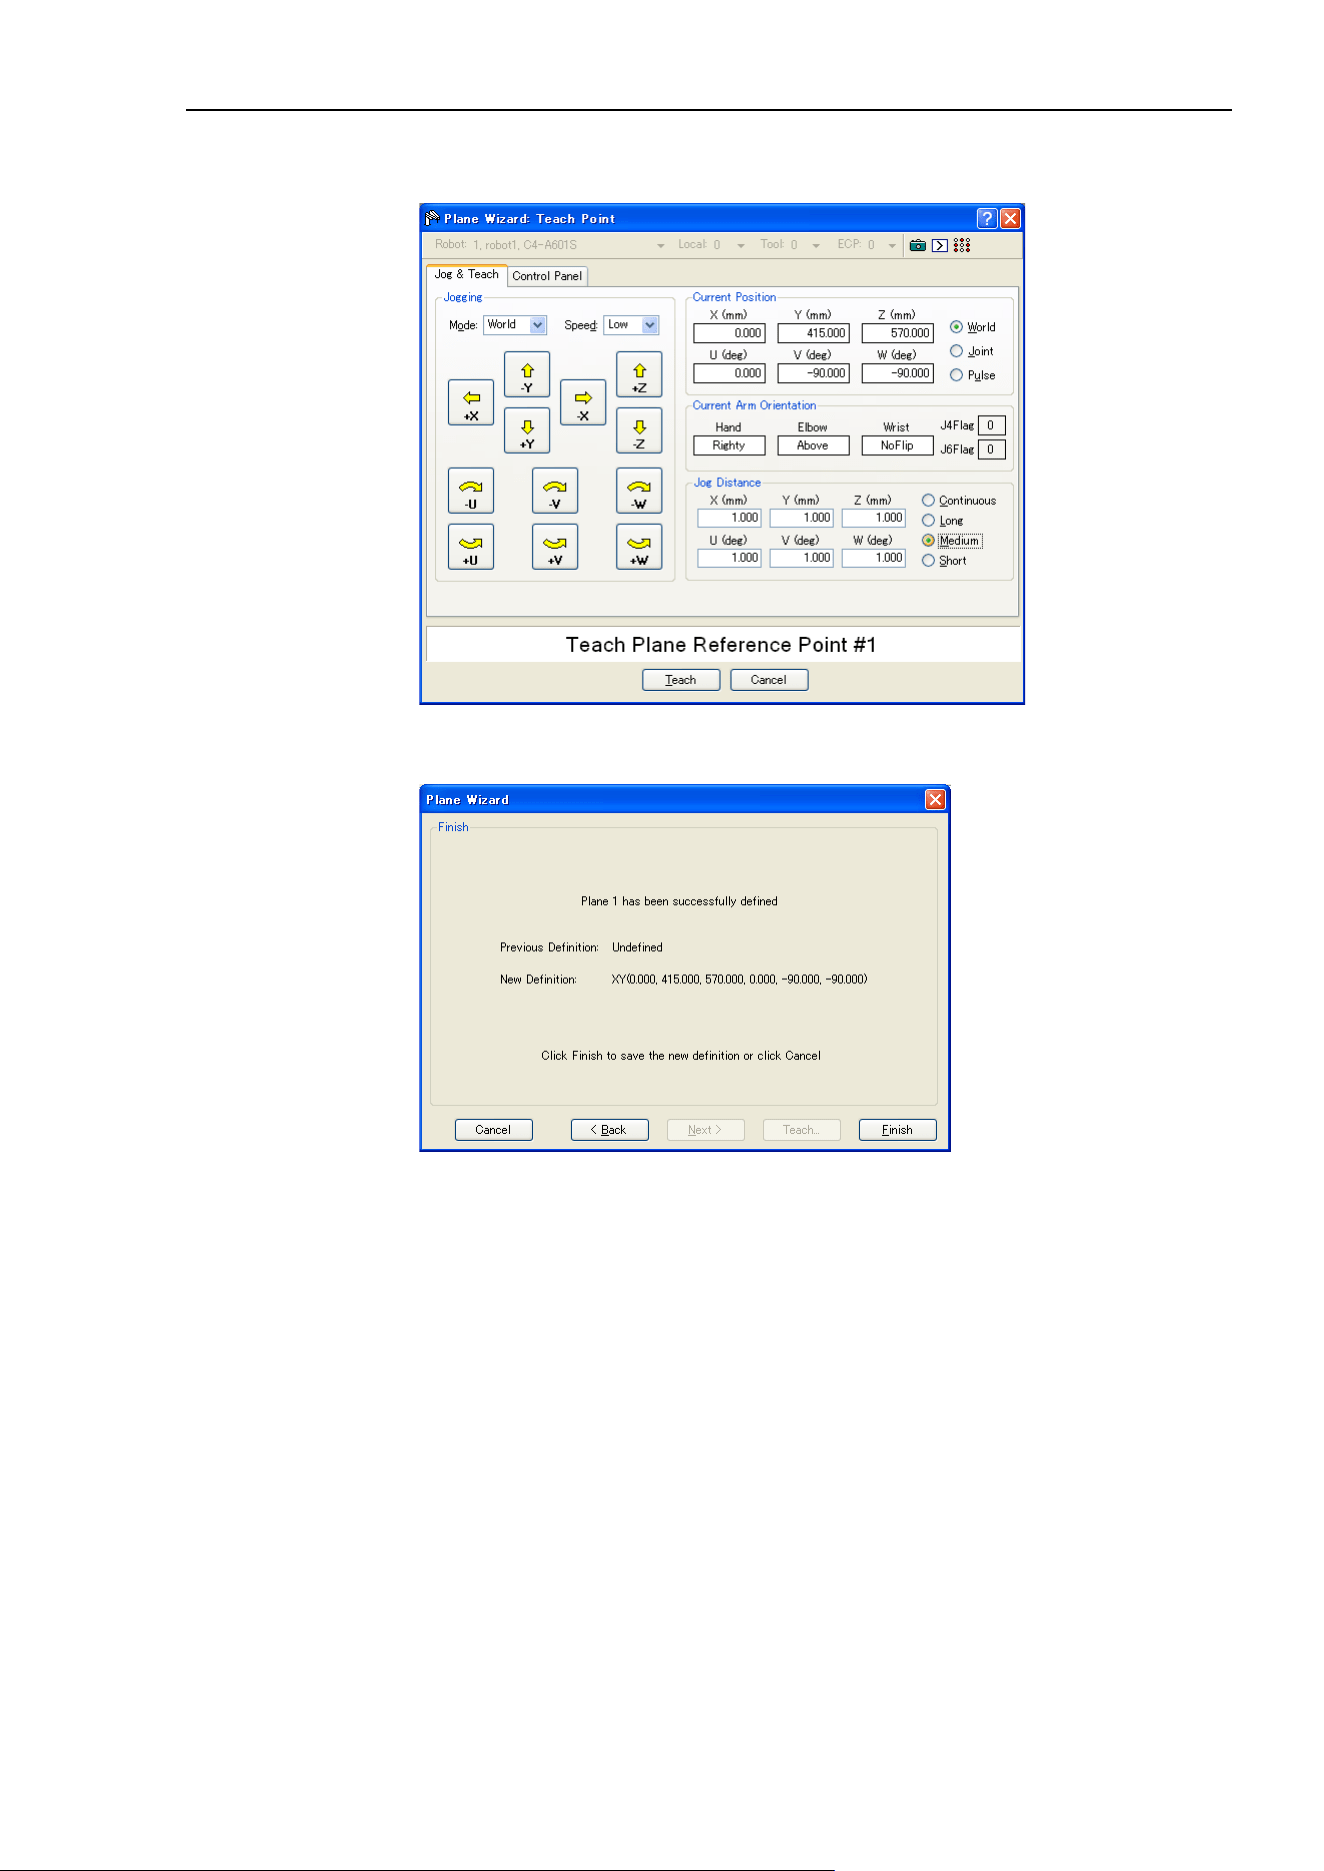
5. The EPSON RC+ 7.0 GUI
EPSON RC+ 7.0 (Ver.7.4) User's Guide Rev.6 121
5. Jog the robot to the reference point to teach the position of it. Click the <Teach>
button to show the following dialog box.
6. The new plane definition is displayed as shown below. Click <Finish> to apply the
new definition.
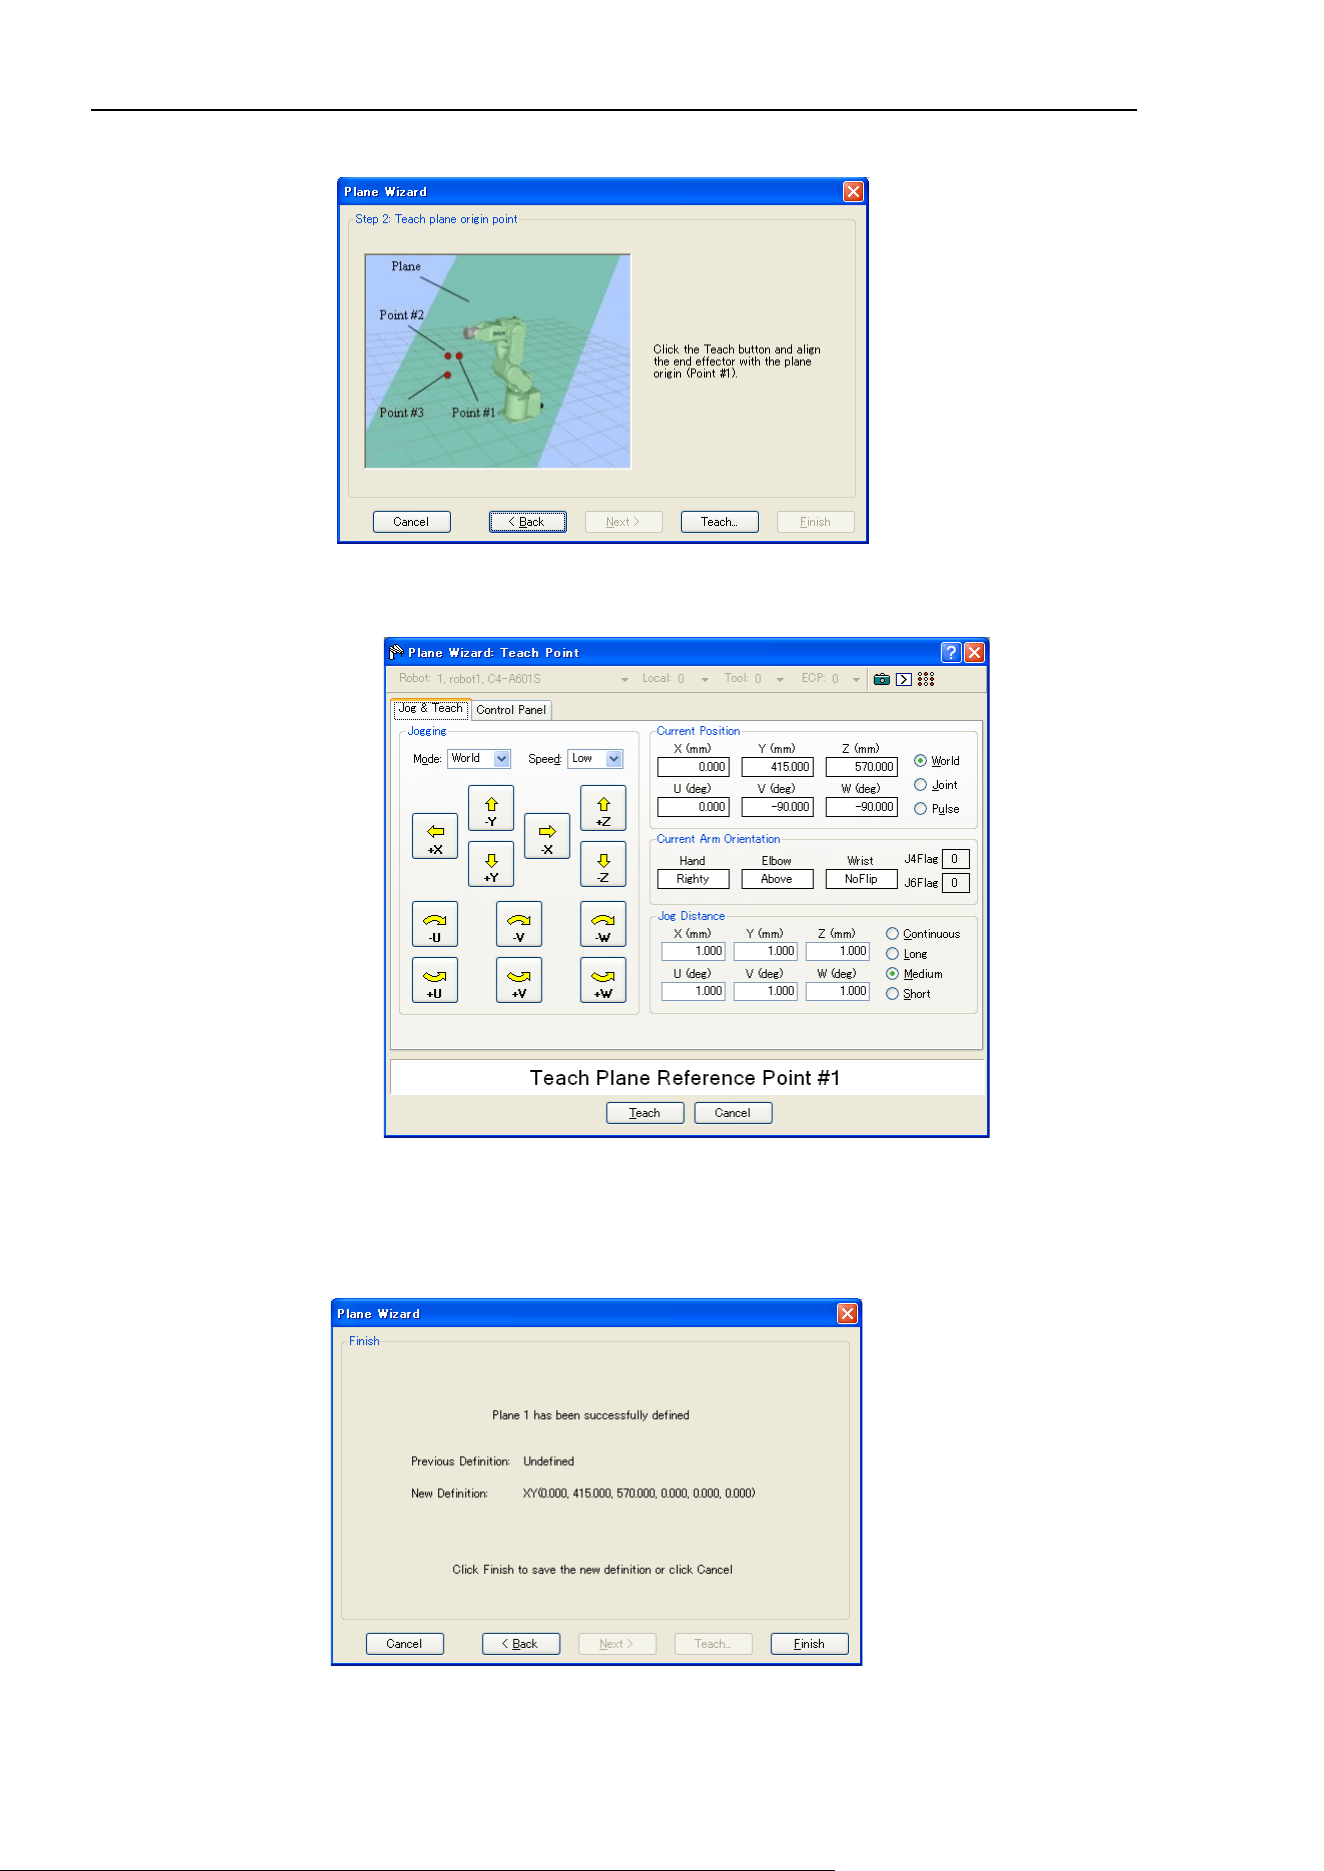
5. The EPSON RC+ 7.0 GUI
122 EPSON RC+ 7.0 (Ver.7.4) User's Guide Rev.6
If the number of points to teach is “3”:
1) Jog the robot to the reference point to teach the position of it (Point #1). Click
the <Teach> button to show the following dialog box.
2) Teach the X axis specified point (Point #2) and the Y axis specified point (Point
#3) in the same way as the step 1).
7. The new plane definition is displayed as shown below. Click <Finish> to apply the
new definition.
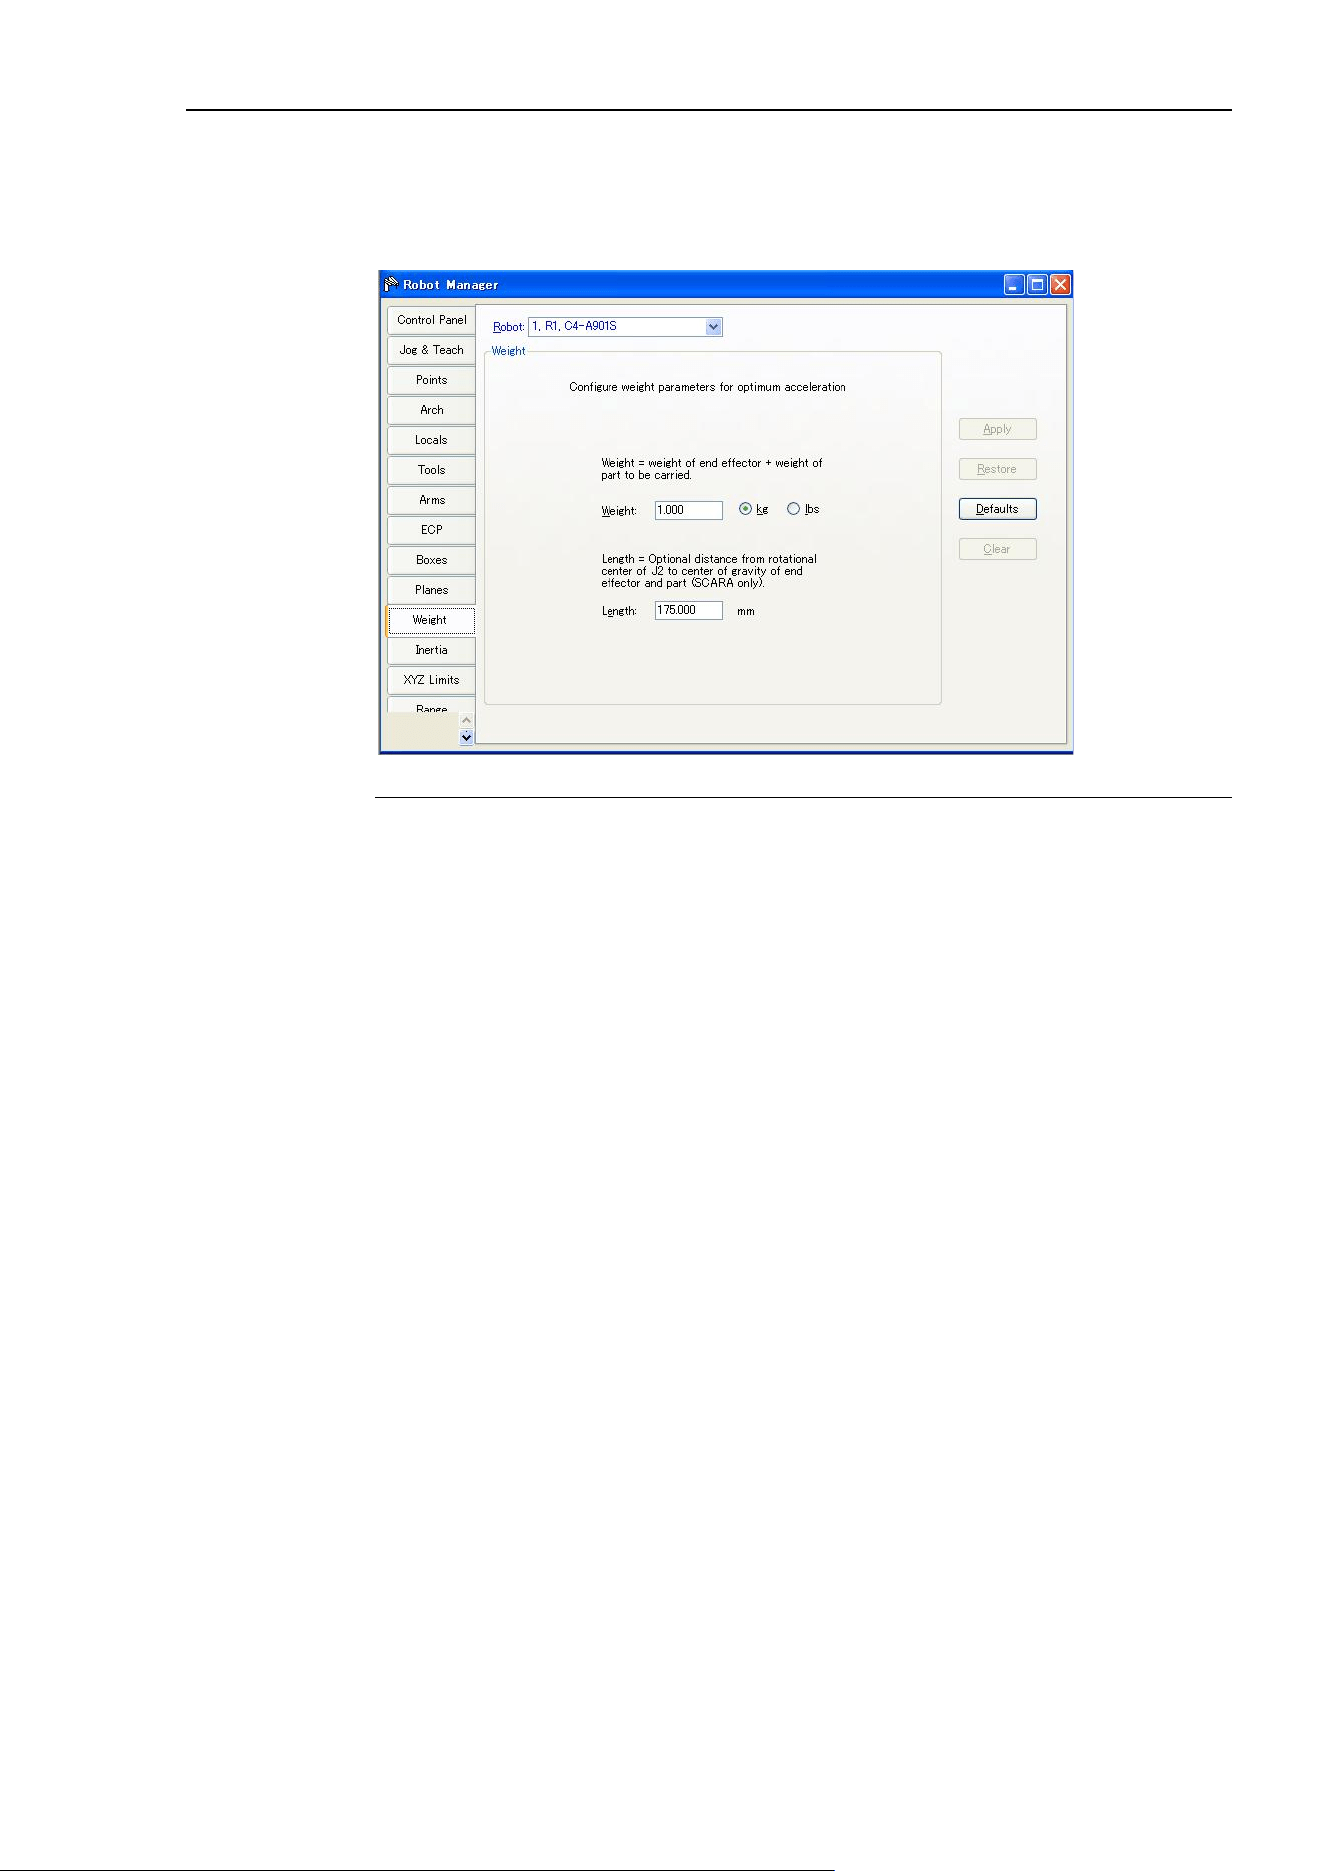
5. The EPSON RC+ 7.0 GUI
EPSON RC+ 7.0 (Ver.7.4) User's Guide Rev.6 123
[Tools]-[Robot Manager]-[Weight] Page
This page is for changing the Weight parameters for the robot.
For details on the Weight parameters, see the SPEL
+
Language Reference: Wight
Statement.
Item Description
Robot
Select a robot.
Weight
Type in the new total weight of the payload on the robot.
Kg/Lb
Choose which unit the weight is represented in: kilograms or pounds.
Length
Type in the new length.
Apply
Sets the current values.
Restore
Reverts back to the previous values.
Defaults
Displays factory default settings.
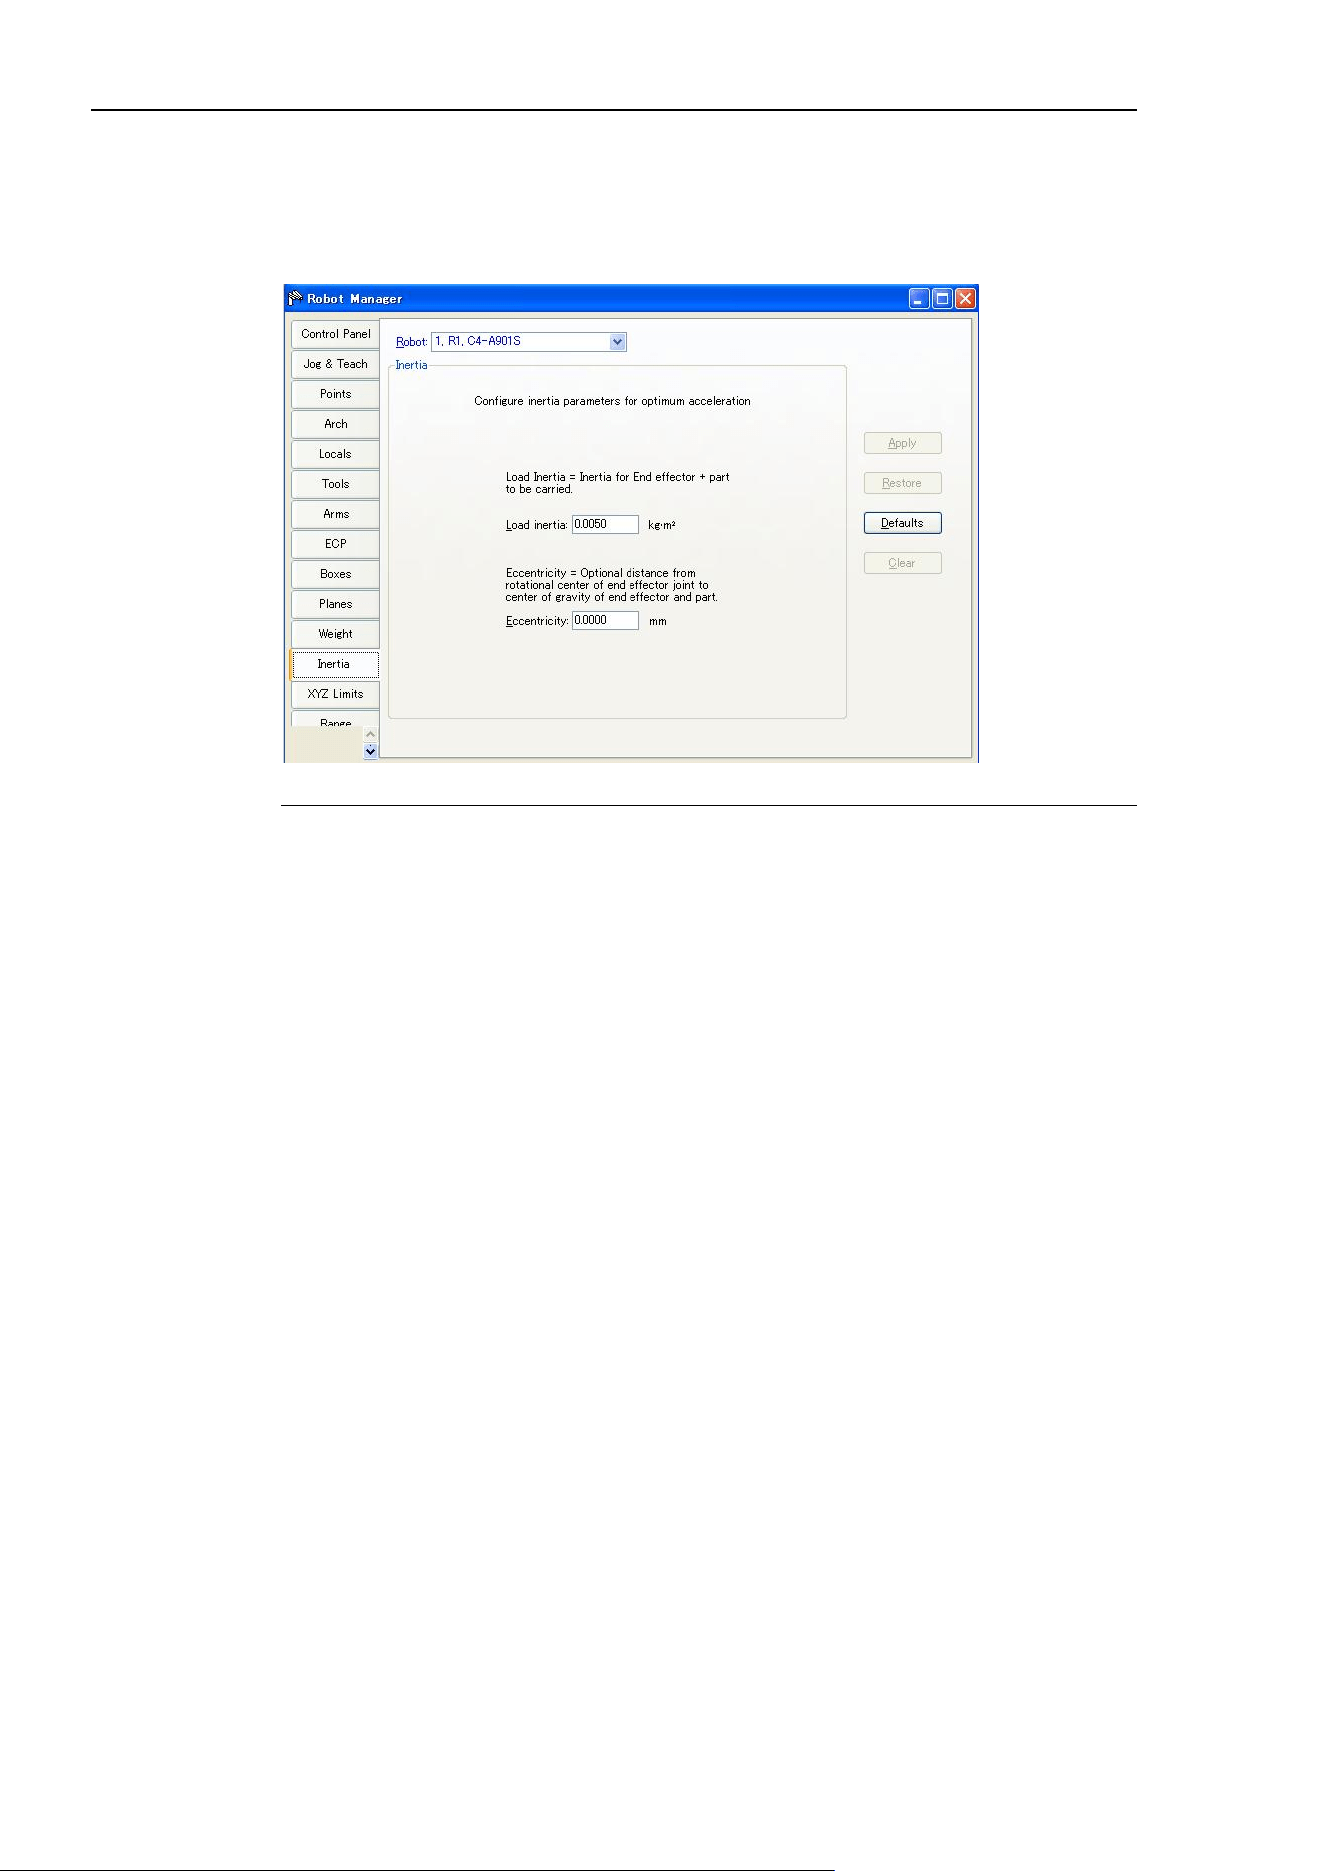
5. The EPSON RC+ 7.0 GUI
124 EPSON RC+ 7.0 (Ver.7.4) User's Guide Rev.6
[Tools]-[Robot Manager]-[Inertia] Page
This page is for changing the Inertia parameters.
For details on the Inertia parameters, see the SPEL
+
Language Reference: Inertia
Statement.
Item Description
Robot
Select a robot.
Load inertia
Type in the new load inertia of the payload on the robot in kg⋅m
2
. This
includes the inertia of end effector plus the part to be carried.
Eccentricity
Type in the new eccentricity value in millimeters. This is the distance from
rotational center of joint 4 to the center of gravity of end effector and part.
Apply
Set the current values.
Restore
Revert back to the previous values.
Defaults
Press the defaults button to display factory default settings.
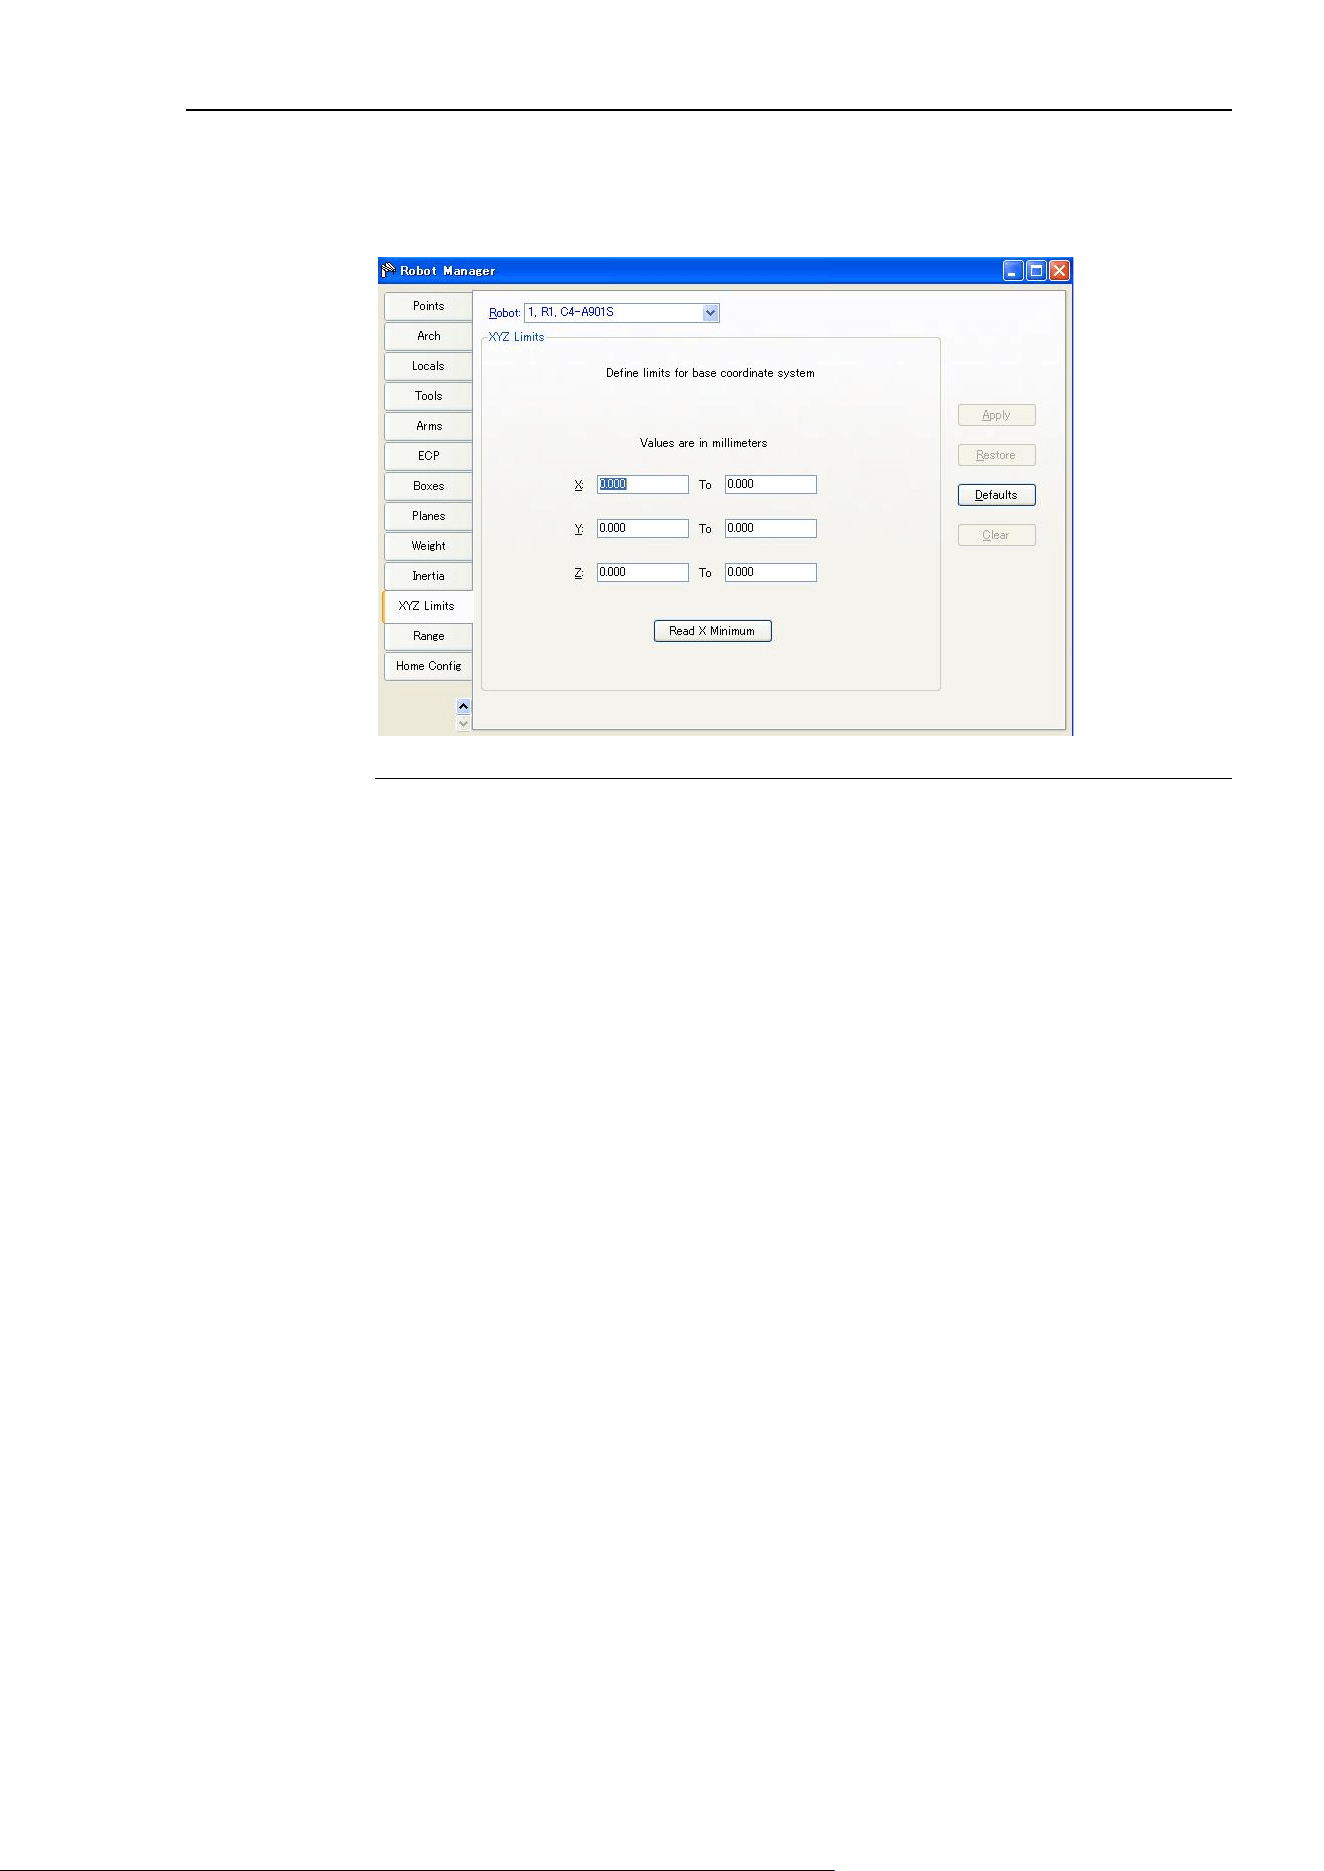
5. The EPSON RC+ 7.0 GUI
EPSON RC+ 7.0 (Ver.7.4) User's Guide Rev.6 125
[Tools]-[Robot Manager]-[XYZ Limits] Page
This page allows you to configure limits for X, Y and Z motion in the robot envelope.
For details on the XYZ limits, see the SPEL
+
Language Reference: XYLim Statement.
Item Description
Robot
Select a robot.
X, Y, Z
Type in the minimum and maximum X, Y, and Z limit values. Setting
both values to zero disables the limits.
Read Current
Click this button to read the value from the current robot position. The
button text shows the axis and minimum or maximum depending on
which text field has the current focus.
Apply
Set the current values.
Restore
Revert back to previous values.
Defaults
Set default values.
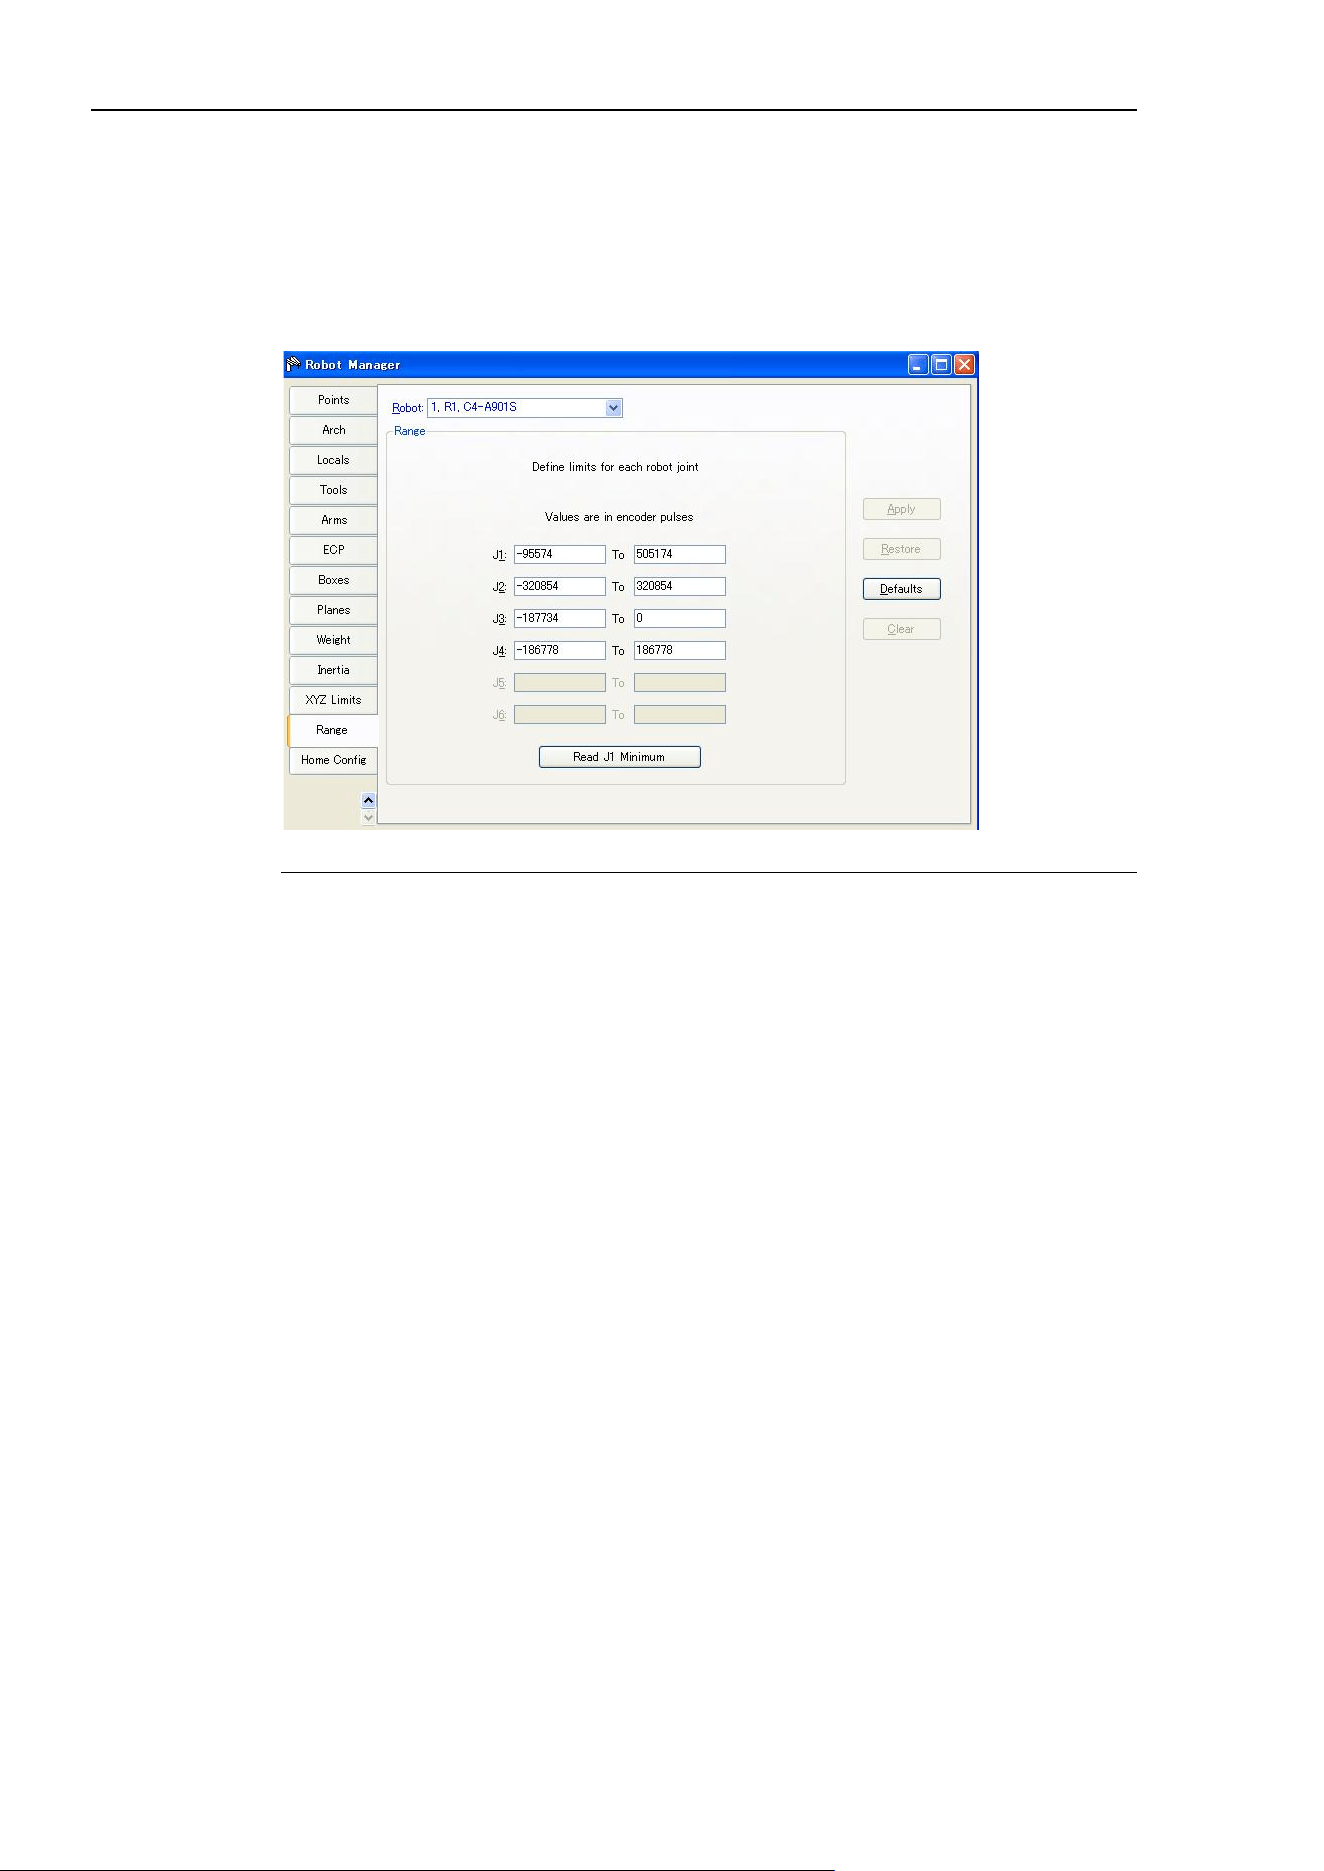
5. The EPSON RC+ 7.0 GUI
126 EPSON RC+ 7.0 (Ver.7.4) User's Guide Rev.6
[Tools]-[Robot Manager]-[Range] Page
This page allows you to configure the robot joint software limits.
For more information on Range, see the SPEL+ Language Reference and the manual for
the robot you are using.
For details on configuring the motion range, see the SPEL
+
Language Reference: Range
Statement.
Item Description
Robot
Select a robot.
J1 - J6
Type in the minimum and maximum encoder pulse values for each joint.
Read Current
Click this button to read the current joint value of the robot into the
current field. The button
text
will change depending on which text field
has focus.
Apply
Save the current changes.
Restore
Revert back to the previous values.
Defaults
Set the default values.
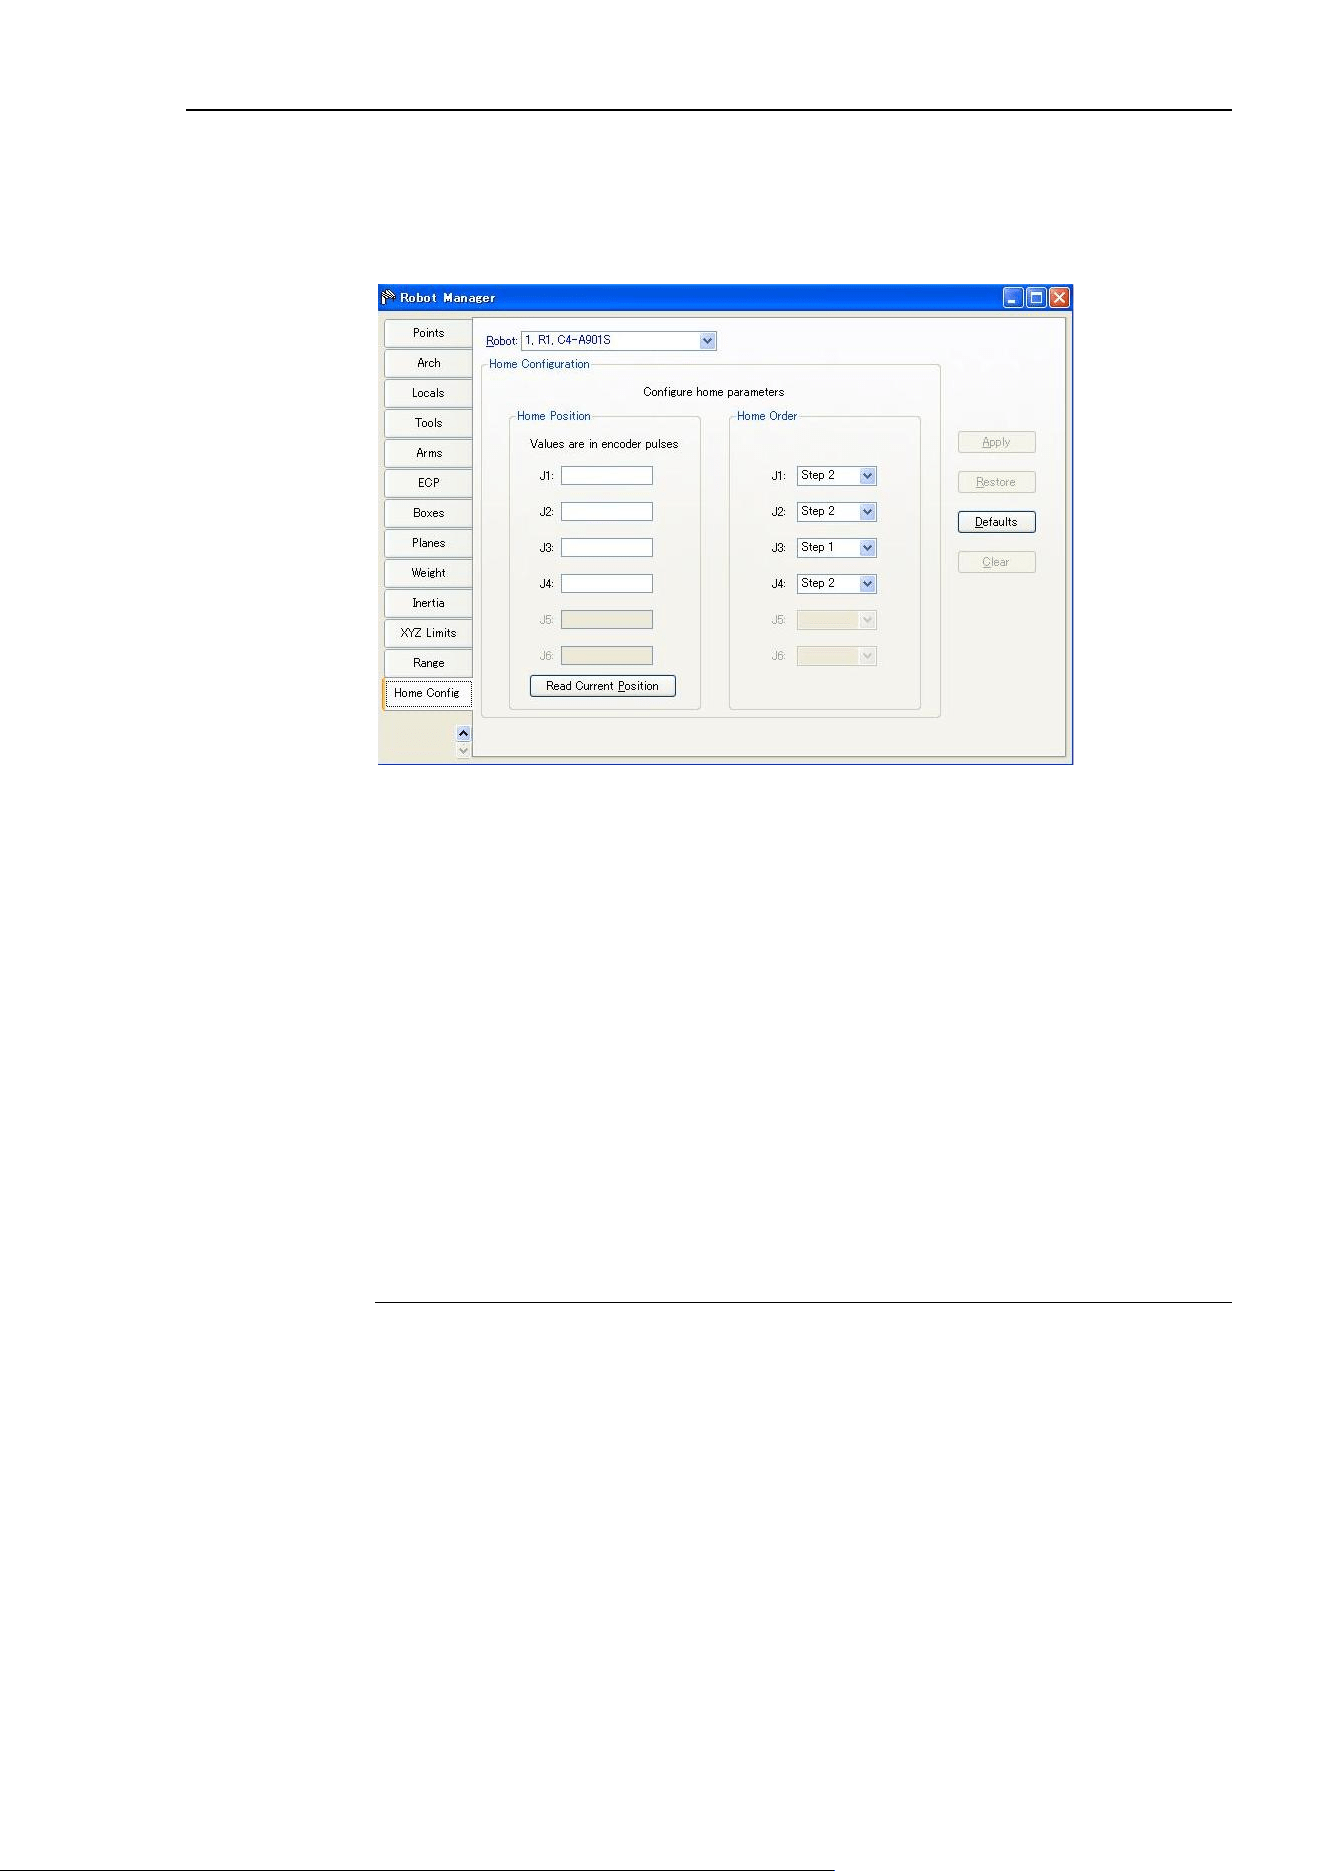
5. The EPSON RC+ 7.0 GUI
EPSON RC+ 7.0 (Ver.7.4) User's Guide Rev.6 127
[Tools]-[Robot Manager]-[Home Config] Page
Home Config allows you to configure the optional user home position.
For details on configuring the home position, see the SPEL
+
Language Reference:
HomeSet Statement.
Changing home position
When you select the [Home Config] tab, the current home position is read from the robot
controller and displayed in the text boxes. If the home position has never been defined,
then the text boxes will be blank.
To define the home position, you can enter an encoder position value for each of the four
robot joints in the text boxes, or you can select the [Jog & Teach] page to jog the robot to
the desired home position, then select the [Home Config] page and click the <Read
Current Position> button to read the current encoder position values.
Changing home order
The home command executes in steps. The number of steps equals the number of joints
on the robot. Select the home step number for each joint using the dropdown list for each
joint. More than one joint can be homed in the same step.
Testing home
After making changes to the home position and home order, you can click the [Robot
Manager]–[Control Panel] tab and click the <Home> button.
Item Description
Robot
Select a robot.
Read Current
Click this button to read the current position encoder pulse value into the
currently selected text field. The button
text
will change according
which text field is selected.
Defaults
Set the value of the [Home order] group box to the default value.
Apply
Save the current changes.
Restore
Revert back to the previous values.
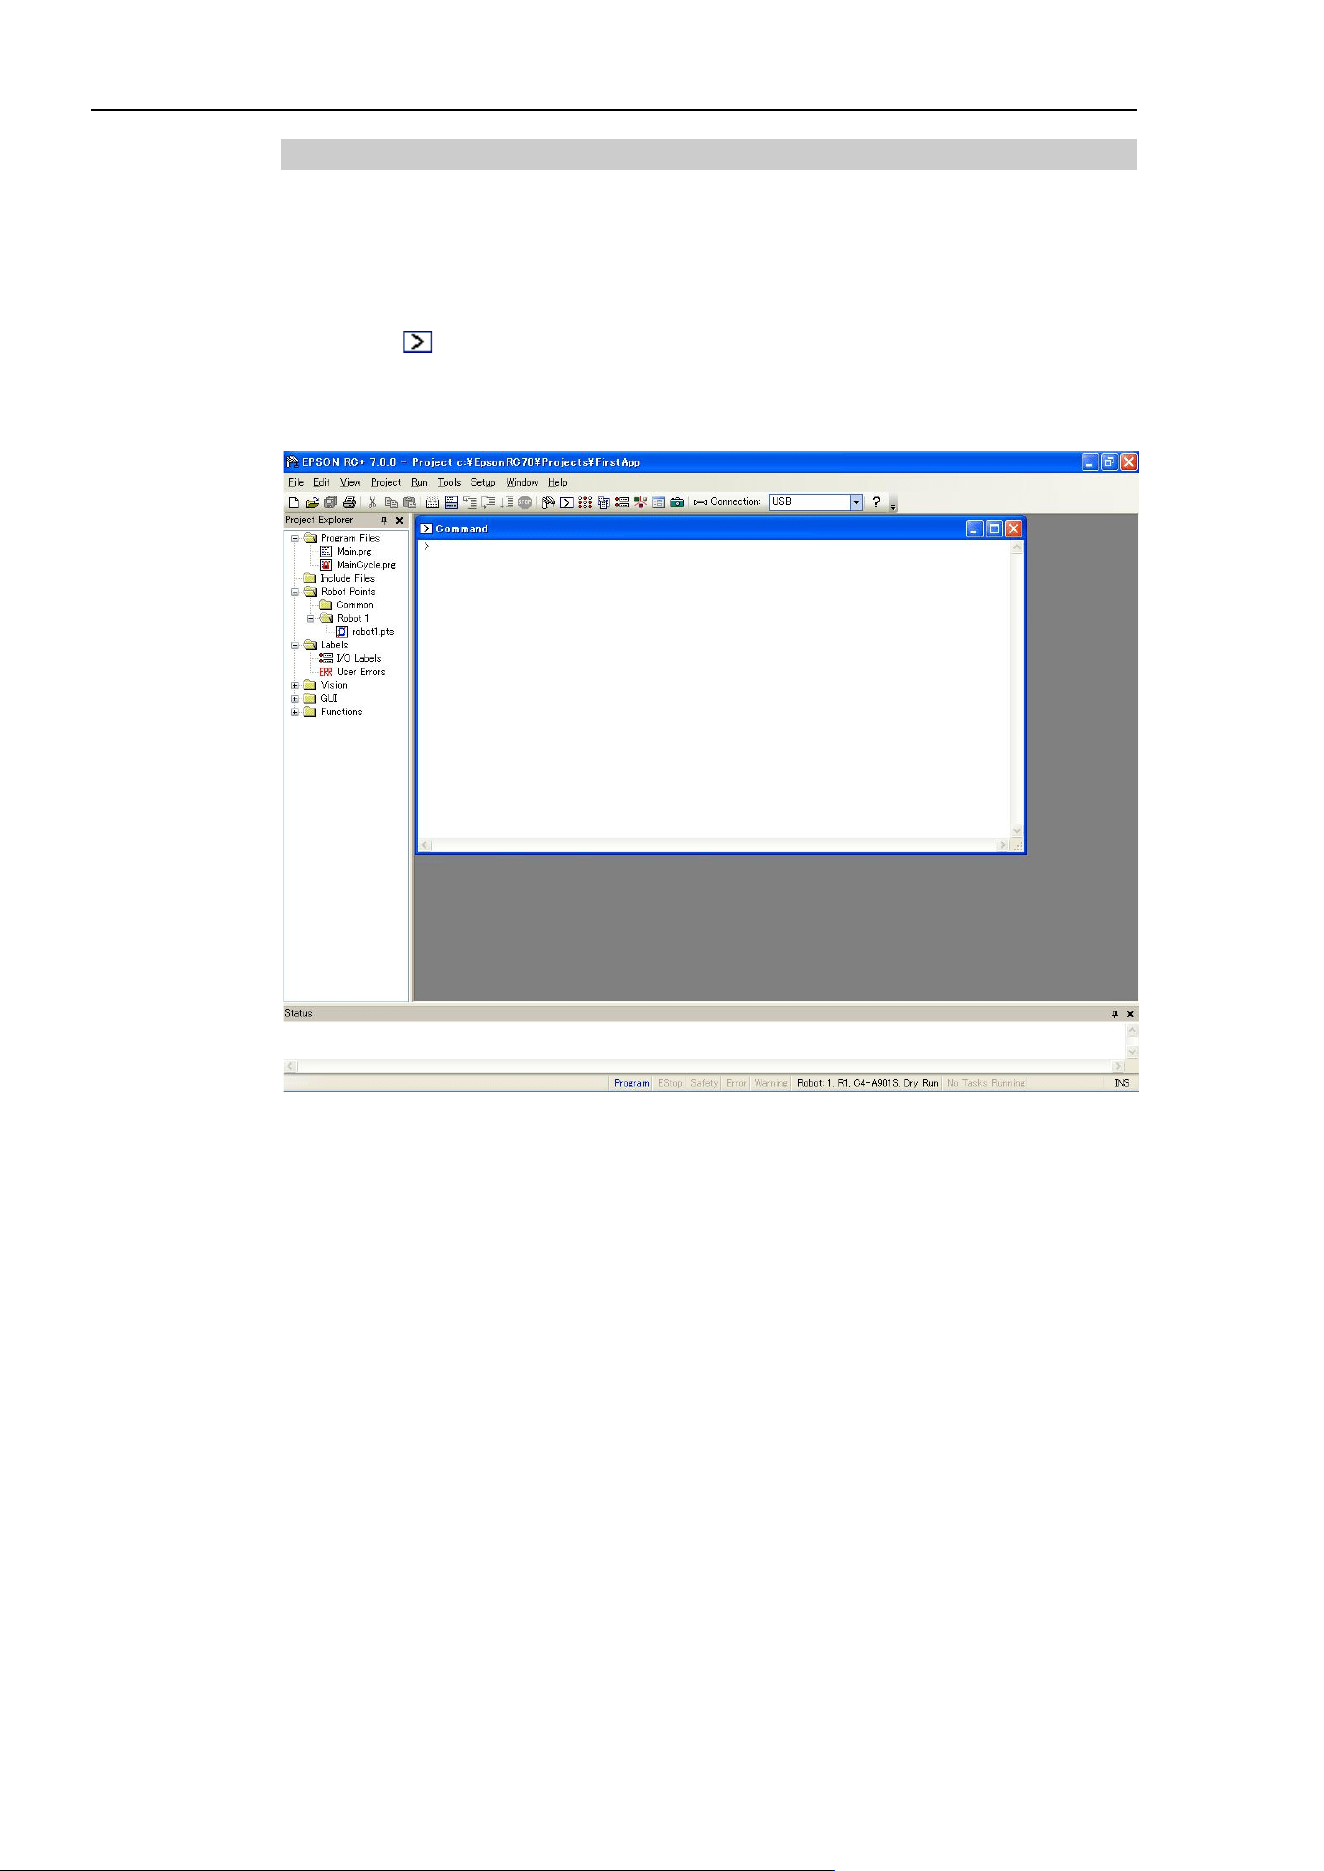
5. The EPSON RC+ 7.0 GUI
128 EPSON RC+ 7.0 (Ver.7.4) User's Guide Rev.6
5.11.2 [Command Window] Command (Tools Menu)
You can execute SPEL
+
commands from the robot controller and view the results.
To open the Command window
Select Command Window from the Tools Menu
Or
Click on the button on the toolbar.
Or
Type Ctrl+M
To execute SPEL+ commands from the Command window
1. Type in the desired command after the prompt (>). Commands can be entered in upper
or lower case.
2. Press <Enter> to execute the command. The cursor can be anywhere on the line when
you press <Enter>.
3. Wait for the prompt to return before typing in a new command.
When an error occurs, an error number will be displayed along with an error message.
You can use the arrow keys or the mouse to move the cursor to any line in the window that
starts with a prompt (>) character and execute it by pressing <Enter>.

5. The EPSON RC+ 7.0 GUI
EPSON RC+ 7.0 (Ver.7.4) User's Guide Rev.6 129
Command Window Keys
Key Action
Ctrl+A
Select entire window.
Ctrl+C
Stop the program and initialize robot controller. If a robot motion
command is in progress, the prompt will return when the command has
been completed.
Ctrl+V
Execute Paste command. Paste from Clipboard to current selection.
Ctrl+W
Re-display last command line after the prompt.
Ctrl+X
Execute Cut command. Cut current selection and put in Clipboard.
Ctrl+Z
Undo last change.
Ctrl+Home
Go to the top of the window.
Ctrl+End
Go to last prompt at end of the window.
?
Translates to "PRINT " when used as the first character of a command.
This can be used to display variables or any statement that requires a
PRINT command.
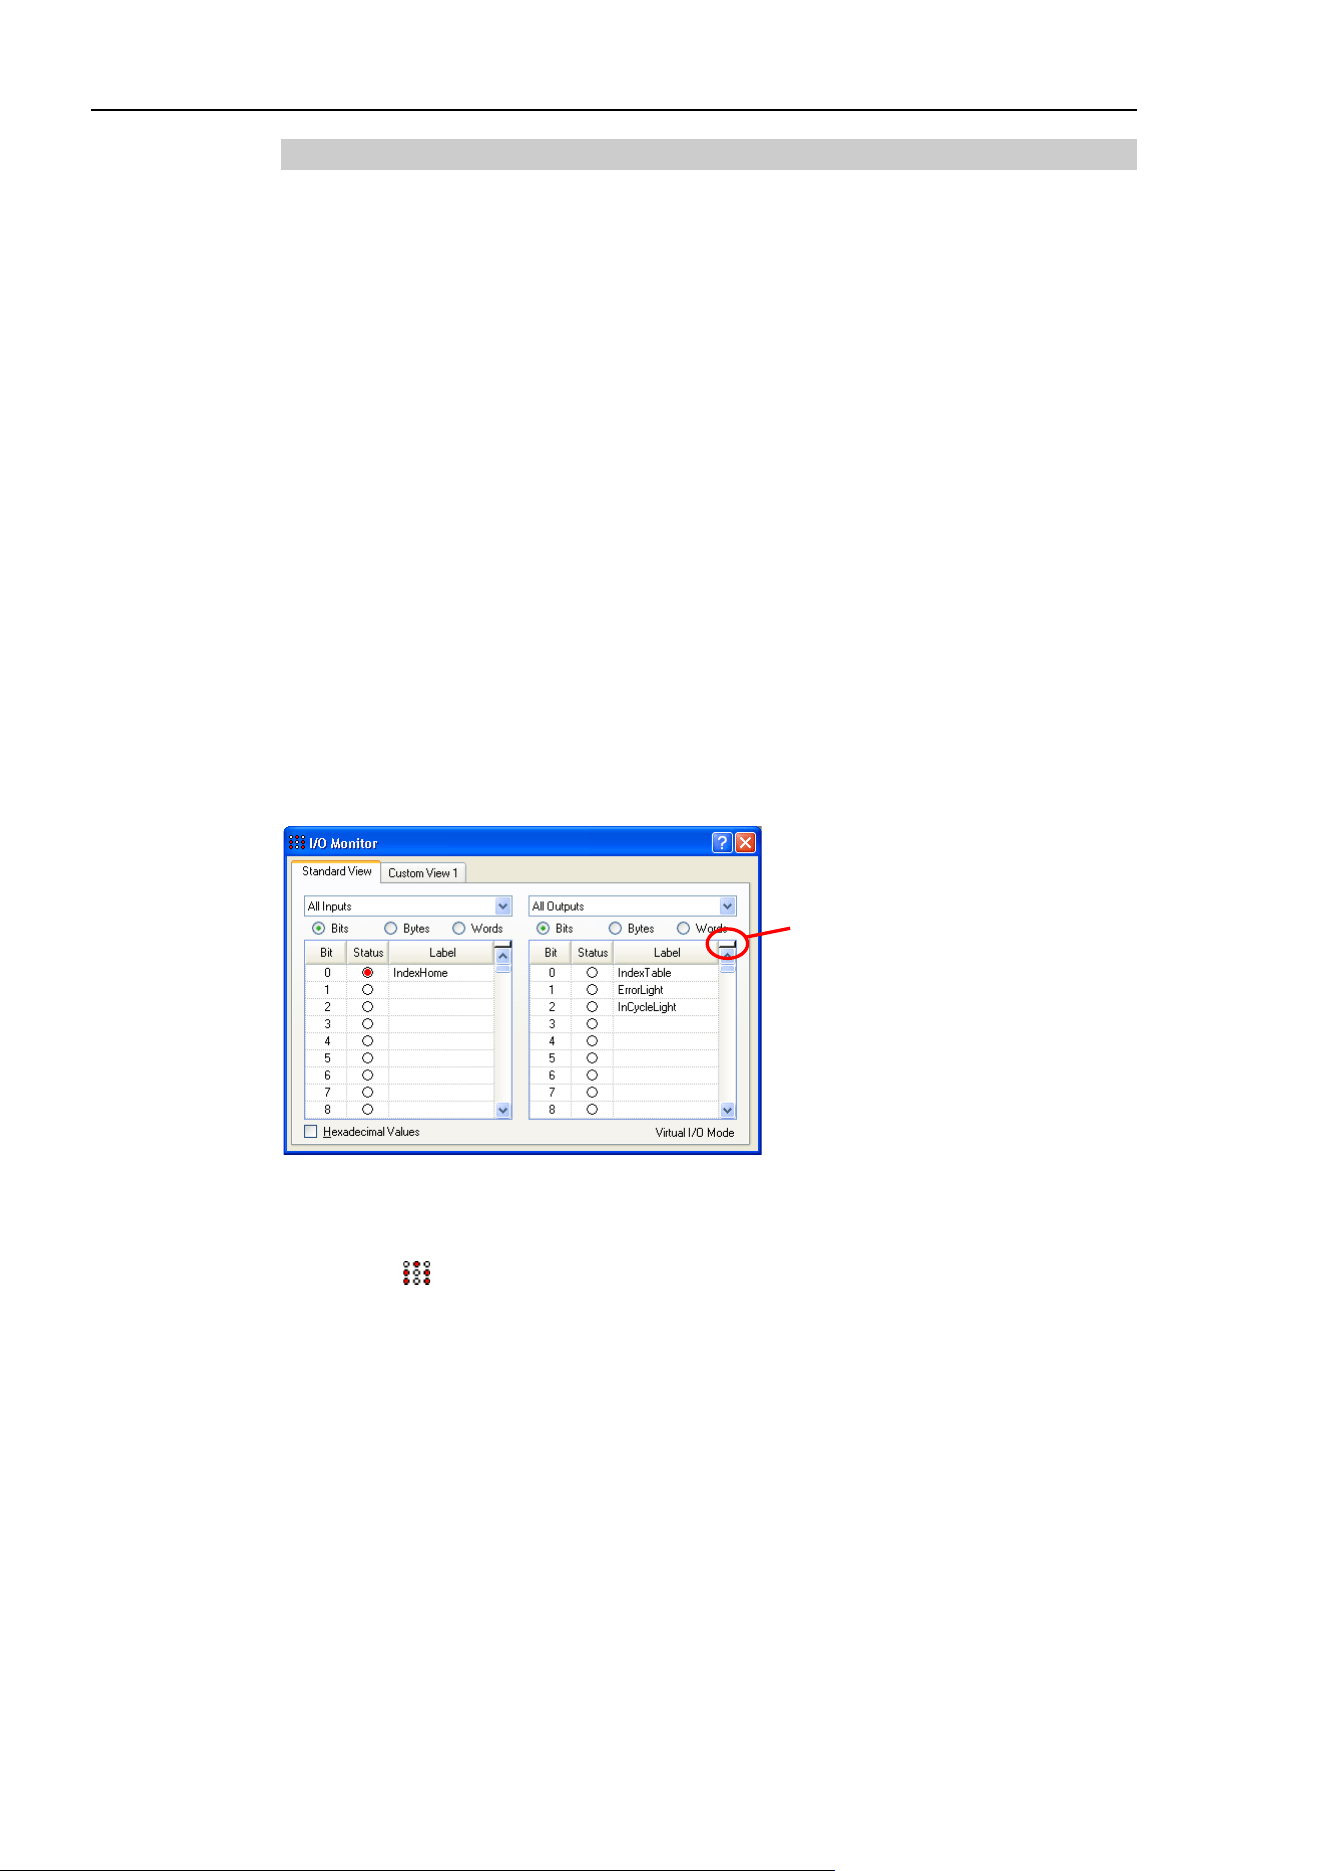
5. The EPSON RC+ 7.0 GUI
130 EPSON RC+ 7.0 (Ver.7.4) User's Guide Rev.6
5.11.3 [I/O Monitor] Command (Tools Menu)
The I/O Monitor window lets you monitor all controller hardware inputs and outputs and
also memory I/O. There are up to four views available: one standard view and three
custom views.
On the standard view, there are two grids. For each grid you can specify which type and
size of I/O to monitor.
For each custom view, you can specify a list of any combination of input, output, or
memory. By default, there is one custom view available. To use the other two custom
views, right click on a tab and check the views you want to be visible. See the section
Custom I/O Views later in this chapter.
Labels that have been defined using the [I/O Label Editor] are displayed next to each bit,
byte, or word.
After the [I/O Monitor] window has been opened, the input and output status for the
current view is constantly updated.
The I/O monitor will always be displayed on top of other child windows, such as program
windows and point windows.
If a description has been entered for an I/O port (bit, byte, or word) in the I/O Label Editor,
then a tool tip will be displayed when the mouse pointer is over the row containing the
port.
You can turn outputs on and off by double clicking on the output LED images in the
Status column.
To open the I/O Monitor
Select I/O Monitor from the Tools Menu.
Or
Click on the tool bar button.
Or
Type Ctrl + I.
Using the I/O Monitor
Select the [Standard View] tab.
Scroll through the grids to locate the desired inputs or outputs to monitor.
You can split each grid into two scroll regions by selecting the split bar in the upper right
corner of the grid and dragging it down. Each scroll region can be individually scrolled.
To turn an output off or on, double click on the LED image for the desired output.
When Virtual I/O is active, you can turn input bits on and off by double clicking on the
input LED images in the Status column.
To view bytes and words in hexadecimal format, check the [Hexadecimal Values]
checkbox.
Grid partition lever
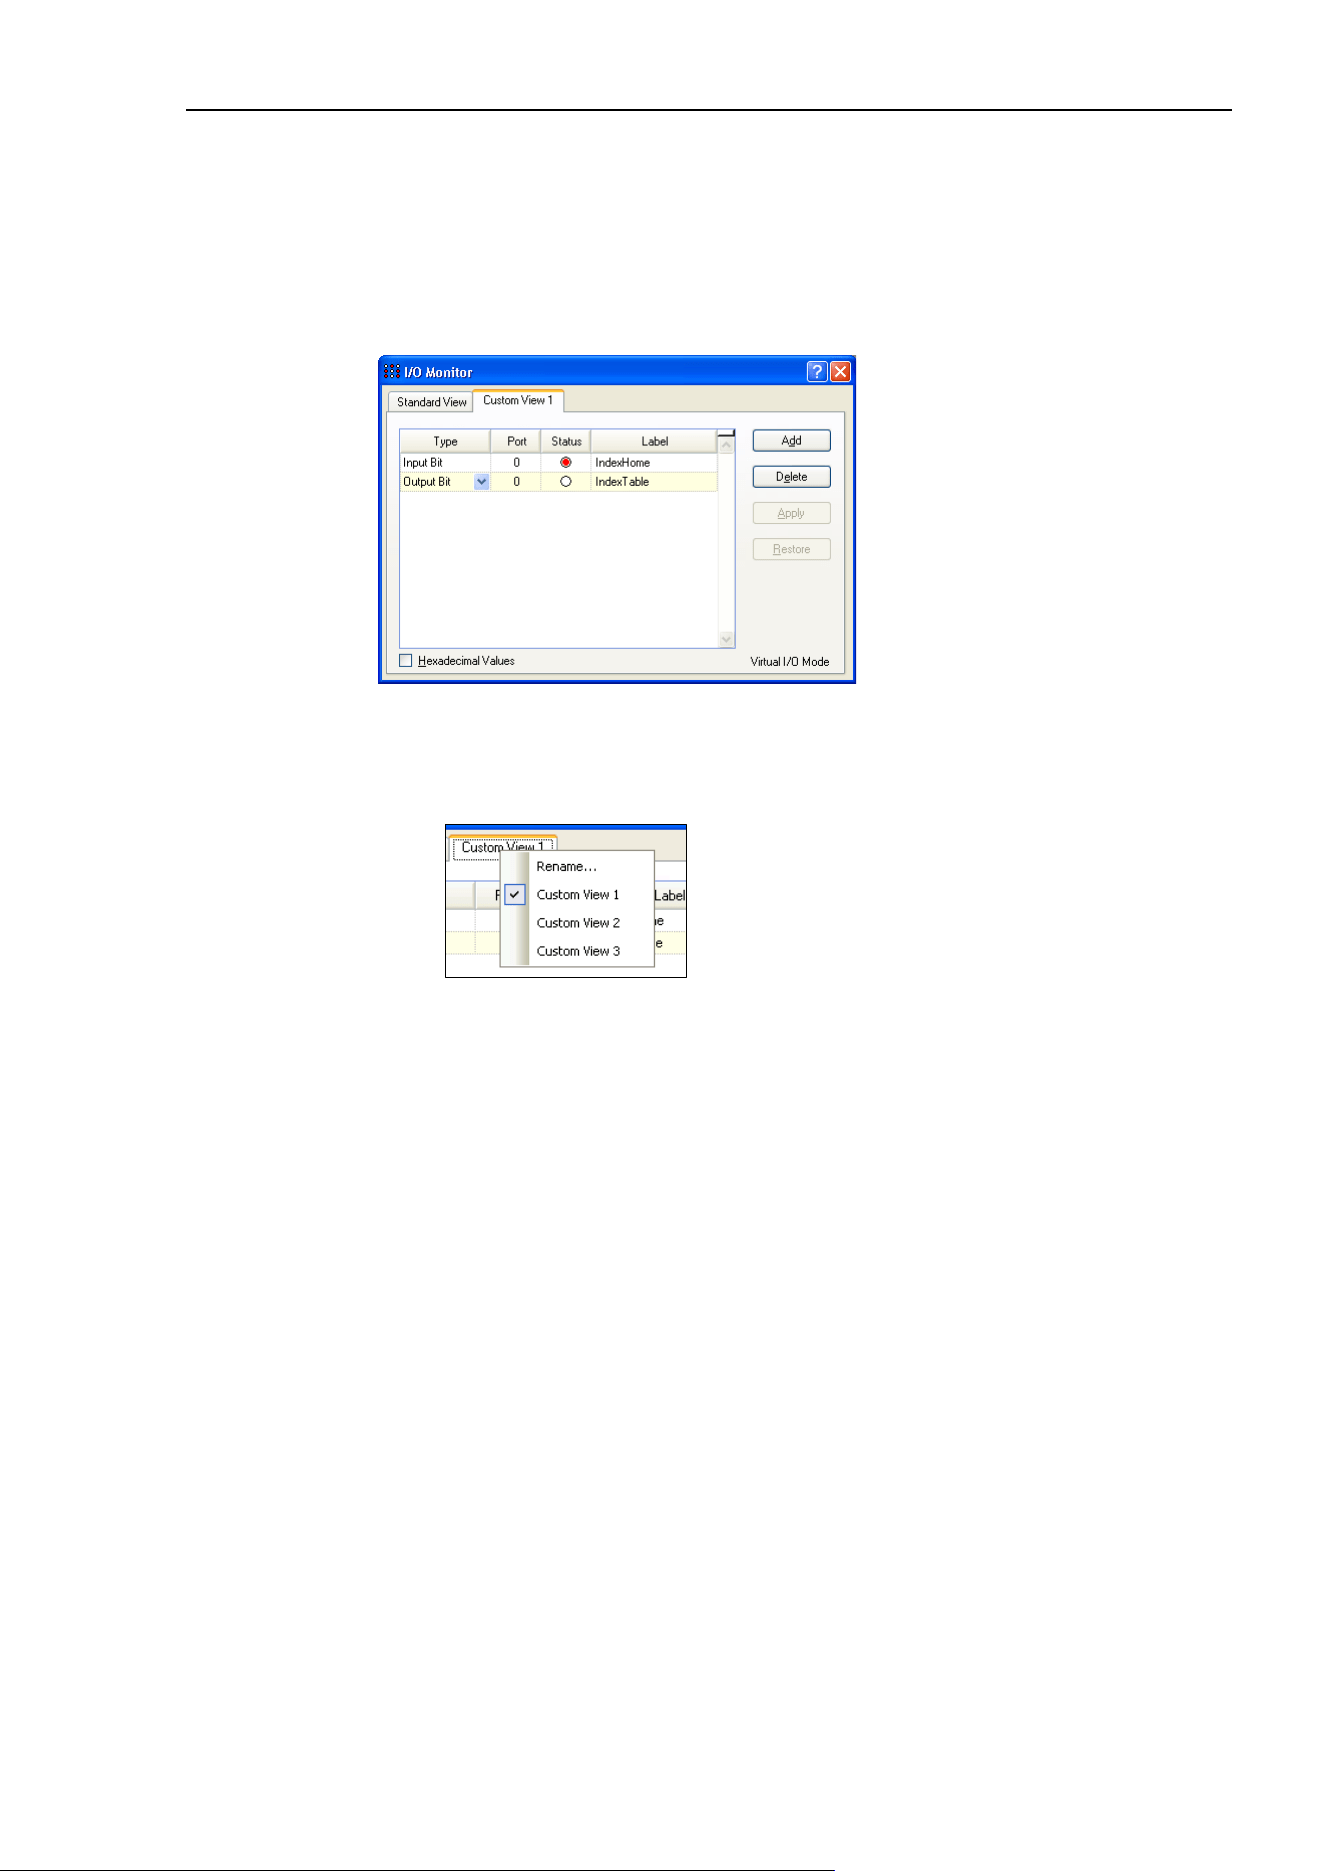
5. The EPSON RC+ 7.0 GUI
EPSON RC+ 7.0 (Ver.7.4) User's Guide Rev.6 131
You can resize the I/O monitor in the vertical direction to show more data. Move your
mouse pointer to the lower right corner of the window to activate a size handle, then click
down and drag the window down or up to the desired size.
Custom I/O Views
You can configure up to three custom I/O views. In each view, you can add any
combination of I/O. You can also change the name of each view and hide each view.
To change a view
1. Click on a custom view tab. If none are currently shown, right click on the [Standard
View] tab and select one of the three custom views to show it.
2. Click the <Add> button to add a new row to the list.
3. Select the <Type> by clicking in the [Type] column, then click the arrow to view a list
of I/O types and select one.
4. In the [Port] column, select the port (bit, byte, or word, depending on I/O type).
5. Add more rows as needed by repeating steps 2 - 4.
<Apply>: Save the changes
<Delete>: Delete a row
<Restore>: Cancel changes.
To rename a view
1. Click on a custom view tab. If none are currently shown, right click on the [Standard
View] tab and select one of the three custom views to show it.
2. Right click on the view tab and select [Rename].
3. Enter the new name for the view.

5. The EPSON RC+ 7.0 GUI
132 EPSON RC+ 7.0 (Ver.7.4) User's Guide Rev.6
5.11.4 Task Manager Command (Tools Menu)
The Task Manager window allows you to Halt (suspend), Resume (continue), and Quit
(abort) tasks.
To open the Task Manager
Select Task Manager from the Tools Menu.
Or
Type Ctrl + T.
Or
Click on the button on the toolbar.
Operation
The Task Manager is used for suspending, resuming, stepping, and stopping tasks.
When Task Manager is started, you will see a grid containing status information for 32
tasks standard tasks and 11 trap tasks. Also, you will see the status information of 16
background tasks if the background task is enabled. There are 8 items shown for each task.
To view all of the columns, use the scroll bar or resize the window.
Task
Number of task from 1 to 32 and 11 trap tasks.
Name
Name of the function that was started as a task.
Status
Current task status: Run, Wait, Halt, Pause, Aborted, Finished.
Type
Task types
Normal This task is a normal task
NoPause
This task does not pause with Pause statement or when
Pause input or Safety Door open occur.
NoEmgAbort This task continuously
processes during the Emergency
Stop or error occurrence.
Line
Current task line number.
Function
Current task function name.
Program
Current task program name.
Start
The date and time that the task was started.
CPU
CPU load factor of each task. This function assists problem detection of
the user created tasks.
In the following Example 1, the function repeats until the standard input I/O bit port 1
turns ON.
Since Sw() is the command in which the tasks are not switched, this task occupies the
process. It may affect other user tasks or the whole system of the Controller. In order to
specify such tasks, use the CPU load factor display.
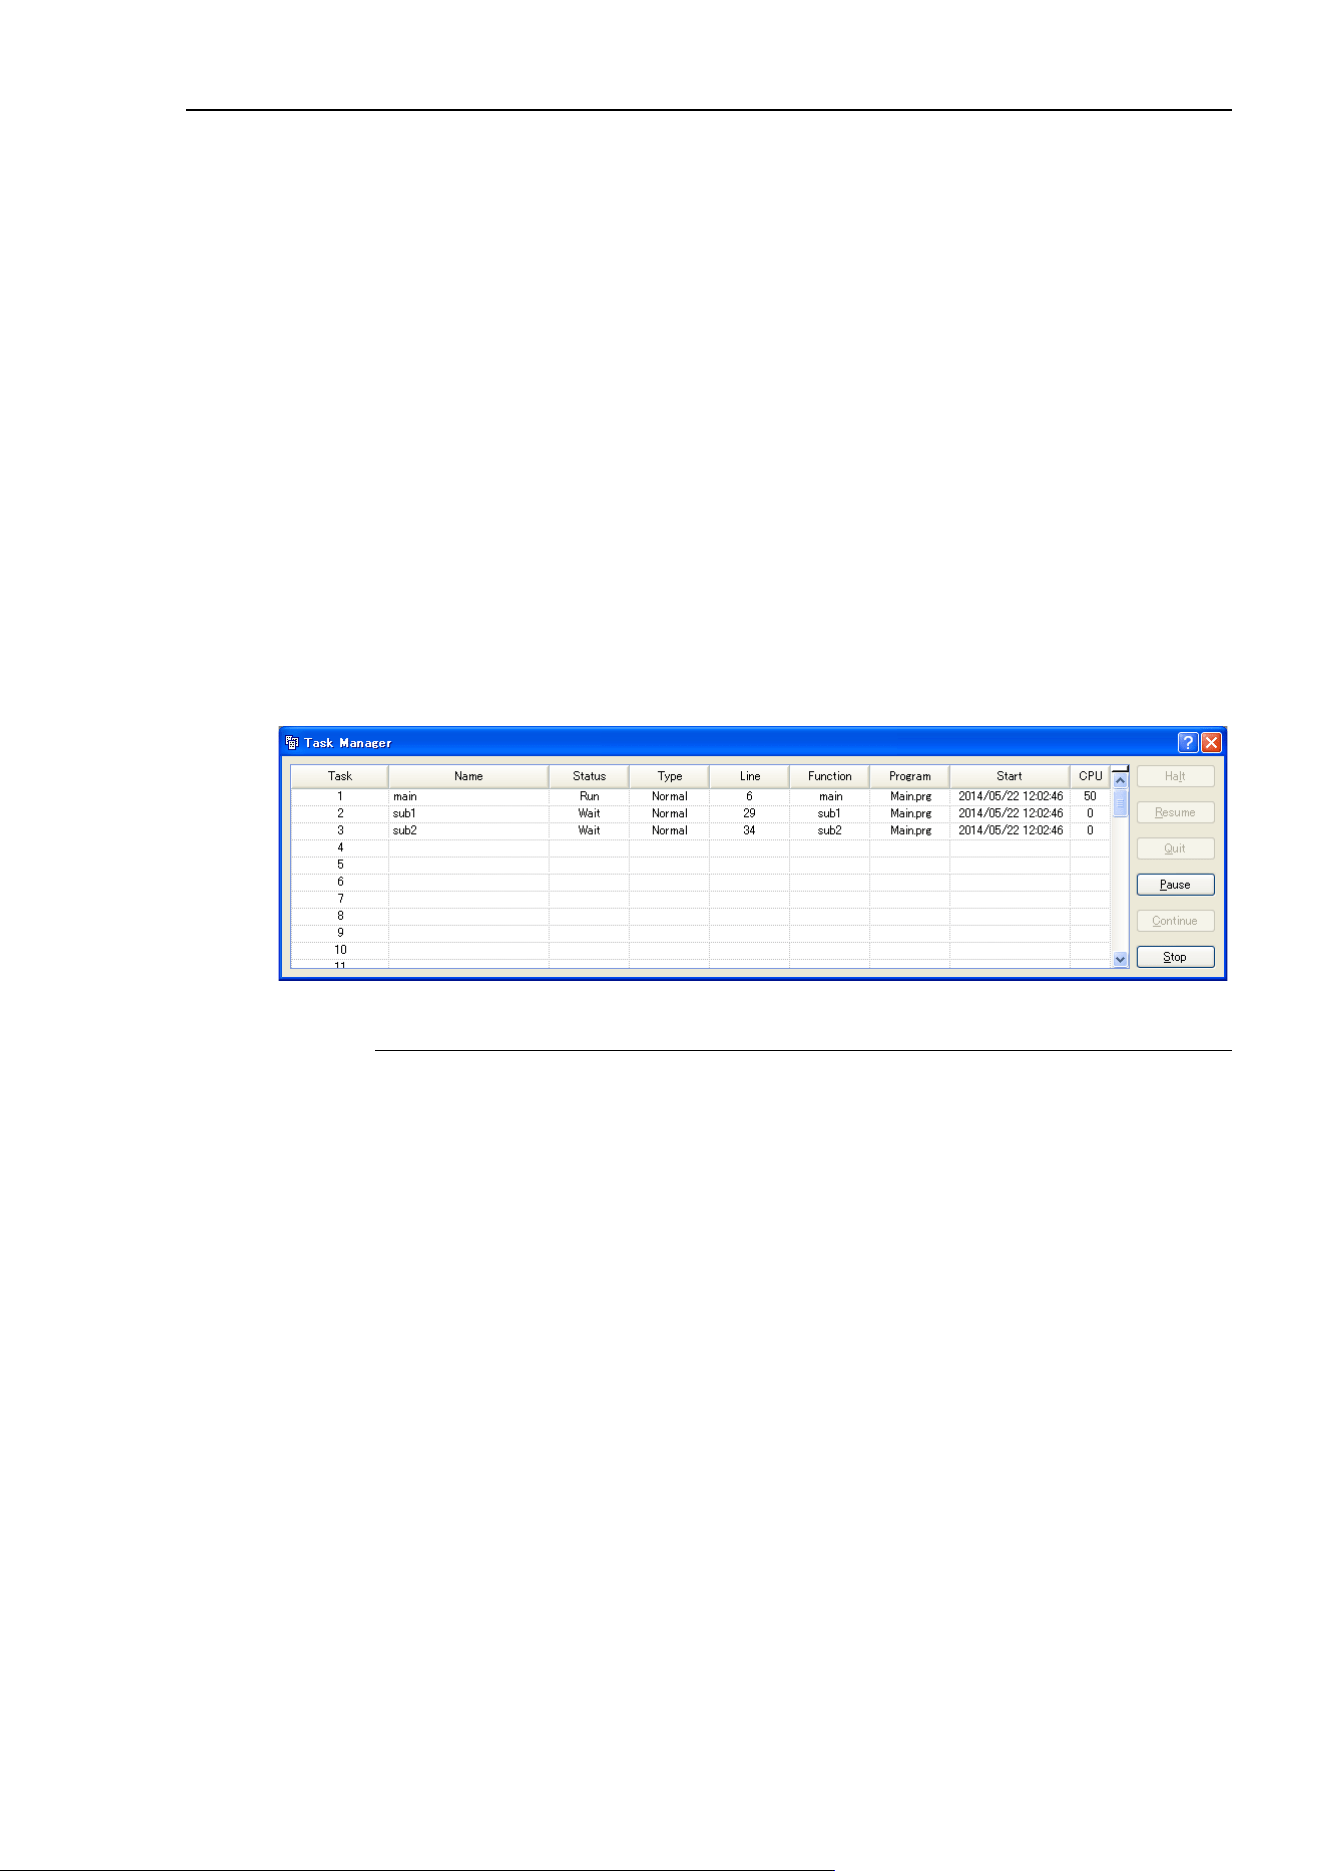
5. The EPSON RC+ 7.0 GUI
EPSON RC+ 7.0 (Ver.7.4) User's Guide Rev.6 133
Restrictions
Displayed values do not guarantee the accuracy. Due to limitations of measuring method,
some differences are included. The load factor of the properly created program is minimal.
Also, in a program like Example 2, commands are executed by other system tasks.
Therefore, the load factor is displayed as “0”.
Example 1)
Function main
Do
Do
If Sw(1) = On Then Exit Do
Loop
Go P(0)
Loop
Fend
Example 2)
Function main
Do
Print "TEST"
Loop
Fend
Item Description
Halt
Suspends the selected task. The halted task can be resumed by the
<
Resume> button. Halt
can only be executed when a task is running
(status is Run). When
Halt is executed, the <Resume>
button will be
enabled. If a motion command
associated with Halt is executed
, the
motion will be completed before the task reaches the
Halt state.
The task also temporarily stops when
the
task is NoPause type or
NoEmgAbort type.
Resume
After one or more tasks are suspended with the <Halt> button, clicking
<
Resume>
make the halted tasks continue where they left off. First, a
confirmation dialog is displayed.
Quit
This button stops the selected task permanently. You cannot resume a
task once you have executed Quit. To restart the task, you must start it
from within a program or from the Run window.
The task also stops
when
the task is NoPause type or NoEmgAbort type.
Pause
This button pauses tasks that can be paused. After pause, you must use
either
<Continue> or <Stop>.
The task does not pause when
the
task is NoPause type or
NoEmgAbort type.
Continue
This button continues all tasks that were paused with the <Pause>
button.
Stop
This button stops all tasks.

5. The EPSON RC+ 7.0 GUI
134 EPSON RC+ 7.0 (Ver.7.4) User's Guide Rev.6
To Halt, Step, Walk, and Resume a task
The <Halt> button will become active after you select a running task.
Click the <Halt> button to stop the task you selected for a moment.
After a task has been halted, the source code will be displayed and the next step will be
indicated. You can click on the <Resume> button to resume execution. (You can also
execute [Step Into], [Step Over], or [Walk] from the [Run] Menu.)
To Pause and Continue tasks
Pause allows you to "suspend" all tasks that can be suspended.
Click on the <Pause> button to pause available tasks. The robot will decelerate to a stop
immediately.
After executing Pause, click on <Continue> to resume all suspended tasks.
To view source code at the current execution line
Select a task row. Then right click and select [Go To Line]. The program editor will be
opened at the current execution line
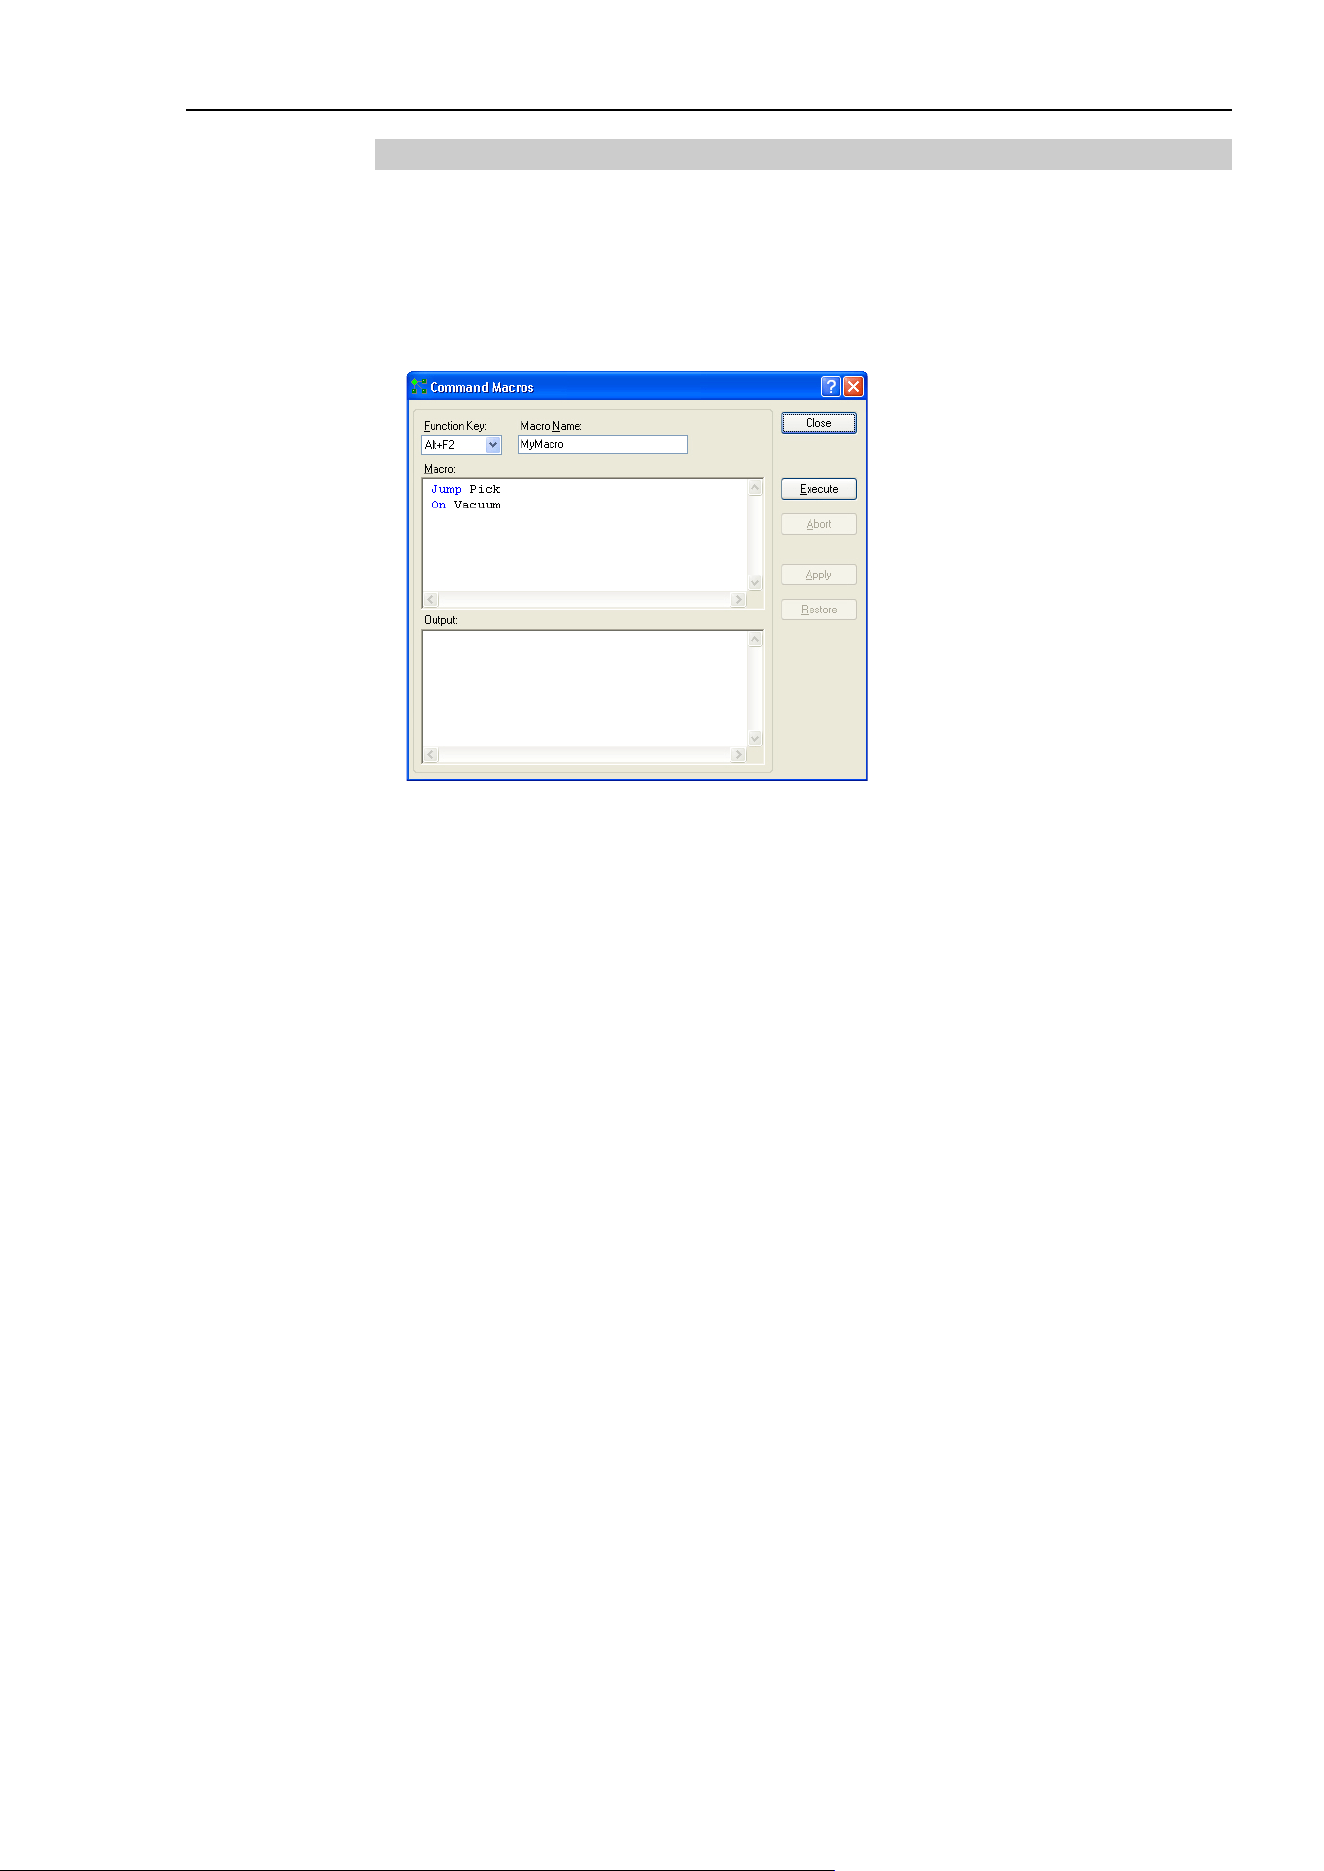
5. The EPSON RC+ 7.0 GUI
EPSON RC+ 7.0 (Ver.7.4) User's Guide Rev.6 135
5.11.5 Macros Command (Tools Menu)
You can create SPEL+ command macros using the Macro Editor. Macros consist of one
or more SPEL+ statements that can be executed from the command window. A macro
statement may use global variables, I/O labels, and point labels. You can assign a macro
to each of the Alt function keys except for Alt+F4, which is a Windows shortcut to close
the application.
1. Select [Tools]-[Macros] to open the [Command Macros] dialog box.
2. Type the macro statements in the [Macro] text box.
3. Click the <Apply> button to save changes.
4. Click <Execute> to run the macro.
5. Click <Close> to close the dialog. You will be prompted to save the macros you have
created or changed.
To open a macro and execute it, type <Alt> + function key. Then click <Execute> to run
it. Macros never execute by pressing the function key. The separate execute step is
provided for safety, since macros can move the robot and control I/O.
Macros can be executed while tasks are running. If invalid commands are executed while
tasks are running, an error will occur.
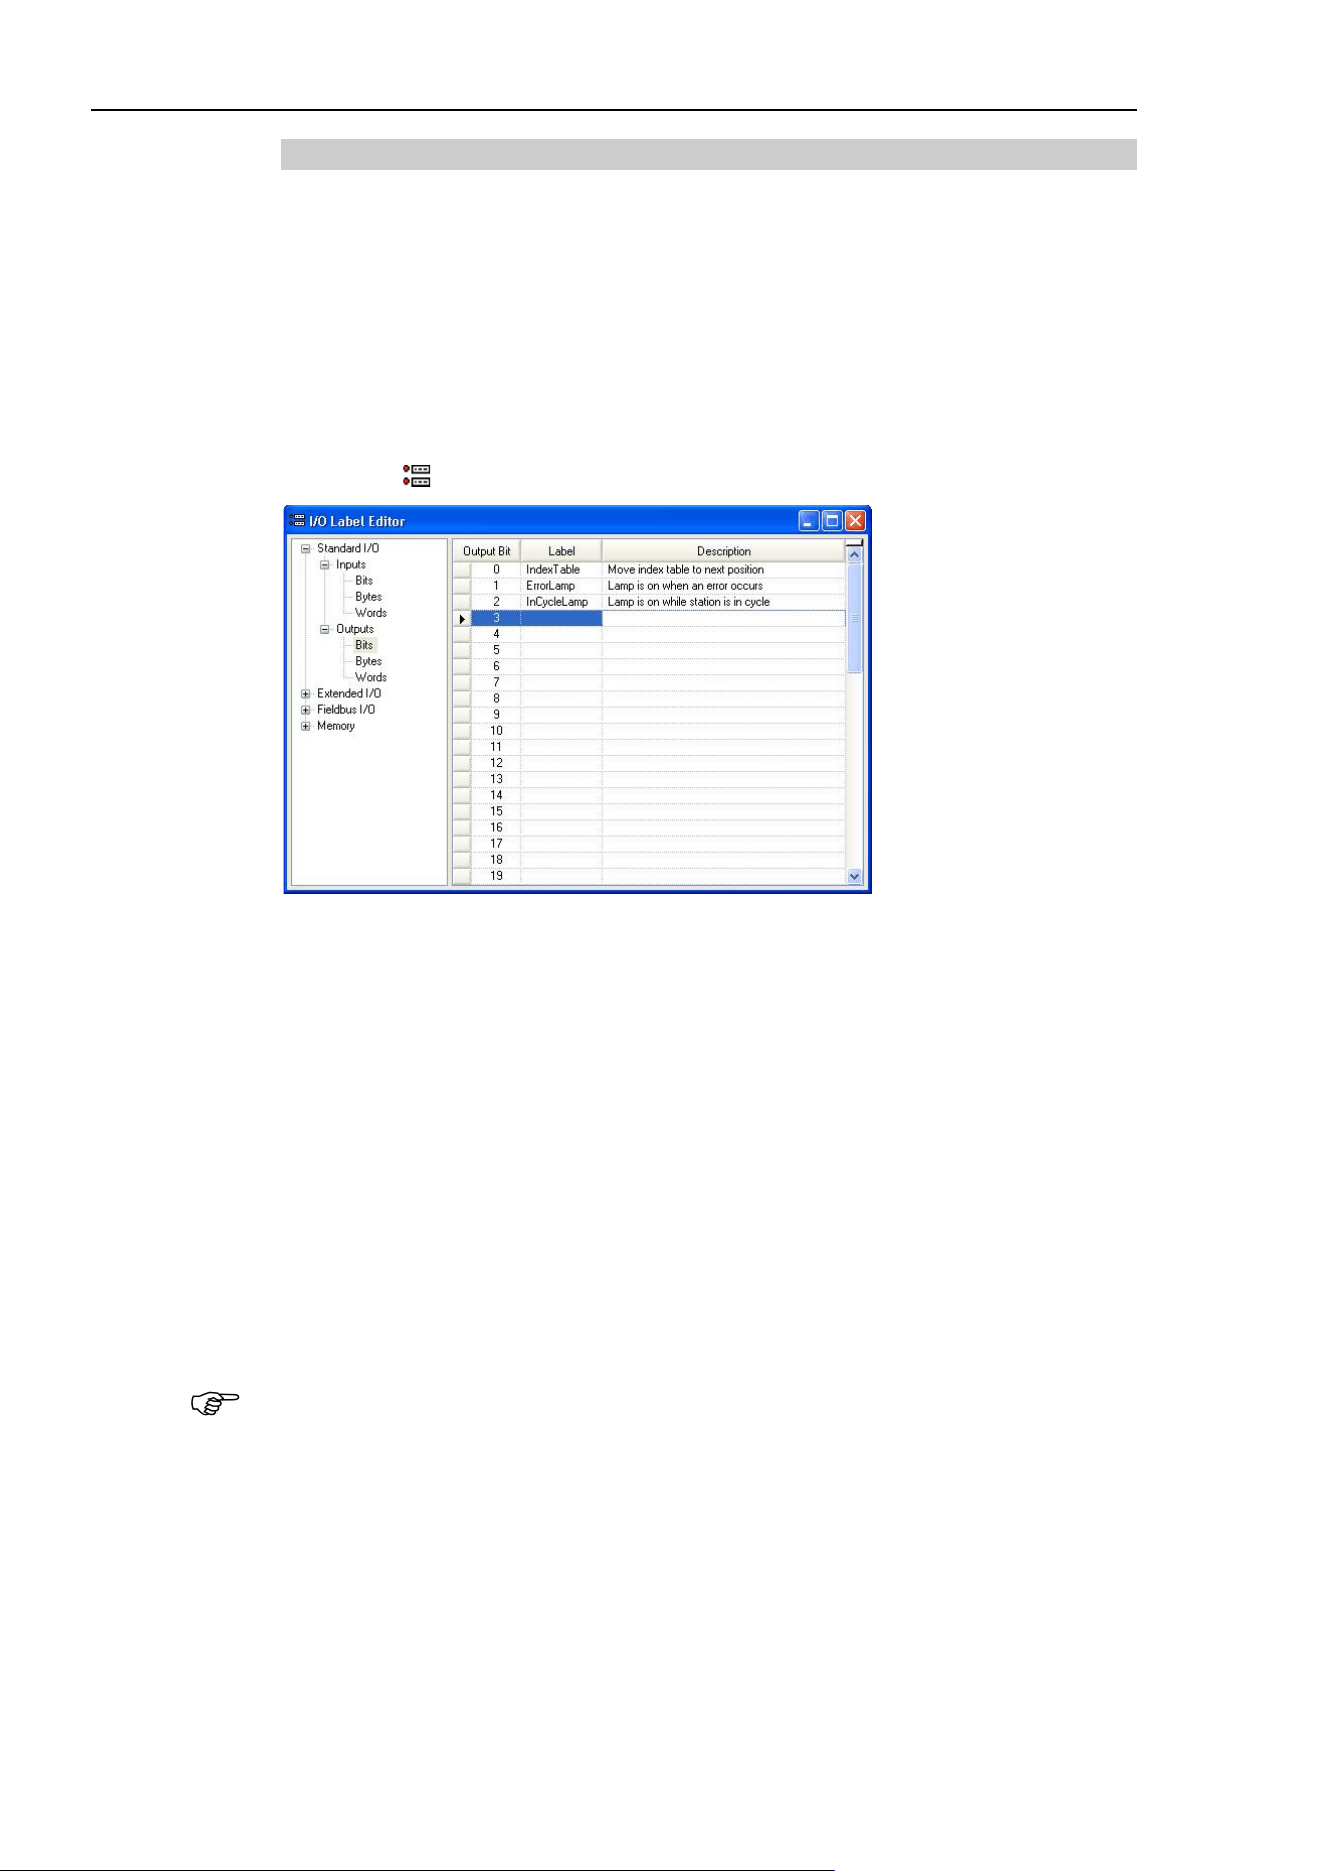
5. The EPSON RC+ 7.0 GUI
136 EPSON RC+ 7.0 (Ver.7.4) User's Guide Rev.6
5.11.6 [I/O Label Editor] Command (Tools Menu)
The I/O label editor lets you define meaningful names for inputs, outputs, and memory I/O
for each project. The labels can be used in your programs, from the Command window, or
in macros. They are also displayed in the I/O Monitor window.
To open the I/O Label Editor
Select I/O Label Editor from the Tools Menu.
Or
Type Ctrl + L.
Or
Click on the button on the toolbar.
The I/O Label Spreadsheet
When you select [I/O Label Editor] from the [Tools] menu, a window opens that contains
a tree and a spreadsheet editor.
The tree on the left side of the window shows the various types of I/O for the controller.
For each type of I/O you can view and edit labels for bits, bytes (8 bits), and words (16
bits).
The first column of the spreadsheet shows the bit, byte, or word number, depending on
which type of I/O you are viewing.
The second column contains the label for each bit, byte, or word in column 1. You can
type in up to 32 characters for a label. Label characters can be alphanumeric or
underscore.
The third column contains the description associated with the label.
If you add a description to an I/O point, then the description will be displayed as a tool tip
on the I/O Monitor.
- The I/O Label Editor shows all available I/O types on your controller.
- For the Editor version, the I/O Label Editor shows the all I/O types.
For example, you can edit Fieldbus I/O labels, but you may not have a Fieldbus board
installed in the controller.
NOTE

5. The EPSON RC+ 7.0 GUI
EPSON RC+ 7.0 (Ver.7.4) User's Guide Rev.6 137
To add or edit a label
Select the type of I/O you want to label in the tree. After you select the I/O type, the
spreadsheet will be refreshed to display the labels for that type. The number of rows in the
spreadsheet equals the number of bits, bytes, or words available for the type you have
selected.
Use the mouse to scroll through the spreadsheet and put the cursor in the [Label] field next
to the bit, bytes, or words number that you want to add a label to. Type in the label, which
can be up to 32 alphanumeric characters without any spaces. Optionally, you can type a
description for the label in the [Description] field.
After adding or editing labels, save the changes by executing [Save] from the [File] menu
or by clicking on the <Save Project> toolbar button. If any duplicate labels are
detected, an error message will be displayed and the save operation will be aborted. You
must correct the duplication before you can save the labels successfully.
To cut and paste labels and descriptions
You can cut and paste labels and descriptions by selecting with the mouse, then executing
[Copy], [Cut], and [Paste] from the [Edit] menu.
You can also cut and paste entire rows using the following steps:
1. Select one or more rows by using the row selectors on the left and execute either the
[Cut] or [Copy] command from the [Edit] menu. When selecting multiple rows, hold
down the shift or control key while selecting rows with the mouse.
2. Select the row where you want to start the paste by clicking the row selector on the left
of the row.
3. Execute the [Paste] command from the [Edit] menu.
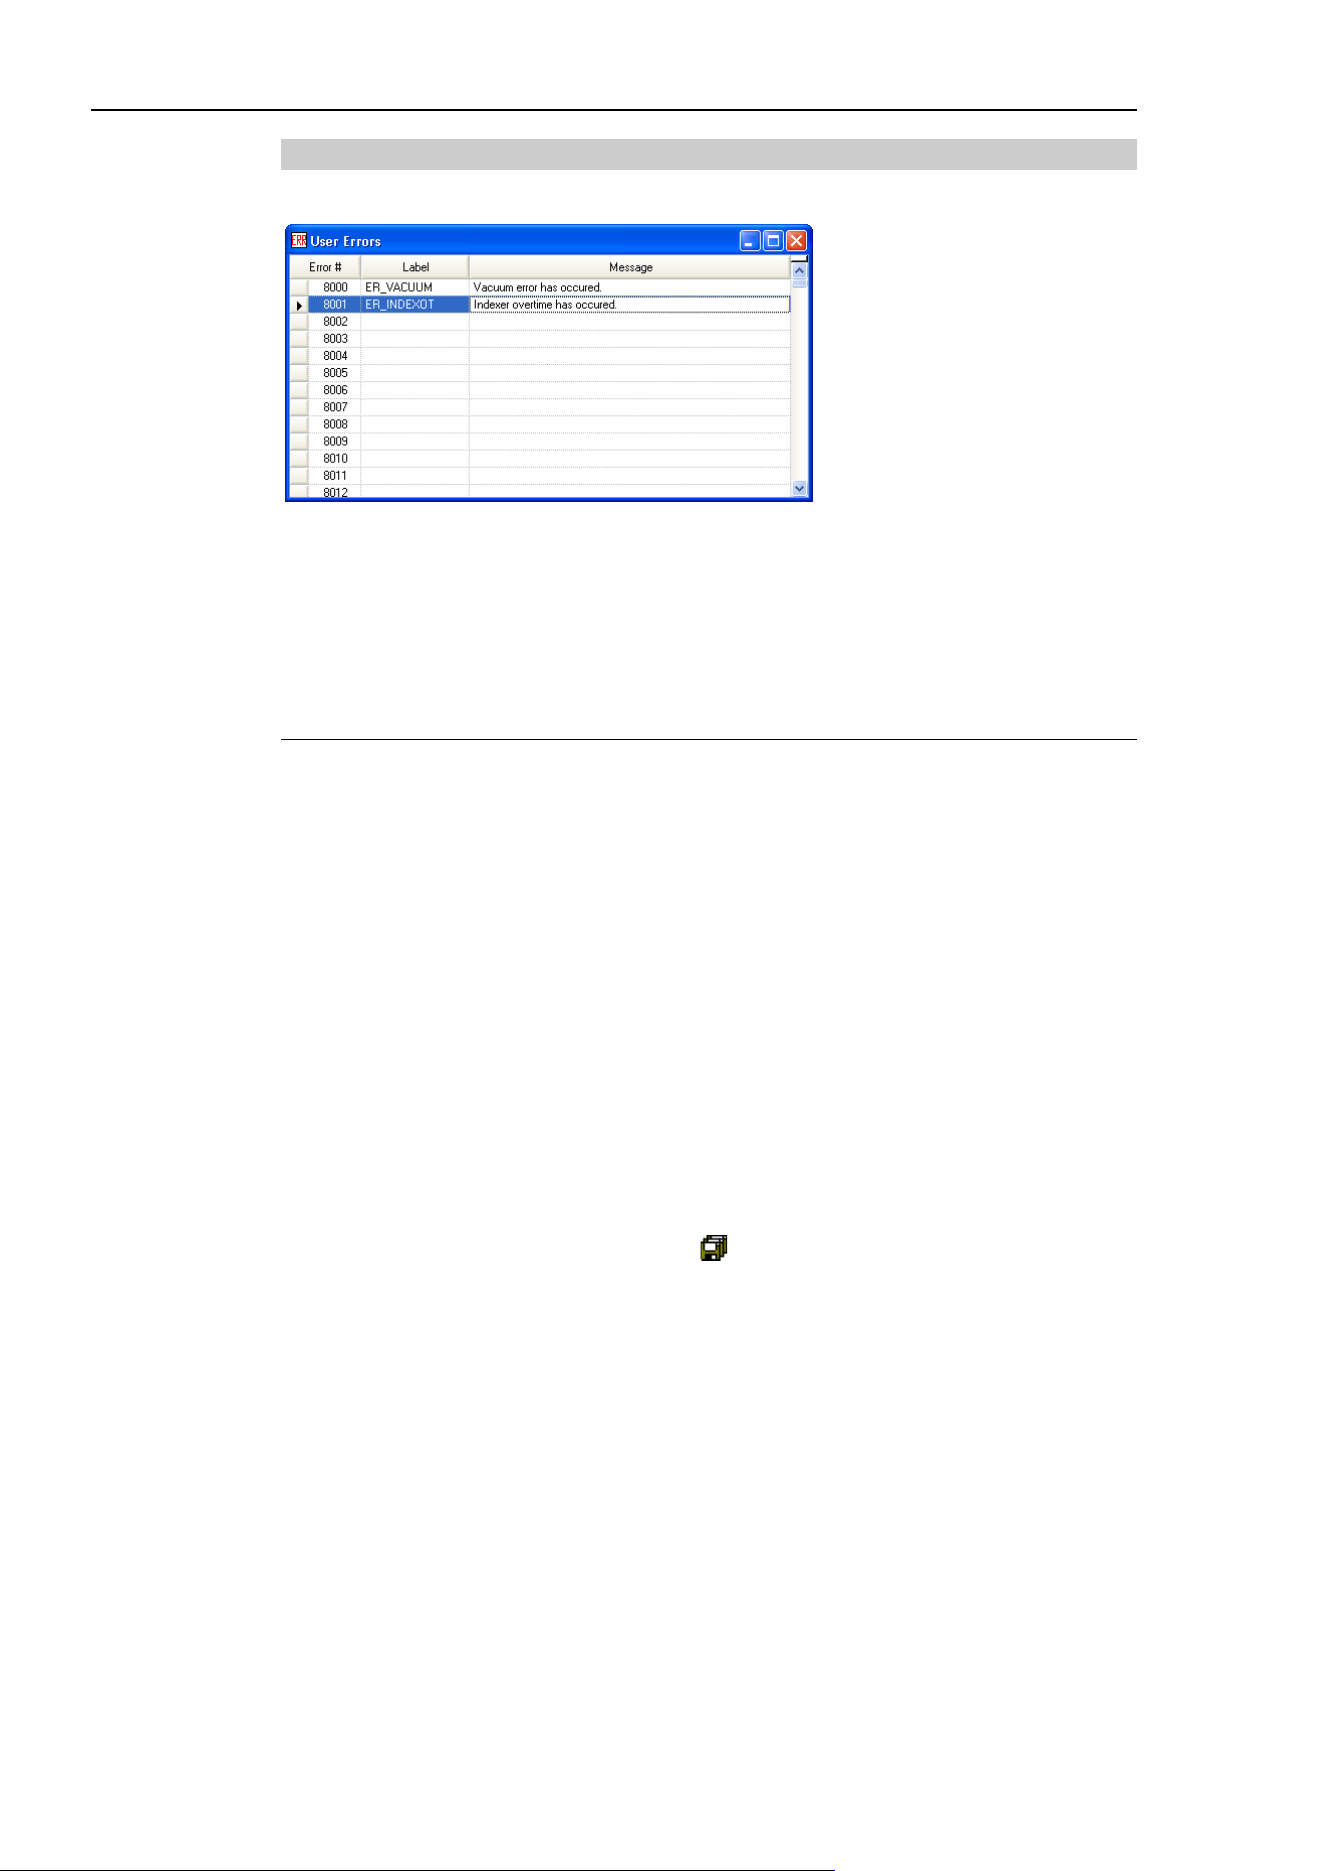
5. The EPSON RC+ 7.0 GUI
138 EPSON RC+ 7.0 (Ver.7.4) User's Guide Rev.6
5.11.7 User Error Editor Command (Tools Menu)
The User Error Editor allows you to define user errors.
User error numbers can be from 8000 to 8999.
Labels can be up to 16 characters in length.
It is recommended that you use the ER_ prefix for each error label and use all caps for the
label. This makes it easy to see error labels in your code.
Some user error examples:
Error # Label Message
8000 ER_VACUUM Vacuum error has occurred.
8001 ER_INDEXOT Indexer overtime has occurred.
In your program code, use the Error statement to generate a user error. For example:
On Vacuum
Wait Sw(VacOn), 1
If Tw = 1 Then
Error ER_VACUUM
EndIf
The user error information is stored in the current project directory in a file called
UserErrors.dat.
You can use the [Import] command from the [File] menu to import user errors from other
projects.
After adding new error definitions, save the changes by executing Save from the [File]
menu or by clicking on the <Save Project> toolbar button. If any duplicate labels are
detected, an error message will be displayed and the save operation will be aborted. You
must correct the duplication before you can save the labels successfully.
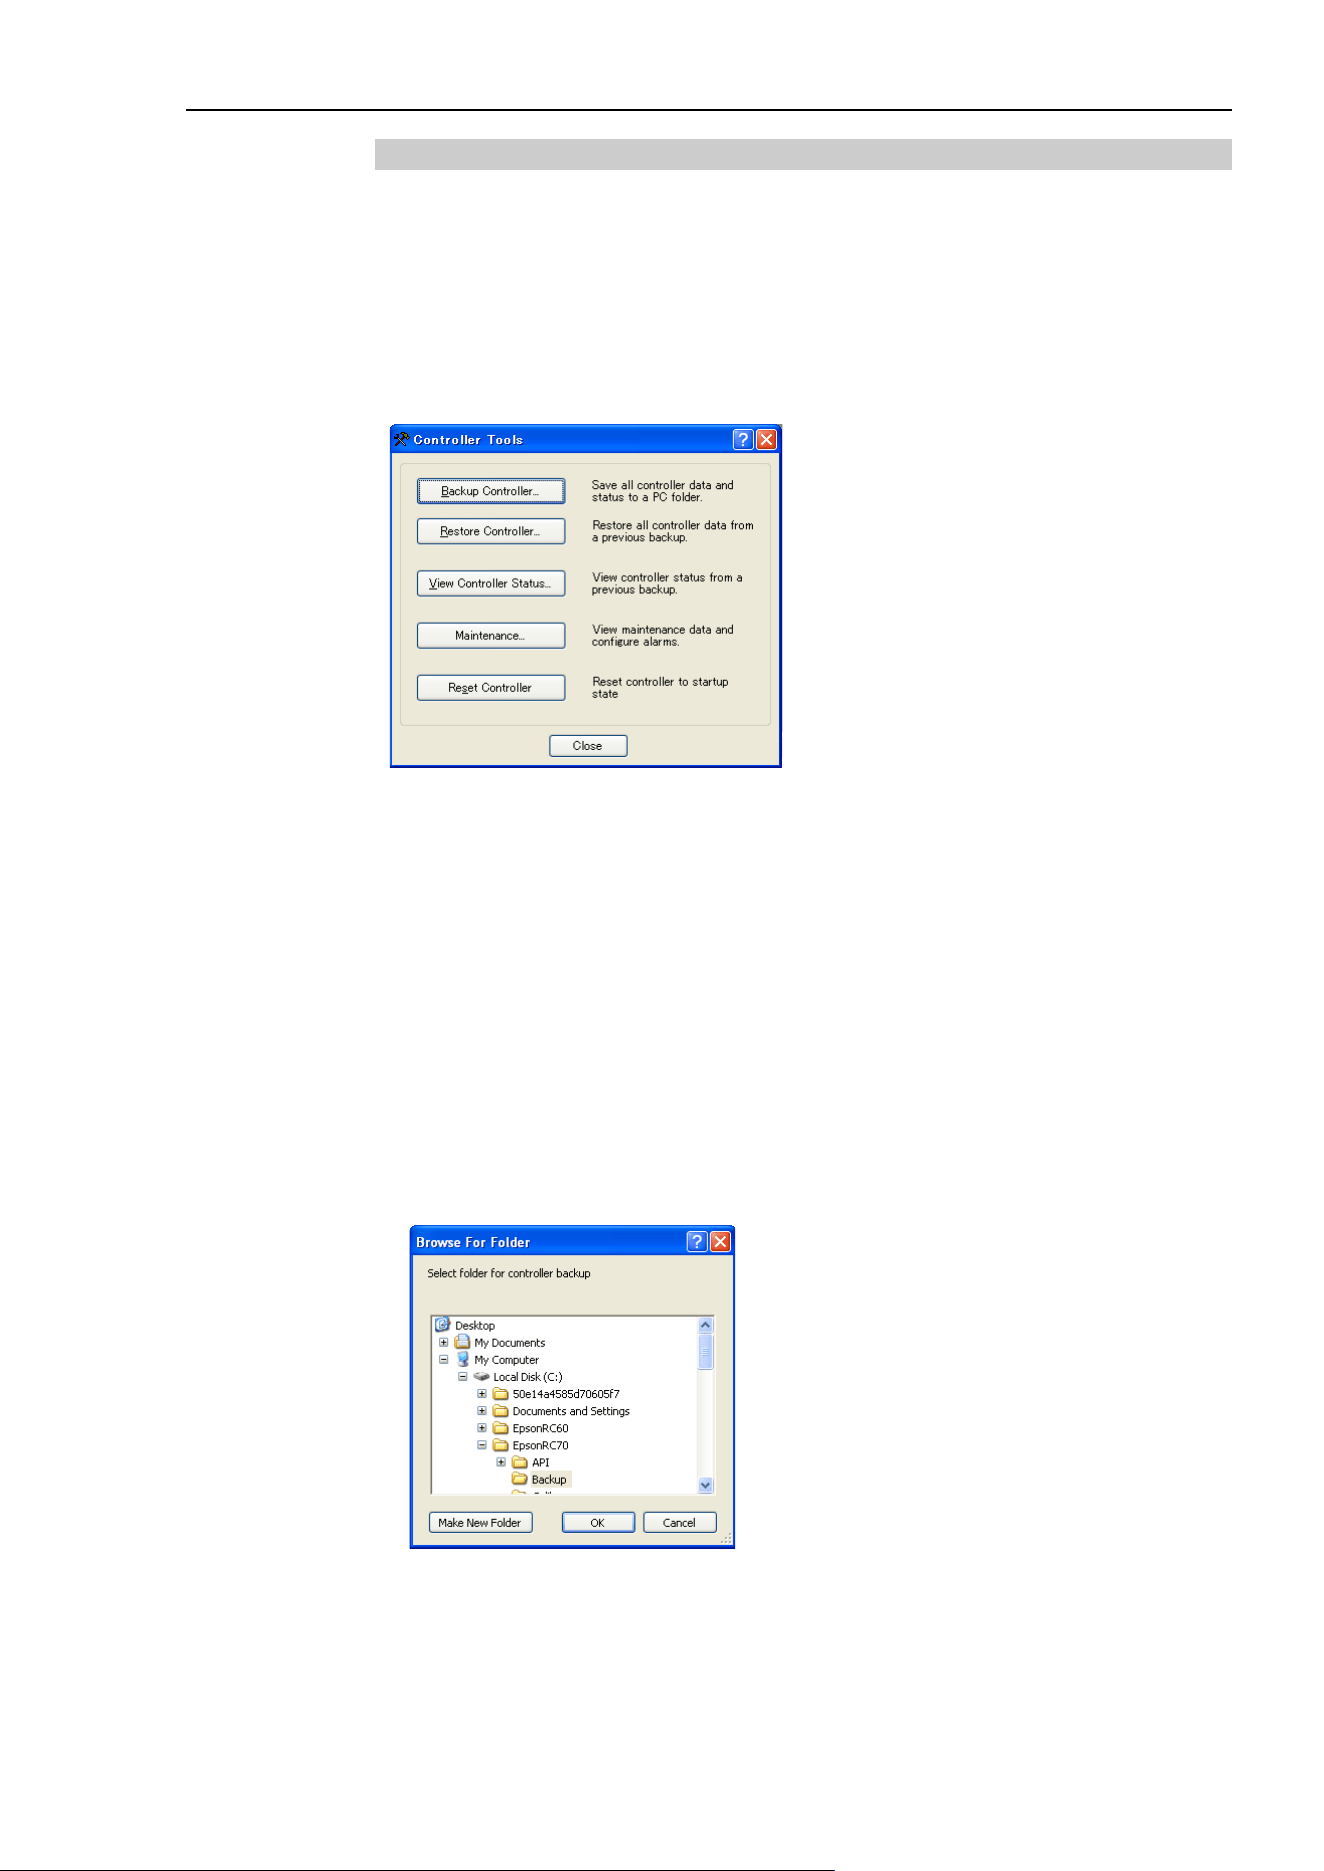
5. The EPSON RC+ 7.0 GUI
EPSON RC+ 7.0 (Ver.7.4) User's Guide Rev.6 139
5.11.8 [Controller] Command (Tools Menu)
Select Controller from the [Tools] menu to open the [Controller Tools] dialog box.
From the [Controller Tools] dialog box, you can save and restore the complete controller
configuration and the project using the [Backup Controller] and [Restore Controller]
commands. You can also save and view controller status, and reset the controller.
Before servicing the system, you should execute [Backup Controller] and store the system
configuration on an external media such as a USB memory key.
If required, you can use [Restore Controller] to restore previously stored data.
Backup Controller
Use Backup Controller to save controller configuration data on your PC.
The current status is saved in a folder containing several files. The controller
configuration settings, task status, I/O status, robot status, etc. are saved in these files.
This is useful for users to send a snapshot of the controller status to the supplier of your
region or to Epson technical support, should the need arise.
Backup Controller is equivalent to connecting a USB memory key to the controller and
pressing the TRIG button on the controller to save controller status.
Controller status is stored in a folder named “B” followed by the controller type, the
controller serial number, and the date / time.
You can configure the controller whether to save the project files in the status folder or not.
See [Setup]-[System Configuration]-[Controller]-[Preferences].
1. Select [Tools]-[Controller].
2. Click on the <Backup Controller> button to open the [Browse For Folder] dialog box.
NOTE
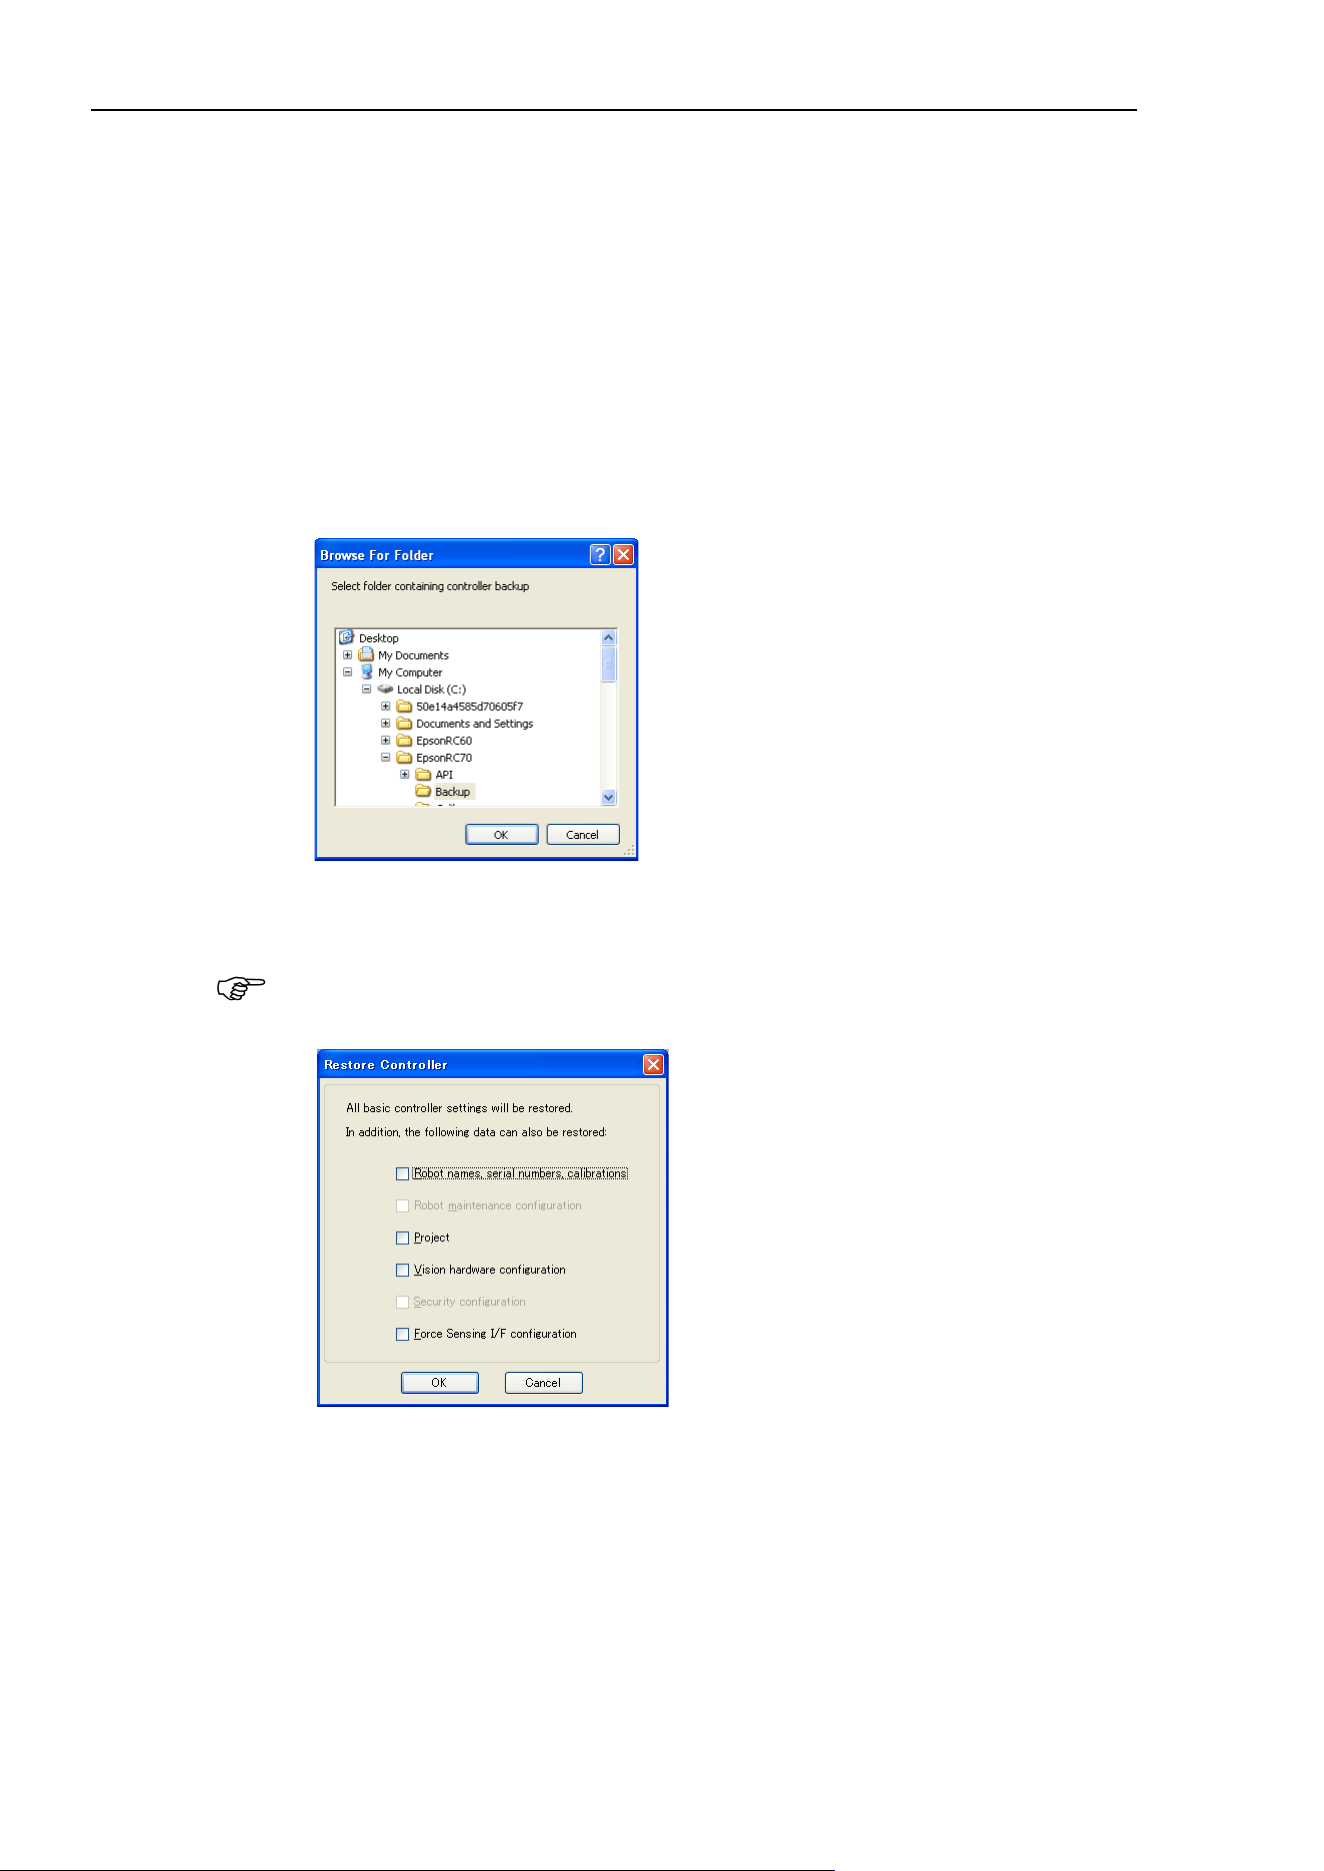
5. The EPSON RC+ 7.0 GUI
140 EPSON RC+ 7.0 (Ver.7.4) User's Guide Rev.6
3. Select the disk drive and parent folder where you want to save the information. You
can create a new parent folder by clicking the <Make New Folder> button.
4. Click <OK>. A new folder containing the backup files will be created in the selected
folder named “B” followed by the controller type, the controller serial number, and the
date / time.
Restore Controller
Use Restore Controller to load controller settings from previously saved backup data. You
cannot restore the controller data while tasks are running. If you attempt to do so, an error
message will be displayed.
To restore controller configuration:
1. Select [Tools]-[Controller].
2. Click on the <Restore Controller> button to open the [Browse For Folder] dialog box.
3. Select the drive and folder where the information is stored. Controller backup
information is stored in a folder that is named “B” followed by the controller type, the
controller serial number, and the date / time.
You can also select a folder containing export controller status information.
4. Click <OK> to display the dialog to select the restore data.
Robot names, serial numbers, calibrations checkbox
This checkbox allows you to restore the robot name, robot serial number, Hofs data,
and CalPls data. Make sure that the correct Hofs data is restored. If the wrong Hofs
data is restored, the robot may move to wrong positions.
The default setting is unchecked.
Robot maintenance configuration checkbox
This checkbox allows you to restore the parts consumption data.
For details, refer to the following manual.
Robot controller RC700 / RC700-A Maintenance 6 Alarm.
This is not checked by the default setting.
NOTE
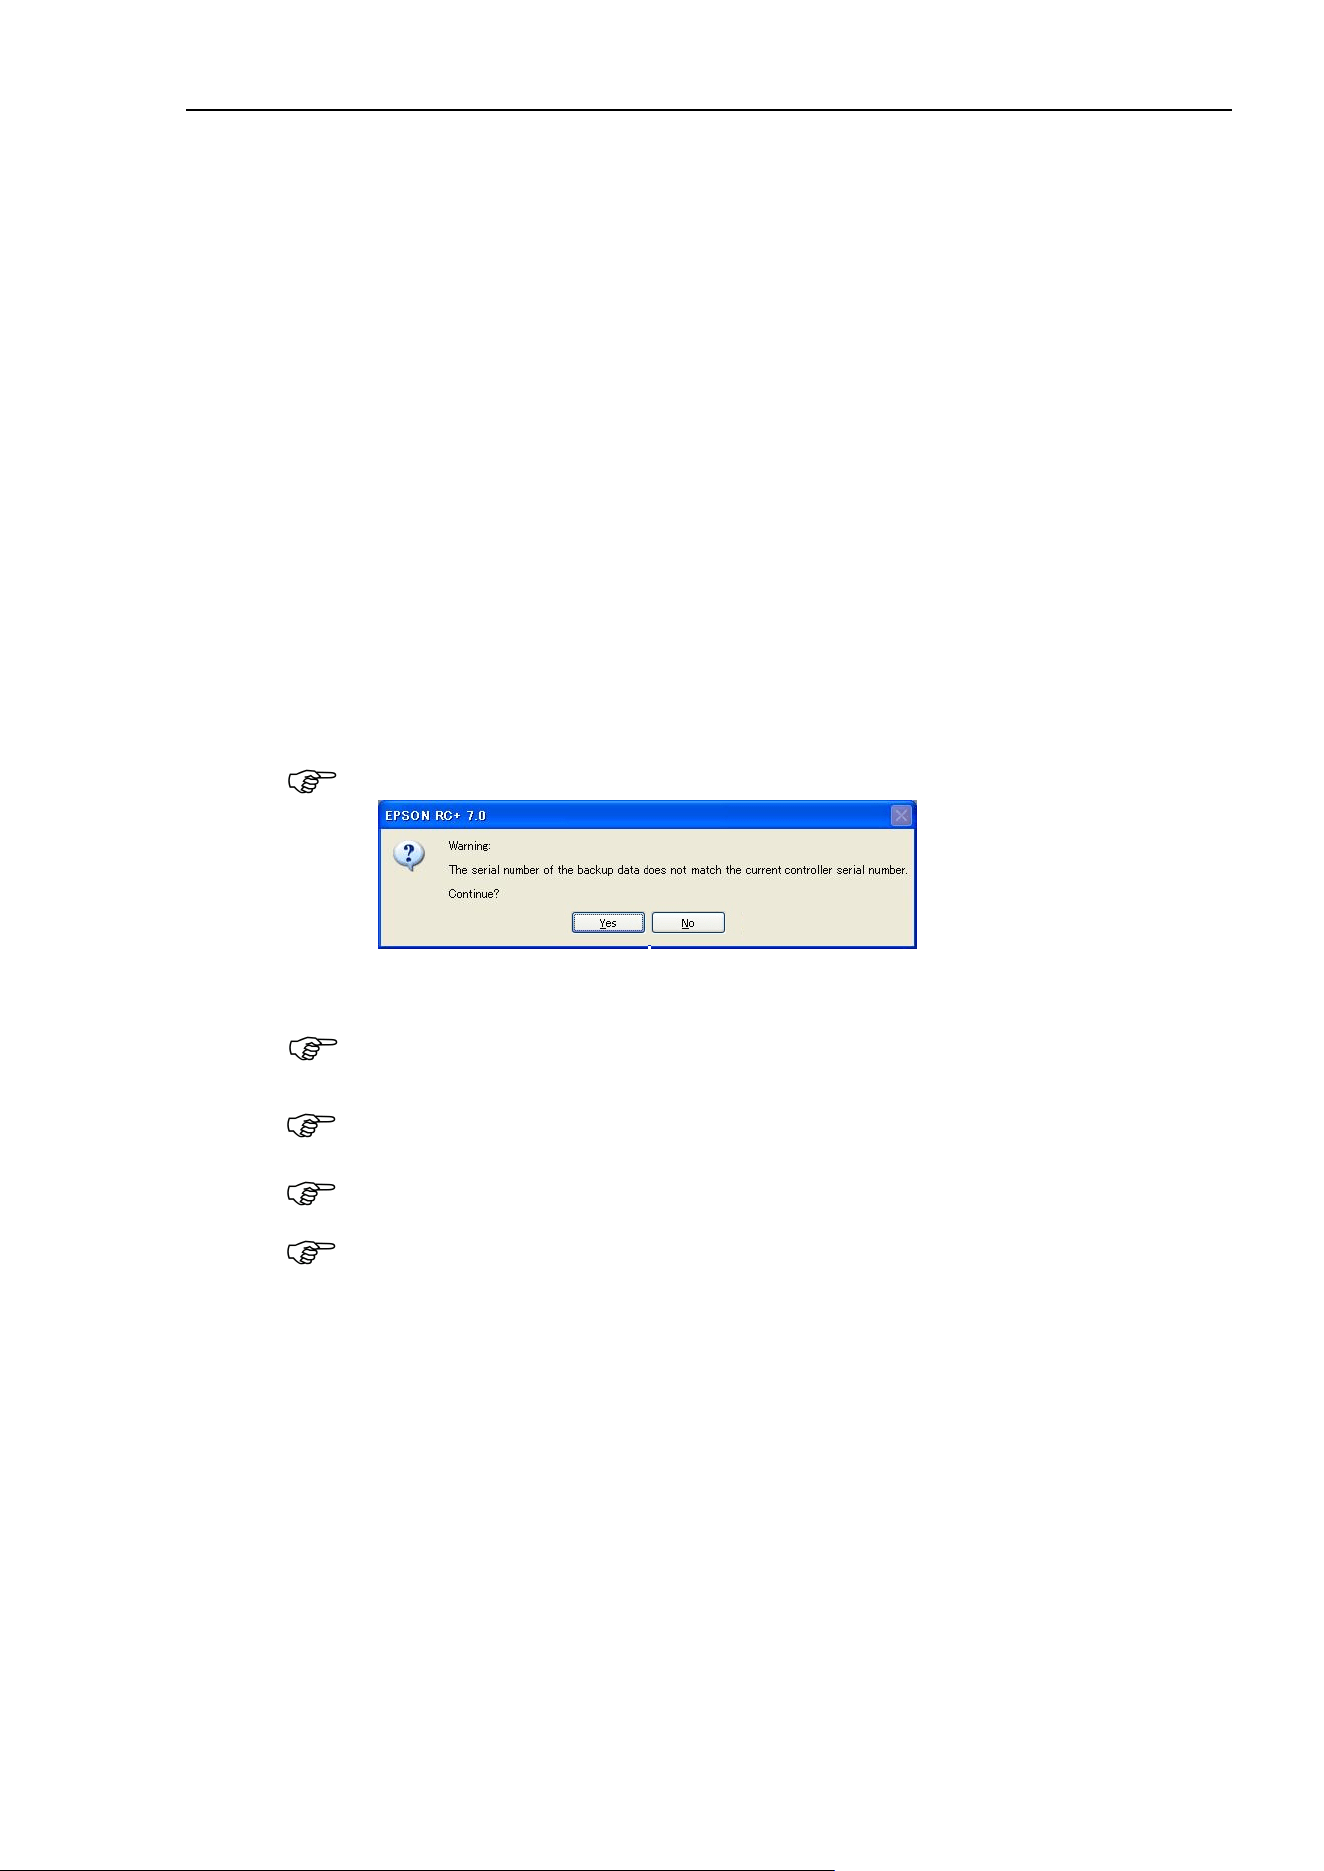
5. The EPSON RC+ 7.0 GUI
EPSON RC+ 7.0 (Ver.7.4) User's Guide Rev.6 141
Project checkbox
This checkbox allows you to restore the files related to projects.
The default setting is unchecked.
When the project is restored, all the values of Global Preserve variables are restored.
For details about Global Preserve variable backup, refer to 5.10.10 [Display Variables]
Command (Run Menu).
Vision hardware configuration checkbox
This checkbox allows you to restore the vision hardware configuration.
For details, refer to the EPSON RC+ 7.0 option: Vision Guide 7.0.
This is not checked by the default setting.
Security configuration checkbox
This checkbox allows you to restore the security configuration.
For details, refer to 15. Security.
This is not checked by the default setting.
Force Sensing I/F configuration checkbox
This checkbox allows you to restore the Force Sensing I/F configuration.
For details, refer to EPSON RC+ 7.0 option Force Guide 7.0.
This is not checked by the default setting.
5. Click the <OK> button to restore the system information.
Restore the system configuration saved using Backup Controller only for the same system.
When different system information is restored, the following warning message appears.
Click the <No> button to cancel restoration of data except for special situations such as
controller replacement.
When restoring the backup which includes the data of the robot configured to the Drive
Unit, be sure to restore the data while the Drive Unit is connected and turned on.
When restoring the backup including the unsupported robot information to the target
controller, an error occurs.
You cannot restore the backup including PG to the virtual controller.
You cannot restore the data that is backed up by the virtual controller to T series
manipulators.
View Controller Status
Click the <View Controller Status> button to view the status data stored from a previous
status export (see the Export Controller Status section above).
NOTE
NOTE
NOTE
NOTE
NOTE
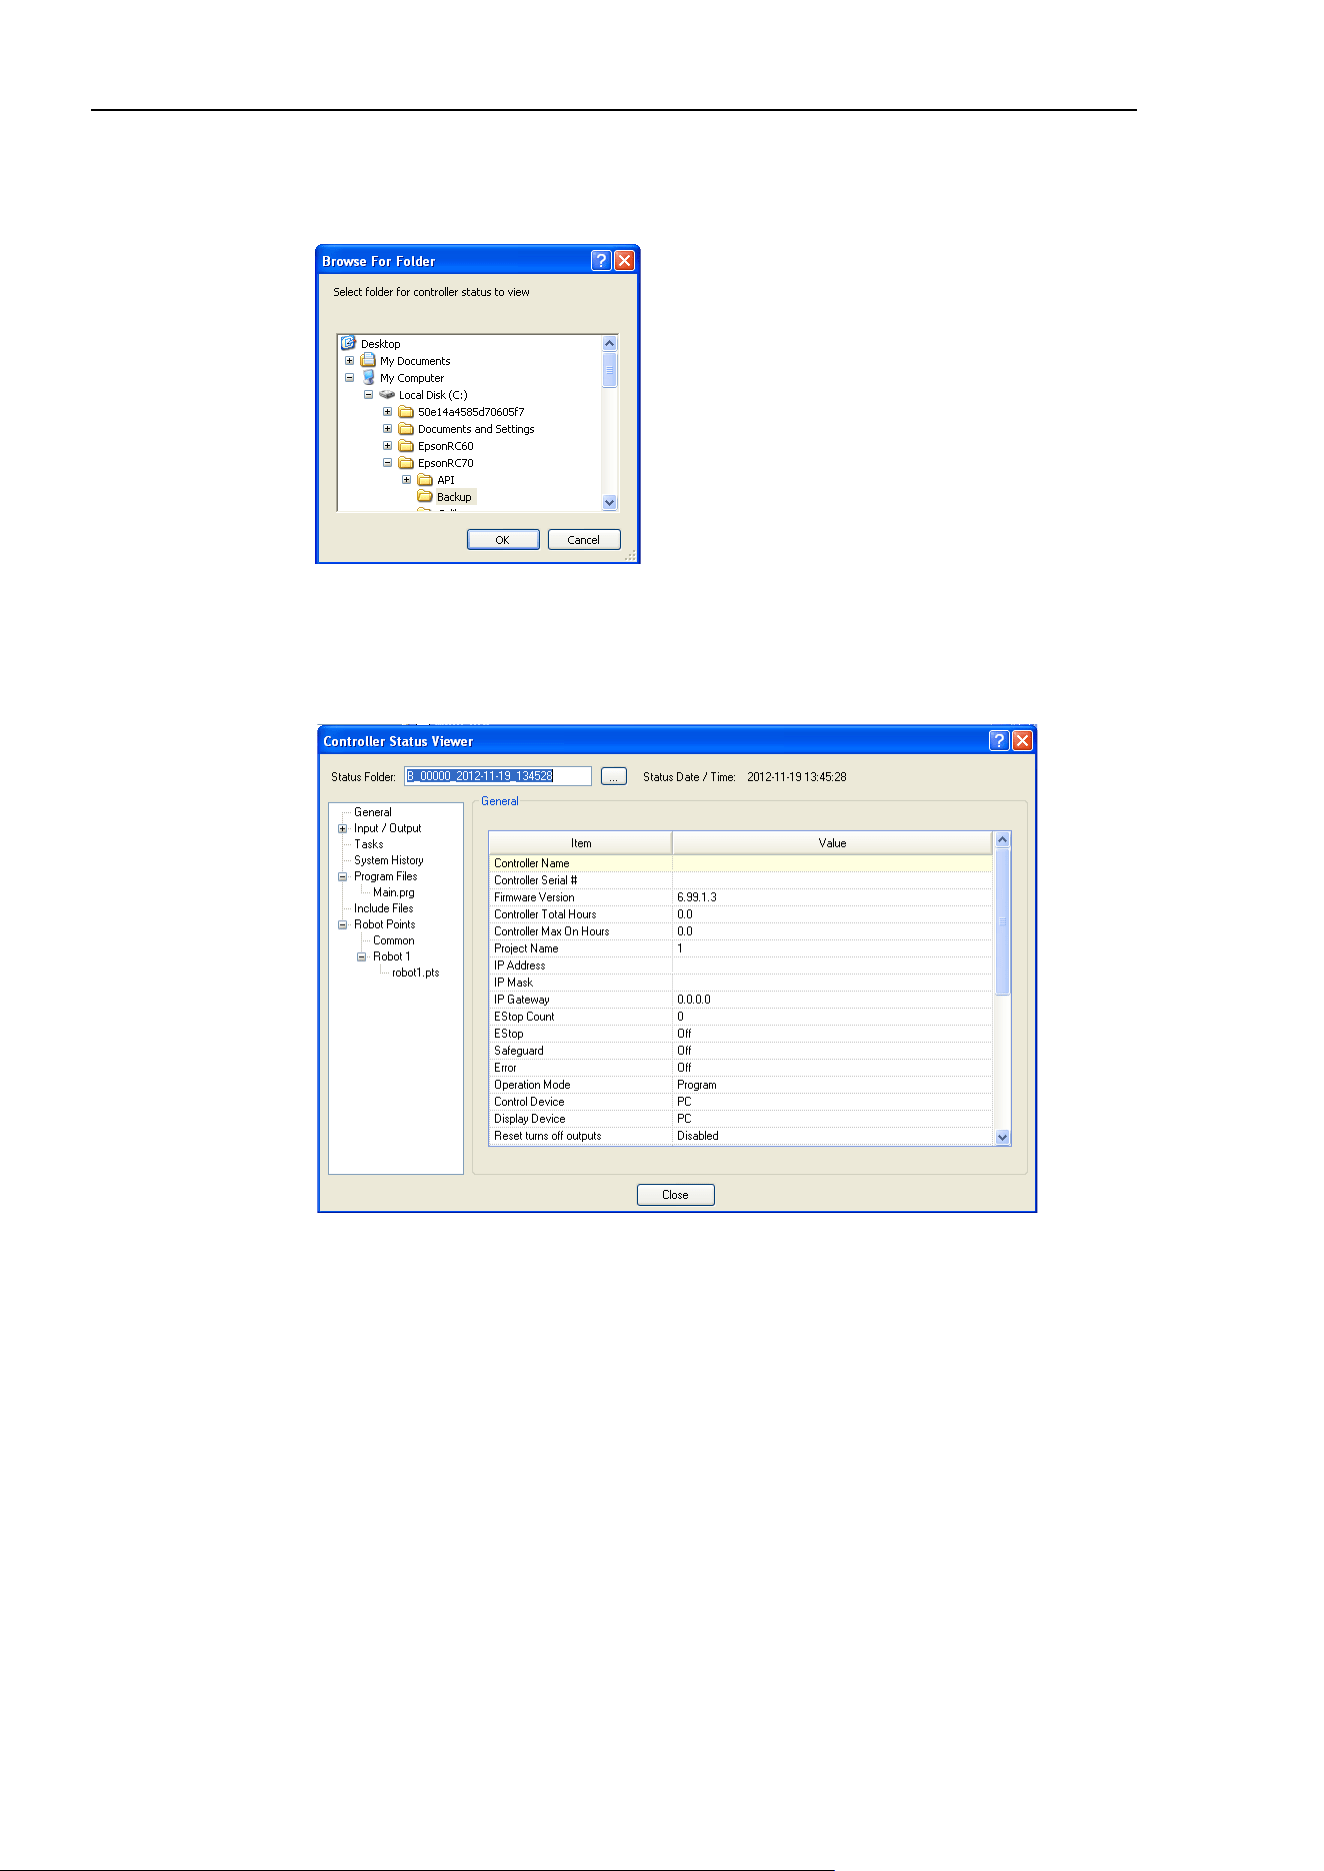
5. The EPSON RC+ 7.0 GUI
142 EPSON RC+ 7.0 (Ver.7.4) User's Guide Rev.6
To view controller status:
1. Select [Tools]-[Controller].
2. Click on the <View Controller Status> button to open the [Browse For Folder] dialog.
3. Select the drive and folder where the information is stored. Controller status
information is stored in a folder that is named “B” followed by the controller type, the
controller serial number, and the date / time.
4. Click <OK> to view the selected controller status.
5. The [Controller Status Viewer] dialog will be displayed.
6. Select items to view from the tree on the left side of the dialog.
7. To view another controller status, click the ellipses button next to the Status Folder
name and select a new status folder.
Reset Controller
Use the <Reset Controller> button to reset the SPEL controller.
Maintenance
It shows the parts consumption data for the Controller or Manipulator parts.
For details, refer to Maintenance 6. Alarm in the RC700 / RC700-A Controller Manual.
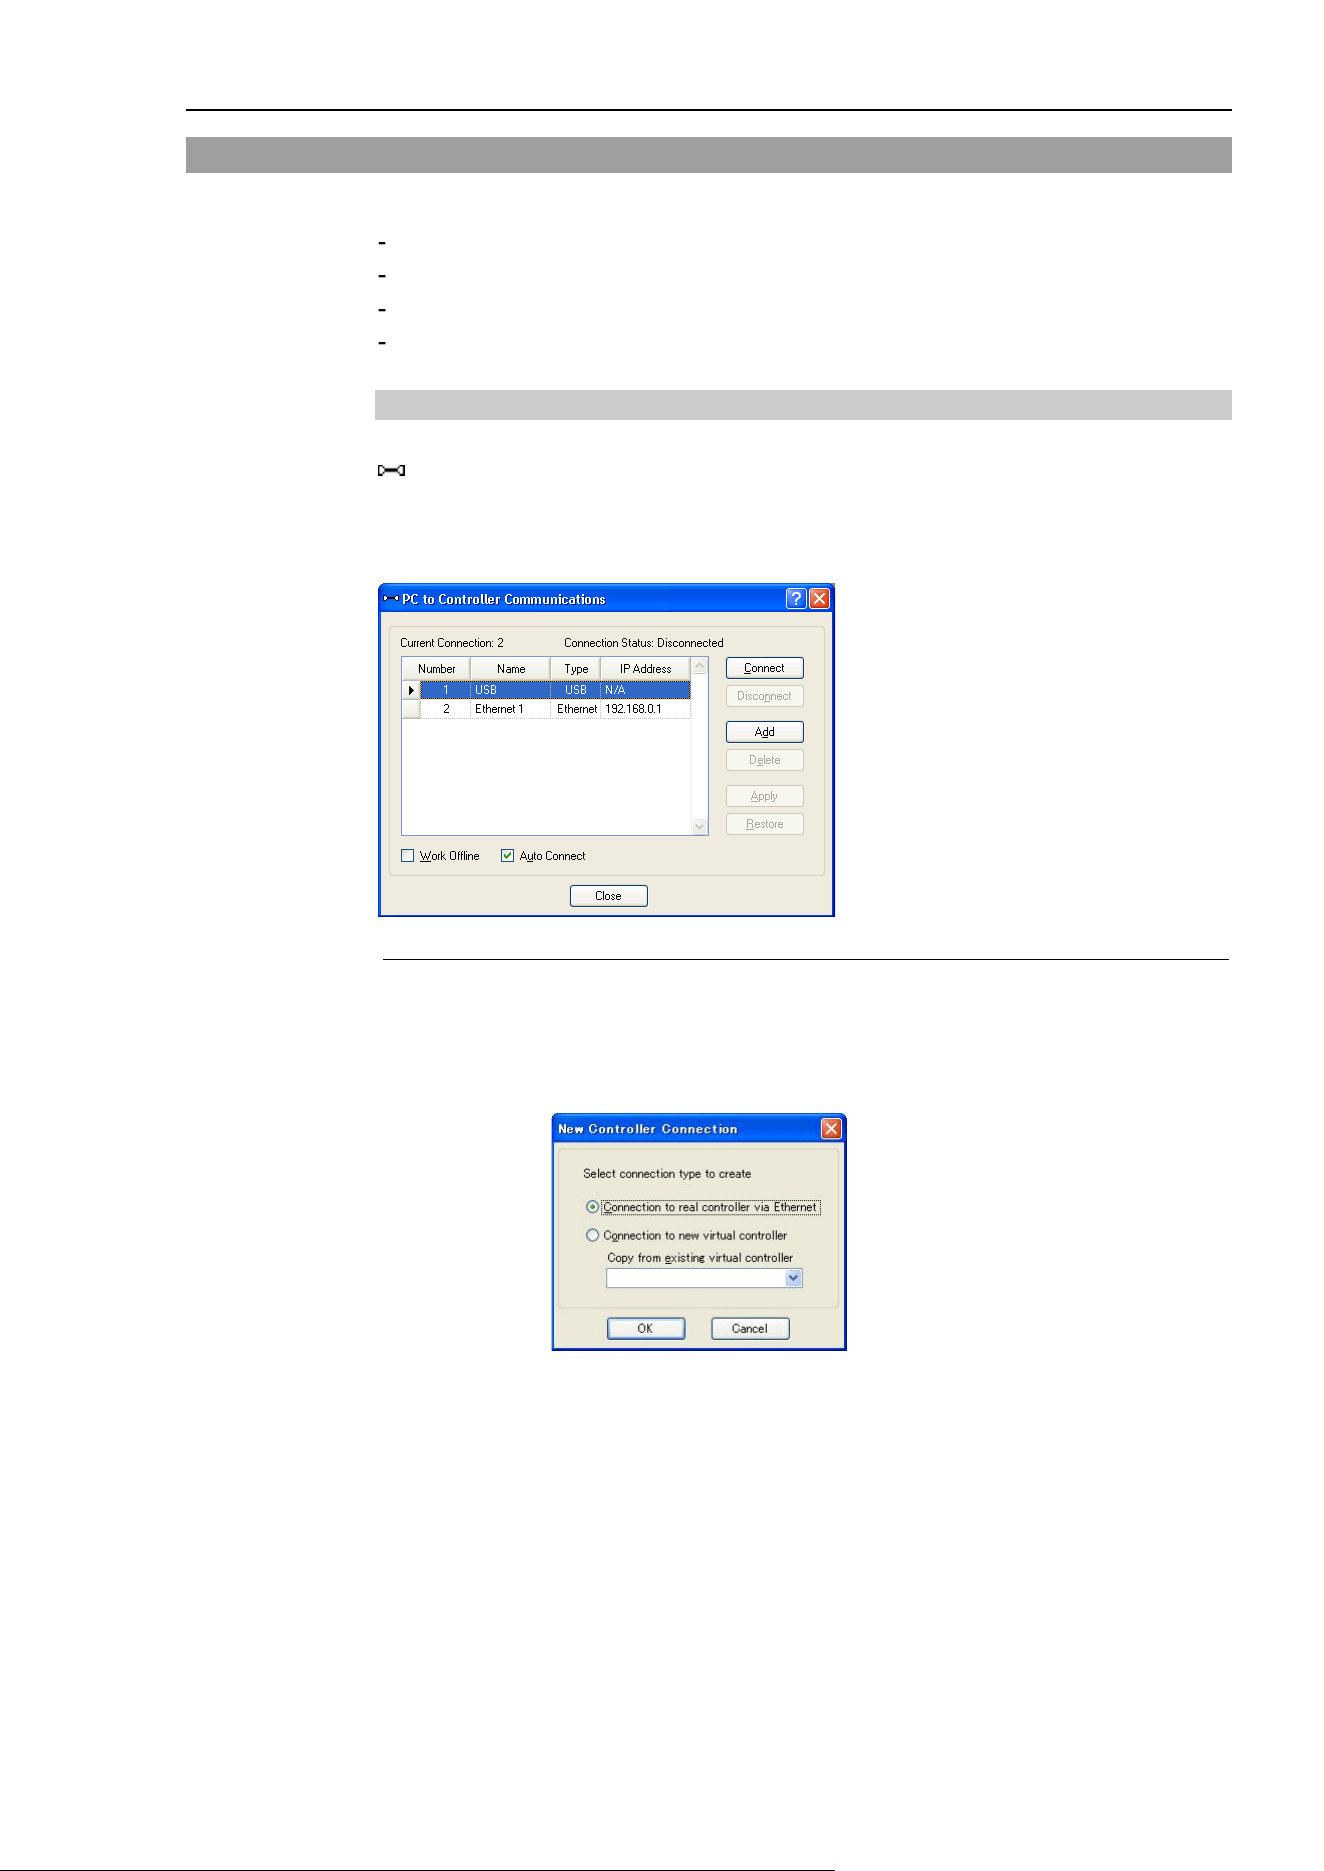
5. The EPSON RC+ 7.0 GUI
EPSON RC+ 7.0 (Ver.7.4) User's Guide Rev.6 143
5.12 [Setup] Menu
The [Setup] menu contains the following commands:
PC to Controller Communications
System Configuration
Preferences
Options
5.12.1 [PC to Controller Communications] Command (Setup Menu)
To configure communications with the Controller, select [PC to Controller
Communications] from the [Setup] menu. The [PC to Controller Communications] dialog
will be displayed as shown below:
Item
Description
Connect
Connect the selected communication.
Disconnect
Disconnect the communication.
Add
Add communication information of Ethernet or a virtual controller.
Clicking this button opens the dialog to specify the communication
type.
Program execution time
In the virtual controller, programs
will execute
continuously for up to
one hour.
If continuous execution is
over one
hour, a warning message appears.
You can execute the program again
after the warning is displayed, and the
continuous execution timer will be
reset.
Delete
Deletes selected communication information. Connection #1 “USB”
cannot be deleted.
Apply
Saves changes.
Restore
Restores to previous settings.
Work Offline
You can build a project without connecting to the controller in Offline
mode. Some functions such as Robot Manager are not available in this
mode.
Auto Connect
If the connection is enabled, connects to the controller automatically.
Close
Closes the dialog.
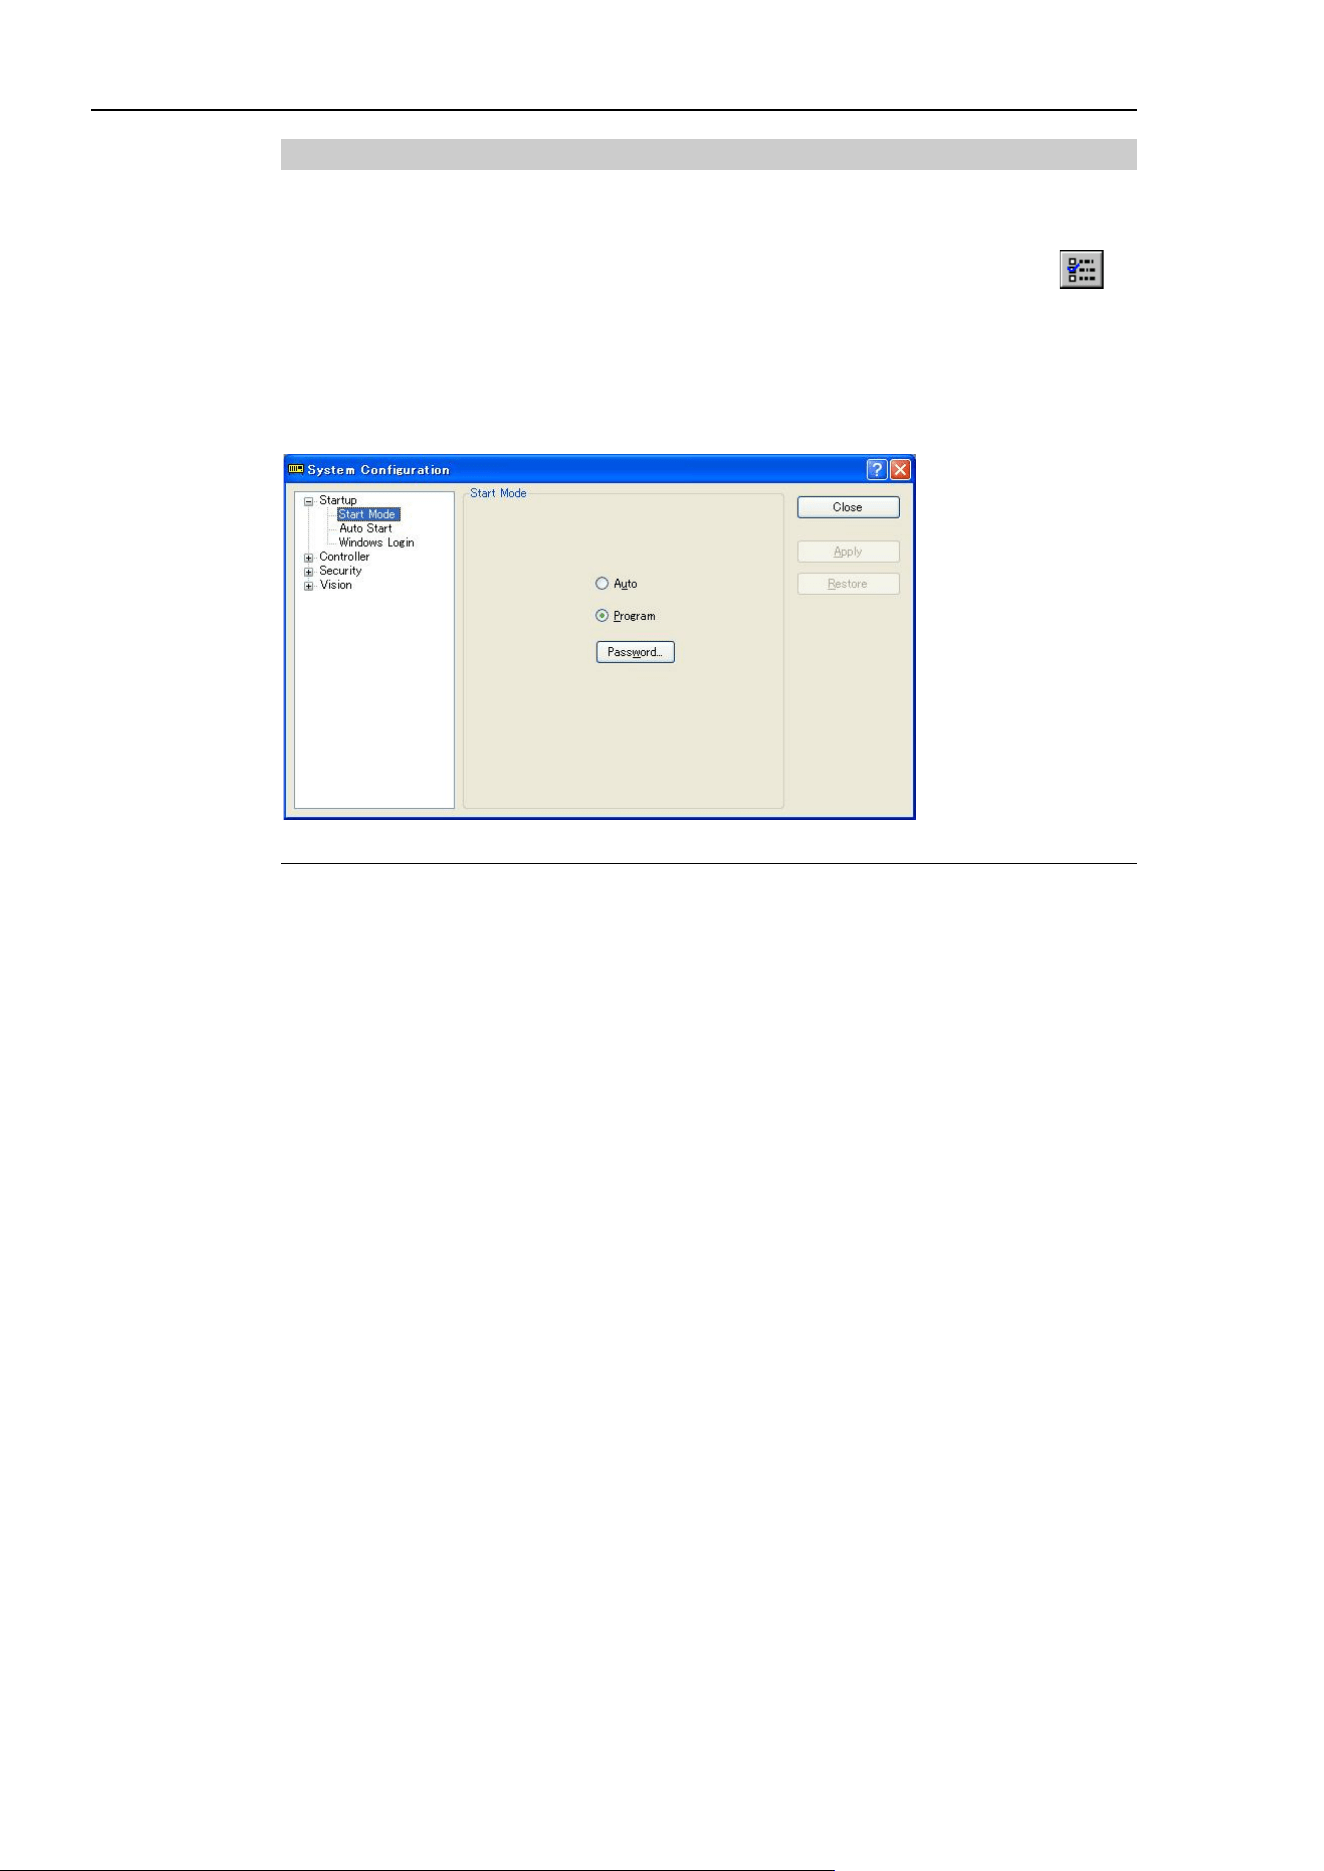
5. The EPSON RC+ 7.0 GUI
144 EPSON RC+ 7.0 (Ver.7.4) User's Guide Rev.6
5.12.2 [System Configuration] Command (Setup Menu)
The [System Configuration] command opens a dialog that contains several pages that are
used to configure the system for the EPSON RC+ 7.0 environment.
To open the [System Configuration] dialog, select [Setup]-[System Configuration] .
[Setup]-[System Configuration]-[Startup]
[Setup]-[System Configuration]-[Startup]-[Start Mode] Page
From the Start Mode page, you can choose whether EPSON RC+ 7.0 starts in Auto mode
or Program mode.
Item Description
Auto
Select Auto to start EPSON RC+ 7.0 in Auto mode. Refer to 4. Operation
for details.
Program
Select Program to start EPSON RC+ 7.0 in Program mode. Refer to 4.
Operation
for details.
Password
Click this button to change the password required to enter Program mode
from
Operator mode when EPSON RC+ 7.0 starts.
Apply
Saves the current changes.
Restore
Reverts back to previous settings.
Defaults
Click this button to set the default startup mode.
Close
Closes the System Configuration dialog.
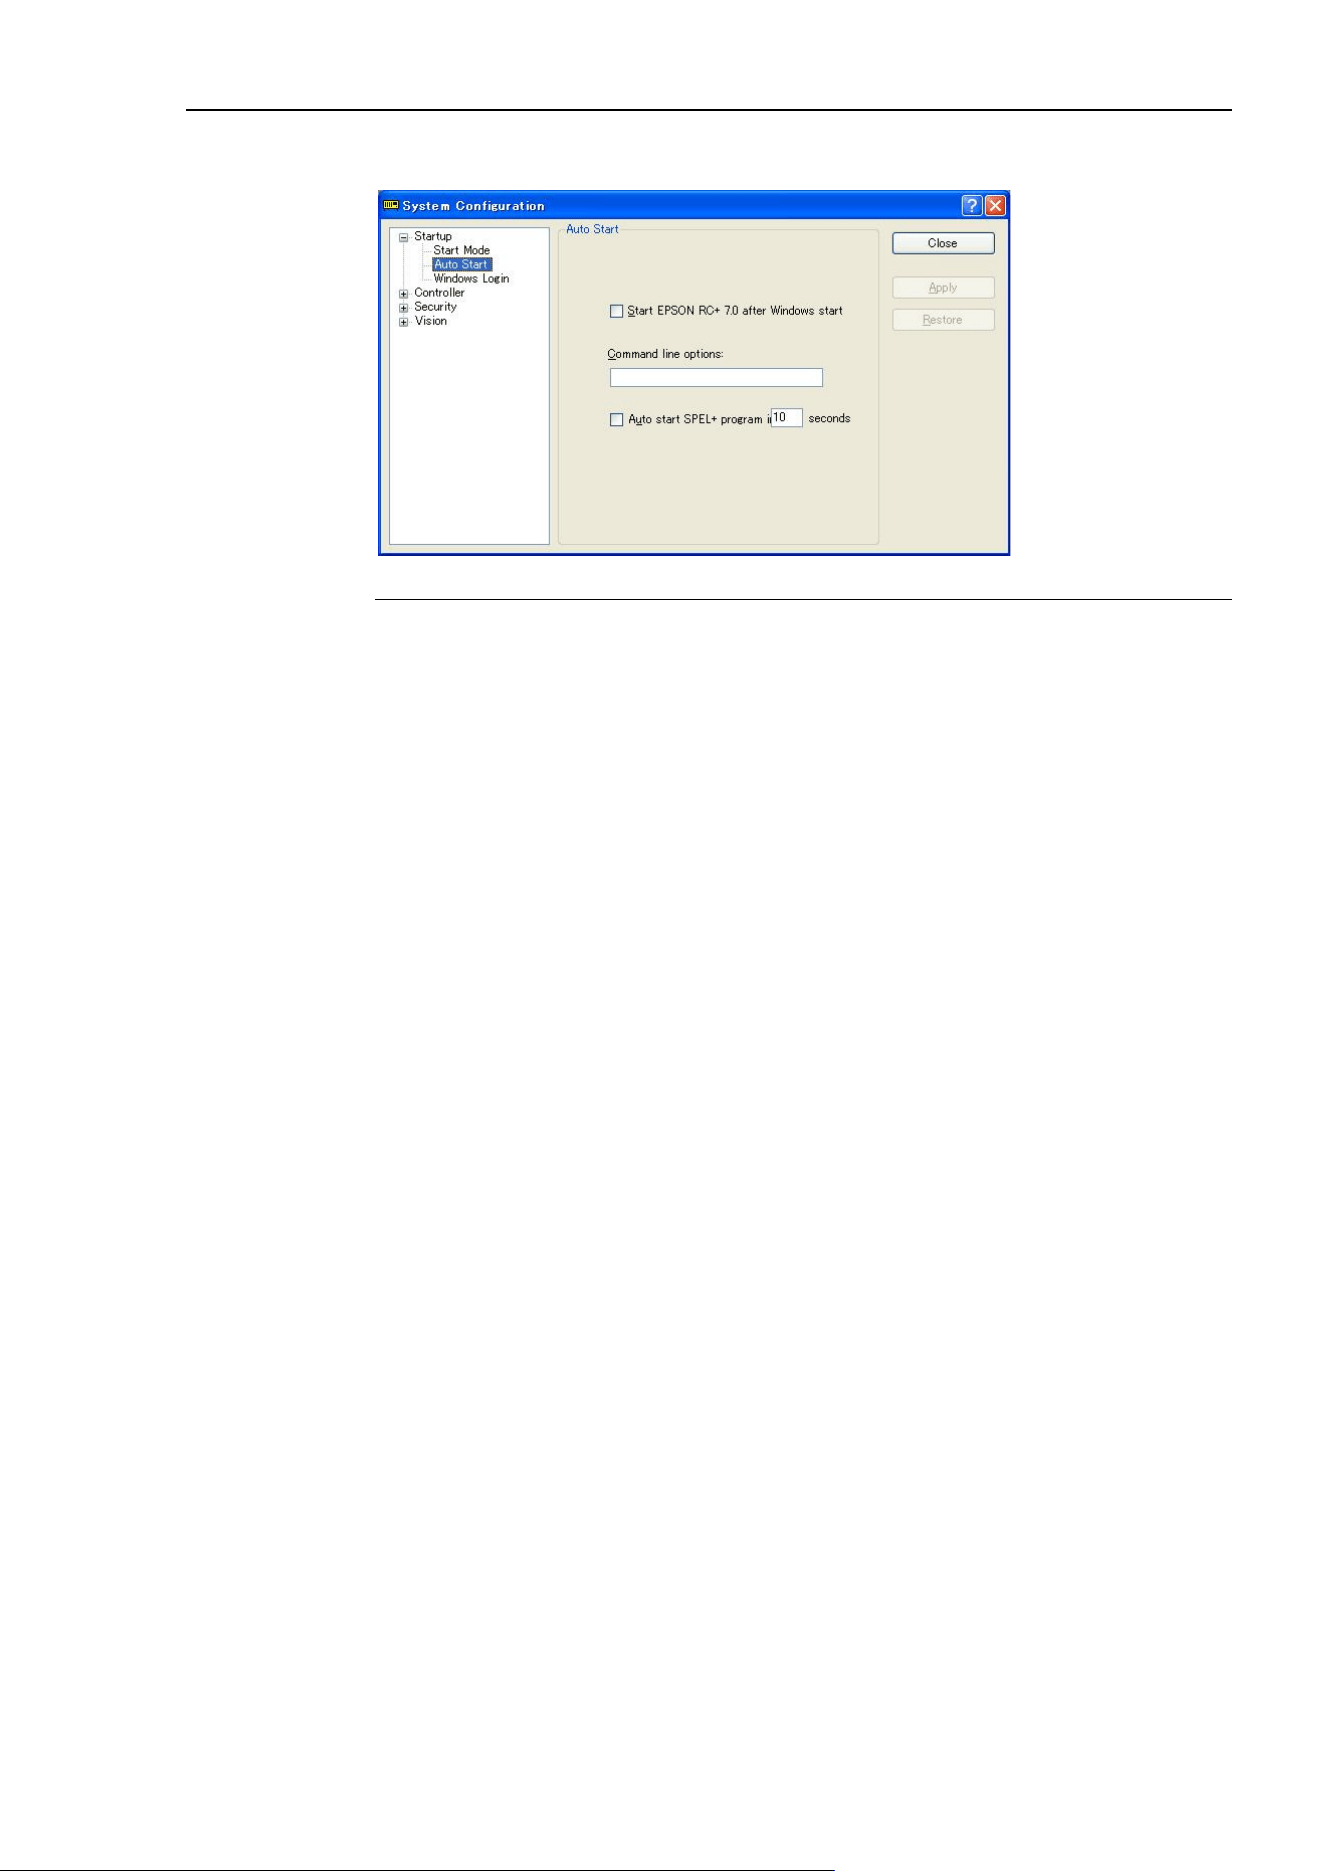
5. The EPSON RC+ 7.0 GUI
EPSON RC+ 7.0 (Ver.7.4) User's Guide Rev.6 145
[Setup]-[System Configuration]-[Startup]-[Auto Start] Page
Item Description
Start EPSON RC+ after
Windows start
Check this box if you want EPSON RC+ 7.0 to automatically
start after Windows starts.
Command line options
Enter the command line options used when EPSON RC+ 7.0
is automatically started. This
is active only when
the Start
EPSON
RC+ 7.0
with Windows start checkbox is not
checked.
Auto start SPEL+
program
Check this box if you want to execute the main program after
a
delay.
This is active only when starting in Operator mode and the
control device is
“Self”.
Apply
Saves the current changes.
Restore
Reverts back to previous settings.
Close
Closes the System Configuration dialog.
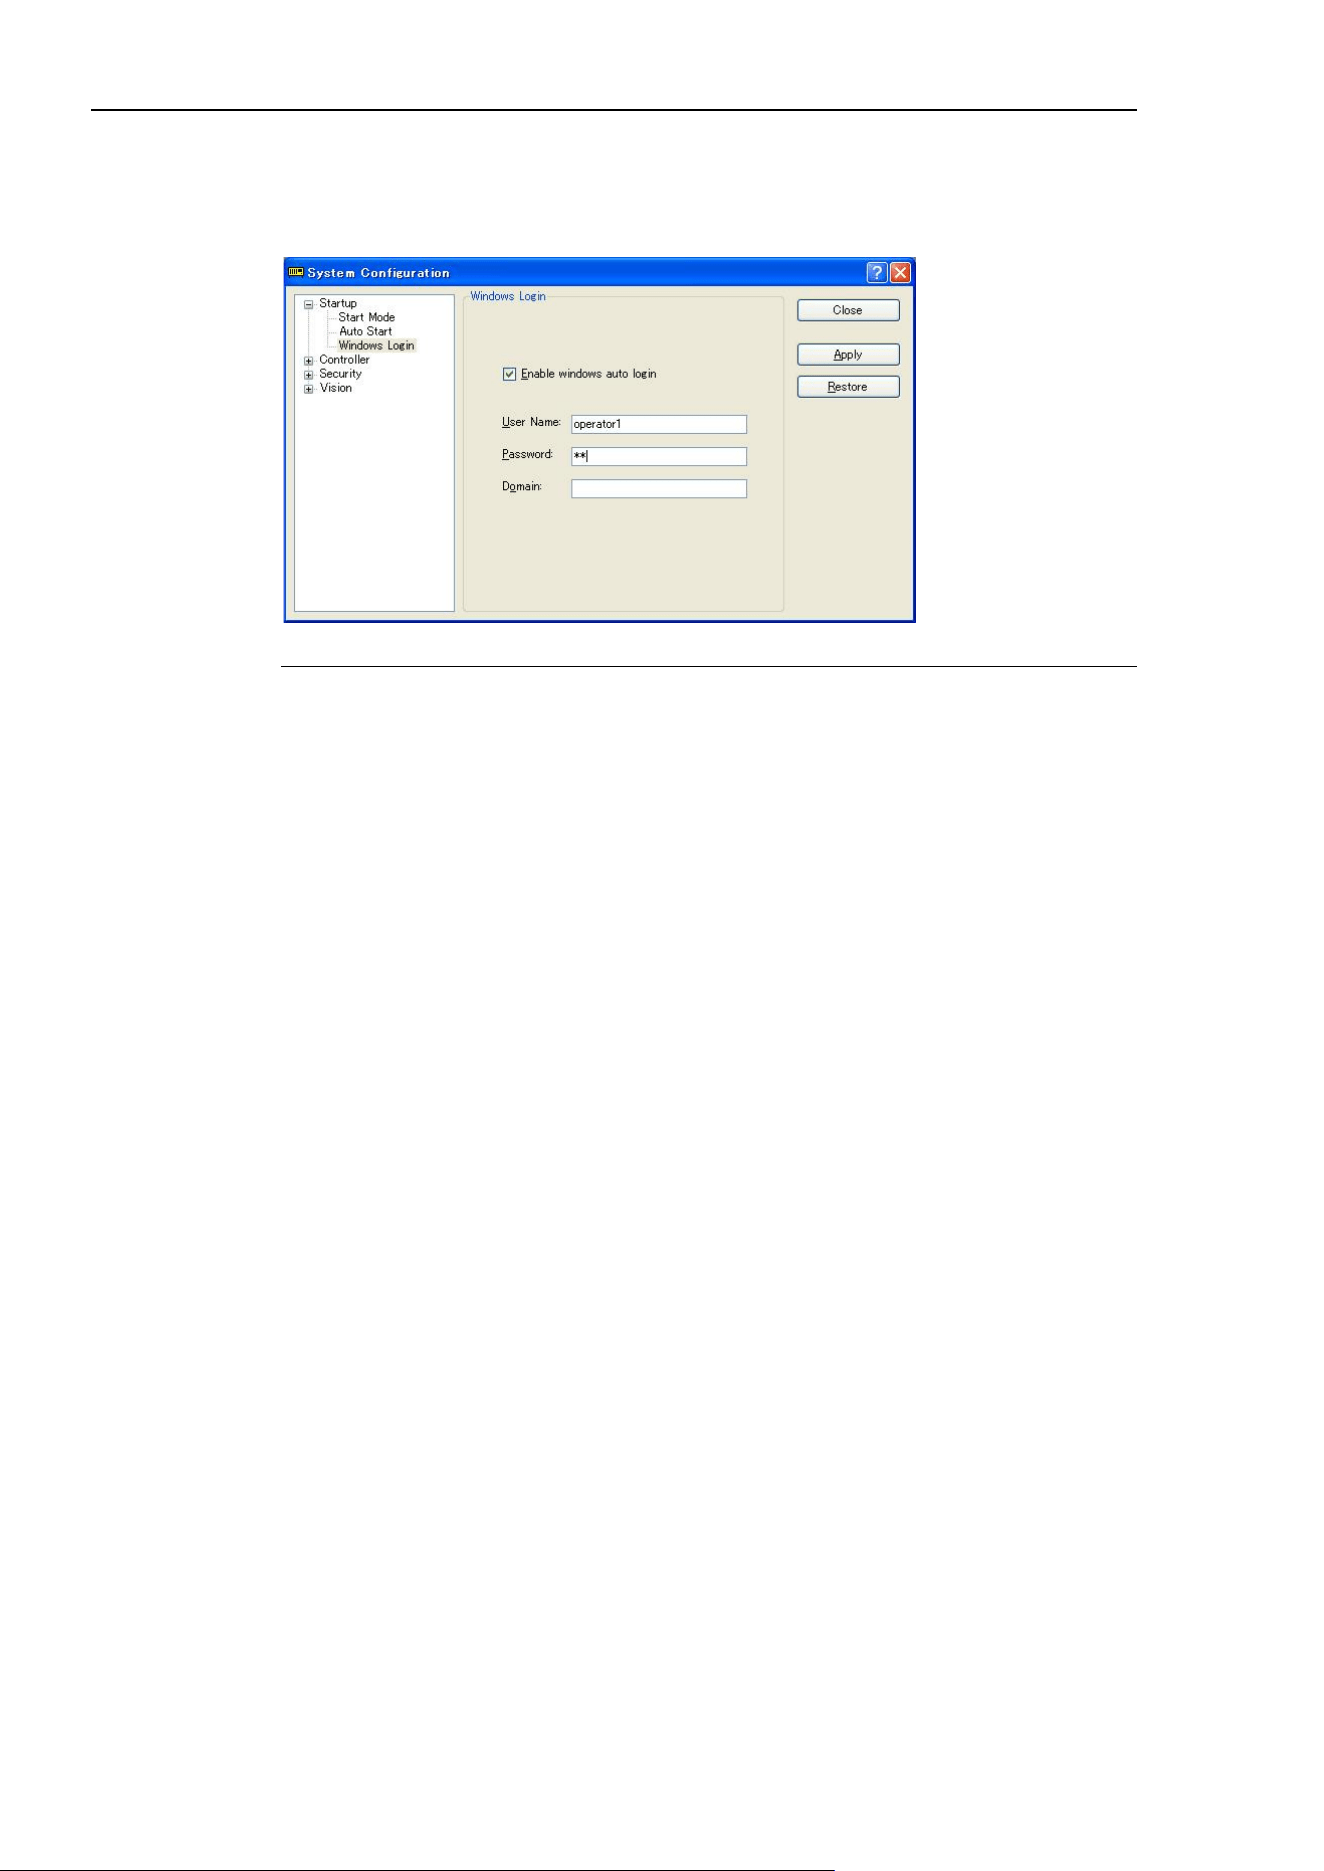
5. The EPSON RC+ 7.0 GUI
146 EPSON RC+ 7.0 (Ver.7.4) User's Guide Rev.6
[Setup]-[System Configuration]-[Startup]-[Windows Login] Page
The Windows Login page allows you to configure the automatic login when Windows
starts.
Item Description
Enable windows auto
login
Check this box if you want to automatically login to Windows
when it starts. You must supply a valid user name, password,
and domain.
User Name
Enter the name of a valid Windows user on the system.
Password
Enter the login password for the user.
Domain
Optional. If the PC is the member of a domain, enter the name
here.
Apply
Saves the current changes.
Restore
Reverts back to previous settings.
Close
Closes the System Configuration dialog.
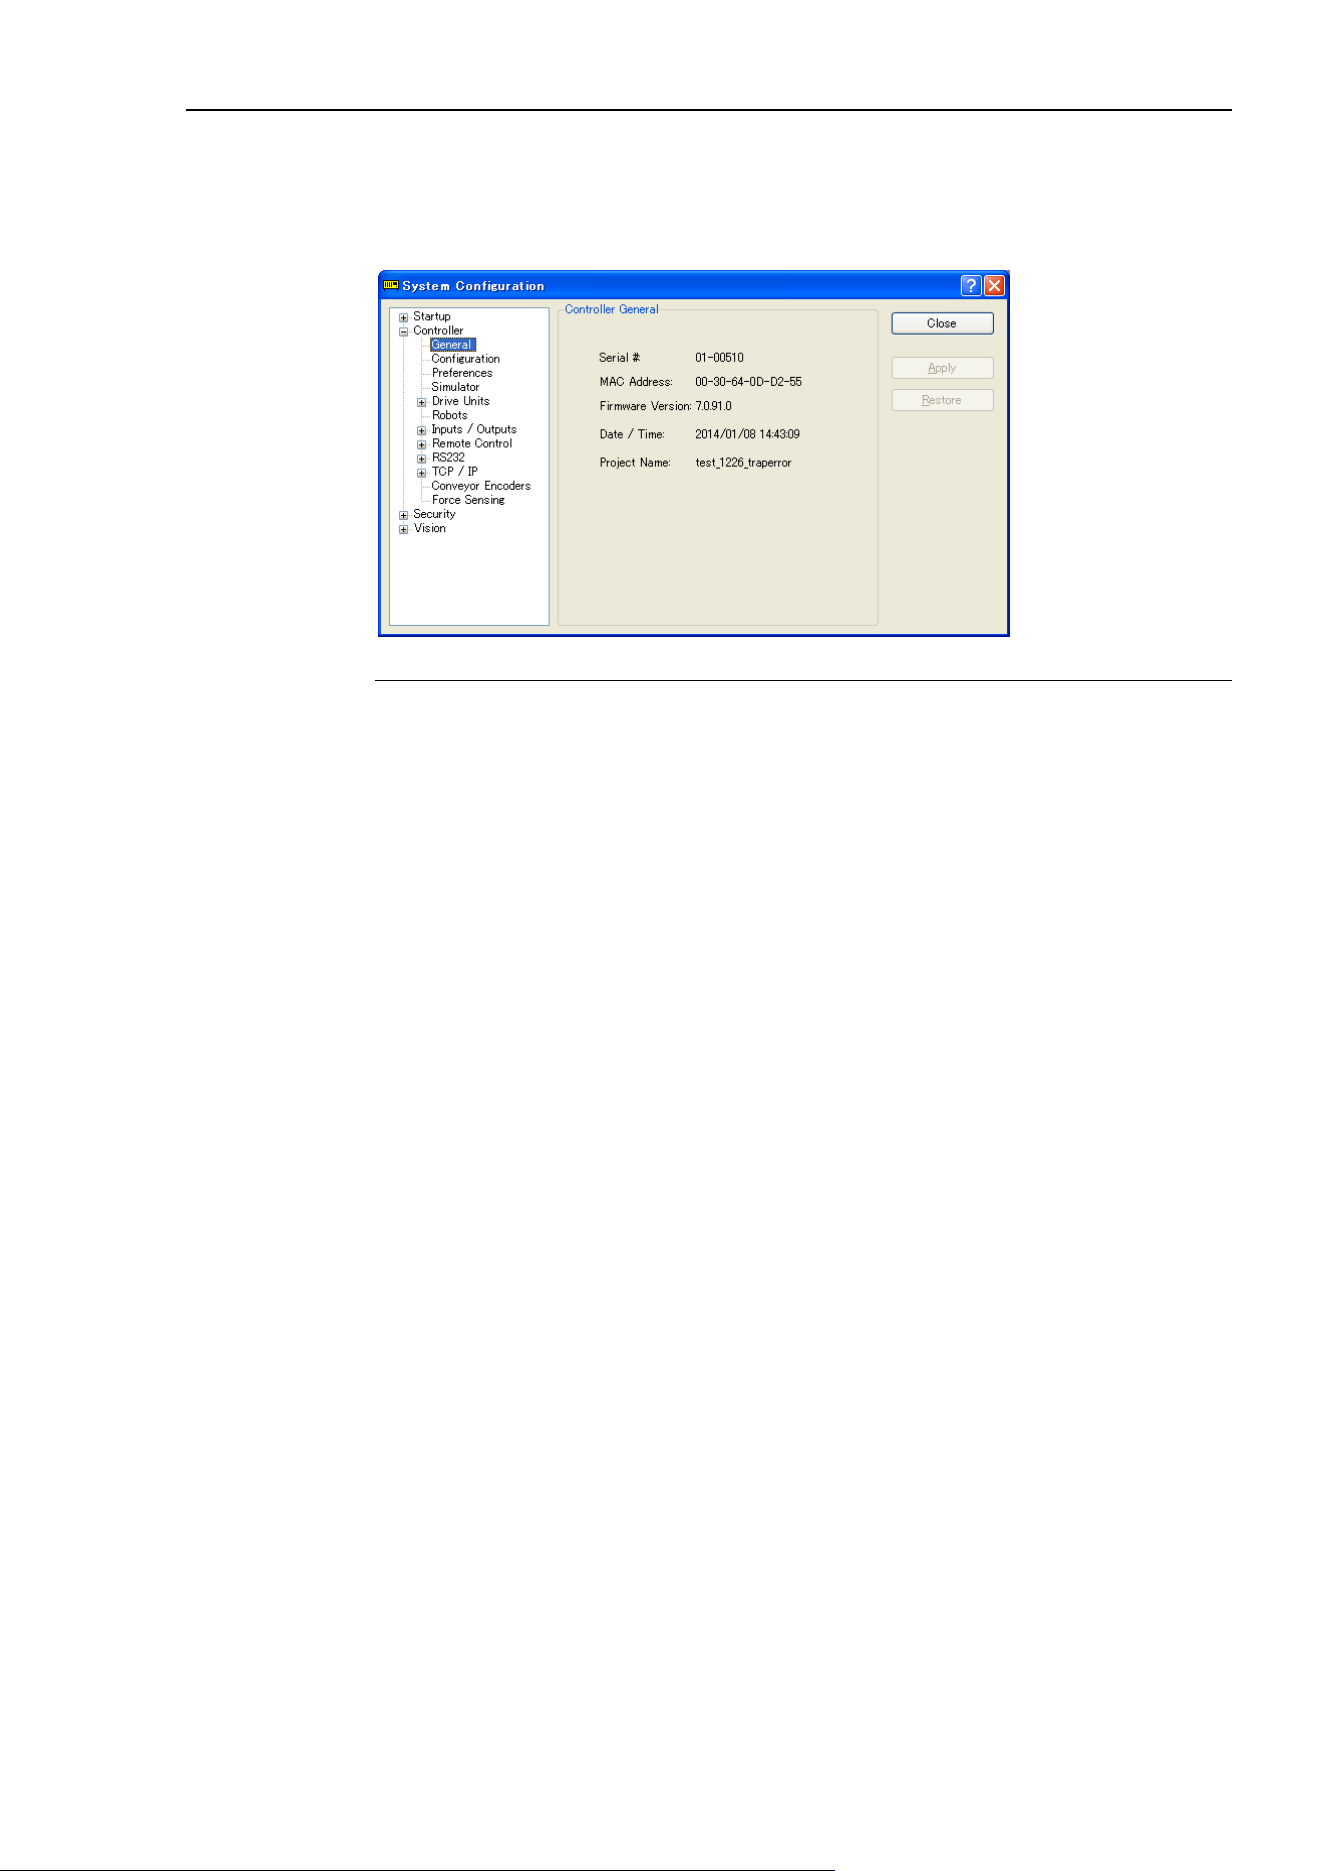
5. The EPSON RC+ 7.0 GUI
EPSON RC+ 7.0 (Ver.7.4) User's Guide Rev.6 147
[Setup]-[System Configuration]-[Controller]
[Setup]-[System Configuration]-[Controller]-[General] Page
This page allows the user to view general information about the controller.
Item Description
Serial #
Displays the serial number of the current controller.
MAC Address
Displays the MAC Address of the controller.
Firmware Version
Displays the firmware version used in the current controller.
Date / Time
Displays the current date and time in the controller.
Project Name
Displays the name of the project in the controller.
Close
Closes the Setup Controller dialog.
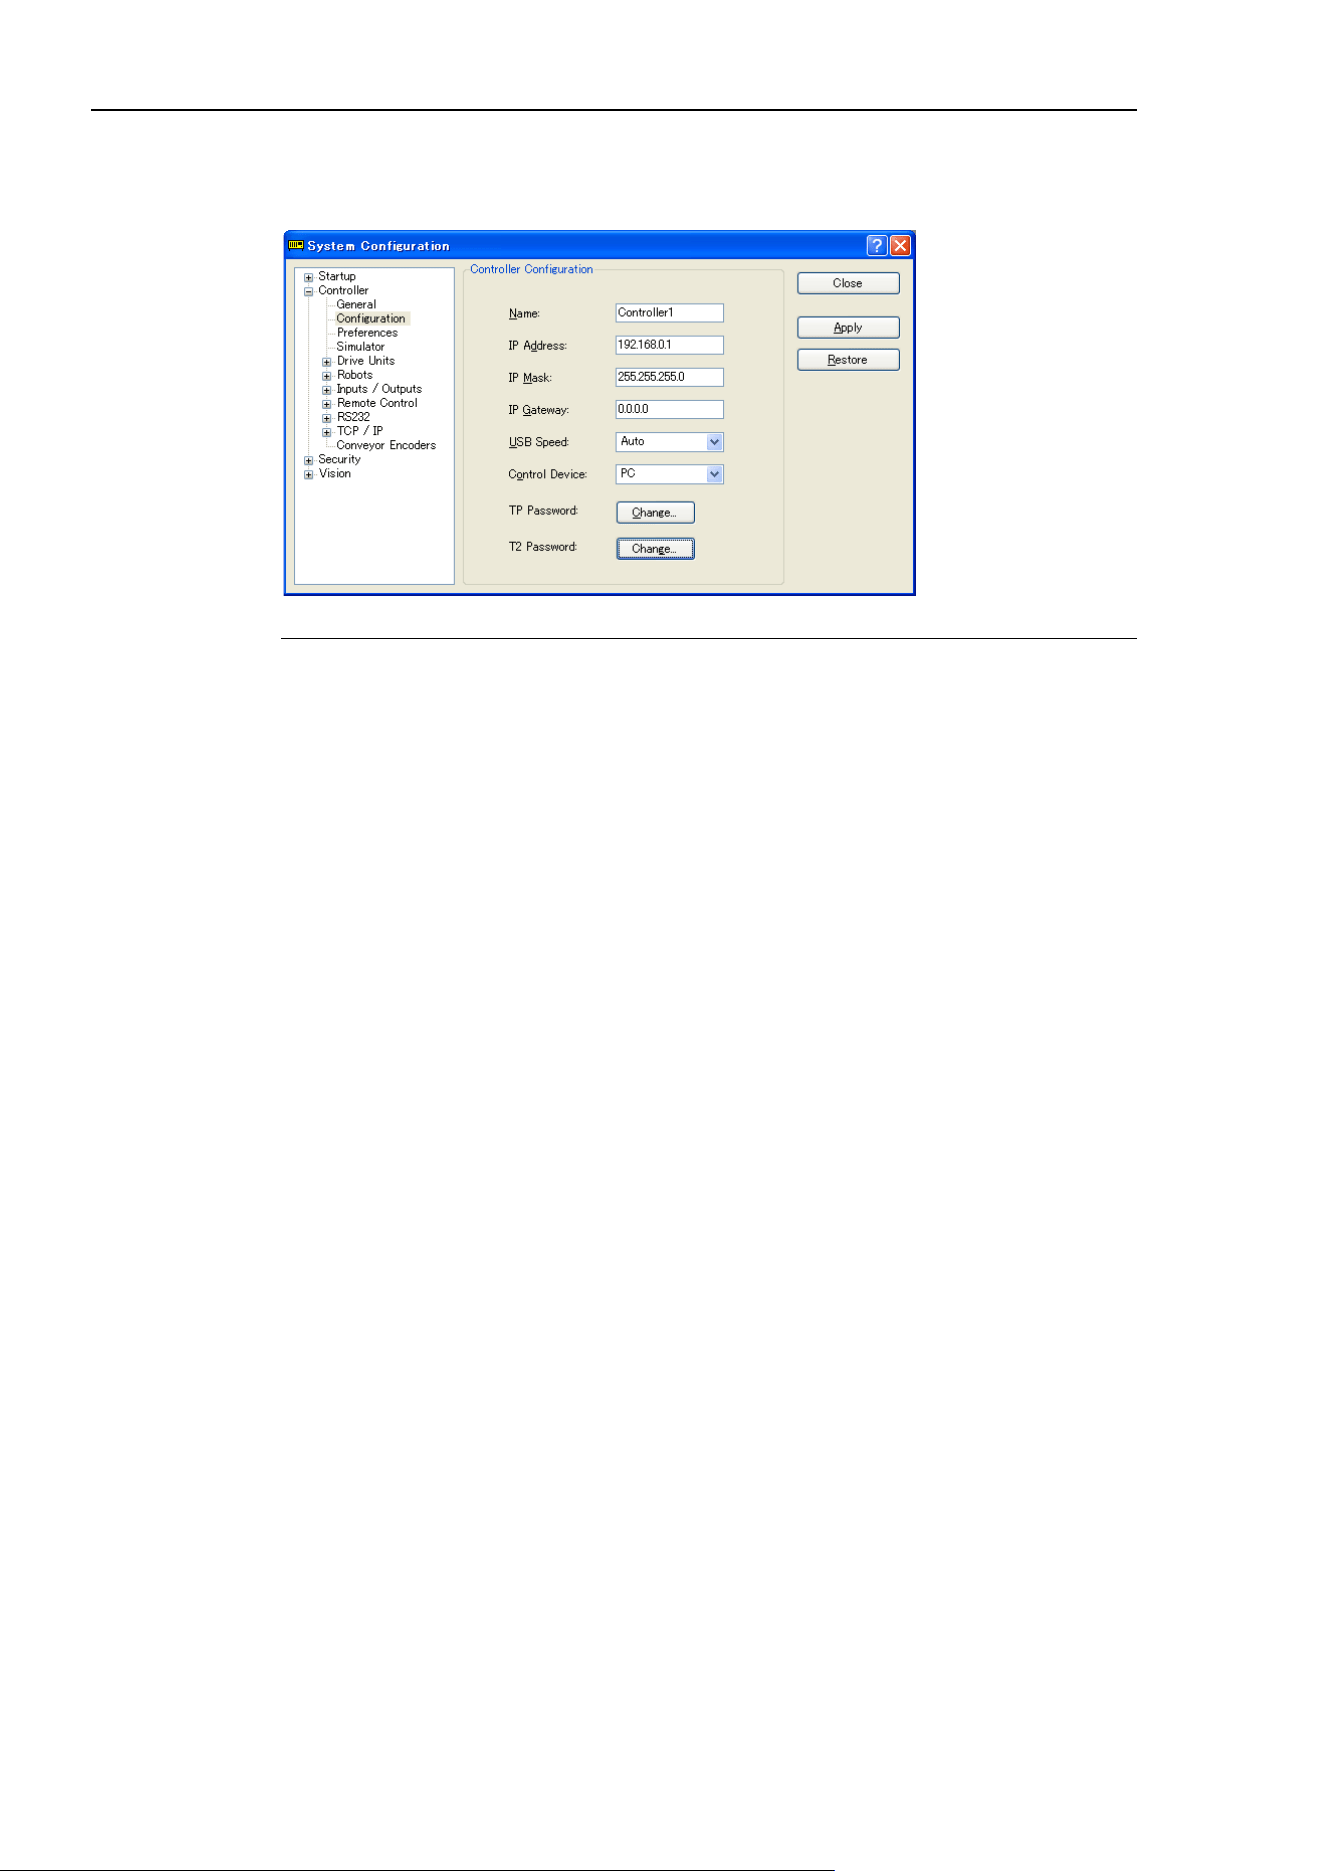
5. The EPSON RC+ 7.0 GUI
148 EPSON RC+ 7.0 (Ver.7.4) User's Guide Rev.6
[Setup]-[System Configuration]-[Controller]-[Configuration] Page
This page allows the user to view and change the controller configuration settings.
Item Description
Name
Use this text box to change the controller name. You may
use any name up to 16 characters long using alphanumeric
characters and underscore.
IP Address
Use this text box to set current IP address of the LAN-1
port. The IP Address must be on the same subnet as the PC.
IP Mask
Use this text box to set the IP mask of the LAN-1 port.
Note that the IP Mask must match the IP mask used for your
network.
IP Gateway
Use this text box to set the IP gateway of the LAN-1 port.
This is only required if you will be accessing the controller
from outside of the loc
al network.
Control Device
Allows you to select the Control Device.
TP Password
Allows you to change the TP password.
T2 Password
Allows you to change the TP2 password.
Apply
Saves the current changes. If necessary, the controller will
be reset to use
the new settings.
Restore
Reverts back to previous settings.
Close
Closes the Setup Controller dialog.
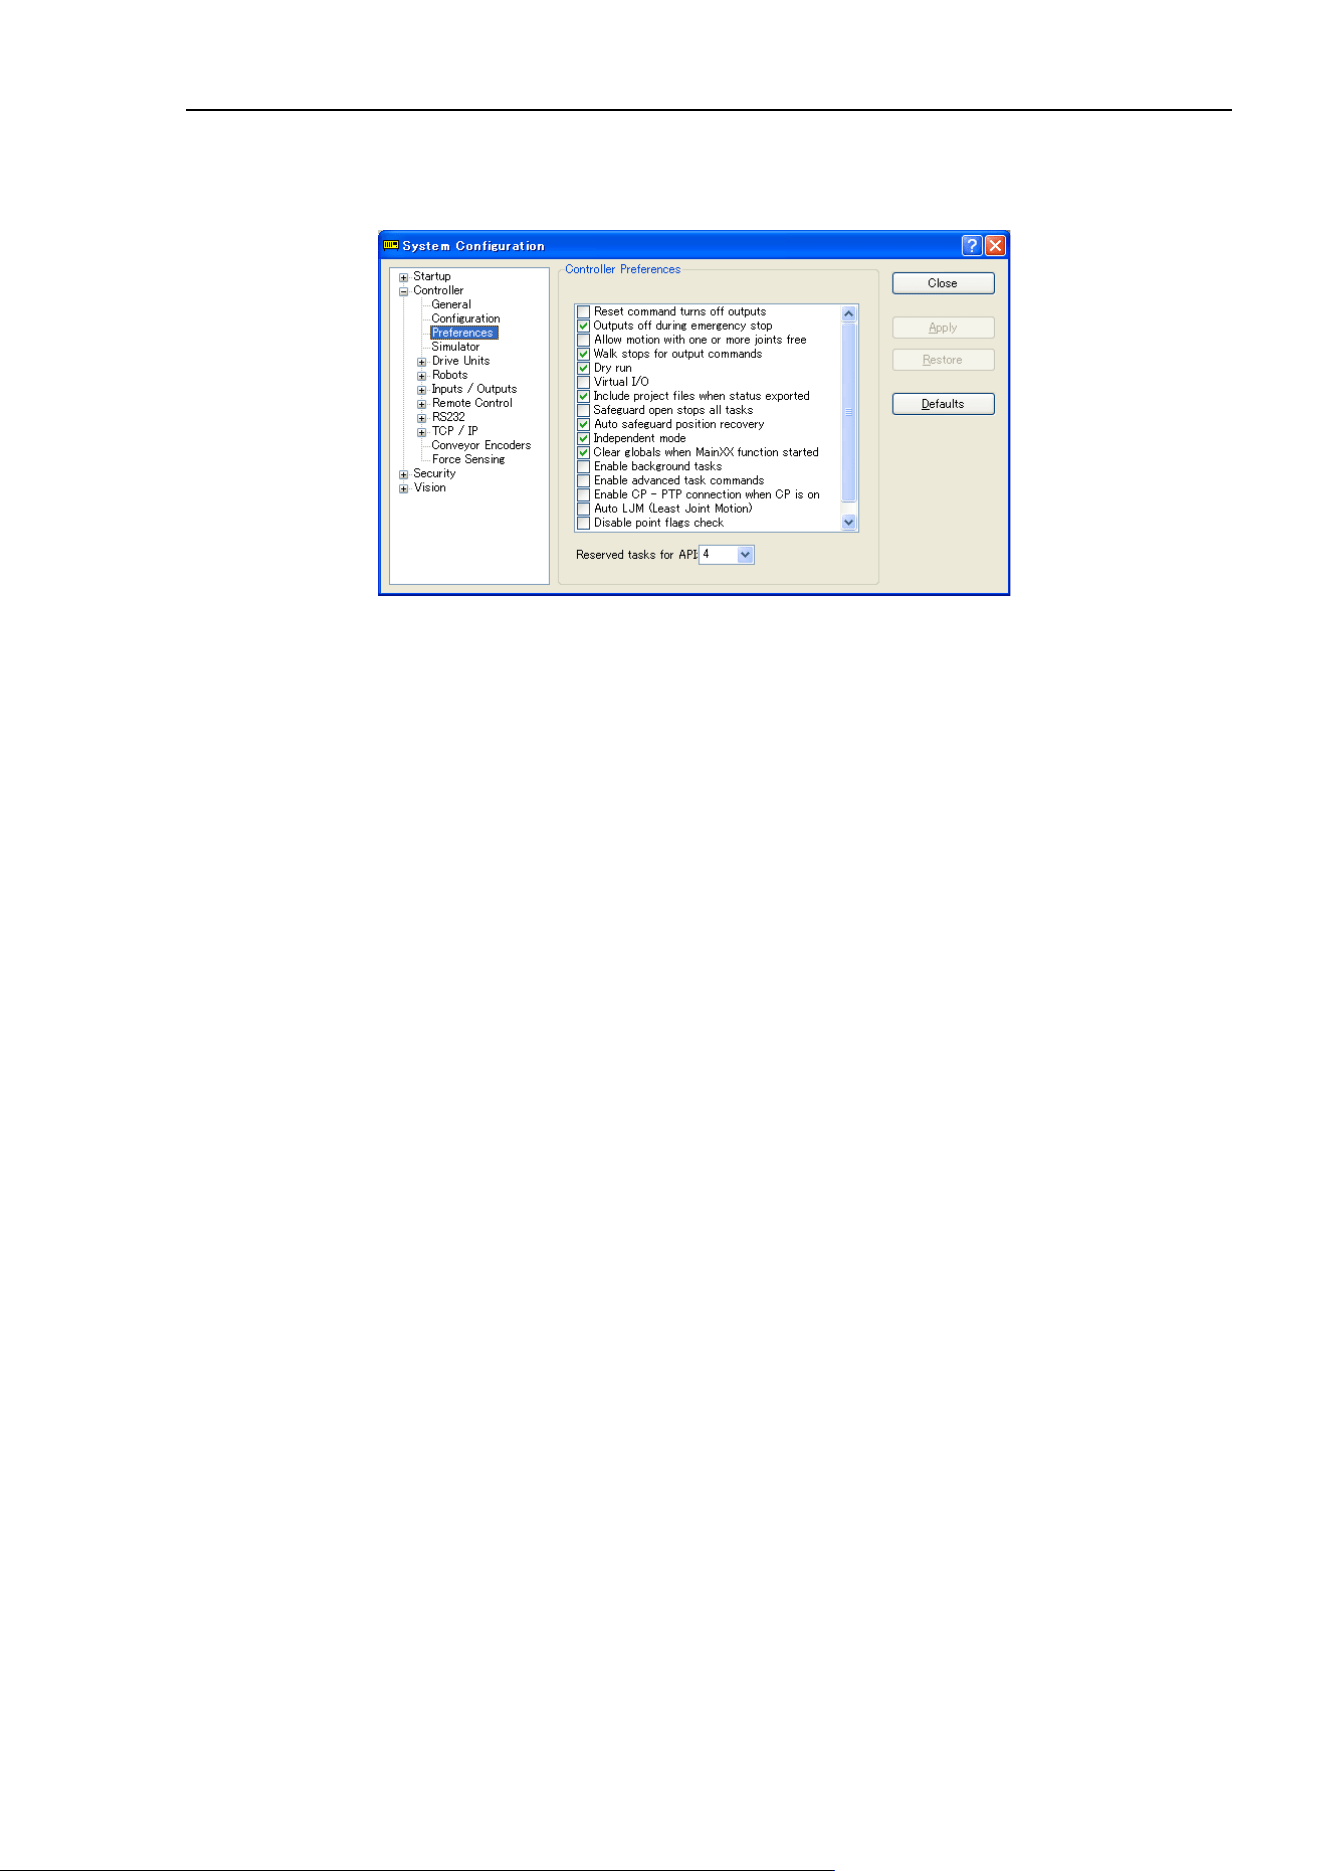
5. The EPSON RC+ 7.0 GUI
EPSON RC+ 7.0 (Ver.7.4) User's Guide Rev.6 149
[Setup]-[System Configuration]-[Controller]-[Preferences] Page
This page contains controller preference settings.
RESET command turns off outputs
When this preference is turned on, all outputs other than remote control outputs will be
turned off when a Reset instruction is executed. The default setting is off.
The outputs of the standard I/O, expansion I/O, and Fieldbus I/O are included in the
“outputs” mentioned in the above preferences [RESET command turns off outputs] and
[Outputs off during Emergency Stop]. Memory I/O is not affected by these preferences.
Therefore, memory I/O bits are not turned off by the RESET command execution or
during Emergency Stop.
Outputs off during Emergency Stop
When this preference is turned on, all outputs other than remote control outputs will be
turned off when emergency stop occurs. Also, no outputs can be turned on until the
emergency stop condition is cleared. The default setting is on.
Uncheck this preference to
execute I/O On/Off using the NoEmgAbort task or background
task after Emergency Stop. If it remains checked, the execution order of turn off by this
preference and turn on using the task are not guaranteed.
You should design your system to always remove all power to output devices when
emergency stop occurs. Even if the controller turns off outputs, the I/O hardware could
malfunction.
Allow motion with one or more joints free
When this preference is turned on, motion commands can be executed after SFree has
been used to free one or more joints. The default setting is off.
Walk stops for output commands
When checked, the Walk command from the Run Menu will execute lines until after the
next motion or output statement (whichever comes first). When unchecked, the Walk
command will execute lines until after the next motion statement and will not stop for
output statements. The default setting is on.
Dry run
This preference allows you to run programs without a robot connected to the controller.
All program statements will work. Motion statements will execute approximately the
same amount of time as when connected to a robot.
NOTE
NOTE

5. The EPSON RC+ 7.0 GUI
150 EPSON RC+ 7.0 (Ver.7.4) User's Guide Rev.6
Virtual I/O
This preference allows you to run programs using virtual I/O. When Virtual I/O is enabled,
I/O commands do not affect the hardware I/O. There are also several commands available
for turning on inputs from within a program. The default setting is off.
Remote function is also available when virtual I/O is enabled.
Include project files when status exported
This preference allows you to configure whether project files are included or not when the
controller status is exported. Refer to 5.11.8 [Controller] Command (Tools Menu). The
default setting is on.
Safeguard open stops all tasks
Check this option to cause all normal tasks and NoPause task to stop when the safeguard is
open. Only NoEmgAbort task and background tasks will continue.
This option can be used in applications where pause / continue are not required.
The default setting is off.
Auto safeguard position recovery
This preference allows you to move a robot back to the position where it was at the
safeguard opened when continuing the program execution.
Auto recover ON
Automatically turns ON a motor and moves a robot in low power
status to the position where it was when the safeguard opened.
Continues the usual cycle. (Default)
Auto recover OFF
In the Run Window and Operator Window, when an operator clicks
the
Continue button, a dialog with a Recover button will be shown.
The operator
needs to hold down the Recover button
until the motor
i
s ON and the robot’s return is finished. Otherwise the robot will
stop
before reaching final position.
After verifying that the robot
’s return is finished, the operator clicks
the
Continue button to continue the usual cycle.
Independent Mode
This preference allows you to use the controller without interfacing with the Windows
(Independent mode).
Use this option when you want to use the controller through the external device using
Remote I/O. This option is checked by default.
Initialize global variables when Main XX function started
This preference allows you to initialize the global variables as the main function becomes
active.
Turn off this preference when you sue the global variables from the background task.
Otherwise, the variables will be initialized by the controller and the variable-access
conflict from tasks will occur. This is turned on by default.
NOTE
5. The EPSON RC+ 7.0 GUI
EPSON RC+ 7.0 (Ver.7.4) User's Guide Rev.6 151
Enable background tasks
This preference allows you to execute background tasks. This is turned off by default.
Enable advanced task commands
This preference allows you to execute StartMain, Cont, Recover, Reset Error commands.
This is turned off by default.
CAUTION
■
Before you execute StartMain, Cont
, Recover, Reset
Error commands, you should
understand each commands specification and verify that the system has the appropriate
condition to execute these commands.
Improper use, such as executing commands continuously in a loop, can reduce the
security of system.
Enable CP – PTP connection when CP is ON
This preference allows you to overlap the trajectories of CP motion and PTP motion
during CP ON.
Over-speed error or Over-acceleration-speed error may occur according to the motion
acceleration / deceleration speed setting. If the error occurs, adjust the acceleration /
deceleration speed setting or uncheck this checkbox.
Auto LJM (Least Joint Motion)
This preference allows you to enable Auto LJM at the controller start up. To disable Auto
LJM temporarily, use AutoLJM Off command.
If Auto LJM is enabled at all times, this function automatically adjusts the posture of the
robot to reduce the motion distance, even when you intended to move the joint widely.
Therefore, it is recommended to disable Auto LJM at the controller start up and operate
the robot as you desired using AutoLJM On command or LJM function.
Disable LJM in Teach Mode
This preference allows you to invalidate LJM in the TEACH mode. The LJM function
becomes invalid regardless of the command of AutoLJM. The default setting is
unchecked.
Disable Point flag check
This preference allows you to continue operation even when point flags, one was specified
as a target point and the other one after the motion completion, do not match in a CP
motion.
However, if the flags do not match at the transferring point while CP On is used, the robot
will stop at the point and the motion will not become a path motion.
Motor off when Enable switch off in Teach Mode
This preference is read-only. It shows whether motors will be turned off when the Enable
switch is off during Teach Mode.
Enable robot maintenance data
This preference allows you to enable the parts consumption management for the Controller and
robot parts.
The default setting is unchecked.
Initial status (at shipment) of controller firmware Ver.7.2.0.x or later is enabled.
NOTE
NOTE
NOTE
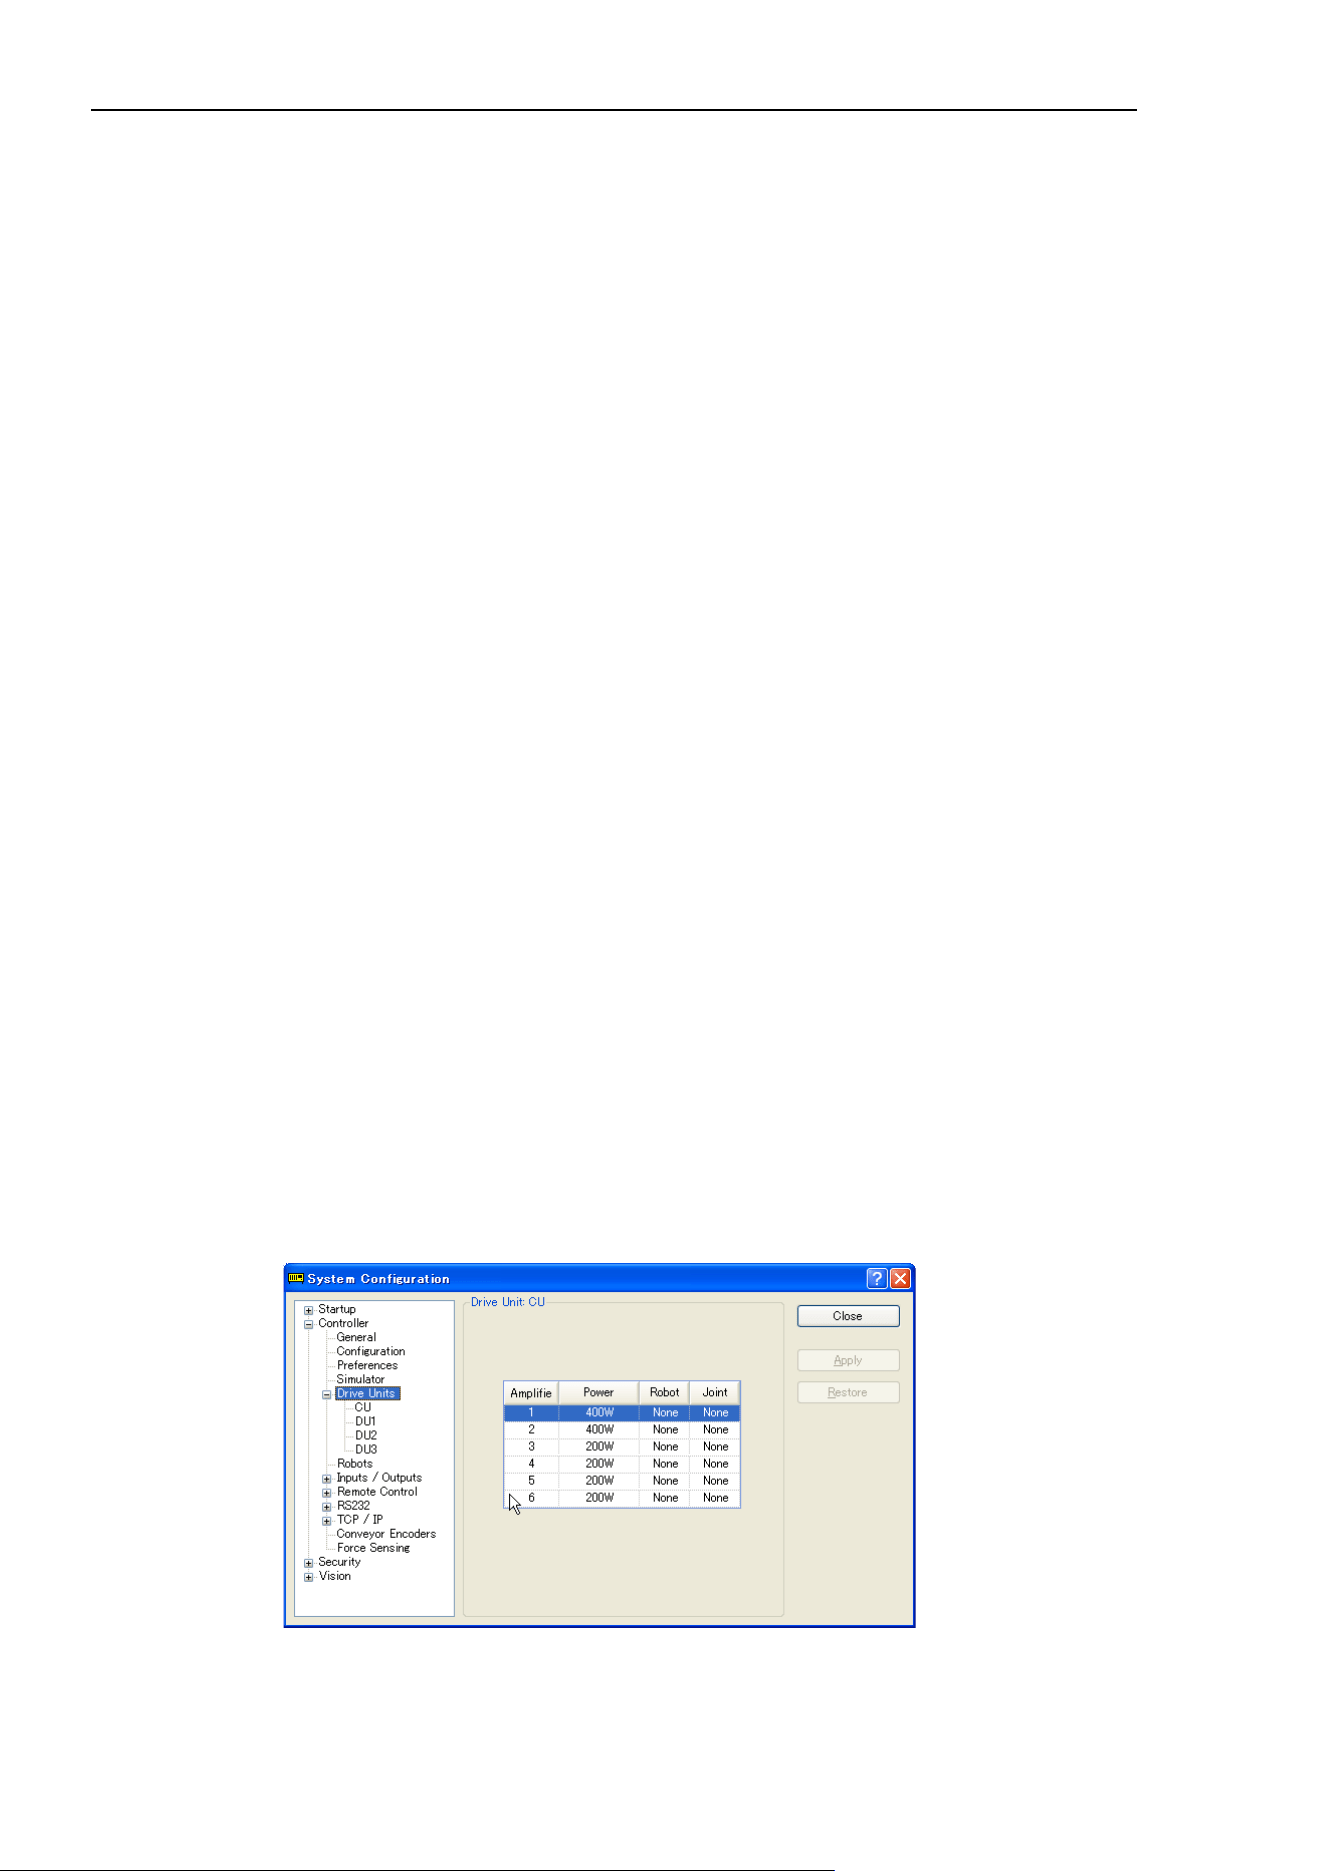
5. The EPSON RC+ 7.0 GUI
152 EPSON RC+ 7.0 (Ver.7.4) User's Guide Rev.6
Motor power low when ForcePowerLow signal OFF
This preference allows you to specify whether or not to invert the logic of the ForcePowerLow
signal input value.
When this checkbox is selected, the ForcePowerLow signal will work as the forced low power
function which operates the robot in the low power mode when remote I/O input signal is Low.
When this checkbox is unchecked, the ForcePowerLow signal will work as the forced low
power function which operates the robot in the low power mode when the remote I/O input
signal is High.
The default setting is unchecked.
For details of the ForcePowerLow signal, refer to 12.1.6 Remote Inputs.
ForcePowerLow signal change pauses all tasks
This preference allows you to specify whether to stop or temporarily stop the tasks when the
input of the ForcePowerLow (forced low power) signal is changed.
When this checkbox is selected, all tasks and commands will be temporarily stopped when the
remote I/O input signal is changed. The program execution can be continued.
When this checkbox is unchecked, all tasks and commands will be stopped when the remote
I/O input signal is changed. The program needs to be restarted.
The default setting is unchecked.
For details of the ForcePowerLow signal, refer to 12.1.6 Remote Inputs.
Reserved tasks for API
This setting is used to execute more than one Spel class methods of the RC+ API.
You can set up to 16 tasks. The default is 0.
The RC+ API tasks use some of the normal tasks. Therefore, if this setting is used, the
number of normal tasks available for the Spel+ programs will be as follows:
(Normal tasks) = 32 - (RC+ API tasks)
Disable Test (T2)
This preference is read-only. It shows whether the execution of Test (T2) of TP3 is
prohibited.
[Setup]-[System Configuration]-[Drive Unit]
This page displays the status of the Drive Unit. It shows Output, Robot, and Axis settings
of each Drive Unit.
NOTE
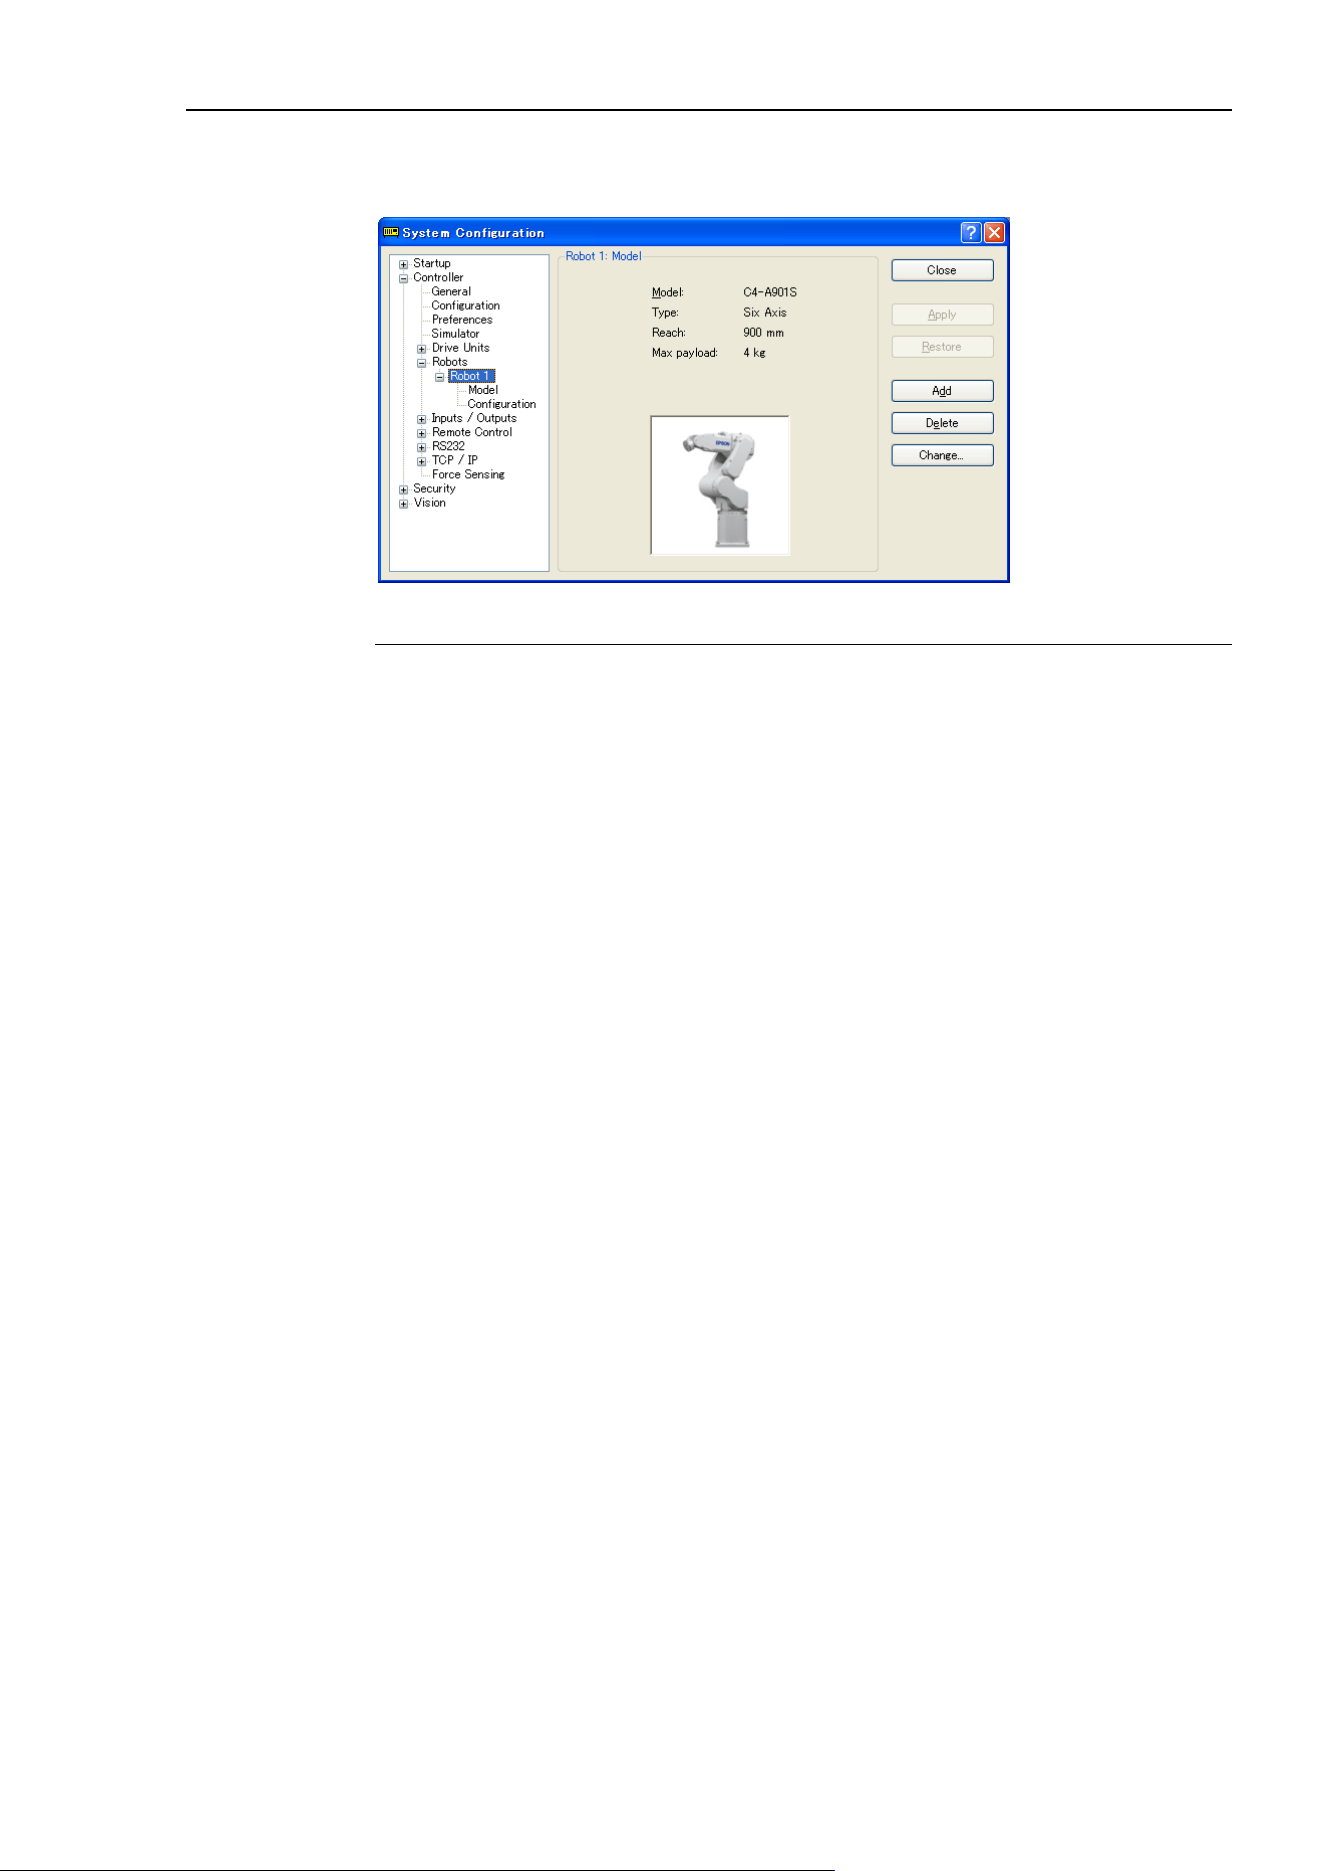
5. The EPSON RC+ 7.0 GUI
EPSON RC+ 7.0 (Ver.7.4) User's Guide Rev.6 153
[Setup]-[System Configuration]-[Robots]
[Setup]-[System Configuration]-[Robots]-[Model] page
Item Description
Model
Displays the robot model.
Type
Displays the robot type.
Reach
Displays the robot length (J1 + J2 for SCARA robots) or reach for
6
-axis robots.
Max payload
Displays maximum payload of the robot.
Add
Adds a robot.
Remove
Deletes a robot.
Close
Closes the System Configuration dialog.
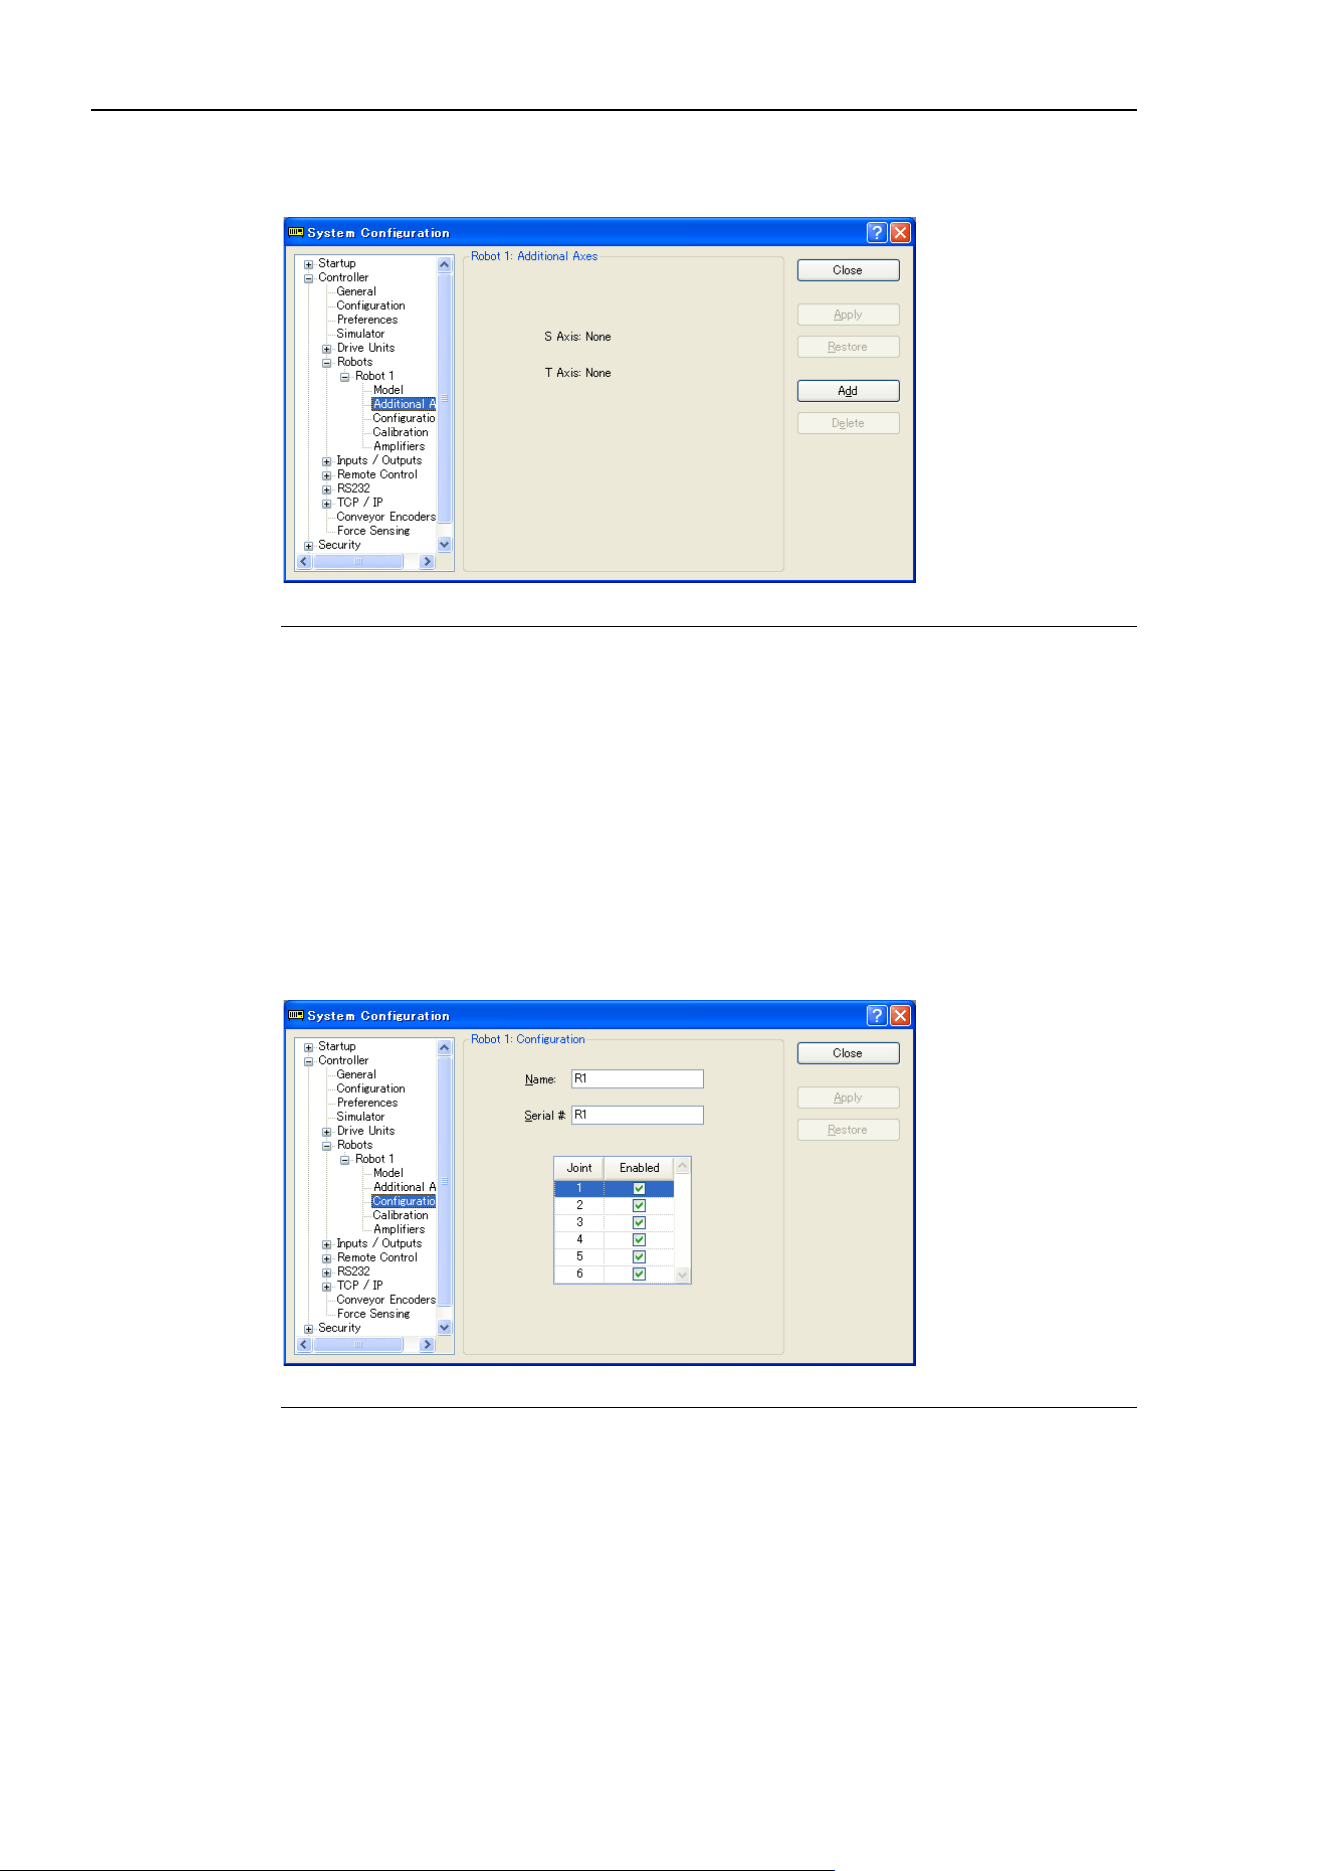
5. The EPSON RC+ 7.0 GUI
154 EPSON RC+ 7.0 (Ver.7.4) User's Guide Rev.6
[Setup]-[System Configuration]-[Robots]-[Robot**]-[Additional Axes]
For details of the additional ST axis, refer to 10.2 Configuration of Additional Axes.
Item Description
S Axis
Displays the configuration of additional S axis.
T Axis
Displays the configuration of additional T axis.
Apply
Saves the current changes.
Restore
Reverts back to previous settings.
Add
Adds an additional axis.
Remove
Deletes an additional axis.
Close
Closes the dialog.
[Setup]-[System Configuration]-[Robots]-[Robot**]-[Configuration] page
Item Description
Name
Enter a Name for the robot.
Serial #
Enter the Serial number of the robot.
Joint
These checkboxes determine if the respective joint is enabled
or disabled.
Apply
Saves the current changes.
Restore
Reverts back to previous settings.
Close
Closes the Setup Controller dialog.
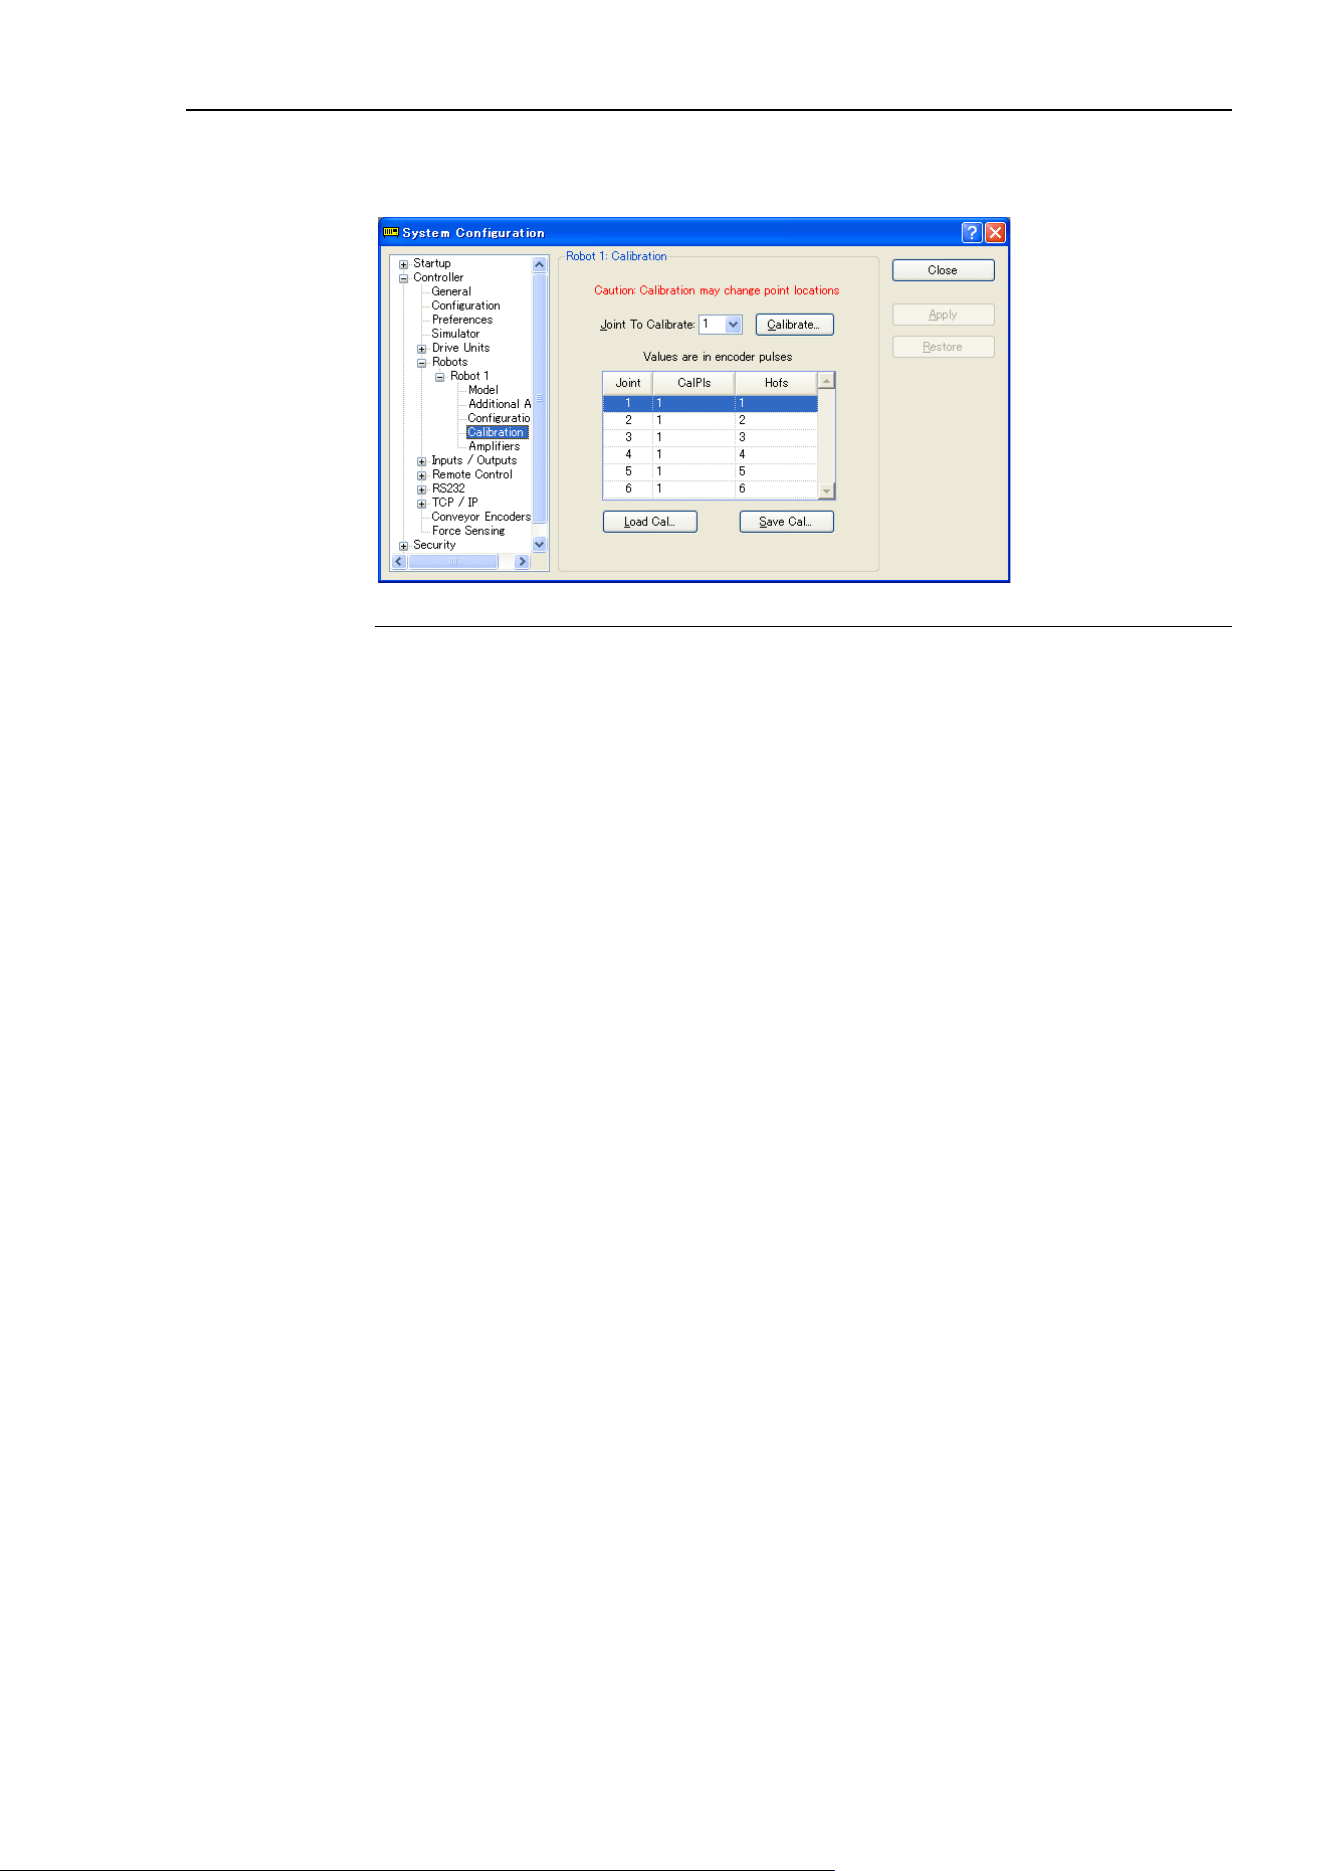
5. The EPSON RC+ 7.0 GUI
EPSON RC+ 7.0 (Ver.7.4) User's Guide Rev.6 155
[Setup]-[System Configuration]-[Robots]-[Robot**]-[Calibration] Page
You can calibrate each joint of the robot from this page.
Item Description
Joint to Calibrate
Select the joint that you want to Calibrate.
Calibrate
Starts the Calibration Wizard dialog that walks you through the
calibration process.
Calpls
These are the Calpls settings for each joint. Normally, the
calibration wizard will calculate these values.
Hofs
These are the Hofs settings for each joint. Normally, the
calibration wizard will calculate these values.
Load Cal
Use this button to load data from a previously save calibration file.
After the data is loaded, the grid will be refreshed to show the
values.
Save Cal
Use this button to save the calibration data to a calibration file.
Apply
Saves the current changes.
Restore
Reverts back to previous settings.
Close
Closes the Setup Controller dialog.
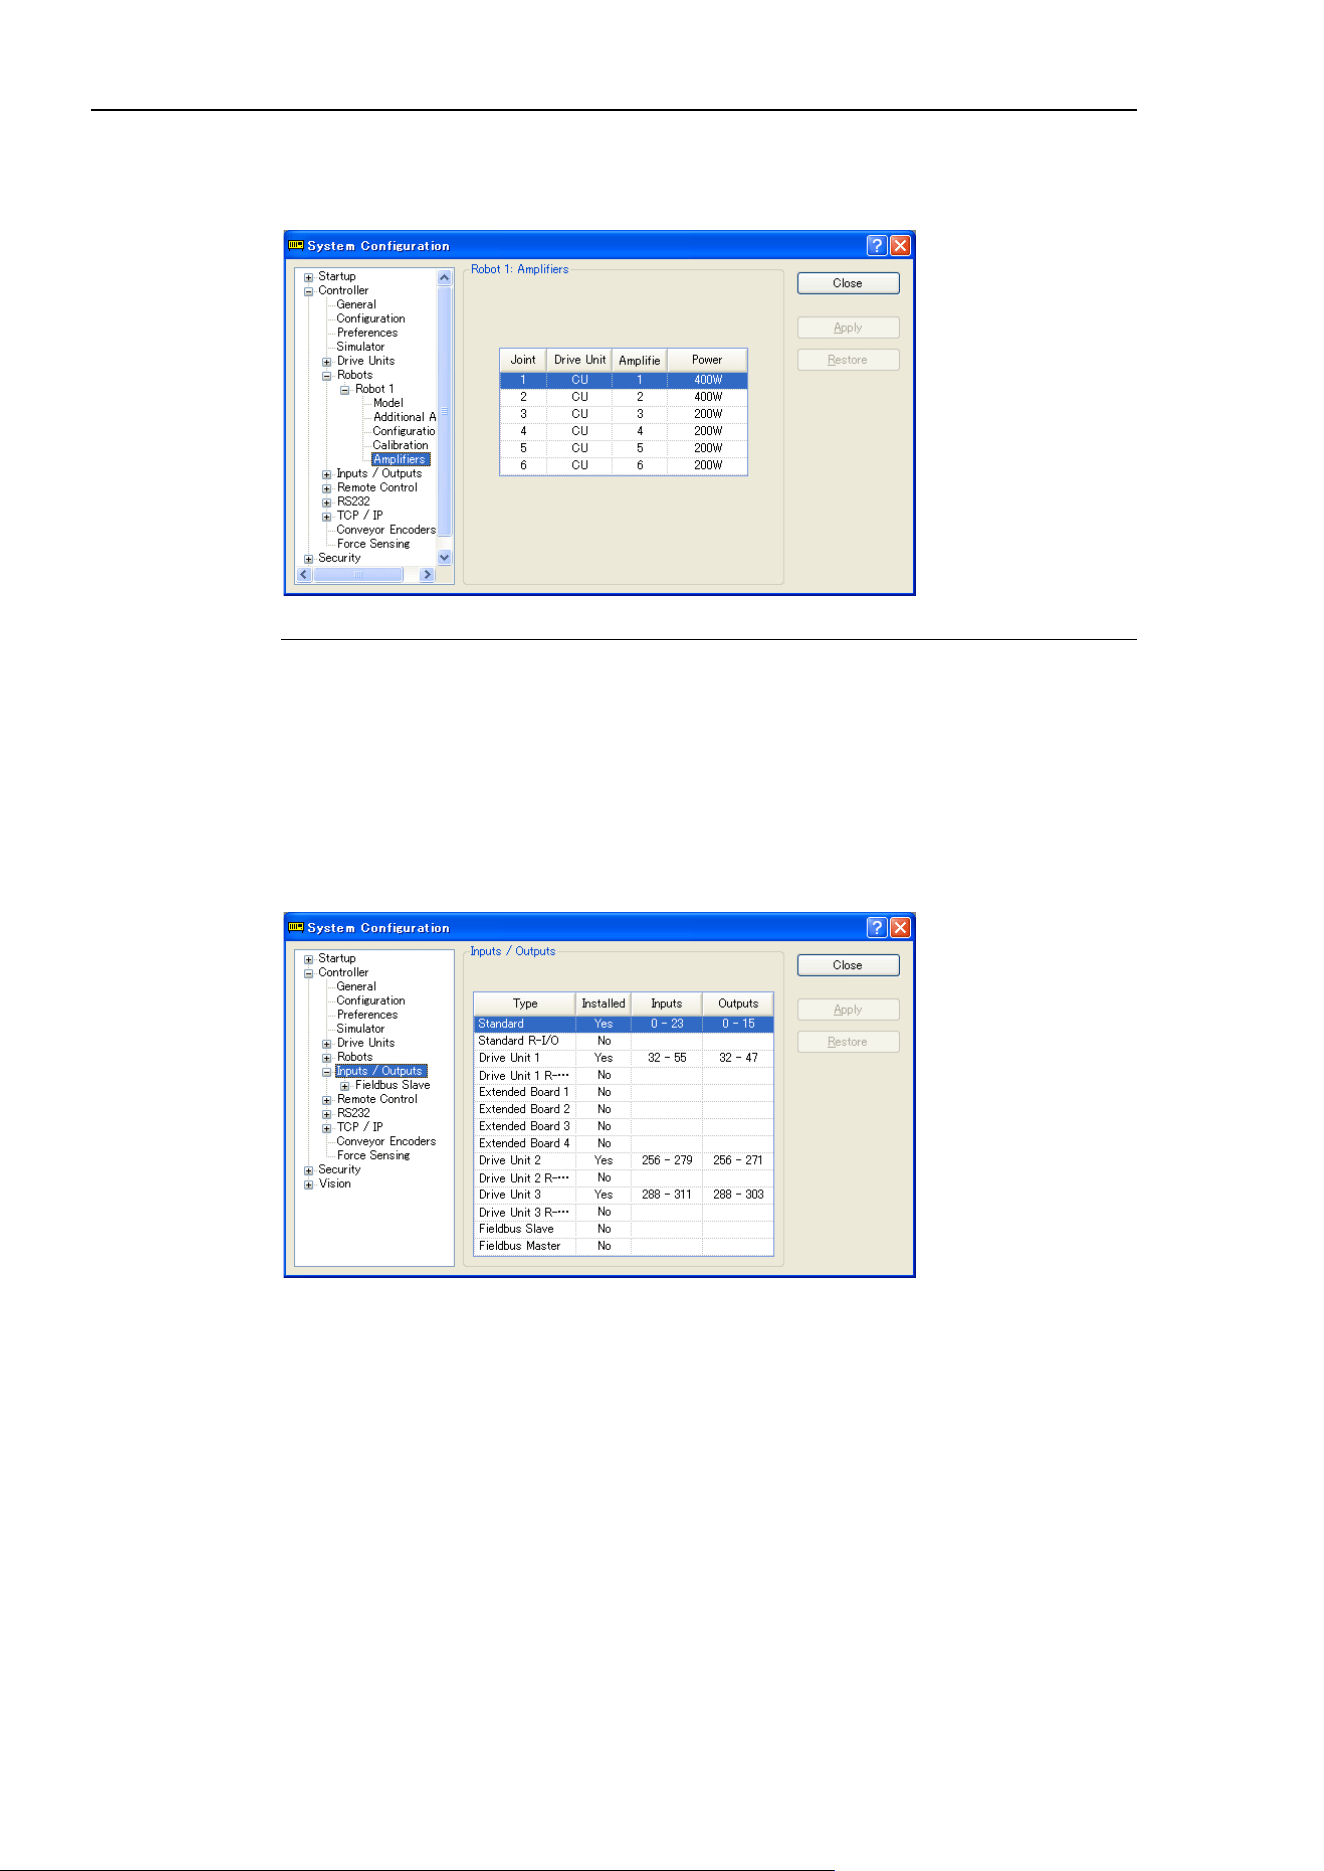
5. The EPSON RC+ 7.0 GUI
156 EPSON RC+ 7.0 (Ver.7.4) User's Guide Rev.6
[Setup]-[System Configuration]-[Robots]-[Robot**]-[Amplifiers] Page
This page shows the power values for the motor amplifiers installed in the controller.
Item Description
Robot Amplifiers
This shows the power for each robot amplifier currently in
the controller
along with the associated drive unit and
amplifier number.
Close
Closes the System Configuration dialog.
[Setup]-[System Configuration]-[Inputs / Outputs] Page
This page shows the I/O hardware installed in the controller. There are no settings to
configure.
[Setup]-[System Configuration]-[Inputs / Outputs]-[Fieldbus Master]
For details of Fieldbus master, refer to the following manual:
Robot Controller RC700/RC90 option: Fieldbus I/O manual
[Setup]-[System Configuration]-[Inputs / Outputs]-[Fieldbus Slave]
For details of Fieldbus slave, refer to the following manual:
Robot Controller RC700/RC90 option: Fieldbus I/O manual
[Setup]-[System Configuration]-[Remote]
For details of Remote function, refer to 12. Remote Control.
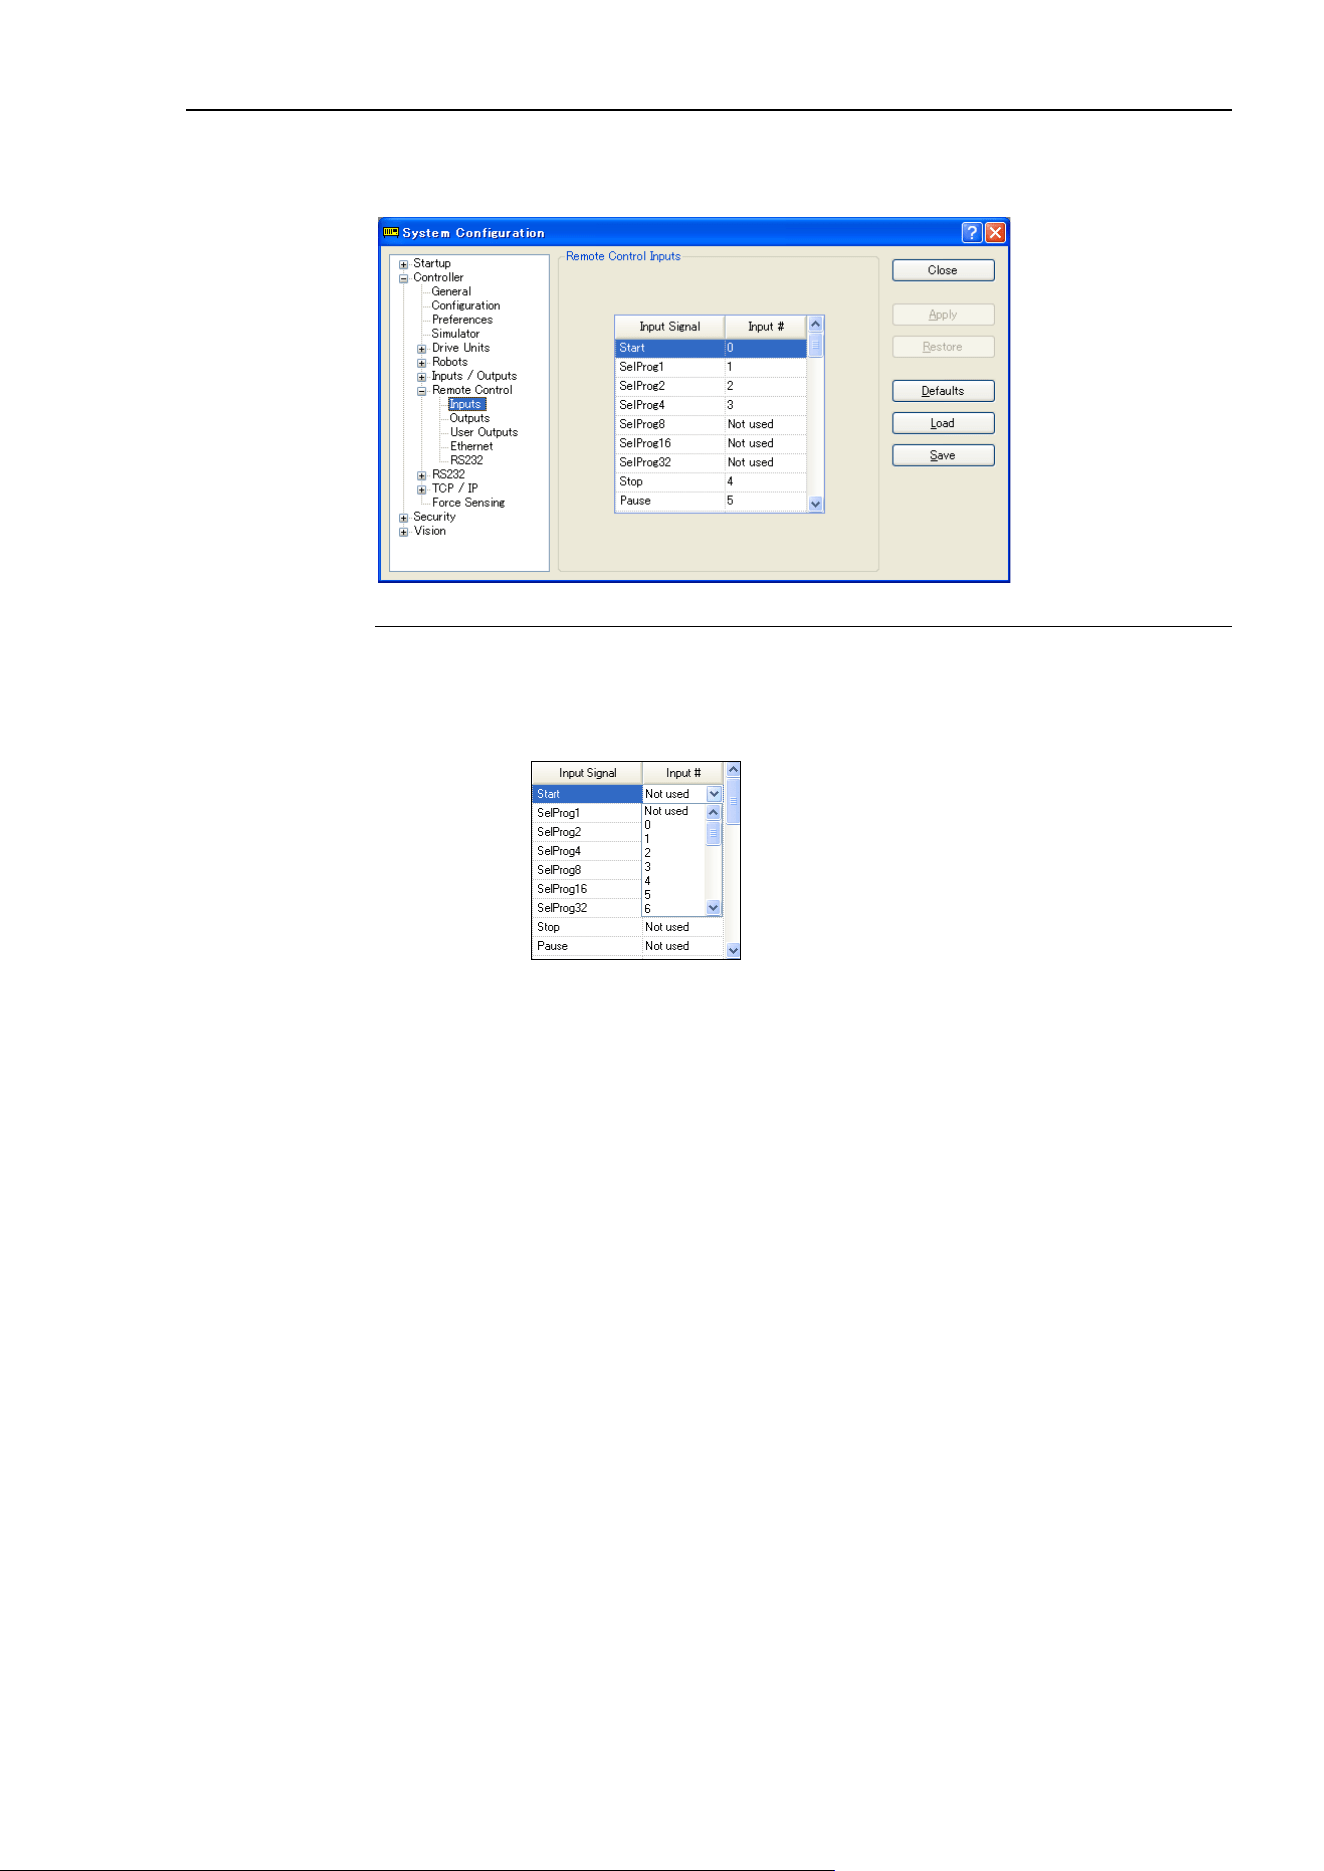
5. The EPSON RC+ 7.0 GUI
EPSON RC+ 7.0 (Ver.7.4) User's Guide Rev.6 157
[Setup]-[System Configuration]-[Remote Control Inputs] Page
Use this page to configure the controller remote control inputs.
Item Description
Input #
Select an input bit to use for the corresponding input signal. Select "Not
used" to disable the remote input.
For example, if
“Start” is assigned to I/O input bit 0, select “Not used”
to
use this as a normal I/O input.
Apply
Saves the current changes.
Restore
Reverts back to previous settings.
Defaults
Click this button to set the default remote inputs. First, a dialog box will
be displayed asking you which type of inputs to use for defaults: Standard,
Fieldbus
master, or Fieldbus slave I/O
. You can also select Clear All to set
all remote inputs to Not used.
Load
Reads the assigned remote inputs and outputs from a file on the PC and
save it in the controller.
Save
Saves the assigned remote inputs and outputs shown in the dialog to a file
on the PC.
Close
Closes the Setup Controller dialog.
Both the remote inputs and outputs are loaded or saved together when using <Load> or
<Save>.
NOTE
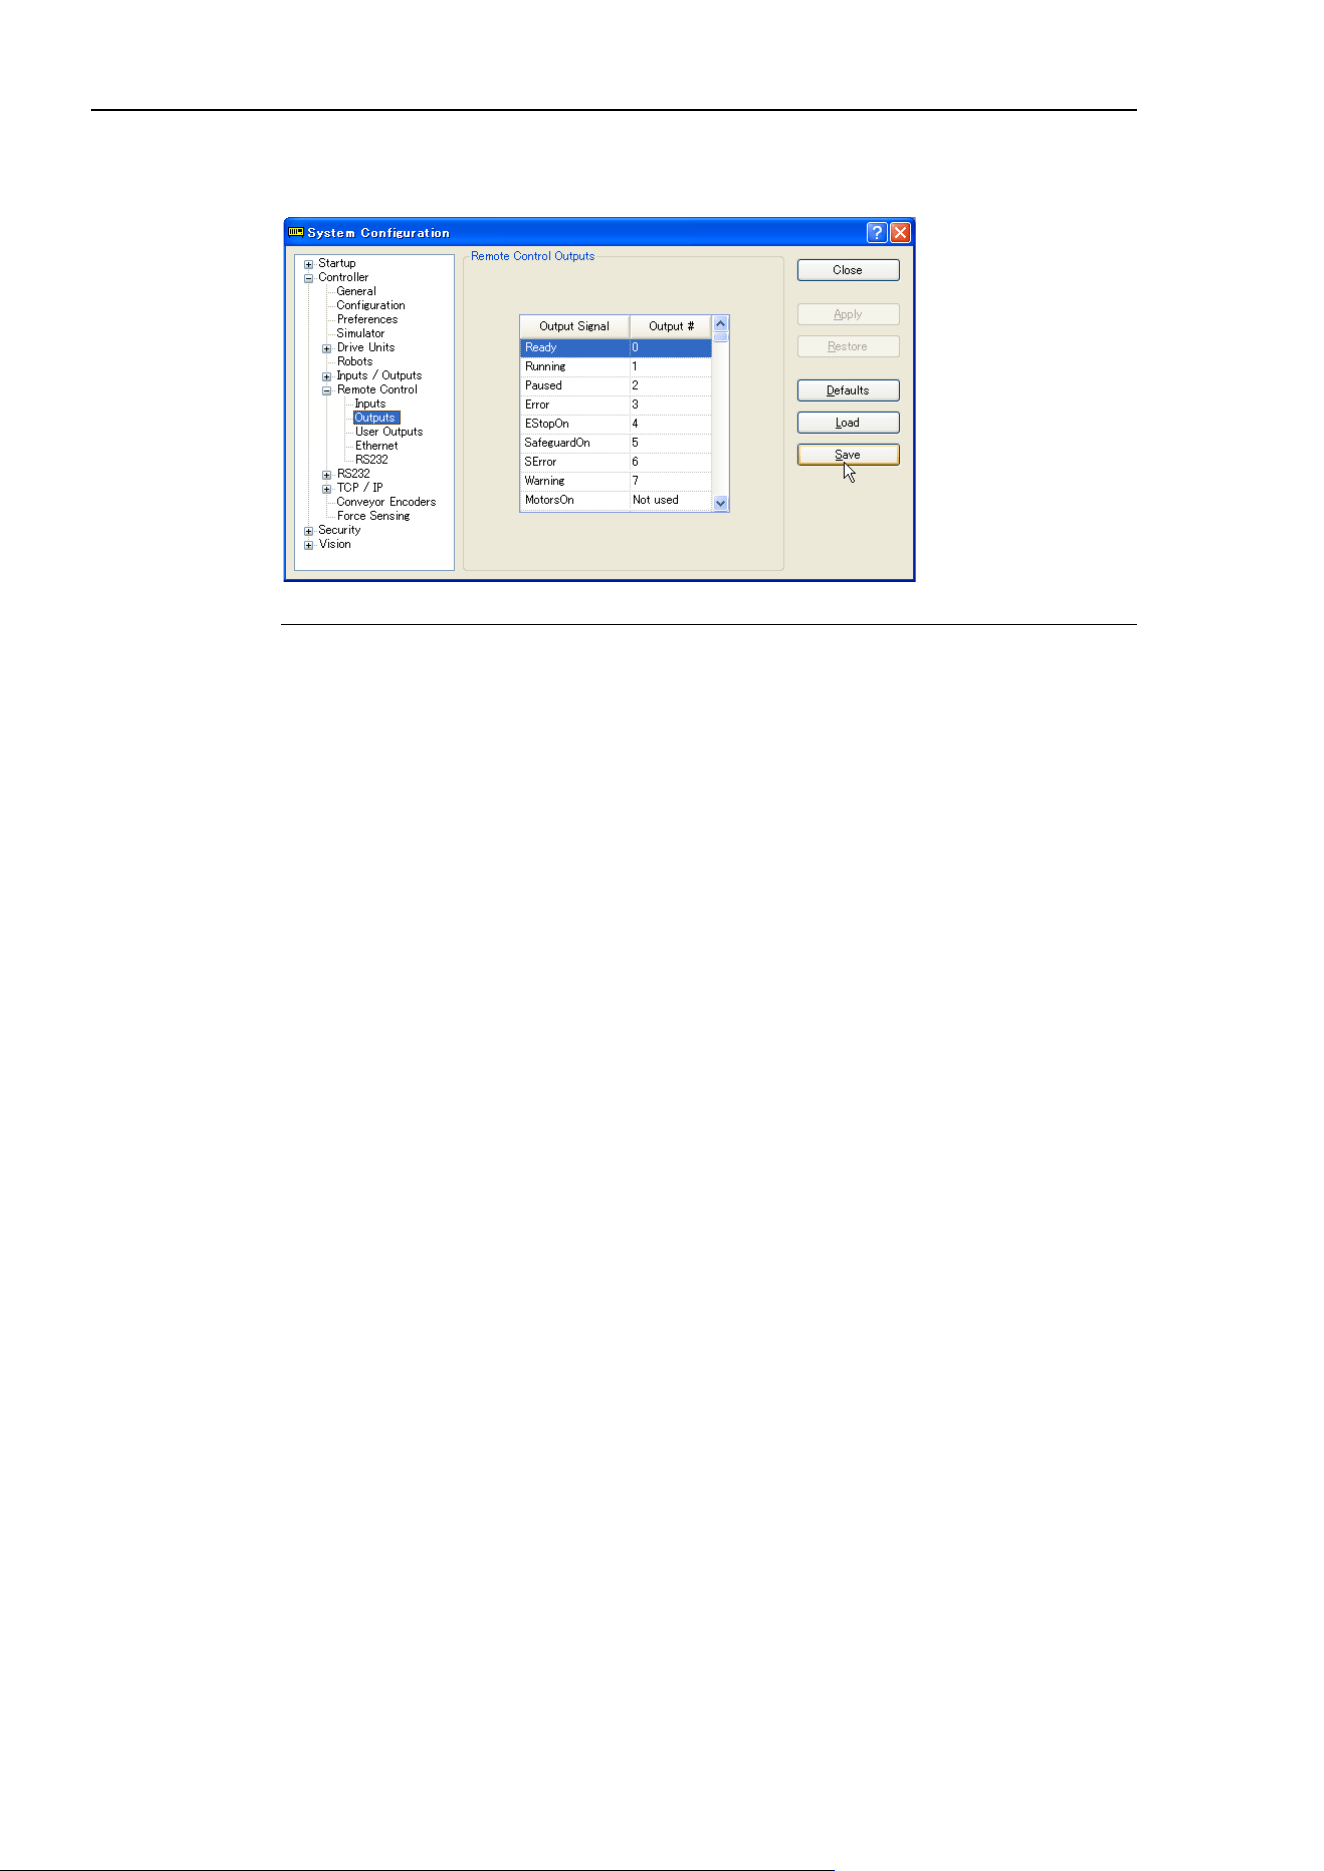
5. The EPSON RC+ 7.0 GUI
158 EPSON RC+ 7.0 (Ver.7.4) User's Guide Rev.6
[Setup]-[System Configuration]-[Remote Control]-[Outputs] Page
Use this page to configure the controller remote control outputs.
Item Description
Output #
Select an output bit to use for the corresponding output signal. Select "Not
used" to disable the remote output.
For example, if
“Ready” is assigned to I/O output bit 0, select “Not used
”
to use this as a normal I/O output.
Apply
Saves the current changes.
Restore
Reverts back to previous settings.
Defaults
Click this button to set the default remote outputs. First, a dialog box will
be displayed asking you which type of outputs to use for defaults:
Standard
, Fieldbus master, or Fieldbus slave I/O. Yo
u can also select
<
Clear All> to set all remote outputs to “Not used”.
Load
Reads the assigned remote inputs and outputs from a file on the PC and
save it in the controller.
Save
Saves the assigned remote inputs and outputs shown in the dialog to a file
on the PC.
Close
Closes the Setup Controller dialog.
Both the remote inputs and outputs are loaded or saved together when using <Load> or
<Save>.
NOTE
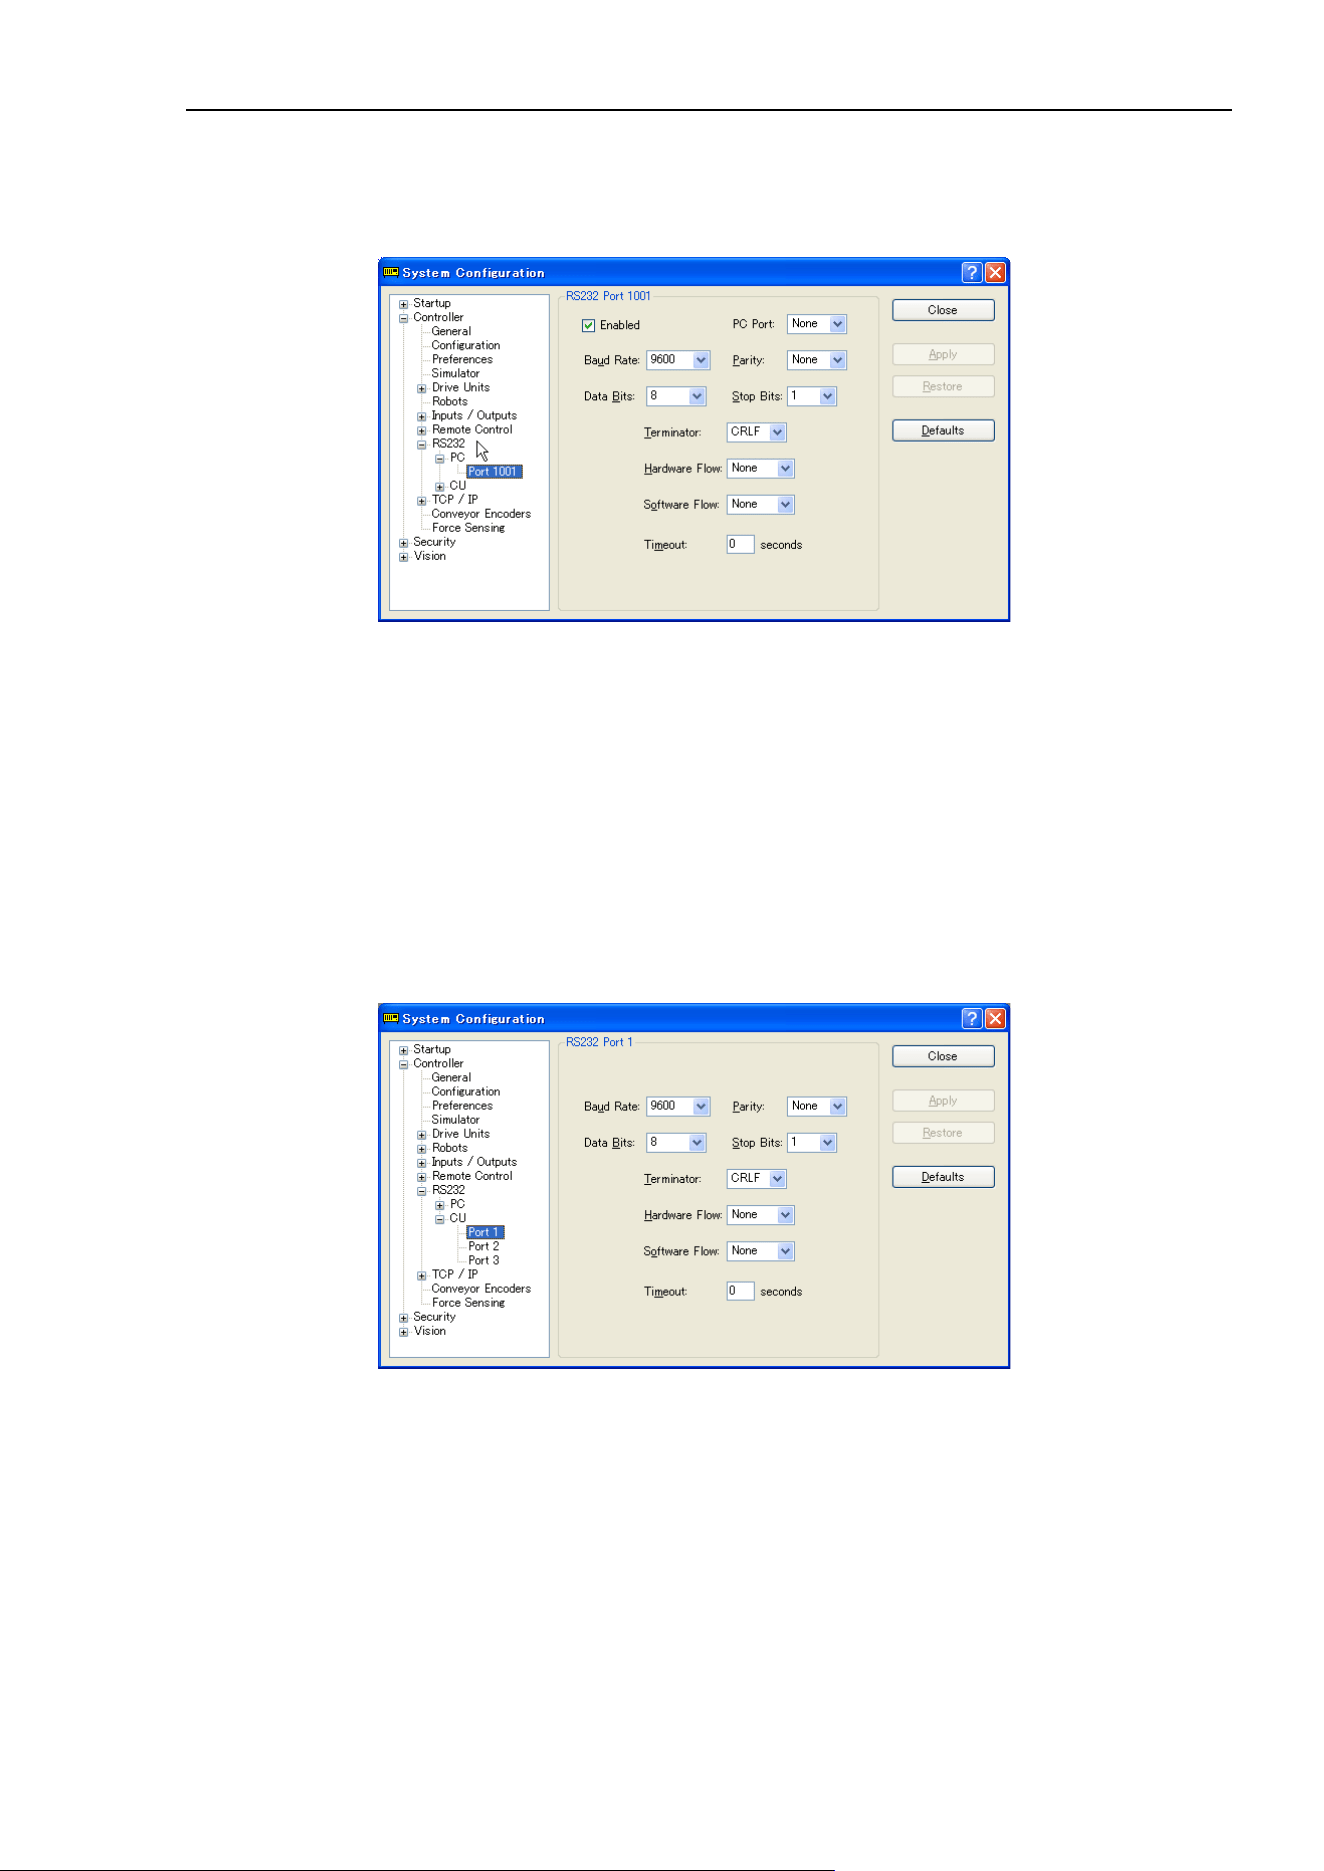
5. The EPSON RC+ 7.0 GUI
EPSON RC+ 7.0 (Ver.7.4) User's Guide Rev.6 159
[Setup]-[System Configuration]-[RS232]
[Setup]-[System Configuration]-[RS232]-[PC] Page
Use this page to configure the RS232 ports on PC.
To configure an RS-232 port
1. Select [System Configuration] from the [Setup] menu and select the page for the
RS232C port you want to configure.
2. Select the [PC port] and change the settings as desired.
3. Set the [Enable] check box.
4. Click <Apply> to save the new settings and click <Close>.
[Setup]-[System Configuration]-[RS232]-[CU] Page
There is one page for each PS232C port. If there are no RS232C ports installed in the
special slot, then no selections are visible in the tree.
To configure an RS-232 port
1. Select [System Configuration] from the [Setup] menu and select the page for the
RS232C port you want to configure.
2. Change the settings as desired.
3. Click <Apply> to save the new settings and click <Close>.
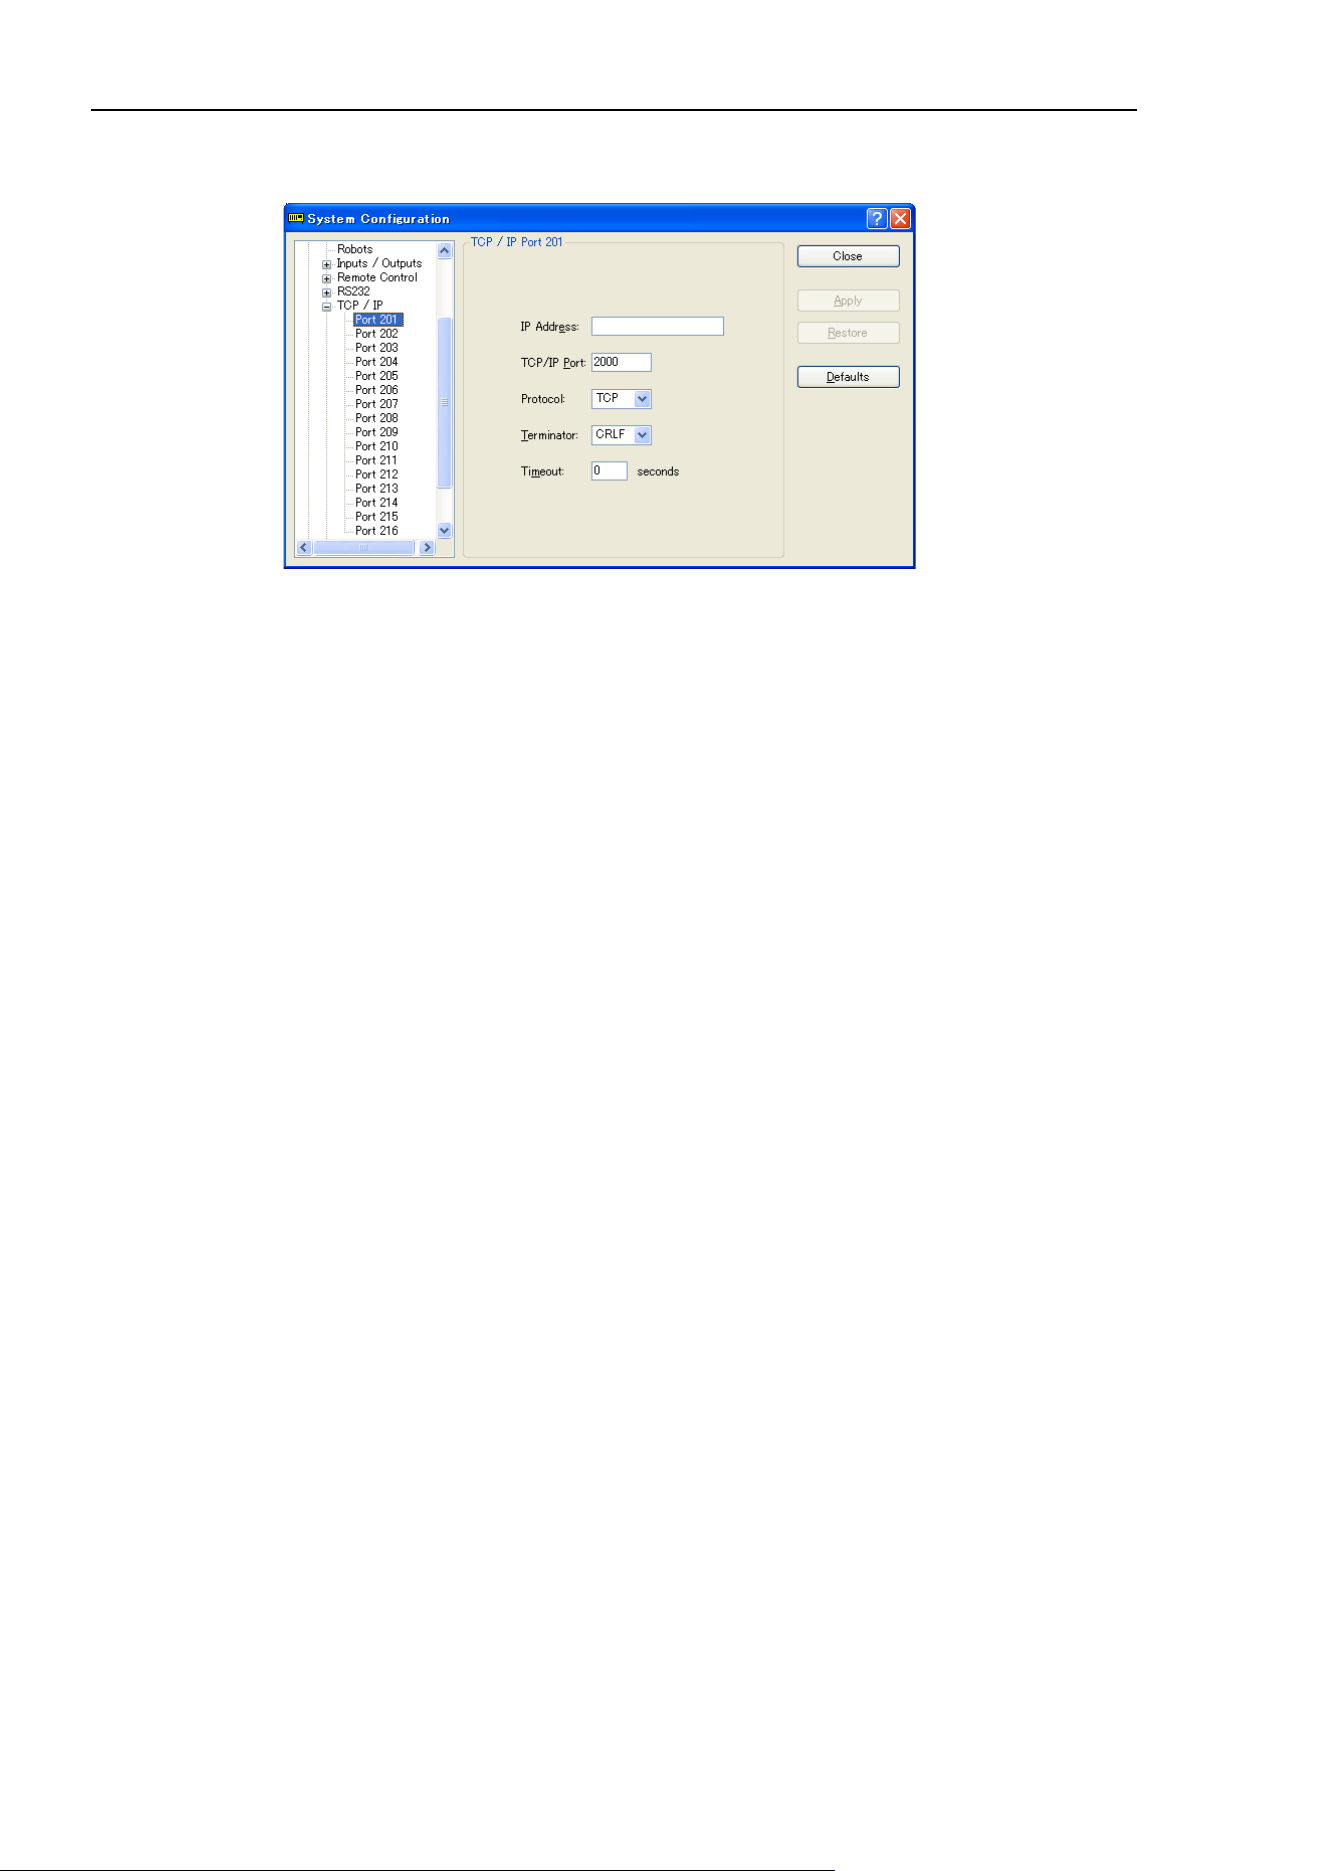
5. The EPSON RC+ 7.0 GUI
160 EPSON RC+ 7.0 (Ver.7.4) User's Guide Rev.6
[Setup]-[System Configuration]-[TCP/IP] Pages
There is one page for each TCP / IP port in the controller.
To configure a TCP/IP port
1. Select [System Configuration] from the [Setup] menu and select the page for the
TCP/IP port you want to configure.
2. Enter the host name or IP address for the controller or PC that you want this controller
to communicate with.
3. Enter the TCP/IP port number. This must be the same port number that is used on the
host device. It must be different from any of the other TCP/IP port numbers used for
the other TCP/IP ports.
4. Change the other settings as desired.
5. Click <Apply> to save the new settings and click <Close>.
[Setup]-[System Configuration]-[Conveyor Encoder]
For details, refer to 16. Conveyor Tracking.
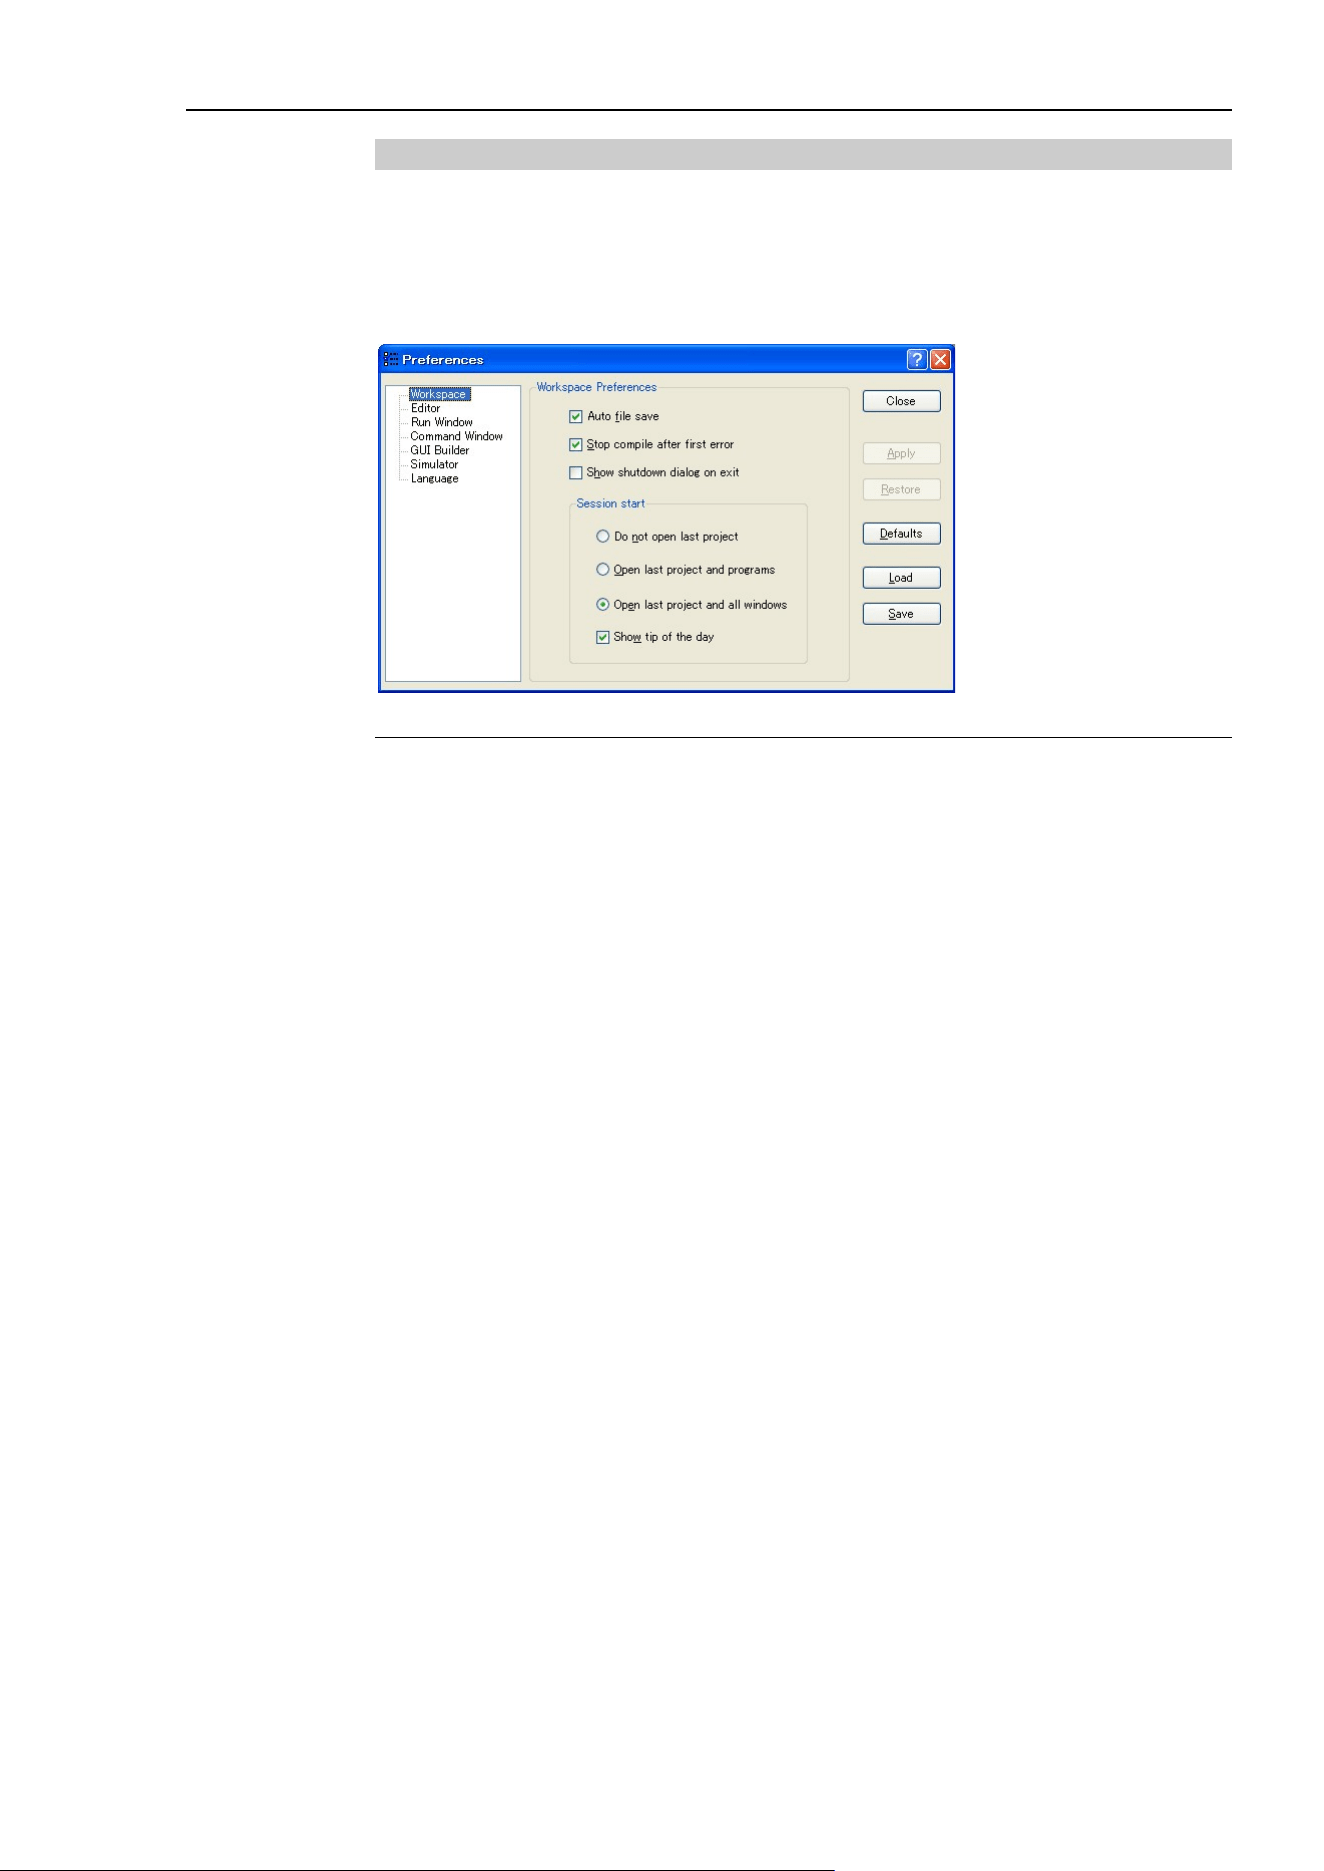
5. The EPSON RC+ 7.0 GUI
EPSON RC+ 7.0 (Ver.7.4) User's Guide Rev.6 161
5.12.3 [Preferences] Command (Setup Menu)
The Preferences command opens a dialog that contains several pages that are used to
configure user preferences for the EPSON RC+ 7.0 environment. To open the
[Preferences] dialog box, select [Setup]-[Preferences].
[Setup]-[Preferences]-[Workspace] Page
From this page, you can configure your workspace preferences.
Item Description
Auto file save
Checking this box will cause EPSON RC+ 7.0 to automatically
save any open files before executing a command that requires
the file to be saved. For example, if a file needs to be saved
before executing a project build, the file will automatically be
saved before running the build. Default is On.
Stop compile after
first error
Stops compile after first error occurs. This makes it easier to see
the first error in the status
pane
and allows you to fix one error at
a time.
Default is On.
Display the shutdown
dialog
on exit
Displays the shutdown dialog when closing the EPSON RC+
7.0
. For details, refer to 5.6.11 Exit Command (File Menu).
Default is
Off.
Do not open last project
If this radio button is selected, the last project will not be opened
when
EPSON RC+ 7.0 is started.
Open last project and
program
file
If this radio button is selected, the last project will be opened
and any program windows that were previously opened will be
opened.
Open last project and
all windows
If this radio button is selected, the last project will be opened
and all windows will be restored to their previous locations.
This is the default setting.
Show Tip of the Day
If this check box is on, the Tip of the Day dialog will be
displayed when
EPSON RC+ 7.0 is started.
Apply
Saves the current changes.
Restore
Reverts back to previous settings.
Default
Sets the default values.
Load
Reads the preferences previously saved on the PC.
Save
Saves the preferences to a file on the PC.
Close
Closes the Preferences dialog.
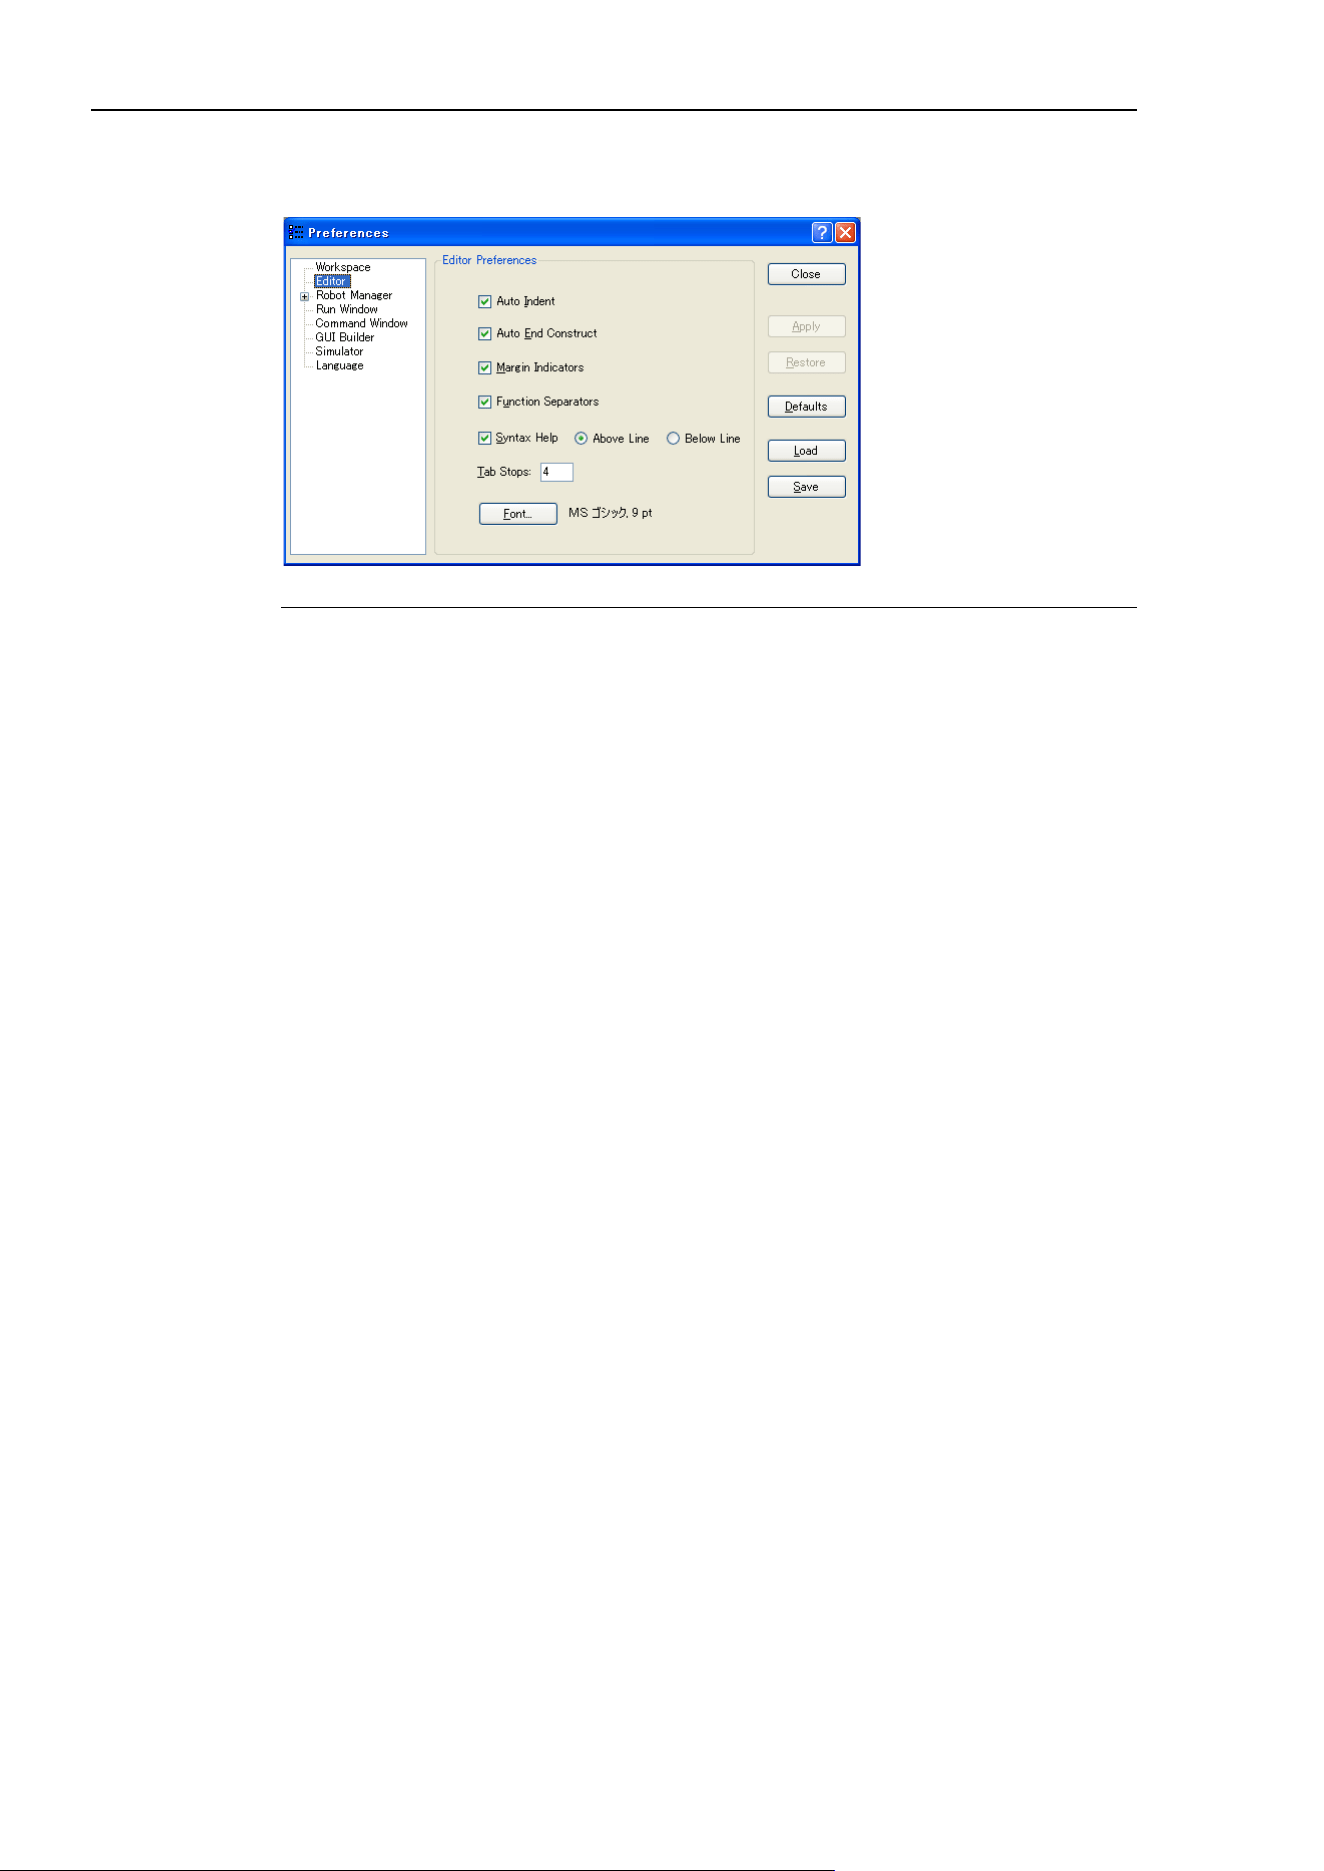
5. The EPSON RC+ 7.0 GUI
162 EPSON RC+ 7.0 (Ver.7.4) User's Guide Rev.6
[Setup]-[Preferences]-[Editor] Page
This page is used to configure your preferences for the program editor windows.
Item Description
Auto Indent
Check this box if you want new lines to follow the indentation
for the previous line. Also, lines will automatically be indented
after Do, If, Else, For, Select, and Case statements. Default is
on.
Auto End Construct
Check this box if you want EPSON RC+ 7.0 to add the end
construct statement for a loop construct. For example, if you
enter a For statement, then a Next statement will be added
automatically. Default is on.
Margin Indicators
Check this box to display a margin on the left side. This margin
is used to indicate lines with breakpoints, current step line,
current execution line. Default is on.
Function Separators
Check this box to display a line after each Fend statement.
Default is on.
Syntax Help
Check this box to enable the Syntax Help window. The Syntax
Help window displays syntax for a keyword after it has been
typed. Default is
on.
Above Line
Select this button to display the syntax help above the input line.
Below Line
Select this button to display the syntax help below the input line.
Tab Stops
Type in the number of columns to move for the TAB key.
Default is 4.
Font
Click on the Font button to open the fonts dialog. Choose the
font you desire for the editor. The monitor window also uses the
editor font. The current font name and size is displayed next to
the
<Font> button.
Apply
Applies the current settings.
Restore
Reverts back to the previous settings.
Defaults
Sets default value.
Load
Reads the preferences previously saved on the PC.
Save
Saves the preferences to a file on the PC.
Close
Closes the Preferences dialog.
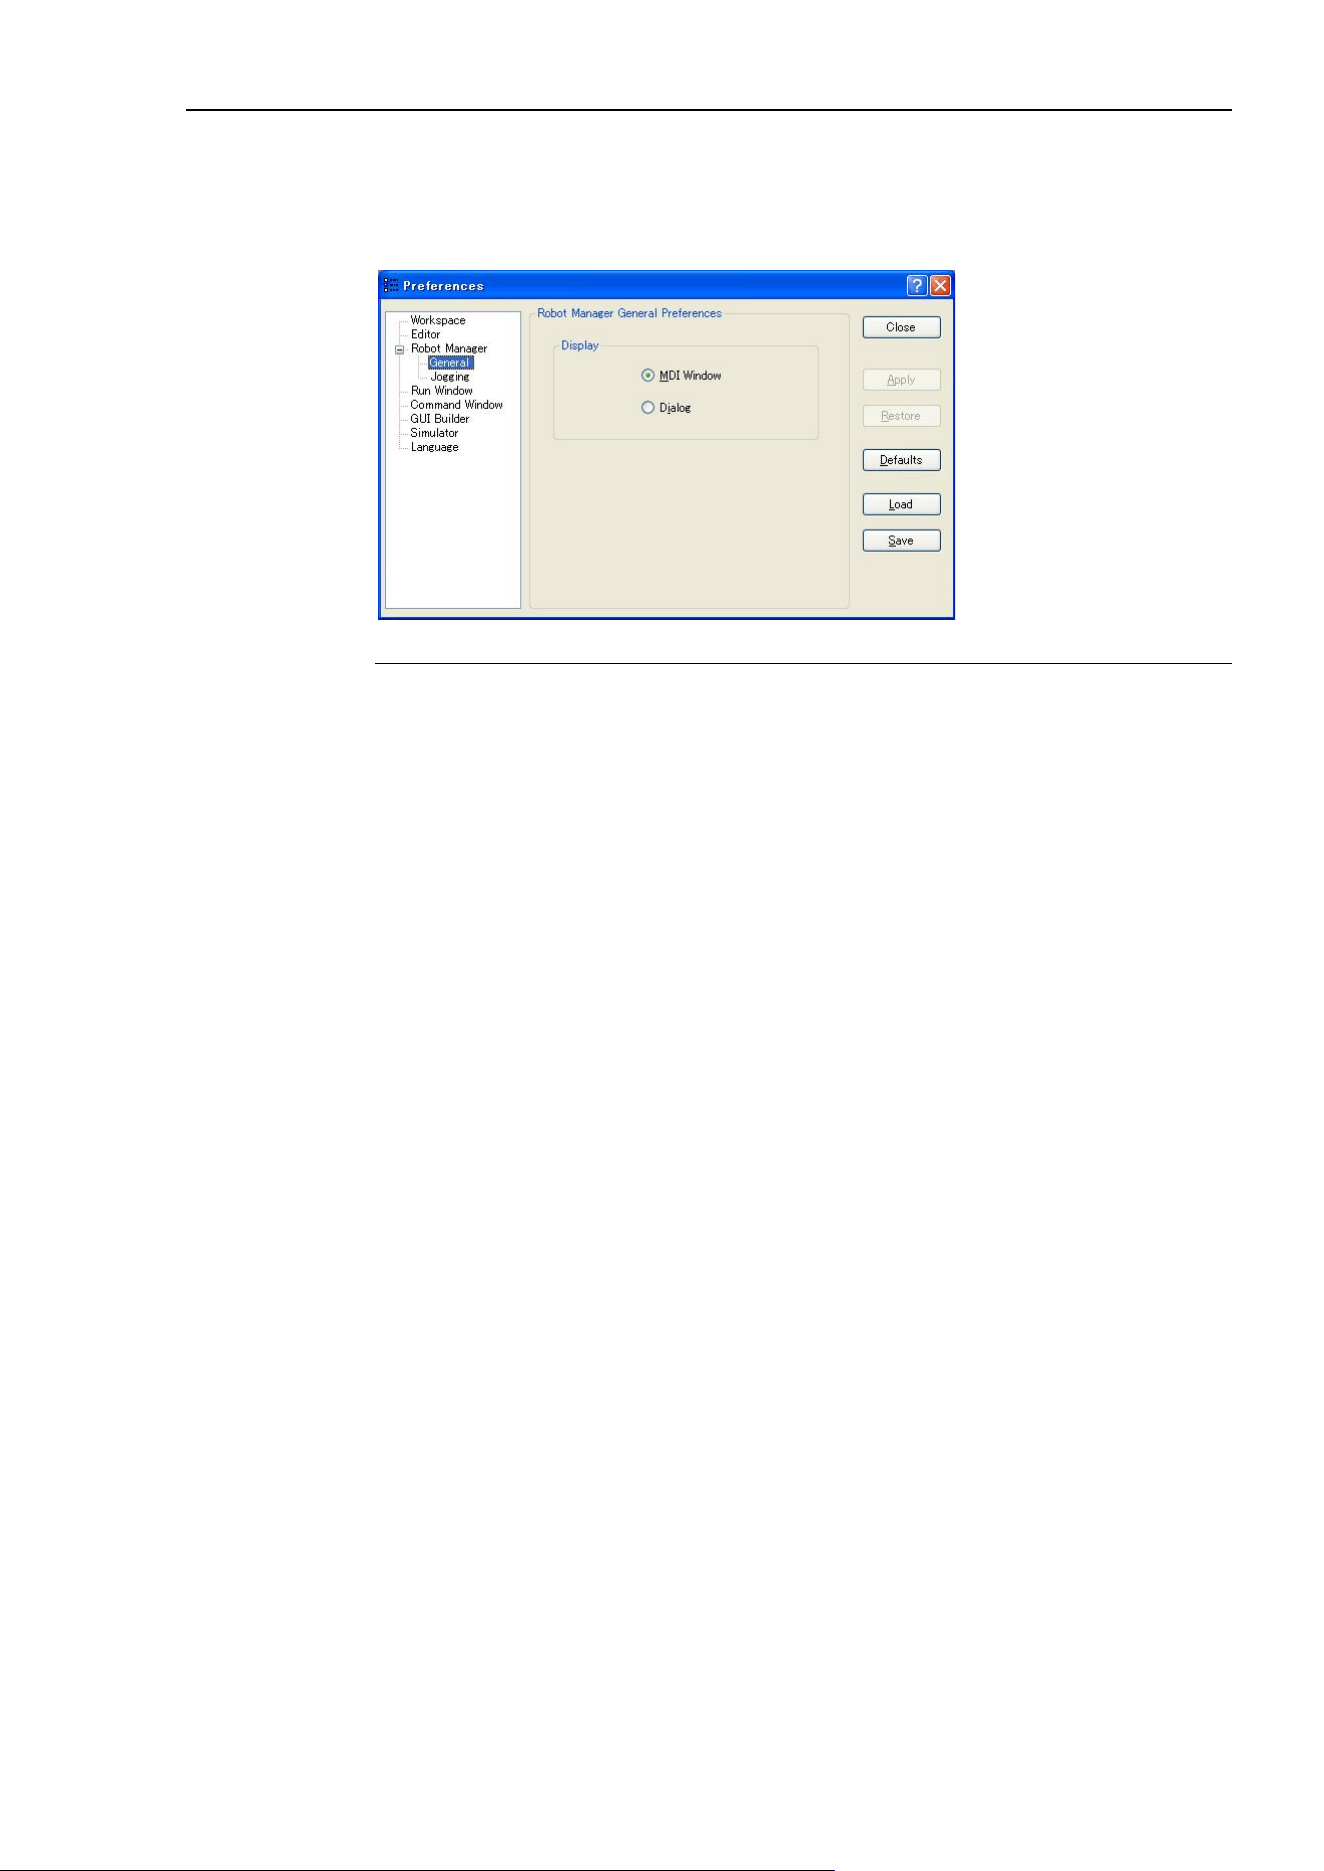
5. The EPSON RC+ 7.0 GUI
EPSON RC+ 7.0 (Ver.7.4) User's Guide Rev.6 163
[Setup]-[Preferences]-[Robot Manager]
[Setup]-[Preferences]-[Robot Manager]-[General] Page
This page lets you configure your preferences for the Robot Manager.
Item Description
Display
Choose if you want the Robot Manager to be displayed as an MDI
Window or as a Dialog.
Apply
Applies the current settings.
Restore
Reverts back to the previous settings.
Defaults
Sets default values.
Load
Reads the preferences previously saved on the PC.
Save
Saves the preferences to a file on the PC.
Close
Closes the Preferences dialog
The Robot Manager can be displayed as an MDI child window (default) or as a dialog.
When displayed as an MDI child, the Robot Manager is displayed in the MDI document
area and can remain open while you work with other windows and dialogs. When
displayed as a dialog, you can only work with the Robot Manager controls until you close
the dialog. When using screen resolutions less than 1024 × 768, only the Dialog mode is
allowed.
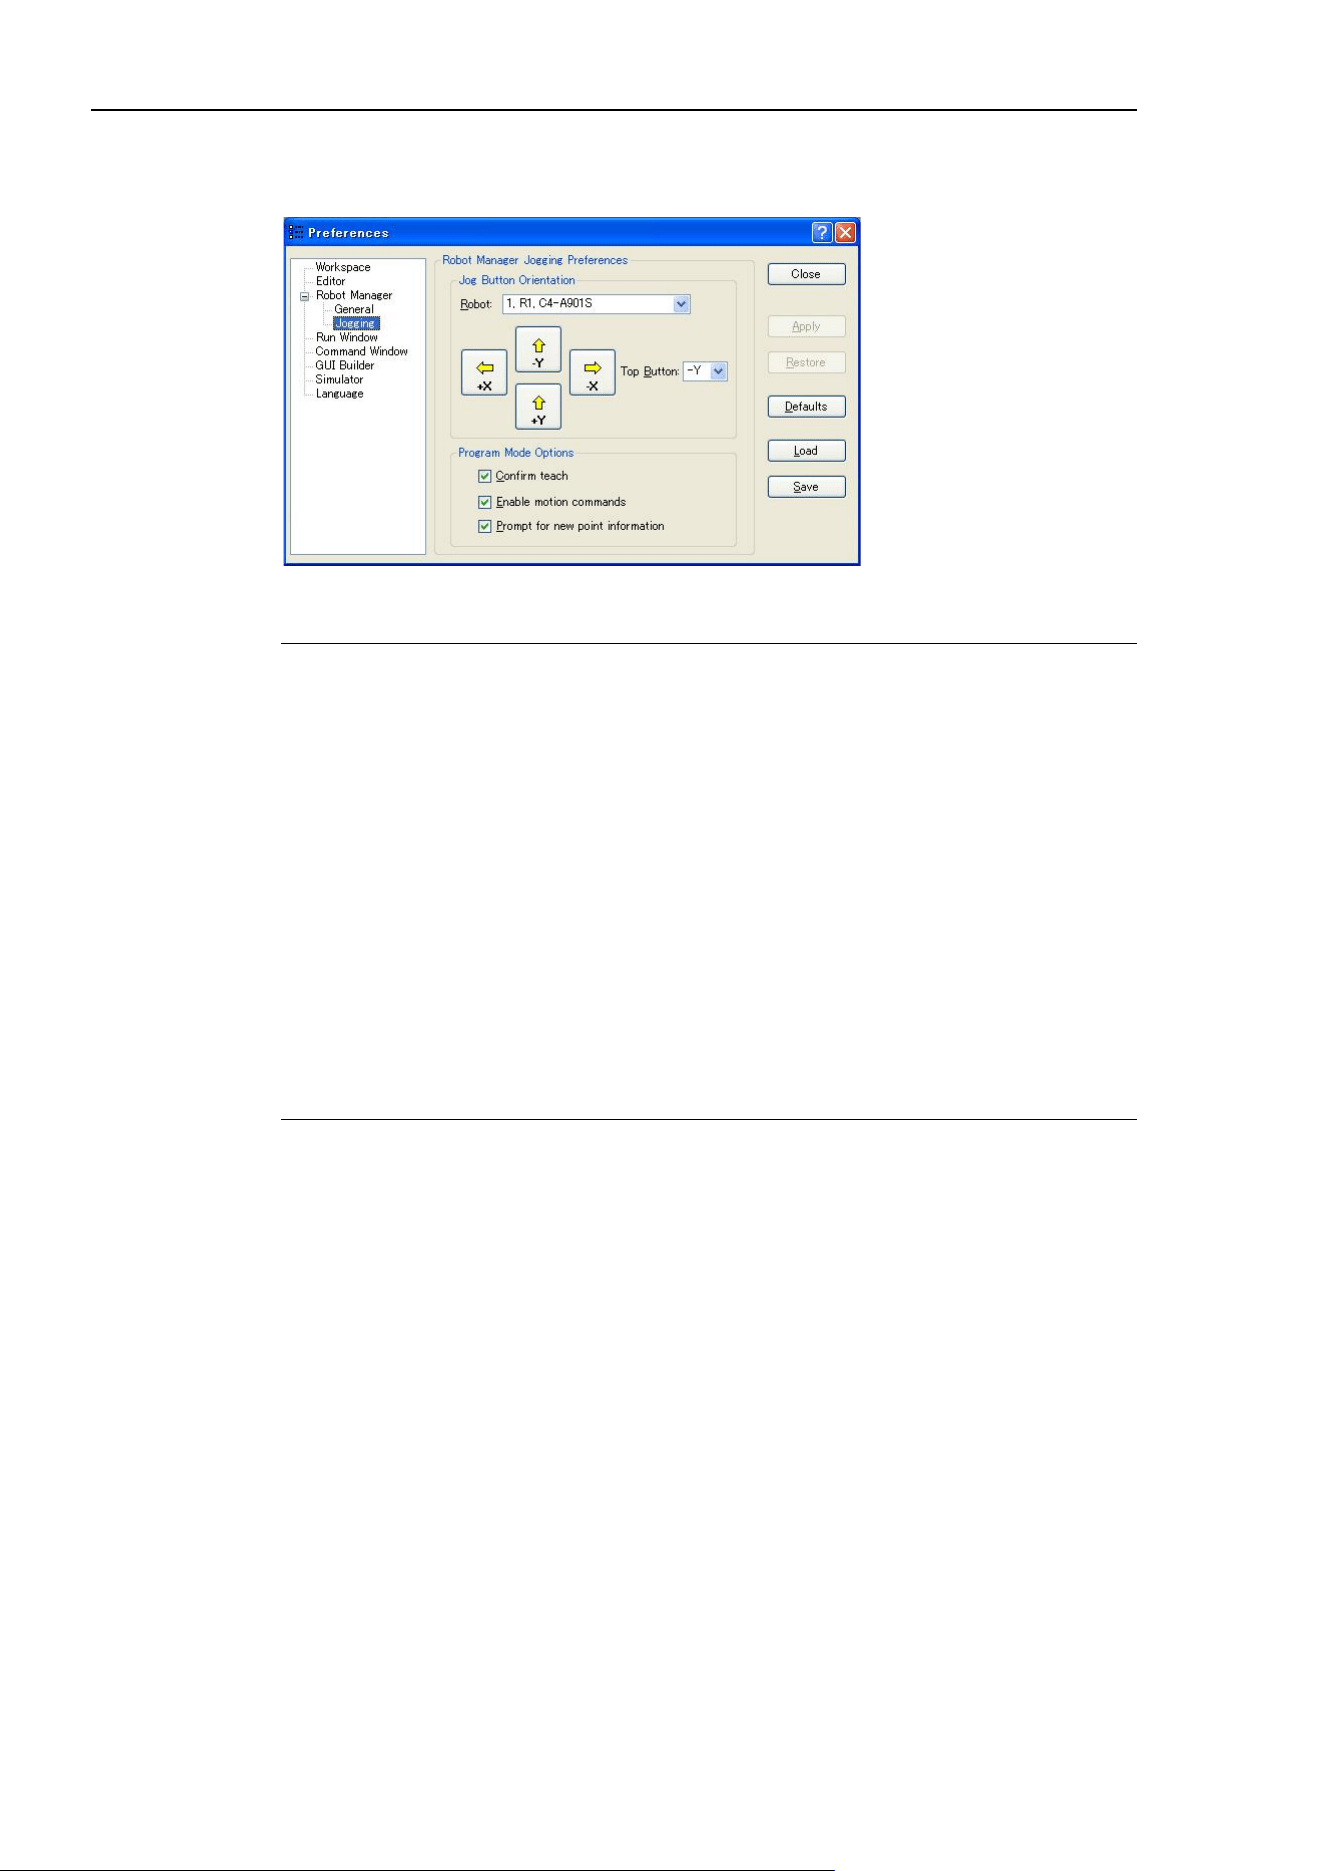
5. The EPSON RC+ 7.0 GUI
164 EPSON RC+ 7.0 (Ver.7.4) User's Guide Rev.6
[Setup]-[Preferences]-[Robot Manager]-[Jogging] Page
This page lets you configure the Robot Manager Jog and Teach page.
Setting Jog Button Orientation
Item Description
Robot
Select a robot.
The jog button orientations are useful for “aligning” your PC monitor with the robot’s
Cartesian coordinate system. Align the buttons so that the robot moves in the direction of
the arrows.
You can change the orientation of the jogging buttons and arrow keys for the X and Y
axes by selecting the desired top button from the Top Button dropdown list.
You can also click on one of the buttons to change it to the top button position.
Program Mode Options
These options affect the Robot Manager Jog & Teach page when used from program mode.
These settings do not affect the Robot Manager when used for operators in auto mode,
such as for the Operator Window or from RC+ API. To configure the Robot Manager for
operators, see [Project]-[Properties]-[Operator Settings]-[Robot Manager].
Item Description
Confirm teach
Check this box if you want a confirmation prompt each
time you press the <Teach> button on the Robot Manager
Jog & Teach page.
Enable motion commands
Check this box if you want to execute motion commands
(Go, Jump, etc.) from the Robot Manager Jog & Teach
page.
Prompt for new point
information
Check this box if you want to be prompted for point label
and description when a new point is taught using the
Teach button.
Apply
Applies the current settings.
Restore
Reverts back to the previous settings.
Defaults
Sets default values.
Load
Reads the preferences previously saved on the PC.
Save
Saves the preferences to a file on the PC.
Close
Closes the Preferences dialog.
NOTE
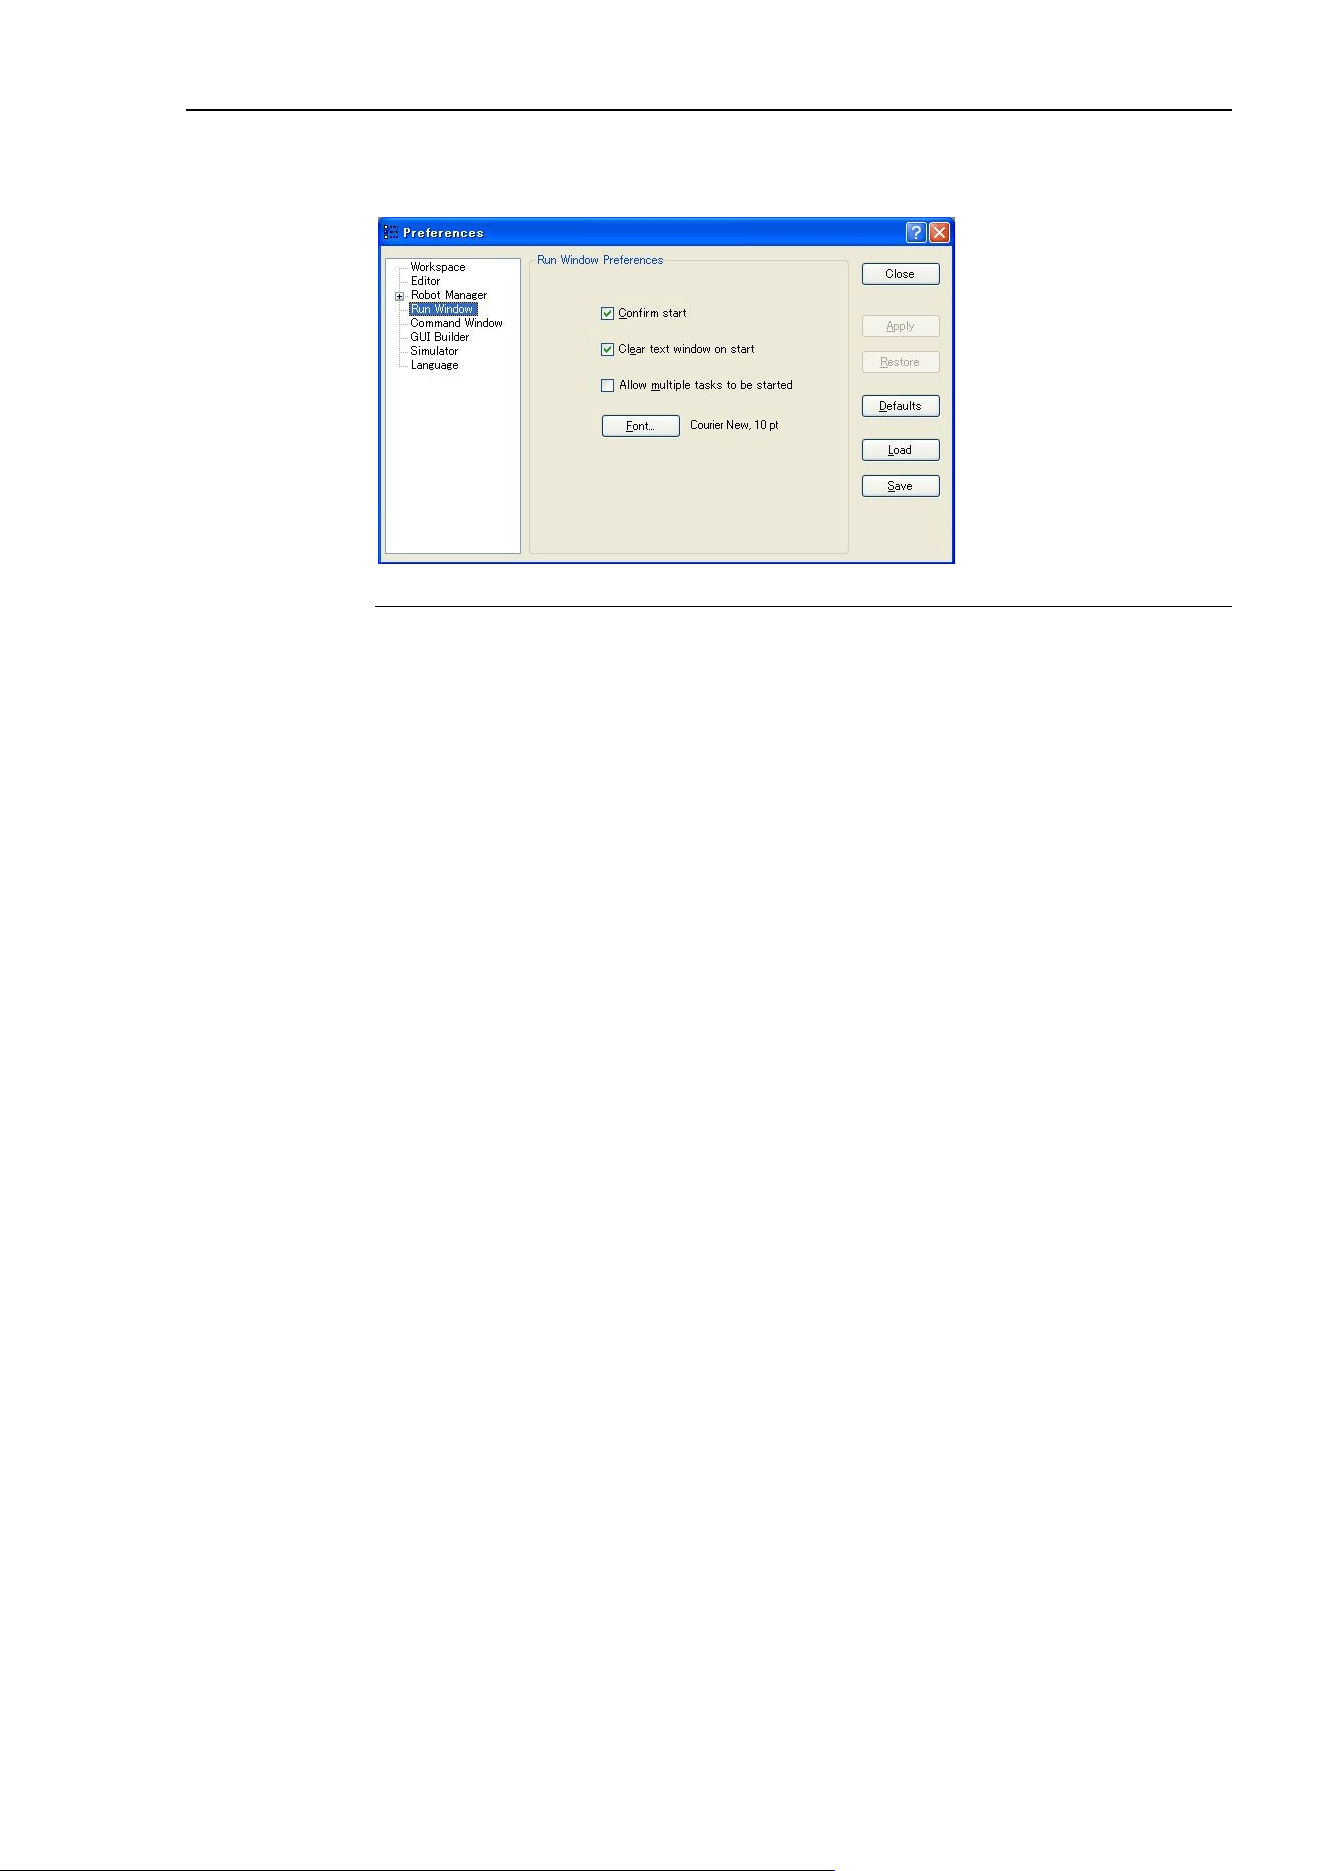
5. The EPSON RC+ 7.0 GUI
EPSON RC+ 7.0 (Ver.7.4) User's Guide Rev.6 165
[Setup]-[Preferences]-[Run Window] Page
This page allows you to change preferences for the Run Window.
Item Description
Confirm Start
This checkbox allows you to select if you want to see a
confirmation message box before a program is started.
Clear text window on start
Checking this will cause the Run Window text pane to be
cleared each time the
<Start> button is clicked.
Allow multiple tasks to be
started
Checking this allows you to start a task from the Run
window while other tasks are running. The
<Start>
button
wil
l not be disabled after starting a task.
Font
Click on the <Font> button to open the fonts dialog.
Choose the font you desire for the Run window. The
current font name and size is displayed next to the
<Font
>
button.
Apply
Applies the current settings.
Restore
Reverts back to the previous settings.
Defaults
Sets default values.
Restore
Reverts back to the previous settings.
Defaults
Sets default values.
Load
Reads the preferences previously saved on the PC.
Save
Saves the preferences to a file on the PC.
Close
Closes the Preferences dialog.
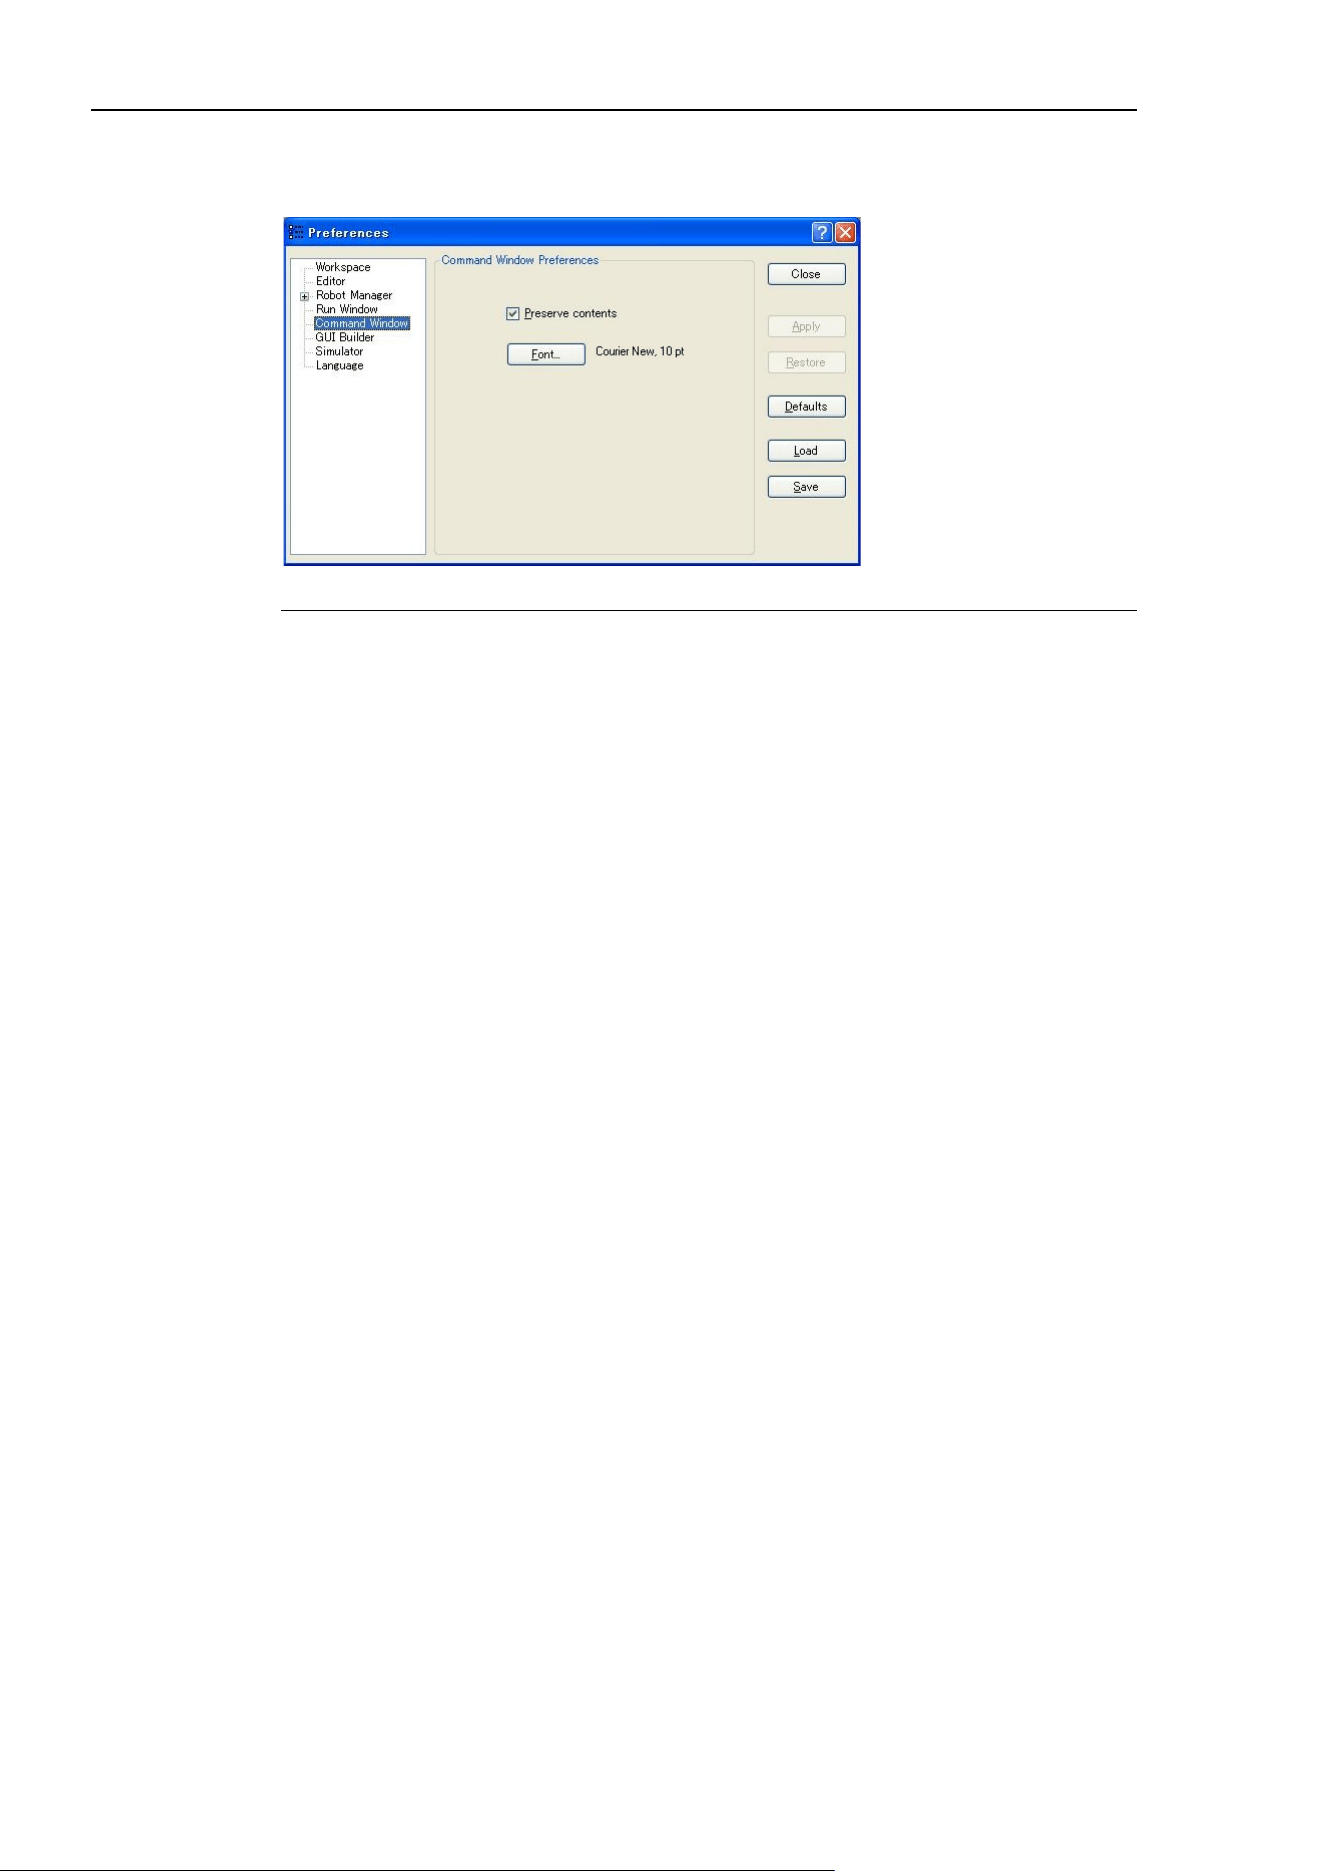
5. The EPSON RC+ 7.0 GUI
166 EPSON RC+ 7.0 (Ver.7.4) User's Guide Rev.6
[Setup]-[Preferences]-[Command Window] Page
This page allows you to change preferences for the Command Window.
Item Description
Preserve contents
Checking this option will cause the command window to
preserve its contents between sessions.
Font
Click on the Font button to change the font for the Command
window.
Apply
Saves the current changes.
Restore
Reverts back to the previous values.
Defaults
Set default values.
Load
Reads the preferences previously saved on the PC.
Save
Saves the preferences to a file on the PC.
Close
Closes the Preferences dialog.
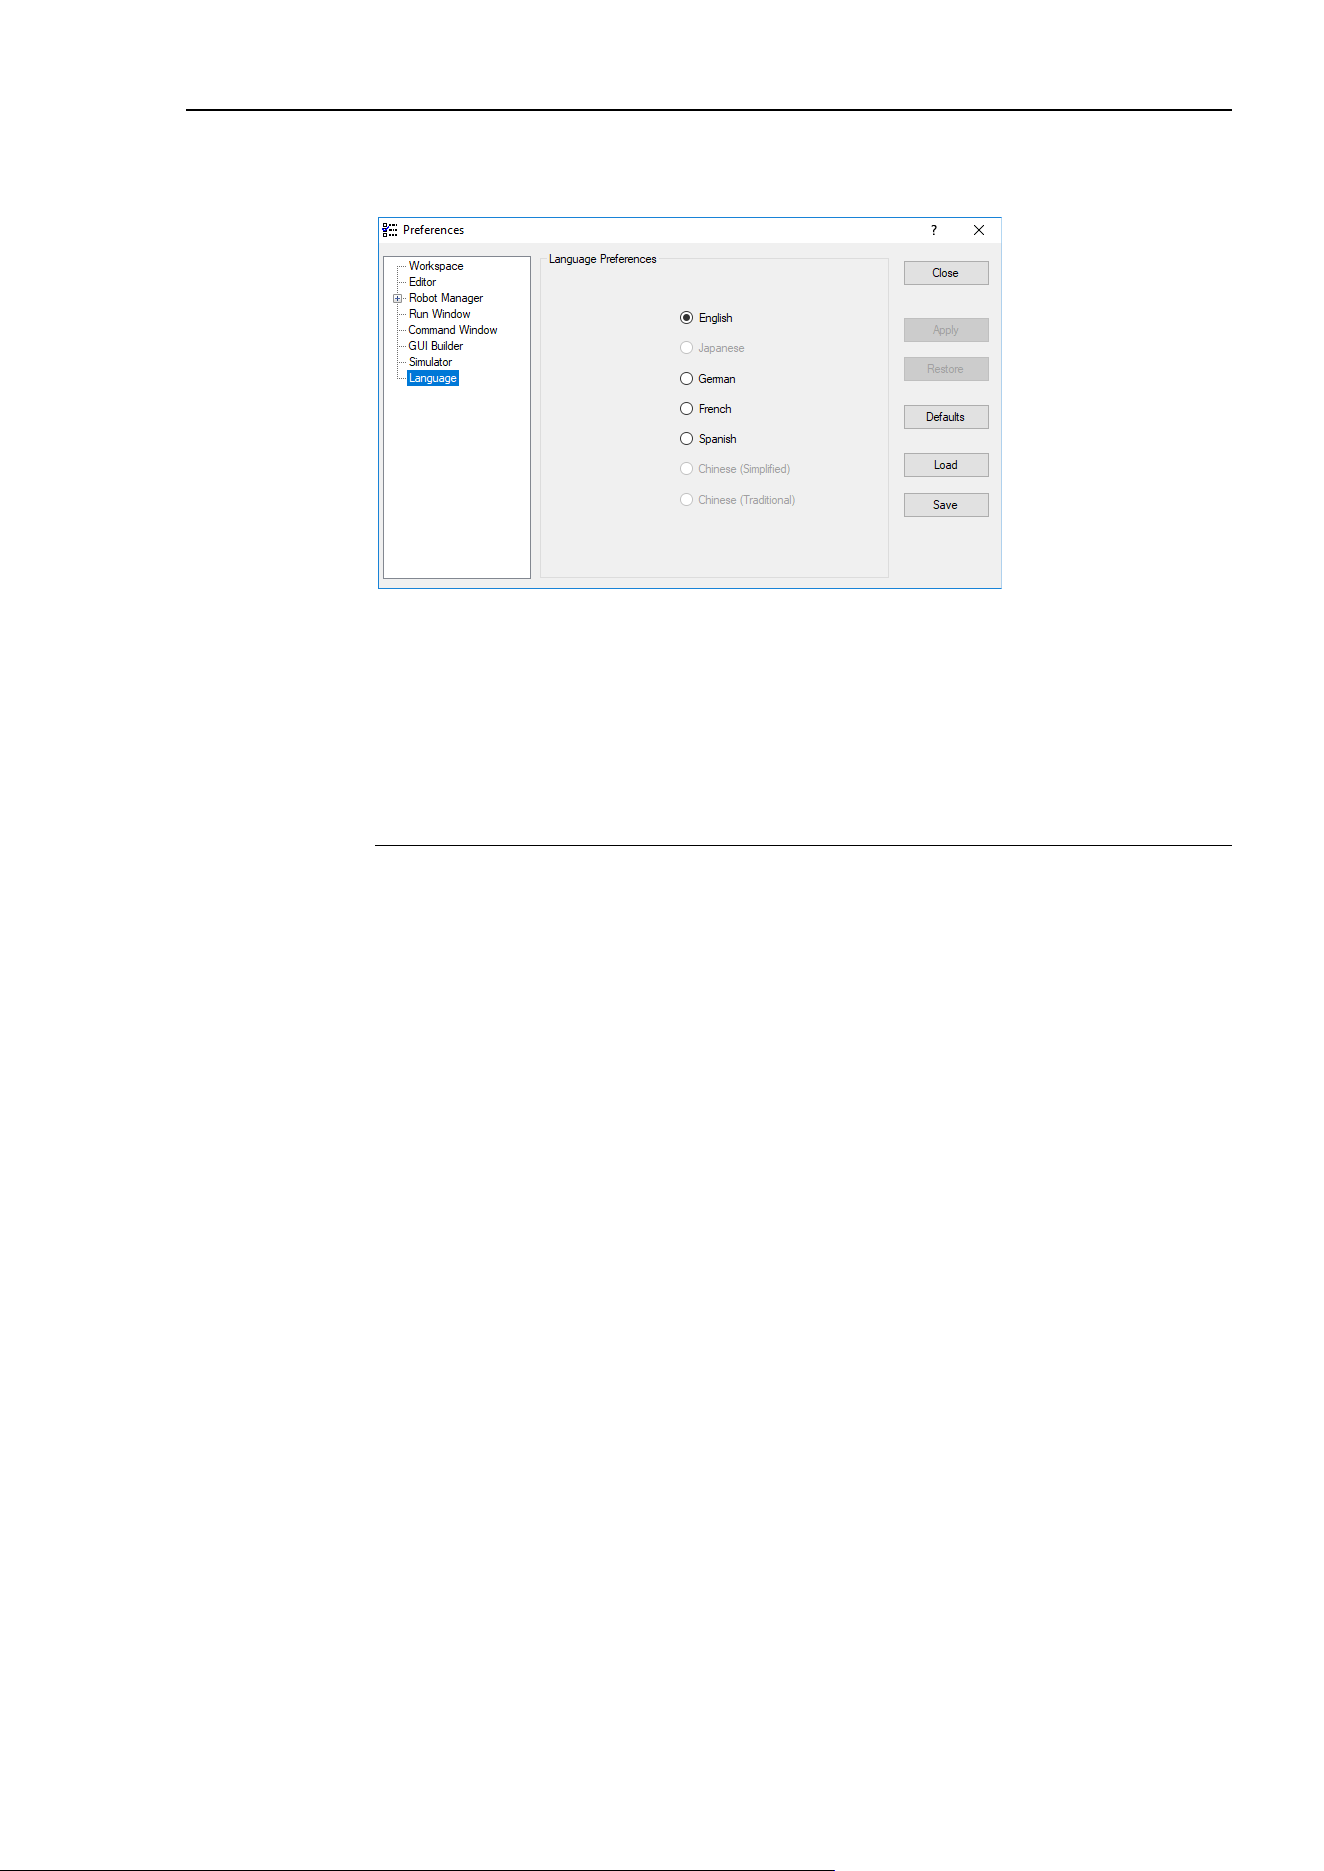
5. The EPSON RC+ 7.0 GUI
EPSON RC+ 7.0 (Ver.7.4) User's Guide Rev.6 167
[Setup]-[Preferences]-[Language] Page
This page allows you to change the EPSON RC+ 7.0 GUI language.
When EPSON RC+ 7.0 is installed on a Windows system using a Western language, then
the English, German, French, and Spanish selections are available.
When it is installed on a Windows system using Japanese, then English and Japanese are
available.
When it is installed on a Windows system using Chinese, then English, Chinese
(Simplified), and Chinese (Traditional) are available.
After selecting the desired language, you must reboot EPSON RC+ 7.0.
Item Description
Language
This set of option buttons allows you to choose which language to use
for the
EPSON RC+ 7.0 GUI.
Apply
Saves the current changes.
Restore
Reverts back to the previous values.
Defaults
Set the default language.
Load
Reads the preferences previously saved on the PC.
Save
Saves the preferences to a file on the PC.
Close
Closes the Preferences dialog.
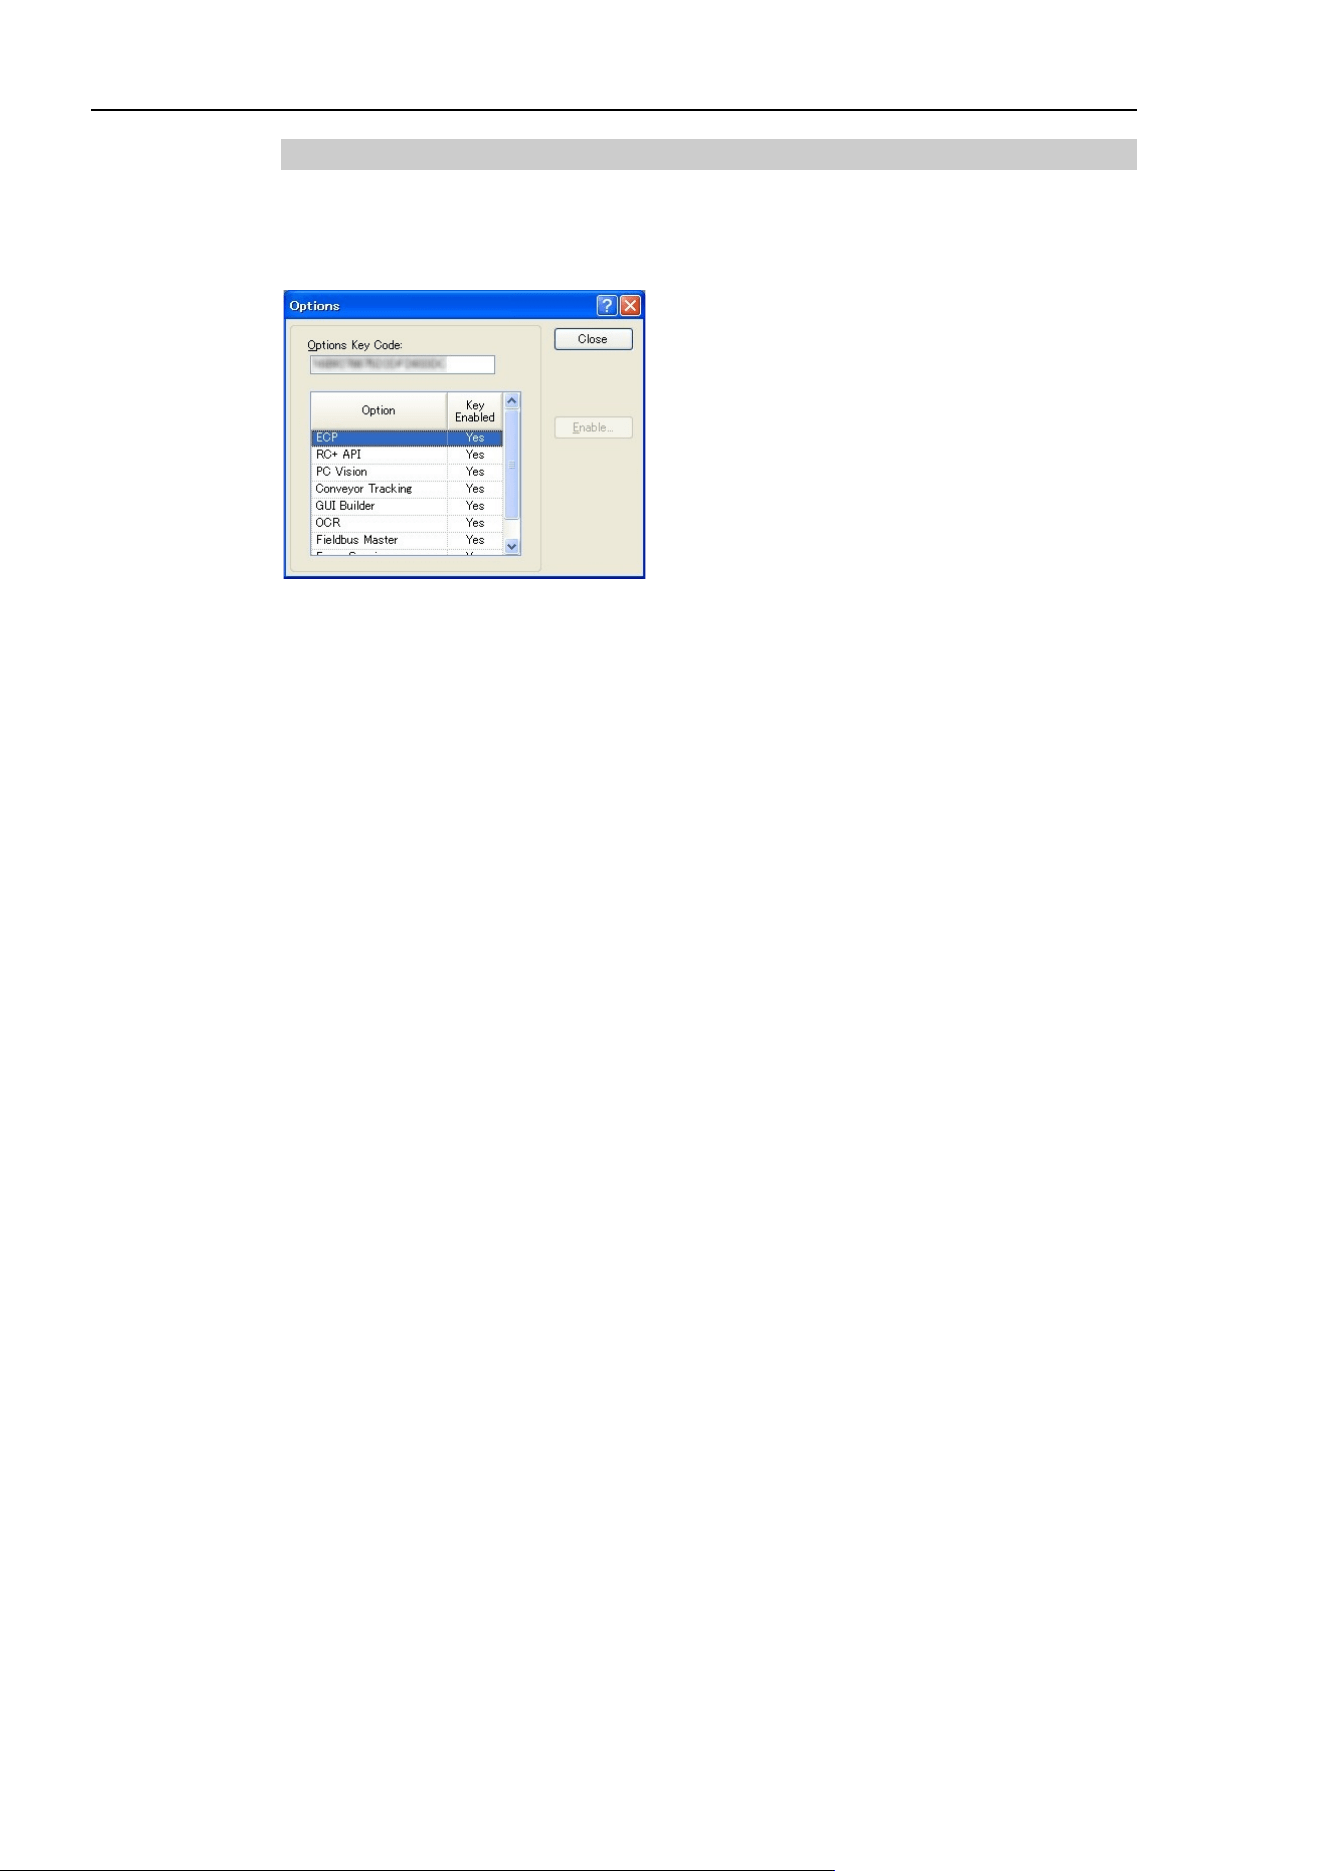
5. The EPSON RC+ 7.0 GUI
168 EPSON RC+ 7.0 (Ver.7.4) User's Guide Rev.6
5.12.4 [Options] Command (Setup Menu)
This dialog allows you to view and enable options in the controller.
EPSON RC+ 7.0 uses a key that is stored in the Spel controller board to enable options on
the system.
If an option is not enabled, you can purchase it from the supplier of your region. When
you call to purchase, you must give the Options Key Code to the operator. You will then
be given a code to enable the option for the current software options key.
After receiving the code, click the <OK> button and enter the code. The option you
purchased should now be enabled.
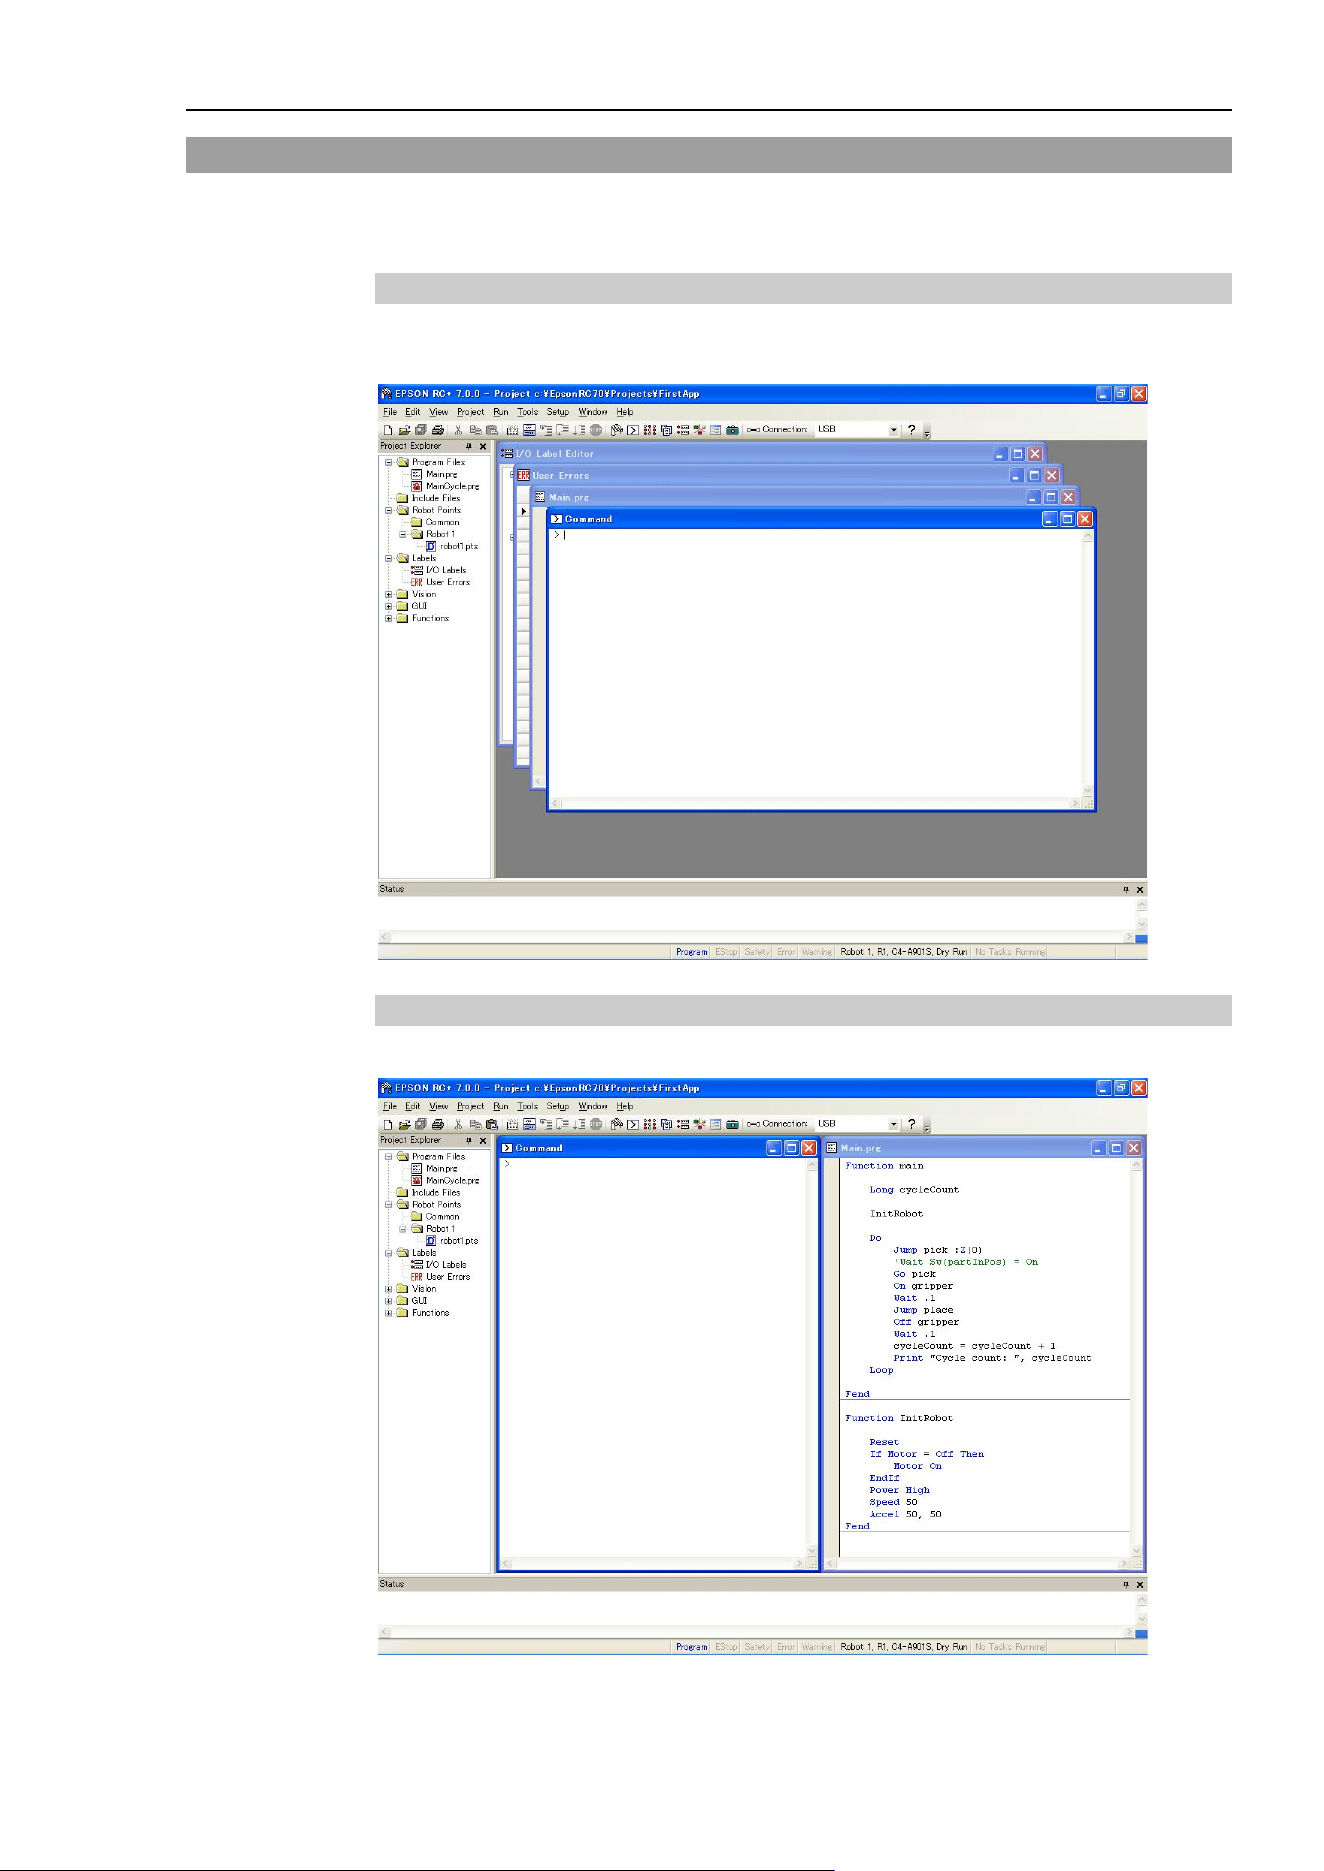
5. The EPSON RC+ 7.0 GUI
EPSON RC+ 7.0 (Ver.7.4) User's Guide Rev.6 169
5.13 [Window] Menu
The [Window] menu contains selections for managing the currently open EPSON RC+ 7.0
child windows.
5.13.1 [Cascade] Command (Window Menu)
Use Cascade to show all of the currently open files in windows of the same size, stacked
one on top of another.
5.13.2 [Tile Vertical] Command (Window Menu)
Use Tile Vertical to evenly display all open windows vertically.
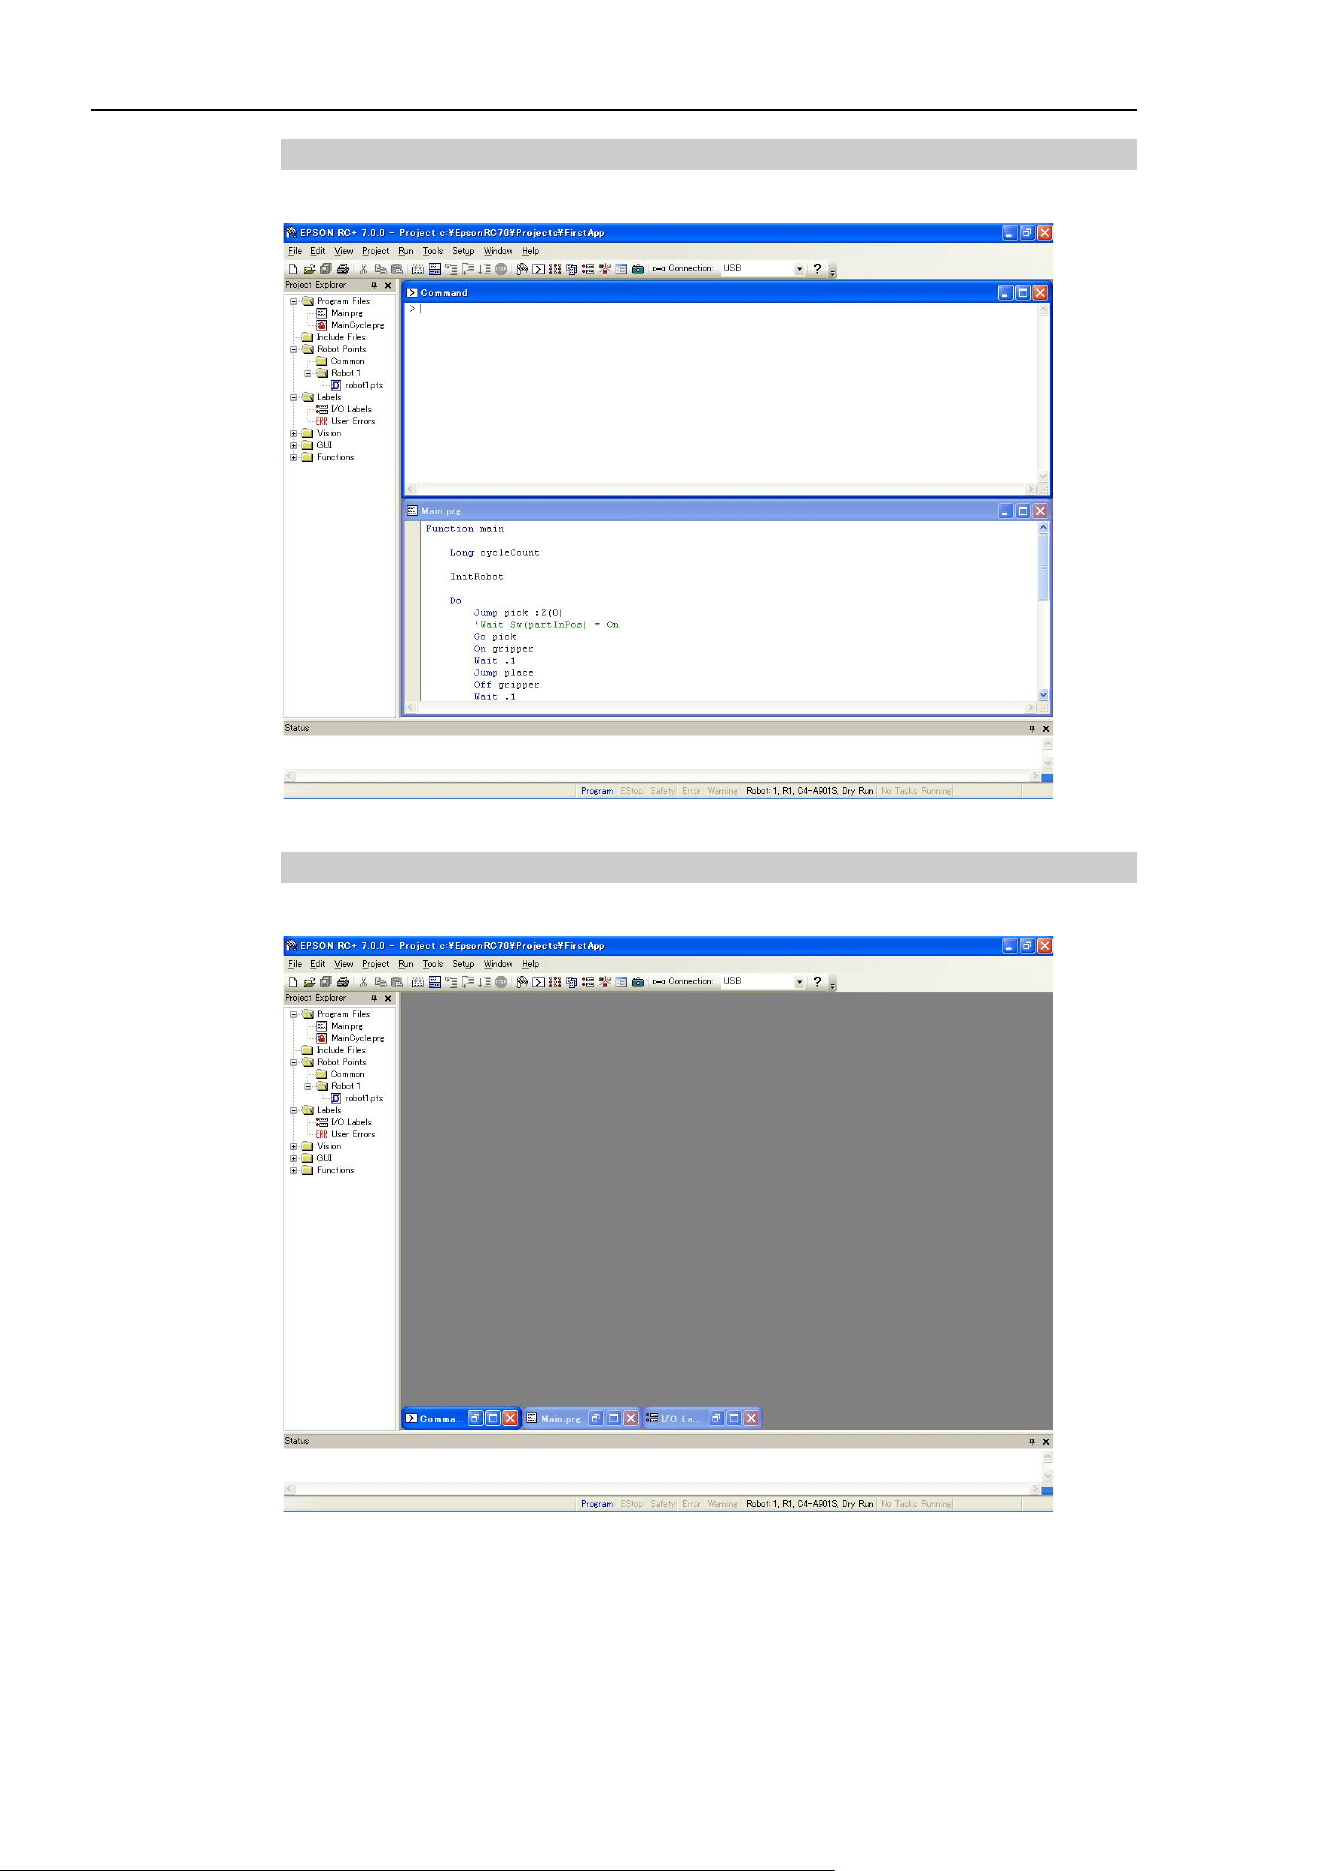
5. The EPSON RC+ 7.0 GUI
170 EPSON RC+ 7.0 (Ver.7.4) User's Guide Rev.6
5.13.3 [Tile Horizontal] Command (Window Menu)
Use Tile Horizontal to evenly display all open windows horizontally.
5.13.4 [Arrange Icons] Command (Window Menu)
Arrange the icons for all child windows that have been minimized.
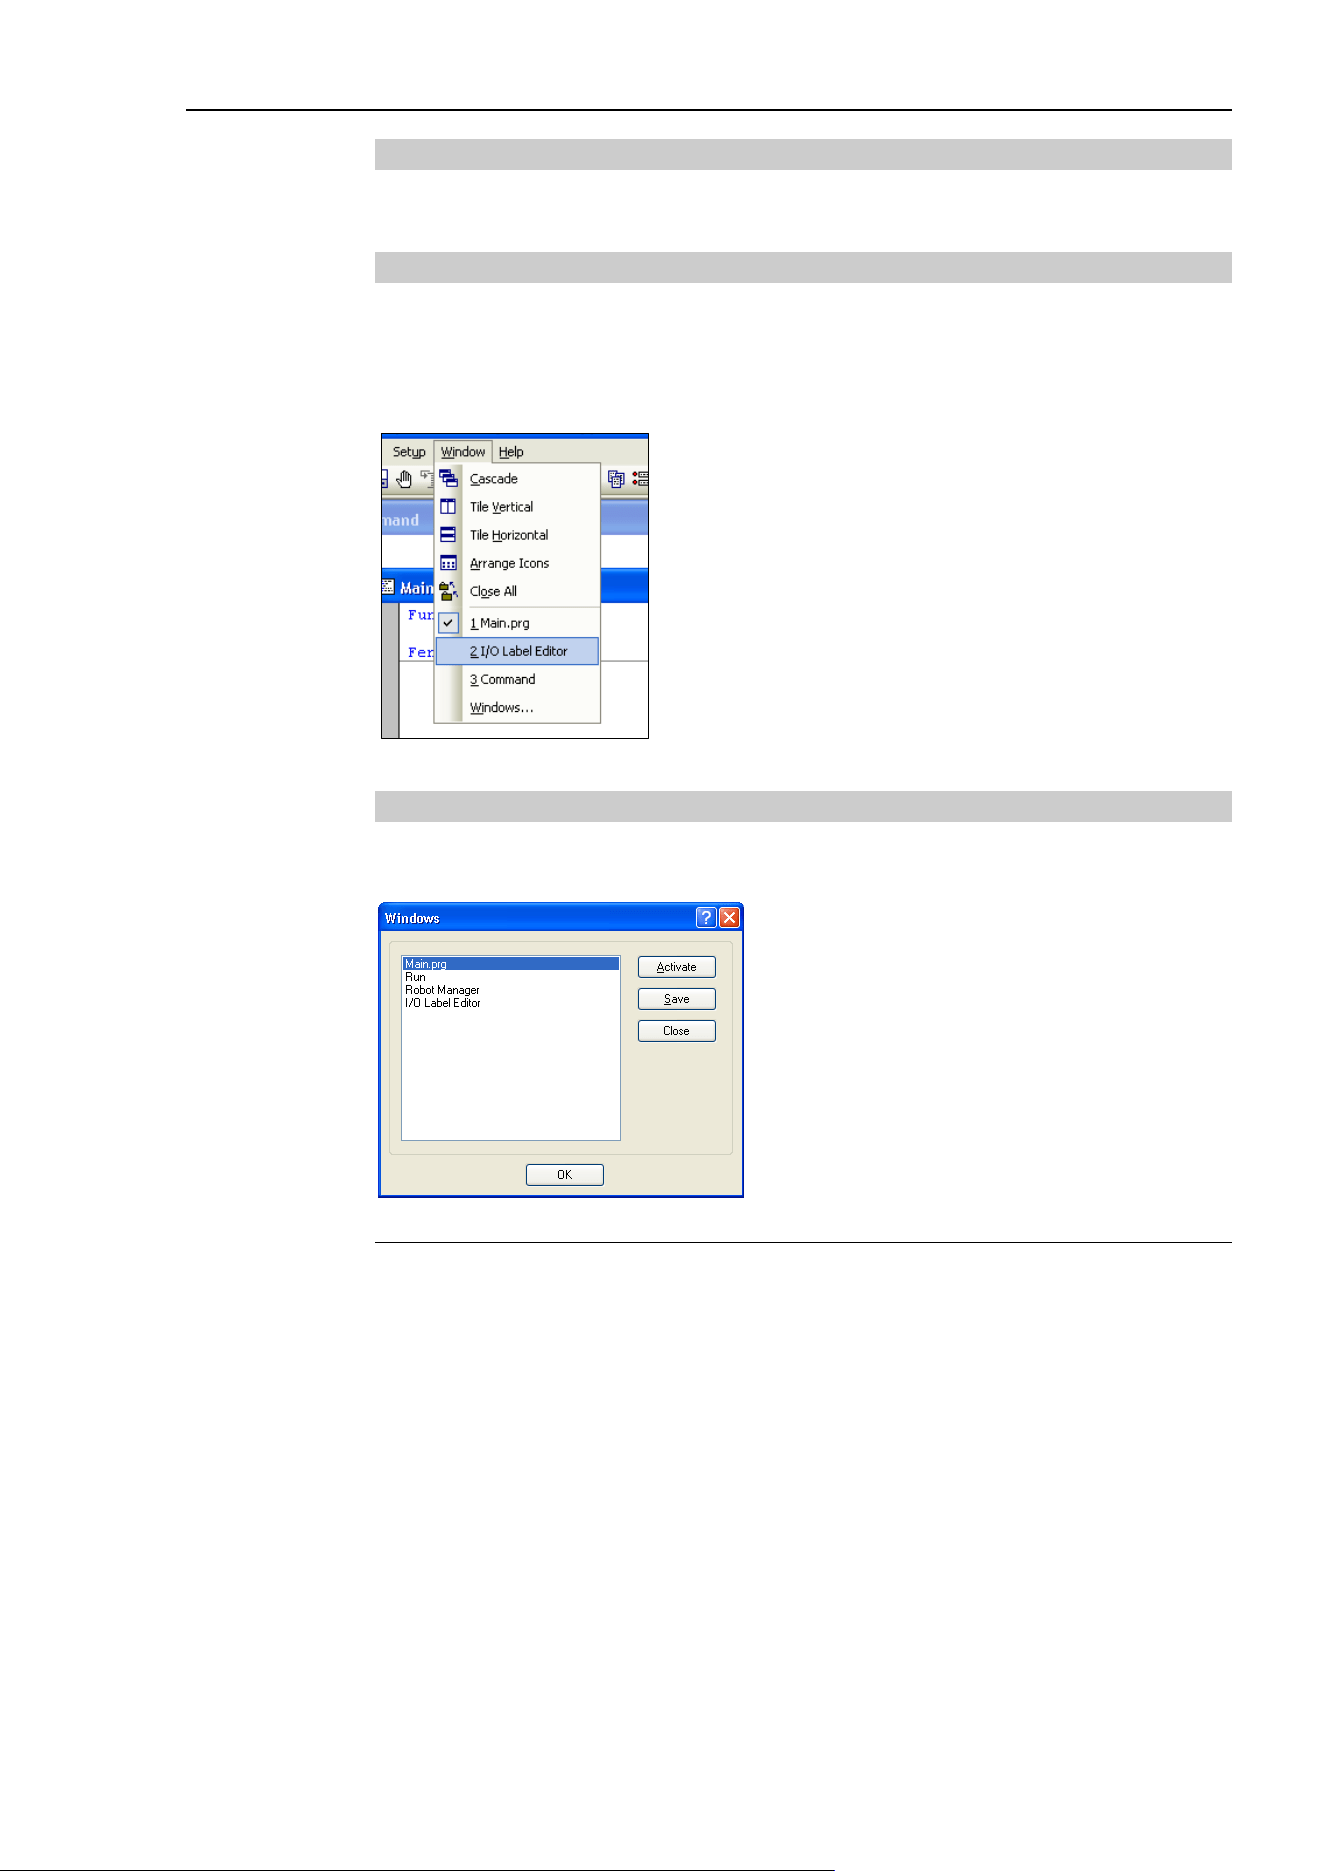
5. The EPSON RC+ 7.0 GUI
EPSON RC+ 7.0 (Ver.7.4) User's Guide Rev.6 171
5.13.5 [Close All] Command (Window Menu)
This command closes all EPSON RC+ 7.0 child windows.
5.13.6 1, 2, 3 Command (Window Menu)
A listing of currently open document windows is displayed at the bottom of the [Window]
menu.
When you choose an open window from the listing, you make that document active. A
check mark appears in front of the document name of the currently active window.
5.13.7 [Windows] Command (Window Menu)
This command displays a dialog that contains a list of all currently open EPSON RC+ 7.0
windows.
Item Description
Activate Brings the selected window into focus.
Save Saves the contents of the selected windows.
Close Closes the selected windows.
OK Closes the dialog.
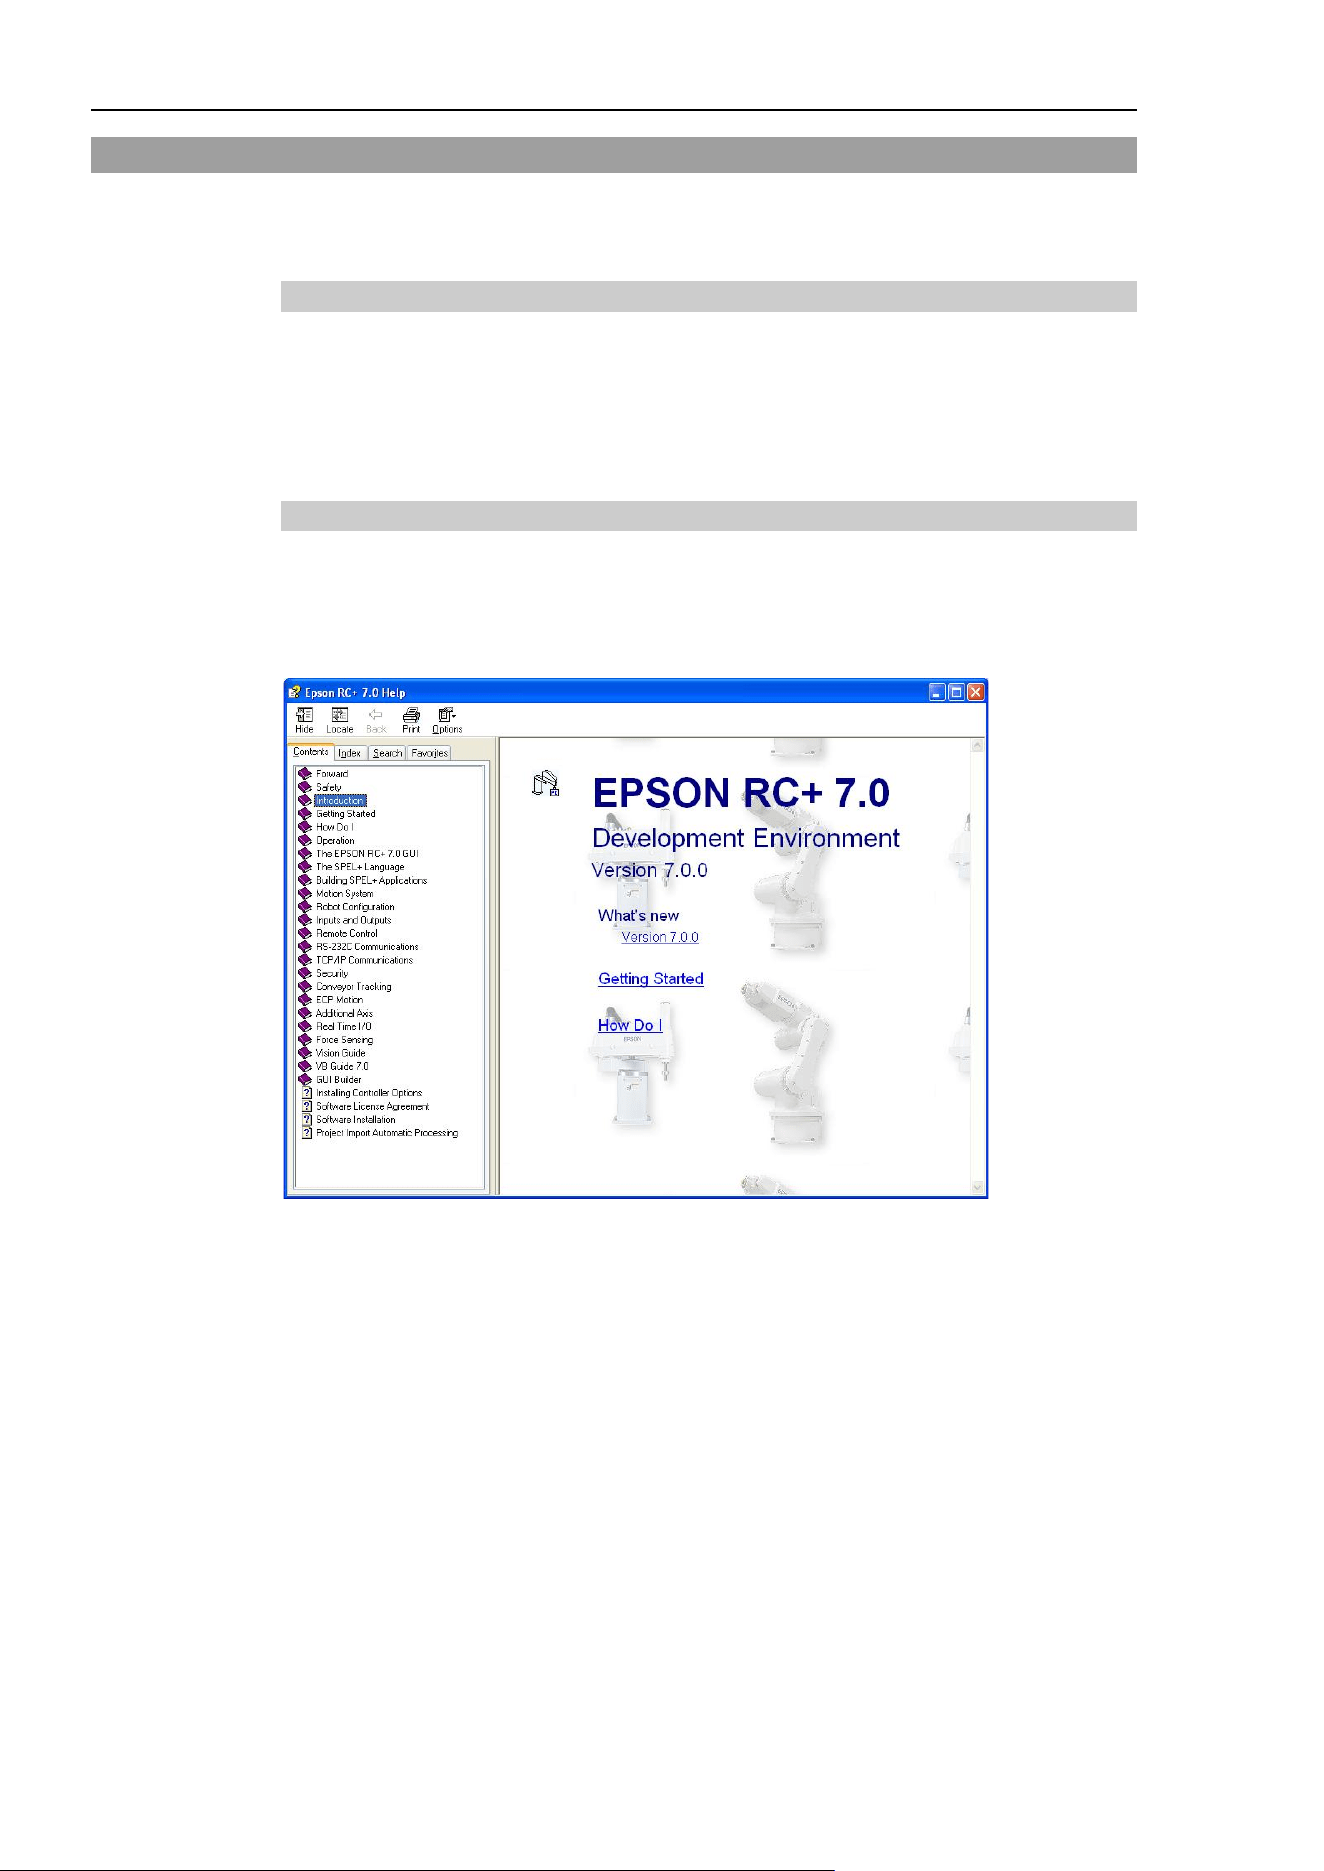
5. The EPSON RC+ 7.0 GUI
172 EPSON RC+ 7.0 (Ver.7.4) User's Guide Rev.6
5.14 [Help] Menu
The [Help] menu contains selections for accessing the help system and manuals along with
version information.
5.14.1 [How Do I] Command (Help Menu)
Select [How Do I] to view topics that contain information for performing common tasks in
EPSON RC+ 7.0.
Shortcuts
Keys: Ctrl + F1
5.14.2 [Contents] Command (Help Menu)
This command opens the Contents view for the EPSON RC+ 7.0 online help system.
From the Contents view, you can navigate through all of the topics in the help system.
Double-click on a book icon to open or close the subtopic list contained within the book
folder.
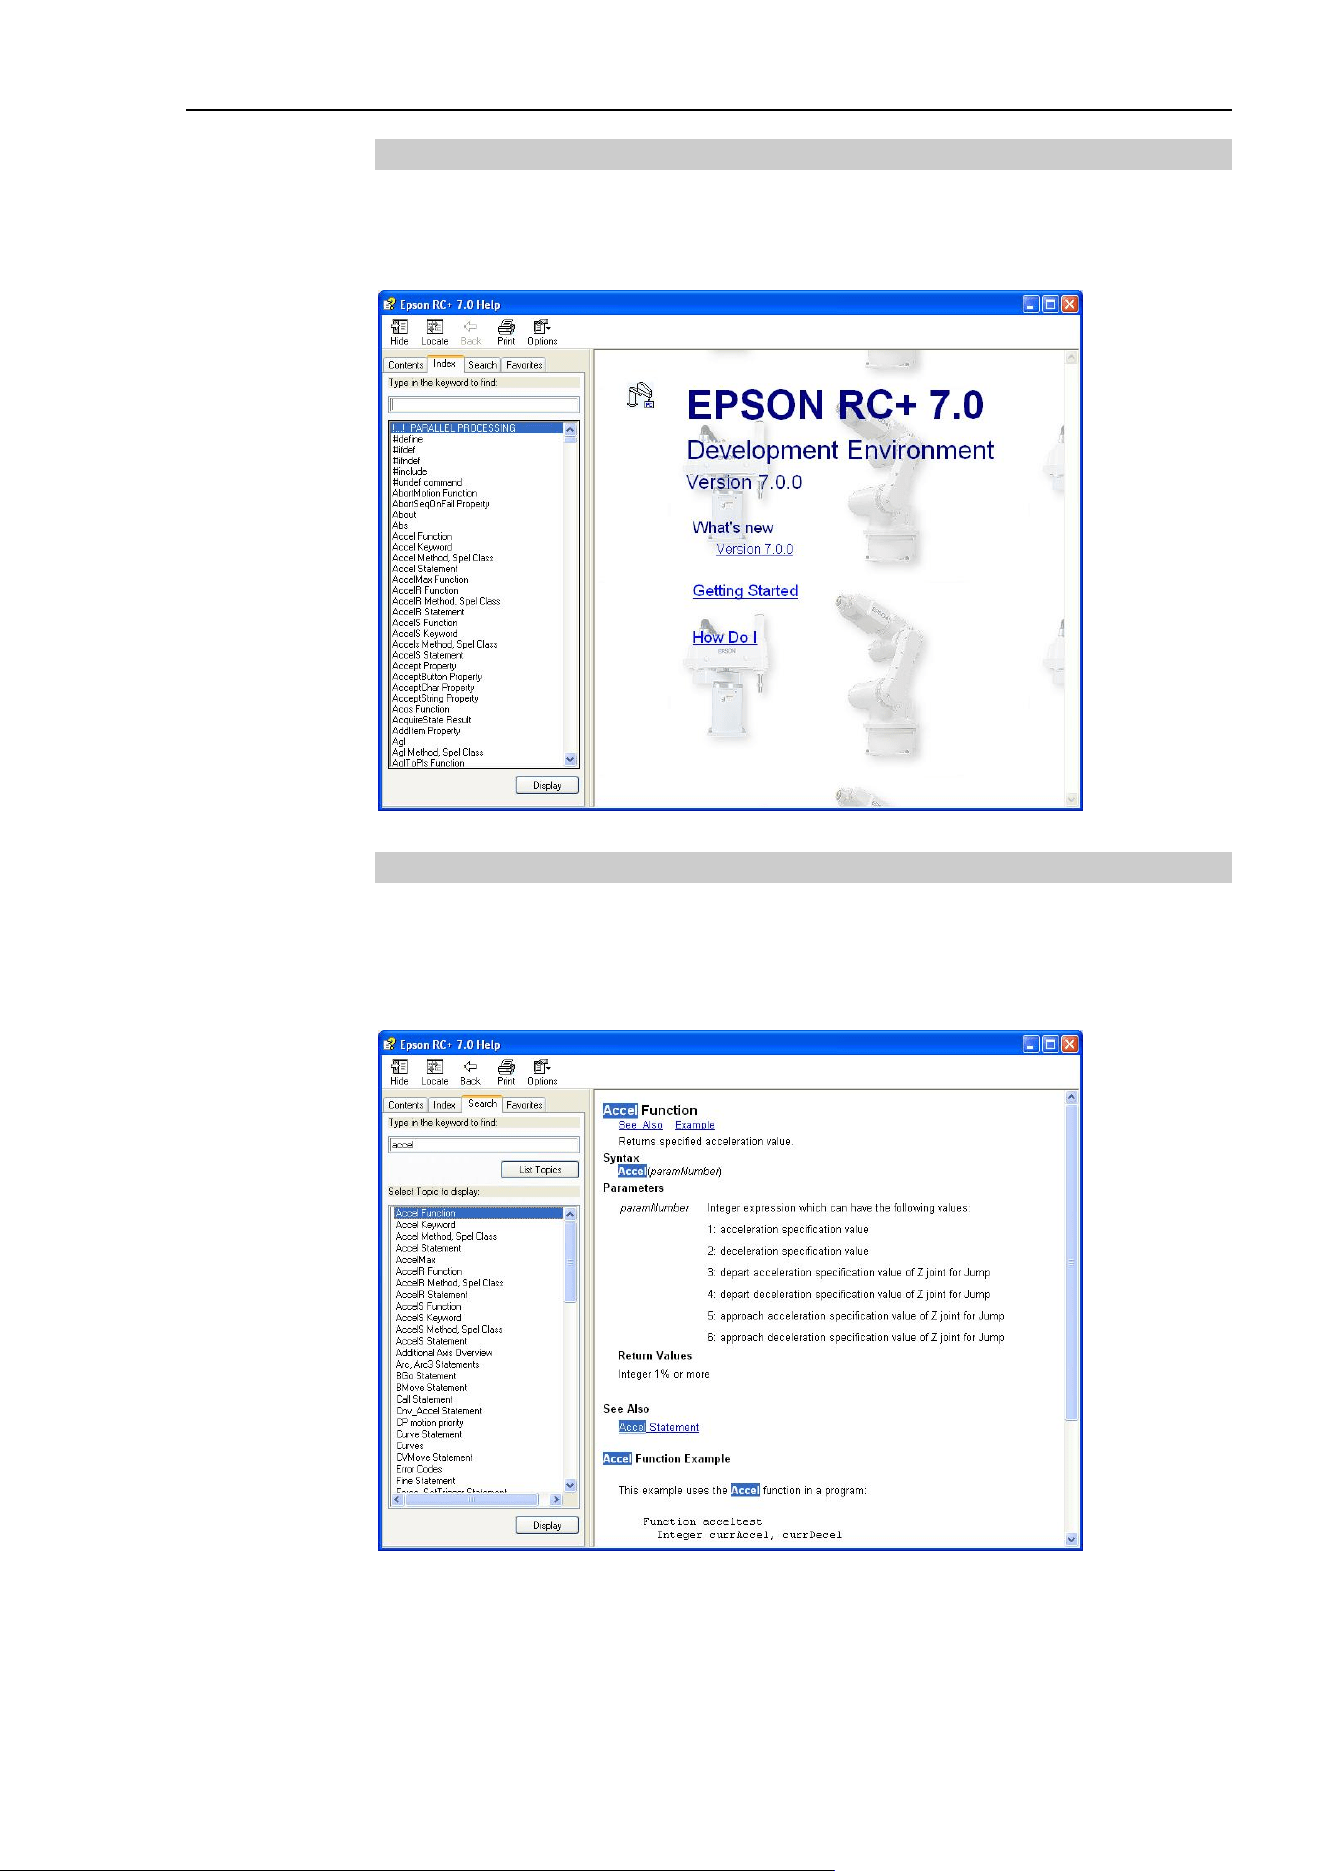
5. The EPSON RC+ 7.0 GUI
EPSON RC+ 7.0 (Ver.7.4) User's Guide Rev.6 173
5.14.3 [Index] Command (Help Menu)
This command opens the Index view for the EPSON RC+ 7.0 online help system.
From the Index view, as you begin typing in a keyword, the alphabetical topic list will
show the keywords starting with the letters you have typed.
5.14.4 [Search] Command (Help Menu)
This command opens the Search view for the EPSON RC+ 7.0 online help system.
From the Search view, you can type in one or more keywords and click List Topics to
show a list of all topics containing one or more of the keywords. The keywords are
highlighted in the topics as shown below.
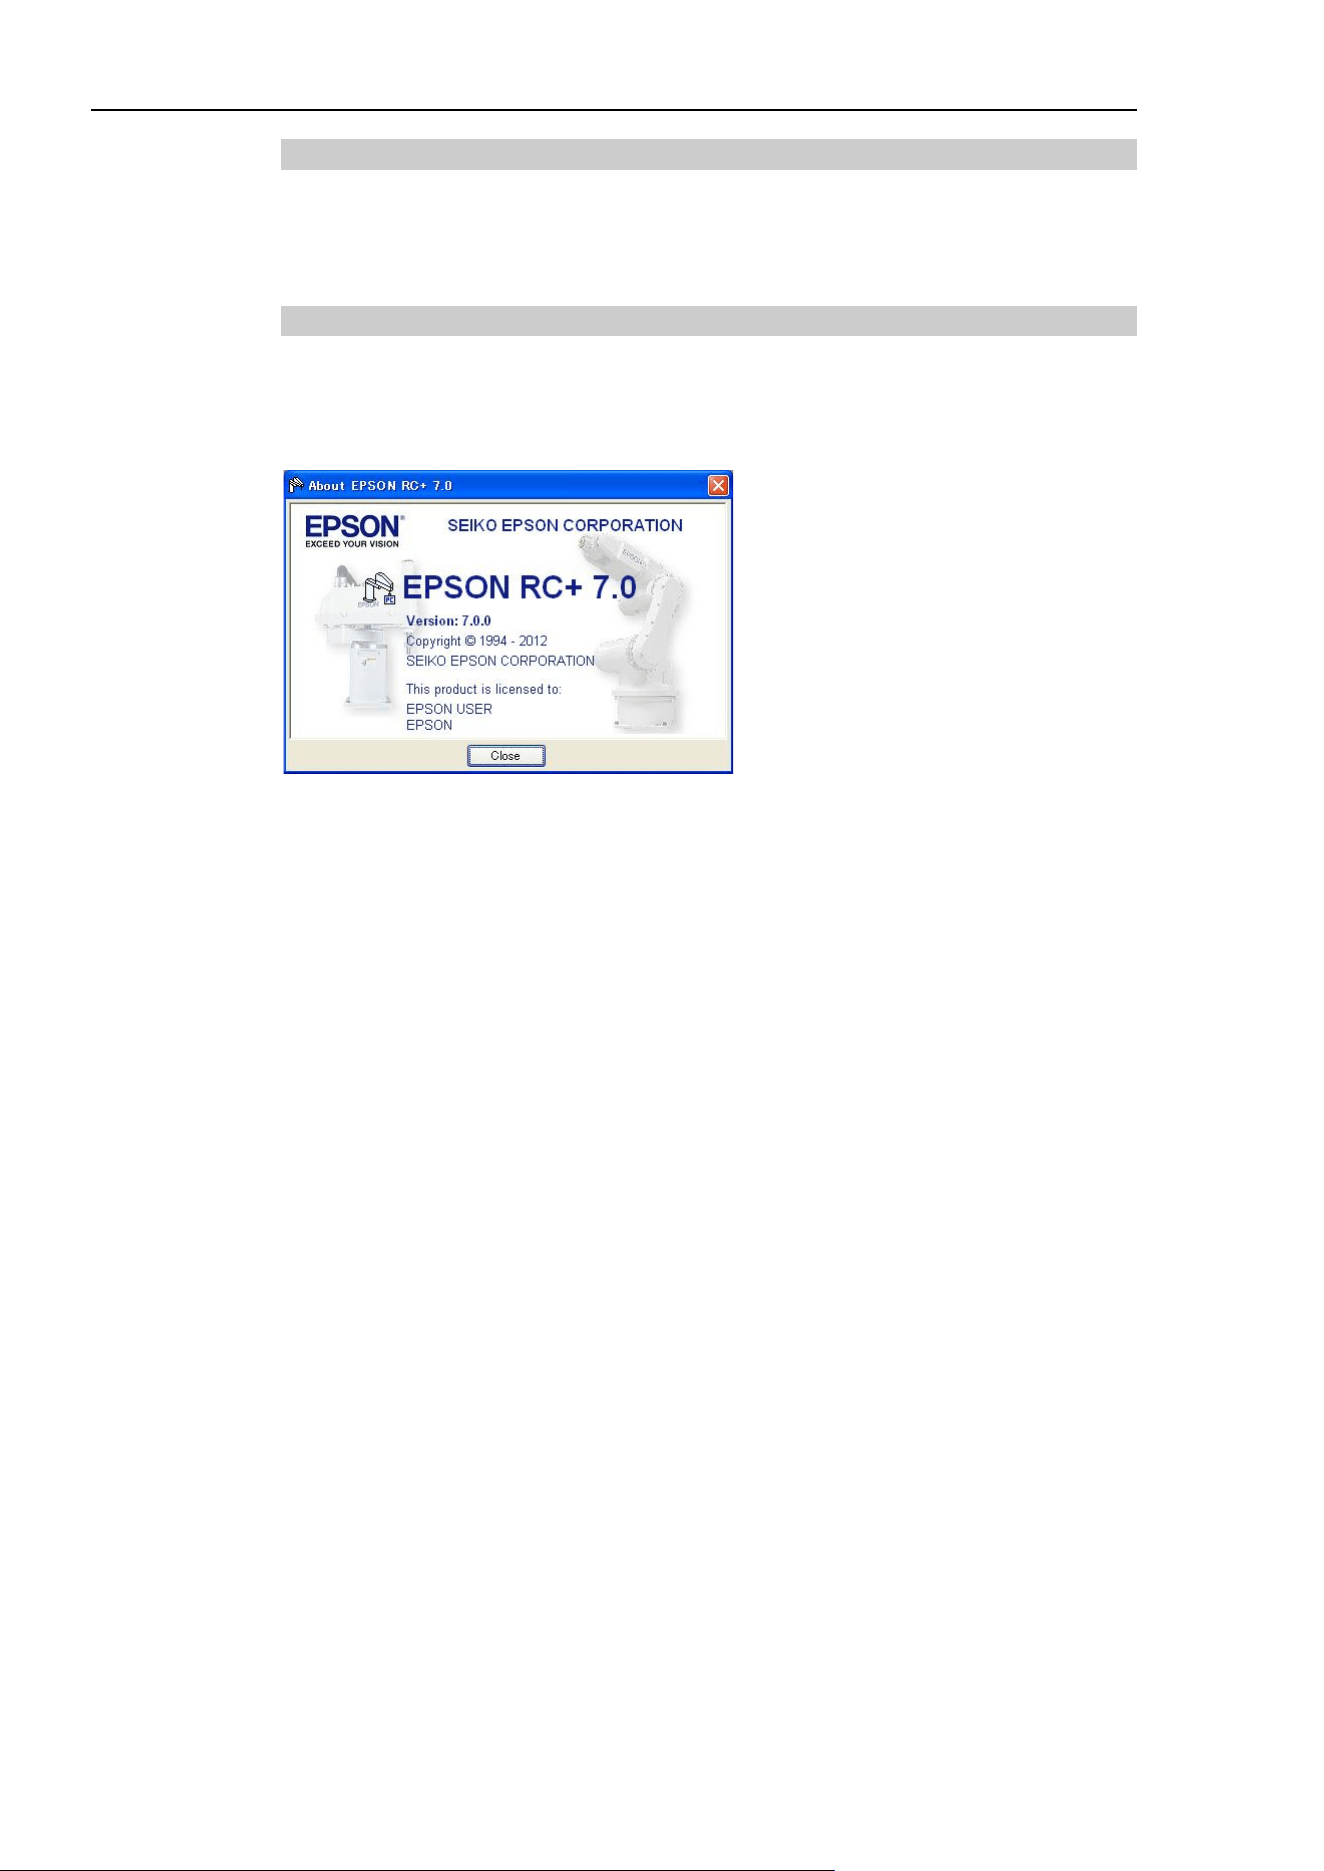
5. The EPSON RC+ 7.0 GUI
174 EPSON RC+ 7.0 (Ver.7.4) User's Guide Rev.6
5.14.5 [Manuals] Submenu (Help Menu)
The Help Menu Manuals submenu contains selections for each of the manuals in Adobe
PDF format. These include manuals for EPSON RC+ 7.0, SPEL
+
Language Reference,
Controller, Robot, and the Options.
5.14.6 [About EPSON RC+ 7.0] Command (Help Menu)
The About command displays a dialog box showing the current version of the EPSON
RC+ 7.0 software, along with copyright and license information. When calling technical
support about EPSON RC+ 7.0, you should report the version you are using from this
dialog.

6. The SPEL+ Language
EPSON RC+ 7.0 (Ver.7.4) User's Guide Rev.6
175
6. The SPEL
+
Language
This chapter contains information about the SPEL
+
Language.
Contents
Overview
Program structure
Commands and statements
Function and variable names
Date types
Operators
Working with variables
Working with strings
Multi-statements
Labels
Comments
Error handling
Multi-tasking
Robot coordinate systems
Robot arm orientations
Robot motion commands
Working with robot points
Input and output control
Using Traps

6. The SPEL+ Language
176
EPSON RC+ 7.0 (Ver.7.4) User's Guide Rev.6
6.1 Overview
SPEL
+
is a BASIC-like programming language that runs in the controller. It supports
multitasking, motion control, I/O control.
Programs are written in ASCII text and then compiled into executable object files.
Several language instructions can also be executed in immediate mode from the Command
window.
6.2 Program Structure
6.2.1 What is a SPEL
+
program?
A SPEL+ program is a collection of functions, variables, and macros. You can put one or
more statement in each line of a program (Multi-Statement). Every program file has a
“.prg” extension and is stored in the project directory.
Each project must include at least one program and define the function called "main".
"Function main" is the default definition. If “Function main” is not found, an error occurs.
In addition, you can define other 63 main functions in the same project. Each program has
own start function: main1, main2…main63. Each of the main functions can be started
from the [Operator window], the remote console, or RC+ API.
A function definition begins with the Function statement and ends with the Fend statement.
The following program file contains two function definitions. Function Main calls
function “Func1”.
MAIN.PRG
Function Main
Call Func1
...
Fend
Function Func1
Jump pickpnt
...
Fend
6.2.2 Calling functions
You can execute a user function by using the Call statement. The function can reside in
any program file in the current project. You can also omit the Call statement if you don't
need the return value. When Call is omitted, then parentheses for the arguments must not
be supplied. To get a return value, use the function in the right hand side of an expression.
Here are some examples:
Call MyFunc(1, 2)
MyFunc 1, 2
Print MyFunc(1, 2)

6. The SPEL+ Language
EPSON RC+ 7.0 (Ver.7.4) User's Guide Rev.6
177
6.3 Commands and Statements
Commands and statements consist of a SPEL
+
instruction followed by the parameters for
that instruction.
A command is executed immediately. You can execute commands from the Command
window or from the Macros dialog box.
Statements can be used only in programs.
Statements can include more than one SPEL
+
instruction. When you put several
statements in a line of a program (Multi-Statement), use a semi-colon (;) to separate
instructions.
The maximum length for a line is 512 characters.
6.4 Function and Variable Names (Naming restriction)
The function name can include up to 64 characters. The variable name can include up to
32 alphanumeric, Japanese, or underscore characters. Characters can be upper case or
lower case.
The following names are valid:
Function main
Real real_var
Integer IntVar
Function and variable names cannot begin with an underscore.
SPEL
+
keywords cannot be used as function or variable names.
String variables must have an additional dollar sign ('$') suffix, as shown in the example
below:
Function Test
String modname$
Print "Enter model name:"
Line Input modname$
Print "model is ", modname$
Fend
Restrictions for naming in SPEL+ language
- Characters can be alphanumeric, Japanese, or underscore character.
- Use alphabets for the first letter.
- Characters can be upper case or lower case.
- No keywords can be used.
- Maximum limits of names are as follows. (For one –byte character)
Name
Max. limit
Point label
32
I/O label
32
User error label
16
Function name
64
Variable name
32
Line label
32
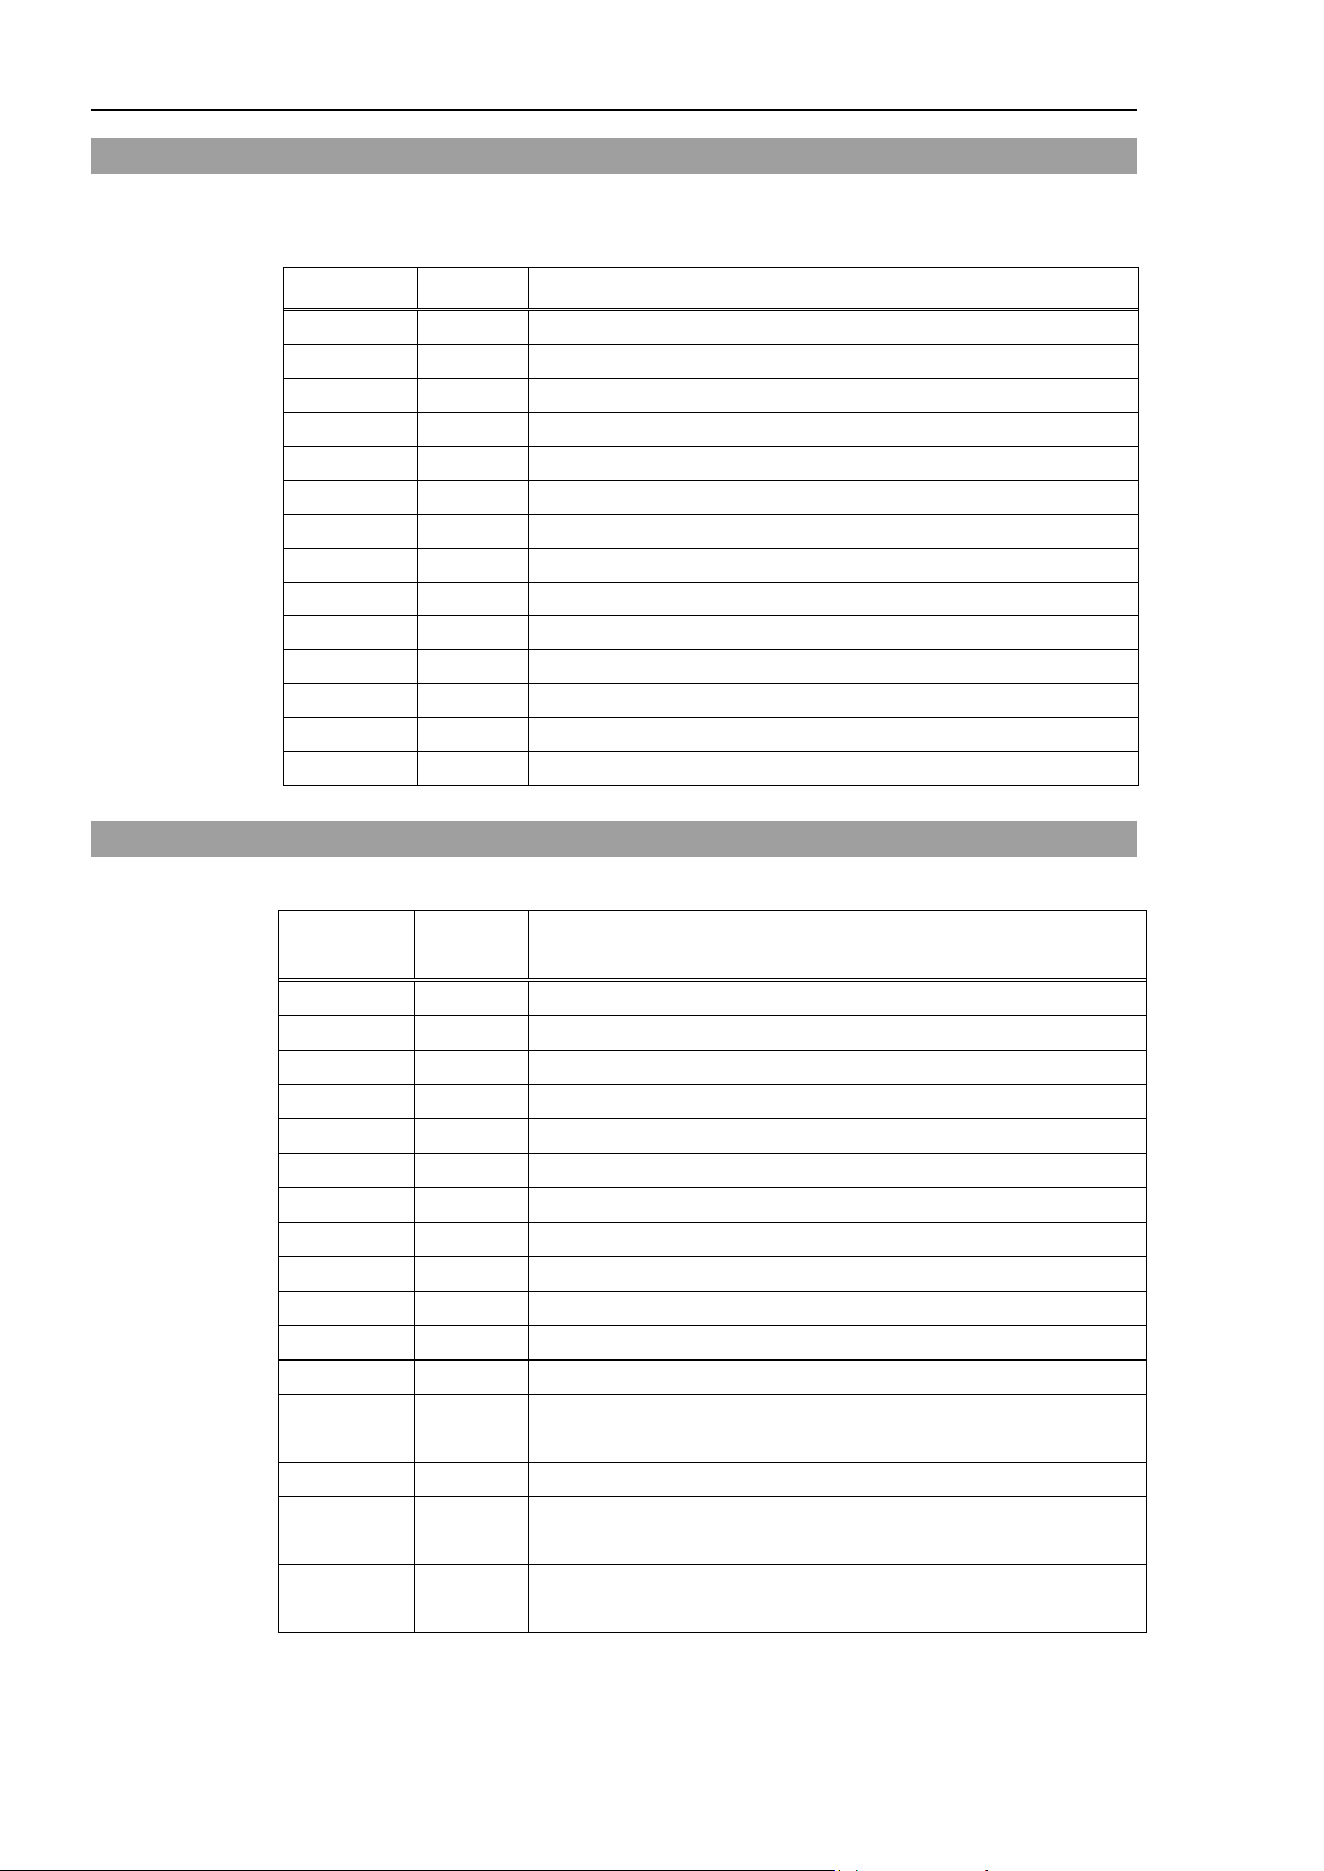
6. The SPEL+ Language
178
EPSON RC+ 7.0 (Ver.7.4) User's Guide Rev.6
6.5 Data Types
You can declare different types of data in your program. All variables must be declared.
The following table shows the different data types for the SPEL
+
language.
Data Type Size Range
Boolean
2 byte
True or False
Byte
2 byte
−128 to +127
Double
8 bytes
−1.79E+308 to 1.79E+308 Number of significant figure is 14
Int32
4 bytes
−2147483648 to +2147483647
Int64
8 bytes
−9223372036854775808 to +9223372036854775807
Integer
2 bytes
−32768 to +32767
Long
4 bytes
−2147483648 to +2147483647
Real
4 bytes
−3.40E+38 to 3.40E+38 Number of significant figure is 6
Short
2 bytes
-32768 to +32767
String
256 bytes
All ASCII characters Up to 255 characters
UByte
2 bytes
0 to +255
UInt32
4 bytes
0 to 4294967295
UInt64
8 bytes
0 to 18446744073709551615
UShort
2 bytes
0 to 65535
6.6 Operators
The following table shows the operators for the SPEL
+
language.
Keyword
or Symbol
Example Description
+
A+B
Addition
−
A-B
Subtraction
*
A*B
Multiplication
/
A/B
Division
**
A**B
Exponentiation
=
A=B
Equal
>
A>B
Greater than
<
A<B
Less than
>=
A>=B
Greater than or equal
<=
A<=B
Less or than equal
<>
A<>B
Not equal
And
A And B
Performs logical and bitwise AND operation.
Mod A Mod B
Returns the remainder obtained by dividing a numeric
expression by another numeric expression.
Not
Not A
Performs logical or bitwise negation of the operand.
Or A Or B
Performs the bitwise Or operation on the values of the
operands.
Xor A Xor B
Performs the bitwise Xor operation on the values of the
operand.

6. The SPEL+ Language
EPSON RC+ 7.0 (Ver.7.4) User's Guide Rev.6
179
6.7 Working with Variables
6.7.1 Variable scopes
There are three different scopes for variables in SPEL
+
:
Local
Module
Global
6.7.2 Local variables
Local variables are available to all statements in the same function. Functions using local
variable names cannot refer to the same local variables in other functions. This is why
they are called locals, because they are local to the function they are being used in.
To declare local variables in a function, use one of the variable declaration instructions at
the beginning of the function after the Function statement:
Boolean, Byte, UByte, Integer, Short, UShort, Long, Int32, UInt32, Int64, UInt64,
Real, Double, String
For example, the following function declares several local variables:
Function test
Integer intVar1, intVar2
Real realVar
String dataStr$
Integer array(10)
.....
Fend
6.7.3 Module variables
Module variables are available to all functions in the same program file.
To declare module variables in a program, use one of the variable declaration instructions
at the beginning of the program before any Function statements:
Boolean, Byte, UByte, Integer, Short, UShort, Long, Int32, UInt32, Int64, UInt64,
Real, Double, String
In order to indicate that a variable is module level, precede the name with "m_", as shown
in the example below. With this, you can improve the program readability.
For example, the following function declares several module level variables:
' Module level vars, used by all functions in this file
Integer m_IntVar1, m_IntVar2
Real m_RealVar
String m_DataStr$
Integer m_Array(10)
Function main
m_IntVar1 = 25
Call test
Fend
Function test
Print m_IntVar1
Fend
TIP

6. The SPEL+ Language
180
EPSON RC+ 7.0 (Ver.7.4) User's Guide Rev.6
6.7.4 Global variables
Global variables can be shared between all functions in a project. The Global instruction
is used to declare a global variable.
To declare global variables in a program, use the Global instruction with the desired
variable type (Boolean, Byte, UByte, Integer, Short, UShort, Long, Int32, UInt32, Int64,
UInt64, Real, Double, String) at the beginning of the program before any Function
statements:
In order to indicate that variables are global, precede the name with "g_", as shown in the
example below. With this, you can improve the program readability.
Program: MAIN.PRG
Global Integer g_TotalCycles
Function main
Call LoadPart
...
...
Fend
Program: LOADPART.PRG
Function LoadPart
Jump pick
On gripper
Wait .1
Jump place
Off gripper
Wait .1
g_TotalCycles = g_TotalCycles + 1
Fend
For more information, see Data Types.
6.7.5 Global Preserve variables
You can preserve global variable values by using the optional Preserve parameter when
you declare global variables.
Preserved variables are stored in the controller’s SRAM.
If the data type of a preserved variable or the number of dimensions is changed, the
variable values will be cleared.
Be careful about the backup battery power, because you will lose the data of global
preserve variables stored in SRAM if the battery is weak.
TIP
NOTE

6. The SPEL+ Language
EPSON RC+ 7.0 (Ver.7.4) User's Guide Rev.6
181
6.7.6 Arrays
You can declare local, module, and global variables with up to three dimensions as arrays
for all data types.
To declare an array, use this syntax:
dataType name ( ubound1 [ , ubound2 [ , ubound3] ] )
SPEL
+
arrays are zero based. The first element is referenced with a value of zero.
The total available number of array elements for local variables is 200 for strings and 2000
for all other types.
The total available number of array elements for global preserve variables is 400 for
strings and 4000 for all other types.
The total available number of array elements for global and module variables is 10,000 for
strings and 100,000 for all other types.
To calculate the total elements used in an array, use the following formula. (If a
dimension is not used, substitute 0 for the ubound values.)
total elements = (ubound1 + 1) * (ubound2 + 1) * (ubound3 + 1)
Array declaration examples:
' Global string array
Global String gData$(10)
Function main
' Arrays local to this function
Integer intArray(10)
Real coords(20, 10)
Use Redim to change the bounds of an array at run time.
Integer a(10)
Redim a(20)
To preserve values when using Redim, add the Preserve optional argument.
Integer a(10)
Redim Preserve a(20)
Use UBound to get the maximum element number.
Integer i, a(10)
For i = 1 to UBound(a)
a(i) = i
Next i
6.7.7 Initial values
All variables are initialized when first used except for Global Preserve variables. Strings
are set to empty, and all other variables are set to zero.
6.7.8 Clearing arrays
Execute Redim (without Preserve) to clear all of the elements of array variables.

6. The SPEL+ Language
182
EPSON RC+ 7.0 (Ver.7.4) User's Guide Rev.6
6.8 Working with Strings
A string in SPEL
+
is a set of ASCII characters (Code &h01 ~ &hff) with a maximum
length of 255.
You must declare strings in your programs with the String instruction.
All string variable names must end with a dollar sign ($) suffix.
The following table shows the string commands available in SPEL
+
.
Keyword Description
Asc
Returns the decimal ASCII value of the first character in a string.
Chr$
Converts an ASCII value into a one character string.
FmtStr
Formats a numerical or date/time expression.
FmtStr$
Formats a numerical or date/time expression.
Hex$
Returns a string containing the hexadecimal value of a number.
InStr
Returns the position of a substring within a string.
LCase$
Returns the specified string in lower case characters.
Left$
Returns a substring beginning with the first character of a string.
Len
Returns the length (number of characters) of a string.
LTrim$
Returns the specified string with left spaces removed.
Mid$
Returns a substring of a string.
ParseStr
Parses a string into an array of tokens.
Right$
Returns a substring from the end of a string.
RTrim$
Returns the specified string with right spaces removed.
Space$
Returns a string containing a specified n
umber of space (ASCII 32)
characters.
Str$
Converts a number to a string.
String
Declare a string variable in a program.
Tab$
Returns a tab string.
UCase$
Returns the specified string in upper case characters.
Val
Converts a string to a number.

6. The SPEL+ Language
EPSON RC+ 7.0 (Ver.7.4) User's Guide Rev.6
183
6.9 Working with Files
SPEL
+
has several commands for handling files.
Keyword Description
AOpen Opens a file for append.
BOpen Opens a file for binary access.
Close Closes a file.
FileExists Checks if a file exists.
FolderExists Check if a folder exists.
FreeFile Returns an unused file handle.
Input Inputs one or more variables from a file
Kill Deletes a file.
Line Input Inputs line from a file.
Read Reads a specified number of bytes into a string variable.
ReadBin Reads binary data.
ROpen Opens a file for reading.
Seek Sets the current file pointer.
Flush Writes data buffer to disk.
WOpen Opens a file for writing.
Write Writes out a variable at the current file pointer without appending a line
terminator.
WriteBin Writes binary data.

6. The SPEL+ Language
184
EPSON RC+ 7.0 (Ver.7.4) User's Guide Rev.6
Before using a file you must open it with one of the following commands: AOpen, Bopen,
ROpen, and WOpen. And specify a file number in the Open statement. File number can
be 30 ~ 63.
Here is an example to save a text file and read it.
String data$(10)
Function SaveData()
Integer fNum, i
fNum = FreeFile
WOpen "c:\mydata\data.txt" As #fNum
' Store the count
Print #fNum, UBound(data$)
For i = 0 To UBound(data$)
Print #fNum, data$(i)
Next i
Close #fNum
Fend
Function LoadData()
Integer fNum, i
fNum = FreeFile
ROpen "c:\mydata\data.txt" As #fNum
Input #fNum, i
Redim data$(i)
For i = 0 To UBound(data$)
Input #fNum, data$(i)
Next i
Close #fNum
Fend

6. The SPEL+ Language
EPSON RC+ 7.0 (Ver.7.4) User's Guide Rev.6
185
6.10 Multi-statements
A program statement can contain several statements separated by semi-colons. The total
length of a multi-statement program line cannot exceed 255 characters.
For example:
Function Test
Pass P1; Pass P2; Go P3 ' Multi-statement
Fend
It is not recommended to use multi-statements. Multi-statements can make your code
more difficult to read and debug.
6.11 Labels
A program line is an alphanumeric name followed by a colon (":") that marks a location in
a program for a GoTo or GoSub statement. The name may be up to 32 characters long and
can include alphanumeric characters and the underscore ("_") character if it is not the first
character. You cannot use any SPEL
+
keywords as labels.
For example:
Function Main
Do
Jump P1
Jump P2
If Sw(1) Then GoTo MainAbort
Loop
MainAbort: ' Program label
Print "Program aborted"
Fend
6.12 Comments
Use comments to add notes to your programs. An apostrophe character (') starts a
comment.
Example:
Function Main
' ****** Main Demo Program ******
Xqt conveyor ' Start up the task for conveyor
Do
Print "Press ENTER to run demo cycle"
Print "Press CTRL+C to quit"
Input dumy
Call demo ' Execute the demo function
Loop ' Return to start of main loop

6. The SPEL+ Language
186
EPSON RC+ 7.0 (Ver.7.4) User's Guide Rev.6
6.13 Error Handling
When an error occurs in a SPEL
+
function, you can cause execution to be transferred to an
error handling routine for processing the error. The routine must be inside a function
definition.
The table on the next page shows the program instructions that are used for error handling.
Item Purpose
OnErr Use the OnErr statement to define the location of the error handling routine.
Err Use Err to retrieve the number for the current error status. Use this in the
error handling routine to determine which error has occurred.
Error Generate a user defined error which can be caught by an error handler.
Era Use Era to retrieve the axis number for which the error occurred.
This is normally used in the error handling routine.
Erl Use Erl to retrieve the line number in which the error occurred.
This is normally used in the error handling routine.
Ert Use Ert to retrieve the task number in which the error occurred.
This is normally used in the error handling routine.
ErrMsg$ Use ErrMsg$ to retrieve the error message associated with a specified error
number.
Errb Use Errb to retrieve the robot number in which the error occurred.
This is normally used in the error handling routine.
User Errors
You can define your own error messages by using the User Error Editor which is available
from the Tools Menu. For details refer to 5.11.7 User Error Editor Command (Tools
Menu).

6. The SPEL+ Language
EPSON RC+ 7.0 (Ver.7.4) User's Guide Rev.6
187
Example
The following example shows a simple error handling routine. When an error occurs,
program execution goes to the ErrHandler label, where the error handler starts. The error
number is displayed and the operator is asked to continue or not. If the operator enters
"N" then the program executes the Quit All statement to end the program.
Function Main
String cont$
Integer i
OnErr Goto Errhandler
For i = 1 To 10
Jump P(i)
Next i
Exit Function
' *** Error handler ***
Errhandler:
enum = Err
Print "Error #", enum, " occurred"
Print "Continue (Y or N)?"
Line Input cont$
Select cont$
Case "y", "Y"
EResume Next
Default
Quit All
Send
Fend

6. The SPEL+ Language
188
EPSON RC+ 7.0 (Ver.7.4) User's Guide Rev.6
6.14 Multi-tasking
For some applications, you may want to control other equipment besides the robot, such as
conveyors, pick and place units, etc. By using multi-tasking, you can control this other
equipment with their own tasks.
SPEL
+
supports up to 32 normal tasks and 16 background tasks (48 tasks in total) running
simultaneously. A task is a function that has been started by the system or by the Xqt
statement.
Use the Xqt
statement to start another task from within a function. You can optionally
specify a task number from 1 to 32 in the Xqt statement.
A task started from a background task is started as a background task. You can execute up
to 16 background tasks simultaneously.
The table below shows the program instructions that are used for multitasking.
Statement Purpose
Xqt
Starts a function as a task.
Halt
Temporarily suspends execution of a task.
Resume
Resumes a task that has been halted.
Quit
Stops a task.
Signal
Sends a signal to one or more tasks that are waiting for the signal using
WaitSig.
SyncLock
Locks a resource for use by the current task and blocks other tasks from
using the resource until SyncUnlock is executed.
WaitSig
Waits for a signal from another task.
Pause
Pause all tasks.
One example for starting another task is to run a conveyor system for the robot work cell.
Program: MAINTASK.PRG
Function Main
Xqt Conveyor ' Start the conveyor task
Do
...
...
Loop
Fend
Program: CONVTASK.PRG
Function Conveyor
Do
Select True
Case Sw(10) = On
Off convCtrl
Case Sw(11) = On
On convCtrl
Send
Loop
Fend

6. The SPEL+ Language
EPSON RC+ 7.0 (Ver.7.4) User's Guide Rev.6
189
6.15 Using Multiple Robots
You can control more than one robot in the same project. Use the Robot statement to
switch the current robot for the current task. For most applications, you should use a
separate task for each robot.
Each robot has its own set of point files. You can configure which point files to use in the
Project Editor. The default point file you configure for each robot is automatically loaded
into memory when the main task is started.
The following program is an example where two robots run simultaneously, each with its
own task.
Function main
Xqt Robot1
Xqt Robot2
Fend
Function Robot1
Robot 1
Speed 50
Do
Jump pick
On gripper1
Wait .1
Jump place
Off gripper1
Wait .1
Loop
Fend
Function Robot2
Robot 2
Speed 50
Do
Jump pick
On gripper2
Wait .1
Jump place
Off gripper2
Wait .1
Loop
Fend
6. The SPEL+ Language
190
EPSON RC+ 7.0 (Ver.7.4) User's Guide Rev.6
6.16 Coordinate Systems
6.16.1 Overview
This section describes the coordinate systems for different types of robots supported in
SPEL
+
. Right-handed rule is used for all coordinate systems.
The following coordinate systems are used in SPEL
+
:
Robot Coordinate System This is the native coordinate system of the robot.
This is also known as the default base coordinate system
or world coordinate system.
Local Coordinate System This is a user defined coordinate system located
somewhere within the working envelop.
Tool Coordinate System This is the coordinate system of the tool mounted on the
robot end-effector. This is also known as the end effector
coordinate system.
World/
Base
Tool
Local
ECP
Figure: Transform order of the position/orientation from origin to tool.
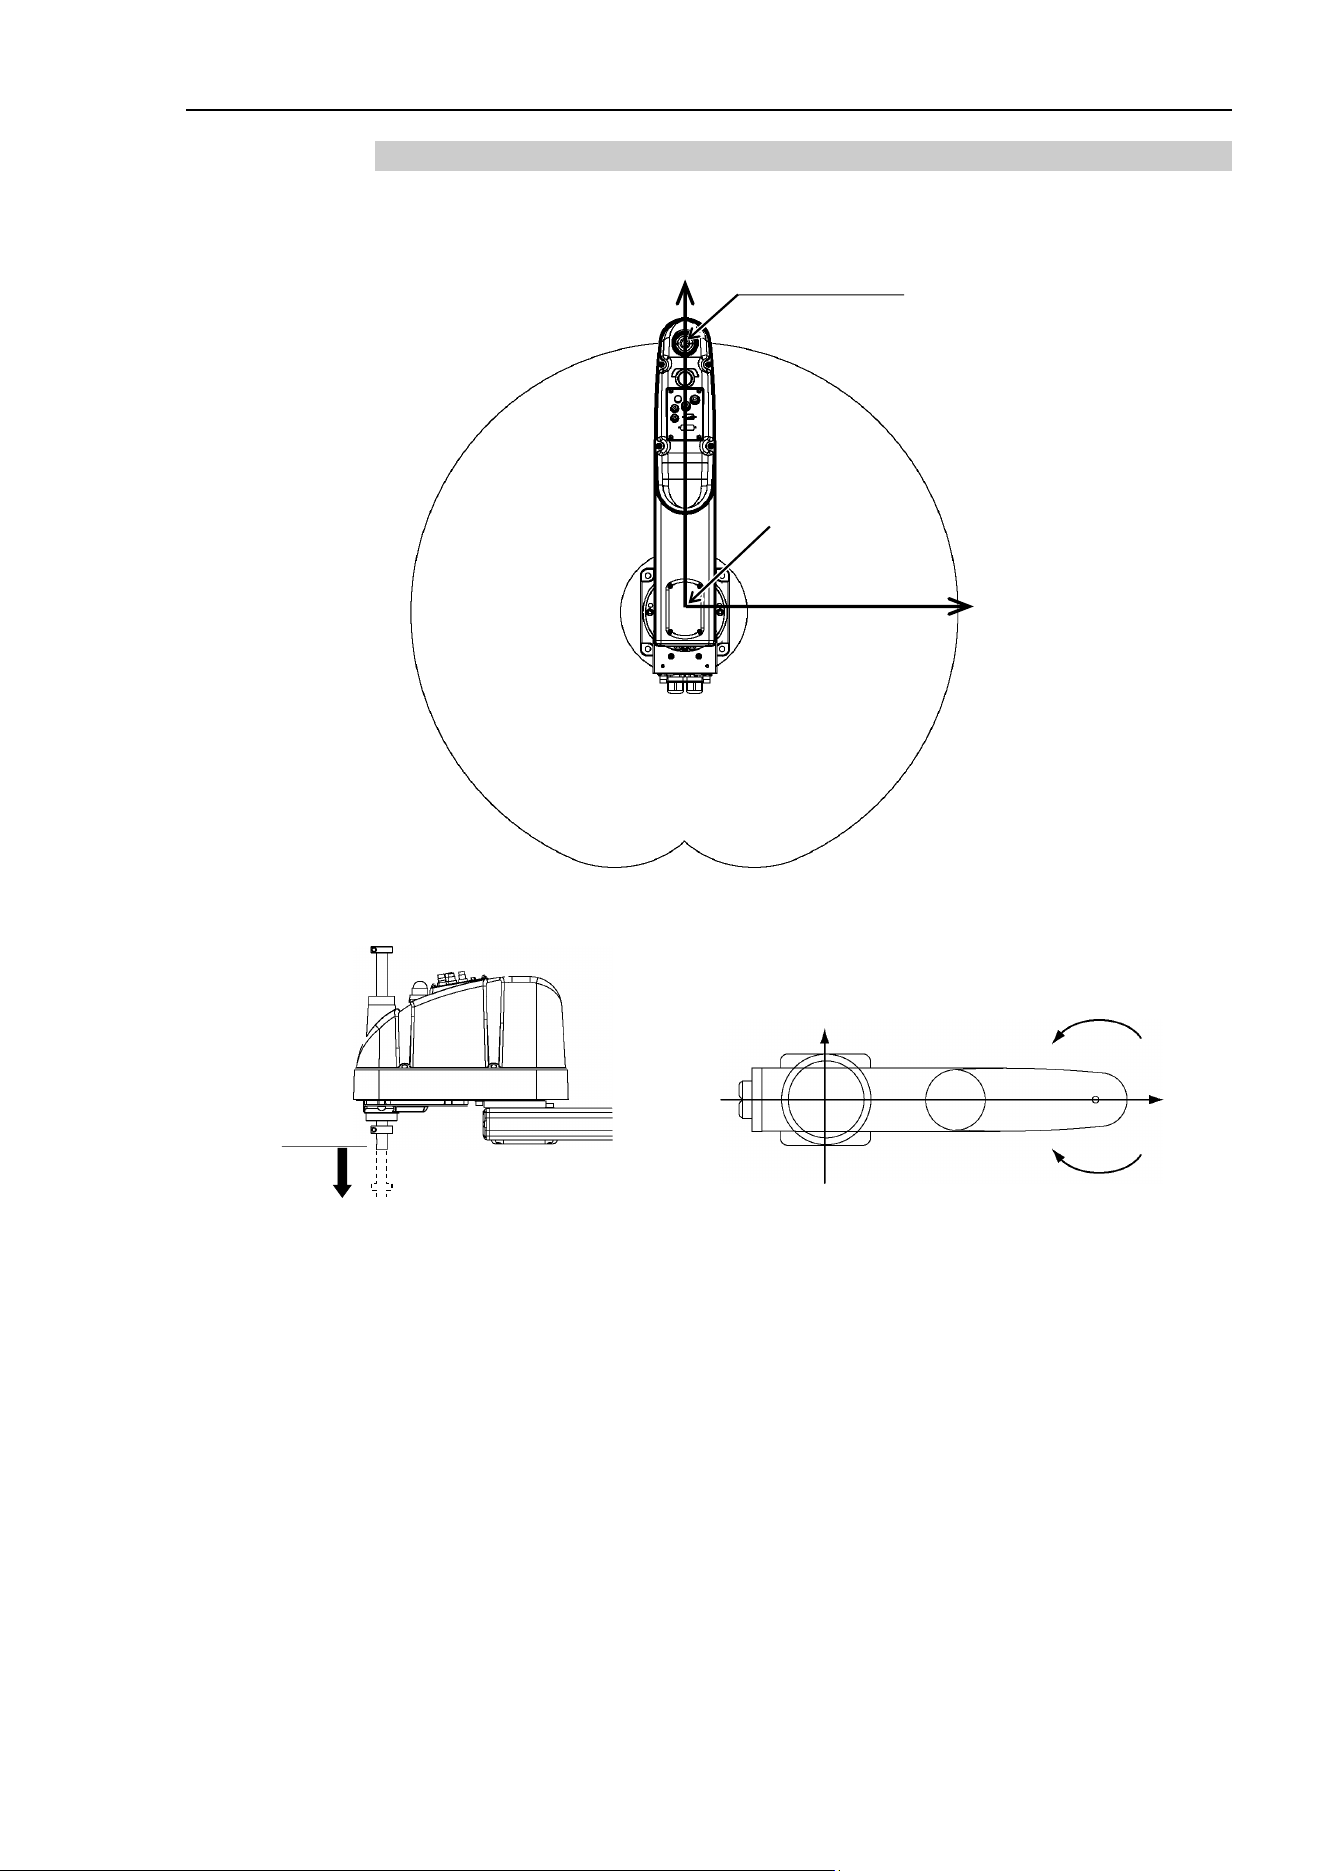
6. The SPEL+ Language
EPSON RC+ 7.0 (Ver.7.4) User's Guide Rev.6
191
6.16.2 Robot Coordinate Systems
Robot Coordinate System of SCARA Robot
Origin
Center of Joint #3
Y+
X+
Robot coordinate system Z axis Robot coordinate system U axis
−Z
+ X
+ Y
+ U
- U
± 360 degrees
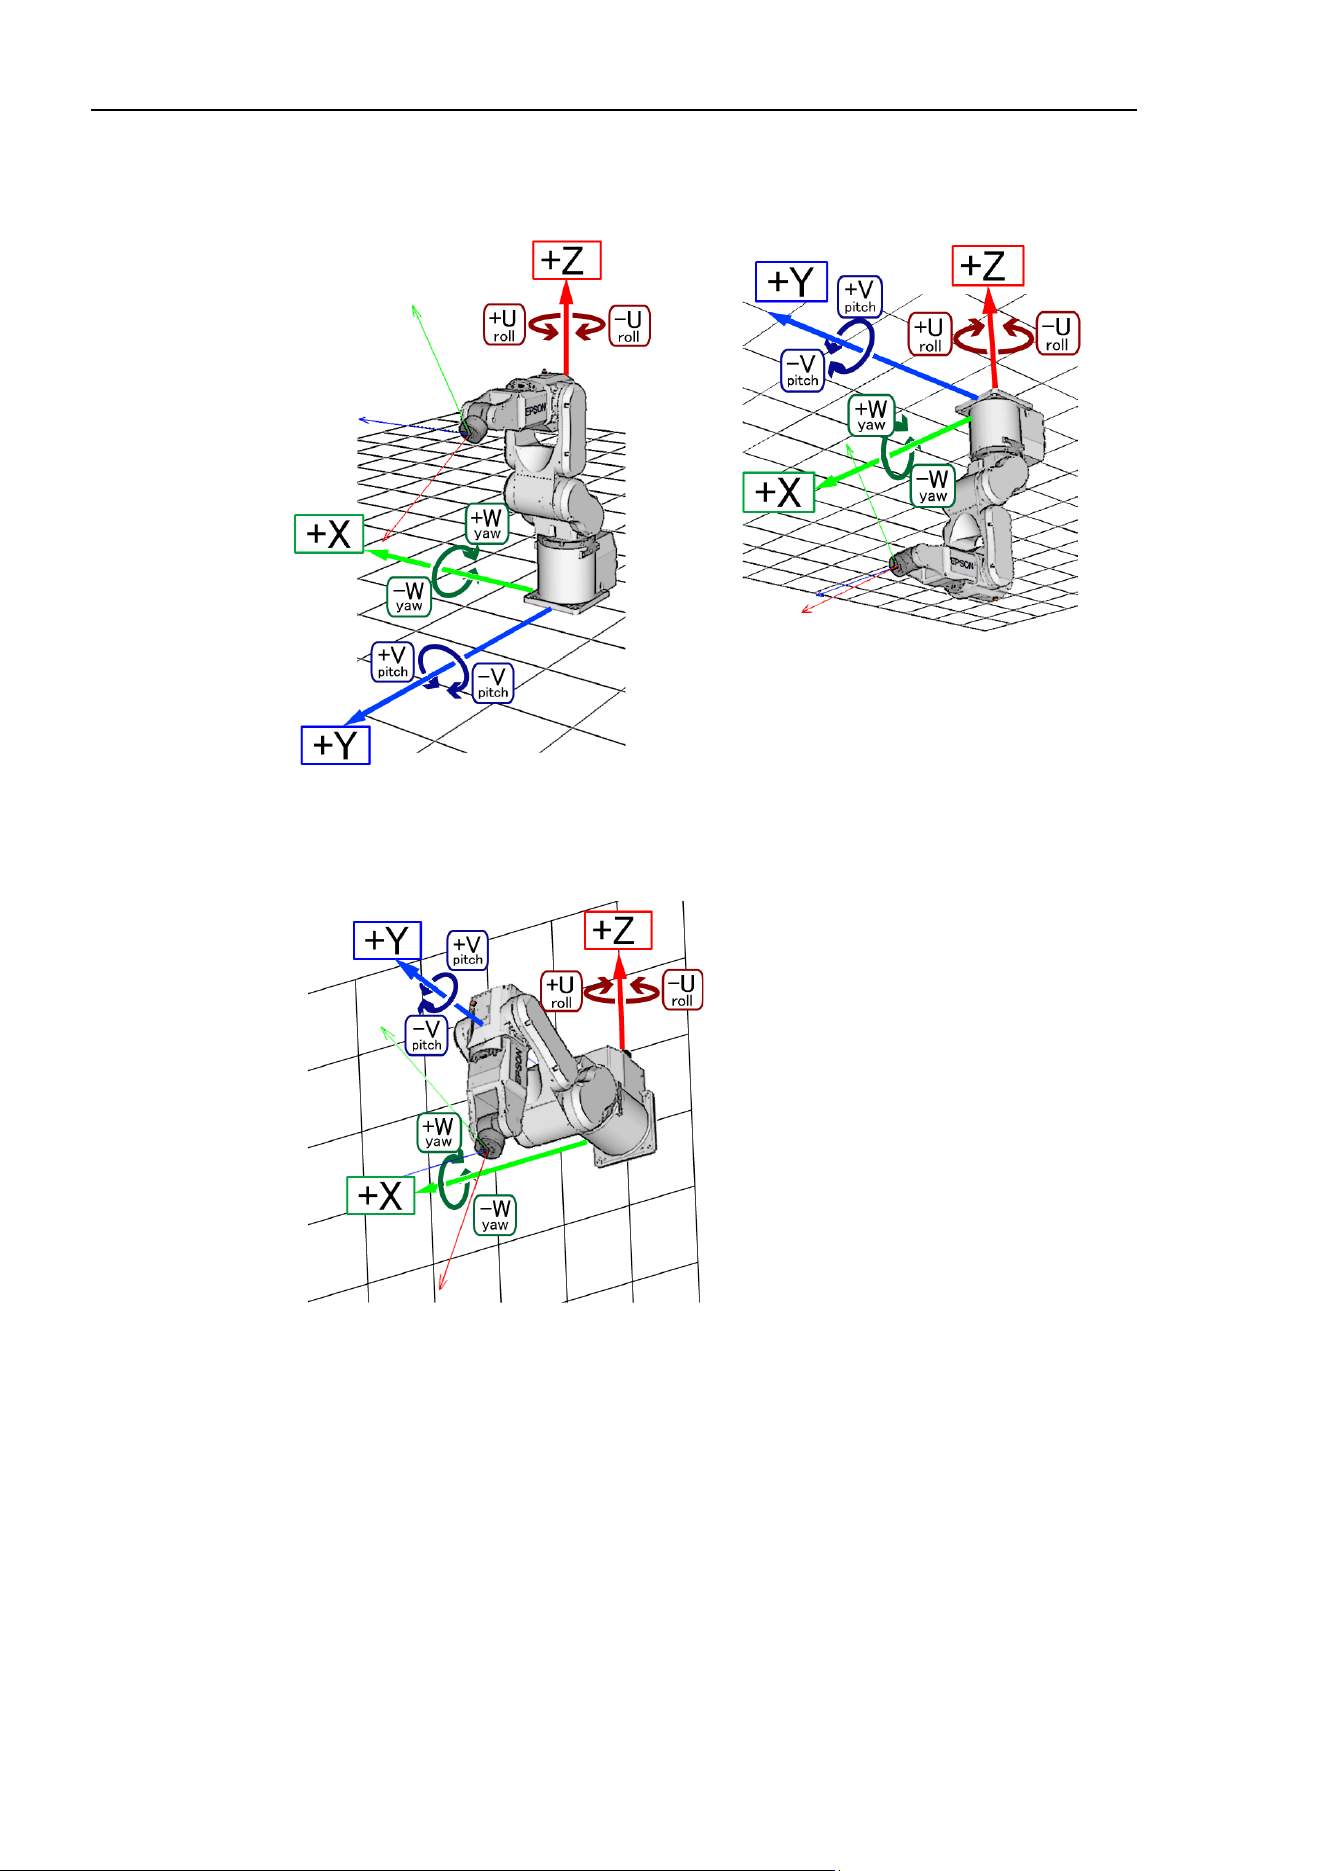
6. The SPEL+ Language
192
EPSON RC+ 7.0 (Ver.7.4) User's Guide Rev.6
Robot Coordinate Systems of 6-Axis Robot
Table Top Mounting
Ceiling Mounting
Side (Wall) Mounting
In the robot coordinate system, +Z axis is defined in the opposite direction of gravity. X
and Y axes are defined in horizontal plane as shown in the figures above.
The position and orientation are designated by the position data (X, Y, Z) and the
orientation data (U, V, W).
Roll-Pitch-Yaw angles are used for the orientation data.
U corresponds to roll (Z-axis rotation), V corresponds to pitch (Y-axis rotation), and W
corresponds to yaw (X-axis rotation).
The orientation is designated by rotating the coordinate axis of U, V, and W, in that order
(movable axis expression).
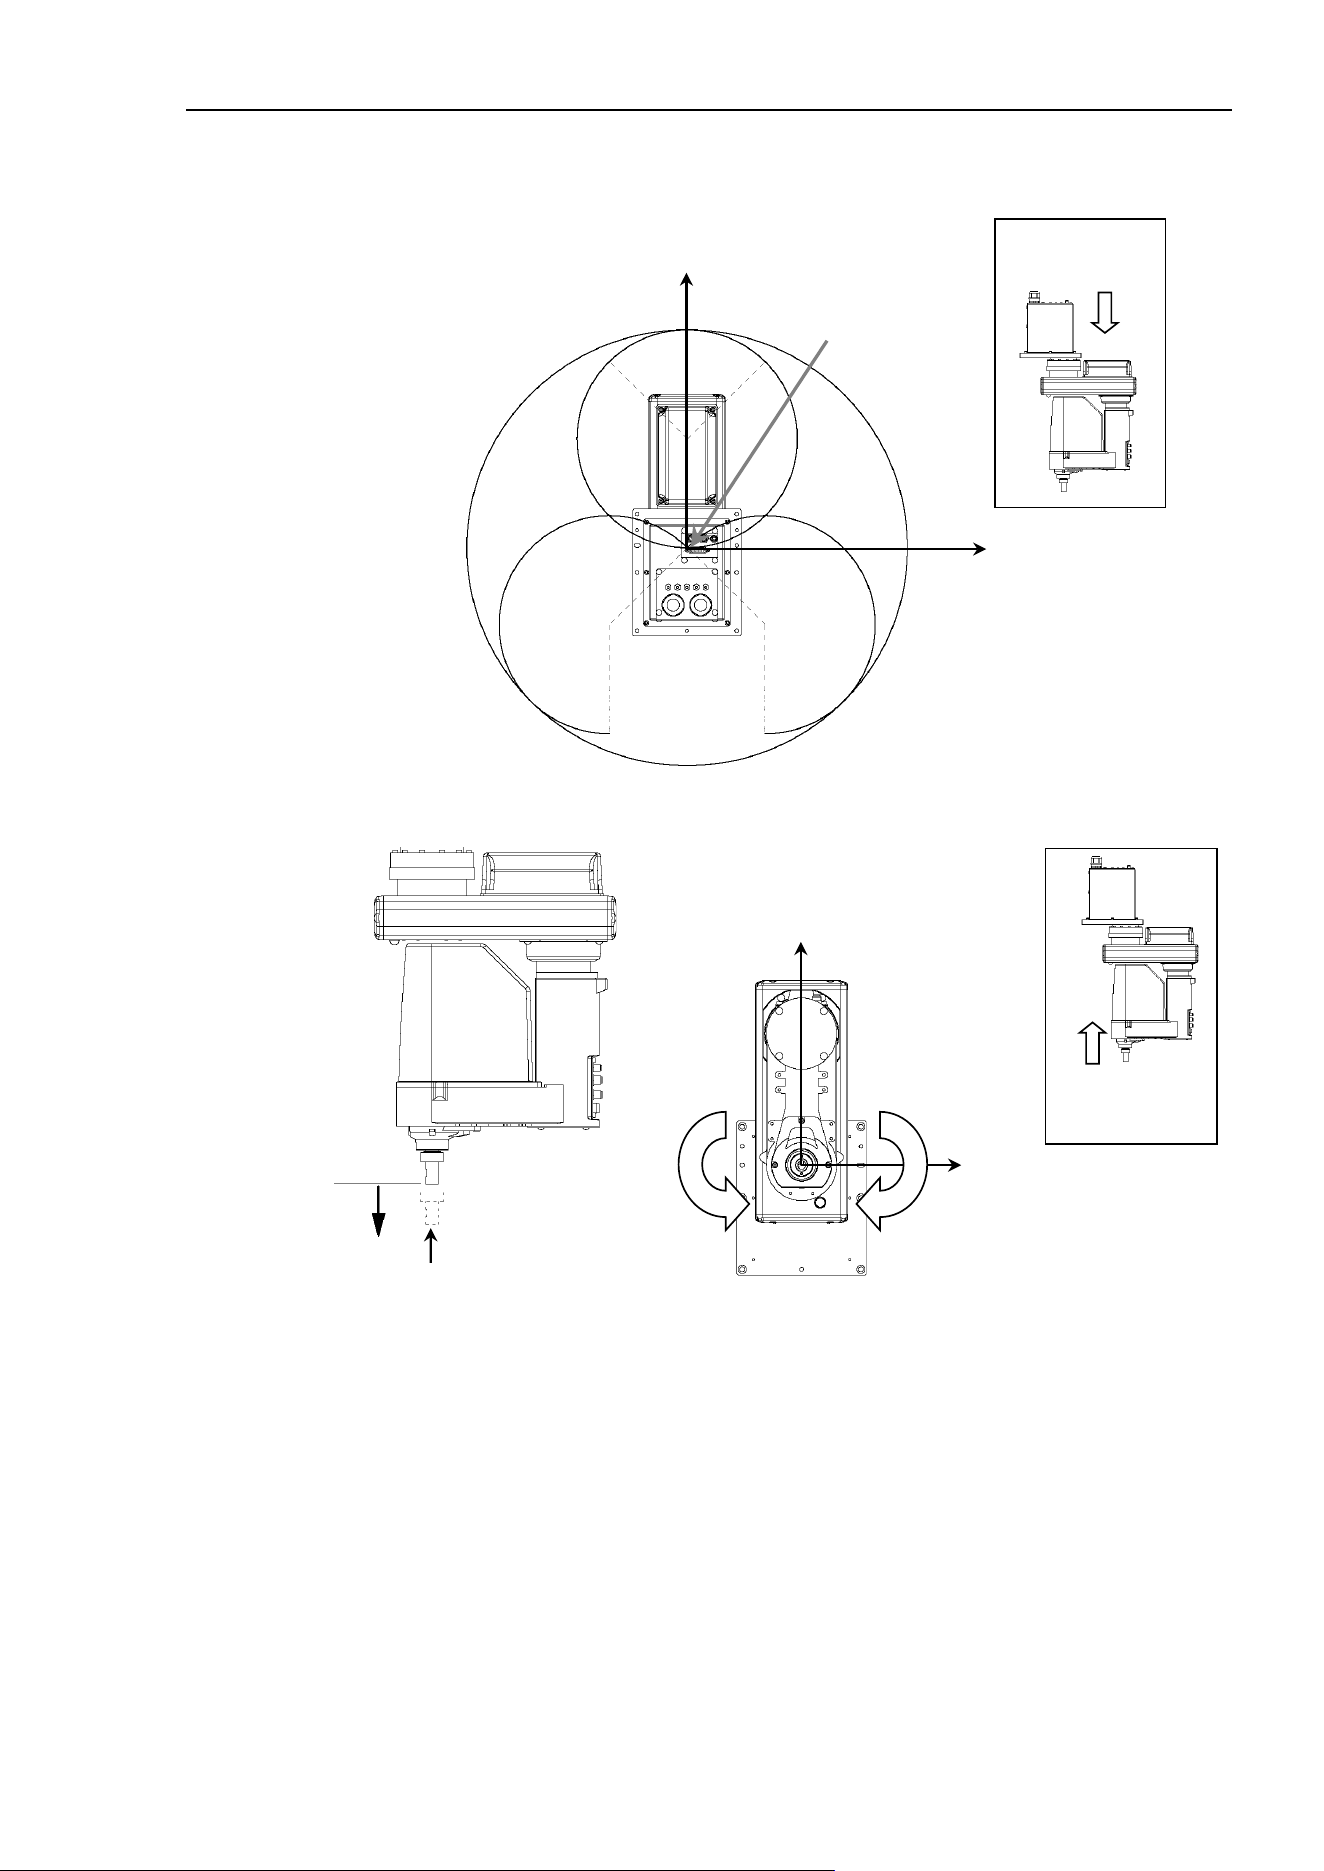
6. The SPEL+ Language
EPSON RC+ 7.0 (Ver.7.4) User's Guide Rev.6
193
Robot Coordinate System of Ceiling Mounting SCARA Robot (RS series)
Origin
Y+
X+
View from this
direction
Robot coordinate system Z axis
Robot coordinate system U axis
-Z
Z=0
Center of Joint #3
- X
+ Y
+ U - U
± 360 degrees
View from this
direction
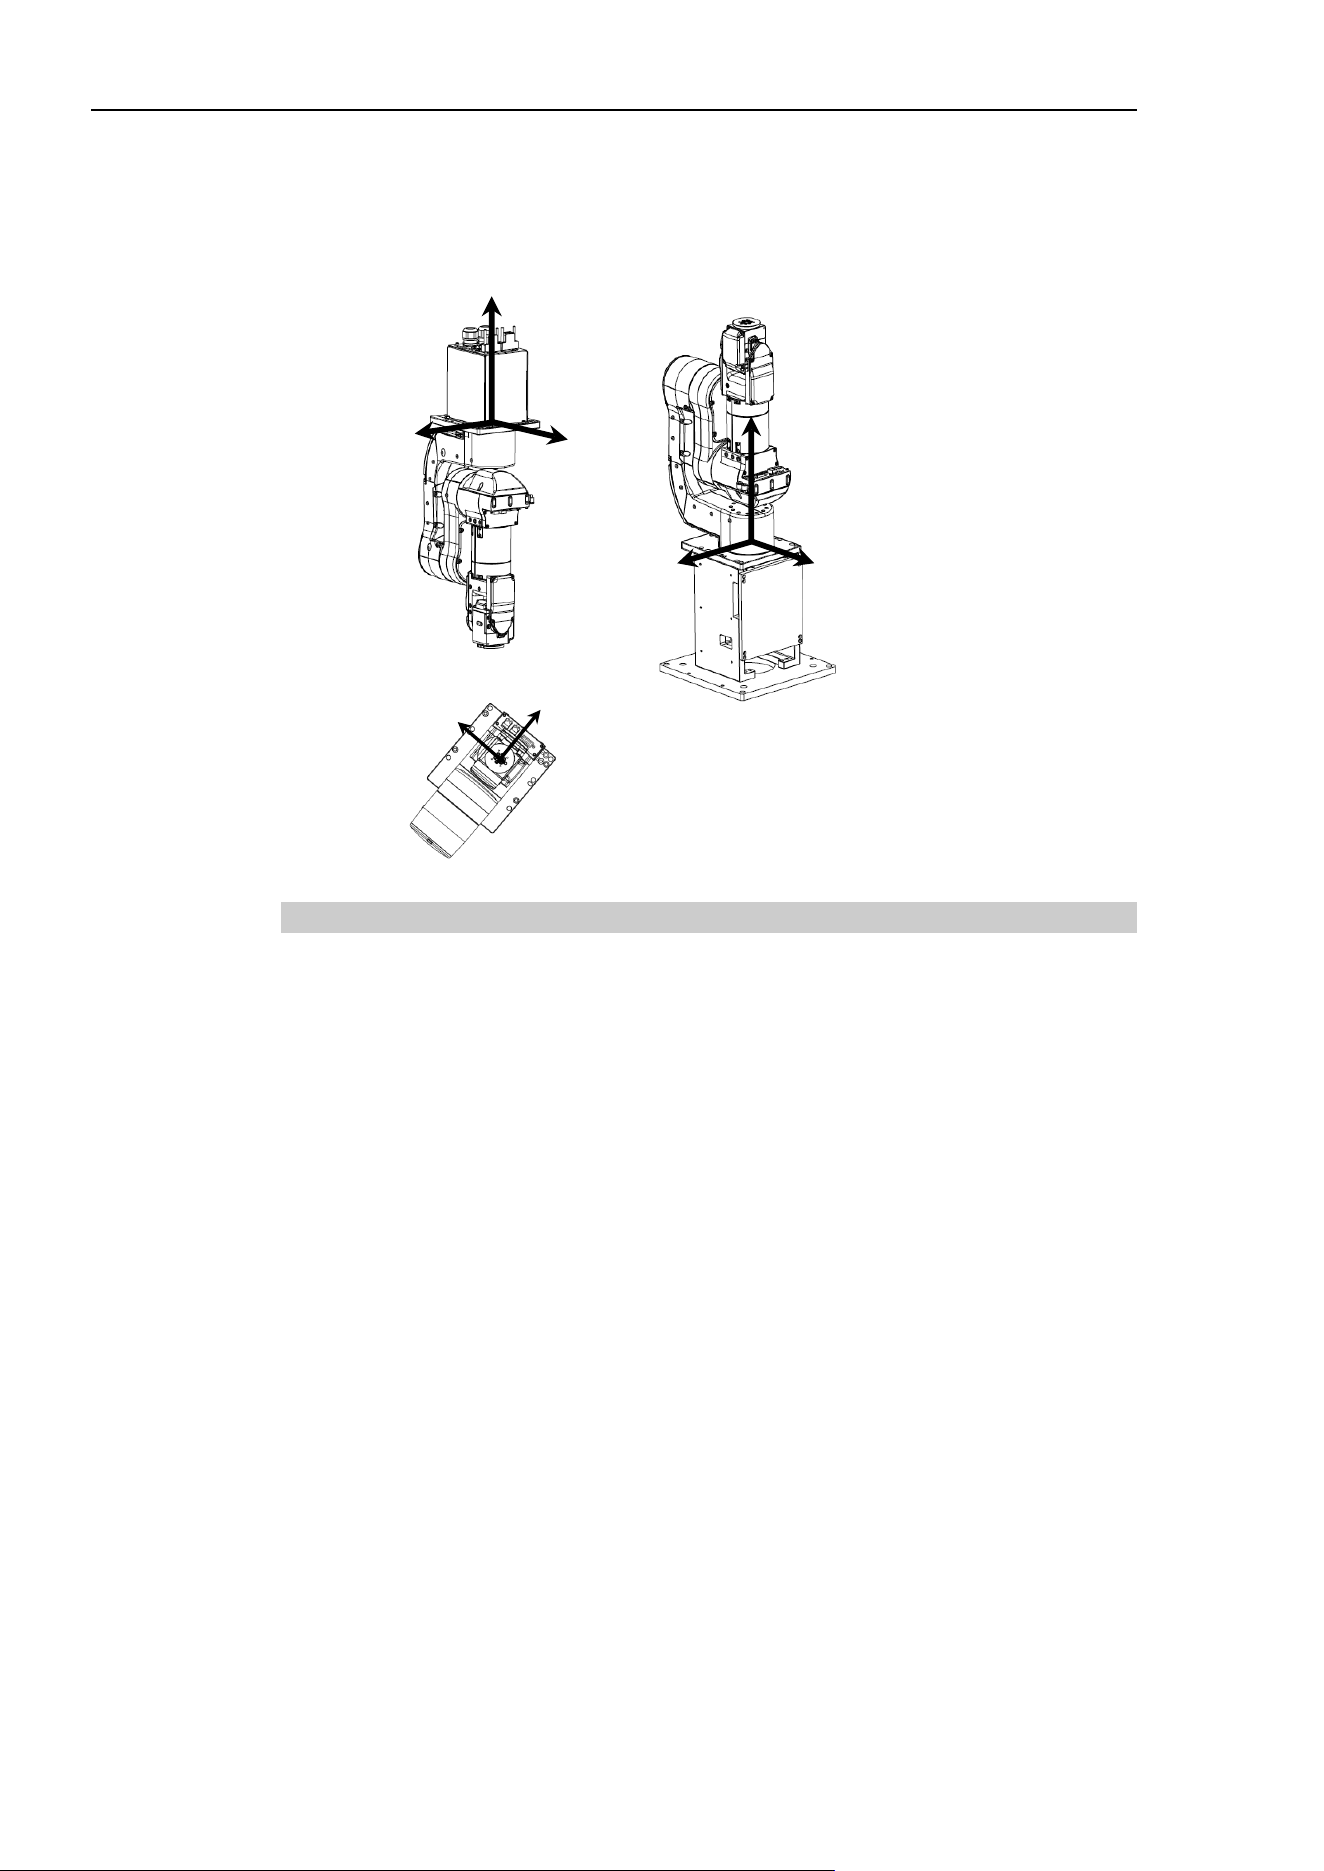
6. The SPEL+ Language
194
EPSON RC+ 7.0 (Ver.7.4) User's Guide Rev.6
Robot Coordinate Systems of N Series Robot
Ceiling Mounting
Table Top Mounting
+Z
+X
+Y
+X
+Y
+Z
+X
+Y
6.16.3 Local Coordinate Systems
This is a user defined coordinate system.
With SPEL
+
, up to 15 relative positional relationships from the robot coordinate system
can be defined as local coordinate systems.
Point data is assigned with a local number from 1 to 15 as the local coordinate system, and
the numbers can be used for point data attributes.
For example, program change can be minimized by using the local coordinate system,
even when the robot orientation and position are changed.
To define a local coordinate system, use the Local statement or Robot Manager of the
EPSON RC+.
The local coordinate system “0” matches the robot coordinate system (Base). Therefore,
when “0” is used for the local number in the point editor or simulator, it is same as
specifying the robot coordinate system.
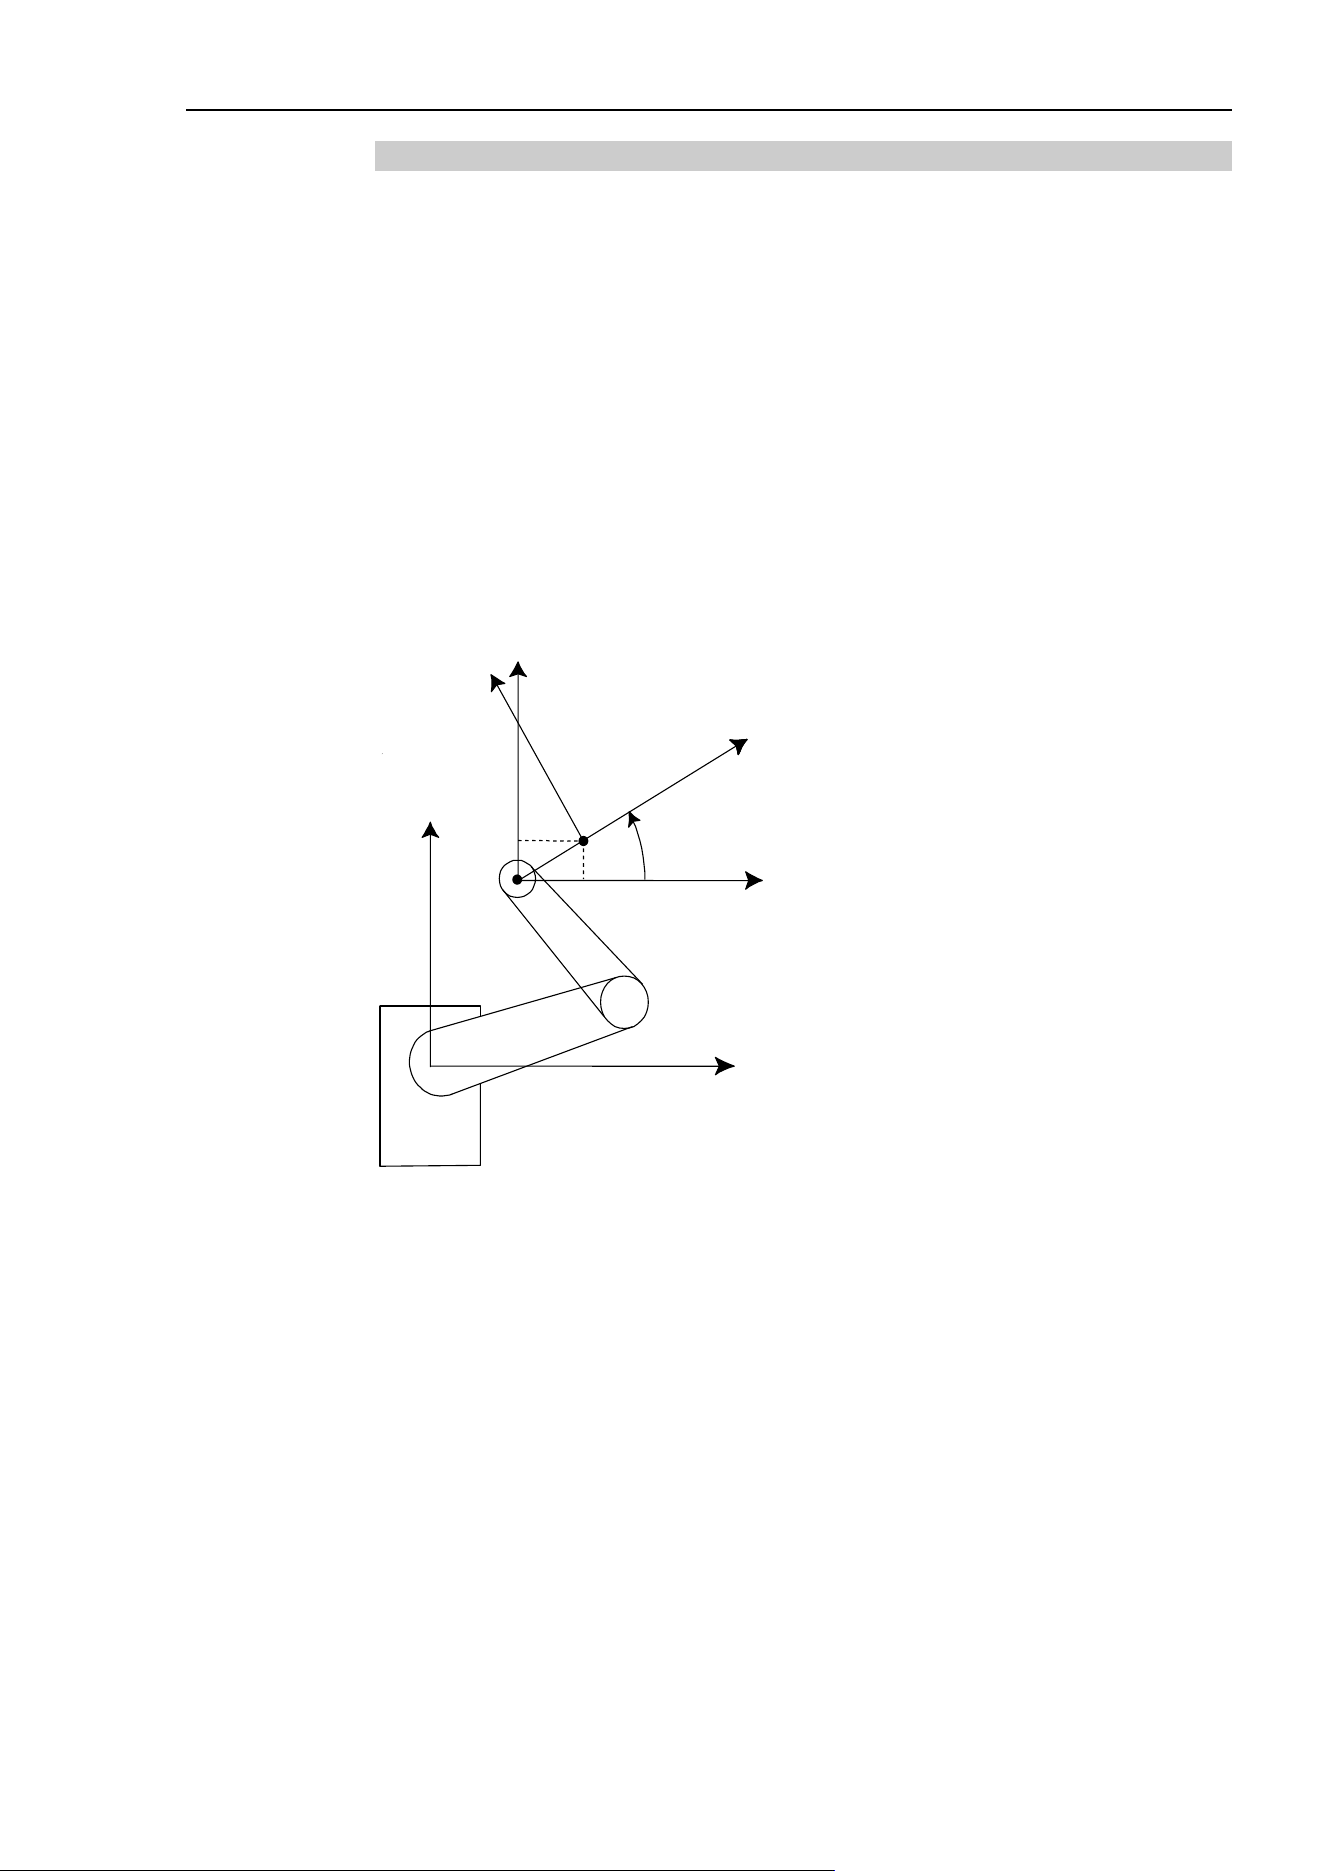
6. The SPEL+ Language
EPSON RC+ 7.0 (Ver.7.4) User's Guide Rev.6
195
6.16.4 Tool Coordinate Systems
This is the coordinate system of the tool mounted on the Joint #6 flange.
Point data is defined by the position and orientation of the tool coordinate system with
respect to a robot coordinate system or a local coordinate system. The position is specified
by the position data (X, Y, Z) and the orientation is specified by the orientation data (U, V,
W) that correspond with roll, pitch, and yaw.
You can also define and use your own tool coordinate systems. To define the tool
coordinate systems, use Tlset or Robot Manager of the EPSON RC+.
The default TOOL 0 coordinate systems are defined as follows according to the robot type.
SCARA Tool 0 coordinate system
The origin of tool 0 for SCARA robots is the center of the forth joint (rotation joint).
When the fourth joint is adjusted to the position of 0 degrees, the tool 0 coordinate system
axes are parallel to the robot coordinate system axes (see the figure below.)
The tool 0 coordinate system rotates as the fourth joint rotates.
Tool 1 coordinate system
Tool 0 coordinate system
Robot coordinate system
X
Y
xt0
xt1
yt0
yt1
a
b
c
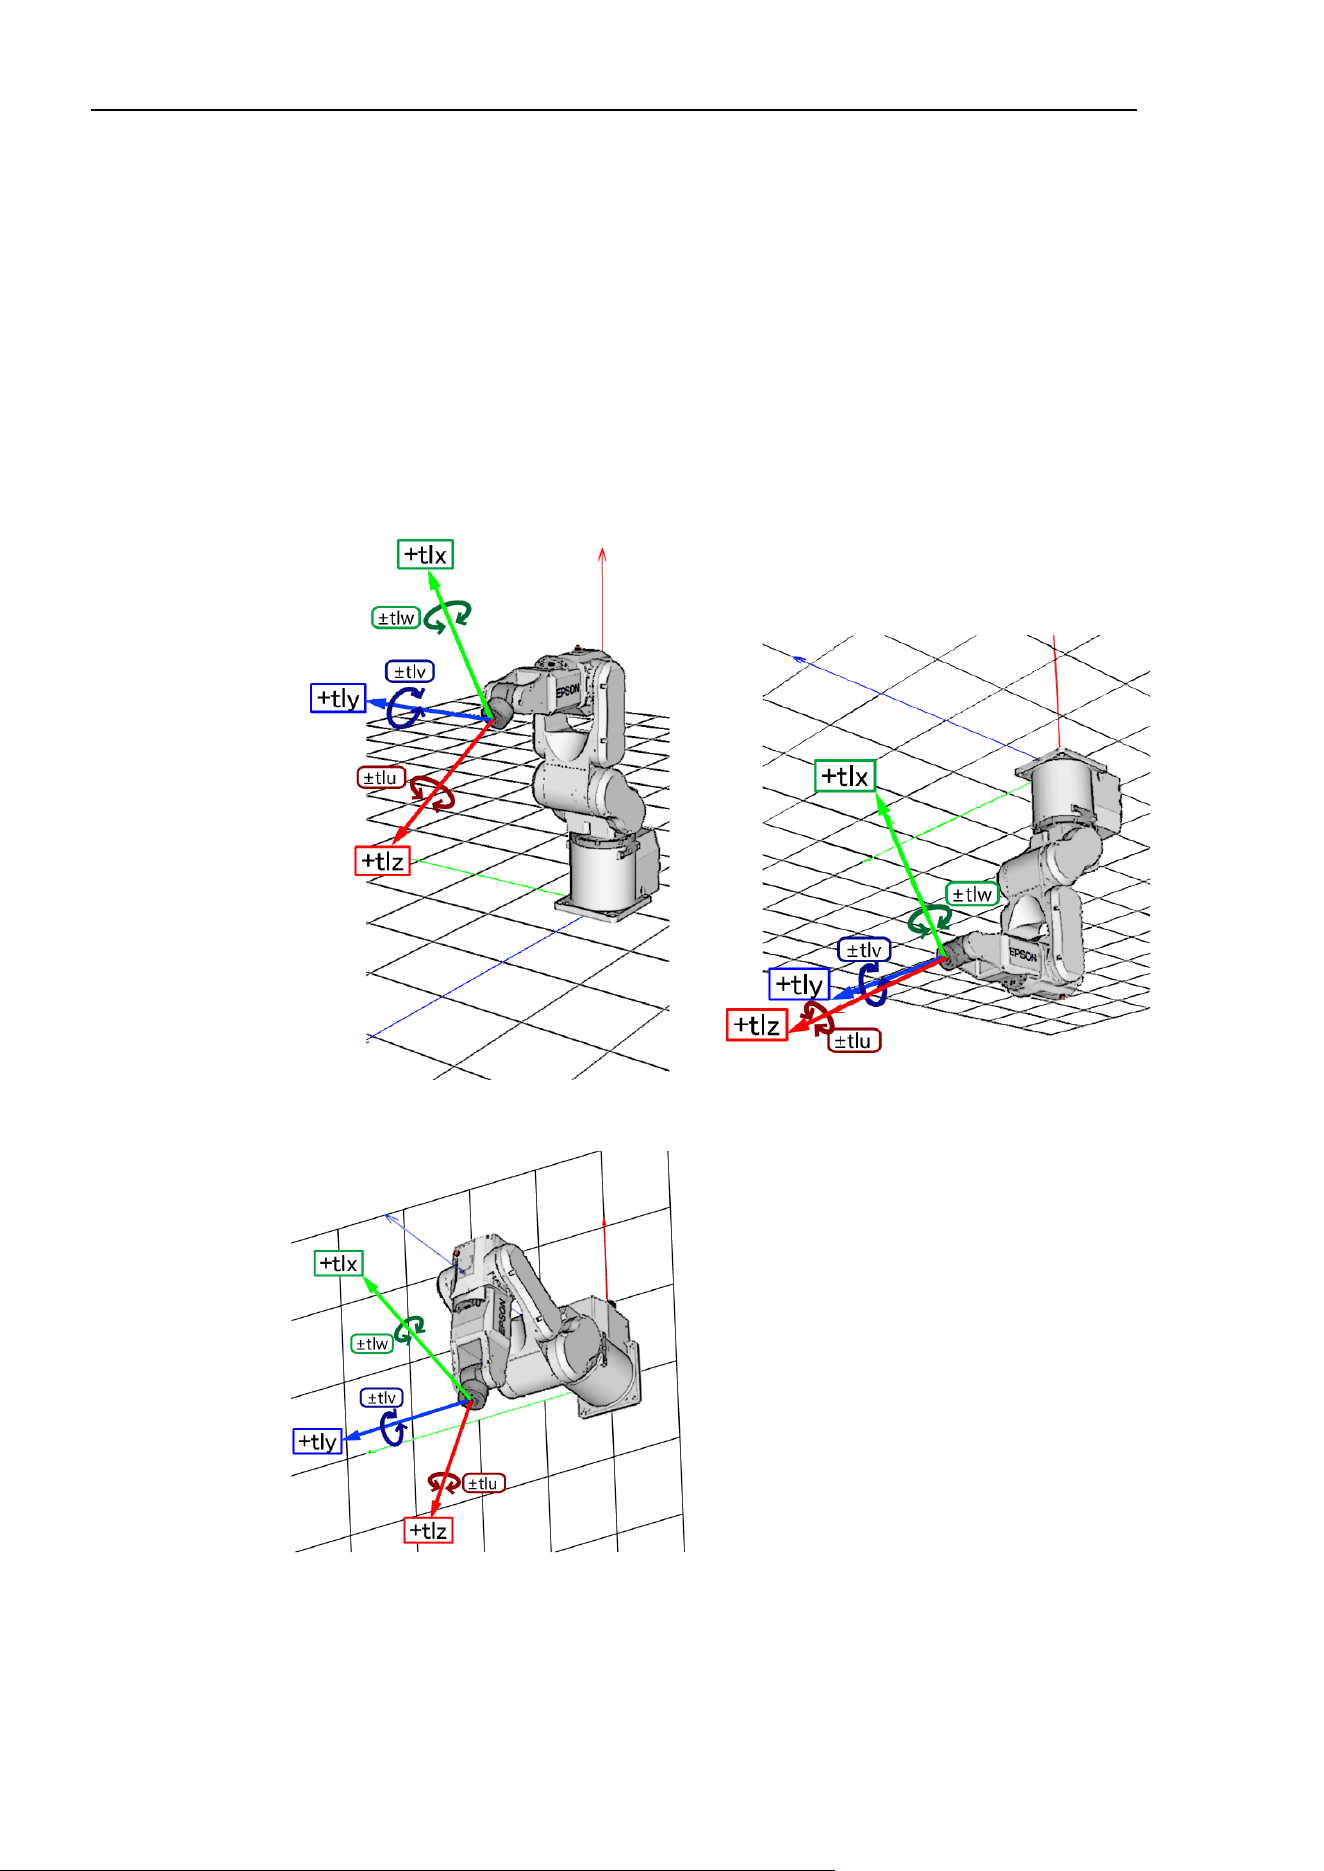
6. The SPEL+ Language
196
EPSON RC+ 7.0 (Ver.7.4) User's Guide Rev.6
6-axis Tool 0 coordinate system
Table and ceiling mounting robots:
The origin of tool 0 is the center of the flange on the sixth joint. When all joint angles are
0 degree, the vertically upward direction is the tool X axis, the tool Y is the same direction
of X axis in the base coordinate system, and the tool Z axis is perpendicular to the sixth
joint flange. (See the figure below).
The tool 0 coordinate system moves as the 6-axis robot changes its orientation.
Wall mounting robots:
The tool 0 coordinate system is defined as below. (tl: abbreviation of Tool)
Table Top Mounting
Ceiling Mounting
Side (Wall) Mounting
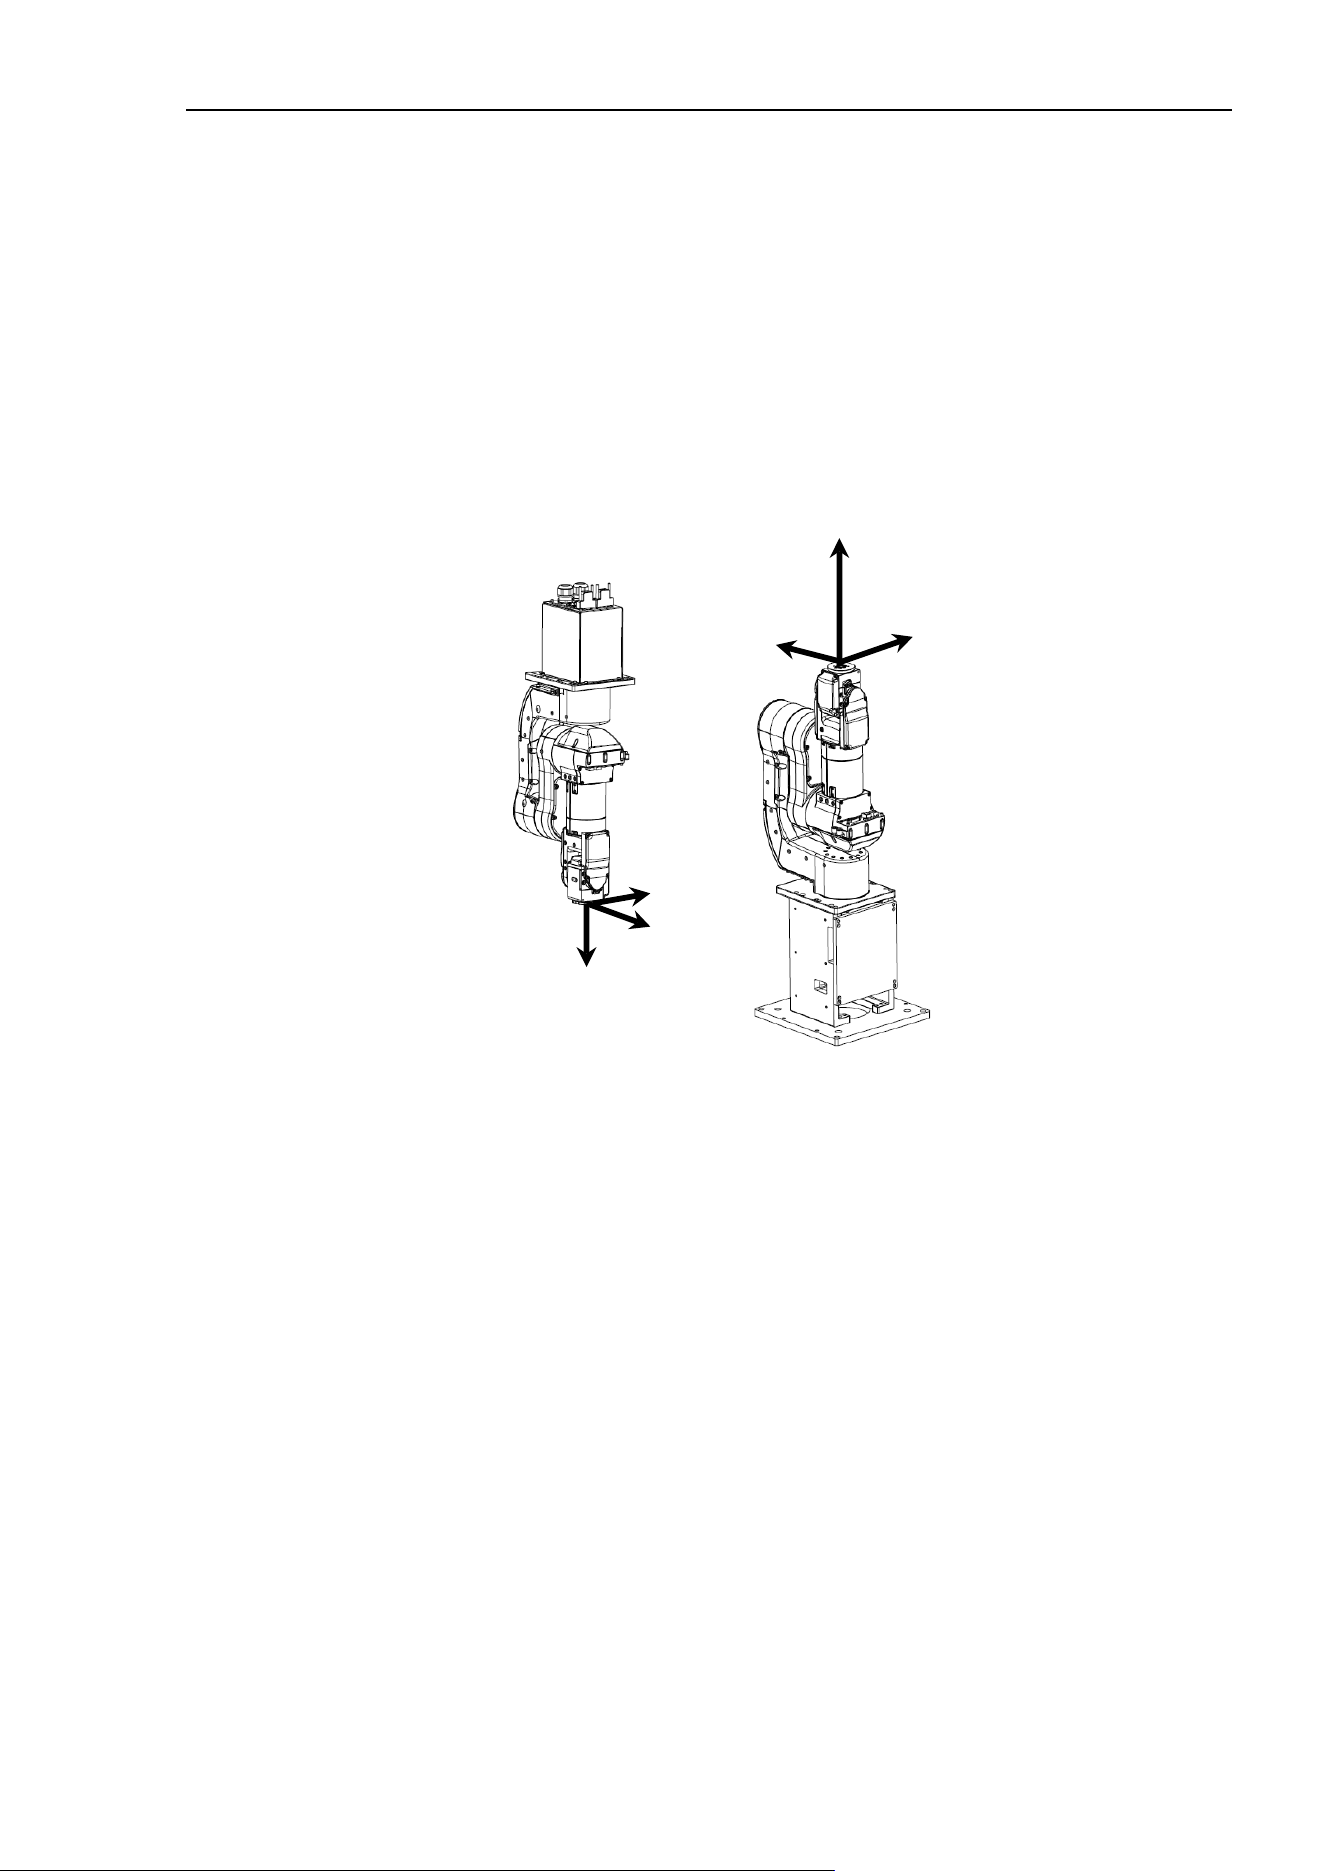
6. The SPEL+ Language
EPSON RC+ 7.0 (Ver.7.4) User's Guide Rev.6
197
N series Tool 0 coordinate system
Ceiling mounting robots:
When all joint angles are 0 degree, the tool 0 coordinate system has the X axis in –X axis
direction, Y axis in the Y axis direction, and the Z axis in the –Z axis direction on the
robot coordinate system. (See the figure below)
Wall mounting robots:
When all joint angles are 0 degree, the tool 0 coordinate system has the X axis in –X axis
direction, Y axis in the Y axis direction, and the Z axis in the Z axis direction on the robot
coordinate system. (See the figure below)
Table Top Mounting
Ceiling Mounting
+Z
+X
+Y
+Z
+X
+Y

6. The SPEL+ Language
198
EPSON RC+ 7.0 (Ver.7.4) User's Guide Rev.6
6.16.5 ECP Coordinate Systems (Option)
Specify a coordinate system whose origin point is on the tip of the outside fixed tool
(hereafter referred to as the external control point or ECP) to move the robot arm holding a
part in the trajectory made on the external control point along with the part’s edges.
The following figures give a concrete example.
An ordinal Move statement controls the moving speed and orientation change of the tool
center point (TCP). In the case of Move statement with the ECP argument, the part’s edge
is controlled to take a straight and constant-speed trajectory instead of TCP. In the
following example of no ECP, TCP takes a straight trajectory but the part’s edge is distant
from ECP.
If there is no orientation change, the trajectory is the same as normal operation of Move
command.
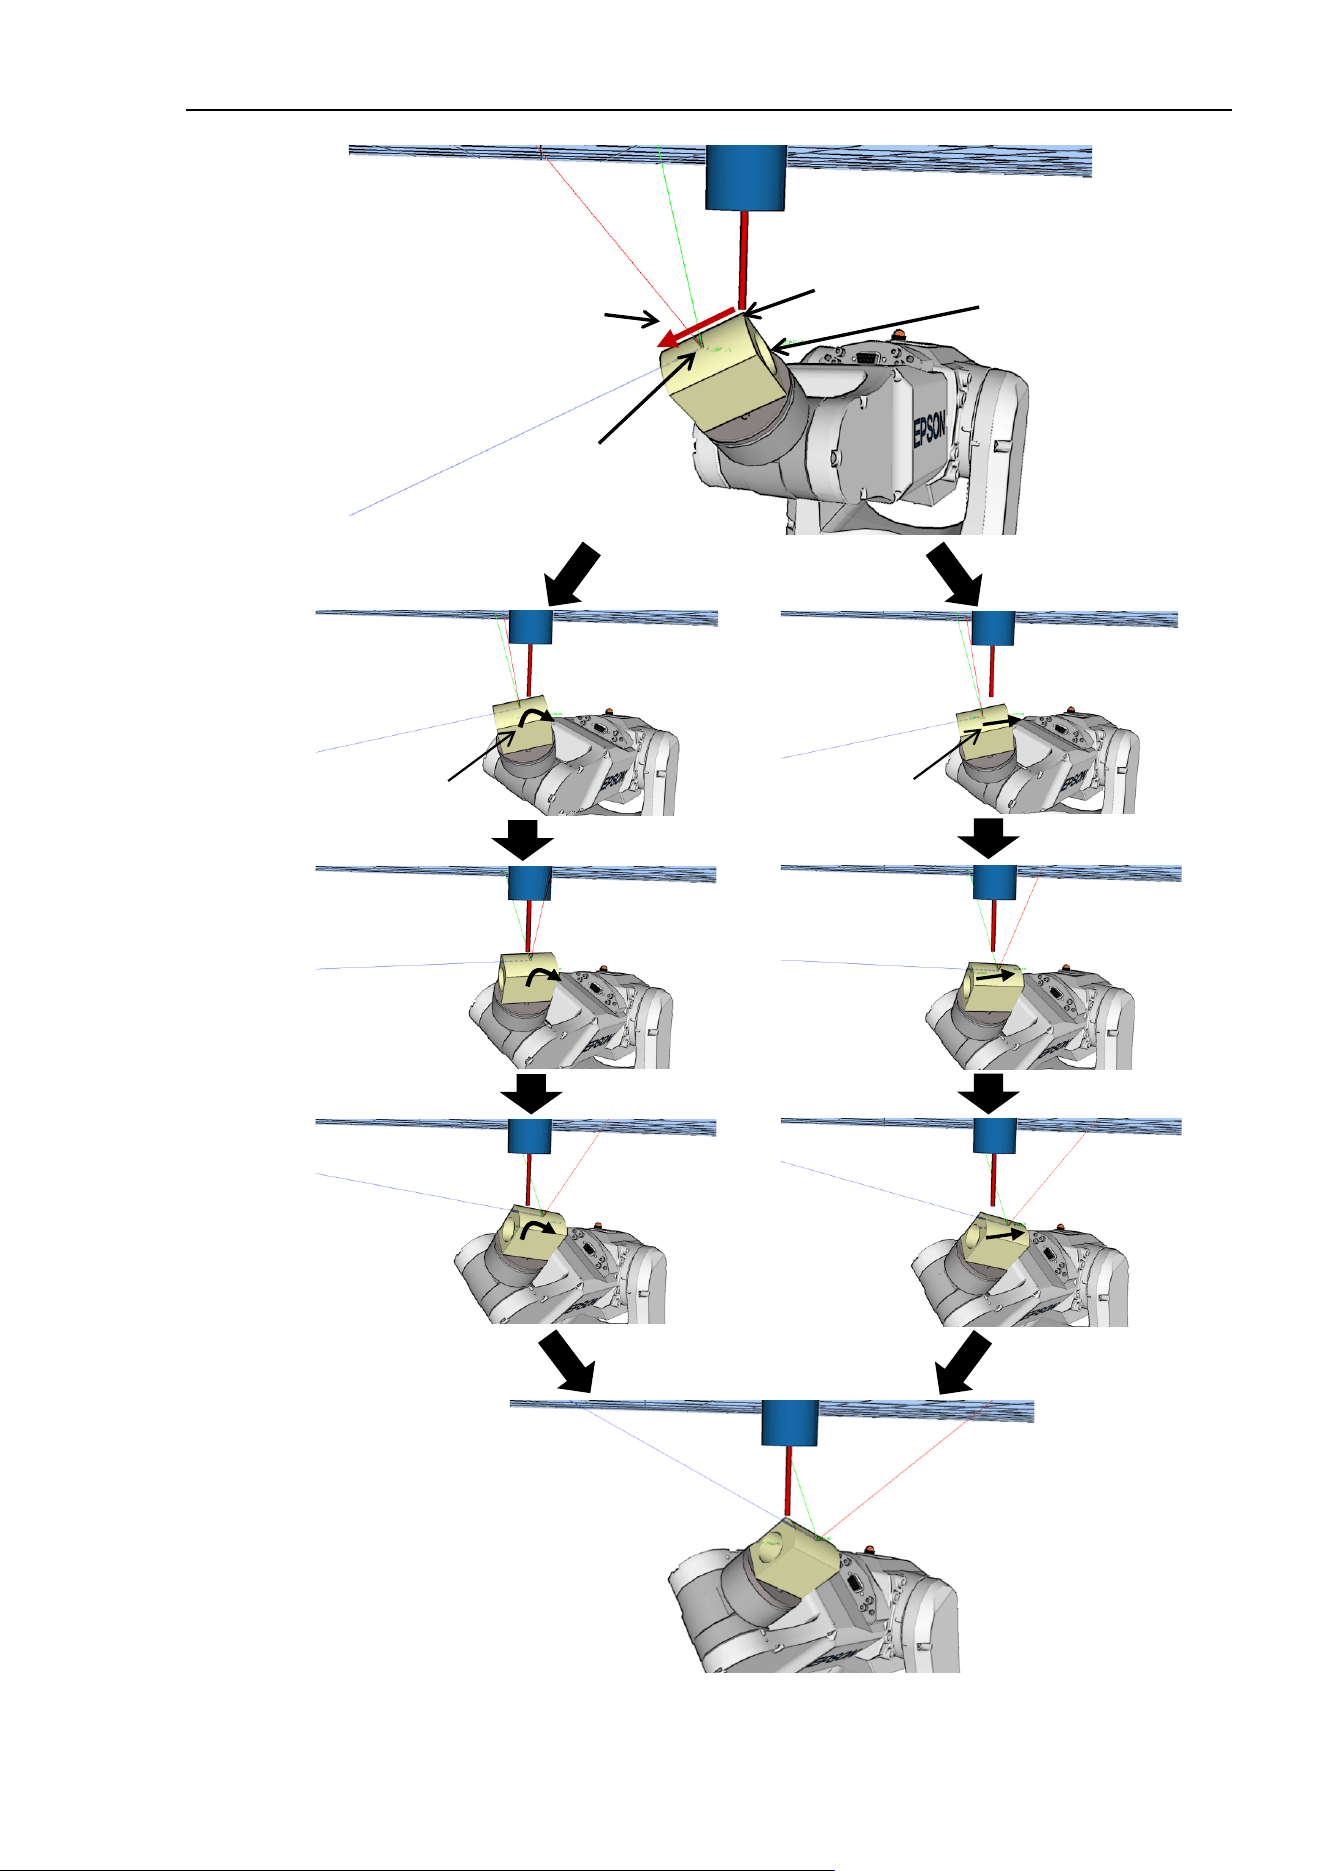
6. The SPEL+ Language
EPSON RC+ 7.0 (Ver.7.4) User's Guide Rev.6
199
External Control Point
ECP coordinate system
Robot coordinate system
Teaching start point
Teaching end point
Want to move at a constant
speed / posture change
along this side
Path along ECP
TCP path
TCP path

6. The SPEL+ Language
200
EPSON RC+ 7.0 (Ver.7.4) User's Guide Rev.6
The following commands are available for optional ECP:
Move command
Arc3 command
Curve and CVMove commands
ECP jog motion in Robot Manager
Use the ECPSet statement for defining an ECP coordinate system. A maximum of 15 ECP
coordinate systems can be defined.
For details, refer to 17. ECP Motion.
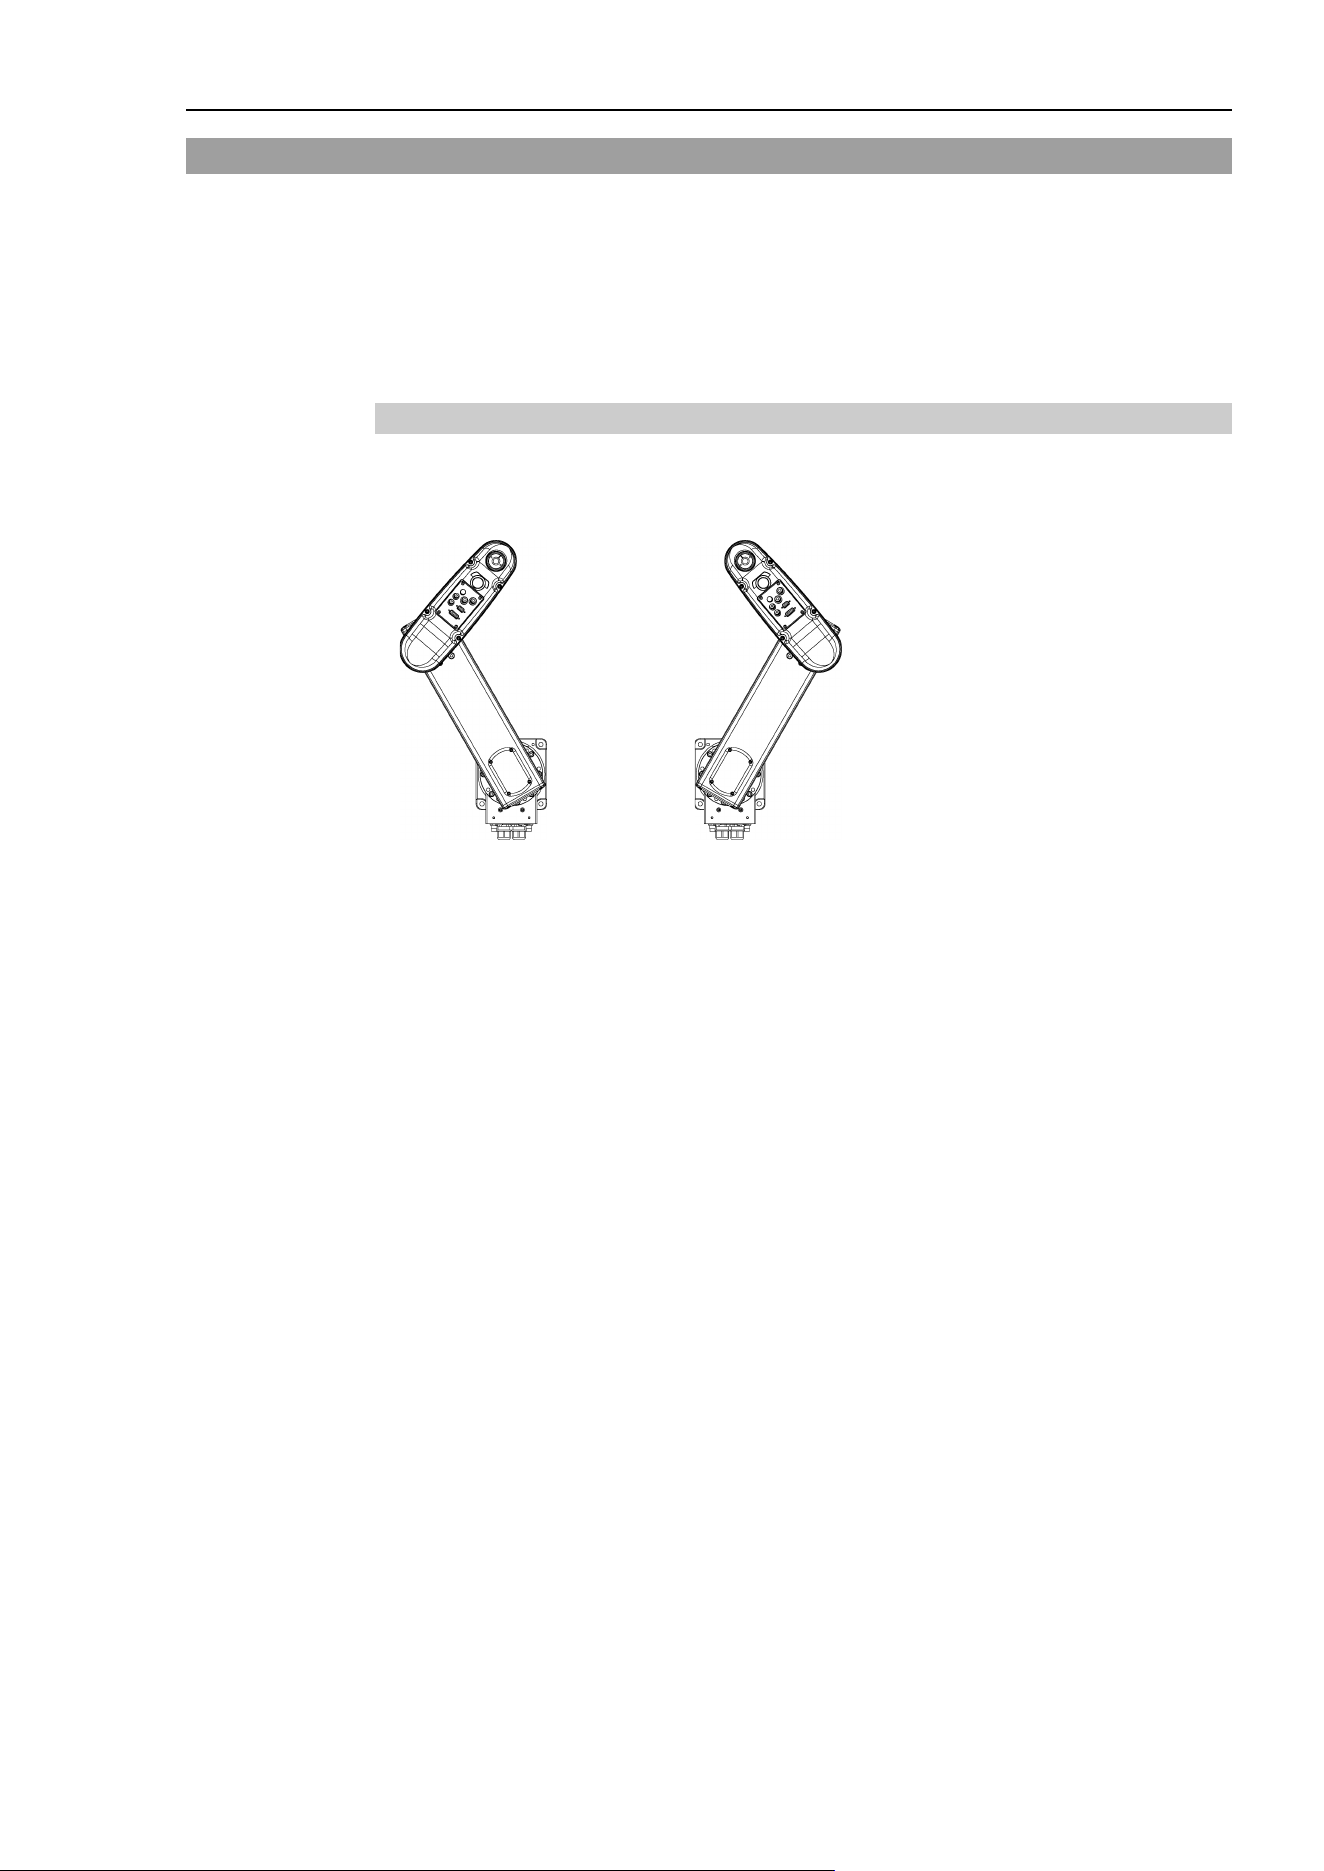
6. The SPEL+ Language
EPSON RC+ 7.0 (Ver.7.4) User's Guide Rev.6
201
6.17 Robot Arm Orientations
When developing a robot program, it is necessary to specify the point data taught for a
particular arm orientation. If you fail to do so, the position can deviate slightly depending
on the arm orientation, which in turn can cause the arm to follow an unexpected path,
resulting in interference with peripheral equipment. This can be dangerous! To prevent
this from happening, the orientation that the arm will be in when moved to the given point
should be specified ahead of time in the point data. Such information can also be changed
from the program.
6.17.1 SCARA robot arm orientations
With two types of arm orientation, a SCARA robot can move to nearly any position and
orientation within a given work envelope. Examples are shown in the figures on the next
page.
Lefty arm orientation
Righty arm orientation
Examples of moving to the same point using Lefty and Righty arm orientations
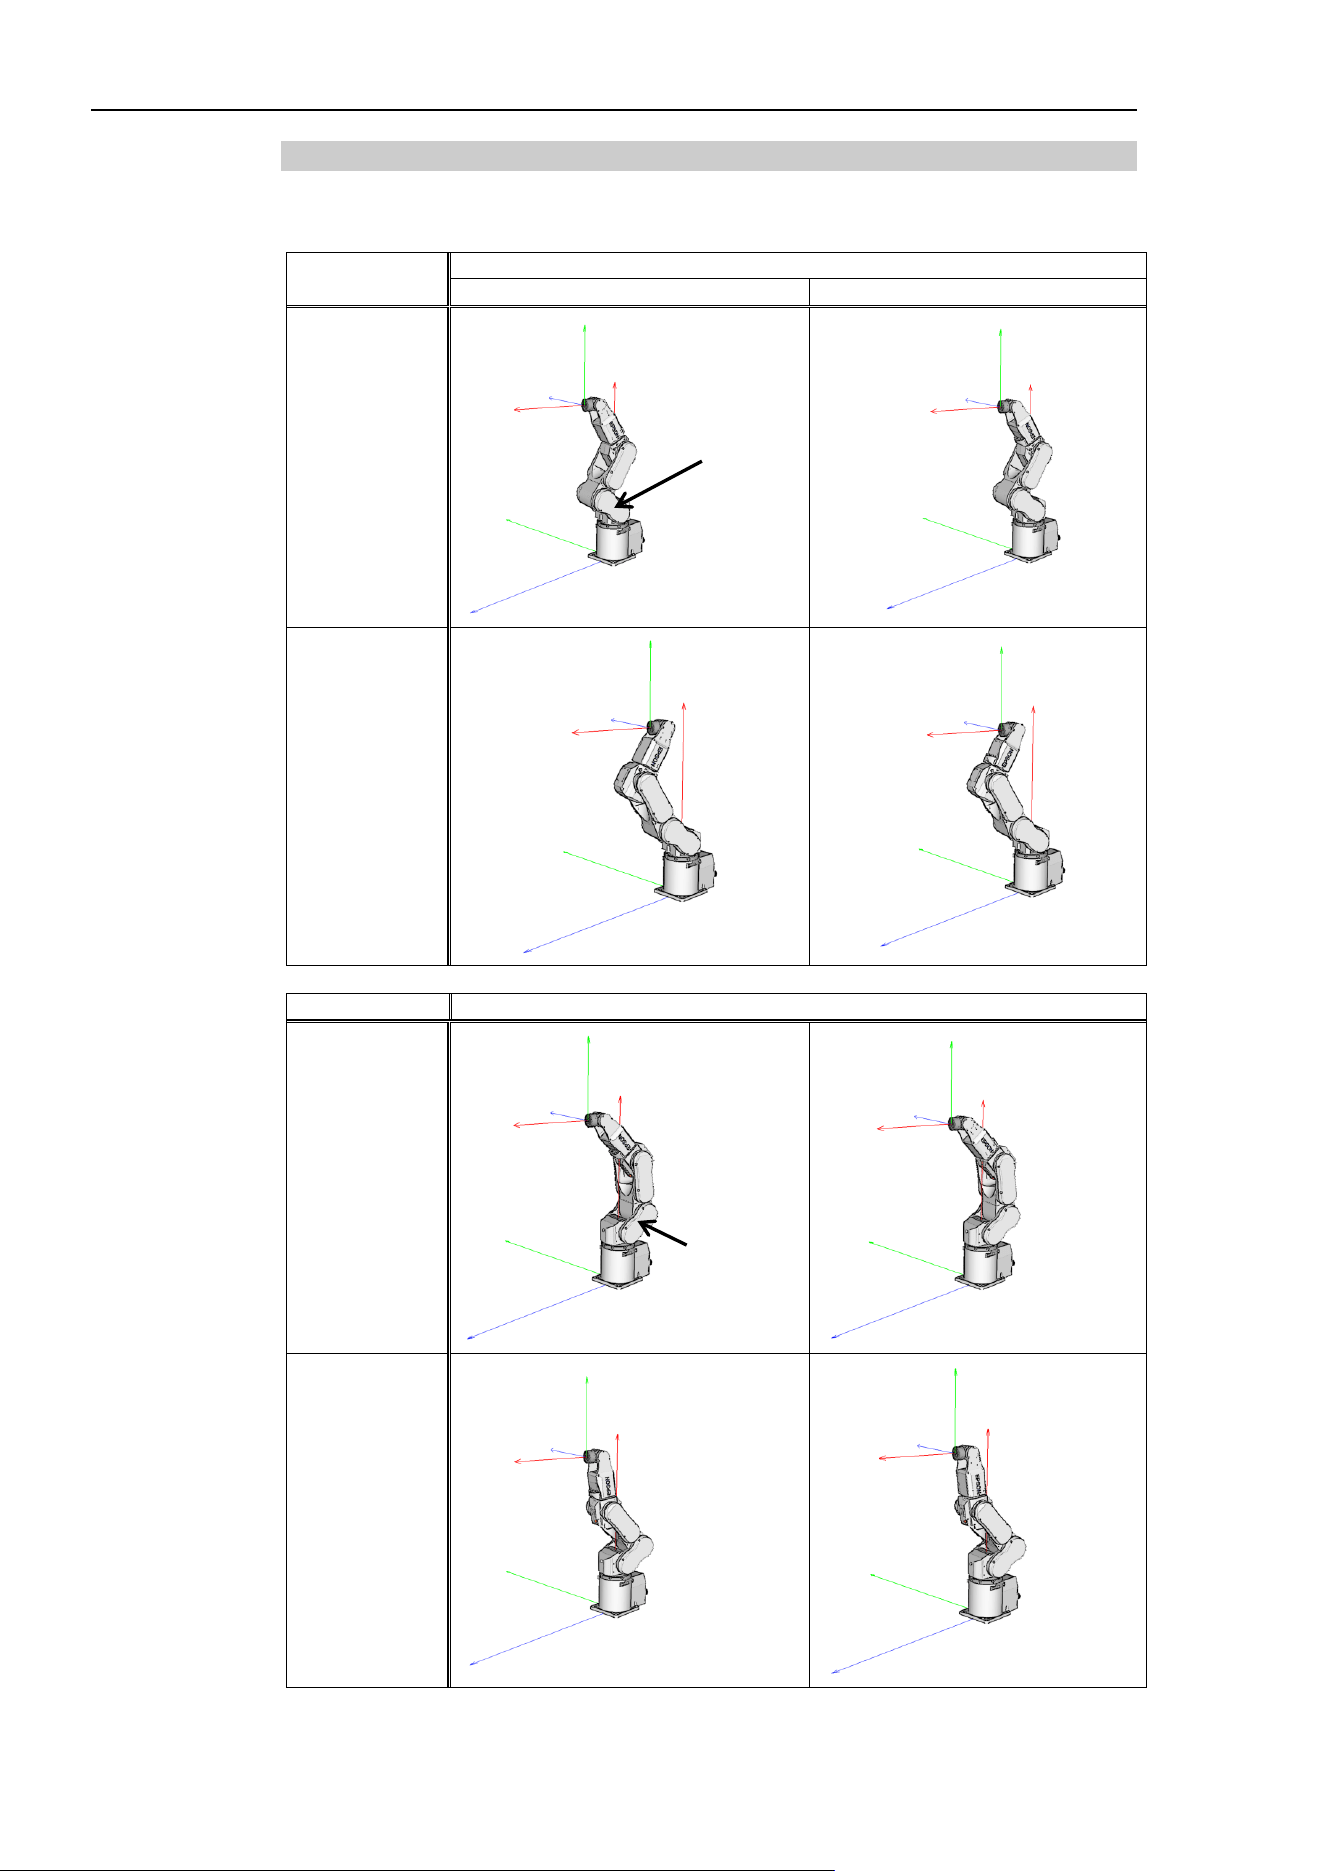
6. The SPEL+ Language
202
EPSON RC+ 7.0 (Ver.7.4) User's Guide Rev.6
6.17.2 6-axis robot arm orientations
The 6-axis robot can be operated in different arm orientations within a given work
envelope as shown below:
Righty hand orientation (Arm #1)
NoFlip wrist orientation
Flip wrist orientation
Above elbow
orientation
Arm #1
Below elbow
orientation
Lefty hand orientation (Arm #1)
Above elbow
orientation
Arm #1
Below elbow
orientation
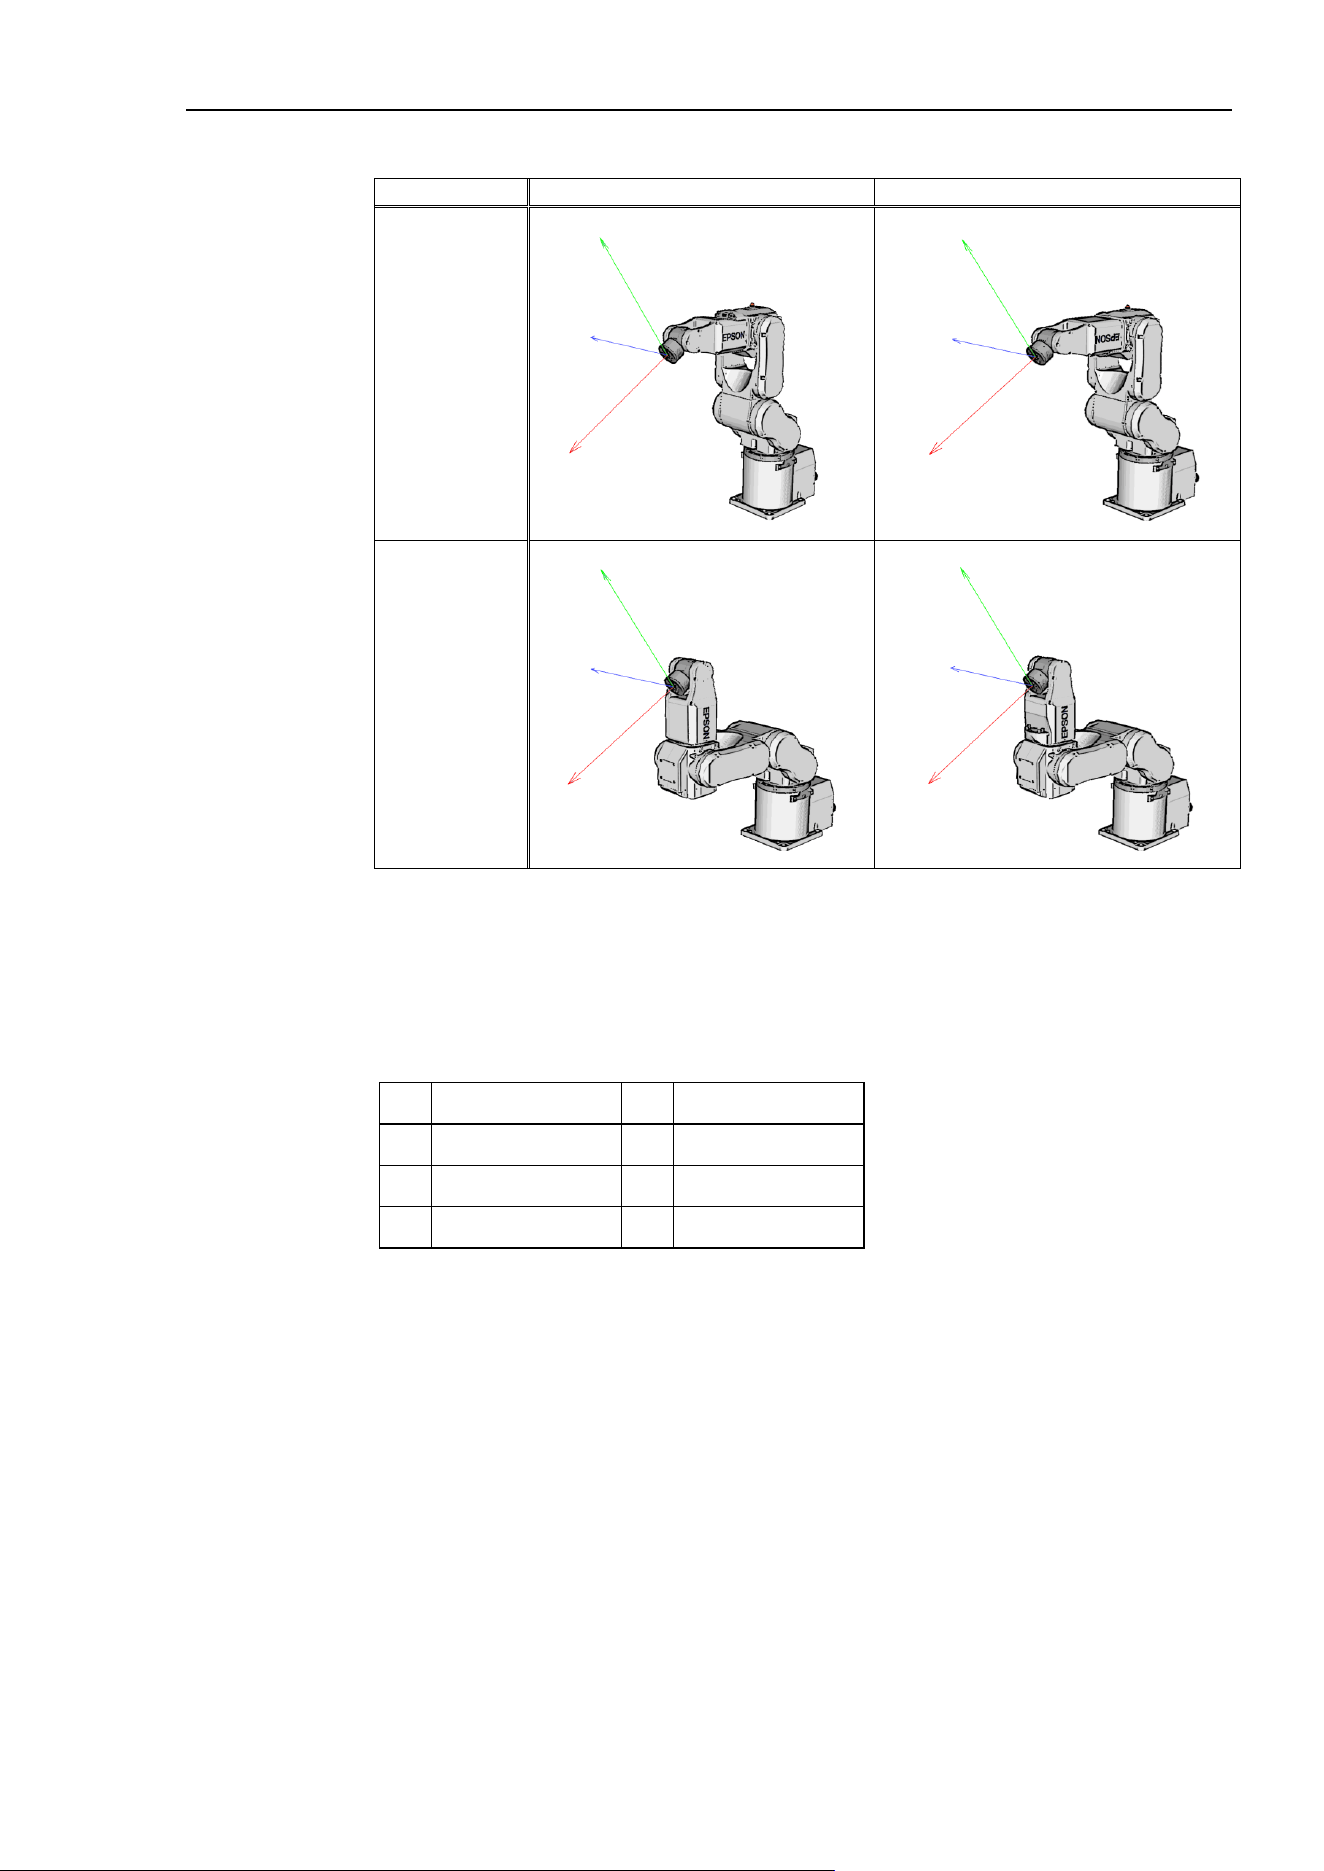
6. The SPEL+ Language
EPSON RC+ 7.0 (Ver.7.4) User's Guide Rev.6
203
The following enlarged figures of right hand orientation are to assist understanding.
NoFlip wrist orientation
Flip wrist orientation
Above elbow
orientation
Below elbow
orientation
To specify orientation for the 6-axis robot, add a forward slash (/) followed by L (for Lefty
hand orientation) or R (Righty hand orientation), A (Above elbow orientation) or B
(Below elbow orientation), and NF (NoFlip wrist orientation) or F (Flip wrist orientation).
There are eight available orientations as shown below, however, the 6-axis robot cannot be
operated in all of the orientations depending on point.
Available Orientation
1 /R /A /NF 5 /R /A /F
2 /L /A /NF 6 /L /A /F
3 /R /B /NF 7 /R /B /F
4 /L /B /NF 8 /L /B /F
At some points in the work envelope, the 6-axis robot can have the same position and
orientation even if the fourth joint or the sixth joint is rotated 360 degrees. To distinguish
these points, the J4Flag and J6Flag point attributes are provided.
To specify the J4Flag, add a forward slash (/) followed by J4F0 (-180 < the forth joint
angle <= 180) or J4F1 (the forth joint angle <= -180 or 180 < the forth joint angle).
To specify the J6Flag, add a forward slash (/) followed by J6F0 (-180 < the sixth joint
angle <= 180), J6F1 (-360 < the sixth joint angle <= -180 or 180 <the sixth joint angle <=
360), or J6Fn (-180*(n+1) < the sixth joint angle <= 180*n or 180*n <the sixth joint angle
<= 180*(n+1)).
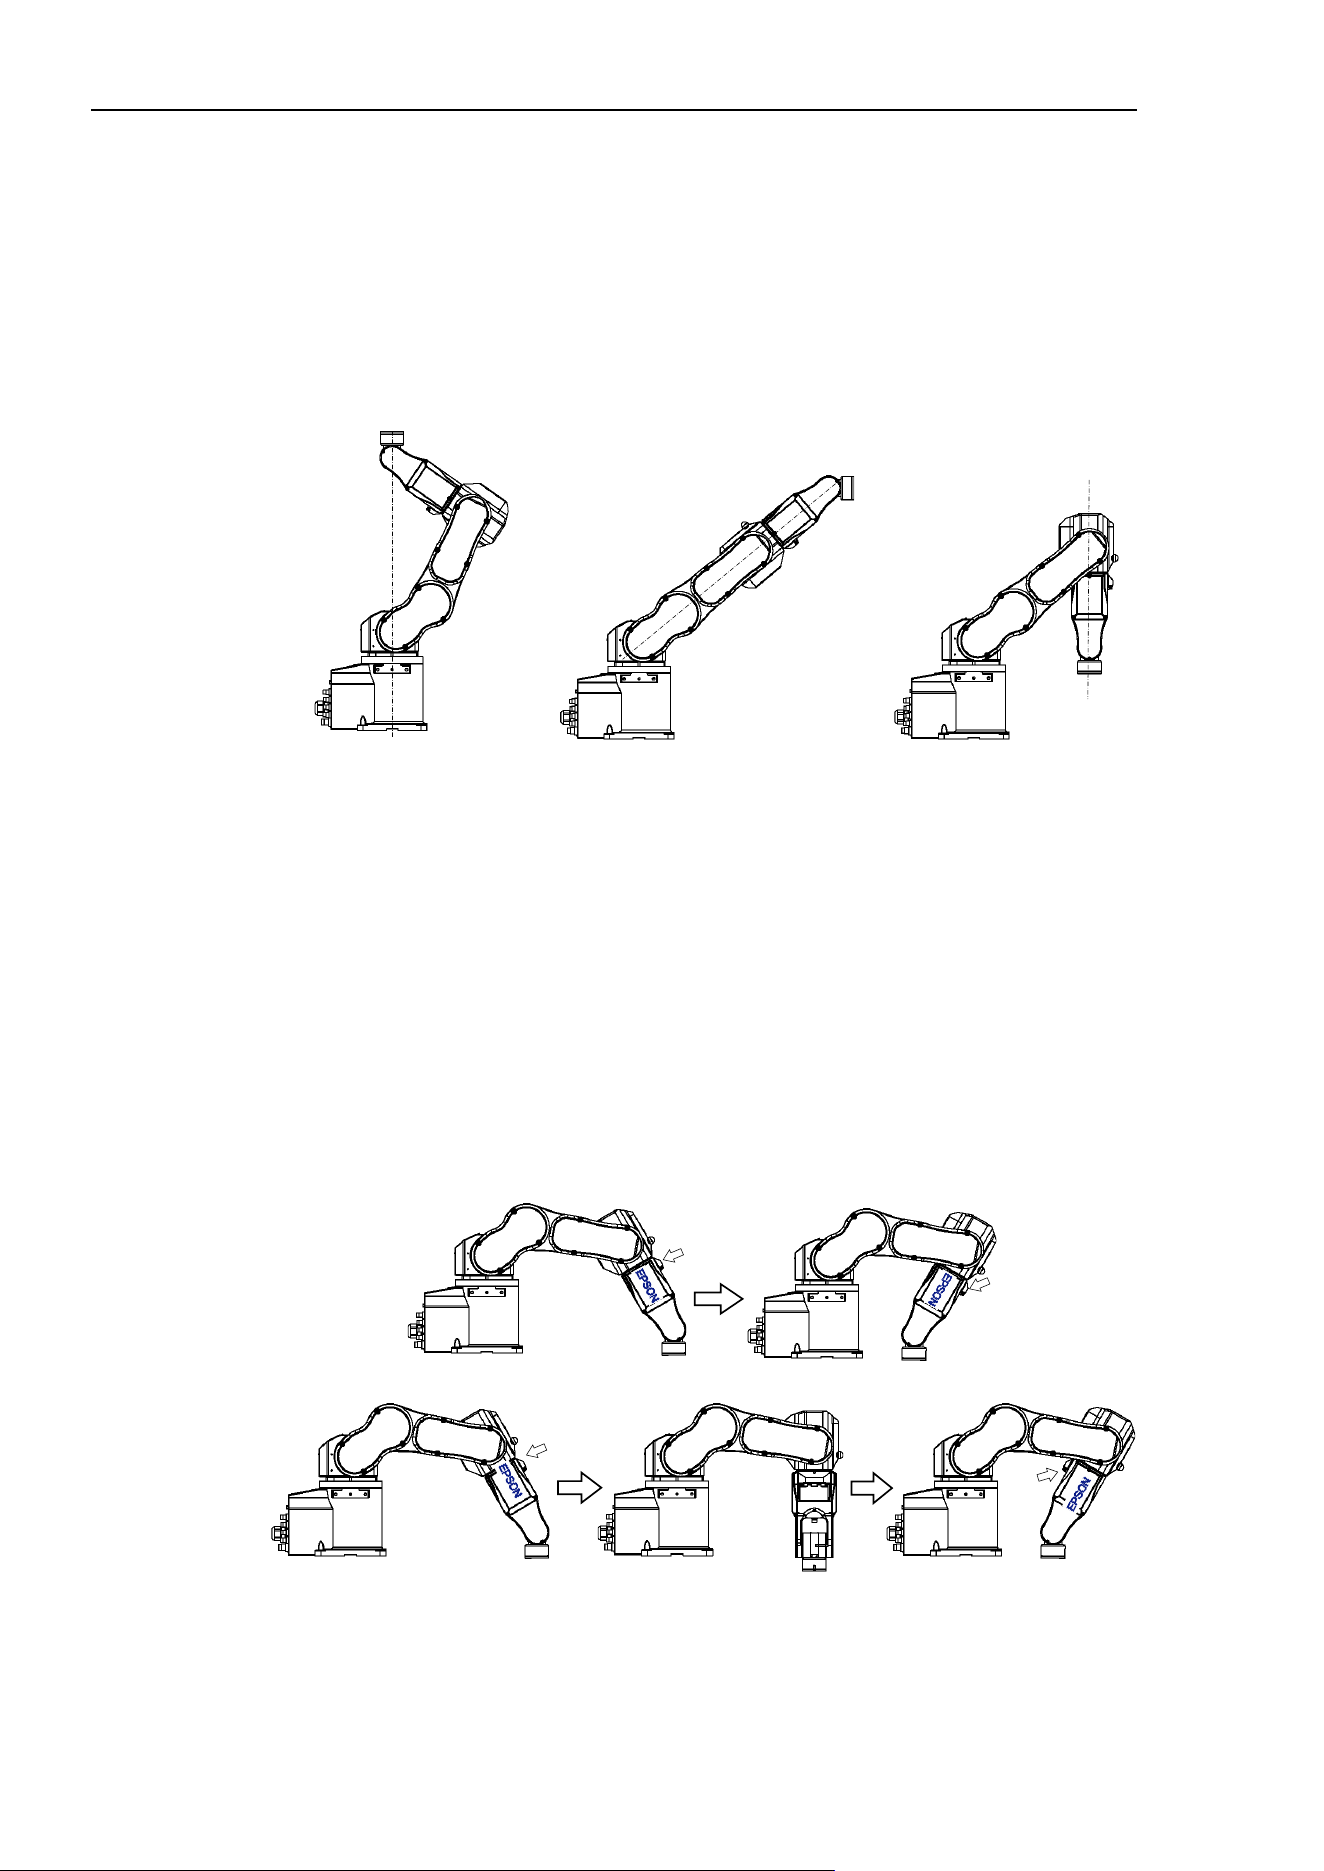
6. The SPEL+ Language
204
EPSON RC+ 7.0 (Ver.7.4) User's Guide Rev.6
Singularity
The orientation in the boundary where the arm orientation switches to the other.
Hand singularity : The boundary where Righty hand orientation and Lefty hand
orientation switch
Elbow singularity : The boundary where Above elbow orientation and Below elbow
orientation switch
Wrist singularity : The boundary where NoFlip wrist orientation and Flip wrist
orientation switch
Hand singularity
Elbow singularity
Wrist singularity
For the 6-axis robot, Hand / Wrist singularities exist also inside the motion range. When
jogging near the singularity, follow the directions below.
PTP motion near the singularity
When jogging a robot from point P1 near the singularity to a point calculated by point
operations such as P1+X(10), the robot may move to unintended direction because the arm
orientation is not properly specified.
For example, when jogging from a point where the wrist is NoFlip to another point
calculated by point operations, if the wrist keeps the NoFlip orientation while jogging,
Joints #4 and #6 may rotate widely (by approx. 180 degrees).
In this case, switch to the Flip wrist orientation to jog smoothly through the wrist
singularity. This phenomenon occurs not only with the point operations but also when
creating points automatically with Pallet command or the result values that run from vision
sequence.
Proper motion
Unintended motion (Joints #4, #6 rotate 180 degrees)

6. The SPEL+ Language
EPSON RC+ 7.0 (Ver.7.4) User's Guide Rev.6
205
However in the cases, it is difficult for users to specify the proper arm orientations by a
program. For this LJM function is a useful command. LJM function switches the arm
orientations to enable the least motion of the joints. For the details of LJM function, refer
to SPEL+ Language Reference manual.
Also, AutoLJM command can automatically apply LJM function to the motion commands
which are included in a particular section of the program without using LJM function.
For details of AutoLJM command, refer to the SPEL+ Language Reference.
In addition, you can set AutoLJM function to be enabled at the controller start up by
setting preferences of the controller. However, if Auto LJM is enabled in preferences, this
function automatically adjusts the posture of the manipulator to reduce the motion distance,
even when you intend to move the joint widely. Therefore, it is recommended to build a
program using AutoLJM command or LJM function to operate the manipulator as you
desired.
If you specify all points by teaching, the arm orientations are also recorded. Therefore, the
manipulator moves to the taught position without using LJM function or AutoLJM.
Instead, the manipulator may move differently from the taught position by the use of LJM
and AutoLJM.
LJM function for CP motion command
LJM function and AutoLJM command described above are also available for CP motion
commands. However, since CP motion commands give priority to operate based on
specified trajectories, the manipulator sometimes reach to the point with a different
posture from the specified one. At this time, if CP motion command is used with CP On,
an error from 4274 to 4278 will occur according to the mismatched point flag. To avoid
the error, operate the manipulator with CP Off, or match the point flag of a target point
and the one after motion completion. If operated with CP Off, the error does not occur
and the manipulator can continue operation from the point where the mismatch happened.
Also, you can set the controller’s preference so that the mismatches of flags are not
considered as an error at the controller startup. However, path motions which use CP On
will be disabled.
CP motion near the singularity (singularity avoiding function in CP motion)
When executing Move or CP motion near the singularity, the joint speed may increase
rapidly. The overspeed error will occur and the joints will move widely and interfere with
peripherals. In particular, the position of Joint #1 near the hand singularity and Joints #2 -
#6 near the wrist singularity change greatly.
EPSON RC+ 7.0 has a singularity avoiding function to prevent acceleration errors during
the execution of CP motion commands that pass the wrist singularity described above.
With this function, the manipulator takes a detour to avoid an acceleration error by passing
a different trajectory and returns to the original trajectory after passing the singularity. For
details of the singularity avoiding function, refer to AvoidSingularity in the SPEL+
Language Reference.
Singularity avoiding function is enabled as default. If you want to avoid the error by
reducing the motion speed in order to maintain the trajectory accuracy, you can disable the
function temporarily by setting “0” to AvoidSingularity.
If you cannot avoid errors even if you use the singularity avoiding function, use PTP
motion to enable the least motion of the joints or arrange the manipulator installation
position and hand offset volume to prevent the CP motion near the singularity.
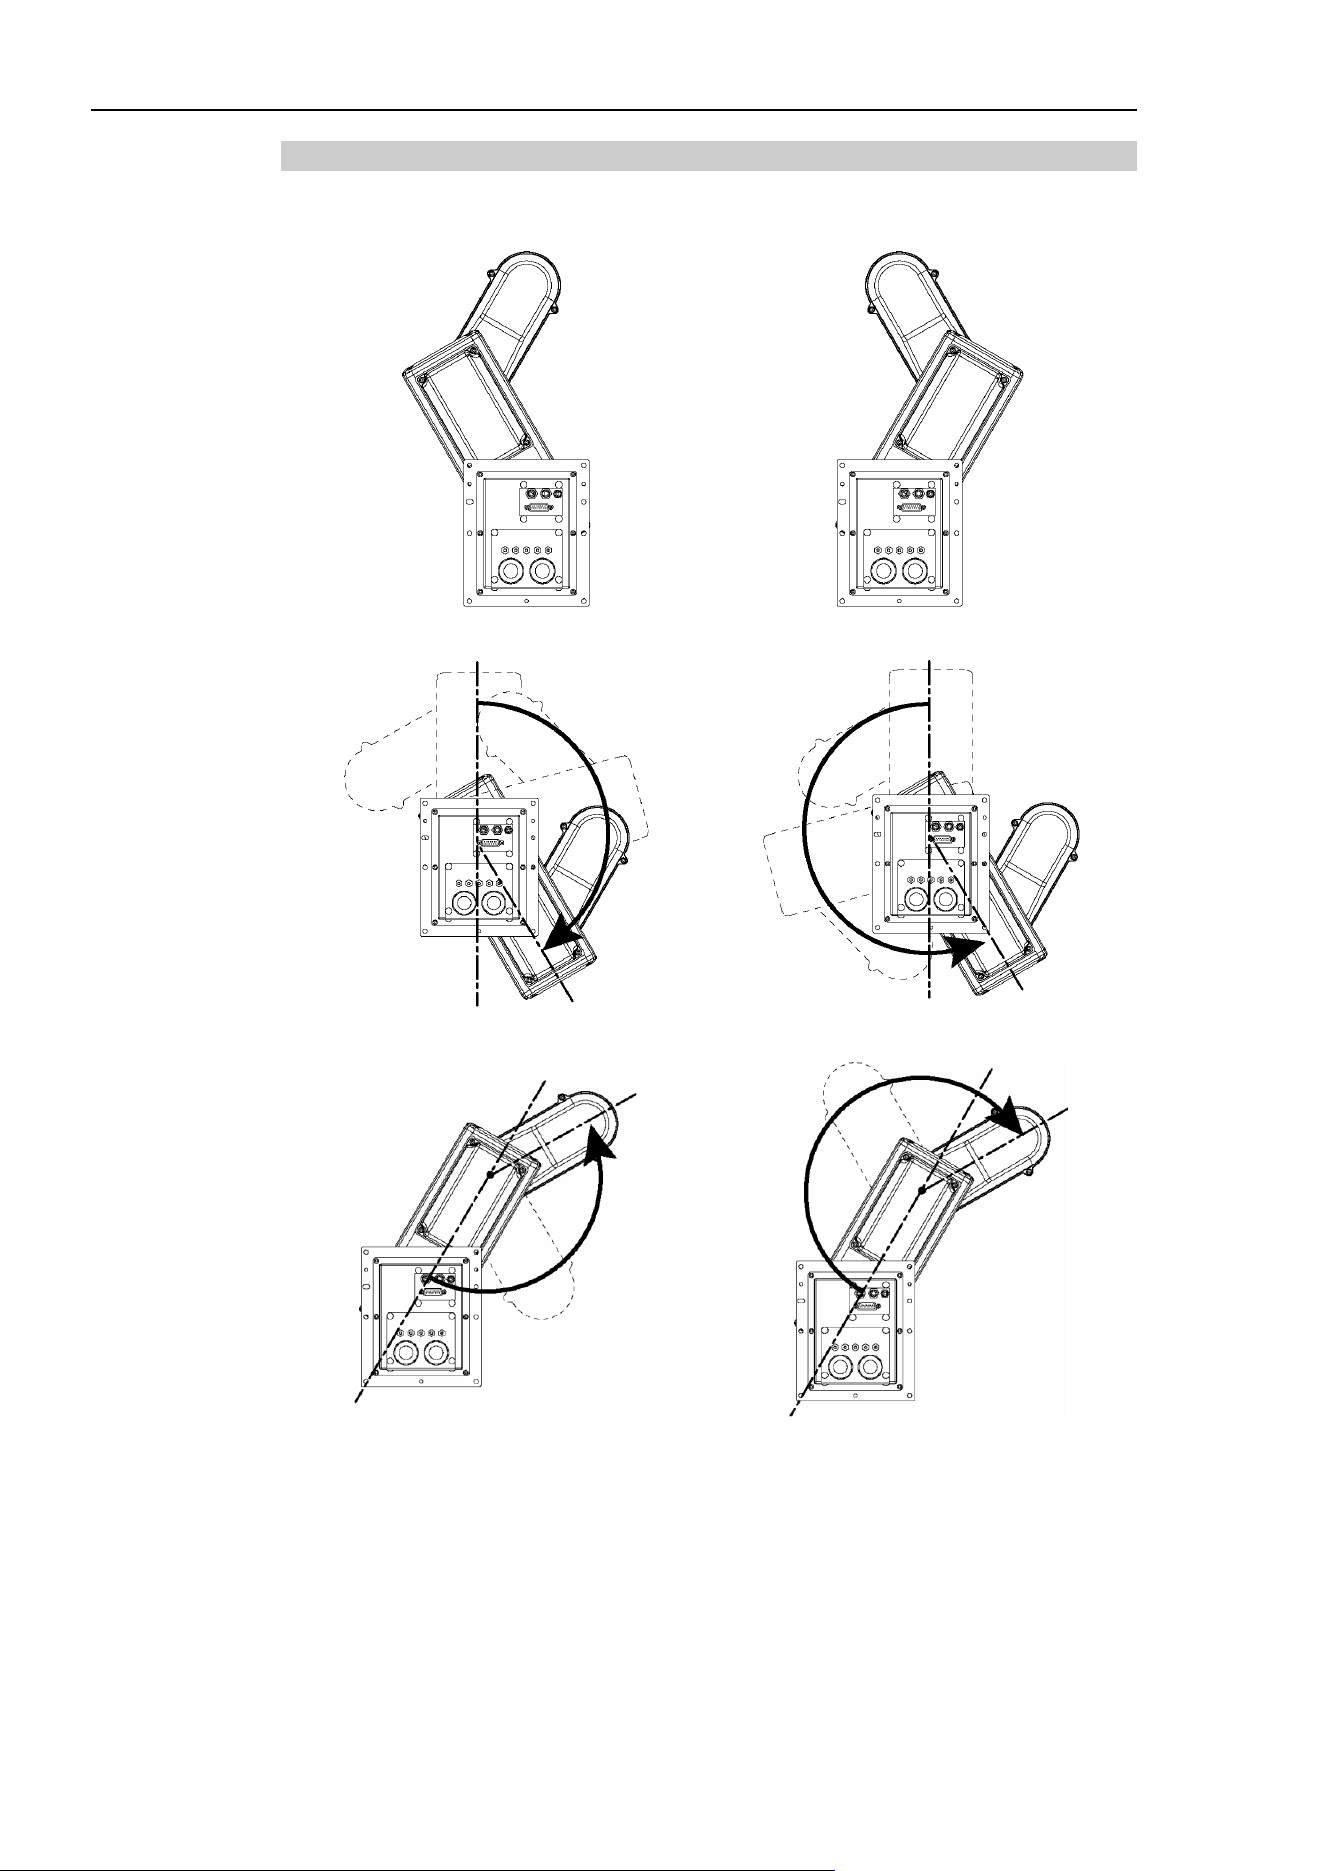
6. The SPEL+ Language
206
EPSON RC+ 7.0 (Ver.7.4) User's Guide Rev.6
6.17.3 RS series arm orientations
The RS series can be operated in various arm orientations within a given work envelope as
shown below:
Lefty arm orientation
Righty arm orientation
J1 F0 arm orientation
J1 F1 arm orientation
J2 F0 arm orientation
J2 F1 arm orientation

6. The SPEL+ Language
EPSON RC+ 7.0 (Ver.7.4) User's Guide Rev.6
207
To specify the arm orientation of the RS series, add a forward slash (/) followed by:
- L (for Lefty hand orientation) or R (Righty hand orientation)
- J1F0 or J1F1
- J2F0 or J2F1.
For the RS series robots, some points in the work envelope can have the same position and
orientation even if J1 or J2 is rotated 360 degrees.
To distinguish these points, the J1Flag and J2Flag point attributes are provided.
To specify the J1Flag, add a forward slash (/) followed by:
- J1F0 (−90 < the first joint angle <= 270), or
- J1F1 (−270 < the first joint angle <= −90 or 270 < the first joint angle <= 450)
To specify the J2Flag, add a forward slash (/) followed by:
- J2F0 (−180 < the second joint angle <= 180), or
- J2F1 (−360 < the second joint angle <= −180 or 180 < the second joint angle <= 360)
There are eight available orientations as shown below.
Note that some combinations are not available depending on the point.
Available Orientation
1 /R /J1F0 /J2F0
2 /L /J1F0 /J2F0
3 /R /J1F1 /J2F0
4 /L /J1F1 /J2F0
5 /R /J1F0 / J2F1
6 /L /J1F0 / J2F1
7 /R /J1F1 / J2F1
8 /L /J1F1 / J2F1
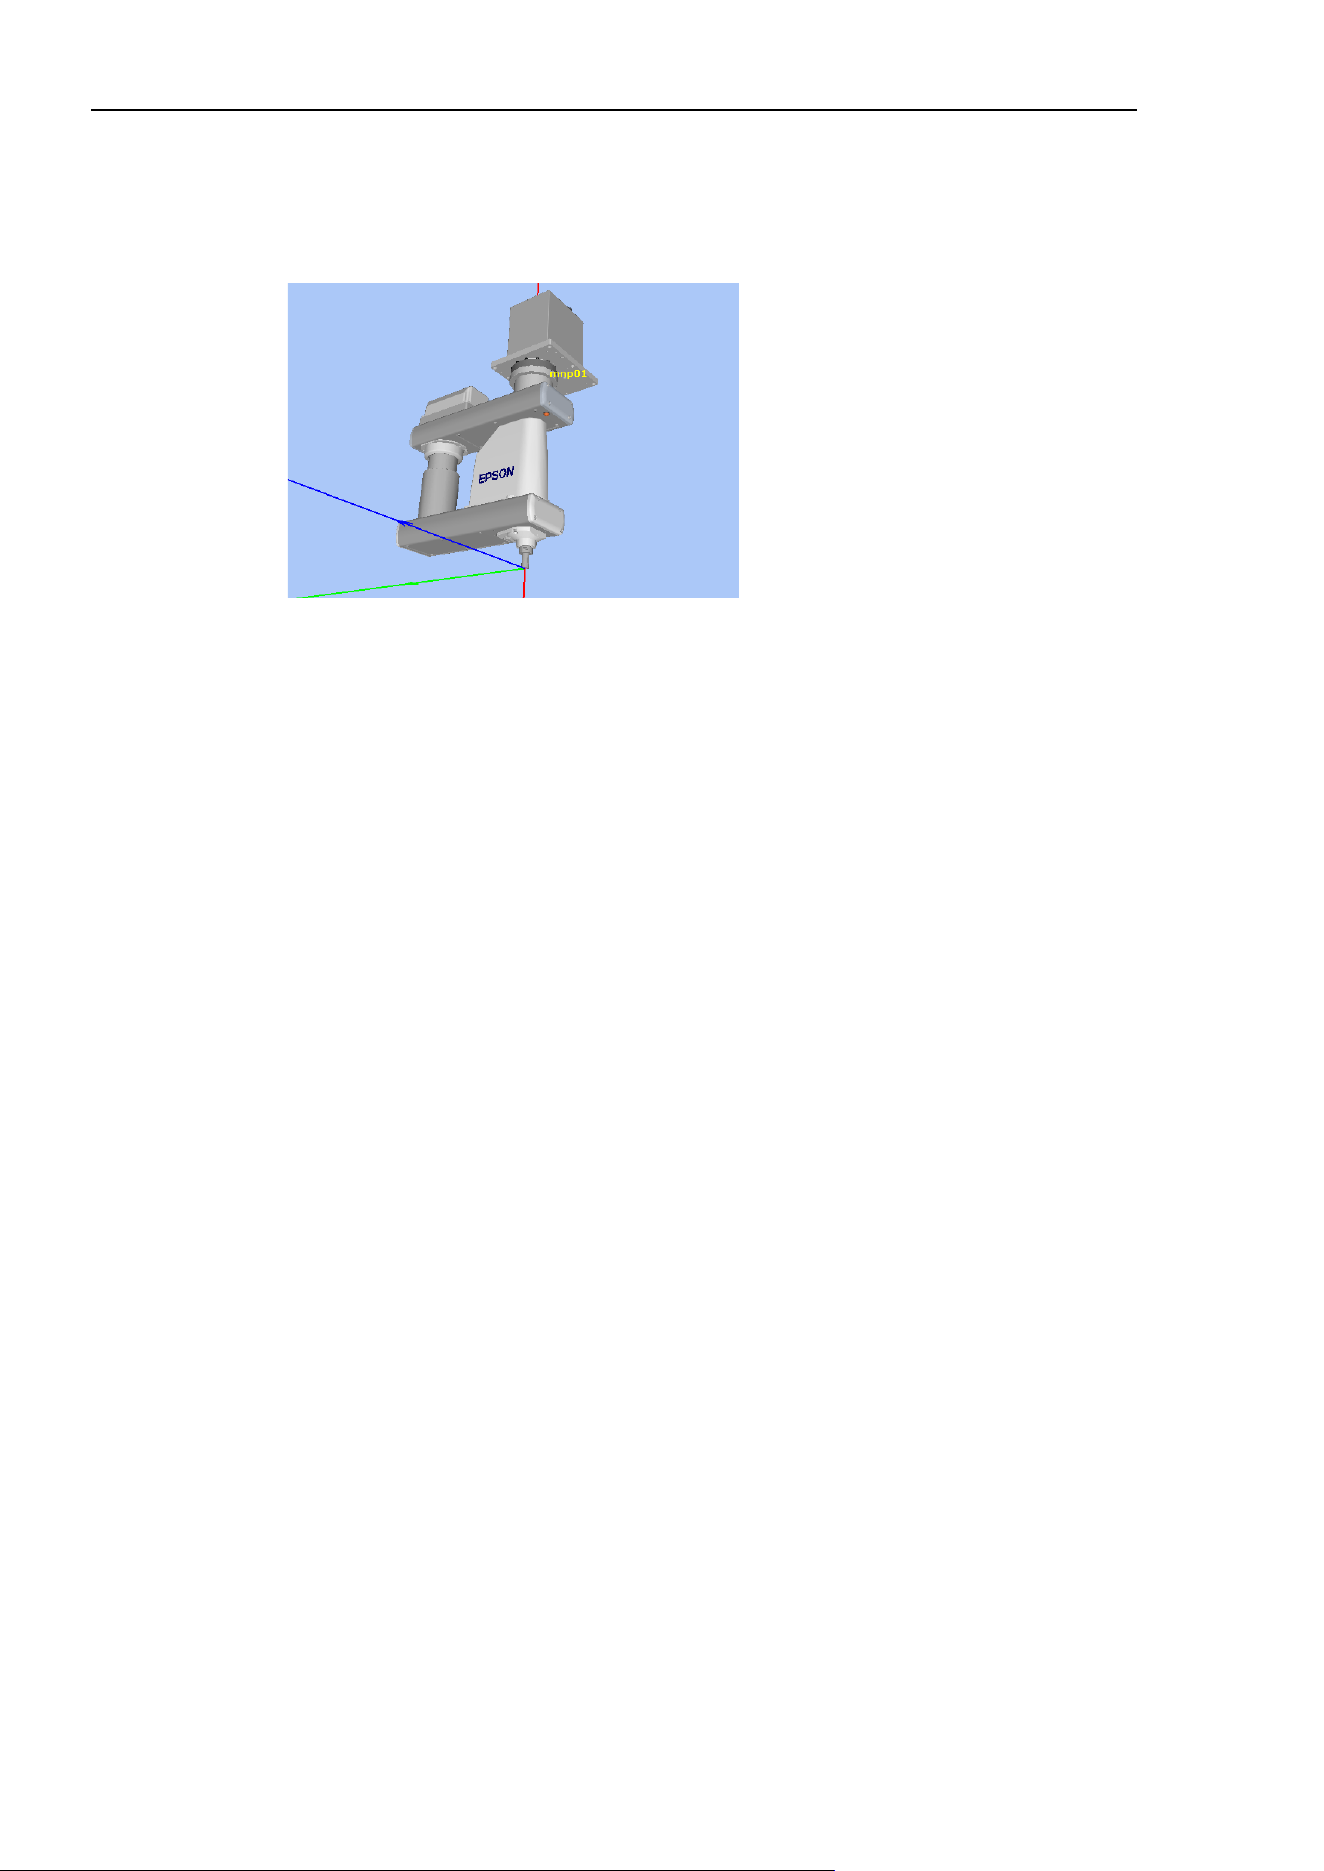
6. The SPEL+ Language
208
EPSON RC+ 7.0 (Ver.7.4) User's Guide Rev.6
Singularity
The orientation in the boundary where the arm orientation switches to the other.
Hand singularity : The boundary where Righty hand orientation and Lefty hand
orientation switch (X=0, Y=0)
Hand singularity
When jogging near the singularity, follow the directions below.
PTP motion near the singularity
When jogging a robot from point P1 near the singularity to a point calculated by point
operations such as P1+X(10), the robot may move to unintended direction because the arm
orientation is not properly specified.
For example, when jogging from a point where the hand is Righty to another point
calculated by point operations, if the hand keeps the Righty orientation while jogging,
Joints #1 may rotate widely (by approx. 180 degrees). In this case, switch to the Lefty
hand orientation to jog smoothly through the wrist singularity.
This phenomenon occurs not only with the point operations but also when creating points
automatically with Pallet command or the result values that run from vision sequence.
However in the cases, it is difficult for users to specify the proper arm orientations by a
program. For this LJM function is a useful command. LJM function switches the arm
orientations to enable the least motion of the joints. For the details of LJM function, refer
to SPEL+ Language Reference manual.
Also, AutoLJM command can automatically apply LJM function to the motion commands
which are included in a particular section of the program without using LJM function.
For details of AutoLJM command, refer to the SPEL+ Language Reference.
In addition, you can set AutoLJM function to be enabled at the controller start up by
setting preferences of the controller. However, if Auto LJM is enabled in preferences, this
function automatically adjusts the posture of the manipulator to reduce the motion distance,
even when you intend to move the joint widely. Therefore, it is recommended to build a
program using AutoLJM command or LJM function to operate the manipulator as you
desired.
If you specify all points by teaching, the arm orientations are also recorded. Therefore, the
manipulator moves to the taught position without using LJM function or AutoLJM.
Instead, the manipulator may move differently from the taught position by the use of LJM
and AutoLJM.

6. The SPEL+ Language
EPSON RC+ 7.0 (Ver.7.4) User's Guide Rev.6
209
CP motion near the singularity (singularity avoiding function in CP motion)
When executing Move or CP motion near the singularity, the joint speed may increase
rapidly. The overspeed error will occur and the joints will move widely and interfere with
peripherals. In particular, the position of Joint #1 near the hand singularity changes
greatly.
EPSON RC+ 7.0 has a singularity avoiding function to prevent acceleration errors during
the execution of CP motion commands that pass the hand singularity described above.
With this function, the manipulator takes a detour to avoid an acceleration error by passing
a different trajectory and returns to the original trajectory after passing the singularity. For
details of the singularity avoiding function, refer to AvoidSingularity in the SPEL+
Language Reference.
Singularity avoiding function is enabled as default. If you want to avoid the error by
reducing the motion speed in order to maintain the trajectory accuracy, you can disable the
function temporarily by setting “0” to AvoidSingularity.
If you cannot avoid errors even if you use the singularity avoiding function, use PTP
motion to enable the least motion of the joints or arrange the manipulator installation
position and hand offset volume to prevent the CP motion near the singularity.
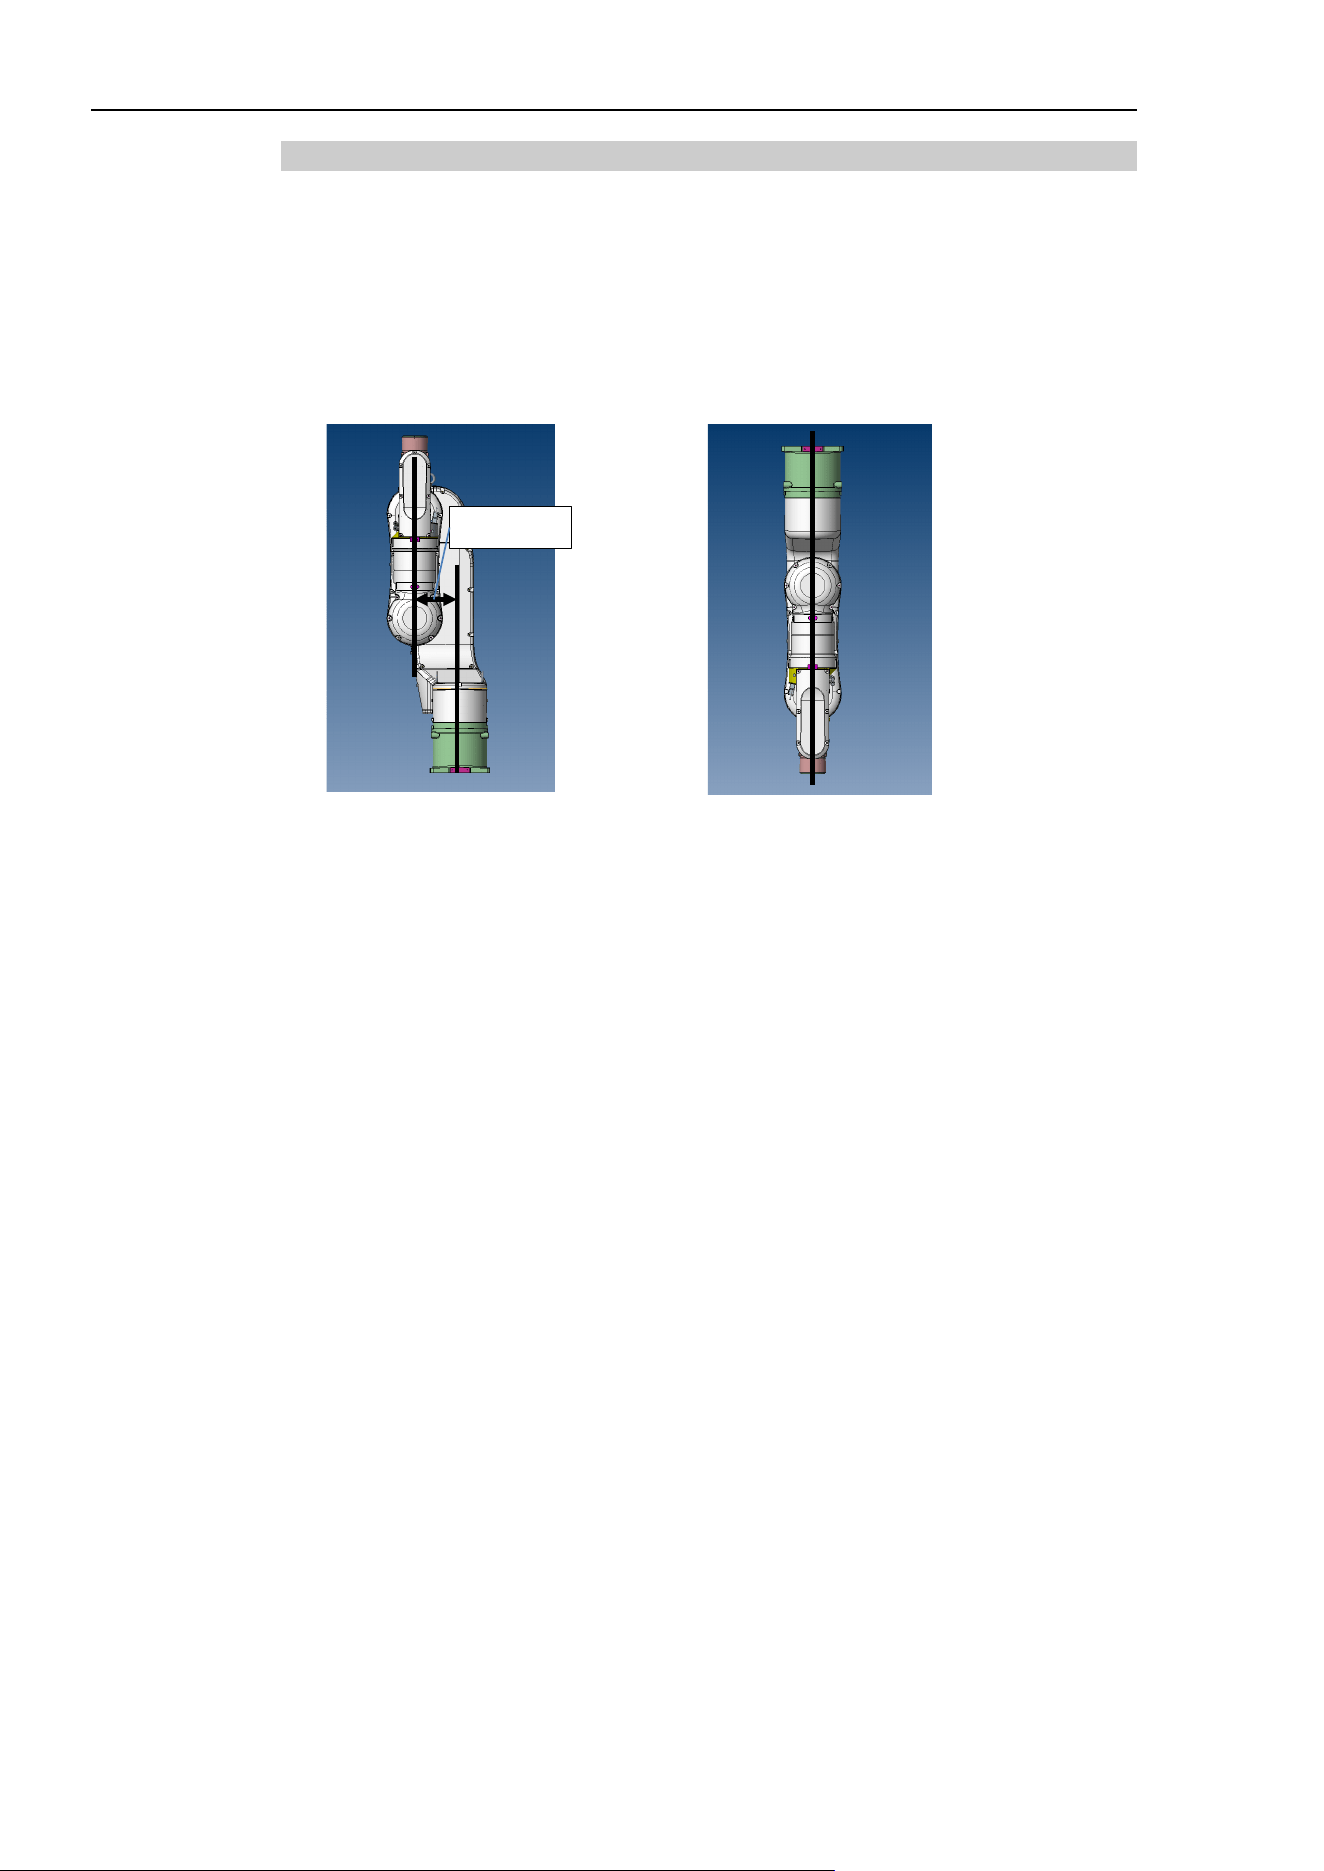
6. The SPEL+ Language
210
EPSON RC+ 7.0 (Ver.7.4) User's Guide Rev.6
6.17.4 N series arm orientations
The N series can be operated in various arm orientations within a given work envelope as
shown below:
Orientation of N series is different depending on “with” and “without” offset.
Offset is a distance between Joint #2 and Joint #1.
With offset: Distance from Joint #2 and Joint #1 is not 0mm
Without offset: Distance from Joint #2 and Joint #1 is 0mm
Orientation example of “with” and “without” offset is as follows:
Without offset
With offset
Offset
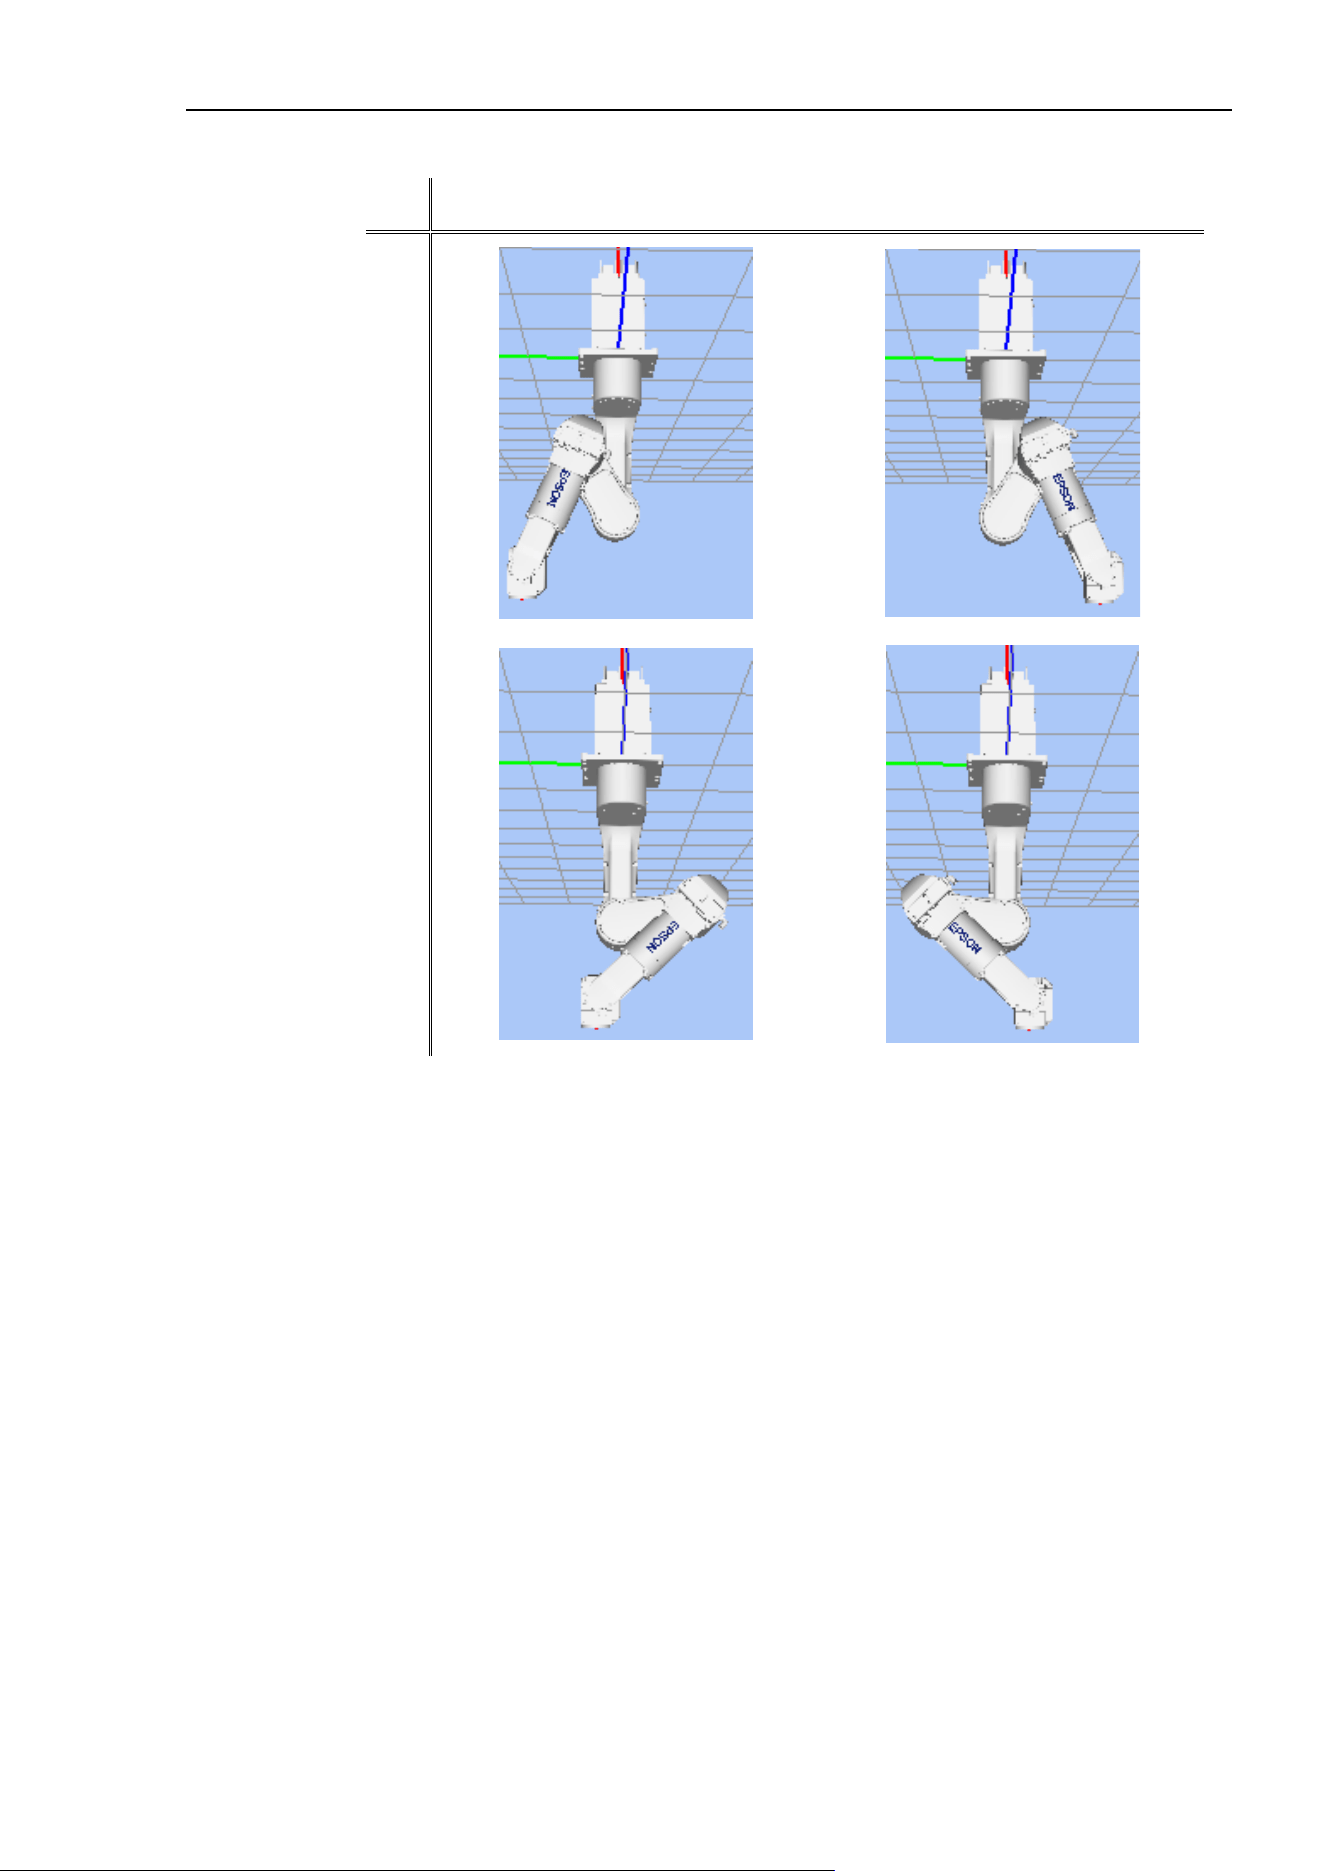
6. The SPEL+ Language
EPSON RC+ 7.0 (Ver.7.4) User's Guide Rev.6
211
Without offset (Illustrations: N2-A450SR)
Arm orientation
Righty arm orientation
Lefty arm orientation
Above elbow orientation
Below elbow orientation
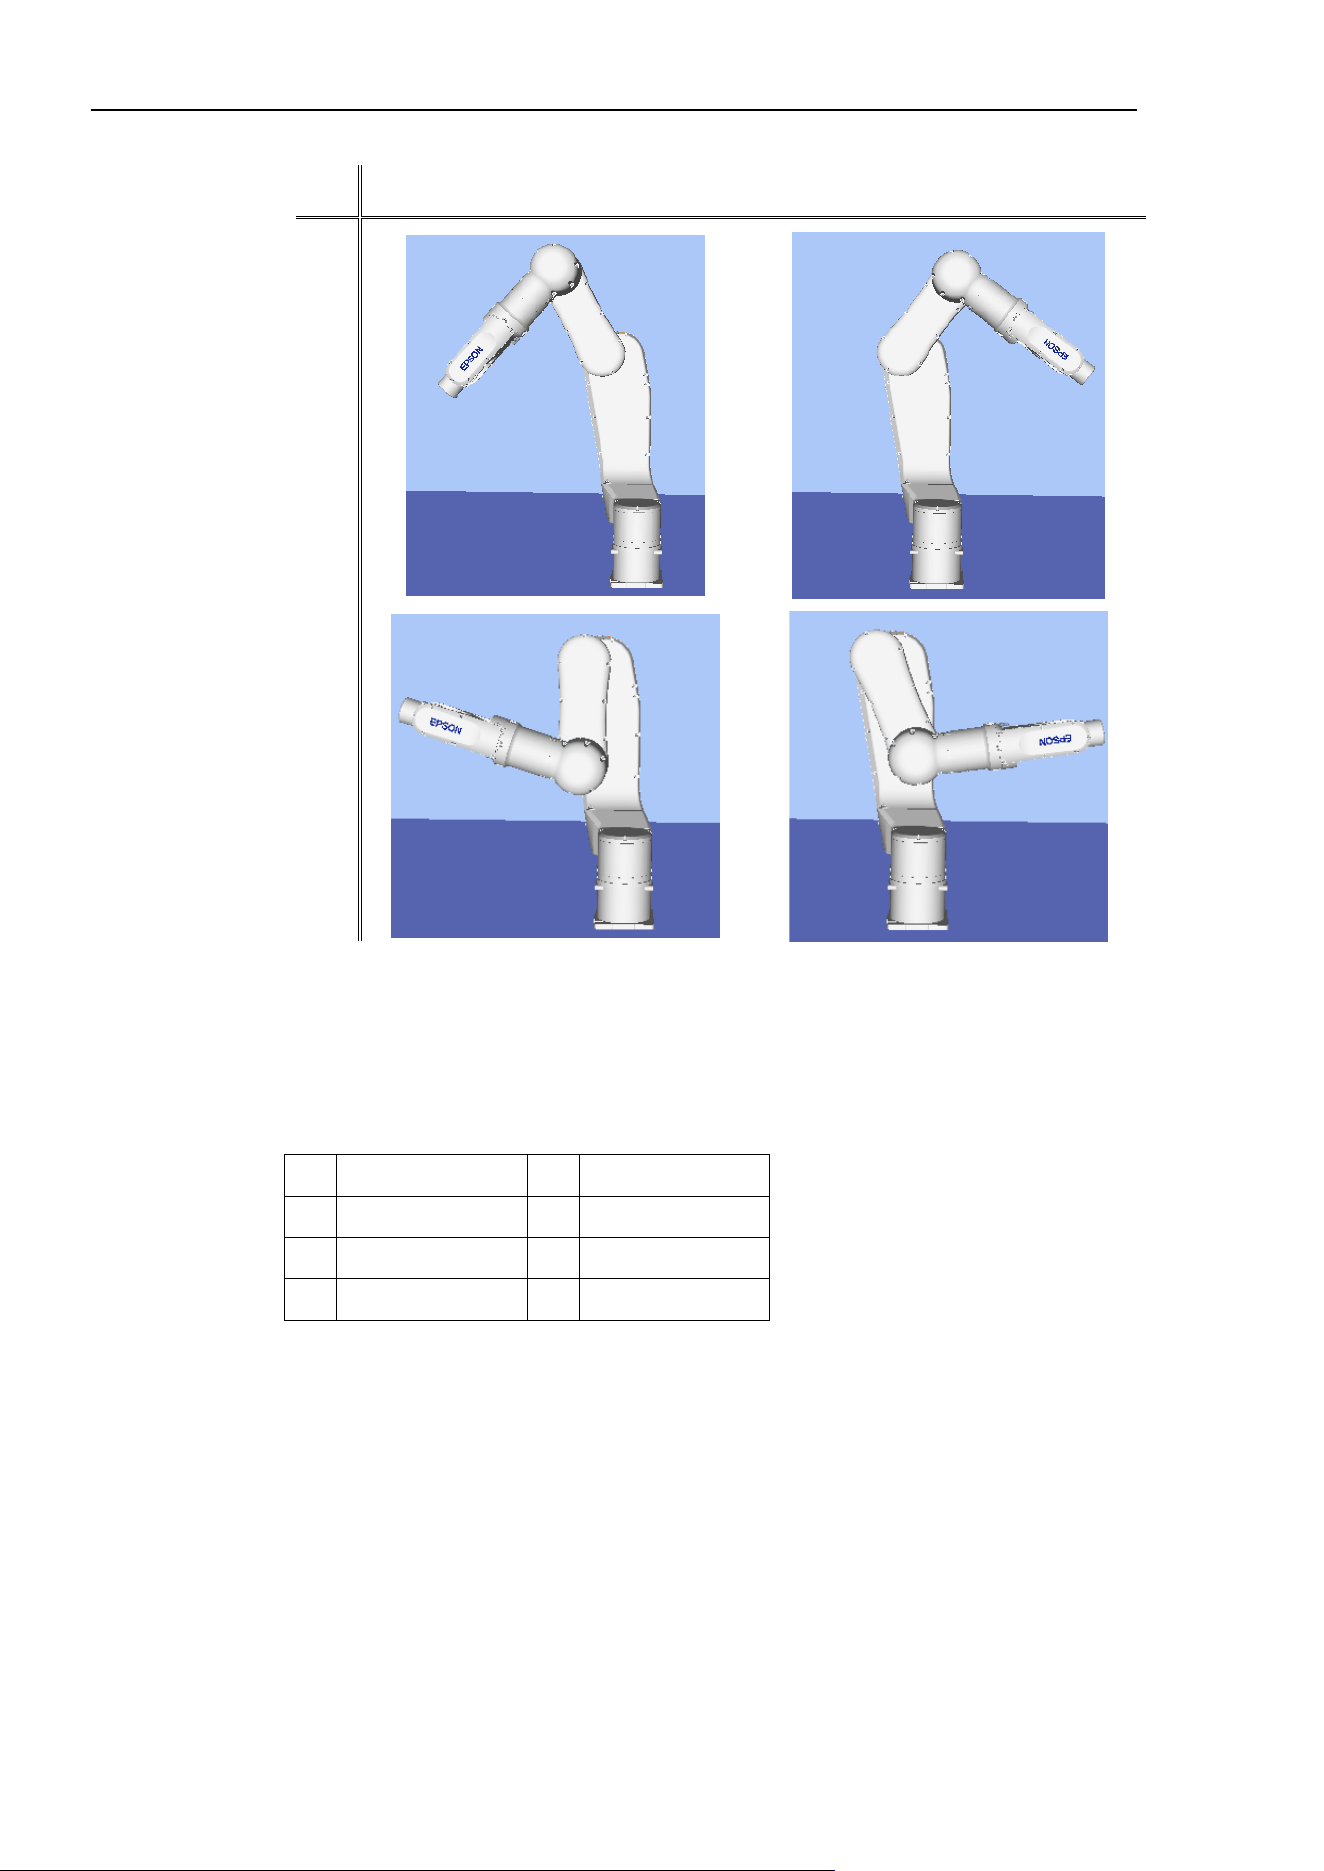
6. The SPEL+ Language
212
EPSON RC+ 7.0 (Ver.7.4) User's Guide Rev.6
With offset (Illustration: N6-A1000S)
Arm orientation
Righty arm orientation
Righty arm orientation
Above elbow orientation
Below elbow orientation
To specify orientation for the N series robot, add a forward slash (/) followed by L (for
Lefty hand orientation) or R (Righty hand orientation), A (Above elbow orientation) or B
(Below elbow orientation), and NF (NoFlip wrist orientation) or F (Flip wrist orientation).
There are eight available orientations as shown below, however, the 6-axis robot cannot be
operated in all of the orientations depending on point.
Available Orientation
1 /R /A /NF 5 /R /A /F
2 /L /A /NF 6 /L /A /F
3 /R /B /NF 7 /R /B /F
4 /L /B /NF 8 /L /B /F
At some points in the work envelope, the 6-axis robot can have the same position and
orientation even if the fourth joint or the sixth joint is rotated 360 degrees. To distinguish
these points, the J4Flag and J6Flag point attributes are provided.
To specify the J4Flag, add a forward slash (/) followed by J4F0 (-180 < the forth joint
angle <= 180) or J4F1 (the forth joint angle <= -180 or 180 < the forth joint angle).
To specify the J6Flag, add a forward slash (/) followed by J6F0 (-180 < the sixth joint
angle <= 180), J6F1 (-360 < the sixth joint angle <= -180 or 180 <the sixth joint angle <=
360), or J6Fn (-180*(n+1) < the sixth joint angle <= 180*n or 180*n <the sixth joint angle
<= 180*(n+1)).
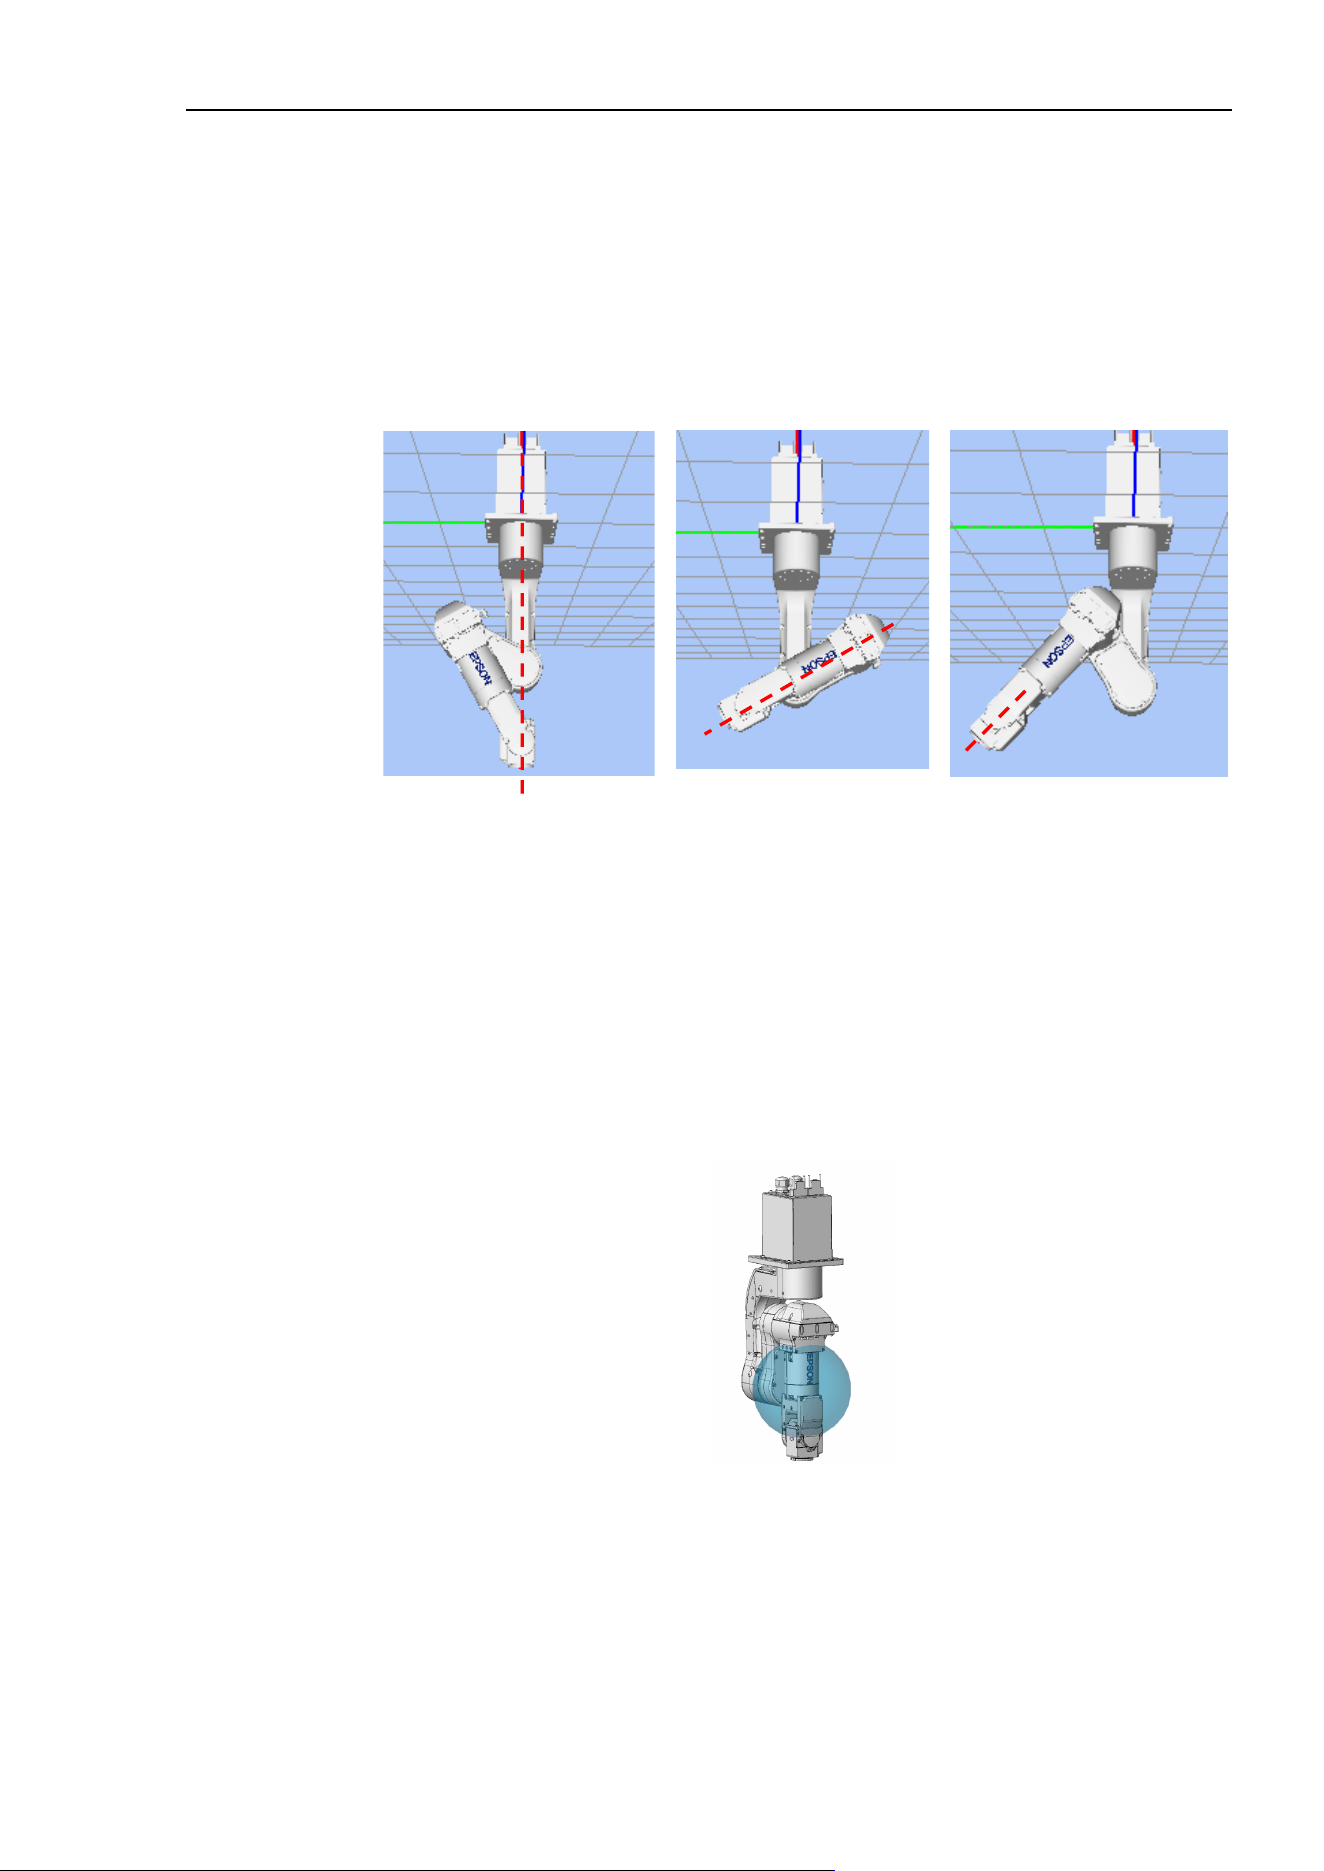
6. The SPEL+ Language
EPSON RC+ 7.0 (Ver.7.4) User's Guide Rev.6
213
Singularity
The orientation in the boundary where the arm orientation switches to the other.
Hand singularity : The boundary where Righty hand orientation and Lefty hand
orientation switch
Elbow singularity : The boundary where Above elbow orientation and Below elbow
orientation switch
Wrist singularity : The boundary where NoFlip wrist orientation and Flip wrist
orientation switch
Hand singularity
Elbow singularity
Wrist singularity
For the N series robot, Hand / Wrist singularities exist also inside the motion range like the
6-axis robot. When jogging near the singularity, pay attention to the same points as the 6-
axis robot. For details, refer to 6.17.2 6-axis robot arm orientations.
The following describes the elbow singularity area which is unique for N series robot.
Elbow singularity area
For the N series robot, the singularity exists where the P point is on the sphere shown in
the figure below. The P point cannot be inside the sphere. Therefore, CP motion to pass
inside the sphere is not available.
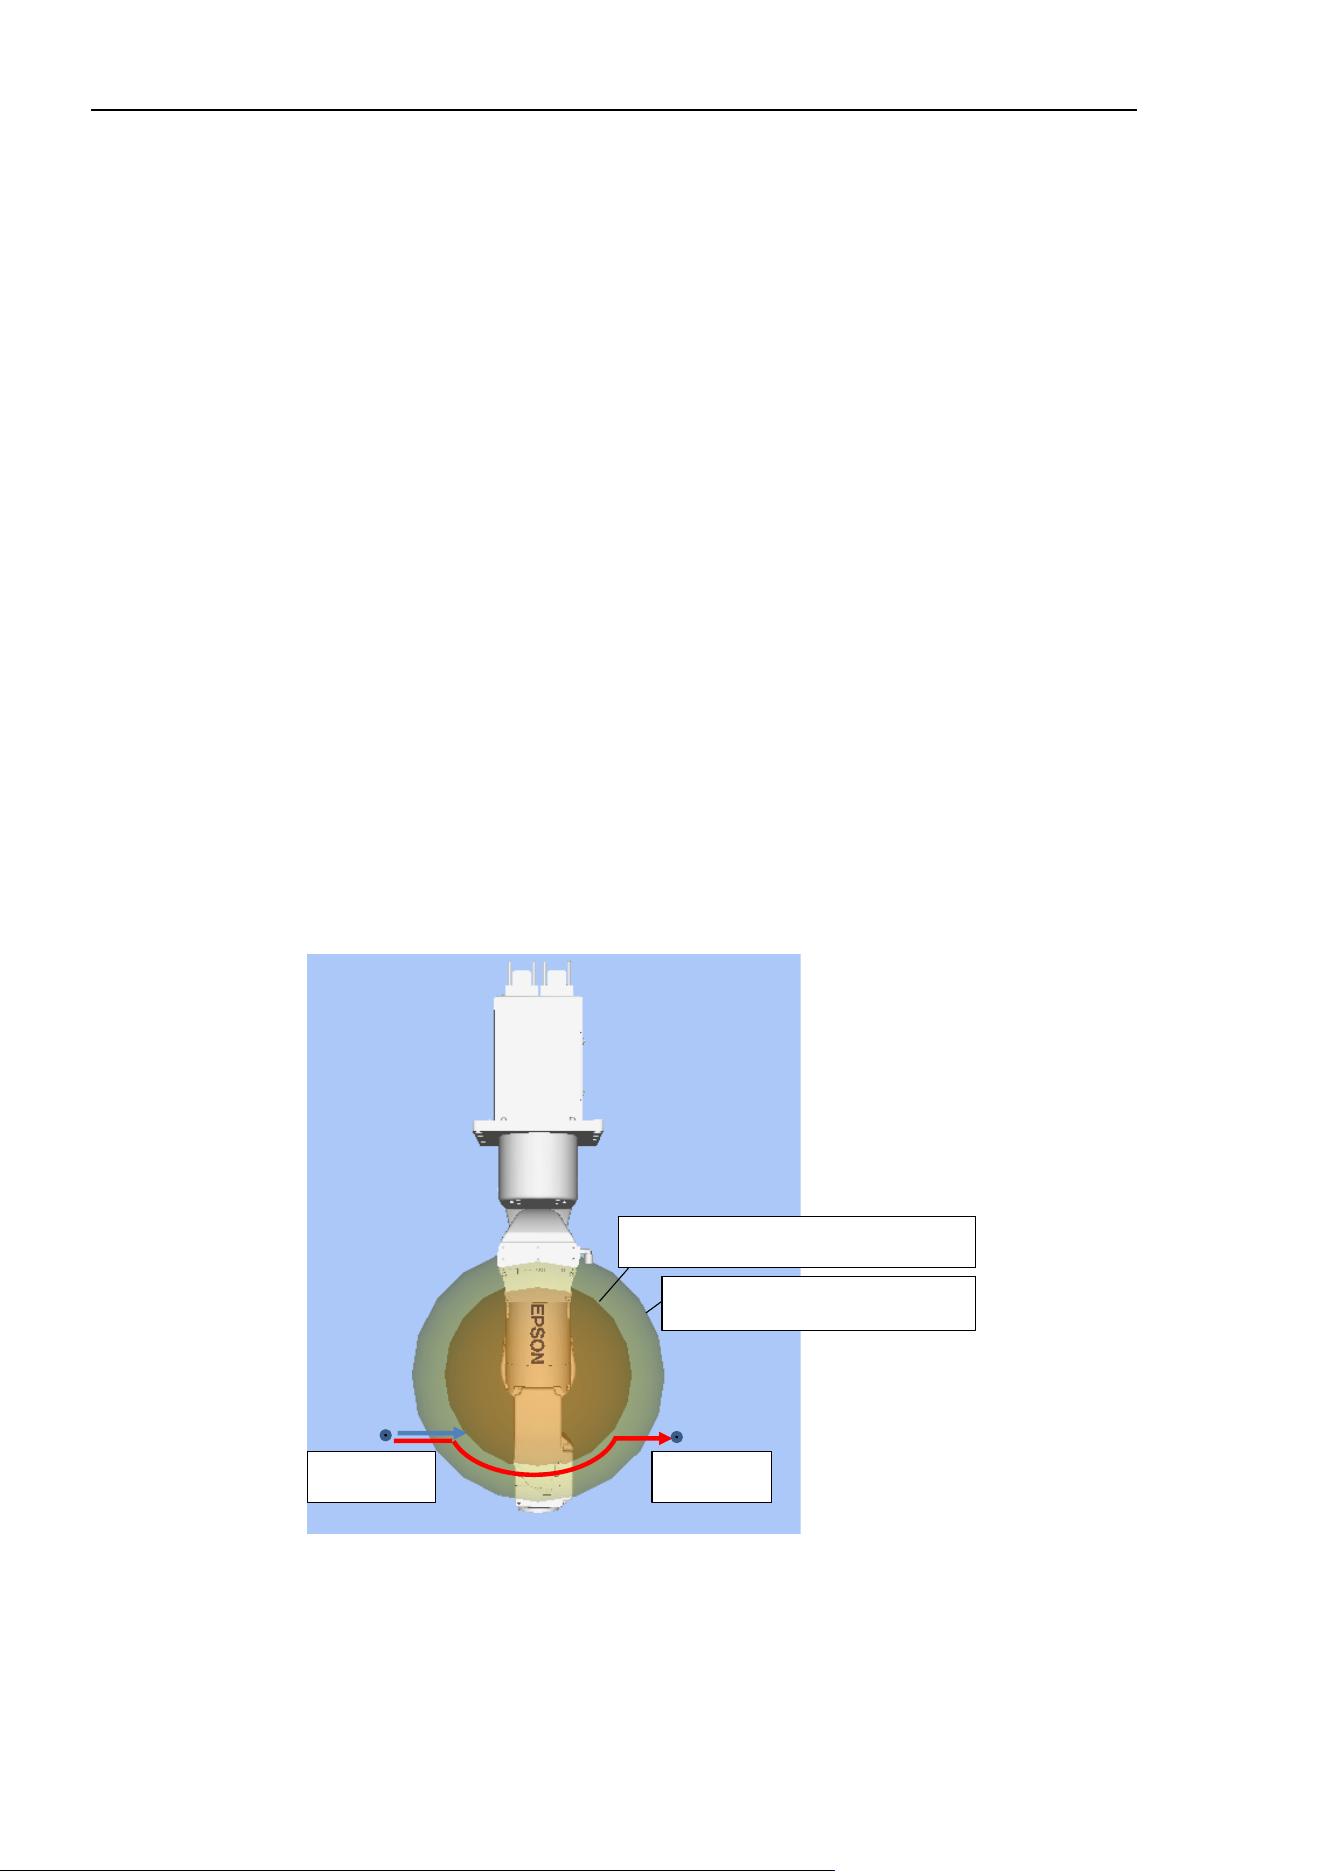
6. The SPEL+ Language
214
EPSON RC+ 7.0 (Ver.7.4) User's Guide Rev.6
Elbow singularity area avoidance motion
When the robot passes through the sphere as shown in the figure below, the robot behaves
differently depending on the mode of singularity avoiding function (AvoidSingularity).
Mode: SING_AVOID
The robot moves to the end point while avoiding the elbow singularity area as indicated
with a red line (P-point trajectory) in the figure below. Also, an error occurs in the
following cases.
- If SpeedS setting value is too large, error 4242, 4243, 4255, or 5044 occurs.
The errors can be prevented by setting SpeedS lower.
- If the motion is stopped/paused, or the safety door is opened during the singularity
avoiding motion (PTP motion), error 4242, 4250, 4252, or 4256 occurs.
Do not stop the operation or open the safety door during the singularity avoiding
motion.
- If the singularity avoiding motion mode (SING_AVOID) is selected for N series, an
error 4255 or 4256 occurs.
Mode: Other than SING_AVOID
The error 4252 occurs when the robot touches the elbow singularity area as indicated with
a blue line (P-point trajectory) in the figure below.
The elbow singularity area (Flange) is an area when Joint #5 is 0°.
Elbow singularity area (P point)
End point Start point
Elbow singularity area (Flange)
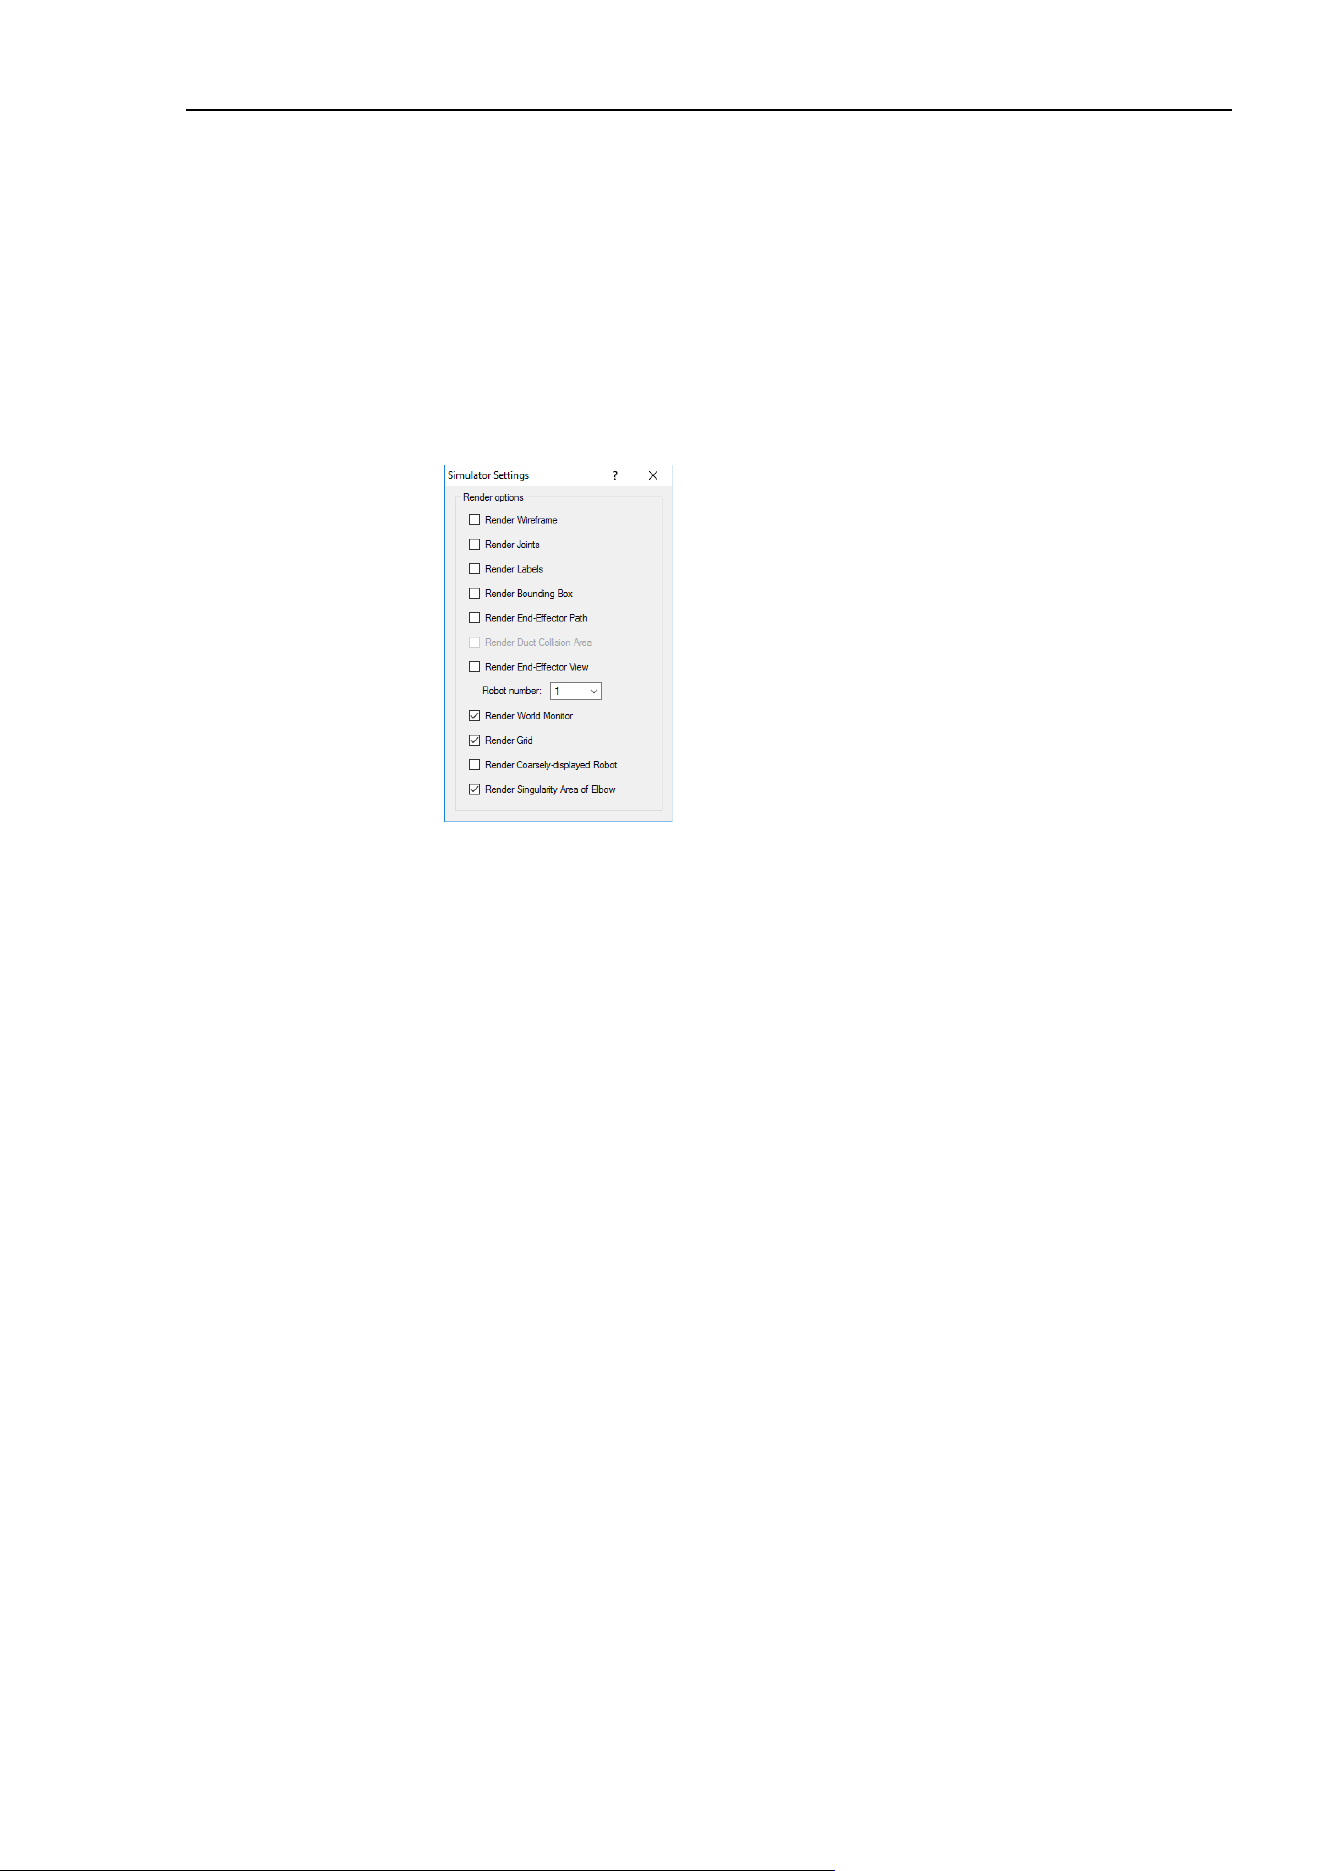
6. The SPEL+ Language
EPSON RC+ 7.0 (Ver.7.4) User's Guide Rev.6
215
Note:
- The pass motion can be confirmed by the sample simulator program “N2_sample”.
- With Jump3, Jump3CP, and JumpTLZ, the motion to pass the elbow singularity
area is not available. (Shoulder and wrist singularity pass motions are possible.)
- In the singularity avoiding motion, the Joint #4 and #6 may rotate largely.
- In the singularity avoiding motion, onward and backward paths may differ.
- To display the elbow singularity area and its neighborhood on the simulator, select
[Render Singularity Area of Elbow] in the [Simulator setting] dialog box.

6. The SPEL+ Language
216
EPSON RC+ 7.0 (Ver.7.4) User's Guide Rev.6
6.18 Robot Motion Commands
SPEL
+
includes several commands for controlling the robot from your programs.
6.18.1 Homing the robot
The Home command moves the robot to a user defined "park" or "idle" position. This
command works for all robots. It is mainly used for absolute encoder robots that normally
do not need to be mechanically homed. Use the HomeSet command to set the home
position and the Hordr command to set the home order.
6.18.2 Point to point motion
Point to point (PTP) commands move the tool center point of the robot from its current
position to a specified point. Motion of the tool center point may not be in a straight line.
To set the speed for point to point commands, use the Speed command. To set
acceleration and deceleration, use the Accel command.
Command Description
Go
Move directly to a point using point to point motion.
Jump
Jump to a point. First move up to the current LimZ setting, the move over
the destination point, then move to the point. The Arch table settings
determine the Jump profile.
Jump3
Jump to a point in 3 dimensions.
Move in a straight line
with the same
orientation until the
recede point. The motion between the recede points
is
PTP motion.
Pass
Move near one or more points.
TGo
Move directly to a point in a tool coordinate system.
BGo
Move
in a PTP motion
to the relative specified point in Base / Local
coordinate system
6.18.3 Linear motion
Linear motion commands move the tool center point of robot from its current position to a
specified point in a straight line. Liner motion is a CP (Continuous Path) motion.
To set velocity (speed) for straight motion, use the SpeedS command. To set acceleration
and deceleration, use the AccelS command.
Command Description
Move
Move in a straight line to the specified point.
TMove
Move in a straight line to the specified point in a tool coordinate system.
Jump3C
P
Jump to a point in 3 dimensions using CP motion. Move in a straight line
until the
recede point. The motion between the recede points
is also a
straight line motion.
BMove
Move in a straight line to the relative specified point in Base / Local
coordinate system

6. The SPEL+ Language
EPSON RC+ 7.0 (Ver.7.4) User's Guide Rev.6
217
6.18.4 Curves
Curves commands move the robot in a circular arc. Curves is a CP (Continuous Path)
motion.
To set velocity (speed) for Curves, use the SpeedS command. To set acceleration and
deceleration, use the AccelS command.
Command Description
Arc
Move the robot through one point to another point using circular
interpolation.
Arc3
Move the robot in 3D using circular interpolation.
Curve
Creates a file containing a path specification.
CVMove
Executes a path specified by Curve.
6.18.5 Joint motion
Command Description
JTran
The JTran command can be used to move one joint of the robot to a
position specified in degrees or millimeters, depending on the joint type.
The speed and acceleration are the same as for point to point motion
commands -- i.e., specified with Speed or Accel commands.
PTran
The PTran command can be used to move one joint of the robot to an
encoder pulse position. The speed and acceleration are the same as for
point to point motion commands
-- i.e., specified with Speed or
Accel
commands.
Pulse
The Pulse command can be used to move all joints of the robot to encoder
pulse positions. The speed and acceleration are the same as for point to
point motion commands -- i.e., specified with Speed or Accel commands.
PG_Scan
The PG_Scan command can be used to
rotate a pulse generator axis of
a
Joint
-type single axis PG robot contin
uously in CW/CCW directions. (To
rotate it
continuously
, you need to enable the continuous rotation
parameter.) The speed and acceleration are the same as for point to point
motion commands -- i.e., specified with Speed or Accel commands.
6.18.6 Controlling position accuracy
Use the Fine command to adjust position accuracy for the end of a motion command. Fine
specifies, for each joint, the allowable positioning error for detecting completion of any
given move. The lower the Fine settings, the more accurate the final position of the joint,
which can cause slower performance. Conversely, large Fine settings can speed up motion
commands, but position accuracy will decrease. For many applications, the default
settings can be used.

6. The SPEL+ Language
218
EPSON RC+ 7.0 (Ver.7.4) User's Guide Rev.6
6.18.7 CP Motion Speed / Acceleration and Tool Orientation
When you attempt to change only the tool orientation while keeping the tool tip of the
robot arm at the specified coordinate point or when the tool orientation variation is larger
than the travel distance of the tool tip, moving the arm by normal CP motion commands
will cause an increase in the variation of speed, acceleration and deceleration of tool
orientation. In some cases, an error will occur.
To prevent these situations, add the ROT parameter to the CP motion commands. The arm
will be moved based on the specified angular velocity and acceleration/deceleration of the
main axis regarding the orientation variation.
The angular velocity and acceleration/deceleration of the main axis regarding the
orientation variation should be specified with the SpeedR and AccelR commands in
advance.
For example:
SpeedR 50 ' degree/sec
AccelR 200, 200 ' degree/sec
2
Move P1 ROT
The tool orientation variation is normally comprised of orientation variations of more than
one rotation axis.
The SpeedR and AccelR parameters specify the angular velocity and acceleration/
deceleration of the main axis regarding the orientation variation. Therefore, actual angular
velocity and acceleration/deceleration of the orientation variation are different from the
parameters except for the case where the rotation axis of the orientation is only one.
While the motion command with the ROT parameter is executed, the specified SpeedS and
AccelS parameters are invalid.
The ROT parameter can be used with the following motion commands:
Move BMove
Arc TMove
Arc3 Jump3CP
6.18.8 PTP Speed / Acceleration for Small Distances
You can change the speed and acceleration for small distances using PTPBoost and
PTPBoostOK. Normally, PTPBoost is not required. In certain cases, you may want to
shorten the cycle time even if vibration becomes larger, or conversely you may want to
reduce vibration even if cycle time becomes longer. PTPBoost is a robot parameter with
values from 0 – 100 that affects the speed and acceleration for small distances. Normally,
for small distance motion, the desired speed cannot be attained using the current
acceleration. By increasing PTPBoost, acceleration, deceleration, and speed are increased
for small distance motion. To check if a motion command will be affected by PTPBoost,
use the PTPBoostOK function. See PTPBoost and PTPBoostOK in the SPEL+ Language
Reference manual for more details.
6.18.9 Pressing Motion
To use the pressing motion, use the following torque control mode commands.
TC (Returns the torque control mode setting and current mode.)
TCSpeed (Specifies / returns the speed limit in the torque control.)
TCLim (Specifies the torque limit of each joint for the torque control mode.)
The low power mode is limited by a low power upper limit. Therefore, normally use the
High power mode. For details and usage of the above commands, refer to “TC Statement”,
“TCSpeed”, and “TCLim” in the SPEL+ Language Reference manual.
NOTE

6. The SPEL+ Language
EPSON RC+ 7.0 (Ver.7.4) User's Guide Rev.6
219
6.18.10 Collision Detection Function (Detection Function of Robot
Motion Error)
Detect the robot motion error from differentiation between desired speed and the actual speed
(speed deviation value). Errors can be detected by this function is classified into A and B.
A: Collision or contact of robot arm or hand occurs
B: Robot motion errors other than collision or contact
Also, error B is classified into below according to the power condition.
Error in high power
B1: Torque saturation due to a low Weight or Inertia setting.
B2: Torque saturation due to combined motion of multiple joints and movement of a long
object.
B3: Torque saturation due to supply voltage reduction.
B4: Error motion due to hardware error or software malfunction.
Error in low power
B4: Error motion due to hardware error or software malfunction.
B5: Torque saturation in low power due to a hand or a long object that exceeds the weight
described in the specifications.
Display either message below and stop the robot when detecting an error A or B. Reduce the
damage of the robot or equipment.
Error 5057: detect the collision in high power. (Detect the robot motion error.)
Error 5058: detect the collision in low power. (Detect the robot motion error.)
The following error has been existed, however, this function can detect the above errors
quickly.
Error 5042, 5043: Position error.
Error is not detected by torque saturation in short time. Detect a state with high risk that causes
a malfunction and stop the robot. The following phenomena may occur if continuing robot
operation in a state of B1 or B2. Make a state that errors not occur.
Loose binding parts such as screws.
Reduction gear is damaged.
Increase a risk of robot damage
Turn ON CollsionDetect command and detection is enabled. (Default in ON)
Default is different depending on the firmware version.
Ver.7.2.1.x or later: default: ON
Before Ver.7.2.0.x: default: OFF
When upgrading before Ver.7.2.0.x or Ver7.2.1.x or later: default: OFF
Reboot a controller to return to the default.
The following describes the detail of error B when error 5057 or 5058 is detected without a
collision or contact of the robot or arm.
In high power mode
Check the torque saturation by using PTRQ command. Torque saturation is occurred if the
joint outputs “1” in PTRQ command.

6. The SPEL+ Language
220
EPSON RC+ 7.0 (Ver.7.4) User's Guide Rev.6
In that case, make sure that the Weight setting is properly and in accord with the hand weight.
Also, make sure that Inertia setting is properly for joint #4 of SCARA robot and joint #6 of 6-
axis robot.
Next, make sure that there is no torque saturation by using PTRQ command by combined
motion that multiple joints (#2, #3 and #5 joints of 6-axis robot) operate in the same direction
and throwing around the long object.
If torque saturation occurs, reduce acceleration/deceleration of Accel command until there is
no torque saturation (the value: 1.0 or less is displayed in PTRQ).
Also, torque saturation may occur due to reduction of supply voltage that inputs to the
controller. Check the power supply voltage is within the specifications.
You can turn ON/OFF the collision detection function per equipment if you want to use
without performing those error detection due to equipment compatibility securement or similar
reasons.
If other error occurs at the same time, take a countermeasure for that first.
In low power mode
Make sure that hand weight is within the specifications.
Also, check the torque saturation when errors occur on the joint #4 and 5 of 6-axis robot.
When torque saturation is occurred, it is long object that cannot be hold by low power mode.
Hold in high power mode.
If other error occurs at the same time, take a countermeasure for that first.
Immediately stop result of the torque saturation by combination of the following motion and
command. Error of A and B can be detected faster.
HP motion: LimitTorqueStop Command
LP motion: LimitTorqueStopLP Command
The following describes details of collision of the robot arm A and contact detection.
For reduction of damage on the arms and the end effectors due to the collision with
peripherals, there are two functions: Collision detection function and torque restriction
function.
The collision detection function detects the collision and stops the robot immediately.
The torque restriction function restricts torque at the collision and also stops the robot
immediately.
These are functions to reduce damage on the robot at the collision, but cannot avoid
damage completely. Also, the functions cannot be used for the purpose of human safety.
The force applied to the robot at the collision can
be roughly divided into two types as shown on the
right: the impact of speed right before the
collision, and the pressing force by the motor
torque after the collision.
The collision detection function and the torque
restriction function reduce damage caused by the
pressing force right after the collision. These
functions do not have any effect on damage
caused by the impact of speed.
Impact of speed
Pressing force by torque
Force
Time

6. The SPEL+ Language
EPSON RC+ 7.0 (Ver.7.4) User's Guide Rev.6
221
The collision detection function detects collision by the speed deviation value for robot
motion control (differentiation between the desired speed and the actual speed) showing an
abnormal value which is greatly different from normal motion due to the collision.
Turn ON CollsionDetect command and the detection is enabled. (Default: ON)
Default is different depending on the firmware version.
Ver.7.2.1.x or later: default: ON
Before Ver.7.2.0.x : default: OFF
Reboot a controller to return to the default.
When enabled, this function reduces the time of pressing force by the motor torque, by
detecting the collision and stopping the robot immediately. This reduces the pressing
force by about 20%. To reduce the damage more, use this function together with the
torque restriction function.
The collision detection function is automatically disabled during the pressing motion and
the force sensing operation described in “6.18.9 Pressing Motion”.
Also, the function may have false detection in cases of powerful contact motion and
significant acceleration and deceleration which may have consecutive torque saturation.
To confirm if there is a risk of false detection, use PTRQ.
If PTRQ is less than 1 for all axes, there is no risk of false detection.
If PTRQ is one, torque saturation is occurring on the axis. This means excessive
acceleration and deceleration are applied, and it is not preferable for motor control. It also
has a risk of damage on the manipulator. In such a situation, take the following
countermeasures.
For contacting operation,
- Check if Weight and Inertia settings are appropriate
- Lower acceleration and deceleration
- Lower speed
When performing contacting motion:
- Lower acceleration and deceleration at a contact
- Set a contacting depth shallow
If you want to operate the manipulator without taking the above countermeasures, you can
enable and disable the function for each axis. Set the function off for the axis which you
want to disable the function.
For details of the command and function, refer to the following manual.
EPSON RC+ 7.0 SPEL
+
Language Reference
CollisionDetect Statement
CollisionDetect Function
6.18.11 Torque Restriction Function
The torque restriction function reduces damage at the collision similarly with “6.18.10
Collision Detection Function”.
The torque restriction value used for this function is defined by adding the margin to the
upper limit torque value used in the program in order to avoid malfunction. By using the
torque restriction function, the pressing force can be reduced.
For example, if the torque is restricted at 30%, the pressing force can also be reduced to
30%. Also, the robot immediately stops when the torque reaches the upper limit value.
By stopping the robot immediately, a further 20-30% reduction effect can be obtained.

6. The SPEL+ Language
222
EPSON RC+ 7.0 (Ver.7.4) User's Guide Rev.6
When the torque is restricted at 30% and the robot is stopped immediately, the total of less
than 25% or equivalent reduction effect can be obtained.
For SCARA robots, the end of the extended shaft may get caught and bent. To reduce
occurrence of the bent shaft, it is recommended to use this function to reduce the pressing
force to the maximum degree.
If malfunction occurs, take any of the following measures for the axis of malfunction.
- Set LimitTorqueStop or LimitTorqueStopLp off
- Increase the threshold value of LimitTorque or LimitTorqueLp
To use the torque restriction function for jogging motion, follow the steps below.
(1) Execute PTCLR and start torque measurement.
(2) Execute the jogging motion.
(3) Measure the maximum torque value by PTRQ, and then add the margin to it.
(4) Set LimitTorqeLP and LimitTorqeLPStop.
If the robot is temporarily stopped in the low power motion, the value larger than the
normal program operation or jogging motion may be obtained. In such case, execute the
temporary stop while measuring PTRQ and include it into measurement.
For details of the command and function, refer to the following manual.
EPSON RC+ 7.0 SPEL
+
Language Reference
LimitTorque Statement, LimitTorque Function,
LimitTorqueLP Statement, LimitTorqueLP Function,
LimitTorqueStop Statement, LimitTorqueStop Function,
LimitTorqueStopLP Statement, LimitTorqueStopLP Function
The following is a sample program which automatically configures the collision detection
function and the torque restriction function.
The program repeats the motion called “all_ax_move”.
The program enables the collision detection function, measures the maximum torque in the
first five moves, adds the margin to the measured value (1.2 times if HighPower, 1.4 times
if LowPower), and sets the upper limit torque value to stop the robot at the upper limit
torque.
This is the example of automatic setting to repeat motion with the above settings from the
sixth time.
When the upper limit torque value is changed, the changed value will be considered as
“1.0” for the subsequent PTRQ measurement. If the margin of 1.2 times is set, PTRQ will
be slightly larger than 0.8, and if the margin of 1.4 rimes is set, PTRQ will be slightly
smaller than 0.7.
Setting example)
Function main
Integer icnt
Real rtrq(6)
Motor On
Power High
‘ Power Low
Weight 8
Speed 50
Accel 80, 80
icnt = 1
PTCLR

6. The SPEL+ Language
EPSON RC+ 7.0 (Ver.7.4) User's Guide Rev.6
223
LimitTorque 100 'init HighPower limit torque
LimitTorqueLP 100 'init LowPower limit torque
CollisionDetect On
Do
Call all_ax_move
Print PTRQ(1), PTRQ(2), PTRQ(3), PTRQ(4), PTRQ(5), PTRQ(6)
icnt = icnt + 1
If icnt = 5 Then
If Power = 1 Then 'High power case
Print "LimitTorque set"
rtrq(1) = PTRQ(1) * 1.2 * LimitTorque(1) + 1.0
rtrq(2) = PTRQ(2) * 1.2 * LimitTorque(2) + 1.0
rtrq(3) = PTRQ(3) * 1.2 * LimitTorque(3) + 1.0
rtrq(4) = PTRQ(4) * 1.2 * LimitTorque(4) + 1.0
rtrq(5) = PTRQ(5) * 1.2 * LimitTorque(5) + 1.0
rtrq(6) = PTRQ(6) * 1.2 * LimitTorque(6) + 1.0
Print LimitTorque(1), LimitTorque(2), LimitTorque(3),
LimitTorque(4), LimitTorque(5), LimitTorque(6)
LimitTorque rtrq(1), rtrq(2), rtrq(3), rtrq(4), rtrq(5),
rtrq(6)
Print LimitTorque(1), LimitTorque(2), LimitTorque(3),
LimitTorque(4), LimitTorque(5), LimitTorque(6)
LimitTorqueStop On
Else 'Low poser case
Print "LimitTorqueLP set"
rtrq(1) = PTRQ(1) * 1.4 * LimitTorqueLP(1) + 1.0
rtrq(2) = PTRQ(2) * 1.4 * LimitTorqueLP(2) + 1.0
rtrq(3) = PTRQ(3) * 1.4 * LimitTorqueLP(3) + 1.0
rtrq(4) = PTRQ(4) * 1.4 * LimitTorqueLP(4) + 1.0
rtrq(5) = PTRQ(5) * 1.4 * LimitTorqueLP(5) + 1.0
rtrq(6) = PTRQ(6) * 1.4 * LimitTorqueLP(6) + 1.0
Print LimitTorqueLP(1), LimitTorqueLP(2),
LimitTorqueLP(3), LimitTorqueLP(4), LimitTorqueLP(5),
LimitTorqueLP(6)
LimitTorqueLP rtrq(1), rtrq(2), rtrq(3), rtrq(4),
rtrq(5), rtrq(6)
Print LimitTorqueLP(1), LimitTorqueLP(2),
LimitTorqueLP(3), LimitTorqueLP(4), LimitTorqueLP(5),
LimitTorqueLP(6)
LimitTorqueStopLP On
EndIf
If icnt > 5 Then
icnt = 6
Endif
Loop While icnt > 0
Fend
Function all_ax_move
Integer icount
Go JA(10, 10, 10, 10, 10, 10)
Go JA(-10, -10, -10, -10, -10, -10)
Fend
6.19 Working with Robot Points
A robot point is a set of coordinates that define a position in the robot work envelope. For
SCARA and Cartesian robots, a point is defined by the position data (X, Y, Z) within the
reference rectangular coordinate space and the orientation data (U) which is the rotation
about the Z axis of the rectangular coordinate.
For 6-axis robots, a point is defined by the position and orientation of the tool coordinate
system with respect to a reference rectangular coordinate system. The point is specified
by the position data (X, Y, Z) and the orientation is specified by the orientation data (U, V,
W) which correspond with roll (rotation about the Z axis), pitch (rotation about the Y axis),
and yaw (rotation about the X axis).
When the additional ST axis is installed, the point is specified by the position data of each
additional axis (S, T).

6. The SPEL+ Language
224
EPSON RC+ 7.0 (Ver.7.4) User's Guide Rev.6
The X, Y, and Z coordinates of a point are specified in millimeters. The U, V, and W
coordinates are specified in degrees.
The S and T coordinates of a point are specified in millimeters or degrees, according to the
type of axis.
Points are referenced using the letter P followed by an integer number or integer
expression or by a label defined in the point file editor or [Robot Manager]-[Jog & Teach]
page.
6.19.1 Defining points
You can define points in a program statement, points editor window, [Robot Manager]-
[Jog & Teach] page, or at the [Command] window.
In a program statement or at the Command window, you can assign coordinates to a point,
or define a point that is the current robot arm position.
P1 = XY(200, 100, -25, 0) 'Assign coordinates to point P1
Pick = XY(300, 200, -45, 0) 'Assign coordinates to point pick
P10 = Here 'Assign a point to current position
6.19.2 Referencing points by point label
You can assign names to point numbers so you can refer to points by name in a program.
Assign names from the point editor (see Editing Points) or the [Robot Manager]-[Jog &
Teach] page. Names must be unique for each point number when used in the same point
file.
Point labels can include up to 32 one-byte alphanumeric, Japanese, and the underscore
characters, or 16 two-byte characters. Characters can be upper case or lower case. Only
alphabets and Japanese can be used for the first letter.
For i = 0 To 10
Go pick
Jump place
Next i

6. The SPEL+ Language
EPSON RC+ 7.0 (Ver.7.4) User's Guide Rev.6
225
6.19.3 Referencing points with variables
Use the letter P followed by a variable name within parentheses that represents the point
number you are referencing.
For i = 0 To 10
Go P(i)
Next i
Although you can define points at the [Command] window for test purposes, it is
recommended that all points be defined in a program, point editor, or with the [Robot
Manager]-[Jog & Teach] page. Points defined at the [Command] window will be cleared
from memory when you build a project or run a program unless you execute “SavePoints”.
6.19.4 Using points in a program
When starting programs, the default point file for the robot is loaded. You can also load
other points in the program using the LoadPoints statement.
Function main
Integer i
LoadPoints "model1.pts"
For i = 0 To 10
Jump pick
Jump place
Next i
Fend
6.19.5 Importing points into program
You can import points into the current project while the program is running using the
ImportPoints statement.
Function main
Integer i
ImportPoints "c:\models\model1.pnt", "robot1.pnt"
LoadPoints "robot1.pnt"
For i = 0 To 10
Jump pick
Jump place
Next i
Fend
6.19.6 Saving and loading points
Use “LoadPoints” to load a point file in the current project. You can optionally specify
the Merge parameter to combine points in a file with points that have already been loaded.
Use “SavePoints” to save the points in a point file. If the point file is in the current project,
it will be updated on the PC when it is connected and the same project is open.
If the point file is not the current project, it will not be automatically updated on the PC.
Use Project Synchronize to copy the file to the PC if desired.
CAUTION
■
Rebuild the
program if Project Synchronize is performed.
NOTE

6. The SPEL+ Language
226
EPSON RC+ 7.0 (Ver.7.4) User's Guide Rev.6
6.19.7 Point attributes
Each point definition can optionally specify a local number and various arm orientations,
depending on the robot type. You can specify point attributes in point assignment
statements or use individual statements and functions to change the attributes of a
previously defined point.
Local point attribute
To specify a local coordinate system number for a point in an assignment statement, add a
forward slash (/) followed by the local number after the coordinates of the point.
P1 = XY(300, -125.54, -42.3, 0) /1 ' P1 is in local 1
The local number can also be an expression enclosed in parentheses.
P2 = P3 /(mylocal)
Use the PLocal function and statement to read and set the local attribute of a point.
Hand point attribute
To specify orientation for the SCARA or 6-axis robot, add a forward slash (/) followed by
L (for Lefty hand orientation) or R (for Righty hand orientation).
P2 = XY(200, 100, -20, -45) /L ' Hand orientation is Lefty
P3 = XY(50, 0, 0, 0) /2 /R ' Righty in Local 2
You can read and set point hand orientation using the Hand statement and function.
Hand P1, Righty
Elbow point attribute
To specify elbow orientation for the 6-axis robot in a point assignment statement, add a
forward slash (/) followed by A (Above elbow orientation) or B (Below elbow orientation),
Elbow orientation is Below.
P1 = XY(0, 600, 400, 90, 0, 180) /B
You can read and set point elbow orientation using the Elbow statement and function.
Wrist point attribute
To specify wrist orientation for the 6-axis robot in a point assignment statement, add a
forward slash (/) followed by NF (NoFlip wrist orientation) or F (Flip wrist orientation).
Wrist orientation is Flip.
P2 = XY(0, 600, 400, 90, 0, 180) /F
You can read and set point wrist orientation using the Wrist statement and function.
J4Flag and J6Flag point attributes
At some points in the work envelope, the 6-axis robot can have the same position and
orientation even if the fourth joint or the sixth joint is rotated 360 degrees. To distinguish
these points, the J4Flag and J6Flag point attributes are provided. These flags allow you to
specify a position range for joint 4 and joint 6 for a given point.
To specify the J4Flag in a point assignment statement, add a forward slash (/) followed by
J4F0 (−180 < the forth joint angle <= 180) or J4F1 (the forth joint angle <= −180 or 180 <
the forth joint angle).
P2 = XY(0, 600, 400, 90, 0, 180) /J4F1
To specify the J6Flag in a point assignment statement, add a forward slash (/) followed by
J6F0 (−180 < the sixth joint angle <= 180), J6F1 (−360 < the sixth joint angle <= −180 or
180 < the sixth joint angle <= 360), or J6Fn (−180*(n+1) < the sixth joint angle <= 180*n
or 180*n < the sixth joint angle <= 180*(n+1)).
P2 = XY(50, 400, 400, 90, 0, 180) /J6F2

6. The SPEL+ Language
EPSON RC+ 7.0 (Ver.7.4) User's Guide Rev.6
227
J1Flag and J2Flag point attributes
At some points in the work envelope, the RS series can have the same position and
orientation even if the first joint or the second joint is rotated 360 degrees. To distinguish
these points, the J1Flag and J2Flag point attributes are provided. These flags allow you to
specify a position range for joint 1 and joint 2 for a given point.
To specify the J1Flag in a point assignment statement, add a forward slash (/) followed by
J1F0 (−90 < the first joint angle <= 270) or J1F1 (−270 <= the first joint angle <= −90 or
270 < the first joint angle <= 450).
P2 = XY(-175, -175, 0, 90) /J1F1
To specify the J2Flag in a point assignment statement, add a forward slash (/) followed by
J2F0 (−180 < the second joint angle <= 180), J2F1 (−360 < the second joint angle <= −180
or 180 < the second joint angle <= 360).
P2 = XY(300, 175, 40, 90) /J2F1
J1Ang and J2Flag point attributes
At the origin of the robot coordinate system, the RS series can have the same position and
orientation even if the first joint is rotated. To distinguish these points, the J1Ang point
attributes are provided.
6.19.8 Extracting and setting point coordinates
Use the CX, CY, CZ, CU, CV, CW, CS, and CT commands to get a coordinate of a point
and set it.
xcoord = CX(P1)
P2 = XY(xcoord, 200, -20, 0)
ycoord = CY(P*) ' Gets current Y position coordinate
CX(pick) = 25.5
CY(pick) = CY(pick) + 2.3
6.19.9 Alteration of points
There are several ways of modifying a point without re-teaching it. You can change one
or more coordinate values with relative offsets or absolute values.
To set an absolute value for a coordinate, use a colon followed by the axis letter and the
value.
To add a relative offset to a coordinate, use an axis letter followed by the offset value or
expression in parentheses. If the offset is negative, then precede the axis letter with the
minus sign. If parentheses are omitted, they will be automatically added.
Go P1 -Z(20)
Move to P1 with a z offset of −20mm
Go P1 :Z(-25)
Move to P1 with a z absolute position of −25mm
Go P1
-X(20) +Y(50) :Z(-25)
Move to P1 with offsets for X and Y relative
offsets and an absolute position for Z
Point alternation of 6-axis robot
When changing the orientation by roll (U), pitch (V), and yaw (W) in the SPEL
+
program,
adding the angles to V and W axes (e.g. +V(10), +W(10)) does not mean the rotation of Y
and X axes in the robot coordinate system. To change the orientation (U, V, and W) after
teaching the points, set the robot to actual posture by Jog & Teach in the Robot Manager.

6. The SPEL+ Language
228
EPSON RC+ 7.0 (Ver.7.4) User's Guide Rev.6
6.20 Input and output control
6.20.1 Hardware I/O
There are 24 DC inputs and 16 DC outputs on a standard controller. By purchasing I/O
boards, you can add additional 128 inputs and 128 outputs. You can expand the I/O by
using the Fieldbus I/O master option and Fieldbus I/O slave option. Also, you can
input/output the Analog signal by using the Analog I/O board option. Refer to 11. Inputs
and Outputs for details.
6.20.2 Memory I/O
There are 128 bytes (1024 bits) of memory I/O. Memory I/O is especially useful for
synchronizing multi-tasking. Each memory bit can be treated as both an input and an
output.
Use the commands with the "Mem" prefix for memory I/O.
6.20.3 I/O Commands
Command Description
In
Reads one byte (eight bits) of input data.
InW
Reads one word (sixteen bits) of input data.
MemIn
Reads one byte (eight bits) of Memory I/O.
MemInW
Reads one word (sixteen bits) of Memory I/O.
MemOff
Turns off one Memory I/O bit.
MemOn
Turns on one Memory I/O bit.
MemSw
Read status of one bit of memory I/O.
Off
Turns off one output bit.
On
Turns on one output bit.
Out
Sets/reads one byte (eight bits) of output data.
OutW
Sets/reads one word (sixteen bits) of output data.
Oport
Reads the status of one output bit.
InBCD
Reads one byte of input data in BCD (binary coded decimal) format.
OpBCD
Outputs one byte of output data in BCD format.
Sw
Read status of one bit of hardware inputs or memory inputs.

6. The SPEL+ Language
EPSON RC+ 7.0 (Ver.7.4) User's Guide Rev.6
229
6.21 Using Traps
Traps enable a program to jump to a label or enable a function to be called when a certain
event occurs.
Traps are divided into the following two types:
4 Traps are fired by user defined input
7 Traps are fired by system
You should keep trap functions short and avoid continuous loops. According to the type,
some Traps must be re-armed. Also, some motion commands are limited to execute in
trap functions.
For details on Trap statement, see the SPEL
+
Language Reference manual.
Here is a simple example for a trap. In this example, when input 1 turns on, it executes the
Sw1Trap function.
Function main
' Sets the trap
Trap 1 Sw(1) = On Xqt Sw1Trap
Do
RunCycle
Loop
Fend
Function Sw1Trap
' Turn on output 1 for 2 seconds
On 1, 2
' Wait for trap condition to clear
Wait Sw(1) = Off
' Re-arm the trap
Trap 1 Sw(1) = On Xqt Sw1Trap
Fend
Trap
Description
Trap 1 – 4 Goto
Trap 1 – 4 Call
Trap 1 – 4 Xqt
Triggered by an input condition specified by the user.
User traps can use GoTo, Call, or Xqt.
Trap Emergency Xqt
When Emergency Stop occurs, a specified function is executed.
Trap Error Xqt
When an error occurs, a specified function is executed.
Trap SgOpen Xqt
When the Safeguard circuit is open, a specified function is
executed.
Trap SgClose Xqt
When the Safeguard circuit is closed, a specified function is
executed.
Trap Pause Xqt
When the system enters the Pause state, a specified function is
executed.
Trap Abort Xqt
When all tasks (except background tasks) have been stopped by
user or system, such as when a command corresponding to
Abort All is executed, a specified function is executed.
Trap Finish Xqt
When all tasks (except background tasks) have been finished, a
specified function is executed. However, the function will not
be executed under the condition that executes Trap Abort.

6. The SPEL+ Language
230
EPSON RC+ 7.0 (Ver.7.4) User's Guide Rev.6
6.21.1 Cautions of Trap when it triggers the system condition
CAUTION
■
Forced Flag
Specify Forced flag in the I/O output commands such as
On/Off command to
enable On/ Off of the I/O outputs during Emergency Stop, Safety Door open,
Teach mode, and error condition.
Do not connect external equipment that operates mechanically such as actuator
to the I/O output that specifies Forced flag. Othe
rwise, the external equipment
may move during Emergency Stop, Safety Door Open, Teach mode, or error
condition and this will cause serious safety problems.
Forced flag is designed to be specified for I/O outputs connected to external
equipment without mech
anical motion such as status display LEDs.
Outputs off during Emergency Stop
Uncheck “Outputs off during Emergency Stop” in the Preferences page of System
Configuration SPEL Controller Board to execute I/O On/Off using the Trap Emergency
Xqt task after Emergency Stop. If this checkbox is checked, the execution order of turning
Off by the controller and turning On using the task are not guaranteed.
6. The SPEL+ Language
EPSON RC+ 7.0 (Ver.7.4) User's Guide Rev.6
231
6.22 Special Tasks
Each task of SPEL
+
pauses by Pause input or Safety Door open and stops by Emergency
Stop or Error. Therefore you cannot create a system that monitors the whole system.
To enable the Robot Controller to monitor the whole system, the following special tasks
are provided:
NoPause/NoEmgAbort task
You can create a task that continues a processing even when the Pause is input or
safeguard is open by specifying NoPause or NoEmgAbort as a task type when creating
Xqt data task.
Background task
You can create a task that starts as the controller power is turned ON and continues a
processing even when the Pause is input or safeguard is open.
These special tasks are useful tasks but may reduce the safety of the system by using them
improperly.
Be sure to understand the following items when using these tasks.
6.22.1 Precautions to Use the Special Tasks
CAUTION
■
Forced Flag
Specify Forced flag in the I/O output commands such as On/Off command to
enable On/ Off of the I/O outputs during Emergency Stop, Safety Door open, and
error.
Do not connect external equipment that operates mechanically
such as actuator
to the I/O output that specifies Forced flag. Connecting external equipment may
cause serious safety problems and operate the external equipment during
Emergency Stop, Safety Door Open, or error occurrence.
Forced flag is designed to be specified for I/O outputs connected to external
equipment without mechanical motion such as status display LEDs.
NoEmgAbort Task
When Emergency Stop or errors occur, finish the task promptly after completing the error
handling.
If you do not complete the NoEmgAbort task, the controller does not change to Ready
status and you cannot cancel the Emergency Stop or the error. You cannot execute Reset
command from the NoEmgAbort task to cancel the Emergency Stop or the error
automatically.
NoEmgAbort task is designed for I/O process without motion and communication with
external device using the Ethernet. Therefore there are commands such as robot motion
commands that cannot be executed in the NoEmgAbort task. An error occurs if you use
these commands. The list of these commands is in the next section.
For details, refer to EPSON RC+ 7.0 Online Help or Xqt in SPEL
+
Language Reference.
NoPause Task
NoPause task continues the operation during the Pause or Safety Door open condition.
However, when a robot is operating NoPause task, the task pauses as the robot pauses.
Background task
Background task always exists while the controller is working, and it is designed for
monitor of the entire system and communication with external device. Therefore there are
commands such as robot motion commands that cannot be executed in the background
6. The SPEL+ Language
232
EPSON RC+ 7.0 (Ver.7.4) User's Guide Rev.6
task. An error occurs if you use these commands. The list of these commands is in the
next section.
In addition, the background task continues processing even when Pause is input or
safeguard is open, so it doesn’t affect the controller state transition.
For details, refer to 6.23 Background Task.
Outputs off during Emergency Stop
Uncheck this preference to execute I/O On/Off using the NoEmgAbort task or background
task after Emergency Stop. If this checkbox is checked, the execution order of turn Off by
the controller and turn On using the task are not guaranteed.
Setting of Safeguard open stops all tasks
When this preference is checked, NoPause task stops by Safety Door open. NoEmgAbort
task or background task continues the task.
Setting of [Enable the Background task]
Set this preference when you use the background task.
Setting of [Initialize global variables as the MainXX starts]
Uncheck this preference when you use the global variables from the background task.
When this checkbox is checked, the controller will initialize the variables and the variable-
access conflict from tasks will occur.
CAUTION
■
Setting of [Enable advanced task commands]
Check this preference when you execute the commands below from a
background task.
StartMain, Cont, Recover, Reset Error, Reset
When you execute these
commands from a task, you should understand each
command specification and verify that the system has the appropriate conditions.
Improper use, such as executing commands continuously in a loop, can reduce
the security of system.

6. The SPEL+ Language
EPSON RC+ 7.0 (Ver.7.4) User's Guide Rev.6
233
6.22.2 NoPause/NoEmgAbort task specification
Status by Event and Task
Event
Task Type
Normal
NoPause
NoEmgAbort
Pause Statement
Pause Input
Pause Button
Pause Continue *1
Continue
Safety Door Open
Pause *2
Continue *1 *2
Continue
Error during Auto Mode
Stop
Stop
Continue
Error during Program Mode
Pause
Pause
Continue
Emergency Stop
Stop
Stop
Continue
Stop Button
Stop Input
Stop Stop Stop
Halt Statement
Halt Button
Pause Pause Pause
Brake Point
Pause Pause Pause
Switching to Teach Mode
Stop
Stop
Stop
*1 When the robot is operating, the task pauses as the robot pauses.
*2 When [Outputs off during Emergency Stop] is checked in the [Preferences] page of
[Setup Controller], normal tasks and NoPause tasks stop by Safety Door open.
Task Execution
Normal
Omit the task type in Xqt statement, or specify Normal for the task
type.
Xqt NormalTask
Xqt NormalTask, Normal
NoPause Specify NoPause in Xqt statement.
Xqt NoPauseTask, NoPause
NoEmgAbort Specify NoEmgAbort in Xqt statement.
Xqt NoEmgAbortTask, NoEmgAbort
You cannot change the task type after executing a task.
main to main63 that are executed at the beginning of the program are executed as normal
tasks.
Type of a task executed in Trap Xqt is determined by the event type.
For details, refer to EPSON RC+ 7.0 Online Help or Trap in SPEL
+
Language Reference.
Restricted Commands by Task Types
Normal
No restriction
NoPause
No restriction
NoEmgAbort Cannot execute the following commands.
Command for robot motion
Commands for vision
Reset, Xqt, Trap, etc.
For details, refer to EPSON RC+ 7.0 Online Help or Xqt in SPEL
+
Language Reference.

6. The SPEL+ Language
234
EPSON RC+ 7.0 (Ver.7.4) User's Guide Rev.6
6.22.3 NoPause/NoEmgAbort task example
The following example shows a program that monitors the error of the controller and
switches the I/O On/Off when error occurs according to the error number.
The program example of ErrOn, EStopOn, SafetyOn are indicated in the EPSON RC+ 7.0
SPEL
+
Language Reference.
Function main
Xqt ErrorMonitor, NoEmgAbort
:
:
Fend
Function ErrorMonitor
Wait ErrorOn
If 4000 < SysErr And Syserr < 5999 Then
Print "Mortion Error = ", SysErr
Off 10, Forced
On 12, Forced
Else
Print "Other Error = ", SysErr
Off 11, Forced
On 13, Forced
EndIf
Fend
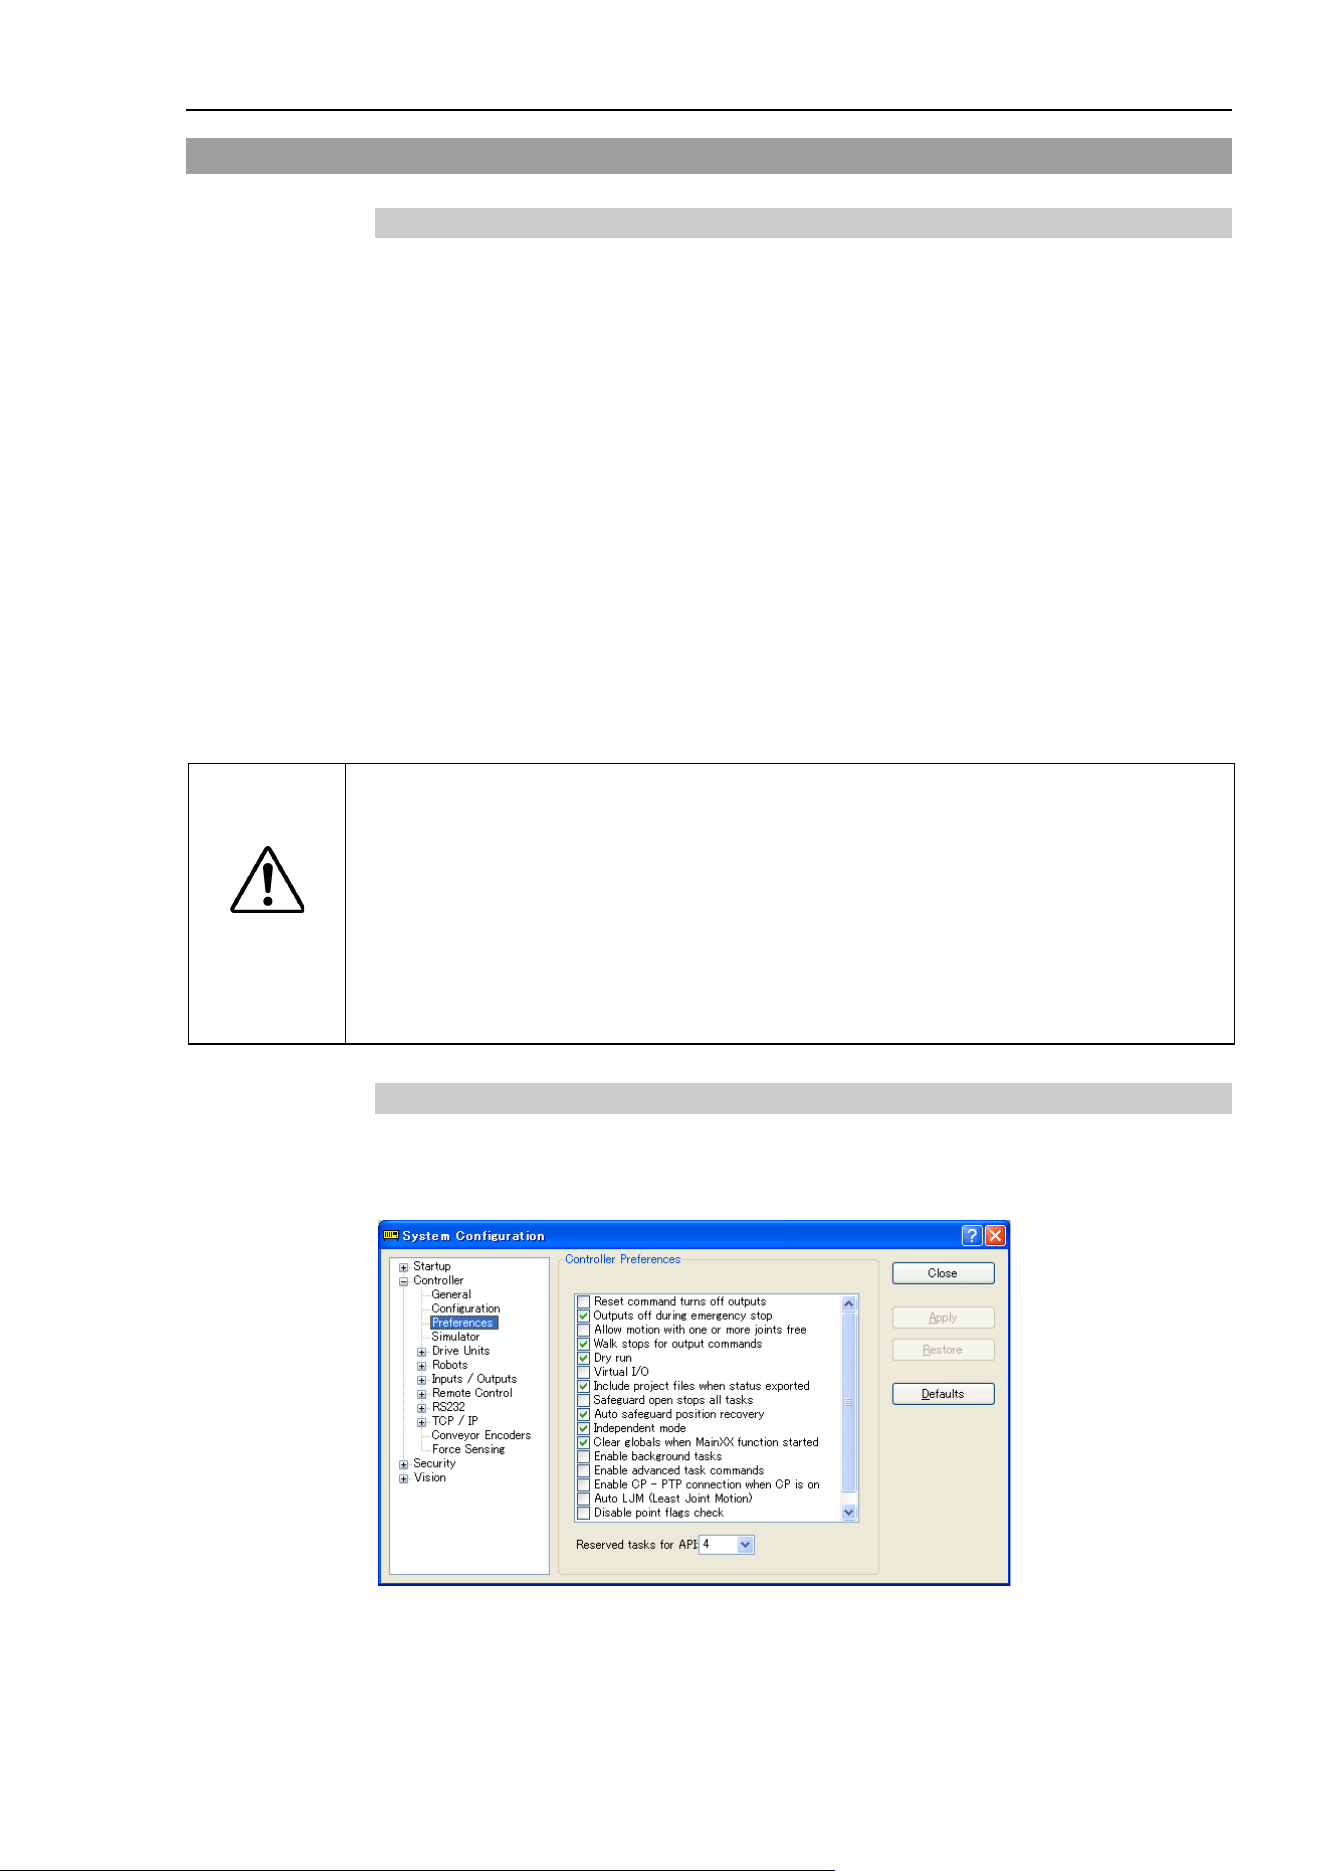
6. The SPEL+ Language
EPSON RC+ 7.0 (Ver.7.4) User's Guide Rev.6
235
6.23 Background Task
6.23.1 Primary features of background task
The purpose of the background task is to monitor the status of the cell as a whole and to
communicate with external devices.
Function BgMain, a function specified as the “Background task” will be automatically
activated as task 65 when the controller starts and loads the project.
If another task is created within the background task using the XQT command, that
created task will be assigned to task No.65 (and onward in the ascending order) and will
also function as a background task. In addition, specifying a task type for an XQT
command in a background task has no meaning.
An operator is not necessarily aware of the operating Background task which does not stop
at the input of emergency stop or safeguard signal. The Background task will not stop
when an operator inputs “PAUSE” or “ABORT”.
In this sense, the background task functions for the application program to work as a part
of the system.
On the other hand, the execution commands to operate the Manipulator, set-up commands
for the Manipulator or the commands for image processing cannot be executed within the
background task.
CAUTION
■
Specify Forced flag in the I/O output commands operated from the background
tasks to enable On/ Off of the I/O outputs during Emergency Stop, Safety Door
open, and error.
Do not connect external equipment that operates mechanically such as actuators
to the I/O output that specifies the Forced flag. Connecting external equipment
may cause serious safety problems and operate the external equipment during
Emergency Stop, Safety Door Open, or error occurrence.
Forced flag is designed to be specified for I/O outputs connected to external
equipment without mechanical motion such as status display LEDs.
6.23.2 Setup and start the background task
When you use the background task, first of all you need to check the [Enable background
tasks] in the [Preferences] page of [Setup]-[System Configuration]-[SPEL Controller
Board].
When you have already checked the box above and the Function BgMain exists in your
program, it will automatically start as Task 65 as the controller starts and loads the project,
it executes as a “Background task”.
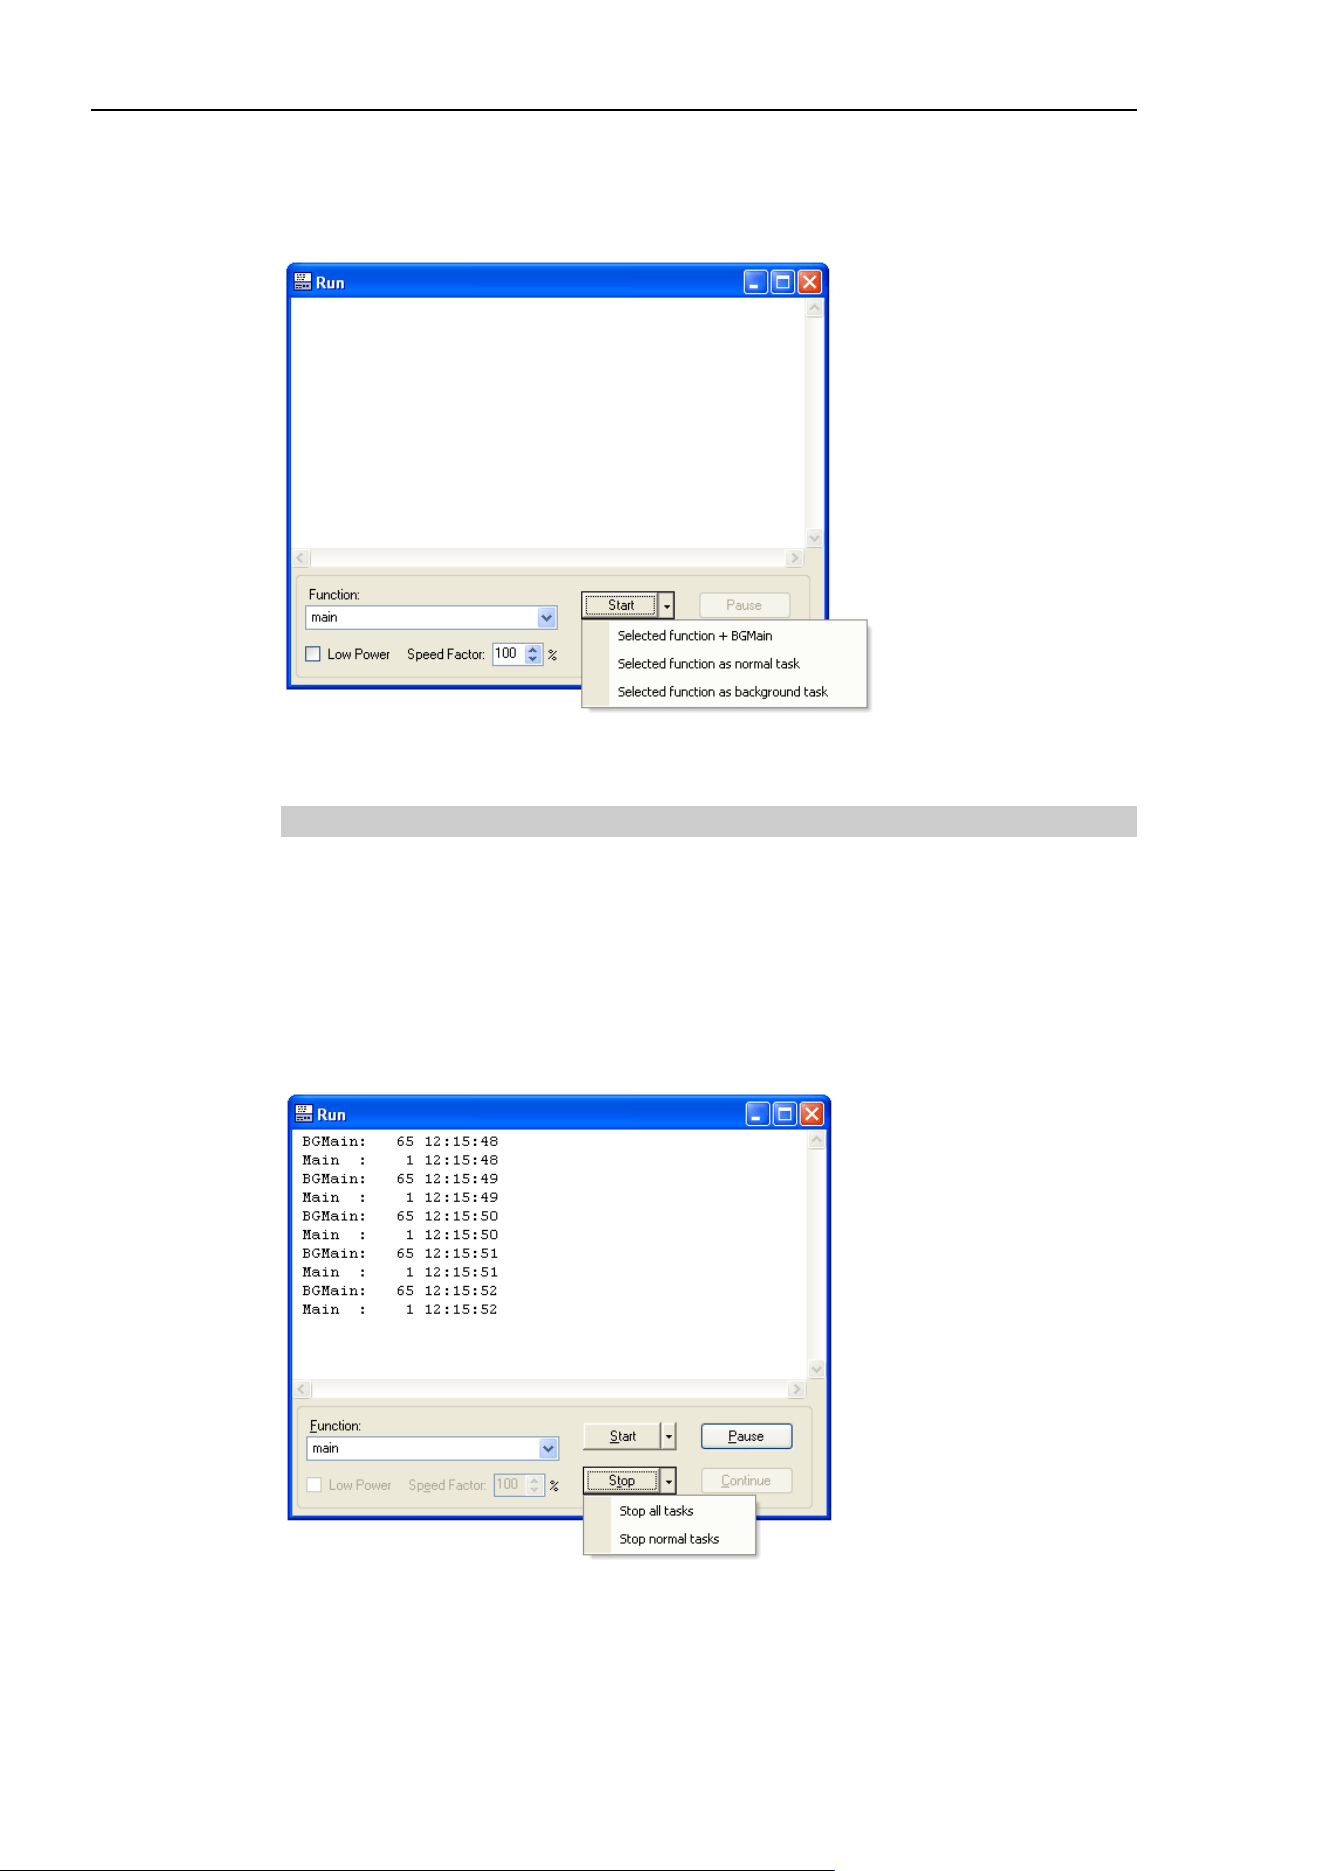
6. The SPEL+ Language
236
EPSON RC+ 7.0 (Ver.7.4) User's Guide Rev.6
However in PROGRAM mode, the Function BgMain will not start automatically. You
need to start it using the <Start> button in the [Run] window.
This is because the PROGRAM mode is for creating programs and debugging and it may
be more efficient when it doesn’t start the Function BgMain.
When the controller operating mode shifts from PROGRAM to AUTO mode, the Function
BgMain will start automatically.
6.23.3 Holding background task (from being activated)
The purpose of the background task is to monitor the status of the cell as a whole and to
communicate with external devices. It is activated before a non-background task is
activated and continues to function when the non-background task either generates an
error or is aborted by an operator. In this sense, the background task can be a program that
never stops functioning.
The background task can be debugged in PROGAM mode. Click the <Stop> button
dropdown menu in the [Run] window and you can select the background task is to be
aborted as well or not.
In the [Task Manager] window, the background tasks can be managed in the same way as
the non-background tasks except for the <Pause/Cont> button. You can set a break point
in a background task and step through the code.
As a rule, the background task cannot be controlled in AUTO mode. It is by design that
any error that occurs in the background task cannot be recovered in AUTO mode.

6. The SPEL+ Language
EPSON RC+ 7.0 (Ver.7.4) User's Guide Rev.6
237
Therefore, thorough debugging in PROGRAM mode is recommended. Be particularly
careful that the communication errors are handled properly without fail before using the
background task in AUTO mode.
The following tables show how the background will (or will not) be affected by operation
from the console.
Operator Window
Button
Background task
START
It will not be affected.
Abort
It will not be affected.
Pause
It will not be affected.
Continue
It will not be affected.
Remote Input
Button
Background task
Start / Stop
It will not be affected.
Pause / Continue
It will not be affected.
Reset
It will not be affected.
Shutdown
It will be stopped.
Run Window (PROGRAM mode)
Button
Background task
Start
You can select how to start the task.
Abort
You can select how to abort the task:
abort only non-background task or abort all tasks including the
background task.
Pause
It will not be affected.
Continue
It will not be affected.
Task Manager (PROPGRAM mode)
Button
Background task
Halt / Resume
When the background task is selected, you cannot execute
Halt/Resume.
Quit
When the background task is selected, you can execute Quit.
Pause/Cont
It will not be affected.
Stop
All tasks including the background task will stop.
Break point (PROGRAM mode)
Switch name
Background task
Set a break point
You can set a breakpoint to the background task.
It will pause at the break point.
Step Into
Available
Step Over
Available
Continue
Available
Walk
Available, but the motion commands are not available to execute from
the background task.

6. The SPEL+ Language
238
EPSON RC+ 7.0 (Ver.7.4) User's Guide Rev.6
6.23.4 Commands that will cause error in background task
The following commands are prohibited in background tasks and execution will result in
error:
commands that relate to the Manipulator operation or operation settings
commands that relate to the Vision relation instruction
TRAP commands
If a program that is to be executed as the background task includes any of the following
commands, it will result in error when executed.
However, using the command related to the Manipulator operation settings or the
Manipulator settings to gain the current setting values or refer to them will not result in
error:
Commands that will cause error are almost the same as with NoEmgAbort, but there are
some commands such as Xqt that can be executed in a background task.
For details, refer to EPSON RC+ 7.0 Online Help or Xqt in SPEL
+
Language Reference.
6.23.5 Background task and Remote control
No matter whether the background task is being executed or not, it doesn’t affect the
remote I/O outputs Ready, Running, and Pause. For example, even if the background task
is being executed, when no non-background tasks (Task No. 1 - 32) are being executed,
the READY output will be ON.

6. The SPEL+ Language
EPSON RC+ 7.0 (Ver.7.4) User's Guide Rev.6
239
6.24 Predefined Constants
There are several predefined constants for use in SPEL
+
program. A project build time,
the values for these constants are substituted for the constant name.
Constant name
Value
Use
TRUE
-1
Boolean expression
FALSE
0
Boolean expression
High
1
Low
0
Off
0
On
1
Above
1
Below
2
NoFlip
1
Flip
2
Righty
1
Lefty
2
J1
1
J2
2
J3
4
J4
8
J5
16
J6
32
J7
64
CR
CHR$(13)
CRLF
CHR$(13)+
CHR$(10)
LF
CHR$(10)
MB_OK
0
MsgBox flags
MB_OKCANCEL
1
MsgBox flags
MB_ABORTRETRYIGNORE
2
MsgBox flags
MB_YESNOCANCEL
3
MsgBox flags
MB_YESNO
4
MsgBox flags
MB_RETRYCANCEL
5
MsgBox flags
MB_ICONSTOP
16
MsgBox flags
MB_ICONQUESTION
32
MsgBox flags
MB_ICONEXCLAMATION
48
MsgBox flags
MB_ICONINFORMATION
64
MsgBox flags
MB_DEFBUTTON1
0
MsgBox flags
MB_DEFBUTTON2
256
MsgBox flags
IDOK
1
MsgBox return
IDCANCEL
2
MsgBox return
IDABORT
3
MsgBox return
IDRETRY
4
MsgBox return
IDIGNORE
5
MsgBox return
IDYES
6
MsgBox return
IDNO
7
MsgBox return
BACKCOLORMODE_VISUALSTYLE
0
For GUI Builder
BACKCOLORMODE_USER
1
For GUI Builder
BORDERSTYLE_NONE
0
For GUI Builder
BORDERSTYLE_FIXEDSINGLE
1
For GUI Builder
BORDERSTYLE_FIXED3D
2
For GUI Builder
CNV_QUELEN_ALL
0
Cnv_QueLen
CNV_QUELEN_UPSTREAM
1
Cnv_QueLen
CNV_QUELEN_PICKUPAREA
2
Cnv_QueLen
CNV_QUELEN_DOWNSTREAM
3
Cnv_QueLen
DEVID_SELF
21
CLS
DEVID_TP
24
CLS
DEVID_TP3
30
CLS
DIALOGRESULT_NOE
0
For GUI Builder
DIALOGRESULT_OK
1
For GUI Builder
DIALOGRESULT_CANCEL
2
For GUI Builder

6. The SPEL+ Language
240
EPSON RC+ 7.0 (Ver.7.4) User's Guide Rev.6
Constant name
Value
Use
DLG_IOMON
102
RunDialog
DLG_ROBOTMNG
100
RunDialog
DLG_ROBOTPANEL
100
ShowDialog
DLG_VGUIDE
110
ShowDialog
DROPDOWNSTYLE_SIMPLE
0
For GUI Builder
DROPDOWNSTYLE_DROPDOWN
1
For GUI Builder
DROPDOWNSTYLE_DROPDOWNLIST
2
For GUI Builder
ERROR_DOINGMOTION
2999
For GUI Builder
ERROR_NOMOTION
2998
For GUI Builder
EVENTTASKTYPE_NORMAL
0
For GUI Builder
EVENTTASKTYPE_NOPAUSE
1
For GUI Builder
EVENTTASKTYPE_NOEMGABORT
2
For GUI Builder
FORCE_LESS
0
Force_SetTrigger
FORCE_GREATER
1
Force_SetTrigger
FORCE_XFORCE
2
Force_SetTrigger
FORCE_YFORCE
3
Force_SetTrigger
FORCE_ZFORCE
4
Force_SetTrigger
FORCE_XTORQUE
5
Force_SetTrigger
FORCE_YTORQUE
6
Force_SetTrigger
FORCE_ZTORQUE
7
Force_SetTrigger
FORMBORDERSTYLE_NONE
0
For GUI Builder
FORMBORDERSTYLE_FIXEDSINGLE
1
For GUI Builder
FORMBORDERSTYLE_FIXED3D
2
For GUI Builder
FORMBORDERSTYLE_FIXEDDIALOG
3
For GUI Builder
FORMBORDERSTYLE_SIZABLE
4
For GUI Builder
IMAGEALIGN_TOPLEFT
1
For GUI Builder
IMAGEALIGN_TOPCENTER
2
For GUI Builder
IMAGEALIGN_TOPRIGHT
3
For GUI Builder
IMAGEALIGN_MIDDLELEFT
4
For GUI Builder
IMAGEALIGN_MIDDLECENTER
5
For GUI Builder
IMAGEALIGN_MIDDLERIGHT
6
For GUI Builder
IMAGEALIGN_BOTTOMLEFT
7
For GUI Builder
IMAGEALIGN_BOTTOMCENTER
8
For GUI Builder
IMAGEALIGN_BOTTOMRIGHT
9
For GUI Builder
IOTYPE_INPUT
0
IOLabel function
IOTYPE_OUTPUT
1
IOLabel function
IOTYPE_MEMORY
2
IOLabel function
IOSIZE_BIT
1
IOLabel function
IOSIZE_BYTE
8
IOLabel function
IOSIZE_WORD
16
IOLabel function
LANGID_ENGLISH
0
ErrMsg$
LANGID_JAPANESE
1
ErrMsg$
LANGID_GERMAN
2
ErrMsg$
LANGID_FRENCH
3
ErrMsg$
LANGID_SIMPLIFIED_CHINESE
4
ErrMsg$
LANGID_TRADITIONAL_CHINESE
5
ErrMsg$
MODE_STANDARD
1
PerformMode
MODE_HIGH_SPEED
2
PerformMode
MODE_LOW_OSCILLATION
3
PerformMode
SCROLLBARS_NONE
0
For GUI Builder
SCROLLBARS_HORIZ
1
For GUI Builder
SCROLLBARS_VERT
2
For GUI Builder
SCROLLBARS_BOTH
3
For GUI Builder
SETLATCH_PORT_CU_0
24
SetLatch
SETLATCH_PORT_CU_1
25
SetLatch
SETLATCH_PORT_DU1_0
56
SetLatch
SETLATCH_PORT_DU1_1
57
SetLatch
SETLATCH_PORT_DU2_0
280
SetLatch
SETLATCH_PORT_DU2_1
281
SetLatch
SETLATCH_TRIGGERMODE_LEADINGEDGE
1
SetLatch
SETLATCH_TRIGGERMODE_TRAILINGEDGE
0
SetLatch

6. The SPEL+ Language
EPSON RC+ 7.0 (Ver.7.4) User's Guide Rev.6
241
Constant name
Value
Use
SHUTDOWN_ALL
0
Shutdown
SHUTDOWN_RESTART
1
Shutdown
SHUTDOWN_EPSONRC
2
Shutdown
SING_NONE
0
AvoidSingularity
SING_THRU
1
AvoidSingularity
SING_THRUROT
2
AvoidSingularity
SING_VSD
3
AvoidSingularity
SING_AUTO
4
AvoidSingularity
STARTPOSITION_MANUAL
0
For GUI Builder
STARTPOSITION_CENTERSCREEN
1
For GUI Builder
STARTPOSITION_CENTERPARENT
2
For GUI Builder
TEXTALIGN_LEFT
1
For GUI Builder
TEXTALIGN_CENTER
2
For GUI Builder
TEXTALIGN_RIGHT
3
For GUI Builder
TEXTALIGN_TOPLEFT
1
For GUI Builder
TEXTALIGN_TOPCENTER
2
For GUI Builder
TEXTALIGN_TOPRIGHT
3
For GUI Builder
TEXTALIGN_MIDDLELEFT
4
For GUI Builder
TEXTALIGN_MIDDLECENTER
5
For GUI Builder
TEXTALIGN_MIDDLERIGHT
6
For GUI Builder
TEXTALIGN_BOTTOMLEFT
7
For GUI Builder
TEXTALIGN_BOTTOMCENTER
8
For GUI Builder
TEXTALIGN_BOTTOMRIGHT
9
For GUI Builder
VISION_SORT_NONE
0
For Vision Guide
VISION_SORT_PIXELX
1
For Vision Guide
VISION_SORT_PIXELY
2
For Vision Guide
VISION_SORT_PIXELXY
3
For Vision Guide
VISION_SORT_CAMERAX
4
For Vision Guide
VISION_SORT_CAMERAY
5
For Vision Guide
VISION_SORT_CAMERAXY
6
For Vision Guide
VISION_SORT_ROBOTX
7
For Vision Guide
VISION_SORT_ROBOTY
8
For Vision Guide
VISION_SORT_ROBOTXY
9
For Vision Guide
VISION_SIZETOFIND_ANY
0
For Vision Guide
VISION_SIZETOFIND_LARGEST
1
For Vision Guide
VISION_SIZETOFIND_SMALLEST
2
For Vision Guide
VISION_BACKCOLOR_NONE
0
For Vision Guide
VISION_BACKCOLOR_BLACK
1
For Vision Guide
VISION_BACKCOLOR_WHITE
2
For Vision Guide
VISION_CAMORIENT_STANDALONE
1
For Vision Guide
VISION_CAMORIENT_FIXEDDOWN
2
For Vision Guide
VISION_CAMORIENT_FIXEDUP
3
For Vision Guide
VISION_CAMORIENT_MOBILEJ2
4
For Vision Guide
VISION_CAMORIENT_MOBILEJ4
5
For Vision Guide
VISION_CAMORIENT_MOBILEJ5
6
For Vision Guide
VISION_CAMORIENT_MOBILEJ6
7
For Vision Guide
VISION_FOUNDCOLOR_LIGHTGREEN
1
For Vision Guide
VISION_FOUNDCOLOR_DARKGREEN
2
For Vision Guide
VISION_GRAPHICS_ALL
1
For Vision Guide
VISION_GRAPHICS_POSONLY
2
For Vision Guide
VISION_GRAPHICS_NONE
3
For Vision Guide
VISION_OPERATION_OPEN
1
For Vision Guide
VISION_OPERATION_CLOSE
2
For Vision Guide
VISION_OPERATION_ERODE
3
For Vision Guide
VISION_OPERATION_DILATE
4
For Vision Guide
VISION_OPERATION_SMOOTH
5
For Vision Guide
VISION_OPERATION_SHARPEN1
6
For Vision Guide
VISION_OPERATION_SHARPEN2
7
For Vision Guide
VISION_OPERATION_HORIZEDGE
8
For Vision Guide
VISION_OPERATION_VERTEDGE
9
For Vision Guide
VISION_OPERATION_EDGEDETECT1
10
For Vision Guide

6. The SPEL+ Language
242
EPSON RC+ 7.0 (Ver.7.4) User's Guide Rev.6
Constant name
Value
Use
VISION_OPERATION_EDGEDETECT2
11
For Vision Guide
VISION_OPERATION_LAPLACE1
12
For Vision Guide
VISION_OPERATION_LAPLACE2
13
For Vision Guide
VISION_OPERATION_THIN
14
For Vision Guide
VISION_OPERATION_THICKEN
15
For Vision Guide
VISION_OPERATION_BINARIZE
16
For Vision Guide
VISION_OPERATION_ROTATE
17
For Vision Guide
VISION_OPERATION_FLIPHORIZ
18
For Vision Guide
VISION_OPERATION_FLIPVERT
19
For Vision Guide
VISION_OPERATION_FLIPBOTH
20
For Vision Guide
VISION_OPERATION_COLORFILTER
21
For Vision Guide
VISION_OPERATION_SUBTRACTABS
22
For Vision Guide
VISION_OPERATION_ZOOM
23
For Vision Guide
VISION_ACQUIRE_NONE
0
For Vision Guide
VISION_ACQUIRE_STATIONARY
1
For Vision Guide
VISION_ACQUIRE_STROBED
2
For Vision Guide
VISION_TRIGGERMODE_LEADINGEDGE
1
For Vision Guide
VISION_TRIGGERMODE_TRAILINGEDGE
2
For Vision Guide
VISION_THRESHCOLOR_BLACK
1
For Vision Guide
VISION_THRESHCOLOR_WHITE
2
For Vision Guide
VISION_OBJTYPE_CORRELATIO
1
For Vision Guide
VISION_OBJTYPE_BLOB
2
For Vision Guide
VISION_OBJTYPE_EDGE
3
For Vision Guide
VISION_OBJTYPE_POLAR
4
For Vision Guide
VISION_OBJTYPE_LINE
5
For Vision Guide
VISION_OBJTYPE_POINT
6
For Vision Guide
VISION_OBJTYPE_FRAME
7
For Vision Guide
VISION_OBJTYPE_IMAGEOP
8
For Vision Guide
VISION_OBJTYPE_OCR
9
For Vision Guide
VISION_OBJTYPE_CODEREADER
10
For Vision Guide
VISION_OBJTYPE_GEOMETRIC
11
For Vision Guide
VISION_DETAILLEVEL_MEDIUM
1
For Vision Guide
VISION_DETAILLEVEL_HIGH
2
For Vision Guide
VISION_DETAILLEVEL_VERYHIGH
3
For Vision Guide
VISION_IMAGESOURCE_CAMERA
1
For Vision Guide
VISION_IMAGESOURCE_FILE
2
For Vision Guide
VISION_CODETYPE_AUTO
0
For Vision Guide
VISION_CODETYPE_EAN13
2
For Vision Guide
VISION_CODETYPE_CODE39
3
For Vision Guide
VISION_CODETYPE_INTERLEAVED25
4
For Vision Guide
VISION_CODETYPE_CODE128
5
For Vision Guide
VISION_CODETYPE_CODABAR
6
For Vision Guide
VISION_CODETYPE_PDF417
8
For Vision Guide
VISION_CODETYPE_QR
10
For Vision Guide
VISION_CODETYPE_EAN8
13
For Vision Guide
VISION_CODETYPE_UPCA
18
For Vision Guide
VISION_CODETYPE_UPCE
19
For Vision Guide
VISION_CODETYPE_UPC
20
For Vision Guide
VISION_EDGETYPE_SINGLE
1
For Vision Guide
VISION_EDGETYPE_PAIR
2
For Vision Guide
VISION_IMAGECOLOR_ALL
1
For Vision Guide
VISION_IMAGECOLOR_RED
2
For Vision Guide
VISION_IMAGECOLOR_GREEN
3
For Vision Guide
VISION_IMAGECOLOR_BLUE
4
For Vision Guide
VISION_IMAGECOLOR_GRAYSCALE
5
For Vision Guide
VISION_POINTTYPE_POINT
0
For Vision Guide
VISION_POINTTYPE_ENDPOINT
1
For Vision Guide
VISION_POINTTYPE_MIDPOINT
2
For Vision Guide
VISION_POINTTYPE_PERPTOLINE
3
For Vision Guide
VISION_POINTTYPE_STARTPOINT
4
For Vision Guide
VISION_POINTTYPE_PERPTOSTARTPOINT
5
For Vision Guide

6. The SPEL+ Language
EPSON RC+ 7.0 (Ver.7.4) User's Guide Rev.6
243
Constant name
Value
Use
VISION_POINTTYPE_PERPTOMIDPOINT
6
For Vision Guide
VISION_POINTTYPE_PERPTOENDPOINT
7
For Vision Guide
VISION_REFTYPE_TAUGHTPOINTS
1
For Vision Guide
VISION_REFTYPE_UPWARDCAMERA
2
For Vision Guide
VISION_IMAGESIZE_320X240
1
For Vision Guide
VISION_IMAGESIZE_640X480
2
For Vision Guide
VISION_IMAGESIZE_800X600
3
For Vision Guide
VISION_IMAGESIZE_1024X768
4
For Vision Guide
VISION_IMAGESIZE_1280X1024
5
For Vision Guide
VISION_IMAGESIZE_1600X1200
6
For Vision Guide
VISION_IMAGESIZE_2048X1536
7
For Vision Guide
VISION_IMAGESIZE_2560X1920
8
For Vision Guide
VISION_WINTYPE_RECTANGLE
1
For Vision Guide
VISION_WINTYPE_ROTATEDRECT
2
For Vision Guide
VISION_WINTYPE_CIRCLE
3
For Vision Guide
VISION_ORIENT_BOTH
1
For Vision Guide
VISION_ORIENT_HORIZ
2
For Vision Guide
VISION_ORIENT_VERT
3
For Vision Guide
VISION_DIRECTION_INSIDEOUT
1
For Vision Guide
VISION_DIRECTION_OUTSIDEIN
2
For Vision Guide
VISION_POLARITY_DARK
1
For Vision Guide
VISION_POLARITY_LIGHT
2
For Vision Guide
VISION_PASSTYPE_SOMEFOUND
1
For Vision Guide
VISION_PASSTYPE_ALLFOUND
2
For Vision Guide
VISION_PASSTYPE_SOMENOTFOUND
3
For Vision Guide
VISION_PASSTYPE_ALLNOTFOUND
4
For Vision Guide
WIN_IOMON
-1
For GUI Builder
WIN_TASKMGR
-2
For GUI Builder
WIN_FORCEMON
-3
For GUI Builder
WIN_SIMULATOR
-4
For GUI Builder
WINDOWSTATE_NORMAL
0
WindowsStatus
WINDOWSTATE_MINIMIZED
1
WindowsStatus
WINDOWSTATE_MAXIMIZED
2
WindowsStatus
WithMove
0
Recover
WithoutMove
1
Recover

6. The SPEL+ Language
244
EPSON RC+ 7.0 (Ver.7.4) User's Guide Rev.6
6.25 Calling Native Functions in Dynamic Link Libraries
EPSON RC+ 7.0 allows you to call native functions in Dynamic Link Libraries (DLLs).
This is used for complicated arithmetic processing and call for a native function of an
external device.
To call the native DLL function, use a Declare statement which is a function definition
command from the SPEL
+
program and write a function call as normal.
For details, refer to the Declare in the EPSON RC+ 7.0 SPEL
+
Language Reference.
Sample of calling a native DLL
By using a development tool such as Microsoft Visual Studio 2019, you can create a
native DLL that can be called from SPEL
+
. Here, it uses Visual Studio 2019 as a sample
to create a function that executes the arithmetic operator.
Step 1: Decide on variable type for a native DLL
You need to plan the data type to use for transferring with the native DLL in the EPSON
RC+ 7.0.
Correspondence table for the EPSON RC+ 7.0 data type and the C/C++ variable type is
shown below.
You cannot use the C/C++ byte type and structure because the EPSON RC+ 7.0 has no
correspond data for them.
Data correspondence
EPSON RC+ 7.0
C/C++
Boolean
short
Byte
short
Short
short
Integer
short
Long
int
Real
float
Double
double
String
char [256] * Null included
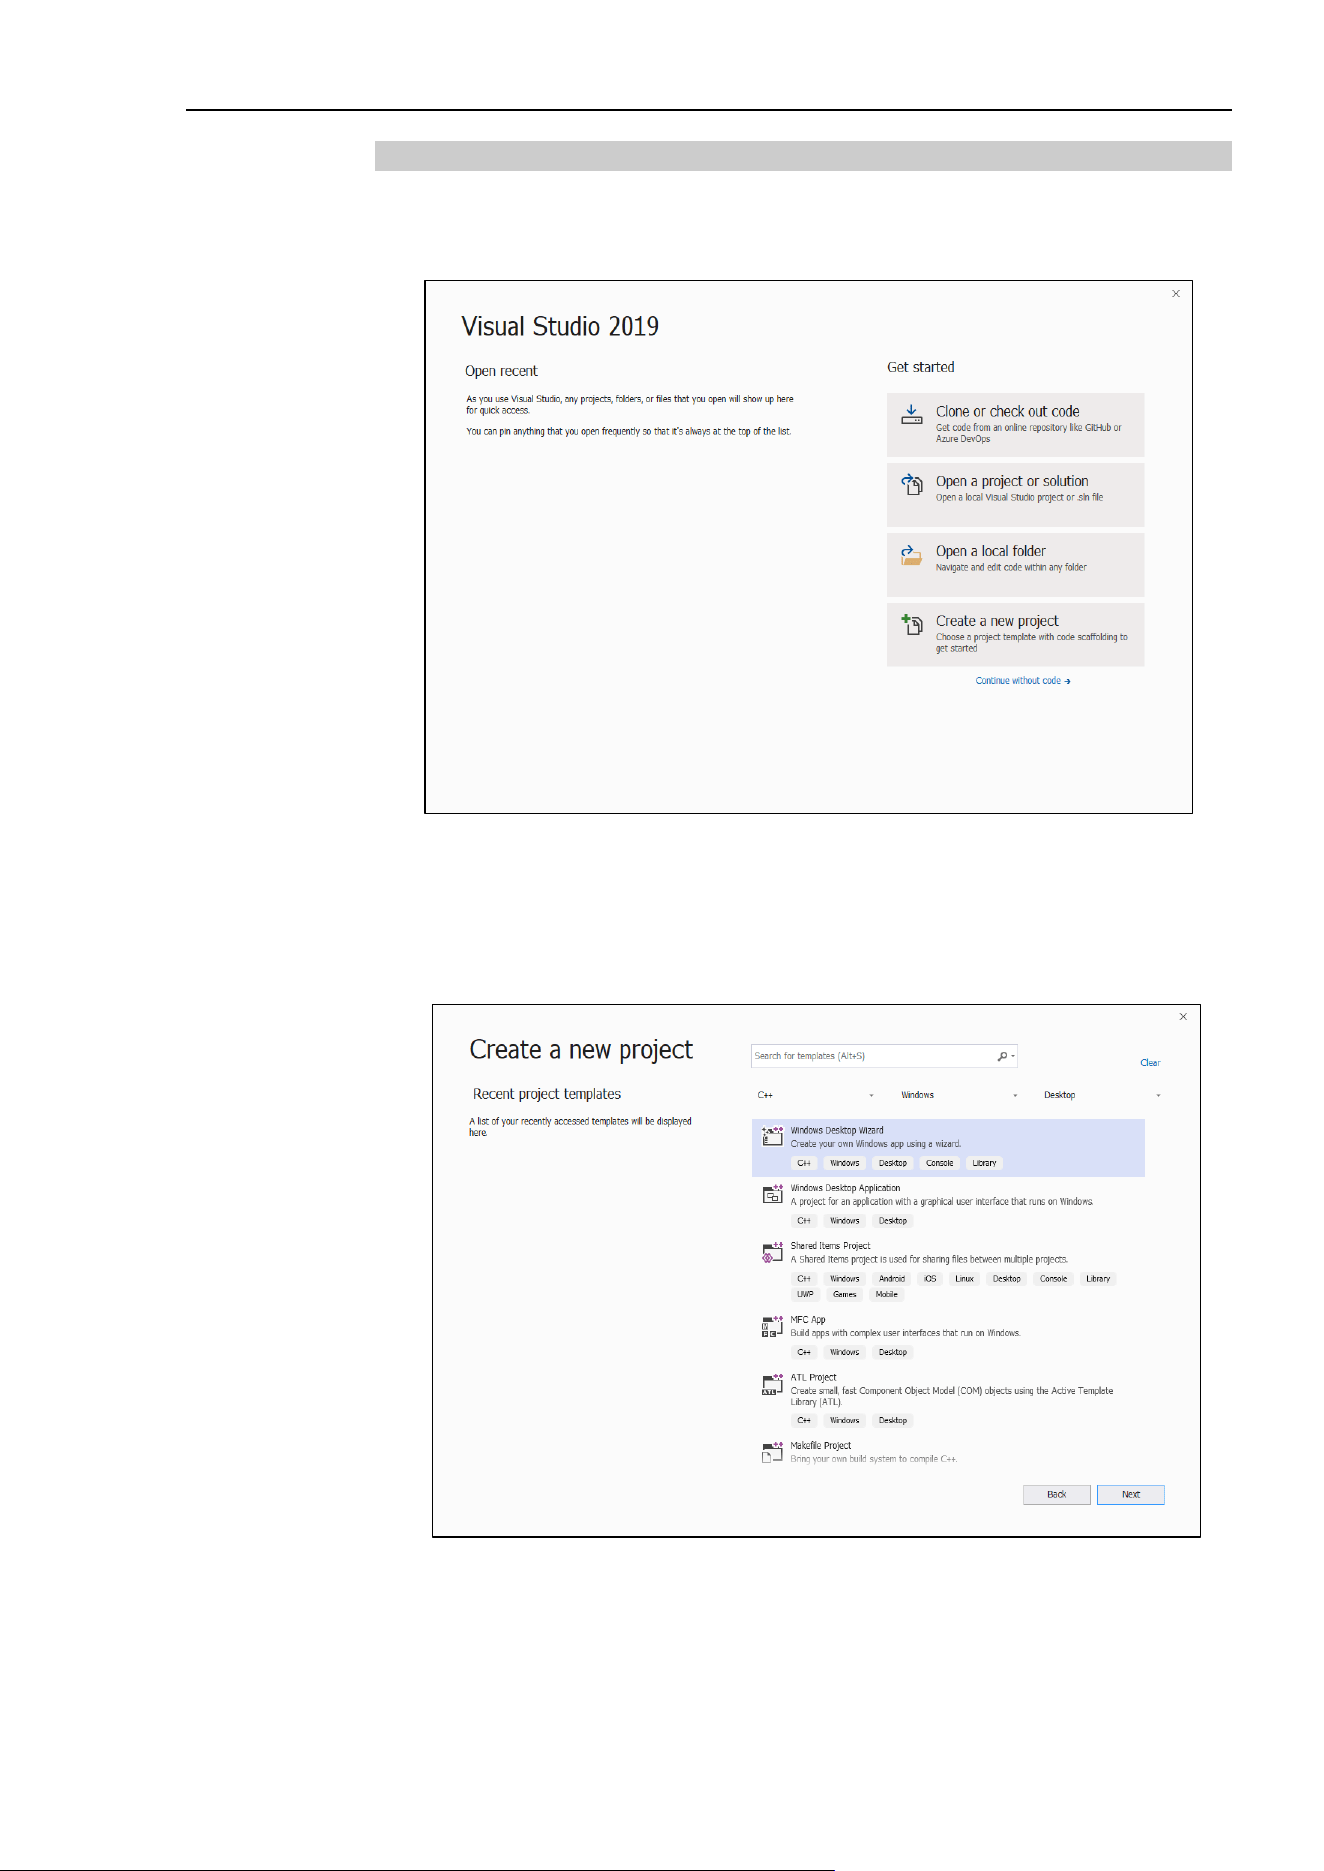
6. The SPEL+ Language
EPSON RC+ 7.0 (Ver.7.4) User's Guide Rev.6
245
Step 2: Create a native DLL
(1) Start Visual Studio 2019.
Select the “Create a new project” on the start window.
(2) [Create a new project] dialog box will appear.
Select “Windows Desktop Wizard” from the project template list shown on the right
of dialog box.
Click the <Next> button.
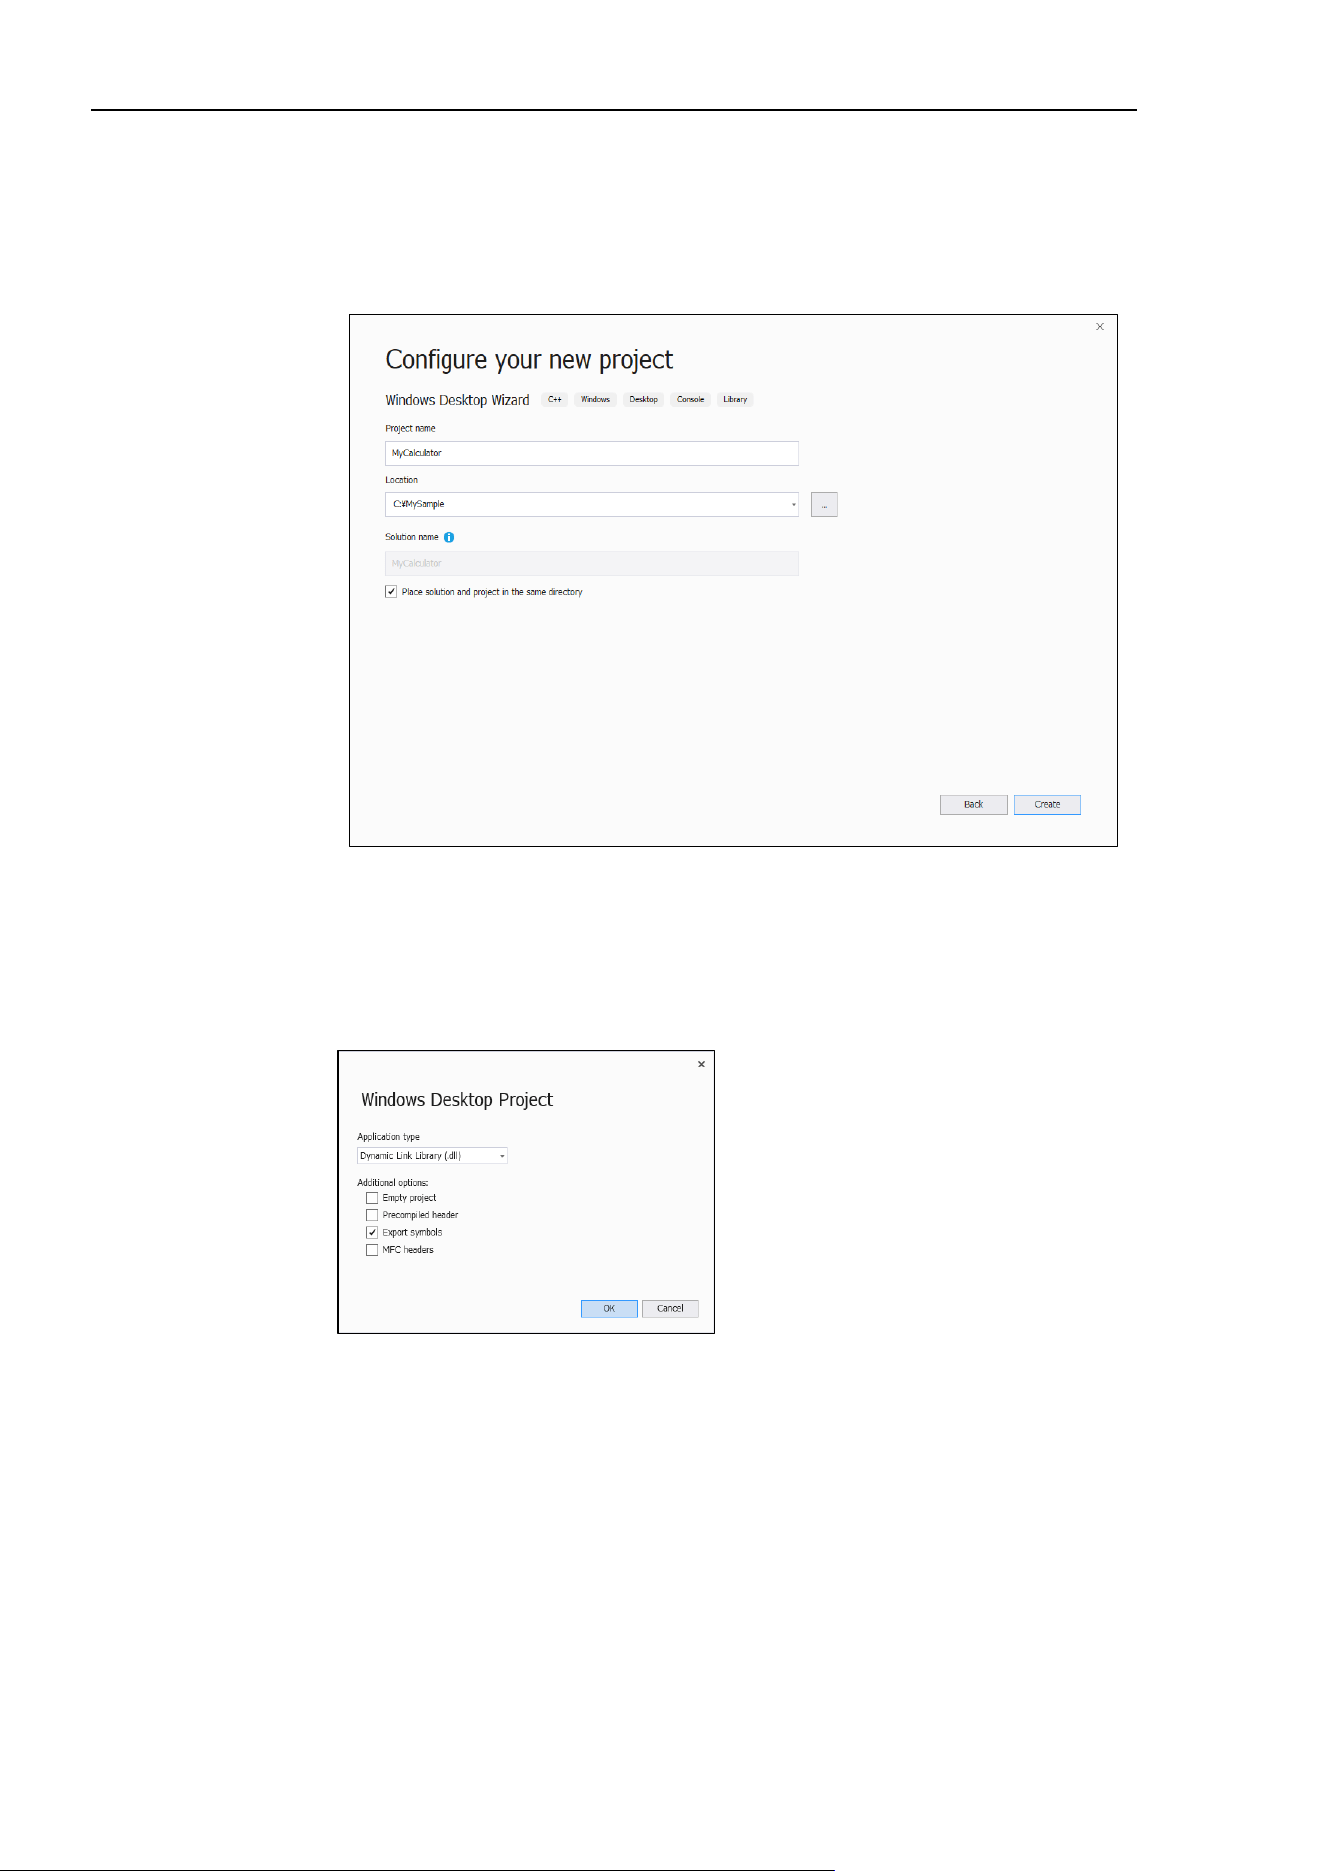
6. The SPEL+ Language
246
EPSON RC+ 7.0 (Ver.7.4) User's Guide Rev.6
(3) Start the Windows Desktop Wizard.
Type in a name for a project in the [Project name] box.
(Here types in “MyCalculator”.)
Click the <Create> button.
(4) Set the project options.
Select the “Dynamic Link Library (.dll)” in the [Application type].
Check the [Export symbols] box in the [Additional options:].
Click the <OK> button.

6. The SPEL+ Language
EPSON RC+ 7.0 (Ver.7.4) User's Guide Rev.6
247
(5) A simple example of function “fnMyCalculator” will be created in MyCalculator.cpp.
Add a function MyArithmetic which executes the arithmetic operator to this file.
MYCALCULATOR_API float MyArithmetic(short value1, short
value2, char * kind )
{
if ( !strcmp(kind, "add") )
{
return (float)(value1 + value2);
}
else if ( !strcmp(kind, "sub") )
{
return (float)(value1 - value2);
}
else if ( !strcmp(kind, "mul") )
{
return (float)(value1 * value2);
}
else if ( !strcmp(kind, "div") )
{
return (float)(value1) / (float)(value2);
}
else
{
strcat_s(kind, 10, " NG");
return 0;
}
}
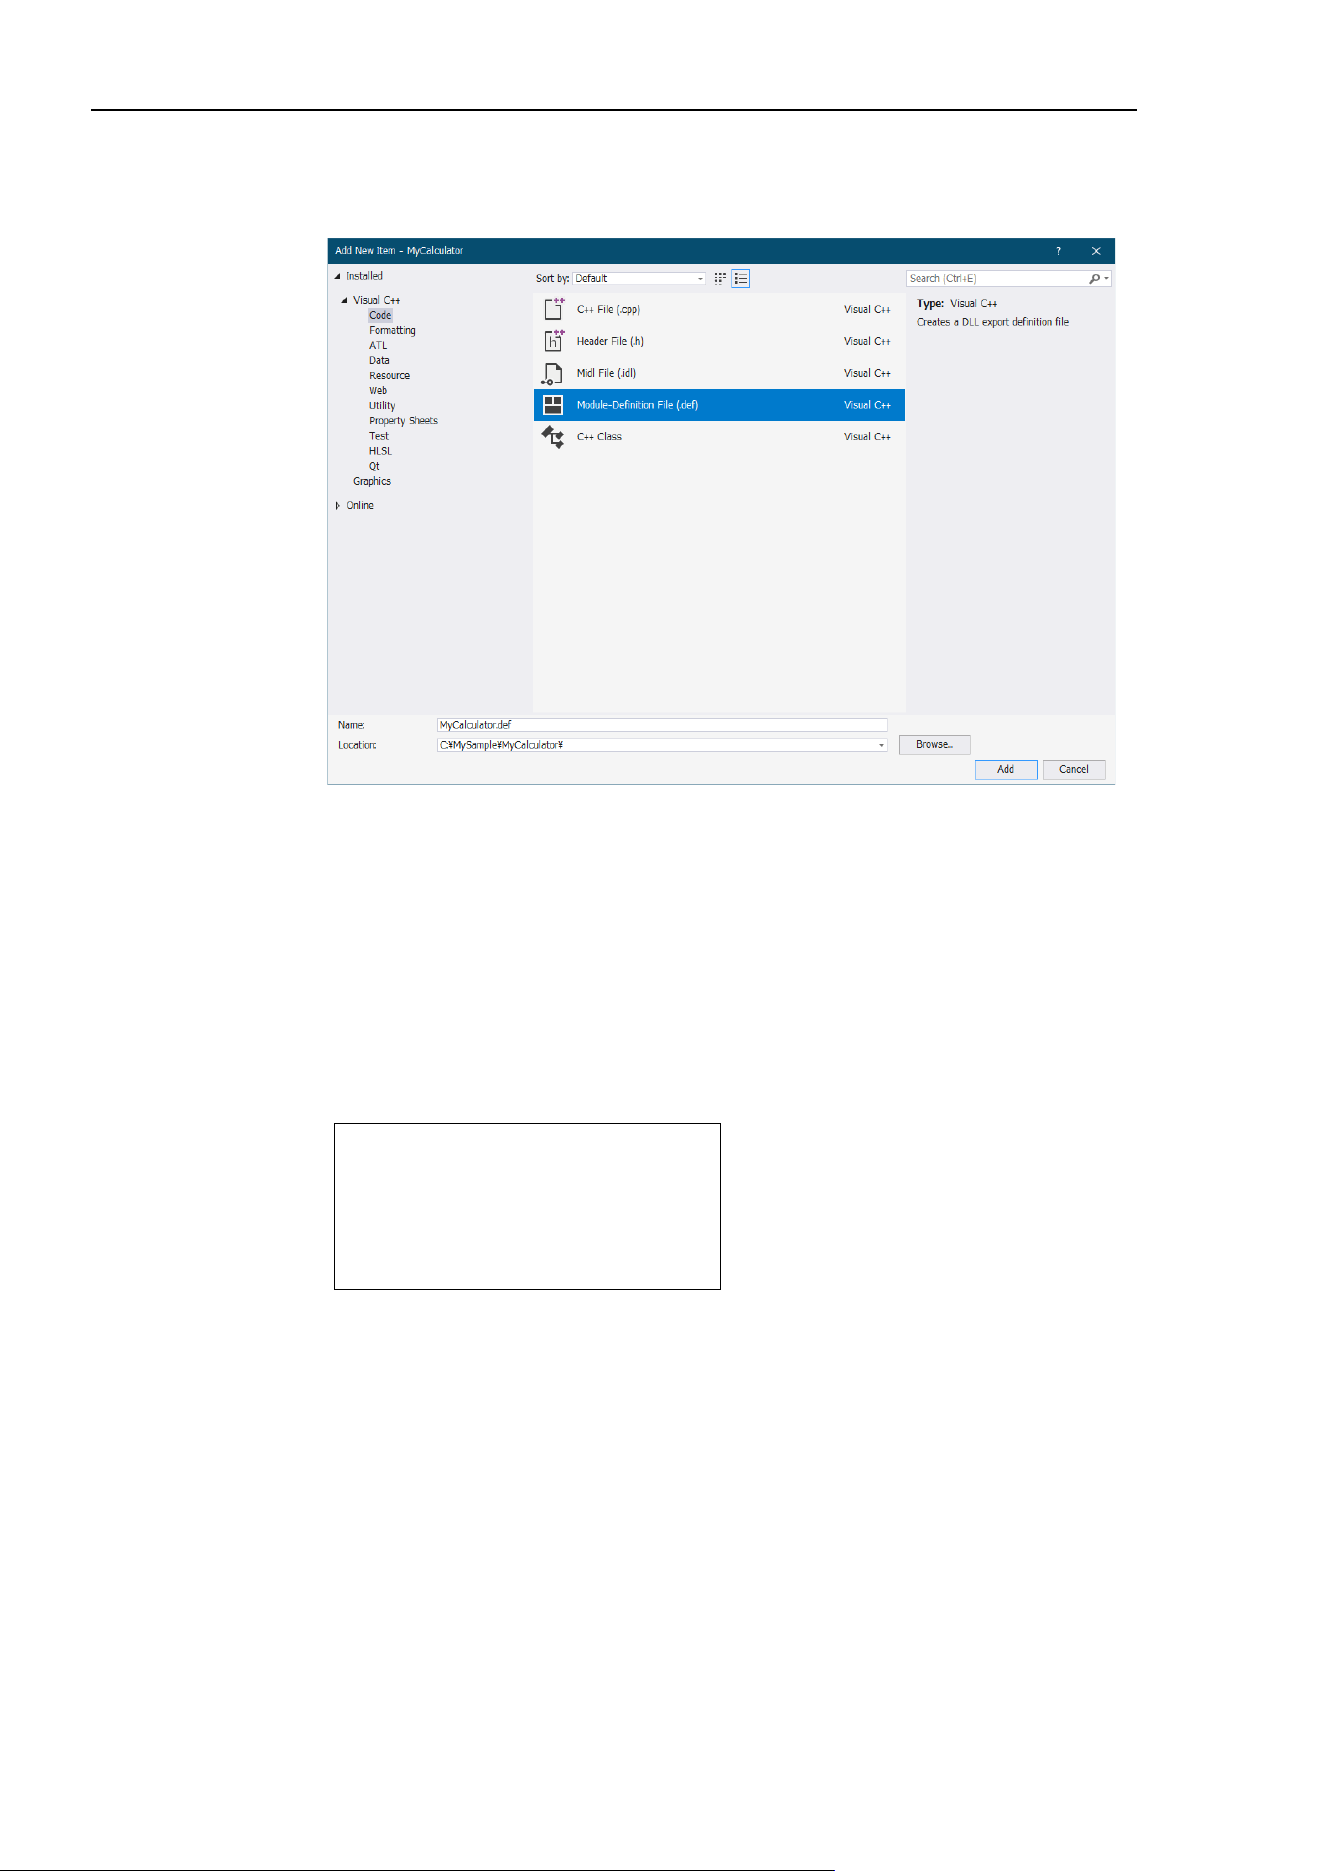
6. The SPEL+ Language
248
EPSON RC+ 7.0 (Ver.7.4) User's Guide Rev.6
(6) Export a function to enable it to be called from SPEL
+
.
Select Visual Studio 2019 menu-[Project]-[Add New Item].
The [Add New Item] dialog box will appear.
Select the [Visual C ++]-[Code] in the tree on the left.
Select “Module-Definition File (.def)” from the project template list shown on the
center of dialog box.
Type in a file name in the [Name:].
(Here types in “MyCalculator.def” as a file name.)
Click the <Add> button.
Register “fnMyCalculator function” and “MyArithmetic function” to the created
“MyCalculator.def” file.
LIBRARY "MyCalculator"
EXPORTS
fnMyCalculator
MyArithmetic
(7) Build the project and create the DLL.
Select Visual Studio 2019 menu-[Build]-[Build MyCalculator].
DLL will be successfully created if any error occurs.

6. The SPEL+ Language
EPSON RC+ 7.0 (Ver.7.4) User's Guide Rev.6
249
Step 3: Call the DLL function from SPEL
+
You can now try your DLL function from SPEL
+
.
Before you call your function from the EPSON RC+ 7.0, you must debug it and check
thoroughly if it can work without errors.
In case that error occurs (such as system error) in the native function, the EPSON RC+ 7.0
will not work normally.
(1) Copy the created MyCalculator.dll to the EPSON RC+ 7.0 project folder (e.g.
C:\EpsonRC70\projects\dllcall).
(2) Define a DLL function which executes the arithmetic operator in the SPEL
+
program
and write a function call for MyArithmetic in Function main.
Declare MyArithmetic, "MyCalculator.dll"(value1 As Integer,
value2 As Integer, ByRef calc$ As String) As Real
Function main
Real result;
String calc$
calc$ = "add"
result = MyArithmetic(1, 2, ByRef calc$);
Print "1+2=", Str$(result)
calc$ = "sub"
result = MyArithmetic(1, 2, ByRef calc$);
Print "1-2=", Str$(result)
calc$ = "mul"
result = MyArithmetic(1, 2, ByRef calc$);
Print "1*2=", Str$(result)
calc$ = "div"
result = MyArithmetic(1, 2, ByRef calc$);
Print "1/2=", Str$(result)
Fend
(3) Build and execute the project.
The following result will be displayed.
1+2=3
1-2=-1
1*2=2
1/2=0.5
Before you build the project, be sure to copy the native DLL to the project folder
without fail. If you fail, a warning or error will occur.
NOTE
NOTE

7. Building SPEL+ Applications
250
EPSON RC+ 7.0 (Ver.7.4) User's Guide Rev.6
7. Building SPEL
+
Applications
7.1 Designing Applications
7.1.1 Creating the simplest application
The simplest SPEL
+
application has one program and one point file. This is what is
automatically defined for you when you create a new project. A blank program named
“Main.prg” and a blank point file named “Points.pts” are created.
To write and run a simple application
1. Select [New Project] from the [Project] menu to create a new project.
2. Write your program source code in the file that was created for you called “Main.prg”.
3. Teach the robot points using the [Robot Manager]-[Jog & Teach] page.
4. Run the program by selecting [Run] Window from the [Run] menu or by pressing F5
(the shortcut key for the [Start] command).
7.1.2 Application layout
Before writing your application, you need to decide what your application will accomplish
and how the project will be structured. Here are some general guide lines.
Programs
Each project can contain up to 64 programs that can be started from the Operator Window,
Remote Control, RC+ API, or GUI Builder. Each program has a start function, as shown
in the table below.
Program #
Program Name
Start Function
0
main
main
1
main1
main1
2
main2
main2
3
main3
main3
4
main4
main4
5
main5
main5
6
main6
main6
7
main7
main7
…
…
…
63
main63
main63
Your project must always define function main so that the main program can be started.
The other programs are optional. If you use the Operator Window for your operator
interface, you can define meaningful names for each of the programs used in your project
in [Project]-[Properties]-[Operator setting]-[Operator Window].

7. Building SPEL+ Applications
EPSON RC+ 7.0 (Ver.7.4) User's Guide Rev.6
251
Operator interface
Operator Window
Use the operator window provided with EPSON RC+ 7.0. You can configure EPSON
RC+ 7.0 so that after Windows starts, EPSON RC+ 7.0 will start in Auto mode, which will
automatically open the Operator Window.
Operators can select up to 64 programs. They can also optionally use the Pause/Continue
buttons, I/O Monitor, Robot Manager, and System History viewer.
To use the Operator Window to allow programs to be started and stopped, the Control
Device must be set to Self from [Setup]-[System Configuration]-[Controller]-
[Configuration].
For details on configuring EPSON RC+ 7.0 for auto start, refer to 4.2.3 Start Mode.
Remote Control
Use remote control to turn motors on/off, home the robot, start programs, etc. A simple
push button box can be used, or a PLC can be connected.
When using Remote Control, the Control Device must be set to Remote from [Setup]-
[System Configuration]-[SPEL Controller Board]-[Configuration].
Windows Applications using RC+ API
Use the RC+ API Option along with a Windows development tool such as Visual Basic,
Visual C#, or Visual C++. See the RC+ API Manual for more information.
GUI Builder
To use the GUI Builder option, refer to the GUI Builder manual.
Safety interface
Use guard doors, safety mats, light curtains, etc. to protect the operator from injury.
Robot Points, Pallets, Tools, Locals
Decide on which points you need for the work cell. In many cases you will only need one
point file per robot.
Take advantage of Pallets, Tools, and Locals. Time spent on using these can save hours
later on the production line. For example, if your cell has many points that take a lot of
time to train, consider using Locals so that if the end effecter is damaged or replaced, you
only need to redefine the Locals, not retrain all of the points.
Try to design in automatic or semi-automatic procedures for calibrating tools and locals.
Even if you define them manually, write instructions on how to define them so the process
can be repeated easily.
Inputs and outputs
Layout your I/O early in the design stages. Use I/O labels in your programs. You must
purchase additional I/O boards if you need more than 24 inputs or 16 outputs. You can
also use the Fieldbus option so the controller can be a Fieldbus slave.
Peripherals
The Robot Controller has one RS-232C port as standard (two ports depending on the type
of controller). You can also add up to 9 ports by installing an optional RS232C expansion
board. Refer to 13. RS-232 Communications for details.
You can use TCP/IP to connect peripheral equipment.
Refer to 14. TCP/IP Communications for details.

7. Building SPEL+ Applications
252
EPSON RC+ 7.0 (Ver.7.4) User's Guide Rev.6
7.1.3 Auto start at power up
Your application can automatically log in a Windows user and start you SPEL
+
project
after Windows boots.
Refer to 4.2.7 Auto Start.

7. Building SPEL+ Applications
EPSON RC+ 7.0 (Ver.7.4) User's Guide Rev.6
253
7.2 Managing Projects
7.2.1 Overview
What is an EPSON RC+ 7.0 Project?
An EPSON RC+ 7.0 project is a collection of SPEL
+
program files, include files, robot
point files, I/O labels, user errors, Vision settings, and conveyor settings used to run a
SPEL
+
application.
Why do you need projects?
Projects are a safe and convenient way to manage your SPEL
+
applications. All the
information for each application is kept in one project. By keeping all of your application
code and point definitions in one project, it is easy to open a project and begin running or
editing. Also, it is easy to create new versions of an application and run older versions.
Projects make it easier to maintain your application code with less chance of a program
being lost.
There are also functions for copying and renaming projects, making it easy to create new
projects from previous versions and for backing up projects to an external media such as a
USB memory key.
What does an EPSON RC+ 7.0 project consist of?
Each project is stored in the \EpsonRC70\Projects directory.
The following paragraphs describe the components of a project.
Project file
This file contains all of the information that describes the project. This file is
automatically created by EPSON RC+ 7.0. You should never edit this file. Doing so may
cause errors when you open the project. The file extension is “.sprj”.
Program files
A program file is an ASCII text file that contains one or more SPEL
+
functions. Each
function in SPEL
+
can be run as a separate task (thread) in the controller or called from
other functions.
Include files can also be used. These contain macro definitions and must be included in a
program file using the #include statement. The file extension is “.prg”.
Point files
A point file contains a list of robot points. The file extension is “.pts”.
Include files
In the include file, you can declare variables and macros. The file extension is “.inc”.
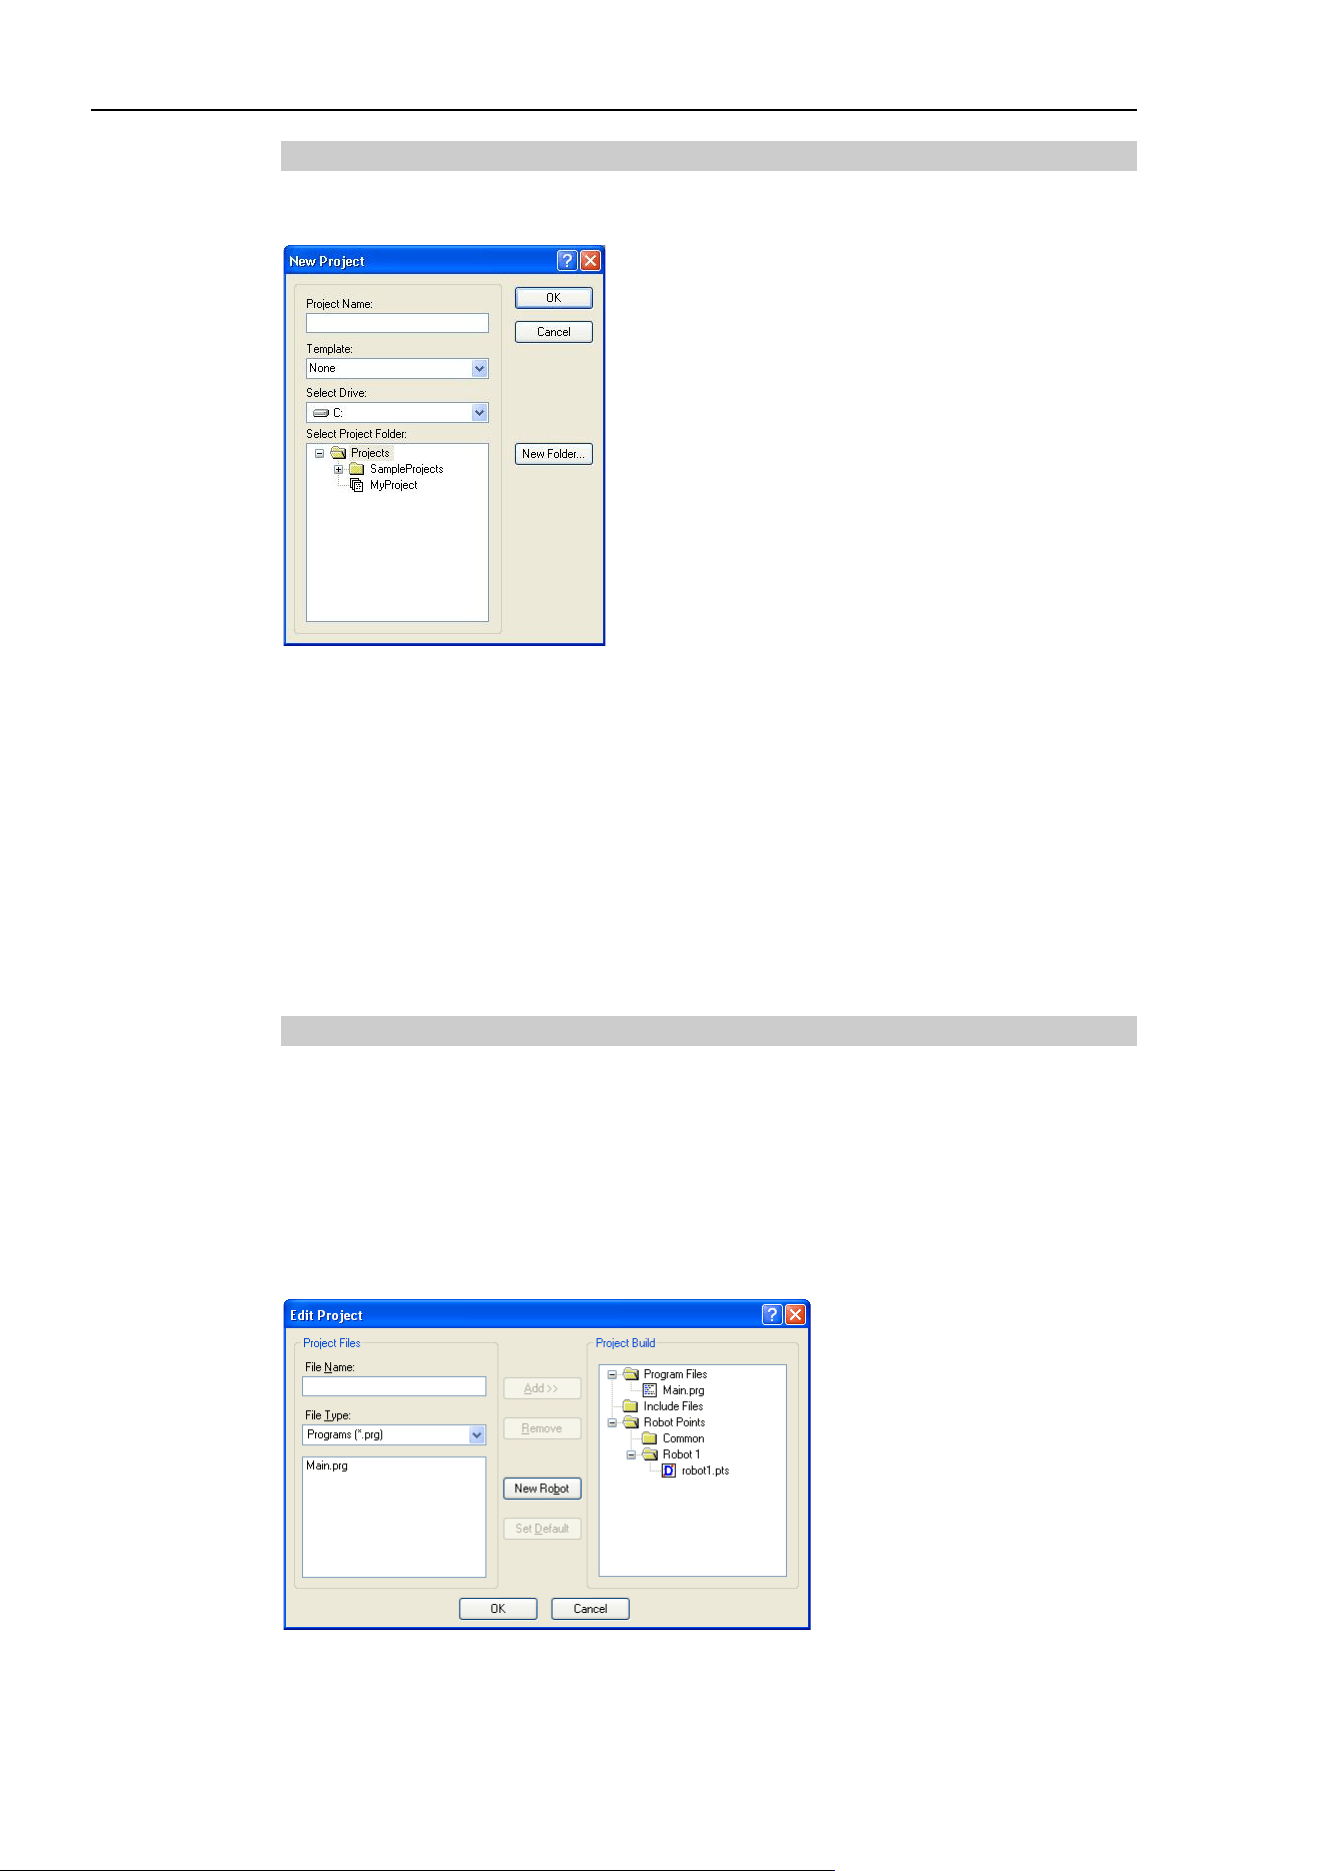
7. Building SPEL+ Applications
254
EPSON RC+ 7.0 (Ver.7.4) User's Guide Rev.6
7.2.2 Creating a new project
Projects always reside in specific drive, \EpsonRC70\Projects folder. Also you can create
a sub-folder to systematize the projects of different types.
To create a new project
1. Select [New Project] from the [Project] menu.
The [New Project] dialog box will appear.
2. Select the disk drive where you want the project to be stored on.
3. Select the project folder or create a new folder by clicking the <New Folder> button
after selecting the parent folder.
4. Type in the name for the new project.
5. Optionally, select a template to base the project on.
6. Choose <OK> to create the project.
7.2.3 Configuring a project
Each application project you create must be configured properly before you can run the
program.
There are two commands in the [Project] menu that allow you to configure a project: [Edit
and Properties].
Editing a project
Select [Edit] from the [Project] Menu to open the [Edit Project] dialog. From this dialog,
you configure program files, include files, and point files used in the current project.
For details on [Project]-[Edit], refer to 5.9.5 [Edit] Command (Project Menu).
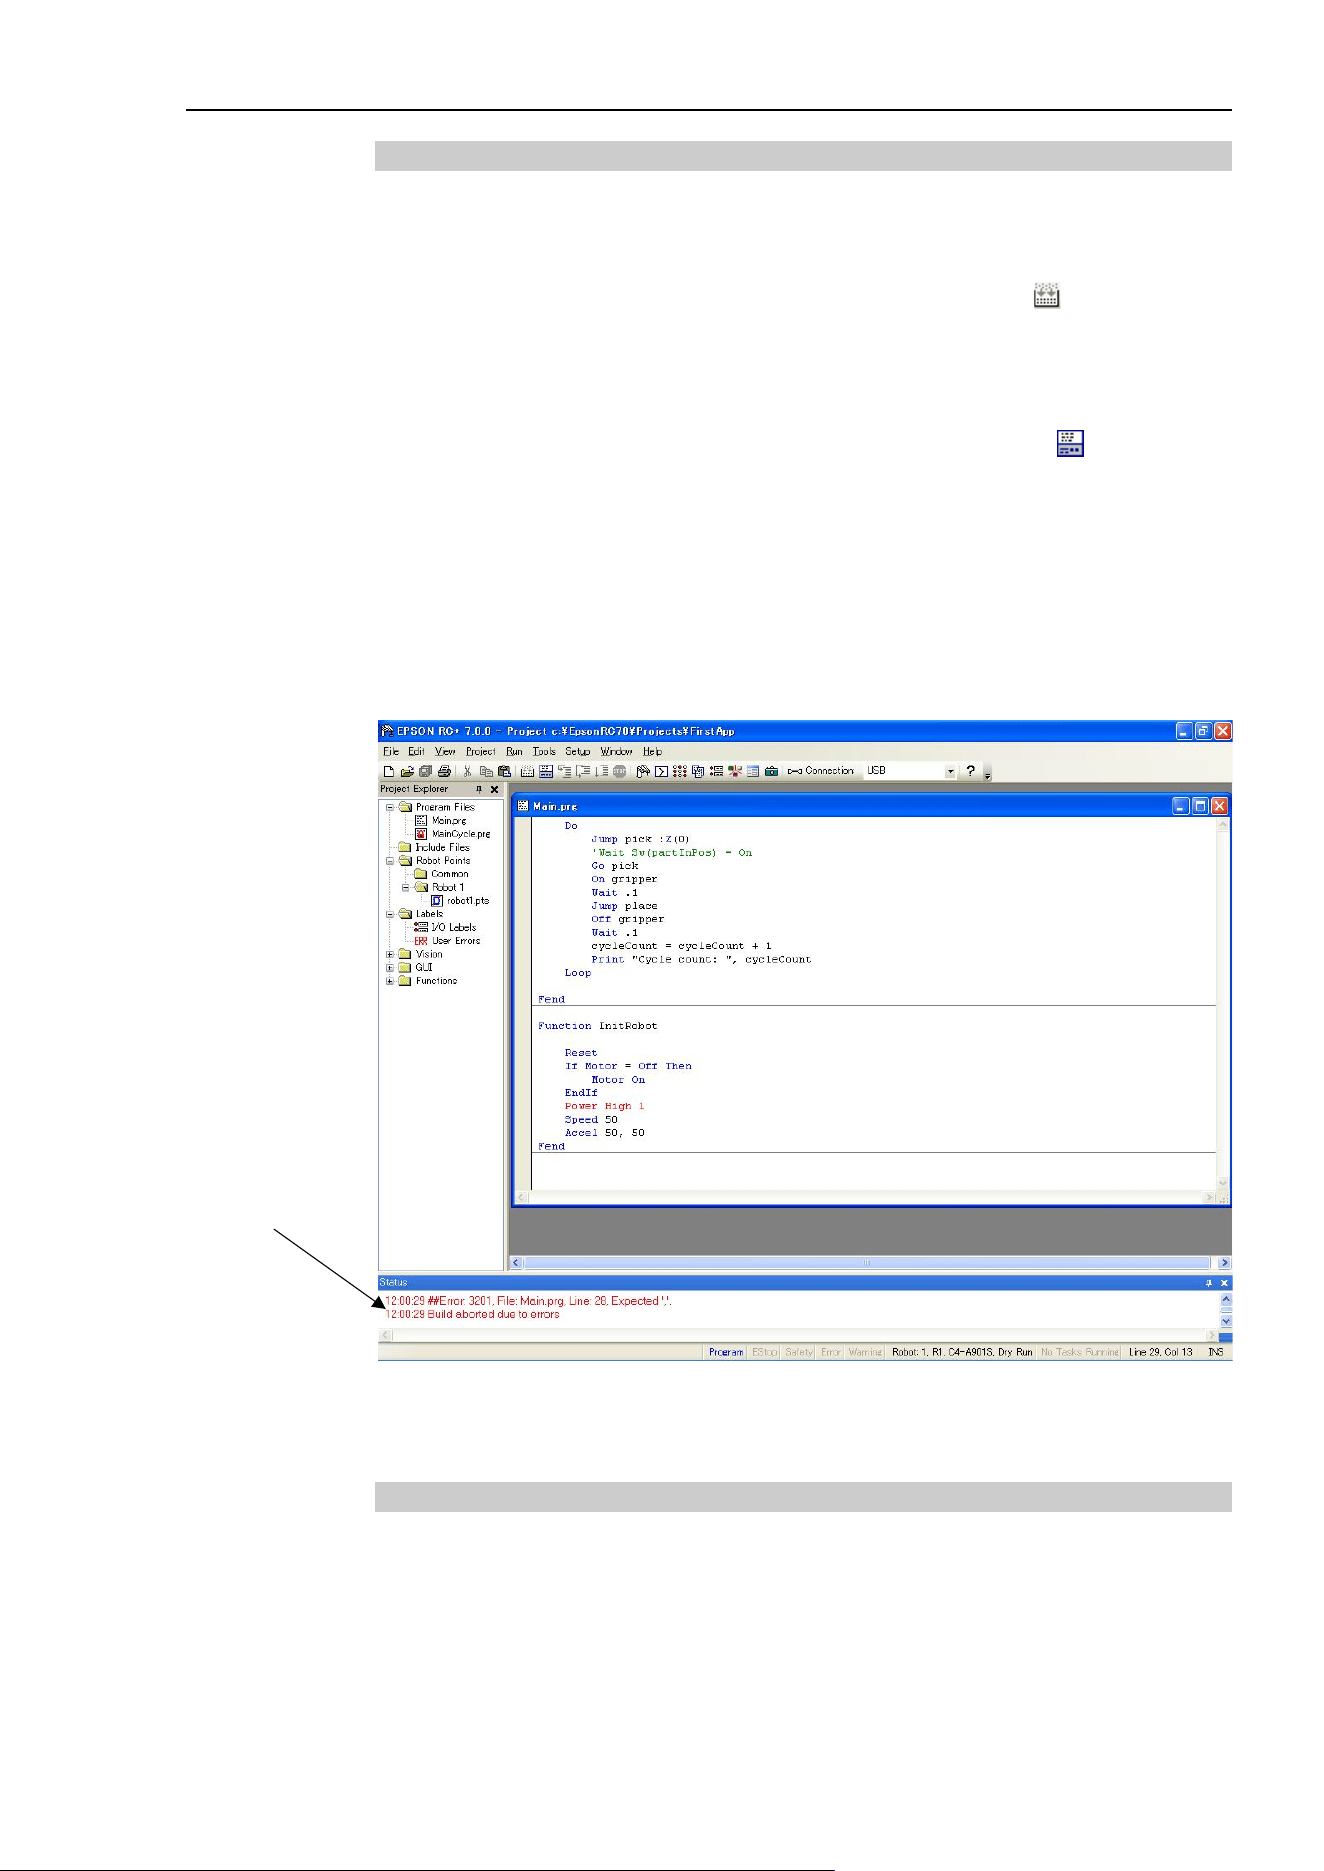
7. Building SPEL+ Applications
EPSON RC+ 7.0 (Ver.7.4) User's Guide Rev.6
255
7.2.4 Building a project
Before you run any program in your application, you must build the project.
To build your application project
Select [Build] from the [Project] menu or click on the <Build> button on the toolbar.
Or
Select [Rebuild] from the [Project] menu. This will rebuild the entire project.
Or
Select [Run Window] from the [Run] menu or click the <Run> button on the toolbar.
The project will be built before the [Run] Window appears.
Or
Select [Operator Window] from the [Run] Menu. The project will be built before the
[Operator Window appears.
After the files have been compiled and linked, the project files are sent to the controller.
Status Pane
This window shows progress messages and error messages during project build.
When errors occur during the build process, a message is displayed that includes the error
number, program file name, and line number. Double click on the line with the error to go
directly to the source code that caused the error.
7.2.5 Backing up a project
To make a backup copy of the current project, use the [Copy Project] command in the
[Project] menu to copy the project to another disk drive or folder. You can also save the
project under a different name.
This command is useful for transferring a project to an external media such as a USB
memory.
Double click
this line to go
to the source
code.

7. Building SPEL+ Applications
256
EPSON RC+ 7.0 (Ver.7.4) User's Guide Rev.6
7.3 Editing Programs
Before you can edit a program, it must be in the current project and opened in a program
window.
To open a program for editing
1. Select [Open] from the [File] menu.
2. Select the file(s) you want to open.
3. Choose <OK> to open the file.
7.3.1 Program rules
A program contains one or more SPEL
+
function definitions.
Lines can be blank. You can insert any number of blank lines to separate subroutines and
functions, if desired.
The maximum length for each line is 512 characters, including the line number, if used.
7.3.2 Typing in program code
You can enter program statements in upper or lower case. Whenever you leave a line that
has been changed, the line will be formatted. SPEL
+
keywords are case formatted and
spaces are inserted around operators and after semi-colons and commas.
Consider using mixed case or lower case for variables and function names instead of all
CAPs. This will make your code easier to read.
Use indentation for statements within loops. The “Auto Indent” feature automatically
moves the cursor under the start of the previous line. It also indents lines after If, Else, For,
Select, Case, and Do statements.
For i = 1 To 10
Jump P(i)
Jump P0
Next i
Use the “Auto End Construct” feature to automatically add the end construct statement.
For example, when you enter a For statement and press <Enter>, a Next statement is
automatically created with an indented blank line above it.
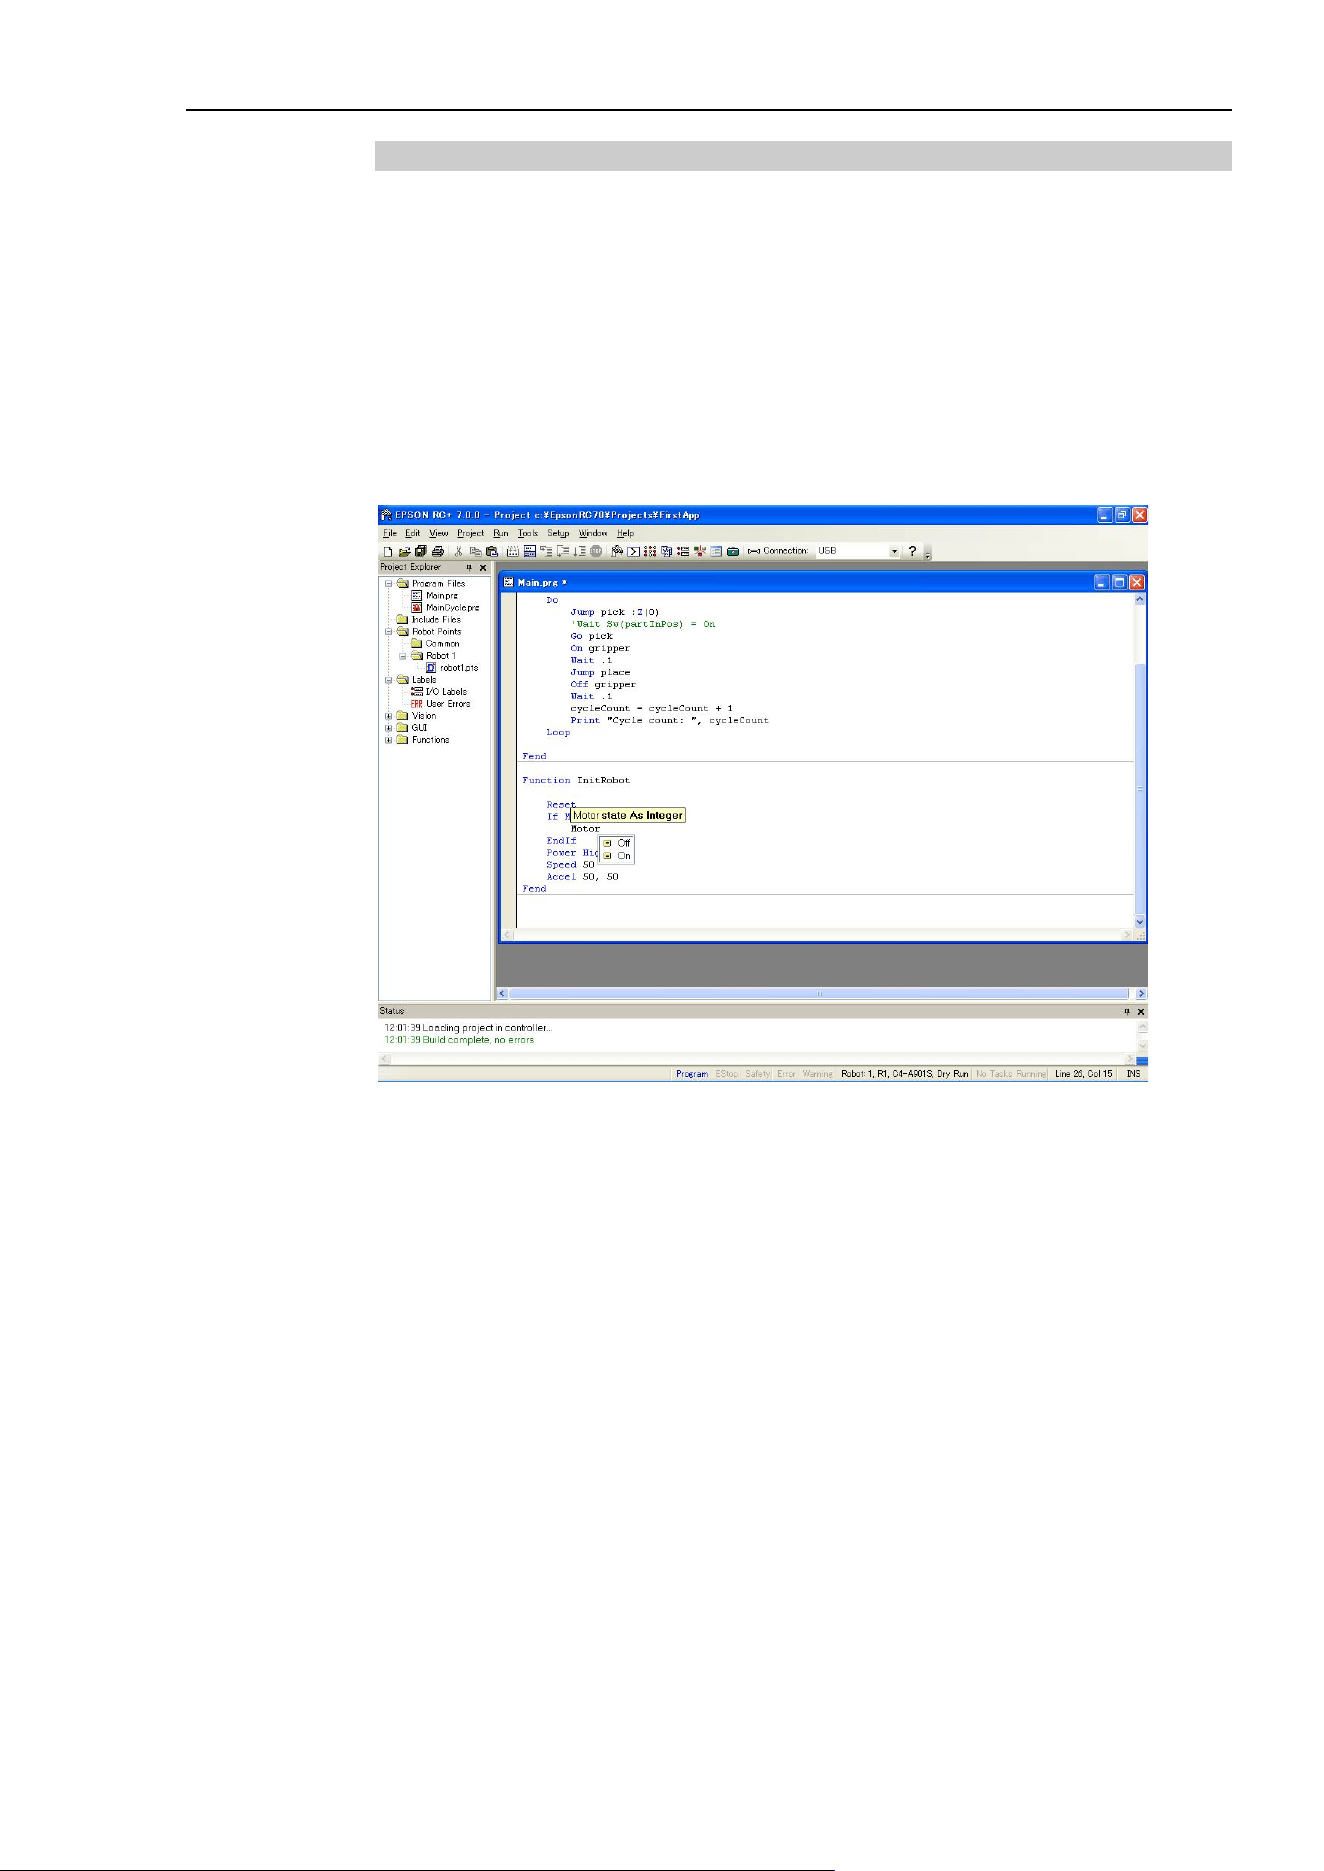
7. Building SPEL+ Applications
EPSON RC+ 7.0 (Ver.7.4) User's Guide Rev.6
257
7.3.3 Syntax Help
When you type in a SPEL
+
keyword, the syntax help window will appear to show the
syntax of the statement or function. After the statement is entered, the syntax helper will
automatically close, or you can press the Esc key to close it. You can enable / disable
Syntax Help from the [Setup]-[Preferences]-[Editor] tab.
A list box will be displayed for some parameters as you type. To select a value in the list,
use the up and down arrow keys, or type the first few characters, to highlight the desired
item, then press <Tab> to select the item. You can also type in a value not shown in the
list, such as a variable or literal constant. Press <Esc> to hide the list box. In addition to
<Tab>, you can use a comma or period to select an item. In the example shown below, the
first parameter of the On statement can be an output label, so a list of output labels in the
current project is displayed.
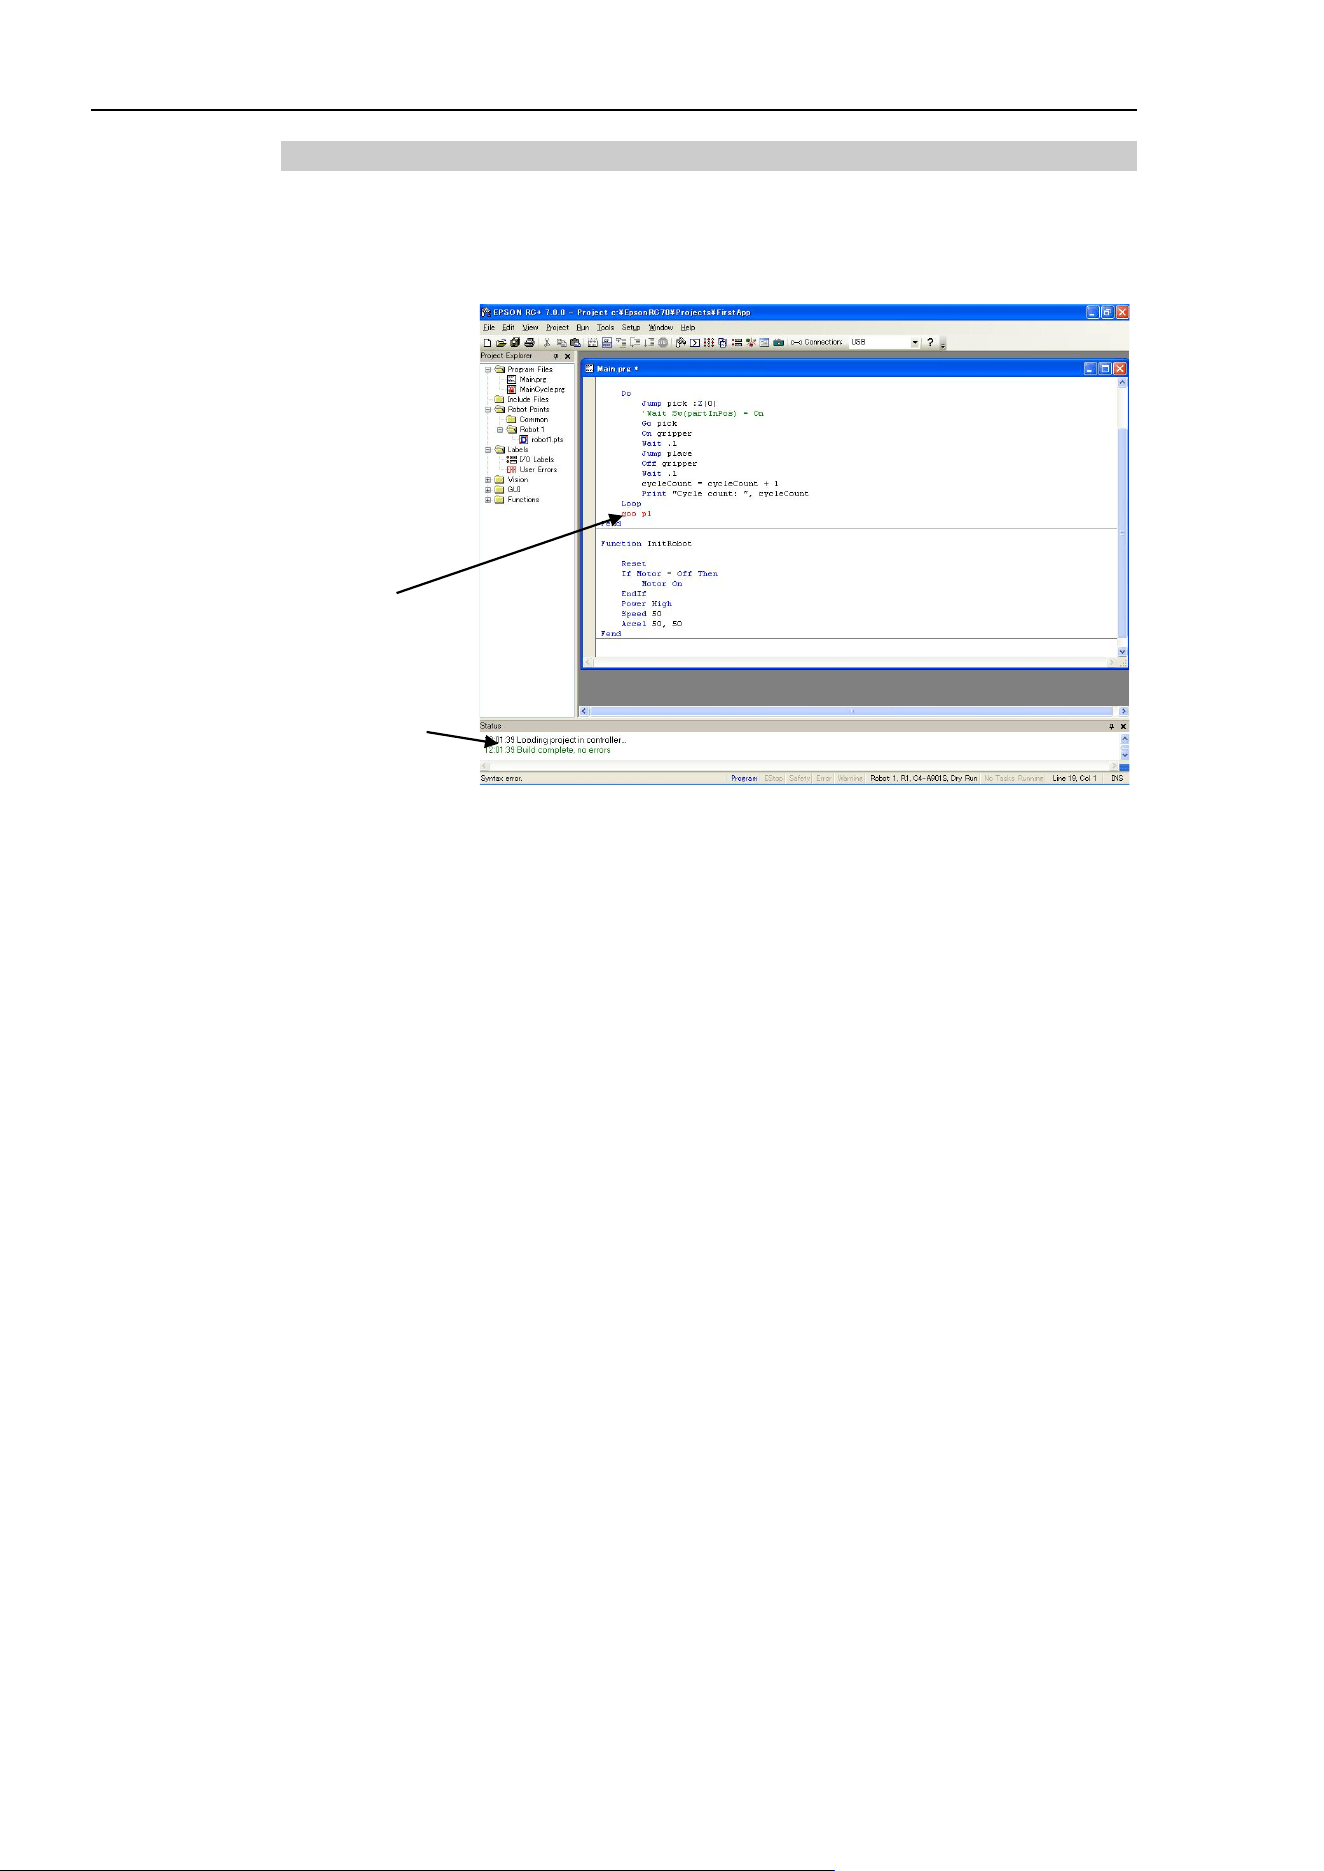
7. Building SPEL+ Applications
258
EPSON RC+ 7.0 (Ver.7.4) User's Guide Rev.6
7.3.4 Syntax Errors
When a syntax error is detected, the line with the error will be displayed in red. If the
caret is placed on the line with the error, then a brief message will be displayed on the
status bar. For example, in the program shown below, the message "Expression expected"
is displayed on the status bar.
Red indicates
syntax error
Error message
in status bar
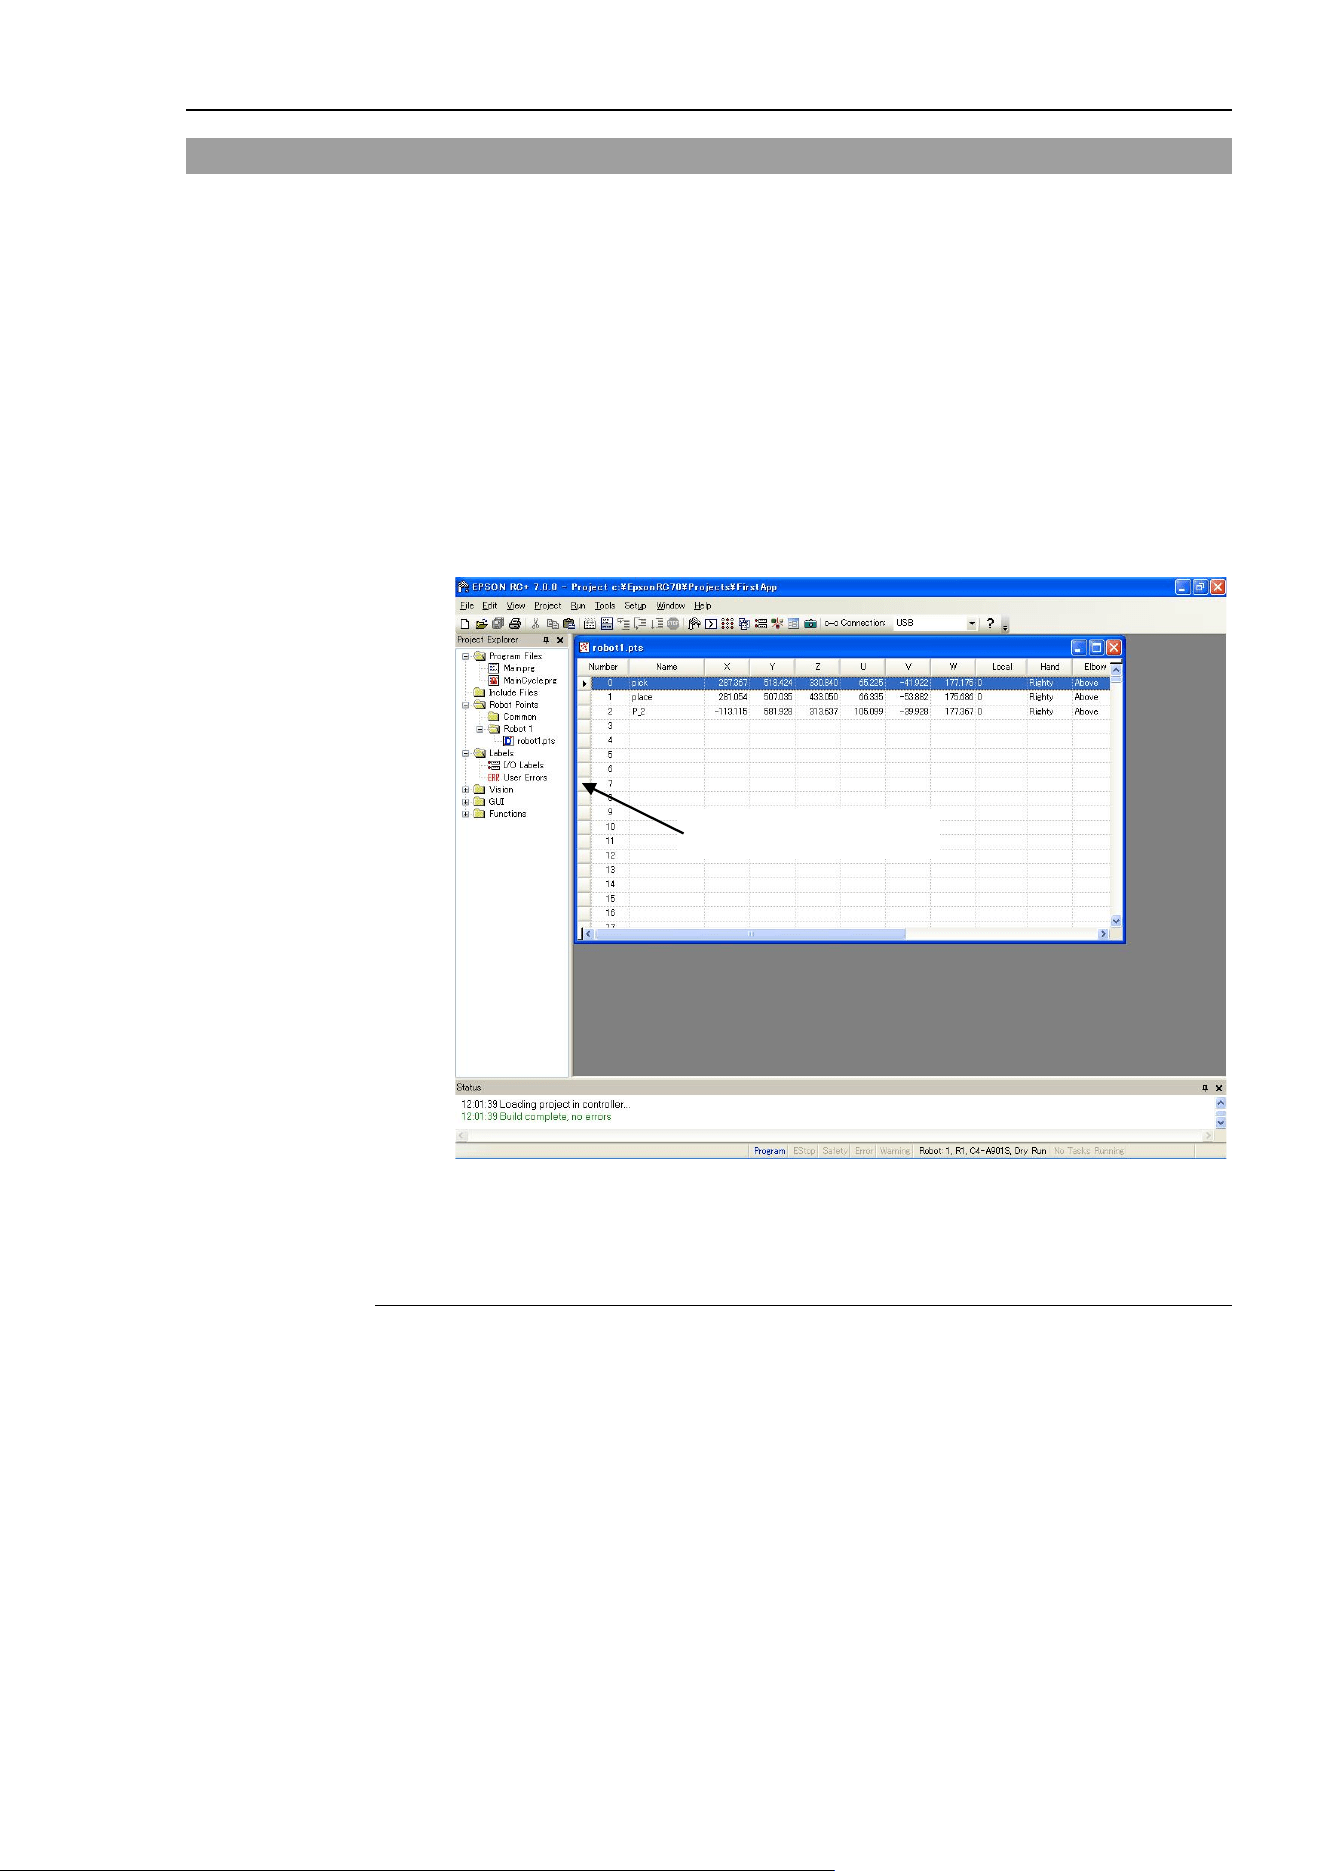
7. Building SPEL+ Applications
EPSON RC+ 7.0 (Ver.7.4) User's Guide Rev.6
259
7.4 Editing Points
You can edit the robot points from the robot point file. You can define new points or cut,
copy, and paste points from one point file to another, including between projects.
To open a point file for editing
1. Select [Open] from the [File] menu to show the Open dialog box.
2. Choose the Points option button. You will see a list of point file names in the files list
box.
3. Select the point file you want to edit by clicking on the name.
4. Click <Open> to open the file. You will see a spread sheet window for the point file
you selected.
The robot points spread sheet window
Click here to select a line.
The spreadsheet window contains one row for each point in the file. The spreadsheet
always contains rows for all points, even if they are not defined. The cells for an
undefined point are blank.
Item Description
Row select column This is the leftmost column. Click on this column to select a
row.
Number column Point number. Range is from 0 to a maximum point number.
Name column Name of the point.
Coordinate columns Coordinates of X, Y, Z in millimeters and U, V, and W in
degrees.
Local number column Drop down list of local numbers. Range is from “0” to “15”.
Hand column Drop down list of robot hand orientations: Lefty and Righty.
Elbow column Drop down list of robot elbow orientations: Above and Below.
This column is shown only for 6-axis robots.

7. Building SPEL+ Applications
260
EPSON RC+ 7.0 (Ver.7.4) User's Guide Rev.6
Wrist column Drop down list of robot wrist orientations: Flip and NoFlip.
This column is shown only for 6-axis robots.
J4Flag column Drop down list of robot J4Flag: “0” and “1”.
This column is shown only for 6-axis robots.
J6Flag column Drop down list of robot J6Flag: “0” – “127”.
This column is shown only for 6-axis robots.
J1Flag column Drop down list of robot J1Flag: “0” and “1”.
This column is shown only for RS series and 6-axis robots.
J2Flag column Drop down list of robot J2Flag: “0” and “1”.
This column is shown only for RS series and N series.
J1Angle Coordinate in units of degrees.
This column is shown only for RS series.
J4Angle Coordinate in units of degrees.
This column is shown only for N series.
To select one or more rows
Click on the row select column (leftmost column) to select a row. To select more than one
row, point to the row select column of the first row you want to select. Hold down the left
mouse button and drag the mouse down or up to select more rows.
To select all rows
Execute Select All from the Edit Menu, or type <Ctrl> + A.
To define a new point
Move the cursor anywhere in the row of the point you want to define using the mouse, and
then click a cell you want to type in. Enter information for the point. This automatically
defines the point, which means it will be sent to the robot controller at the next project
build or Jog and Teach command.
For example, click on the Name column and type in a name of the point. Press the
<TAB> key to move to the X coordinate column. Type a coordinate value and then press
<Enter>. You will see zeros automatically entered in all of the other coordinates. This
means that the point is defined.
To delete a point
Select the row containing the point and cut it by selecting [Cut] from the [Edit] menu or by
typing <Ctrl> + X.
To cut and paste points
1. Select one or more rows and execute either [Cut] or [Copy] from the [Edit] menu.
2. Select the row where you want to start the paste.
3. Select [Paste] from the [Edit] menu.
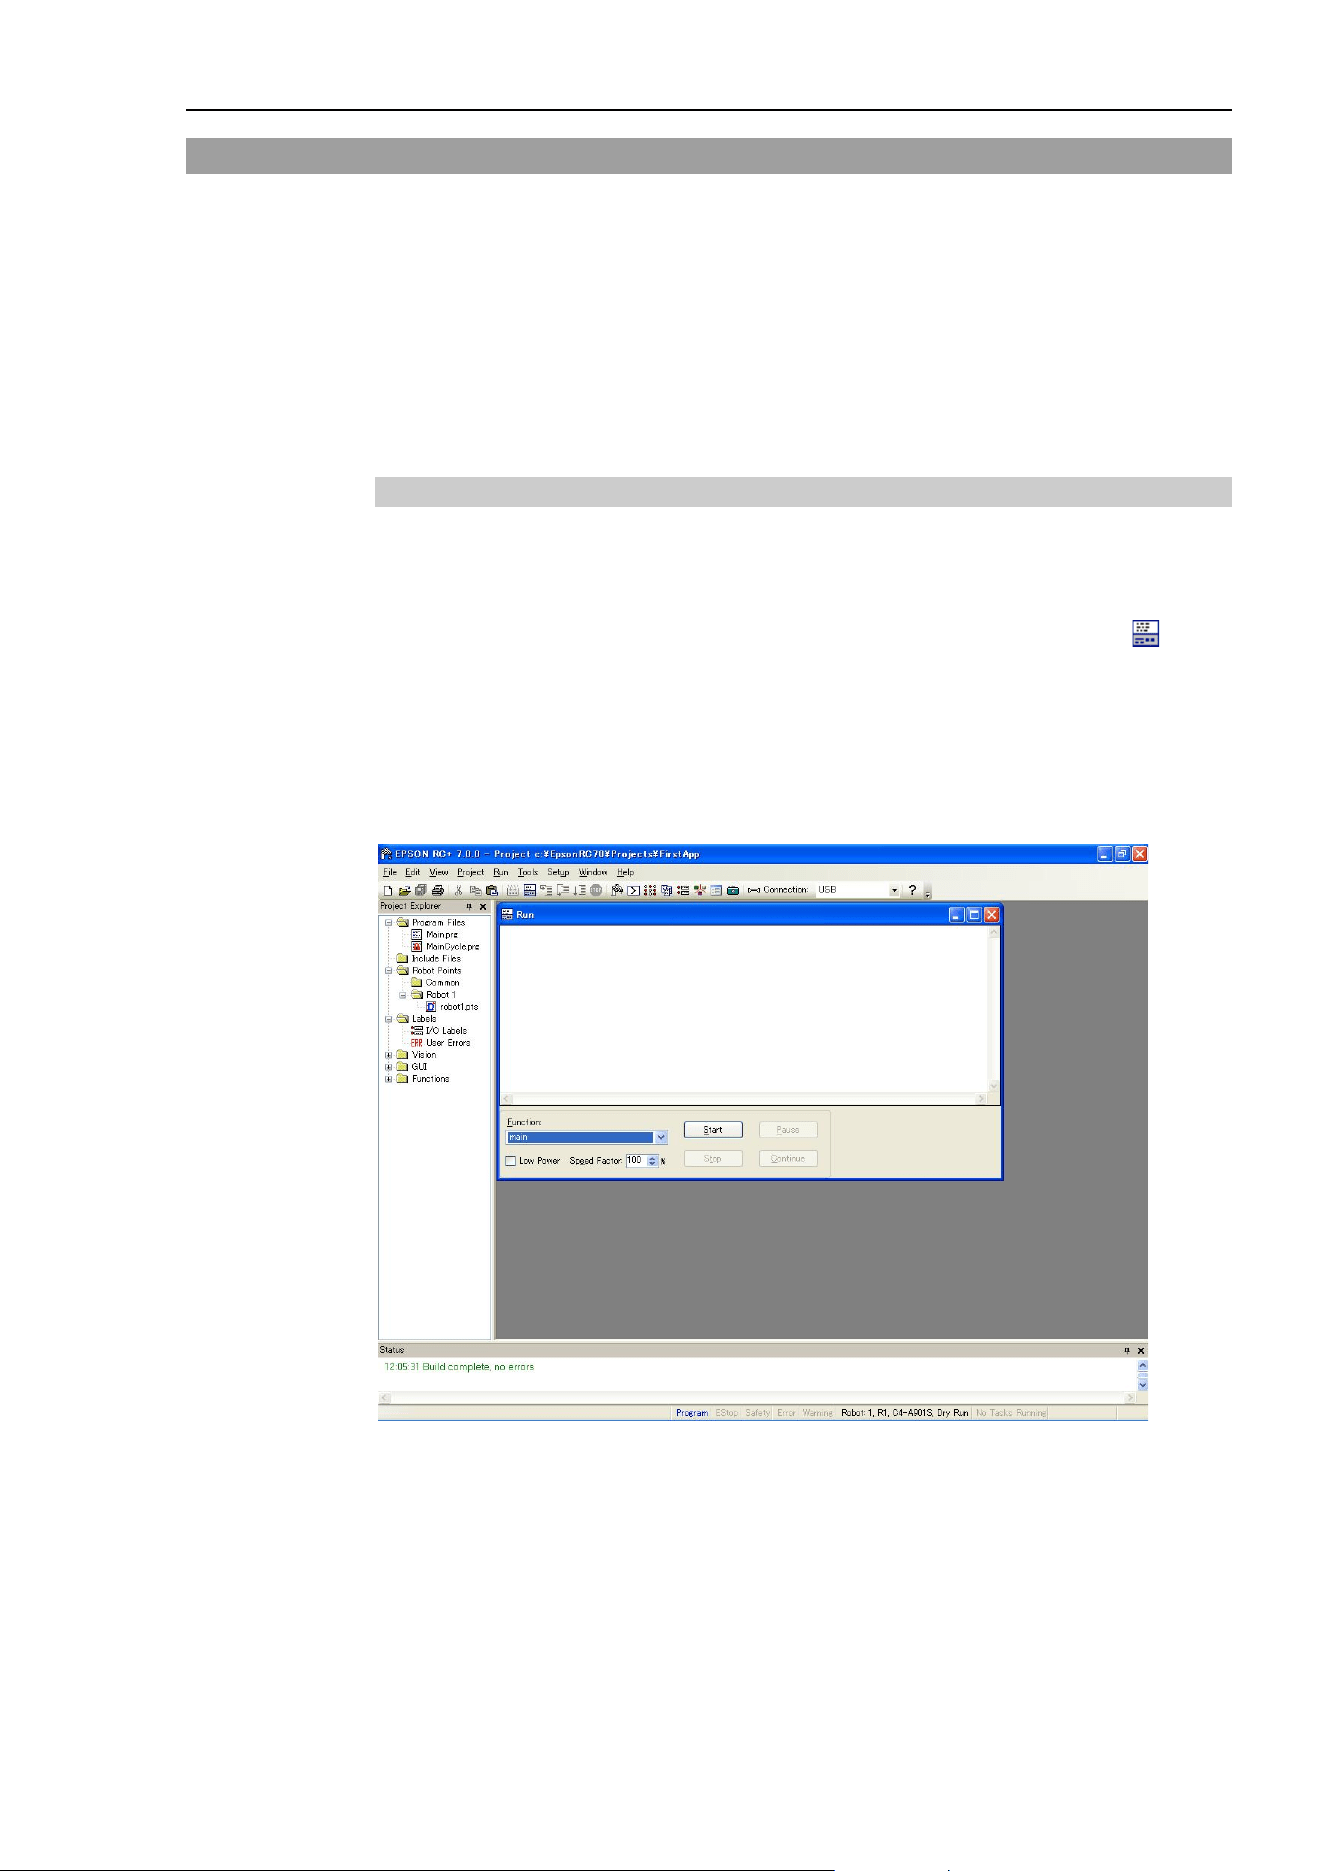
7. Building SPEL+ Applications
EPSON RC+ 7.0 (Ver.7.4) User's Guide Rev.6
261
7.5 Running and Debugging Programs
You can run programs from the Run Window or from the Operator Window. The Run
Window is used primarily for testing and debugging. The Operator Window is used as an
operator interface for simple applications or demos. You can also run programs using the
RC+ API option or GUI Builder option.
To run a program
Select [Run] Window from the [Run] menu. This command will build the project (if
required) and open the [Run] Window. The [Run] Window allows you to choose which
function to execute. Select a function, and then click <Start>.
7.5.1 The Run window
The Run window includes controls for running the programs in the current project.
To open the Run window
Select [Run] Window from the [Run] Menu, or click on the <Run> button on the
toolbar. If necessary, all changed open files will be saved and the project will be built. If
the build is successful, the Run window will appear.
To close the Run window
Choose [Close] from the [File] menu or click on the button in the upper right hand
corner of the window.

7. Building SPEL+ Applications
262
EPSON RC+ 7.0 (Ver.7.4) User's Guide Rev.6
Item Description
Text area This is the area that takes up most of the run window. Output
from your programs is displayed here. When your program uses
an Input statement, you can type in the requested input from this
text box. You can use the scroll bars to view the entire text
buffer.
If an error occurs while running a program, the error number,
program file name, line number and function name will be
displayed in this text area. You can double click on the line
where the error is displayed to directly go to the source line that
caused the problem.
Function Select a function to start. Functions are sorted alphabetically.
Function main is selected by default.
Low Power When this box is checked, SPEL
+
ignores the Power High
command. This allows you to run your program in low power
mode to verify operation without having to change the program.
Speed Factor Specifies the robot motion speed factor. The speed factor is a
percentage of maximum point to point speed and linear
interpolated speed. For example, if you program executes Speed
80 and the speed factor is 50%, the robot will move at speed 40.
Start Starts the function shown in the function drop down list.
Stop Stops all tasks. If the robot is executing a motion command
when this button is pressed, the robot will decelerate to a stop.
Pause Pauses all tasks with pause enabled. Activates the <Continue>
button. If the robot is executing a motion command when this
button is pressed, the robot will decelerate to a stop.
Continue Continues paused tasks.
CTRL+C Same as <Stop> button.
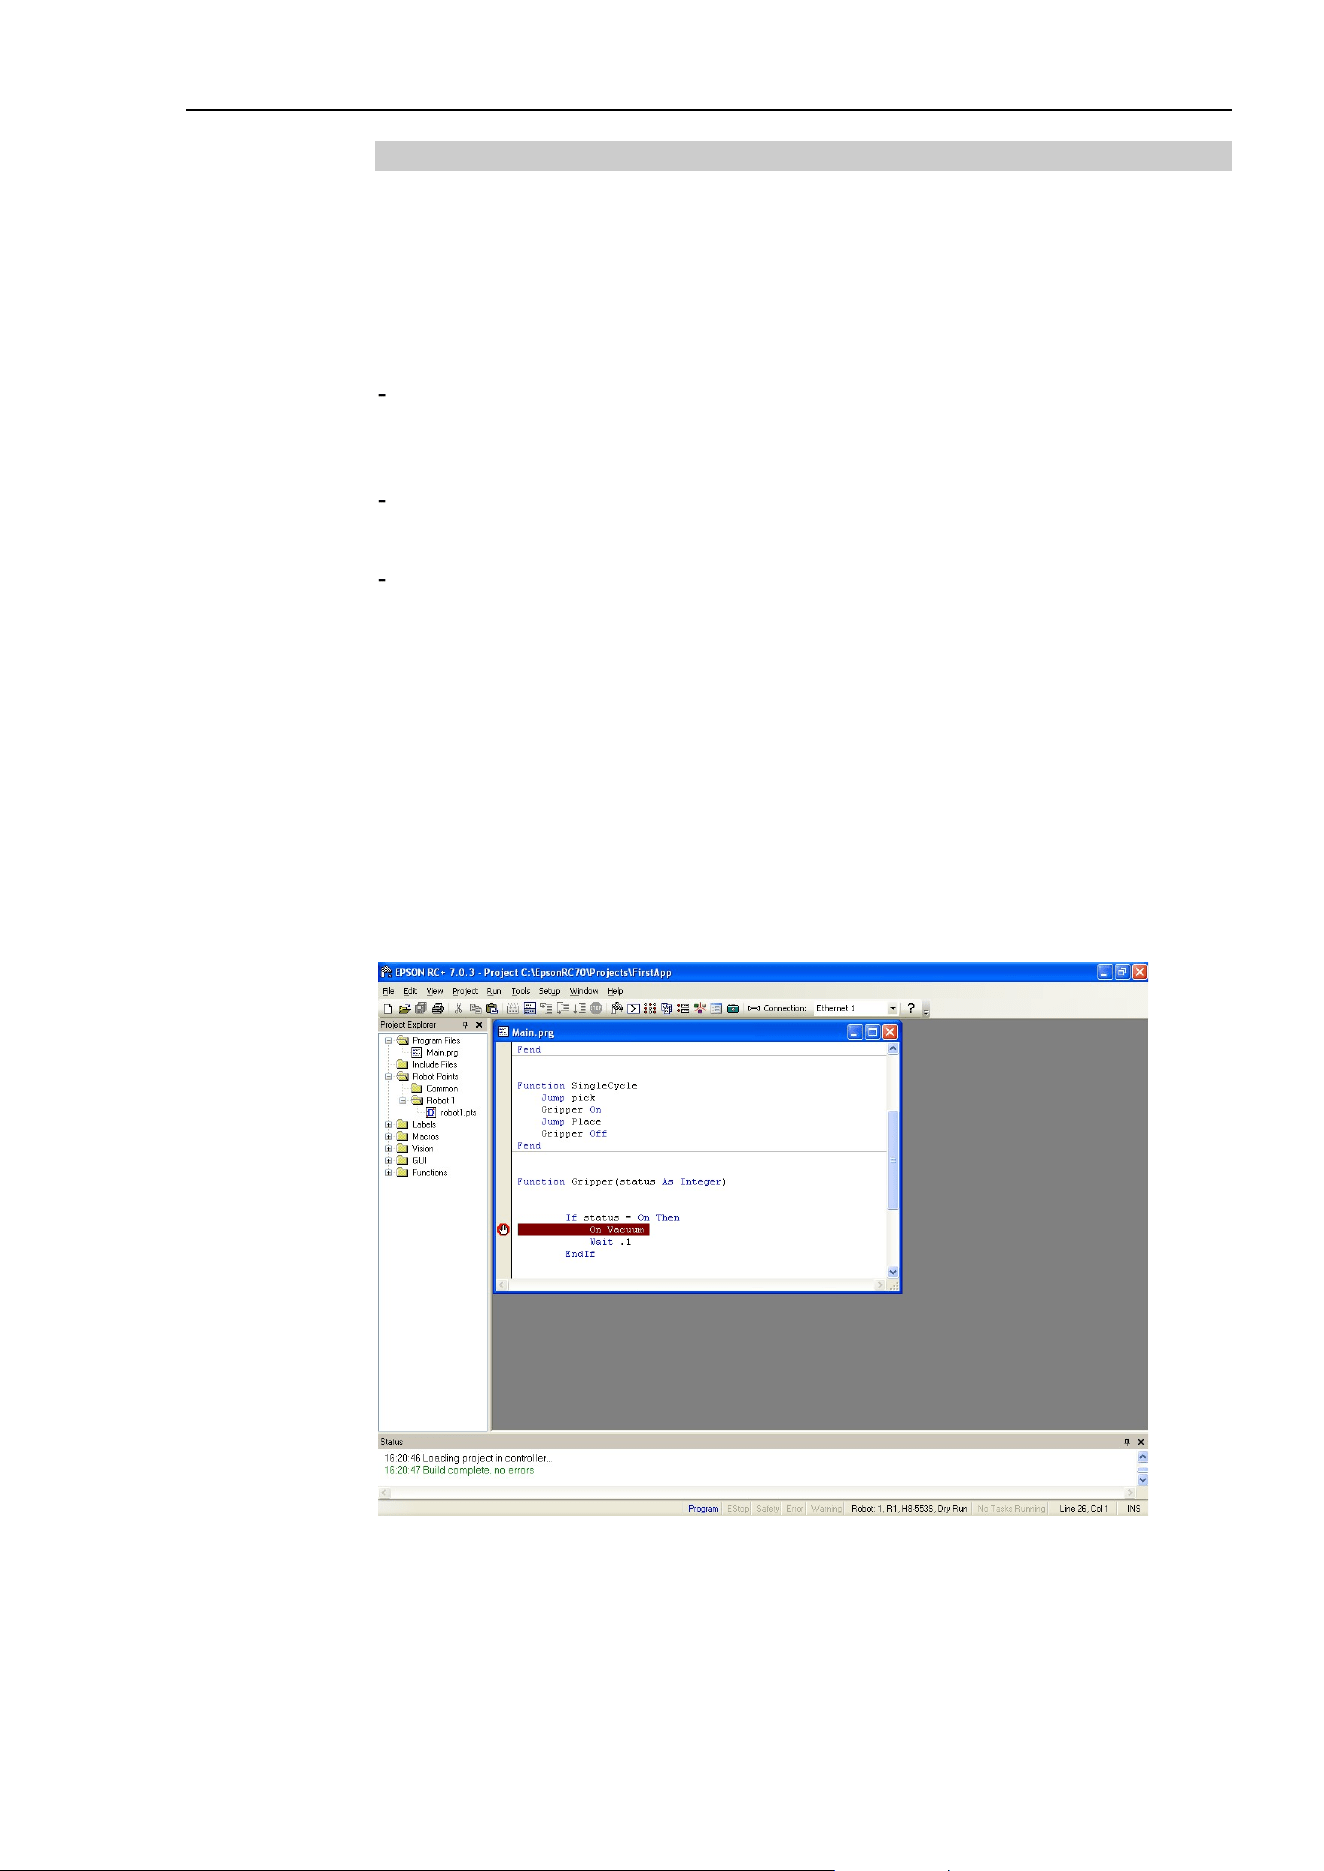
7. Building SPEL+ Applications
EPSON RC+ 7.0 (Ver.7.4) User's Guide Rev.6
263
7.5.2 Debugging
EPSON RC+ 7.0 supports source level debugging. You can set breakpoints and step
through your source code. You can also pause / continue a program or halt a task using
the Task Manager.
Setting and clearing breakpoints
Open the program where you want to set a breakpoint, and then click on the line where
you want to stop. Use one of the following methods to set a breakpoint:
If Margin Indicators are enabled, then click in the margin next to the line on the left.
You will see a breakpoint symbol next to the line.
Or
Type F9.
Or
Select Toggle Breakpoint from the [Run] menu.
Execute one of the methods above to clear a breakpoint, or select [Clear All Breakpoints]
from the [Run] menu.
You cannot set a breakpoint on non-executing statements, such as #define, #include, or
blank lines.
After setting a breakpoint, the task will halt when the execution line is reached the
breakpoint. You can set or clear a breakpoint while a task is running.
When reached a breakpoint, the program window containing the program source line at the
breakpoint is opened and the line is highlighted in yellow. The task number is shown in
the title of the program window.
If more than one task reaches a breakpoint, then a program window will be opened for
each task. This allows you to step through each task that reached the breakpoint.
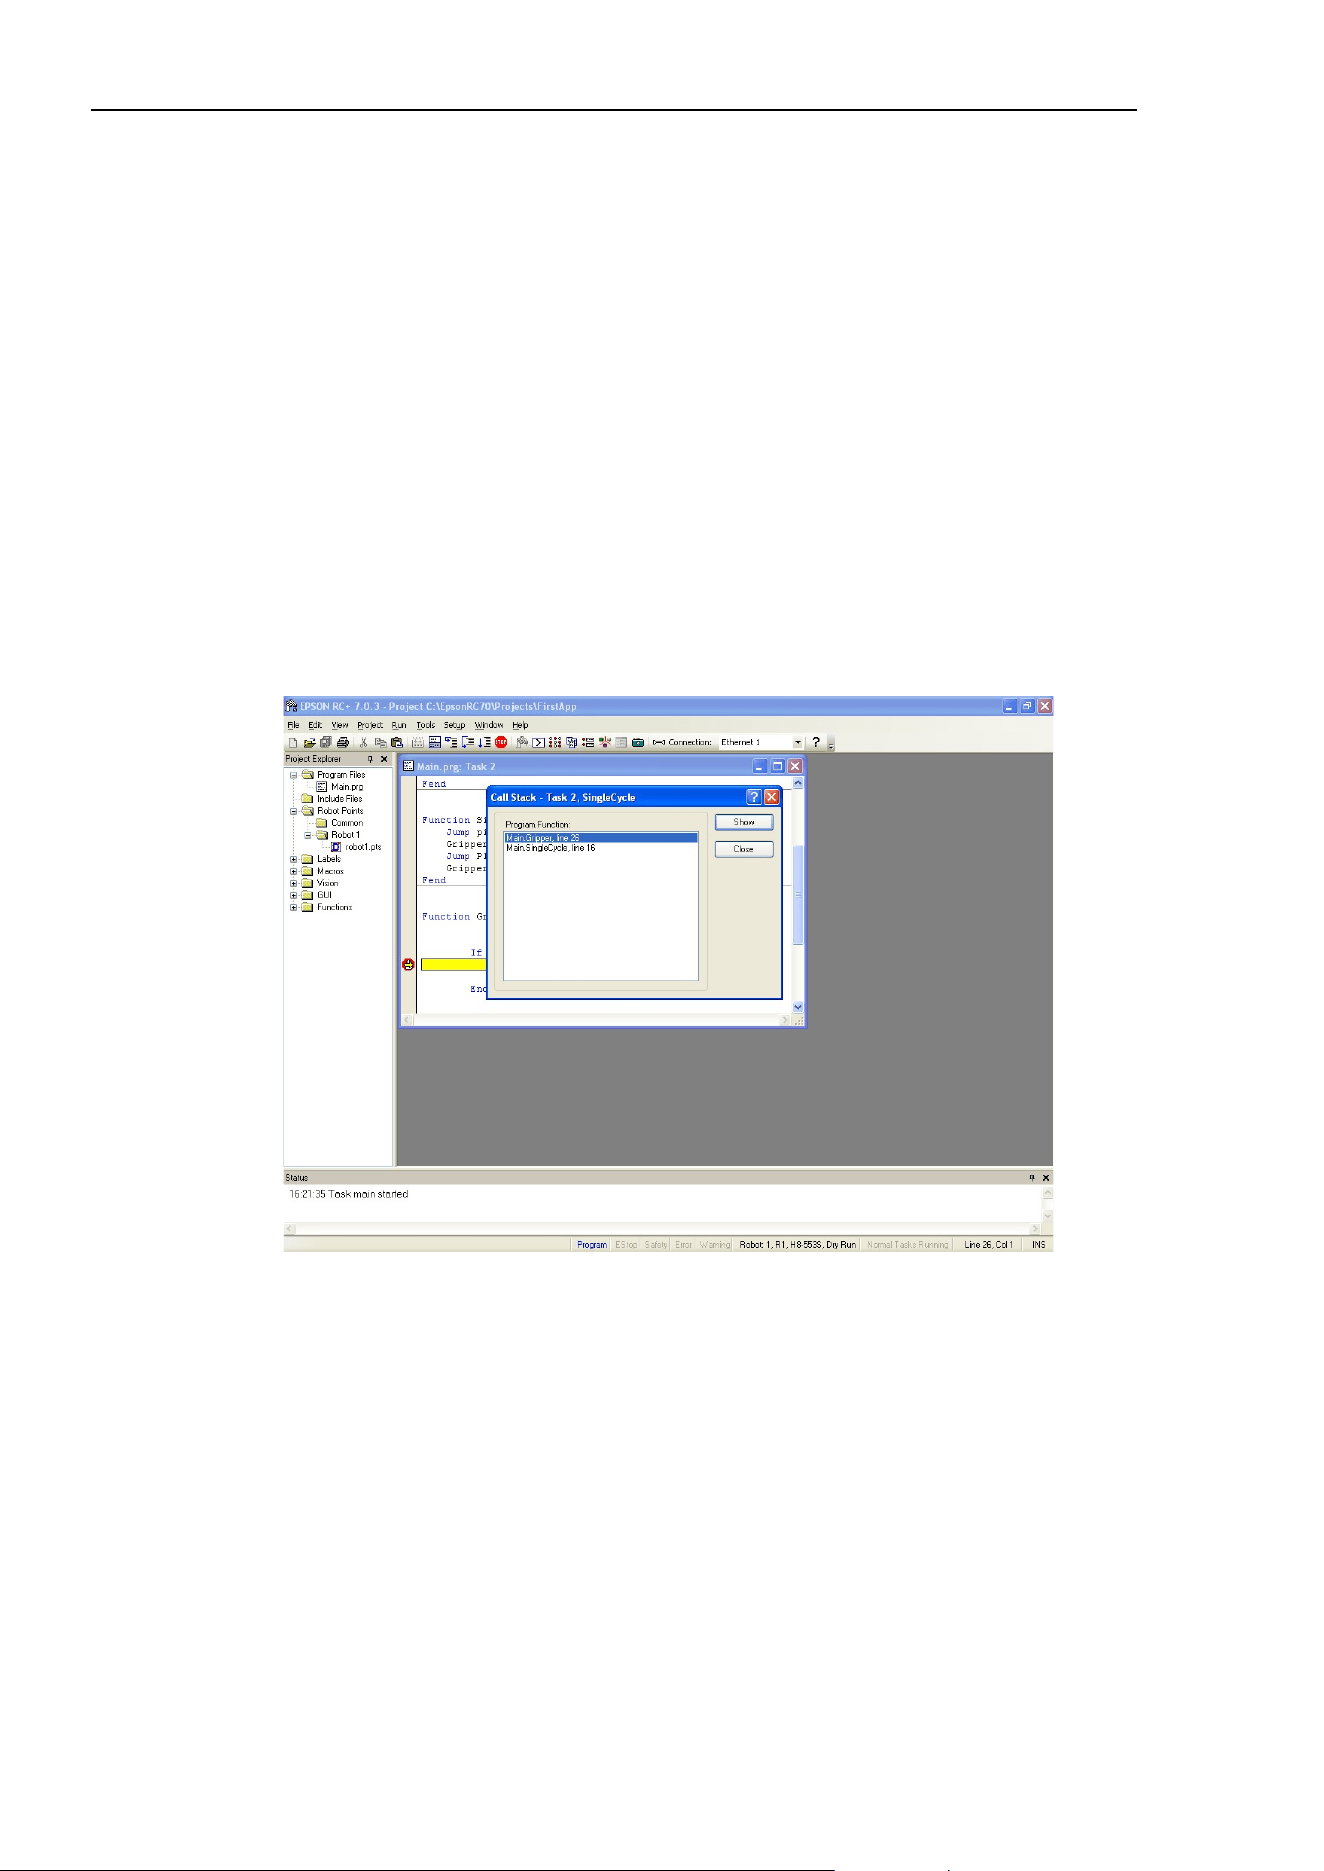
7. Building SPEL+ Applications
264
EPSON RC+ 7.0 (Ver.7.4) User's Guide Rev.6
Stepping through a program
There are three commands on the [Run] Menu that are used for stepping through code.
[Step Into] steps through each line and also steps into functions when a step is executed on
a Call statement.
[Step Over] steps through each line but when a Call statement is encountered, the function
in the statement is executed completely.
Walk executes lines until after the next motion command and then halts the task. It will
halt after the next output command if the [Setup]-[System Configuration]-[Controller]-
[Preferences]-[Walk stops for outputs] checkbox is checked.
To step through code, you must set a breakpoint and run until the breakpoint is reached, or
suspend a task from the Task Manager using the <Halt> button.
Viewing the Call Stack
Sometimes you may want to examine the call stack for the current task after you halt the
task from the task manager, or reach a break point.
To view the call stack, select [Call Stack] from the [Run] Menu. The [Call Stack] list will
be displayed, as shown below.
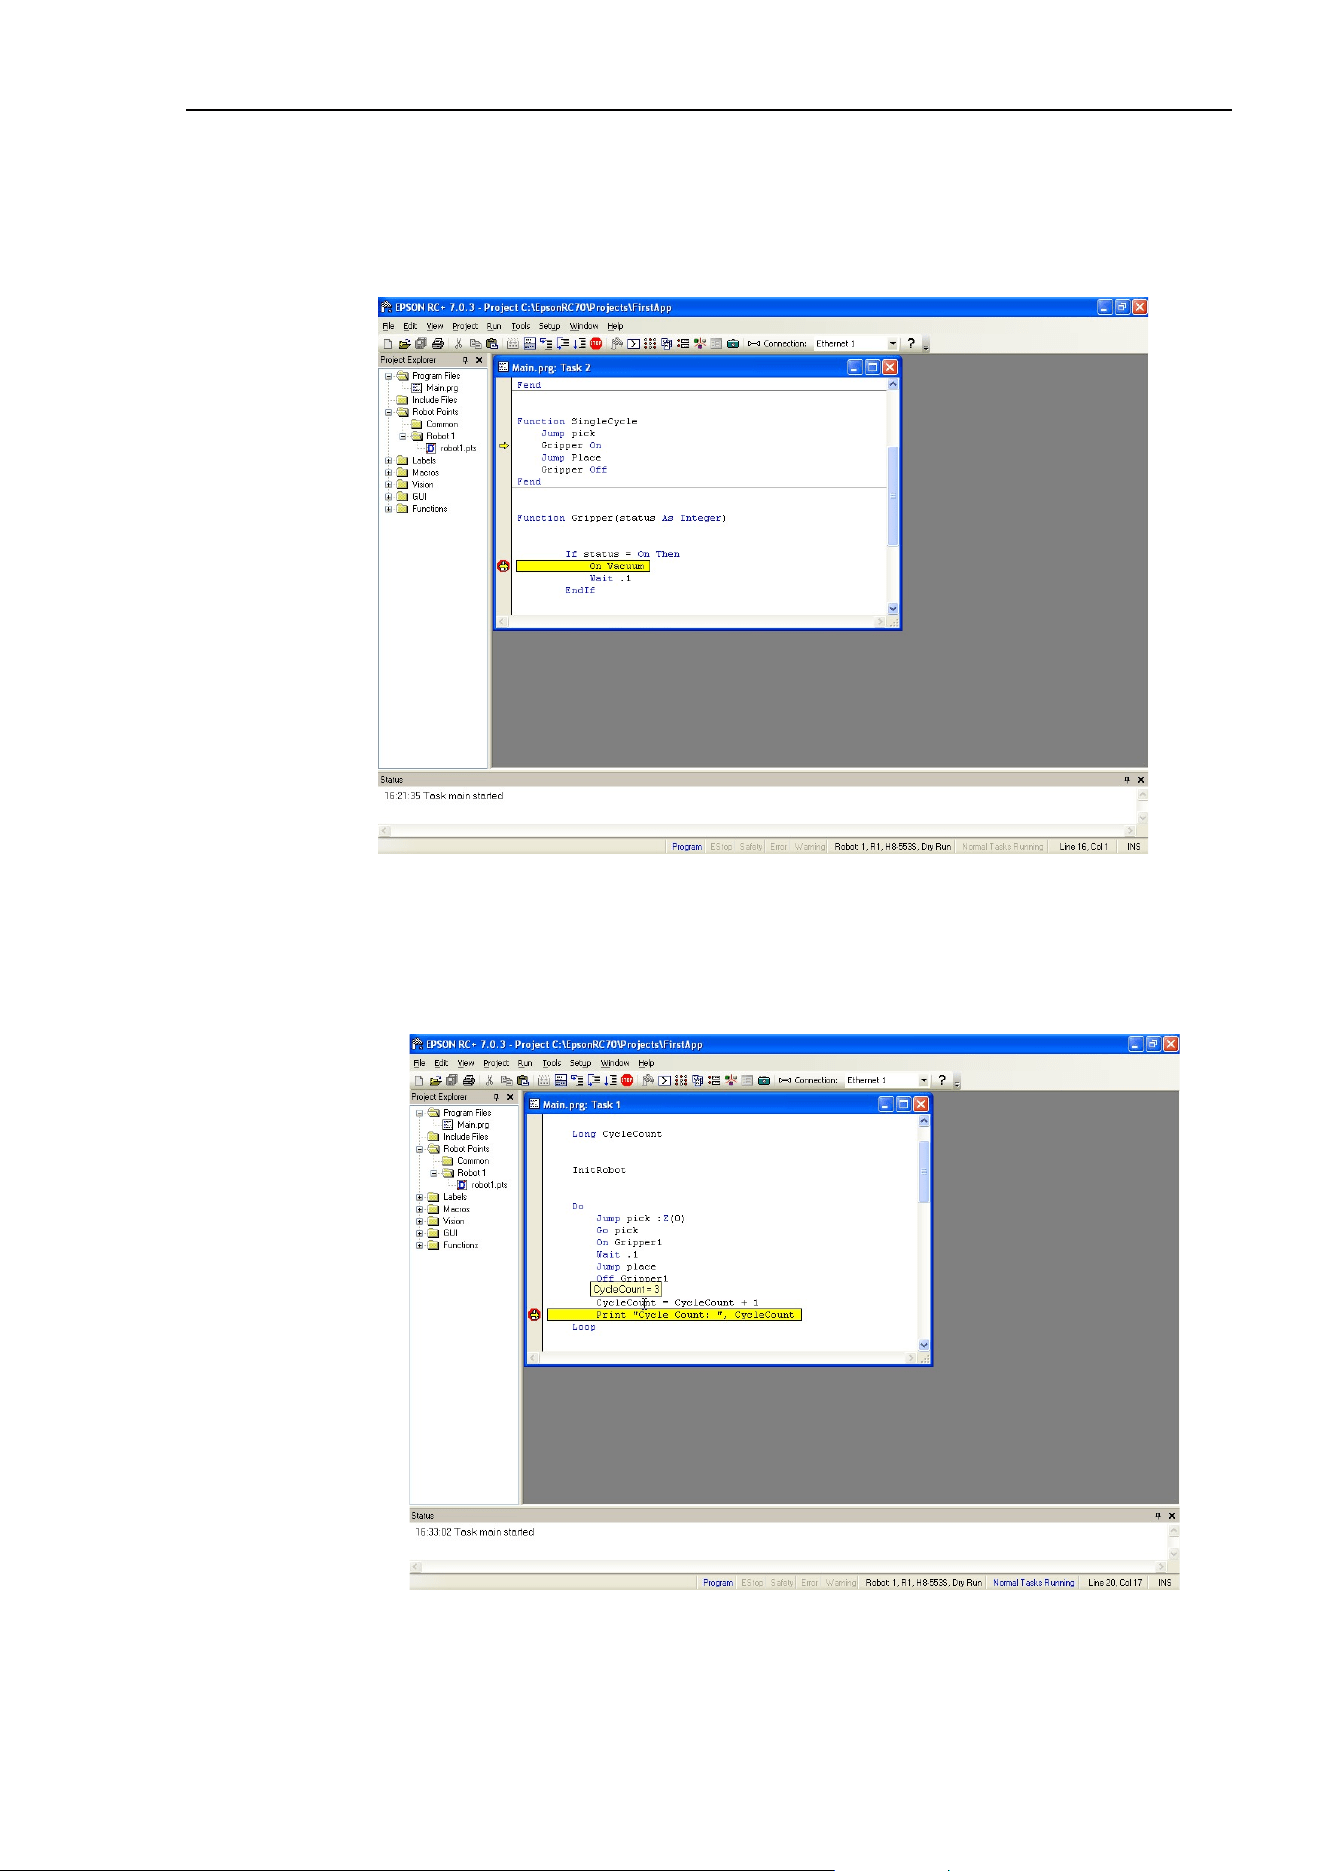
7. Building SPEL+ Applications
EPSON RC+ 7.0 (Ver.7.4) User's Guide Rev.6
265
After you double click a function in the Call Stack list, the function will be displayed in a
program window and an arrow in the left margin will point to the line where the next
function in the call stack is being called. In the example below, the arrow in the
SingleCycle function is pointing to the Gripper On statement to indicate that Gripper was
called from SingleCycle.
Displaying variables
To view variable values, you can do one of the following:
1. When a task is halted by halt or breakpoint, you can view the value for a variable by
moving the mouse cursor over the variable name. The value will be displayed in a tool
tip type window above the variable name.
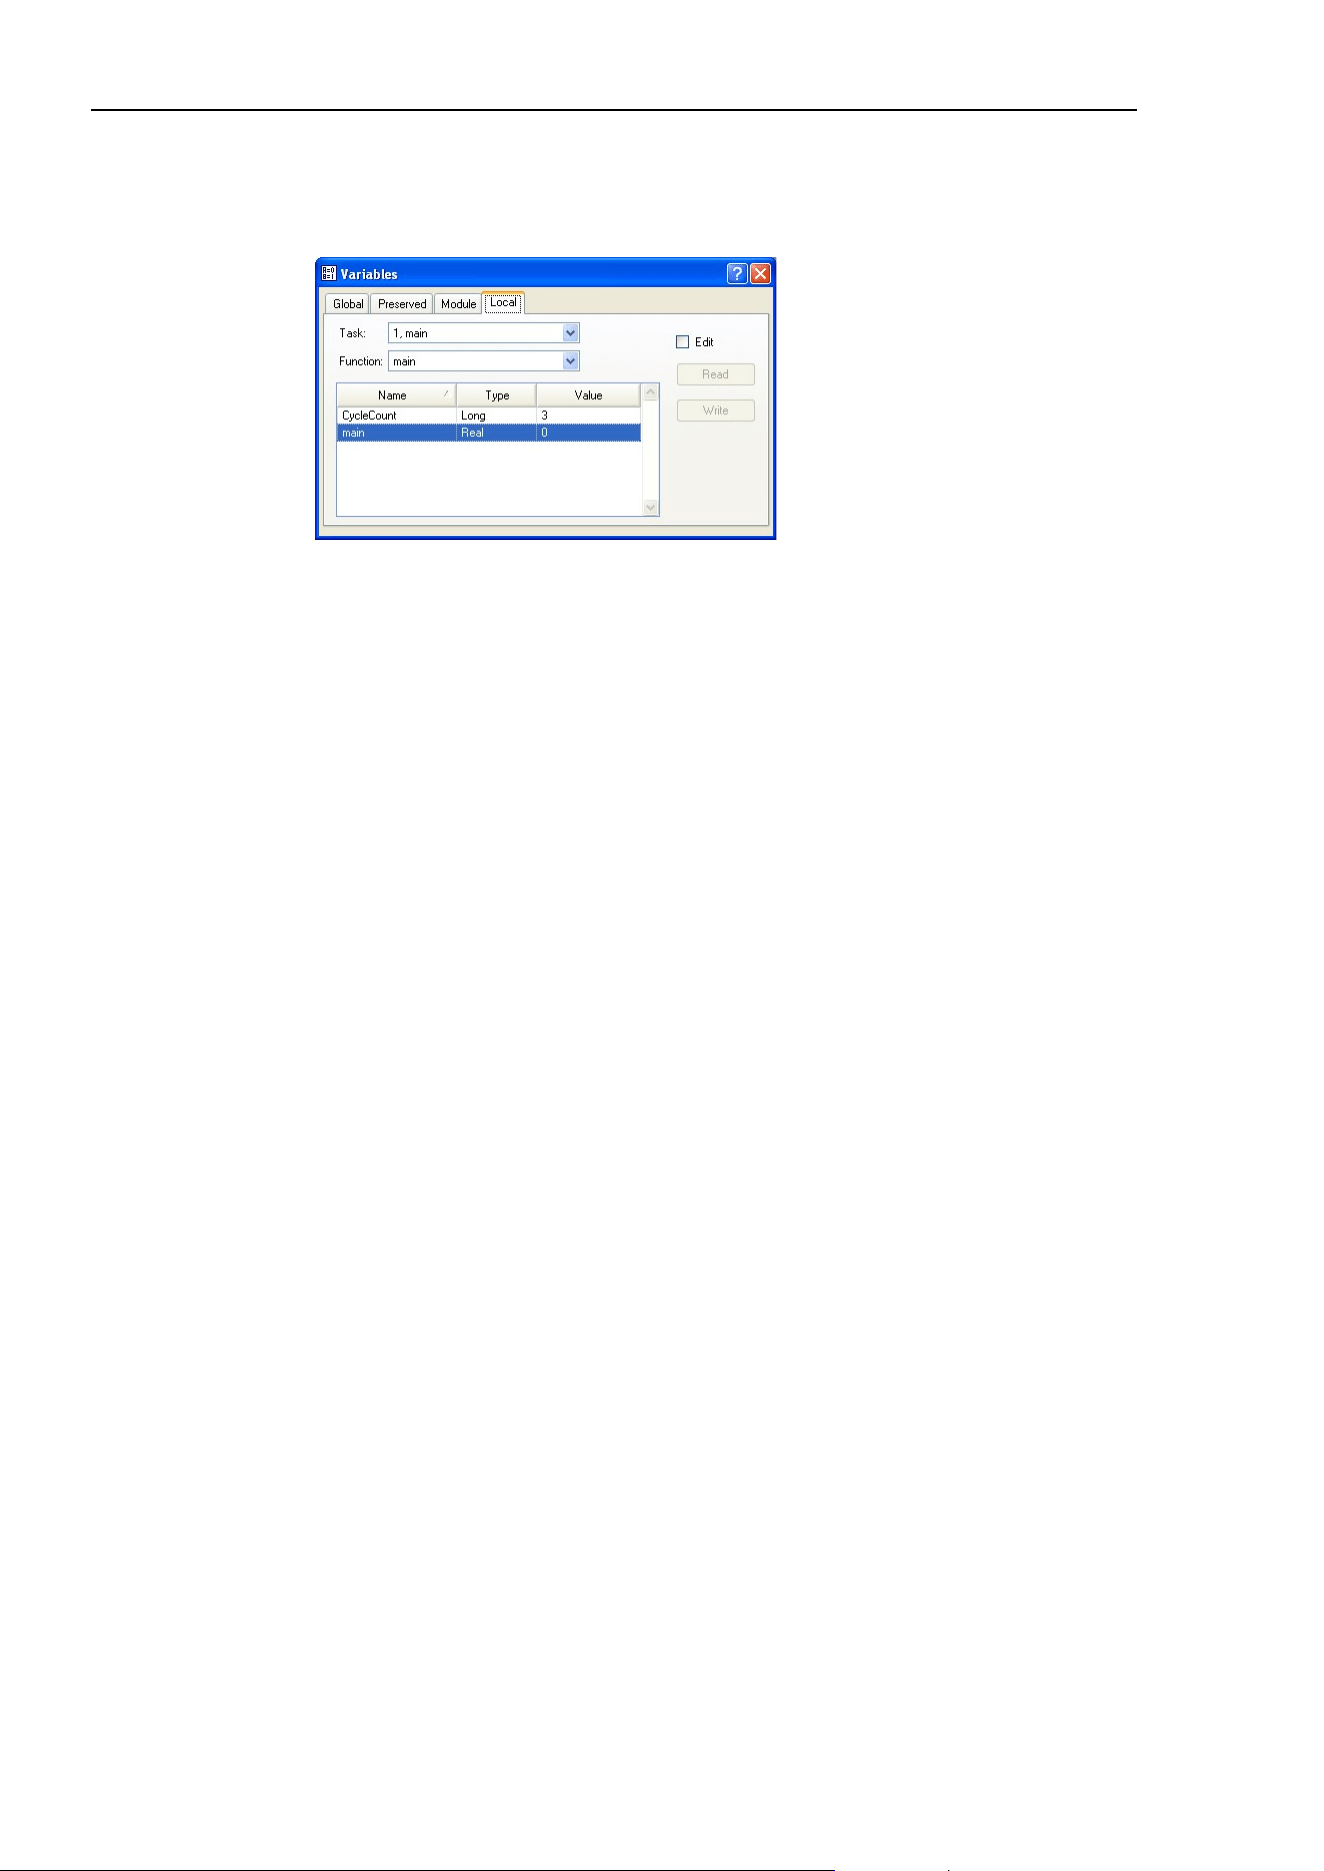
7. Building SPEL+ Applications
266
EPSON RC+ 7.0 (Ver.7.4) User's Guide Rev.6
2. Select [Display Variables] from the [Run] menu to display the variable display dialog.
This dialog has three tabs for viewing Global, Module, and Local variables.
Up to 600 variables can be displayed on each tab.
You can change the value of a variable by checking the [Edit] checkbox, then type in the
new value in the value column. Next, click the <Write> button to change the variable.
When the [Edit] box is checked, the variable values are not automatically updated. You
can click the <Read> button to update all values.
NOTE
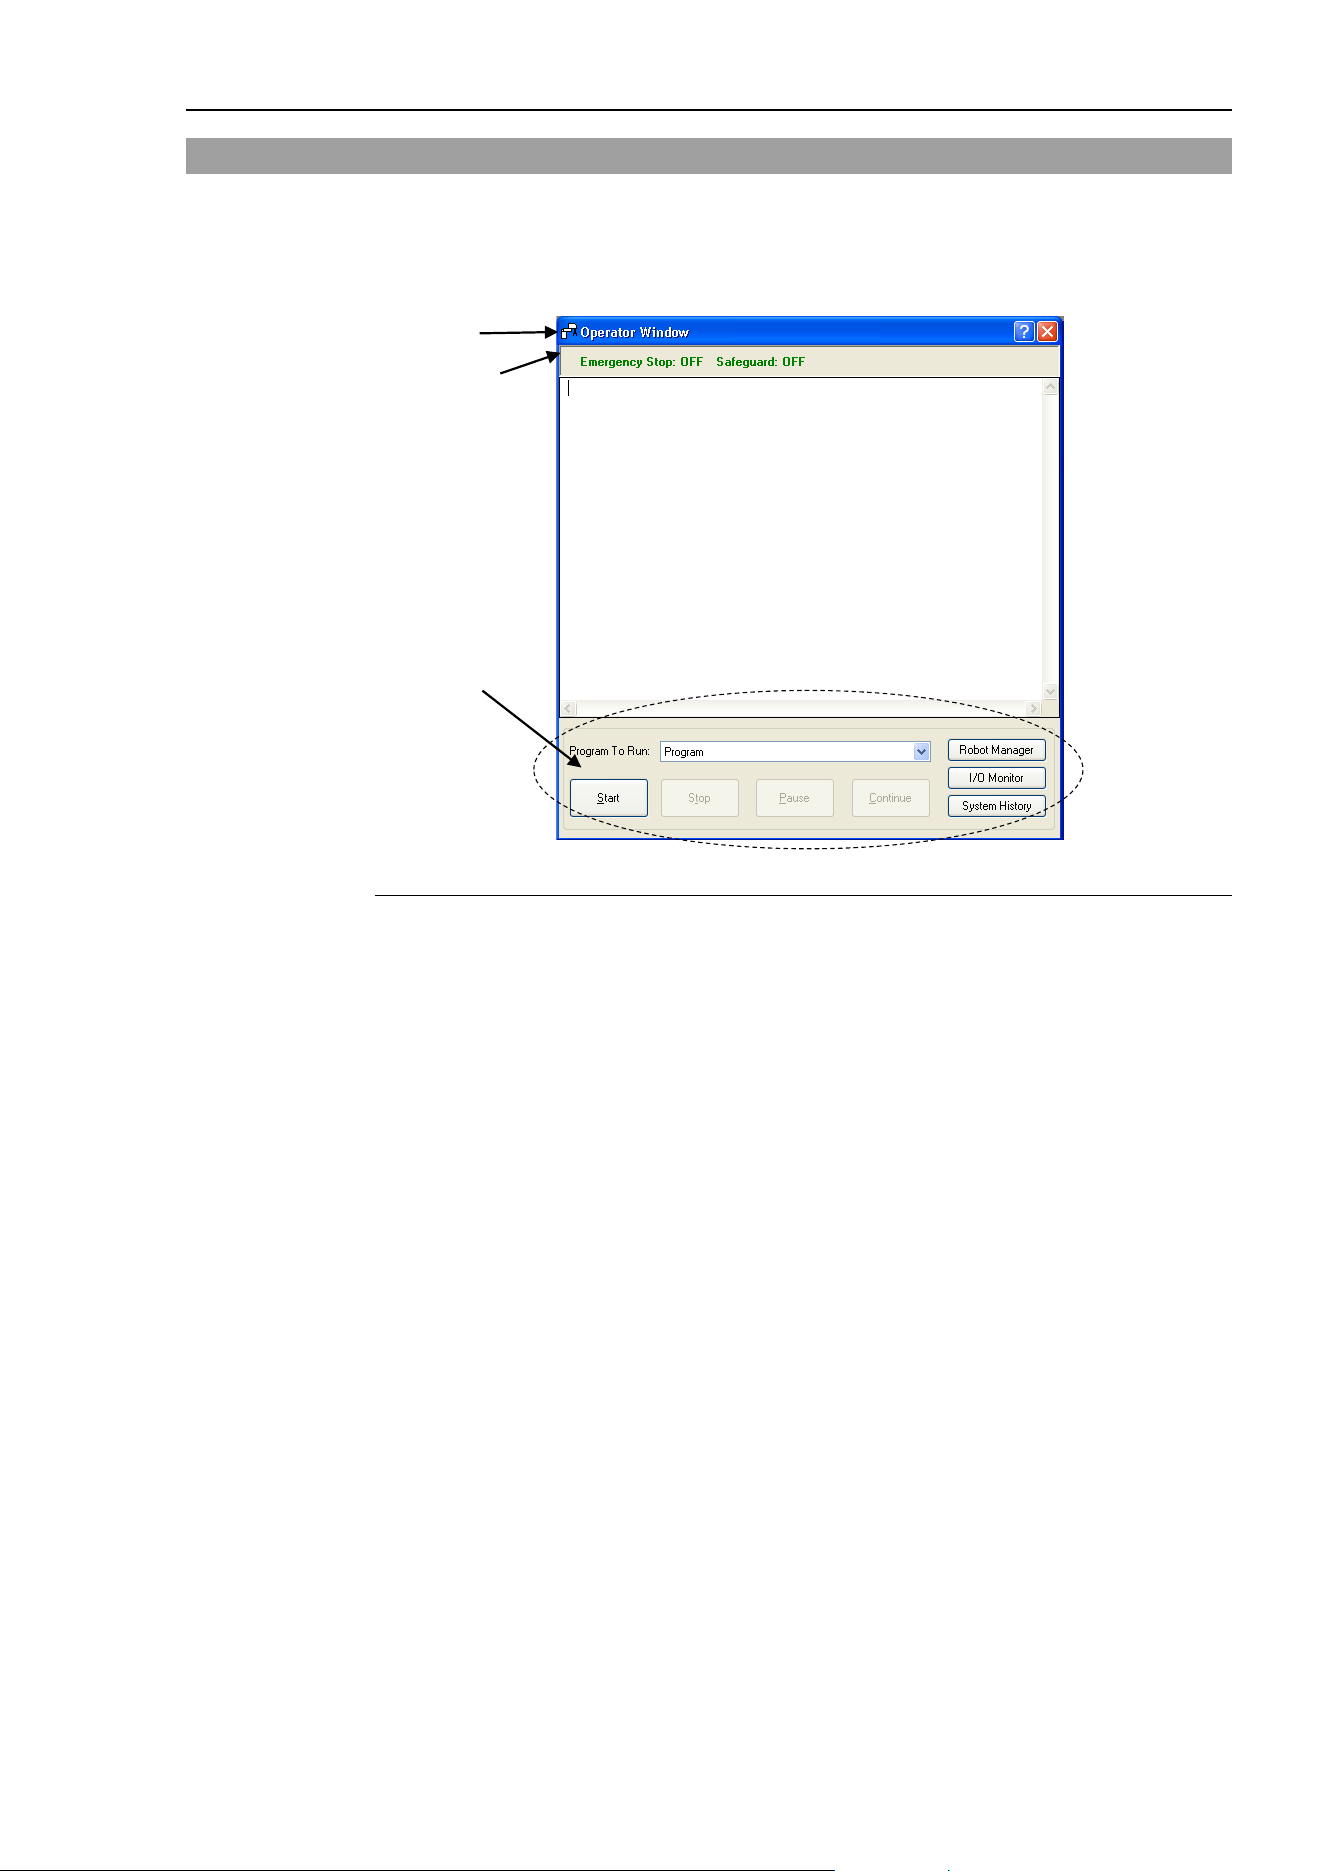
7. Building SPEL+ Applications
EPSON RC+ 7.0 (Ver.7.4) User's Guide Rev.6
267
7.6 The Operator Window
The Operator Window can be used as a simple interface for operators. You can configure
EPSON RC+ 7.0 to open only the Operator Window when started. In addition, when
Remote Control is being used, the Operator Window can be displayed for monitoring
purposes.
Title
Status bar
Operator
buttons
Item Description
Program to Run
Select a program to run.
Start
Starts the selected program.
Stop
Stops all tasks.
Pause
Pauses all tasks that are enabled for pause.
Continue
Continues paused tasks.
Robot Manager
Opens the Robot Manager dialog in operator mode.
It cannot be shown while the program is running.
I/O Monitor
Opens the I/O Monitor in operator mode. This window can
remain open while programs are running.
System
History
Opens the System History window.
This window can remain open while programs are running.
Status Bar
The status bar is located at the top of the window and shows
emergency stop and safeguard status. In addition, if a warning
is detected from the
controller (such as low encoder battery), a
warning label will be displayed on the right side of the status
bar. If the mouse is over this label, you can see the warning
error message. When there is no warning, the warning label is
hidden.
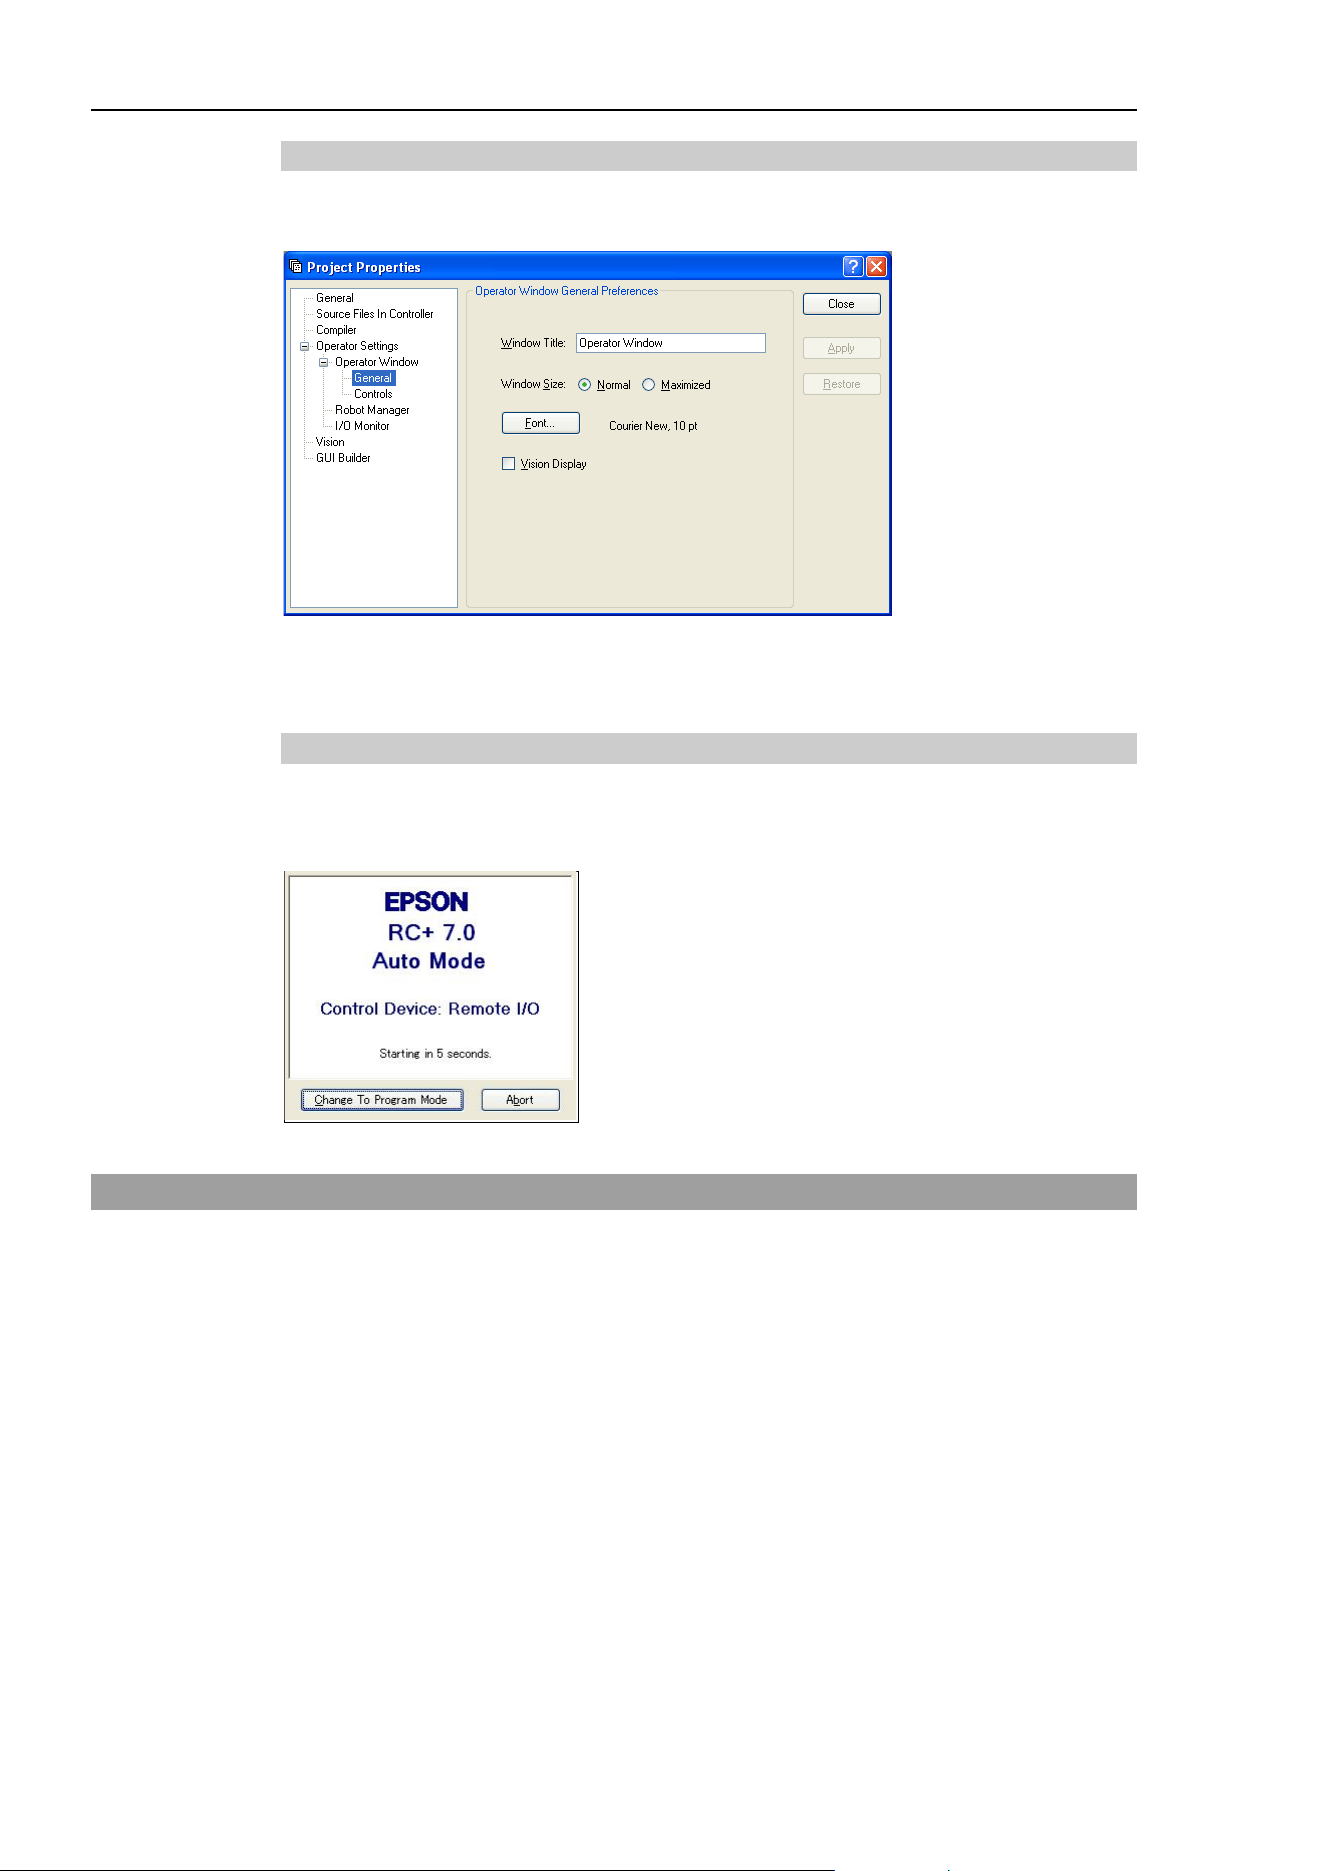
7. Building SPEL+ Applications
268
EPSON RC+ 7.0 (Ver.7.4) User's Guide Rev.6
7.6.1 Operator window configuration
You can configure the Operator Window from the Operator Window pages in [Project]-
[Properties].
There are several settings for operator Robot Manager and I/O Monitor.
For details, refer to 5.9.15 [Properties] Command (Project Menu).
7.6.2 Auto start configuration
You can configure the system to let it log into Windows automatically. Also you can
configure a program to start automatically from the [Operator] window. For details, refer
to 4.2.7 Auto Start.
7.7 Using Remote Control
You can design your application to be run from external equipment using hardware I/O
control. This includes push button boxes, PLCs, and other PC systems.
Refer to 12. Remote Control for details.
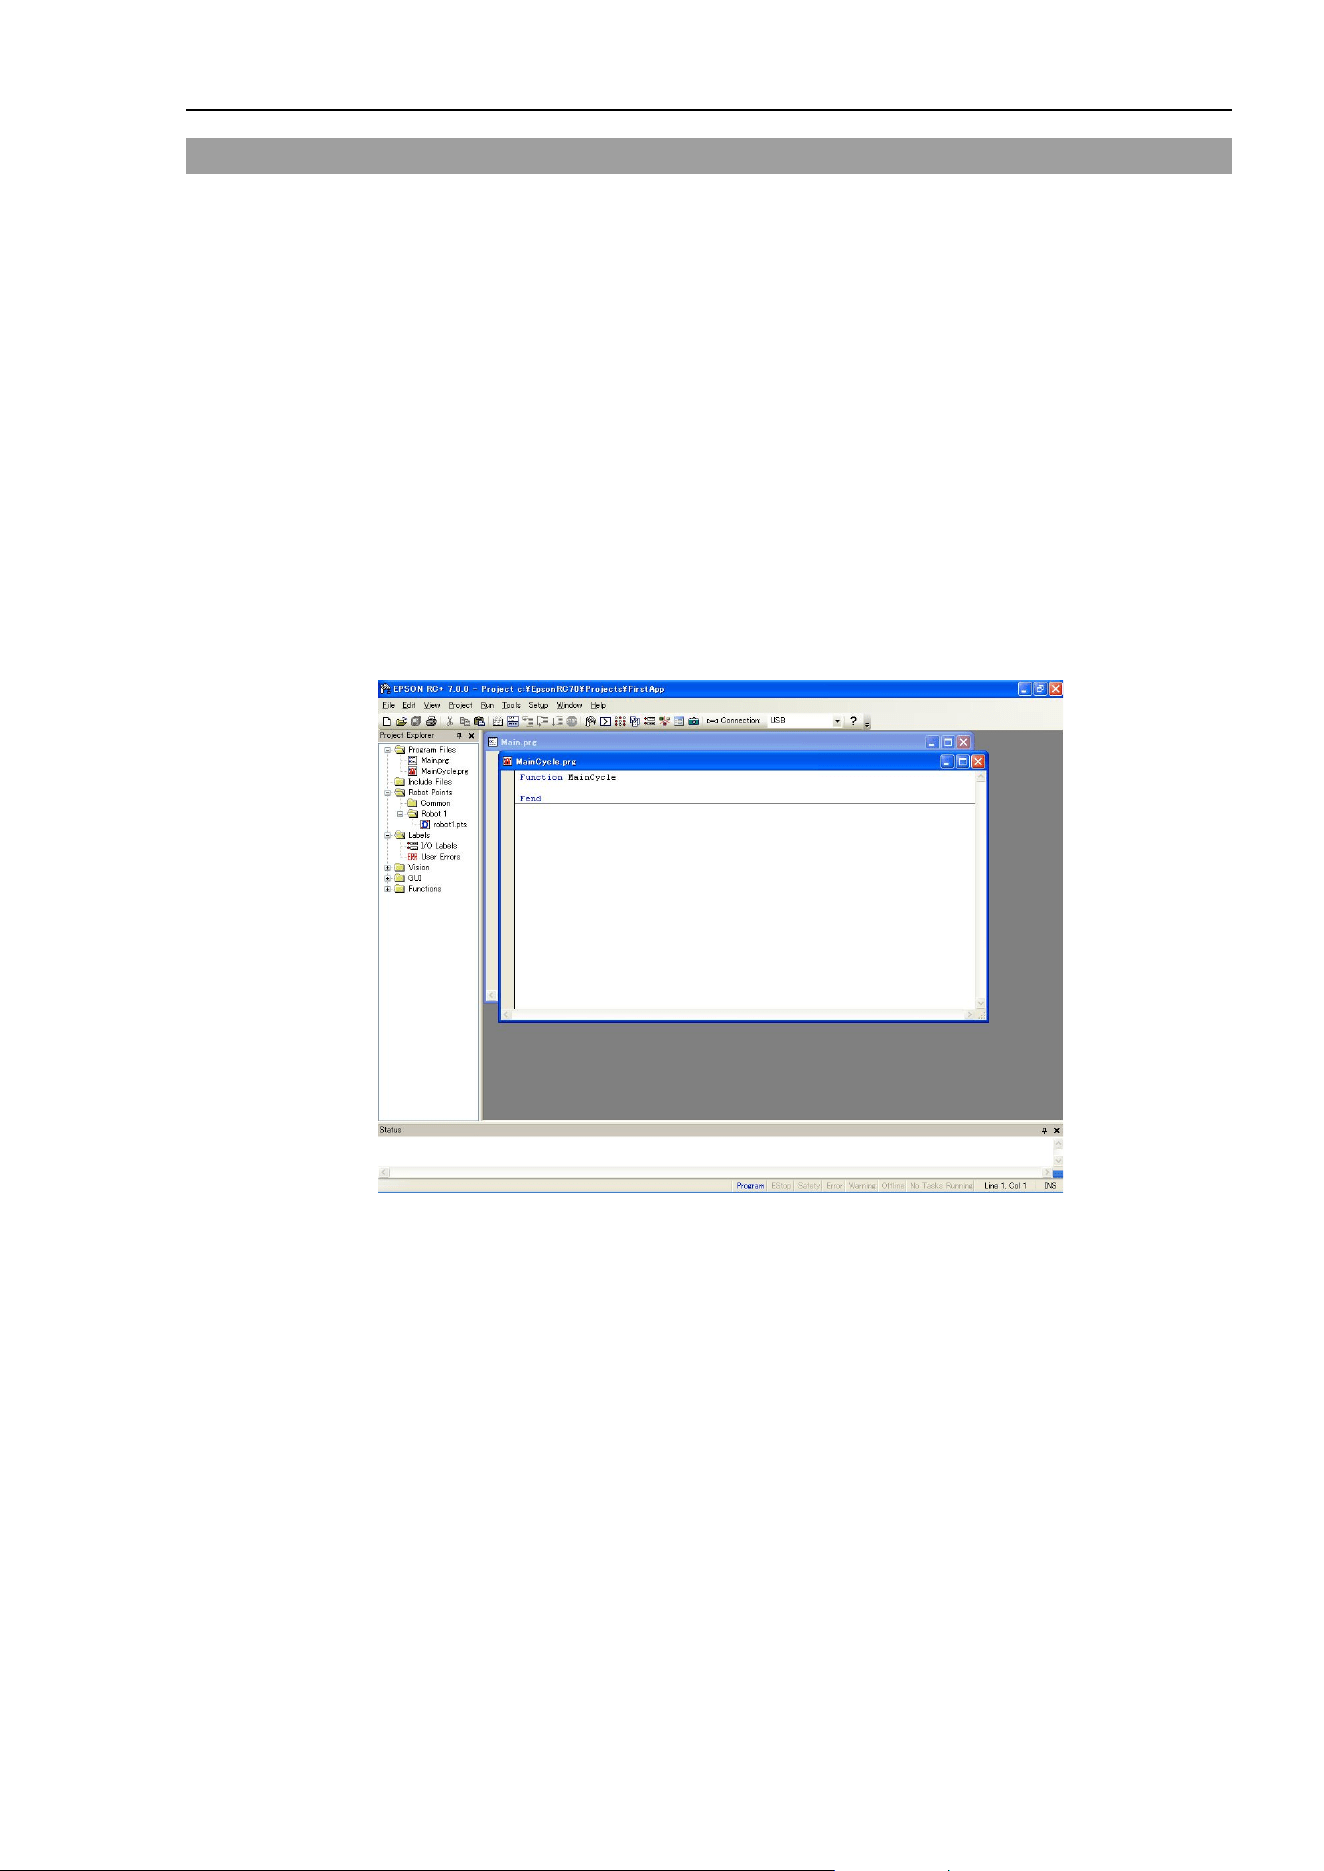
7. Building SPEL+ Applications
EPSON RC+ 7.0 (Ver.7.4) User's Guide Rev.6
269
7.8 Using Encrypt Files
Encrypted files allow you to prevent end users from viewing your source code. When a
file is encrypted, you must supply a password to open the file. Other users cannot view
the file contents, even with an external editor, such as Notepad.
Each encrypted file can have its own password, or you can choose to encrypt multiple files
with one password. You can encrypt program files, include files, Vision Guide, and GUI
Builder.
If an encrypted file is imported from another project, it will remain encrypted in the
current project.
As an example, assume you have some special SPEL+ programming code that you do not
want your end users to view. But you want to allow end users to change some of the code
in the project. To do this, put all of the functions you want to be hidden in one or more
encrypted program and include files. When you go to the customer site, you can view
your encrypted code by supplying the password(s) to open the encrypted files.
When files are encrypted, their icons are shown with a lock in the Project Explorer and
also in the title bar of the program window. In the screenshot below, the file
MainCycle.prg is encrypted, so its icons include a lock image.
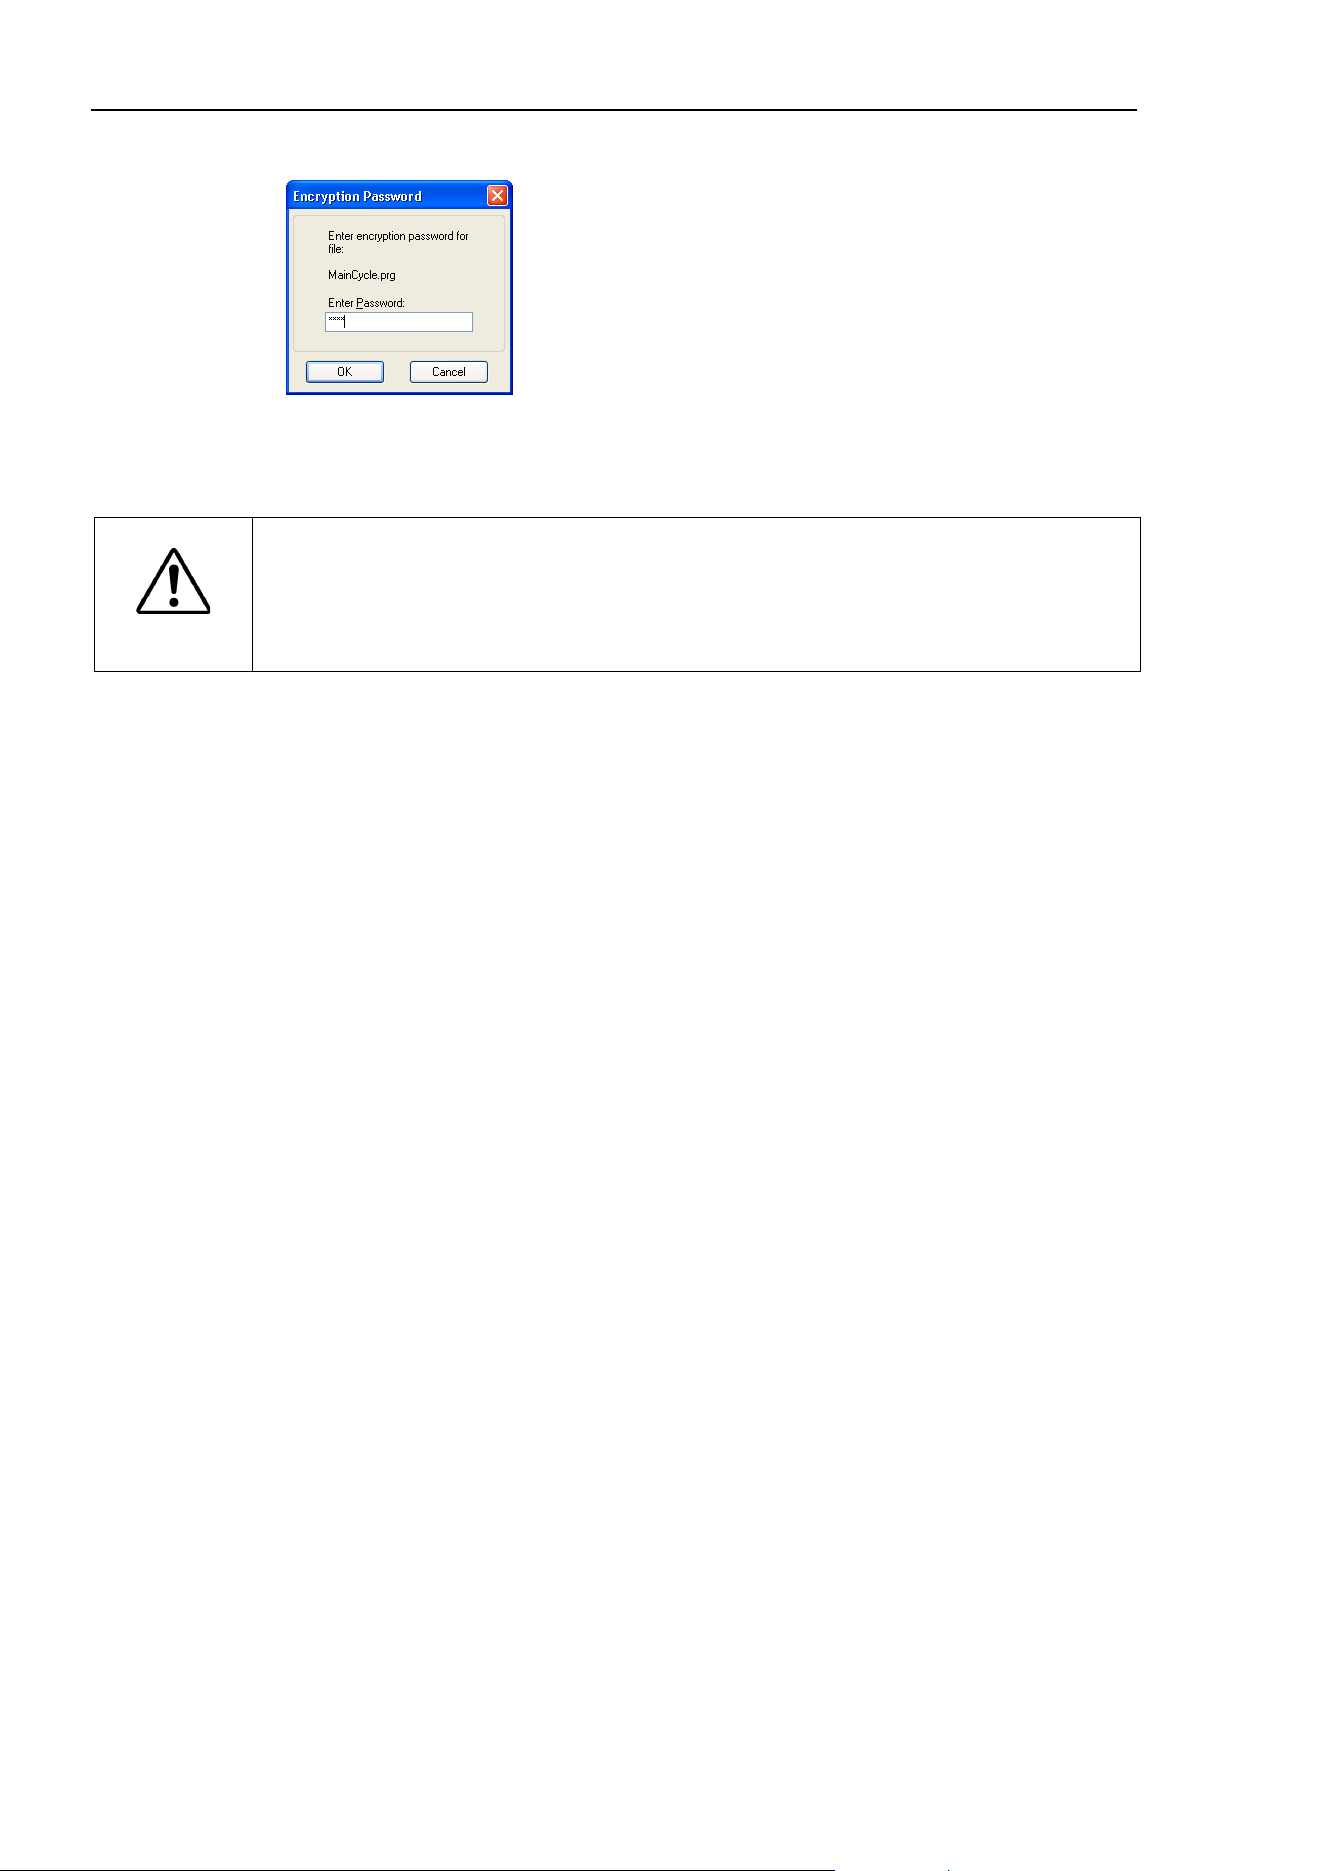
7. Building SPEL+ Applications
270
EPSON RC+ 7.0 (Ver.7.4) User's Guide Rev.6
When you open an encrypted file, you will be prompted for the password.
Up to 16 characters can be entered for password.
CAUTION
■
USE EXTREME CAUTION!
Keep a record of the password(s) used for encryption in a safe place.
Once a file is encrypted, it can only be opened with the password you enter.
If you forget the password, the
file contents CANNOT BE RECOVERED.
To configure encrypted files in your project, select Properties from the Project menu, then
select Encrypted Files in the tree on the left. Refer to section 5.9.15 [Properties]
Command (Project Menu) for details.
NOTE

8. Simulator
EPSON RC+ 7.0 (Ver.7.4) User's Guide Rev.6 271
8. Simulator
8.1 Simulator Functions
Simulator functions enable easy robot motion checking on your PC, which gives you
flexibility to consider the system layout, measure the operation time, and create robot
programs.
They are useful from the introduction stage to the launch of robot system.
8.1.1 Overview
The following are the major simulator functions:
Robot motion 3D display
Shows robot orientation and motion in a 3D display from various viewpoints.
Offers accurate display data based on design data.
This function is not available for the manipulator series (models) as described below.
If a simplified layout consideration or measurement of motion time is needed, set an
alternative model. However, external dimensions and motion range may differ.
Be careful when you set the alternative models.
For details on the unsupported models, refer to the following section.
Appendix C: Simulator Functions List of Unsupported Manipulator Models
Series Model
Alternative model
(When using a Virtual Controller)
X5
All models
No alternative model
-
G6
Protected model
G6-***D*, G6-***P*
Standard model, Cleanroom model
G6-***S*, G6-***C*
*
G6-II
Protected model
G6-***D*-II, G6-***P*-II
Standard model, Cleanroom model
G6-***S*-II, G6-***C*-II
*
G10
Protected model
G10-***D*, G10-***P*
Standard model, Cleanroom model
G10-***S*, G10-***C*
*
G10-II
Protected model
G10-***D*-II, G10-***P*-II
Standard model, Cleanroom model
G10-***S*-II, G10-***C*-II
*
G20
Protected model
G20-***D*, G20-***P*
Standard model, Cleanroom model
G20-***S*, G20-***C*
*
G20-II
Protected model
G20-***D*-II, G20-***P*-II
Standard model, Cleanroom model
G20-***S*-II, G20-***C*-II
*
*: External dimensions and motion range differ.
Interference check
Checks whether the robot (including the hand and devices installed on the robot) interferes
with itself or its peripherals.
(This function is not available for the robots that do not support 3D display.)
Robot operation time prediction
Predicts the robot operation time for a program.
Considers the speed setting (Speed, etc.) and acceleration / deceleration setting (Accel,
etc.) when predicting the robot motion time.
8. Simulator
272 EPSON RC+ 7.0 (Ver.7.4) User's Guide Rev.6
SPEL+ program execution
Allows you to create, execute, and debug SPEL+ programs.
The restrictions on the simulator functions are described in 8.4 Simulator Specifications
and Restrictions.
8.1.2 System Requirements
Recommended specification
When using CAD data, we recommend the following environment.
OS
Windows 10 Pro 32 bit version / 64 bit version
Windows 8.1 Pro 32 bit version / 64 bit version
Windows 7 Professional SP1 32 bit version / 64 bit version
CPU
Core i5 or more
Memory
2 GB or more
Hard disk spare capacity
4 GB or more
Graphic
DirectX10.1 or later must be available.
OpenGL2.1 or later must be supported.
Minimum specification
To use one robot with several peripherals and operate them in a simple manner, the
following environment is required.
OS
Windows 10 Pro 32 bit version
Windows 8.1 Pro 32 bit version
Windows 7 Professional SP1 32 bit version
CPU
1.6 GHz or more, 32 bit (x86) Multi Core Processor
Memory
512 MB or more
Hard disk spare capacity
4 GB or more
Graphic
OpenGL1.5 or later must be supported.
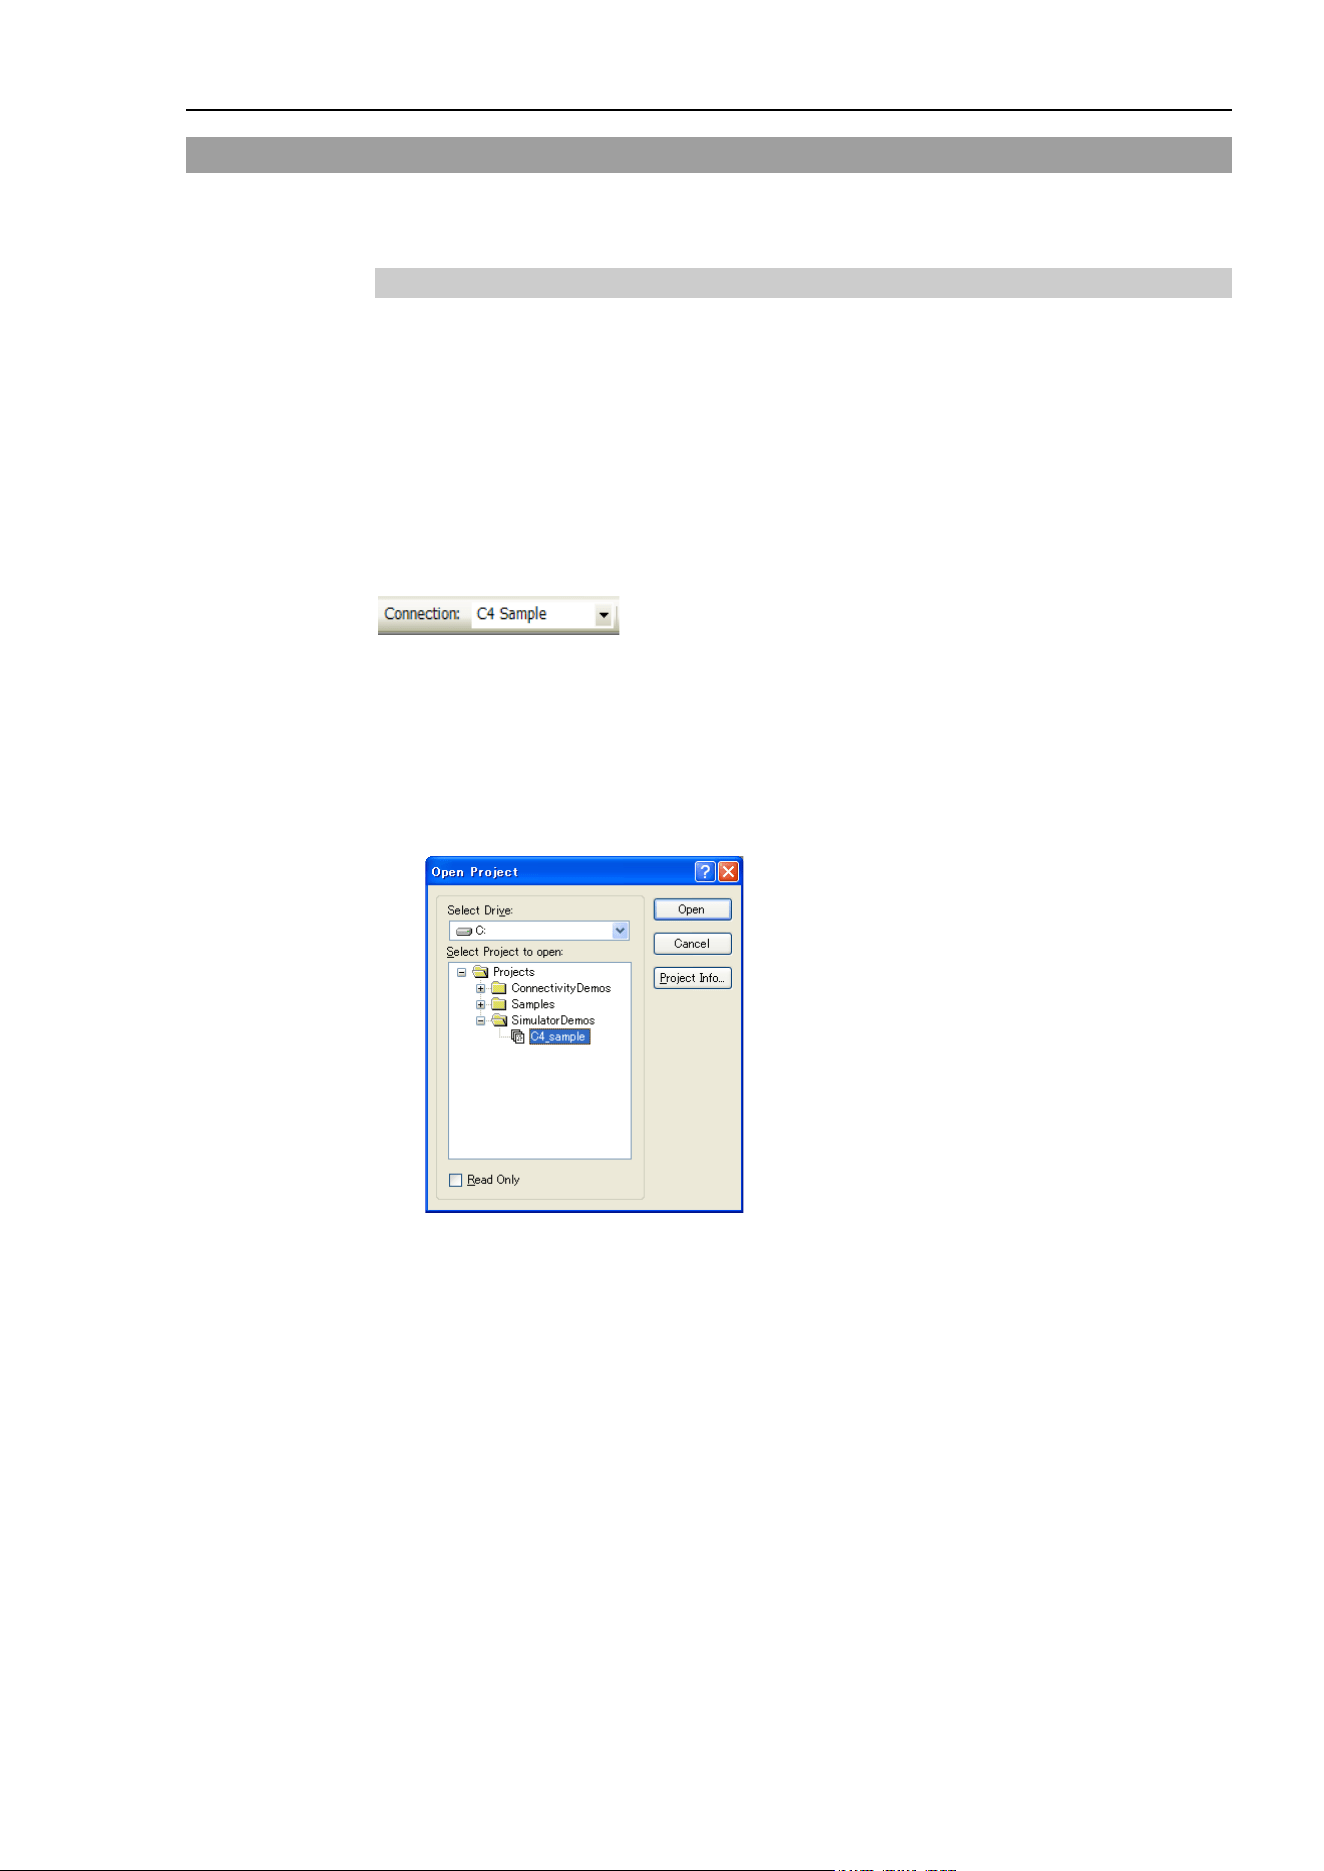
8. Simulator
EPSON RC+ 7.0 (Ver.7.4) User's Guide Rev.6 273
8.2 Using the Simulator
You can try the simulation functions using the provided sample virtual controllers and
projects.
8.2.1 Working with the samples
You can operate a robot easily using the samples provided. Follow the steps below:
1. Connect with a sample virtual controller (robot)
2. Open the corresponding sample project
3. Display the [Robot Simulator] window
4. Operate the robot by executing a program
5. Next step
1. Connect with a sample virtual controller
Select “C4 Sample” from the EPSON RC+ 7.0 Tool bar-<Connection> list box.
When the connection is complete, the <Connection> list box shows “C4 Sample”.
2. Open a corresponding sample project
(1) Click the EPSON RC+ 7.0 menu-[Project]-[Open…].
(2) Select [Projects]-[SimulatorDemos]-[C4 Sample].
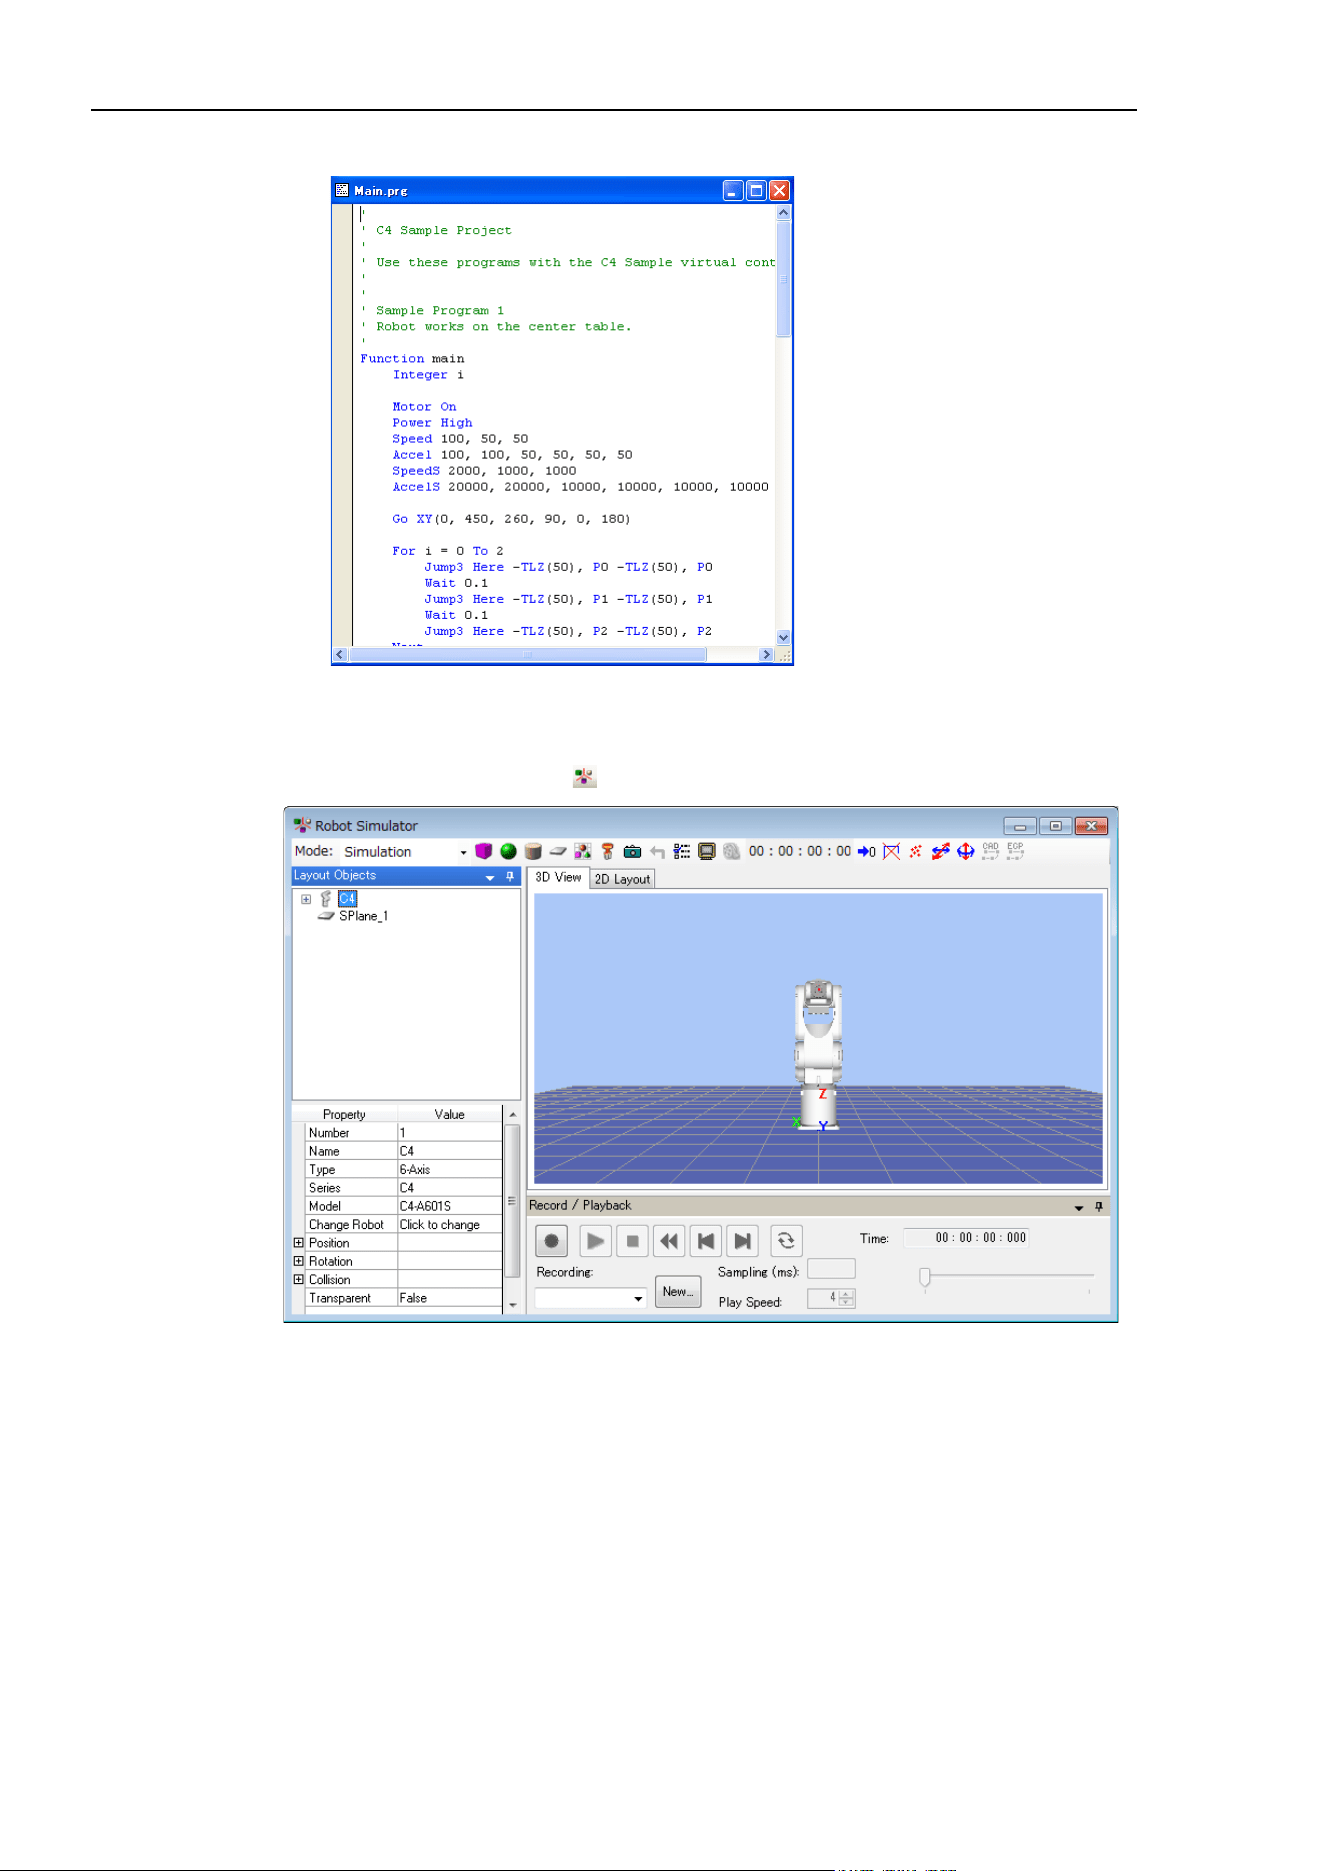
8. Simulator
274 EPSON RC+ 7.0 (Ver.7.4) User's Guide Rev.6
(3) Click the <Open> button. Then, the following program window appears.
3. Display the [Robot Simulator] window
Click the Tool bar-<Simulator > button. The [Robot Simulator] window appears.
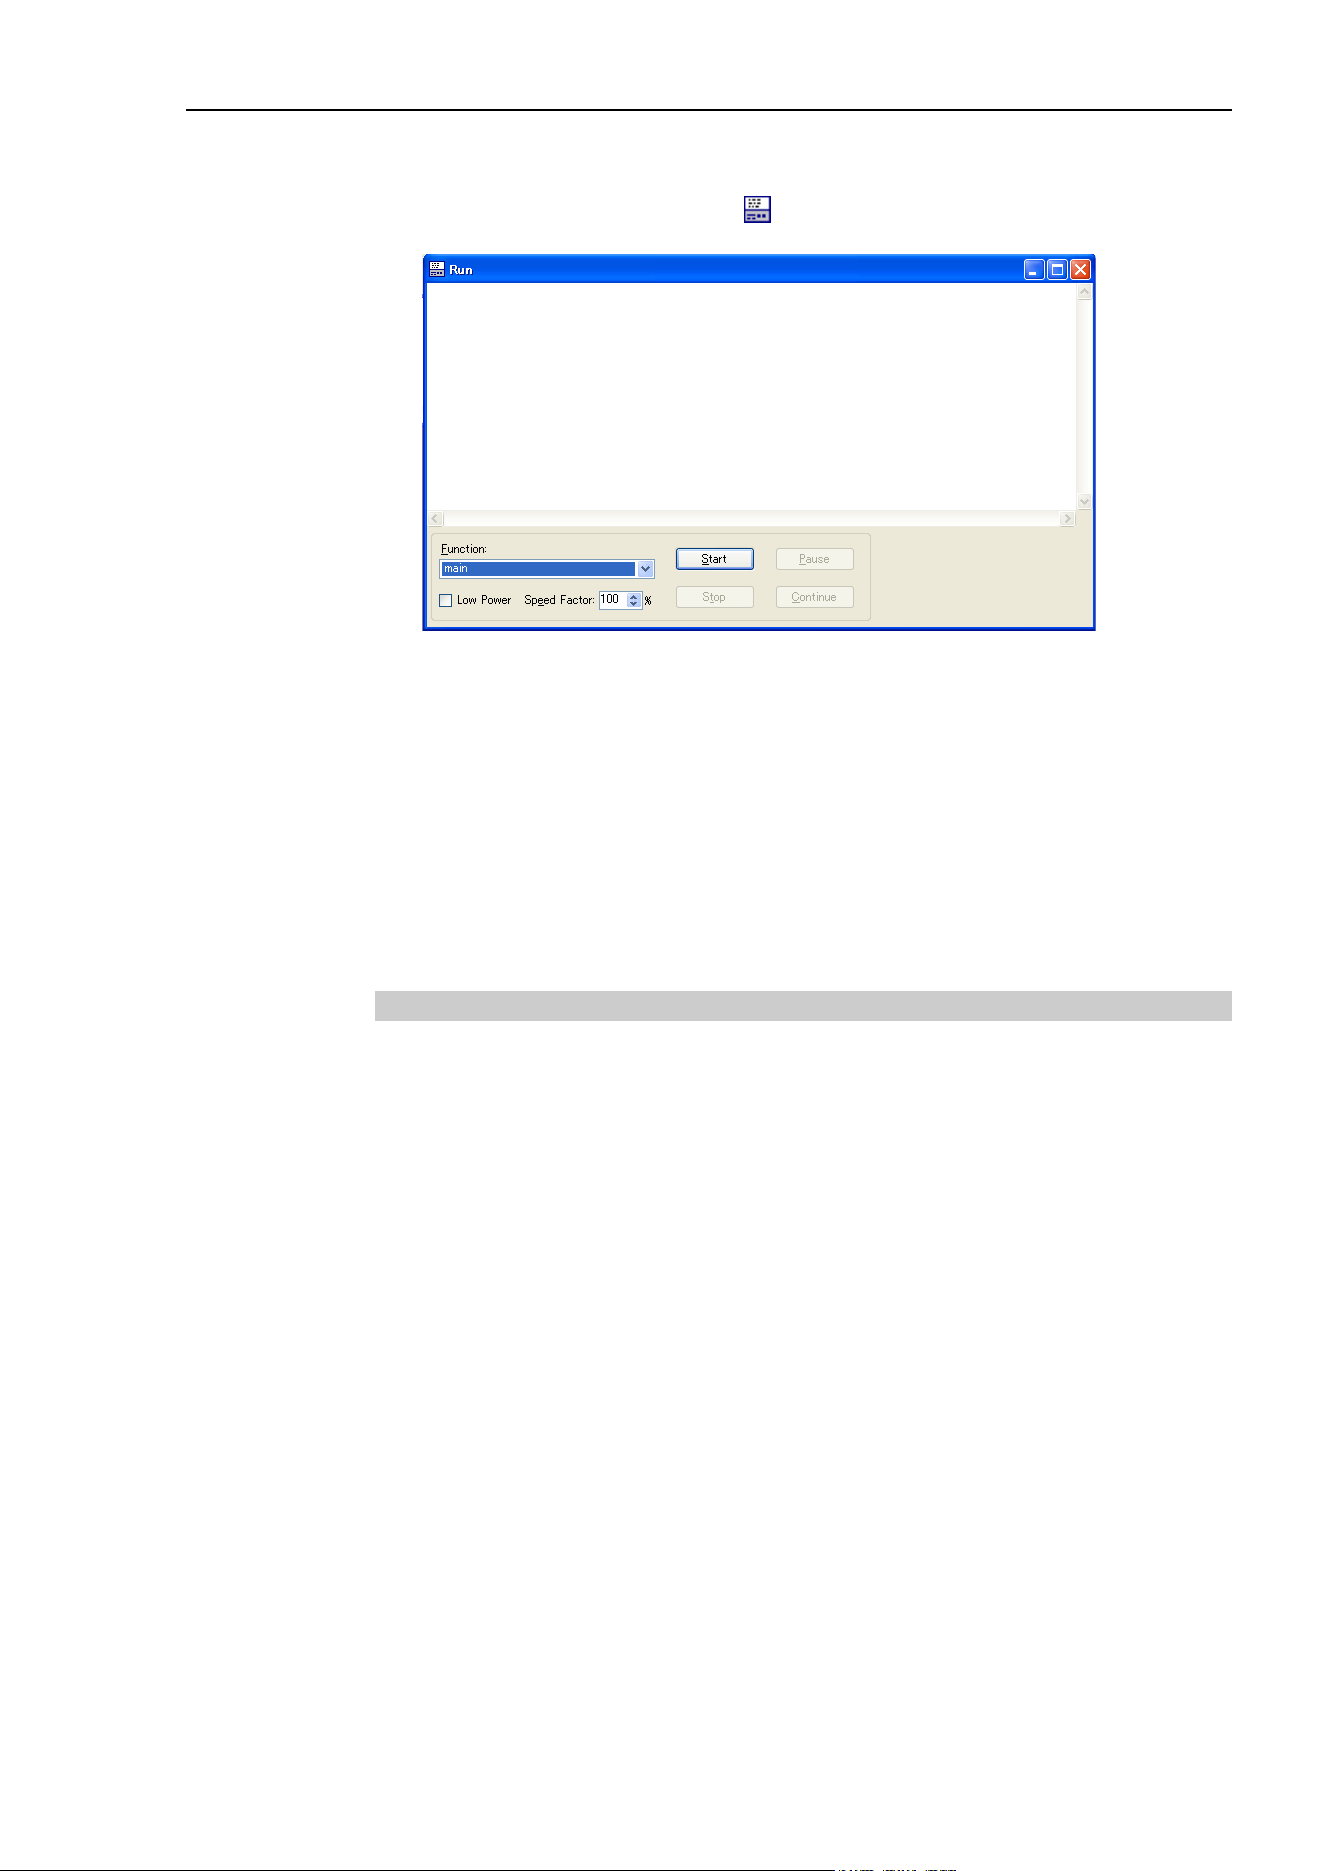
8. Simulator
EPSON RC+ 7.0 (Ver.7.4) User's Guide Rev.6 275
4. Operate the robot by executing program
(1) Click the Tool bar-<Run Window > button. The project will be built and the
[Run] window will appear.
(2) Click the <Start> button.
The message “Are you ready to start?” appears. Click the <Yes> button.
The program starts and the robot moves in the 3D display.
5. Next step
If you want to change the sample, follow the steps in 8.2.2 Working with the user created
system - Steps 5 to 7. If you want to create your own system, start from Step 1.
If you want to change the sample virtual controller, follow the steps in 8.3.5 Virtual
controller - Copy the sample or configured virtual controller and change the copied
sample.
8.2.2 Working with the user created system
You can create your own system and simulate the robot operation on your PC.
Follow the steps below:
1. Create a new virtual controller (Connection setting)
2. Connect with the virtual controller
3. Configure a robot
4. Display the [Robot Simulator] window
5. Create and place objects
6. Create a project and program
7. Operate the robot by executing the program
8. Measure the robot operation time
9. Test for collisions
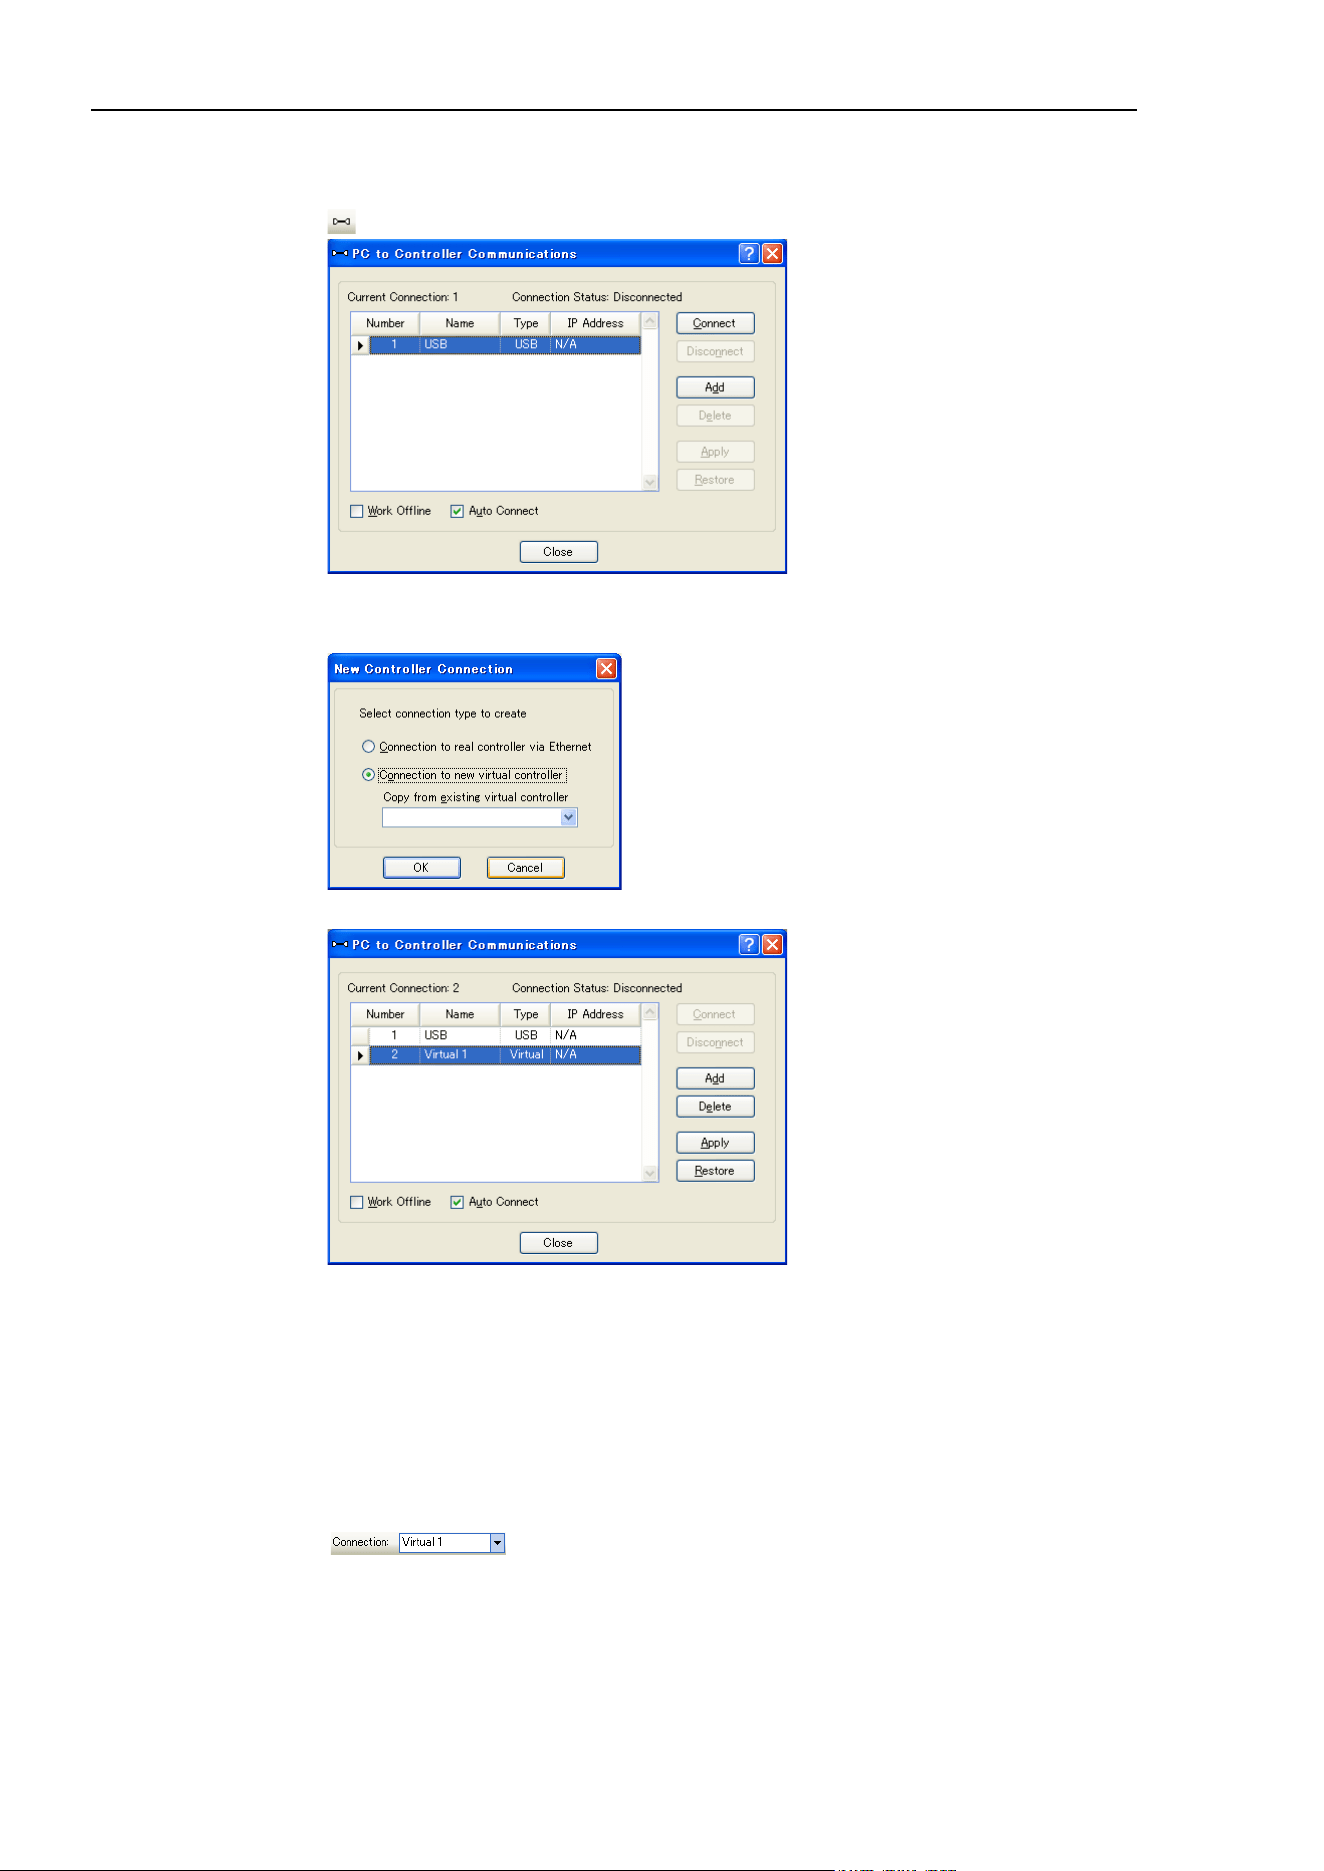
8. Simulator
276 EPSON RC+ 7.0 (Ver.7.4) User's Guide Rev.6
1. Create a new virtual controller (Connection setting)
(1) Click the EPSON RC+7.0 Tool bar-<Setup PC to robot controller communications.
> button. The [PC to Controller Communications] dialog appears.
(2) Click the <Add> button. The [New Controller Connection] dialog appears.
(3) Select the [Connection to new virtual controller] and click the <OK> button.
(4) A new virtual controller named “Virtual 1” is created. Click the <Apply> button.
Note: In the virtual controller, programs will execute continuously for up to one hour.
If continuous execution is over one hour, a warning message appears.
You can execute the program again after the warning is displayed, and the
continuous execution timer will be reset.
(5) Close the dialog to return to the EPSON RC+ 7.0 main window.
2. Connect with the virtual controller
(1) Select the created “Virtual 1” connection from the EPSON RC+ 7.0 Tool bar-
<Connection> list box. When the connection is complete, the <Connection> list box
shows “Virtual 1”.
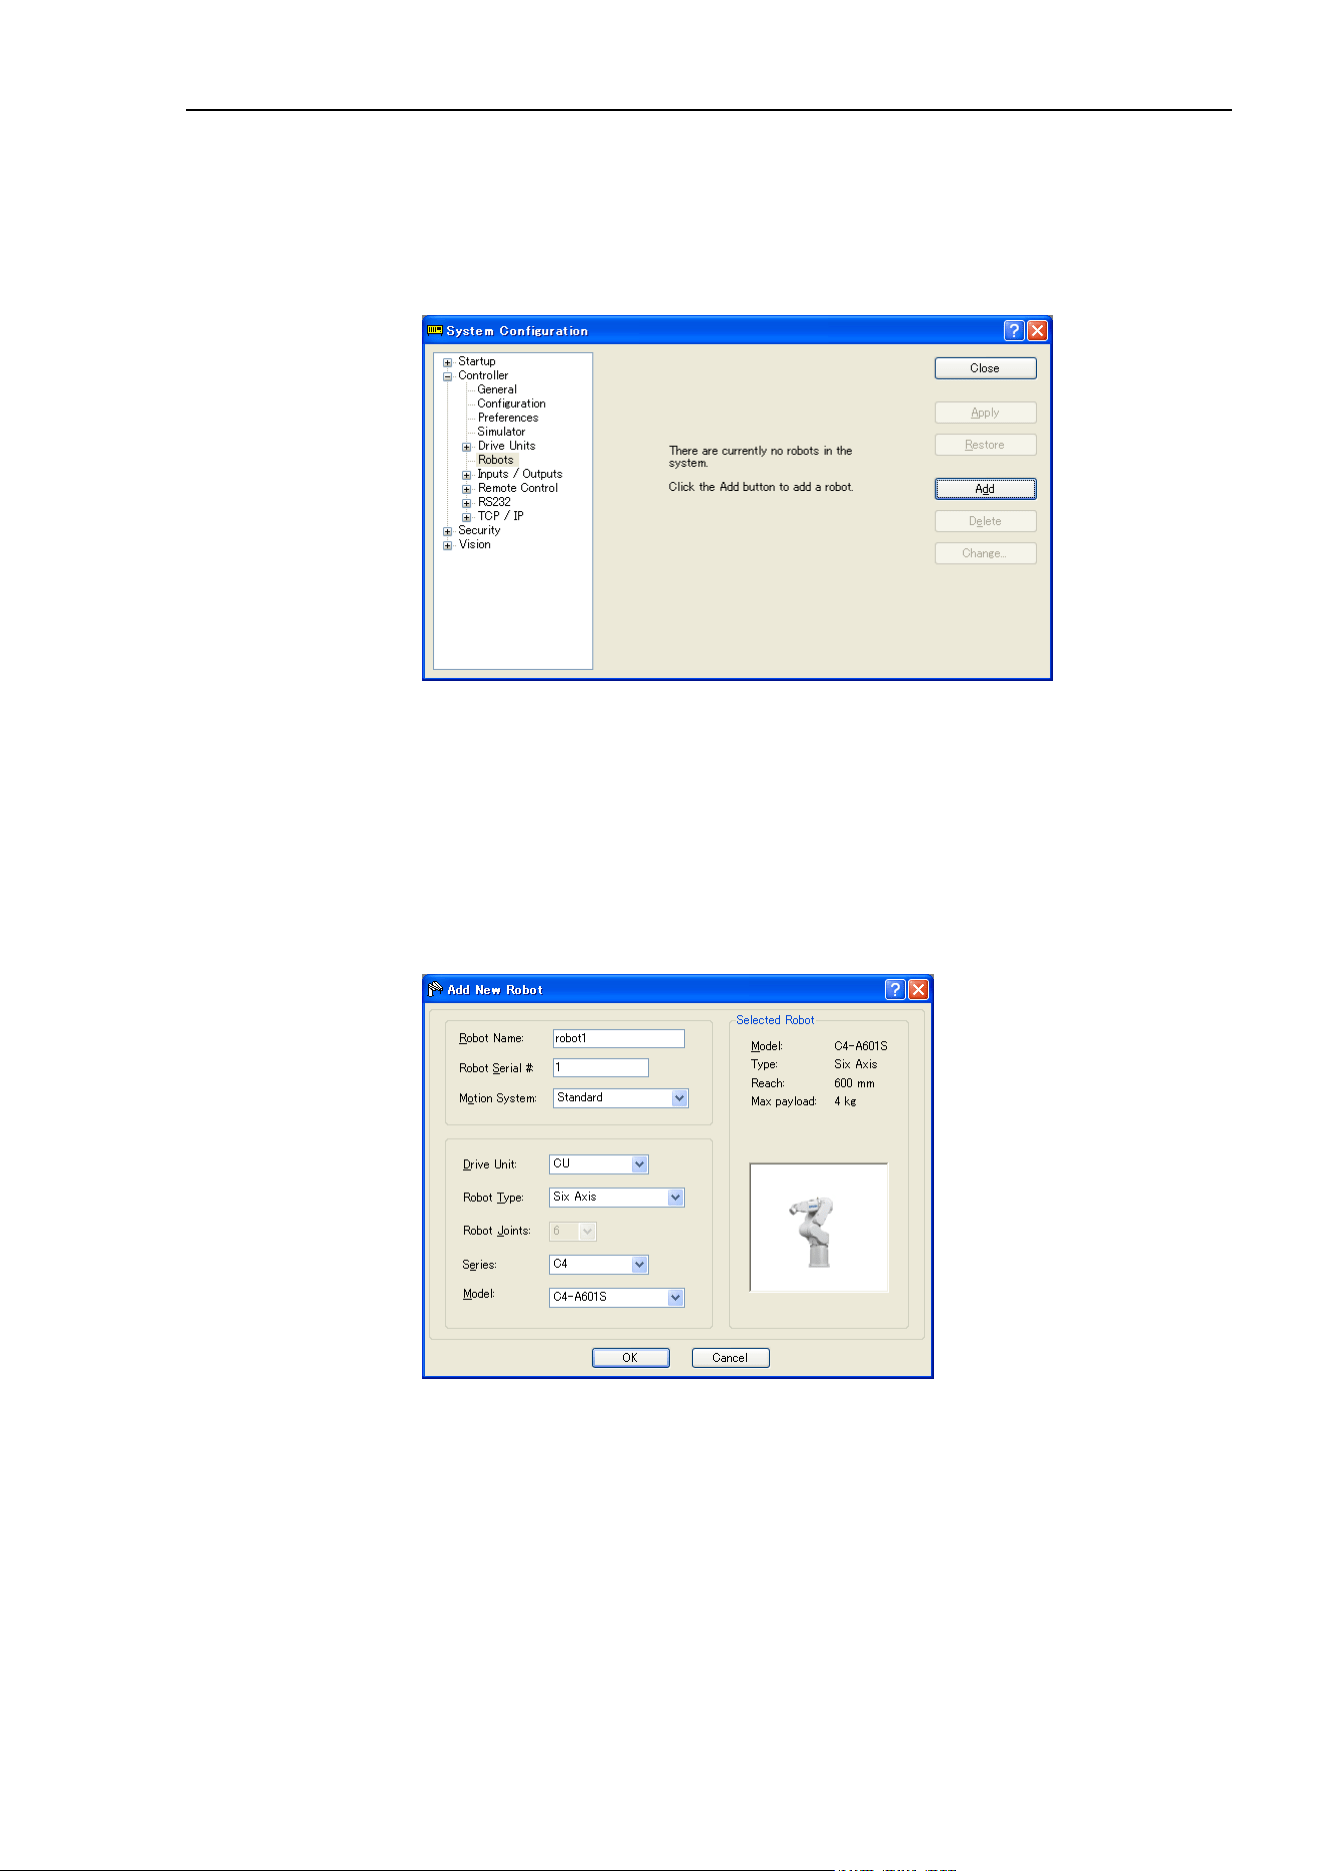
8. Simulator
EPSON RC+ 7.0 (Ver.7.4) User's Guide Rev.6 277
3. Configure a robot
In this tutorial, a C4-A601S robot model is used.
(1) Select the EPSON RC+ 7.0 menu-[Setup]-[Controller].
(2) Select the [Controller]-[Robots] from the tree, the message “There are currently no
robots in the system. Click the Add button to add a robot” will appear.
(3) Click the <Add> button to open the [Add New Robot] dialog box. Input the robot
information as follows:
[Robot Name]: robot1
[Robot Serial #]: 1
[Drive Unit]: CU
[Robot Type]: Six Axis
[Series]: C4
[Robot]: C4-A601S
(4) Click the <Apply> button. The message “Restarting Controller” appears.
(5) When the message disappears, close the window and go back to the EPSON RC+ 7.0
main window.
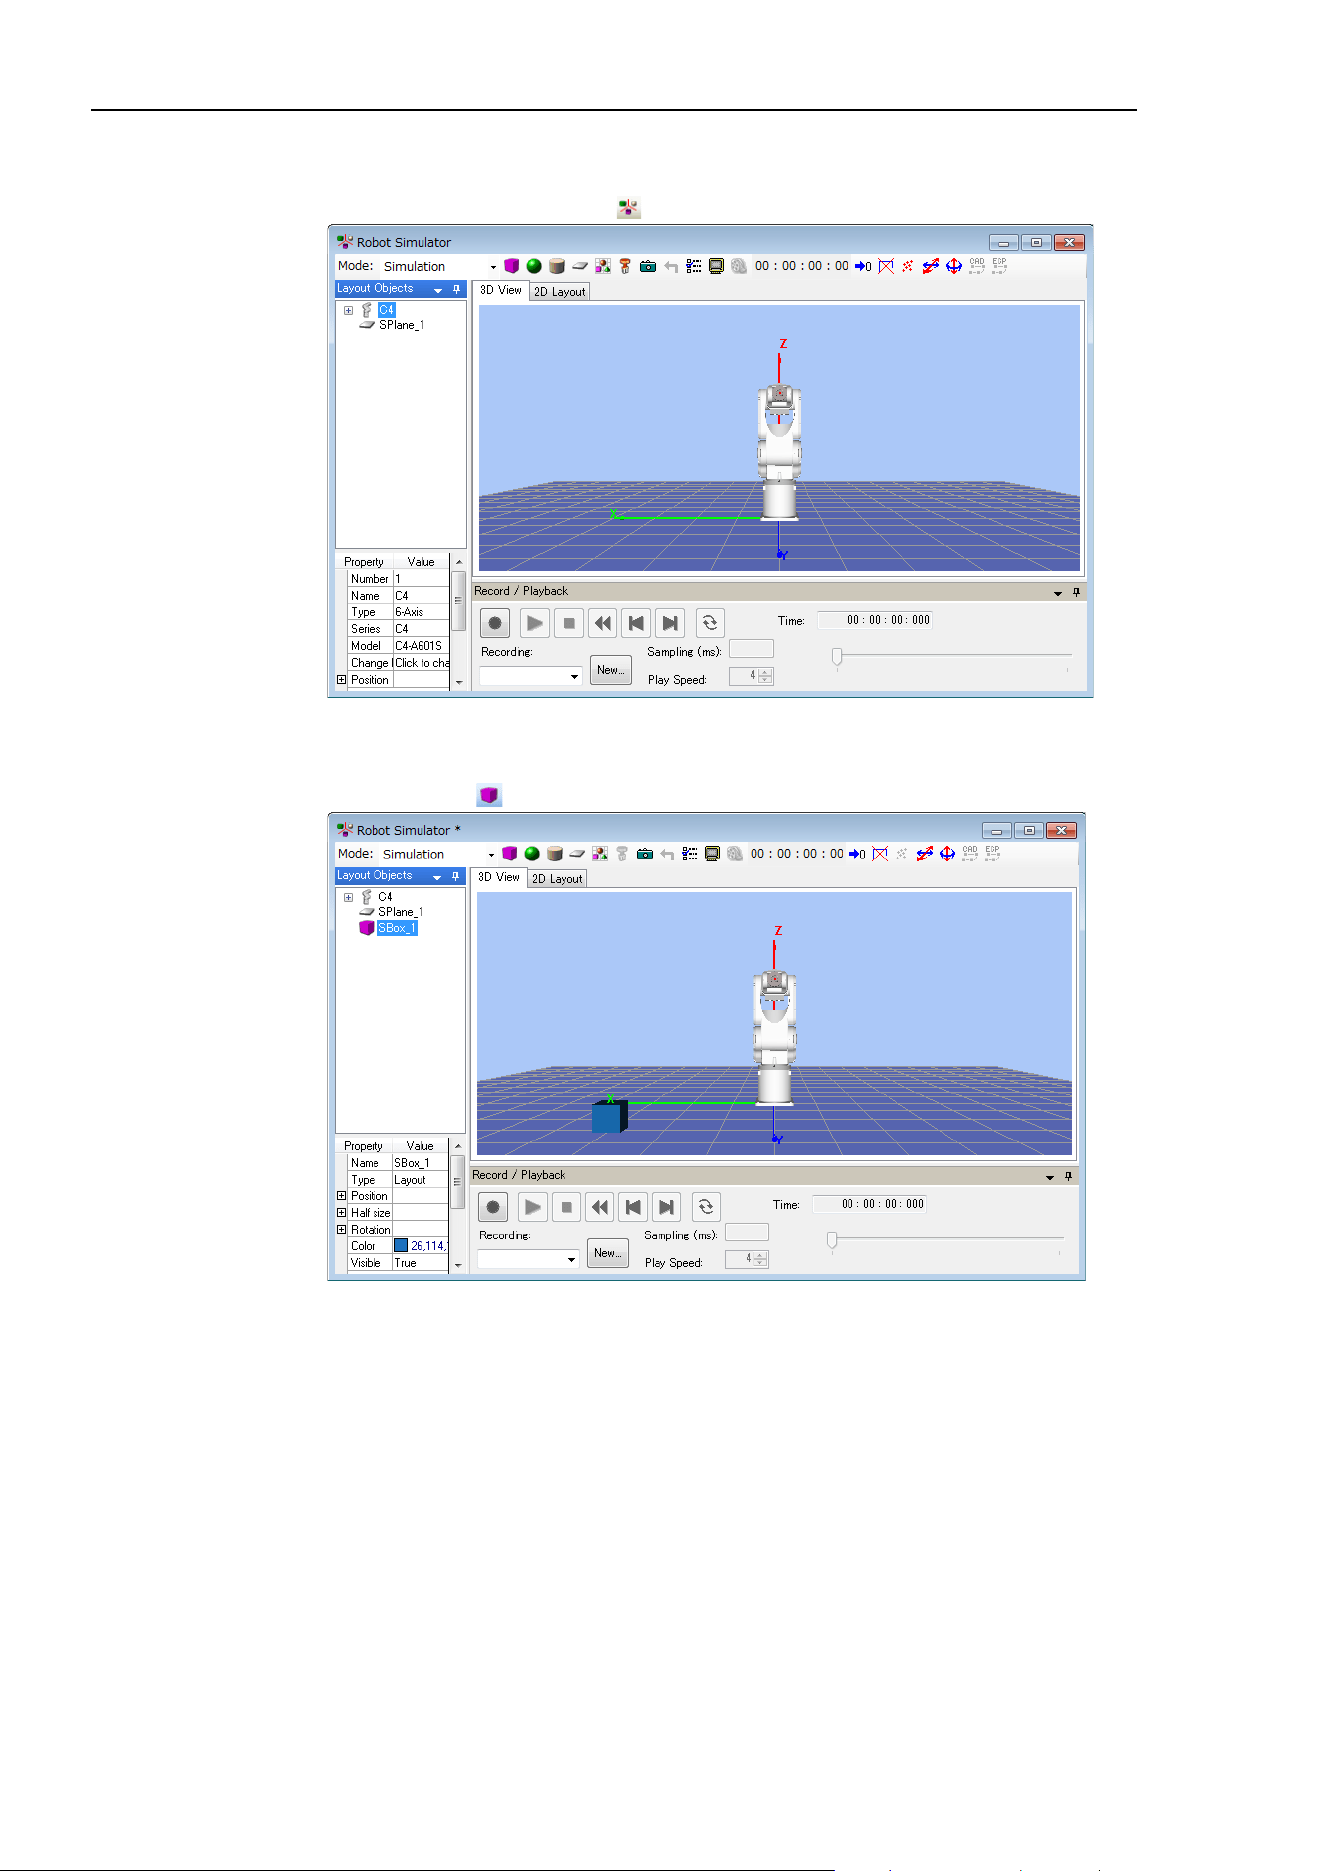
8. Simulator
278 EPSON RC+ 7.0 (Ver.7.4) User's Guide Rev.6
4. Display the [Robot Simulator] window
(1) Click the Tool bar-<Simulator > button. The following window appears.
5. Place the objects
For this tutorial, we will add a box to the layout.
(1) Click the <Box > button on the Tool bar.
(2) Select “SBox_1” from the [Layout Objects] and change the [Property]-[Position]. For
this tutorial, enter X = 600, Y = 300.
To change the position, you can also drag the objects in the [2D Layout] tab.
To save the layout change, execute the EPSON RC+ 7.0 menu-[File]-[Save].
TIP
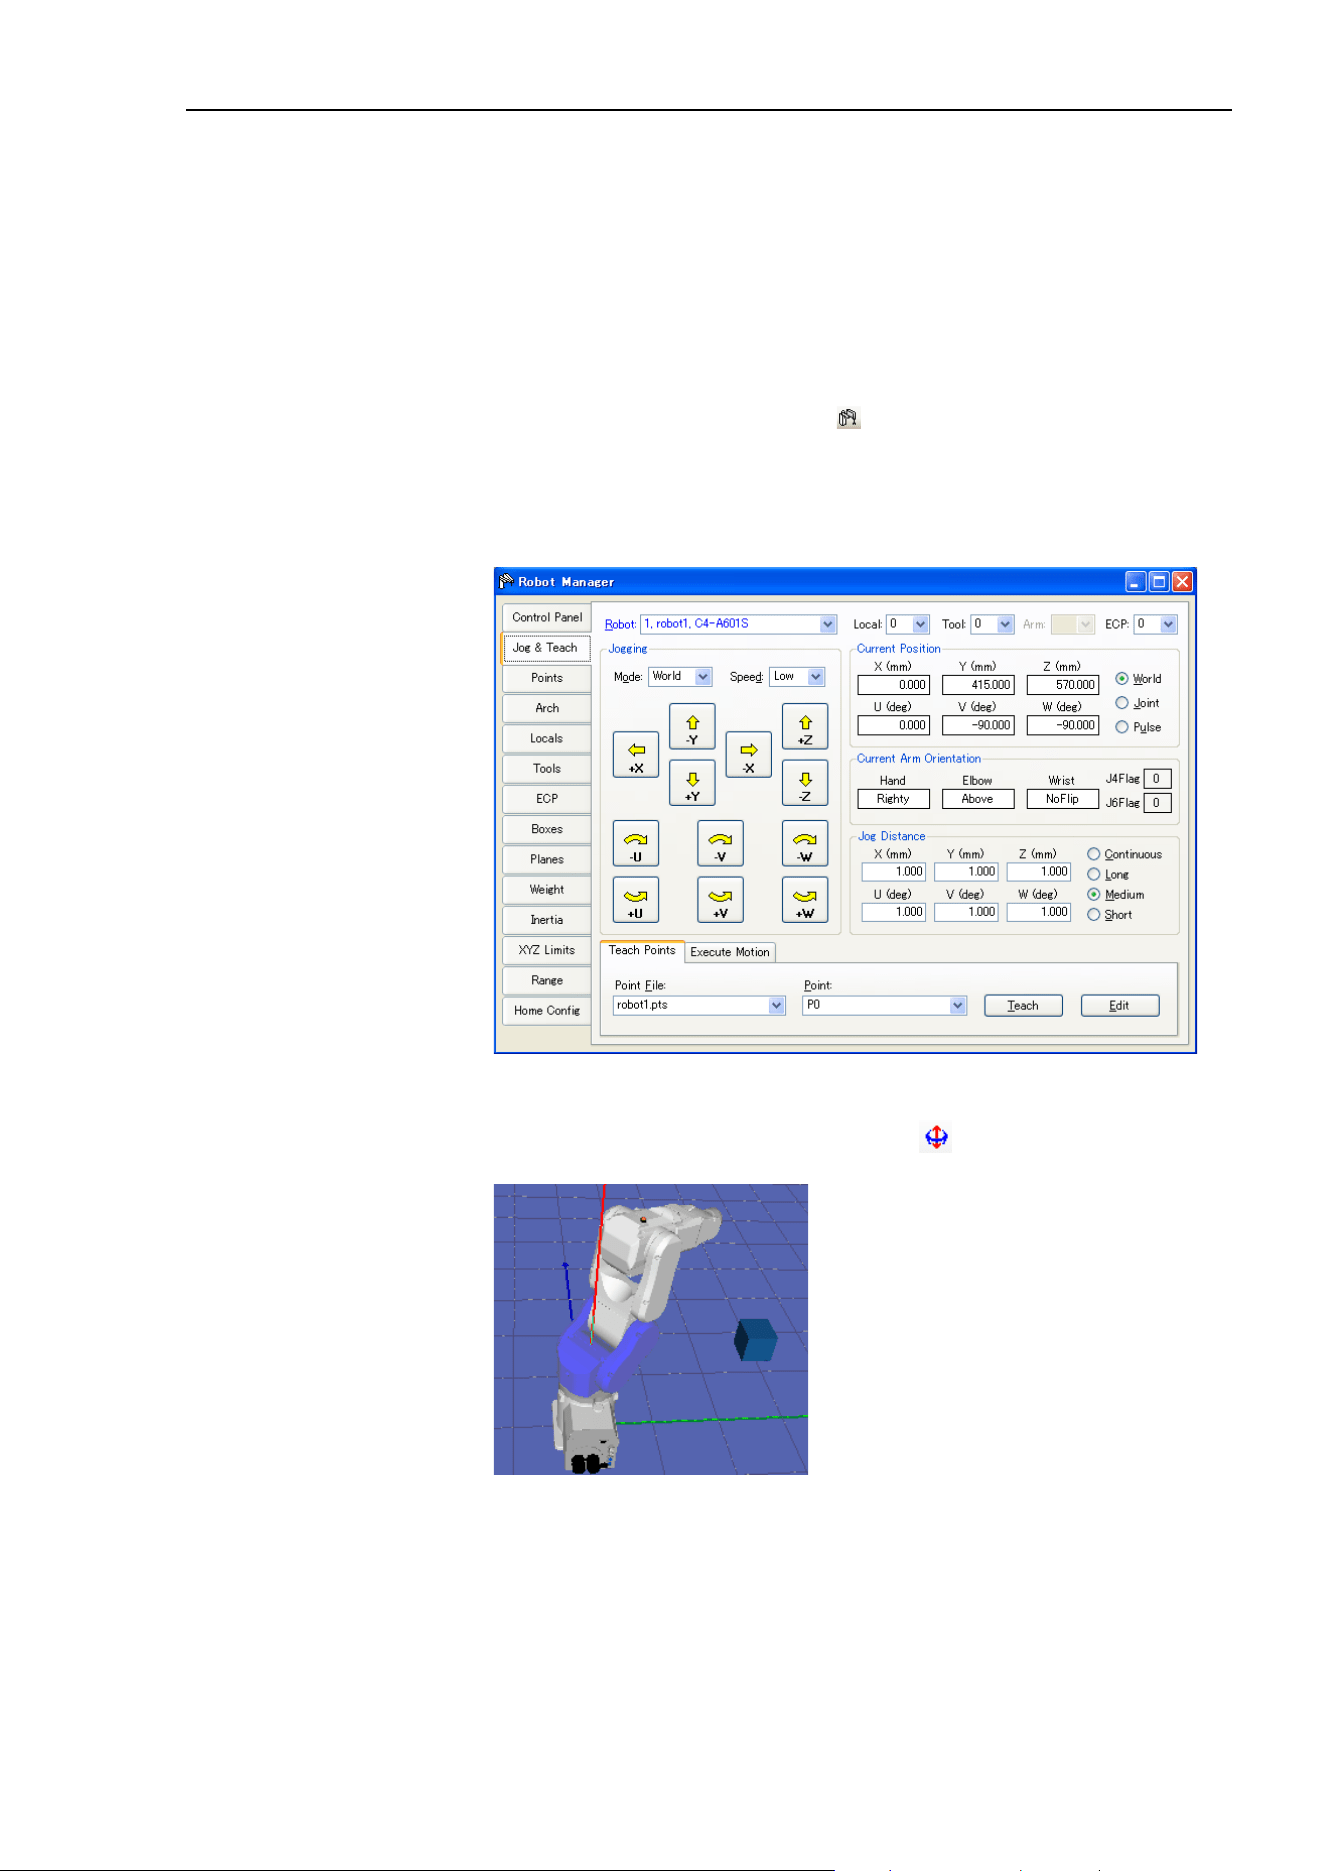
8. Simulator
EPSON RC+ 7.0 (Ver.7.4) User's Guide Rev.6 279
6. Create a project and program
(1) Create a new project
(1)-1 Click the EPSON RC+ 7.0 menu-[Project]-[New Project].
(1)-2 Enter a new project name. For this tutorial, enter “Test”.
(1)-3 Click the <OK> button. Then, the project “Test” is created.
(2) Operate the robot and teach points.
(2)-1 Click the Tool bar-<Robot Manager > button. The [Robot Manager]
window appears.
(2)-2 Select the [Control Panel] tab and click the <MOTOR ON> button.
The message appears to confirm the operation. Click the <Yes> button.
(2)-3 Select the [Jog & Teach] tab. The following dialog appears.
(2)-4 In the [Robot Simulator] window, move the robot joint to a point where it
does not interfere with the box.
To move the robot joint, click the<Rotate/Jog
> button on the tool bar and
drag the joint, or drag while simultaneously pressing the <Ctrl> key.
(2)-5 Go back to the [Robot Manager] window and click the <Teach> button in the
[Teach] tab. The message appears to confirm the operation. Click the <Yes>
button.
(2)-6 The [New Point Information] dialog appears. Click the <OK> button.
(2)-7 Select “P1 - (undefined)” from the [Point] list box on the lower right.
(2)-8 In the [Robot Simulator] window, drag the robot joint while simultaneously
pressing the <Ctrl> key to another point without interfering with the box.
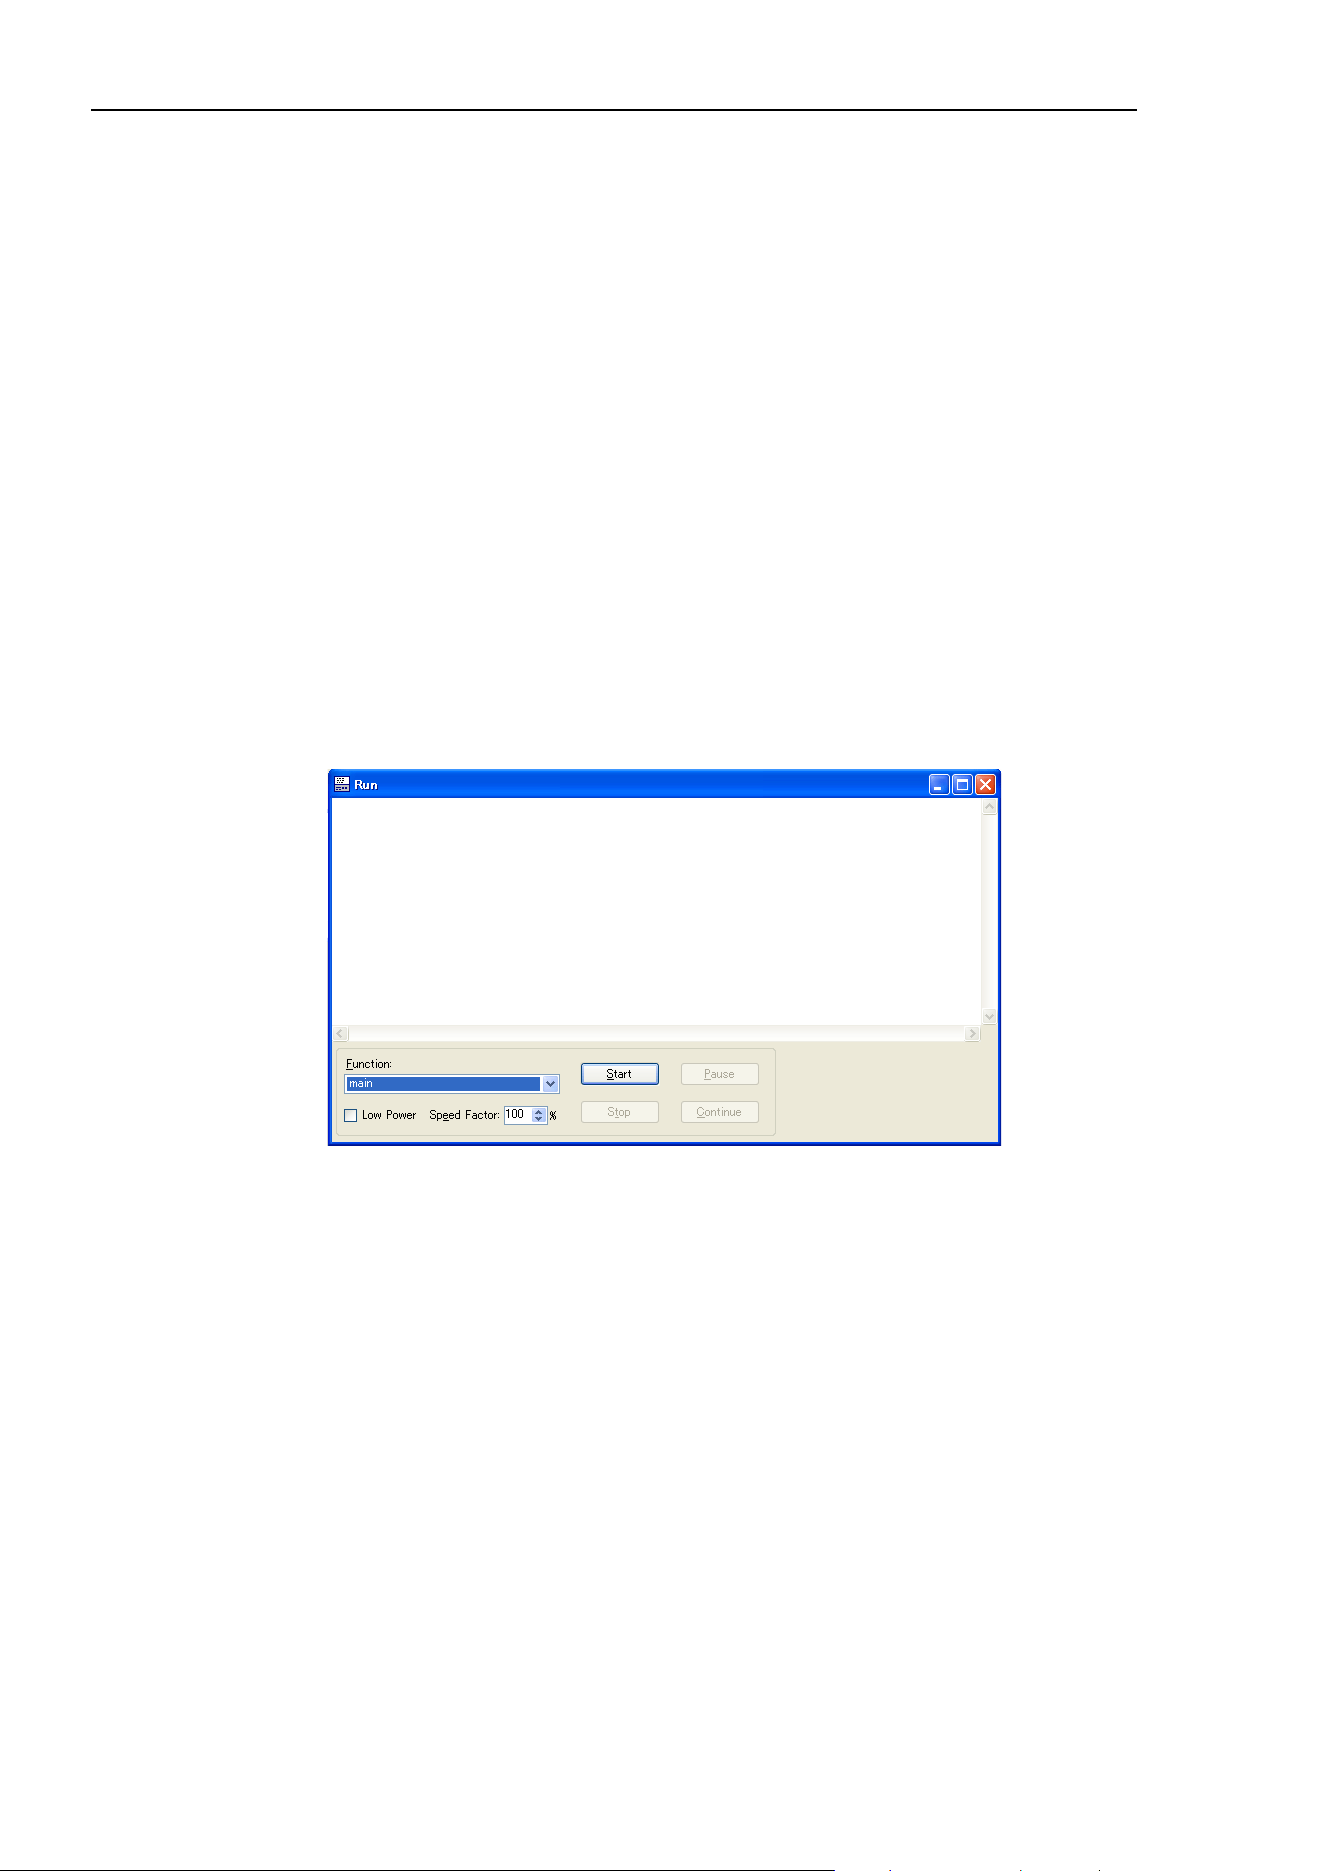
8. Simulator
280 EPSON RC+ 7.0 (Ver.7.4) User's Guide Rev.6
(2)-9 Go back to the [Robot Manager] window and click the <Teach> button. The
message appears to confirm the operation. Click the <Yes> button.
(2)-10 The [New Point Information] dialog appears. Click the <OK> button.
(2)-11 Click the Tool bar-<Save all files> button to save the P0 and P1 data.
You can also use the [Jog & Teach] window to move the robot.
(3) Create and execute a program with robot motion.
(3)-1 Create the following program in the program “Main.prg”.
Function main
Go P0
Go P1
Fend
(3)-2 Click the Tool bar-<Build> button to build the program.
When the program building is completed, the message “Build complete, no
errors” appears in the [Status] window.
7. Operate the robot by executing program
(1) Click the Tool bar-<Run Window> button. The following window appears.
(2) Click the <Start> button.
The message “Are you ready to start?” appears. Click <Yes> button.
The program starts and the robot moves in the 3D display.
TIP
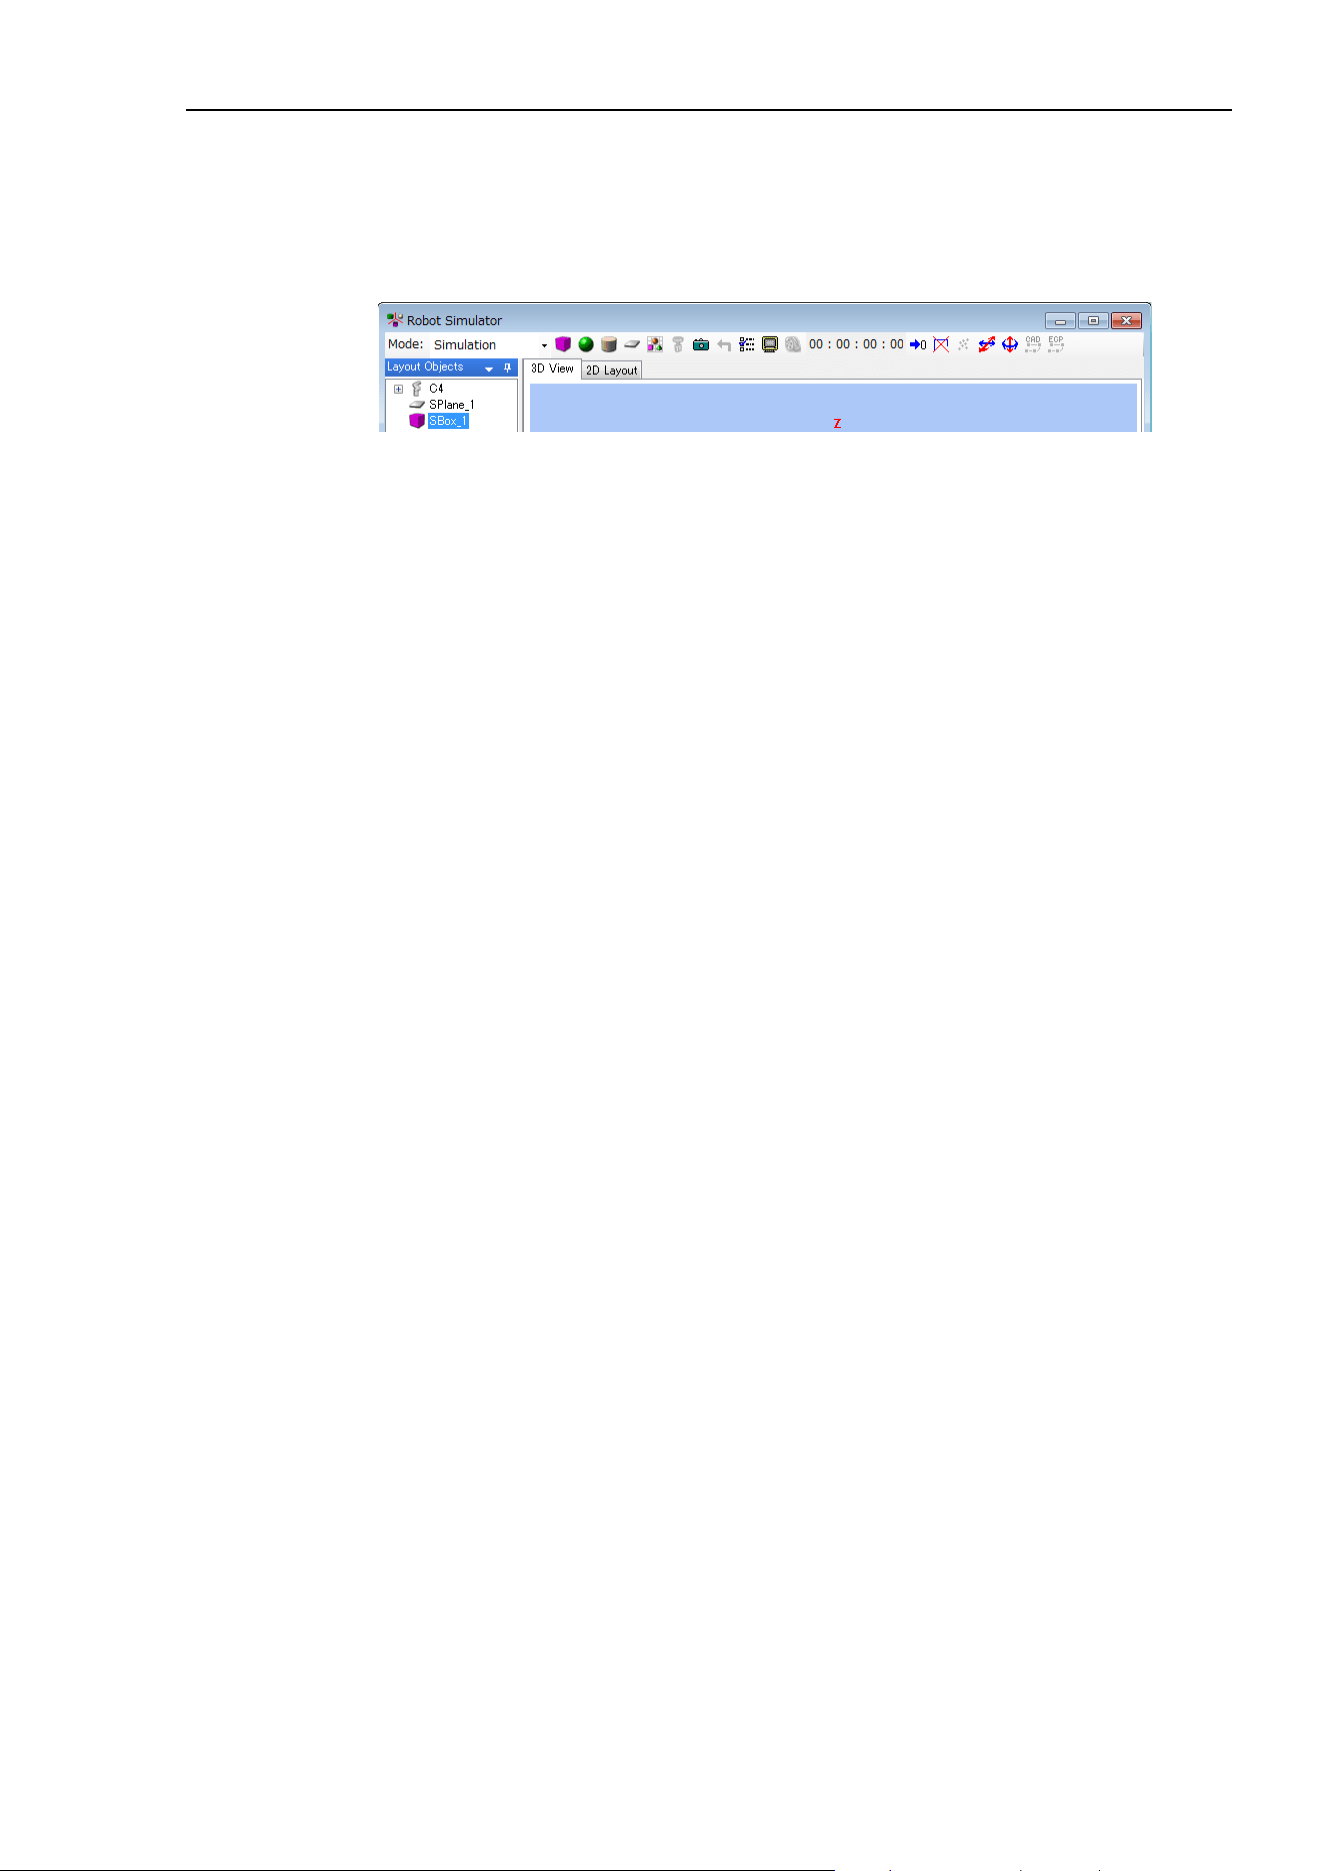
8. Simulator
EPSON RC+ 7.0 (Ver.7.4) User's Guide Rev.6 281
8. Measure the robot operation time
The elapsed program run time (cycle time) is displayed in the Tool bar of the [Robot
Simulator] window.
It is the execution time of the program from start to finish.
The following describes how to measure the operation time between two points (P0 P1).
(1) Change the program in the “Main.prg” file to the following program.
Function main
Motor On
Power High
Speed 100
Accel 100,100
Go P0
Fend
Function main2
Go P1
Fend
(2) Click the Tool bar-<Build> button to build the project.
When the project build is complete, the message “Build complete, no errors” appears
in the [Status] window.
(3) Click the Tool bar-<Run Window> button.
(4) Confirm that “main” is selected in the [Function] dropdown list and click the <Start>
button.
The message “Are you ready to start?” appears. Click <Yes> button.
The program starts and the robot goes to P0, the point to start the time measurement,
in the 3D display.
(5) Select “main2” in the [Function] dropdown list.
(6) Click the <Start> button.
The message “Are you ready to start?” appears. Click the <Yes> button.
The program starts and the robot moves in the 3D display.
Now, the cycle time displayed in the Tool bar is the execution time to move the robot
from P0 to P1.
When you operate the real robot, the actual cycle time will be longer than the simulated
cycle time according to the model, Fine, load settings. For details, refer to 8.4 Simulator
Specifications and Restrictions.
Also, when Speed, Accel values in the program are changed, the cycle time will reflect it.
Motion command includes Move and Jump as well as Go.
For the information on how to use these commands, refer to Online Help or SPEL
+
Language Reference manual.
NOTE
TIP

8. Simulator
282 EPSON RC+ 7.0 (Ver.7.4) User's Guide Rev.6
9. Test the collision detection
(1) Go back to the [Robot Simulator] window.
(2) Drag the robot joint while simultaneously pressing the <Ctrl> key to a point where it
interferes with the box. When the robot joint hits the box, the display turns to red.
(3) In the [Robot Manager] window, select “P2 - (undefined)” from the [Point] list box in
the [Teach] tab.
(4) Click the <Teach> button.
The message to confirm the operation appears. Click the <Yes> button.
(5) The [New Point Information] dialog appears. Click the <OK> button.
(6) Click the Tool bar-<Save all files> button and save the P2 information.
(7) Go back to the [Robot Simulator] window and drag the robot joint while
simultaneously pressing the <Ctrl> key to the point where it does not interfere with
the box.
(8) Click the Tool bar-<Reset Collision > button. Then, the red display returns to
normal.
(9) Add the following function to the “Main.prg” program file.
Function main3
Go P2
Fend
(10) Click the Tool bar-<Build> button to build the project.
When the project build is complete, the message “Build complete, no errors” appears
in the [Status] window.
(11) Click the Tool bar-<Run Window> button.
(12) Select “main3” in the [Function].
(13) Click the <Start> button. The message “Are you ready to start?” appears. Click the
<Yes> button. The program starts and the robot moves in the 3D display. When the
robot joint hits the box, the display turns to red.
When a collision happens, the users can stop the controller program execution with an
error. For details, refer to 8.3.3 Collision detection.
TIP
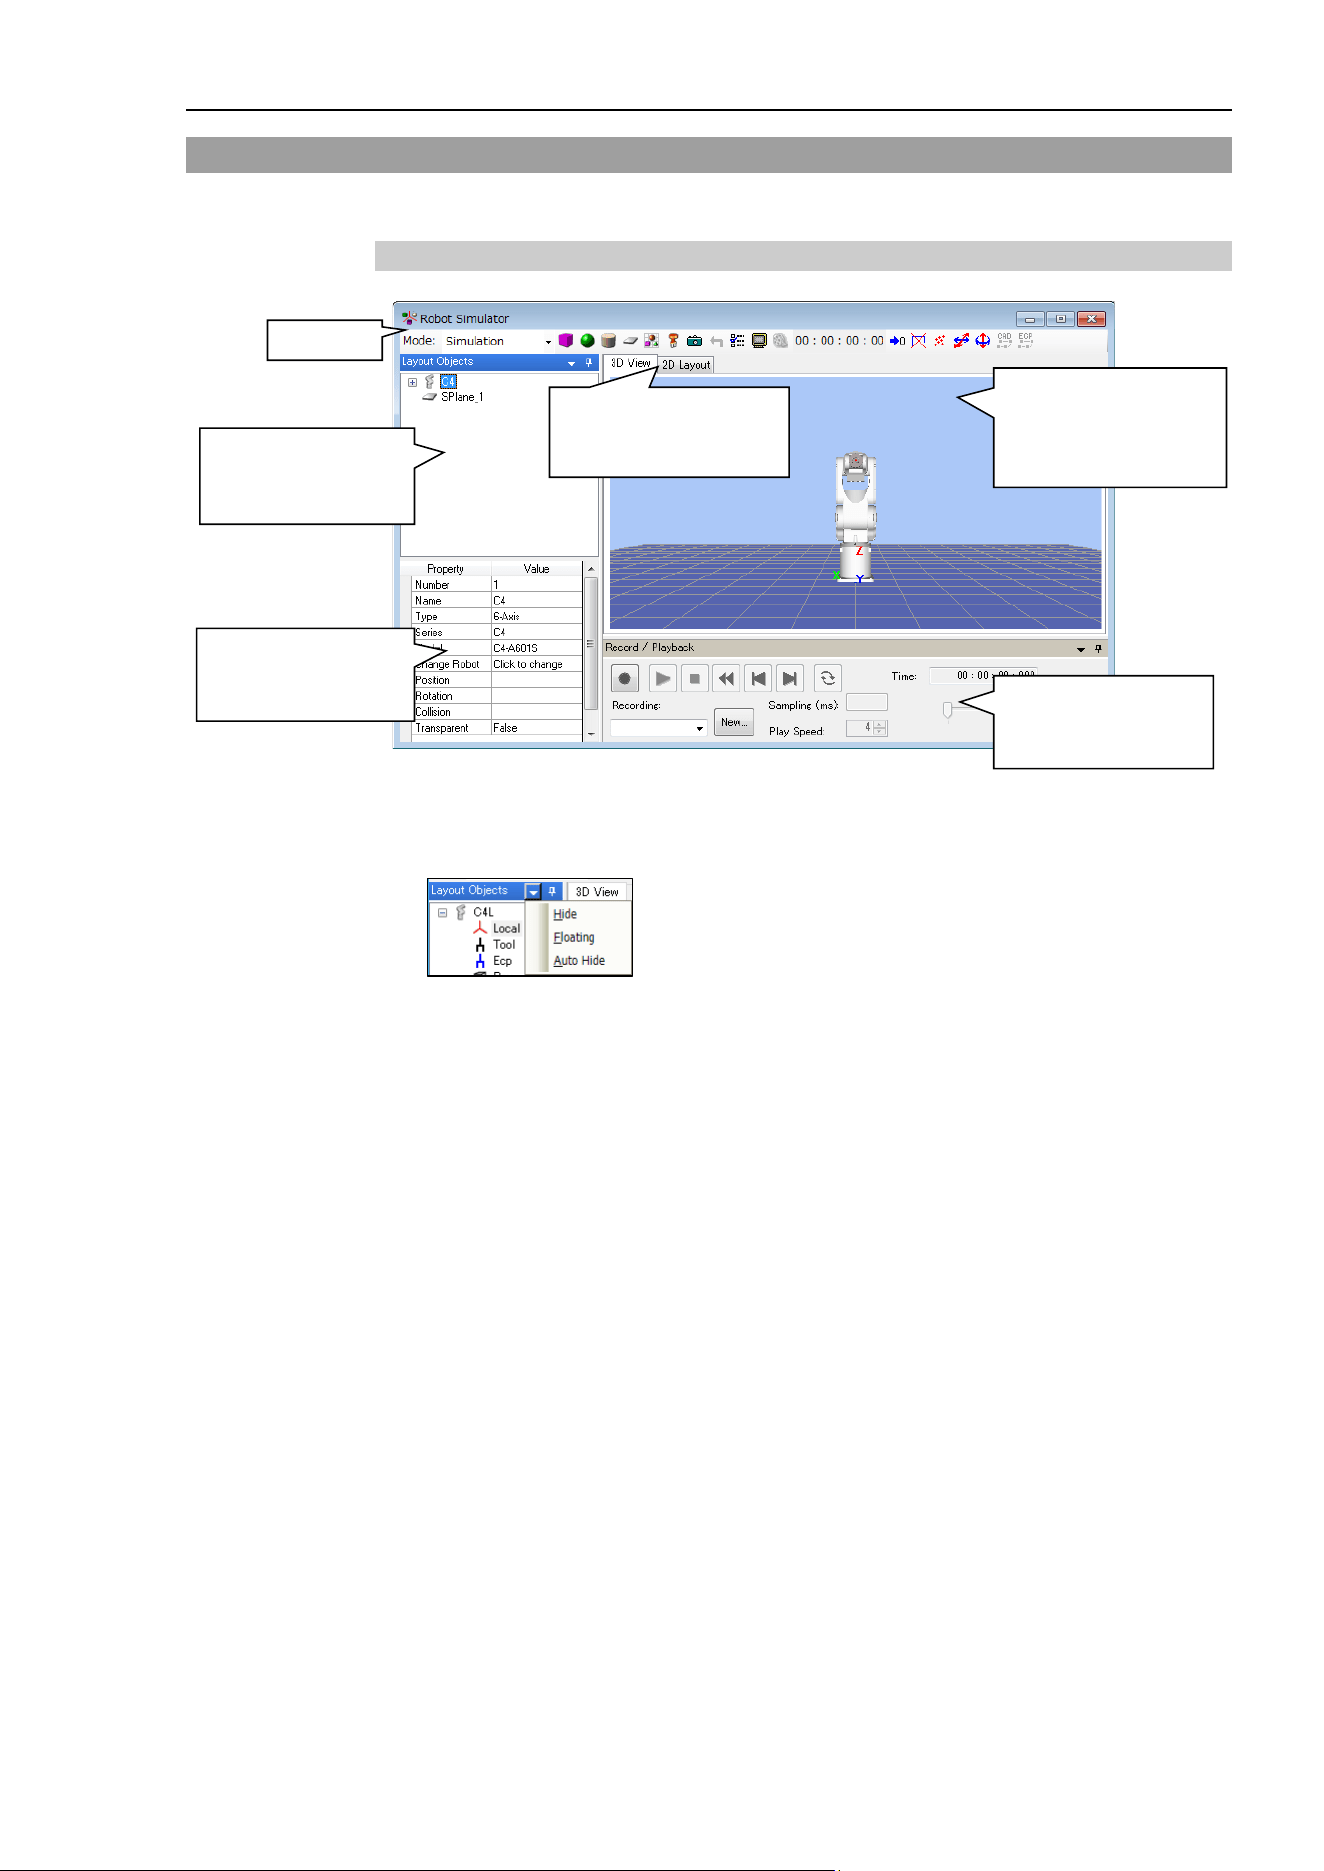
8. Simulator
EPSON RC+ 7.0 (Ver.7.4) User's Guide Rev.6 283
8.3 Description of Functions
This section describes how to use the [Robot Simulator] window and its functions.
8.3.1 [Robot Simulator] window layout
(5) 3D Display
shows the robot orientation
and motion from various
points of view.
(2) Layout Object
shows the list of robots
and layout objects.
(3) Property Grid
shows the settings of the
robots and layout objects.
(6) Record / Playback
Records and reproduce
the simulation product.
(4) 2D Layout
Places and shows the robot
and layout object positions.
(1) Tool bar
You can select the following display methods for the layout panel including (2) Layout
Object and (3) Property Grid, and (6) Record/Playback panel.
Hide, Floating, Auto Hide
Panel that you selected to Hide can be re-displayed by clicking <Ctrl> + <Shift> + <R>
key.
TIP
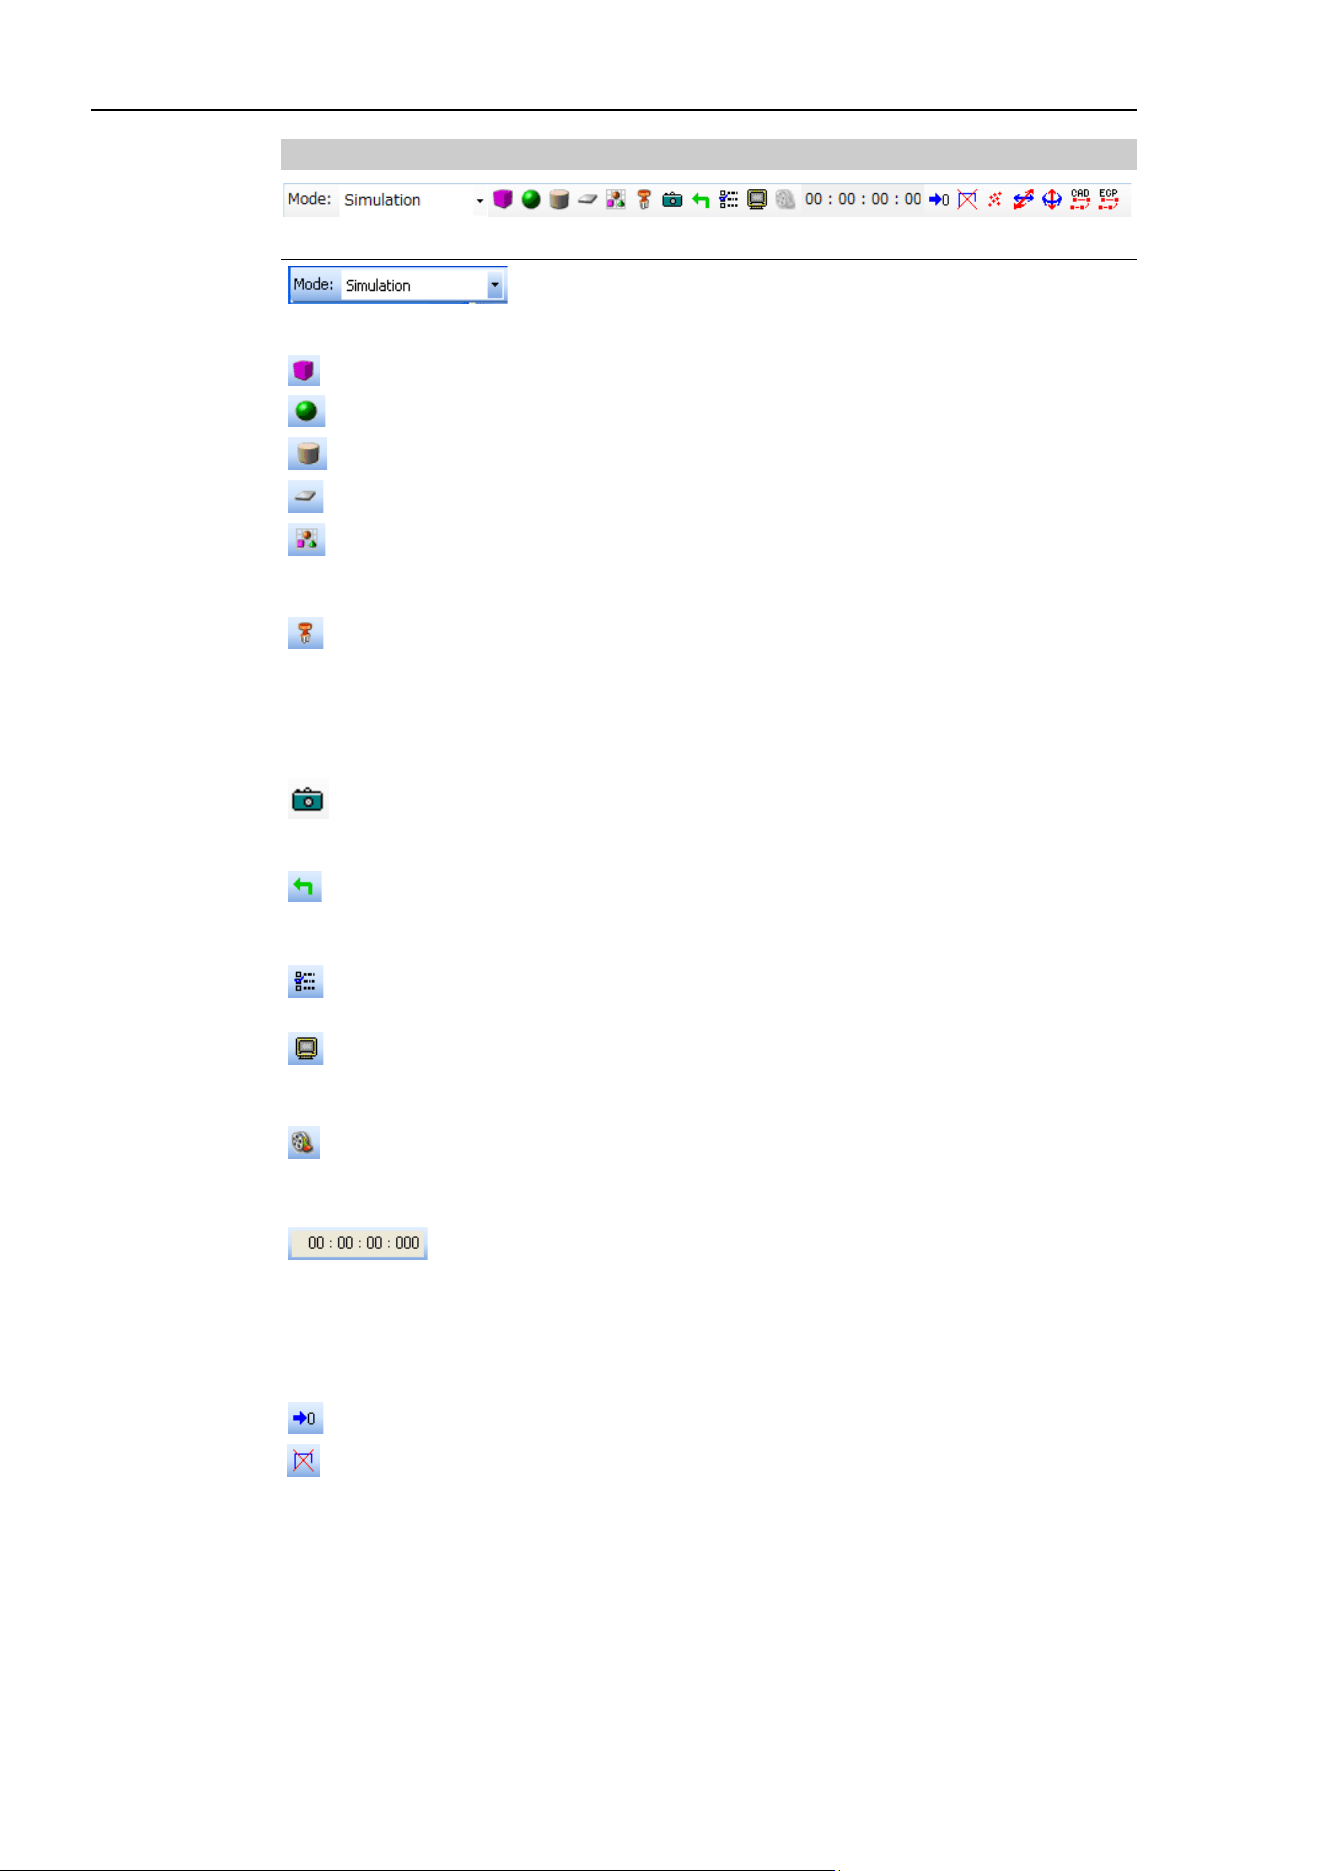
8. Simulator
284 EPSON RC+ 7.0 (Ver.7.4) User's Guide Rev.6
(1) Tool bar
Button Description
Simulator operating mode.
It switches between <
Simulation Mode> and <Playback
Mode>.
Layout Box
Adds a box object.
Layout Sphere
Adds a sphere object
.
Layout Cylinder
Adds a cylinder
object.
Layout Plane
Adds a floor / wall object
.
CAD
Adds a CAD object.
When you
click this button, a dialog appears to load the CAD
data
from a file.
Hand
Adds a hand object.
When you click this button, the dialog appears to load
the
CAD
data
from a file.
Sample data is provided in EPSON RC+7.0 directory
(EpsonRC70
\Simulator\HandSamples)
Camera
Add a virtual camera.
When you click th
is button, the dialog appears to select a
camera and lens.
Reset Collision
Resets the collision detection status.
When you click this button while the robot is not interfering
with any layout objects, the red display turns to normal.
Simulator Settings
Shows the [Simulator Settings] dialog.
In this dialog, the
3D [Render Options] can be configured.
Screenshot
Saves the current 3D display as an image file.
A dialog appears to specify a file name and format before
saving.
Create Movie
Plays a simulation result (log file) in the Playback mode and
saves into a movie file. A dialog appears to specify the file and
format to save.
Elapsed
Time
Shows the program execution time as if you ran the same
program with a real
controller.
When
a program starts, the elapsed time counter counts from 0
and stops
when the program finished. It pauses counting when
the program is paused and resumes
when the program
continues execution.
Clear Elapsed Time
Resets the elapsed time.
Clear TCP path
Clear the TCP path (including Render Singularity Avoiding
path
) which the robot displays.
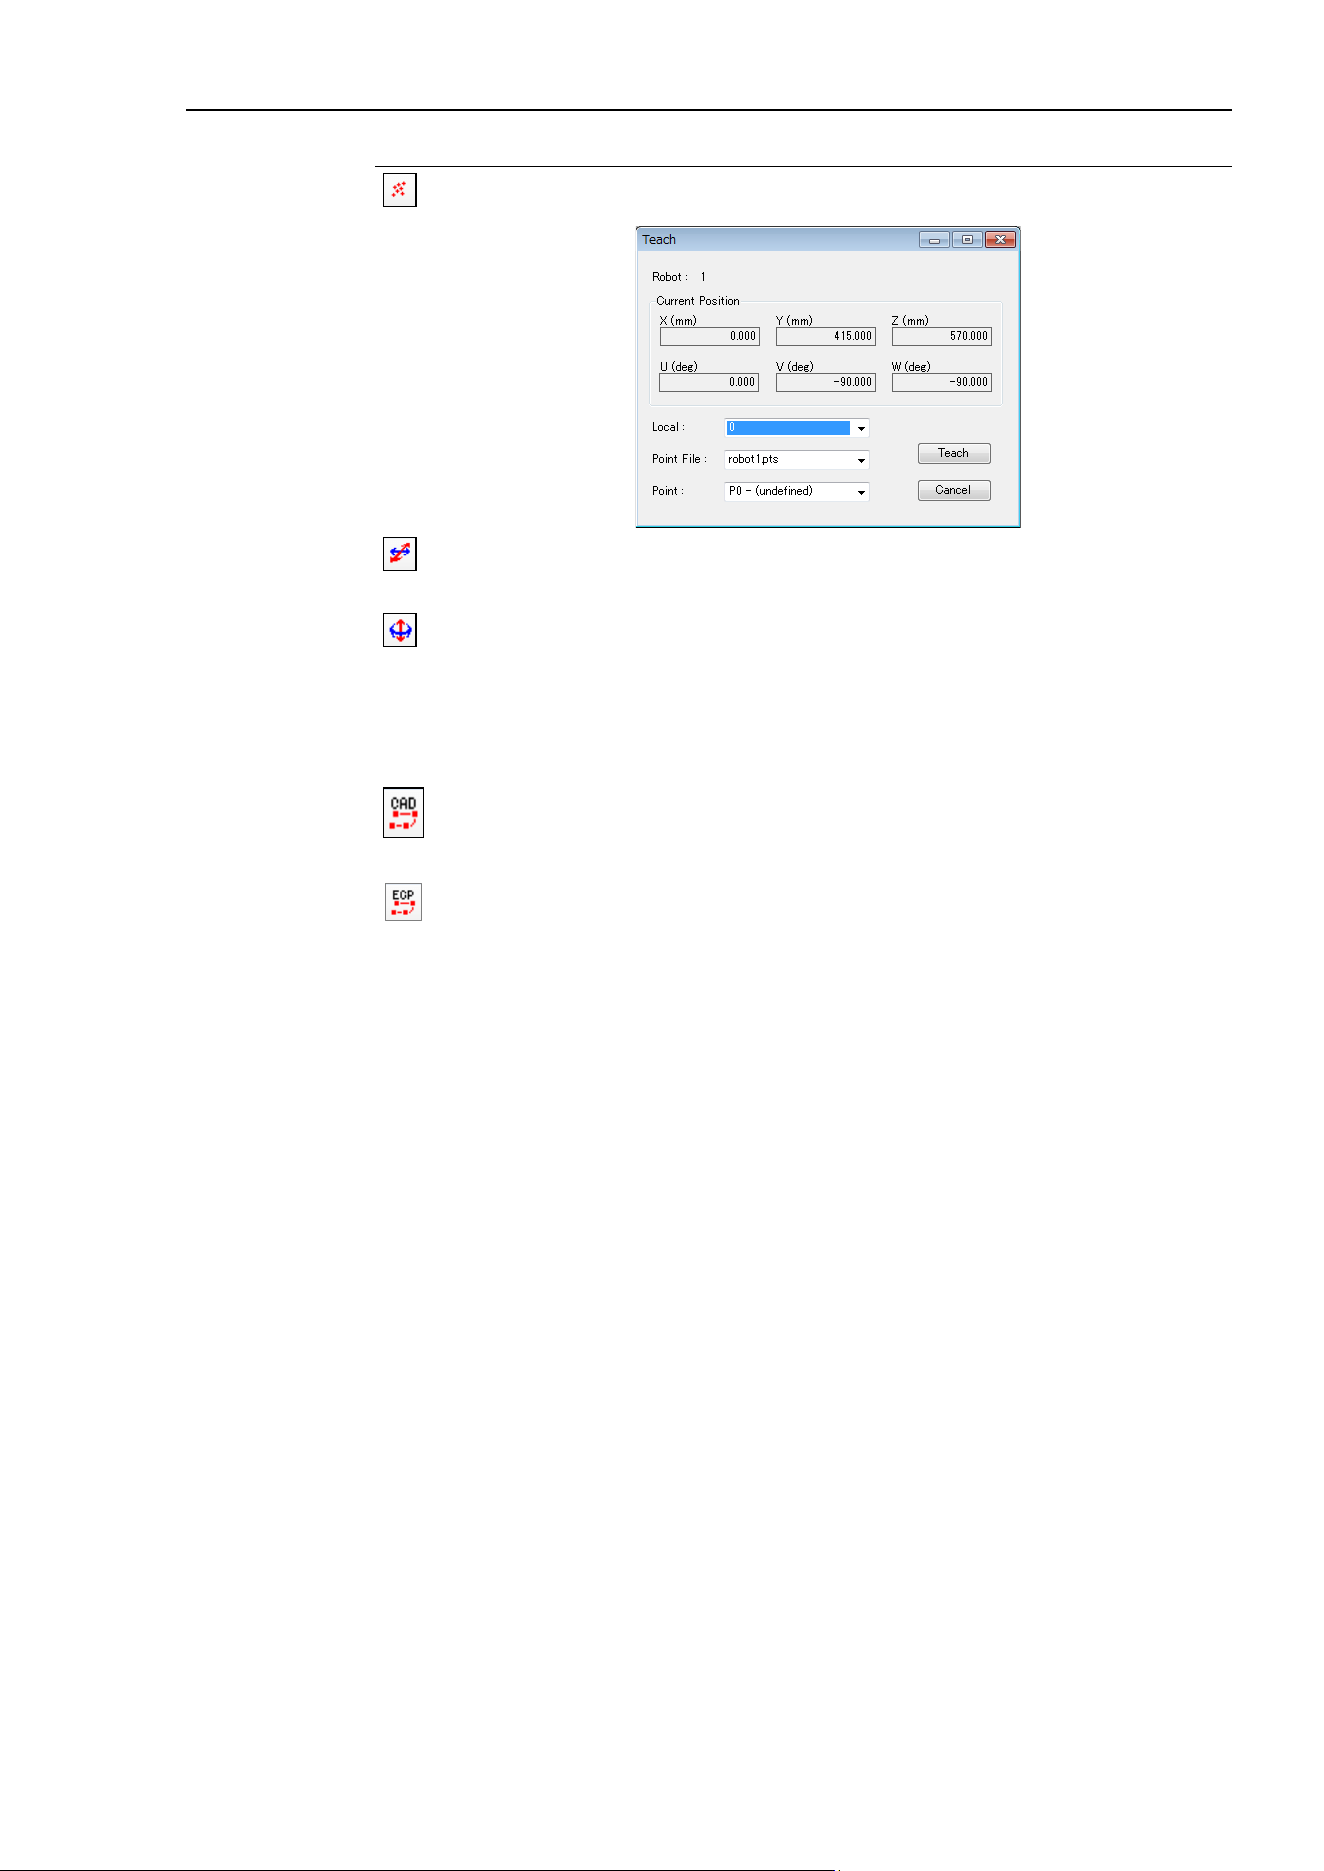
8. Simulator
EPSON RC+ 7.0 (Ver.7.4) User's Guide Rev.6 285
Button Description
Teach Point
Displays the [Teach] dialog box.
Current robot position can be registered as a point.
Move
Displays the guide
s. The objects can be moved by
dragging the
guide
s.
Rotate/Jog
Displays the guides. The objects can be rotated by dragging the
guide
s.
The guide
s for the Manipulator are shown only at the
Manipulator base.
The guide
s for the manipulator arm change to blue when
selected.
Joint angle can be changed by dragging the guides.
CAD to Point
Switches to the mode for outputting the point data from the
CAD
data.
CAD to Point
for ECP
Switches to the mode for outputting the point data for external
control point
(ECP) motion from the CAD data.
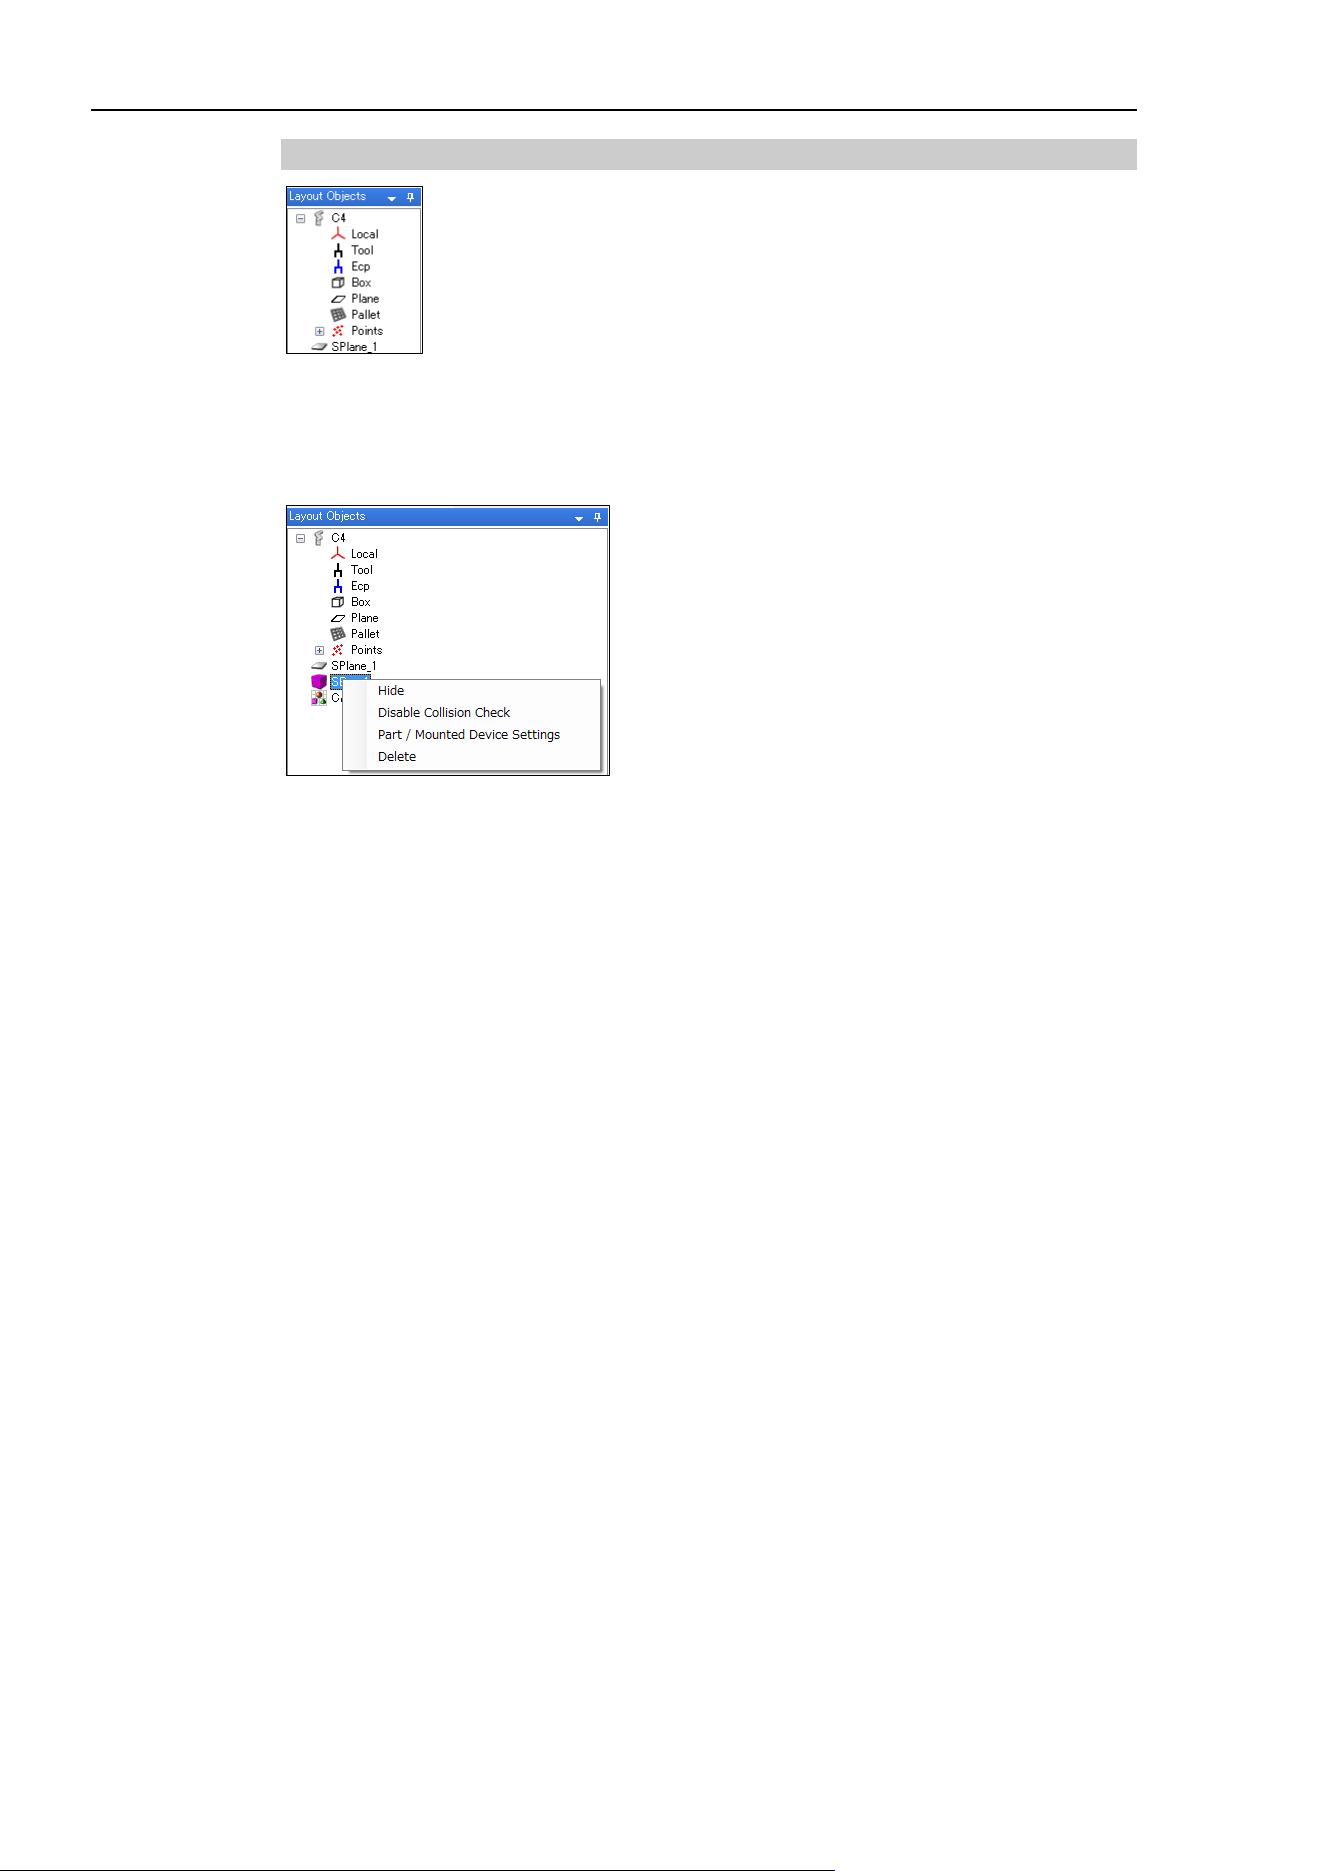
8. Simulator
286 EPSON RC+ 7.0 (Ver.7.4) User's Guide Rev.6
(2) Layout Objects Pane
The Layout Objects pane shows the robot objects and layout objects in a tree format.
The context menu appears by right-clicking the layout object. The frequently used
functions can be used without operating by the property grid.
The displayed items vary depending on objects.
[Cut], [Copy], and [Paste] commands in the [Edit] menu are available for the layout
objects except CAD objects.
Also, the hierarchy of the layout objects can be changed by dragging and dropping.
What is an Object?
The objects in the simulator are either a “Robot Object” or a “Layout Object”:
A “Robot Object” includes the robot itself, its hand, local coordinates, point information,
etc.
A “Layout Object” includes objects to be placed around the robot to simulate the robot
peripheral environment in the 3D display.
◆ Robot Object
Robot : The robot itself. The display data is handled by the simulator.
Hand : The hand is created by loading the CAD data (XVL(.xv3),
VRML2.0, STEP, and IGES) from a file.
Force Sensor : Set force sensor can be displayed.
Object to reflect force control data :Force Control, Force Guide
Object to reflect a robot parameter : Local, Tool, Box, Plane, Pallet
Object to reflect robot point data : Point
◆ Layout Objects
Simple object : Box, Sphere, Cylinder, Floor / Wall
The display data for these objects is handled by the simulator.
The object size can be changed as desired by editing properties.
CAD object : These objects are created by loading CAD data (XVL(.xv3),
VRML2.0, STEP, IGES, and DXF) from a file.
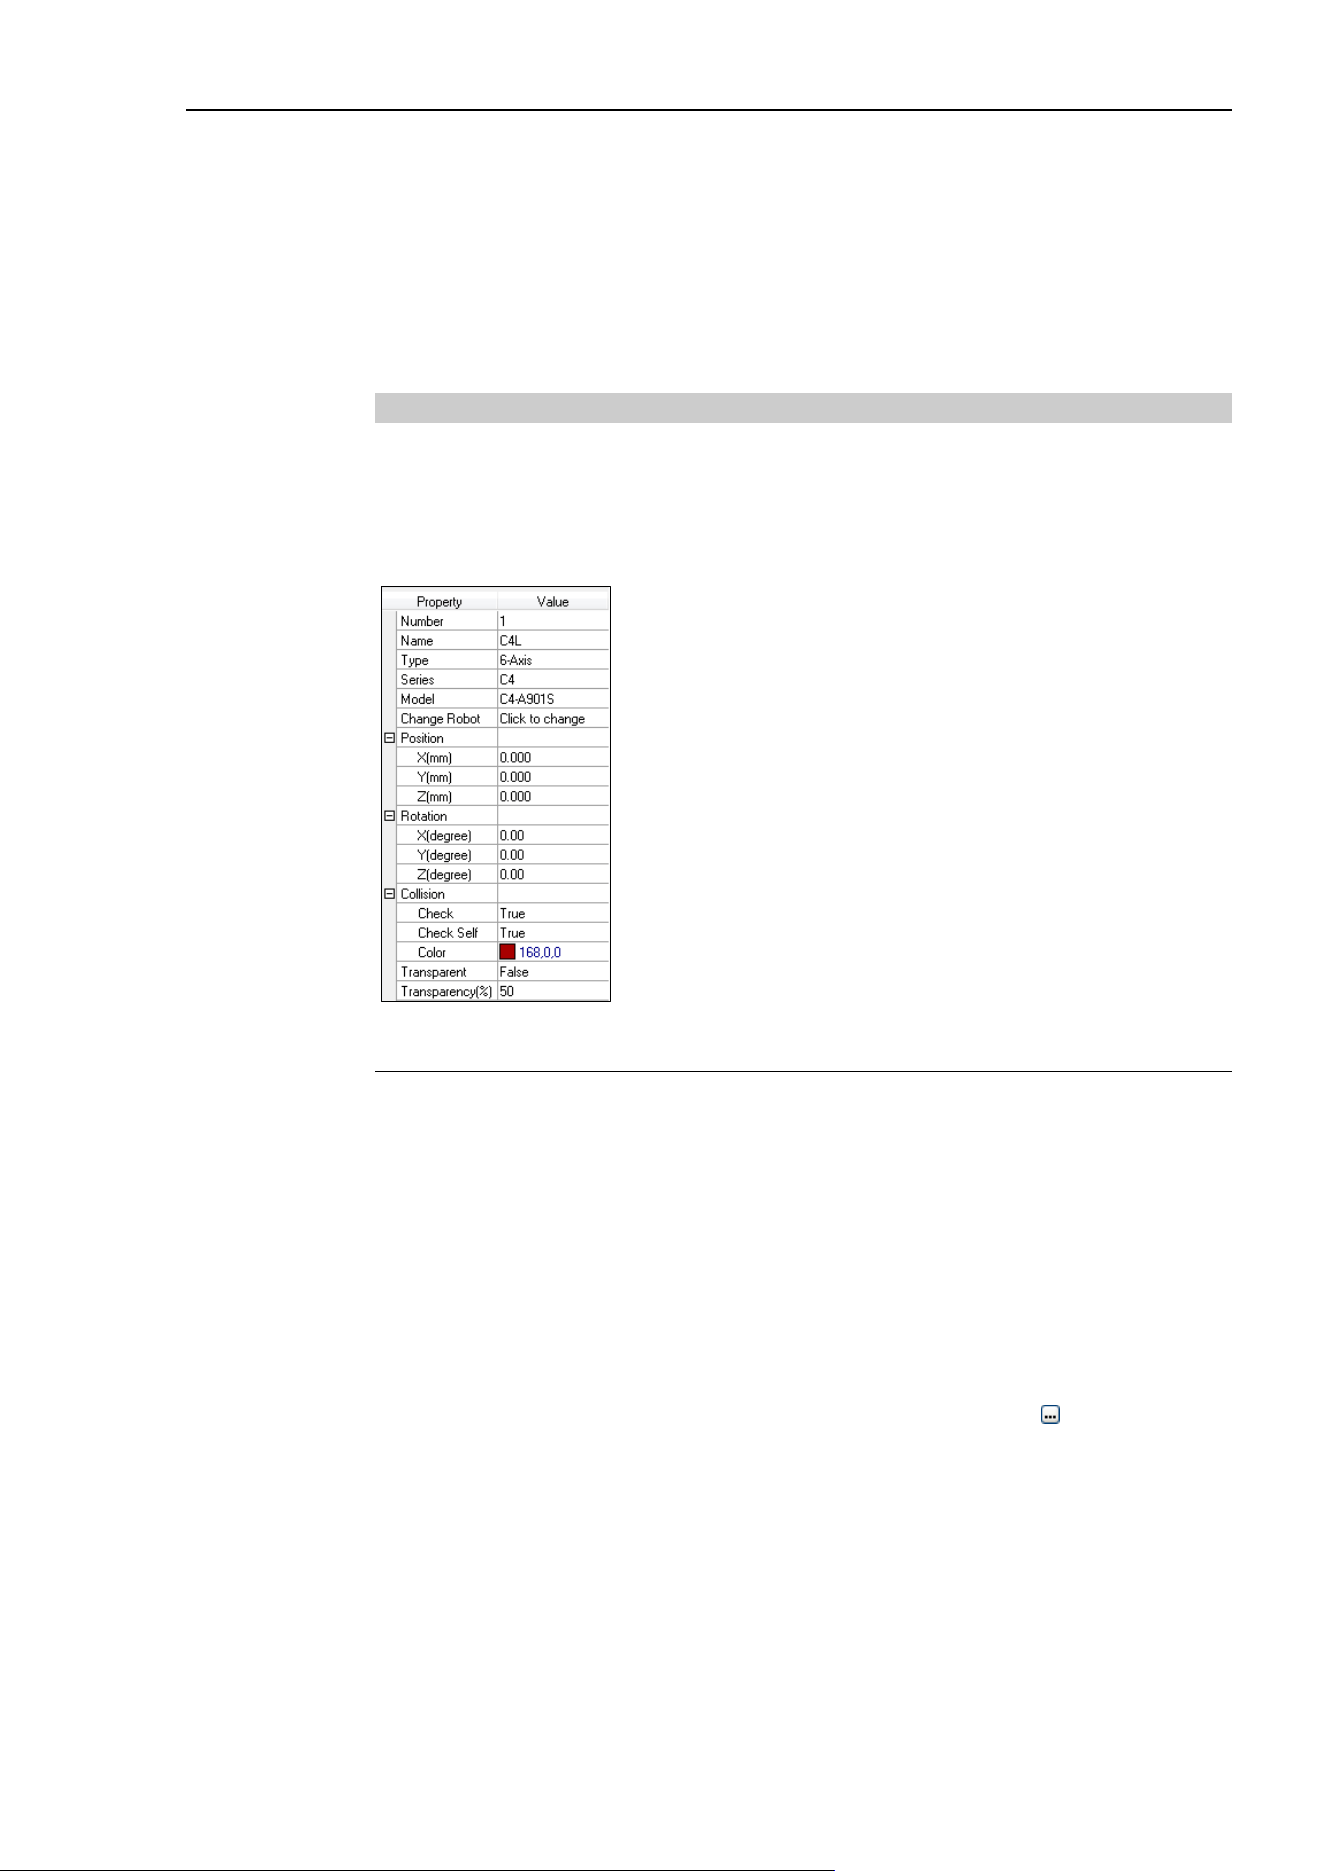
8. Simulator
EPSON RC+ 7.0 (Ver.7.4) User's Guide Rev.6 287
Camera Objects : The following devices can be displayed.
Devices that are supported in EPSON RC+ 7.0 Option Vision
Guide 7.0 Hardware & Setup can be selected..
Camera : USB and GigE camera can be selected.
Lens : Each model of standard camera lens and megapixel camera lens
can be selected.
Extension tube : Each length of tubes can be selected.
(3) Property Grid Pane
In the Property Grid pane, you can view and change the settings of the robot objects and
layout objects in the Layout Object pane.
◆ Robot Object Properties
Robot
Property Value
Number
Robot number
Name
Robot name
You can specify any name for a robot.
Type
Robot type
The r
obot type (SCARA and 6-Axis) is shown.
This property is read
-only.
Series
Robot series
The r
obot series is shown. This property is read-only.
Model
Robot model name
The r
obot model is shown. This property is read-only.
Change Robot
If you want to change the robot model, click on button. When you
click on this button, a dialog appears to change the robot.
For details, see
Changing the robot model described later in this
chapter
.
Position
Robot position
Specifies the
robot's base center in the simulator World coordinates.
Rotation
Robot angle

8. Simulator
288 EPSON RC+ 7.0 (Ver.7.4) User's Guide Rev.6
Collision Property Value
Check
Enables / disables the collision detection for layout objects.
Enable
: True (default)
Disable
: False
Even if this is enabled, it does not detect collision
between the robot
base and layout objects.
Check Self
Enables / disables the collision detection for a robot itself.
Enable
: True (default)
Disable
: False
Color
Specify color to be used when collision of the arms is detected.
Default: 168,0,0
Property Value
Transparent
Semi-transparent : True
Not semi
-transparent : False (Default)
The front
-back relation of the objects may be incorrect depending
on the viewing angle. For details, refer to
8.4 Simulator
Specification
s and Restrictions.
Transparency
Specify the transparency in the range of 1 to 90%.
Transparency increases as the
setting value becomes larger.
Changing the robot model
When you want to change the displayed robot model, click the <Change Robot> button.
The [System Configuration]-[(Name of the displayed robot)]–[Model] dialog will be
displayed. If you cannot see the button, increase the property grid width and click the
[Value] column of the grid once.
When you change the displayed robot model, all the settings for the robot (Local
coordinates, Tool coordinates, etc.) will be initialized to the default values.
Local / Tool / Box / Pallet
If the local coordinate system of the corresponding number is not defined yet, the check
box is grayed.
Property Description
Visible
Shows / Not show corresponding settings.
Visible
: Check
Not visible
: Uncheck (default)
For Local 0 (Base), “Visible” is the default.
TIP
NOTE
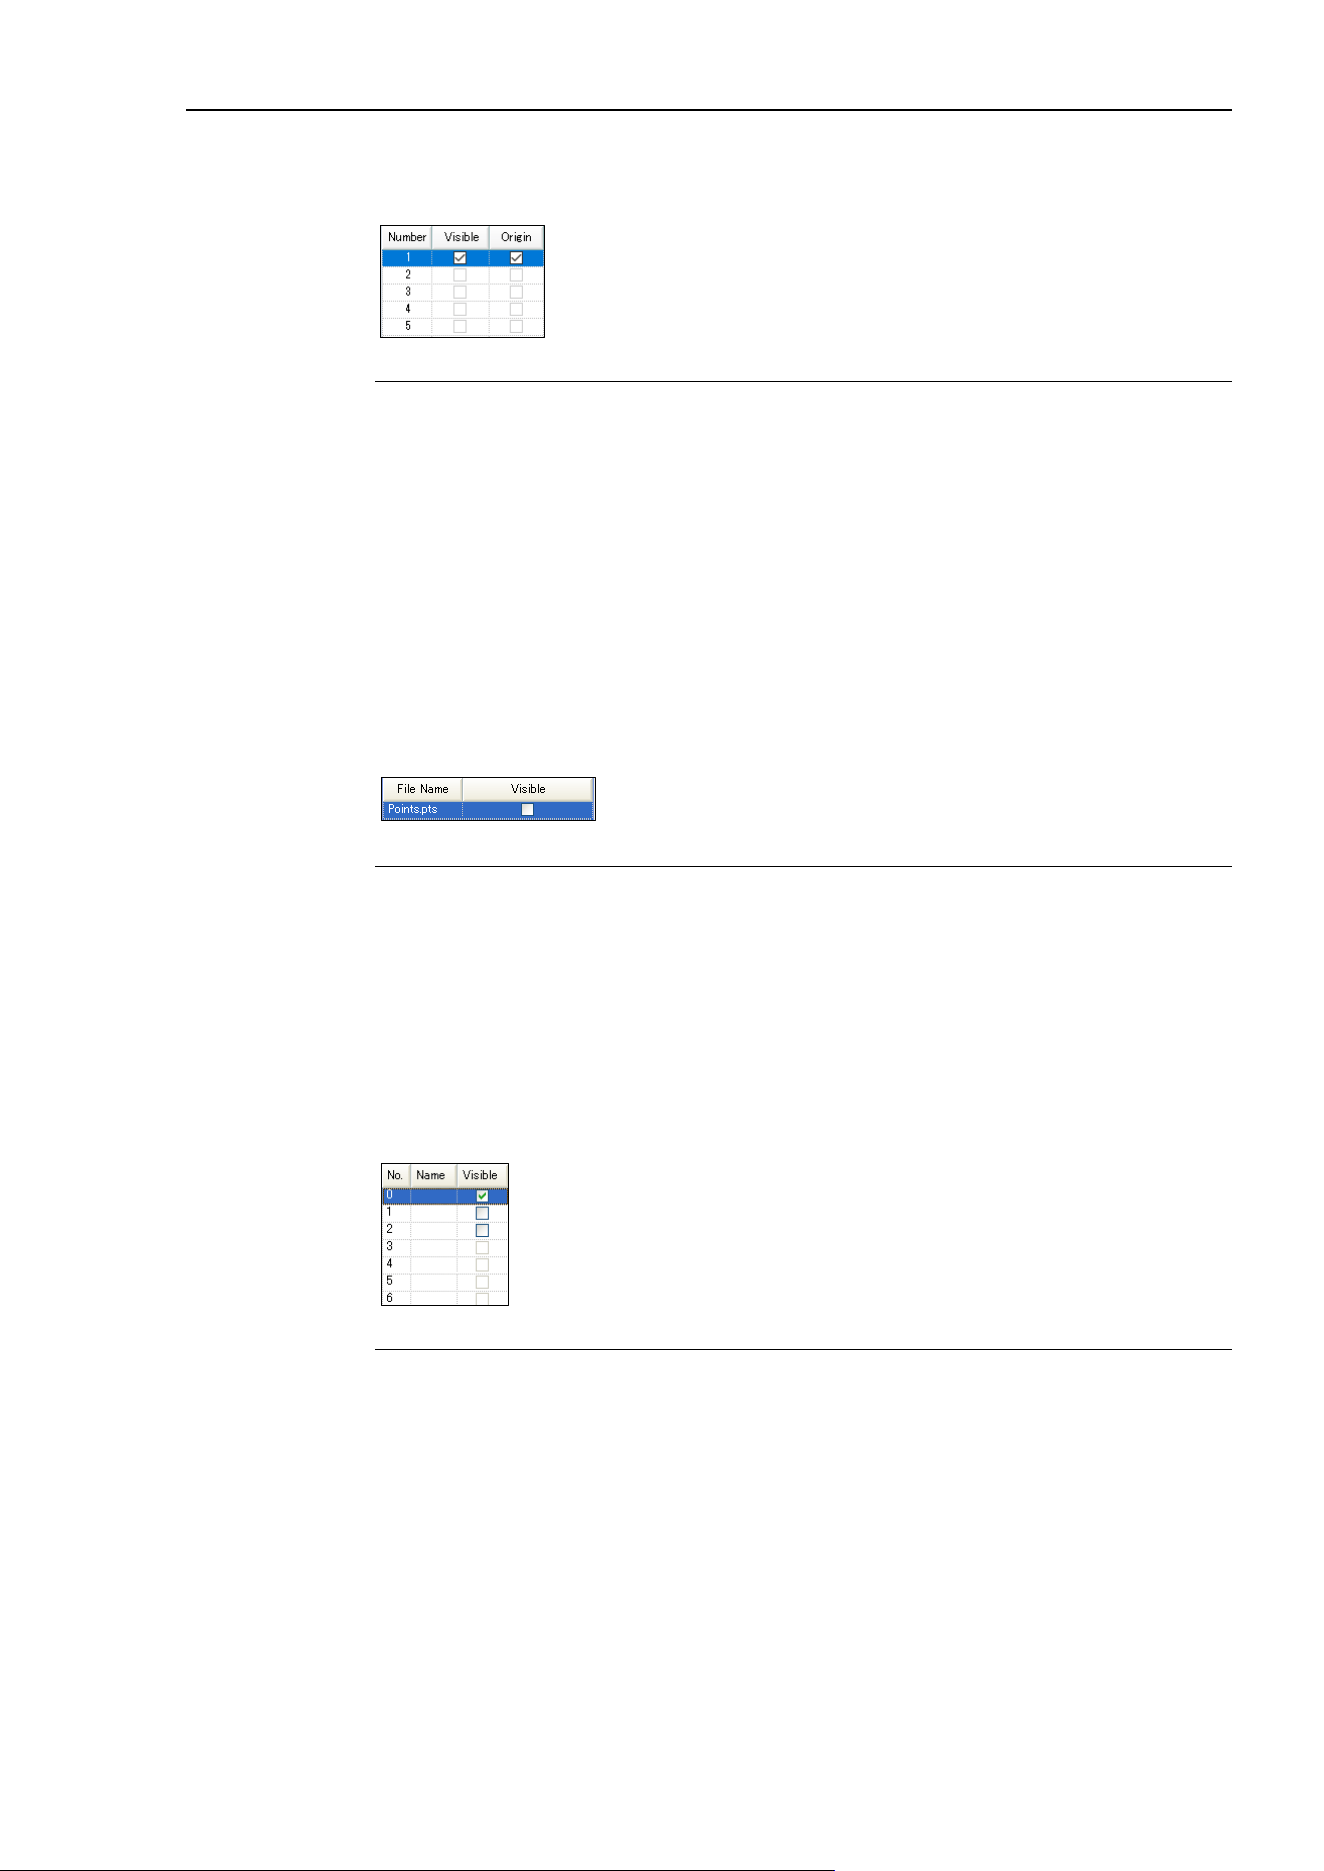
8. Simulator
EPSON RC+ 7.0 (Ver.7.4) User's Guide Rev.6 289
Plane
If the each setting of the corresponding number is not defined yet, the check box is grayed.
Property Description
Visible
Shows / Not show corresponding settings.
Visible
: Check
Not visible
: Uncheck (default)
Origin
Shows / Not show the origin of corresponding settings.
When the checkmark is not placed in
[Visible], the [Origin] checkbox
is
grayed.
Visible
: Check
Not visible
: Uncheck (default)
Points
Display the point display setting status in the point file. Switch to show/non-show all
points.
Property Description
File Name
Show a point file name.
Visible
Shows / Not show all points
Visible
: Check
Not visible
: Uncheck
If it is set to
show some points, the check box shows indeterminate
state.
Point
If the point of the corresponding number is not defined yet, the check box is grayed.
Property Description
Name
Shows a point label
In the
dialog, point labels cannot be configured or edited.
Visible
Shows / Not show a point
Visible
: Check
Not visible
: Uncheck (default)
If you cannot see the [Visible] column, increase the property grid display width.
TIP
8. Simulator
290 EPSON RC+ 7.0 (Ver.7.4) User's Guide Rev.6
Force Control
Show the display method of the force objects in the force file. Switch visible and not
visible of the all force objects.
Property Description
File Name
Show a force file name.
Visible
Shows / Not Show all force objects.
Visible
: Check
Not visible
: Uncheck
If it is set to show some
force objects, the check box shows
indeterminate state.
Force Object
Show the display method of the force control objects, force trigger objects, and force
monitor objects in the force file. Switch visible and not visible of the all force objects of
the specified type.
If there is no force object of the specified type, the checkbox is grayed.
Property Description
Type
Control (force control), Trigger (force trigger), and Monitor (force
m
onitor) are shown.
Visible
Shows / Not Show all force objects of the specified type.
Visible
: Check
Not Visible
: Uncheck
If
it is set to “Visible” for some force objects, the check box shows
indeterminate state.
Force Control, Force Trigger, Force Monitor
When the force object of the corresponding number is not defined yet, the checkbox is
grayed.
Property Description
Name
Show a force label.
In the dialog, force label
cannot be configured or edited.
Visible
Shows / Not Show the force object.
Visible
: Check
Not Visible
: Uncheck
8. Simulator
EPSON RC+ 7.0 (Ver.7.4) User's Guide Rev.6 291
Force Guide
Show the display method of the force guide object in the sequence which is set by the
force guide, and switch visible and not visible of the all force objects.
Property Description
Sequence
Show a force guide sequence name.
Visible
Shows / Not Show the all force objects.
Visible
: Check
Not visible
: Uncheck
If it is set to
“Visible” for some force objects, the check box shows
indeterminate state.
Force Guide Object
When the force guide object type of the corresponding number (a step number in the
sequence) is “Decision” or “SPELFunc”, the checkbox is grayed. When the [Enabled]
property of the object is set to “False”, the [Name] is also grayed.
Property Description
Name
Show a force guide object name.
Visible
Shows / Not Show the force guide object.
Visible
: Check
Not visible
: Uncheck
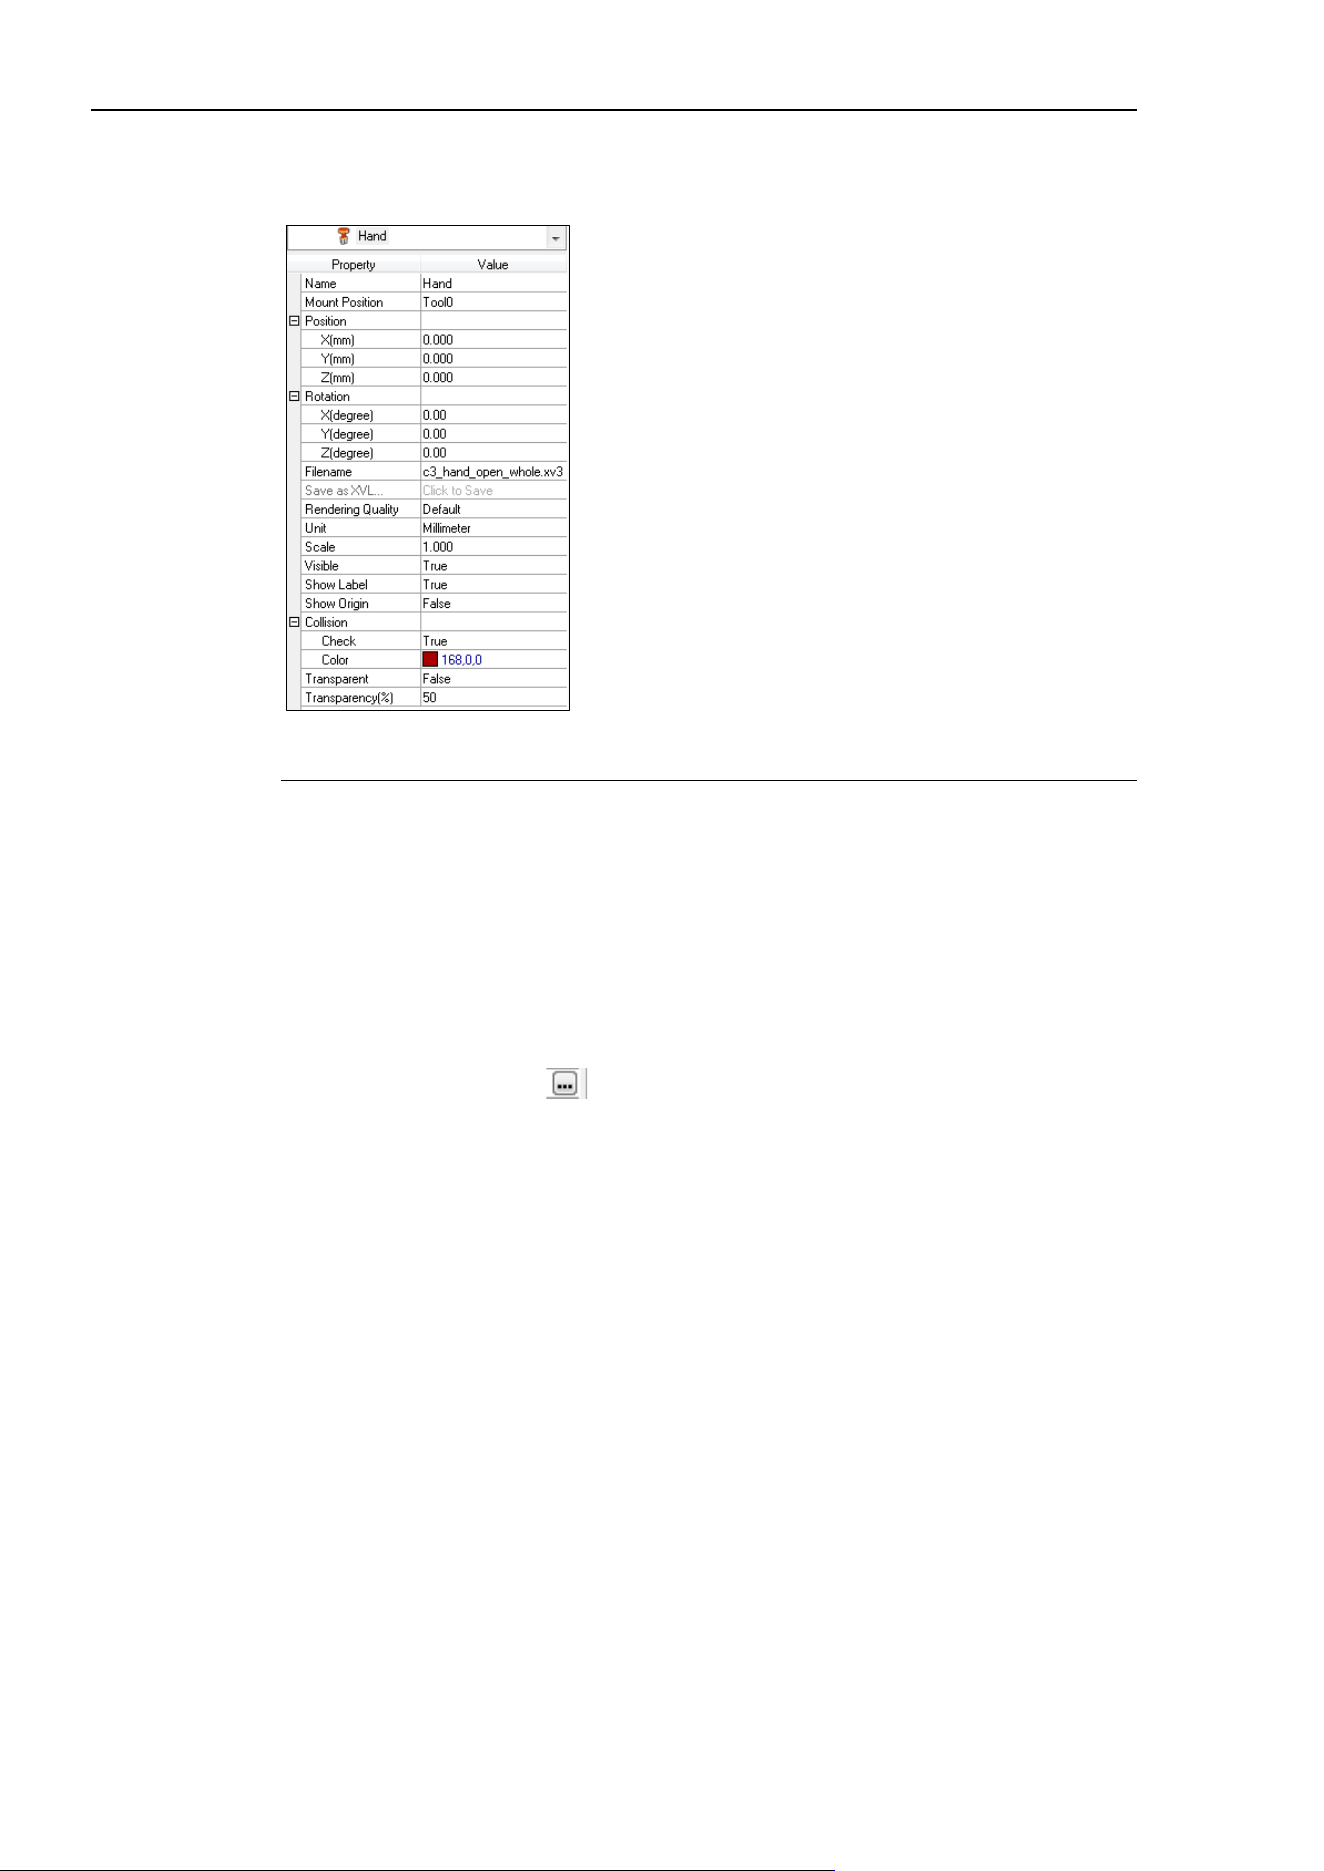
8. Simulator
292 EPSON RC+ 7.0 (Ver.7.4) User's Guide Rev.6
Hand
When a hand is registered with a robot, “Hand” is added in the Layout Objects tree.
Property Value
Name
Hand name
You can specify any name for a
hand. (Default: Hand)
Mounted Position
Hand mounting position
It can be attached to Force Sensor or Tool coordinate system.
Position
Mounting offset from the robot end effector position.
Rotation
Hand mounting direction
File name
CAD data file name of the hand
It cannot be changed.
Save as XVL…
The loaded hand object can be saved in the XVL format.
Click
and specify the destination.
When the XVL
-format hand data is loaded, this item is grayed out
and cannot be
used.
Rendering Quality
Set the rendering quality.
Standard
: Default
Quali
ty-preferred : Fine
Speed
-preferred : Fast
Visible
Visible : True (default)
Not visible
: False
Show Label
Displays the label : True
Not display the label
: False (default)
This property sets
whether to display the label when [Label Display]
in the [S
imulator setting] is specified.
Show Origin
Displays the origin coordinate system : True
Not displays the origin coordinate system
: False (default)

8. Simulator
EPSON RC+ 7.0 (Ver.7.4) User's Guide Rev.6 293
Collision Property Value
Check
Enables / disables the collision detection.
Enable
: True (default)
Disable
: False
Collision with the robot flange
is not detected even when this
property is set
“True”.
Color
Specify the color to be used when collision is detected.
Default: 168,0,0
Property Value
Transparent
Semi-transparent : True
Not semi
-transparent : False (Default)
The front
-
back relation of the objects may be incorrect depending on
the viewing angle. For details, refer to
8.4 Simulator Specifications
and Restriction
s.
Transparency
Specifies the transparency in the range of 1 to 90%.
Transparency increases as the setting value becomes larger.

8. Simulator
294 EPSON RC+ 7.0 (Ver.7.4) User's Guide Rev.6
Force Sensor
By registering Force Sensor, “Force Sensor” is displayed in the layout object.
Property Value
Number
Displays a sensor number registered in the controller.
Label
Displays a sensor name registered in the controller.
Visible
Visible : True (Default)
Not visible
: False
Show Label
Display a label : True
Not display a label
: False (Default)
This property sets
whether to display the label when [Label
Display] in the [S
imulator Setting] is set.
Model
Displays a model registered in the controller.
Flange
Displays a flange determined by combination of the robot and
Force Sensor (default). Select
“None” to hide.
Show Flange Offset
Show : True
Not show
: False (Default)
Specifies whether to display the flange offset position in
coordinate system.
Show Sensor Tip
Show : True
Not show
: False (Default)
Specifies whether to display the tip position of Force Sensor
in
coordinate system.
For properties such as “Collision” or “Transparent”, refer to the hand or layout objects
properties.
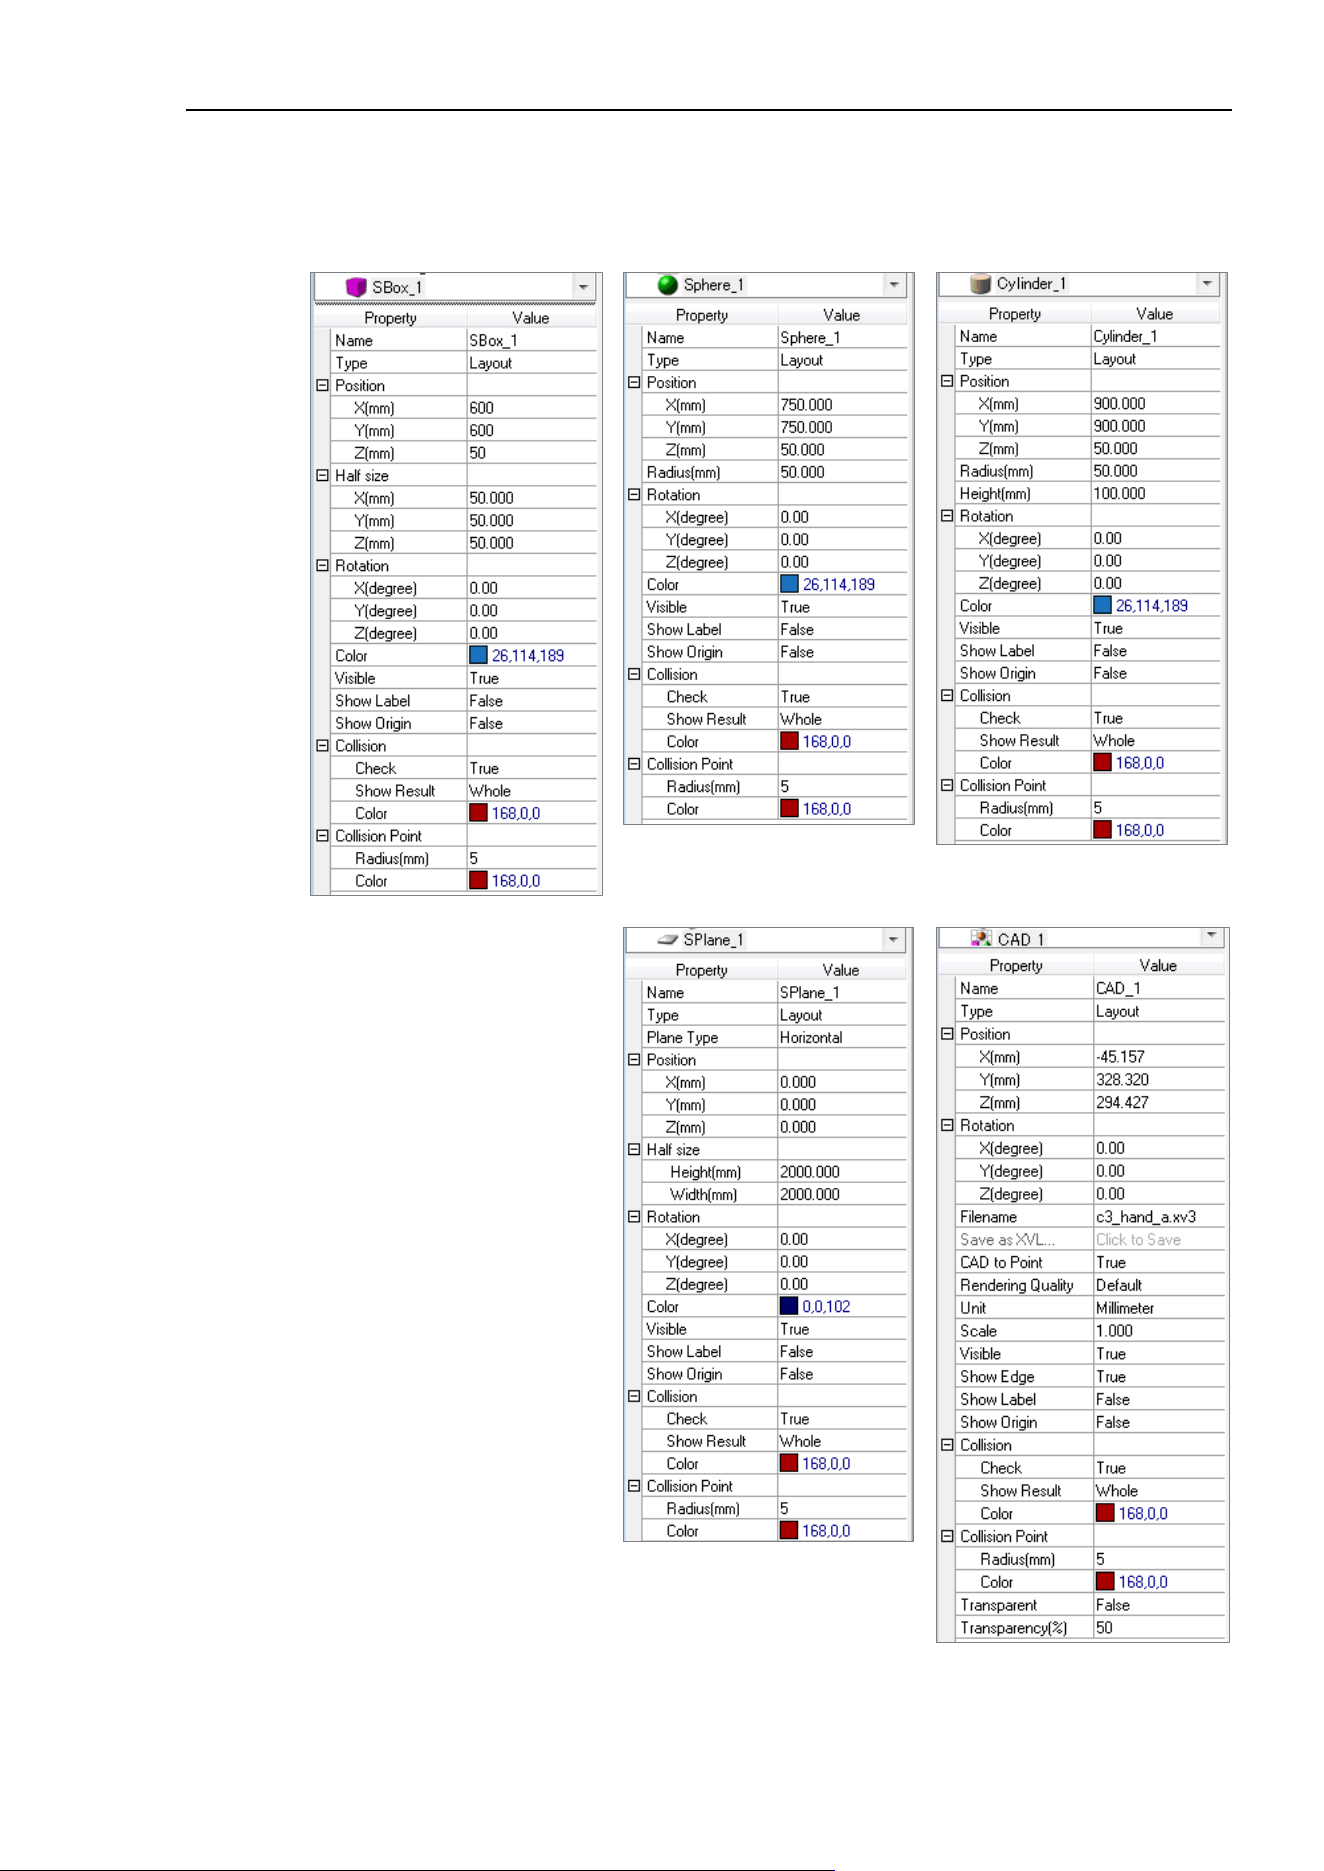
8. Simulator
EPSON RC+ 7.0 (Ver.7.4) User's Guide Rev.6 295
◆ Layout Object
Layout Box / Layout Sphere / Layout Cylinder / Layout Plane / CAD
There are common attributes for all objects and others are for particular objects.

8. Simulator
296 EPSON RC+ 7.0 (Ver.7.4) User's Guide Rev.6
Property Object Description
Name
All
You can specify any name.
Plane Type
Plane
Floor : Horizontal (default )
Wall : Vertical
Type
All
Clicking the button to display the [Object Settings]
dialog. You can set the type.
Layout : Layout object (Default)
Part : Part object
Mounted Device : Mounted device
Position
All
Specifies a center point in simulator World coordinates.
Layout Cylinder: Bottom surface center
Half size
Box
Specifies a length from the center.
The box length is double this length.
Radius
Sphere
Cylinder
Sphere radius
Cylinder radius
Height
Cylinder
Plane
Cylinder height
Floor length / Wall height
Width
Plane
Floor width / Wall width
Rotation
All
Object angle (Z-axis centering)
File name
CAD
CAD data file name. It cannot be changed.
Save as XVL…
CAD
The loaded hand object can be saved in the XVL
format.
Click and specify the destination.
When the XVL-format hand data is loaded, this item is
grayed out and cannot be used.
CAD to Point
CAD
Use this property to generate a point from the CAD data
by using CAD To Point. For details, refer to 8.3.4 CAD
To Point.
Rendering Quality
CAD
Set the rendering quality.
Standard : Default
Quality-preferred : Fine
Speed-preferred : Fast
Unit
CAD
Set the unit of length for the CAD data.
Scale
CAD
Set the scale ratio of the CAD data.
Color
Box
Sphere
Cylinder
Display color
Click the drop-down to change display color.
The display color setting dialog will be displayed.
Refer to Change layout object color for the details.

8. Simulator
EPSON RC+ 7.0 (Ver.7.4) User's Guide Rev.6 297
Property Object Description
Visible
All
Visible : True (default)
Not visible : False
Show Edge
CAD
Displays Edge (edge line) of the CAD data.
Display : True (default)
Not display : False
The display time can be reduced and operability can be
improved by hiding the edge lines.
Show Label
All
Displays the label : True
Not display the label : False (default)
This property sets whether to display the label when [Label
Display] in the [Simulator setting] is specified.
Show Origin
All
Displays the origin coordinate system : True
Not displays the origin coordinate system : False (default)
Transparent
CAD
Semi-transparent : True
Not semi-transparent : False (default)
The front-back relation of the objects may be incorrect
depending on the viewing angle. For details, refer to
8.4
Simulator Specifications and Restrictions.
Transparency
CAD
Specify the transparency in the range of 1 to 90%.
Transparency increases as the setting value becomes larger.
Collision
Property Object Description
Check
CAD
Enables/disables the collision detection.
Enable : True (default)
Disable : False
Collision with the robot flange is not detected even when
this property is set “True”.
Show result
CAD
Specify how to display the color configured in Color
property when collision is detected.
Entirely : Whole (default)
Collision point : Point
Entire object and collision point : WholeAndPoint
Color
CAD
Specify the color to be used when collision of the arms is
detected.
Default: 168,0,0
Collision Point
Property Object Description
Radius(mm)
CAD
Specify the radius of collision point displayed when
collision is detected.
Color
CAD
Specify the color to be used when collision is detected.
Default: 168,0,0
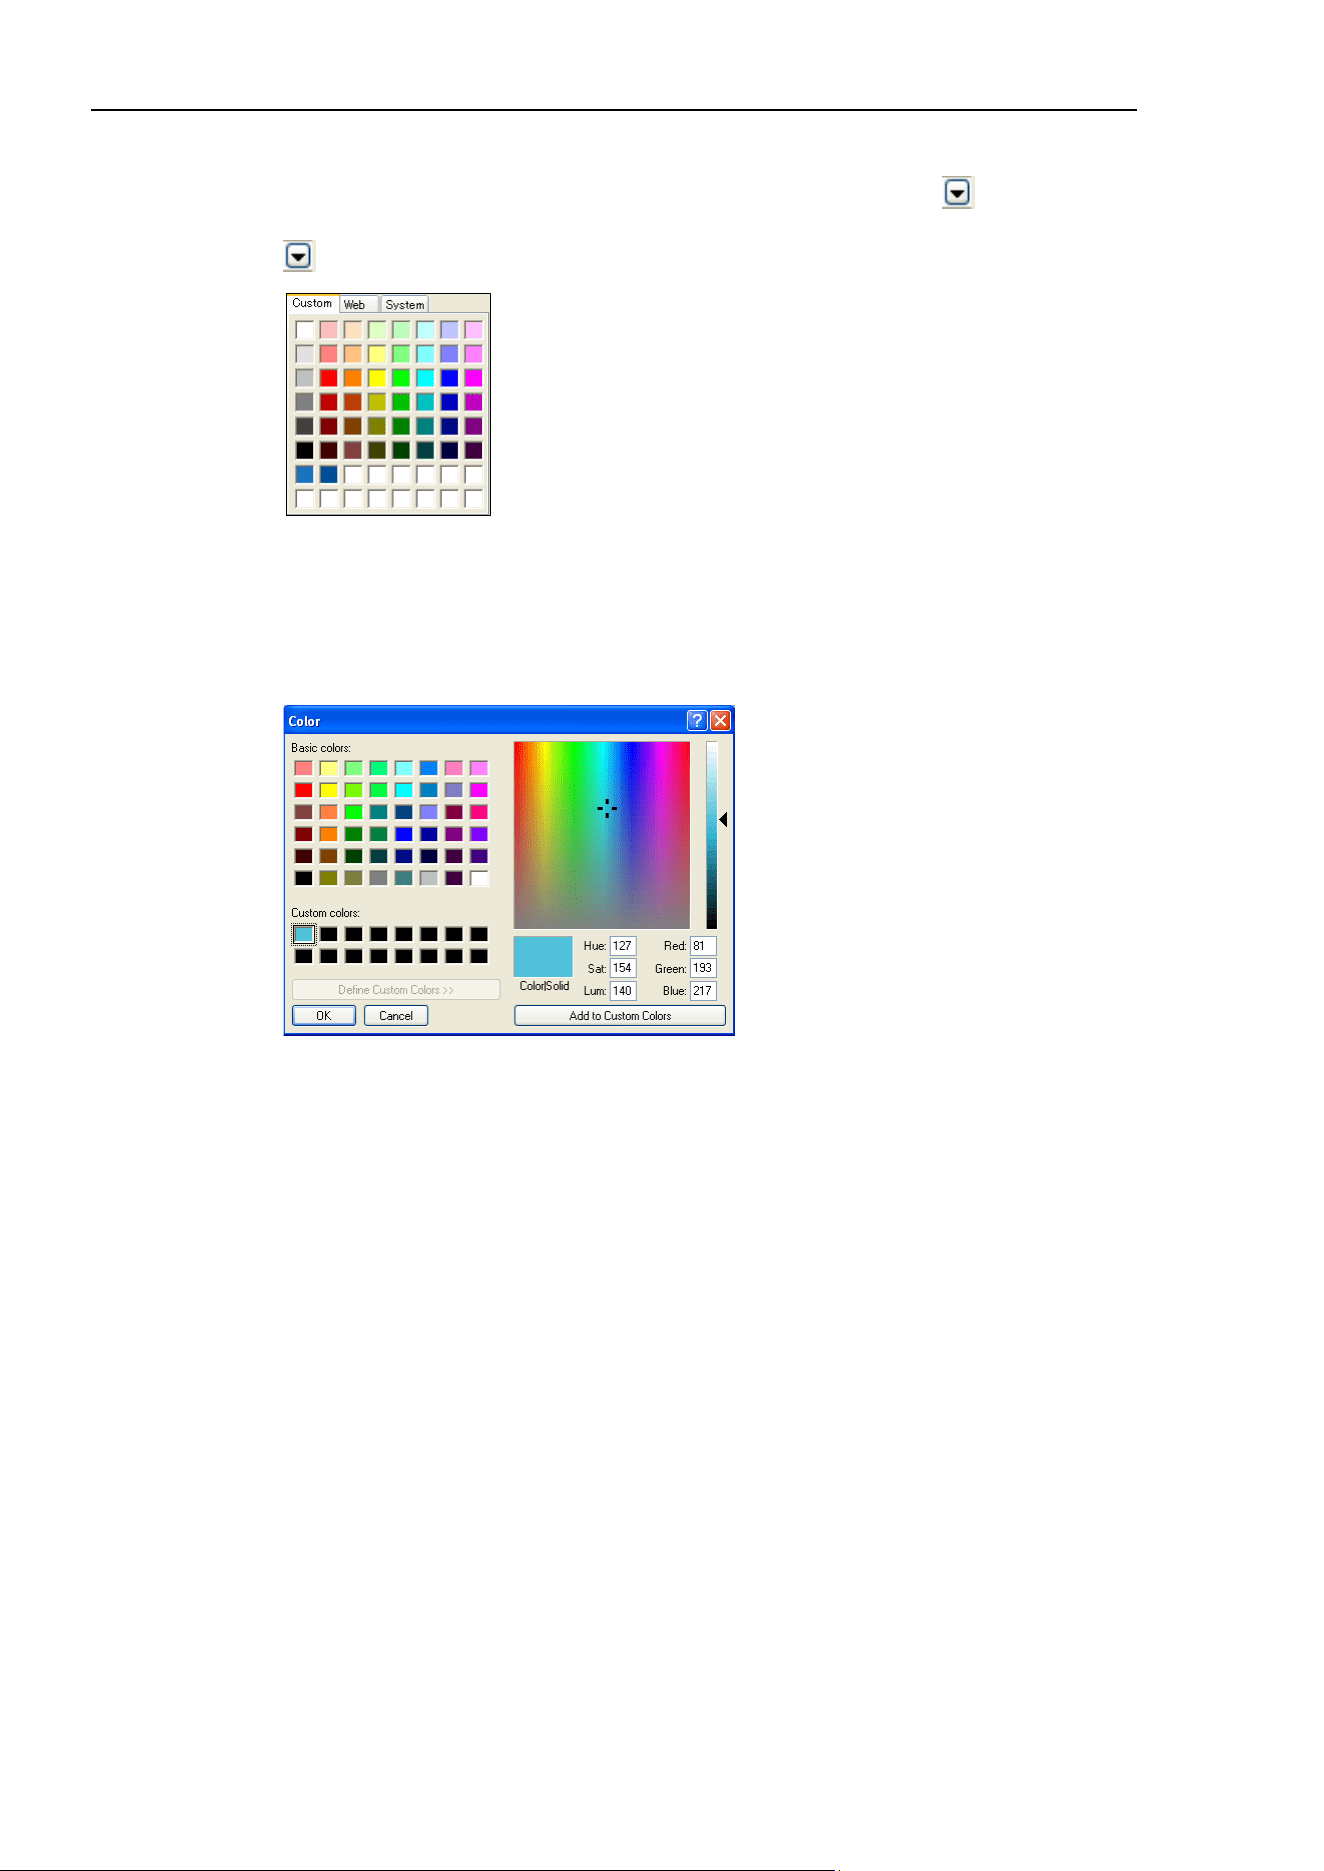
8. Simulator
298 EPSON RC+ 7.0 (Ver.7.4) User's Guide Rev.6
Change layout object color
When you want to change layout object color, click on the drop-down
in the Color
property and the dialog shown below will be displayed. If you cannot see the drop-down
, increase the property grid width.
Click color you want to display. Layout object color will be changed.
If you do not want to change color, click anywhere other than the display color setting
dialog. The dialog will be closed.
If you create a custom color, right-click any color in the bottom two rows (16 colors) in
the [Custom] tab, and the color setting dialog will be displayed.
Create a custom color and click the <OK> button.
Created color will be displayed in the display color setting dialog.
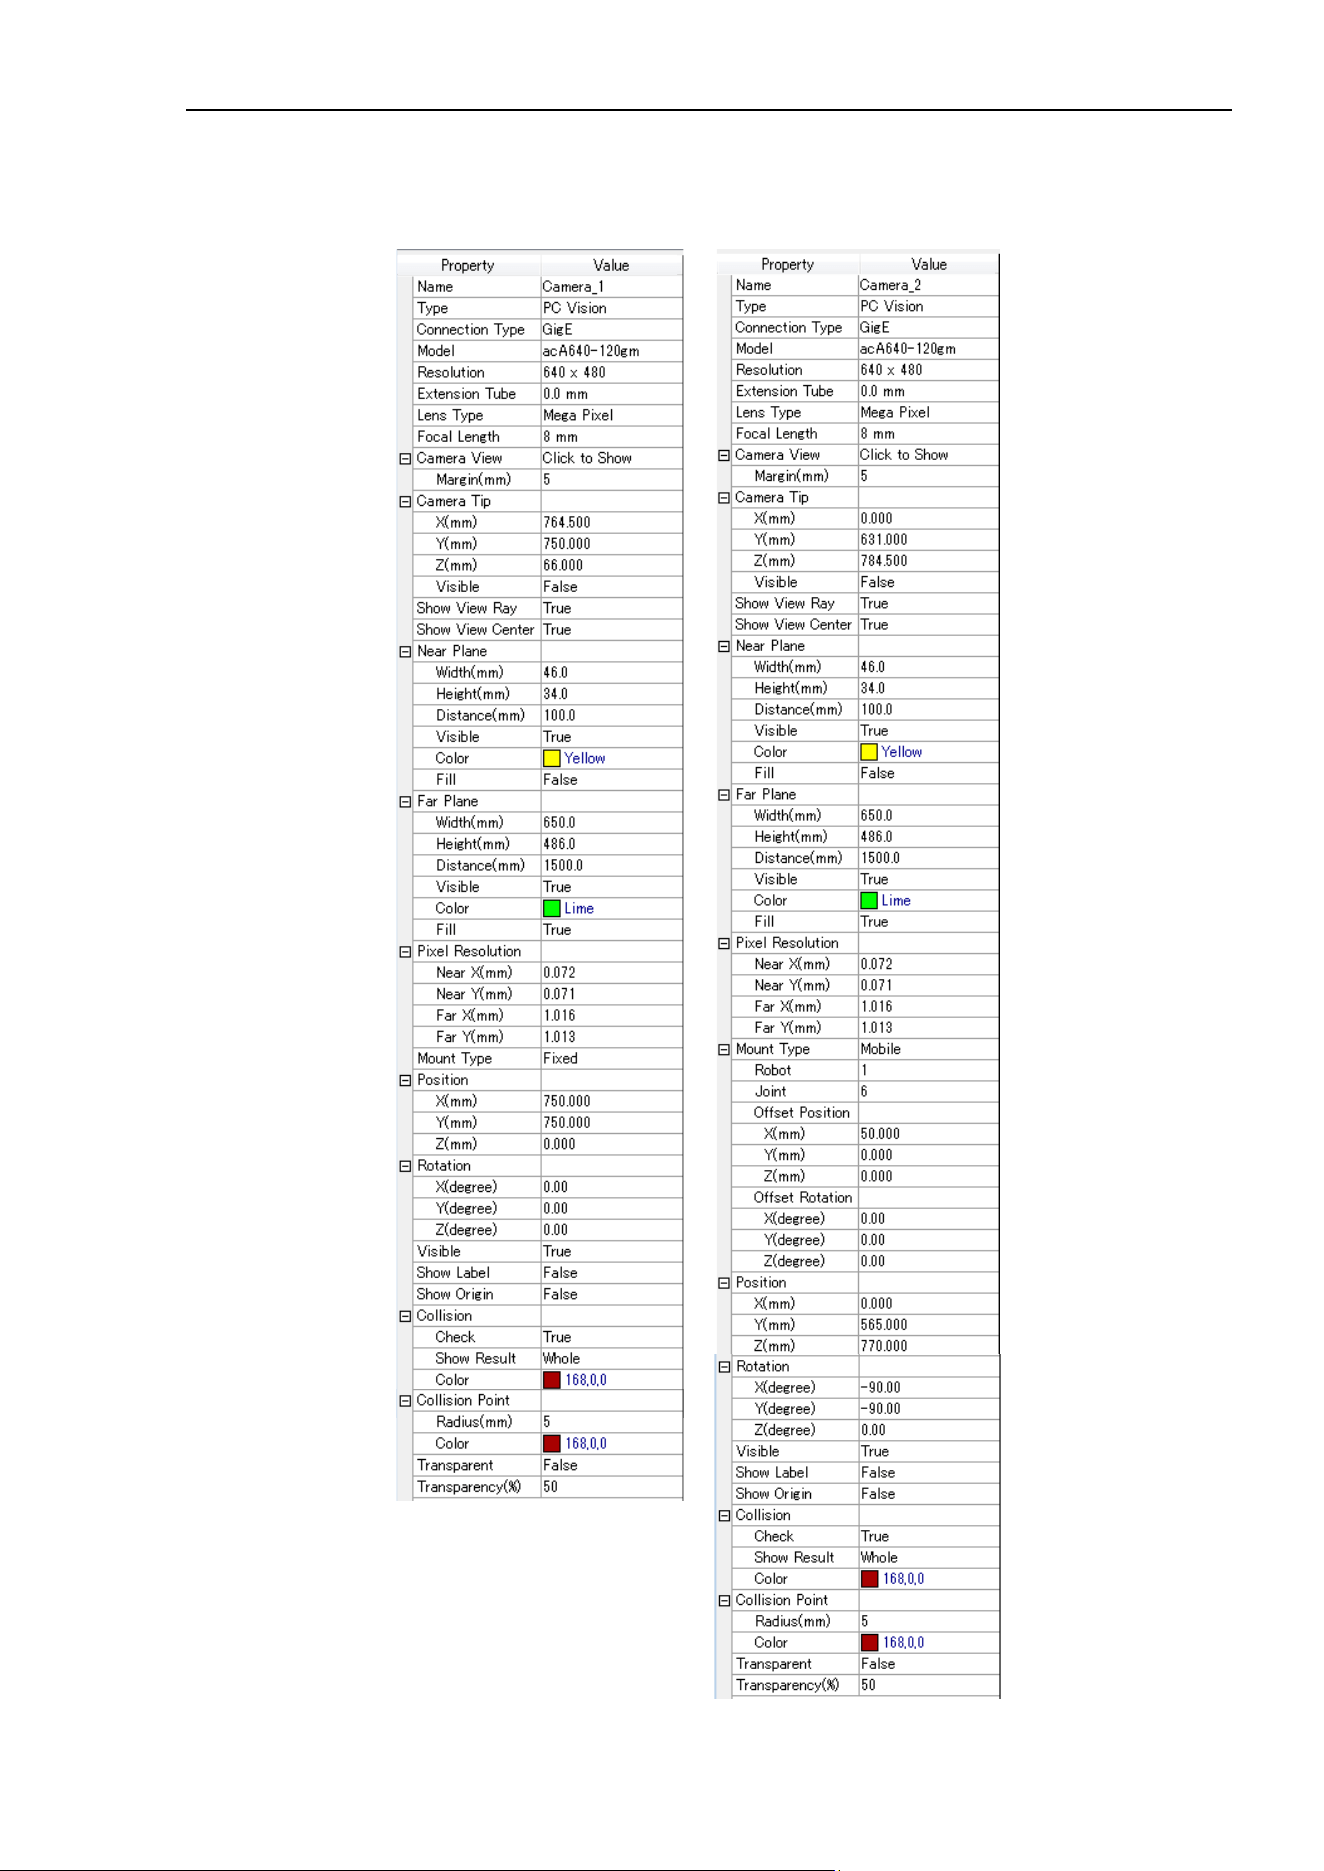
8. Simulator
EPSON RC+ 7.0 (Ver.7.4) User's Guide Rev.6 299
Camera Objects
Some properties are common for the both fixed camera and mobile camera, and other
properties are only enabled for either one of them.

8. Simulator
300 EPSON RC+ 7.0 (Ver.7.4) User's Guide Rev.6
Property Object Description
Camera View
Property Object Description
Click to Show
All
Clicks the to show the camera view.
Margin
All
Sets a margin of lengthwise direction from camera view to
a border of the camera view window.
Show : True
Not show : False (Default)
Camera Tip
Property Object Description
X, Y, Z
All
Displays the world coordinates on the edge of the camera
lens.
Change the value to change the camera position.
Visible
All
Visible : True (Default)
Not visible : False
Near Plane/ Far Plane
Property Object Description
Width
All
Displays the camera view width.
Height
All
Displays the camera view height.
Distance
All
Displays distance of Camera Tip and Near Plane/ Far
Plane.
Visible
All
Visible / not visible the depth of field.
Visible : True (Default)
Not visible : False
Color
All
Sets the camera view color.
Name
All
Displays the camera name.
Type
All
Displays the camera type. You can change it.
Connection Type
All
Displays connection type of camera.
Model
All
Displays a camera model. You can change it.
Resolution
All
Displays a camera resolution.
Extension Tube
All
Displays a length of extension tube.
You can change it.
Lens Type
All
Displays a lens type.
You can change it.
Focal Length
All
Displays focal length of lens.
You can change it.
Show View Ray
All
Show / not show the view ray.
Show : True (default)
Not show : False
Show View
Center
All
Show / not show the view center.
Show : True (default)
Not show : False

8. Simulator
EPSON RC+ 7.0 (Ver.7.4) User's Guide Rev.6 301
Property Object Description
Fill
All
Sets a fill of the camera view.
In case of Near Plane:
Display : True
Not display : False (Default)
In case of Far Plane:
Display : True (Default)
Not display: False
Pixel Resolution
Property Object Description
Near X, Y
All
Displays the size of Near Plane in pixel.
Far X, Y
All
Displays the size of Far Plane in pixel.
Mount type
Property Object Description
Mount type
All
Displays the mount type of camera.
Fixed camera/mobile camera can be changed.
Robot
Mobile
Displays the mounted robot number.
You can change it.
Joint
Mobile
Displays the mounted joint number.
You can change it.
Offset Position
Mobile
Display the relative position from the mounted joint.
Offset Rotation
Mobile
Display the relative orientation from the mounted joint.
For properties such as “Collision” or “Transparent”, refer to the layout objects properties.
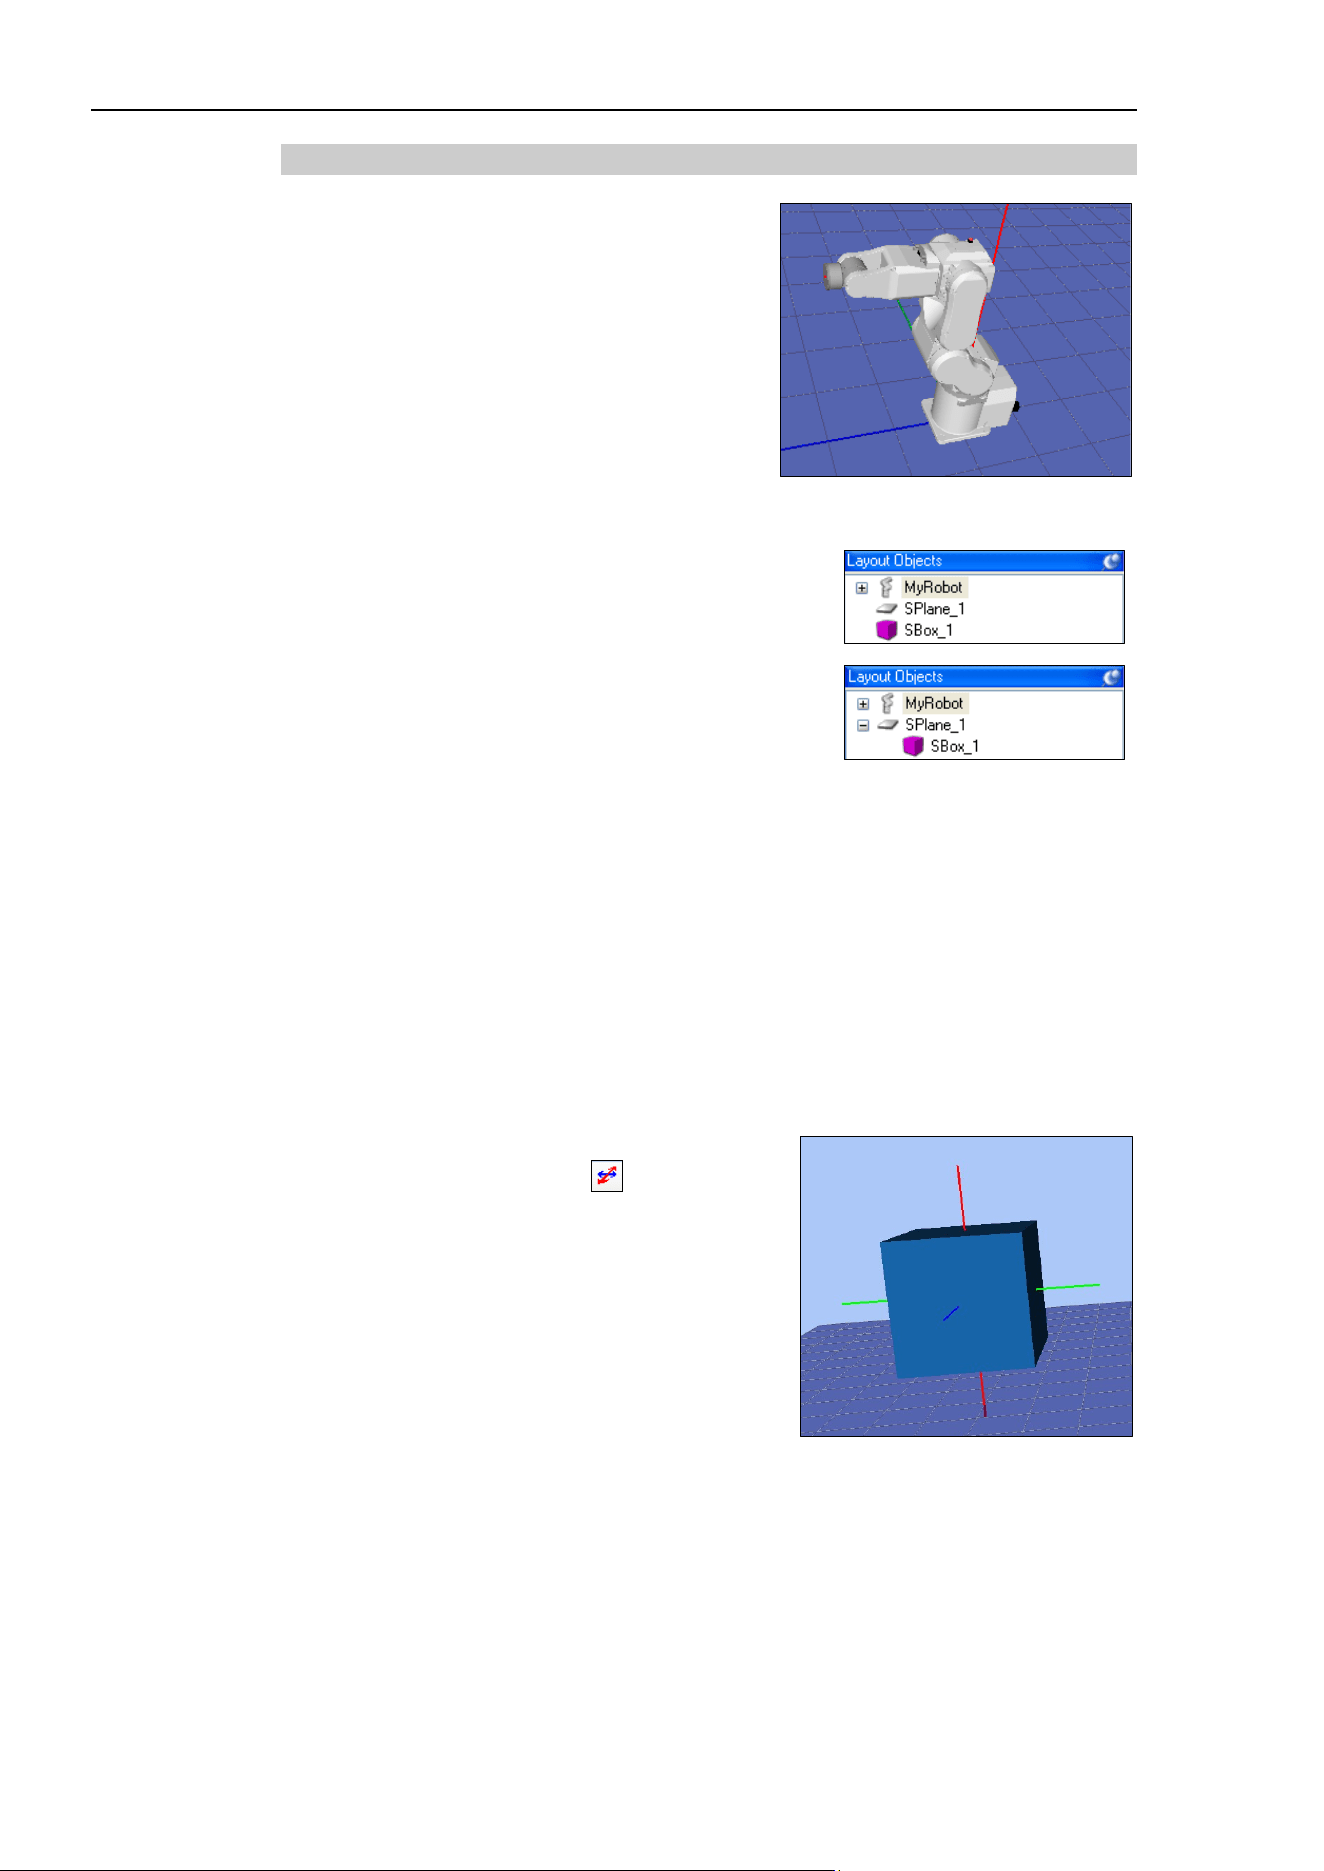
8. Simulator
302 EPSON RC+ 7.0 (Ver.7.4) User's Guide Rev.6
(4) 3D Display
In the 3D display, you can check the robot
orientation and motion from various points of
view.
Adding a layout object
When a layout object is added while the robot object is
selected in [Layout Objects], it will be added as
independent object.
When a layout object is added while the layout object is
selected in [Layout Objects], it will be added as a
grouped object of the selected object.
Grouped objects move together when the parent object moves.
RightTable/CenterTable/LeftTable of the sample virtual controller “C4 Sample” is an
example of grouping.
Editing a layout object
[Cut], [Copy], and [Paste] commands in the [Edit] menu are available for the layout
objects except CAD objects.
Changing a hierarchy of layout objects
To change a hierarchy of layout objects, drug and drop a layout object in the layout object.
Change the robot / layout object position
The grids indicating directions to move can be
displayed by clicking the <Move
> button on the
toolbar and clicking the object such as a robot or a
box. They can also be displayed by clicking the
object while pressing the <Shift> key.
To move the object, drag the grid corresponding to
the axis.
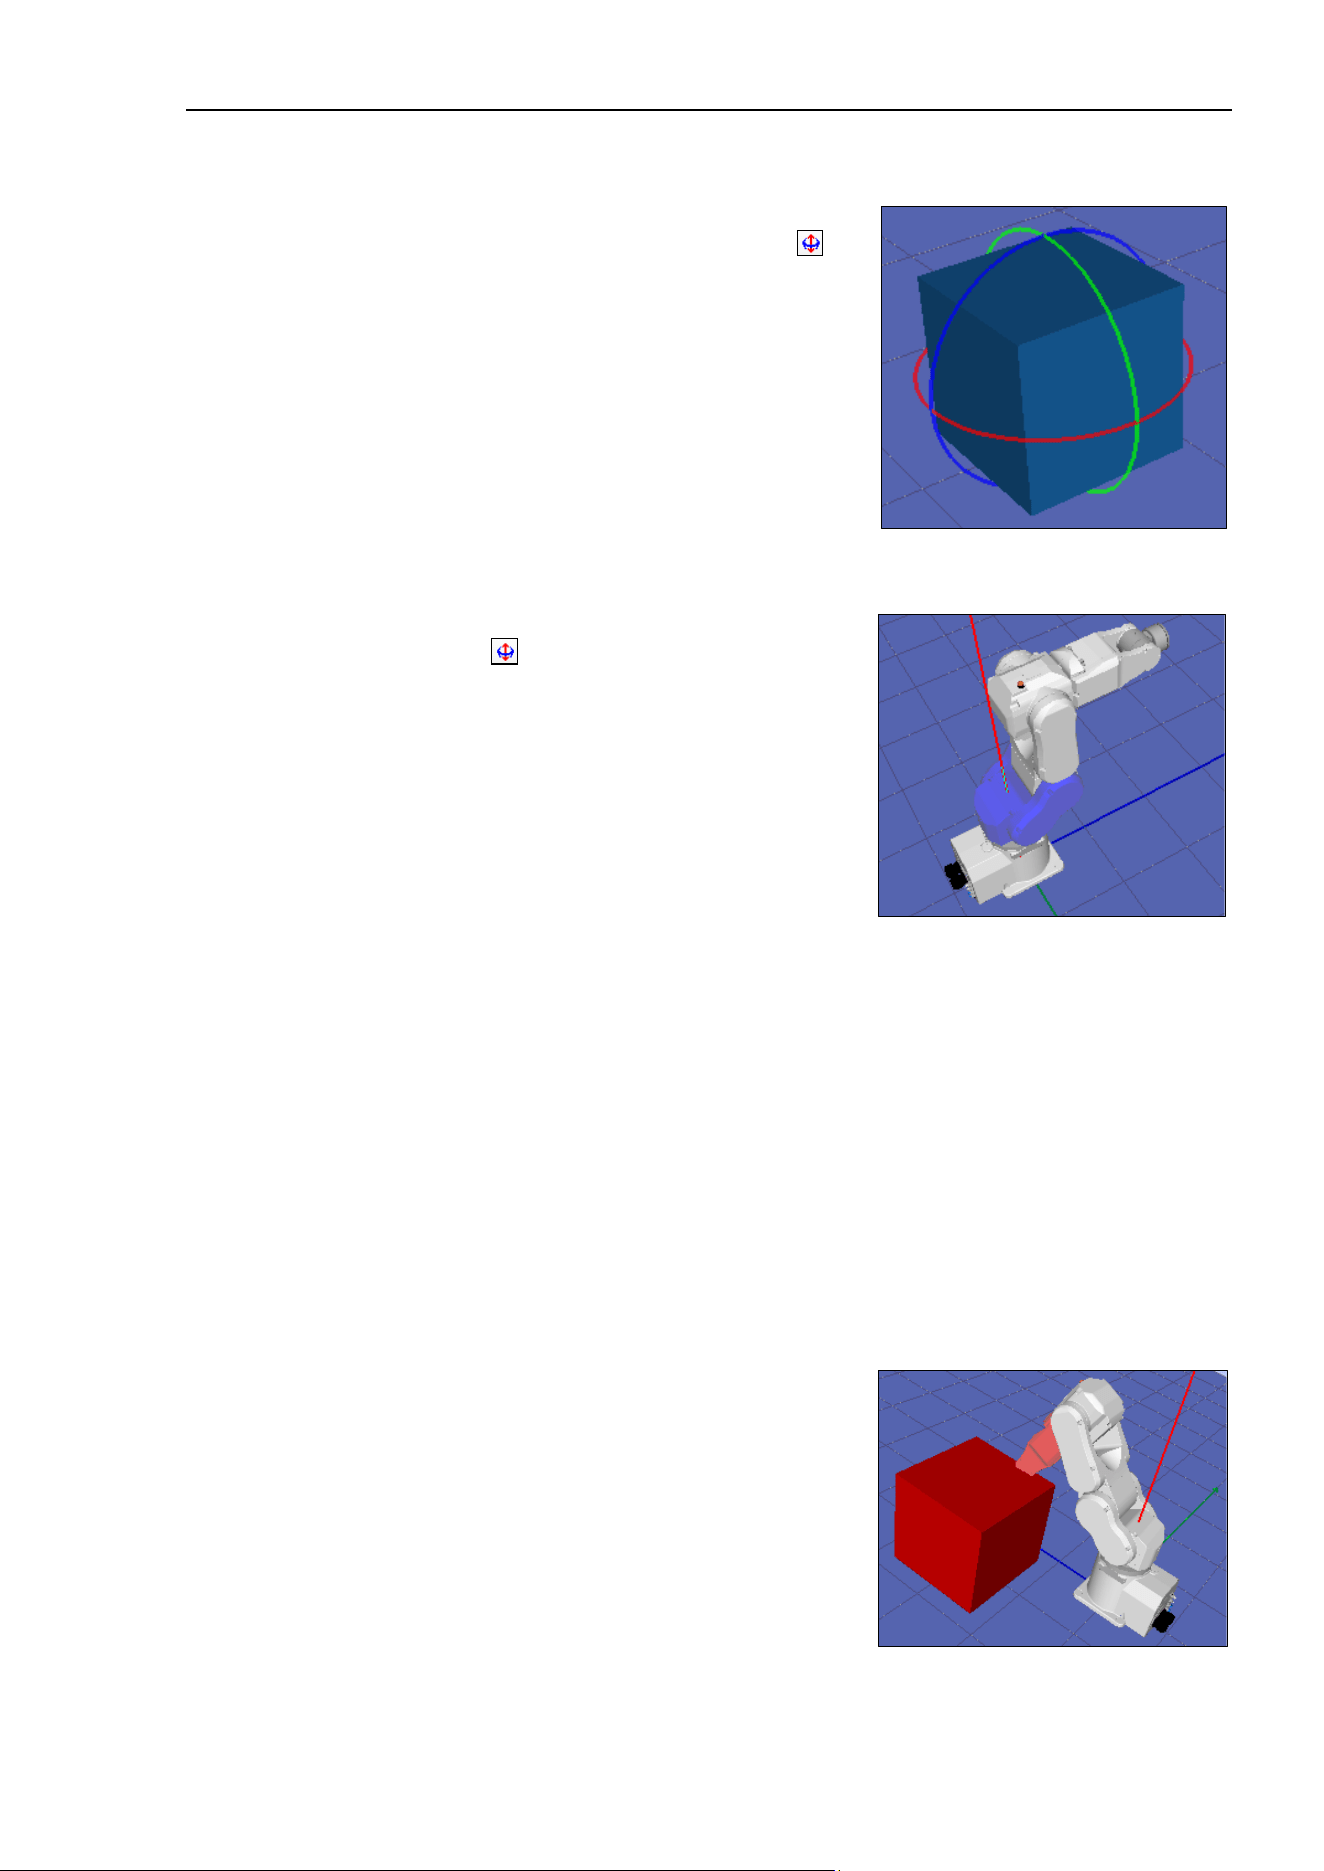
8. Simulator
EPSON RC+ 7.0 (Ver.7.4) User's Guide Rev.6 303
Rotate the robot / layout object
The grids which indicate the rotation directions
can be displayed by clicking the <Rotate/Jog
>
button on the toolbar and clicking the object such
as a robot base or a box. They can also be
displayed by clicking the object while pressing the
<Ctrl> key.
To rotate the object, drug the guide corresponding
to the direction you want to rotate the object.
Move the robot joint
The robot joint can be moved by clicking the
<Rotate/Jog
> button on the toolbar and
dragging the joint. The selected joint is displayed
in blue.
The joint can also be moved by dragging while
pressing the <Ctrl> key.
If a robot moves to a point out of the motion
range, the joint comes back to the previous point.
Change the view point
To rotate the view point, press the mouse left button and drag the 3D display.
To move the view point up and down, press the mouse right and left button and drag the
3D display.
Also, you can use the <L>, <R>, <D>, and <U> key to move the view point.
You can reset the view point from the menu opened by right click.
Zoom the layout
To zoom the 3D display, use the mouse wheel to scroll.
You can change the zoom level from the menu opened by right clicking with the mouse.
Check for collisions
When a collision between a robot and layout
object is detected, the collided robot joint and
layout object are displayed in red.
For details, refer to 8.3.3 Collision detection.
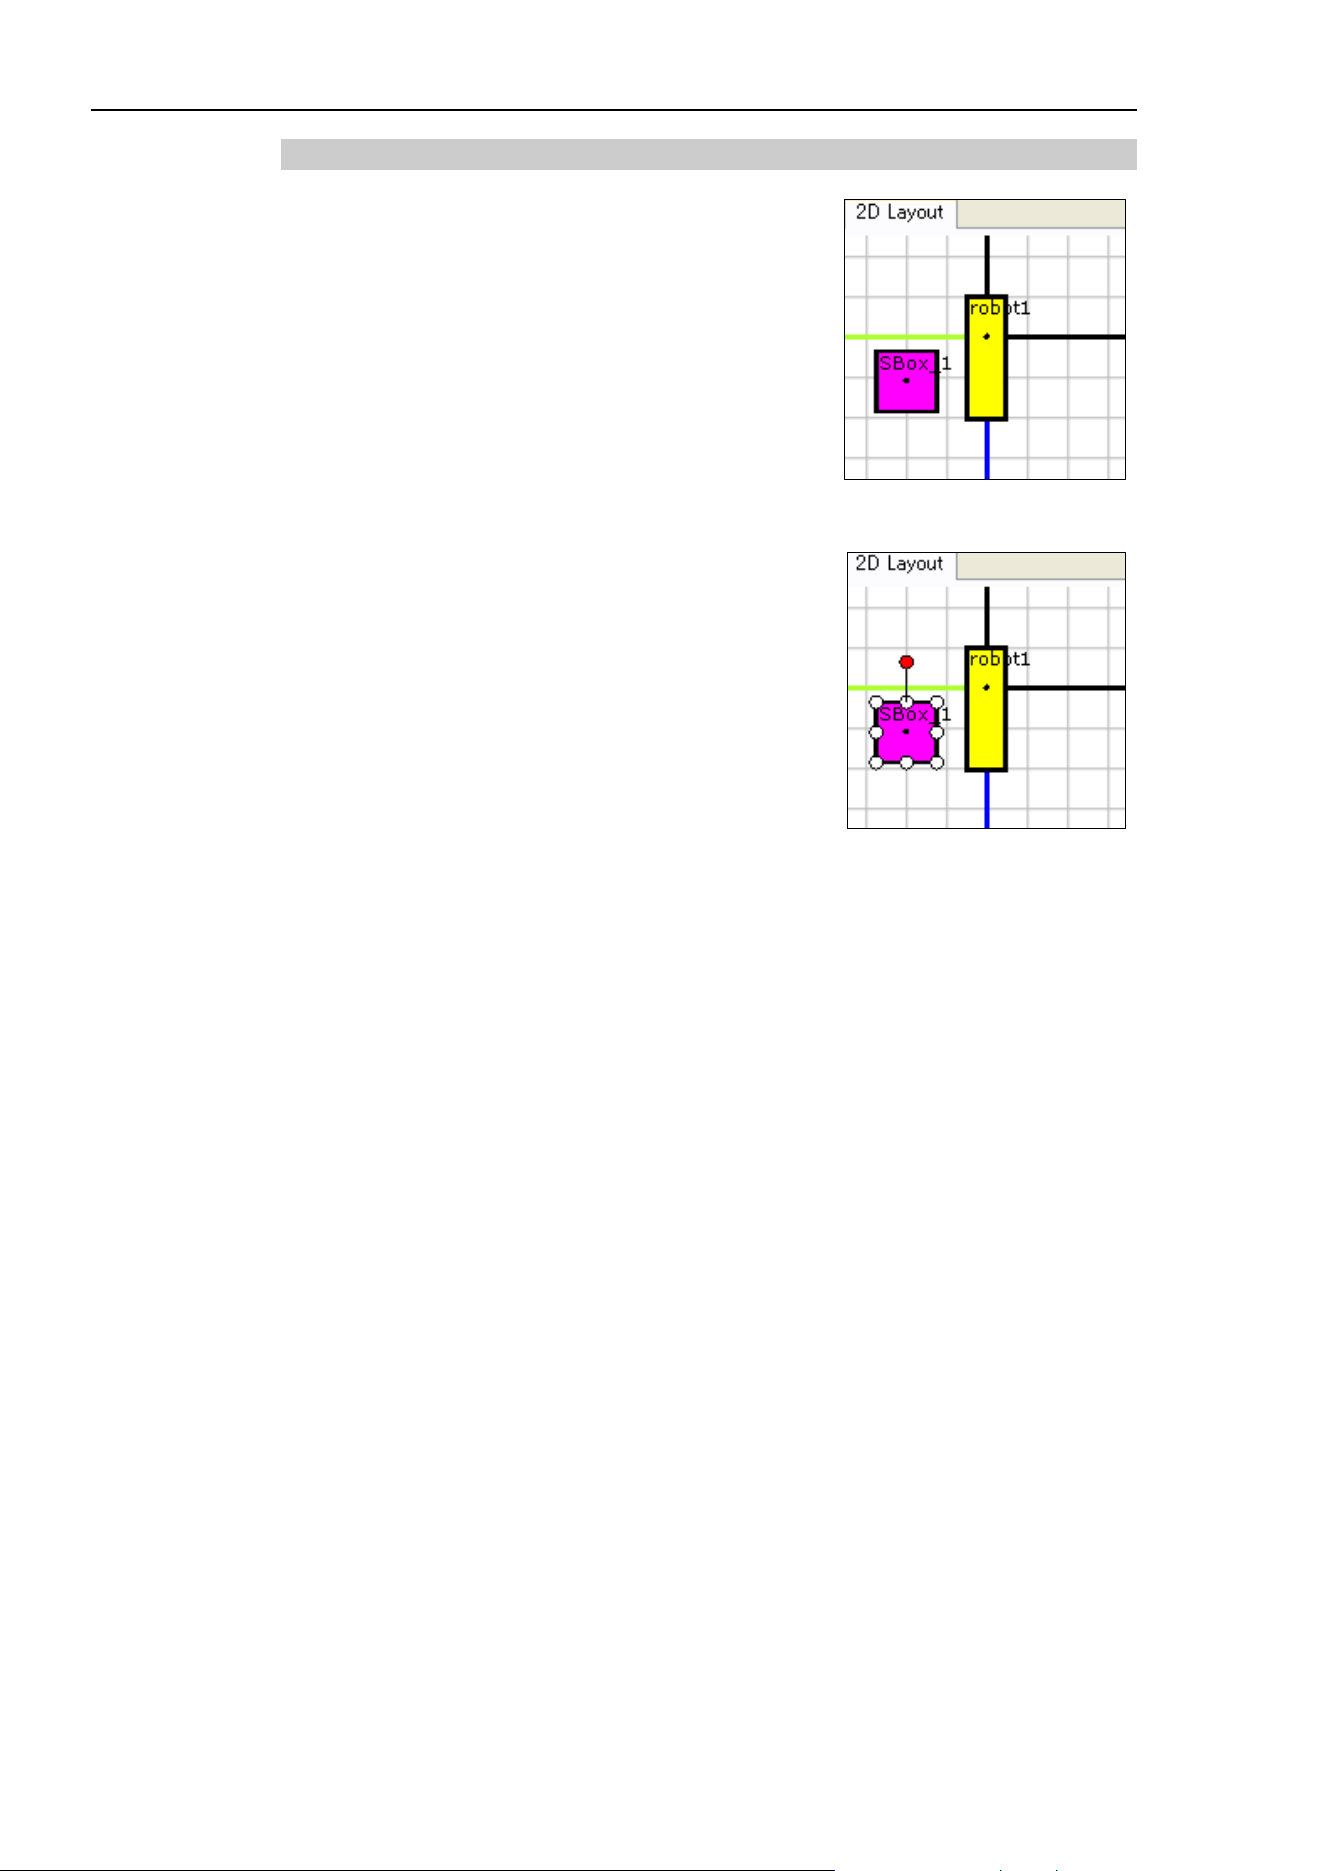
8. Simulator
304 EPSON RC+ 7.0 (Ver.7.4) User's Guide Rev.6
(5) 2D Layout
In the [2D Layout] panel, you can specify and check
the robot objects and layout objects positions.
Change robot and layout object position
Drag an object (robot, box, etc.) to change its position.
To move an object in Z direction, use the <D> and <U>
keys.
Drag to change the size of an object, and drag to
rotate an object.
If you are moving a box, it is shown as in the figure on
the right:
Zoom the layout
To zoom the 2D layout, use the mouse wheel to scroll.
Move the display area
To move the 2D layout display area, drag the 2D layout while simultaneously pressing the
<Shift> key.
Rotate the display
To rotate the 2D layout display area, right-click on the 2D layout and use the options -
[Rotate Clockwise] [Rotate CounterClockwise].
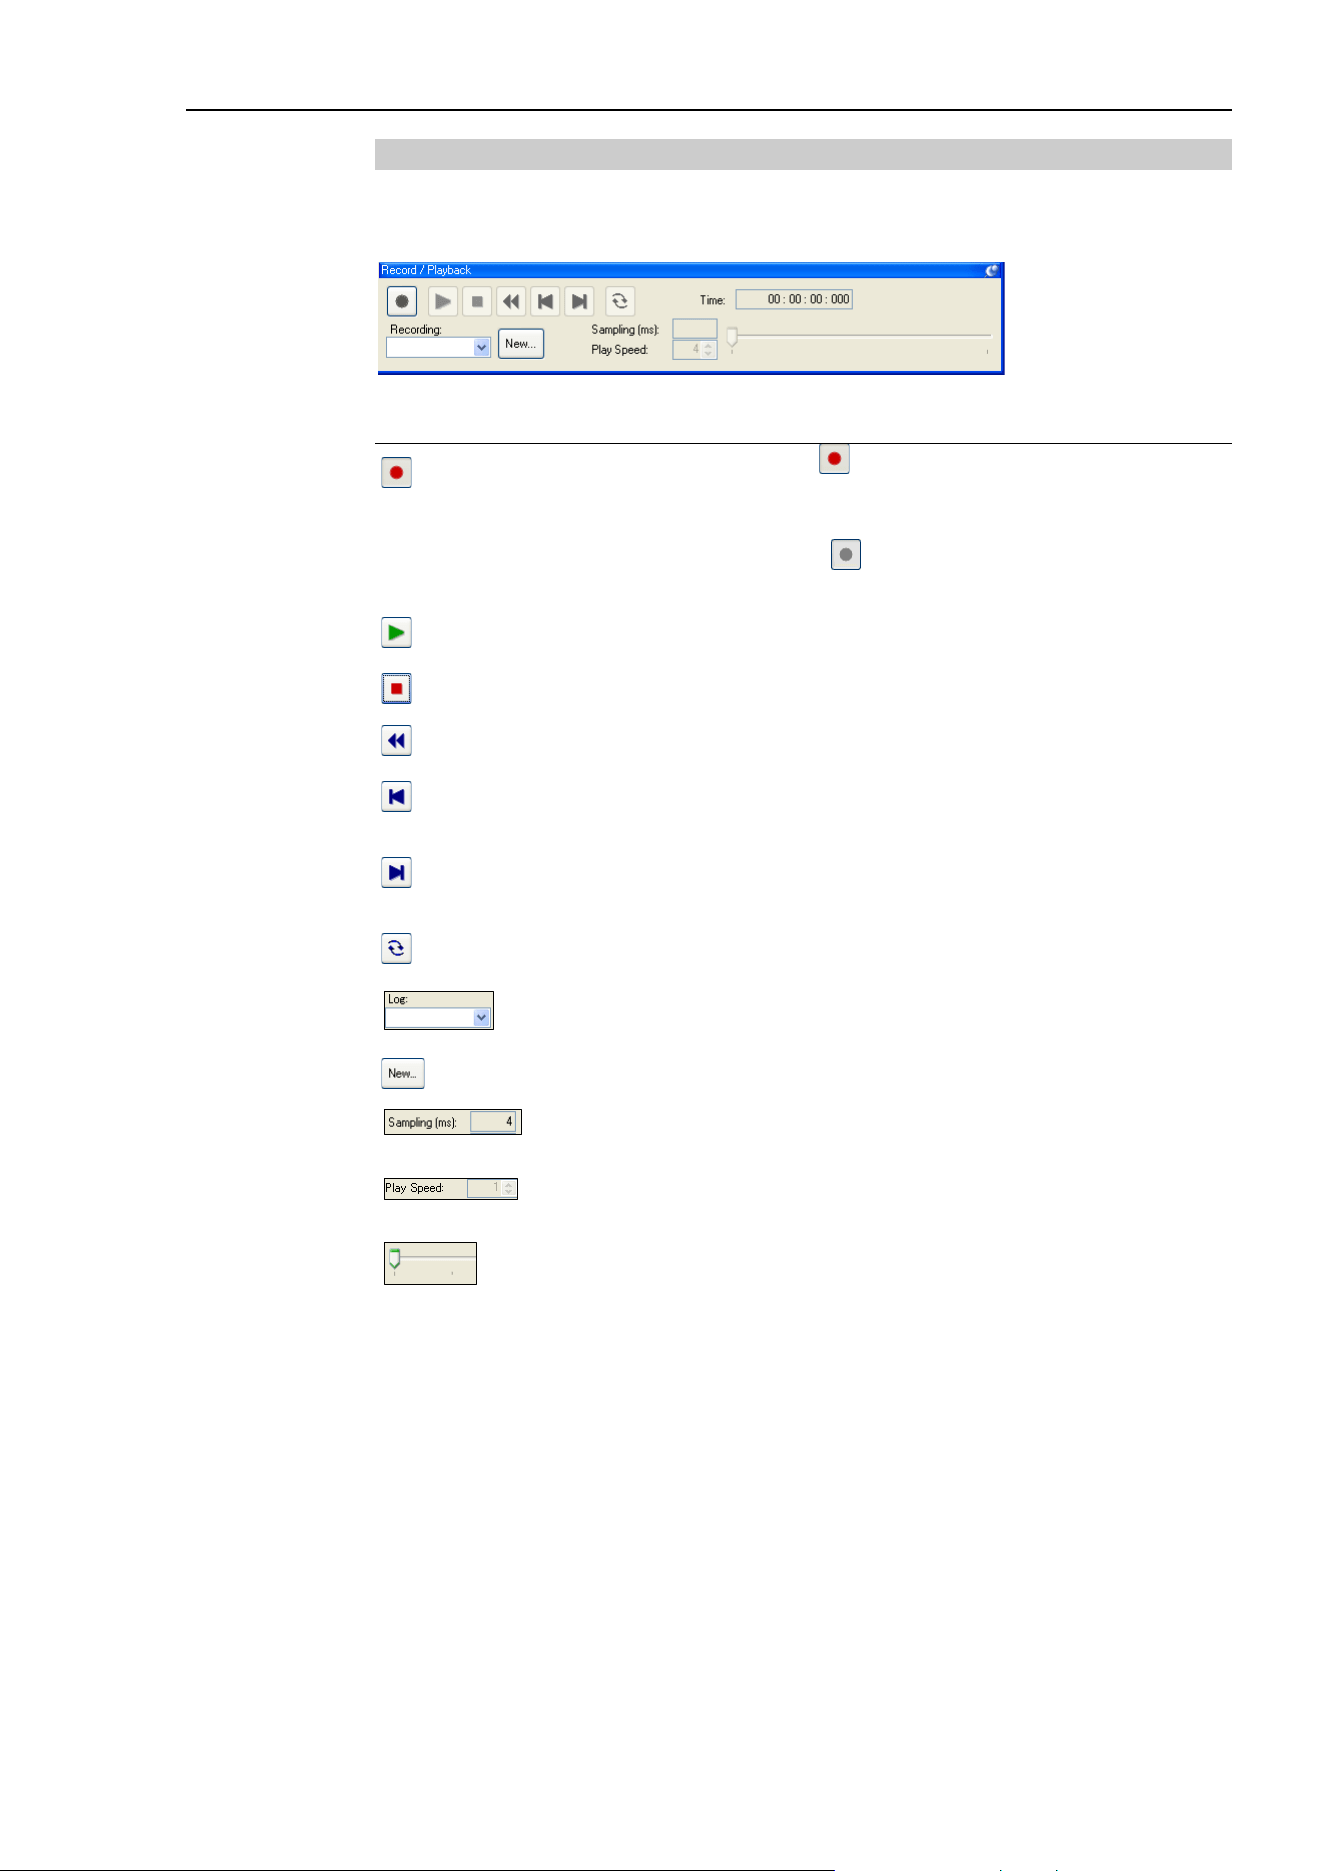
8. Simulator
EPSON RC+ 7.0 (Ver.7.4) User's Guide Rev.6 305
(6) Record / Playback
In Playback mode, you can record and produce simulation results.
Also, you can store the simulation results in movie files.
Function Description
RECORD
When the button is red
, it saves the simulation result into the
specified log file. Every time you execute the program, the log file
is overwritten with the new information.
When the button is gray
, it doesn’t save the simulation result.
As the default, it doesn
’t save the simulation result.
PLAY
Plays a simulation result of a specified log file.
STOP
Stops the simulation playback.
REWIND
Puts the playback step to the starting point.
BACK
Goes back one step.
The n
umber of steps back is specified in [Play Speed].
NEXT
Goes to next step.
The n
umber of steps to go is specified in [Play Speed].
REPEAT
When this button is pressed, repeats the simulation playback.
Log list
Specifies a recording file to record and play.
New button
Create a new log file.
Sampling
Displays the log file sampling interval.
Play Speed
Specifies the playback interval with a number of steps.
Play position
Display the current playing position.
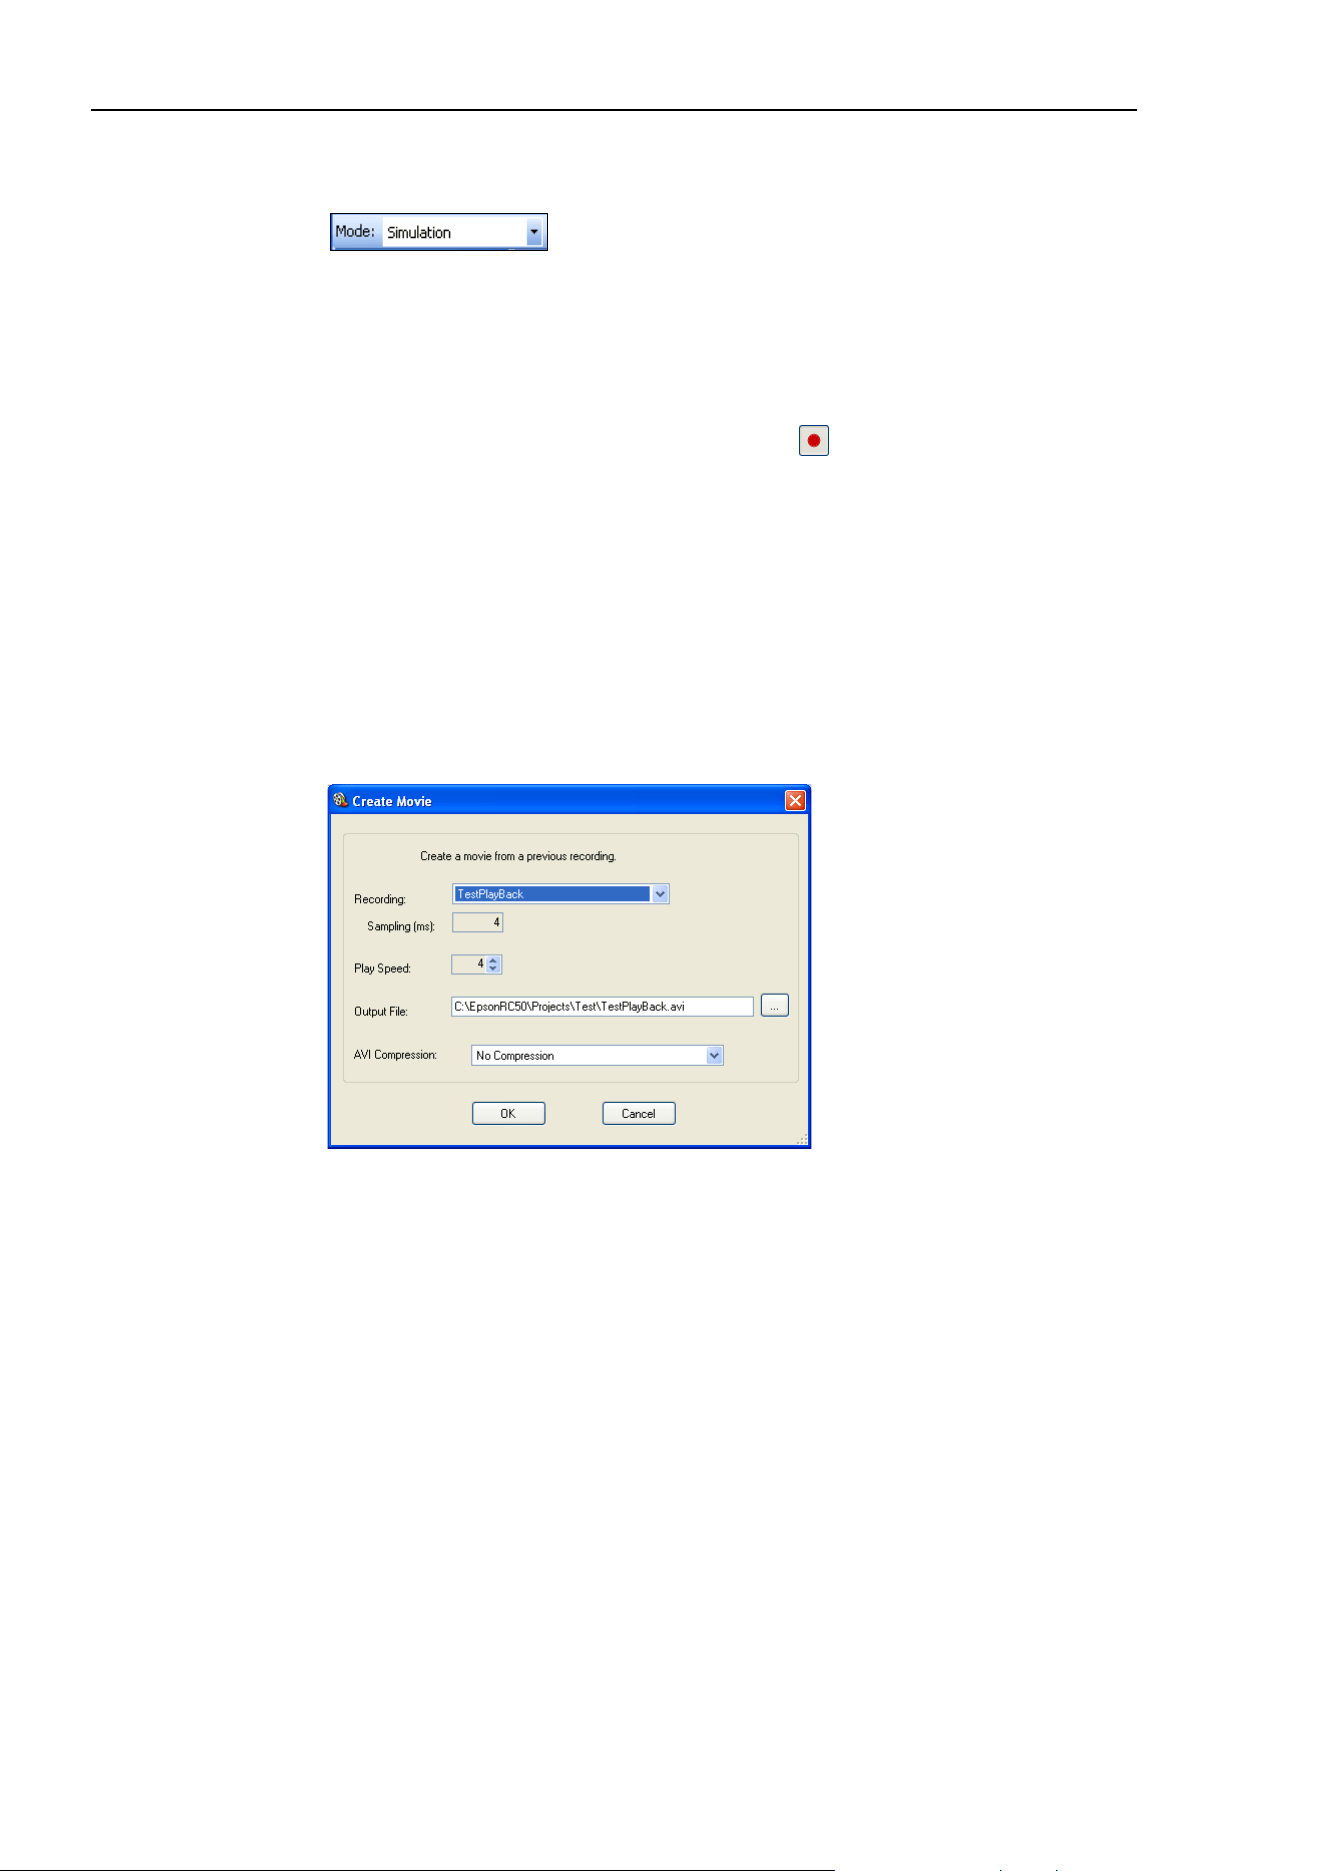
8. Simulator
306 EPSON RC+ 7.0 (Ver.7.4) User's Guide Rev.6
Produce the robot motion by outputting to a recording file
(1) Confirm that the mode is “Simulation” mode on the Simulator Tool bar.
(2) Click on the <New> button in the [Record / Playback] window. The [New
Recording] dialog appears.
(3) Here, enter “TestPlayBack” and click the <OK> button.
Now, you can see “TestPlayBack” in the Recording list.
(4) Click on the <RECORD> button in the [Record / Playback] window, which enables
recording. Now, the <RECORD> button is in red .
(5) Start a program from the [Run] window to move the robot. The simulation result is
saved in the recording file while executing the program.
(6) Change the simulator operating mode to “Playback Mode” again.
(7) Click on the <PLAY> button and the simulation result starts to play.
Produce the robot motion with saving in a movie file at once
(1) Confirm that the mode is set to “Playback” on the Simulator Tool bar.
(2) Click the <Create Movie> button in the Simulator Tool bar.
(3) When the [Create Movie] dialog appears, select “TestPlayBack” from the Log list.
(4) Specify the [Output File] and [AVI Compression] if necessary.
(5) Click on the <OK> button.
The [Create Movie] status window appears and the specified movie file is created
with playing the log file.
(6) The created movie file is “TestPlayBack.avi” in EPSON RC+ 7.0 project folder
(\EpsonRC70\projects\“a project name”).
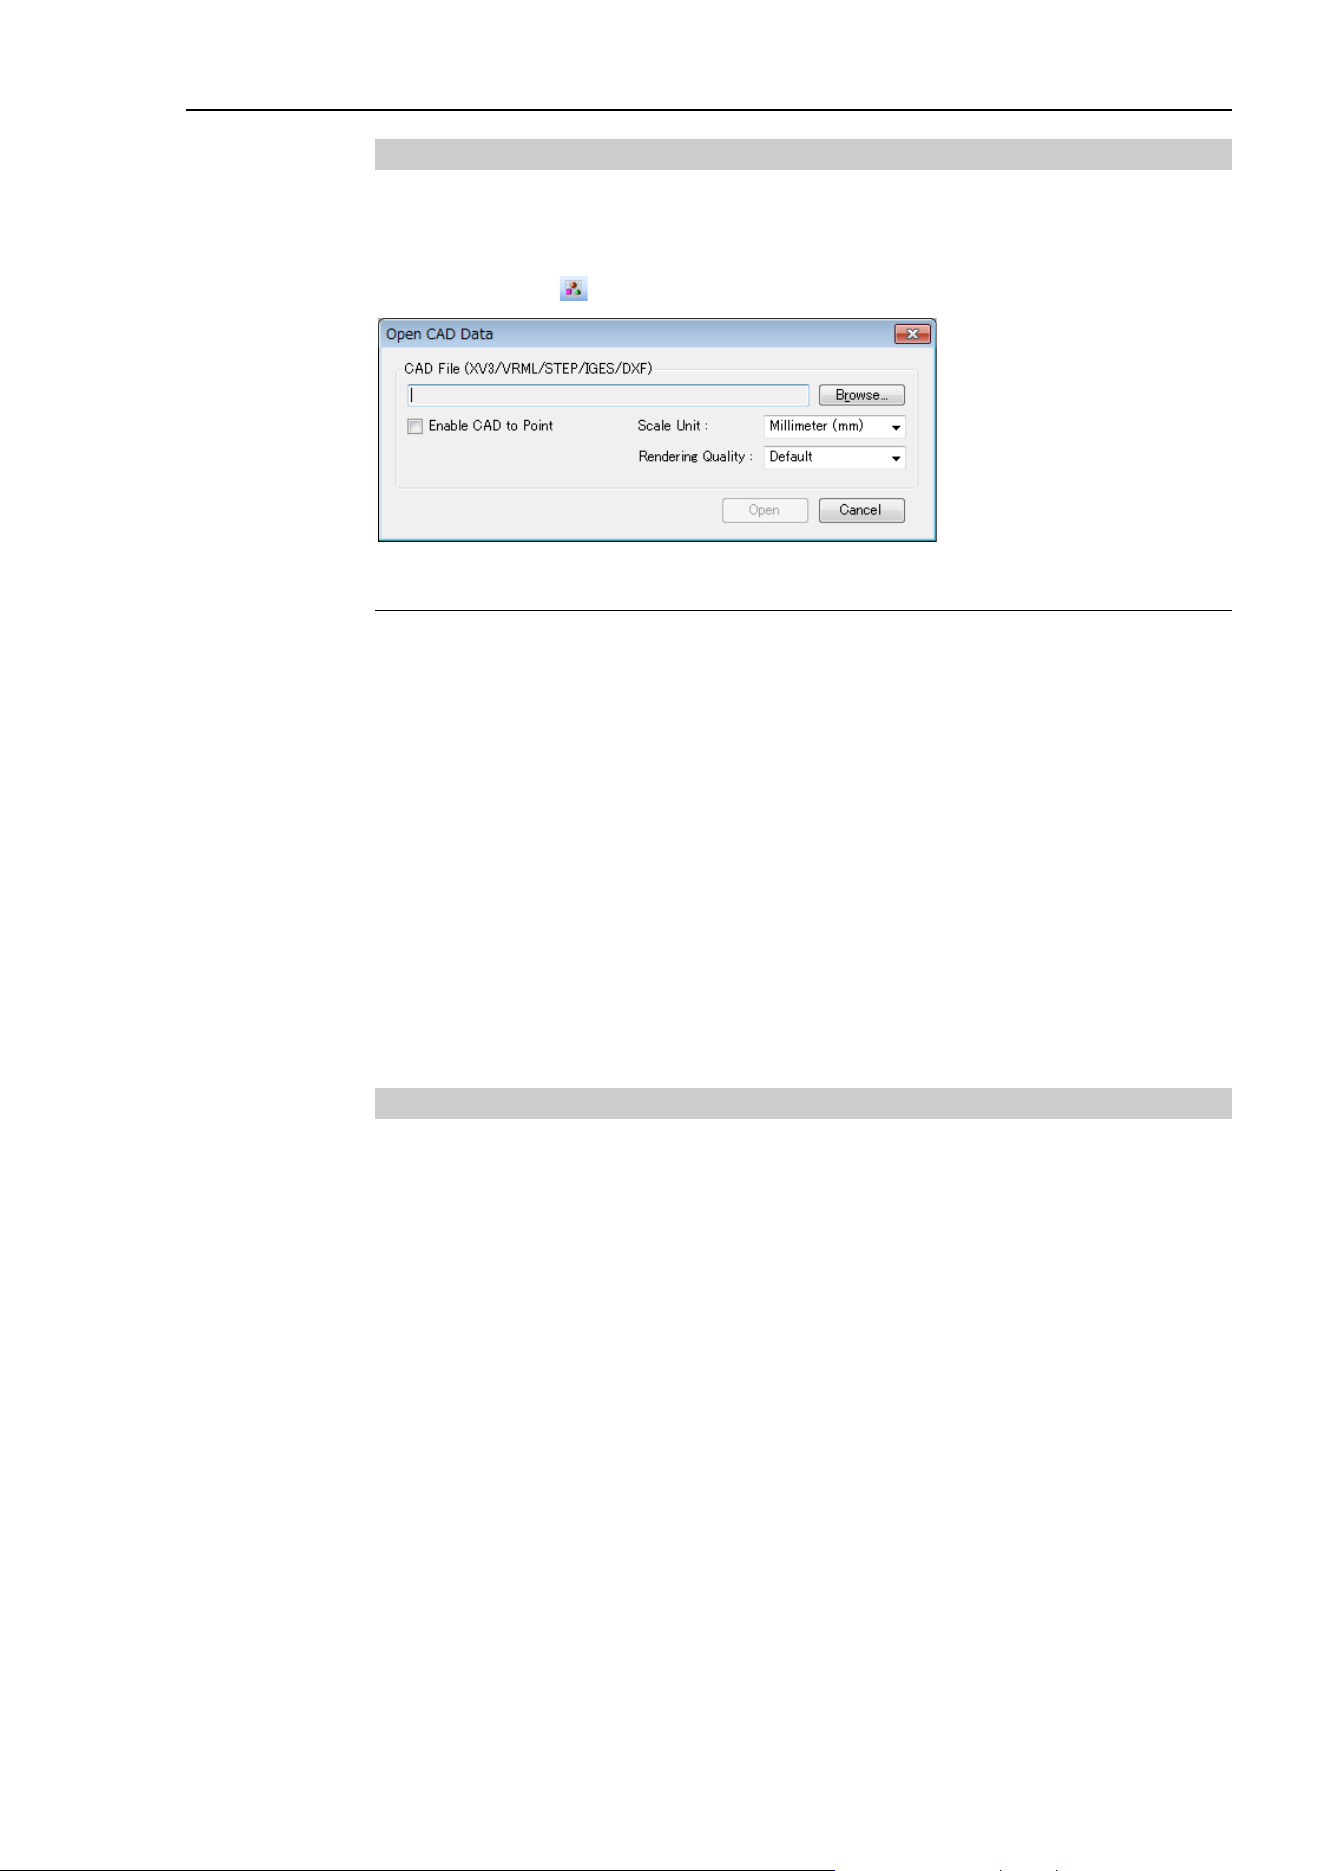
8. Simulator
EPSON RC+ 7.0 (Ver.7.4) User's Guide Rev.6 307
(7) Loading the CAD file
The CAD file can be loaded to lay out the hand or CAD object data in the 3D display.
For details of available CAD data, refer to Available CAD data for 3D display in 8.4.2
Specifications and precautions for the 3D display.
Pressing the <CAD > button on the toolbar opens the [Open CAD Data] dialog box.
Function Description
<Browse> button
Displays the dialog box for selecting the file.
Select a
CAD file to load.
Scale Unit
Select a unit of length used in the CAD data in order to match the
unit with the simulator.
This can be changed in the property grid after loading the data.
Rendering Quality
Specify the rendering quality.
If
“Fine” is selected, the data is displayed in details but it takes
time.
If
“Fast” is selected, the details are not displayed (e.g. the screw
holes are shown as
a square), but the data can be displayed faster.
Enable CAD to Point
Check this checkbox to use the CAD to Point which extracts the
points from the loaded
CAD data.
This can be changed in the property grid after loading the data.
If the data is loaded as
Hand, this item does not appear.
<Open> button
Starts loading the data.
(8) Saving the CAD file
The loaded CAD file can be converted to the XVL format to save. Converting the file to
the XVL format can reduce the file size, resulting in a shorter loading time.
There are two ways to save the files: saving the CAD files one by one, or saving them
altogether. The CAD files can be saved one by one in the property grid, or altogether in
the [Save CAD/Hand] dialog box.
To save the CAD files one by one
(1) Select the CAD object to save in the layout object.
(2) Click [Click to Save] of the <Save as XVL…> property in the property grid.
(3) The [Save As] dialog box appears. Click <Save>.
(4) If the file is saved successfully, the confirmation message appears. Click <Yes>.
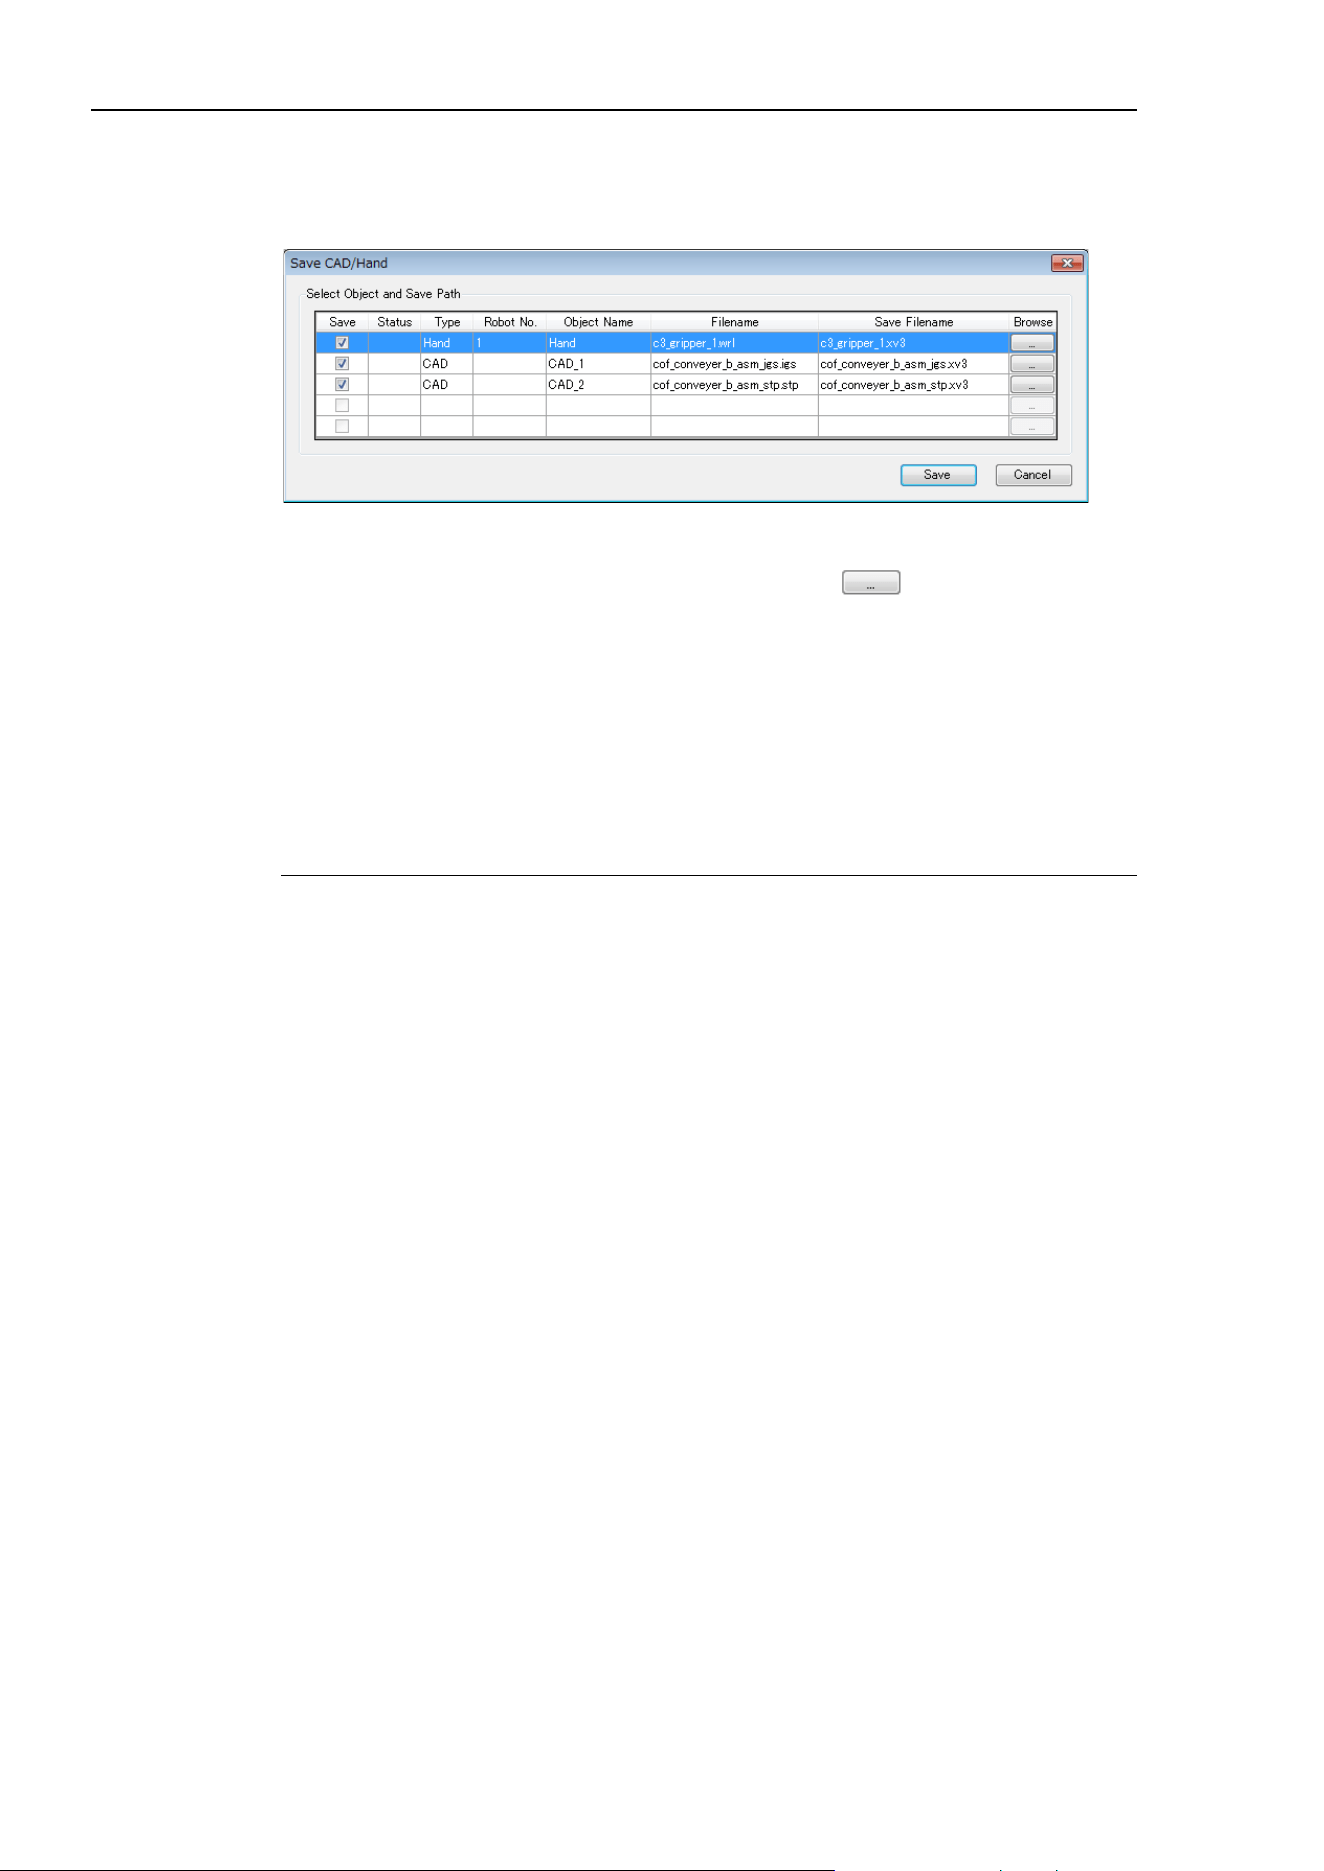
8. Simulator
308 EPSON RC+ 7.0 (Ver.7.4) User's Guide Rev.6
To save the CAD files altogether
(1) If there is an unsaved CAD data or Hand data when you attempt to exit the EPSON
RC+ or turn off the Controller, the [Save CAD/Hand] dialog box appears.
(2) The changed data is saved in the same folder as the previous data.
The filename extension is changed to “xv3” automatically. If you want to change the
file name or the destination to save, click the <Browse > button to display the
[Save As] dialog box, and then change the file name and destination.
(3) Click the <Save> button.
(4) If the file is saved successfully, “Success” will be displayed in [Status].
(5) Click the <Close> button to close the dialog.
CAD/Hand save dialog box
Function Description
[Save] checkbox
Check the checkbox of the object to save.
Status
If the file is saved successfully, it shows “Success”.
If failed, it shows “Fail”.
Type
Displays either “Hand” or “Cad”.
Robot No.
If the type is “Hand”, the robot number is displayed.
Object Name
Displays the setting value of [Name] in the property grid.
Filename
Displays the name of the loaded file.
Save Filename
Displays the name of the destination file selected in the [Save As]
dialog box.
Browse
Displays the [Save As] dialog box.
<Save> button
Starts saving the file.
<Cancel> button
Cancel saving the file.
<Close> button
Close the dialog.
This button appears when saving is completed successfully.
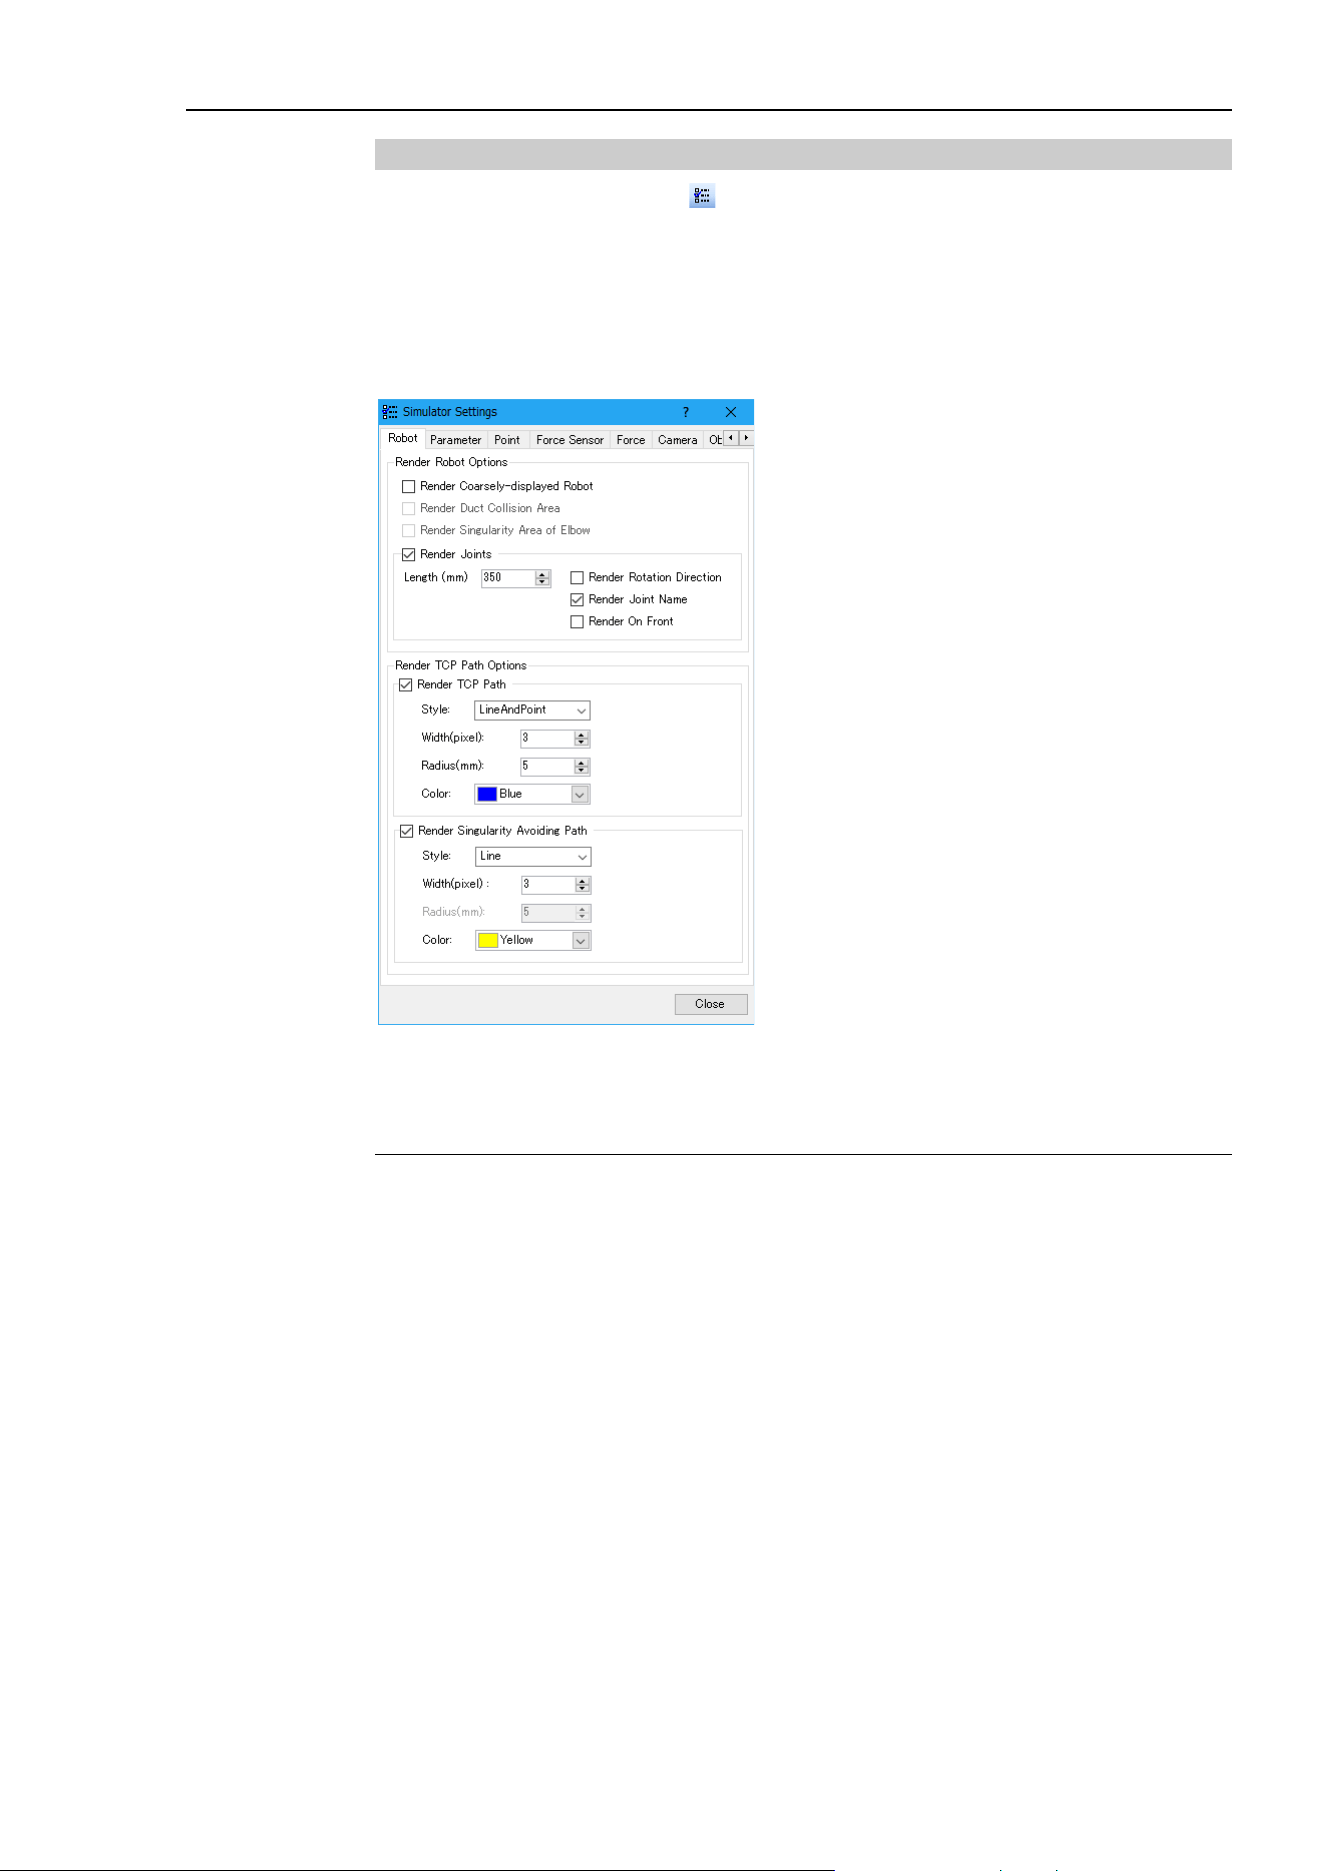
8. Simulator
EPSON RC+ 7.0 (Ver.7.4) User's Guide Rev.6 309
8.3.2 Simulator Settings
Pressing the <Simulator Settings > button displays the [Simulator Settings] dialog box.
This dialog box is used to configure the 3D display. The settings will be kept after
restarting the EPSON RC+ 7.0.
[Robot]
Settings related to 3D display of the robot.
Render Robot Options
Function Description
Render Coarsely
-displayed
Robot
Displays the simplified robot data.
The setting is effective the next time you connect the robot.
This option is useful when the computer capacity is
insufficient or the CAD data is large.
R
ender Duct Collision Area
Displays the range of collision detection at the robot duct
with a
bounding box.
T
his option is available for G1 and LS series.
Render S
ingularity Area of
Elbow
Displays the elbow singularity area and elbow singularity
neighborhood on the simulator.
This
option is available for N series.
Render Joints
Displays an arrow that shows a supporting point and a
rotation axis
of the robot.
Length
Set a length for rendering the joints.
Render Rotation
Direction
Display a rotation direction when rendering the joints.
Render Joint Name
Display the joint names (J1, J2, J3, J4, J5, J6) when
rendering the joints.
Render On Front
Display the arrow of “Render Joints” in front of the robot.
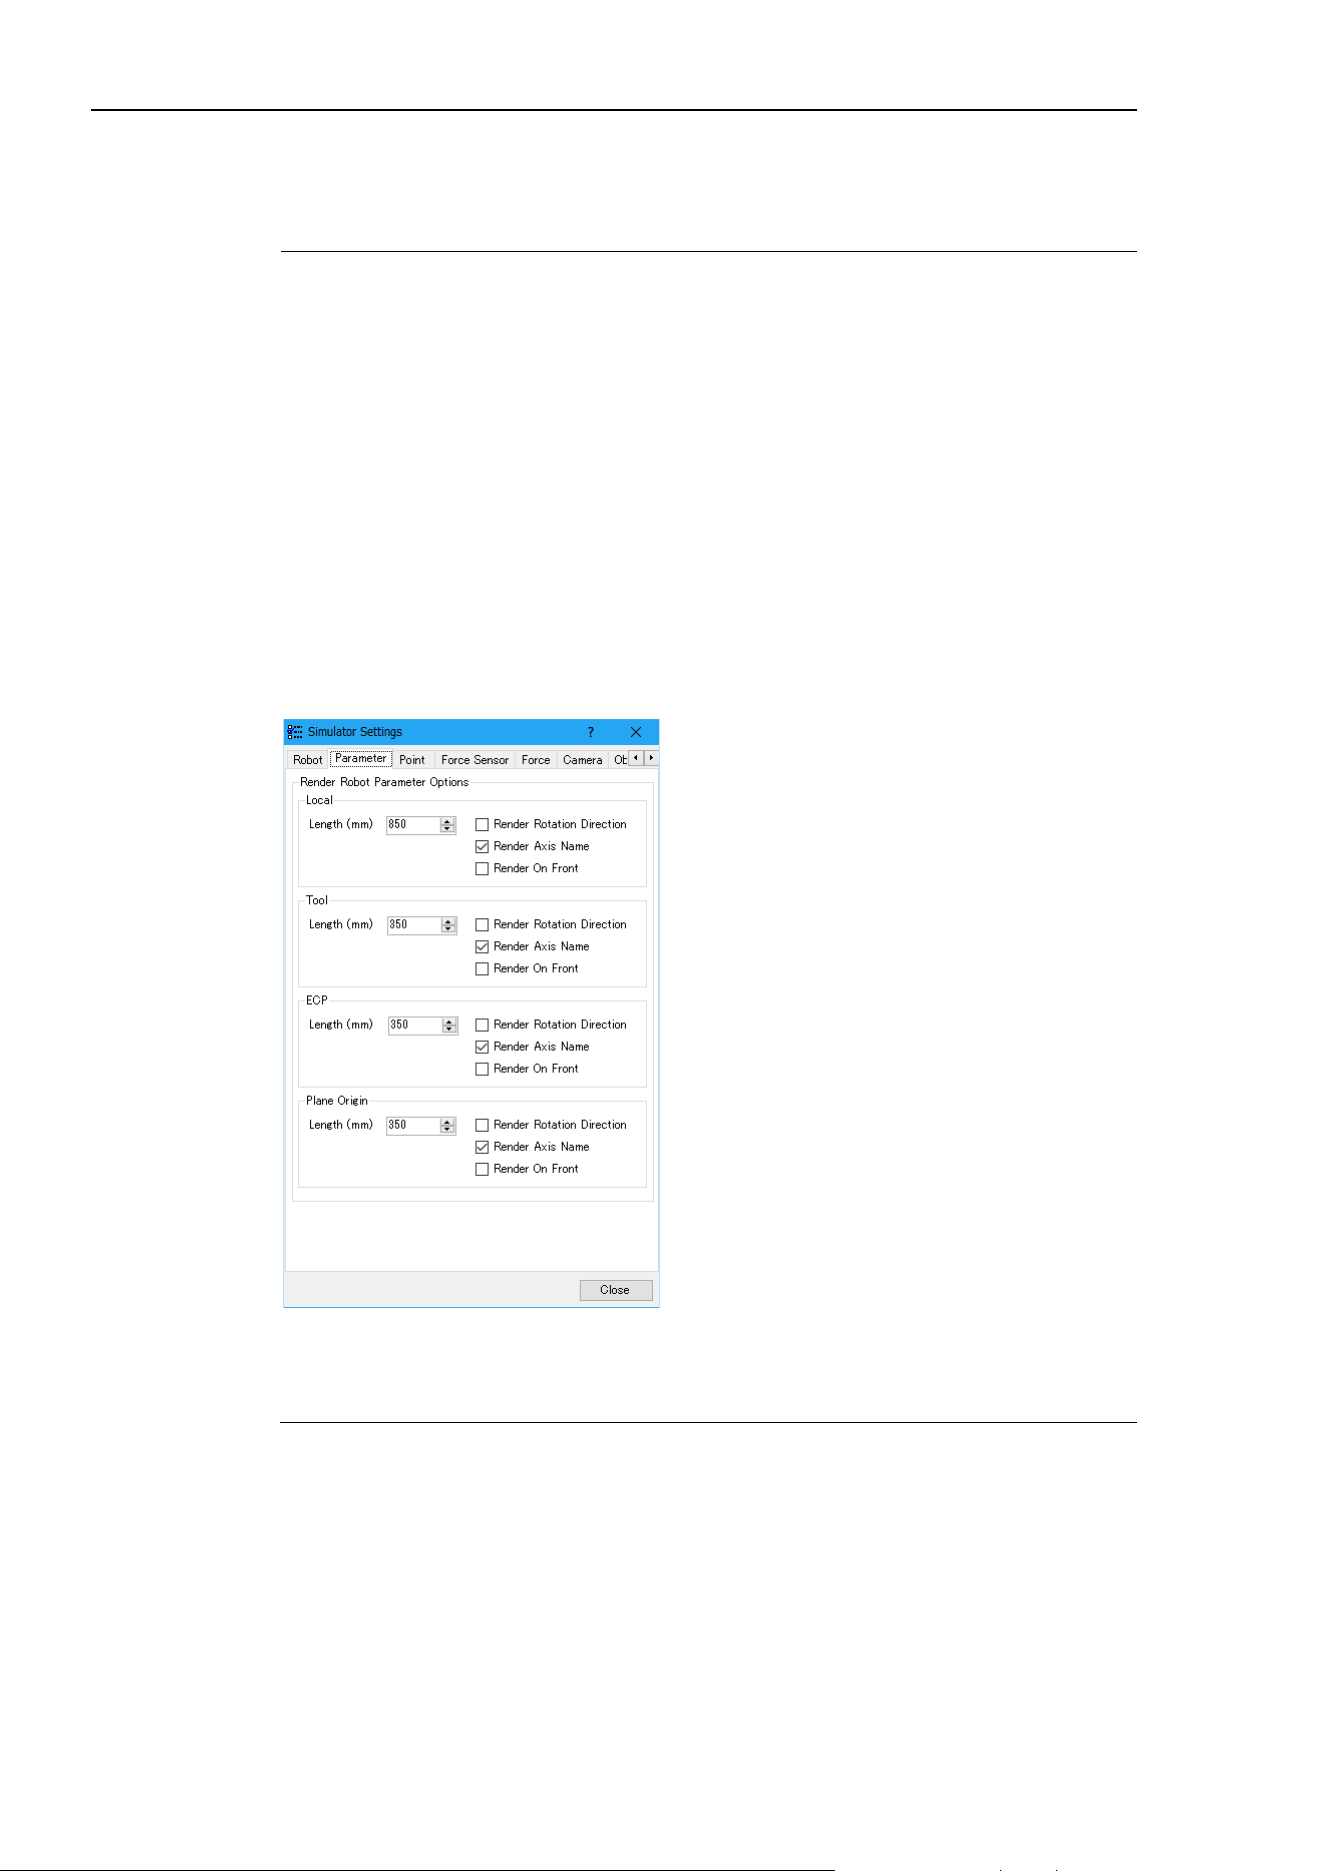
8. Simulator
310 EPSON RC+ 7.0 (Ver.7.4) User's Guide Rev.6
Render TCP Path Options
Function Description
Render
TCP Path
Displays the path of the origin point on active Tool
coordinate system for a fixed time.
R
ender Singularity
Avoiding path
Only displays the path of operation to avoid render
singularity
for the path of the origin point on active Tool
coordinate system
.
Style
Select line or dot to indicate the paths.
Width
Specify the line width of paths.
Radius
Specify the diameter of dots indicating paths.
Color
Specify the color of paths.
[Parameter]
Settings related to 3D display of robot parameters.
You can set the local coordinate system, tool coordinate system, ECP coordinate system,
and plane origin coordinate system.
Render Robot Parameter Options
Function Description
Length
Set a length of the coordinate axis.
Render Rotation Direction
Display the rotational direction of the coordinate axis.
Render Axis Name
Display the coordinate axis names (X, Y, Z, U, V, W).
R
ender On Front
Display the arrow of “Render Robot Parameter” in front of
the robot or the object.
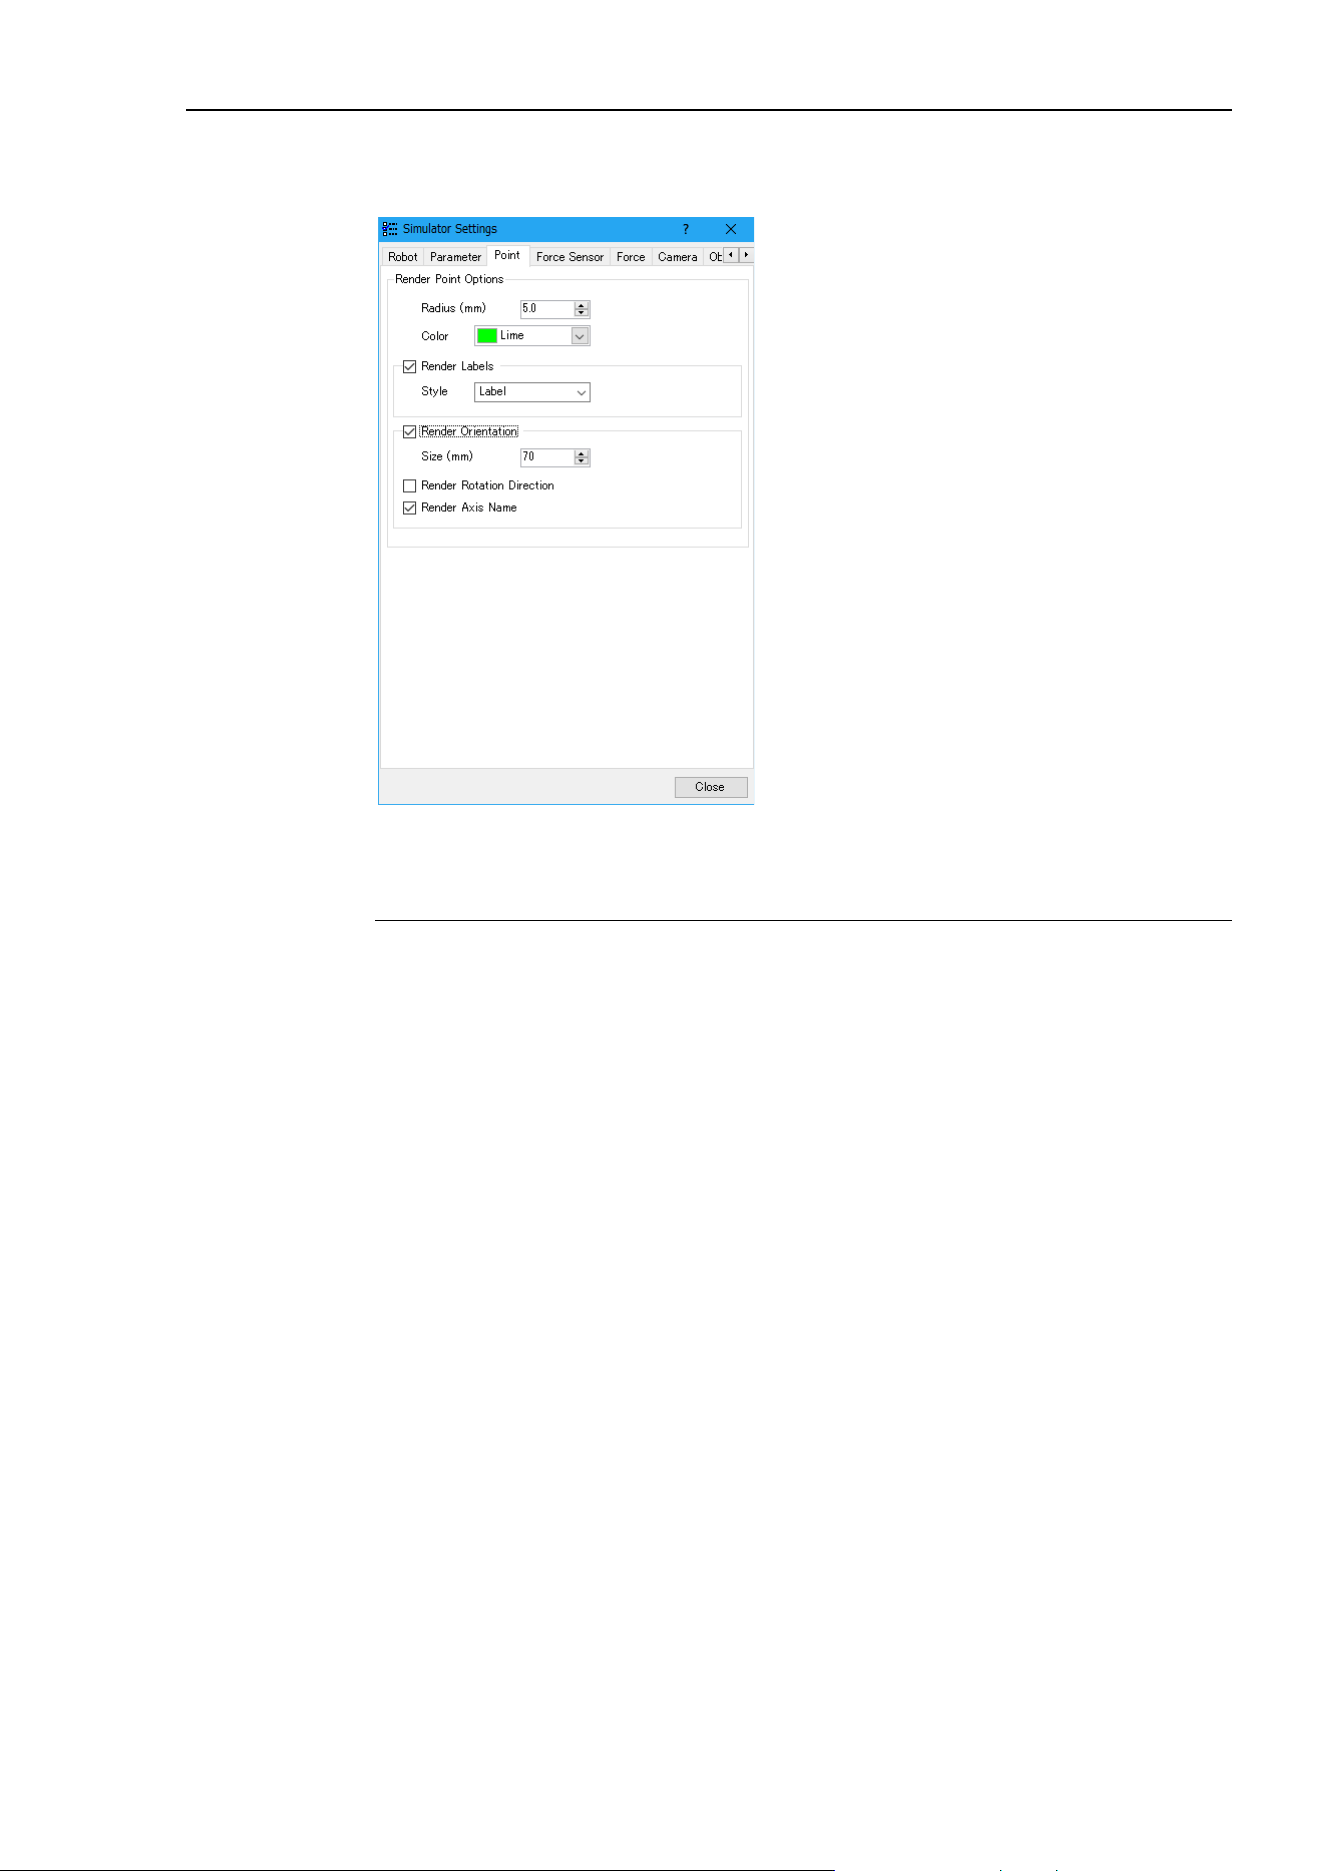
8. Simulator
EPSON RC+ 7.0 (Ver.7.4) User's Guide Rev.6 311
[Point]
Settings related to 3D display of the point data of the robot.
Render Point Options
Function Description
Radius
Specify the diameter of dots indicating points.
Color
Specify the color of dots indicating points.
Render Labels
Display a point label.
Style
Set a display style when rendering the point label.
Label
: Label registered in point file.
Number
: Point number
NumberAndLabel:
Point number and label
Render Orientation
Display an orientation at the point as a coordinate axis.
Size
Set a size of coordinate axis that shows the orientation at the
point.
Render Rotation Direction
Display the rotational direction on the coordinate axis that
shows the orientation at the point.
Render Axis Name
Display the coordinate axis name (X, Y, Z, U, V, W) of the
coordinate axis that shows the orientation at the point.
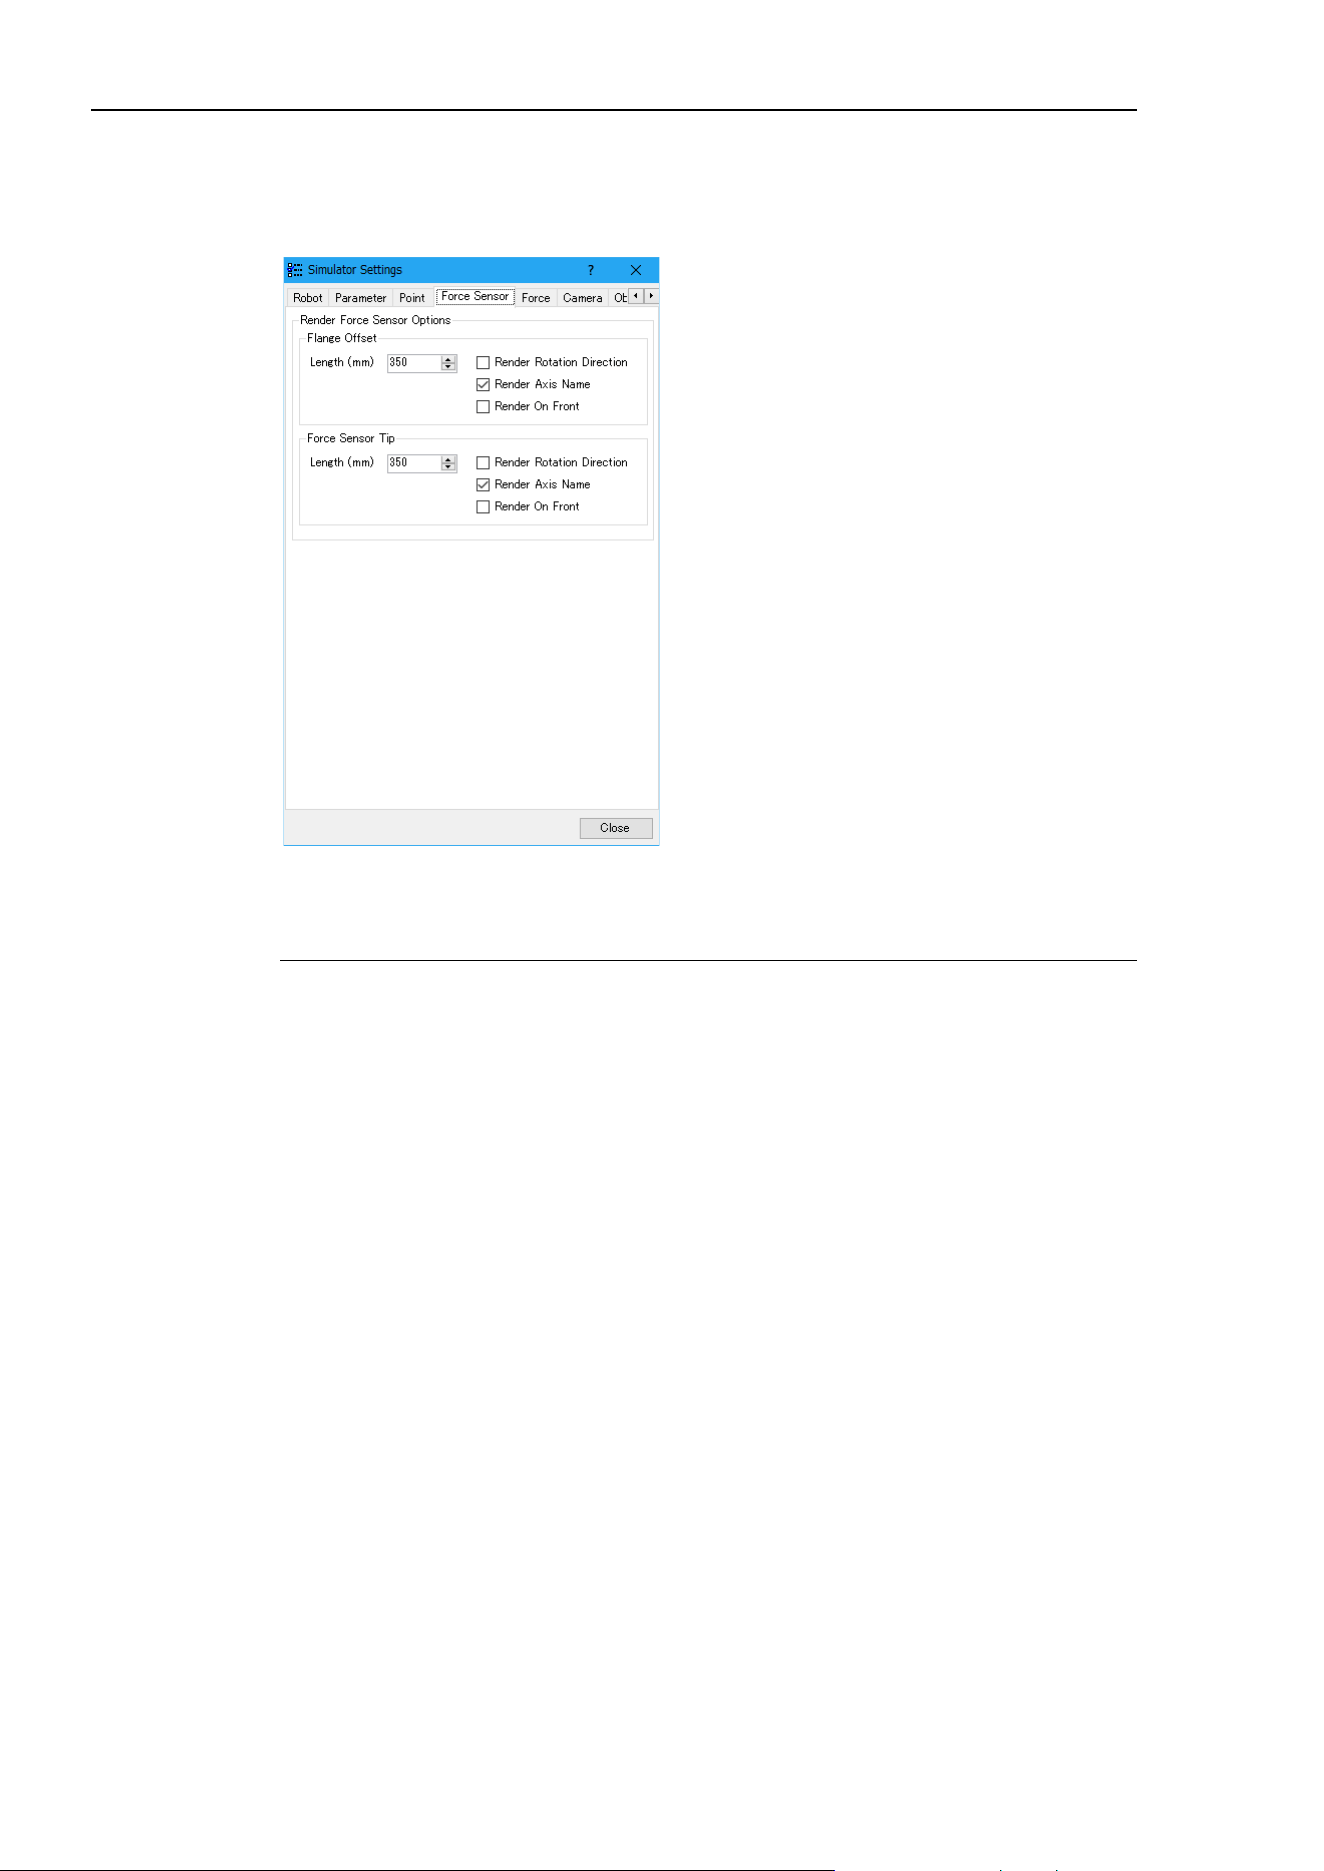
8. Simulator
312 EPSON RC+ 7.0 (Ver.7.4) User's Guide Rev.6
[Force Sensor]
Settings related to 3D display of the force sensor.
You can set the coordinate system that shows a flange offset and tip of the force sensor.
Render Force Sensor Options
Function Description
Length
Set a length of the coordinate system.
Render Rotation Direction
Display the rotational direction of the coordinate axis.
Render Axis Name
Display the coordinate axis names (X, Y, Z, U, V, W).
Render On Front
Display the arrow of “Render Force Sensor” in front of the
robot or the object.
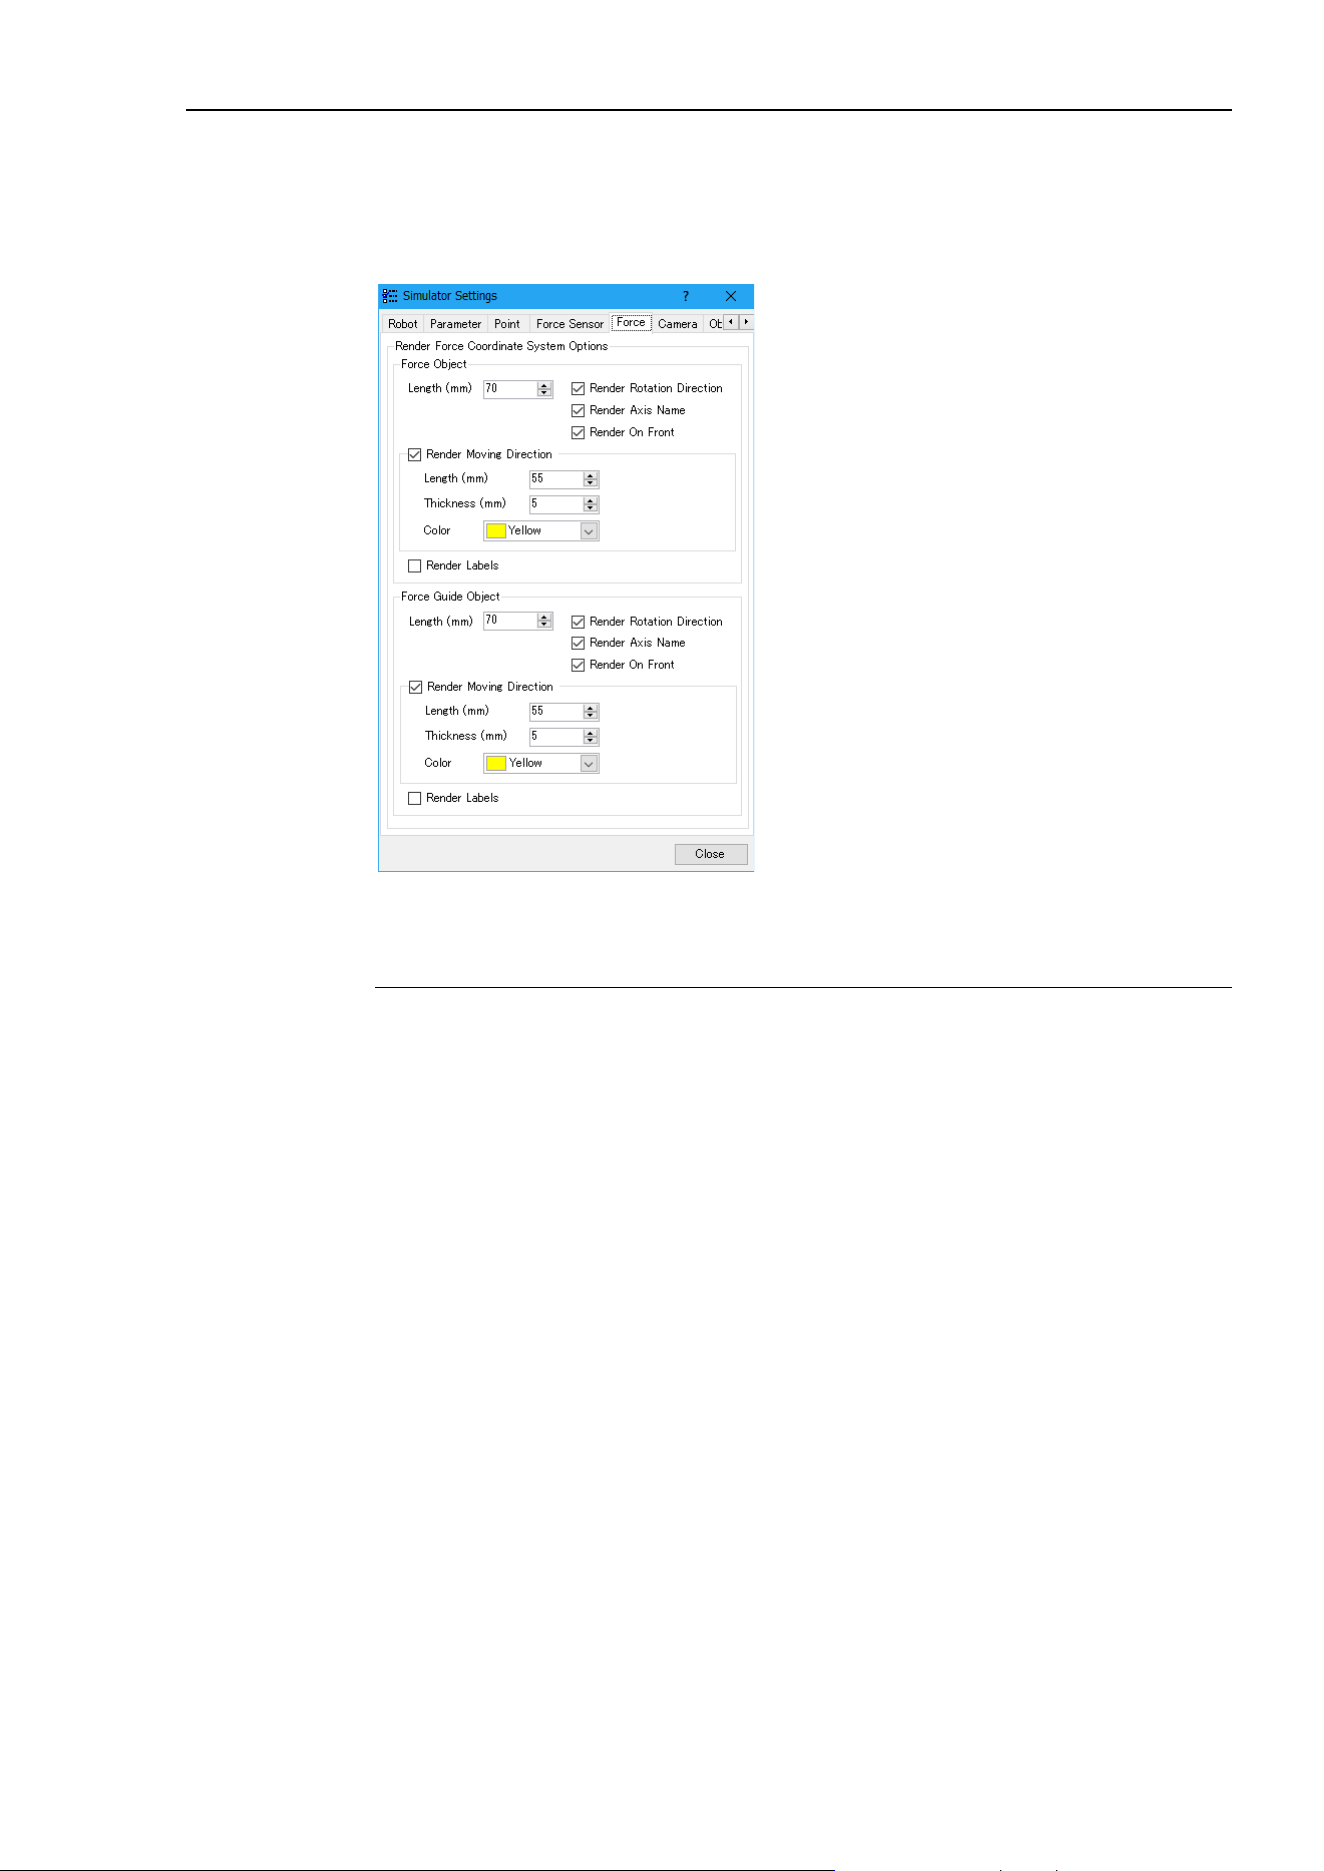
8. Simulator
EPSON RC+ 7.0 (Ver.7.4) User's Guide Rev.6 313
[Force]
Settings related to 3D display of the force control data.
You can set the force coordinate system and moving direction for force object or force
guide object.
Render Force Coordinate System Options
Function Description
Length
Set a length of the coordinate axis of the force coordinate
system.
Render Rotation Direction
Display the rotational direction of the coordinate axis.
Render Axis Name
Display the coordinate axis names (Fx, Fy, Fz, Tx, Ty, Tz).
Render On Front
Display the arrow of “Render Force Coordinate System” in
front of the robot
or the force sensor.
Render Moving Direction
Show the moving direction of the robot by the force control.
Length
Set a length of an arrow that shows the moving direction of
the robot.
Thickness
Set a thickness of an arrow that shows the moving direction
of the robot.
Color
Set a color of an arrow that shows the moving direction of
the robot.
Render Labels
Show a label of the force object and force guide object
name.
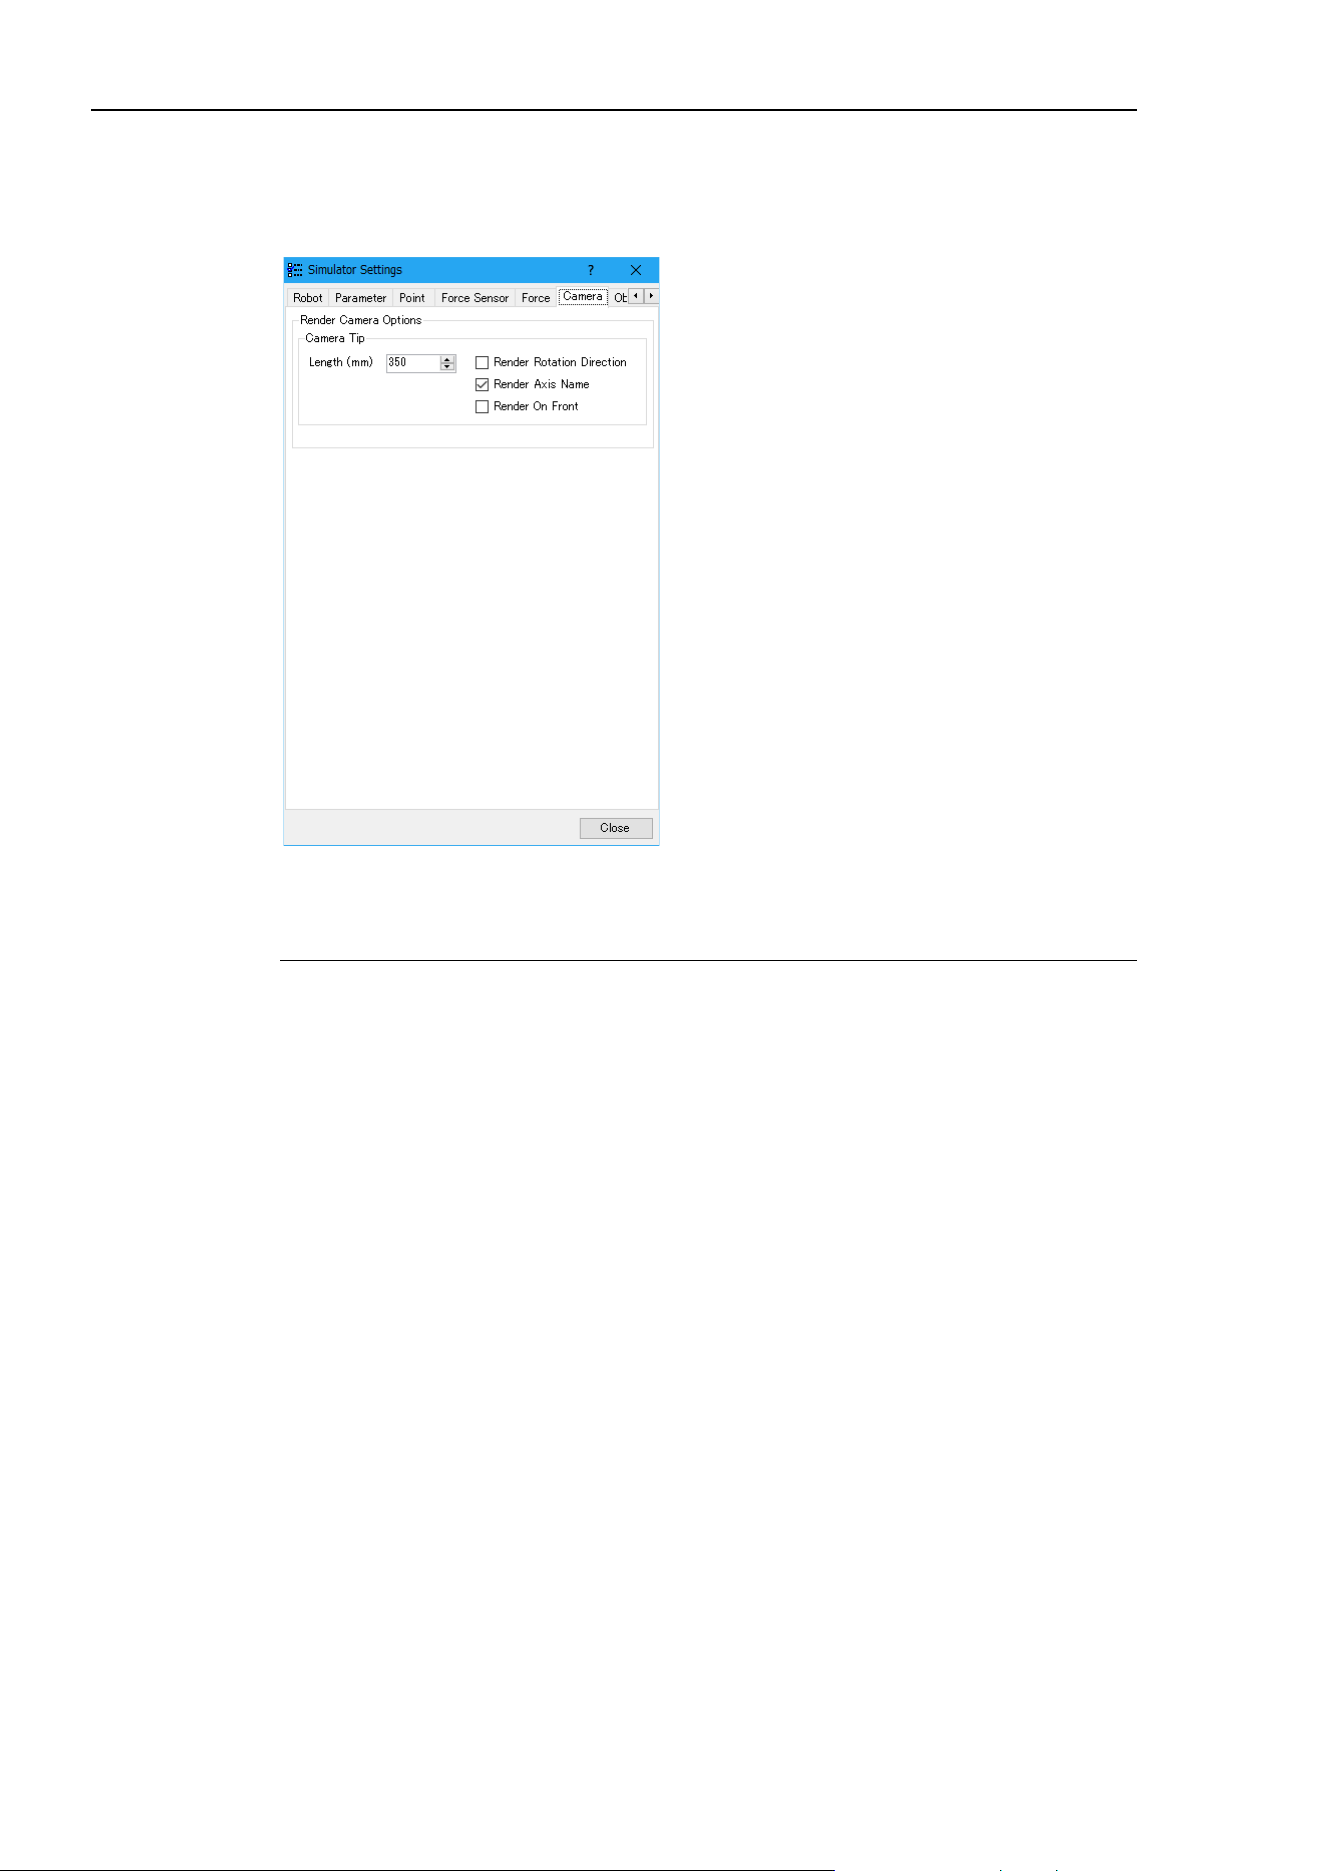
8. Simulator
314 EPSON RC+ 7.0 (Ver.7.4) User's Guide Rev.6
[Camera]
Settings related to 3D display of the the camera object.
You can set the display of the coordinate system that shows the camera tip.
Render Camera Options
Function Description
Length
Set a length of the coordinate axis.
Render Rotation Direction
Display the rotational direction of the coordinate axis.
Render Axis Name
Display the coordinate axis names (X, Y, Z, U, V, W).
Render On Front
Display the arrow of “Render Camera” in front of the
object.
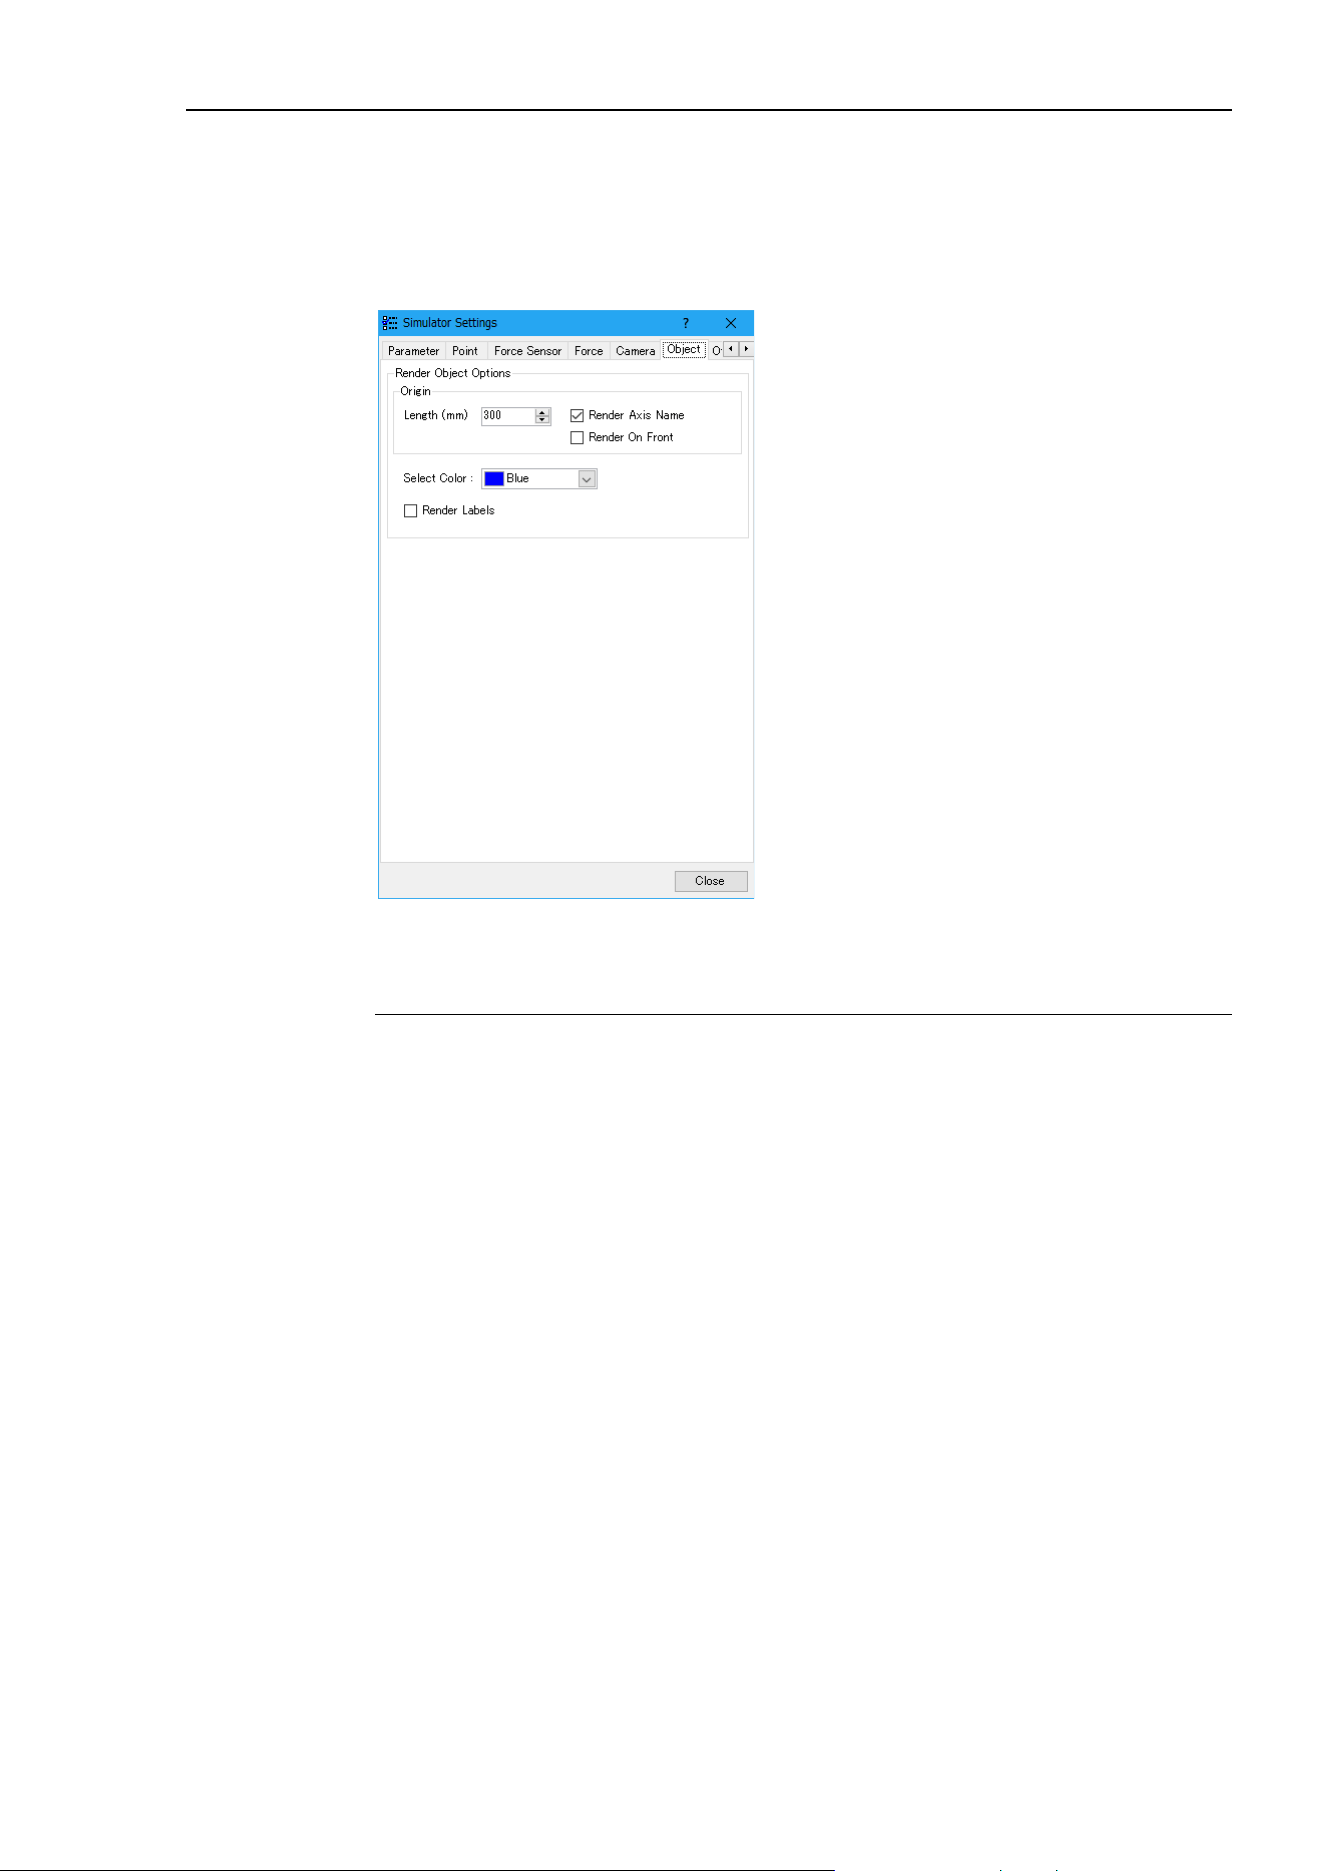
8. Simulator
EPSON RC+ 7.0 (Ver.7.4) User's Guide Rev.6 315
[Object]
Settings related to 3D display of the general objects including robot, CAD object, and
simple object.
You can set the display of coordinate system which shows an origin of the object and a
selection color when the robot and CAD object move or rotate.
Render Object Options
Function Description
Length
Set a length of the coordinate axis which shows an origin of
the object.
Render Axis Name
Display a coordinate axis name. Display the coordinate axis
names
(X, Y, Z).
Render On Front
Display the arrow of “Render Object” in front of the object.
Select Color
Set a color when the robot and CAD object move, rotate, or
jog.
Render Labels
Display names of robot and layout object.
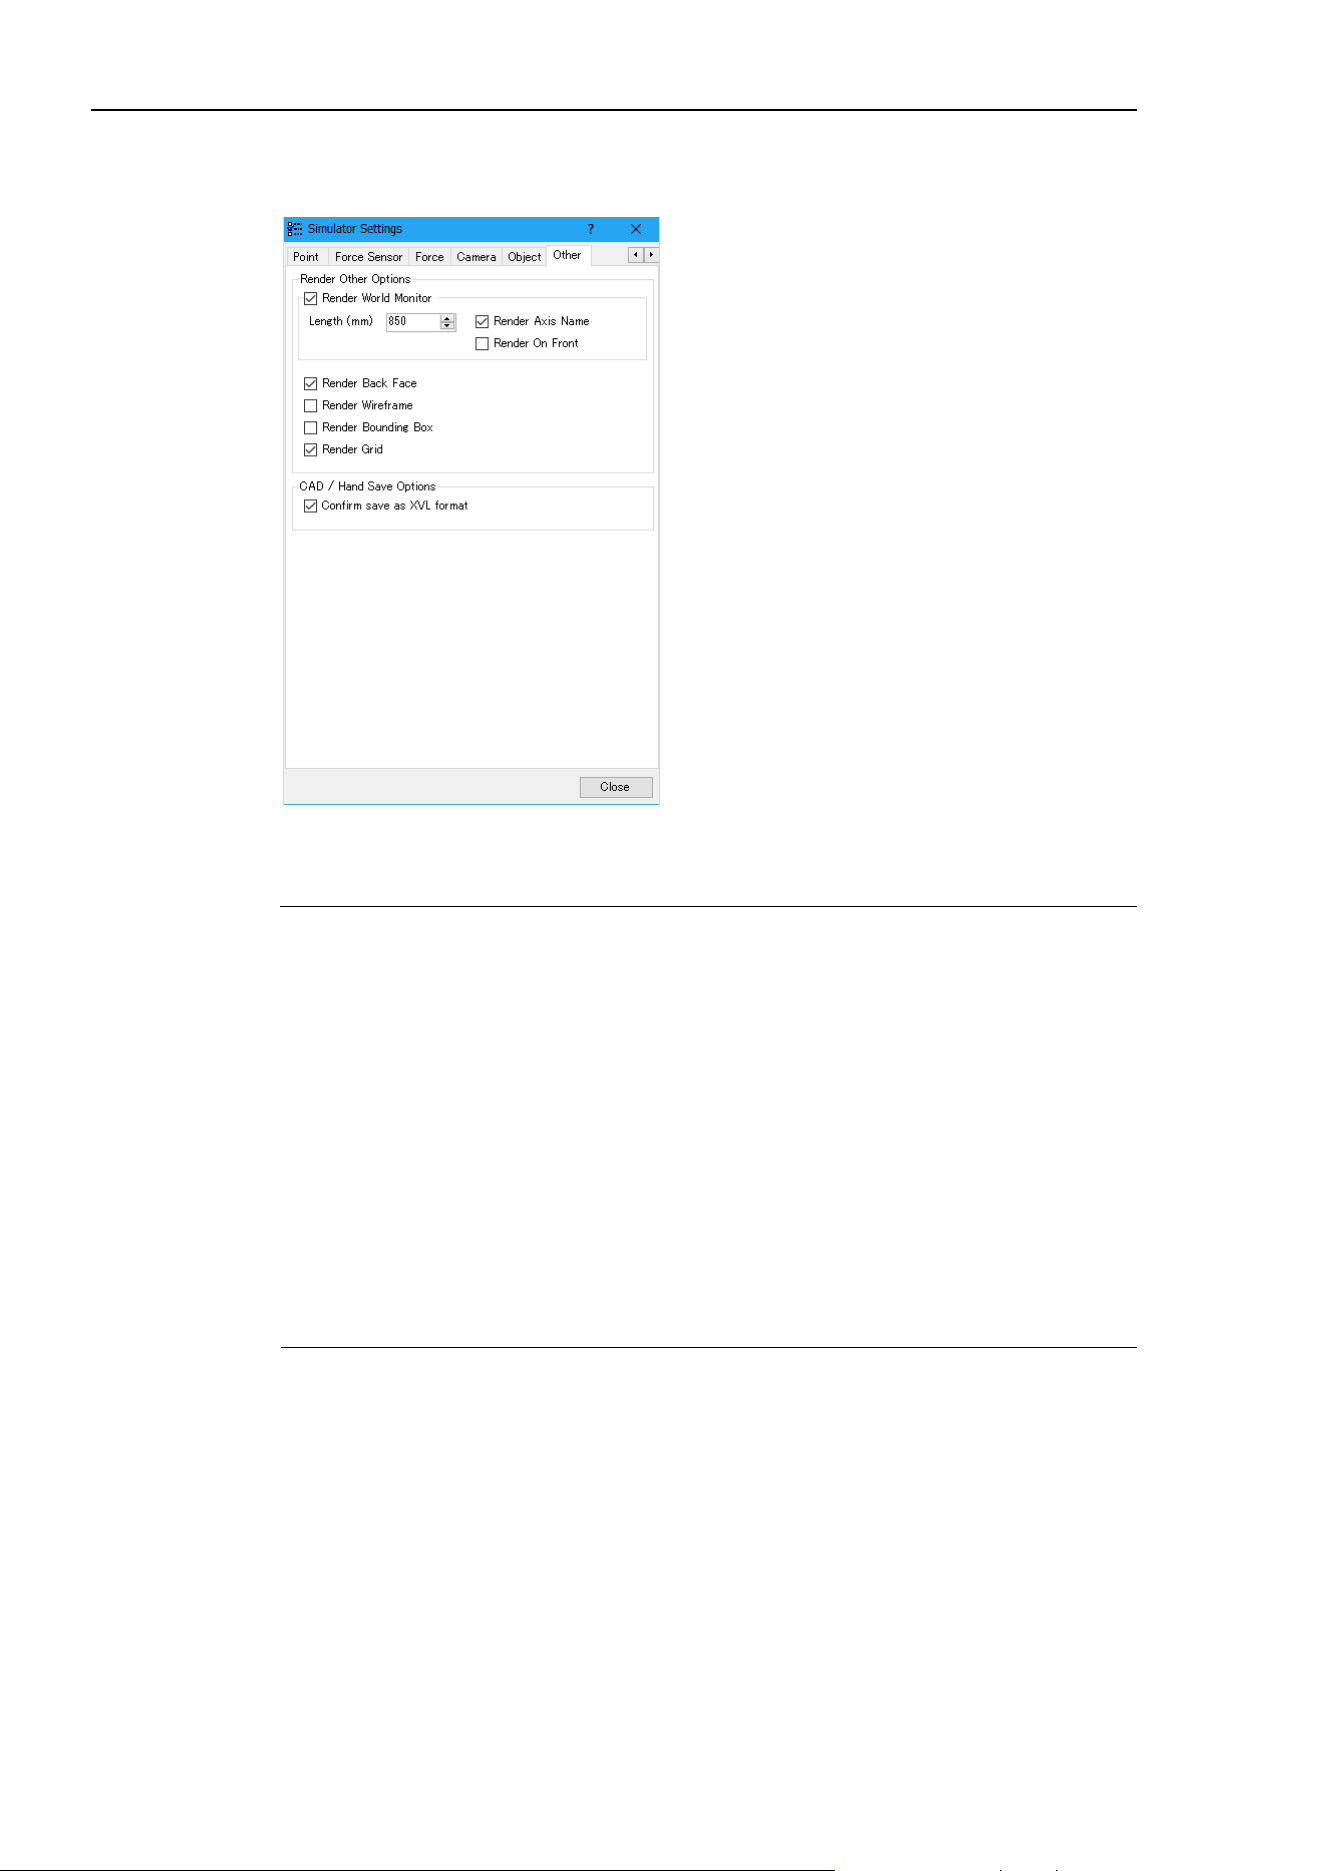
8. Simulator
316 EPSON RC+ 7.0 (Ver.7.4) User's Guide Rev.6
[Other]
Other settings related to 3D display.
Render Other Options
Function Description
Render World Monitor
Displays the World coordinates.
Length
Set a length of the coordinate axis which shows a world
coordinate.
Render Axis Name
Displays the name of coordinates (X, Y, Z).
Render On Front
Display the arrow of “Render Other” in front of the object.
Render Back Face
Displays the surface of polygons.
Render Wireframe
Changes to the wire frame model (3D image only using
lines and
dots)
Render Bounding Box
Displays the robot and layout objects with a bounding box.
Render Grid
Displays the grids on the simulator.
CAD/Hand Save Options
Function Description
Confirm save as XVL
Displays the [Save CAD/Hand] dialog box if there is CAD
data or Hand object in other than XVL format when starting
the
simulator.
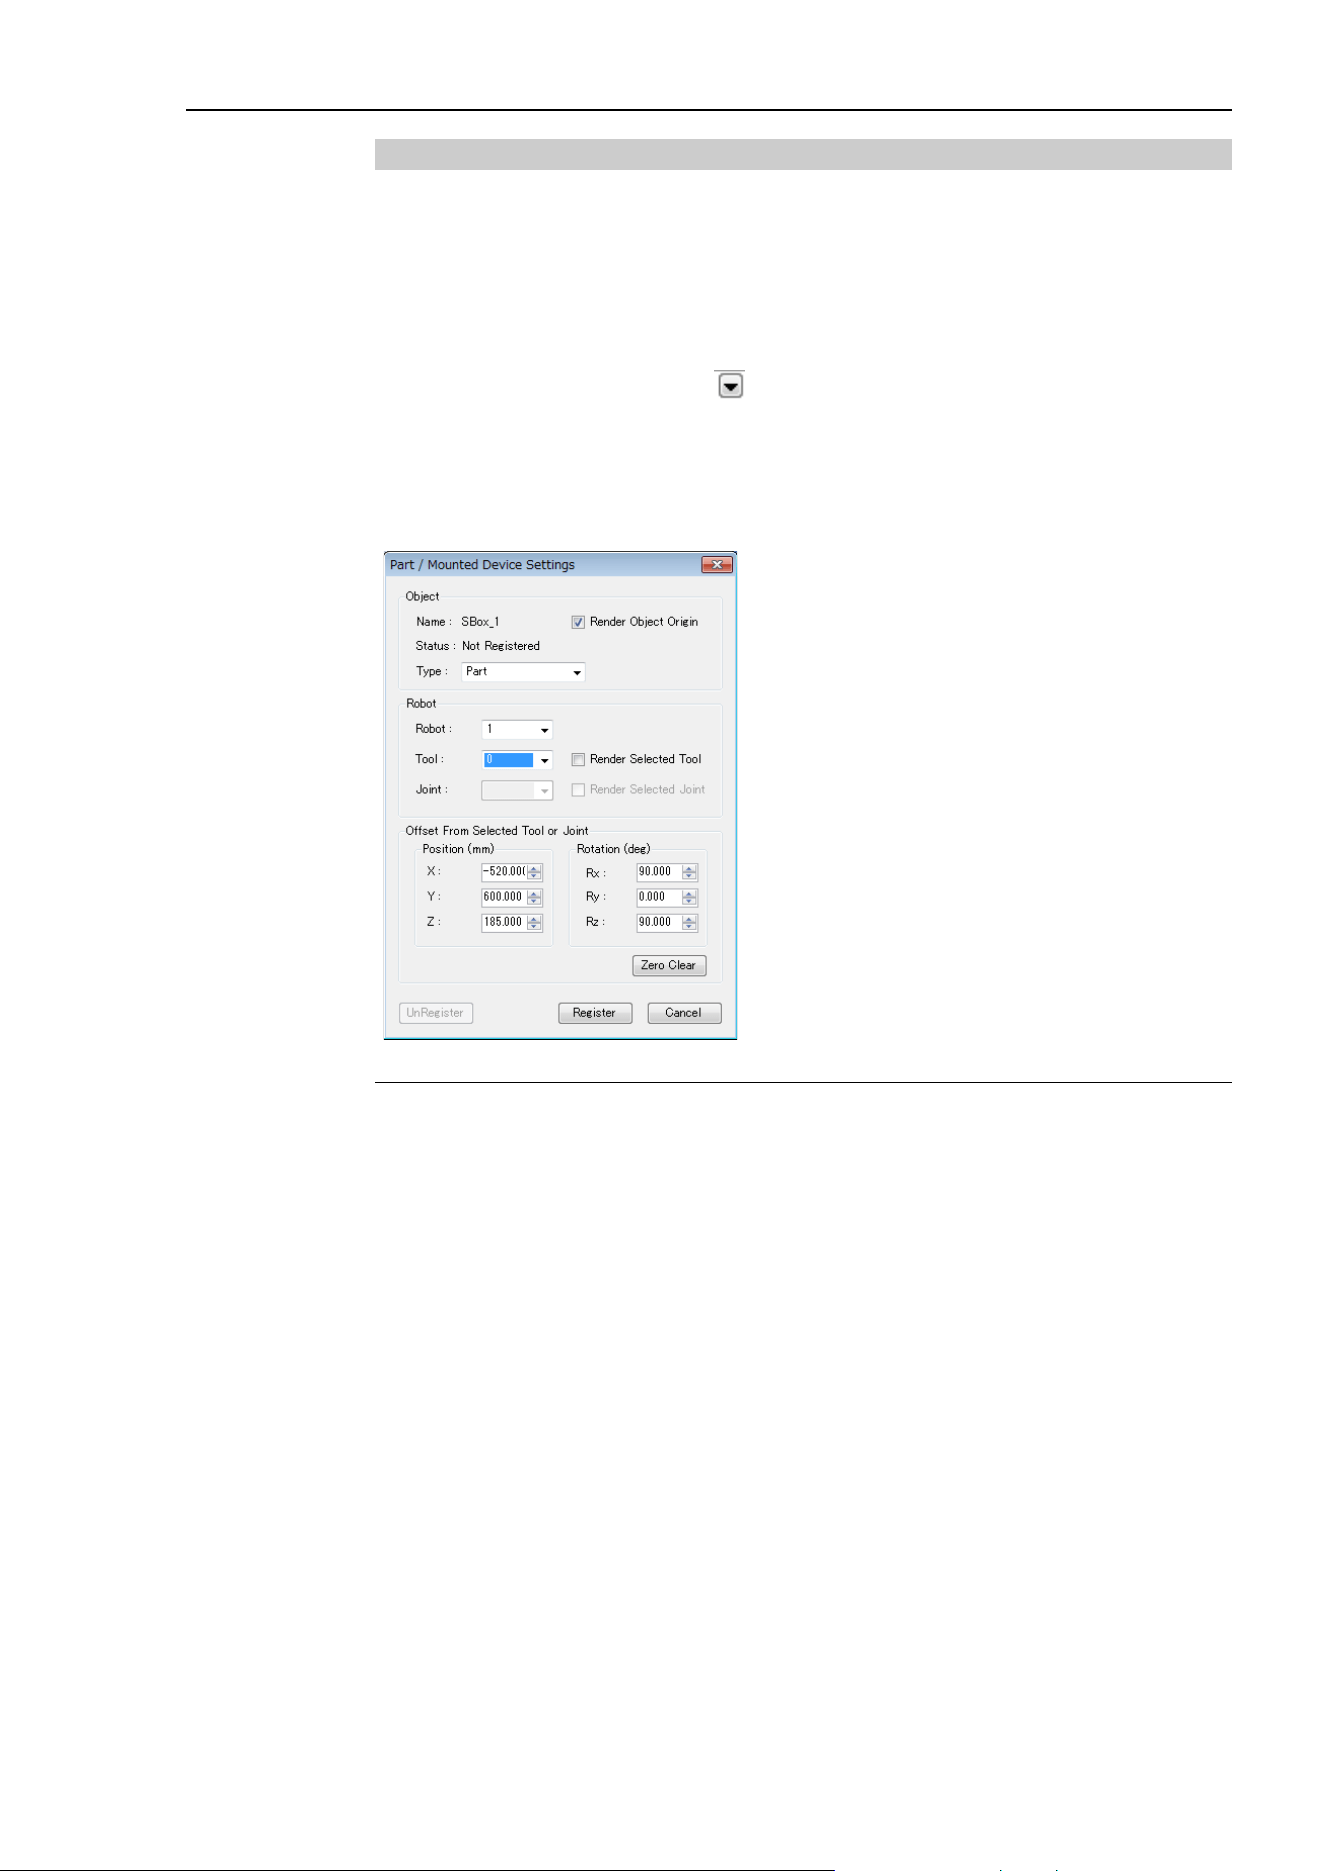
8. Simulator
EPSON RC+ 7.0 (Ver.7.4) User's Guide Rev.6 317
8.3.3 Part/Mounted Device Settings
You can move the layout objects along with the robot like part such as workpieces grasped
by the robot or devices mounted on the robot arm.
Set the layout objects for part/mounted device settings in the [Part/Mounted Device
Settings] dialog. In the dialog, there are two methods to display
1. Right-click the target object.
Select [Part/Mounted Device Settings] from the displayed context menu.
2. Click the <Downward arrow
> button displayed on [Type] of the property grid.
There are two methods to reset the Part/Mounted Device Settings and return the [Type] to
“Layout”.
1. Click the <UnResister> button on the [Part/Mounted Device Settings] dialog.
2. Select the “Layout” on the [Type] property of property grid.
Function Description
Type
S
elect from the following.
Layo
ut : Layout objects (Default)
Part
: Part objects
Mounted Device
: Mounted device
Render Object Origin
Display the object origin.
Robot
Set a robot that relates to the selected object.
Tool
When the
[Type] is “Part”, set the tool coordinate system to
place an object.
Render Selected Tool
Display the tool coordinate
system.
Joint
When t
he [Type] is “Mounted Device”, set joint number to
place an object.
Render Selected Joint
Display joints.
Offset From Selected
Tool
or Joint
Set a relative position from the selected tool or joint.
Zero Clear
Set the offset value to
“0.000”.

8. Simulator
318 EPSON RC+ 7.0 (Ver.7.4) User's Guide Rev.6
Function Description
Register
Register an object to the selected type.
UnRegister
Return the registered [Type] of the object
to “Layout”.
Cancel
Cancel the settings.
8.3.4 Collision detection
In the simulation, collisions can be detected between the robots including its hand and the
layout objects. (X5 series cannot use this function.)
Here we describe the settings and details of collision detection.
Basic settings for collision detection
In the [Property Grid] of the robot, the following can be configured.
Property Value
Check Collision
Enables / disables the collision detection for layout objects.
Enable:
True (default)
Disable:
False
Collision
between the robot base and layout objects is not detected
e
ven when this property is set “True”.
Check Self Collision
Enables / disables the collision detection for a robot itself.
Enable:
True (default)
Disable:
False
Target of collision detection
In the Property Grid of the layout objects, the following can be configured.
Collision
Property Object Value
Check
CAD
Enables / disables the collision detection for a robot.
Enable: True (default)
Disable: False
Collision with the robot flange is not detected even
when this property is set “True”.
Show result
CAD
Specify how to display the color configured in Color
property when a collision is detected.
Entirely : Whole (default)
Collision point : Point
Entire object and collision point : WholeAndPoint
Color
CAD
Specify a color to be used when collision is detected.
Default: 168,0,0
Collision Point
Property Object Value
Radius(mm)
CAD
Specify the radius of collision point displayed when
collision is detected.
Color
CAD
Specify the color to be used when collision of the arms
is detected.
Default: 168,0,0
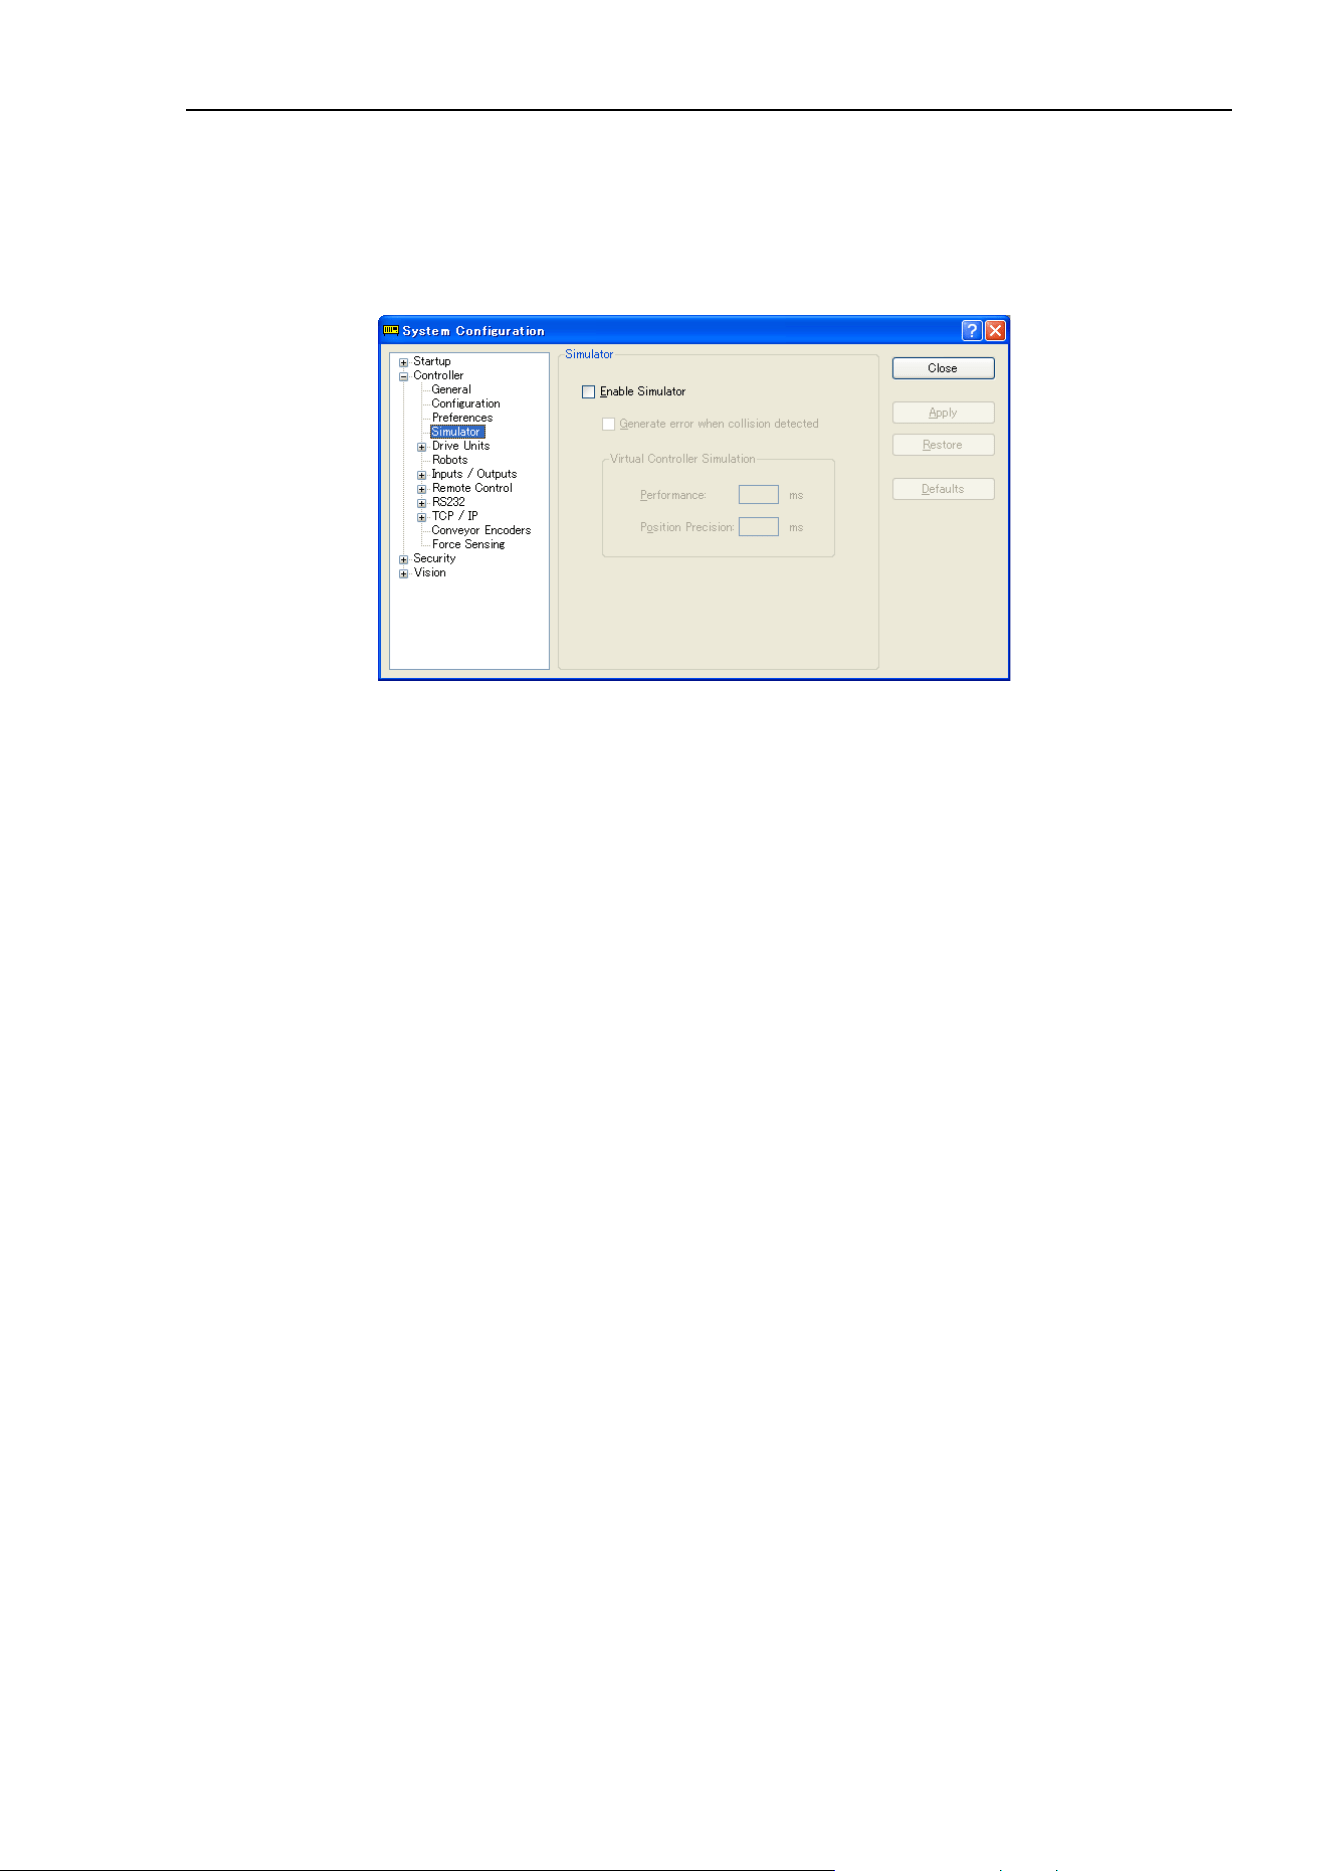
8. Simulator
EPSON RC+ 7.0 (Ver.7.4) User's Guide Rev.6 319
Generate error when collision is detected
When you open the [Setup]-[System Configuration]-[Controller]-[Simulator] and check
the [Generate error when collision detected] checkbox, if a collision is detected during
SPEL
+
program execution, an error occurs in the controller and the program stops.
After checking the check box, click <Apply> and then click <Close>.
The purpose of this function is to find where the program has a problem and not to prevent
the collision of robots.
It cannot guarantee that it has enough time for robots to stop when the simulator detects
the collision.
Caution about the collision detection of Floor / Wall
A collision is detected when a floor or wall is in contact with the robot. If the robot or
plane positions are changed so that the robot passes completely through the plane, then no
collision is detected.
Accuracy of collision detection
The collision detection in the simulator cannot guarantee accuracy. Make sure to have a
margin when you apply the simulation result for a real robot system.
Caution about the CAD data
Collision cannot be detected when the CAD data has only the wire frame models. To use
the collision detection function, add surface to the CAD data.
The restrictions of the simulator are described in 8.4 Simulator Specifications and
Restrictions.
NOTE
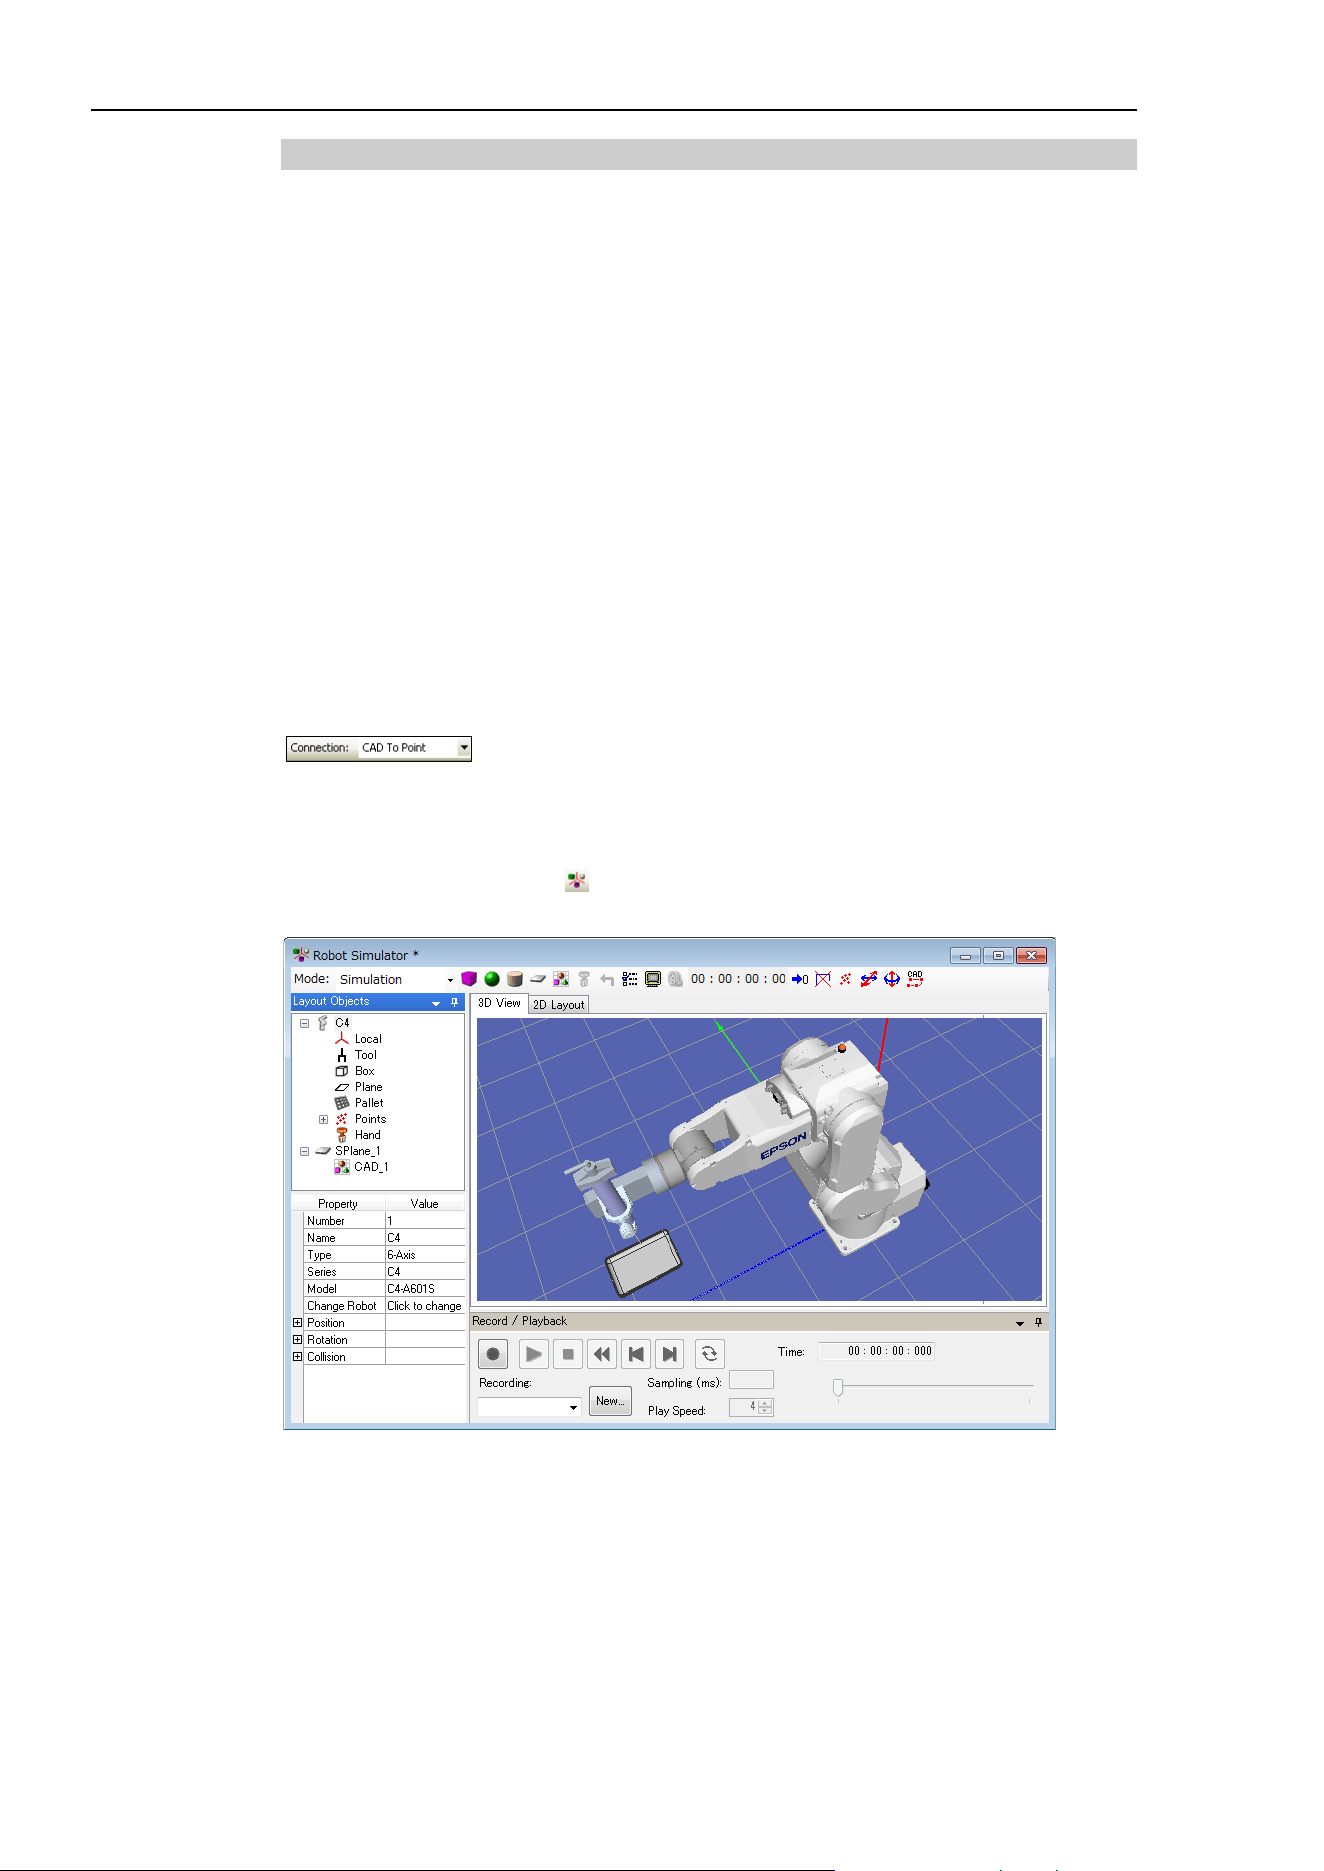
8. Simulator
320 EPSON RC+ 7.0 (Ver.7.4) User's Guide Rev.6
8.3.5 CAD To Point
CAD To Point outputs the edge (edge line) information included in the CAD data as a
point data. This function enables the user to generate a point data according to the path by
sequentially selecting the edges of the CAD data shown in the 3D display. Since this
function automatically register points of manipulator motion based on the CAD data of the
work piece, it can save time to develop a program.
Follow the simple CAD data sample below to use CAD To Point.
In this example, a motion in which the tip of a syringe traces a periphery of the CAD
object (tray) will be created.
1. Connect to the virtual controller (CAD To Point)
2. Open a project file
3. Select edges of the CAD object to generate a motion path
4. Export the edges as point data
5. Create a program
6. Execute the program and operate the manipulator
1. Connect to the virtual controller (CAD To Point)
Select “CAD To Point” from the EPSON RC+ 7.0 tool bar-<Current controller
connection> list box. When the connection is completed, “CAD To Point” will be
displayed in <Current controller connection> list box.
Click the tool bar-<Simulator > to display the [Robot Simulator] window. The CAD
object “Work” and the Hand are placed in “CAD To Point”.
2. Open a project file
(1) Click the EPSON RC+ 7.0 menu-[Project]-[Open…].
(2) Select [Projects]-[SimulatorDemos]-[CAD_To_Point].
(3) Click the <Open> button.
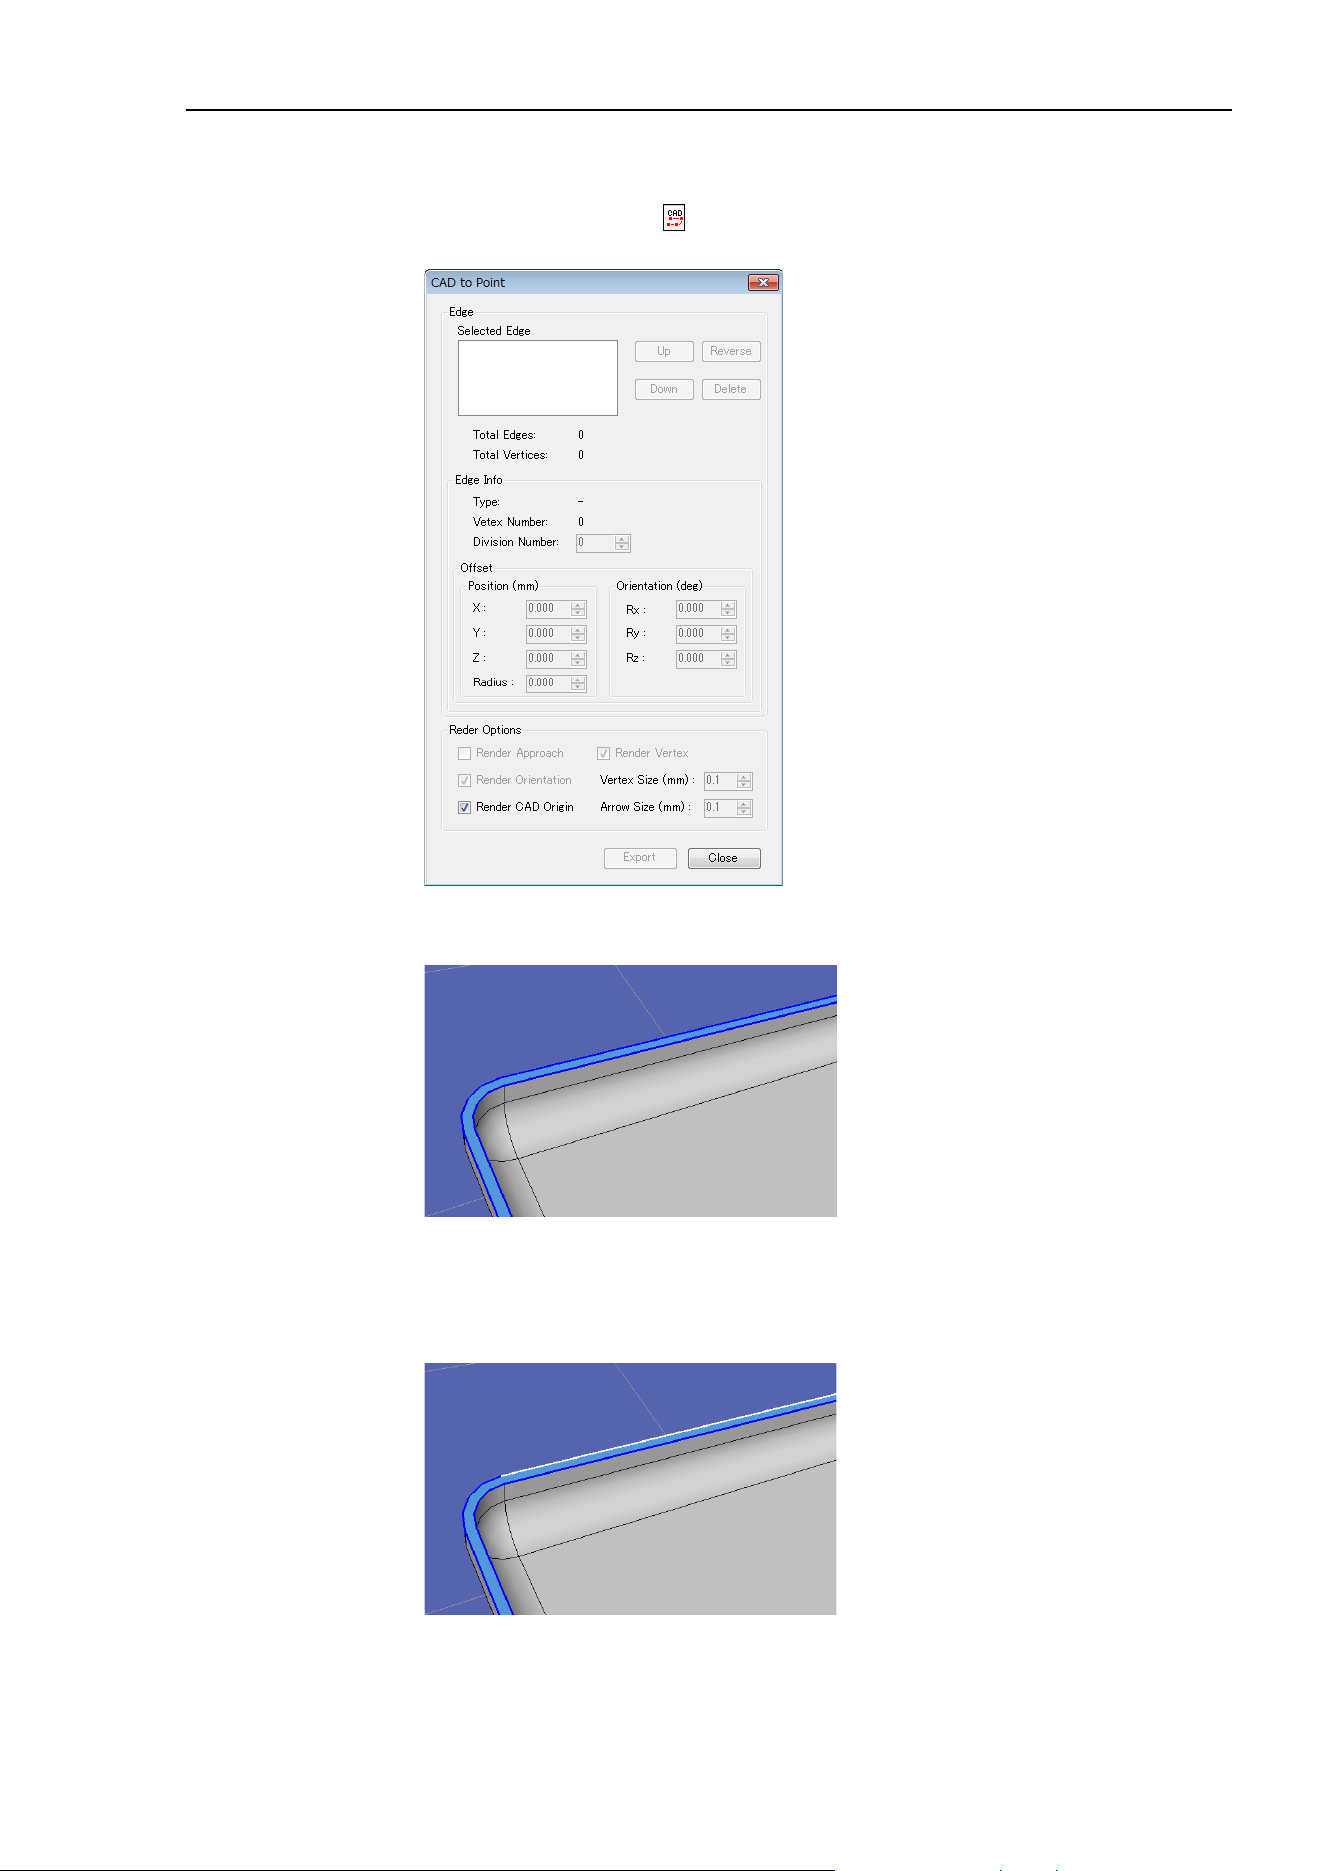
8. Simulator
EPSON RC+ 7.0 (Ver.7.4) User's Guide Rev.6 321
3. Select edges of the CAD object to generate the motion path
(1) Click the <CAD to Point > button on the toolbar to display the [CAD to Point]
dialog box.
(2) Hover the mouse over the CAD object and select a part having the edges. The
selected part turns to be light blue and the edges are shown in blue.
(3) Hover the mouse over a desired blue edge.
The selected edge turns to be white. Select the line first. This sample program will
not operate properly when selecting the curve first since this is designed to select the
line first.
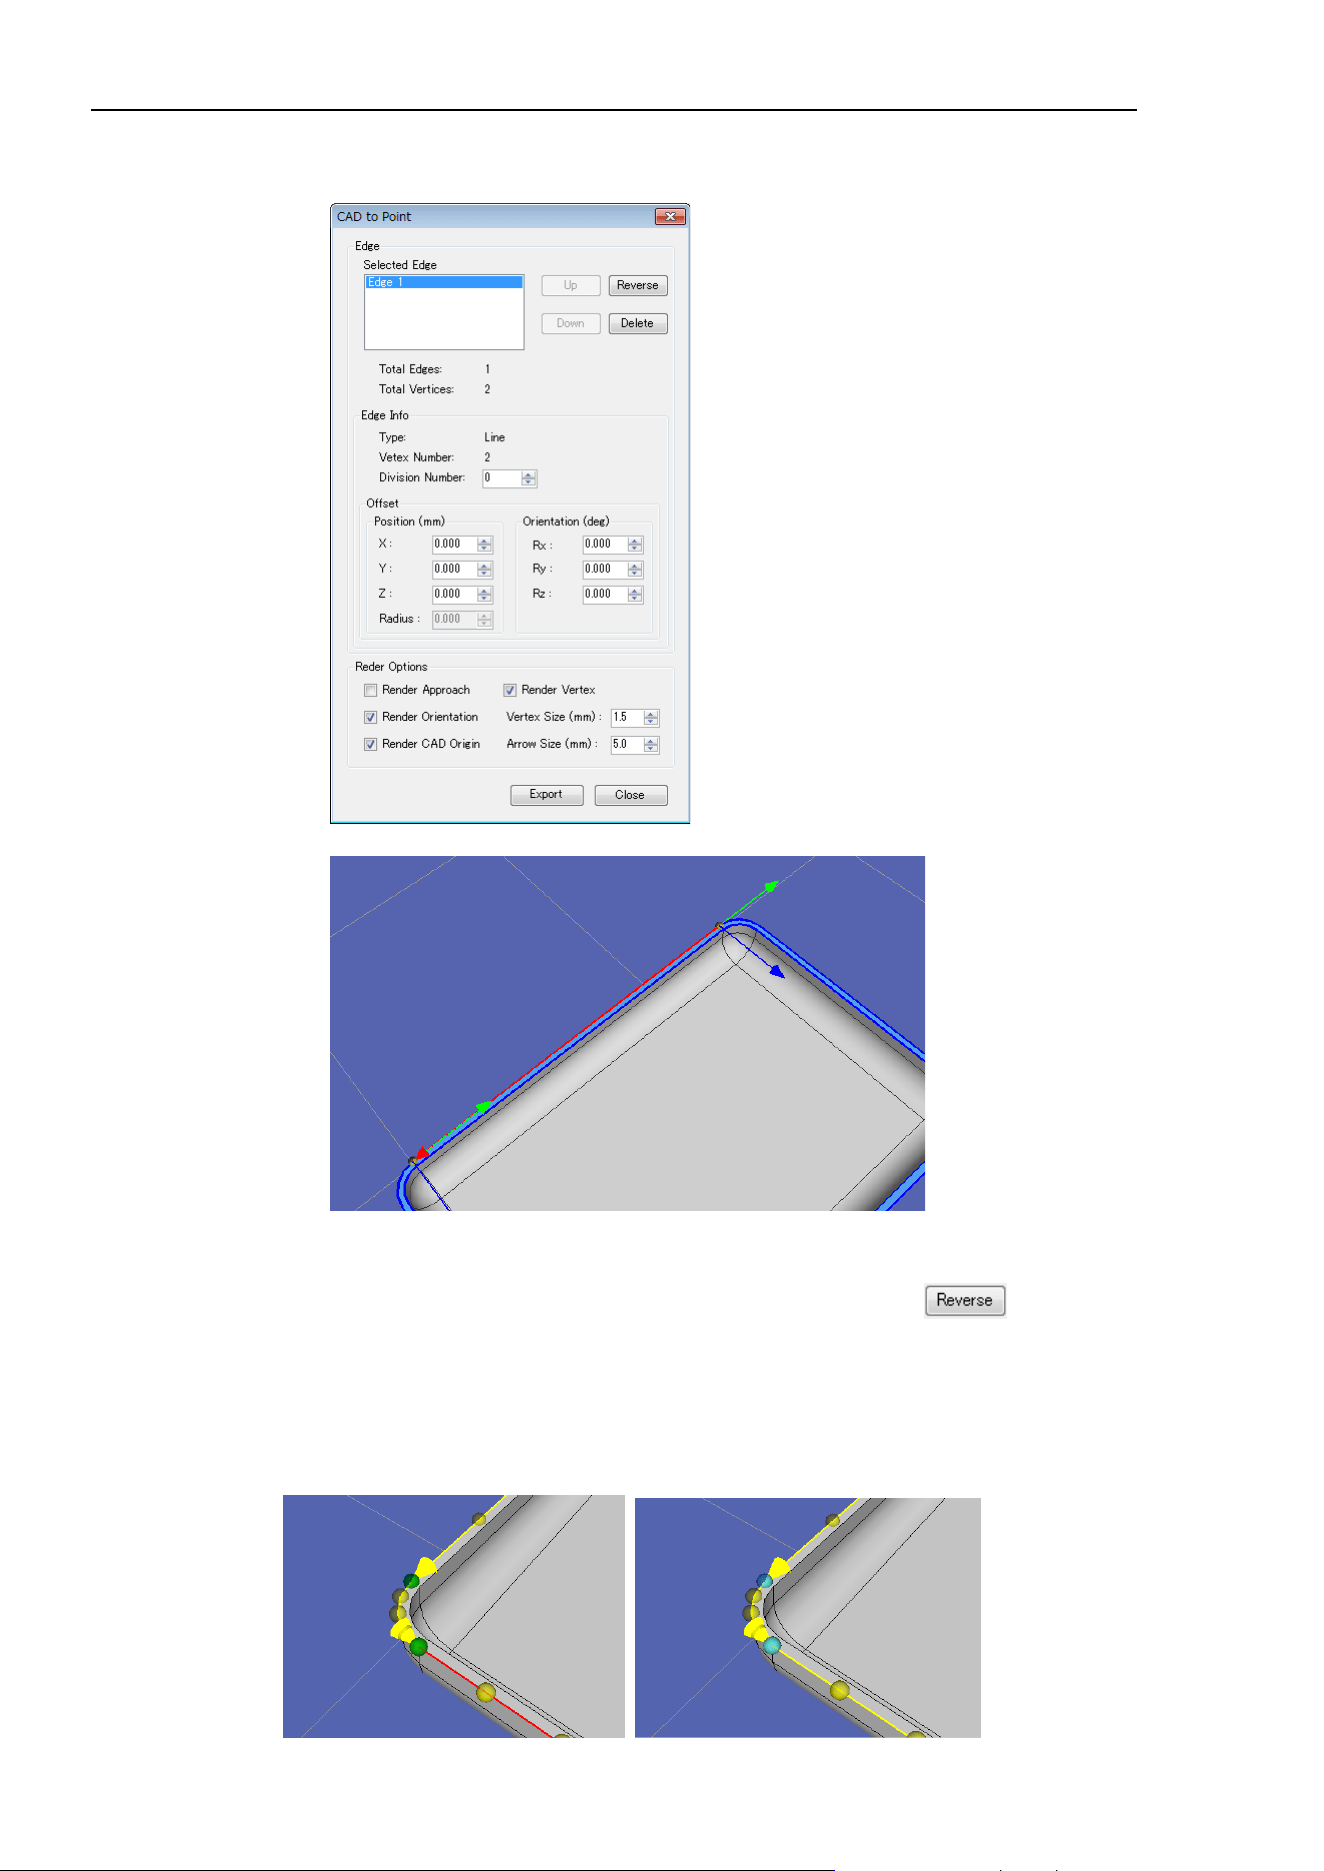
8. Simulator
322 EPSON RC+ 7.0 (Ver.7.4) User's Guide Rev.6
(4) Click the white edge. The selected edge will be shown in the [Selected Edge] box of
the [CAD to Point] dialog box.
In the 3D View, the selected edge is indicated with a red arrow.
The arrow indicates the direction from the starting point to the end point.
The direction of the arrow can be reversed by clicking the <Reverse > button.
If a start and end points of the consecutive edge with the same moving direction are piled
up, the vertex color changes. When the both position (X,Y,Z) and orientation (U,V,W)
match, the vertex is displayed in green. When only the position (X,Y,Z) matches, the
vertex is displayed in light blue
TIP
TIP
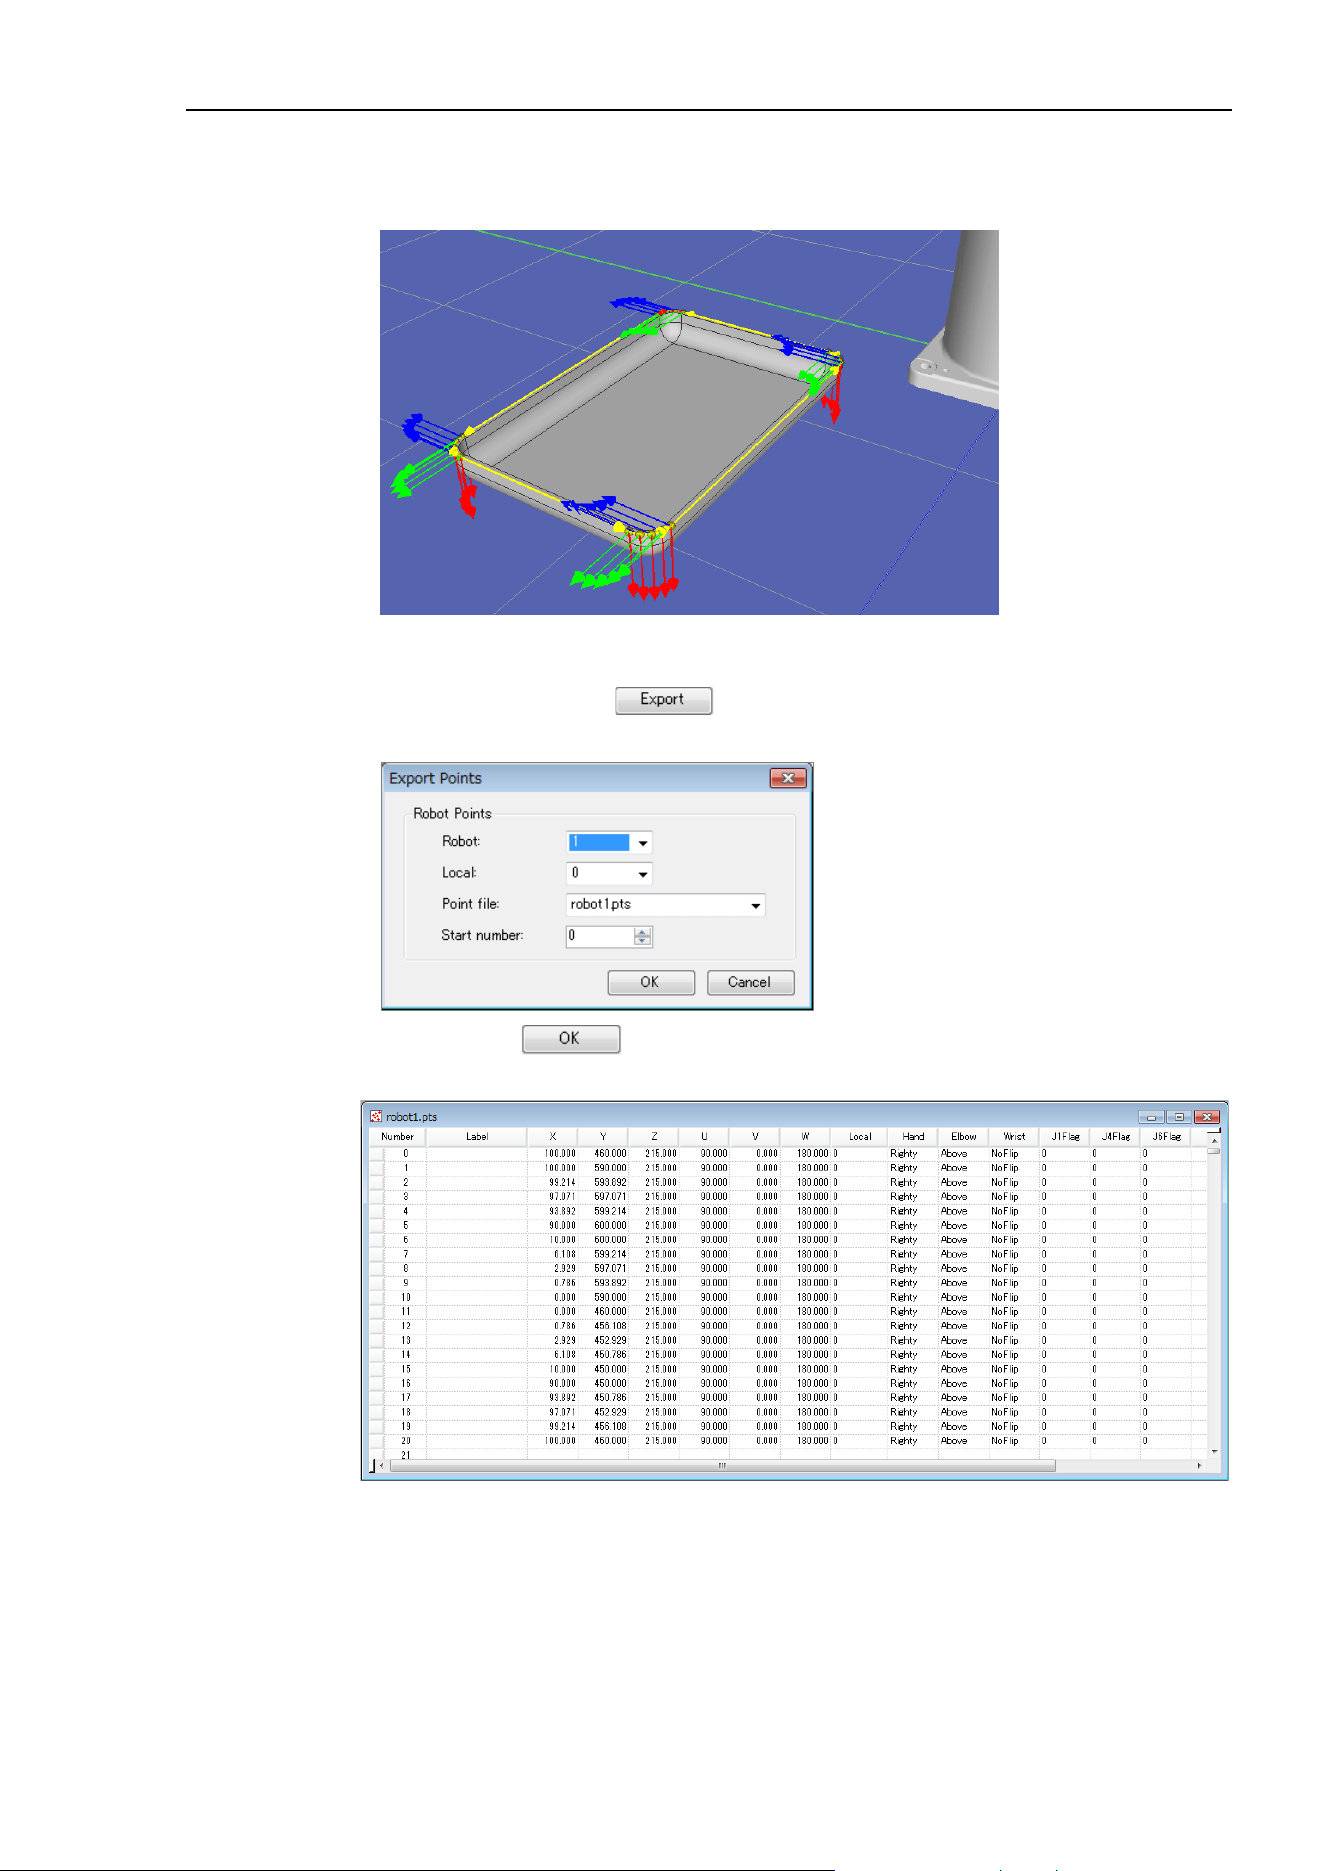
8. Simulator
EPSON RC+ 7.0 (Ver.7.4) User's Guide Rev.6 323
The image will be shown as below after you select the edges one by one in
counterclockwise to trace the periphery.
4. Export the edges as point data
Click the <Export Points > button of the [CAD to Point] dialog box to display
the [Export Points] dialog box.
Click the <OK > button to output the point data to the rows No.0-20 in the point
file named “robot1.pts”.
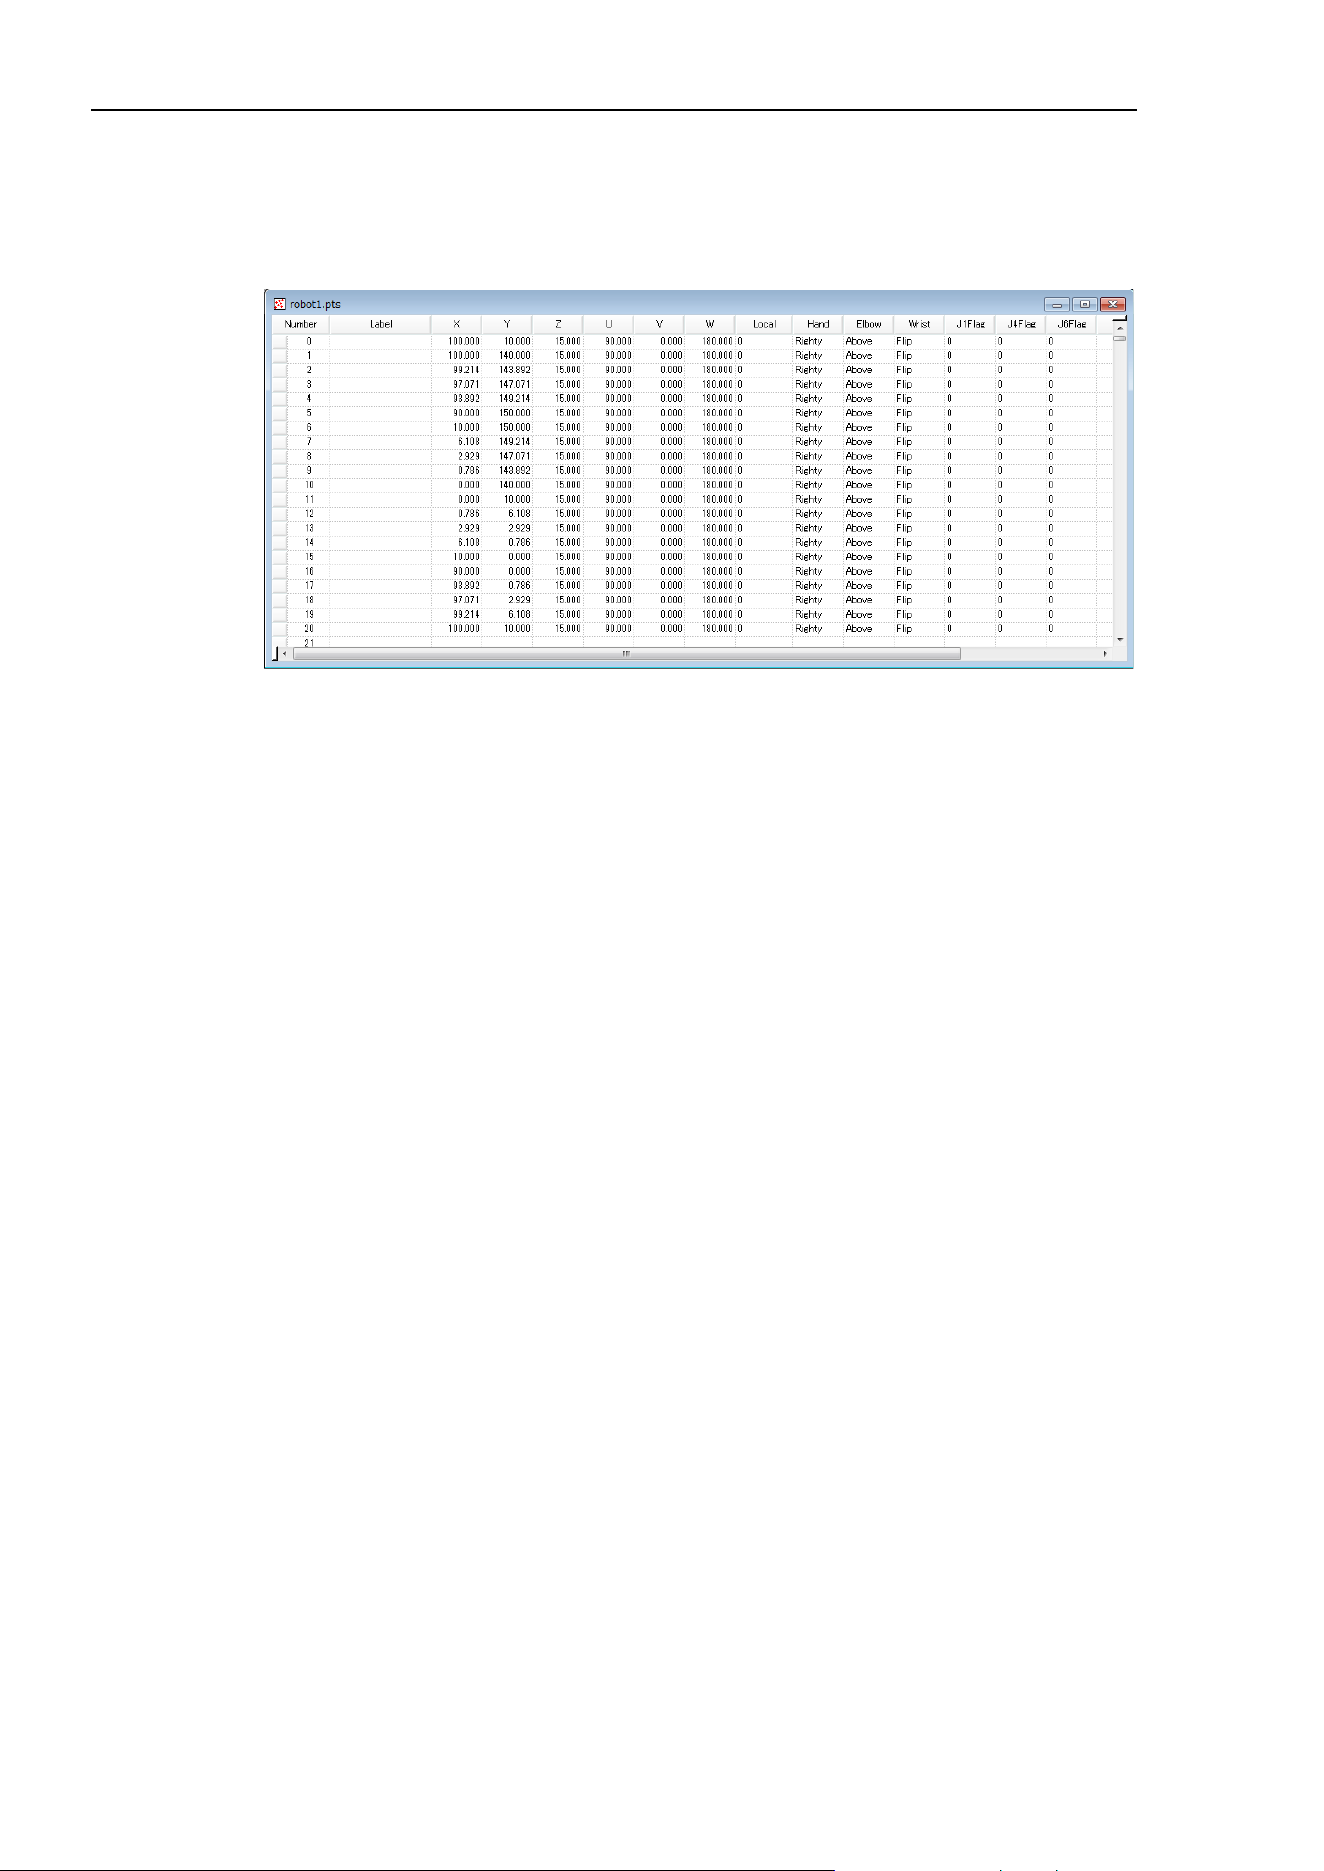
8. Simulator
324 EPSON RC+ 7.0 (Ver.7.4) User's Guide Rev.6
5. Create a Program
(1) Set the appropriate robot orientation for the point data
Open the point file “robot1.pts” from the layout object, and change the wrist
orientation (Wrist) of the exported No. 0-20 from “NoFlip” to “Flip”.
(2) Write the following program in “Main.prg” program
Function main
Motor On
TLSet 1, XY(-112, -41, 80, 0, -90, 0)
Tool 1
Go P0
Move P1 CP
Arc P3, P5 CP
Move P6 CP
Arc P8, P10 CP
Move P11 CP
Arc P13, P15 CP
Move P16 CP
Arc P18, P20 CP
Pulse 0, 0, 0, 0, 0, 0
Motor Off
Fend
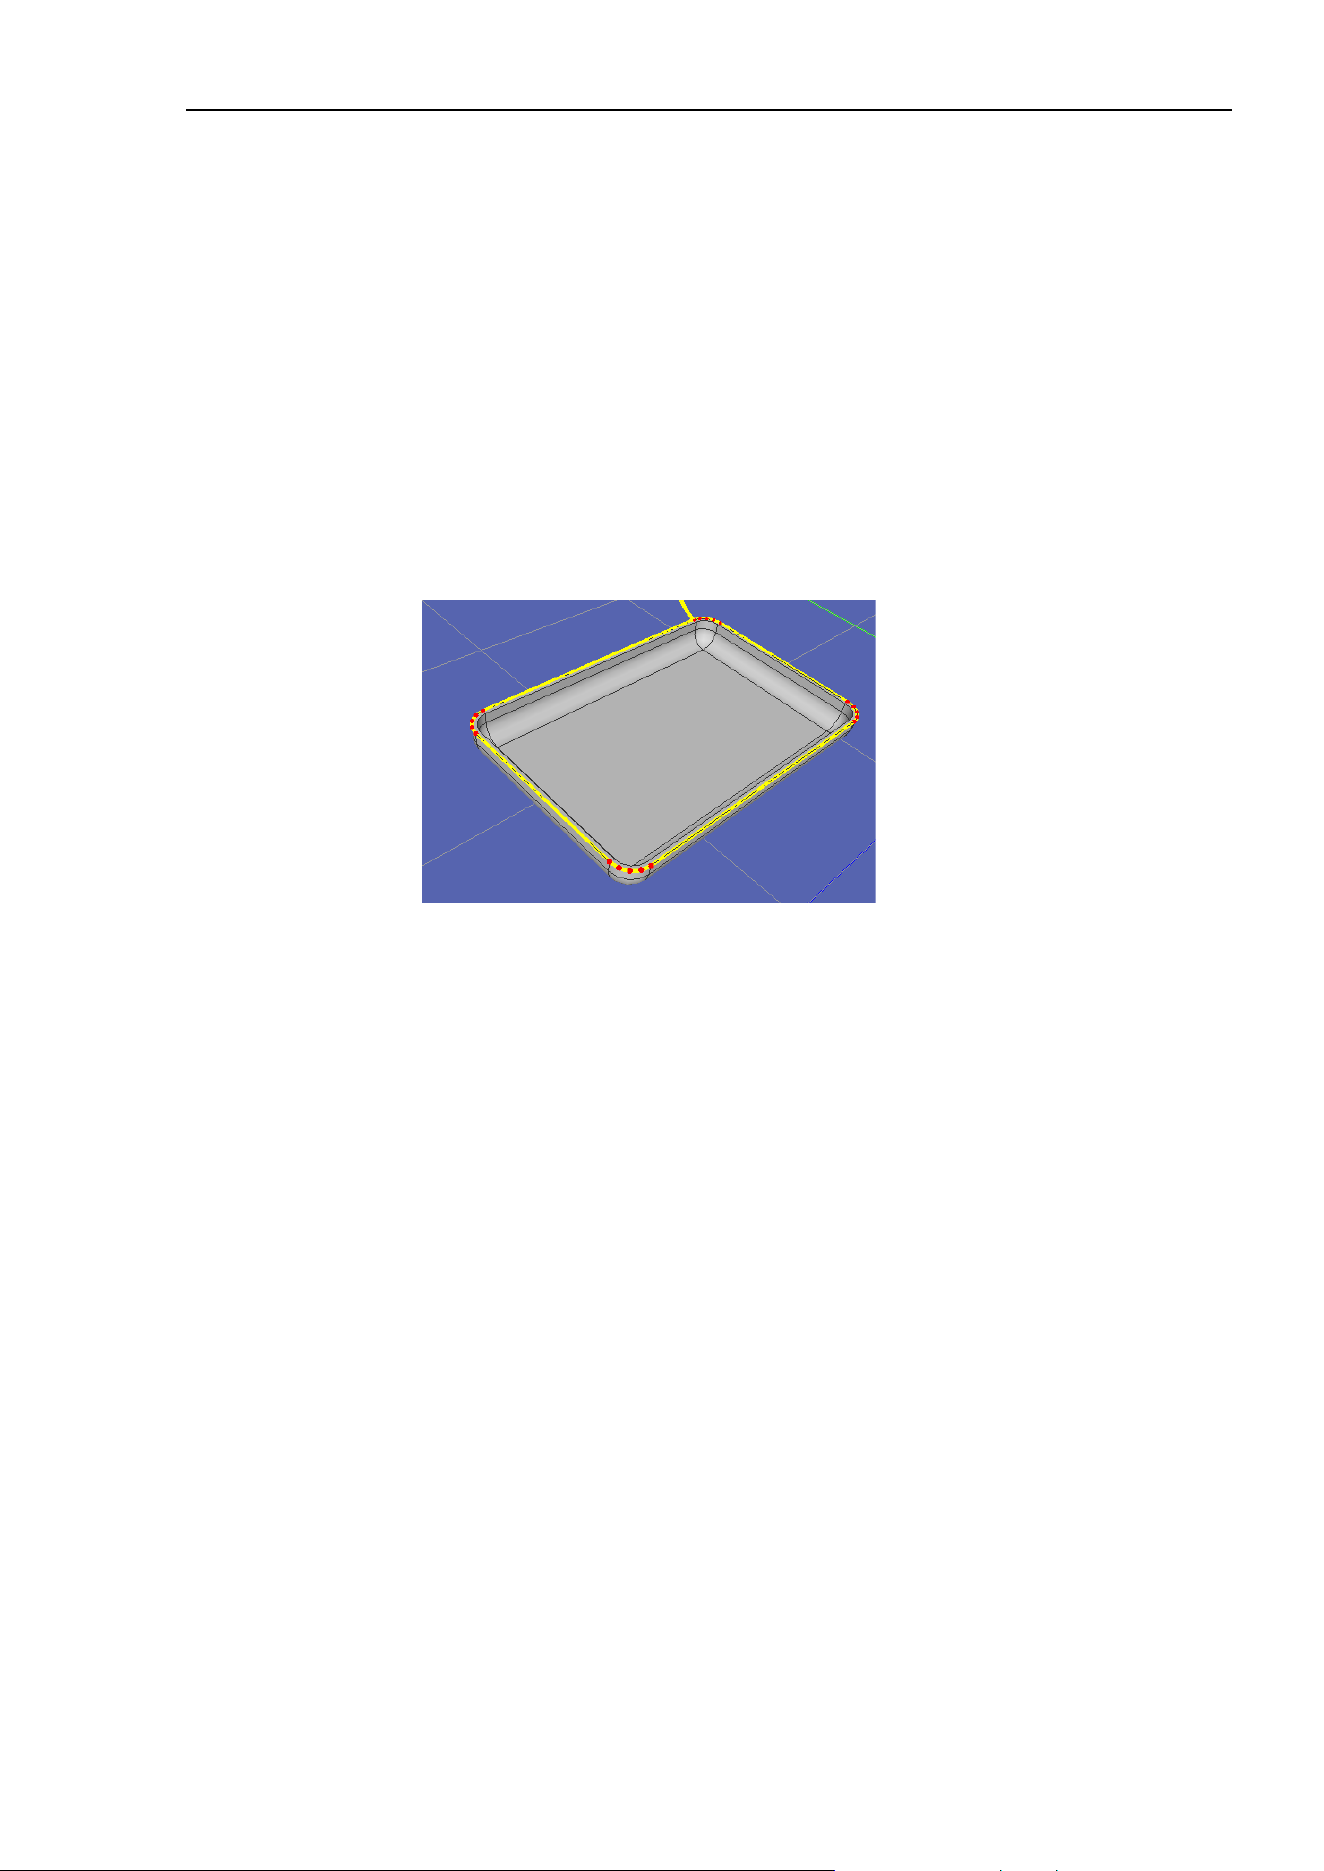
8. Simulator
EPSON RC+ 7.0 (Ver.7.4) User's Guide Rev.6 325
By using Tool coordinate system 1, the tip of the syringe can trace outlines of workpiece.
(3) Click the tool bar-<Build project>. The program will be built.
When the program build is completed normally, the message “Build complete, no errors”
will be displayed in the Status window.
6. Execute the program and operate the manipulator
(1) Click the tool bar<Open run window> to open the <Run> window
(2) Click <Start>. Then, the message “Are you ready to start?” will be displayed. Click
<Yes>.
(3) The program will be executed. Check that the manipulator moves from P0 to P20
sequentially and the tip of the syringe traces the edge of Work in counterclockwise
direction.
TIP
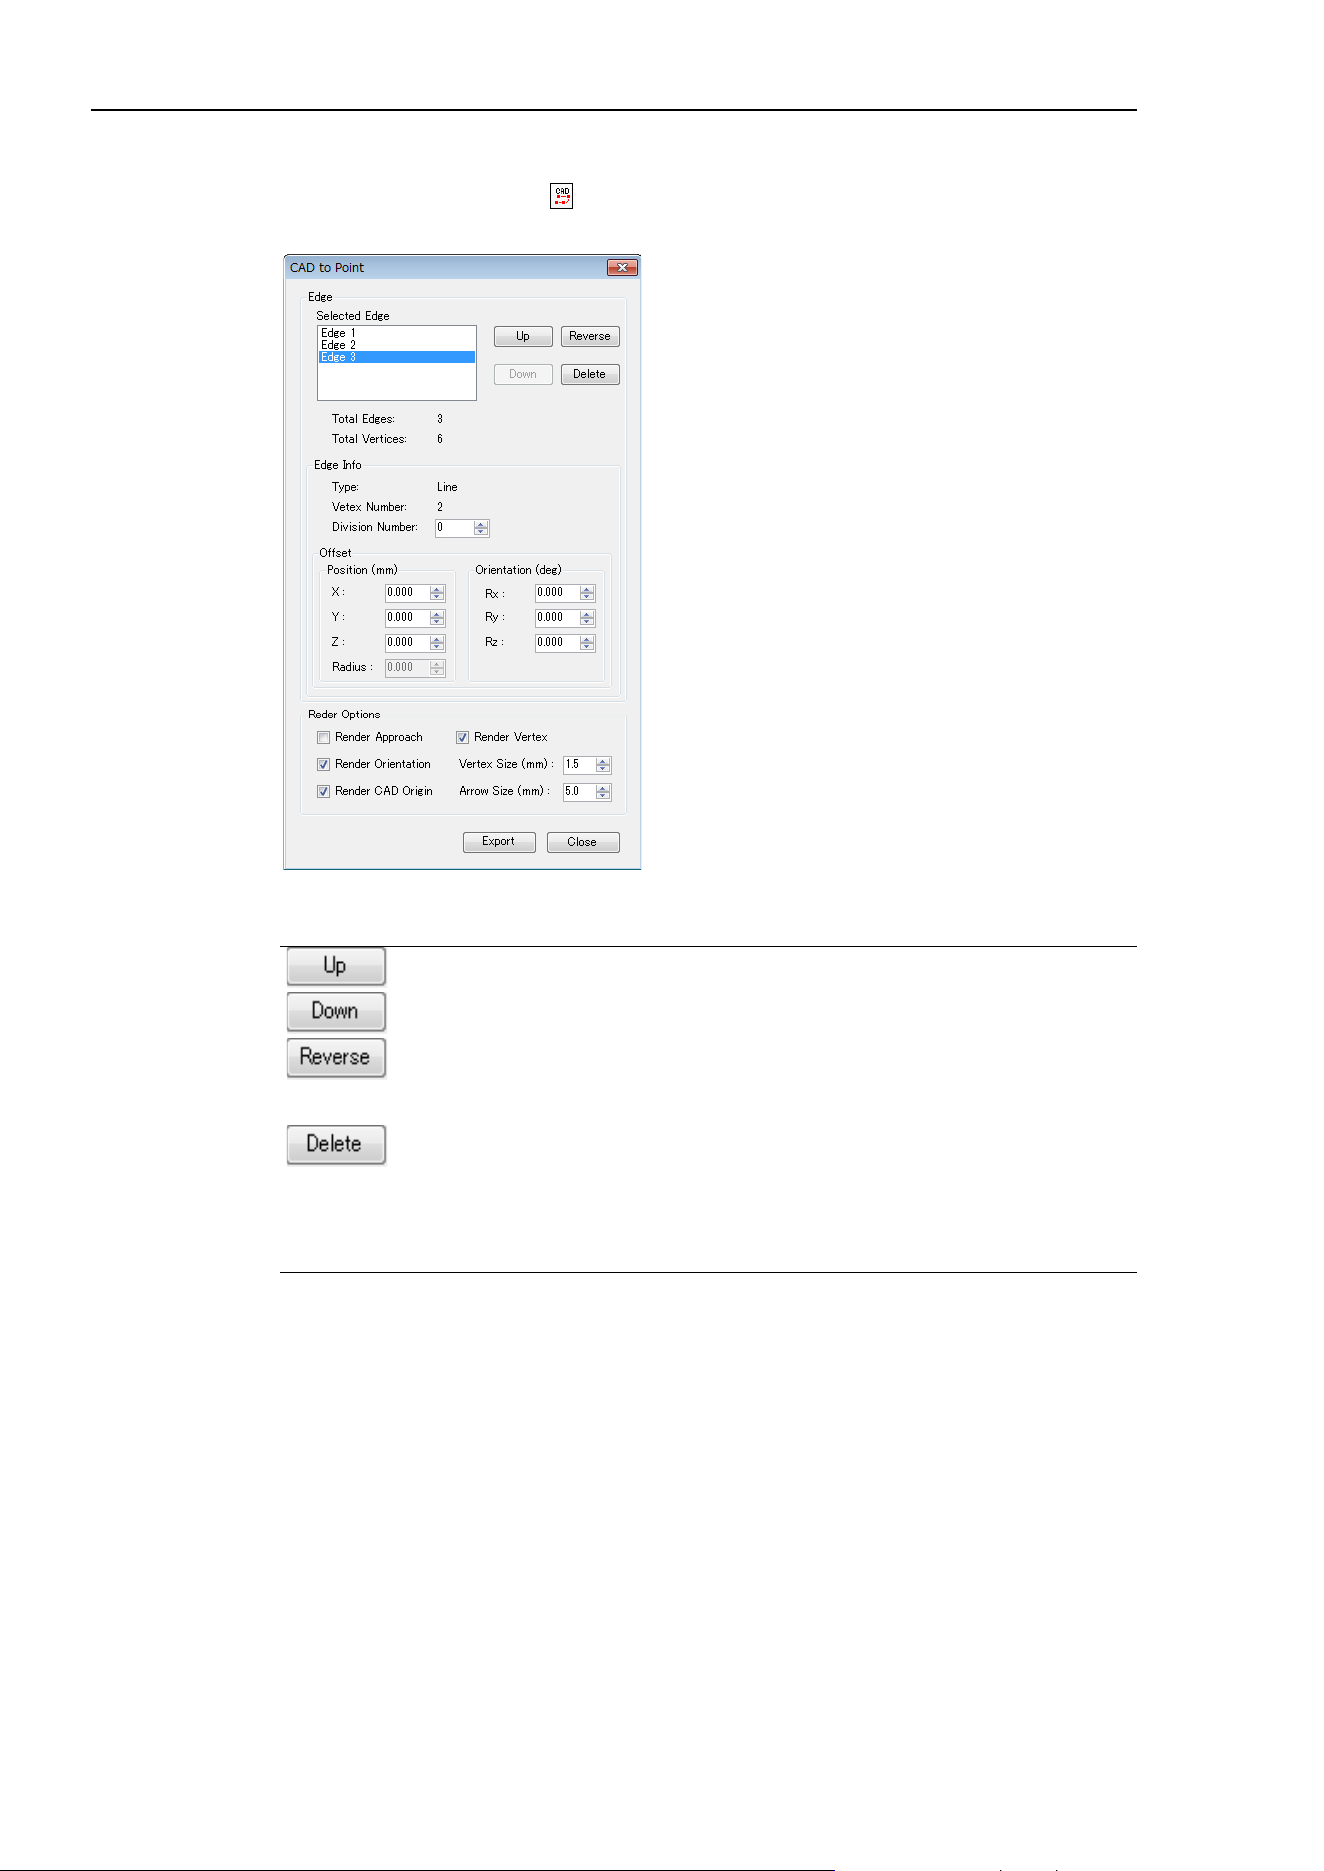
8. Simulator
326 EPSON RC+ 7.0 (Ver.7.4) User's Guide Rev.6
7. Function of CAD to Point
Pressing the <CAD to Point
> button on the toolbar to display [Export Points] dialog
box.
Edge
Function Description
Up button
Move the order of the selected edge to up.
Down button
Move the order of the selected edge to down.
Reverse button
Switch the start point and end point of the selected edge.
Red arrow
on the edge indicates the direction from start
point to end point.
Delete button
Delate the selected edge.
Edge Information
Function Description
Type
Display the type of the selected edge.
Types are
Line, Curve, and Composite Curve.
Vertex N
umber
Display the number of vertex of selected edge.
Increase or decrease division number to increase or decrease
the number of
vertex.
Division Number
Set the division number of the selected edge.
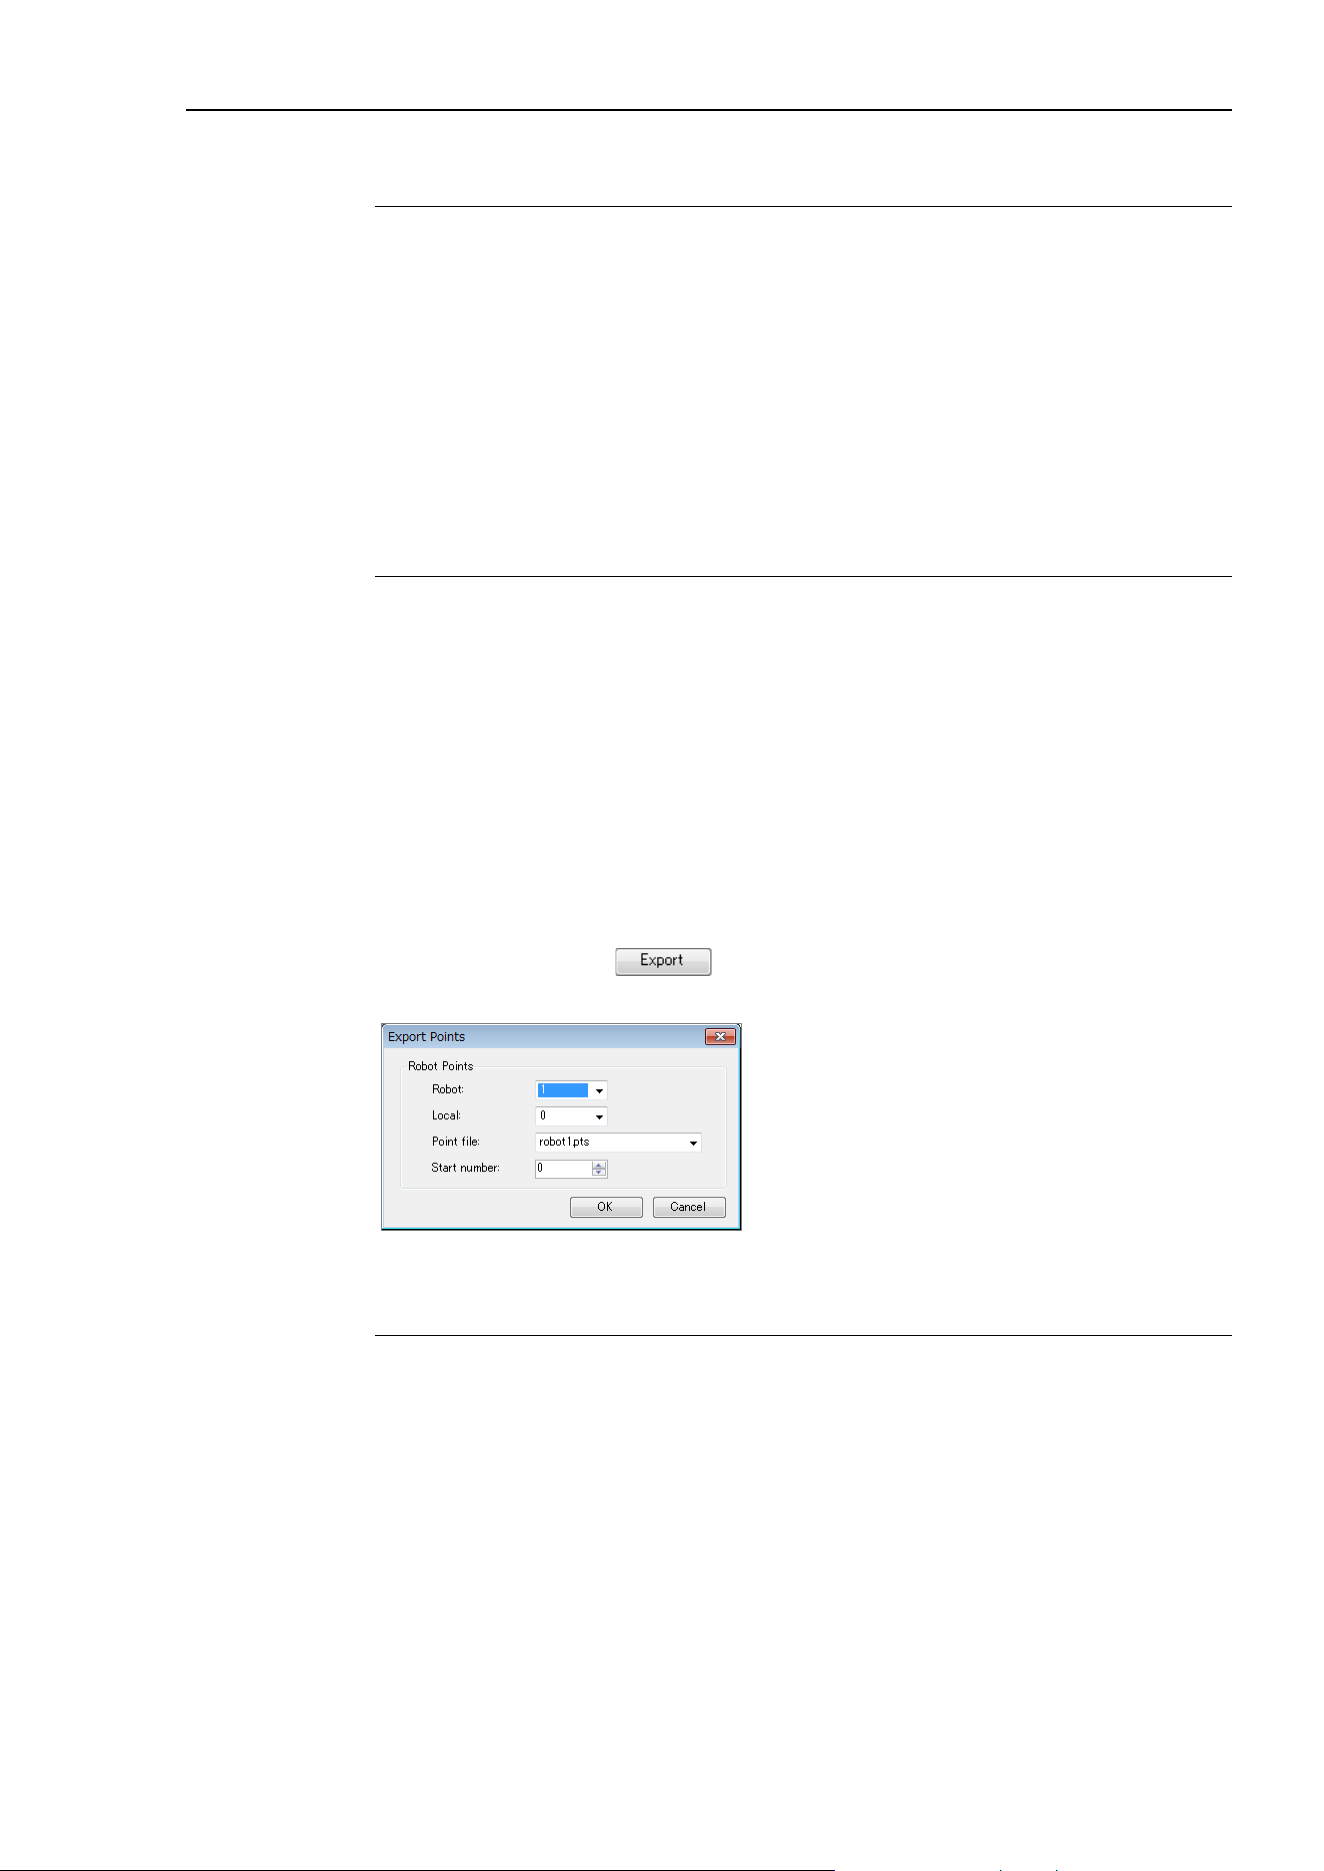
8. Simulator
EPSON RC+ 7.0 (Ver.7.4) User's Guide Rev.6 327
Offset
Function Description
Position
Enable to move the vertex position to X, Y, and Z direction.
Refer to the coordinate system of
CAD object for the
directions.
Also, enable to expand or
decrease from the center of the
arc
to radius direction if the edge is curve or composite
curve which can approximate to the arc.
Orientation
Enable to rotate tool orientation to Rx, Ry, and Rz direction.
Refer to the coordinate system of CAD object for the
directions.
Render Option
Function Description
Render Approach
Display the Z-axis (red arrow) of the render orientation to
the vertex. It is useful when Z-axis of the render
orientation cannot be seen due to workpieces.
Render Orientation
Display the orientation on the vertex.
Only displays when the vertex is displayed.
Render CAD Origin
Display the origin of CAD object in coordinate system.
Render Vertex
Display the vertex of the selected edge.
Vertex Size
Set the vertex size.
Arrow Size
Change an arrow size that is directed to start point to end
point of the selected edge.
Click the <Export Points > button on the [CAD to Point] dialog to display the
[Export Points] dialog.
Point output
Function Description
Robot
Set the robot to output the points.
Local
Set the local coordinate to output the points.
Point File
Set the point file to output the points.
Start Number
Set the start number of outputting points.
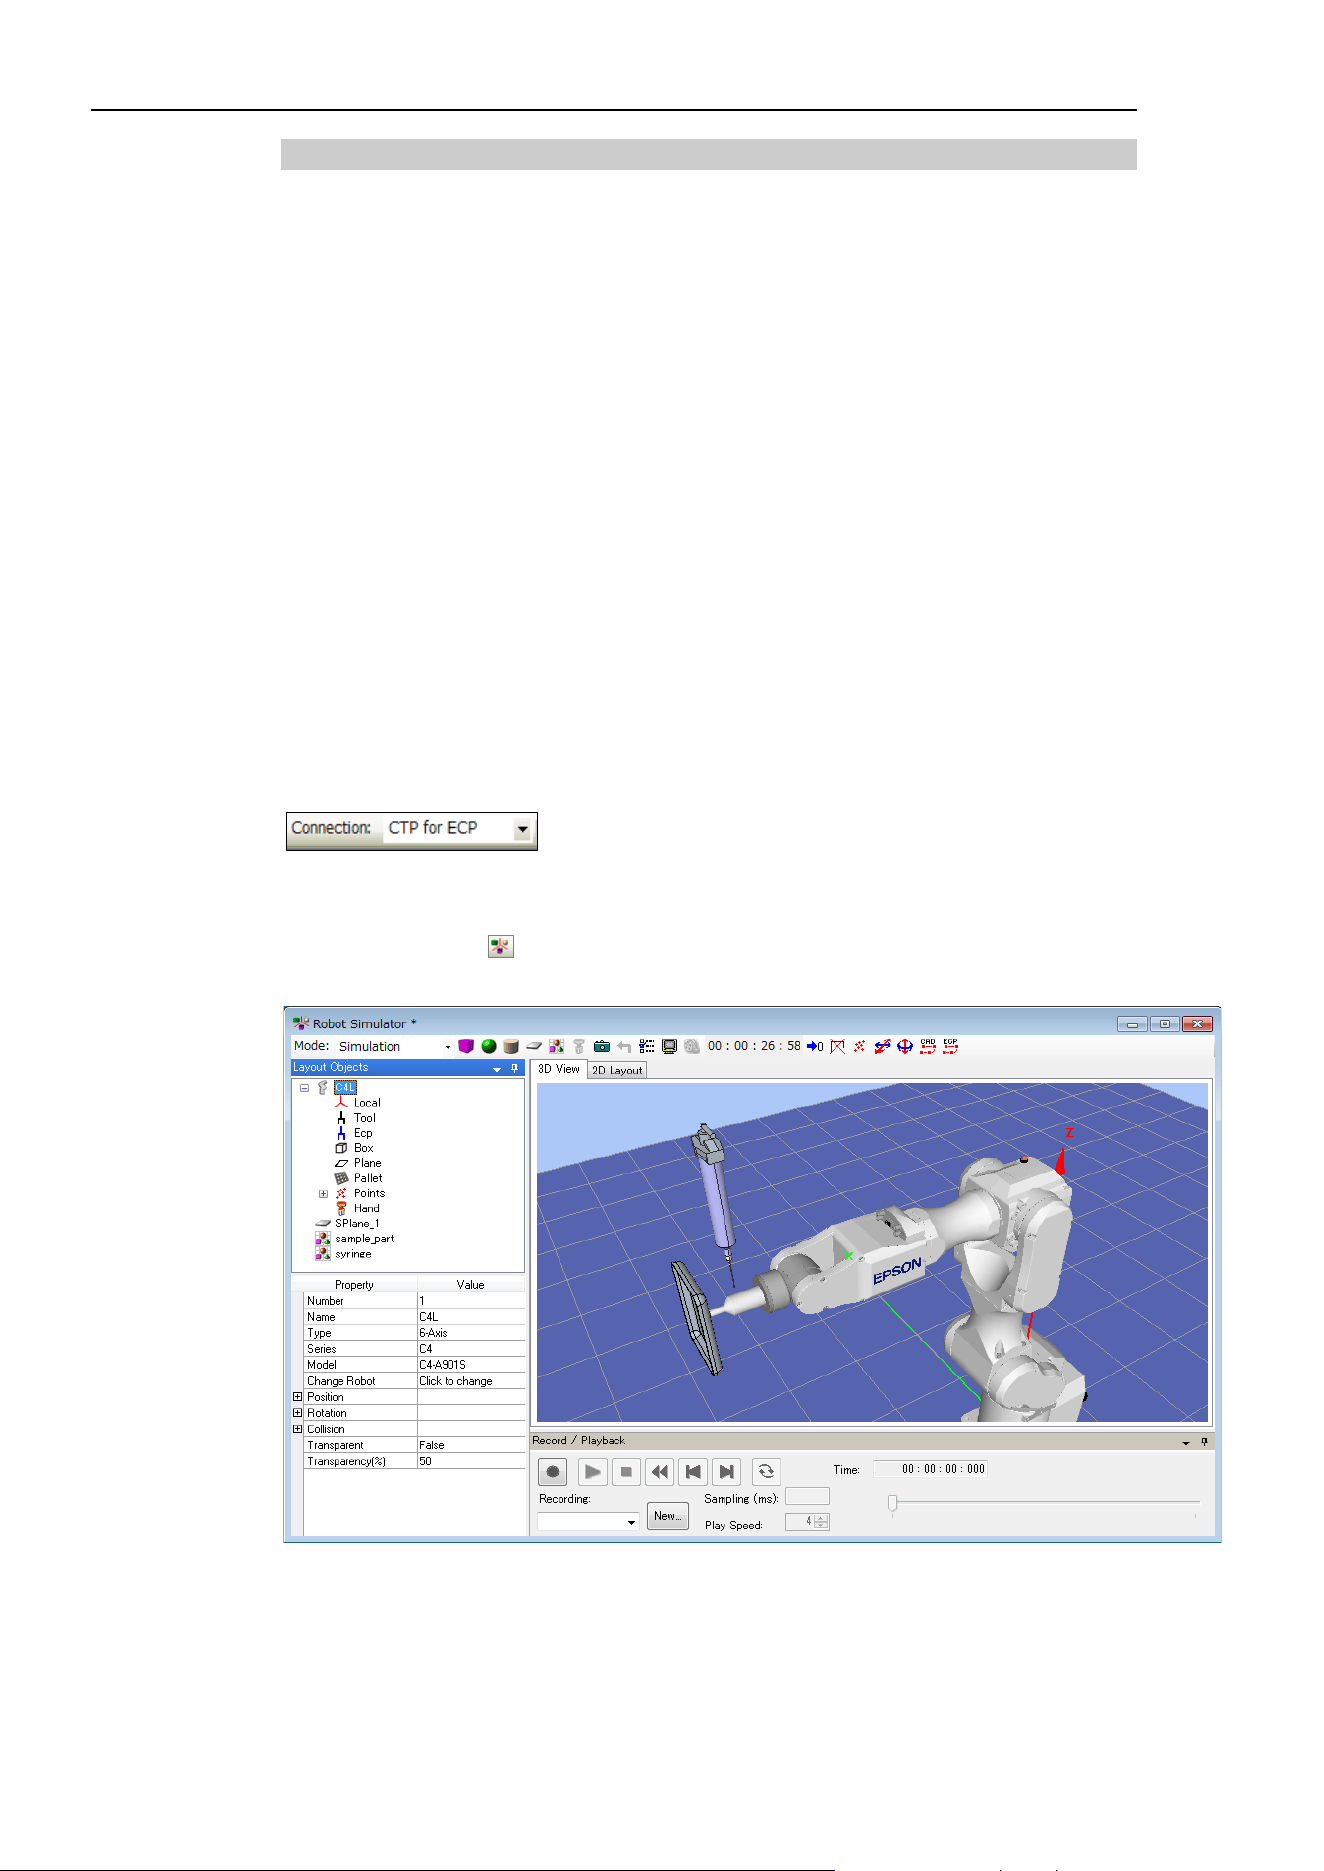
8. Simulator
328 EPSON RC+ 7.0 (Ver.7.4) User's Guide Rev.6
8.3.6 CAD to Point for ECP
CAD To Point for ECP is a function to output edge line information which is included in
CAD data as point data to operate external control point (ECP) motion. By the robot
grasps workpiece and selecting edges of CAD objects on the 3D view sequentially, you
can generate point data along with the motion path. The robot motion points can be
registered automatically based on CAD data such as part. Therefore, development time of
programs can be shortened.
Use a sample using easy CAD data to execute CAD To Point for ECP.
In the example, create a motion to follow an outer circumference of grasped CAD object
(tray) by the robot on the edge of fixed syringe.
Operate the following procedures:
1. Connect to virtual controller “CTP for ECP”
2. Open a project
3. Select CAD Object and ECP
4. Select an edge of CAD object and create a motion path of the robot
5. Output as point data
6. Create a program
7. Execute the program and move the robot
1. Connect to virtual controller “CTP for ECP”
Select “CTP for ECP” of [Connection:] on EPSON RC+ 7.0 toolbar.
When the connection is complete, “CTP for ECP” is displayed in the [Connection:] box.
Click the <Simulator > button on the toolbar to display the [Simulator] window. CAD
objects: “sample_part” and “syringe”, and Hand objects are placed.
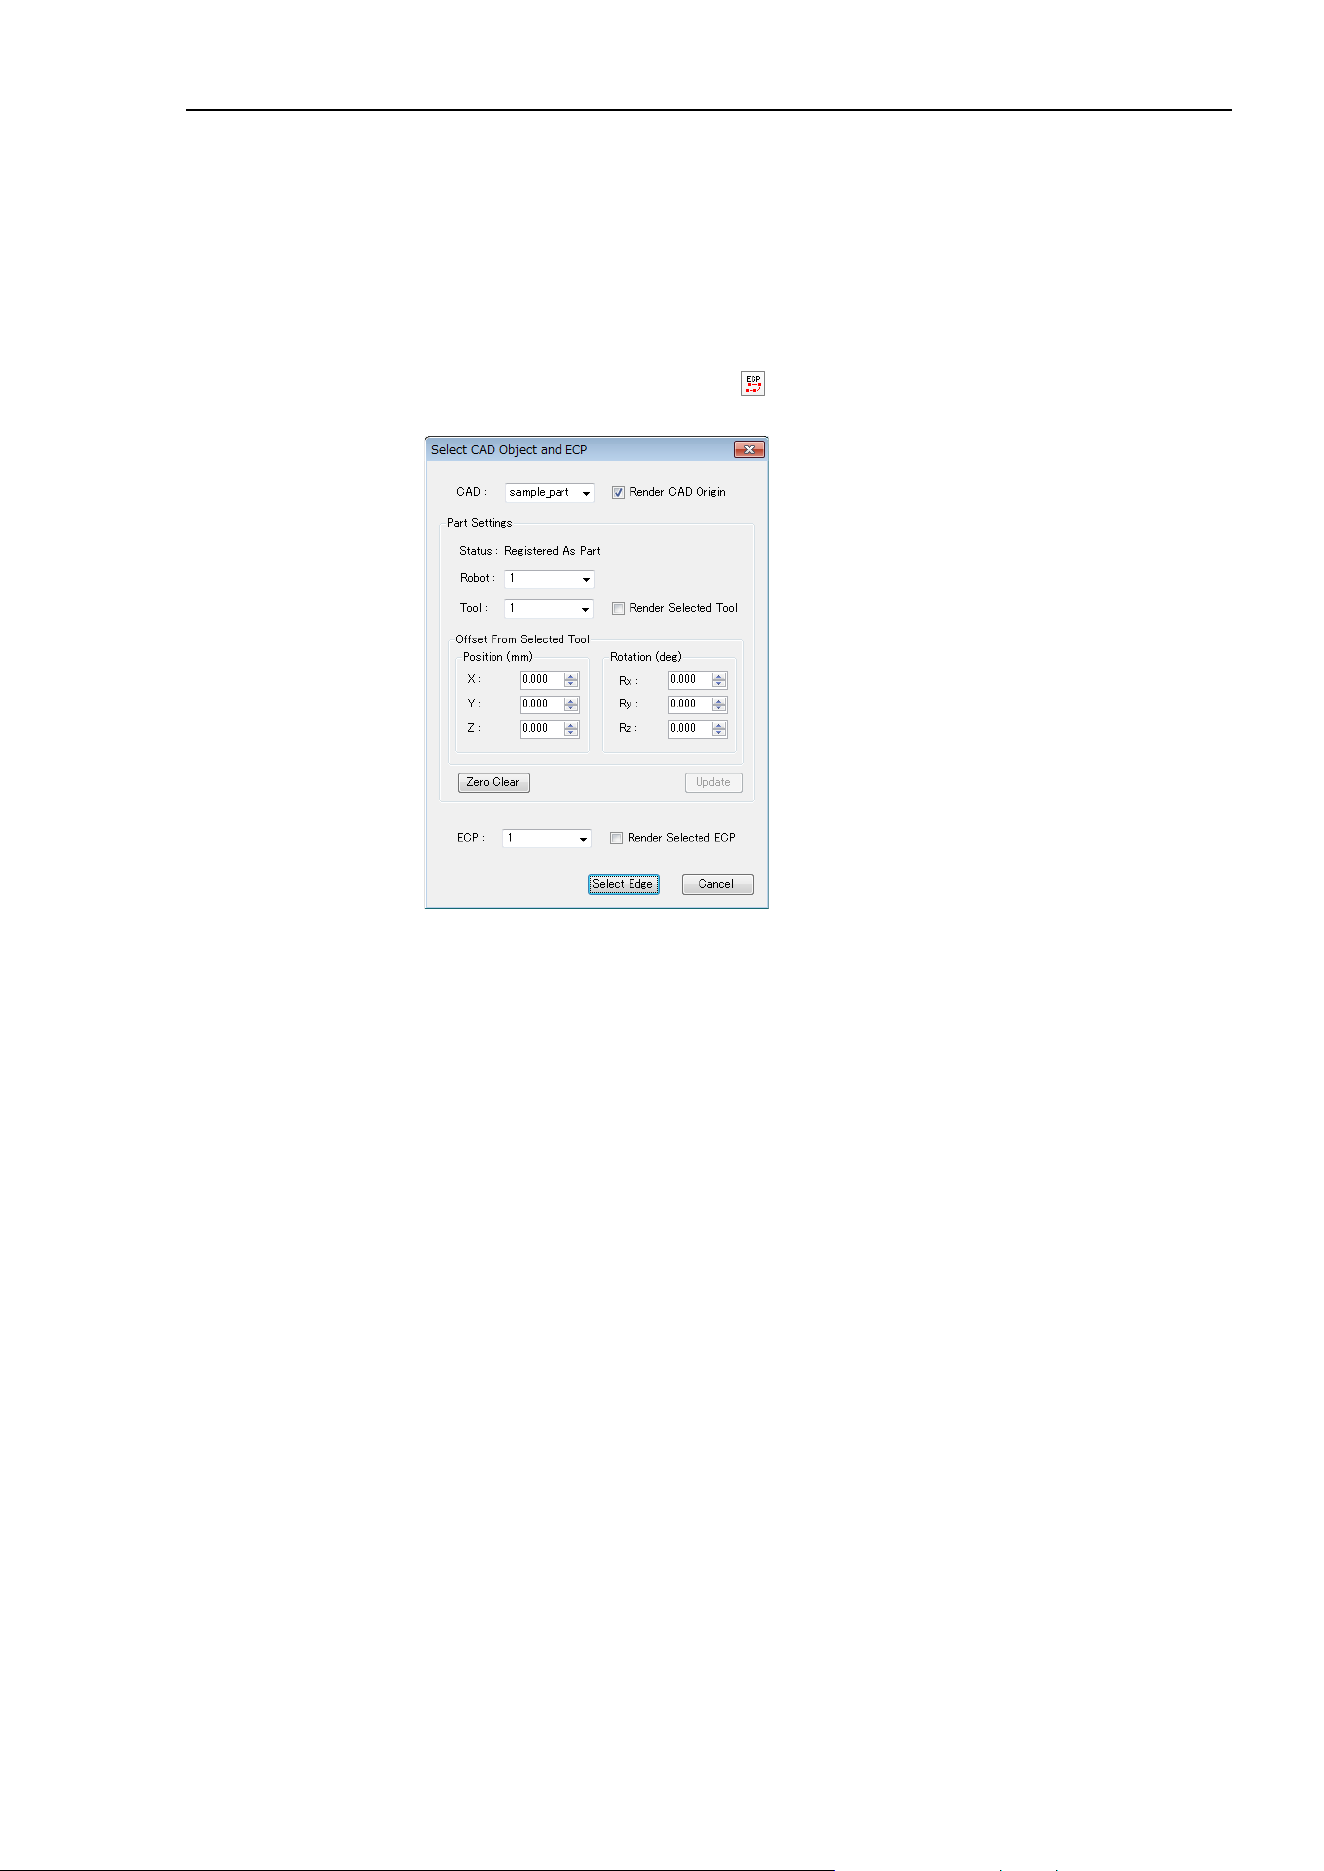
8. Simulator
EPSON RC+ 7.0 (Ver.7.4) User's Guide Rev.6 329
2. Open a project
(1) Click [Open…] from [Project] on EPSON RC+ 7.0 menu.
(2) Select [Projects]-[SimulatorDemos]-[CAD_to_Point_for_ECP].
(3) Click the <Open> button.
3. Select CAD Object and ECP
(1) Click the <CAD to Point forECP > on the toolbar to display the [Select CAD
Object and ECP] dialog.
(2) Set as follows.
CAD : sample_part
Robot : 1
Tool : 1
Offset settings (X, Y, Z, Rx, Ry, Rz)
: 0.000
ECP : 1
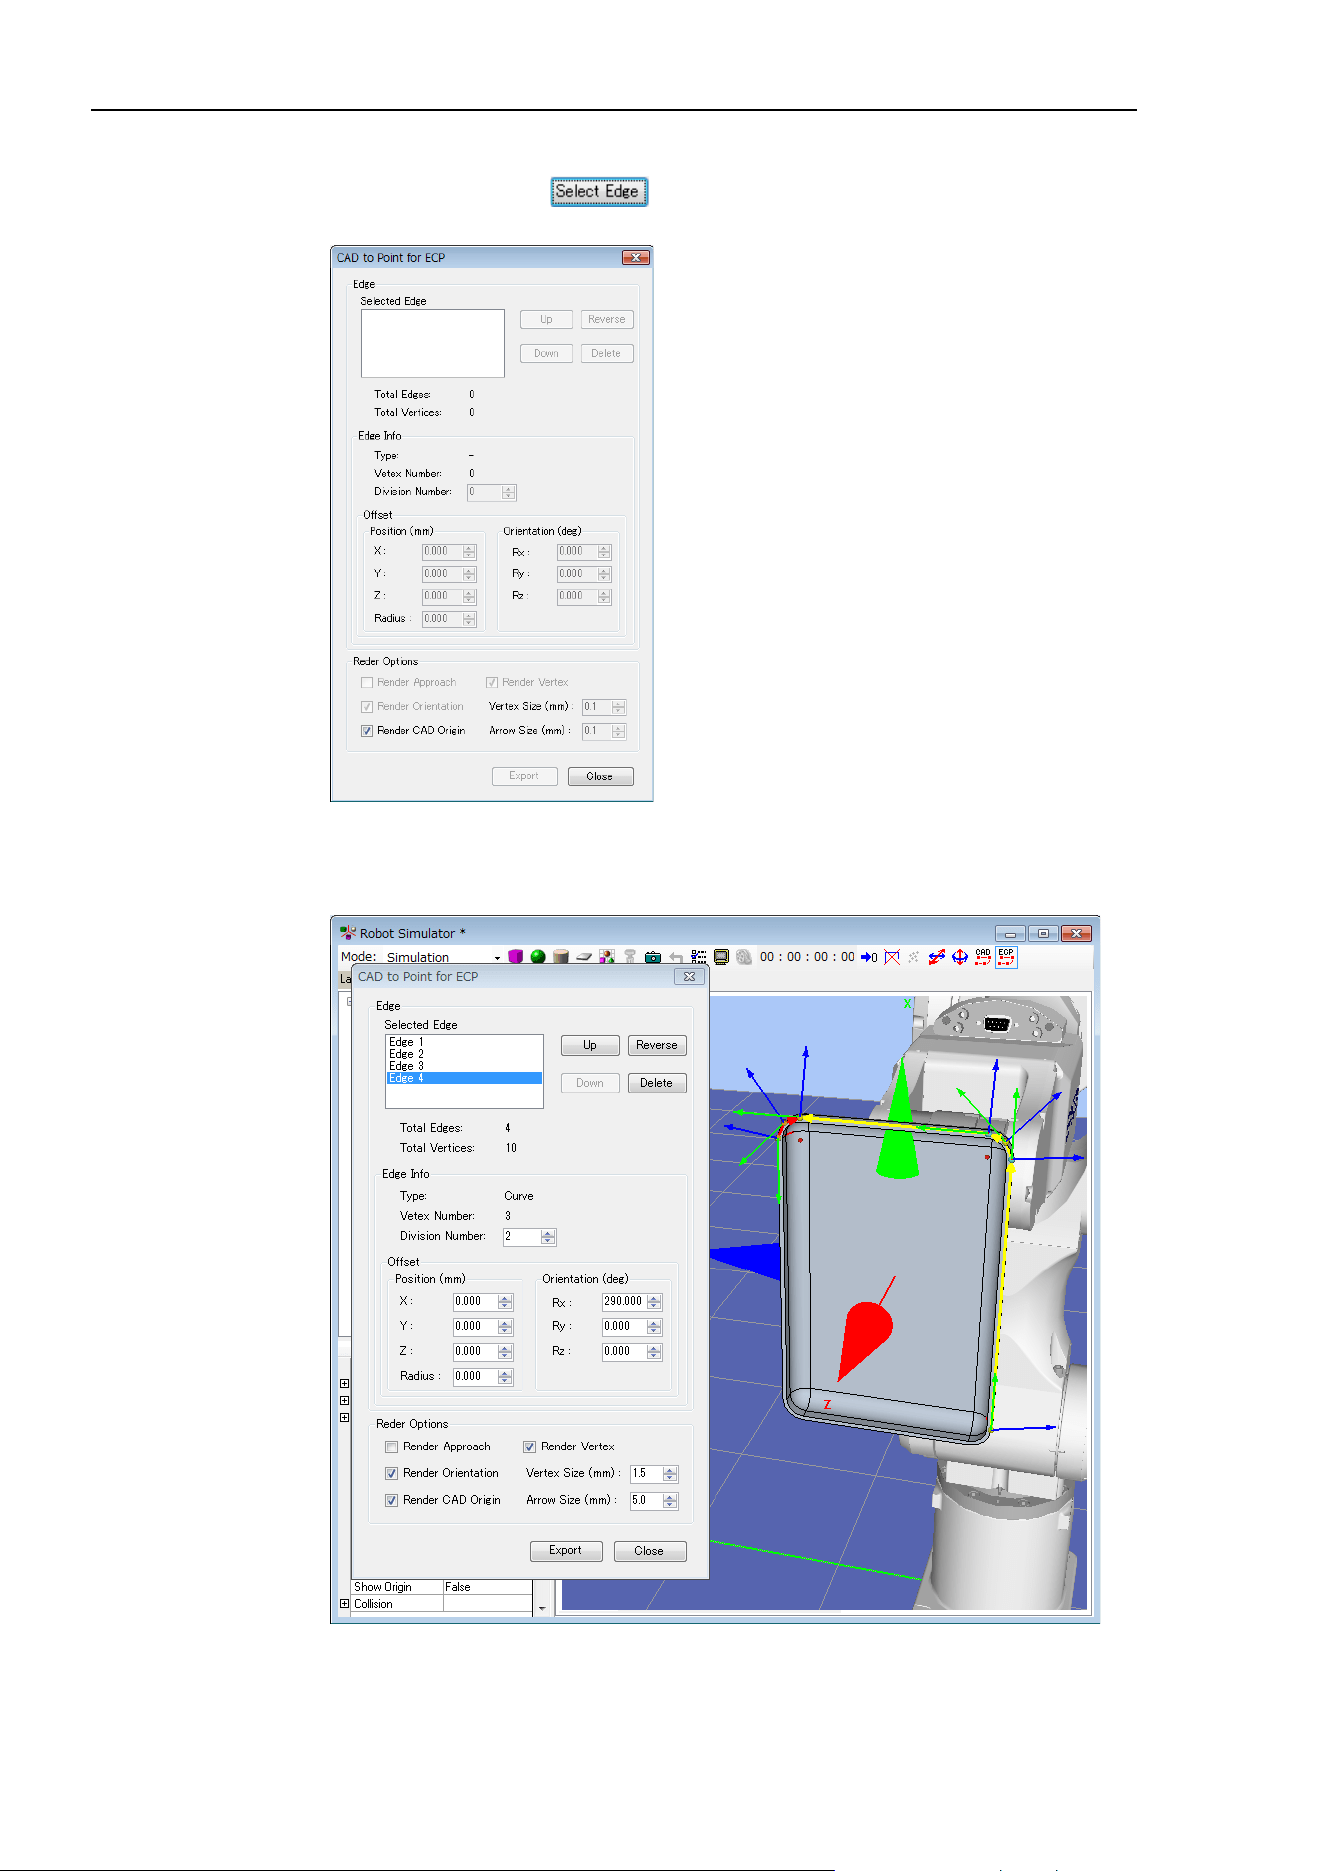
8. Simulator
330 EPSON RC+ 7.0 (Ver.7.4) User's Guide Rev.6
4. Select an edge of CAD object and create a motion path of the robot
(1) Click the <Select Edge > button to display the [CAD to Point for ECP]
dialog.
(2) To operate the sample program properly, select edges in counterclockwise rotation
sequentially from edge of straight part of right tray.
For selection of surface including edges and edges, refer to 8.3.5 CAD To Point.
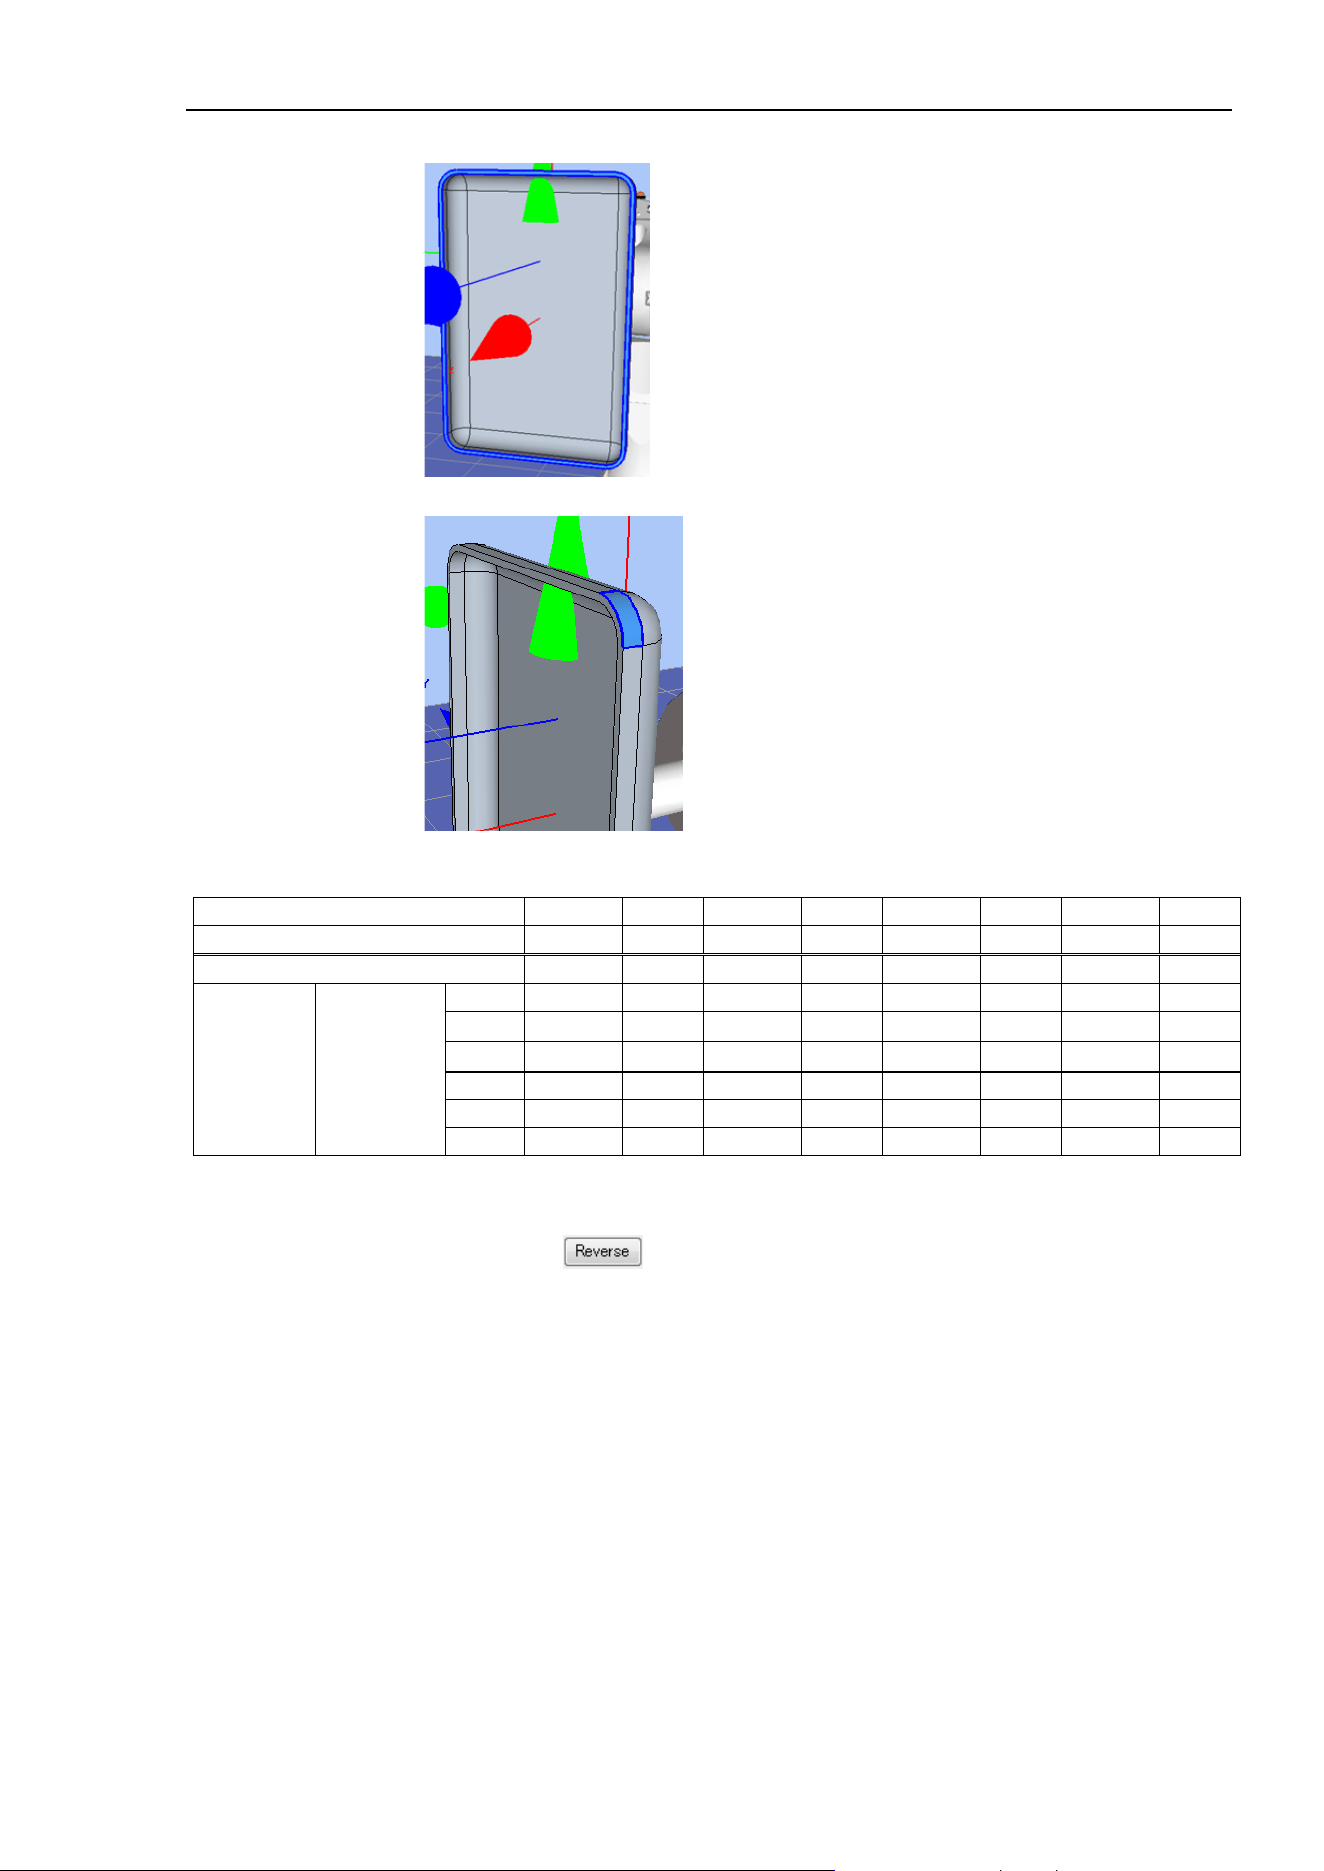
8. Simulator
EPSON RC+ 7.0 (Ver.7.4) User's Guide Rev.6 331
The straight part indicates edges on flat surface on the outer circumference.
The curve part indicates edges on side of the tray.
For division number and offset for each edge, refer to the following values.
Edge number
1
2
3
4
5
6
7
8
Type
Straight
Curve
Straight
Curve
Straight
Curve
Straight
Curve
Division number
0
2
0
2
0
2
0
2
Offset
Position
(mm)
X
0
0
0
0
0
0
0
0
Y
0
0
0
0
0
0
0
0
Z
0
0
0
0
0
0
0
0
Orientation
(deg)
Rx
20
290
20
290
20
-70
20
110
Ry
0
0
0
0
0
0
0
180
Rz
0
0
270
0
180
90
90
0
The arrow direction of edges indicates direction of start and end point of generating point.
Click the <Reverse > button to invert the arrow direction. Make sure to set the
arrow direction will be counterclockwise rotation.
TIP
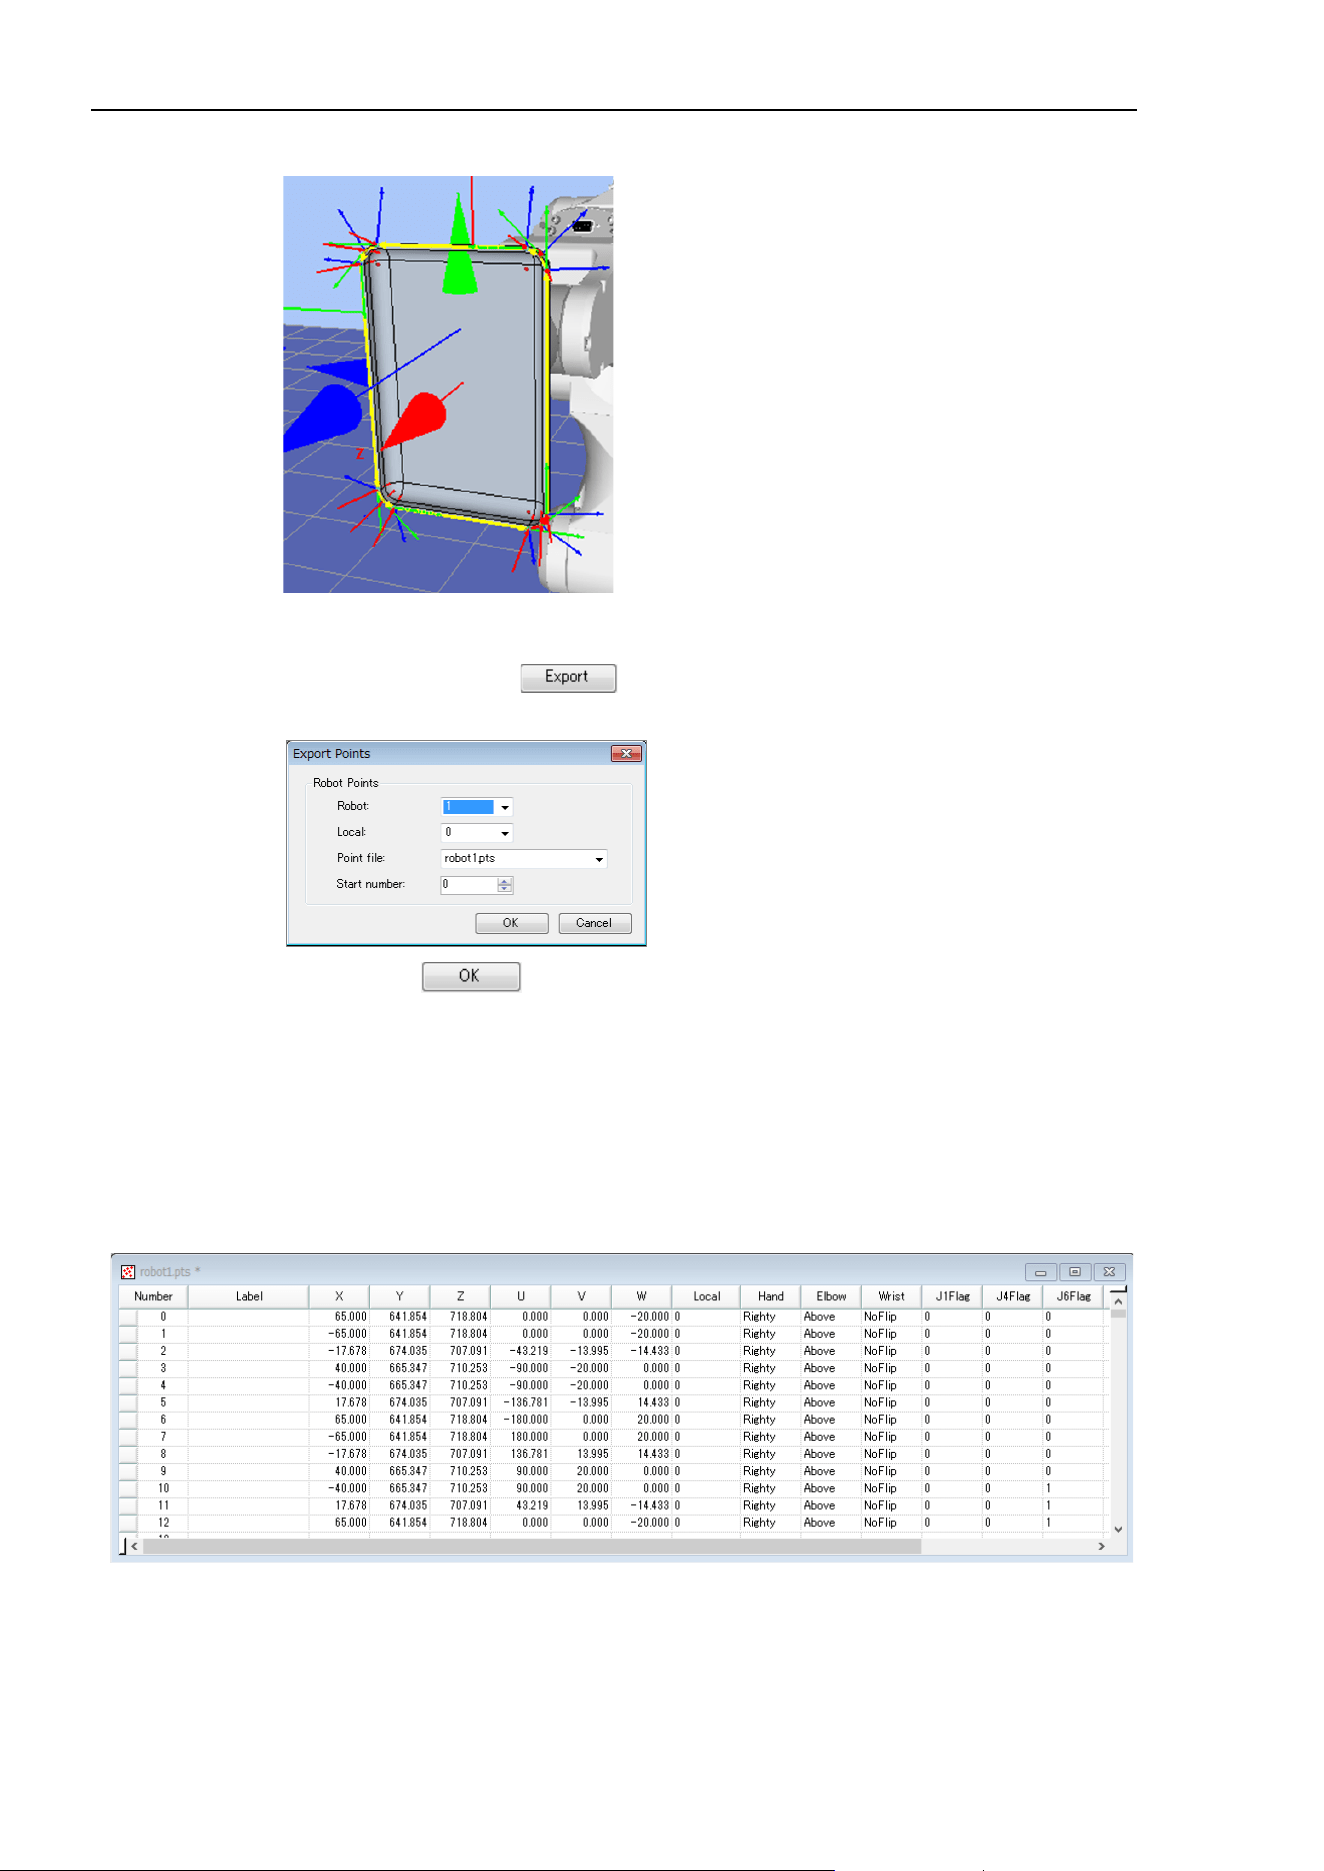
8. Simulator
332 EPSON RC+ 7.0 (Ver.7.4) User's Guide Rev.6
When all edges are set properly, it will be as follows.
5. Output as point data
Click the <Export Points > button of the [CAD to Point (ECP support)] dialog to
display the [Export Points] dialog.
Click the <OK > button to output the point data to No.0-12 of the point file
“robot1.pts”.
6. Create a program
(1) Set the proper robot orientation for the point data.
Open the point file “robot1.pts” from the layout objects and perform the following.
Wrist orientation (Wrist) of output point No.0-12 : NoFlip → Flip
J6Flag of point No. 10-12 : 0 → 1

8. Simulator
EPSON RC+ 7.0 (Ver.7.4) User's Guide Rev.6 333
(2) Create the following program in Main.prg program.
Function main
Motor On
Power High
Tool 1
ECP 1
Go P0
Move P1 ECP CP
Arc3 P2, P3 ECP CP
Move P4 CP
Arc3 P5, P6 ECP CP
Move P7 CP
Arc3 P8, P9 ECP CP
Move P10 CP
Arc3 P11, P12 ECP CP
Pulse 0, 0, 0, 0, 0, 0
Motor Off
Fend
(3) Click the <Build> button on the toolbar. Build the program.
When the build is complete normally, the message “Build complete, no errors” appears in
the [Status] window.
7. Execute the program and move the robot
(1) Click the <Run> window button on the tool bar to display the Run window.
(2) Click the <Start> button. When the message “Are you ready to start?” is appeared,
click the <Yes>.
(3) Confirm that the program is executed and follow an outer circumference of grasped
CAD object (tray) by the robot on the edge of fixed syringe to operate ECP motion.
Functions of CAD to Point for ECP
Click the < CAD to Point for ECP > button on the toolbar to display the [CAD to Point
(ECP support)] dialog. For functions, refer to 8.3.5 CAD to Point - 7. Function of CAD to
Point.
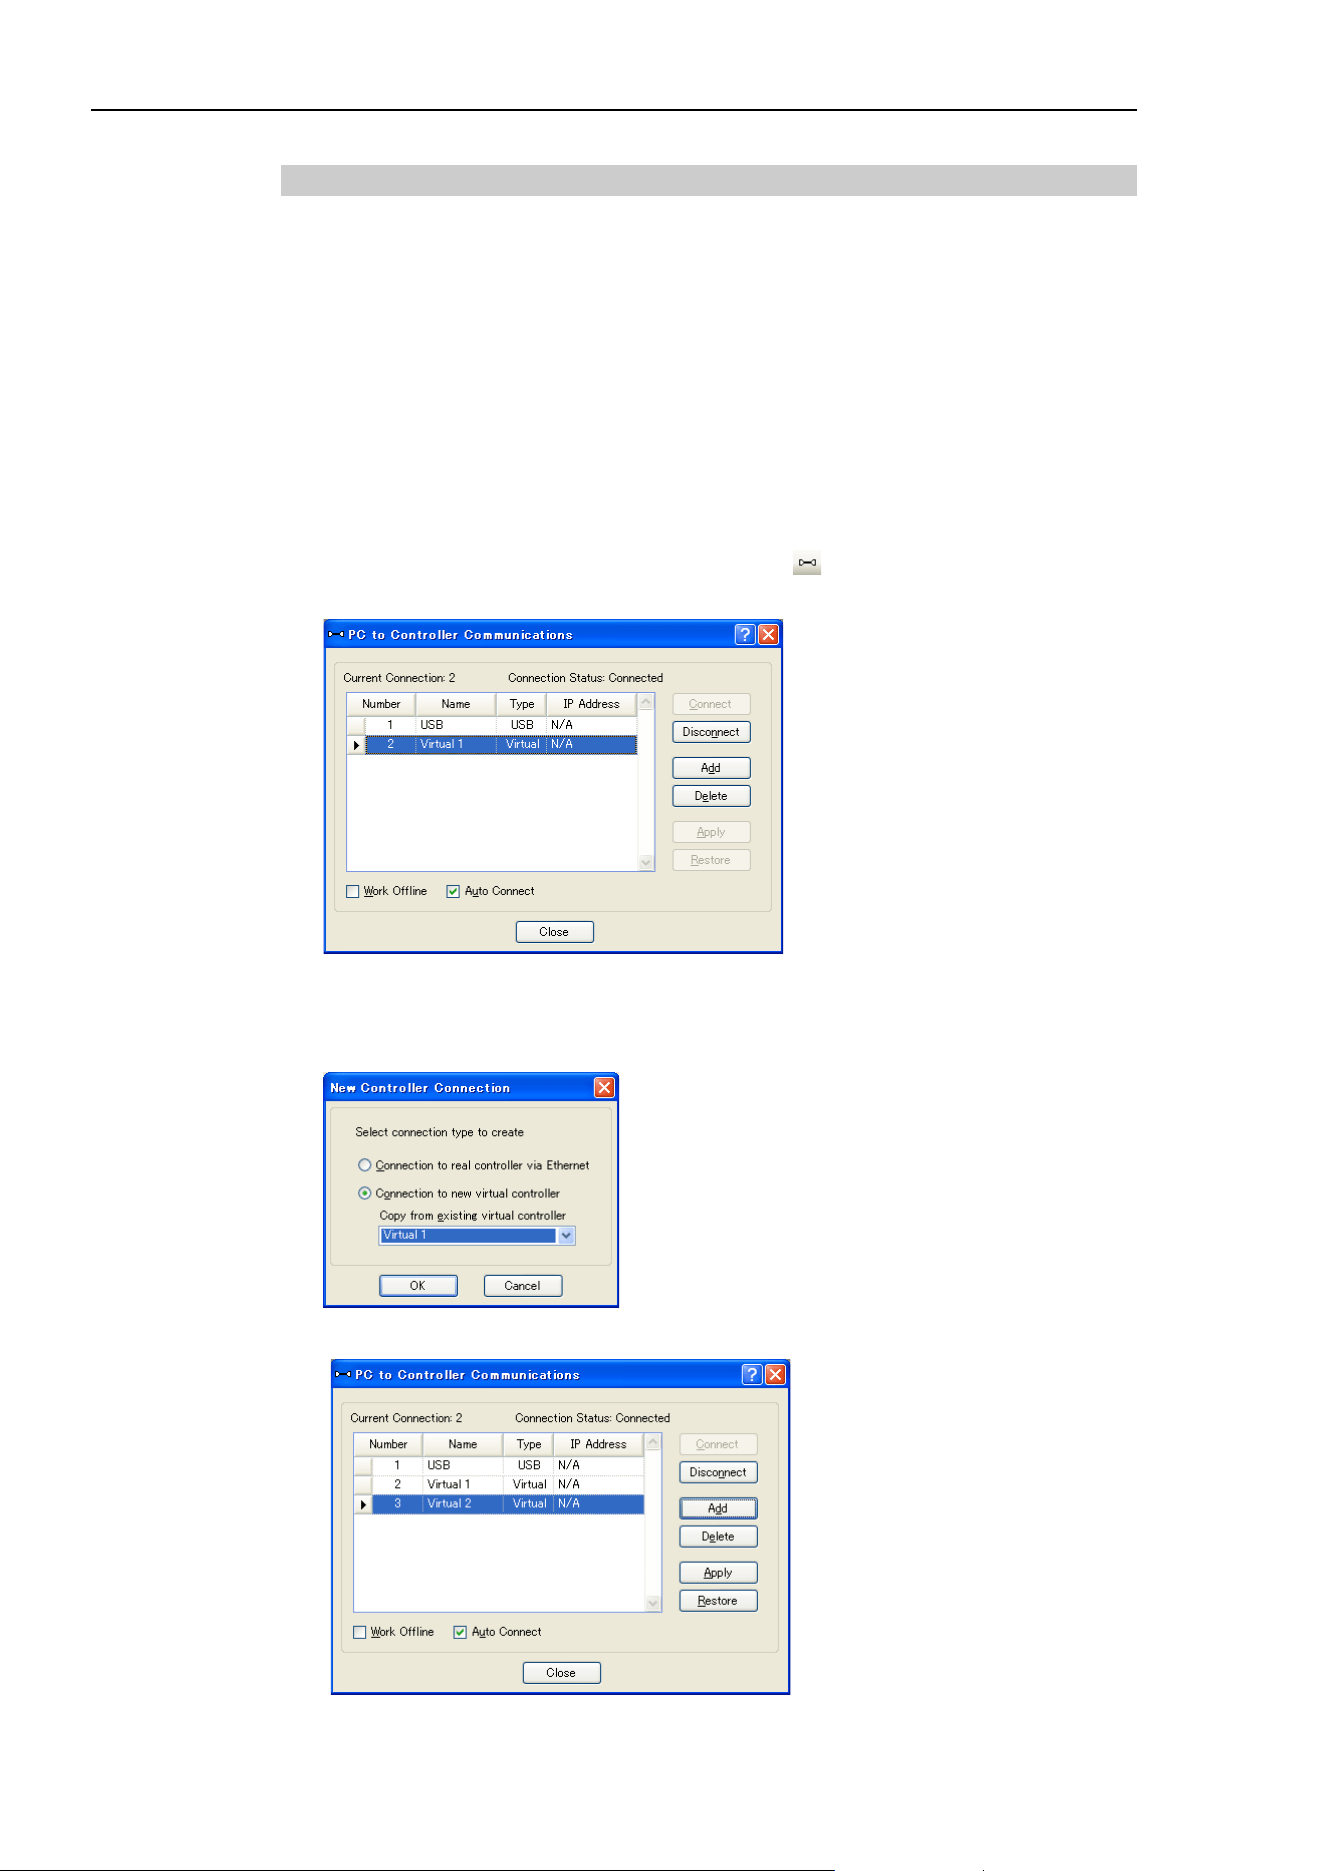
8. Simulator
334 EPSON RC+ 7.0 (Ver.7.4) User's Guide Rev.6
8.3.7 Virtual controller
To execute programs in the simulator, you need to create a virtual controller with defined
robot and layout.
Robot settings and layout settings for the 3D display are saved for each virtual controller.
If you want to transfer the robot or layout data, you can copy and transfer the data.
The virtual controller created by the EPSON RC+ 7.0 Ver. 7.3.0 cannot be used in lower
versions of EPSON RC+.
Create a new virtual controller
Refer to 8.2.2 Working with the user created system.
Copy the sample or configured virtual controller
(1) Click the EPSON RC+ 7.0 Tool bar-<Connection > button.
The [PC to Controller Communications] dialog appears.
(2) Click the <Add> button. The [New Controller Connection] dialog appears.
(3) Select the <Connection to new virtual controller> option button and specify a virtual
controller from the list box. Click the <OK> button.
(4) New “Virtual 2” is created. Click the <Apply> button.
(5) Close the dialog and go back to the EPSON RC+ 7.0 main window.
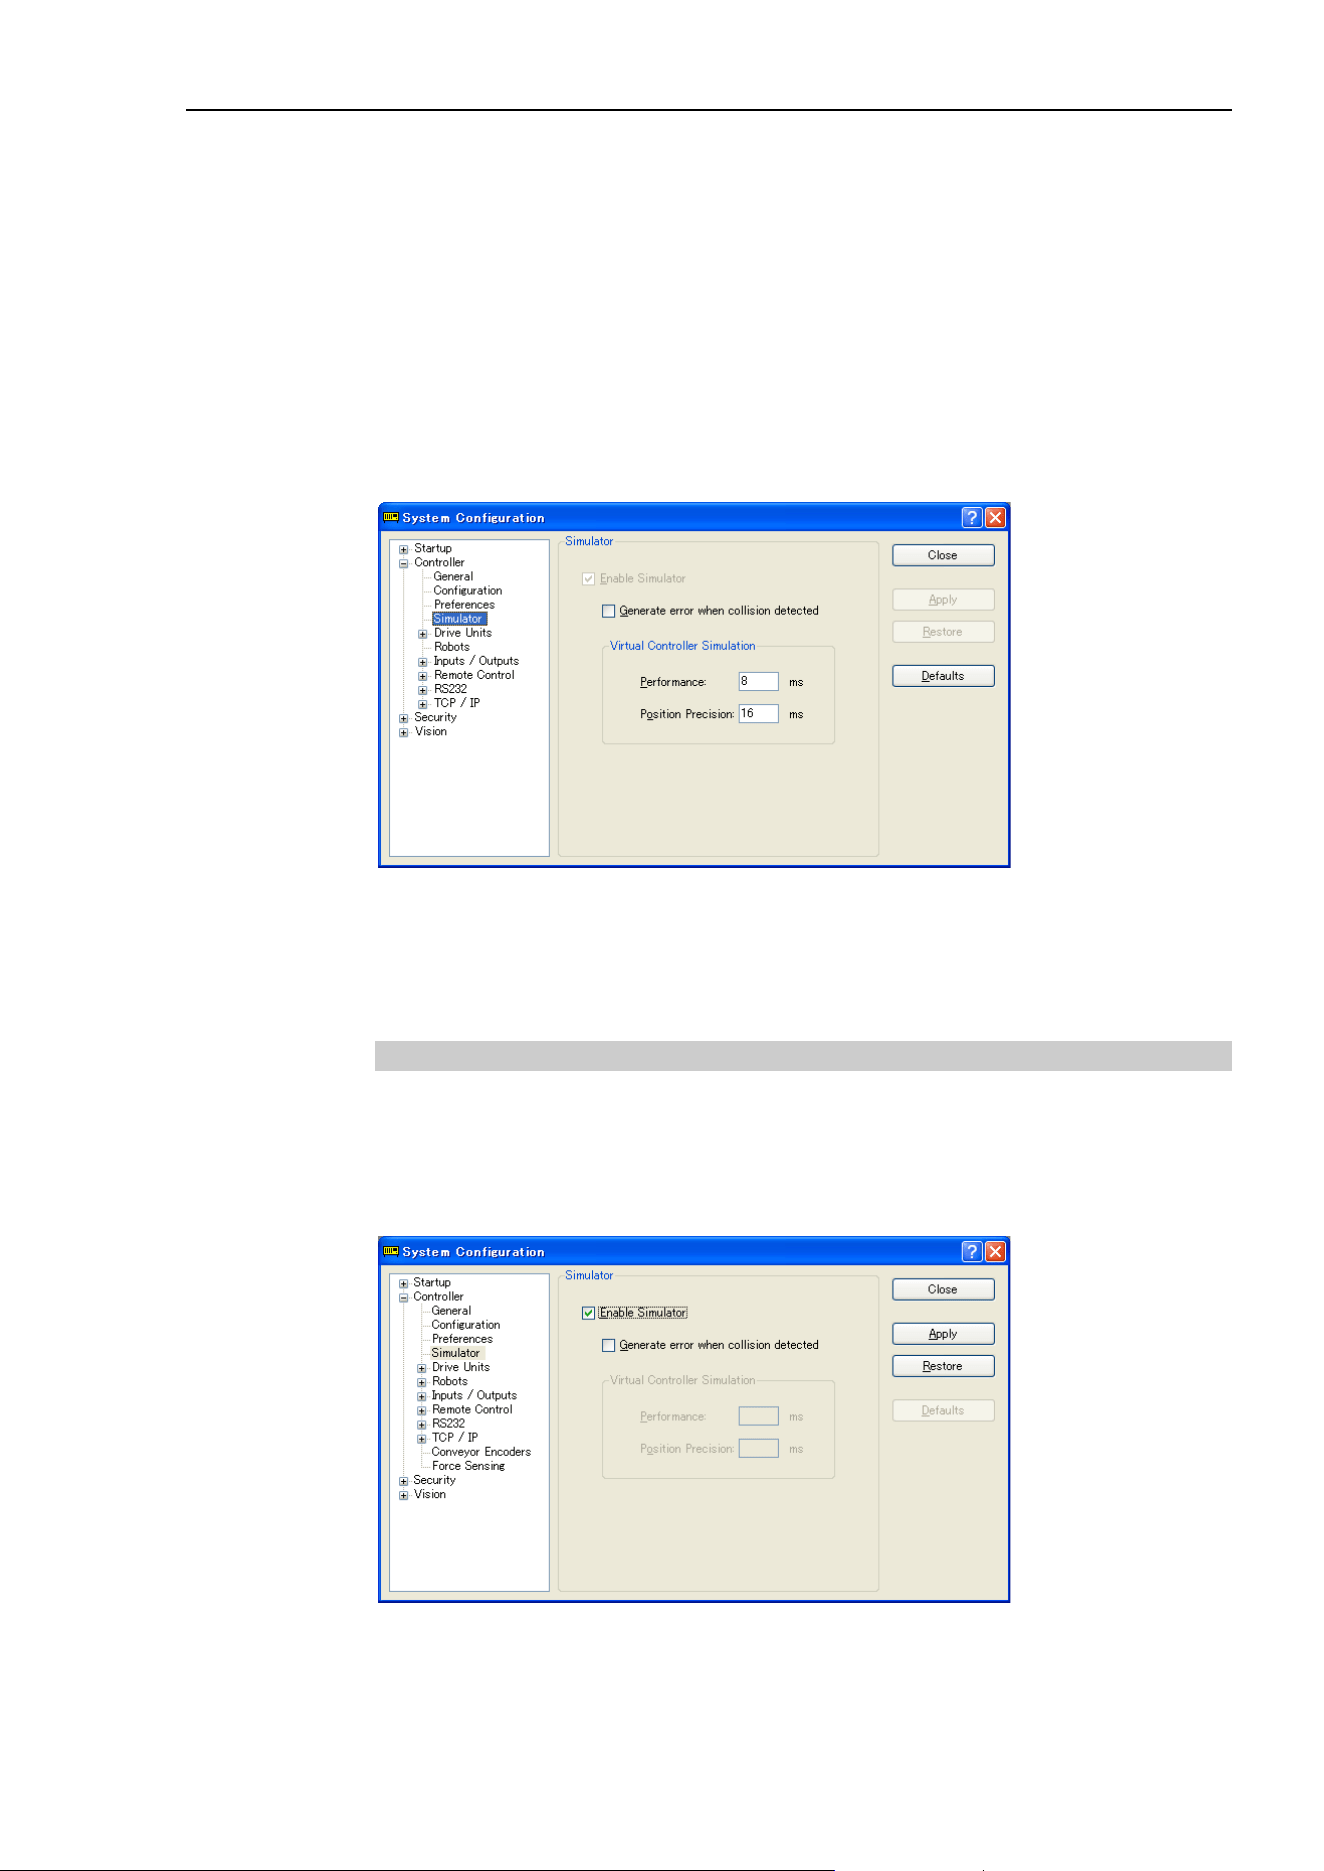
8. Simulator
EPSON RC+ 7.0 (Ver.7.4) User's Guide Rev.6 335
(6) Connect to “Virtual 2” and display the [Robot Simulator] window.
The robot setting and layout setting of 3D display has been taken over from “Virtual
1”.
(7) When you want to change the robot type, use the [Change Robot] in the robot object
property.
For details, refer to 8.3.1 [Robot Simulator] layout – (3) Property Grid.
Virtual controller configuration
Normally you don’t need to configure a virtual controller.
The configuration is available from the [Setup]-[System Configuration]-[Controller]-
[Simulator] page.
[Performance] : You normally don’t need to change the setting from 8 ms (default).
[Position Precision] : You normally don’t need to change the setting from 16 ms (default).
The situations when you need to change these settings are described in 8.4 Simulator
Specifications and Restrictions.
8.3.8 Connection with controller
Enable the Simulator in controller
From the [Setup]-[System Configuration]-[Controller]-[Simulator], check the [Enable
Simulator] check box to enable the simulator function.
After checking the check box, click the <Apply> button and then click the <Close> button.
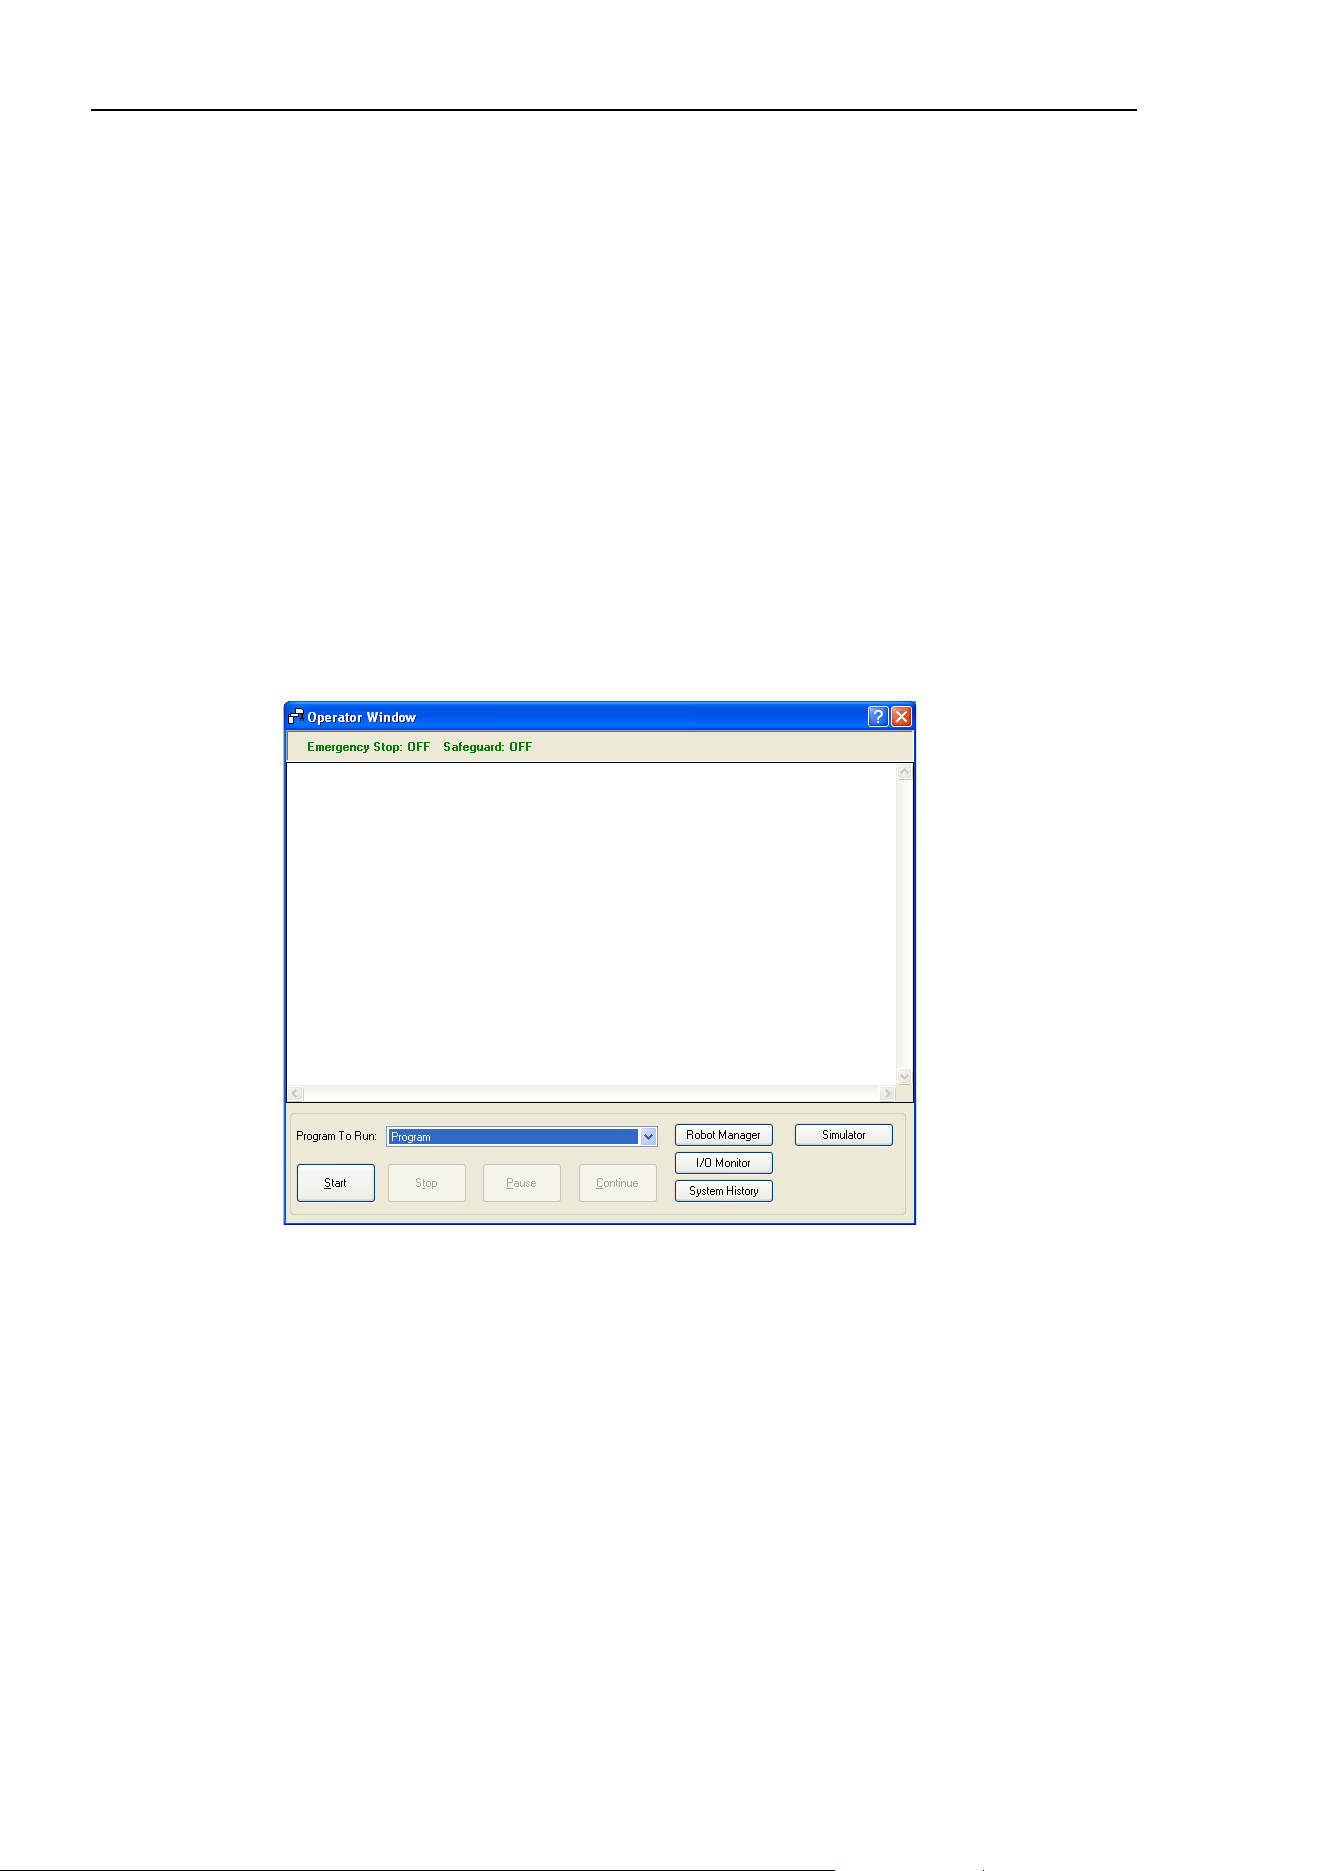
8. Simulator
336 EPSON RC+ 7.0 (Ver.7.4) User's Guide Rev.6
If collision with the simulator object is detected during a Jog motion or a robot motion
command execution when the Simulator is enabled, the Manipulator stops operation and a
Warning occurs.
To avoid collision with peripherals by using the Simulator, set 15 mm or greater margins
to the simulator object.
Function restrictions when connected with controller
- You cannot change the manipulator from the [Robot Simulator] window.
- You cannot select and move the manipulator arms in the [Robot Simulator]
window, except during the controller Dry run.
- When the manipulator connected to the controller is not supported in the Simulator,
the object list and the manipulator in 2D layout and 3D window are not displayed.
- The [Record/Playback] functions are not available.
Operator Window
When you enable the Simulator, the <Simulator> button is added to the Operator Window.
When you click on the <Simulator> button, the 3D display window appears.
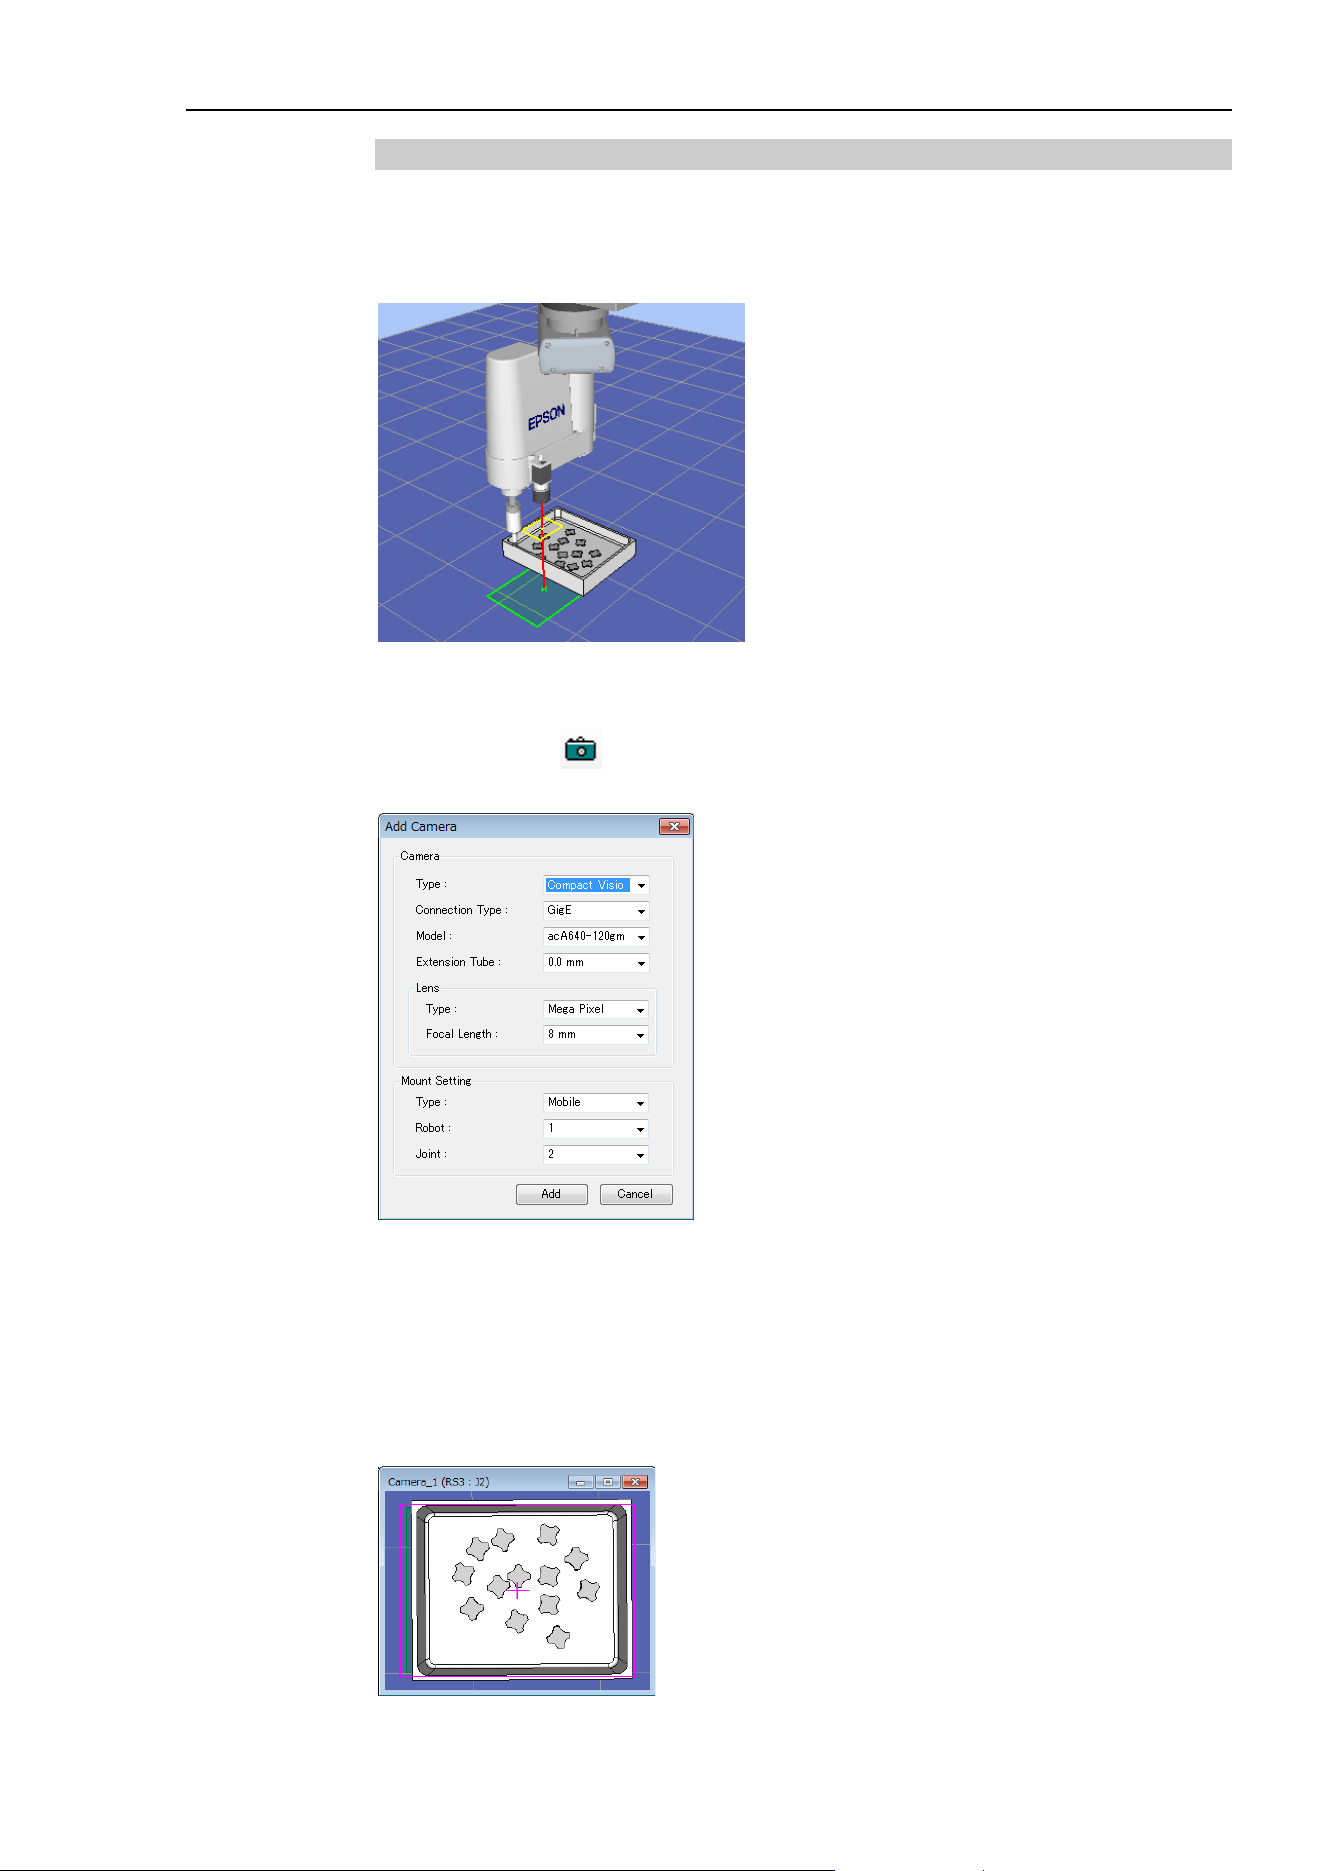
8. Simulator
EPSON RC+ 7.0 (Ver.7.4) User's Guide Rev.6 337
8.3.9 Virtual Camera Settings and Camera View Display
Virtual camera settings are function to select camera or lens, and install as the fixed
camera or mount as the mobile camera to the robot. Display of the camera view is a
function to display images of the set camera. You can select the camera or lens and verify
the layout by the simulator.
Add virtual cameras
Click the <Camera
> button on the toolbar to display the [Add Cameras] dialog.
After selecting devices and setting the mounting type, click the <Add> button.
If setting [Type] to “Mobile”, right click on the camera object of the layout object to
display the context menu. Select [Camera Mount Settings] to display the [Camera Mount
Settings] dialog. Set the relative position to joints.
Camera view display
By clicking the [Show Camera View] from the context menu of the camera objects, the
camera view is displayed.
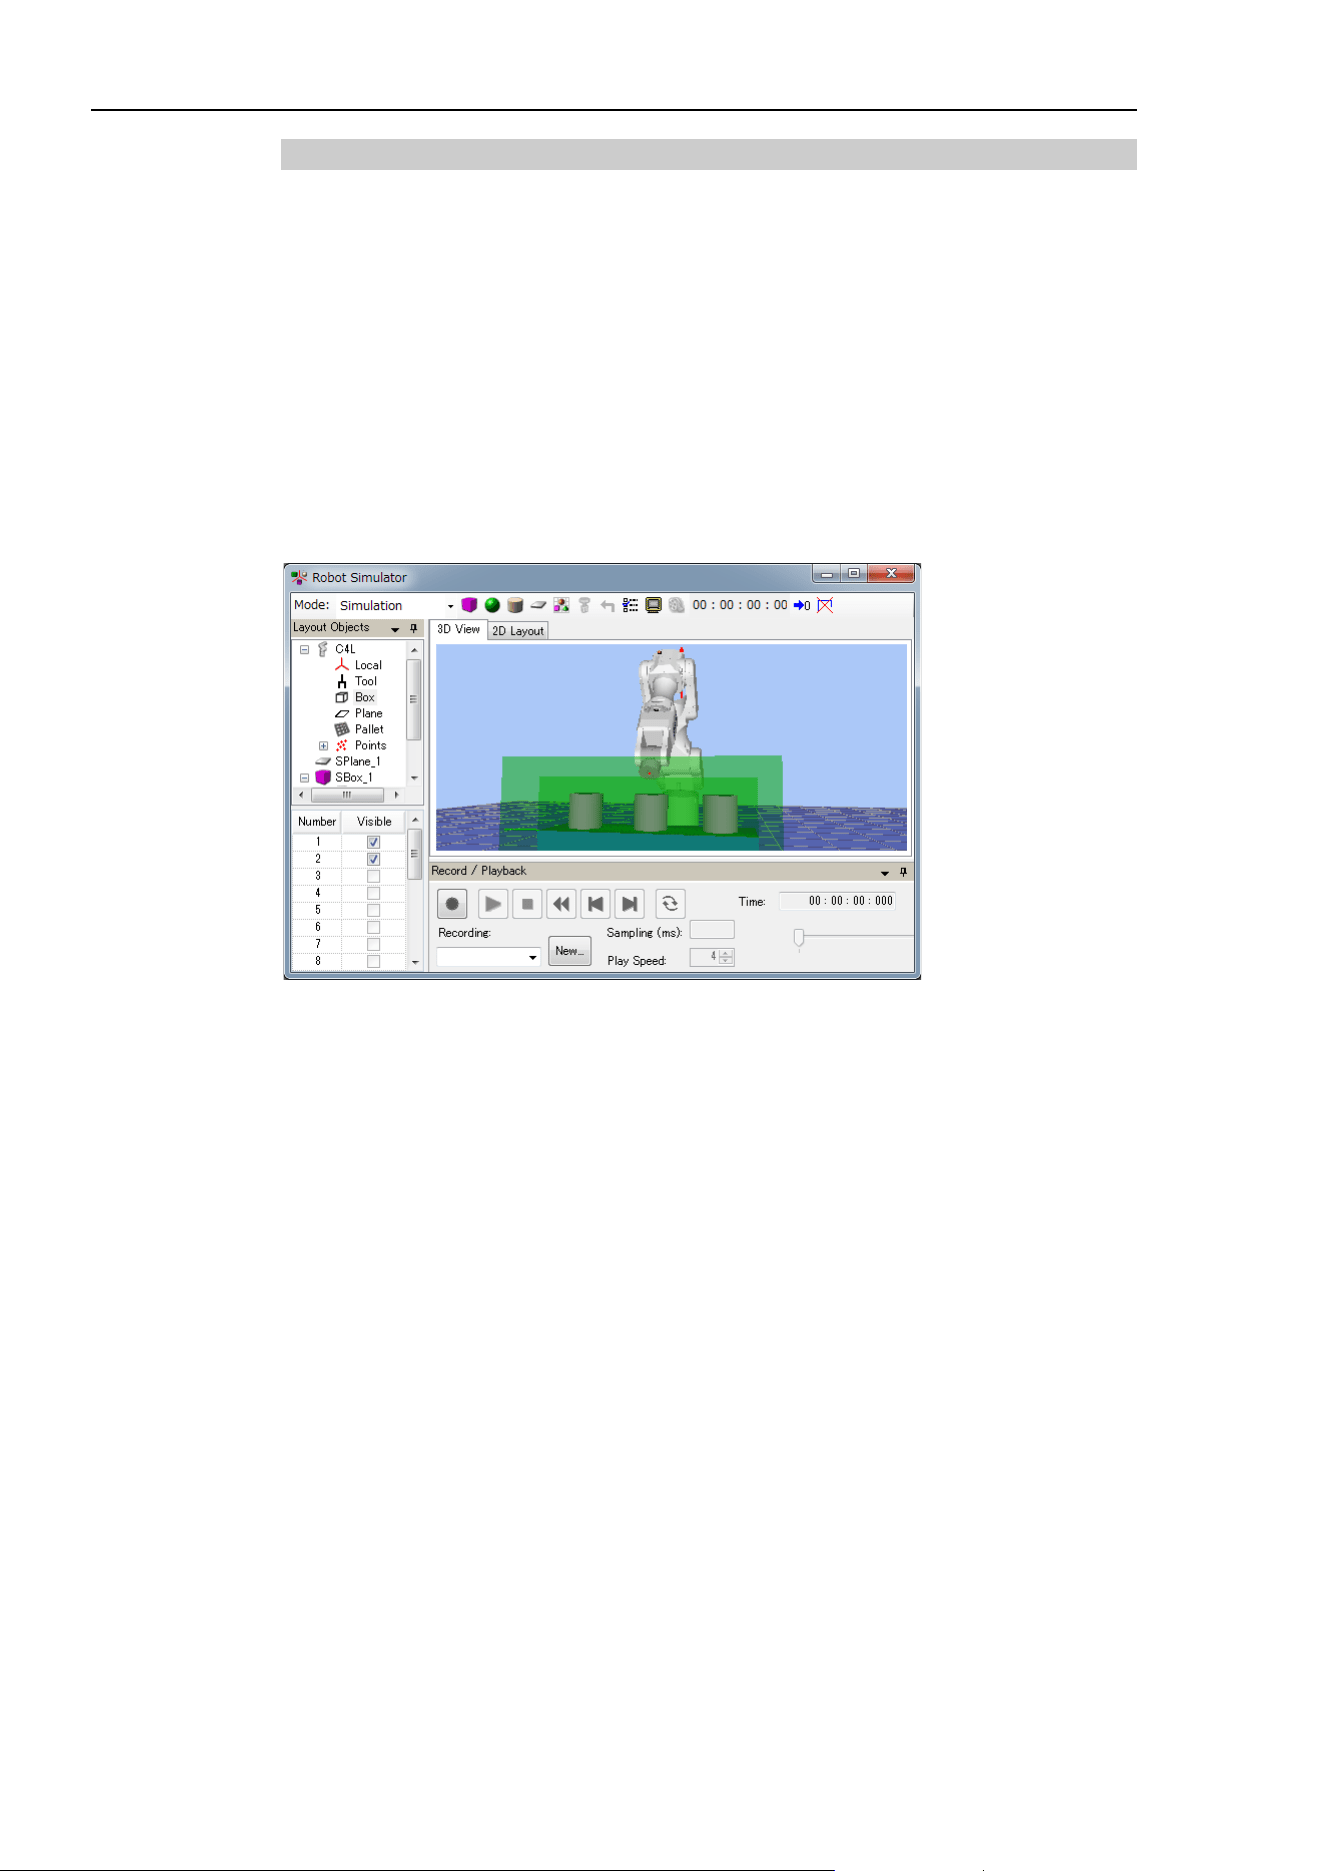
8. Simulator
338 EPSON RC+ 7.0 (Ver.7.4) User's Guide Rev.6
8.3.10 Motion restriction by BOX
By using the BOX command together with the GetRobotInsideBox function or the OnErr
command, robot power and motion can be restricted when the tool center point (TCP)
enters the approach check area (BOX).
Sample project using BOX
In the sample project, BOX2 is set outside BOX1. When the tool center point calculated
based on the currently selected tool enters BOX2, the robot will stop temporarily. If the
program execution is continued, the robot will resume operation in the restricted status
(low speed, low power).
Then, when the robot enters BOX1 inside BOX2, the robot will abort operation.
Use the sample project to execute the motion restriction using BOX.
The sample project is in \EpsonRC70\projects\SimulatorDemos\BOX_sample.
For details of the usage of the project, refer to 8.2.1 Working with the samples.
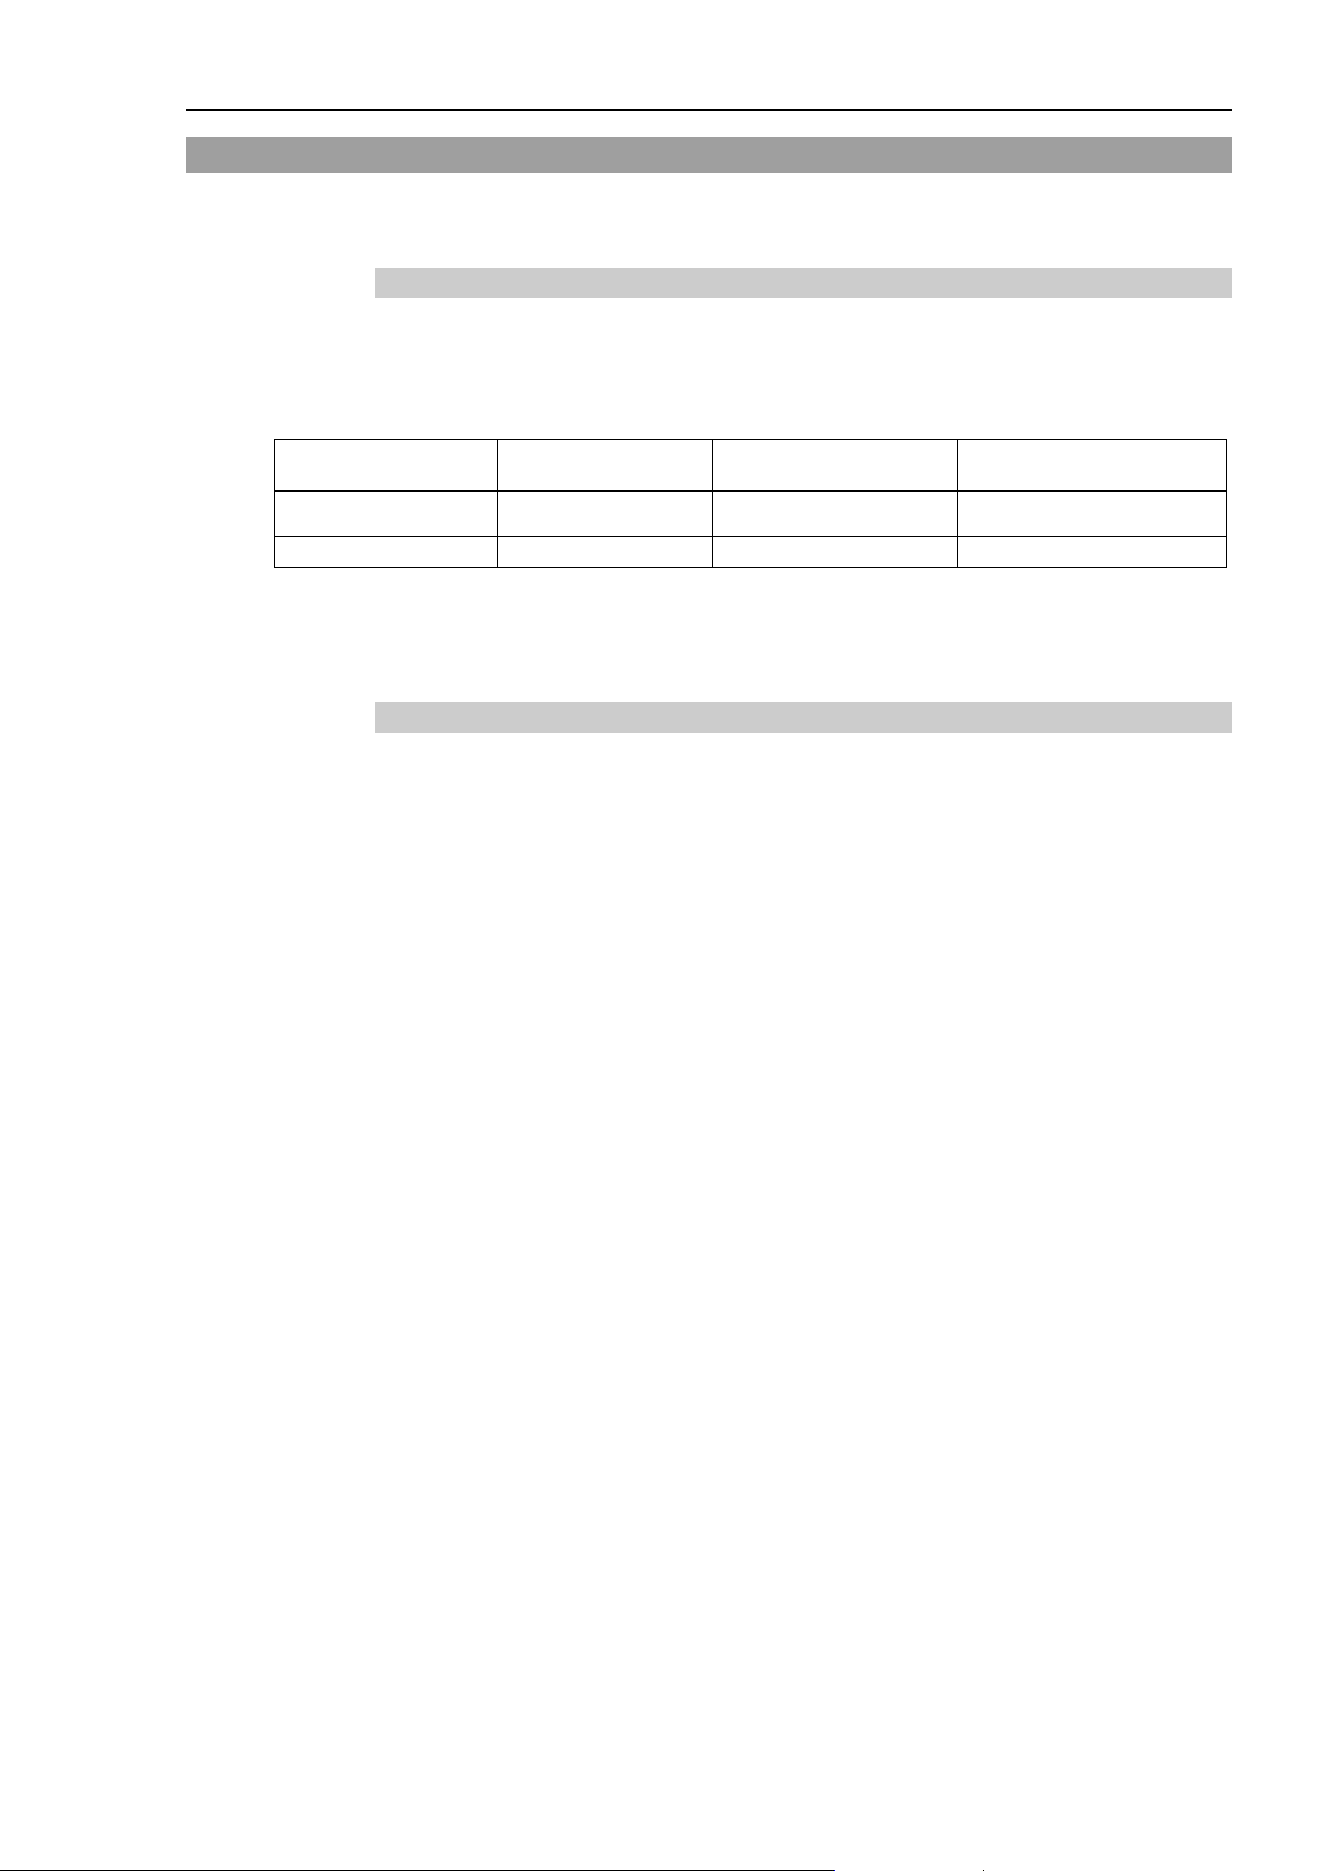
8. Simulator
EPSON RC+ 7.0 (Ver.7.4) User's Guide Rev.6 339
8.4 Simulator Specifications and Restrictions
This section describes the simulator specification, its restrictions, and precautionary
statements.
8.4.1 EPSON RC+ 7.0 package
EPSON RC+ 7.0 has two packages:
EPSON RC+ 7.0 : Standard package for developing the robot system
EPSON RC+ 7.0 Trial : Trial package for limited use (program execution on PC)
* It cannot connect with a robot controller.
Program execution
on PC
Connection with
controller
Connection with controller
+ 3D display
EPSON RC+ 7.0
OK *2 OK OK *1
EPSON RC+ 7.0 Trial
OK *2
-
-
*1 Requires the configuration to enable the simulator functions in EPSON RC+ 7.0.
Refer to 8.3.6 Connection with controller for the detail information.
*2 Continuous execution time of program is limited.
8.4.2 Specifications and precautions for the 3D display
Available robots for 3D display
In the future, we will add more robots for 3D display. Please contact the supplier of your
region for the latest information.
Some robots cannot use this function. For more details on unsupported models, refer to
Appendix C: Simulator Functions List of Unsupported Manipulator Models.
The flexible duct is displayed roughly.
- Check the dimensions in the manipulator manual.
- The duct actually vibrates while the manipulator is moving, the simulator doesn’t
display the vibration. Check how the duct vibrates with your real manipulator.
The bellow for Cleanroom or Protection model is displayed roughly
- Check the dimensions in the manipulator manual.
Available CAD data for 3D display
The following format is available for 3D display to show the robot hand and CAD object.
- VRML 2.0
Limits of reading: VRML2.0 prototype is not supported.
- STEP (AP203/AP214)
Limits of reading: The file whose character code is only ASCII can be read. In
addition, if Color is configured in Face, the specified Color is displayed.
- IGES
- DXF
DXF Format (DXF R13, DXF R14, DXF 2000/2000i, DXF 2002 ) of AutoCAD ®
software
The data file must be saved in the specified folder on the PC and not saved in EPSON
RC+.
NOTE
NOTE

8. Simulator
340 EPSON RC+ 7.0 (Ver.7.4) User's Guide Rev.6
The character code of file path for CAD data
For CAD data file in VRML 2.0 format and IGES format
, the data cannot be loaded when
the character code which is different from the language in the operating environment is
included in the file path (a file and folder name). Change the file and folder name to be
the same character code as the language in operating environment.
Memory usage of CAD data
The memory usage of 32 bit applications is limited to 2 GB. The CAD data cannot be
loaded when the total of memory usage of the application and the CAD exceeds 2 GB.
Therefore, there is a limit of the total number of polygons and polylines.
When the error message appears, reduce the number of polygons and polylines.
CAD data setup orientation
Some CAD data coordinates may be different from those of the simulator.
Adjust the coordinates to the correct position by changing [Property]-[ Rotation] after
loading the CAD data.
When loading CAD data as a hand, set the origin of the CAD data in the Tool0 position of
the manipulator. Set the coordinates to the correct position by changing [Property]-
[ Position] after loading the CAD data.
Number of available layout objects
You can create as many layout objects as you want.
However, when there are many objects to display, the display update interval becomes
longer and the judgment of collision detection becomes rough. Especially for CAD data,
displaying data that is too complicated is not recommended.
Shape of CAD object
The shape of objects may be displayed incorrectly (such as a clearance arises between the
faces) depending on the CAD data. In such a case, the shape may be improved by
converting the data to a different format.
Front-back relation of objects in semi-transparent display
The front-back relation of the objects may be incorrect when displaying the CAD and
Hand objects in semi-transparent display.
Rendering speed
It may take a few seconds to render the objects depending on the display adapter, and
operability such as in selecting the object may be decreased. It is recommended to update
the driver to the latest version.
8.4.3 Specifications and precautions for Simulation (program
execution on PC)
Overview
The Simulator produces the robot motions virtually on your PC.
It is designed to make the performance gap between the real system and the virtual system
as small as possible. However, a few differences in the virtual system are inevitable. The
operation time prediction and collision detection do not guarantee the precision.
Fully understand the contents in this chapter and check if the real system operates without
any problems before you go to full-scale operation.

8. Simulator
EPSON RC+ 7.0 (Ver.7.4) User's Guide Rev.6 341
Operation time prediction
Operation time displayed in the [Robot Simulator] window is approximate time required
for executing the program.
Time for the motion commands such as Go, Jump reflects the Speed and Accel values in
the program. The operation time may vary when you operate the real robots from the
displayed operation time according to conditions such as the Fine setting and servo delay.
In particular, when small ranges are used with the Fine instruction, the real robots need a
longer operation time for accurate positioning.
The simulation cannot guarantee the precision but the margin of error in the operation time
is within 10% when you execute motions with the standard cycle time (with the default
Fine settings).
Considered in the operation time prediction
Not considered in the operation time prediction
Robot model
Speed settings (Speed, Speeds, etc.)
Acceleration settings (Accel, Accels, etc.)
Load (Weight, Inertia)
Others (ARCH, CP)
Fine setting
Error within 10% from the default
(Motions of standard cycle time)
With larger setting than the default,
the operation time will be shorter.
With smaller setting than the default,
the operation time will be shorter.
Servo delay
With the real robots, the operation will be longer.
Time for the other commands than the motion commands is a virtually executed time on
PC; therefore the actual time varies widely depending on the PC performance.
When measuring the motion time between two points, as simple program as possible is
recommended. Refer to 8.2.2 Working with the user created system - 8. Measure the robot
operation time.
Collision Detection Precision
The Simulator Collision Detection provides an indication whether robots collide with the
peripheral equipment or not when the program is executed. It does not consider the error
in path due to servo delay. Be aware that a margin is necessary for the real robot system.
The Simulator judges collisions more accurately when the robot motion speed is slow.
The judgment of collision detection during program execution is accomplished with the
3D display update. When your PC has high graphics performance, the collision judgment
becomes more accurate.
In Playback mode, the Simulator judges collisions in all steps and is useful when you need
accurate detection.
The Simulator cannot guarantee the precision but the margin of error in the collision
detection is within 10 mm when you execute motions with Speed 100% on a PC of the
recommended specifications.

8. Simulator
342 EPSON RC+ 7.0 (Ver.7.4) User's Guide Rev.6
Motion duty and Overload error
In the Simulator, you cannot detect the overload error. Even when the motion duty is too
high and the robot should have the overload error and stop, it keeps moving.
Duty 50% - As a measure of possible duty, the robot can really keep moving at duty 50%
with the maximum acceleration/deceleration speed and without the overload error.
However, it depends on the robot model type, load, points to go to, and
acceleration/deceleration speed setting, etc.
Time progress difference by PC condition
On a PC that meets the system condition, progress of the time in the Simulator and the real
time (as you see on the watch) are almost the same (few percentages difference).
If you are running other applications such as Windows Media Player simultaneously, the
time progress in the Simulator can widely vary from the real time. In this case, use the
Simulator function while other applications are not running.
Also, on some PC models, the time progress in the Simulator may widely vary from the
real time. In this case, set the [Performance] at 16 ms and the [Position Precision] at 20
ms, which may close the gap of the time progress.
Time confirmation program
(If the two printed times are within 27 to 33 seconds, there is no problem.)
Function main
Print Time$
Wait 30
Print Time$
Fend
Execution on PC below the minimum of specification
You can install the EPSON RC+ and use the Simulator functions on a PC that doesn’t
meet the minimum of the specification.
However, it doesn’t guarantee the correct motions because the following may happen:
- Operation time prediction is not accurate
- Collision Detection has a large margin of error
- 3D display skips updates
8.4.4 Specifications and precautions of EPSON RC+
Restriction on the controller settings
When you connect with a virtual controller, the following items are grayed and become
unavailable to change.
Setup: System Configuration: Controller: Configuration Page: IP Address, etc.
Setup: System Configuration: Controller: Preference Page: Dry run, etc.
Backup and restore of the controller setting
The setting data that you backup in the virtual controller can be restored in a controller.
Also, the setting data that you backup in a controller can be restored in a virtual controller.
However, there are restrictions. For more details, refer to 5.11.8 [Maintenance] (Tools
menu)-[Backup Controller] and [Restore Controller].
TIP

8. Simulator
EPSON RC+ 7.0 (Ver.7.4) User's Guide Rev.6 343
8.4.5 Restriction on SPEL+ command execution
(1) I/O operation and commands (On, Off, SW, Ctr, etc.)
All I/O including the option boards are available in a virtual controller. Operating I/O
data is stored in the PC memory (virtual I/O mode). The I/O input status can be
changed from the EPSON RC+ I/O Monitor window. Also, the I/O input status can
be changed using the SetSw or SetIn statements in a SPEL
+
program.
Even if you specify an asynchronous On/Off command, the I/O status cannot be
changed after the specified time and the Ctr function always returns 0.
(2) Ethernet / RS-232C communication command
(Print #, Input #, OpenCom, OpenNet, etc.)
All 16 Ethernet ports are available. However, an Ethernet port requires configuration
of the IP address and TCP/IP port.
For RS-232C, all 8 ports including the option RS-232C board are available.
NOTE
For RC700/RC700-A Controller and RC90 Controller, up to 5 ports including the
standard port and the option RC-232C board are available. Be careful of the number
of the ports when using the project created in the virtual controller to the Controller.
As a default, Ethernet / RS-232C communication commands do not perform actual
communication.
To use the actual Ethernet/RC-232C ports, be sure to configure as described in (3).
Output data from Print #, etc. is saved in the communication output file. In the input
by Input#, etc, the return value is 0 (numeric data) or blank (string). However, if you
create a communication response file, the return value depends on the file content.
Communication output file
When calling OpenCom or OpenNet command, a communication output file is
created in the \EpsonRC70\Virtual\Mounted Volume\Project folder on the PC.
DummySend***.dat : Communication output file (*** is the port number)
When a communication output file already exists, the previous output data is deleted.
The file is deleted when you switch the project; save the file in a proper folder if you
need.
When executing the following program,
OpenCom #1
Print #1, 123
Print #1, "TEST DATA"
CloseCom #1
the DummySend001.dat file will contain...
123
TEST DATA
NOTE
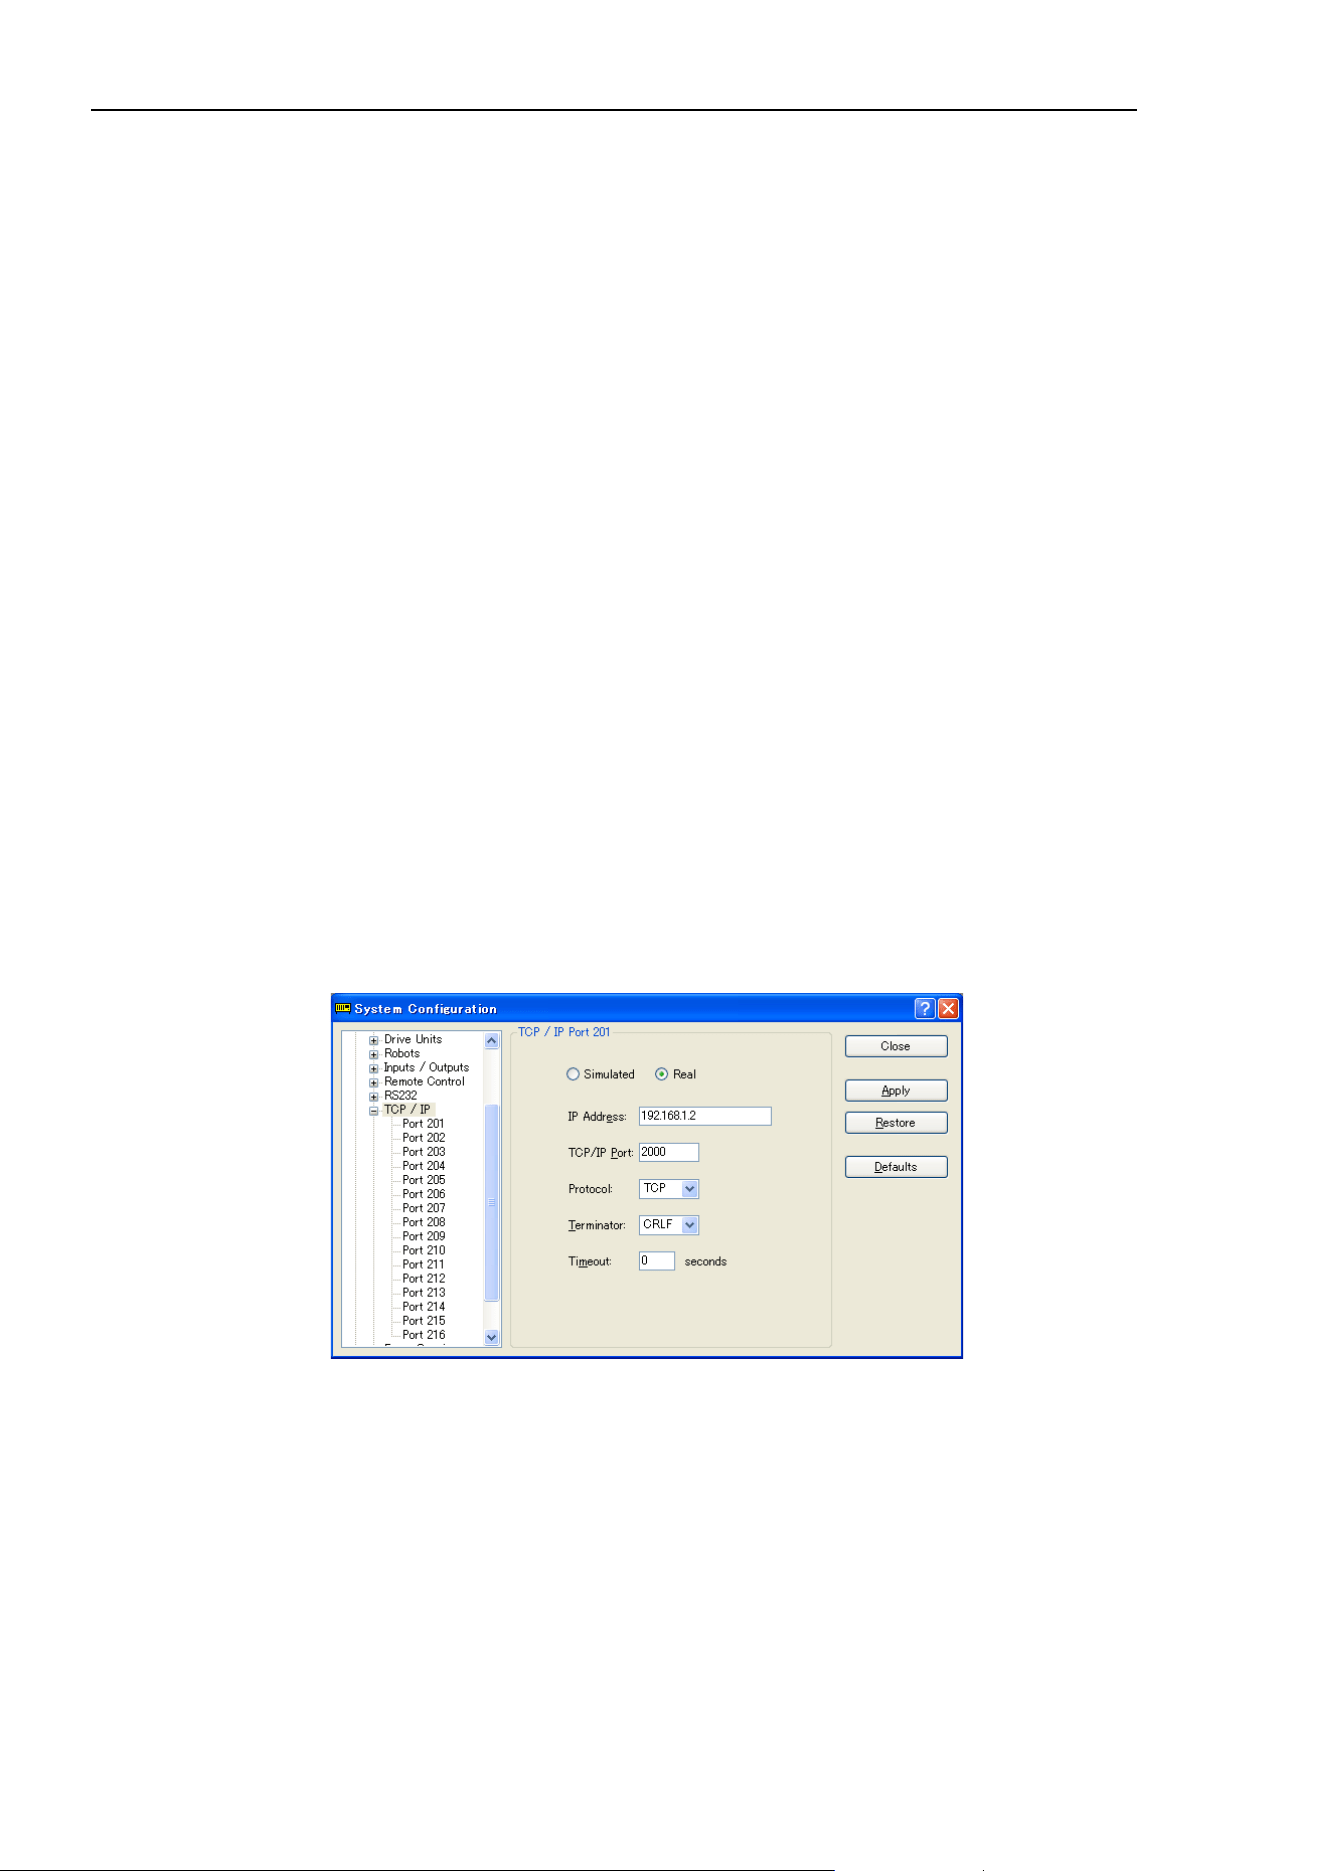
8. Simulator
344 EPSON RC+ 7.0 (Ver.7.4) User's Guide Rev.6
Communication response file
Copy the communication response file to the \EpsonRC70\Virtual\Mounted
Volume\Project folder in before running a program. The file is deleted when you
change the project; save the file in another folder if you need to keep it.
When calling OpenCom or OpenNet command, the communication response file is
loaded.
DummyRead***.dat : Communication response file (*** is a port number)
When the following DummyRead001.dat file is used,
321
Test Data
and the following program is executed,
Integer i
String s$
OpenCom #1
Input #1, i
Input #1, s$
CloseCom #1
Print i
Print s$
the return values are i = 321 (numeric data), and s$ = "Test Data" (string).
(3) How to enable the actual ports of Ether net/RS-232C in the virtual controller
Actual ports become available when [Real] is selected in [Setup]-[System
Configuration]-[Controller]-[TCP/IP].
Change the port settings, then click <Apply> and <Close>.
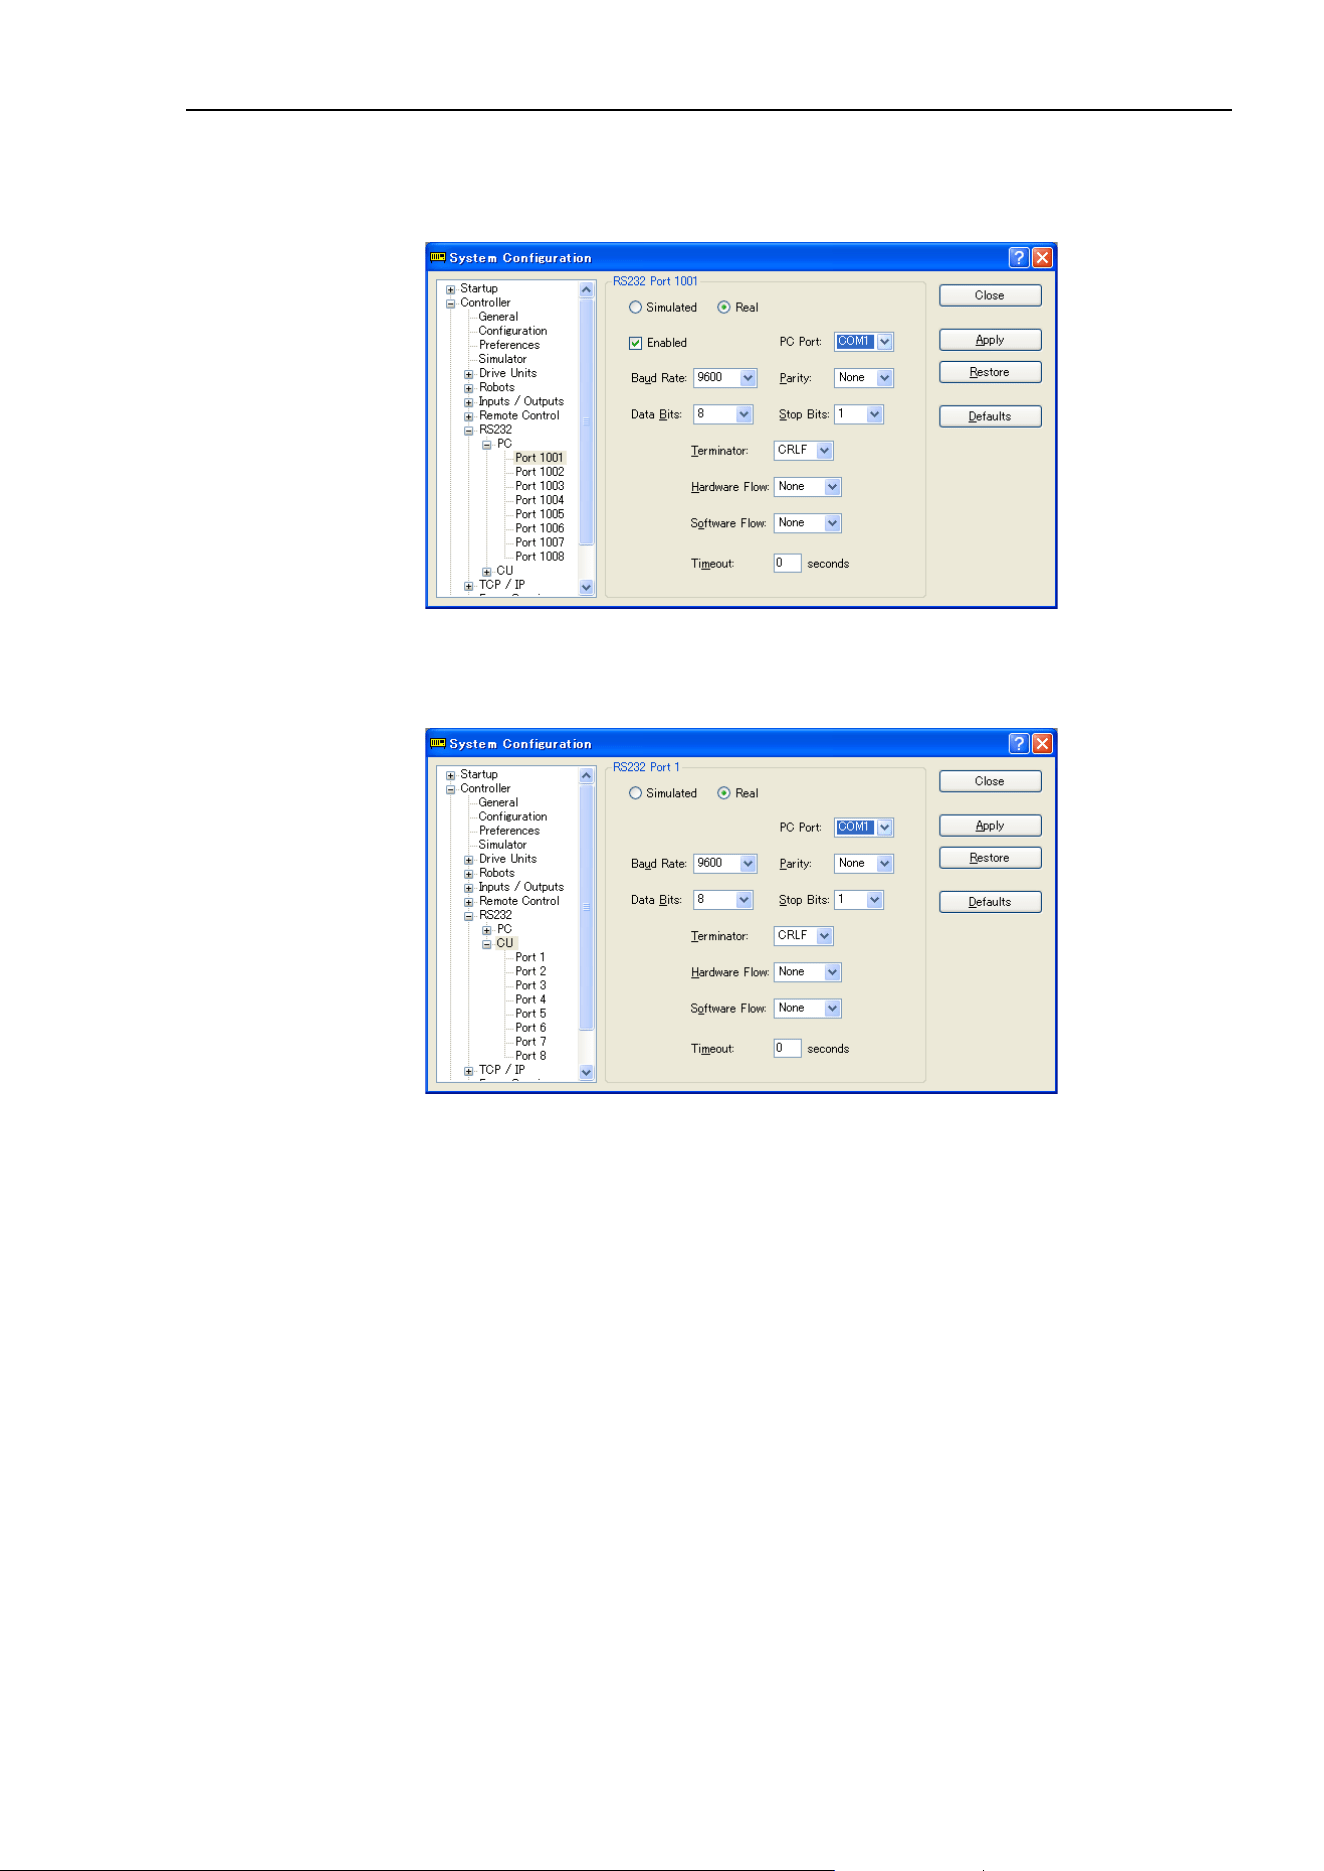
8. Simulator
EPSON RC+ 7.0 (Ver.7.4) User's Guide Rev.6 345
Actual ports become available when [Real] is selected in [Setup]-[System
Configuration]-[Controller]-[RS-232C] -[PC].
Select the PC port, then click <Apply> and <Close>.
Actual ports become available when [Real] is selected in [Setup]-[System
Configuration]-[Controller]-[RS-232C] -[Controller].
Select the PC port, then click <Apply> and <Close>.
To use the actual Ethernet/RC-232C ports, select the actual ports in the configuration
dialog.
(4) Vision command (VRun, VGet, etc.)
For the vision-related commands, communication with the Compact Vision (CV1) is
not performed. However, the commands can be executed with virtual camera
function. Vision sequence can be executed with an image file set in ImageFile
property as an input image. Also the result can be acquired by VGet. When the PC
vision is set and the GigE camera is connected, vision commands such as VRun and
VGet the can be executed using actual camera image. In this case, commands can be
executed from the virtual camera function like the Compact Vision, when the GigE
camera is not connected.
For the Vision Guide, refer to EPSON RC+ option Vision Guide 7.0.

8. Simulator
346 EPSON RC+ 7.0 (Ver.7.4) User's Guide Rev.6
(5) Other restrictions
For the Wait command, the following syntax is not supported:
Wait InsideBox()
Wait InsidePlane()
For the Time and Date commands, the time can be displayed, but the time setting is
not available.
For the SimSet commands, the motion of the parts that specify Pick or Place and
movement or rotation of the objects that specify PositonX, PositionY, PositionZ,
RotaitonX, RotationY, or RotationZ cannot be recorded and produced by the
[Record/Playback] functions.
(6) Program execution time
In the virtual controller, programs will execute continuously for up to one hour.
If continuous execution is over one hour, a warning message appears.
You can execute the program again after the warning is displayed, and the continuous
execution timer will be reset.
8.4.6 Specifications and precautions of EPSON RC+ 7.0 Trial
Version upgrade from EPSON RC+ 7.0 Trial to EPSON RC+ 7.0
Follow the procedures in Appendix A: Software Installation to upgrade to EPSON RC+ 7.0.
The EPSON RC+ 7.0 Trial version doesn’t need to be uninstalled.
You can continue to use the projects and virtual controllers (layout) that you used in the
EPSON RC+ 7.0 Trial in the EPSON RC+ 7.0 Standard version.
NOTE

9. Motion System
EPSON RC+ 7.0 (Ver.7.4) User's Guide Rev.6
347
9. Motion System
EPSON RC+ supports the motion systems listed below.
- Standard Motion System
- PG Motion System
9.1 Standard Motion System
The standard motion system consists of the Control Units and the Drive Units (optional,
up to three units).
You can connect one robot to the Control Unit directly. For details on the Robot
Controller and maintenance, refer to the Robot Controller manual.
The Drive Units are automatically recognized at the startup of the Control Unit if they are
connected to the system.
When addition and removal of the Drive Units are automatically recognized, the startup
time becomes longer in order to reboot the Control Unit.
9.2 Drive Module Software Configuration
The drive module is configured at the factory before shipment. It is automatically
recognized by the controller and you do not have to configure the settings.
Also, you do not have to configure the settings for the drive module in the Drive Unit
which is automatically recognized.
9.3 PG Motion System
The PG (Pulse Generator) Motion System is an option.
When a PG board is installed in the controller, it is automatically recognized. You can
select it in the robot configuration dialog.
For instructions on using the PG Motion System, refer to the Robot Controller Option PG
Motion System manual.
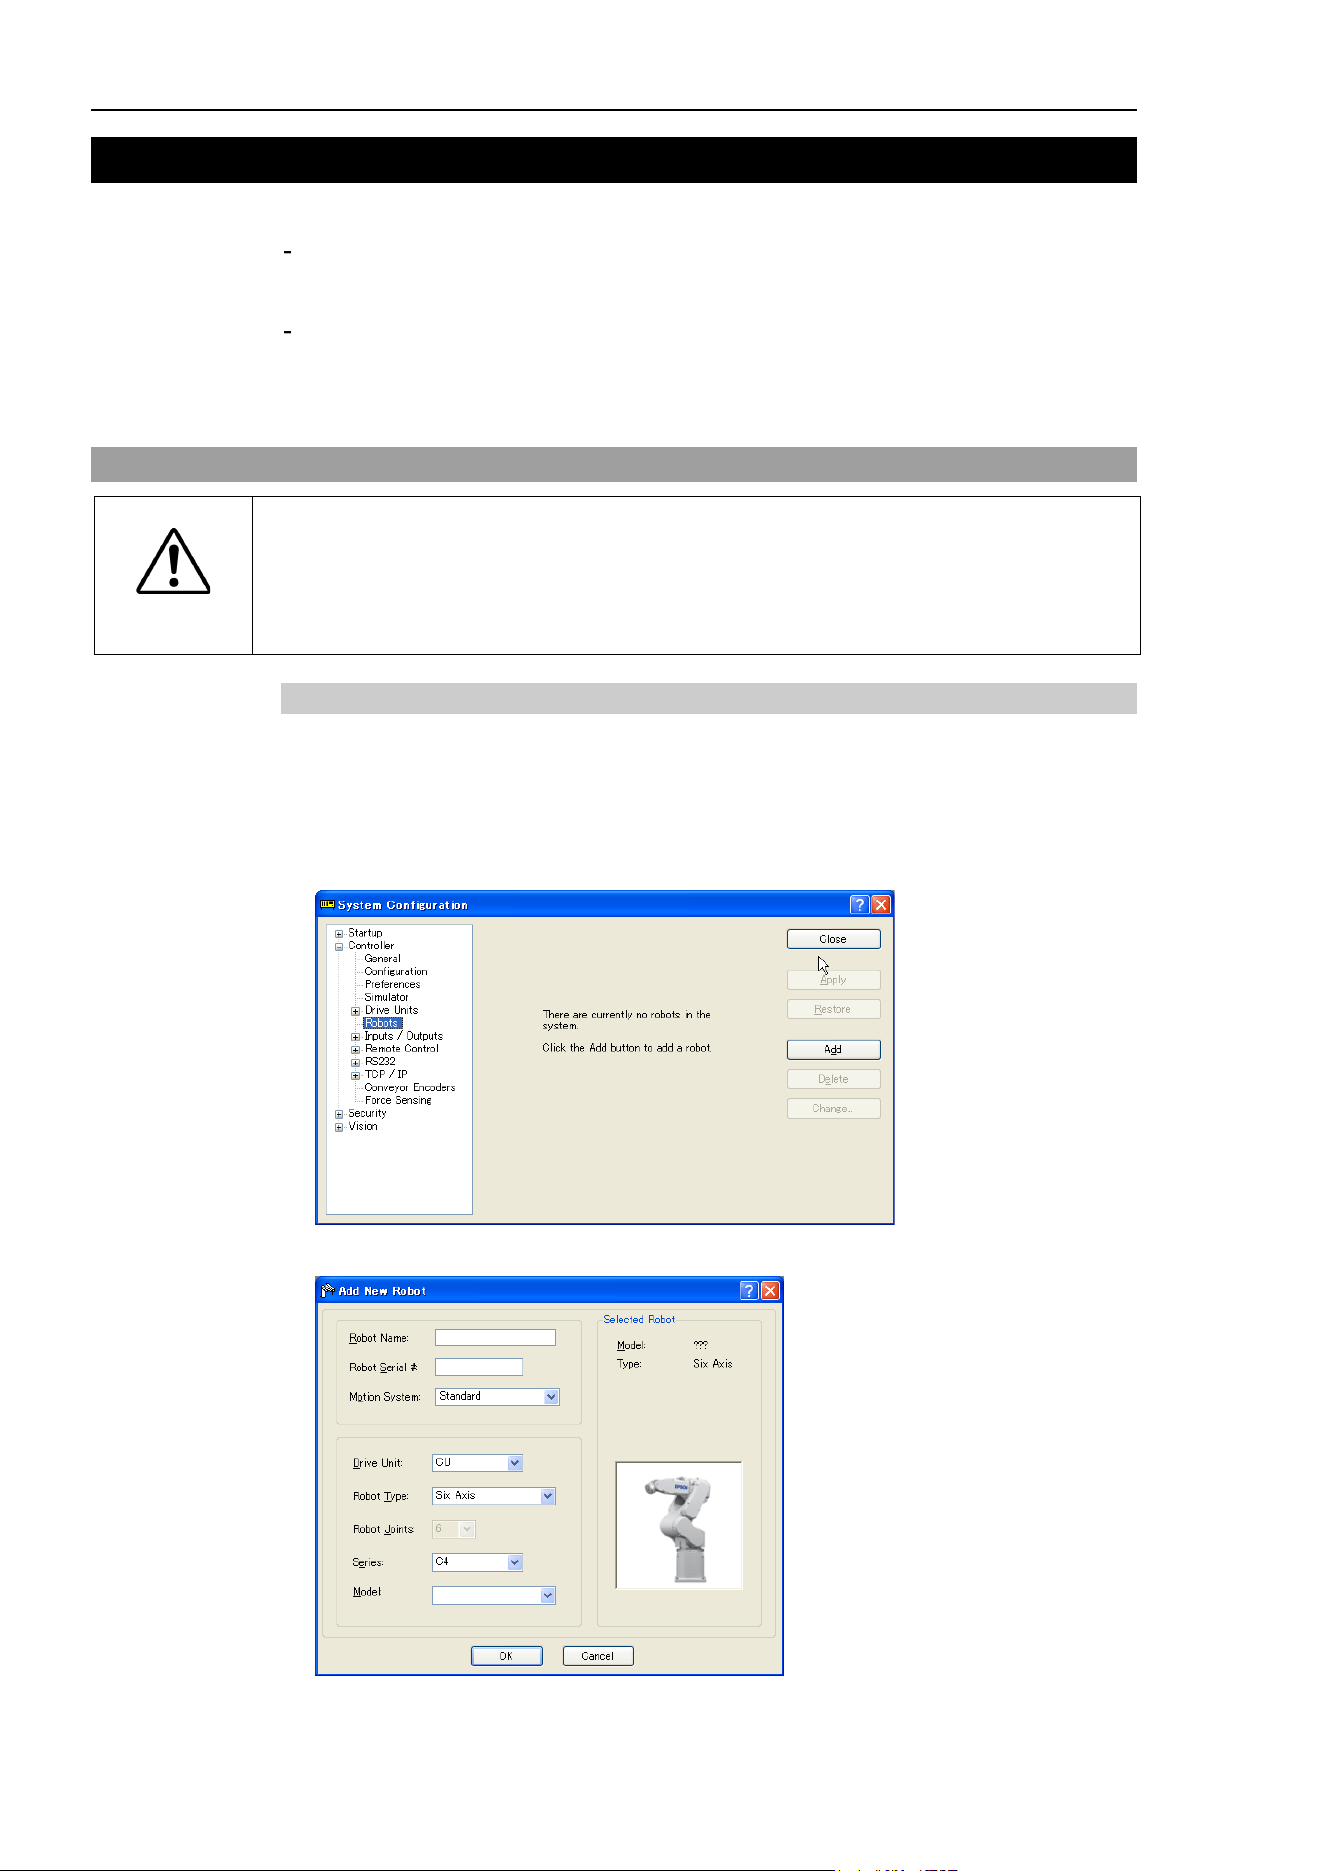
10. Robot Configuration
348 EPSON RC+ 7.0 (Ver.7.4) User's Guide Rev.6
10. Robot Configuration
This chapter contains information for adding robots and configuring additional axes.
Robot Configuration
Adding a standard robot
Additional axes Configuration
Adding a robot with additional axes
Robots are configured from the Robots folder on the [Setup]-[Controller] dialog tree.
10.1 Setting the Robot Model
CAUTION
■
Each robot is configured before shipment. Therefore, it is normally unnecessary
to change the settings. If you change the settings, it may cause the robot to
malfunction or perform unusual motion. This is extremely hazardous and you
should be careful.
10.1.1 Adding a standard robot
If you have purchased the PG motion system Option, you can add user defined robots.
Refer to the Robot Controller Option PG Motion System manual.
1. From the Setup Menu, select System Configuration.
2. Click [Robots] in the tree on the left.
3. Click <Add> and the following dialog box will appear.

10. Robot Configuration
EPSON RC+ 7.0 (Ver.7.4) User's Guide Rev.6
349
4. Type in a name for the new manipulator and enter the serial number on the
manipulator’s nameplate. Any serial number can be used, but it is recommended that
you use the number that is stamped on the manipulator.
5. Select a motion system to use from the [Motion System] dropdown list. If there are no
other motion systems installed, then “Standard” will already be selected.
6. Select a Drive Unit for your manipulator from the [Drive Unit] dropdown list.
7. Select a manipulator type from the [Robot type] box.
8. Select a manipulator series from the [Series] dropdown list.
9. Select a manipulator model from the [Model] dropdown list.
After you select a manipulator model, all manipulators available for the type of motor
driver currently installed in the controller will be displayed. If you use [Dry run], all
robots selected in step 9 will be shown.
10. Click <OK> and the controller will be rebooted.
10.1.2 Calibrating a standard robot
The calibration method differs according to the manipulator model.
For details, refer to the Manipulator manual: Maintenance section: Calibration.
10.1.3 Changing robot system parameters
The following system parameters for the robot can be changed from EPSON RC+ 7.0:
Enable/Disable Joints
You can disable one or more joints from [Setup]-[System Configuration]-[Robots]-
[Robot**]-[Configuration]. On robots with a ball screw Z axis, you must disable both
joints 3 and 4 together.
Hofs
Hofs are the joint home offsets. You can view and edit the values from [System
Configuration]-[Robots]-[Robot**]-[Calibration]. However, it is recommended that you
use the Robot Calibration wizard to set these values. These values are unique for each
robot and are supplied from the factory. Hofs are especially important for SCARA
robots because the values determine that both lefty and righty hand orientation will
position the robot at the same point.
CalPls
CalPls values are joint calibration offsets. You can view and edit the values from
[System Configuration]-[Robots]-[Robot**]-[Calibration]. However, it is recommended
that you use the Robot Calibration wizard to set these values. These values are unique
for each robot and are supplied from the factory. CalPls values are used to calibrate joint
position after replacing a motor or encoder.
These are one-time settings for each robot. Additional robot parameters can be set from
the Robot Manager.
To change robot parameters, follow these steps:
1. Select [System Configuration] from the [Setup Menu].
2. Under the [Robot] folder in the tree on the left, select [Robot**]-[Calibration].
3. Execute the calibration wizard or change values for Hofs or CalPls.
4. Click <Apply> to make the changes permanent.
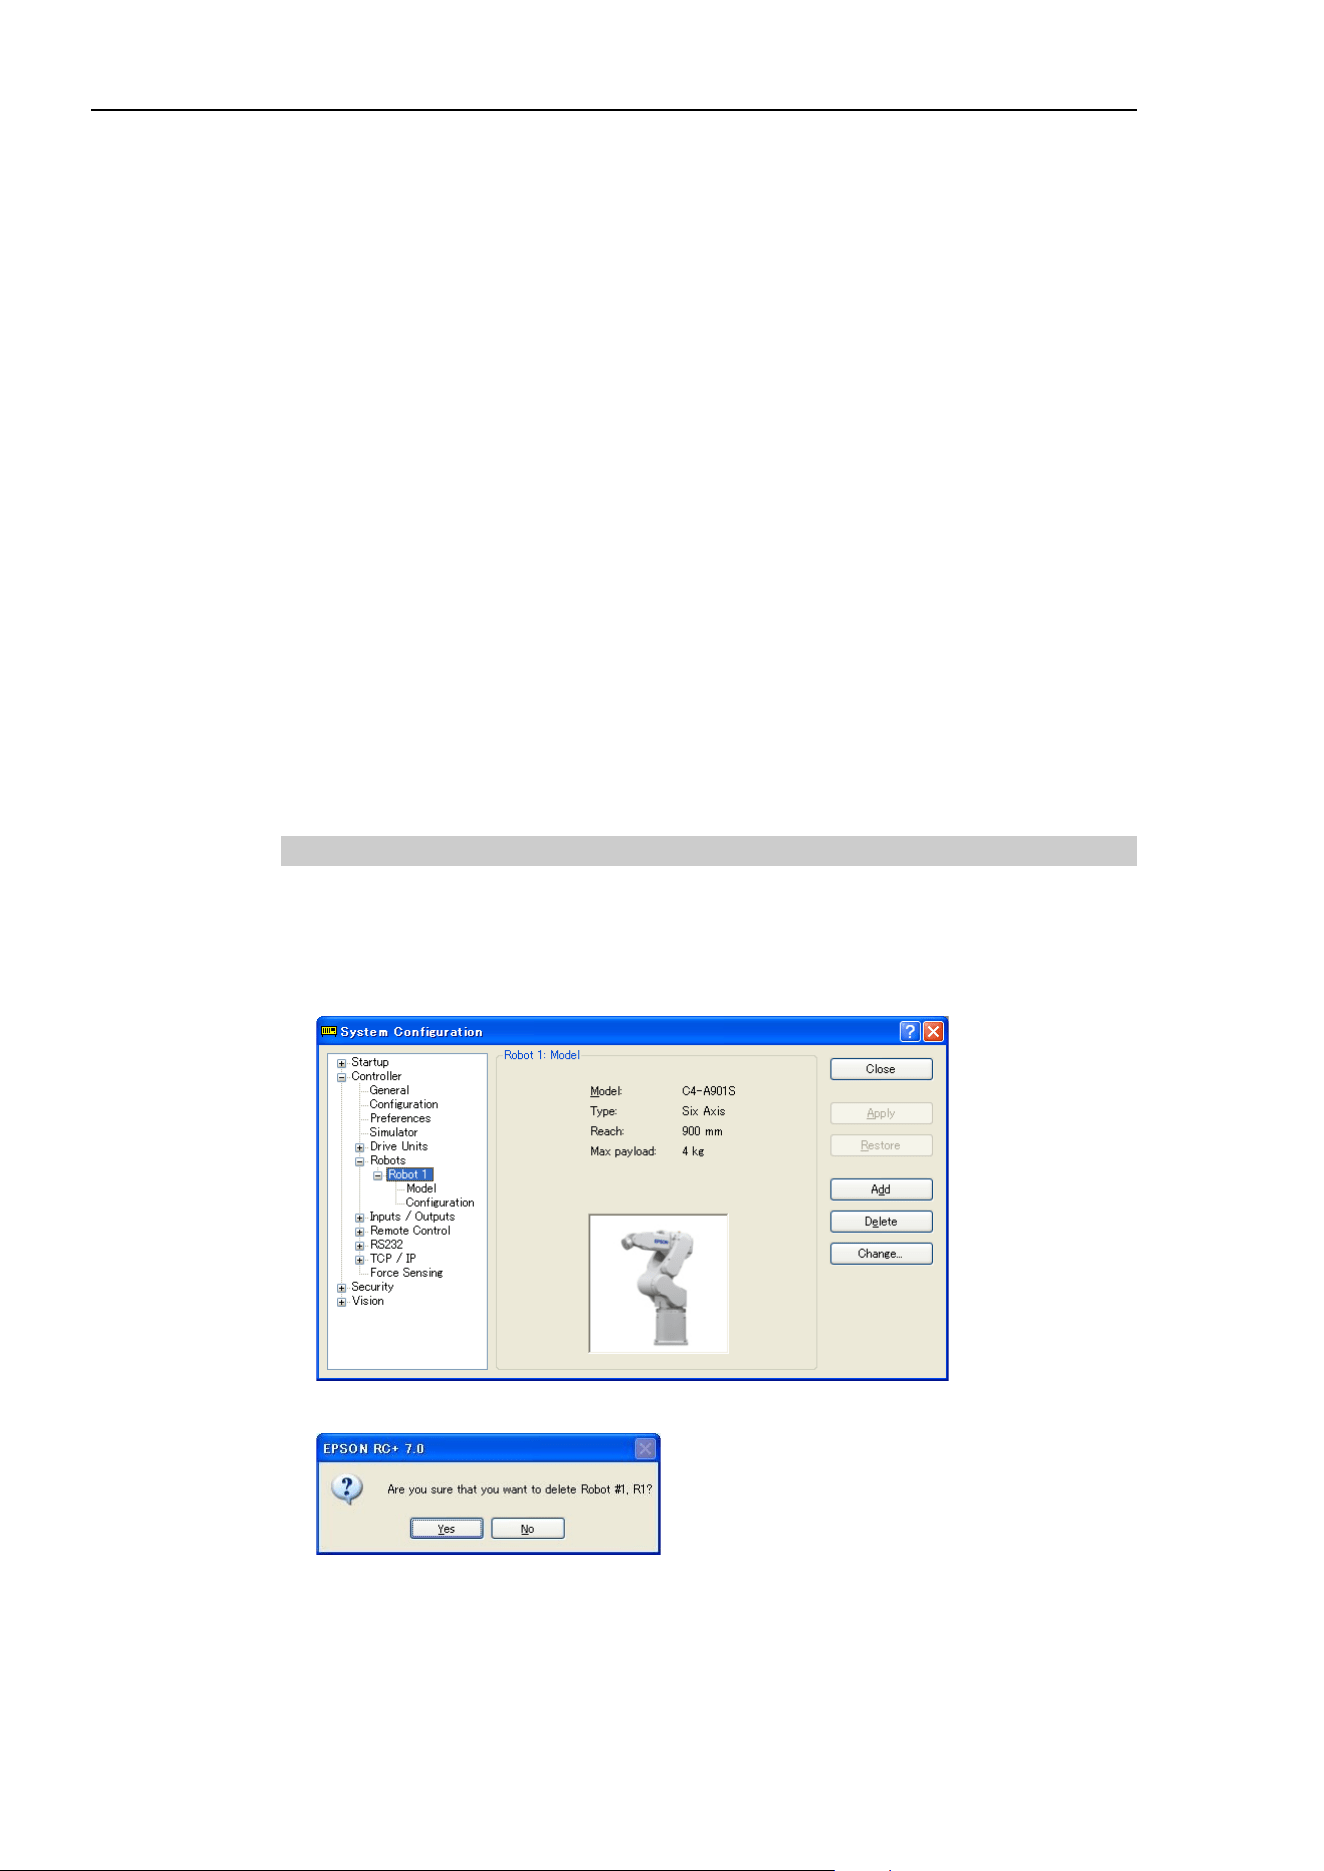
10. Robot Configuration
350 EPSON RC+ 7.0 (Ver.7.4) User's Guide Rev.6
Saving robot calibration data
You can save and load individual robot calibration files. This is useful for moving a robot
from one controller to another. When you save calibration data, a file is created with an
MPD file extension. This file contains Hofs and CalPls values.
To save robot calibration data
1. Select [System Configuration] from the [Setup] menu.
2. Under the [Robot] folder in the tree on the left, select [Robot**]-[Calibration].
3. Ensure that the robot serial number is correct. The serial number will be used to create
the default file name. It is recommended that the serial number be used.
4. Click the <Save Cal> button. Browse to a destination directory and click Save.
Loading robot calibration data
To load robot calibration data
1. Select [System Configuration] from the [Setup] menu.
2. Under the Robot folder in the tree on the left, select [Robot**]-[Calibration].
3. Click the <Load Cal> button.
4. Browse to the desired MPD file and click <Open>.
10.1.4 Deleting a standard robot
1. Select <System Configuration> from the <Setup> menu.
2. Under the [Robot] folder in the tree on the left, select [Robot**].
You can only delete the last robot.
3. Click <Delete> and the next dialog will appear.
4. Click <Yes> and the controller will be rebooted.
If you delete only an additional axis from its installed robot, refer to 10.2.5 Deleting the
additional axes.
NOTE
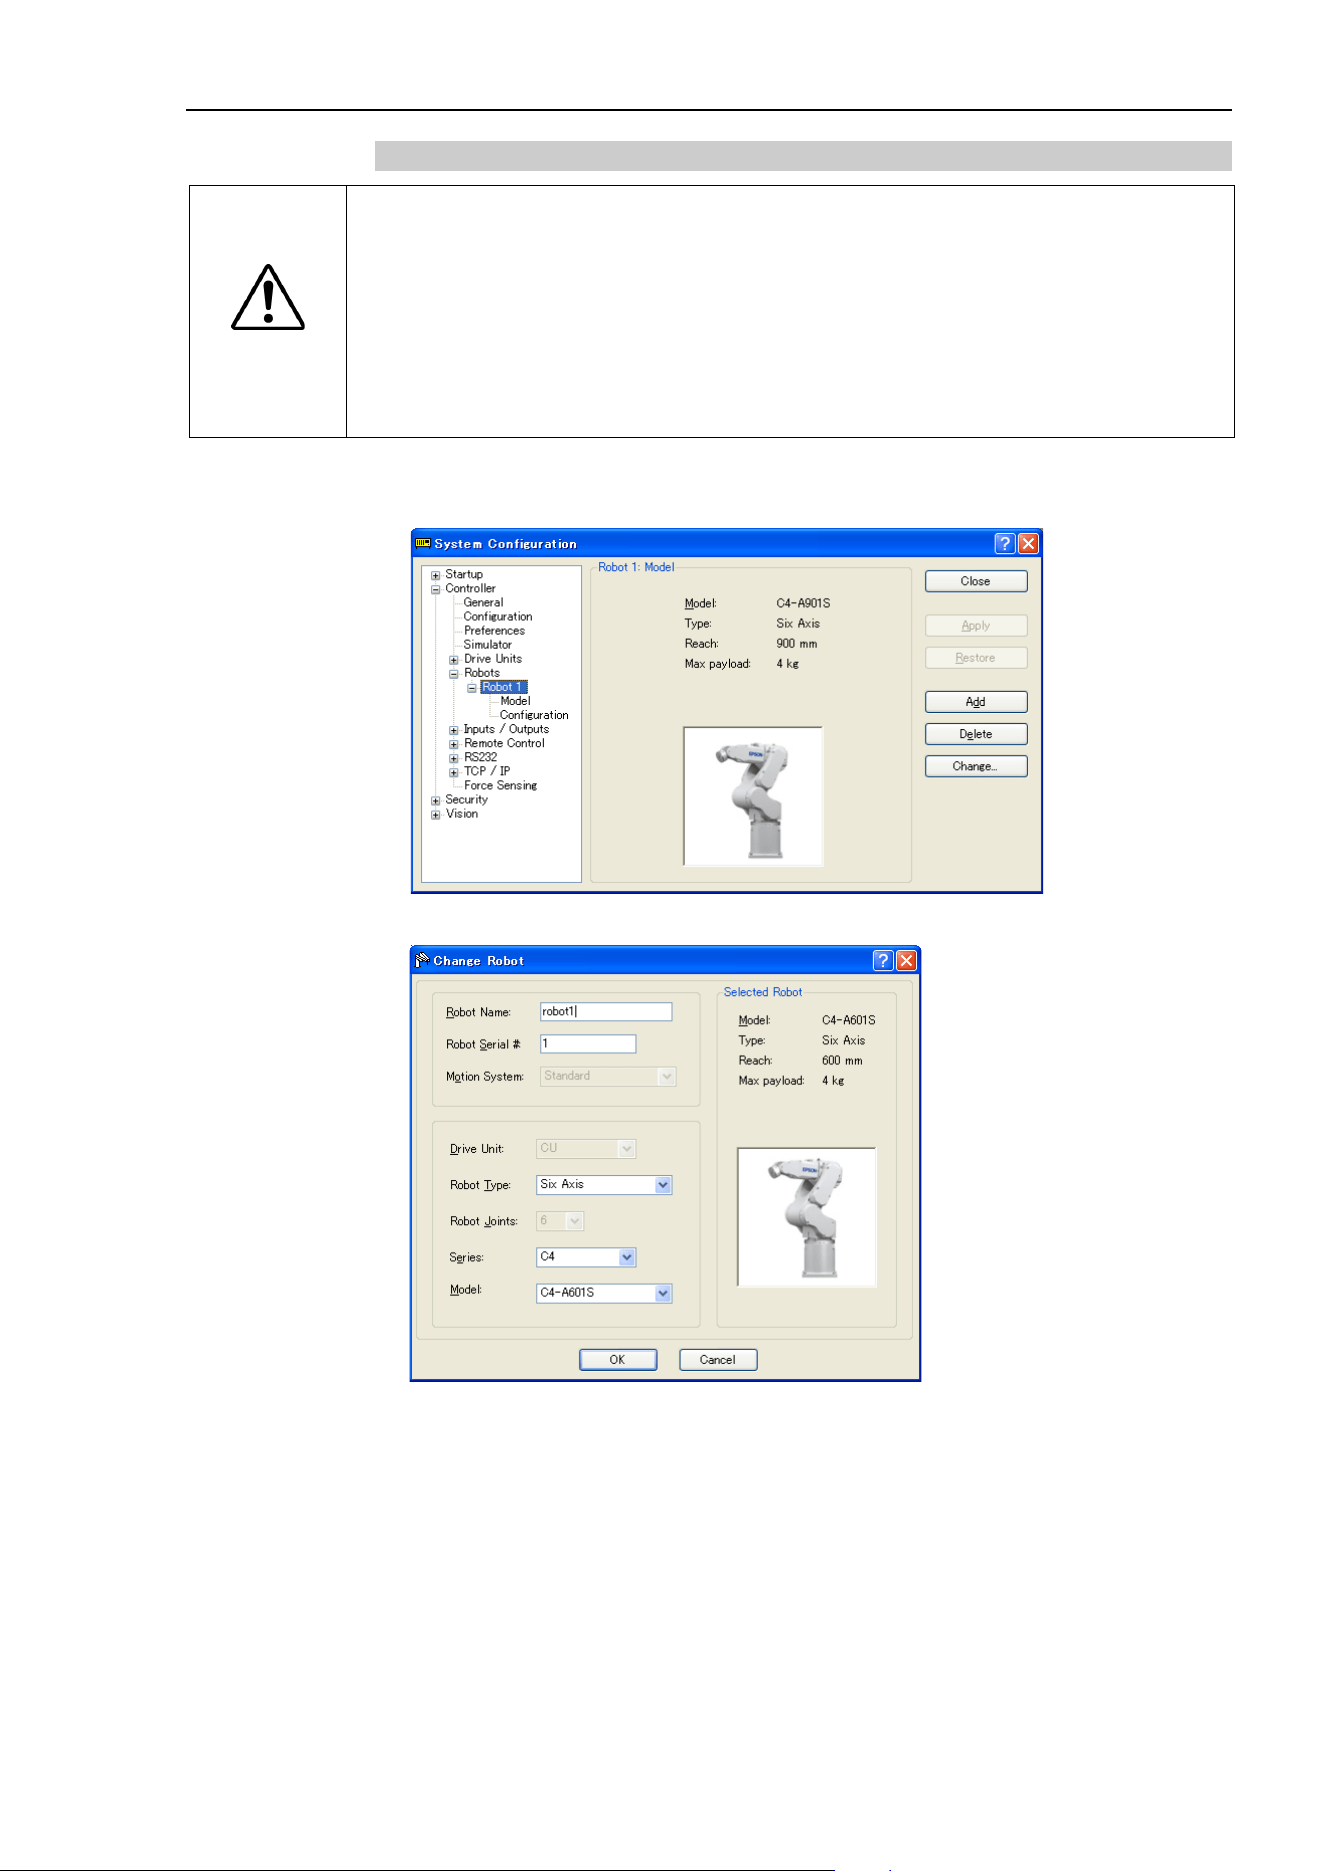
10. Robot Configuration
EPSON RC+ 7.0 (Ver.7.4) User's Guide Rev.6
351
10.1.5 Changing the Robot
CAUTION
■
Changing the manipulator should be done with great caution. It initializes the
robot calibration parameters (Hofs, CalPls), additional axis information, and PG
parameter data. Before changing the robot, make sure to save the calibration
data by following the procedure below.
1. Select the EPSON RC+ 7.0 menu-[Setup]-[System Configuration].
2. Select [Robot]-[Robot**]-[Calibration] from the tree list. Then, click <Save>.
1. Select the EPSON RC+ 7.0 menu-[Setup]-[System Configuration].
2. Select [Robot]-[Robot**] from the tree list.
3. Click the <Change…> button. The following dialog box will be displayed.
4. Input the robot name and serial number printed on the name plate of the manipulator.
Any serial number can be entered. However, enter the number printed on the
manipulator.
5. Select the robot type in the [Robot type] box.
6. Select the series name of the manipulator in the [Series] box.
7. Select the robot model in the [Model] box. Available robots will be displaed according
to the format of the currently installed motor driver. When [Dry run] is used, all the
manipulators of the series selected in Step 6 will be displayed.
8. Click the <OK> button. The controller will be restarted.
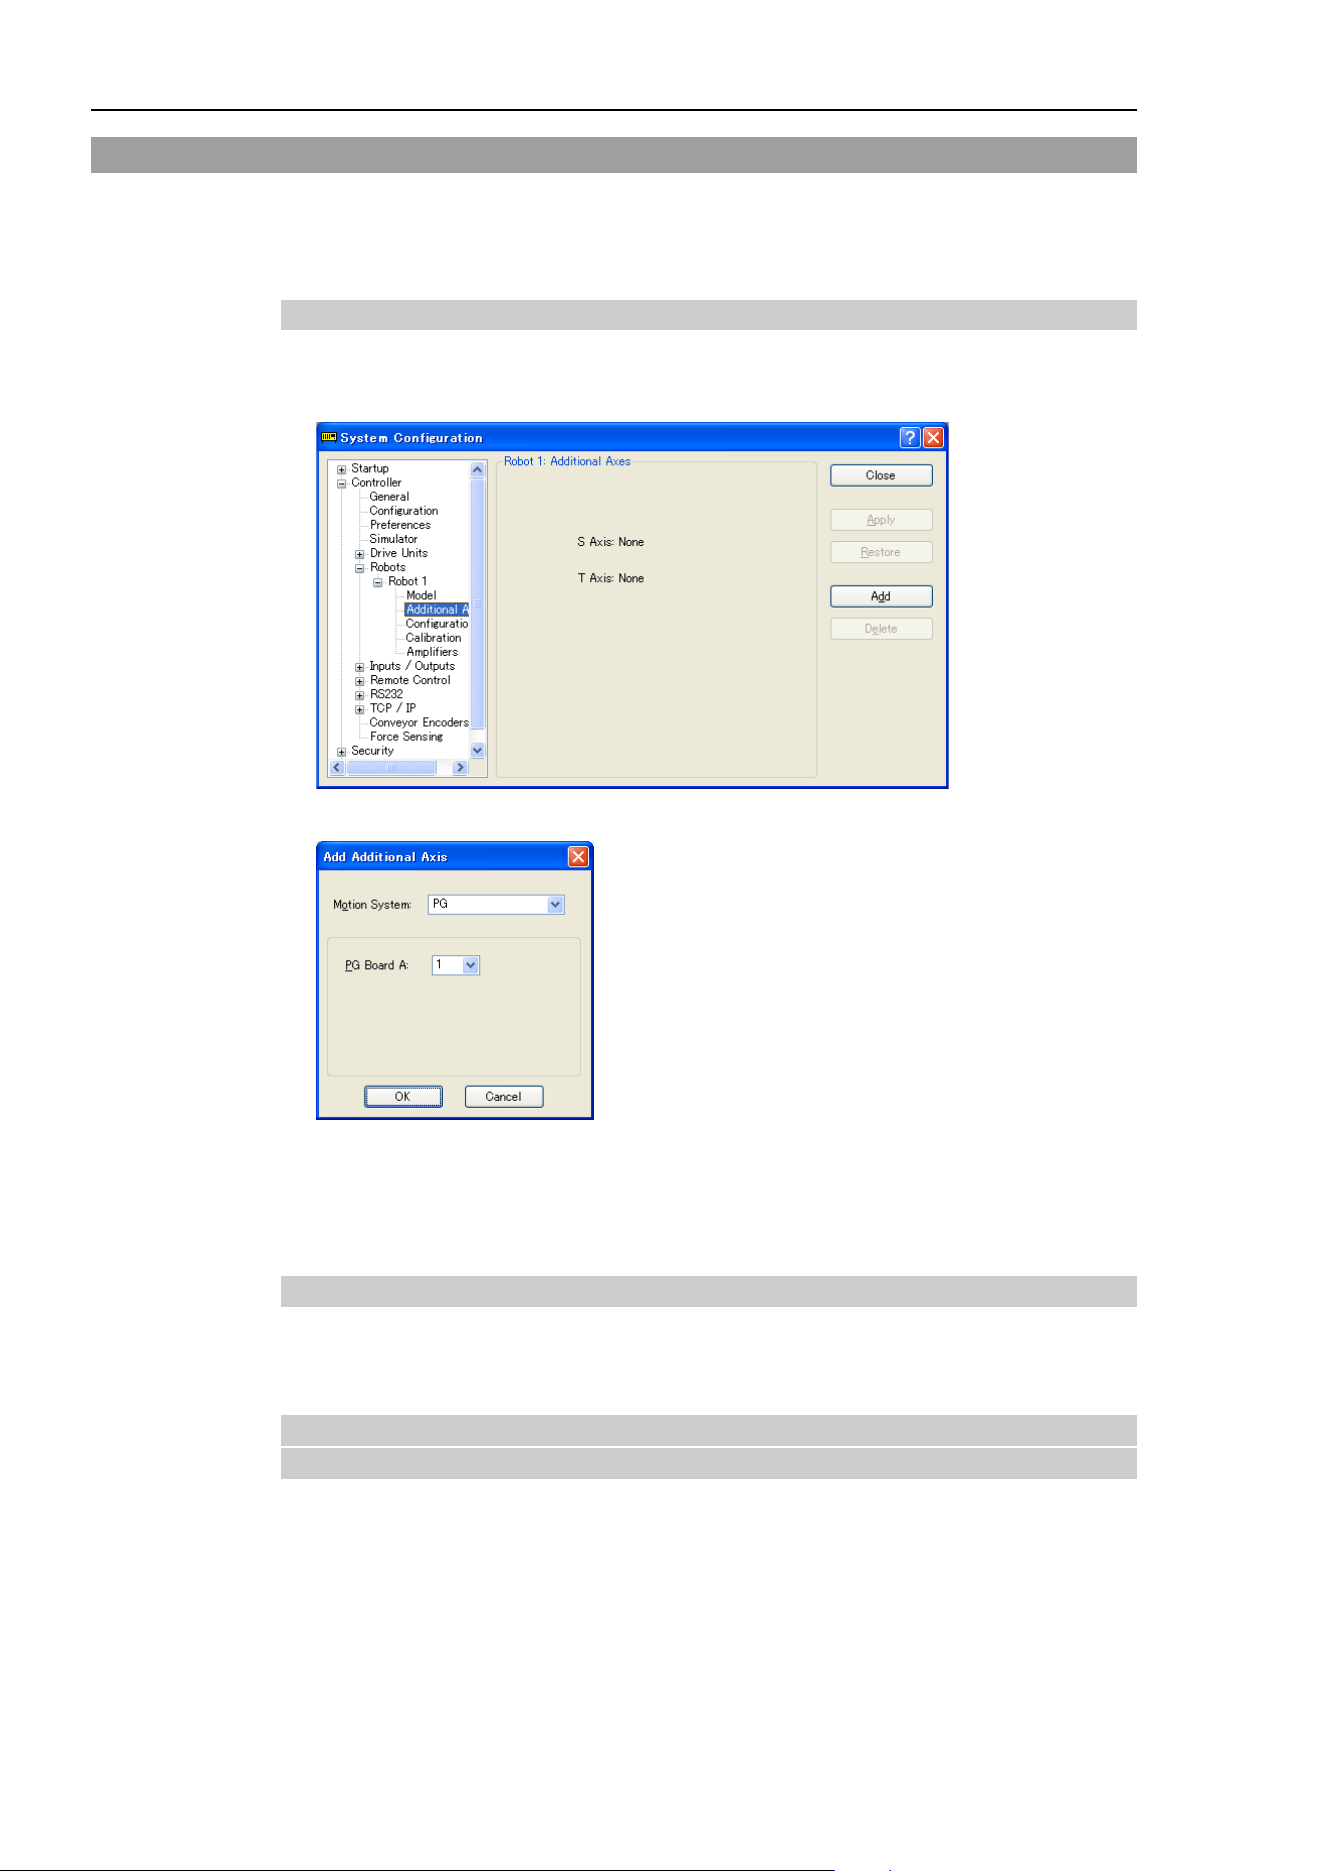
10. Robot Configuration
352 EPSON RC+ 7.0 (Ver.7.4) User's Guide Rev.6
10.2 Configuration of Additional Axes
Using the additional axes feature, you can configure the axes that move with the
manipulator.
You can configure up to two additional axes (S and T).
10.2.1 Adding the additional S axis
1. Select [System Configuration] form the [Setup] menu.
2. Under the [Robot] folder in the tree on the left, select [Robot**]-[Additional Axes].
3. Click <Add> and the next dialog will appear.
4. Select “PG” for a motion system.
5. Select a PG board A.
6. Click OK and the controller will be rebooted.
10.2.2 Adding the additional T axis
After the additional S axis has been added to the robot, you can add the additional T axis.
The procedure is the same as for the S axis. Refer to 10.2.1 Adding the additional S axis.
10.2.3 Changing the parameters of robot with additional axes
installed
For details, refer to the Robot Controller Option PG Motion System manual.
NOTE
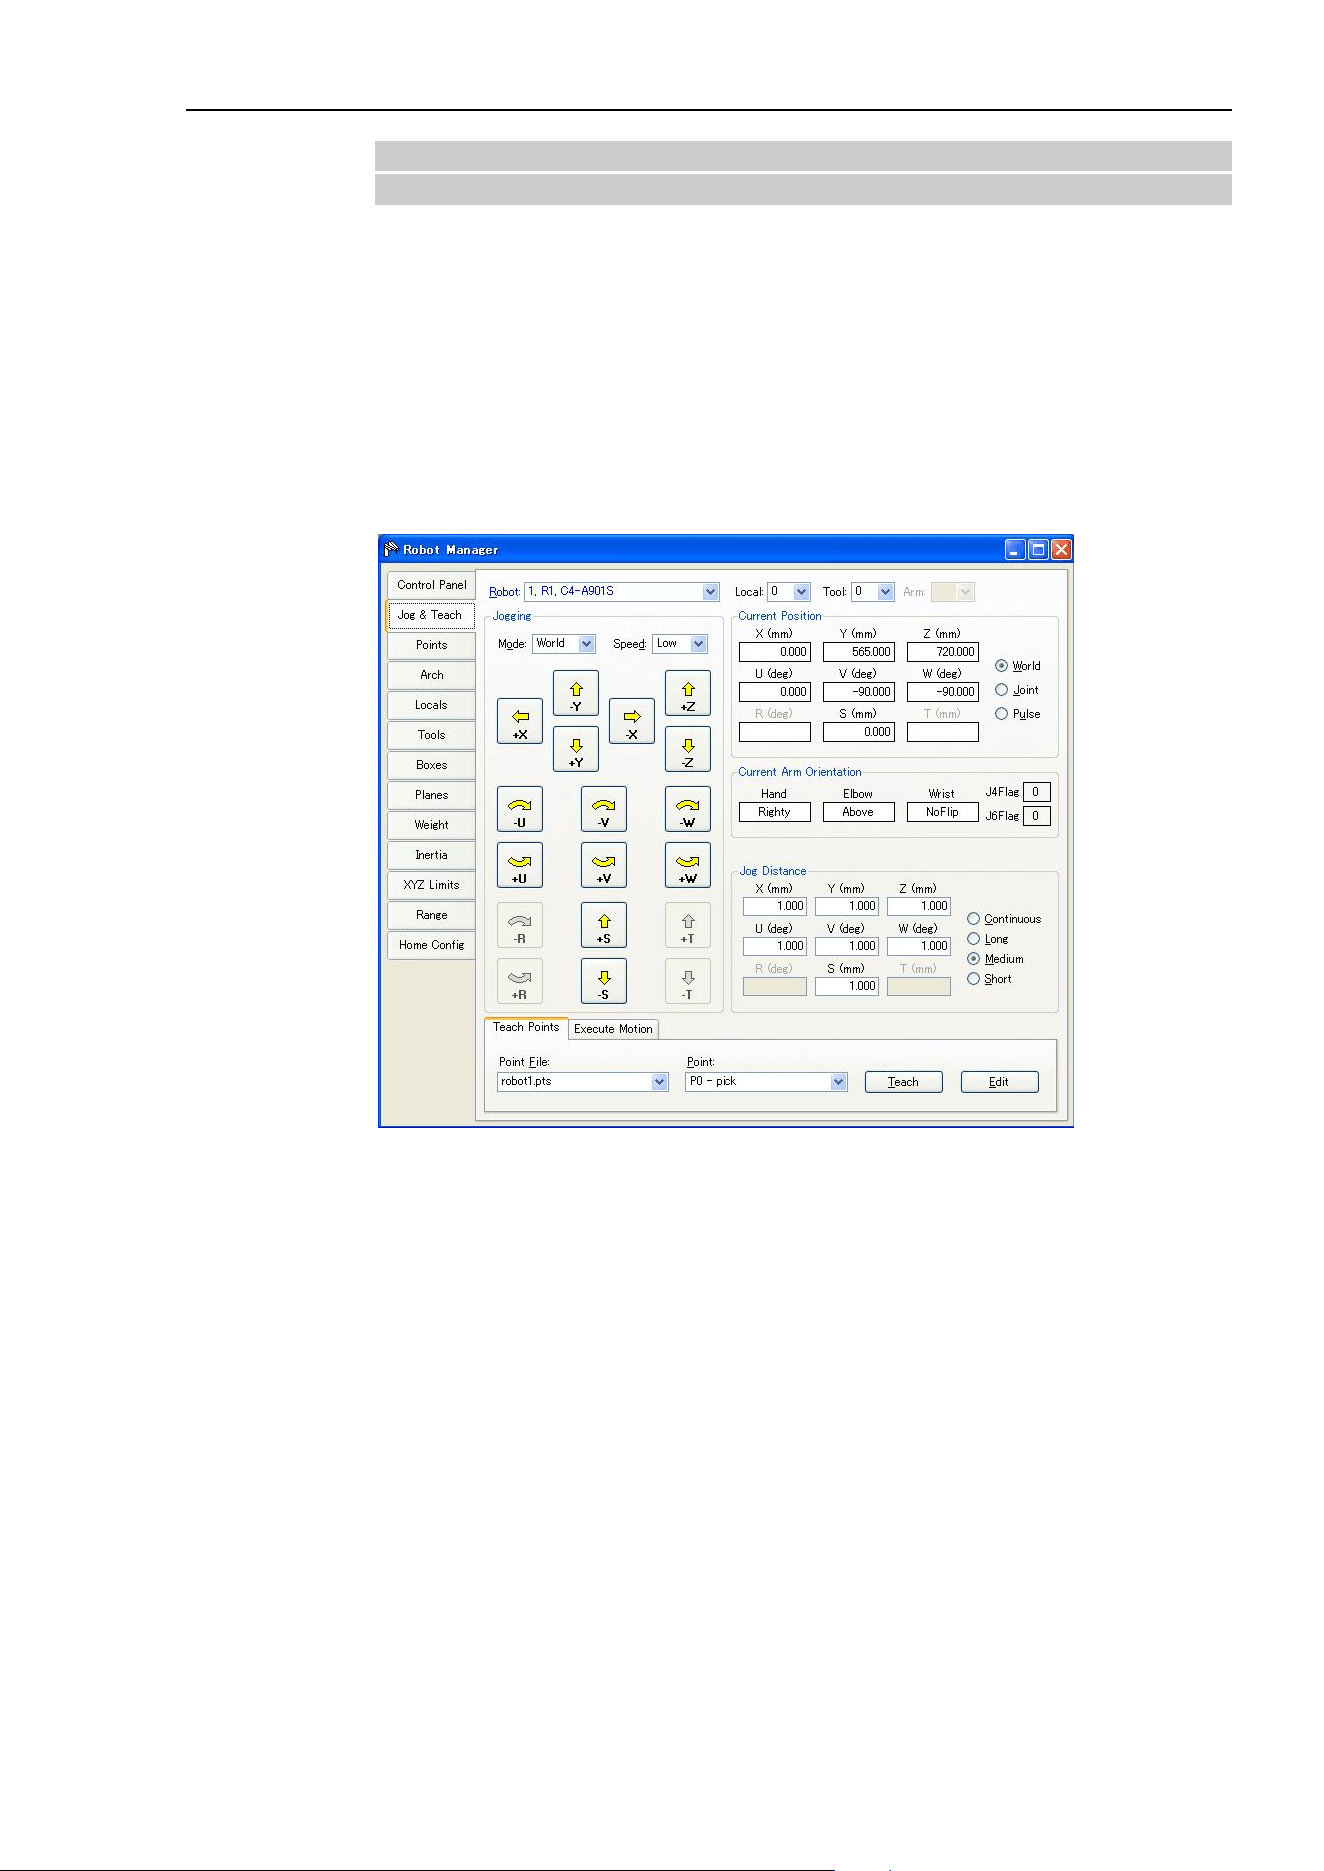
10. Robot Configuration
EPSON RC+ 7.0 (Ver.7.4) User's Guide Rev.6
353
10.2.4 Differences of the standard robot and robot with additional
axes
The robot with additional axes installed has some parts which are different from the
standard robot when using GUI and SPEL
+
commands.
For the SPEL
+
commands, refer to the SPEL
+
Language Reference manual.
The main differences in the EPSON RC+ 7.0 GUI are as below.
Tools: Robot Manager: Jog & Teach Page
You can jog the additional S and T axes. When the additional T axis is not installed, the
jog buttons will be dimmed.
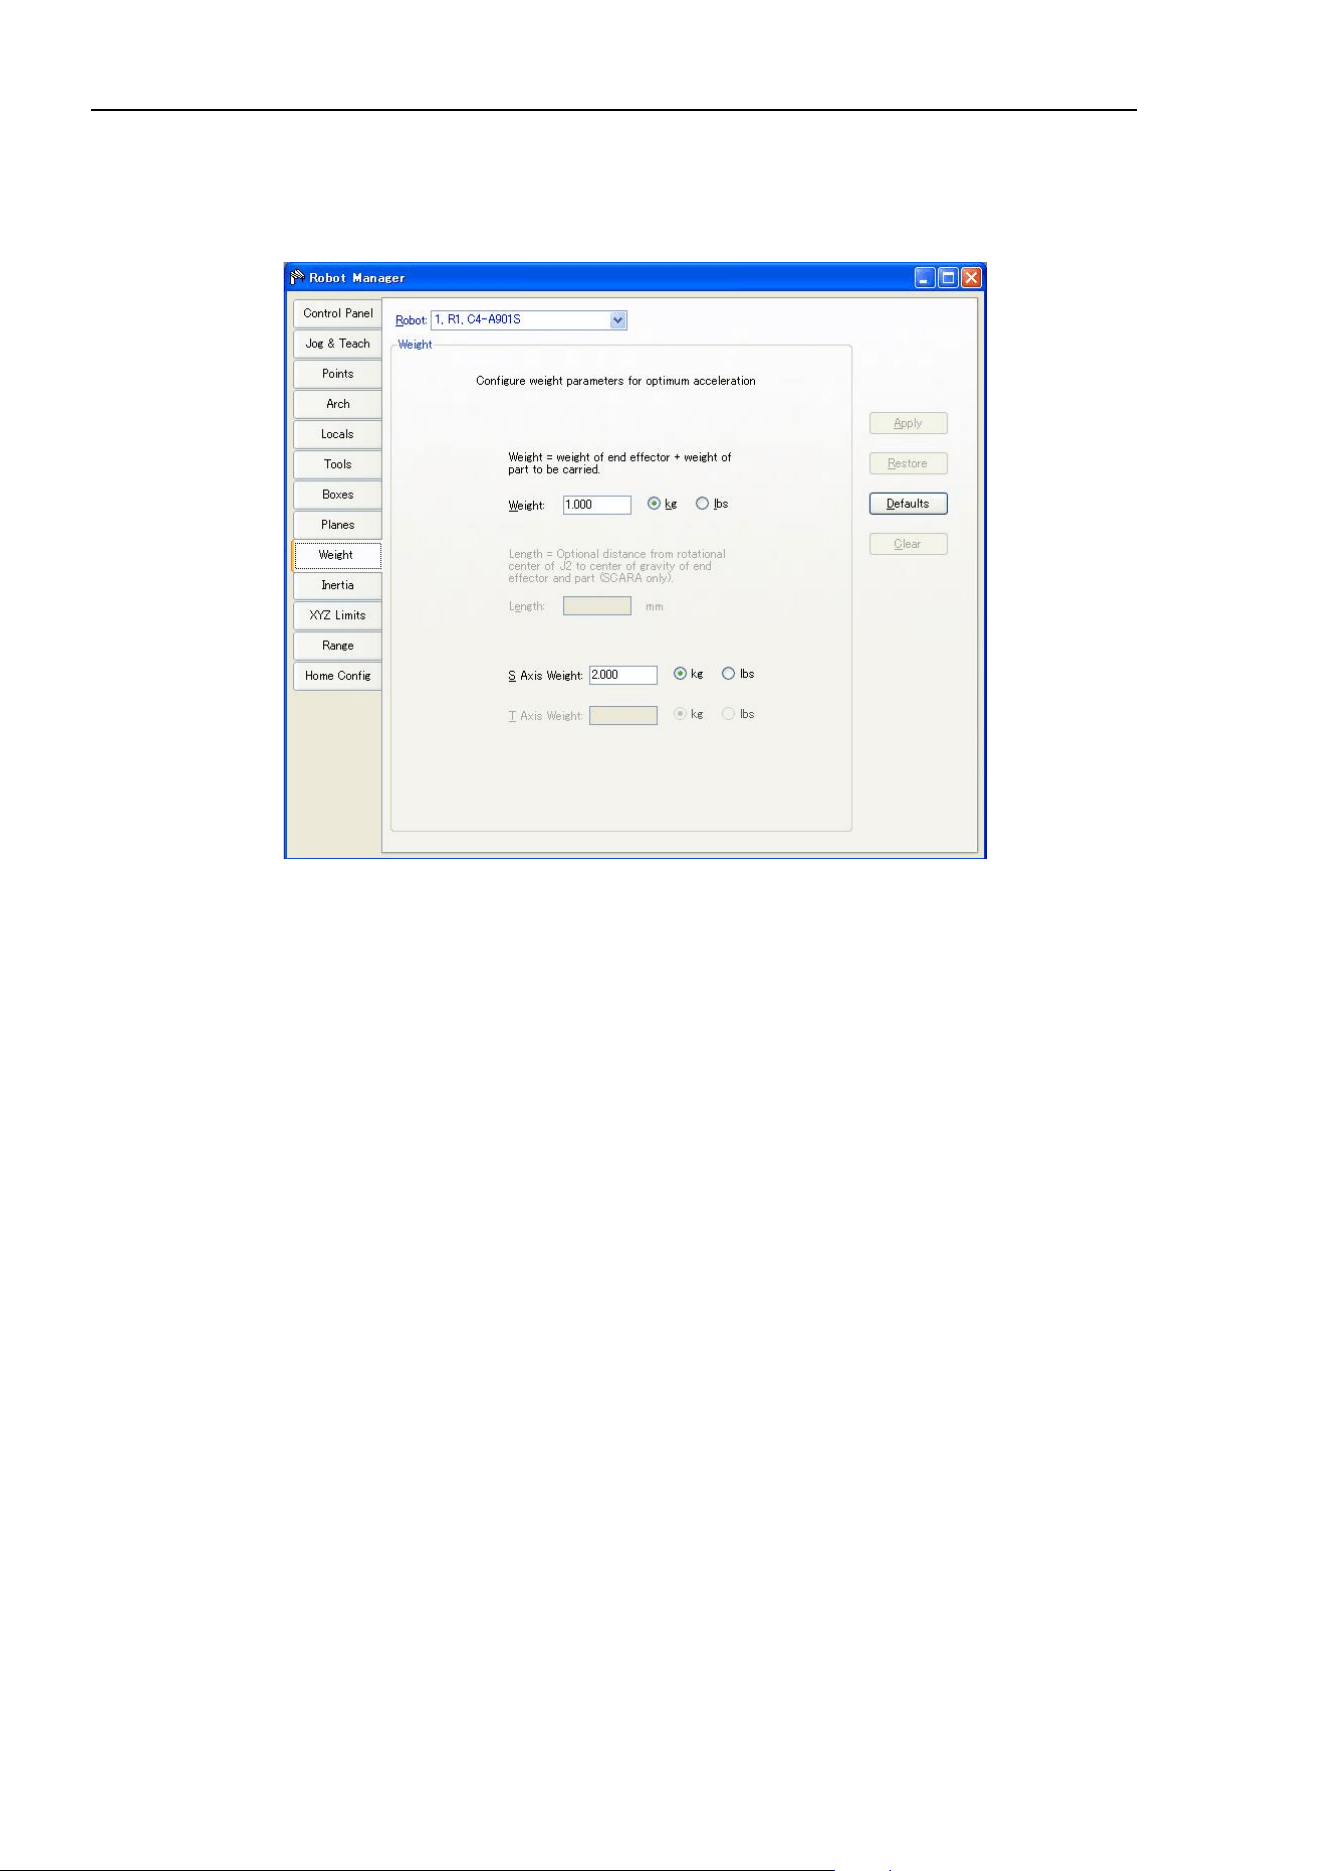
10. Robot Configuration
354 EPSON RC+ 7.0 (Ver.7.4) User's Guide Rev.6
Tools: Robot manager: Weight Page
This page is for changing the Weight parameters for the robot. When the additional T axis
is not installed, the corresponding weight setting will be dimmed.
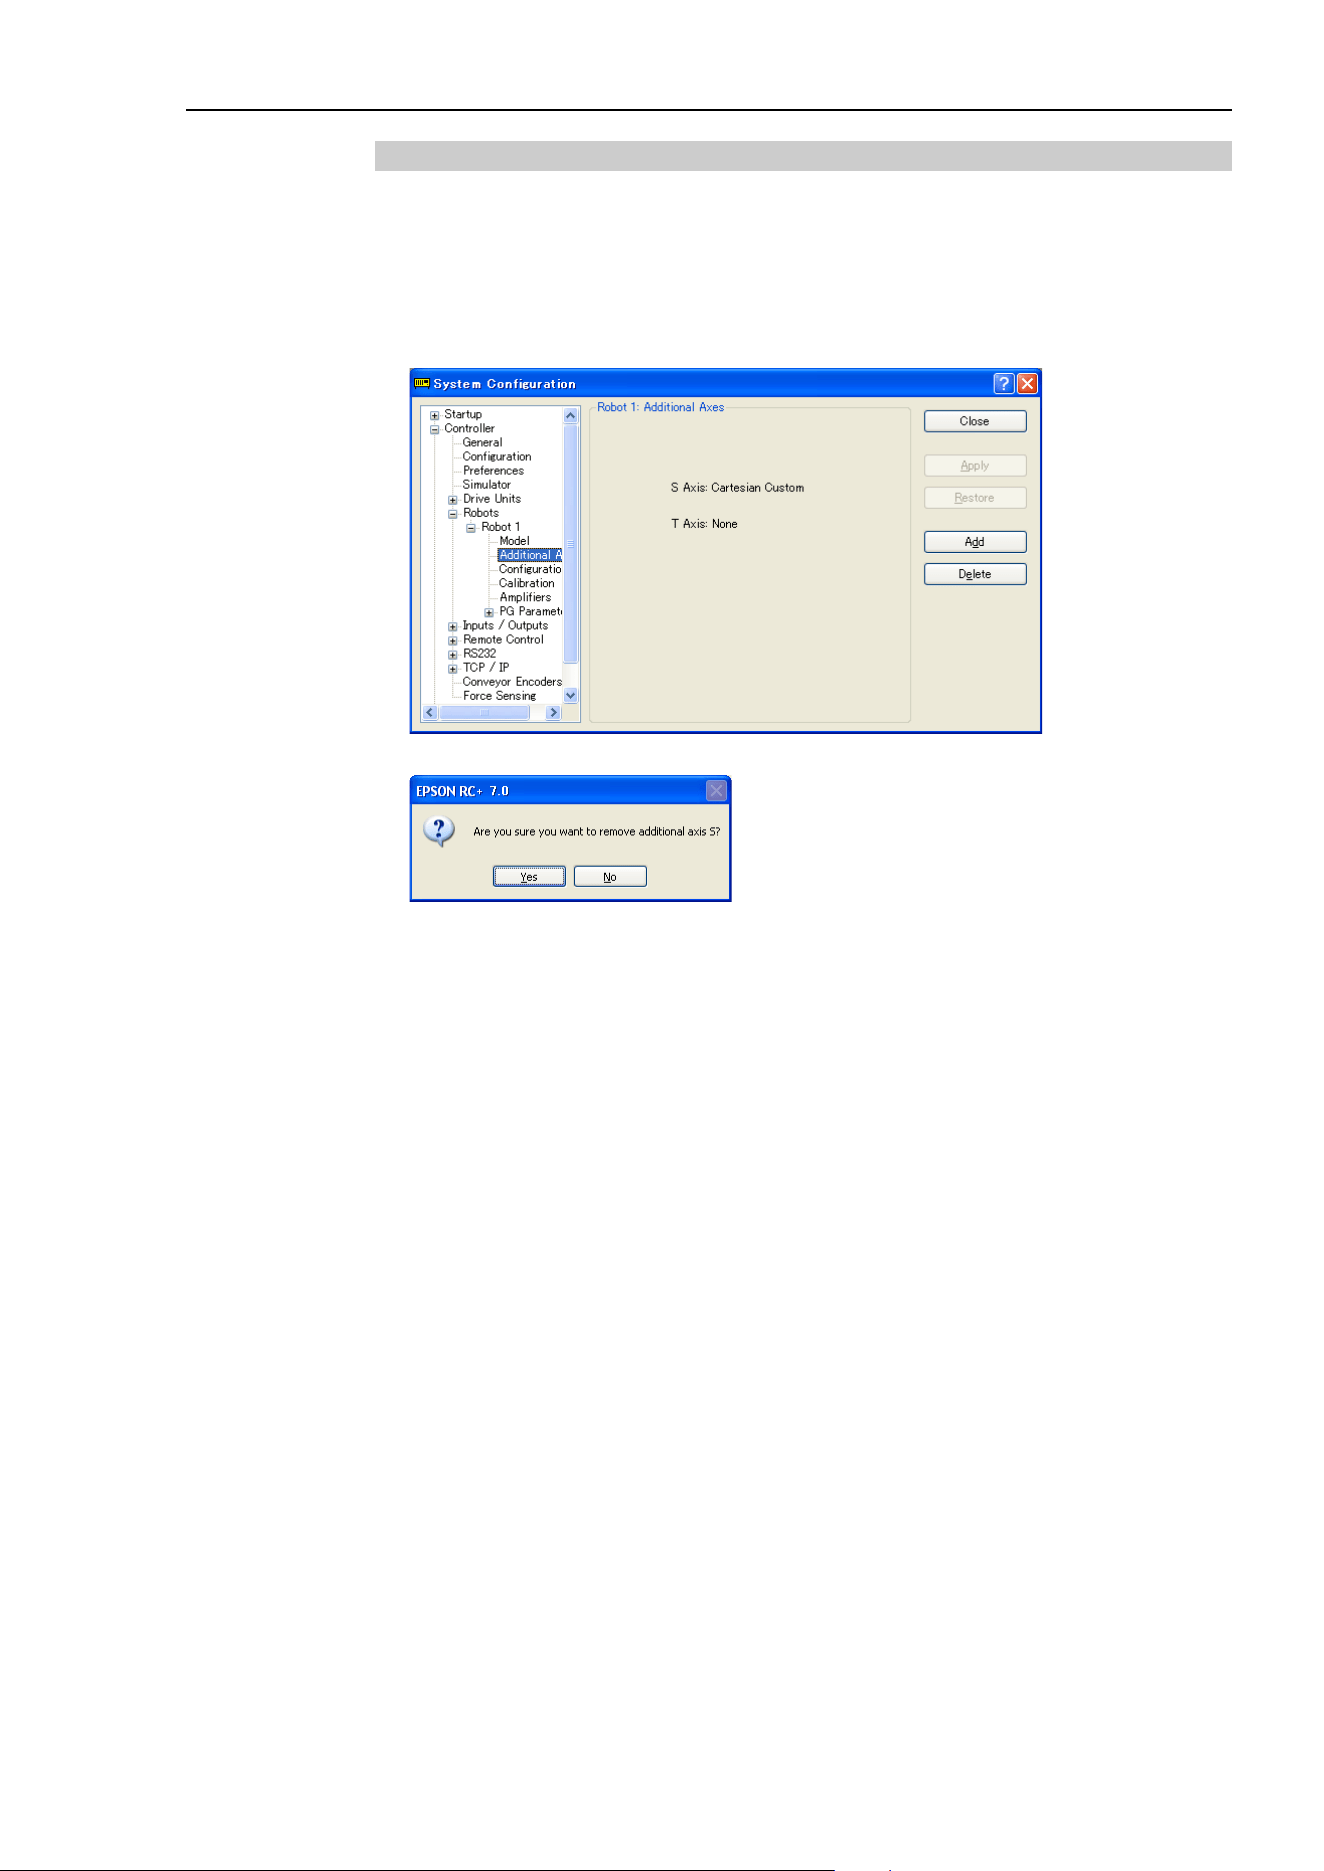
10. Robot Configuration
EPSON RC+ 7.0 (Ver.7.4) User's Guide Rev.6
355
10.2.5 Deleting the additional axes
When the additional T axis is installed, delete it first.
When only the additional S axis is installed, delete it.
1. Select System Configuration from the Setup Menu.
2. Under the [Robot] folder in the tree on the left, select [Robot**]-[Additional Axes].
3. Click <Delete> and the next dialog will appear.
4. Click <Yes> and the controller will be rebooted.
NOTE

11. Inputs and Outputs
356 EPSON RC+ 7.0 (Ver.7.4) User's Guide Rev.6
11. Inputs and Outputs
11.1 Overview
The controller I/O has the following types of I/O:
Standard I/O This digital I/O comes standard with the controller.
Expansion I/O This is optional digital I/O that can be added to the controller to
expand standard I/O. Up to four boards can be added, each with
24 inputs and 16 outputs.
Fieldbus master I/O An optional board for the controller to expand the standard I/O.
You can add one of the following boards which support the
fieldbus master board: DeviceNet, EtherNet/IP, PROFIBUS-
DP
Fieldbus slave I/O An optional board for the controller to expand the standard I/O.
You can add one of the following boards which support the
Fieldbus slave mode: DeviceNet, EtherNet/IP, PROFIBUS-DP,
CC-Link, PROFINET, EtherCAT
Memory I/O This is built-in memory bits that can be used for inter-task
communications.
Analog I/O This is option to add analog input/output function to the
controller.
For Standard, Expansion, Fieldbus master, and Fieldbus slave I/O, there are input bits
numbered starting with 0, and output bits numbered starting with 0.
For memory I/O, each memory bit is both an input and an output.
For specifications and instructions on wiring I/O, refer to the Robot Controller manual.
11.2 I/O Commands
The SPEL+ language has several commands for inputs and outputs listed below. For
details on each command, see the SPEL+ Language Reference.
Input Commands
In Reads one byte of input bits.
InBCD Reads one byte of input bits in Binary Coded Decimal format.
InW Reads one word of input bits.
Oport Reads one output bit.
Sw Reads one input bit.
Output Commands
Off Turns off one output bit with optional time.
On Turns on one output bit with optional time.
OpBCD Sets one byte of output bits in Binary Coded Decimal format.
Out Sets / reads one byte of output bits.
OutW Sets / reads one word of output bits.
Memory I/O Commands
MemOff Turns off one memory bit.
MemOn Turns on one memory bit.
MemOut Sets / reads one byte of memory bits.
MemSw Reads one bit of memory.
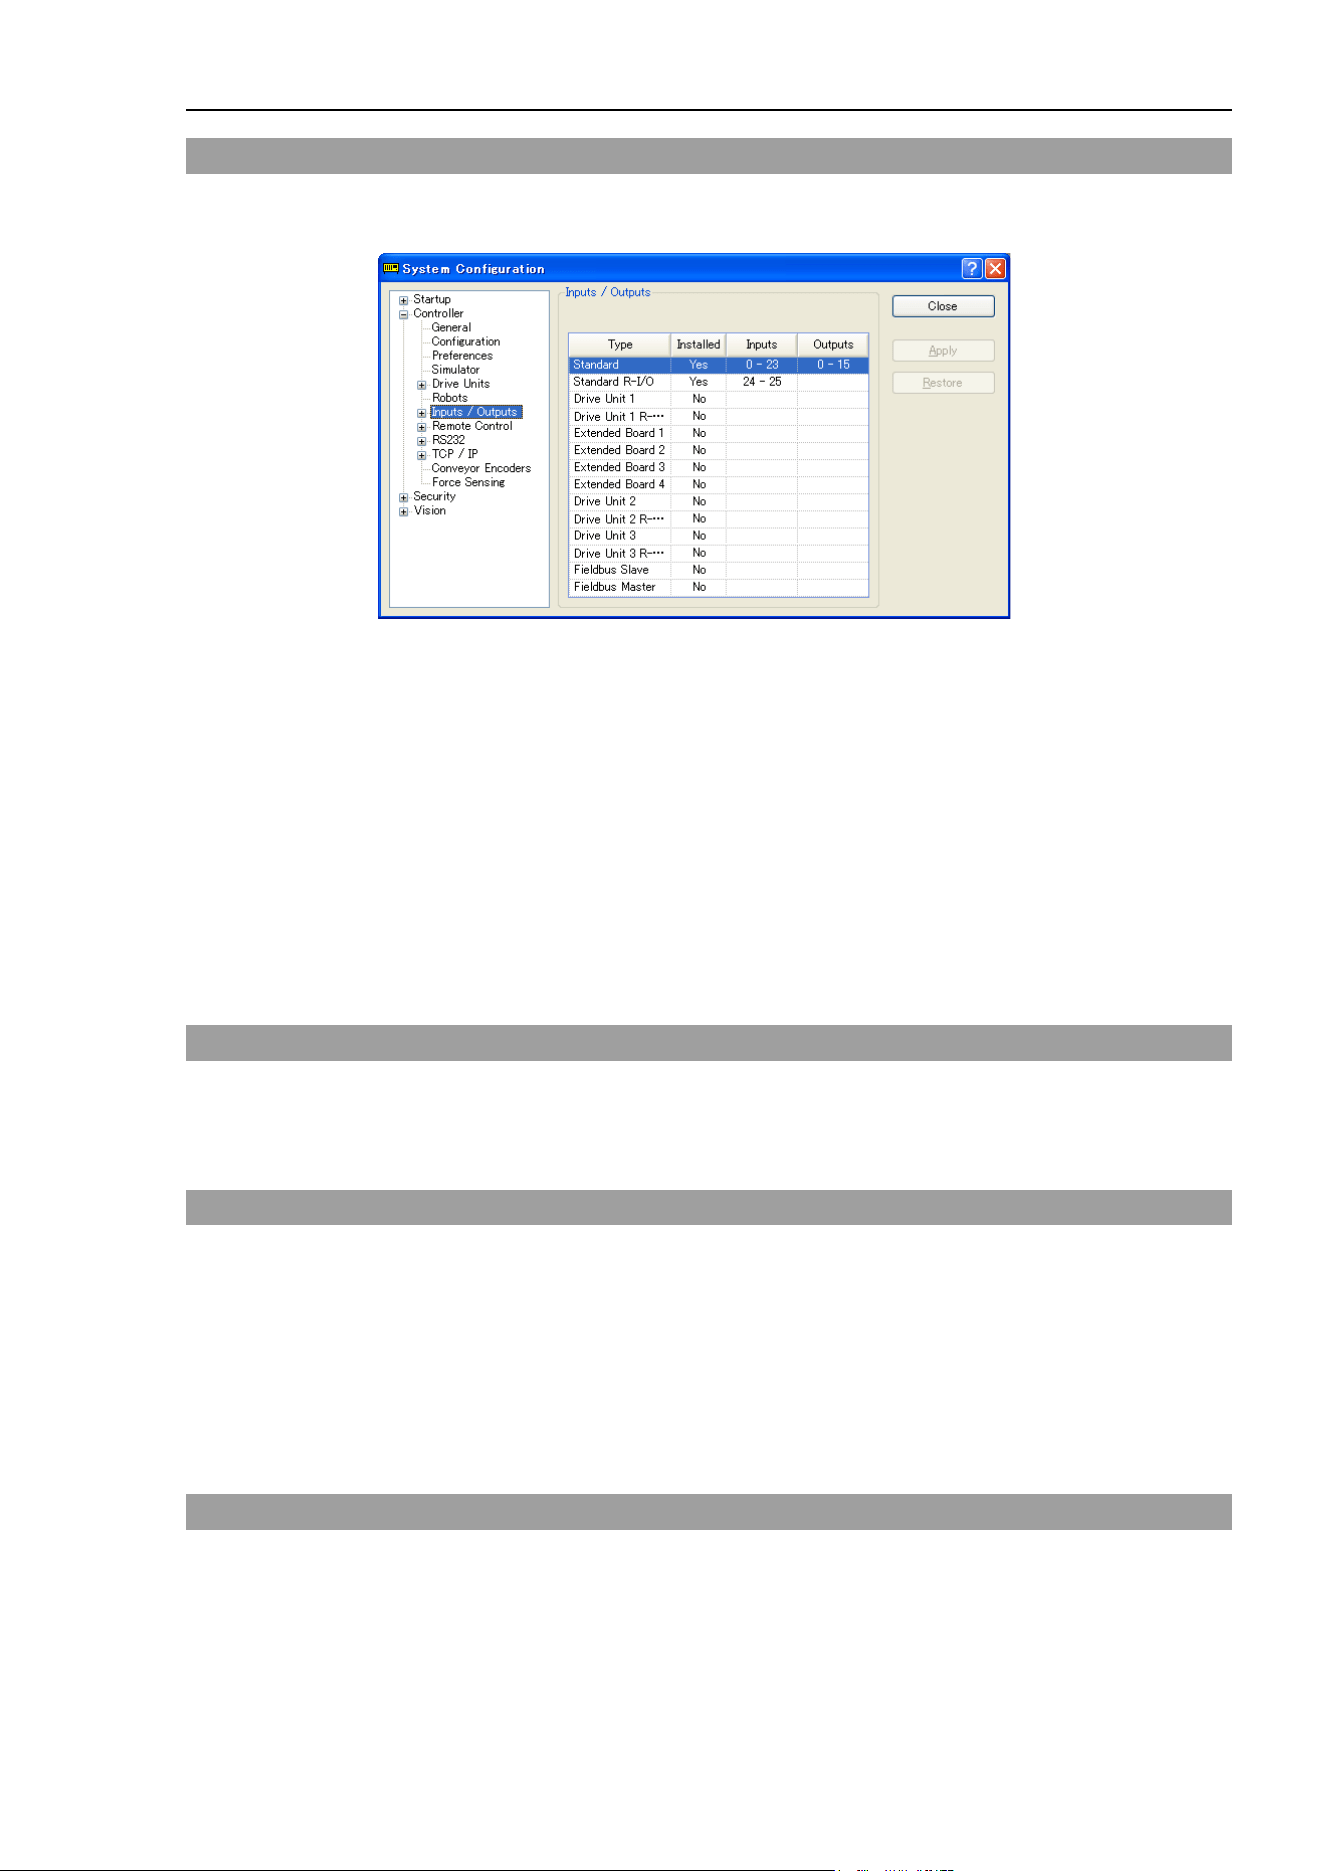
11. Inputs and Outputs
E
PSON RC+ 7.0 (Ver.7.4) User's Guide Rev.6
357
11.3 I/O Configuration
To view the current I/O configuration, select [Setup]-[System Configuration]-[Inputs and
Outputs]. This will show you what I/O is installed on the controller.
Standard and expansion I/O
The board is automatically configured by the controller. To add expansion I/O boards,
refer to Robot Controller manual.
The standard I/O in the Drive Unit automatically increases depending on the number of
Drive Unit.
Fieldbus master I/O / Fieldbus slave I/O
For details on how to configure, add, check the boards, refer to the Robot Controller
Option Fieldbus I/O manual.
Analog I/O
The board is automatically configured by the controller. To configure, add, or confirm the
analog I/O boards, refer to Robot Controller manual.
11.4 Monitoring I/O
To monitor I/O, use the I/O Monitor tool by selecting [Tools]-[I/O Monitor]. From the I/O
monitor, you can view inputs and outputs or memory I/O in bit, byte, and word formats.
For details on how to use the I/O Monitor tool, see 5.11.3 [I/O Monitor] Command .
11.5 Virtual I/O
The Controller supports virtual I/O. When enabled, virtual I/O allows you to simulate
your hardwired I/O. You can turn on / off any input bit or output bit. Normally this is
used when the controller is in Dry Run mode with no robot or I/O connected.
Virtual I/O Commands
SetIn Set the value of an 8 bit input port.
SetInW Set the value of a 16 bit input port.
SetSw Set the value of one input bit.
11.6 Fieldbus Master I/O
The Fieldbus master I/O is an option.
For details on how to use, refer to the Robot Controller Option Fieldbus I/O manual.

11. Inputs and Outputs
358 EPSON RC+ 7.0 (Ver.7.4) User's Guide Rev.6
11.7 Fieldbus Slave I/O
The Fieldbus slave I/O includes the standard functions (ModBusRTU and ModBusTCP),
and the options.
For types and usage of the optional Fieldbus slaves, refer to the Robot Controller option
Fieldbus I/O manual.
11.7.1 ModBus Slave
ModBus TCP and ModBus RTU can be used as the Fieldbus slave I/O as standard.
ModBus cannot be used when other Fieldbus slave boards are installed.
ModBus is a protocol which has a dialect. Although connection with the standard
ModBus protocol has been confirmed, use the ModBus slave in the system after checking
connectivity with equipment to be connected.
11.7.2. Supported Functions
The Controller supports following ModBus functions.
Function code
Function name
Description
1 Read Coil Status
Use this function to read the status of the input bit port.
No broadcast.
2 Read Input Status
Use this function to read the status of the output bit port.
No broadcast.
3 Read Holding Registers
Use this function to read the status of the input word port.
No broadcast.
4 Read Input Registers
Use this function to read the status of the output word port.
No broadcast.
5
Force Single Coil
Use this function to configure an input bit port.
6
Preset Single Register
Use this function to configure an input word port.
15
Force Multiple Coils
Use this function to configure several input bit ports.
16
Preset Multiple Registers
Use this function to configure several input word port.
NOTE

11. Inputs and Outputs
E
PSON RC+ 7.0 (Ver.7.4) User's Guide Rev.6
359
11.7.3 Address map
Input I/O
Output I/O
Fieldbus I/O Address
ModBus Address
Fieldbus I/O Address
ModBus Address
Word
Bit
Holding register
Coil
Word
Bit
Holding register
Coil
32
512
40032
512
32
512
30032
10512
513
513
513
10513
514
514
514
10514
515
515
515
10515
516
516
516
10516
517
517
517
10517
518
518
518
10518
519
519
519
10519
520
520
520
10520
521
521
521
10521
522
522
522
10522
523
523
523
10523
524
524
524
10524
525
525
525
10525
526
526
526
10526
527
527
527
10527
33
528
40033
528
33
528
30033
10528
529
529
529
10529
530
530
530
10530
531
531
531
10531
532
532
532
10532
533
533
533
10533
534
534
534
10534
535
535
535
10535
536
536
536
10536
537
537
537
10537
538
538
538
10538
539
539
539
10539
540
540
540
10540
541
541
541
10541
542
542
542
10542
543
543
543
10543
159
2544
40159
2544
159
2544
30159
12544
2545
2545
2545
12545
2546
2546
2546
12546
2547
2547
2547
12547
2548
2548
2548
12548
2549
2549
2549
12549
2550
2550
2550
12550
2551
2551
2551
12551
2552
2552
2552
12552
2553
2553
2553
12553
2554
2554
2554
12554
2555
2555
2555
12555
2556
2556
2556
12556
2557
2557
2557
12557
2558
2558
2558
12558
2559
2559
2559
12559
Note that the addresses are specified with the numbers fewer than the originals by 1.
The address to access to the input bit port 512 is 511.
NOTE
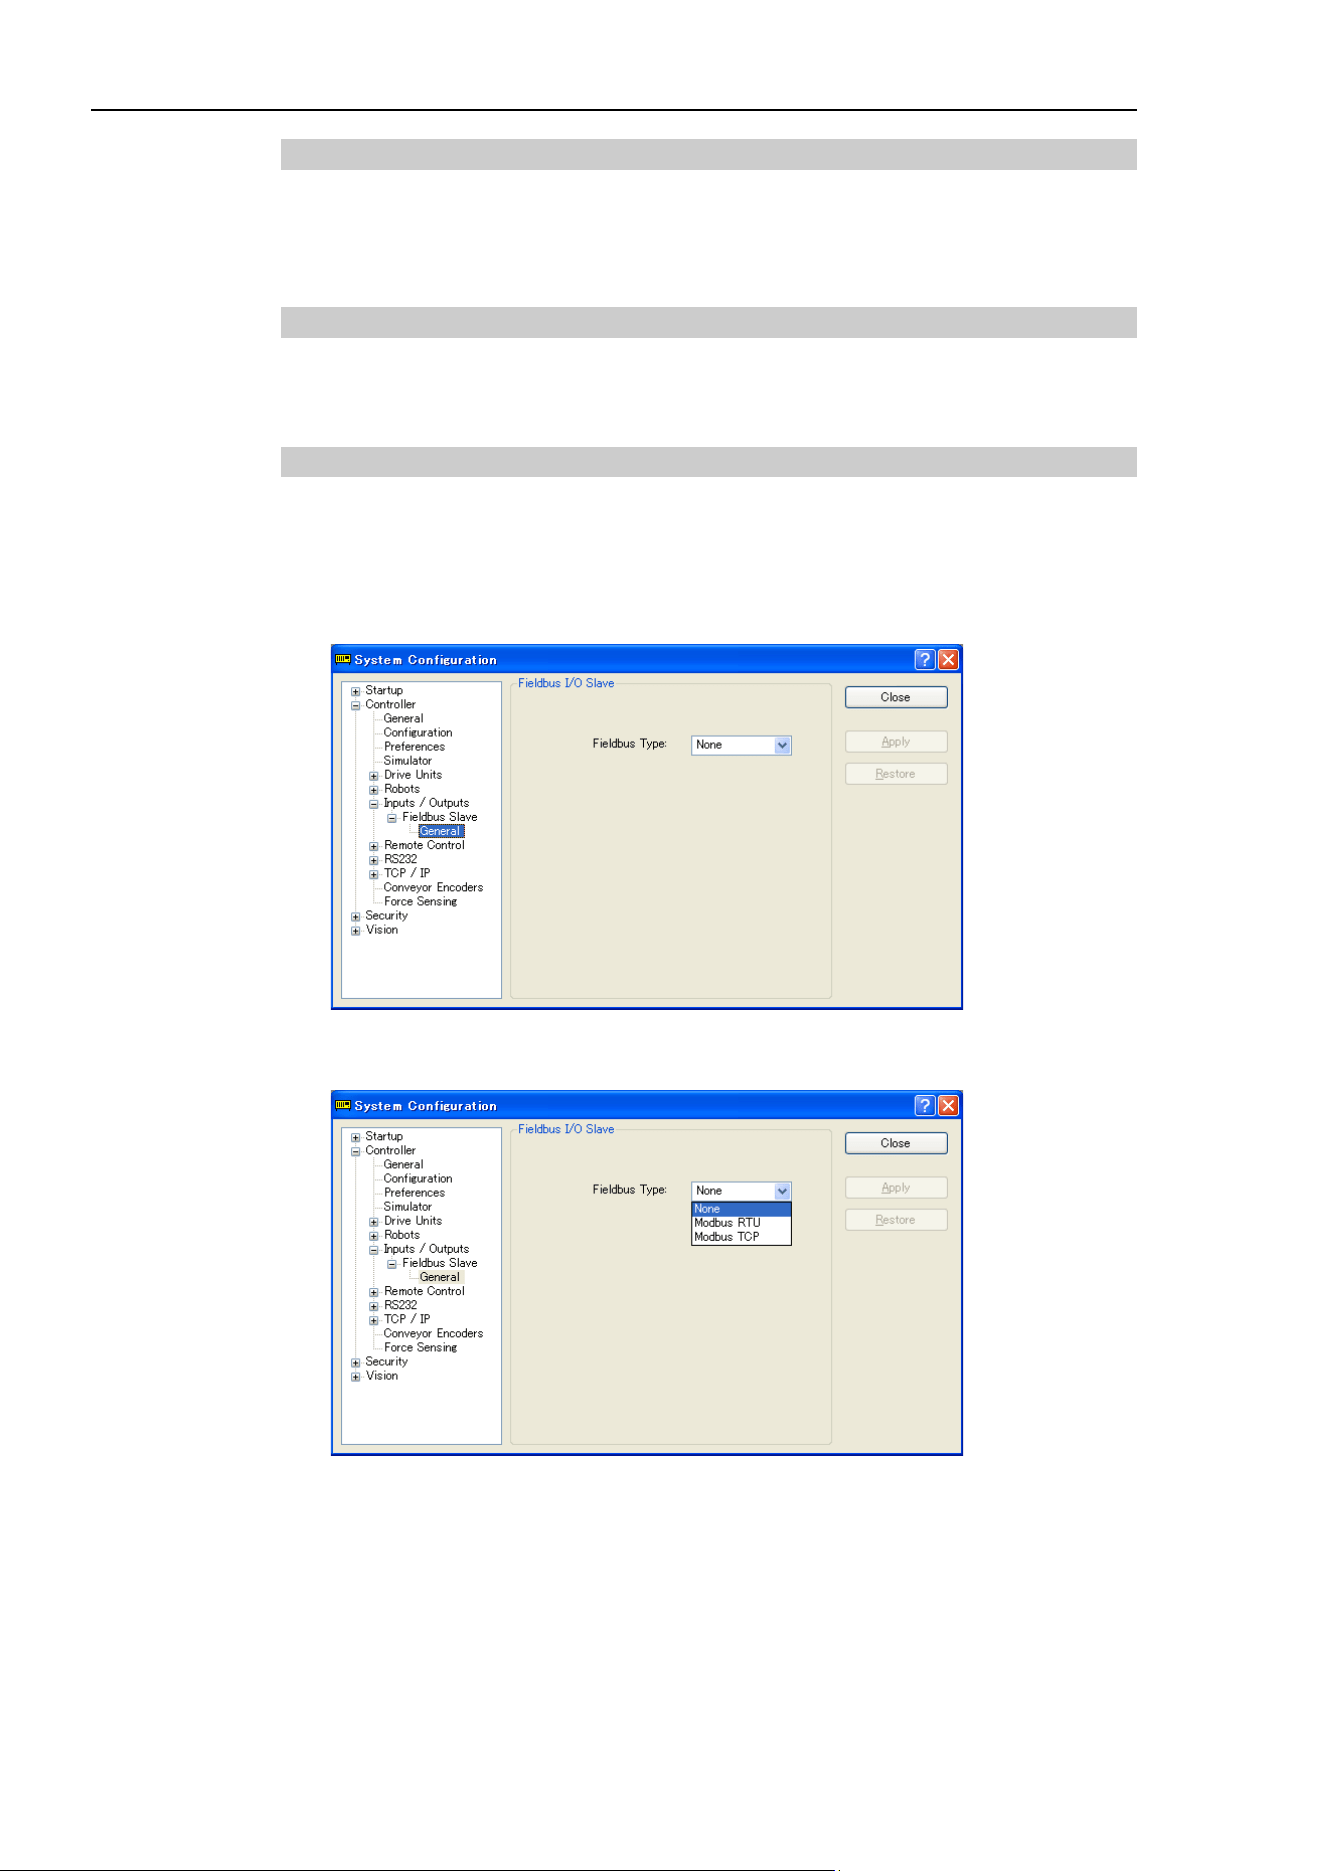
11. Inputs and Outputs
360 EPSON RC+ 7.0 (Ver.7.4) User's Guide Rev.6
11.7.4 ModBus RTU
ModBusRTU is the Fieldbus which uses the serial communication. It can be used with the
RS-232C port which is installed to the Controller as standard, and the optional extended
RS-232C port.
11.7.5 ModBus TCP
ModBusTCP is the Fieldbus which uses the Ethernet communication (socket
communication). It can be used with the Ethernet installed to the Controller as standard.
11.7.6 How to Configure ModBus
(1) Use of ModBus
ModBus can be enabled in the following dialog box. This dialog box appears when
the optional Fieldbus slave board is not installed.
[System Configuration]-[Controller]-[Inputs / Outputs]-[Fieldbus Slave]-[General]
Select any of “Disable”, “ModBus RTU”, or “ModBus TCP” from the pull-down
menu.
ModBus does not function if the Fieldbus slave board is installed while “ModBus
RTU” or “ModBus TCP” is selected. However, setting will be held.
NOTE
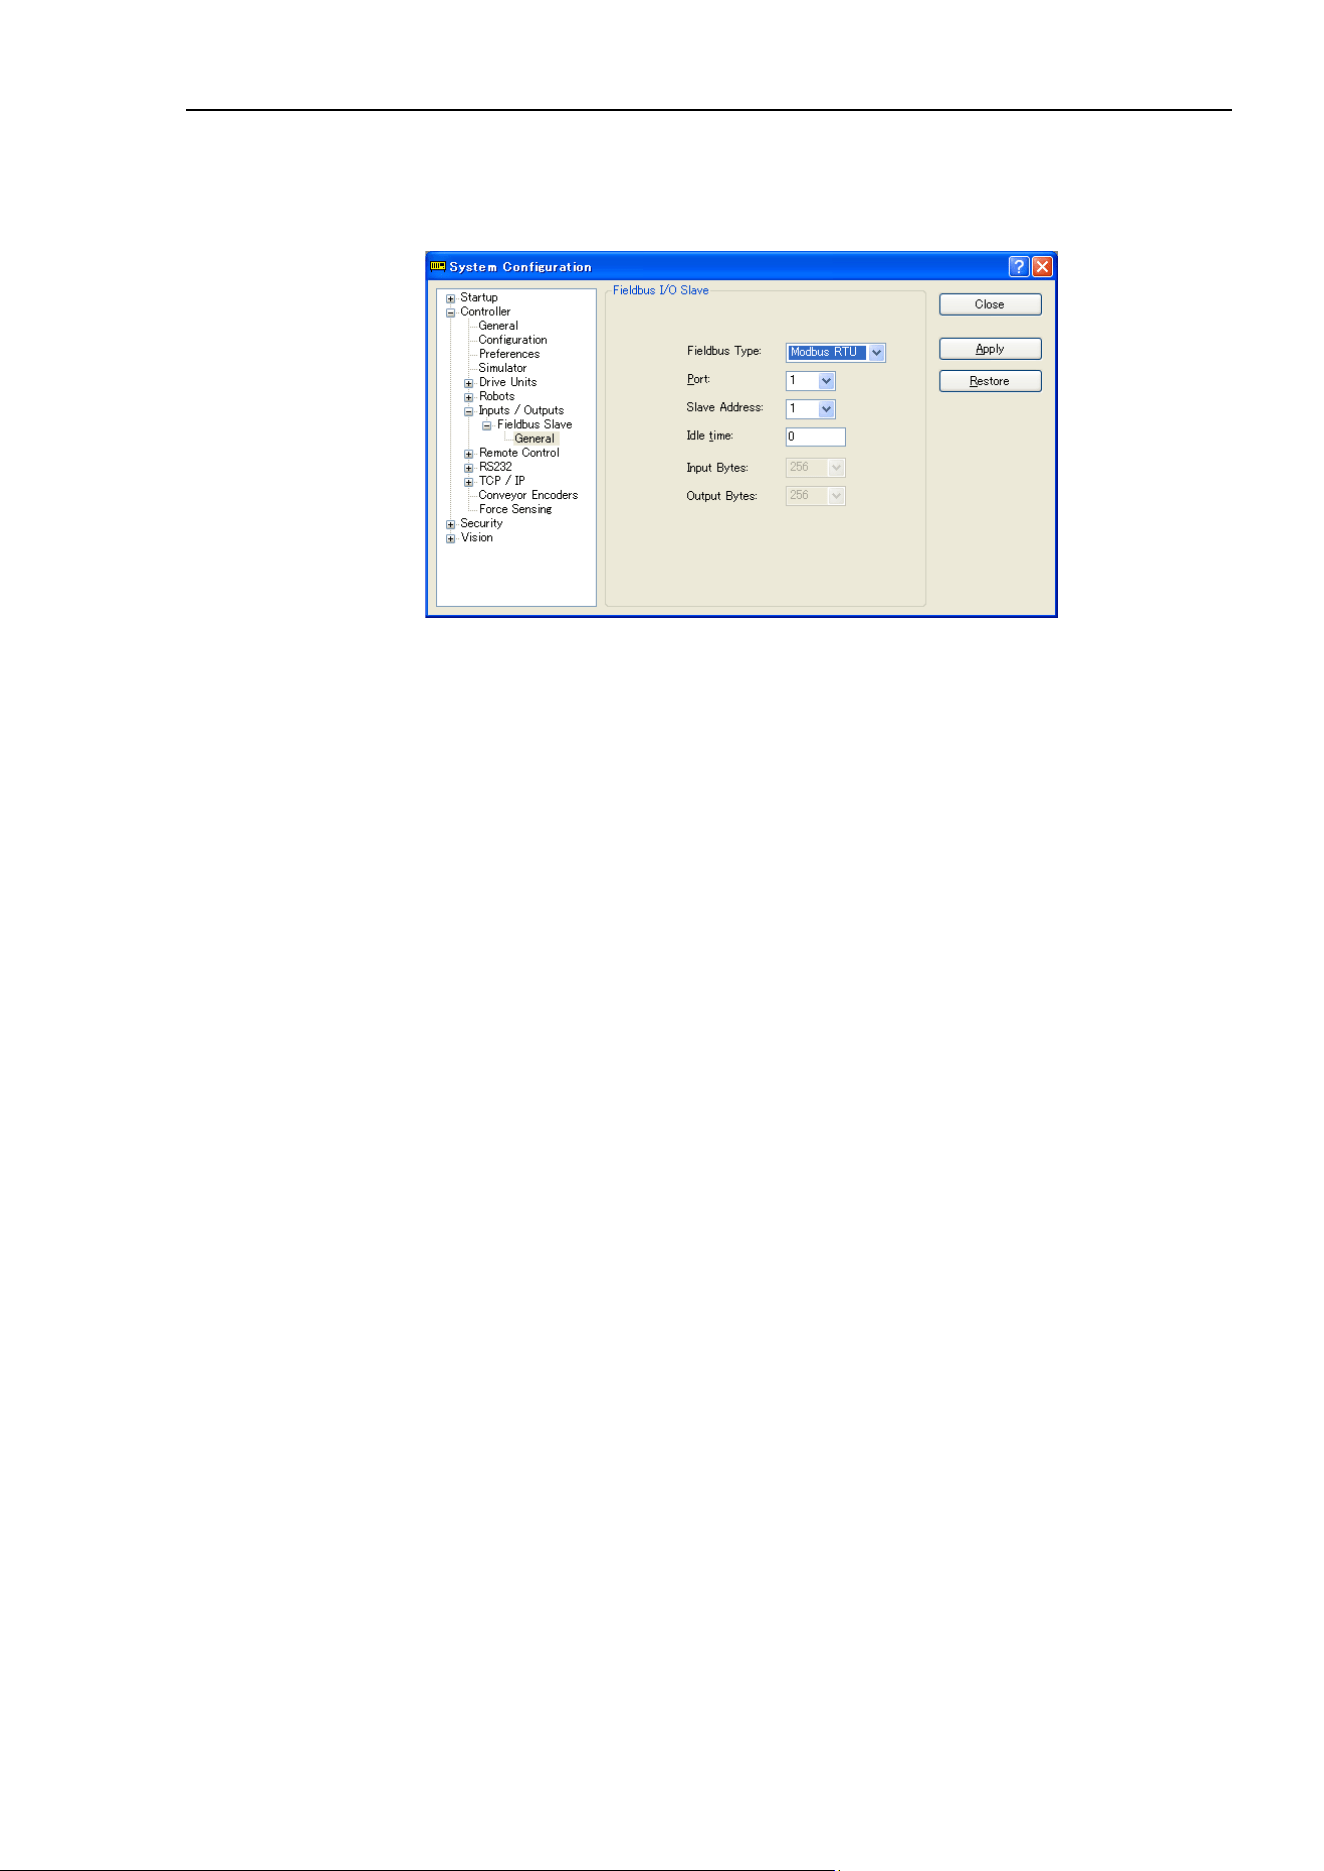
11. Inputs and Outputs
E
PSON RC+ 7.0 (Ver.7.4) User's Guide Rev.6
361
(2) ModBus RTU detailed settings
If “ModBusRTU” is selected for the Fieldbus type, the detailed dialog box to enable
ModBusRTU will be displayed. Set each item.
[Port]
Select the serial port number to be used.
Other settings such as the baud rate are done in the RS-232C configuration dialog
box (other menu).
- If unused port number is selected, a controller error occurs after rebooting the
Controller.
- To change the settings of the selected port such as a baud rate, disable ModBus i
n
a
dvance. Settings cannot be changed if the port is set to ModBus.
[Idle time]
Set the idle time to be added to the sending frame specified by the ModBusRTU
protocol. By the protocol specification, the time for 3.5 characters is defined before
and after the sending frame.
The idle time can be set in units of 1 ms. If “0” is specified for the setting value, the
time for 3.5 characters will be set.
Set this item if the connected equipment cannot receive a response with the time for
3.5 characters.
NOTE
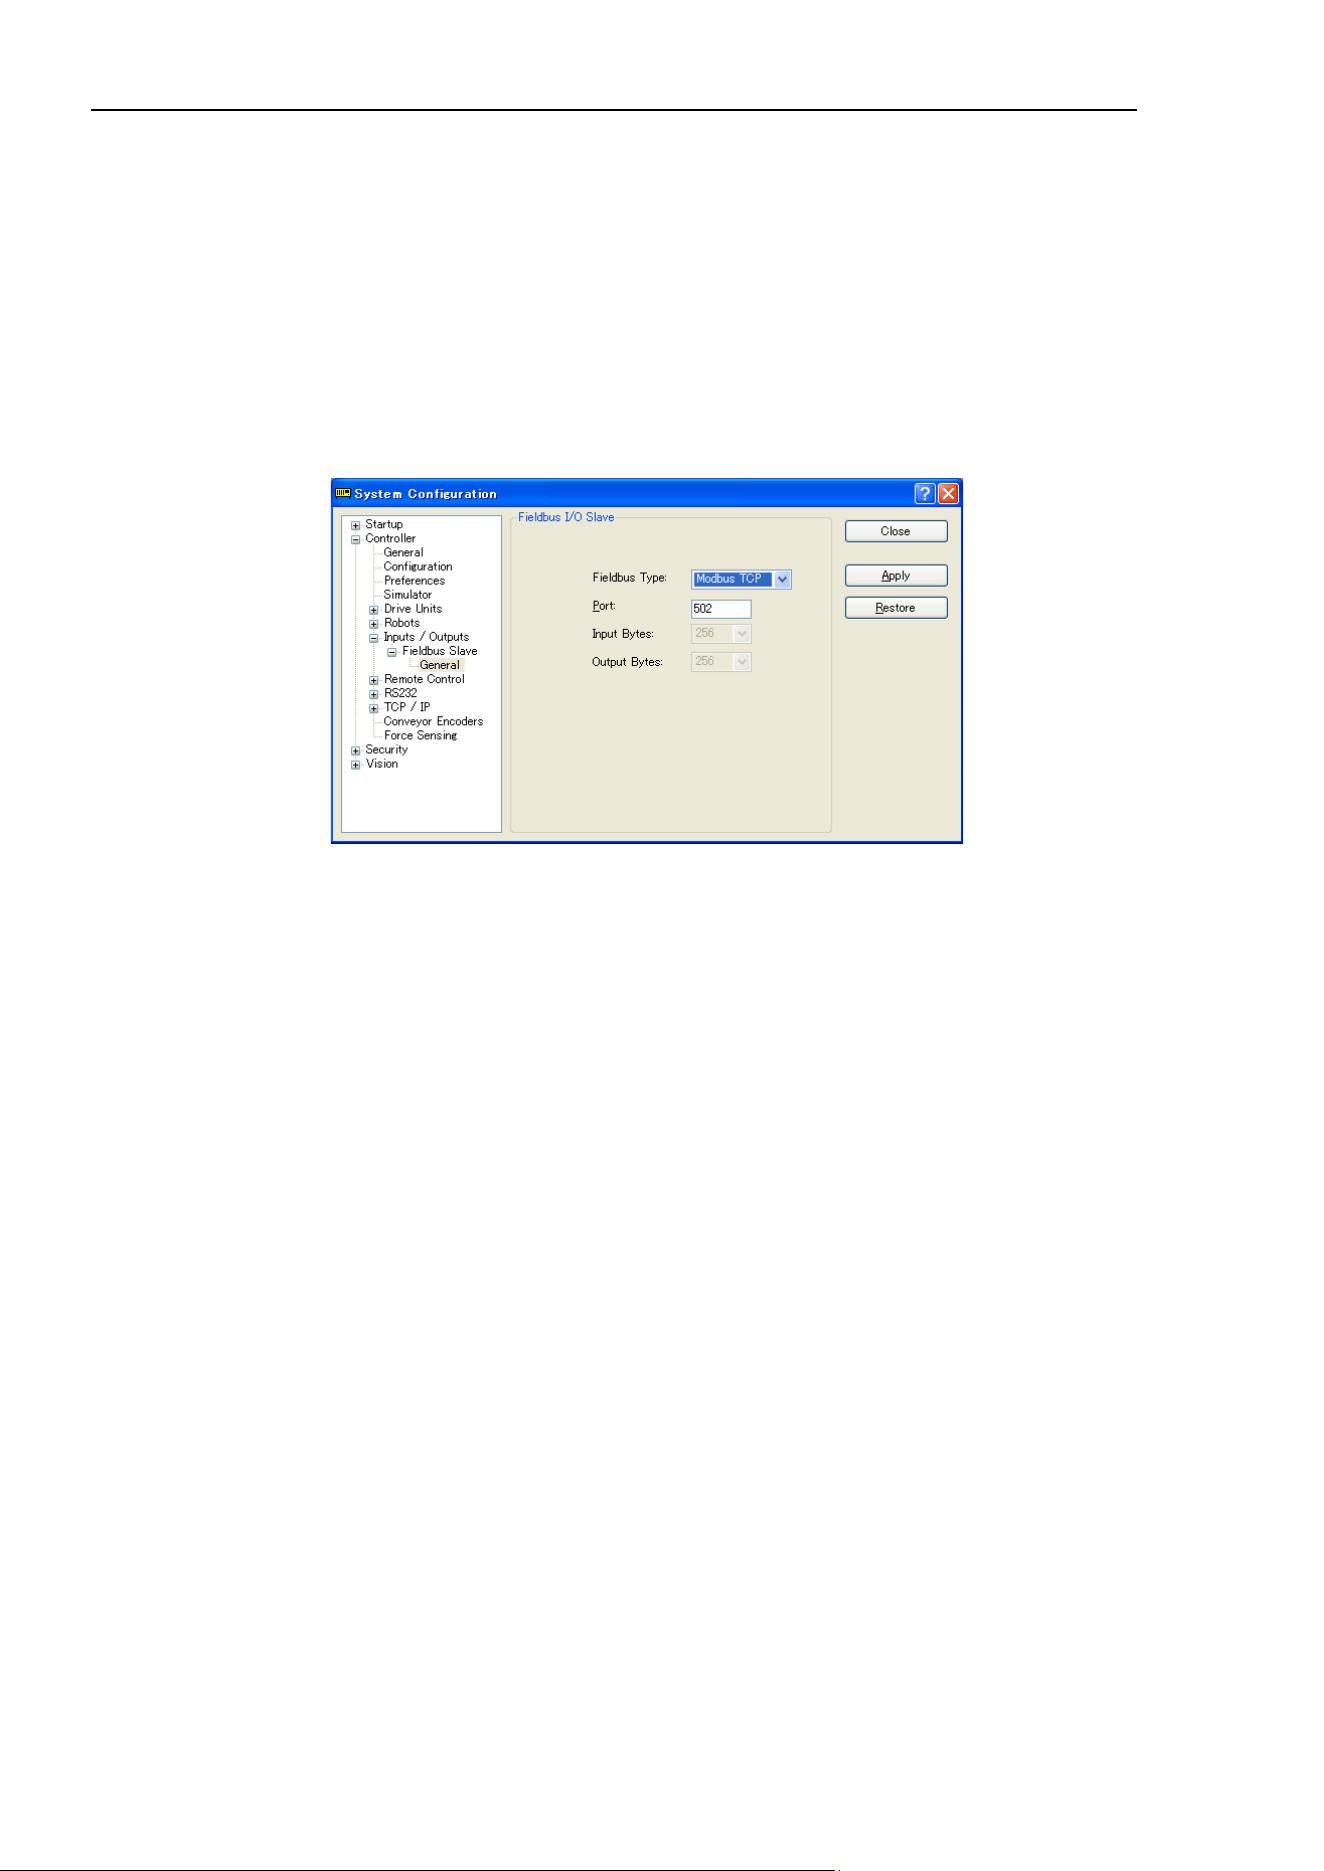
11. Inputs and Outputs
362 EPSON RC+ 7.0 (Ver.7.4) User's Guide Rev.6
[Slave address]
For the ModBusRTU slaves, the slave address set to the transmission frame is
checked and the request for that address is only processed.
Set the desired address.
Be careful not to conflict with other equipment.
(3) ModBus TCP detailed settings
If “ModBusTCP” is selected for the [Fieldbus Type], the dialog box to enable
ModBusTCP will be displayed. Set each item.
[Port]
Select the port number to be used. Default is “502”.
Set the port number not to conflict with other system.
NOTE
NOTE

12. Remote Control
EPSON RC+ 7.0 (Ver.7.4) User's Guide Rev.6
363
12. Remote Control
By using Input/Output, Ethernet (TCP/IP), and RS-232C, the controller can control
manipulators from an external device. The external device can execute several commands,
including Motor On/Off, Start, Pause, Continue, and Stop.
For details on extended function of the remote I/O, refer to EPSON RC+ 7.0 Remote
Control Reference manual.
12.1 Remote I/O
There are three basic steps required for remote control configuration:
1. Configure Remote Control inputs and outputs using the [Remote Control] tab on the
[Setup]-[System Configuration]-[Remote Control] page.
Nothing is initially assigned to remote functions.
2. Set the control device to remote on the [Setup]-[System Configuration]-[Configuration]
page.
To enable external remote inputs, assign the remote functions and also set the control
device to remote. When control device setting is remote, the controller is only
controllable from the remote device.
Remote control function can be used in the following systems.
Example: Control the robot from a PLC
Use remote control to control the robot (controller) from a PLC.
When using a PLC, you will need to be familiar with the handshake required to use
remote inputs. See details below.
Example: Control the robot using a push button box with buttons and lights
The lights are connected to remote control outputs on the controller to indicate status,
such as AutoMode, MotorOn, Error, etc. The buttons are connected to remote inputs to
control motor power and start programs.
For details of each I/O connection, refer to the following manuals:
Robot Controller Setup & Operation I/O Connector
I/O Remote Settings
Expansion I/O Board
Robot Controller Option Fieldbus I/O
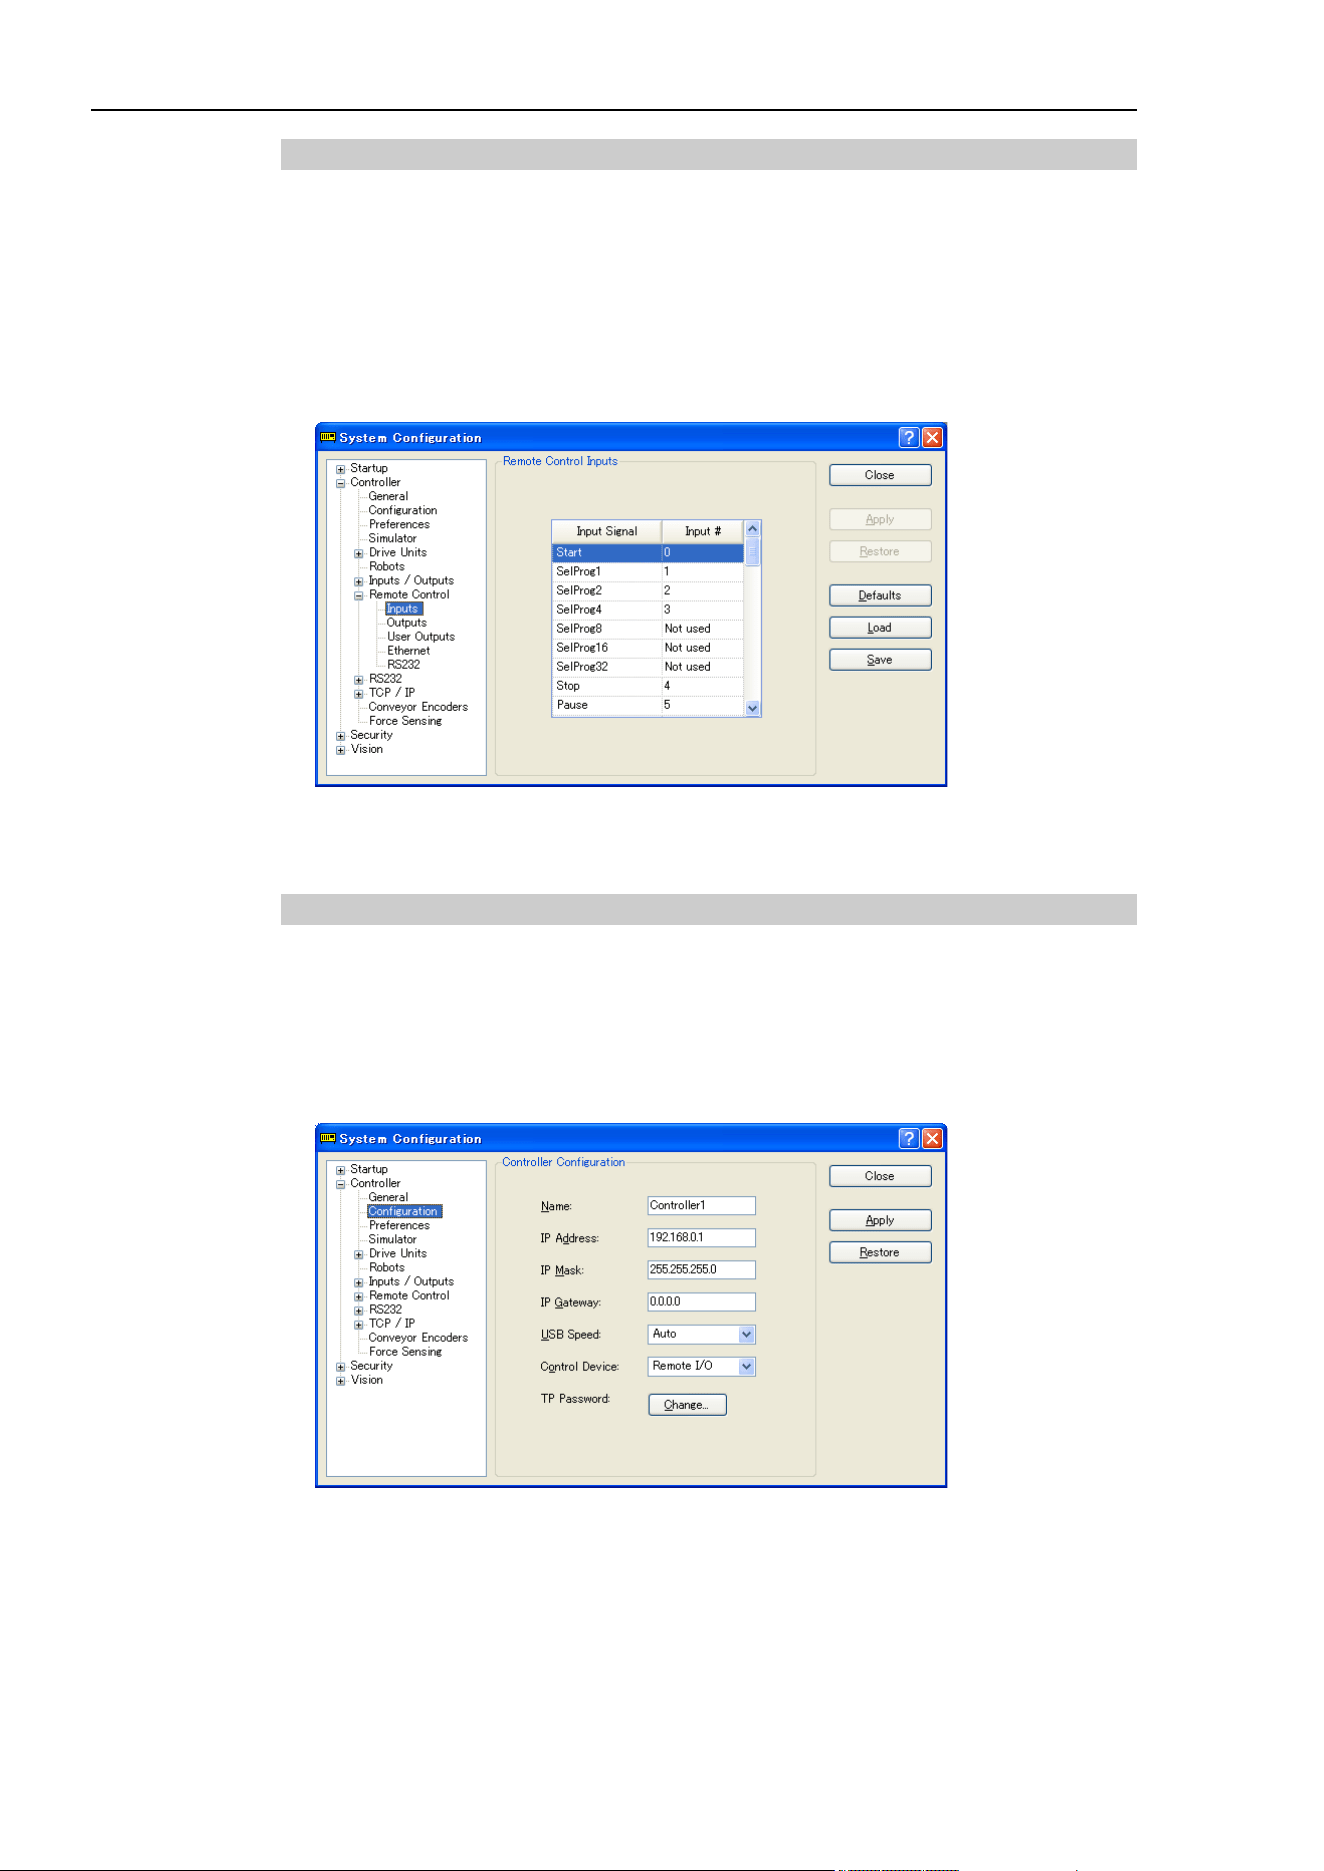
12. Remote Control
364 EPSON RC+ 7.0 (Ver.7.4) User's Guide Rev.6
12.1.1 Remote Control Input Output Configuration
The following is the procedure to assign the remote control functions to the I/O system.
1. Select [System Configuration] from the [Setup] menu and select the [Remote Control
Inputs] or [Remote Control Outputs] page.
2. For each input or output you want to use for remote control, click on the Input # or
Output # cell for the desired signal, then click the dropdown arrow and select a bit
number in the list.
3. Click <OK> to save the new settings.
For details using this dialog, refer to 5.12.2 [System Configuration] Command (Setup
Menu).
12.1.2 Control Device Configuration
The following is the procedure to set the control device to “Remote I/O”.
1. Select [System Configuration] from the [Setup] menu, and click on [SPEL Controller
Board]-[Configuration] in the tree on the left.
Select “Remote” in the [Control Device] box.
2. Click <Apply> to save the new setting and the click <Close>.
For details on using this dialog, refer to 5.12.2 [System Configuration] Command (Setup
Menu) – [Setup]-[System Configuration]-[Controller]-[Configuration].
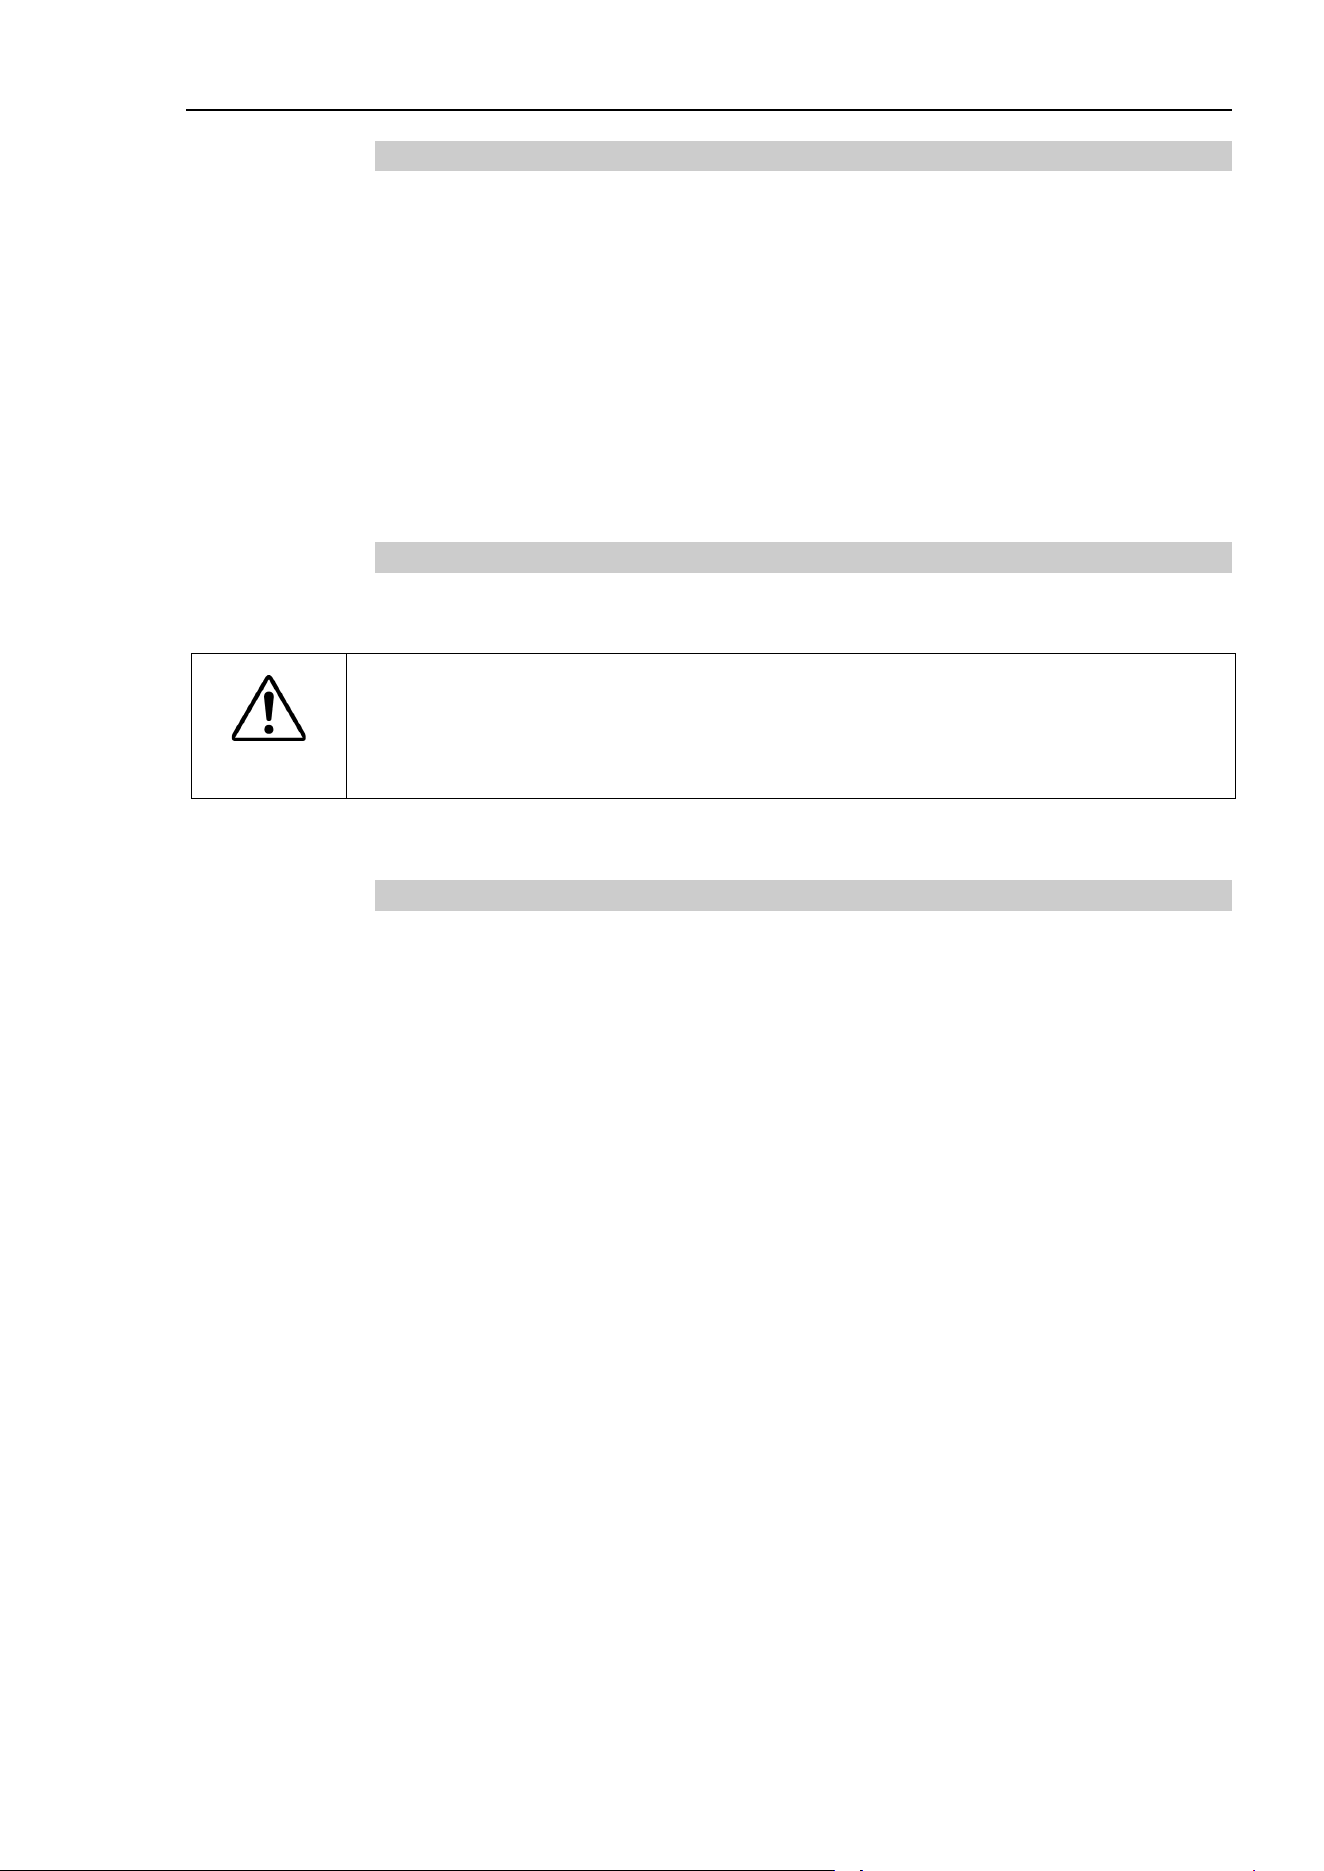
12. Remote Control
EPSON RC+ 7.0 (Ver.7.4) User's Guide Rev.6
365
12.1.3 Auto Mode with Remote Control
To run in auto cycle with remote control
1. The host device (e.g. PLC) should wait for the AutoMode and Ready remote output to
turn on before issuing remote commands.
2. Now the remote input commands will be accepted.
To monitor remote operation from the EPSON RC+ 7.0 Operator Window
1. Set the EPSON RC+ 7.0 Start Up Mode to “Auto”.
For details, refer to 4.2.3 Start Mode.
2. The PC should also be configured to automatically log into Windows and start EPSON
RC+ 7.0 at Windows start. Refer to 4.2.7 Auto Start.
12.1.4 Teach Mode with Remote Control
When using a remote control with Teach Mode ON, no remote input commands can be
used. Remote status outputs will still operate.
WARNING
■
Remote status outputs (such as MotorOn, Home, etc.) will operate when Teach
Mode is ON, even when the enable switch (
dead man’s switch) is disengaged.
Therefore, DO NOT use remote status outputs to
drive any devices that cause
motion or any other safety hazard.
You can monitor teach mode status using the TeachMode remote output.
12.1.5 Debugging Remote Control
You can debug programs using Remote Control from the EPSON RC+ 7.0 development
environment.
To run programs by remote control for debugging:
1. Create a program (in the same manner as usual).
2. Open the Run Window and click Enable Remote I/O.
3. Now the remote commands will be accepted.
You can set breakpoints and print messages to the Run window.
If you cannot wire the I/O, use virtual I/O mode for debugging. Remote function is also
available when virtual I/O is enabled.
NOTE

12. Remote Control
366 EPSON RC+ 7.0 (Ver.7.4) User's Guide Rev.6
12.1.6 Remote Inputs
Remote inputs are used to control the Manipulators and start programs. Certain conditions
must be met before inputs are enabled, as shown in the table below.
To accept external remote inputs, assign the remote function and set remote to the control
device. When external remote input is available, “AutoMode output” turns ON.
Except “SelProg”, the signals execute each function when the signal starts in input
acceptance condition. The function executes automatically. Therefore, no special
programming is needed.
When an error occurs, you must execute a “Reset” to clear the error condition before any
other remote input commands can be executed. Use the “Error output” and “Reset input”
to monitor the error status and clear error conditions from the remote device.
Name Default Description
Input Acceptance
Condition
(*1)
Start
0 Executes function selected at SelProg. (*2)
Ready output ON
Error output OFF
EStopOn output OFF
SafeguardOn output OFF
Pause input OFF
Stop input OFF
SelProg1
1
Specifies the executing Main function number.
(*2)
SelProg2
2
SelProg4
3
SelProg8
Not Set
SelProg16
Not Set
SelProg32
Not Set
Stop
4
All tasks and commands are stopped.
Pause
5
All tasks are paused. (*3)
Running output ON
Continue
6
Continues the paused task.
Paused output ON
Pause input OFF
Stop input OFF
Reset
7
Resets emergency stop and error. (*4)
Ready output ON
Shutdown
Not Set
Terminates the system
ForcePowerLow
(*6)
Not Set
Operates as the forced low power function.
The robot is operated in the low power mode.
Power High control from the command is not
accepted.
Executes the following according to the controller
preferences.
Stops or temporarily stops all the tasks and
commands. (*12)
Any time
This input is acceptable
even AutoMode output is
OFF.
SelRobot
Not Set
Changes the output condition of MotorsOn,
AtHome, PowerHigh, and MCalReqd. (*9)
SelRobot1
SelRobot2
SelRobot4
SelRobot8
SelRobot16
Not Set
Specify the number of robot which executes a
command. (*5)
SetMotorOn
Not Set
Turn ON robot motors. (*5) (*6)
Ready output ON
EStopOn output OFF
SafeguardOn output OFF
SetMotorsOff input OFF
NOTE

12. Remote Control
EPSON RC+ 7.0 (Ver.7.4) User's Guide Rev.6
367
Name Default Description
Input Acceptance
Condition
(*1)
SetMotorOff
Not Set
Turn OFF robot motors. (*5)
Ready output ON
SetPowerHigh
Not Set
Set the robot power mode to High (*5)
Ready output ON
EStopOn output OFF
SafeguardOn output OFF
SetPowerLow input OFF
SetPowerLow
Not Set
Set the robot power mode to Low. (*5)
Ready output ON
Home
Not Set
Move the Robot Arm to the home position
defined by the user.
Ready output ON
Error output OFF
EStopOn output OFF
SafeguardOn output OFF
MotorsOn output ON
Pause input OFF
Stop input OFF
MCal
Not Set
Execute MCal (*5) (*7)
Ready output ON
Error output OFF
EStopOn output OFF
SafeguardOn output OFF
MotorsOn output ON
Pause input OFF
Stop input OFF
Recover
Not Set
After the safeguard is closed, recover to the
position where the safeguard was open.
Paused output ON
Error output OFF
EStopOn output OFF
SafeguardOn output OFF
RecoverReqd output ON
Pause input OFF
Stop input OFF
ResetAlarm
Not Set
Cancel the alarm (*11)
SelAlarm1
SelAlarm2
SelAlarm4
SelAlarm8
Not Set Specify the alarm number to cancel (*10)
ALIVE Not Set
Input signal for alive monitoring of the controller.
Same signal as the input will be output to ALIVE
output. The master equipment can perform alive
monitoring of the controller by switching the
input periodically and checking the output signal.
(*1) “AutoMode output” ON is omitted from the table. This is an input acceptance condition for all functions.
(*2) “Start input” executes Function specified by the following six bits: SelProg 1, 2, 4, 8, 16, and 32.
Function
SelProg1
SelProg2
SelProg4
SelProg8
SelProg16
SelProg32
Main
0
0
0
0
0
0
Main1
1
0
0
0
0
0
Main2
0
1
0
0
0
0
Main3
1
1
0
0
0
0
.
.
.
Main60
0
0
1
1
1
1
Main61
1
0
1
1
1
1
Main62
0
1
1
1
1
1
Main63
1
1
1
1
1
1
0=OFF, 1=ON

12. Remote Control
368 EPSON RC+ 7.0 (Ver.7.4) User's Guide Rev.6
(*3) “NoPause task” and “NoEmgAbort task” do not pause.
For details, refer to EPSON RC+ 7.0 Online Help or Pause in SPEL
+
Language Reference.
(*4) Turns OFF the I/O output and initializes the robot parameter.
For details, refer to EPSON RC+ 7.0 Online Help or Reset in SPEL
+
Language Reference.
(*5) The values specified by “SelRobot1, 2, 4, 8, and 16” correspond to the robot numbers.
Robot number
SelRobot1
SelRobot2
SelRobot4
SelRobot8
SelRobot16
0 (All)
0
0
0
0
0
1
1
0
0
0
0
2
0
1
0
0
0
3
1
1
0
0
0
.
.
.
13
1
0
1
1
0
14
0
1
1
1
0
15
1
1
1
1
0
16
0
0
0
0
1
0=OFF, 1=ON
(*6) Initializes the robot parameter.
For details, refer to EPSON RC+ 7.0 Online Help or Motor in SPEL
+
Language Reference.
(*7) For details, refer to EPSON RC+ 7.0 Online Help or MCal in SPEL
+
Language Reference.
(*8) This is for experienced users only. Make sure that you fully understand the input specification before
using.
CmdRunning output and CmdError output will not change for this input.
“NoEmgAbort task” will not stop by this input.
When the input changes from ON to OFF, all tasks and commands will stop.
(*9) This function changes the output condition of MotorsOn, AtHome, PowerHigh, and MCalReqd.
By setting this signal with the condition selected using SelRobot1 - SelRobot16, you can switch the output
condition.
Once you select the condition, it will be kept until you change it or turn off / restart the Controller. All
manipulators are selected as default.
(*10) The values specified by “SelAlarm1, 2, 4, and 8” correspond to the alarm numbers.
Alarm #
Target
SelAlarm1
SelAlarm2
SelAlarm4
SelAlarm8
1
Controller battery
1
0
0
0
2
Battery of the robot connected to CU
0
1
0
0
3
Grease of the robot connected to CU
1
1
0
0
4
Battery of the robot connected to DU1
0
0
1
0
5
Grease of the robot connected to DU1
1
0
1
0
6
Battery of the robot connected to DU2
0
1
1
0
7
Grease of the robot connected to DU2
1
1
1
0
8
Battery of the robot connected to DU3
0
0
0
1
9
Grease of the robot connected to DU3
1
0
0
1
0=OFF, 1=ON
The following parts are subject to grease up.
6-axis robot: Bevel gear on the Joint #6
SCARA, RS series: Ball screw spline unit on the Joint # 3
(*11) The specified alarm can be canceled by selecting the conditions using SelAlarm1-SelAlarm8 and setting
this signal.

12. Remote Control
EPSON RC+ 7.0 (Ver.7.4) User's Guide Rev.6
369
(*12) Operation of all tasks and commands, power mode of the robot, and PowerHigh command by the setting
of the controller preferences.
Preferences (1): “Motor power low when ForcePowerLow signal OFF”
Preferences (2): “ForcePowerLow signal change pauses all tasks”
For details of the controller preferences, refer to [Setup]-[System Configuration]-[Controller]-
[Preferences] in 5.12.2 [System Configuration] Command (Setup Menu).
Preferences (1) Preferences (2) ForcePowerLow
All tasks and
commands
Power mode PowerHigh
0
0
1→0
Stop
Low only
Accept
0
0
0→1
Stop
Low only
Not accept
0
1
1→0
Continue
High/Low
Accept
0
1
0→1
Temp. stop
Low only
Not accept
1
0
1→0
Stop
Low only
Not accept
1
0
0→1
Stop
Low only
Accept
1
1
1→0
Temp. stop
Low only
Not accept
1
1
0→1
Continue
High/Low
Accept

12. Remote Control
370 EPSON RC+ 7.0 (Ver.7.4) User's Guide Rev.6
12.1.7 Remote Outputs
Remote outputs provide status for the Manipulator(s) and Controller.
Remote outputs provide the assigned function used with any control device. The outputs
execute automatically. Therefore, no special programming is needed.
Name Default Description
Ready 0
Turns ON when the controller startup completes and no task
is running.
Running 1
Turns ON when task is running.
However, turns OFF when “Paused output” is ON.
Paused
2
Turns ON when pause task exists.
Error 3
Turns ON when an error occurs.
Use “Reset input” to recover from the error.
EStopOn
4
Turns ON at Emergency Stop.
SafeguardOn
5
Turns ON when the safeguard is open.
SError
6
Turns ON when critical error occurs.
When a critical error occurs, “Reset input”
does not function.
Reboot the controller to recover.
Warning 7
Turns ON when warning occurs.
The task runs as normal with the warning. However, be sure
to eliminate the cause of the warning as soon as possible.
MotorsOn
Not set
Turns ON when the robot motor is ON. (*5)
AtHome
Not set
Turns ON when the robot is in the home position. (*5)
PowerHigh
Not set
Turns ON when the robot’s power mode is High. (*5)
MCalReqd
Not set
Turns ON when the robot hasn’t executed MCal. (*5)
RecoverReqd
Not set
Turns ON when at least one robot is waiting for Recover
after the safeguard is closed.
RecoverInCycle
Not set
Turns ON when at least one robot is executing Recover.
WaitingRC
Not set
Turns ON when the Controller is waiting to connect with
RC+.
CmdRunning
Not set
Turns ON when an input command is executing.
CmdError
Not set
Turns ON when an input command cannot be accepted.
CurrProg1
CurrProg2
CurrProg4
CurrProg8
CurrProg16
CurrProg32
Not set
Indicates the running or the last main function number
(*1)
AutoMode
Not set
Turns ON in remote input acceptable status. (*2)
TeachMode
Not set
Turns ON in TEACH mode.
TestMode
Not set
Turns ON in TEST mode.
EnableOn
Not set Turns ON when the enable switch is ON.
ErrorCode1
.
.
.
ErrorCode8192
Not set
Indicates the error number.
InsideBox1
.
.
.
InsideBox15
Not set
Turns ON when the robot is in the approach check area. (*3)
InsidePlane1
.
.
.
InsidePlane15
Not set
Turns ON when a robot is on the approach plane area. (*4)
Alarm
Not set
Turns ON when any of the alarms is occurring. (*9)

12. Remote Control
EPSON RC+ 7.0 (Ver.7.4) User's Guide Rev.6
371
Name Default Description
Alarm1
Not set
Turns ON when a battery alarm of the controller is occurring.
Alarm2
Not set
Turns ON when a battery alarm of the robot connected to CU
is occurring.
Alarm3
Not set
Turns ON when a grease alarm of the robot connected to CU
is occurring. (*10)
Alarm4
Not set
Turns ON when a battery alarm of the robot connected to
DU1 is occurring.
Alarm5
Not set
Turns ON when a grease alarm of the robot connected to
DU1 is occurring. (*10)
Alarm6
Not set
Turns ON when a battery alarm of the robot connected to
DU2 is occurring.
Alarm7
Not set
Turns ON when a grease alarm of the robot connected to
DU2 is occurring. (*10)
Alarm8
Not set
Turns ON when a battery alarm of the robot connected to
DU3 is occurring.
Alarm9
Not set
Turns ON when a grease alarm of the robot connected to
DU3 is occurring. (*10)
PositionX Not set
Outputs current X coordinate in the World coordinate system
(*6) (*7)
PositionY Not set
Outputs current Y coordinate in the World coordinate system
(*6) (*7)
PositionZ Not set
Outputs current Z coordinate in the World coordinate system
(*6) (*7)
PositionU Not set
Outputs current U coordinate in the World coordinate system
(*6) (*7)
PositionV Not set
Outputs current V coordinate in the World coordinate system
(*6) (*7)
PositionW Not set
Outputs current W coordinate in the World coordinate system
(*6) (*7)
Torque1
Not set
Outputs the current torque value of Joint #1 (*6) (*7)
Torque2
Not set
Outputs the current torque value of Joint #2 (*6) (*7)
Torque3
Not set
Outputs the current torque value of Joint #3 (*6) (*7)
Torque4
Not set
Outputs the current torque value of Joint #4 (*6) (*7)
Torque5
Not set
Outputs the current torque value of Joint #5 (*6) (*7)
Torque6
Not set
Outputs the current torque value of Joint #6 (*6) (*7)
CPU
Not set
Outputs the CPU load factor of the user program (*8)
ESTOP Not set
Outputs how many times emergency stops have been
executed.
ALIVE Not set
Output signal for alive monitoring of the controller. The
signal input by ALIVE input will be output. The master
equipment can perform alive monitoring of the controller by
switching the input periodically and checking the output
signal.
ForceControlOn Not set
Turns ON when the robot is executing the force control
function. (*5)

12. Remote Control
372 EPSON RC+ 7.0 (Ver.7.4) User's Guide Rev.6
(*1) Outputs the current or the last function number of CurrProg1, 2, 4, 8, 16, or 32.
Function name CurrProg1 CurrProg2 CurrProg4 CurrProg8 CurrProg16 CurrProg32
Main
0
0
0
0
0
0
Main1
1
0
0
0
0
0
Main2
0
1
0
0
0
0
Main3
1
1
0
0
0
0
.
.
.
Main60
0
0
1
1
1
1
Main61
1
0
1
1
1
1
Main62
0
1
1
1
1
1
Main63
1
1
1
1
1
1
0=OFF, 1=ON
(*2) Remote function is available in the followings conditions.
- The setting is Auto mode and the control device is remote.
- The setting is Program mode and Remote I/O is enabled.
(*3) For details, refer to EPSON RC+ 7.0 Online Help or Box in SPEL
+
Language Reference.
(*4) For details, refer to EPSON RC+ 7.0 Online Help or Plane in SPEL
+
Language Reference.
(*5) Manipulator status is output as follows, according to the condition selected in SelRobot.
Wait at least 40 ms before inputting the signal after changing the condition in SelRobot.
Name
(SelRobot1- SelRobot16) condition when inputting SelRobot
0: All robots are selected
1 - 16: Particular robot number is selected
MotorsOn
Turns ON when at least one motor is
ON.
Turns ON when the motor of the selected
robot is ON.
AtHome
Turns ON when all robots are in the
home position.
Turns ON when the selected robot is in the
home position.
PowerHigh
Turns ON when at least one robot’s
power mode is High.
Turns ON when the selected robot’s power
mode is High.
MCalReqd
Turns ON when at least one robot hasn’t
executed MCal.
Turns ON when the selected robot hasn’t
executed MCal.
ForceControlOn
Turns ON when at least one robot is
executing the force control function.
Turns ON when the selected robot is
executing the force control function.
(*6) Outputs information of the selected robot when SelRobot1, SelRobot2, SelRobot4, SelRobot8, and
SelRobot16 are set. If not, information of Robot 1 will be output.
(*7) Outputs information in Real format.
(*8) Outputs the total load factor of the user created tasks. For details on the CPU load factor, refer to the task
manager.
(*9) The signal turns on when the alarm occurs either in the controller alarm information or the robot alarm
information.
(*10) The following parts are subject to grease up.
6-axis robot: Bevel gear on the Joint #6
SCARA, RS series: Ball screw spline unit on the Joint # 3
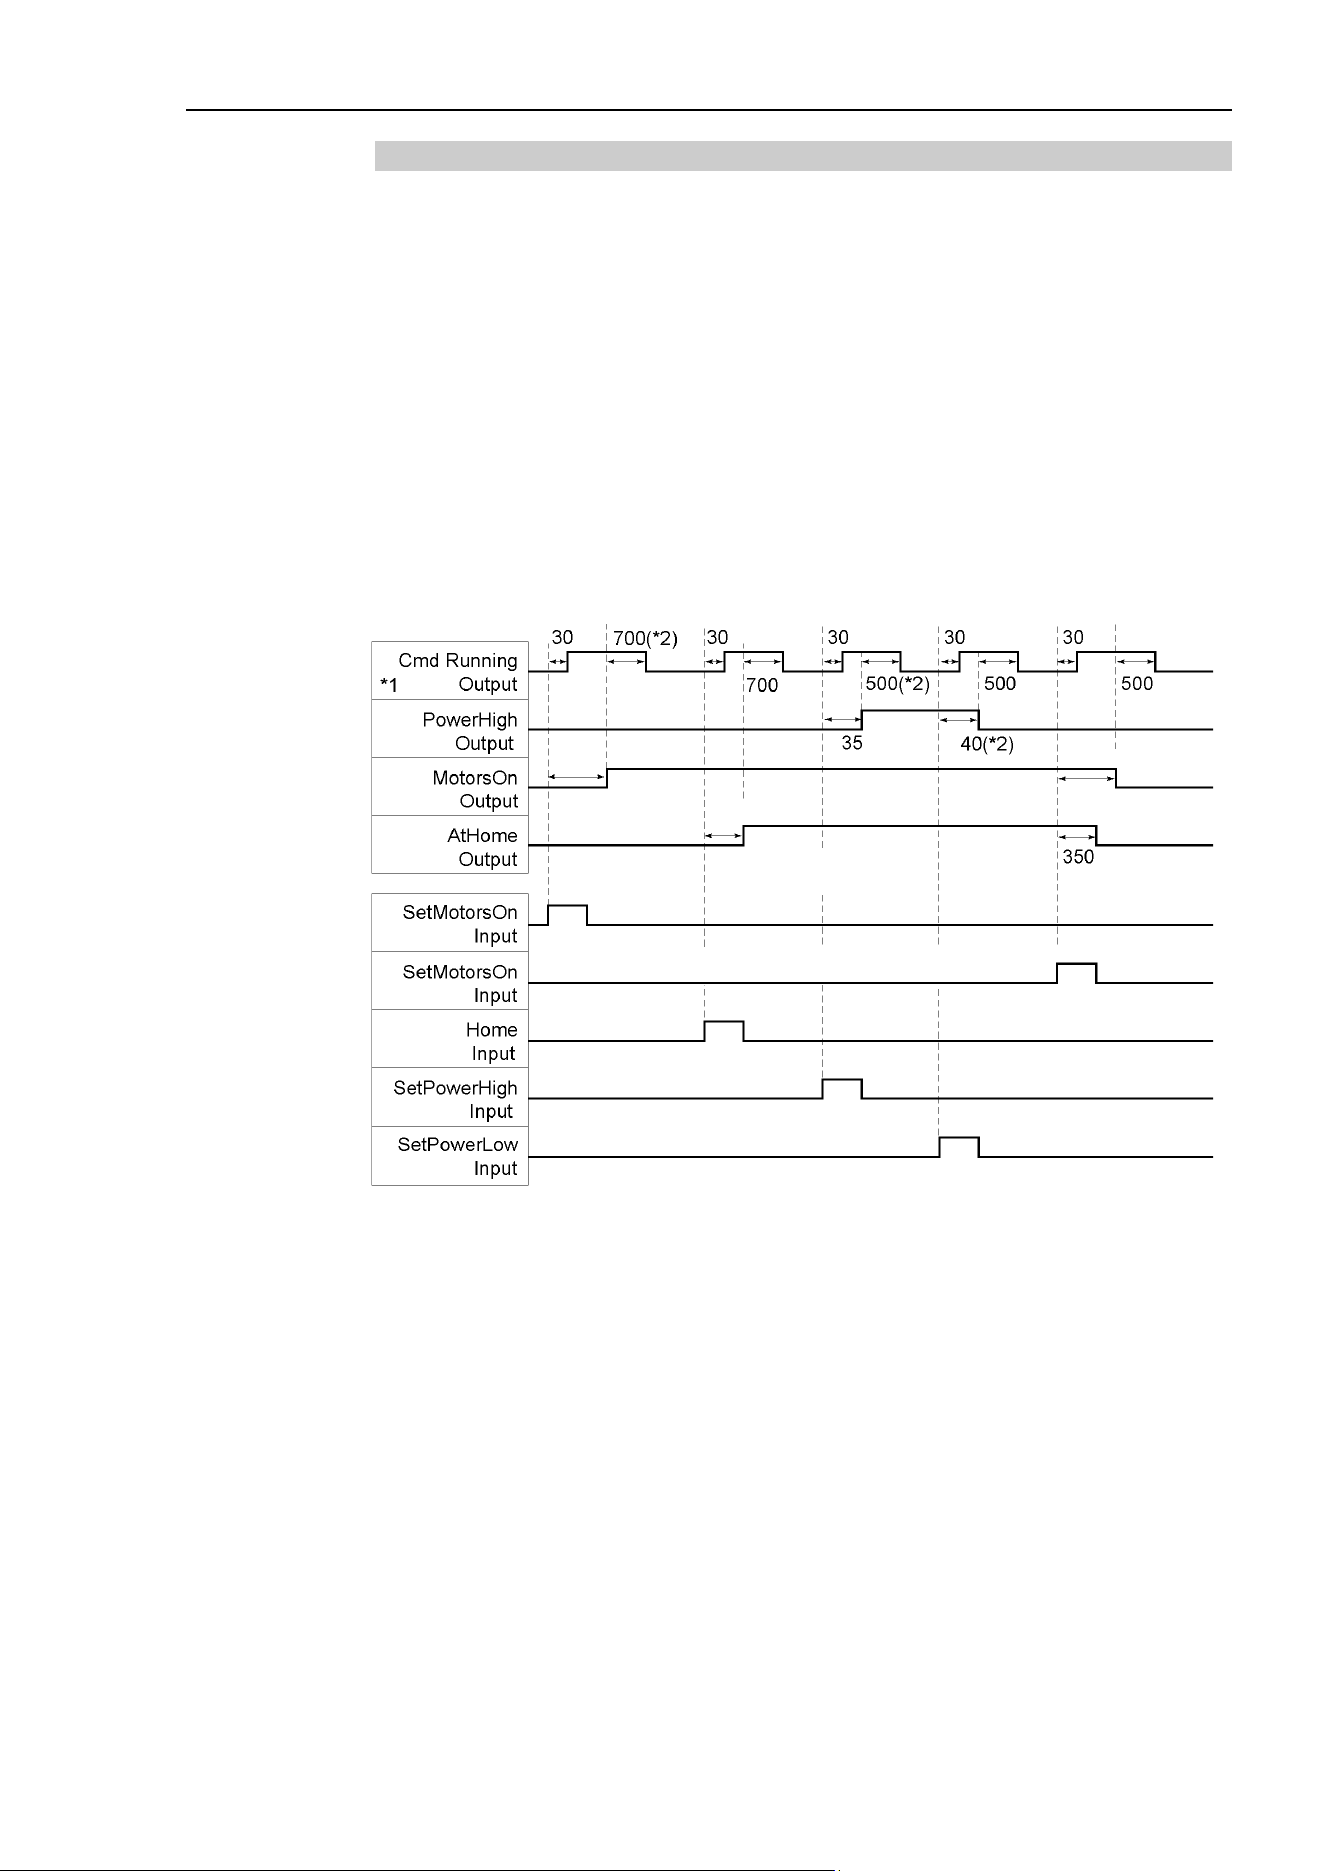
12. Remote Control
EPSON RC+ 7.0 (Ver.7.4) User's Guide Rev.6
373
12.1.8 Remote Input Handshake Timing
The following charts indicate the timing sequences for the primary operations of the
Controller.
The indicated time lapses (time durations) should be referred to only as reference values
since the actual timing values vary depending on some factors such as the numbers of
manipulators and running tasks. Check carefully and refer to the following charts for the
timing interrelation when you enter an input signal.
During system design, make sure that you actuate only one remote input operation at a
time, otherwise an error will occur.
The pulse width of an input signal must be 25 or more milliseconds to be detected.
[Unit: msec]
Timing Diagram for Operation Execution Sequence
approx. 1000 (*2)
aprox.1000 (*2)
By Home motion
*1 The motion of the CmdRunnig can be different from this figure according to the
condition.
*2 Refer to only as reference value for a robot. It can be different according to the
number of robots.
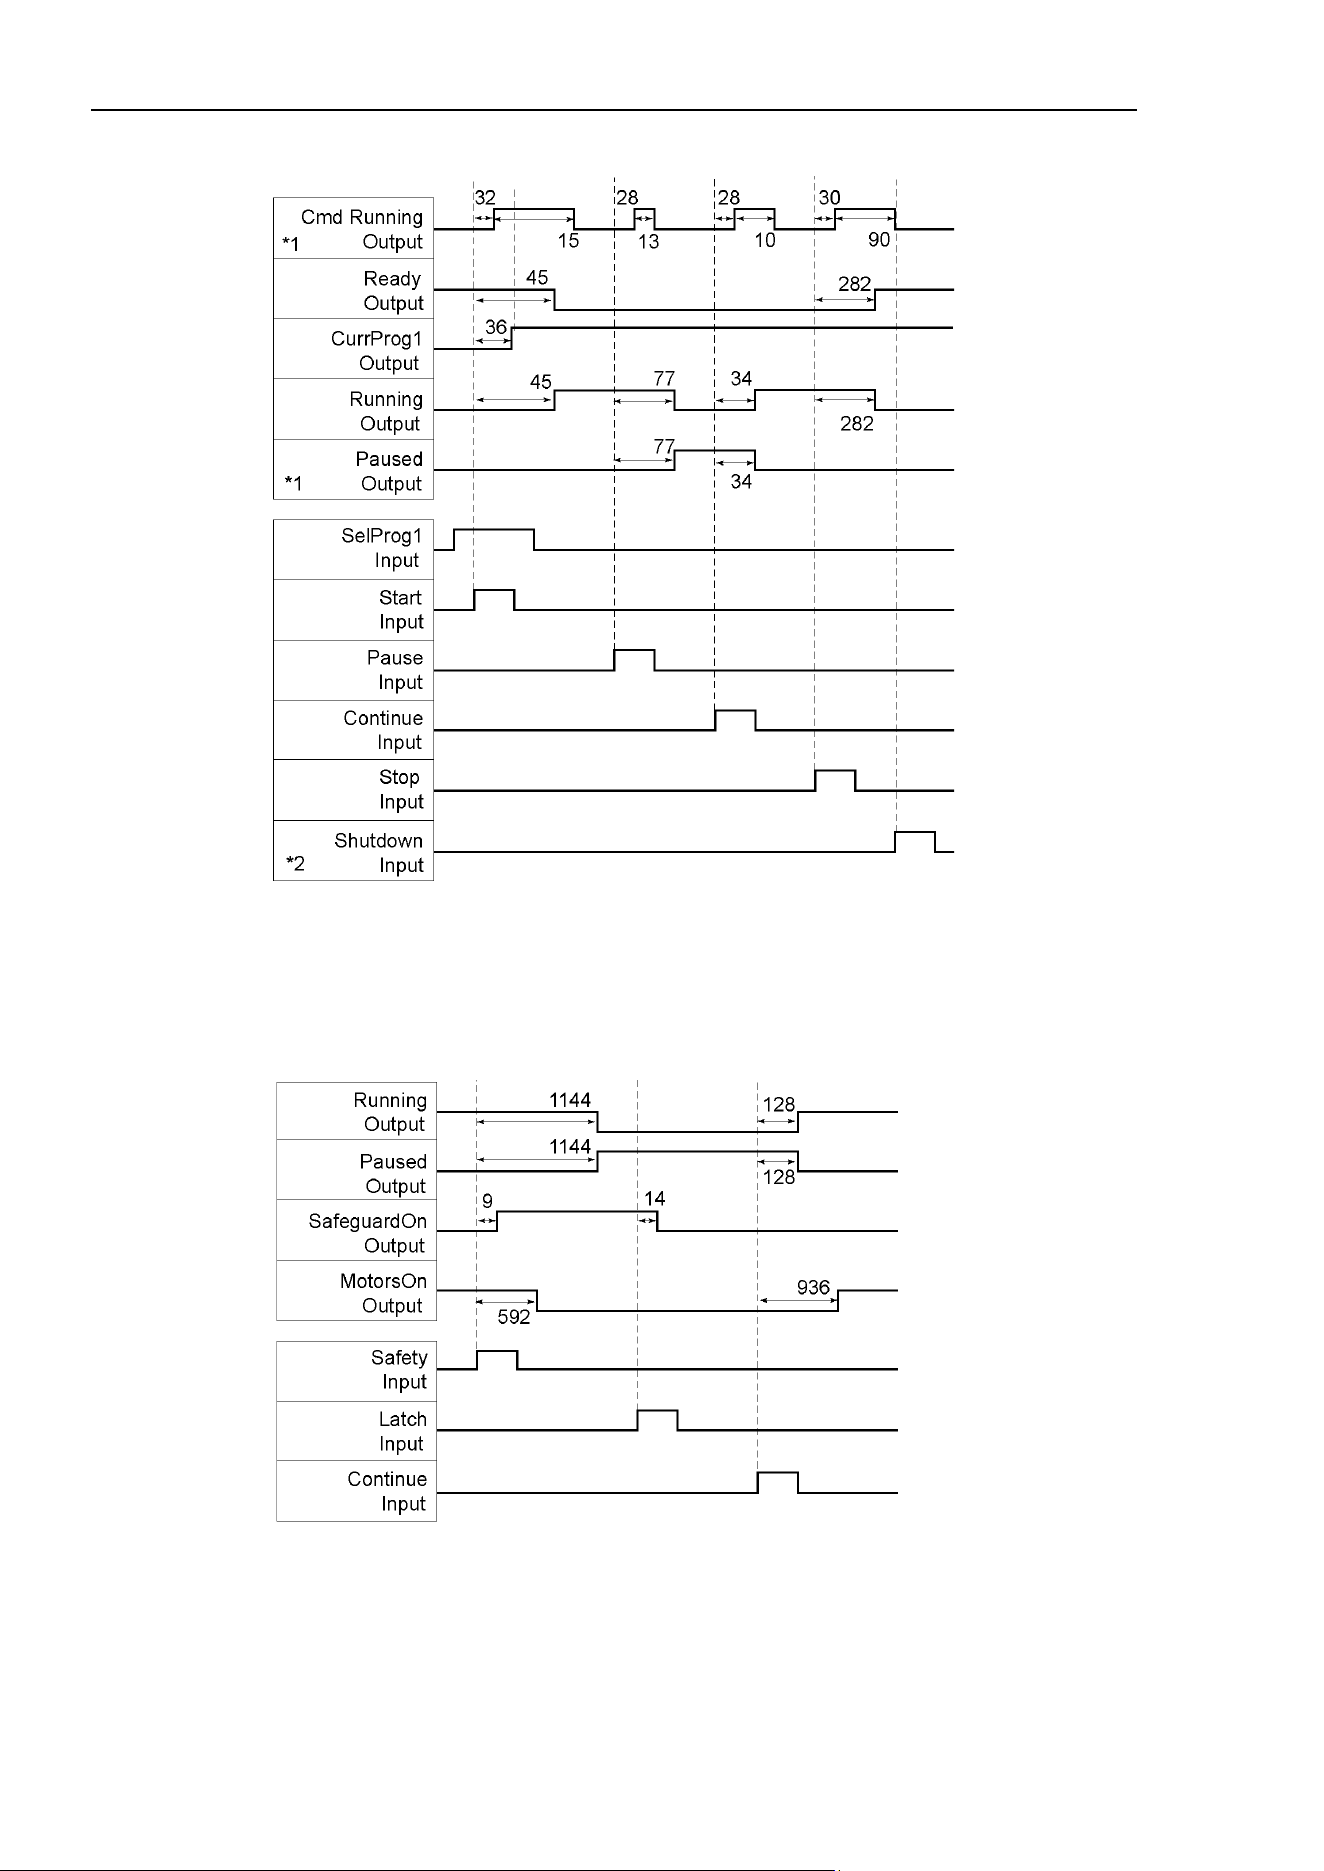
12. Remote Control
374 EPSON RC+ 7.0 (Ver.7.4) User's Guide Rev.6
Timing Diagram for Program Execution Sequence
*1 Differs according to the setting condition of Quick Pause and the program running
condition when the PAUSE is input.
*2 Shutdown input can be accepted when the Ready output is ON.
Timing Diagram for Safety Door Input Sequence
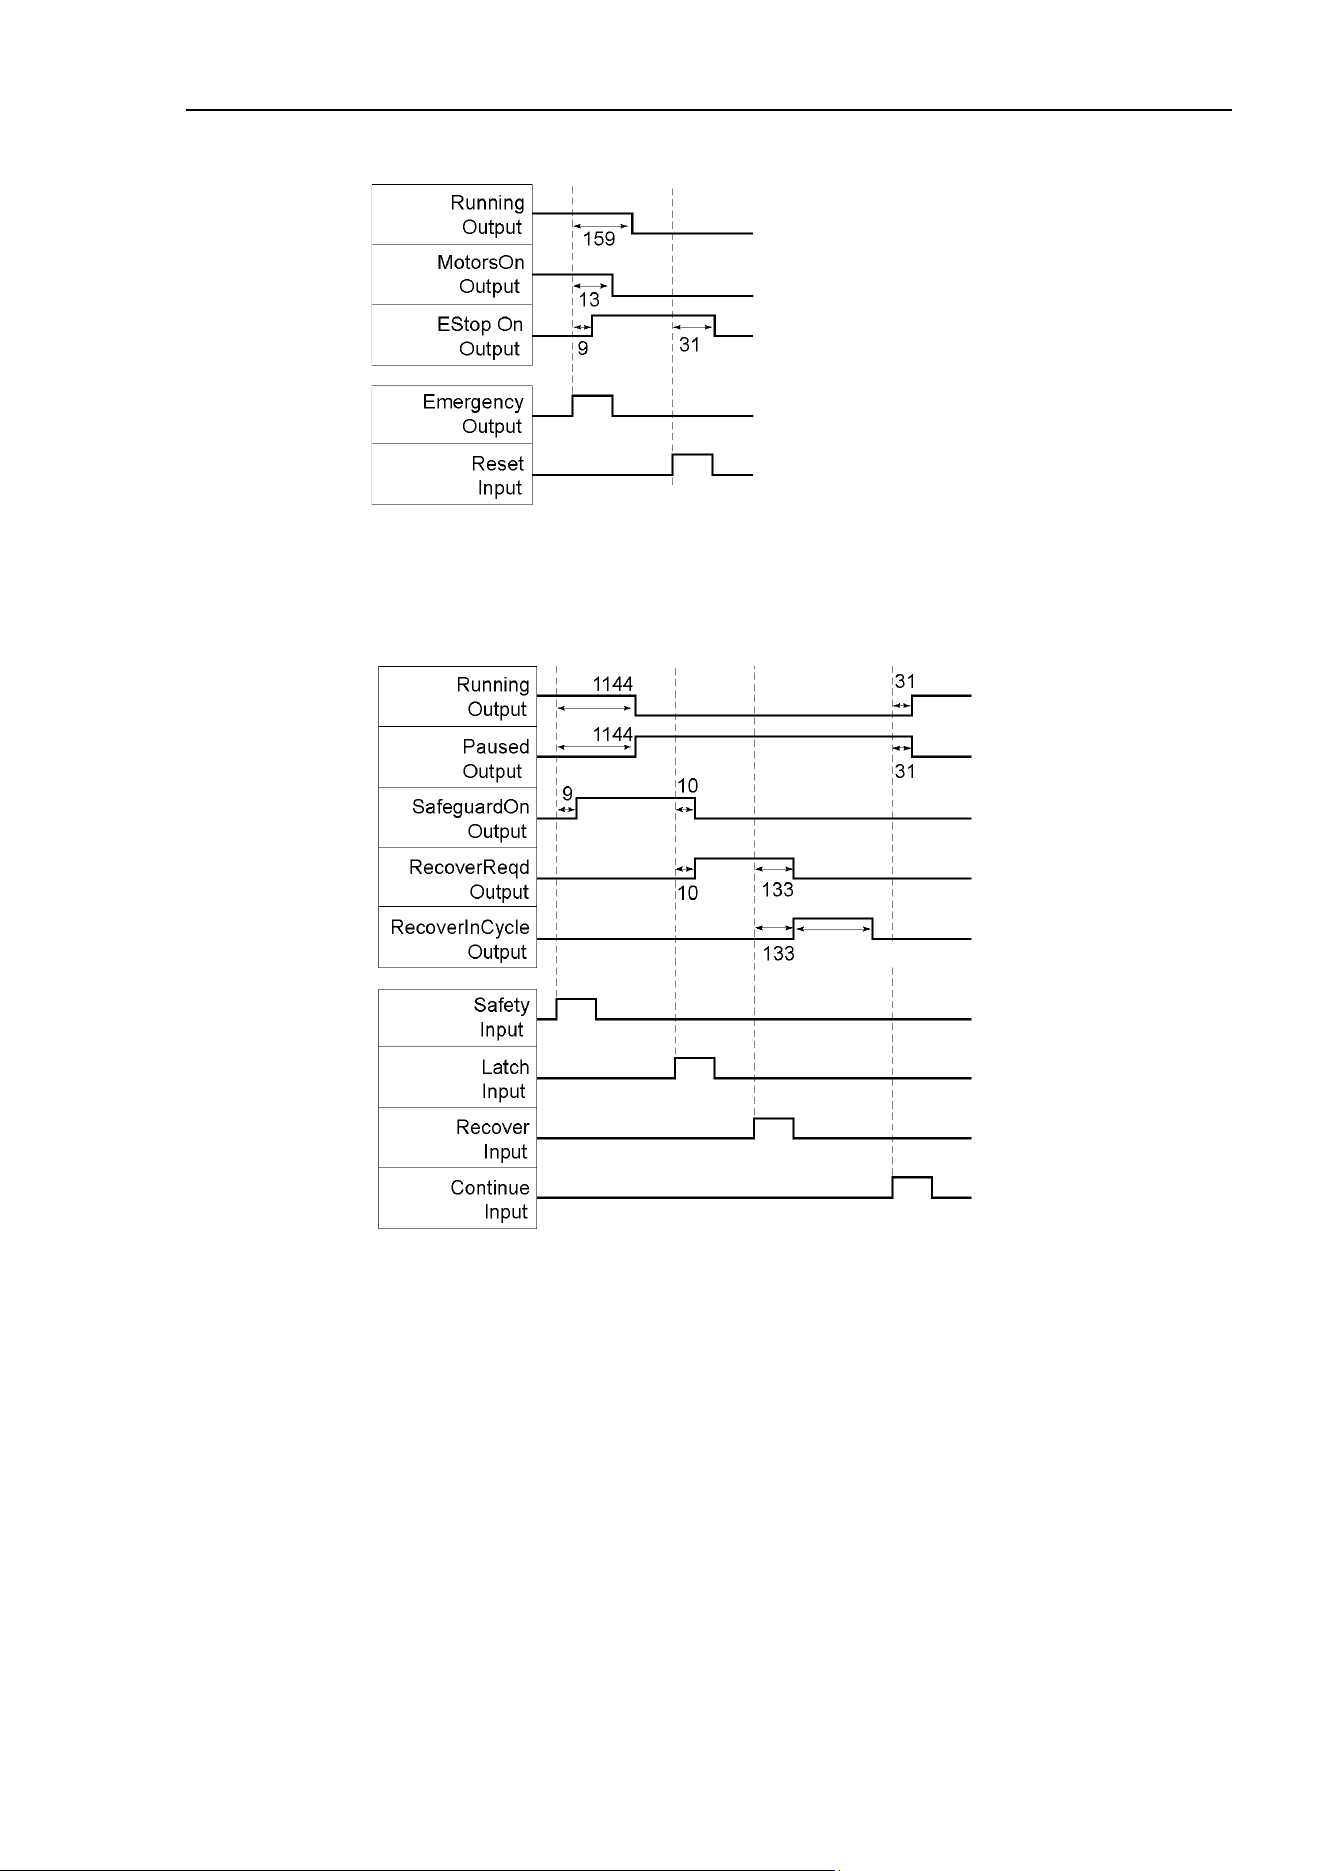
12. Remote Control
EPSON RC+ 7.0 (Ver.7.4) User's Guide Rev.6
375
Timing Diagram for Emergency Stop Sequence
If an error occurs, the Error output will turn on. To clear the error, you must turn on the
Reset input. No other inputs will be accepted when there is an error condition.
Timing Diagram for Recover Sequence
By Recover motion
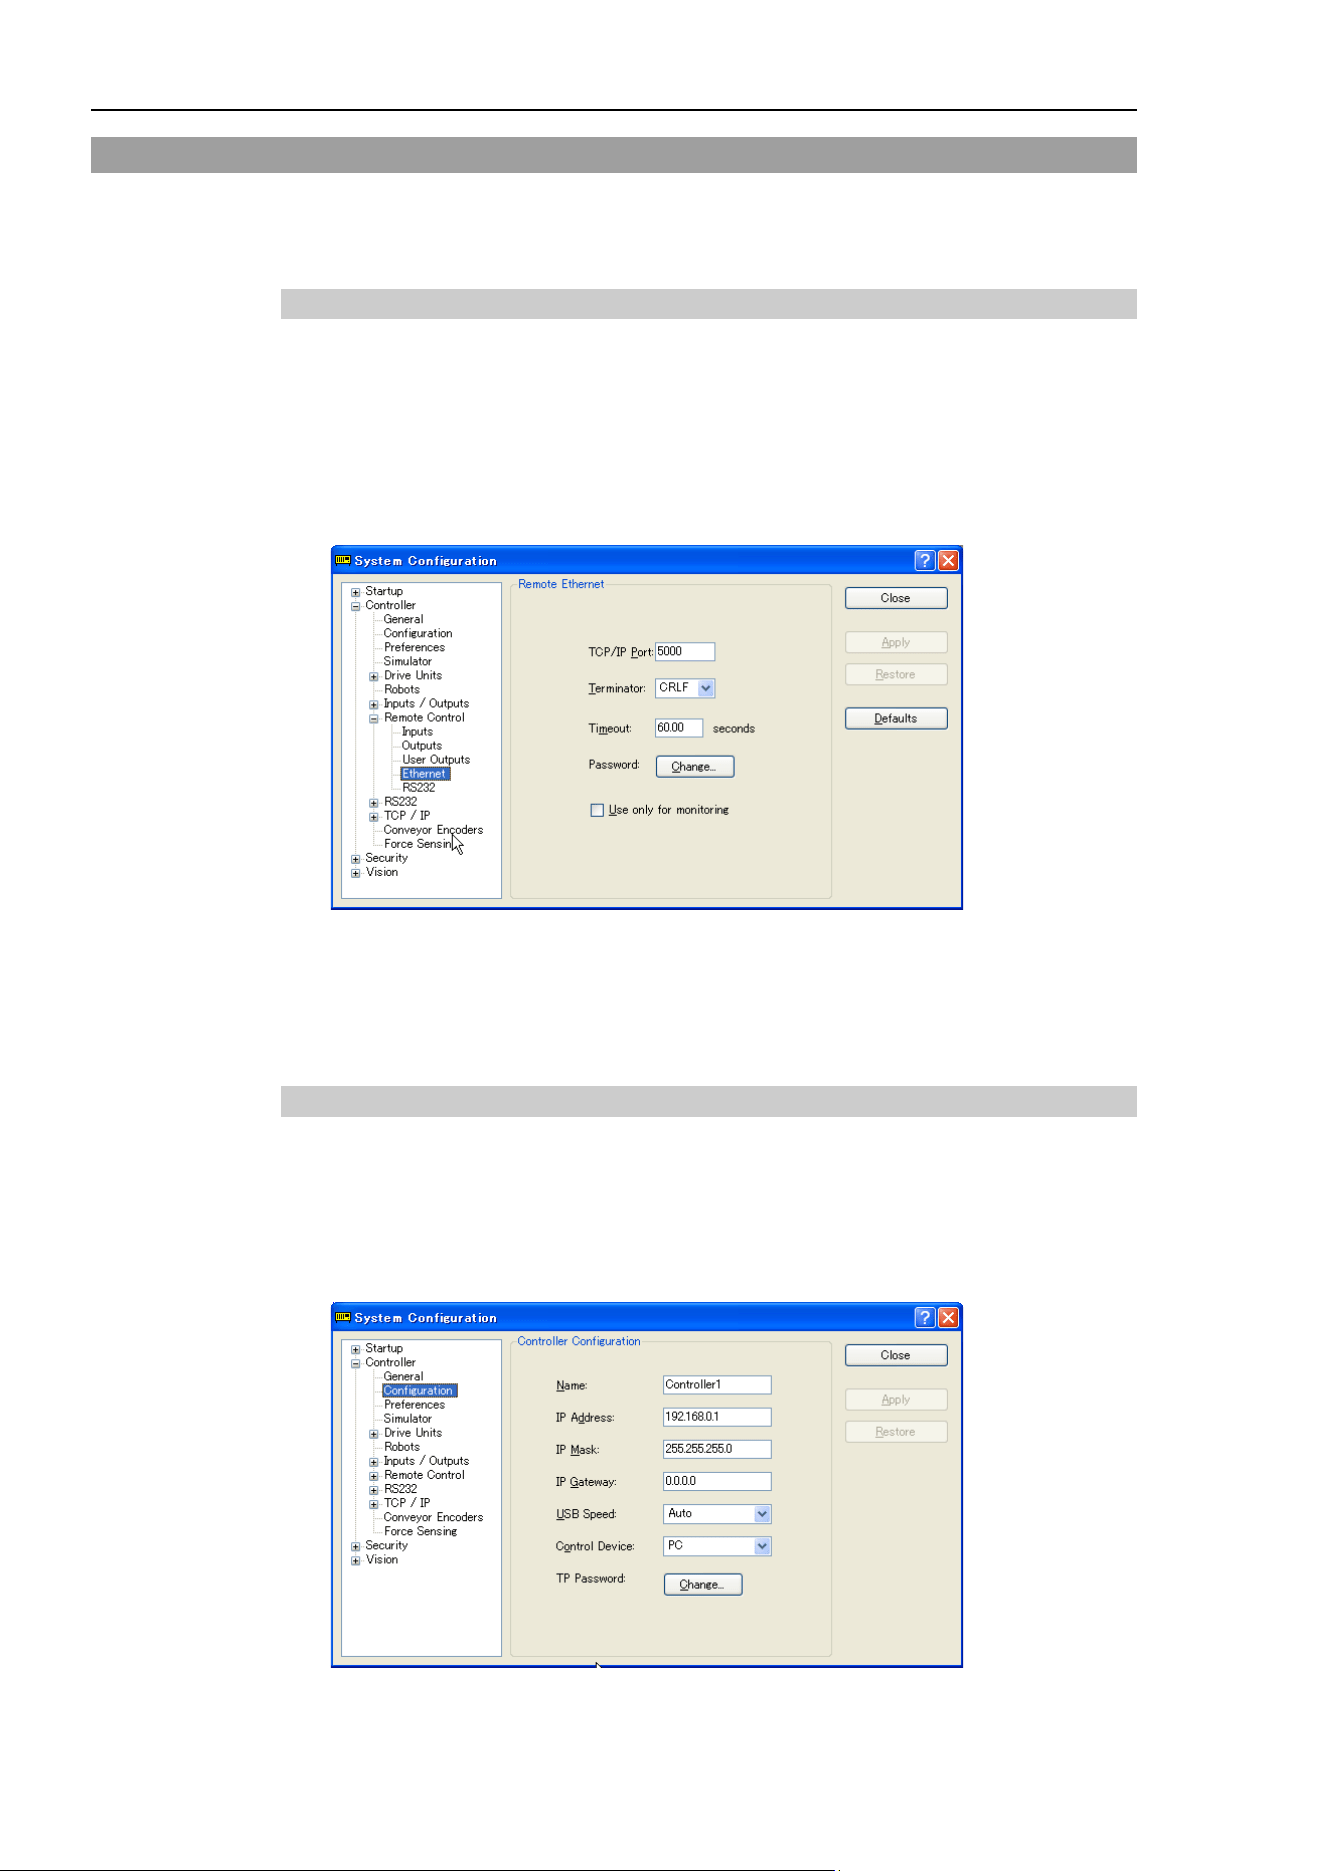
12. Remote Control
376 EPSON RC+ 7.0 (Ver.7.4) User's Guide Rev.6
12.2 Remote Ethernet
Remote Ethernet makes it possible to control the robot and controller from external
equipment by sending the remote commands through Ethernet (TCP/IP).
12.2.1 Remote Ethernet Configuration
To set the remote Ethernet functions valid, follow the procedures below to configure the
parameter.
(1) Select [System Configuration] from the [Setup] menu and select the [Remote
Control]-[Ethernet] page.
(2) Configure the necessary items for the remote Ethernet control.
(3) Click <Apply> to save the new setting and click <Close>.
For the details of the dialog setting, refer to the section 5.12.2 [System Configuration]
Command (Setup menu)–[Setup]-[System Configuration]-[Remote].
Following setting for the control device is not necessary when you select “Use only for
monitoring”, and only acquire the value using the Remote Ethernet control.
12.2.2 Control Device Configuration
Set the control device to “Remote Ethernet” by the following procedure.
(1) Select [System Configuration] from the [Setup] menu and select [Controller
Configuration] page.
Select “Remote Ethernet” in the [Controller device] box.
(2) Click <Apply> button to save the new settings, click <Close>.
For the details of the dialog setting, refer to the section 5.12.2 [System Configuration]
Command (Setup menu) – [Setup]-[System Configuration]-[Setup].
12. Remote Control
EPSON RC+ 7.0 (Ver.7.4) User's Guide Rev.6
377
12.2.3 Remote Ethernet Control Execution
Set the remote control available by the following procedure.
(1) Connect from client equipment to the specified port in the Remote Ethernet of the
Controller.
(2) Specify the password set in the Remote Ethernet to the parameter and send the Login
command.
(3) Client equipment has to wait until Auto (GetStatus command response) is ON, before
execution of remote command.
(4) Now remote command will be accepted.
Each command executes the function the input acceptance condition.
12.2.4 Debugging Remote Ethernet Control
Program debug from EPSON RC+ 7.0 development environment is capable as follows.
(1) Build a program as usual.
(2) Open the Run window and click the <Ethernet Enable>button.
When you only acquire the value using the Remote Ethernet control, the <Ethernet
Enable> button is not displayed. Click the <Start> button of the device specified as
the control device.
(3) Now remote command will be accepted.
Breakpoint setting and output to the Run window is available.
If not Login within 5 minutes from external equipment, the connection will be cut down
automatically. After Login, if no command is send within the timeout duration of the
remote Ethernet, connection will be cut down. In this case, establish the connection again.
If error occurs execute the Reset command to clear the error condition before executing
the operation command. To clear the error condition from external equipment by
monitoring, use the “GetStatus” and “Reset” command.
CAUTION
■
If you set “0” in the [Timeout] box,
time out duration is infinite. In this case, the
task continues to execute even without the communication from client. This
means the robot may keep moving and cause unexpected damage. Ensure the
ways other than the communication to stop the task.
NOTE

12. Remote Control
378 EPSON RC+ 7.0 (Ver.7.4) User's Guide Rev.6
12.2.5 Remote Ethernet Command
Format: $ remote command {, parameter....} terminator
Note: Remote command with parameters uses ( , ) (comma) to separate $ remote
command and parameters. Do not put a space before and after the comma
separated character and the parameter.
Remote command
Parameter Contents
Input acceptance
condition (*1)
Login Password
Start the Controller Remote Ethernet function
Authentication by password
Execute Login correctly, commands
execution is enabled until Logout
Available any time
(*2)
Logout
Exit Controller Remote Ethernet function
After Logout, execute the Login command to
start remote Ethernet function.
Logout during task execution causes an error.
Available any time
(*2)
Start Function No.
Execute the function of specified number
(*3)(*11)
Auto ON
Ready ON
Error OFF
EStop OFF
Safeguard ON
Stop
Stop all tasks and commands
Auto ON
Pause
Pause all tasks (*4)
Auto ON
Running ON
Continue
Continue paused tasks
Auto ON
Paused ON
Reset
Clear emergency stop and error (*5)
Auto ON
Ready ON
SetMotorsOn
Robot number
Turn ON the robot motor (*6)(*7)
Auto ON
Ready ON
EStop OFF
Safeguard OFF
SetMotorsOff
Robot number
Turn OFF the robot motor (*7)
Auto ON
Ready ON
SetCurRobot Robot number
Select the manipulator
Auto ON
Ready ON
GetCurRobot
Acquires the current manipulator number
Available any time
(*
2
)
Home Robot number
Move the arm to home position defined by
user
Auto ON
Ready ON
Error OFF
EStop OFF
Safeguard OFF
GetIO I/O bit No.
Acquire the specified I/O bit
Available any time
(*2)
SetIO I/O bit No. & value
Set the I/O specified bit
1: Turn ON the bit
0: Turn OFF the bit
Ready ON
GetIOByte I/O port No.
Acquire the specified I/O port (8 bit)
Available any time
(*1)
SetIOByte
I/O port No. & value
Set the I/O specified port (8 bit)
Ready ON
GetIOWord I/O word port No.
Acquire the specified I/O word port (16 bit)
Available any time
(*2)
SetIOWord
I/O word port No. &
value
Set the I/O specified word port (8 bit)
Auto ON
Ready ON
GetMemIO Memory I/O bit No.
Acquire the specified memory I/O bit
Available any time
(*2)
SetMemIO
Memory I/O bit No. &
value
Set the specified memory I/O bit
1: Turn ON the bit
0: Turn OFF the bit
Auto ON
Ready ON

12. Remote Control
EPSON RC+ 7.0 (Ver.7.4) User's Guide Rev.6
379
Remote command
Parameter Contents
Input acceptance
condition (*1)
GetMemIOByte Memory I/O port No.
Acquire the specified memory I/O port
Available any time
(*2)
SetMemIOByte
Memory I/O port No.
& value
Set the specified memory I/O port (8 bit)
Auto ON
Ready ON
GetMemIOWord
Memory I/O word port
No.
Acquire the specified memory I/O word port
(16 bit)
Available any time
(*2)
SetMemIOWord
Memory I/O word port
No. & value
Set the specified memory I/O word port
(16 bit)
Auto ON
Ready ON
GetVariable
Parameter name
{, type}
Acquire the value of backup (Global
Preserve) parameter (*8)
Available any time
(*2)
[Parameter name]
(Array element),
[Parameter name type],
[Number to acquire]
Acquire the value of backup (Global
Preserve) array parameter (*9)
SetVariable
Parameter name & value
{, type}
Set the value in the backup (Global Preserve)
parameter (*8)
Auto ON
Ready ON
GetStatus
Acquire the Controller state
Available any time
(*1)
Execute Command string
Execute the command (*10) (*11)
Auto ON
Ready ON
Error OFF
EStop OFF
Safeguard OFF
Abort
Abort the command execution
Auto ON
GetAlm
Acquire the alarm state (*12)
Available any time
(*2)
ResetAlm Alarm number
Reset the alarm of the specified alarm number
(*12)
Auto ON
Ready ON
(*1) The Controller state bit from GetStatus.
(*2) “Available any time” is applicable if the following conditions are met.
When “Remote Ethernet” is set as the control device, or,
“Remote Ethernet” is not set as the control device, but set to be used for monitoring.
(*3) Execute the function specified in the Main[Function No.].
Function Name
Function No.
Main
0
Main1
1
Main2
2
Main3
3
Main4
4
Main5
5
Main6
6
Main7
7
:
:
Main63
63
(*4) Pause command is not available for “NoPause task” and “NoEmgAbort task”.
For the details, refer to the help or the section “Pause” in the EPSON RC+7.0 Language reference
manual.
(*5) I/O output will be turned OFF and the robot parameter will be initialized.
For the details, refer to the help or the section “Reset” in the EPSON RC+7.0 Language reference manual.
(*6) The robot parameter will be initialized.
For the details, refer to the help or the section “Motor” in the EPSON RC+7.0 Language reference manual.

12. Remote Control
380 EPSON RC+ 7.0 (Ver.7.4) User's Guide Rev.6
(*7) When “0” is specified for the manipulator number, all the manipulator will be operated
If you wish to operate particular manipulator, specify the manipulator number (1 to 16) of the target
manipulators.
(*8) Parameter type means {Boolean | Byte | Double | Integer | Long | Real | String | Short | UByte | UShort |
Int32 | UInt32 | Int64 | UInt64
}.
Type specified: for the backup parameters when the parameter name and type are same.
Type not specified: for the backup parameters when the parameter names are same.
(*9) For the array element, specify an element you acquire as the following:
You need to specify an element if when acquiring from the head of the array.
1D array
Parameter name (0)
Acquire from the head.
Parameter name
(Element number)
Acquire from the specified element number.
2D array
Parameter name (0,0)
Acquire from the head.
Parameter name
(Element number 1, 2)
Acquire from the specified element number.
3D array
Parameter name (0,0,0)
Acquire from the head.
Parameter name
(Element number 1, 2, 3)
Acquire from the specified element number.
You cannot omit the parameter type and number to acquire.
You cannot specify a string for the parameter type.
Available number to acquire is up to 100. If you specify a number over the number of array elements,
you have an error.
e.g.) "$GetVariable,gby2(3,0),Byte,3"
It acquires values of gby2(3,0), gby2(3,1), gby2(3,2) of Byte type 2D array parameter gby2.
(*10) Specify the command and parameters in the double quotation marks.
Command string to be executed and execution result string are restricted to 4060 bytes.
Robot motion command will be executed to the selected manipulator. Check which robot is selected by
using GetCurRobot before command execution.
Following commands are available while Execute is running.
Commands available while Execute is running
Remote Command
Abort
GetStatus
SetIO
SetIOByte
SetIOWord
SetMemIO
SetMemIOByte
SetMemIOWord
When the commands specified in (SetIO, SetIOByte, SetIOWord, SetMemIO, SetMemIOByte,
SetMemIOWrod) are the same and executed at the same time, the command executed later will result in
error. Make sure to check the execution result by using GetStatus after the execution of Execute
command and output command which the Execute command is being executed.
(*11) To execute commands of PCDaemon function, be sure to execute while the EPSON RC+ 7.0 is
connected. If the EPSON RC+ 7.0 is not connected, command execution will result in error.
(*12) For details of the alarms, refer to the following manuals.
Robot Controller RC700 / RC700-A Maintenance 6. Alarm
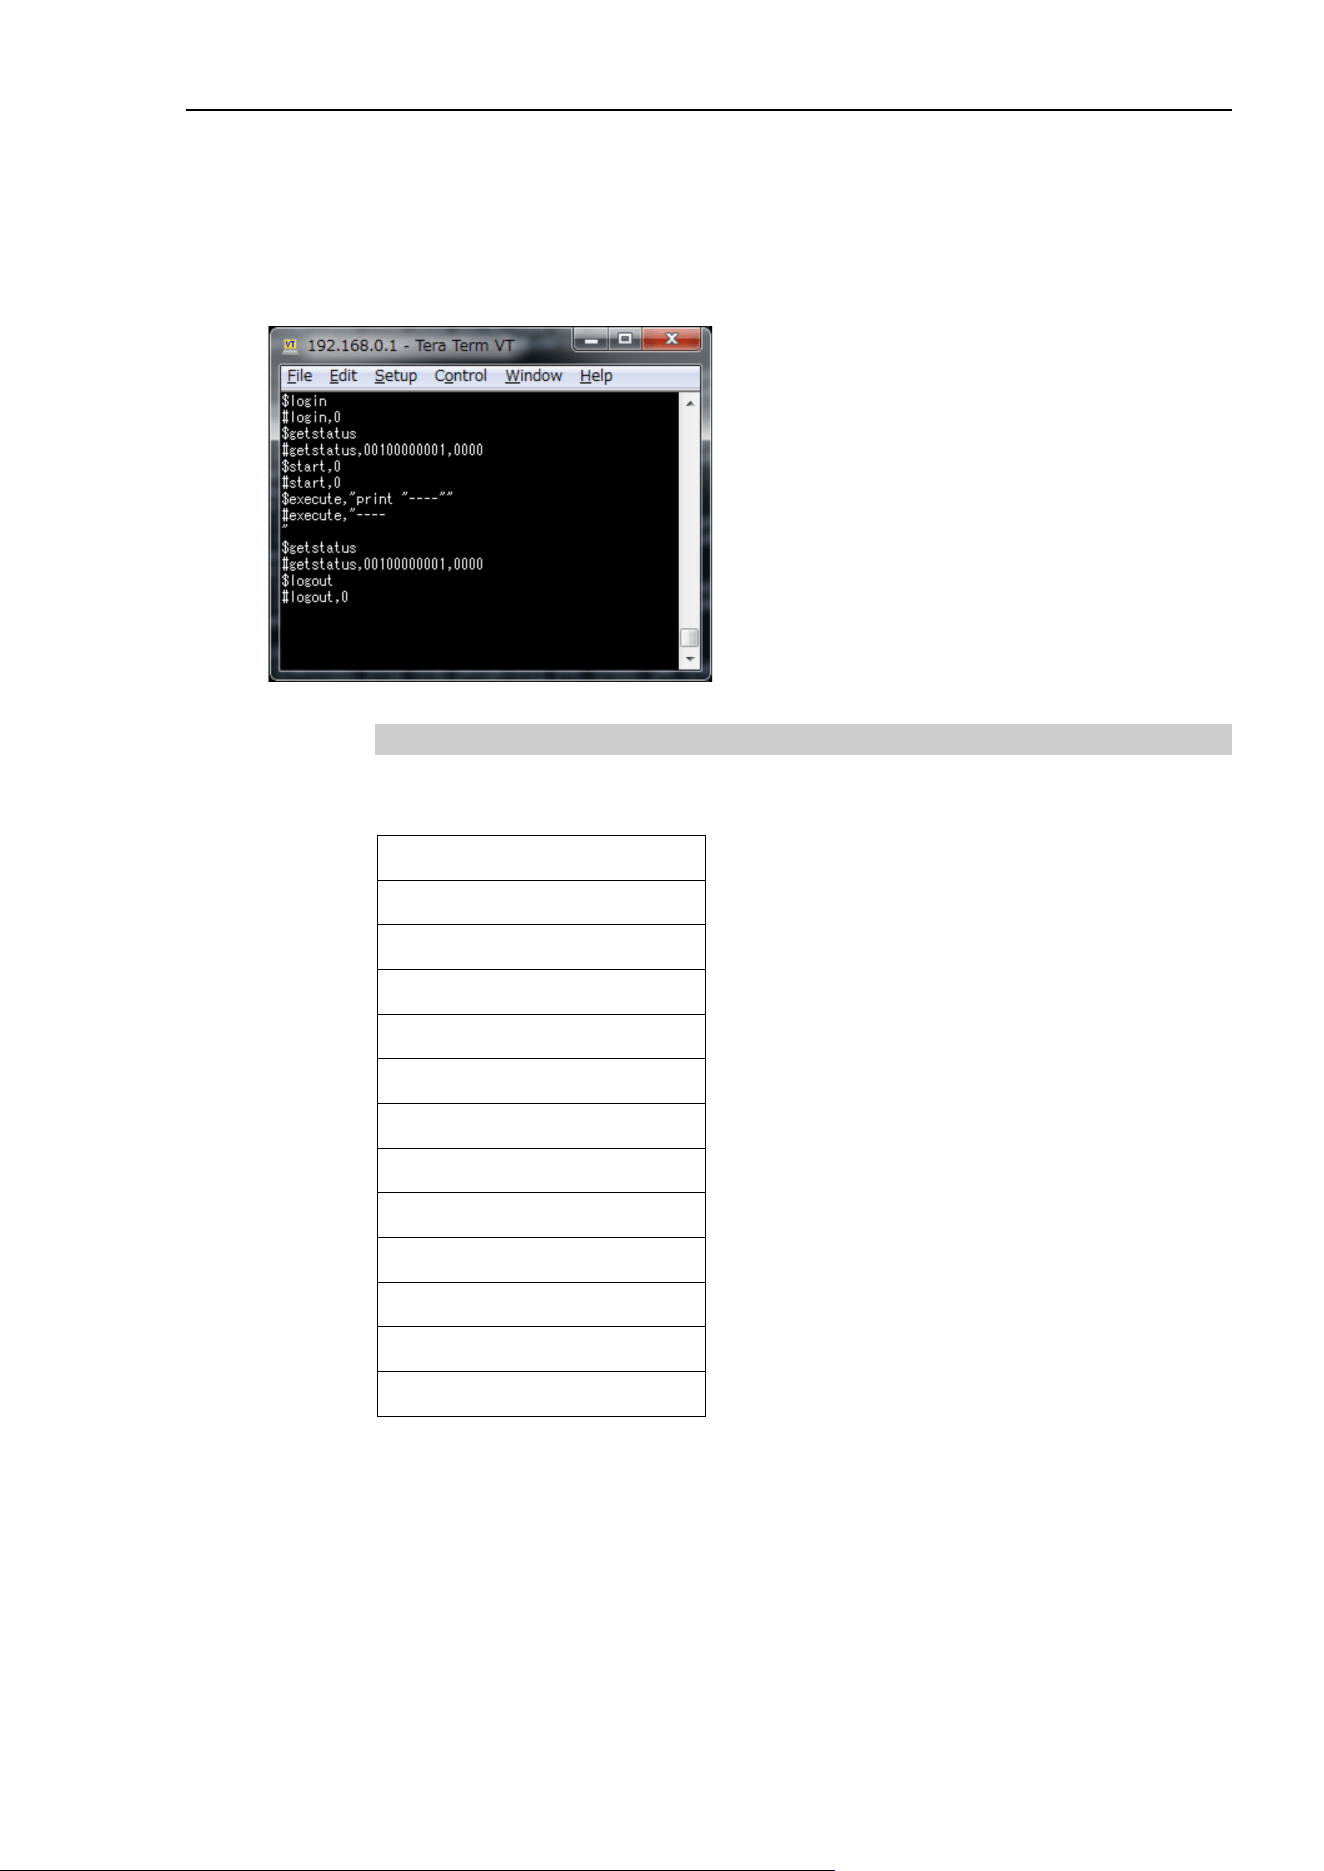
12. Remote Control
EPSON RC+ 7.0 (Ver.7.4) User's Guide Rev.6
381
(*13) “Command string” parameter of Execute command encloses in (“ ”) (double quotation marks).
If the parameter includes (“ ”), refer to the following execution example. In SPEL+ language,
Chr$(34) is used for (“ ”) (double quotation marks).
Refer to Print# in SPEL+ Language Reference.
Execution Example of TeraTerm:
(New-line Receive: AUTO, Transmit: CR+LF, Local echo: ON)
12.2.6 Monitoring command
When the Remote Ethernet control is not set as the control device but set to be used for
monitoring, following commands are only available to be executed.
Remote Command
Login
Logout
GetIO
GetIOByte
GetIOWord
GetMemIO
GetMemIOByte
GetMemIOWord
GetVariable
GetStatus
GetCurRobot
GetAlm

12. Remote Control
382 EPSON RC+ 7.0 (Ver.7.4) User's Guide Rev.6
12.2.7 Response
When the Controller receives the command correctly, the response in the following format
is shown in the executing command.
Command Format
Remote command that acquire
the value
Except GetIO, GetVariable, and
GetStatus
#[Remote command],[0] terminator
GetIO
#GetIO,[0 | 1] terminator *1
GetMemIO
#GetMemIO,[0 | 1] terminator *1
GetIOByte
#GetIOByte,[ Hex string (00 to FF) of Byte (8Bit)]
terminator
GetMemIOByte
#GetMemIOByte,[ Hex string (00 to FF) of Byte
(8Bit)] terminator
GetIOWord
#GetIOWord,[ Hex string (0000 to FFFF) of Word
(16Bit)] terminator
GetIOMemWord
#GetMemIOWord,[ Hex string (0000 to FFFF) of
Word (16Bit)] terminator
GetVariable
# GetVariable,[Parameter value] terminator
GetVariable (in case of array)
# GetVariable,[ Parameter value 1],[ Parameter value
2],...,terminator *4
GetStatus
#GetStatus,[Status],[Error, Warning code] tenimator
Example) #GetStatus,aaaaaaaaaaa,bbbb
*2 *3
Execute
If the value is returned as a result of command
execution
#Execute,”[Execution result]” terminator
GetAlm
# GetAlm,[number of alarms],[alarm number]
..terminator
e.g.) When no alarm is occurring
# GetAlm,0 terminator
e.g.) When Alarm 1 and 9 are occurring
# GetAlm,2,1,9 terminator
*1 [0 | 1] I/O bit ON: 1/ OFF: 0
*2 Status
In the example above, 11 digits “aaaaaaaaaaa” is for the following 11 flags.
Test/Teach/Auto/Warning/SError/Safeguard/EStop/Error/Paused/Running/Ready
ON: 1/ OFF: 0
If Ready and Auto are ON, it is “00100000001”.
*3 Error / Warning code
It is indicated in 4 digits. If there is no error and warning, it is 0000.
e.g.)1 : #GetStatus,0100000001,0000
The bits for Auto and Ready are ON (1).
This means that AutoMode is ON and be in Ready state. You can execute the
command.
e.g.)2 : #GetStatus,0110000010,0517
This means the warning occurs during the operation. Take appropriate action for
the warning code. (In this case, warning code is 0517)

12. Remote Control
EPSON RC+ 7.0 (Ver.7.4) User's Guide Rev.6
383
Flag
Contents
Test
Turn ON in the TEST mode
Teach
Turn ON in the TEACH mode
Auto
Turn ON in the remote input acceptance condition
Warning
Turn ON in the warning condition
Task can be executed as usual even in a warning condition. However, take
action for the warnings as soon as possible.
SError
Turn ON in the serious error condition
When a serious error occurs, reboot the Controller to recover from the
error condition. “Reset input” is not available.
Safeguard
Turn ON with safety door open
EStop
Turn ON in the emergency condition
Error
Turn ON in the error condition
Use “Reset input” to recover from the error condition.
Paused
Turn ON with paused task
Running
Turn ON with task executing
Turn OFF when “Paused output” is ON
Ready
Turn ON with the Controller completed the startup and no task executing
*4 It returns values of specified number in the Number to acquire.
Error response
When the Controller cannot receive the remote command correctly, the error response is
shown in the following format.
Format: ![Remote command],[Error code] terminator
Error code Contents
10
Remote command does not begin with $
11
Remote command is wrong
Login is not executed
12
Remote command format is wrong
13
Login command password is wrong
14
Specified number to acquire is out of range
(1 or more and 100 or less)
Number to acquire is omitted
Specified a string parameter
15
Parameter is not existed
Dimension of parameter is wrong
Element out of range is called
19
Request time out
20
Controller is not ready
21
Cannot execute since the Execute is running
99
System error
Communication error
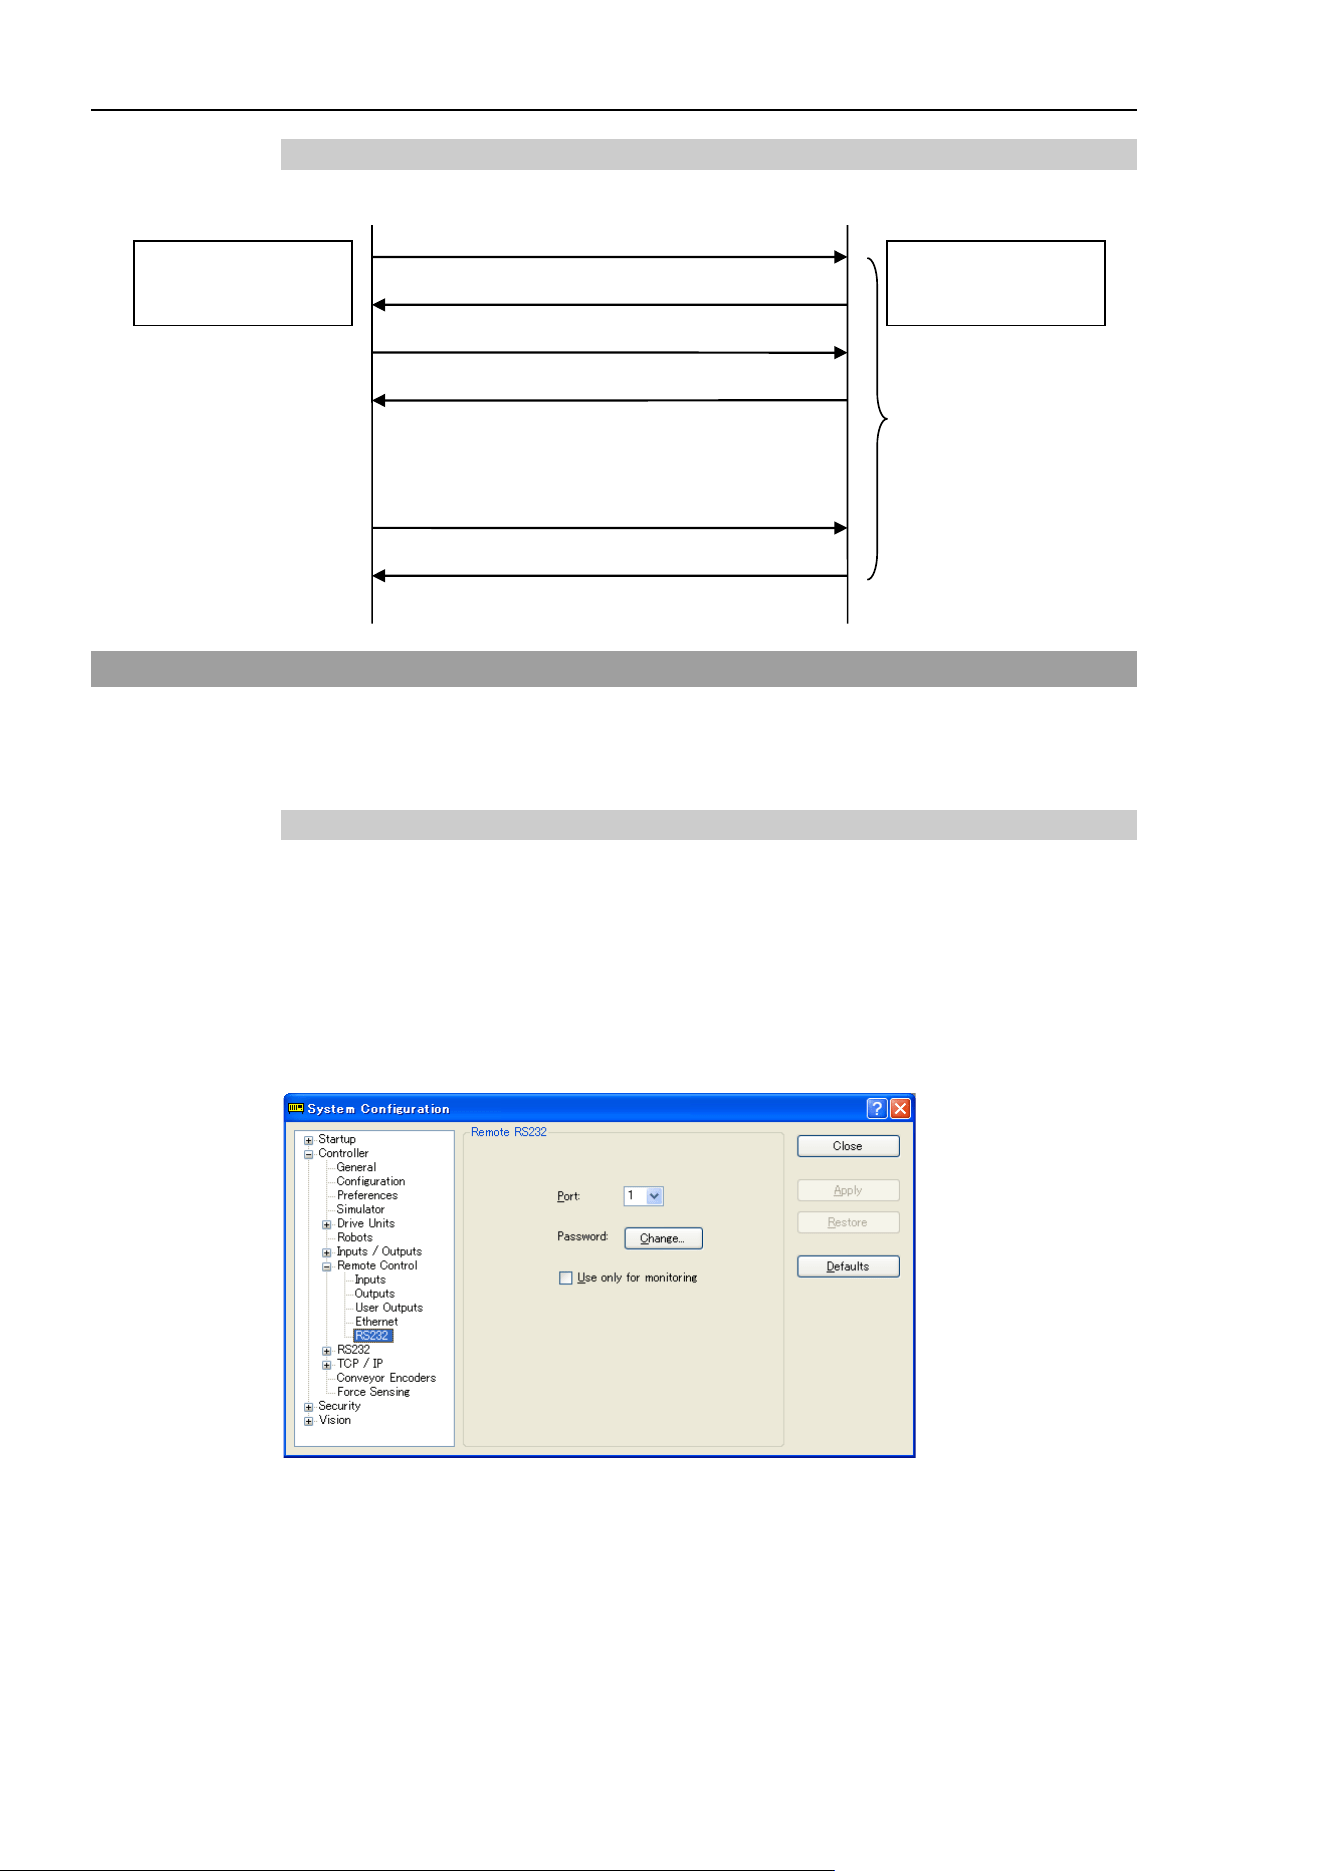
12. Remote Control
384 EPSON RC+ 7.0 (Ver.7.4) User's Guide Rev.6
12.2.8 Response timing of Remote Ethernet control
Communication sequence
Controller
IP xxx.xxx.xxx.xxx
Ethernet Client
IP zzz.zzz.zzz.zzz
(1) Login
(2) Response
(3) Command request
(4) Response
(5) Logout
(6) Response
Request from
zzz.zzz.zzz.zzz:zz
is only available
:
:
12.3 Remote RS232
Remote RS232 makes it possible to control the robot and controller from external
equipment by sending the remote commands through RS-232C.
12.3.1 Remote RS232 setting
To set the remote RS232 functions valid, follow the procedures below to configure the
remote RS232.
(1) Select [Controller] from the [Setup] menu-[System Configuration] and display the
[System Configuration] dialog box. Select [RS232] from the tree structure-
[Controller]-[Remote].
(2) Configure the necessary items for the remote RS232 control.
(3) Click <Apply> to save the new setting and click <Close>.
For the details of the dialog setting, refer to the section 5.12.2 [System Configuration]
(Setup menu) – [Setup]-[System Configuration]-[Remote].
When you only acquire the value using the Remote RS232 control, the RS232 Enable
button is not displayed. Click the Start button of the device specified as the control device.
Following setting for the control device is not necessary when you select “Use only for
monitoring”, and only acquire the value using the remote RS232 control.
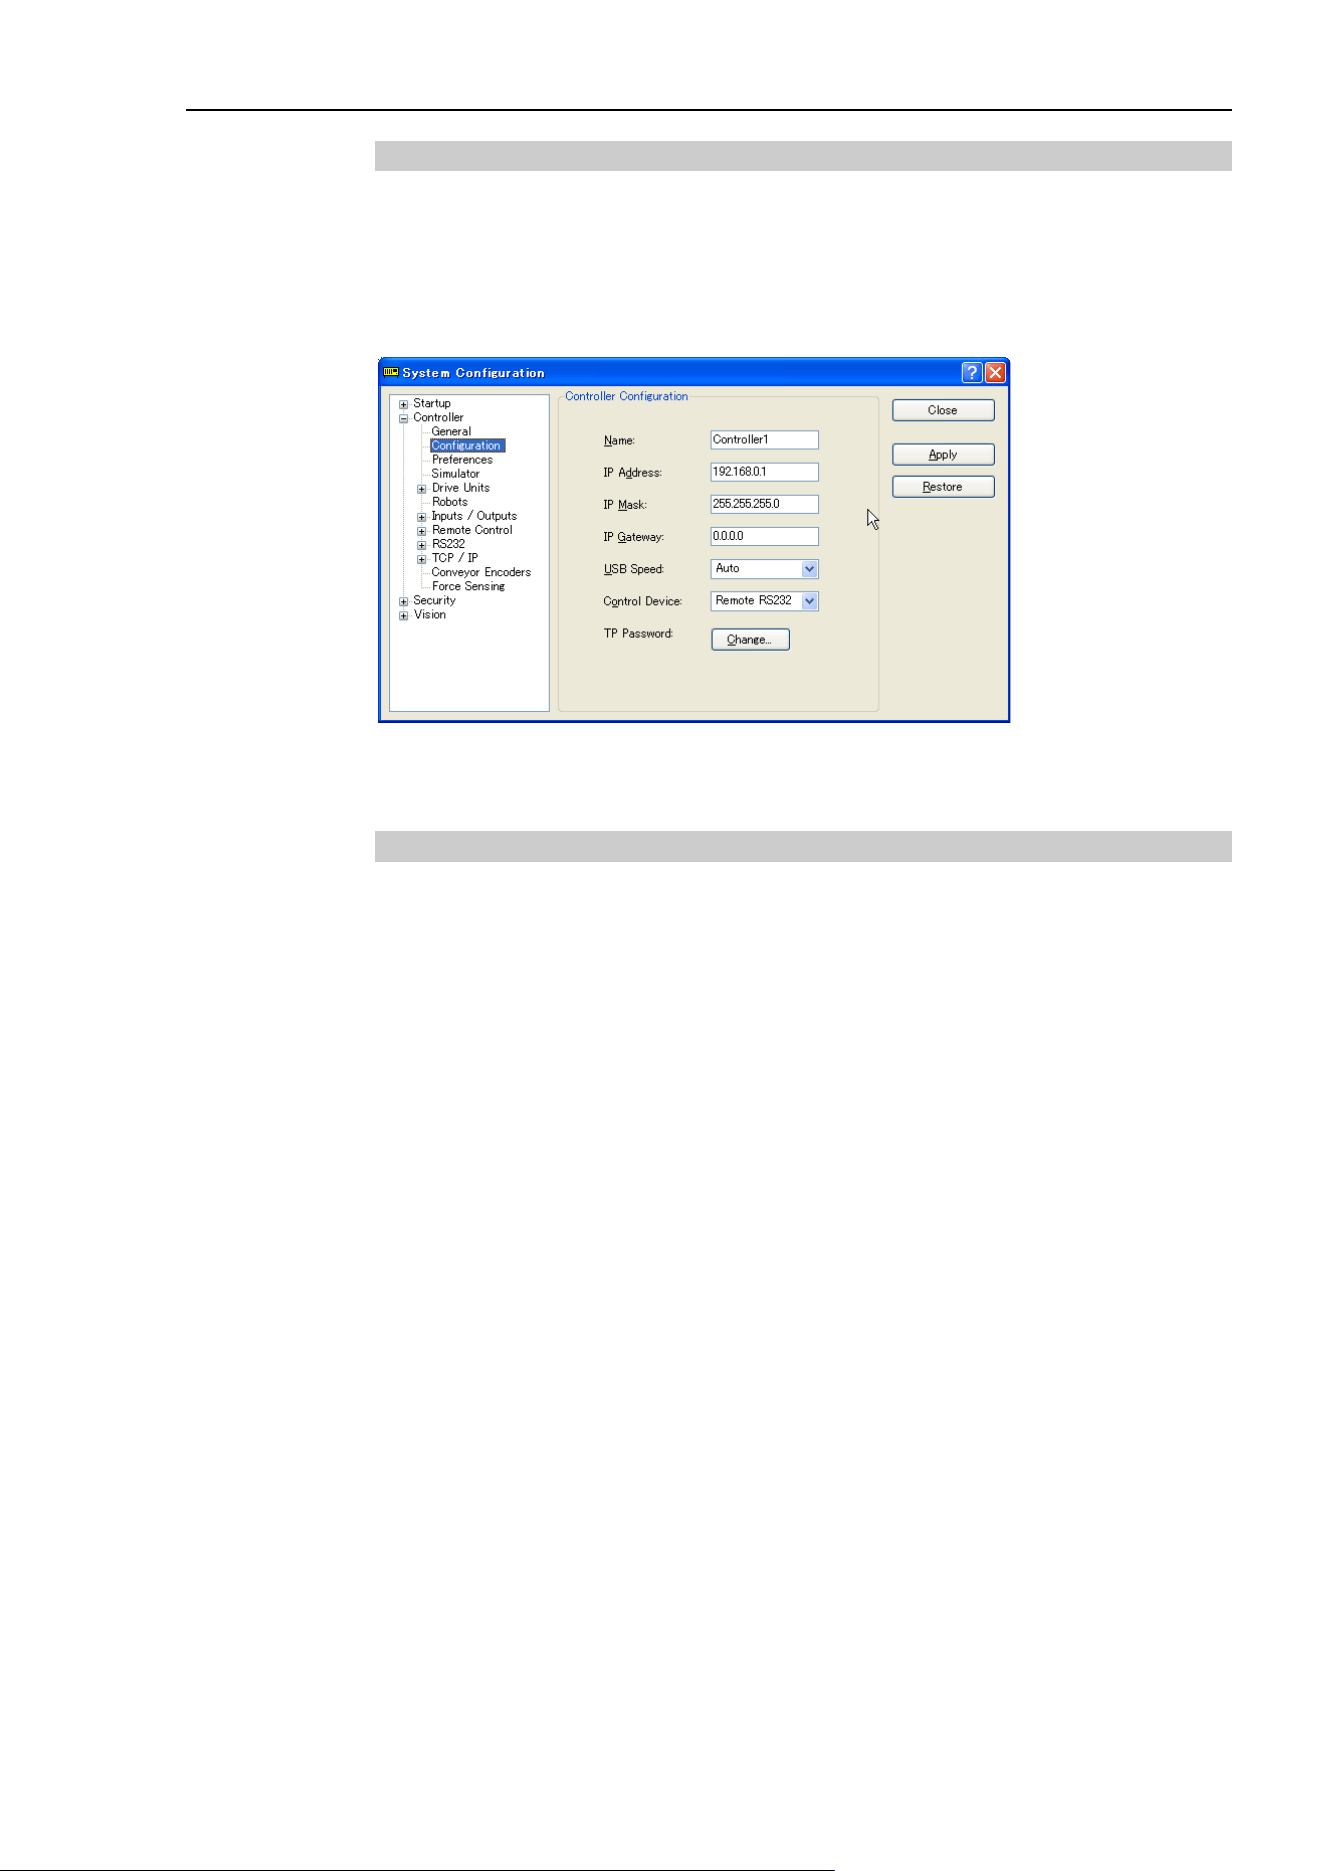
12. Remote Control
EPSON RC+ 7.0 (Ver.7.4) User's Guide Rev.6
385
12.3.2 Control device setting
Set the control device to “Remote RS232” by the following procedure.
(1) Select Controller from the [Setup] menu and select [System Configuration] to display
the [System Configuration] dialog box.
Select “Remote RS232” in the [Control Device] box.
(2) Click <Apply> to save the new settings, and then click <Close>.
For the details of the dialog setting, refer to the section 5.12.2 [System Configuration]
(Setup menu) – [Setup]-[ System Configuration]-[Controller]-[Configuration].
12.3.3 Execution of remote RS232 control
Set the remote RS232 control available by the following procedure.
(1) Open RS-232C port that is connected from client equipment to the specified port in
the Remote RS232 of the Controller, using the communication parameter specified in
the RS-232C port setting.
(2) Send the remote start command (EOT).
(3) Specify the password set in the Remote RS232 to the parameter and send the Login
command.
(4) Client equipment has to wait until Auto (GetStatus command response) is ON, before
execution of remote command.
(5) Now remote command will be accepted.
Each command executes the function when the input acceptance condition is satisfied.
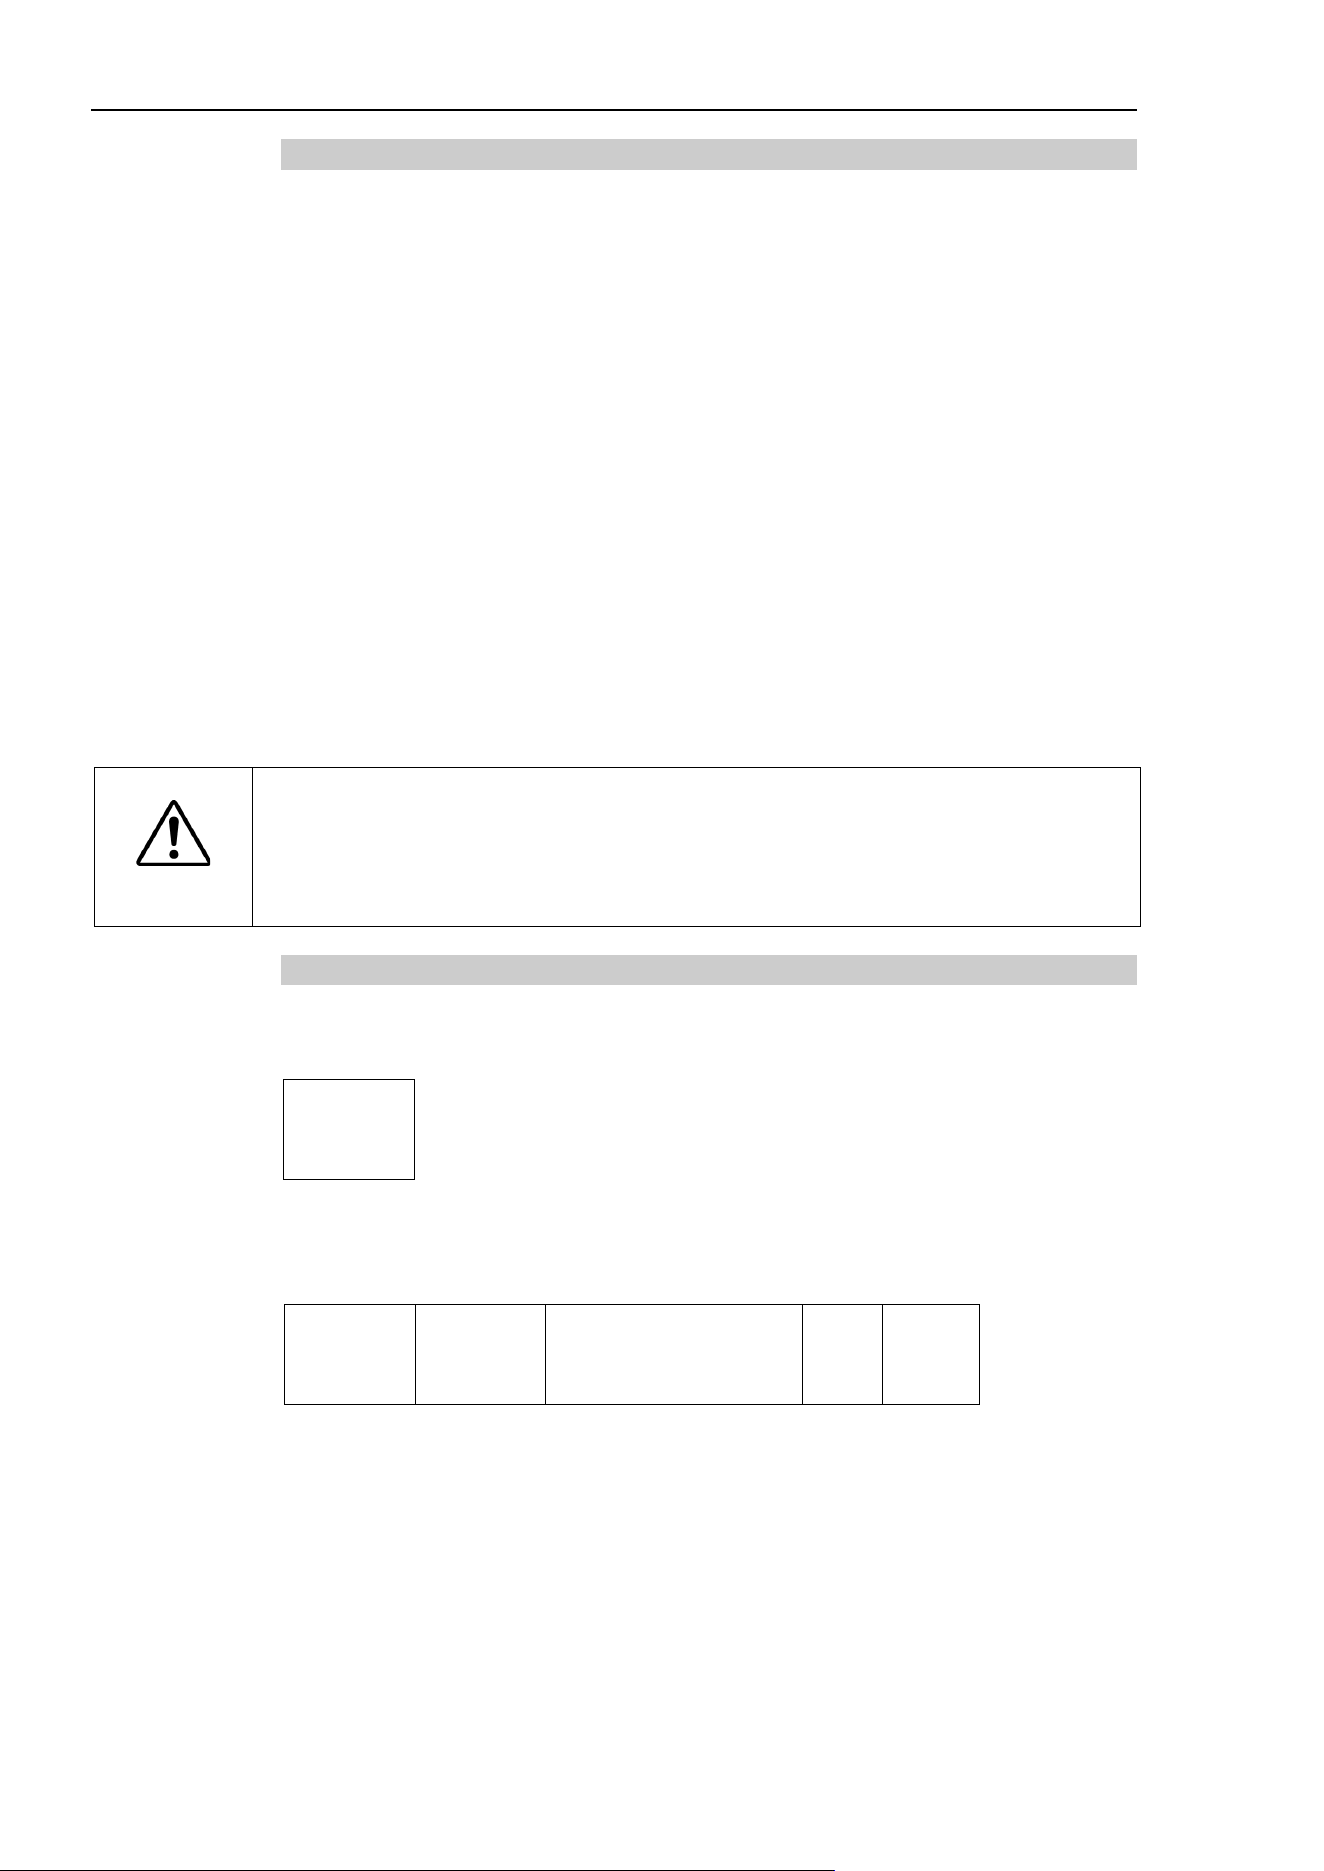
12. Remote Control
386 EPSON RC+ 7.0 (Ver.7.4) User's Guide Rev.6
12.3.4 Debugging remote RS232 control
Program debug from EPSON RC+ 7.0 development environment is capable as follows.
(1) Build a program as usual.
(2) Open the Run window and click the <RS232 Enable> button.
When you only acquire the value using the Remote RS232 control, the <RS232
Enable> button is not displayed. Click the Start button of the device specified as the
control device.
(3) Now remote command will be accepted.
Breakpoint setting and output to the Run window is available.
After Login, if no command is send within the timeout duration of the RS-232C, the
timeout error will be returned. In this case, re-execute from sending remote start
command.
If error occurs, execute the Reset command to clear the error condition before executing
the operation command. To clear the error condition from external equipment by
monitoring, use the “GetStatus” and “Reset” command.
CAUTION
■
If you set “0” in the [Timeout] box, time out duration is infinite. In this case, the
task continues to execute even without the communication from client. This
means the robot may keep moving and cause unexpected damage. Ensure the
ways other than the communication to stop the task.
12.3.5 Remote RS232 Command
Remote start
Start the Remote RS232 function of the Controller.
EOT
1byte
EOT : &H04(&H is hexadecimal)
Request format
STX
1byte
Command
1Byte
Data
Variable
ETX
1Byte
BCC
1Byte
STX : &H02
ETX : &H03
BCC : Checksum of sent and received data
XOR value from the command to ETX per 1Byte
NOTE

12. Remote Control
EPSON RC+ 7.0 (Ver.7.4) User's Guide Rev.6
387
Remote
Command
Send
command
Data Description
Input
Acceptance
Condition (*1)
Login
‘L’
&H4C Password
Authentication by password
Execute Login correctly, commands execution is
enabled until Logout
Available any
time
(*2)
Logout
‘l’
&H6C
After Logout, execute the Login command to start
remote RS232 function.
Logout during task execution causes an error.
Available any
time
(*2)
Start
‘G’
&H47 Function
No.
(1Byte)
Execute the function of specified number(*3)(*11)
Example) Execute ‘main’
&H02&H47&H00&H03&H44
Auto ON
Ready ON
Error OFF
EStop OFF
Safeguard ON
Stop
‘Q’
&H51
Stop all tasks and commands Auto ON
Pause
‘P’
&H50
Pause all tasks (*4)
Auto ON
Running ON
Continue
‘C’
&H43
Continue paused tasks
Auto ON
Paused ON
Reset
‘R’
&H52
Clear emergency stop and error (*5)
Auto ON
Ready ON
SetMotorsOn
‘M’
&H4D
Robot
number
(1Byte)
Turn ON the robot motor (*6)(*7)
Auto ON
Ready ON
EStop OFF
Safeguard OFF
SetMotorsOff
‘N’
&H4E
Robot
number
(1Byte)
Turn OFF the robot motor (*7)
Auto ON
Ready ON
SetCurRobot
‘Y’
&H59
Robot
number
(1Byte)
Select the robot
Auto ON
Ready ON
GetCurRobot
‘
y
’
&H79
Acquire the current robot number
Available any
time
(*2)
Home
‘H’
&H48
Robot
number
(1Byte)
Move the arm to home position defined by user
Auto ON
Ready ON
Error OFF
EStop OFF
Safeguard
OFF
GetIO
‘i’
&H69
I/O bit No
(2Byte)
Acquire the specified I/O bit
Example) Acquire the I/O bit 1
&H02&H69&H0001&H03&H6B
Available any
time
(*2)
SetIO
‘I’
&H49
[I/O bit
No.]
(2Byte)
[value]
(1Byte)
Set the I/O specified bit
&H01: Turn ON the bit
&H00: Turn OFF the bit
Example) Turn ON the I/O bit 1
&H02&H49&H0001&H01&H03&H4A
Auto ON
Ready ON
GetIOByte
‘b’
&H62
I/O port
No.
(1Byte)
Acquire the specified I/O port (8 bit) (*8)
Example) Acquire the I/O port 1
&H02&H62&H01&H03&H60
Available any
time
(*2)

12. Remote Control
388 EPSON RC+ 7.0 (Ver.7.4) User's Guide Rev.6
Remote
Command
Send
command
Data Description
Input
Acceptance
Condition (*1)
SetIOByte
‘B’
&H42
[I/O port
No.](1Byt
e)[value]
(1Byte)
Set the I/O specified port (8 bit) (*8)
Example) Set &H0F to the I/O port 1
&H02&H42&H01&H0F&H03&H4F
Auto ON
Ready ON
GetIOWord
‘w’
&H77
I/O word
port No.
(1Byte)
Acquire the specified I/O word port (16 bit) (*8)
Example) Acquire the I/O word port 1
&H02&H77&H01&H03&H75
Available any
time
(*2)
SetIOWord
‘W’
&H57
[I/O word
port No.]
(1Byte)
[value]
(2Byte)
Set the I/O specified word port (16 bit) (*8)
Example) Set &H010F to the I/O word port 1
&H02&H57&H01&H010F&H03&H5B
Auto ON
Ready ON
GetMemIO
‘o’
&H6F
Memory
I/O bit No.
(2Byte)
Acquire the specified memory I/O bit (*8)
Example) Acquire memory I/O bit 1
&H02&H6F&H0001&H03&H6D
Available any
time
(*2)
SetMemIO
‘O’
&H4F
[Memory
I/O bit
No.]
(2Byte)
[value]
(1Byte)
Set the I/O specified bit (*8)
&H01: Turn ON the bit
&H00: Turn OFF the bit
Example) Turn ON the memory I/O bit 1
&H02&H4F&H0001&H01&H03&H4C
Auto ON
Ready ON
GetMemIOByte
‘t’
&H74
Memory
I/O port
No.
(1Byte)
Acquire the specified memory I/O port (8 bit) (*8)
Example) Acquire the memory I/O port 1
&H02&H74&H01&H03&H76
Available any
time
(*2)
SetMemIOByte
‘T’
&H54
[Memory
I/O port
No.]
(1Byte)
[value]
(1Byte)
Set the I/O specified port (8 bit) (*8)
Example) Set &H0F to the memory I/O port 1
&H02&H54&H01&H0F&H03&H59
Auto ON
Ready ON
GetMemIOWord
‘u’
&H75
Memory
I/O word
port No.
(1Byte)
Acquire the specified memory I/O word port (16
bit) (*8)
Example) Acquire the memory I/O word port 1
&H02&H75&H01&H03&H77
Available any
time (*2)
SetMemIOWord
‘U’
&H55
[Memory
I/O word
port No.]
(1Byte)
[value]
(1Byte)
Set the I/O specified word port (16 bit) (*8)
Example) Set &H010F to the memory I/O word
port 1
&H02&H55&H01&H010F&H03&H59
Auto ON
Ready ON

12. Remote Control
EPSON RC+ 7.0 (Ver.7.4) User's Guide Rev.6
389
Remote
Command
Send
command
Data Description
Input
Acceptance
Condition (*1)
GetVariable
‘v’
&H76
[Parameter
name],(&
H2C)
[type]
(1Byte)
Acquire the value of backup (Global Preserve)
parameter (*8)
Example) Acquire the Global Integer g_Status
&H02&H76&H67&H5F&H53&H74&H61&H74
&H75&H73&H2C&H03&H03&H56
Available any
time (*2)
[Parameter
name]
(&H2C)
(Array
element)
(&H2C),
[Parameter
type]
(1Byte),
(&H2C)
[Number
to acquire]
(2Byte)
Acquire the value of backup (Global Preserve)
array parameter (*9)
Example) Acquire all of Global Integer
g_intArray(10)
&H02&H76&H67&H5F&H69&H6E&H74&H41
&H72&H72&H61&H79&H2C
&H0000&H2C&H03&H2C&H000A&H03&H42E
Example) Acquire 10 elements from elements
(3,5,0) of Global Integer g_int3Array(10,10,10)
&H02&H76&H67&H5F&H69&H6E&H74&H33
&H41&H72&H72&H61&H79&H2C
&H0003&H2C&H0005&H2C&H0000&H2C&H0
3&H2C&H000A&H03&H77
SetVariable
‘V’
&H56
[Parameter
name],
(&H2C)
[value]
(type size)
(&H2C),
[type]
(1Byte)
Set the value in the backup (Global Preserve)
parameter (*8)
Example) Set &H0 to Global Integer g_Status
&H02&H56&H67&H5F&H53&H74&H61&H74
&H75&H73&H2C&H0000&H2C&H03&H03&H
5A
Auto ON
Ready ON
GetStatus
‘S’
&H53
Acquire the Controller state
Available any
time (*10)
Execute
‘X’
&H58
Command
string
Execute the command (*10) (*11)
Example) Execute ‘print here’
&H02&H58&H22&H70&H72&H69&H6E&H74
&H20&H68&H65&H72&H65&H22&H03&H10
Auto ON
Ready ON
Error OFF
EStop OFF
Safeguard OFF
Abort
‘A’
&H41
Abort the command execution (*10)
Auto ON
GetAlm
‘z’
&H7A
Acquire the alarm state
Available any
time (*2)
ResetAlm
‘Z’
&H5A
Alarm
number
(1 Byte)
Reset the alarm of the specified alarm number
e.g.) When resetting the Alarm 5
&H02&H5A&H05&H03&H5C
Auto ON
Ready ON
(*1) The Controller state bit from GetStatus.
(*2) “Available any time” is applicable if the following conditions are met.
When “Remote Ethernet” is set as the control device, or,
“Remote Ethernet” is not set as the control device, but set to be used for monitoring.

12. Remote Control
390 EPSON RC+ 7.0 (Ver.7.4) User's Guide Rev.6
(*3) Execute the function specified in the Main[Function No.].
Function Name
Function No.
Main
0
Main1
1
Main2
2
Main3
3
Main4
4
Main5
5
Main6
6
Main7
7
:
:
Main63
63
(*4) Pause command is not available for “NoPause task” and “NoEmgAbort task”.
For the details, refer to the help or the section “Pause” in the EPSON RC+7.0 Language reference
manual.
(*5) I/O output will be turned OFF and the robot parameter will be initialized.
For the details, refer to the help or the section “Reset” in the EPSON RC+7.0 Language reference manual.
(*6) The robot parameter will be initialized.
For the details, refer to the help or the section “Motor” in the EPSON RC+7.0 Language reference manual.
(*7) When “0” is specified for the manipulator number, all the manipulator will be operated
If you wish to operate particular manipulator, specify the manipulator number (1 to 16) of the target
manipulators.
(*8) Parameter type
Parameter type
Type value(1Byte)
Boolean
&H00
Byte
&H01
Double
&H02
Integer
&H03
Long
&H04
Real
&H05
String
&H06
UByte
&H07
Short
&H08
UShort
&H09
Int32
&H0A
UInt32
&H0B
Int64
&H0C
UInt64
&H0D
For the backup parameters when the parameter name and type are same.

12. Remote Control
EPSON RC+ 7.0 (Ver.7.4) User's Guide Rev.6
391
(*9) For the array element, specify an element you acquire as the following:
You need to specify an element when acquiring from the head of the array.
Specify the array element in 2Byte value.
1D array
Parameter name&H2C&H0000
Acquire from the head.
Parameter name, element number.
Acquire from the specified
element number.
2D array
Parameter name
&H2C&H0000&H2C&H0000
Acquire from the head.
Parameter name, element number 1, element
number 2
Acquire from the specified
element number.
3D array
Parameter name
&H2C&H0000&H2C&H0000&H2C&H0000
Acquire from the head.
Parameter name, element number 1, element
number 2, element number 3
Acquire from the specified
element number.
You cannot specify a string for the parameter type.
Available number to acquire is up to 100. If you specify a number over the number of array elements,
you have an error.
(*10) Specify the command and parameters in the double quotation marks.
Command string to be executed and execution result string are restricted to 4060 bytes.
Robot motion command will be executed to the selected manipulator. Check which robot is selected by
using GetCurRobot before command execution.
Following commands are available while Execute is running.
Commands available while Execute is running
Remote Command
Abort
GetStatus
SetIO
SetIOByte
SetIOWord
SetMemIO
SetMemIOByte
SetMemIOWord
When the commands specified in (SetIO, SetIOByte, SetIOWord, SetMemIO, SetMemIOByte,
SetMemIOWrod) are the same and executed at the same time, the command executed later will result in
error. Make sure to check the execution result by using GetStatus after the execution of Execute
command and output command which the Execute command is being executed.
(*11) To execute commands of PCDaemon function, be sure to execute while the EPSON RC+ 7.0 is
connected. If the EPSON RC+ 7.0 is not connected, command execution will result in error.
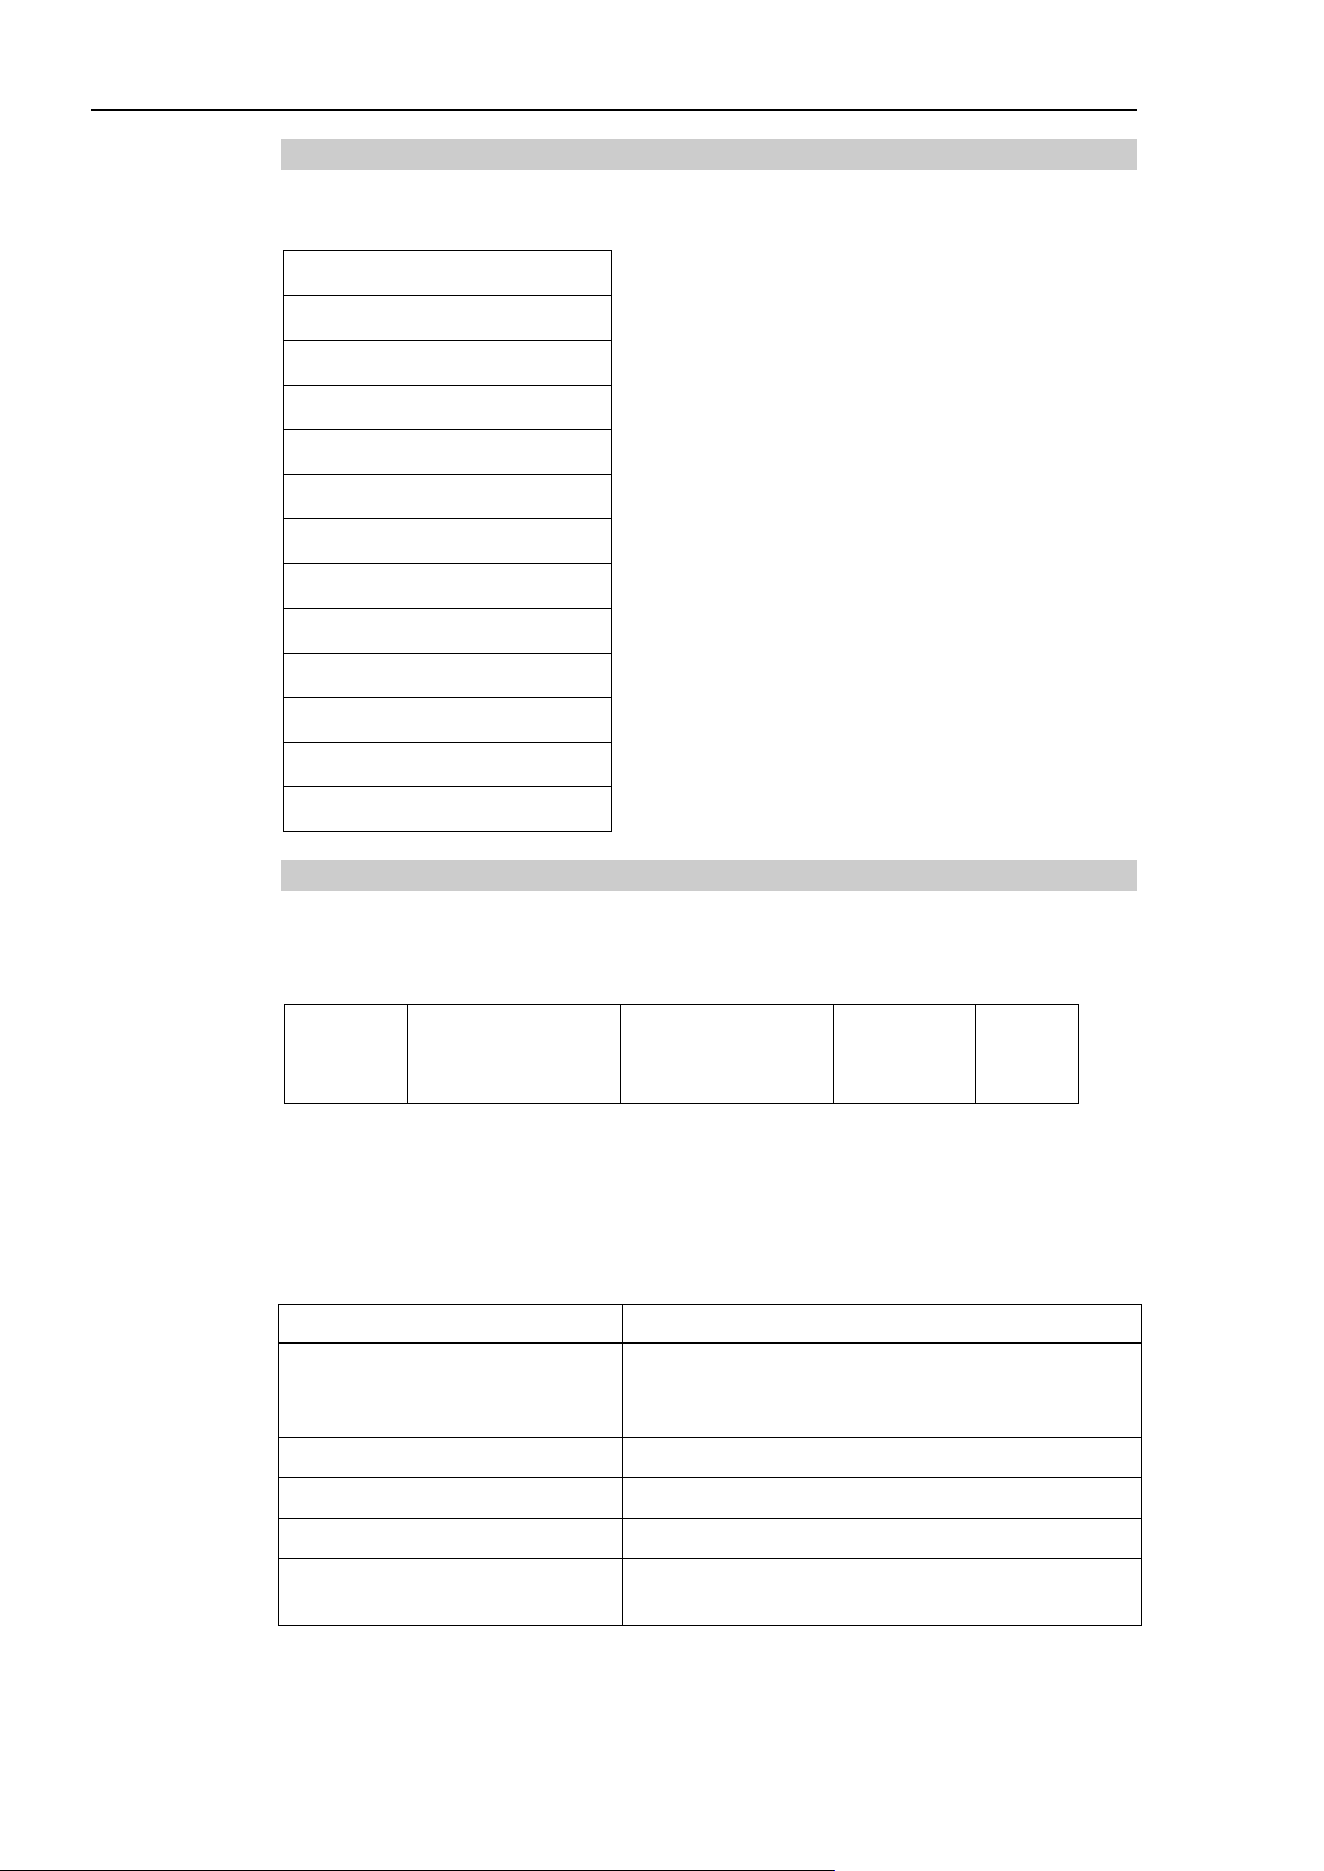
12. Remote Control
392 EPSON RC+ 7.0 (Ver.7.4) User's Guide Rev.6
12.3.6 Monitoring command
When the remote RS232 control is not set as the control device but set to be used for
monitoring, following commands are only available to be executed.
Remote Command
Login
Logout
GetIO
GetIOByte
GetIOWord
GetMemIO
GetMemIOByte
GetMemIOWord
GetVariable
GetStatus
GetCurRobot
GetAlm
12.3.7 Response
When the Controller receives the command correctly, the response in the following format
is shown in the executing command.
Response Format
ACK
1Byte
Command
1Byte
Data
Variable
ETX
1Byte
BCC
1Byte
ACK : &H06
ETX : &H03
BCC : Checksum of sent and received data
XOR value from the command to ETX per 1Byte
Command
Format
Remote command that acquire
the value
Except the following commands
[ACK][Command](1Byte)[ETX][BCC]
GetCurRobot
[ACK]’y’[Robot number] [ETX][BCC]
GetIO
[ACK] ‘i’[&H00 | &H01] [ETX][BCC] *1
GetMemIO
[ACK] ‘o’[&H00 | &H01] [ETX][BCC] *1
GetIOByte
[ACK] ‘b’[ Byte value (8Bit) (&H00 to &HFF)]
[ETX][BCC]

12. Remote Control
EPSON RC+ 7.0 (Ver.7.4) User's Guide Rev.6
393
Command
Format
GetMemIOByte
[ACK] ‘t’[ Byte value (8Bit) (&H00 to &HFF)]
[ETX][BCC]
GetIOWord
[ACK] ‘w’[Word value (16Bit) (&H0000 to
&HFFFF)] [ETX][BCC]
GetIOMemWord
[ACK] ‘u’[Word value (16Bit) (&H0000 to
&HFFFF)] [ETX][BCC]
GetVariable
[ACK] ‘v’[Parameter value]*5 [ETX][BCC]
GetVariable (in case of array)
[ACK] ‘v’[Parameter value 1] *5 [Parameter value
2] *5... [ETX][BCC] *4
GetStatus
[ACK] ‘S’[Status][Error, Warning code]
[ETX][BCC]
e.g:
[ACK] ‘S’[aaaaaaaaaaa][bbbb][ETX][BCC]
*2 *3
Execute
If the value is returned as a result of command
execution
[ACK] ‘X’”[Execution result]” [ETX][BCC]
GetAlm
[ACK] ‘z’ [number of alarms][alarm number]...
[ETX][BCC]
e.g) When no alarm is occurring
&H06&H7A&H00&H03&H79
e.g.) When Alarm 1 and 9 are occurring
&H06&H7A&H02&H01&H09&H03&H73
*1 [&H00 | &H01] I/O bit ON: &H01/ OFF: &H00
*2 Status
In the example above, 11 digits [aaaaaaaaaaa] is for the following 11 flags.
Test/Teach/Auto/Warning/SError/Safeguard/EStop/Error/Paused/Running/Ready
&H01 is ON /&H00 is OFF
If Ready and Auto are ON, it is
[&H00&H00&H01&H00&H00&H00&H00&H00&H00&H00&H01].
*3 Error / Warning code
It is indicated in 4 digits. If there is no error and warning, it is
“0000”(&H30&H30&H30&h30).
e.g.)1 : [ACK]
‘S[&H00&H00&H01&H00&H00&H00&H00&H00&H00&H00&H01][ &H30&
H30&H30&h30]
The bits for Auto and Ready are &H01.
This means that AutoMode is ON and in Ready state. You can execute the
command.
e.g.)2 : [ACK]
‘S[&H00&H00&H01&H01&H00&H00&H00&H00&H00&H01&H00][ &H30&
H35&H31&h37]
This means the warning occurs during the operation. Take appropriate action
according to the warning code. (In this case, warning code is 0517)
Flag
Contents
Test
Turn ON in the TEST mode
Teach
Turn ON in the TEACH mode
Auto
Turn ON in the remote input acceptance condition
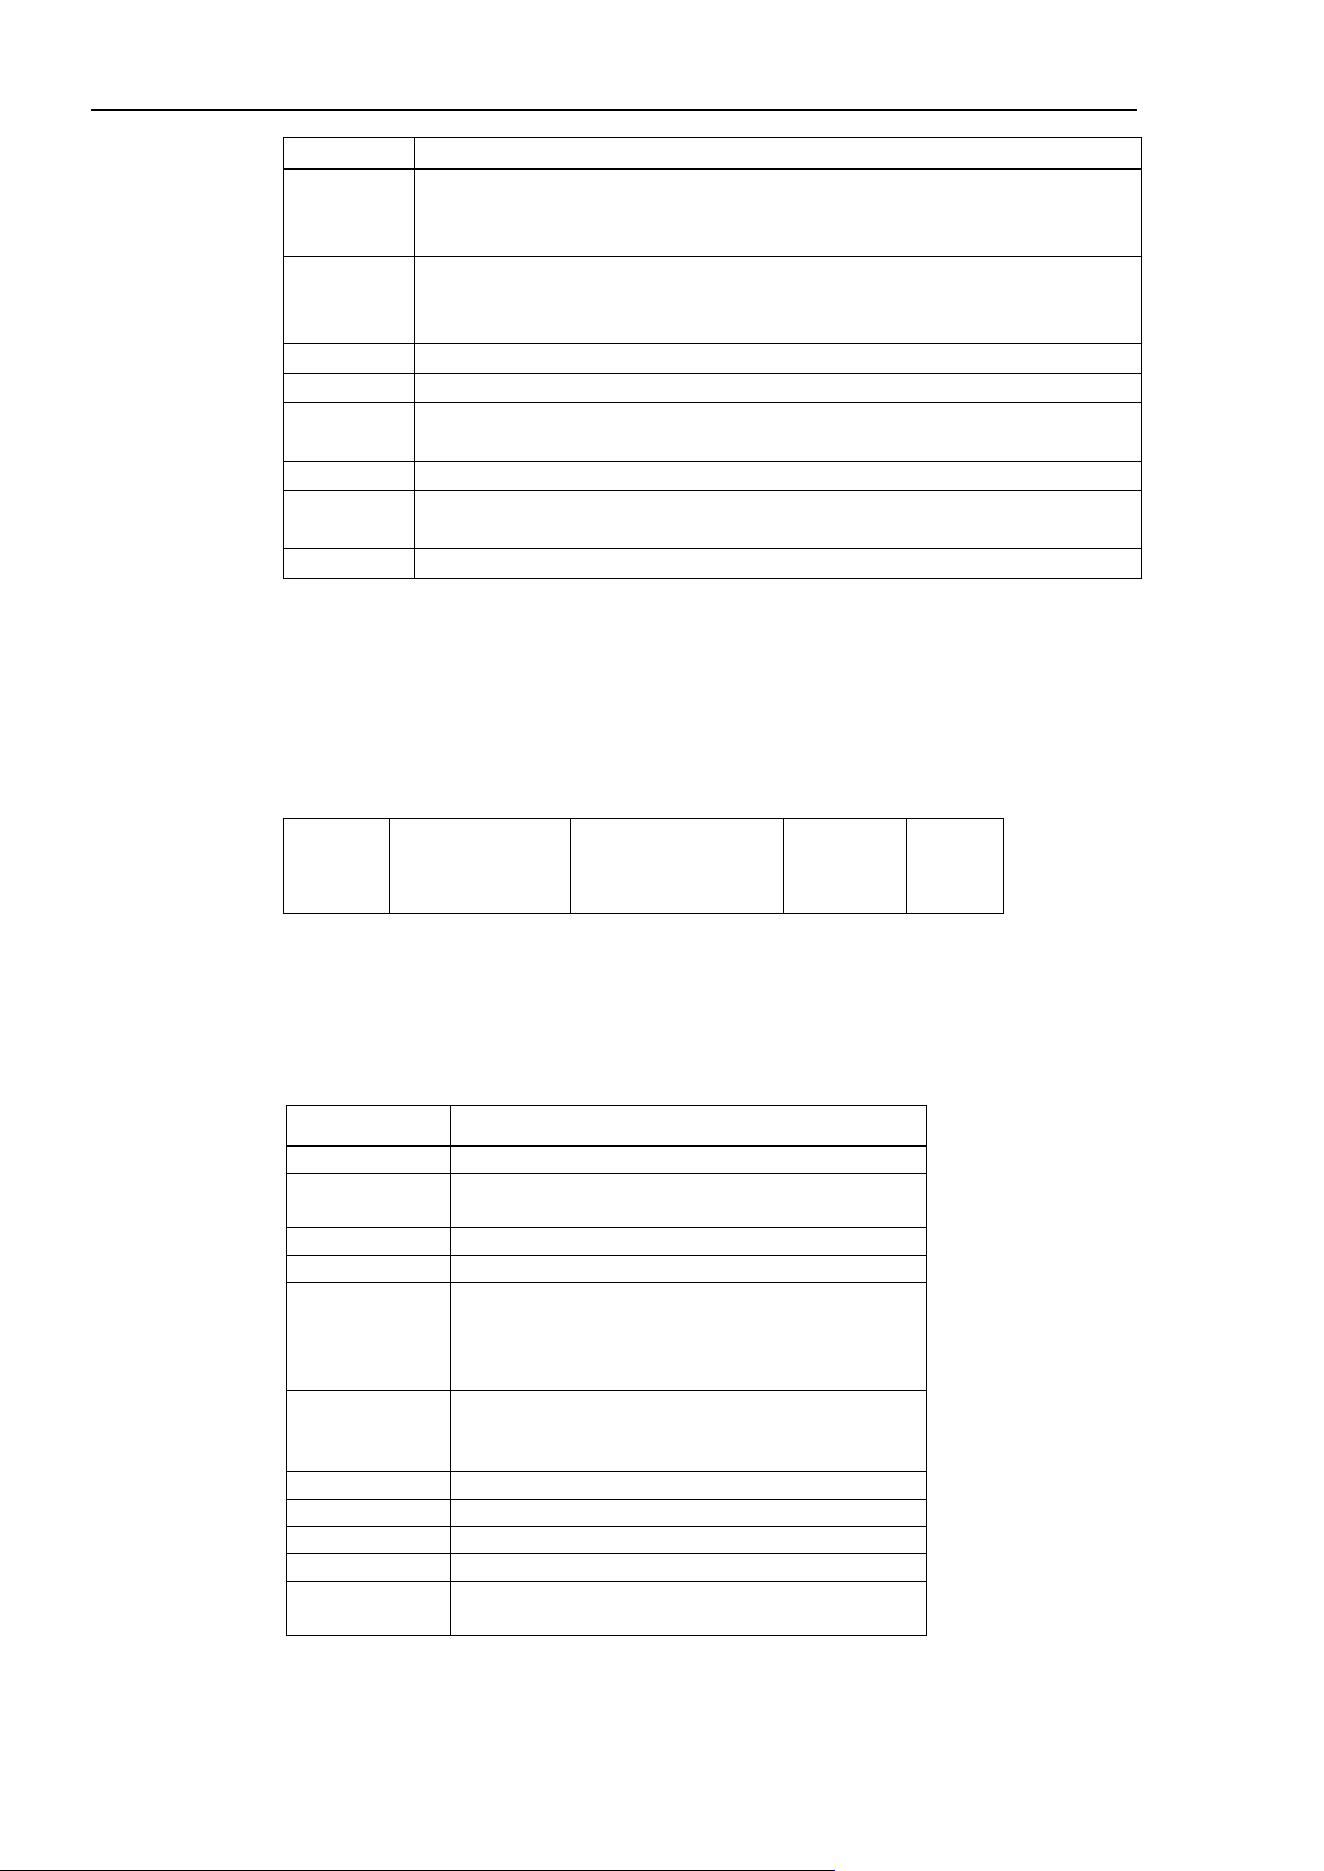
12. Remote Control
394 EPSON RC+ 7.0 (Ver.7.4) User's Guide Rev.6
Flag
Contents
Warning
Turn ON in the warning condition
Task can be executed as usual even a warning condition. However, take
action for the warning as soon as possible.
SError
Turn ON in the serious error condition
When a serious error occurs, Reboot the Controller to recover from the
error condition. “Reset input” is not available.
Safeguard
Turn ON with safety door open
EStop
Turn ON in the emergency condition
Error
Turn ON in the error condition
Use “Reset input” to recover from the error condition.
Paused
Turn ON with paused task
Running
Turn ON with task executing
Turn OFF when “Paused output” is ON
Ready
Turn ON with the Controller completed the startup and no task executing
*4 It returns values of specified number in the Number to acquire.
*5 Binary data. If you convert it to the specified data type after acquisition, conversion
process is required.
Error response
When the Controller cannot receive the remote command correctly, the error response is
shown in the following format.
NAK
1Byte
Command
1Byte
Error code
2Byte
ETX
1Byte
BCC
1Byte
NAK : &H15
ETX : &H03
BCC : Checksum of sent and received data
XOR value from the command to ETX per 1Byte
Error code Contents
10
Remote command does not begin with $
11
Remote command is wrong
Login is not executed
12
Remote command format is wrong
13
Login command password is wrong
14
Specified number to acquire is out of range
(Less than 1 or more than 100)
Number to acquire is omitted
Specified a string parameter
15
Parameter is not existed
Dimension of parameter is wrong
Element out of range is called
16
BCC is wrong
19
Request time out
20
Controller is not ready
21
Cannot execute since the Execute is running
99
System error
Communication error
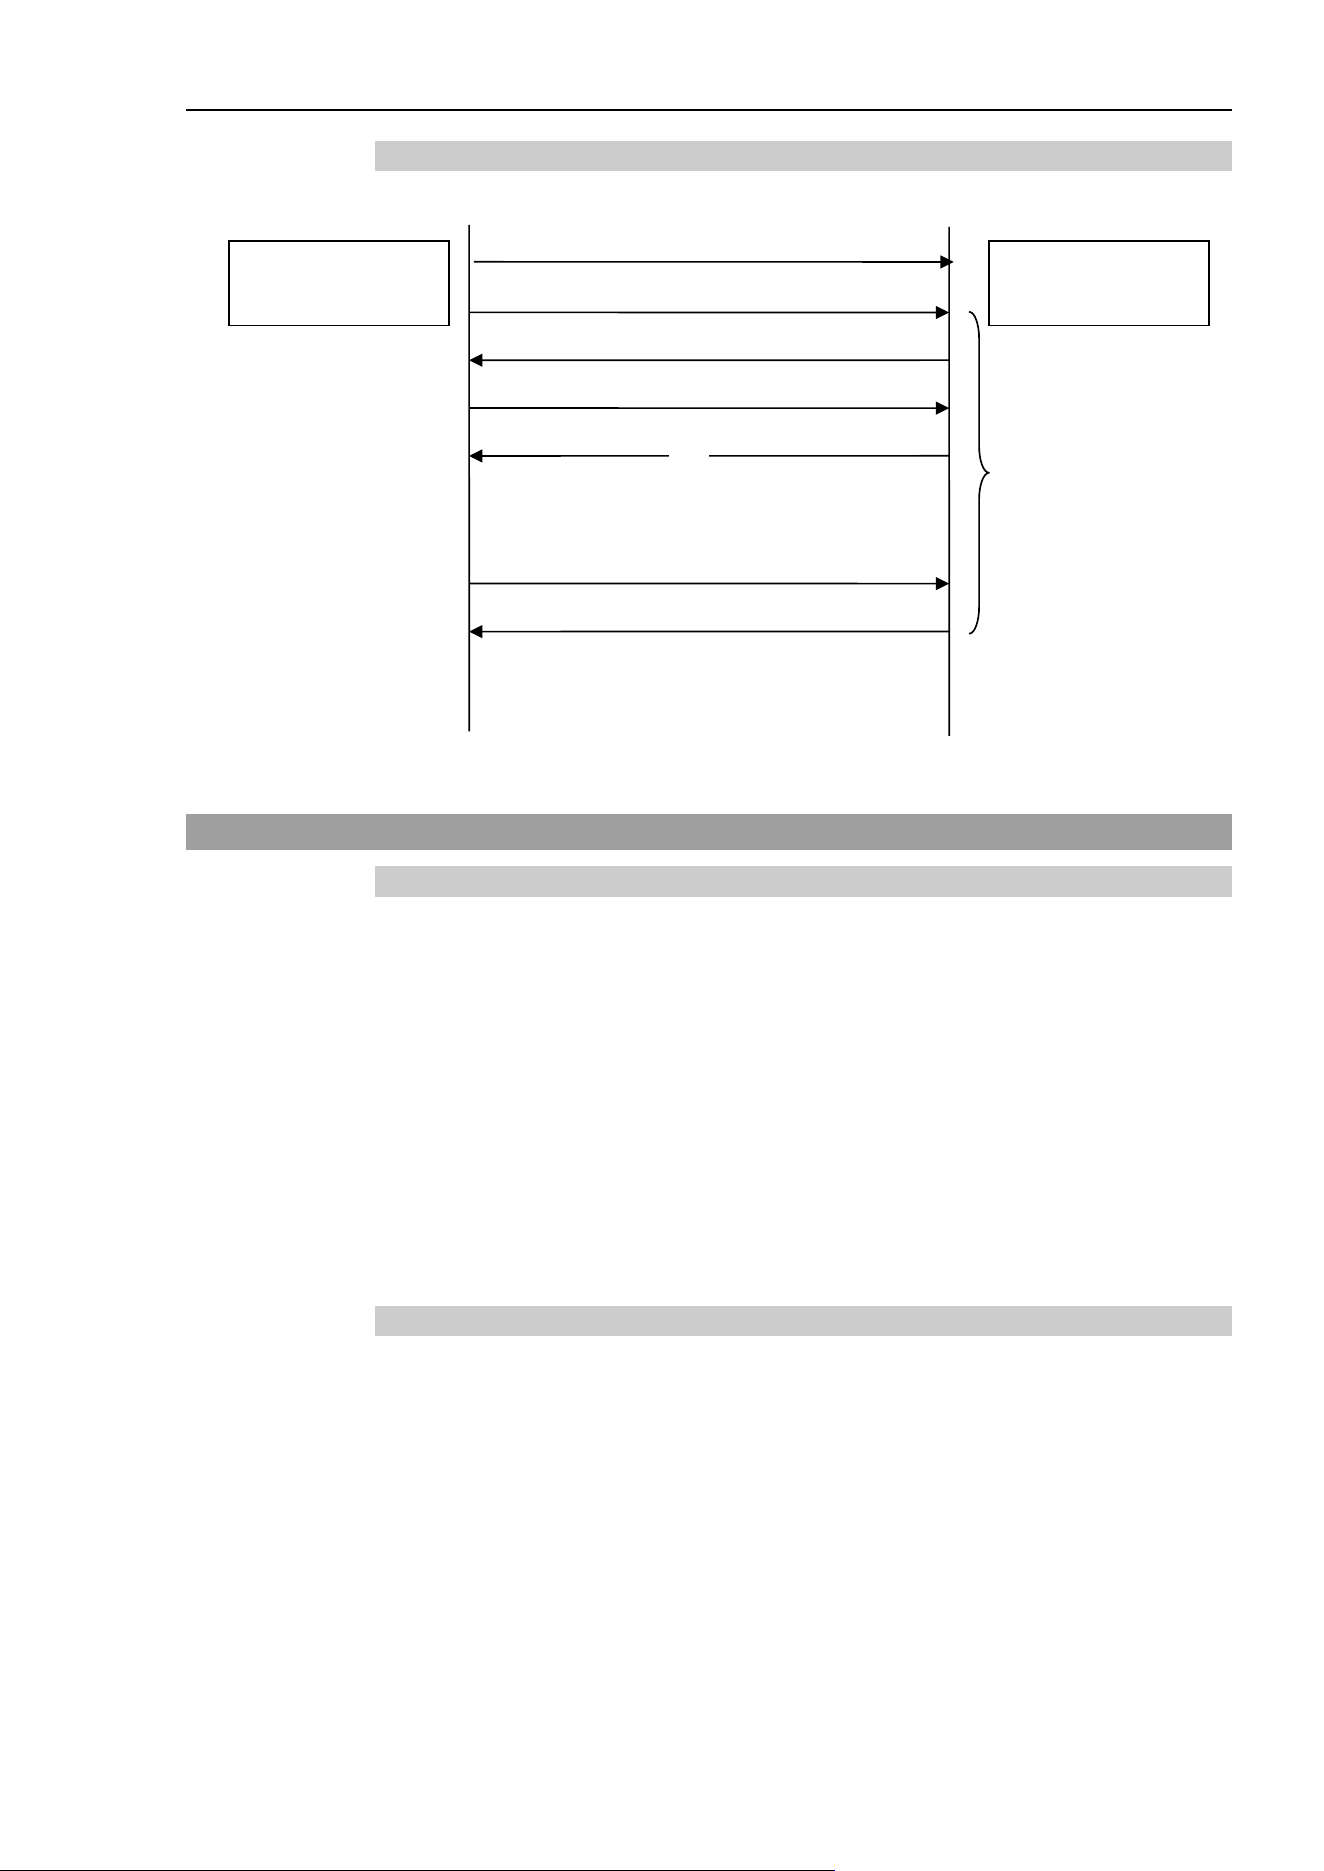
12. Remote Control
EPSON RC+ 7.0 (Ver.7.4) User's Guide Rev.6
395
12.3.8 Response timing of Remote Ethernet control
12.4 User-defined Remote Output I/O
12.4.1 What is user-defined remote output I/O?
User-defined remote output I/O is the remote output I/O that the user arbitrarily sets the
output conditions.
Output to the I/O without creating dedicated tasks to the user program is possible.
- 8 user-defined remote output I/O are available.
- Output condition is specified by the condition expression of the SPEL language.
- Evaluation of output conditions are performed in 30 ms periods.
- Output method when condition is met can be selected from Level, Pulse, and Latch.
- Output polarity (active low/ active high) when condition is met can be selected.
12.4.2 Output conditions
Output conditions consist of the ON and OFF conditions. The OFF condition is set only
when the output method is “Latch”.
[ON condition]
Set the condition expression to start output.
[OFF condition]
Set the condition expression to terminate the latch output.
180Controller
Port xx
RS-232C
RemoteController
Port zz
[2] Login
[3] Response
[4] Command request
[5] Response
[6] Logout
[7] Response
Request from the
Remote Controller is
only available
:
:
:
[1] EOT
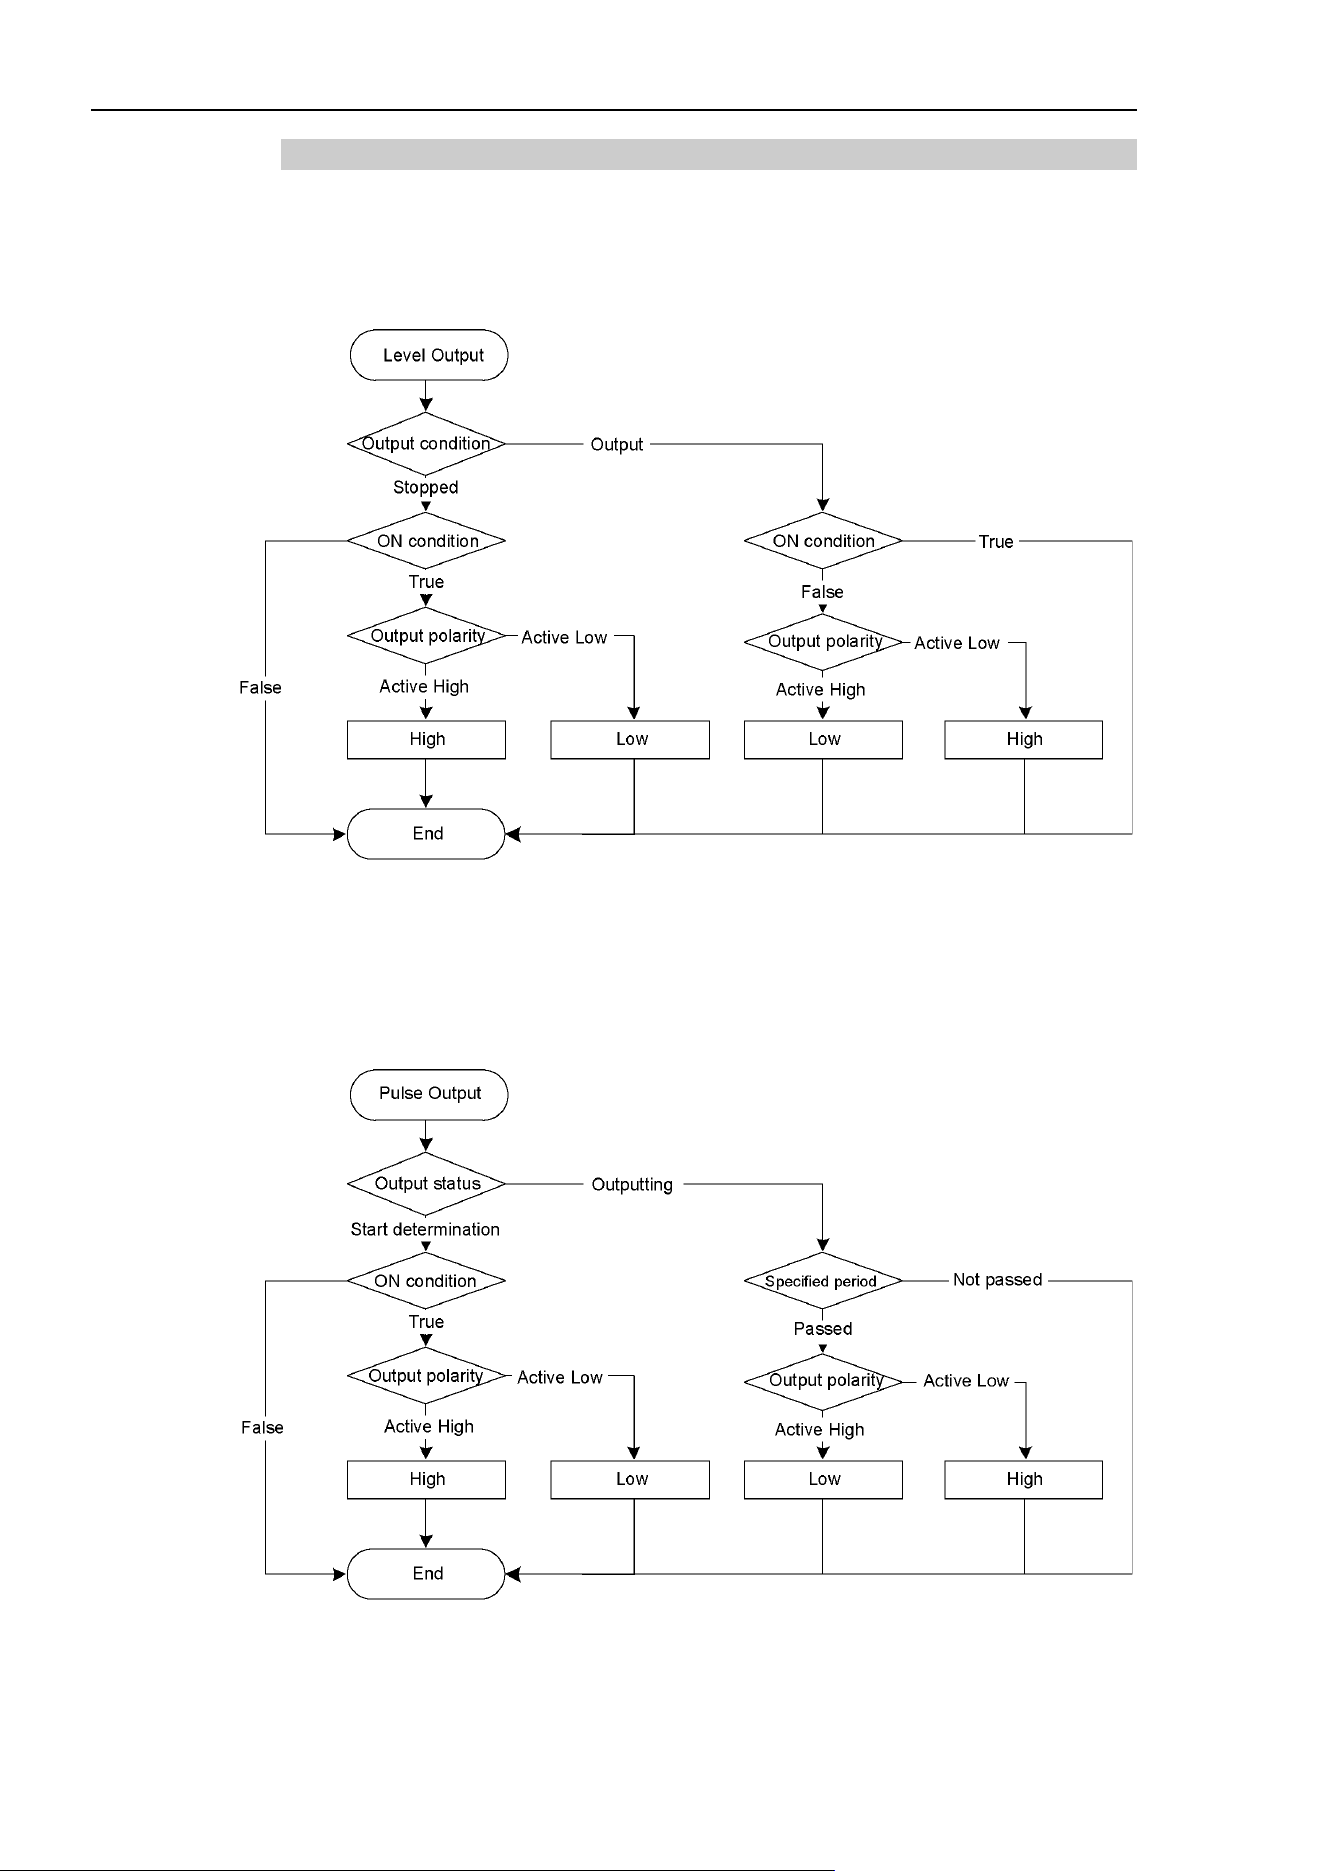
12. Remote Control
396 EPSON RC+ 7.0 (Ver.7.4) User's Guide Rev.6
12.4.3 Output
Level output
It outputs with the selected polarity while the ON condition is met. Output terminates
when the ON condition is not met.
Pulse output
It outputs with the selected polarity for the specified time (10 ms unit) after the ON
condition is met.
Output terminates when the specified time elapses.
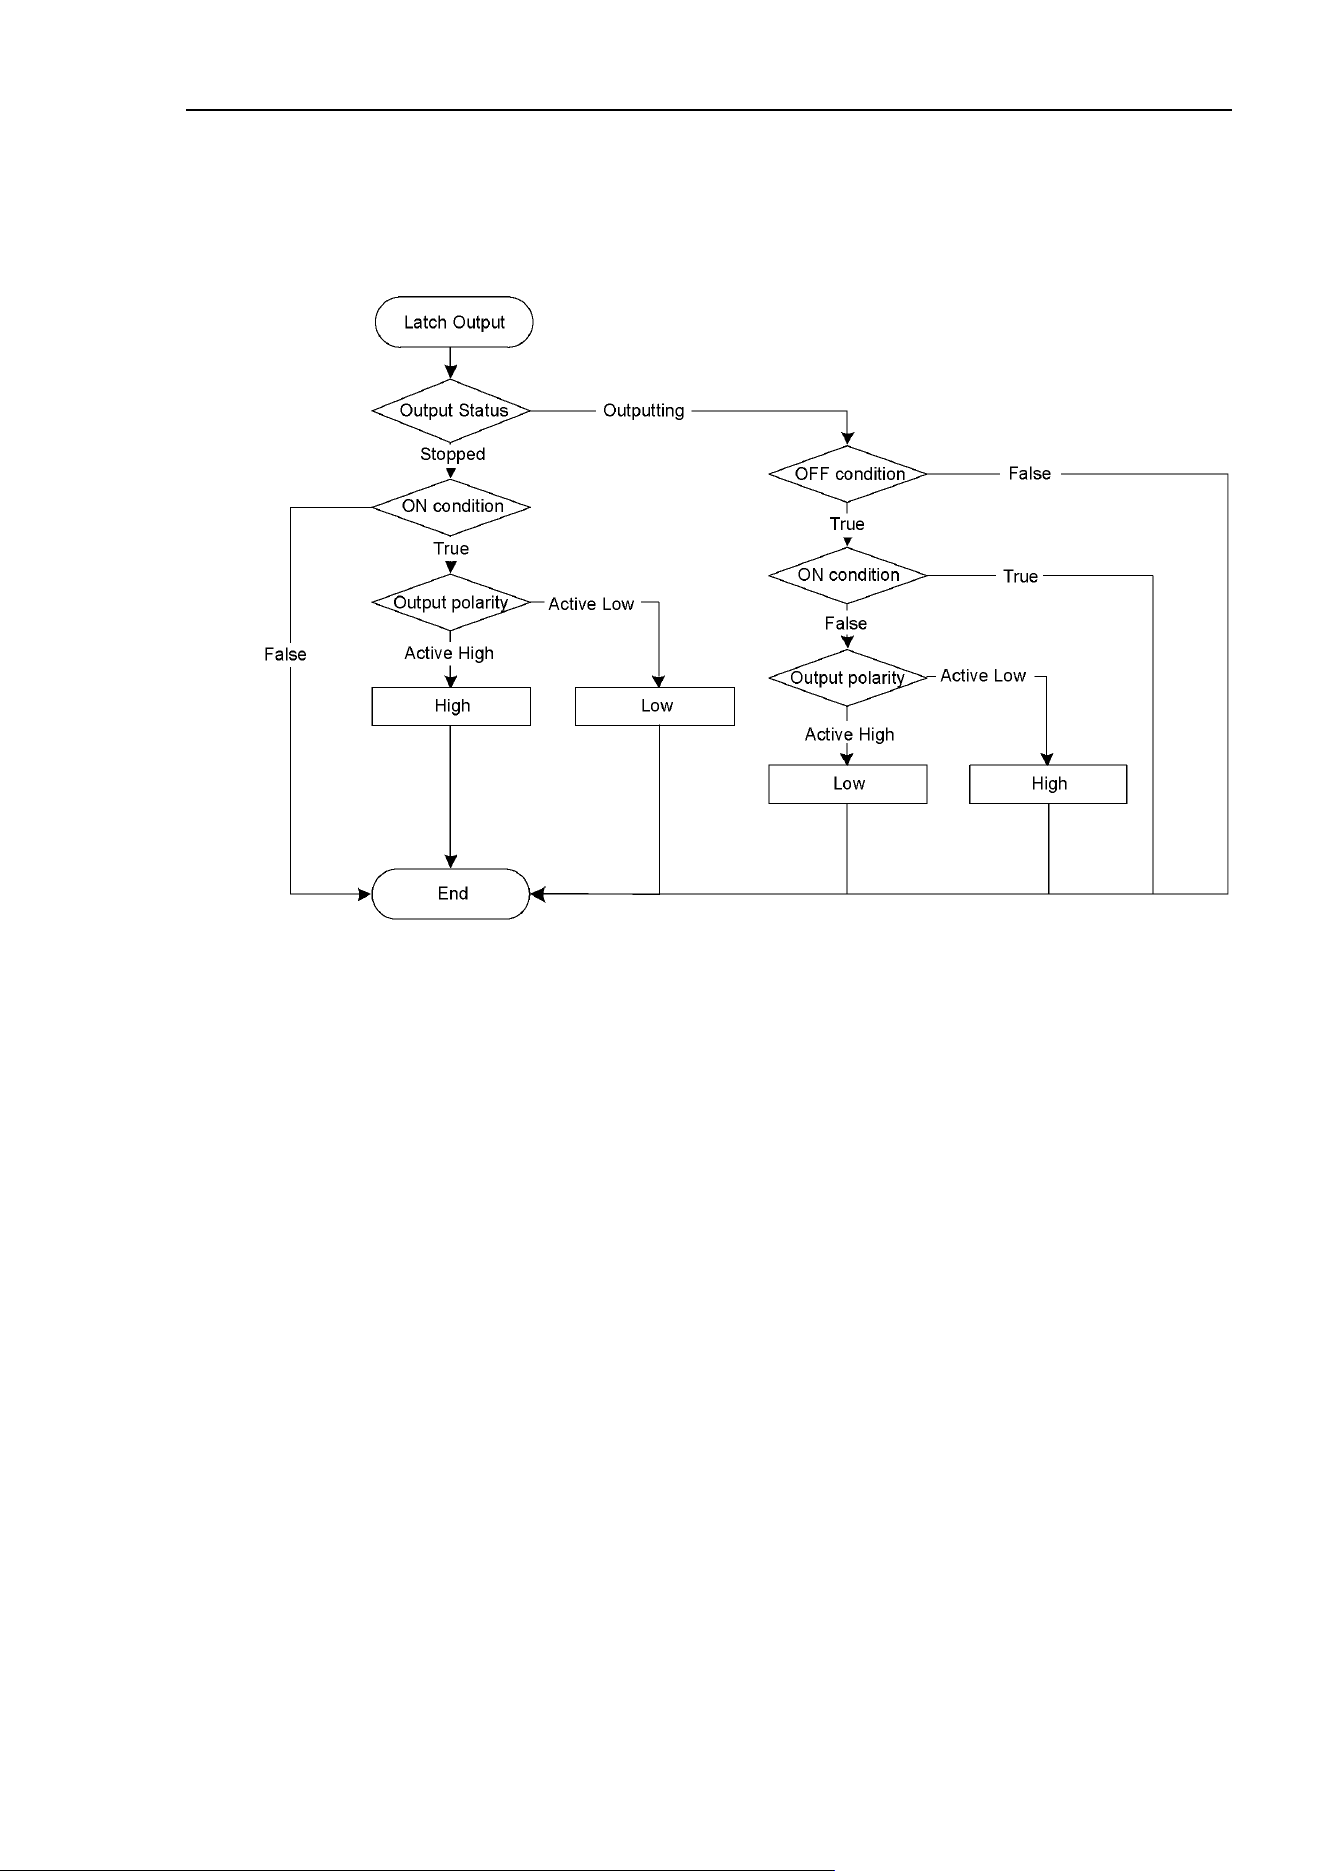
12. Remote Control
EPSON RC+ 7.0 (Ver.7.4) User's Guide Rev.6
397
Latch output
Output starts with the selected polarity when ON condition is met. Output terminates
when OFF condition is met and ON condition is not met at the same time.

12. Remote Control
398 EPSON RC+ 7.0 (Ver.7.4) User's Guide Rev.6
12.4.4 Restrictions
Condition expressions of the SPEL language are used to specify conditions. However,
they have following restrictions.
- Variables cannot be used.
- Labels cannot be used.
- Available functions are limited.
Available Functions
A
Abs
Acos
Agl
And
Arm
ArmDef
Asc
Asin
Atan
Atan2
B
BClr
BClr64
BoxDef
BSet
BSet64
BTst
BTst64
C
Cos
CR
CS
CT
CtrlDev
CtrlInfo
CU
CurPos
CV
CW
CX
CY
CZ
D
DegToRad
DispDev
Dist
E
ECP
ECPDef
ECPSet
ElapsedTime
Era
Errb
ErrorOn
Ert
EStopOn
F
Fine
Fix
G
GetRobotInsideBox
GetRobotInsidePlane
H
Hand
Hofs
HomeDef
Hour
I
In
InBCD
Inertia
InPos
InReal
InsideBox
InsidePlane
InW
J
J1Angle
J1Flag
J4Flag
J6Flag
JRange
L
LatchState
LimitTorque
LimZMargin
Local
LocalDef
LShift
LShift64
M
MCalComplete
MemIn
MemInW
MemSw
Motor
O
OLRate
Oport
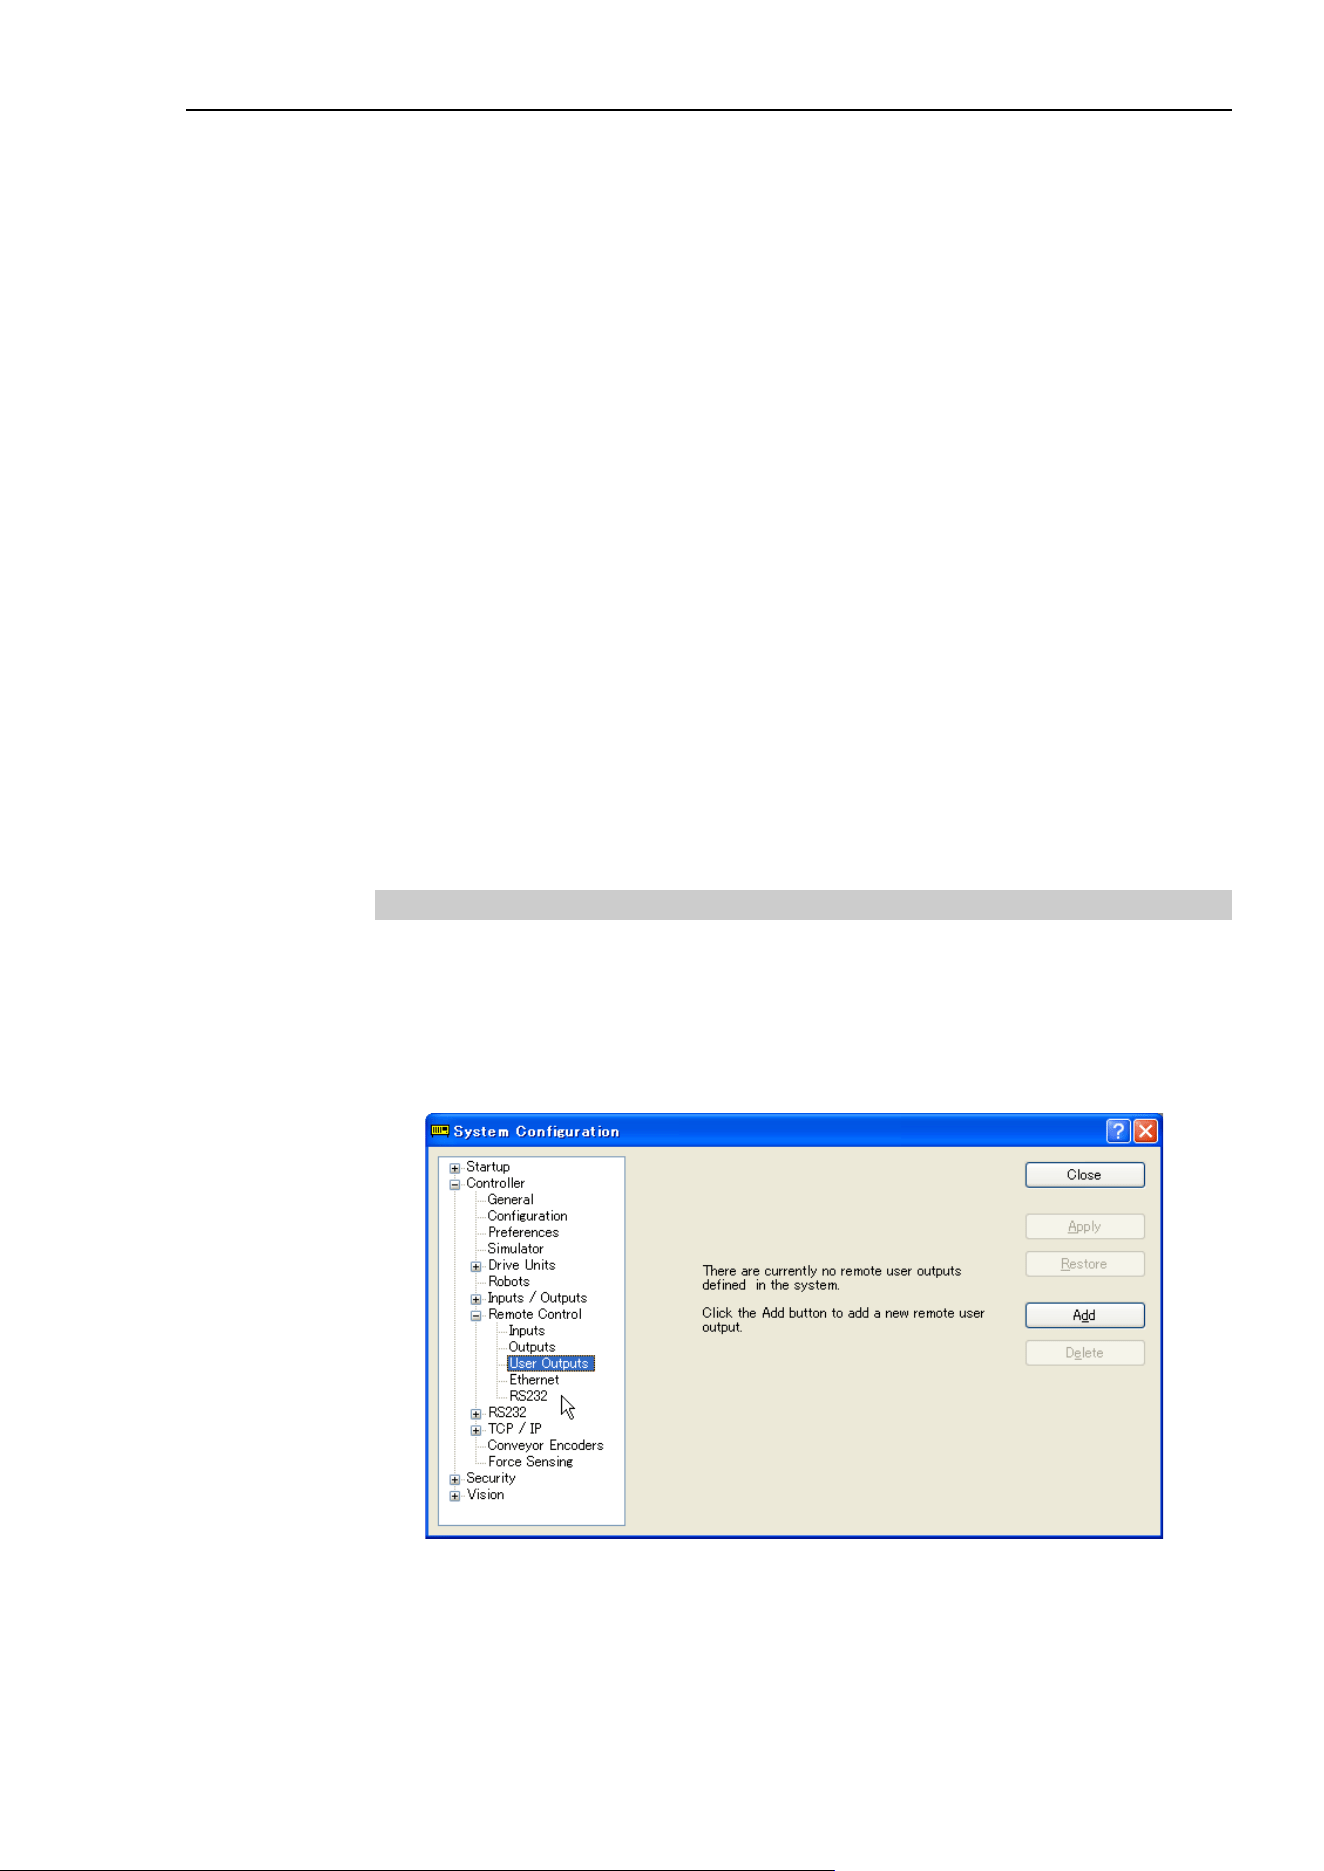
12. Remote Control
EPSON RC+ 7.0 (Ver.7.4) User's Guide Rev.6
399
P
PAgl
PauseOn
PDef
PG_Lspeed
Plane
PlaneDef
PLocal
Pls
PPls
Power
PTPBoost
Q
QPDecelR
QPDecelS
R
RadToDeg
RealAccel
RealPls
RealPos
RecoverPos
Rnd
RobotInfo
RobotType
RShift
RShift64
S
SafetyOn
Sgn
Sin
Speed
SpeedFactor
SpeedR
SpeedS
Sqr
Stat
Sw
SyncRobots
SysErr
T
Tan
TaskDone
TaskInfo
TaskState
TCLim
TcSpeed
TeachOn
Time
TLDef
TLSet
Tool
V
Val
W
Weight
X
XY
XYLimDef
12.4.5 How to set the user-defined output remote I/O
(1) Add the use-defined output remote I/O
The user-defined output remote I/O are not defined as default. To use them, add the
output remote I/O in the configuration dialog box and configure the output condition.
The added I/O will be available in the remote output setting.
[System Configuration] - [Controller] – [Remote Control] – [User Outputs]
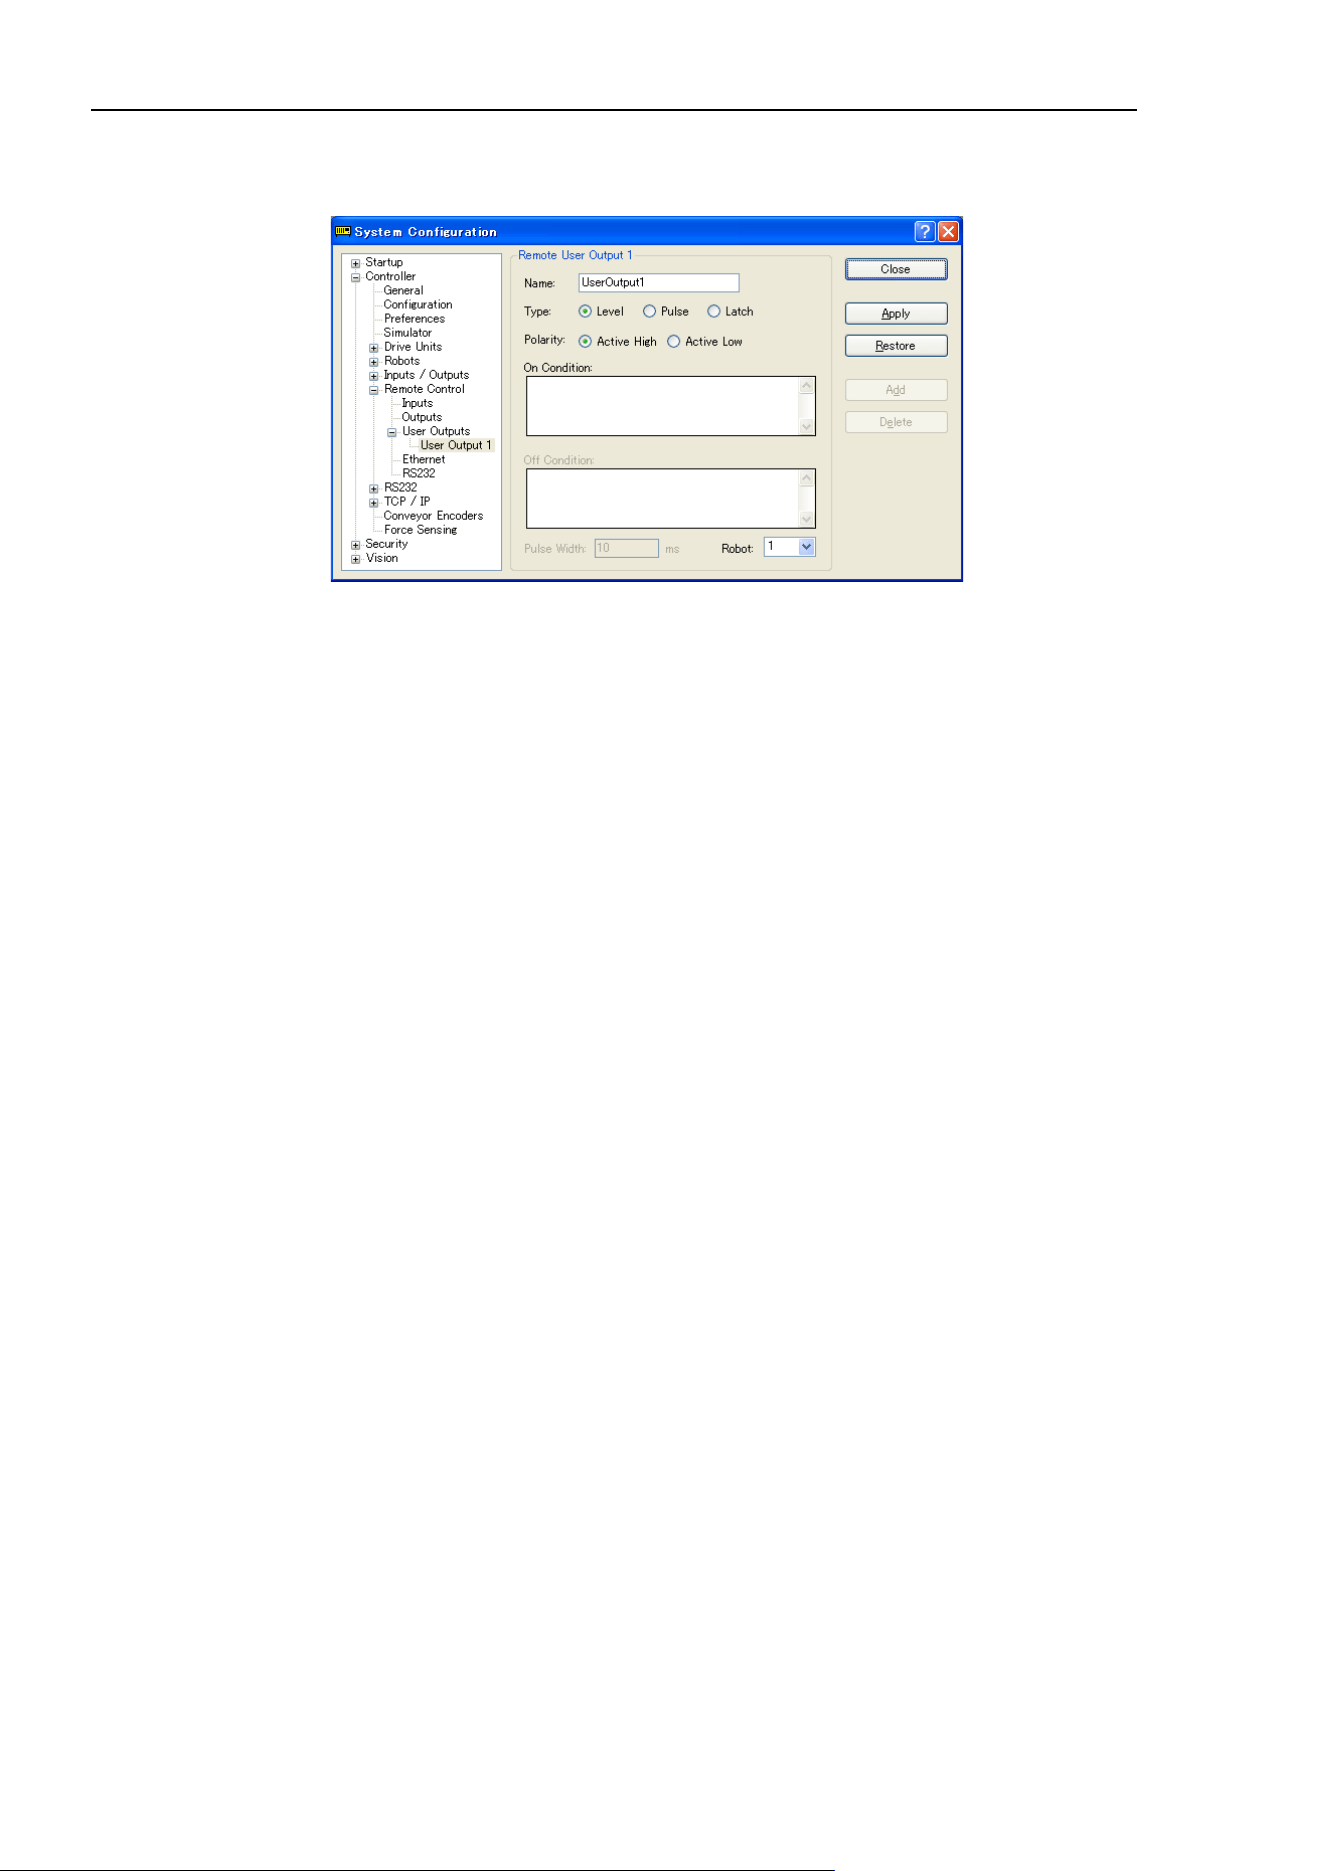
12. Remote Control
400 EPSON RC+ 7.0 (Ver.7.4) User's Guide Rev.6
Click the <Add> button. The following dialog box will appear.
Select the items and set the condition expressions. Then, click the <Apply> button.
[Name]
Set the name of the signal. Default is “UseroutputX”.
X = I/O number
The name specified here is displayed in the remote output setting and the I/O monitor.
[Type]
Select the output type.
[Polarity]
Select the polarity to output when the condition is met.
Active high: High Active low: Low
[On Condition]
Set the condition to start output. Setting is required for all output types.
[Off Condition]
Setting is required if the Latch output is selected.
[Robot]
Setting is required if the expression related to the manipulator is used for On and Off
conditions. The conditions for only one robot can be set.
This setting is not necessary if the manipulator-related condition is not used.
If unregistered robot number is specified, an initialization error occurs at the
Controller restart.
NOTE
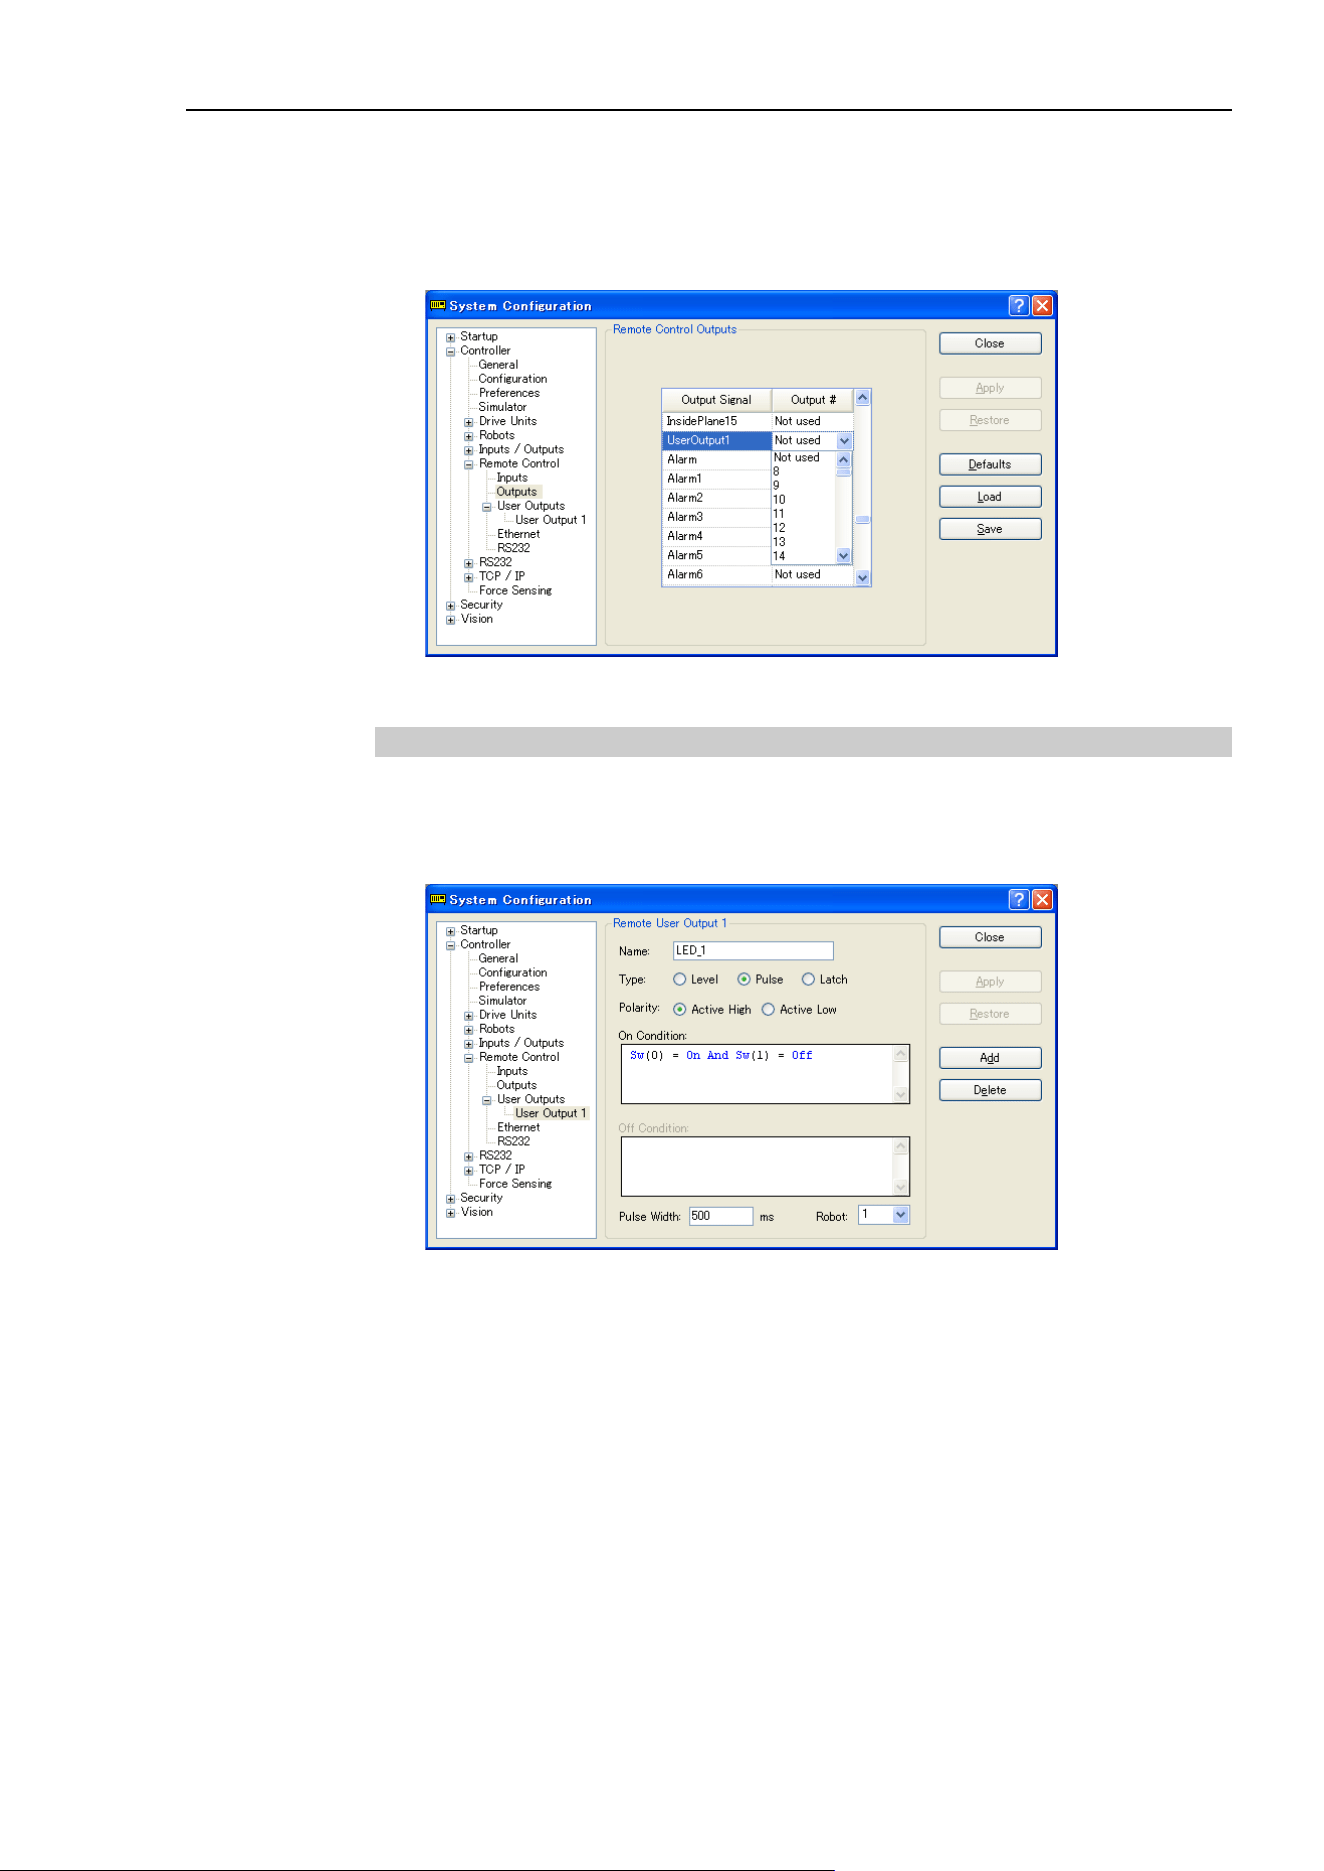
12. Remote Control
EPSON RC+ 7.0 (Ver.7.4) User's Guide Rev.6
401
(2) Setting of remote outputs
To enable the added I/O outputs, assign the registered user definition to the target I/O.
Assignment is done by the remote output.
[System Configuration] – [Controller] – [Remote Controller] – [Outputs]
The names of the added signals appear in [Output Signal]. Select the bit to output.
12.4.6 Usage example
If you want to turn ON the bit port 8 of the standard I/O for 500 ms when the bit port
0 of the standard I/O input is ON and the bit port 1 is OFF:
(1) User definition
1. Set “LED_1” for the [Name] in this example. Change the setting if necessary.
2. Select “Pulse” for [Type].
3. Select [Active High] for [Polarity] in order to output ON.
4. Set the On condition. In this example, set the following condition expression.
Sw(0) = On And Sw(1) = Off
5. Set “500” for [Pulse Width].
6. Click the <Apply> button.
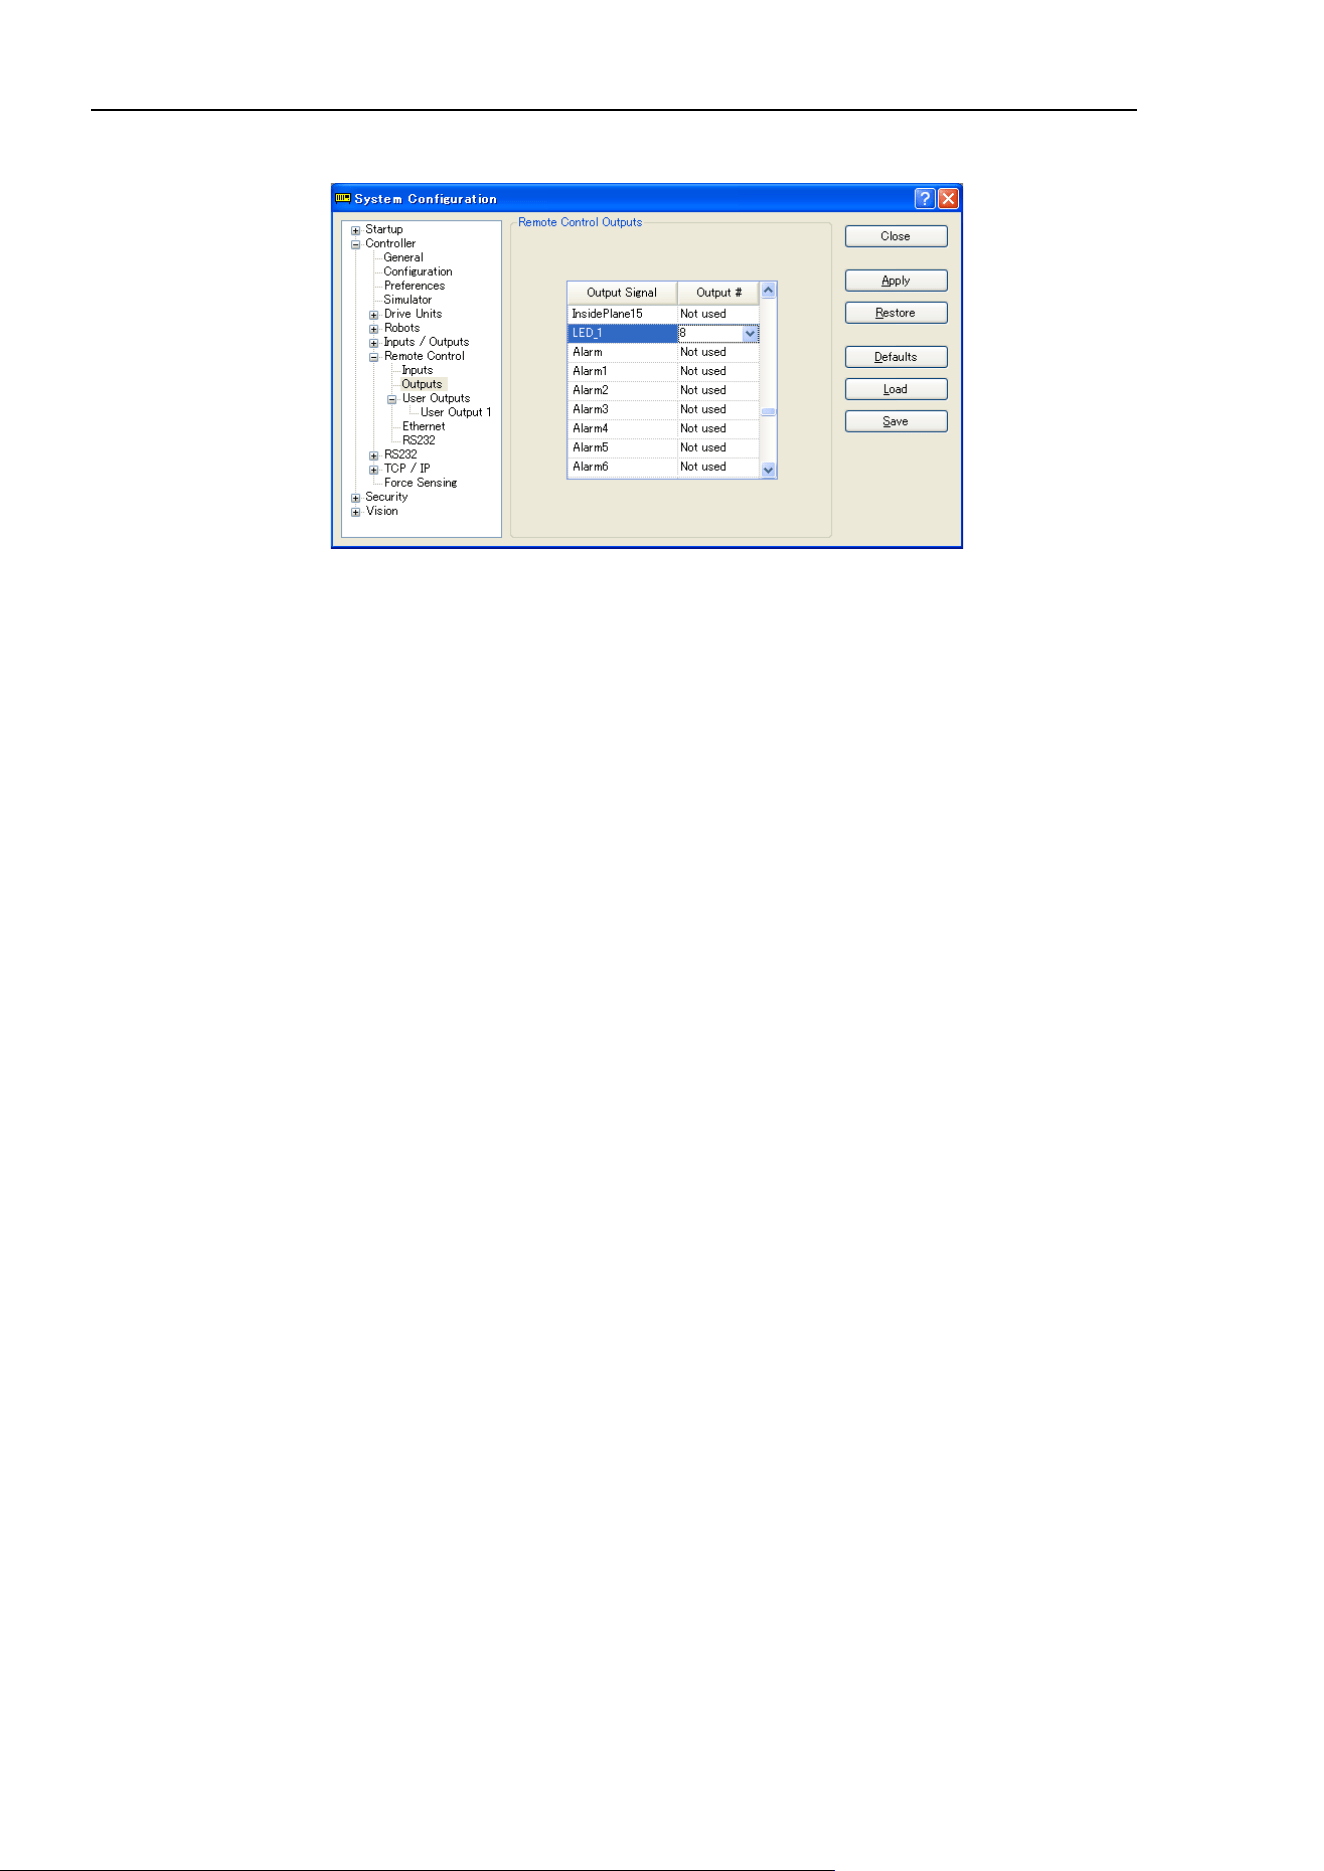
12. Remote Control
402 EPSON RC+ 7.0 (Ver.7.4) User's Guide Rev.6
(2) Setting in the [Remote Control Outputs]
1. Select the output bit “8” for the configured name (LED_1).
2. Click the <Apply> button.
Now, output to the I/O will be executed according to the condition expression after
rebooting.
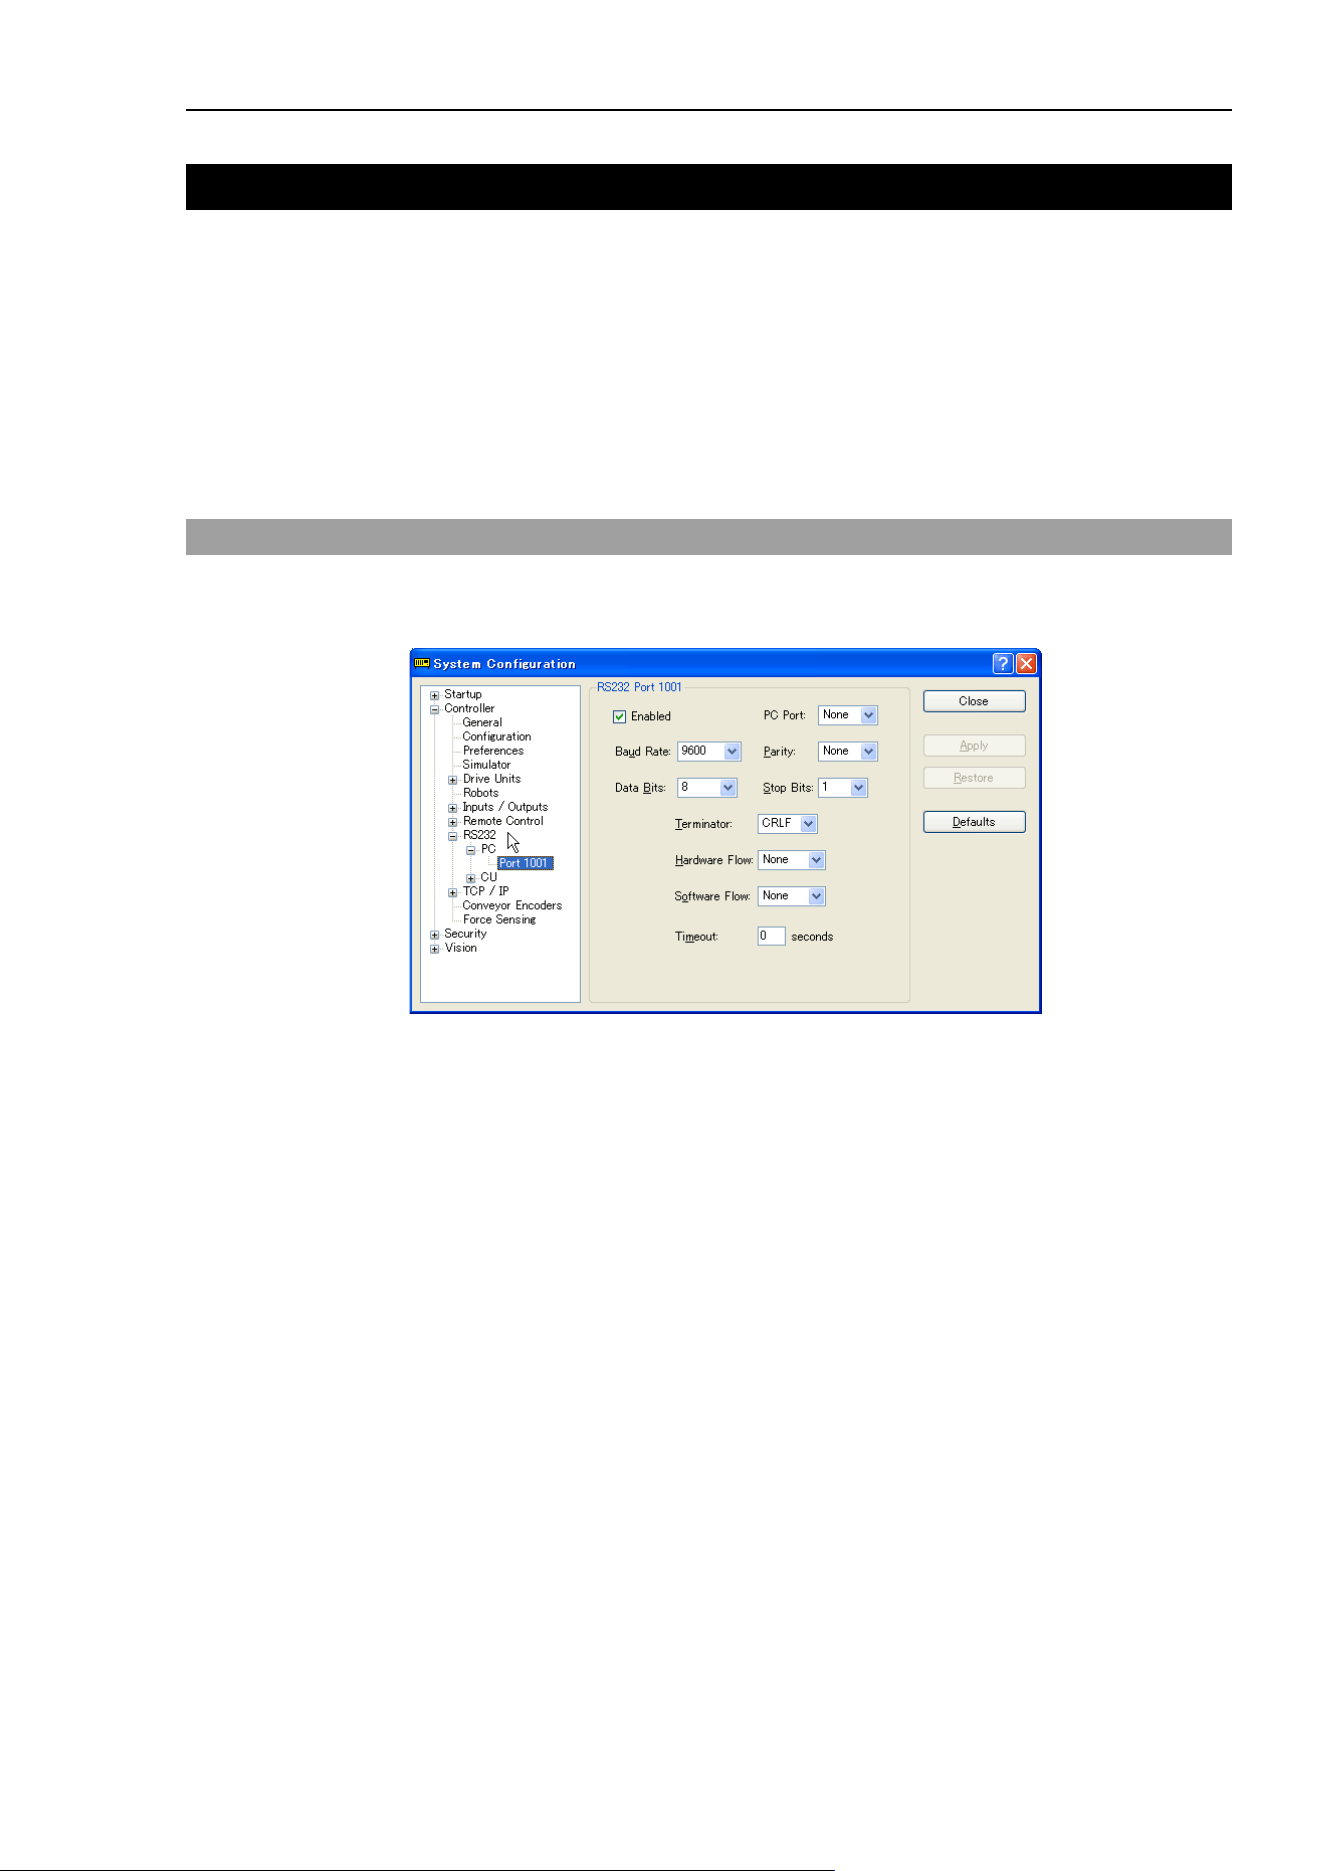
13. RS-232C Communications
EPSON RC+ 7.0 (Ver.7.4) User's Guide Rev.6
403
13. RS-232C Communications
The Robot Controller supports:
Windows part : Standard RS-232C port × 2
(Standard: Port 1001 only, High-speed: Port 1001, 1002)
Standard RS-232C : 1 port as standard
Expanded RS-232C : Option RS-232C port × 4 at maximum (2 ports per board)
However, RS-232C port × 2 at maximum when using Force
Sensor I/F board. (For a board, one is the maximum.)
For instructions on how to install RS-232C boards, refer to the Robot Controller manual.
13.1 RS-232C Software Configuration
To configure a Windows Part RS-232C port
1. Select [System Configuration] from the [Setup] menu and open the dialog box.
2. Select [Controller]-[RS-232C]-[PC] from the tree on the left.
3. Set the [Enabled] check box.
4. Change the settings as desired.
5. Click <Apply> to save the new settings.
6. Click <Close>.
If several ports are used for communication at one time with more than a 19200 baud rate,
error 2929 or 2922 may occur. In this case, select a lower baud rate or avoid using several
ports at one time.
NOTE
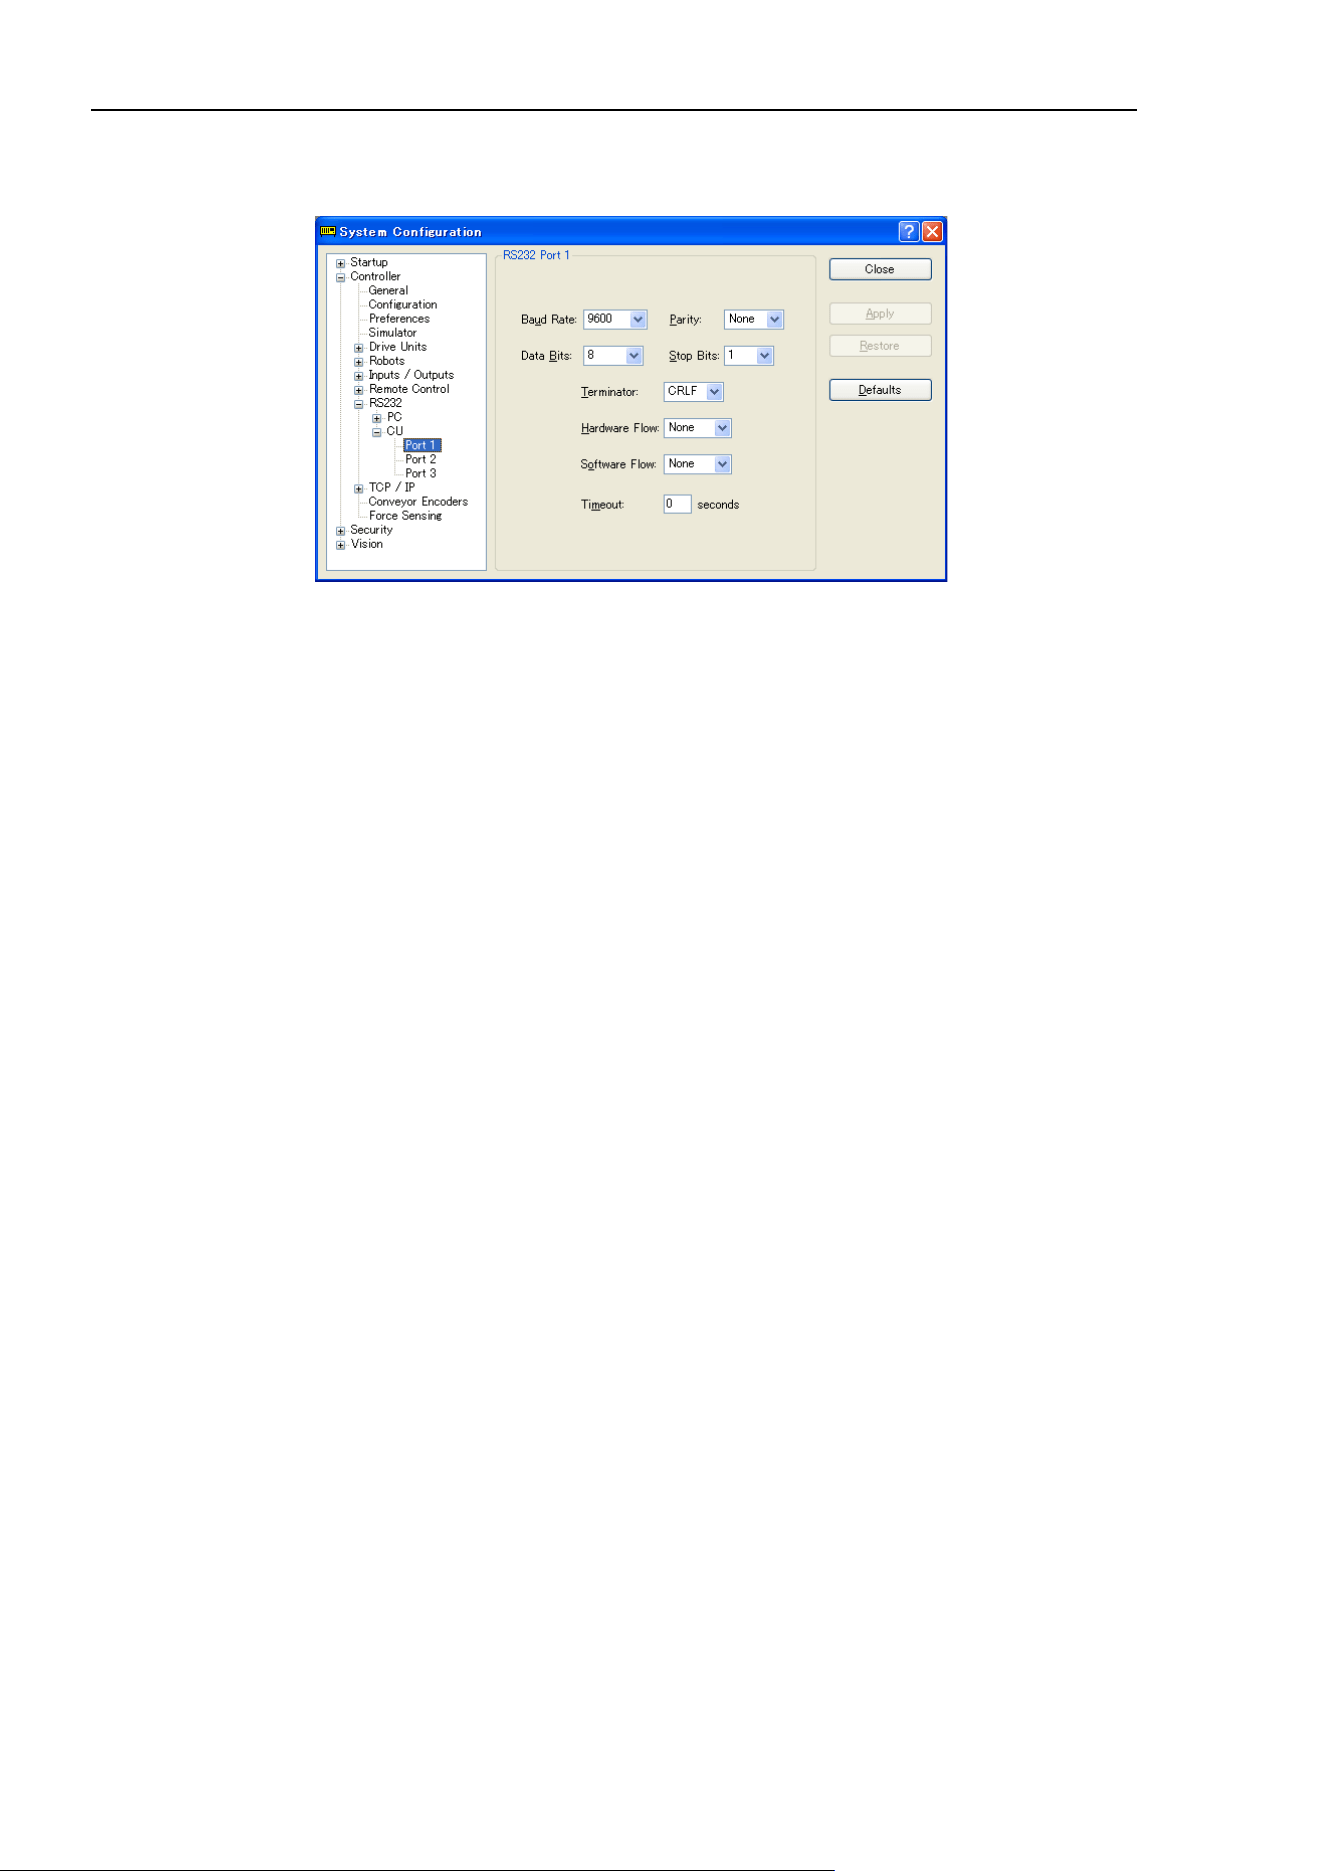
13. RS-232C Communications
404 EPSON RC+ 7.0 (Ver.7.4) User's Guide Rev.6
To configure a standard / option RS-232C port
1. Select [System Configuration] from the [Setup] menu and open the dialog box.
2. Select the [Controller]-[RS-232C]-[CU] from the tree on the left.
3. Select a port to configure.
4. Change the settings as desired.
5. Click <Apply> to save the new settings.
6. Click <Close>.

13. RS-232C Communications
EPSON RC+ 7.0 (Ver.7.4) User's Guide Rev.6
405
13.2 RS-232C Commands
The following is a list of all of the commands associated with RS-232C communications.
For details, please see the online help or SPEL
+
Language Reference Manual.
OpenCom Opens a communications port.
ChkCom Returns port status: the number of bytes waiting to be read or error
condition.
CloseCom Closes a communications port.
SetCom Sets communications port parameters at runtime or from the
Command window.
Print # Sends characters out of the port.
Input # Receives characters from the port into one or more variables.
Line Input # Receives one line characters from the port into one string variable.
Read # Receives one or more characters from the port into one string variable.
ReadBin # Receives one or more bytes from the port.
Write # Sends characters out of the port.
WriteBin # Sends one or more bytes out of the port.
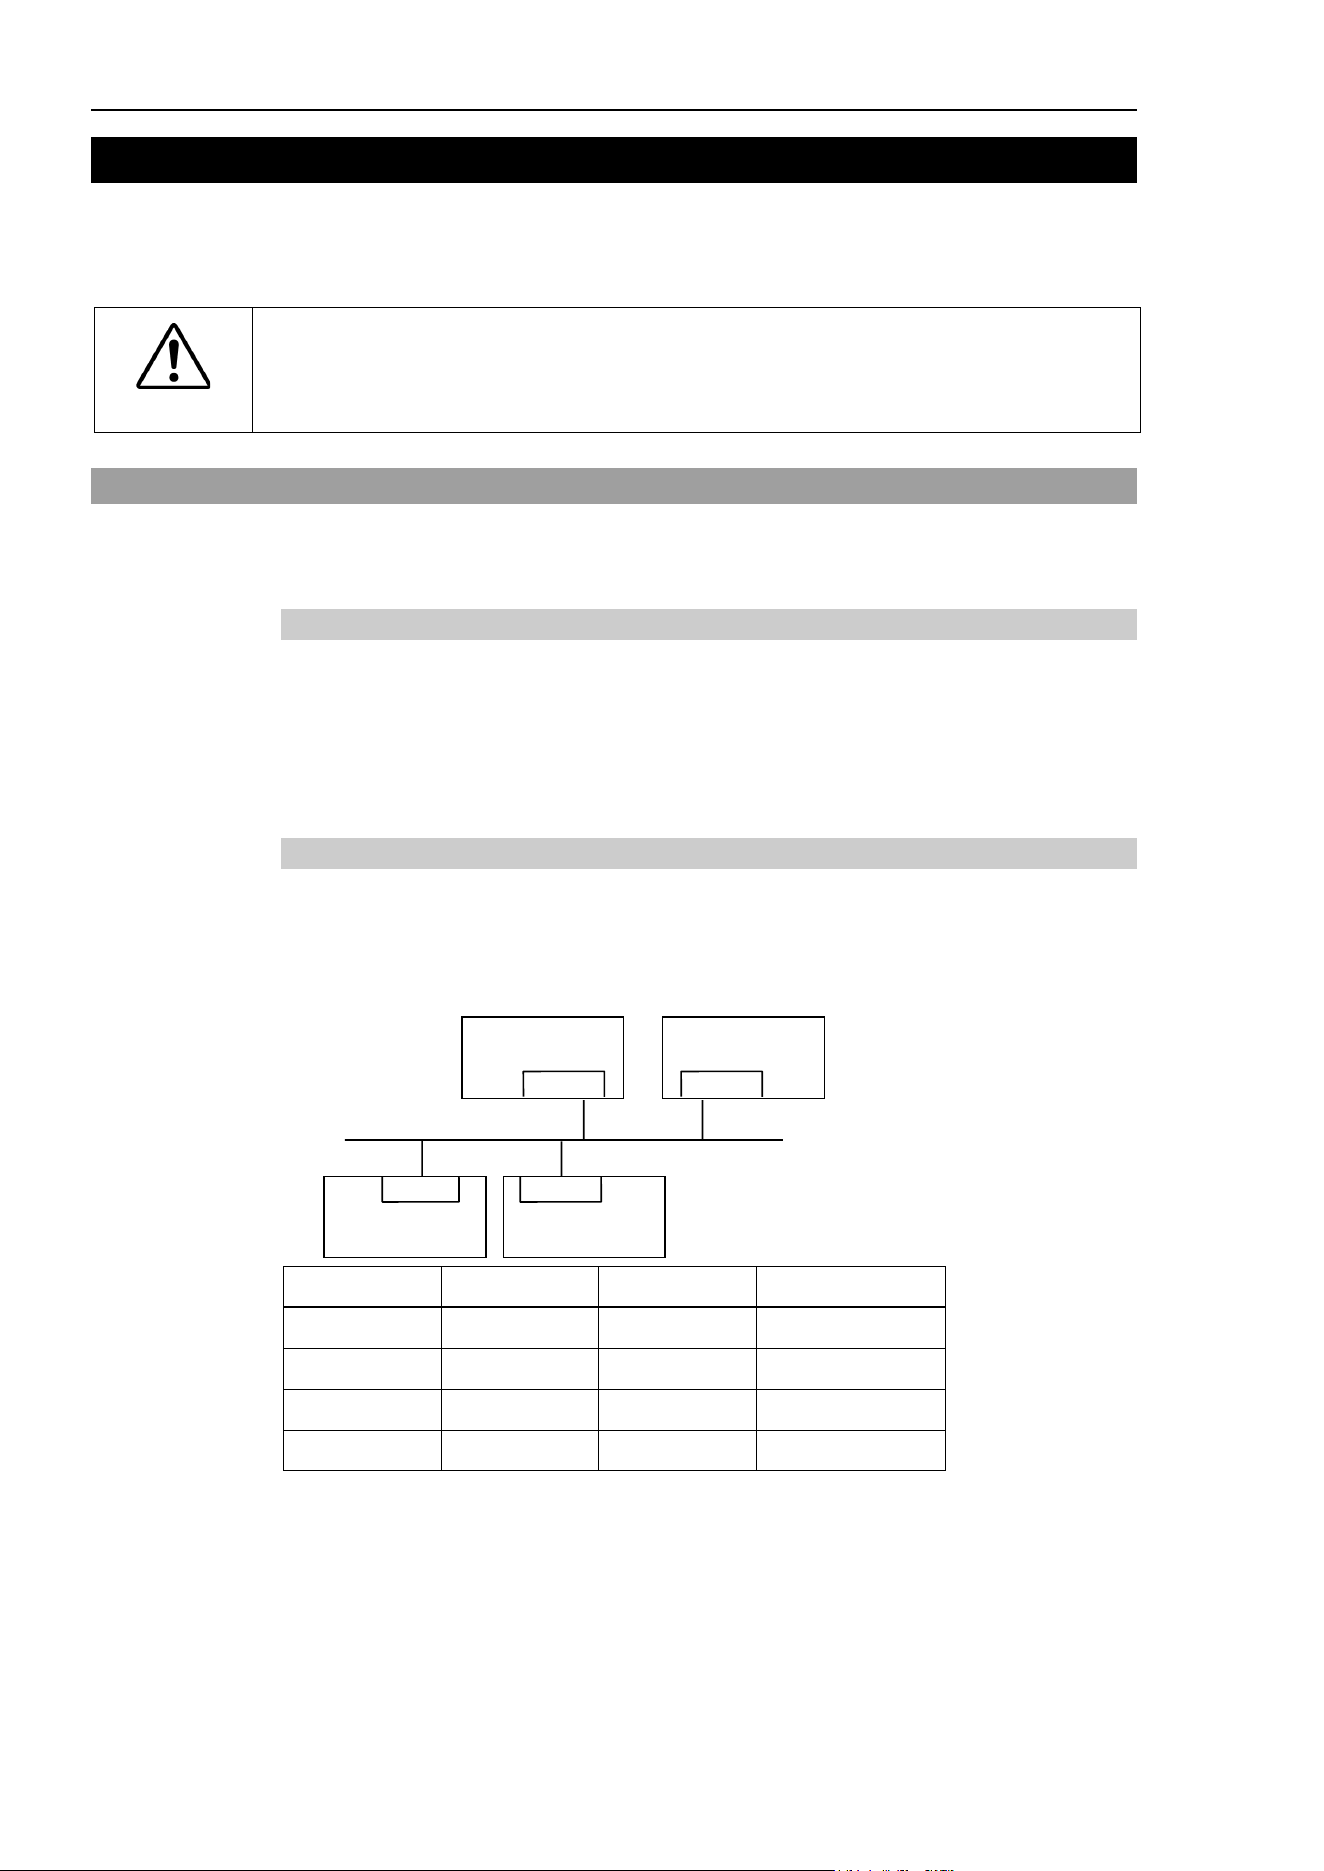
14. TCP/IP Communications
406 EPSON RC+ 7.0 (Ver.7.4) User's Guide Rev.6
14. TCP/IP Communications
EPSON RC+ 7.0 supports 16 TCP/IP ports that allow peer to peer communications.
This chapter contains instructions on using TCP/IP, including IP addresses of LAN-1 port
and Windows TCP/IP configuration.
CAUTION
■
LAN
-
2 is not available for pear to pear communications of EPSON RC+ 7.0.
For details, refer to
Robot Controller manual: Setup & Operation 7. LAN (Ethernet
Communication) Port
.
14.1 TCP/IP Setup
Before you can use TCP/IP communications between PCs and controllers, you must
configure your network. The following sections describe basic network configuration.
14.1.1 Ethernet Hardware
The Controller includes a built in Ethernet interface with an RJ45 connector accessible
from the controller front panel. It supports 10BaseT (10 Mbps) and 10BaseTX (100
Mbps).
Your PC will need a 10BaseT 10/100 adapter to communicate with the Controller via
Ethernet.
14.1.2 IP Addresses
The controller has a fixed IP address that you can configure from EPSON RC+ 7.0. To
configure the IP address, mask, and gateway for the controller, refer to 5.12.2 [System
Configuration] Command (Setup Menu).
The following table shows a typical IP address configuration.
PC1 Controller 1
LAN-1 LAN
PC2 Controller 2
Ethernet
LAN LAN-1
Host Name IP Address Subnet Subnet Mask
PC1 192.168.0.1 192.168.0 255.255.255.0
PC2 192.168.0.2 192.168.0 255.255.255.0
Controller1 192.168.0.3 192.168.0 255.255.255.0
Controller2 192.168.0.4 192.168.0 255.255.255.0
In this example, the network address (subnet) is 192.168.0. With a subnet mask of
255.255.255.0, there can be 254 hosts on this subnet (0 and 255 cannot be used).
Refer to the Microsoft Windows operating system manual for instructions on setting the
PC IP address.

14. TCP/IP Communications
EPSON RC+ 7.0 (Ver.7.4) User's Guide Rev.6
407
14.1.3 IP Gateway
If you are connecting PCs and controllers on different networks, you will need to route
traffic between the networks using one or more routers. Each device communicating via
Ethernet will need to have their default gateway address set to the address of the router for
its subnet.
To configure the gateway address for the controller, refer to 5.12.2 [System Configuration]
Command (Setup Menu).
14.1.4 Testing Windows TCP/IP setup
Use the ping command from a Command Window to test communications.
First, do a loopback test to check if you can ping your own address by using the local IP
address:
C:\>ping 127.0.0.1
Pinging 127.0.0.1 with 32 bytes of data:
Reply from 127.0.0.1: bytes=32 time<10ms TTL=128
Reply from 127.0.0.1: bytes=32 time<10ms TTL=128
Reply from 127.0.0.1: bytes=32 time<10ms TTL=128
Reply from 127.0.0.1: bytes=32 time<10ms TTL=128
C:\>
Ping your PC’s IP address:
C:\>ping 192.168.0.1
Pinging 192.168.0.1 with 32 bytes of data:
Reply from 192.168.0.1: bytes=32 time<10ms TTL=128
Reply from 192.168.0.1: bytes=32 time<10ms TTL=128
Reply from 192.168.0.1: bytes=32 time<10ms TTL=128
Reply from 192.168.0.1: bytes=32 time<10ms TTL=128
C:\>
Now ping controller on the network. :
C:\>ping 192.168.0.3
Pinging pc2 [192.168.0.3] with 32 bytes of data:
Reply from 192.168.0.3: bytes=32 time<10ms TTL=128
Reply from 192.168.0.3: bytes=32 time<10ms TTL=128
Reply from 192.168.0.3: bytes=32 time<10ms TTL=128
Reply from 192.168.0.3: bytes=32 time<10ms TTL=128
C:\>
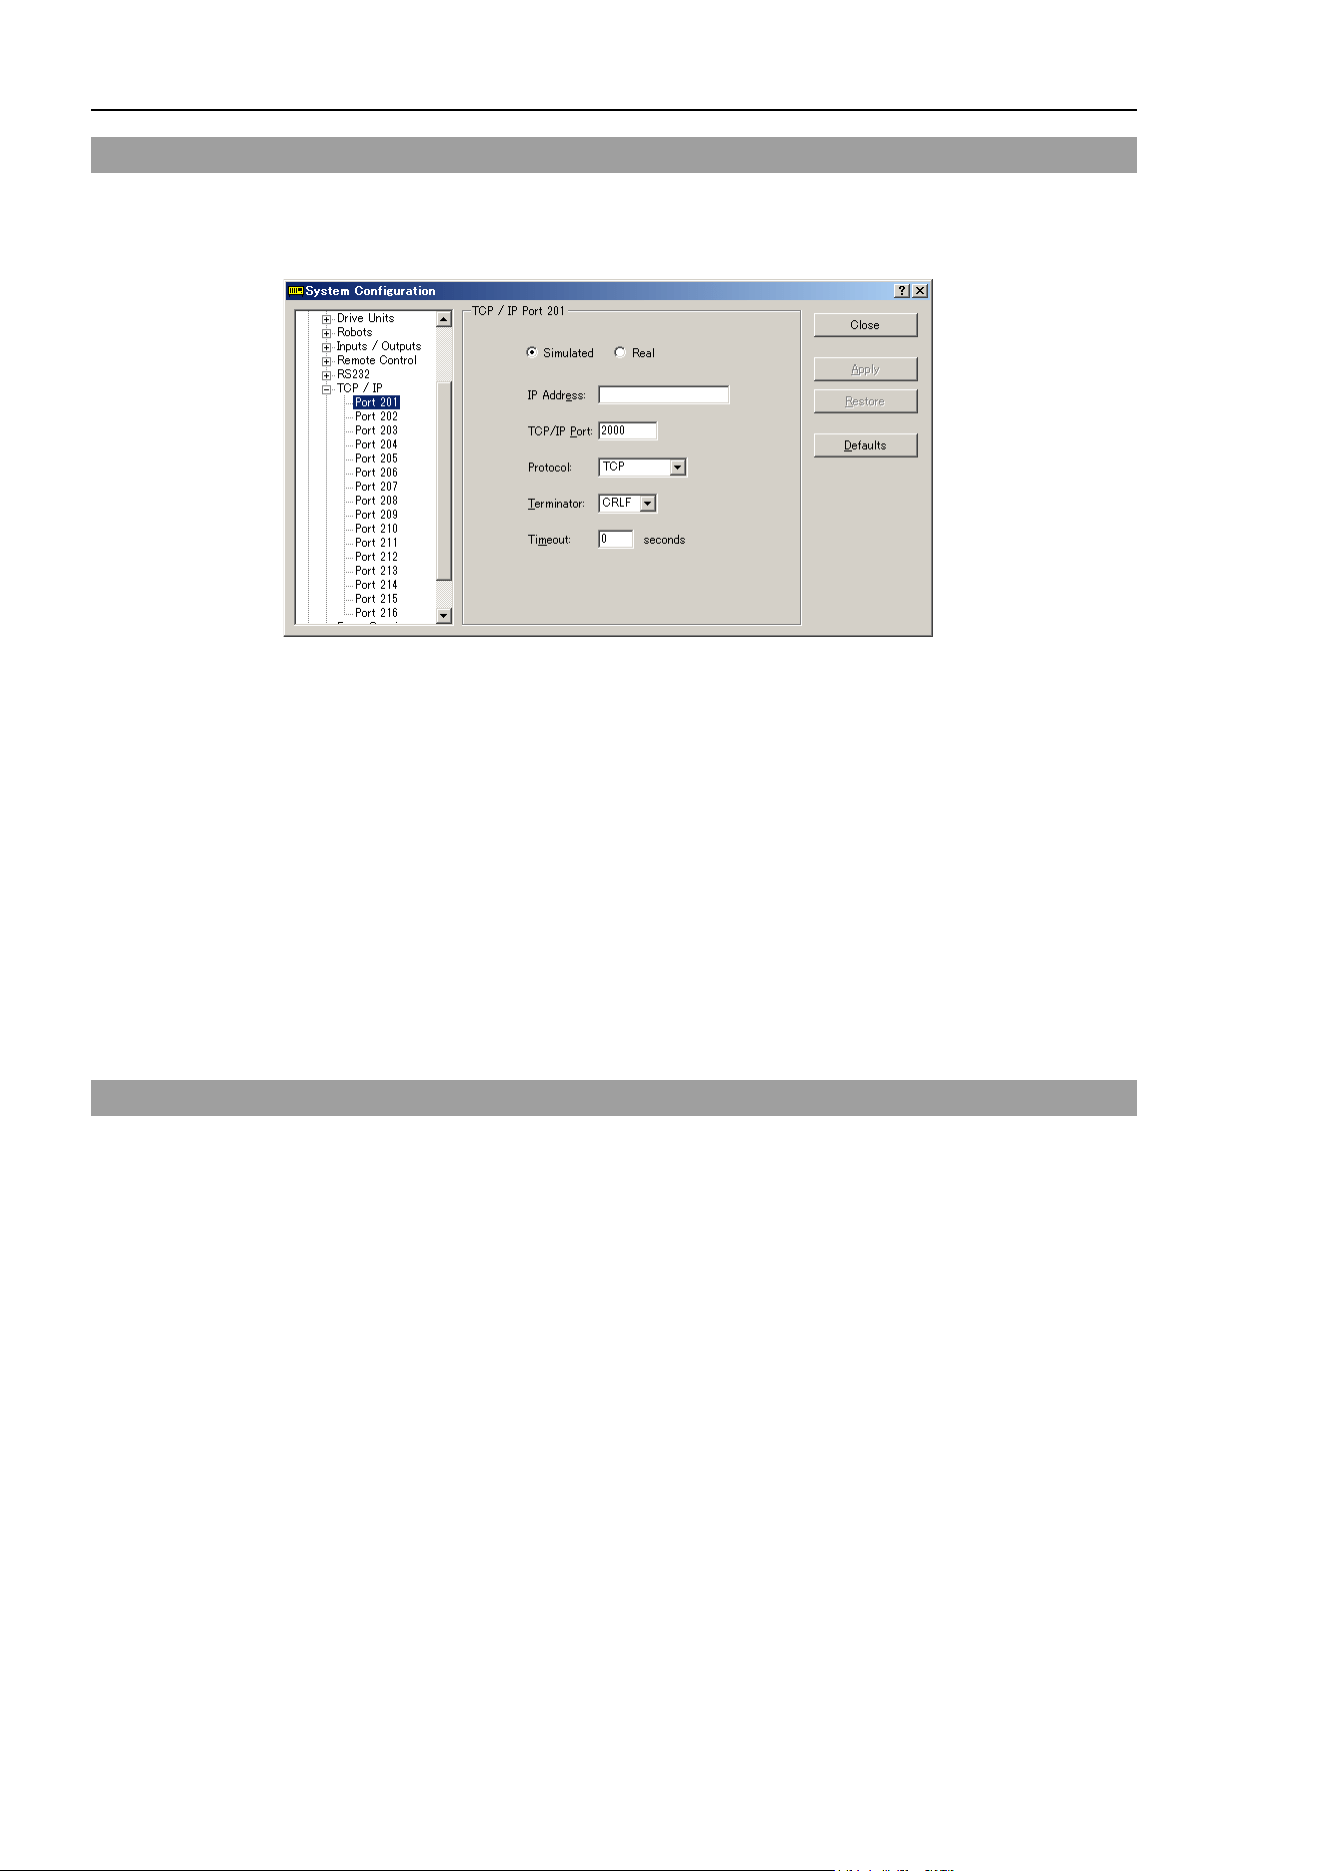
14. TCP/IP Communications
408 EPSON RC+ 7.0 (Ver.7.4) User's Guide Rev.6
14.2 TCP/IP Software Configuration
You can configure TCP/IP settings for the controller in a SPEL
+
program using the SetNet
command. You can also configure settings from the [TCP/IP] tab on the [Setup]-[System
Configuration] dialog.
To configure a TCP/IP port
1. Select the TCP/IP port you want to configure from [Setup]-[System Configuration]-
[Controller]-[TCP/IP].
2. Enter the IP address for the controller or PC that you want this controller to
communicate with.
The controller does not support DNS, so you must specify an IP address for the host
you are communicating with. You cannot specify a name for the host.
3. Enter the TCP/IP port number. This must be the same port number that is used on the
host device. It must be different from any of the other TCP/IP port numbers used for
the other TCP/IP ports.
4. Change the other settings as desired.
5. Click <Apply> to save the new settings and click <Close>.
14.3 TCP/IP Commands
Here is a list of all of the commands associated with TCP/IP communications. For details,
please see the online help or SPEL
+
Language Reference Manual.
OpenNet Opens a TCP/IP port.
ChkNet Returns port status: the number of bytes waiting to be read or error
condition.
CloseNet Closes a TCP/IP port.
SetNet Sets communications port parameters at runtime or from the
Command window.
Print # Sends characters out of the port.
Input # Receives characters from the port into one or more variables.
Line Input # Receives one line characters from the port into one string variable.
Read # Receives one or more characters from the port into one string variable.
ReadBin # Receives one or more bytes from the port.
Write # Sends characters out of the port.
WriteBin # Sends one or more bytes out of the port.

15. Security
EPSON RC+ 7.0 (Ver.7.4) User's Guide Rev.6
409
15. Security
15.1 Overview
The Security function allows you to manage EPSON RC+ 7.0 users and also monitor
usage.
When the Security function is activated, administrators can add groups and users. Each
group can have one or more rights associated with it. For example, you can create a group
called Maintenance that has rights to edit robot points, use Jog & Teach, and enable you to
use the Command Window. When a user attempts to do something that he/she does not
have a right for, a message “Permission denied” will be displayed.
Each login session is recorded in a Microsoft Access compatible data base. Security Log
Viewer is included that allows you to view each session’s activity.
User can login to EPSON RC+ with a name and password. Optionally, EPSON RC+ can
use the Windows user name to log in automatically.
15.2 Security Configuration
EPSON RC+ 7.0 requires a path for security files. If you have more than one system on a
network, it is recommended that you setup the security files path for all systems to store
the security logs in a server on the network.
To administer EPSON RC+ 7.0 security:
1. Start EPSON RC+ 7.0.
2. Select [Setup]-[System Configuration].
3. Click on the [Security] tree.
4. On the [General] tree, type in the path for your security files or click the <Browse>
button.
5. Click on the [Users] tree.
6. For each user on your system, click <New> button.
Each new user belongs to the Guest group by default. Click in the group field, then
click the dropdown button to select the desired group.
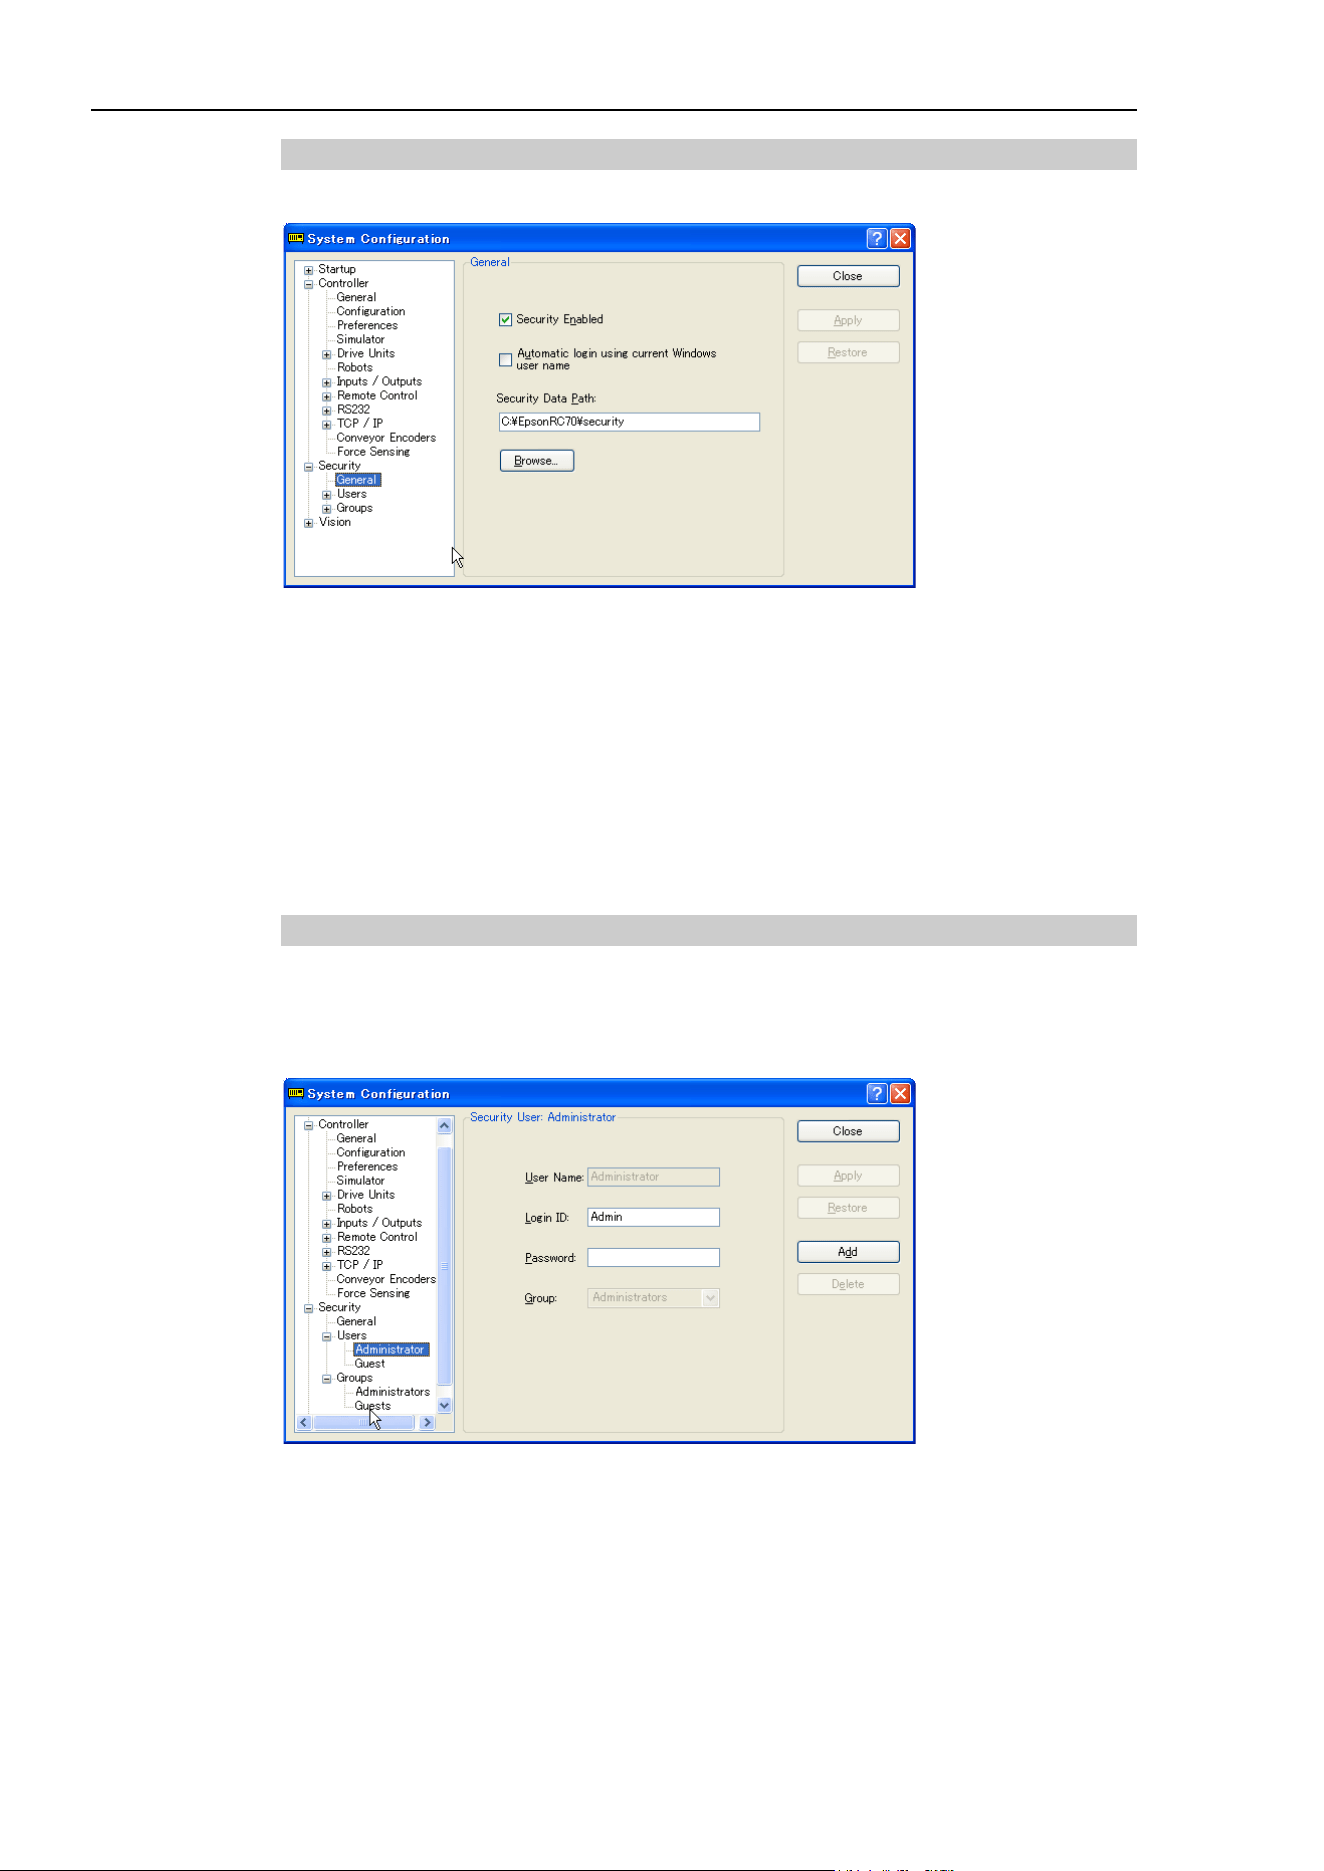
15. Security
410 EPSON RC+ 7.0 (Ver.7.4) User's Guide Rev.6
[General] Tab
This tab allows you to configure the general security settings.
Automatic log in using current Windows user name
Check this box if you want EPSON RC+ 7.0 to use the current Windows login ID. When
the Security function is active, you will not see a login dialog when EPSON RC+ starts,
unless EPSON RC+ cannot find the user in the Security system.
Security data path
This is the path where security files will be stored.
This path should be protected with Windows security rights so that only Administrators
can delete the files in this path. All other EPSON RC+ users should have only read rights
to the files in this path.
User Page
This page allows you to add and remove EPSON RC+ 7.0 users.
Two users are permanent: Administrator and Guest. Only the passwords can be changed
for these users. You should always use a password for the Administrator, though no
password is set at shipment time.
To add a user
1. Click the <Add> button.
2. A new user will be added to the tree.
3. Click the [Group] tree for the new user.
4. Click the dropdown button and select the group for the user.
To delete a user
1. Click the [User] you want to delete in the tree.
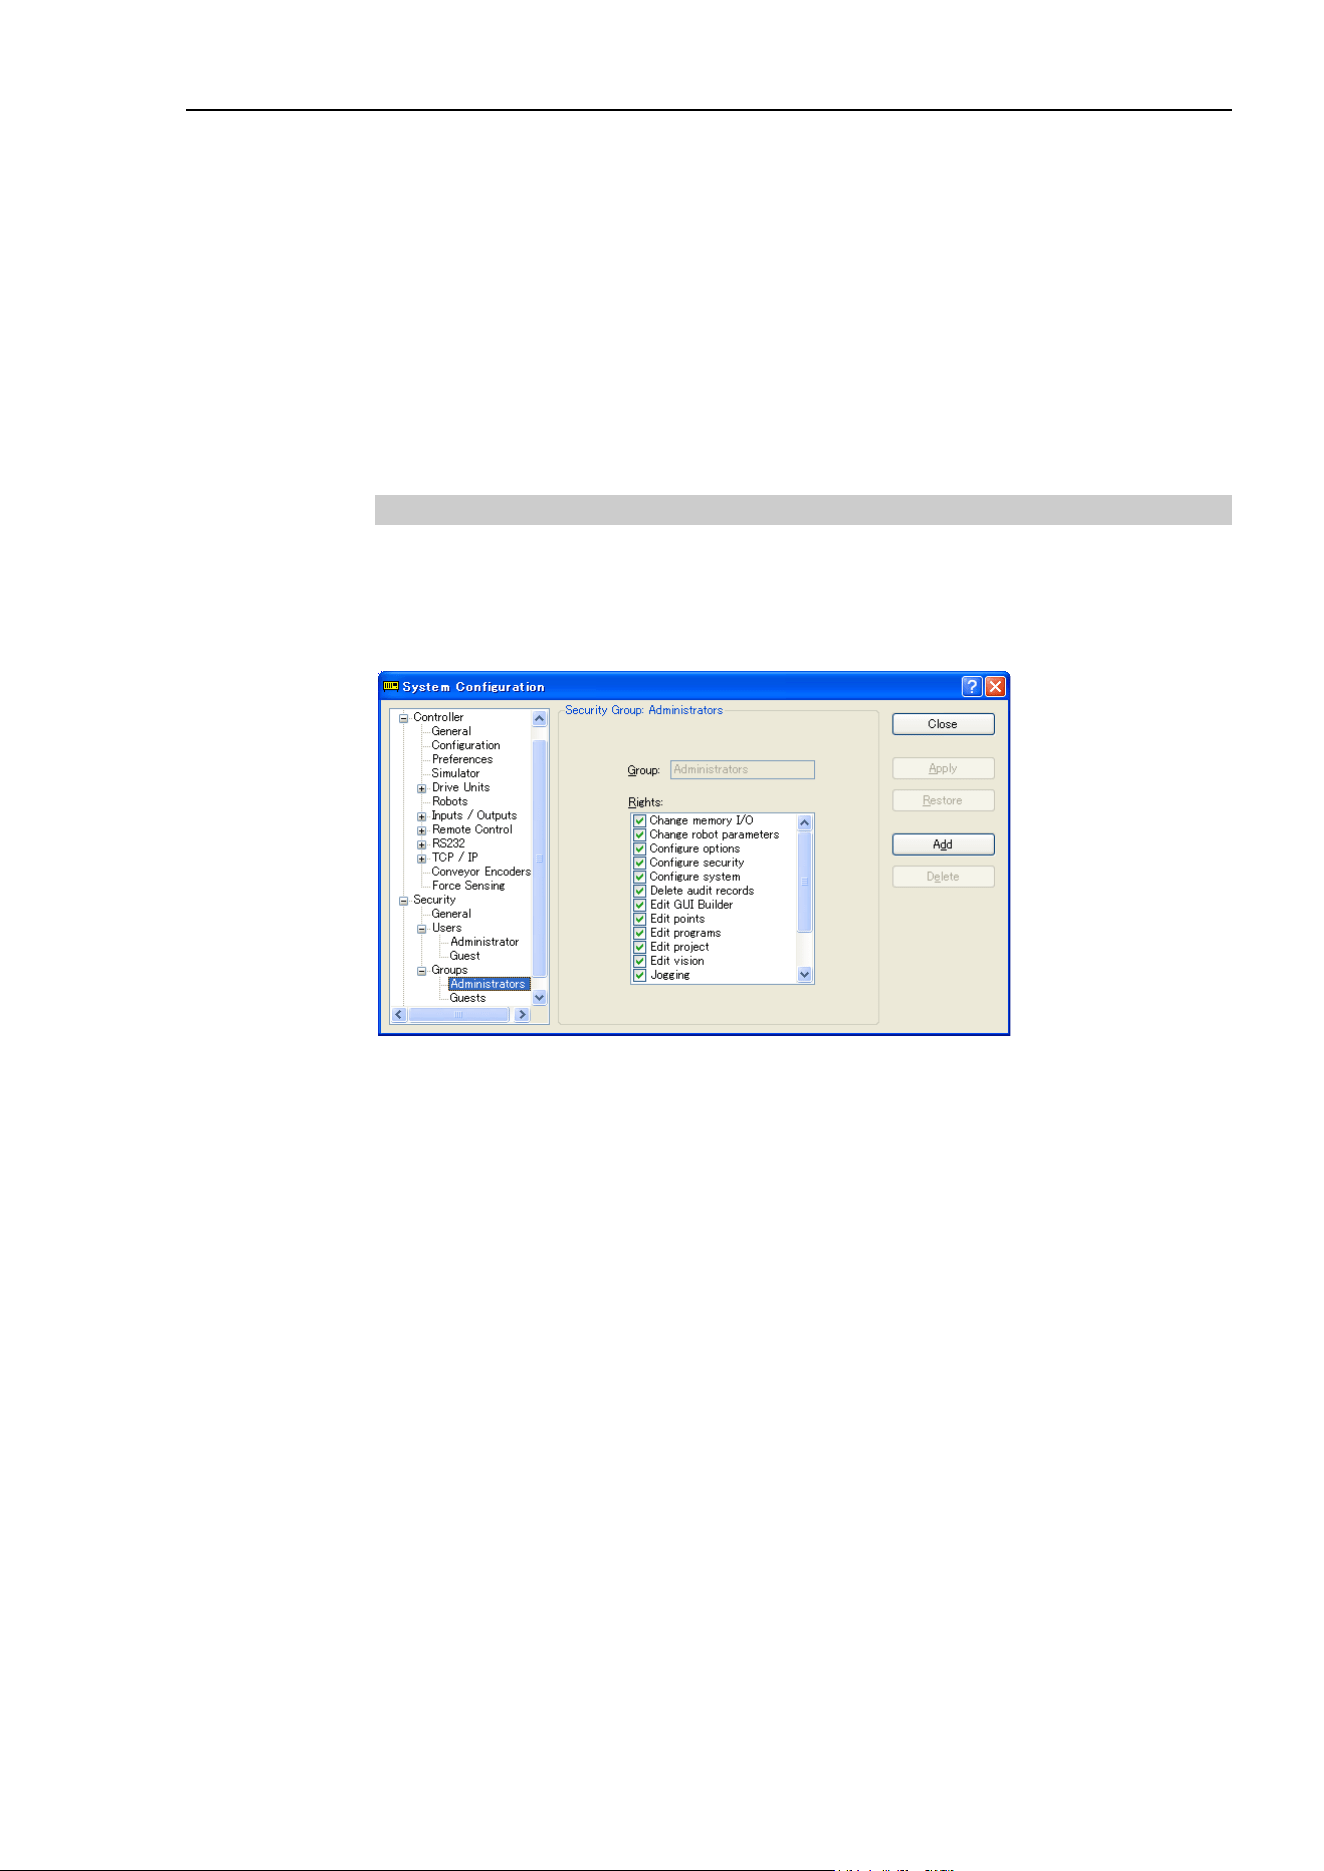
15. Security
EPSON RC+ 7.0 (Ver.7.4) User's Guide Rev.6
411
2. Click the <Delete> button.
3. A confirmation message to delete the user will appear.
To change a user’s group
1. Click the [Group] dropdown for the user you want to change.
2. Click a dropdown button in the field and select a new group.
Editing Name, Login ID, and Password
1. Click a [User] you want to change.
2. Edit the field. All fields are not case sensitive.
Group Page
This page allows you to configure user groups. Every EPSON RC+ 7.0 user must belong
to a group.
Two groups cannot be deleted or modified: Administrators and Guests. Administrators
have full rights, and Guests have no rights.
To add a group
1. Click the <Add> button.
2. Type in a name for the group.
3. Click the <Apply> button.
To delete a group
1. Select the group you want to delete.
2. Click the <Delete> button.
3. A confirmation message to delete the group will appear.
To change rights for groups
1. Select the group you want to change rights for.
Note that you cannot change rights for Administrators and Guests.
2. To add a right, set the checkbox(es) for the desired rights in the [Rights] checkbox
list.
3. To remove rights, clear the checkbox(es) for the rights you want to remove in the
[Right] checkbox list.

15. Security
412 EPSON RC+ 7.0 (Ver.7.4) User's Guide Rev.6
Group Rights
The list below shows the rights that are available for user groups. Administrators have full
rights, and Guests have no rights.
Right Description
Configure options Users can change option settings in [Setup]-[Options].
Use Command Window Users can open the command window and execute
commands.
Configure system Users can configure the entire EPSON RC+ system.
Jog Users can open the [Jog & Teach] dialog and jog a robot.
Check security log Users can see security logs.
Delete security log Users can delete security logs in [Tools]-[Audit Viewer].
Teach points Users can teach points and delete points from the Jog &
Teach dialog.
Edit vision Users can edit vision parameters.
Edit programs Users can edit program.
Edit projects Users can edit projects.
Edit points Users can change points.
Change memory I/O Users can turn ON/OFF memory I/O bits.
Change robot parameter Users can open the [Robot Manager] dialog and change the
settings.
Output port ON Users can turn ON/OFF outputs.
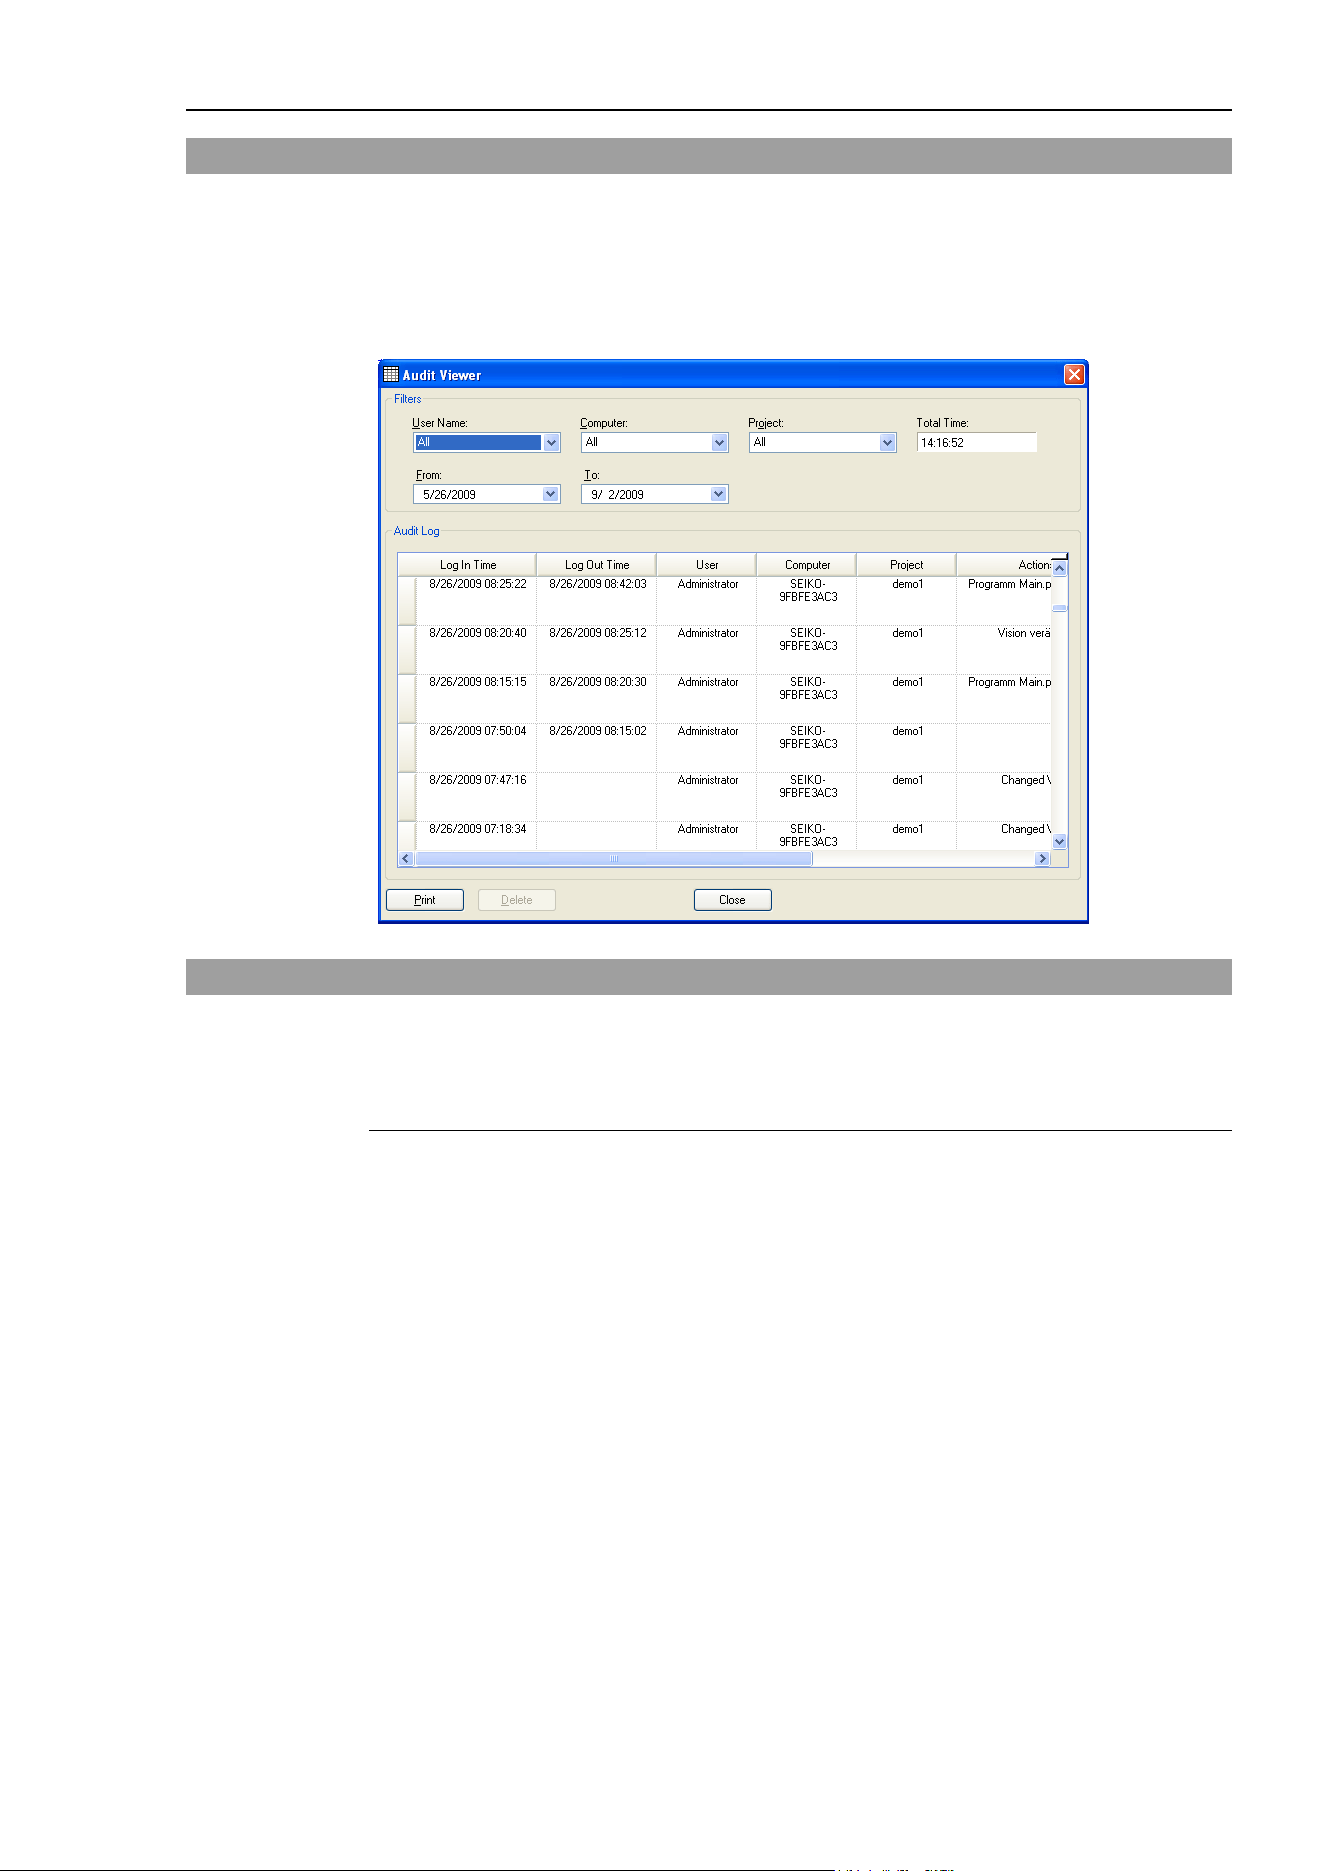
15. Security
EPSON RC+ 7.0 (Ver.7.4) User's Guide Rev.6
413
15.3 Security Audit Viewer
When the Security function is enabled, EPSON RC+ 7.0 will keep track of who logs into
the system and actions performed.
Activity is stored to the security data path in the Microsoft Access compatible data base
format.
To view the security logs, select [Audit Viewer] from the [Tools] menu.
15.4 SPEL
+
Security Command
Here are the SPEL
+
commands that are enabled with the Security function. For details,
please see the EPSON RC+ 7.0 Online Help or SPEL+ Language Reference manual.
Command Description
LogIn Function Logs in the application as another user at runtime.
GetCurrentUser$ Function Returns the login ID of the current user.

16. Conveyor Tracking
414 EPSON RC+ 7.0 (Ver.7.4) User's Guide Rev.6
16. Conveyor Tracking
16.1 Overview
Conveyor Tracking is a process in which a robot picks up parts from a stationary or
moving conveyor that are found by a vision system or sensor.
The EPSON RC+ 7.0 Conveyor Tracking option supports both tracking and indexed
conveyor systems.
• Tracking conveyor system
Conveyor moves constantly. Vision system or sensor system finds the parts on it and
robot picks them up as they move. During tracking, the robot can move along with
the part as it picks up parts.
• Indexed conveyor system
Conveyor moves a specified distance and then stops. The vision system finds the
parts and robot picks up each part. After finding and picking up all parts, the
conveyor moves again.
A total of 16 physical conveyors can be defined on each system. A physical conveyor has
one encoder whose signals are received by an encoder board.
Up to 16 logical conveyors can be defined in each project. To define a logical conveyor,
set a conveyor number, a robot number, encoder number and select vision or sensor.
Multiple conveyors and multiple-robot conveyors are supported.
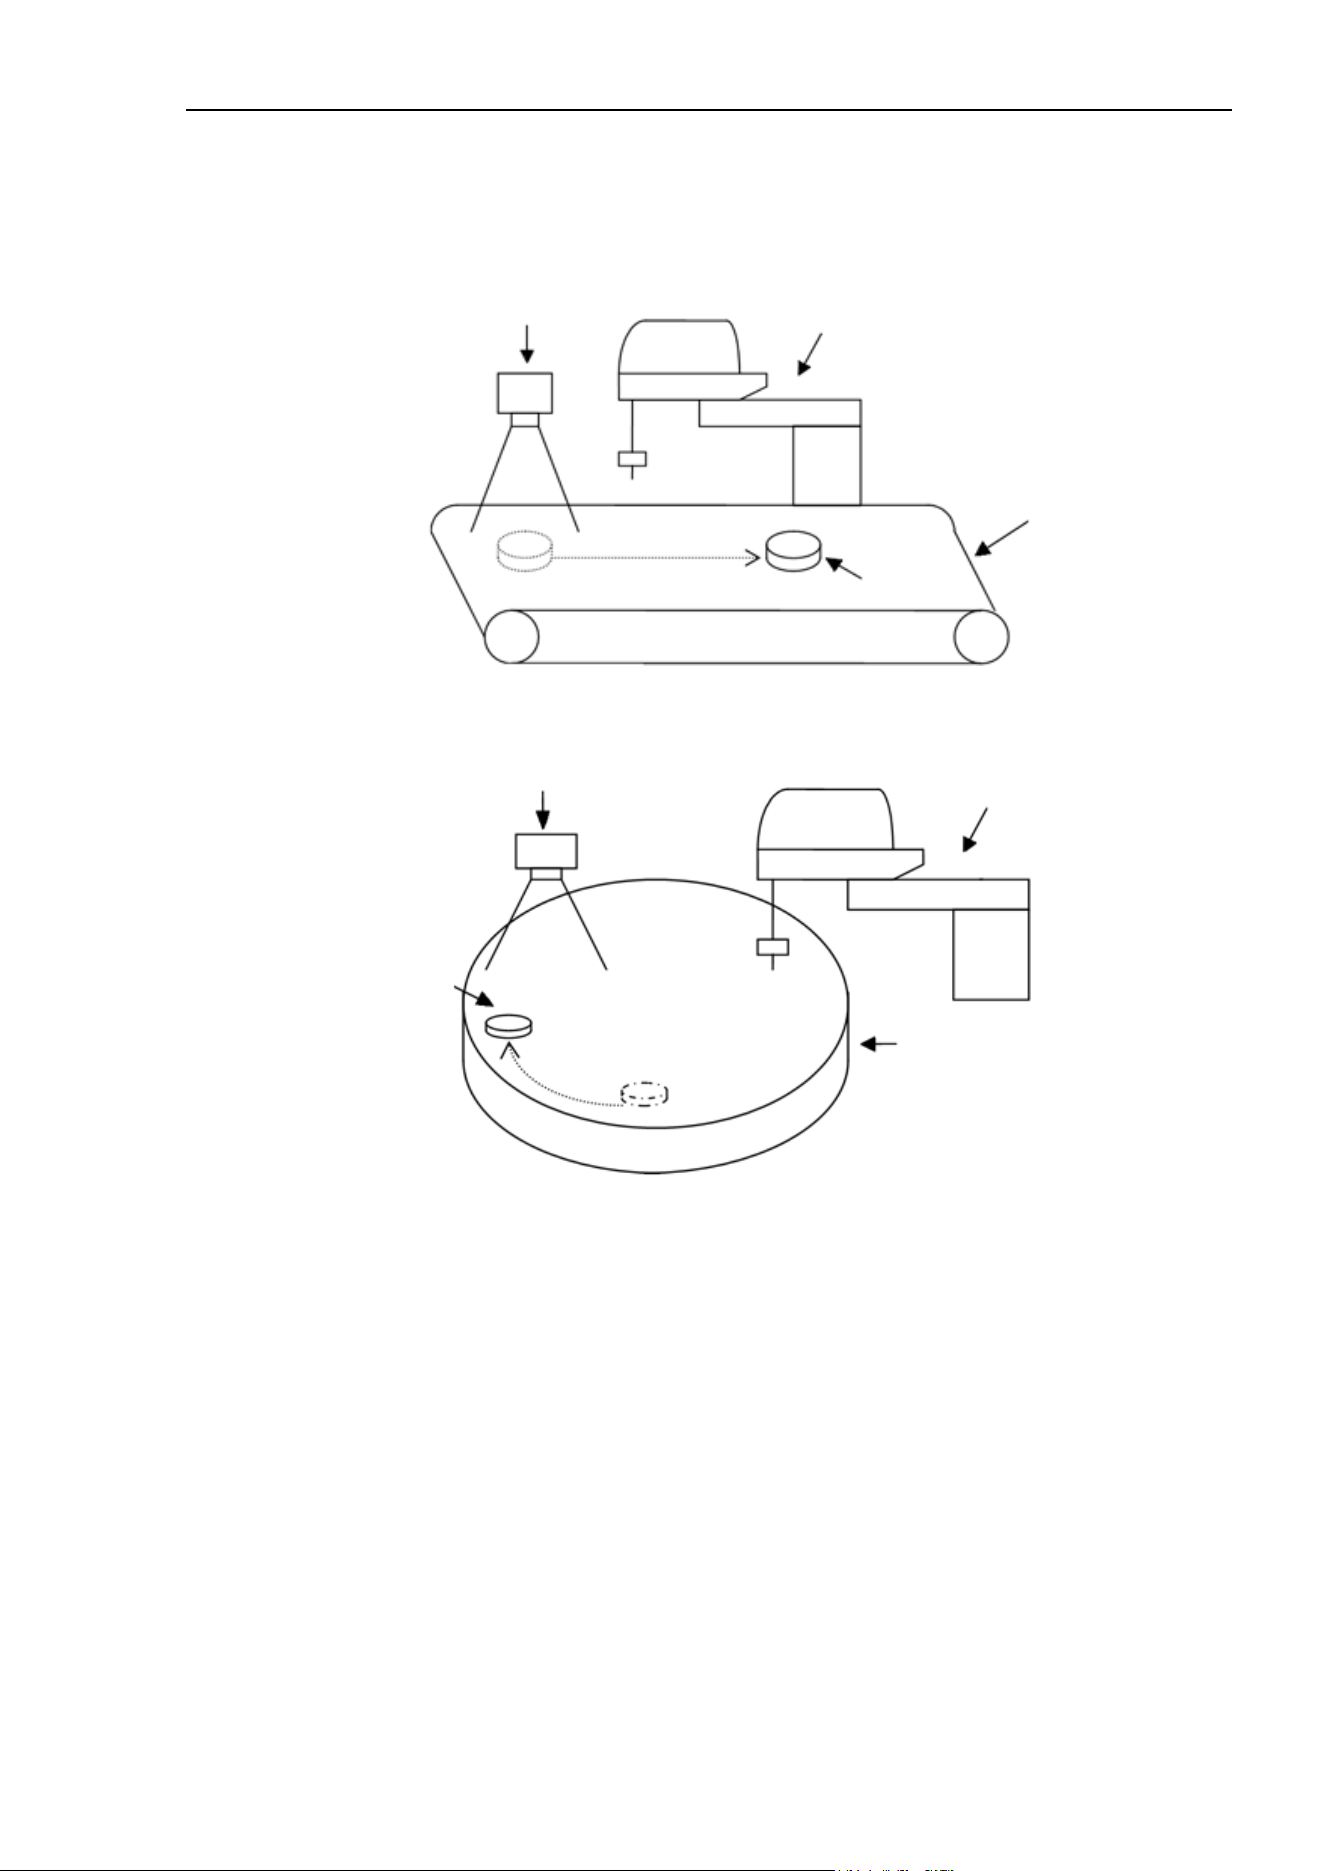
16. Conveyor Tracking
EPSON RC+ 7.0 (Ver.7.4) User's Guide Rev.6
415
The Conveyor Tracking option is available for straight conveyors and circular conveyors,
as shown in the figures below. These conveyors have different calibration and
programming methods.
Robot
Camera
Straight conveyor
Part
Straight conveyor tracking system
Robot
Camera
Circular conveyor
Part
Circular conveyor tracking system
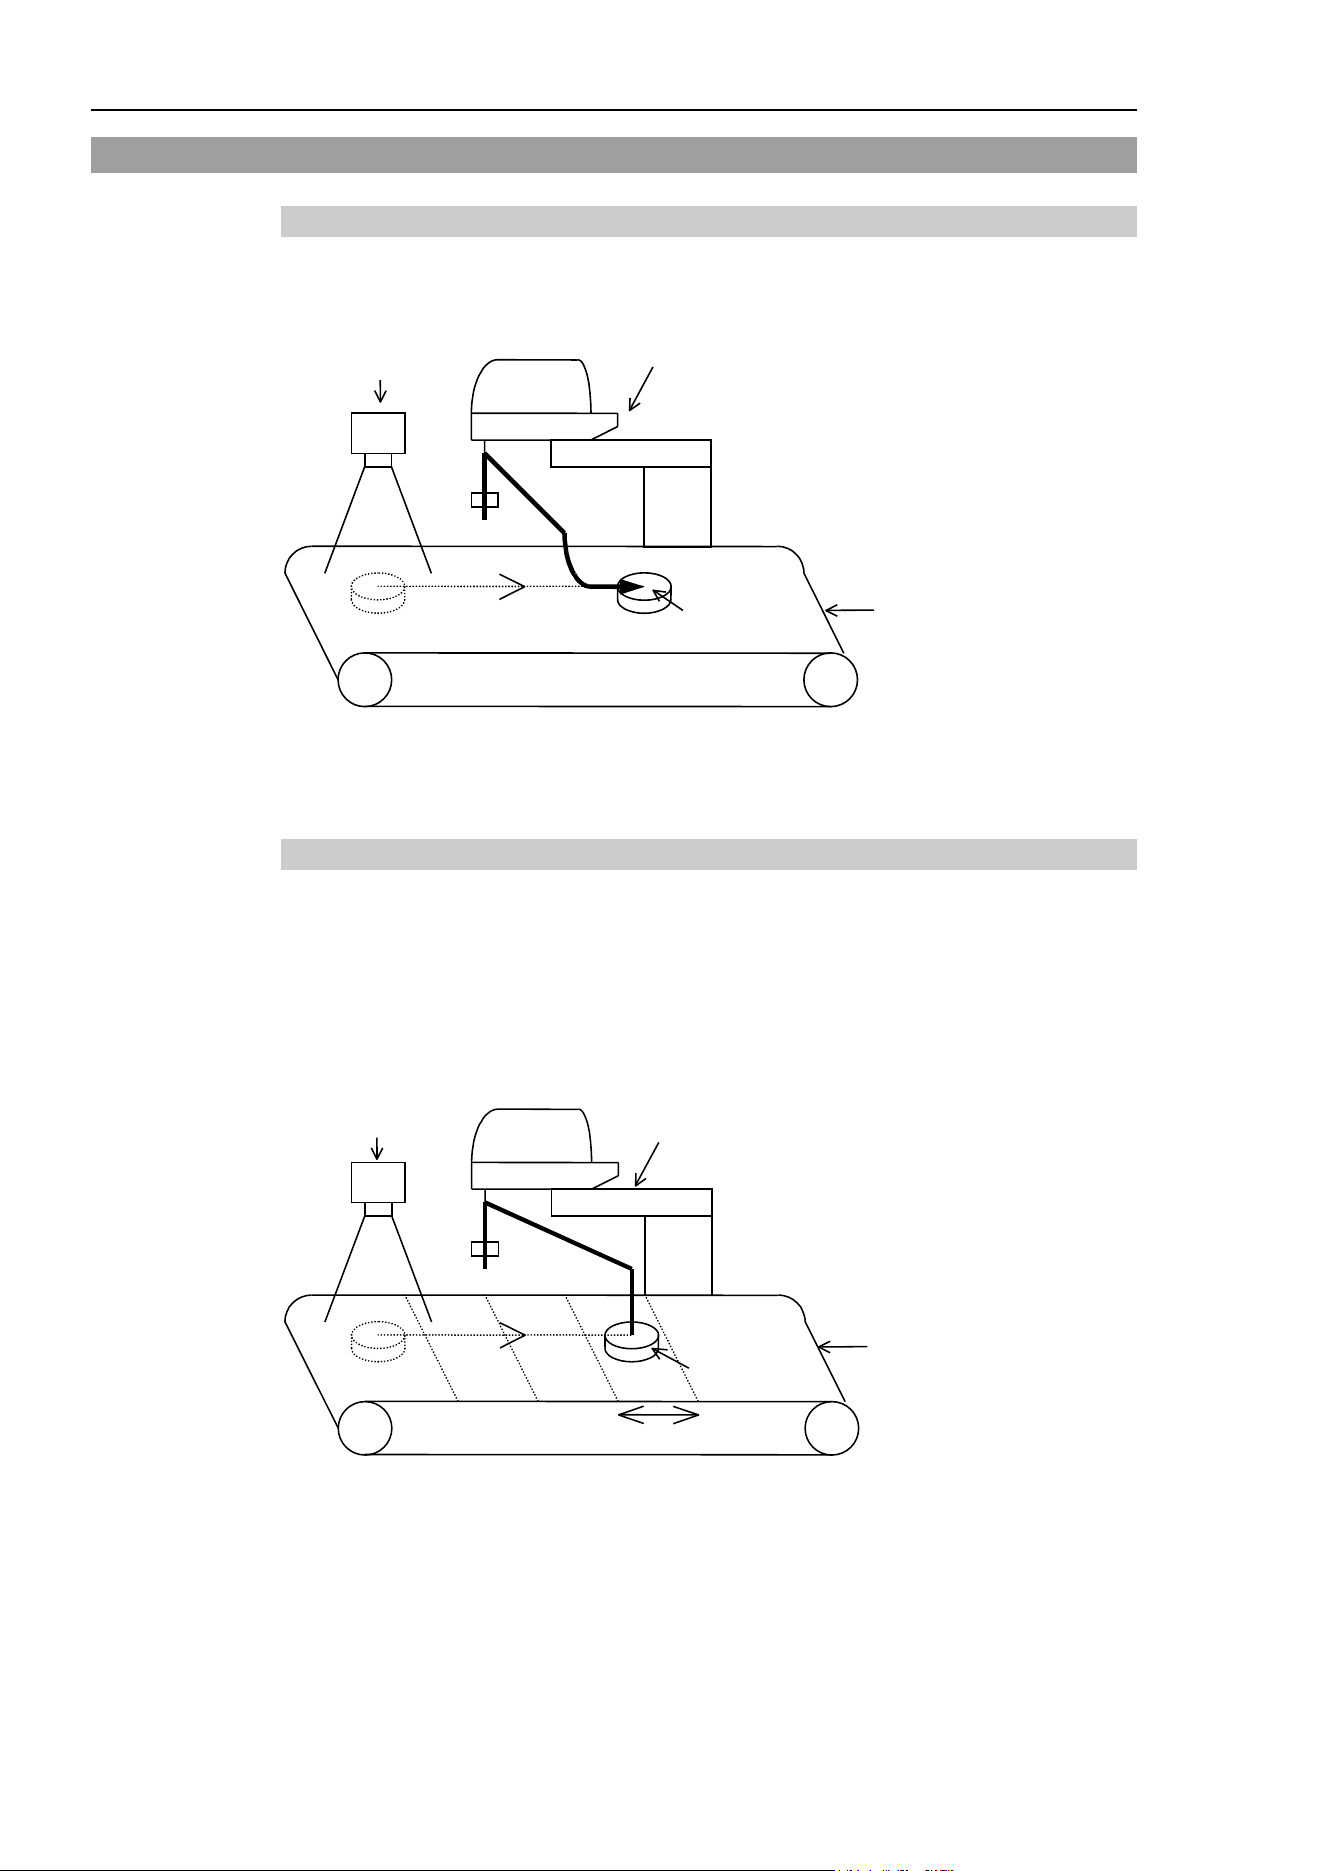
16. Conveyor Tracking
416 EPSON RC+ 7.0 (Ver.7.4) User's Guide Rev.6
16.2 Conveyor Tracking Processes
Tracking conveyor system
1. Vision system or sensor system finds the parts on a continuously moving conveyor.
2. Robot picks up the parts on the conveyor as they move.
Robot
Camera
Conveyor
Part
Configuration example of
Tracking Conveyor System (Vision System)
Indexed conveyor system
1. Conveyor moves a specified distance.
2. Vision system or sensor system finds the parts on the conveyor when it stops.
3. Robot picks up the parts found by vision system.
4. After finding and picking up all parts, conveyor moves by the specified distance
again.
Index distance
Robot
Camera
Conveyor
Part
Configuration example of
Indexed Conveyor System (Vision System)
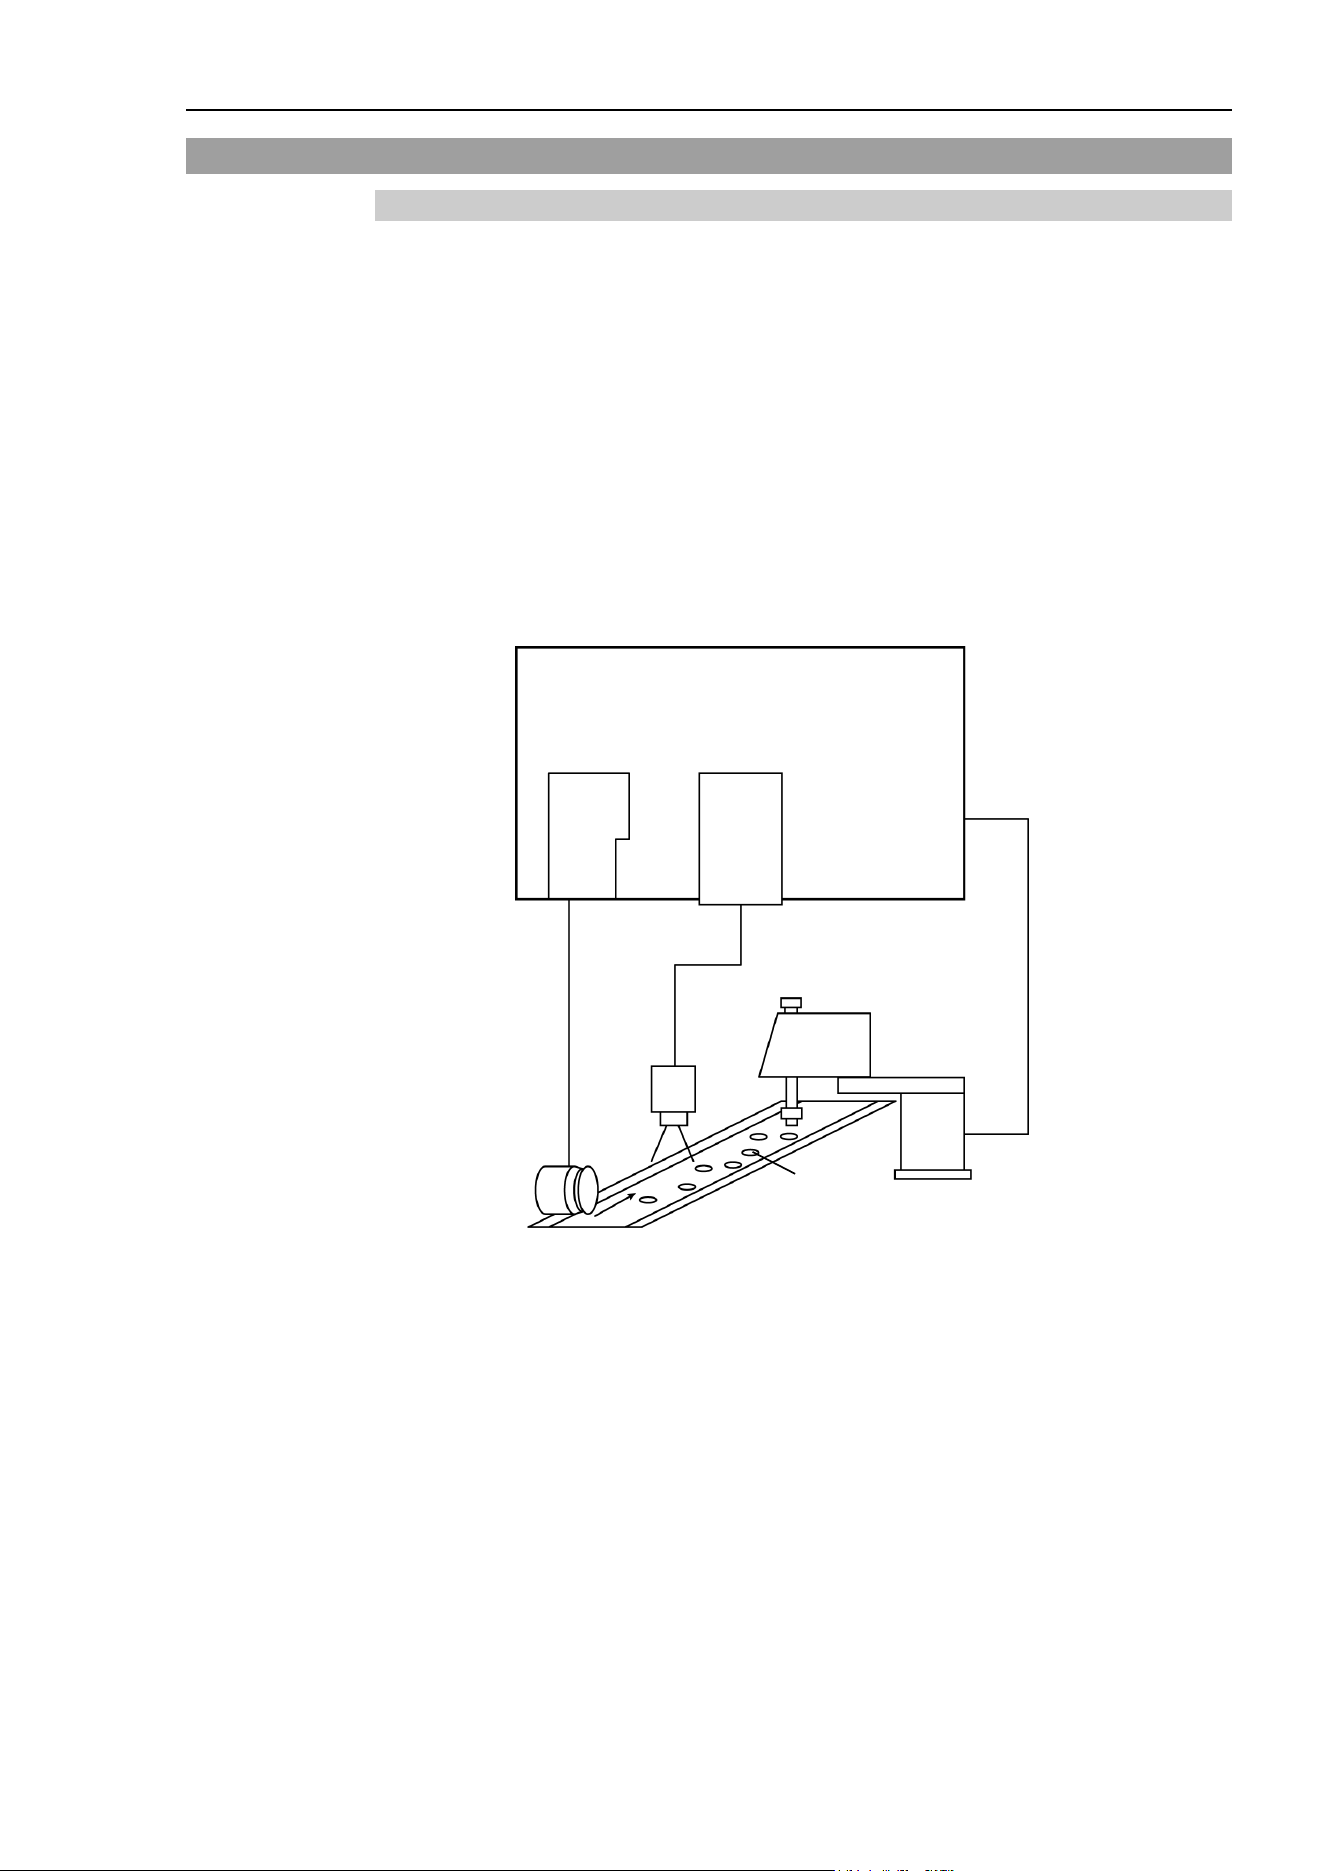
16. Conveyor Tracking
EPSON RC+ 7.0 (Ver.7.4) User's Guide Rev.6
417
16.3 System Structure
Structure of Vision Conveyor Tracking System
The structure of the vision conveyor tracking system is shown in the figures below.
For this system, you need to set the same timing for the vision system to search for parts
on the conveyor and for the encoder on the conveyor to latch position. To set the same
timing, use the asynchronous reset mode in the vision system (if you don’t use
asynchronous reset mode, the timing of image acquisition is different from the encoder
latch timing and the pickup precision will decrease).
Asynchronous reset mode allows the camera to acquire an image at the moment of trigger
input and transfers the image to the vision sequence.
The hardware trigger or the software trigger can be selected for this system. The hardware
trigger is wired to the counter trigger input of the PG board and latches the encoder on the
conveyor by using the signals from the sensor and I/O. Software trigger latches the
encoder on the conveyor by using a Spel program.
Robot Controller
PG I/O
Robot
Camera
Conveyer
Encoder
Parts
Vision Conveyor Tracking Overview (using a software trigger)
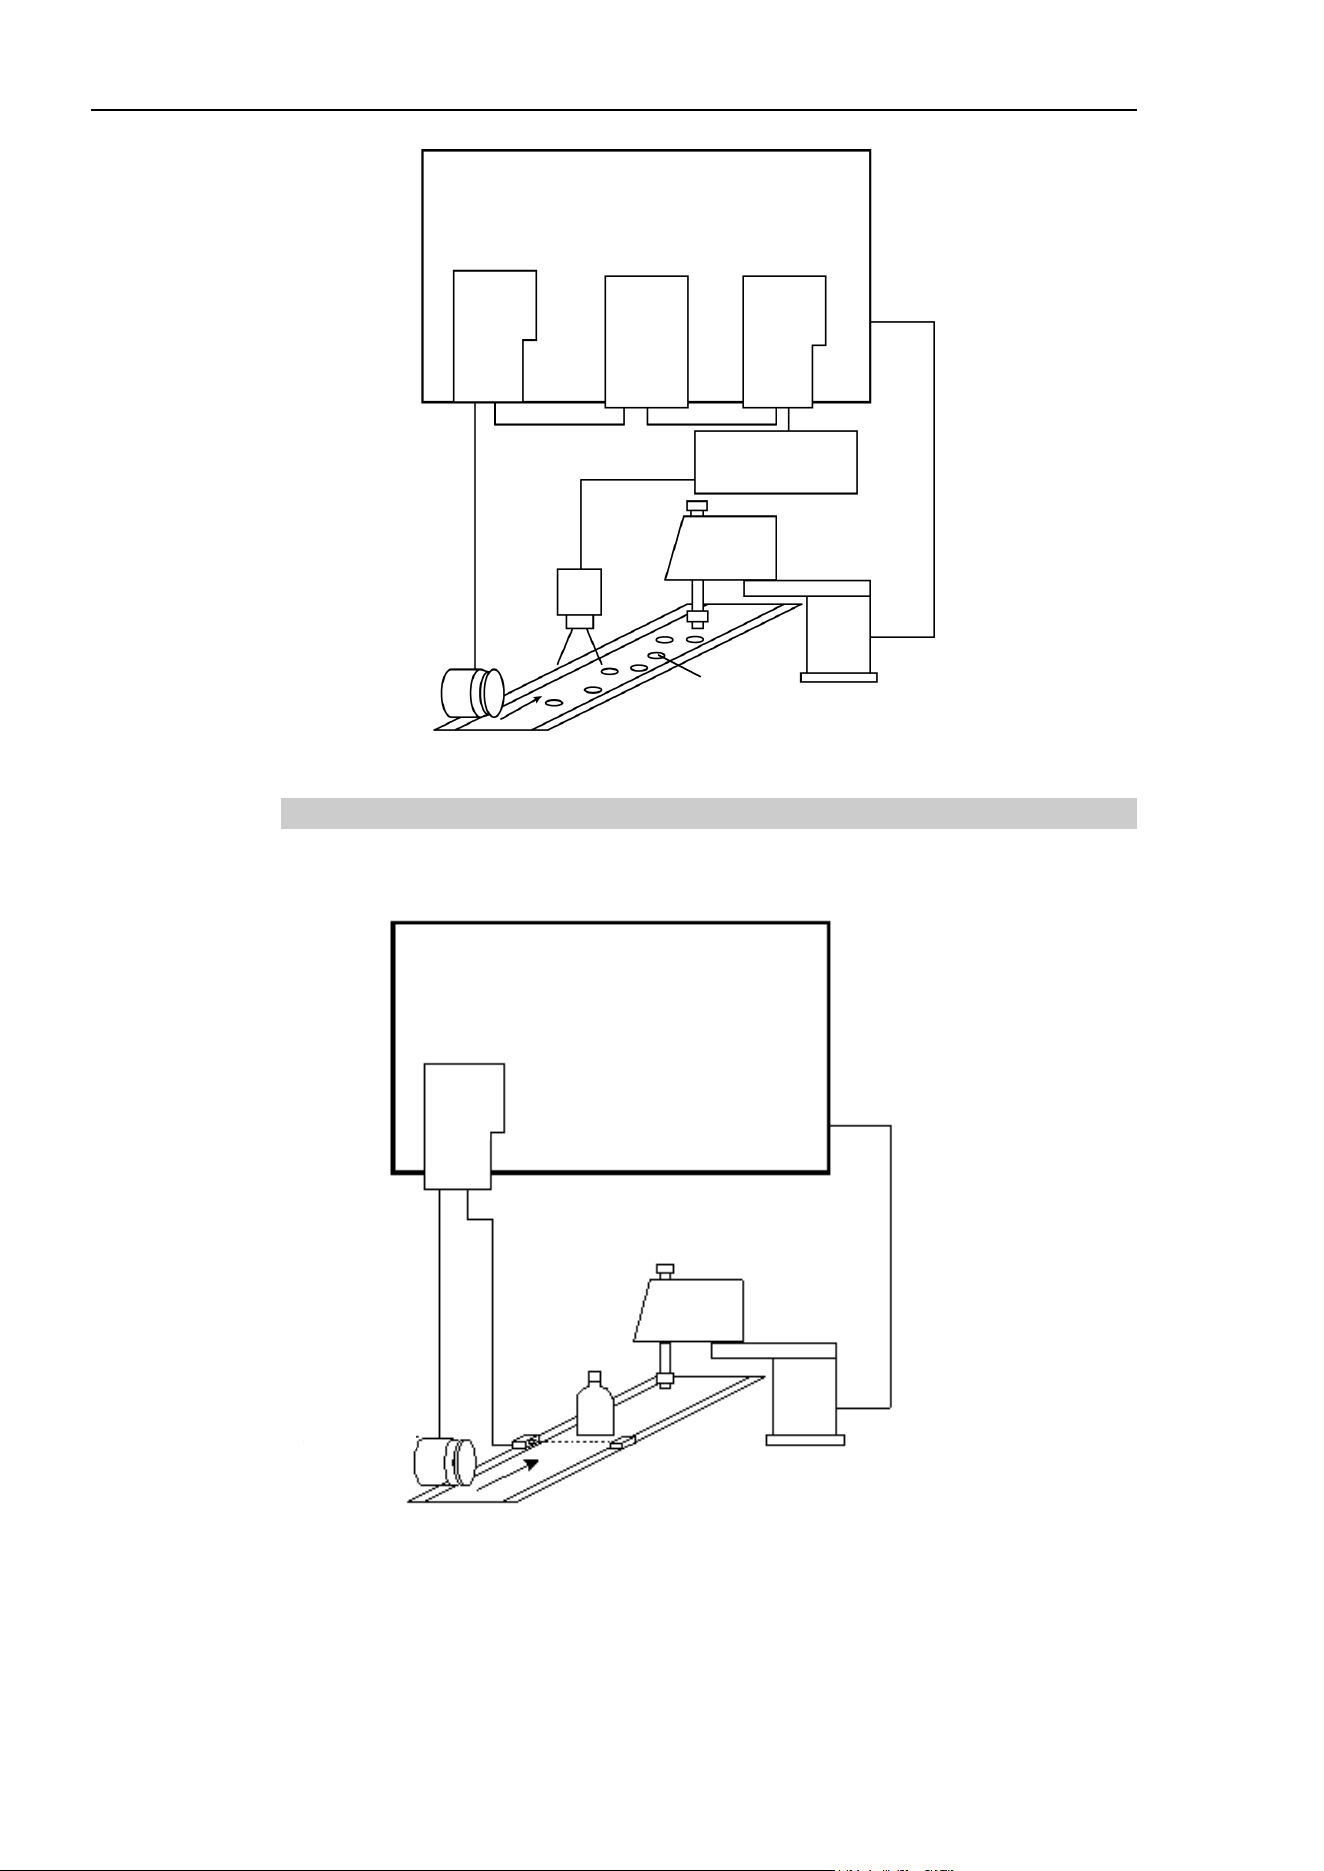
16. Conveyor Tracking
418 EPSON RC+ 7.0 (Ver.7.4) User's Guide Rev.6
Robot Controller
PG I/O
Robot
Camera
Conveyer
Encoder
Parts
Vision
Camera
power
Vision Conveyor Tracking Overview (using a hardware trigger)
Structure of Sensor Conveyor Tracking System
The structure of the Sensor Conveyor Tracking System is shown in the figure below. This
system uses a hardware trigger.
PG
Board
Robot
Sensor
Conveyor
Encoder
RC700
Sensor Conveyor Tracking Overview

16. Conveyor Tracking
EPSON RC+ 7.0 (Ver.7.4) User's Guide Rev.6
419
16.4 Hardware Installation
To use conveyor tracking, you must install encoders for each physical conveyor on the
system. Each encoder is wired to a single channel on a PG (Pulse Generator) board. Each
board can accommodate up to 4 encoders. A trigger input is also provided for each
encoder to latch position, such as when used with a vision camera with a strobe.
PG board specifications
The table below shows the specification for the PG board.
Board Name H756
Compatible Controller
RC700/ RC90 (EPSON RC+ 7.0)
Board Extension Capability 4 boards maximum
Encoder channels 4 channels / board
Encoder Type ABZ phase differential input (RS-422 line receiver)
Input Pulse Rate Max. 5 MPPS
Input Signal Conveyor pulse latch input
Board Address
Set the DIP switch according the board number.
(See DIP Switch Settings later in this chapter).
connector DX10A - 100S (Hirose Electric Co.,Ltd.)
Power Supply
24V ±2V 200mA or under
The following encoder models have been tested:
OMRON E6B2-CWZ1X
TAMAGAWA TS5312N512-2000C/T
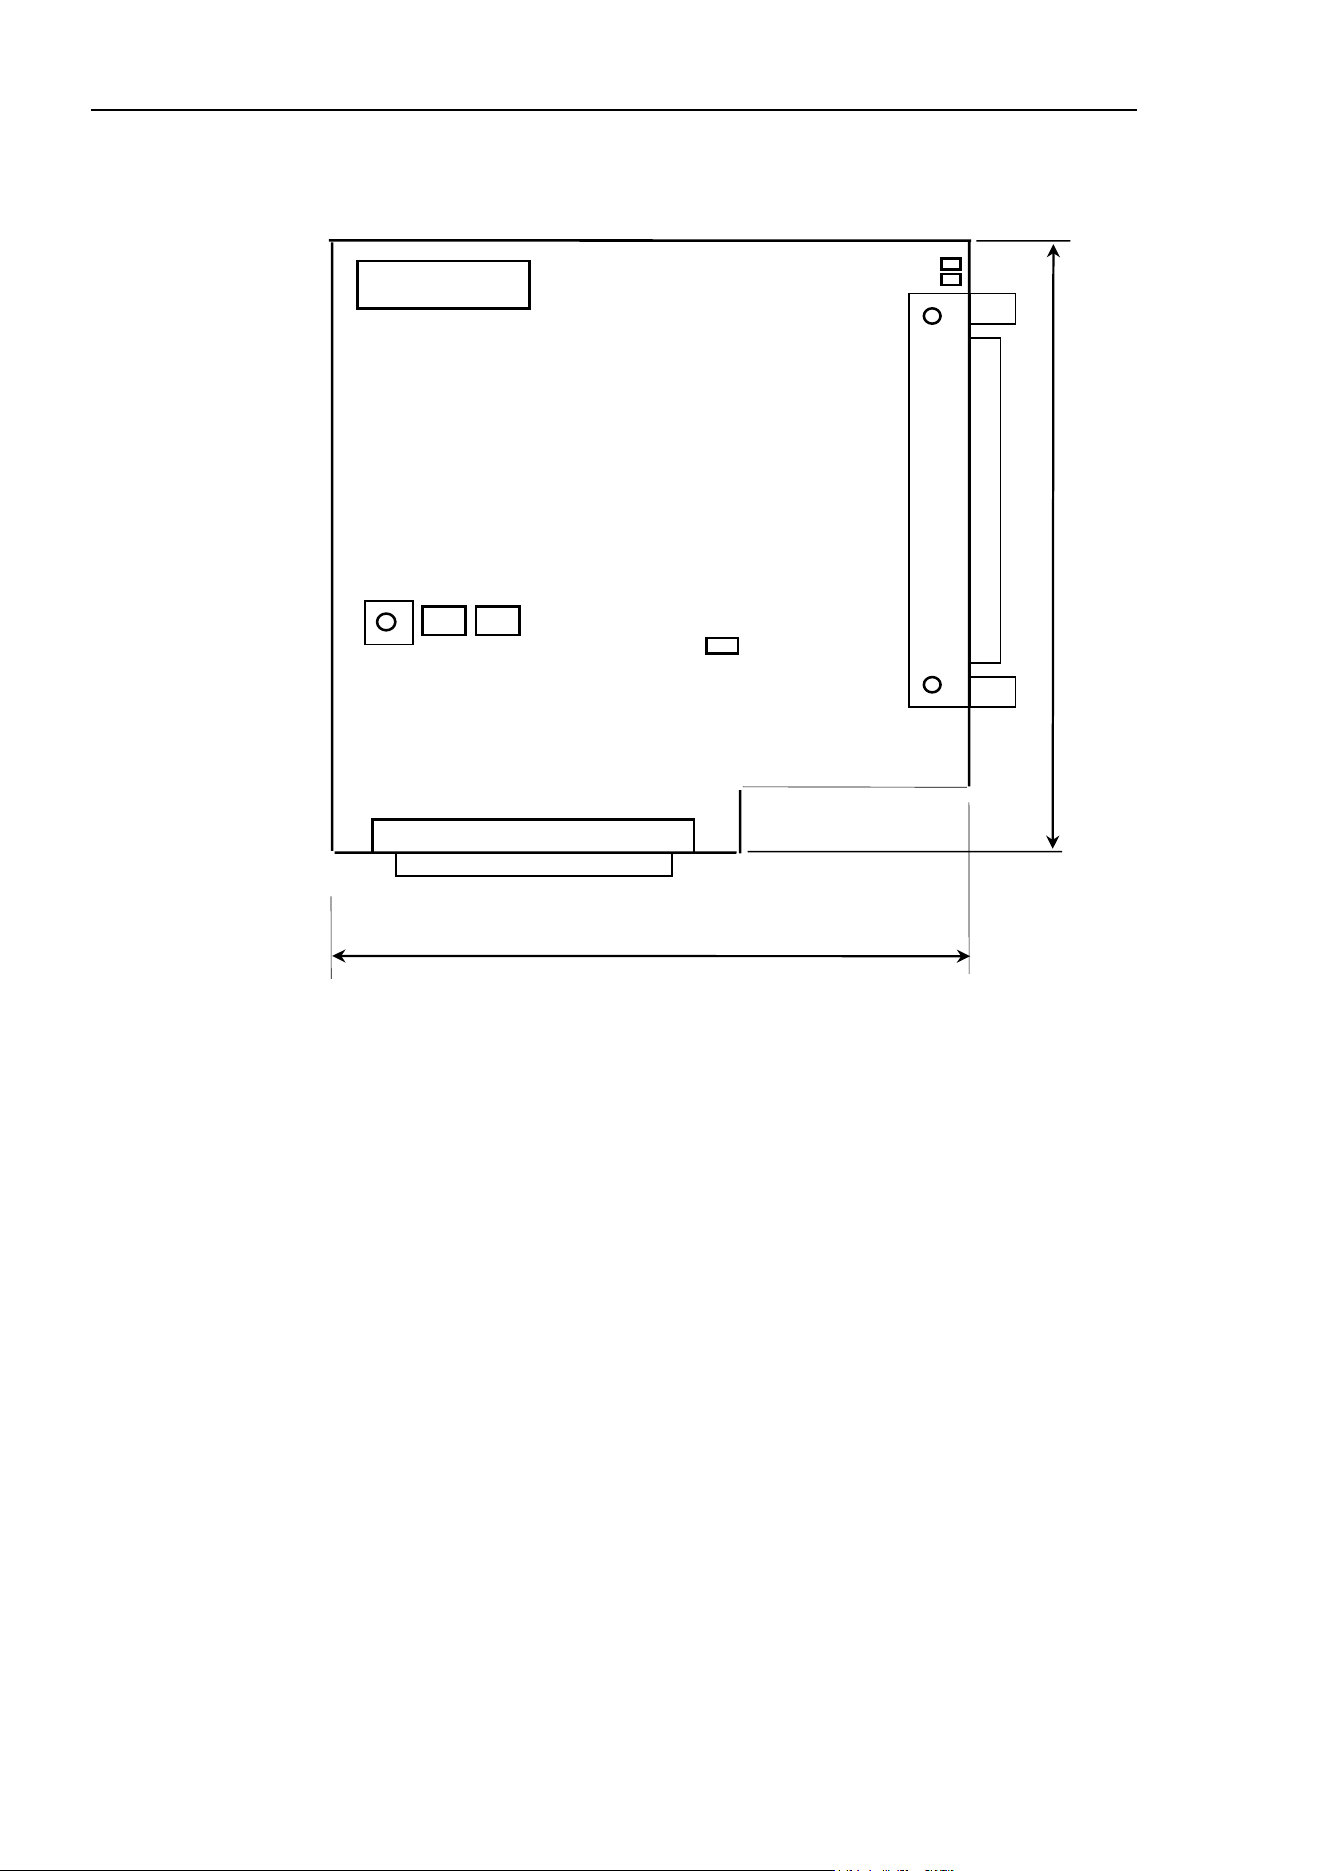
16. Conveyor Tracking
420 EPSON RC+ 7.0 (Ver.7.4) User's Guide Rev.6
The figure below shows the layout of the PG board.
JP1
CN2
134
130
CN1
CN3
X
Y
S3
S2
S1

16. Conveyor Tracking
EPSON RC+ 7.0 (Ver.7.4) User's Guide Rev.6
421
DIP switch settings
The board address is set by DIP switch (S2, S3) on the PG Board according to the board
number, as shown in the following table.
Board # Address
S2
S3
1
(A15)
2
(A14)
3
(A13)
4
(A12)
1
(A11)
2
(A10)
3
(A9)
4
(A8)
1 1100h OFF OFF OFF ON OFF OFF OFF ON
2 1200h OFF OFF OFF ON OFF OFF ON OFF
3 1300h OFF OFF OFF ON OFF OFF ON ON
4 1400h OFF OFF OFF ON OFF ON OFF OFF
If you purchased the PG board separately, place the attached Board No. Label sticker on
the board panel prior to installation of the board in the Control Unit and keep a written
record of the address setting and the board number.
If you have purchased the PG Board with the Control Unit, the board address has been set
properly before shipment and further settings should not be necessary.
Jumper settings
The jumpers are reserved and should not be changed.
Rotary switch settings
The rotary switch S1 is reserved and should not be changed.
S1 : Position of 1
Signal Connections
The table below lists the connectors on the PG board and the compatible connectors for
wiring:
Receptacle on the Board
DXA10A-100S
(manufacturer: Hirose Electric Co.,Ltd.)
Wiring Plug
Connectors
Individually pressed-in type
DX30-100P (for AWG#30)
DX30A-100P (for AWG#28)
Pressed-in-as-a-whole type
DX31-100P (for AWG#30)
DX31A-100P (for AWG#28)
Soldered type DX40-100P
Connector for Wiring to the Cover
DX-100-CV1

16. Conveyor Tracking
422 EPSON RC+ 7.0 (Ver.7.4) User's Guide Rev.6
Signal Assignments: PG board connector (DX10A-100S)
The signals on the PG board connector are assigned as shown in the table below.
Pin
Dir
Signal
Description
Pin
Dir
Signal
Description
1
-
-
Not used
51
-
-
Not used
2
-
-
Not used
52
-
-
Not used
3
-
-
Not used
53
-
-
Not used
4
-
-
Not used
54
-
-
Not used
5
-
-
Not used
55
-
-
Not used
6
-
-
Not used
56
-
-
Not used
7
-
-
Not used
57
-
-
Not used
8
-
-
Not used
58
-
-
Not used
9
-
-
Not used
59
-
-
Not used
10
In
TRG1
Trigger input for Counter1
60
-
-
Not used
11
In
TRG2
Trigger input for Counter2
61
-
-
Not used
12
In
TRG3
Trigger input for Counter3
62
-
-
Not used
13
In
TRG4
Trigger input for Counter4
63
-
-
Not used
14 In EXTV
External power supply for
Input circuit
64 In
EXTV
GND
External power supply
GND for Input circuit
15 In EXTV
External power supply for
Input circuit
65 In
EXTV
GND
External power supply
GND for Input circuit
16
-
-
Not used
66
-
-
Not used
17
-
-
Not used
67
-
-
Not used
18
-
-
Not used
68
-
-
Not used
19
-
-
Not used
69
-
-
Not used
20
-
-
Not used
70
-
-
Not used
21
-
-
Not used
71
-
-
Not used
22
-
-
Not used
72
-
-
Not used
23
-
-
Not used
73
-
-
Not used
24
-
-
Not used
74
-
-
Not used
25 In +A1
Phase +A signal for
Counter 1
75 In +A3
Phase +A signal for
Counter 3
26 In
−A1
Phase −A signal for
Counter 1
76 In
−A3
Phase −A signal for
Counter 3
27 In +B1
Phase +B signal for
Counter 1
77 In +B3
Phase +B signal for
Counter 3
28 In
−B1
Phase −B signal for
Counter 1
78 In
−B3
Phase −B signal for
Counter 3
29 In +Z1
Phase +Z signal for
Counter1
79 In +Z3
Phase +Z signal for
Counter 3
30 In
−Z1
Phase −Z signal for
Counter 1
80 In
−Z3
Phase −Z signal for
Counter 3
31
-
-
Not used
81
-
-
Not used
32
-
-
Not used
82
-
-
Not used
33
-
-
Not used
83
-
-
Not used
34
-
-
Not used
84
-
-
Not used
35
-
-
Not used
85
-
-
Not used
36
-
-
Not used
86
-
-
Not used
37
-
-
Not used
87
-
-
Not used
38
-
-
Not used
88
-
-
Not used
39
-
-
Not used
89
-
-
Not used
40
-
-
Not used
90
-
-
Not used
41 In +A2
Phase +A signal for
Counter 2
91 In +A4
Phase +A signal for
Counter 4
42 In
−A2
Phase
−
A signal for
Counter 2
92 In
−A4
Phase
−
A signal for
Counter 4
43 In +B2
Phase +B signal for
Counter 2
93 In +B4
Phase +B signal for
Counter 4
44 In
−B2
Phase −B signal for
Counter 2
94 In
−B4
Phase −B signal for
Counter4

16. Conveyor Tracking
EPSON RC+ 7.0 (Ver.7.4) User's Guide Rev.6
423
Pin
Dir
Signal
Description
Pin
Dir
Signal
Description
45 In +Z2
Phase +Z signal for
Counter 2
95 In +Z4
Phase +Z signal for
Counter 4
46 In
−Z2
Phase −Z signal for
Counter 2
96 In
−Z4
Phase −Z signal for
Counter 4
47
-
-
Not used
97
-
-
Not used
48
-
-
Not used
98
-
-
Not used
49
-
-
Not used
99
-
-
Not used
50
-
GND
GND
100
-
GND
GND
Pin # 25 ~ 30, 41 ~ 46, 75 ~ 80, 91 ~ 96
Connect the pin numbers shown above with encoder output (+A, −A, +B, −B, +Z, −Z).
Pins # 10 ~ 13
When the conveyor pulse is latched by external signal, connect the pin numbers
shown above with latch signal. Exactly when the signal is turned OFF to ON, the
encoder pulse is latched.
Pins # 14, 15, 64 and 65
When using the pin # 10 ~ 13, connect external power with the pin numbers shown
above.
When not using the pin # 10 ~ 13, it is not necessary to connect external power with
the pin numbers shown above.

16. Conveyor Tracking
424 EPSON RC+ 7.0 (Ver.7.4) User's Guide Rev.6
Signal Assignments: PG board connector terminal block 1
The signals on the PG board connector terminal block #1 are assigned as shown in the
table below. The pin numbers in parentheses are the pins on the PG board connector.
Pin
Signal
Description
Pin
Signal
Description
1 (16)
-
Not used
26 (32)
-
Not used
2 (17)
-
Not used
27 (33)
-
Not used
3 (18)
-
Not used
28 (34)
-
Not used
4 (19)
-
Not used
29 (35)
-
Not used
5 (20)
-
Not used
30 (36)
-
Not used
6 (21)
-
Not used
31 (37)
-
Not used
7 (22)
-
Not used
32 (38)
-
Not used
8 (23)
-
Not used
33 (39)
-
Not used
9 (24)
-
Not used
34 (40)
-
Not used
10 (25) +A1
Phase +A signal for
Counter 1
35 (41) +A2 Phase +A signal for Counter 2
11 (26)
−A1
Phase −A signal for
Counter 1
36 (42)
−A2 Phase −A signal for Counter 2
12 (27) +B1
Phase +B signal for
Counter 1
37 (43) +B2 Phase +B signal for Counter 2
13 (28)
−B1
Phase −B signal for
Counter 1
38 (44)
−B2 Phase −B signal for Counter 2
14 (29) +Z1
Phase +Z signal for
Counter 1
39 (45) +Z2 Phase +Z signal for Counter 2
15 (30)
−Z1
Phase −Z signal for
Counter 1
40 (46)
−Z2 Phase −Z signal for Counter 2
16 (31)
-
Not used
41 (47)
-
Not used
17 (48)
-
Not used
42 (49)
-
Not used
18 (9)
-
Not used
43 (50)
GND
Ground
19 (60)
-
Not used
44 (61)
-
Not used
20 (10) TRG1
Trigger input for
Counter 1
45 (11) TRG2 Trigger input for Counter 2
21 (1)
-
Not used
46 (5)
-
Not used
22 (2)
-
Not used
47 (6)
-
Not used
23 (3)
-
Not used
48 (7)
-
Not used
24 (4)
-
Not used
49 (8)
-
Not used
25 (14) EXTV External power supply 50 (64)
EXTV
GND
External power supply ground

16. Conveyor Tracking
EPSON RC+ 7.0 (Ver.7.4) User's Guide Rev.6
425
Signal Assignments: PG board connector terminal block 2
The signals on the PG board connector terminal block #2 are assigned as shown in the
table below. The pin numbers in parentheses are the pins on the PG board connector.
Pin
Signal
Description
Pin
Signal
Description
1 (66)
-
Not used
26 (82)
-
Not used
2 (67)
-
Not used
27 (83)
-
Not used
3 (68)
-
Not used
28 (84)
-
Not used
4 (69)
-
Not used
29 (85)
-
Not used
5 (70)
-
Not used
30 (86)
-
Not used
6 (71)
-
Not used
31 (87)
-
Not used
7 (72)
-
Not used
32 (88)
-
Not used
8 (73)
-
Not used
33 (89)
-
Not used
9 (74)
-
Not used
34 (90)
-
Not used
10 (75) +A3
Phase +A signal for
Counter 3
35 (91) +A4 Phase +A signal for Counter 4
11 (76)
−A3
Phase −A signal for
Counter 3
36 (92)
−A4 Phase −A signal for Counter 4
12 (77) +B3
Phase +B signal for
Counter 3
37 (93) +B4 Phase +B signal for Counter 4
13 (78)
−B3
Phase −B signal for
Counter 3
38 (94)
−B4 Phase −B signal for Counter 4
14 (79) +Z3
Phase +Z signal for
Counter 3
39 (95) +Z4 Phase +Z signal for Counter 4
15 (80)
−Z3
Phase −Z signal for
Counter 3
40 (96)
−Z4 Phase −Z signal for Counter 4
16 (81)
-
Not used
41 (97)
-
Not used
17 (98)
-
Not used
42 (99)
-
Not used
18 (59)
-
Not used
43 (100)
GND
Ground
19 (62)
-
Not used
44 (63)
-
Not used
20 (12) TRG3
Trigger input for
Counter 3
45 (13) TRG4 Trigger input for Counter 4
21 (51)
-
Not used
46 (55)
-
Not used
22 (52)
-
Not used
47 (56)
-
Not used
23 (53)
-
Not used
48 (57)
-
Not used
24 (54)
-
Not used
49 (58)
-
Not used
25 (15) EXTV External power supply 50 (65)
EXTV
GND
External power supply ground
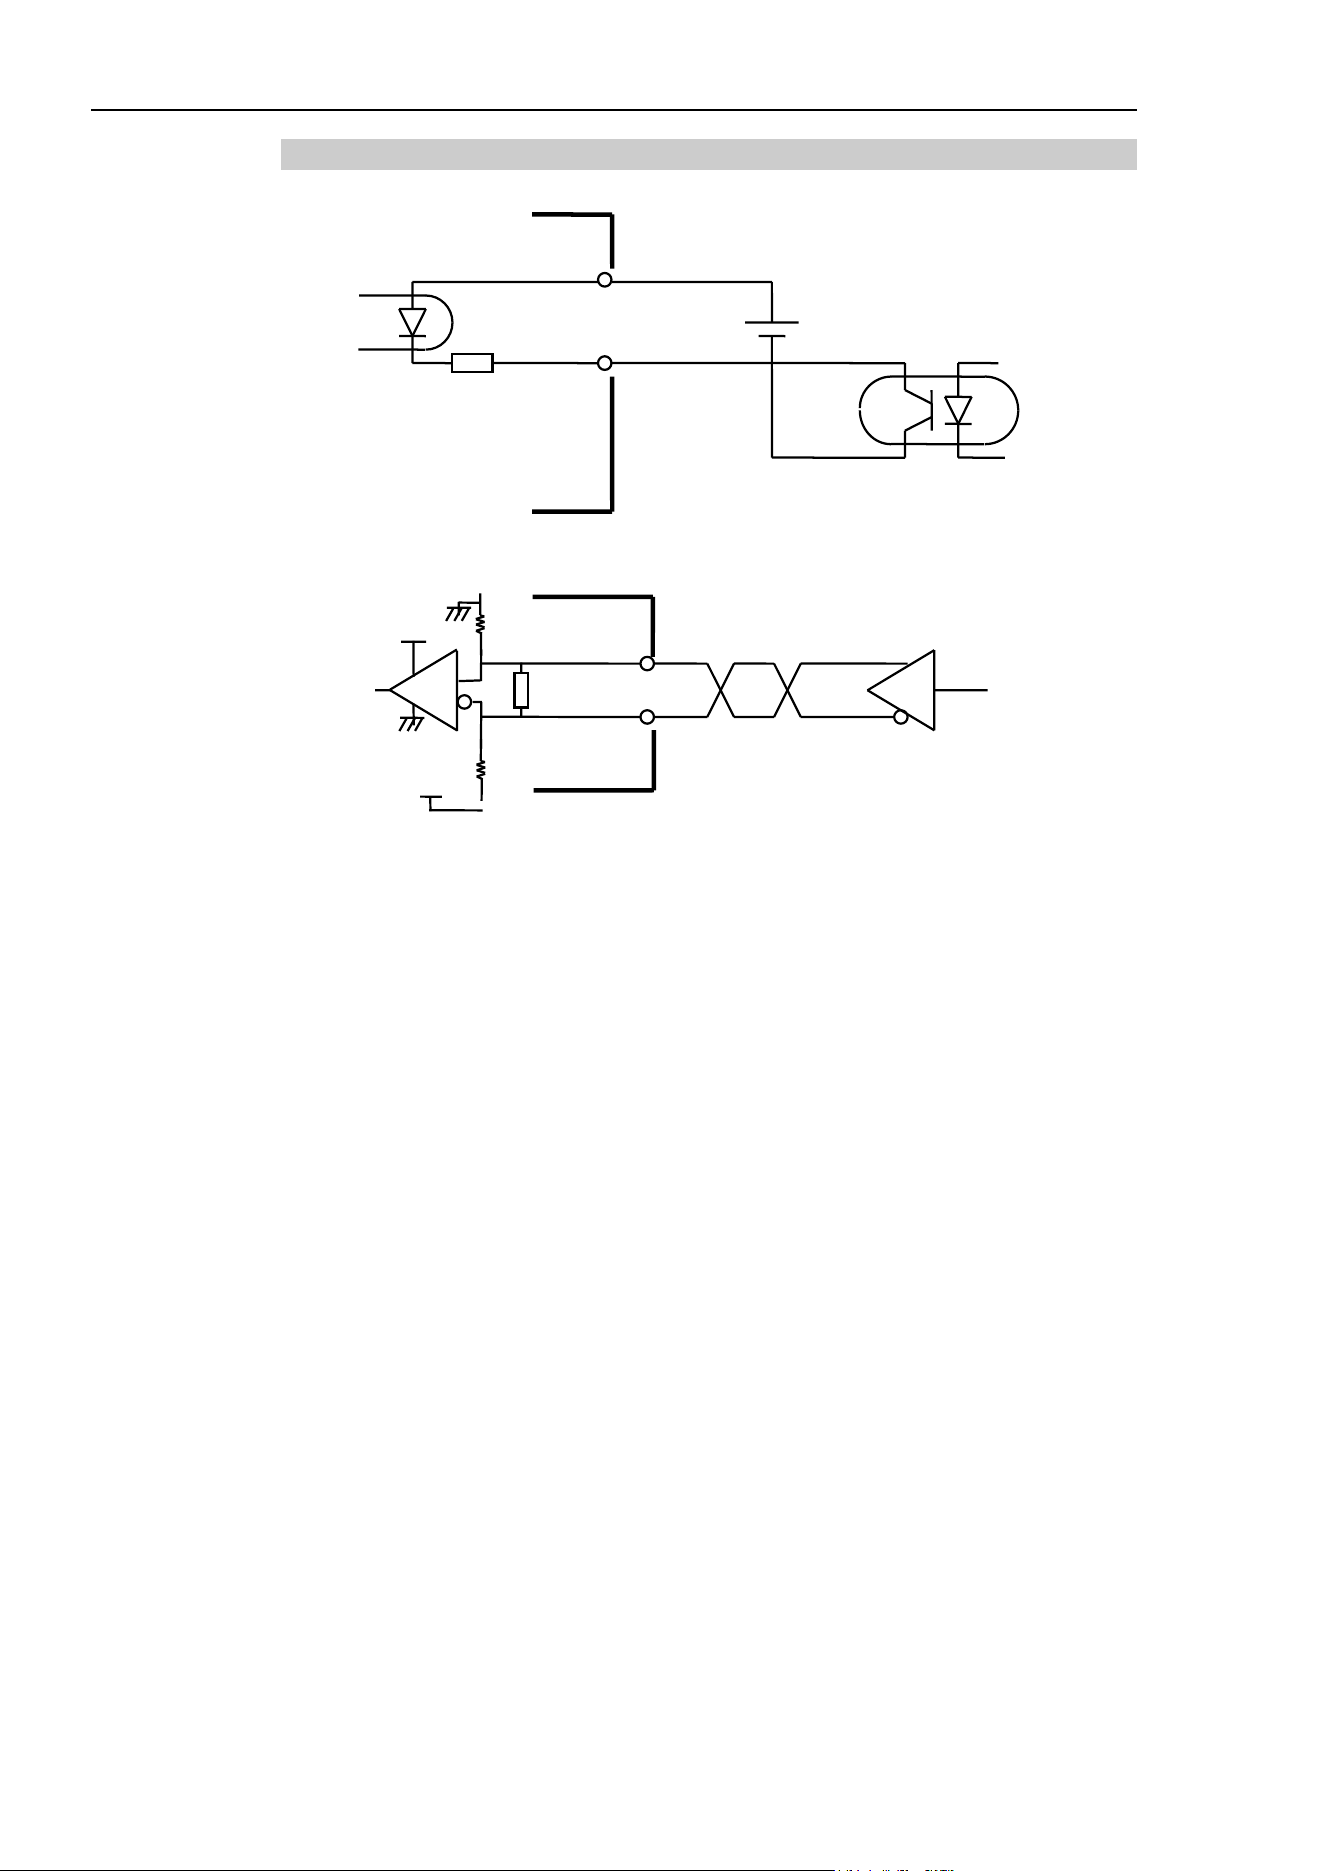
16. Conveyor Tracking
426 EPSON RC+ 7.0 (Ver.7.4) User's Guide Rev.6
Encoder Input Circuit
EXTV
TRIG
[Board]
[Drive]
External power supply:
+24V
ON : 2.5mA or over
OFF : 0.8mA or under
6.8 kΩ
+A, B, Z
-A, B, Z
[Board]
[Driver]
220 Ω
26C31
equivalent
Line driver RS422
compliant and connection
+5V
+5V
26C32
equivalent
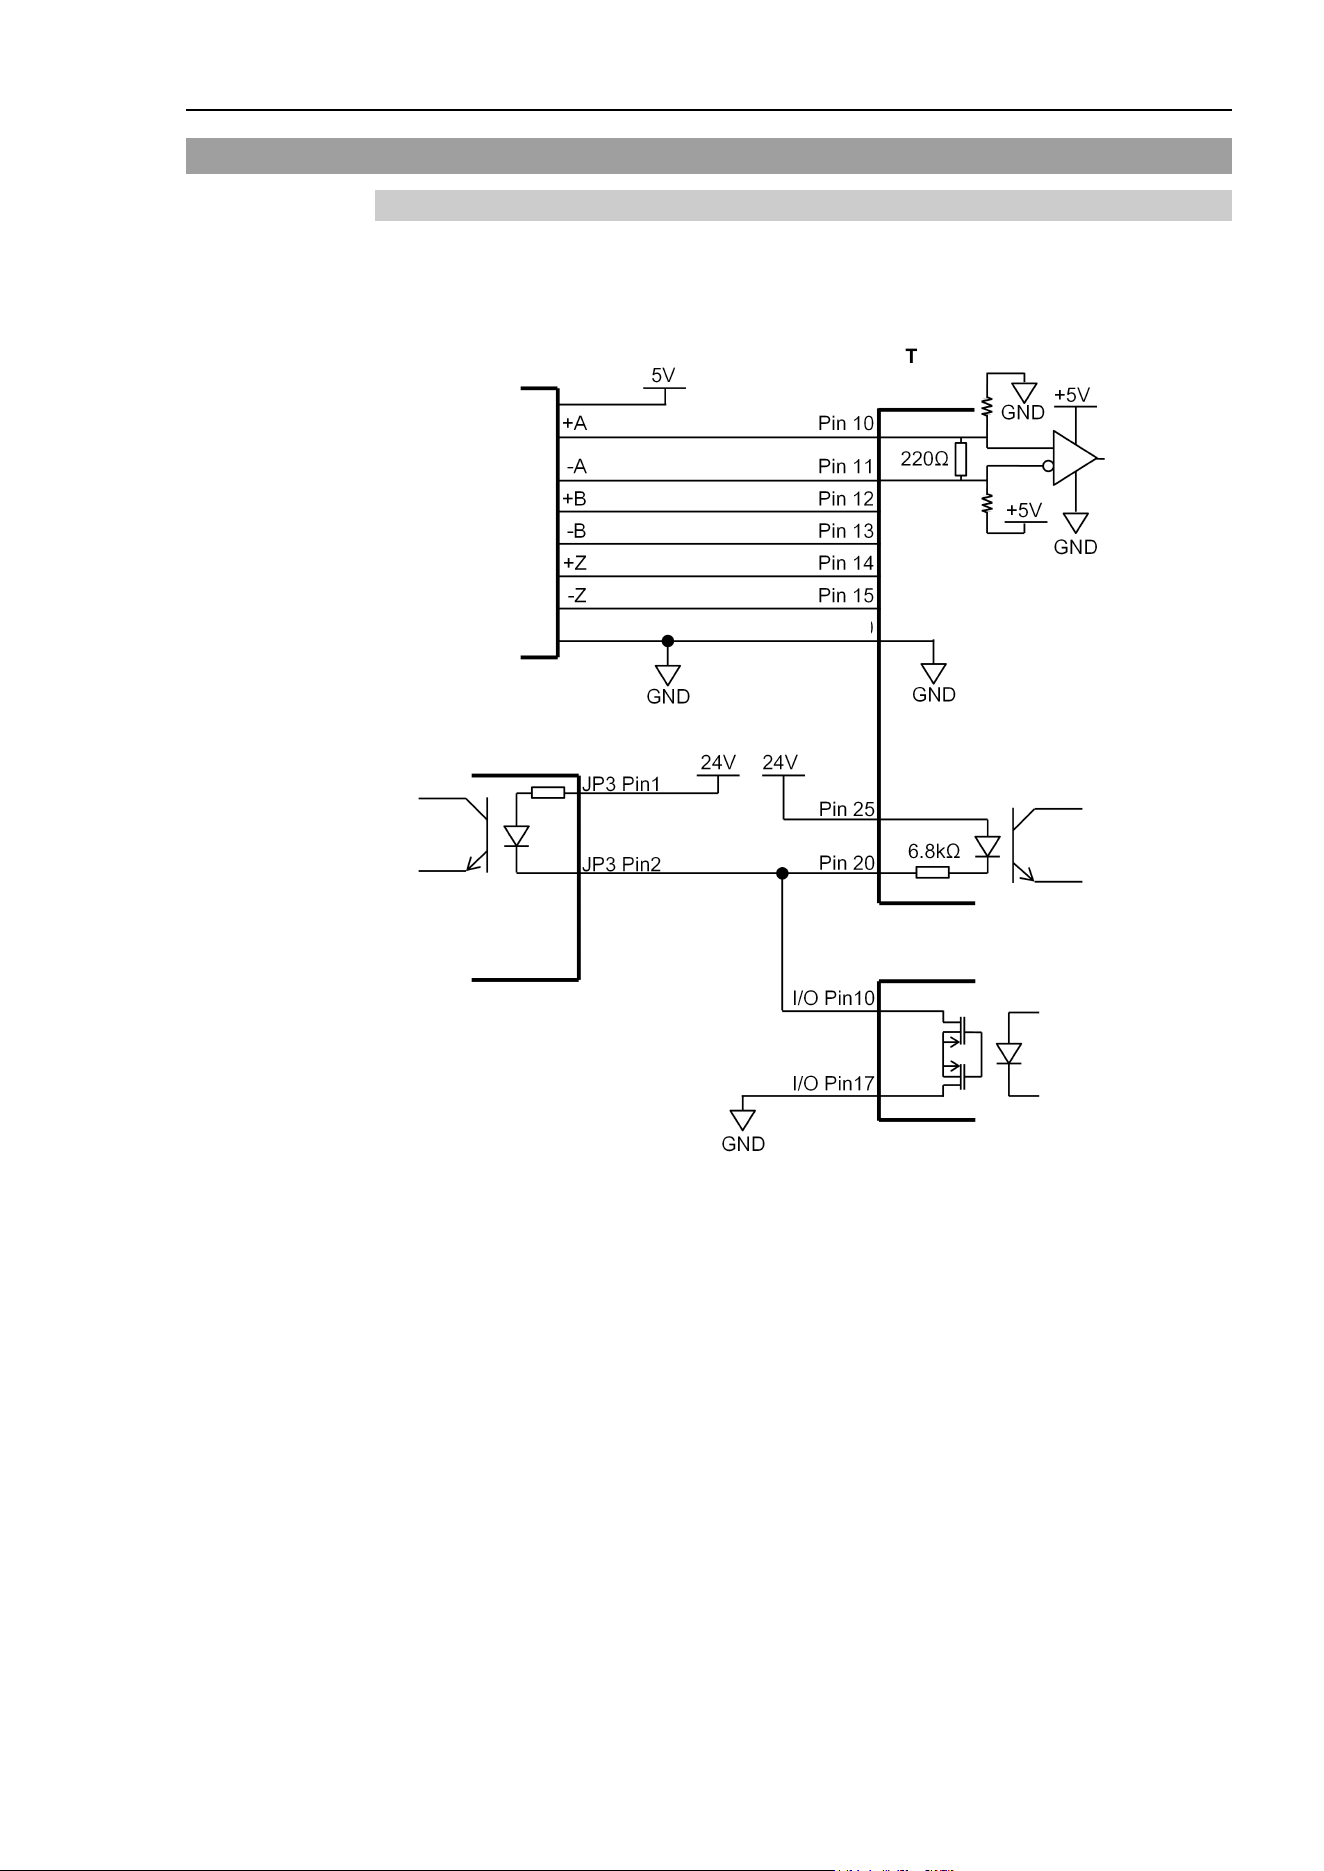
16. Conveyor Tracking
EPSON RC+ 7.0 (Ver.7.4) User's Guide Rev.6
427
16.5 Wiring example of Vision Conveyor Tracking System
Example using I/O Output (sink type) to Synchronize
Wire the vision trigger and the hardware conveyor trigger to the I/O output of the same bit
number. The PG board detects the trigger when the I/O output turns from OFF to ON. Set
the camera so that it also detects the trigger when the I/O output turns from OFF to ON.
Controller I/O
Encoder
Terminal block1 for PGcable
Equivalent
to 26C32
Vision
Trigger input
I/O output
Counter 1
Trigger input
B and Z phases are
same as A phase
CV1 USB camera
Trigger connector (JP3)
Pin 43
Wiring example of the conveyor encoder, vision trigger, and hardware conveyor trigger
(CV1, I/O output No. 0 and Counter 1 are used)
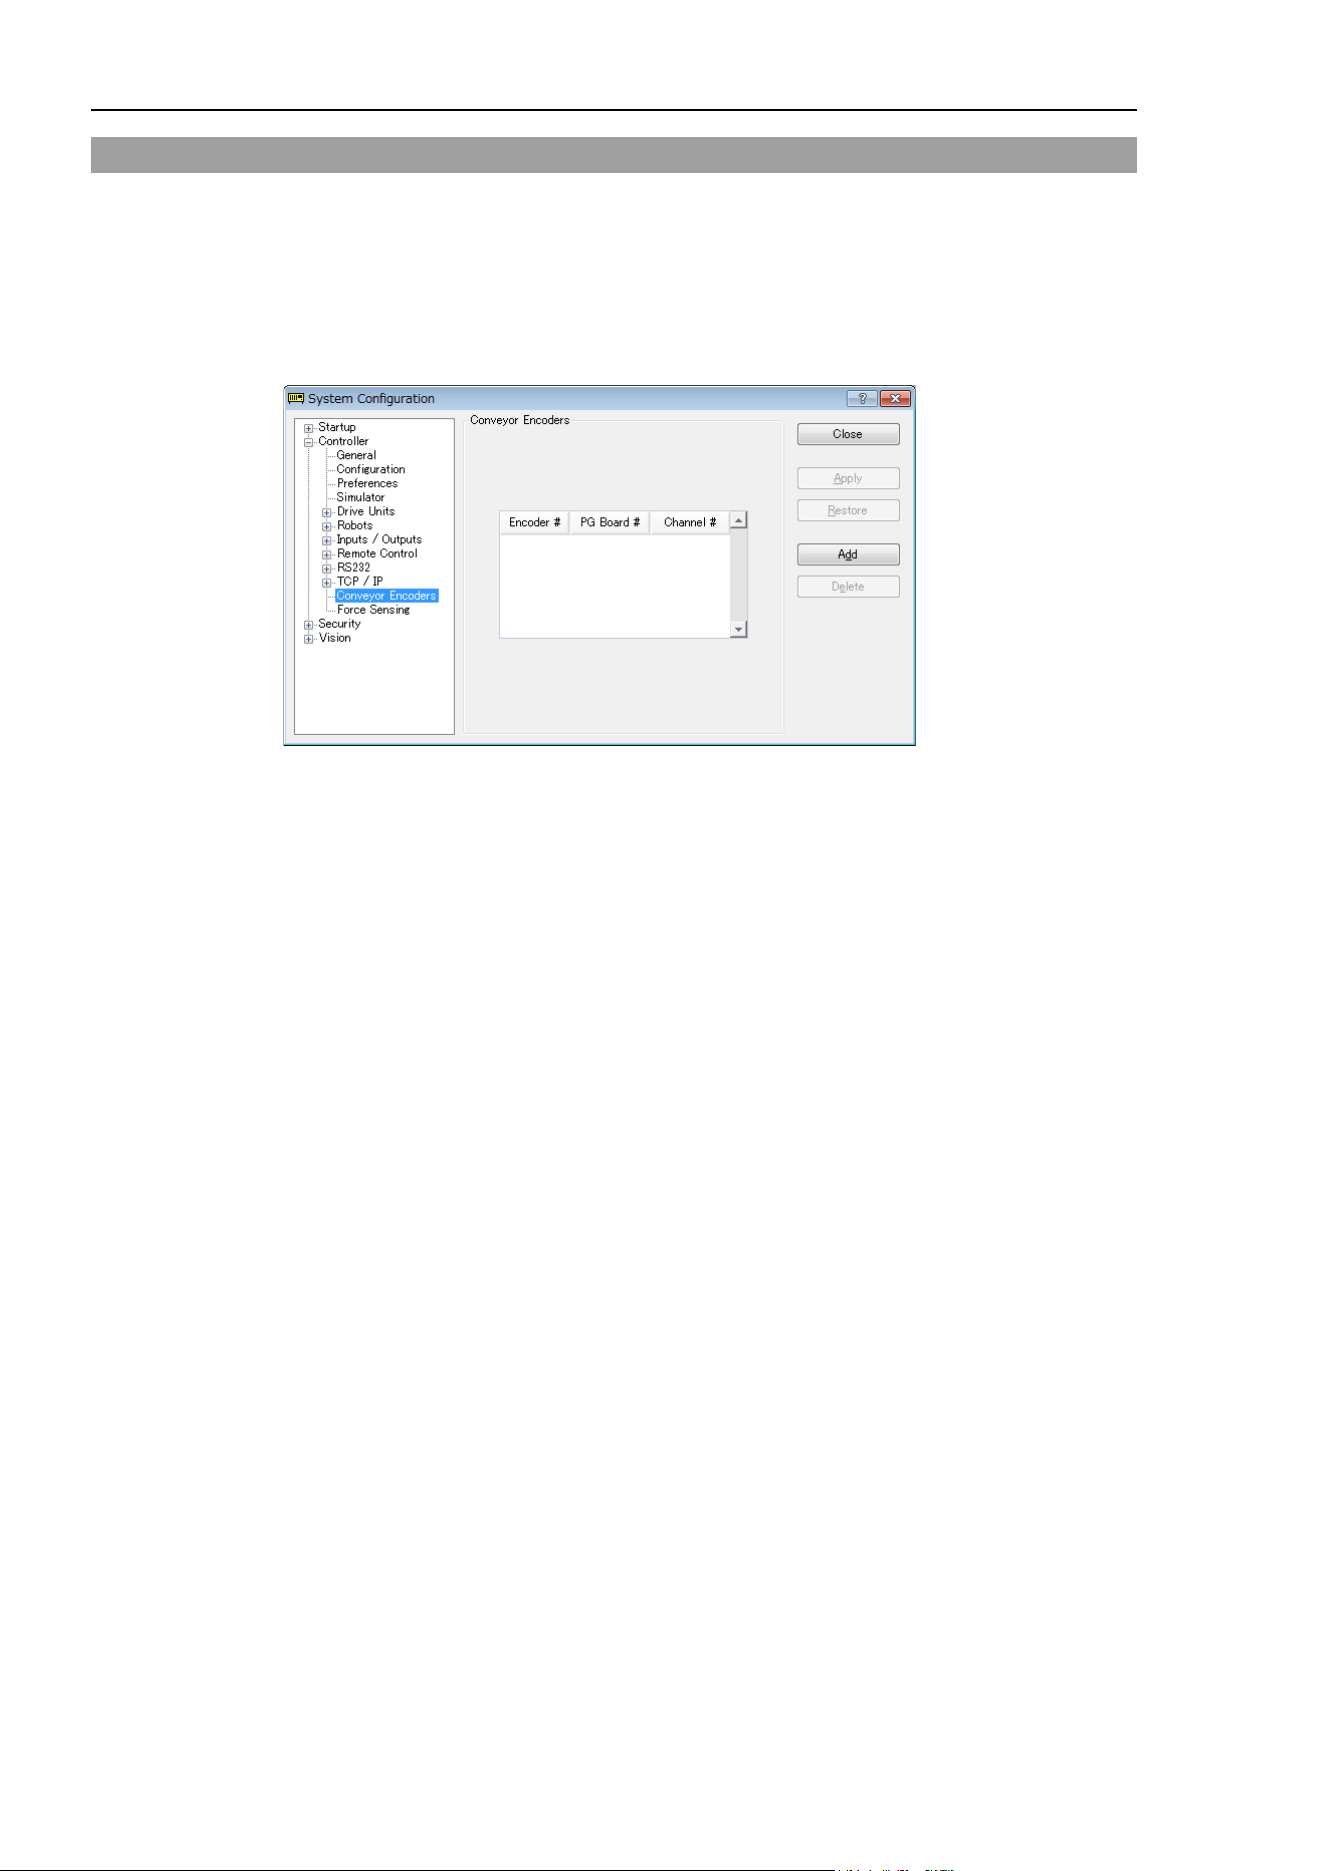
16. Conveyor Tracking
428 EPSON RC+ 7.0 (Ver.7.4) User's Guide Rev.6
16.6 Conveyor Encoder Configuration
Before you can create any conveyors in a project, you must first add conveyor encoders to
the system. Each physical conveyor must have an encoder.
First, you must install one PG board for every four encoders in the PC Control Unit and
wire the encoders to the board(s).
To define system encoders in EPSON RC+, select [Setup]-[System Configuration] and
select the [Conveyor Encoders].
Click the <Add> button to add an encoder. Encoders are added in the order of Axis
number.
You can delete the last encoder in the list. Select it, then click the <Delete> button.
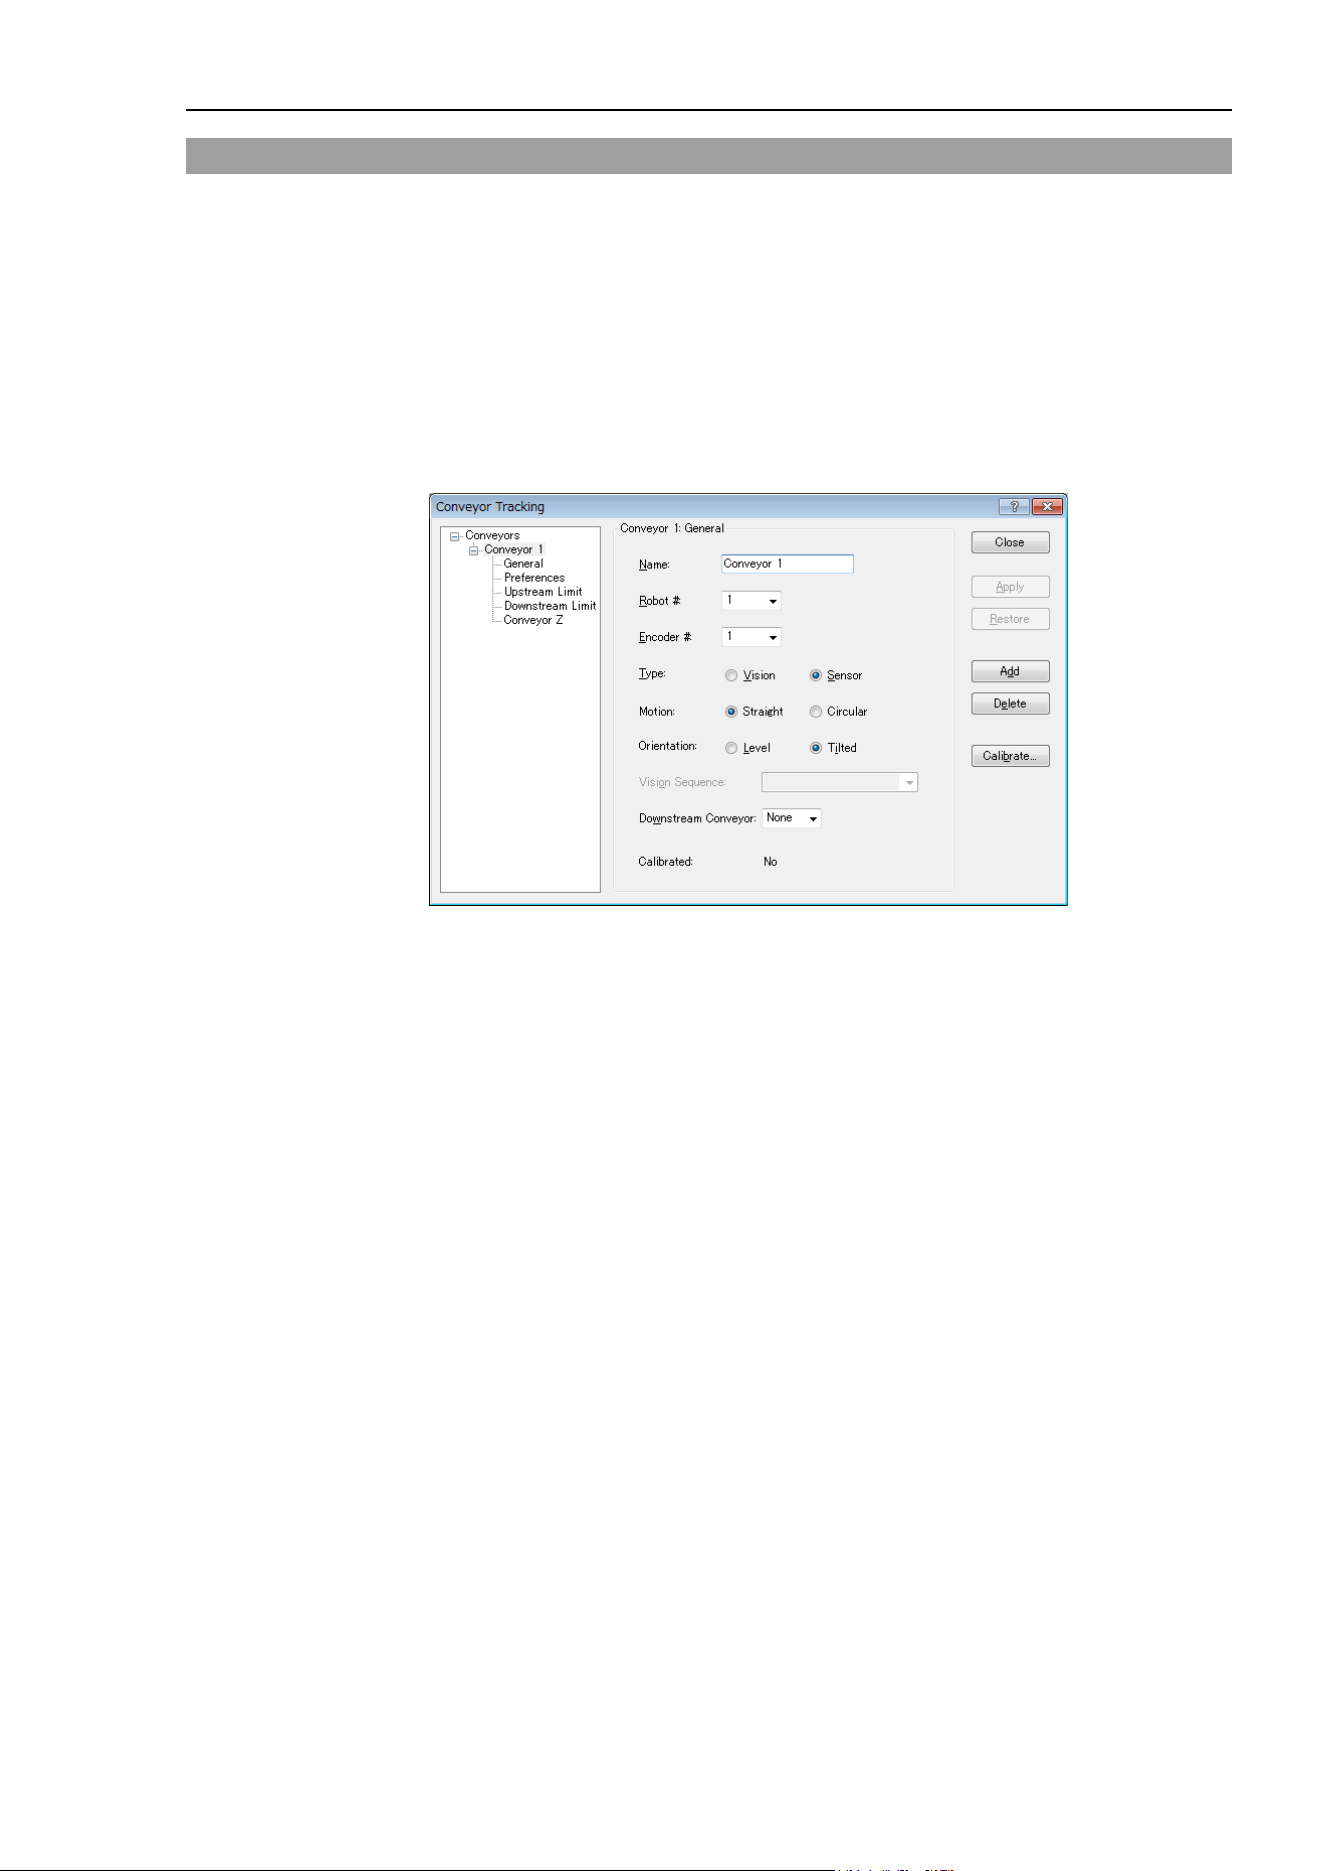
16. Conveyor Tracking
EPSON RC+ 7.0 (Ver.7.4) User's Guide Rev.6
429
16.7 Verifying Encoder Operation
After wiring the encoders and adding them to RC+ (as described in the previous section),
follow these steps to verify operation.
1. Start RC+.
2. Create a new project called “TestCnv”.
3. Create a conveyor by reference to the previous section.
Conveyor 1: Encoder
Type : Sensor
Make sure to perform the calibration, otherwise the conveyor tracking system cannot
work properly. When you only check the encoder operation, it is not necessary to
calibrate the conveyors.
4. Now you can use the Cnv_Pulse function to read pulses from Encoder 1 from a
program or from the monitor window.
For example, execute this print statement from the monitor window to read the pulses
from encoder 1. Then move the conveyor and execute the command again.
>print cnv_pulse(1)
You can also use a simple program as shown below. Start the program and move the
conveyor. When the conveyor starts moving, the value of Cnv_Pulse will be changed.
Function main
Do
Print Cnv_Pulse(1)
Wait .5
Loop
Fend

16. Conveyor Tracking
430 EPSON RC+ 7.0 (Ver.7.4) User's Guide Rev.6
16.8 Verifying Hardware Conveyor Trigger / Vision Trigger
Verifying the Hardware Conveyor Trigger
1. Move the conveyor and stop it.
2. Check the encoder pulse. Enter the following to the command window.
> Print Cnv_Pulse (Conveyor number)
3. Turn ON the I/O output number which the trigger is wired to. Latch the encoder pulse.
4. Check the latch pulse. Enter the following to the command window.
> Print Cnv_LPulse (Conveyor number)
- If the same value as obtained in the Step 2 is latched, the verification is completed.
- If not, check the hardware conveyor trigger wiring.
Verifying the Vision Trigger
1. Set the RuntimeAcquire property of the vision sequence to “Strobed” and the
TriggerMode property to “Leading”.
2. Execute the vision sequence and put it into the trigger waiting state.
3. Turn ON the I/O output number which the trigger is wired to and release the shutter.
- If the captured image is displayed on the VisionGuide window, the verification is
completed.
- If not, check the vision trigger wiring.

16. Conveyor Tracking
EPSON RC+ 7.0 (Ver.7.4) User's Guide Rev.6
431
16.9 Key Terms
Here explains key terms used in this section.
Queue Waiting queue of the FIFO (First-In, First-Out) type
for each
conveyor.
With the queue, you can register the pose data of work pieces running
on the conveyor and user data. When you add data, it will be
registered to the end of the queue. When you delete data from the
queue, the remaining data in the queue will be moved up
automatically.
Queue depth The number of data entries registered in a queue.
Maximum number of queue data is 1000.
Queue user
data
Optional real value that can be registered in a queue.
You can store additional information such as sorted data or part type
determined by the image processing.
Downstream
Conveyor
Use this when using multiple conveyors and you
run them
continuously. By making an association (upstream/downstream)
between conveyors, you can move a queue using the Cnv_QueMove
command. “Multiple conveyors” is not necessarily more than one
conveyor. You can use one long physical conveyor and set upstream
side and downstream side as different logical conveyors. This enables
the robots cooperative work, for instance, robot at the downstream
side can pick up the work pieces that the robot at upstream fails to
pick in time.
Upstream
Limit
Dividing line in the upstream side of the Pickup Area.
Downstream
Limit
Dividing line in the downstream side of the Pickup Area.
Pickup Area The area between the upstream limit and downstream limit.
The robot picks parts which flow in the Pickup Area.
The robot starting pickup near the downstream limit
continues its
operation over the downstream limit.
Make sure that the Pickup Area covers the whole robot motion range.
For details, refer to 16.15 Pickup Area.

16. Conveyor Tracking
432 EPSON RC+ 7.0 (Ver.7.4) User's Guide Rev.6
16.10 Conveyor Tracking Commands
All Conveyor Tracking commands begin with the same prefix: "Cnv_". Here is a list of all
of the commands. For details, please see the EPSON RC+ Online Help or SPEL
+
Language Reference manual.
Command Description / Usage
Cnv_AbortTrack Aborts a motion command to a conveyor queue point.
Cnv_Accel Function Sets/ returns acceleration and deceleration of the conveyor.
Cnv_Accel Sets acceleration and deceleration of the conveyor.
Cnv_DownStream Function Returns the downstream limit for the specified conveyor.
Cnv_Downstream Sets the downstream limit of the conveyor.
Cnv_Fine Function Returns the setting of the range to judge if the tracking motion is
completed or not for the specified conveyor.
Cnv_Fine Sets / returns the value of Cnv_Fine for one conveyor.
Cnv_Mode Function Returns the conveyor mode setting value.
Cnv_Mode Sets the conveyor mode setting value.
Cnv_LPulse Function Returns the pulse latched by a conveyor trigger.
Cnv_Name$ Function Returns the name of the specified conveyor.
Cnv_Number Function Returns the number of a conveyor specified by name.
Cnv_OffsetAngle Sets the angle offset.
Usage: This command is available only for the circular conveyor.
Cnv_OffsetAngle Function Returns the offset angle.
Cnv_Point Function Returns a robot point in the specified conveyor's coordinate system
derived from sensor coordinates.
Usage: Use this function when registering a point in the queue.
Cnv_PosErr Function Returns deviation in current tracking position compared to tracking target.
Cnv_Pulse Function Returns the current position of a conveyor in pulses.
Cnv_QueAdd Adds a robot point to a conveyor queue.
Usage: Use this command to register a point in the queue.
Cnv_QueGet Function Returns a point from the specified conveyor's queue.
Usage: Use this command for robot tracking motion.
Cnv_QueLen Function Returns the number of items in the specified conveyor's queue.
Usage: Use this command to keep the robot waiting until the part (queue)
enters the tracking area.
Cnv_QueList Displays a list of items in the specified conveyor's queue.
Cnv_QueMove Moves data from upstream conveyor queue to downstream conveyor
queue.
Usage: Use this command for the multi conveyor system.
Cnv_QueReject Sets / displays the minimum distance to prevent the double conveyors
register.
For details, refer to Cnv_QueReject.
Cnv_QueReject Function Sets / returns and displays the queue reject distance for a conveyor.
Cnv_QueRemove Removes items from a conveyor queue.
Cnv_QueUserData Function Sets / returns and displays user data associated with a queue entry.

16. Conveyor Tracking
EPSON RC+ 7.0 (Ver.7.4) User's Guide Rev.6
433
Cnv_RobotConveyor Function
Returns the conveyor being tracked by a robot.
Cnv_Speed Function Returns the current speed of a conveyor.
Cnv_Trigger Latches current conveyor position for the next Cnv_QueAdd statement.
Usage: Use this command when using the software trigger.
Cnv_Upstream Function Returns the upstream limit for the specified conveyor.
Cnv_Upstream Sets the upstream limit of the conveyor.
To track a part as the conveyor moves, you must use Cnv_QueGet in a motion command
statement. For example:
Jump Cnv_QueGet(1) ' this tracks the part
You cannot assign the result from Cnv_QueGet to a point and then track it by moving to
the point.
P1 = Cnv_QueGet(1)
Jump P1 ' this does not track the part!
When you assign the result from Cnv_QueGet to a point, the coordinate values correspond
to the position of the part when the point assignment was executed.
NOTE
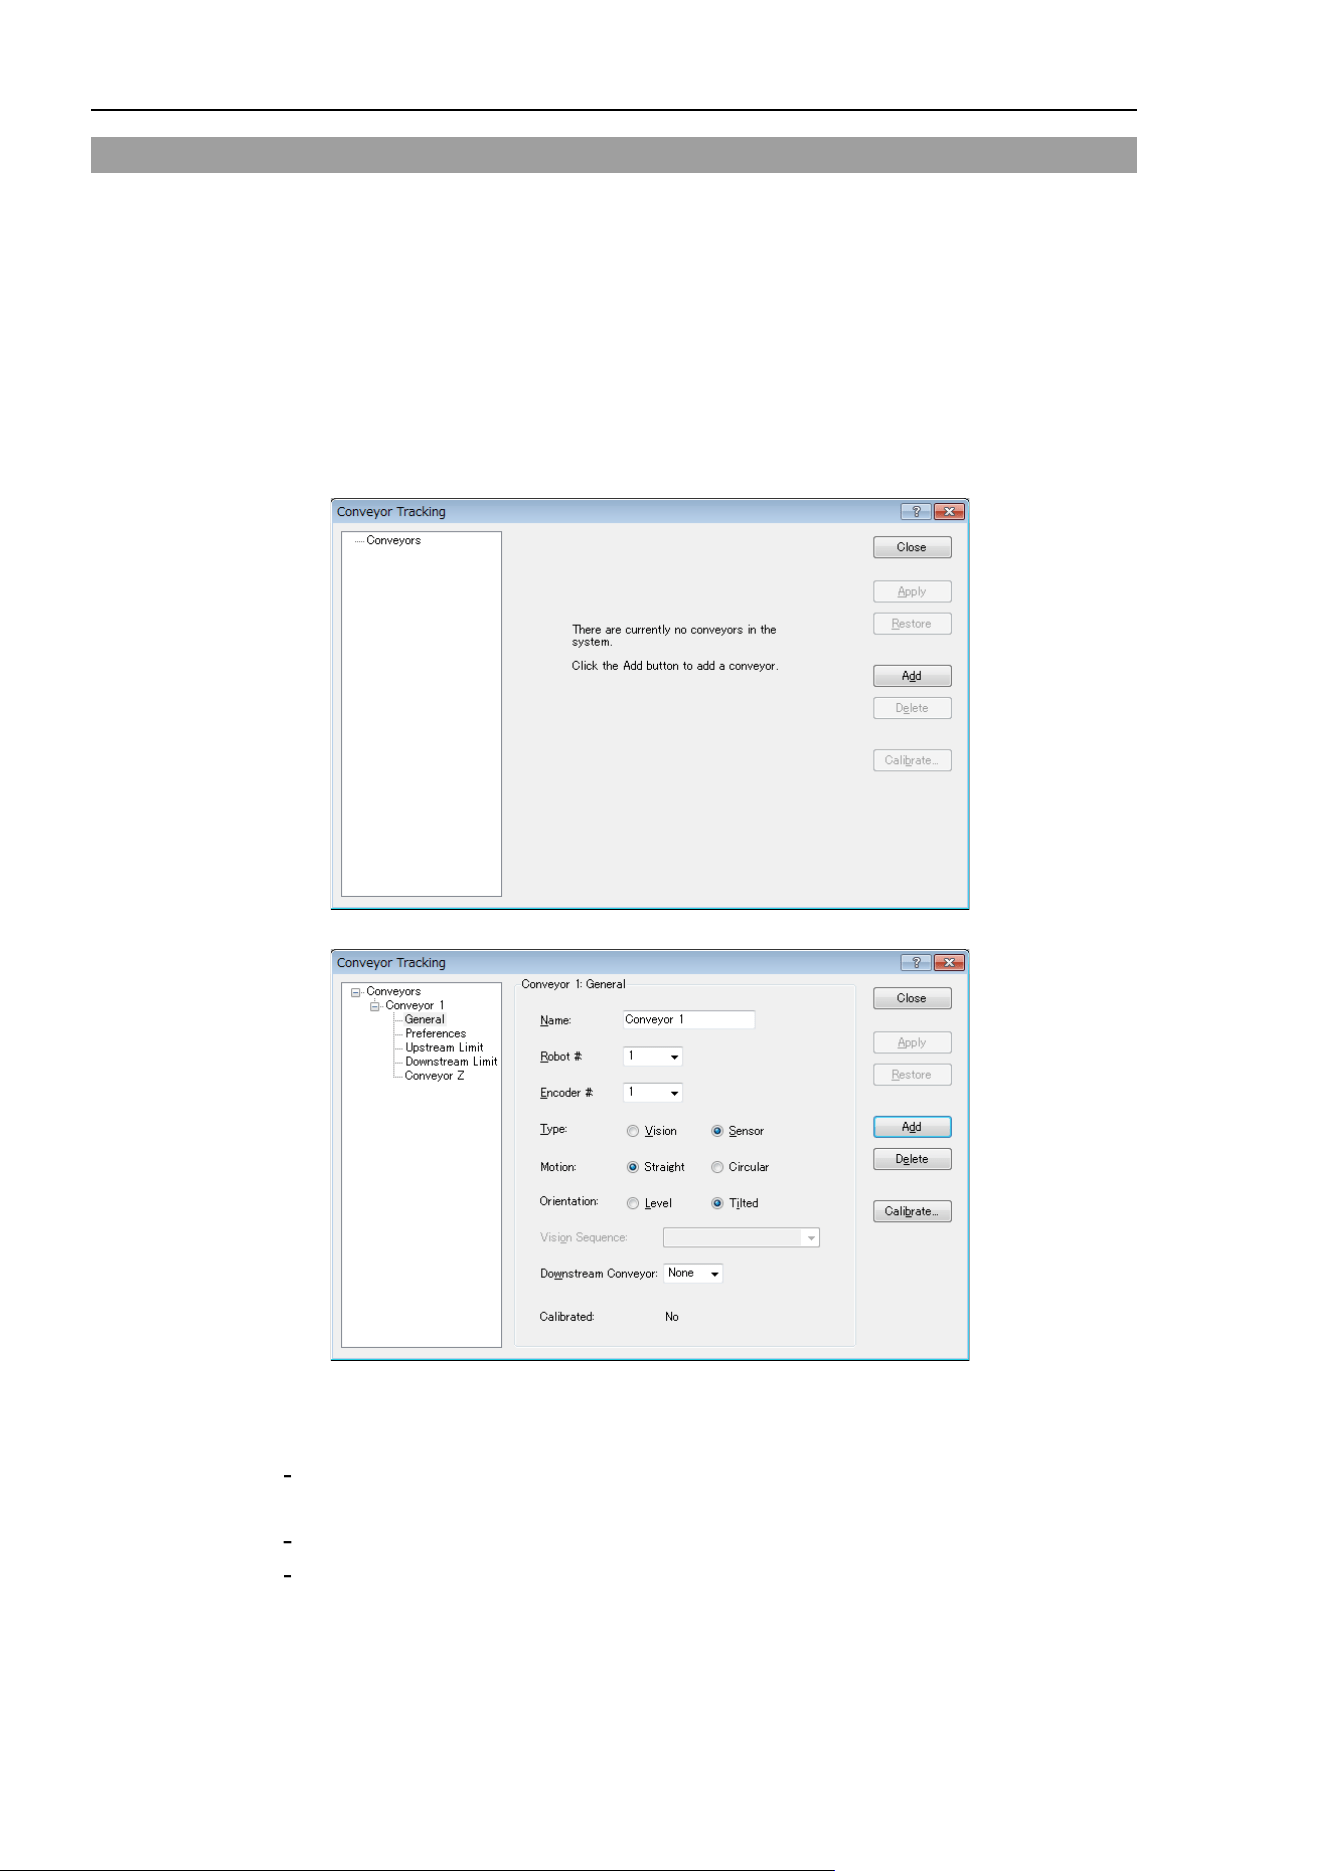
16. Conveyor Tracking
434 EPSON RC+ 7.0 (Ver.7.4) User's Guide Rev.6
16.11 Creating Conveyors in a Project
Conveyors are configured for each EPSON RC+ project. Up to 16 conveyors can be
created per project. A conveyor is a logical entity that combines a robot with one or more
conveyors.
There are two types of conveyors: vision and sensor. If you will be using a vision camera
to find the parts on the conveyor, you must first create a vision sequence to find the parts.
This vision sequence is required when you define the conveyor.
To add a conveyor to a project
1. Select [Tools]-[Conveyor Tracking] to open the [Conveyor Tracking] configuration
dialog.
2. To add a conveyor, click the <Add> button. The following dialog will appear.
3. Enter a name for the conveyor, then specify the Robot #, Encoder #, Type, Motion,
and Orientation.
A default conveyor name is created automatically when a new conveyor is added.
You can change the name as desired.
When you use a straight conveyor, select “Line” for [Motion].
When you use a circular conveyor, select “Circular” for [Motion].
NOTE
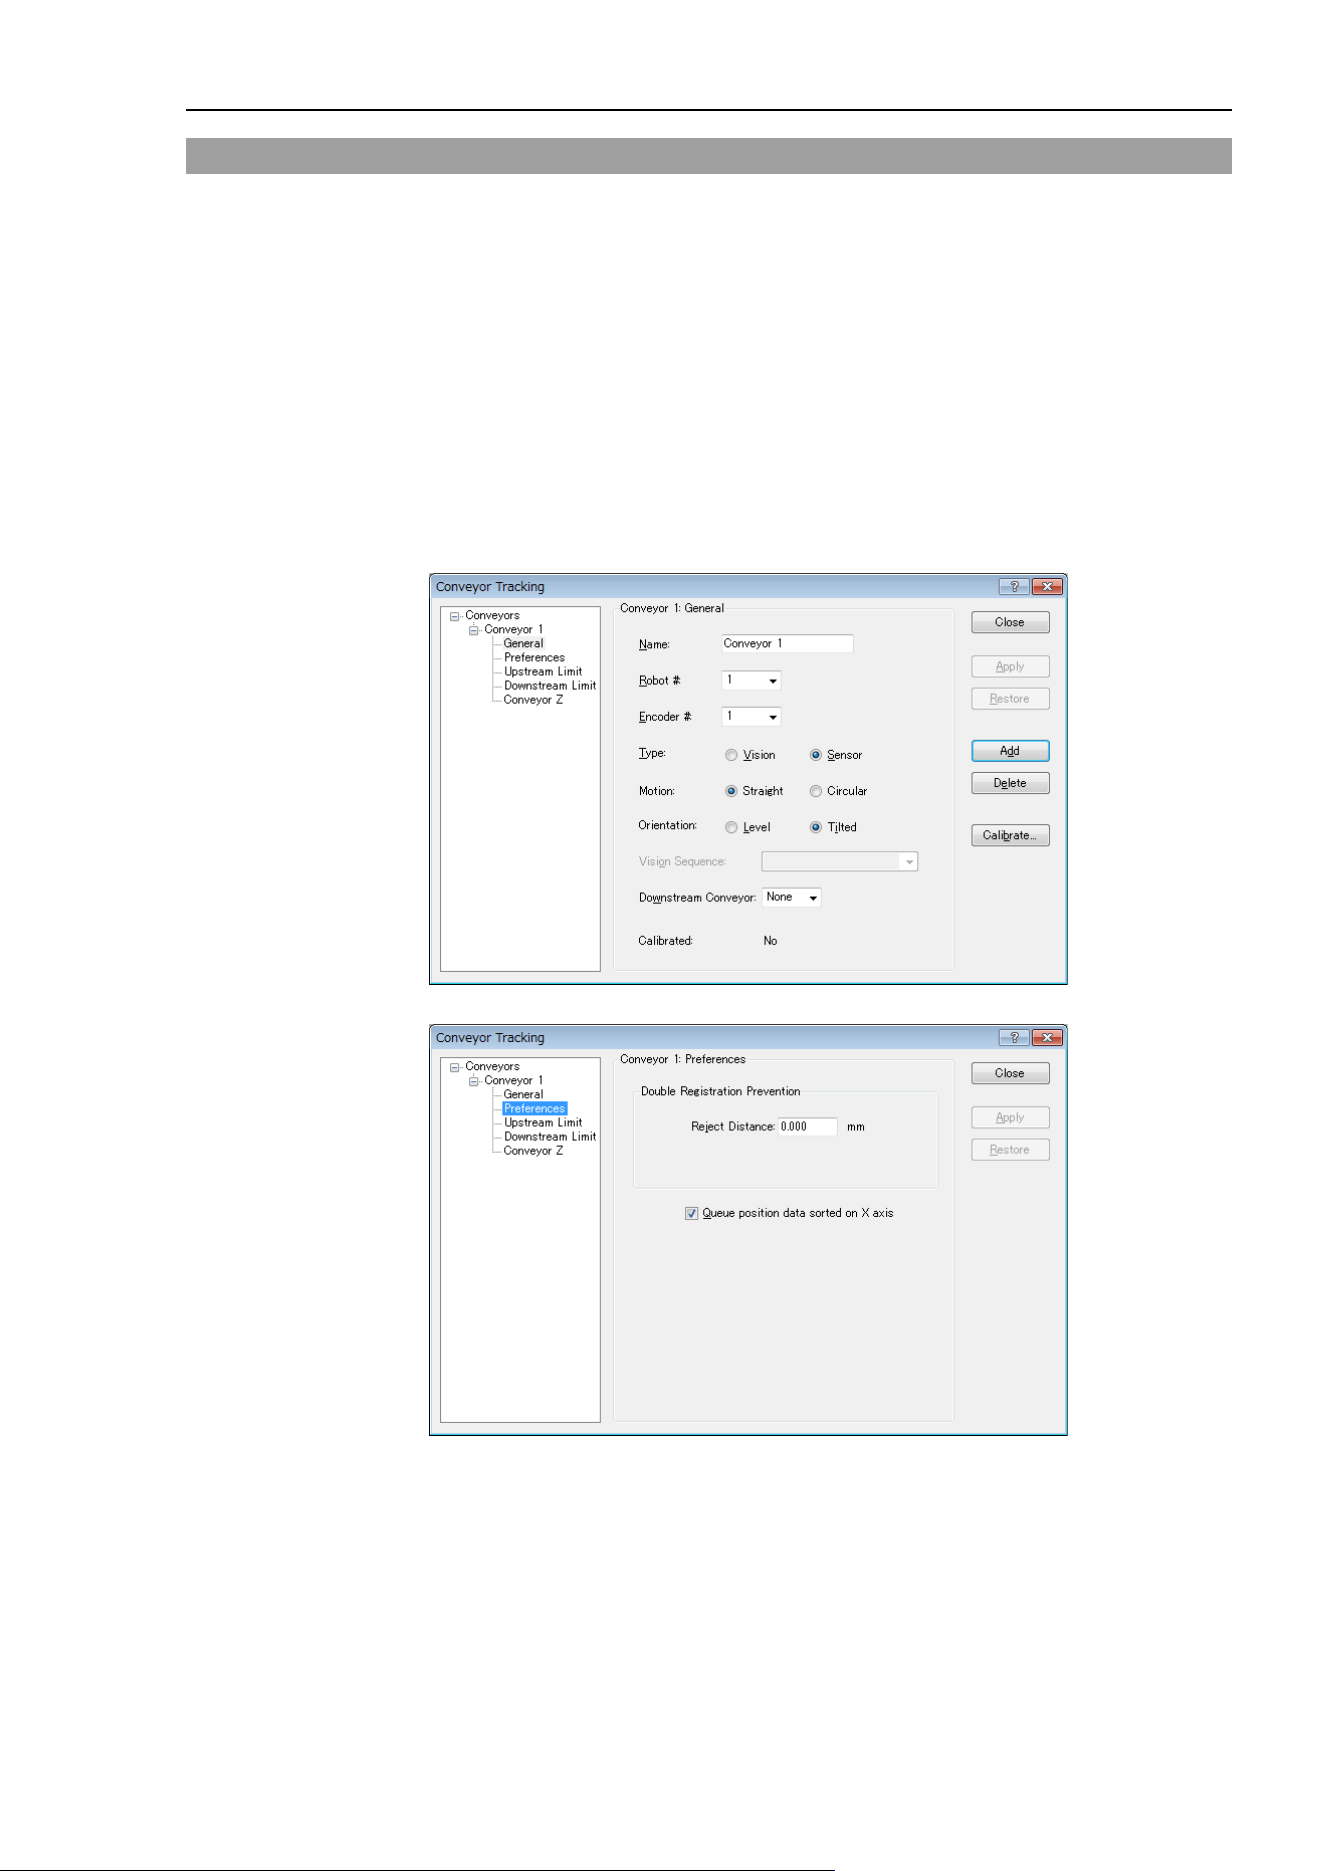
16. Conveyor Tracking
EPSON RC+ 7.0 (Ver.7.4) User's Guide Rev.6
435
16.12 Configuring Conveyors
After a conveyor has been created, you can set its parameters.
1. Select [Tools]-[Conveyor Tracking].
2. Click on the conveyor you want to change.
3. There are three setup pages shown in the tree under each conveyor: [General],
[Preferences], [Upstream Limit], [Downstream Limit], and [Conveyor Z].
To change the [Upstream Limit] and [Downstream Limit], refer to 16.15 Pickup Area
- Changing the Upstream / Downstream limits positions.
To change the settings of Reject Distance and queue position data sort, click on
[Preferences].
To change other parameters, click on [General].
4. Click on [General] or [Preferences].
The following dialog appears. Edit any of the configuration options.
5. Click <Apply> to save changes.
If you changed Robot #, Encoder #, Orientation, Type, or Vision Sequence, then you
need to calibrate the conveyor again.
NOTE

16. Conveyor Tracking
436 EPSON RC+ 7.0 (Ver.7.4) User's Guide Rev.6
The following table explains the parameters you can edit in the [General] and
[Preferences] pages.
Name You can name conveyors.
There is a restriction on the number of characters to be input.
1-byte characters: up to 15 characters
2-byte characters: up to 7 characters
Robot # You can select a robot number from the robots currently
configured in the controller.
Encoder # You can select an encoder number from
the encoders
currently configured in the controller.
Type Vision: Detects work pieces using vision search.
Sensor: Detects work pieces using a sensor.
Motion
You can select the conveyor motion; Straight conveyor or
Circular conveyor.
Orientation When you selected Straight conveyor, you can specify if the
conveyor is level or tilted.
<Tilted> is selected by default and normally you don’t have
to change it.
Tilted: Conveyor slope is detected during the calibration.
Level: Conveyor slope is not detected during the calibration.
You need to observe the following:
The conveyor must be level with the robot X and Y
planes.
Vision Sequence Select a vision sequence for the calibration.
This is only necessary when using the vision type.
Downstream
Conveyor
When two or more conveyors have been set, you can select a
conveyor number for the downstream conveyor.
Calibrate… Click this button to execute the calibration.
The calibration procedure is different for each
type and
conveyor orientation.
Adjust Z After the calibration is completed, you can calibrate the Z
coordinate value of the conveyor again.
Reject Distance You can set a minimum distance to prevent the registration of
duplicate conveyors.
・ The distance also can be set from the SPEL program using
the Cnv_QueReject command.
・ If the distance is different from the one set by
Cnv_QueReject command, the Cnv_QueReject command
setting has precedence.
Queue position
data sorted on X
axis
You can select whether to sort the queue or not.
After the calibration, change the parameters for Robot #, Encoder #, Type, Motion,
Orientation, Vision Sequence, Adjust Z, and Upstream/Downstream limit.
NOTE

16. Conveyor Tracking
EPSON RC+ 7.0 (Ver.7.4) User's Guide Rev.6
437
16.13 Vision Conveyors
A vision conveyor uses a camera to locate parts that will be retrieved by one or more
robots. In this section, instructions are provided for vision conveyor calibration.
The straight conveyor and the circular conveyor have different calibration methods.
Vision conveyor camera and lighting
It is important to choose the correct camera and lighting for the vision conveyors used in
your application.
For applications with a slow moving conveyor and non-critical pick up constraints, you
may be able to use a Vision Guide camera and simple lighting with no strobe.
For applications with fast moving parts, you will need to use a camera that is capable of
asynchronous reset along with a strobe lamp. This method is more expensive.
If you are using multiple asynchronous reset cameras in multiple tasks, you must use
SyncLock to lock the vision system during VRun and waiting until the picture is acquired.
For example:
SyncLock 1 ' Lock vision for this task
VRun FindPart
On strobe, .2
Do
VGet FindPart.AcquireState, state
Loop Until state = 3
SyncUnlock 1 ' Unlock vision
Vision calibration sequence
Before you can calibrate a vision conveyor, you must first create a calibration sequence.
This sequence is used by the system during the calibration process and must be linked to a
camera calibration. The conveyor system commands use camera coordinates in
millimeters. Although you can use any type of Vision Guide camera calibration, you only
need to use a Standalone calibration.
The calibration sequence needs a sequence that uses one object for each work piece.
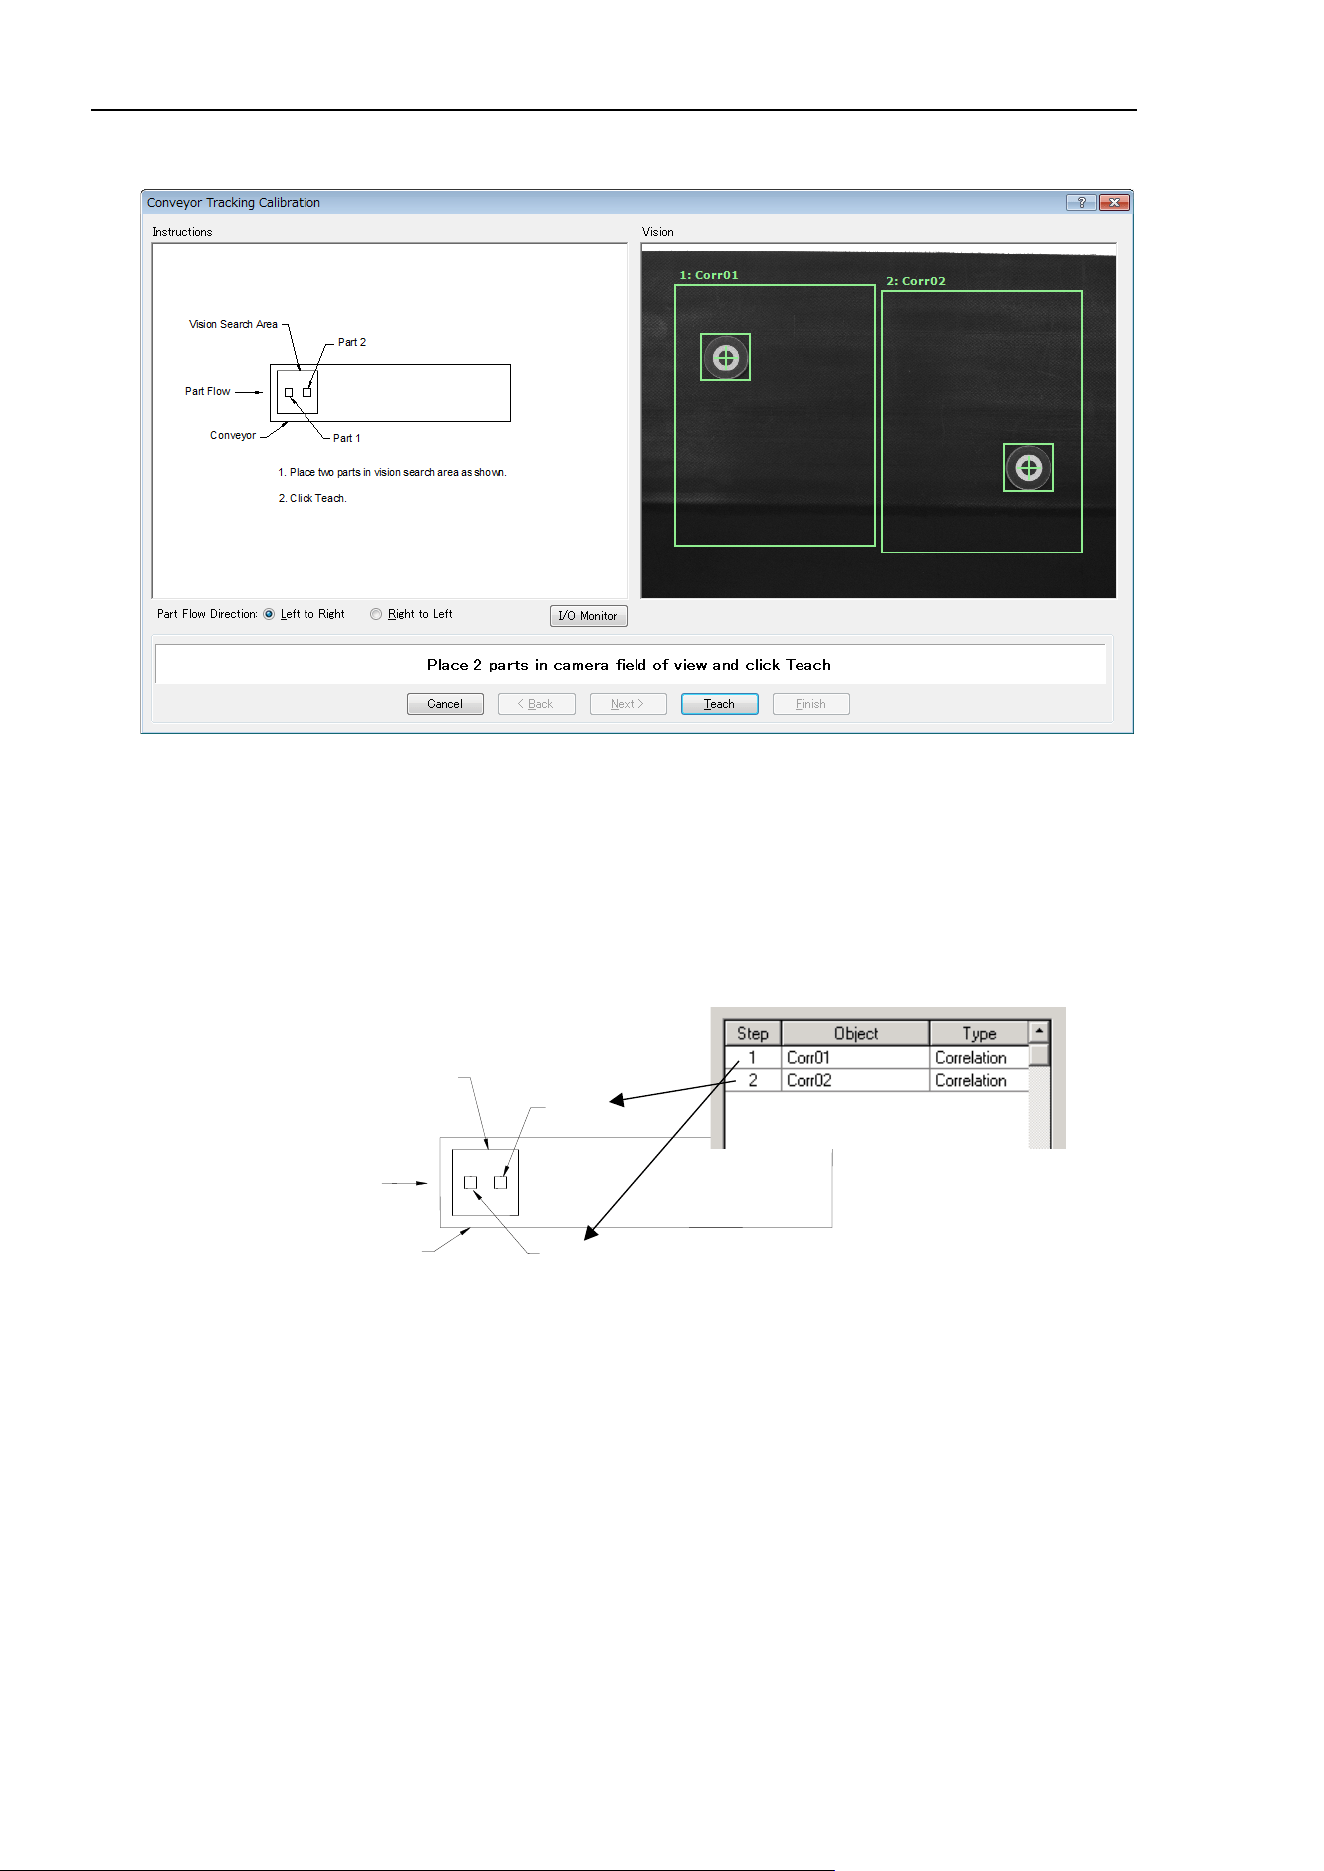
16. Conveyor Tracking
438 EPSON RC+ 7.0 (Ver.7.4) User's Guide Rev.6
Place two work pieces on the conveyor as shown below.
It is recommended to place the two parts diagonally in the field of view. Also, the first
object of a sequence must be taught with the robot as Part 1. The second object of a
sequence must be taught with the robot as Part 2.
Also, the two parts can be anywhere in the field of view. However, to make it as easy as
possible for operators to calibrate the conveyor, the parts that will be found in the vision
sequence should be located such that part 2 is after part 1 in the direction of part flow. In
the figure below, object 1 in the vision sequence is Corr01, which locates Part 1. Object 2
is Corr02, which locates Part 2.
Conveyor
Vision Search Area
Part 2
Part Flow
Part 1
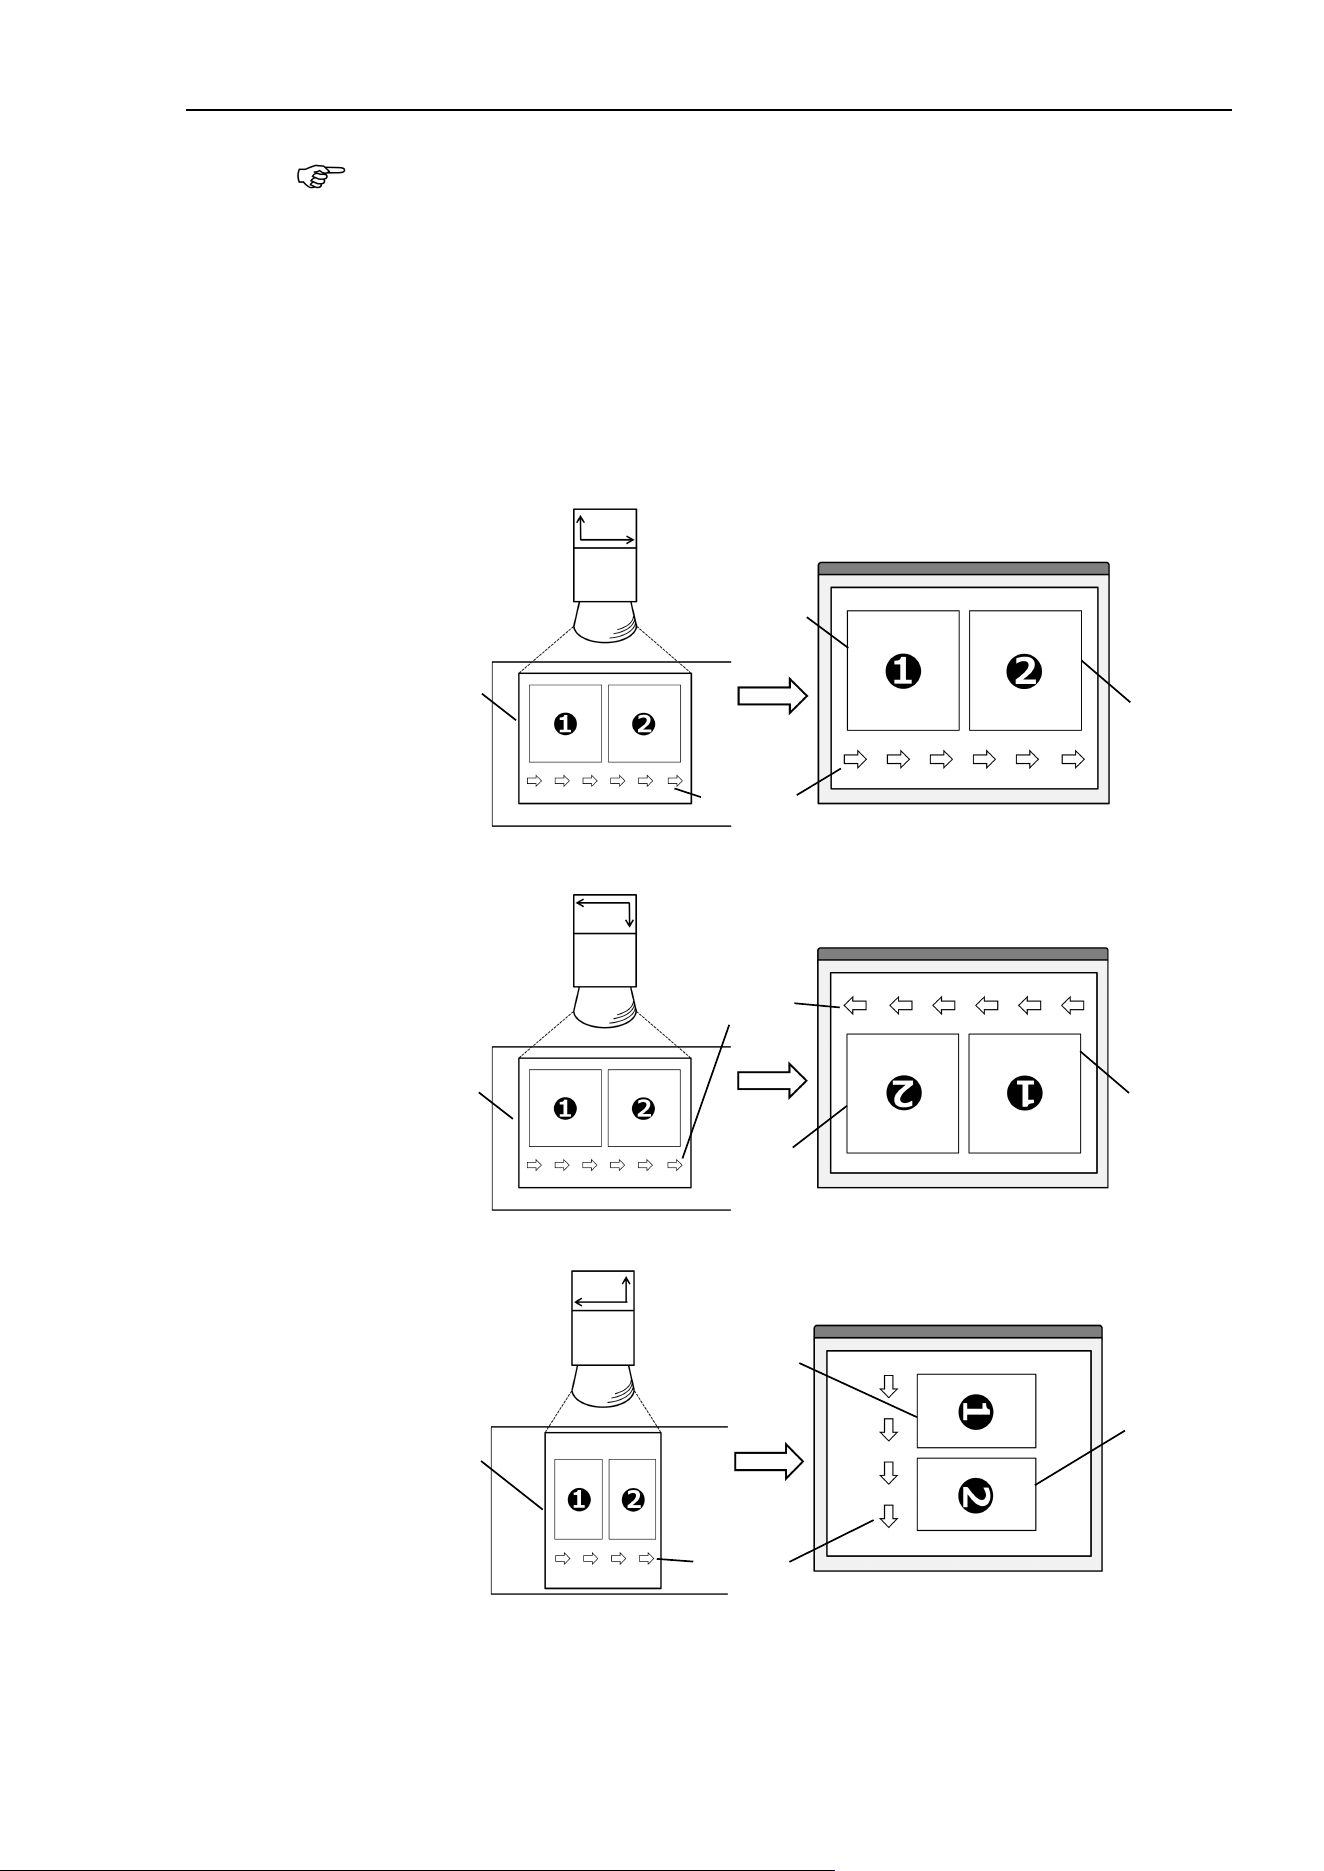
16. Conveyor Tracking
EPSON RC+ 7.0 (Ver.7.4) User's Guide Rev.6
439
When calibrating the vision conveyor tracking, pay attention to the followings to calibrate
properly.
- Check the conveyor direction in the image display.
- In “teaching in the vision search area”, place the work 1 on the upstream side and the
work 2 on the downstream side.
- Set the objects for detecting the work 1 and 2 in numerical order in the calibration
sequence.
The orientation of the camera’s FOV displayed in the image display may differ from it
actually looks. See the illustrations below. When the camera’s mounting direction is
reversed, you need to pay attention to the positional relation of the work pieces and the
vision objects.
Conveyor
Work 1
Work 2
First
vision object
Image display
Conveyor
direction
Camera’s
FOV
Camera
Camera
coordinate
system
X
Y
Second
vision object
Camera
coordinate
system
X
Y
Second
vision object
Camera’s
FOV
Work 1
Work 2
Conveyor
direction
Conveyor
Image display
Camera
First
vision object
Camera
coordinate
system
Y
Work 1
Work 2
Conveyor
direction
Image display
Camera
X
Conveyor
Camera’s
FOV
Second
vision object
First
vision object
NOTE
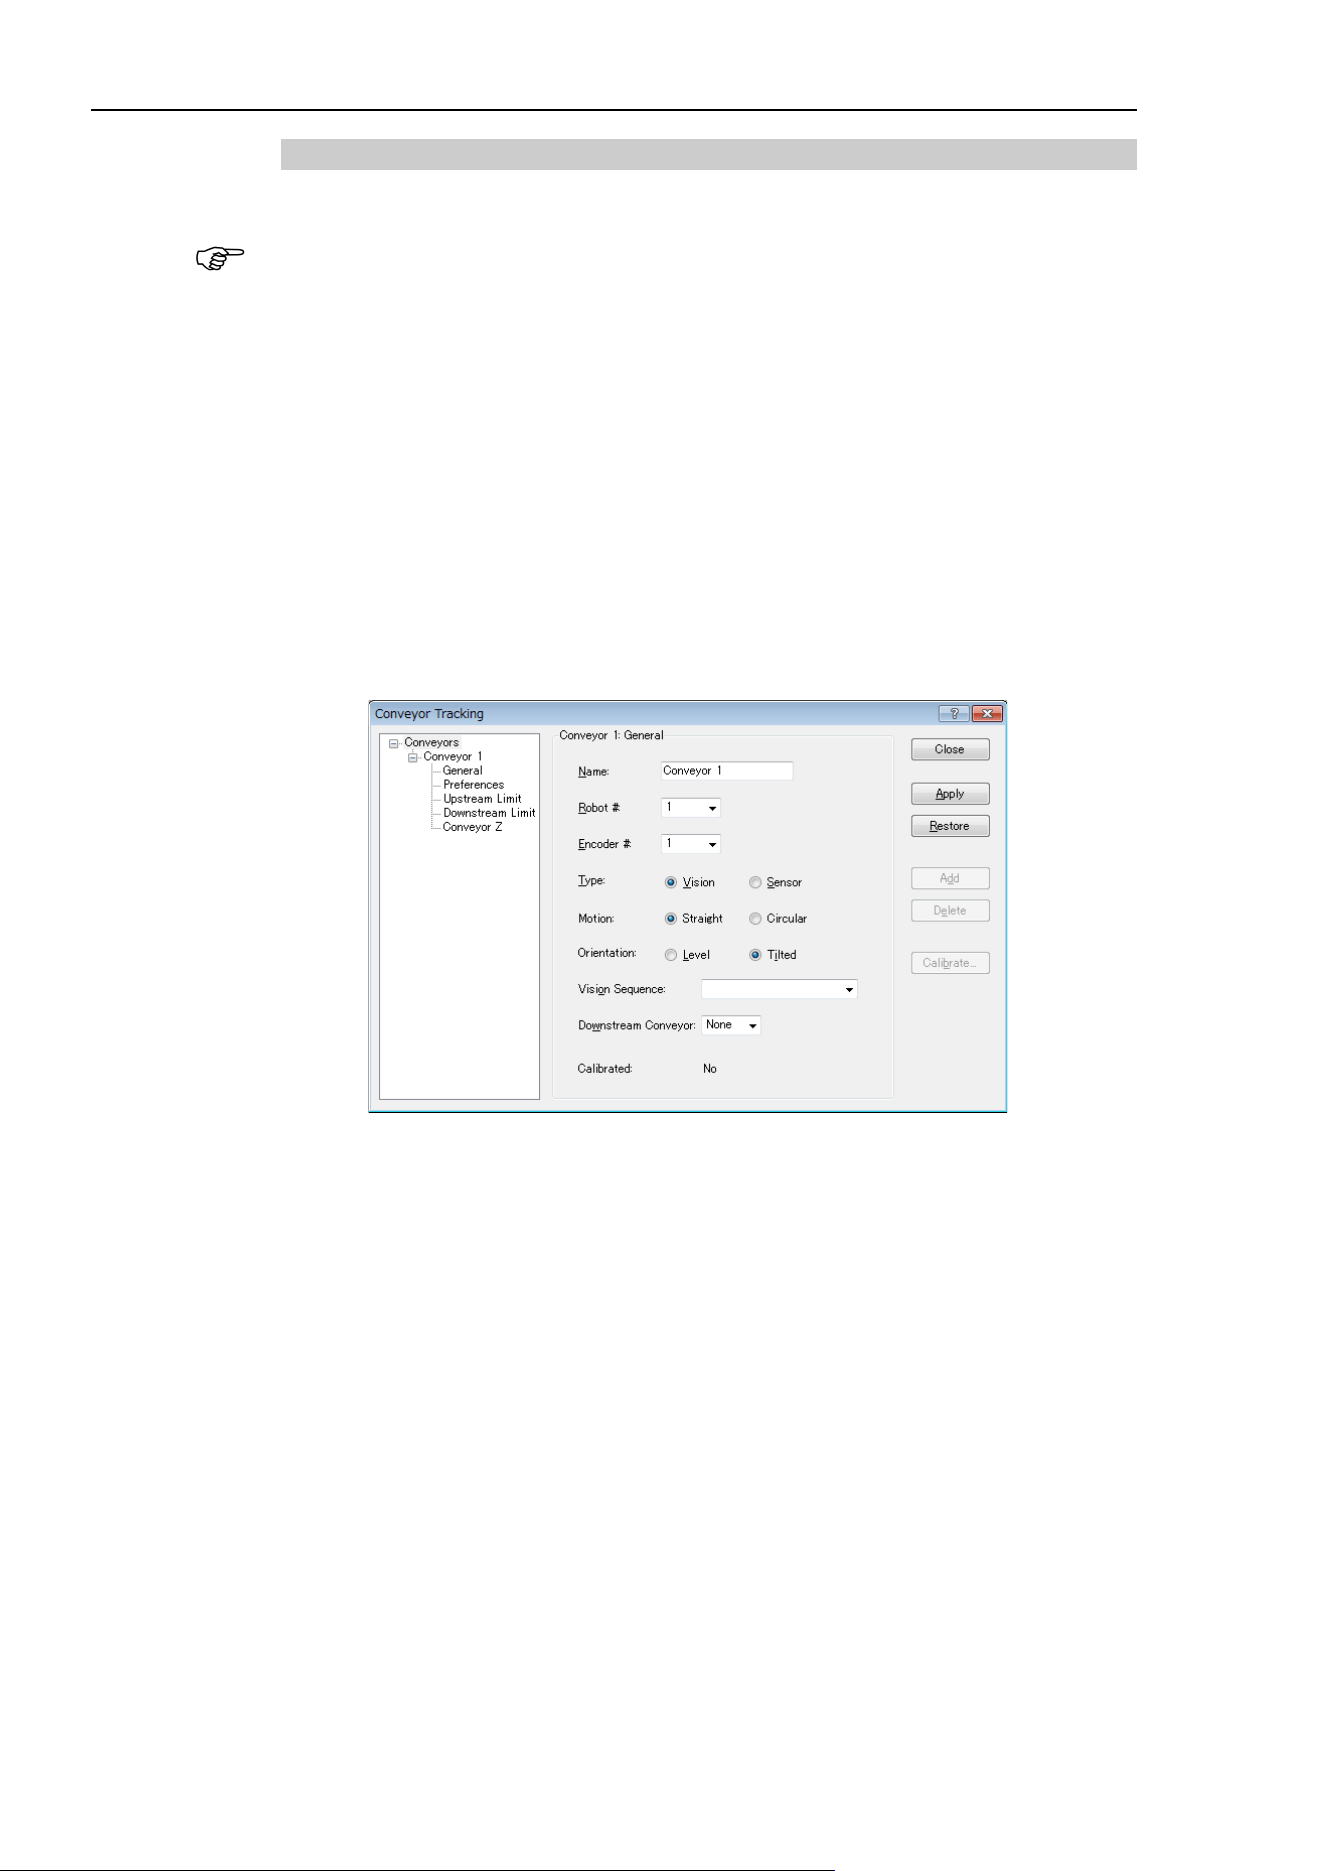
16. Conveyor Tracking
440 EPSON RC+ 7.0 (Ver.7.4) User's Guide Rev.6
Vision conveyor calibration (Straight conveyor)
Follow these steps to calibrate a straight vision conveyor:
- When teaching part positions with the robot during calibration, it is important to
position X, Y, and Z of each point accurately. The conveyor is calibrated in X, Y, Z, U,
V, and W.
- To perform the fine calibration, in the step 15 and 17, set as wide distance as possible
between the upstream limit and downstream limit. After the calibration, adjust the
Pickup Area by resetting the upstream / downstream limits.
- For the level orientation, it determines the conveyor height with the position of robot
end effector taught in the step 12. It cannot be used for the tilted conveyor for it does
not detect the conveyor slope. The steps 19 to 20 are not displayed.
- For the tilted orientation, it calibrates the conveyor slope with the position of robot end
effector taught in the steps 12, 14, 16, 18, and 20.
1. Select [Tools]-[Conveyor Tracking].
2. Select the conveyor you want to calibrate.
3. Select <Vision> for the [Type].
4. Set the [Vision Sequence].
5. Click the <Apply> button.
6. Click the <Calibrate> button. The [Conveyor Tracking Calibration] wizard will
appear. Follow the instructions for each step. Before you can proceed to the next
step, you must click the <Teach> button. You can go back to previous steps
using the <Back> button.
7. Select the [Part Flow Direction] to best match the conveyor you are calibrating.
The instruction pictures will change according to the setting. [Part Flow
Direction] is only used to aid in the instructions. It has no effect on the
calibration.
8. Place two parts on the conveyor as shown in the figure in the wizard.
9. Check the live video in [Vision]. The camera orientation may not be the same as
the picture.
NOTE
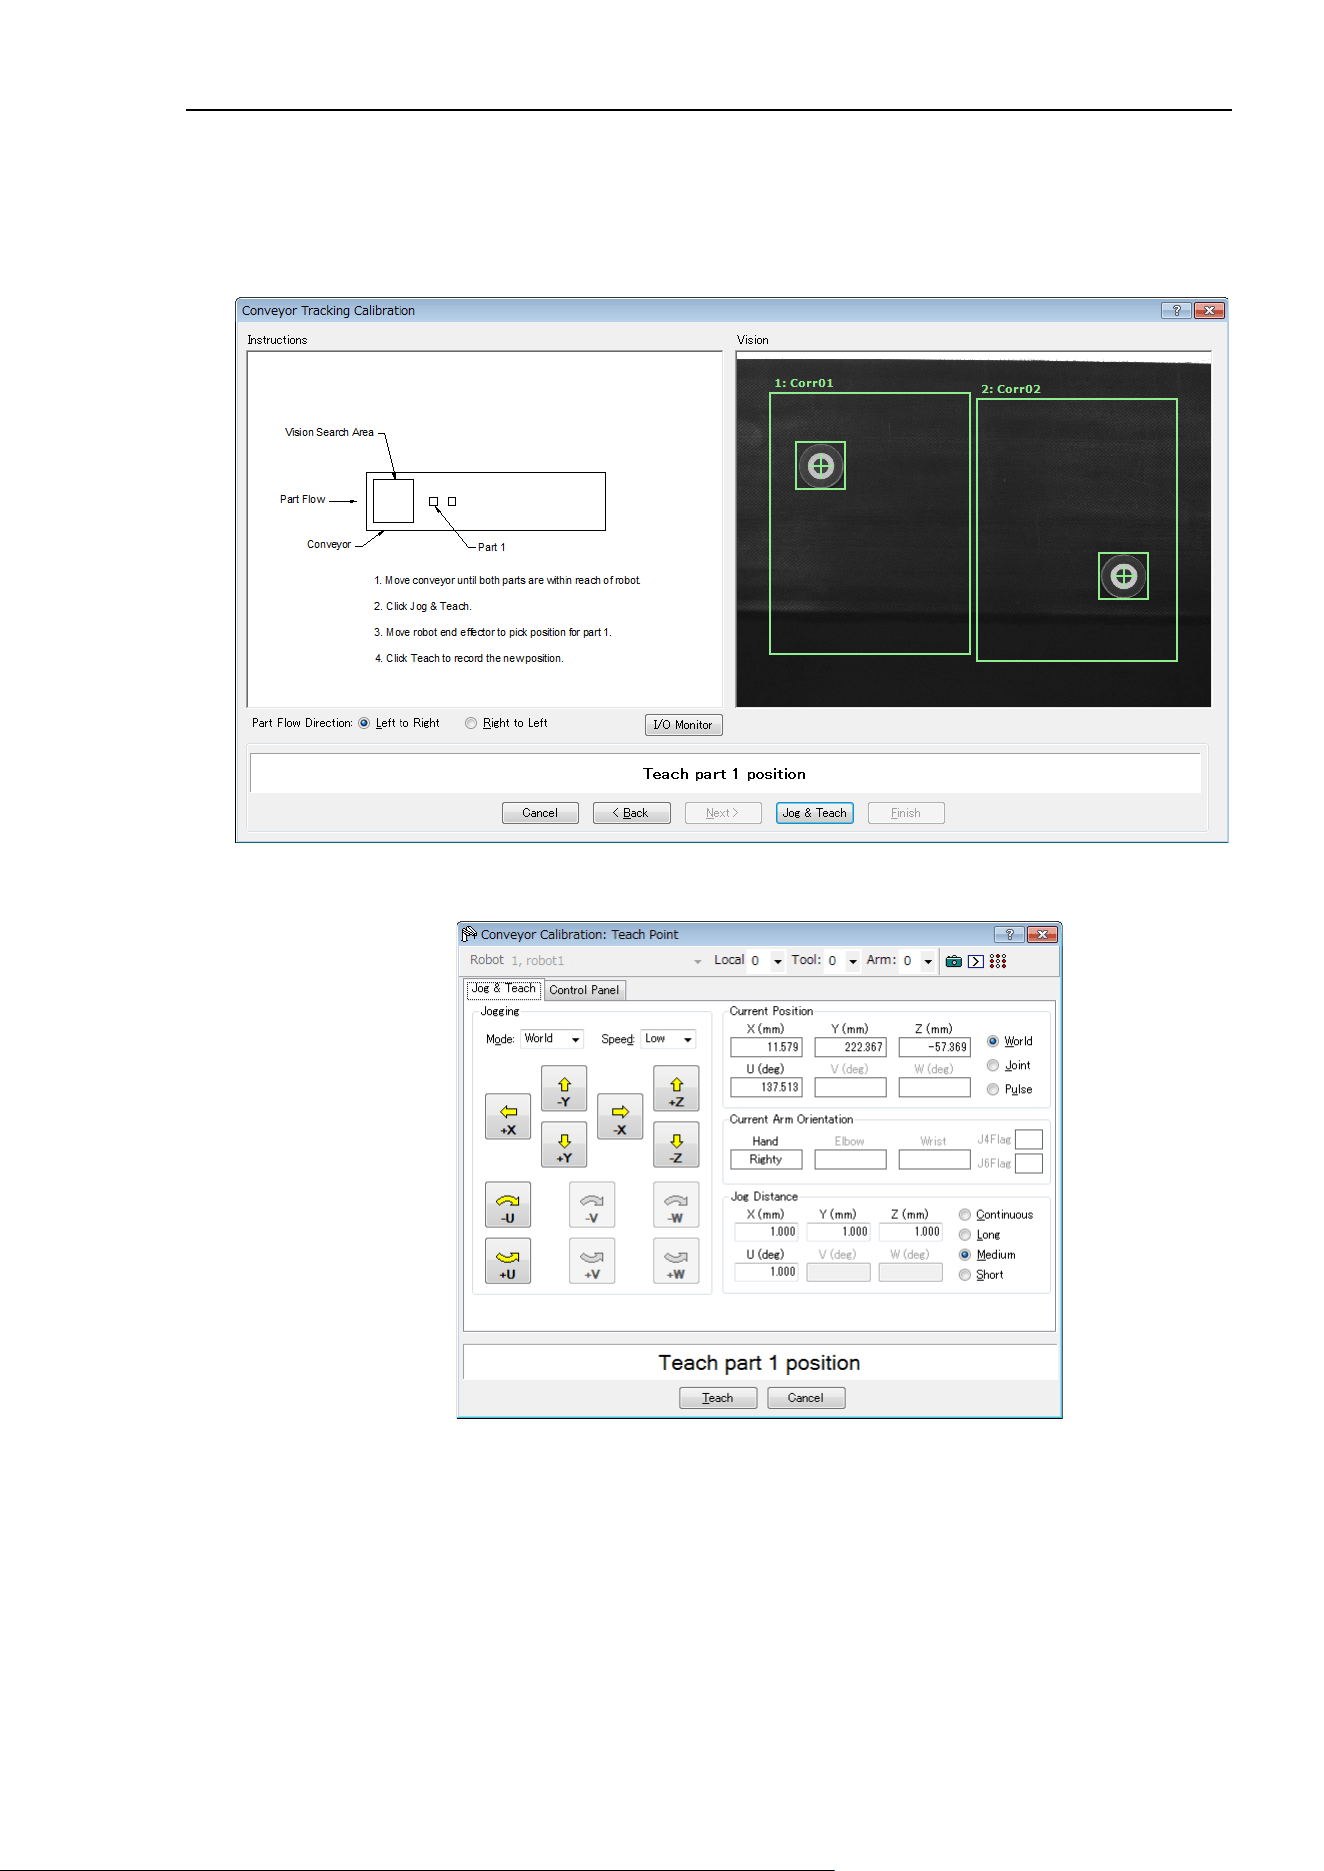
16. Conveyor Tracking
EPSON RC+ 7.0 (Ver.7.4) User's Guide Rev.6
441
10. Arrange the parts to be inside the range correctly and click <Teach> button. Use
the camera video to ensure that the parts are within the correct search area for
each.
11. Move the conveyor until both parts are within reach of the robot. Do not move
the parts, only the conveyor. Click the <Jog & Teach> button.
12. The [Jog & Teach] dialog will appear. Click the jog buttons to move the robot
end effector to the pick position for Part 1. Click the <Teach> button.
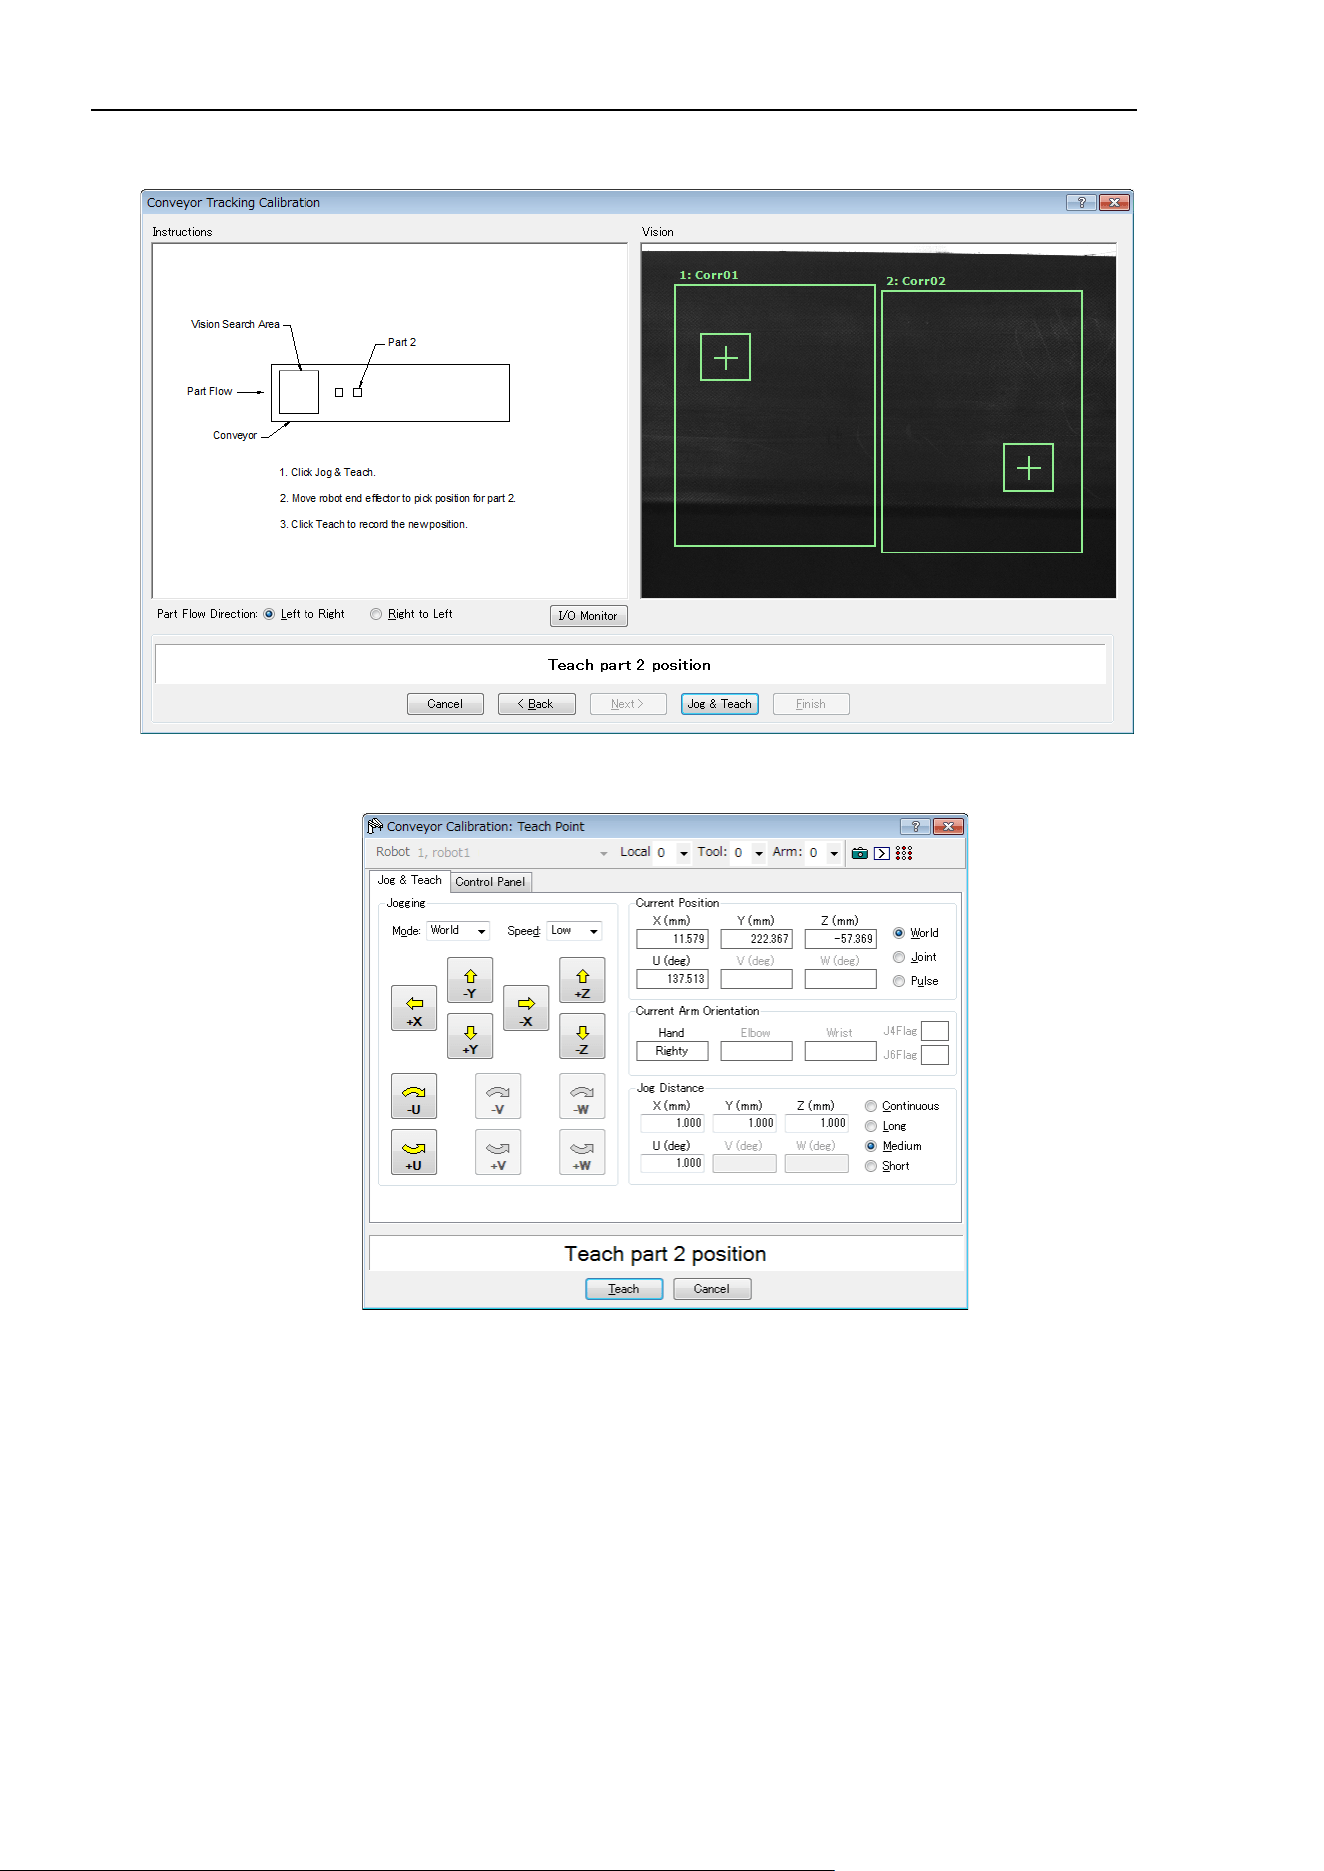
16. Conveyor Tracking
442 EPSON RC+ 7.0 (Ver.7.4) User's Guide Rev.6
13. Click the <Jog & Teach> button.
14. The [Jog & Teach] dialog will appear. Click the jog buttons to move the robot
end effector to the pick position for Part 2. Click the <Teach> button.
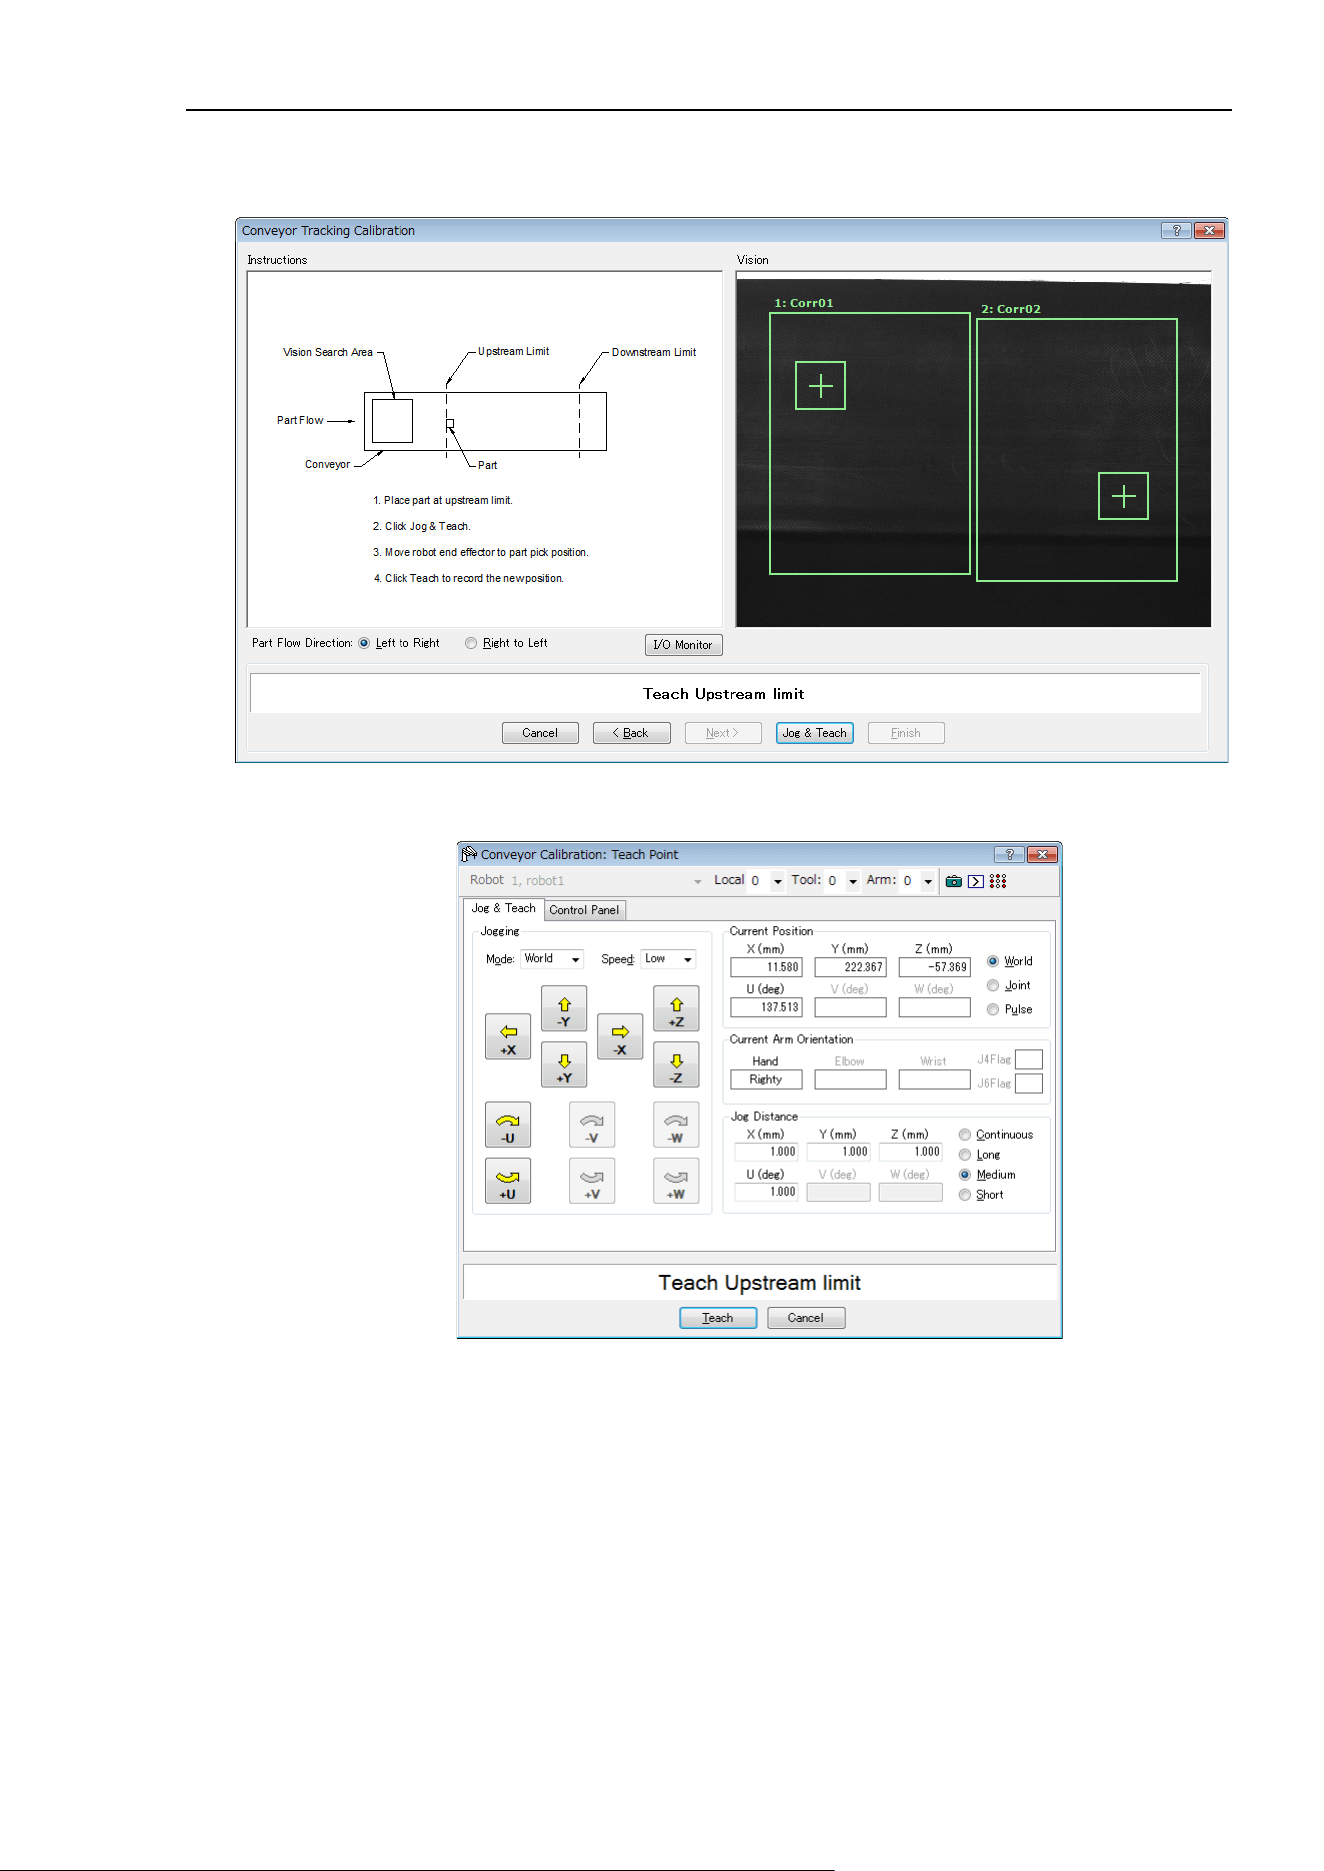
16. Conveyor Tracking
EPSON RC+ 7.0 (Ver.7.4) User's Guide Rev.6
443
15. Now move or place the part at the upstream limit.
Click the <Jog & Teach> button.
16. The [Jog & Teach] dialog will appear. Click the jog buttons to move the robot
end effector to the pick position. Click the <Teach> button.
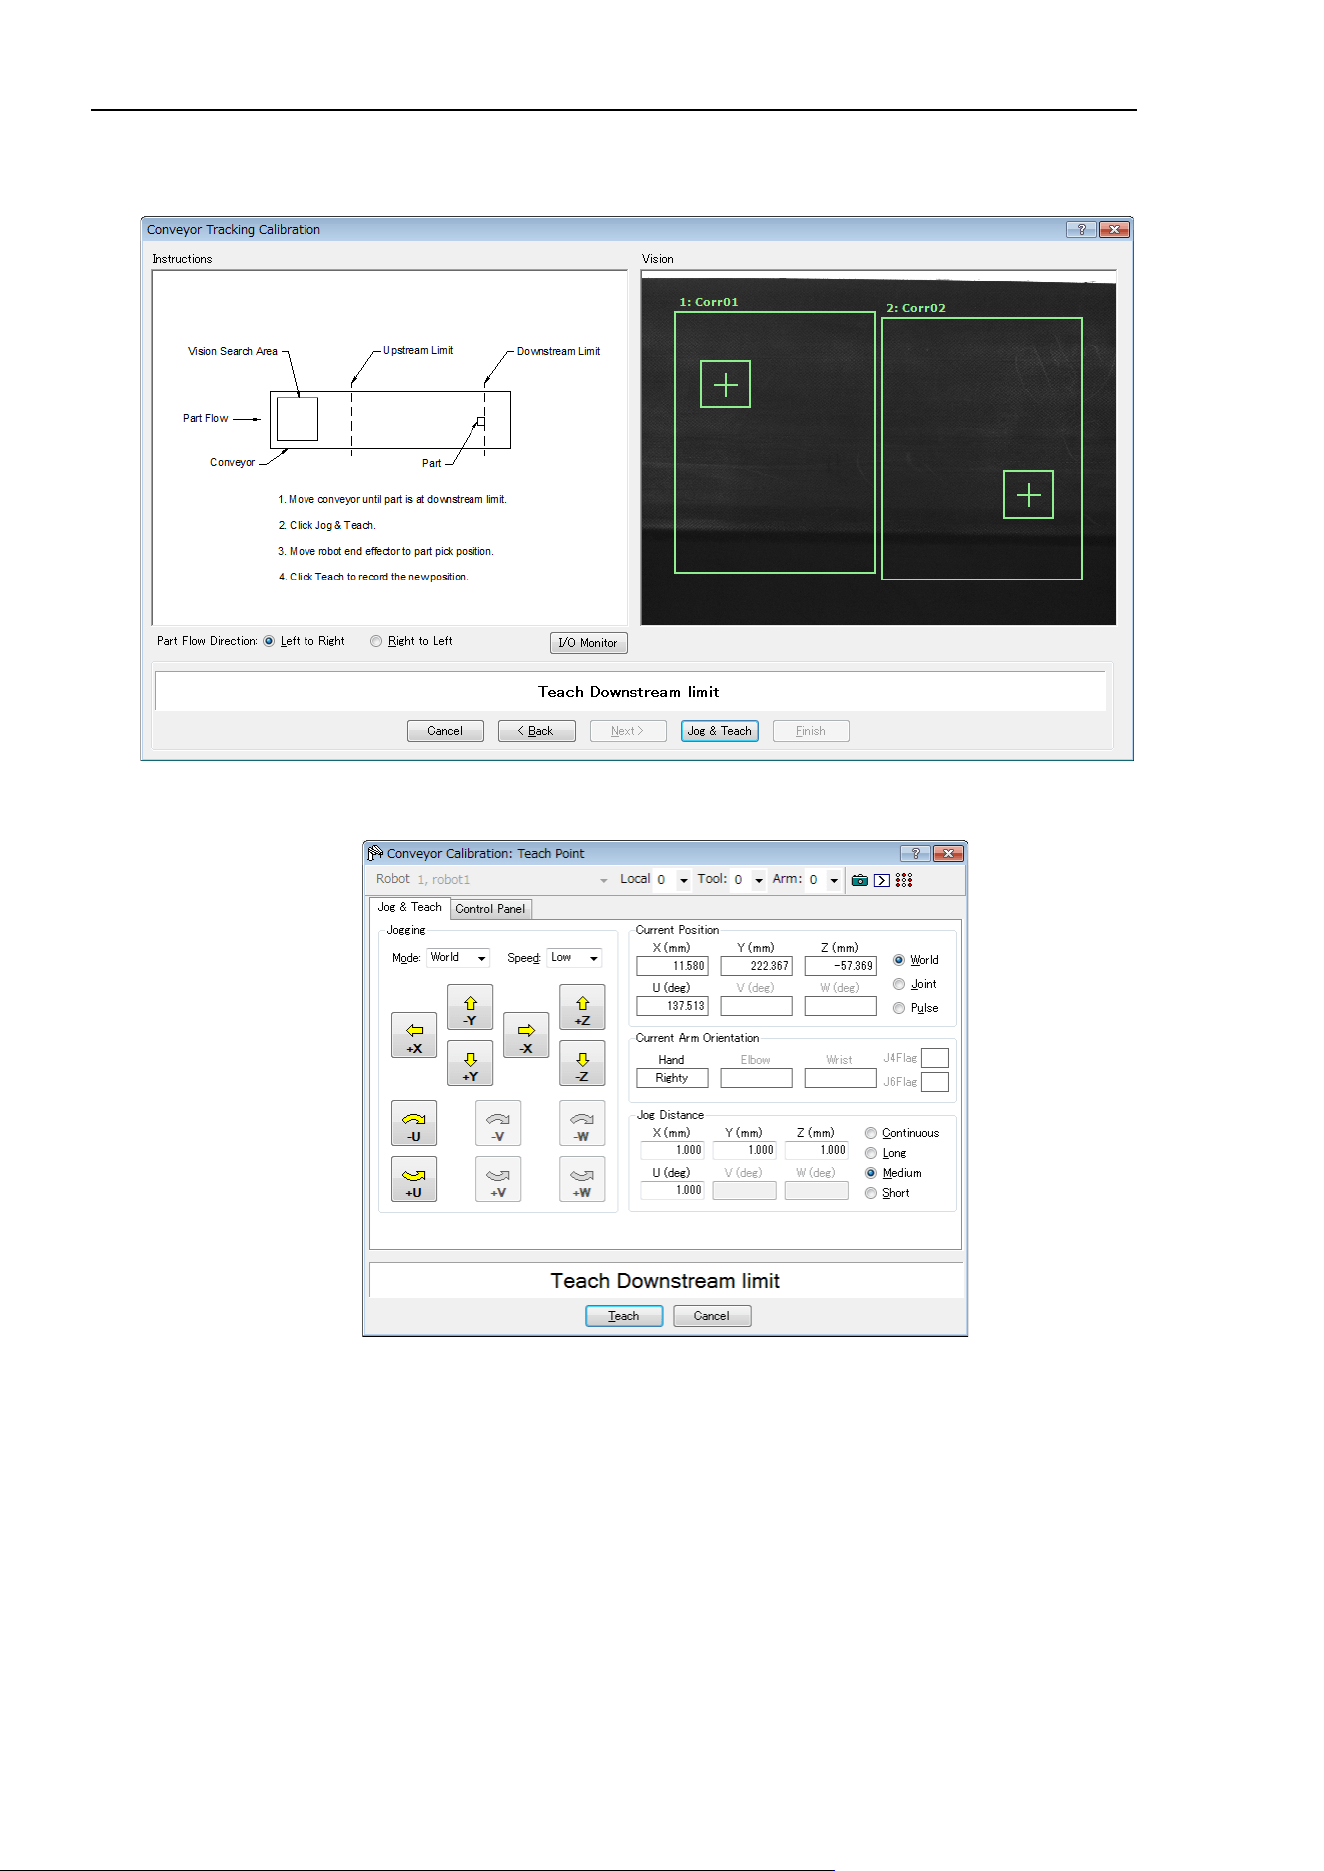
16. Conveyor Tracking
444 EPSON RC+ 7.0 (Ver.7.4) User's Guide Rev.6
17. Move the conveyor so the part is at the downstream limit. Do not move the part,
only the conveyor. Click the <Jog & Teach> button.
18. The [Jog & Teach] dialog will appear. Click the jog buttons to move the robot
end effector towards the part. Click the <Teach> button.
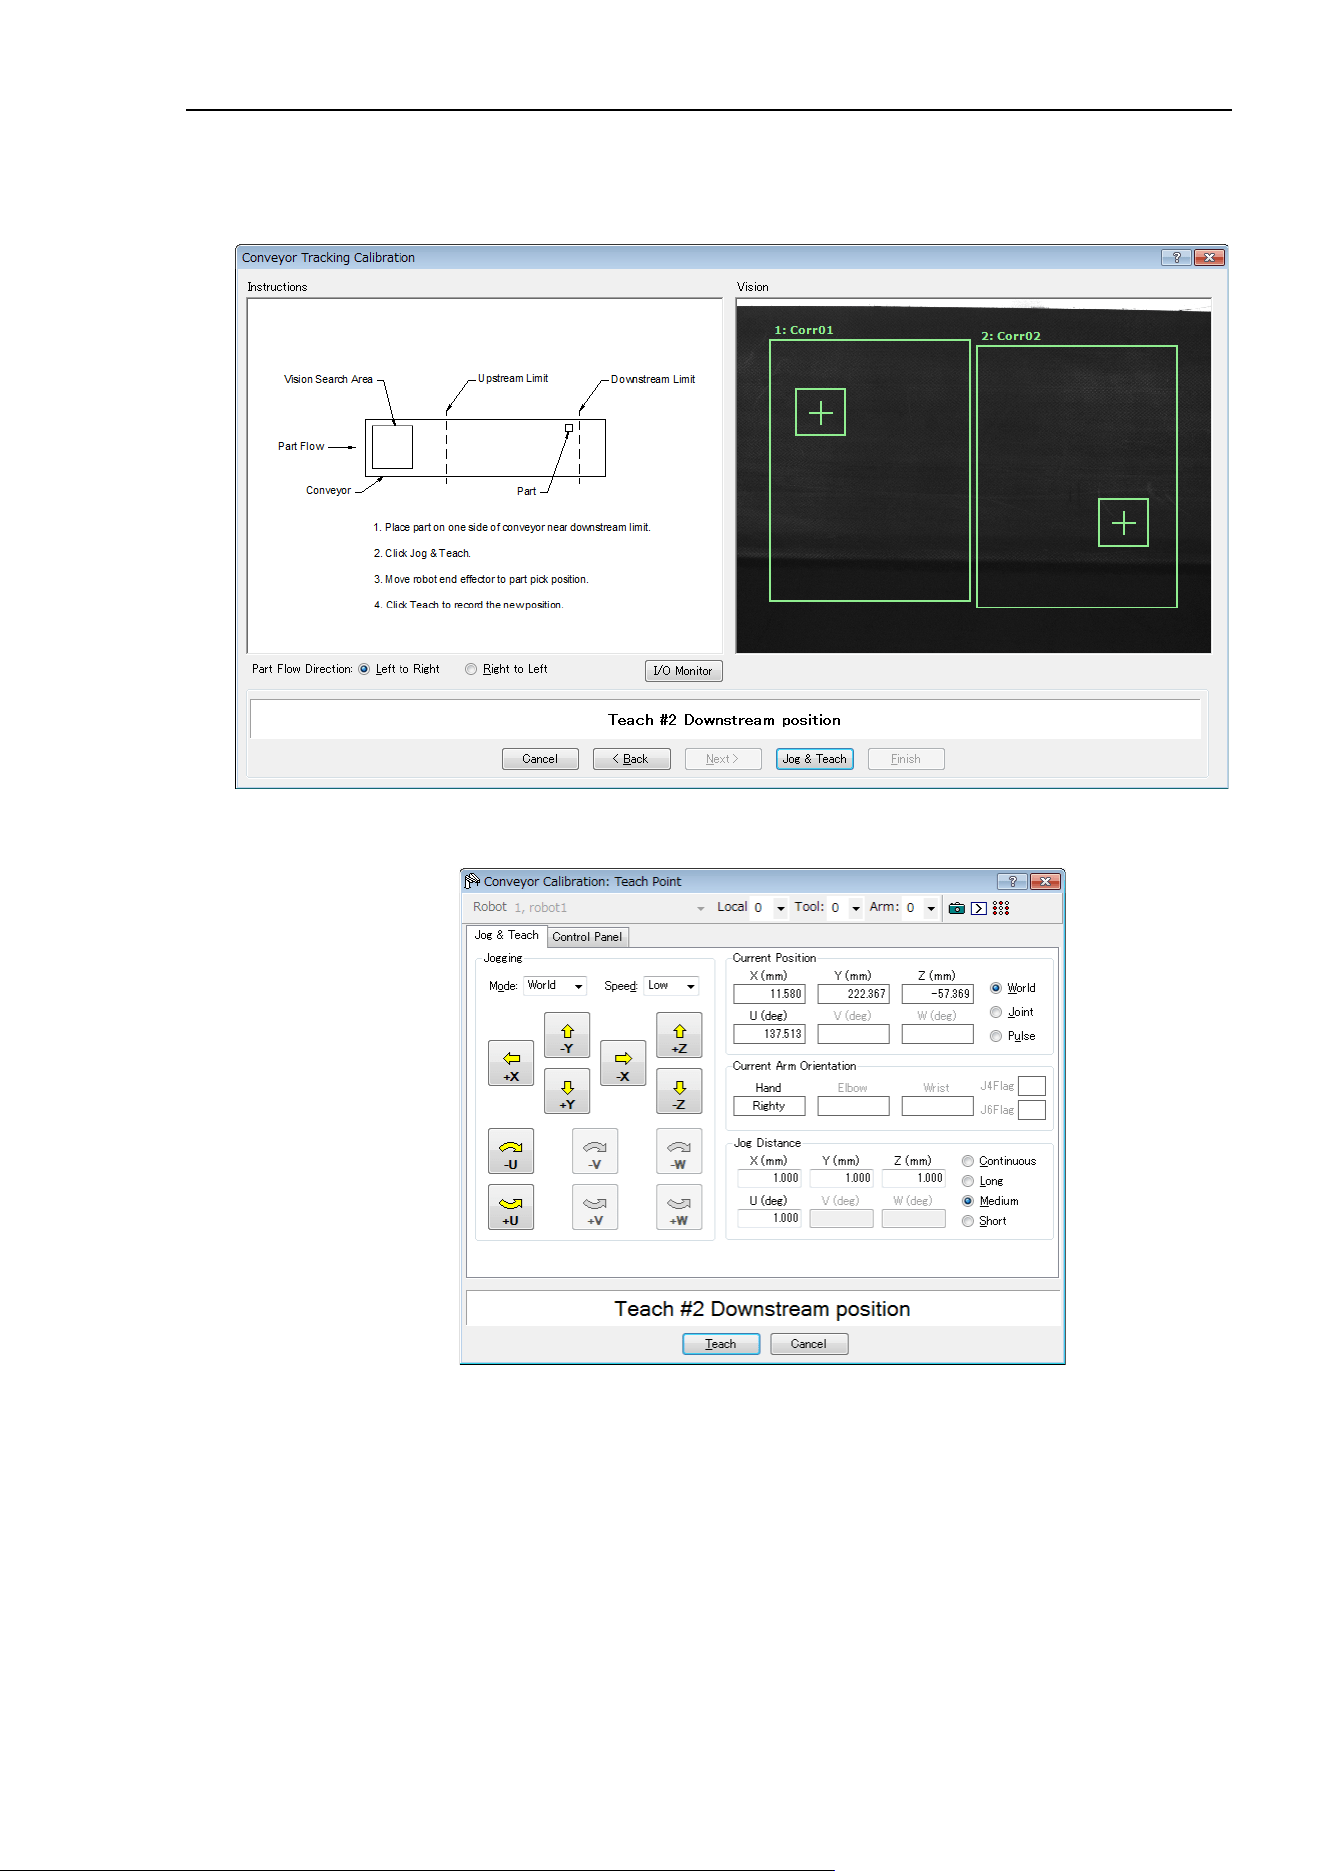
16. Conveyor Tracking
EPSON RC+ 7.0 (Ver.7.4) User's Guide Rev.6
445
19. Place a part on one side of the conveyor near the downstream limit. This point is
used to determine the tilt of the conveyor from side to side. Click the <Jog &
Teach> button.
20. The [Jog & Teach] dialog will appear. Click the jog buttons to move the robot
end effector to the part position. Click the <Teach> button.
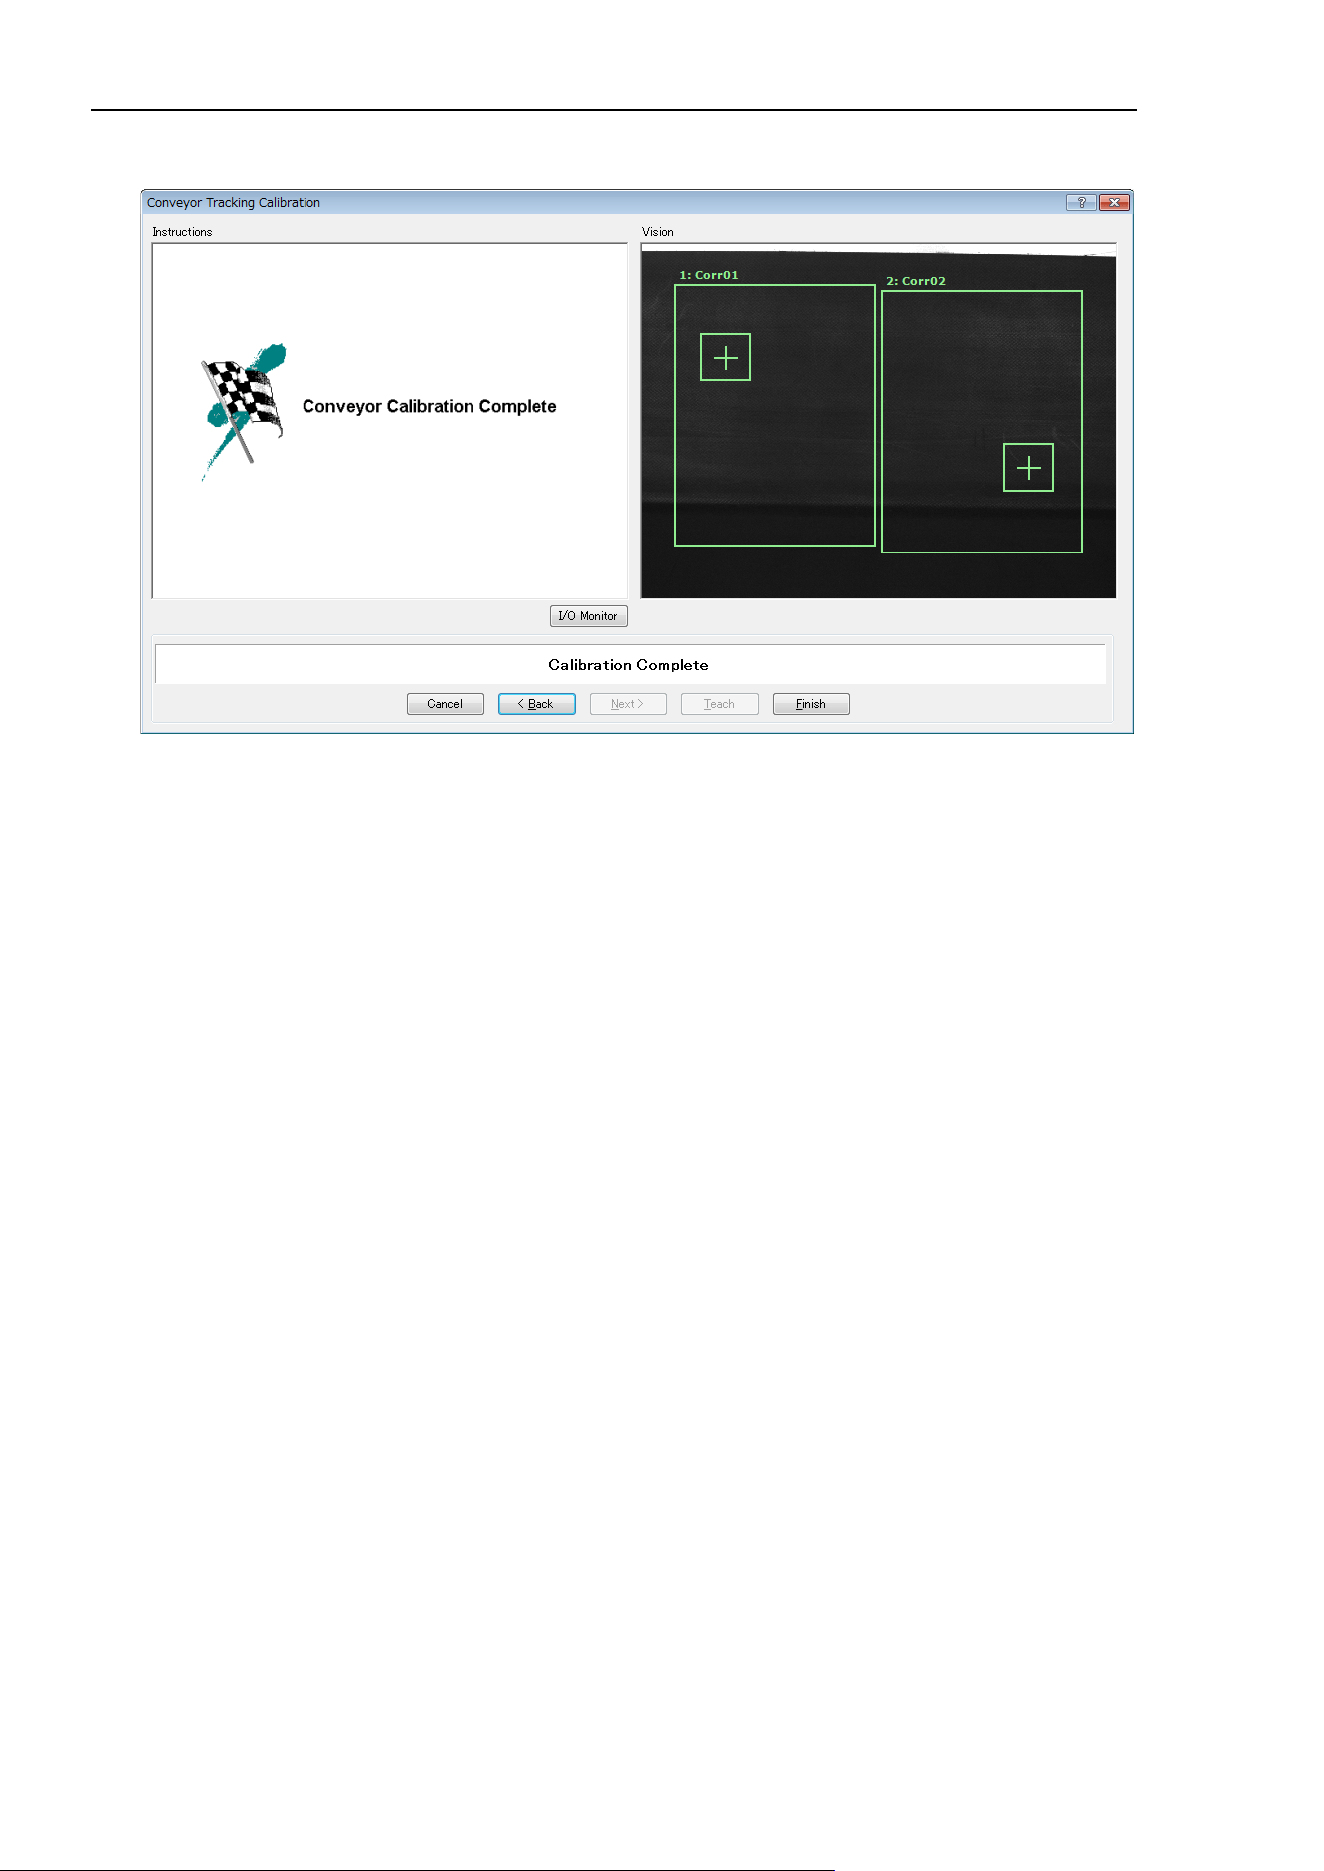
16. Conveyor Tracking
446 EPSON RC+ 7.0 (Ver.7.4) User's Guide Rev.6
21. The calibration complete picture will be displayed. Click the <Finish> button.
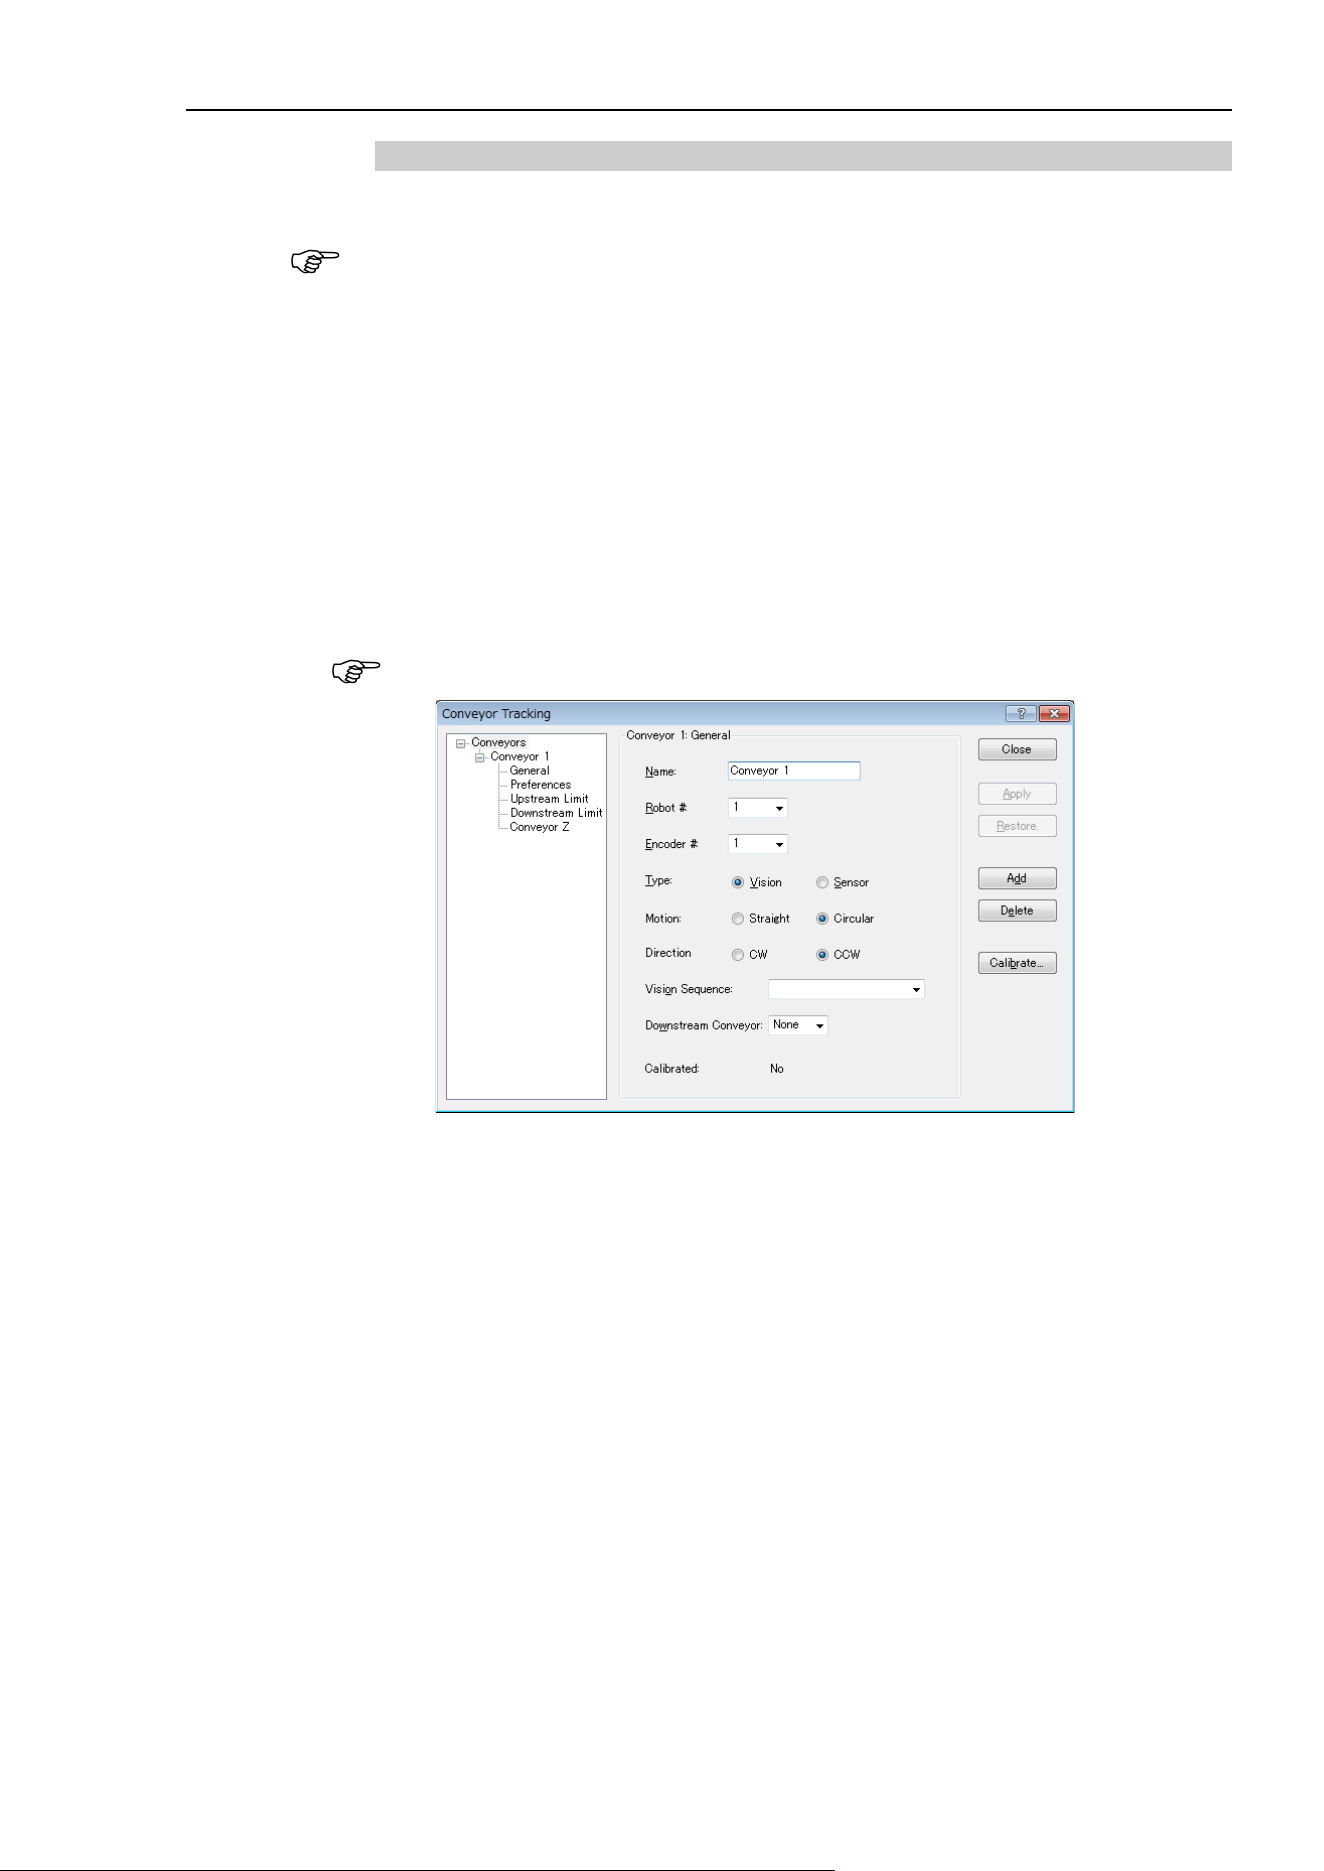
16. Conveyor Tracking
EPSON RC+ 7.0 (Ver.7.4) User's Guide Rev.6
447
Vision conveyor calibration (Circular conveyor)
Follow these steps to calibrate a circular vision conveyor:
- When teaching part positions with the robot during calibration, it is important to
position X, Y, and Z of each point accurately. The conveyor is calibrated in X, Y, Z, U,
V, and W.
- To perform the fine calibration, in steps 13, 17, and 19, teach the position when the
robot is directly above the parts 1 and set as wide a distance as possible between the
points to be taught.
1. Select [Tools]-[Conveyor Tracking].
2. Select the conveyor you want to calibrate.
3. Select <Vision> for the [Type].
4. Select <Circular> for the [Motion].
5. Select the conveyor rotating direction for the [Direction].
Be careful not to calibrate with a wrong direction, otherwise, the robot will not track
the parts.
6. Select the [Vision Sequence].
7. Click the <Apply> button.
8. Click the <Calibrate> button. The [Conveyor Tracking Calibration] wizard will
appear. Follow the instructions for each step. Before you can proceed to the next
step, you must click the <Teach> button. You can go back to previous steps using
the <Back> button.
9. Check if the conveyor direction shown in the wizard is the same as the conveyor you
want to use.
10. Place two parts on the conveyor as shown in the figure in the wizard.
11. Select the [Vision] tab to see live video. The camera orientation may not be the
same as the picture.
NOTE
NOTE
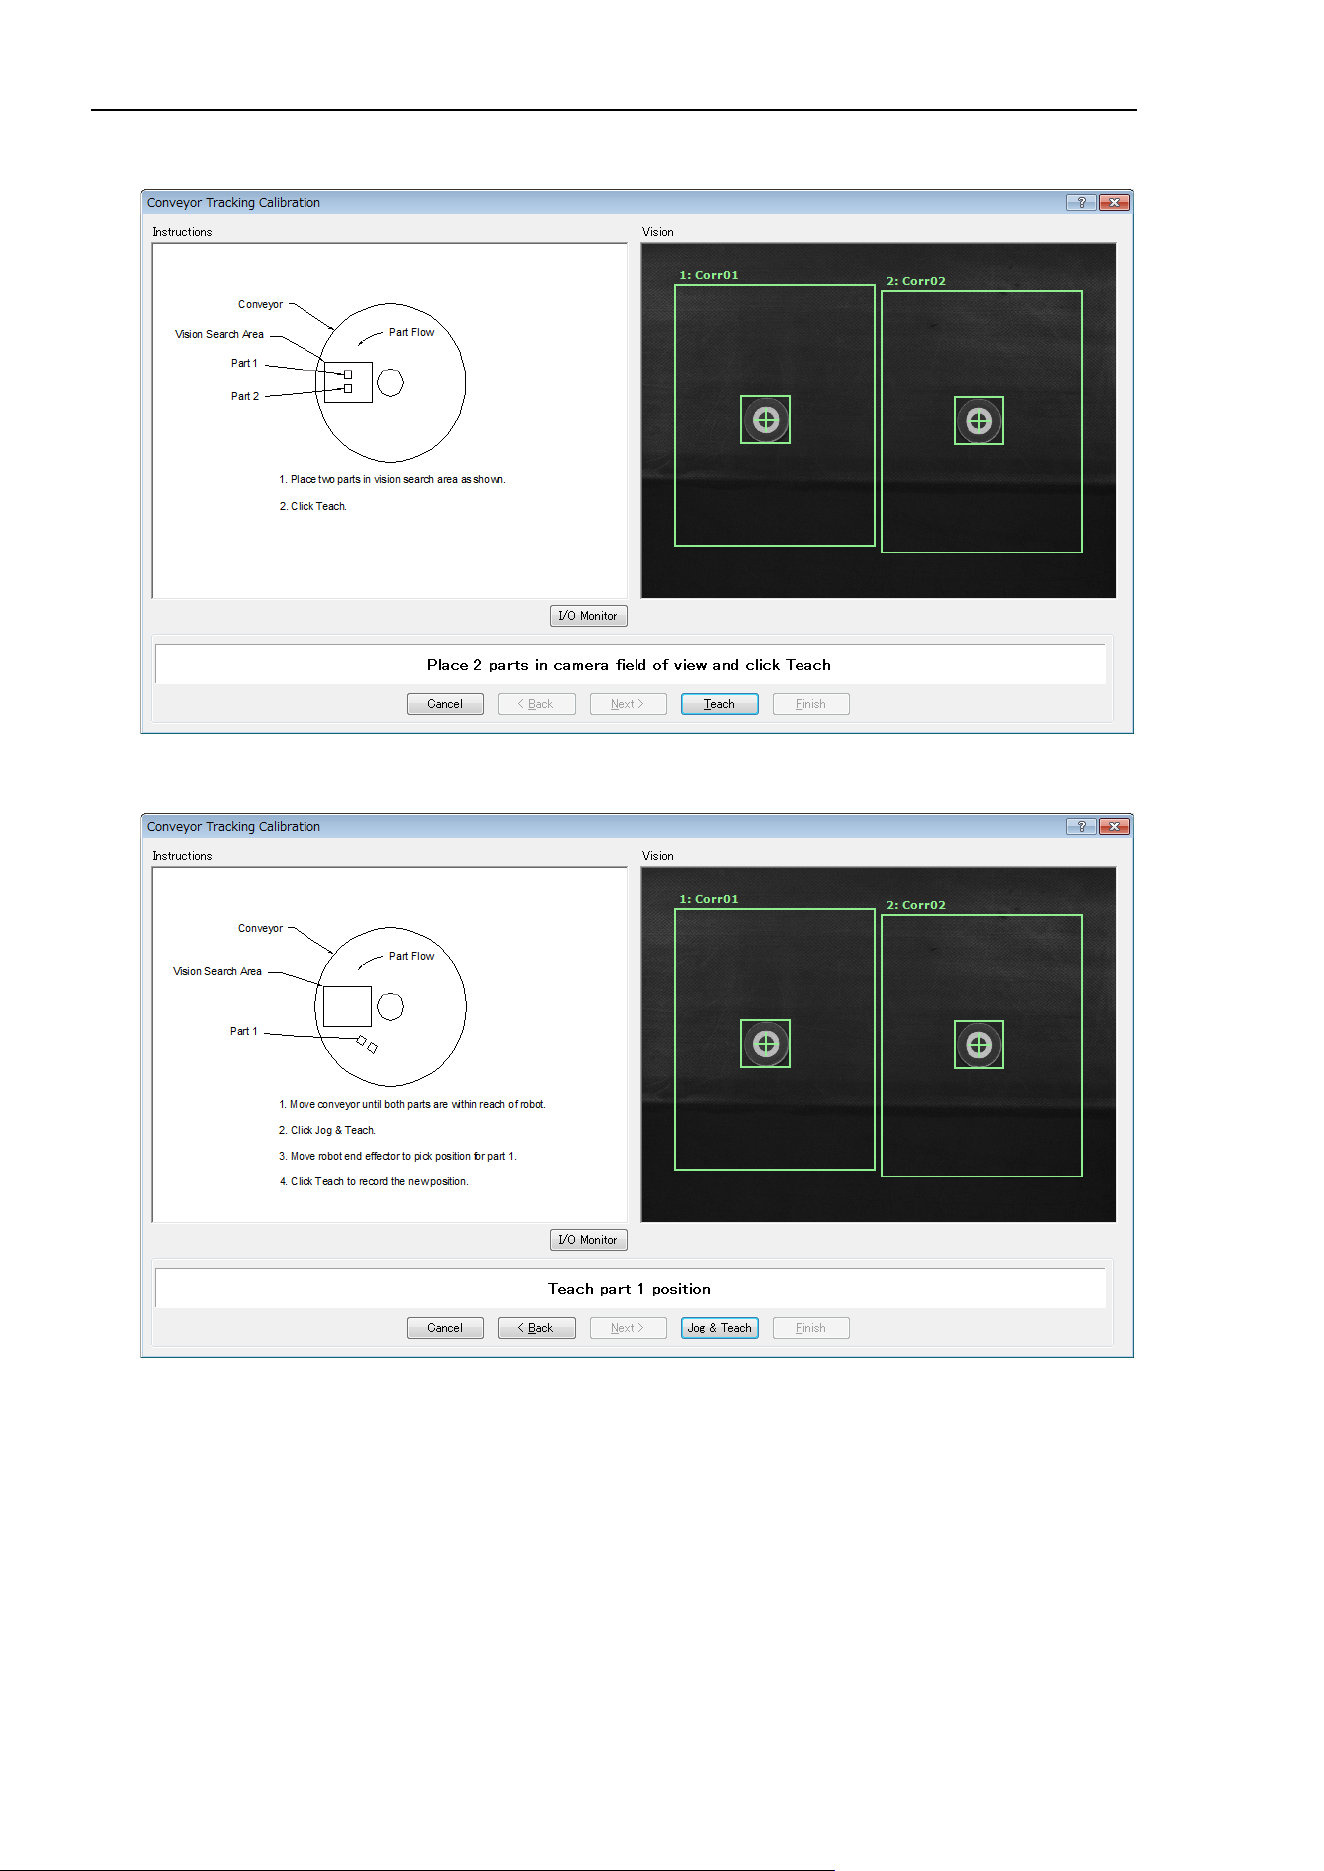
16. Conveyor Tracking
448 EPSON RC+ 7.0 (Ver.7.4) User's Guide Rev.6
12. Arrange the parts to be inside the range correctly and click the <Teach> button.
13. Move the conveyor until both parts are within reach of the robot. Do not move the
parts, only the conveyor.
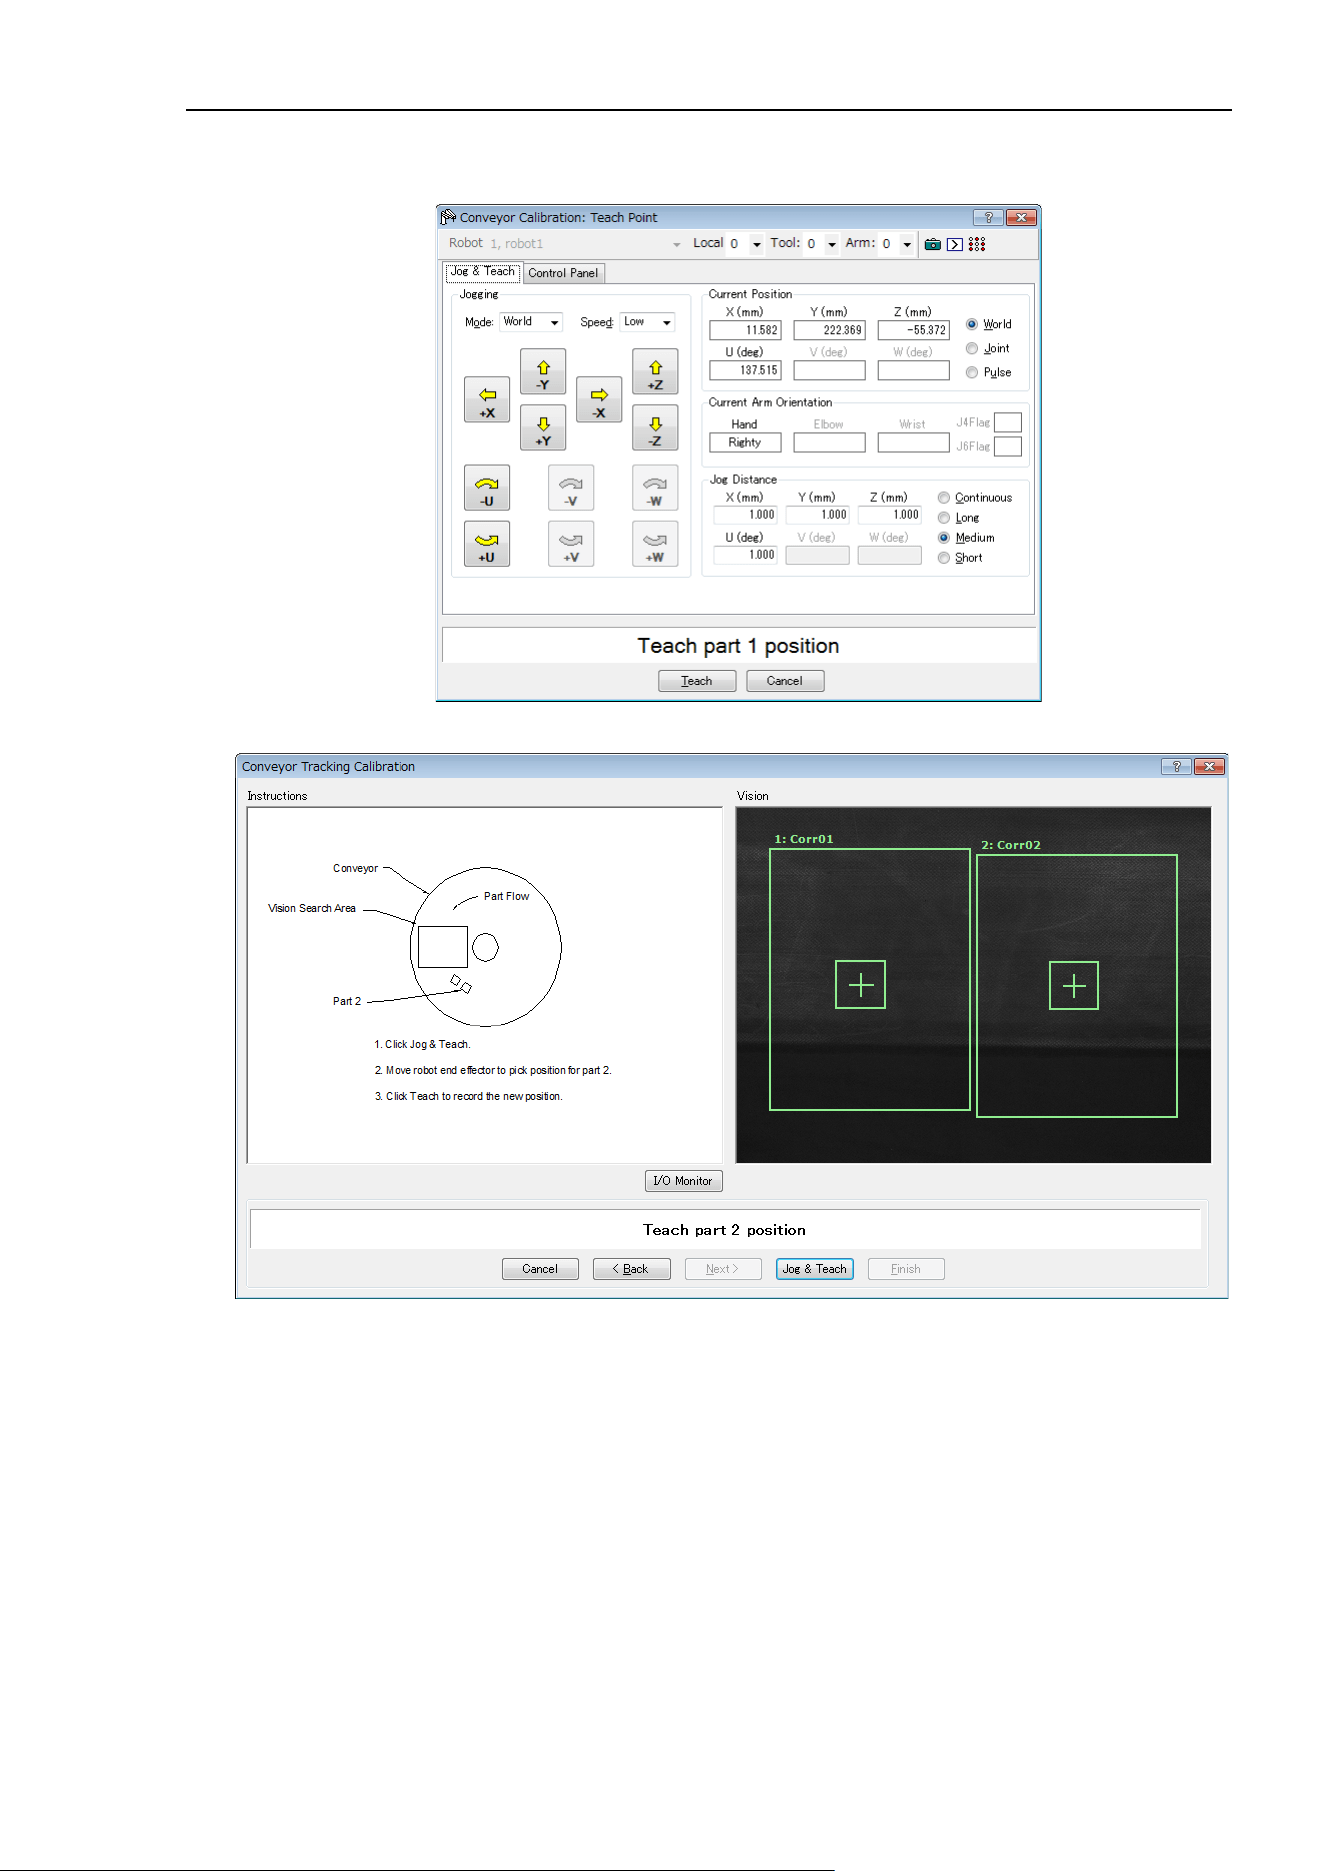
16. Conveyor Tracking
EPSON RC+ 7.0 (Ver.7.4) User's Guide Rev.6
449
14. The [Jog & Teach] dialog will appear. Click the jog buttons to move the robot end
effector to the pick position for Part 1. Click the <Teach> button.
15. Click the <Jog&Teach> button.
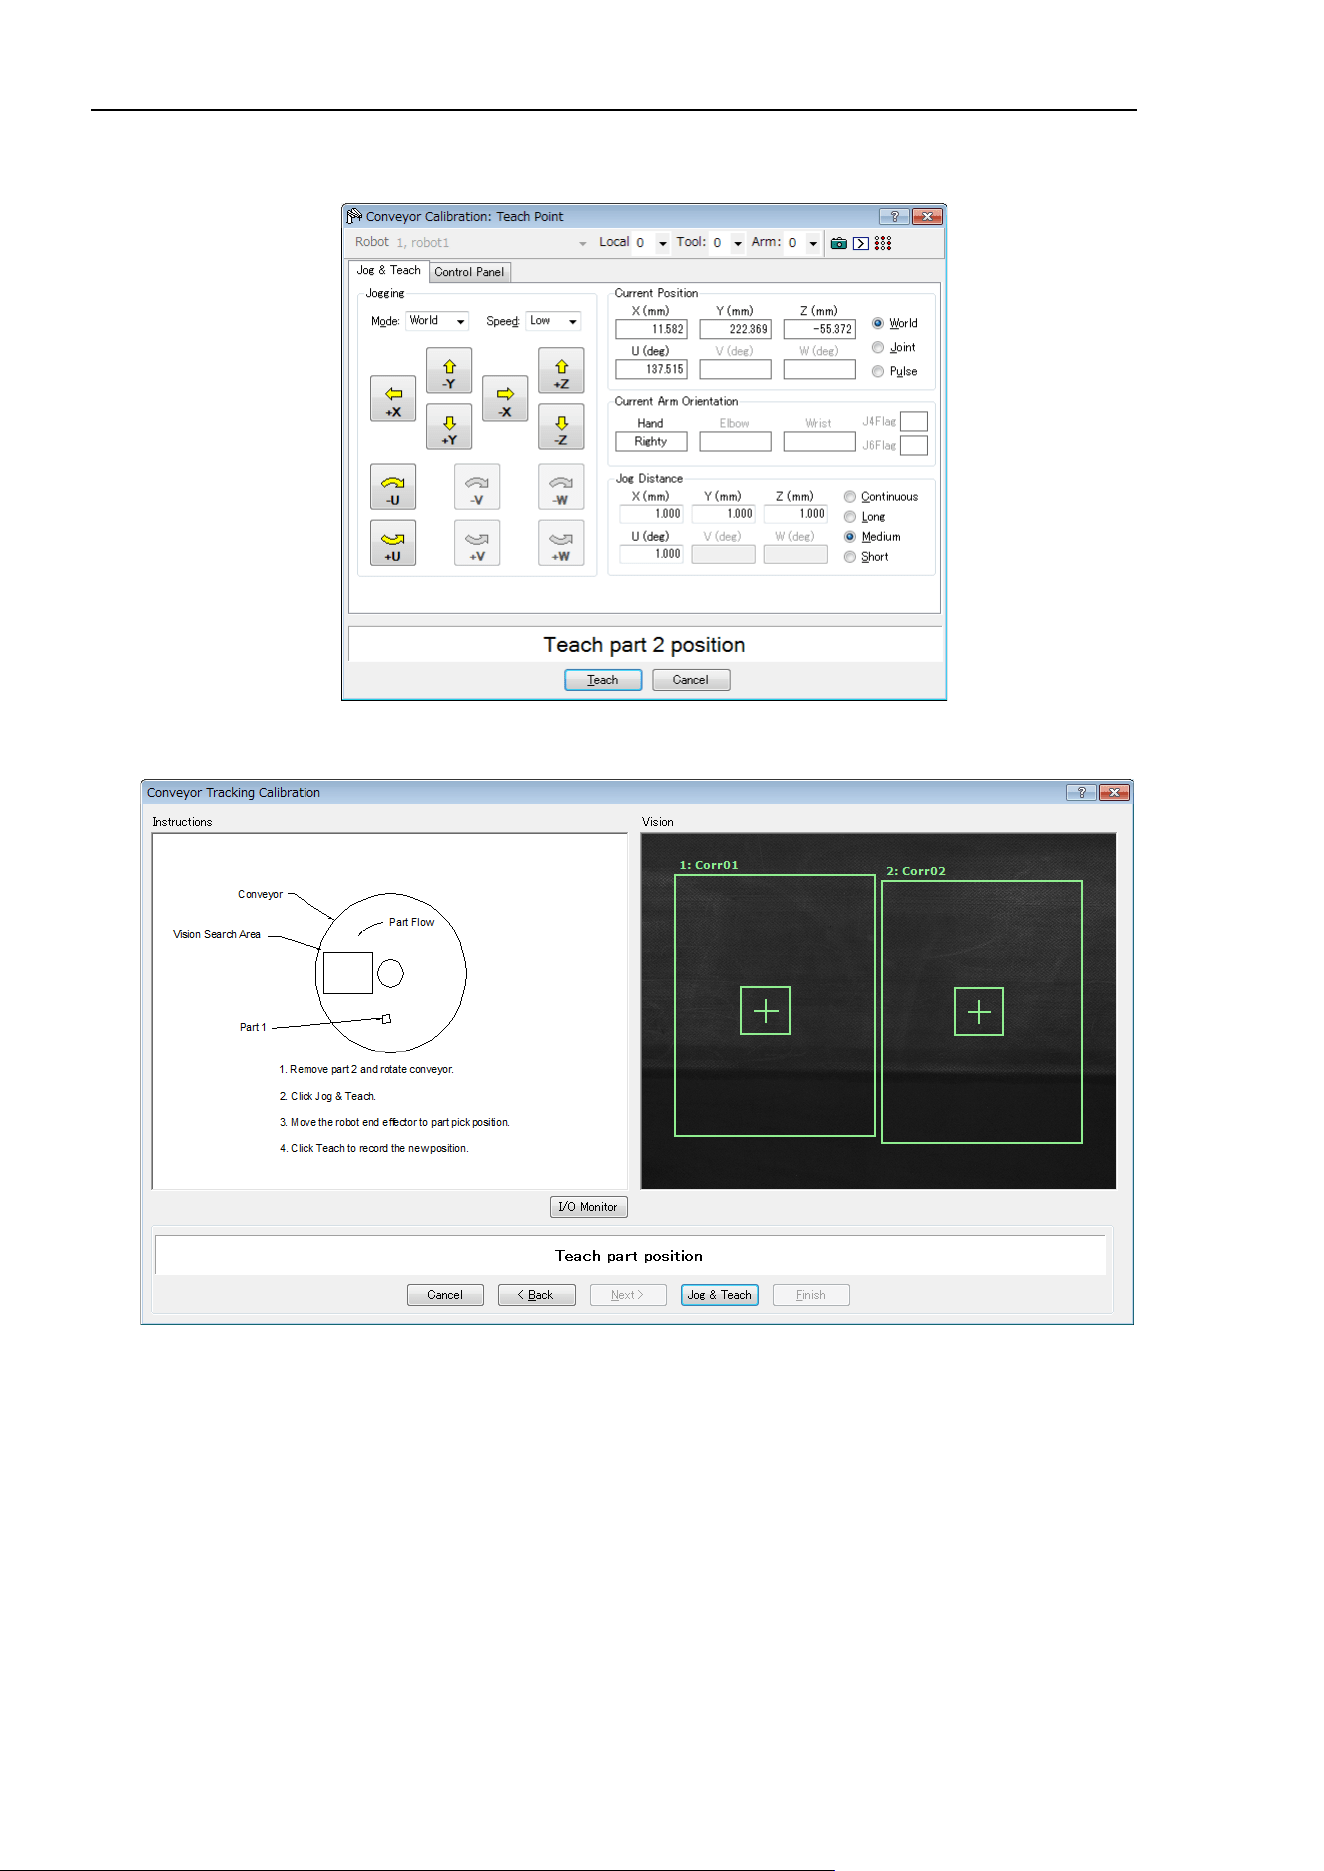
16. Conveyor Tracking
450 EPSON RC+ 7.0 (Ver.7.4) User's Guide Rev.6
16. The [Jog & Teach] dialog will appear. Click the jog buttons to move the robot end
effector to the pick position for Part 2. Click the <Teach> button.
17. Remove Part 2. Move the conveyor to move Part 1.
Click the <Jog&Teach> button.
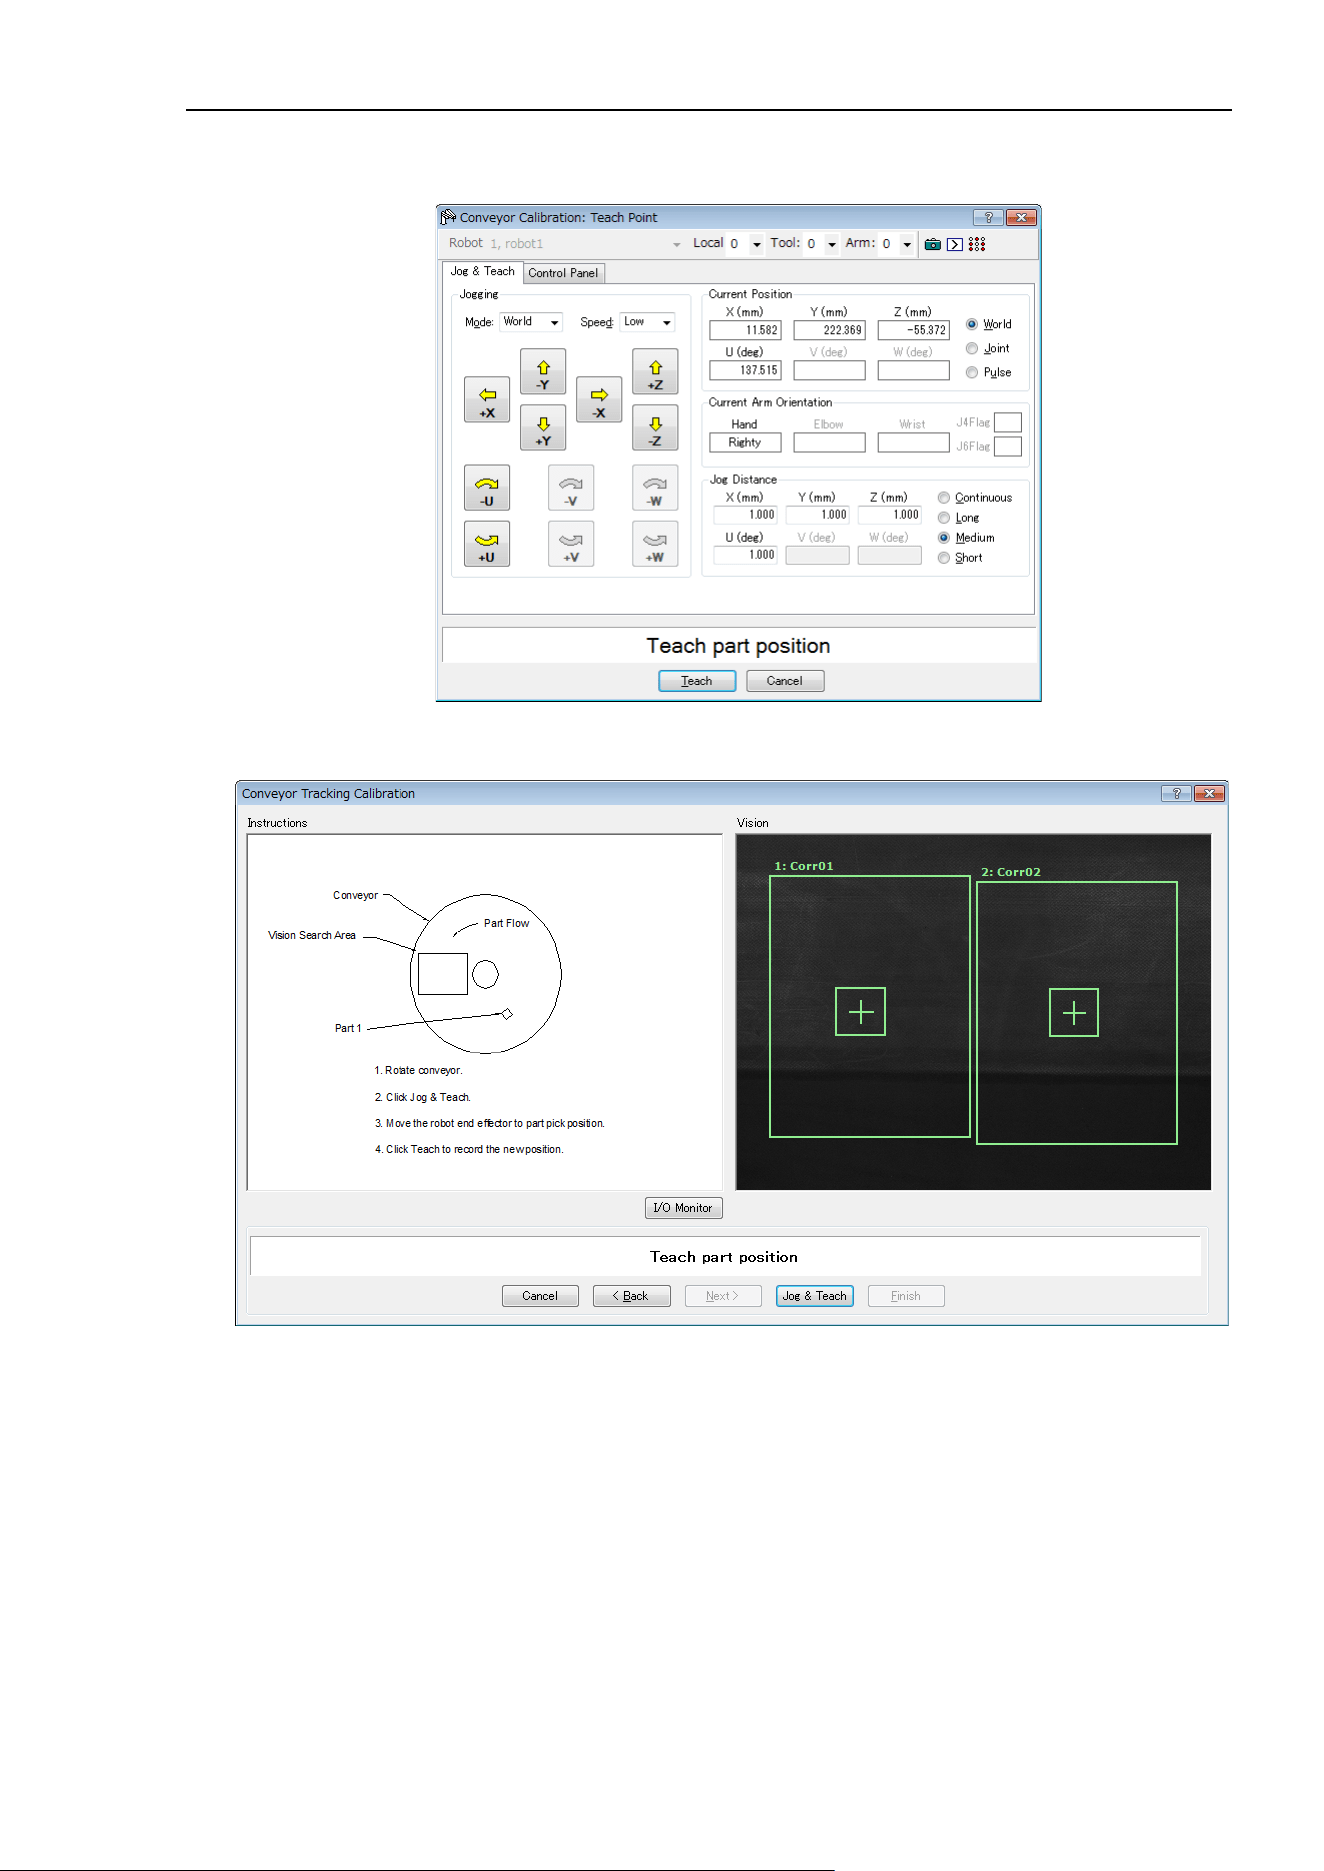
16. Conveyor Tracking
EPSON RC+ 7.0 (Ver.7.4) User's Guide Rev.6
451
18. The [Jog & Teach] dialog will appear. Click the jog buttons to move the robot end
effector to the pick position. Click the <Teach> button.
19. Move the conveyor by hand to move Part 1.
Click the <Jog&Teach> button.
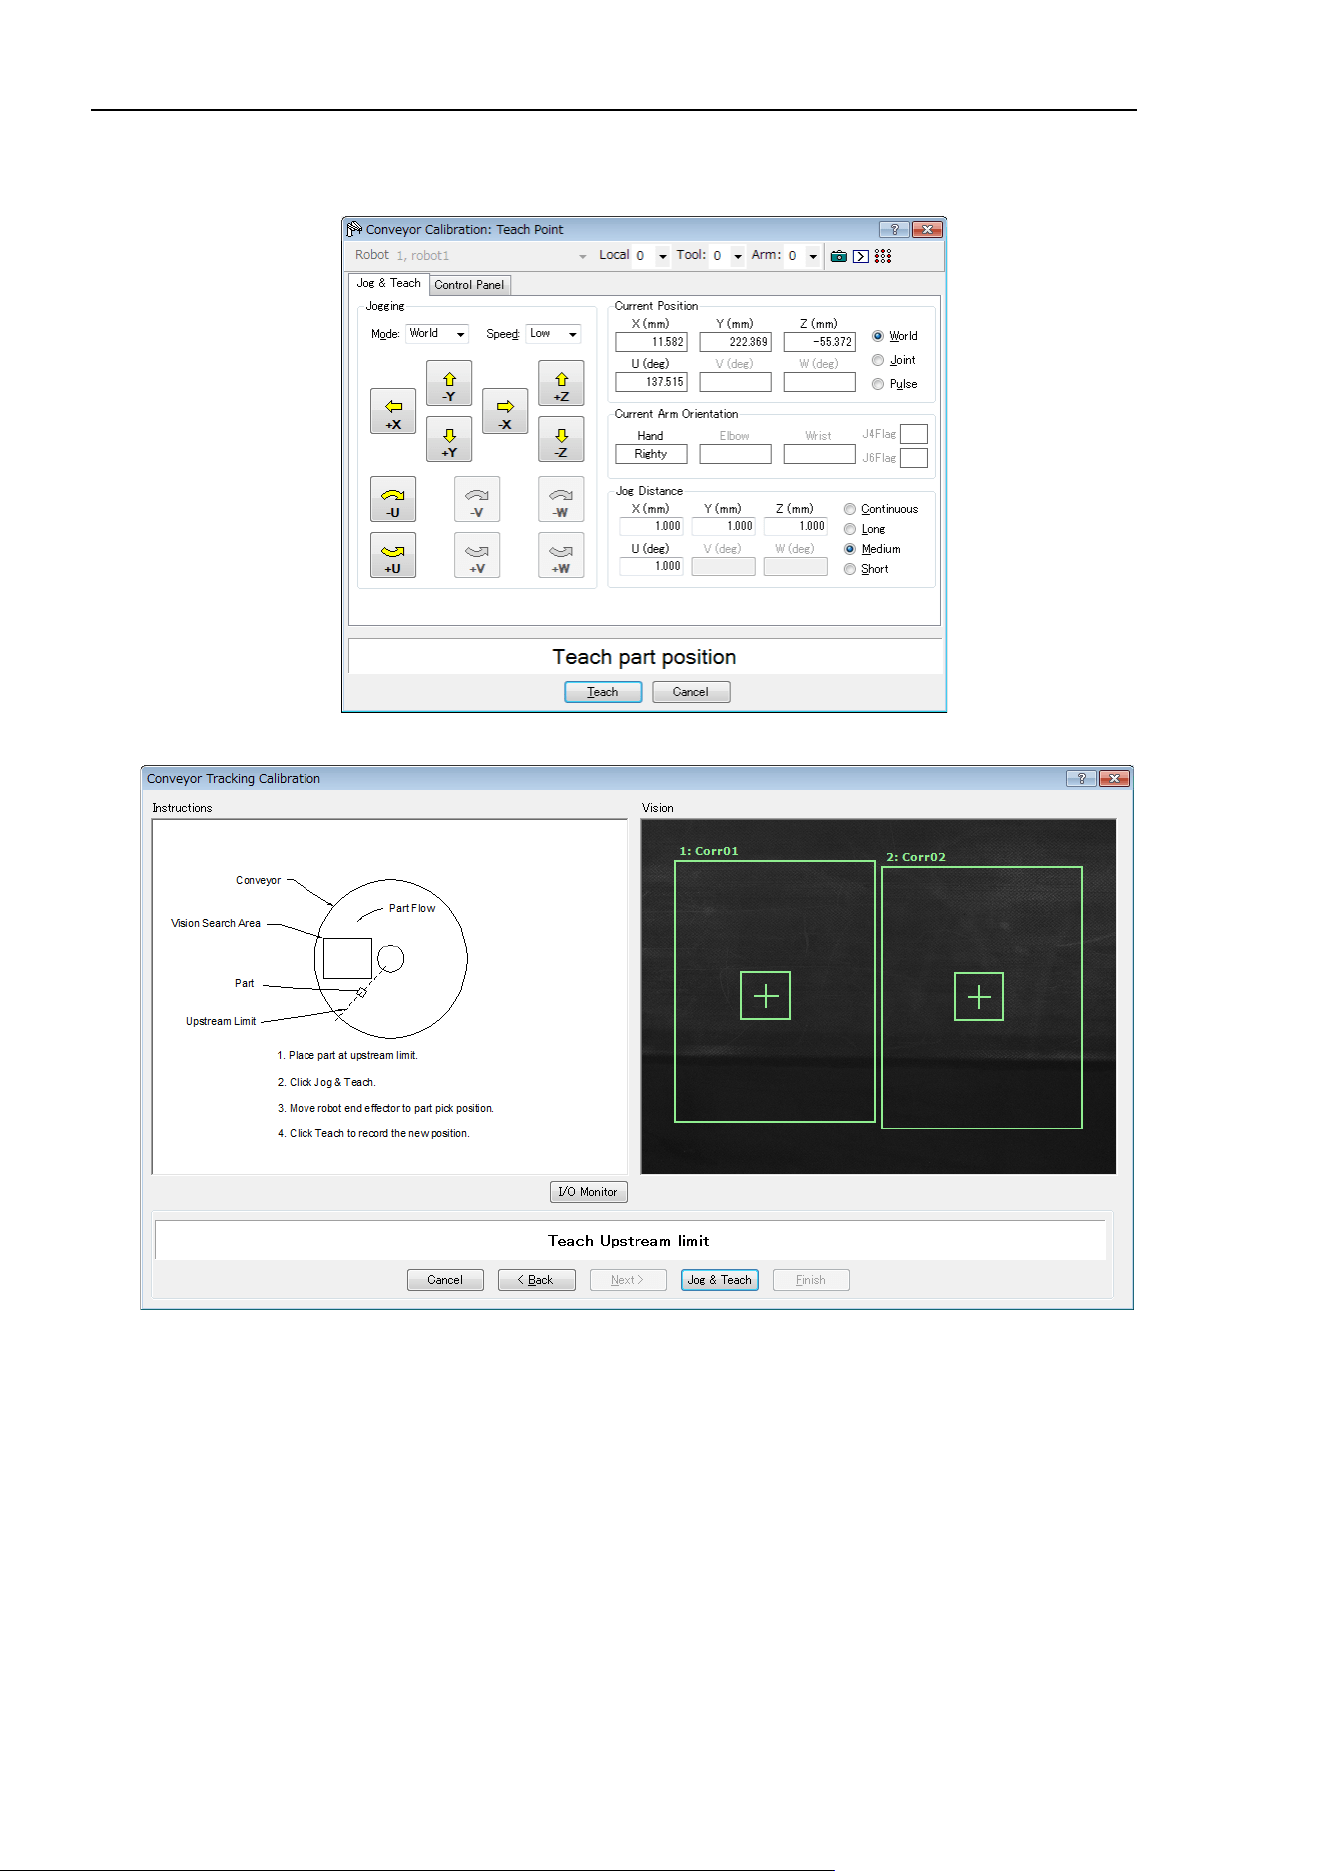
16. Conveyor Tracking
452 EPSON RC+ 7.0 (Ver.7.4) User's Guide Rev.6
20. The [Jog & Teach] dialog will appear. Click the jog buttons to move the robot end
effector to the pick position. Click the <Teach> button.
21. Place a part on the upstream limit. Click the <Jog & Teach> button.
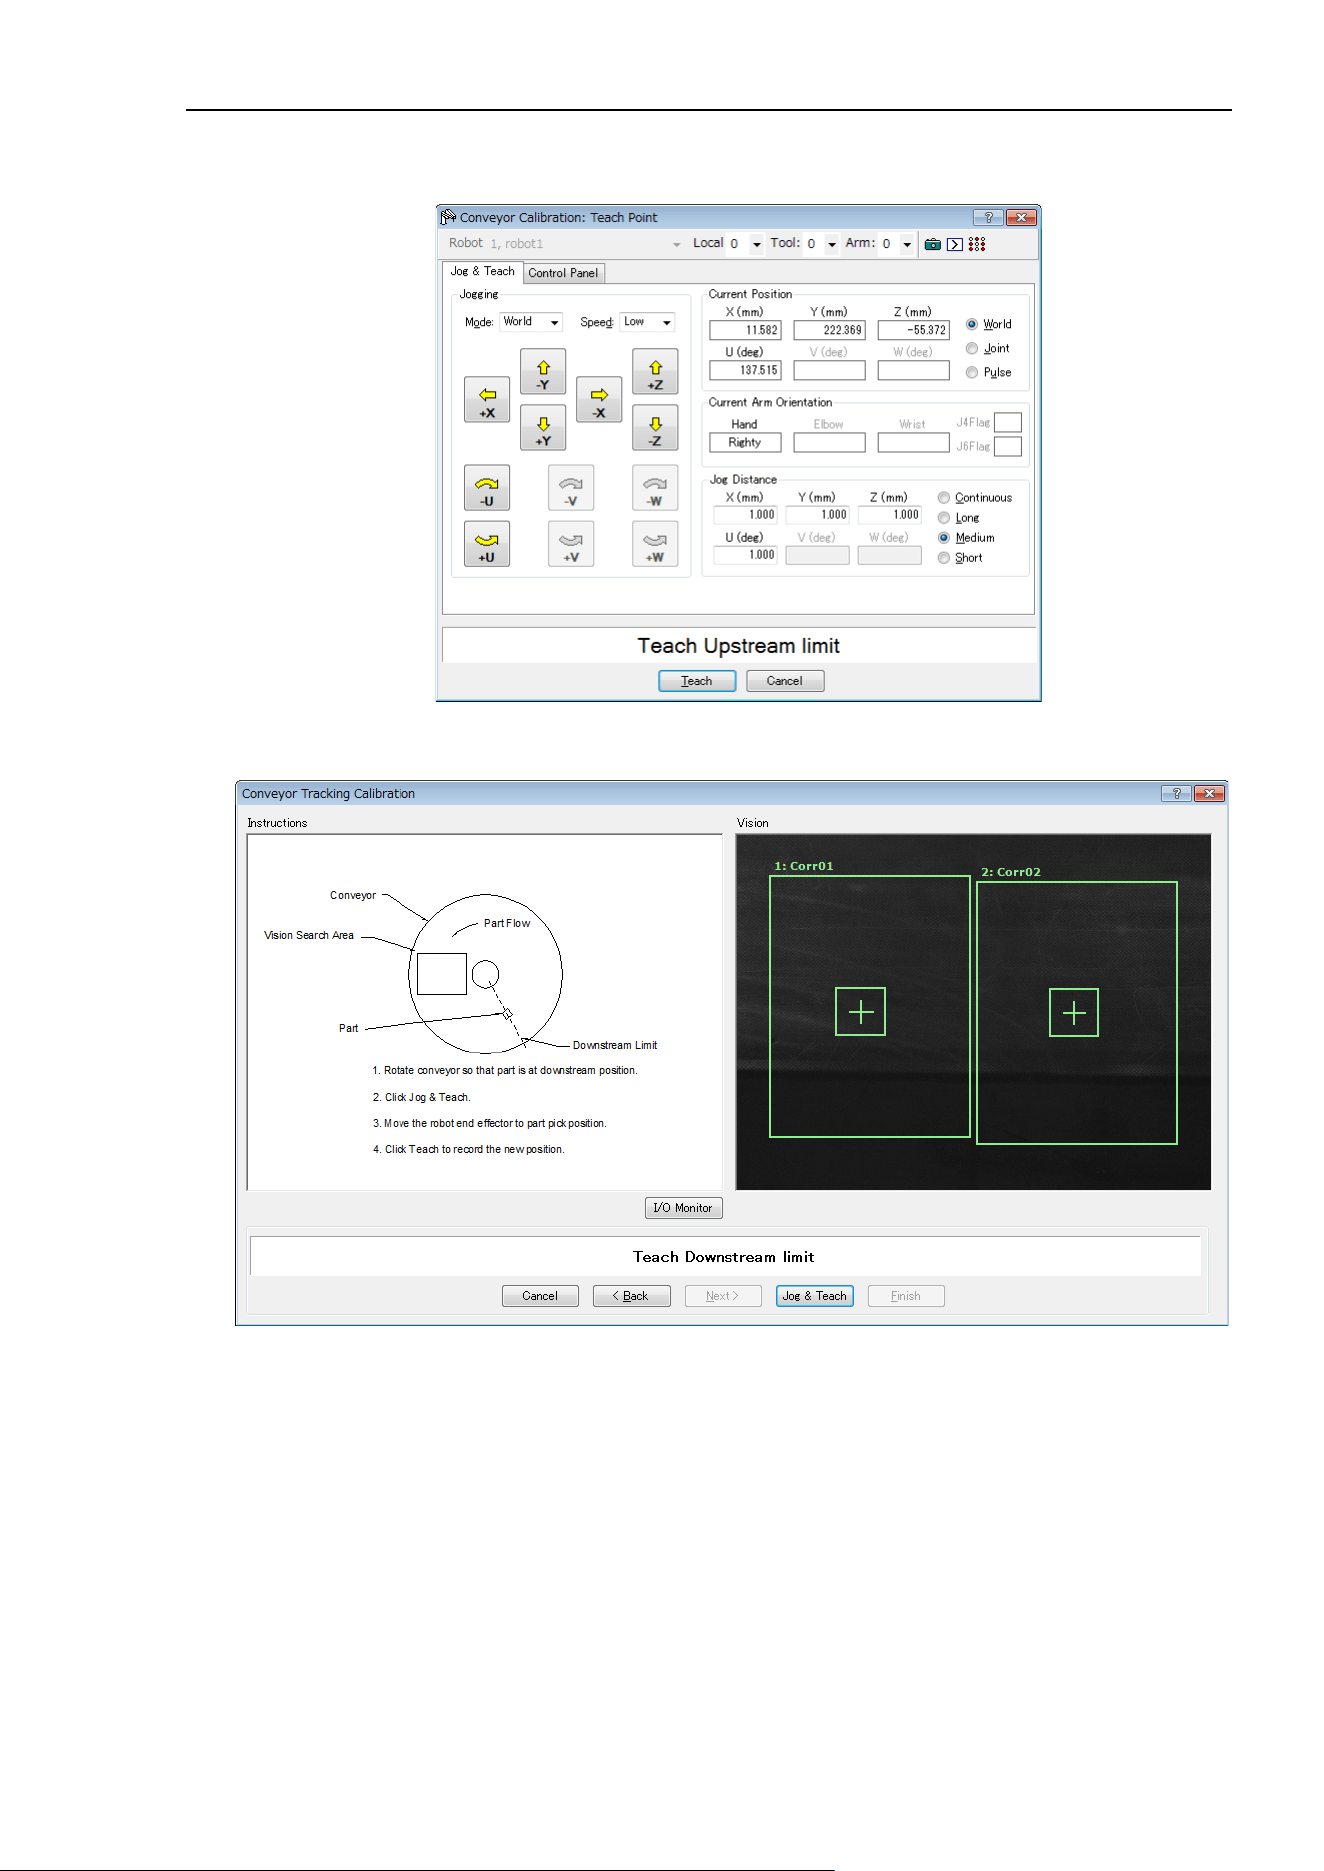
16. Conveyor Tracking
EPSON RC+ 7.0 (Ver.7.4) User's Guide Rev.6
453
22. The [Jog & Teach] dialog will appear. Click the jog buttons to move the robot end
effector to the pick position. Click the <Teach> button.
23. Move the conveyor so the part is on the downstream limit. Click the <Jog &
Teach> button.
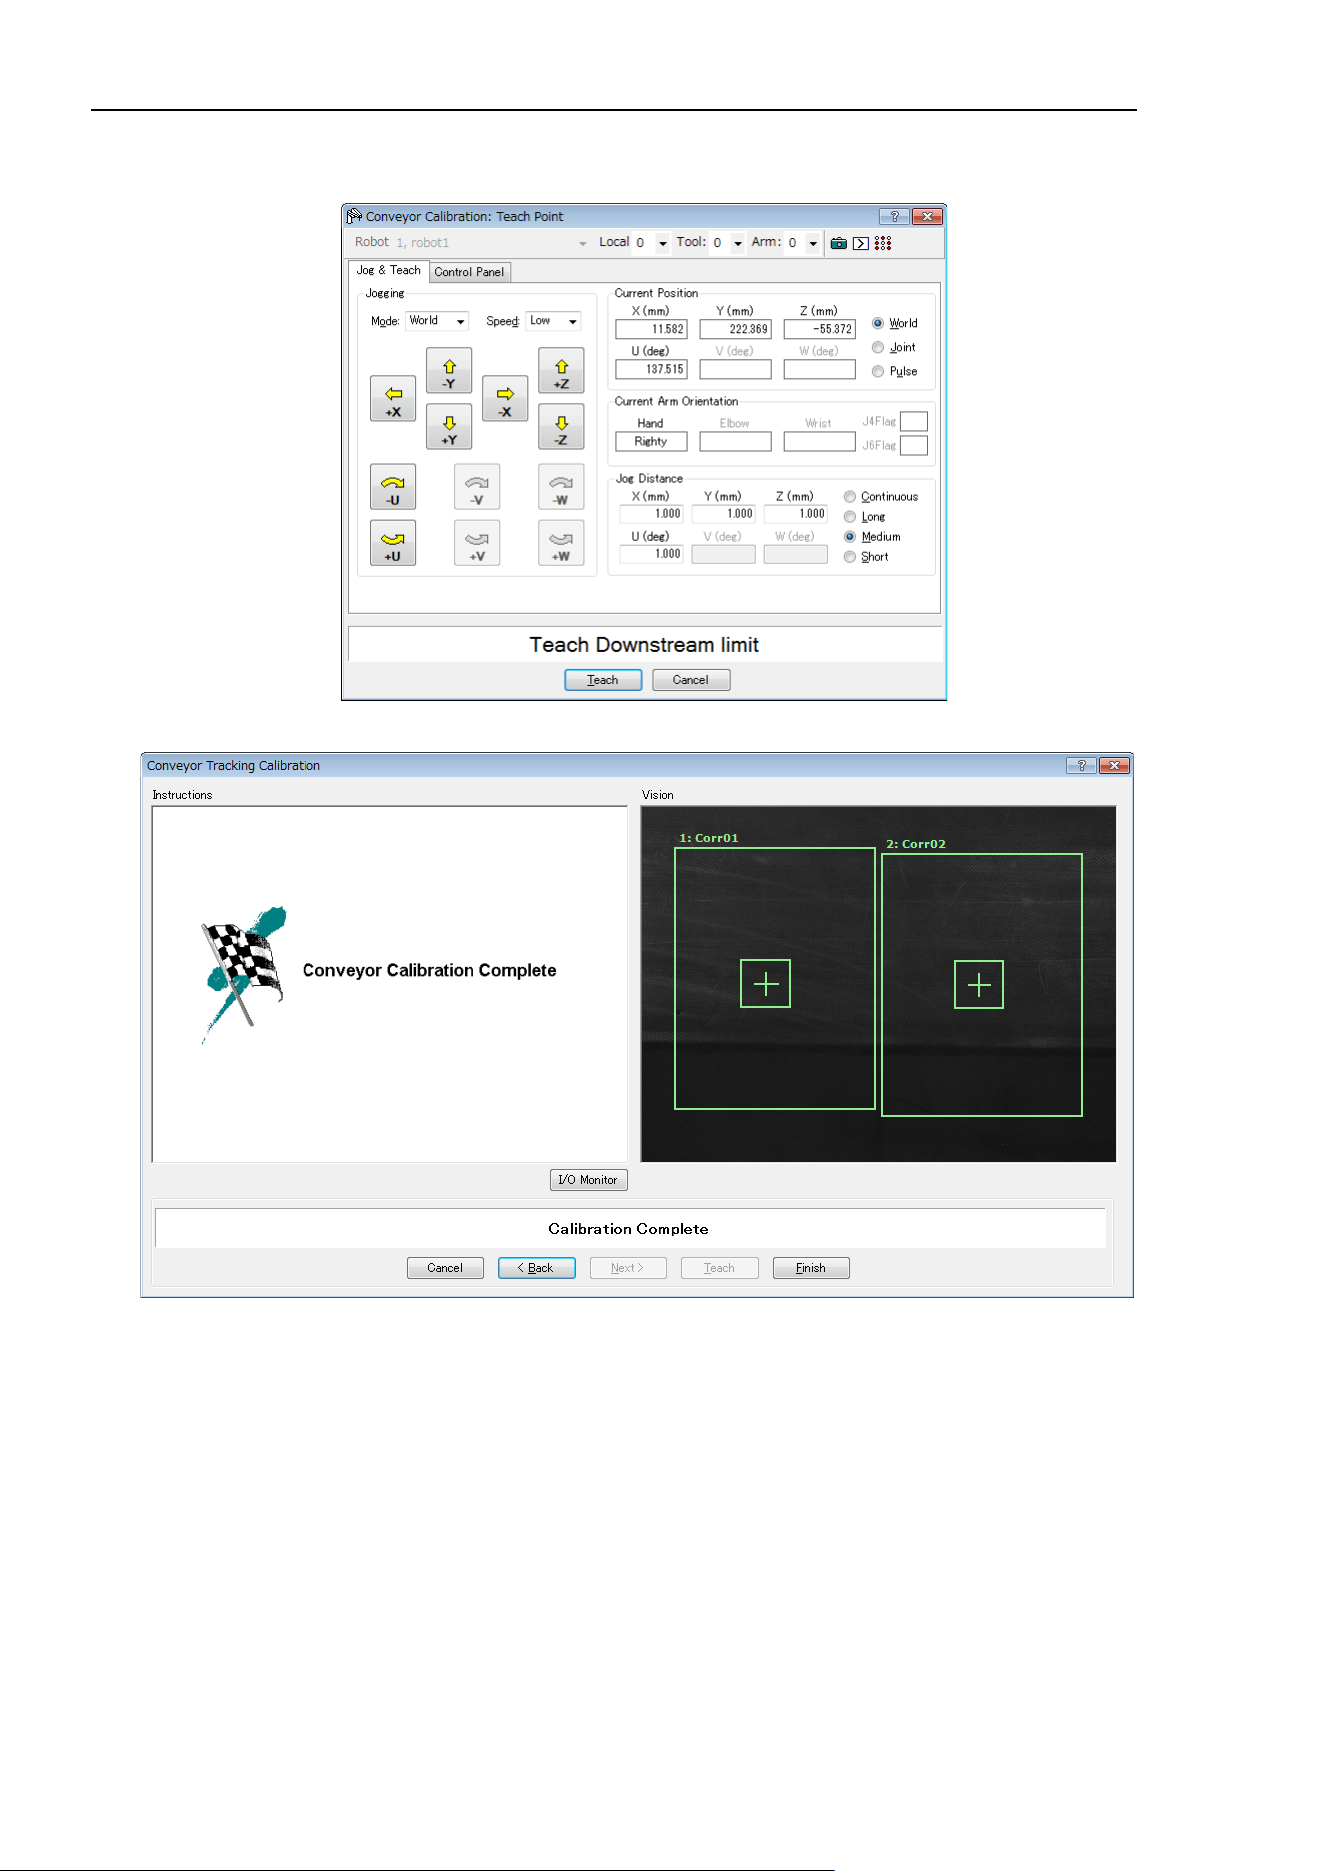
16. Conveyor Tracking
454 EPSON RC+ 7.0 (Ver.7.4) User's Guide Rev.6
24. The [Jog & Teach] dialog will appear. Click the jog buttons to move the robot end
effector to the pick position. Click the <Teach> button.
25. The calibration complete picture will be displayed. Click the <Finish> button.

16. Conveyor Tracking
EPSON RC+ 7.0 (Ver.7.4) User's Guide Rev.6
455
Vision conveyor operation check
After the calibration, we recommend that you check if the vision conveyor works properly.
Select the suitable method since the verification procedures vary depending on the system.
This section uses the program and the command window described in 16.19 Sample
Program.
Method 1: When the conveyor can be stopped arbitrary and the conveyor speed can be
30 mm/sec or less
1. Clear the all queue data registered to the conveyor.
>Cnv_QueRemove 1,all
2. Place the part in the vision search area.
3. Execute the program “ScanConveyorStrobed” to register a queue.
4. Halt the program “ScanConveyorStrobed” and move the conveyor until the part
enters the Pickup Area.
5. Pick up the part.
When using the 6-axis robot, set U, V, and W values as follows.
When using the SCARA robot, setting of U, V, and W are not necessary.
>Go Cnv_Queget(1,0):U(90):V(0):W(180)
6. Check if the robot end effector is above the center of the part.
7. Move the conveyor at 50mm/sec or less and check if the robot follows the part. At
this point, the end effector will be off the center of part but this is no problem.
8. Stop the tracking motion of the robot.
>Cnv_AbortTrack
In case the following symptoms occur with the above method, the Vision Guide or
conveyor calibration was not executed properly. Perform the calibration again.
- In step (6), the robot end effector is more than 1 mm away from the center of the part.
- The robot cannot follow the part when the conveyor is moved in step (7).
Method 2: When the conveyor can be stopped arbitrary and the conveyor speed can be
100 mm/sec or less
1. Clear the all queue data registered to the conveyor.
>Cnv_QueRemove 1,all
2. Place the part in the vision search area.
3. Execute the program “ScanConveyorStrobed” to register a queue.
4. Halt the program “ScanConveyorStrobed” and move the conveyor until the part
enters the Pickup Area.

16. Conveyor Tracking
456 EPSON RC+ 7.0 (Ver.7.4) User's Guide Rev.6
5. Pick up the part.
When using the 6-axis robot, set U, V, and W values as follows.
When using the SCARA robot, setting of U, V, and W are not necessary.
>Go Cnv_Queget(1,0):U(90):V(0):W(180)
6. Check if the robot end effector is above the center of the part.
7. Change the mode to “High Power”.
>Power High
8. Move the conveyor and check if the robot follows the part. At this point, the end
effector will be off the center of the part but this is no problem.
9. Stop the tracking motion of the robot.
>Cnv_AbortTrack
In case the following symptoms occur with the above method, the Vision Guide or
conveyor calibration was not executed properly. Perform the calibration again.
- In step (6), the robot end effector is more than 2 mm away from the center of the part.
- The robot cannot follow the parts when the conveyor is moved in step (8).
Method 3: When the conveyor can be stopped arbitrary
1. Clear the all queue data registered to the conveyor.
>Cnv_QueRemove 1,all
2. Place the part in the vision search area.
3. Execute the program “ScanConveyorStrobed” to register a queue.
4. Halt the program “ScanConveyorStrobed” and move the conveyor until the part
enters the Pickup Area.
5. Pick up the part.
When using the 6-axis robot, set U, V, and W values as follows.
When using the SCARA robot, setting of U, V, and W are not necessary.
>Go Cnv_Queget(1,0):U(90):V(0):W(180)
6. Check if the robot end effector is above the center of the part.
7. Stop the tracking motion of the robot.
>Cnv_AbortTrack
8. Use the program “Main” to check if the robot follows the part. At this point, change
the wait time after tracking to 0.2 ~ 0.5 in the sample program.
In case the following symptoms occur with the above method, the Vision Guide or
conveyor calibration was not executed properly. Perform the calibration again.
- In step (6), the robot end effector is more than 1 mm away from the center of the part.
- The robot moves to different position from the parts in step (8).

16. Conveyor Tracking
EPSON RC+ 7.0 (Ver.7.4) User's Guide Rev.6
457
Method 4: When the conveyor cannot be stopped and the speed cannot be changed
arbitrary
1. Move the conveyor.
2. Change the sample program as follows.
Change the wait time after tracking to 0.2 ~ 0.5
Set the tracking mode to “0”
3. Execute the sample program “Main”.
4. Place the part after the conveyor speed becomes constant.
5. Check if the robot follows the part.
6. Change the sample program as follows.
Set the tracking mode to “1”.
7. Execute the sample program “Main”.
8. Place the part when the conveyor speed becomes constant.
9. Check if the robot follows the part.
In case the following symptoms occur with the above method, the Vision Guide or
conveyor calibration was not executed properly. Perform the calibration again.
- When comparing step (5) and (9), a distance between the robot and the part is smaller
in step (5).
- The robot moves to different position from the parts in step (5).
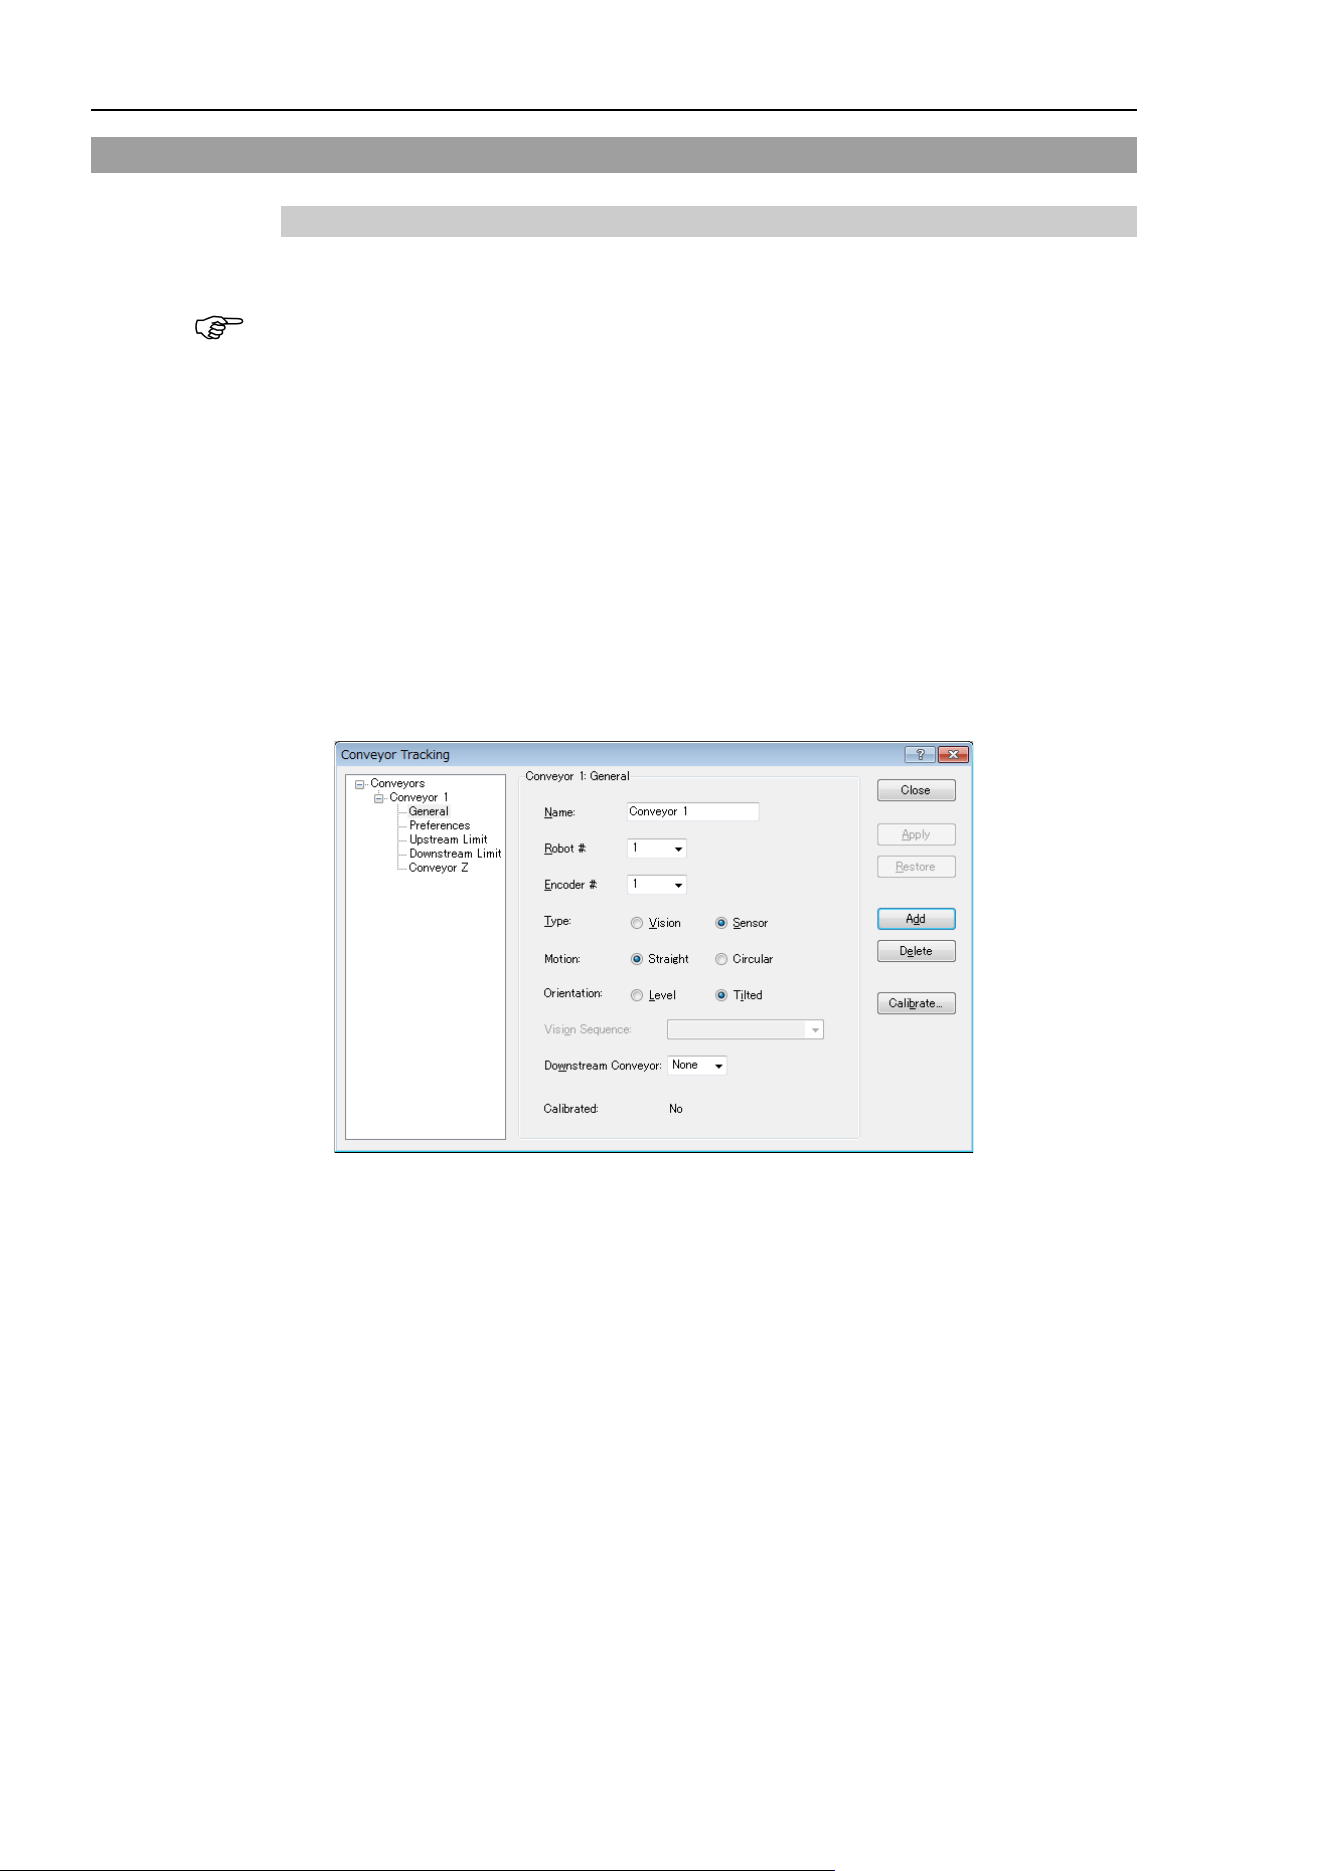
16. Conveyor Tracking
458 EPSON RC+ 7.0 (Ver.7.4) User's Guide Rev.6
16.14 Sensor Conveyors
Sensor conveyor calibration (Straight conveyor)
Follow these steps to calibrate a straight sensor conveyor:
- When teaching part positions with the robot during calibration, it is important to position
X, Y, and Z of each point accurately. The conveyor is calibrated in X, Y, Z, U, V, and
W.
- To perform the fine calibration, in steps 9 and 11, set as wide a distance as possible
between the upstream limit and the downstream limit. After calibration, adjust the
Pickup Area by resetting the upstream / downstream limits.
- For the level orientation, the conveyor height is determined by the position of the robot
end effector taught in step 8. It cannot be used for the tilted conveyor for it does not
detect the conveyor slope. Steps 19 to 20 are not displayed.
- For the tilted orientation, it calibrates the conveyor slope with the position of robot end
effector taught in the steps 8, 10, 12, and 14.
1. Select [Tools]-[Conveyor Tracking].
2. Select the conveyor you want to calibrate.
3. Click the <Calibrate> button. The Conveyor Tracking Calibration wizard will
appear.
4. Follow the instructions for each step. Before you can proceed to the next step, you
must click the <Teach> button. You can go back to previous steps using the <Back>
button.
5. Select the [Part Flow Direction] to best match the conveyor you are calibrating. The
instruction pictures will change according to the setting. [Part Flow Direction] is
only used to aid in the instructions. It has no effect on the calibration.
NOTE
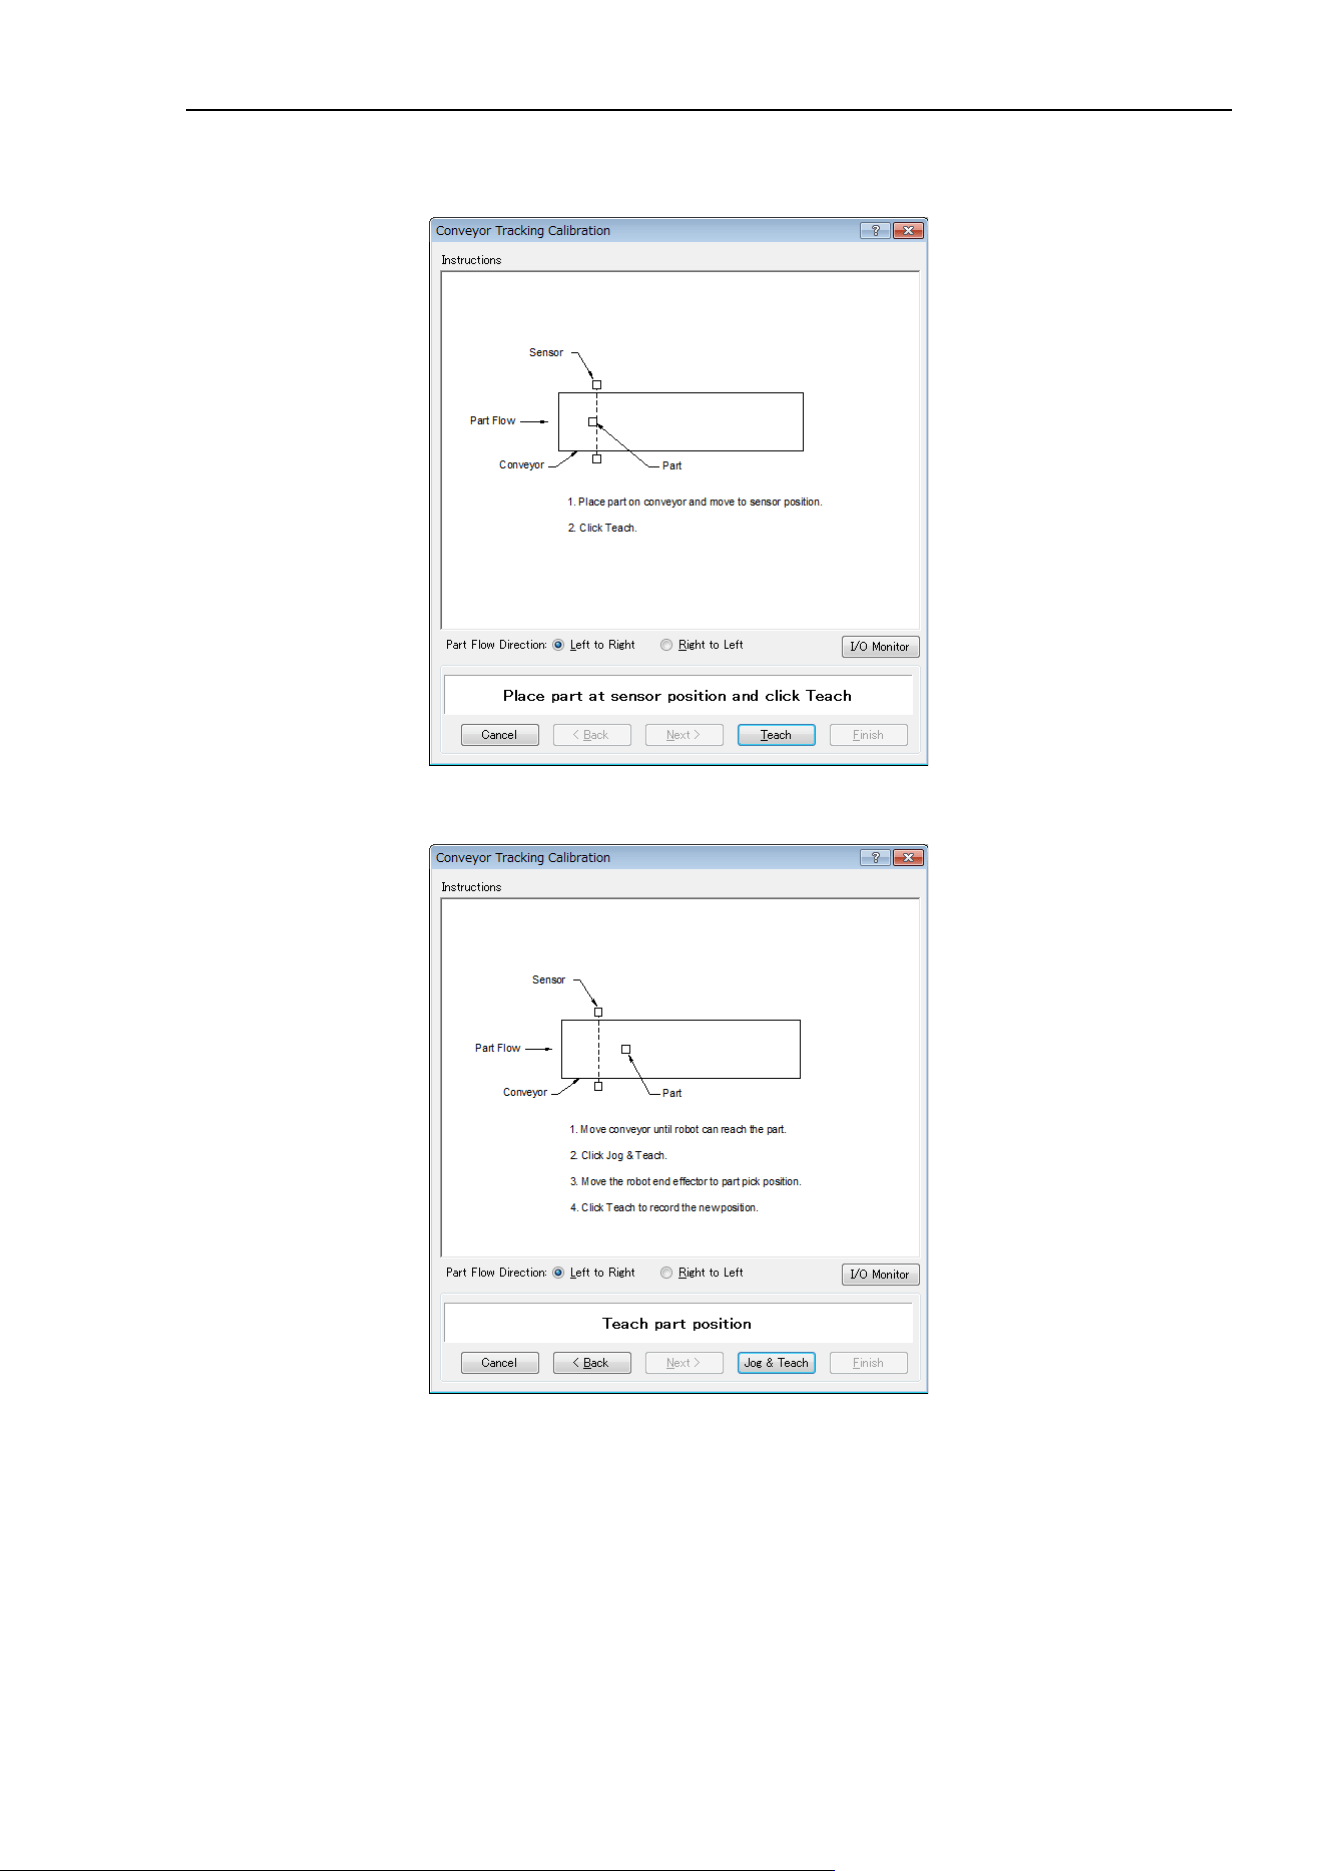
16. Conveyor Tracking
EPSON RC+ 7.0 (Ver.7.4) User's Guide Rev.6
459
6. For the first wizard step, place a part on the conveyor and move the conveyor toward
the sensor until the sensor just turns on. Click the <Teach> button.
7. Move the conveyor by hand until the part is within reach of the robot. Do not move
the part itself, only the conveyor. Click the <Jog & Teach> button.
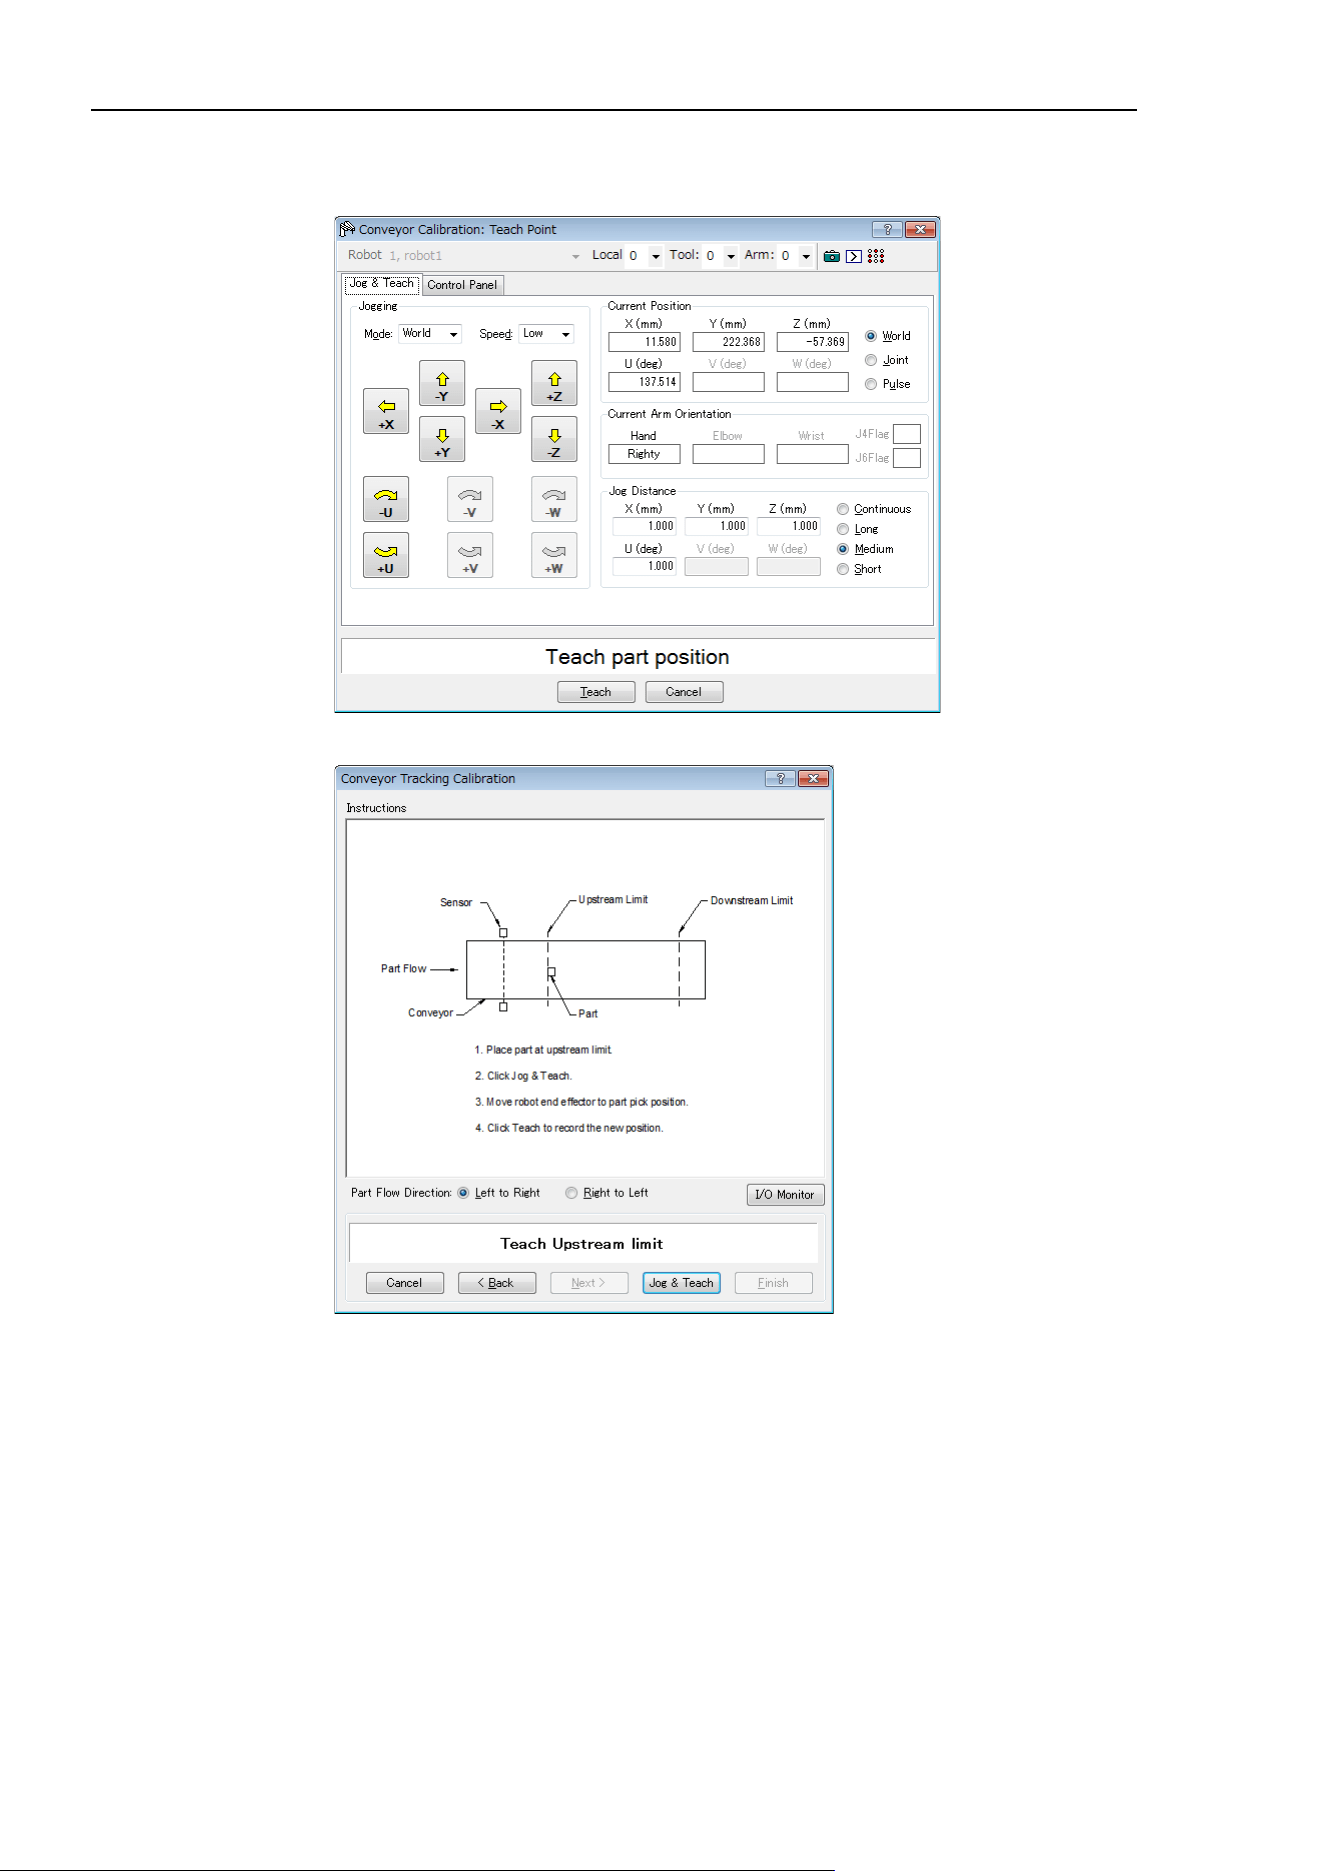
16. Conveyor Tracking
460 EPSON RC+ 7.0 (Ver.7.4) User's Guide Rev.6
8. The Jog & Teach dialog will appear. Click the jog buttons to move the robot end
effector to the pick position. Click the <Teach> button.
9. Now move or place the part at the upstream limit. Click the <Jog & Teach> button.
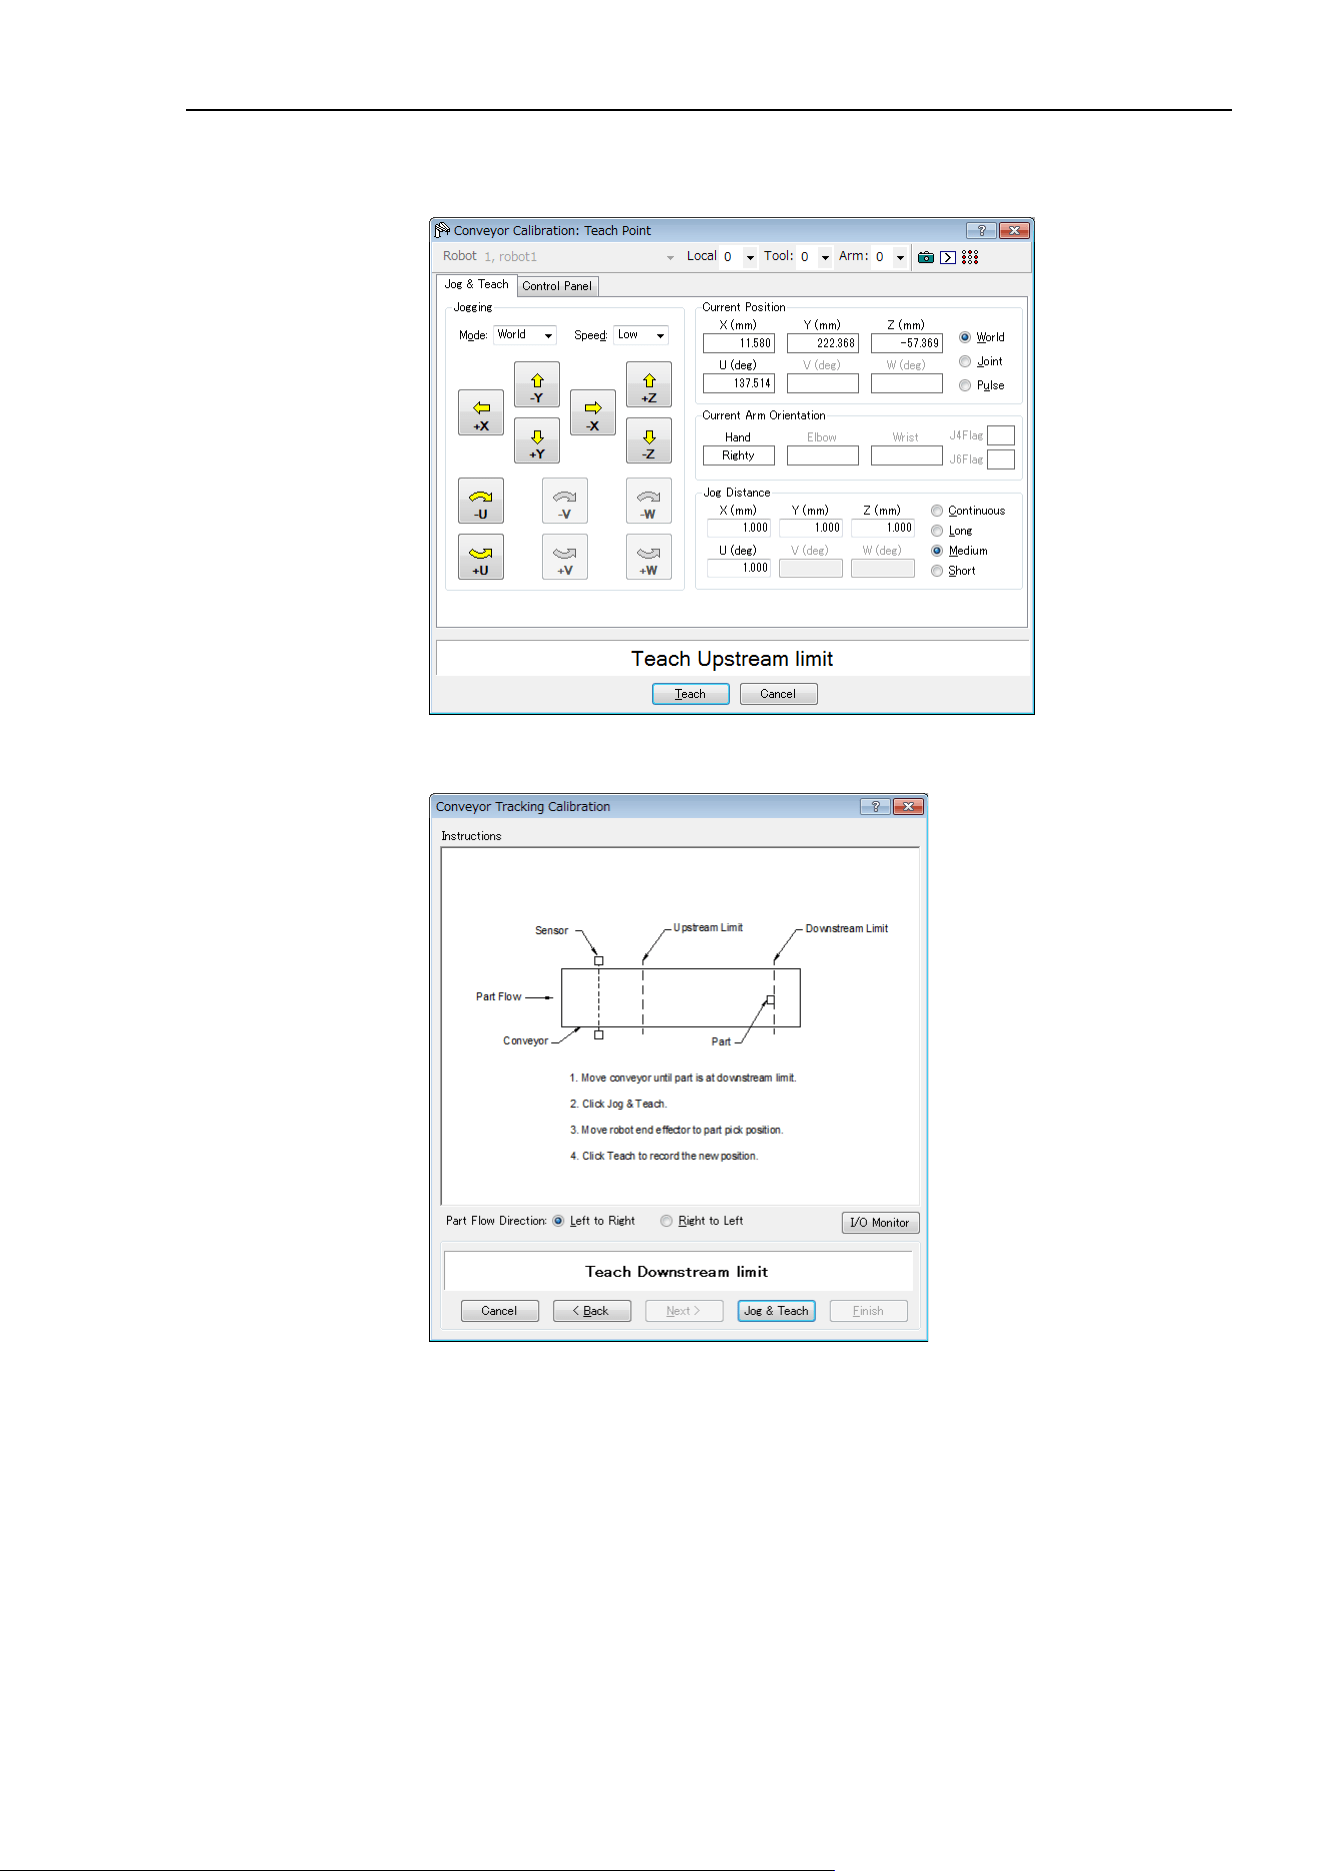
16. Conveyor Tracking
EPSON RC+ 7.0 (Ver.7.4) User's Guide Rev.6
461
10. The Jog & Teach dialog will appear. Click the jog buttons to move the robot end
effector to the pick position. Click the <Teach> button.
11. Move the conveyor so the part is at the downstream limit. Do not move the part,
only the conveyor. Click the <Jog & Teach> button.
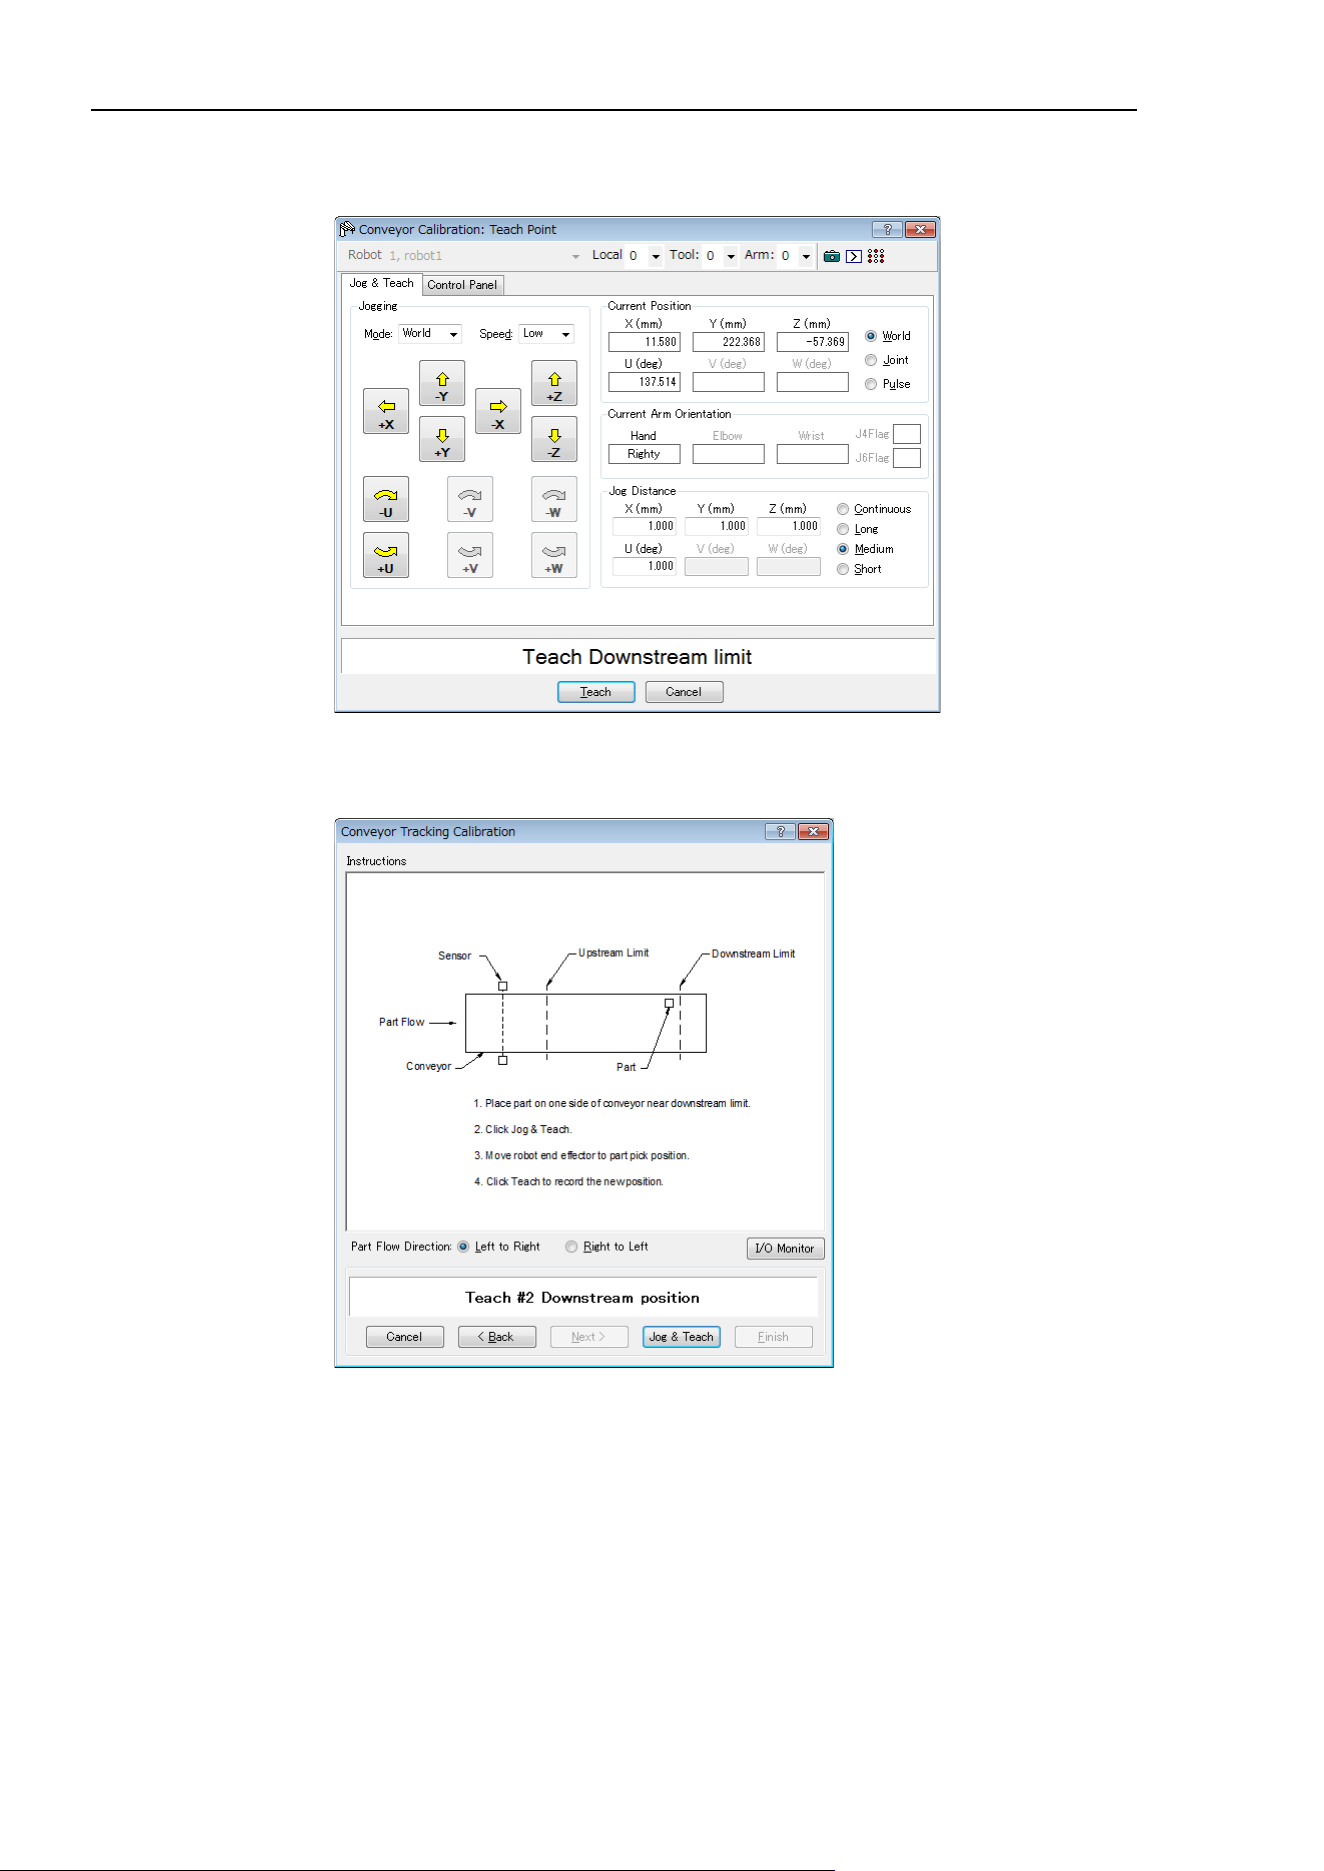
16. Conveyor Tracking
462 EPSON RC+ 7.0 (Ver.7.4) User's Guide Rev.6
12. The [Jog & Teach] dialog will appear. Click the jog buttons to move the robot end
effector to the pick position. Click the <Teach> button.
13. Place a part on one side of the conveyor near the downstream limit. This point is
used to determine the tilt of the conveyor from side to side. Click the <Jog &
Teach> button.
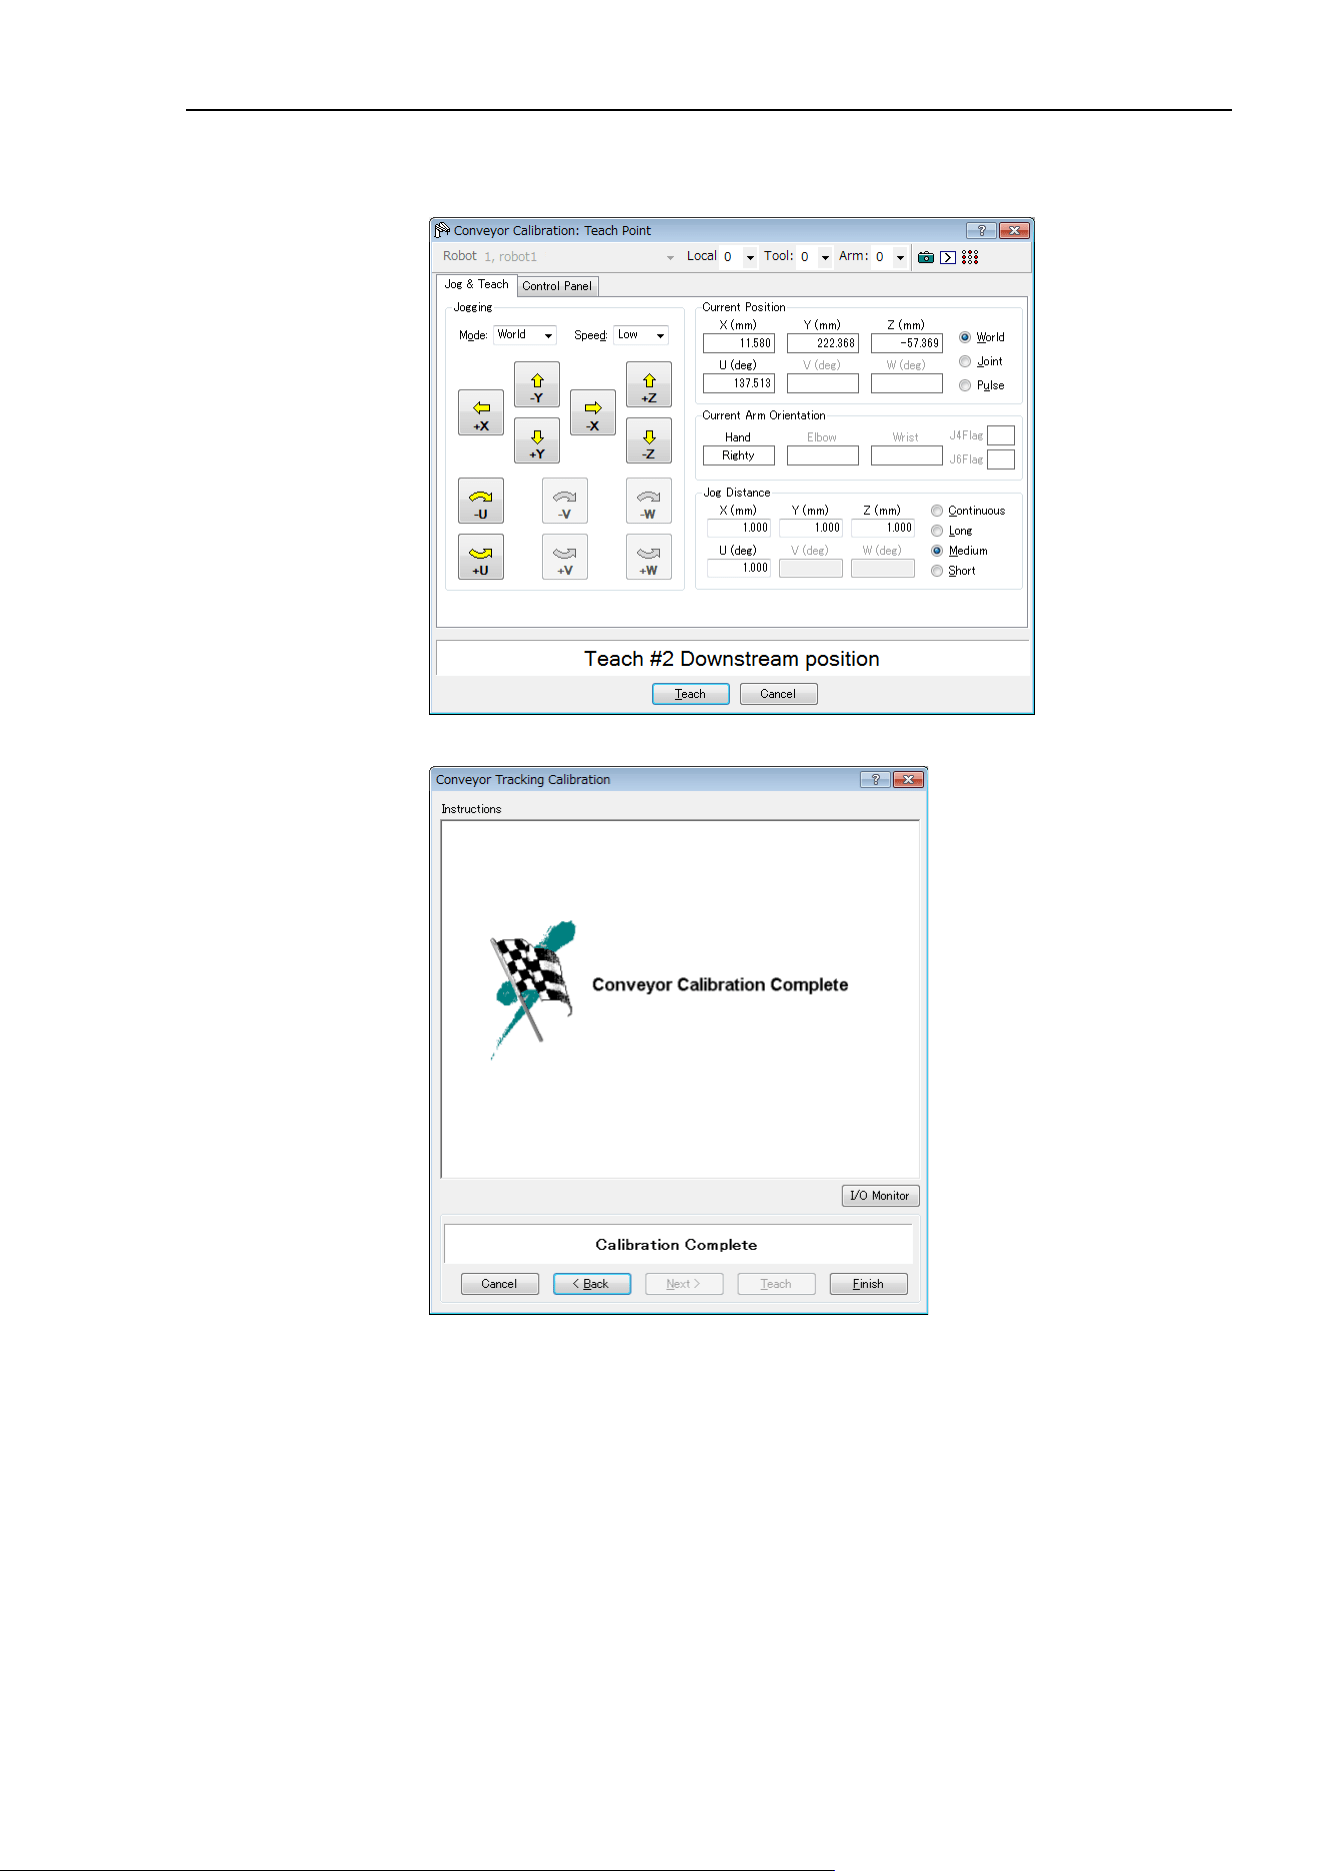
16. Conveyor Tracking
EPSON RC+ 7.0 (Ver.7.4) User's Guide Rev.6
463
14. The [Jog & Teach] window will appear. Click the jog buttons to move the robot end
effector to the pick position. Click the <Teach> button.
15. The calibration complete picture will be displayed. Click the <Finish> button.
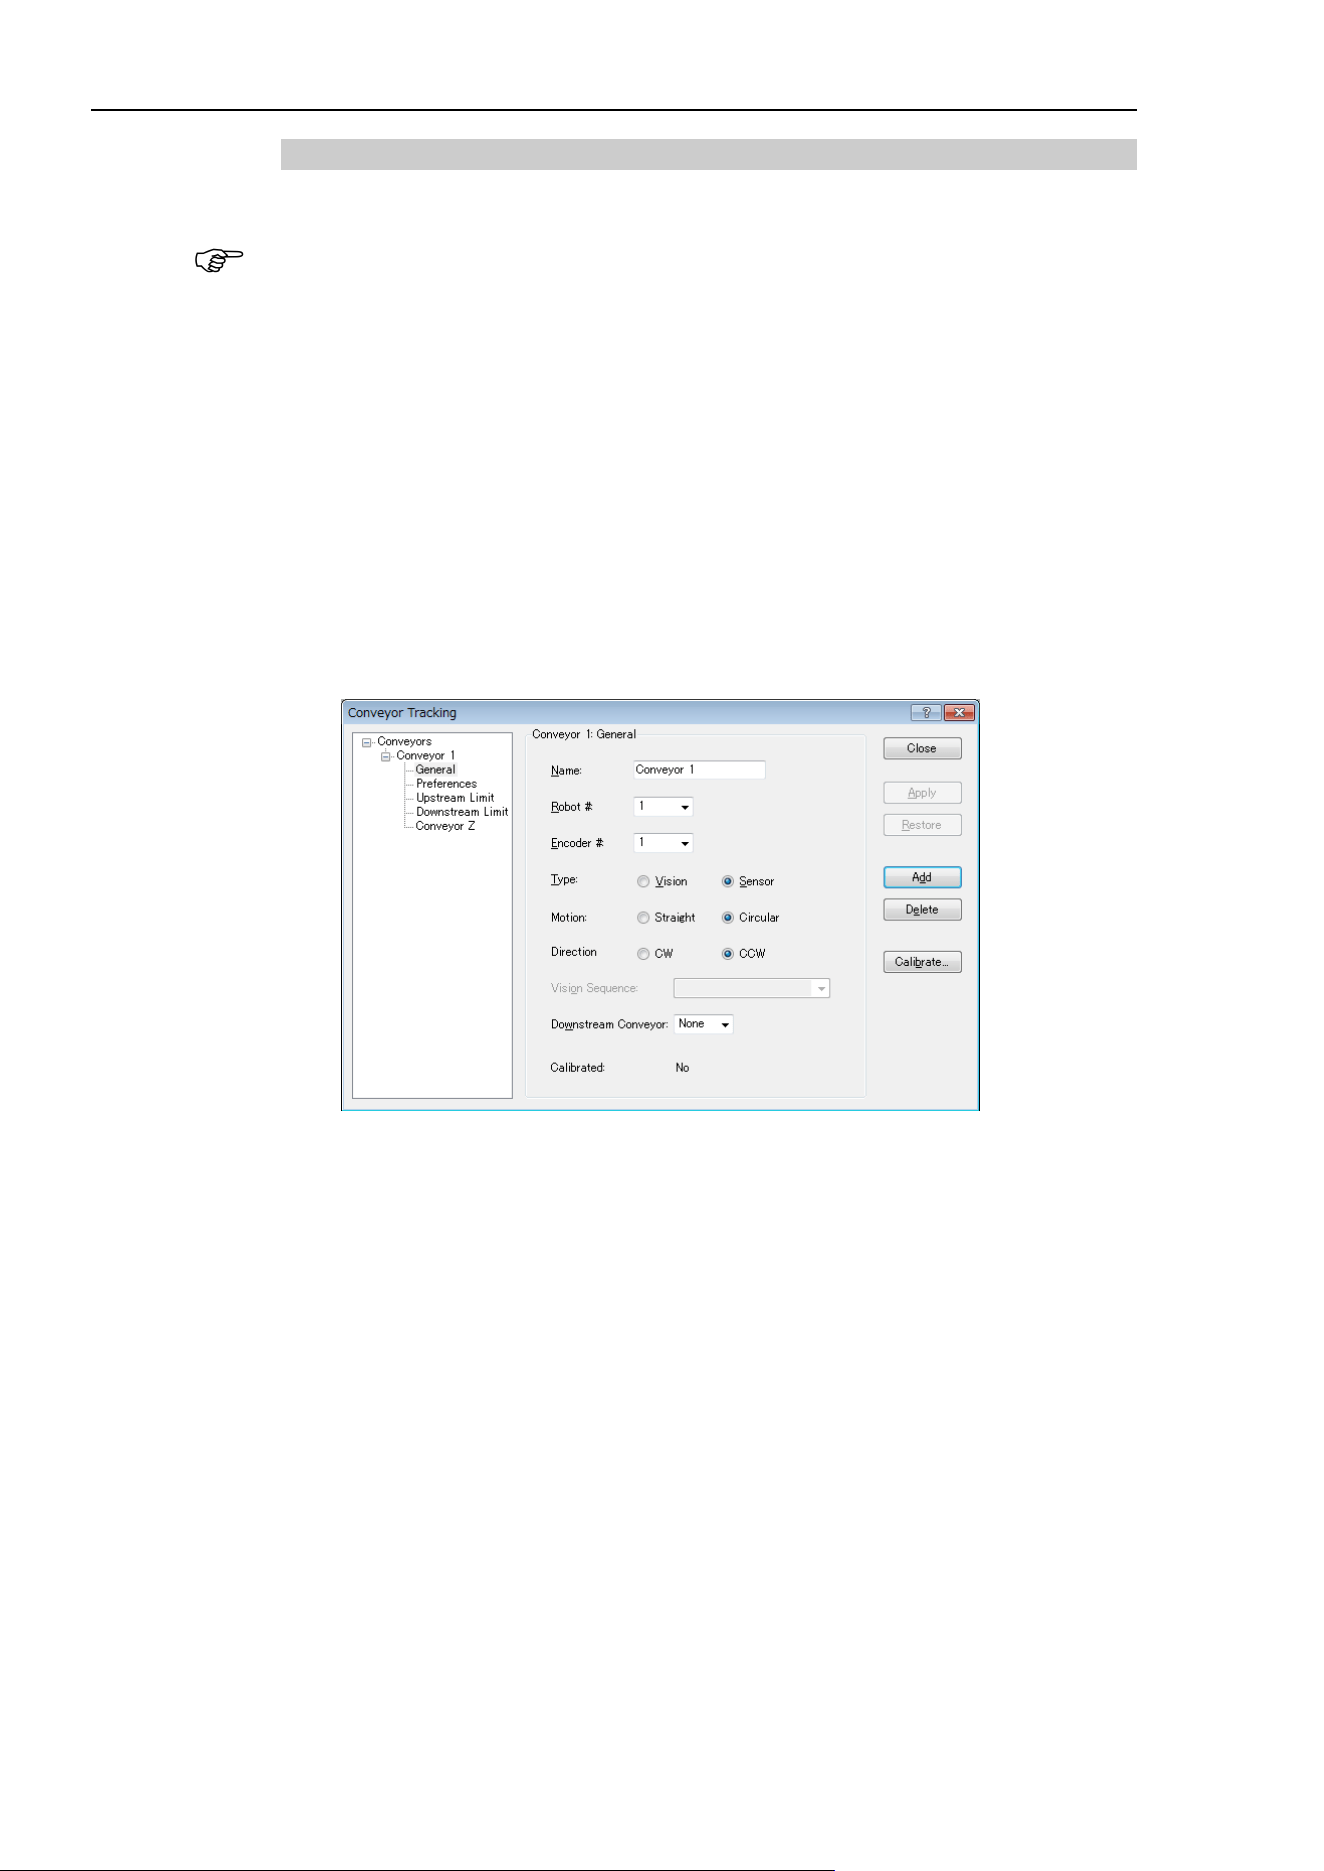
16. Conveyor Tracking
464 EPSON RC+ 7.0 (Ver.7.4) User's Guide Rev.6
Sensor Conveyor Calibration (Circular conveyor)
Follow these steps to calibrate a circular sensor conveyor:
- When teaching part positions with the robot during calibration, it is important to position
X, Y, and Z of each point accurately. The conveyor is calibrated in X, Y, Z, U, V, and
W.
- To perform the fine calibration, in steps 10, 12, and 14, teach the position when the
robot is directly above the parts and set as wide a distance as possible between the
points being taught.
1. Select [Tools]-[Conveyor Tracking].
2. Select the conveyor you want to calibrate.
3. Select <Sensor> for the [Type].
4. Select <Circular> for the [Motion].
5. Select the conveyor rotating direction for the [Direction].
Be careful not to calibrate with a wrong direction, otherwise, the robot will not track
the parts.
6. Click the <Apply> button.
7. Click the <Calibrate> button. The [Conveyor Tracking Calibration] wizard will
appear. Follow the instructions for each step. Before you can proceed to the next
step, you must click the <Teach> button. You can go back to previous steps using
the <Back> button.
8. Check if the conveyor direction shown in the wizard is the same as the conveyor you
want to use.
NOTE
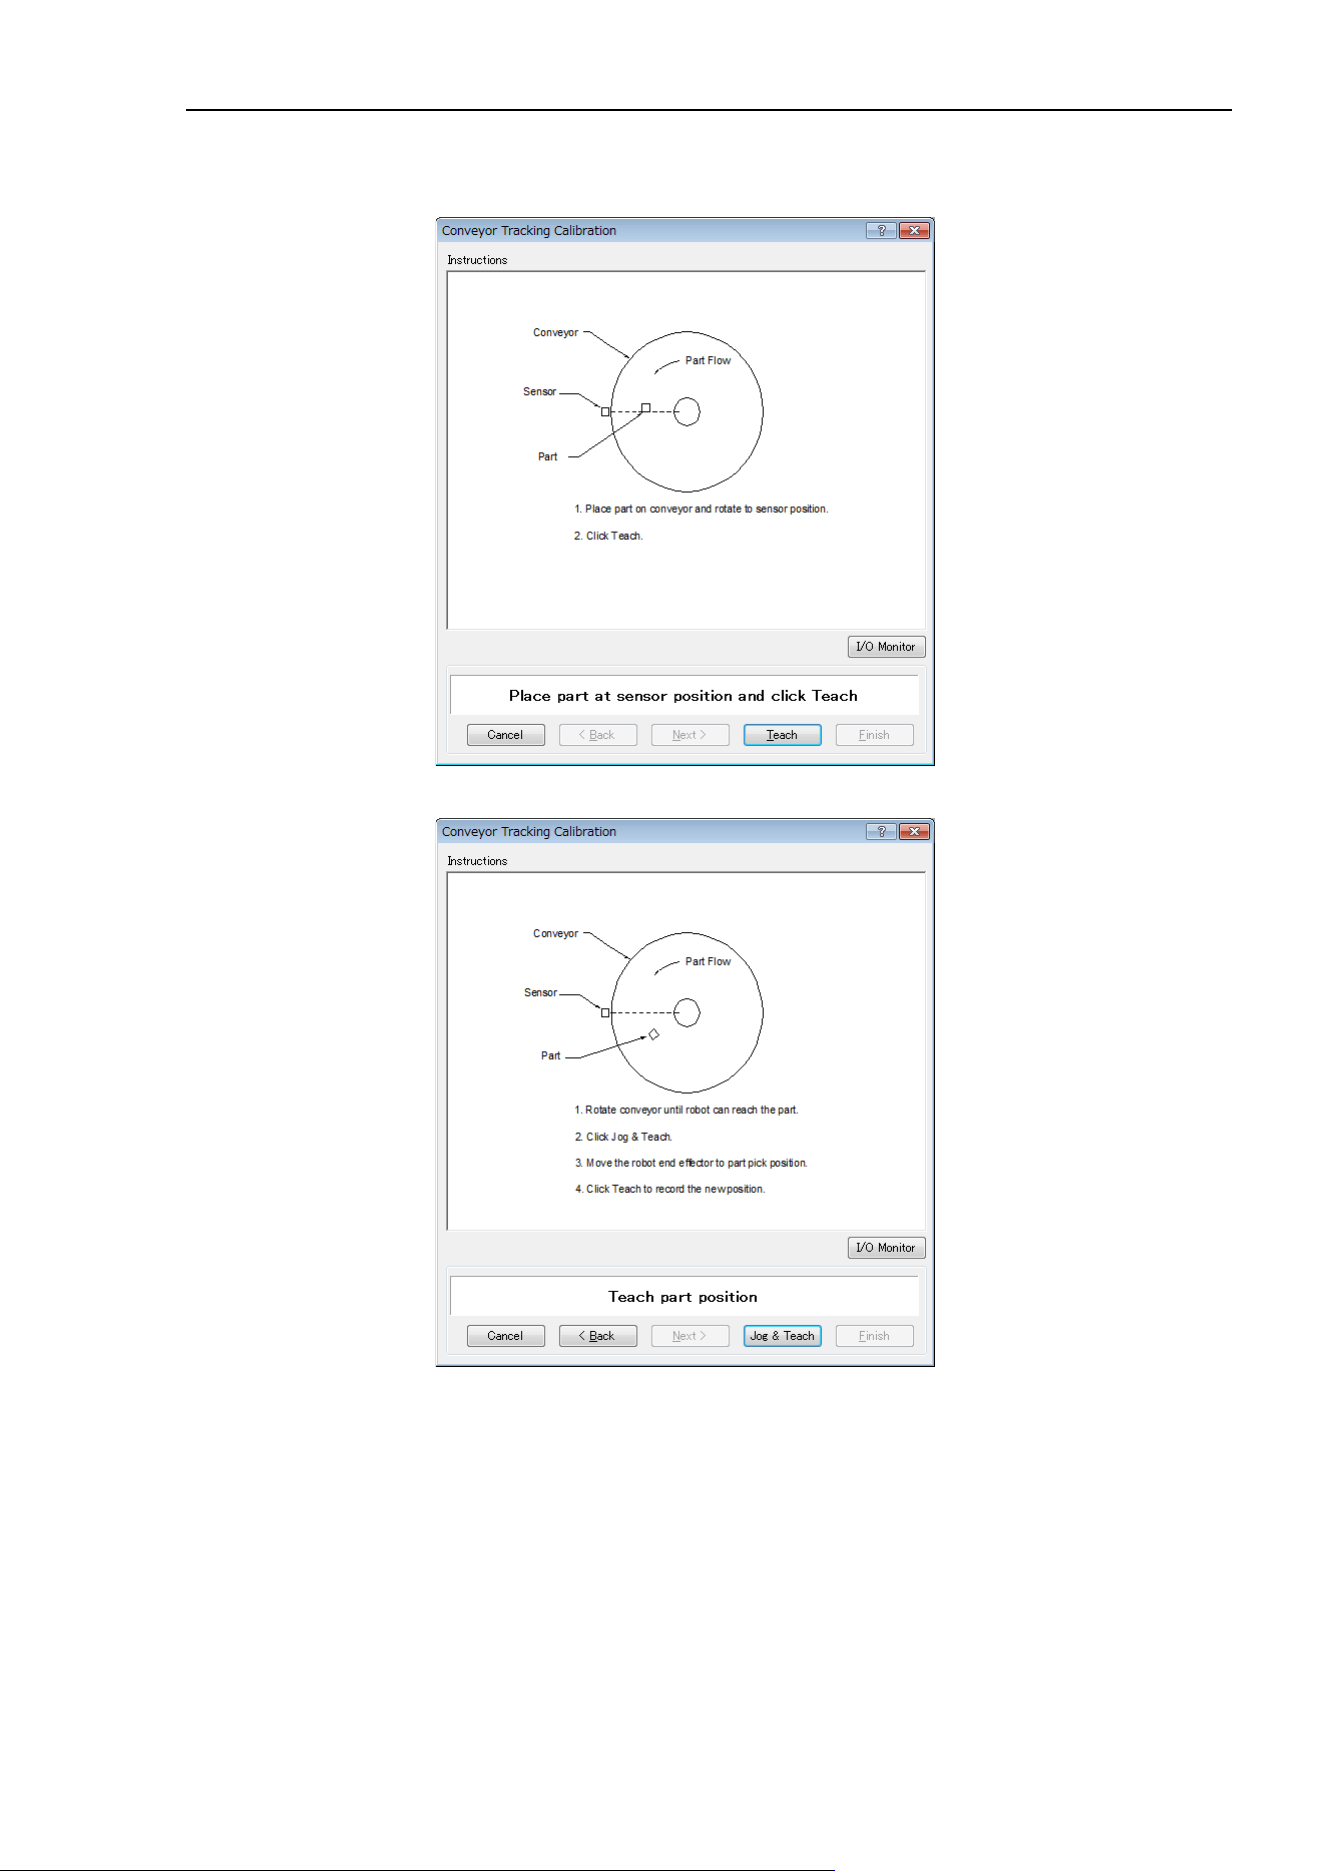
16. Conveyor Tracking
EPSON RC+ 7.0 (Ver.7.4) User's Guide Rev.6
465
9. Place a part on the conveyor and move the conveyor toward the sensor until the
sensor just turns on. Click the <Teach> button.
10. Move the conveyor by hand to move the part. Click the <Jog & Teach> button.
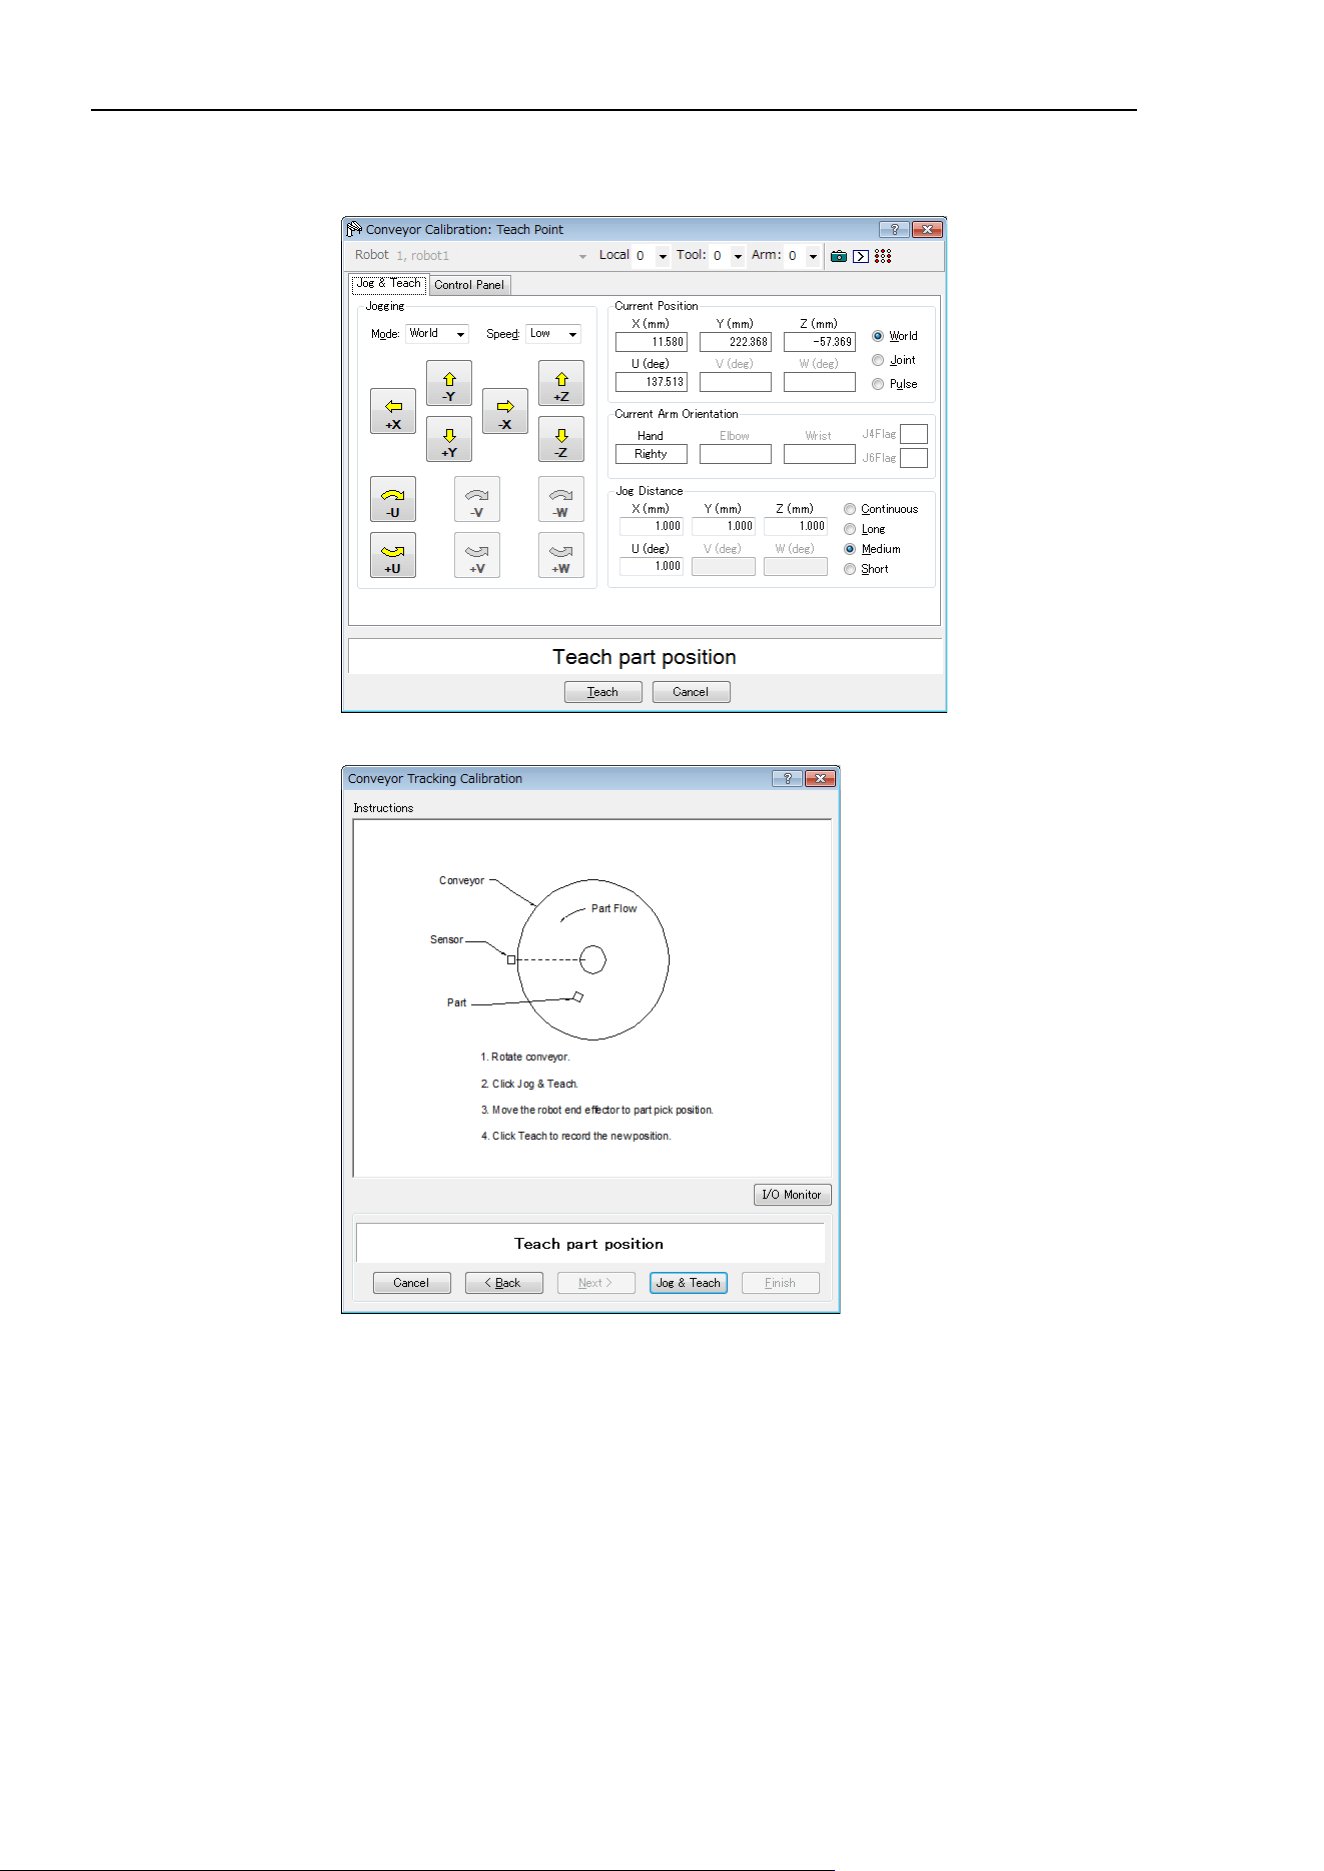
16. Conveyor Tracking
466 EPSON RC+ 7.0 (Ver.7.4) User's Guide Rev.6
11. The [Jog & Teach] dialog will appear. Click the jog buttons to move the robot end
effector to the pick position. Click the <Teach> button.
12. Move the conveyor to move the part. Click the <Jog & Teach> button.
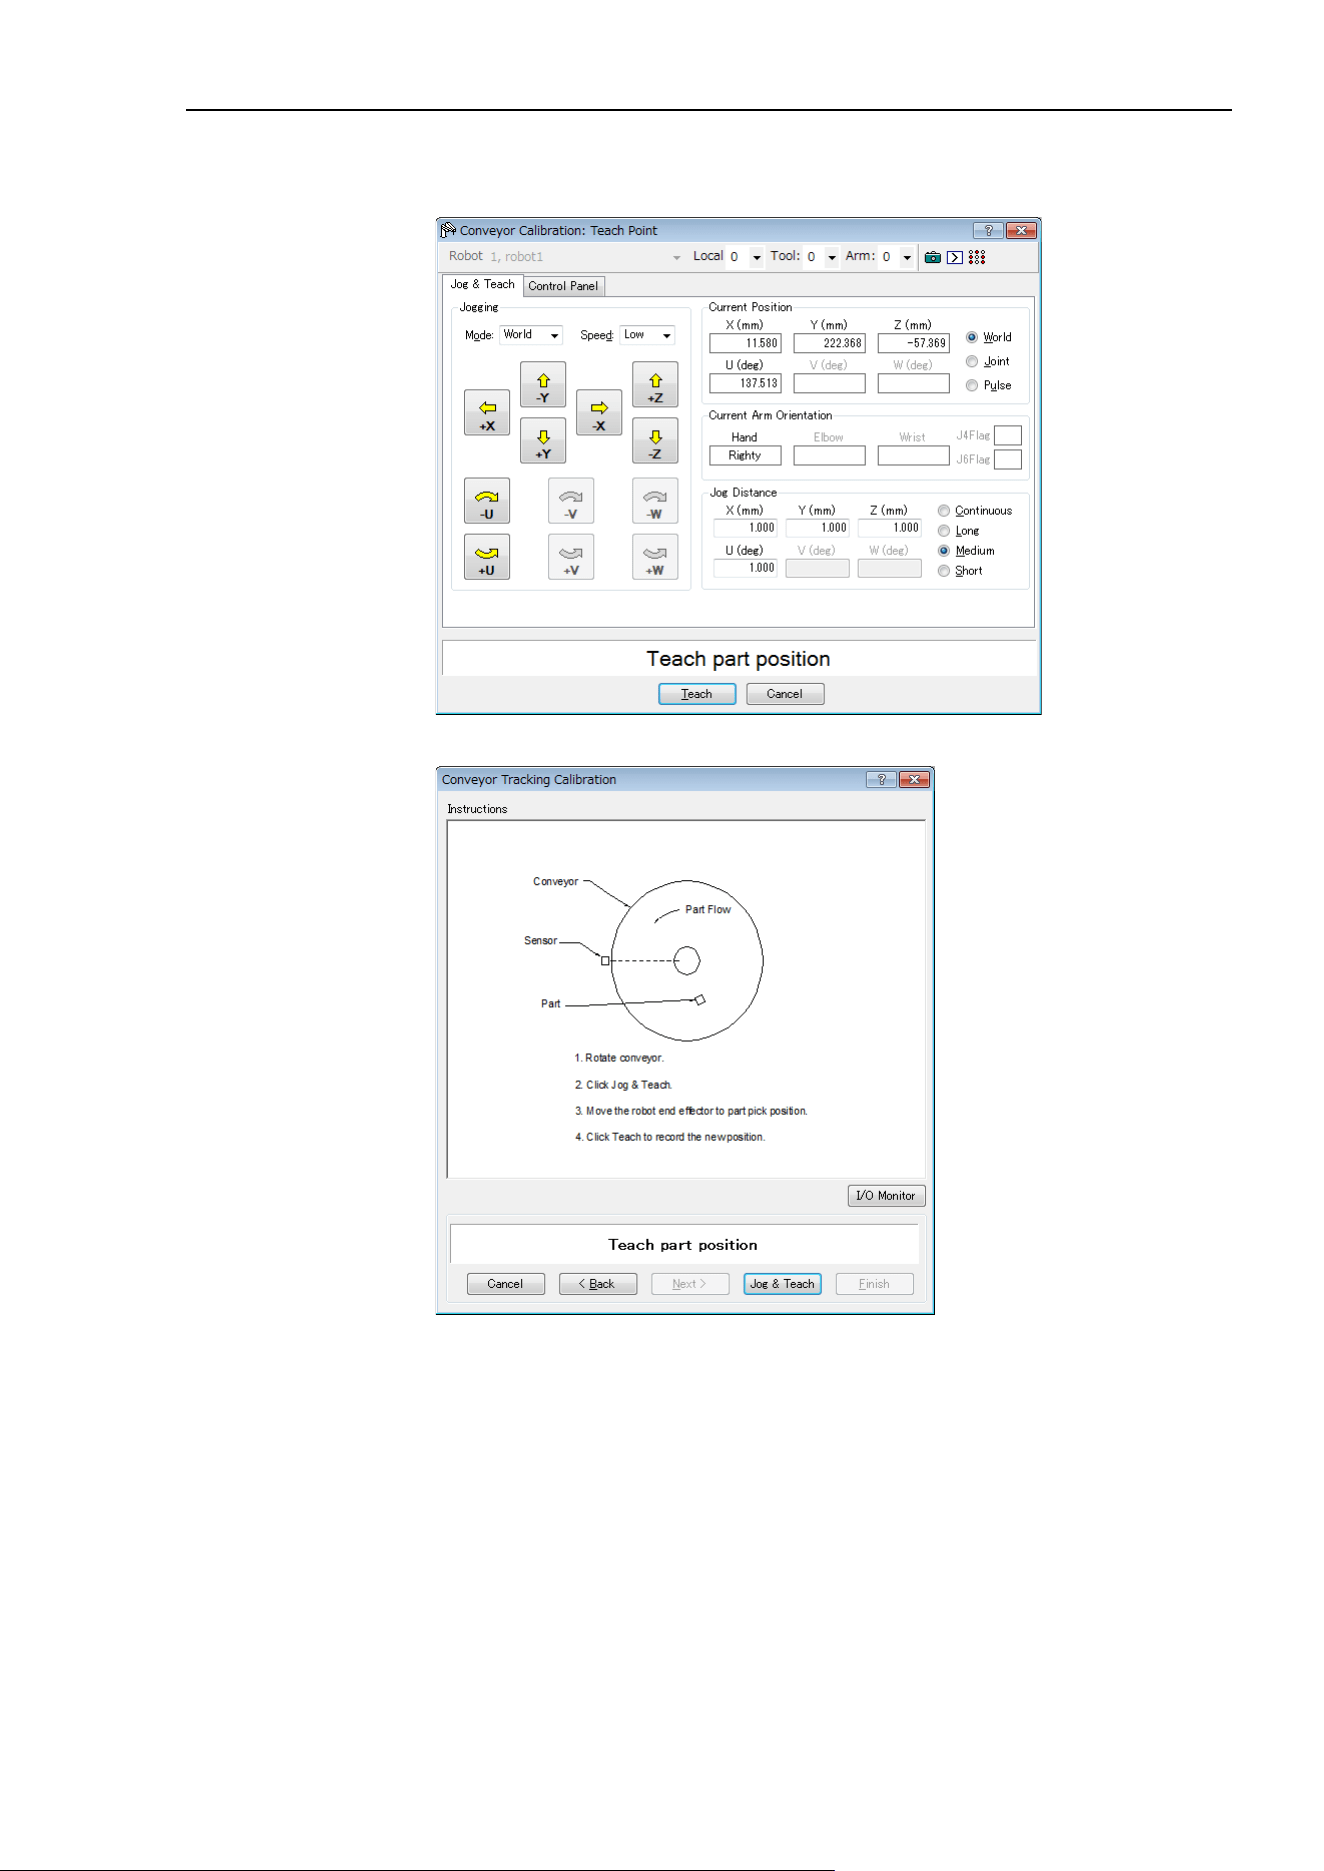
16. Conveyor Tracking
EPSON RC+ 7.0 (Ver.7.4) User's Guide Rev.6
467
13. The [Jog & Teach] dialog will appear. Click the jog buttons to move the robot end
effector to the pick position. Click the <Teach> button.
14. Move the conveyor to move the part. Click the <Jog & Teach> button.
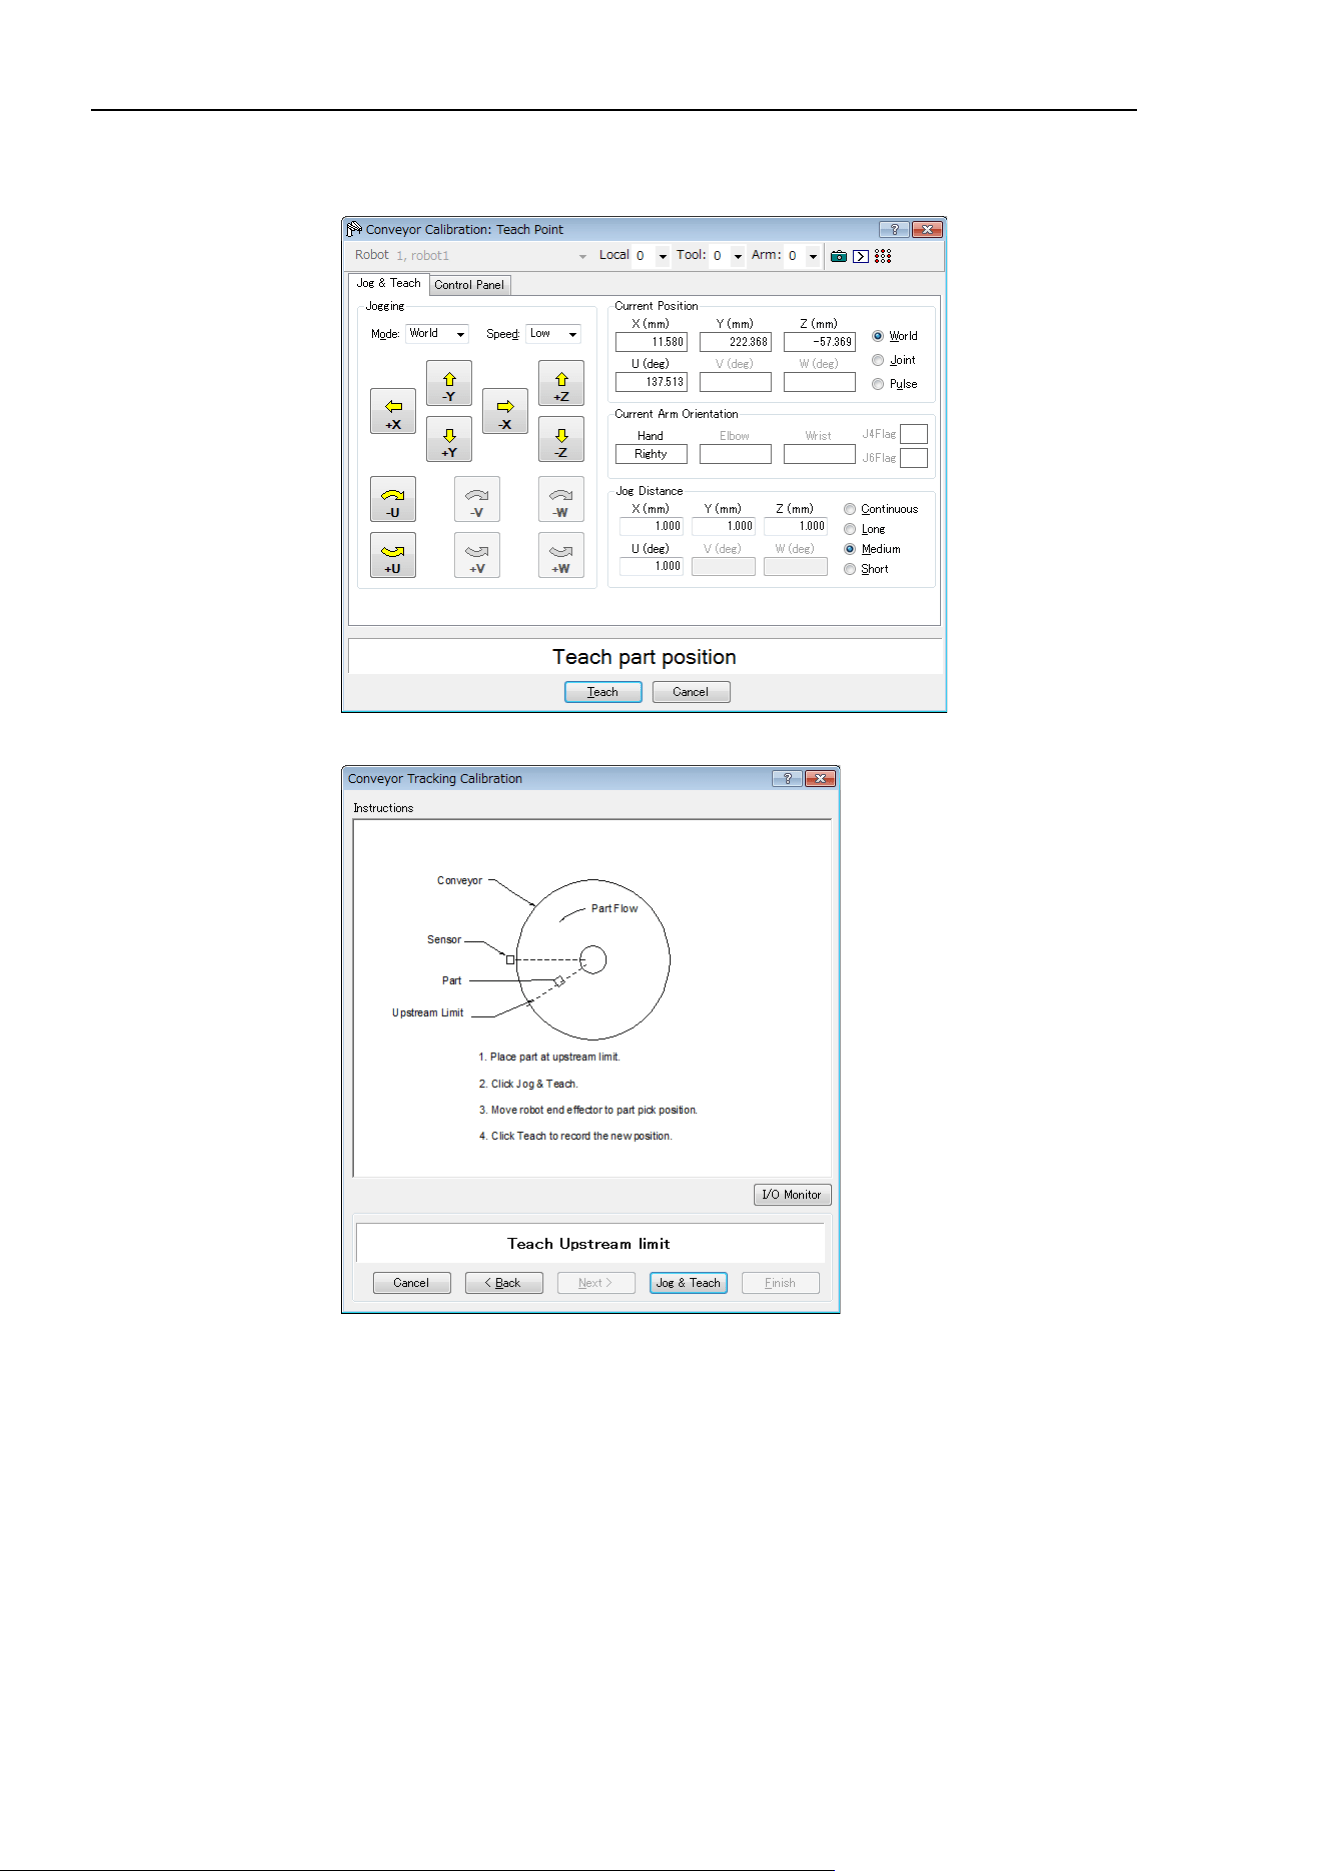
16. Conveyor Tracking
468 EPSON RC+ 7.0 (Ver.7.4) User's Guide Rev.6
15. The [Jog & Teach] dialog will appear. Click the jog buttons to move the robot end
effector to the pick position. Click the <Teach> button.
16. Place a part on the upstream limit. Click the <Jog & Teach> button.
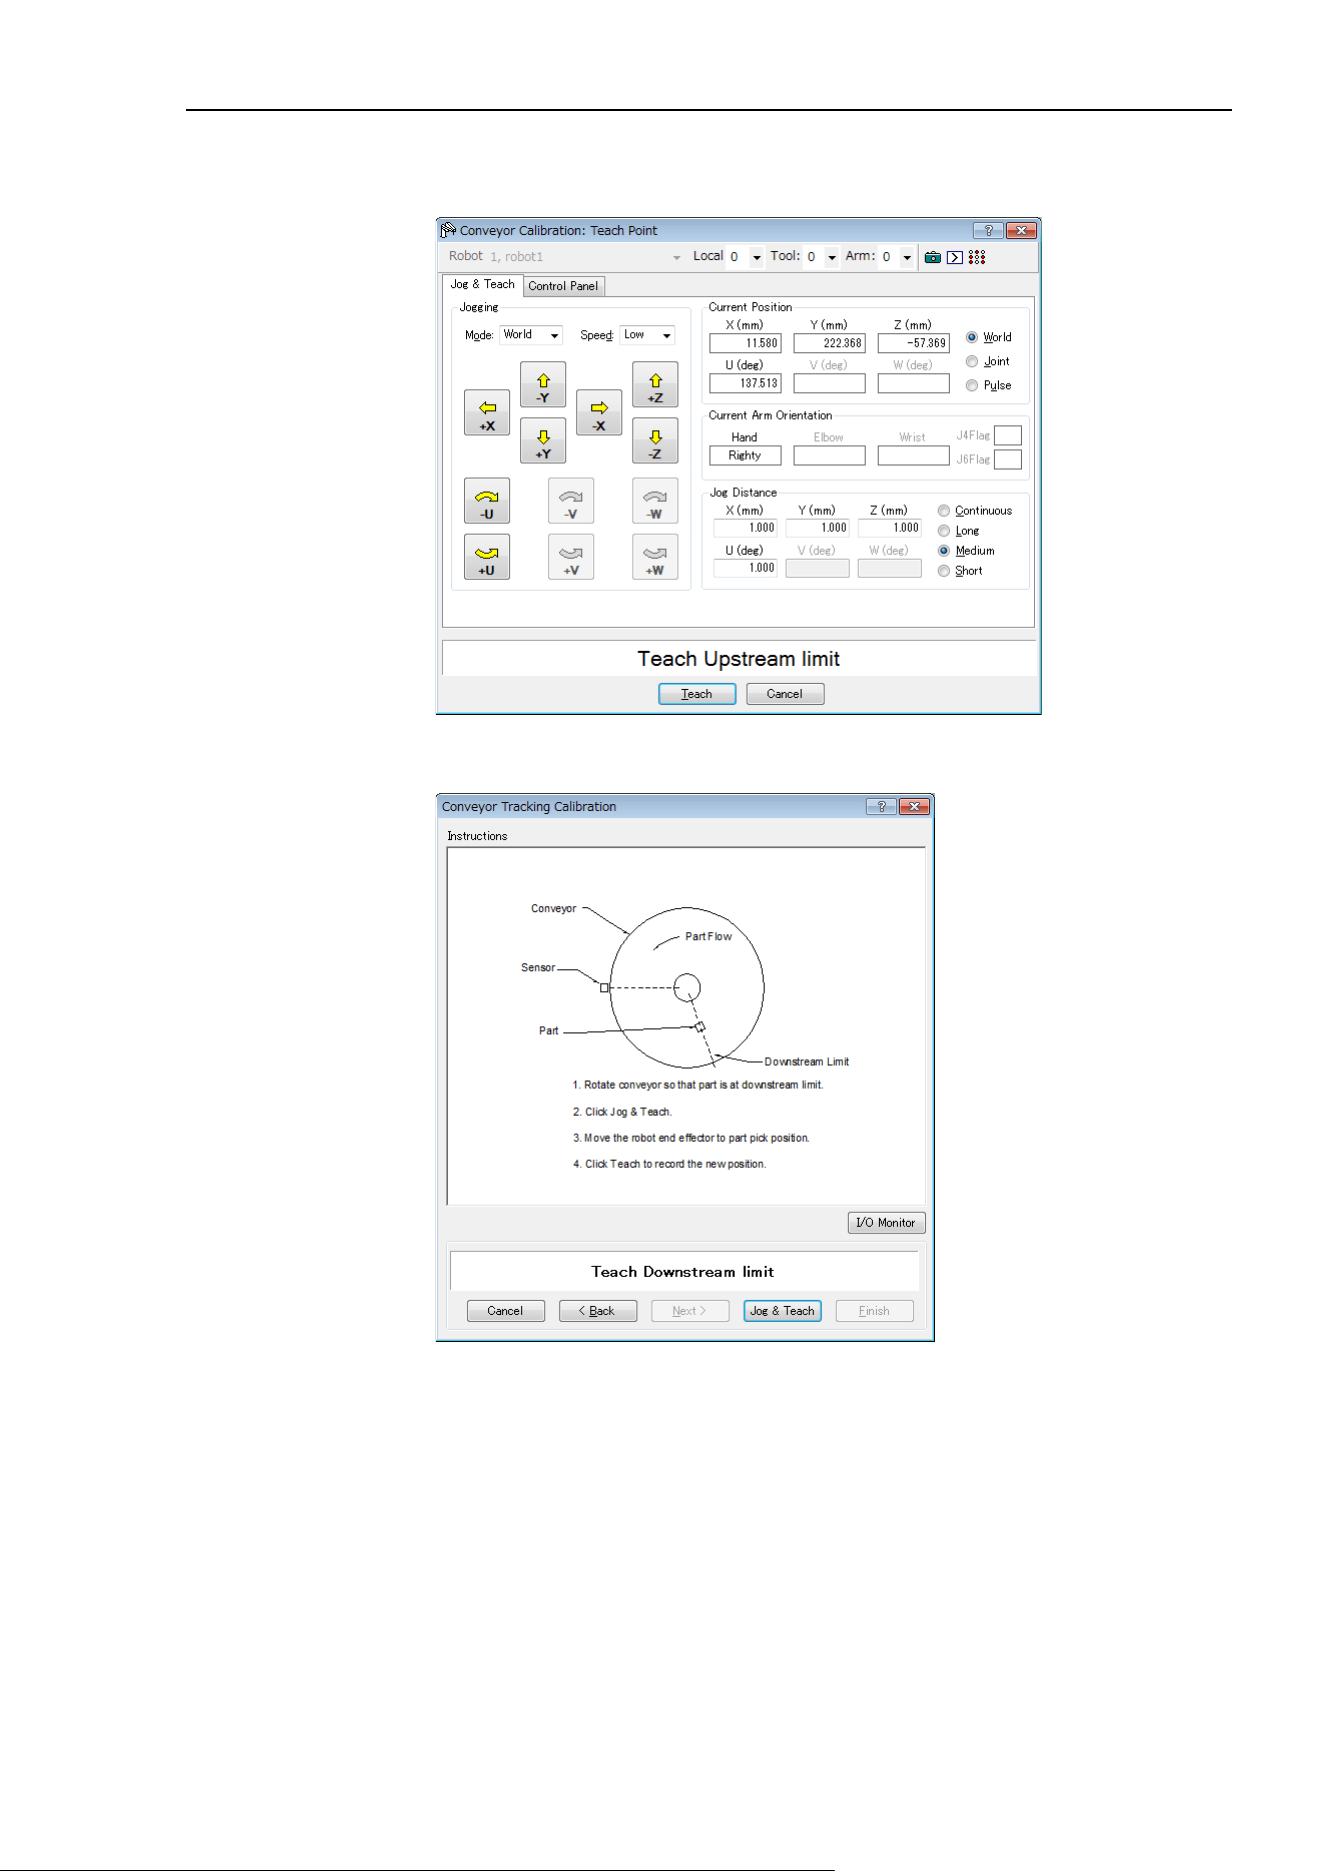
16. Conveyor Tracking
EPSON RC+ 7.0 (Ver.7.4) User's Guide Rev.6
469
17. The [Jog & Teach] dialog will appear. Click the jog buttons to move the robot end
effector to the pick position. Click the <Teach> button.
18. Move the conveyor so the part is at the downstream limit. Click the <Jog & Teach>
button.
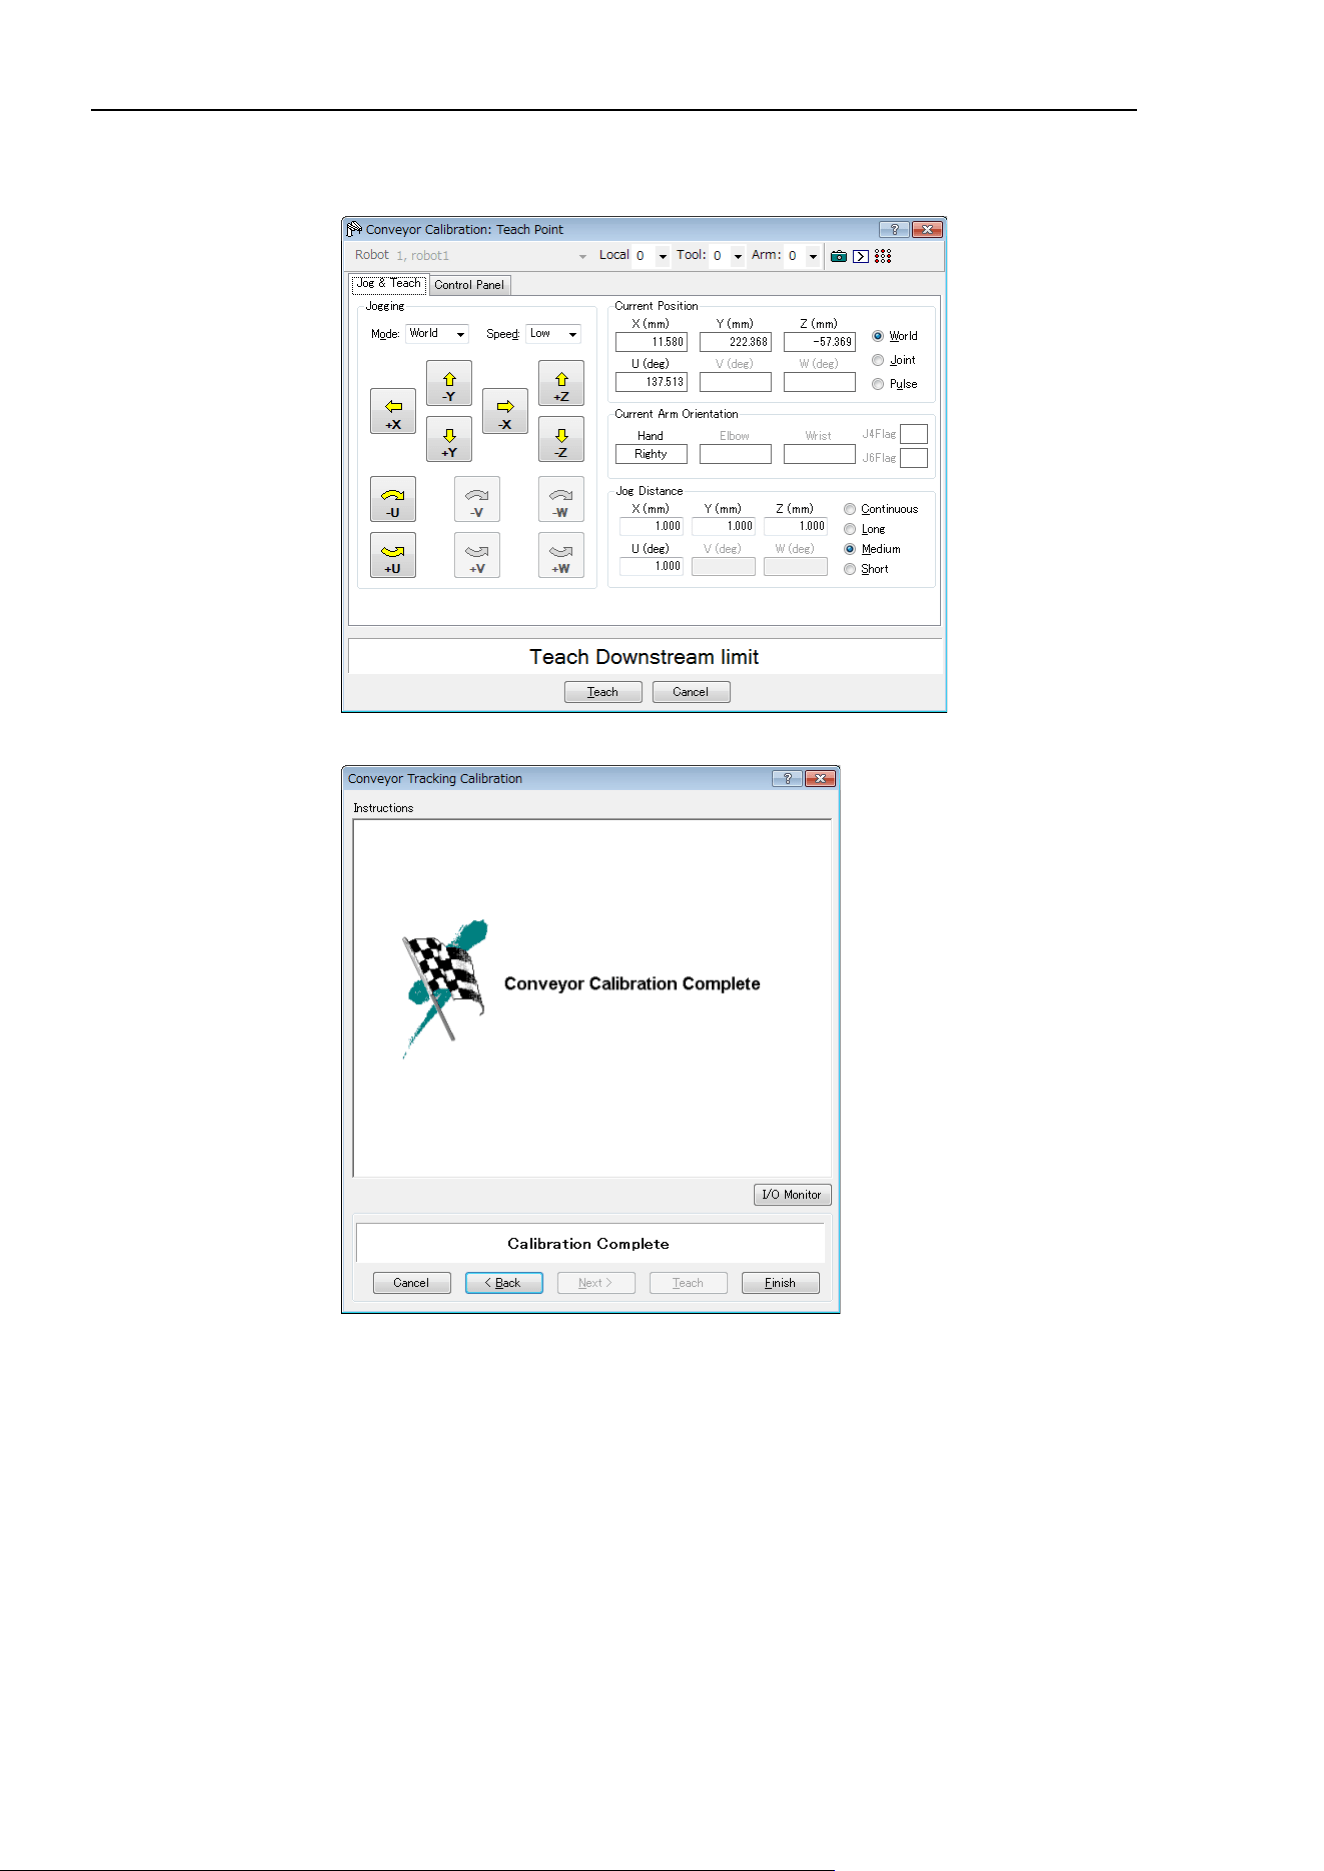
16. Conveyor Tracking
470 EPSON RC+ 7.0 (Ver.7.4) User's Guide Rev.6
19. The Jog & Teach dialog will appear. Click the jog buttons to move the robot end
effector to the pick position. Click the <Teach> button.
20. The calibration complete picture will be displayed. Click the <Finish> button.

16. Conveyor Tracking
EPSON RC+ 7.0 (Ver.7.4) User's Guide Rev.6
471
Sensor conveyor operation check
After the calibration, we recommend that you check if the sensor conveyor works properly.
Select the suitable method since the verification procedures vary depending on the system.
This section uses the program and the command window described in 16.19 Sample
Program.
Method 1: When the conveyor can be stopped arbitrary and the conveyor speed can be
30 mm/sec or less
1. Clear the all queue data registered to the conveyor.
>Cnv_QueRemove 1,all
2. Detect the part using the sensor.
3. Execute the program “ScanConveyor” to register a queue.
4. Halt the program “ScanConveyor” and move the conveyor until the part enters the
Pickup Area.
5. Pick up the part.
When using the 6-axis robot, set U, V, and W values as follows.
When using the SCARA robot, setting of U, V, and W are not necessary.
>Go Cnv_Queget(1,0):U(90):V(0):W(180)
6. Check if the robot end effector is above the center of the part.
7. Move the conveyor at 50mm/sec or less and check if the robot follows the part. At
this point, the end effector will be off the center of the part but this is no problem.
8. Stop the tracking motion of the robot.
>Cnv_AbortTrack
In case the following symptoms occur with the above method, the conveyor calibration
was not executed properly. Perform the calibration again.
- In step (6), the robot end effector is more than 1 mm away from the center of the part.
- The robot cannot follow the part when the conveyor is moving in step (7).
Method 2: When the conveyor can be stopped arbitrary and the conveyor speed can be
100 mm/sec or less
1. Clear the all queue data registered to the conveyor.
>Cnv_QueRemove 1,all
2. Detect the part using the sensor.
3. Execute the program “ScanConveyor” to register a queue.
4. Halt the program “ScanConveyor” and move the conveyor until the part enters the
Pickup Area.

16. Conveyor Tracking
472 EPSON RC+ 7.0 (Ver.7.4) User's Guide Rev.6
5. Pick up the part.
When using the 6-axis robot, set U, V, and W values as follows.
When using the SCARA robot, setting of U, V, and W are not necessary.
>Go Cnv_Queget(1,0):U(90):V(0):W(180)
6. Check if the robot end effector is above the center of the part.
7. Change the mode to “High Power”.
>Power High
8. Move the conveyor and check if the robot follows the part. At this point, the end
effector will be off the center of the part but this is no problem.
9. Stop the tracking motion of the robot.
>Cnv_AbortTrack
In case the following symptoms occur with the above method, the conveyor calibration
was not executed properly. Perform the calibration again.
- In step (6), the robot end effector is more than 2 mm away from the center of the part.
- The robot cannot follow the part when the conveyor is moving in step (8).
Method 3: When the conveyor can be stopped arbitrary
1. Clear the all queue data registered to the conveyor.
>Cnv_QueRemove 1,all
2. Detect the part using the sensor.
3. Execute the program “ScanConveyor” to register a queue.
4. Halt the program “ScanConveyor” and move the conveyor until the part enters the
Pickup Area.
5. Pick up the part.
When using the 6-axis robot, set U, V, and W values as follows.
When using the SCARA robot, setting of U, V, and W are not necessary.
>Go Cnv_Queget(1,0):U(90):V(0):W(180)
6. Check if the robot end effector is above the center of the part.
7. Stop the tracking motion of the robot.
>Cnv_AbortTrack
8. Use the program “Main” to check if the robot follows the part. At this point, change
the wait time after tracking to 0.2 ~ 0.5 in the sample program.
In case the following symptoms occur with the above method, the conveyor calibration
was not executed properly. Perform the calibration again.
- In step (6), the robot end effector is more than 1 mm away from the center of the part.
- The robot moves to a different position from the part in step (8).

16. Conveyor Tracking
EPSON RC+ 7.0 (Ver.7.4) User's Guide Rev.6
473
Method 4: When the conveyor cannot be stopped and the speed cannot be changed
arbitrary
1. Move the conveyor.
2. Change the sample program as follows.
Change the wait time after tracking to 0.2 ~ 0.5
Set the tracking mode to “0”
3. Execute the sample program “Main”.
4. Place the part after the conveyor speed becomes constant.
5. Check if the robot follows the part.
6. Change the sample program as follows.
Set the tracking mode to “1”.
7. Execute the sample program “Main”.
8. Place the part when the conveyor speed becomes constant.
9. Check if the robot follows the part.
In case the following symptoms occur with the above method, the conveyor calibration
was not executed properly. Perform the calibration again.
- When comparing step (5) and (9), the distance between the robot and the part is
smaller in step (5).
- The robot moves to the different position from the parts in step (5).
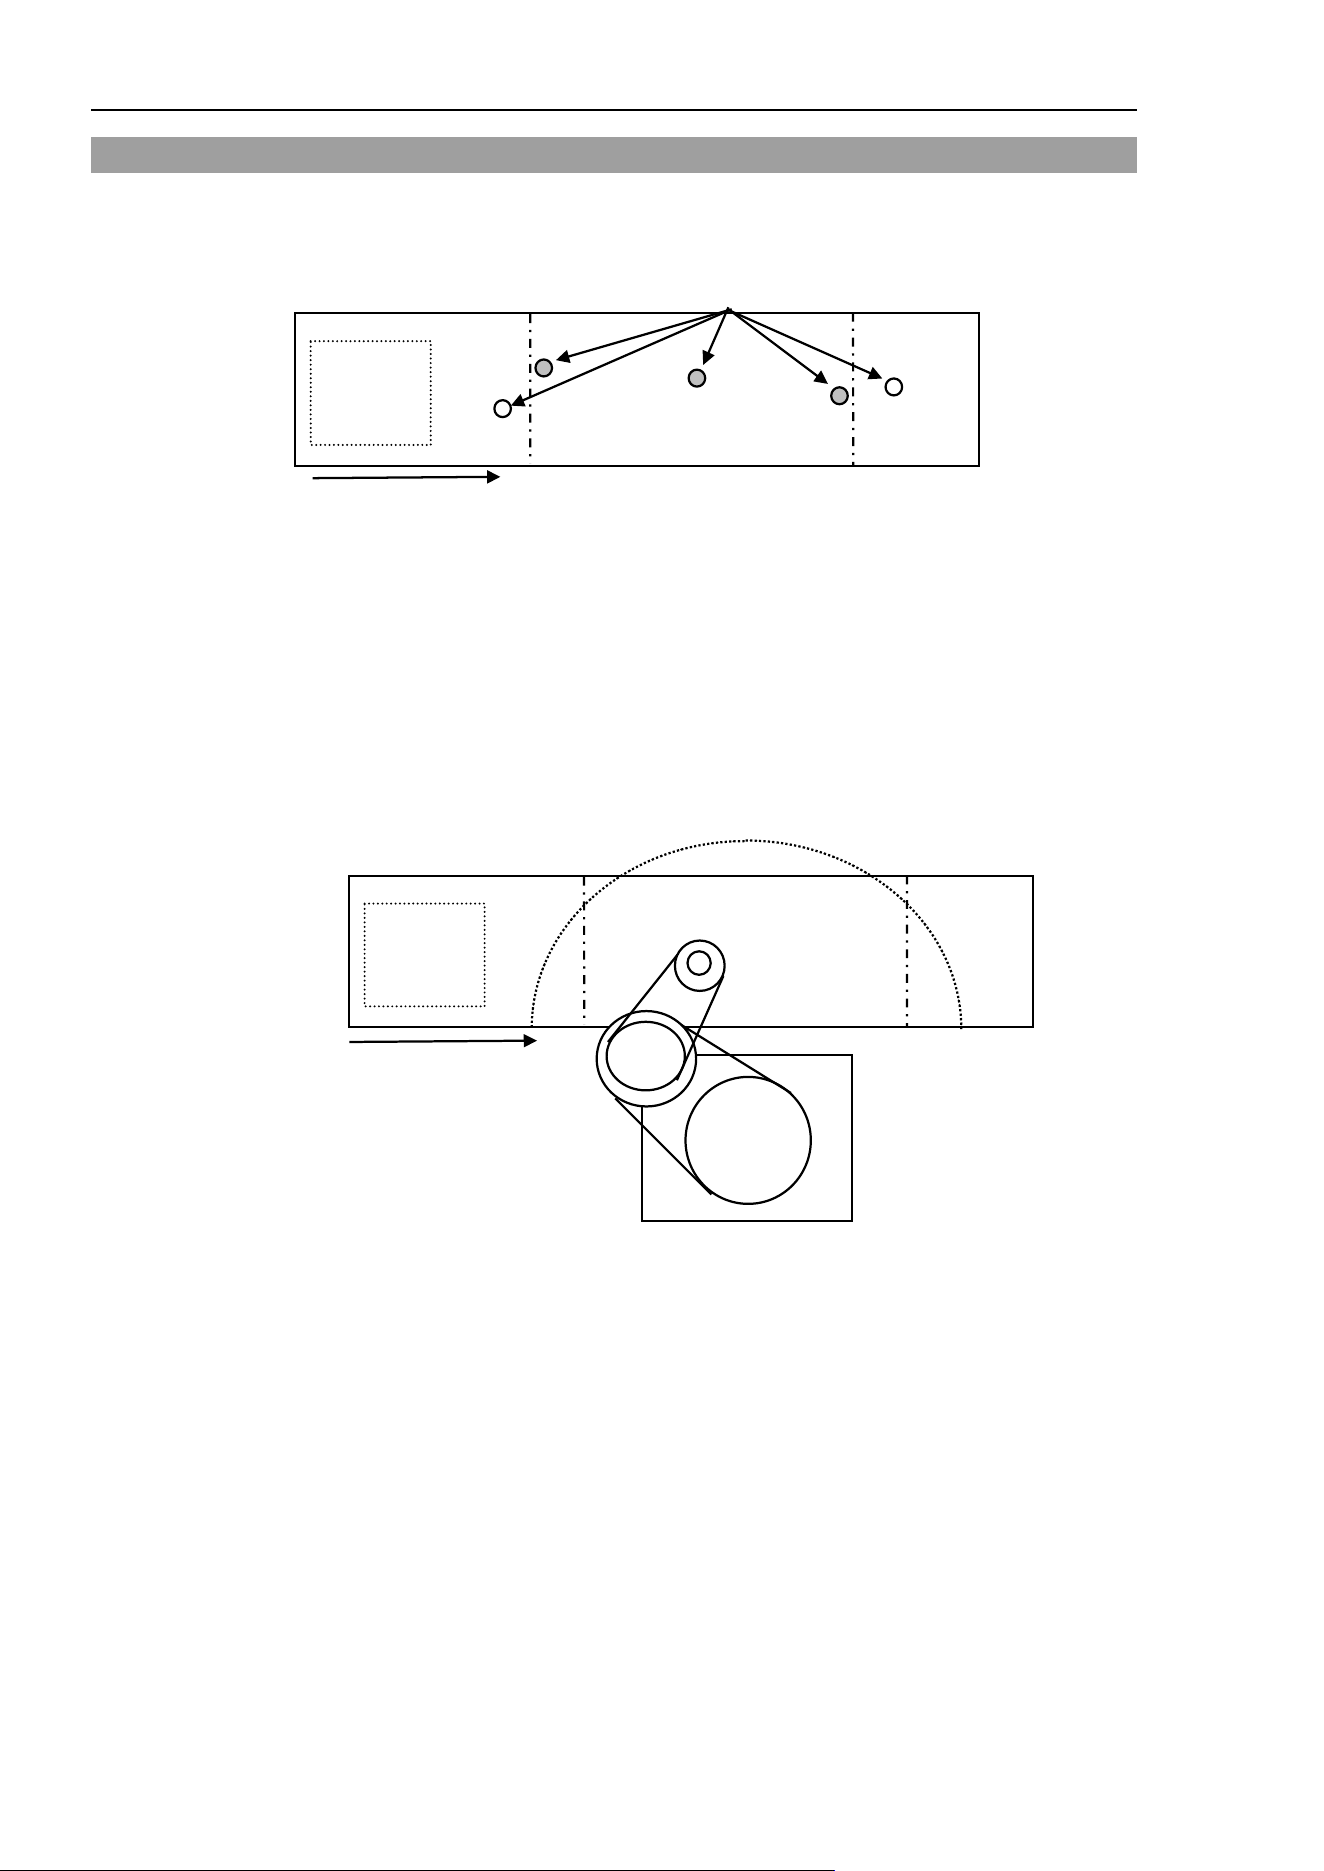
16. Conveyor Tracking
474 EPSON RC+ 7.0 (Ver.7.4) User's Guide Rev.6
16.15 Pickup Area
The Pickup Area is the range where the robot can pick up parts.
In the figure below, the robot can pick up the parts in gray.
Parts Flow
Conveyor
Downstream limit
Upstream limit
Parts
Vision
search area
Pickup Area
If the Pickup Area is not appropriate, the robot cannot pick up parts. Follow the steps and
cautions below to carefully set the Pickup Area.
To define the Pickup Area:
1. After calibration, the Pickup Area will be defined as shown in the following figure.
Note that the positions of upstream limit and downstream limit depend on the
positions you teach during the calibration.
Downstream limit
Robot motion range
Conveyor
Part Flow
Upstream limit
Pickup Area
Vision
search area
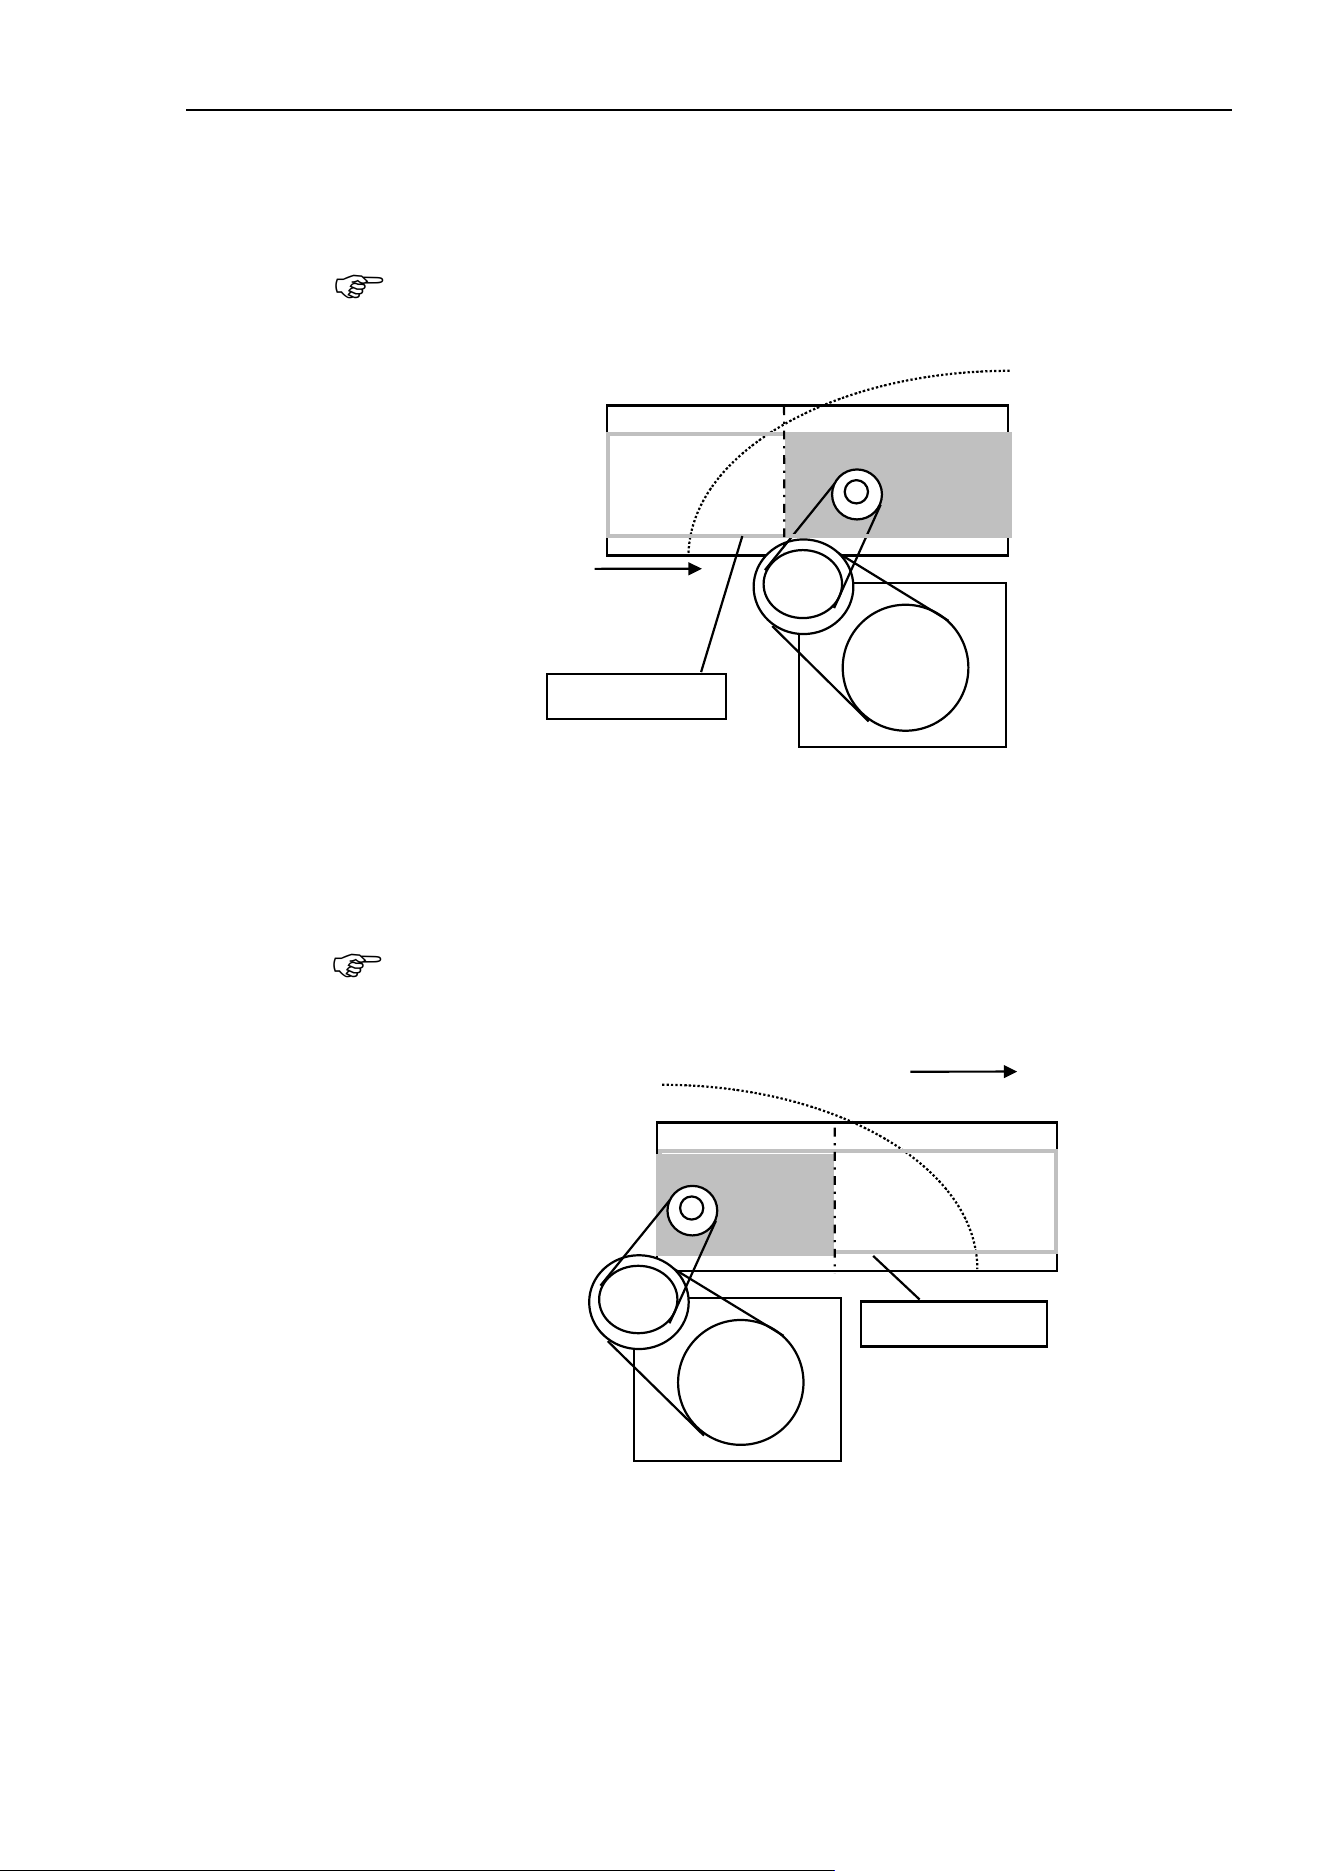
16. Conveyor Tracking
EPSON RC+ 7.0 (Ver.7.4) User's Guide Rev.6
475
2. Decide the upstream limit position.
The robot starts pickup from the line defined by the upstream limit. The Pickup Area
from the upstream limit must be within the robot motion range. (See the figure below.)
The robot does not start pickup until parts cross the upstream limit. If you set the
upstream limit in uppermost position, you can reduce the robot standby time.
Robot motion range
Part Flow
Conveyor
Upstream limit
Tracking area
Pickup Area
3. Decide the downstream limit position.
Once the robot starts pickup, it continues its operation even over the downstream limit
to complete the whole operation. Therefore, set the downstream limit in uppermost
possible position so that the robot can operate within its motion range until it
completes the operation. (See the figure below.)
The downstream limit position depends on the conveyor speed and robot position
when it starts pickup. If the robot goes over the motion range during the operation,
move the downstream limit to upper side.
Downstream limit
Robot motion range
Part Flow
Tracking area
Pickup Area
NOTE
NOTE
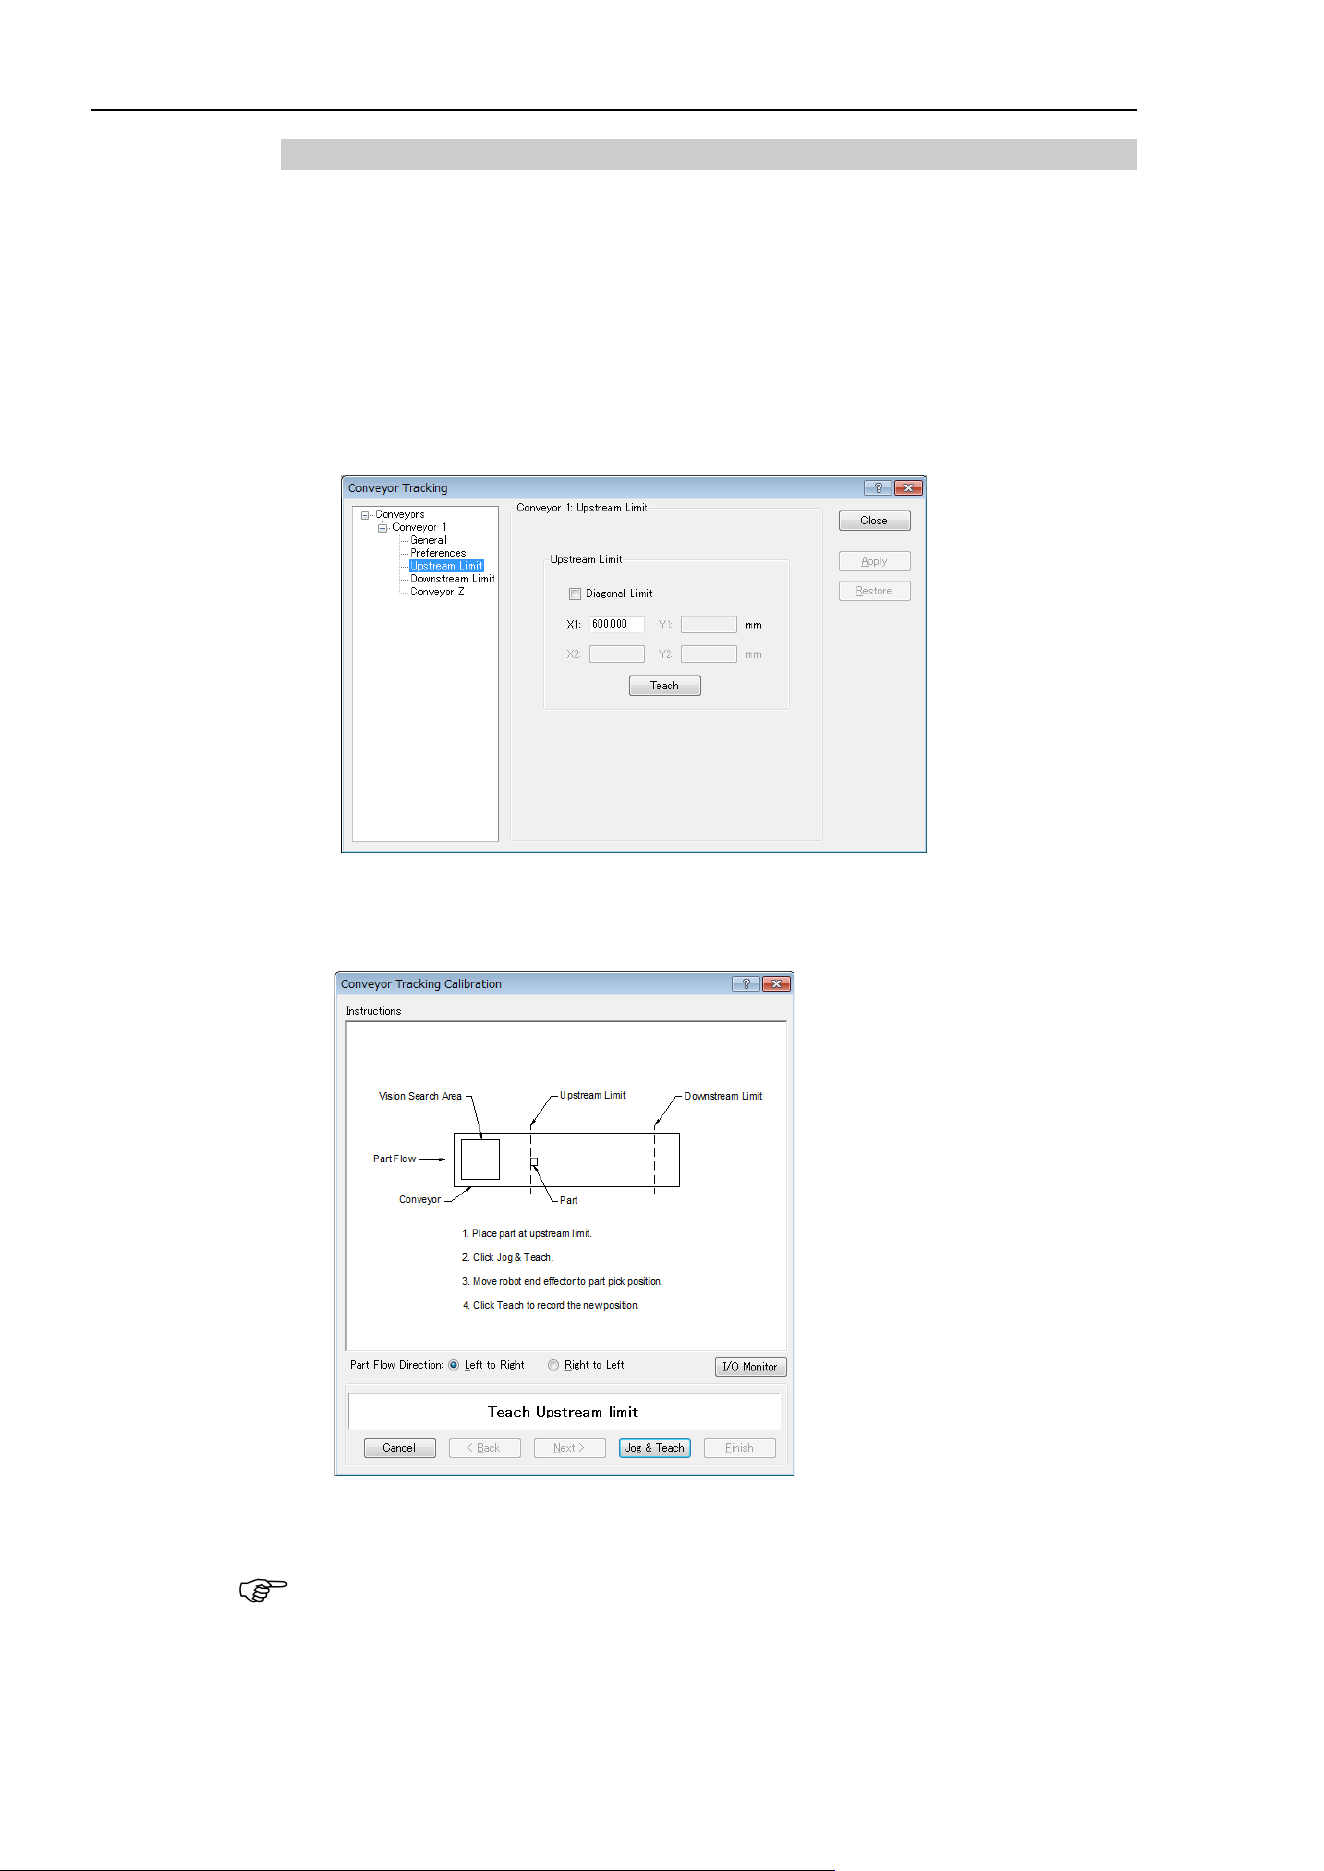
16. Conveyor Tracking
476 EPSON RC+ 7.0 (Ver.7.4) User's Guide Rev.6
Changing the Upstream / Downstream limits positions
To change the upstream limit and downstream limit positions, follow the steps below.
To change the Upstream Limit:
1. Select [Tools]-[Conveyor Tracking].
2. Select the conveyor you want to edit.
3. Click [Upstream Limit].
4. The dialog shown below appears.
To define the X1 value, enter a value directly or use Jog & Teach. Entering values
directly is for fine adjustment.
5. When you directly specify the value, enter the value in the box and click <Apply>.
6. When you use Jog & Teach, click the <Teach> button.
7. The dialog shown below appears. Follow the directions as you do during calibration.
To change the downstream limit, click [Downstream Limit] and edit the value in the same
way as the upstream limit.
Upstream and downstream positions can be changed from the Spel program by using
Cnv_Upstream and Cnv_Downstream commands.
(Diagonal upstream and downstream cannot be changed from the Spel program)
NOTE
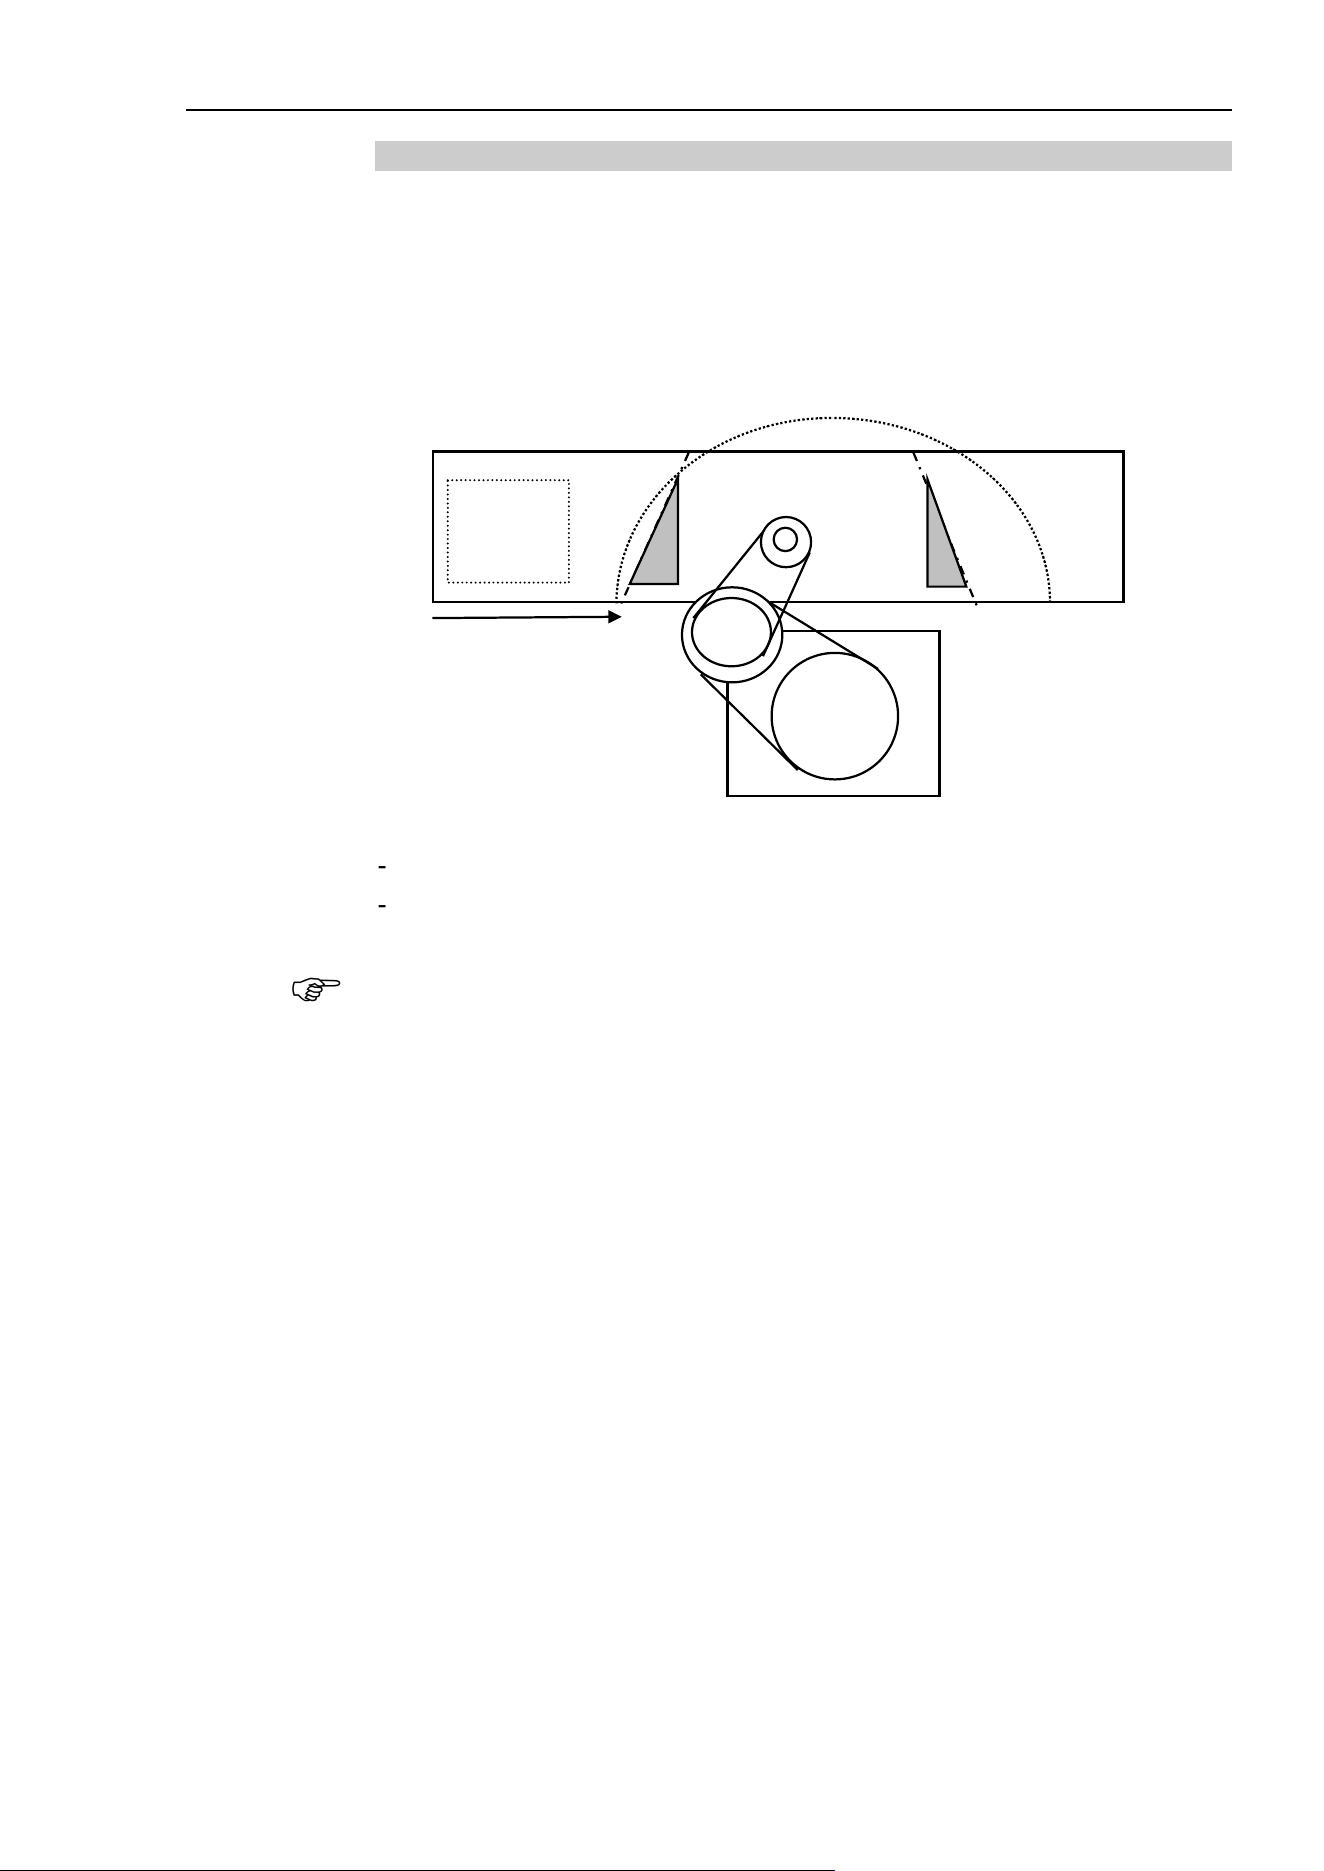
16. Conveyor Tracking
EPSON RC+ 7.0 (Ver.7.4) User's Guide Rev.6
477
Diagonal Upstream / Downstream Limits
After the calibration, you can set the dividing lines for the Pickup Area (upstream limit /
downstream limit) directed diagonally to the part flow.
When you change the dividing lines to diagonal positions, the Pickup Area also changes as
shown below. The area indicated in gray is widened by changing the dividing lines to
diagonal positions. In addition, diagonal dividing lines are called the diagonal upstream /
downstream limits.
Part Flow
Conveyor
Diagonal downstream limit
Diagonal upstream limit
Robot motion range
Pickup Area
Vision
search area
The following are the advantages you can get by widening the Pickup Area.
Reduce robot standby time by widening the upper side Pickup Area.
Less possibility of missing parts which flow longer after the downstream limit.
If there are too many parts on the conveyor for the robot to pick up, it only makes the
robot move for longer distance and longer time and the number of parts the robot can pick
up may decrease, even in a widened Pickup Area.
The robot capacity (how fast or how many parts robot can pick up) depends on the Pickup
Area width, robot standby position, and conveyor speed.
NOTE
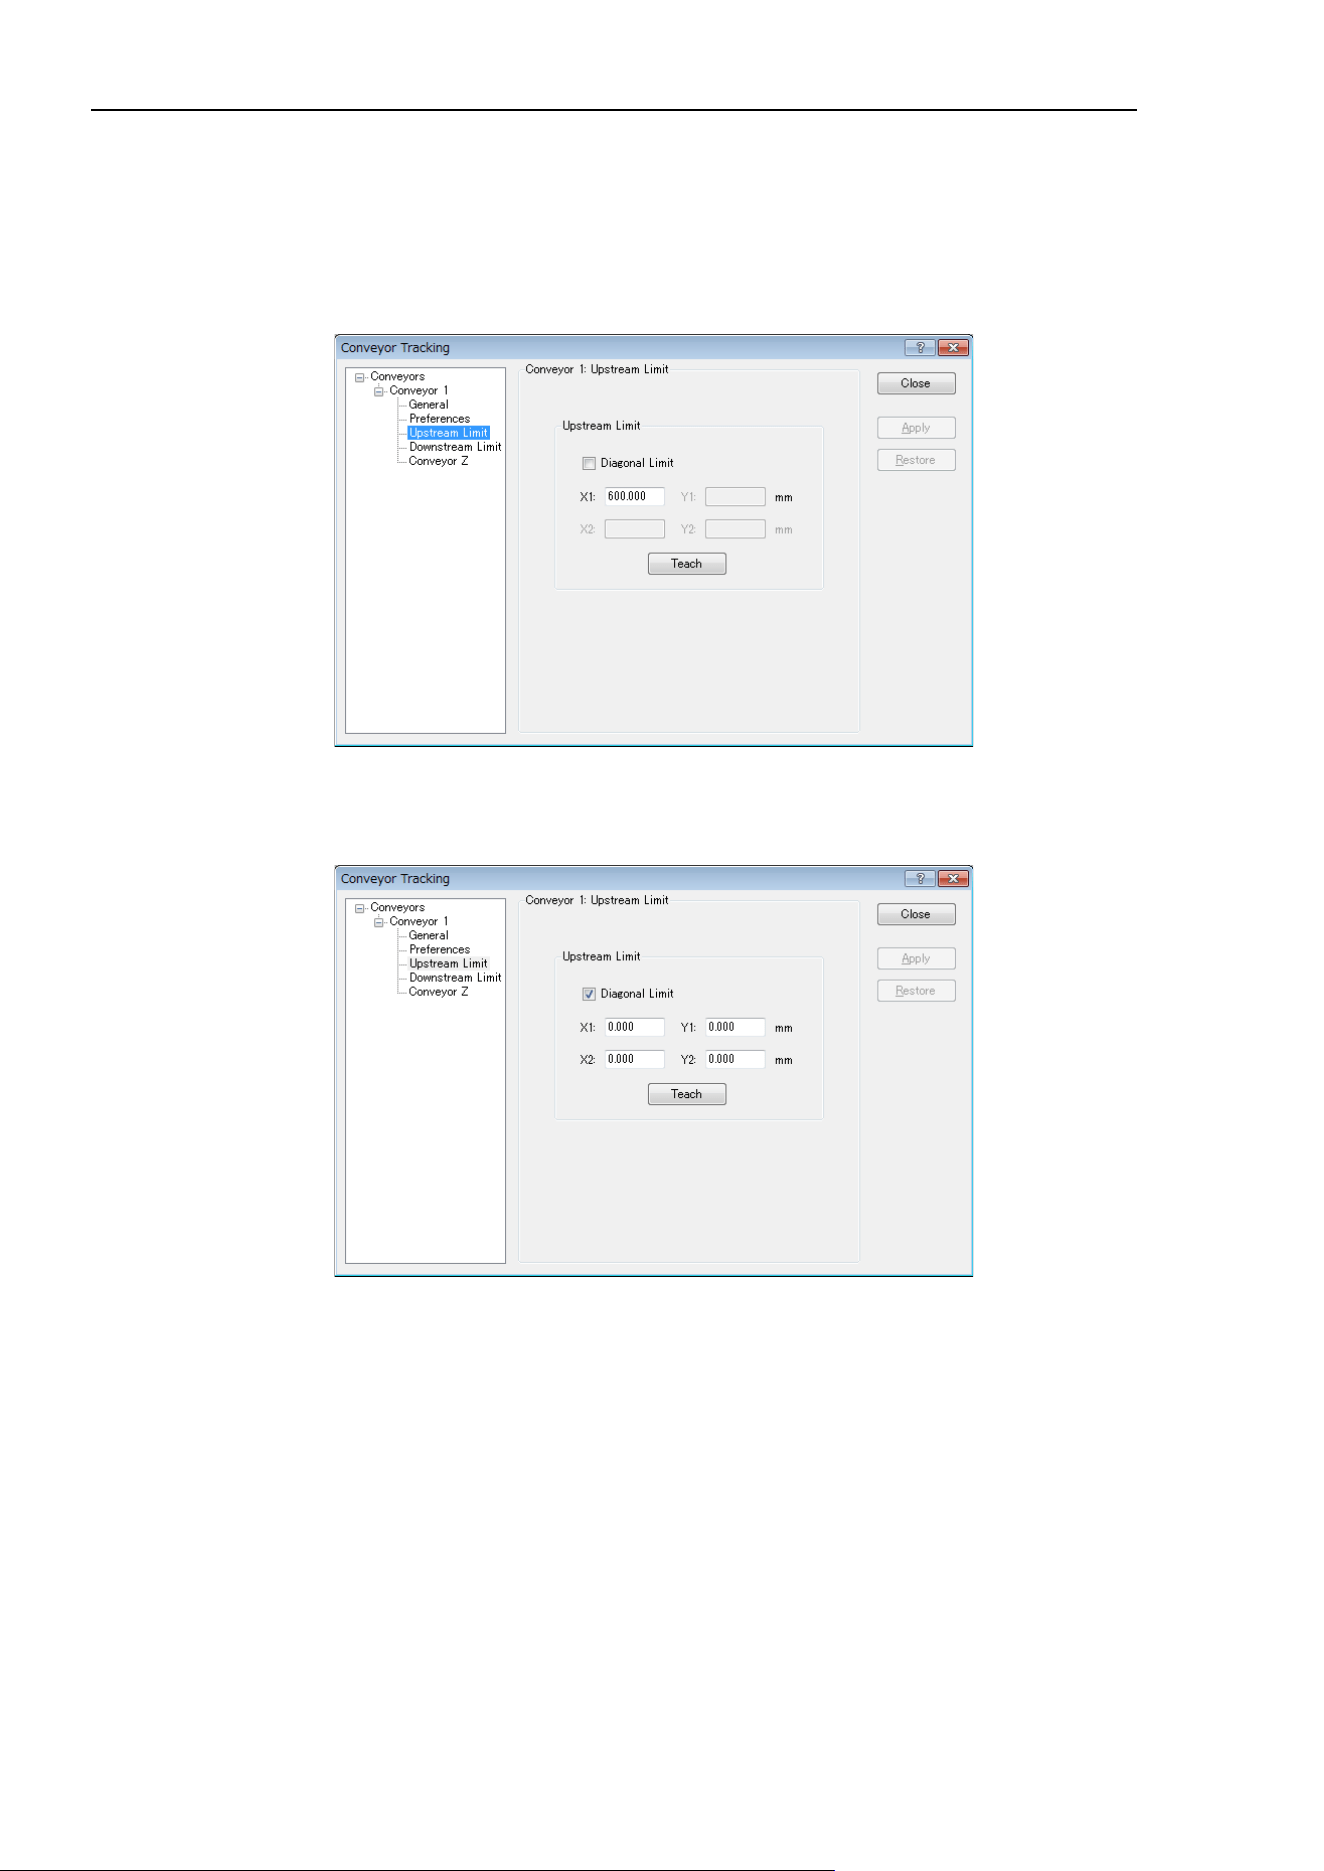
16. Conveyor Tracking
478 EPSON RC+ 7.0 (Ver.7.4) User's Guide Rev.6
To set the diagonal upstream limit:
1. Select [Tools]-[Conveyor Tracking].
2. Select the conveyor you want to edit.
3. Click on [Upstream Limit].
4. The dialog shown below appears.
Check the [Diagonal Limit] check box in [Upstream Limit] and click the <Apply>
button.
The following dialog appears.
To define the values for X1, Y1, X2, Y2, enter the values directly or use Jog &
Teach. Entering values directly is for fine adjustment.
5. When you directly specify the values, enter the values in the boxes and click the
<Apply> button.
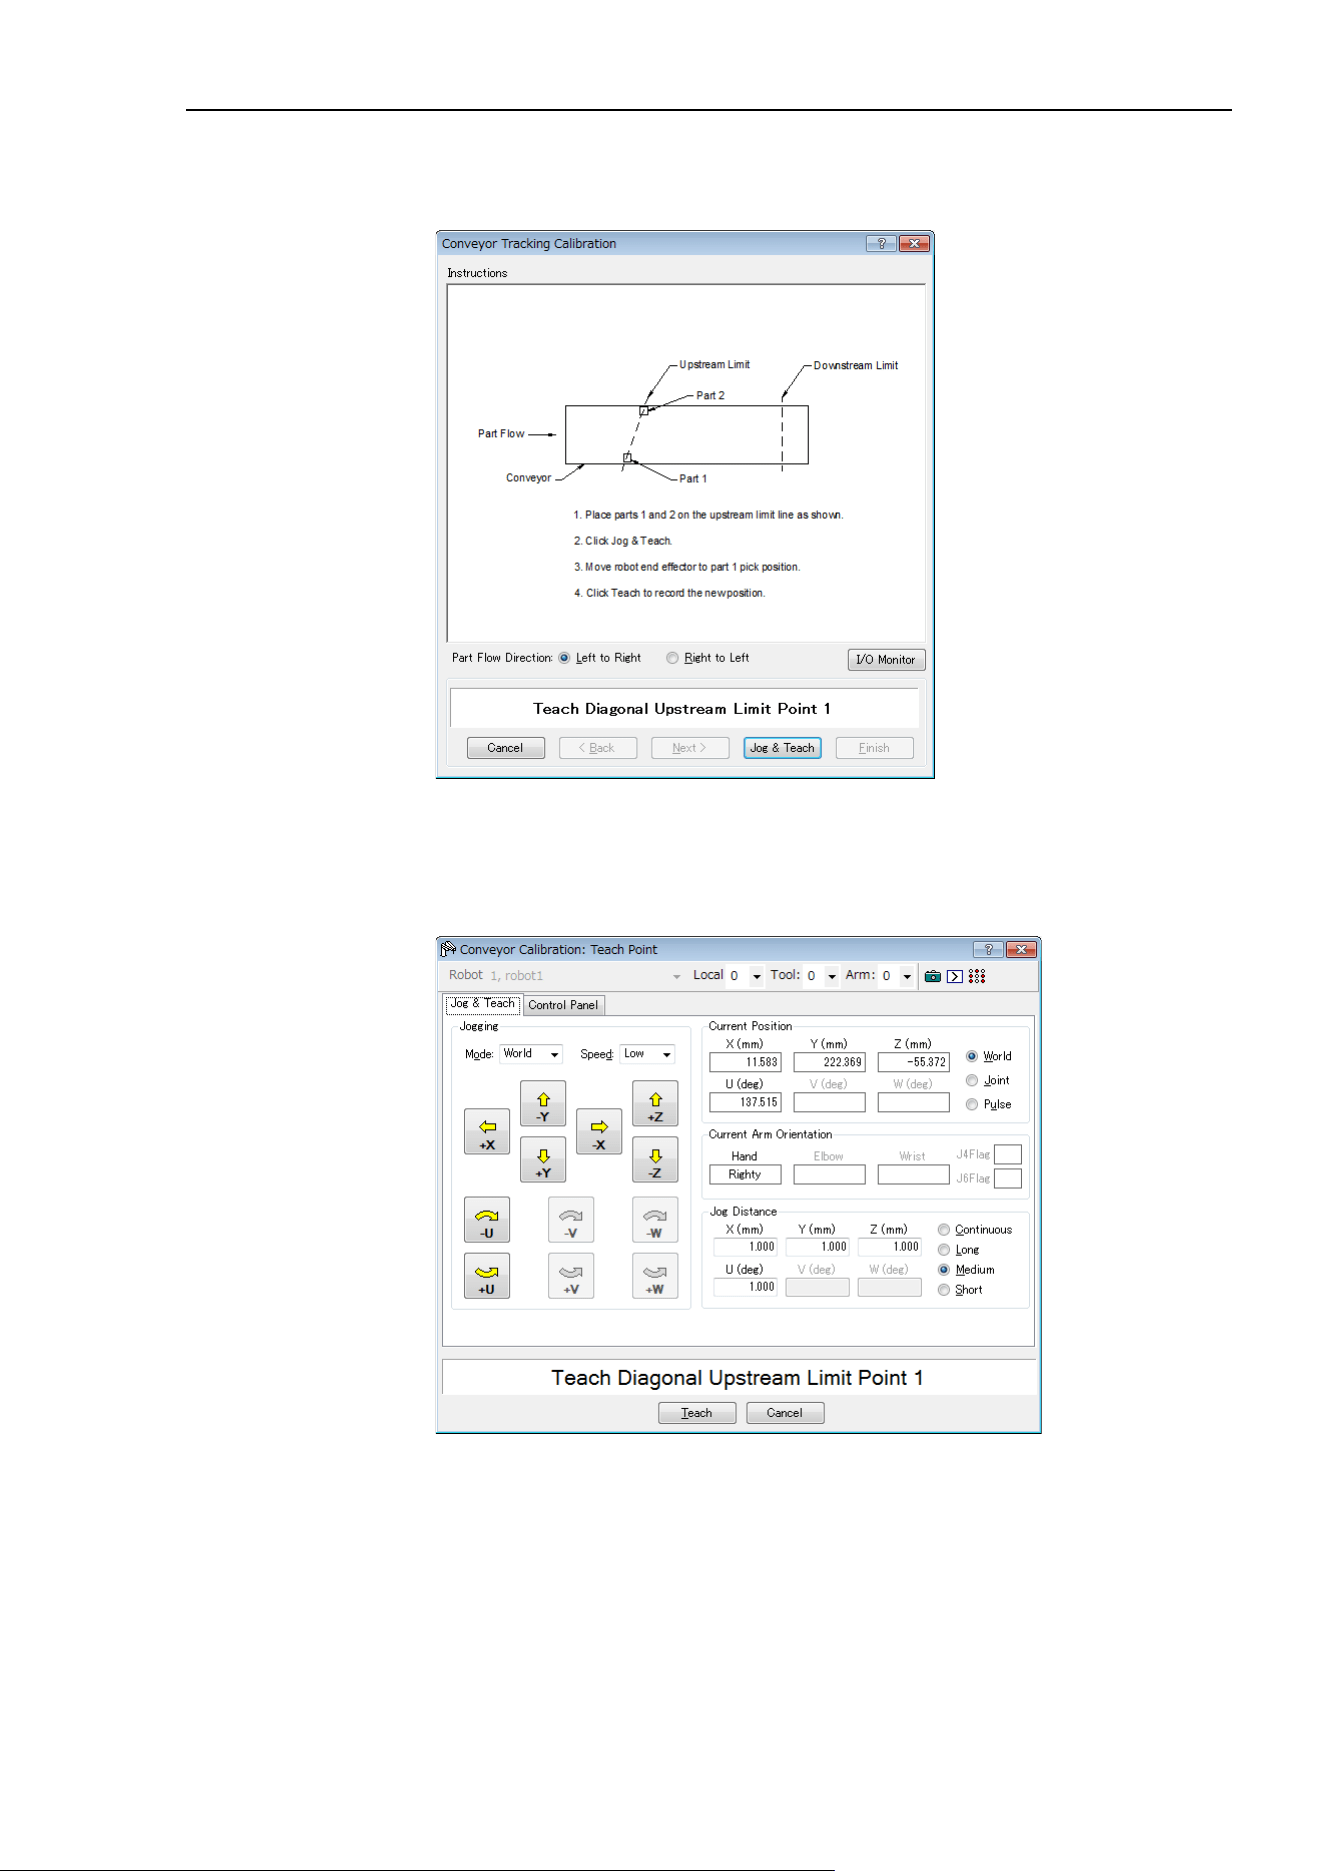
16. Conveyor Tracking
EPSON RC+ 7.0 (Ver.7.4) User's Guide Rev.6
479
6. When you use Jog & Teach, click the <Teach> button.
The dialog shown below appears.
7. Place two parts on the conveyor.
Click the <Jog & Teach> button.
8. The [Jog & Teach] dialog appears. Click the jog buttons to move the robot end
effector to the pick position. Click the <Teach> button.
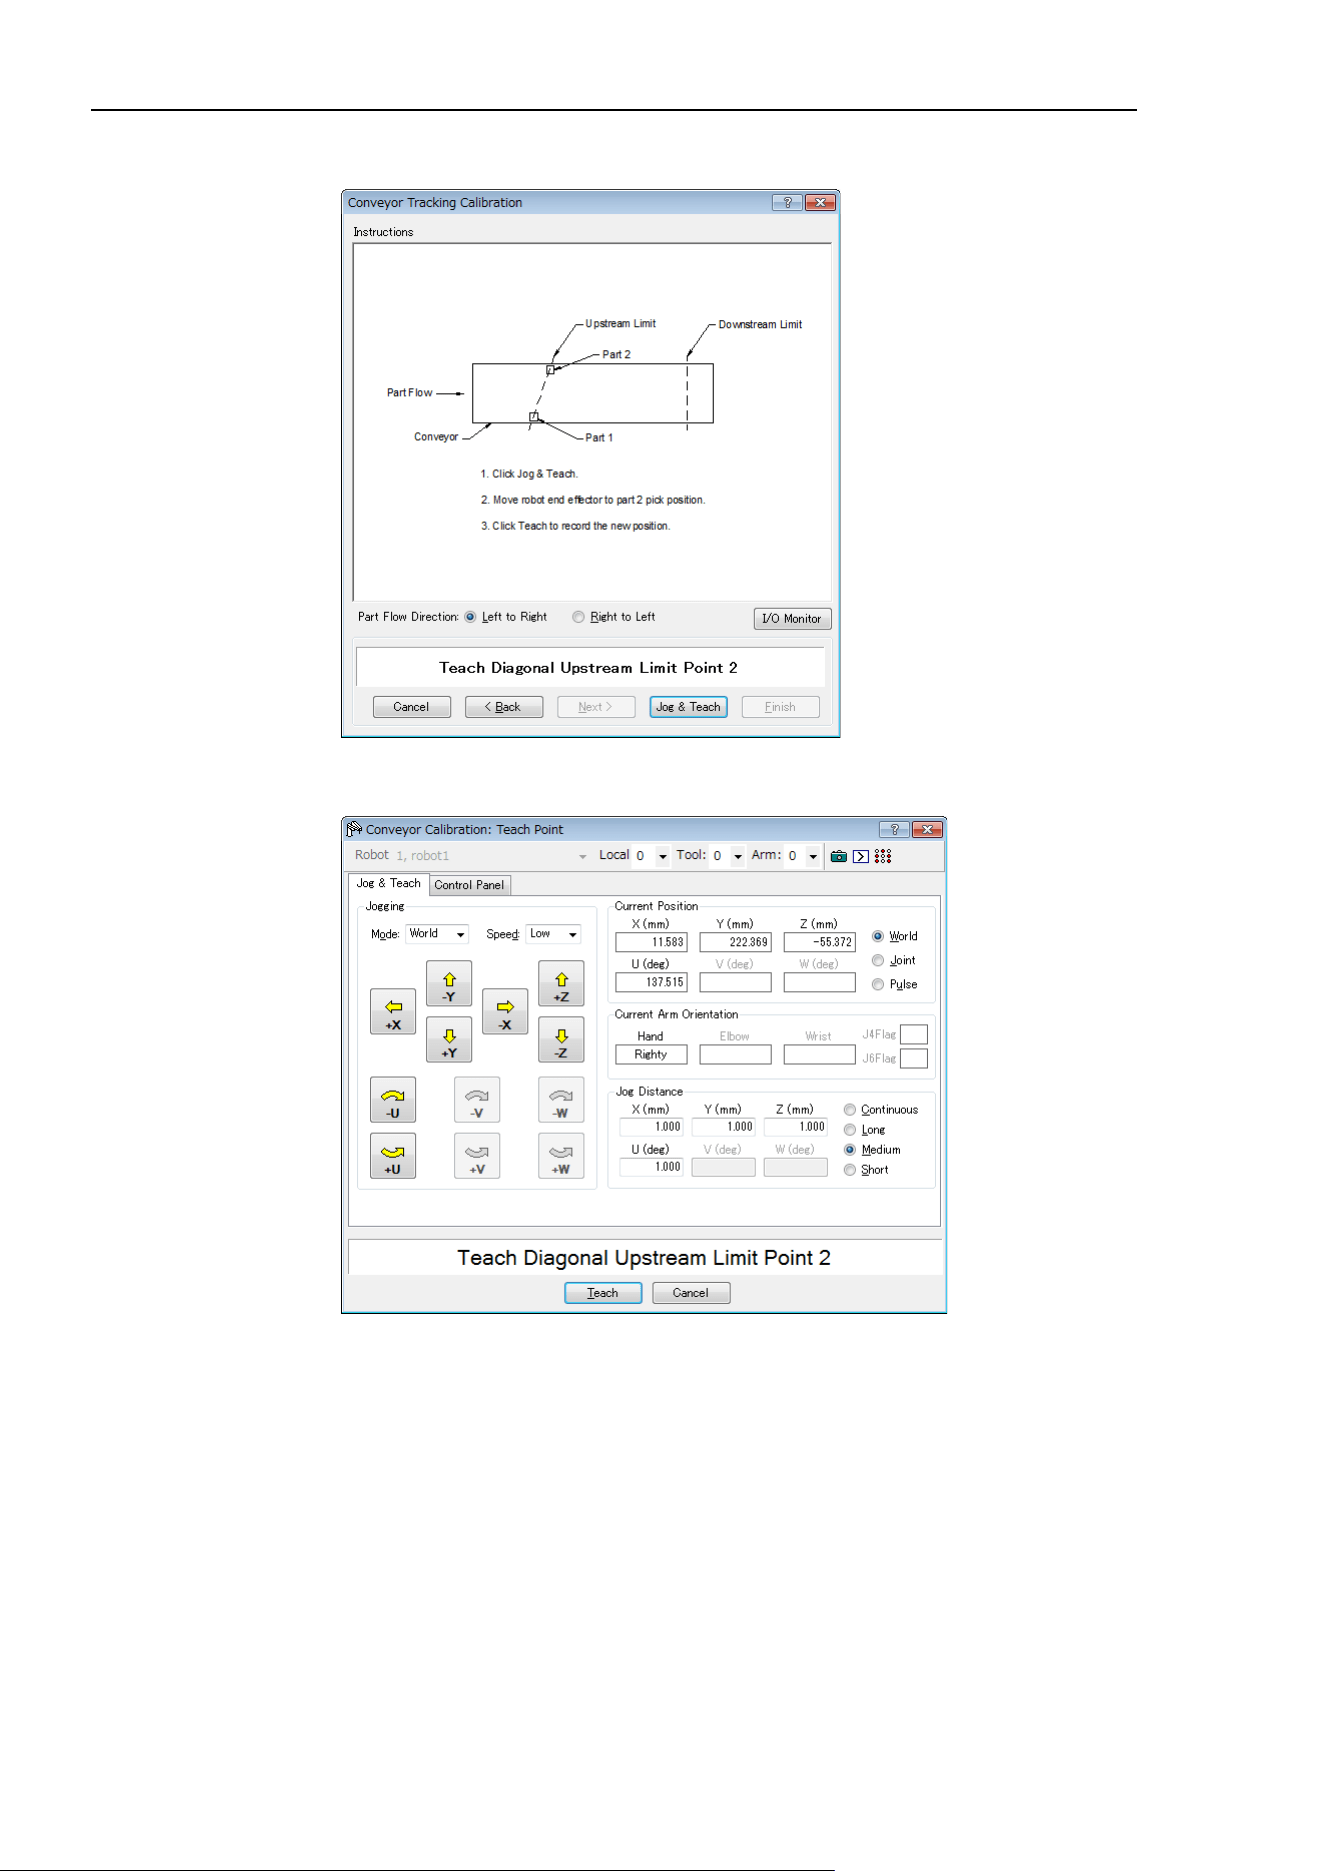
16. Conveyor Tracking
480 EPSON RC+ 7.0 (Ver.7.4) User's Guide Rev.6
9. The dialog shown below appears. Click the <Jog & Teach> button.
10. The [Jog & Teach] dialog appears. Click the jog buttons to move the robot end
effector to the pick position. Click the <Teach> button.
To set the diagonal downstream limit, click [Downstream Limit] to display the
downstream limit setting page and check the [Diagonal Limit] check box, then click
the <Apply> button.
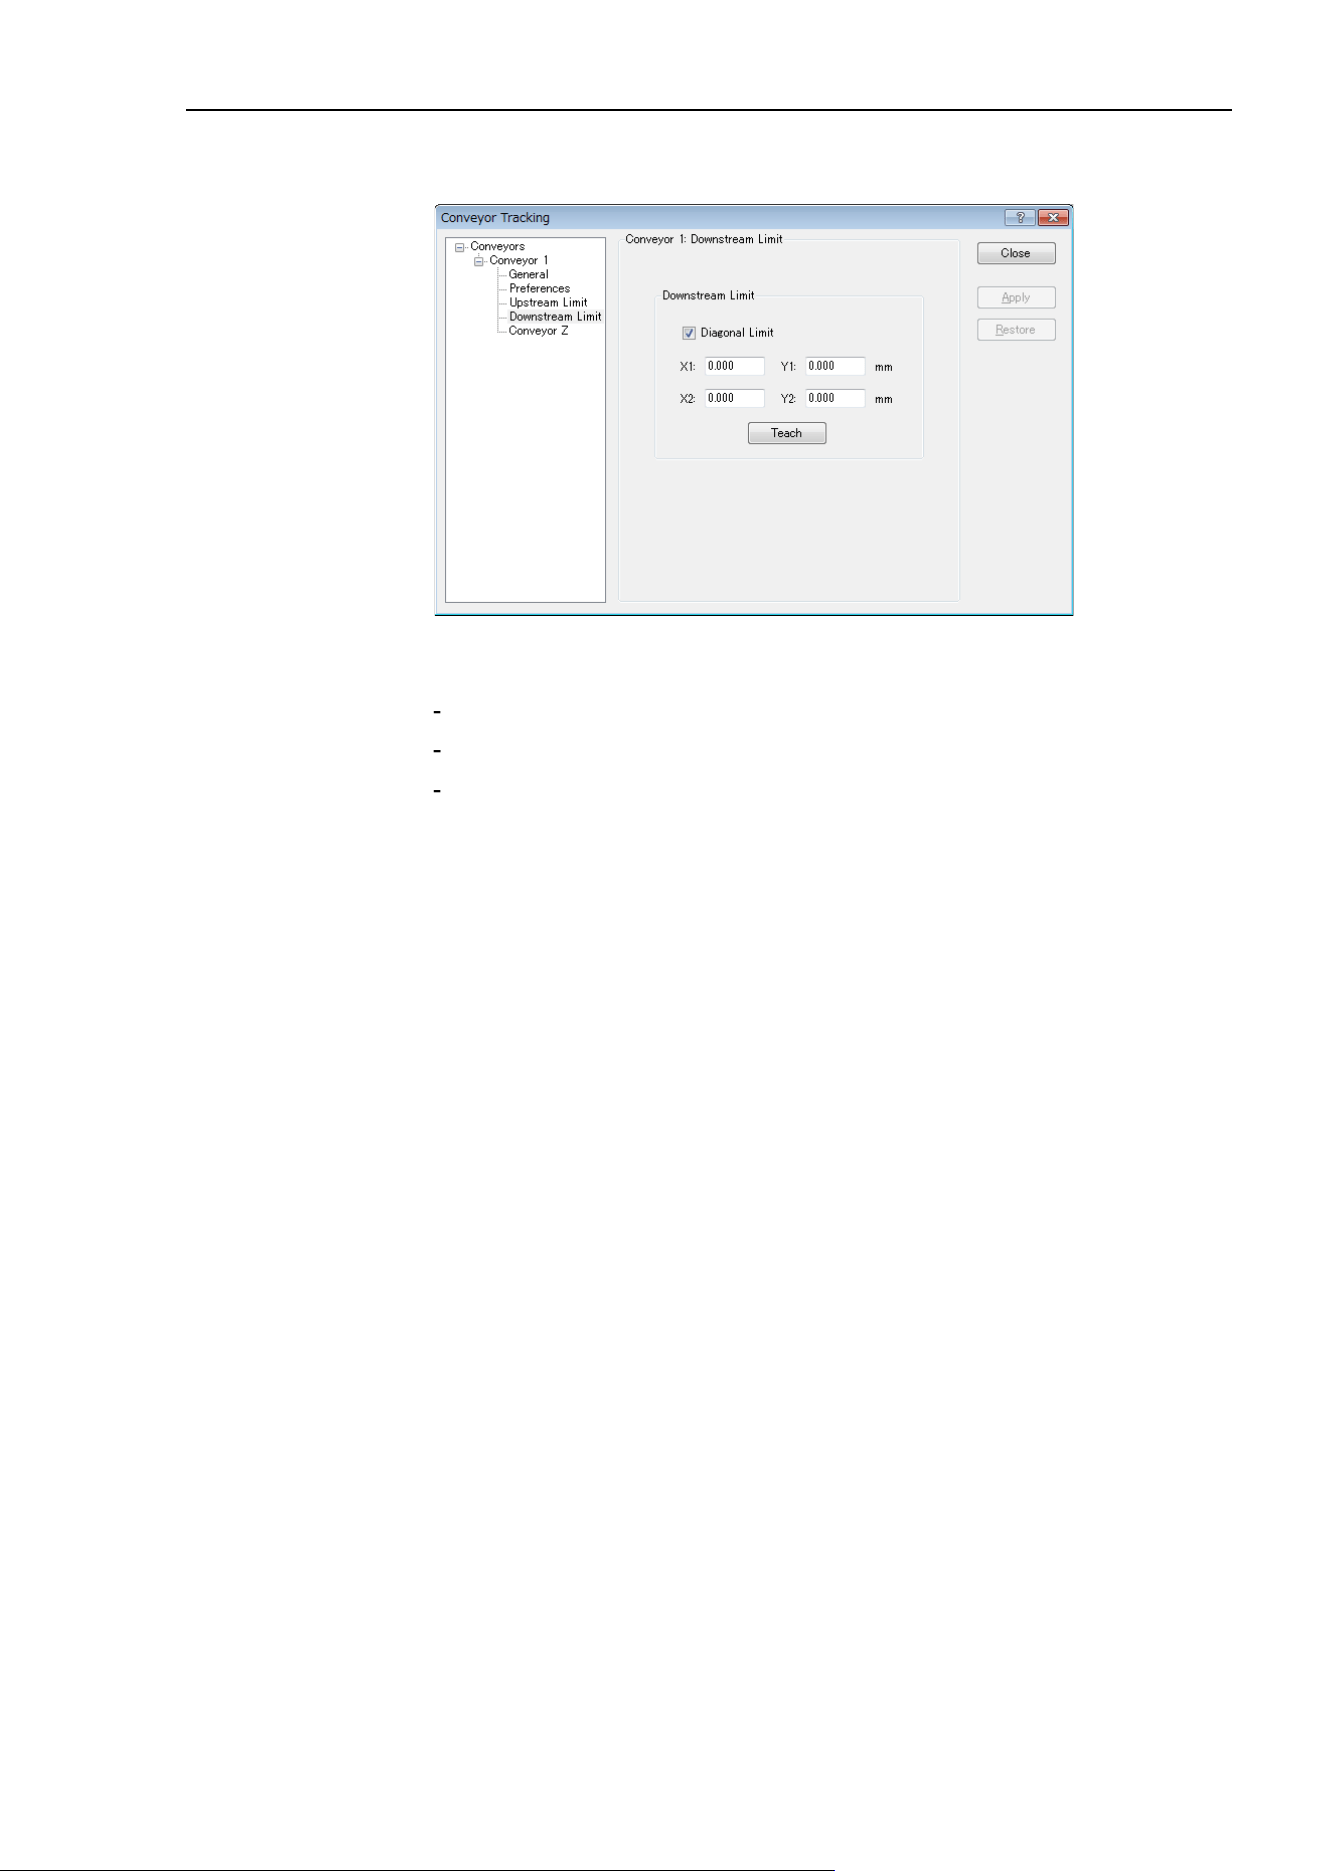
16. Conveyor Tracking
EPSON RC+ 7.0 (Ver.7.4) User's Guide Rev.6
481
The following dialog appears. Click the <Teach> button and follow the directions in
the wizard.
Note that the “Error 4415” occurs when the diagonal upstream / downstream limits
are defined as in the following cases.
They are perpendicular to the part flow direction.
They are parallel to the part flow direction.
The diagonal upstream limit and downstream limit cross on the conveyor.
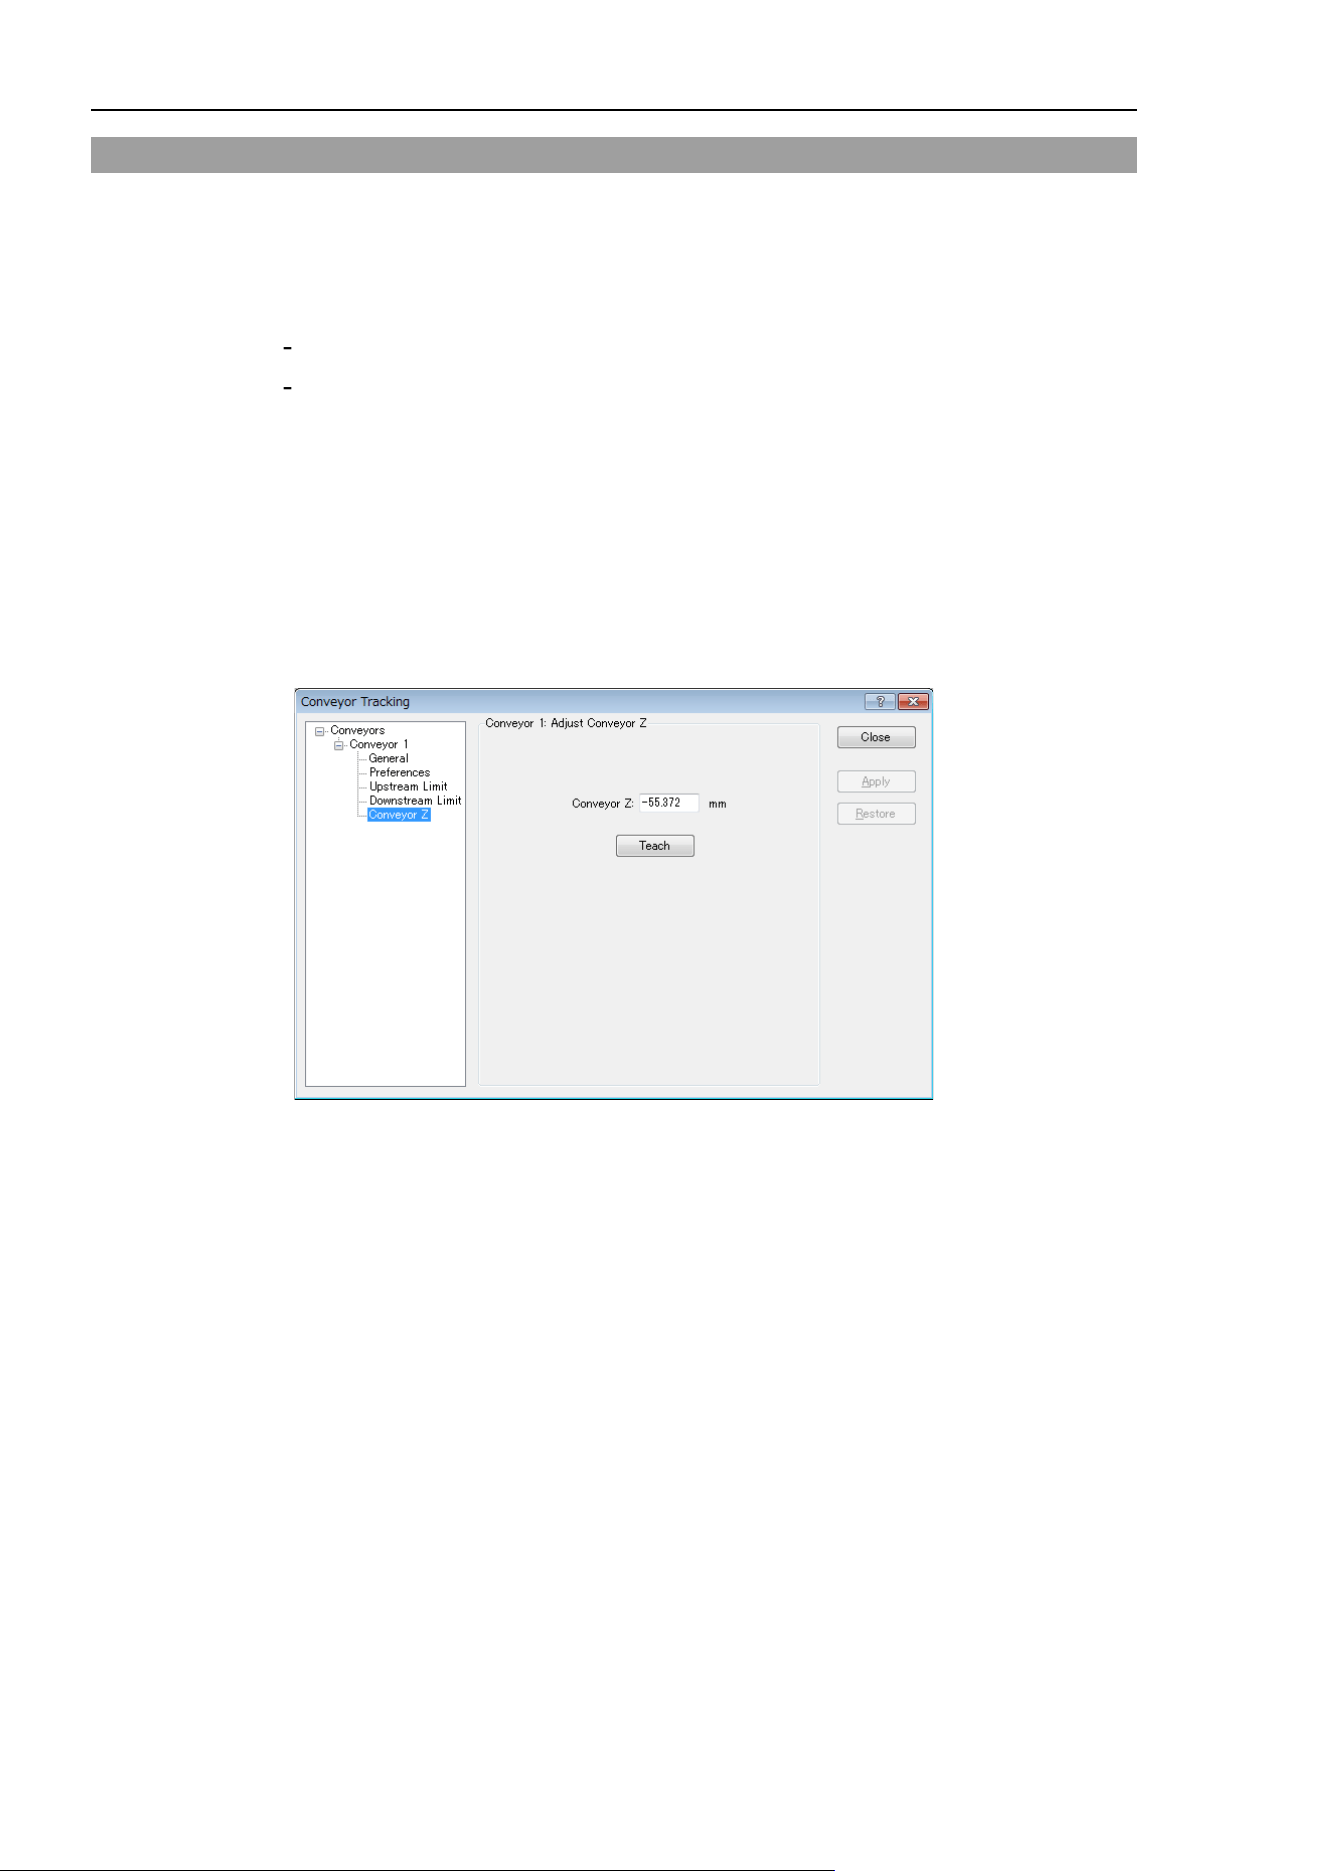
16. Conveyor Tracking
482 EPSON RC+ 7.0 (Ver.7.4) User's Guide Rev.6
16.16 Adjusting the Z value
You can adjust the conveyor Z value after the calibration is completed.
Adjusting the Z value is a function to change the work pickup height that has been
determined during calibration.
In the following cases, adjust the Z value:
To use a pickup area that is different from the one defined during calibration.
The tool has been changed on the robot after calibration.
To adjust the Z value:
1. Select [Tools]-[Conveyor Tracking].
2. Select the conveyor you want to edit.
3. Click on [Conveyor Z].
4. The dialog shown below appears.
Click on <Teach>.
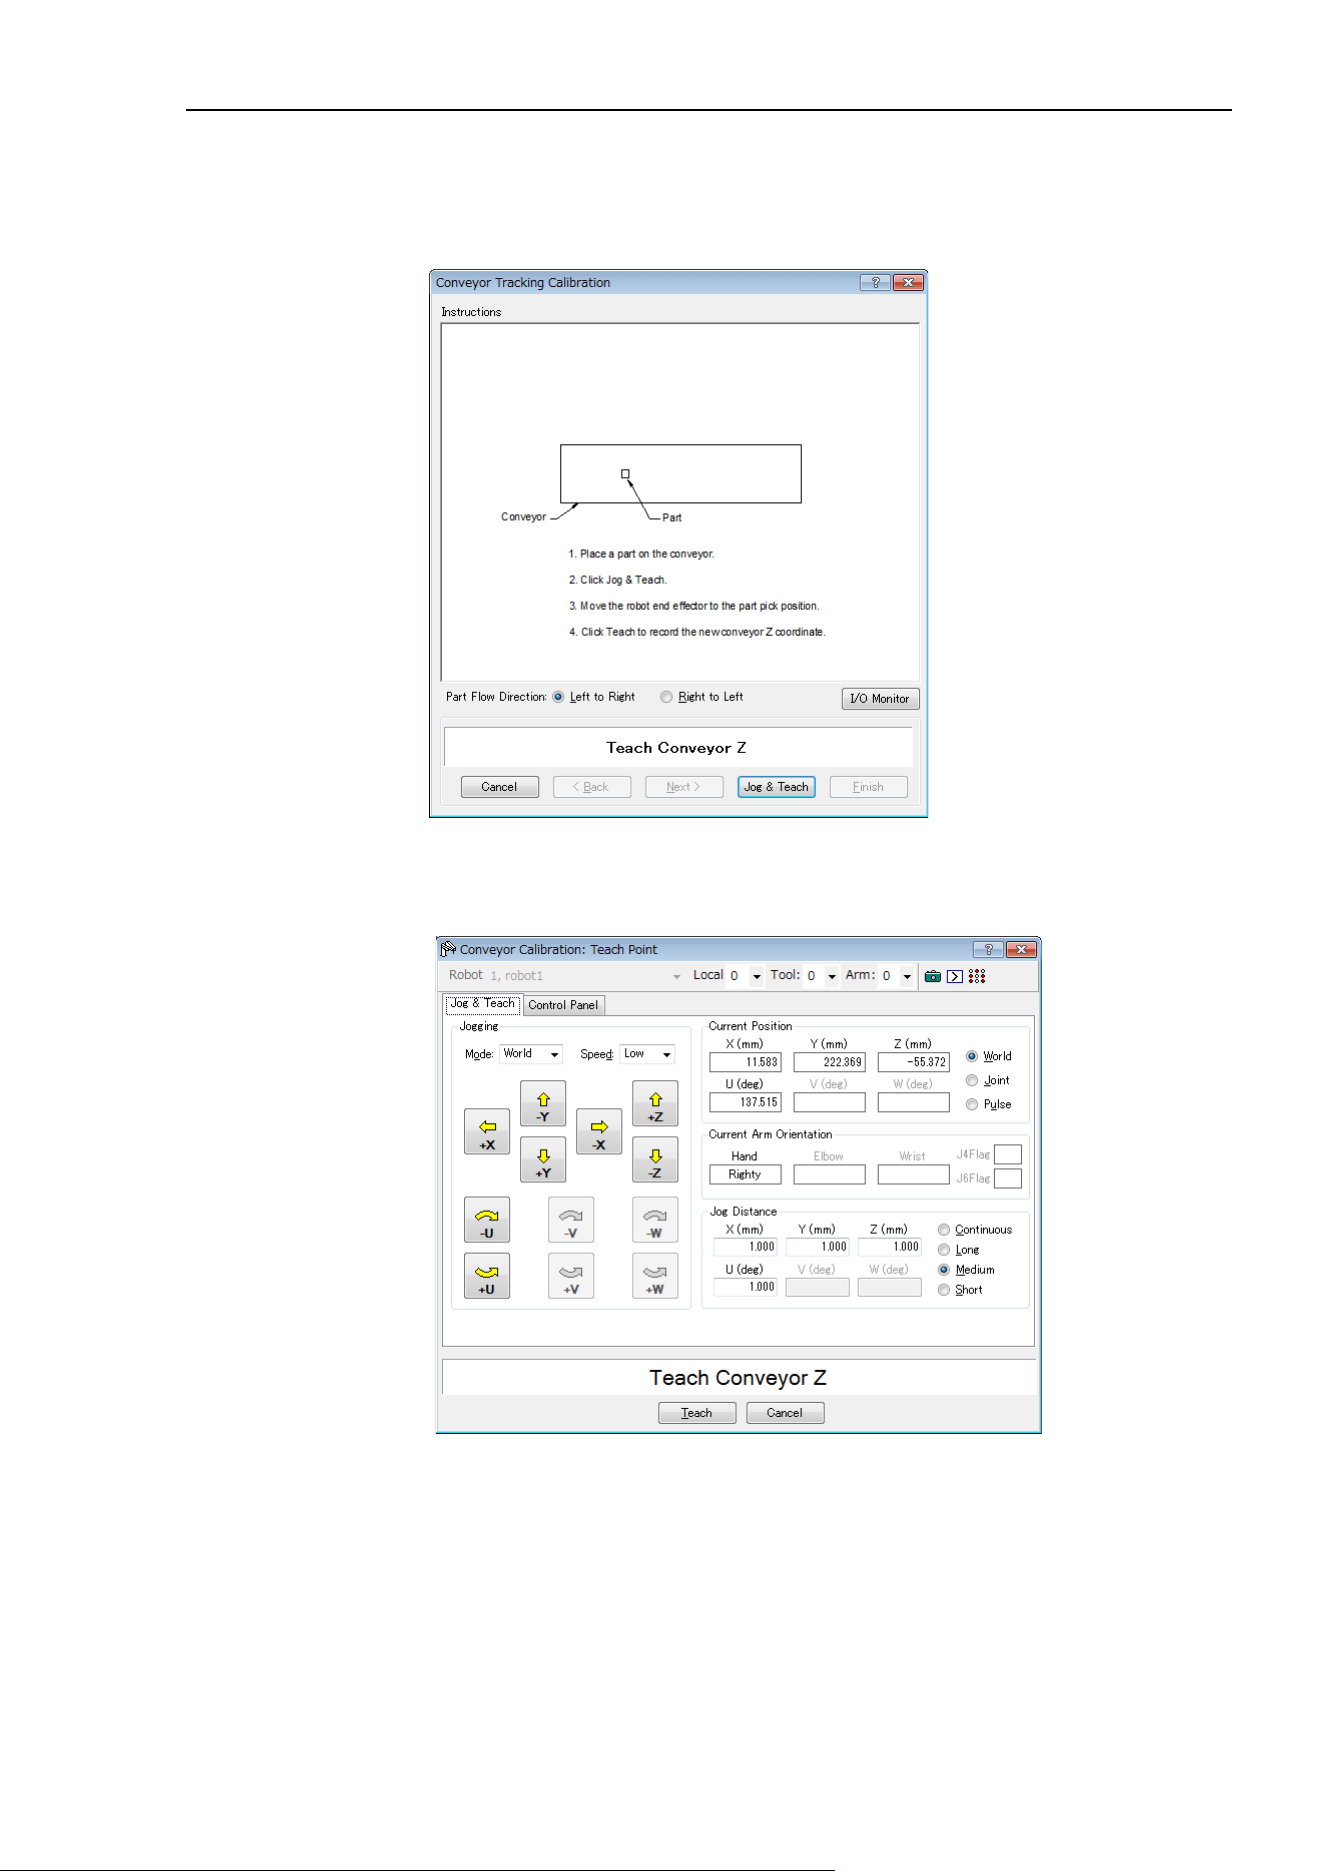
16. Conveyor Tracking
EPSON RC+ 7.0 (Ver.7.4) User's Guide Rev.6
483
5. The dialog shown below appears.
Place a part on the conveyor in the robot motion range.
Click on the <Jog & Teach> button.
6. The [Jog & Teach] dialog will appear. Click the jog buttons to move the robot end
effector to the pick position.
Click the <Teach> button.
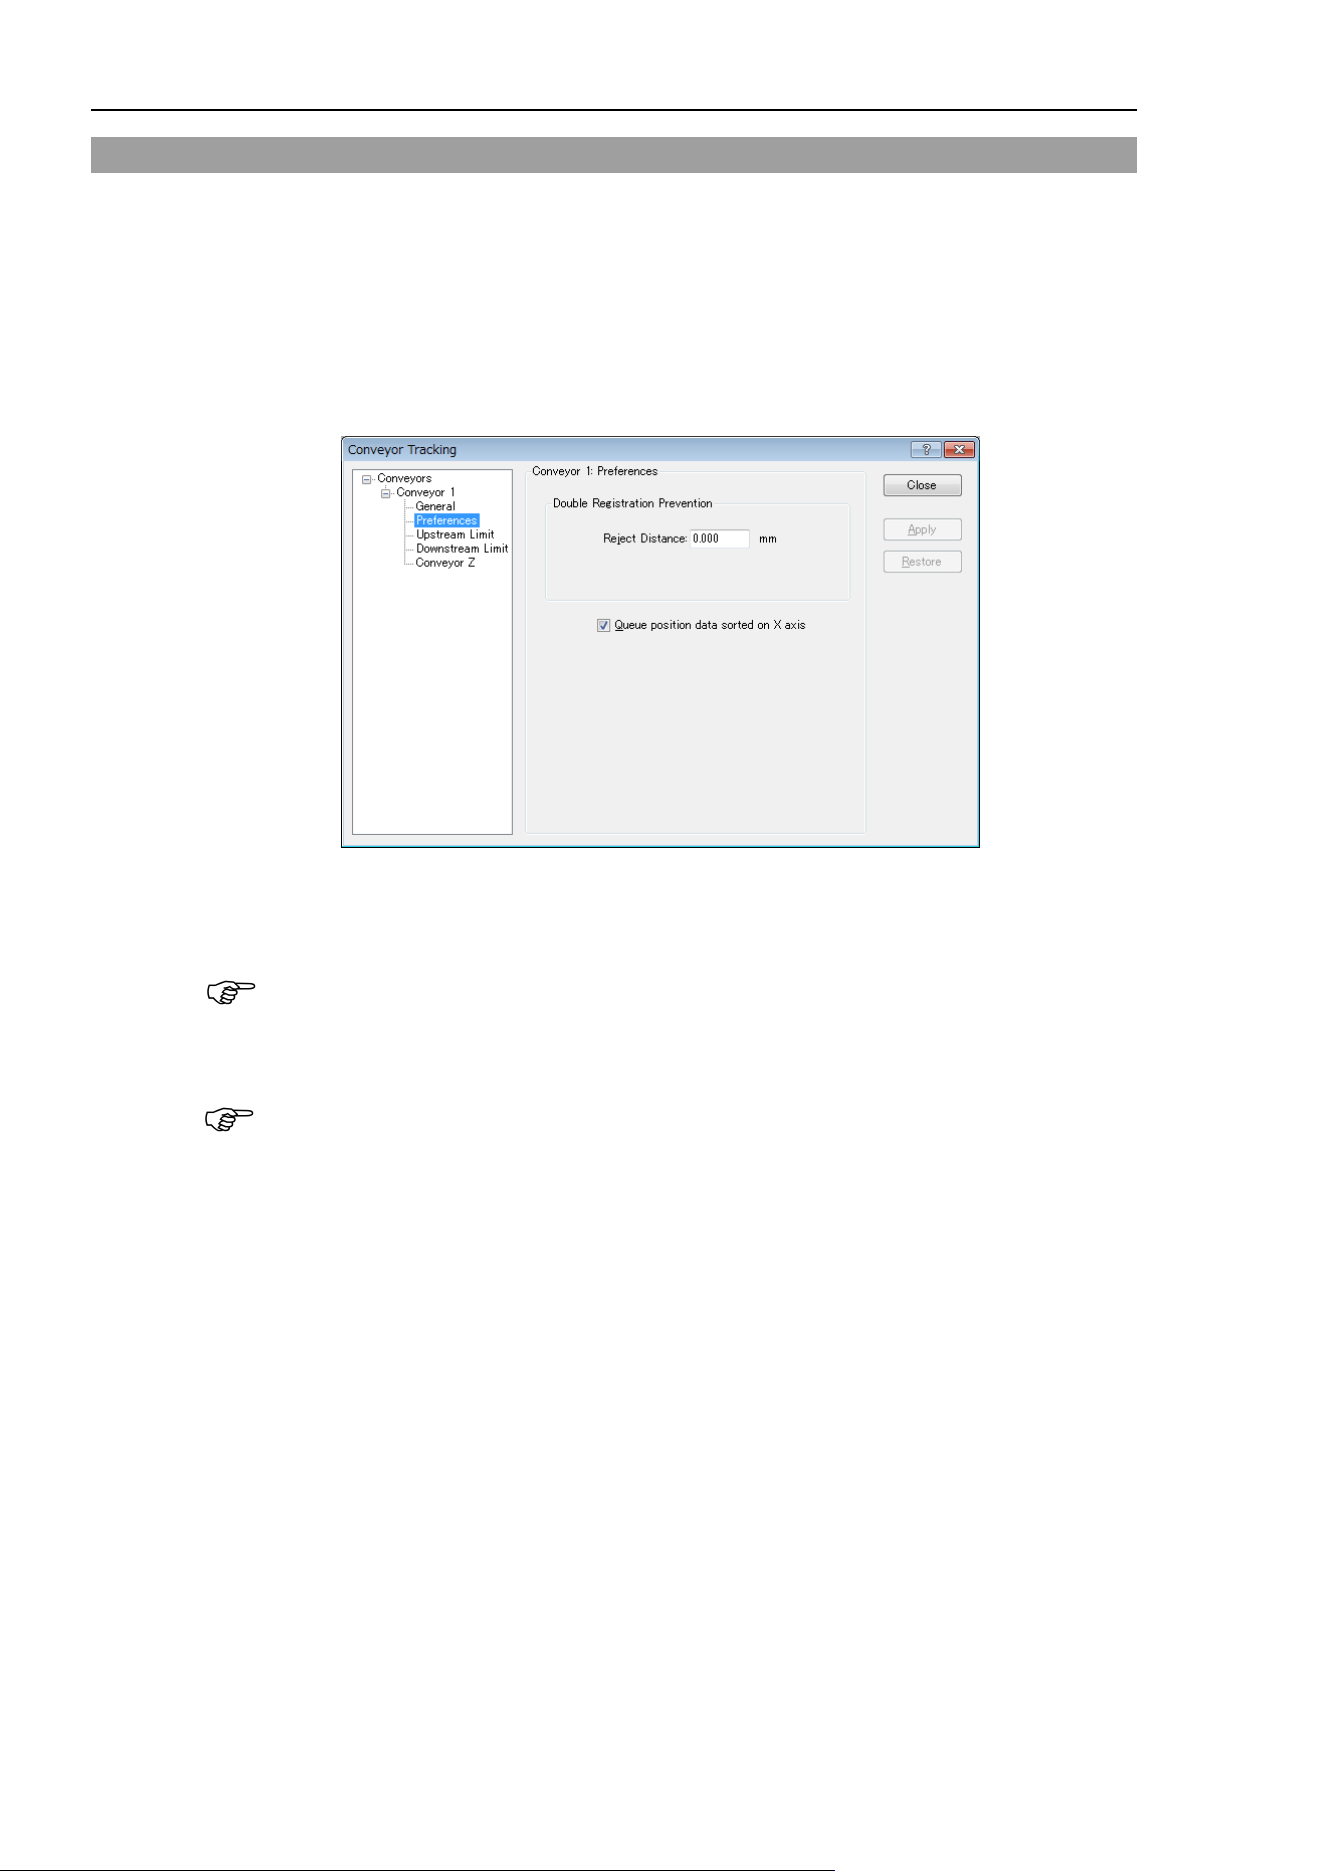
16. Conveyor Tracking
484 EPSON RC+ 7.0 (Ver.7.4) User's Guide Rev.6
16.17 Queue Sorting
When you set the queue sorting, it registers the queue data in the order of position along
the X axis in the conveyor local coordinate system.
Set 0 for the index number of Cnv_QueGet command. If you set nothing, the robot picks
up parts from the downstream side.
To set the queue sorting
1. Select [Tools]-[Conveyor Tracking].
2. Click the conveyor you want to configure and select the [Preferences].
3. Set the [Queue position data sorted on X axis] checkbox.
4. Click the <Apply> button.
When you set a diagonal upstream limit, register the queue data in the order of entering
the Pickup Area.
Also, when you set a diagonal upstream limit, note that the queue sorting cannot be
canceled.
The queue sorting function is applied to both upstream and downstream conveyors.
NOTE
NOTE
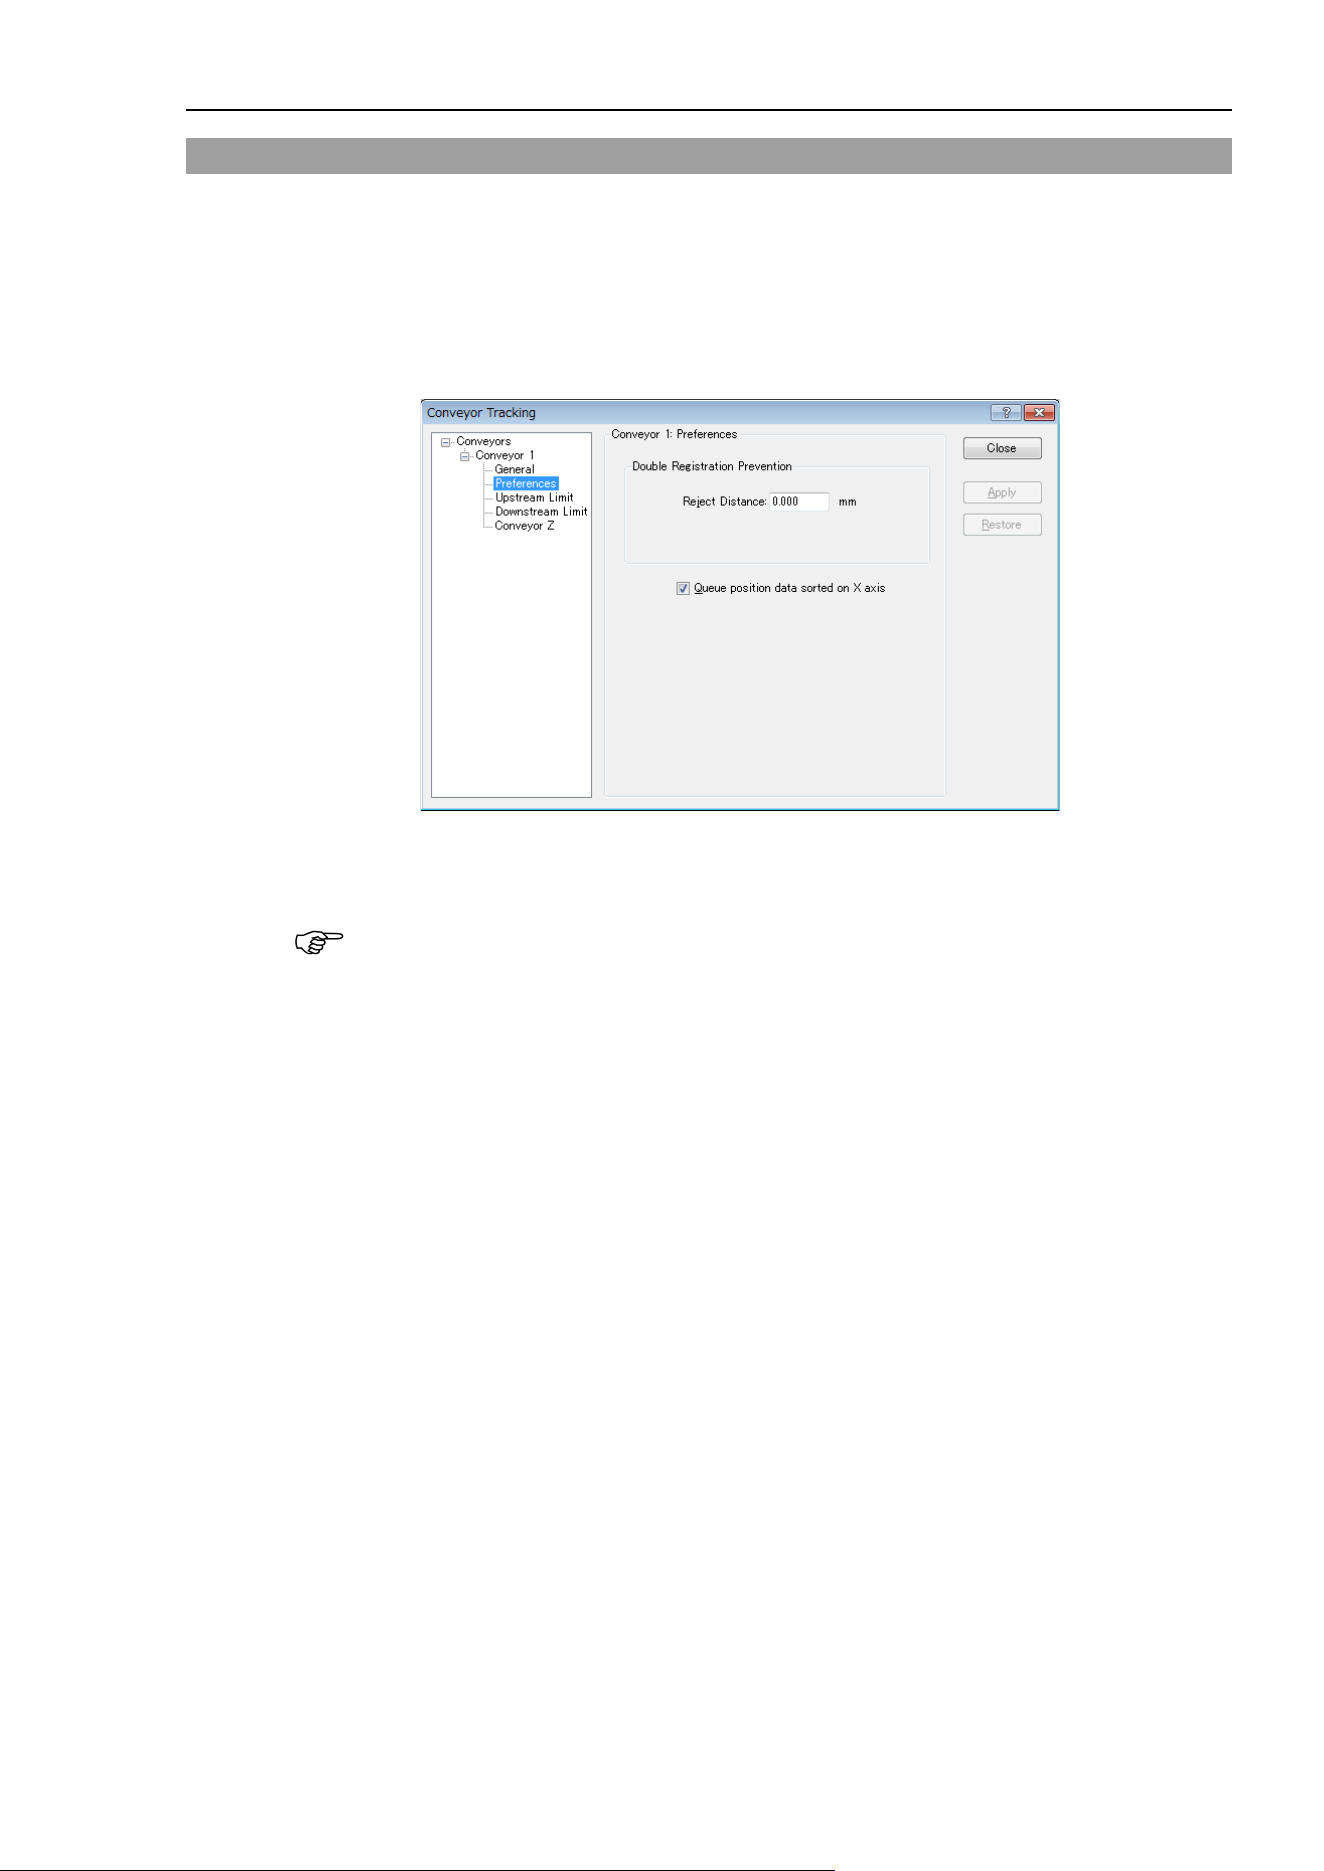
16. Conveyor Tracking
EPSON RC+ 7.0 (Ver.7.4) User's Guide Rev.6
485
16.18 Cnv_QueReject
Cnv_QueReject avoids registering the same part doubly. If Cnv_QueReject value is not
changed from the default (0), the robot may perform the pickup motion at the position
where the part is not placed, since the same part is registered to the queue several times.
Cnv_QueReject can be set by using the command or by following the steps below.
1. Select [Tools] – [Conveyor Tracking].
2. Click the conveyor to set. Select [Preferences].
3. Set the value to [Reject Distance].
4. Click the <Apply> button.
If “Cnv_QueRejet” is used in the program, the value set for “Cnv_QueRejet” will be used
instead of the value set in the above step.
NOTE

16. Conveyor Tracking
486 EPSON RC+ 7.0 (Ver.7.4) User's Guide Rev.6
16.19 Sample Program
Vision conveyor programming
Typically, two tasks are used to operate a vision conveyor. One task finds parts with the
vision system and adds them to the conveyor queue.
The other task checks for parts in the Pickup Area of the conveyor queue. When a part is
in the Pickup Area, the robot is commanded to pick up the part and place it to the specified
position.
The following example shows two tasks. The scanning task uses the vision system to find
parts and add them to the conveyor queue. There are two examples for the scanning task.
“ScanConveyorNonStrobed” does not use a strobe lamp and hardware trigger. In this case,
“Cnv_Trigger” must be called before running the vision sequence.
“ScanConveyorStrobed” uses a strobe lamp and hardware conveyor trigger. “PickParts”
waits for parts to be present in the Pickup Area and commands the robot to pick and place
each part.
If you are using an asynchronous reset camera and strobe, then the strobe trigger should
also be wired to the trigger on the PG board. In this case, the vision sequence
“RuntimeAcquire property” must be set to “Strobed”.
The following program is a sample with Conveyor #1.
This sample program automatically recovers when the robot tracks the work piece that is
out of the tracking area.
Function main
Xqt ScanConveyorStrobed 'Task that registers queues
Xqt PickParts 'Task that tracks parts (queue)
Fend
Function ScanConveyorNonStrobed
Integer i, numFound
Real x, y, u
Boolean found
Cnv_OffsetAngle 1,xx 'Command used for only circular conveyors
'Adjust the tracking error with an offset value in xx
'Turn OFF the camera shutter and I/O (conveyor trigger)
Off trigger; Off Cv_trigger
Do
'Search for parts on the conveyor
VRun FindParts
'Turn ON the camera shutter and I/O (conveyor trigger)
On Trigger; On Cv_Trigger
Do
VGet FindParts.AcquireState, state
Loop Until state = 3
VGet FindParts.Parts.NumberFound, numFound
'Register the part that has been shot as a queue
For i = 1 to numFound
VGet FindParts.Parts.CameraXYU(i), found, x, y, u

16. Conveyor Tracking
EPSON RC+ 7.0 (Ver.7.4) User's Guide Rev.6
487
Cnv_QueAdd 1, Cnv_Point(1, x, y)
Next i
'Turn OFF the camera shutter and I/O (conveyor trigger)
Off Trigger; Off Cv_Trigger
Wait .1
Loop
Fend
Function PickParts
OnErr GoTo ErrHandler
Integer ErrNum
'Select the tracking mode
Cnv_Mode 1,1
WaitParts:
Do
'Wait until a part (queue) enters the Pickup Area
Wait Cnv_QueLen(1, CNV_QUELEN_PICKUPAREA) > 0
'Start tracking the parts
'When using the 6-axis robot
Jump3 place_1,Cnv_QueGet(1):Z(**):U(90):V(0):W(180),
Cnv_QueGet(1):U(90):V(0):W(180)
'When using the SCARA robot
Jump Cnv_QueGet(1)
On gripper
'Set the time necessary for the robot to pick up the part
Wait .1 ' The robot moves at the same speed as the conveyor
' for the Wait time specified to this part.
'Move the picked part to a specified place
Go place_2
Off gripper
'Set the time necessary for the robot to release the part
Wait .1
'Clear the picked part (queue)
Cnv_QueRemove 1, 0
Loop
'Clear the parts (queue) in the downstream side from the Pickup Area
'Automatically recovers from the error
'“The specified queue data is outside the set area”
ErrHandler:
ErrNum = Err
If ErrNum = 4406 Then
Cnv_QueRemove 1, 0
EResume WaitParts
'Displays the error other than
'“The specified queue data is outside the set area”
Else

16. Conveyor Tracking
488 EPSON RC+ 7.0 (Ver.7.4) User's Guide Rev.6
Print "Error!"
Print "No.", Err, ":", ErrMsg$(Err)
Print "Line :", Erl(0)
'User error occurred
Error 8000
EndIf
Fend
When you use the strobe light and software trigger, use the “ScanConveyorStrobed”
function shown below.
Function ScanConveyorStrobed
Integer i, numFound, state
Real x, y, u
Boolean found
Cnv_OffsetAngle 1,xx ' Command used only for circular conveyors
'Adjust the tracking error with an offset value in xx
'Turn OFF the camera shutter
Off trigger
Do
'Search for parts on the conveyor
VRun FindParts
'Turn ON the camera shutter
On Trigger
Do
VGet FindParts.AcquireState, state
Loop Until state = 3
Cnv_Trigger 1 'Latch the encoder with software trigger
VGet FindParts.Parts.NumberFound, numFound
'Register the part that has been shot as a queue
For i = 1 to numFound
VGet FindParts.Parts.CameraXYU(i), found, x, y, u
Cnv_QueAdd 1, Cnv_Point(1, x, y)
Next i
'Turn OFF the camera shutter
Off Trigger
Wait .1
Loop
Fend
If the asynchronous reset mode is not used, “ScanConveyorStrobed” is as follows.
Function ScanConveyorNonStrobed
Integer i, numFound
Real x, y, u
Boolean found
Cnv_OffsetAngle 1,xx ‘Command used only for circular conveyors
‘Adjust the tracking error with an offset value in xx
Do
Cnv_Trigger 1 ‘Latch the encoder with software trigger
‘Search for parts on the conveyor
NOTE
NOTE

16. Conveyor Tracking
EPSON RC+ 7.0 (Ver.7.4) User's Guide Rev.6
489
VRun FindParts
VGet FindParts.Parts.NumberFound, numFound
‘Register the part that has been shot as a queue
For i = 1 to numFound
VGet FindParts.Parts.CameraXYU(i), found, x, y, u
Cnv_QueAdd 1, Cnv_Point(1, x, y)
Next i
Wait .1
Loop
Fend

16. Conveyor Tracking
490 EPSON RC+ 7.0 (Ver.7.4) User's Guide Rev.6
Sensor conveyor programming
Typically, two tasks are used to operate a sensor conveyor. One task waits for a part to
trip the sensor and add it to the conveyor queue. The other task checks for parts in the
Pickup Area of the conveyor queue. When a part is in the Pickup Area, the robot is
commanded to pick up the part and place it to the specified position.
This sample program automatically recovers when the robot tracks the work piece that is
out of the tracking area.
Function main
Xqt ScanConveyor 'Task that registers queues
Xqt PickParts 'Task that tracks parts (queue)
Fend
Function ScanConveyor
Double lpulse1 'Previous latch pulse
lpulse1 = Cnv_LPulse(1) 'Register the latch pulse as lpulse1
Do
'Register a part as a queue only when it passes the sensor
If lpulse1 <> Cnv_LPulse(1) Then
Cnv_QueAdd 1, Cnv_Point(1, 0, 0)
lpulse1 = Cnv_LPulse(1) 'Update lpulse1
EndIf
Loop
Fend
Function PickParts
OnErr GoTo ErrHandler
Integer ErrNum
‘Select teh tracking mode
Cnv_Mode 1,1
WaitParts:
Do
'Wait until a part (queue) enters the Pickup Area
Wait Cnv_QueLen(1, CNV_QUELEN_PICKUPAREA) > 0
‘Start tracking the parts
‘When using the 6-axis robot
Jump3 place_1,Cnv_QueGet(1):Z(**):U(90):V(0):W(180),
Cnv_QueGet(1):U(90):V(0):W(180)
'When using the SCARA robot
Jump Cnv_QueGet(1)
On gripper
'Set the time necessary for the robot to pick up the part
Wait .1 ' The robot moves at the same speed as the conveyor
' for the Wait time specified to this part.
'Move the picked part to a specified place

16. Conveyor Tracking
EPSON RC+ 7.0 (Ver.7.4) User's Guide Rev.6
491
Go place_2
Off gripper
'Set the time necessary for the robot to release the part
Wait .1
'Clear the picked part (queue)
Cnv_QueRemove 1, 0
Loop
'Clear the parts (queu) in the downstream side from the Pickup Area
'Automatically recovers from the error
'“The specified queue data is outside the set area”
ErrHandler:
ErrNum = Err
If ErrNum = 4406 Then
Cnv_QueRemove 1, 0
EResume WaitParts
'Displays the error other than
'“The specified queue data is outside the set area”
Else
Print "Error!"
Print "No.", Err, ":", ErrMsg$(Err)
Print "Line :", Erl(0)
'User error occurred
Error 8000
EndIf
Fend
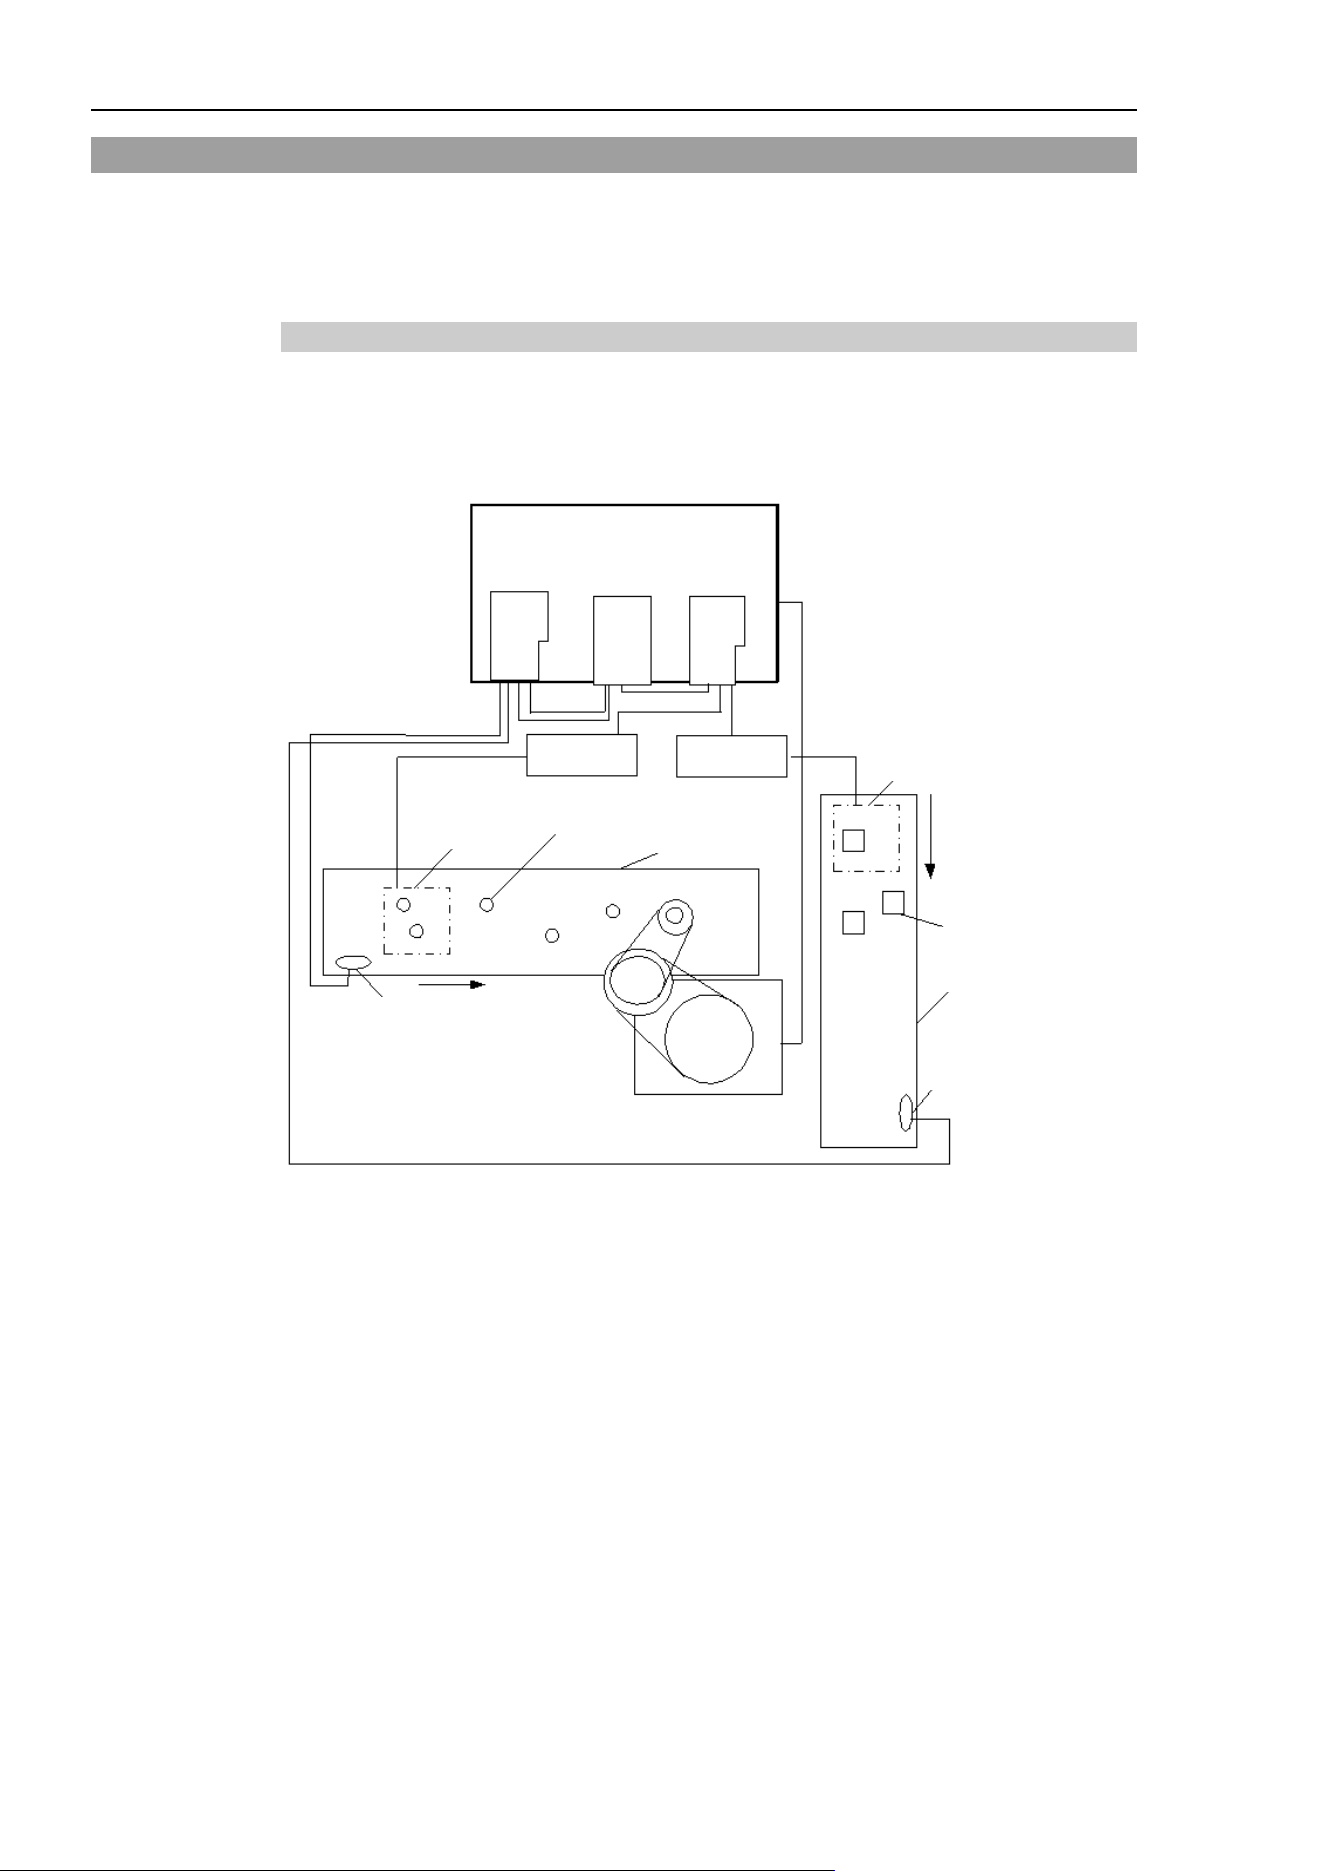
16. Conveyor Tracking
492 EPSON RC+ 7.0 (Ver.7.4) User's Guide Rev.6
16.20 Multiple Conveyors
EPSON RC+ 7.0 supports multiple logical conveyors and robots. You can use multiple
robots with one conveyor.
This section describes a conveyor system that uses one robot with two or more conveyors.
Conveyor tracking for several conveyors
This section describes a conveyor system where one robot picks up “Part 1” from
Conveyor 1 and puts the picked parts above “Parts 2” on Conveyor 2 as shown in the
figure below.
In this conveyor system, each conveyor needs one encoder and camera (sensor).
Robot Controller
PG
I/O
Vision
Power 1 Power 2
Camera 1 view
Part 1
Conveyor 1
Conveyor 2
Part 2
Encoder 1
Encoder 2
Robot
Camera 2 view
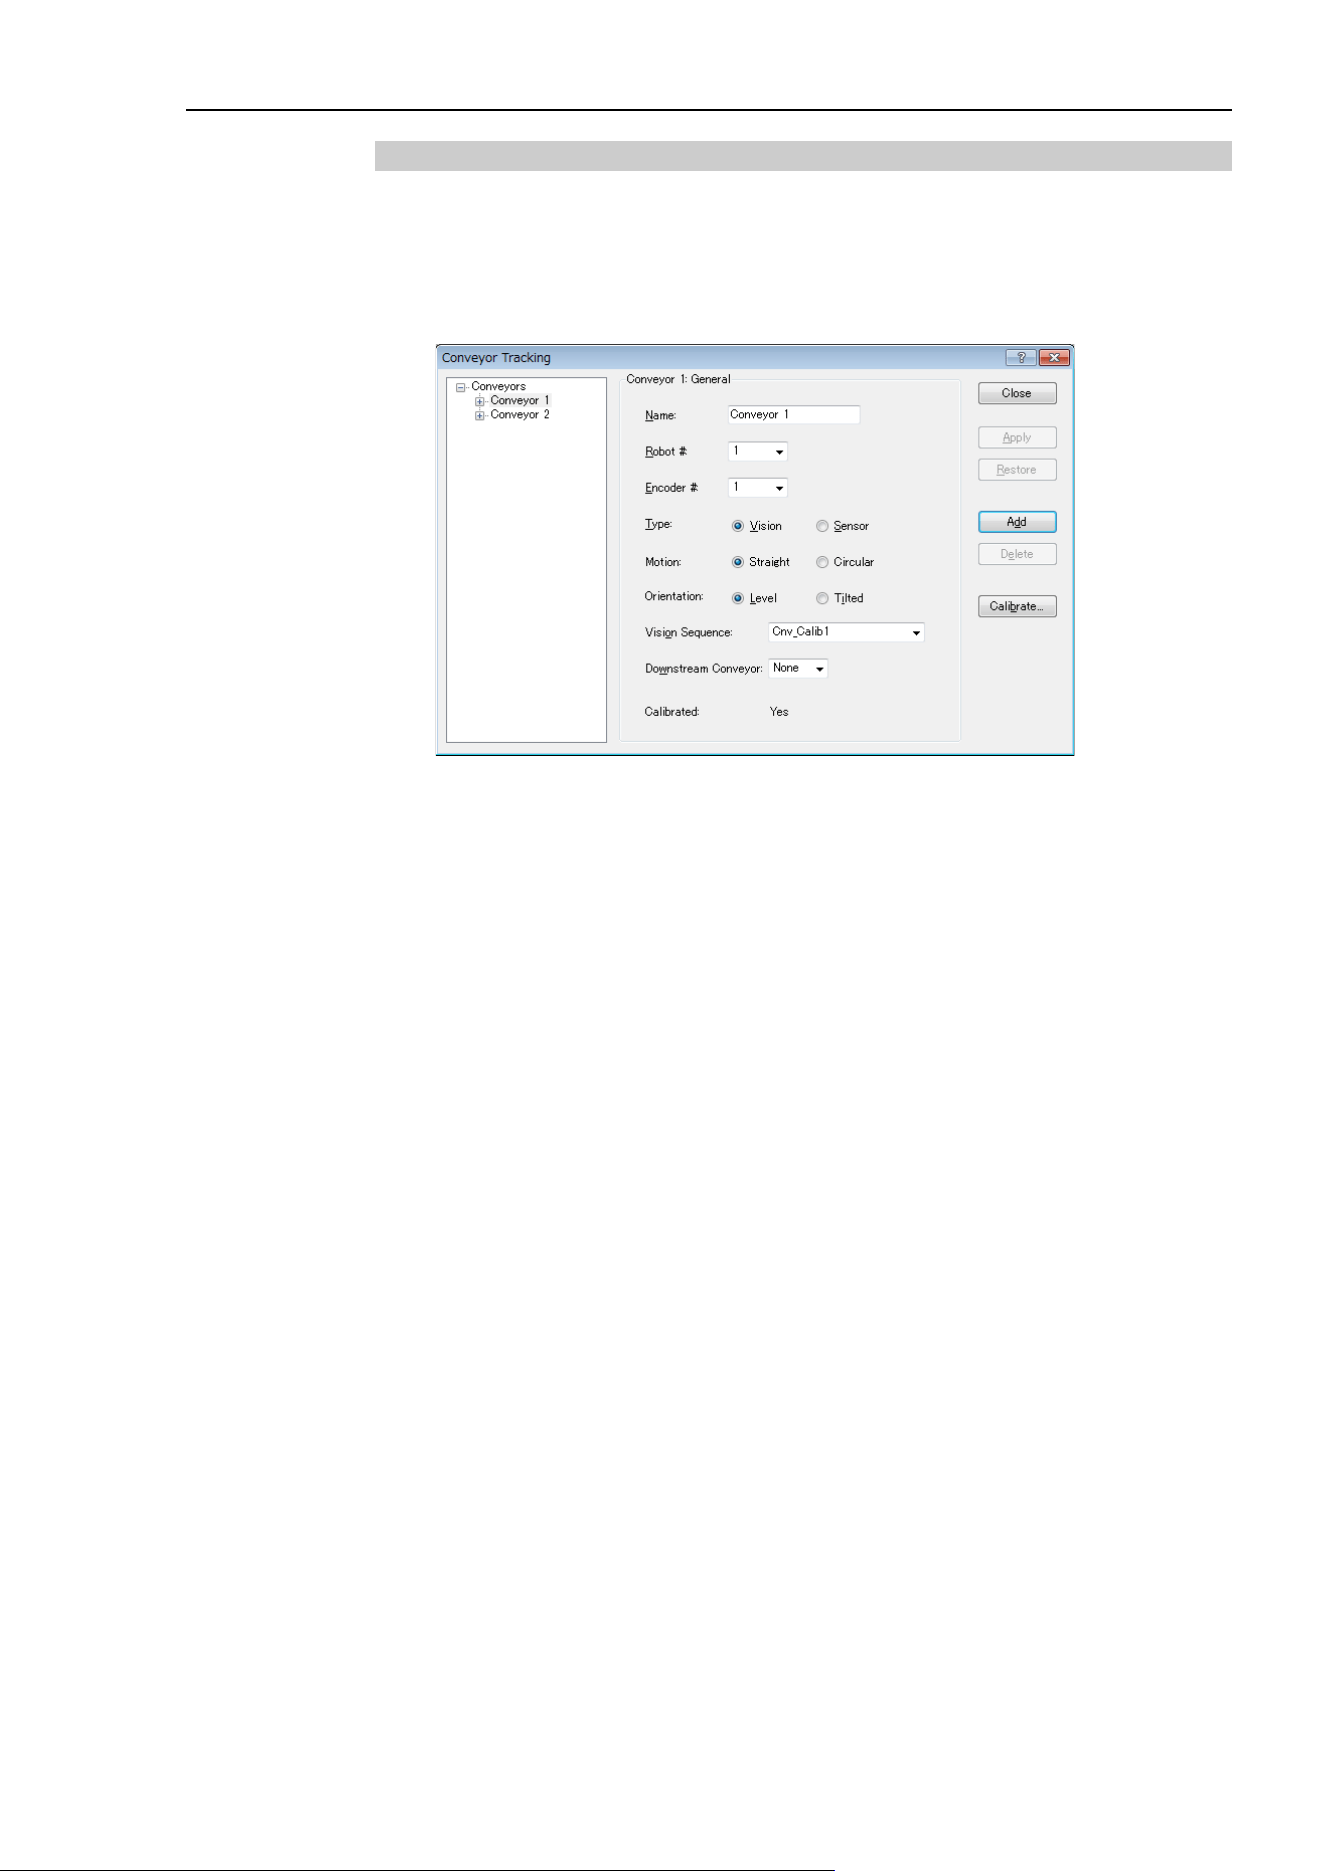
16. Conveyor Tracking
EPSON RC+ 7.0 (Ver.7.4) User's Guide Rev.6
493
How to use several conveyors
The usage of several conveyors is described below.
1. Refer to 16.11 Creating Conveyors in a Project and create Conveyor 1 and
Conveyor 2. (Set the robot in the upstream side to the Conveyor 1.)
2. For the [Encoder] and [Vision Sequence], set the different number and sequence for
each conveyor 1 and 2.
3. Calibrate Conveyor 1.
4. Refer to 16.13 Vision Conveyors or 16.14 Sensor Conveyors and check the conveyor
operation.
5. Calibrate Conveyor 2.
6. Check the operation of Conveyor 2.
The following program is a sample.
This sample program automatically recovers when the robot tracks the work piece
that is out of the tracking area.
Function main
'Task that registers parts in the queues
Xqt ScanConveyorStrobed
'Task that tracks parts (queue)
Xqt PickParts
Fend
Function ScanConveyorStrobed
Integer i, j, numFound, state
Real x, y, u
Boolean found
'Turn OFF the camera shutter and I/O (conveyor trigger)
'Cv_trigger1: Conveyor 1, Cv_trigger2: Conveyor 2
Off trigger; off Cv_trigger1; off Cv_trigger2
Do
'Register the parts (queue) of the Conveyor 1
'Search for a part on the conveyor
VRun FindParts1
'Turn ON the camera shutter and I/O (conveyor trigger)

16. Conveyor Tracking
494 EPSON RC+ 7.0 (Ver.7.4) User's Guide Rev.6
On Trigger; On Cv_Trigger1
Do
VGet FindParts1.AcquireState, state
Loop Until state = 3
VGet FindParts1.Parts.NumberFound, numFound
'Register the part that has been shot as a queue
For i = 1 to numFound
VGet FindParts.Parts.CameraXYU(i), found, x, y, u
Cnv_QueAdd 1, Cnv_Point(1, x, y)
Next i
'Turn OFF the camera shutter and I/O (conveyor trigger)
Off Trigger; Off Cv_Trigger
Wait .1
'Register the parts (queue) of the Conveyor 2
'Search for part on the conveyor
VRun FindParts2
'Turn ON the camera shutter and I/O (conveyor trigger)
On Trigger; On Cv_Trigger1
Do
VGet FindParts2.AcquireState, state
Loop Until state = 3
VGet FindParts2.Parts.NumberFound, numFound
'Register the part that has been shot as a queue
For j = 1 to numFound
VGet FindParts2.Parts.CameraXYU(j), found, x, y, u
Cnv_QueAdd 2, Cnv_Point(2, x, y)
Next j
'Turn OFF the camera shutter and I/O (conveyor trigger)
Off Trigger; Off Cv_Trigger2
Wait .1
Loop
Fend
Function PickParts
OnErr GoTo ErrHandler
Integer ErrNum
MemOff 1
MemOff 2
Do
'Tracking of Conveyor 1
WaitPickup1:
'Turn ON the memory I/O when the Conveyor 1 tracking phase starts
MemOn 1

16. Conveyor Tracking
EPSON RC+ 7.0 (Ver.7.4) User's Guide Rev.6
495
'Clear the parts (queue) in the downstream side from the downstream limit
Do While Cnv_QueLen(1, CNV_QUELEN_DOWNSTREAM) > 0
Cnv_QueRemove 1, 0
Loop
'Move to the standby position when there is no part (queue) in the Pickup Area
If Cnv_QueLen(1, CNV_QUELEN_PICKUPAREA) = 0 Then
Jump place
EndIf
'Wait until a part (queue) enters the Pickup Area
Wait Cnv_QueLen(1, CNV_QUELEN_PICKUPAREA) > 0
'Start tracking the parts
Jump Cnv_QueGet(1)
On gripper
Wait .1
'Clear the picked part (queue)
Cnv_Queremove 1,0
'Finish the Conveyor 1 tracking phase
MemOff 1
'Tracking of the Conveyor 2
WaitPickup2:
'Start the Conveyor 2 tracking phase
MemOn 2
'Clear the parts (queue) in the downstream side from the downstream limit
Do While Cnv_QueLen(2, CNV_QUELEN_DOWNSTREAM) > 0
Cnv_QueRemove 2, 0
Loop
'Move to the standby position when there is no part (queue) in the Pickup Area
If Cnv_QueLen(2, CNV_QUELEN_PICKUPAREA) = 0 Then
Jump place
EndIf
'Wait until a part (queue) enters the Pickup Area
Wait Cnv_QueLen(2, CNV_QUELEN_PICKUPAREA) > 0
'Start tracking the parts
Jump Cnv_QueGet(2)
Off gripper
Wait .1
'Clear the picked part (queue)
Cnv_QueRemove 2, 0
'Finish the Conveyor 2 tracking phase
MemOff 2
Loop
'Clear the parts (queue) in the downstream side from the Pickup Area
'Automatically recovers from the error

16. Conveyor Tracking
496 EPSON RC+ 7.0 (Ver.7.4) User's Guide Rev.6
'“The specified queue data is outside the set area”
ErrHandler:
ErrNum = Err
If ErrNum = 4406 Then
If MemSw(1) = On Then
Cnv_QueRemove 1
EResume WaitPickup1
EndIf
If MemSw(2) = On Then
Cnv_QueRemove 2
EResume WaitPickup2
EndIf
'Automatically recovers from the error
'“The specified queue data is outside the set area”
Else
Print "Error!"
Print "No.", Err, ":", ErrMsg$(Err)
Print "Line :", Erl(0)
'User error occurred
Error 8000
EndIf
Fend
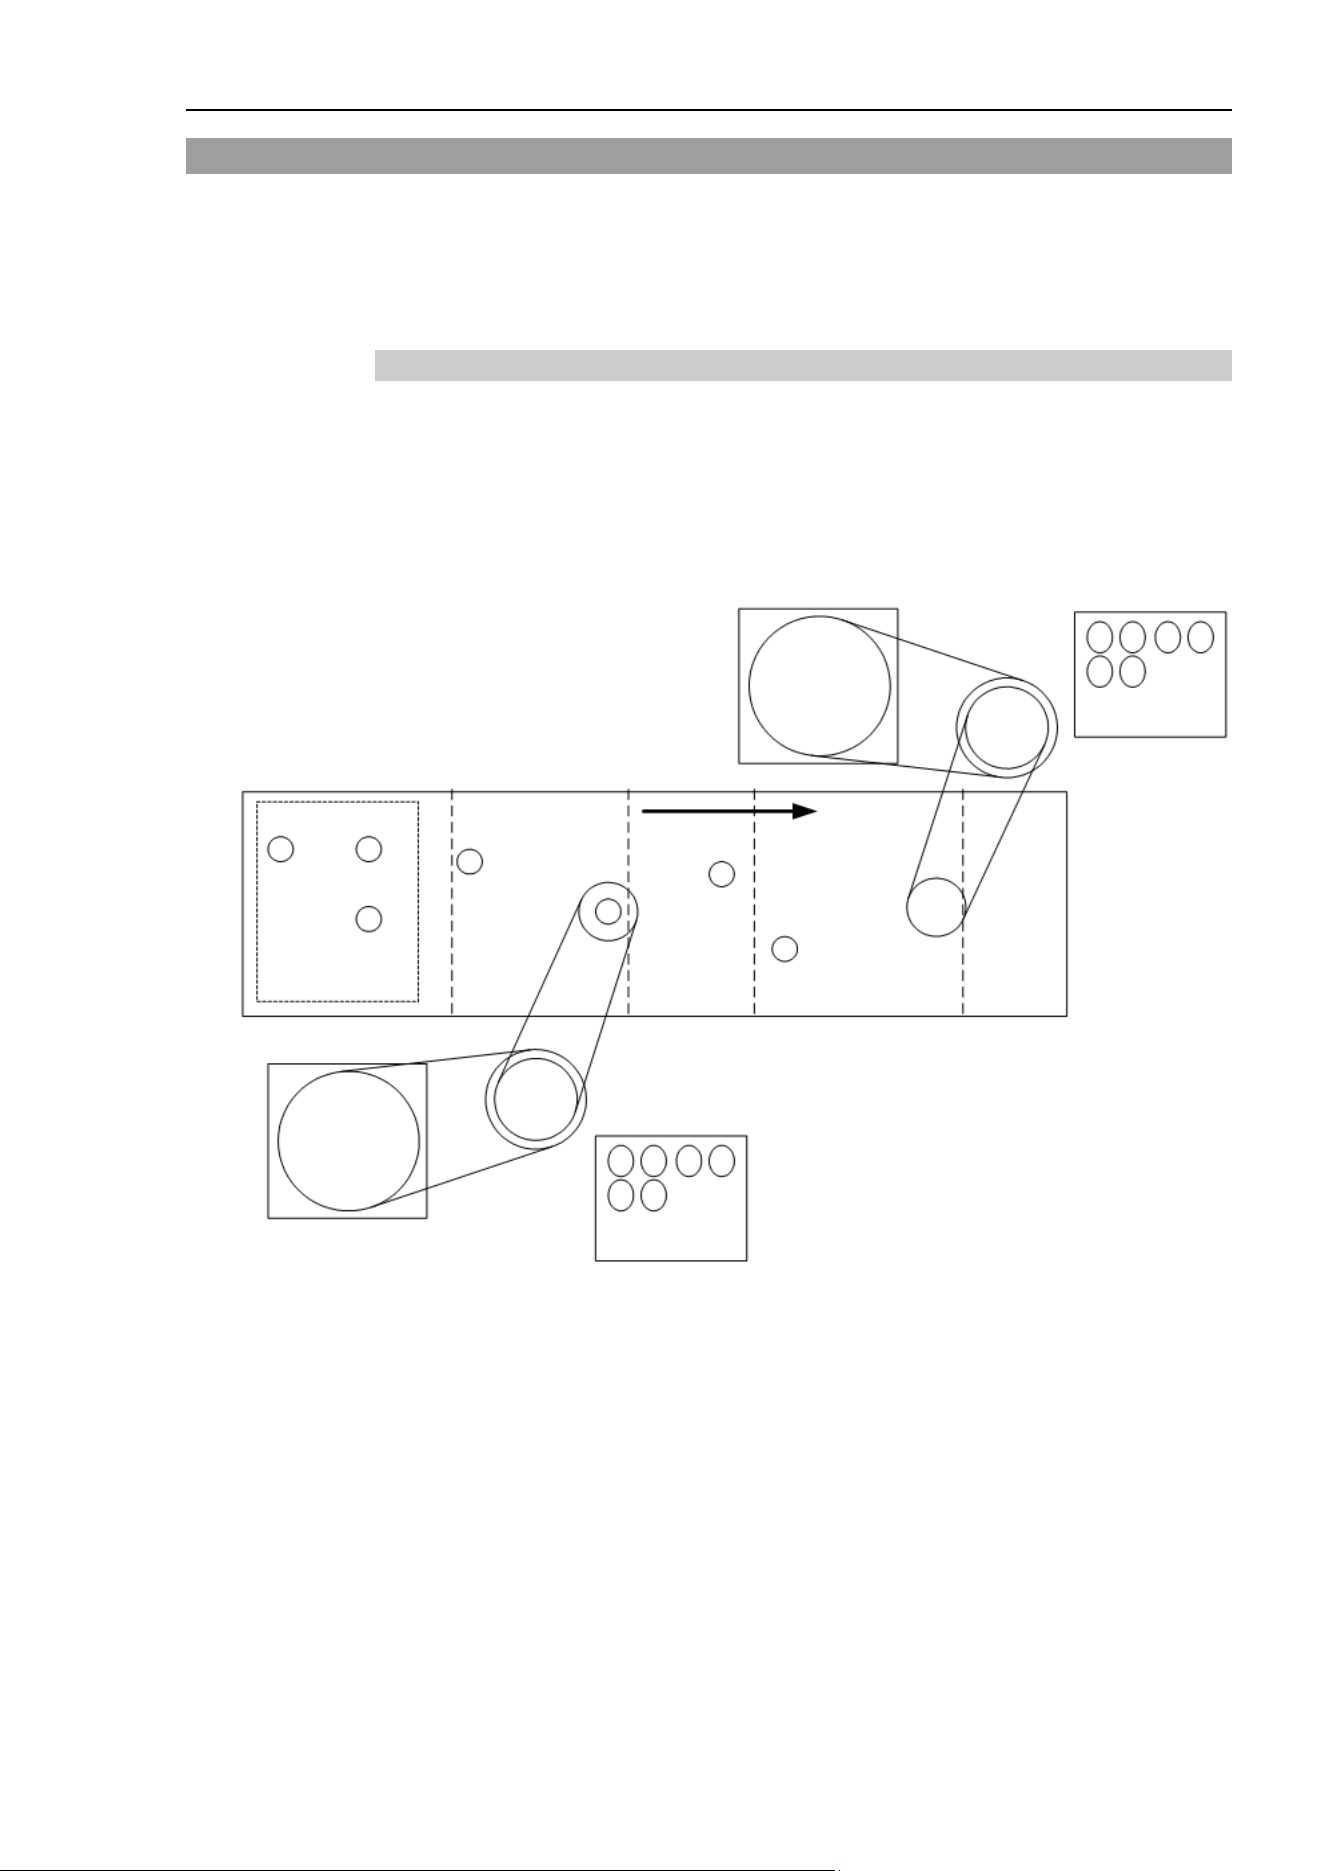
16. Conveyor Tracking
EPSON RC+ 7.0 (Ver.7.4) User's Guide Rev.6
497
16.21 Multi-robot Conveyor
EPSON RC+ supports multiple logical conveyors and robots. You can use multiple robots
with one conveyor, or multiple robots with multiple conveyors.
This section describes a conveyor system that uses two or more robots with one conveyor
and a conveyor system that uses one robot with two or more conveyors.
Multi-robot conveyor
The multi-robot system uses two or more robots with one conveyor as shown below. In
this system, the second robot (downstream) picks up the parts that the first robot
(upstream) failed to pick up.
Although the system uses several robots, it uses only one camera (sensor), encoder, and
conveyor.
Robot 2
Upstream conveyor
Upstream limit
Downstream limit
Robot 1
Upstream limit Downstream limit
Downstream conveyor
Vision
search area
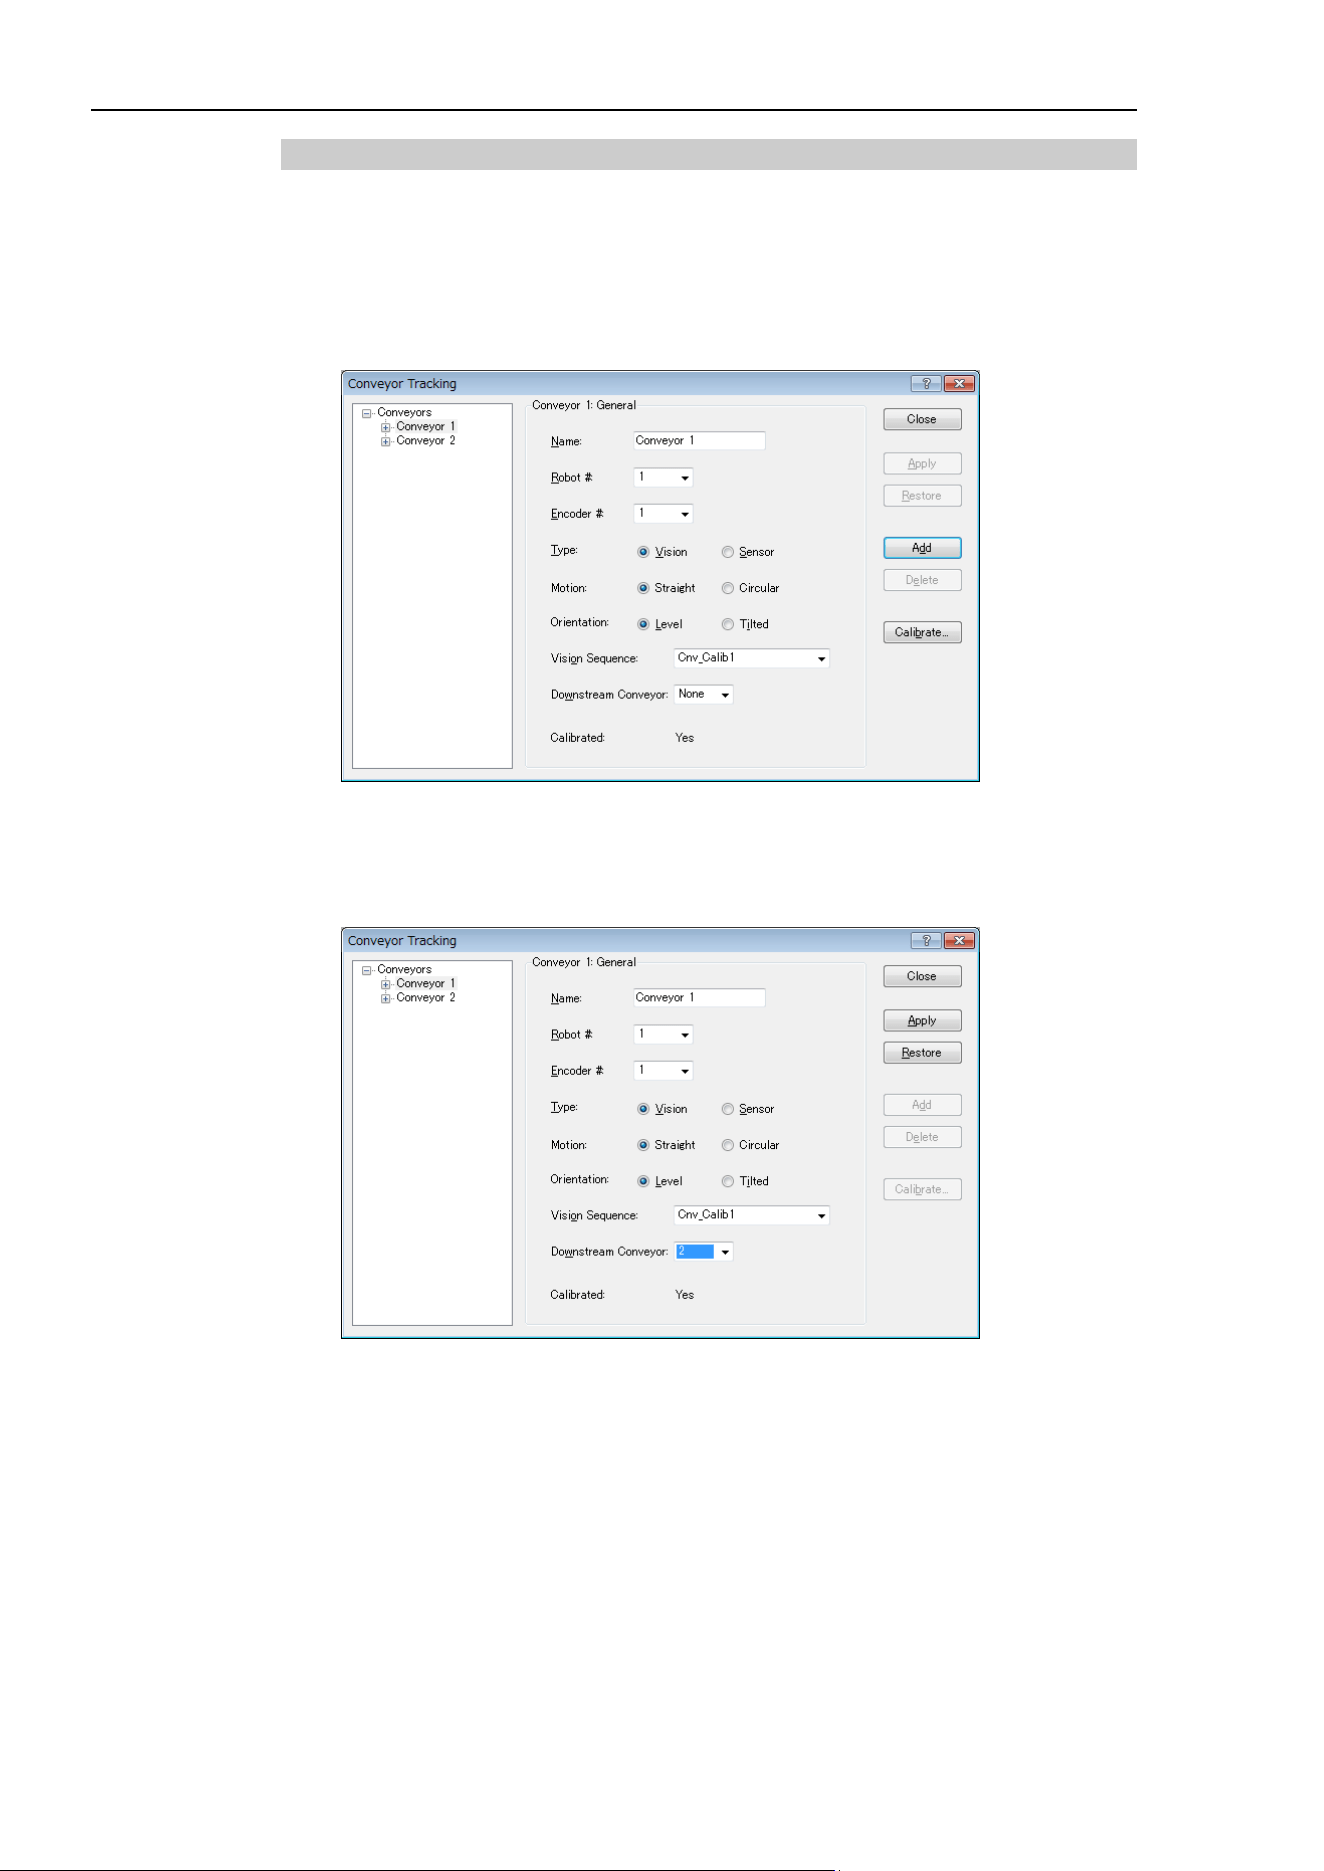
16. Conveyor Tracking
498 EPSON RC+ 7.0 (Ver.7.4) User's Guide Rev.6
How to use multi-robot conveyor
To use the multi-robot conveyors, set the upstream and downstream conveyors.
Instructions for using multi-robot conveyors are described below.
1. Refer to 16.11 Creating Conveyors in a Project and create conveyors 1 and 2.
(Set the upstream-side robot to Conveyor 1.)
2. For [Encoder] and [Vision Sequence], set the same number and sequence for both
conveyors 1 and 2.
3. Calibrate Conveyor 1.
4. Refer to the section operation check in 16.13 Vision Conveyors or 16.14 Sensor
Conveyors and check the conveyor operation.
5. Set [Downstream Conveyor] to “2”.
6. Calibrate Conveyor 2.
7. Check the operation of Conveyor 2.
(7)-1 Clear the all queue data registered to each conveyor.
>Cnv_QueRemove 1,all
>Cnv_QueRemove 2,all
(7)-2 Place the part in the vision search area.
(7)-3 Execute the program “ScanConveyorStrobed(ScanConveyor)” and register a
queue.
(7)-4 Halt the program “ScanConveyorStrobed” and move the conveyor until the
part enters the Pickup Area.

16. Conveyor Tracking
EPSON RC+ 7.0 (Ver.7.4) User's Guide Rev.6
499
(7)-5 Stop the program “ScanConveyorStrobed” and move the conveyor until the
part enters the Pickup Area of the conveyor 2.
(7)-6 Execute the command below to move the queue from conveyor 1 to
conveyor 2.
>Cnv_QueMove 1,0
(7)-7 Pick up the part.
>Jump Cnv_Queget(2)
(7)-8 Check if the robot end effector is above the center of a part. If the robot end
effector is not above the center of the part, perform the calibration again.
(7)-9 Move the conveyor and check if the robot follows the part. At this point, the
end effector will be off the center of part but this is not a problem.
(7)-10 Stop the tracking motion.
>Cnv_AbortTrack
8. The following is a sample program.
Function main
Xqt ScanConveyorStrobed 'Task that registers queues
'Task for the upstream robot to track the parts (queue)
Xqt PickParts1
'Task for the downstream robot to track the parts (queue)
Xqt PickParts2
Fend
Function ScanConveyorStrobed
Integer i, numFound, state
Real x, y, u
Boolean found
'Turn OFF the camera shutter and I/O (conveyor trigger)
Off trigger; off Cv_trigger
Do
'Search for a part on the conveyor
VRun FindParts
'Turn ON the camera shutter and the I/O (hardware conveyor trigger)
On Trigger; On Cv_Trigger
Do
VGet FindParts.AcquireState, state
Loop Until state = 3
VGet FindParts.Parts.NumberFound, numFound
'Register the found part to the queue of conveyor 1
For i = 1 to numFound
VGet FindParts.Parts.CameraXYU(i), found, x, y, u
Cnv_QueAdd 1, Cnv_Point(1, x, y)
Next i
'Turn OFF the camera shutter and the I/O (hardware conveyor trigger)
Off Trigger; Off Cv_Trigger

16. Conveyor Tracking
500 EPSON RC+ 7.0 (Ver.7.4) User's Guide Rev.6
Wait .1
Loop
Fend
Function PickParts1
OnErr GoTo ErrHandler
Integer ErrNum
WaitParts:
Do
'Wait until a part (queue) enters the Pickup Area
Wait Cnv_QueLen(1, CNV_QUELEN_PICKUPAREA) > 0
'Start tracking the part
Jump Cnv_QueGet(1)
On gripper
Wait .1
'Move the picked part to a specified place
Jump place
Off gripper
Wait .1
'Clear the picked part (queue)
Cnv_QueRemove 1, 0
Loop
'Move the parts (queue) in the downstream side than the Pickup Area of conveyor 1
' to the conveyor 2
ErrHandler:
ErrNum = Err
If ErrNum = 4406 Then
Cnv_QueMove 1, 0
EResume WaitParts
'When an error except the conveyor tracking motion range error occurs,
'display the error
Else
Print "Error!"
Print "No.", Err, ":", ErrMsg$(Err)
Print "Line :", Erl(0)
'User error occurred
Error 8000
EndIf
Fend

16. Conveyor Tracking
EPSON RC+ 7.0 (Ver.7.4) User's Guide Rev.6
501
Function PickParts2
OnErr GoTo ErrHandler
Integer ErrNum
WaitParts:
Do
'Wait until a part (queue) enters the Pickup Area
Wait Cnv_QueLen(2, CNV_QUELEN_PICKUPAREA) > 0
'Start tracking the part
Jump Cnv_QueGet(2)
On gripper
Wait .1
'Move the picked part to a specified place
Jump place
Off gripper
Wait .1
'Clear the picked part (queue)
Cnv_QueRemove 2, 0
Loop
'Clear the parts (queue) in the downstream side than the Pickup Area of conveyor 2
'Automatically recovers from the error
'“The specified queue data is outside the set area”
ErrHandler:
ErrNum = Err
If ErrNum = 4406 Then
Cnv_QueRemove 2, 0
EResume WaitParts
'When an error except “The specified queue data is outside the set area”
'occurs, display the error
Else
Print "Error!"
Print "No.", Err, ":", ErrMsg$(Err)
Print "Line :", Erl(0)
'User error occurred
Error 8000
EndIf
Fend

16. Conveyor Tracking
502 EPSON RC+ 7.0 (Ver.7.4) User's Guide Rev.6
16.22 Abort Tracking
There are some situations when you want to abort tracking a part that moves out of the
Pickup Area while the robot is tracking the part. In this case, use the Cnv_AbortTrack
command in a separate task that monitors the conveyor queue.
Function MonitorDownstream
Robot 1
Do
If Cnv_QueLen(1, CNV_QUELEN_DOWNSTREAM) > 0 Then
Cnv_AbortTrack 0
EndIf
Wait .1
Loop
Fend
16.23 Conveyor Tracking with 6-Axis Robot
When you use a 6-axis robot in a conveyor tracking system, you need to set the values of
U, V, and W. For this, use the Cnv_QueGet command.
The following shows the case where the robot end effector moves toward a part during the
pickup.
Go Cnv_Queget(Conveyor number,[Index]):U(90):V(0):W(180)
To use the Jump3 command, write a program as follows:
Jump3 P1,Cnv_QueGet(1):Z(**):U(90):V(0):W(180),
Cnv_QueGet(1):U(90):V(0):W(180)
P1 and Z(**) height should be the same.
The followings are points to be known before setting the Z(**) height.
Home position of Z in the tracking coordinate is the calibration position.
To raise the Z height in the tracking coordinate, offset in a positive (+) direction.
To lower the Z height in the tracking coordinate, offset in a minus (-) direction.
Robot coordinate P1 can be converted to the conveyor coordinate and displayed.
> print P1@cnv1
16.24 Tracking Mode
There are two tracking modes: picking quantity-priority mode and picking accuracy-
priority mode. The mode can be selected by the Cnv_Mode command.
Tracking mode selection is only available for linear conveyors. For circular conveyors,
the picking quantity-priority mode is only available.
Picking quantity-priority mode
Picking quantity-priority mode prioritizes reducing time to catch up with the work piece
(queue) over the picking accuracy. This mode is suitable for the conveyor tracking system
in which space between the work pieces is narrow.
NOTE

16. Conveyor Tracking
EPSON RC+ 7.0 (Ver.7.4) User's Guide Rev.6
503
When the picking quantity-priority mode is selected, tracking delay (situation in which
the Manipulator does picking motion at the posterior part of the work piece to the
direction of the conveyor motion) may occur. If the tracking delay occurs, write the
program as follows.
Go Cnv_Queget(Conveyor number,[Index])+X(**)
Picking accuracy-priority mode
Picking accuracy-priority mode improves the picking accuracy while it takes more time to
catch up with the work piece. This mode is suitable for the conveyor tracking system for
small work pieces.
Picking accuracy-priority mode should be used for the conveyors of 350 mm/sec or less.
When the conveyor of 350 mm/sec or more is used, the tracking mode will be picking
quantity-priority mode regardless of the setting of Cnv_Mode.
Although the tracking delay does not occur in the picking accuracy-priority mode, the
Manipulator may slide to the direction of the conveyor motion in Go, Move, or Jump3
motions after the downward motion of the Z-axis. If this occurs, take following
countermeasures (these may not be effective for Go and Move motions)
For Go motion: Change to Jump motion. Or, reduce the values of Accel and Speed.
For Move and Jump3 motions: Reduce the values of AccelS and SpeedS.
16.25 How to shorten the picking cycle time
There are following two methods to shorten the picking cycle time.
・Use the Arch command
・Use the Cnv_Accel command
The followings are the points to consider when using the Cnv_Accel command.
Maximum Cnv_Accel value is 5000 mm/sec
2.
If the Cnv_Accel setting value is 0 or exceeds 5001, the default value (2000 mm/sec
2
)
will be set.
If the acceleration error occurs, greater Cnv_Accel value cannot be specified. Decrease
the Cnv_Accel value or decrease Accel or AccelS.
When Cnv_Accel is used in the picking accuracy-priority mode, the manipulator may
slide to the direction of the conveyor motion after the downward motion of the Z-axis.
16.26 Manipulator Posture
Manipulator posture during the tracking motion is always the default posture regardless of
the posture at the conveyor tracking calibration. To specify the posture for the tracking,
write a program as follows.
Example: tracks the work piece with Lefty arm position
jump Cnv_Queget(Conveyor number,[Index])/L
During tracking motion, singularity avoiding function cannot be used. Therefore, set the
positions of the Manipulator and the conveyor so that the Manipulator does not pass
through the singularity.
NOTE
NOTE
NOTE
NOTE
NOTE
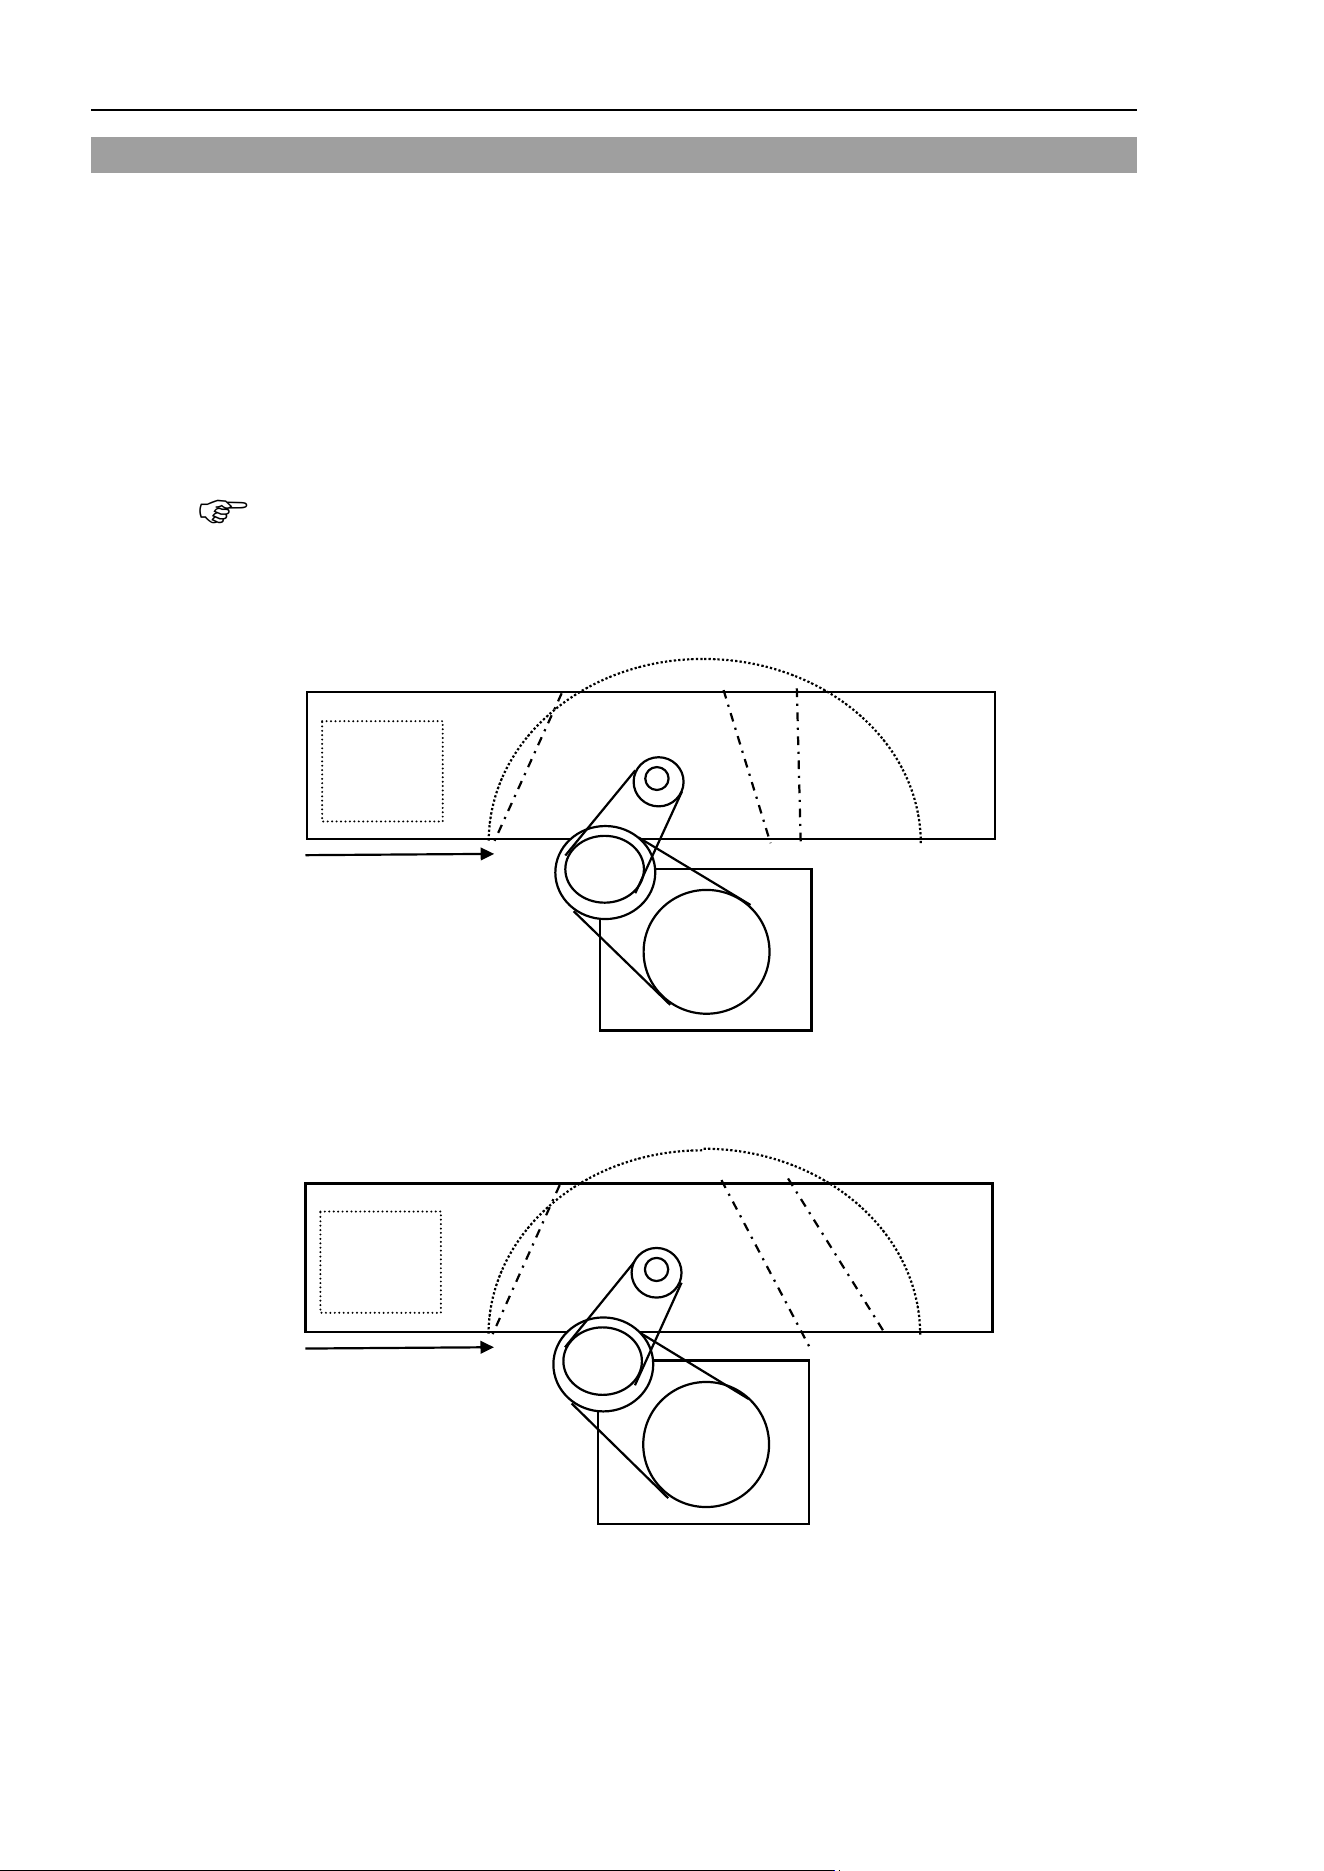
16. Conveyor Tracking
504 EPSON RC+ 7.0 (Ver.7.4) User's Guide Rev.6
16.27 Tracking Abort Line
The tracking abort lines can be configured after the calibration. These lines can be placed
straight or diagonally between the downstream limit and the robot’s motion range as
shown below.
The tracking abort lines cancel or abort the robot’s tracking motion in following cases:
- When it is predicted before the robot starts tracking that it catches up the work piece
downstream than the abort tracking line.
- When the work piece passes the tracking abort line after the robot starts the tracking
motion. Also, the hand rises if a distance between the work piece and the end of the
robot (tool) is shorter than a certain value. (the height can be specified)
Set the tracking abort line within the robot’s motion range since the robot aborts the
tracking motion when the work piece being tracked passes the line.
If errors such as the out of motion range error occurs even though the tracking abort line is
set, set the line more upstream than the current position.
Conveyor direction
Conveyor
Diagonal
upstream limit
Diagonal
downstream limit
Robot motion range
Camera’s
FOV
Tracking abort line
Conveyor direction
Conveyor
Diagonal
upstream limit
Diagonal
downstream limit
Robot motion range
Camera’s
FOV
Tracking abort line
NOTE
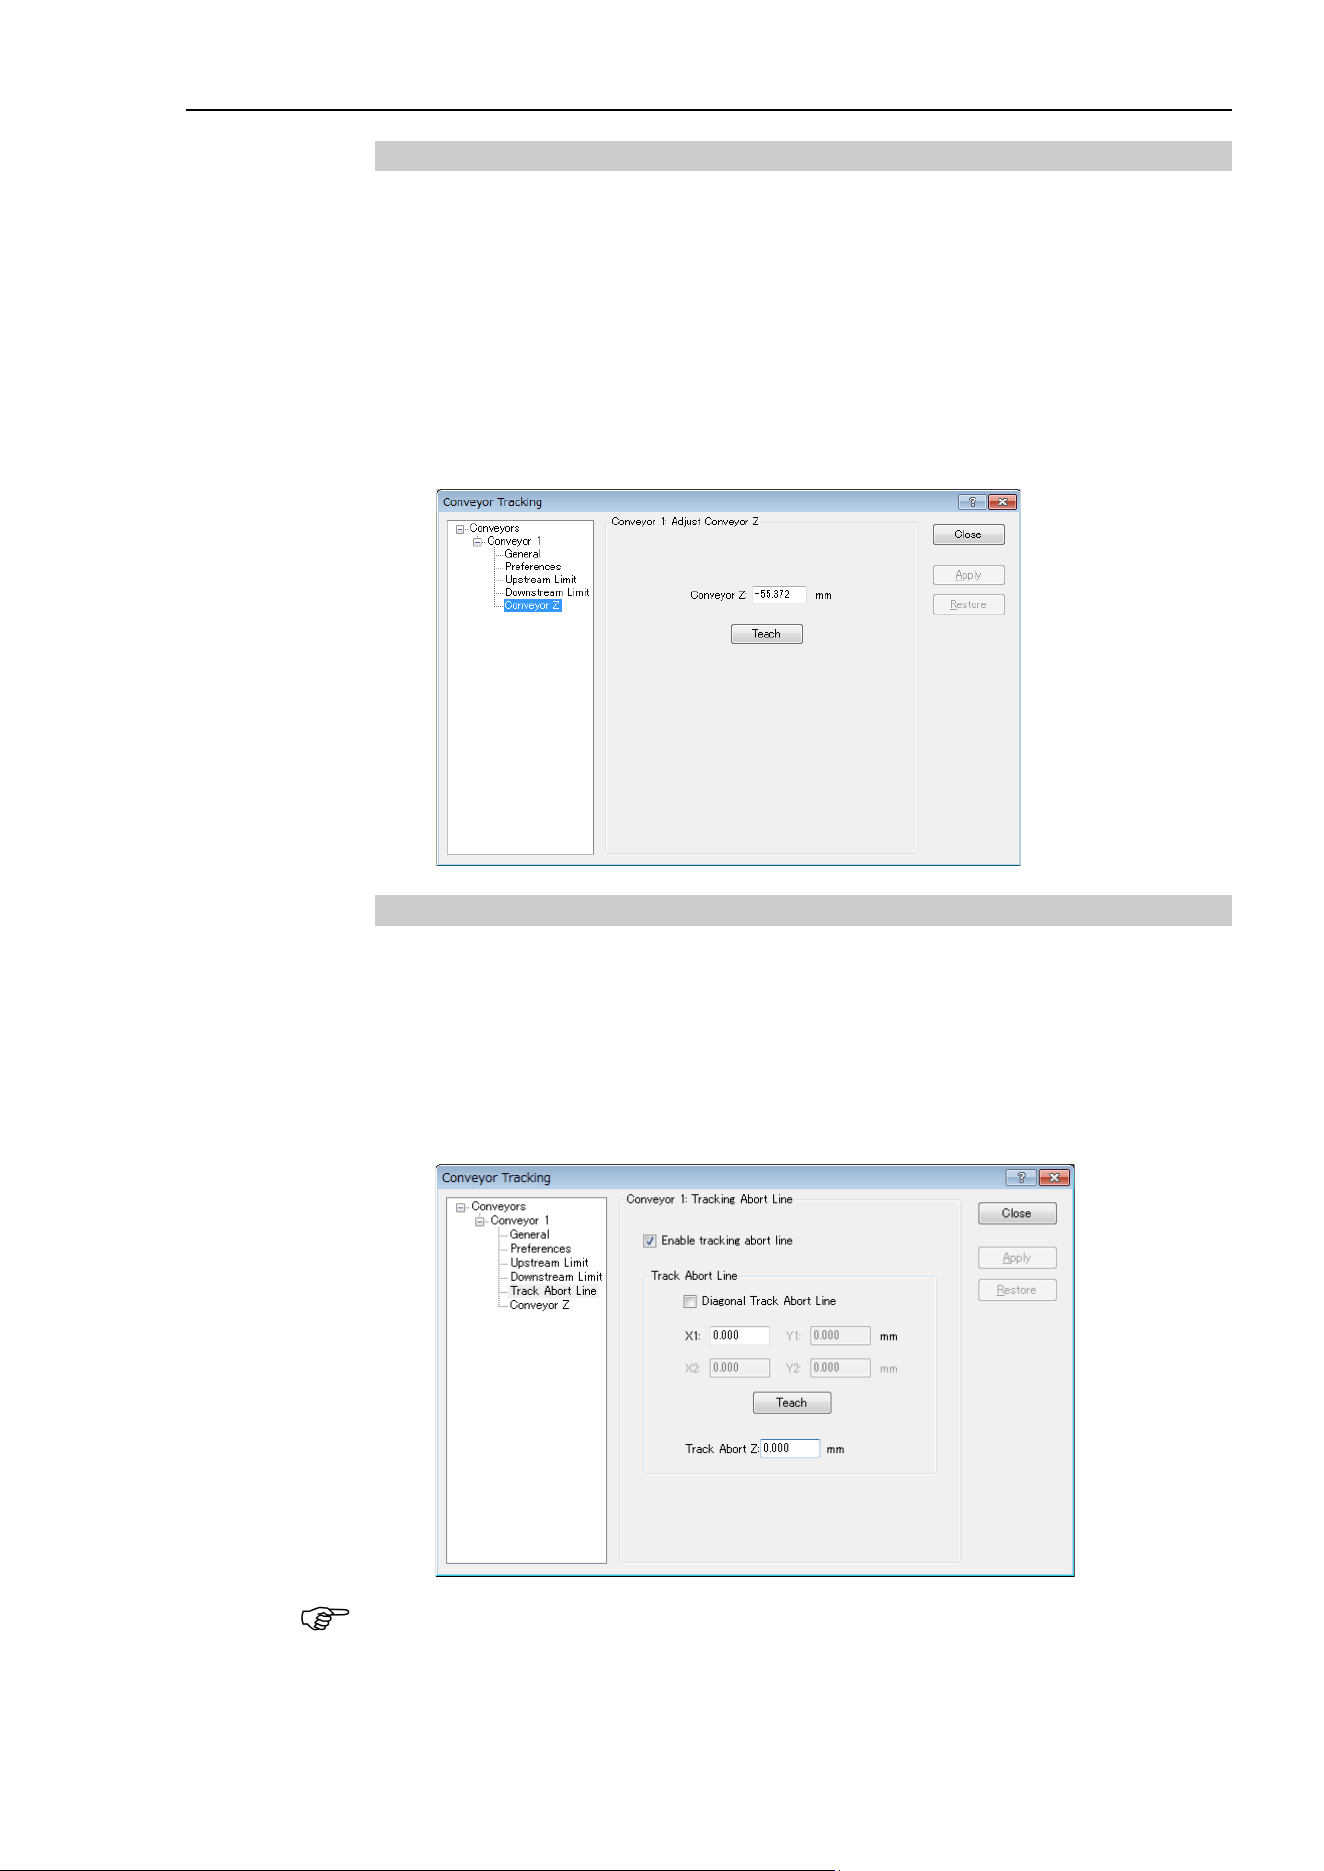
16. Conveyor Tracking
EPSON RC+ 7.0 (Ver.7.4) User's Guide Rev.6
505
How to set a tracking abort line
Set a tracking abort line in the following way.
1. Select [Tools] - [Conveyor Tracking].
2. Select the conveyor to configure.
3. Select [Track Abort Line].
4. Check the [Enable tracking abort line] checkbox.
5. If you want to enable the diagonal tracking abort line, check the [Diagonal Track
Abort Line] checkbox.
6. Click <Teach>. The GUI will be displayed.
How to set the Z rising height
The default rising height during tracking abort is 10 mm. The setting can be changed by
the following steps.
1. Select [Tools] - [Conveyor Tracking].
2. Select the conveyor to configure.
3. Select[Track Abort Line].
4. Set the rising height and click <Apply>.
If the out of motion range error occurs while the hand rises, decrease the rising height.
NOTE

16. Conveyor Tracking
506 EPSON RC+ 7.0 (Ver.7.4) User's Guide Rev.6
How to check the tracking abort state
Tracking abort state can be checked by using the Cnv_Flag command.
If the return value for Cnv_Flag is as follows, take the countermeasures as described
below.
If the return value is 0:
Tracking motion was completed.
If the return value is 1:
Tracking motion was canceled.
The downstream limit position is not proper. Set the downstream limit more upstream
than the current position.
If the return value is 2:
Tracking motion was aborted.
The downstream limit position or the robot’s waiting position is not proper. Set the
downstream limit more upstream than the current position, or set the robot’s waiting
position closer to the downstream limit.
If the return value is 3:
Tracking motion was aborted.
The downstream limit position or the picking time is not proper. Set the downstream
limit more upstream than the current position, or shorten the picking time.
If the return value is 4:
Cancel the tracking motion.
The robot tracked the work piece that is out of the tracking area. Pickup failure is
occurring. To reduce the missed work pieces, take the following measures.
- Reduce the number of work pieces
- Increase the acceleration by Cnv_Accel
- Set the downstream conveyor
When the tracking motion is canceled or aborted, the program executes the next command
without stopping.
Program
If the tracking abort line is configured, the error 4406 does not occur. When you set the
tracking abort line, use Cnv_Flag as in the following program. Do not use this program
when the abort line is not used.
Use the program 2 after the downstream limit is configured in the program 1 and
Cnv_Flag do not return 2 and 3.
When using the program 1, the robot can operate without an error even though the
downstream setting is not adequate since the robot aborts the tracking motion. However,
abort of tracking increases the cycle time. It is recommended to adjust the downstream
line if you are using the program 1.
NOTE
NOTE
NOTE

16. Conveyor Tracking
EPSON RC+ 7.0 (Ver.7.4) User's Guide Rev.6
507
Program 1
Function RB1
Double OffX, OffY, ZPick
'Handling offset value
OffX = 0
OffY = 0
ZPick = 0
'Move to the waiting position
Jump P0
Do
'Wait until the work piece passes the upstream limit
Wait Cnv_QueLen(1, CNV_QUELEN_PICKUPAREA) > 0
Jump Cnv_QueGet(1) +X(OffX) +Y(OffY) -Z(ZPick) 'Start tracking
If Cnv_Flag(1) = 0 Then
On Vacuum1 'Vacuum ON
Wait 0.1
'Abort tracking since the work piece passes the tracking abort line during the picking
If Cnv_Flag(1) = 3 Then
Jump P2 'Move to the position to release the pickup-failed work piece
Off Vacuum1 'Release the work piece
Wait 0.1
Jump P0 'Move to the waiting position
'Pick up the work piece
Else
Cnv_QueRemove 1, 0 'Delete the picked queue
Jump P1 'Move to the position to release the work piece
Off Vacuum1 'Release the work piece
Wait 0.1
EndIf
'Cancel the tracking motion since the work piece passes the tracking abort line
'during tracking
ElseIf Cnv_Flag(1) = 1 Then
Cnv_QueRemove 1, 0 'Delete the queue data
'Abort the tracking motion since the work piece passed the tracking abort line
ElseIf Cnv_Flag(1) = 4 Then
Cnv_QueRemove 1, 0 'Delete the queue data
'Abort the tracking motion since the work piece passed the tracking abort line
'during tracking
ElseIf Cnv_Flag(1) = 2 Then
Cnv_QueRemove 1, 0 'Delete the queue data
Jump P0 'Move to the waiting position
EndIf
Loop
Fend
Program 2
Function RB1
Double OffX, OffY, ZPick
'Handling offset value
OffX = 0
OffY = 0
ZPick = 0
'Move to the waiting position
Jump P0

16. Conveyor Tracking
508 EPSON RC+ 7.0 (Ver.7.4) User's Guide Rev.6
Do
'Wait until the work piece passes the upstream limit
Wait Cnv_QueLen(1, CNV_QUELEN_PICKUPAREA) > 0
Jump Cnv_QueGet(1) +X(OffX) +Y(OffY) -Z(ZPick) 'Start tracking
If Cnv_Flag(1) = 0 Then
On Vacuum1 'Vacuum ON
Wait 0.1
Cnv_QueRemove 1, 0 'Delete the picked queue
Jump P1 'Move to the position to release the work piece
Off Vacuum1 'Release the work piece
Wait 0.1
'Cancel the tracking motion since the work piece passes the tracking abort line
'during tracking
ElseIf Cnv_Flag(1) = 1 Then
Cnv_QueRemove 1, 0 'Delete the queue data
'Cancel the tracking motion since the robot tracked the work piece
'that is out of the tracking area
ElseIf Cnv_Flag(1) = 4 Then
Cnv_QueRemove 1, 0 'Delete the queue data
EndIf
Loop
Fend

16. Conveyor Tracking
EPSON RC+ 7.0 (Ver.7.4) User's Guide Rev.6
509
16.28 Tips for Accuracy Improvement of Conveyor Tracking
16.28.1 Overview
This section provides the tips for improving the robot’s performance to handle the work
pieces in the Conveyor Tracking, which uses the vision system to detect the work pieces.
Process of Accuracy Improvement
Prepare the conveyor tracking in the following steps.
1. System construction
2. Vision calibration
3. Conveyor calibration
4. Check of the work piece detection accuracy and the detection rate
5. Check of the work piece handling accuracy
In order to improve the handling accuracy, proper preparations and adjustments in each
step are necessary. The following sections describe tips for accuracy improvement for
each step.
Subsequent descriptions use the SCARA robot. Please note that the tips are common in
SCARA and 6-Axis robots.
16.28.2 Tips for System Construction
Tool Settings
In order to realize precise pickups, the end effector of the robot needs to pick up the work
pieces correctly with a tool such as a vacuum pad attached.
To pick up the work piece accurately by the tool, it is necessary to configure the tool in
[Tools] page.
Eccentricity of the tool causes a constant pickup position gap. Make sure to configure the
tool settings.
Also, adjustment by the tool settings is not effective for the improper tool such as a
randomly-distorted vacuum pad due to the degenerated rubber. Make sure to use the
proper tool.
For details on the tool setting, refer to 5.11.1 [Robot Manager] Command (Tools Menu) -
[Tools] page
For details on the tool number selection, refer to 5.11.1 [Robot Manager] Command
(Tools Menu) - [Jog and Teach] page
After adjusting the tool, make sure to check the operation and ensure that the calibration
result is accurate.
NOTE
NOTE
NOTE
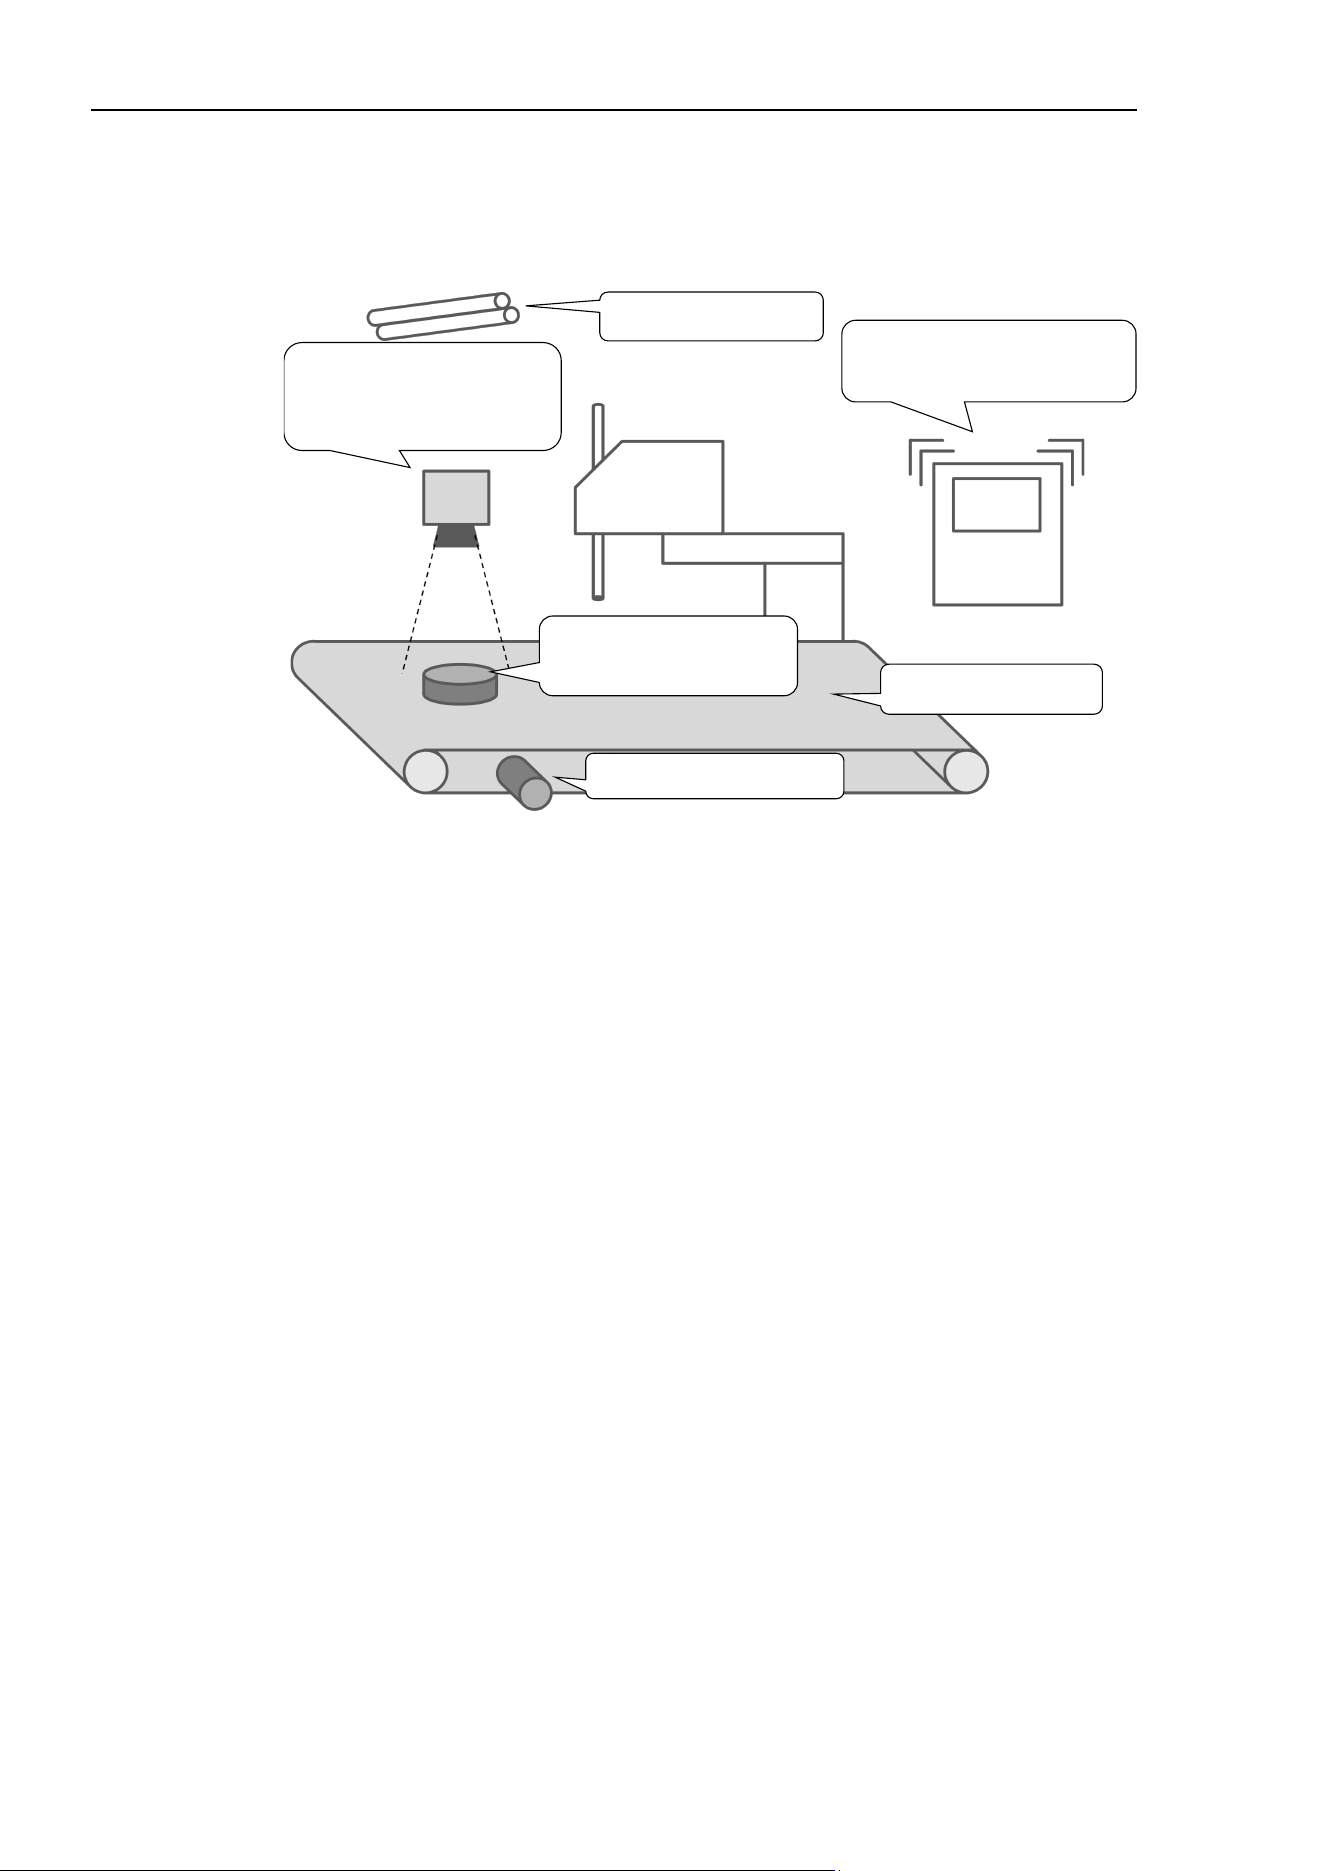
16. Conveyor Tracking
510 EPSON RC+ 7.0 (Ver.7.4) User's Guide Rev.6
Installation and Environment
In order to realize precise pickups, the camera and the conveyor should be installed in the
proper environment and calibrated properly.
Install the system with attention to the following points.
Flicker of fluorescent
Camera, lens,
work distance,
Parallelism of the conveyor
and the camera
Contrast of the work
piece and the conveyor
Slippage of the encoder
Slippage and backlash due
to the ambient vibration
Tilt of the conveyor
Important Points for Installation of the Conveyor System
- Use a proper camera and lens. Configure a work distance (distance from the lens to
the object) properly.
Also, ensure parallelism of the camera and the conveyor in order not to cause
distortion of the field of view (FOV).
- Ensure horizontality of the horizontal conveyor to match the positions of the robot
coordinate system and the conveyor coordinate system.
For the tilted conveyors, calibrate the tilt properly.
- If the encoder slips, pulse of the conveyor movement cannot be counted correctly.
- If the contrast of the work piece and the conveyor is low, edges of the work piece are
difficult to be detected.
- Ambient vibration and source of the impact may cause slippage and backlash of the
camera, the conveyor, and the work pieces. It may result in decrease in accuracy.
- General fluorescent lights have periodic flickers and may affect the work detection.
Consider using fluorescent lights specialized for image processing or the LED lighting
system.
Select and install the appropriate cameras and lenses to realize work detection which
satisfies required pickup accuracy. Required work detection accuracy should be threefold
of the required pickup accuracy.
For details on modification of the FOV for accuracy improvement, refer to 3. Tips for
Vision Calibration – Field of View of Cameras.
NOTE
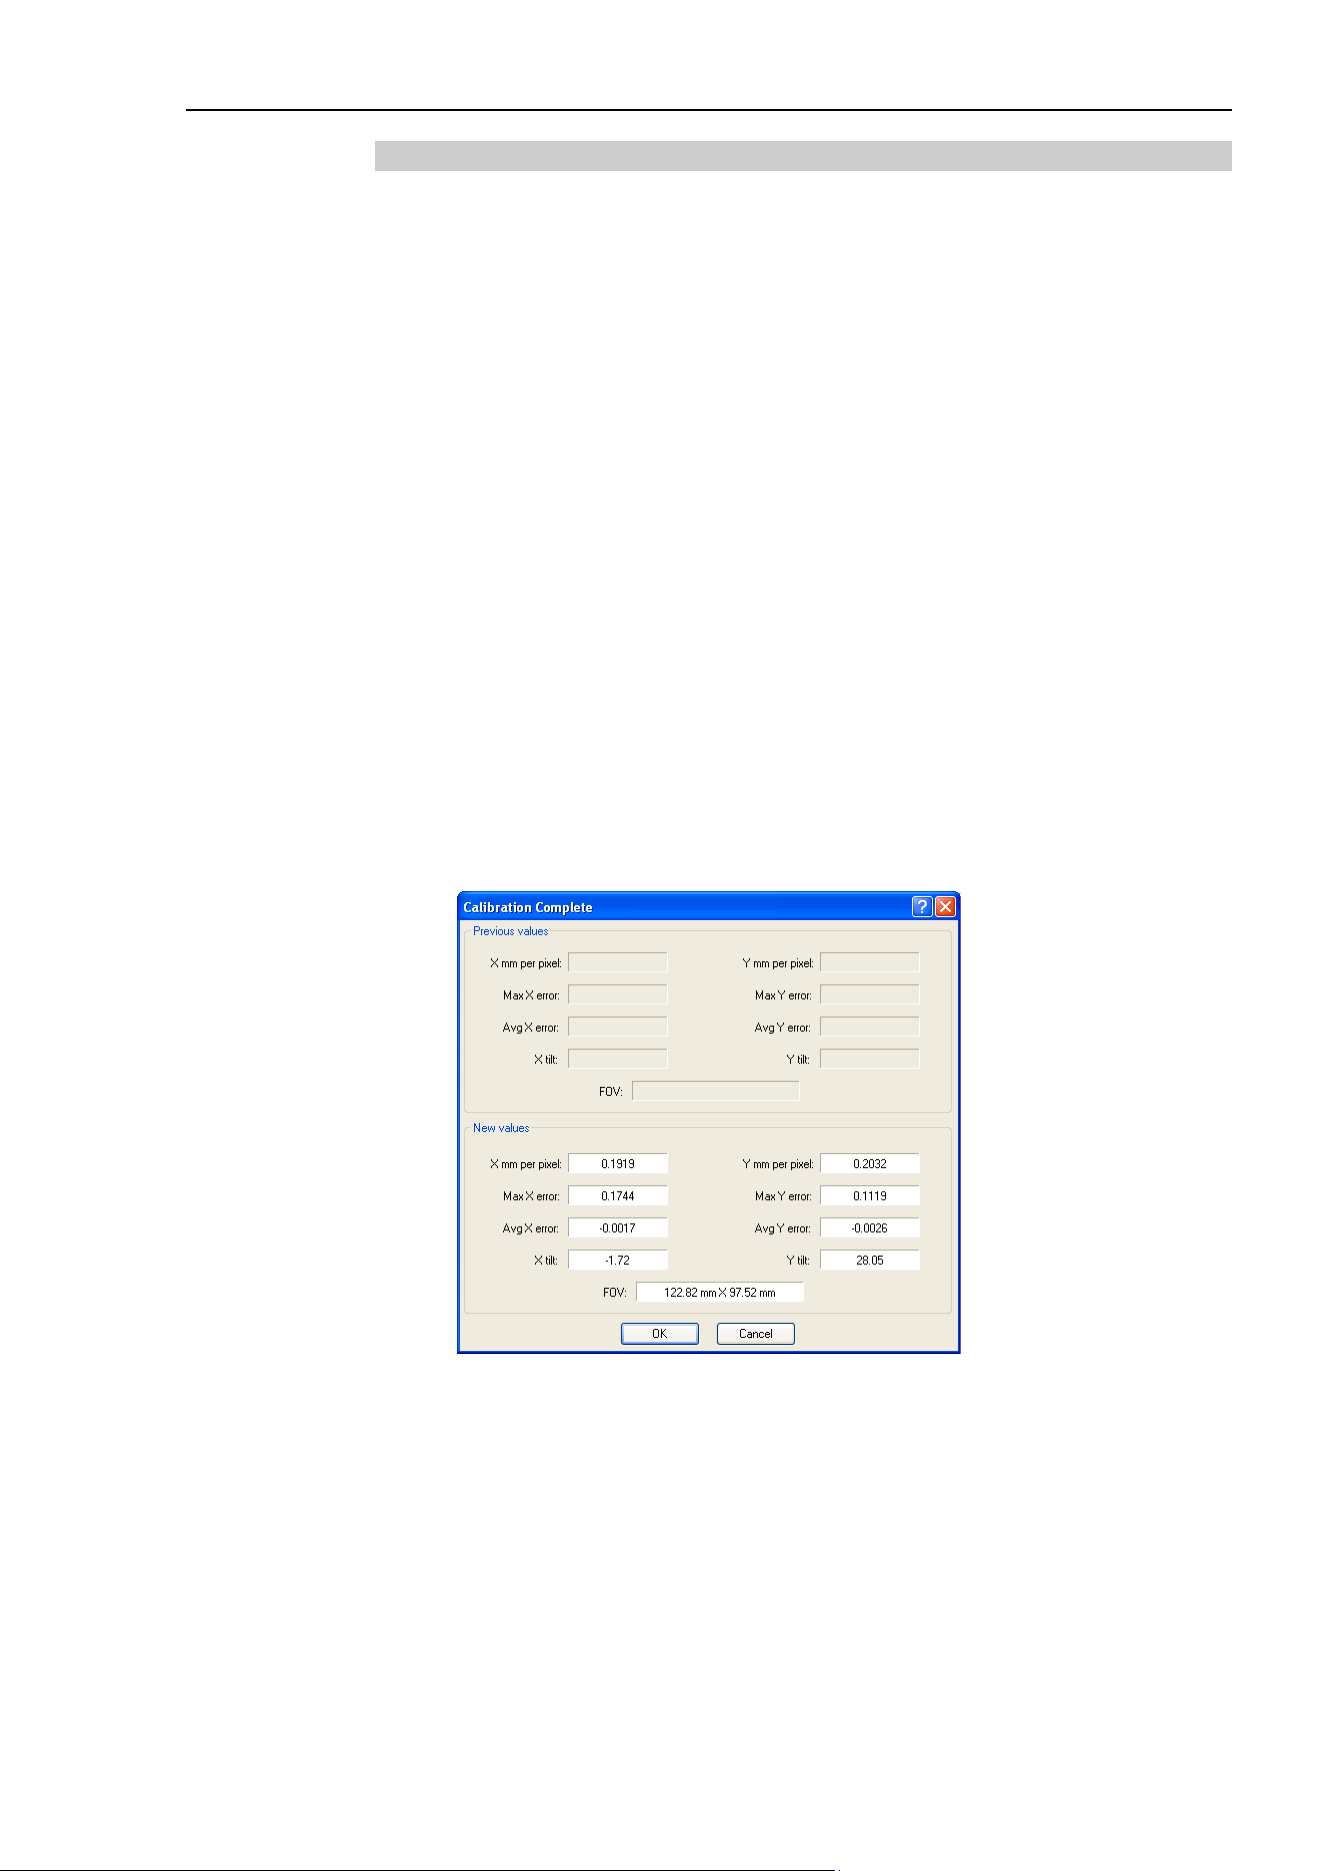
16. Conveyor Tracking
EPSON RC+ 7.0 (Ver.7.4) User's Guide Rev.6
511
16.28.3 Tips for Vision Calibration
Field of View of Cameras
A large field of view increases mm/pixel (length of 1 pixel) value and decreases detection
accuracy of the work pieces.
If the following values from the calibration result do not satisfy the required accuracy,
consider the following methods.
XmmPerPixel (X mm of one pixel),
YmmPerPixel (Y mm of one pixel)
- Reinstall the camera and the work piece to shorten the work distance (distance from
the lens to the object)
- Use a high resolution camera
- Use a high resolution lens (e.g. our mega pixel lens) or a long-focal-length lens.
For details on the vision calibration, refer to the following manual.
Vision Guide 7.0 Software 7. Vision Calibration
Deviation and Tilt of the Field of View
If Error (deviation) or Tilt values displayed in the calibration result were more than “1”, it
can be considered that calibration was not done properly.
For details, refer to the following manual.
Vision Guide Software 7.4.7 Calibration Complete dialog
Dialog displaying the calibration results
NOTE
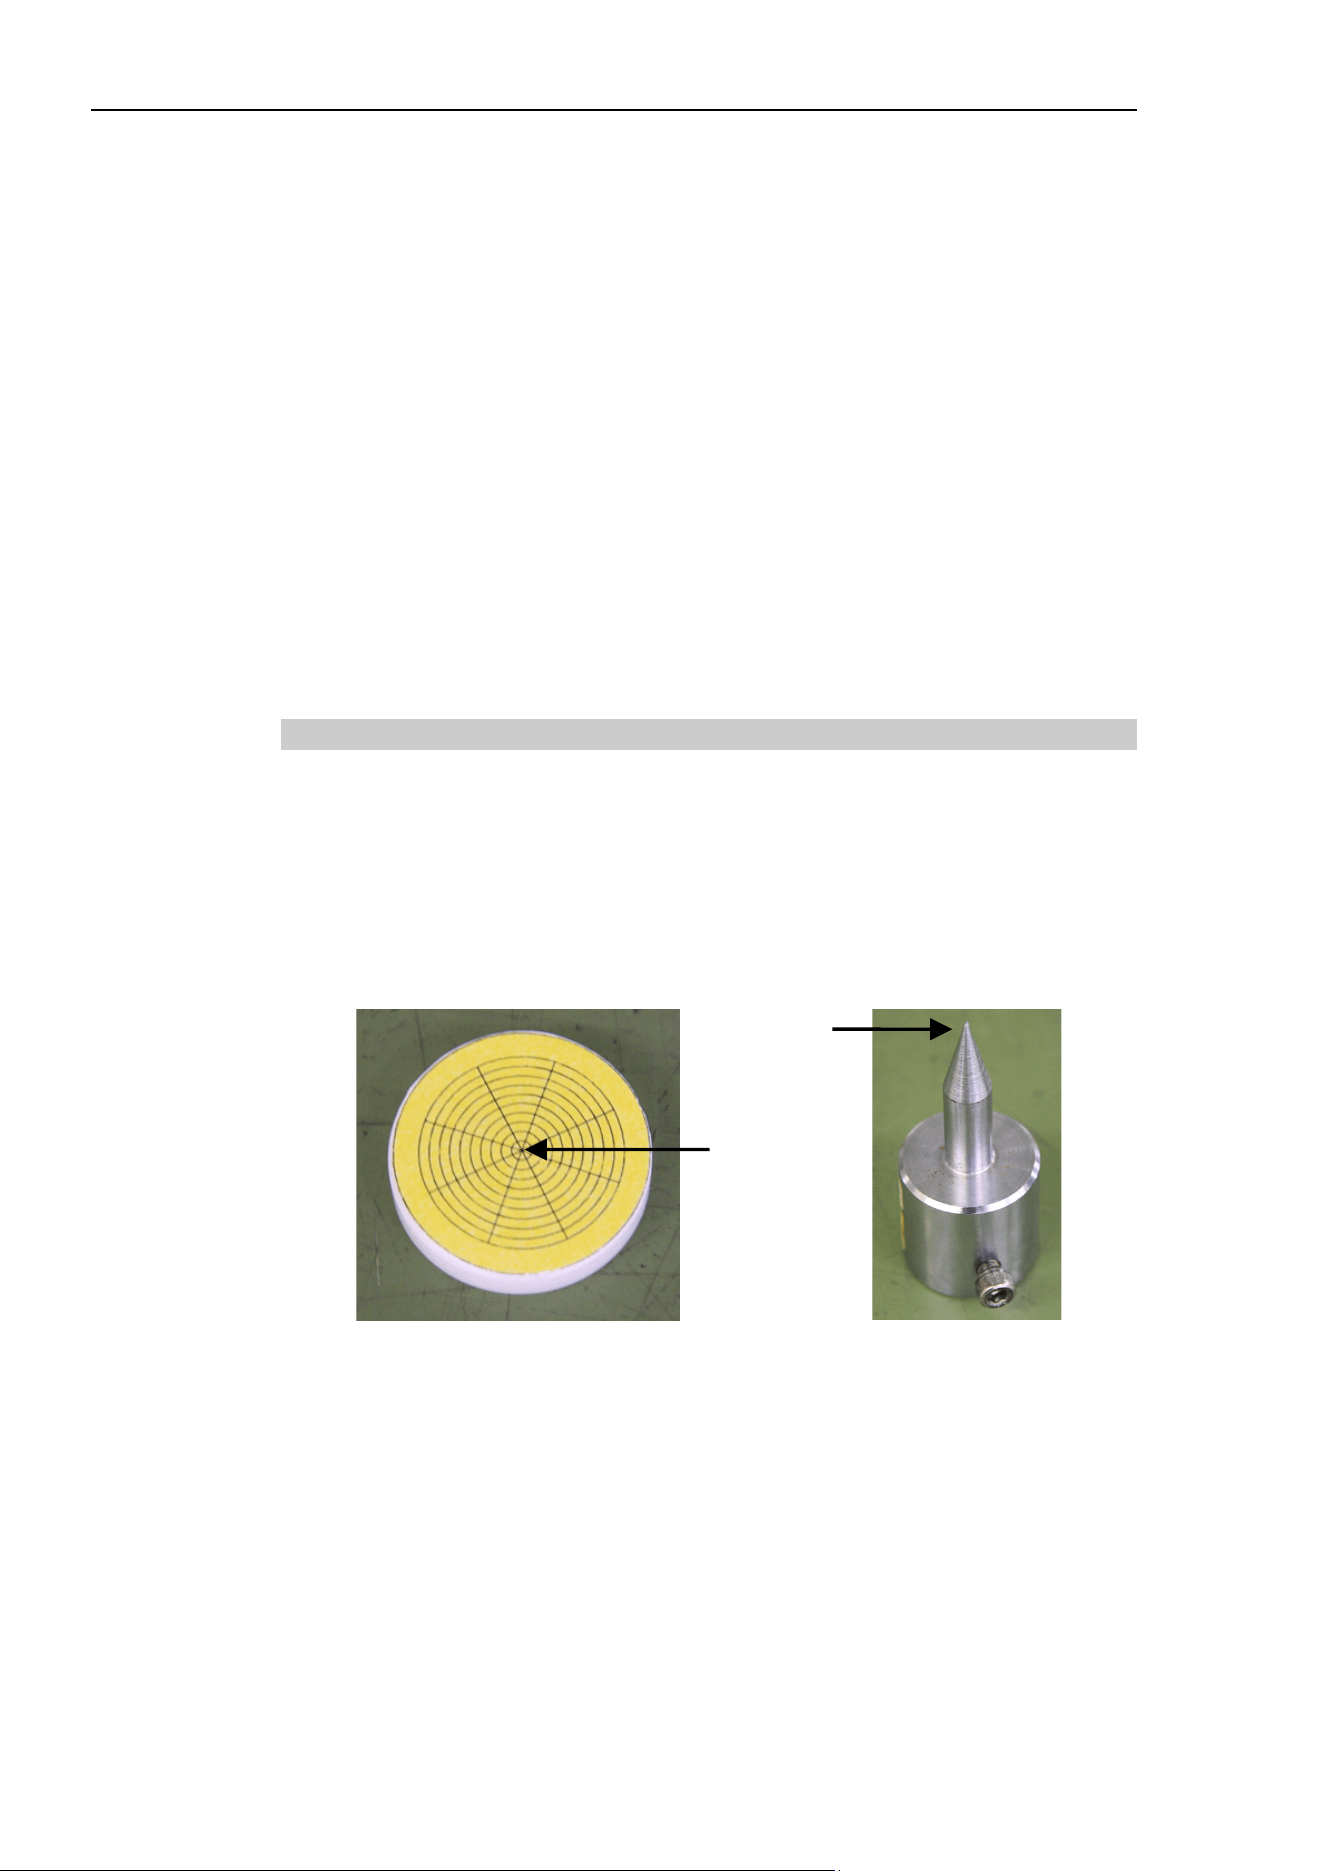
16. Conveyor Tracking
512 EPSON RC+ 7.0 (Ver.7.4) User's Guide Rev.6
Reference Point Detection
For the vision calibration, use a proper combination of the reference point and the vision
object; for instance, use a perfect circle as a reference point and detect it by the Blob
object. In addition, it is necessary to perform a calibration with the “aperture” and “focus”
of the camera adjusted to the work piece.
- Adjust the camera aperture not too bright and not too dark in order to detect edges and
marks of the work piece.
- Adjust the focus to see the work piece sharply. Blurs may affect the detection rate and
accuracy.
If the work piece is thick and the top face does not come into the focus when the focus is
placed on the conveyor, adjust the focus to the top face and set the reference point at the
same height to calibrate.
For details on the reference points, refer to the following manual.
Vision Guide 7.0 Software 7.2 Reference Points
For details on the vision objects, refer to the following manual.
Vision Guide 7.0 Software 6. Vision Objects
16.28.4 Tips for Conveyor Calibration
Work Piece and Tool
In order to realize precise pickups, it is necessary to perform a correct teaching in the
conveyor calibration. To move the center of the end effector to the feature point (e.g. the
center point) of the work piece detected by the camera, it is recommended, for example, to
use a work piece and a tool as described below.
Work piece : Teaching point is easy to be found
Tool : Tip point is easy to be found (Make sure to configure the tool settings.)
Example of the work piece and the tool used in the conveyor calibration
Perform a model teaching by overlaying the model origin of the Corr or Geom object on
the teaching point, and adjust the positions of the camera coordinate system and the
conveyor coordinate system correctly. If the teaching point is the center of balance of the
work piece (a perfect circle or a square), the center can be detected as the model origin by
the Blob object.
Teaching
point
NOTE
NOTE
NOTE
Tool tip point

16. Conveyor Tracking
EPSON RC+ 7.0 (Ver.7.4) User's Guide Rev.6
513
Z Value Adjustment
The work piece and the tool used in the conveyor calibration can have a different height
from those used in actual work piece handling. By adjusting the Z value after replacing
the tool and the work piece, errors related to the Z offset can be solved.
In the following cases, Z value adjustment is effective.
Tool cannot reach and pick up the work piece. (Z offset is too large)
Robot collides with the work piece and damages it. (Z offset is too small)
Like the above cases, redoing of the whole conveyor calibration process may not be
required. If there is a problem in the pickup height, adjust the Z value as a first step.
For details on the Z value adjustment, refer to 16.16 Adjusting the Z value.
16.28.5 Troubleshooting for Work Piece Detection
Teaching of Pickup Position
In order to realize precise pickups, the pickup position of the work piece should be
detected properly as a model origin. To compensate the constant pickup position gap in
work piece handling due to the gap between the pickup position and the model origin,
following methods are effective.
- Perform a model teaching by overlaying the model origin of the Corr or Geom object
on the teaching point and set the CameraX and CameraY as the pickup position.
- To set the center of balance as a pickup position, detect it as a model origin by the
Blob object and set the CameraX and CameraY as the pickup position.
CameraX: X coordinate of the detected work piece position in the camera coordinate
system
CameraY: Y coordinate of the detected work piece position in the camera coordinate
system
For details on the vision objects, refer to the following manual.
Vision Guide 7.0 Software 6. Vision Objects
If the Work Piece Cannot Be Detected in the Search Area
If the work piece which is in the search area cannot be detected and an image processing
error occurs, it can be improved by adjusting the vision properties. See the following
points.
- Adjust the camera’s exposure time
Long exposure time affects the work detection since it may blur the image of the
moving work piece.
Use the ExposureTime property to shorten the exposure time.
- Adjust the shape score value
If the work detection rate is unstable, it may be improved by adjusting the Accept
property of the vision object.
For details on the vision properties, refer to the following manual.
Vision Guide 7.0 Properties and Results Reference
NOTE
NOTE
NOTE
NOTE
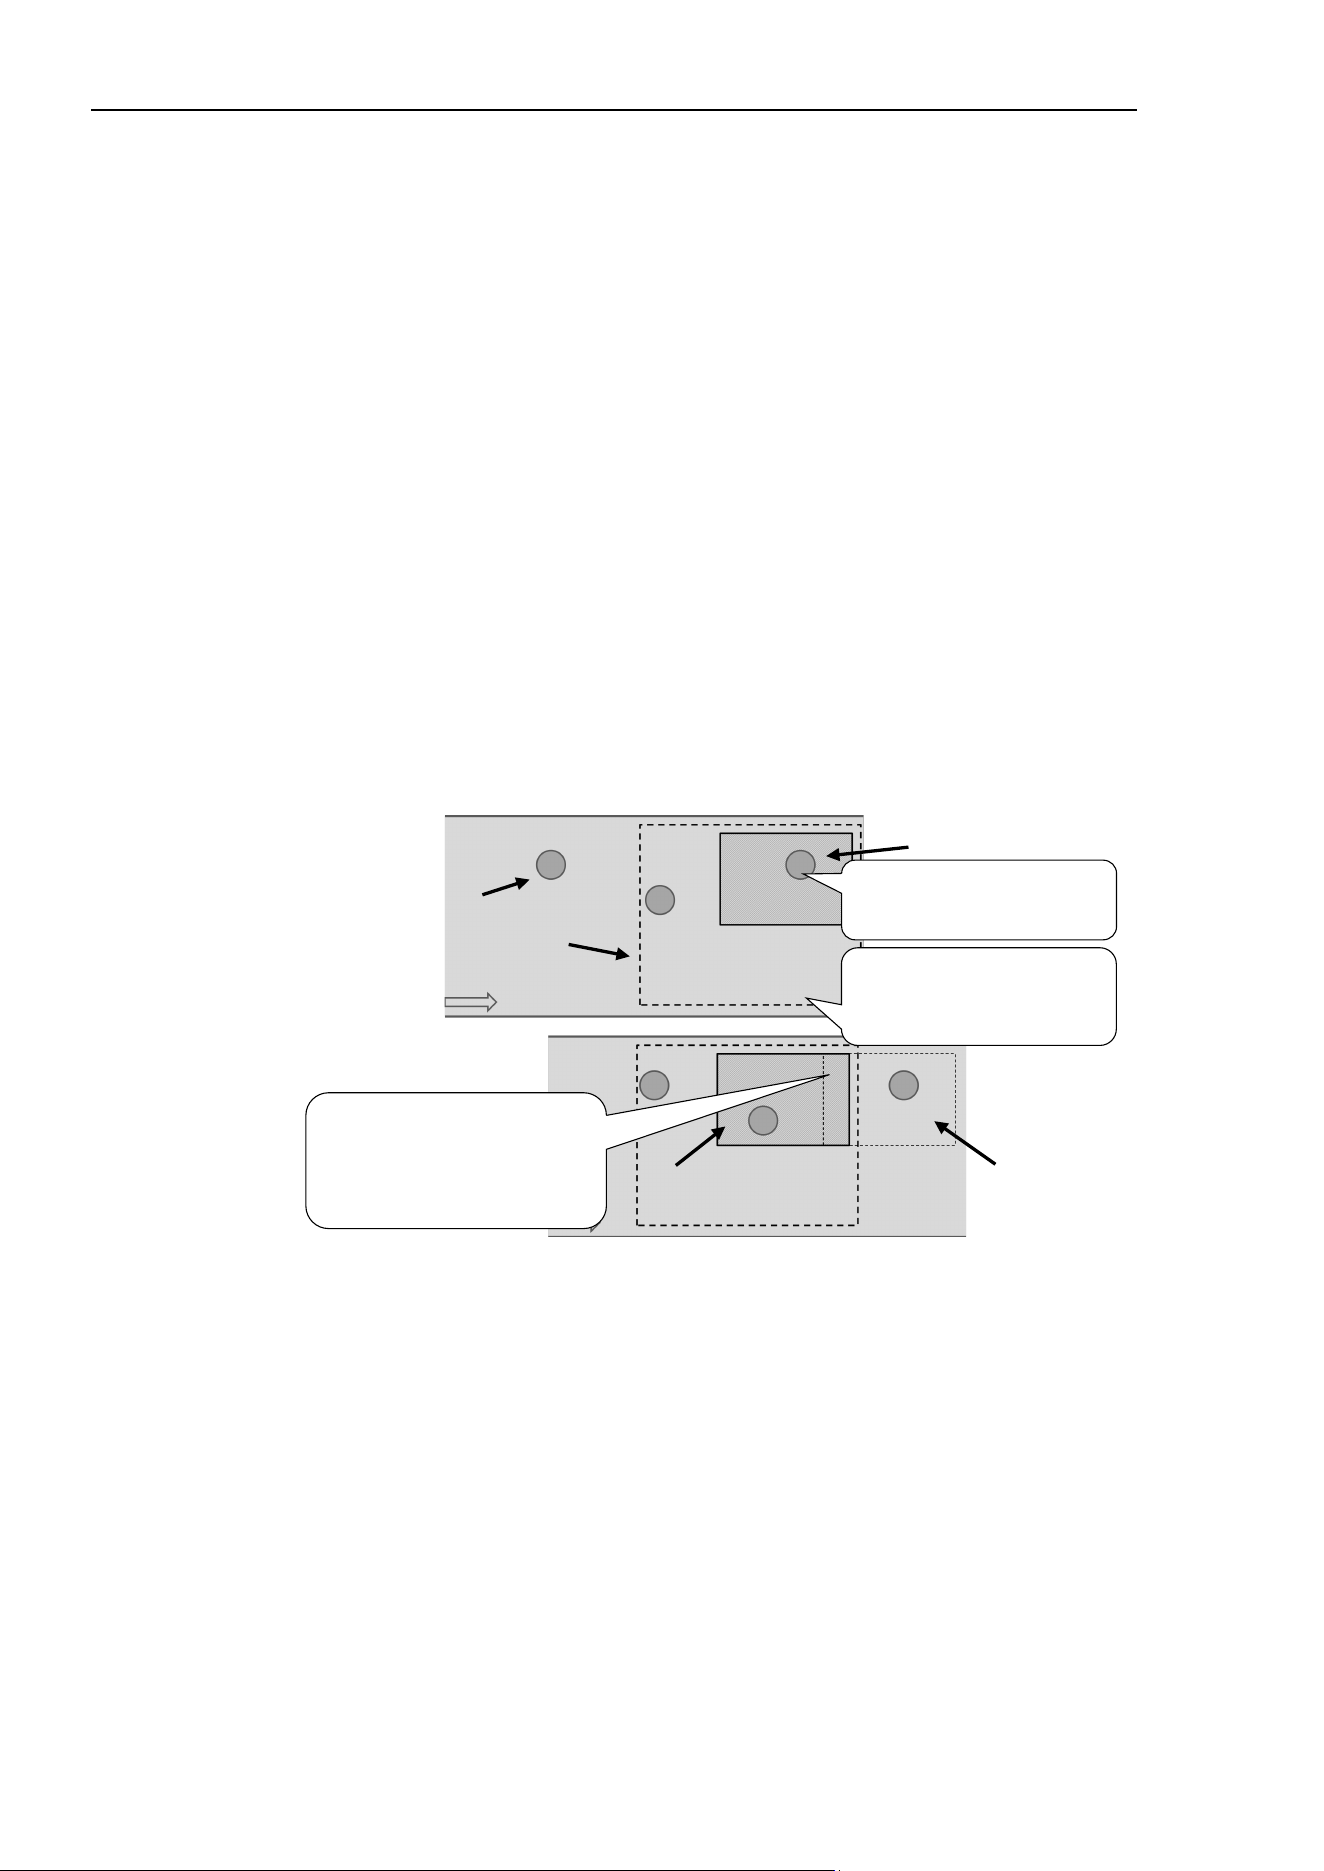
16. Conveyor Tracking
514 EPSON RC+ 7.0 (Ver.7.4) User's Guide Rev.6
If Work Detection Does Not Satisfy the Required Accuracy
If the work detection does not satisfy the required accuracy, it can be improved by
adjusting the vision properties. See the following points.
- Adjust the camera’s exposure time
Long exposure time affects the work detection since it may blur the image of the
moving work piece.
Use the ExposureTime property to shorten the exposure time.
- Adjust the camera’s field of view
Wide field of view increases the length of 1 pixel and decreases the detection accuracy.
Check the XmmPerPixel and YmmPerPixel values.
Example: If approximately 0.5 mm of the image blur at the 100 mm/sec of the conveyor
speed is acceptable, set the exposure time to 5 msec.
For details on the vision properties, refer to the following manual.
Vision Guide 7.0 Properties and Results Reference
If the Image Processing Cannot Be Done in Time
If the image processing cannot be done in time, it can be improved by adjusting the search
area and the vision properties. See the following points.
n times of sequence
n+1 times of sequence
Conveyor moving
direction
Previous search area
Current search area
Do not search the area
where work pieces do not
come
Considering the conveyor
speed and the sequence
processing time,
cover the whole search area
Work piece
Search area
Adjust the property to
Increase the search speed
Camera’s FOV
Tips for the case if the image processing cannot be done in time
- Adjust the search window of the object
A large search window increases time to execute the vision objects. Adjust the search
window as small as possible by eliminating the area where work pieces do not come
in.
- Adjust the number of the objects to be detected
When you want to detect only one work piece at a time, setting the NumberToFind
property to “1” may reduce the execution time.
NOTE
NOTE
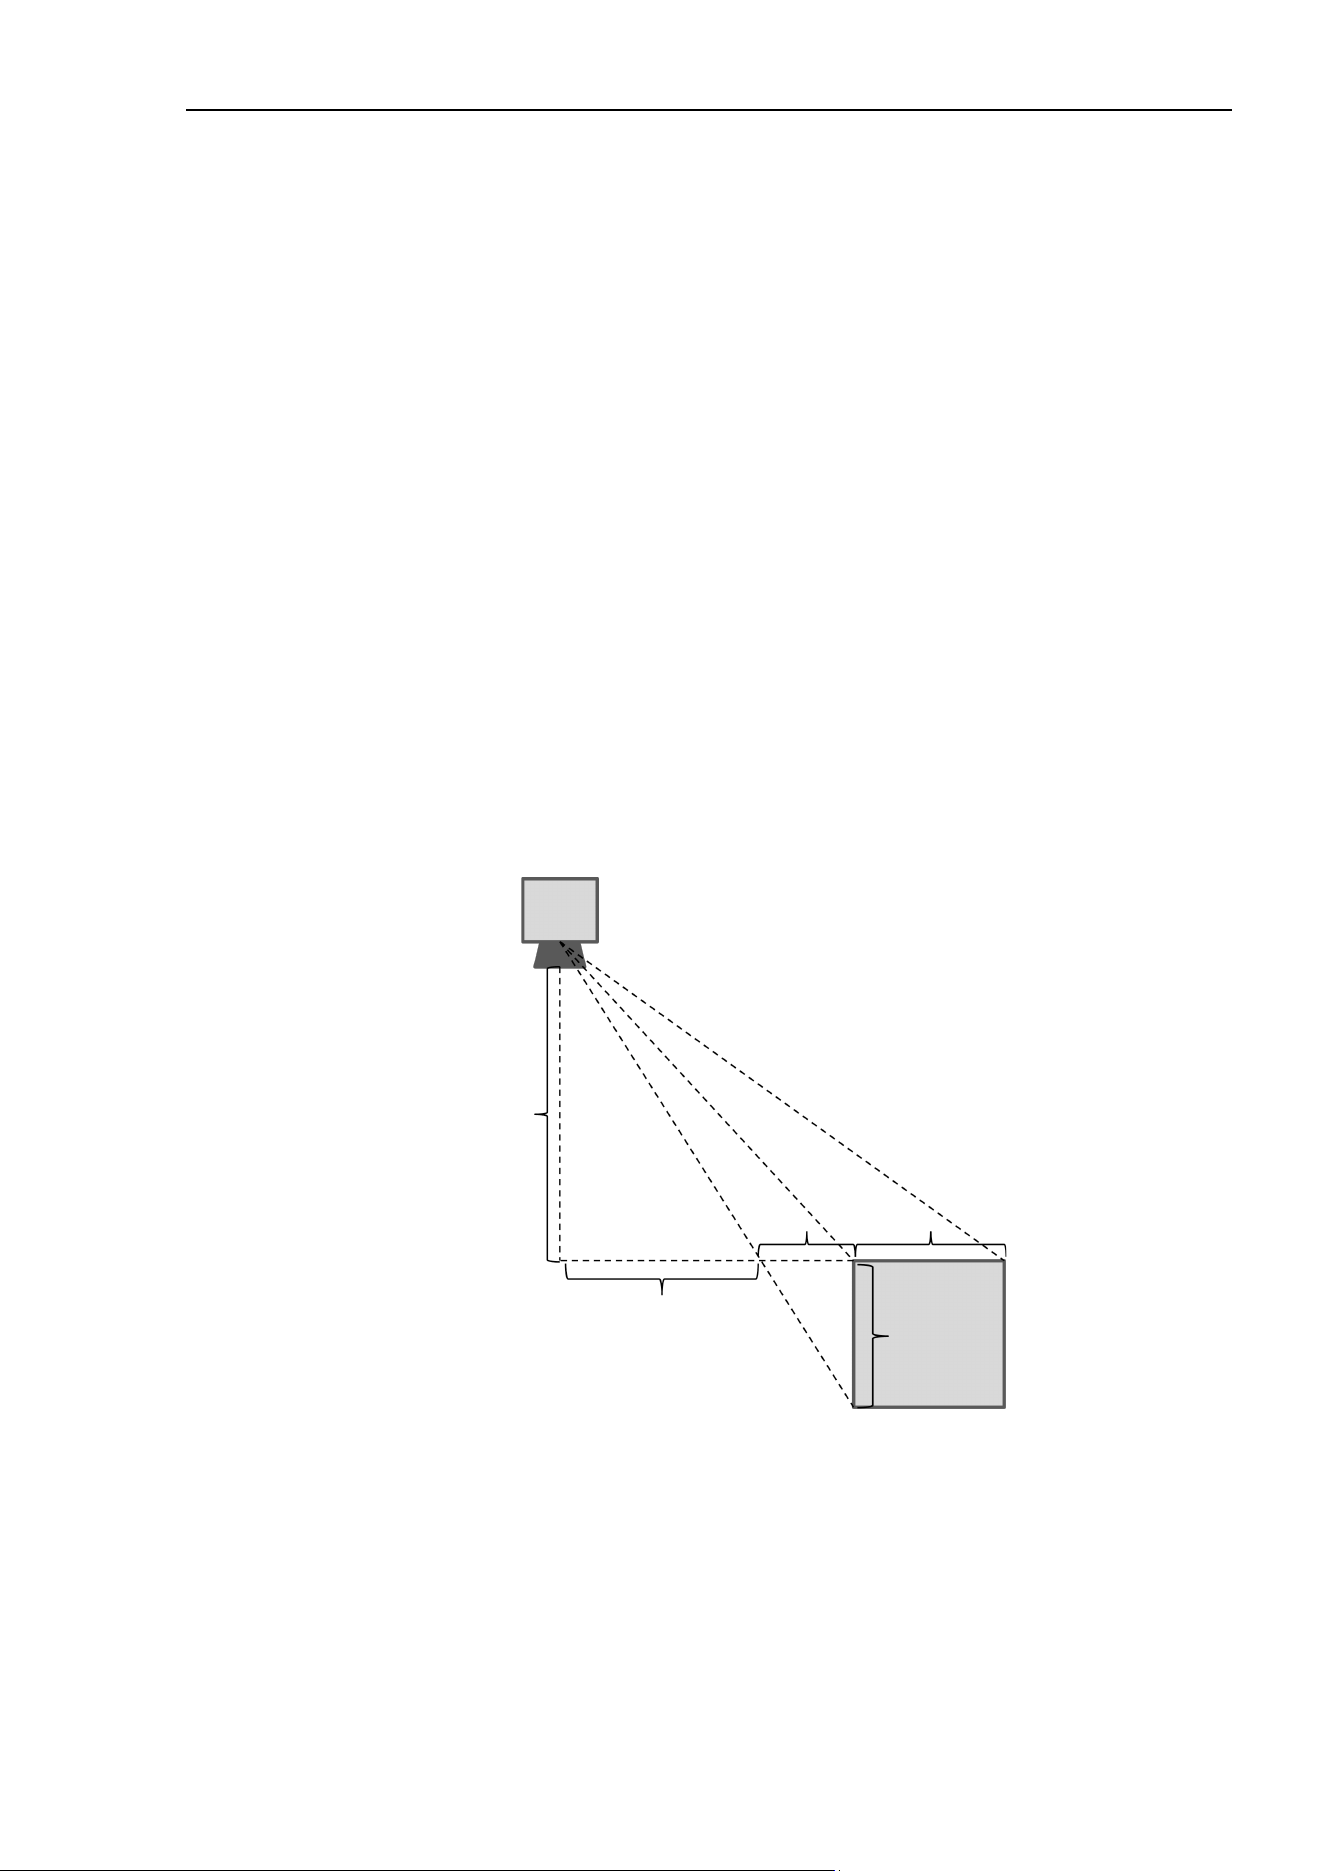
16. Conveyor Tracking
EPSON RC+ 7.0 (Ver.7.4) User's Guide Rev.6
515
- Adjust the range of the expected scale
If there is no great variability in size of the work pieces, set the ScaleEnable property
to “False”. If there is a small variability, narrow the ranges of the ScaleFactorMax
and the ScaleFactorMin properties as much as possible.
- Adjust the range of the angled detection
If there is no great variability in angle among the work pieces, set the AngleEnable
property to “False”. If there is a small variability, narrow the range of the
AngleRange property as much as possible.
- Adjust the timeout period
A process is aborted when the image processing time is considered to exceed the
timeout period. If image processing times vary, both the detection rate and the
execution time may be improved by shortening the Timeout property.
For details on the vision properties, refer to the following manual
Vision Guide 7.0 Properties and Results Reference
When Using A Thick Work Piece
If the work piece is thick, the camera’s FOV includes the lateral side of the work piece as
shown in the figure below. If the top face and the lateral side of the work piece have
similar color, those two faces may be detected as a single top face of the work piece. Pay
attention to this influence especially when using the thick work pieces.
Work
height: C
Top face
Width of the
lateral side: B
WD
Distance from the
center of FOV: A
B = A / WD × C
WD = 500 mm
A = 150 mm
C = 10mm
In the above case
width of the lateral side is
3 mm
Influence of detecting the lateral side of the work piece
This influence can be decreased by increasing the work distance or replacing the lens with
a one with a long focal distance and a narrow angle of view.
NOTE
NOTE
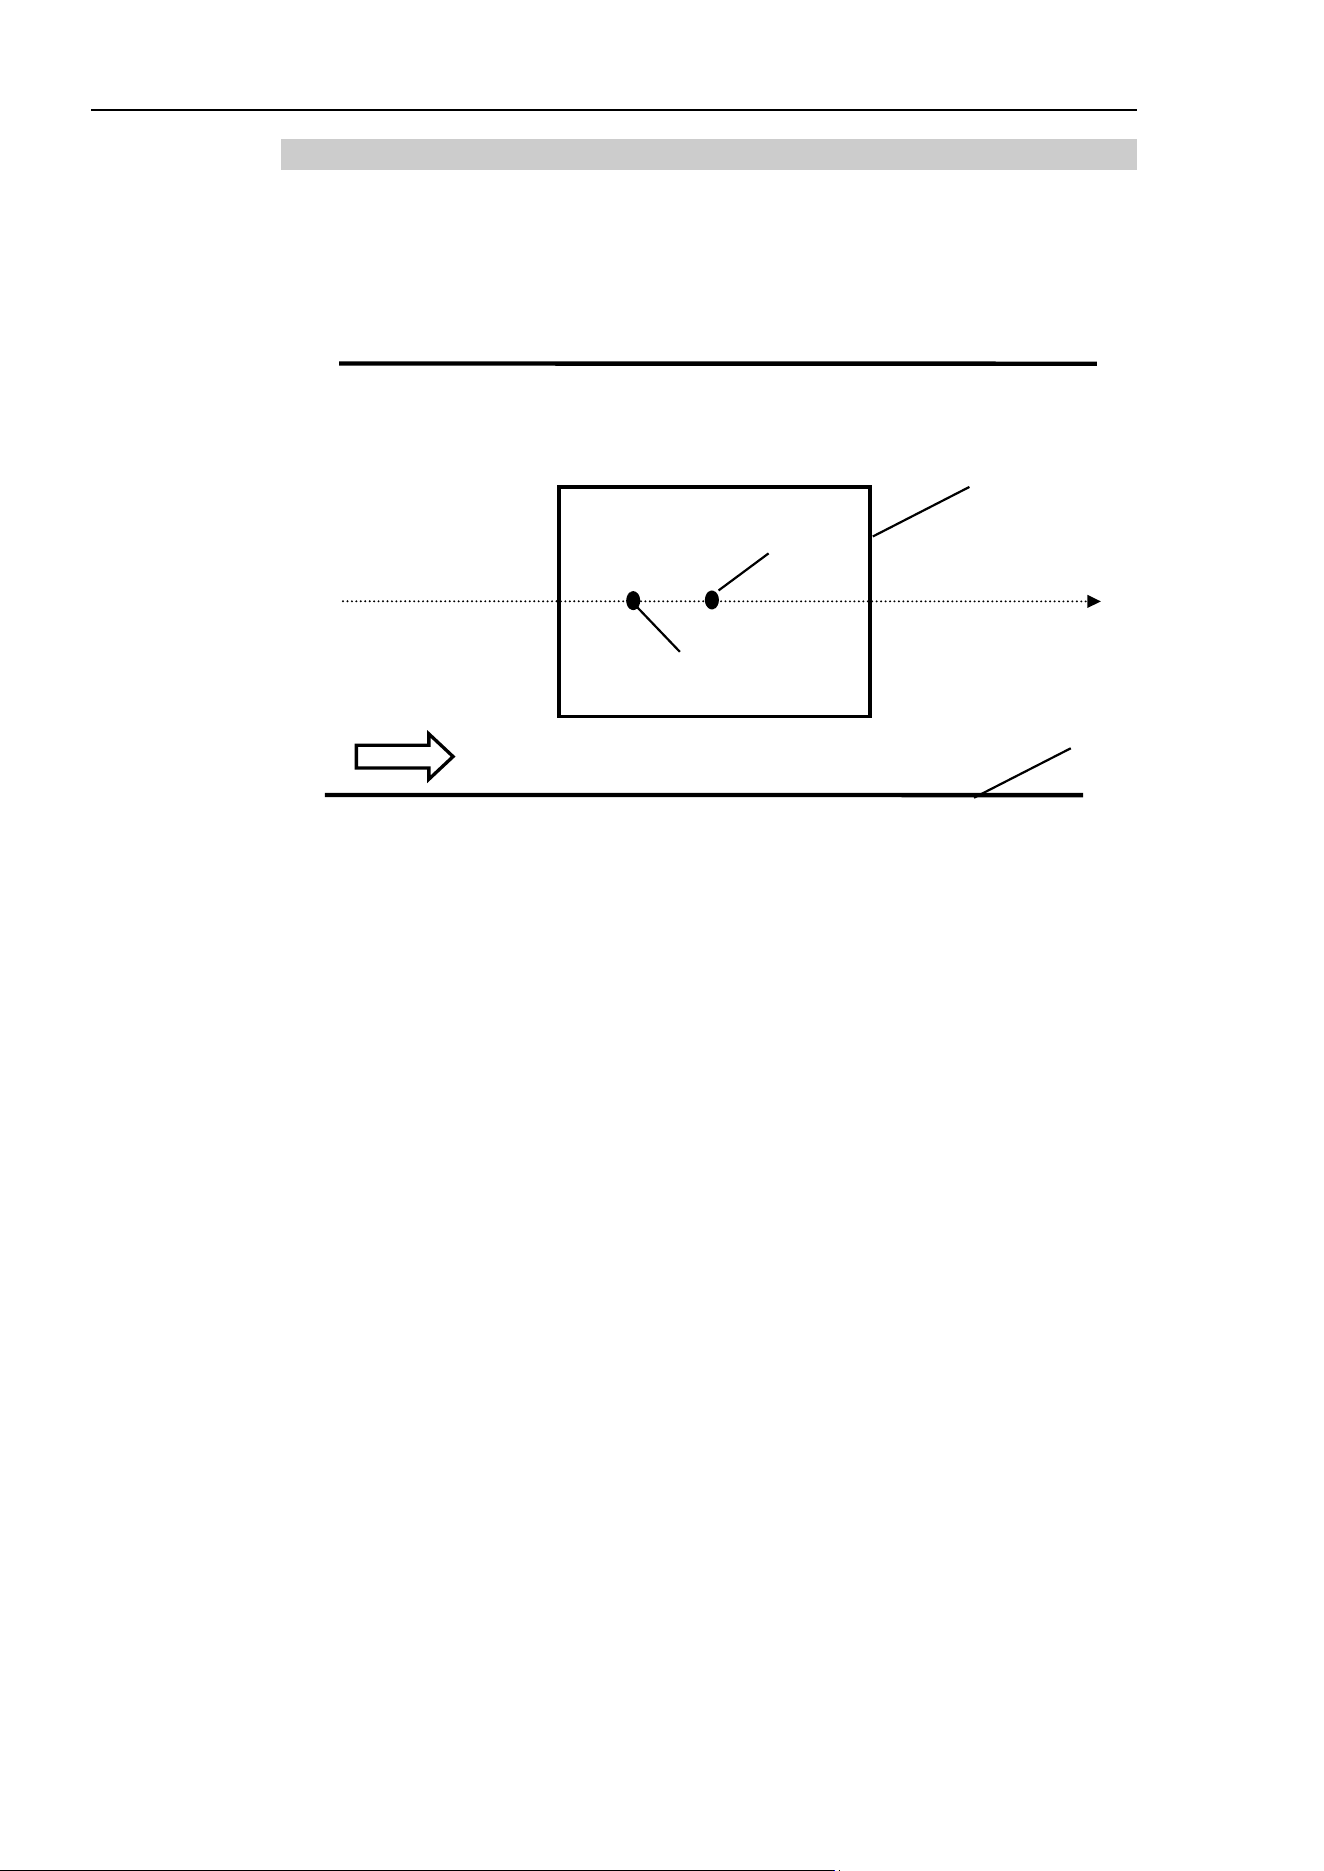
16. Conveyor Tracking
516 EPSON RC+ 7.0 (Ver.7.4) User's Guide Rev.6
16.28.6 Offset
Pickup of moving parts
When the “pickup accuracy-priority mode” is selected for the tracking mode, the pickup
position of the robot may deviate from the center of the part as shown below. This gap
occurs as a result of accuracy errors of the vision system calibration, tool calibration, and
tracking.
Conveyor
Part
Conveyor moving direction
Conveyor coordinate X
Center of the part
Pickup position of the robot
Followings are countermeasures for the problem.
1. Feed the part with an angle near 0 degree. Then, pick up the part.
2. Measure the gap between the center of the part and the robot’s pickup position.
3. Repeat the steps 1 and 2 for five times and calculate the average.
4. Set the average calculated in the step 3 to the program as follows.
Jump Cnv_QueGet(1) +X(**)
5. Feed the part with an angle near 90 degrees. Then, pick up the part.
6. If t the gap is large, fine-tune the value set in the step (4).
7. Feed the part with an angle near 0. Then, pick up the part.
8. If the gap is large, fine-tune the value set in the step (6).
9. Repeat the steps 6 through 8 until you get the suitable accuracy for the system.
When the conveyor speed is 200 mm/sec, the gap between the center of the part and the
pickup position of the robot cannot be smaller than plus or minus 1 mm.
When the conveyor speed is faster than 200 mm/sec, the gap increases.
When the conveyor speed is slower than 200 mm/sec, the gap decreases.
If the gap between the center of the part and the pickup position can be measured by using
the vision system, compensate the “Offset” by following steps.
1. Feed the part with an angle near 0 degree. Then, pick up the part.
2. Take the image of the picked part, and record X and Y coordinates.
3. Repeat the steps 1 and 2 for five times and calculate the average.
4. Feed the part with an angle of about 90 degrees. Then, pick up the part.
NOTE
NOTE
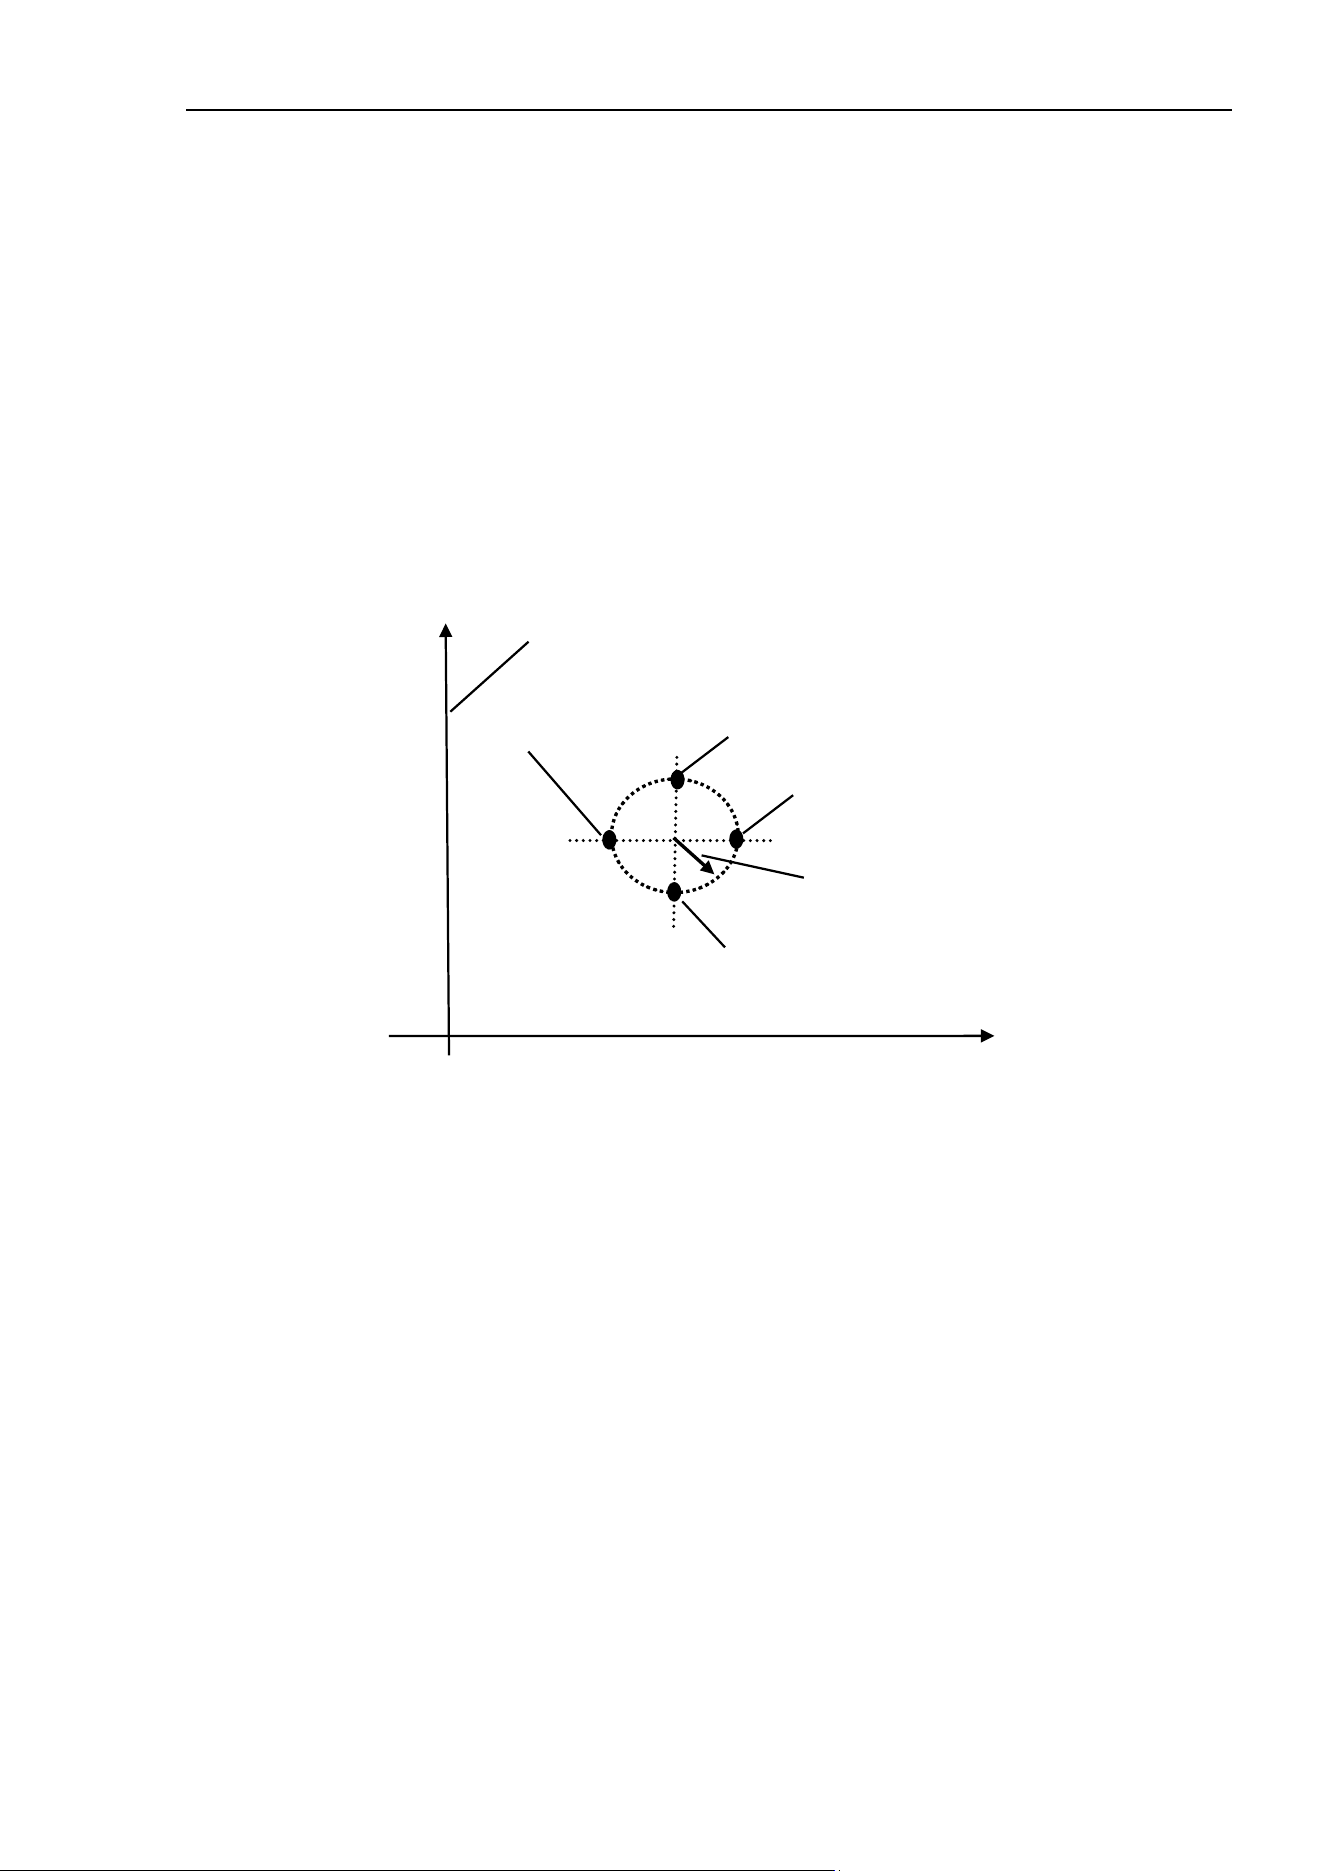
16. Conveyor Tracking
EPSON RC+ 7.0 (Ver.7.4) User's Guide Rev.6
517
5. Take the image of the picked part by the camera, and record the X and Y coordinates.
6. Repeat the steps 5 and 6 for five times and calculate the average.
7. Feed the part with an angle near 180 degrees. Then, pick up the part.
8. Take the image of the picked part by the camera and record X and Y coordinates.
9. Repeat the steps 7 and 8 for five times and calculate the average.
10. Feed the part with an angle near 270 degrees. Then, pick up the part.
11. Take the image of the picked part by the camera and record X and Y coordinates.
12. Repeat the steps 11 and 12 for five times and calculate the average.
13. Plot the values in the steps 3, 6, 9, and 12 as shown in the figure below, and calculate
the offset value.
Offset value
X coordinate of the Vision system
Pickup position
at 0 degree
Pickup position at 270 degrees
Y coordinates of the Vision system
Pickup position
at 90 degrees
Pickup position
at 180 degrees
14. Set the offset value to the program as follows.
Jump Cnv_QueGet(1) +X(offset)
If a negative value is set to “offset”, the error 4406 may occur when the following program
is executed.
Wait Cnv_QueLen(1, CNV_QUELEN_PICKUPAREA) > 0
Jump Cnv_QueGet(1) -X(offset)
The error can be avoided by performing any of the followings.
- Set the wait time before Jump command.
- Set the “offset” when registering the queue and not to register when executing the
Jump command.
NOTE
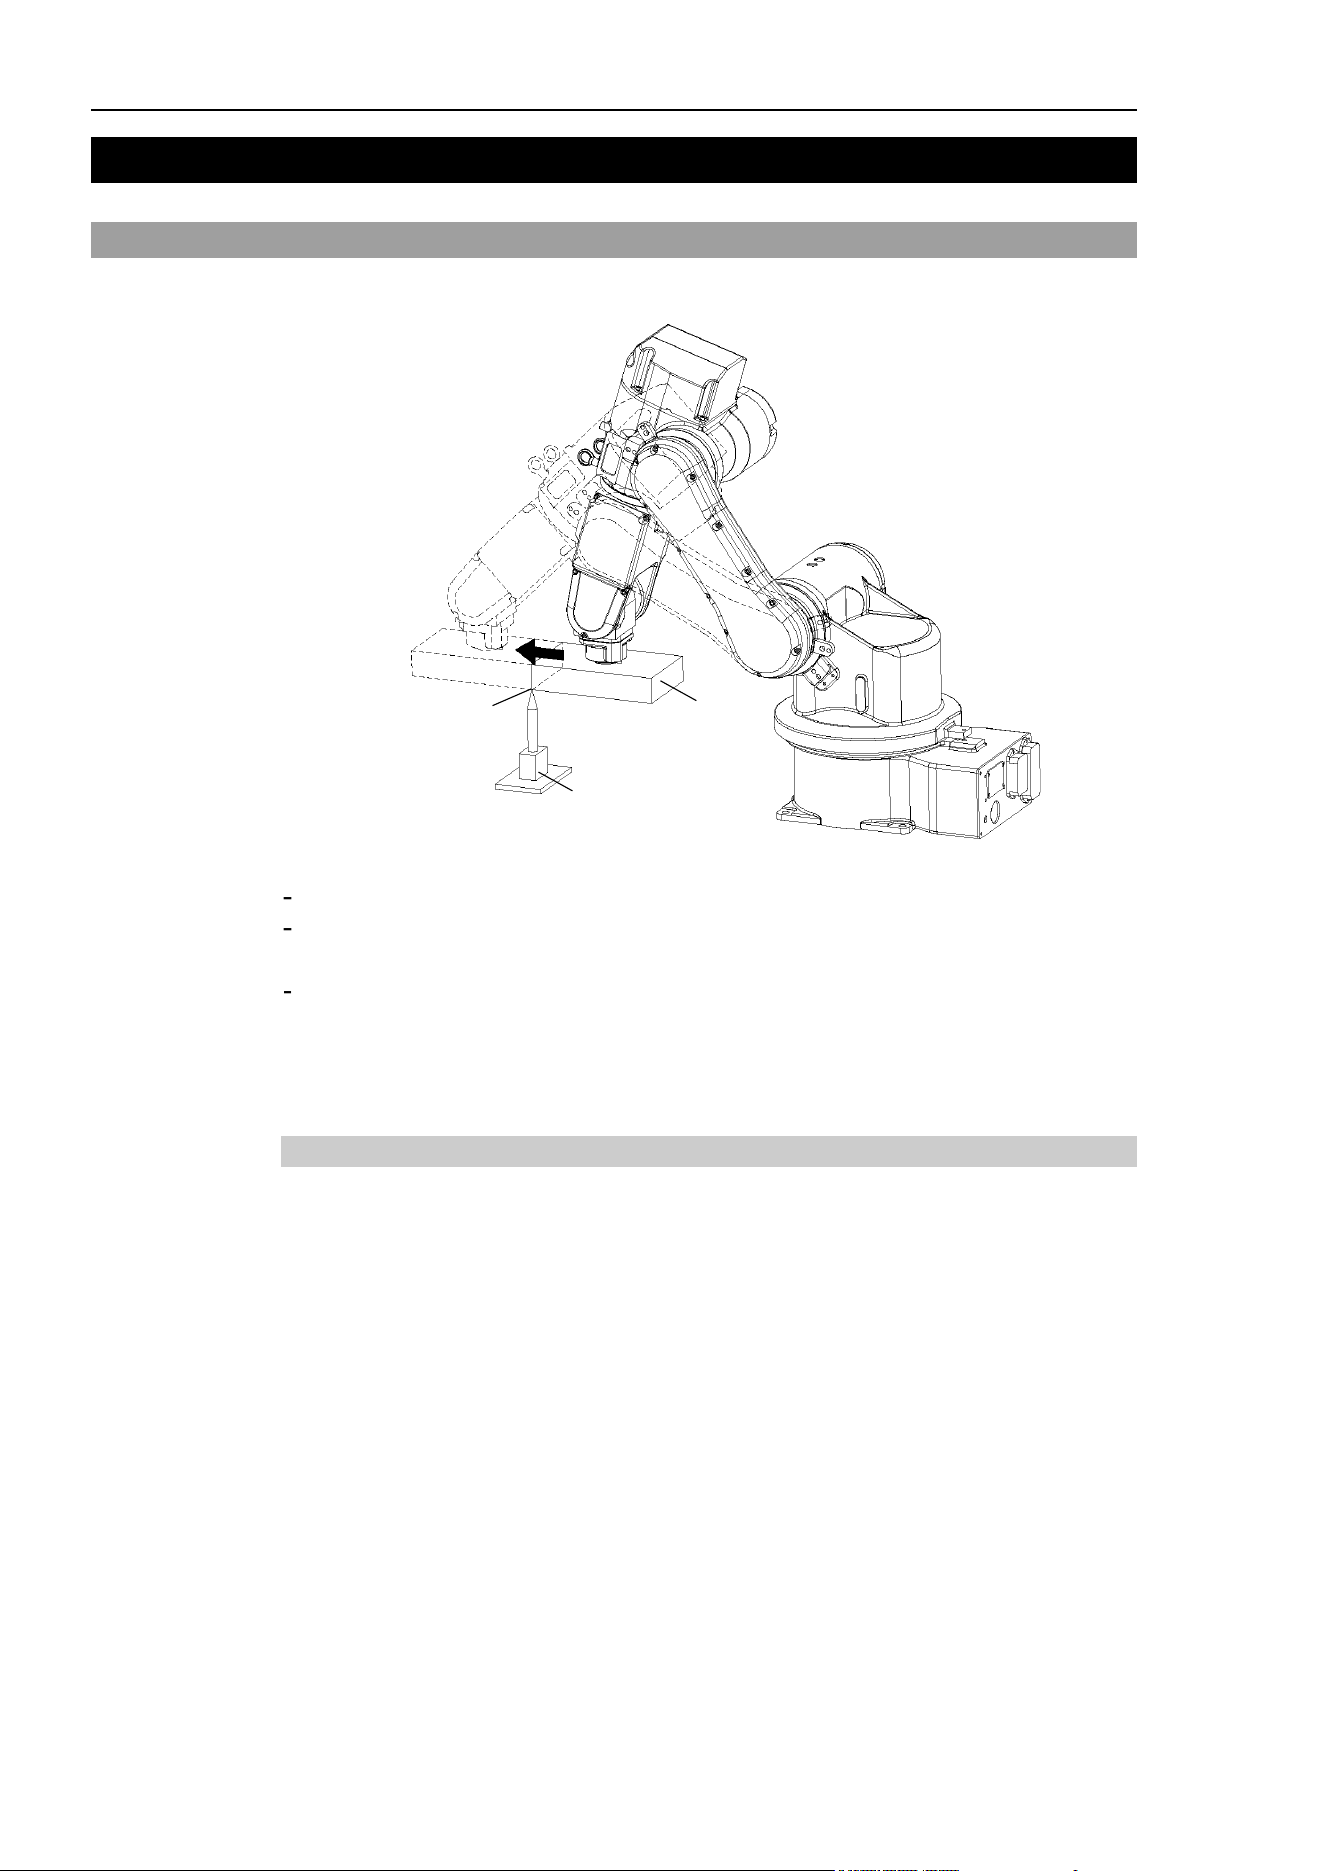
17. ECP Motion
518 EPSON RC+ 7.0 (Ver.7.4) User's Guide Rev.6
17. ECP Motion
17.1 Overview
An ECP (external control point) motion is when the robot arm holding a part follows a
specified trajectory (part’s edges, etc.) using an outside fixed tool.
External Control Point
(ECP)
Outside Fixed Tool
Part
The ECP option supports the following:
ECP definition by ECPSet statement and selection by ECP statement
ECP motion commands (additional functions of Move, Arc3, Curve, and CVMove
commands)
Teaching with ECP jogging
This option is available for SCARA (including RS series), Cartesian and 6-axis robots
(including N series). Also, it can be used with multi-robot systems.
Up to 15 ECP coordinate systems can be defined.
How to move the arm with ECP motion
In the following paragraphs, the process for moving the 6-axis robot arm with ECP motion
is explained as an example.
1. Setting an ECP
The ECP (external control point) is a coordinate system data used for defining the robot
position and orientation at a processing point on the tip of the outside fixed tool.
The ECP should be defined based on the robot coordinate system or desired local
coordinate system.
For example, when a drawing shows that the ECP is located at X=300, Y=300, Z=300
based on the robot coordinate system, specify it as shown below.
ECPSet 1,XY(300,300,300,0,0,0) ' Defines ECP No.1
When you have no ECP location data, you can specify it by teaching.
As an example, attach the tool of which you know the data precisely and bring the tip of
the tool close to the ECP and then teach its position anywhere as P0. Then, specify the
ECP using P0 coordinate data as shown below.
ECPSet 1,P0 :U(0) :V(0) :W(0) ' Defines ECP No.1
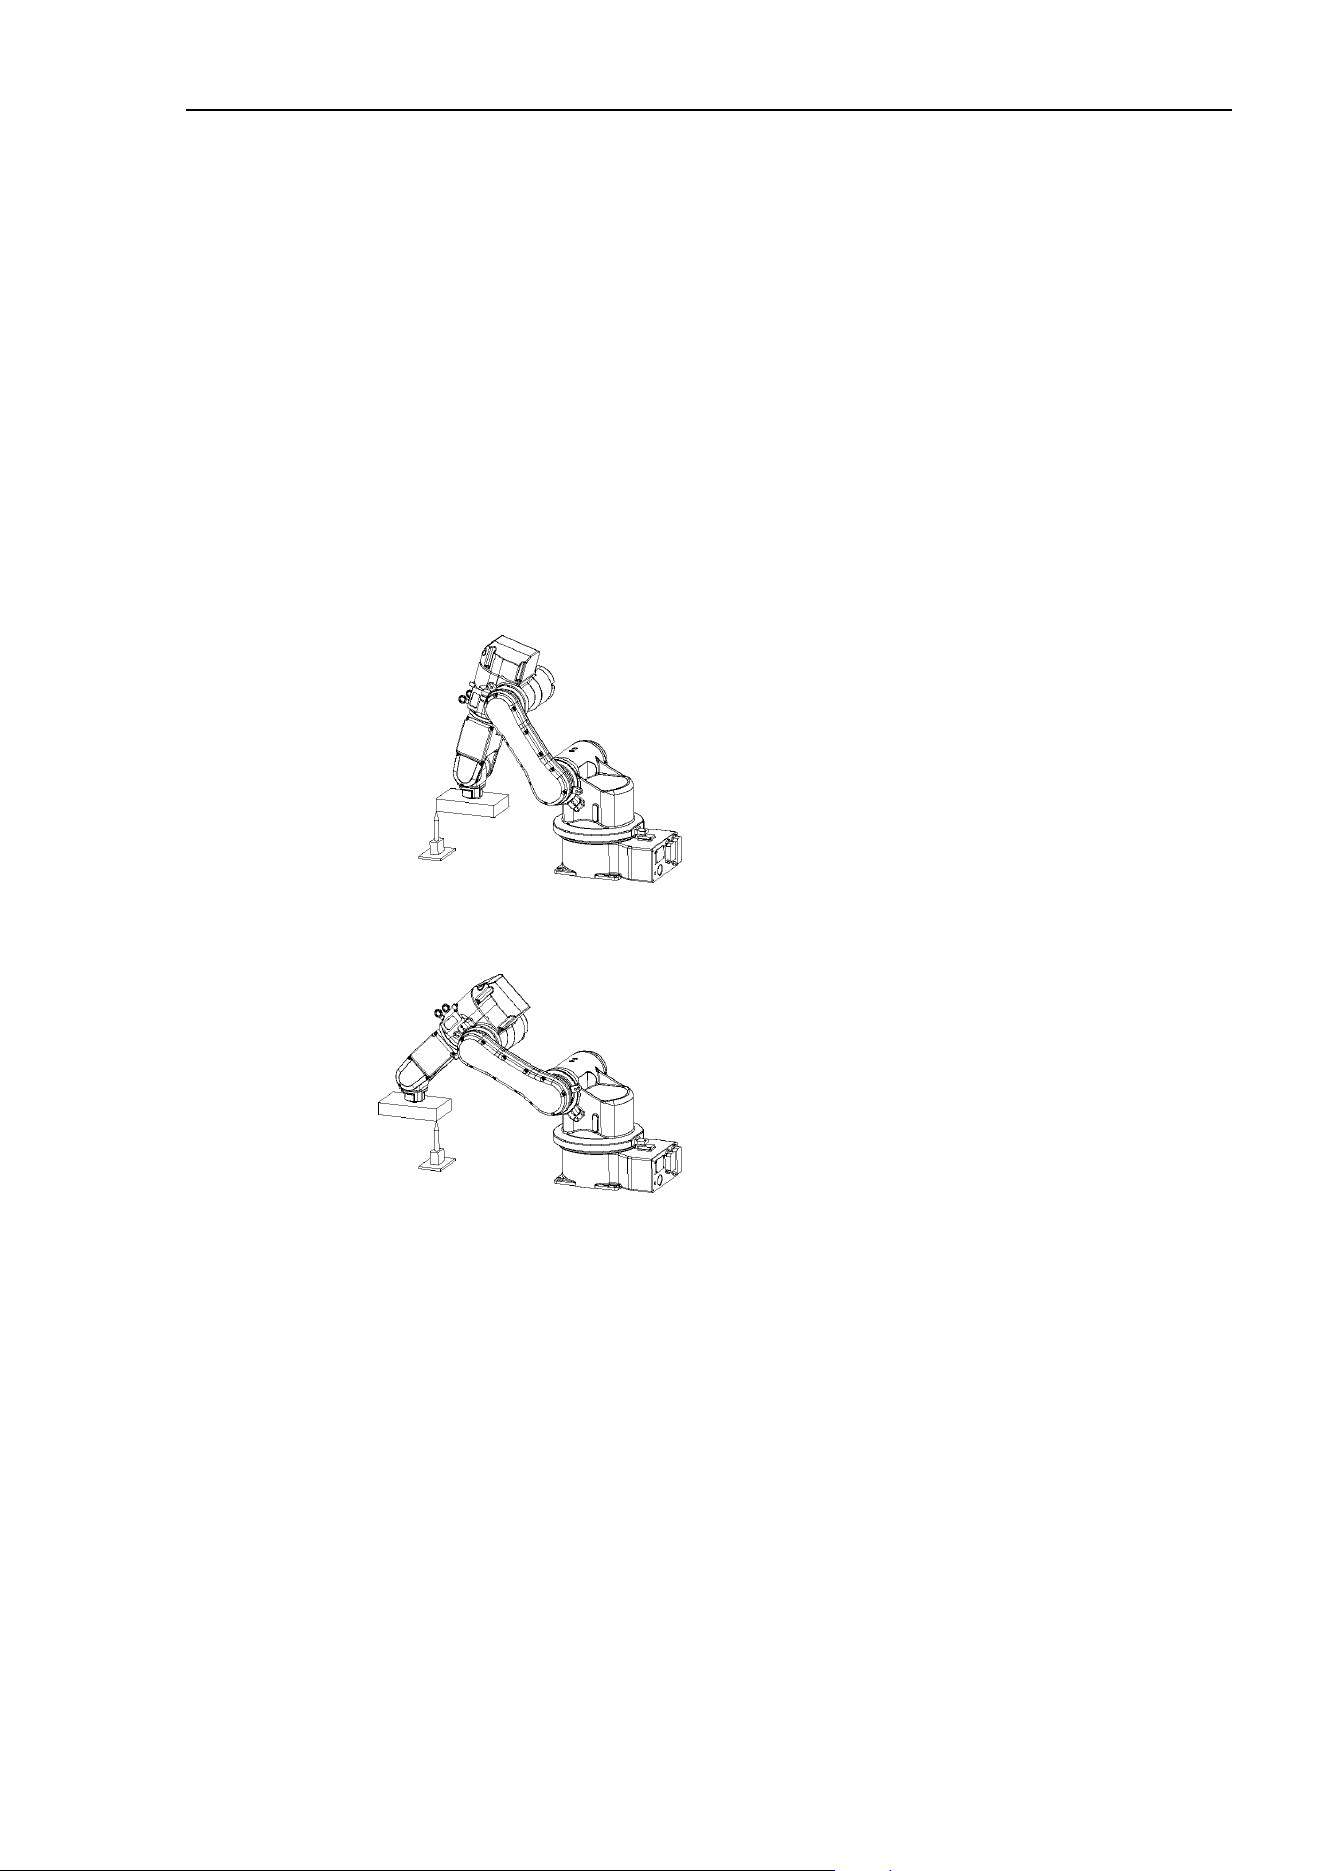
17. ECP Motion
EPSON RC+ 7.0 (Ver.7.4) User's Guide Rev.6 519
The orientation data (U, V, W) were set to 0 in the above examples. In these cases, the
orientation in the ECP coordinate system is equal to that in the reference robot coordinate
system.
You can specify U, V, and W coordinates in the ECP coordinate system. However, this
data is valid only during the tangential correction mode ON in the Curve statement and
ECP jog motion.
2. Teaching
Teach the point data while moving the robot arm holding the actual part. In this section,
the part is assumed to be a rectangular solid and the arm is moved straight so that it
touches one side of the part of the ECP specified in the previous section 1. Setting the ECP.
For details on teaching, refer to 5.11.1 [Robot Manager] (Tools Menu)-[Jog and Teach]
Page.
2-1 Teaching the motion start point
Move the arm to the motion start point and teach it as P1.
2-2 Teaching the motion end point
Move the arm to the motion end point and teach it as P2.
ECP Jog Mode:
The ECP jog mode is an additional jog mode used for teaching besides the Joint, World,
and Tool jog modes.
The ECP jog mode is based on the selected ECP coordinate system.
3. Executing Motion
To move the arm with ECP motion, add the “ECP” parameter to a motion command.
ECP 1 ' Select ECP
Go P1 ' Moves the arm to the motion start point
Move P2 ECP ' Executes ECP motion
Use the Arc3 command to move the arm in an arc trajectory with the fixed tool. Use the
Curve and CVMove commands to move the arm in cubic spline curves.
NOTE
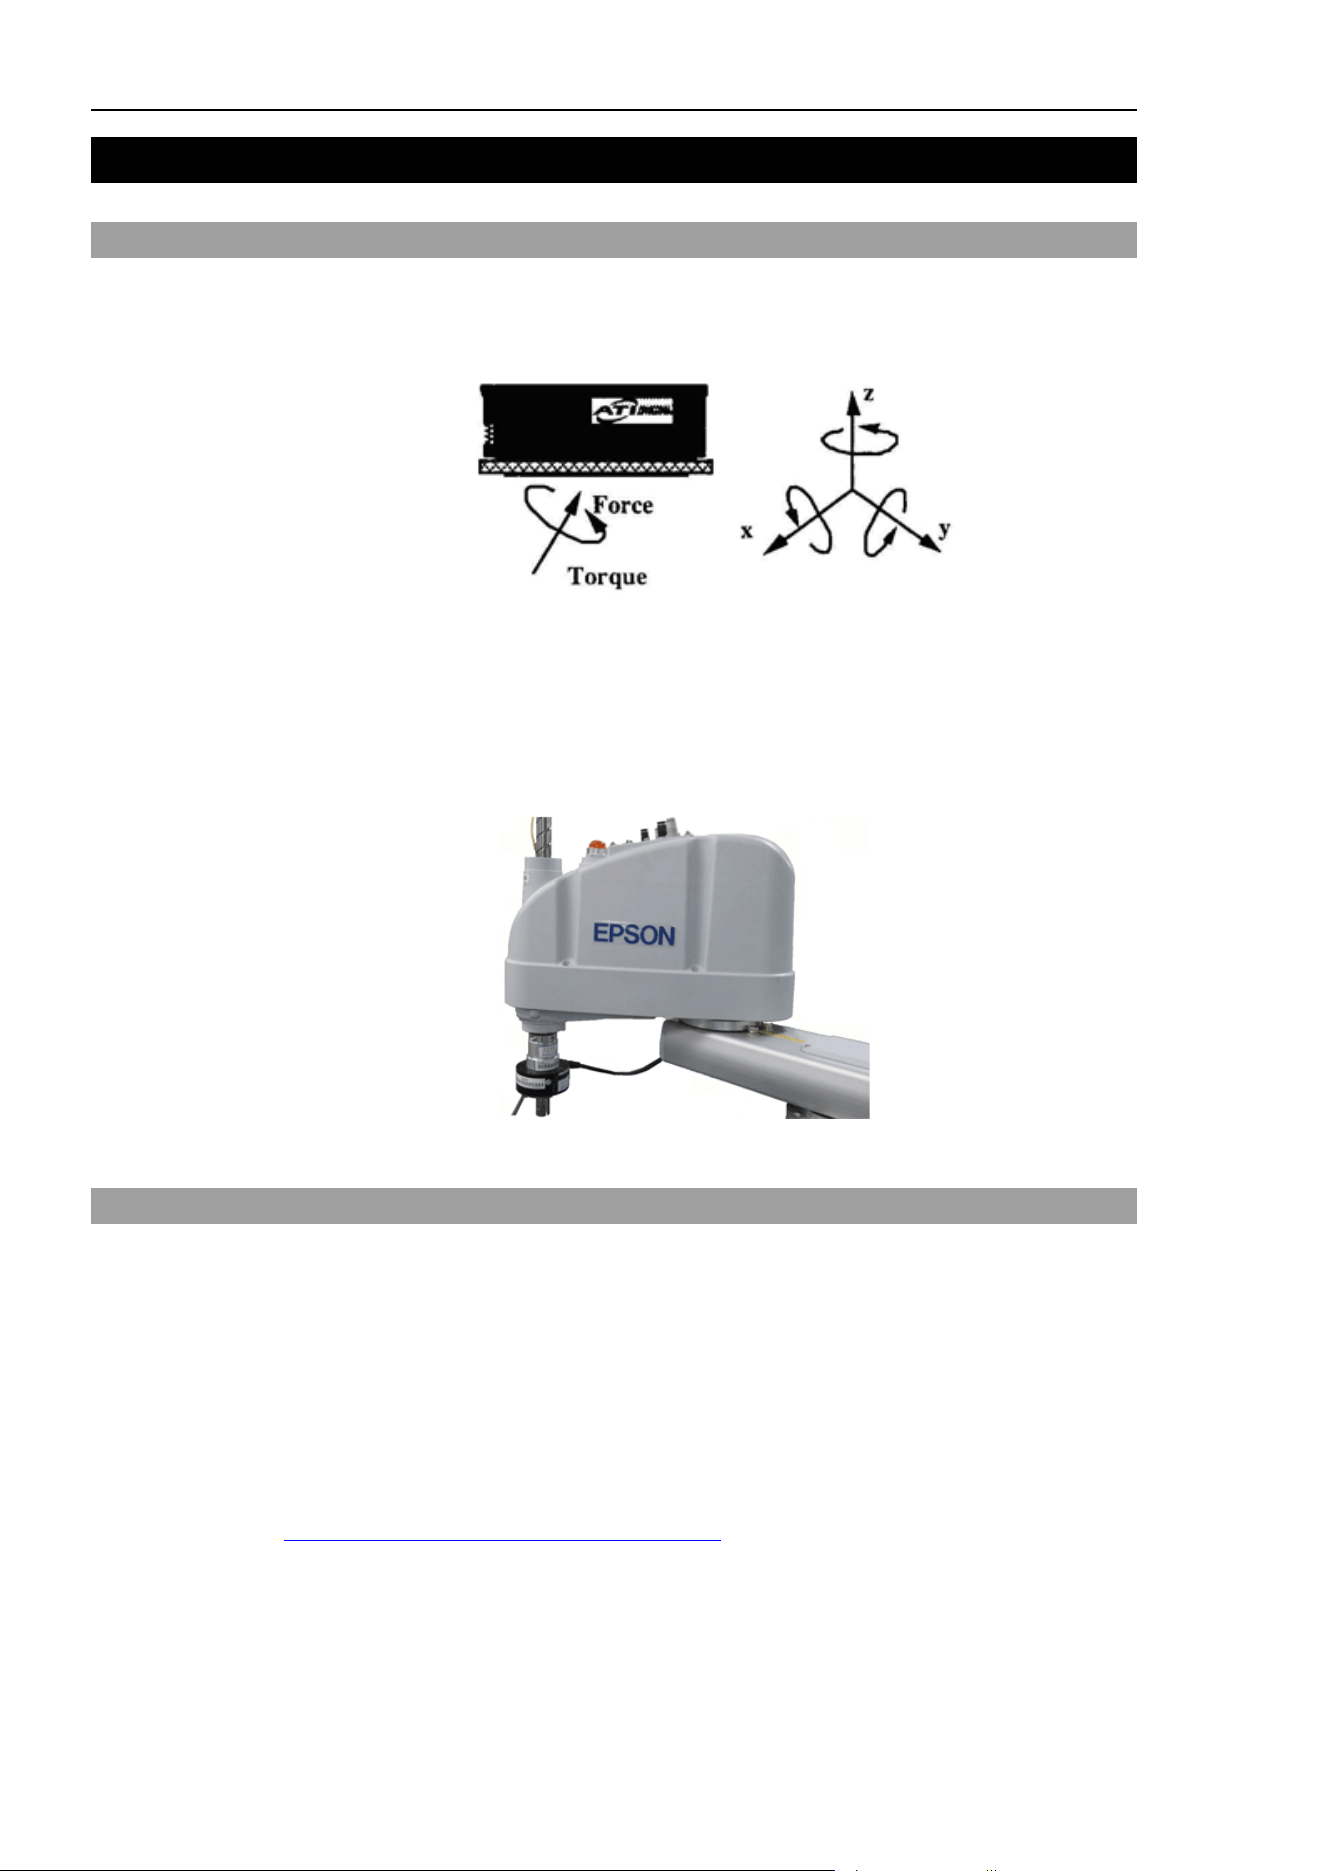
18. Force Sensing
520 EPSON RC+ 7.0 (Ver.7.4) User's Guide Rev.6
18. Force Sensing
18.1 Overview
The EPSON RC+ Force Sensing Option allows you to integrate force sensing in your
applications. The force sensor is typically mounted on the robot's U axis. The sensor has
6 axes: ForceX, ForceY, ForceZ, TorqueX, TorqueY, TorqueZ.
With this option you can do the following:
• Read one or all 6 force/torque sensing axes values.
• Set triggers for motion commands.
• Use multiple force sensors in the same application. (up to 2 sensors)
SCARA robot with Gamma force sensor
18.2 Specifications
EPSON RC+ supports ATI force sensors using PCI interface boards.
For the PCI interface board, we support the following products of National Instruments.
PCI-6220 Connect one force sensor
PCI-6224 Connect one or two force sensors
PCI-6034E Connect one force sensor (Conventional
)
Note that we offer only the software license of this option. If you need ATI Force Sensor,
a set of the PCI interface board and the sensor, please purchase it separately.
For specifications on force sensors, please see the ATI website:
http://www.ati-ia.com/products/ft/sensors.aspx
In addition, it is required for the users to prepare for installation to the manipulator. For
details, refer to “18.3 Installation”.

18. Force Sensing
EPSON RC+ 7.0 (Ver.7.4) User's Guide Rev.6 521
18.3 Installation
The Force Sensing Option must be enabled in the RC700 controller. If you purchased the
option with your system, the option will already be installed and configured.
You can also purchase the Force Sensing Option and install it in the field. See the chapter
Installing EPSON RC+ Options for details.
Installing the force transducer circuit board
If you are adding Force Sensing in the field, you must install the force transducer board(s)
in your system, and then run the NI-DAQmx driver installer.
Board Installation
Before installing the force sensing circuit board(s), you must first install the National
Instruments DAQmx drivers that came with the board. To install the National Instruments
DAQ drivers:
1. Run the NI-DAQmx driver installer.
2. Accept defaults for each step of the installation wizard.
3. Shutdown the system.
4. Install the board(s).
5. Start the system.
6. Run the National Instruments Measurement & Automation Explorer program once to
verify that the board(s) that were installed are recognized.
You do not need to install the ATI software that came with the force transducer.
The calibration for the transducer must be loaded into memory. EPSON RC+ 7.0 handles
this when you import the calibration data file as described in the section Software
Configuration later in this chapter. The calibration data file can be located on the CD that
came with the force transducer.
Mounting the force transducer
To mount the force transducer to the robot:
1. Remove the top cover of the transducer.
2. Remove the robot's end effector axis coupling and mount it to the transducer cover.
3. Install the transducer cover / coupling assembly onto the transducer.
4. Install the entire assembly on the end effector axis.
NOTE
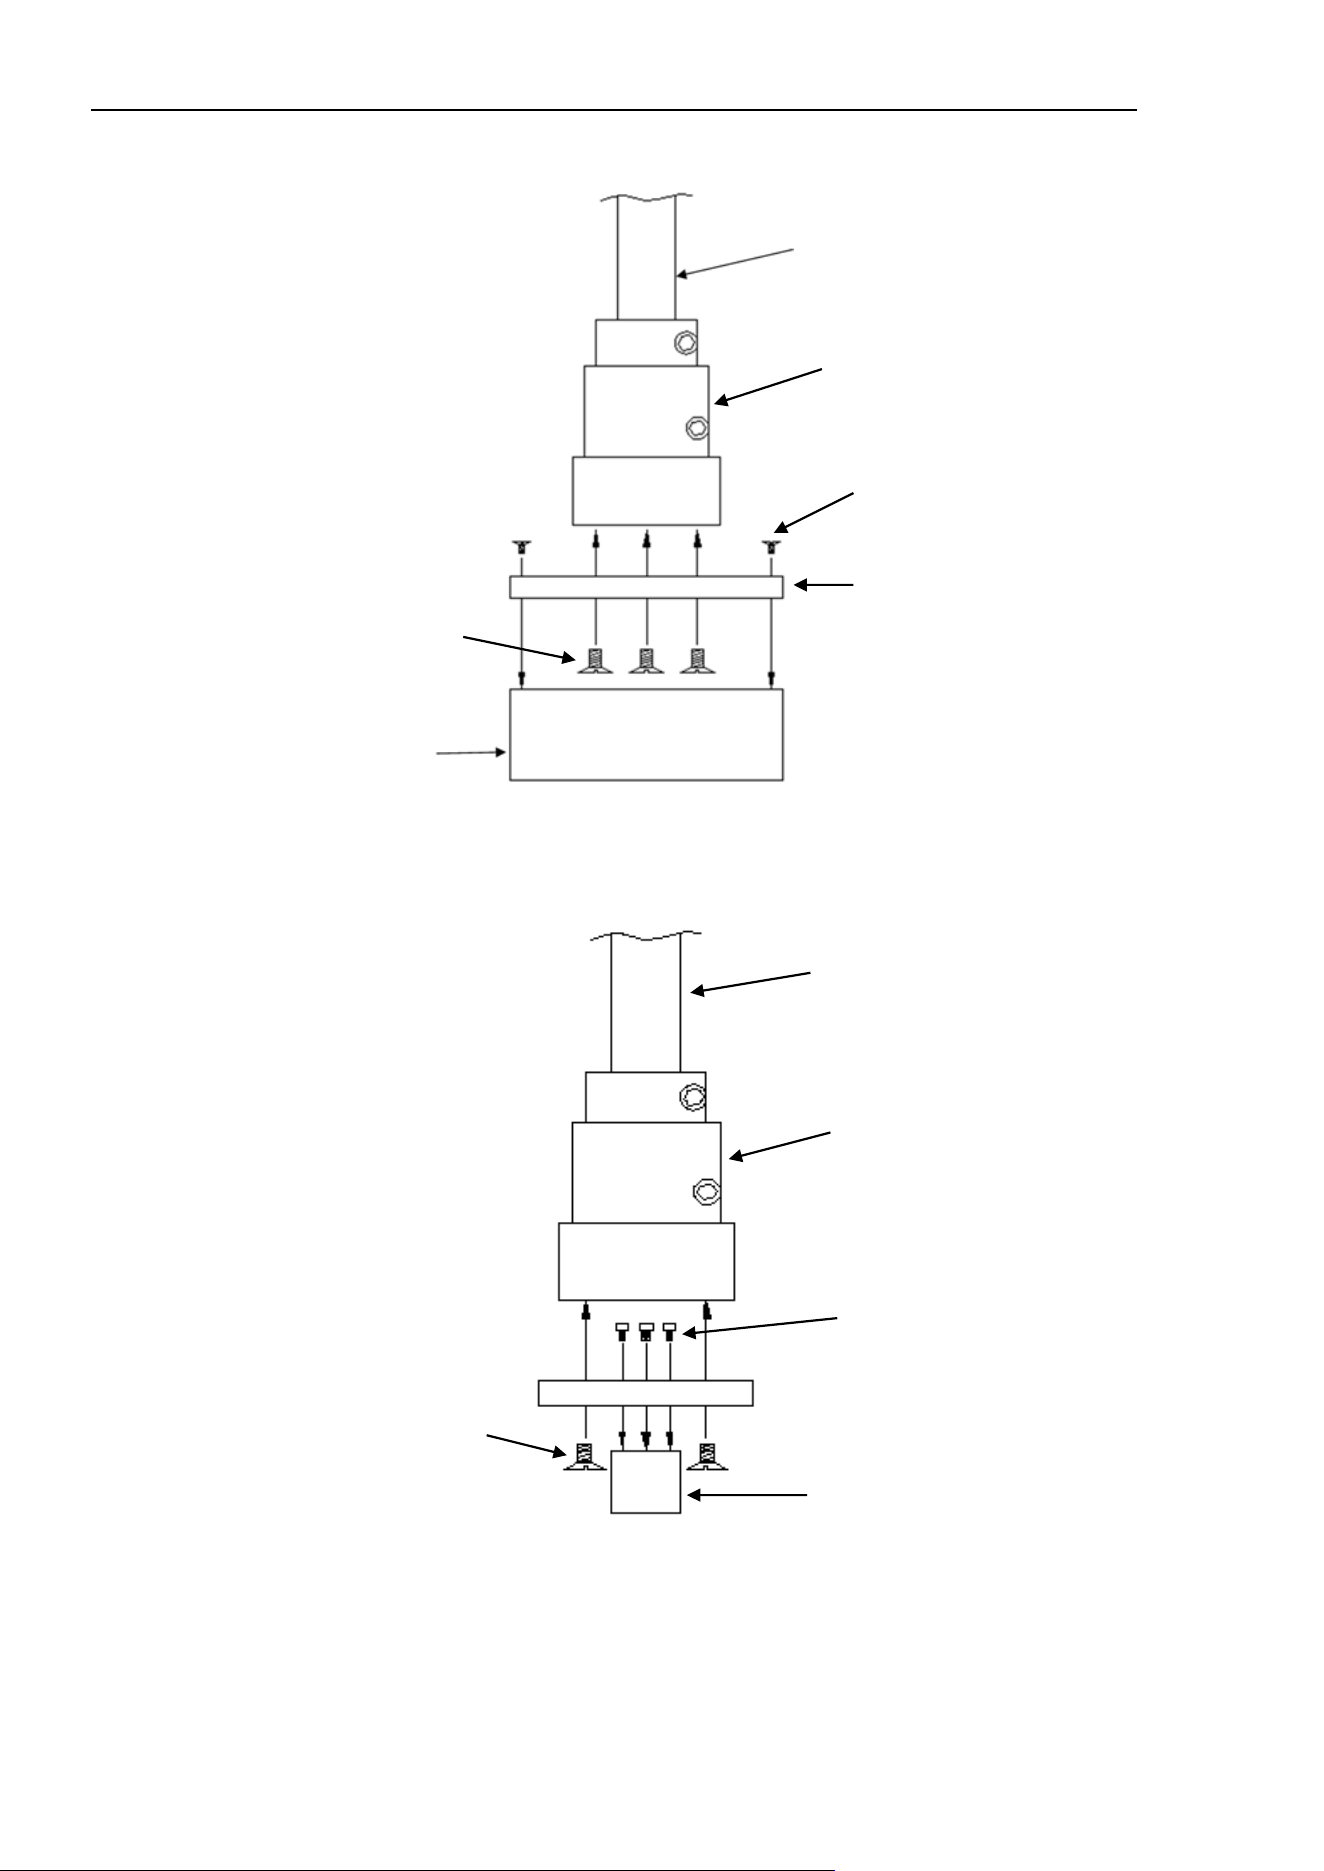
18. Force Sensing
522 EPSON RC+ 7.0 (Ver.7.4) User's Guide Rev.6
The following figures show mounting for gamma and nano transducers.
End effector axis shaft
Gamma force
transducer
Force sensor coupling
8 mounting screws
Force sensor
mounting cover
4 mounting screws
Mounting the Gamma Force Sensor
End effector axis shaft
Force sensor coupling
3 mounting screws
Nano force transducer
4 mounting screws
Mounting the Nano Force Sensor
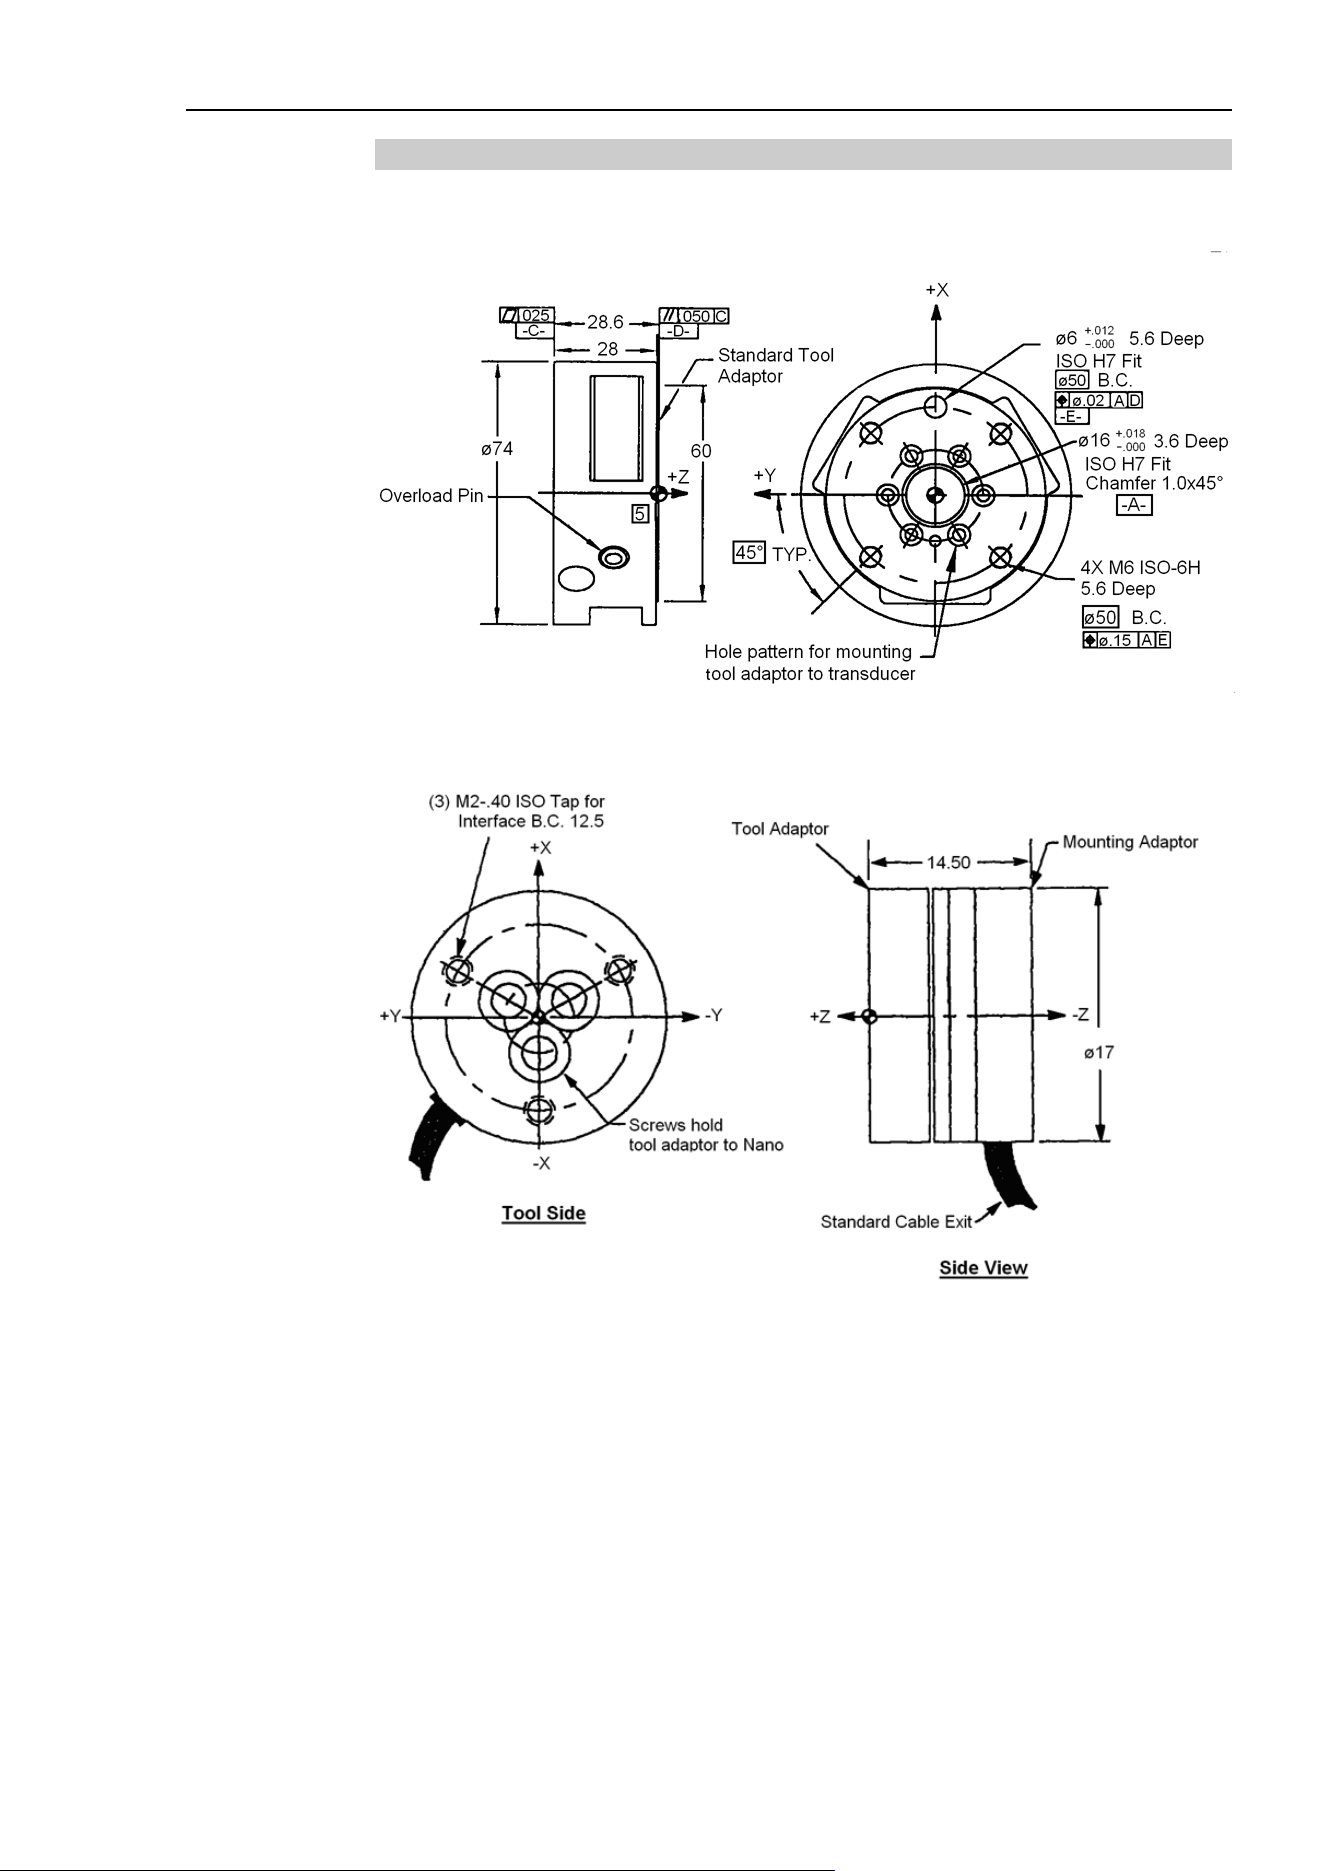
18. Force Sensing
EPSON RC+ 7.0 (Ver.7.4) User's Guide Rev.6 523
Mounting tooling to force sensor
The following diagrams show the tooling mounting dimensions for Gamma and Nano
force transducers.
Tool mounting for Gamma transducer
Tool mounting for Nano transducer
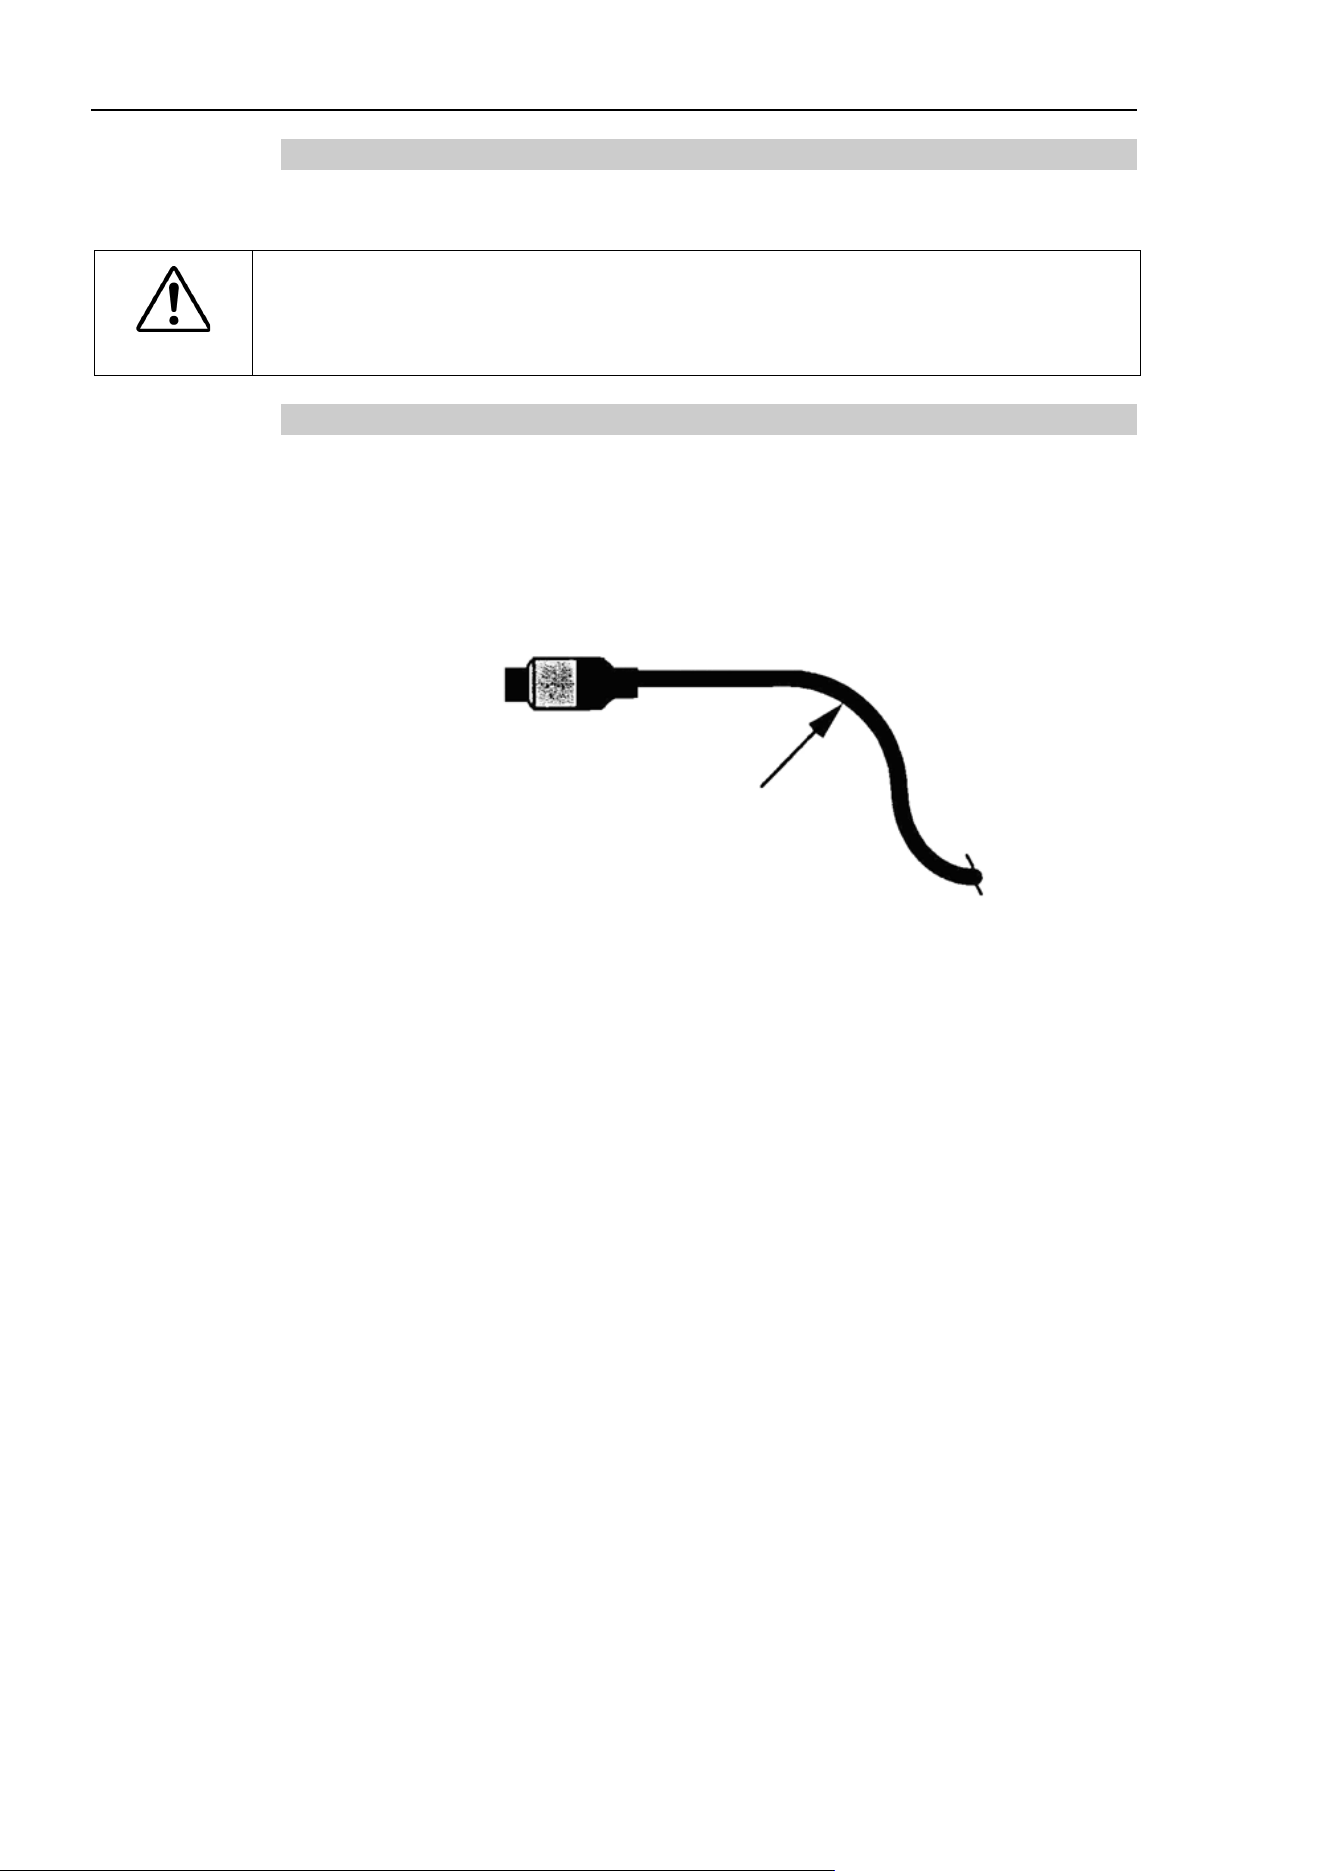
18. Force Sensing
524 EPSON RC+ 7.0 (Ver.7.4) User's Guide Rev.6
Connecting the force transducer
Use the cable supplied with the transducer to connect it to the PC board. The Nano
transducer connects to an external interface box which in turn connects to the PC board.
CAUTION
■
Make sure power is off before connecting or disconnecting the force transducer.
Protect transducer from electro
-static discharge. Do not touch the internal
electronics or connector pins.
Routing the transducer cable
The transducer cable must be routed so that it is not stressed, pulled, kinked, cut, or
otherwise damaged throughout the full range of motion. If the cable will rub other cables
during cycling, use a plastic spiral wrap to protect it.
When the cable is cycling below the minimum bending radius the cable may fail due to
fatigue. A small radius can be used if the cable is not being moved.
Minimum cycled bending radius
40 mm (at room temperature)
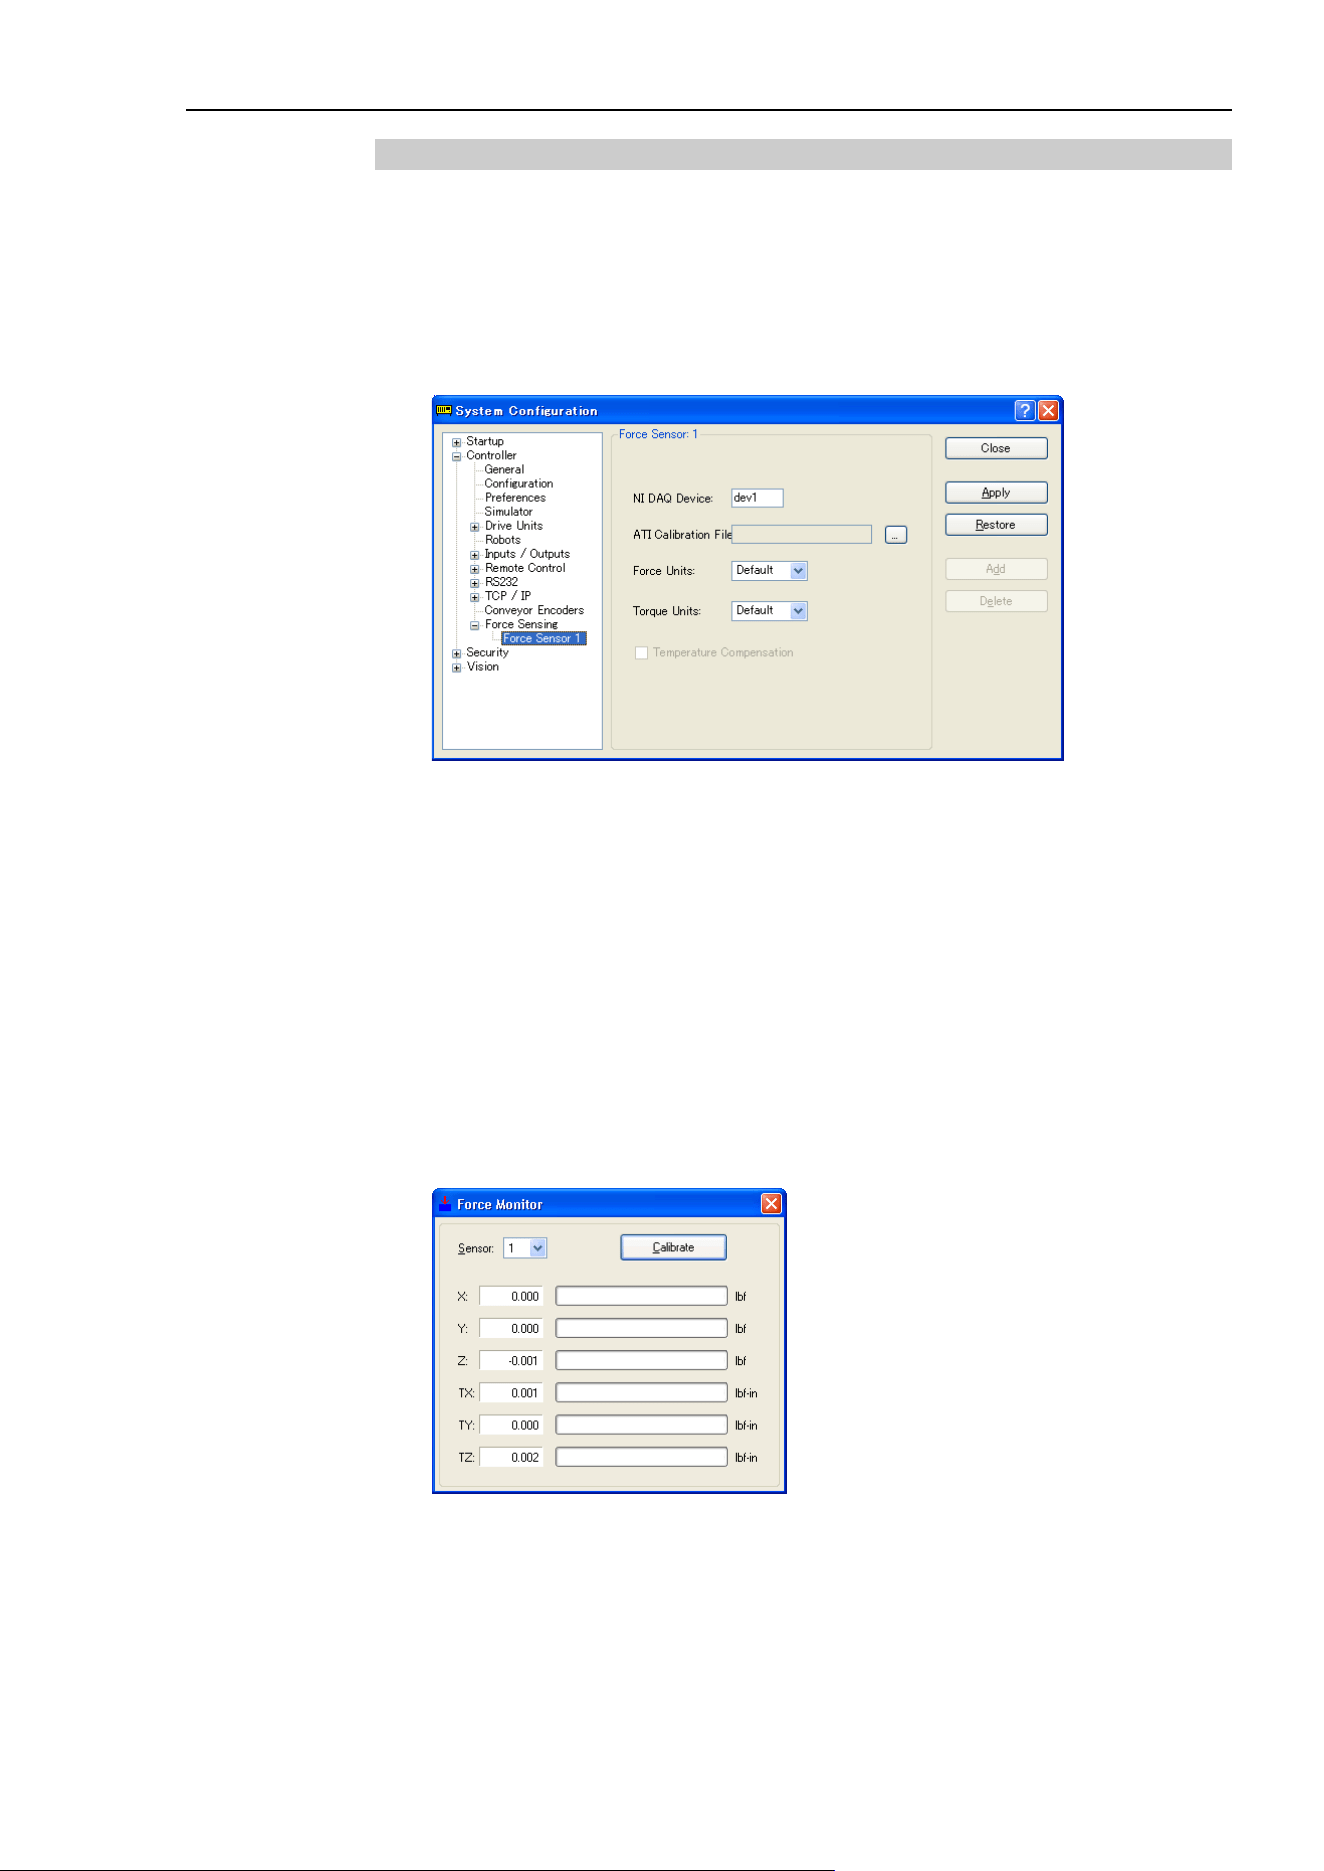
18. Force Sensing
EPSON RC+ 7.0 (Ver.7.4) User's Guide Rev.6 525
Software Configuration
To configure EPSON RC+ 7.0 Force Sensing:
1. Start EPSON RC+ 7.0, then select [Setup]-[System Configuration].
2. Click on the [Force Sensing] item in the tree on the left. If [Force Sensing]is not
displayed, then the software options key for Force Sensing has not been enabled.
3. To add a board, click the <Add> button. A new force sensor will be shown in the
tree on the left, and the controls used to configure the sensor will become enabled.
4. Enter the [NI DAQ device] name. This is assigned by the National Instruments
software. To view NI DAQ device numbers, run the Nation Instruments
Measurement & Automation Explorer.
5. Click the button shown on the right of [ATI Calibration File] to import a calibration
file for the sensor. This can be found on the CD that came with the sensor. Navigate
to the calibration file whose name includes the serial number of the sensor. Click
<Open>, and the file will be copied to the EpsonRC70\force directory.
6. Leave the force and torque units at the default setting to use the native units. The
actual units will be displayed in the sensor list after you click <Apply>. Or, you can
select the desired units.
7. Click <Apply> to accept the new sensor.
8. From the [Tools] menu, select [Force Monitor]. This will open the [Force Monitor]
window.
9. Apply pressure to the sensor. You should see the values change on the [Force
Monitor] window. If you are using multiple sensors, change the sensor number on
the monitor and verify that each sensor is working.

18. Force Sensing
526 EPSON RC+ 7.0 (Ver.7.4) User's Guide Rev.6
18.4 Force Sensing Commands
All Force Sensing commands begin with the same prefix: "Force_". Here is a list of all of
the commands. For details, please see the online help or SPEL
+
Language Reference
Manual.
Force_Calibrate Zeros out all axes for the current sensor.
Force_ClearTrigger Clears all trigger conditions for the current sensor.
Force_GetForce Returns the current value for one axis for the current sensor.
Force_GetForces Returns the current values for all axes for the current sensor in an
array.
Force_Sensor Sets / returns the current sensor for the current task.
Force_SetTrigger Sets /displays the force limit triggers for the current sensor.

18. Force Sensing
EPSON RC+ 7.0 (Ver.7.4) User's Guide Rev.6 527
18.5 Using the Force Sensing Trigger
You can configure the system to stop the robot after the force sensing trigger has been
activated. You can set the trigger to activate when one or more force sensing axes reaches
a preset limit. You use the Till command to check the trigger condition during motion.
Stopping Motion along Z axis
Use a trigger on the ZForce axis to stop the robot during Z axis motion.
For example:
' Set the force trigger to fire when force on Z axis is less than −10
Force_ClearTrigger
Force_SetTrigger FORCE_ZFORCE, -10, FORCE_LESS
Till Force
Jump P1
Speeds 1
Move P2 Till
You can combine other conditions with Force in the Till command:
Till Sw(1) = On Or Force
You can combine other force/torque conditions by calling Force_SetTrigger more than once.
In this case, clear all triggers first before setting them.
Force_ClearTrigger
Force_SetTrigger FORCE_ZFORCE, -10, FORCE_LESS
Force_SetTrigger FORCE_XFORCE, 5, FORCE_GREATER
Stopping Motion along X or Y axes
Use a trigger on the XForce, XTorque, YForce, YTorque axes to stop the robot during Z
axis motion. You need to align the force sensor by rotating the robot's U axis. The X and
Y axes of the force sensor are marked on the transducer.
For example:
' Set the force trigger to fire when torque or force on X axis is less than −10
Force_ClearTrigger
Force_SetTrigger FORCE_XFORCE, -10, FORCE_LESS
Force_SetTrigger FORCE_XTORQUE, -10, FORCE_LESS
Till Force
Jump P1
Speeds 1
Move P2 Till
19. Distance Tracking Function
528 EPSON RC+ 7.0 (Ver.7.4) User's Guide Rev.6
19. Distance Tracking Function
19.1 Overview
Distance tracking function controls the robot so that a constant distance can be kept
between the robot and the workpiece.
Distance sensor which is connected to the analog I/O board (optional) is used.
To use the function, analog I/O board (optional) is required.
Select one axis from below as the direction to control.
Tool coordinate system: X axis, Yaxis, Zaxis
ECP coordinate system: X axis, Yaxis, Zaxis
ECP coordinate system can be selected only when the ECP (external control point motion)
option is enabled.
Specify the axis to be controlled by AIO_TrackingSet.
The distance tracking function is available for SCARA robots (including RS series
manipulators) and 6-Axis robots (including N series manipulators). Also, it can be used
with multi-robot systems.
Note that the following A, B, and C when using the distance tracking function in multi-
robot systems.
A: Two robots : Up to two distance tracking sensors are available.
Two robots can use each distance tracking sensor to
execute the distance tracking function simultaneously.
B: Three robots : One distance tracking sensor is available.
One robot can use the distance tracking function.
However, three robots can use the one distance tracking
sensor and execute the distance tracking function in order
by switching it.
C: More than four robots : The distance tracking function is not available.
When using the distance tracking function in multi-robot systems, you cannot connect the
force sensor.
CAUTION
■
We recommend using a laser displacement meter for a distance sensor.
For the specifications of the distance sensor, please check its manual
thoroughly. Improper use of the sensor may result in abnormal motions of the
robot.
For connection and use of analog I/O board, refer to the following manuals:
Robot Controller RC700 / RC700-A
Setup & Operation 14.6 Analog I/O Board
Robot Controller RC90 / RC90-B (EPSON RC+ 7.0)
Setup & Operation 13.5 Analog I/O Board
19.1.1 Distance Tracking Accuracy
For the accuracy achieved by this function, see the after mentioned experiment results.
However, the accuracy of the distance tracking function may differ depending on the robot
model, speed, and workpiece shape.
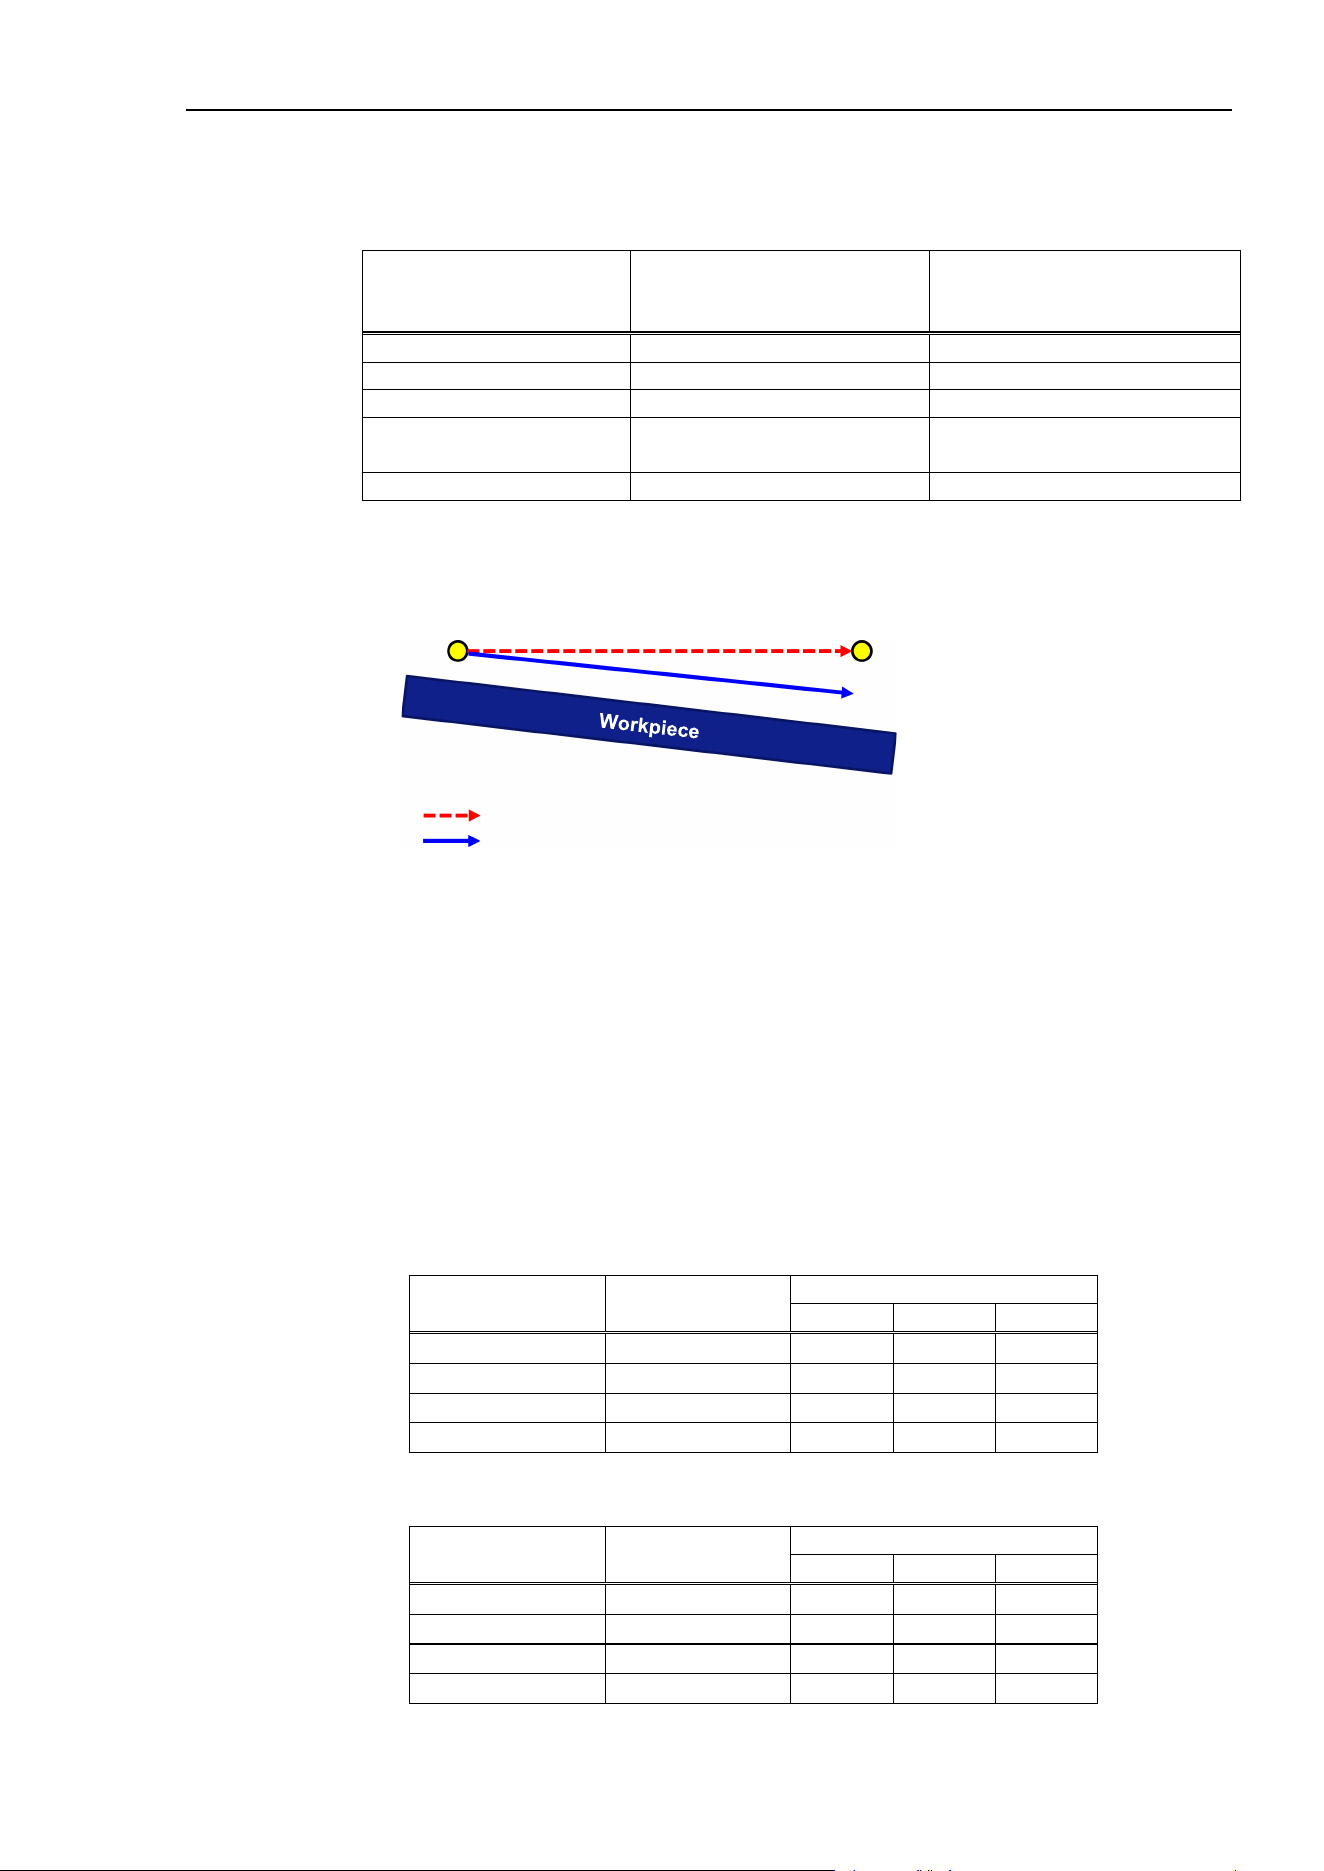
19. Distance Tracking Function
EPSON RC+ 7.0 (Ver.7.4) User's Guide Rev.6 529
Experiment conditions
Robot: 6-axis robot C4L
Laser displacement meter: Two types (See the table below for specifications)
Medium speed,
Medium accuracy
laser displacement meter
High speed
High accuracy
laser displacement meter
Measured distance (mm)
20 to 30
7.2 to 8.8
Spot diameter (um)
Approx. 25×1200
Approx. ø20
Repeatability (um)
1
0.02
Sampling cycle
0.33, 1, 2, 5 ms
(4 levels available)
20, 50, 100, 200, 500, 1000 us
(6 levels available)
Light source (Laser class)
Class 2
Class 1
Experiment environment
Start point and target point have been taught in advance.
P1 (Start point) P2 (Target point)
Robot trajectory without the distance tracking function
Robot trajectory with the distance tracking function
Without the distance tracking function:
Robot moves in a straight line from the start point to the target point.
With the distance tracking function:
The robot moves on a trajectory to keep a constant distance to the workpiece like
the blue arrow (robot trajectory) shown in the above figure.
Experiment results
Values of the distance tracking accuracy are the width of variations in the distance
measured values between the start point and end point of the distance tracking function.
Two types of the laser displacement meter are used. (See the tables below for the
experiment results.)
Distance tracking accuracy of
medium speed and medium accuracy laser displacement meter
Robot SpeedS
(mm/s)
Robot AccelS
(mm/s*s)
Workpiece tilt (mm)
5 deg.
10 deg.
15 deg.
10
100
± 0.03
± 0.04
± 0.06
30
300
± 0.06
± 0.09
± 0.14
50
500
± 0.09
± 0.15
± 0.32
100
1000
± 0.15
± 0.30
± 0.48
Distance tracking accuracy of
high speed and high accuracy laser displacement meter
Robot SpeedS
(mm/s)
Robot AccelS
(mm/s*s)
Workpiece tilt (mm)
5 deg.
10 deg.
15 deg.
10
100
± 0.02
± 0.04
± 0.05
30
300
± 0.04
± 0.06
± 0.13
50
500
± 0.06
± 0.11
± 0.20
100
1000
± 0.13
± 0.20
± 0.35
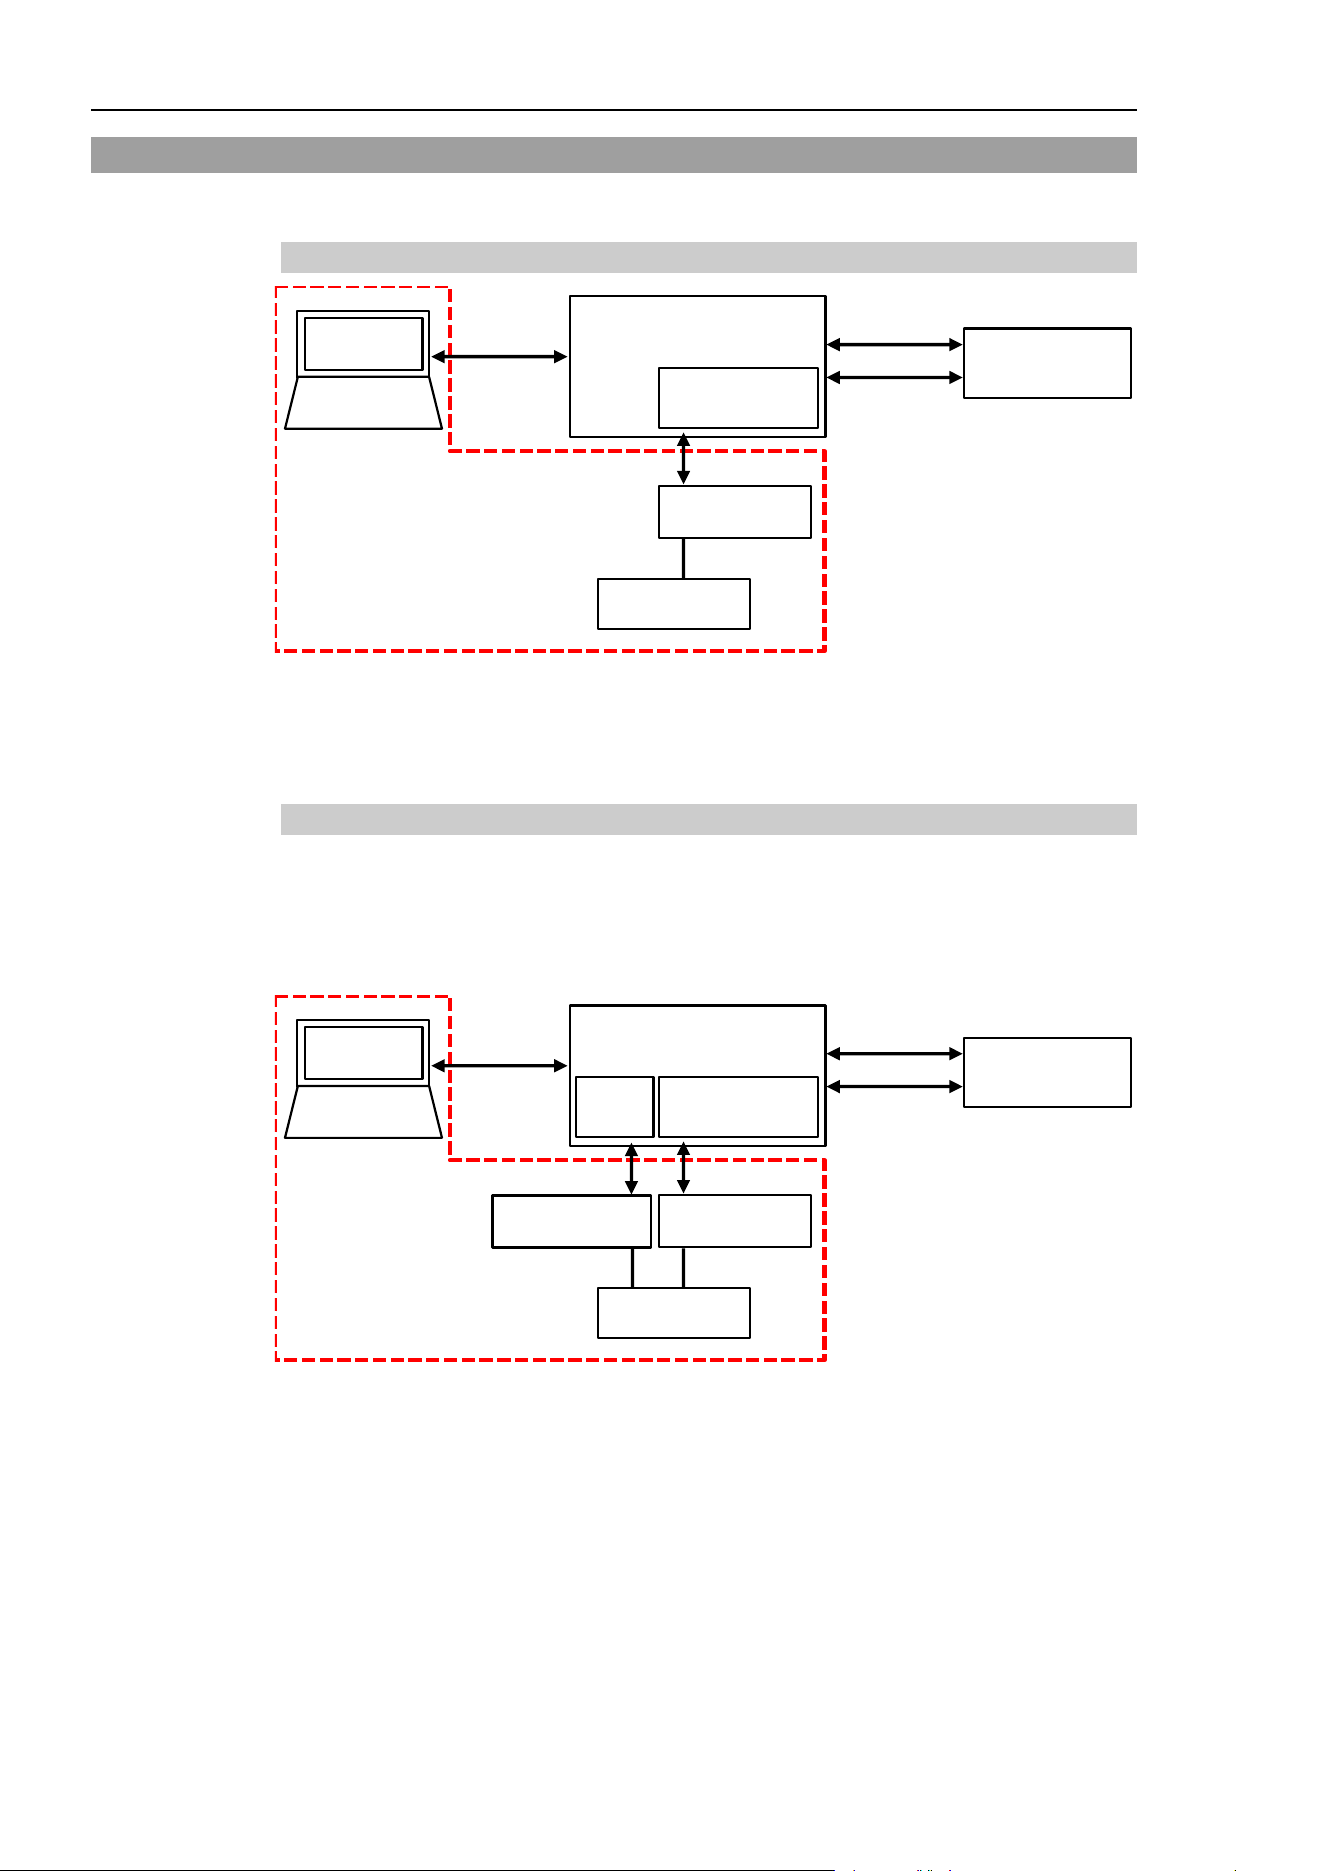
19. Distance Tracking Function
530 EPSON RC+ 7.0 (Ver.7.4) User's Guide Rev.6
19.2 Connection Example
This section describes the connection example of the distance tracking function.
19.2.1 Basic Connection Example
Robot Controller
(RC700, RC90)
Manipulator
M/C Signal
M/C Power
Analog I/O board
(Option)
Distance sensor
Power
Analog I/O
Requires preparation by users
USB, LAN
Cable
Development PC
Please prepare the following items by yourself.
1. Power (select depending on the distance sensor to be used.)
2. Distance sensor (e.g. laser displacement meter)
3. Development PC
19.2.2 Connection Example for Dispense Application
Distance tracking function is available for dispense applications. To realize the dispense
application with high accuracy, it is important to keep a constant needle gap (distance
between tip of the needle and the workpiece). Constant needle gap can be realized with
the distance tracking function. Figure below is a connection example for dispense
application.
Robot Controller
(RC700, RC90)
Manipulator
M/C Signal
M/C Power
Analog I/O board
(Option)
Distance sensor
Power
Analog I/O
Requires preparation by users
USB, LAN
Cable
Development PC
Standard
I/O
Dispenser
Binary I/O
Please prepare the following items by yourself.
1. Power (select depending on the distance sensor and dispenser to be used.)
2. Distance sensor (e.g. laser displacement meter)
3. Dispenser
4. Development PC
NOTE
NOTE
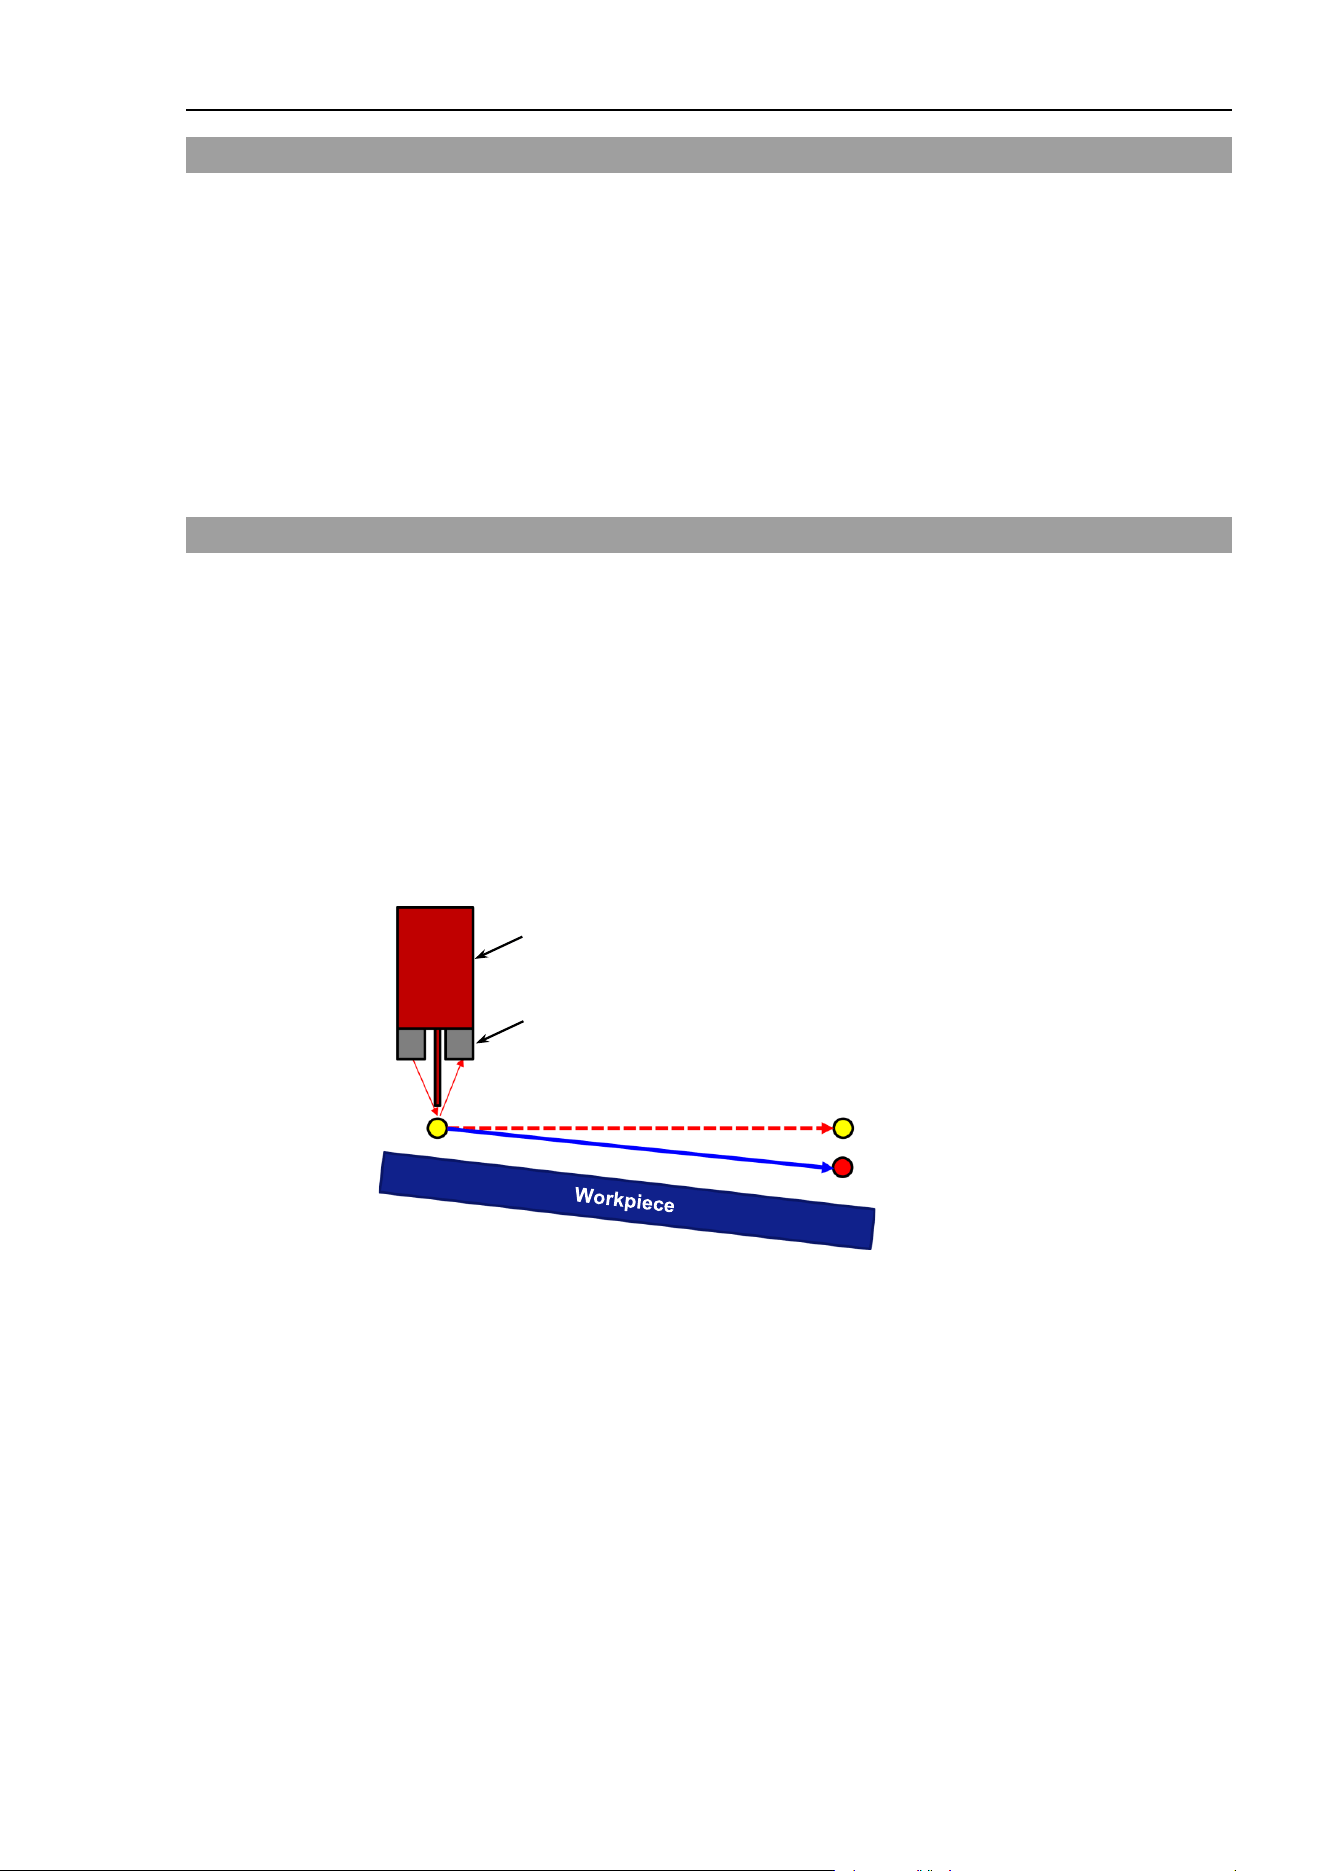
19. Distance Tracking Function
EPSON RC+ 7.0 (Ver.7.4) User's Guide Rev.6 531
19.3 Commands
List of SPEL+ commands for the distance tracking function.
AIO_TrackingSet : Sets the distance tracking function
AIO_TrackingStart : Starts the distance tracking function
AIO_TrackingEnd : Ends the distance tracking function
AIO_TrackingON Function : Returns status of the distance tracking function
For more details on the commands, refer to the following manual:
EPSON RC+ 7.0 SPEL+ Language Reference
19.4 Steps to adjust parameters
The accuracy of the distance tracking function may differ depending on the robot model,
speed, and workpiece shape.
Therefore, you need to set parameters depending on the working environment when using
the distance tracking function.
To improve the accuracy of the distance tracking function, adjust parameters and set a
proper value.
Parameters to be set are ProportionalGain, IntegralGain, and DifferentialGain. Those are
parameters for AIO_TrackingStart.
In the steps to adjust parameters, it is assumed to use a flat metallic plate as a workpiece in
the dispense application as shown below.
P1 (Start point)
P2 (Target point)
Dispenser
Laser displacement meter
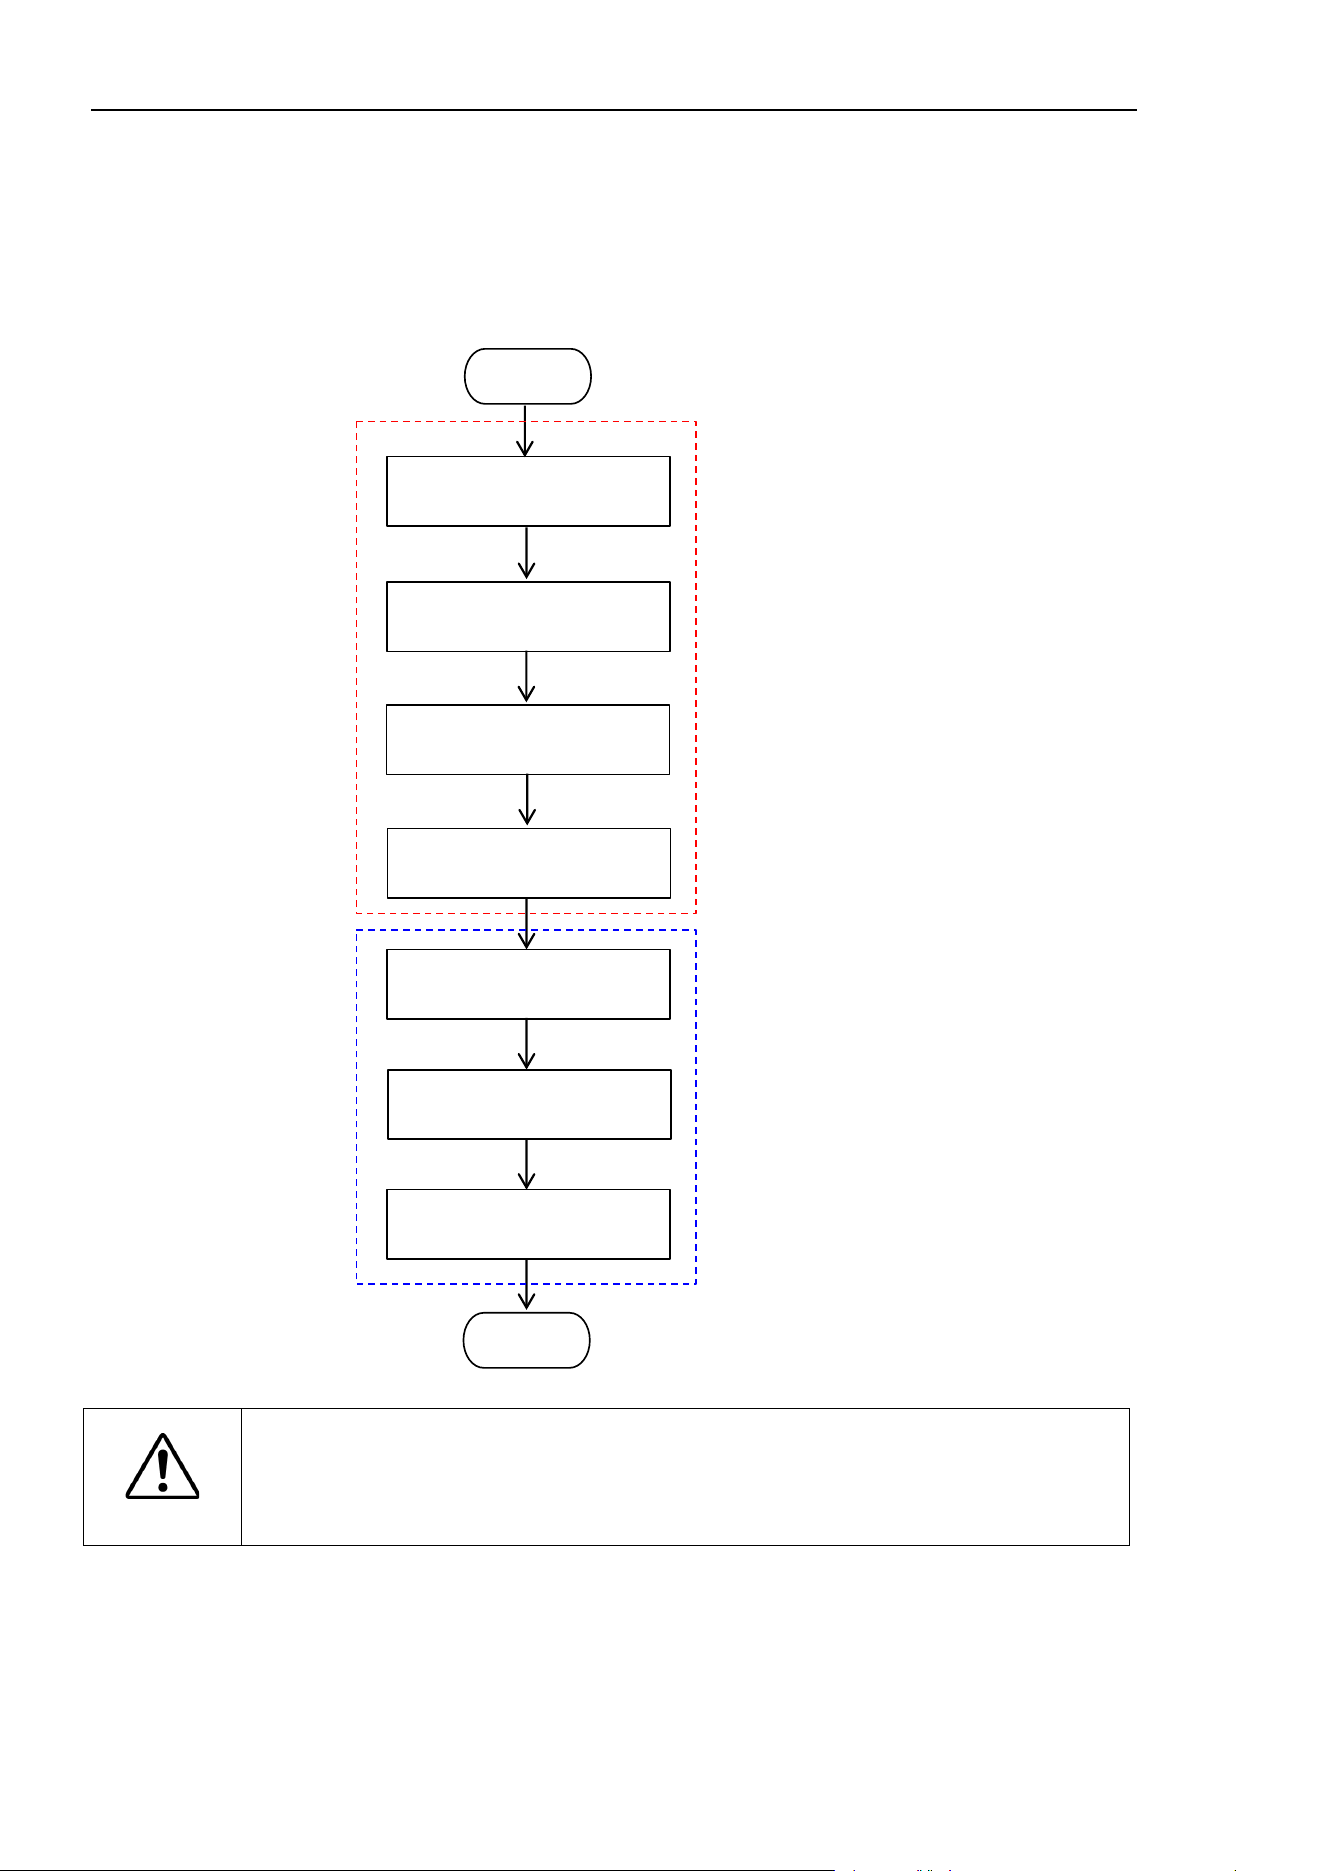
19. Distance Tracking Function
532 EPSON RC+ 7.0 (Ver.7.4) User's Guide Rev.6
Steps to adjust parameters are below:
Statuses at the beginning are as follows:
Dispenser: Connection and settings have completed.
Laser displacement meter: Connected to analog I/O.
Describe in order of the preparation for parameter adjustment and parameter adjustment.
Check motions of
analog I/O board
Teaching a robot
ProportionGain setting
IntegralGain setting
DifferentialGain setting
Start
End
Create a motion program
Add program for logging
Preparation
Parameter adjustment
CAUTION
■
The parameters used in this step are reference values.
Please note that the operation may not be successful or the motion may be
vibratory depending on the set parameters and some operating conditions.
■
If the robot moves abnormally, immediately hold down the emergency button.
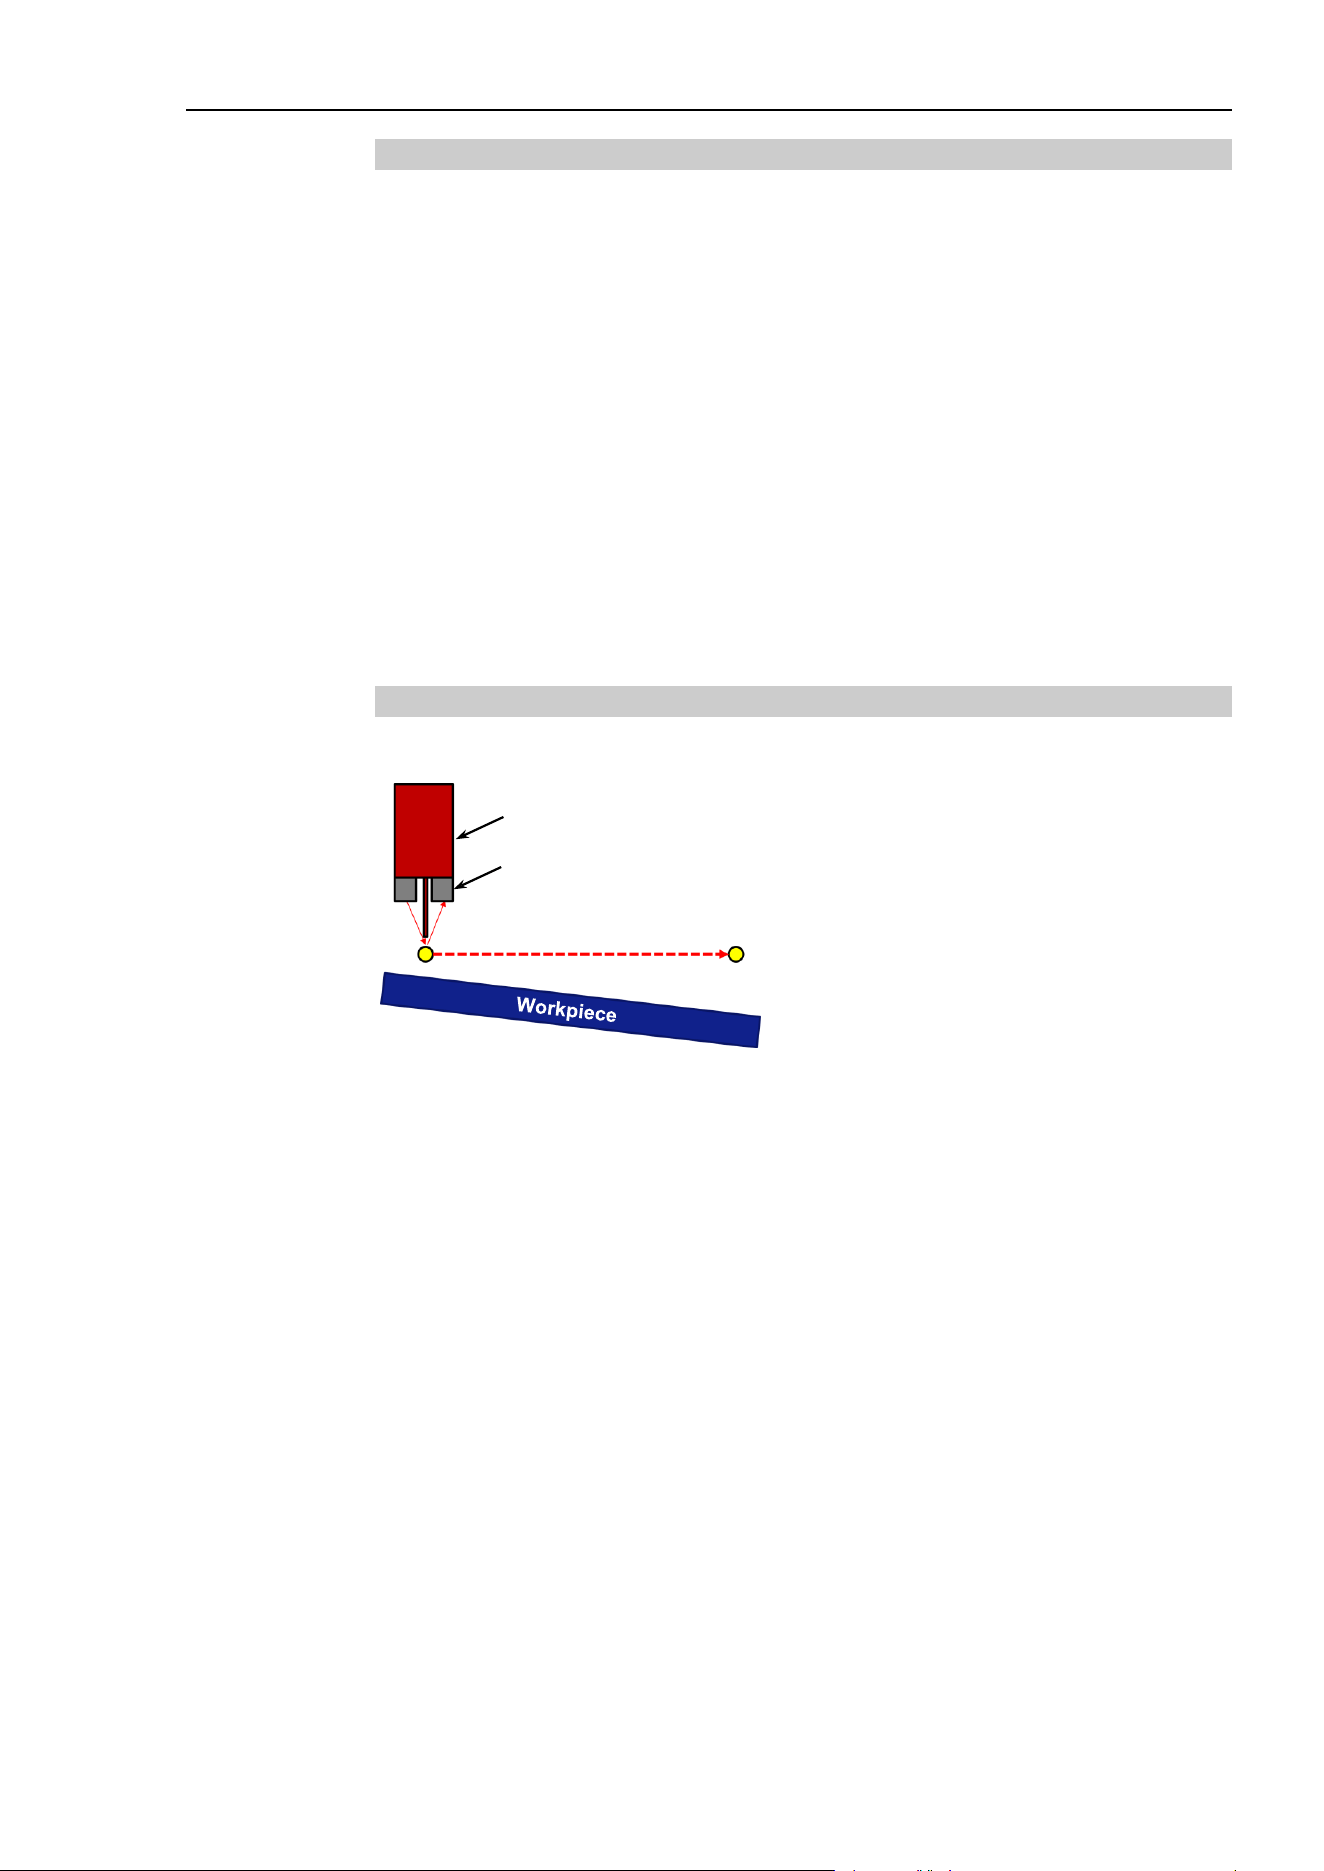
19. Distance Tracking Function
EPSON RC+ 7.0 (Ver.7.4) User's Guide Rev.6 533
19.4.1 Check Motions of Analog I/O Board
The following steps describe how to check the motion of the analog I/O board.
(1) Make sure that the analog I/O board and the laser displacement meter (distance
sensor) are connected properly.
For connection and use of the analog I/O board, refer to the following manuals:
Robot Controller RC700 / RC700-A
Setup & Operation 14.6 Analog I/O Board
Robot Controller RC90 / RC90-B (EPSON RC+ 7.0)
Setup & Operation 13.5 Analog I/O Board
(2) Execute the following command on the command window.
>Print AIO_In(channel number of the analog I/O board)
(3) Output voltage from the laser displacement meter is displayed.
Check the displayed value and the value measured by the laser displacement meter.
If those values are the same, the analog I/O board works properly.
19.4.2 Teaching a Robot
Teach the start and target point of the distance tracking function.
P1 (Start point)
P2 (Target point)
Dispenser
Laser displacement meter
(1) Move the robot to a position where the laser displacement meter will be within the
measurable range.
(2) Set a robot position and orientation within the range and teach as the start point (P1).
When using the distance tracking function for a dispense application, be sure to check
that the needle gap at the start point is same as the recommended gap value of the
dispenser.
(3) Move the robot to the target point.
(4) Teach a moved point as the target point (P2).
Sometimes the laser displacement meter cannot measure the tilt of workpiece due to
workpiece types (especially mirrored object), its tilt angle, and types of the laser
displacement meter. In that case, place the bottom of a chassis of the laser displacement
meter in parallel with the workpiece surface.
For layout of the distance sensor (laser displacement meter) and target workpiece, follow
the specifications of each distance sensor.
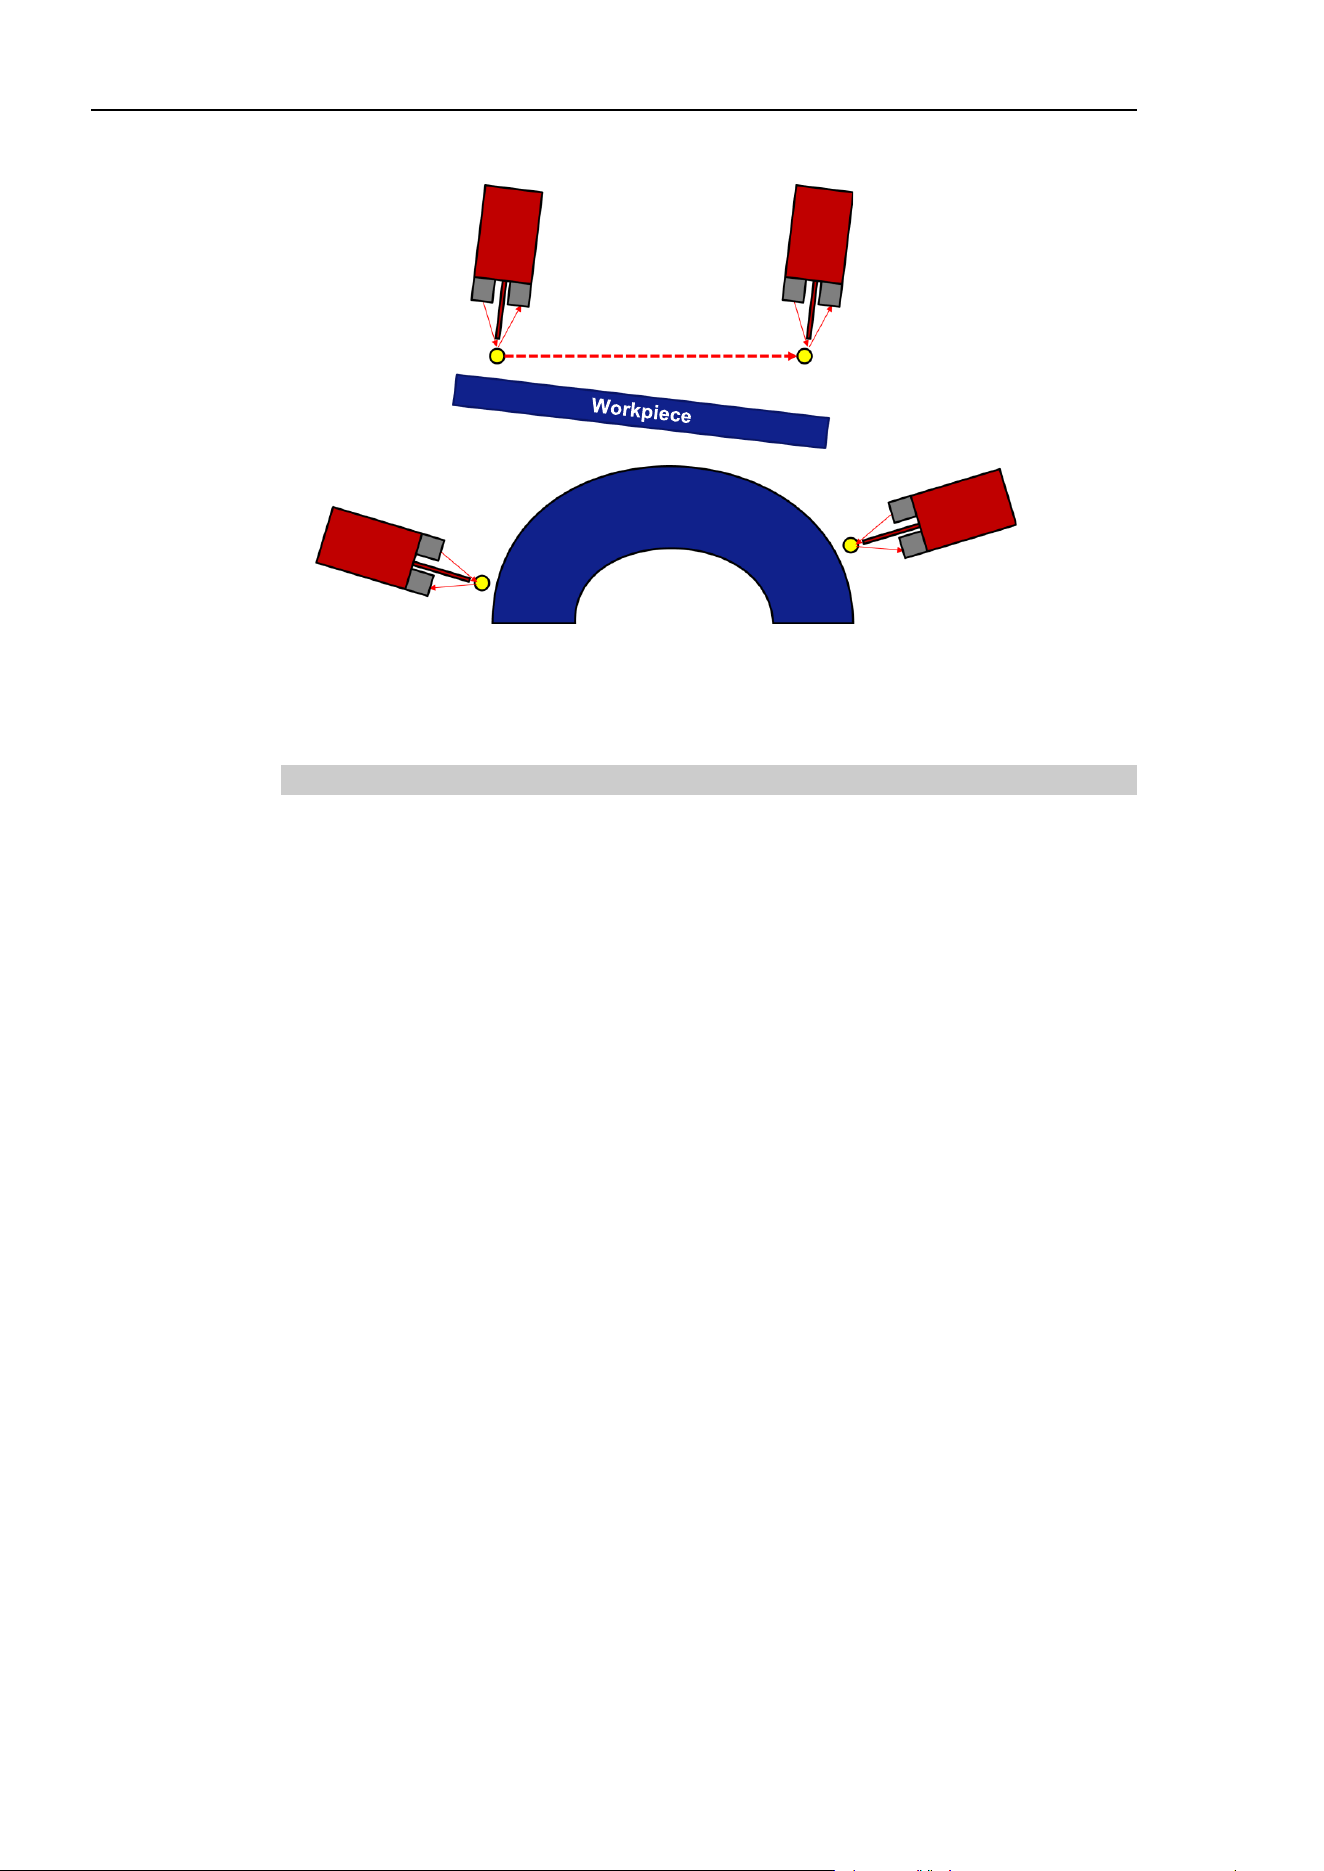
19. Distance Tracking Function
534 EPSON RC+ 7.0 (Ver.7.4) User's Guide Rev.6
Ex: When placing the workpiece and chassis of the laser displacement meter in parallel
P1 (Start point)
P2 (Target point)
P1
(Start point)
P2
(Target point)
For the arc-shaped workpiece as shown above, teach the trajectory of the arc shape by
using Move or Arc command before executing the distance tracking function.
19.4.3 Create a Motion Program
Create a motion program for the distance tracking function.
Program example:
Move the robot from P1 to P2 by using the distance tracking function. Set the needle tip
position of the dispenser for Tool coordinate system. However, the dispenser does not
move until the parameter adjustment ends. Parameters of
AIO_TrackingSet are examples.
Be sure to set parameters depending on the working environment.
Function AIOTrackingSample
' -------------Robot settings---------------
Motor On
Power High
SpeedS 30
AccelS 300, 300
Tool 1
' ----------------Motion part------------------------------------------------------------------------
Move P1 ' Move to start point
AIO_TrackingSet 1, -1, 0, -3, 3, 0, 2
' Set the distance tracking function
Wait 2
AIO_TrackingStart 1, 10, 0, 0
' Start the distance tracking function
Move P2 ' Move to target point
AIO_TrackingEnd ' End the distance tracking function
Wait 2
Motor Off
Fend
Set the default values for parameters of AIO_TrackingStart as follows:
ProportionalGain : 10
IntegralGain : 0
DifferentialGain : 0

19. Distance Tracking Function
EPSON RC+ 7.0 (Ver.7.4) User's Guide Rev.6 535
19.4.4 Add a Program for Distance Sensor Logging
To adjust the parameters (ProportionalGain, IntegralGain, DifferentialGain), you need to
check the measured data of the laser displacement meter during execution of the distance
tracking function.
Measured data of the laser displacement meter can be acquired by the following sample
program.
Add ★ to the program created in 19.4.3.

19. Distance Tracking Function
536 EPSON RC+ 7.0 (Ver.7.4) User's Guide Rev.6
_________________________________________________________________
Integer fileNum ' ★ Declare a file number
Function AIOTrackingSample
'=============================================================
' Program to record the measured value of the distance sensor during execution of the
distance tracking function.
'=============================================================
'------------- Robot setting ---------------
Motor On
Power High
SpeedS 30
AccelS 300, 300
Tool 1
'--------- Create a CSV file for recording ------------------
fileNum = FreeFile ' ★ Acquire a file number
WOpen "AIO_Monitor.csv" As #fileNum
' ★ Save to Project folder
'----------------Motion part------------------------------------------------------------------------
Move P1 ' Move to start point
Xqt AIO_Monitor ' ★Start to record the measured value by distance sensor
AIO_TrackingSet 1, -1, 0, -3, 3, 0, 2
' Set the distance tracking function
Wait 2
AIO_TrackingStart 1, 10, 0, 0 ' Start the distance tracking function
Move P2 ' Move to target point
AIO_TrackingEnd ' End the distance tracking function
Wait 2
Quit AIO_Monitor ' ★Quit recording the values by distance sensor
Close #fileNum ' ★Close CSV
Motor Off
Fend
____________________________________________________________________
Function AIO_Monitor ' ★
'=======================================================
' Called by AIOTrackingSample.
' Keep recording values input to Ch1 of analog I/O board to CSV.
'=======================================================
Do ' ★
Print #fileNum, AIO_In(1) ' ★
Wait 0.002 ' ★
Loop ' ★
Fend ' ★
_________________________________________________________________
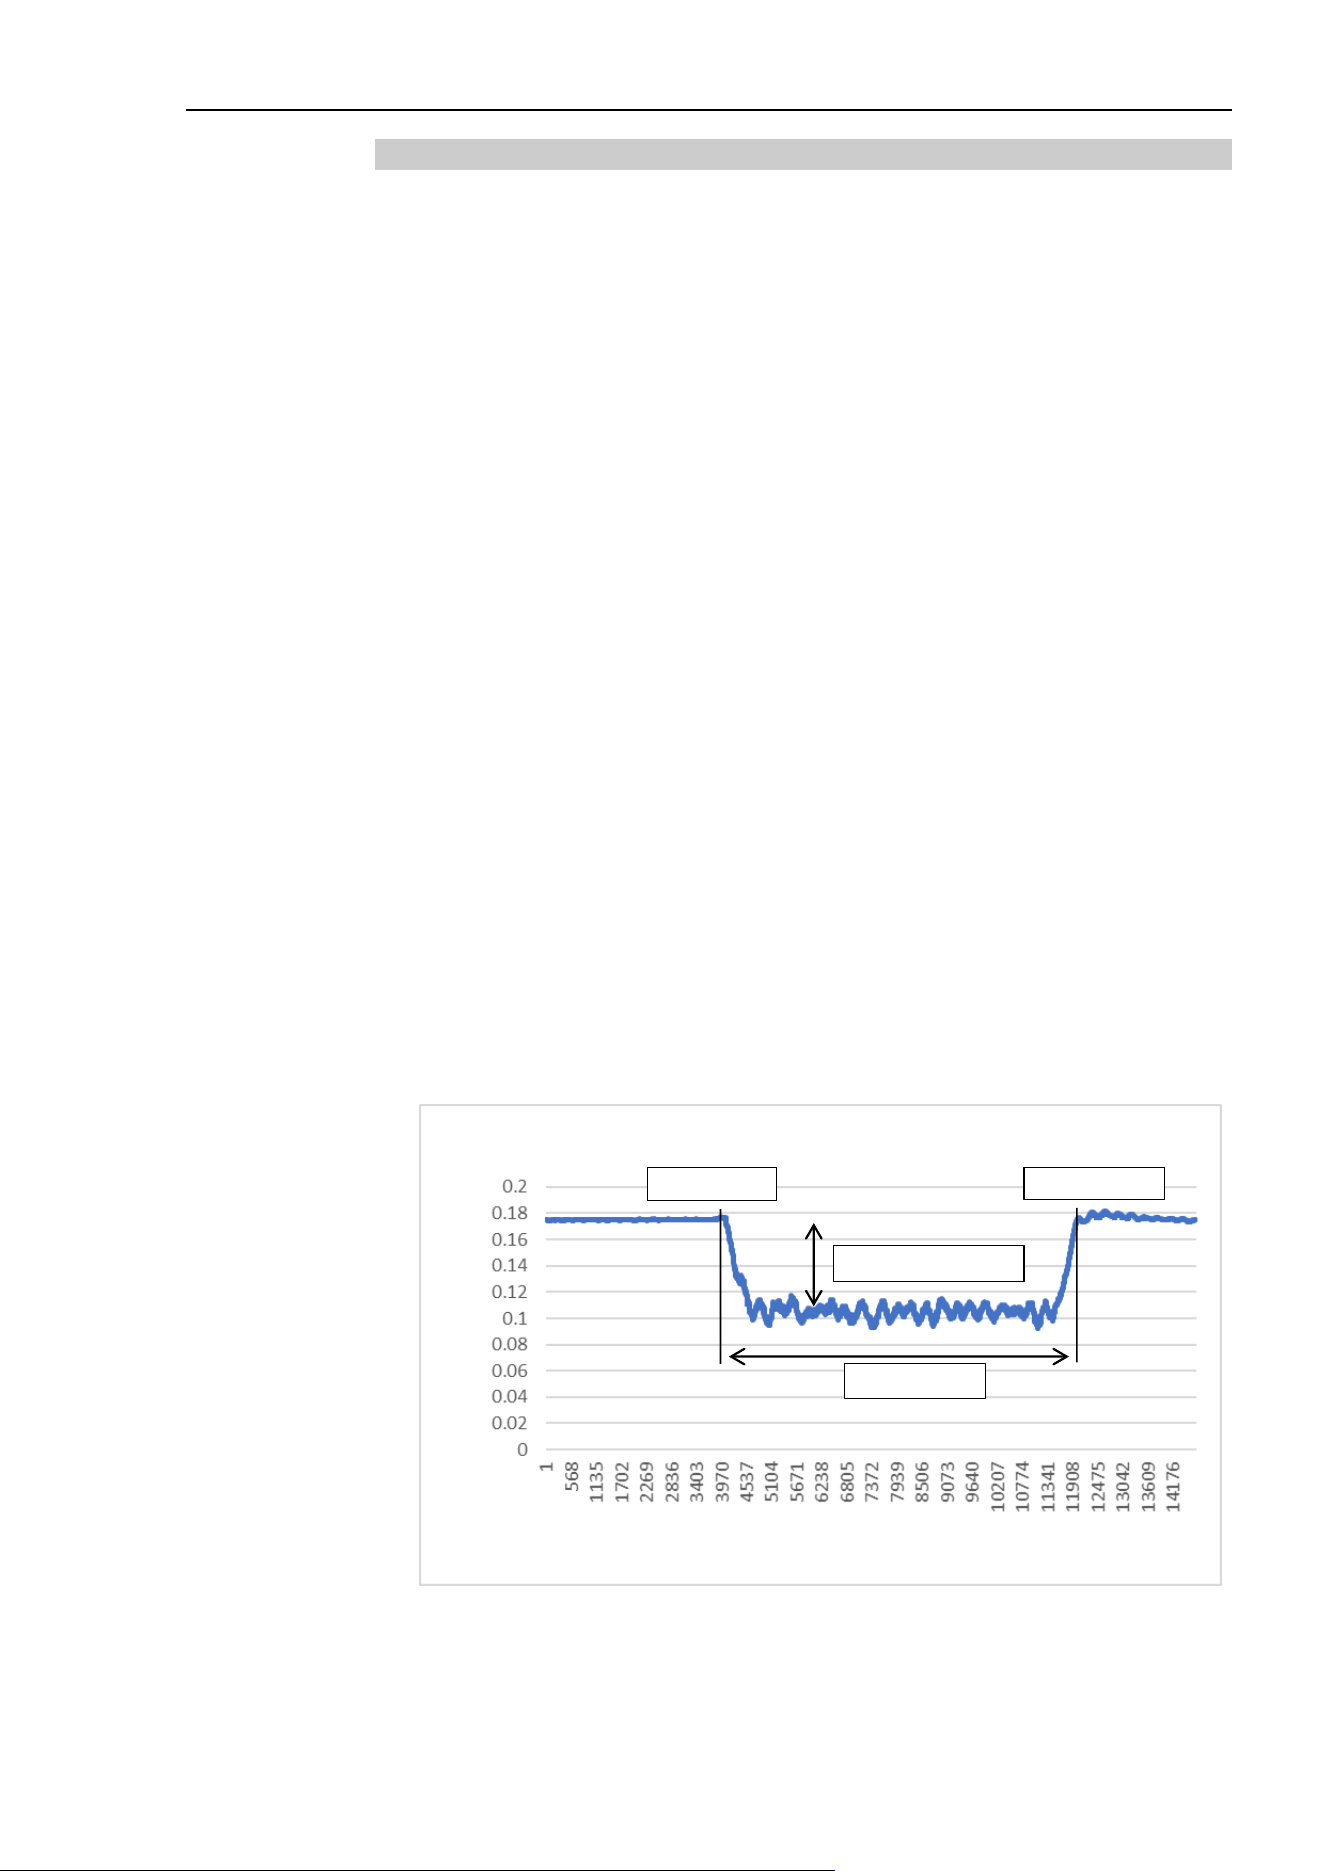
19. Distance Tracking Function
EPSON RC+ 7.0 (Ver.7.4) User's Guide Rev.6 537
19.4.5 ProportionalGain Setting
This section describes how to execute the program created in 19.4.4 and adjust
ProportionalGain.
(1) Test run in low speed
Execute the program created in 19.4.4 in low speed (10mm/s or less).
Set SpeedS to 10 or less and AccelS to 100 or less.
Make sure that the robot moves to the target point and the program works properly.
Since the value of ProportionalGain is small, the robot moves straight to the target
point. Be sure to move the robot in the environment with no obstacles between the
motion start point and target point.
When 4603: out of range error occurs:
Since the value of ProportionalGain is small, “4603: Out of range error” may occur.
If the error occurs, increase the value of ProportionalGain by 10.
(2) Test run in actual speed
Since it was confirmed that the program works properly at (1), execute the program in
the desired working environment. Set robot speed and acceleration to desired value.
When 4603: out of range error occurs:
Parameter adjustment is required. Refer to the following tips to adjust parameters,
and then check the motion again.
- Value of ProportionalGain is small. Increase the current value by 10.
- Robot speed is too fast. Move the robot in 100mm/s or less.
(3) Check the motion results
“AIO_Monitor.csv” is created in the project folder of EPSON RC+7.0. Open the file
in spreadsheet software and create a line graph or a scatter plot by all data of column
A.
Graph shown below will be created. Check the correction accuracy on the graph.
In case of the the following graph, the correction accuracy is approx. 70um.
If the correction accuracy is within the target accuracy, parameter adjustment ends.
Correction accuracy
Motion starts
In operation
Motion ends
Number of data
AIO_Monitor
Measured value by distance sensor[mm]
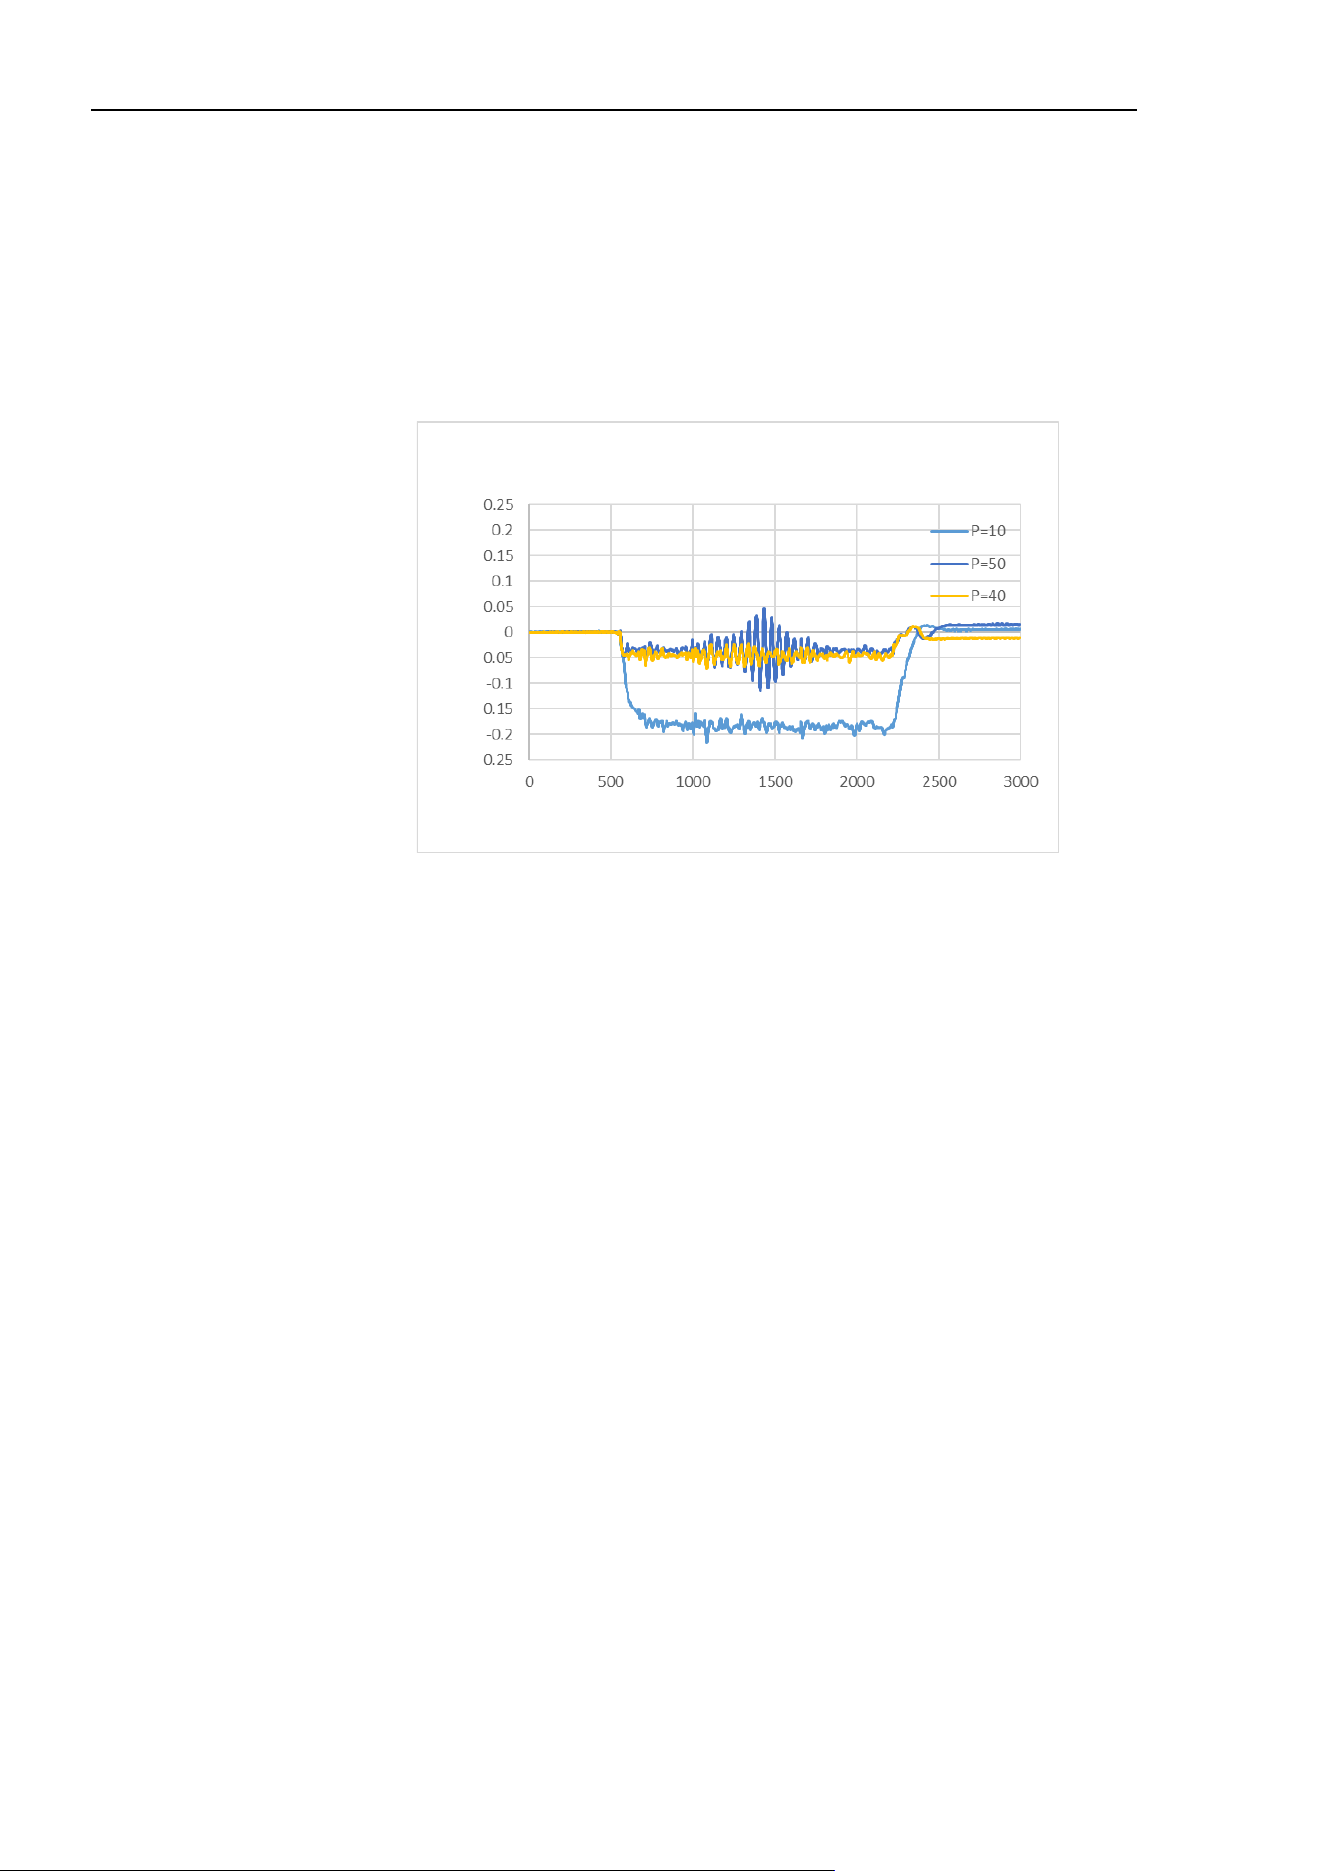
19. Distance Tracking Function
538 EPSON RC+ 7.0 (Ver.7.4) User's Guide Rev.6
(4) Adjustment of ProportionalGain
If the correction accuracy does not achieve the target value, adjustment of
ProportionalGain is required.
ProportionalGain is a parameter to set strength of correction. Adjust value of
ProportionalGain and repeat the program execution to calculate a proper value.
Be sure to increase the value of ProportionalGain gradually. Changing the value to a
larger one at one time is extremely hazardous and the robot may move unintentionally.
When adjusting ProportionalGain, keep IntegralGain and DifferentialGain to “0”.
Number of data
AIO_Monitor (ProportionalGain adjustment)
Measured value by distance sensor[mm]
When adjusting ProportionalGain, the correction accuracy is improved.
However, if increasing the value too much, the robot motion will be vibratory.
Refer to the upper graph: P=50
ProportionalGain value without robot vibrations and the best correction accuracy is
an optimum value.
Refer to the upper graph: P=40
If the target correction accuracy is not achieved even if ProportionalGain is adjusted,
you need to adjust IntegralGain.
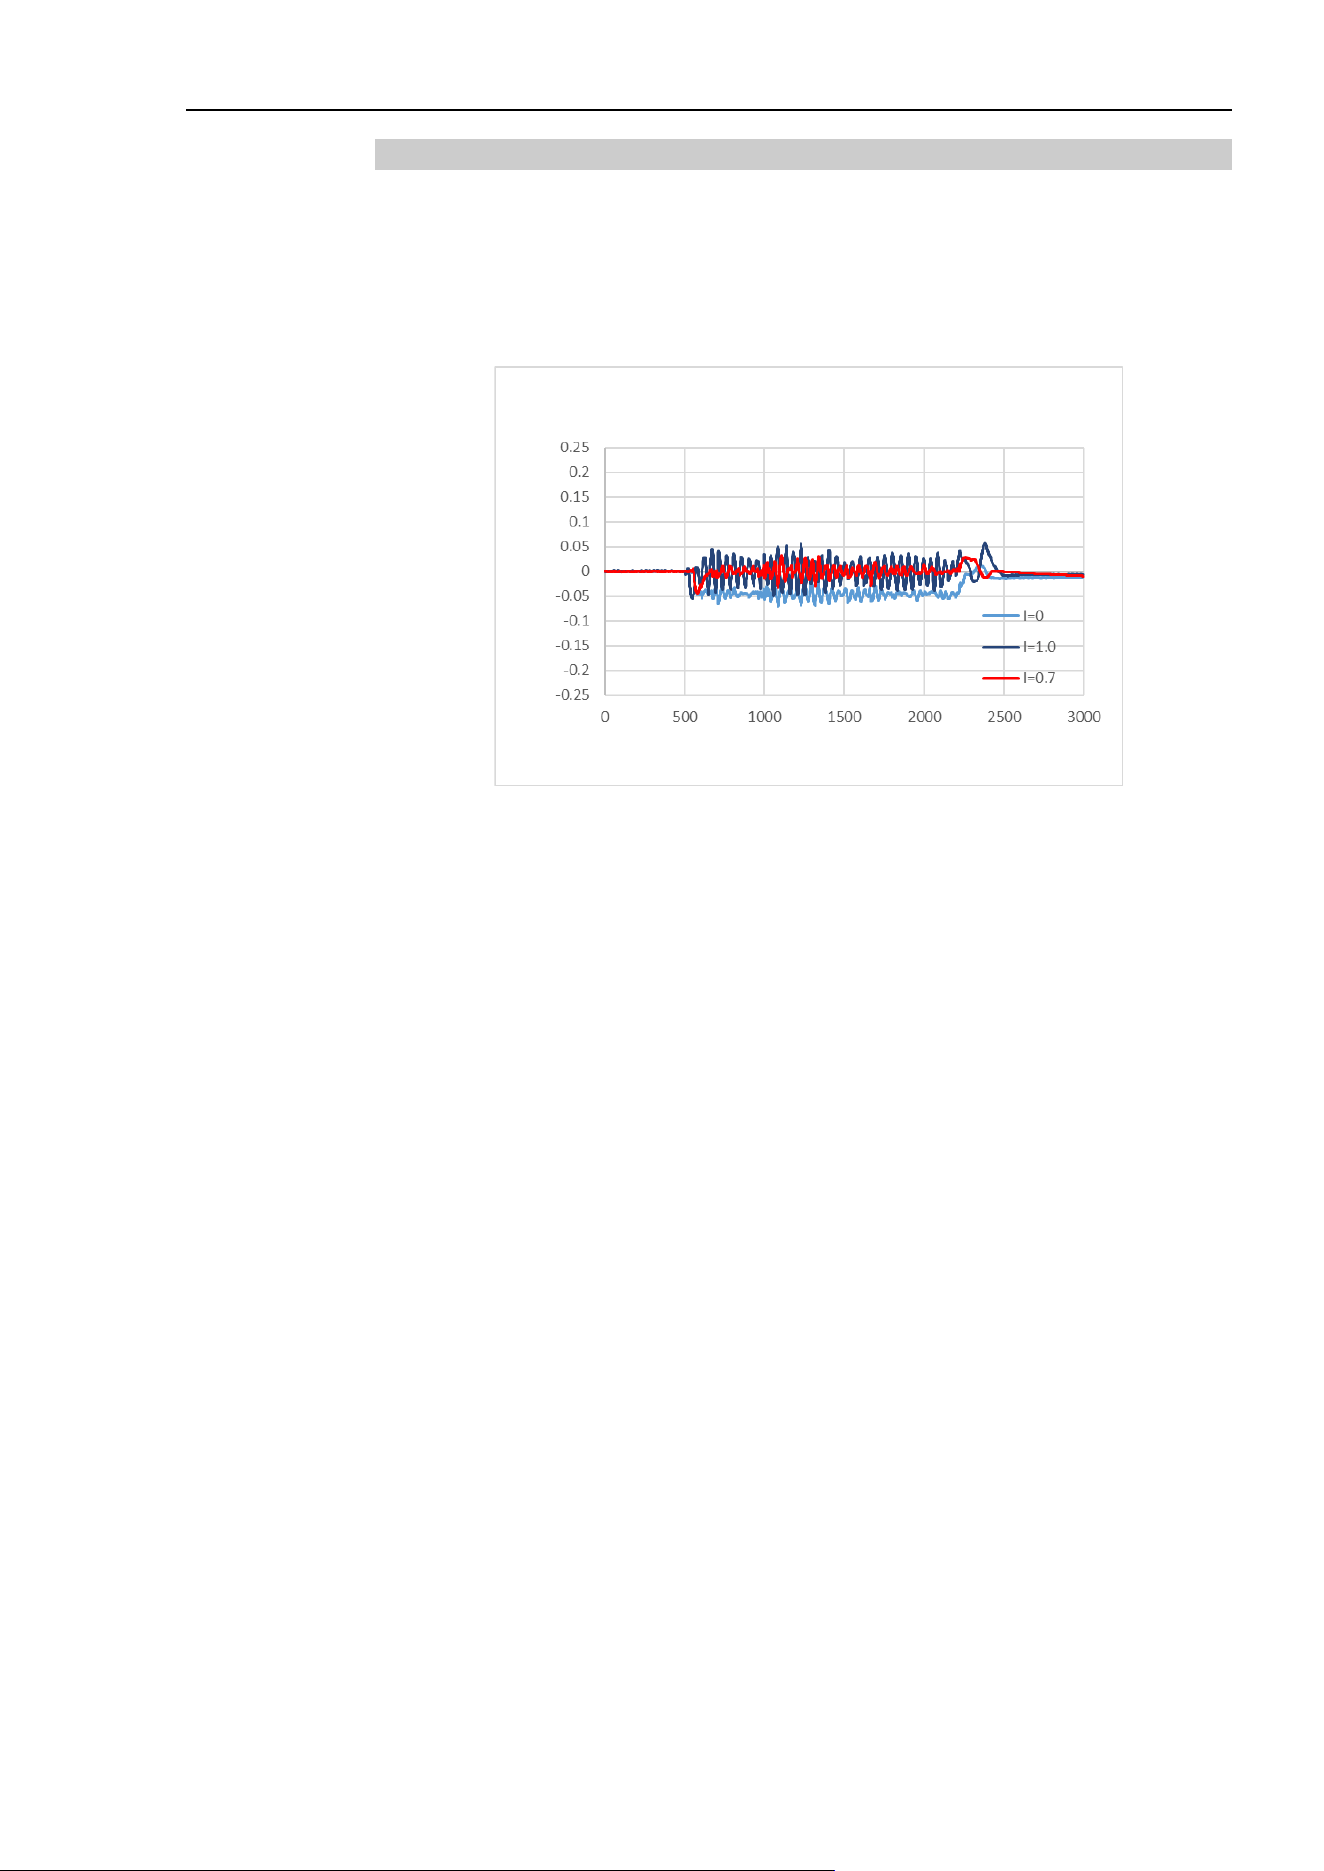
19. Distance Tracking Function
EPSON RC+ 7.0 (Ver.7.4) User's Guide Rev.6 539
19.4.6 IntegralGain Setting
IntegralGain is a parameter to clear an offset between the target value.
Adjust value of IntegralGain and repeat the program execution to calculate a proper value.
Be sure to increase the value of IntegralGain gradually. Changing the value to a larger one
at one time is extremely hazardous and the robot may move unintentionally.
When adjusting IntegralGain, keep ProportionalGain to the value calculated in 19.4.5 and
DifferentialGain to “0”.
Number of data
AIO_Monitor (IntegralGain adjustment)
Measured value by distance sensor[mm]
When adjusting IntegralGain, offset between the target value is cleared.
However, if increasing the value too much, the robot motion will be vibratory.
Refer to the upper graph: I=1.0
IntegralGain value without robot vibrations and the best correction accuracy is an
optimum value.
Refer to the upper graph: I=0.7
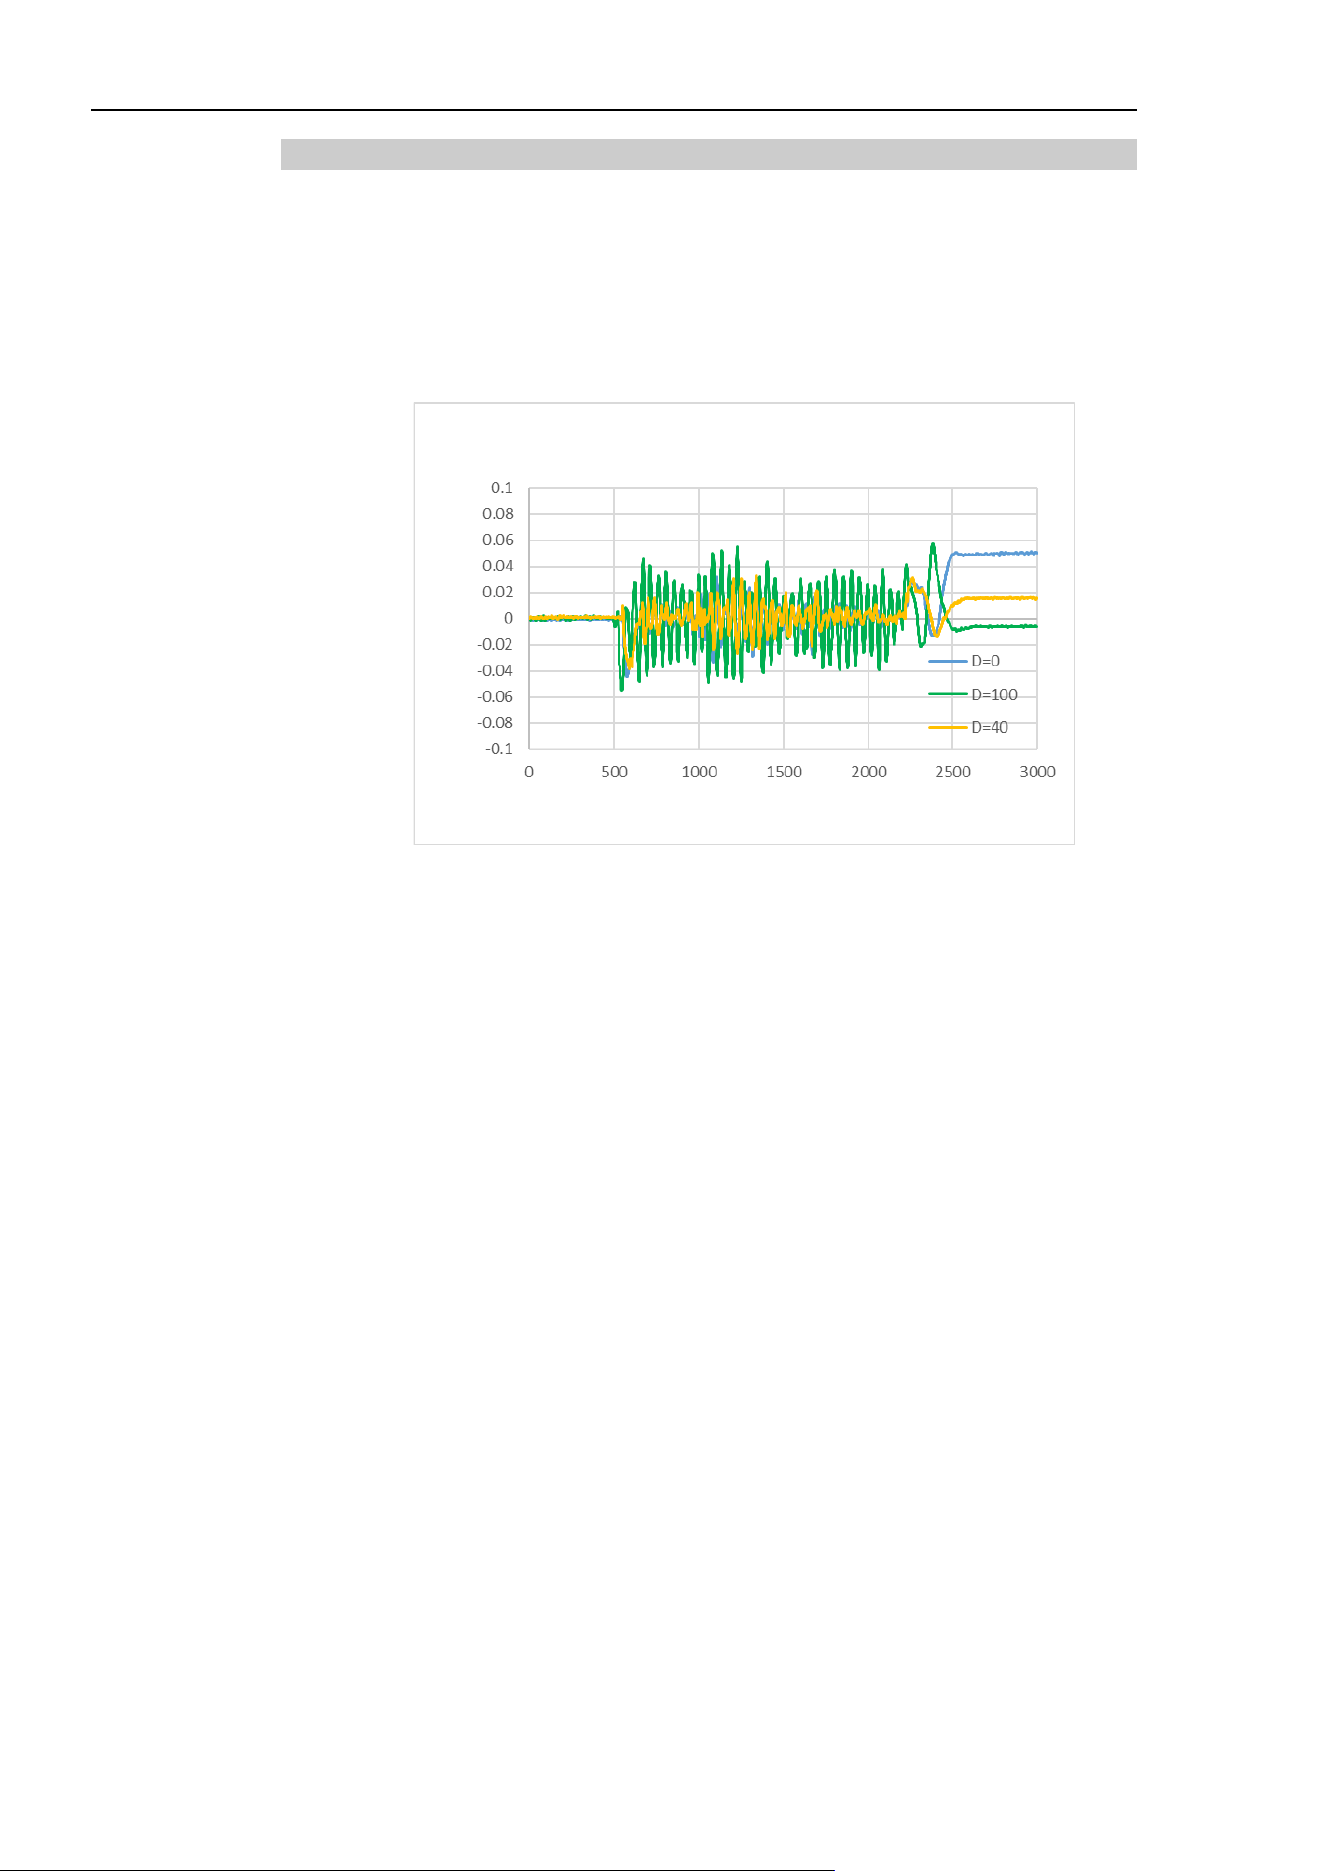
19. Distance Tracking Function
540 EPSON RC+ 7.0 (Ver.7.4) User's Guide Rev.6
19.4.7 DifferentialGain Setting
DifferentialGain is a parameter to improve the responsiveness of correction.
Adjust value of DifferentialGain and repeat the program execution to calculate a proper
value.
Be sure to increase the value of DifferentialGain gradually. Changing the value to a larger
one at one time is extremely hazardous and the robot may move unintentionally.
When adjusting DifferentialGain, enter the value calculated in 19.4.5 for ProportionalGain
and the value calculated in 19.4. 6 for DifferentialGain.
Number of data
AIO_Monitor (DifferentialGain adjustment)
Measured value by distance sensor[mm]
When adjusting DifferentialGain, the responsiveness of correction is improved.
However, if increasing the value too much, the robot motion will be vibratory.
Refer to the upper graph: D=100
DifferentialGain value without robot vibrations and the best correction accuracy is an
optimum value.
Refer to the upper graph: D=40
Now, gain adjustment is completed.

19. Distance Tracking Function
EPSON RC+ 7.0 (Ver.7.4) User's Guide Rev.6 541
19.5 Example of Dispense Application
The following describes a program example when using the distance tracking function for
dispense applications.
CAUTION
■
The parameters used in this step are reference values.
Please note that the operation may not be successful or the motion may be
vibratory depending on the set parameters and some operating conditions.
■
If the robot moves abnormally, immediately hold down the emergency button.
19.5.1 Basic Example
It is a program using the distance tracking function when the robot moves from P1 to P2.
Dispenser is connected to output No.1 of the standard I/O.
For more details on connection of the standard I/O, refer to the following manuals:
Robot Controller RC700 / RC700-A
Setup & Operation 11. I/O Connector
Robot Controller RC90 / RC90-B (EPSON RC+ 7.0)
Setup & Operation 11. I/O Connector
Function AIOTrackingSample
'------------- Robot settings----------------
Motor On
Power High
SpeedS 30
AccelS 300, 300
Tool 1
'---------------- Motion part-------------------------------------------------------------------------
Move P1 ' Move to start point
AIO_TrackingSet 1, -1, 0, -3, 3, 0, 2
' Set the distance tracking function
AIO_TrackingStart 1, 10, 0, 0
' Start the distance tracking function
Move P2 !D1; On 1; D99; Off 1!
' Move to target point, start and end of dispenser application
AIO_TrackingEnd ' End of the distance tracking function
Motor Off
Fend

19. Distance Tracking Function
542 EPSON RC+ 7.0 (Ver.7.4) User's Guide Rev.6
19.5.2 Example with Application Amount Control
It is a program example when controlling the application amount depending on the robot
speed.
This program can prevent amassing fluid at the start point, end point, and corners.
When using this function, a dispenser with “external input of the application amount” is
required.
For adjustment procedures of application amount and connection method, refer to the
manual of the dispenser to be used.
Function Main
'-------------Robot settings ---------------
Motor On
Power High
SpeedS 30
AccelS 300, 300
Tool 1
AIO_Set 1, On, RealTCPSpeed, 100, 0
' Start the analog output of the robot speed
'----------------Motion part-----------------------------------------------------------------------------
Move P1 ' Move to start point
AIO_TrackingSet 1, -1, 0, -3, 3, 0, 2
' Set the distance tracking function
AIO_TrackingStart 1, 10, 0, 0
' Start the distance tracking function
Move P2 !D1; On 1; D99; Off 1! ' Move to the end point
AIO_TrackingEnd ' End of the distance tracking function
AIO_Set 1, Off '
End the analog output of the robot speed
Motor Off
Fend
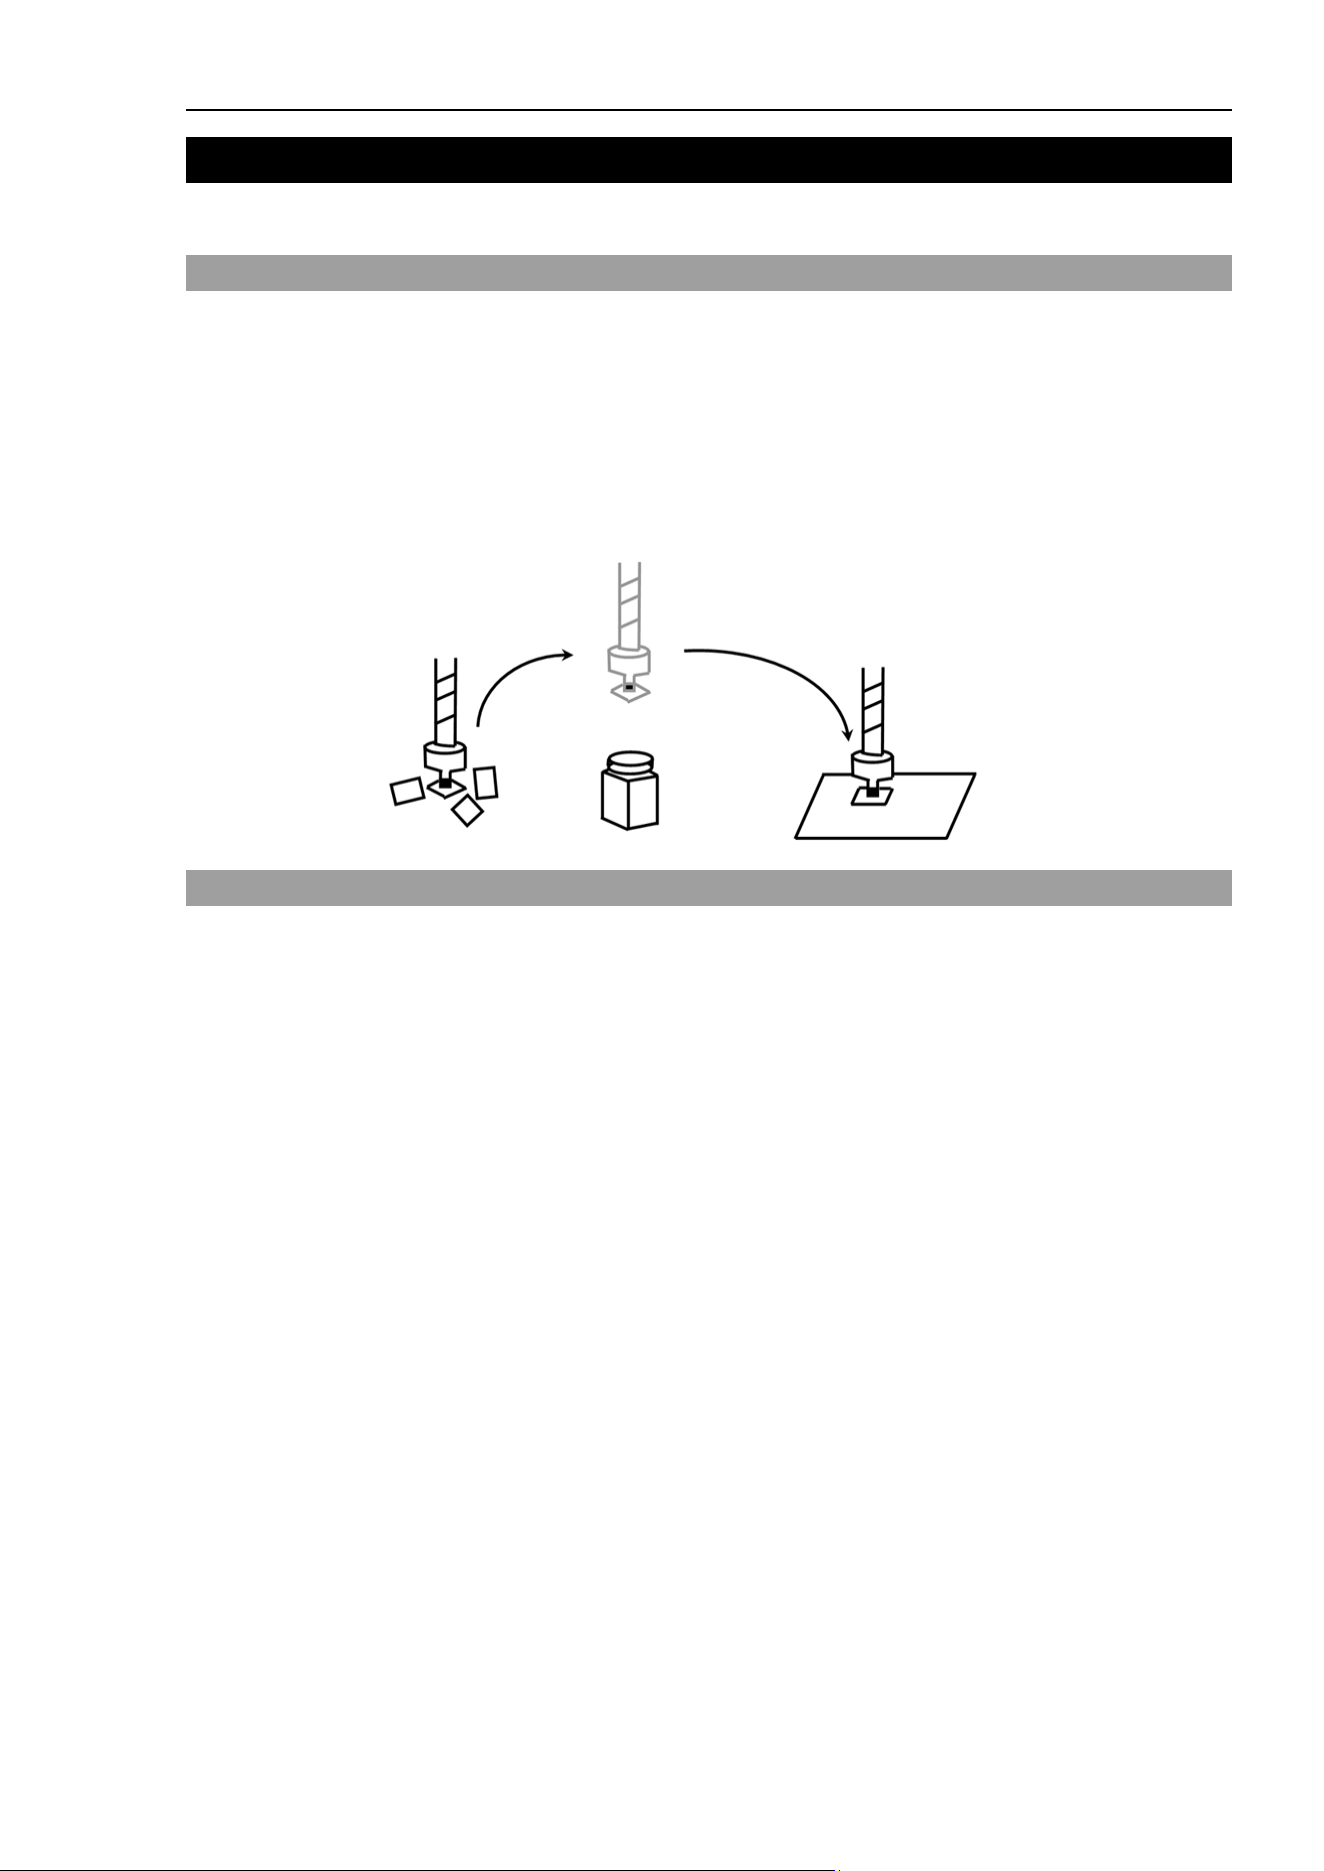
20. Real-Time I/O
EPSON RC+ 7.0 (Ver.7.4) User's Guide Rev.6 543
20. Real-Time I/O
You can use this function only with the controller RC700 / RC700-A.
20.1 Overview
Real-time I/O is a feature that allows you to input trigger signals into the R-I/O connector
of the robot controller so that you can latch and acquire the robot position at high speed
while it is operating.
An example of an application using real-time I/O is "Picture on the fly": This synchronizes
the robot position detection and the vision position detection, and performs part pickup,
alignment, and assembly without stopping the robot.
With the real-time I/O feature, you can reduce the robot stop time for vision image
acquisition that is necessary for traditional vision applications.
20.2 Specifications
R-I/O Connector
The RC700 / RC700-A robot controller has an R-I/O connector that is used to connect the
real-time I/O trigger input signals. An R-I/O input is a special input interface that
monitors the signals at higher speed than the standard I/O inputs. There are two trigger
input signals on each of the Control Unit and Drive Units. For example, set the
transmission type sensor so that it reacts when the robot passes the camera acquisition
point and use the R-I/O connector so that the R-I/O input is detected at the moment shutter
clicked.
For the details of the hardware (connection connector, connection circuit), refer to the
Robot Controller manual, Setup & Operation: I/O Remote Settings.
Real-time I/O commands
There are special commands provided for use the real-time I/O. The following are basic
descriptions of these commands.
For more details, refer to the manual SPEL+ Language Reference.
LatchEnable
This command is used to enable or disable the latch function of the robot position
information with the real-time I/O. When LatchEnable On executes, it enables the
robot position latch function using the trigger input signals connected to the R-I/O
connector. After the latch is enabled, the robot current position information is
latched when the first trigger input is detected. To repeatedly latch the robot position,
execute LatchEnable Off and then execute LatchEnable On again. To use the
command repeatedly, it requires 60 ms minimum interval for each command
processing time but it is not necessary to consider the command executing time.

20. Real-Time I/O
544 EPSON RC+ 7.0 (Ver.7.4) User's Guide Rev.6
SetLatch
Specifies the real-time input port that you connected the trigger input signal to, and
the input logic. The table below shows the port numbers you can specify. Specify
the port number that the robot using R-I/O is connected. If the other ports are
specified, an error will occur. One robot cannot wait for the trigger signals from
multiple ports.
Point Port number
Control Unit
INPUT
2 points
24,25
Drive Unit 1
INPUT
2 points
56,57
Drive Unit 2
INPUT
2 points
280,281
Drive Unit 3
INPUT
2 points
312,313
Execution of SetLatch requires approximately 40 msec for processing.
LatchState Function
This function returns the position latch status.
After it confirms that the latch has been done, it acquires the position information
using the LatchPos Function.
LatchPos Function
This function returns the robot position information latched by the trigger input.
Executing the LatchPos Function needs approximately 15 msec for processing.
To return Tool 0 and Arm 0 positions:
Set the WithoutToolArm parameter when using the “Picture on the fly” application.
RobotPos Vision Sequence Property
When acquiring the parts place position by using the RobotPos result, set the robot
position in image capturing to this property before acquiring the RobotPos result.
Also, set the RobotPos sequence property to set the robot coordinates of the image
acquisition position to calculate the part position when you use a mobile camera
system.
In any of the above cases, the system can calculate the correct part position by using
the position acquired by LatchPos Function in this property.
For the details, refer to the manual Vision Guide 7.0 Properties & Results Reference.
Latch accuracy
The following is the theoretical sampling time used to latch the position information.
Sampling time [μsec]
Control Unit
4-axis robot
32
6-axis robot
32
Drive Unit
4-axis robot
32
6-axis robot
21
You can get a rough idea of latch accuracy from the robot speed (parts moving speed) at
the latch trigger input and the sampling time. For real accuracy, you must have a margin
on the required accuracy because time delay and variation in the hardware may affect.
The latch accuracy will improve as the robot moves slower at the trigger input.
Latched position accuracy [mm] = Robot speed [mm/sec] × Sampling time [sec]
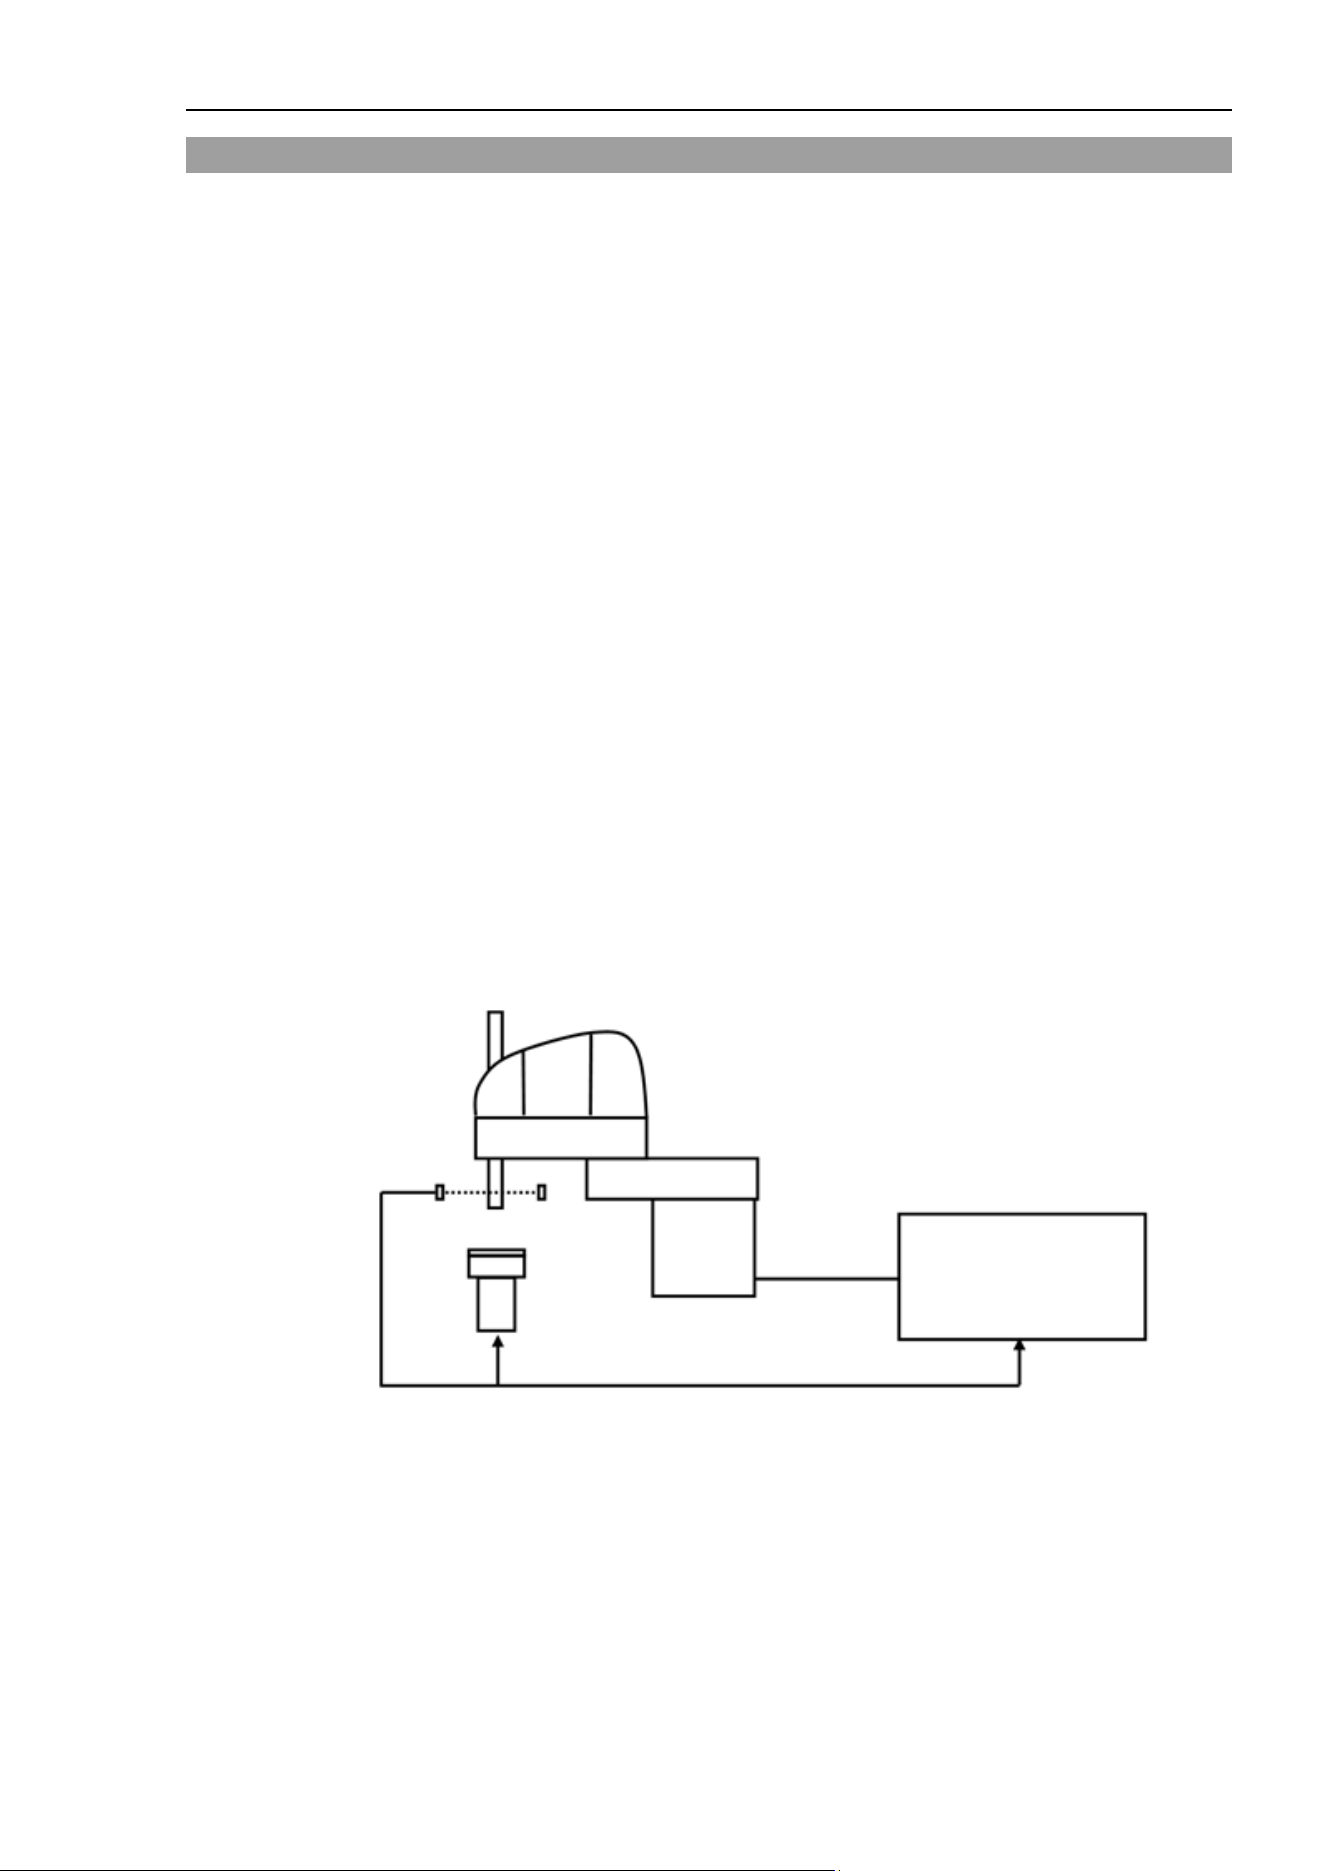
20. Real-Time I/O
EPSON RC+ 7.0 (Ver.7.4) User's Guide Rev.6 545
20.3 Usage
1. Basic example
The following program is a sample to connect any trigger signal to the R-I/O connector of
the controller, latch the robot position information while it is operating at the trigger input,
and show the latched position information.
Function Main
Motor On
Power High
Speed 50; Accel 50, 50
SpeedS 500; AccelS 5000
Go P0 'Start point
SetLatch SETLATCH_PORT_CU_0,
SETLATCH_TRIGGERMODE_LEADINGEDGE
LatchEnable On 'Enable the latch
Move P1 'Start the operation, trigger input while operating
Wait LatchState = True 'Confirmed the latch is complete
P3 = LatchPos 'Acquire the latched position
LatchEnable Off 'Disable the latch
Print P3 'Show the latched position
Fend
2. Example with Vision system
This is an example that uses the robot end effector to handle parts, passes above the
external fixed upward camera acquisition point without stopping, and assembles the parts
with an appropriate position correction.
Sensor
Shooting trigger
Controller
R-I/O Input
Trigger signal
This system has a transmission type sensor that outputs the trigger signal when the robot
end effector handles a part and passes the camera acquisition point. Then, it connects the
sensor output with both the R-I/O and the camera trigger input for external tuning and
synchronizes the latched robot position information and the camera image. It calculates
the part position error and offsets the position comparing the robot position information
from the camera image to the robot position information from the real-time I/O.
In this case, the robot vision system must be calibrated as the upward fixed camera. Also,
by registering the parts place position in advance, robot position information can be
acquired for precise parts placement by CalRobotPlacePos result. Parts place position can
be set in the CalRobotPlacePos property wizard.
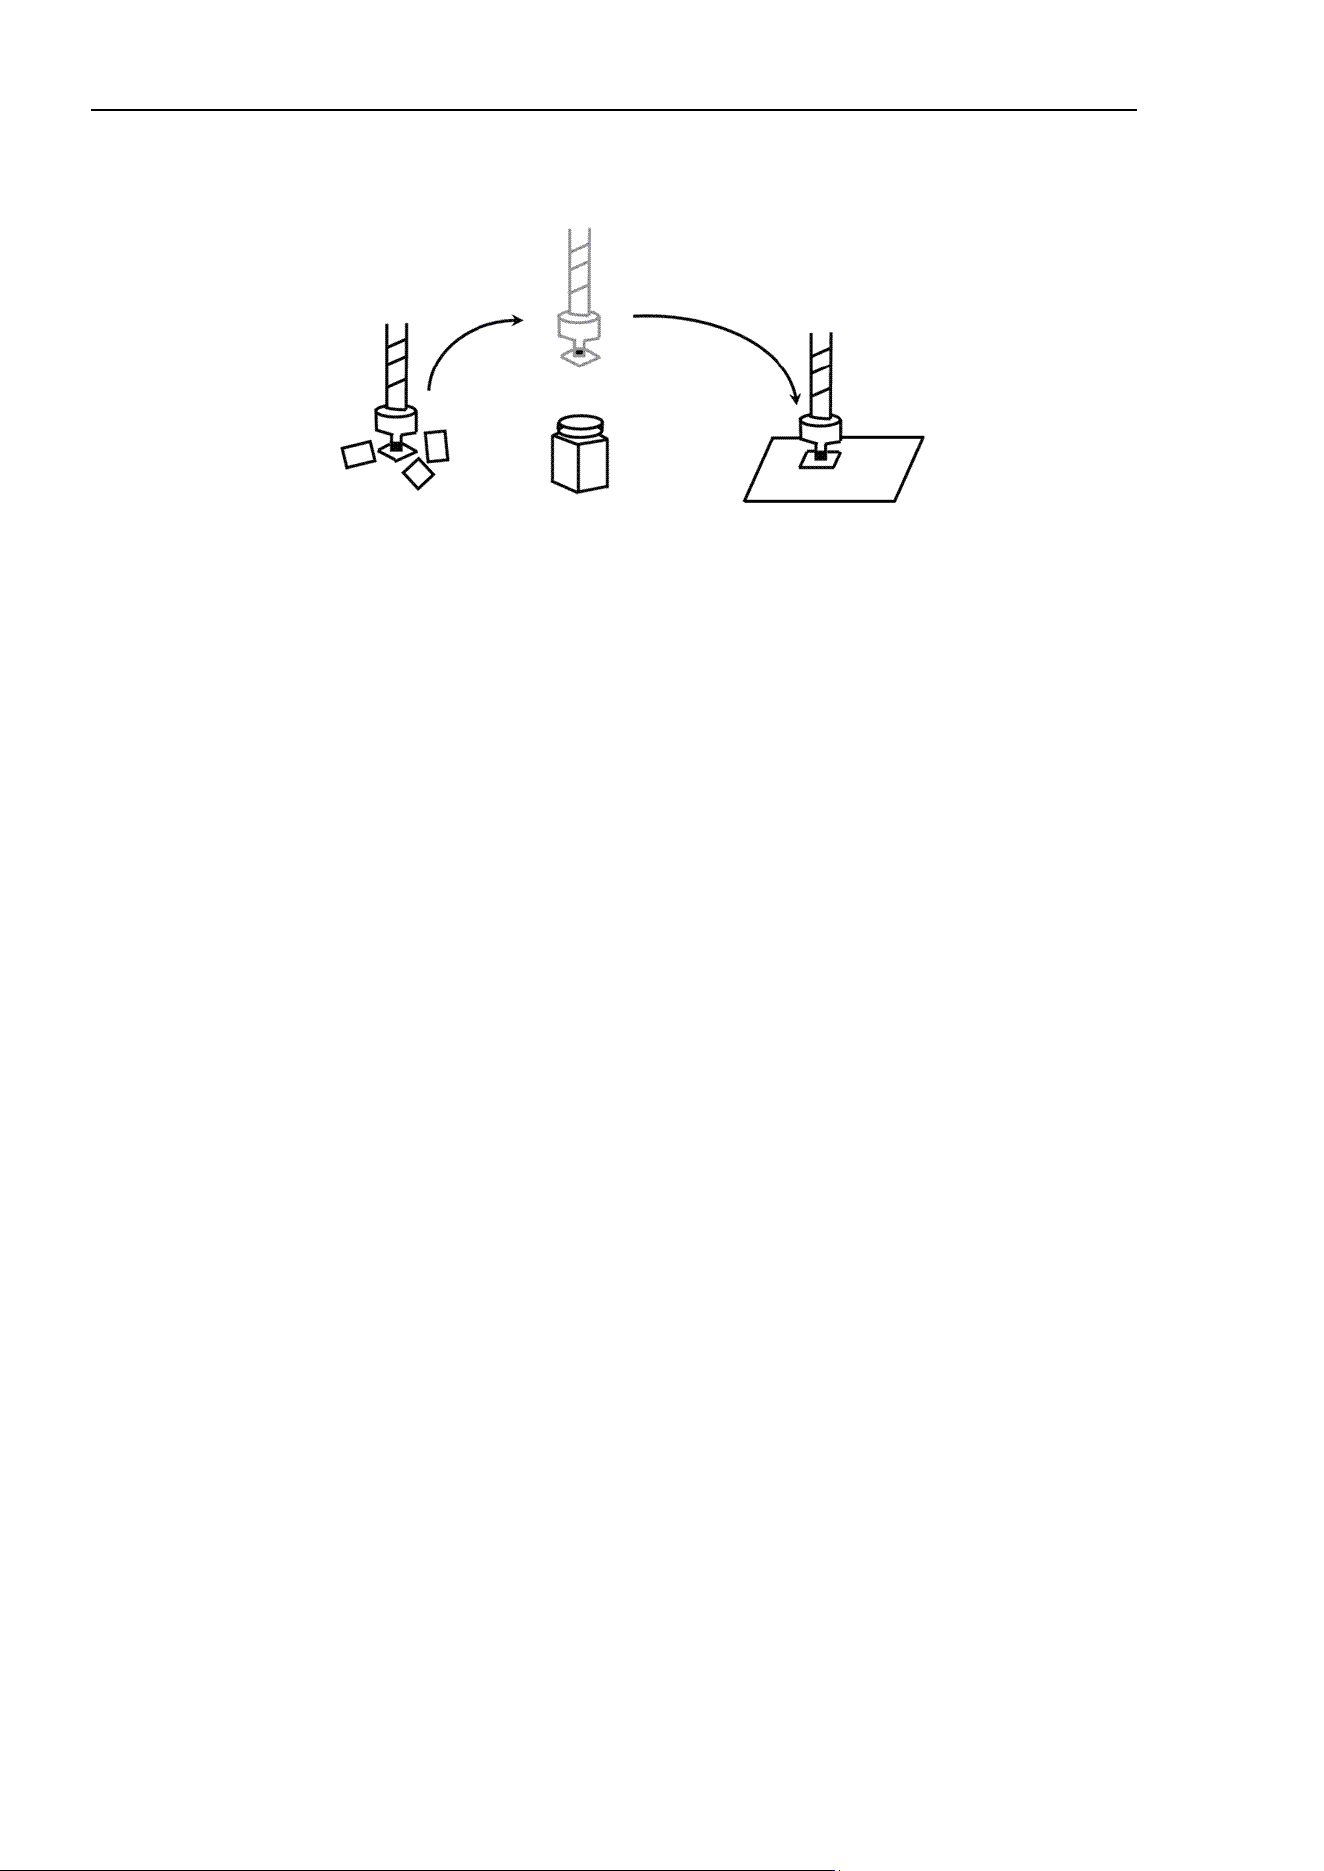
20. Real-Time I/O
546 EPSON RC+ 7.0 (Ver.7.4) User's Guide Rev.6
For details on the camera trigger signal connection and the vision calibration, refer to the
manual Vision Guide 7.0.
The following program is a sample.
StartPos
FrontPos
TargetPos
PassingPos
Function Main
Robot 1
Motor On
Power High
Speed 100
Accel 100, 100
Jump InitPos 'Move to the initial position
Wait 1.0
SetLatch 24, SETLATCH_TRIGGERMODE_LEADINGEDGE
'Set the latch condition
MemOff 0
Xqt PictureOnFly_Camera 'Start the shooting task
Jump StartPos C0 'Move to the part feed point
Wait 0.5
LatchEnable On 'Start waiting the latch
MemOn 0 'Enable the shooting
Jump FrontPos C0 CP 'Move close to the camera
Go PassingPos CP 'Pass over the camera
Go TargetPos :Z(-70) CP 'Move over the assembly point
Wait MemSw(1) = On 'Wait until the image processing is complete
Wait LatchState = True 'Wait for position latch completion
LatchEnable Off 'Disable the position latch
Jump ExactTargetPos C0 LimZ (-70) 'Move to the assembly point
Wait 0.5
Jump InitPos 'Move to the initial point
Wait 0.5
Motor Off
Fend
' Function to execute from work image capturing to work place acquisition
Function PictureOnFly_Camera
'Vision Result variable

20. Real-Time I/O
EPSON RC+ 7.0 (Ver.7.4) User's Guide Rev.6 547
Integer AcqStat 'Strobe imaging completion flag
Boolean Found 'Work detection status
Wait MemSw(0) = On 'Waits the imaging start flag
MemOff 1 'Clear the imaging completion flag
MemOff 0 'Clear the imaging start flag
AcqStat = 0 'Clear the strobe imaging flag
VRun PictureOnFly_i
Do Until AcqStat = 3 'Wait for strobe
VGet PictureOnFly_i.AcquireState, AcqStat
Loop
'Check the work detection
VGet PictureOnFly_i.Geom01.Found, Found
If Found = False Then
Print “Work NotFound”
Pause
Else
MemOn 1 'Change the camera imaging flag
EndIf
Wait LatchState = True 'Wait for the trigger
'Set the image capturing position (trigger position) to the Vision
VSet PictureOnFly_i.RobotPos, LatchPos (WithoutToolArm)
'Acquire the robot position
VGet PictureOnFly_i.Geom01.RobotPlacePos, Found, ExactTargetPos
Fend
21. Additional Axis
548 EPSON RC+ 7.0 (Ver.7.4) User's Guide Rev.6
21. Additional Axis
21.1 Overview
You can attach up to two additional drive axes (per manipulator) which can operate in
association with the manipulator. The position data of the additional axis is saved with the
robot point data. The additional axis can move simultaneously with the manipulator by
motion commands and you can design an application using a traveling axis (manipulator
on the straight axis) with simple programming.
If you want to operate the manipulator and drive axis separately, you need to define the
additional axis as another manipulator using the multi-manipulators feature.
CAUTION
■
When you use the additional axis as traveling axis and mount a manipulator(s)
on the axis, the reaction force of manipulator(s) is put on the traveling axis.
Therefore, you should limit the
acceleration/deceleration speed with the Accel
setting so that it is within the allowable inertia of traveling axis. In addition, the
manipulator may swing widely at the positioning and possibly break the
additional axis.
21.2 Specifications
Types of additional axis
The supported additional axis is the PG axis, controlled by the pulse generator board. However,
note that the PG axis has some limitations.
Limitations of a PG additional axis
a. Synchronizes with the manipulator to start motion but not to finish.
b. Does not support Path motion with CP On and Pass. Stops for every motion.
c. Does not go through the CVMove series of points
d. Calibration is necessary using the MCAL command. Cannot operate the
additional axis and the robot together until the calibration is complete. If
movement of the PG additional axis is “0”, and Go and Move are executed to
the point where only the robot moves, the robot will move singly.
Number of additional axis
Up to two additional axes are available for each of the SCARA robot series (including RS
series), Cartesian coordinate robot, 6-axis robot (including N series), and Joint type robot.
However, the number of axes you can add is determined by how many axes are available with
your controller.
Position data management
The additional axes are allocated to Joint #8 and #9 for all robot types. The position data are
shown in the S and T coordinate values of point data of the manipulator to which you add the
additional axes.
The additional axis as Joint #8 is called the additional S axis and Joint #9 is the additional T
axis.
The coordinate values of additional axes are saved with the robot point data but don’t have any
effect on the robot coordinate system.
NOTE

21. Additional Axis
EPSON RC+ 7.0 (Ver.7.4) User's Guide Rev.6 549
How to operate
The additional axis can move simultaneously with the manipulator (synchronous start / stop).
However, if you use the PG axis, it doesn’t synchronize with manipulator to finish and operate
by the different acceleration/deceleration speed from the manipulator. See below for the
details of motion commands.
Also, you can operate the additional axis and manipulator separately by proper management of
the point data. However, you cannot operate separately both of them in arbitrary timing. In
this case, use the multi-manipulators function and set the drive axis as another manipulator.
Command specification
Pulse, Go, BGo, TGo, Pass
The additional axis can operate in association with the manipulator motion. However, if
you use the PG axis, it synchronizes only to start the motion and a motion command
completes when both the manipulator and axis finish each motion. In addition, if the PG
additional axis has a travel distance, the Path motion with CP On and Pass are prohibited
and the axis moves with CP Off automatically.
Move, BMove, Tmove
The additional axis can operate in association with the manipulator motion. However, if
you use the PG axis, it synchronizes only to start the motion and a motion command
completes when both the manipulator and axis finish each motion. In addition, if the PG
additional axis has a travel distance, the Path motion with CP On is prohibited and the
axis moves with CP Off automatically.
Arc, Arc3
The additional axis can operate in association with the manipulator motion. It doesn’t go
through the specified midPoint and directly goes to the end point. If you use the PG axis,
it synchronizes only to start the motion and a motion command completes when both the
manipulator and axis finish each motion. In addition, if the PG additional axis has a
travel distance, the Path motion with CP On is prohibited and the axis moves with CP Off
automatically.
CVMove
The additional axis can operate in association with the manipulator motion. If you use a
servo axis for the additional axis, for each of the S and T axis it creates a curve going
through the S and T coordinates specified by a series of point data. However, if you use
the PG axis for the additional axis, it doesn’t go through the series of points and directly
goes to the end point. Also, it synchronizes only to start the motion and a motion
command completes when both the manipulator and axis finish each motion. In addition,
if the PG additional axis has a travel distance, the Path motion with CP On is prohibited
and the axis moves with CP Off automatically.
Jump
The additional axis executes PTP motion in association with the manipulator horizontal
motion. However, if you use the PG axis, it synchronizes only to start the motion and a
motion command completes when both the manipulator and axis finish each motion. In
addition, if the PG additional axis has a travel distance, the Path motion with CP On is
prohibited and the axis moves with CP Off automatically.
Jump3, Jump3CP
The additional axis can operate in association with the manipulator depart / span /
approach motion. However, if you use the PG axis, it synchronizes only to start the
motion and a motion command completes when both the manipulator and axis finish each
motion. In addition, if the PG additional axis has a travel distance, the Path motion with
CP On and Pass are prohibited and the axis moves with CP Off automatically.

21. Additional Axis
550 EPSON RC+ 7.0 (Ver.7.4) User's Guide Rev.6
JTran, PTran
The additional axis can operate separately by specifying as Joint #8, #9.
Example:
> JTran 8, 90 'Move the additional S axis by 90 mm
> PTran 9, 10000 'Move the additional T axis by 10000 pulse
21.3 Usage
Additional axis configuration
For the instruction of configuring the additional axis, refer to 10.2 Configuration of
Additional Axes.
If you use the PG axis for the additional axis, you need to set the PG parameters. For the
details of PG parameters, refer to the Robot Controller option: PG Motion System manual.
Point data usage
This example specifies the position data of manipulator and additional ST axes and substitutes
them to the point data.
P1 = XY(10, 20, 30, 40) :ST(10, 20) ' SCARA robot
P1 = XY(10, 20, 30, 40, 50, 60) :ST(10, 20) ' 6-axis robot
This example specifies the position data of manipulator and additional ST axes and executes a
PTP motion.
Go XY(10, 20, 30, 40) :ST(10, 20)
Go XY(10, 20, 30, 40, 50, 60) :ST(10, 20)
This example specifies the position data of additional ST axes individually
P1 = XY(10, 20, 30, 40) :S(10) :T(20)
P1 = XY(10, 20, 30, 40) :S(10)
P1 = XY(10, 20, 30, 40) :T(20)
This example omits the robot position assignment XY( ) and specifies only the additional axis
position. Then, the point data is defined so that the manipulator doesn’t move (undefined).
P1 = ST(10, 20)
Go P1 ' Only additional axis moves and the manipulator remains at the current
position.
This example operates only the additional axis.
Go ST(10, 20) ' Only the additional axis moves.
This example omits the additional axis position assignment ST( ) and specifies only the
manipulator position. Then, the point data is defined so that the additional axis doesn’t move
(undefined).
P1 = XY(10, 20, 30, 40)
Go P1 ' Only the manipulator moves and the additional axis remains at the current
position.
This example operates the manipulator only.
Go XY(10, 20, 30, 40) ' Only the manipulator moves.
This example calculates the additional axis coordinate value using a point operator expression.
P1 = XY(10, 20, 30, 40, 50, 60) :ST(10, 20)
P2 = P1 + S(10) + T(20) ' Add the offset amount to the additional ST axes for P1.

21. Additional Axis
EPSON RC+ 7.0 (Ver.7.4) User's Guide Rev.6 551
Note that you cannot use the point operator for undefined points.
P1 = XY(10, 20, 30, 40, 50, 60)
P2 = P1 + S(10) + T(20)
‘ Error (ST are undefined for P1 and
you cannot use the point operator)
P1 = XY(10, 20, 30, 40, 50, 60) +ST(10, 20) ‘ Error
P1 = XY(10, 20, 30, 40, 50, 60) +S(10) +T(20) ‘ Error
Go ST(10, 20) + X(10)
‘ Error (XY are undefined and
you cannot use the point operator)
This example shows the additional ST axes coordinate values retrieved from the point data.
Print CS(P1), CT(P1)
Pallet motion
When you specify a pallet with the point data including the position data of additional axis, the
position data of additional axis is also calculated by the pallet operator. If you use the
additional axis as traveling axis, you can define a wide range pallet than for a single
manipulator.
Also, if you want to use the additional axis not as traveling axis and exclude the additional axis
position from the pallet operator, define the pallet with the point data that clears the additional
axis position data.
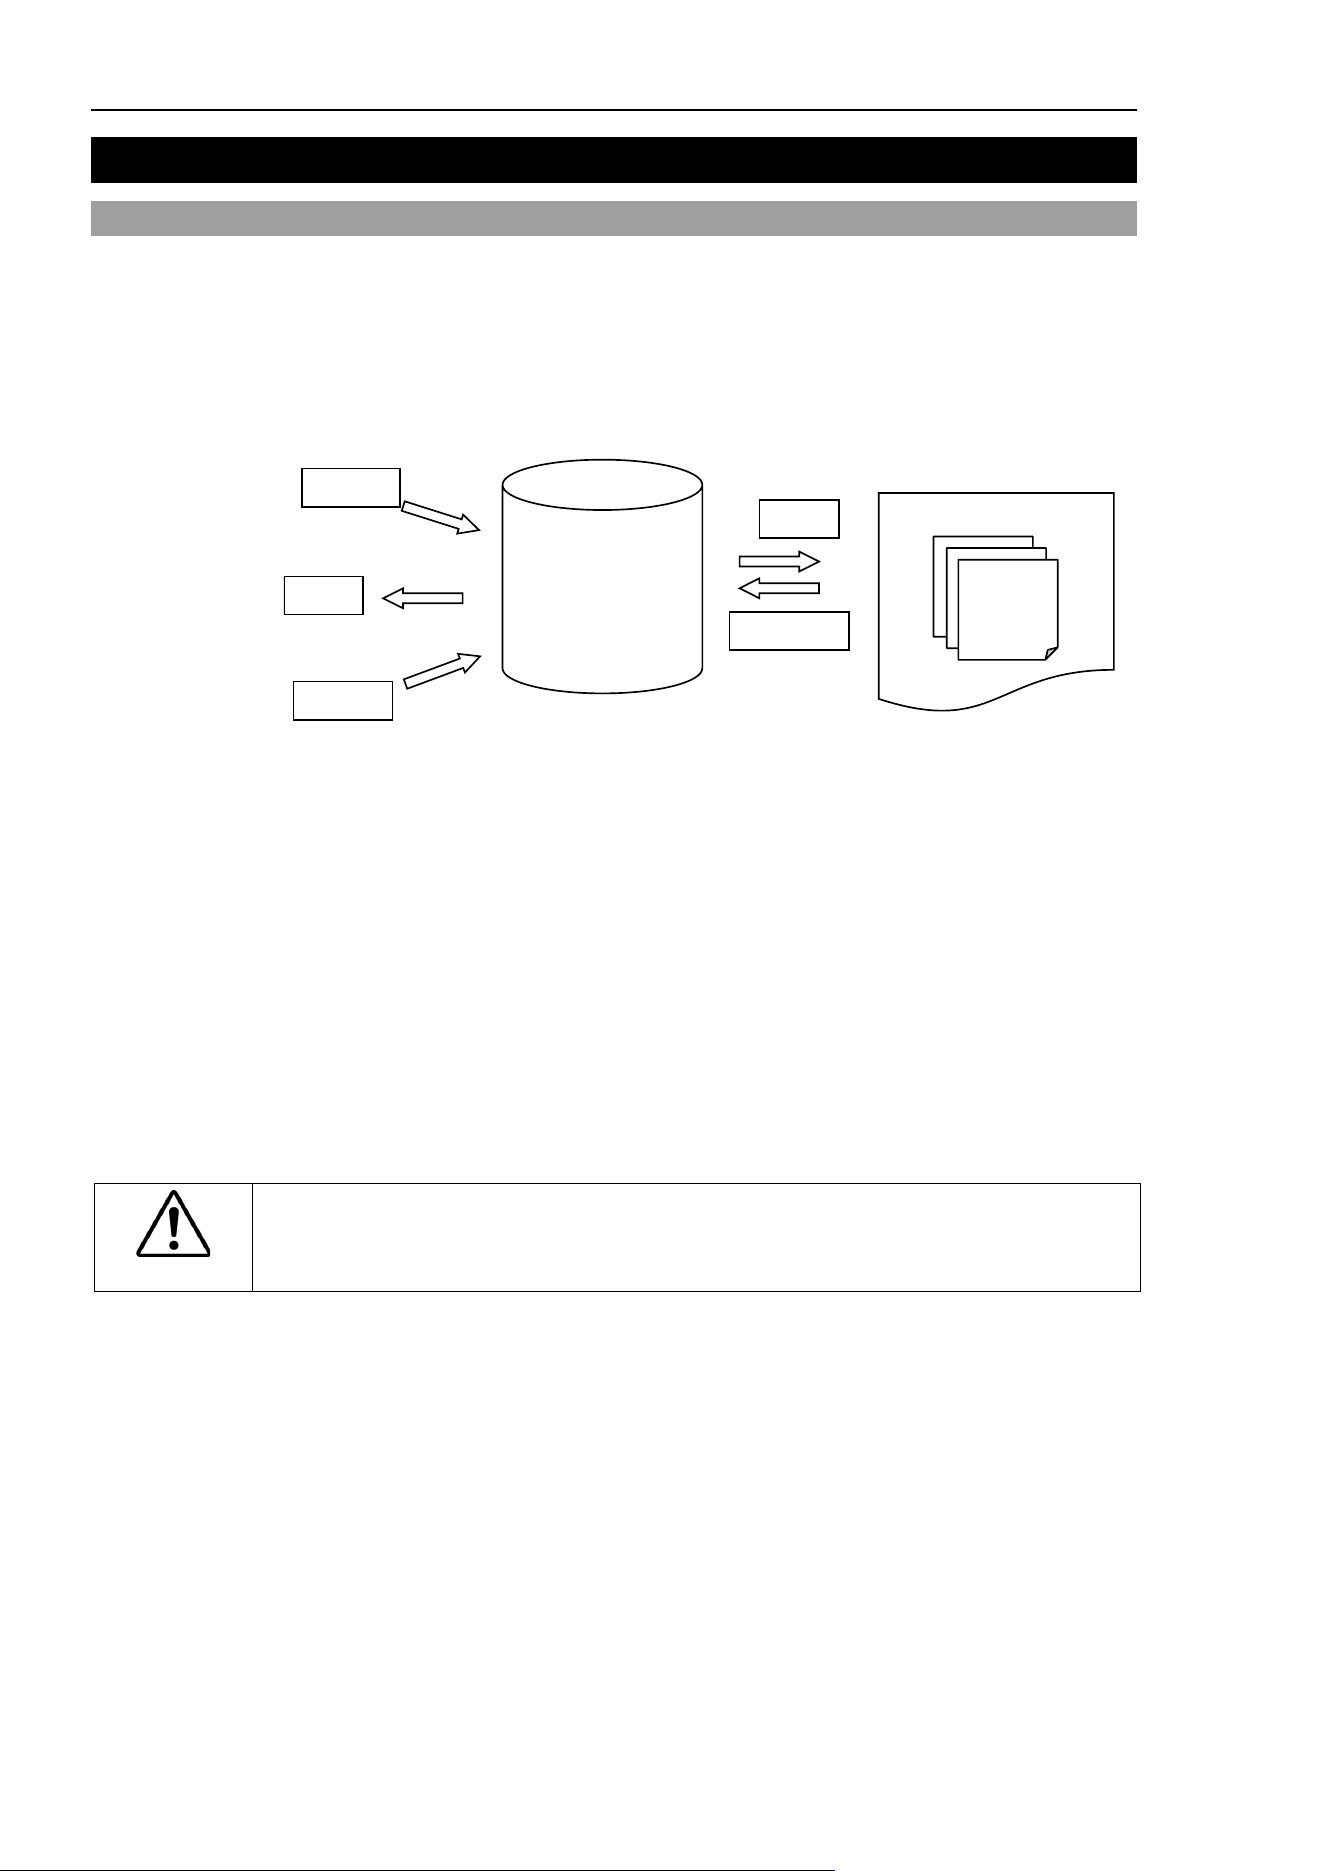
22. Calibration of Commercial Vision Sensor and Robot
552 EPSON RC+ 7.0 (Ver.7.4) User's Guide Rev.6
22. Calibration of Commercial Vision Sensor and Robot
22.1 Overview
When using the commercially available vision sensors or image processing systems,
instead of our Vision Guide, it is necessary to calibrate the image processing result (image
coordinate system, camera coordinate system) with the robot coordinate system. This
chapter describes the calibration procedure.
The figure below shows commands and functions related to calibration and behaviors of
data and files.
Create
VxCalib
Project folder
File
(*.caa)
Delete
Save
Load
Calibration data
(Max.
16)
(in the robot
controller memory)
VxCalSave
VxCalLoad
Use
VxTrans
The vision calibration data can be created in the following steps.
(1) Install the camera
(2) Create the image processing sequence for calibration(in each vision sensor)
(3) Teach the robot position for calibration at necessary parts
(4) Perform image processing at necessary parts and acquire the image processing result.
(5) Execute calibration (VxCalib command)
(6) Save calibration data (VxCalSave command)
If you are using our Vision Guide option, refer to the Vision Guide manual. Calibration
with the Vision Guide option can be configured by the wizard easily.
CAUTION
■
We cannot answer the questions regarding communication
settings and usage
for commercial vision sensors. Please contact the manufacture directly.
NOTE
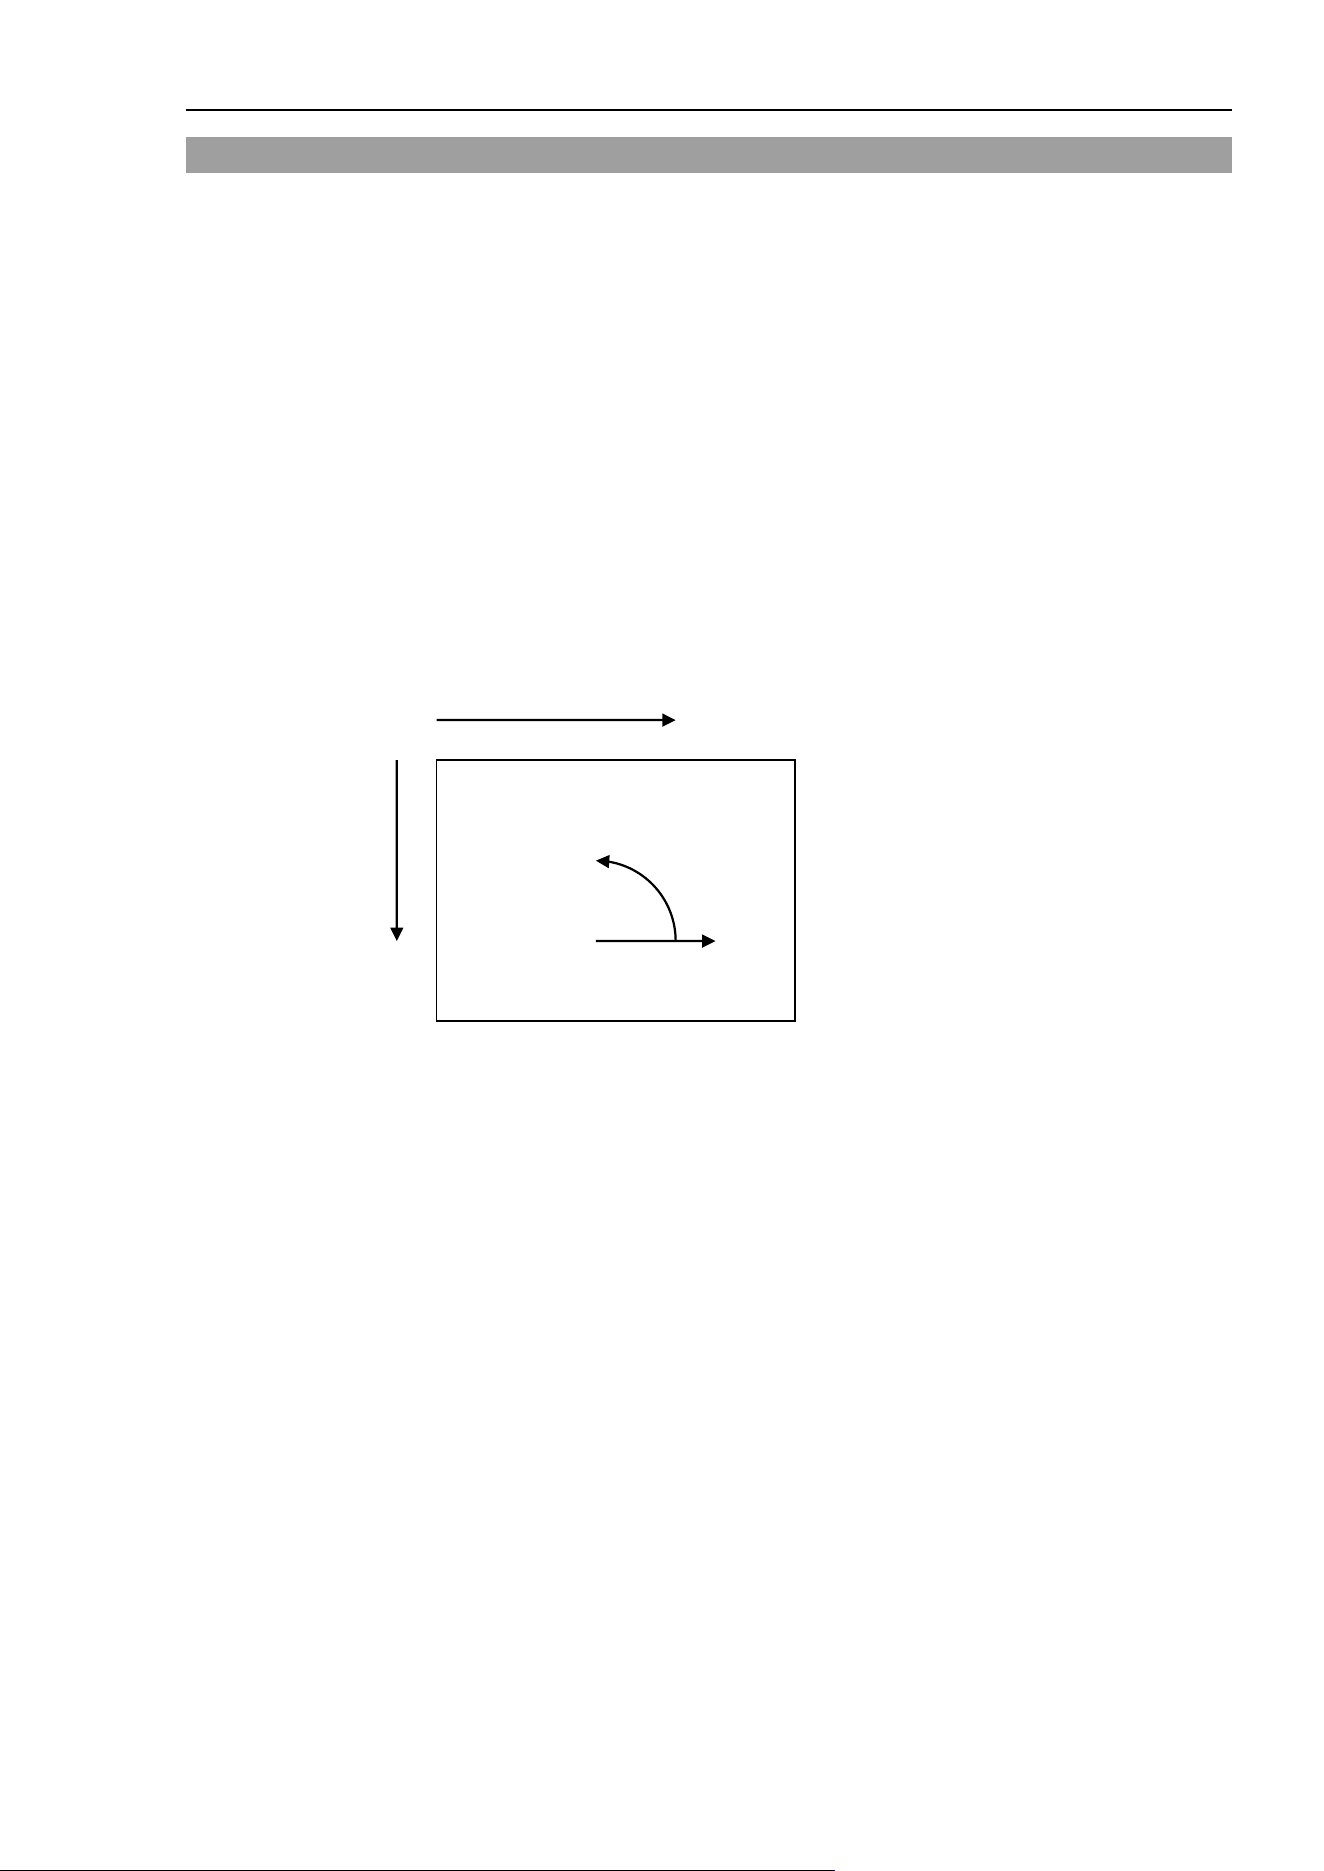
22. Calibration of Commercial Vision Sensor and Robot
EPSON RC+ 7.0 (Ver.7.4) User's Guide Rev.6 553
22.2 Specifications
Calibration data/Calibration file
Up to 16 calibration data can be saved to the robot controller at the same time.
If you are using more than 16 calibration data, load them from the file and save to the file.
Up to 16 files can be created. Be careful not to exceed the maximum number of files.
Camera installation
Following seven camera mounting types are supported. For details, refer to
21.3 Camera
Installation
.
1: Standalone
2: Fixed downward camera
3: Fixed upward camera
4: Mobile camera on the Joint #2
5: Mobile camera on the Joint #4
6: Mobile camera on the Joint #5
7: Mobile camera on the Joint #6
Image coordinate system
Following image shows the adapted image coordinate system. The unit is pixel.
+X
+Y
0, 0
0°
+Θ

22. Calibration of Commercial Vision Sensor and Robot
554 EPSON RC+ 7.0 (Ver.7.4) User's Guide Rev.6
22.3 Camera Installation
Camera installation method can be selected for each calibration data. The data set
required for calibration differs depending on mounting types. Note that the wrong setting
may result in improper calibration.
EPSON RC+ 7.0 supports the following camera installations:
Camera Installation
Description
Standalone
Camera can be installed anywhere. Camera does not
have a relation with the robot. With this method,
position information in the Robot coordinate system
cannot be acquired. However, it can be converted from
the image coordinate system to the camera coordinate
system. That is, simple length measurement can be
performed.
Fixed downward
Camera and target objects do not move and is looking
down into robot work envelope. The camera acquires
position information in the Robot coordinate system.
The camera must be installed vertically to the XY plane
of the specified coordinate system. (Angle gap may
result in poor accuracy)
Specified coordinate systems are Robot coordinate
system and Local coordinate system.
Uses nine reference points.
Fixed upward
Camera does not move and is looking up into a portion
of the robot work envelope.
For example, this installation method is used to check
the position of the object which is carried by the robot.
It does not require a reference point. The calibration
target is on the end effector or the object held by the
robot.
Mobile camera on the Joint #2
Camera is mounted on Joint 2 on SCARA robot or
Cartesian robot. It reports robot world coordinates.
Uses one reference point.
Mobile camera on the Joint #4
Camera is mounted on Joint 4 on SCARA robot or
Cartesian robot. It reports robot world coordinates.
Uses one reference point.
Mobile camera on the Joint #5
Camera is mounted on Joint 5 on 6-Axis robot. It
reports robot world coordinates.
Uses one reference point.
Mobile camera on the Joint #6
Camera is mounted on Joint 6 on 6-Axis robot. It
reports robot world coordinates.
Uses one reference point.
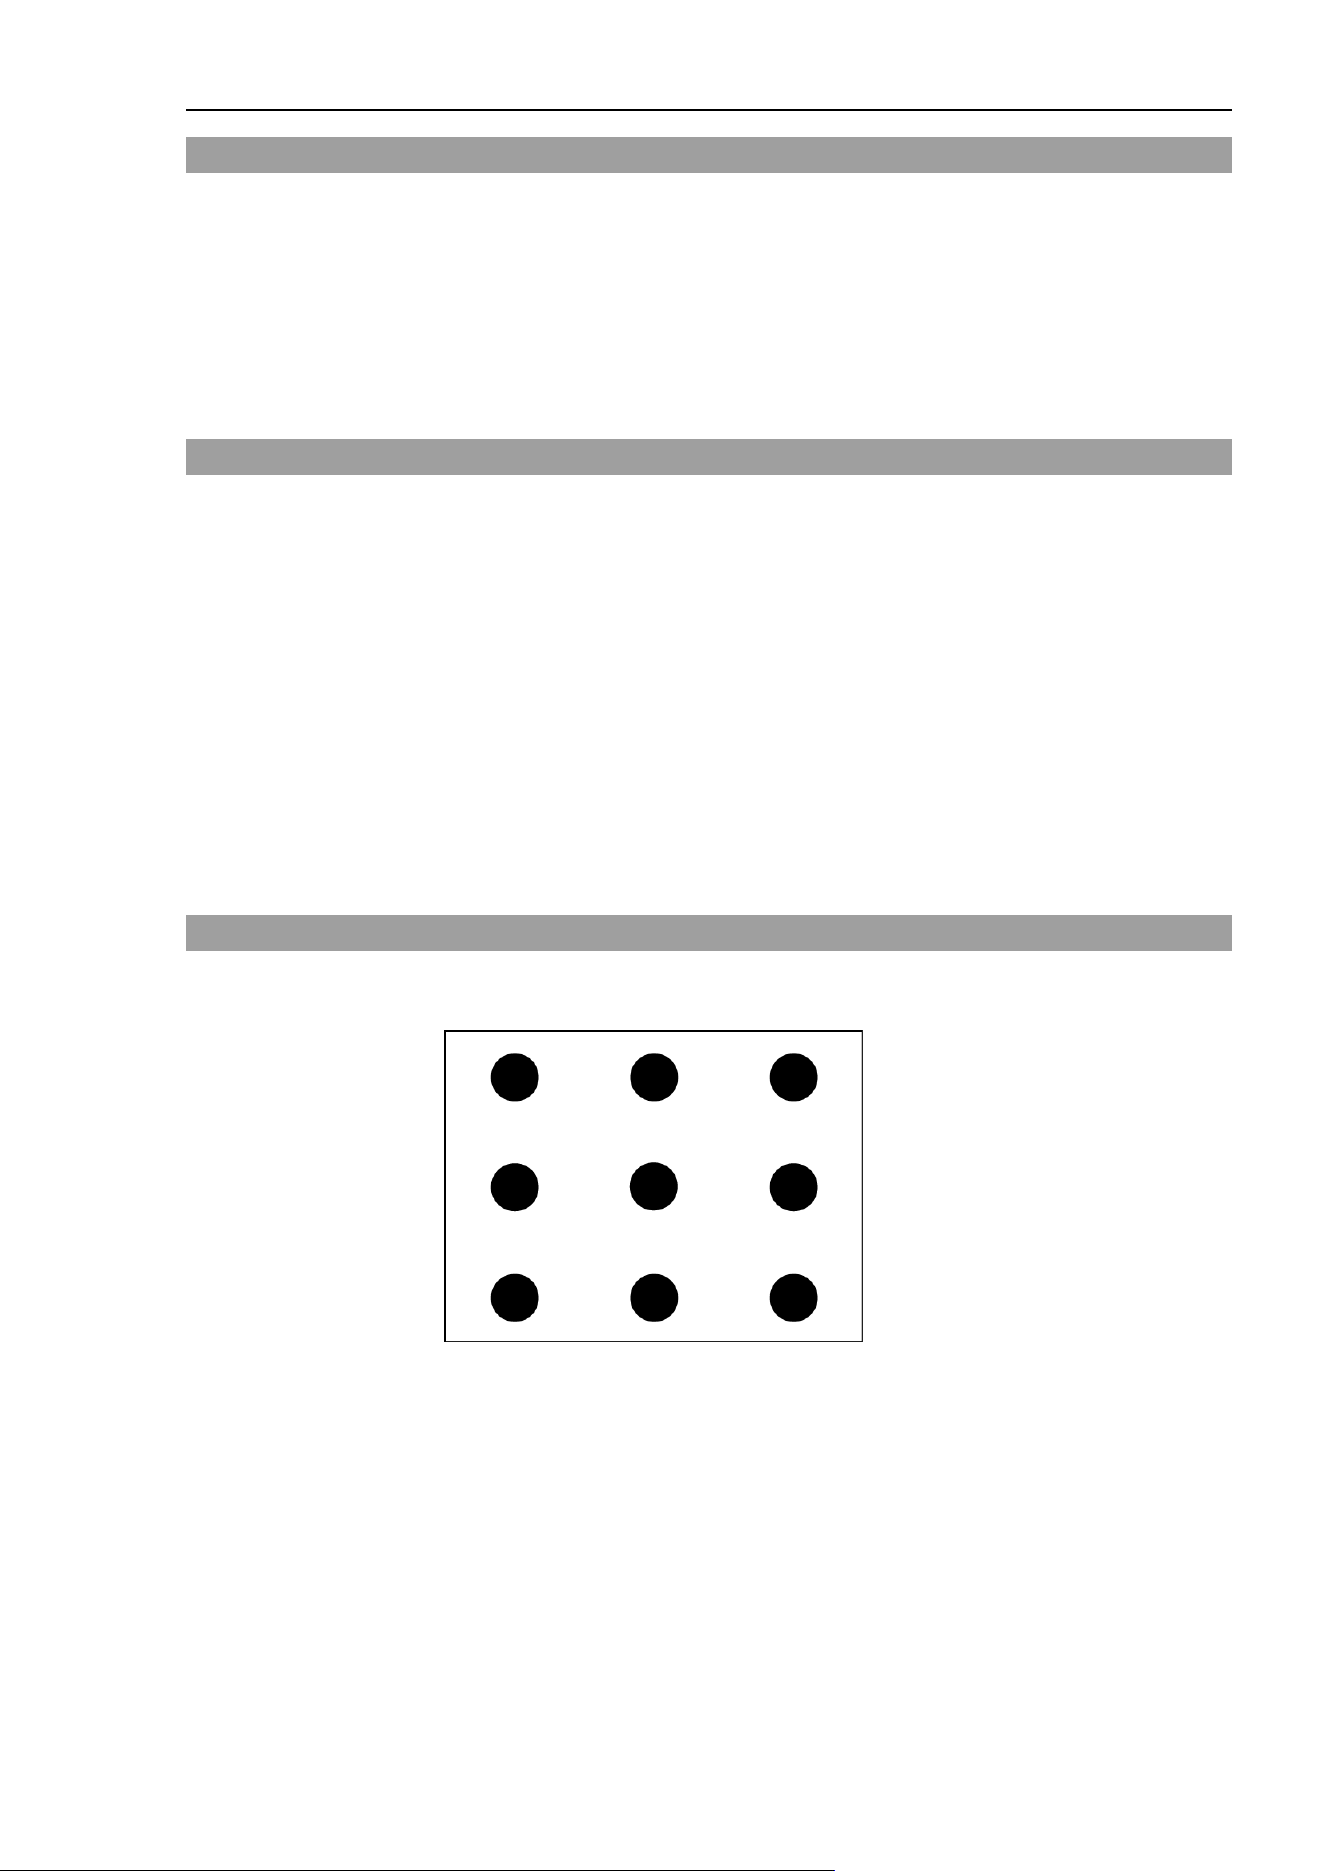
22. Calibration of Commercial Vision Sensor and Robot
EPSON RC+ 7.0 (Ver.7.4) User's Guide Rev.6 555
22.4 Reference Points
Reference points are important points to be used to calibrate the relation of the image
coordinates and the Camera or Robot coordinate systems.
Each calibration scheme requires one or more reference points. The methods for teaching
these points vary according to the camera mounting and orientation.
For Standalone camera calibration, you manually enter the coordinate values of the
reference points into the system.
For all other camera calibrations, you teach the reference points using the robot.
22.5 Reference Points for Mobile Camera
This scheme requires one reference point. Also, TowRefPoint parameter can be specified.
If TowRefPoint parameter is True, a pair (two points) of the position data is required for
the reference point. Each position data consists of two position data of the robot when the
U axis is at 0 degree and 180 degrees in the specified coordinate system.
By the TwoRefPoint function, the system can determine more precise position of the
reference position in the robot coordinate system. However, this function is not necessary
if the robot tool is defined accurately.
For the reference point, the taught points where the robot jogged can be used.
Here are some examples of taught reference points:
- A part or calibration target in the robot work envelope.
- A hole somewhere in the work envelope that a tool mounted on the robot end effector
can be slipped into.
22.6 Reference Points for Fixed Camera
The 'Fixed Downward' and 'Standalone' calibration schemes require a calibration target
plate or sheet that contains nine targets.
Fixed Camera Calibration Targets
For 'Fixed Downward' calibrations, the targets could be holes in a plate that a rod on the
robot end effector can be slipped into. The distances between the targets do not have to be
exact.
For Standalone cameras, a pattern sheet can be used. The horizontal and vertical distances
between the targets must be known.

22. Calibration of Commercial Vision Sensor and Robot
556 EPSON RC+ 7.0 (Ver.7.4) User's Guide Rev.6
22.7 Command List
Following table shows the commands and functions related to Vision calibration.
For details, refer to the SPEL+ Language Reference.
Command name
Function
VxCalib Statement
Creates calibration data for the vision system.
VxCalDelete Statement
Deletes the calibration data.
VxCalLoad Statement
Loads the calibration data from a file.
VxCalInfo Function
Returns the calibration completion status and the calibration
result.
VxCalSave Statement
Saves the calibration data to a file.
VxTrans Function
Converts pixel coordinates to robot coordinates and returns
the converted point data
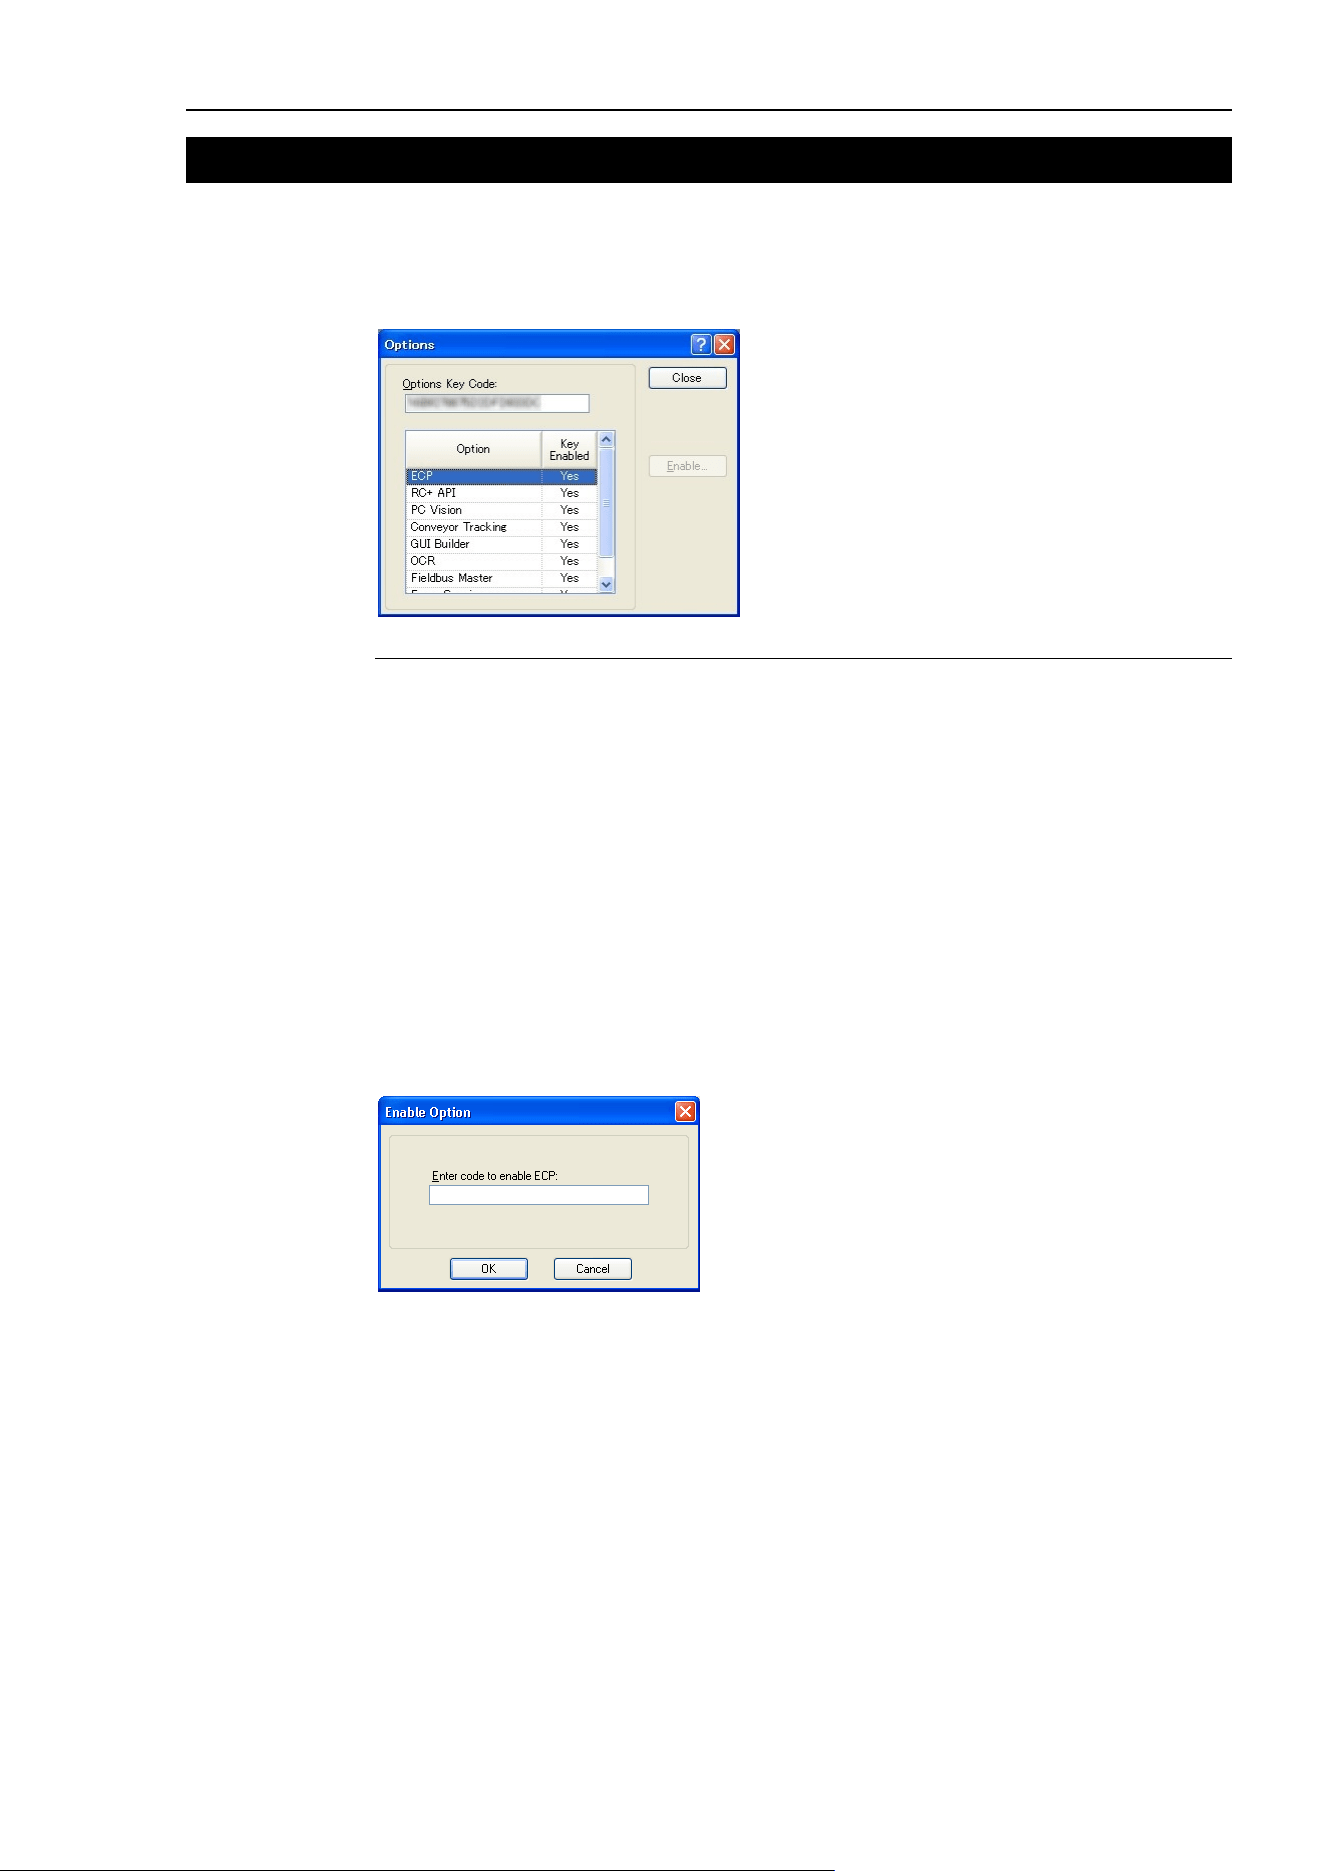
23. Installing Controller Options
EPSON RC+ 7.0 (Ver.7.4) User's Guide Rev.6 557
23. Installing Controller Options
When you purchase options with your system, the options have already been installed on
your system before shipment. Of course, you can purchase options separately.
To see what options are enabled on your system, select [Setup]-[Options]. The following
dialog will be displayed.
Item Description
Option Name of the option.
Key Enabled Indicates that the option is enabled in the controller.
To enable an option on site
1. Copy and paste or write down the Options Key Code. You can view this from the
[Setup]-[Controller]-[Options] dialog.
2. Call the supplier of your region to purchase the enable key code for the desired option.
3. You will receive a code to enable the option from the supplier of your region.
4. Select the option to enable on the grid, and then click the <Enable> button.
5. Enter in the code you received from the supplier of your region.
The key code is case sensitive.
If the DMB Board or CF card is replaced
If the DMB board or CF card is replaced due to malfunction, all configured options will
be disabled. Follow the procedure in To enable an option on site to configure the
options again.
* If the DMB board or CF card is replaced, the previous code for enabling the option
cannot be used.
NOTE

24. Software License Agreement
558 EPSON RC+ 7.0 (Ver.7.4) User's Guide Rev.6
24. Software License Agreement
SOFTWARE LICENSE AGREEMENT
IMPORTANT! READ THIS SOFTWARE LICENSE AGREEMENT CAREFULLY
BEFORE INSTALLING OR USING THIS SOFTWARE.
This software products and/or any accompanying explanatory written materials (the
“Software”) should only be installed or used by the Licensee (“you”) on the condition
you agree with SEIKO EPSON CORPORATION (including its affiliates and licensors,
“EPSON”) to the terms and conditions of this Agreement. By installing or using the
Software, you are representing to agree with all the terms and conditions of this
Agreement. If you do not agree with the terms and conditions of this Agreement, you
are not permitted to install or use the Software. In this Agreement, affiliates mean any
corporation or entity of which EPSON owns, directly or indirectly, a majority of the
assets or voting stock.
1. License.
EPSON grants you a personal, nonexclusive, limited license to
(i) install and use the Software on any single computer or EPSON’s robot controller
products, following the instructions, terms and conditions under the “Epson RC+7.0
User’s Guide” and its “Appendix B: EPSON RC +7.0 Software”;
(ii) make one copy of the Software for backup and archival purposes. For clarity, such
backup and archival copy so made shall be treated as the Software herein;
2. Limitations.
You shall use the Software in a manner permitted herein. You agree not to (i) modify,
adapt, translate or make any derivative works from the Software and (ii) attempt to
reverse engineer, decompile, disassemble or otherwise attempt to discover the source
code of the Software. Unless otherwise provided herein, you shall not share, rent, lease,
encumber, sublicense, lend or distribute the Software.
3. Third Party Software
The Software may contain third party’s software (“Third Party Software”, including
open-source software, such as GNU General Public License and GNU Lesser/ Library
GPL). For clarity, a Third Party Software named XVL Kernel, owned by Lattice
Technology Co.,Ltd (“XVL Kernel”) is included in the Software. If the Software
contains the Third Party Software, you shall review and comply with the terms and
conditions applicable to such Third Party Software before using the Software.
4. Ownership.
Excluding the Third Party Software, any title, ownership, intellectual property rights
and any other rights in and to the Software shall remain with EPSON. Any title,
ownership, intellectual property rights and any other rights in and to XVL Kernel,
which is a Third Party Software, shall remain with Lattice Technology Co.,Ltd. You
shall not be granted any title, ownership, intellectual property rights or any other rights
in and to the Software unless explicitly provided herein. The Software is protected by
Japanese Copyright Law and international copyright treaties, as well as other
intellectual property laws and treaties. You agree not to remove or alter any copyright
and other proprietary notices on any copies of the Software.

24. Software License Agreement
EPSON RC+ 7.0 (Ver.7.4) User's Guide Rev.6 559
5. Protection and Security.
You agree to use your best efforts and take all reasonable steps to safeguard the
Software to ensure that no unauthorized person has access to it and that no
unauthorized copy, publication, disclosure or distribution of the Software is made.
You acknowledge that the Software contains valuable, confidential information and
trade secrets and that unauthorized use and copy are harmful to EPSON. You shall
hold in strict confidence the Software and any information obtained in connection with
the Software.
6. No Warranty.
You acknowledge and agree that the use of the Software is at your sole risk. THE
SOFTWARE IS PROVIDED “AS IS” AND WITHOUT ANY WARRANTY OF
ANY KIND. EPSON DOES NOT AND CANNOT WARRANT THE
PERFORMANCE OR RESULTS YOU MAY OBTAIN BY USING THE
SOFTWARE. EPSON MAKES NO WARRANTIES OF ANY KIND, EXPRESS OR
IMPLIED, INCLUDING, BUT NOT LIMITED TO THE IMPLIED WARRANTIES
OF NON-INFRINGEMENT, MERCHANTABILITY OR FITNESS FOR ANY
PARTICULAR PURPOSE.
7. Limitation of Liability.
IN NO EVENT WILL EPSON BE LIABLE TO YOU, WHETHER ARISING
UNDER CONTRACT, TORT (INCLUDING NEGLIGENCE), STRICT LIABILITY,
BREACH OR WARRANTY, MISREPRESENTATION OR OTHERWISE, FOR
ANY DIRECT, INDIRECT, CONSEQUENTIAL, INCIDENTAL OR SPECIAL
DAMAGES, INCLUDING ANY LOST PROFITS OR LOST SAVINGS, EVEN IF
EPSON OR ITS REPRESENTATIVE HAS BEEN ADVISED OF THE
POSSIBILITY OF SUCH DAMAGES, OR FOR ANY CLAIM BY ANY THIRD
PARTY. IN THE EVENT LIMITATION OF LIABILITY HEREUNDER IS FOUND
INVALID OR UNENFORCEABLE BY A COURT OF COMPETENT
JURISDICTION, THE AGGREGATE LIABILITY OF EPSON TO YOU FOR ANY
DAMAGES OR LOSS SHALL NOT EXCEED THE TOTAL AMOUNT PAID BY
YOU TO EPSON IN CONSIDERATION OF THE SOFTWARE.
8. Termination.
Without prejudice to any other rights EPSON has, this Agreement shall immediately
terminate without any notice upon failure by you to comply with its terms. You may
also terminate this Agreement at any time by uninstalling and destroying the Software.
For clarity, you shall not be released from any obligations imposed prior to the
termination of this Agreement.
9. Export Restriction.
You agree not to transfer, export or re-export the Software and any data or information
which you obtained from the Software or in connection with this Agreement without a
proper license under Japanese law, restrictions and regulations or the laws of the
jurisdiction in which you obtained the Software.
10. Governing Law and Severability
This Agreement shall be governed by and construed under the laws of Japan without
regard to its conflicts of law rules. If any provision herein is found invalid or
unenforceable by a court of competent jurisdiction, it will not affect the validity of the
balance of this Agreement, which shall remain valid and enforceable according to its
terms.

24. Software License Agreement
560 EPSON RC+ 7.0 (Ver.7.4) User's Guide Rev.6
11. Updating Software Version.
Epson may provide you an updated version of the Software for the purpose of
improvement and bug-fixes. Such updated Software shall be deemed to be the
Software and be governed by this Agreement.
12. Entire Agreement.
This Agreement is the entire agreement between the parties with respect to the
Software and supersedes any communication, advertisement, or representation
concerning the Software. This Agreement shall be binding upon and inure to the
benefit of the parties hereto and their respective successors, assigns and legal
representatives.
13. General Provisions.
(1) EPSON may change, modify or otherwise alter this Agreement in its sole discretion at
any time with or without notice to you. You shall review this Agreement on a regular
basis to acknowledge such changes. By using the Software after any such changes
have been made, you are deemed to agree to comply with, and to be bound by, the
modified Agreement.
(2) Any translation of this Agreement is provided solely for your convenience and is not
intended to modify the terms and conditions of this Agreement. In the event of a
conflict between the Japanese version and any versions in other languages of this
Agreement, the Japanese version shall prevail and govern.
14. U.S. Government End Users.
If you are acquiring the Software on behalf of any unit or agency of the United States
Government, the following provisions apply. The Government agrees:
(i) if the Software is supplied to the Department of Defense (DoD), the Software is
classified as “Commercial Computer Software” and the Government is acquiring only
“restricted rights” in the Software and its documentation as that term is defined in
Clause 252.227-7013(c)(1) of the DFARS; and (ii) if the Software is supplied to any
unit or agency of the United States Government other than DoD, the Government’s
rights in the Software and its documentation will be as defined in Clause 52.227-
19(c)(2) of the FAR or, in the case of NASA, in Clause 18-52.227-86(d) of the NASA
supplement to the FAR.
©Seiko Epson Corporation 2016. All rights reserved.

Appendix A: Automatic Processing of Project Import
EPSON RC+ 7.0 (Ver.7.4) User's Guide Rev.6 A-1
Appendix A: Automatic Processing of Project Import
Project Import for EPSON RC+ 6.*
When projects created in EPSON RC+ 6.* are imported, all project files are copied to the
new EPSON RC+ 7.0 project directory.
Vision Guide Conversion
When using the smart camera or flame grabber, model images of each object (Correlation
object, Geometric object, etc.) are not imported.
Perform model teaching again after importing them.
Project Import for EPSON RC+ 5.*
When projects created in EPSON RC+ 5.* are imported, all project files are copied to the
new EPSON RC+ 7.0 project directory. In addition, the following processes are executed
automatically:
- Point file update
- User Program Conversion
Point File Update
For EPSON RC+ 5.*, the .PTS files are updated automatically to the EPSON RC+
6.0 .PTS file version.
User Program Conversion
Project Import for EPSON RC+ 3.* / 4.*
When projects created in EPSON RC+ 3.* / 4.* are imported, the following processes are
executed automatically:
- User program conversion
- Point file conversion
- I/O label file conversion
- User error label file conversion
- Vision Guide conversion
User Program Conversion
The tables below show the syntax conversions from EPSON RC+ 3.* / 4.* to EPSON RC+
7.0.
Project Type
EPSON RC+ 4.*
EPSON RC+ 7.0
Syntax
While
Do While
Wend
Loop
Trap...Call
Trap...Xqt
Project Type
EPSON RC+ 3.*
EPSON RC+ 7.0
Syntax
While
Do While
Wend
Loop
Trap...Call
Trap...Xqt
On $, Off $
MemOn, MemOff
Sw($
MemSw(
Sw $(
MemSw(
In($
MemIn(
In $(
MemIn(

Appendix A: Automatic Processing of Project Import
A-2 EPSON RC+ 7.0 (Ver.7.4) User's Guide Rev.6
Project Type
EPSON RC+ 3.*
EPSON RC+ 7.0
Out $
MemOut
Xqt !
Xqt
Quit !
Quit
Resume !
Resume
Halt !
Halt
Point File Conversion
For EPSON RC+ 3.*, the EPSON RC+ 7.0 *PTS files are generated automatically from
the .PNT files and corresponding .DEF files.
Project Type
EPSON RC+ 3.*
EPSON RC+ 7.0
Point File
*.PNT file (Point file)
*.DEF file (Point label file)
*.PTS
For EPSON RC+ 4.*, the EPSON RC+ 7.0 *.PTS files are generated automatically from
the .PNT files.
Project Type
EPSON RC+ 4.*
EPSON RC+ 7.0
Point File
*.PNT file (Point file)
*.PTS
I/O Label File Conversion
IOLabels.dat is generated automatically from the following three files.
Project Type
EPSON RC+ 3.* / 4.*
EPSON RC+ 7.0
I/O Label File
inplabel.txt
outlabel.txt
memlabel.txt
IOLabels.dat
User Error Label File Conversion
Files are changed automatically as the user error numbers are changed.
Project Type
EPSON RC+ 3.* / 4.*
EPSON RC+ 7.0
User Error Label
30000 to 30999
8000 to 8999
User Error Label File
UserErrors.txt
UserErrors.dat
Vision Guide Conversion
EPSON RC+ 3.* / 4.* project vision files are updated to EPSON RC+ 7.0 format
automatically. Files related to sequence, objects, and calibration are all imported.
Note:
When using the smart camera or flame grabber, model images of each object (Correlation
object, Geometric object, etc.) are not imported.
Perform model teaching again after importing them.

Appendix A: Automatic Processing of Project Import
EPSON RC+ 7.0 (Ver.7.4) User's Guide Rev.6 A-3
Project Import for SPEL for Windows 2.*
When projects created in SPEL for Windows 2.* are imported, the following processes are
executed automatically.
- User program conversion
- Point file conversion
- I/O label file conversion
- Global Preserve variable table conversion
- Global variable conversion
- Local variable conversion
User Program Conversion
The table below shows the syntax conversions to EPSON RC+ 7.0.
Project Type
SPEL for Windows 2.*
EPSON RC+ 7.0
Syntax
While
Do While
Wend
Loop
Trap n...Call
Trap n...Xqt
On $, Off $
MemOn, MemOff
Sw($
MemSw(
Sw $(
MemSw(
In($
MemIn(
In $(
MemIn(
Out $
MemOut
Xqt !
Xqt
Quit !
Quit
Resume !
Resume
Halt !
Halt
Palet
Pallet
Print"
Print "
Date$(0)
Date$
Time$(0)
Time$
JS(0)
JS
TW(0)
TW
ZeroFlg(0)
ZeroFlg
Entry
Global
Config statement
SetCom statement
Cooked
Line deleted
SetRaw
Line deleted
SelRB
Line deleted
SelRB1
Line deleted
Extern
Line deleted
End
Quit All
GetDate d$
d$ = Date$
GetTime t$
t$ = Time$
Point File Conversion
EPSON RC+ 7.0 *.PTS files are generated automatically from the .PNT files and
corresponding .DEF files.
Project Type
SPEL for Windows 2.*
EPSON RC+ 7.0
Point File
*.PNT file (Point file)
*.DEF file (Point label)
*.PTS
I/O Label File Conversion
Converts the I/O labels automatically.
Project Type
SPEL for Windows 2.*
EPSON RC+ 6.0
I/O Label File
ProjectName.IOL
IOLabels.dat

Appendix A: Automatic Processing of Project Import
A-4 EPSON RC+ 7.0 (Ver.7.4) User's Guide Rev.6
Global Preserve Variable Table Conversion
Backup variable definitions created in the SPEL for Windows 2.* Project Menu are
converted into Global Preserve declaration statements in the first program file.
(Example)
If the SPEL for Windows 2.* project defines an integer backup variable called
“s_iValue”, the following statement is generated in the first program of the project.
Global Preserve Integer s_iValue
Global Variable Conversion
Global variables (Entry / Extern) in SPEL for Windows 2.* projects are converted to
Global variables in EPSON RC+ 7.0.
Project Type
SPEL for Windows 2.*
EPSON RC+ 7.0
Global Variable (Command)
Entry / Extern command
Global command
Local Variable Conversion
Local variables in SPEL for Windows 2.* functions can be used throughout the entire file
in which they are declared. These variables are converted to module variables or local
variables in EPSON RC+ 7.0, depending on their scope.
If the variable is used in only one function, it is converted to a local variable in that
function.
If the variable is used in more than one function, it is converted to a module variable.
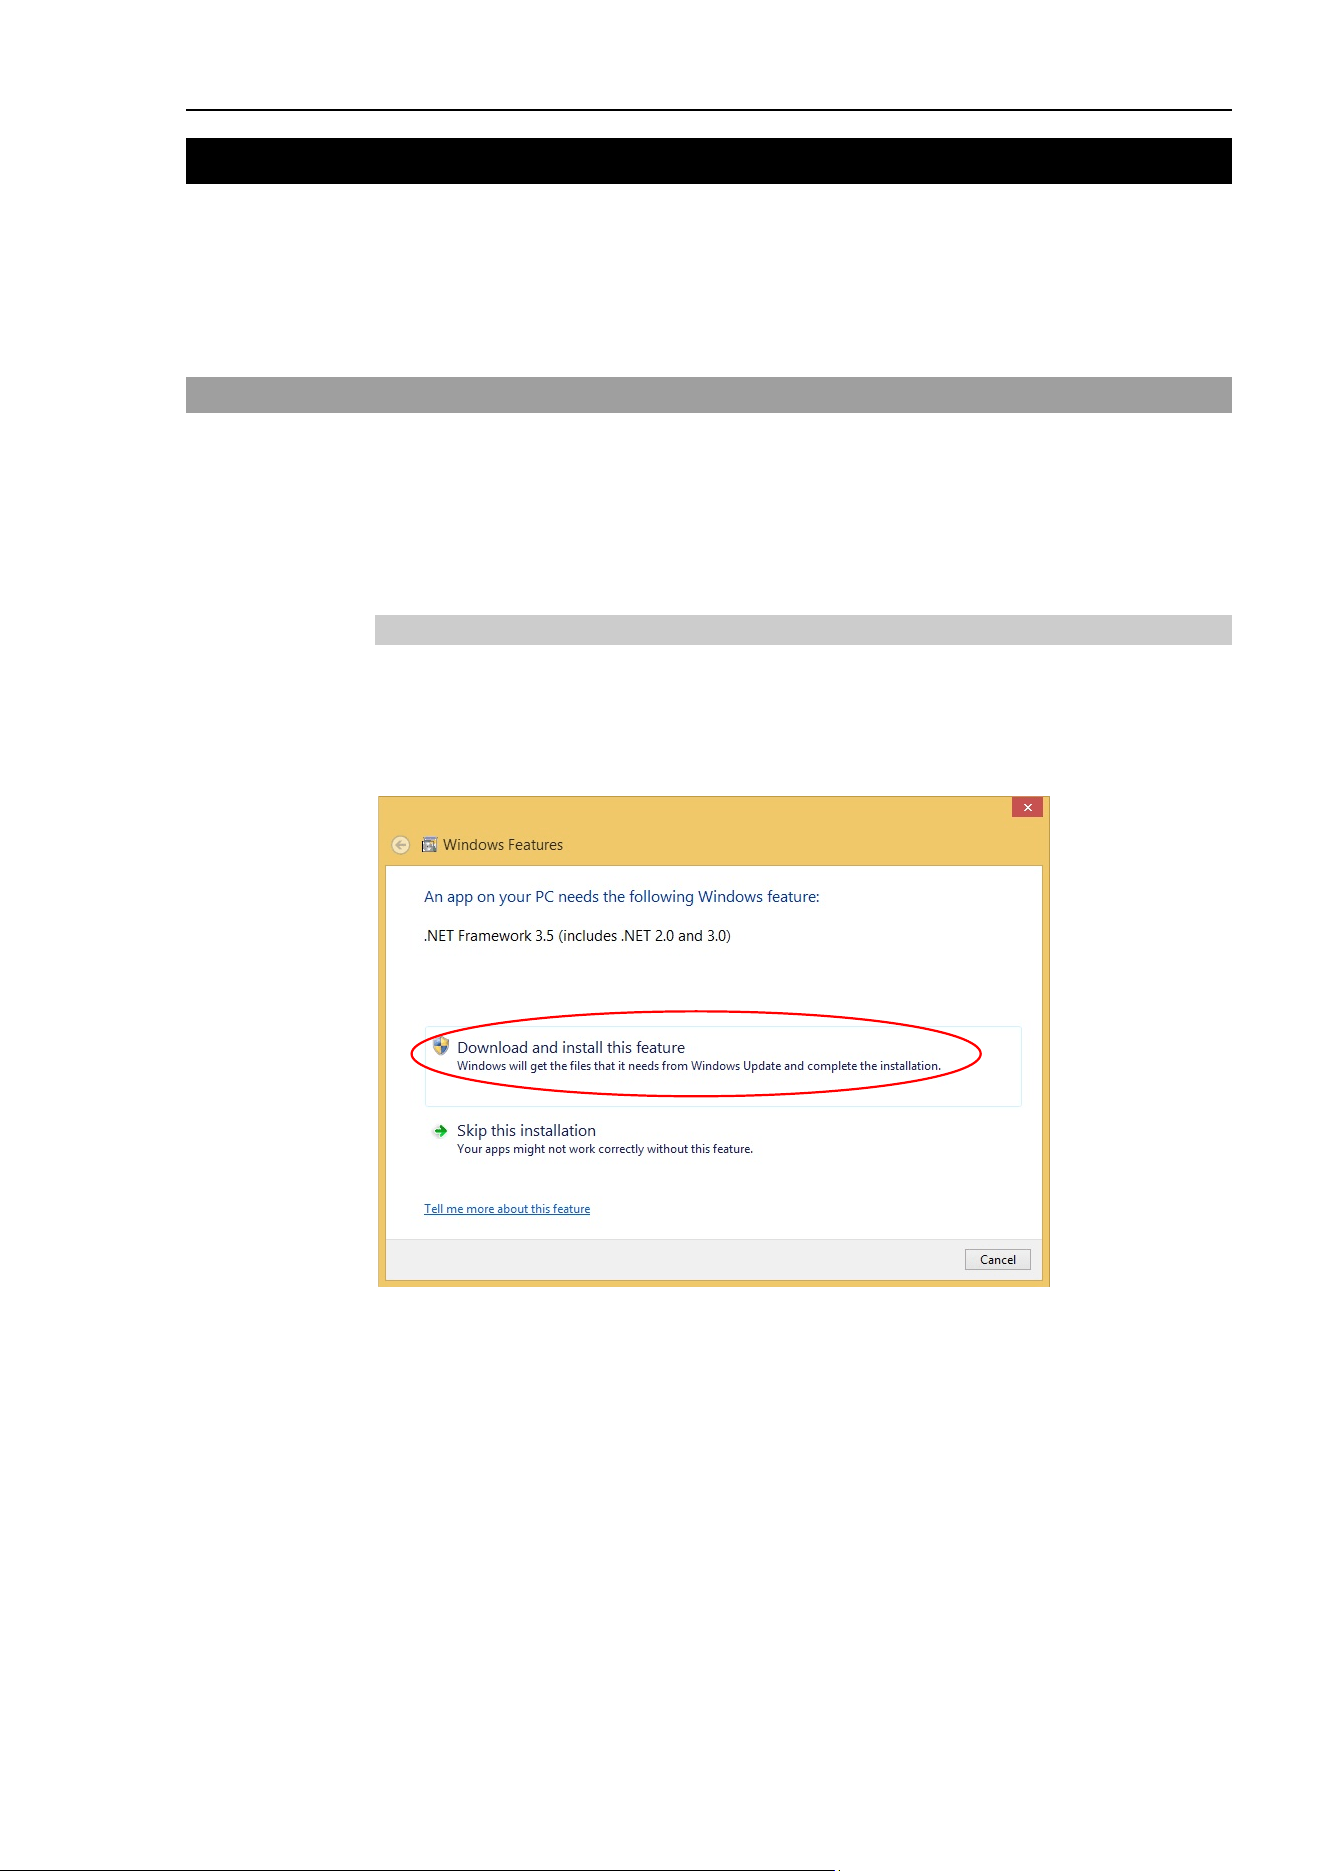
Appendix B: EPSON RC+ 7.0 Software
EPSON RC+ 7.0 (Ver.7.4) User's Guide Rev.6 B-1
Appendix B: EPSON RC+ 7.0 Software
EPSON RC+ 7.0 can be used in the following operating systems.
Windows 7 Professional Service Pack 1
Windows 8.1 Pro (EPSON RC+ 7.0 Ver.7.1.0 or later)
Windows 10 Pro (EPSON RC+ 7.0 Ver.7.2.0 or later)
Before Installing EPSON RC+ 7.0 Software
If you are using the Windows 8.1 Pro or later, follow the steps below and configure “.NET
Framework 3.5” before installing the EPSON RC+ 7.0 software.
EPSON RC+ 7.0 cannot be used with the Windows 8.1 Pro or later if “NET Framework
3.5” is not configured.
When the computer can be connected to the Internet
If the Internet environment is available, insert the EPSON RC+7.0 setup DVD to the DVD
drive.
The following dialog box will appear if “.NET Framework 3.5” is not configured.
Select “Download and install this feature” and install “.NET Framework 3.5” by following
the instruction.
The EPSON RC+ 7.0 will be installed after “.NET Framework 3.5” is installed.
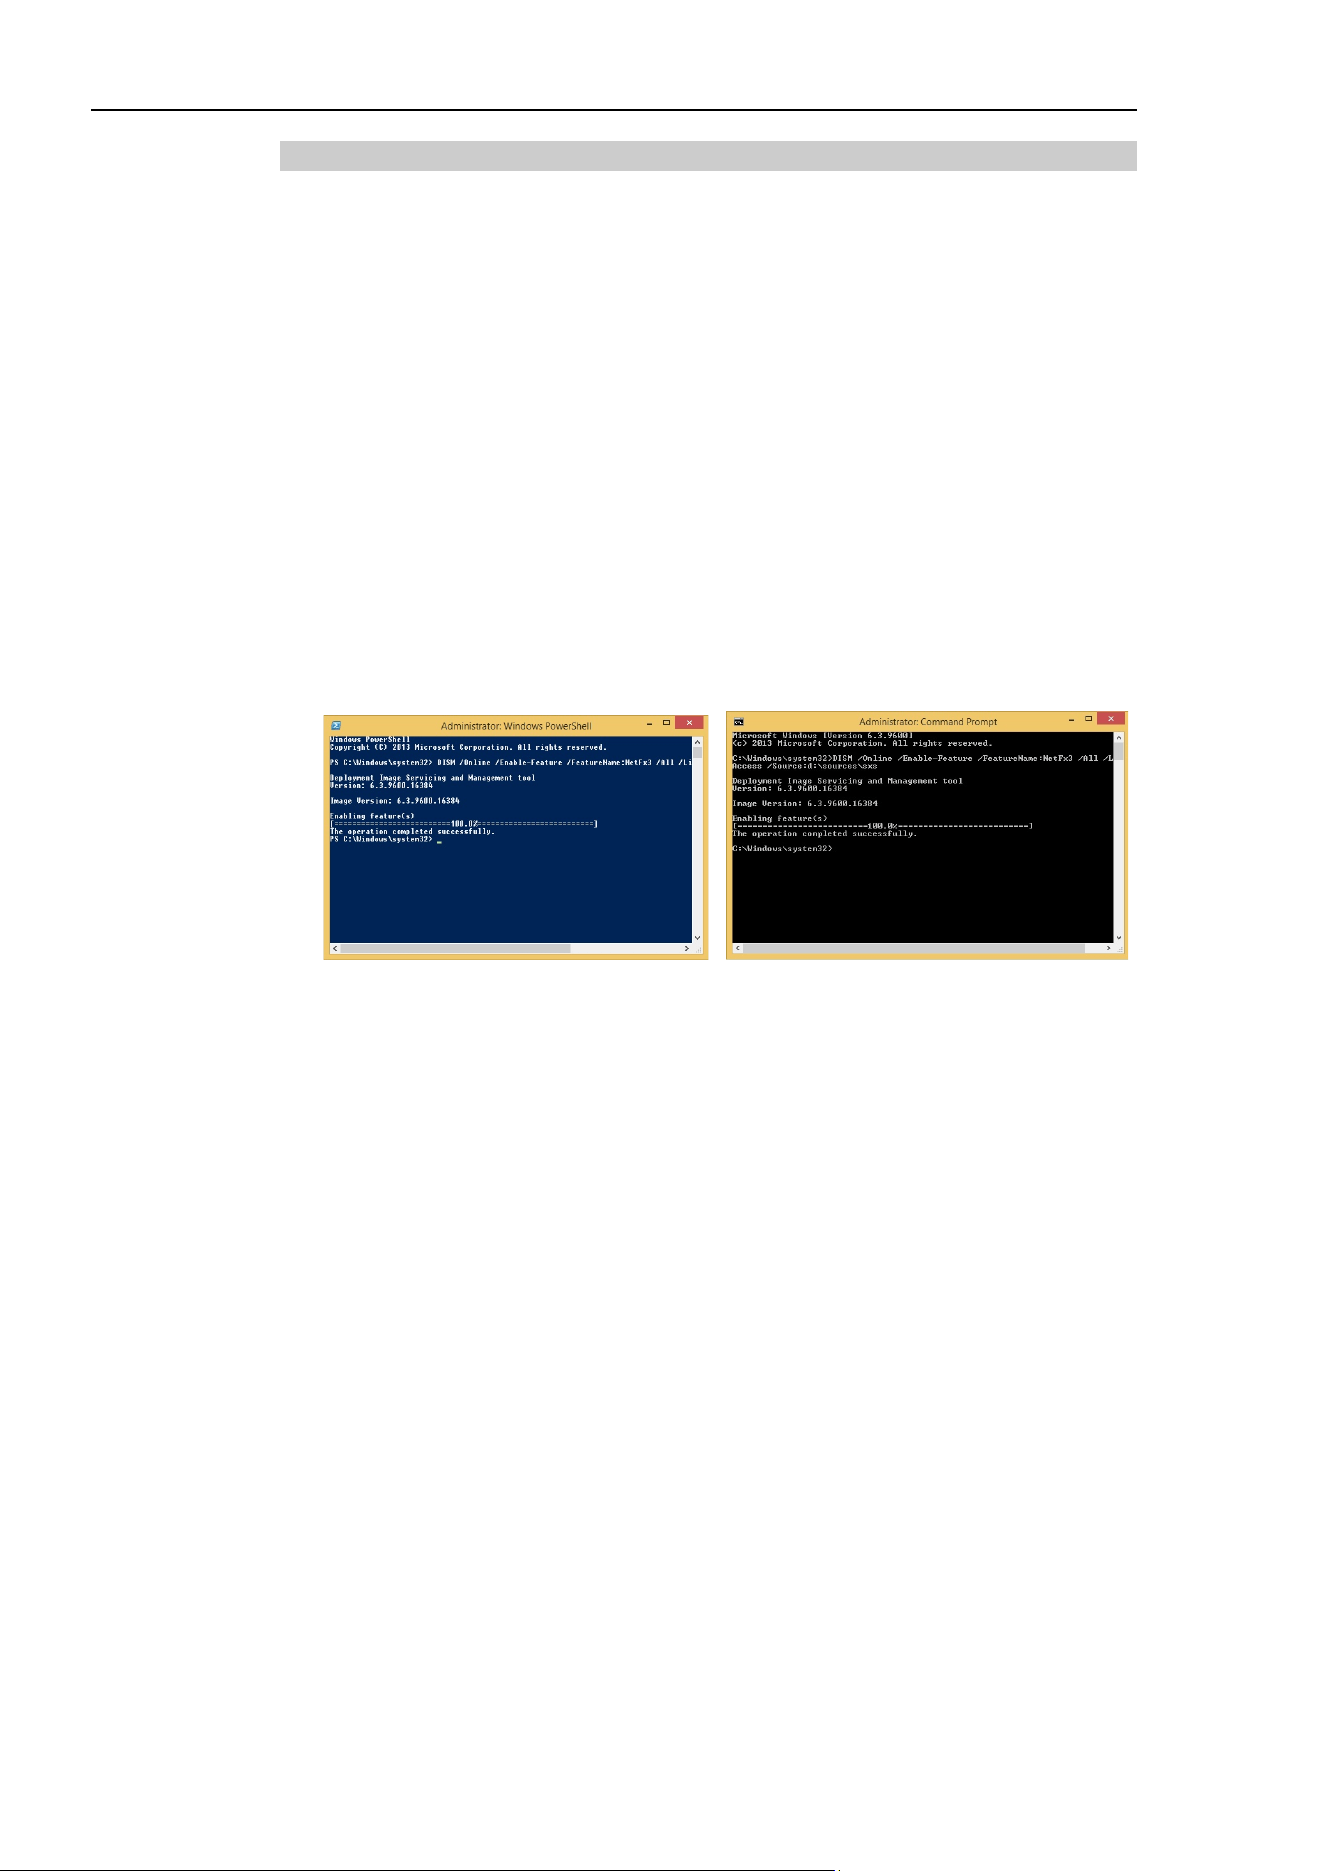
Appendix B: EPSON RC+ 7.0 Software
B-2 EPSON RC+ 7.0 (Ver.7.4) User's Guide Rev.6
When the computer cannot be connected to the Internet
If the computer cannot be connected to the Internet, install “.NET Framework 3.5” from
the media that you have installed the Windows 8.1 Pro or later.
After installing “.NET Framework 3.5”, install the EPSON RC+ 7.0.
If you do not have the installation media of Windows 8.1 Pro or later, install the feature in
the environment where the Internet connection is available.
“.NET Framework 3.5” can be enabled by specifying the installation media (ISO image or
DVD) that you have installed the Windows 8.1 Pro or later from using Deployment Image
Servicing and Management (DISM) command line tool.
1. Open the WindowsPowerShell or the command prompt window using the
administrative credential. * WindowsPowerShell is recommended.
(Select [Run as an administrator].)
2. Execute the following command.
DISM /Online /Enable-Feature /FeatureName:NetFx3 /All /LimitAccess
/Source:d:\sources\sxs
* “/Source:d:\sources\sxs” is the path to the installation disc. Select the drive
according to the PC environment.
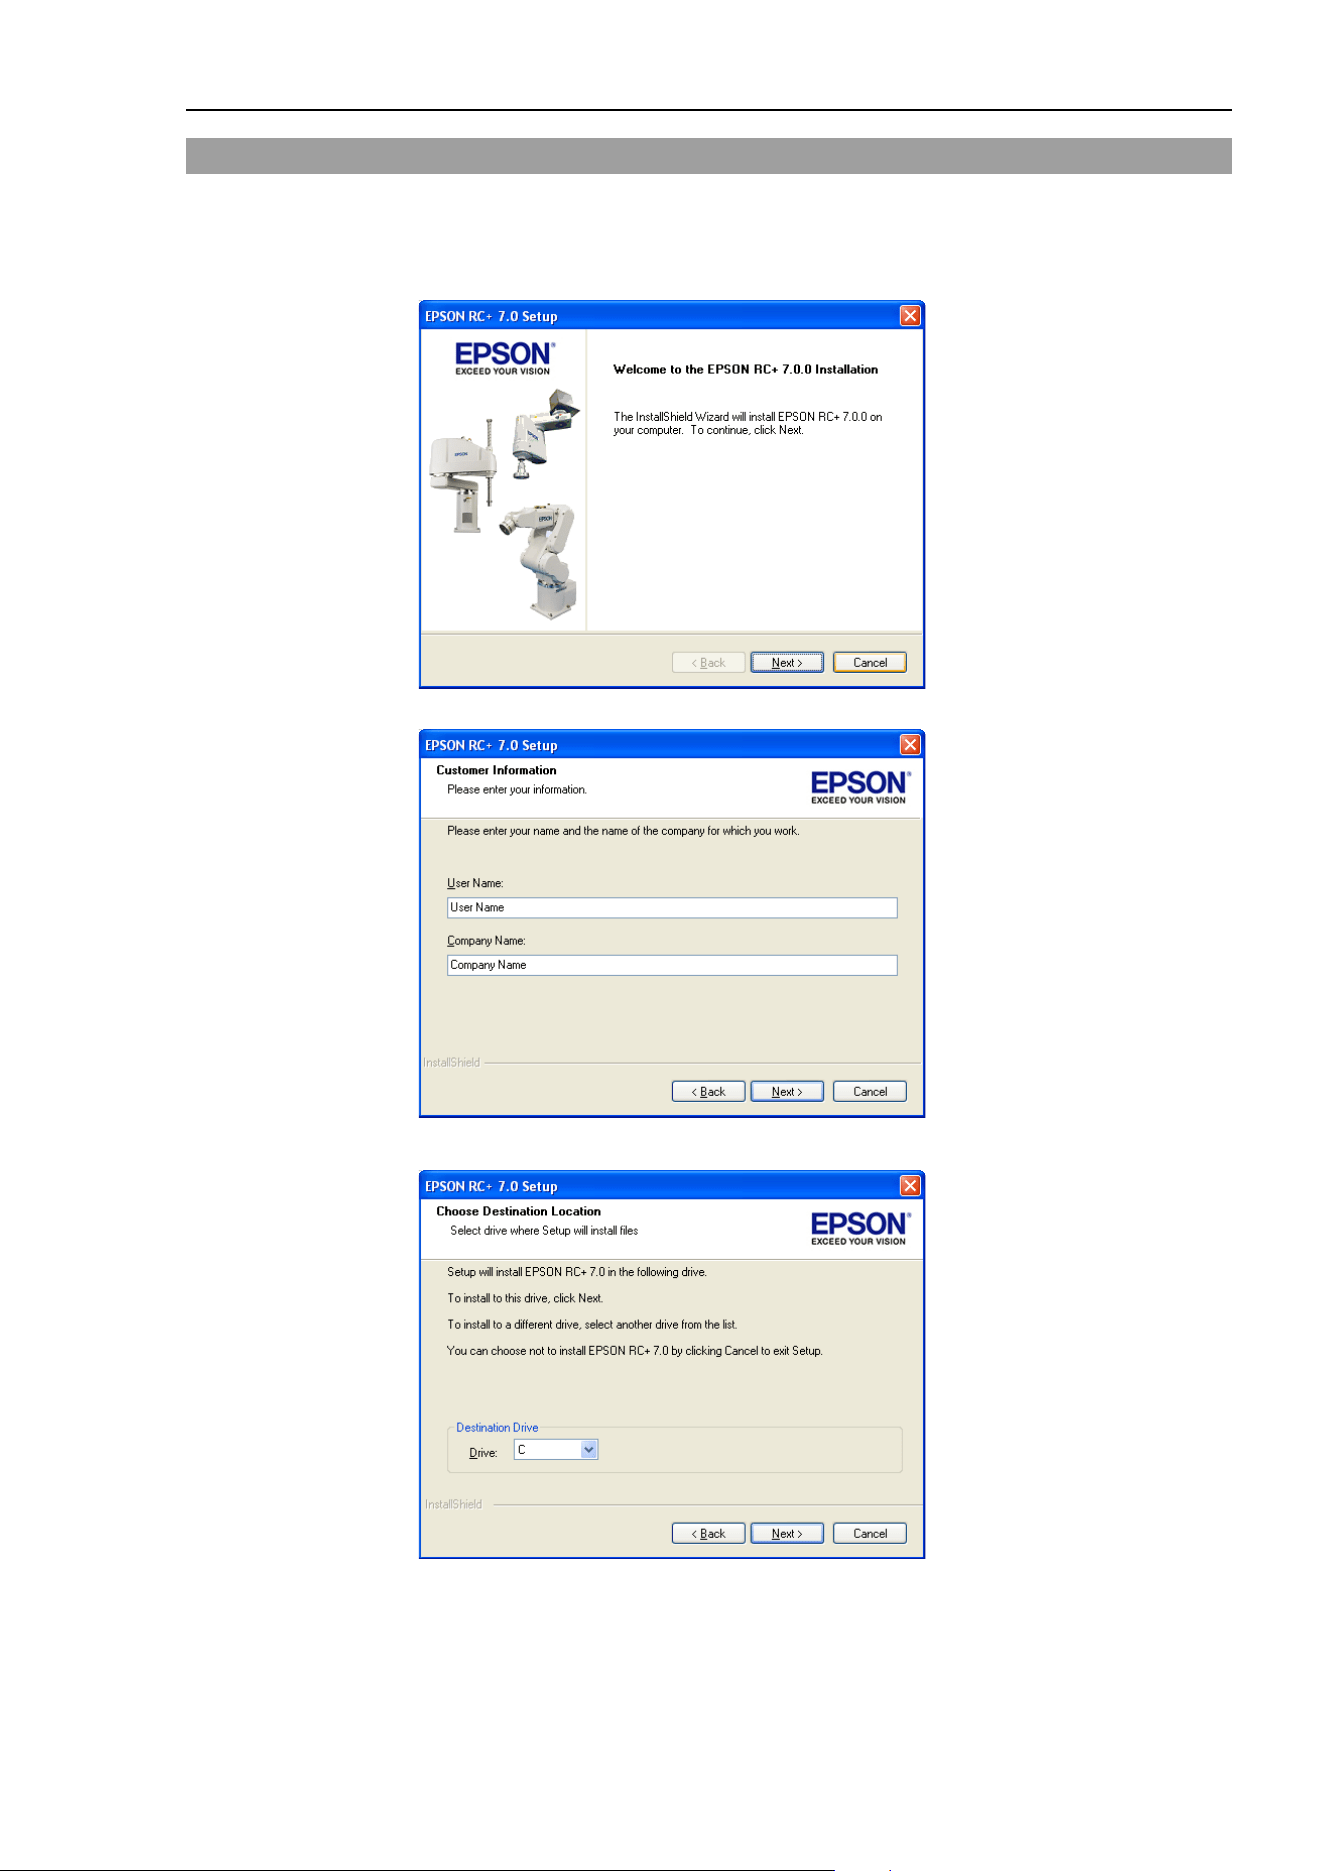
Appendix B: EPSON RC+ 7.0 Software
EPSON RC+ 7.0 (Ver.7.4) User's Guide Rev.6 B-3
EPSON RC+ 7.0 Software Installation
The EPSON RC+ 7.0 software needs to be installed on your development PC.
(1) Insert the EPSON RC+ 7.0 Setup DVD in the DVD drive.
(2) The following dialog will be displayed. Click <Next>.
(3) Enter your user name and company name and click <Next>.
(4) Select the drive where you want to install EPSON RC+ 7.0 and click <Next>.
The installation directory is called EpsonRC70. This cannot be changed.
NOTE
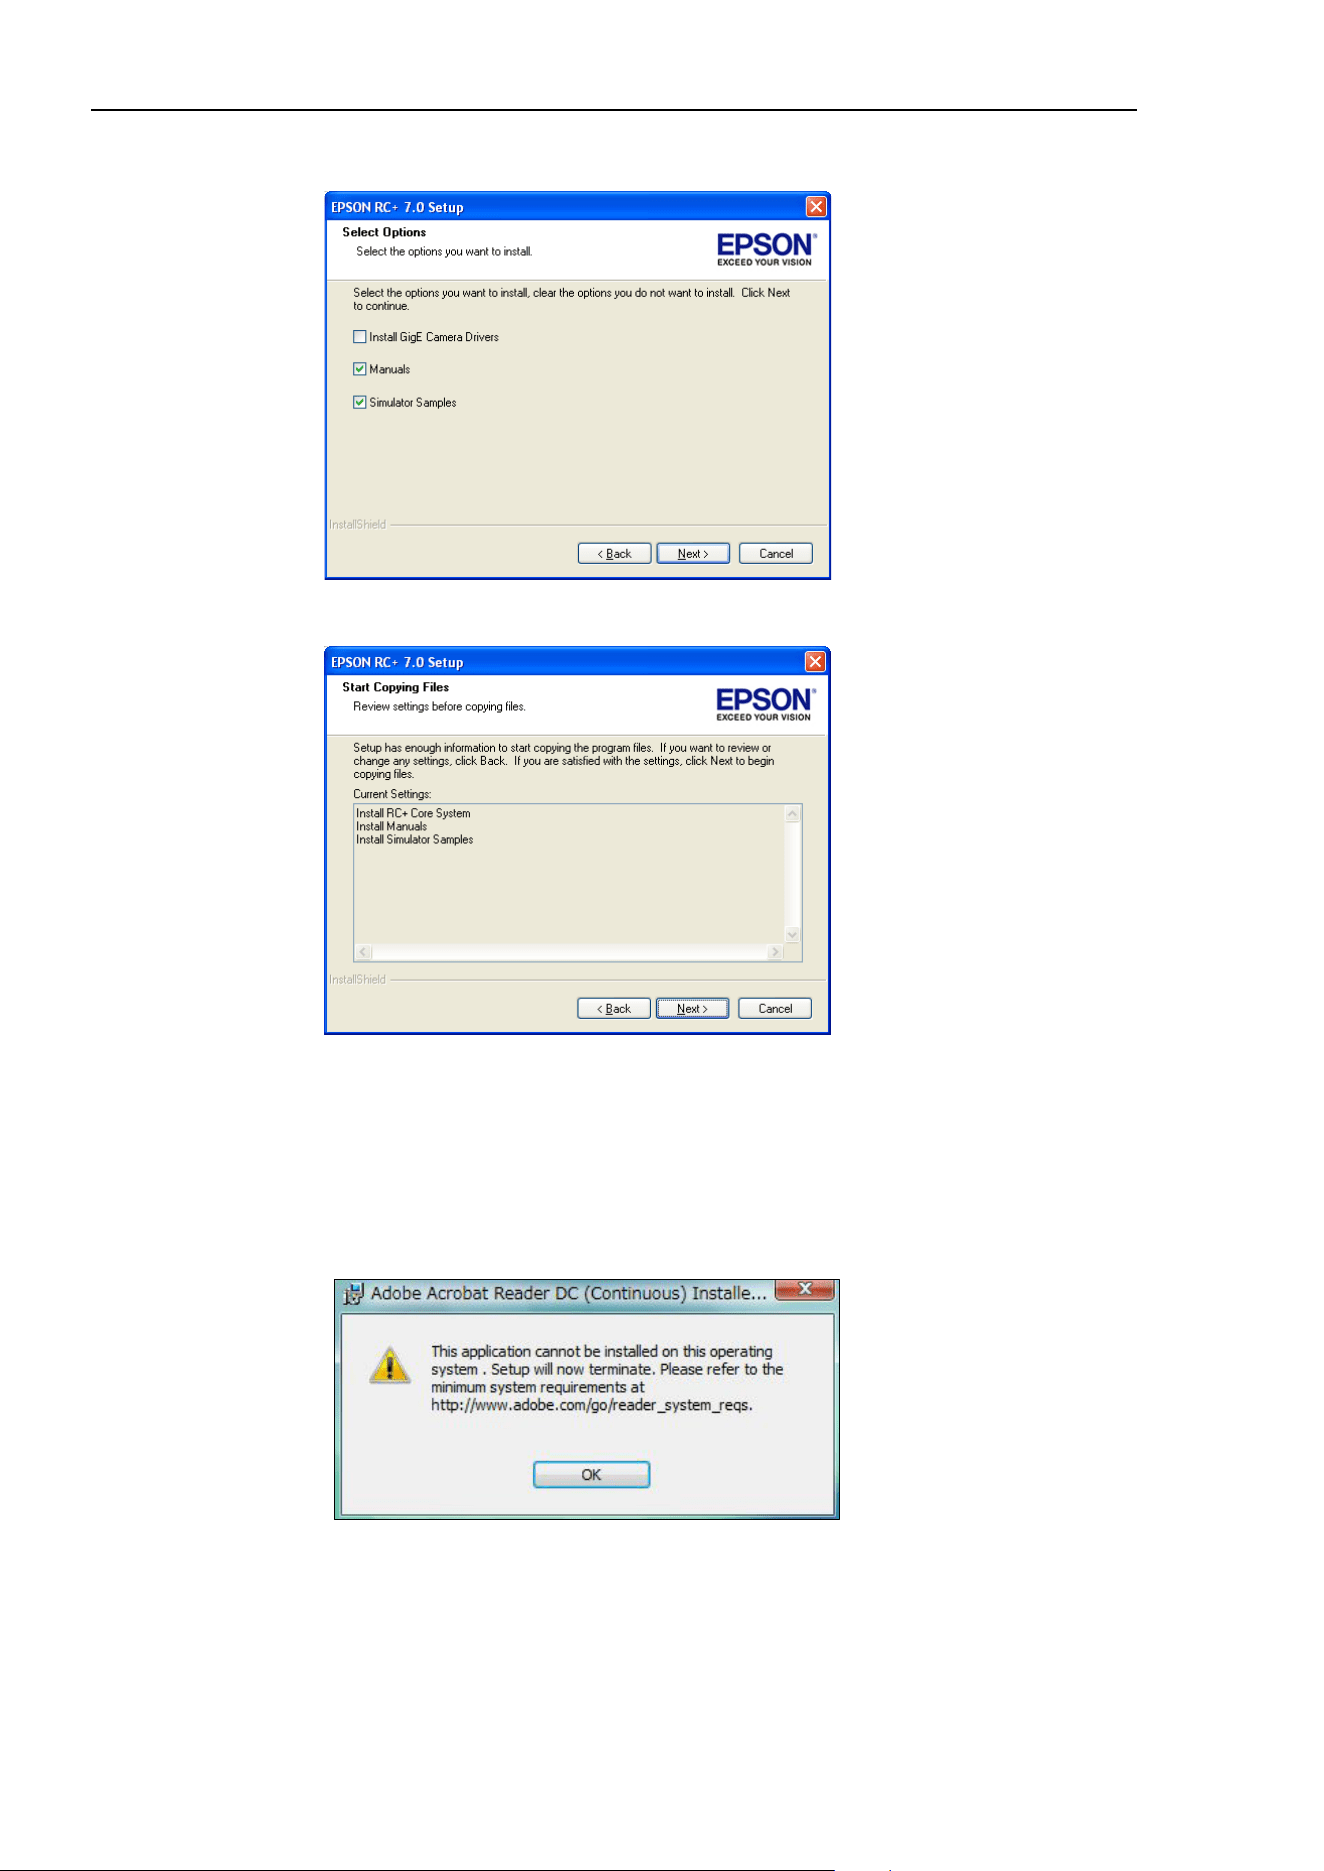
Appendix B: EPSON RC+ 7.0 Software
B-4 EPSON RC+ 7.0 (Ver.7.4) User's Guide Rev.6
(5) The dialog for selecting the options to be installed will be displayed. Check the
options you want to install and click <Next>.
(6) The dialog to review the settings will be displayed. If you are satisfied with the
settings, click <Next>.
(7) If required, install “Windows Installer” and “Microsoft .NET Framework 3.5” on your
system. This may take several minutes.
Adobe Reader needs to be installed on your PC in order to view the EPSON RC+ 7.0
manuals. If the installer cannot find Adobe Reader on your system, it will be
installed at this time. Follow the instructions in the Adobe installer. Do not restart
the system after the Adobe Reader installation has completed.
If installing the EPSON RC+7.0 to PC that Windows XP or Windows Vista is
installed, the following message appears.
Confirm the message and click the <OK> button.
Adobe Acrobat Reader DC will not be installed.
(8) After the installation has completed, restart your computer.
The EPSON RC+ 7.0 software installation is now completed.
NOTE
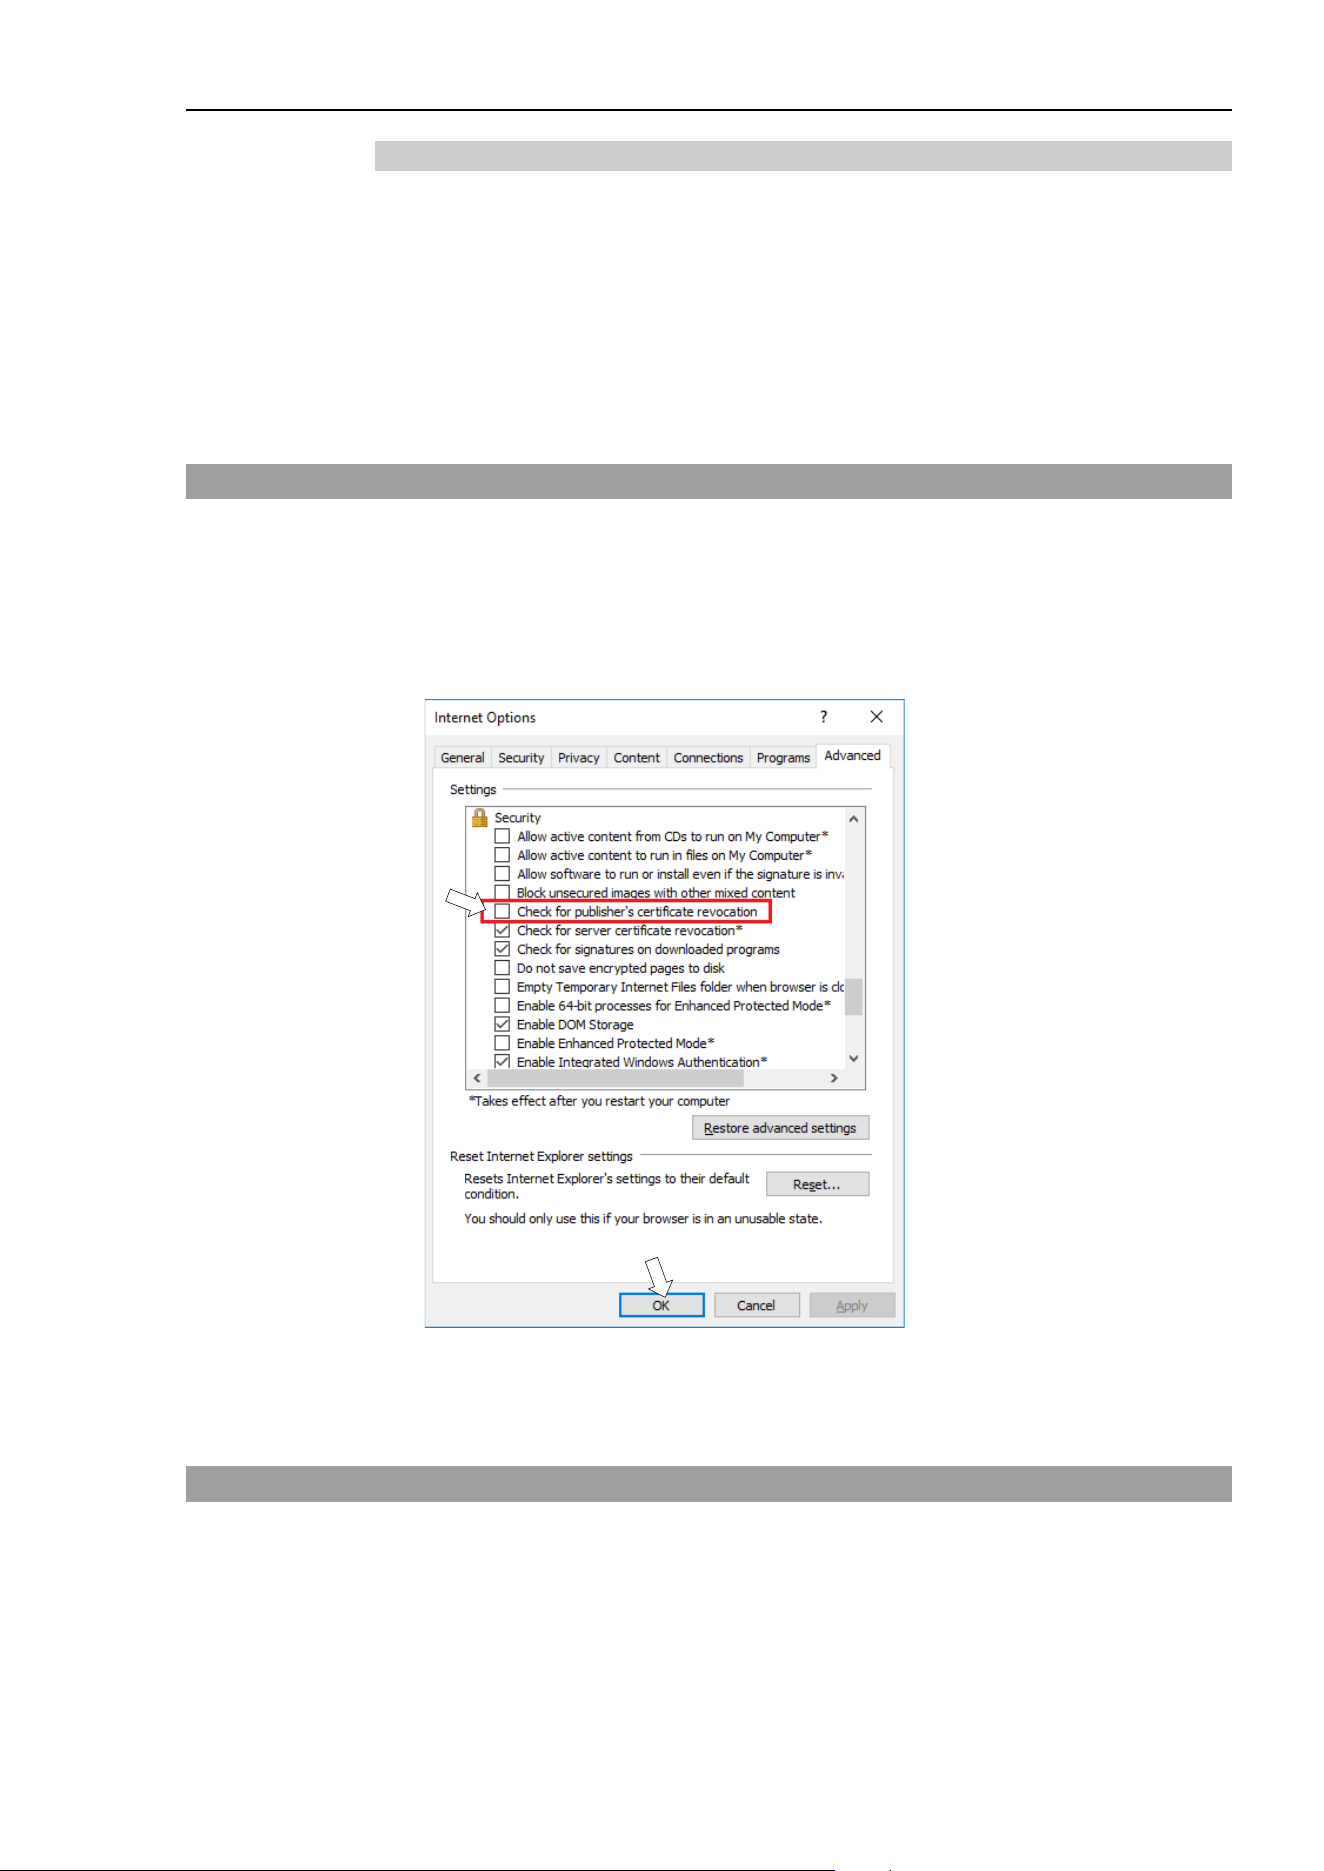
Appendix B: EPSON RC+ 7.0 Software
EPSON RC+ 7.0 (Ver.7.4) User's Guide Rev.6 B-5
To install the service pack
If the following folder exists in the EPSON RC+7.0 setup DVD, the service pack is
available.
\EpsonRC\Service_Packs
Install the latest service pack by double-clicking “erc***sp*.exe” in the folder. (***:
RC+
version / *: service pack version
)
For details of the service pack, refer to “readme*.txt”. (*: language)
After Installing EPSON RC+ 7.0 Software
EPSON RC+ 7.0 software may boot slowly when using PC with EPSON RC+7.0 software
in an environment without the internet connection. Follow the steps below and change the
configurations of the internet options.
(1) Start the Internet Explorer and display the [Internet Options] dialog.
Click the [Advanced] tab.
(2) Uncheck the [Check for publisher’s certification revocation] checkbox.
(3) Click the <OK> button.
EPSON RC+ 7.0 Software Update
Make sure that EPSON RC + 7.0 is updated by a user with Administrator right.
Insert the EPSON RC+ 7.0 setup DVD into the DVD drive and follow the menu to update
the software.
NOTE

Appendix B: EPSON RC+ 7.0 Software
B-6 EPSON RC+ 7.0 (Ver.7.4) User's Guide Rev.6

Appendix C: Simulator Functions List of Unsupported Manipulator Models
EPSON RC+ 7.0 (Ver.7.4) User's Guide Rev.6 C-1
Appendix C: Simulator Functions List of Unsupported
Manipulator Models
Simulator functions do not support the following Manipulator models.
X5 series Manipulators
All models do not support the simulator functions.
There is no alternative model.
G6 series Manipulators
Protected models as described in the table below do not support the simulator functions.
G6-451D
G6-551D
G6-651D
G6-451D-II
G6-551D-II
G6-651D-II
G6-451DR
G6-551DR
G6-651DR
G6-451DR-II
G6-551DR-II
G6-651DR-II
G6-451DW
G6-551DW
G6-651DW
G6-451DW-II
G6-551DW-II
G6-651DW-II
G6-451P
G6-551P
G6-651P
G6-451P-II
G6-551P-II
G6-651P-II
G6-451PR
G6-551PR
G6-651PR
G6-451PR-II
G6-551PR-II
G6-651PR-II
G6-451PW
G6-551PW
G6-651PW
G6-451PW-II
G6-551PW-II
G6-651PW-II
G6-453D
G6-553D
G6-653D
G6-453D-II
G6-553D-II
G6-653D-II
G6-453DR
G6-553DR
G6-653DR
G6-453DR-II
G6-553DR-II
G6-653DR-II
G6-453DW
G6-553DW
G6-653DW
G6-453DW-II
G6-553DW-II
G6-653DW-II
G6-453P
G6-553P
G6-653P
G6-453P-II
G6-553P-II
G6-653P-II
G6-453PR
G6-553PR
G6-653PR
G6-453PR-II
G6-553PR-II
G6-653PR-II
G6-453PW
G6-553PW
G6-653PW
G6-453PW-II
G6-553PW-II
G6-653PW-II
When connecting to Virtual Controller, the following models can be set as an alternative
model. However, external dimensions and motion range of arms may differ.
Standard model : G6-***S*, G6-***S*-II
Cleanroom model : G6-***C*, G6-***C*-II
For more details, refer to the following manual:
SCARA Robot G6 series Manipulator Manual

Appendix C: Simulator Functions List of Unsupported Manipulator Models
C-2 EPSON RC+ 7.0 (Ver.7.4) User's Guide Rev.6
G10 series Manipulators
Protected models as described in the table below do not support the simulator functions.
G10-651D
G10-851D
G10-651D-II
G10-851D-II
G10-651DR
G10-851DR
G10-651DR-II
G10-851DR-II
G10-651DW
G10-851DW
G10-651DW-II
G10-851DW-II
G10-651P
G10-851P
G10-651P-II
G10-851P-II
G10-651PR
G10-851PR
G10-651PR-II
G10-851PR-II
G10-651PW
G10-851PW
G10-651PW-II
G10-851PW-II
G10-654D
G10-854D
G10-654D-II
G10-854D-II
G10-654DR
G10-854DR
G10-654DR-II
G10-854DR-II
G10-654DW
G10-854DW
G10-654DW-II
G10-854DW-II
G10-654P
G10-854P
G10-654P-II
G10-854P-II
G10-654PR
G10-854PR
G10-654PR-II
G10-854PR-II
G10-654PW
G10-854PW
G10-654PW-II
G10-854PW-II
When connecting to Virtual Controller, the following models can be set as an alternative
model. However, external dimensions and motion range of arms may differ.
Standard model : G10-***S*, G10-***S*-II
Cleanroom model : G10-***C*, G10-***C*-II
For more details, refer to the following manual:
SCARA Robot G10/G20 series Manipulator Manual
G20 series Manipulators
Protected models as described in the table below do not support the simulator functions.
G20-851D
G20-A01D
G20-851D-II
G20-A01D-II
G20-851DR
G20-A01DR
G20-851DR-II
G20-A01DR-II
G20-851DW
G20-A01DW
G20-851DW-II
G20-A01DW-II
G20-851P
G20-A01P
G20-851P-II
G20-A01P-II
G20-851PR
G20-A01PR
G20-851PR-II
G20-A01PR-II
G20-851PW
G20-A01PW
G20-851PW-II
G20-A01PW-II
G20-854D
G20-A04D
G20-854D-II
G20-A04D-II
G20-854DR
G20-A04DR
G20-854DR-II
G20-A04DR-II
G20-854DW
G20-A04DW
G20-854DW-II
G20-A04DW-II
G20-854P
G20-A04P
G20-854P-II
G20-A04P-II
G20-854PR
G20-A04PR
G20-854PR-II
G20-A04PR-II
G20-854PW
G20-A04PW
G20-854PW-II
G20-A04PW-II
When connecting to Virtual Controller, the following models can be set as an alternative
model. However, external dimensions and motion range of arms may differ.
Standard model : G20-***S*, G20-***S*-II
Cleanroom model : G20-***C*, G20-***C*-II
For more details, refer to the following manual:
SCARA Robot G10/G20 series Manipulator Manual