Feel free to contact us for any
questions, technical difficulties, or
further guidance.
We are here to help.
help@remotestartx.com
When contacting support, please
state the year, make, and model, as
well as the service # from the back of
the remote starter module.
12522
START-X
General Info:
• Press LOCK 3 mes to start the
vehicle.
• Pressing LOCK 3 mes again will
shut off the vehicle.
• Pressing the brake will shut
down the vehicle.
• The remote starter will shut off
a er 15 minutes.
• A er remote star ng, enter the
vehicle and turn the key to on.
Don’t crank.
Please watch the video at:
RemoteStartX.com/Ford4
START-X
— REMOTE —
STARTER KIT
SELECT FORDS
WWW.REMOTESTARTX.COM
HELP@REMOTESTARTX.COM

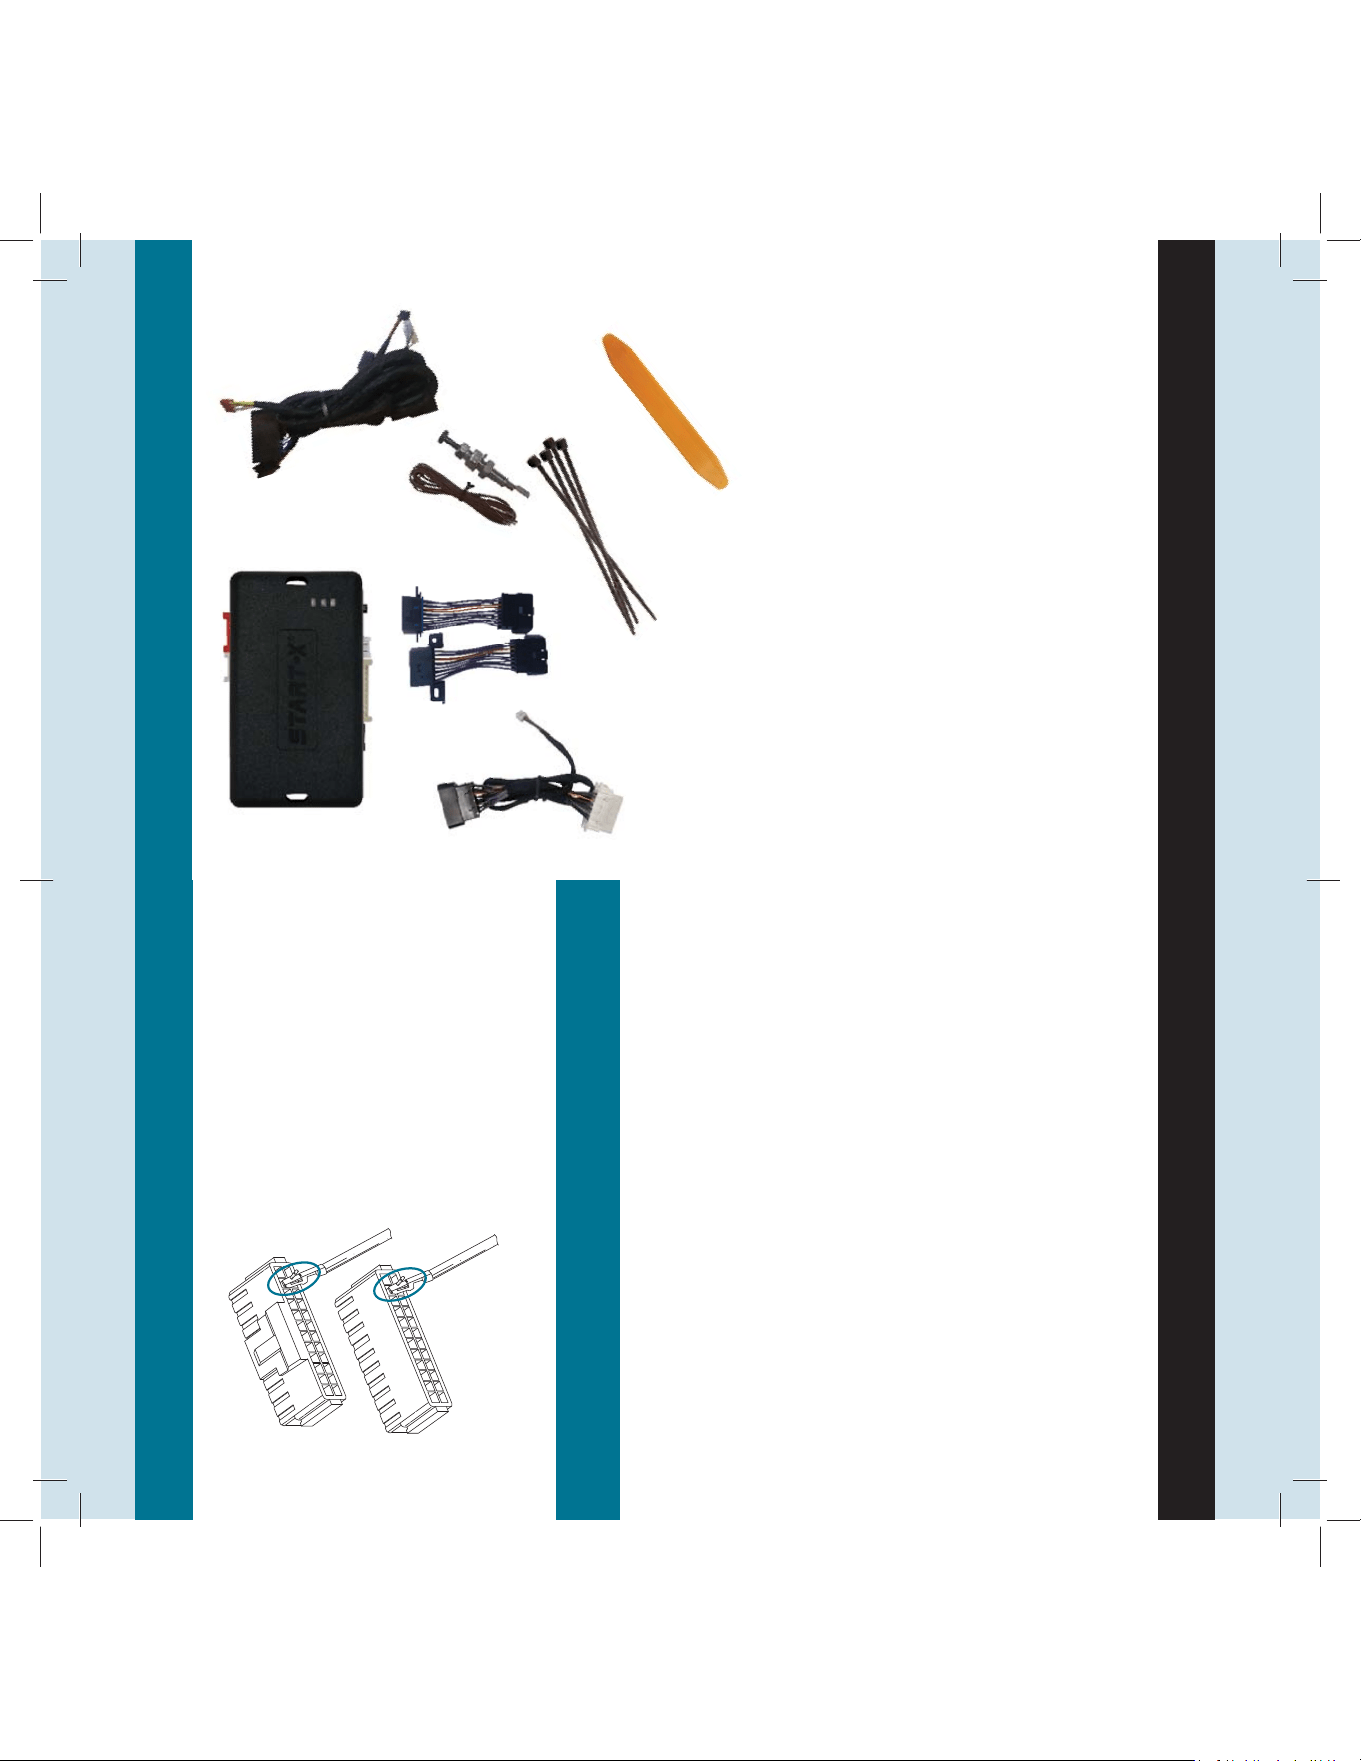
What’s in the Kit:
HELP@REMOTESTARTX.COM
© 2019 BA Technologies LLC All Rights Reserved | 10
Adding Optional Wires
Troubleshooting Tips
When adding addi onal wires,
ensure that the side of the
wire with the tab is facing the
outer edge of the connector.
(see diagram)
Things to keep in mind when lock 3x does not work:
If the wire marked 13 in the 20-pin white connector
(the external trigger) is momentarily grounded, the
vehicle will start. This indicates that everything is
working – except for some reason, 3X lock is not being
detected.
If the device is not programmed, and the li le black
connector is plugged in, all 3 LEDs will fl ash. If it is
already programmed, no LEDs will light up.
Master Reset Procedure:
Hold down programming bu on while plugging in
black connector with red and black wires. Let go of
bu on when only the RED LED is lit. Push and hold
bu on again un l all three LEDs start to alternate.
HELP@REMOTESTARTX.COM
What’s in the Kit
© 2019 BA Technologies LLC All Rights Reserved | 3
B
C
E
D
F
G
B
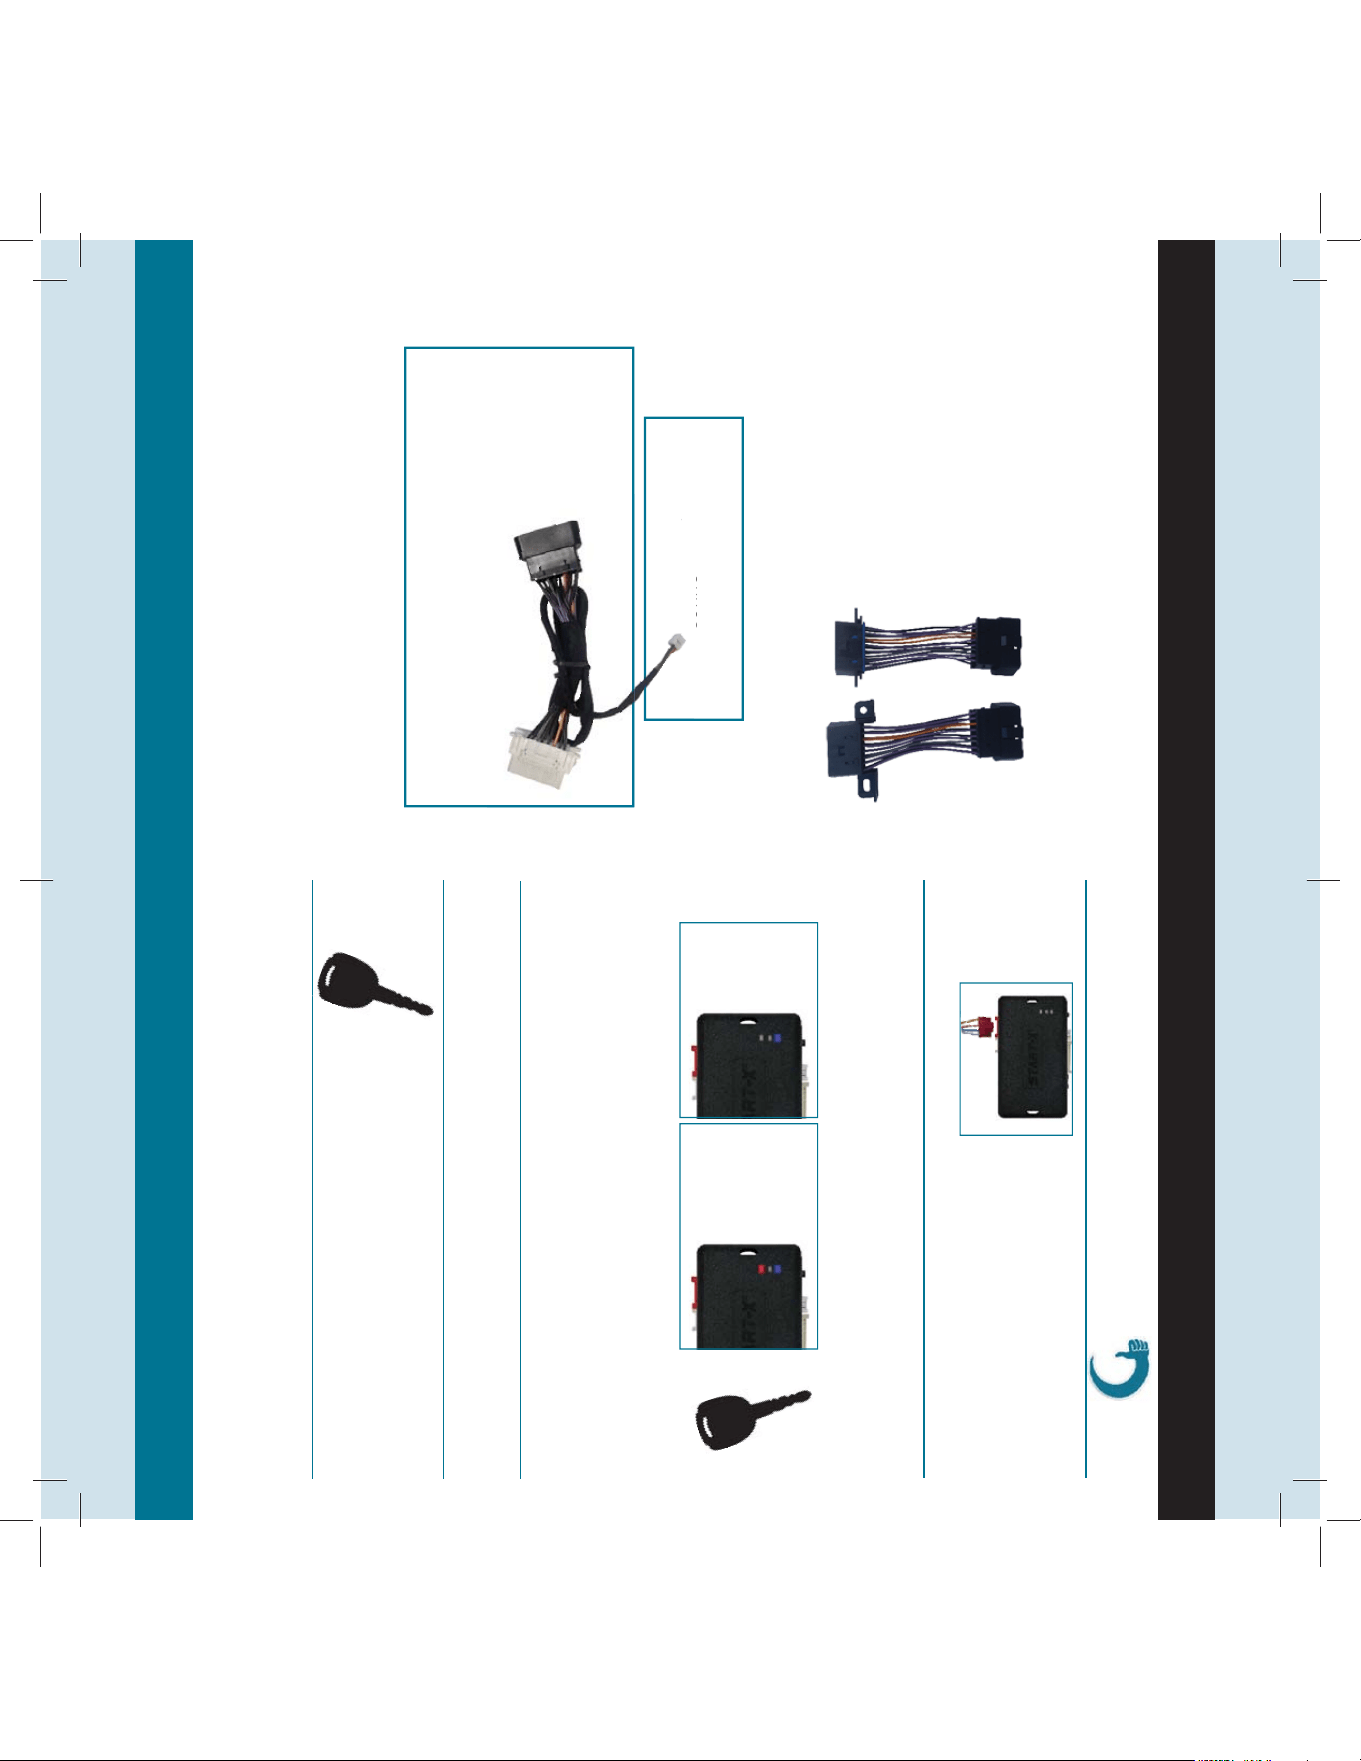
REMOTE START MODULE
C WIRING HARNESS
D MAIN OBD2 THARNESS
Replaces the factory OBD2 port.
E VEHICLE SPECIFIC OBD2 ADAPTER
Plugs into the main OBD2 T-Harness. Choose the one that fi ts
your vehicle.
F PROFESSIONAL INSTALLER
Extra wires and hoodpin for a professional installer.
H ZIP TIES
Use to e up wires and secure the module in the vehicle.
I
PRY TOOL
Use to assist with disassembly of the vehicle.
H
Wiring Harness Components
HELP@REMOTESTARTX.COM
© 2019 BA Technologies LLC All Rights Reserved | 4
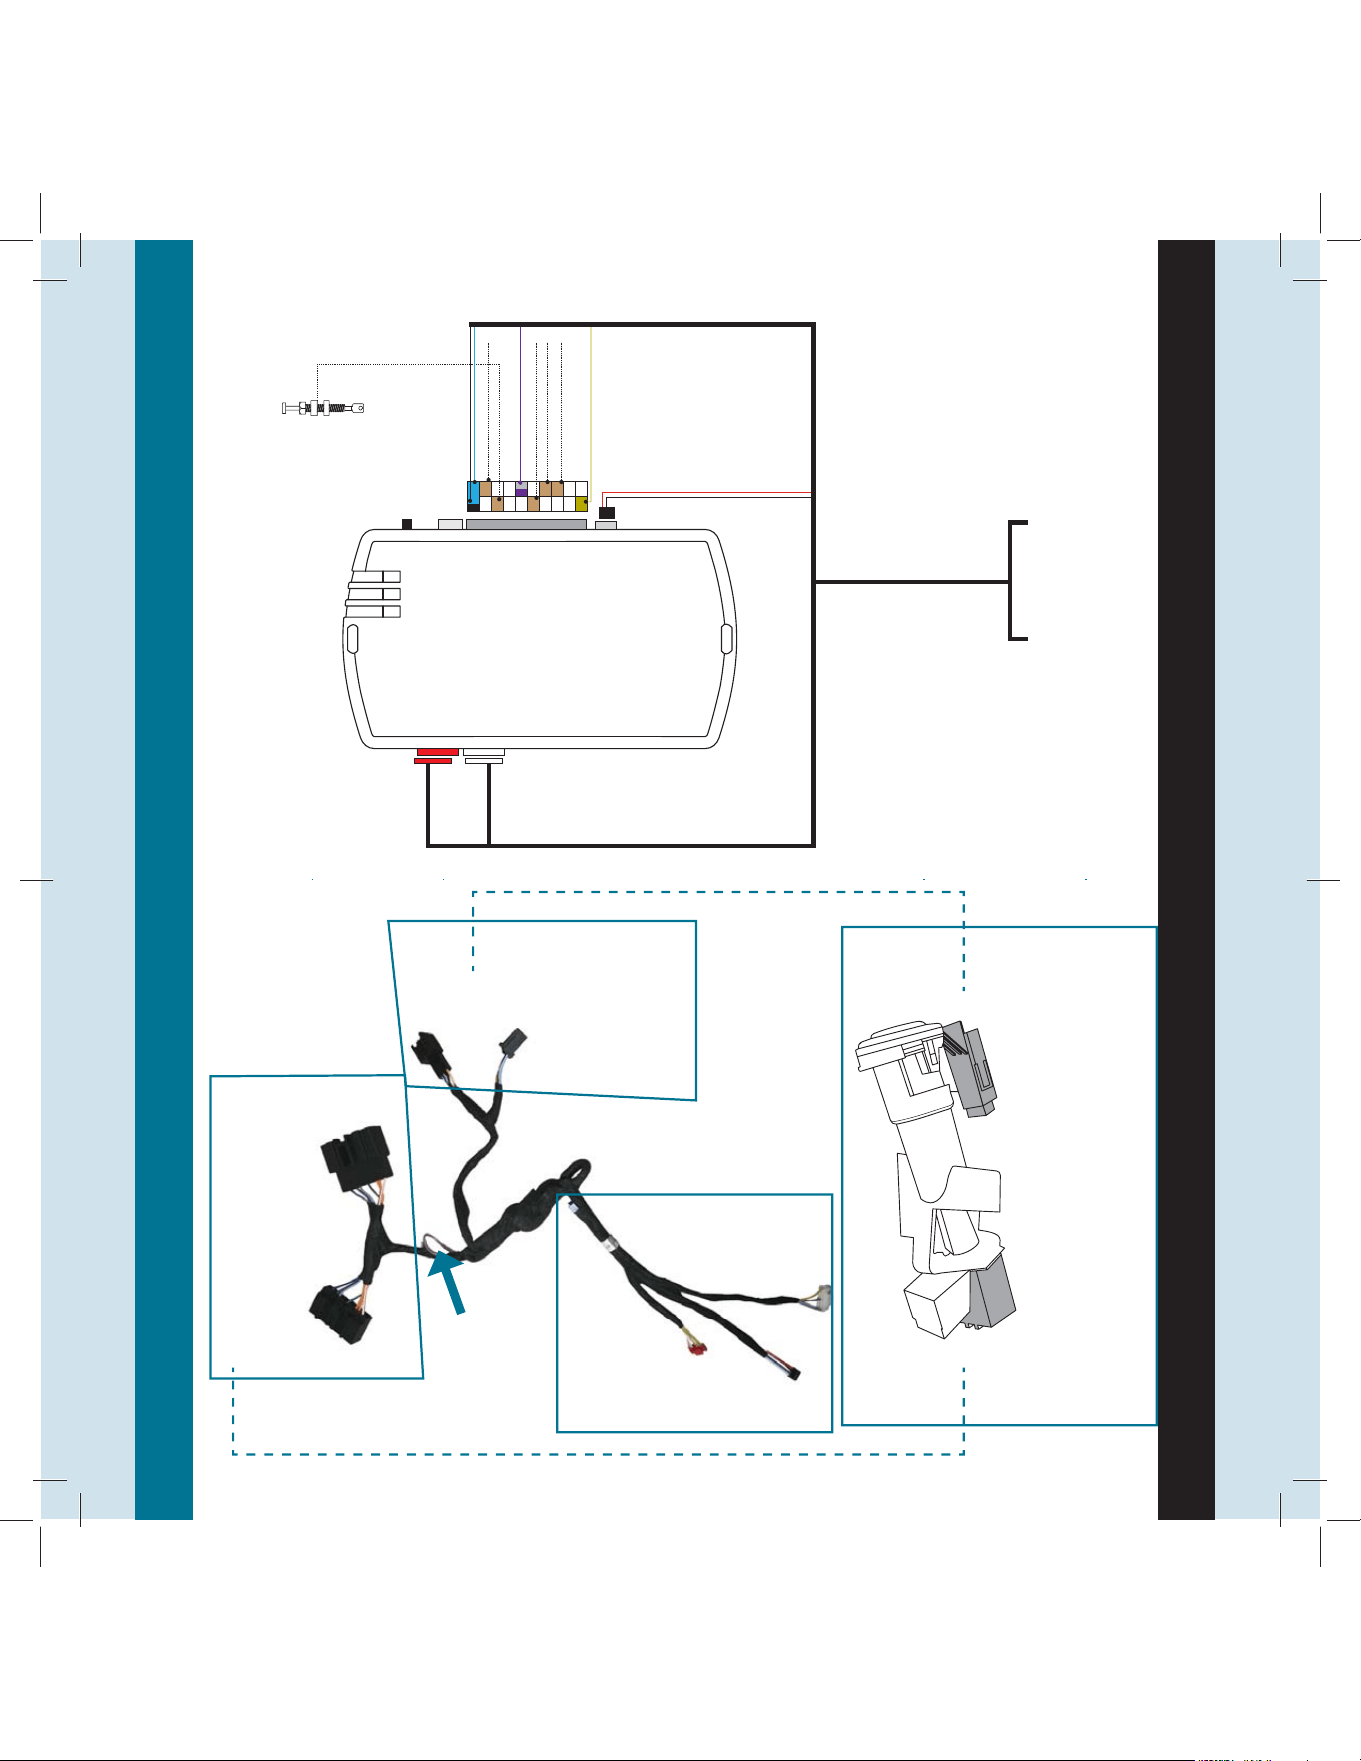
Ignition Barrel
B
C
REMOTE START
CONNECTORS
Connect these
connectors to
the remote start
module.
B
C
IGNITION SWITCH
CONNECTOR
Connect in-line with the con-
nec on towards the back of
the igni on cylinder.
WIRE
Fiesta, cut this loop.
All other vehicles, leave
as is.
IGNITION SWITCH
CONNECTION
IMMOBILIZER
CONNECTOR
Connect in-line
with the connector
towards the front of
the igni on cylinder.
IMMOBILIZER
CONNECTION
LOCATE THE METAL IGNITION CYLINDER BEHIND WHERE
YOU INSERT THE KEY. TOWARDS THE FRONT IS THE 4PIN
IMMOBILIZER CONNECTOR. TOWARDS THE BACK IS THE
7PIN IGNITION SWITCH CONNECTOR
HELP@REMOTESTARTX.COM
Wiring Diagram
© 2019 BA Technologies LLC All Rights Reserved | 9
Remote
Start
Module
8
5
19
13
PROGRAMMING
BUTTON
5-PIN
CONNECTOR
6-PIN RED
CONNECTOR
NOT
USED
HOOD PIN
GROUND EXTERNAL TRIGGER
UNLOCK
LOCK
14
PARKING LIGHTS
Connect to vehicle.
*brown wires are
optional
Programming Instructions
HELP@REMOTESTARTX.COM
© 2019 BA Technologies LLC All Rights Reserved | 8
G
Turn the key to the OFF posi on and remove the key.
Wait 3 seconds.
Turn the key to the OFF posi on and remove the key.
Wait 3 seconds.
Insert the second key into the igni on and
turn to the ON/RUN posi on. Wait 3 seconds,
or listen for 3 door chimes.
F
H
KEY
#2
KEY
#1
Insert the fi rst key into the igni on and turn to the ON/RUN
posi on.
The blue & red LEDs will fl ash 10 mes quickly.
Wait.
The blue LED will fl ash quickly.
I
BLUE AND RED
WILL FLASH
RAPIDLY 10
TIMES
BLUE LED
WILL FLASH
RAPIDLY
YOUR MODULE IS NOW SUCCESSFULLY PROGRAMMED.
Connect the red connector.
J
RED
CONNECTOR
Timing is crucial for successful programming. If the LEDs don’t
fl ash as described, try cycling the keys with focusing on 3 door
chimes, as opposed to 3 seconds.
HELP@REMOTESTARTX.COM
© 2019 BA Technologies LLC All Rights Reserved | 5
OPTIONAL VEHICLE SPECIFIC
OBD2 ADAPTER
If the white OBD2 connector
in the T-Harness does not fi t
your vehicle use one of the
adapters.
Connect the adapter to the
OBD2 T-Harness. Mount the
other side to the vehicle.
OBD2 THARNESS
Replaces the factory OBD2 port.
Connect to the remote
starter module.
Connect in-line with the vehicles
OBD2 connector.
Co
nn
ec
t to t
he
Installation Outline
HELP@REMOTESTARTX.COM
© 2019 BA Technologies LLC All Rights Reserved | 6
Vehicle Access:
B Gain access to the areas of the vehicle where the
T-harnesses and module will be installed.
See diagram below.
C Connect the T-Harnesses (main T-harness and
OBD2 T-harness) to the vehicle and the module to
the T-Harness.
D Complete the programming.
Direc ons are on pages 7-8.
E Secure the module with zip es.
Follow these general steps for a successful installa on.
Remove the three screws beneath the steering column.
Use the pry tool to release the trim.
HELP@REMOTESTARTX.COM
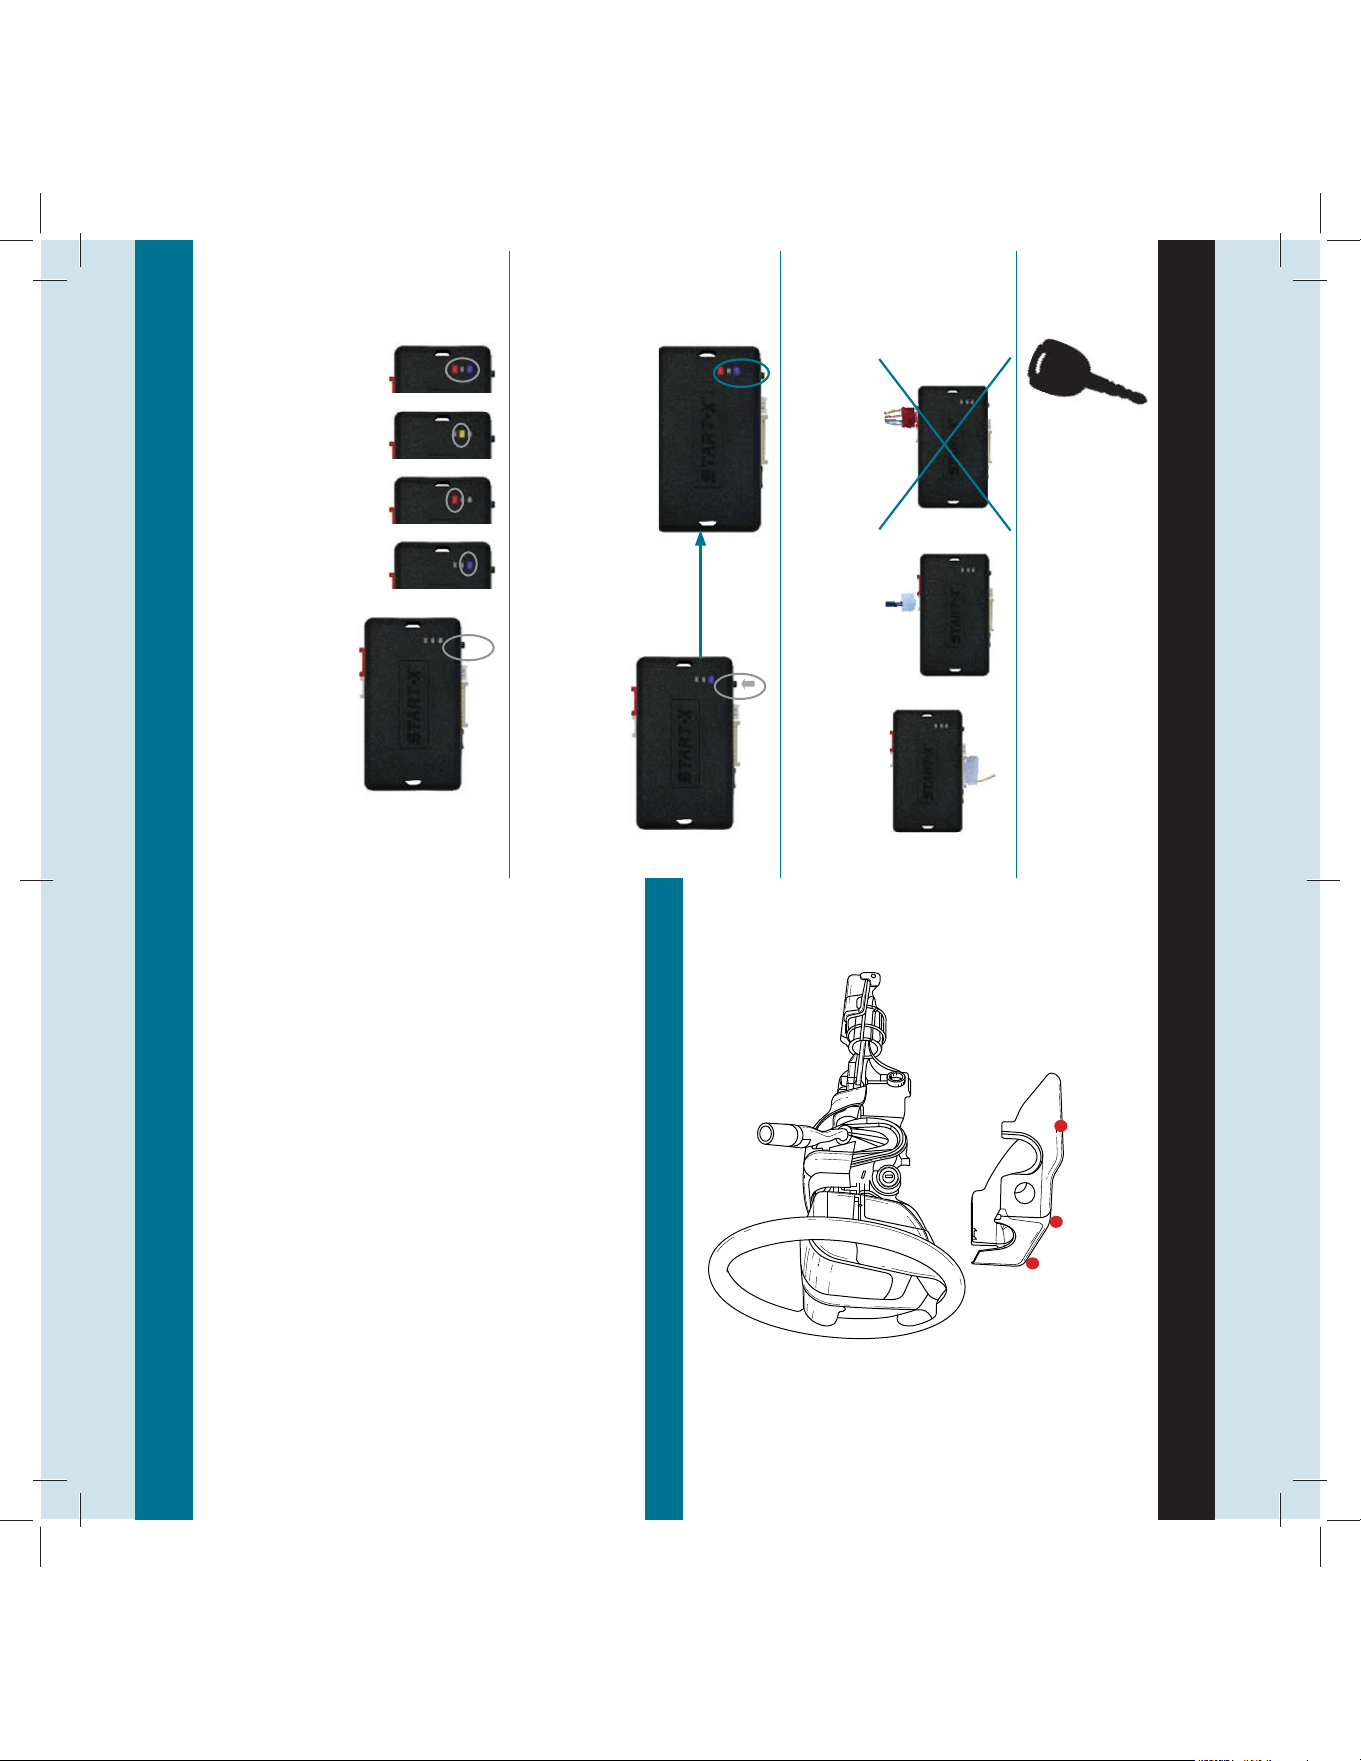
Programming Instructions
© 2019 BA Technologies LLC All Rights Reserved | 7
KEY
#1
E
Press and hold the programming bu on. With your fi nger s ll
holding down the bu on, connect the black connector.
The blue, red, yellow, and blue & red LEDs will alternate.
When the blue and red LEDs are momentarily lit, release the
programming bu on.
The blue and red LEDs should stay lit. If they don’t, then unplug the
black connector and restart Step 1.
Insert both white connectors, but leave the red one
disconnected.
Insert one key into the igni on and turn to
the ON/RUN posi on. Wait 3 seconds. Or
listen for 3 door chimes.
B
C
D
BLUE AND RED ARE LIT
PROGRAMMING
BUTTON
BLUE
& RED
YELLOWREDBLUE
PROGRAMMING
BUTTON
LARGER WHITE
CONNECTOR
SMALLER WHITE
CONNECTOR
RED
CONNECTOR
Two master keys are required; a clone will not work.