
Scan to register
bellakitchenware.com
VersaBrew
2-in-1 Coffee System
Instruction Manual
VersaBrew
Sistema de café 2 en 1
Manual de instrucciones
35104_35147_35148_35149_35221_Bella_2in1 Coffee Maker_IM_V9_R5.indd 135104_35147_35148_35149_35221_Bella_2in1 Coffee Maker_IM_V9_R5.indd 1 2024-09-17 11:58 AM2024-09-17 11:58 AM

35104_35147_35148_35149_35221_Bella_2in1 Coffee Maker_IM_V9_R5.indd 235104_35147_35148_35149_35221_Bella_2in1 Coffee Maker_IM_V9_R5.indd 2 2024-09-17 11:58 AM2024-09-17 11:58 AM

1
TABLE OF CONTENTS
IMPORTANT SAFEGUARDS ....................................................................................................................................................2
NOTES ON THE PLUG ..............................................................................................................................................................3
NOTES ON THE CORD.............................................................................................................................................................3
PLASTICIZER WARNING .........................................................................................................................................................4
ELECTRIC POWER ......................................................................................................................................................................4
GETTING TO KNOW YOUR COFFEE MAKER ..................................................................................................................4
BEFORE FIRST USE .....................................................................................................................................................................5
IMPORTANT: PRODUCT OPERATION - CARAFE ............................................................................................................5
PRODUCT OPERATION – SINGLE SERVE MODE ...........................................................................................................5
SELECTING MODE – CARAFE OR SINGLE SERVE ..........................................................................................................5
USE OF FILTER BASKET HOLDER/ADAPTER ..................................................................................................................... 7
INSTALLING THE REMOVABLE PUNCTURE NEEDLE FOR POD SINGLE SERVE MODE ....................................8
SETTING UP THE COFFEE MAKER TO BREW SINGLE SERVE .....................................................................................8
BREWING MODES ....................................................................................................................................................................8
CARAFE BREWING MODE .................................................................................................................................................... 9
SINGLE SERVE BREWING MODE ....................................................................................................................................... 9
BREWING SINGLE SERVE OVER ICE ................................................................................................................................. 9
DESCALING REMINDER ......................................................................................................................................................... 9
CLEANING THE PUNCTURE NEEDLES .............................................................................................................................. 9
CLEANING ................................................................................................................................................................................. 9
LIMITED TWO-YEAR WARRANTY ......................................................................................................................................10
ÍNDICE
MEDIDAS IMPORTANTES DE SEGURIDAD ..................................................................................................................... 11
NOTAS SOBRE EL ENCHUFE ..............................................................................................................................................12
NOTAS SOBRE EL CABLE .....................................................................................................................................................13
ADVERTENCIA SOBRE EL ACABADO .............................................................................................................................. 13
ENERGÍA ELÉCTRICA ............................................................................................................................................................13
CONOZCA SU CAFETERA ...................................................................................................................................................14
ANTES DEL PRIMER USO .......................................................................................................................................................15
IIMPORTANTE: FUNCIONAMIENTO DEL PRODUCTO - MODO JARRA ............................................................ 15
FUNCIONAMIENTO DEL PRODUCTO – MODO MONODOSIS ............................................................................15
SELECCIÓN DE MODO – JARRA O MONODOSIS ....................................................................................................15
USO DEL SOPORTE DE LA CANASTA DEL FILTRO/ADAPTADOR ............................................................................17
INSTALACIÓN DE LA AGUJA PERFORADORA DESMONTABLE PARA CÁPSULAS ..........................................18
CONFIGURAR LA CAFETERA PARA PREPARAR EN MONODOSIS .......................................................................18
MODOS DE PREPARACIÓN ................................................................................................................................................18
MODO DE PREPARACIÓN JARRA ..................................................................................................................................... 19
SISTEMA DE PREPARACIÓN MONODOSIS ...................................................................................................................19
PREPARACIÓN MONODOSIS SOBRE HIELO ................................................................................................................ 19
RECORDATORIO DE DESCALCIFICACIÓN .................................................................................................................... 19
LIMPIEZA DE LAS AGUJAS PERFORADORAS ...............................................................................................................19
LIMPIEZA ....................................................................................................................................................................................19
GARANTÍA LIMITADA DE DOS AÑOS ...........................................................................................................................20
35104_35147_35148_35149_35221_Bella_2in1 Coffee Maker_IM_V9_R5.indd 135104_35147_35148_35149_35221_Bella_2in1 Coffee Maker_IM_V9_R5.indd 1 2024-09-17 11:58 AM2024-09-17 11:58 AM

2
IMPORTANT SAFEGUARDS
When using electrical appliances, basic safety precautions should always be
followed to reduce the risk of fire, electric shock, and/or injury to persons,
including the following:
1. READ ALL INSTRUCTIONS.
2. This appliance is not intended for use by persons (including children) with
reduced physical, sensory, or mental capabilties,or lack of experience and
knowledge, unless they are closely supervised and instructed concerning use of
the appliance by a person responsible for their safety.
3. Close supervision is necessary when any appliance is used by or near children.
Children should be supervised to ensure that they do not play with the
appliance.
4. Do not touch hot surfaces. Use handles or knobs. Care must be taken, as burns
can occur from touching hot parts or from spilled, hot liquid.
5. To protect against electric shock, do not place cord, plug, or coffee maker in
water or other liquid.
6. Unplug from outlet when the coffee maker is not in use and before cleaning.
Allow to cool before putting on or taking off parts and before cleaning the
appliance.
7. Coffee maker must be operated on a flat surface away from the edge of
counter to prevent accidental tipping.
8. Do not operate any appliance with a damaged supply cord or plug, or after
the appliance malfunctions or has been dropped or damaged in any manner.
Supply cord replacement and repairs must be conducted by the manufacturer,
its service agent, or similarly qualified persons in order to avoid a hazard. Call
the provided customer service number for information on examination, repair,
or adjustment.
9. The use of accessory attachments not recommended by the appliance
manufacturer may cause injuries.
10. Do not use outdoors.
11. Do not let cord hang over edge of table or counter or touch hot surfaces,
including stove.
12. Do not place on or near a hot gas or electric burner, or in a heated oven.
13. Avoid contacting moving parts.
14. Be certain lid is securely in place during frothing or warming.
15. To disconnect appliance, press control button(s) until power indicator light is no
longer glowing and then remove plug from wall outlet.
16. To unplug, grasp the plug and pull from the outlet. Never pull from the power
cord.
17. Do not place coffee maker in a cabinet when in use.
18. WARNING! To avoid hot water spraying from the piercing needle, do not lift
the lid during the brew process.
19. Do not use appliance for other than intended use.
20. WARNING! To reduce the risk of fire or electric shock, do not remove the
bottom cover of the coffee maker. There are no user-serviceable parts inside.
21. CAUTION! Cut Hazard: Removable single-serve pod holder contains a sharp
needle. Use caution when handling.
35104_35147_35148_35149_35221_Bella_2in1 Coffee Maker_IM_V9_R5.indd 235104_35147_35148_35149_35221_Bella_2in1 Coffee Maker_IM_V9_R5.indd 2 2024-09-17 11:58 AM2024-09-17 11:58 AM

3
22. CAUTION! Cut Hazard: Piercing needle is sharp. Use caution when cleaning.
23. To reduce the risk of fire do not store angthing directly on top of the appliance
surface when the appliance is operating.
CAUTION: There are two sharp needles that puncture the capsules.
One is located inside the capsule adaptor and the other is located on the top
underside of the adaptor compartment. To avoid risk of injury do not place
fingers inside either parts. Also exercise caution when cleaning the parts.
CAUTION: There are boiling water in the front tab lid section during the
brew process. Do not open the lid at any time for risk of injury.
24. The container is designed for use with this appliance. It must never be used on
a range top. (Unless specific instructions for use on a range top are provided
and include the precautions to be observed.)
25. Only use capsules intended for this appliance. If the capsule does not fit,do not
force the capsule into the appliance.
26. WARNING: To avoid the risk of injury, do not open the brew chamber during
the brew process.
27. Do not use a cracked container or a container having a loose or weakened
handle.
28. Do not clean container with cleansers, steel wool pads, or other abrasive
material.
29. Do not set a hot container on a wet or cold surface.
30. Be careful that the heating element surface is subject to residual heat after use.
FOR HOUSEHOLD USE ONLY
NOTES ON THE PLUG
This appliance has a polarized plug (one blade is wider than the other). To reduce
the risk of electric shock, this plug will fit in a polarized outlet only one way. If the
plug does not fit fully into the outlet, reverse the plug. If it still does not fit, contact
a qualified electrician. Do not modify the plug in any way.
NOTES ON THE CORD
A. A short power-supply cord (or detachable power-supply cord) is to be
provided to reduce risks resulting from becoming entangled in or tripping over
a longer cord.
B. Longer detachable power-supply cords or extension cords are available and
may be used if care is exercised in their use.
C. If a long detachable power-supply cord or extension cord is used:
1. The marked electrical rating of the cord set, or extension cord should
be at least as great as the electrical rating of the appliance.
2. If the appliance is of the grounded type, the extension cord should
be a grounding-type3-wire cord.
3. The longer cord should be arranged so that it will not drape over the
countertop or tabletop where it can be pulled on by children or tripped
over.
SAVE THESE INSTRUCTIONS
35104_35147_35148_35149_35221_Bella_2in1 Coffee Maker_IM_V9_R5.indd 335104_35147_35148_35149_35221_Bella_2in1 Coffee Maker_IM_V9_R5.indd 3 2024-09-17 11:58 AM2024-09-17 11:58 AM
4
PLASTICIZER WARNING
CAUTION: To prevent plasticizers from migrating to the finish of the countertop
or tabletop or other furniture, place NON-PLASTIC coasters or place mats between
the appliance and the finish of the countertop or tabletop.
Failure to do so may cause the finish to darken, permanent blemishes may occur,
or stains can appear.
ELECTRIC POWER
If the electrical circuit is overloaded with other appliances, your appliance may not
operate properly. It should be operated on a separate electrical circuit from other
appliances. WARNING: To reduce the risk of fire or electrical shock, do not remove
this cover. No user serviceable parts inside. Repair should be done by authorized
service personnel only.
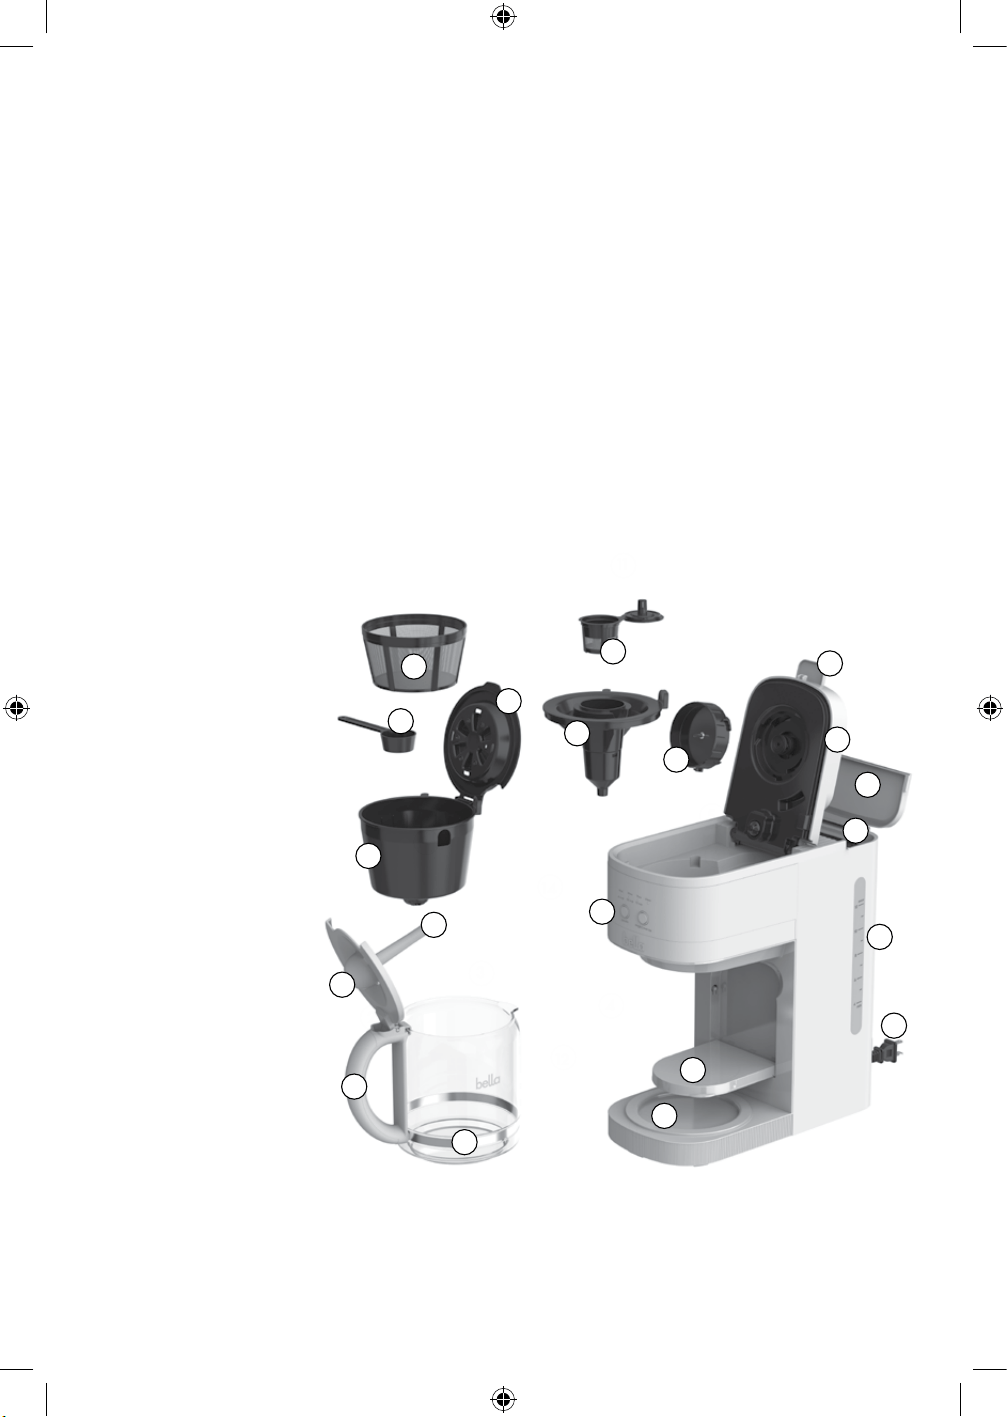
GETTING TO KNOW YOUR COFFEE MAKER
Product may vary slightly from illustration.
1. Measuring Scoop
2. Permanent Filter
3. Filter Basket Lid
4. Filter Basket Holder
5. Carafe Lid
6. Carafe Handle
7. Carafe
8. Flavor Infusion Tube
9. Reusable ground
coffee filter (single serve)
10. Pod Adapter
11. Pod Adapter Attachment
12. Flip Down Drip Tray
13. Buttons
14. Warming Plate
15. Handle
16. Top Lid
17. Water Tank Lid
18. Water Tank
19. Water Window
20. Cord Storage(not shown)
1
2
3
4
5
6
11
12
14
15
13
1
2
3
4
5
6
7
8
9
10
11
12
13
14
15
16
17
18
19
20
35104_35147_35148_35149_35221_Bella_2in1 Coffee Maker_IM_V9_R5.indd 435104_35147_35148_35149_35221_Bella_2in1 Coffee Maker_IM_V9_R5.indd 4 2024-09-17 11:58 AM2024-09-17 11:58 AM

5
BEFORE FIRST USE
Before first use, clean this product for optimal operation.
Please refer to the “Getting to know your coffee maker” section for information about this product
and all parts included.
1. Remove stickers and labels from this product.
2. Remove the funnel, small coffee basket and coffee spoon, then wash them thoroughly in clean water with mild
detergent and install them back.
3. For the removal and installation of the funnel and small coffee basket, please refer to the instructions in the
section “Use of Filter Basket Holder/Adapter”.
IMPORTANT: PRODUCT OPERATION - CARAFE
1. Add water to the water tank, the water level must be within the “MAX” 1.8L water mark.
2. Place the filter basket holder and close the top lid.
3. Place the provided carafe and choose the desired carafe size.
4. Insert the power plug into a power outlet that matches the voltage frequency.
4.1. After placing the filter basket holder press the carafe button. The default 12 cup LED light will turn on
and the carafe button will flash. After 5 seconds, if there is no operation, the carafe button will become solid
and the unit will begin brewing coffee.
4.2. To brew other carafe sizes, press the carafe button. The default size or last size brewed will illuminate,
and the carafe button will flash. Press the carafe button again to adjust the carafe size, and then wait
for 5 seconds to select it.
5. The carafe indicator light and the selected carafe size indicator light will stay on, and the coffee machine will
start to brew. After the coffee is finished brewing the unit will enter a 2hour keep warm mode. When the 2 hour
time is over, all indicators lights will shut off.
PRODUCT OPERATION – SINGLE SERVE MODE
1. Add water to the water tank, the water level must be within the “MAX” line. Place the pod adapter and close
the top lid.
2. Make sure the drip tray has been flipped down over the warming plate.
3. Place a mug/travel cup on the drip tray, and choose the desired cup size.
4. Insert the power plug into a power outlet that matches the voltage frequency.
4.1. Press the single/over ice button. The default size 10 oz LED indicator light will illuminate solid
and the single/over ice button will flash. After 5 seconds if there is no operation the single/over ice button will
become solid and unit begin brewing coffee.
4.2. To brew other single serve sizes press the single/over ice button. The default or last setting cup size will
come on and the single button will flash. While the single button is flashing press it again to change the cup
size, and then wait for 5 seconds to confirm your selection.
5. The single orange indicator light and the selected cup size indicator light will stay on, and the coffee machine
will start brewing. Once the coffee is finished brewing, all indicator lights will turn off.
All indicator lights turn off after brewing and unit enters standby mode after the following operations
(the function indicators remain on, and the last selected cup size indicator flashes):
1. Opening the top lid.
2. Adding or removing the ground coffee filter (single serve).
3. Pressing the single/over ice button.
SELECTING MODE – CARAFE OR SINGLE SERVE
1. Carafe for drip brewing mode.
2. Prepare a mug or travel cup according to different cup sizes of single serve brewing mode.
35104_35147_35148_35149_35221_Bella_2in1 Coffee Maker_IM_V9_R5.indd 535104_35147_35148_35149_35221_Bella_2in1 Coffee Maker_IM_V9_R5.indd 5 2024-09-17 11:58 AM2024-09-17 11:58 AM
6
OPERATION INSTRUCTIONS
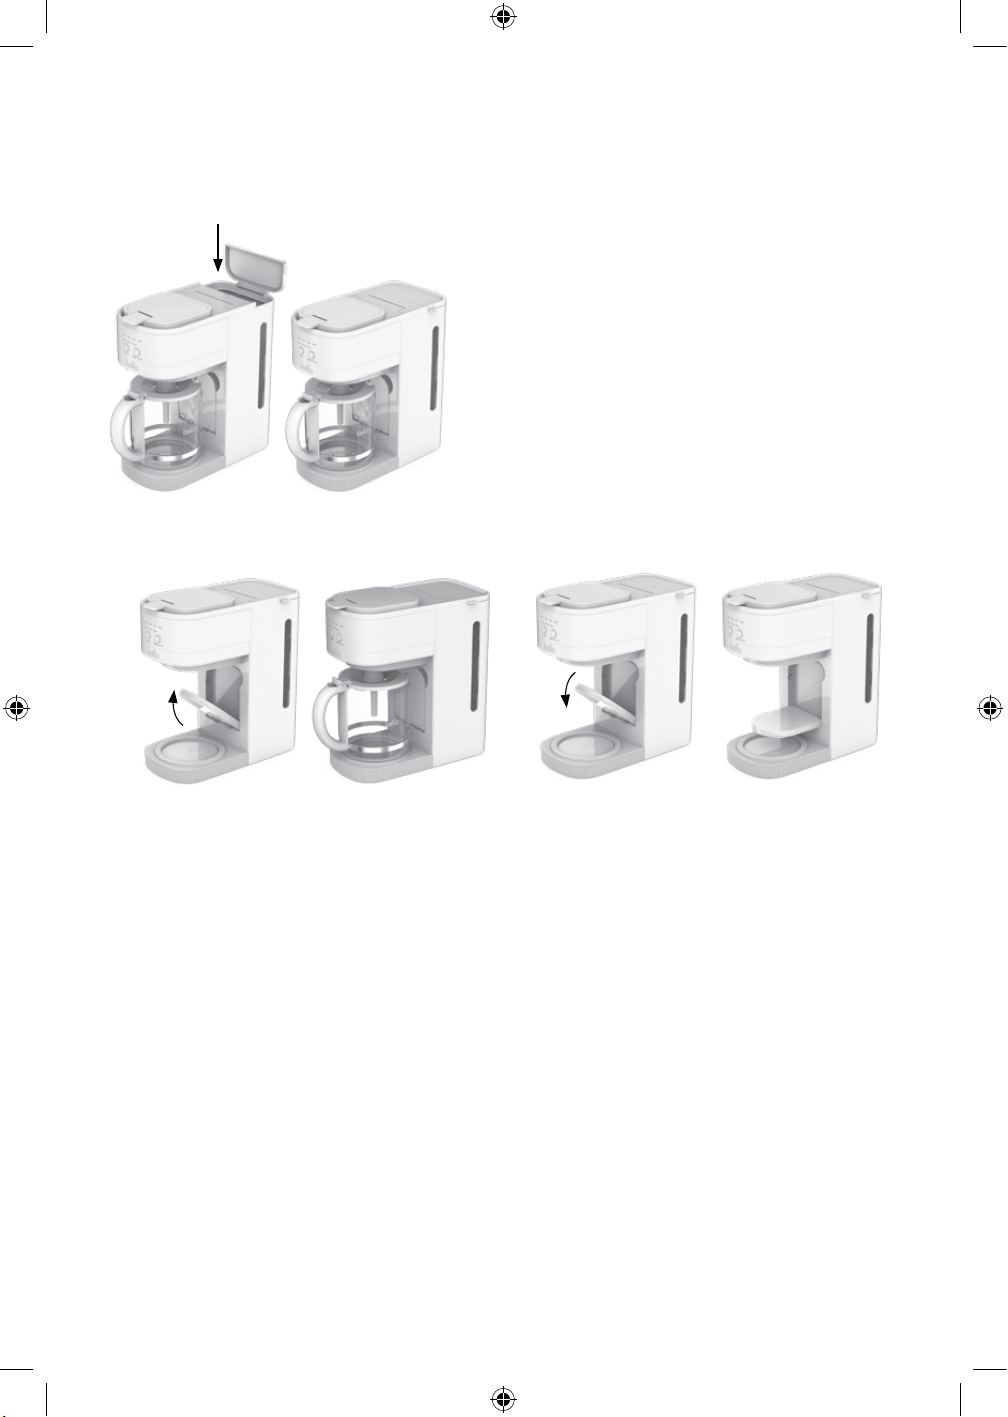
Fill the water tank-Maximum capacity is 1.8L/60oz
1. Fill a pitcher with cool water and pour it into the water tank. Please ensure that the added water does
not exceed “MAX”-1.8L/60oz.
NOTE: Never add warm or hot water.
2. Close the water tank lid.
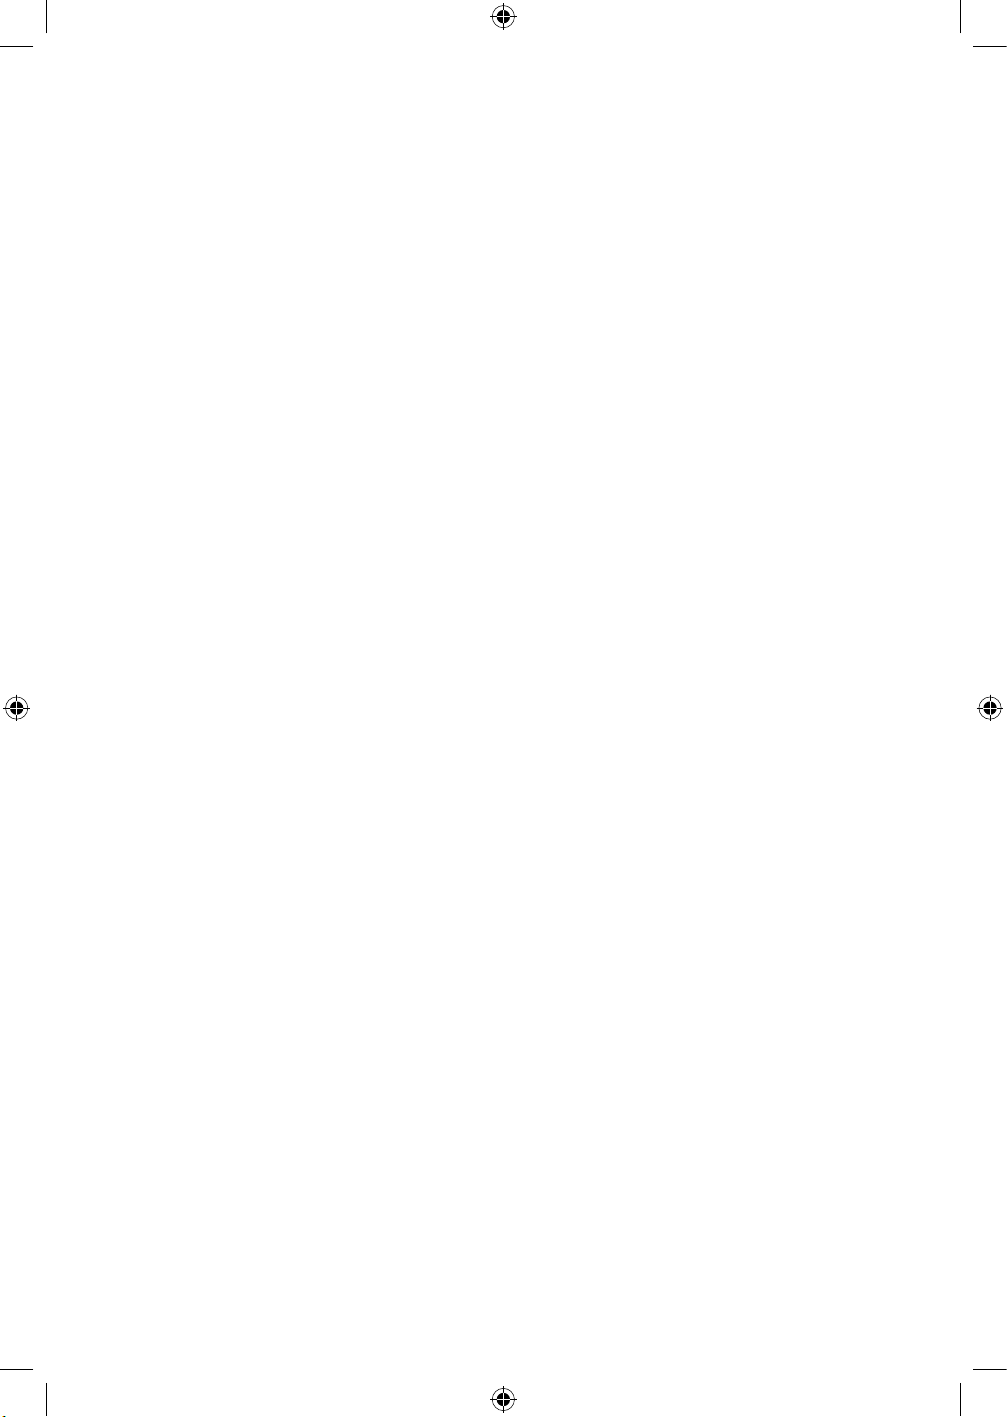
Place a carafe for brewing in carafe mode and cup or travel mug when brewing in single serve mode
If the carafe mode is selected, the drip tray should be flipped up to make space for the carafe. If the K-CUP single
serve mode is selected, the drip tray should be flipped down before placing the mug/travel cup.
Single serve modeCarafe brewing mode
35104_35147_35148_35149_35221_Bella_2in1 Coffee Maker_IM_V9_R5.indd 635104_35147_35148_35149_35221_Bella_2in1 Coffee Maker_IM_V9_R5.indd 6 2024-09-17 11:58 AM2024-09-17 11:58 AM

7
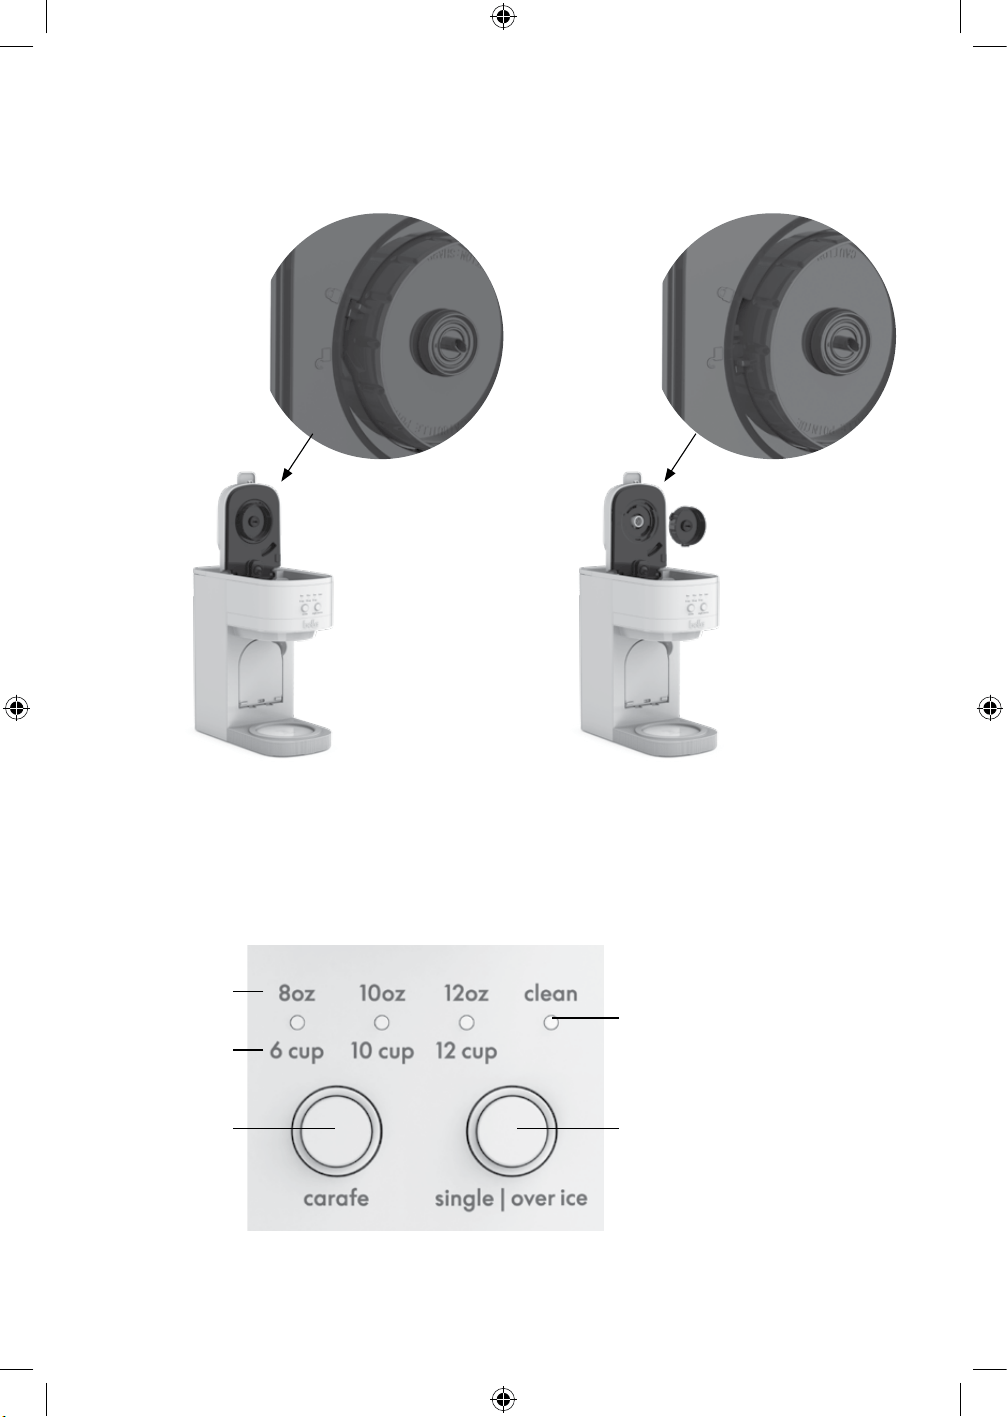
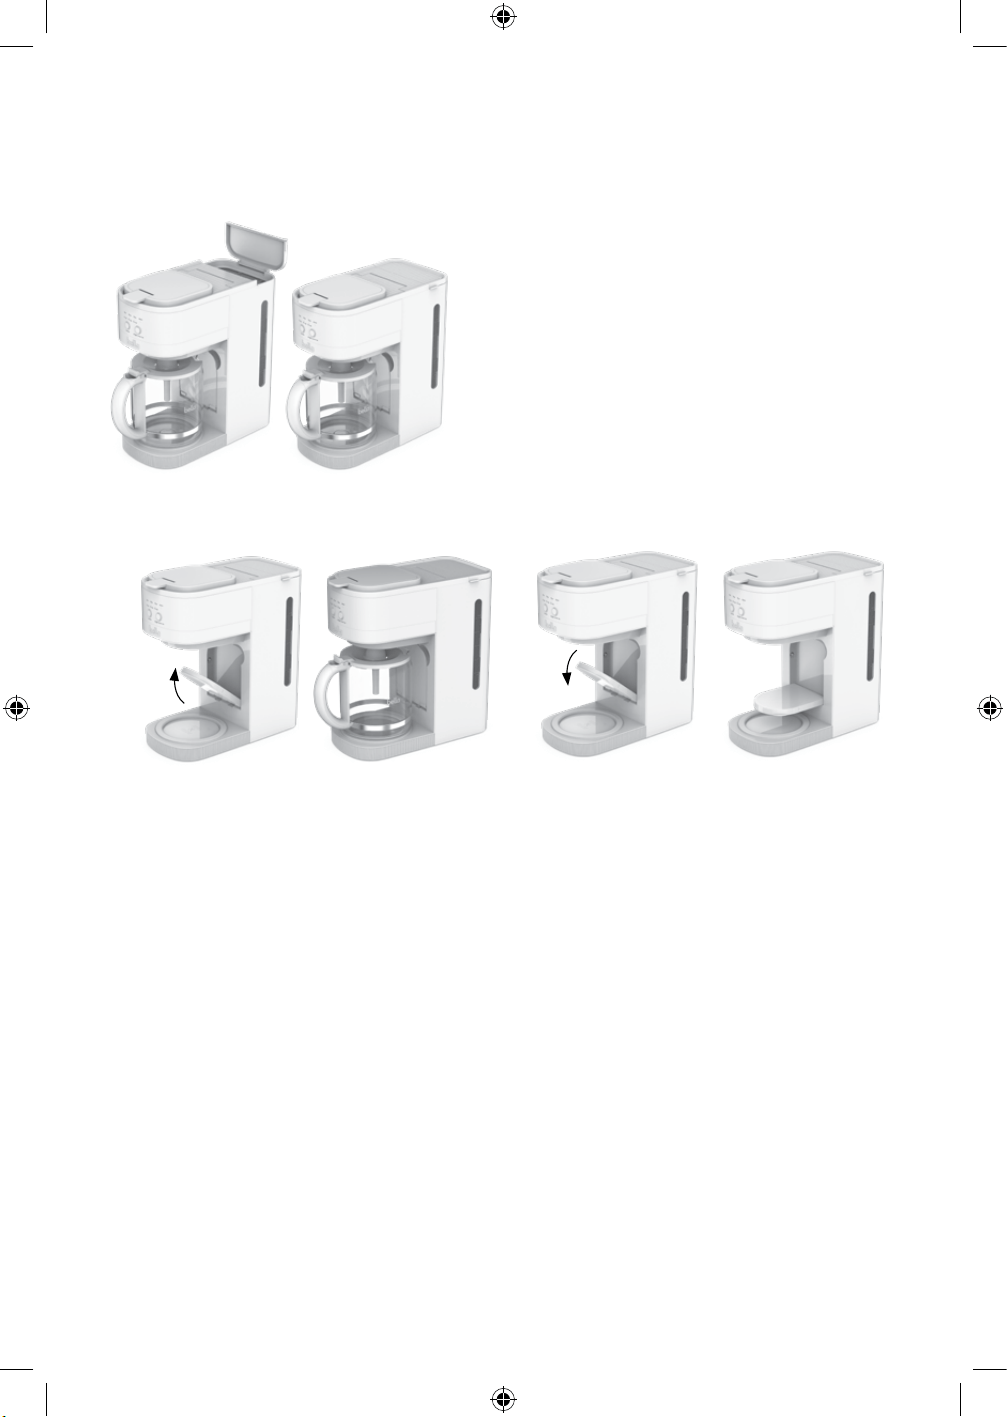
USE OF FILTER BASKET HOLDER/ADAPTER
Use the correct attachment for the brewing mode. Filter Basket Holder for carafe mode and single serve pod adapter
Single Serve mode.
1. Place the Filter Basket Holder in the coffee machine when preparing drip brewed coffee, as shown on
the left figure.
2. Place the single serve pod adapter with magnet in the coffee machine when preparing pod single serve brewed
coffee, as shown on the right figure.
Pod adapterFilter basket holder
Carafe brewing mode Single serve brewing mode
35104_35147_35148_35149_35221_Bella_2in1 Coffee Maker_IM_V9_R5.indd 735104_35147_35148_35149_35221_Bella_2in1 Coffee Maker_IM_V9_R5.indd 7 2024-09-17 11:58 AM2024-09-17 11:58 AM
8
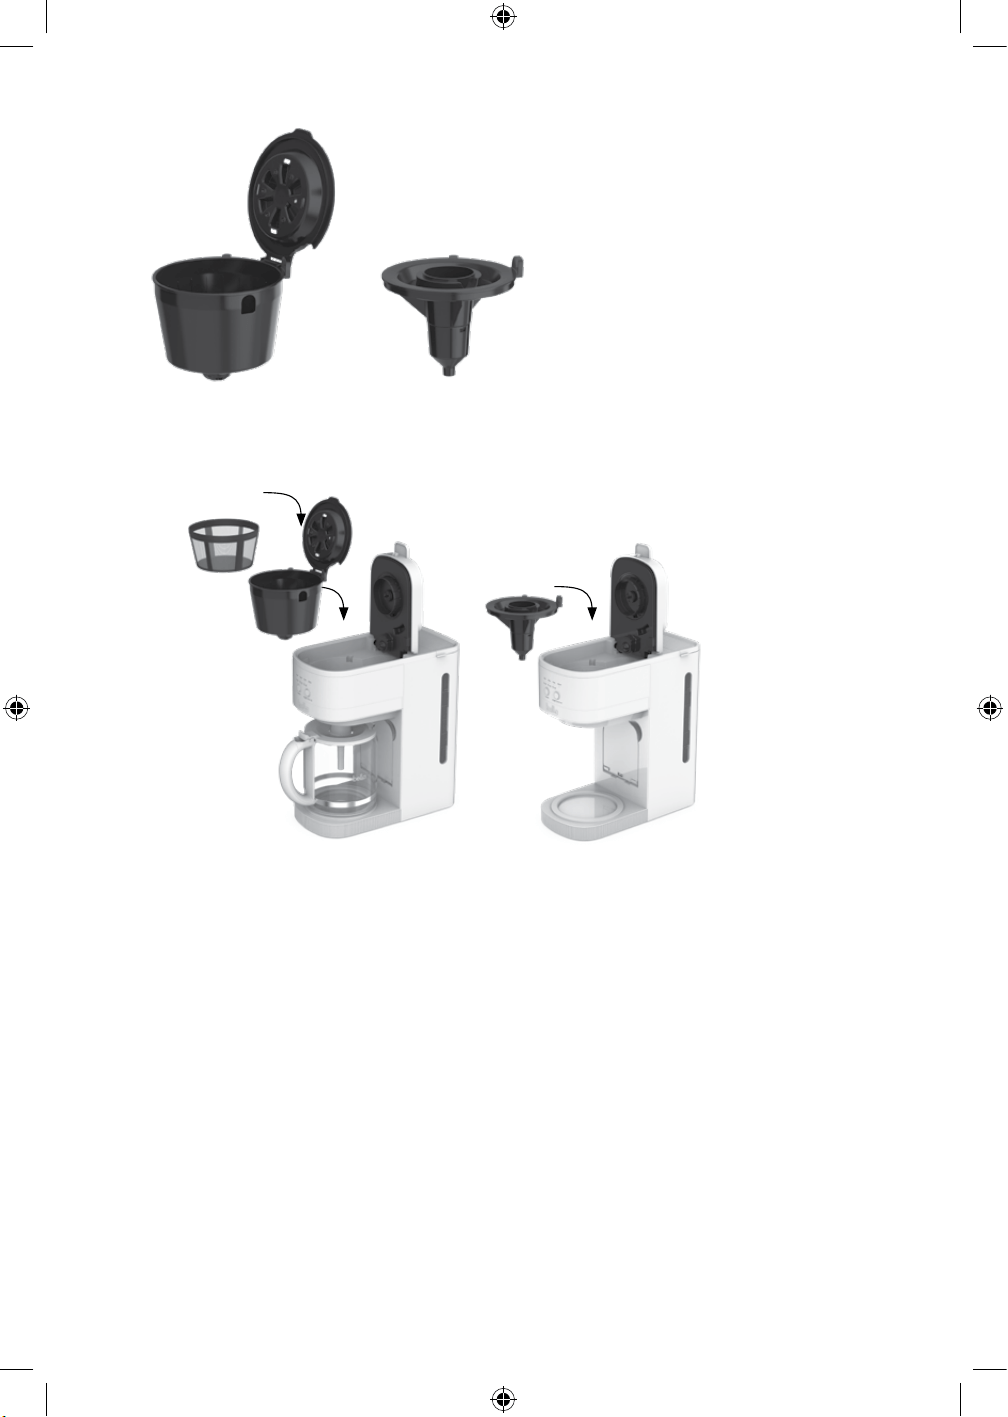
INSTALLING THE REMOVABLE PUNCTURE NEEDLE FOR POD SINGLE SERVE MODE
NOTE: There are sharp coffee capsule puncture needles. One is inside the pod adapter, and the other one
in on the top lower side of the adapter compartment. To avoid injury, do not touch fingers or hands on any
of the needles and be careful when cleaning parts.
SETTING UP THE COFFEE MAKER TO BREW SINGLE SERVE
1. Make sure the coffee machine is plugged into an AC 120V 60Hz socket.
2. When brewing pod coffee, ensure that the pod adapter with single serve coffee filter is installed and the drip
tray is flipped down.
3. Make sure the top lid is firmly closed.
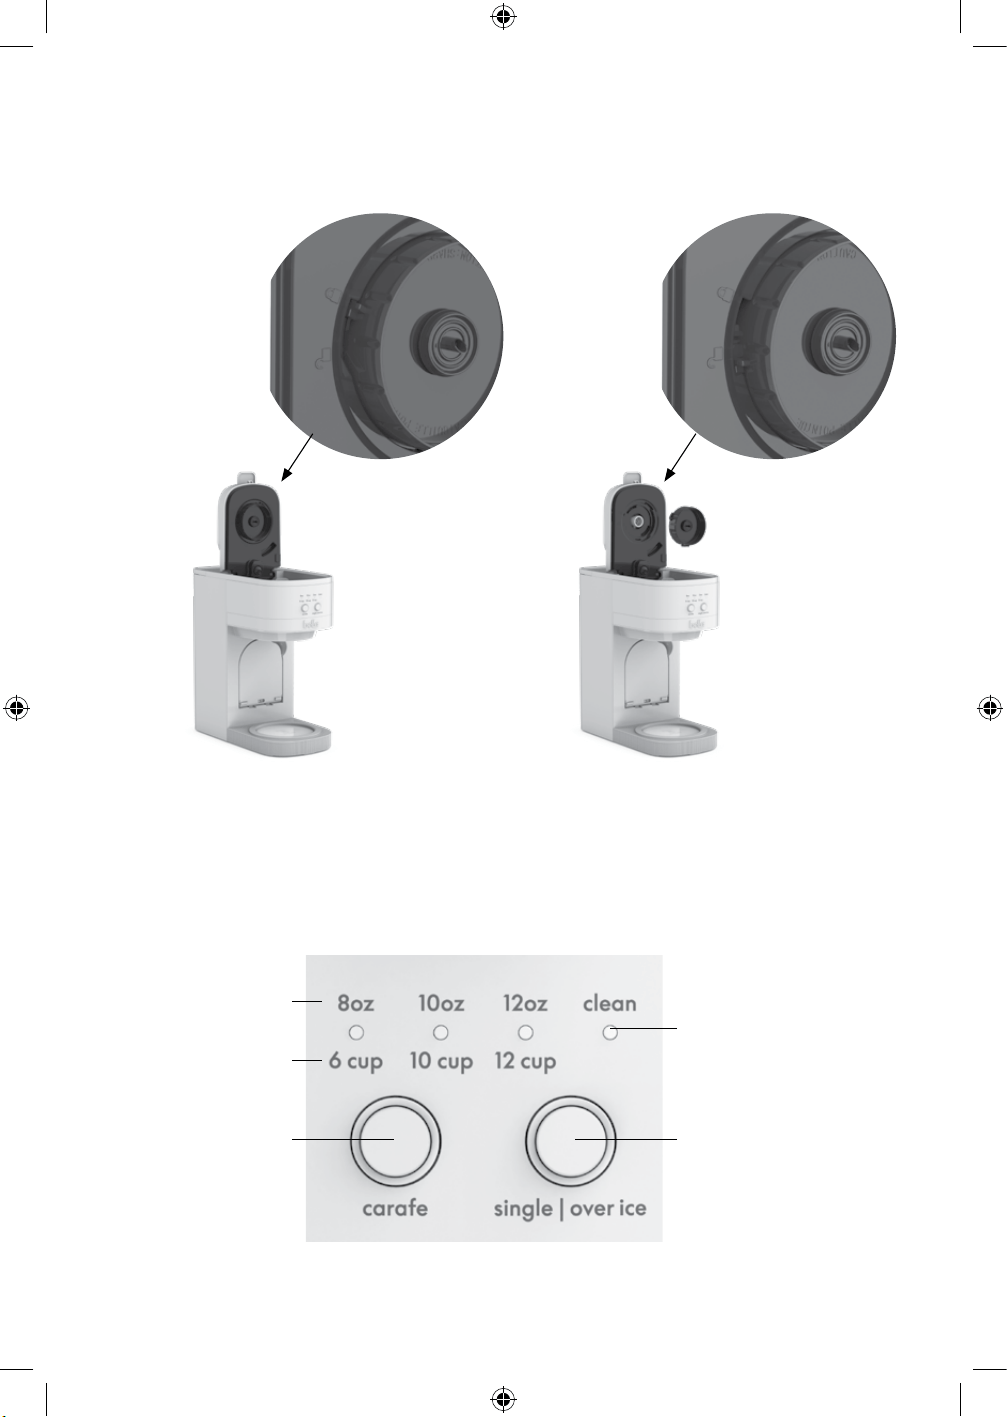
BREWING MODES
Locked Unlocked
Clean
reminder
Single serve pod and
ground coee function
Single
cup sizes
Carafe sizes
Drip carafe
function
35104_35147_35148_35149_35221_Bella_2in1 Coffee Maker_IM_V9_R5.indd 835104_35147_35148_35149_35221_Bella_2in1 Coffee Maker_IM_V9_R5.indd 8 2024-09-17 11:58 AM2024-09-17 11:58 AM

9
CARAFE BREWING MODE
1. Insert the drip filter basket holder and close the filter basket lid and the top lid.
2. To select the carafe size, press the Carafe button to cycle through the indicator lights for 6 CUP/10 CUP/12 CUP.
3. 5 seconds after selecting the carafe size, the coffee maker will begin to brew automatically. During that time
The carafe indicator light and size indicator light will remain on until the brewing has finished.
4. The machine will enter 2-hour Keep Warm mode after the brewing is finished. Cup size indicator light will
shut off.
5. When the keep warm time is finished, all indicator lights will turn off.
SINGLE SERVE BREWING MODE
1. Insert the single serve adapter with magnet, put in a coffee capsule and close the top lid. Flip the drip tray
down so it is parallel to the warming plate.
2. To adjust the cup size press the single/over ice button. The indicator lights of 8 oz/10 oz/12 oz will flash.
3. 5 seconds after selecting the cup size, the coffee maker will begin to brew automatically. During this time
the single indicator light and cup size indicator light will remain on until the coffee maker has finished brewing.
When the brewing has stopped all indicator light will turn off.
BREWING SINGLE SERVE OVER ICE
1. Follow the above step 1 for Brewing Single Serve.
2. Add ice to your glass or travel mug before brewing.
3. To select the oz size, press and hold the single/over ice button for 3 seconds to enter the over ice function, the
default 10oz indicator light will illuminate.
4. Press the single/over ice button again to cycle through the sizes for 8 oz/10 oz/12 oz.
5. 5 seconds after selecting the oz size, the coffee maker will begin to brew automatically.
6. During this time the single indicator will slowly pulse on and off and the cup size indicator light will remain
on until the coffee maker has finished brewing.
7. When the brewing has stopped all indicator lights will turn off and the machine will automatically shut off.
DESCALING REMINDER
When the CLEAN indicator light begins to flash on the Coffee Maker it indicates descaling is necessary.
1. Fill the glass carafe with 1 part white vinegar to 3 parts cold water and add to the coffee tank.
2. Make sure the coffee filter is inserted into the removable filter holder.
3. Remove the pod Adapter Attachment (puncture needle) in the pod adapter and reinstall it after descaling.
4. Plug the power cord into a 120V AC electrical outlet.
5. Press and hold both the carafe and single/over ice buttons for 5 seconds. The CLEAN icon will light up and
enter cleaning mode.
6. Rinse thoroughly by brewing 2 to 3 carafes full of clean, cold water.
7. Allow the Coffee Maker to cool for 15 minutes before next use.
CLEANING THE PUNCTURE NEEDLES
Take out the pod Adapter Attachment and rinse it under running water. This part is also dishwasher safe.
NOTE: Be careful not to touch the sharp puncture needles.
CLEANING
1. Wipe the housing with a damp soft cloth and never use abrasive cleaners or scouring pads as they may scratch
the topcoat.
2. The carafe and single serve filters, single serve Adapter Attachment (puncture needle), and other detachable
accessories can be rinsed under water or are dishwasher safe.
NOTE: Do not immerse this product in water.
35104_35147_35148_35149_35221_Bella_2in1 Coffee Maker_IM_V9_R5.indd 935104_35147_35148_35149_35221_Bella_2in1 Coffee Maker_IM_V9_R5.indd 9 2024-09-17 11:58 AM2024-09-17 11:58 AM

10
SENSIO Inc. hereby warrants that for a period of TWO YEARS from the date of purchase,
this product will be free from mechanical defects in material and workmanship, and
for 90 days in respect to non-mechanical parts. At its sole discretion, SENSIO Inc. will
either repair or replace the product found to be defective, or issue a refund on the
product during the warranty period.
The warranty is only valid for the original retail purchaser from the date of initial retail
purchase and is not transferable. Keep the original sales receipt, as proof of purchase is
required to obtain warranty validation. Retail stores selling this product do not have the
right to alter, modify, or in any way revise the terms and conditions of the warranty.
EXCLUSIONS:
The warranty does not cover normal wear of parts or damage resulting from any of the
following: negligent use of the product, use of improper voltage or current, improper
routine maintenance, use contrary to the operating instructions, disassembly, repair, or
alteration by anyone other than qualified SENSIO Inc. personnel. Also, the warranty
does not cover Acts of God such as fire, floods, hurricanes, or tornadoes.
SENSIO Inc. shall not be liable for any incidental or consequential damages caused
by the breach of any express or implied warranty. Apart from the extent prohibited
by applicable law, any implied warranty of merchantability or fitness for a particular
purpose is limited in time to the duration of the warranty. Some states, provinces or
jurisdictions do not allow the exclusion or limitation of incidental or consequential
damages, or limitations on how long an implied warranty lasts, and therefore, the
above exclusions or limitations may not apply to you. The warranty covers specific legal
rights which may vary by state, province and/or jurisdiction.
HOW TO OBTAIN WARRANTY SERVICE:
You must contact Customer Service at our toll-free number: 1-866-832-4843.
A Customer Service Representative will attempt to resolve warranty issues over the
phone. If the Customer Service Representative is unable to resolve the problem, you will
be provided with a case number and asked to return the product to SENSIO Inc. Attach
a tag to the product that includes: your name, address, daytime contact telephone
number, case number, and description of the problem. Also, include a copy of the
original sales receipt. Carefully package the tagged product with the sales receipt,
and send it (with shipping and insurance prepaid) to SENSIO Inc.’s address. SENSIO
Inc. shall bear no responsibility or liability for the returned product while in transit to
SENSIOInc.’s Customer Service Center.
LIMITED TWO-YEAR WARRANTY
35104_35147_35148_35149_35221_Bella_2in1 Coffee Maker_IM_V9_R5.indd 1035104_35147_35148_35149_35221_Bella_2in1 Coffee Maker_IM_V9_R5.indd 10 2024-09-17 11:58 AM2024-09-17 11:58 AM
11
MEDIDAS IMPORTANTES
DE SEGURIDAD
Al utilizar aparatos eléctricos, deben seguirse siempre las precauciones básicas
de seguridad para reducir el riesgo de incendio, descarga eléctrica y/o lesiones,
incluidas las siguientes:
1. Lea todas las instrucciones.
2. Este aparato no está diseñado para que lo utilicen personas (incluidos niños)
con capacidades físicas, sensoriales o mentales limitadas, ni con falta
de experiencia o conocimiento, a menos que hayan recibido supervisión
o instrucciones sobre el uso del aparato por parte de una persona responsable
de su seguridad.
3. Es necesaria una estrecha supervisión cuando los niños utilizan un aparato
o si este se utiliza cerca de ellos. Se debe supervisar a los niños para
asegurarse de que no jueguen con el aparato.
4. No toque las superficies calientes. Use las asas o las perillas. Se debe tener
cuidado, ya que pueden producirse quemaduras al tocar piezas calientes
o líquido caliente derramado.
5. Para evitar una descarga eléctrica, no sumerja el cable, el enchufe
o la cafetera en agua u otro líquido.
6. Desenchufe la cafetera del tomacorriente cuando no la utilice y antes
de limpiarla. Deje que se enfríe antes de poner o quitar piezas y antes
de limpiar el aparato.
7. La cafetera debe operarse sobre una superficie plana lejos del borde
de la mesada para evitar volcarla accidentalmente.
8. No utilice un aparato con un cable de alimentación o enchufe dañados,
después de una avería, de una caída o si se dañó de cualquier manera.
El fabricante, su agente de servicio o personas calificadas de manera
similar deben encargarse de reemplazar el cable de alimentación y demás
reparaciones para evitar un peligro. Comuníquese con el servicio de atención
al cliente para obtener información sobre el proceso de revisión, reparación
o ajuste.
9. El uso de accesorios que no cuenten con la recomendación del fabricante del
aparato puede ocasionar lesiones.
10. No utilice en exteriores.
11. No deje que el cable cuelgue sobre el borde de una mesa o un mostrador,
ni que toque superficies calientes, incluidas hornillas.
12. No lo coloque sobre un hornillo eléctrico o a gas caliente o cerca de uno,
ni en un horno caliente.
13. Evite el contacto con las piezas móviles.
14. Asegúrese de que la tapa esté bien colocada durante el espumado o
calentamiento.
15. Para desconectar el aparato, presione los botones de control hasta que la luz
indicadora de encendido ya no brille y luego desenchufe del tomacorriente.
16. Para desenchufarlo, sujete el enchufe y jálelo del tomacorriente. Nunca tire del
cable de alimentación.
35104_35147_35148_35149_35221_Bella_2in1 Coffee Maker_IM_V9_R5.indd 1135104_35147_35148_35149_35221_Bella_2in1 Coffee Maker_IM_V9_R5.indd 11 2024-09-17 11:58 AM2024-09-17 11:58 AM

12
17. No coloque la cafetera en un gabinete mientras la usa.
18. ¡ADVERTENCIA! Para evitar que rocíe agua caliente de la aguja perforadora,
no levante la tapa durante el proceso de preparación.
19. No utilice el aparato para un uso que no sea el previsto.
20. ¡ADVERTENCIA! Para reducir el riesgo de incendios o de descargas eléctricas,
no quite la cubierta inferior de la cafetera. No contiene piezas que el usuario
pueda reparar o cambiar. La reparación la debe realizar solo el personal
autorizado del servicio técnico.
21. ¡PRECAUCIÓN! Riesgo de corte: El soporte de cápsula monodosis
desmontable contiene una aguja filosa. Tenga mucho cuidado al manipularla.
22. ¡PRECAUCIÓN! Riesgo de corte: La aguja perforadora es filosa. Tenga
cuidado al limpiar.
23. Para reducir el riesgo de incendio, no ponga nada directamente encima
de la superficie del aparato cuando esté en funcionamiento.
PRECAUCIÓN: Hay dos agujas afiladas que perforan las cápsulas.
Una se encuentra dentro del adaptador para cápsula y la otra en la parte
inferior del compartimento del adaptador. Para evitar el riesgo de lesiones
no ponga los dedos dentro de ninguna de las dos piezas. Tenga cuidado
también al limpiar las piezas.
PRECAUCIÓN: Durante el proceso de preparación del café hay agua
hirviendo en la sección de la pestaña de la tapa frontal. Para evitar lesiones,
no abra la tapa en ningún momento.
24. El recipiente está diseñado para usarse con este electrodoméstico. Nunca
debe usarse sobre una estufa. (A menos que se proporcionen instrucciones
específicas para el uso en una estufa e incluyan las precauciones que deben
observarse.)
25. Use solo cápsulas destinadas para este aparato. Si la cápsula no encaja,
no la fuerce en el aparato.
26. ADVERTENCIA: Para evitar el riesgo de lesión, no abra la cámara de
preparación mientras está preparando café.
27. No utilice un recipiente agrietado o que tenga el asa floja o debilitada.
28. No limpie el recipiente con limpiadores, estropajos de acero u otros materiales
abrasivos.
29. No coloque un recipiente caliente sobre una superficie húmeda o fría.
30. Tenga cuidado de que la superficie del elemento calefactor quede expuesta al
calor residual después de su uso.
SOLO PARA USO DOMÉSTICO
NOTAS SOBRE EL ENCHUFE
Este aparato posee un enchufe polarizado (una clavija es más ancha que la
otra). Para reducir el riesgo de descarga eléctrica, este enchufe encajará en un
tomacorriente polarizado en un solo sentido. Si el enchufe no entra completamente
en el tomacorriente, gire el enchufe.
Si aun así no encaja, contacte a un técnico electricista calificado. No modifique el
enchufe de ninguna manera.
35104_35147_35148_35149_35221_Bella_2in1 Coffee Maker_IM_V9_R5.indd 1235104_35147_35148_35149_35221_Bella_2in1 Coffee Maker_IM_V9_R5.indd 12 2024-09-17 11:58 AM2024-09-17 11:58 AM

13
NOTAS SOBRE EL CABLE
a) Se debe brindar un cable de alimentación corto (o un cable de alimentación
desconectable) para reducir los riesgos de enredarse o tropezarse con un
cable largo.
b) Hay disponibles cables eléctricos desconectables más largos o cables de
extensión, y estos se pueden utilizar si se tiene cuidado al usarlos.
c) Si se utiliza un cable eléctrico desconectable largo o un cable de extensión:
1) La clasificación eléctrica marcada en el cable de alimentación
desconectable o cable de extensión deberá ser al menos igual a la
clasificación eléctrica del aparato;
2) Si el aparato es del tipo con conexión a tierra, el cable de extensión
deberá ser un cable de 3 hilos con conexión a tierra.
3) El cable más largo deberá colocarse de manera que no cuelgue de un
mostrador o mesa de donde los niños pudieran jalarlo o tropezar con él.
ADVERTENCIA SOBRE EL ACABADO
PRECAUCIÓN: Para evitar que el acabado de la encimera o de la mesa u otros
muebles se dañe, coloque posavasos o manteles individuales que NO SEAN DE
PLÁSTICO entre el electrodoméstico y el acabado de la encimera o de la mesa.
No hacerlo puede provocar el oscurecimiento del acabado, generar desperfectos
permanentes u ocasionar la aparición de manchas.
ENERGÍA ELÉCTRICA
Si el circuito eléctrico se sobrecarga con otros electrodomésticos, es posible que
el aparato no funcione correctamente. Debe utilizarse en un circuito eléctrico
diferente al de otros electrodomésticos.
ADVERTENCIA: Para reducir el riesgo de incendio o de descarga eléctrica no quite
la cubierta. No hay piezas que el usuario pueda reparar adentro. La reparación la
debe realizar solo el personal autorizado del servicio técnico.
GUARDE ESTAS INSTRUCCIONES
35104_35147_35148_35149_35221_Bella_2in1 Coffee Maker_IM_V9_R5.indd 1335104_35147_35148_35149_35221_Bella_2in1 Coffee Maker_IM_V9_R5.indd 13 2024-09-17 11:58 AM2024-09-17 11:58 AM

14
CONOZCA SU CAFETERA
El producto puede diferir ligeramente del que aparece en la ilustración.
1. Cuchara de medición
2. Filtro permanente
3. Tapa de la canasta del filtro
4. Soporte de la canasta del
filtro
5. Tapa de la jarra
6. Asa de la jarra
7. Jarra
8. Tubo de mezcla
9. Filtro para café molido
(Monodosis)
10. Adaptador de cápsula
11. Accesorio adaptador de
cápsula
12. Luces indicadoras
13. Botones
14. Bandeja de goteo
reclinable
15. Placa de calentamiento
16. Asa
17. Tapa superior
18. Tapa del depósito de agua
19. Depósito de agua
20. Ventana de agua
21. Cable de alimentación
22. Almacenamiento del cable
(no se muestra)
1
2
3
4
5
6
11
12
14
15
13
1
2
3
4
5
6
7
8
9
10
11
12
13
14
15
16
17
18
19
20
35104_35147_35148_35149_35221_Bella_2in1 Coffee Maker_IM_V9_R5.indd 1435104_35147_35148_35149_35221_Bella_2in1 Coffee Maker_IM_V9_R5.indd 14 2024-09-17 11:58 AM2024-09-17 11:58 AM

15
ANTES DEL PRIMER USO
Antes del primer uso, limpie este producto para un funcionamiento óptimo.
Consulte la sección “Conozca su cafetera” para obtener información sobre este producto y todas las piezas incluidas.
1. Quite los adhesivos y etiquetas del producto.
2. Quite el embudo, la canasta pequeña de café y la cuchara de café, luego lávelas bien con agua limpia y
detergente suave, y vuelva a instalarlos.
3. Para quitar e instalar el embudo y la canasta pequeña de café, consulte las instrucciones en la sección
“Uso del soporte de la canasta del filtro/adaptador”.
IIMPORTANTE: FUNCIONAMIENTO DEL PRODUCTO - MODO JARRA
1. Agregue agua al depósito de agua. El nivel de agua debe estar debajo de la marca de agua “MAX” de 1.8L.
2. Introduzca el soporte de la canasta del filtro y cierre la tapa.
3. Coloque la jarra suministrada y elija el tamaño deseado de jarra.
4. Inserte el enchufe en un tomacorriente que coincida con la frecuencia de voltaje.
4.1 Después de colocar el soporte de la canasta del filtro presione el botón Carafe. La luz LED por defecto
de 12 tazas se encenderá y parpadeará el botón Carafe. Tras 5 segundos, si no funciona, el botón Carafe
se volverá sólido y la unidad comenzará a preparar café.
4.2 Para preparar otros tamaños de jarras, presione el botón Carafe. Se encenderá el tamaño por defecto
o el último utilizado, y parpadeará el botón Carafe. Vuelva a presionar el botón Carafe para ajustar el tamaño
de la jarra y luego espere 5 segundos para seleccionarlo.
5. La luz indicadora Carafe y la luz indicadora del tamaño seleccionado de jarra, y la cafetera comenzará
a preparar. Un vez que se termine de preparar el café, la unidad ingresará en un modo de mantener caliente
de 2 horas. Cuando pasan las 2 horas, todas las luces indicadoras se apagan.
FUNCIONAMIENTO DEL PRODUCTO – MODO MONODOSIS
1. Agregue agua al depósito de agua. El nivel de agua debe estar debajo de la línea “MAX”. Coloque el
adaptador simple y cierre la tapa superior.
2. Asegúrese de que la bandeja de goteo se haya invertido sobre la placa de calentamiento.
3. Coloque una taza/vaso de viaje en la bandeja de goteo y elija el tamaño deseado de taza.
4. Inserte el enchufe en un tomacorriente que coincida con la frecuencia de voltaje.
4.1. Presione el botón single/over ice. Se encenderá sólida la luz indicadora LED del tamaño por defecto de 10
oz y parpadeará el botón single/over ice. Tras 5 segundos, si no funciona, el botón single/over ice se volverá
sólido y la unidad comenzará a preparar café.
4.2. Para preparar otros tamaños monodosis, presione el botón single/over ice. Se encenderá el tamaño
por defecto o el último utilizado, y parpadeará el botón single/over ice. Mientras el botón single/over ice
parpadea, presiónelo de nuevo para cambiar el tamaño de la taza, y luego espere 5 segundos para confirmar
la selección
5. La luz indicadora Single y la luz indicadora del tamaño seleccionado de taza, y la cafetera comenzará
a preparar. Una vez que se termine de preparar el café, todas las luces indicadoras se apagarán.
Todas las luces indicadoras se apagan después de preparar y la unidad ingresa en modo de espera después
de las operaciones siguientes (los indicadores de función permanecen encendidos y parpadea el indicador
del último tamaño seleccionado de taza):
1. Abrir la tapa superior.
2. Agregar o quitar el filtro de café molido (monodosis)
3. Presionar el botón single/over ice.
SELECCIÓN DE MODO – JARRA O MONODOSIS
1. Use Jarra para la preparación por goteo.
2. Use Monodosis para preparar una taza o un vaso de viaje conforme a los diferentes tipos de taza
en este modo.
35104_35147_35148_35149_35221_Bella_2in1 Coffee Maker_IM_V9_R5.indd 1535104_35147_35148_35149_35221_Bella_2in1 Coffee Maker_IM_V9_R5.indd 15 2024-09-17 11:58 AM2024-09-17 11:58 AM
16
USO DEL SOPORTE DE LA CANASTA DEL FILTRO/ADAPTADOR
Use el accesorio correcto para el modo de preparación. Soporte de la canasta del filtro para el modo jarra
y monodosis.
1. Coloque el soporte de la canasta del filtro en la cafetera al preparar café por goteo, como se muestra
en la imagen izquierda.
2. Coloque el adaptador monodosis con cápsula con el imán de la cafetera al preparar café monodosis con
cápsula, como se muestra en la imagen de la derecha.
Adaptador simple
Soporte de la canasta del ltror
Carafe brewing mode Single serve brewing mode
INSTRUCCIONES DE FUNCIONAMIENTO
Llene el depósito de agua. La capacidad máxima es de 1.8 L/60 oz
1. Llene una jarra con agua fría y viértala en el depósito de agua. Asegúrese de que el agua agregada no supere
la marca “MAX” de 1.8 L/60 oz. NOTA: Nunca agregue agua tibia o caliente.
2. Cierre la tapa del depósito de agua.
Coloque una jarra cuando prepare en modo jarra o una taza o vaso de viaje cuando prepare en modo monodosis.
Si selecciona el modo Jarra, la bandeja de goteo debe invertirse hacia arriba para hacer espacio para la jarra.
Si selecciona el modo Monodosis, la bandeja de goteo debe invertirse hacia abajo antes de colocar la taza/vaso
de goteo.
Sistema de preparación monodosisModo de preparación Jarra
35104_35147_35148_35149_35221_Bella_2in1 Coffee Maker_IM_V9_R5.indd 1635104_35147_35148_35149_35221_Bella_2in1 Coffee Maker_IM_V9_R5.indd 16 2024-09-17 11:58 AM2024-09-17 11:58 AM
17
USO DEL SOPORTE DE LA CANASTA DEL FILTRO/ADAPTADOR
Use el accesorio correcto para el modo de preparación. Soporte de la canasta del filtro para el modo jarra
y monodosis.
1. Coloque el soporte de la canasta del filtro en la cafetera al preparar café por goteo, como se muestra
en la imagen izquierda.
2. Coloque el adaptador monodosis con cápsula con el imán de la cafetera al preparar café monodosis con
cápsula, como se muestra en la imagen de la derecha.
Adaptador simple
Soporte de la canasta del ltror
Carafe brewing mode Single serve brewing mode
35104_35147_35148_35149_35221_Bella_2in1 Coffee Maker_IM_V9_R5.indd 1735104_35147_35148_35149_35221_Bella_2in1 Coffee Maker_IM_V9_R5.indd 17 2024-09-17 11:58 AM2024-09-17 11:58 AM
18
INSTALACIÓN DE LA AGUJA PERFORADORA DESMONTABLE PARA CÁPSULAS
NOTA: Hay agujas perforadoras de cápsulas de café que son filosas. Una está ubicada dentro del adaptador de
cápsulas y la otra está ubicada encima de la parte inferior del compartimiento del adaptador. Para evitar lesiones, no
toque las agujas con los dedos o manos y tenga cuidado al limpiar las piezas.
CONFIGURAR LA CAFETERA PARA PREPARAR EN MONODOSIS
1. Asegúrese de que la cafetera esté enchufada en un tomacorriente de 120 V CA a 60 Hz.
2. Al preparar café de cápsula, asegúrese de que el adaptador de cápsulas con el filtro de café monodosis esté
instalado y la bandeja de goteo esté invertida hacia abajo.
3. Asegúrese de que la tapa superior esté bien cerrada.
MODOS DE PREPARACIÓN
Bloqueado Desbloqueado
Recordatorio
de limpieza
Función de cápsula
monodosis y café
molido
Tamaños de
taza
Tamaños de jarra
Función de jarra
por goteo
35104_35147_35148_35149_35221_Bella_2in1 Coffee Maker_IM_V9_R5.indd 1835104_35147_35148_35149_35221_Bella_2in1 Coffee Maker_IM_V9_R5.indd 18 2024-09-17 11:58 AM2024-09-17 11:58 AM

19
MODO DE PREPARACIÓN JARRA
1. Inserte el soporte de la canasta del filtro de goteo y cierre la tapa de la canasta del filtro y la tapa superior.
2. Para seleccionar el tamaño de jarra, presione el botón Carafe para pasar por las luces indicadoras de 6,
10 y 12 tazas.
3. 5 segundos después de seleccionar el tamaño de jarra, la cafetera comenzará a preparar automáticamente.
En ese tiempo, la luz indicadora Carafe y la luz indicadora de tamaño permanecerán encendidas hasta que
haya terminado la preparación.
4. La máquina ingresará en modo Mantener caliente por 2 horas una vez terminada la preparación.
La luz indicadora de tamaño de taza se apagará.
5. Una vez que se termine el tiempo de mantener caliente, todas las luces indicadoras se apagarán.
SISTEMA DE PREPARACIÓN MONODOSIS
1. El adaptador monodosis con imán, coloque una cápsula de café y cierre la tapa superior. Invierta la bandeja
de goteo hacia abajo para que esté paralela a la placa de calentamiento.
2. Para ajustar el tamaño de la taza, presione el botón single/over ice. Las luces indicadoras de 8, 10 y 12 oz
parpadearán.
3. 5 segundos después de seleccionar el tamaño de monodosis, la cafetera comenzará a preparar
automáticamente. En ese tiempo, la luz indicadora Single y la luz indicadora de tamaño de taza permanecerán
encendidas hasta que haya terminado la preparación. Cuando haya terminado la preparación, todas las luces
indicadoras se apagarán.
PREPARACIÓN MONODOSIS SOBRE HIELO
1. Siga el paso 1 de arriba para preparación monodosis.
2. Agregue hielo al vaso o taza antes de preparar.
3. Para seleccionar el tamaño en oz, mantenga presionado el botón single/over ice por 3 segundos para ingresar
a la función sobre hielo. Se encenderá la luz indicadora por defecto de 10 oz.
4. Vuelva a presionar el botón single/over ice para pasar por los tamaños de 8, 10 y 12 oz.
5. 5 segundos después de seleccionar el tamaño oz y de mantener presionado el botón single/over ice por
3 segundos, la cafetera comenzará a preparar automáticamente.
6. En este momento, el indicador Single pulsará despacio y la luz indicadora de tamaño de taza permanecerá
encendida hasta que la cafetera haya terminado de la preparación.
7. Cuando haya terminado la preparación, todas las luces indicadoras se apagarán y la máquina se apagará
automáticamente..
RECORDATORIO DE DESCALCIFICACIÓN
Cuando la luz indicadora CLEAN comience a parpadear en la cafetera, deberá descalcificarla.
1. Llene la jarra con 1 parte de vinagre blanco y 3 partes de agua fría, y viértala en el depósito de café.
2. Asegúrese de que el filtro de café esté insertado en el soporte del filtro extraíble.
3. Quite el accesorio adaptador de copa K (aguja perforadora) en el adaptador de copa K y vuelva a instalarlo
después de descalcificar.
4. Enchufe el cable de alimentación a un tomacorriente de 120 V CA.
5. Mantenga presionado el botón Carafe y Single por 5 segundos. El icono CLEAN se encenderá e ingresará
al modo de limpieza.
6. Enjuague bien preparando 2 a 3 jarras repletas de agua fría.
7. Deje que la cafetera se enfríe 15 minutos antes de volver a usarla.
LIMPIEZA DE LAS AGUJAS PERFORADORAS
Quite el accesorio adaptador simple y enjuáguelo bajo agua. Esta pieza también es apta para el lavavajillas.
NOTA: Tenga cuidado de no tocar las agujas perforadoras que son filosas.
LIMPIEZA
1. Limpie la carcasa con un paño suave humedecido. Nunca use limpiadores abrasivos o estropajos,
ya que pueden dañar el recubrimiento superior.
2. Los filtros monodosis y de jarra, el accesorio adaptador monodosis (aguja perforadora) y otros accesorios
desmontable se pueden enjuagar bajo agua o son aptos para lavavajillas.
Nota: No sumerja este producto en agua.
35104_35147_35148_35149_35221_Bella_2in1 Coffee Maker_IM_V9_R5.indd 1935104_35147_35148_35149_35221_Bella_2in1 Coffee Maker_IM_V9_R5.indd 19 2024-09-17 11:58 AM2024-09-17 11:58 AM

20
Mediante la presente, SENSIO Inc. garantiza que, durante el plazo de DOS AÑOS a partir
de la fecha de compra, este producto no presentará defectos mecánicos en el material
ni en la mano de obra, y durante 90 días, no los presentará en las piezas no mecánicas.
A su entera discreción, SENSIO Inc. reparará o reemplazará el producto que resulte
defectuoso, o emitirá un reembolso por el producto durante el plazo de garantía.
Esta garantía es válida únicamente para el comprador minorista original a partir de
la fecha de compra minorista inicial y no es transferible. Conserve el recibo de compra
original, ya que se exige una prueba de compra para obtener la validación de la garantía.
Las tiendas minoristas no tienen derecho a alterar, modificar ni corregir de ninguna
manera los términos y condiciones de la garantía.
EXCLUSIONES:
La garantía no cubre el desgaste normal de las piezas ni el daño ocasionado por
cualquiera de las siguientes causas: uso negligente del producto, uso de un voltaje
o corriente incorrectos, mantenimiento de rutina inadecuado, uso contrario al de las
instrucciones de funcionamiento, desarmado, reparación o alteración a cargo de personas
que no sean miembros del personal calificado de SENSIO Inc. Asimismo, la garantía no
cubre actos de la naturaleza, como incendios, inundaciones, huracanes o tornados.
SENSIO Inc. no asumirá responsabilidad por daños incidentales o resultantes ocasionados
por la violación de cualquier garantía expresa o implícita. Salvo en la medida en que lo
prohíban las leyes aplicables, cualquier garantía implícita de comerciabilidad o aptitud
para un propósito particular se limita temporalmente a la duración de la garantía. Algunos
estados, provincias o jurisdicciones no permiten la exclusión ni la limitación de daños
incidentales o resultantes, o limitaciones sobre la duración de una garantía implícita y, por
lo tanto, es posible que las exclusiones o limitaciones mencionadas no le correspondan.
La garantía cubre derechos legales específicos que pueden variar de un estado, una
provincia o una jurisdicción a otros.
CÓMO OBTENER EL SERVICIO DE GARANTÍA:
Debe comunicarse con el Servicio de atención al cliente a nuestro número telefónico
gratuito: 1-866-832-4843. Un representante del Servicio de atención al cliente intentará
resolver los problemas referidos a la garantía por teléfono. Si este no puede resolver el
problema, le proporcionarán un número de caso y le solicitarán que devuelva el producto
a SENSIO Inc. Adhiera una etiqueta al producto que incluya: su nombre, dirección,
número telefónico de contacto durante el día, número de caso y descripción del problema.
Además, incluya una copia del recibo de compra original. Envuelva cuidadosamente
el producto etiquetado con el recibo de compra, y envíelo (con el envío y el seguro
prepagados) a la dirección de SENSIO Inc. SENSIO Inc. no asumirá obligación ni
responsabilidad alguna por el producto devuelto que esté en el trayecto hacia el Centro
de servicio al cliente de SENSIO Inc.
GARANTÍA LIMITADA DE DOS AÑOS
35104_35147_35148_35149_35221_Bella_2in1 Coffee Maker_IM_V9_R5.indd 2035104_35147_35148_35149_35221_Bella_2in1 Coffee Maker_IM_V9_R5.indd 20 2024-09-17 11:58 AM2024-09-17 11:58 AM

35104_35147_35148_35149_35221_Bella_2in1 Coffee Maker_IM_V9_R5.indd 2135104_35147_35148_35149_35221_Bella_2in1 Coffee Maker_IM_V9_R5.indd 21 2024-09-17 11:58 AM2024-09-17 11:58 AM
For customer service questions or comments
Para preguntas o comentarios sobre servicio al cliente
1-866-832-4843 / help@bellahousewares.com
Made in China / Hecho en China
Sensio Inc.
dba Made by Gather
TM
New York, NY 10016/USA
35104_35147_35148_35149_35221 R. 5
35104_35147_35148_35149_35221_Bella_2in1 Coffee Maker_IM_V9_R5.indd 2235104_35147_35148_35149_35221_Bella_2in1 Coffee Maker_IM_V9_R5.indd 22 2024-09-17 11:58 AM2024-09-17 11:58 AM
