
HA110, HA850
EN Operator's manual 2-13
DE Bedienungsanweisung 14-26
FR Manuel d'utilisation 27-39
Contents
Introduction..................................................................... 2
Safety..............................................................................4
Assembly........................................................................ 8
Operation........................................................................ 9
Maintenance................................................................. 10
Technical data.............................................................. 11
EC Declaration of Conformity....................................... 13
Introduction
Product description
We have a policy of continuous product development
and therefore reserve the right to modify the design and
appearance of the products without prior notice.
Note: This manual cover both gasoline operated and
battery operated power units.
Intended use
WARNING: This attachment may only be
used together with the intended product, see
the accessory chapter in the Operator’s
Manual of the product.
WARNING: Never use HA110 with a battery
operated power unit.
Only use HA110 with a gasoline operated power unit.
Use HA850 with either a gasoline operated power unit or
a battery operated power unit.
The product is only designed for cutting branches and
twigs.
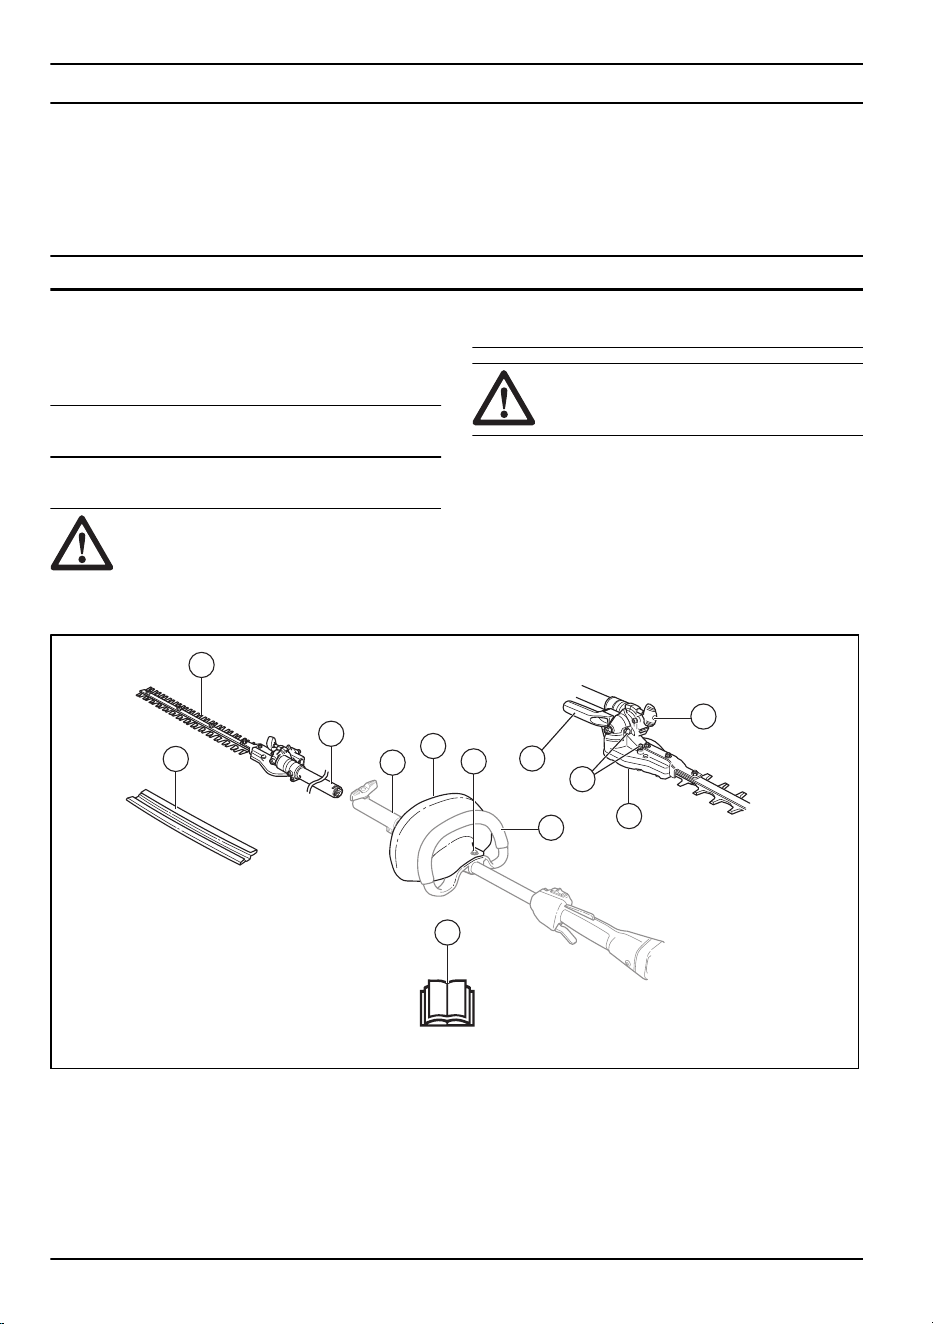
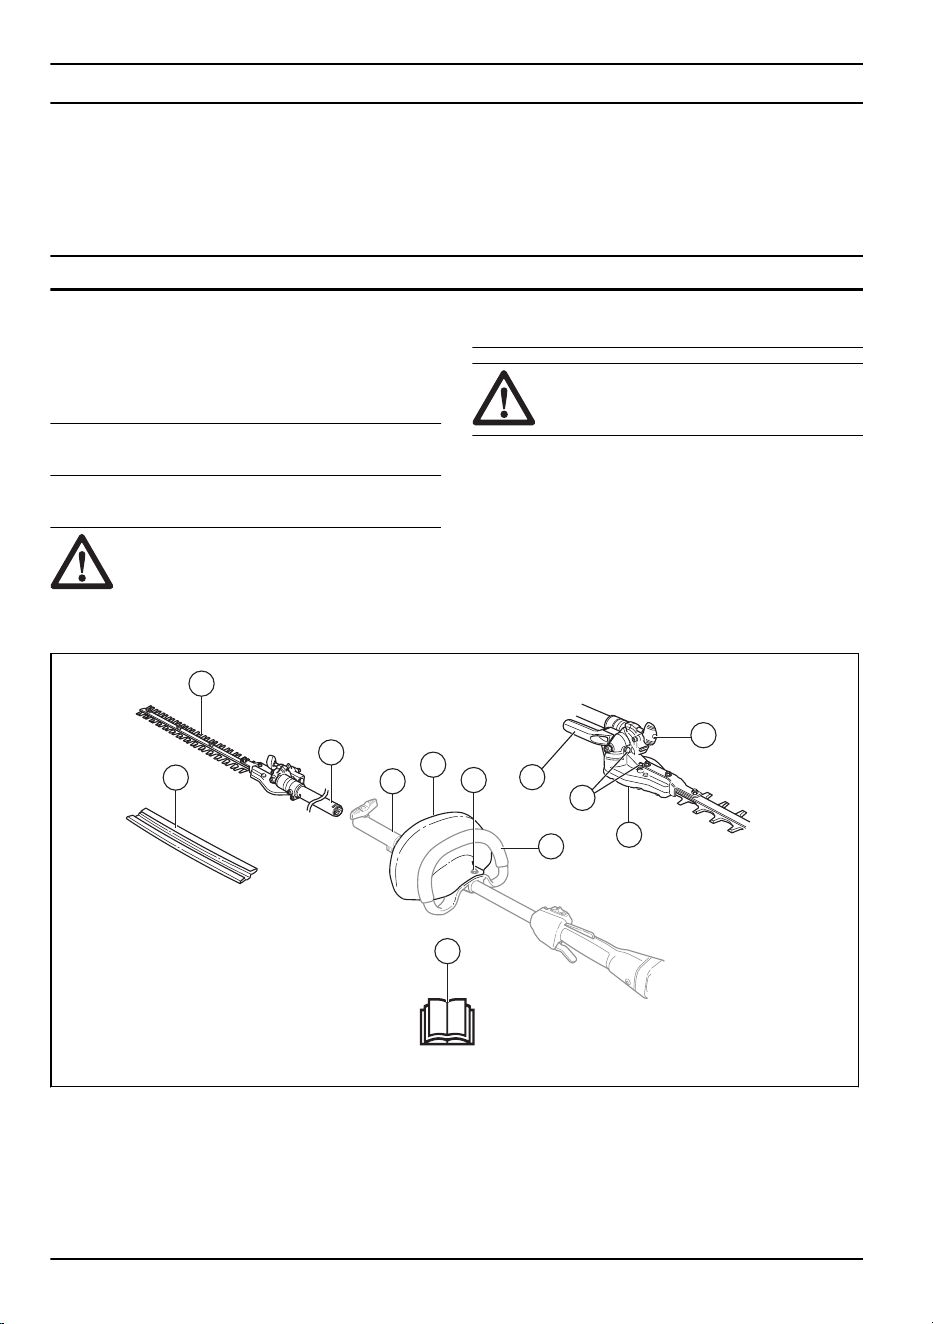
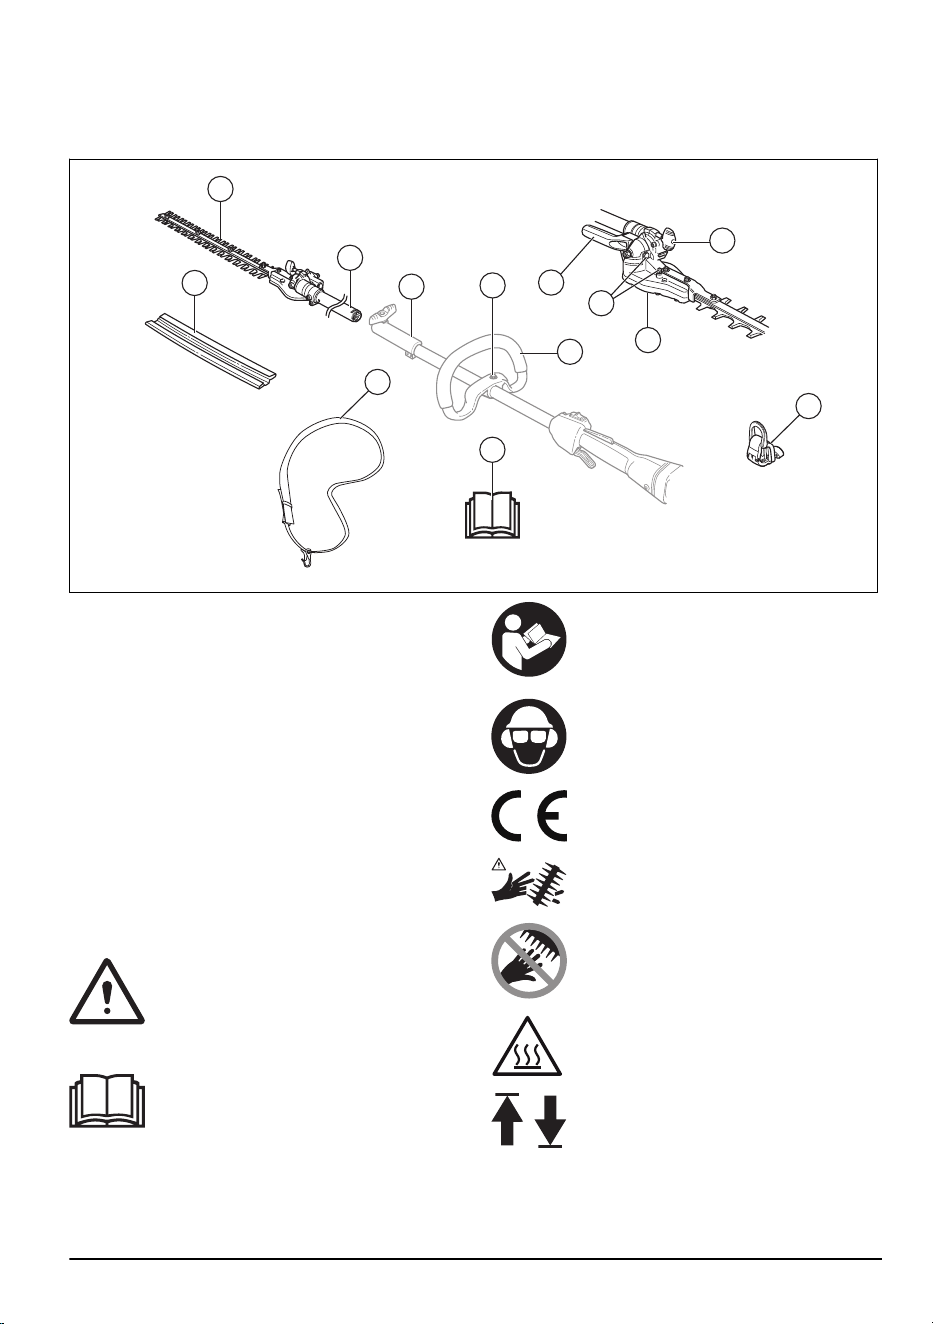
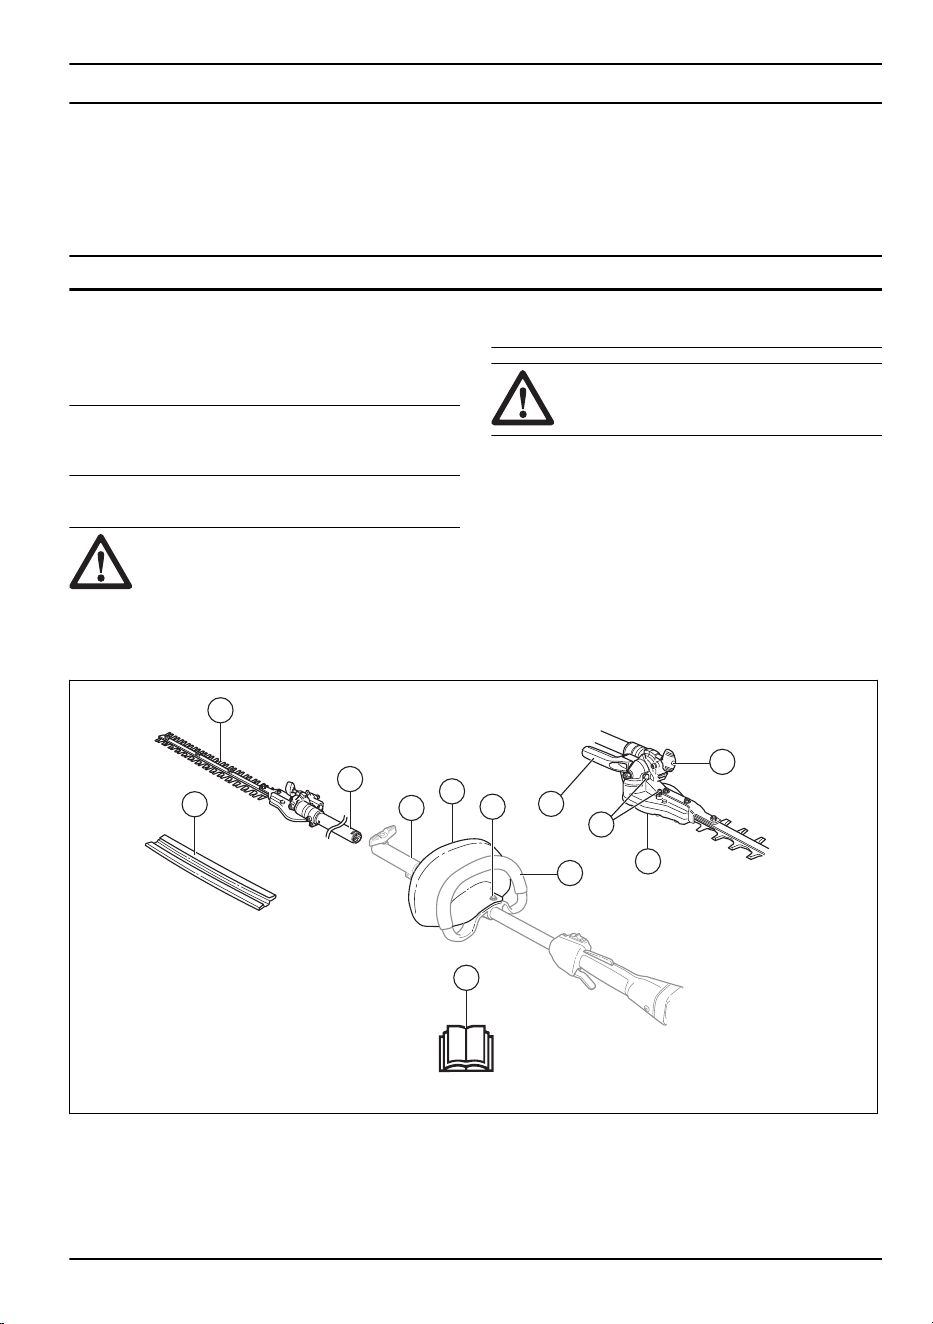
Attachment overview for HA110 (for gasoline products only)
1
9
4
6
3
12
2
11
10
7
8
5
1. Cutter
2. Grease nipple and plug for filling lubricant
3. Bevel gear
4. Front handle
5. Hand guard mounting screw
6. Angle adjustment knob
7. Hand guard (only on gasoline operated power units)
8. Operator′s manual
9. Transport guard
10. Shaft coupling
11. Shaft (110 mm for HA110 and only on gasoline
operated power units)
12. Angle adjustment handle (HA850)
2 820 - 002 - 13.12.2019
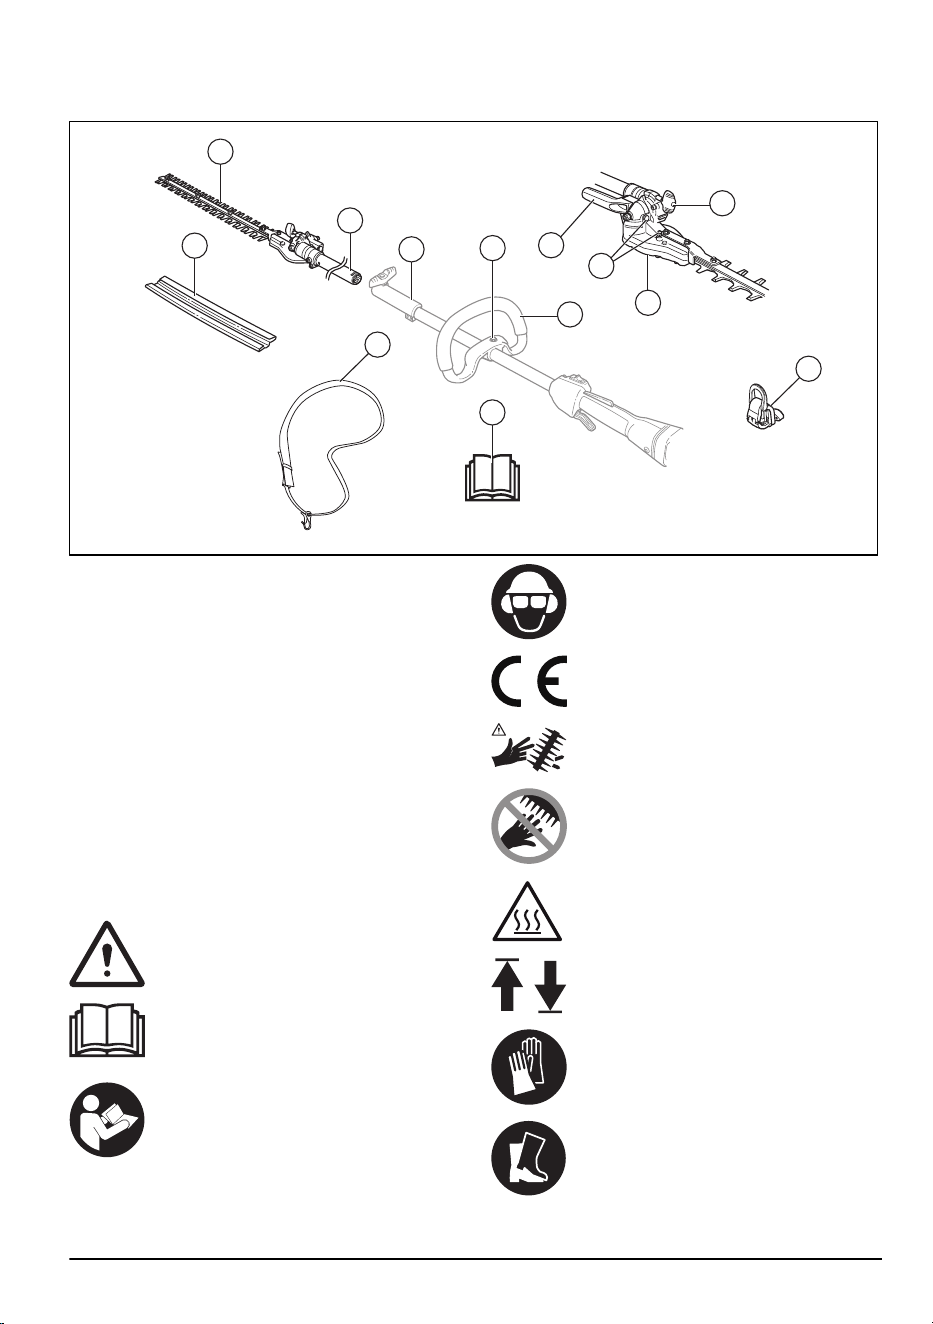
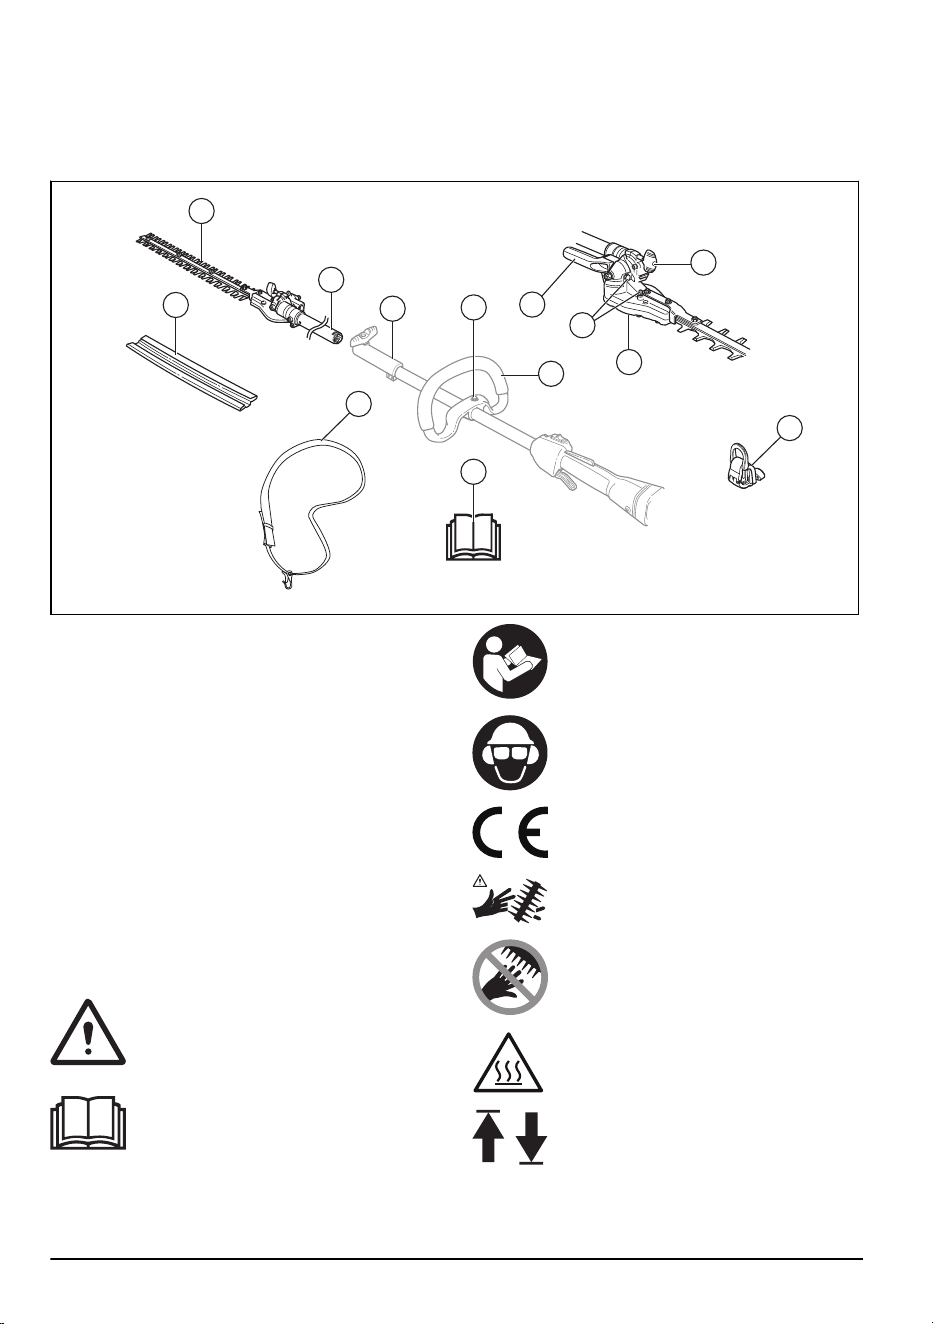
Attachment overview for HA850
1
8
4
6
3
11
2
10
9
7
5
12
13
1. Cutter
2. Grease nipple and plug for filling lubricant
3. Bevel gear
4. Loop handle
5. Hand guard mounting screw
6. Angle adjustment knob
7. Operator′s manual
8. Transport guard
9. Shaft coupling
10. Shaft (829 mm for HA850
11. Angle adjustment handle (HA850)
12. Harness
13. Harness support hook
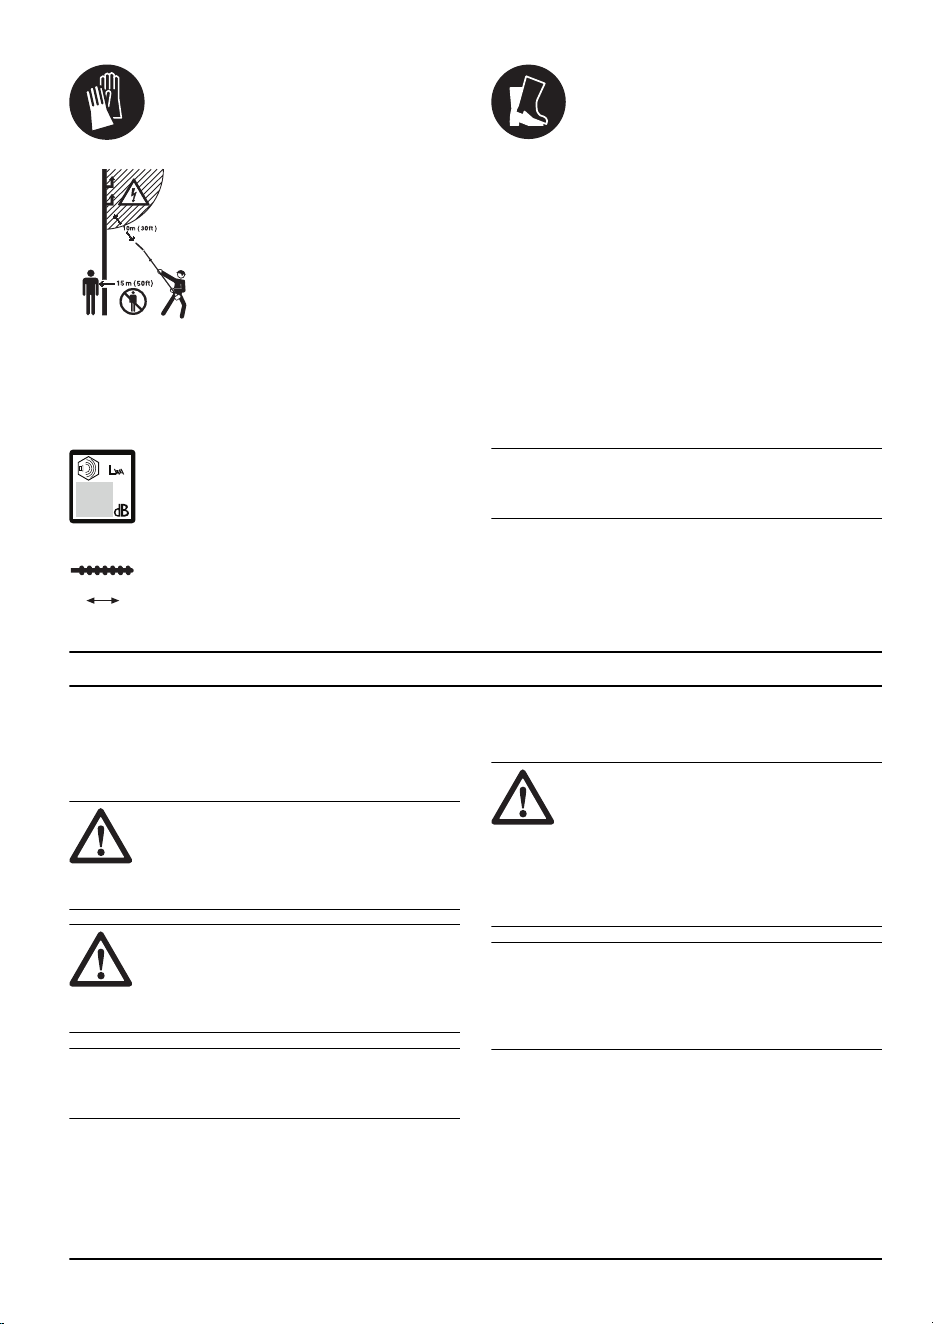
Symbols on the attachment and the
power unit
Careless or incorrect use of this product can
result in serious or fatal injury to the operator
or others.
Read the operator’s manual carefully and
make sure you understand the instructions
before you use the attachment.
Read the operator’s manual carefully and
make sure you understand the instructions
before you use the attachment.
Wear approved protective helmet, hearing
and eye protection.
This attachment is in accordance with
applicable EC directives.
DANGER - Keep hands away from blade.
DANGER - Keep hands away from blade.
Keep all parts of your body away from the
hot surfaces.
Arrows which show limits for handle
positioning.
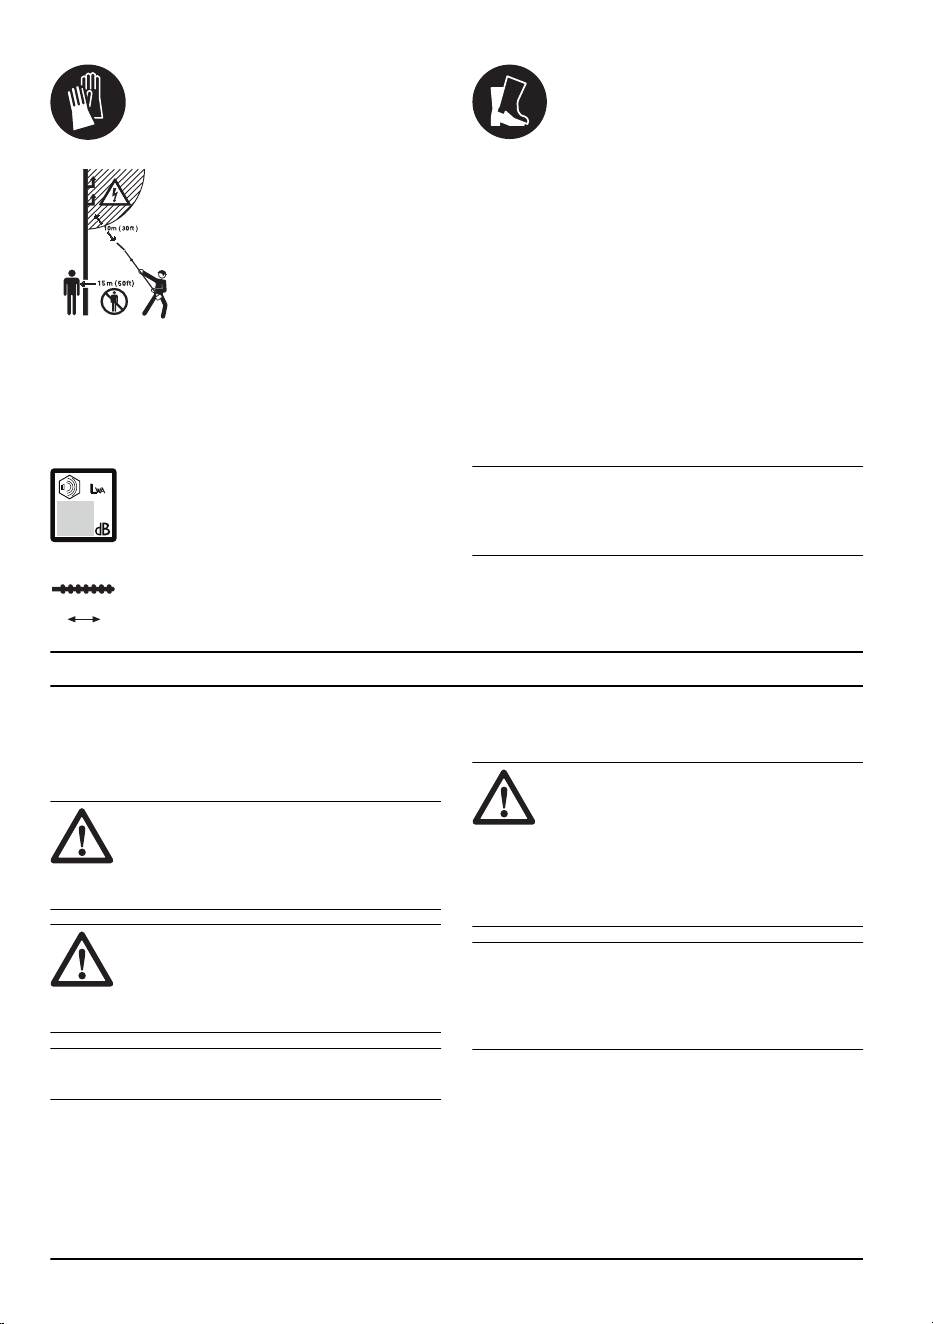
Always wear approved protective gloves.
Wear sturdy, non-slip boots.
820 - 002 - 13.12.2019 3
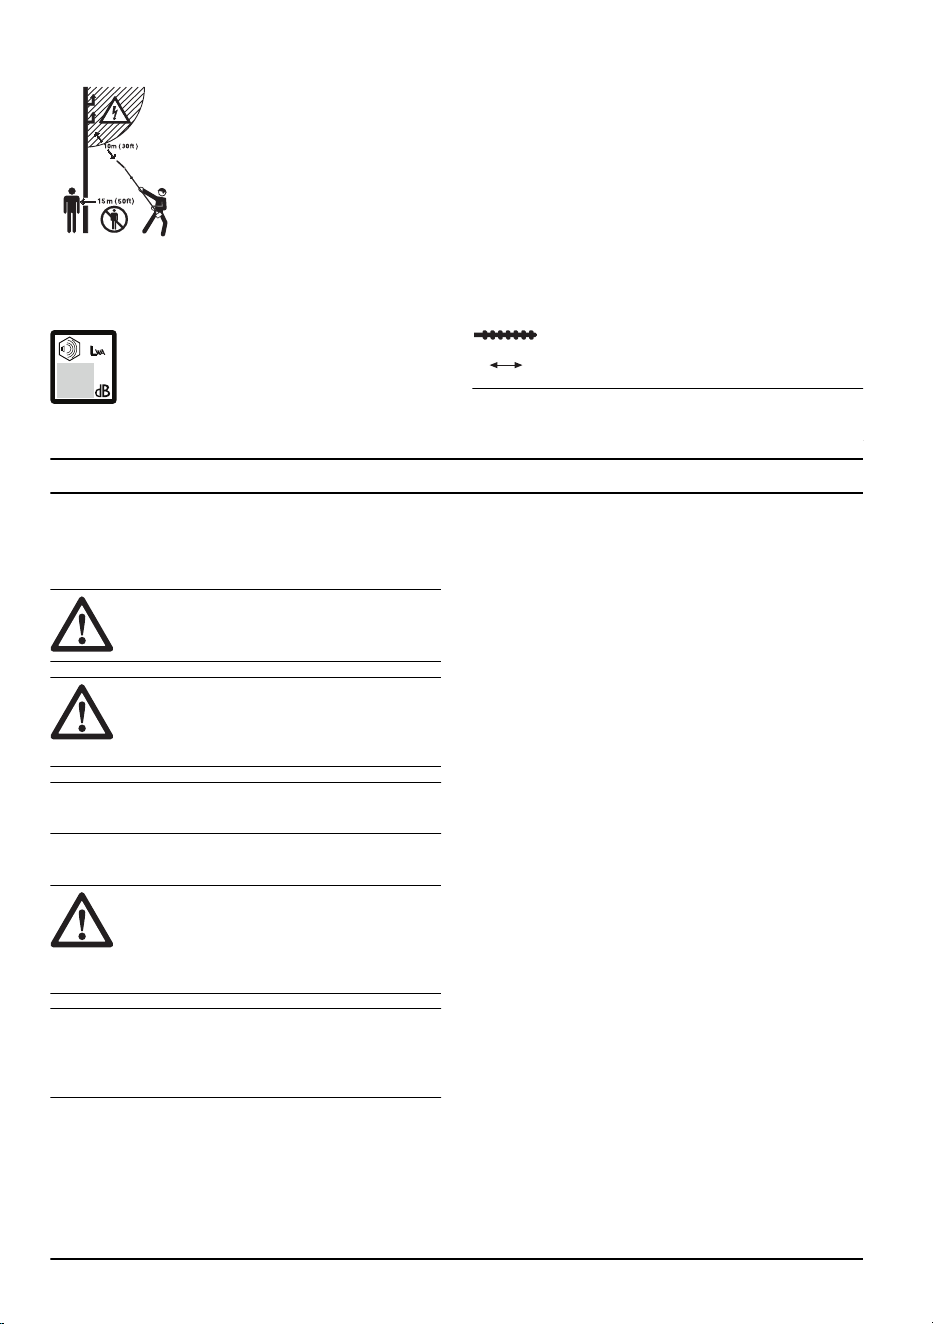
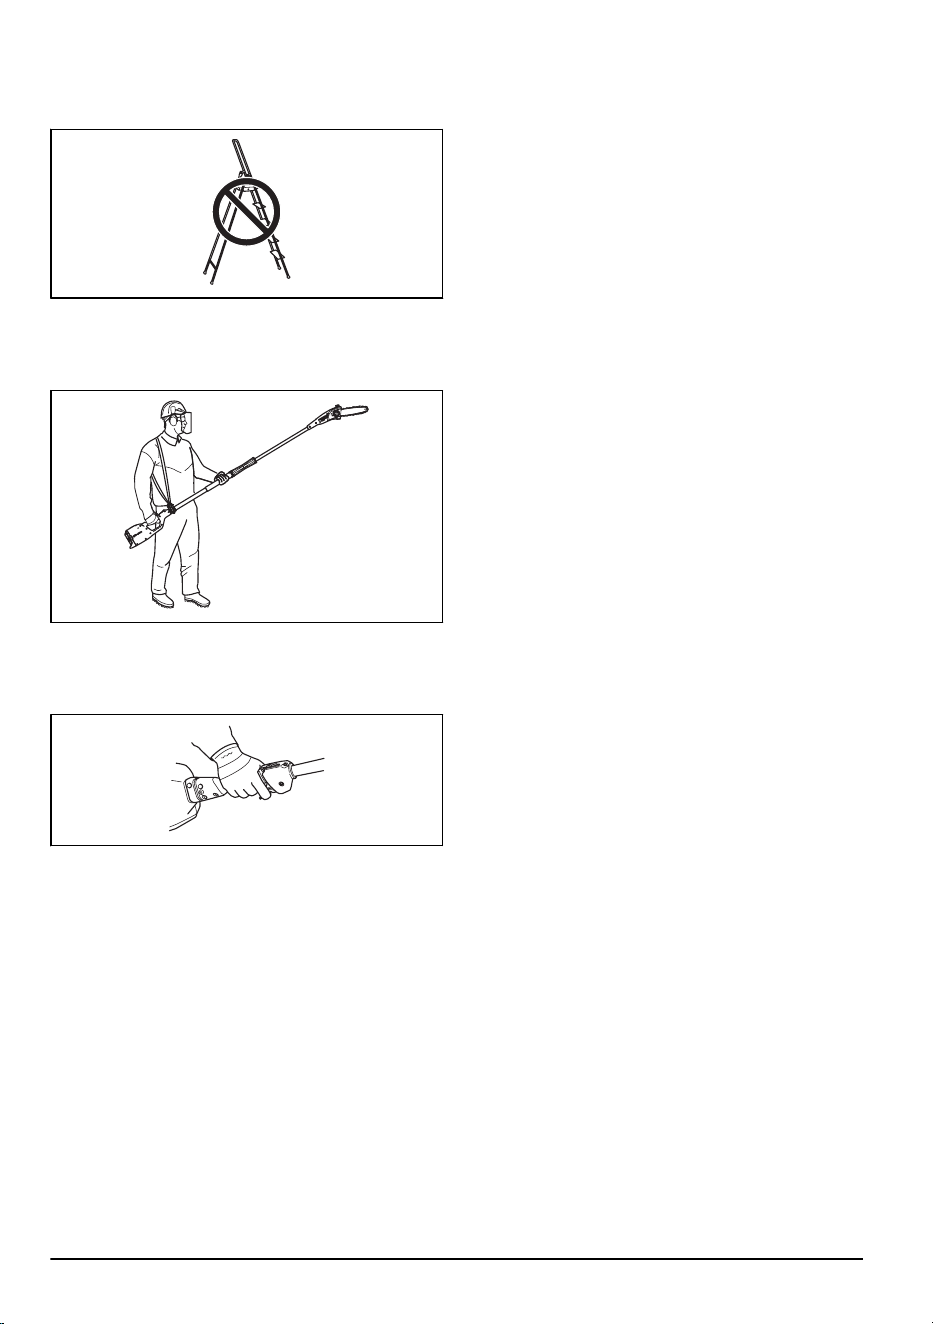
DANGER - Keep sufficient distance away from electrical power lines. This product is not
electrically insulated. If the product touches or comes close to high-voltage power lines it
could lead to death or serious bodily injury. Electricity can jump from one point to another by
arcing. The higher the voltage, the greater the distance electricity can jump. Electricity can
also travel through branches and other objects, especially if they are wet. Always keep a dis-
tance of at least 10 m between the product and high-voltage power lines and/or any objects
that are touching them. If have to work within this safe distance you should always contact
the relevant power company to make sure the power is switched off before you start work.
The operator of the product must ensure, while working, that no persons or animals come
closer than 15 meters.
Noise emission to the environment
according to the European Community’s
Directive. The attachment’s emission is
specified in the Technical data chapter and
on the label.
Max 3/10 sec
Cutting unit operating cycle, operation time/
idle time.
Note: Other symbols/decals on the attachment refer to
special certification requirements for certain markets.
Safety
Safety definitions
Warnings, cautions and notes are used to point out
specially important parts of the manual.
WARNING: Used if there is a risk of injury or
death for the operator or bystanders if the
instructions in the manual are not obeyed.
CAUTION: Used if there is a risk of damage
to the product, other materials or the
adjacent area if the instructions in the
manual are not obeyed.
Note: Used to give more information that is necessary in
a given situation.
General power tool safety warnings
WARNING: Read all safety warnings,
instructions, illustrations and specifications
provided with this power tool. Failure to
follow all instructions listed below may result
in electric shock, fire and/or serious injury.
Note: Save all warnings and instructions for future
reference. The term "power tool" in the warnings refers
to your mains-operated (corded) power tool or battery-
operated (cordless) power tool.
Hedge trimmer safety warnings
• Keep all parts of the body away from the blade. Do
not remove cut material or hold material to be cut
when blades are moving.
Blades continue to move
after the switch is turned off. A moment of inattention
while operating the hedge trimmer may result in
serious personal injury.
• Carry the hedge trimmer by the handle with the
cutter blade stopped and taking care not to operate
any power switch.
Proper carrying of the hedge
trimmer will decrease the risk of inadvertent starting
and resultant personal injury from the blades.
• When transporting or storing the hedge trimmer,
always fit the blade cover.
Proper handling of the
hedge trimmer will decrease the risk of personal
injury from the blades.
• When clearing jammed material or servicing the unit,
make sure all power switches are off and the lock-off
is in the locked position.
Unexpected actuation of the
hedge trimmer while clearing jammed material or
servicing may result in serious personal injury.
• Hold the hedge trimmer by insulated gripping
surfaces only, because the blade may contact
hidden wiring or its own cord.
Blades contacting a
"live" wire may make exposed metal parts of the
hedge trimmer "live" and could give the operator an
electric shock.
• Keep all power cords and cables away from cutting
area.
Power cords or cables may be hidden in
hedges or bushes and can be accidentally cut by the
blade.
• Do not use the hedge trimmer in bad weather
conditions, especially when there is a risk of
lightning.
This decreases the risk of being struck by
lightning.
Safety instructions for extended reach
hedge trimmers
• To reduce the risk of electrocution, never use the
extended-reach hedge trimmer near any electrical
power lines. Contact with or use near power lines
4
820 - 002 - 13.12.2019
may cause serious injury or electric shock resulting
in death.
• Always use two hands when operating the extended-
reach hedge trimmer. Hold the extended-reach
hedge trimmer with both hands to avoid loss of
control.
• Always use head protection when operating the
extended-reach hedge trimmer overhead. Falling
debris can result in serious personal injury.
General safety instructions
WARNING: Read all safety warnings and all
instructions. Failure to follow the warnings
and instructions may result in electric shock,
fire and/or serious injury.
• Please read the operator’s manual carefully and
make sure you understand the instructions before
using the attachment.
• These instructions supplement the instructions that
were included with the product. For other
procedures, please refer to the operating instructions
for the product.
• Under no circumstances may the design of the
attachment be modified without the permission of the
manufacturer. Do not use an attachment that
appears to have been modified by others and always
use original accessories. Non-authorized
modifications and/or accessories can result in
serious personal injury or the death of the operator
or others.
Save all warnings and instructions for
future reference
Safety instructions for operation
• If you encounter a situation where you are uncertain
how to proceed you should ask an expert. Contact
your dealer or your service workshop.
• Avoid all usage which you consider to be beyond
your capability.
• Cutting tool. Do not touch the tool without first,
switching off the engine/remove the battery.
• Never allow children to use the product.
• Ensure that no-one comes closer than 15 m while
you are working.
• Never allow anyone else to use the product without
first ensuring that they have understood the contents
of the operator’s manual.
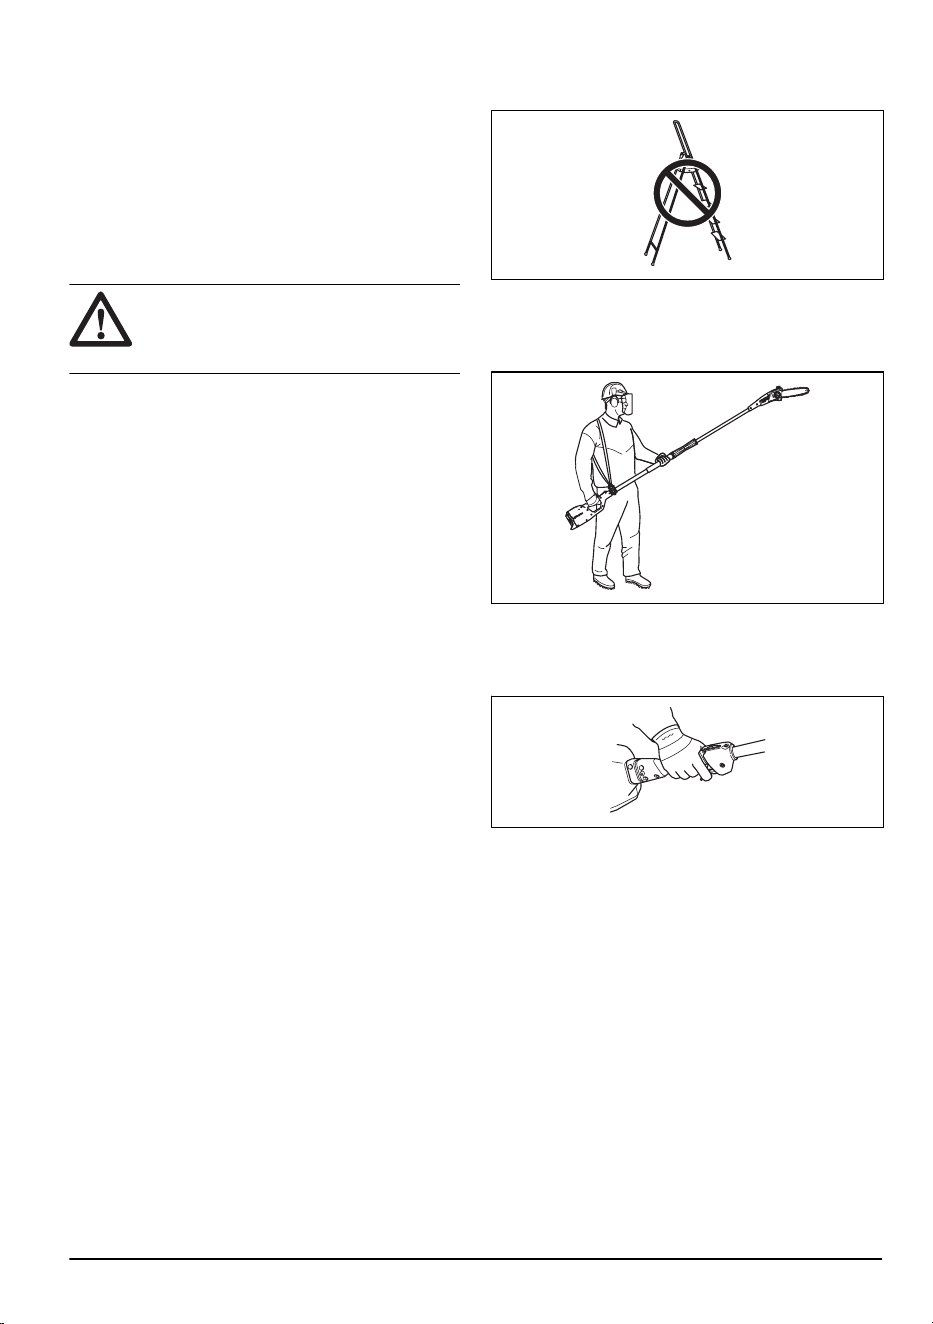
• Never work from a ladder, stool or any other raised
position that is not fully secured.
• Always ensure you have a safe and stable working
position.
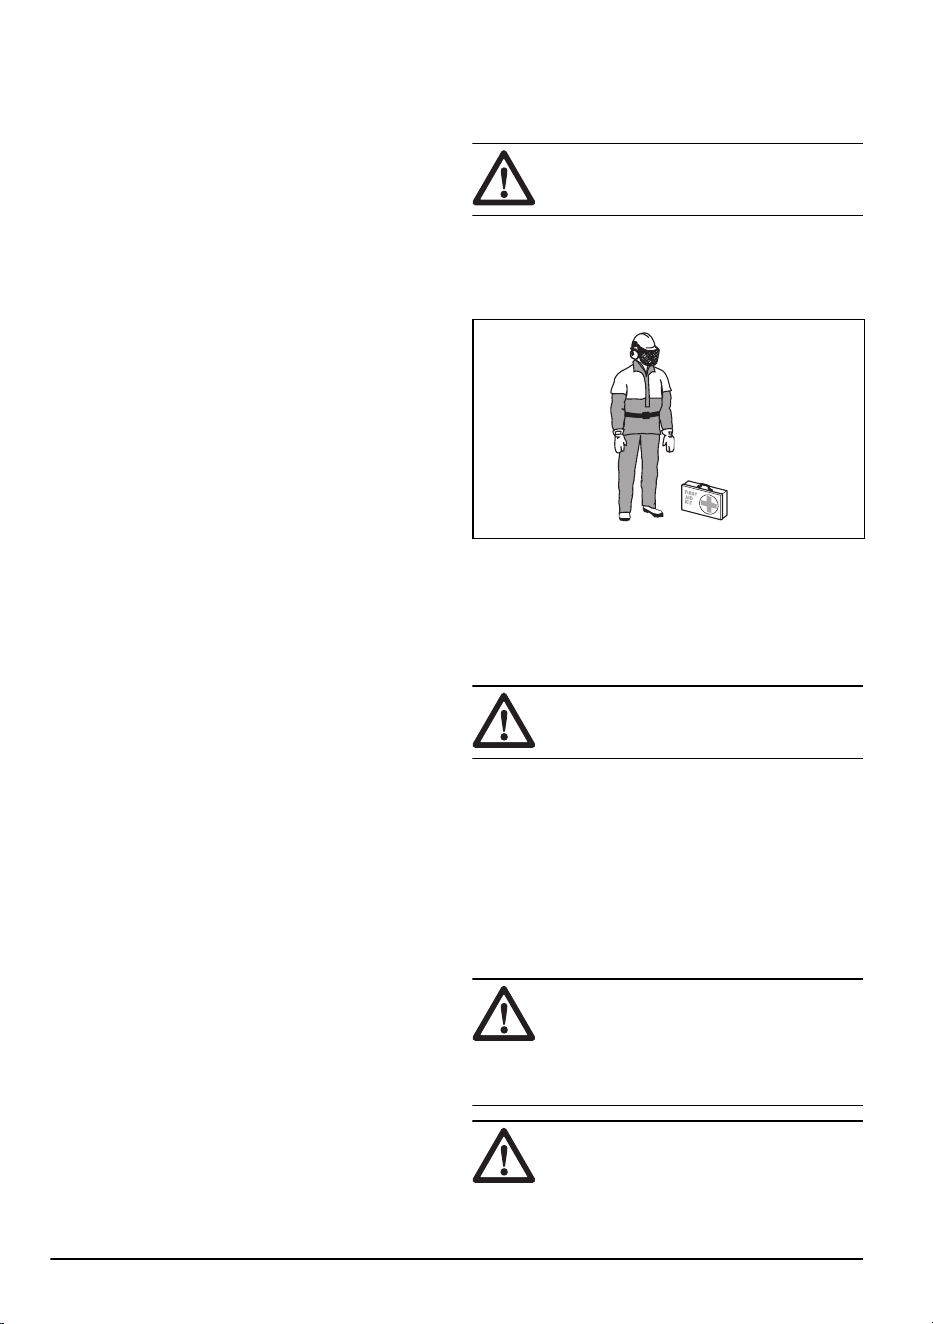
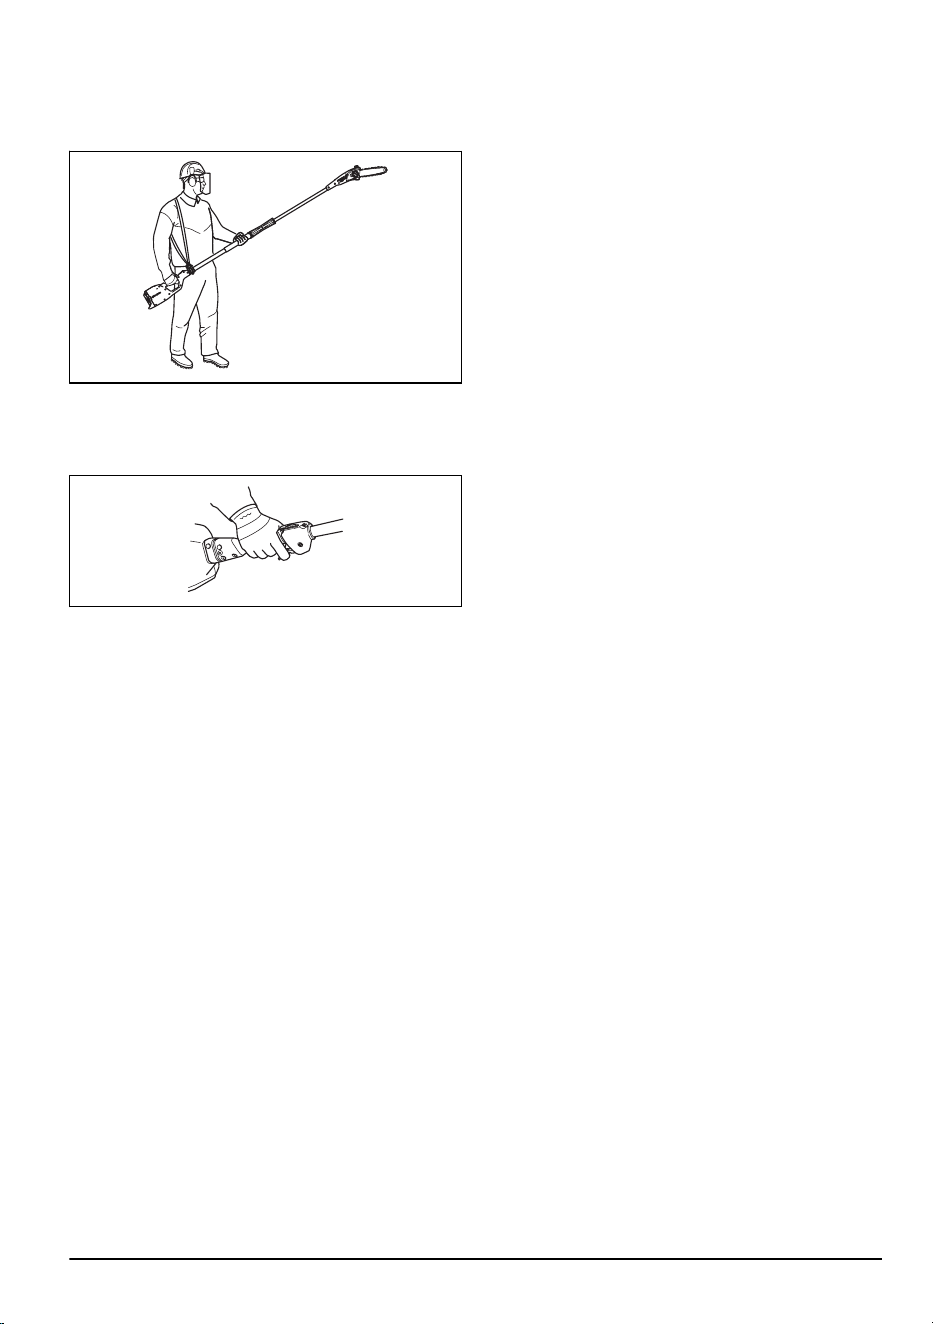
• Always use both hands to hold the product. Hold the
product at the side of your body.
• Make sure that you connect the harness to the
support hook. Only use a single harness.
• Use your right hand to control the throttle/power
trigger .
• If an emergency occurs, let go of the product and let
it fall to the ground.
• Make sure that your hands and feet do not come
near the cutting attachment when the engine/motor
is running.
• When the engine/motor is switched off, keep your
hands and feet away from the cutting attachment
until it has stopped completely.
• Watch out for stumps of branches that can be thrown
out during cutting.
• Always lay the product on the ground when you are
not using it.
• Do not cut too close to the ground. Stones and other
objects can be thrown out.
• Check the working area for foreign objects such as
electricity cables, insects and animals, etc, or other
objects that could damage the cutting attachment,
such as metal items.
• If any foreign object is hit or if vibrations occur, stop
the product immediately. If you have a gasoline
820 - 002 - 13.12.2019
5
operated product, disconnect the spark plug cap
from the spark plug. If you have a battery operated
product, remove the battery. Check that the product
is not damaged. Repair any damage.
• If anything jams in the blades while you are working,
stop the product immediately. If you have a gasoline
operated product, switch off the engine and
disconnect the spark plug cap from the spark plug. If
you have a battery operated product, switch off the
motor and remove the battery. Make sure the
product has stopped completely before cleaning the
blades.
Safety instructions for hedge trimmer
attachments
• Keep all parts of the body away from the blade. Do
not remove cut material or hold material to be cut
when blades are moving. Blades continue to move
after the switch is turned off. A moment of inattention
while operating the hedge trimmer may result in
serious personal injury.
• Carry the hedge trimmer by the handle with the
blade stopped and taking care not to operate any
power switch. Proper carrying of the hedge trimmer
will decrease the risk of inadvertent starting and
resultant personal injury from the blades.
• When transporting or storing the hedge trimmer,
always fit the blade cover. Proper handling of the
hedge trimmer will decrease the risk of personal
injury from the blades.
• When clearing jammed material or servicing the unit,
make sure all power switches are off and the power
cord is disconnected. Unexpected actuation of the
hedge trimmer while clearing jammed material or
servicing may result in serious personal injury.
• Hold the hedge trimmer by insulated gripping
surfaces only, because the blade may contact
hidden wiring or its own cord. Blades contacting a
"live" wire may make exposed metal parts of the
hedge trimmer "live" and could give the operator an
electric shock.
• Keep all power cords and cables away from cutting
area. Power cords or cables may be hidden in
hedges or bushes and can be accidentally cut by the
blade.
• Do not use the hedge trimmer in bad weather
conditions, especially when there is a risk of
lightning. This decreases the risk of being struck by
lightning.
• To reduce the risk of electrocution, never use the
extended-reach hedge trimmer near any electrical
power lines. Contact with or use near power lines
may cause serious injury or electric shock resulting
in death.
• Always use two hands when operating the extended-
reach hedge trimmer. Hold the extended-reach
hedge trimmer with both hands to avoid loss of
control. Always use head protection when operating
the extended-reach hedge trimmer overhead. Falling
debris can result in serious personal injury.
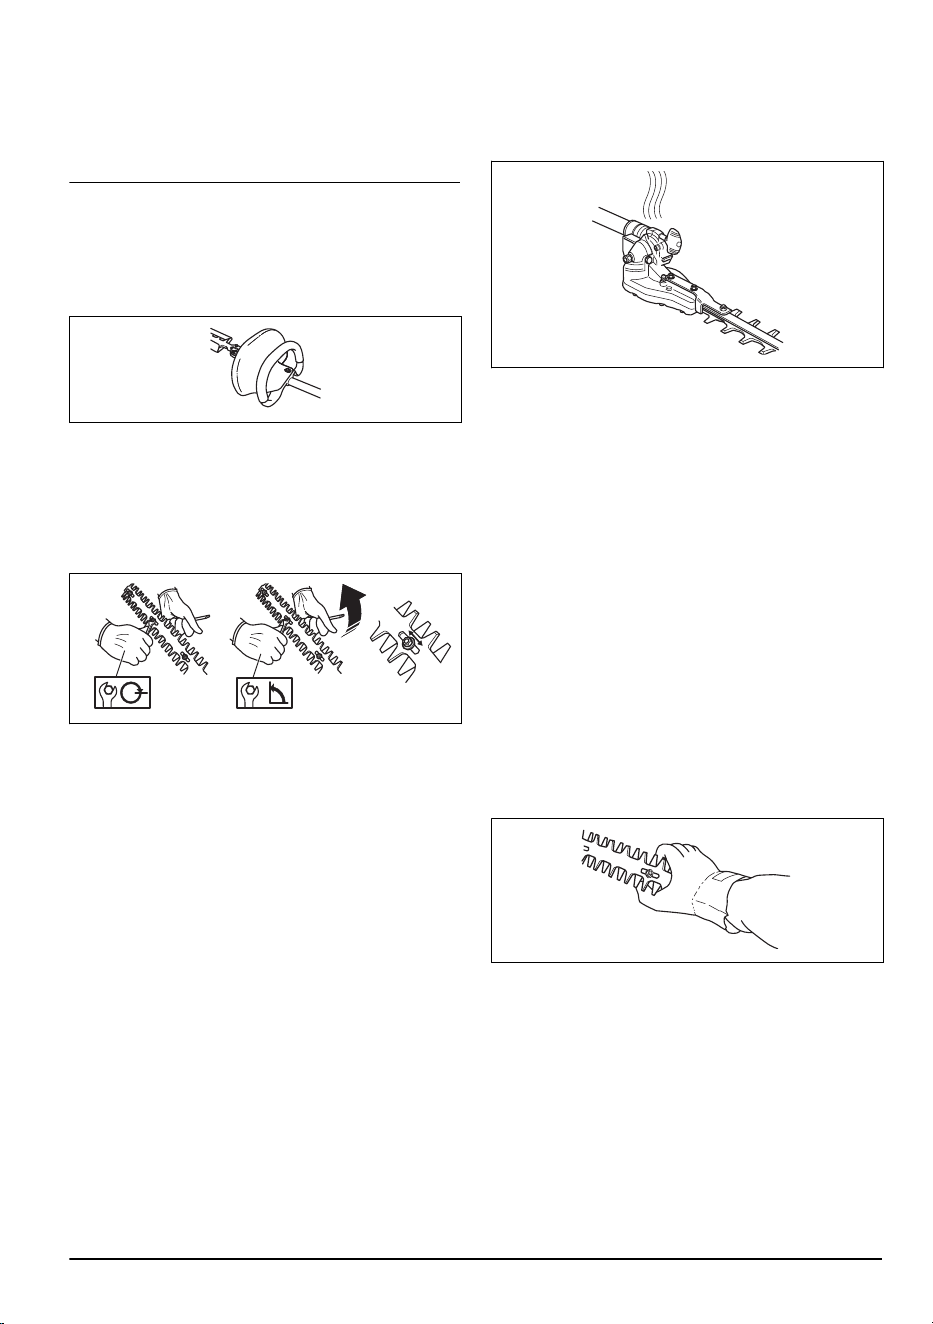
Personal protective equipment
WARNING: Read the warning instructions
that follow before you use the product.
• Long-term exposure to noise can result in permanent
hearing impairment. Always use approved hearing
protection.
• Always wear protective, non-slip boots.
• Always wear working clothes and heavy-duty long
trousers.
• Never wear loose clothing or jewellery.
• Make sure your hair does not hang below shoulder
level.
Safety devices on the product
WARNING:
Read the warning instructions
that follow before you use the product.
In this section the product’s safety features, its purpose
and how checks and maintenance should be carried out
to ensure that it operates correctly. See instructions
under the heading
Introduction on page 2
to find where
these parts are located on your product.
The life span of the product can be reduced and the risk
of accidents can increase if product maintenance is not
carried out correctly and if service and/or repairs are not
carried out professionally. If you need further information
please contact your nearest servicing dealer.
WARNING:
Never use a product with
defective safety components. The product's
safety equipment must be inspected and
maintained as described in this section. If
your product fails any of these checks,
contact your service agent to get it repaired.
CAUTION: All servicing and repair work on
the machine requires special training. This is
especially true of the machine′s safety
equipment. If your machine fails any of the
checks described below you must contact
6 820 - 002 - 13.12.2019
your service agent. When you buy any of
our products we guarantee the availability of
professional repairs and service. If the
retailer who sells your machine is not a
servicing dealer, ask him for the address of
your nearest service agent.
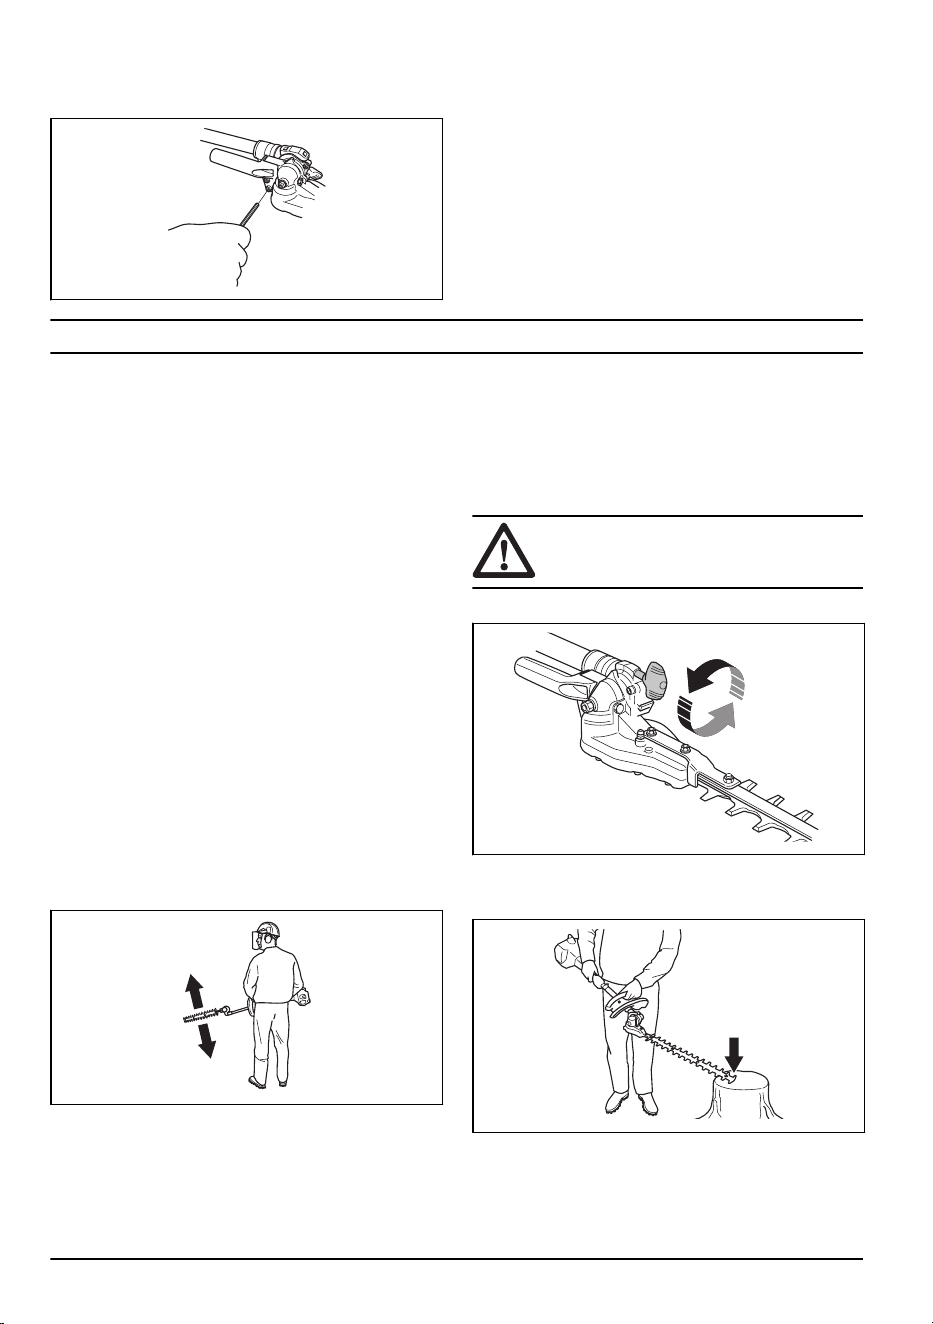
To do a check of the hand guard (HA110, for gasoline
products only)
The hand guard prevents hands from coming in contact
with the moving blades, for example, if the operator
loses grip on the front handle.
1. Check that the hand guard is fitted correctly.
2. Check that the hand guard is undamaged.
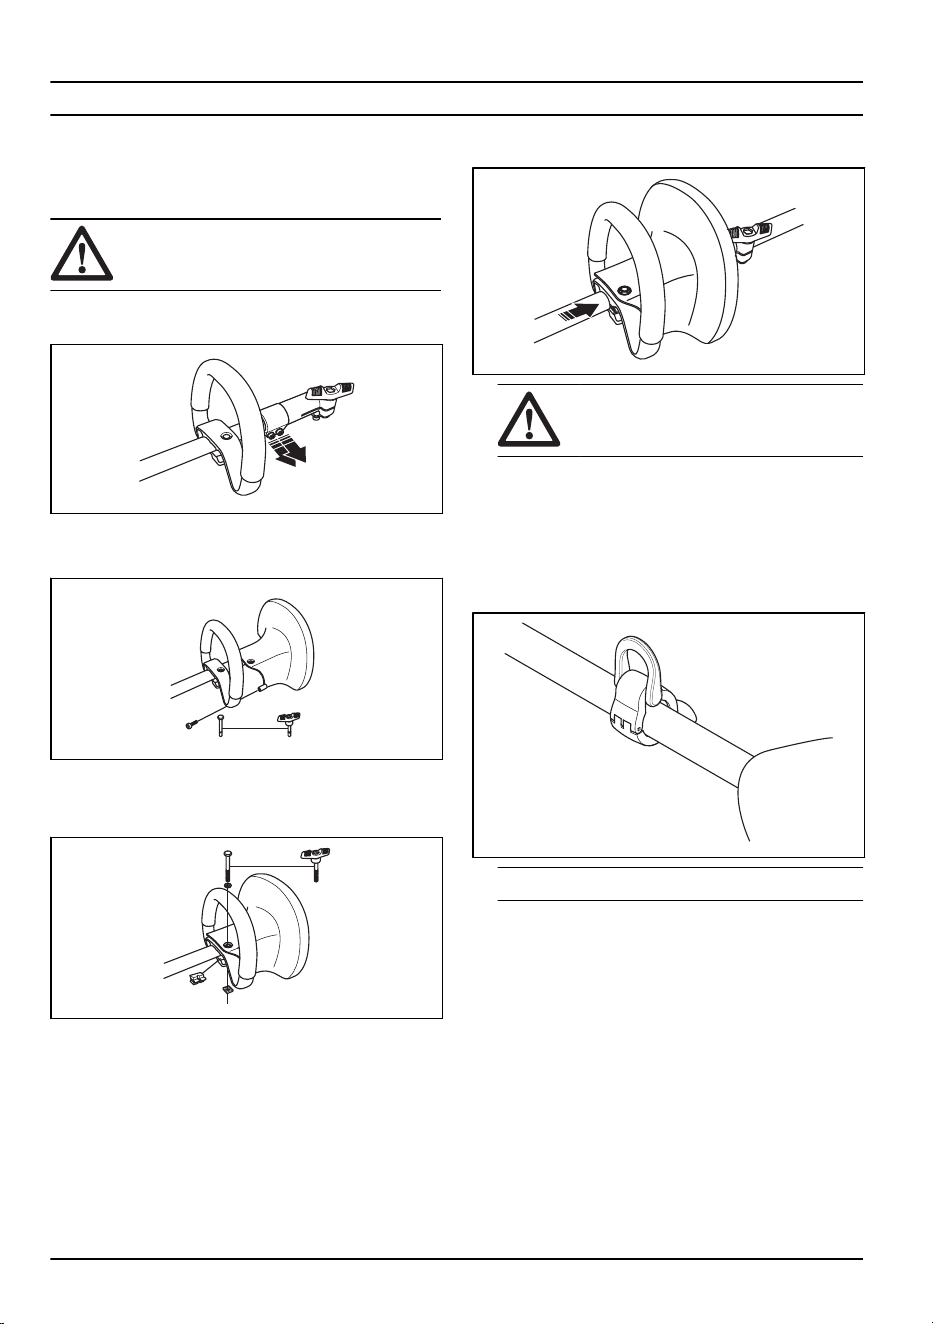
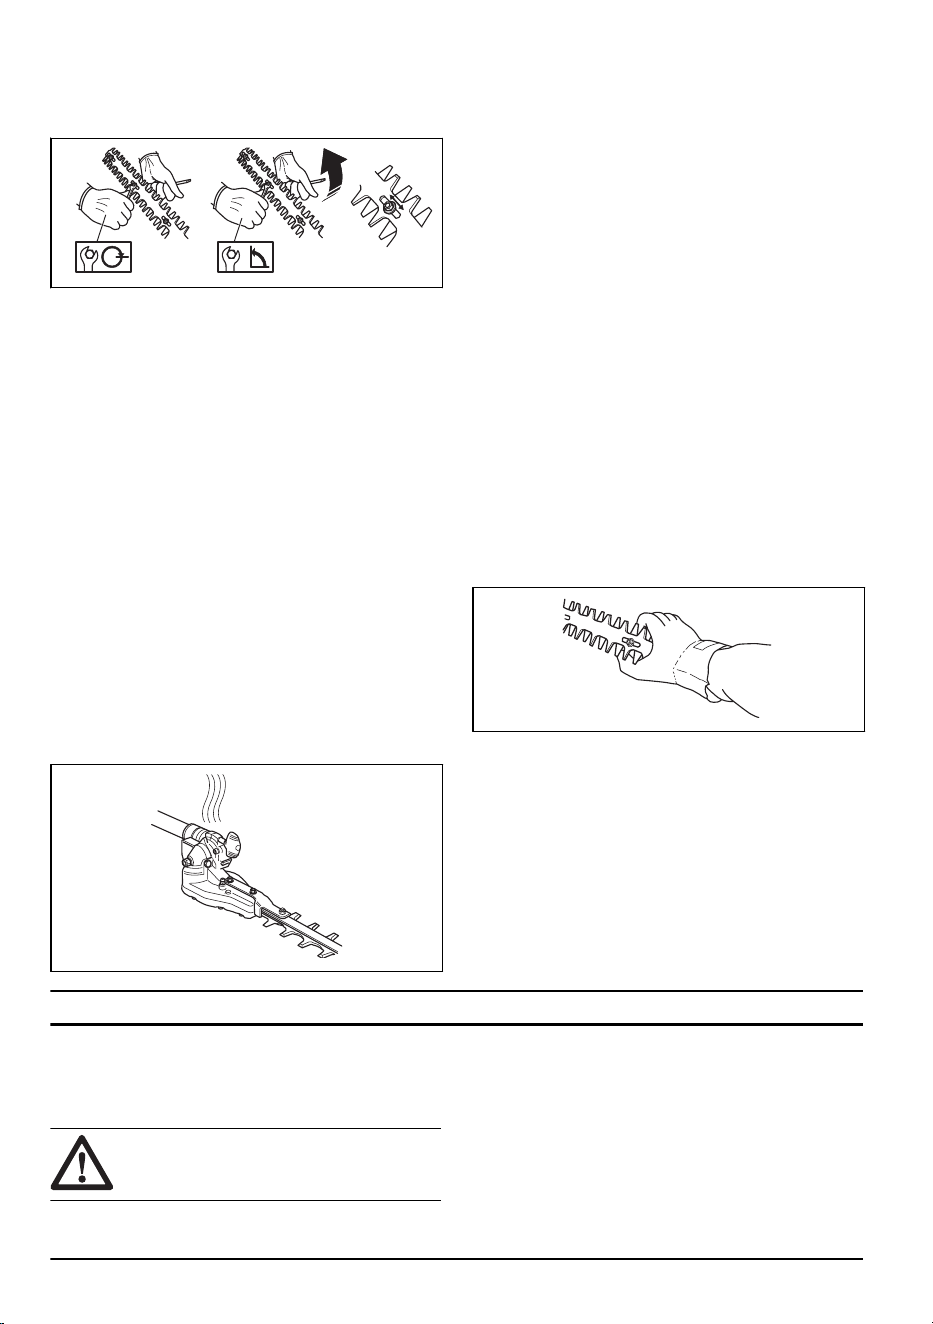
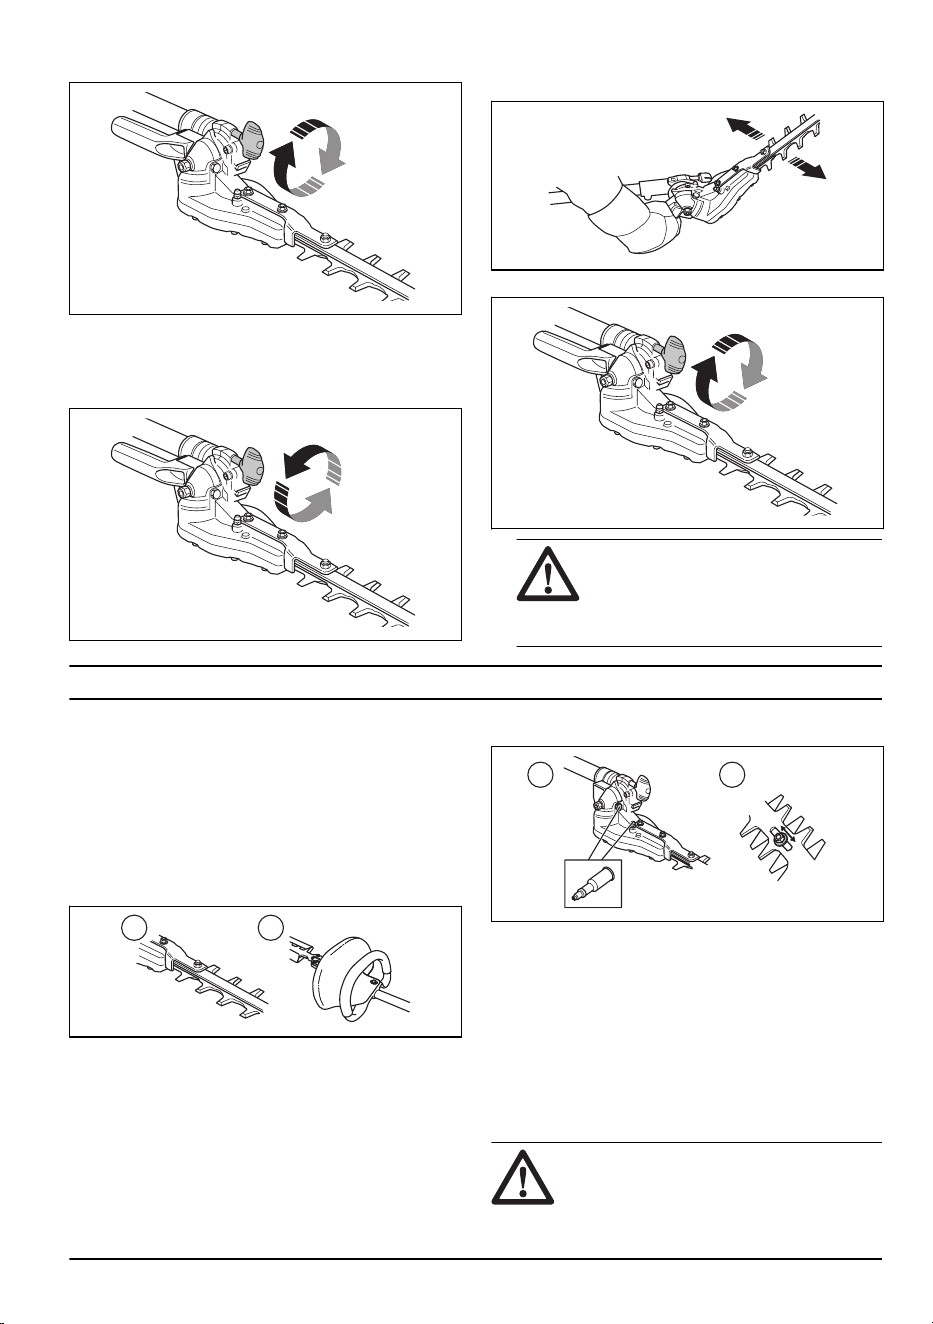
To do a check of the blades
To ensure good cutting results it is important that the
contact pressure between the blades is correct.
1. The contact pressure is adjusted by turning the
screws on the underside of the bar clockwise as far
as they will go.
2. Then turn the screws anticlockwise a 1/4 turn.
3. Lock the screws using the locking nut on the top of
the bar.
4. Check that the screws are loose enough to allow the
washers under the screw heads to slide sideways.
5. When the blades are correctly adjusted the play
between the blades should be 0,2–0,4 mm,
measured at the screws.
6. The edges of the blades are too hard to be filed. Dull
blades should be sharpened using a grinder.
7. Replace the blades if they are bent or damaged.
Hot surface
The gear housing gets hot when the product has been in
use. Do not touch the gear housing to avoid burning
yourself.
Safety instructions for maintenance
Read the warning instructions that follow before you use
the product.
• Always stop the product before you work on any part
of the cutting equipment. If you have a gasoline
operated product, disconnect the spark plug cap
from the spark plug. If you have a battery operated
product, remove the battery. Check that the cutting
equipment has stopped completely before you start
any work on it.
• The transport guard should always be fitted to the
cutting attachment when the product is not in use.
• Make sure the cutting attachment has stopped
before cleaning, carrying out repairs or an
inspection. If you have a gasoline operated product,
disconnect the spark plug cap from the spark plug. If
you have a battery operated product, remove the
battery.
• Always wear heavy-duty gloves when repairing the
cutting attachment. This is extremely sharp and can
easily cause cuts.
• Store the product out of reach of children.
• Use only original spare parts for repairs.
820 - 002 - 13.12.2019
7
Assembly
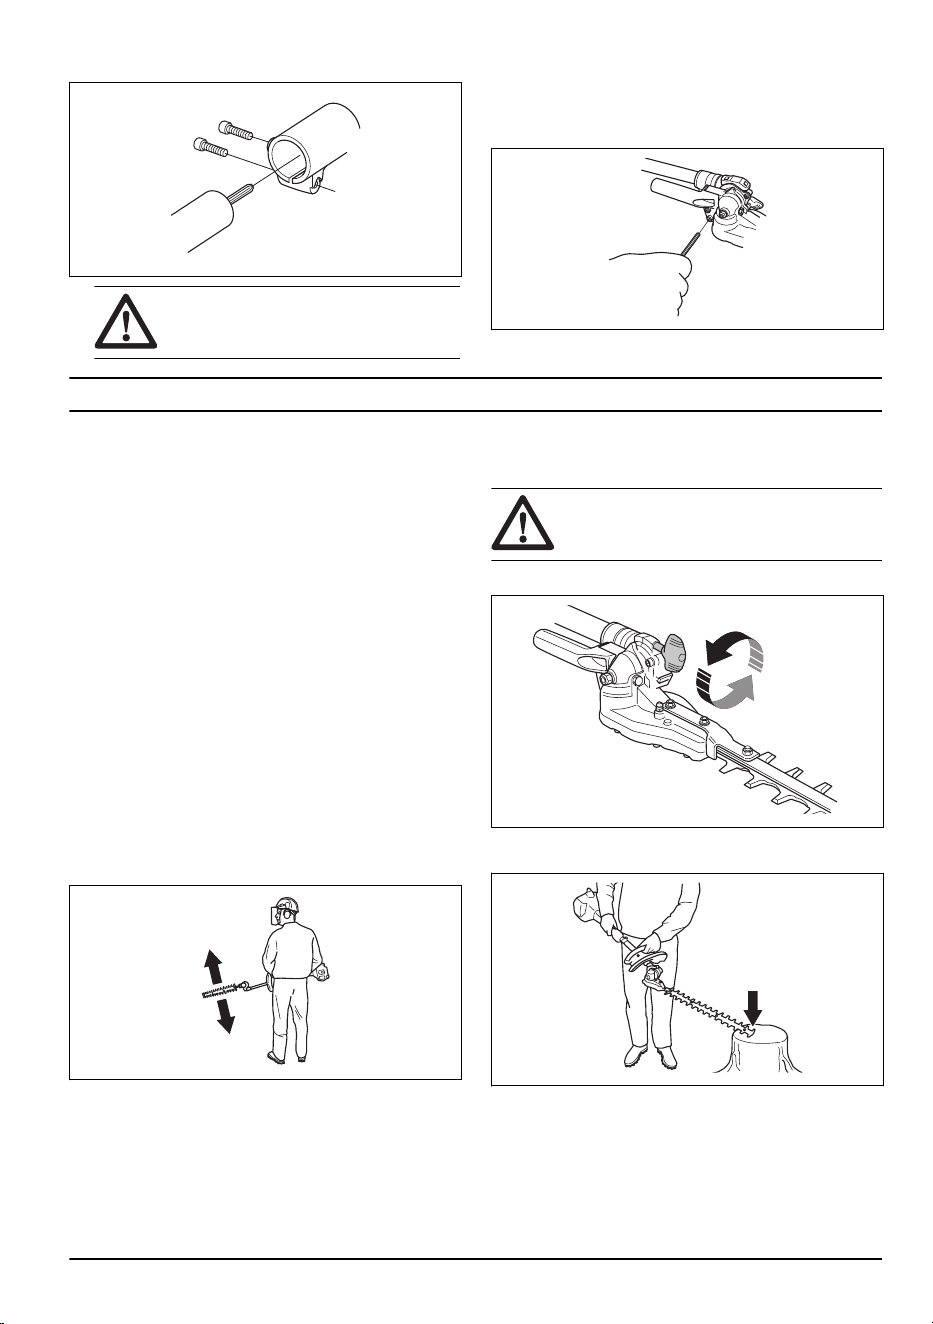
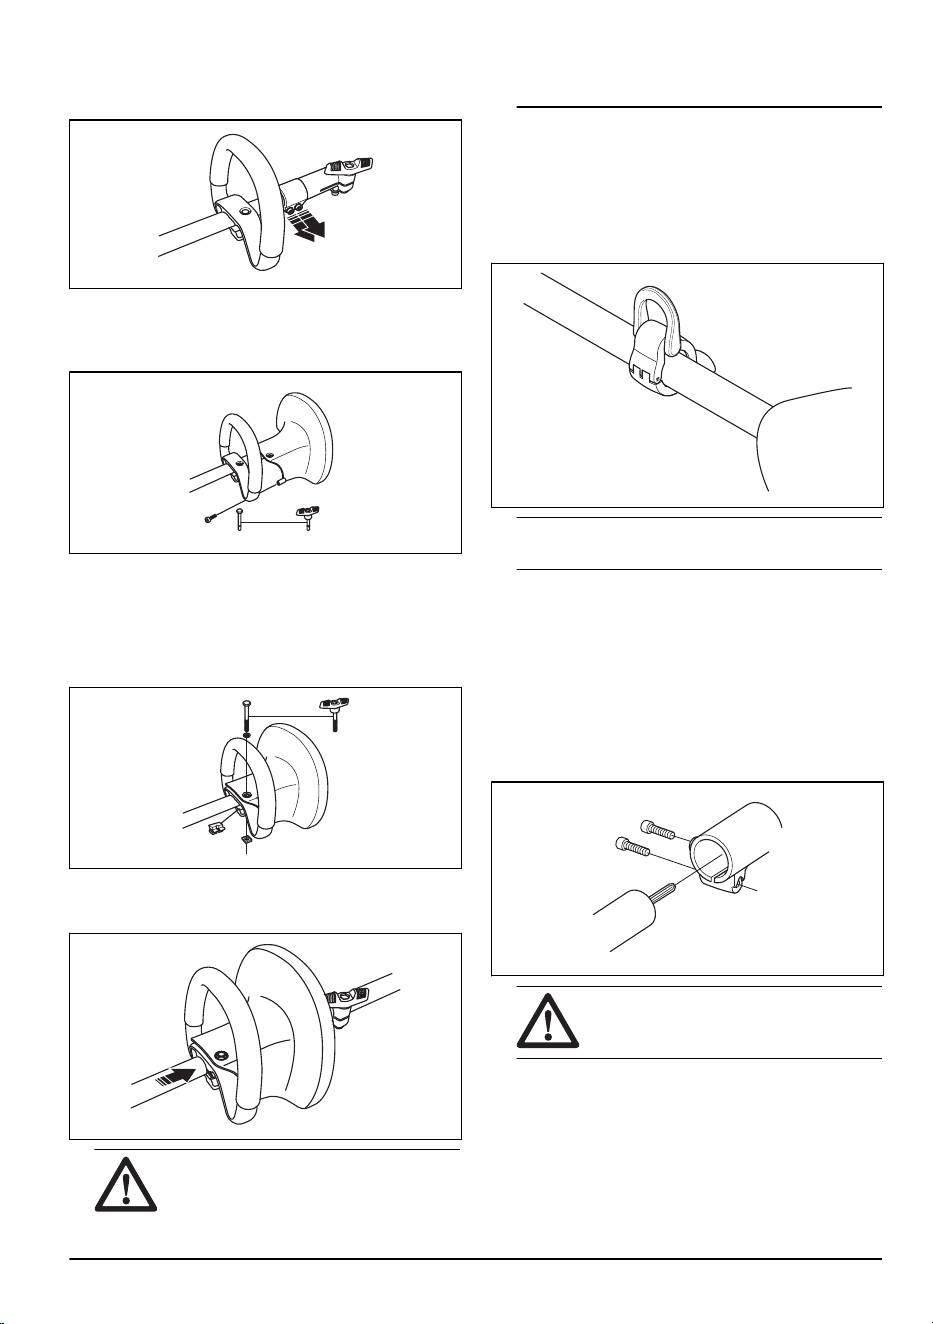
To assemble the hand guard and loop
handle - only gasoline products
(HA110)
WARNING: Never use HA110 with a battery
operated power unit.
1. Loosen the clutch sleeve’s two mounting bolts and
dismantle the clutch sleeve.
2. Assemble the hand guard and loop handle by
screwing them together. Take care to align the holes
in both parts.
3. Slide the loop handle and hand guard onto the shaft.
4. Slide the spacer into the slot in the loop handle.
5. Fit the nut and screw. Do not overtighten.
6. Now make a final adjustment to give yourself a
comfortable working position. Tighten the screw.
CAUTION: The loop handle and hand
guard must not be fitted behind the
arrow marked on the shaft.
7. Fit the clutch sleeve and tighten the two mounting
bolts.
To install the suspension ring if
applicable
1. Install the suspension ring between the arrows on
the rear handle and the loop handle.
Note: Do not put the loop handle on the decal.
2. Adjust the ring to make the product balanced, and
easy to use.
To assemble the cutting head
It is important that the hedge trimmer is laid on a flat
surface when you fit the cutting head. Otherwise the
cutting head may not be fitted straight.
8
820 - 002 - 13.12.2019
1. Fit the cutting head to the shaft.
CAUTION: Make sure the drive shaft
inside the shaft engages with the recess
in the cutting head.
2. Tighten the lower screw first, then the upper screw.
To assemble the handle (HA850)
1. Install the handle with the 2 screws.
Operation
To do a check before start
1. Examine the work area. Remove any objects that
could be thrown out.
2. Examine the cutting attachment. Do not use blades
that are damaged.
3. Examine that the product is in perfect work order.
Examine that all nuts and screws are tight.
4. Make sure the gear housing is lubricated correctly.
See
To lubricate the gear housing on page 10
for
instructions.
5. Examine that the cutting attachment stops when the
throttle/power trigger is released.
6. Only use the product for the purpose it was intended
for.
7. Make sure that the handle and safety features are in
good working order. Never use a product that lacks a
part or has been modified outside its specifications.
To operate the product
1. Work with a swinging action from the bottom
upwards when trimming sides.
2. Adjust the throttle/speed setting to suit the load.
3. When you use a gasoline operated product to cut a
hedge, make sure the engine face away from the
hedge.
4. Do not rush the work, but work steadily until all the
branches have been cut back cleanly.
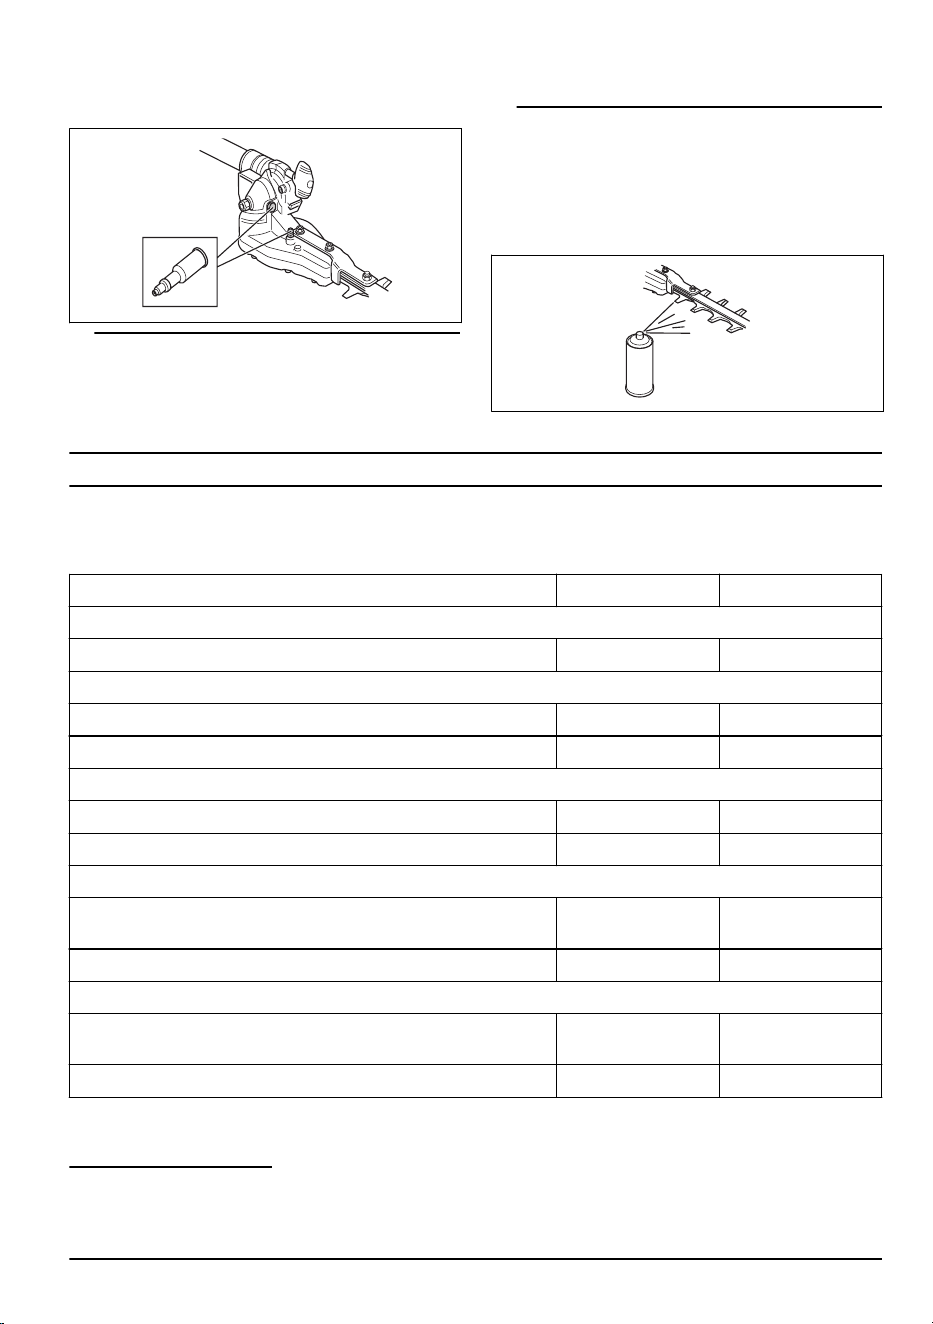
To change the hedge trimmer angle
(HA110)
WARNING: Never use HA110 with a battery
operated power unit.
1. Loosen the knob.
2. Press the cutting unit against the hedge or some
other firm surface until the required angle is set.
820 - 002 - 13.12.2019 9
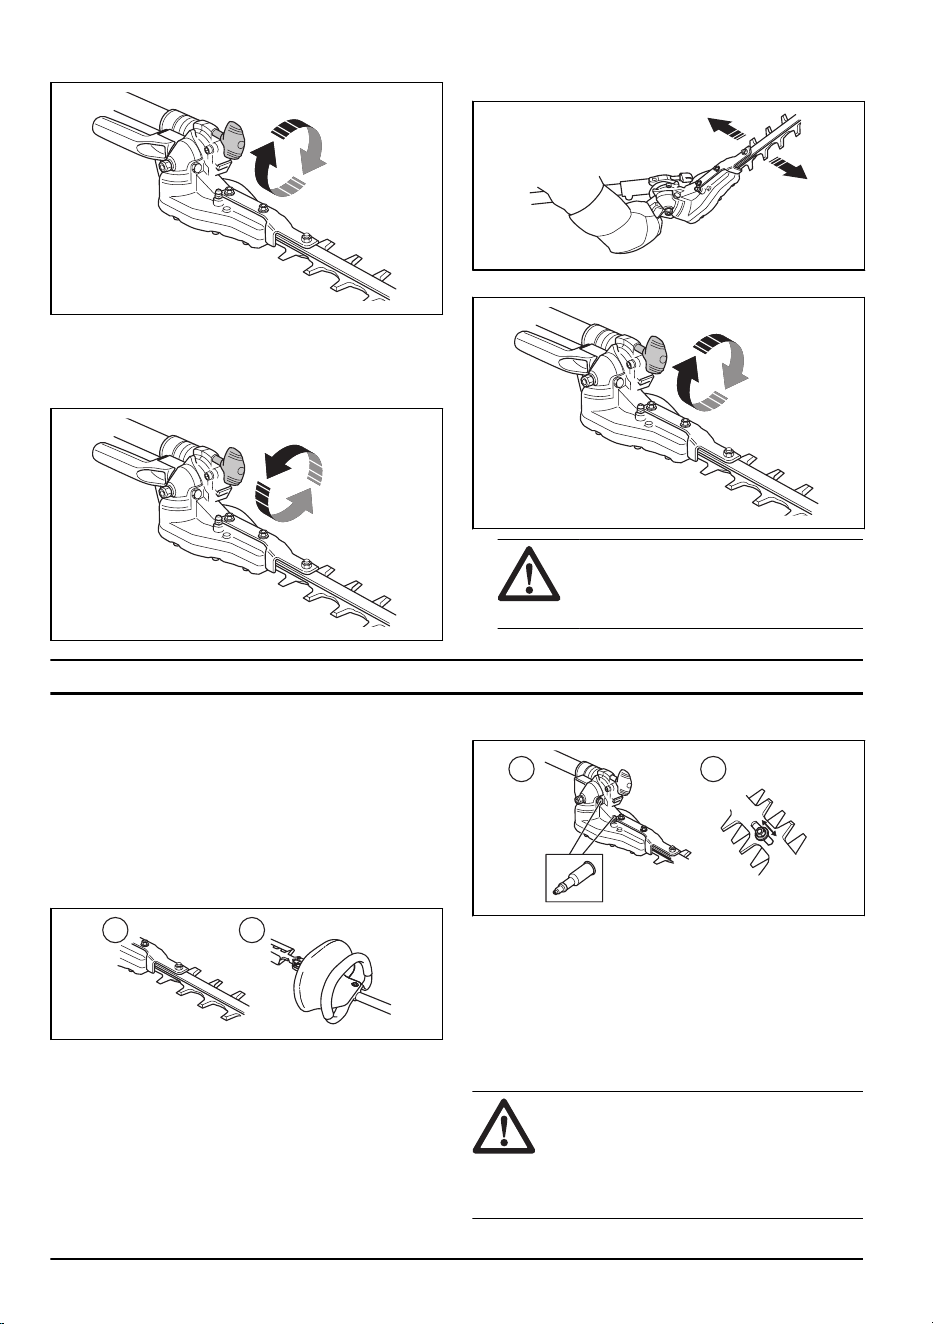
3. Tighten the knob.
To change the hedge trimmer angle
(HA850)
1. Undo the knob.
2. Adjust the angle with the help of the handle on the
cutting unit.
3. Tighten the knob.
WARNING: Do not hold the cutting head
when you adjust the angle. The blades
are sharp and you could easily cut
yourself.
Maintenance
Introduction
Below you will find some general maintenance
instructions. If you need further information please
contact your service workshop.
To perform maintenance on the
attachment
To do daily maintenance
A B
1. Examine that the blades (A) do not move when the
throttle/power trigger is released or when the choke
is in the start position.
2. Examine that the hand guard (B) (HA110) is not
damaged. Replace the guard if necessary.
To perform weekly maintenance
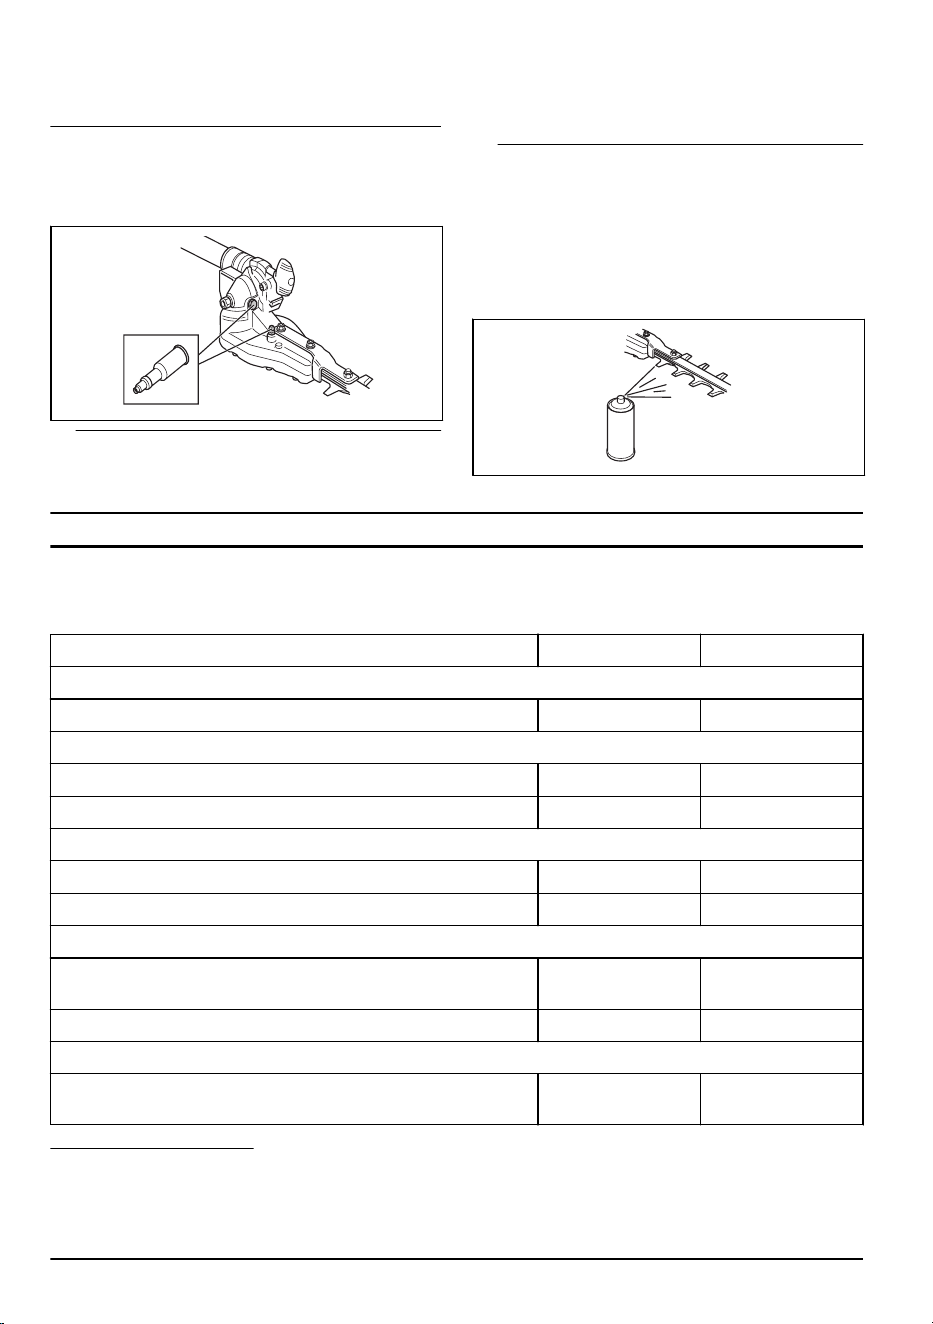
A B
1. Fill the gear housing (A) with grease. New products
are first filled with grease after approximately 20
hours of operation, and subsequently approximately
every 60 hours of operation.
2. Check that the screws that hold the blades together
(B) are correctly tightened.
To lubricate the gear housing
CAUTION: The gear housing must not be
filled completely with grease. The grease
expands as the product heats up during
operation. If the gear housing is completely
filled with grease it can damage the seals
and lead to leakage of grease.
10 820 - 002 - 13.12.2019
There is a grease nipple and a plug for filling lubricant
on the gear housing.
1. Use a grease gun to fill with grease.
Note: New products are first filled with grease after
approximately 20 hours of operation, and
subsequently approximately every 60 hours of
operation. Use Husqvarna AB special grease, no.
503 98 96-01. The grease in the bevel gear does not
normally need to be changed except if repairs are
carried out.
To clean and lubricate the cutter
1. Clean any resin and plant residue from the blades
with a cleaning agent before and after the use of the
product.
2. Lubricate the blade bars with spray grease before
long periods of storage.
Technical data
Technical data for gasoline operated product
HA110 HA850
Weight
Weight, kg 2.0 2.4
Blades
Blade length, mm 550/21.7 550/21.7
Speed, blade, rpm 4184 4184
Noise emissions
Sound power level, measured dB (A) 111 110
Sound power level, guaranteed L
WA
dB (A) 114 113
Noise levels
1
Equivalent sound pressure level at the operator’s ear, measured ac-
cording to EN15503 dB(A)
Equipped with approved accessory (original) 99 98
Vibration levels
2
Equivalent vibration levels (a
hv,eq
) at handles, measured according to
EN ISO 22867, m/s
2
Equipped with approved accessory (original), left/right 5.6/7.6 5.7/7.5
1
Reported data for equivalent sound pressure level for the machine has a typical statistical dispersion (stand-
ard deviation) of 1 dB(A).
2
Reported data for equivalent vibration level has a typical statistical dispersion (standard deviation) of 1 m/s
2
.
820 - 002 - 13.12.2019 11

Technical data for battery operated product
325iLK + Hedge trimmer attachment HA850
Weight
Weight, kg (included Battery BLi200) 3.7+2.5
Blades
Blade length, mm 550
Speed, blade, rpm 3000
Noise emissions
3
Sound power level, measured dB (A) 95
Sound power level, guaranteed L
WA
dB (A) 96
Sound levels
4
Sound pressure level at the operator’s ear, measured according to ISO 26868 dB(A)
Equipped with approved accessory (original) 89
Vibration levels
5
Vibration levels at handles, measured according to EN 62841-1, m/s
2
Equipped with approved accessory (original), left/right 2.9/2.2
3
Noise emissions in the environment measured as sound power (LWA) in conformity with EC di-rective
2000/14/EC. Reported sound power level for the machine has been measured with the original cutting attach-
ment that gives the highest level. The difference between guaranteed and measured sound power is that the
guaranteed sound power also includes dispersion in the meas-urement result and the variations between dif-
ferent machines of the same model according to Di-rective 2000/14/EC.
4
Reported data for sound pressure level for the machine has a typical statistical dispersion (standard deviation)
of 3 dB (A) and has been measured with the original attachment that gives the high-est level.
5
Reported data for vibration level has a typical statistical dispersion (standard deviation) of 2 m/s
2
. For compar-
ison of vibrations levels, battery and combustion products use vibration calculator. https://www.husqvar-
na.com/uk/services-solutions/vibration-calculator/.
12 820 - 002 - 13.12.2019

EC Declaration of Conformity
EC Declaration of Conformity - for
gasoline operated products
Husqvarna AB, SE-561 82 Huskvarna, Sweden, tel:
+46-36-146500, declares that the hedge trimmer
attachments Husqvarna AB HA110 (ONLY VALID for
Petrol products) and HA850, with serial numbers dating
from 2019 onwards (the year is clearly stated on the
rating plate, followed by the serial number), comply with
the requirements of the COUNCIL’S DIRECTIVE:
• of May 17, 2006 ”relating to machinery” 2006/42/EC
• of February 26, 2014 ”relating to electromagnetic
compatibility” 2014/30/EU.
• of June 8, 2011 "on the restriction of use of certain
hazardous substances in electrical and electronic
equipment" 2011/65/EC
• of May 8, 2000 ”relating to the noise emissions in the
environment” 2000/14/EC.
The following standards have been applied:
EN ISO 12100:2010, ISO 10517:2009
0404, RISE SMP Svensk Maskinprovning AB, has
carried out EC type examination in accordance with the
machinery directive’s (2006/42/EC) article 12, point 3b.
The certificate for EC type examination in accordance
with annex IV, have the number: SEC/14/2416
Huskvarna 2019-06-24
Per Gustafsson, Development Manager (Authorized
representative for Husqvarna AB and responsible for
technical documentation)
EC Declaration of Conformity - for
battery operated products
Husqvarna AB, SE-561 82 Huskvarna, Sweden, tel:
+46-36-146500, declares that the hedge trimmer
attachment Husqvarna HA850 attachment with power
unit Husqvarna 325iLK with serial numbers dating from
2019 onwards (the year is clearly stated on the rating
plate, followed by the serial number), comply with the
requirements of the COUNCIL’S DIRECTIVE:
• of May 17, 2006 ”relating to machinery” 2006/42/EC
• of February 26, 2014 ”relating to electromagnetic
compatibility” 2014/30/EU.
• of June 8, 2011 "on the restriction of use of certain
hazardous substances in electrical and electronic
equipment" 2011/65/EC
• of May 8, 2000 ”relating to the noise emissions in the
environment” 2000/14/EC.
The following standards have been applied:
IEC 62841-4-2, EN 50581:2012
RISE SMP Svensk maskinprovning AB, Box 7035,
SE-750 07 Uppsala, Sweden has performed voluntary
type examination on behalf of Husqvarna AB. The
certificate is numbered: SEC/14/2416
RISE SMP Svenska Maskinprovning AB has also
verified agreement with the appendix V of the council's
directive 2000/14/EC. The certificate have the number:
01/094/028
For information relating to noise emissions, refer to
#
.
Huskvarna 2019-06-24
Per Gustafsson, Development Manager (Authorized
representative for Husqvarna AB and responsible for
technical documentation)
820 - 002 - 13.12.2019 13
Inhalt
Einleitung...................................................................... 14
Sicherheit......................................................................16
Montage........................................................................20
Betrieb.......................................................................... 22
Wartung........................................................................ 23
Technische Angaben.................................................... 24
EG-Konformitätserklärung............................................ 26
Einleitung
Produktbeschreibung
Wir arbeiten ständig an der Weiterentwicklung unserer
Geräte und behalten uns daher das Recht auf
Änderungen ohne vorherige Ankündigung, z. B. von
Form und Aussehen, vor.
Hinweis: Dieses Handbuch bezieht sich sowohl auf
benzin- als auch auf akkubetriebene Antriebsaggregate.
Verwendungszweck
WARNUNG: Dieses Anbaugerät darf nur
zusammen mit dem vorgesehenen Gerät
verwendet werden. Siehe Kapitel
„Anbaugeräte“ der Bedienungsanleitung des
Geräts.
WARNUNG: Verwenden Sie HA110 nie mit
einem akkubetriebenen Antriebsaggregat.
Verwenden Sie HA110 nur mit einem benzinbetriebenen
Antriebsaggregat. Verwenden Sie HA850 entweder mit
einem benzinbetriebenen oder einem akkubetriebenen
Antriebsaggregat.
Das Gerät ist nur zum Schneiden von Ästen und
Zweigen konstruiert.
Anbaugeräteübersicht für HA110 (nur für benzinbetriebene Geräte)
1
9
4
6
3
12
2
11
10
7
8
5
1. Messer
2. Schmiernippel und Schmiermittel-Einfüllstopfen
3. Winkelgetriebe
4. Vorderer Handgriff
5. Befestigungsschraube Handschutz
6. Drehknopf Winkeleinstellung
7. Handschutz (nur bei benzinbetriebenen
Antriebsaggregaten)
8. Betriebsanleitung
9. Transportschutz
10. Führungsrohrverbindung
14 820 - 002 - 13.12.2019
11. Führungsrohr (110 mm für HA110 und nur bei
benzinbetriebenen Antriebsaggregaten)
12. Handgriff Winkeleinstellung (HA850)
Anbaugeräteübersicht für HA850
1
8
4
6
3
11
2
10
9
7
5
12
13
1. Messer
2. Schmiernippel und Schmiermittel-Einfüllstopfen
3. Winkelgetriebe
4. Loophandgriff
5. Befestigungsschraube Handschutz
6. Drehknopf Winkeleinstellung
7. Betriebsanleitung
8. Transportschutz
9. Führungsrohrverbindung
10. Führungsrohr (829 mm für HA850
11. Handgriff Winkeleinstellung (HA850)
12. Tragegurt
13. Aufhänghaken Tragegurt
Symbole auf dem Anbaugerät und dem
Antriebsaggregat
Eine unsachgemäße oder nachlässige
Handhabung dieses Geräts kann bei
Anwendern oder sonstigen Personen
schwere Verletzungen oder sogar tödliche
Unfälle zur Folge haben.
Lesen Sie die Betriebsanleitung
aufmerksam durch, und machen Sie sich mit
den Anweisungen vertraut, bevor Sie das
Anbaugerät verwenden.
Lesen Sie die Betriebsanleitung
aufmerksam durch, und machen Sie sich mit
den Anweisungen vertraut, bevor Sie das
Anbaugerät verwenden.
Tragen Sie einen zugelassenen
Schutzhelm, einen Gehörschutz sowie einen
Sichtschutz.
Dieses Anbaugerät stimmt mit den
geltenden EG-Richtlinien überein.
GEFAHR: Berühren Sie die Messer nicht mit
den Händen.
GEFAHR: Berühren Sie die Messer nicht mit
den Händen.
Halten Sie alle Körperteile von heißen
Oberflächen fern.
Pfeile, die die Grenzen für die Positionierung
des Handgriffs markieren.
820 - 002 - 13.12.2019 15
Tragen Sie immer zugelassene
Schutzhandschuhe.
Tragen Sie rutschfeste und stabile Stiefel.
GEFAHR: Halten Sie genügend Abstand von elektrischen Leitungen. Dieses Gerät ist nicht
elektrisch isoliert. Wenn das Gerät in Kontakt mit oder in die Nähe von stromführenden Lei-
tungen kommt, können Todesfälle oder schwere Verletzungen die Folge sein. Elektrizität
kann über einen sogenannten Spannungsbogen von einem Punkt zu einem anderen über-
tragen werden. Je höher die Spannung, desto größer die Distanz, über die Elektrizität über-
tragen werden kann. Elektrizität kann auch durch Äste und andere Gegenstände übertragen
werden, besonders dann, wenn diese feucht sind. Halten Sie mit dem Gerät immer einen
Abstand von mindestens 10 m zu stromführenden Leitungen und/oder Gegenständen, die
mit diesen in Kontakt stehen, ein. Wenn Sie mit einem kürzeren Sicherheitsabstand arbeiten
müssen, wenden Sie sich immer an den betreffenden Stromversorger, um sicherzustellen,
dass der Strom ausgeschaltet ist, bevor Sie mit der Arbeit beginnen.
Der Bediener des Geräts hat darauf zu achten, dass während der Arbeit keine Menschen
oder Tiere näher als 15 Meter herankommen.
Umweltbelastende Geräuschemissionen
gemäß der EG-Richtlinie. Die
Emissionswerte des Anbaugeräts sind im
Abschnitt „Technische Daten“ und auf dem
Geräteschild angegeben.
Max 3/10 sec
Schneideinheit Arbeitszyklus, Betriebszeit/
Leerlauf.
Hinweis: Sonstige Symbole/Aufkleber auf dem
Anbaugerät beziehen sich auf spezielle
Zertifizierungsanforderungen, die in bestimmten
Ländern gelten.
Sicherheit
Sicherheitsdefinitionen
Warnungen, Vorsichtsmaßnahmen und Hinweise
werden verwendet, um auf besonders wichtige Teile der
Bedienungsanleitung hinzuweisen.
WARNUNG: Wird verwendet, wenn bei
Nichtbeachtung der Anweisungen in diesem
Handbuch die Gefahr von Verletzung oder
Tod des Bedieners oder anderer Personen
besteht.
ACHTUNG: Wird verwendet, wenn bei
Nichtbeachtung der Anweisungen in diesem
Handbuch die Gefahr von Schäden am
Gerät, an anderen Materialien oder in der
Umgebung besteht.
Hinweis: Für weitere Informationen, die in bestimmten
Situationen nötig sind.
Allgemeine Sicherheitshinweise für
elektrisch betriebene Werkzeuge
WARNUNG: Lesen Sie alle für dieses
Elektrowerkzeug vorgesehenen
Sicherheitshinweise, Anleitungen,
Abbildungen und technischen Daten. Wenn
Sie die unten stehenden Anweisungen nicht
befolgen, kann dies zu elektrischen
Schlägen, Brand und/oder schweren
Verletzungen führen.
Hinweis: Bewahren Sie alle Warnhinweise und
Anweisungen für spätere Referenzzwecke auf. Der
Begriff „Elektrowerkzeug“ in den Warnhinweisen bezieht
sich auf ein Elektrowerkzeug mit Netzbetrieb (über ein
Kabel) oder mit Akkubetrieb (kabellos).
Sicherheitshinweise für Heckenscheren
• Halten Sie alle Körperteile von den Messern fern.
Entfernen Sie geschnittenes Material nicht und
halten Sie zu schneidendes Material nicht fest, wenn
sich die Messer bewegen.
Die Messer bewegen sich
nach dem Ausschalten des Motors weiter. Bei der
Arbeit mit der Heckenschere können bereits kurze
16 820 - 002 - 13.12.2019

Phasen der Unaufmerksamkeit zu schweren
Verletzungen führen.
• Tragen Sie die Heckenschere mit zum Stillstand
gekommenen Messern am Griff und achten Sie
darauf, dass Sie keine Schalter betätigen.
Ein
ordnungsgemäßer Transport der Heckenschere
verringert das Risiko eines unbeabsichtigten
Betriebs und daraus resultierender Verletzungen
durch die Messer.
• Beim Transportieren oder Aufbewahren der
Heckenschere muss immer die Messerabdeckung
angebracht werden.
Durch eine korrekte
Handhabung der Heckenschere wird das
Verletzungsrisiko, das durch die Messer besteht,
reduziert.
• Stellen Sie beim Beseitigen von eingeklemmtem
Material oder bei der Wartung des Geräts sicher,
dass alle Schalter ausgeschaltet sind und dass die
Sperrvorrichtung betätigt ist.
Eine unerwartete
Betätigung der Heckenschere beim Entfernen von
festklemmendem Material oder bei der Wartung
kann zu schweren Verletzungen führen.
• Halten Sie die Heckenschere nur an isolierten
Griffoberflächen fest, da die Messer ggf. in Kontakt
mit innenliegender Verdrahtung oder mit ihrem
eigenen Kabel kommen kann.
Messer, die mit einem
stromführenden Leiter in Kontakt kommen, können
freiliegende Metallteile der Heckenschere unter
Strom setzen und dem Bediener einen Stromschlag
versetzen.
• Halten Sie alle Kabel vom Schnittbereich fern.
In
Hecken oder Büschen können stromführende Kabel
verlaufen, die versehentlich mit den Messern in
Kontakt kommen könnten.
• Verwenden Sie die Heckenschere nicht bei
schlechtem Wetter, insbesondere dann nicht, wenn
die Gefahr eines Blitzeinschlages besteht.
Dadurch
wird die Gefahr eines Blitzschlags reduziert.
Sicherheitshinweise für ausziehbare
Heckenscheren
• Verwenden Sie die ausziehbare Heckenschere
niemals in der Nähe von
Hochspannungsfreileitungen, um das Risiko eines
Stromschlags zu reduzieren. Ein Kontakt mit bzw.
eine Verwendung in der Nähe von
Hochspannungsfreileitungen kann zu schweren
Verletzungen oder elektrischen Schlägen mit
Todesfolge führen.
• Benutzen Sie stets zwei Händen bei der
Verwendung der ausziehbaren Heckenschere.
Halten Sie die ausziehbare Heckenschere mit
beiden Händen, um immer die Kontrolle zu behalten.
• Tragen Sie bei der Verwendung der ausziehbaren
Heckenschere über Kopf stets einen Kopfschutz.
Herabfallende Pflanzenteile können schwere
Verletzungen verursachen.
Allgemeine Sicherheitshinweise
WARNUNG: Lesen Sie sämtliche
Sicherheitshinweise und Anweisungen
durch. Wenn Sie die Warn- und
Sicherheitshinweise nicht befolgen, kann
dies zu Elektroschock, Brand und/oder
schweren Verletzungen führen.
• Lesen Sie die Betriebsanleitung sorgfältig durch und
machen Sie sich mit dem Inhalt vertraut, bevor Sie
das Anbaugerät benutzen.
• Diese Anweisungen ergänzen die Anweisungen, die
im Lieferumfang des Geräts enthalten waren.
Weitere Verfahren finden Sie in der
Bedienungsanleitung des Geräts.
• Unter keinen Umständen darf die ursprüngliche
Konstruktion des Anbaugerätes ohne Genehmigung
des Herstellers geändert werden. Verwenden Sie
keine Anbaugeräte, die modifiziert wurden, und
verwenden Sie immer Originalzubehör. Unzulässige
Änderungen und/oder unzulässiges Zubehör können
zu schweren oder sogar tödlichen Verletzungen des
Anwenders oder anderer Personen führen.
Bewahren Sie alle Warnhinweise und
Anweisungen für spätere
Referenzzwecke auf.
Sicherheitshinweise für den Betrieb
• Wenn Sie in eine Situation kommen, die Sie in
Bezug auf die weitere Anwendung des Geräts
verunsichert, lassen Sie sich von einem Experten
beraten. Wenden Sie sich an Ihren Händler oder Ihre
Servicewerkstatt.
• Führen Sie keine Arbeiten aus, mit denen Sie sich
überfordert fühlen.
• Schneidwerkzeug. Berühren Sie das Werkzeug nur,
wenn Sie zuvor den Motor abgeschaltet haben/den
Akku entnommen haben.
• Gestatten Sie auf keinen Fall Kindern, das Gerät zu
verwenden.
• Achten Sie darauf, dass sich niemand auf unter
15 m nähert, während Sie arbeiten.
• Lassen Sie niemals jemand anderen das Gerät
benutzen, ohne sich zu vergewissern, dass die
Person den Inhalt der Betriebsanleitung verstanden
hat.
820 - 002 - 13.12.2019
17
• Arbeiten Sie niemals stehend auf einer Leiter oder
einem Hocker oder in einer anderen erhöhten und
nicht ausreichend gesicherten Position.
• Sorgen Sie stets dafür, dass Sie bei der Arbeit fest
und sicher stehen.
• Halten Sie das Gerät immer mit beiden Händen fest.
Halten Sie das Gerät an der Seite des Körpers.
• Stellen Sie sicher, dass Sie den Tragegurt am
Aufhänghaken befestigen. Verwenden Sie nur einen
Tragegurt.
• Betätigen Sie den Gashebel mit der rechten Hand.
• Lassen Sie im Notfall das Gerät auf den Boden
fallen.
• Sorgen Sie dafür, dass Hände und Füße nicht an die
Schneidausrüstung kommen, wenn der Motor läuft.
• Wenn Sie den Motor abgestellt haben, halten Sie
Hände und Füße von der Schneidausrüstung fern,
bis diese völlig zum Stillstand gekommen ist.
• Achten Sie auf Aststückchen, die beim Schneiden
weggeschleudert werden können.
• Legen Sie das Gerät immer auf den Boden, wenn
Sie nicht damit arbeiten.
• Führen Sie Schneidarbeiten nicht zu nah am Boden
aus. Steine oder andere lose Gegenstände könnten
hochgeschleudert werden.
• Kontrollieren Sie den Arbeitsbereich auf
Fremdkörper wie Stromleitungen, Insekten oder
Tiere usw. sowie auf Gegenstände, die die
Schneidausrüstung beschädigen könnten, z. B.
Metallteile.
• Wenn ein Fremdkörper getroffen wird oder
Vibrationen auftreten, müssen Sie das Gerät sofort
stoppen. Wenn Ihr Gerät mit Benzin betrieben wird,
entfernen Sie die Zündkappe von der Zündkerze.
Wenn Ihr Gerät mit einem Akku betrieben wird,
nehmen Sie den Akku heraus. Kontrollieren Sie, ob
das Gerät beschädigt ist. Reparieren Sie eventuelle
Schäden.
• Wenn sich beim Arbeiten etwas in den Messern
verfängt, stoppen Sie das Gerät sofort. Wenn Ihr
Gerät benzinbetrieben ist, schalten Sie den Motor ab
und entfernen Sie die Zündkappe von der
Zündkerze. Wenn Ihr Gerät akkubetrieben ist,
schalten Sie den Motor ab und nehmen Sie den
Akku heraus. Stellen Sie sicher, dass das Gerät
vollständig zum Stillstand gekommen ist, bevor Sie
die Messer reinigen.
Sicherheitshinweise für
Heckenscheren-Anbaugeräte
• Halten Sie alle Körperteile von den Messern fern.
Entfernen Sie geschnittenes Material nicht und
halten Sie zu schneidendes Material nicht fest, wenn
sich die Messer bewegen. Die Messer bewegen sich
nach dem Ausschalten des Motors weiter. Bei der
Arbeit mit der Heckenschere können bereits kurze
Phasen der Unaufmerksamkeit zu schweren
Verletzungen führen.
• Tragen Sie die Heckenschere mit zum Stillstand
gekommenen Messern am Griff und achten Sie
darauf, dass Sie keine Schalter betätigen. Ein
ordnungsgemäßer Transport der Heckenschere
verringert das Risiko eines unbeabsichtigten
Betriebs und daraus resultierender Verletzungen
durch die Messer.
• Beim Transportieren oder Aufbewahren der
Heckenschere muss immer die Messerabdeckung
angebracht werden. Durch eine korrekte
Handhabung der Heckenschere wird das
Verletzungsrisiko, das durch die Messer besteht,
reduziert.
• Stellen Sie beim Beseitigen von eingeklemmtem
Material oder bei der Wartung des Geräts sicher,
dass alle Schalter ausgeschaltet sind und dass das
Netzkabel getrennt ist. Eine unerwartete Betätigung
der Heckenschere beim Entfernen von
festklemmendem Material oder bei der Wartung
kann zu schweren Verletzungen führen.
• Halten Sie die Heckenschere nur an isolierten
Griffoberflächen fest, da die Messer ggf. in Kontakt
mit innenliegender Verdrahtung oder mit ihrem
eigenen Netzkabel kommen kann. Messer, die mit
einem stromführenden Leiter in Kontakt kommen,
können freiliegende Metallteile der Heckenschere
unter Strom setzen und dem Bediener einen
Stromschlag versetzen.
• Halten Sie alle Netzkabel vom Schnittbereich fern. In
Hecken oder Büschen können stromführende Kabel
verlaufen, die versehentlich mit den Messern in
Kontakt kommen könnten.
18
820 - 002 - 13.12.2019

• Verwenden Sie die Heckenschere nicht bei
schlechtem Wetter, insbesondere dann nicht, wenn
die Gefahr eines Blitzeinschlages besteht. Dadurch
wird die Gefahr eines Blitzschlags reduziert.
• Verwenden Sie die ausziehbare Heckenschere
niemals in der Nähe von
Hochspannungsfreileitungen, um das Risiko eines
Stromschlags zu reduzieren. Ein Kontakt mit bzw.
eine Verwendung in der Nähe von
Hochspannungsfreileitungen kann zu schweren
Verletzungen oder elektrischen Schlägen mit
Todesfolge führen.
• Benutzen Sie stets zwei Händen bei der
Verwendung der ausziehbaren Heckenschere.
Halten Sie die ausziehbare Heckenschere mit
beiden Händen, um immer die Kontrolle zu behalten.
Tragen Sie bei der Verwendung der ausziehbaren
Heckenschere über Kopf stets einen Kopfschutz.
Herabfallende Pflanzenteile können schwere
Verletzungen verursachen.
Persönliche Schutzausrüstung
WARNUNG: Lesen Sie die folgenden
Warnhinweise, bevor Sie das Gerät
benutzen.
• Eine längerfristige Lärmeinwirkung kann zu
bleibenden Gehörschäden führen. Tragen Sie stets
einen zugelassenen Gehörschutz.
• Tragen Sie als Schutz stets rutschfeste Stiefel.
• Tragen Sie immer Arbeitskleidung und robuste,
lange Hosen.
• Tragen Sie niemals lose sitzende Kleidung oder
Schmuck.
• Sorgen Sie dafür, dass das Haar nicht weiter als bis
auf Schulterhöhe herabfällt.
Sicherheitsvorrichtungen am Gerät
WARNUNG: Lesen Sie die folgenden
Warnhinweise, bevor Sie das Gerät
benutzen.
In diesem Abschnitt werden einzelnen Teile der
Sicherheitsausrüstung des Gerätes beschrieben, welche
Funktion sie haben und wie ihre Kontrolle und Wartung
ausgeführt werden sollen, um sicherzustellen, dass sie
funktionsfähig sind. Die Einbaulage dieser
Komponenten ist unter der Überschrift
Einleitung auf
Seite 14
gelistet.
Die Lebensdauer der Maschine kann verkürzt werden
und die Unfallgefahr kann steigen, wenn die Wartung
des Geräts nicht ordnungsgemäß und Service und/oder
Reparaturen nicht fachmännisch ausgeführt werden.
Wenden Sie sich für weitere Informationen an Ihre
Vertragswerkstatt.
WARNUNG: Benutzen Sie kein Gerät mit
defekten Sicherheitsvorrichtungen. Die
Sicherheitsausrüstung des Gerätes muss so
kontrolliert und gewartet werden, wie dies in
diesem Abschnitt beschrieben wird. Wenn
Ihr Gerät diesen Anforderungen nicht
entspricht, muss eine Servicewerkstatt
aufgesucht werden.
ACHTUNG: Service und Reparatur des
Gerätes erfordern eine Spezialausbildung.
Dies gilt besonders für die
Sicherheitsausrüstung des Geräts. Wenn Ihr
Gerät den unten aufgeführten
Kontrollanforderungen nicht entspricht,
müssen Sie Ihre Servicewerkstatt
aufsuchen. Beim Kauf eines unserer
Produkte wird gewährleistet, dass
Reparatur- oder Servicearbeiten
fachmännisch ausgeführt werden. Sollte der
Verkäufer Ihres Gerätes nicht an unser
Fachhändler-Service-Netz angeschlossen
sein, fragen Sie nach unserer
nächstgelegenen Servicewerkstatt.
So prüfen Sie den Handschutz (HA110, nur für
benzinbetriebene Geräte)
Der Handschutz schützt die Hände davor, mit den in
Bewegung befindlichen Messern in Berührung zu
kommen, z. B. wenn dem Benutzer der vordere
Handgriff aus der Hand gleitet.
1. Kontrollieren Sie, ob der Handschutz fest sitzt.
2. Kontrollieren Sie, ob der Handschutz intakt ist.
820 - 002 - 13.12.2019
19
So kontrollieren Sie die Messer
Um ein gutes Schnittergebnis zu erzielen, muss der
Anpressdruck zwischen den Messern korrekt sein.
1. Drehen Sie zum Justieren des Anpressdrucks die
Schrauben auf der Unterseite des Messerbalkens im
Uhrzeigersinn bis zum Anschlag ein.
2. Lockern Sie anschließend die Schraube gegen den
Uhrzeigersinn 1/4 Umdrehung.
3. Fixieren Sie die Schraube mit der Gegenmutter auf
der Oberseite des Messerbalkens.
4. Stellen Sie sicher, dass die Schraube nur so fest
angezogen ist, dass sich die Unterlegscheiben unter
dem Schraubenköpfen seitlich verschieben lassen.
5. Bei korrekter Einstellung soll das Spiel zwischen den
Messern, gemessen an den Schrauben, 0,2–0,4 mm
betragen.
6. Die Schneidkanten der Messer sind zum Feilen zu
hart. Stumpfe Messer sind mit einer Schleifmaschine
zu schärfen.
7. Ersetzen Sie verbogene oder beschädigte Messer.
Heiße Oberfläche
Nach der Arbeit mit dem Gerät ist das Getriebegehäuse
heiß. Um Verbrennungen zu vermeiden, berühren Sie
das Getriebegehäuse nicht.
Sicherheitshinweise für die Wartung
Lesen Sie die folgenden Warnhinweise, bevor Sie das
Gerät benutzen.
• Schalten Sie vor Arbeiten an der Schneidausrüstung
oder an Teilen von dieser das Gerät stets aus. Wenn
Ihr Gerät mit Benzin betrieben wird, entfernen Sie
die Zündkappe von der Zündkerze. Wenn Ihr Gerät
mit einem Akku betrieben wird, nehmen Sie den
Akku heraus. Kontrollieren Sie, ob die
Schneidausrüstung völlig zum Stillstand gekommen
ist, bevor Sie Arbeiten daran vornehmen.
• Der Transportschutz ist immer an der
Schneidausrüstung anzubringen, wenn das Gerät
nicht benutzt wird.
• Achten Sie vor Reinigungs-, Reparatur- oder
Inspektionsarbeiten darauf, dass die
Schneidausrüstung zum Stillstand gekommen ist.
Wenn Ihr Gerät mit Benzin betrieben wird, entfernen
Sie die Zündkappe von der Zündkerze. Wenn Ihr
Gerät mit einem Akku betrieben wird, nehmen Sie
den Akku heraus.
• Tragen Sie bei der Reparatur der
Schneidausrüstung immer feste Handschuhe. Sie ist
sehr scharf, und es kann sehr leicht zu
Schnittwunden kommen.
• Bewahren Sie das Gerät für Kinder unzugänglich
auf.
• Verwenden Sie für Reparaturen ausschließlich
Originalersatzteile.
Montage
So montieren Sie Handschutz und
Loophandgriff – nur benzinbetriebene
Geräte (HA110)
WARNUNG: Verwenden Sie HA110 nie mit
einem akkubetriebenen Antriebsaggregat.
20 820 - 002 - 13.12.2019
1. Lösen Sie die beiden Befestigungsschrauben der
Kupplungsmuffe und bauen Sie die Kupplungsmuffe
aus.
2. Montieren Sie den Handschutz und Loophandgriff
durch Zusammenschrauben dieser Teile. Legen Sie
die Bohrungen in den beiden Teilen genau
aufeinander.
3. Schieben Sie den Loophandgriff und den
Handschutz auf das Führungsrohr.
4. Schieben Sie den Abstandhalter in die Führung im
Loophandgriff.
5. Montieren Sie Mutter und Schraube. Ziehen Sie
beide nicht zu fest an.
6. Nehmen Sie nun eine Feineinstellung vor, sodass
sich eine bequeme Arbeitsstellung ergibt. Ziehen Sie
die Schraube fest.
ACHTUNG:
Loophandgriff und
Handschutz dürfen nicht hinter der
Pfeilmarkierung am Führungsrohr
angebracht werden.
7. Setzen Sie die Kupplungsmuffe ein und ziehen Sie
die zwei Befestigungsschrauben fest.
So installieren Sie die Aufhängöse, falls
vorhanden
1. Installieren Sie die Aufhängöse zwischen den Pfeilen
auf dem hinteren Griff und dem Loophandgriff.
Hinweis: Bringen Sie den Loophandgriff nicht auf
dem Aufkleber an.
2. Justieren Sie die Aufhängöse so, dass das Gerät
ausbalanciert und einfach zu bedienen ist.
So montieren Sie den Schneidkopf
Bei der Montage des Schneidkopfes ist wichtig, dass die
Heckenschere auf einer ebenen Unterlage liegt.
Andernfalls kann es passieren, dass der Schneidkopf
schief angebracht wird.
1. Bringen Sie die Schneidausrüstung an das
Führungsrohr an.
ACHTUNG: Achten Sie darauf, dass die
Antriebswelle am Führungsrohr in die
Aussparung im Schneidkopf eingreift.
2. Ziehen Sie zuerst die untere Schraube, danach die
obere Schraube an.
820 - 002 - 13.12.2019
21
So montieren Sie den Griff (HA850)
1. Montieren Sie den Griff mit den 2 Schrauben.
Betrieb
So prüfen Sie das Gerät vor dem
Betrieb
1. Untersuchen Sie das Arbeitsumfeld. Entfernen Sie
Gegenstände, die weggeschleudert werden könnten.
2. Überprüfen Sie die Schneidausrüstung. Verwenden
Sie keine beschädigten Messer.
3. Prüfen Sie, ob sich das Gerät in einem
einwandfreien Betriebszustand befindet. Prüfen Sie,
ob alle Muttern und Schrauben angezogen sind.
4. Sorgen Sie dafür, dass das Getriebe ausreichend
geschmiert ist. Siehe
So schmieren Sie das
Getriebegehäuse auf Seite 23
für Anweisungen.
5. Prüfen Sie, ob die Schneidausrüstung anhält, wenn
der Gashebel losgelassen wird.
6. Benutzen Sie das Gerät nur für solche Arbeiten, für
die es vorgesehen ist.
7. Sorgen Sie dafür, dass der Handgriff in gutem
Zustand ist und die Sicherheitseinrichtungen intakt
sind. Verwenden Sie niemals ein Gerät, bei dem ein
Teil fehlt oder das so modifiziert wurde, dass es
nicht mehr den technischen Daten entspricht.
So bedienen Sie das Gerät
1. Beim Beschneiden der Seiten mit pendelnden
Bewegungen von unten nach oben arbeiten.
2. Passen Sie die Gas-/Drehzahleinstellung an die
Belastung an.
3. Wenn Sie ein benzinbetriebenes Gerät zum
Schneiden einer Hecke verwenden, stellen Sie
sicher, dass der Motor von der Hecke weg zeigt.
4. Arbeiten Sie nicht zu schnell, sondern gehen Sie in
angemessenem Tempo vorwärts, so dass alle
Zweige zu einer gleichmäßigen Fläche geschnitten
werden.
So ändern Sie den Winkel der
Heckenschere (HA110)
WARNUNG: Verwenden Sie HA110 nie mit
einem akkubetriebenen Antriebsaggregat.
1. Lockern Sie den Drehknopf.
2. Drücken Sie die Schneidausrüstung gegen die
Hecke oder eine feste Unterlage, bis der
gewünschte Winkel eingestellt ist.
22 820 - 002 - 13.12.2019
3. Ziehen Sie den Drehknopf an.
So ändern Sie den Winkel der
Heckenschere (HA850)
1. Lockern Sie den Drehknopf.
2. Justieren Sie den Winkel mithilfe des Griffs am
Schneidwerk.
3. Ziehen Sie den Drehknopf an.
WARNUNG: Beim Einstellen des
Winkels nicht um den Schneidkopf
herum fassen. Die Messer sind scharf
und können leicht Schnittwunden
verursachen.
Wartung
Einleitung
Nachstehend folgen einige allgemeine
Wartungsanweisungen. Sollten Sie weitere
Informationen brauchen, wenden Sie sich bitte an Ihre
Servicewerkstatt.
Warten des Geräts
So führen Sie die tägliche Wartung durch
A B
1. Stellen Sie sicher, dass sich die Messer (A) nicht
bewegen, wenn der Gashebel nicht betätigt wird
oder wenn der Choke sich in der Startposition
befindet.
2. Überprüfen Sie, dass der Handschutz (B) (HA110)
nicht beschädigt ist. Ersetzen Sie den Schutz
gegebenenfalls.
So führen Sie die wöchentliche Wartung durch
A B
1. Füllen Sie Schmierfett in das Getriebegehäuse (A)
ein. Die Erstbefüllung mit Fett ist bei einem Neugerät
nach etwa 20 Betriebsstunden vorzunehmen,
danach etwa alle 60 Stunden.
2. Kontrollieren Sie, ob die Schrauben, die die Messer
zusammenhalten (B), ordnungsgemäß angezogen
sind.
So schmieren Sie das
Getriebegehäuse
ACHTUNG: Das Getriebegehäuse darf nicht
vollständig mit Fett befüllt werden. Das Fett
dehnt sich durch die beim Betrieb des
Geräts entstehende Wärme aus. Ist das
820 - 002 - 13.12.2019 23
Getriebegehäuse vollständig mit Schmierfett
befüllt, könnte es passieren, dass
Dichtungen zerstört werden und Fett austritt.
Am Getriebegehäuse befinden sich ein Schmiernippel
und ein Fetteinfüllstopfen.
1. Verwenden Sie zum Nachfüllen von Schmierfett eine
Fettspritze.
Hinweis: Die Erstbefüllung mit Fett ist bei einem
Neugerät nach etwa 20 Betriebsstunden
vorzunehmen, danach etwa alle 60 Stunden.
Verwenden Sie Husqvarna AB Spezialfett
Nr. 503 98 96-01. Das Fett im Getriebegehäuse
muss normalerweise nur bei Reparaturen
gewechselt werden.
So reinigen und schmieren Sie die
Messer
1. Entfernen Sie vor und nach jedem Gebrauch des
Geräts Harz und Pflanzenrückstände mit einem
Reinigungsmittel von den Messern.
2. Bevor Sie das Gerät für längere Zeit aufbewahren,
schmieren Sie die Klingen mit Sprühschmiermittel.
Technische Angaben
Technische Daten für benzinbetriebene Geräte
HA110 HA850
Gewicht
Gewicht, kg 2,0 2,4
Messer
Messerlänge, mm 550/21,7 550/21,7
Messerdrehzahl, U/min 4184 4184
Geräuschemissionen
Gemessener Schallleistungspegel dB (A) 111 110
Garantierter Schallleistungspegel L
WA
dB (A) 114 113
Geräuschpegel
6
Äquivalenter Schalldruckpegel am Ohr des Bedieners, gemessen
gem. EN 15503, dB (A)
Ausgestattet mit zugelassenem Zubehör (Original) 99 98
Vibrationspegel
7
Äquivalente Vibrationspegel (a
hv,eq
) an den Griffen, gemessen nach
EN ISO 22867, m/s
2
6
Berichten zufolge liegt der Schalldruckpegel für dieses Gerät normalerweise bei einer Ausbreitungsklasse
(Standardabweichung) von 1 dB(A).
7
Berichten zufolge liegt der äquivalente Vibrationspegel normalerweise bei einer Ausbreitungsklasse (Standar-
dabweichung) von 1 m/s
2
.
24 820 - 002 - 13.12.2019

HA110 HA850
Ausgestattet mit zugelassenem Zubehör (Original), links/rechts 5,6/7,6 5,7/7,5
Technische Daten für akkubetriebene Geräte
325iLK + Heckenscherenaufsatz HA850
Gewicht
Gewicht, kg (inklusive Akku BLi200) 3,7+2,5
Messer
Messerlänge, mm 550
Messerdrehzahl, U/min 3000
Geräuschemissionen
8
Gemessener Schallleistungspegel dB (A) 95
Garantierter Schallleistungspegel L
WA
dB (A) 96
Geräuschpegel
9
Schalldruckwert am Ohr des Bedieners, gemessen gemäß ISO 26868, dB (A)
Ausgestattet mit zugelassenem Zubehör (Original) 89
Vibrationspegel
10
Vibrationspegel an den Griffen, gemessen gemäß EN 62841-1, m/s
2
Ausgestattet mit zugelassenem Zubehör (Original), links/rechts 2,9/2,2
8
Umweltbelastende Geräuschemission, gemessen als Schallleistung (LWA) gemäß EG-Richtlinie 2000/14/EG.
Der aufgezeichnete Schallleistungspegel für das Gerät wurde unter Verwendung der originalen Schneidaus-
rüstung, die den höchsten Pegel ergibt, gemessen. Der Unterschied zwischen garantiertem und gemessenem
Schallleistungspegel besteht darin, dass beim garantierten Schallleistungspegel auch eine Streuung im Mes-
sergebnis und Abweichungen zwischen verschiedenen Geräten desselben Modells (gemäß der Richtlinie
2000/14/EG) berücksichtigt werden.
9
Berichten zufolge liegt der Schalldruckpegel für dieses Gerät normalerweise bei einer Ausbreitungsklasse
(Standardabweichung) von 3 dB (A) und wurde mit dem Original-Anbaugerät, das den höchsten Pegel ergibt,
geprüft.
10
Berichten zufolge liegt der Vibrationspegel normalerweise bei einer Ausbreitungsklasse (Standardabwei-
chung) von 2 m/s
2
. Verwenden Sie zum Vergleich von Vibrationspegeln, Akku- und Verbrennungsgeräten den
Vibrationsrechner: https://www.husqvarna.com/de/serviceangebote/vibrationswert-rechner/.
820 - 002 - 13.12.2019 25

EG-Konformitätserklärung
EG-Konformitätserklärung für
benzinbetriebene Geräte
Husqvarna AB, SE-561 82 Huskvarna, Schweden, Tel.:
+46-36-146500, erklärt hiermit, dass die
Heckenscherenaufsätze Husqvarna AB HA110 (GILT
NUR für benzinbetriebene Geräte) und HA850 mit
Seriennummer ab 2019 (die Jahreszahl ist auf dem
Typenschild angegeben, mitsamt einer nachfolgenden
Seriennummer) den Vorschriften der RICHTLINIE DES
RATES entsprechen:
• „Maschinenrichtlinie“ 2006/42/EG vom 17. Mai 2006
• Richtlinie „über elektromagnetische Verträglichkeit“,
2014/30/EU vom 26. Februar 2014
• „Richtlinie zur Beschränkung der Verwendung
bestimmter gefährlicher Stoffe in Elektro- und
Elektronikgeräten“ 2011/65/EG vom 8. Juni 2011.
• „Richtlinie über umweltbelastende
Geräuschemissionen von zur Verwendung im Freien
vorgesehenen Geräten und Maschinen“ 2000/14/EG
vom 8. Mai 2000
Die folgenden Normen werden erfüllt:
EN ISO 12100:2010, ISO 10517:2009
0404, RISE SMP Svensk Maskinprovning AB, hat die
EG-Typenprüfung gemäß Maschinenrichtlinie
(2006/42/EG) Artikel 12, Absatz 3b durchgeführt. Die
Prüfnachweise über die EG-Typenprüfung gemäß
Anlage IV haben die Nummer: SEC/14/2416
Huskvarna 2019-06-24
Per Gustafsson, Entwicklungsleiter (bevollmächtigter
Vertreter für Husqvarna AB, verantwortlich für die
technische Dokumentation)
EG-Konformitätserklärung für
akkubetriebene Geräte
Husqvarna AB, SE-561 82 Huskvarna, Schweden, Tel.:
+46-36-146500, erklärt hiermit, dass der
Heckenscherenaufsatz Husqvarna HA850, Aufsatz mit
Antriebsaggregat Husqvarna 325iLK mit Seriennummer
ab 2019 (die Jahreszahl ist auf dem Typenschild
angegeben, mitsamt einer nachfolgenden
Seriennummer) den Vorschriften der RICHTLINIE DES
RATES entspricht:
• „Maschinenrichtlinie“ 2006/42/EG vom 17. Mai 2006
• Richtlinie „über elektromagnetische Verträglichkeit“,
2014/30/EU vom 26. Februar 2014
• „Richtlinie zur Beschränkung der Verwendung
bestimmter gefährlicher Stoffe in Elektro- und
Elektronikgeräten“ 2011/65/EG vom 8. Juni 2011.
• „Richtlinie über umweltbelastende
Geräuschemissionen von zur Verwendung im Freien
vorgesehenen Geräten und Maschinen“ 2000/14/EG
vom 8. Mai 2000
Die folgenden Normen werden erfüllt:
IEC 62841-4-2, EN 50581:2012
RISE SMP Svensk maskinprovning AB, Box 7035,
SE-750 07 Uppsala, Sweden, hat im Auftrag von
Husqvarna AB eine freiwillige Typenprüfung
durchgeführt. Zertifikats-Nummer: SEC/14/2416
RISE SMP Svenska Maskinprovning AB hat das
Einverständnis mit Anhang V der Richtlinien des Rates
2000/14/EG ebenfalls bestätigt. Das Zertifikat hat die
Nummer: 01/094/028
Informationen zu Geräuschemissionen finden Sie unter
#
.
Huskvarna 2019-06-24
Per Gustafsson, Entwicklungsleiter (bevollmächtigter
Vertreter für Husqvarna AB, verantwortlich für die
technische Dokumentation)
26
820 - 002 - 13.12.2019
Sommaire
Introduction................................................................... 27
Sécurité.........................................................................29
Montage........................................................................33
Utilisation...................................................................... 34
Entretien....................................................................... 36
Caractéristiques techniques......................................... 37
Déclaration de conformité CE.......................................39
Introduction
Description du produit
Nous travaillons continuellement au développement de
nos produits et nous réservons le droit d'en modifier,
entre autres, la conception et l'aspect sans préavis.
Remarque: Le présent manuel concerne à la fois les
blocs d'alimentation fonctionnant à l'essence et ceux
alimentés par batterie.
Utilisation prévue
AVERTISSEMENT: Cet accessoire ne doit
être utilisé qu'avec le produit prévu à cet
effet, voir le chapitre sur l'accessoire du
manuel d'utilisation du produit.
AVERTISSEMENT: N'utilisez jamais HA110
avec un bloc d'alimentation alimenté par
batterie.
Utilisez uniquement HA110 avec un bloc d'alimentation
fonctionnant à l'essence. Utilisez HA850 avec un bloc
d'alimentation fonctionnant à l'essence ou un bloc
d'alimentation alimenté par batterie.
Le produit est uniquement destiné à la taille des
branches et des rameaux.
Présentation de l'accessoire pour HA110 (pour les produits à essence
uniquement)
1
9
4
6
3
12
2
11
10
7
8
5
1. Couteau
2. Bouchon de graissage et raccord pour le
remplissage du lubrifiant
3. Renvoi d'angle
4. Poignée avant
5. Vis de fixation de la protection anti-rebond
6. Manette du réglage de l’angle
7. Protection anti-rebond (uniquement sur les blocs
d'alimentation fonctionnant à l'essence)
8. Manuel d'utilisation
820 - 002 - 13.12.2019 27
9. Protection de transport
10. Raccord du tube de transmission
11. Arbre (110 mm pour HA110 et uniquement sur les
blocs d'alimentation fonctionnant à l'essence)
12. Poignée du réglage de l'angle (HA850)
Présentation de l'accessoire pour HA850
1
8
4
6
3
11
2
10
9
7
5
12
13
1. Couteau
2. Bouchon de graissage et raccord pour le
remplissage du lubrifiant
3. Renvoi d'angle
4. Poignée anneau
5. Vis de fixation de la protection anti-rebond
6. Manette du réglage de l’angle
7. Manuel d'utilisation
8. Protection de transport
9. Raccord du tube de transmission
10. Arbre (829 mm pour HA850
11. Poignée du réglage de l'angle (HA850)
12. Harnais
13. Crochet de suspension du harnais
Symboles sur l'accessoire et le bloc
d'alimentation
Une utilisation erronée ou négligente de ce
produit peut occasionner des blessures
graves, voire mortelles pour l'utilisateur ou
d'autres personnes.
Avant d'utiliser l'accessoire, lisez
attentivement le manuel de l'opérateur et
assimilez les instructions qu'il contient.
Avant d'utiliser l'accessoire, lisez
attentivement le manuel de l'opérateur et
assimilez les instructions qu'il contient.
Portez un casque de protection, des
protège-oreilles et des protections pour les
yeux homologués.
Cet accessoire est conforme aux directives
CE en vigueur.
DANGER – Maintenez vos mains à distance
de la lame.
DANGER – Maintenez vos mains à distance
de la lame.
Maintenez toutes les parties de votre corps
à distance des surfaces chaudes et
brûlantes.
Flèches indiquant les limites de
positionnement de la poignée.
28 820 - 002 - 13.12.2019
Portez toujours des gants de protection
homologués.
Utilisez des bottes antidérapantes et
stables.
DANGER - Restez à une distance suffisante des lignes électriques. Ce produit ne comporte
pas d'isolation électrique. Si le produit entre en contact avec ou est utilisé à proximité de lig-
nes à haute tension, ceci peut entraîner des blessures corporelles très graves, voire mor-
telles. Un courant électrique peut être transmis d’un point à un autre par un arc électrique.
Plus la tension est élevée et plus la distance de transmission du courant électrique est éle-
vée. Un courant électrique peut également passer par des branches et d’autres objets, no-
tamment s’ils sont mouillés. Conservez toujours une distance d'au moins 10 m entre le pro-
duit et les lignes à haute tension et/ou tout objet en contact avec ces lignes. Si vous devez
travailler dans ce périmètre de sécurité, contactez toujours le fournisseur d'électricité afin de
vous assurer que le courant a bien été coupé avant de commencer les travaux.
L'utilisateur du produit doit s'assurer qu'aucune personne ou animal ne s'approche à moins
de 15 mètres pendant le travail.
Émissions sonores dans l'environnement
selon la directive de la Communauté
européenne. Les émissions de l'accessoire
sont indiquées au chapitre Caractéristiques
techniques et sur l'étiquette.
Max 3/10 sec
Cycle de fonctionnement de l'unité de
coupe, temps de fonctionnement/temps de
ralenti.
Remarque: Les autres symboles/autocollants présents
sur l'accessoire concernent des exigences de
certification spécifiques à certains marchés.
Sécurité
Définitions de sécurité
Des avertissements, des recommandations et des
remarques sont utilisés pour souligner des parties
spécialement importantes du manuel.
AVERTISSEMENT: Symbole utilisé en cas
de risque de blessures ou de mort pour
l'opérateur ou les personnes à proximité si
les instructions du manuel ne sont pas
respectées.
REMARQUE: Symbole utilisé en cas de
risque de dommages pour le produit,
d'autres matériaux ou les environs si les
instructions du manuel ne sont pas
respectées.
Remarque: Symbole utilisé pour donner des
informations supplémentaires pour une situation
donnée.
Consignes générales de sécurité
relatives à l'outil à moteur
AVERTISSEMENT: Lisez l'ensemble des
avertissements de sécurité, des consignes,
des illustrations et des spécifications
fournies avec cet outil électrique. Le non-
respect des consignes énumérées ci-
dessous peut être à l'origine d'un choc
électrique, d'un incendie et/ou de blessures
graves.
Remarque: Conservez toutes ces consignes et
instructions pour toute consultation ultérieure. Le terme
« outil électrique » utilisé dans les avertissements fait
référence à l'outil branché sur secteur (fil) ou à l'outil
alimenté par batterie (sans fil).
Consignes de sécurité concernant le
taille-haie
• Maintenez toutes les parties de votre corps à
distance de la lame. Ne retirez pas le matériel
végétal coupé et n'attrapez pas le matériel à couper
lorsque les lames bougent.
Les lames continuent de
bouger une fois l'interrupteur en position d'arrêt. Un
820 - 002 - 13.12.2019 29
moment d'inattention pendant l'utilisation du taille-
haie peut entraîner des blessures personnelles
graves.
• Transportez le taille-haie par la poignée avec la lame
de coupe arrêtée, en prenant soin de ne pas
actionner d'interrupteur d'alimentation.
Le transport
correct du taille-haie diminue le risque de démarrage
par inadvertance et de blessures corporelles
provoquées par les lames.
• Mettez toujours la protection de la lame lors du
transport ou du remisage du taille-haie.
Une
manipulation correcte du taille-haie réduira le risque
de blessures corporelles provoquées par les lames.
• Lorsque vous dégagez les matières végétales
coincées ou que vous procédez à l'entretien de
l'unité, assurez-vous que tous les interrupteurs
d'alimentation sont en position d'arrêt et que le
cordon d'alimentation est en position verrouillée.
Un
démarrage inattendu du taille-haie lorsque vous
dégagez le matériel végétal coincé ou que vous
procédez à l'entretien peut entraîner des blessures
corporelles graves.
• Tenez le taille-haie par les surfaces de préhension
isolées uniquement, car la lame risque d'entrer en
contact avec du câblage caché ou son propre fil.
Si
les lames touchent un câble sous tension, elles
risquent de mettre également sous tension les
parties métalliques exposées du taille-haie, ce qui
pourrait envoyer un choc électrique à l'utilisateur.
• Maintenez tous les câbles et cordons d'alimentation
à distance de la zone de coupe.
Les cordons
d'alimentation et les câbles peuvent être masqués
par des haies ou des buissons et être coupés
accidentellement par la lame.
• N'utilisez pas le taille-haie en cas de mauvaises
conditions météorologiques, en particulier lorsqu'il y
a un risque de foudre.
Cela permet de réduire le
risque d'être frappé par la foudre.
Instructions de sécurité pour taille-
haies longue portée
• Pour réduire le risque d'électrocution, n'utilisez
jamais le taille-haie longue portée à proximité de
lignes électriques. Tout contact ou utilisation à
proximité de lignes électriques peut provoquer des
blessures graves ou des chocs électriques pouvant
entraîner la mort.
• Utilisez toujours le taille-haie longue portée à deux
mains. Tenez le taille-haie longue portée avec les
deux mains pour ne pas risquer de perdre le
contrôle.
• Utilisez toujours un casque lorsque vous utilisez le
taille-haie longue portée en hauteur. Les chutes de
débris peuvent causer de graves blessures
personnelles.
Instructions générales de sécurité
AVERTISSEMENT: Lire toutes les
consignes et instructions de sécurité. Le
non-respect des consignes et mises en
garde peut être à l'origine d'un choc
électrique, d'un incendie et/ou de blessures
graves.
• Lisez attentivement et assimilez le manuel
d'utilisation avant d'utiliser l'accessoire.
• Ces consignes complètent les instructions fournies
avec le produit. Pour d'autres procédures, veuillez
vous reporter aux instructions d'utilisation du produit.
• Ne modifiez jamais l'accessoire sans l'autorisation
du fabricant. N'utilisez pas un accessoire qui semble
avoir été modifié par un tiers et utilisez toujours des
accessoires d'origine. Des modifications non
autorisées et/ou l'emploi d'accessoires non
homologués peuvent provoquer des accidents
graves, voire mortels, à l'utilisateur ou d'autres
personnes.
Conservez toutes ces consignes et
instructions pour toute consultation
ultérieure
Instructions de sécurité pour le
fonctionnement
• Si vous vous trouvez dans une situation où vous
n'êtes pas sûr de la marche à suivre, consultez un
expert. Adressez-vous à votre revendeur ou à votre
atelier d'entretien.
• Évitez les tâches pour lesquelles vous ne vous
sentez pas suffisamment qualifié.
• Outil de coupe. Ne touchez jamais l'outil sans avoir
préalablement arrêté le moteur ou retiré la batterie.
• Ne laissez jamais un enfant utiliser le produit.
• Assurez-vous qu'aucune personne ne s’approche à
moins de 15 m pendant que vous travaillez.
• Ne laissez jamais d'autres personnes utiliser le
produit sans vous être assuré au préalable que ces
personnes ont bien compris le contenu du manuel
de l'opérateur.
• Ne travaillez jamais debout sur une échelle, un
tabouret, ou dans toute autre position surélevée
n’offrant pas une sécurité maximale.
30
820 - 002 - 13.12.2019
• Adoptez toujours une position de travail sûre et
stable.
• Tenez toujours la machine des deux mains. Tenez le
produit sur le côté du corps.
• Assurez-vous de fixer le harnais au crochet de
suspension. N'utilisez qu'un seul harnais.
• Utilisez votre main droite pour manœuvrer la
gâchette d'accélération/de puissance.
• En cas d'urgence, lâchez le produit et laissez-le
tomber au sol.
• Assurez-vous que ni vos mains, ni vos pieds ne se
trouvent à proximité de l'équipement de coupe
quand le moteur tourne.
• Après l'arrêt du moteur, maintenez vos mains et vos
pieds à l'écart de l'équipement de coupe jusqu'à
l'arrêt total de celui-ci.
• Attention aux éclats de bois pouvant être projetés
durant la coupe.
• Posez toujours le produit sur le sol lorsque vous ne
l'utilisez pas.
• Ne pas couper trop près du sol. Des pierres et
d'autres objets sont susceptibles d'être projetés.
• Étudiez attentivement la zone de travail afin de
détecter les corps étrangers tels que les câbles
électriques, les insectes, les animaux, etc., ou tout
autre objet pouvant endommager l'équipement de
coupe comme, par exemple, les objets en métal.
• Arrêtez immédiatement le produit s'il vibre ou bute
sur un corps étranger. Si vous disposez d'un produit
fonctionnant à l'essence, retirez le chapeau de
bougie de la bougie. Si vous disposez d'un produit
alimenté par batterie, retirez la batterie. Vérifiez que
le produit n'a subi aucun dommage. Réparez tout
éventuel dommage.
• Si un objet reste coincé entre les lames durant le
travail, arrêtez immédiatement le produit. Si vous
disposez d'un produit fonctionnant à l'essence,
arrêtez le moteur et déposez le capuchon de la
bougie. Si vous disposez d'un produit alimenté par
batterie, arrêtez le moteur et retirez la batterie.
Assurez-vous que le produit est complètement arrêté
avant de nettoyer les lames.
Consignes de sécurité pour
accessoires pour taille-haie
• Maintenez toutes les parties de votre corps à
distance de la lame. Ne retirez pas le matériel
végétal coupé et n'attrapez pas le matériel à couper
lorsque les lames bougent. Les lames continuent de
bouger une fois l'interrupteur en position d'arrêt. Un
moment d'inattention pendant l'utilisation du taille-
haie peut entraîner des blessures personnelles
graves.
• Portez le taille-haie par la poignée avec la lame
arrêtée en prenant soin de ne pas actionner
d'interrupteur d'alimentation. Le transport correct du
taille-haie diminue le risque de démarrage par
inadvertance et de blessures corporelles provoquées
par les lames.
• Mettez toujours la protection de la lame lors du
transport ou du remisage du taille-haie. Une
manipulation correcte du taille-haie réduira le risque
de blessures corporelles provoquées par les lames.
• Lorsque vous dégagez le matériel végétal coincé ou
que vous procédez à l'entretien de l'unité, assurez-
vous que tous les interrupteurs d'alimentation sont
en position d'arrêt et que le cordon d'alimentation est
débranché. Un démarrage inattendu du taille-haie
lorsque vous dégagez le matériel végétal coincé ou
que vous procédez à l'entretien peut entraîner des
blessures corporelles graves.
• Tenez le taille-haie par les surfaces de préhension
isolées uniquement, car la lame risque d'entrer en
contact avec du câblage caché ou son propre fil. Si
les lames touchent un câble sous tension, elles
risquent de mettre également sous tension les
parties métalliques exposées du taille-haie, ce qui
pourrait envoyer un choc électrique à l'utilisateur.
• Maintenez tous les câbles et cordons d'alimentation
à distance de la zone de coupe. Les cordons
d'alimentation et les câbles peuvent être masqués
par des haies ou des buissons et être coupés
accidentellement par la lame.
• N'utilisez pas le taille-haie en cas de mauvaises
conditions météorologiques, en particulier lorsqu'il y
a un risque de foudre. Cela permet de réduire le
risque d'être frappé par la foudre.
• Pour réduire le risque d'électrocution, n'utilisez
jamais le taille-haie longue portée à proximité de
lignes électriques. Tout contact ou utilisation à
proximité de lignes électriques peut provoquer des
blessures graves ou des chocs électriques pouvant
entraîner la mort.
• Utilisez toujours le taille-haie longue portée à deux
mains. Tenez le taille-haie longue portée avec les
deux mains pour ne pas risquer de perdre le
contrôle. Utilisez toujours un casque lorsque vous
utilisez le taille-haie longue portée en hauteur. Les
820 - 002 - 13.12.2019
31
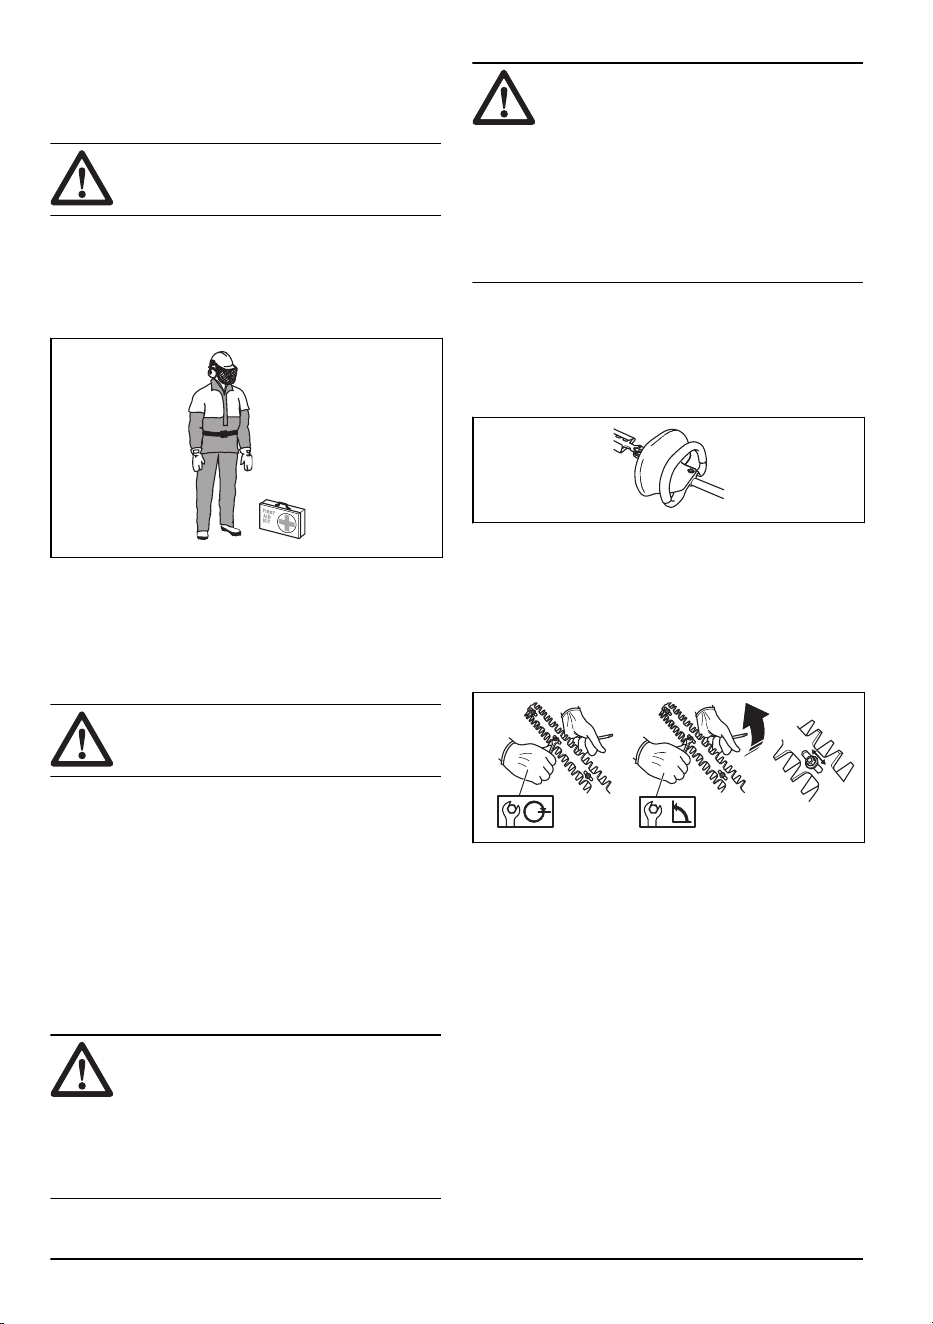
chutes de débris peuvent causer de graves
blessures personnelles.
Équipement de protection individuel
AVERTISSEMENT: Lisez les instructions qui
suivent avant d'utiliser le produit.
• Une exposition prolongée au bruit risque de causer
des lésions auditives permanentes. Utilisez toujours
des protecteurs d'oreilles agréés.
• Portez toujours des bottes de protection
antidérapantes.
• Toujours porter des vêtements de travail et des
pantalons longs résistants.
• Ne jamais porter des vêtements amples ou des
bijoux.
• Éviter les cheveux longs en dessous des épaules.
Dispositifs de sécurité sur le produit
AVERTISSEMENT:
Lisez les instructions qui
suivent avant d'utiliser le produit.
Cette section présente les fonctions de sécurité, les
instructions d’utilisation, de contrôle et d’entretien afin
de garantir son bon fonctionnement. Consultez les
instructions à la section
Introduction à la page 27
pour
savoir où se trouvent ces équipements sur votre produit.
La durée de vie du produit risque d'être écourtée et le
risque d'accidents accru si la maintenance du produit
n'est pas effectuée correctement et si les mesures
d'entretien et/ou de réparation ne sont pas effectuées de
manière professionnelle. Pour plus d'informations,
contactez l'atelier de réparation du revendeur le plus
proche.
AVERTISSEMENT:
N'utilisez jamais une
machine dont les équipements de sécurité
sont défectueux. Contrôlez et entretenez les
équipements de sécurité du produit
conformément aux instructions données
dans ce chapitre. Si les contrôles du produit
ne donnent pas de résultat positif, contactez
votre agent d’entretien pour le faire réparer.
REMARQUE: L’entretien et la réparation de
la machine exigent une formation spéciale.
Ceci concerne particulièrement l’équipement
de sécurité de la machine. Si les contrôles
suivants ne donnent pas un résultat positif,
adressez-vous à un atelier spécialisé.
L’achat de l’un de nos produits offre à
l’acheteur la garantie d’un service et de
réparations qualifiés. Si le point de vente
n’assure pas ce service, s’adresser à
l’atelier spécialisé le plus proche.
Pour contrôler la protection anti-rebond (HA110, pour
les produits à essence uniquement)
Cette protection empêche les mains d'entrer en contact
avec les lames activées, au cas où, par ex., l'utilisateur
lâcherait accidentellement la poignée avant.
1. S’assurer que le protège-main est solidement monté.
2. S’assurer que le protège-main est entier.
Pour contrôler les lames
Pour obtenir un bon résultat de coupe, il est important
que la pression de contact entre les couteaux soit
correcte.
1. Le réglage de la pression de contact s’effectue en
serrant à fond dans le sens des aiguilles d’une
montre les vis situées sur la partie inférieure de la
poutrelle des couteaux.
2. Dévisser ensuite la vis de 1/4 de tour dans le sens
contraire des aiguilles d’une montre.
3. Bloquer la vis à l’aide du contre-écrou sur la partie
supérieure de la poutrelle des couteaux.
4. Contrôler que le serrage de la vis est tel qu’il est
possible de déplacer latéralement la rondelle située
sous la tête de la vis.
5. Lorsque les lames sont réglées correctement, un jeu
de 0,2-0,4 mm entre les lames doit pouvoir être
mesuré au niveau des vis.
6. Les dents des couteaux sont trop dures pour pouvoir
être limées. Utiliser une meuleuse pour affûter les
couteaux émoussés.
32
820 - 002 - 13.12.2019
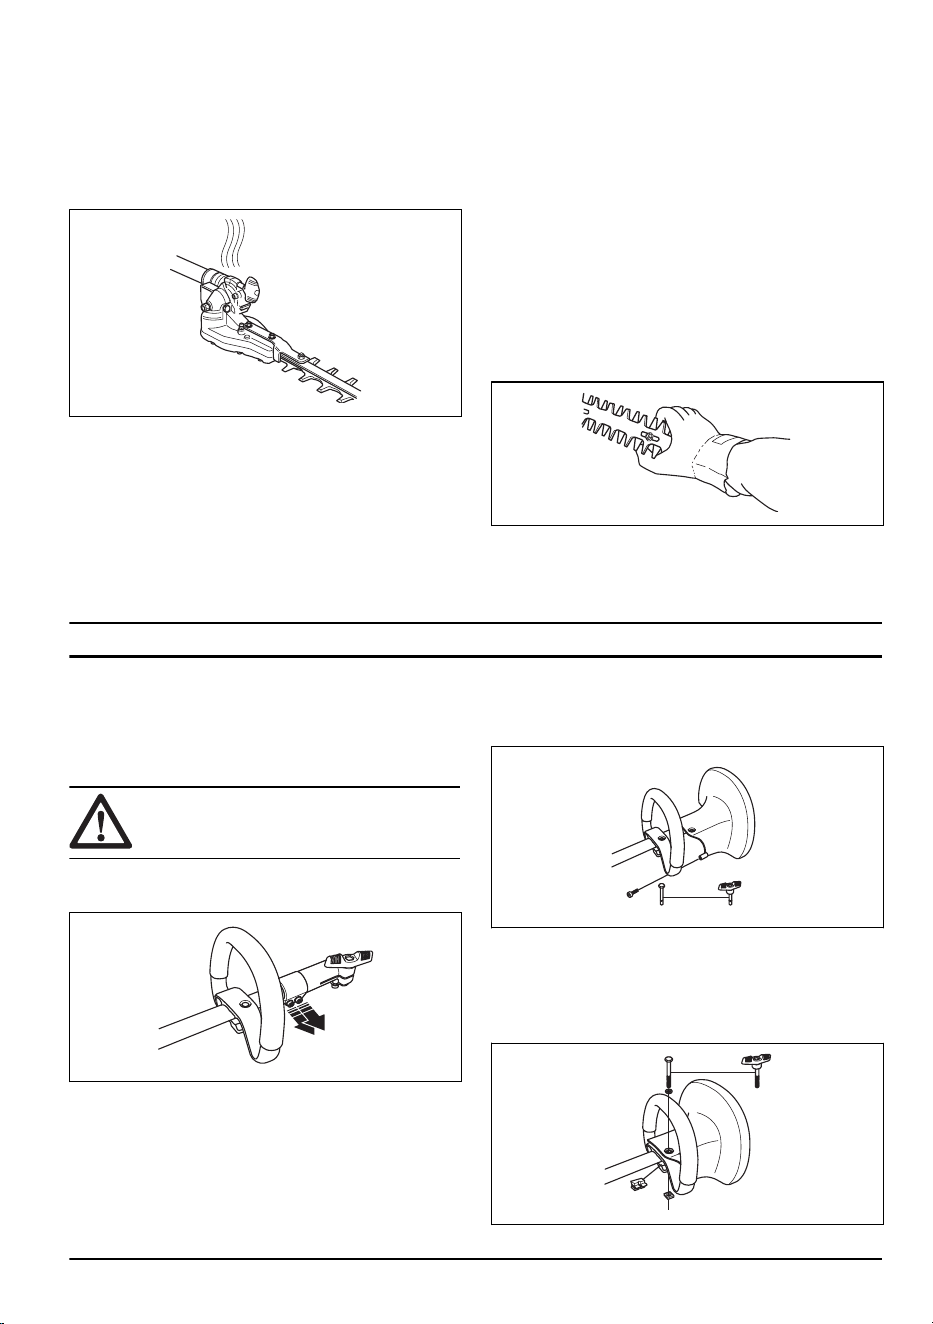
7. Remplacer les couteaux s’ils sont courbés ou
endommagés.
Surface chaude
Après l’utilisation du produit, le carter d'engrenage est
chaud. Ne touchez pas le carter d'engrenage afin
d'éviter les brûlures.
Consignes de sécurité pour l'entretien
Lisez les instructions qui suivent avant d'utiliser le
produit.
• Arrêtez toujours le produit avant de manipuler une
quelconque pièce de l'équipement de coupe. Si vous
disposez d'un produit fonctionnant à l'essence,
débranchez le capuchon de la bougie. Si vous
disposez d'un produit alimenté par batterie, retirez la
batterie. Vérifiez que l'équipement de coupe est
complètement arrêté avant de commencer toute
intervention sur celui-ci.
• La protection pour le transport doit toujours être mise
sur l’équipement de coupe quand le produit n’est pas
utilisé.
• Avant de commencer les travaux de nettoyage, de
réparation ou d’inspection, assurez-vous que
l’équipement de coupe est arrêté. Si vous disposez
d'un produit fonctionnant à l'essence, débranchez le
capuchon de la bougie. Si vous disposez d'un
produit alimenté par batterie, retirez la batterie.
• Toujours utiliser des gants de protection robustes
lors de la réparation de l’équipement de coupe. Il est
très tranchant et peut facilement provoquer des
coupures.
• Rangez le produit hors de portée des enfants.
• Utilisez uniquement des pièces de rechange
d'origine pour les réparations.
Montage
Pour monter la protection de la main et
la poignée en boucle - seulement pour
les produits fonctionnant à l'essence
(HA110)
AVERTISSEMENT: N'utilisez jamais HA110
avec un bloc d'alimentation à batterie.
1. Desserrez les deux boulons de fixation du manchon
d'embrayage et démontez le manchon d'embrayage.
2. Assemblez la protection de la main et la poignée en
boucle en les vissant ensemble. Vérifier
soigneusement que les trous des deux éléments
correspondent bien.
3. Enfiler la poignée en boucle et le protège-main sur le
tube de transmission.
4. Introduire l’entretoise dans la rainure de la poignée
anneau.
5. Monter l’écrou et la vis. Ne serrez pas trop fort.
820 - 002 - 13.12.2019 33
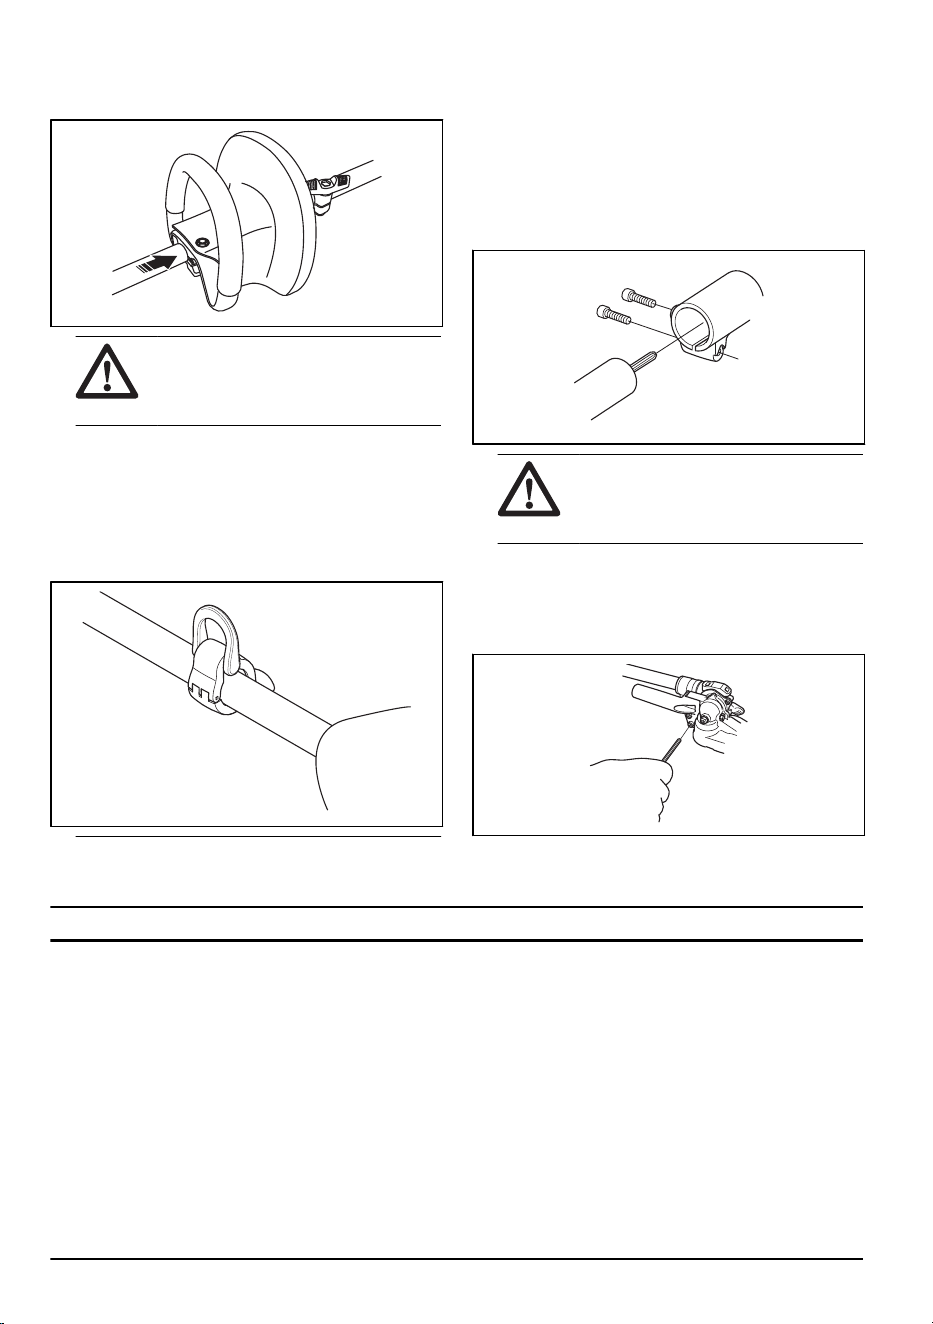
6. À présent, effectuez un réglage d'appoint pour
obtenir une position de travail confortable. Serrez la
vis.
REMARQUE: La poignée en boucle et la
protection de la main ne doivent pas être
montés à l'arrière du repère fléché situé
sur l'arbre.
7. Montez le manchon d'embrayage et serrez les deux
boulons de fixation.
Pour installer l'œillet de suspension, le
cas échéant
1. Installez l'œillet de suspension entre les flèches sur
la poignée arrière et la poignée en anneau.
Remarque: ne placez pas la poignée en anneau sur
l'autocollant.
2. Réglez l'œillet pour équilibrer le produit et faciliter
son utilisation.
Montage de la tête de coupe
Lors du montage de l’unité de coupe, il est important
que le taille-haie soit posé sur une surface plane.
Autrement, l’unité de coupe risque d’être montée de
travers.
1. Monter l’unité de coupe sur le tube de transmission.
REMARQUE: Veiller à ce que l’arbre
d’entraînement sur le tube de
transmission se place correctement dans
la rainure de l’unité de coupe.
2. Serrer la vis inférieure en premier, puis ensuite la vis
supérieure.
Pour monter la poignée (HA850)
1. Posez la poignée avec les 2 vis.
Utilisation
Pour contrôler avant le démarrage
1. Examinez la zone de travail. Retirer tout objet
susceptible d’être projeté.
2. Examinez l'accessoire de coupe. N'utilisez pas des
lames endommagées.
3. Vérifiez que le produit est en parfait état d'utilisation.
Vérifiez que tous les écrous et toutes les vis sont
correctement serrés.
4. Contrôler que l’engrenage est correctement lubrifié.
Consultez la section
Pour lubrifier le carter
d'engrenage à la page 36
pour plus d'instructions.
5. Vérifiez que l'accessoire de coupe s'arrête dès que
la gâchette d'accélération/de puissance est relâchée.
6. Utilisez le produit uniquement pour les travaux
auxquels il est destiné.
7. Contrôler que la poignée et les dispositifs de sécurité
sont en bon état. N'utilisez jamais un produit dont
une pièce est manquante ou ayant été modifié
contrairement aux spécifications.
34 820 - 002 - 13.12.2019
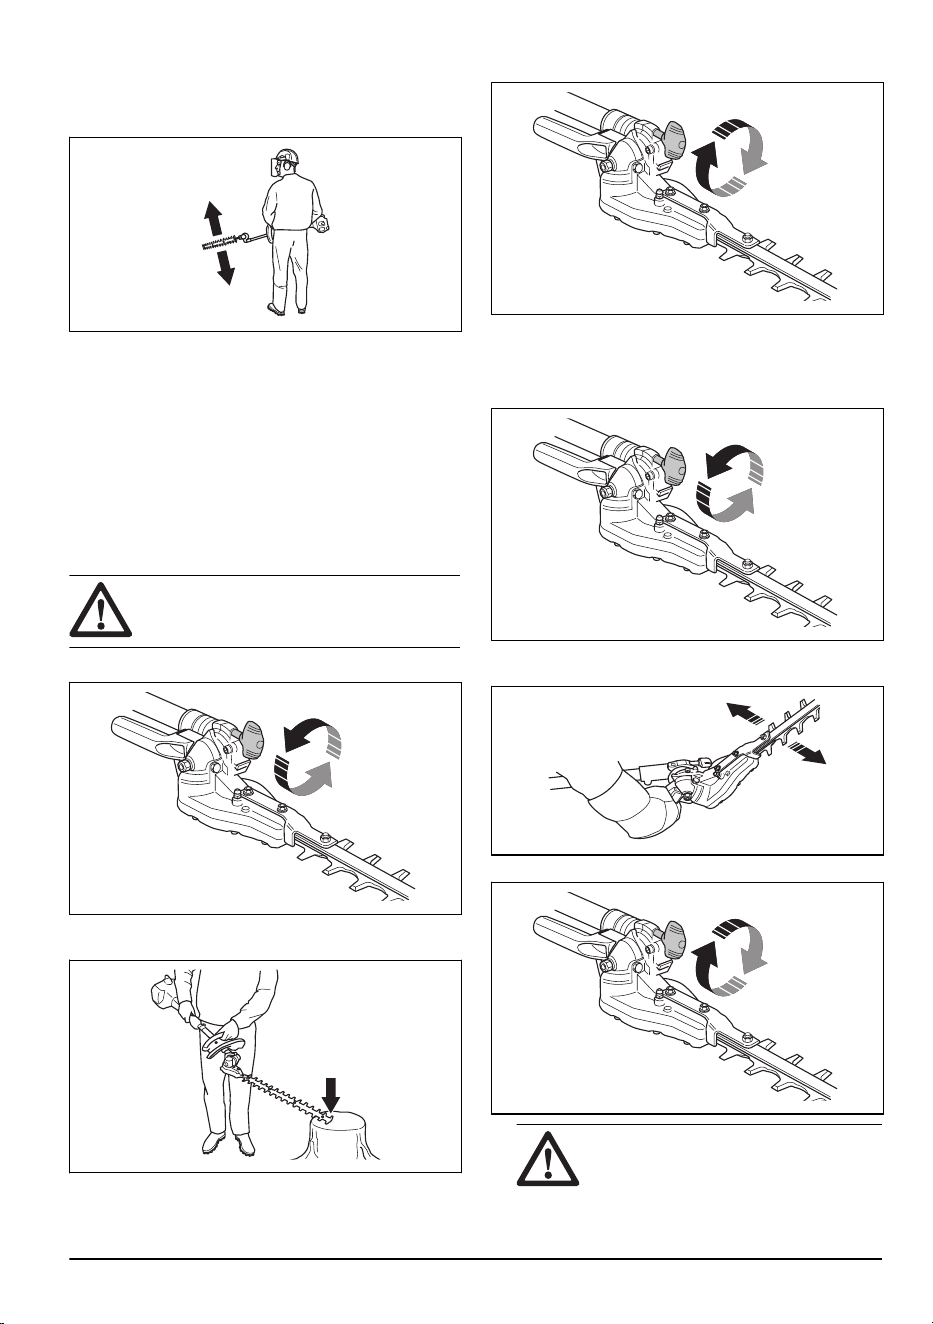
Pour utiliser le produit
1. Travailler en effectuant des mouvements de
balancier de bas en haut lors de la taille des côtés.
2. Réglez l'accélération/la vitesse en fonction de la
charge.
3. Lorsque vous utilisez un produit fonctionnant à
l'essence pour couper une haie, assurez-vous que le
moteur est maintenu à distance de la haie.
4. Ne jamais forcer, mais adopter un rythme de travail
régulier, de sorte que toutes les branches puissent
être coupées uniformément.
Pour modifier l'angle du taille-haie
(HA110)
AVERTISSEMENT: N'utilisez jamais HA110
avec un bloc d'alimentation alimenté par
batterie.
1. Desserrer la manette
2. Appuyer l’unité de coupe contre la haie ou tout autre
base stable jusqu’à obtention de l’angle souhaité.
3. Serrer la manette.
Pour modifier l'angle du taille-haie
(HA850)
1. Desserrer la manette.
2. Régler l’angle à l’aide de la poignée sur l’unité de
coupe.
3. Serrer la manette.
AVERTISSEMENT: Ne pas toucher
l’unité de coupe lors du réglage de
l’angle. Les couteaux sont très
820 - 002 - 13.12.2019 35
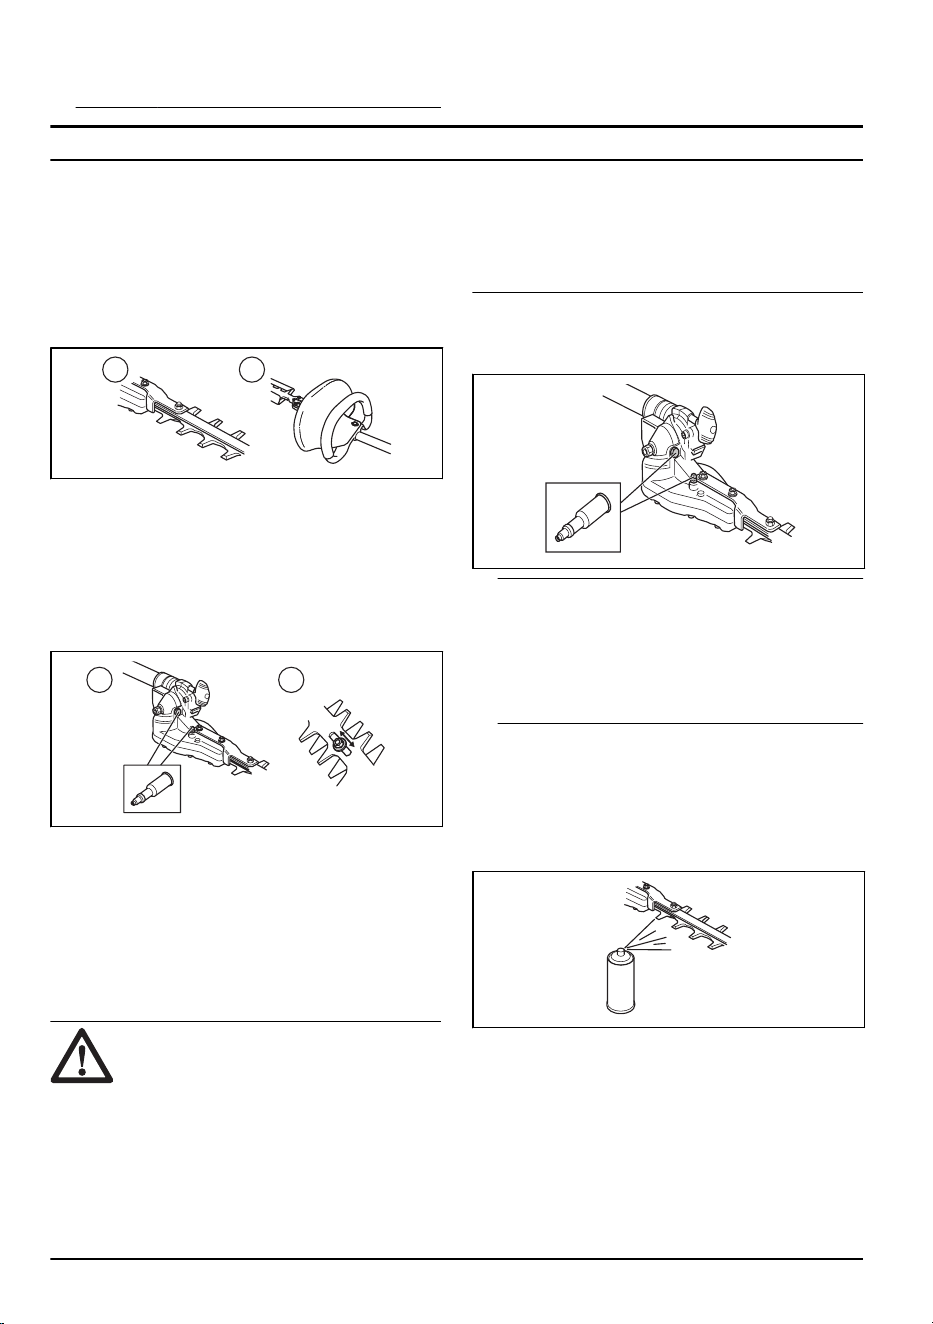
tranchants et peuvent facilement causer
des coupures.
Entretien
Introduction
Nous donnons ici quelques conseils d’entretien à
caractère général. Pour plus d’informations, contacter
l’atelier de réparation.
Entretien de l'accessoire
Pour procéder à l'entretien quotidien
A B
1. Vérifiez que les lames (A) ne bougent pas lorsque la
gâchette d'accélération/de puissance est relâchée
ou lorsque le starter est en position de démarrage.
2. Vérifiez que la protection anti-rebond (B) (HA110)
n'est pas endommagée. Remplacez la protection si
nécessaire.
Entretien hebdomadaire
A B
1. Remplissez le carter d'engrenage (A) de graisse. Sur
des produits neufs, le premier remplissage de
graisse doit être effectué après environ 20 heures
d'utilisation puis environ toutes les 60 heures
d'utilisation.
2. Vérifiez que les vis qui maintiennent les lames
ensemble (B) sont correctement serrées.
Pour lubrifier le carter d'engrenage
REMARQUE: L’engrenage ne doit pas être
entièrement rempli de lubrifiant. Le lubrifiant
se dilate sous l'effet de la chaleur qui se
dégage lors du fonctionnement du produit.
Si le carter d'engrenage est entièrement
rempli de lubrifiant, les joints d'étanchéité
risquent d'être endommagés, entraînant des
fuites de lubrifiant.
Le carter d’engrenage comporte un graisseur et un
bouchon pour le remplissage du lubrifiant.
1. Utiliser une seringue pour remplir de graisse.
Remarque: Sur des produits neufs, le premier
remplissage de graisse doit être effectué après
environ 20 heures d'utilisation puis environ toutes les
60 heures d'utilisation. Utilisez de la graisse spéciale
Husqvarna AB n° 503 98 96-01. En général, il n'est
pas nécessaire de remplacer le lubrifiant du carter,
sauf en cas de réparations.
Pour nettoyer et lubrifier la lame
1. Avant et après utilisation, nettoyez les lames à l'aide
d'un agent de nettoyage pour éliminer toute trace de
résine et de sève.
2. Avant une période de remisage prolongée, lubrifiez
les lames à l'aide d'un lubrifiant en aérosol.
36
820 - 002 - 13.12.2019

Caractéristiques techniques
Caractéristiques techniques des produits fonctionnant à l'essence
HA110 HA850
Poids
Poids, kg 2,0 2,4
Lames
Longueur de lame, mm 550/21,7 550/21,7
Vitesse, lame, tr/min 4184 4184
Émissions sonores
Niveau de puissance sonore, mesuré dB(A) 111 110
Niveau de puissance acoustique, garanti L
WA
dB(A) 114 113
Niveaux sonores
11
Niveau de pression sonore équivalent au niveau de l'oreille de l'utili-
sateur, mesuré selon EN15503, dB(A)
Équipée d'un accessoire homologué (d'origine) 99 98
Niveaux de vibrations
12
Niveaux de vibrations équivalents (a
hv,eq
) mesurés au niveau des
poignées selon EN ISO 22867, en m/s
2
Équipée d'un accessoire homologué (d'origine), gauche/droite 5,6/7,6 5,7/7,5
Caractéristiques techniques du produit alimenté par batterie
325iLK + Accessoire pour taille-haie HA850
Poids
Poids, kg (batterie Bli200 incluse) 3,7+2,5
Lames
Longueur de lame, mm 550
Vitesse, lame, tr/min 3 000
11
Les données reportées pour le niveau de pression sonore équivalent pour la machine montrent une disper-
sion statistique typique (déviation standard) de 1 dB(A).
12
Les données reportées pour le niveau de vibrations équivalent montrent une dispersion statistique type (dévi-
ation standard) de 1 m/s
2
.
820 - 002 - 13.12.2019 37

325iLK + Accessoire pour taille-haie HA850
Émissions sonores
13
Niveau de puissance sonore mesuré dB(A) 95
Niveau de puissance acoustique, garanti L
WA
dB(A) 96
Niveaux sonores
14
Niveau de pression sonore au niveau des oreilles de l'utilisateur, mesurée selon la
norme ISO 26868, en dB(A)
Équipée d'un accessoire homologué (d'origine) 89
Niveaux de vibrations
15
Niveau de vibration au niveau des poignées mesuré selon la norme EN 62841-1 en
m/s
2
Équipée d'un accessoire homologué (d'origine), gauche/droite 2,9/2,2
13
Émissions sonores dans l'environnement mesurées comme puissance acoustique (LWA) selon la direc-
tive CE 2000/14/CE. Le niveau de puissance sonore reporté pour la machine a été mesuré avec l'accessoire
de coupe d'origine qui donne le niveau le plus élevé. Le niveau de puissance sonore garanti diffère du niveau
mesuré en cela qu'il prend également en compte la dispersion et les variations d'une machine à l'autre du
même modèle, conformément à la directive 2000/14/CE.
14
Le niveau de pression sonore pour la machine a été mesuré avec l'accessoire d'origine qui donne le niveau le
plus élevé et les données reportées montrent une dispersion statistique typique (déviation standard) de 3 dB
(A).
15
Les données reportées pour le niveau de vibrations montrent une dispersion statistique typique (déviation
standard) de 2 m/s
2
. Pour comparer les niveaux de vibrations, la batterie et les produits de combustion uti-
lisent le calculateur de vibrations. https://www.husqvarna.com/fr/services-solutions/calculateur-de-vibrations/.
38 820 - 002 - 13.12.2019

Déclaration de conformité CE
Déclaration de conformité CE - pour les
produits fonctionnant à l'essence
Nous, Husqvarna AB, SE-561 82 Huskvarna, Suède,
tél. : +46-36-146500, déclarons que les accessoires
pour taille-haie Husqvarna AB HA110 (VALABLE
UNIQUEMENT pour les produits fonctionnant à
l'essence) et HA850 portant les numéros de série à
partir du 2019 et suivants (l'année est indiquée
clairement sur la plaque signalétique et suivie d'un
numéro de série) sont conformes aux dispositions de la
DIRECTIVE DU CONSEIL :
• du 17 mai 2006 « relative aux machines »
2006/42/CE
• du 26 février 2014 « relative à la compatibilité
électromagnétique » 2014/30/UE.
• du 8 juin 2011 relative à la « limitation de l'utilisation
de certaines substances dangereuses dans les
équipements électriques et électroniques »
2011/65/CE
• du 8 mai 2000 « émissions sonores dans
l'environnement » 2000/14/CE.
Les normes harmonisées suivantes ont été appliquées :
EN ISO 12100:2010, ISO 10517:2009
0404, RISE SMP Svensk Maskinprovning AB, a procédé
à des tests de type CE conformément à l'article 12,
point 3b de la directive machines (2006/42/CE). Le
certificat d'examen de type CE selon l'annexe IV a le
numéro : SEC/14/2416
Huskvarna 2019-06-24
Per Gustafsson, Directeur du développement
(Représentant autorisé d'Husqvarna AB et responsable
de la documentation technique)
Déclaration de conformité CE - pour les
produits alimentés sur batterie
Nous, Husqvarna AB, SE-561 82 Huskvarna, Suède,
tél. : +46‐36‐146500, déclarons que l'accessoire pour
taille-haie Husqvarna HA850 avec bloc d'alimentation
Husqvarna 325iLK portant les numéros de série à partir
du 2019 et suivants (l'année est clairement indiquée sur
la plaque signalétique et suivie d'un numéro de série)
est conforme aux dispositions de la DIRECTIVE DU
CONSEIL :
• du 17 mai 2006 « relative aux machines »
2006/42/CE
• du 26 février 2014 « relative à la compatibilité
électromagnétique » 2014/30/UE.
• du 8 juin 2011 relative à la « limitation de l'utilisation
de certaines substances dangereuses dans les
équipements électriques et électroniques »
2011/65/CE
• du 8 mai 2000 « émissions sonores dans
l'environnement » 2000/14/CE.
Les normes harmonisées suivantes ont été appliquées :
IEC 62841-4-2, EN 50581:2012
RISE SMP Svensk maskinprovning AB, Box 7035,
SE-750 07 Uppsala, Sweden a effectué un examen de
type volontaire au nom de Husqvarna AB. Le certificat
porte le numéro : SEC/14/2416
RISE SMP Svenska Maskinprovning AB a également
vérifié la conformité à l'annexe V de la directive du
conseil 2000/14/CE. Le certificat porte le numéro :
01/094/028
Pour toute information relative aux émissions sonores,
veuillez consulter la section
#
.
Huskvarna 2019-06-24
Per Gustafsson, Directeur du développement
(Représentant autorisé d'Husqvarna AB et responsable
de la documentation technique)
820 - 002 - 13.12.2019
39

Original instructions
Originalanweisungen
Instructions d’origine
1141197-20
2020-01-09

