www.auna-multimedia.com
Glastonbury DAB
CD-Player mit DAB+/FM-Radio
CD Player with DAB+/FM-Radio
Lecteur CD avec radio DAB+/FM
Lettore CD con radio DAB+/FM
Reproductor de CD con radio DAB+/FM
10041146 10041147

3
DE
ES
Escanee el código QR para descargar el manual de instrucciones
más reciente en su idioma.
FR
Scannez le QR code pour télécharger le mode d‘emploi à jour dans
votre langue.
IT
Scansionate il codice QR per scaricare il manuale d‘uso attuale nella
vostra lingua.
INHALT
Technische Daten 4
Sicherheitshinweise 5
Geräteübersicht 7
BT Mode 9
AUX IN Modus 9
USB-Betrieb 9
CD-Player 10
UKW-Radio 11
DAB-Radio 11
Einstellungen 13
Fehlerbehebung 17
Spezielle Entsorgungshinweise für Verbraucher in Deutschland 18
Hinweise zur Entsorgung 20
Konformitätserklärung 20
Sehr geehrter Kunde,
wir gratulieren Ihnen zum Erwerb Ihres Gerä-
tes. Lesen Sie die folgenden Hinweise sorgfäl-
tig durch und befolgen Sie diese, um möglichen
Schäden vorzubeugen. Für Schäden, die durch
Missachtung der Hinweise und unsachgemäßen
Gebrauch entstehen, übernehmen wir keine Haf-
tung. Scannen Sie den folgenden QR-Code, um
Zugri auf die aktuellste Bedienungsanleitung
und weitere Informationen rund um das Produkt
zu erhalten.
4
DE
TECHNISCHE DATEN
Artikelnummer 10041146, 10041147
Stromversorgung
Netzadapter Eingang
Netzadapter Eingang
100-240 V ~ 50/60 Hz
12 V ⎓ 2 A
CD-Player
Unterstützte Disk-Formate CD/MP3/WMA
UKW-Radio
Frequenzen 87,5–108MHz
DAB-Radio
Frequenzen 174,928–239,200MHz
BT
BT Frequenzbereich 2402 GHz - 2480 MHz
BT-Sendeleistung 2dBm

5
DE
SICHERHEITSHINWEISE
Allgemeine Sicherheitshinweise
VORSICHT
Verletzungsgefahr! Hören Sie nicht mit übermäßig hoher
Lautstärke Musik, da dies zu Hörschäden führen kann.
• Kinder ab 8 Jahren, psychisch, sensorisch und körperlich eingeschränkte
Menschen dürfen das Gerät nur benutzen, wenn sie vorher von einer
für sie verantwortlichen Aufsichtsperson ausführlich mit den Funktionen
und den Sicherheitsvorkehrungen vertraut gemacht wurden und die
damit verbundenen Risiken verstehen.
• Önen Sie niemals die Geräteabdeckung und versuchen Sie keinesfalls,
selbst Reparaturen am Gerät vorzunehmen.
• Wenden Sie sich für Reparaturen an hierfür qualiziertes Personal. Das
Gerät enthält keine vom Nutzer zu wartenden Gerätebestandteile.
• Eine unsachgemäße Handhabung kann zu Schäden am Gerät und zum
Erlöschen des Garantieanspruchs führen.
Stromversorgung
• Verwenden Sie ausschließlich das im Lieferumfang enthaltene Netzteil.
Die Verwendung eines anderen Netzteils kann zum Erlöschen der
Garantie und/oder irreparablen Schäden am Gerät führen.
• Ziehen Sie während Gewittern den Stecker des Geräts aus der
Steckdose.
• Stellen Sie sicher, dass das Gerät ausgeschaltet wurde, bevor Sie den
Netzstecker ziehen.
• Wenn Sie eine Mehrfachsteckdose oder den Stecker als
Trennvorrichtung verwenden, sollten Sie darauf achten, dass diese
immer leicht zugänglich und betriebsbereit sind.
• Werfen Sie Batterien niemals in oenes Feuer und versuchen Sie
keinesfalls, deren Außenhülle zu önen.
• Batterien sind, wenn sie verschluckt werden, gesundheitsgefährdend
und sollten deshalb außerhalb der Reichweite von kleinen Kindern
gelagert werden.
Luftzufuhr
• Blockieren oder bedecken Sie keinesfalls die Belüftungsönungen,
Löcher oder Önungen des Geräts, mit Gegenständen wie Teppichen,
Tüchern und ähnlichem, da andernfalls die Funktionalität und/oder die
Belüftung für eine sicherer Verwendung nicht gewährleistet werden
können.
6
DE
• Die Unterseite des Geräts kann warm werden, wenn das Gerät über
einen längeren Zeitraum verwendet wird. Dies ist normal.
Standort
• Vergewissern Sie sich, dass das Gerät auf einer achen und stabilen
Oberäche steht.
• Stellen Sie das Gerät maximal 1,4 Meter von der nächsten Steckdose
entfernt auf. Vergewissern Sie sich, dass das Netzstromkabel und die
Lautsprecherkabel nicht zu einer Stolperfalle werden können.
• Platzieren Sie das Gerät mindestens einen Meter von anderen
elektrischen Geräten entfernt, um Störgeräusche zu vermeiden.
• Achten Sie darauf, dass das Gerät genug Platz nach oben hat, so dass
die Antenne richtig ausgerichtet werden kann.
• Stellen Sie das Gerät niemals direkt auf antike oder polierte
Oberächen.
WARNUNG
Todesgefahr! Verätzungsgefahr
Verschlucken Sie keine Batterien. Die mit diesem
Produkt gelieferte Fernbedienung enthält eine
Knopfzelle. Wenn die Knopfzellenbatterie verschluckt
wird, kann sie innerhalb von nur 2 Stunden schwere
innere Verbrennungen verursachen und zum Tod führen.
Wenn Sie glauben, dass Batterien verschluckt wurden
oder in einen Körperteil eingedrungen sein könnten,
suchen Sie sofort einen Arzt auf.
Hinweise zum Laser
VORSICHT
Verletzungsgefahr! Berühren Sie niemals die optische Linse
im CD-Fach und schauen sie auch nicht in diese hinein.
• Bei diesem Gerät handelt es sich um ein Laserprodukt der Klasse 1.
• Die Verwendung von nicht in der Bedienungsanleitung aufgeführten
Steuerungen oder eine nicht autorisierte Modikation des Geräts,
kann zu einer schädlichen Freisetzung von Laserstrahlung führen.

7
DE
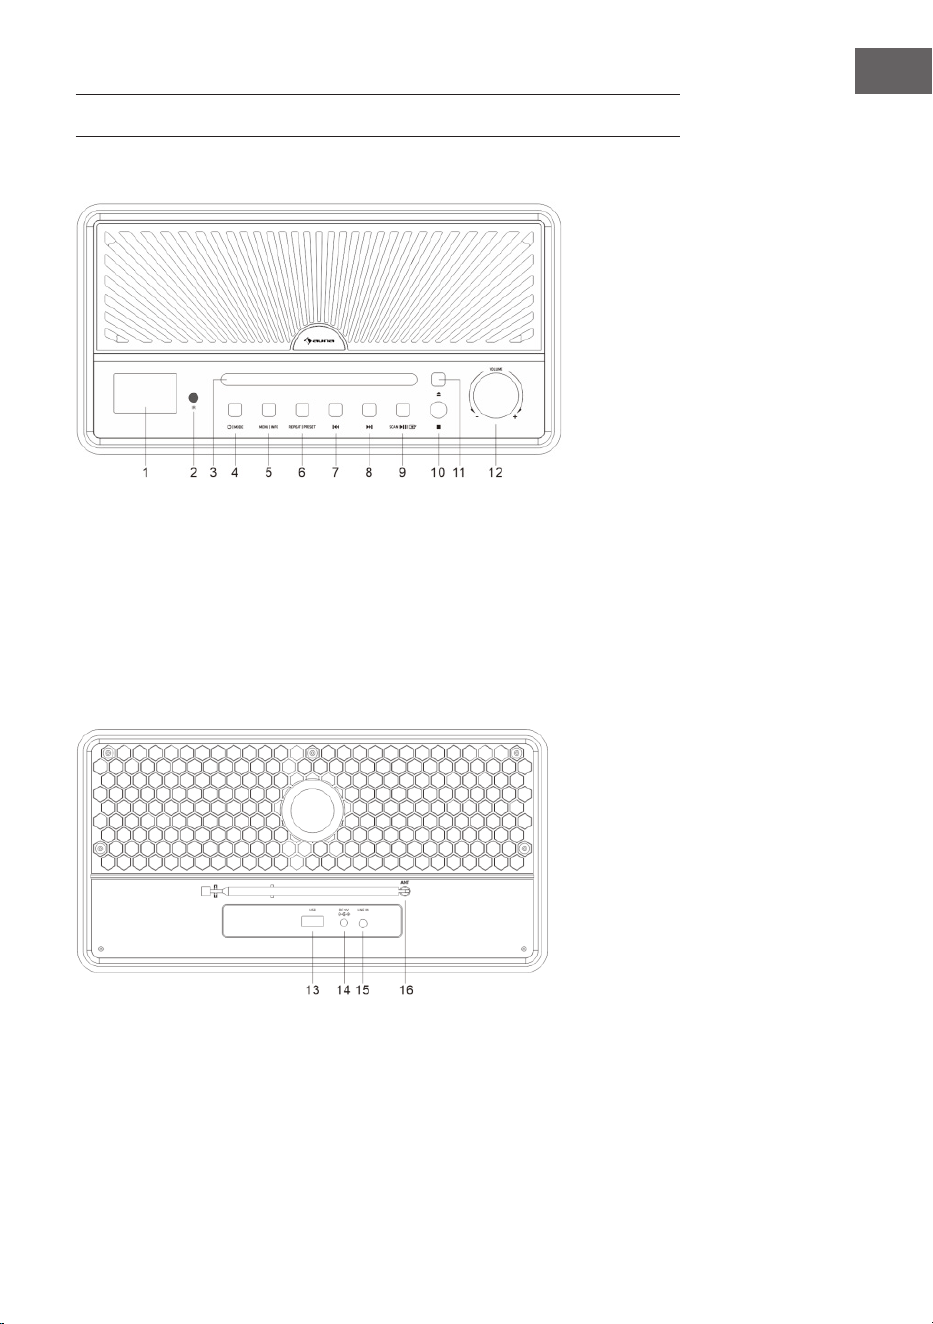
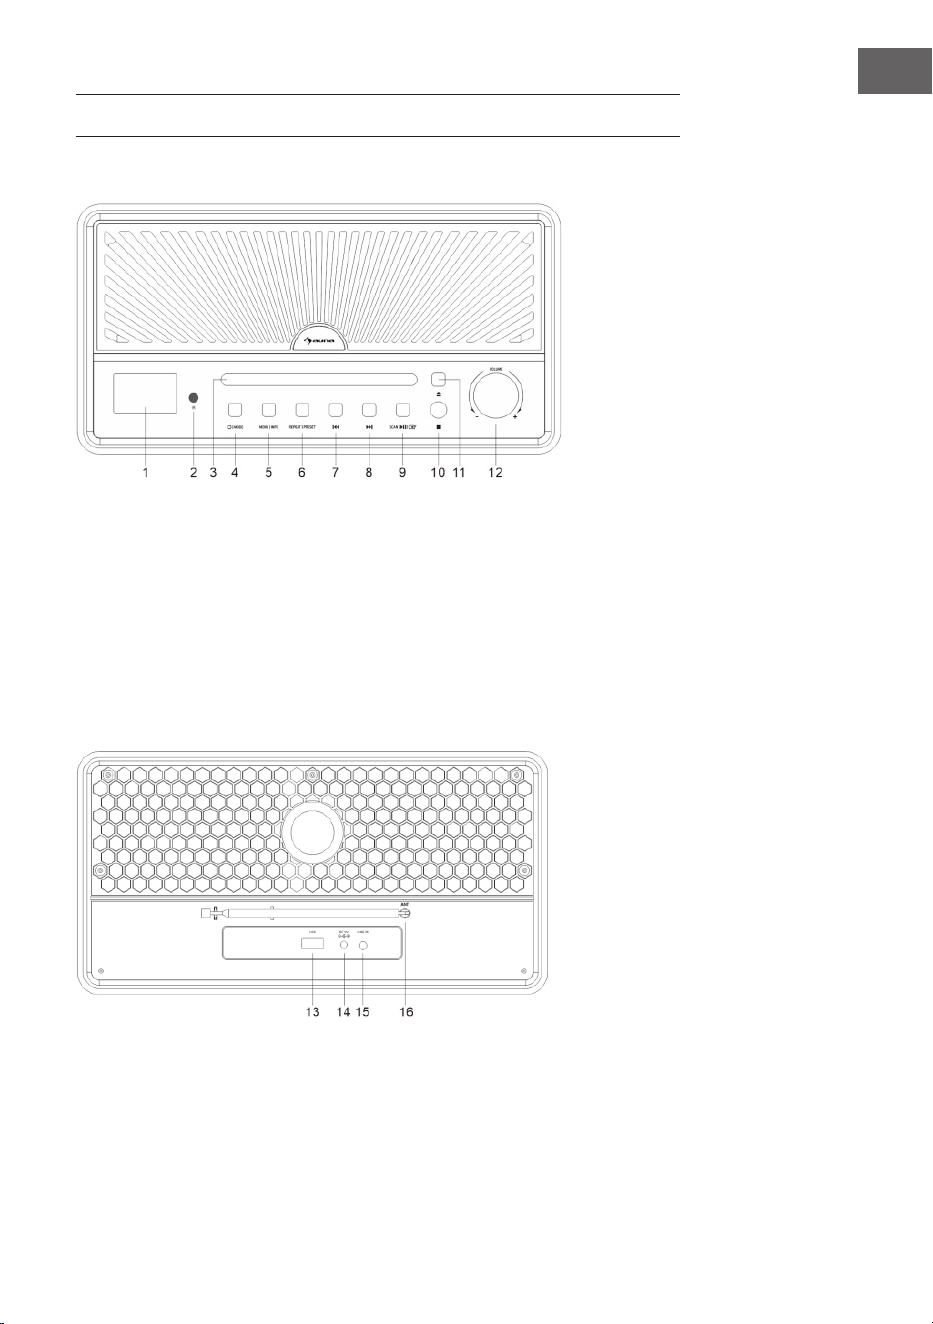
GERÄTEÜBERSICHT
Frontansicht
1 Anzeige
2 IR-Sensor für die Fernbedienung
3 CD-Lade
4 Ein/Aus-Schalter
Modus
5 Menü/Info-Taste
6 Wiederholen/Senderspeicher
7 Titel/Radiosender zurück
8 Titel/Radiosender vor
9 Sendersuche /
Wiedergabe oder Pause /
Eingabebestätigung
10 Stopp
11 CD auswerfen
12 Lautstärkeregler
Rückansicht
13 USB-Anschluss
14 Stromversorgung (Netzteil)
15 Audioeingang
16 Antenne

8
DE
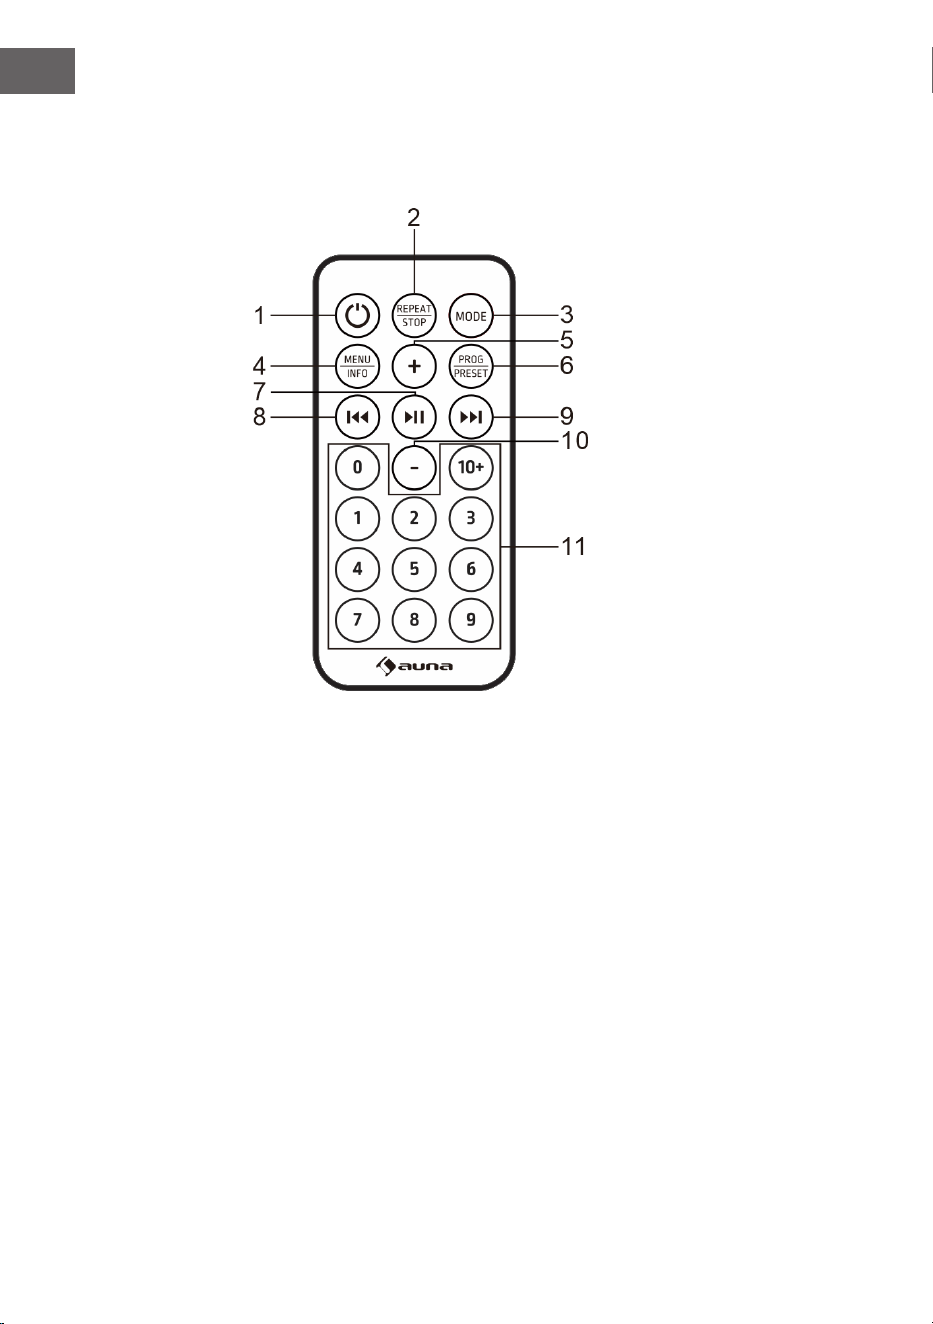
Fernbedienung
Tasten
1 Ein/Aus
2 Wiederholung/Stopp
3 Modus
4 Menü/Info
5 Lautstärke erhöhen
6 Programm / Senderspeicher
7 Wiedergabe und Pause / Eingabebestätigung / Sendersuche
8 Titel/Radiosender zurück
9 Titel/Radiosender vor
10 Lautstärke verringern
11 Zahltentasten

9
DE
Erste Schritte
1. Drücken und halten Sie die POWER-Taste, um das Gerät einzuschalten.
Das Gerät wechselt in den Standby-Modus. Auf dem Display wird
„00:00“ angezeigt und blinkt. Das Datum und die Uhrzeit werden
automatisch eingestellt, sobald das Gerät lokale Rundfunksignale
empfängt (und wenn solche Informationen verfügbar sind).
2. Drücken Sie erneut auf die POWER-Taste, um das Menü aufzurufen.
(Hinweis: Durch Drücken der POWER-Taste wechseln Sie zwischen
dem eingeschaltetem Modus und Standby (Anzeige von Uhrzeit und
Datum).
BT-WIEDERGABE
Wenn Sie Ihr BT-Gerät zum ersten Mal mit diesem Lautsprecher verwenden,
müssen Sie es zunächst mit dem Lautsprecher verbinden oder "koppeln".
1. Drücken Sie die MODE-Taste, um den BT-Modus auszuwählen. Auf dem
Display wird "Pairing" angezeigt, was bedeutet, dass das System den
Pairing-Modus aktiviert hat und von Ihrem BT-fähigen Gerät gesucht
werden kann.
2. Aktivieren Sie Ihr BT-fähiges Gerät und wählen Sie den Suchmodus.
"Glastonbury Go" erscheint in der Liste Ihrer BT-Geräte. Wählen Sie
"Glastonbury Go" in der Pairing-Liste aus.
3. Nach dem erfolgreichen Pairing ertönt ein Signalton. Auf dem Display
wird "Verbunden" angezeigt. Wenn das zu koppelnde Gerät nicht
verbunden ist, gibt das Gerät ebenfalls einen Signalton aus.
AUX IN MODUS
Drücken Sie die Taste MODE, um den AUX-Modus auszuwählen. Verwenden
Sie ein 3,5-mm-Audiokabel (nicht im Lieferumfang enthalten), um den
Player mit anderen Audioausgangsgeräten zu verbinden (z. B.: Mobiltelefon
usw.).
USB-BETRIEB
Drücken Sie die MODE-Taste, um den USB-Modus auszuwählen. Stecken
Sie den USB-Flash-Treiber mit MP3-Dokumenten ein, das Gerät spielt die
MP3-Dateien automatisch ab.

10
DE
CD-PLAYER
1. Drücken Sie die Mode-Taste, um den CD-Modus aufzurufen. Wenn sich
keine Disc im Fach bendet, wird „NO DISC“ angezeigt.
2. Drücken Sie die OPEN/CLOSE-Taste am Gerät, um die CD-Klappe zu
önen.
3. Legen Sie eine CD mit dem Etikett nach oben in das CD-Fach ein und
drücken Sie die Taste, um die CD-Klappe zu schließen.
4. Verwenden Sie die Bedienelemente am Gerät oder auf der
Fernbedienung, um die Wiedergabe der eingelegten CD zu starten.
Wiedergabe anhalten
• Drücken Sie im CD-Modus die Taste STOP am Gerät oder halten Sie
die Taste REPEAT/STOP auf der Fernbedienung gedrückt, um die
Wiedergabe anzuhalten. Drücken Sie diese Taste, um mit dem ersten
Titel zu beginnen und die Titel der Reihe nach abzuspielen.
Wiederholungsfunktion
• Wenn Sie im CD/USB-Modus bei der Musikwiedergabe zum ersten Mal
REPEAT drücken, wird die aktuelle Wiedergabe wiederholt. Wenn Sie
zweimal auf REPEAT drücken, wird die gesamte CD wiederholt. Drücken
Sie dreimal auf REPEAT, um die Wiederholungsfunktion abzubrechen.
Programfunktion
Programmieren von Titeln auf der CD ist nur bei angehaltener Wiedergabe
möglich.
1. Drücken Sie die STOP-Taste am Gerät oder halten Sie sie gedrückt und
drücken Sie REPEAT/STOP auf der Fernbedienung, um in den Stopp-
Zustand zu gelangen.
2. Drücken Sie die Taste PRESET, um das Programmmenü aufzurufen. Auf
dem Display wird "PG" angezeigt.
3. Drücken Sie die Taste PREV/NEXT oder die Zierntaste, um den
gewünschten Titel auszuwählen, der programmiert werden soll.
Drücken Sie die PRESET-Taste zur Bestätigung. Auf dem Display wird
"P01" angezeigt.
4. Wiederholen Sie den obigen Schritt, um weitere gewünschte Titel zu
speichern, bis alle Titel programmiert sind.
5. Drücken Sie die Taste , um die Wiedergabe ab dem
ersten programmierten Titel zu starten.
(Hinweis: Halten Sie die STOP-Taste zweimal gedrückt, um das Programm
zu löschen, wenn die CD angehalten wurde).
11
DE
UKW-RADIO
1. Diese Radioantenne bendet sich auf der Rückseite des Geräts. Wenn
Sie Radio hören möchten, ziehen Sie die Antenne aus.
2. Drücken Sie die MODE-Taste, um den UKW-Modus auszuwählen.
3. Sendersuche
• Halten Sie die Taste um automatisch einen Sender zu
suchen. Das Gerät speichert die Radiosender automatisch, nachdem die
Suche abgeschlossen ist. Drücken Sie die Taste ⏮ oder ⏭ , um einen
Sender auszuwählen.
• Drücken Sie , um manuell nach Sendern zu suchen.
• Halten Sie die Tasten ⏮ oder ⏭ gedrückt, um das Frequenzband
nach oben oder unten abzustimmen.
Audio-Einrichtung
Dieses Gerät kann im UKW-Modus zwischen Mono und Stereo wechseln.
1. Halten Sie im UKW-Modus die Taste MENU|INFO gedrückt, um das
Menü aufzurufen. "Audo setting" erscheint auf der Anzeige. Drücken Sie
die Taste zur Bestätigung.
2. Drücken Sie die ⏮ oder ⏭-Taste, um die verfügbaren Optionen
auszuwählen: 'Stereo allowed' (STEREO zugelassen), Forced mono'
(MONO erzwungen). Drücken Sie die Taste zur
Bestätigung.
DAB-RADIO
1. Die Radioantenne bendet sich auf der Rückseite des Geräts. Wenn Sie
Radio hören möchten, ziehen Sie die Antenne aus.
2. Drücken Sie die MODE-Taste, um den DAB-Modus auszuwählen.
3. Drücken Sie um einen Sender automatisch zu suchen.
Das Gerät speichert die Radiosender automatisch, nachdem die Suche
abgeschlossen ist.
4. Drücken Sie die ⏮ oder ⏭-Taste, um den Sender in der Senderliste
auszuwählen. Drücken Sie dann zur Bestätigung die Taste ⏯.
Senderspeicher bereinigen
Mit dieser Funktion werden alle Sender aus der DAB-Senderliste entfernt,
die in Ihrem Gebiet nicht empfangen werden können.
12
DE
1. Halten Sie im DAB-Modus die Taste MENU|INFO gedrückt, um ins
Menü zu gelangen. Drücken Sie die ⏮ oder ⏭-Taste, bis 'System'
erscheint. Drücken Sie zum Bestätigen .
2. Wählen Sie mit den ⏮ und ⏭-Tasten “Prune” aus und drücken zum
Bestätigen .
3. Drücken Sie die ⏮ oder ⏭-Taste und wählen Sie 'Yes, um ungültige
Sender aus der Senderliste zu entfernen. Drücken Sie die Taste
zur Bestätigung.
DRC (Steuerung des Dynamikbereichs)
Mit DRC wird eine gewisse Angleichung der Unterschiede in der Lautstärke
zwischen den Radiosendern eingeschaltet oder ausgeschaltet.
1. Halten Sie im DAB-Modus die MENU|INFO-Taste gedrückt. Drücken
Sie die ⏮ oder ⏭-Taste, bis 'System' erscheint. Dann zur Bestätigung
drücken.
2. Wählen Sie mit den ⏮ und ⏭-Tasten 'DRC' aus und drücken Sie zur
Bestätigung .
3. Drücken Sie die ⏮ oder ⏭-Taste, um die verfügbaren Optionen
auszuwählen: o, high, low. drücken Sie zur Bestätigung .
• o: keine Angleichung angewendet
• high: maximale Angleichung angewendet
• Low: maximale Angleichung angewendet
Senderreihenfolge
1. Halten Sie im DAB-Modus die Taste MENU|INFO gedrückt, um das
Menü aufzurufen. Drücken Sie die ⏮ oder ⏭-Taste bis 'System'
erscheint und drücken Sie zum Aufrufen die Taste .
2. Wählen Sie mit den ⏮ und ⏭-Tasten 'Station Order' auf.
(Senderreihenfolge) und drücken Sie zur Bestätigung .
3. Drücken Sie die ⏮ oder ⏭-Taste, um die verfügbaren Optionen
auszuwählen: Alphanumerisch, Aktiv, Multiplex. Drücken Sie zur
Bestätigung die Taste .
Speichern des voreingestellten Senders
Das Gerät kann bis zu 20 Sender als voreingestellte Sender speichern.
1. Stellen Sie im DAB/UKW-Modus einen Sender ein.
2. Halten Sie die Taste MENU|INFO gedrückt. Drücken Sie die ⏮ oder
⏭-Taste, bis "Preset" auf dem Display angezeigt wird. Drücken Sie
dann um das Menü aufzurufen.
3. Drücken Sie die ⏮ oder ⏭-Taste, um eine voreingestellte Nummer
13
DE
auszuwählen.
4. Halten Sie die Taste gedrückt, um den Sender zu
speichern.
5. So hören Sie einen gespeicherten Sender: Halten Sie die Taste PRESET
gedrückt, um die Liste der voreingestellten Sender aufzurufen. Drücken
Sie die ⏮ oder ⏭-Taste, um den gewünschten gespeicherten Sender
auszuwählen. Um den Sender zu hören, drücken Sie zur Bestätigung
die Taste .
EINSTELLUNGEN
Uhrzeit einstellen
1. Halten Sie die Taste MENU|INFO gedrückt, um das Menü aufzurufen.
Drücken Sie die ⏮ oder ⏭-Taste, bis 'System' auf dem Display
erscheint. Drücken Sie dann zum Aufrufen .
2. Drücken Sie die ⏮ oder ⏭-Taste auf die Position 'Time Setup' und
drücken Sie zur Bestätigung.
3. Drücken Sie die ⏮ oder ⏭-Taste, um durch die folgenden
Einstellungen zu blättern.
• Uhr einstellen: Drücken Sie , um "Set clock" (Uhr stellen)
aufzurufen. Drücken Sie die ⏮ oder ⏭-Taste, um die Zahlen bis zur
gewünschten Position zu durchlaufen und drücken Sie
zur Bestätigung.
• Datum einstellen: Drücken Sie , um “Set date” (Datum
einstellen) aufzurufen. Drücken Sie die ⏮ oder ⏭-Taste, um die
Nummer bis zur gewünschten Position zu durchlaufen und drücken Sie
zur Bestätigung. Das Datum wird im Format TT-MM-JJJJ
angezeigt. .
• Automatische Aktualisierung (Zeitsynchronisierung mit dem Radio):
Drücken Sie , um "Auto-Update" aufzurufen. Drücken Sie
die ⏮ oder ⏭-Taste, um die verfügbaren Optionen auszuwählen: Vom
Radio / Keine Aktualisierung. Drücken Sie zur Bestätigung die Taste
.
• 12/24 Stundenformat einstellen: Drücken Sie , um
'Set 12/24 hour' aufzurufen. Drücken Sie die ⏮ oder ⏭-Taste, um
die verfügbaren Optionen zu wählen: 12-Stundenformat einstellen /
24-Stundenformat einstellen. Drücken Sie zur Bestätigung die Taste
.
Wecker stellen
1. Halten Sie MENU|INFO gedrückt, um das Menü aufzurufen. Drücken
14
DE
Sie die Taste ⏮ oder ⏭, bis "System" auf dem Display angezeigt wird.
Drücken Sie dann zum Aufrufen.
2. Drücken Sie die Taste ⏮ oder ⏭ bis zur Position "Alarm" und drücken
Sie zum Aufrufen .
3. Drücken Sie die Taste ⏮ oder ⏭, um durch die folgenden
Auswahlmöglichkeiten zu blättern.
• Ein/Aus: Drücken Sie , um den Alarm ein-/auszuschalten.
• Zeit: Drücken Sie die Taste ⏮ oder ⏭ bis zur Position "Zeit" und drücken
Sie die Taste zur Eingabe. Drücken Sie die Taste ⏮ oder ⏭, um die Zeit
einzustellen, und drücken Sie zur Bestätigung.
• Tage: Drücken Sie die Taste ⏮ oder ⏭ bis zur Position "Tage" und
drücken Sie zur Eingabe. Drücken Sie die Taste ⏮
oder ⏭, um die verfügbaren Optionen auszuwählen: Täglich, Einmal,
Wochentage, Wochenende und drücken Sie zur Bestätigung.
• Modus: Drücken Sie die Taste ⏮ oder ⏭ bis zur Position "Modus" und
drücken Sie zur Bestätigung . Drücken Sie die Taste ⏮
oder ⏭, um die Tonquelle für den Alarm auszuwählen. Quellenoptionen:
DAB, FM, Summer. Drücken Sie dann zur Bestätigung .
• Lautstärke: Drücken Sie die ⏮ oder ⏭ Taste bis zur Position "Lautstärke"
und drücken Sie zur Bestätigung . Drücken Sie die ⏮ oder
⏭ Taste, um die Lautstärke des Weckers auszuwählen und drücken Sie
zur Bestätigung .
• Zuletzt gehört: Drücken Sie die Taste ⏮ oder ⏭ bis zur Position "Zuletzt
gehört" und drücken Sie zur Bestätigung . Drücken Sie die
Taste ⏮ oder ⏭, um den gewünschten Speicherplatz als Alarmquelle
auszuwählen. Drücken Sie zur Bestätigung . (Hinweis: Die
Funktion ist verfügbar, wenn der Speicherplatz eingestellt ist.)
• Speichern: Wenn die obige Einstellung abgeschlossen ist, drücken
Sie die Taste ⏮ oder ⏭ in der Position "Speichern" und drücken Sie
auf , um die Alarmeinstellung zu speichern. Wenn die
Alarmeinstellung aktiv ist, wird das entsprechende Symbol für Alarm 1
oder Alarm 2 auf dem Display angezeigt.
Hinweis: Zur eingestellten Zeit ertönt der Alarm. Die Lautstärke wird
allmählich erhöht, bis sie die eingestellte Lautstärke erreicht. Das
entsprechende Alarmsymbol blinkt ebenfalls auf dem Display. Wenn der
Alarm ertönt, drücken Sie eine beliebige Taste (außer dem Lautstärkeregler)
auf dem Bedienfeld, um den Alarm abzuschalten.
SNOOZE-Funktion: Wenn der Alarm ertönt, drehen Sie den Lautstärkeregler
am Gerät oder die VOL-Taste auf der Fernbedienung, um die SNOOZE-
Funktion zu aktivieren und eine Schlummerzeit von 10 Minuten einzulegen.
Drücken Sie eine beliebige Taste (außer dem VOLUME-Knopf) auf dem

15
DE
Bedienfeld, um den Alarm auszuschalten.
Schlaf-Timer-Einstellung
Dieses Gerät kann nach einer bestimmten Zeit automatisch in den Standby-
Modus wechseln.
1. Halten Sie MENU|INFO gedrückt, um das Menü aufzurufen. Drücken
Sie die ⏮ oder ⏭-Taste bis "System" auf dem Display erscheint.
Drücken Sie dann zur Bestätigung .
2. Drücken Sie die ⏮ oder ⏭-Taste auf die Position "Sleep" und drücken
Sie zum Einstellen.
3. Drücken Sie die ⏮ oder ⏭-Taste, um die Zeitspanne auszuwählen: Aus,
15, 30, 45, 60, 90. Drücken Sie die Taste zur Bestätigung.
Sprache wählen
1. Halten Sie MENU|INFO gedrückt, um das Menü aufzurufen. Drücken
Sie die ⏮ oder ⏭-Taste bis "System" auf dem Display erscheint.
Drücken Sie dann zum Aufrufen .
2. Drücken Sie die ⏮ oder ⏭-Taste auf die Position “Language” (Sprache)
und drücken Sie zur Bestätigung .
3. Drücken Sie die ⏮ oder ⏭-Taste, um die gewünschte Sprache
auszuwählen. Drücken Sie zur Bestätigung .
Einstellung der Hintergrundbeleuchtung
1. Halten Sie MENU|INFO gedrückt, um das Menü aufzurufen. Drücken
Sie die ⏮ oder ⏭-Taste bis "System" auf dem Display erscheint.
Drücken Sie dann zum Bestätigen.
2. Drücken Sie die ⏮ oder ⏭-Taste auf die Position "Backlight" und
drücken Sie zur Bestätigung.
3. Drücken Sie die ⏮ oder ⏭-Taste, um durch die folgenden Optionen zu
blättern.
• Timeout: Um die Dauer der Hintergrundbeleuchtung festzulegen,
bevor sie gedimmt wird.): Drücken Sie , um "Timeout"
aufzurufen. Drücken Sie die ⏮ oder ⏭-Taste, um die Timeout-Optionen
auszuwählen: Ein (die Hintergrundbeleuchtung wird nicht gedimmt), 10
Sekunden, 20 Sekunden, 30 Sekunden, 45 Sekunden, 60 Sekunden, 90
Sekunden, 120 Sekunden, 180 Sekunden, und drücken Sie
zur Bestätigung.
• On Level: (Zum Festlegen der Helligkeitsstufe bei eingeschalteter
Hintergrundbeleuchtung) : Drücken Sie um "On level"
aufzurufen. Drücken Sie die ⏮ oder ⏭-Taste, um die Helligkeitsstufen
zu wählen: Hoch/Niedrig/Mittel und drücken Sie zur
16
DE
Bestätigung.
Zurücksetzen auf Werkseinstellungen
1. Halten Sie MENU|INFO gedrückt, um das Menü aufzurufen. Drücken
Sie die ⏮ oder ⏭-Taste, bis "System" auf dem Display erscheint.
Drücken Sie dann zum Aufrufen.
2. Drücken Sie die ⏮ oder ⏭-Taste auf die Position "Factory reset" und
drücken Sie zur Bestätigung .
3. Drücken Sie die ⏮ oder ⏭-Taste, um "Ja" auszuwählen. Drücken
Sie dann die Taste , um das Zurücksetzen auf die
Werkseinstellungen zu bestätigen.
Softwareversion Anzeige (SW Version)
1. Halten Sie MENU|INFO gedrückt, um das Menü aufzurufen. Drücken
Sie die ⏮ oder ⏭-Taste, bis "System" auf dem Display erscheint.
Drücken Sie dann zum Aufrufen .
2. Drücken Sie die ⏮ oder ⏭-Taste auf die Position "SW version" und
drücken Sie zur Bestätigung.
3. Es wird die Version der Systemsoftware angezeigt..
17
DE
FEHLERBEHEBUNG
Wenn Sie das folgende Problem haben, gehen Sie bitte nach der folgenden
Methode vor. Wenn das Problem immer noch nicht gelöst werden kann,
wenden Sie sich bitte an den Kundendienst.
Problem Lösung
Es ist kein Ton zu hören. 1. Überprüfen Sie die Verbindung des
Players mit dem Mobiltelefon oder
einem anderen Audio-Ausgabegerät.
2. Die Lautstärke ist zu niedrig
eingestellt. Stellen Sie die Lautstärke
ein.
Der CD-Spieler spielt eine CD
nicht ab.
1. Prüfen Sie, ob die CD in der richtigen
Richtung eingelegt ist.
2. Prüfen Sie, ob sich eine CD in der
Schublade bendet.
3. Die CD ist verschmutzt. Bitte reinigen
Sie die CD.
Die Fernbedienung
funktioniert nicht.
1. Entfernen Sie alle Gegenstände
zwischen Fernbedienung und Player.
2. Wenn die Batterie verbraucht ist,
ersetzen Sie sie durch eine neue
(Knopfzelle CR 2032).
3. Bei der Auslieferung ab Werk ist die
Isolierfolie in das Batteriefach eingelegt
worden. Ziehen Sie sie vor dem
Gebrauch heraus.
Die Taste funktioniert nicht. Dies kann durch die Netzspannung oder
eine andere Störung verursacht werden.
Bitte schalten Sie das Gerät aus und
nach 10 Sekunden wieder ein.

18
DE
SPEZIELLE ENTSORGUNGSHINWEISE FÜR
VERBRAUCHER IN DEUTSCHLAND
Entsorgen Sie Ihre Altgeräte fachgerecht. Dadurch wird gewährleistet,
dass die Altgeräte umweltgerecht verwertet und negative Auswirkungen
auf die Umwelt und menschliche Gesundheit vermieden werden. Bei der
Entsorgung sind folgende Regeln zu beachten:
• Jeder Verbraucher ist gesetzlich verpichtet, Elektro- und
Elektronikaltgeräte (Altgeräte) sowie Batterien und Akkus
getrennt vom Hausmüll zu entsorgen. Sie erkennen die
entsprechenden Altgeräte durch folgendes Symbol der
durchgestrichene Mülltonne (WEEE Symbol).
• Sie haben Altbatterien und Altakkumulatoren, die nicht vom Altgerät
umschlossen sind, sowie Lampen, die zerstörungsfrei aus dem
Altgerät entnommen werden können, vor der Abgabe an einer
Entsorgungsstelle vom Altgerät zerstörungsfrei zu trennen.
• Bestimmte Lampen und Leuchtmittel fallen ebenso unter das Elektro-
und Elektronikgesetz und sind dementsprechend wie Altgeräte zu
behandeln. Ausgenommen sind Glühbirnen und Halogenlampen.
Entsorgen Sie Glühbirnen und Halogenlampen bitte über den Hausmüll,
sofern Sie nicht das WEEE Symbol tragen.
• Jeder Verbraucher ist für das Löschen von personenbezogenen Daten
auf dem Elektro- bzw. Elektronikgerät selbst verantwortlich.
Rücknahmepicht der Vertreiber
Vertreiber mit einer Verkaufsäche für Elektro- und Elektronikgeräte von
mindestens 400 Quadratmetern sowie Vertreiber von Lebensmitteln
mit einer Gesamtverkauläche von mindestens 800 Quadratmetern, die
mehrmals im Kalenderjahr oder dauerhaft Elektro- und Elektronikgeräte
anbieten und auf dem Markt bereitstellen, sind verpichtet,
1. bei der Abgabe eines neuen Elektro- oder Elektronikgerätes an einen
Endnutzer ein Altgerät des Endnutzers der gleichen Geräteart, das
im Wesentlichen die gleichen Funktionen wie das neue Gerät erfüllt,
am Ort der Abgabe oder in unmittelbarer Nähe hierzu unentgeltlich
zurückzunehmen und
2. auf Verlangen des Endnutzers Altgeräte, die in keiner äußeren
Abmessung größer als 25 Zentimeter sind, im Einzelhandelsgeschäft
oder in unmittelbarer Nähe hierzu unentgeltlich zurückzunehmen;
die Rücknahme darf nicht an den Kauf eines Elektro- oder
Elektronikgerätes geknüpft werden und ist auf drei Altgeräte pro
Geräteart beschränkt.

19
DE
• Bei einem Vertrieb unter Verwendung von Fernkommunikationsmitteln
ist die unentgeltliche Abholung am Ort der Abgabe auf Elektro- und
Elektronikgeräte der Kategorien 1, 2 und 4 gemäß § 2 Abs. 1 ElektroG,
nämlich „Wärmeüberträger“, „Bildschirmgeräte“ (Oberäche von mehr
als 100 cm²) oder „Großgeräte“ (letztere mit mindestens einer äußeren
Abmessung über 50 Zentimeter) beschränkt. Für andere Elektro- und
Elektronikgeräte (Kategorien 3, 5 ,6) ist eine Rückgabemöglichkeit in
zumutbarer Entfernung zum jeweiligen Endnutzer zu gewährleisten
• Altgeräte dürfen kostenlos auf dem lokalen Wertstohof oder in
folgenden Sammelstellen in Ihrer Nähe abgegeben werden: www.take-
e-back.de
• Für Elektro- und Elektronikgeräte der Kategorien 1, 2 und 4 an bieten
wir auch die Möglichkeit einer unentgeltlichen Abholung am Ort der
Abgabe. Beim Kauf eines Neugeräts haben sie die Möglichkeit eine
Altgerätabholung über die Webseite auszuwählen.
• Batterien können überall dort kostenfrei zurückgegeben werden, wo sie
verkauft werden (z. B. Super-, Bau-, Drogeriemarkt). Auch Wertsto- und
Recyclinghöfe nehmen Batterien zurück. Sie können Batterien auch per
Post an uns zurücksenden. Altbatterien in haushaltsüblichen Mengen
können Sie direkt bei uns von Montag bis Freitag zwischen 07:30 und
15:30 Uhr unter der folgenden Adresse unentgeltlich zurückgeben:
Chal-Tec GmbH
Member of Berlin Brands Group
Handwerkerstr. 11
15366 Dahlwitz-Hoppegarten
Deutschland
• Wichtig zu beachten ist, dass Lithiumbatterien aus Sicherheitsgründen
vor der Rückgabe gegen Kurzschluss gesichert werden müssen (z. B.
durch Abkleben der Pole).
• Finden sich unter der durchgestrichenen Mülltonne auf der Batterie
zusätzlich die Zeichen Cd, Hg oder Pb ist das ein Hinweis darauf, dass
die Batterie gefährliche Schadstoe enthält. (»Cd« steht für Cadmium,
»Pb« für Blei und »Hg« für Quecksilber).
Hinweis zur Abfallvermeidung
Indem Sie die Lebensdauer Ihrer Altgeräte verlängern, tragen Sie dazu
bei, Ressourcen eizient zu nutzen und zusätzlichen Müll zu vermeiden.
Die Lebensdauer Ihrer Altgeräte können Sie verlängern indem Sie defekte
Altgeräte reparieren lassen. Wenn sich Ihr Altgerät in gutem Zustand
bendet, könnten Sie es spenden, verschenken oder verkaufen.

20
DE
HINWEISE ZUR ENTSORGUNG
Wenn es in Ihrem Land eine gesetzliche Regelung
zur Entsorgung von elektrischen und elektronischen
Geräten gibt, weist dieses Symbol auf dem Produkt
oder auf der Verpackung darauf hin, dass dieses
Produkt nicht im Hausmüll entsorgt werden darf.
Stattdessen muss es zu einer Sammelstelle für
das Recycling von elektrischen und elektronischen
Geräten gebracht werden. Durch regelkonforme
Entsorgung schützen Sie die Umwelt und die
Gesundheit Ihrer Mitmenschen vor negativen
Konsequenzen. Informationen zum Recycling
und zur Entsorgung dieses Produkts, erhalten
Sie von Ihrer örtlichen Verwaltung oder Ihrem
Hausmüllentsorgungsdienst.
Dieses Produkt enthält Batterien. Wenn es in Ihrem
Land eine gesetzliche Regelung zur Entsorgung
von Batterien gibt, dürfen die Batterien nicht im
Hausmüll entsorgt werden. Informieren Sie sich
über die örtlichen Bestimmungen zur Entsorgung
von Batterien. Durch regelkonforme Entsorgung
schützen Sie die Umwelt und die Gesundheit Ihrer
Mitmenschen vor negativen Konsequenzen.
KONFORMITÄTSERKLÄRUNG
Hersteller:
Chal-Tec GmbH, Wallstraße 16, 10179 Berlin,
Deutschland.
Importeur für Großbritannien:
Berlin Brands Group UK Limited
PO Box 42
272 Kensington High Street
London, W8 6ND
United Kingdom
Hiermit erklärt Chal-Tec GmbH, dass der
Funkanlagentyp Glastonbury DAB der Richtlinie
2014/53/EU entspricht. Der vollständige Text der
EU-Konformitätserklärung ist unter der folgenden
Internetadresse verfügbar: use.berlin/10041146

21
EN
CONTENTS
Technical Data 22
Safety Instructions 23
Product Overview 25
BT Mode 27
AUX IN Mode 27
USB Mode 27
CD mode 28
FM Mode 29
DAB Mode 29
Settings 31
Troubleshooting 34
Disposal Considerations 35
Declaration of Conformity 35
Dear Customer,
Congratulations on purchasing this equipment.
Please read this manual carefully and take care of
the following hints to avoid damages. Any failure
caused by ignoring the items and cautions men-
tioned in the instruction manual are not covered
by our warranty and any liability. Scan the QR
code to get access to the latest user manual and
other information about the product.
22
EN
TECHNICAL DATA
Item number 10041146, 10041147
Power supply
Adapter input
Adapter output
100-240 V ~ 50/60 Hz
12 V ⎓ 2 A
CD player
Supported disc formats CD/MP3/WMA
FM radio
Frequencies 87.5–108MHz
DAB radio
Frequencies 174.928–239.200MHz
BT
BT frequency range 2402 GHz - 2480 MHz
BT transmission power 2dBm

23
EN
SAFETY INSTRUCTIONS
General safety instructions
CAUTION
Risk of injury. Do not listen to music at excessive volume as
this may result in a loss of hearing.
• This device may be only used by children 8 years old or older and
persons with limited physical, sensory and mental capabilities
and/ or lack of experience and knowledge, provided that they have
been instructed in use of the device by a responsible person who
understands the associated risks.
• Only put CDs in the CD compartment.
• Never open the device cover. Do not attempt to repair the device by
yourself.
• Consult qualied personnel for repairs. The device does not contain
user-serviceable device components.
• Improper handling may damage the device and therefore void the
warranty.
Power Connection
• Use only the supplied power adapter. Use of any other adapter will void
the warranty and / or cause irreparable damage to the device.
• Unplug the device from the main power supply during thunderstorms.
• Be sure to turn o the power before unplugging the power cord.
• If you are using a multiple socket power strip or the plug as a splitting
device, ensure that the plugs are always accessible and ready for use.
• Never throw batteries into an open re and do not attempt to open
their outer shells.
• Batteries are harmful if swallowed and should therefore be stored
out of the reach of small children. If you think batteries have been
swallowed or may have entered any part of your body, seek medical
attention immediately.
Ventilation
• Do not block or cover the ventilation holes, vents, or openings of the
unit with anything, such as carpet, cloth, or similar, as otherwise the
openings may not be able to ensure functionality and / or ventilation
for safe use.
24
EN
• The bottom of the unit may become warm if the unit is used for an
extended period of time. This is normal.
Location
• Make sure the unit is standing on a at and stable surface.
• Do not place the device more than 4.5 feet (1.4 meters) away from the
nearest outlet. Make sure that the power cord and speaker cords do not
create a tripping hazard.
• Place the device at least 3.25 feet (1 meter) away from other electrical
devices in order to avoid noise interference.
• Make sure the device has enough room for the antenna to be properly
aligned.
• Never place the unit directly on antique or polished surfaces.
WARNUNG
Todesgefahr! Verätzungsgefahr
Verschlucken Sie keine Batterien. Die mit diesem
Produkt gelieferte Fernbedienung enthält eine
Knopfzelle. Wenn die Knopfzellenbatterie verschluckt
wird, kann sie innerhalb von nur 2 Stunden schwere
innere Verbrennungen verursachen und zum Tod führen.
Wenn Sie glauben, dass Batterien verschluckt wurden
oder in einen Körperteil eingedrungen sein könnten,
suchen Sie sofort einen Arzt auf.
Notes on the laser
CAUTION
Risk of injury. Never touch the optical lens in the CD
compartment or look directly into it.
• This device is a Class 1 laser product
• The use of controls not listed in the operating instructions or
unauthorised modication of the unit may result in the harmful release
of laser radiation.
25
EN
PRODUCT OVERVIEW
Front panel
1 Display
2 Remote control censor
3 Disc tray
4 POWER / MODE button
5 MENU / INFO button
6 REPEAT / PRESET button
7 Previous track / station
8 Next track / station
9 Scan / play or pause / enter
button
10 Stop button
11 Eject
12 Volume knob
Rear panel
13 USB port
14 Power input jack
15 Audio input jack
16 Antenna

26
EN
Remote control
Buttons
1 Power button
2 REPEAT / STOP button
3 MODE button
4 MENU / INFO button
5 Volume up
6 PROGRAM / PRESET button
7 Play or pause / enter / search for station
8 Previous track / station
9 Next track / station
10 Volume down
11 Number button

27
EN
Getting started
1. Press and Hold the POWER button to turn on the unit. The unit will
enter standby mode. The display will show "00:00" and ash. The
date and time is automatically set once it receives local broadcast
signals(and when such info is available).
2. Press to POWER button again to enter menu.
(Note: By pressing the POWER button you switch between "ON" mode
and "Standby" mode (showing clock and date).
BT MODE
The rst time you use your BT device with this speaker, you will need to or
pair it with the speaker rst.
1. Press the MODE button to select BT mode. The display will show
"Pairing" indicating that the system has entered pairing mode and will
be searchable by your BT enabled device.
2. Activate your BT enabled device and select the search mode.
"Glastonbury Go" will appear on your BT device list. Select
"Glastonbury Go" in the pairing list.
3. There will be a prompt sound after the successful pairing. The display
will show "Connected". If the pairing device is disconnected, the unit
will also issue a prompt sound.
AUX IN MODE
Press the MODE button to select AUX mode. use 3.5mm audio cable (not
provided) to connect player with other audio output devices(such as:mobile
phone, etc):
USB MODE
Press the MODE button to select USB mode. Insert a USB ash drive with
MP3 documents, the device will play the MP3 les automatically.

28
EN
CD MODE
1. Press Mode button to enter CD mode.If there is no disc on the tray, it
shows “NO DISC”.
2. Press the OPEN/CLOSE button on the unit to open the CD door.
3. Insert a CD in the disc tray with the label facing up and press the
button to close the CD door.
4. Use the controls on the unit or the remote to begin playing the loaded
disc.
STOP Function
• In CD mode, press the STOP button on the unit or hold and press the
REPEAT/STOP button on the remote , the player will enter stop state.
Press ⏯ this button will start from rst song and play in sequence.
Repeat Function
• In CD/USB mode, when playing music, pressing REPEAT for the rst
time will repeat current playing. Pressing REPEAT twice will repeat the
whole disc. Press REPEAT three times to cancel repeat function.
Program Function
Programming tracks of disc are only possible when playback is stopped.
1. Press the STOP button on the unit or hold and press REAPEAT/STOP on
the remote control to enter STOP state.
2. Press PRESET button to enter program menu. The display will show
“PG”.
3. Press “PREV/NEXT” button or number button to select the desired
track to be programmed. And press PRESET button to conrm. The
display will show P01.
4. Repeat the above step to store other desired tracks until all tracks are
programmed.
5. Press the PLAY/PAUSE button to start playback from the rst
programmed track.
(Note: Hold and press STOP button twice to clear the program when the
disc is stopped).
29
EN
FM MODE
1. This radio antenna is on the back of the machine. When you need to
listen to radio, please extend the antenna.
2. Press the MODE button to select FM mode.
3. Search for station
• Hold and press the button to automatically search for
station. The unit will store radio stations automatically after the search
is complete. Press the ⏮ or ⏭ button to select the station.
• Press the to manually search for station.
• Hold and press the ⏮ or ⏭ button to tune up or down the frequency
band.
Audio Setup
This unit can select audio type between Mono and Stereo in FM mode.
1. In FM mode, hold and press MENU|INFO to enter menu. "Audio
setting" is showing on the display. And then press to
enter.
2. Press the ⏮ or ⏭ button to select the available options: Stereo
allowed, Forced mono. And the press the to conrm.
DAB MODE
1. This radio antenna is on the back of the machine. When you need to
listen to radio, please extend the antenna.
2. Press the MODE button to select DAB mode.
3. Press the button to automatically search for station. The
unit will store radio stations automatically after the search is complete.
4. Press the ⏮ or ⏭ button to select the station in the station list. And
then press the "Play/Pause" to conrm.
Prune
This feature removes any stations that in the DAB station list but have no
service in your area.
1. In DAB mode, hold and press the MENU|INFO to enter menu. Press
the ⏮ or ⏭ button until "System". And the press the to
enter.
2. Press the ⏮ or ⏭ button to "Prune" and press to enter.

30
EN
3. Press the ⏮ or ⏭ button to choosing "Yes" to remove invalid stations
from the station list. And the press to conrm.
DRC (Dynamic Range Control)
This DRC adds or removes a degree of compensation for the dierence in
the dynamic range between radio stations.
1. In DAB mode, hold and press MENU|INFO to enter menu. Press the ⏮
or ⏭ button until "System". And the press to enter.
2. Press the ⏮ or ⏭ button to "DRC" and press to enter.
3. Press the ⏮ or ⏭ button to select the available options: o, high, low.
And the press to conrm
• o: no compensation applied
• high: mximum compensation applied
• Low: medium compensation applied
Station Order
1. In DAB mode, hold and press MENU|INFO to enter menu. Press the ⏮
or ⏭ button until "System".And the press to enter.
2. Press the ⏮ or ⏭ button to "Station order" and press to
enter.
3. Press the ⏮ or ⏭ button to select the available options: Alphanumeric,
Active, Multiplex. And the press the to conrm.
Storing preset station
The unit can store up to 20 stations as preset stations.
1. In DAB/FM mode, tune to a station.
2. Hold and press MENU|INFO to enter menu. Press the ⏮ or ⏭ button
until "Preset" showing on the display. And the press to
enter.
3. Press the ⏮ or ⏭ button to select a preset number.
4. Hold and press the to store the station.
5. To listen to a preset station, hold and press PRESET to enter preset
station list. Press the ⏮ or ⏭ button to select a desired preset station.
And the press to conrm to listen the station.
31
EN
SETTINGS
Time Setup
1. Hold and press MENU|INFO to enter menu. Press the ⏮ or ⏭ button
to "System" showing on the display. And then press to
enter.
2. Press the ⏮ or ⏭ button to "Time setup" position and press
to enter.
3. Press the ⏮ or ⏭ button to cycle through the below options.
• Set clock: Press to enter "Set clock". Press the ⏮ or
⏭ button to cycle through the number to desired position and press
to conrm.
• Set date: Press to enter "Set date". Press the ⏮ or ⏭
button to cycle through the number to desired position and press
to conrm. The date is displayed in DD-MM-YYYY.
• Auto update (To synchronize time from radio): Press to
enter "Auto update". Press the ⏮ or ⏭ button to select the available
options: From radio / No update. And the press to
conrm
• Set 12/24 hour: Press to enter "Set 12/23 hour". Press the
⏮ or ⏭ button to select the available options:Set 12 hour / Set 24 hour.
And the press to conrm
Alarm Setting
1. Hold and press MENU|INFO to enter menu. Press ⏮ or ⏭ button to
“System” showing on the display. And then press to
enter.
2. Press ⏮ or ⏭ button to “Alarm” position and press to
enter.
3. Press ⏮ or ⏭ button to cycle through the below options.
• On/O: Press to turn the alarm on/o.
• Time: Press ⏮ or ⏭ button to “Time” position and press Press
to enter. And press ⏮ or ⏭ button to set time and press
to conrm.
• Days: Press ⏮ or ⏭ button to “Days” position and press
to enter. And press ⏮ or ⏭ button to select the available options:Daily,
Once, Weekdays, Weekends and press to conrm.
• Mode: Press ⏮ or ⏭ button to “Mode” position and press
to enter. And press ⏮ or ⏭ button to select the sound
source of the alarm. Source options: DAB, FM, Buzzer. And then press
to conrm
• Volume: Press ⏮ or ⏭ button to “Volume”position and press
32
EN
to enter. And press ⏮ or ⏭ button to select the alarm
volume level and press to conrm.
• Last listened: Press ⏮ or ⏭ button to “Last listened” position and press
to enter. And press ⏮ or ⏭ button to select the desired
preset station as alarm source. And press to conrm.
(Note: The function is available when the preset station is set.)
• Save: When the above setting is nished, press ⏮ or ⏭ button the
“Save” position and press to save the alarm setting.
When the alarm setting is active, the corresponding alarm 1 or alarm 2
icon will show on the display.
Note:
At the set time, the alarm will sound. The volume will increase gradually
until it reaches the set volume level. The corresponding alarm icon will also
ash on the display.
When the alarm goes o, press any button(except VOLUME knob) on the
panel to turn o the alarm.
SNOOZE Function: When the alarm goes o, rotate VOLUME knob on the
unit or VOL key on the remote control to activate SNOOZE function and
snooze for 10 minutes. Press any button(except VOLUME knob) on the panel
to turn o the alarm.
Sleep Timer Setup
This unit can switch to standby automatically after a period.
1. Hold and press MENU|INFO to enter menu. Press the ⏮ or ⏭ button
to "System" showing on the display. And then press to
enter.
2. Press the ⏮ or ⏭ button to "Sleep" position and press
to enter.
3. Press the ⏮ or ⏭ button to select the time period: o, 15, 30,45,60,90 .
And the press the to conrm.
Language Setup
1. Hold and press MENU|INFO to enter menu. Press the ⏮ or ⏭ button
to "System" showing on the display. And then press to
enter.
2. Press the ⏮ or ⏭ button to "Language" position and press
to enter.
3. Press the ⏮ or ⏭ button to select the desired language . And the press
the to conrm.
33
EN
Backlight Setup
1. Hold and press MENU|INFO to enter menu. Press the ⏮ or ⏭ button
to "System" showing on the display. And then press to
enter.
2. Press the ⏮ or ⏭ button to "Backlight" position and press
to enter.
3. Press the ⏮ or ⏭ button to cycle through the below options.
• Timeout (To dene the duration of the backlight before it it dimmed.):
Press to enter "Timeout". Press the ⏮ or ⏭ button to
select the timeout options: On(the backlight does not dim), 10 Sec, 20
Sec, 30 Sec, 45 Sec, 60 Sec, 90 Sec, 120 Sec, 180 Sec, and press " "
to conrm.
• On Level (To dene the brightness level when the backlight is switched
on) : Press to enter "On level". Press the ⏮ or ⏭
button to select the brightness levels: High/Low/Medium and press
to conrm.
Factory reset
1. Hold and press MENU|INFO to enter menu. Press the ⏮ or ⏭ button
to "System" showing on the display. And then press to
enter.
2. Press the ⏮ or ⏭ button to "Factory reset" position and press
to enter.
3. Press the ⏮ or ⏭ button to select "Yes" . And the press the
to conrm factory reset.
SW Version-Software Version Display
1. Hold and press MENU|INFO to enter menu. Press the ⏮ or ⏭ button
to "System" showing on the display. And then press to
enter.
2. Press the ⏮ or ⏭ button to "SW version" position and press
to enter.
3. The system software version will be displayed.
34
EN
TROUBLESHOOTING
If you are suering from following problem, please refer to following
supplied method. If the problem still can’t be solved, please contact the
customer support.
Problem Solution
There is no sound. 1. Check the player connection
between the mobile phone or other
audio output device.
2. The volume is turned down.
Adjust the volume.
The CD player does not play a disc. 1. Check whether the disc is put in
the proper direction.
2. To check whether there is disc in
the tray.
3. The disc is dirty. Please clean the
disc.
The remote control does not work. 1. Remove obstacles between
remote control and player.
2. If the battery is exhausted,
replace it with a new one (button
cell CR 2032).
3. The insulation sheet has
been inserted in the battery
compartment when shipped from
the factory. Pull it out before use.
Buttons do not work. It may be caused by the power
wave or other abnormity, please
turn o the power and turn it on
again after 10 seconds.

35
EN
DISPOSAL CONSIDERATIONS
If there is a legal regulation for the disposal of
electrical and electronic devices in your country,
this symbol on the product or on the packaging
indicates that this product must not be disposed of
with household waste. Instead, it must be taken to
a collection point for the recycling of electrical and
electronic equipment. By disposing of it in accordance
with the rules, you are protecting the environment and
the health of your fellow human beings from negative
consequences. For information about the recycling
and disposal of this product, please contact your local
authority or your household waste disposal service.
This product contains batteries. If there is a legal
regulation for the disposal of batteries in your country, the
batteries must not be disposed of with household waste.
Find out about local regulations for disposing of batteries.
By disposing of them in accordance with the rules, you are
protecting the environment and the health of your fellow
human beings from negative consequences.
DECLARATION OF CONFORMITY
Manufacturer:
Chal-Tec GmbH, Wallstrasse 16, 10179 Berlin,
Germany.
Importer for Great Britain:
Berlin Brands Group UK Limited
PO Box 42
272 Kensington High Street
London, W8 6ND
United Kingdom
Hereby, Chal-Tec GmbH declares that the radio
equipment type Glastonbury DAB is in compliance with
Directive 2014/53/EU. The full text of the EU declaration
of conformity is available at the following internet
address: use.berlin/10041146
For Great Britain: Hereby, Chal-Tec GmbH declares
that the radio equipment type Glastonbury FM is in
compliance with the relevant statutory requirements. The
full text of the declaration of conformity is available at the
following internet address: use.berlin/10041146


37
FR
SOMMAIRE
Fiche technique 38
Consignes de sécurité 39
Descriptif de l'appareil 41
Mode BT 43
Mode AUX IN 43
Fonctionnement USB 43
Lecteur CD 44
Radio FM 45
Radio DAB 45
Réglages 47
Résolution des problèmes 51
Informations sur le recyclage 52
Déclaration de conformité 52
Cher client, chère cliente,
Toutes nos félicitations pour l’acquisition de
ce nouvel appareil. Lisez attentivement les in-
dications suivantes et suivez-les pour éviter
d'éventuels dommages. Nous ne saurions être
tenus pour responsables des dommages dus au
non-respect des consignes et à la mauvaise uti-
lisation de l’appareil. Scannez le QR-Code pour
obtenir la dernière version du mode d'emploi
ainsi que d'autres informations concernant le
produit.
38
FR
FICHE TECHNIQUE
Numéro d'article 10041146, 10041147
Alimentation
Entrée de l'adaptateur
secteur
Entrée de l'adaptateur
secteur
100-240 V ~ 50/60 Hz
12 V ⎓ 2 A
Lecteur CD
Formats de disques pris en
charge
CD/MP3/WMA
Radio FM
Fréquences 87,5 – 108 MHz
Radio DAB
Fréquences 174,928 - 239,200 MHz
BT
Plage de fréquence BT 2402 GHz - 2480 MHz
Puissance d'émission BT 2 dBm

39
FR
CONSIGNES DE SÉCURITÉ
Consignes générales de sécurité
ATTENTION
Risque de blessure ! N'écoutez pas de musique à un volume
trop élevé, car cela pourrait endommager votre audition.
• Les enfants à partir de 8 ans et les personnes sourant de handicaps
mentaux, sensoriels et physiques ne peuvent utiliser l'appareil que s'ils
ont été parfaitement familiarisés avec les fonctions et les précautions
de sécurité par une personne responsable et s'ils comprennent les
risques associés.
• N'ouvrez jamais le couvercle de l'appareil et n'essayez jamais d'eectuer
vous-même des réparations sur l'appareil.
• Contactez le personnel qualié pour les réparations. L'appareil ne
contient aucun composant pouvant être réparé par l'utilisateur.
• Une manipulation incorrecte peut endommager l'appareil et annuler la
garantie.
Alimentation
• Utilisez uniquement le bloc d'alimentation inclus dans la livraison.
L'utilisation de toute autre alimentation peut annuler la garantie et/ou
causer des dommages irréparables à l'appareil.
• Débranchez la che l'appareil de la prise pendant les orages.
• Assurez-vous que l'appareil est éteint avant de le débrancher du secteur.
• Si vous utilisez une multiprise ou la che comme dispositif de
déconnexion, veillez à ce qu'elles soient toujours facilement accessibles
et prêtes à être utilisées.
• Ne jetez jamais les piles au feu et n'essayez jamais d'ouvrir leur boîtier
extérieur.
• Les piles sont dangereuses pour la santé si elles sont avalées et doivent
donc être conservées hors de portée des jeunes enfants.
Alimentation en air
• N'obstruez pas et ne couvrez pas les ouvertures de ventilation, les
trous ou les ouvertures de l'appareil avec des objets tels que des tapis,
des chions et autres, sinon le fonctionnement et/ou la ventilation ne
peuvent être garantis pour une utilisation sûre.
• Le fond de l'appareil peut devenir chaud si l'appareil est utilisé pendant
une longue période. Cela est normal.

40
FR
Emplacement
• Veillez à ce que l'appareil soit placé sur une surface plane et stable.
• Ne placez pas l'appareil à plus de 1,4 mètre de la prise de courant
la plus proche. Veillez à ce que le câble d'alimentation secteur et
les câbles des enceintes ne puissent pas constituer un risque de
trébuchement.
• Placez l'appareil à au moins un mètre des autres appareils électriques
pour éviter les parasites sonores.
• Veillez à ce que l'appareil dispose d'un espace suisant vers le haut
pour pouvoir diriger l'antenne correctement.
• Ne placez jamais l'appareil directement sur des surfaces anciennes ou
polies.
MISE EN GARDE
Danger de mort ! Risque de brûlure chimique
N'avalez pas les piles. La télécommande fournie avec
ce produit contient une pile bouton. Si la pile bouton
est avalée, elle peut provoquer de graves brûlures
internes potentiellement mortelles en seulement 2
heures. Si vous pensez que des piles ont pu être avalées
ou sont entrées dans une partie du corps, consultez
immédiatement un médecin.
Remarques sur le laser
ATTENTION
Risque de blessure ! Ne touchez ou ne regardez jamais la
lentille optique du compartiment CD.
• Cet appareil est un produit laser de classe 1.
• L'utilisation de commandes autres que celles spéciées dans le
mode d'emploi ou la modication non autorisée de l'appareil
peuvent entraîner une exposition dangereuse aux rayonnements
laser.
41
FR
DESCRIPTIF DE L'APPAREIL
Vue de face
1 Aichage
2 Capteur IR pour la
télécommande
3 Tiroir CD
4 Interrupteur de marche/arrêt
Mode
5 Touche Menu/Info
6 Répéter/Mémorisation de
stations
7 Titre/station de radio précédent
8 Titre/station de radio suivant
9 Recherche de stations / lecture
ou pause / conrmation de
saisie
10 Stop
11 Éjecter le CD
Vue arrière
12 Réglage du volume
13 Port USB
14 Alimentation électrique (bloc
d'alimentation)
15 Entrée audio
16 Antenne
42
FR
Télécommande
Touches
1 Marche/arrêt
2 Répétition/arrêt
3 Mode
4 Menu/Info
5 Augmenter le volume
6 Programme/Mémorisation de station
7 Lectue et pause / Conrmation de saisie / Recherche de stations
8 Titre/station de radio précédent
9 Titre/station de radio suivant
10 Diminution du volume
11 Touches numériques

43
FR
Premiers pas
1. Maintenez la touche POWER pour allumer l'appareil. L'appareil passe
en mode veille. L'écran aiche « 00:00» et clignote. La date et l'heure
sont réglées automatiquement dès que l'appareil reçoit des signaux
de radiodiusion locaux (et lorsque de telles informations sont
disponibles).
2. Appuyez à nouveau sur la touche POWER pour aicher le menu.
(Remarque : en appuyant sur la touche POWER, vous basculez entre les
modes allumé et veille (aichage de l'heure et de la date).
MODE BT
Lorsque vous utilisez votre appareil BT avec cette enceinte pour la première
fois, vous devez d'abord le « coupler » avec l'enceinte.
1. Appuyez sur la touche MODE pour sélectionner le mode BT. L'écran
aiche « Pairing », ce qui signie que le système a activé le mode
d'appairage et qu'il peut rechercher votre appareil compatible BT.
2. Activez l'appareil BT externe et sélectionnez le mode de recherche.
« Glastonbury Go » apparaît dans la liste de vos appareils BT.
Sélectionnez « Glastonbury Go » dans la liste d'appairage.
3. Une fois l'appairage réussi, un signal sonore retentit. L'écran aiche «
Connecté ». Si l'appareil à coupler n'est pas connecté, l'appareil émet
également un signal sonore.
MODE AUX IN
Appuyez sur la touche MODE pour sélectionner le mode AUX. Utilisez un
câble audio de 3,5 mm (non fourni) pour connecter le lecteur à d'autres
appareils à sortie audio (par exemple un téléphone portable etc).
FONCTIONNEMENT USB
Appuyez sur la touche MODE pour sélectionner le mode USB. Insérez le
lecteur ash USB contenant des chiers MP3, l'appareil lit automatiquement
les chiers MP3.

44
FR
LECTEUR CD
1. Appuyez sur la touche Mode pour passer en mode CD. S'il n'y a pas de
disque dans le lecteur, l'écran aiche « NO DISC ».
2. Appuyez sur la touche OPEN/CLOSE de l'appareil pour ouvrir le
compartiment CD.
3. Insérez un CD avec étiquette vers le haut dans le compartiment CD
et appuyez à nouveau sur la touche OPEN/CLOSE pour fermer le
compartiment CD.
4. Utilisez les commandes de l'appareil ou de la télécommande pour
lancer la lecture du CD inséré.
Pour arrêter la lecture
• En mode CD, appuyez sur la touche STOP de l'appareil ou maintenez
la touche REPEAT/STOP de la télécommande pour mettre la lecture en
pause. Appuyez sur cette touche pour commencer par le premier titre et
les écouter dans l'ordre.
Fonction de répétition
• En mode CD/USB, lorsque vous appuyez sur REPEAT pour la première
fois pendant la lecture de musique, la piste en cours est répétée. Si
vous appuyez deux fois sur la touche REPEAT, le CD entier est répété.
Appuyez trois fois sur REPAT pour quitter la fonction de répétition.
Fonction programme
La programmation de pistes sur le CD n'est possible que si la lecture est
arrêtée.
1. Appuyez sur la touche STOP de l'appareil ou maintenez-la et appuyez
sur REPEAT/STOP de la télécommande pour passer à l'état d'arrêt.
2. Appuyez sur la touche PRESET pour aicher le menu de programme.
L'écran aiche « PG ».
3. Appuyez sur la touche PREV/NEXT ou sur la touche numérique pour
sélectionner le titre que vous souhaitez programmer. Appuyez sur la
touche PRESET pour conrmer. L'écran aiche « P01 ».
4. Répétez l'étape ci-dessus pour enregistrer les autres titres souhaités,
jusqu'à ce que tous les titres soient programmés.
5. Appuyez sur la touche pour démarrer la lecture à partir
du premier titre programmé.
(Remarque : appuyez deux fois sur la touche STOP et maintenez-la pour
eacer le programme lorsque le CD est en pause).
45
FR
RADIO FM
1. L'antenne de la radio se trouve à l'arrière de l'appareil. Si vous
souhaitez écouter la radio, déployez complètement l'antenne.
2. Appuyez sur la touche MODE pour sélectionner le mode FM.
3. Recherche de stations
• Maintenir la touche pour rechercher automatiquement
une station. L'appareil mémorise automatiquement les stations de radio
une fois la recherche terminée. Appuyez sur les touches ⏮ou ⏭ de
l'appareil ou de la télécommande pour sélectionner une station.
• Appuyez sur pour rechercher les stations manuellement.
• Maintenez les touches ⏮ou ⏭ pour régler la bande de fréquences
vers le haut ou vers le bas.
Conguration audio
Cet appareil peut passer du mode mono au mode stéréo en mode FM.
1. En mode FM, maintenez la touche MENU/INFO pour accéder au menu.
L'écran aiche « Audo setting ». Appuyez sur la touche
pour conrmer.
2. Appuyer sur la touche ⏮ ou ⏭ pour sélectionner les options
disponibles : Stereo allowed (STEREO autorisé), Forced mono (MONO
forcé). Appuyez sur la touche pour conrmer.
RADIO DAB
1. L'antenne radio se trouve à l'arrière de l'appareil. Si vous souhaitez
écouter la radio, déployez complètement l'antenne.
2. Appuyez sur la touche MODE pour sélectionner le mode DAB.
3. Appuyez sur la touche pour rechercher
automatiquement une station. L'appareil mémorise automatiquement
les stations de radio une fois la recherche terminée.
4. Appuyez sur les touches ⏮ou ⏭ pour sélectionner une station.
Appuyez sur la touche ⏯pour conrmer.
Nettoyage de la liste de stations mémorisées
Cette fonction permet de supprimer de la liste des stations DAB toutes les
stations qui ne peuvent pas être captées dans votre région.
46
FR
1. En mode DAB, maintenez la touche MENU/INFO pour accéder au
menu. Appuyez sur la touche ⏮ ou ⏭ jusqu'à ce que « Système »
s'aiche. Appuyez sur pour conrmer.
2. Utilisez les touches ⏮ et ⏭ pour sélectionner Prune et appuyez sur
pour conrmer.
3. Appuyez sur la touche ⏮ ou ⏭ et sélectionnez Yes pour supprimer les
stations non valables de la liste des stations. Appuyez sur la touche
pour conrmer.
DRC (contrôle de la plage dynamique)
Le DRC permet d'activer ou de désactiver une certaine égalisation des
diérences de volume sonore entre les stations de radio.
1. En mode DAB, maintenez la touche MENU/INFO. Appuyez sur la
touche ⏮ ou ⏭ jusqu'à ce que Système s'aiche. Puis appuyer sur
pour conrmer.
2. Utilisez les touches ⏮ et ⏭ pour sélectionner DRC et appuyez sur
pour conrmer.
3. Appuyez sur la touche ⏮ ou ⏭ pour sélectionner les options
disponibles : o, high, low. appuyez sur pour conrmer.
• o : aucune compression appliquée
• high : compression maximale appliquée
• high : compression minimale appliquée
Ordre des stations
1. En mode DAB, maintenez la touche MENU/INFO pour accéder au
menu. Appuyez sur la touche ⏮ ou ⏭ jusqu'à ce que Système s'aiche
et appuyez sur la touche pour y accéder.
2. Sélectionnez Station Order à l'aide des touches ⏮ et ⏭. (ordre des
stations) et appuyez sur pour conrmer.
3. Appuyer sur la touche ⏮ ou ⏭ pour sélectionner les options
disponibles : Alphanumérique, Actif, Multiplex. Appuyez sur la touche
pour conrmer.
Mémorisation de la station présélectionnée
L'appareil peut enregistrer jusqu'à 20 stations présélectionnées.
1. Réglez une station en mode DAB/FM.
2. Maintenez la touche MENU|INFO. Appuyez sur la touche ⏮ ou ⏭
jusqu'à ce que l'écran aiche Preset. Appuyez sur pour
aicher le menu.
3. Appuyez sur les touches ⏮ou ⏭ pour sélectionner un numéro pré
47
FR
réglé.
4. Maintenez la touche pour enregistrer la station.
5. Pour écouter une station préréglée : Maintenez la touche PRESET
pour aicher la liste des stations préréglées. Appuyez sur les touches
⏮ ou ⏭ pour choisir la station mémorisée. Appuyez sur la touche
pour conrmer et écouter la station.
RÉGLAGES
Réglage de l'heure
1. Maintenez la touche MENU/INFO pour accéder au menu. Appuyez sur
la touche ⏮ ou ⏭ jusqu'à ce que Système s'aiche à l'écran. Appuyez
ensuite sur pour y accéder.
2. Appuyez sur la touche ⏮ ou ⏭ sur la position Time Setup et appuyez
sur pour conrmer.
3. Appuyez sur la touche ⏮ ou ⏭ pour faire déler les paramètres
suivants.
• Régler l'horloge : Appuyez sur pour accéder à Set clock
(régler l'horloge). Appuyez sur la touche ⏮ ou ⏭ pour faire déler les
chires jusqu'à la position souhaitée et appuyez sur pour
conrmer.
• Réglage de la date : Appuyez sur pour accéder à Set
date (régler la date). Appuyez sur la touche ⏮ ou ⏭ pour faire déler les
chires jusqu'à la position souhaitée et appuyez sur pour
conrmer. La date est aichée au format jj-mm-aaaa.
• Mise à jour automatique (synchronisation de l'heure avec la radio) :
Appuyez sur pour accéder à Auto-Update. Appuyez sur la
touche ⏮ ou ⏭ pour sélectionner les options disponibles : De la radio /
Pas de mise à jour. Appuyez sur la touche pour conrmer.
• Réglage du format 12/24 heures : Appuyez sur pour
aicher Set 12/24 hour. Appuyez sur la touche ⏮ ou ⏭ pour sélectionner
les options disponibles : régler le format 12 heures / régler le format 24
heures. Appuyez sur la touche pour conrmer.
Réglage du réveil
1. Maintenez la touche MENU/INFO pour accéder au menu. Appuyez
sur la touche ⏮ ou ⏭ jusqu'à ce que l'écran aiche System. Appuyez
ensuite sur pour y accéder.
2. Appuyez sur la touche ⏮ ou ⏭ jusqu'à la position Alarme et appuyez
sur pour y accéder.
3. Appuyez sur la touche ⏮ ou ⏭ pour faire déler les paramètres

48
FR
suivants.
• Marche/arrêt : appuyez sur pour activer/désactiver
l'alarme.
• Heure : Appuyez sur la touche ⏮ ou ⏭ jusqu'à la position Heure et
appuyer sur la touche pour saisir. Appuyez sur la touche ⏮ ou ⏭ pour
régler l'heure, puis appuyez pour conrmer.
• Jours : Appuyez sur la touche ⏮ ou ⏭ jusqu'à la position Jours et
appuyer sur la touche pour saisir. Appuyez sur la touche
⏮ ou ⏭ pour sélectionner les options disponibles : tous les jours, une
seule fois, jours de la semaine, le week-end, et appuyez sur 3} pour
conrmer.
• Appuyez sur la touche ⏮ ou ⏭ jusqu'à la position Mode et appuyez
sur pour conrmer. Appuyez sur la touche ⏮ ou ⏭ pour
sélectionner la source sonore de l'alarme. Options de source : DAB, FM,
buzzer. Appuyez sur la touche .pour conrmer.
• Appuyez sur la touche ⏮ ou ⏭ jusqu'à la position Volume et appuyez
sur pour conrmer. Appuyez sur la touche ⏮ ou ⏭ pour
sélectionner le volume de l'alarme et appuyez sur pour
conrmer.
• Dernièrement écouté : Appuyez sur la touche ⏮ ou ⏭ jusqu'à la
position Dernièrement écouté et appuyez sur pour
conrmer. Appuyez sur les touches ⏮ ou ⏭ pour sélectionner
l'emplacement mémoire souhaité comme source de l'alarme. Appuyez
sur pour conrmer. (Remarque : la fonction est disponible
lorsque l'emplacement de mémoire est déni)
• Enregistrer : Lorsque le réglage ci-dessus est terminé, appuyer sur la
touche ⏮ ou ⏭ en position Enregistrer et appuyez sur
pour enregistrer le réglage de l'alarme. Lorsque le réglage de l'alarme
est actif, le symbole correspondant à l'alarme 1 ou à l'alarme 2 s'aiche
à l'écran.
Remarque : l'alarme retentit à l'heure programmée. Le volume sonore
augmente progressivement jusqu'à atteindre le volume que vous avez déni.
Le symbole d'alarme correspondant clignote également sur l'écran. Lorsque
l'alarme retentit, appuyez sur n'importe quelle touche (sauf la touche de
réglage du volume) du panneau de commande pour l'arrêter.
Fonction SNOOZE: lorsque l'alarme retentit, tournez le réglage du volume
sur l'appareil ou la touche VOL de la télécommande pour activer la fonction
SNOOZE et arrêter l'alarme pendant 10 minutes. Appuyez sur n'importe
quelle touche (sauf le réglage du volume) du panneau de commande pour
l'arrêter.
49
FR
Réglage de la minuterie de mise en veille
Cet appareil peut passer automatiquement en mode veille après un certain
temps.
1. Maintenez la touche MENU/INFO pour accéder au menu. Appuyez sur
la touche ⏮ ou ⏭ jusqu'à ce que Système s'aiche à l'écran. Appuyez
ensuite sur la touche pour conrmer.
2. Appuyez sur la touche ⏮ ou ⏭ jusqu'en position Sleep et appuyez sur
pour eectuer le réglage.
3. Appuyez sur la touche ⏮ ou ⏭ pour sélectionner le délai : Arrêt, 15, 30,
45, 60, 90. Appuyez sur la touche pour conrmer.
Choix de la langue
1. Maintenez la touche MENU/INFO pour accéder au menu. Appuyez sur
la touche ⏮ ou ⏭ jusqu'à ce que Système s'aiche à l'écran. Appuyez
ensuite sur pour y accéder.
2. Appuyez sur la touche ⏮ ou ⏭ sur la position Language (langue) et
appuyez sur pour conrmer .
3. Appuyez sur les touches ⏮ ou ⏭ pour choisir la station mémorisée.
Appuyez sur la touche pour conrmer.
Réglage du rétroéclairage
1. Maintenez la touche MENU/INFO pour accéder au menu. Appuyez sur
la touche ⏮ ou ⏭ jusqu'à ce que Système s'aiche à l'écran. Appuyez
ensuite sur pour conrmer.
2. Appuyez sur la touche ⏮ ou ⏭ sur la position Backlight et appuyez sur
pour conrmer.
3. Appuyez sur la touche ⏮ ou ⏭ pour faire déler les options suivantes.
• Timeout : pour dénir la durée du rétroéclairage avant qu'il ne soit
atténué : Appuyez sur pour accéder à Timeout. Appuyez
sur la touche ⏮ ou ⏭ pour sélectionner les options de temporisation :
Marche (le rétroéclairage ne s'atténue pas), 10 secondes, 20 secondes,
30 secondes, 45 secondes, 60 secondes, 90 secondes, 120 secondes,
180 secondes, puis appuyez sur pour conrmer.
• On Level : (Pour dénir le niveau de luminosité lorsque le
rétroéclairage est activé) : Appuyez sur pour accéder à
On level. Appuyez sur la touche ⏮ ou ⏭ pour sélectionner le niveau de
luminosité : Haute/Basse/Moyenne et appuyez sur pour
conrmer.
Réinitialisation aux paramètres d'usine
50
FR
1. Maintenez la touche MENU/INFO pour accéder au menu. Appuyez sur
la touche ⏮ ou ⏭ jusqu'à ce que Système s'aiche à l'écran. Appuyez
ensuite sur pour y accéder.
2. Appuyez sur la touche ⏮ ou ⏭ sur la position Factory reset et appuyez
sur pour conrmer.
3. Appuyez sur les touches ⏮ ou ⏭ pour choisir Oui. Appuyez ensuite
sur la touche pour conrmer la réinitialisation des
paramètres d'usine.
Version de logiciel (SW version)
1. Maintenez la touche MENU/INFO pour accéder au menu. Appuyez sur
la touche ⏮ ou ⏭ jusqu'à ce que Système s'aiche à l'écran. Appuyez
ensuite sur pour y accéder.
2. Appuyez sur la touche ⏮ ou ⏭ sur la position SW version et appuyez
sur pour conrmer.
3. La version du logiciel système s'aiche.
51
FR
RÉSOLUTION DES PROBLÈMES
Si vous rencontrez le problème suivant, veuillez suivre la méthode ci-
dessous. Si le problème n'est toujours pas résolu, veuillez contacter le
service clientèle.
Problème Solution
Aucun son audible. 1. Vériez la connexion du lecteur avec le
téléphone portable ou un autre appareil
audio.
2. Le volume est réglé trop bas. Réglez
le volume.
Le lecteur CD ne lit pas un CD. 1. Vériez que le CD est inséré dans le
bon sens.
2. Vériez qu'il y a un CD dans le tiroir.
3. le CD est poussiéreux. Veuillez
nettoyer le CD.
La télécommande ne
fonctionne pas.
1. Retirez tout objet entre la
télécommande et le lecteur.
2. Si la pile est vide, remplacez-la par
une nouvelle(pile bouton CR 2032).
3. Au départ de l'usine, un lm isolant
est inséré dans le compartiment à piles.
Retirez-le avant utilisation.
La touche ne fonctionne pas. Cela peut être dû à la tension du réseau
ou à une autre perturbation. Éteignez
l'appareil et rallumez-le après 10
secondes.

52
FR
CONSEILS POUR LE RECYCLAGE
S‘il existe une réglementation pour l‘élimination ou le
recyclage des appareils électriques et électroniques
dans votre pays, ce symbole sur le produit ou sur
l‘emballage indique que cet appareil ne doit pas
être jeté avec les ordures ménagères. Vous devez le
déposer dans un point de collecte pour le recyclage
des équipements électriques et électroniques.
La mise au rebut conforme aux règles protège
l‘environnement et la santé de vos semblables des
conséquences négatives. Pour plus d‘informations
sur le recyclage et l‘élimination de ce produit, veuillez
contacter votre autorité locale ou votre service de
recyclage des déchets ménagers.
Ce produit contient des piles. S‘il existe une
réglementation pour l‘élimination ou le recyclage
des piles dans votre pays, vous ne devez pas les
jeter avec les ordures ménagères. Renseignez-vous
sur les dispositions locales relatives à la collecte
des piles usagées. La mise au rebut conforme aux
règles protège l‘environnement et la santé de vos
semblables des conséquences négatives.
DÉCLARATION DE CONFORMITÉ
Fabricant :
Chal-Tec GmbH, Wallstraße 16, 10179 Berlin,
Allemagne.
Importateur pour la Grande Bretagne :
Berlin Brands Group UK Limited
PO Box 42
272 Kensington High Street
London, W8 6ND
United Kingdom
Le soussigné, Chal-Tec GmbH, déclare que
l’équipement radioélectrique du type Glastonbury DAB
est conforme à la directive 2014/53/UE. Le texte
complet de la déclaration UE de conformité est
disponible à l’adresse internet suivante : use.
berlin/10041146

53
IT
INDICE
Dati tecnici 54
Avvertenze di sicurezza 55
Descrizione del dispositivo 57
Modalità BT 59
Modalità AUX IN 59
Modalità USB 59
Lettore CD 60
Radio FM 61
Radio DAB 61
Impostazioni 63
Risoluzione dei problemi 66
Avviso di smaltimento 67
Dichiarazione di conformità 67
Gentile cliente,
La ringraziamo per l'acquisto del dispositivo. La
preghiamo di leggere attentamente le seguenti
indicazioni e di seguirle per prevenire eventuali
danni. Non ci assumiamo alcuna responsabilità
per danni scaturiti da una mancata osservanza
delle avvertenze di sicurezza e da un uso impro-
prio del dispositivo. Scansionare il seguente codi-
ce QR per accedere al manuale d'uso più recente
e ricevere informazioni sul prodotto.

54
IT
DATI TECNICI
Numero articolo 10041146, 10041147
Alimentazione
Ingresso adattatore di rete
Ingresso adattatore di rete
100-240 V ~ 50/60 Hz
12 V ⎓ 2 A
Lettore CD
Formati supportati CD/MP3/WMA
Radio FM
Frequenze 87,5–108MHz
Radio DAB
Frequenze 174,928–239,200MHz
BT
Gamma di frequenza BT 2402 GHz-2480 MHz
Potenza di trasmissione BT 2dBm

55
IT
AVVERTENZE DI SICUREZZA
Avvertenze di sicurezza generiche
ATTENZIONE
Pericolo di lesioni! Non ascoltare la musica a volumi
eccessivamente alti, poiché ciò potrebbe causare danni
all'udito.
• I bambini a partire da 8 anni e le persone con limitate capacità siche,
psichiche e sensoriali possono utilizzare il dispositivo solo se sono stati
istruiti da una persona responsabile della loro sicurezza sulle modalità
d'uso e sulle procedure di sicurezza e se questi comprendono i rischi
associati.
• Non aprire mai la copertura del dispositivo e non tentare assolutamente
di eettuare riparazioni in modo autonomo.
• Per eventuali riparazioni, rivolgersi a personale qualicato. Il dispositivo
non contiene componenti che necessitano di manutenzione da parte
dell'utente.
• Un trattamento improprio può danneggiare il dispositivo e invalidare la
garanzia.
Alimentazione
• Utilizzare solo l'alimentatore in dotazione. L'uso di qualsiasi altro
alimentatore può invalidare la garanzia e/o causare danni irreparabili al
dispositivo.
• Togliere la spina dalla presa elettrica durante i temporali.
• Assicurarsi che il dispositivo sia stato spento prima di scollegarlo dalla
rete.
• Se si usa una presa multipla o la spina come dispositivo di
scollegamento, assicurarsi che siano sempre facilmente accessibili e
pronte all'uso.
• Non gettare mai le batterie nelle amme libere e non cercare
assolutamente di aprire il loro involucro esterno.
• Le batterie sono pericolose per la salute se ingerite e devono quindi
essere conservate fuori dalla portata dei bambini piccoli.
Alusso d'aria
• Non bloccare o coprire le prese d'aria, i fori o le aperture del dispositivo
con oggetti come tappeti, panni e simili, altrimenti non è possibile
garantire la funzionalità e/o la ventilazione necessarie per un utilizzo
sicuro.
• La parte inferiore del dispositivo può diventare calda se viene utilizzato
56
IT
per un lungo periodo di tempo. Questo è del tutto normale.
Luogo di posizionamento
• Assicurarsi che il dispositivo sia posizionato su una supercie piana e
stabile.
• Posizionare il dispositivo a non più di 1,4 metri dalla presa di corrente
più vicina. Assicurarsi che il cavo di alimentazione e i cavi degli
altoparlanti non rappresentino un pericolo di inciampo.
• Posizionare il dispositivo ad almeno un metro di distanza da altri
dispositivi elettrici per evitare interferenze.
• Garantire spazio suiciente sopra al dispositivo, in modo da poter
orientare correttamente l'antenna.
• Non posizionare mai il dispositivo direttamente su superci antiche o
lucide.
AVVERTIMENTO
pericolo di morte! Pericolo di ustioni chimiche
Non ingerire le batterie. Il telecomando fornito con
questo prodotto contiene una batteria a bottone. Se
la batteria a bottone viene ingoiata, può causare gravi
ustioni interne e la morte in sole 2 ore. Se si sospetta
che le batterie possano essere state ingerite o penetrate
in una parte del corpo, consultare immediatamente un
medico.
Note sul laser
ATTENZIONE
Pericolo di lesioni! Non toccare la lente ottica nel vano CD e
non guardarci dentro.
• Questo dispositivo è un prodotto laser di classe 1.
• L'uso di controlli diversi da quelli specicati nel manuale e
la modica non autorizzata del dispositivo possono causare
l'esposizione a raggi laser dannosi.

57
IT
DESCRIZIONE DEL DISPOSITIVO
Lato anteriore
1 Display
2 Sensore IR per il telecomando
3 Vano CD
4 Interruttore On/O
Modalità
5 Tasto Menu/Info
6 Ripetizione/Memoria delle
emittenti
7 Brano/emittente precedenti
8 Brano/emittente successivi
9 Ricerca emittenti/Riproduzione
o pausa/Confermare
l'inserimento
10 Stop
11 Espulsione del CD
12 Regolazione del volume
Lato posteriore
13 Connessione USB
14 Alimentazione (alimentatore)
15 Ingresso audio
16 Antenna

58
IT
Telecomando
Tasti
1 On/O
2 Ripetizione/Stop
3 Modalità
4 Menu/Info
5 Alzare il volume
6 Programmazione/Memoria delle emittenti
7 Riproduzione e pausa/Confermare l'inserimento/Ricerca emittenti
8 Brano/emittente precedenti
9 Brano/emittente successivi
10 Abbassare il volume
11 Tasti numerici

59
IT
Primi passaggi
1. Tenere premuto POWER per accendere il dispositivo. Il dispositivo
passa in modalità standby. Il display mostra "00:00" e lampeggia.
La data e l'ora vengono impostate automaticamente quando il
dispositivo riceve i segnali radio locali (e quando tali informazioni sono
disponibili).
2. Premere di nuovo POWER per accedere al menu. (Nota: premendo il
tasto POWER si passa dalla modalità operativa a quella di standby
(visualizzazione dell'ora e della data).
MODALITÀ BT
Quando si usa un dispositivo BT con questo altoparlante per la prima volta,
è necessario prima collegarlo o "accoppiarlo".
1. Premere il tasto MODE per selezionare la modalità BT. Il display
mostra "Pairing" per indicare che il sistema ha attivato la modalità di
accoppiamento e può essere cercato dal dispositivo BT.
2. Attivare il dispositivo con funzione BT e selezionare la modalità di
ricerca. "Glastonbury Go" compare nell'elenco dei dispositivi BT.
Selezionare "Glastonbury Go" nell'elenco dei dispositivi disponibili per
l'accoppiamento.
3. Dopo l'accoppiamento, viene emesso un segnale acustico. Sul display
compare "Connesso". Se il dispositivo da accoppiare non è collegato
viene emesso un segnale acustico.
MODALITÀ AUX IN
Premere il tasto MODE per selezionare la modalità AUX. Utilizzare un cavo
audio da 3,5 mm (non incluso in consegna) per collegare il lettore ad altri
dispositivi audio (ad es. telefono cellulare, ecc.).
MODALITÀ USB
Premere il tasto MODE per selezionare la modalità USB. Inserendo una
chiavetta USB con le MP3, il dispositivo li riproduce automaticamente.

60
IT
LETTORE CD
1. Premere il tasto MODE per entrare in modalità CD. Se nel vano non è
presente alcun disco, compare "NO DISC".
2. Premere il tasto OPEN/CLOSE sul dispositivo per aprire il vano CD.
3. Inserire un CD nel vano con l'etichetta rivolta verso l'alto e premere
nuovamente il tasto OPEN/CLOSE per chiudere il vano CD.
4. Utilizzare gli elementi di controllo sul dispositivo o sul telecomando
per avviare la riproduzione del CD inserito.
Interrompere la riproduzione
• In modalità CD, premere il tasto STOP sul dispositivo o tenere
premuto il tasto REPEAT/STOP sul telecomando per interrompere la
riproduzione. Premere questo tasto per iniziare con il primo brano e
riprodurre i titoli in ordine.
Funzione di ripetizione
• Se in modalità CD/USB si preme REPEAT per la prima volta durante
la riproduzione, il brano corrente viene ripetuto. Se si preme REPEAT
due volte, viene ripetuto l'intero CD. Premere REPEAT tre volte per
interrompere la funzione di ripetizione.
Funzione di programmazione
La programmazione dei brani sul CD è possibile solo quando la
riproduzione è inattiva.
1. Premere il tasto STOP sul dispositivo o tenere premuto REPEAT/STOP
sul telecomando per fermare la riproduzione.
2. Premere PRESET per accedere al menu della programmazione. Sul
display compare "PG".
3. Premere il tasto PREV/NEXT o il tasto numerico per selezionare
il brano desiderato per la programmazione. Premere PRESET per
confermare. Sul display compare "P01".
4. Ripetere il passaggio precedente per salvare altri titoli desiderati no a
quando sono stati programmate tutte le tracce.
5. Premere il tasto per avviare la riproduzione dalla prima
traccia programmata.
(Nota: premere due volte il tasto STOP a lungo per cancellare la
programmazione quando il CD è stato fermato).
61
IT
RADIO FM
1. L'antenna radiofonica si trova sul lato posteriore del dispositivo. Per
ascoltare la radio, estrarre l'antenna.
2. Premere il tasto MODE per selezionare la modalità FM.
3. Ricerca emittenti
• Tenere premuto il tasto per cercare automaticamente
un'emittente. Il dispositivo salva automaticamente le emittenti radio al
termine della ricerca. Premere ⏮o ⏭ per selezionare un'emittente.
• Premere per cercare manualmente le emittenti.
• Tenere premuto ⏮ o ⏭ per sintonizzare la banda di frequenza verso
l'alto o verso il basso.
Congurazione audio
In modalità FM, questo dispositivo può passare da mono a stereo.
1. In modalità FM, tenere premuto il tasto MENU/INFO per accedere al
menu. Sul display compare "Audio setting". Premere per
confermare.
2. Premere ⏮ o ⏭ per selezionare le opzioni disponibili: "Stereo
allowed" (stereo consentito), "Forced mono" (mono forzato). Premere
per confermare.
RADIO DAB
1. L'antenna radiofonica si trova sul lato posteriore del dispositivo. Per
ascoltare la radio, estrarre l'antenna.
2. Premere il tasto MODE per selezionare la modalità DAB.
3. Premere il tasto per cercare automaticamente
un'emittente. Il dispositivo salva automaticamente le emittenti radio al
termine della ricerca.
4. Premere ⏮o ⏭ per selezionare un'emittente nell'elenco. Premere ⏯
per confermare.
Pulire la memoria delle emittenti
Questa funzione rimuove dall'elenco delle emittenti DAB tutte quelle che
non possono essere ricevute nella zona in cui ci si trova.
1. In modalità DAB, tenere premuto il tasto MENU/INFO per accedere
al menu. Premere ⏮ o ⏭ nché compare "System". Premere
62
IT
per confermare.
2. Utilizzare ⏮ e ⏭ per selezionare "Prune" e premere per
confermare.
3. Premere ⏮ o ⏭ per selezionare "Yes" e rimuovere le emittenti non
valide dall'elenco. Premere per confermare.
DRC (controllo della gamma dinamica)
Con DRC si attiva o disattiva una certa compensazione delle dierenze di
volume tra le emittenti radio.
1. In modalità DAB, tenere premuto il tasto MENU/INFO. Premere ⏮
o ⏭ nché compare "System". Quindi premere per
confermare.
2. Utilizzare ⏮ e ⏭ per selezionare "DRC" e premere per
confermare.
3. Premere ⏮ o ⏭ per selezionare le opzioni disponibili: "o", "high",
"low" e premere per confermare.
• O: non viene applicata alcuna compensazione
• High: viene applicata la compensazione massima
• Low: viene applicata la compensazione minima
Ordine delle emittenti
1. In modalità DAB, tenere premuto il tasto MENU/INFO per accedere
al menu. Premere ⏮ o ⏭ nché compare "System " e premere il tasto
per accedere.
2. Utilizzare ⏮ e ⏭ per selezionare "Station Order" (ordine delle
emittenti) e premere per confermare.
3. Premere ⏮ o ⏭ per selezionare le opzioni disponibili: alfanumerico,
attivo, multiplex. Premere per confermare.
Salvare le emittenti come predenite
Il dispositivo può memorizzare no a 20 emittenti come stazioni
preimpostate.
1. In modalità DAB/FM, sintonizzarsi su un'emittente.
2. Tenere premuto il tasto MENU/INFO. Premere ⏮ o ⏭ no a quando
compare "Preset" sul display. Premere per accedere al
menu.
3. Premere ⏮o ⏭ per selezionare il numero della posizione predenita.
4. Tenere premuto il tasto per salvare l'emittente.
5. Per ascoltare un'emittente predenita: tenere premuto il tasto PRESET
per accedere all'elenco delle emittenti predenite. Premere ⏮ o ⏭ per
63
IT
selezionare l'emittente salvata desiderata. Premere per
confermare e ascoltare l'emittente.
IMPOSTAZIONI
Impostare l'ora
1. Tenere premuto il tasto MENU/INFO per accedere al menu. Premere ⏮
o ⏭ nché compare "System" sul display. Premere poi
per accedere.
2. Premere ⏮ o ⏭ no alla posizione "Time Setup" e premere
per confermare.
3. Premere ⏮ o ⏭ per scorrere tra le seguenti impostazioni.
• Impostare l'ora: premere per accedere a "Set clock"
(impostare l'ora). Premere ⏮ o ⏭ per scorrere i numeri no alla
posizione desiderata e premere per confermare.
• Impostare la data: premere per accedere a "Set date"
(impostare la data). Premere ⏮ o ⏭ per scorrere i numeri no alla
posizione desiderata e premere per confermare. La data
viene mostrata nel formato GG-MM-AAAA.
• Aggiornamento automatico (sincronizzazione dell'ora con la radio):
premere per accedere a "Auto-Update". Premere
⏮ o ⏭ per selezionare le opzioni disponibili: Dalla radio/Nessun
aggiornamento. Premere per confermare.
• Impostare il formato 12/24 ore: premere per accedere a
"Set 12/24 hour". Premere ⏮ o ⏭ per selezionare le opzioni disponibili:
Impostare formato 12 ore/Impostare formato 24 ore. Premere per
confermare.
Impostare la sveglia
1. Tenere premuto MENU/INFO per accedere al menu. Premere ⏮
o ⏭ no a quando compare "System" sul display. Premere poi
per accedere.
2. Premere ⏮ o ⏭ no alla posizione "Alarm" e premere
per entrare.
3. Premere ⏮ o ⏭ per scorrere tra le seguenti opzioni.
• On/O: premere per attivare/disattivare la sveglia.
• Ora: premere ⏮ o ⏭ no alla posizione "Ora" e premere il tasto per
l'inserimento. Premere ⏮ o ⏭ per impostare l'ora e premere per
confermare.
64
IT
• Giorni: premere ⏮ o ⏭ no alla posizione "Giorni" e premere
per l'inserimento. Premere ⏮ o ⏭ per selezionare
le opzioni disponibili: tutti i giorni, una volta sola, giorni feriali, ne
settimana e premere per confermare.
• Modalità: premere ⏮ o ⏭ no alla posizione "Modalità " e premere
per confermare. Premere ⏮ o ⏭ per selezionare la fonte
audio della sveglia. Fonti audio disponibili: DAB, FM, segnale acustico.
Premere per confermare.
• Volume: premere ⏮ o ⏭ no alla posizione "Volume" e premere
per confermare. Premere ⏮ o ⏭ per selezionare il volume
della sveglia e premere per confermare.
• Ascoltata di recente: premere ⏮ o ⏭ no alla posizione "Ascoltata di
recente" e premere per confermare. Premere ⏮ oder
⏭ per selezionare la posizione di memoria desiderata come fonte
audio per la sveglia. Premere per confermare. (Nota: la
funzione è disponibile quando la posizione di memoria è impostata).
• Salvare: una volta completata l'impostazione, premere ⏮ o ⏭ no alla
posizione "Salvare" e premere per salvare l'impostazione
della sveglia. Quando l'impostazione della sveglia è attiva, sul display
compare il simbolo corrispondente per Sveglia 1 o Sveglia 2.
Nota: la sveglia suona all'ora impostata. Il volume aumenterà gradualmente
no a raggiungere il livello impostato. Sul display lampeggia anche il
simbolo della sveglia corrispondente. Quando suona la sveglia, premere
un tasto qualsiasi (tranne quello del volume) sul pannello di controllo per
spegnerla.
Funzione SNOOZE: quando suona la sveglia, girare la manopola del
volume sul dispositivo o il tasto VOL sul telecomando per attivare la
funzione SNOOZE e continuare a dormicchiare per 10 minuti. Premere un
tasto qualsiasi (tranne la manopola VOLUME) sul pannello di controllo per
spegnere la sveglia.
Impostazione del timer di autospegnimento
Questo dispositivo può passare automaticamente alla modalità standby
dopo un certo periodo di tempo.
1. Tenere premuto MENU/INFO per accedere al menu. Premere ⏮ o
⏭ nché compare "System" sul display. Premere per
confermare.
2. Premere ⏮ o ⏭ no alla posizione "Sleep" e premere per
impostare la durata.
3. Premere ⏮ o ⏭ per selezionare il periodo di tempo: O, 15, 30, 45, 60,
90. Premere il tasto per confermare.

65
IT
Selezionare la lingua
1. Tenere premuto MENU/INFO per accedere al menu. Premere ⏮ o ⏭
nché compare "System" sul display. Premere poi per
accedere.
2. Premere ⏮o ⏭ no alla posizione "Language" (lingua) e premere per
confermare .
3. Premere ⏮ o ⏭ per selezionare la lingua desiderata. Premere
per confermare.
Impostazione della retroilluminazione
1. Tenere premuto MENU/INFO per accedere al menu. Premere ⏮ o
⏭ nché compare "System" sul display. Premere per
confermare.
2. Premere ⏮ o ⏭ no alla posizione "Backlight" (retroilluminazione) e
premere per confermare.
3. Premere ⏮ o ⏭ per scorrere tra le seguenti opzioni.
• Timeout (per impostare la durata no allo spegnimento della
retroilluminazione): premere per accedere a "Timeout".
Premere ⏮ o ⏭ per selezionare le opzioni di timeout: On (l'intensità
della retroilluminazione non diminuisce), 10 secondi, 20 secondi, 30
secondi, 45 secondi, 60 secondi, 90 secondi, 120 secondi, 180 secondi e
premere per confermare.
• On Level(per impostare il livello di luminosità quando la
retroilluminazione è accesa): premere per accedere a
"On level". Premere ⏮ o ⏭ per selezionare i livelli di luminosità: Alto/
Basso/Medio e premere per confermare.
Resettare alle impostazioni di fabbrica
1. Tenere premuto MENU/INFO per accedere al menu. Premere ⏮ o ⏭
nché compare "System" sul display. Premere poi per
accedere.
2. Premere ⏮ o ⏭ no alla posizione "Factory reset" e premere
per confermare.
3. Premere ⏮ o ⏭ per selezionare "Sì". Quindi premere il tasto
per confermare il ripristino delle impostazioni di
fabbrica.
Visualizzare la versione del software (SW version)
1. Tenere premuto MENU/INFO per accedere al menu. Premere ⏮ o ⏭
nché compare "System" sul display. Premere poi per
66
IT
RISOLUZIONE DEI PROBLEMI
Se si verica il seguente problema, utilizzare il metodo seguente. Se il
problema non può essere risolto, contattare il servizio clienti.
Problema Soluzione
Non si sente alcun suono. 1. Controllare il collegamento del lettore
al telefono cellulare o ad altri dispositivi
audio.
2. Il volume è troppo basso. Regolare il
volume.
Il lettore CD non riproduce
un CD.
1. Vericare che il CD sia inserito nella
direzione corretta.
2. Controllare se nel vano è presente
un CD.
3. Il CD è sporco. Pulire il CD.
Il telecomando non funziona. 1. Rimuovere tutti gli oggetti che si
trovano tra il telecomando e il lettore.
2. Quando la batteria è scarica,
sostituirla con una nuova(batteria a
bottone CR 2032).
3. Alla consegna, nel vano batteria
è inserita una pellicola isolante.
Rimuoverla prima dell'uso.
Il tasto non funziona. Questo può essere causato dalla
tensione di rete o da qualche altro
disturbo. Spegnere il dispositivo e
riaccenderlo dopo 10 secondi.

67
IT
SMALTIMENTO
Se nel proprio paese si applicano le
regolamentazioni inerenti lo smaltimento di
dispositivi elettrici ed elettronici, questo simbolo
sul prodotto o sulla confezione segnala che questi
prodotti non possono essere smaltiti con i riuti
normali e devono essere portati a un punto di
raccolta di dispositivi elettrici ed elettronici. Grazie
al corretto smaltimento dei vecchi dispositivi si
tutela il pianeta e la salute delle persone da possibili
conseguenze negative. Informazioni riguardanti
il riciclo e lo smaltimento di questi prodotti si
ottengono presso l’amministrazione locale oppure il
servizio di gestione dei riuti domestici.
Il prodotto contiene batterie. Se nel proprio
paese si applicano le regolamentazioni inerenti
lo smaltimento di batterie, non possono essere
smaltite con i normali riuti domestici. Preghiamo
di informarvi sulle regolamentazioni vigenti sullo
smaltimento delle batterie. Grazie al corretto
smaltimento dei vecchi dispositivi si tutela l’ambiente
e la salute delle persone da conseguenze negative.
DICHIARAZIONE DI CONFORMITÀ
Produttore:
Chal-Tec GmbH, Wallstraße 16, 10179 Berlino,
Germania.
Importatore per la Gran Bretagna:
Berlin Brands Group UK Limited
PO Box 42
272 Kensington High Street
London, W8 6ND
United Kingdom
Il fabbricante, Chal-Tec GmbH, dichiara che il tipo di
apparecchiatura radio Glastonbury DAB è conforme
alla direttiva 2014/53/UE. Il testo completo della
dichiarazione di conformità UE è disponibile al
seguente indirizzo Internet: use.berlin/10041146

68
IT
accedere.
2. Premere ⏮ o ⏭ no alla posizione "SW version" e premere
per confermare.
3. Viene mostrata la versione del software di sistema.

69
ES
CONTENIDO
Datos técnicos 70
Indicaciones de seguridad 71
Descripción general del aparato 73
Modo BT 75
Modo AUX IN 75
Funcionamiento del USB 75
Reproductor de CD 76
Radio UKW 77
Radio DAB 77
Conguración 79
Reparación de anomalías 83
Indicaciones sobre la retirada del aparato 84
Declaración de conformidad 84
Estimado cliente:
Le felicitamos por la adquisición de este produc-
to. Lea atentamente el siguiente manual y siga
cuidadosamente las instrucciones de uso con el
n de evitar posibles daños. La empresa no se
responsabiliza de los daños ocasionados por un
uso indebido del producto o por haber desaten-
dido las indicaciones de seguridad. Escanee el
siguiente código QR para obtener acceso al ma-
nual de usuario más reciente y otra información
sobre el producto.

70
ES
DATOS TÉCNICOS
Número del artículo 10041146, 10041147
Suministro eléctrico
Entrada del adaptador de
red
Entrada del adaptador de
red
100-240 V ~ 50/60 Hz
12 V ⎓ 2 A
Reproductor de CD
Formatos de disco
compatibles
CD/MP3/WMA
Radio UKW
Frecuencias 87,5–108MHz
Radio DAB
Frecuencias 174,928 - 239,200MHz
BT
Rango de frecuencia BT 2400 GHz - 2480 MHz
Potencia de transmisión BT 2dBm

71
ES
INDICACIONES DE SEGURIDAD
Indicaciones generales de seguridad
ATENCIÓN
¡Peligro de lesiones! No escuche la música a un volumen
demasiado alto, ya que podría provocar daños auditivos.
• Los niños mayores de 8 años y las personas con discapacidad física,
sensorial o psíquica pueden utilizar el aparato si han sido previamente
instruidos por una persona responsable sobre el funcionamiento del
mismo y conocen las funciones, las indicaciones de seguridad y los
riesgos asociados.
• Nunca abra la tapa del aparato y no intente reparar el aparato usted
mismo.
• Contacte con personal cualicado en caso de reparaciones. El aparato
no contiene piezas que el usuario pueda reparar.
• Un uso inadecuado puede dañar el aparato y provocar la cancelación de
la garantía.
Suministro eléctrico
• Utilice solamente la fuente de alimentación incluida en el envío. El uso
de cualquier otra fuente de alimentación puede provocar la cancelación
de la garantía o causar daños irreparables en el aparato.
• En caso de tormenta, desconecte el enchufe de la toma de corriente.
• Asegúrese de que el aparato esté apagado antes de desenchufarlo de la
red eléctrica.
• Si utiliza una base múltiple o el enchufe como dispositivo de
desconexión, debe tener en cuenta que siempre deba estar accesible y
listo para funcionar.
• Nunca tire las pilas al fuego ni intente abrir la carcasa protectora.
• Las pilas son nocivas si se ingieren y deben guardarse fuera del alcance
de los niños.
Ventilación
• No obstruya ni cubra las rejillas de ventilación, oricios o aberturas del
aparato con objetos como alfombras, paños y similares, ya que podrían
poner en riesgo su funcionalidad o ventilación en cuanto a un uso
seguro.
• La parte inferior del aparato puede calentarse si se utiliza durante un
periodo de tiempo prolongado. Se trata de un fenómeno normal.
72
ES
Lugar de instalación
• Asegúrese de que el aparato esté colocado sobre una supercie plana
y estable.
• Coloque el aparato a un máximo de 1,4 metros de la toma de corriente
más cercana. Asegúrese de que el cable de alimentación y el cable del
altavoz no provoquen tropiezos.
• Coloque el aparato al menos a un metro de otros dispositivos eléctricos
para evitar interferencias.
• Asegúrese de que el aparato tenga suciente espacio hacia arriba para
que la antena se pueda orientar correctamente.
• Nunca coloque el aparato directamente sobre supercies antiguas o
pulidas.
ADVERTENCIA:
¡Peligro de muerte! ¡Peligro de quemaduras químicas!
No te tragues las pilas. El mando a distancia
suministrado con este producto contiene una pila de
botón. Si se ingiere la pila de botón, puede causar
graves quemaduras internas y la muerte en el plazo de
2 horas. Si cree que se pueden haber ingerido las pilas,
o que se han introducido en alguna parte del cuerpo,
busque atención médica inmediatamente.
Indicaciones sobre el láser
ATENCIÓN
¡Peligro de lesiones! Nunca toque ni mire directamente la
lente óptica del compartimento de CD.
• Este aparato es un producto láser de clase 1.
• El uso de controles distintos a los especicados en el manual de
instrucciones o la modicación no autorizada del aparato puede
provocar una exposición perjudicial a la radiación láser.

73
ES
DESCRIPCIÓN GENERAL DEL APARATO
Vista frontal
1 LED
2 Sensor IR para el mando a
distancia
3 Bandeja de CD
4 Modo
interruptor ON/OFF
5 Botón de menú/información
6 Memoria de repetición/
transmisión
7 Título/emisora de radio anterior
8 Título/emisora de radio
posterior
9 Búsqueda de canales /
reproducción o pausa /
conrmación de entrada
10 Stop
Vista trasera
11 Expulsar CD
12 Regulador de volumen
13 Conexión USB
14 Suministro eléctrico (fuente de
alimentación)
15 Entrada de audio
16 Antena

74
ES
Mando a distancia
Botones
1 Encender/apagar
2 Repetir/Parar
3 Modo
4 Menú/info
5 Subir el volumen
6 Programa/Memoria de emisoras
7 Reproducción o pausa / conrmación de entrada / búsqueda de
emisoras
8 Título/emisora de radio anterior
9 Título/emisora de radio posterior
10 Disminuir el volumen
11 Teclas numéricas

75
ES
Primeros pasos
1. Pulse y mantenga pulsado el botón POWER para encender el aparato.
El aparato pasa al modo de espera. La pantalla muestra "00:00" y
parpadea. La fecha y la hora se ajustan automáticamente cuando la
unidad recibe señales de emisión locales (y cuando dicha información
está disponible).
2. Pulse de nuevo el botón POWER para entrar en el menú. (Nota: Al
pulsar el botón POWER se alterna entre el modo de encendido y el
modo de espera (visualización de la hora y la fecha).
MODO BT
Cuando utilices tu dispositivo BT con este altavoz por primera vez, primero
debes conectarlo o "emparejarlo" con el altavoz.
1. Pulse el botón MODE varias veces para seleccionar el modo USB. La
pantalla muestra "Pairing", lo que signica que el sistema ha activado
el modo de emparejamiento y puede ser buscado por su dispositivo
con BT.
2. Activa tu dispositivo con BT y selecciona el modo de búsqueda.
"Glastonbury Go" aparece en la lista de tus dispositivos BT. Seleccione
"Glastonbury Go" en la lista de emparejamientos.
3. Tras el emparejamiento exitoso, suena una señal acústica. La pantalla
muestra "Conectado". Si la unidad que se va a emparejar no está
conectada, la unidad también emite un pitido.
MODO AUX IN
Pulse el botón MODE varias veces para seleccionar el modo USB. Utilice un
cable de audio de 3,5 mm (no incluido) para conectar el reproductor a otros
dispositivos de salida de audio (por ejemplo: teléfono móvil, etc.).
FUNCIONAMIENTO DEL USB
Pulse el botón MODE varias veces para seleccionar el modo USB. Inserte
el controlador ash USB con documentos MP3, la unidad reproduce los
archivos MP3 automáticamente.

76
ES
REPRODUCTOR DE CD
1. Pulse el botón Mode varias veces para seleccionar el modo CD. Si no
hay ningún disco en la bandeja, aparece "NO DISC".
2. Pulse el botón de apertura/cierre del compartimento del CD para abrir
la tapa del CD.
3. Introduzca un CD en el compartimento para CDs con la etiqueta hacia
arriba y pulse el botón para cerrar la puerta del CD.
4. Utilice los controles del aparato o del mando a distancia para iniciar la
reproducción del CD introducido.
Parar la reproducción
• En el modo CD, pulse el botón STOP de la unidad o mantenga
pulsado el botón REPEAT/STOP del mando a distancia para detener
la reproducción. Pulsa este botón para empezar con la primera pista y
reproducir en orden.
Función de repetición
• En el modo CD/USB, cuando se pulsa REPEAT por primera vez durante
la reproducción de música, se repite la reproducción actual. Si pulsa
dos veces REPEAT, se repite todo el CD. Pulse tres veces REPEAT para
cancelar la función de repetición.
Función del programa
La programación de pistas en el CD sólo es posible cuando la reproducción
está detenida.
1. Pulse o mantenga pulsado el botón STOP de la unidad y pulse
REPEAT/STOP en el mando a distancia para entrar en el estado de
parada.
2. Pulse el botón PRESET para entrar en el programa del menú. En la
pantalla aparece «PG».
3. Pulse la tecla PREV/NEXT o la tecla numérica para seleccionar la pista
que desee programar. Pulse el botón PRESET para conrmar. En la
pantalla aparece «P01».
4. Repita el paso anterior para almacenar más títulos deseados hasta que
todos los títulos estén programados.
5. Pulse el botón para iniciar la reproducción desde la
primera pista programada.
(Nota: Mantenga pulsado el botón STOP dos veces para borrar el programa
cuando el CD se haya detenido).

77
ES
RADIO UKW
1. Esta antena de la radio se encuentra en la parte posterior del aparato.
Si quieres escuchar la radio, saca la antena.
2. Pulse el botón MODE varias veces para seleccionar el modo UKW.
3. Buscar emisoras
• Mantenga pulsado el botón para buscar
automáticamente una emisora. El aparato almacena las emisoras de
radio automáticamente una vez nalizada la búsqueda. Pulse la tecla ⏮
o ⏭ para seleccionar una emisora.
• Pulse para buscar los canales manualmente.
• Mantenga pulsado el botón ⏮ o ⏭ para sintonizar hacia arriba o hacia
abajo la banda de frecuencia.
Conguración de audio
Esta unidad puede cambiar entre mono y estéreo en modo FM.
1. En el modo FM, mantenga pulsado el botón MENU|INFO para entrar
en el menú. en la pantalla aparece "Audo setting". Pulse el botón
para conrmar.
2. Pulse el botón⏮ o ⏭ para seleccionar las opciones disponibles:
'Stereo allowed' (Estéreo), 'Forced mono' (Mono forzado). Pulse el
botón para conrmar.
RADIO DAB
1. La antena de radio se encuentra en la parte trasera de la unidad. Si
quieres escuchar la radio, saca la antena.
2. Pulse el botón MODE varias veces para seleccionar el modo DAB.
3. Mantenga pulsado el botón para buscar emisoras
automáticamente. El aparato almacena las emisoras de radio
automáticamente una vez nalizada la búsqueda.
4. Pulse la tecla ⏮ o ⏭ para seleccionar el canal en la lista de canales.
Pulse el botón ⏯para conrmar.
Borrar la memoria de emisoras
Esta función elimina todas las emisoras de la lista de emisoras DAB que no
se pueden recibir en su zona.

78
ES
En el modo DAB, mantenga pulsado el botón MENU|INFO para entrar en
el menú. Pulse la tecla ⏮ o ⏭ hasta que aparezca "Sistema". Finalmente,
pulse la tecla para conrmar.
5. Utilice las teclas⏮ y ⏭ para seleccionar "Prune" y pulse para
conrmar.
6. Pulse la tecla ⏮ o ⏭ y seleccione "Sí para eliminar los canales no
válidos de la lista de canales". Pulse el botón para
conrmar.
DRC (control de rango dinámico)
El DRC activa o desactiva cierta ecualización de las diferencias de volumen
entre las emisoras de radio.
1. En el modo DAB, mantenga pulsada la tecla MENU|INFO. Pulse la
tecla ⏮ o ⏭ hasta que aparezca "Sistema". A continuación, pulse
para conrmar.
2. Utilice las teclas⏮ y ⏭ para seleccionar "DRC" y pulse
para conrmar.
3. Pulse el botón ⏮ o ⏭ para seleccionar las opciones disponibles: o
(apagado), high (alto), low (bajo). Pulse para conrmar.
• o: no se aplica la alineación
• alto: máxima alineación aplicada
• Low: máxima alineación aplicada
Lista de emisoras
1. En el modo DAB, mantén pulsado el botón MENU|INFO para entrar en
el menú. Pulse la tecla ⏮ o ⏭ hasta que aparezca 'Sistema' y pulse la
tecla para entrar.
2. Utilice las teclas⏮ y ⏭ para seleccionar 'Station order' (orden de las
emisoras) y pulse para conrmar.
3. Pulse la tecla ⏮ o ⏭ para seleccionar las opciones disponibles:
Alfanumérico, Activo, Multiplex. Pulse el botón para
conrmar.
Guardar la emisora preseleccionada
El aparato puede almacenar hasta 20 emisoras como preseleccionadas.
1. En el modo DAB/UKW, sintonice una emisora.
2. Mantenga pulsada la tecla MENU/INFO. Pulse la tecla ⏮ o ⏭ hasta
que aparezca "Preset" en la pantalla. Pulse el botón
para entrar en el menú.
3. Pulse la tecla ⏮o ⏭ para seleccionar un número de preselección.
79
ES
4. Mantenga pulsado el botón para guardar la emisora.
5. Para escuchar una emisora preseleccionada: Mantenga pulsado el
botón PRESET para acceder a la lista de emisoras preseleccionadas.
Pulse los botones ⏮ oder ⏭ para seleccionar la emisora memorizada
deseada. Para escuchar la emisora, pulse el botón para
conrmar.
CONFIGURACIÓN
Congurar la hora
1. Mantén pulsado el botón MENU|INFO para entrar en el menú.
Pulse la tecla ⏮ o ⏭ hasta que aparezca "System" en la pantalla. A
continuación, pulse para acceder.
2. Pulse el botón⏮ o ⏭ hasta la posición 'Conguración de la hora' y
pulse para conrmar.
3. Pulse el botón⏮ o ⏭ para desplazarse por los siguientes ajustes.
• Poner el reloj en hora: Pulse para acceder a 'Set clock'
(Ajustar el reloj). Pulse la tecla ⏮ o ⏭ para desplazarse por los números
hasta la posición deseada y pulse para conrmar.
• Fija la fecha: Pulse para acceder a 'Set date' (Ajustar la
fecha). Pulsa la tecla ⏮ o ⏭ para desplazarte por los números hasta
la posición deseada y pulsa para conrmar. La fecha se
muestra en el formato DD-MM-AAAA.
• Actualización automática (sincronización horaria con la radio): Pulse
para acceder a 'Auto update' (Actualización automática).
Pulse la tecla ⏮ o ⏭ para seleccionar las opciones disponibles: De
la Radio / No hay actualización. Pulse el botón para
conrmar.
• Establecer el formato de 12/24 horas: Pulse para
acceder a 'Set 12/24' (Ajustar 12/24 horas). Pulse el botón⏮ o ⏭ para
seleccionar las opciones disponibles: Ajustar formato de 12 horas
/ Ajustar formato de 24 horas. Pulse el botón para
conrmar.
Congurar la alarma
1. Mantén pulsado MENU|INFO para entrar en el menú. Pulse la tecla ⏮
o ⏭ hasta que aparezca "System" en la pantalla. A continuación, pulse
para acceder.
2. Pulse el botón ⏮ o ⏭ hasta la posición "Alarm" (alarma) y pulse
para entrar.
3. Pulse el botón⏮ o ⏭ para desplazarse por los siguientes ajustes de la
80
ES
alarma.
• Encendido/Apagado: Pulse para encender o apagar la
alarma.
• Hora: Pulse la tecla ⏮ o ⏭ hasta la posición "Hora" y pulse la tecla para
entrar. Pulse el botón ⏮ o ⏭ para ajustar la hora y pulse para conrmar.
• Días: Pulse la tecla ⏮o ⏭ hasta la posición "Día" y pulse la tecla
para entrar. Pulse el botón⏮o ⏭ para seleccionar las
opciones disponibles: o (apagado), high (alto), low (bajo). Pulse para
conrmar.
• Modo: Pulse el botón ⏮ o ⏭ hasta la posición "Modo" y pulse
para entrar. Pulse la tecla ⏮ o ⏭ para seleccionar la
fuente de sonido de la alarma. Opciones de origen: DAB, FM, timbre.
Pulse para conrmar.
• Volumen: Pulse el botón ⏮ o ⏭ hasta la posición "Volumen" y pulse
para entrar. Pulse el botón ⏮ o ⏭ para seleccionar el
volumen de la alarma y pulse para conrmar.
• Última escucha: Pulse el botón ⏮ o ⏭ hasta la posición "Última
escucha" y pulse para entrar. Pulse los botones ⏮ oder
⏭, para seleccionar la posición de memoria deseada para una alarma.
Pulsa para conrmar. (Nota: La función está disponible
cuando la ubicación de la memoria está ajustada)
• Guardar: Una vez completado el ajuste anterior, pulse el botón ⏮ o ⏭
en la posición "Guardar" y pulse para guardar el ajuste
de la alarma. Cuando el ajuste de la alarma está activo, en la pantalla
aparece el símbolo correspondiente a la alarma 1 o a la alarma 2.
Nota: La alarma suena a la hora jada. El volumen se incrementa
gradualmente hasta llegar al volumen establecido. El símbolo de alarma
correspondiente también parpadea en la pantalla. Cuando suene la alarma,
pulse cualquier botón (excepto el control de volumen) del panel de control
para apagar la alarma.
Función SNOOZE: Cuando suene la alarma, gire el control de volumen
de la unidad o el botón VOL del mando a distancia para activar la función
SNOOZE y repetir la alarma durante 10 minutos. Pulsa cualquier botón
(excepto el control de volumen) del panel de control para apagar la alarma.
Ajuste del temporizador para dormir
Esta unidad puede pasar automáticamente al modo de espera después de
un tiempo determinado.
1. Mantén pulsado MENU|INFO para entrar en el menú. Pulse la tecla ⏮
o ⏭ hasta que aparezca "System" en la pantalla. Pulse

81
ES
para conrmar.
2. Pulse el botón⏮ o ⏭ hasta la posición 'Sleep' y pulse
para conrmar.
3. Pulse la tecla ⏮ o ⏭ para seleccionar el periodo de tiempo: Apagado,
15, 30, 45, 60, 90. Pulse el botón para conrmar.
Selección de idioma
1. Mantén pulsado MENU|INFO para entrar en el menú. Pulse la tecla ⏮
o ⏭ hasta que aparezca "System" en la pantalla. A continuación, pulse
para acceder.
2. Pulse el botón⏮o ⏭ hasta la posición 'Language' (idioma) y pulse
para conrmar .
3. Pulse los botones ⏮ o ⏭ para seleccionar el idioma deseado. Pulsa
para conrmar.
Ajuste de la luz de fondo
1. Mantén pulsado MENU|INFO para entrar en el menú. Pulse la tecla ⏮
o ⏭ hasta que aparezca "System" en la pantalla. Pulsa
para conrmar.
2. Pulse el botón⏮ o ⏭ hasta la posición 'Backlight' (luz de fondo) y
pulse para conrmar.
3. Pulse el botón⏮ o ⏭ para desplazarse por las siguientes opciones.
• Tiempo de espera: Para establecer la duración de la luz de fondo antes
de que se atenúe): Pulse para acceder a "Tiempo de
espera". Pulse la tecla ⏮ o ⏭ para seleccionar las opciones de tiempo
de espera: Encendido (la luz de fondo no se atenúa), 10 segundos, 20
segundos, 30 segundos, 45 segundos, 60 segundos, 90 segundos, 120
segundos, 180 segundos, y pulse para conrmar.
• Nivel de encendido: (Para ajustar el nivel de brillo cuando la luz de
fondo está encendida) : Pulse para acceder a "On level".
Pulse la tecla ⏮ o ⏭ para seleccionar los niveles de brillo: Alto/Bajo/
Medio y pulse para conrmar.
Restablecer valores de fábrica
1. Mantén pulsado MENU|INFO para entrar en el menú. Pulse la tecla ⏮
o ⏭ hasta que aparezca "System" en la pantalla. A continuación, pulse
para acceder.
2. Pulse el botón⏮ o ⏭ hasta la posición 'Factory reset' (valores de
fábrica) y pulse para conrmar.
3. Pulse los botones ⏮ o ⏭ para seleccionar 'Sí'. A continuación, pulse el
botón para conrmar el restablecimiento de fábrica.

82
ES
Versión de software (versión SW)
1. Mantén pulsado MENU|INFO para entrar en el menú. Pulse la tecla ⏮
o ⏭ hasta que aparezca "System" en la pantalla. A continuación, pulse
para acceder.
2. Pulse el botón⏮ o ⏭ hasta la posición 'SW version' y pulse
para conrmar.
3. La versión del software del sistema se muestra.

83
ES
REPARACIÓN DE ANOMALÍAS
Si tiene el siguiente problema, utilice el siguiente método. Si el problema
sigue sin resolverse, póngase en contacto con el servicio de atención al
cliente.
Anomalía Solución
No Se escucha ningún sonido. 1. Comprueba la conexión del
reproductor con el teléfono móvil u otro
dispositivo de salida de audio.
2. El volumen es demasiado bajo. Ajuste
el volumen.
El reproductor de CD no
reproduce un CD.
1. Compruebe que el CD está insertado
en la dirección correcta.
2. Comprueba si hay un CD en el cajón.
3. El CD está sucio. Por favor limpie el
CD.
El mando a distancia no
funciona.
1. Retire todos los objetos entre el
mando a distancia y el reproductor.
2. Cuando se agote la pila, sustitúyala
por una nueva (pila de botón CR 2032).
3. Cuando se entrega de fábrica, la
lámina aislante se ha introducido en el
compartimento de la batería. Sácalos
antes de usarlos.
La tecla no funciona. Esto puede ser causado por la tensión
de la red o alguna otra perturbación.
Por favor, apaga el aparato y vuelve a
encenderlo después de 10 segundos.

84
ES
RETIRADA DEL APARATO
Si en su país existe una disposición legal relativa a
la eliminación de aparatos eléctricos y electrónicos,
este símbolo estampado en el producto o en
el embalaje advierte que no debe eliminarse
como residuo doméstico. En lugar de ello, debe
depositarse en un punto de recogida de reciclaje
de aparatos eléctricos y electrónicos. Una gestión
adecuada de estos residuos previene consecuencias
potencialmente negativas para el medio ambiente
y la salud de las personas. Puede consultar más
información sobre el reciclaje y la eliminación de este
producto contactando con su administración local o
con su servicio de recogida de residuos.
Este producto contiene baterías. Si en su país existe
una disposición legal relativa a la eliminación de
baterías, estas no deben eliminarse como residuo
doméstico. Infórmese sobre la normativa vigente
relacionada con la eliminación de baterías. Una
gestión adecuada de estos residuos previene
consecuencias potencialmente negativas para el
medio ambiente y la salud de las personas.
DECLARACIÓN DE CONFORMIDAD
Fabricante:
Chal-Tec GmbH, Wallstraße 16, 10179 Berlín, Alemania.
Importador para Gran Bretaña:
Berlin Brands Group UK Limited
PO Box 42
272 Kensington High Street
London, W8 6ND
United Kingdom
Por la presente, Chal-Tec GmbH declara que el tipo de
equipo radioeléctrico Glastonbury DAB es conforme
con la Directiva 2014/53/UE. El texto completo de la
declaración UE de conformidad está disponible en la
dirección Internet siguiente: use.berlin/10041146