
Setup Instructions
Product No. 3519011
CORDLESS
TILLER

2
Need further help?
suppor[email protected]
See our full range at
www.vonhaus.com
Besoin d’aide supplémentaire ?
suppor[email protected]
Découvrez notre gamme complète sur
www.vonhaus.com
Benötigen Sie weitere Hilfe?
suppor[email protected]
Entdecken Sie unser gesamtes
Sortiment auf
www.vonhaus.com
Necesita más ayuda?
suppor[email protected]
Descubra toda nuestra gama en
www.vonhaus.com
Hai bisogno di ulteriore assistenza?
suppor[email protected]
Scopri tutta la nostra gamma su
www.vonhaus.com

3
Safety
Maintain a safe distance
from bystanders
Do not use in
wet conditions
Protect your ears
Protect your eyes
Wear suitable footwear
Protect your hands
Protective clothing
must be worn
Beware of
kickback
Sharp edges
Potential finger
trap points
4
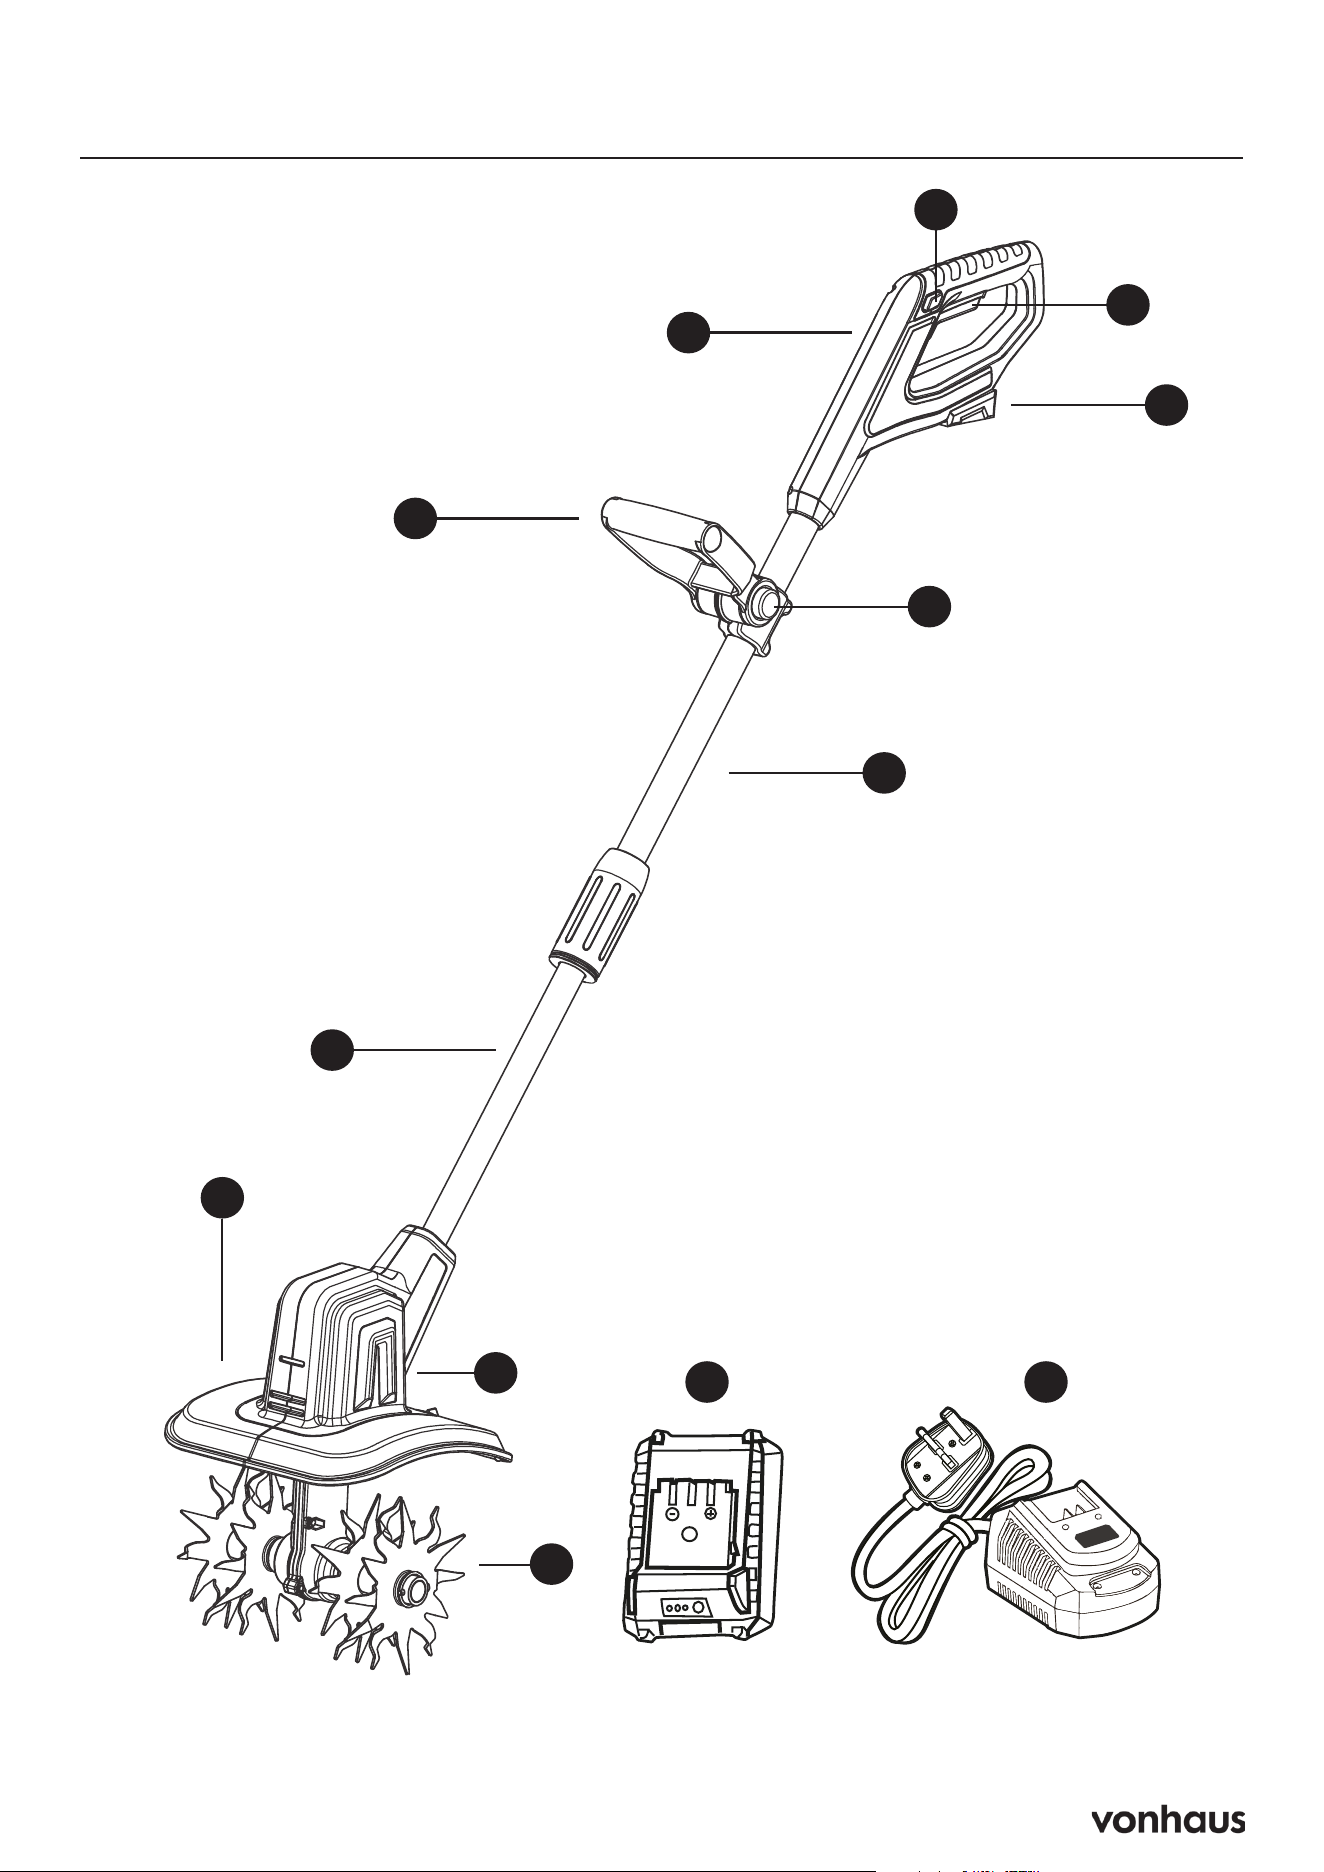
Components
C
L M
G
H
E
B
D
I
K
F
A. Safety Switch
B. Operational Switch
C. Handle
D. Battery Slot
E. Front Handle
F. Handle Adjustment Button
G. Upper Shaft
H. Lower Shaft
I. Safety Guard
J. Motor Housing
K. Blades
L. Battery
M. Charger
A
J
5
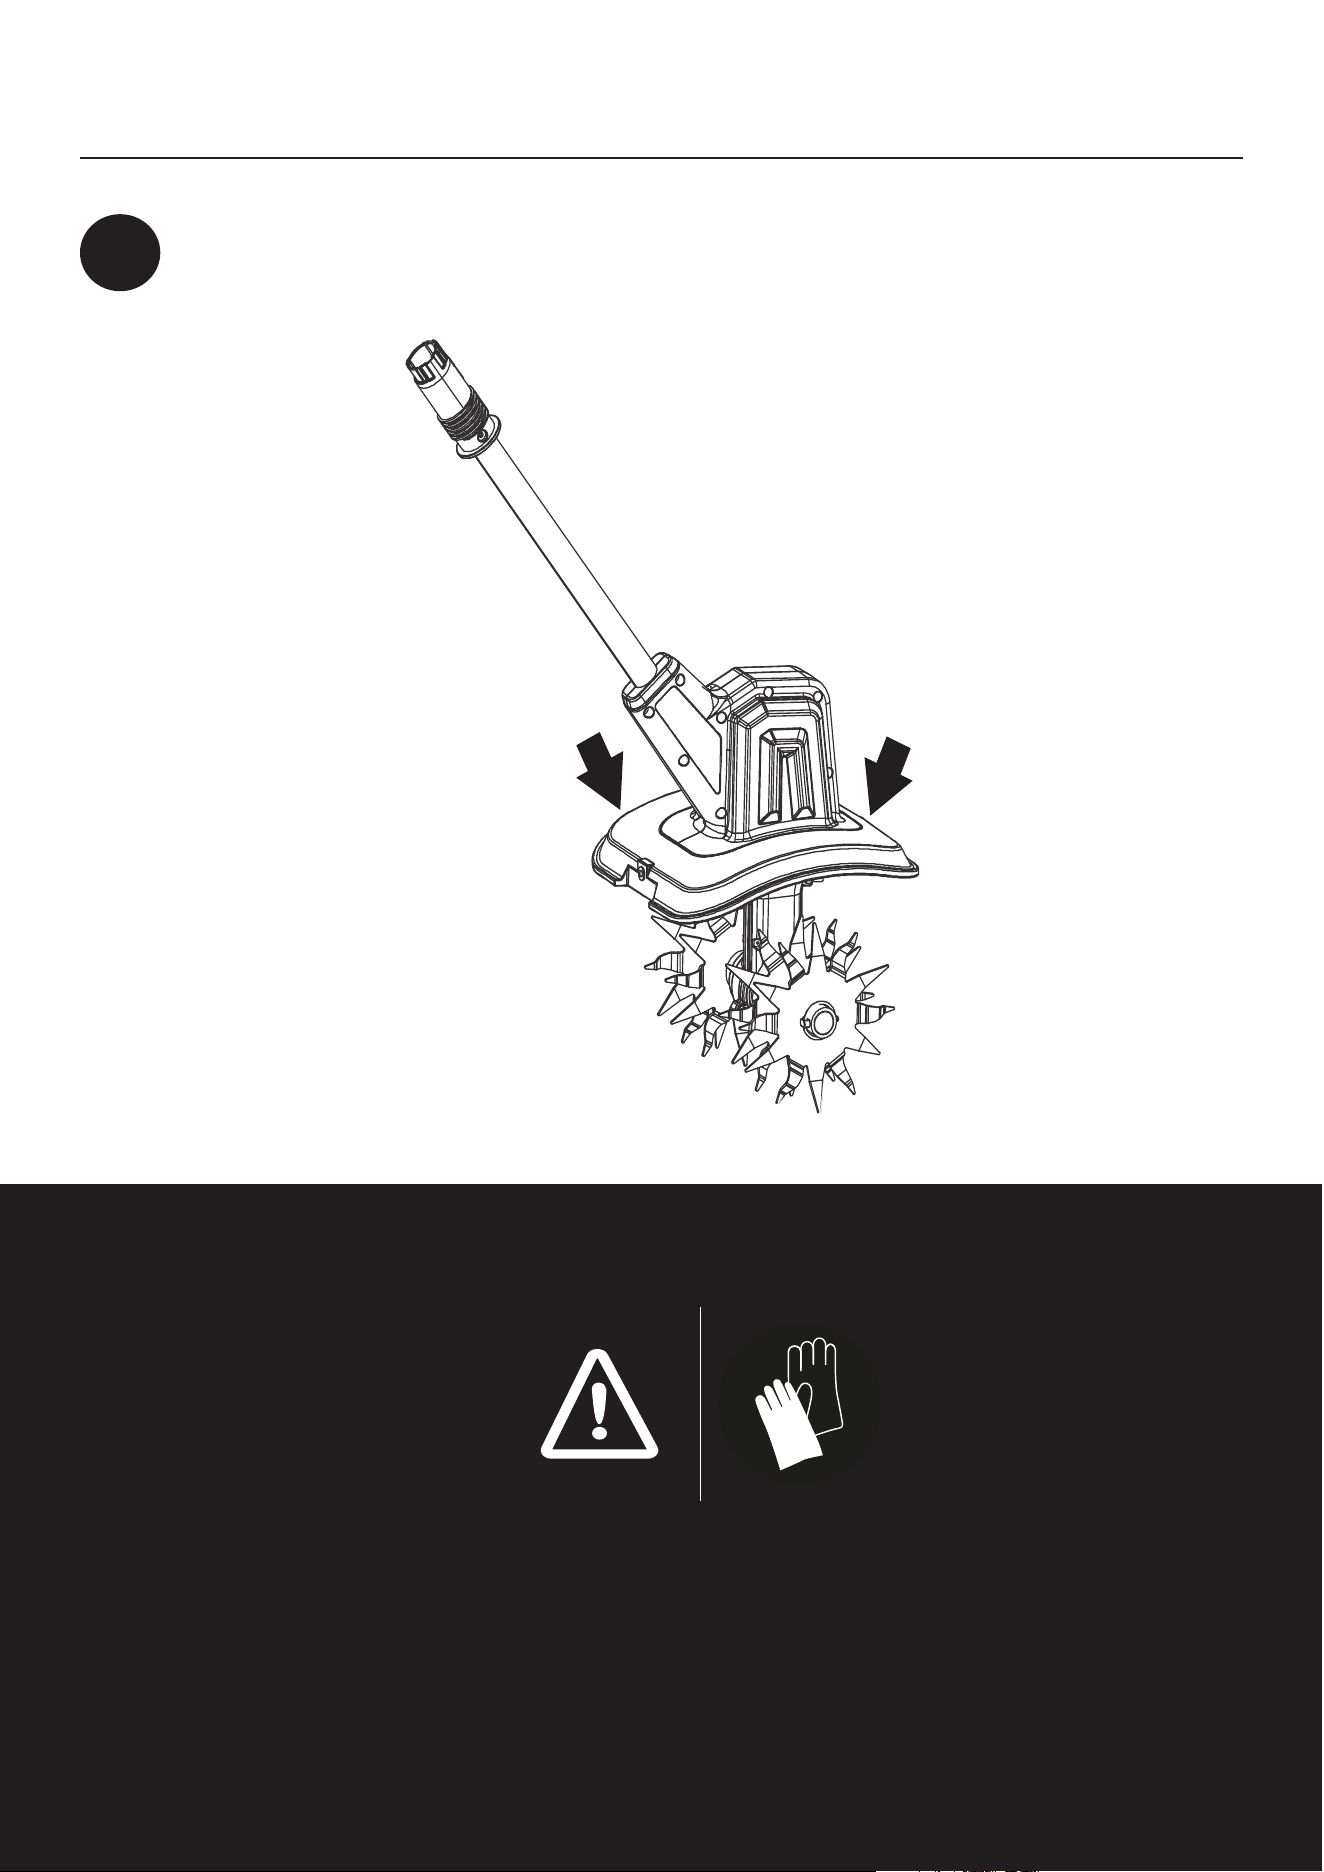
Assembly
1
Put the safety guard onto the motor housing.
WARNING! The Metal Blades are Sharp!
Always wear safety gloves when mounting
and removing the metal blades.

6
Assembly
2
Attach the safety guard with the
screw. Tighten the screw with an
allen wrench.
7
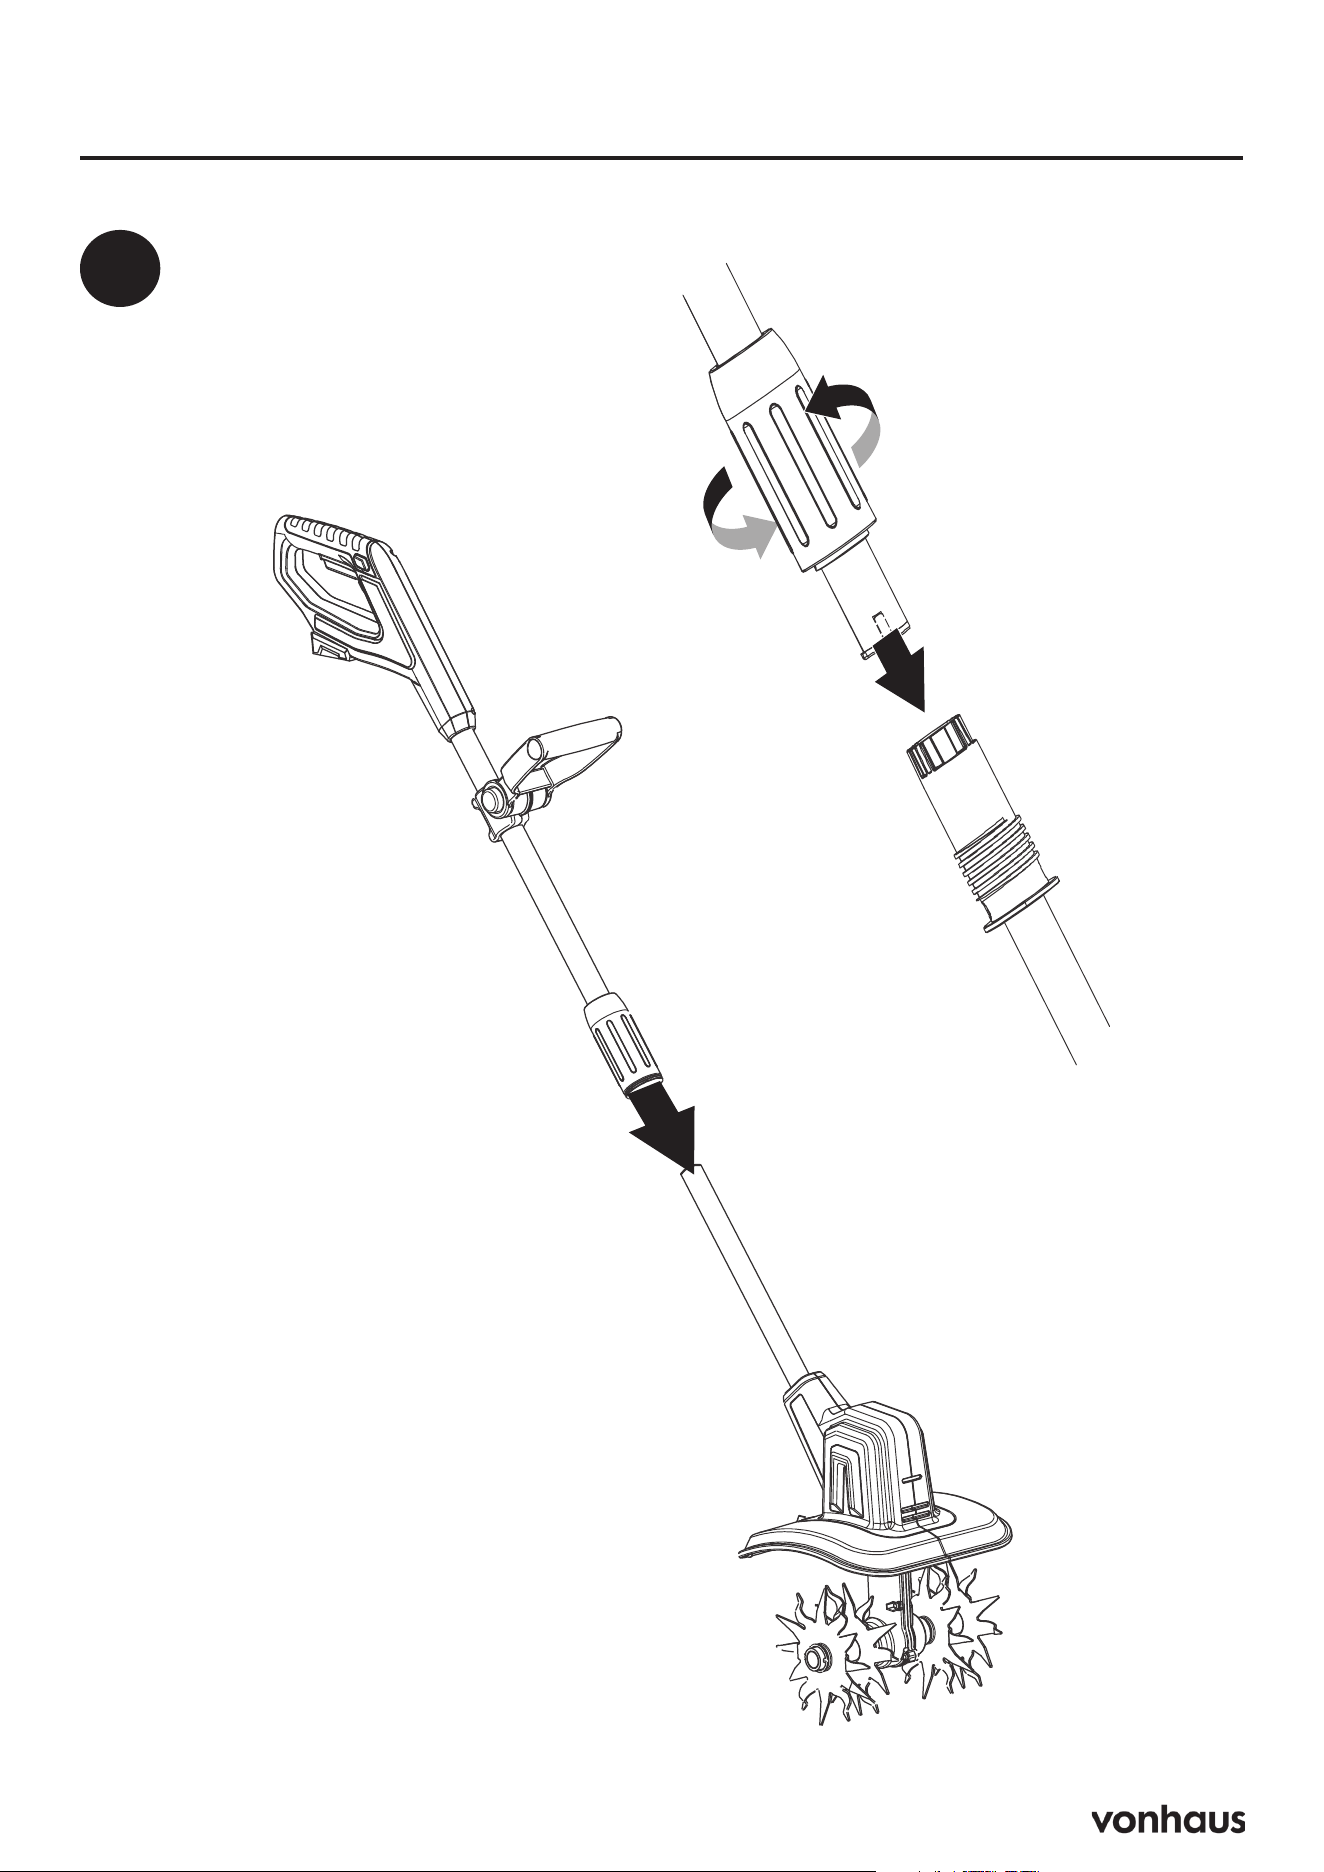
Assembly
3
Insert the upper shaft
into the lower shaft and
tighten the shaft lock.
8
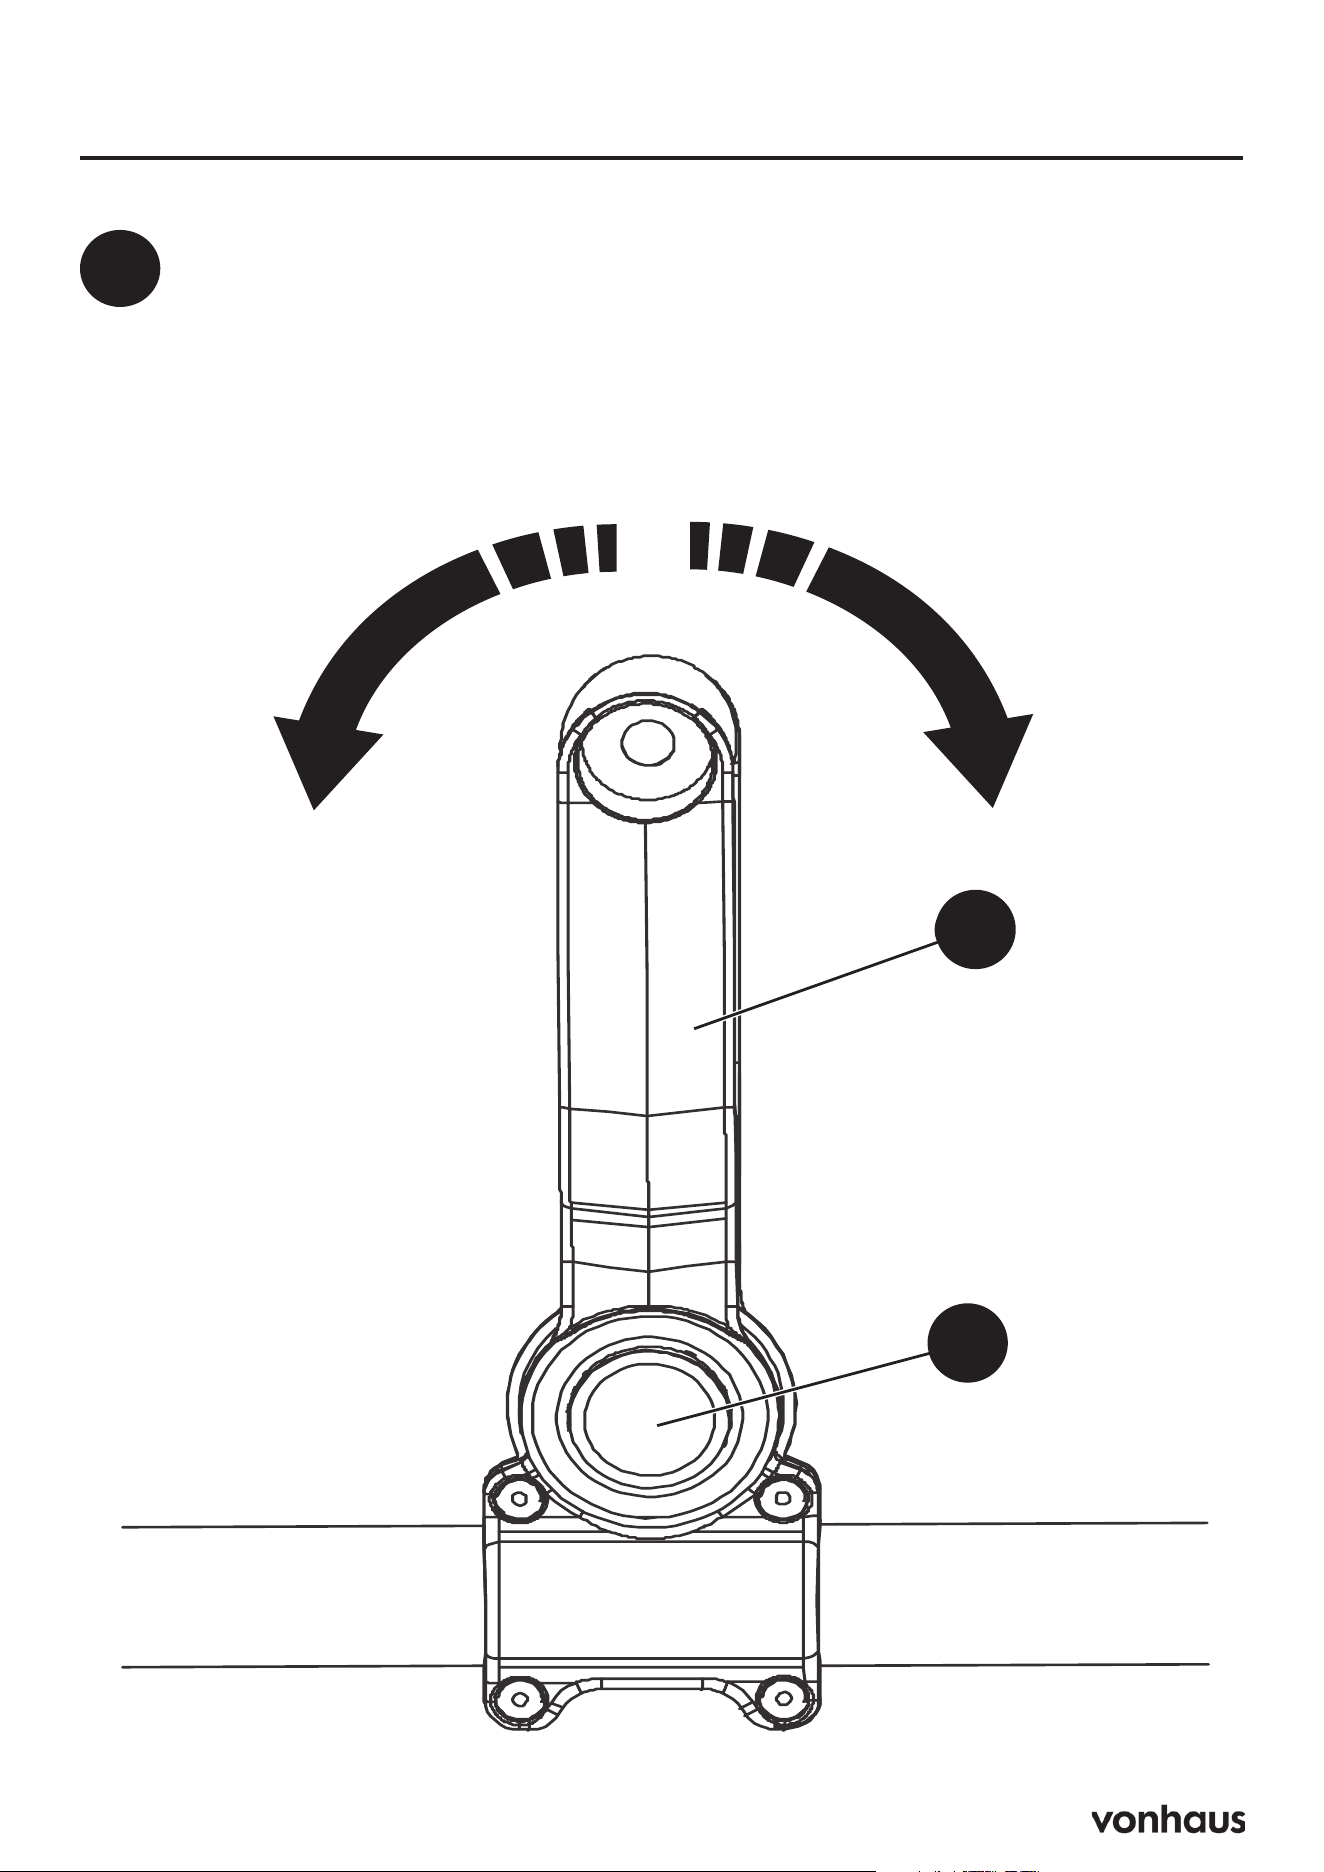
Operation
1
• Push and hold the handle adjust-
ment button (A)
• Adjust the front handle (B) to an
applicable position.
• Release the handle adjustment
button. Make sure that the front
handle locks into place.
A
B
9
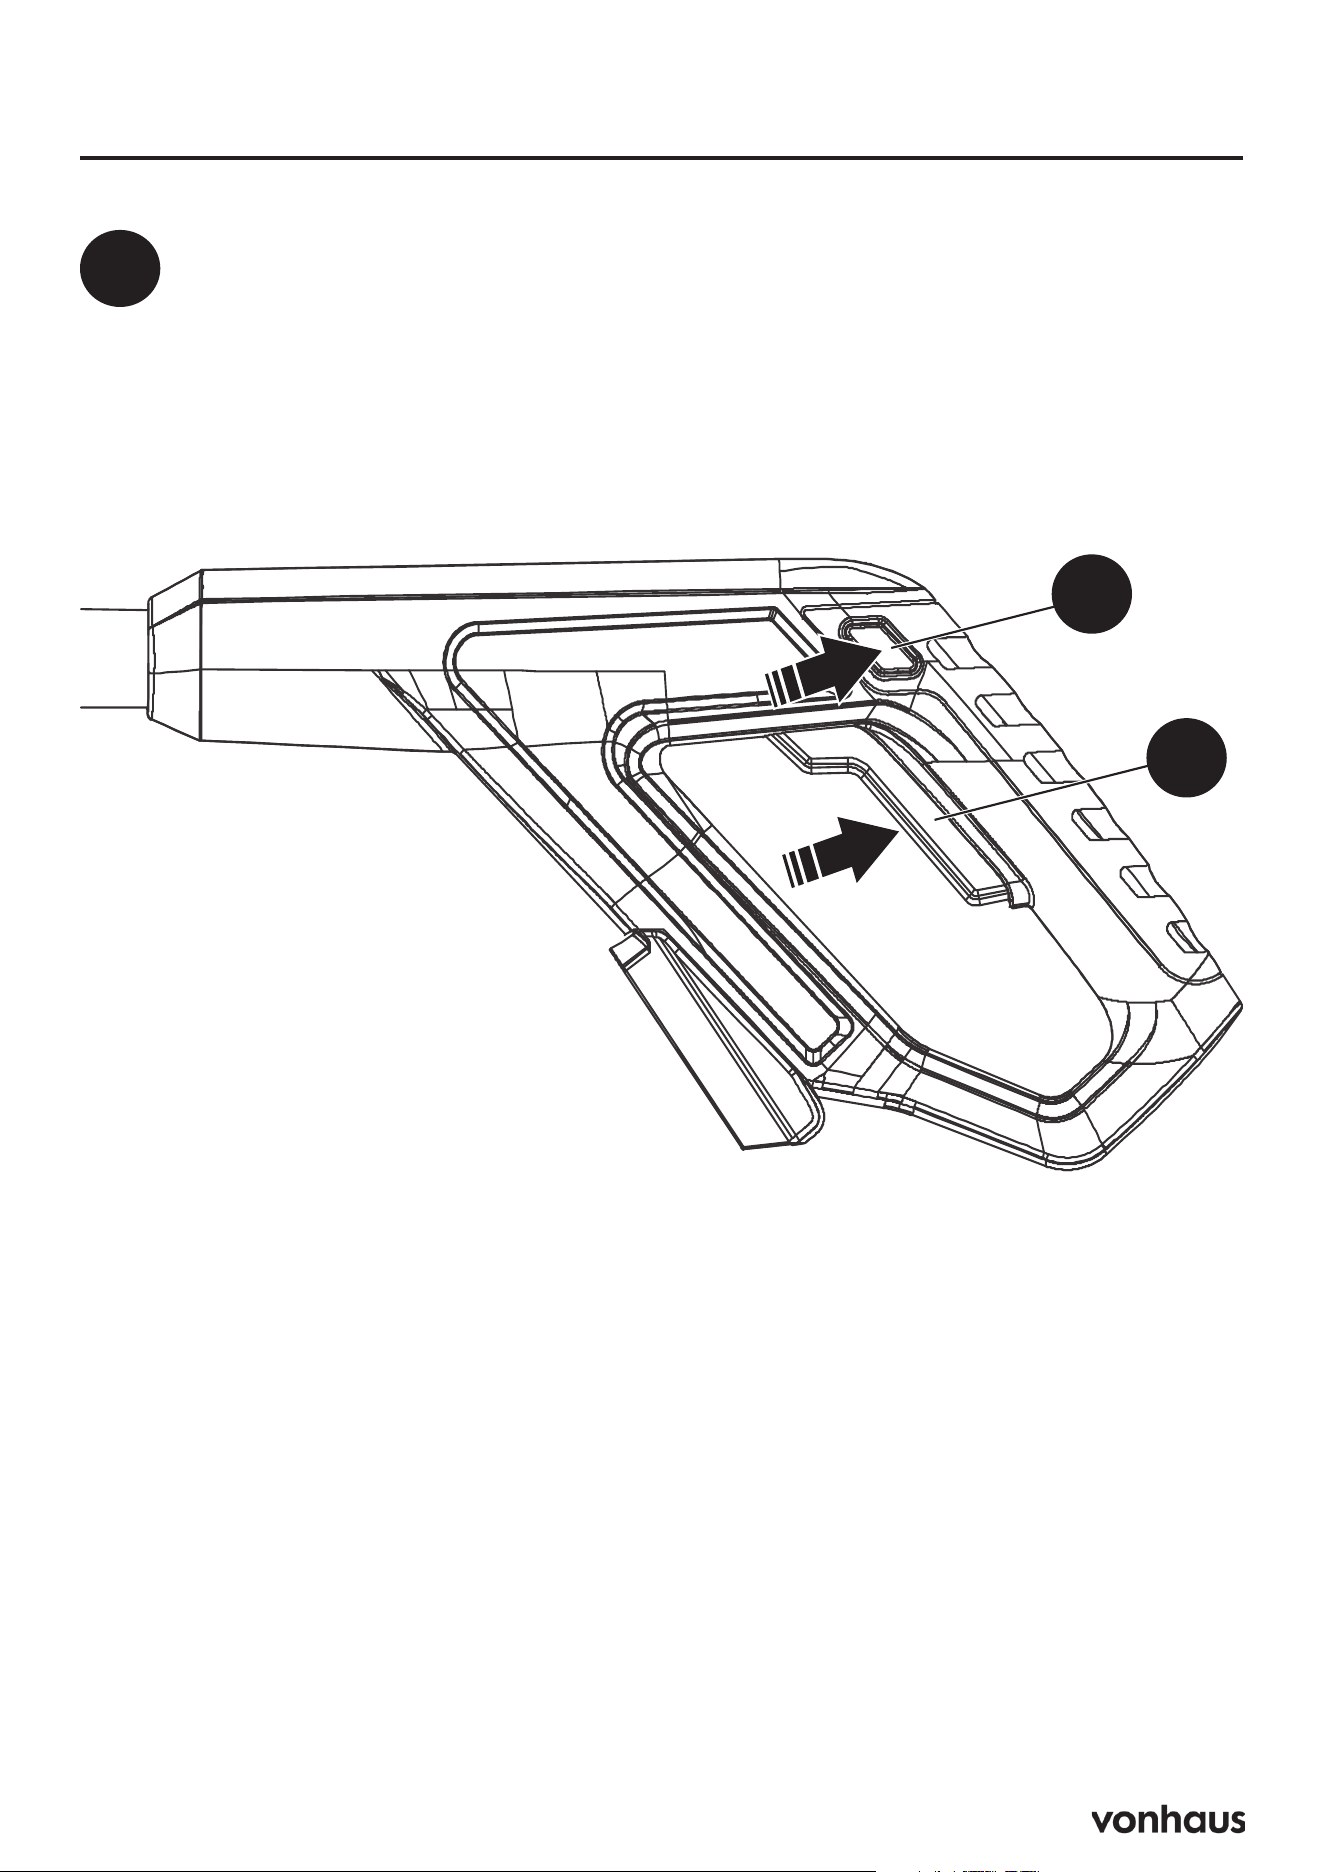
Operation
2
• Hold the product tightly with both
hands.
• Push and hold the safety switch (A).
• Push and hold the power switch (B) to
start the product.
• Release the safety switch
• Move the product slowly forward and
back in a rocking motion. Pull the pod-
uct back towards you and let it move
forward at its own pace.
• Release the power switch to stop the
product.
A
B
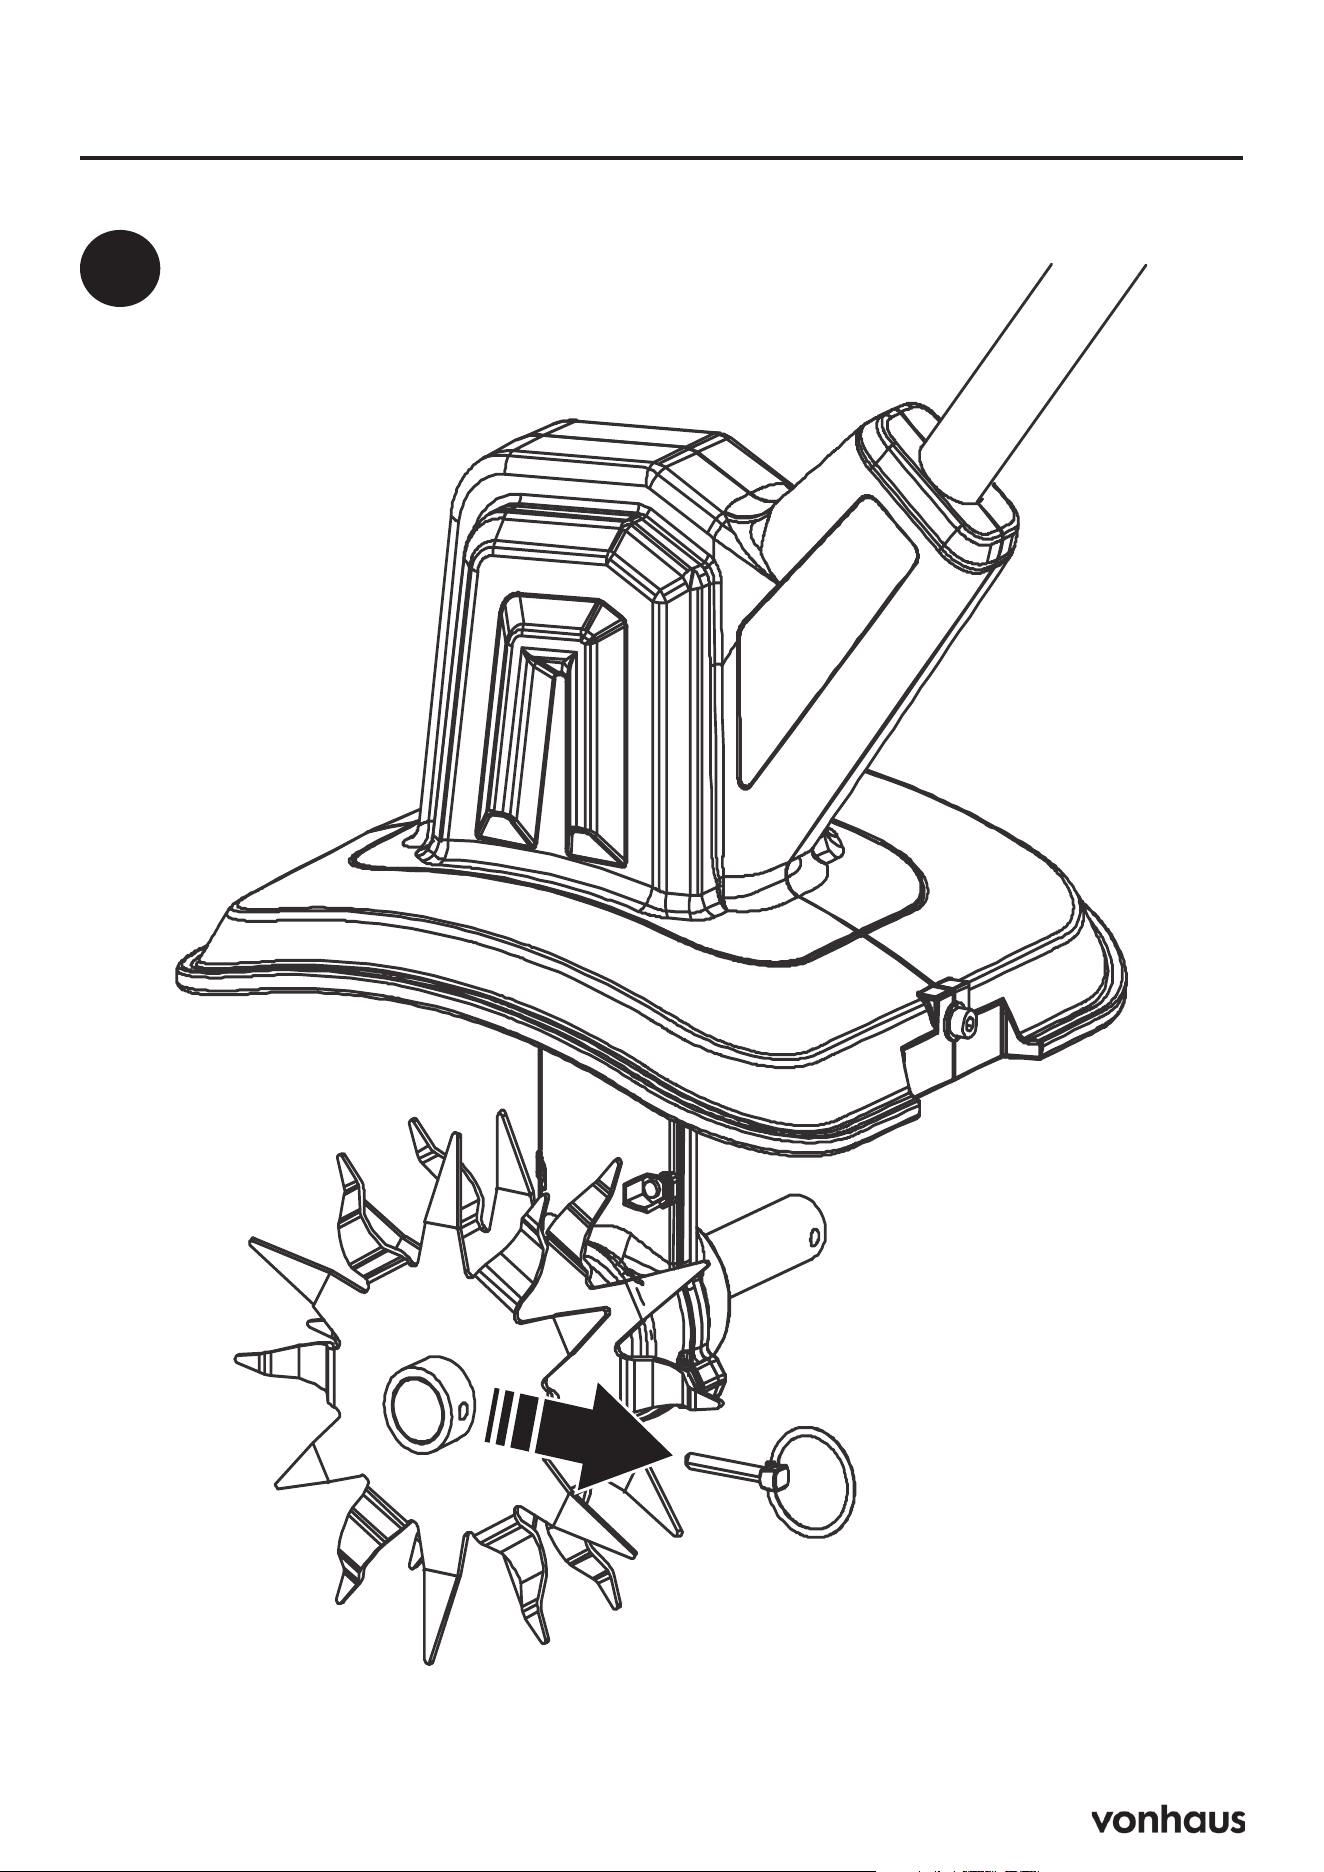
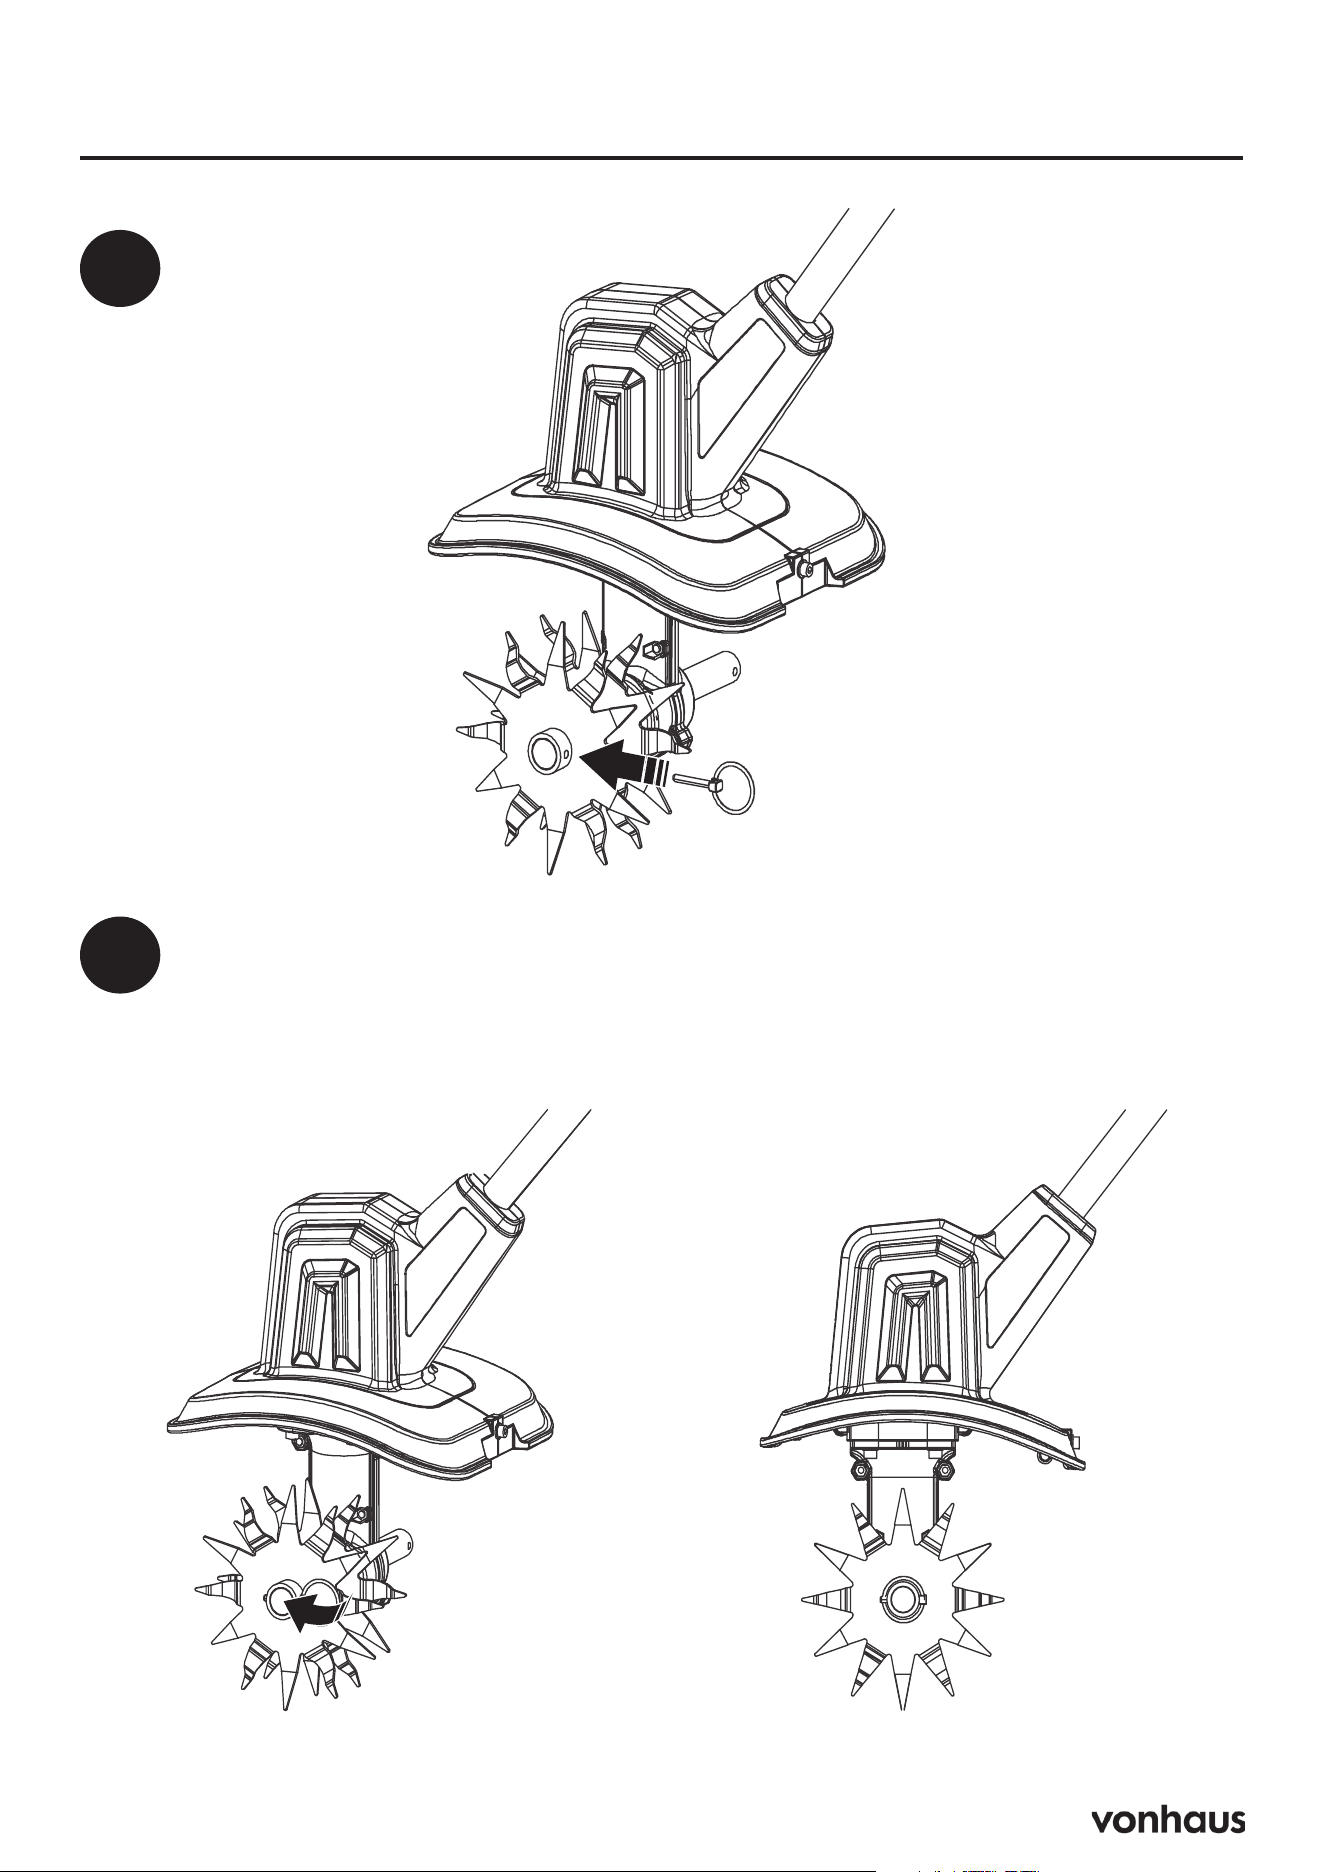
10
Removing / Installing the Blades
1
Remove the
locking pin.
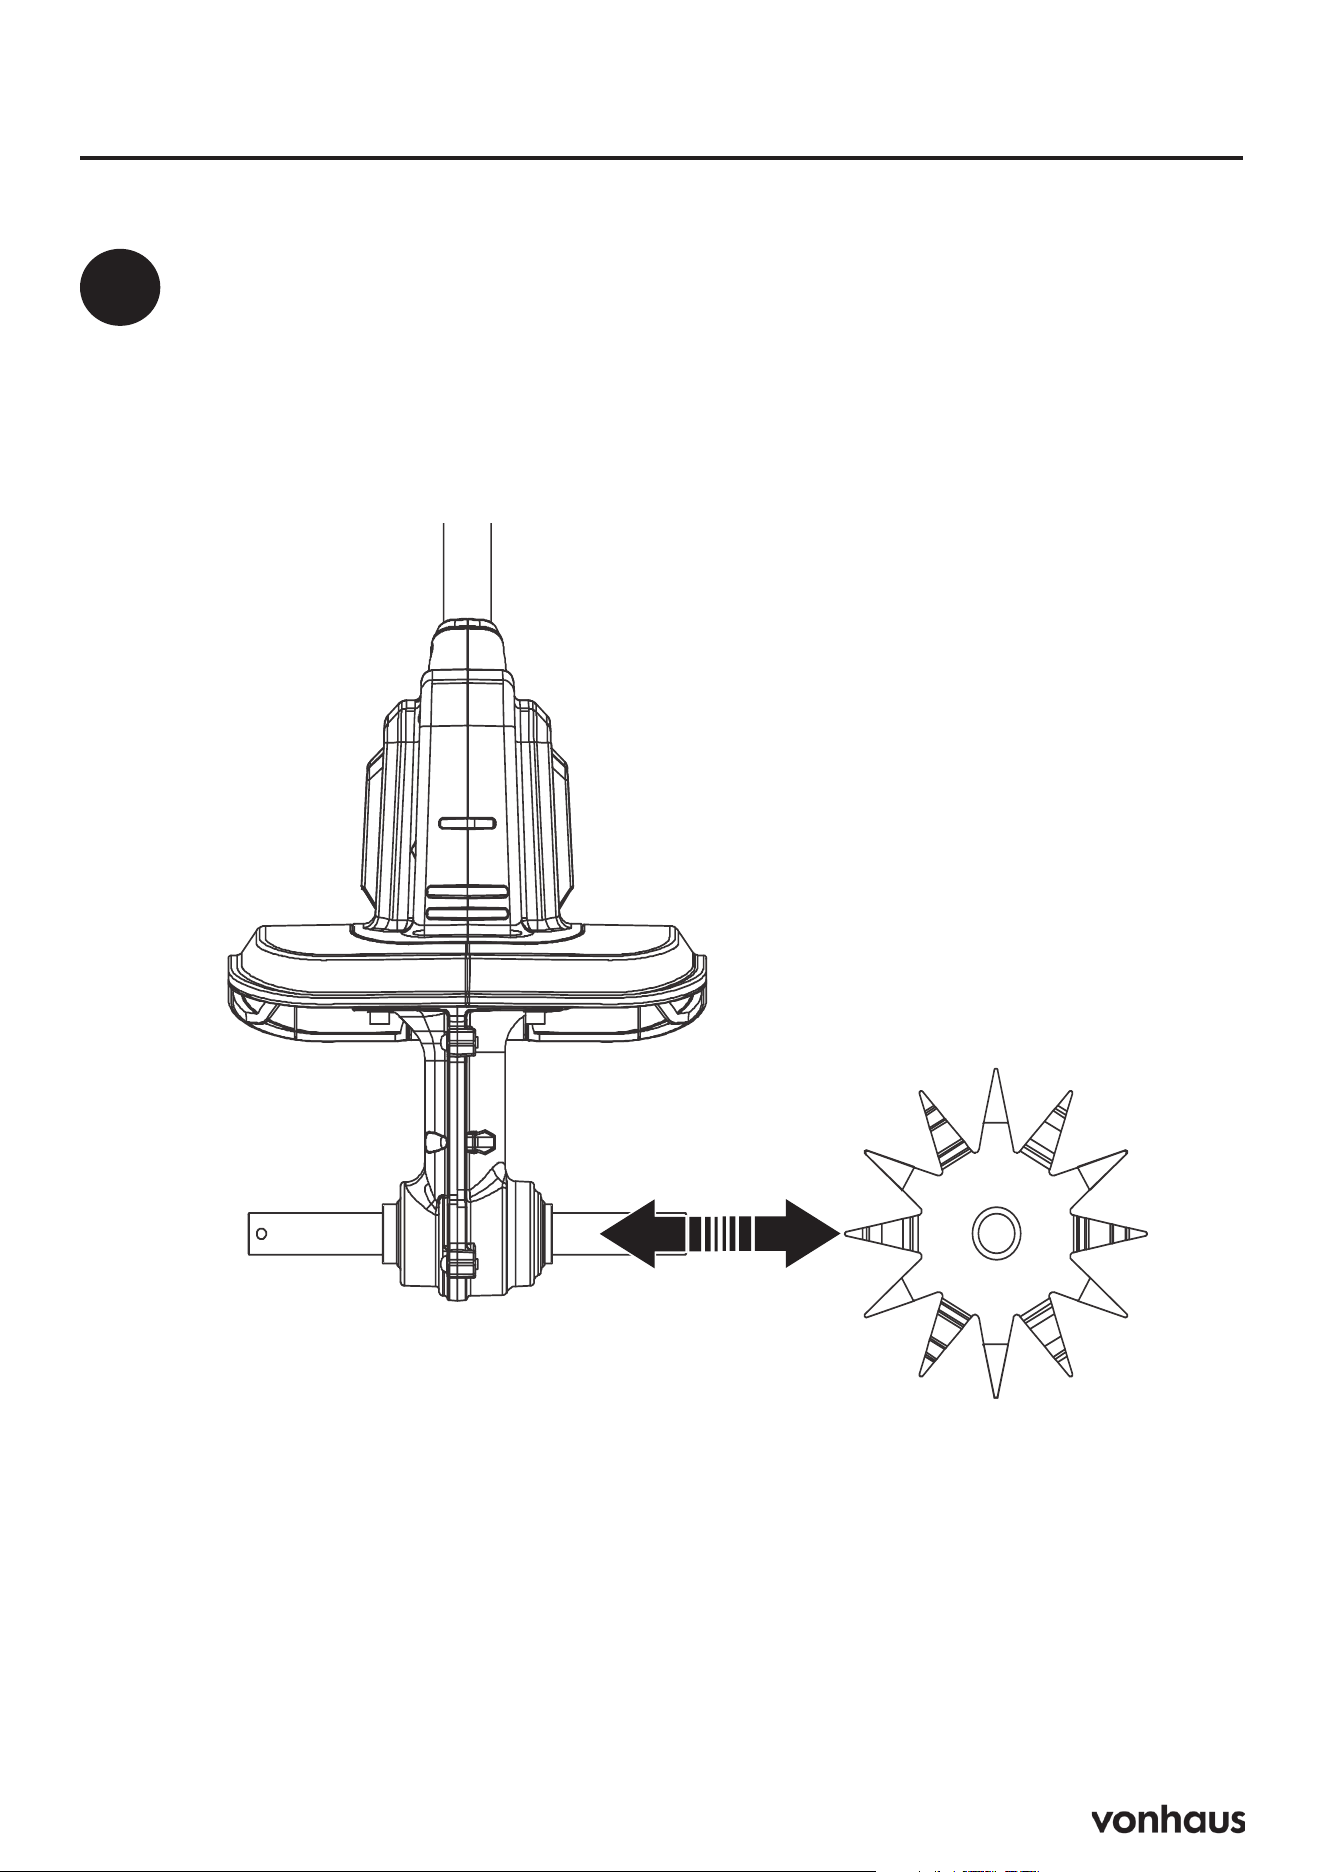
11
Removing / Installing the Blades
2
Replace the blades.
Make sure to attach the new
blades the same way as the
old ones.
12
Removing / Installing the Blades
3
4
Put the ring of the locking
pin around the axle.
Insert the locking
pin again.
13
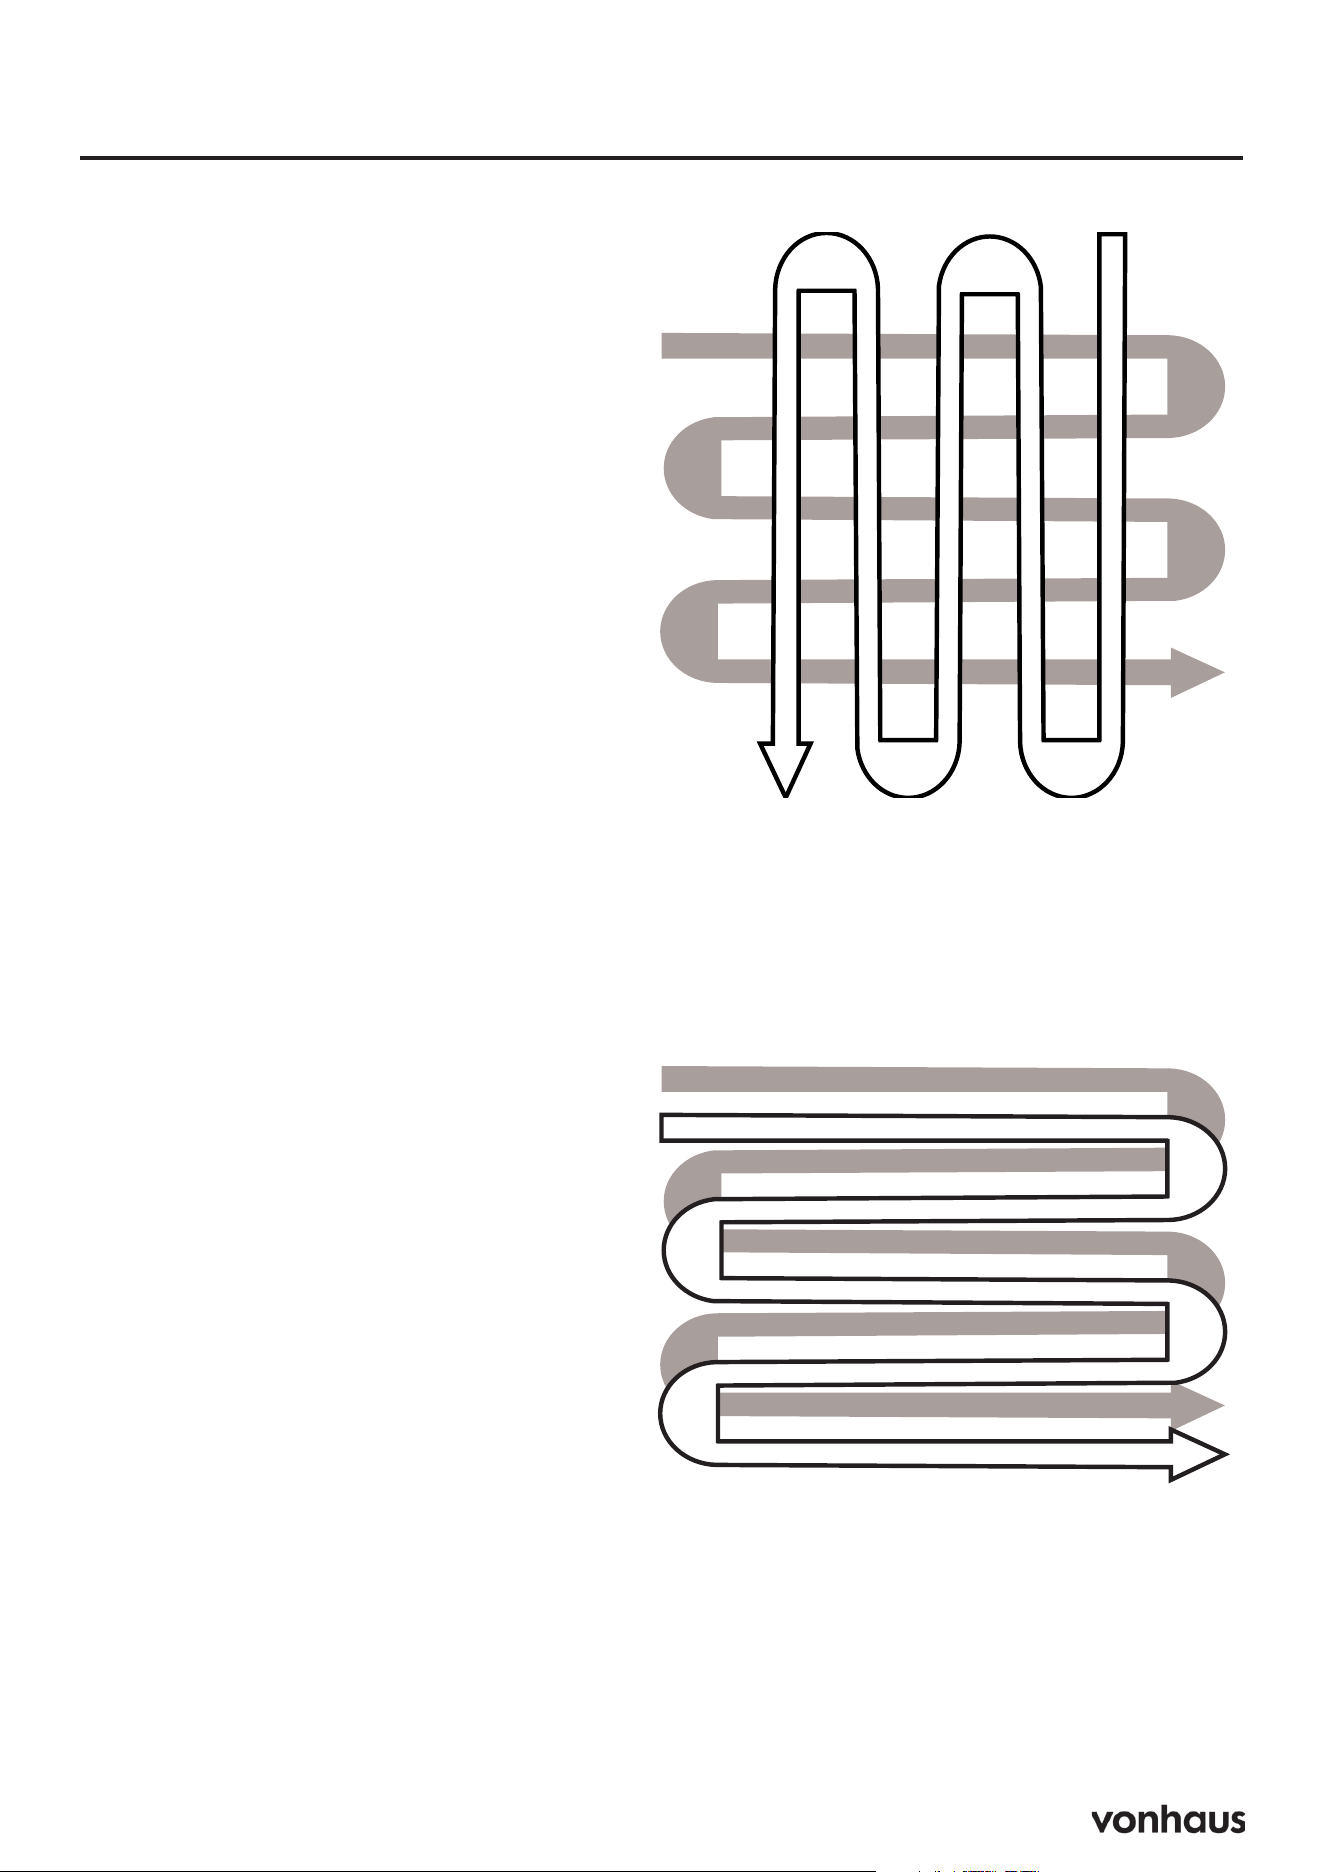
Tilling Pattern
Pattern B
(Overlap Pattern):
The overlap pattern ensures
consistent soil preparation
without missing any spots.
• First pass: Till entire area
• Second pass: Overlap
previous rows
Pattern A
(Cross Pattern):
The cross pattern is excellent
for breaking up compacted soil
and mixing in organic matter.
• First pass: Till entire area
• Second pass: Work at 90°
angle to first pass

14
Working Position
Warning!
• Maintain a safe distance
when working.

15
Safety Warnings
Essential Safety Rules:
• Read and save all instructions
• Not for use by children or persons with
reduced capabilities
• Use only as described in instructions
• Keep work area clean and well-lit
• Wear eye protection and appropriate safe-
ty gear
• Stay alert - don’t operate when tired or
under influence
Electrical Safety:
• Use only matching outlets - never modify
plug
• Keep tool dry - avoid wet conditions
• Protect power cord from damage
Key Operation Points:
Ensure switch is off before connecting power
Maintain proper footing and balance
Keep loose clothing/hair away from moving
parts
Don’t force the tool - use correct tool for job
Disconnect power before adjusting/maintain-
ing
Maintenance:
• Store safely away from children
• Keep tools sharp and well-maintained
• Check regularly for damage
• Repair if needed before use
FAILURE TO FOLLOW SAFETY RULES MAY
RESULT IN SHOCK, FIRE OR INJURY
Cordless Tiller Safety
Essential Rules:
• Keep body away from cutting blades
• Switch off before clearing jams
• Use both handles for proper control
• Check area for obstacles before use
When Carrying/Storing:
• Carry by handle only
• Ensure blade has stopped
• Hold only by insulated grips
WARNING:
• Momentary inattention can cause serious
injury
• Hidden wires may cause electric shock
• Keep these instructions for future reference
Training and Preparation
Before Use:
• Read all instructions carefully
• Never allow children to operate
• Check local age restrictions
• Keep others and pets away
• Operator is responsible for accidents
Required Safety Gear:
• Safety goggles
• Ear protection
• Sturdy footwear
• Long trousers
• Proper work clothes
IMPORTANT:
• Never use damaged equipment
• No unauthorized modifications
• Maintain clear work area
Information

16
Operation & Maintenance
Remove Battery When:
• Leaving product unattended
• Clearing blockages
• Servicing/cleaning
• Abnormal vibration occurs
Operation Rules:
• Use only in good light
• Maintain balance
• Walk, never run
• Keep vents clear
• Direct debris away from people
Maintenance:
• Keep all parts tight
• Replace worn parts
• Store in dry place
• Before powering on, please ensure there is
no grass trapped between the blades, as
this can affect blade rotation.
Important Warnings
Long-term use may cause vibration-related
health issues
Product creates electromagnetic field - consult
doctor if you have medical implants
Watch for thrown objects
Emergency Response
Stay alert for early risk signs
Stop motor immediately if malfunction occurs
Have repairs done by qualified professional
Product Specifications
Voltage: 20V DC
Speed (No Load): 300 RPM
Blade Dimensions:
• Width: 200mm
• Working Depth: 160mm
Information

17
Battery Guide
Battery Installation:
• Remove battery before maintenance/trans-
port
• Slide battery until it clicks
• Press side buttons to remove
Initial Use
Your tool requires charging before first use as
batteries are shipped uncharged.
Temperature Requirements
• Safe charging range: 40°F-105°F
(4.5°C-40.5°C)
• Optimal charging temperature: 75°F
(24°C)
• Tool won’t charge below 32°F (0°C) or
above 113°F (45°C)
Normal Operation
The charger may become warm and emit a
humming sound during charging - this is nor-
mal.
Troubleshooting
If charging fails:
1. Test outlet with another device
2. Check if outlet is switch-controlled
3. Ensure proper temperature range
4. Contact service center if problems persist
Battery Care
• Recharge when power noticeably decreas-
es
• Don’t continue using with depleted battery
• Never fully discharge batteries
• Charge after each use
• Store at 40°F-75°F (4.5°C-24°C)
FIRE HAZARD WARNING
When disconnecting: Always unplug charger
from outlet first, then disconnect from tool.
Information

18
Legal
DISPOSAL INFORMATION
Please recycle where facilities exist. Check with
your local authority for recycling advice.
CUSTOMER SERVICE
If you are having difficulty using this product
and require support, please contact support@
vonhaus.com
WARRANTY
To register your product and find out if you
qualify for a free extended warranty please go
to www.vonhaus.com/warranty.
Please retain a proof of purchase receipt or
statement as proof of the purchase date.
The warranty only applies if the product is used
solely in the manner indicated in the warnings
page of this manual, and all other instructions
have been followed accurately.
Any abuse of the product or the manner in which
it is used will invalidate the warranty.
RETURNS
Returned goods will not be accepted unless
re-packaged in its original packaging and ac-
companied by a relevant and completed returns
form. This does not affect your statutory rights.
No rights are given under this warranty to a
person acquiring the appliance second-hand
or for commercial or communal use.
COPYRIGHT
All material in this instruction manual are copy-
righted by DOMU Brands.
Any unauthorised use may violate worldwide
copyright, trademark, and other laws.
THANK YOU
Thank you for purchasing your product/appli-
ance.
Should you require assistance with your pur-
chase, please contact us: suppor[email protected]
VonHaus is a registered trademark of DOMU
Brands Ltd.
Made in China for DOMU Brands.
AUTHORISED REPRESENTATIVE
Authorised Representative Service
77 Camden Street Lower
Dublin, D02 XE80, Ireland
CUSTOMER SERVICE ADDRESS
FAO Customer Service
Unit 30 Stakehill Industrial Estate
Middleton
Manchester
M24 2RW

Product No. 3519011