
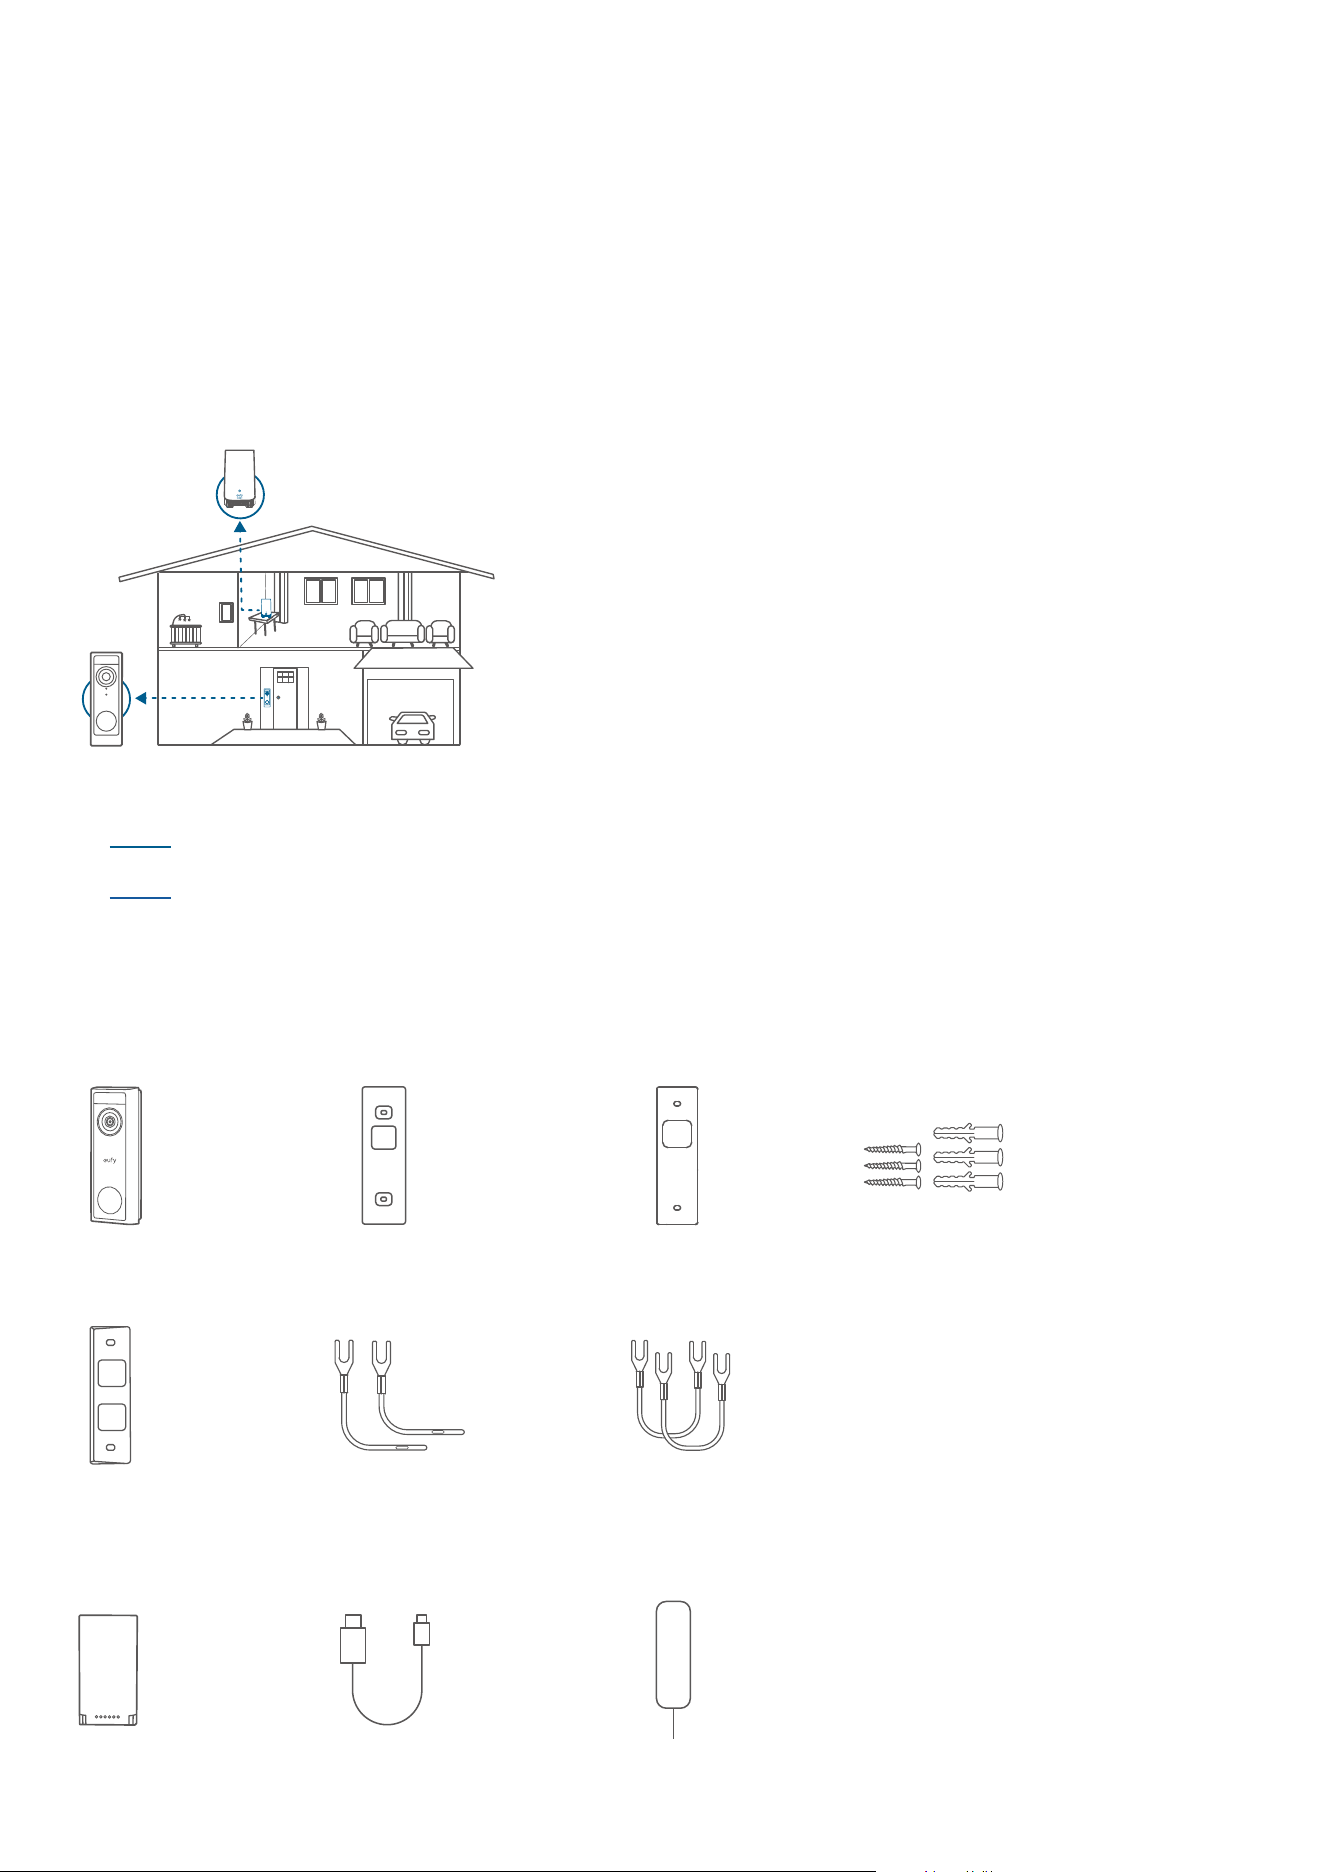
How the System Works
Works Independently
This video doorbell can work independently once it is connected to your home wireless router. Additionally, you
have a variety of options to receive notifications and hear a ring when someone presses your video doorbell.
Use a traditional doorbell chime (if you have one).
Use a eufy Security doorbell chime (sold separately).
Use an Amazon Alexa Echo Show device.
Works with eufy Security HomeBase (Optional)
The video doorbell detects motion at your porch and lets you to answer the door anytime, anywhere. You can
store video clips in the built-in storage of your eufy Security HomeBase 2 or HomeBase S380 (sold separately).
When someone rings the doorbell, people in the house will be notified.
HomeBase
Click here to view Installation Video
Click here to view how to choose the proper Power Option
Get Items Ready
To install the doorbell
Must
Video Doorbell C31
Mounting Bracket
Screw Hole
Positioning Card
Screw Pack
Optional
Jumpers for Existing
Chime
15
o
Mounting
Wedge
Extension Wires
To charge the battery
Rechargeable
Battery Pack
USB-C Charging
Cable
Detaching Pin
Other
Quick Start Guide
Tools You will Need
· Phillips-Head Screwdriver
· Power Drill (15/64" Drill Bit)
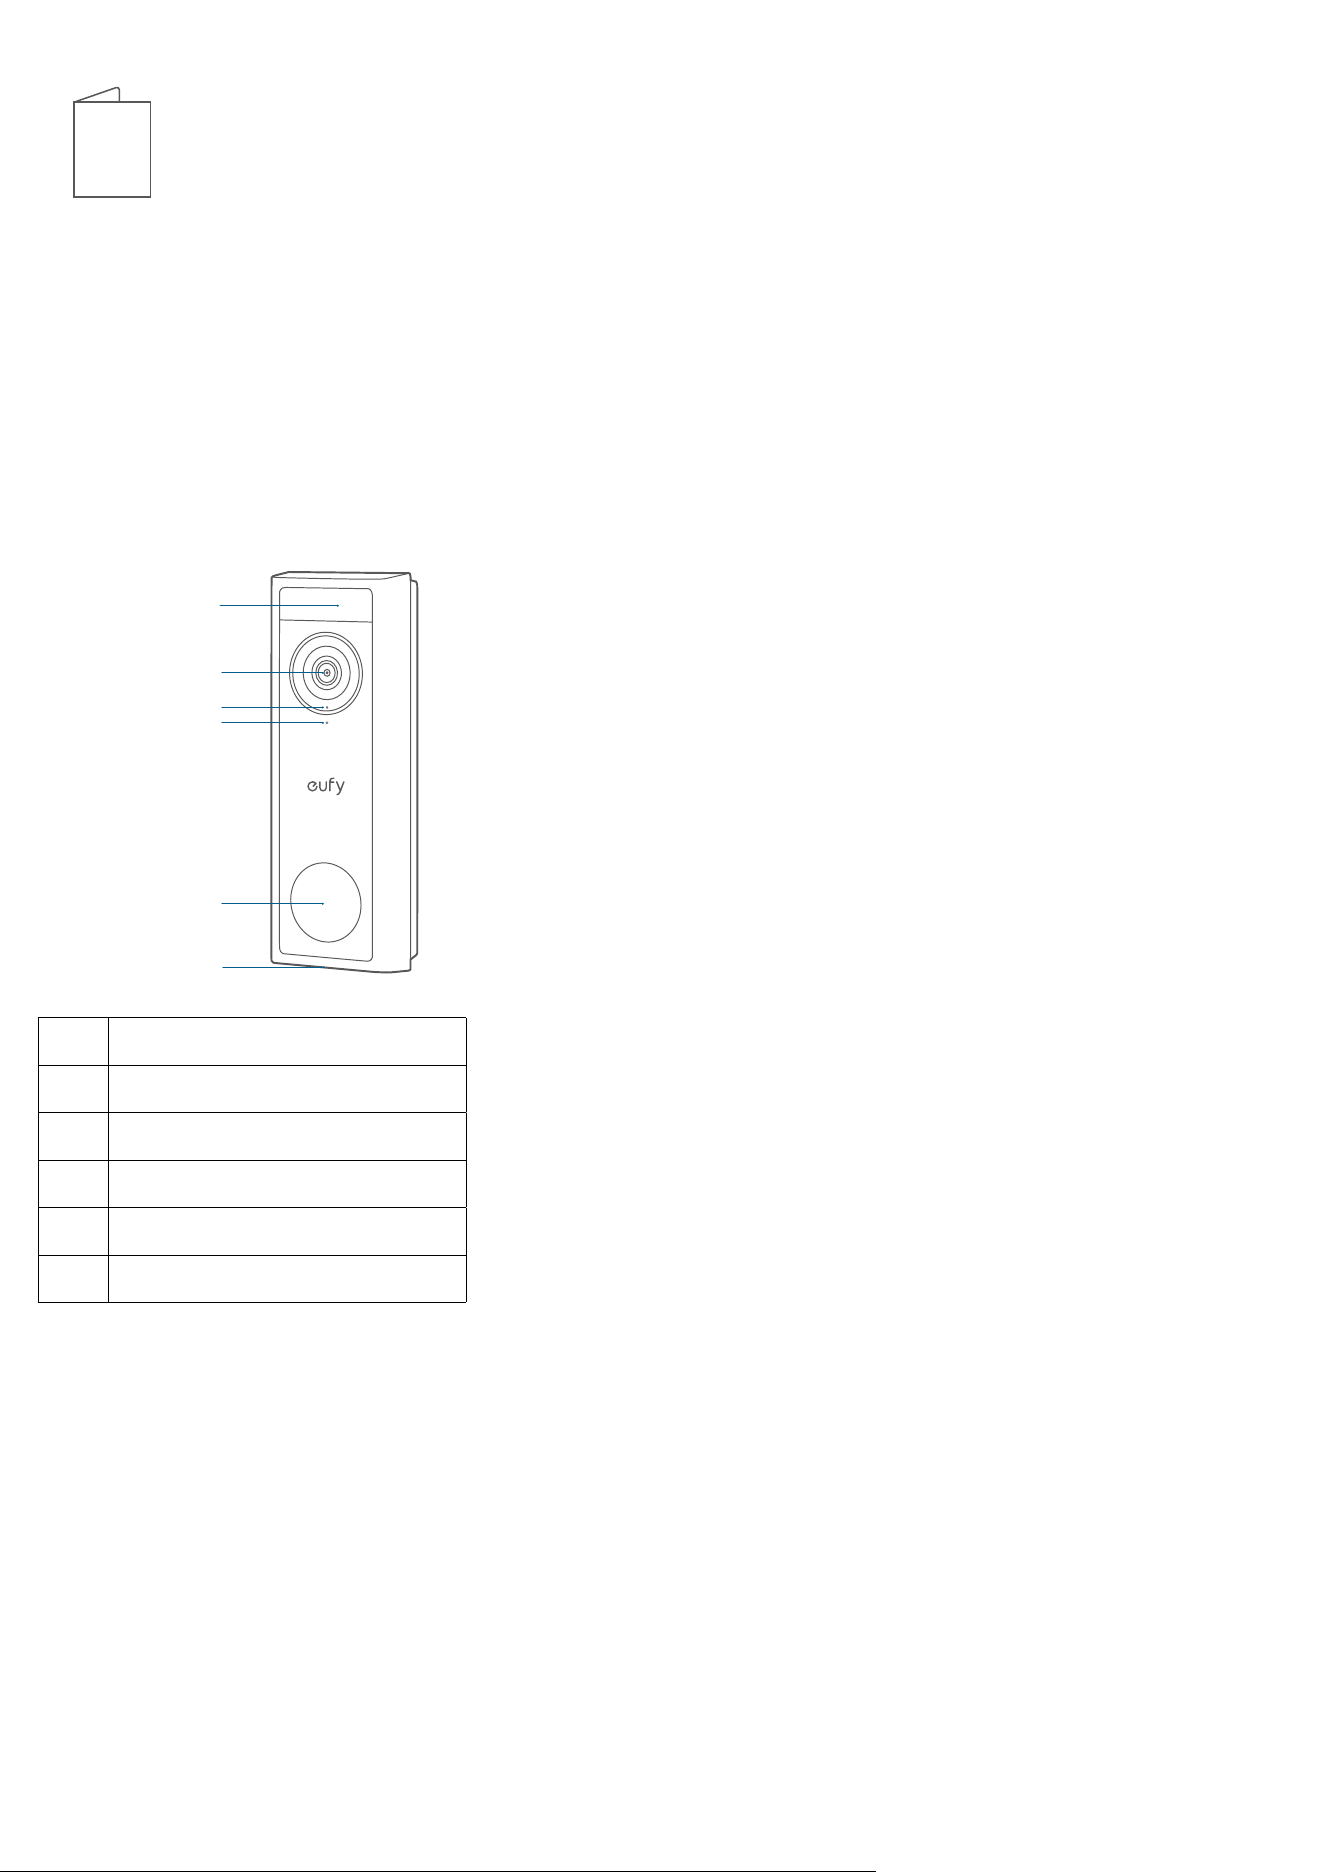
At a Glance
Front View
⑤
①
②
③
④
⑥
❶
Motion Sensor
❷
Camera Lens
❸
Microphone
❹
Ambient Light Sensor
❺
LED Ring / Doorbell Button
❻
Speaker
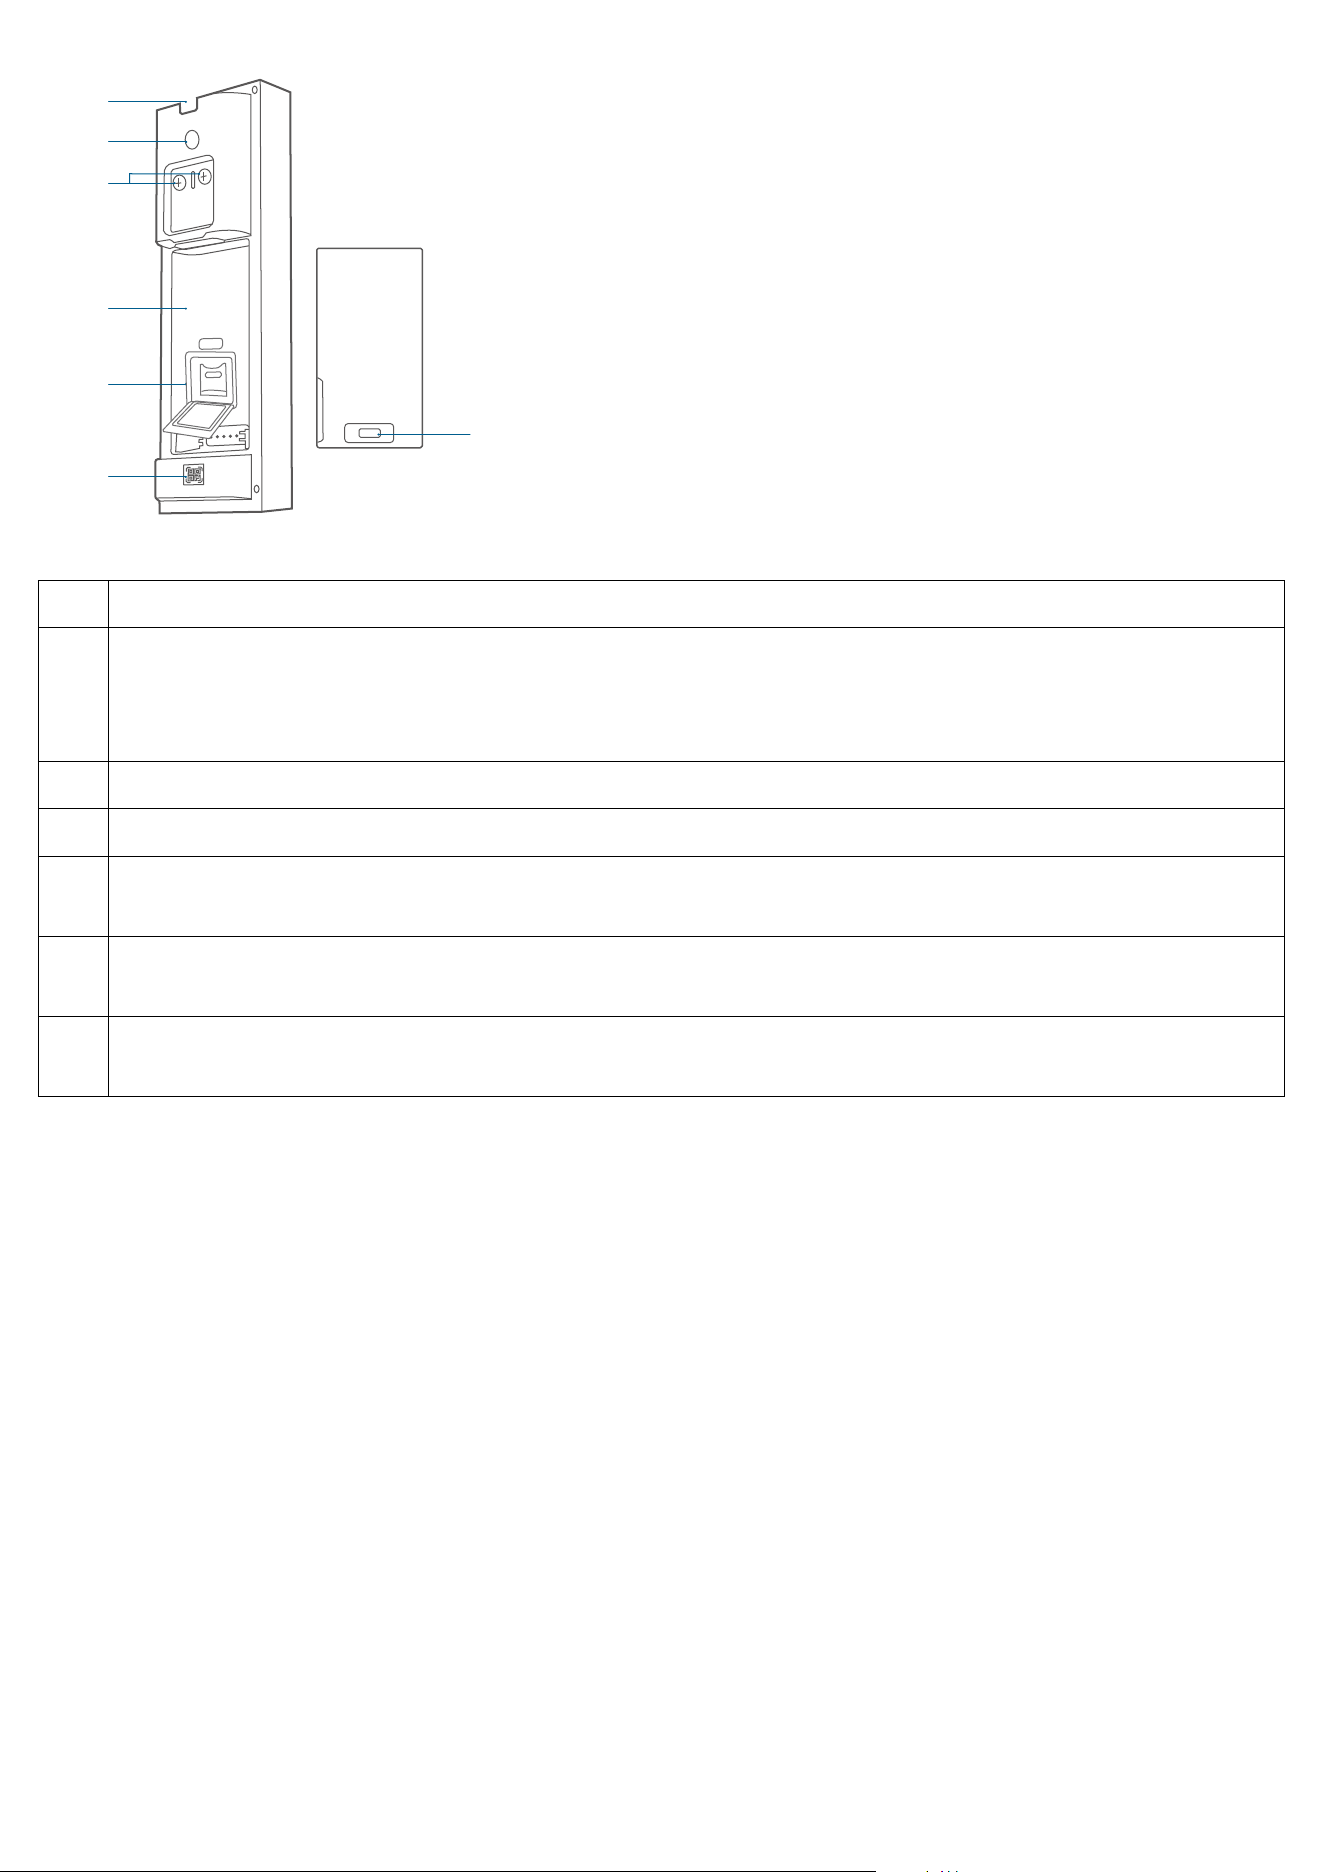
Rear View
①
②
③
④
SYNC
⑤
⑥
⑦
❶
Detaching Mechanism
❷
SYNC Button
· Press to turn on the doorbell.
· Press and hold for 2 seconds until you hear a beep to set up the doorbell. (Optional)
· Press quickly 5 times within 3 seconds to turn o the doorbell.
❸
Power Terminals for Existing Doorbell Wires (Optional)
❹
Battery Compartment
❺
SD Card Slot
· Li up the silicone lid to insert the SD Card.
❻
QR Code
· Scan to add the doorbell in the app.
❼
USB-C Port
· Use to charge the battery.
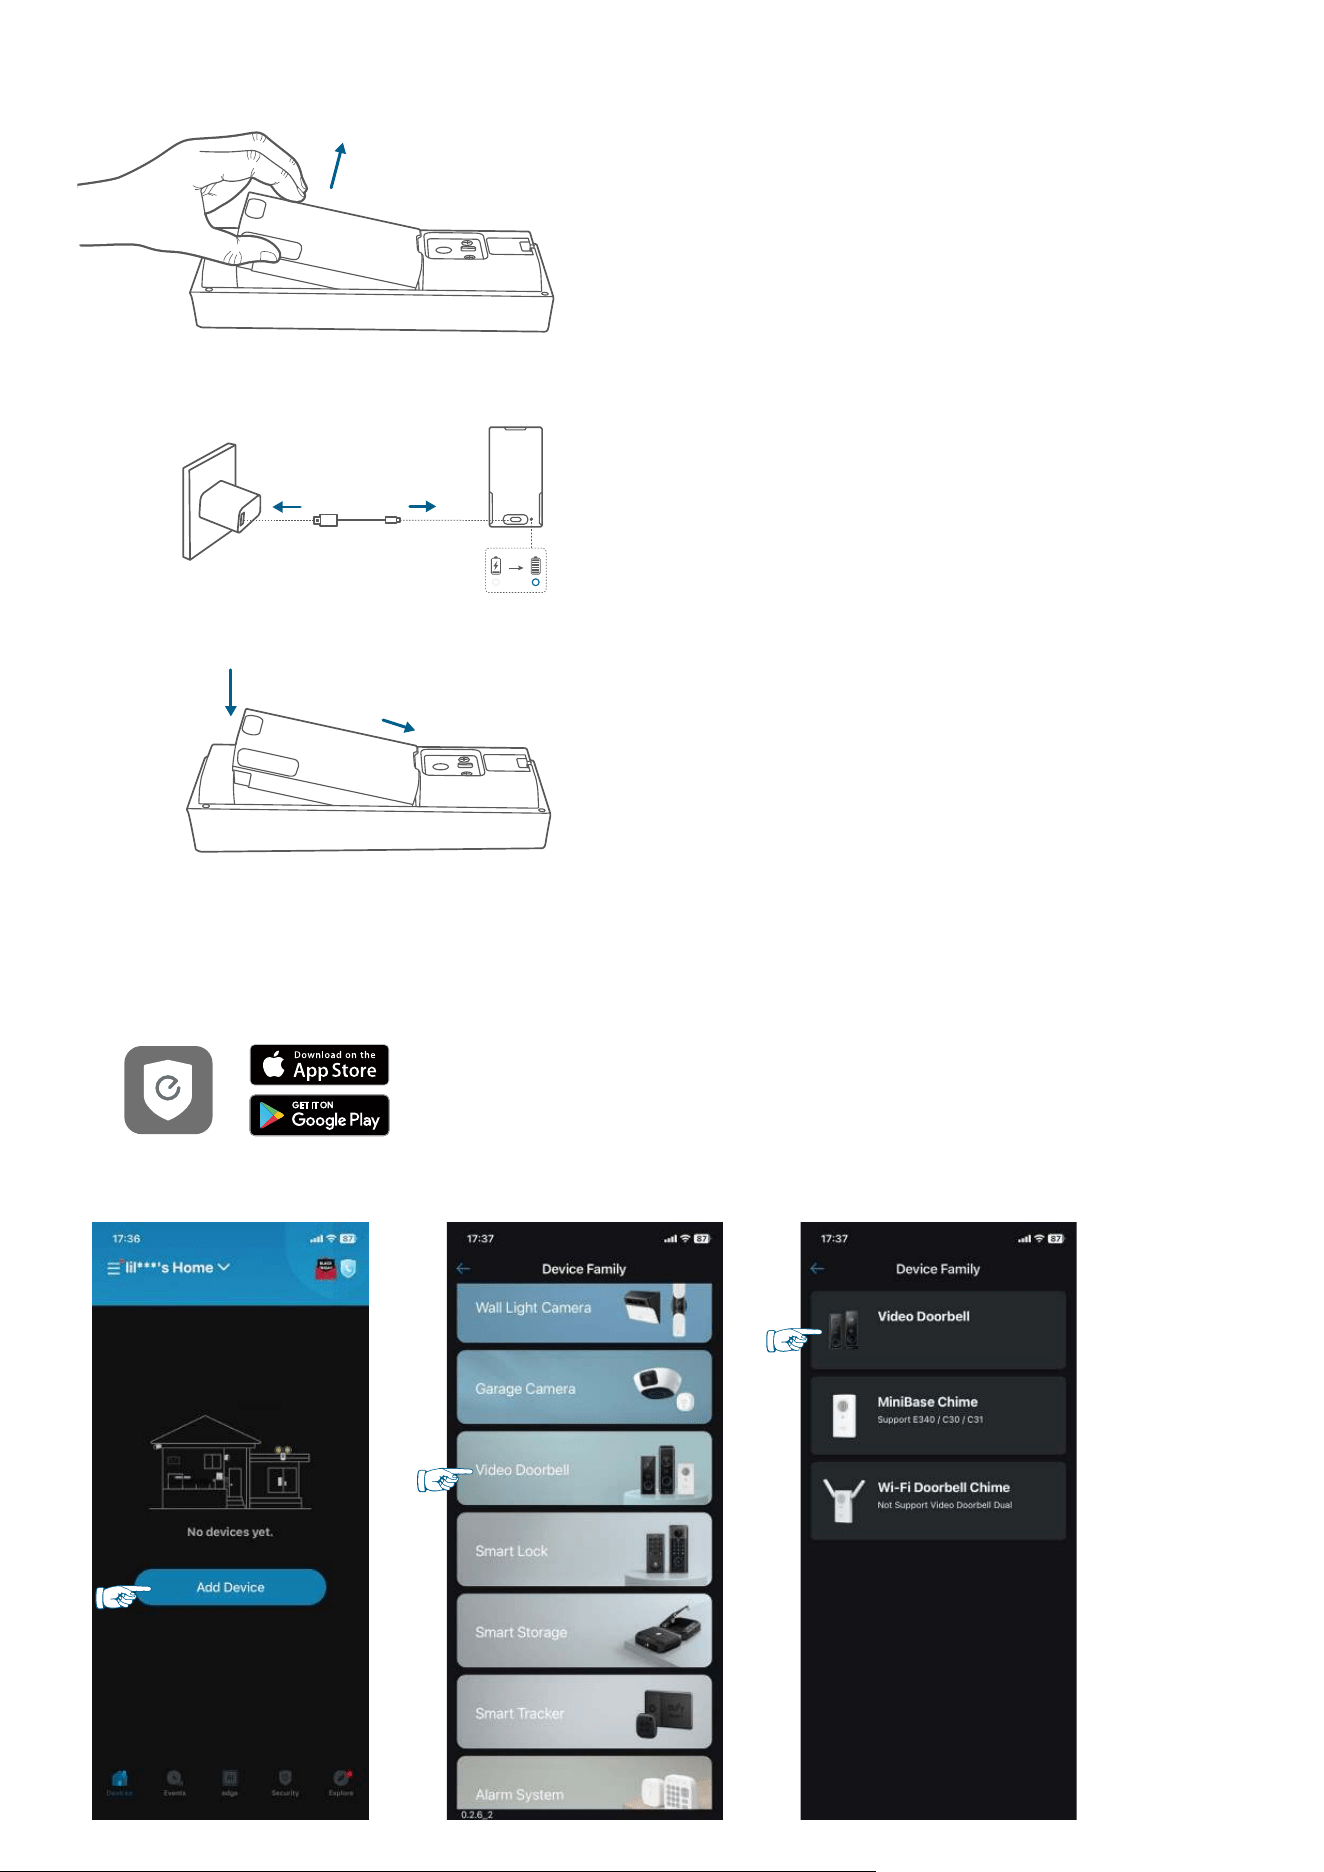
Step 1. Charge the Battery Pack
Fully charge the rechargeable battery pack before installation.
❶
❷
❸
Step 2. Set Up the System
1. Download and install the eufy Security app, then sign in or create an account.
2. Tap Add Device on the home screen of the app, and select Video Doorbell > Video Doorbell.
3. Follow the in-app instructions to add the video doorbell.
Step 3. Determine the Power Option
Option 1: Battery Powered
If you don't have existing doorbell wiring at your front door, use the included battery. You are free to determine
the location of the doorbell, and the mounting will be easy and quick.
When the battery is low, you will need to recharge it. Battery life varies with use. If you choose this option,
please skip to
“Step 4. DOORBELL MOUNTING (Battery Powered)”.
Option 2: Wire Powered
If you have existing and working doorbell wires at your front door, the video doorbell will be constantly powered
by these wires. So there's no need to detach and recharge aer installation.
The mounting position is limited. If you choose this option, please skip to
“Step 4. DOORBELL MOUNTING (Wire
Powered)”.
Step 4. DOORBELL MOUNTING (Battery Powered)
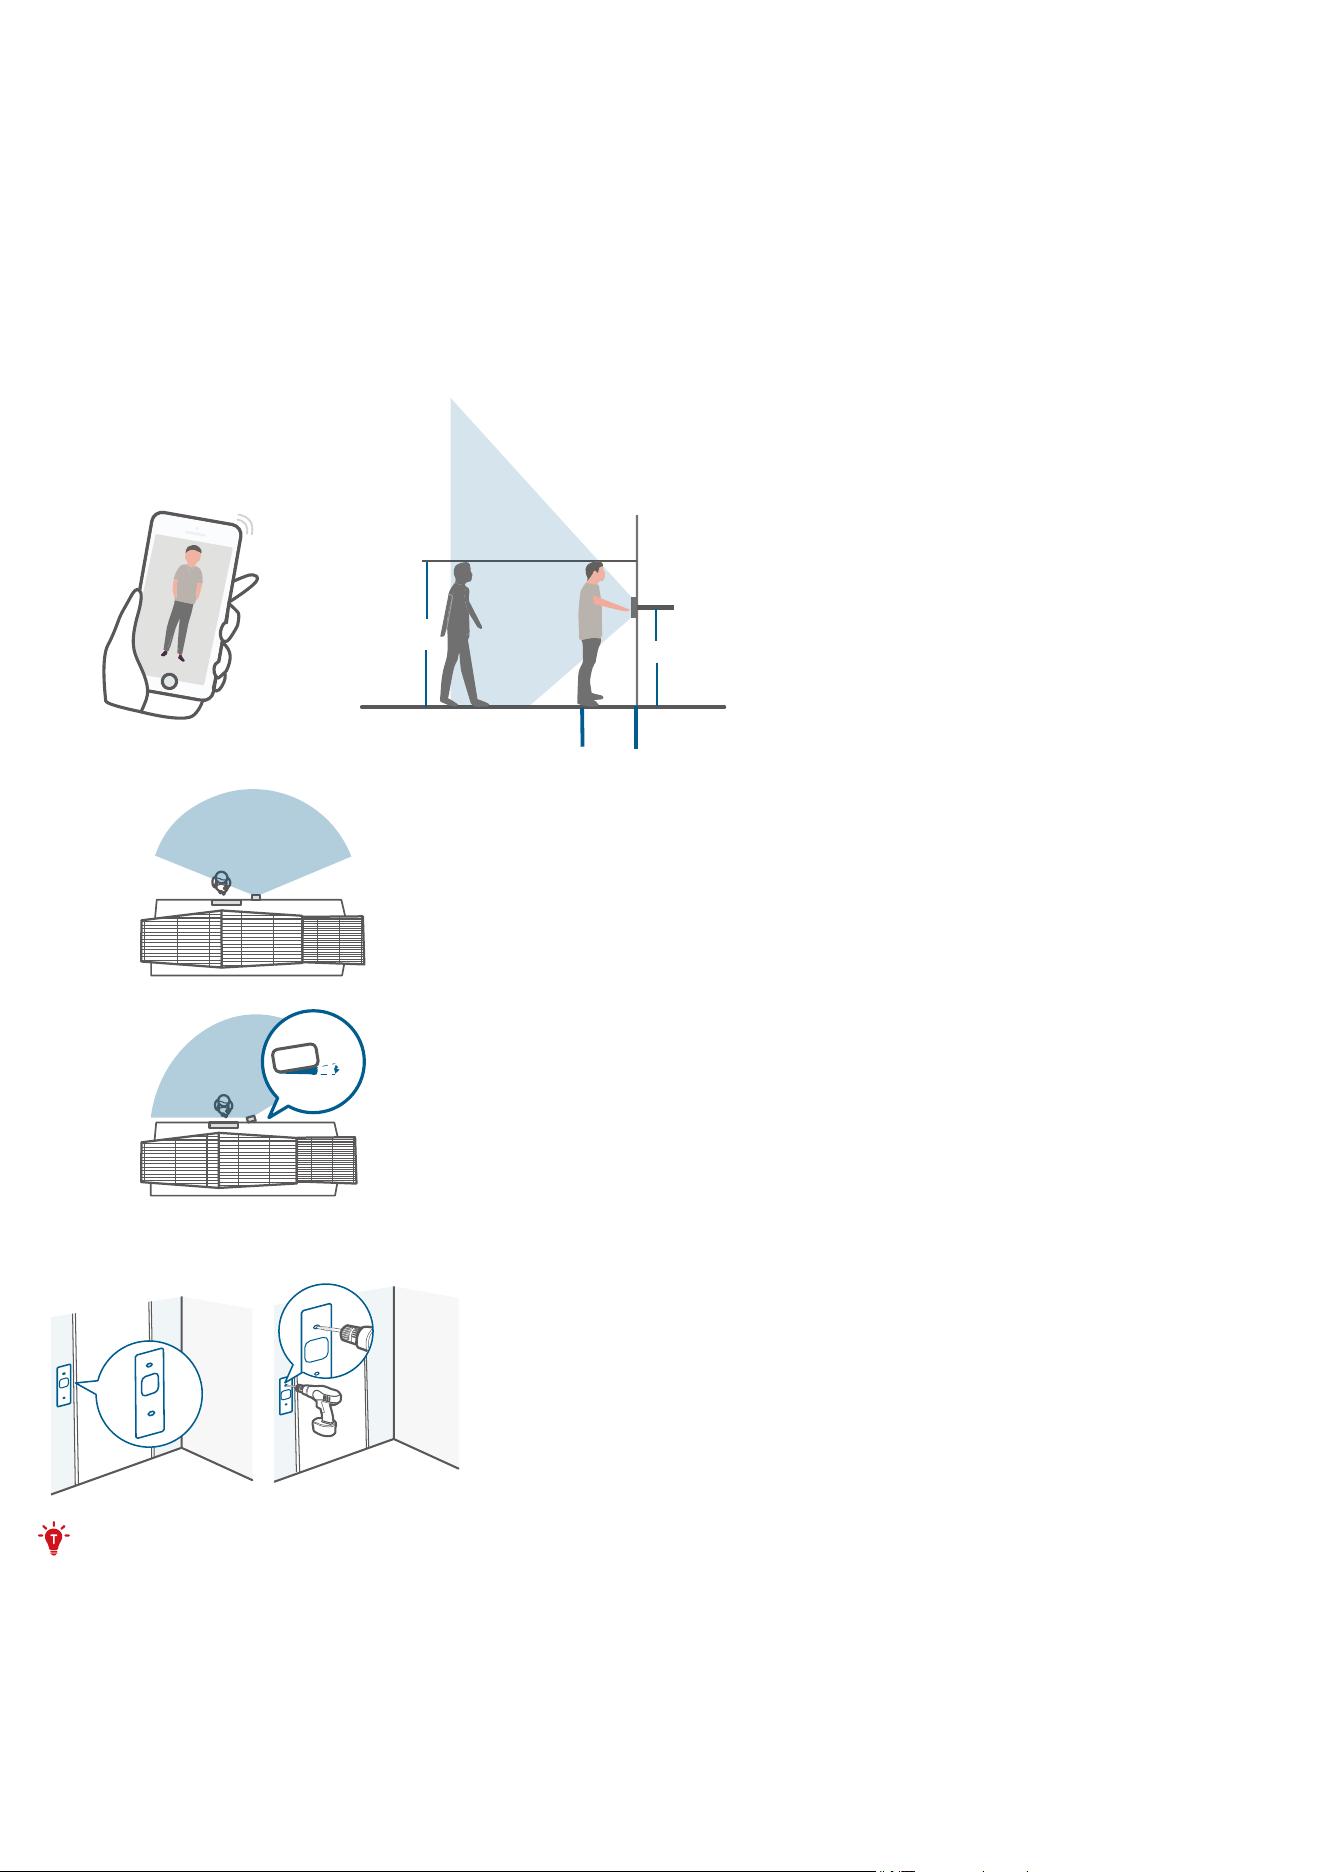
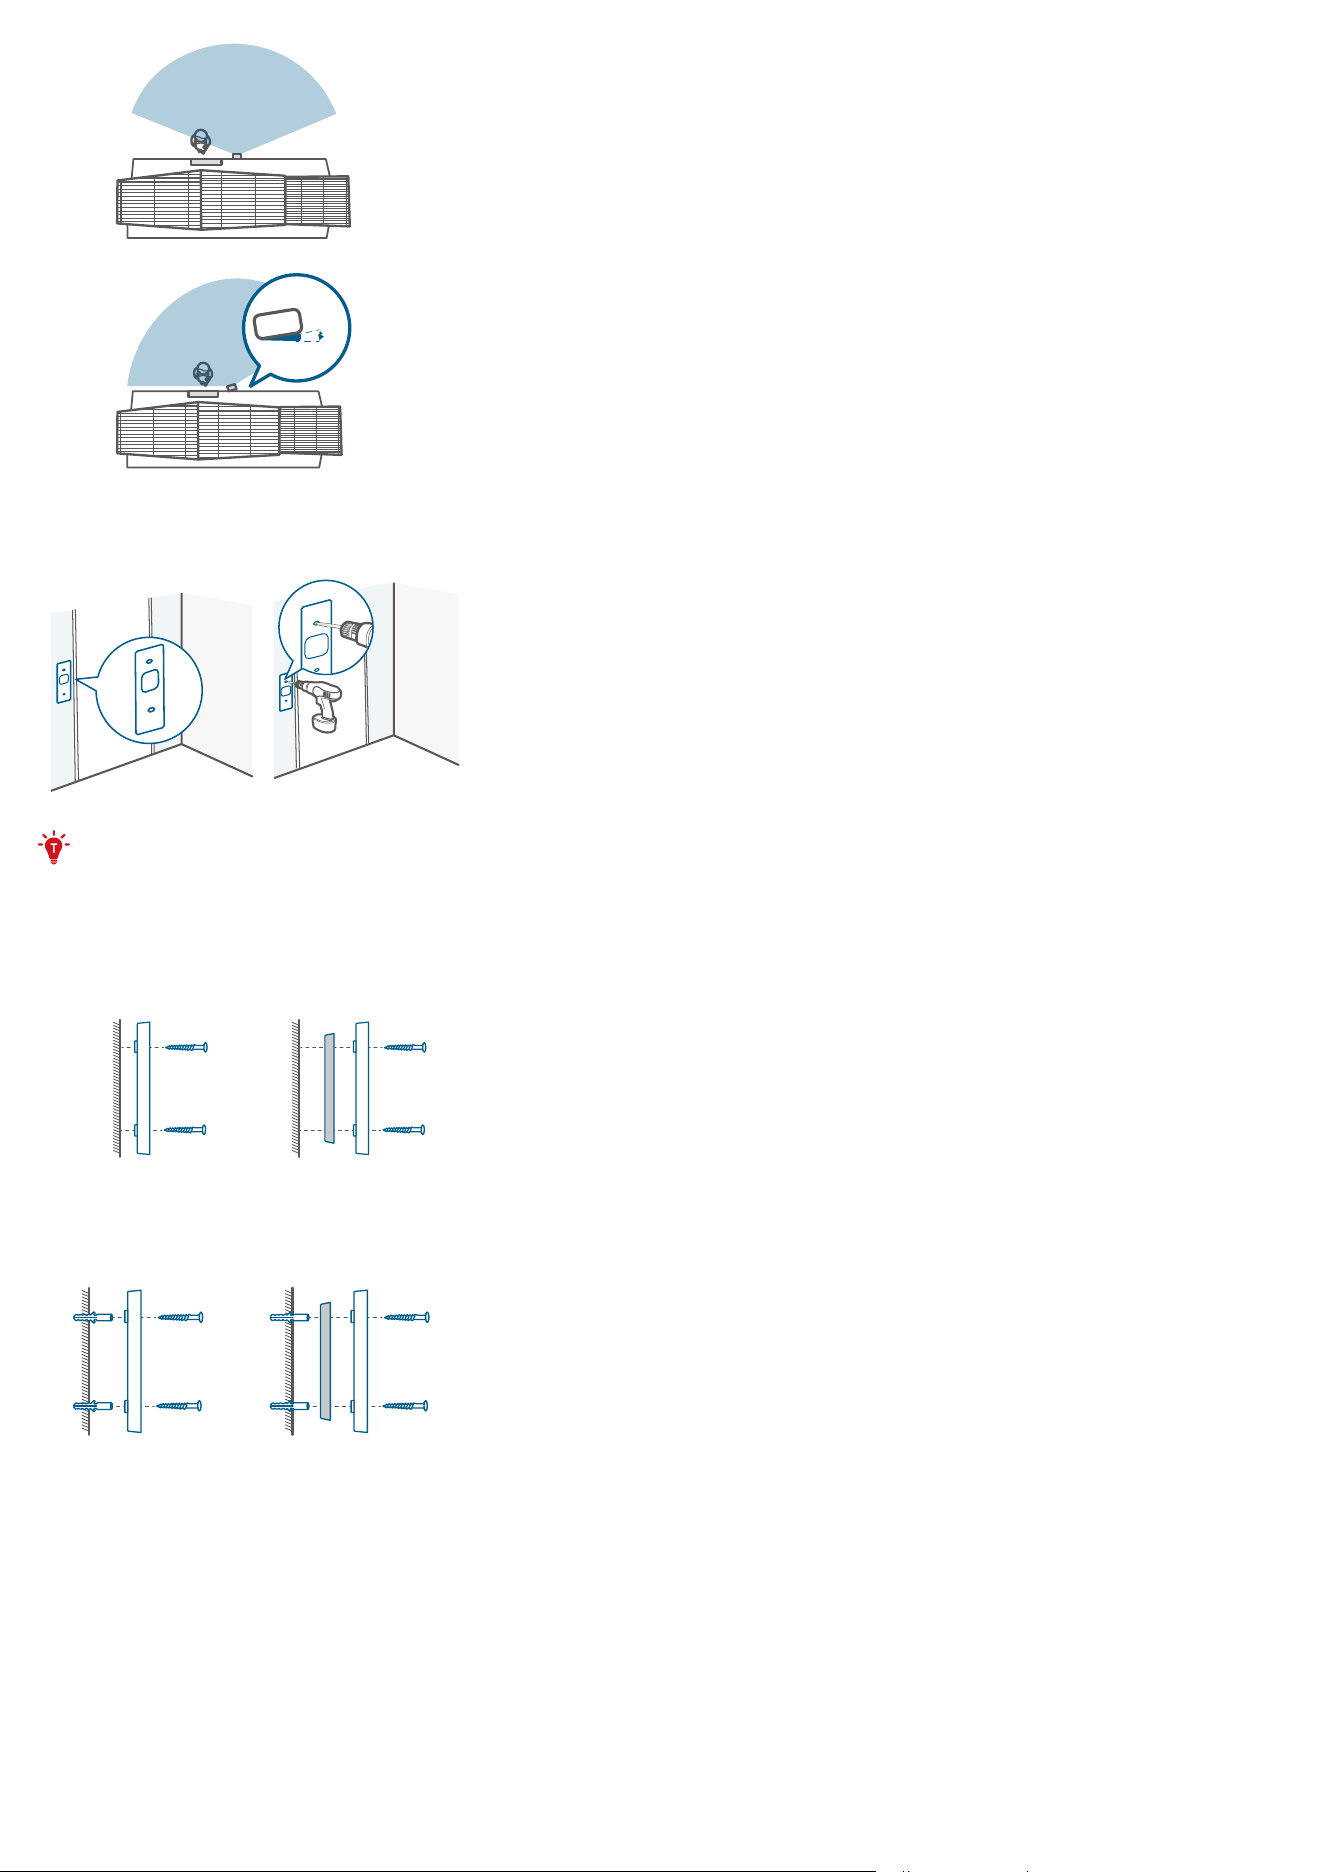
1. Choose a Location
1. Take the video doorbell to your front door and check the live view in the app. Choose a location where you
can see the desired field of view. Consider the following factors:
• Check if you can reuse the existing holes and anchors in the wall or door frame.
• If you want to place the doorbell near a side wall, make sure the wall isn't in the field of view. Otherwise, the
IR light will be reflected and the night vision will be blurred.
• If you are drilling the mounting holes for the first time, the recommended height is 48" (1.2m) above the
ground.
• To adjust the angle, use the 15º mounting wedge as a supplementary mounting bracket.
1.76m(5’9”)
1.2m (48")
0.3m
(12")
1m
(40")
15°
2. Place the screw hole positioning card against the wall to mark the location. If mounting on a hard wall (brick,
concrete, or stucco), use a 15/64" (5.95mm) drill bit to drill 2 holes through the screw hole positioning card.
What you need: Phillips-Head Screwdriver; Power Drill (15/64" Drill Bit)
2. Mount the Bracket
Use the provided screws to secure the mounting bracket on the wall.
Wooden Wall
Mounting
Bracket
Mounting
Wedge
Mounting
Bracket
Without 15º Mounting Wedge
With 15° Mounting Wedge
Hard Wall
Mounting
Bracket
Mounting
Wedge
Mounting
Bracket
Without 15º Mounting Wedge
With 15° Mounting Wedge
3. Install the Doorbell
Align the doorbell with the bottom of the mounting bracket, then press the top of the doorbell into place until it
clicks.
4. Recharge the Battery
1. Insert the detaching pin into the pin hole on the top of the doorbell, then li the top for removal.
2. Repeat steps in “Step 1. Charge the Battery Pack”.
You can purchase an extra battery pack for quick replacement.
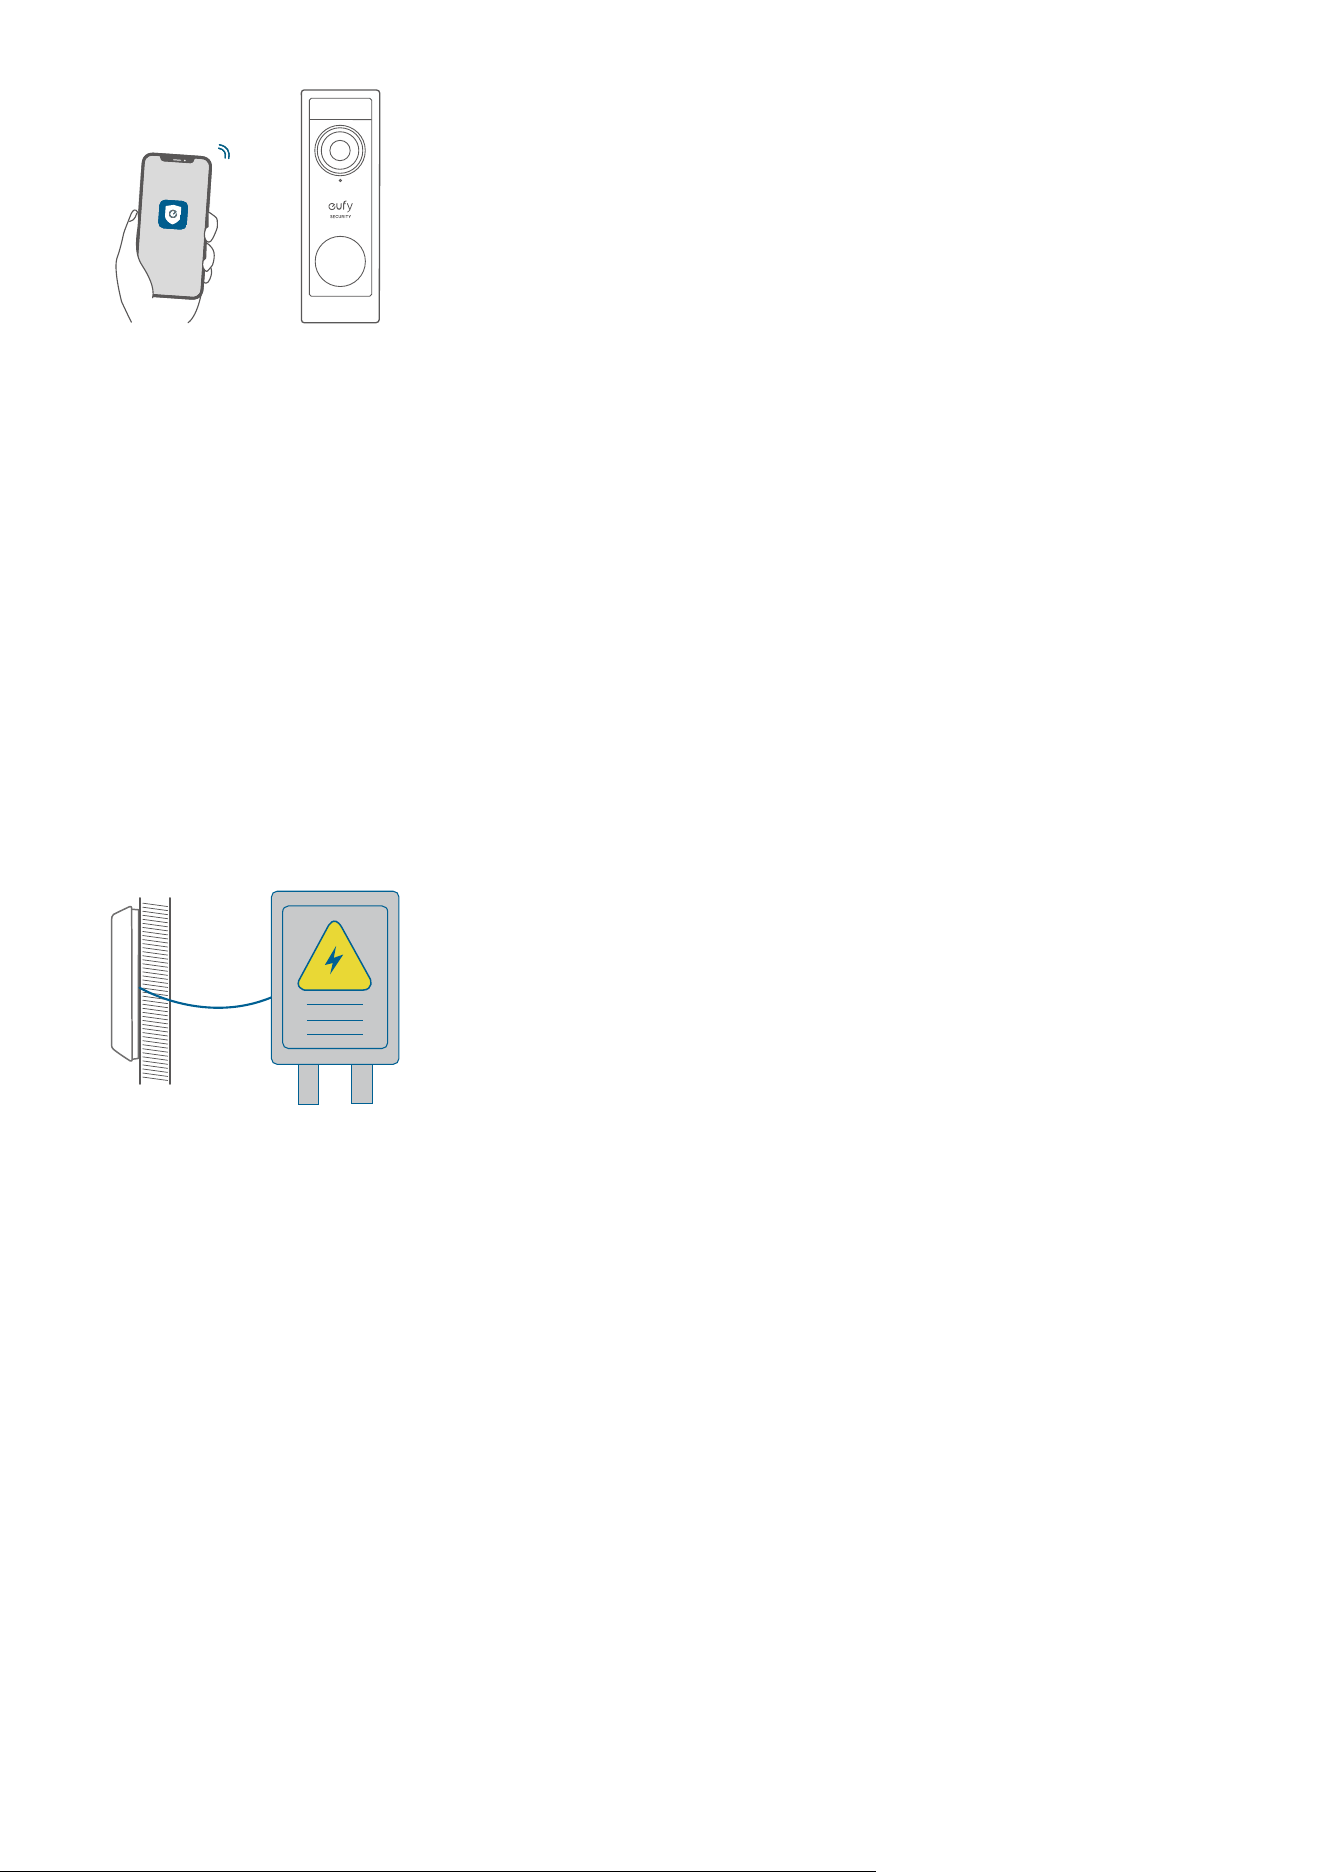
Step 4. DOORBELL MOUNTING (Wire Powered)
1. Check the Doorbell Wires
1. Ring the existing doorbell to check if it is working. If it doesn't ring, your doorbell wires may be defective. Power
on the doorbell by the built-in battery or consult an electrician to repair the wires.
2. Shut o the power at the circuit breaker. Turn the lights on and o to make sure the electricity in your home is
properly shut o.
OFF
OFF
Always be careful when handling wires. If you're not comfortable installing it yourself, have a qualified
electrician to do it.
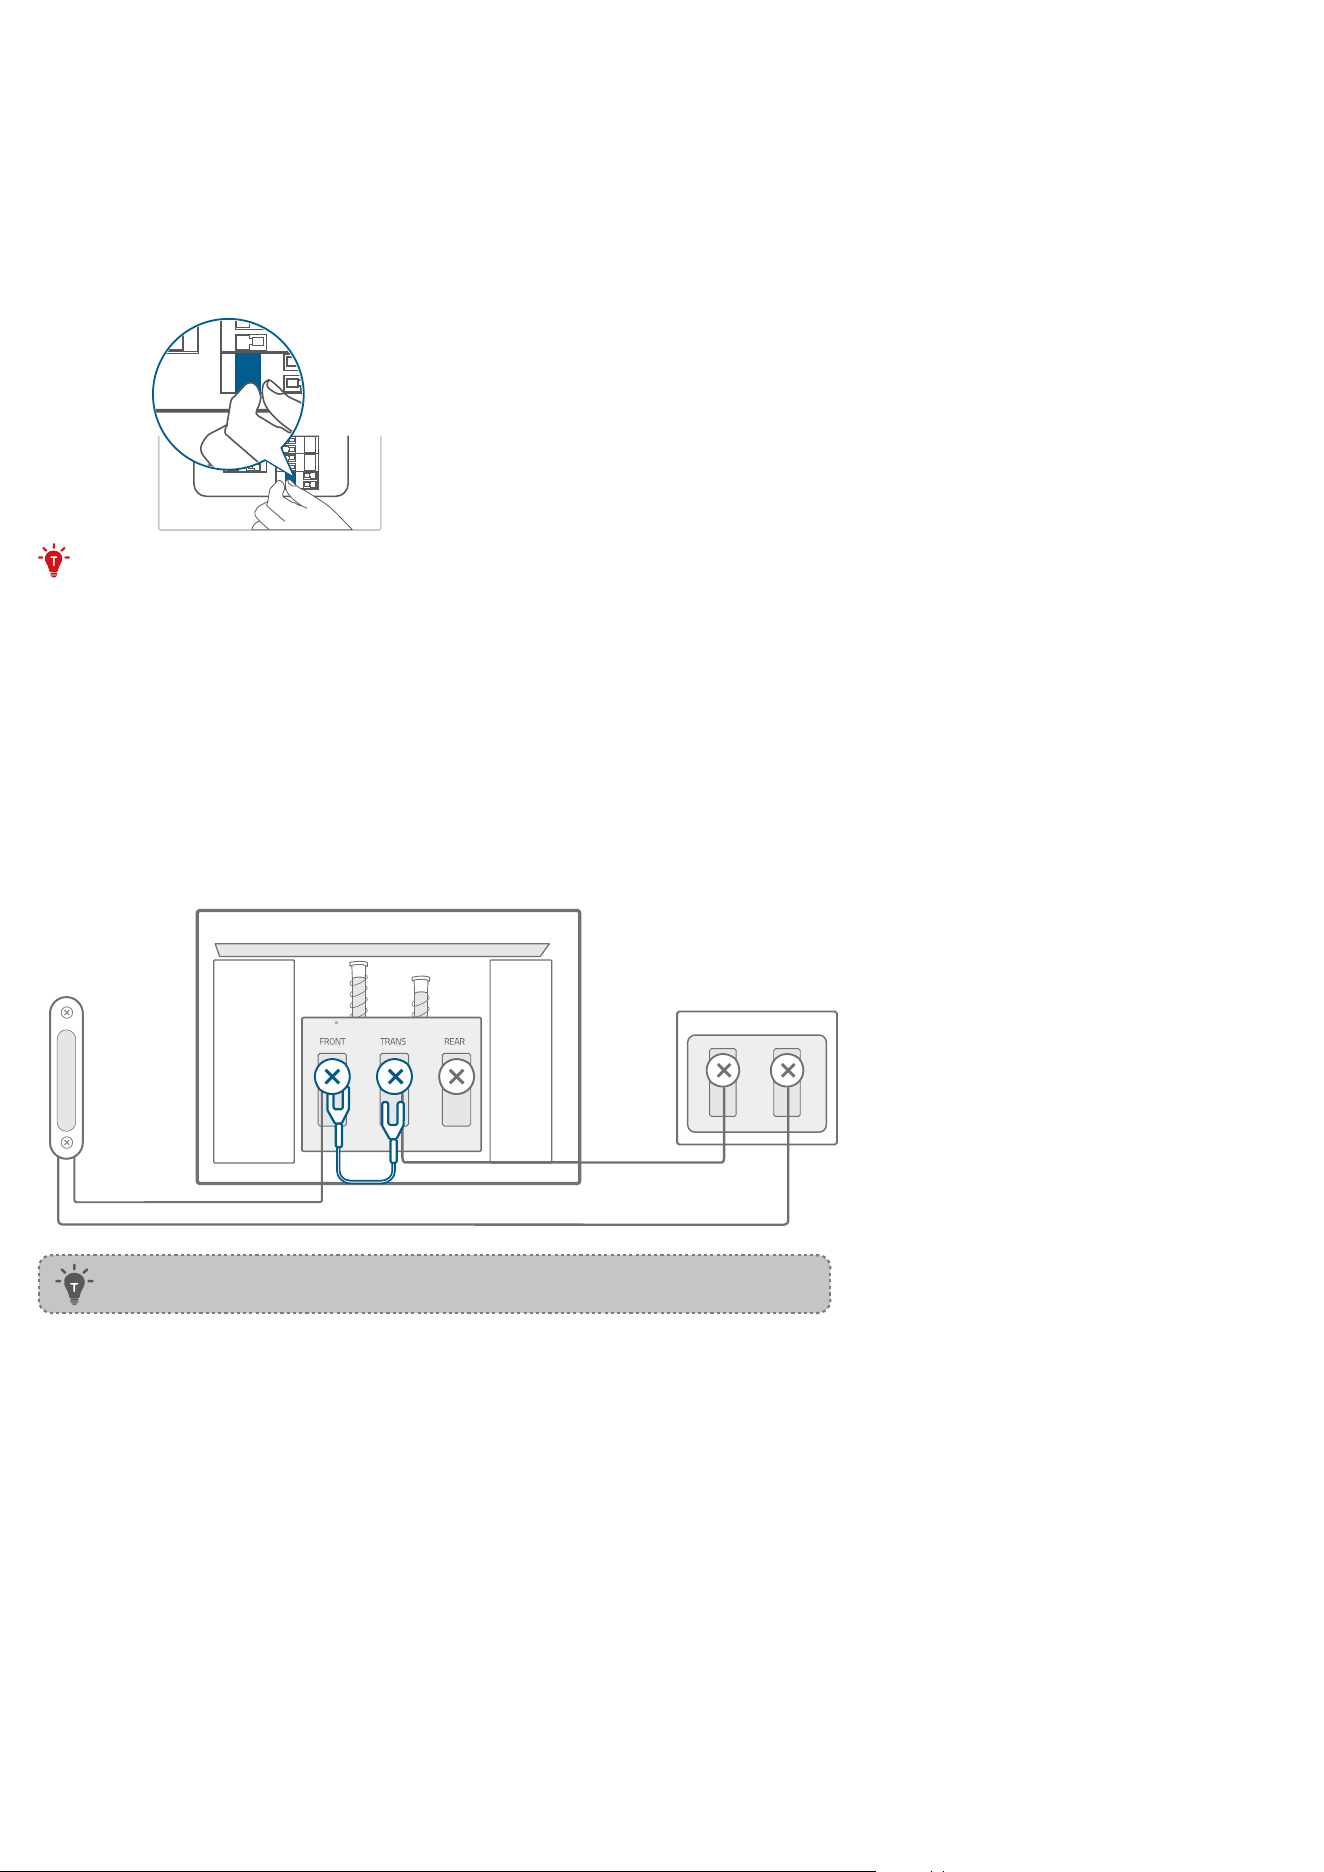
Optional: if you want to enable 24/7 recording:
The video doorbell requires suicient power. Follow steps below to bypass the chime:
1. Find the doorbell chime in your house if you have one.
2. Remove the cover and find the screw terminals with TRANS and FRONT markings.
3. Use the provided jumper to connect FRONT and TRANS terminals on the circuit.
Note: When the jumper is in place, then existing chime will not sound anymore.
2. Detach the Existing Doorbell Button
If you already have existing doorbell wiring:
1. Remove the existing doorbell button with a Phillips-head screwdriver (not provided).
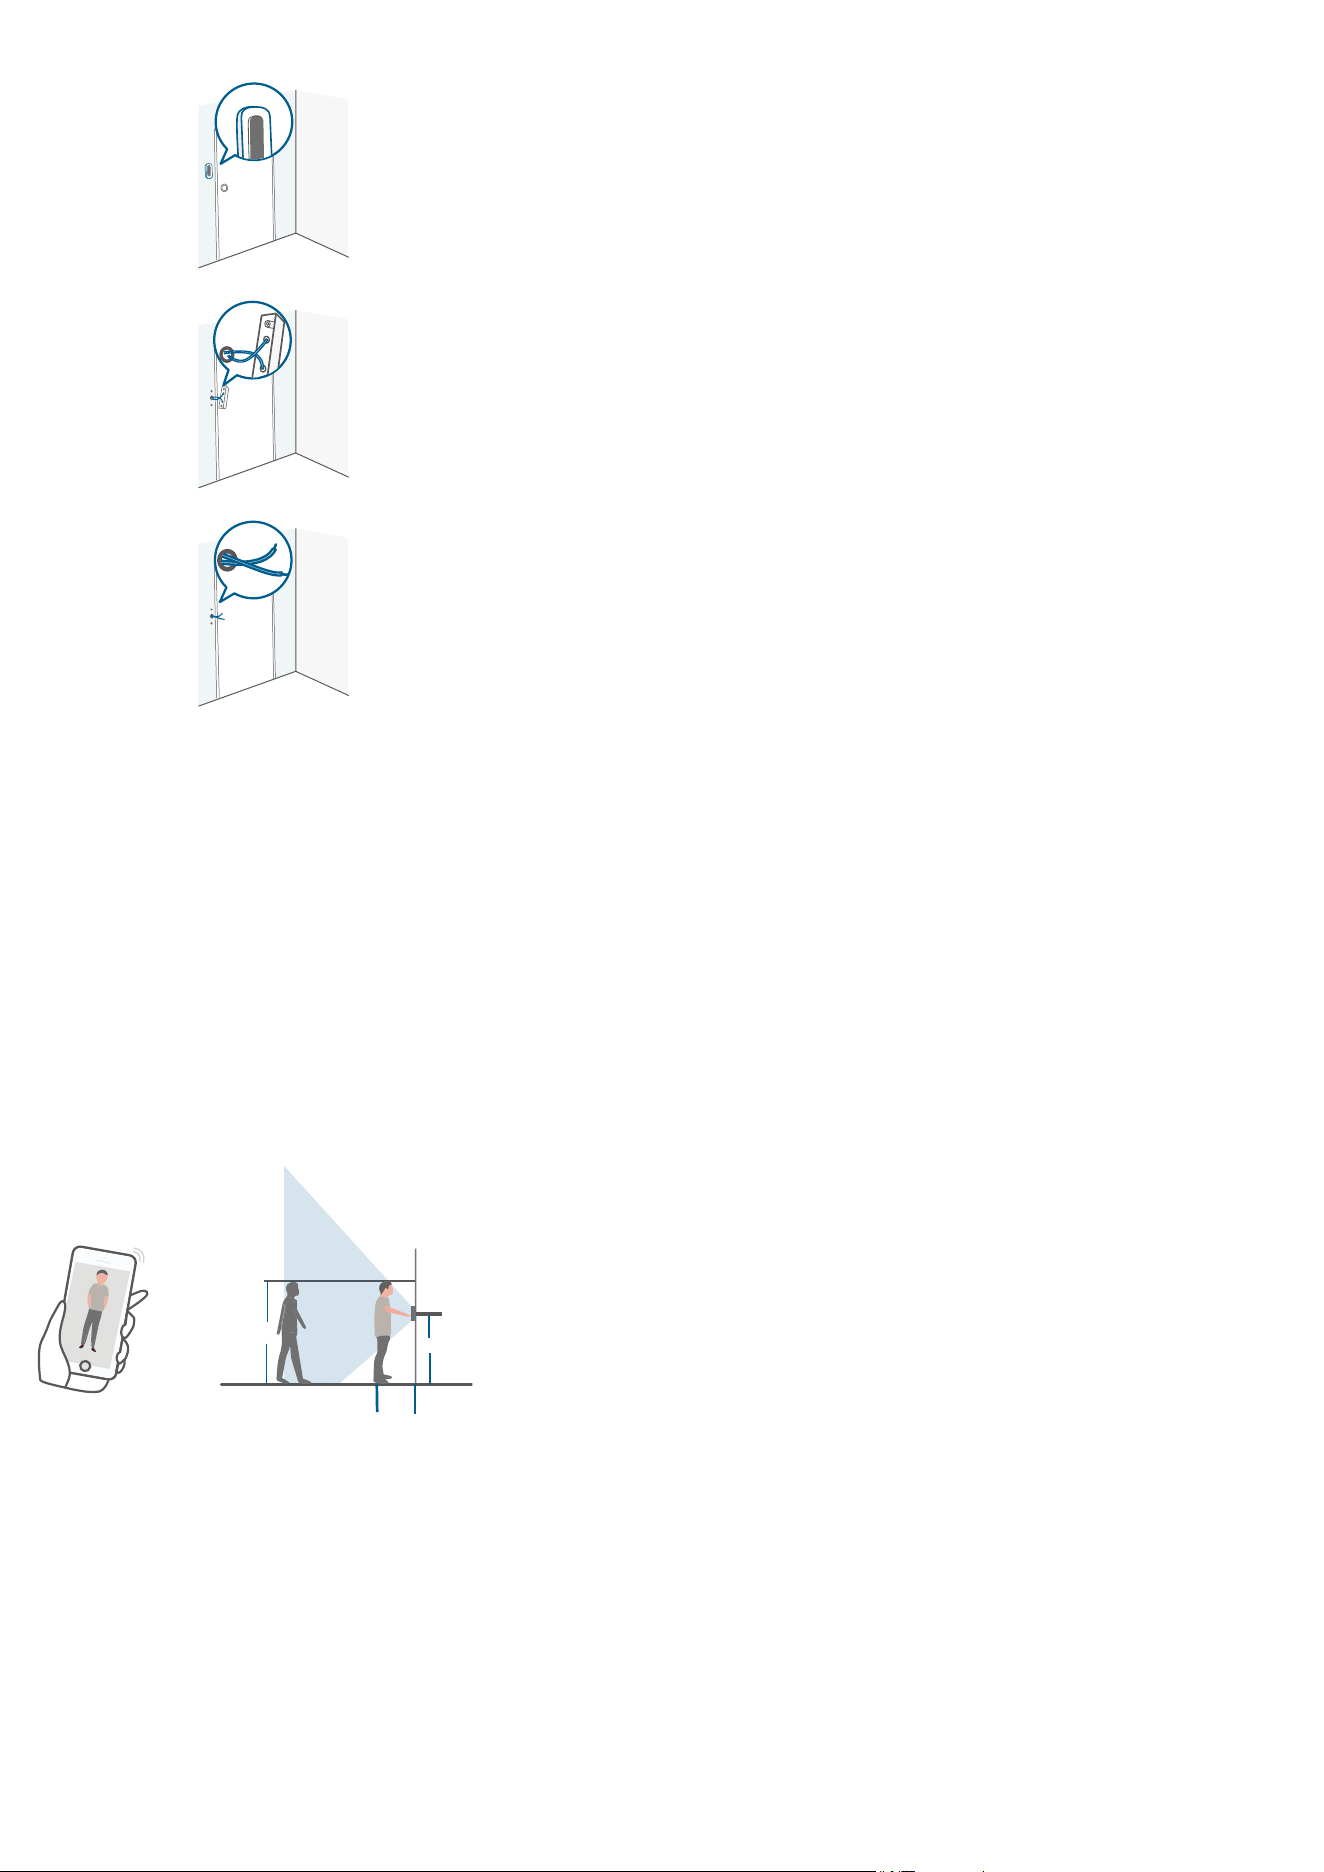
2. Pull the two wires out carefully when removing the existing doorbell. Straighten the wire ends if necessary.
3. Choose a Location
1. Take the video doorbell to your front door and check the live view in the app. Choose a location where you
can see the desired field of view. Consider the following factors:
• Check if you can reuse the existing holes and anchors in the wall or door frame.
• If you want to place the doorbell near a side wall, make sure the wall isn't in the field of view. Otherwise, the
IR light will be reflected and the night vision will be blurred.
• If you are drilling the mounting holes for the first time, the recommended height is 48" (1.2m) above the
ground.
• To adjust the angle, use the 15
º
mounting wedge as a supplementary mounting bracket.
1.76m(5’9”)
1.2m (48")
0.3m
(12")
1m
(40")
15°
2. Place the screw hole positioning card against the wall to mark the location. If mounting on a hard wall (brick,
concrete, or stucco), use a 15/64" (5.95mm) drill bit to drill 2 holes through the screw hole positioning card.
What you need: Phillips-Head Screwdriver; Power Drill (15/64" Drill Bit)
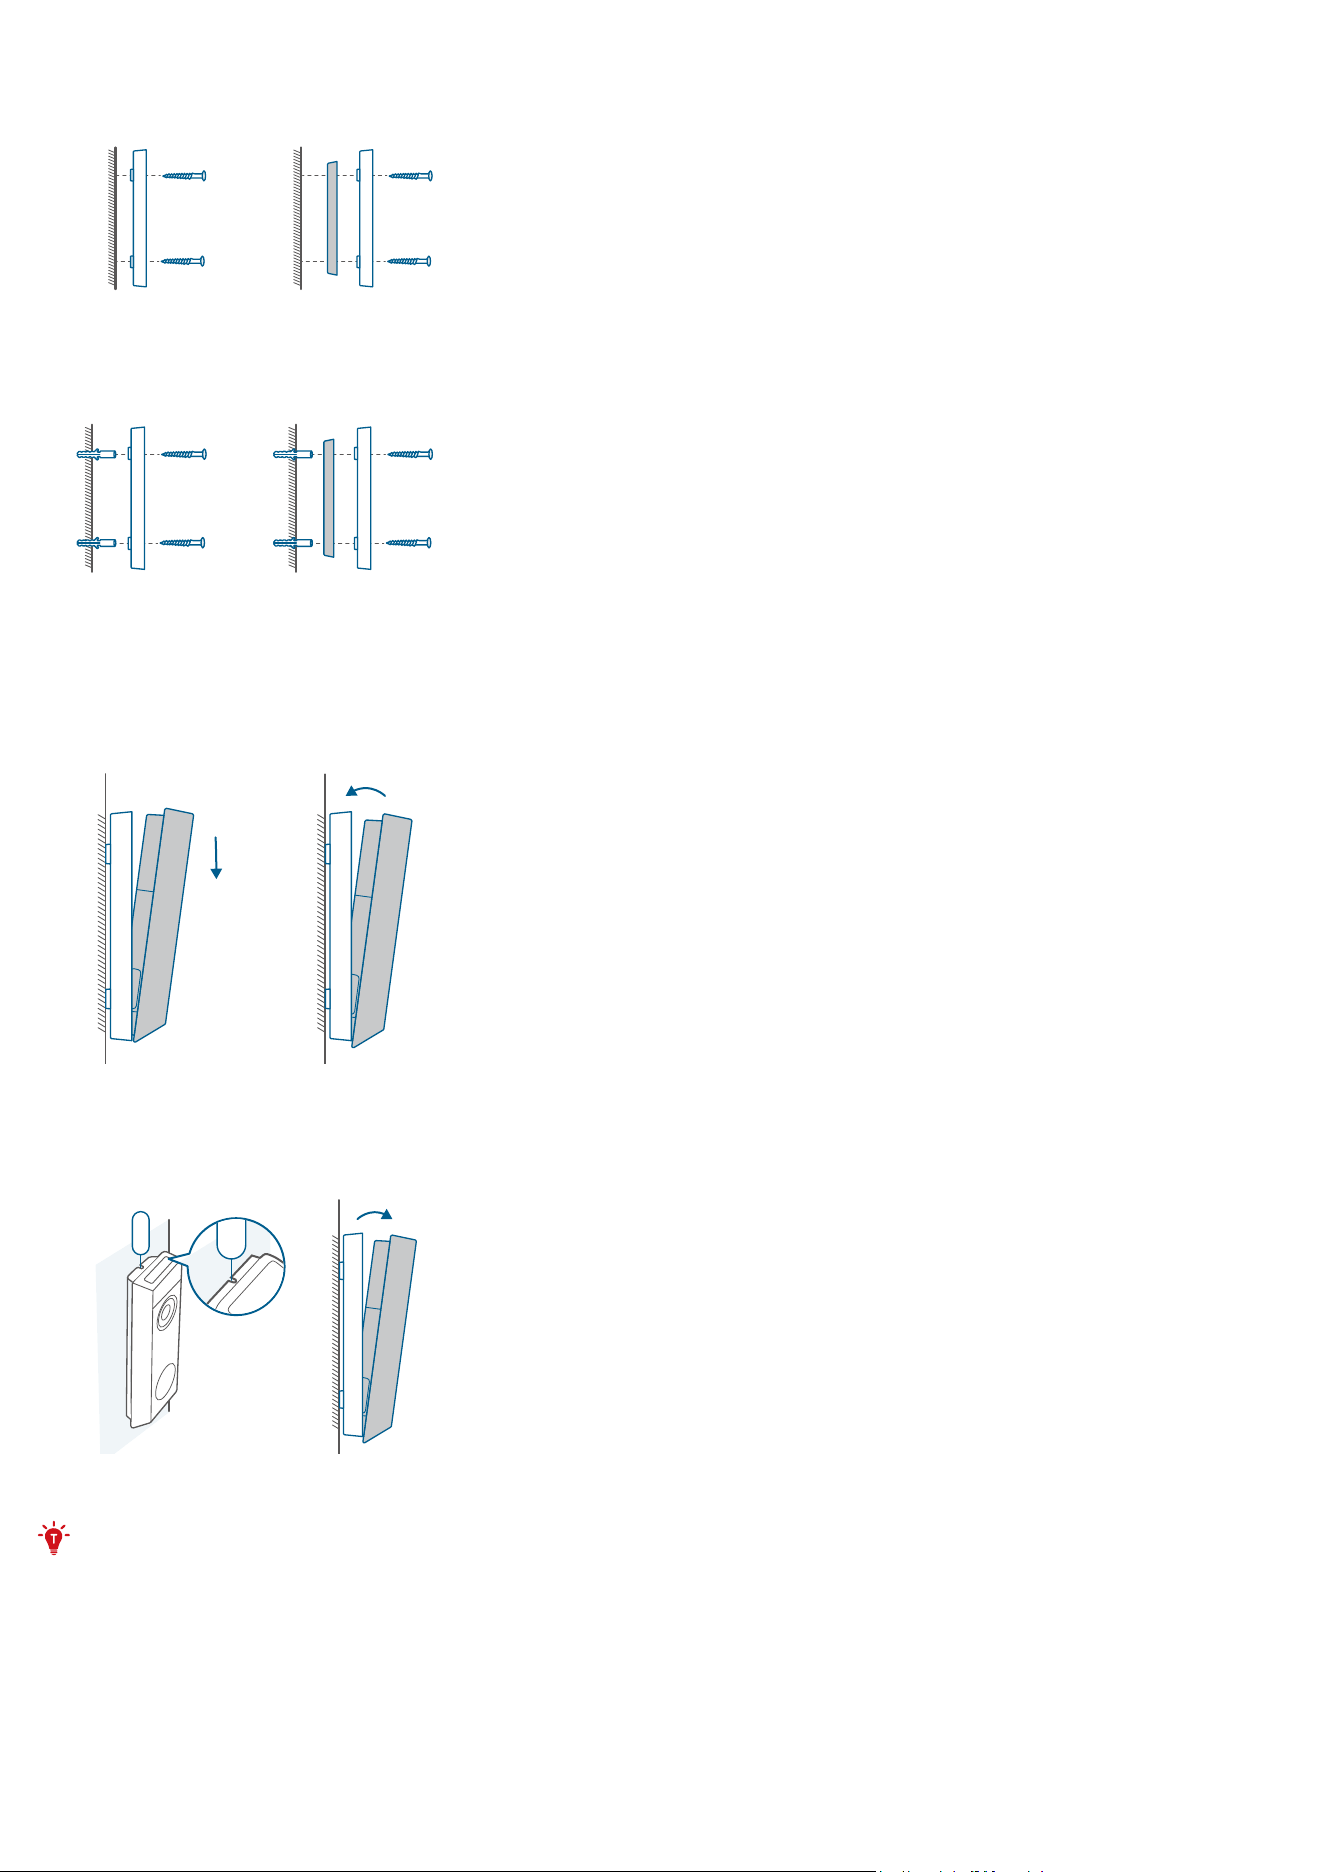
4. Mount the Bracket
Use the provided screws to secure the mounting bracket on the wall.
Wooden Wall
Mounting
Bracket
Mounting
Wedge
Mounting
Bracket
Without 15º Mounting Wedge
With 15° Mounting Wedge
Hard Wall
Mounting
Bracket
Mounting
Wedge
Mounting
Bracket
Without 15º Mounting Wedge
With 15° Mounting Wedge
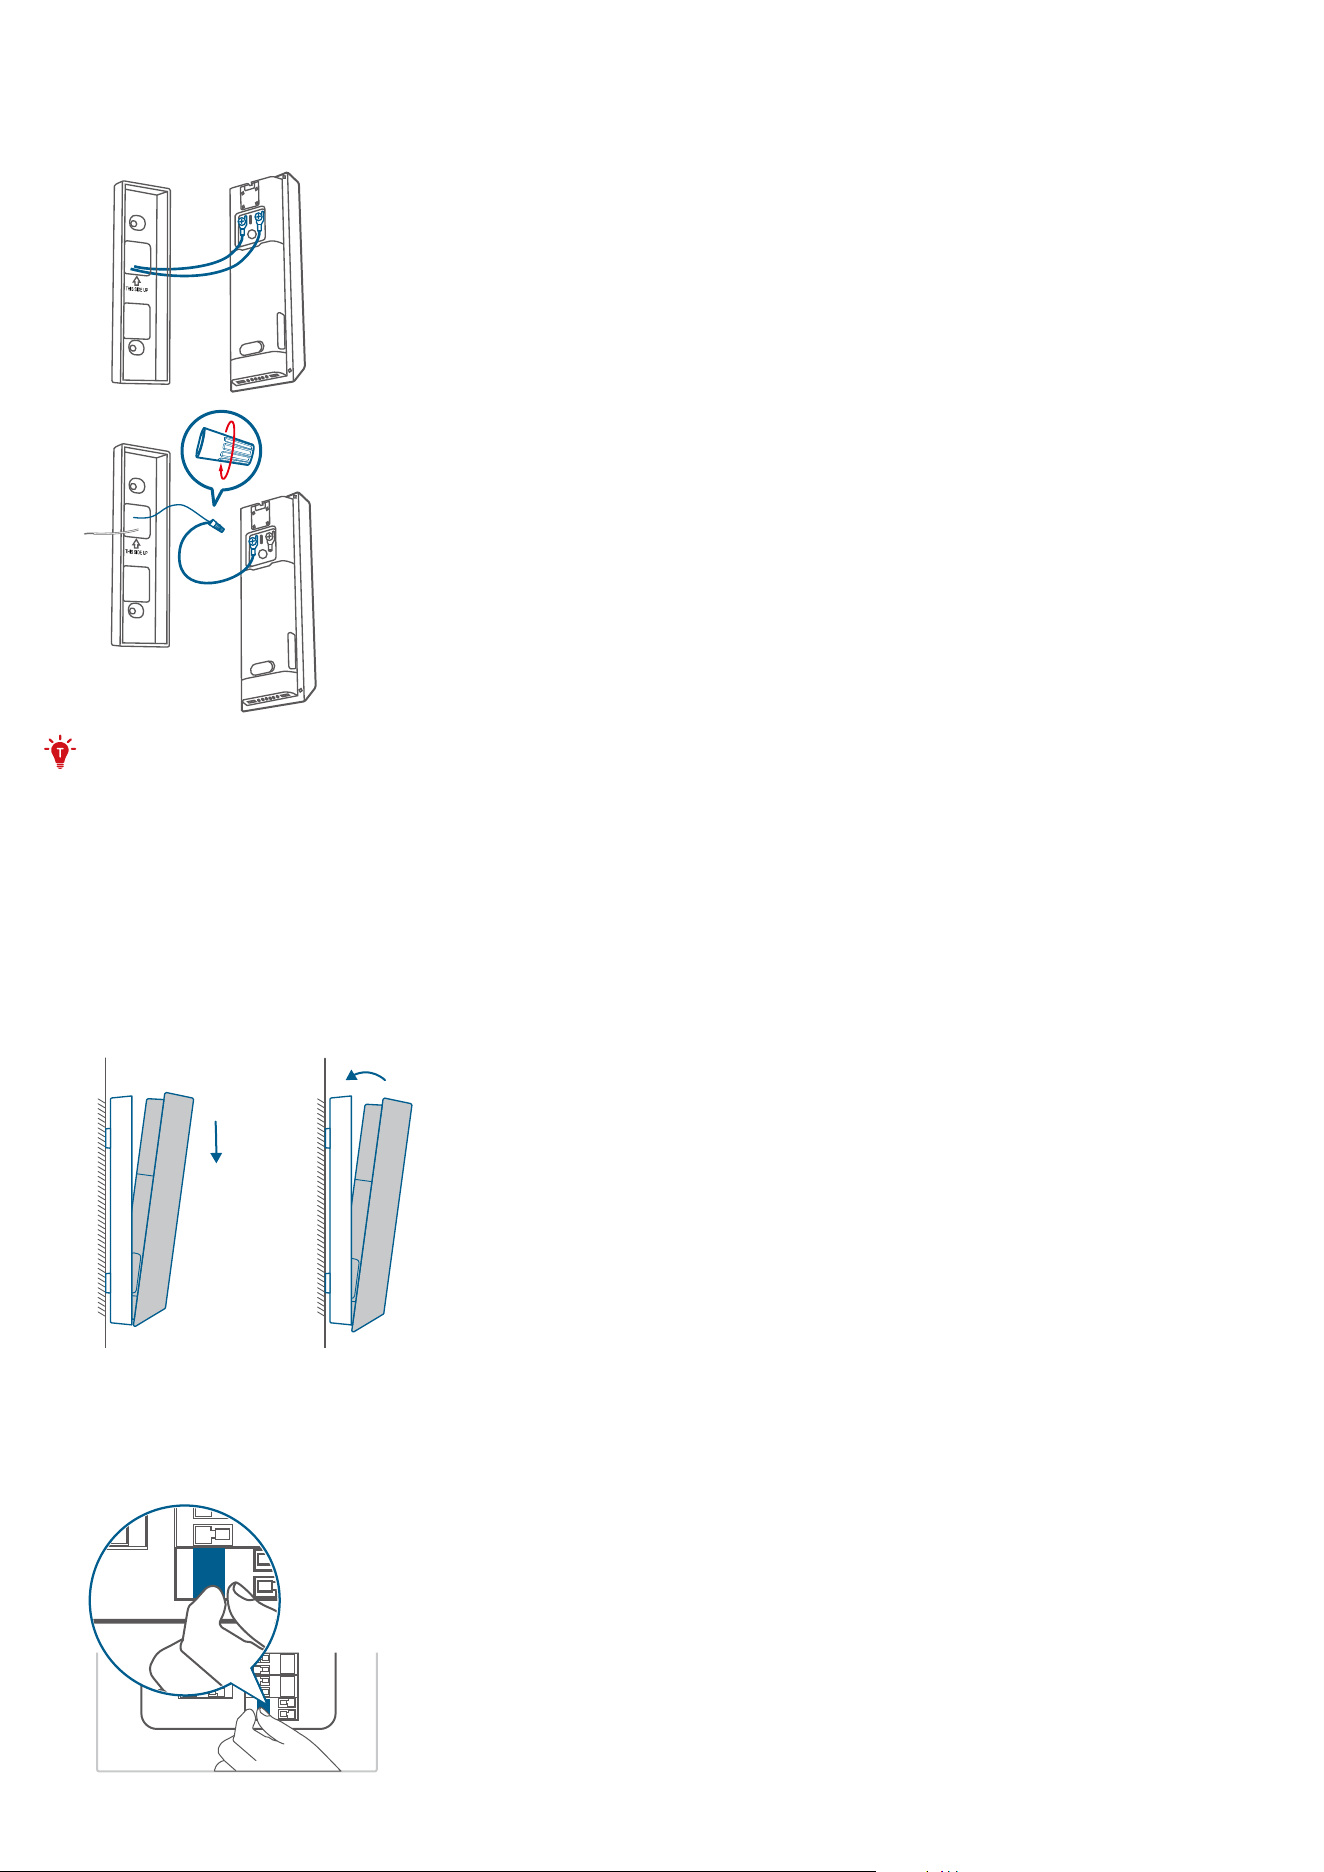
5. Connect the Wires to the Doorbell
Connect the wires to the terminals on the back of the doorbell, then tighten the terminal screws. Wire can be
connected to any terminal.
SYNC
SYNC
1. To prevent short-circuiting, make sure the wires are not touching each other aer connecting them to the
terminals.
2. If the wires are too short, use the extension wires and wire nuts to make them longer. Use electrical wiring
tape instead if there is no more space on the wall for wire nuts.
6. Install the Doorbell
Align the doorbell with the bottom of the mounting bracket, then press the top of the doorbell into place until it
clicks.
7. Restore Power
Switch the main circuit breaker back to ON. You're all set!
OFF
OFF