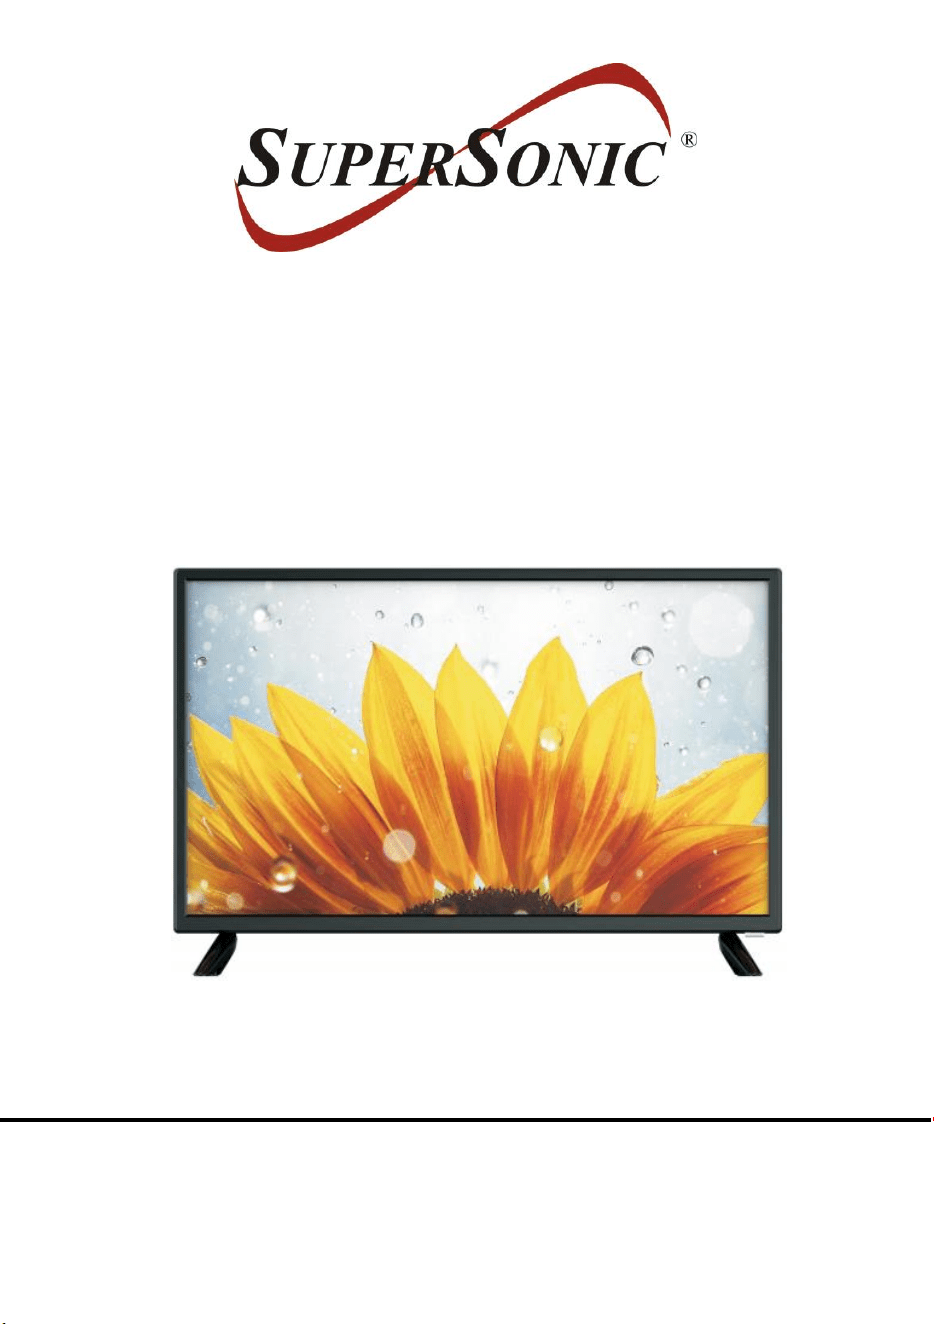
23.6” LED TV COMPATIBLE
WITH DVD PLAYER
MODEL NO.: SC-2426SDVD
USER MANUAL
Please read this manual carefully before using,
and keep it for future reference.
1
Safety information
CAUTION:
DVD/VIDEO CD/CD PLAYER IS A CLASS 1 LASER PRODUCT. HOWEVER THIS
DVD/VIDEO CD/CD PLAYER USES A VISIBLE LASER BEAM WHICH COULD
CAUSE HAZARDOUS RADIATION EXPOSURE IF DIRECTED. BE SURE TO
OPERATE THE DVD/VIDEO CD/CD PLAYER CORRECTLY AS INSTRUCTED.
WHEN THIS DVD/VIDEO CD/CD PLAYER IS PLUGGED TO THE WALL OUTLET, DO
NOT PLACE YOUR EYES CLOSE TO THE OPENING OF THE DISC TRAY AND
OTHER OPENINGS TO LOOK INTO THE INSIDE OF THIS PLAYER.
USE OF CONTROLS OR ADJUSTMENTS OR PERFORMANCE OF PROCEDURES
OTHER THAN THOSE SPECIFIED HEREIN MAY RESULT IN HAZARDOUS
RADIATION EXPOSURE.
DO NOT OPEN COVERS AND REPAIR YOURSELF. REFER SERVICING TO
QUALIFIED PERSONNEL.
WARNING:
- TO PREVENT FIRE OR SHOCK HAZARD. DO NOT USE THIS POWER CORD WITH
AN EXTENSION CORD, RECEPTACLE OR OTHER OUTLET UNLESS THE BLADES
CAN BE FULLY INSERTED TO PREVENT BLADE EXPOSURE.
- TO PREVENT FIRE OR SHOCK HAZARD. DO NOT EXPOSE THIS APPLIANCE TO
RAIN OR MOISTURE.
CAUTION - LASER RADIATION WHEN OPEN, DO NOT STARE INTO BEAM.
VENTILATION WARNING - THE NORMAL VENTILATION OF THE PRODUCT SHALL
NOT BE IMPEDED FOR INTENDED USE.
The lightning flash and
arrow head within the
triangle is a warning
sign alerting you of
“ dangerous
voltage”inside the
product.
CAUTION: TO REDUCE THE RISK
OF ELECTRIC SHOCK. DO NOT
REMOVE COVER (OR BACK).
NO USER SERVICEABLE PARTS
INSIDE. REFER SERVICING TO
QUALIFIED SERVICE PERSONNEL.
The exclamation
point within the
triangle is a warning
sign alerting you of
important
instructions
accompanying the
product.
Always follow basic safety precautions when using electrical products, especially
when children are present.
WARNING: To avoid the risk of electrical shock, make sure the product is unplugged
from the electrical outlet before relocating, servicing, or cleaning it.
IMPORTANT INSTRUCTIONS
2
Read all instructions before using
⚫ Do not use this product near water.
⚫ Install the product in accordance with the operating instructions.
⚫ Do not set the product near heat sources, such as radiators, heat registers, stoves, or
other apparatus (including amplifiers) that produce heat.
⚫ Protect the power cord from being walked on or pinched, particularly at plugs,
convenience receptacles, and the point where they exit the product.
⚫ Where the MAINS plug or an appliance coupler is used as the disconnect device, the
disconnect device shall remain readily operable.
⚫ Unplug the product during lightning storms or when unused for long periods of time.
⚫ The product shall not be exposed to dripping or splashing and that no objects filled
with liquids, such as vases, shall be placed on the product.
⚫ Do not place in or expose the product to direct sunlight, extreme heat, humid or dusty
locations.
⚫ Never operate this product if it has a damaged power cord or plug, do not work
properly, has been dropped, damaged, or exposed to moisture, water, or other liquids.
⚫ Do not attempt to examine or repair this product yourself; take the product to a service
center for inspection and repair.
⚫ Keep magnetic objects such as speakers, at a distance from the player.
LASER SAFETY
This set employs an optical laser beam system in the CD mechanism
designed with built-in safeguards. Do not attempt to disassemble.
Exposure to this invisible laser light beam may be harmful to the human
eye. This is a Class-1 laser product. Use of controls, adjustments or
procedures other than those specified herein may result in hazardous
laser light beam exposure. This compact disc player should not be
adjusted or repaired by anyone except qualified service personnel. The
laser mechanism in the set corresponds to the stylus (needle) of a record
player. Although this product uses a laser pick-up lens, it is completely
safe when operated according to directions.
NOTE: The manufacturer is not responsible for any radio or TV interference caused by
unauthorized modifications. Such modifications could void the user's authority to operate
the equipment.
1) Operate turning controls and switches as instructed in the manual.
2) Before turning on the power for the first time, make sure that the plug is properly
installed.
3) Store your discs in a cool area to avoid damage from heat.
Battery Handling and Usage
● Keep batteries away from children and pets. Only adults should handle batteries.
● Never throw batteries into a fire or expose them to fire or other heat sources.
● Follow the battery safety and usage instructions.

3
DISC Handling and Maintenance
Handling precautions
⚫ Hold the disc by the edges so the surface will not be soiled with fingerprints. Fingerprints,
dirt and scratches can cause skipping and distortion.
⚫ Do not write on the label side with a ball-point pen or other writing utensils.
⚫ Do not use record cleaning sprays, benzine, thinner, static electricity prevention liquids.
⚫ Be careful not to drop or bend the disc.
⚫ Do not install more than 1 disc on the disc compartment.
⚫ Do not try to close the disc cover when the disc is not installed properly.
⚫ Be sure to store the disc in its exclusive case when not in use.
If the surface is soiled
Wipe gently with a soft, damp (water only) cloth.
When wiping discs, always move the cloth from the center hole toward the outside,
which will not cause distortion. (If you wipe the discs using a circular motion, circular
scratches are likely to occur, which will cause distortion.)
If the disc is brought from a cold to a warm environment, moisture may
form on the disc.
Wipe this moisture off with a soft, dry, lint-free cloth before using the disc.
Improper disc storage
You can damage discs if you store them in the following places:
⚫ Areas exposed to direct sunlight
⚫ Humid or dusty areas
⚫ Areas directly exposed to a heat outlet or heating appliance
User Manual………………………………….……………………..………………………………1
Remote Control…………………………………………………………………………..…………1
Power Cord………………………………………………………………………………………….1
Car Adaptor……………………………………………….…………………………………………1
All the pictures in this manual are just for your reference, appearance and display
should subject to the final product.
ACCESSORIES

4
TABLE OF CONTENTS
GETTING STARTED
IMPORTANT INSTRUCTIONS...........................................................................................1-3
ACCESSORIES.....................................................................................................................3
FEATURES............................................................................................................................5
GENERAL PARTS..............................................................................................................6-7
REMOTE CONTROL........................................................................................................8-9
REMOTE CONTROL PREPARATION.................................................................................10
BASIC CONNECTION....................................................................................................11-13
OPERATIONS
BASIC OPERATIONS....................................................................................................14-19
DVD..................................................................................................1 4-18
TV................................................................................................................................19
LIVE TV.........................................................................................................20-22
CONNECTION...............................................................................................................23-25
MULTI-SCREEN.............................................................................................................26-27
SMART FUNCTIONS.....................................................................................................28-30
PICTURE AND SOUND...........................................................................................31-35
CHANNEL........................................................................................................................36
ACCESSIBILITY..........................................................................................................37
SYSTEM AND SUPPORT..............................................................................................38-40
FOR REFERENCE
MAINTENANCE...........................................................................................................41
WALL MOUNTING……………………………………………………………………..……41
STAND INSTALLATION……………………………………………………………………..……42
SPECIFICATIONS............................................................................... ........................43
TROUBLESHOOTING............................................................................. ...............44-45

5
23.6" LED DISPLAY
This player has a built-in LED display window to provide clear vision and low radiation.
With Built-in DVD Player
Support Auto Program Scanning Function
Support Digital Broadcasting Reception
Compatible with USB for Music, Photo and Video Playback (TV Mode)
Support Multi-languages On Screen Display
Support Full Function Remote Control
Compatible with LAN, HDMI Input
Compatible with EARPHONE and OPTICAL Output
With Detachable Stand Holder
With External Antenna Jack
With Built-in Speakers
With Noise Reduction Function
FEATURES
6
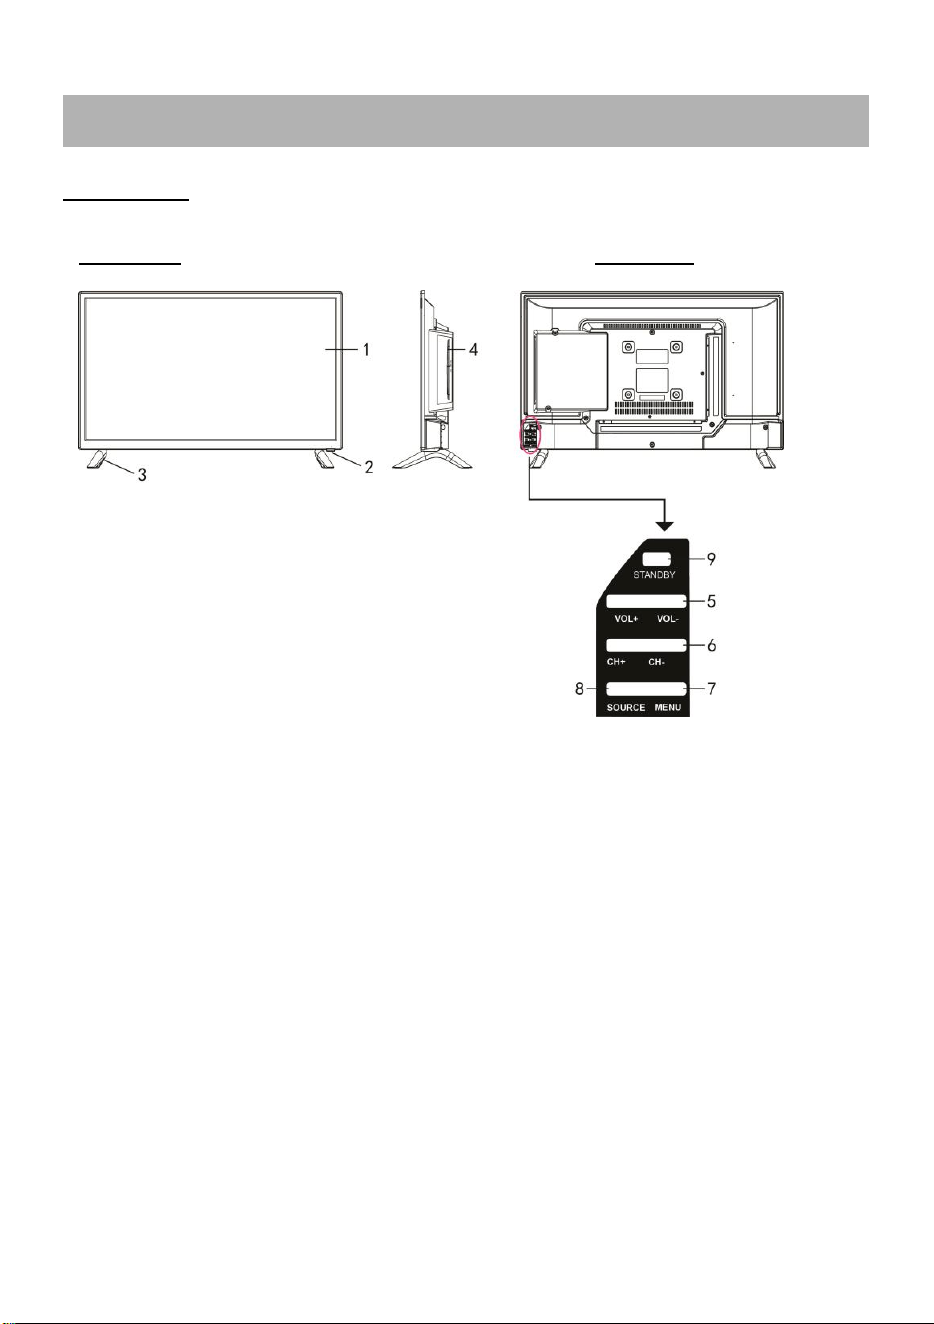
MAIN UNIT
1. LED display screen
2. Remote control sensor / Power indicator- In standby mode the indicator light will display red
color; when switching on the unit the indicator light will display blue color.
3. Stand holder
4. Disc slot - To insert a disc according to the silk screen on the side of this slot.
5. VOL +/- button - To increase/decrease the volume level or move left/right.
6. CH +/- button- To select next/previous channel or move up/down.
7. MENU button- To enter menu setting page.
8. SOURCE button- To select the input source.
9. STANDBY button- To turn ON/OFF the TV.
GENERAL PARTS
Front View
Back View

7
1. Power input (AC cord)
2. Power input (DC)
3. LAN input terminal
4. OPTICAL output terminal
5. RF input terminal- To connect the external antenna.
6. EARPHONE output terminal
7. USB 1/2 input terminal (TV)
8. HDMI1/2/3 input terminal
GENERAL PARTS
Back View
8
REMOTE CONTROL
1 STANDBY(POWER)
Set the unit in standby mode; press it again to switch it on.
2 INPUT /
Press to select desired input source. / Press to open
or close the disc compartment in DVD mode.
3 Number buttons (0-9)
Input the number information, such as channel
number and so on.
4 MTS
To select desired soundtrack in TV mode.
5
Switch the digit when watching TV programs.
6
Move fast backward.
7
Start/pause playing.
8
Move fast forward.
9
Stop playing.
10 MENU
Call out the main menu or return to previous
menu.
11 4 Color
Customized in different page.
12 DIRECTION/OK
Move up, down, left, right/Confirm.
/
Press to play previous chapter. / To play next
Chapter.
13 BACK
Return to the previous interface or menu.
GOTO
To play a certain point in DVD mode.
14 EXIT
Exit the current interface or menu.
SETUP
Press to enter setup menu in DVD mode.

9
REMOTE CONTROL
15 HOME
Enter home page.
16 VOL +/-
Increase/decrease the volume level.
17 CH +/-
Play the next/previous program.
18 MUTE
Mute the sound.
19 LIVETV
TV source.
20 SLEEP
Set desired sleep time.
21 CC
CC in LIVE TV.
22 FREE
Press to enter the free video directly.
23 SPORTS
Press to enter the sport programme directly.
24 DEEZER
Press to enter the deezer directly.
25 Content area
Six buttons for CSP Apps.
10
REMOTE CONTROL PREPARATION
BATTERY INSTALLATION
Install the batteries as the following pictures. Be sure + and – terminals are positioned
as indicated in the battery compartment (Fig1).
SERVICE LIFE OF BATTERIES
- The batteries normally last for one year although this depends on how often the
remote control is used.
- If the remote control fails to work even when it is operated near the player, replace the
batteries.
- Use two size AAA dry batteries.
NOTE:
● Do not drop, step on or otherwise impact the remote control. This may damage the
parts or lead to malfunction.
● If the remote control is not going to be used for a long time, remove the batteries.
REMOTE CONTROL
OPERATION
Point the remote control from no more
than about 6m from the remote control
sensor and within about 60°of the
front of the player (Fig2).
NOTES:
- The operating distance may vary
according to the brightness of the
room.
- Do not point bright light at remote
control sensor.
- Do not place objects between the
remote control and the remote control
sensor.
- Do not use this remote control while
simultaneously operating the remote
control of any other equipments.
Fig1 Fig2
Remote Control
Sensor
Push
Open
Press

11
● Ensure all the cables are disconnected from the main unit before connecting to AC
power source.
● Read through the instructions before connecting other equipments.
CONNECTING TO AC POWER SOURCE
CONNECT EXTERNAL ANTENNA TO UNIT
Install external antenna into antenna jack for best picture.
BASIC CONNECTION
Antenna
Outdoor
antenna
amplifier
Indoor
antenna
amplifier
Power plug
of antenna
amplifier
75 OHM
antenna
plug
To power outlet
12
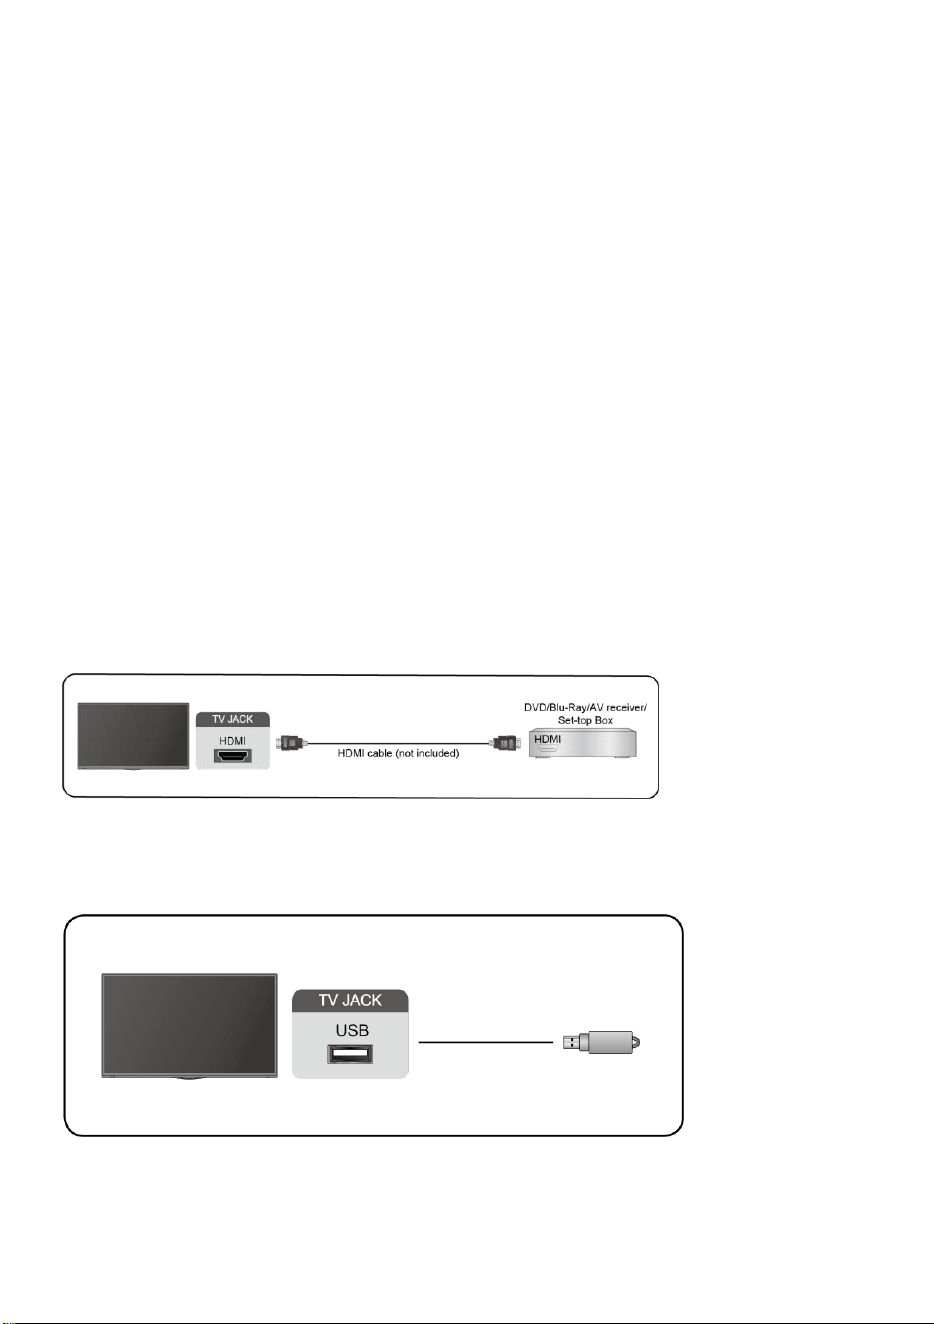
HDMI CONNECTION
EARPHONE CONNECTION
HDMI cable
(Not included)
Use HDMI cable to connect the unit with
other devices to receive high-definition
multimedia signal.
Back of DVD/VCR
Earphone cable
(Not included)
13
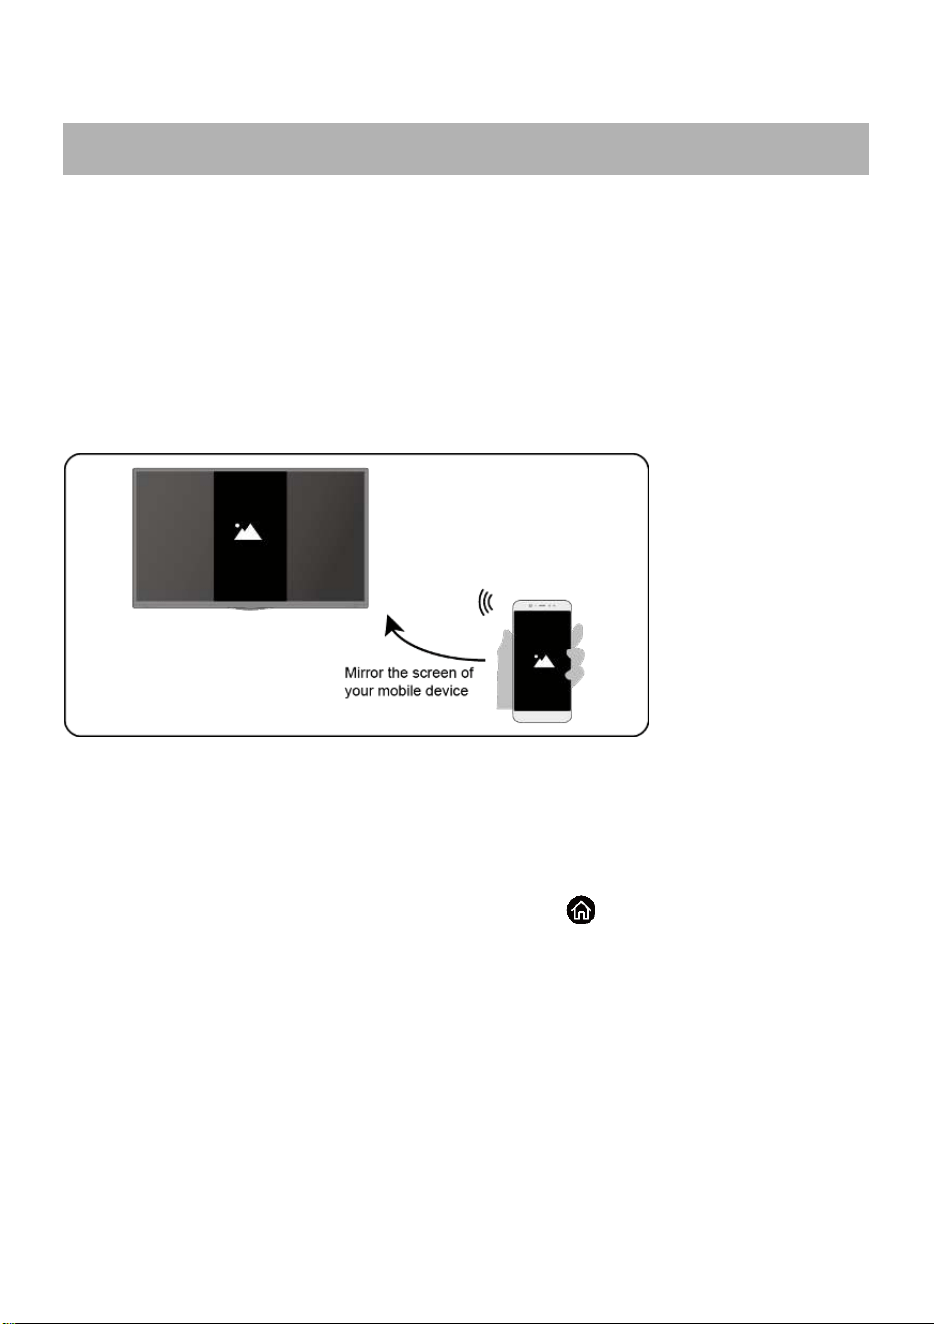
USB CONNECTION
OPTICAL CONNECTION
RJ-45 (Local Area Network) Connection
USB Memory Device
(Not included)
Use a LAN cable (not included) to
connect this TV with available network.
Use OPTICAL cable (not included) to connect the unit with
amplifier or other audio decoding devices for coaxial audio
signal output.
14
MAKE SURE ALL THE EQUIPMENTS AND POWER PLUG
ARE CONNECTED PROPERLY AND THE UNIT IS SET IN CORRECT
MODE BEFORE OPERATING.
- Press STANDBY button on the unit or remote control to power ON the unit (indicator
will glow blue); press it again to power OFF (standby mode) the unit (indicator will
glow red).
1. Basic play
Press the OK + EXIT button to switch to DVD mode. If there is no disc in the DVD player the
screen will show “ NO DISC ”. Insert Disc according to picture next to disc slot. Do not touch the
playing surface. Hold the disc around the outside with your fingers and place the disc into the
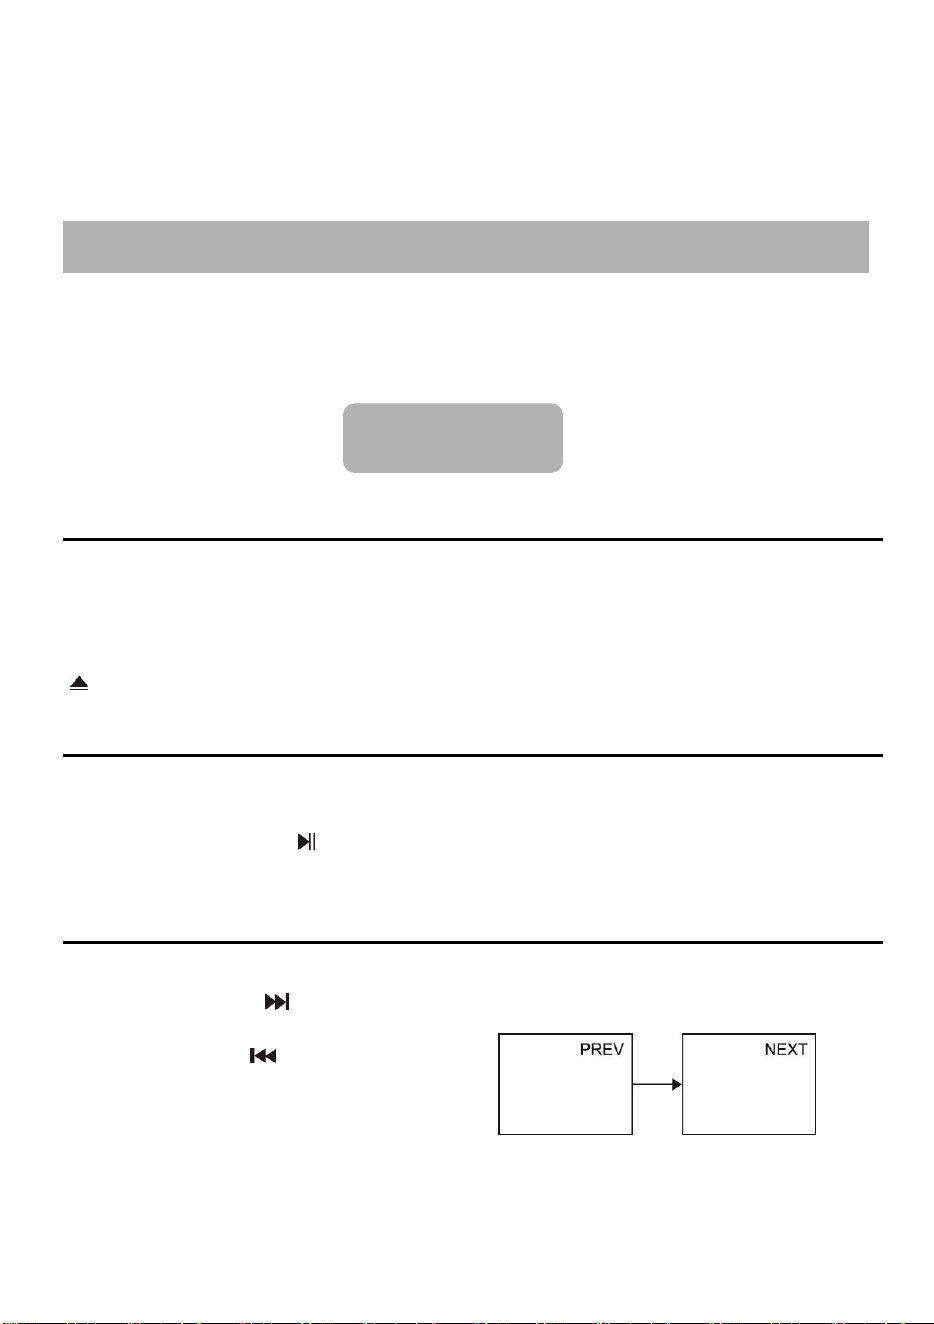
slot . The player will automatically draw the disc into the player . To “Eject” the disc , press the
“ ” button on the remote control.
2. Stopping play
Press █ (STOP) button to PRE STOP. Press █ (STOP) button again to stop playing
NOTE: When player is stopped, the player records the point where STOP was pressed
(RESUME function). Press
button again, playback will resume from this point. When the
tray is taken out or █ (STOP) is pressed again, the RESUME function will be cleared.
3. Skipping ahead or backward
Skipping ahead
During playback, press
button to play the next chapter (Video CD/CD).
Skipping backward
During playing, press button to play the
previous chapter (Video CD/CD).
BASIC OPERATIONS
DVD
15
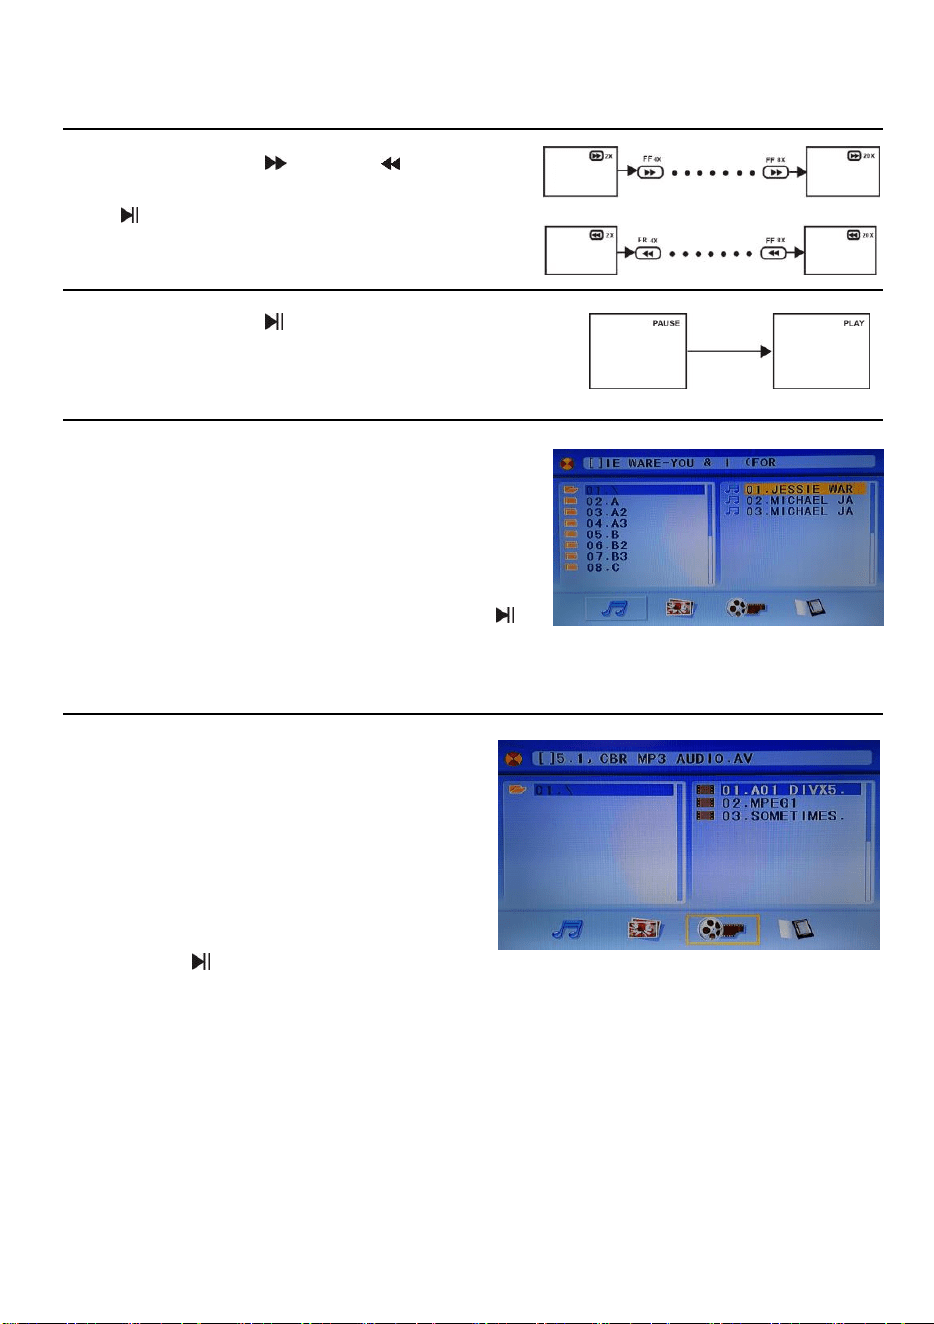
4. Fast forward/Fast backward
During playback, press
button or button to fast
forward/backward.
Press button to resume normal play.
5. Pause/play
During playback, press button to pause playing, press it
again to resume normal playback.
6. Music playback
a) Insert the disc which contains music files and after a
few seconds, the screen will show all the folders on the
disc.
b) Select the folder you want to play by navigation
buttons and press the OK button to confirm.
c) The files in this folder are displayed and select the
desired song by navigation buttons, then press the
or OK button to start playback.
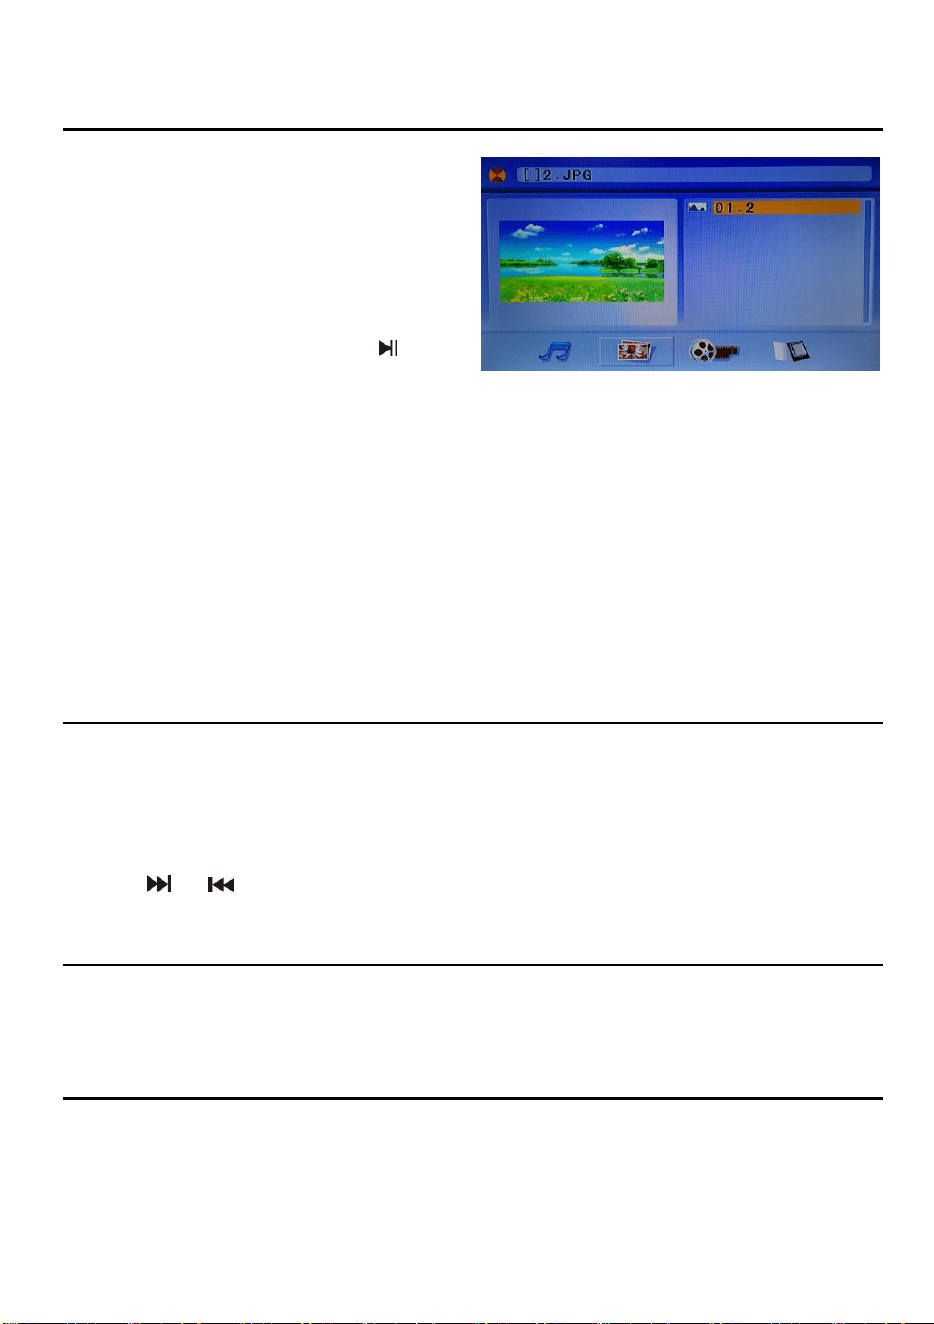
7. Movie playback
a) Insert the disc which contains movie
files and after a few seconds, the screen
will show all the folders on the disc.
b) Select the folder you want to play by
navigation buttons and press the OK button
to confirm.
c) The files in this folder are displayed and
select the desired file by navigation buttons,
then press the or OK button to start playback.
d) Press STOP █ button to return to play list page.
16
8. JPEG playback
For JPEG picture CD, select the folder you
want to play by the navigation buttons and
press OK button to confirm. The files in this
folder are displayed and select your pictures
by using the up/down navigation buttons and
press OK button to confirm. Thumbnail
of picture will be displayed while you scrolling
across the file name. Then press the
button
to start playback.
NOTE: The time of loading and displaying a picture depends on its size.
During playback, press STOP █ button to return to file selecting page.
Rotating pictures
- Press RIGHT navigation button to rotate the picture clockwise.
- Press LEFT navigation button to rotate the picture counter-clockwise.
Flipping pictures
- Press UP navigation button to flip the picture vertically.
- Press DOWN navigation button to flip the picture horizontally.
9. Enjoying Video CD with playback control
a) Press number buttons to select corresponding track.
Example: Track 9, press 0 and 9, several seconds later, it will automatically switch to track 9.
Track 15, press 1 and 5, several seconds later, it will automatically switch to track 15.
NOTE: The function is available when press the MENU button repeatedly to select MENU
PLAY “OFF”.
b) Press
or button, the player will play the next or previous track.
10. GOTO
Press GOTO button continuously to select the item you want to set and enter a time number,
chapter number, track number, etc. Accordingly, the disc will be played from the selected point.
11. Initial settings
Once the initial programming is entered it will be retained in memory until changed, the
player can always be operated under the same conditions.
17
Common procedure for initial settings
● Press SETUP button on remote control.
● Use the navigation buttons to select preferred item, and press OK button, each screen
for setting the value is displayed. Then move the navigation buttons to set the item and
press OK button to confirm the settings.
● Press SETUP button again to close setup menu.
● Use LEFT or RIGHT navigation button to switch to another main setup item. Then press
DOWN button to confirm the selection. Press RIGHT or OK button to enter sub-menu page;
press LEFT button to return to previous menu page.
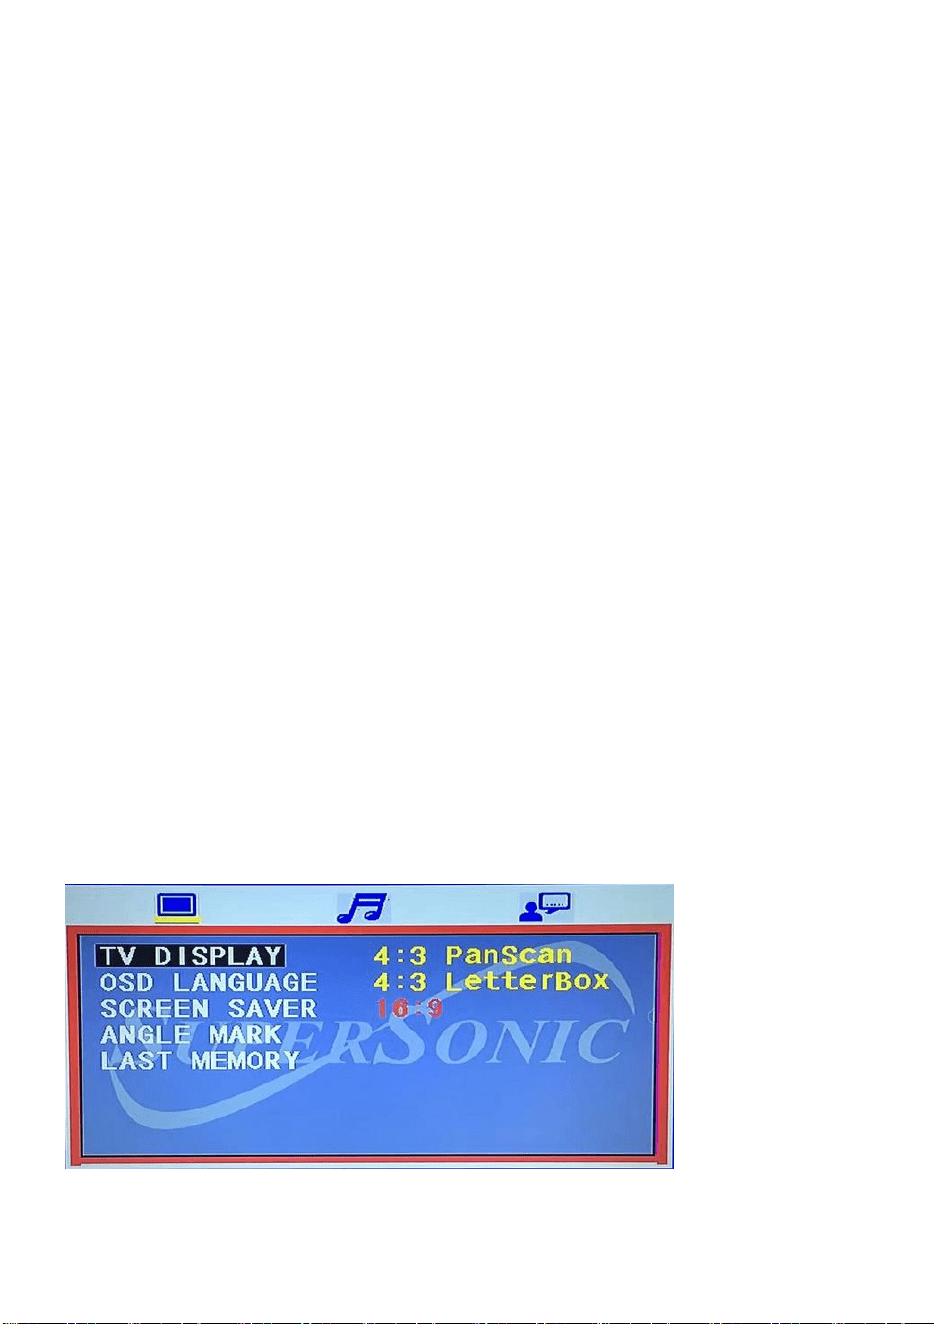
1. GENERAL
1.1 TV DISPLAY - It is for selecting TV output mode.
Available Options:
a) 4 :3 PanScan.
b) 4 :3 Letterbox.
c) 16:9.
1.2 OSD LANGUAGE - It is used to choose your desired OSD language.
1.3 SCREEN SAVER - If no operation is carried out for around 5 minutes, screen saver will
display on the screen when SCREEN SAVER is ON.
1.4 ANGLE MARK - It is used to select whether or not the multi-angle icon is display on
screen when a Multi-angle disc is playing.
1.5 LAST MEMORY - Enter another input source during DISC playback, and then back to
DVD input source again, this unit will resume playback from the point where last playback
was stopped, if LAST MEMORY is ON.

18
2. AUDIO
SPEAKER SETUP- It is used to select desired audio output mode.
Options:
a) STEREO
b) MONO L/R
c) MIX MONO
3. PREFERENCE
3.1 TV SYSTEM - Select desired TV system.
3.2 DEFAULT - It is used to reset to factory settings.

19
- Press STANDBY button on the unit or remote control to power ON the unit
(indicator will glow blue); press it again to power OFF (standby mode) the unit
(indicator will glow red).
SELECT DESIRED PROGRAM
1. Press CH+ button to play next channel.
2. Press CH- button to play previous channel.
3. Press number buttons on remote control directly to select desired program.
VOLUME CONTROL
- Press VOL+ or VOL- to adjust the level of current volume.
Available range: 0-100.
MUTE CONTROL
- Press MUTE button to mute the sound, press it again to turn on the sound.
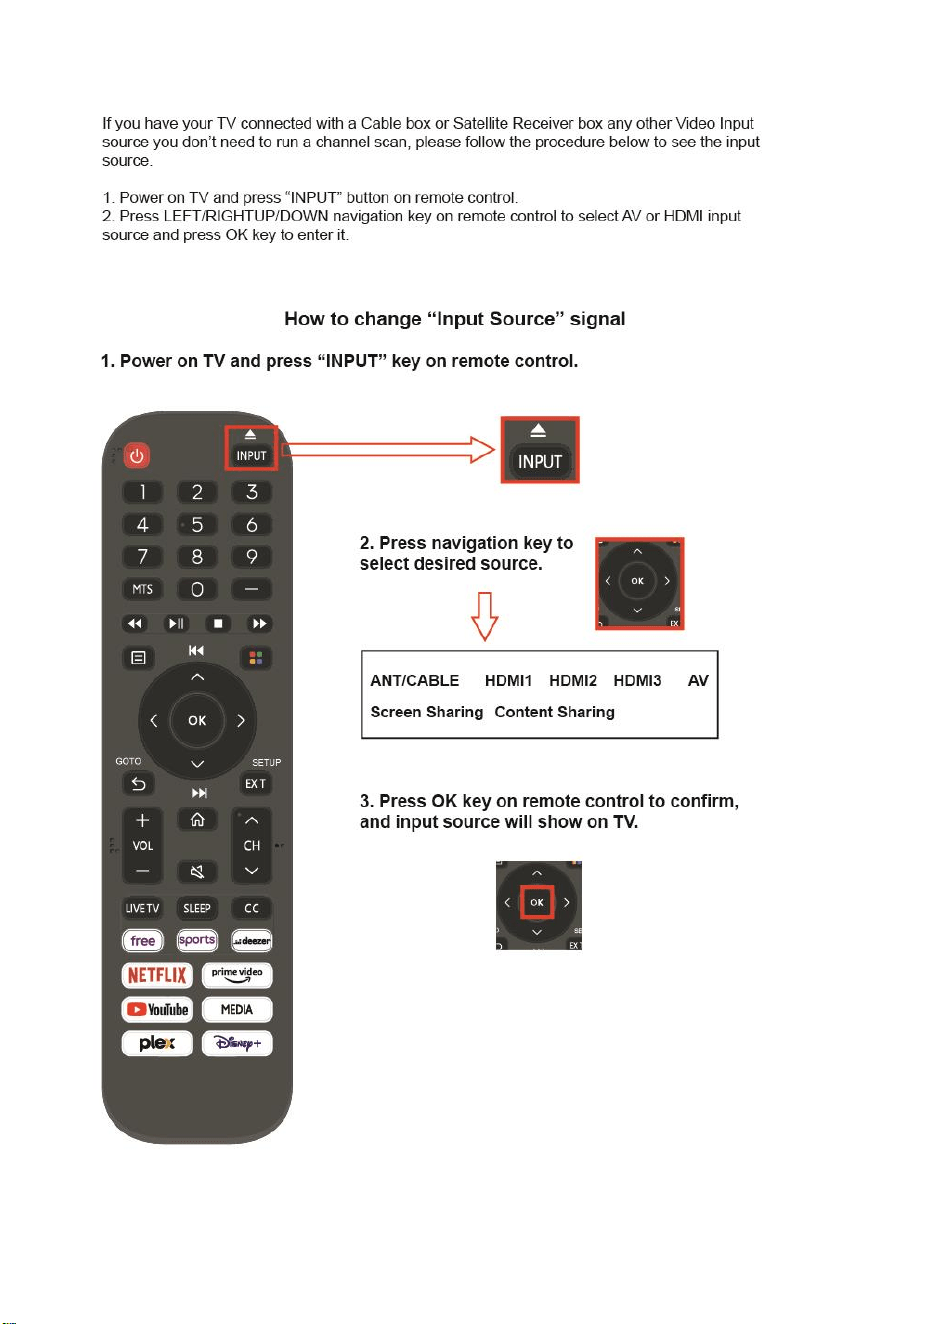
SOURCE SETTING
- Press INPUT button on the remote control to display the sources list.
- Press navigation buttons to select desired input source, and then press OK button to
confirm selection.
INFORMATION DISPLAY
- Press UP navigation button on remote control to display information of current program.
MEDIA PLAYBACK
- Press INPUT button on remote control to switch the unit to USB mode.
- Insert a USB memory device into USB slot before following operations.
- Press UP/DOWN/LEFT/RIGHT navigation button to move the cursor.
- Press BACK button to return to previous menu page.
TV
20
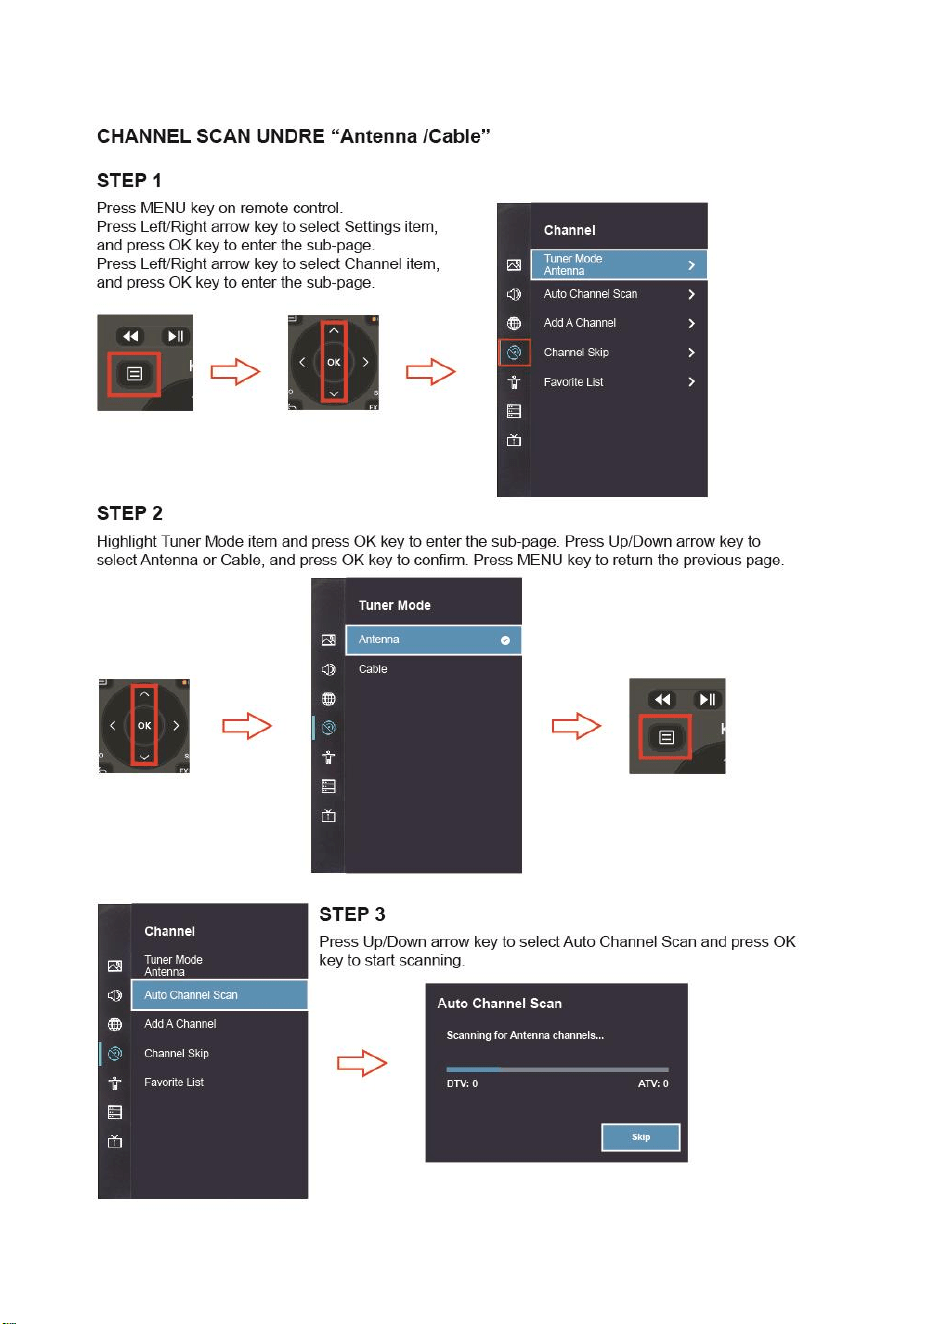
Channel Scan
Auto Channel Scan
> Settings > Channel > Auto Channel Scan
Note:
Before you select Automatic Scan, you can press
> Settings >Channel > Tuner Mode,
press OK button into the sub-menu, select
Antenna or Cable.
Channel List
Display the channel list
In Live TV, press
button on the remote
control to display the channel list menu.
LIVE TV
21
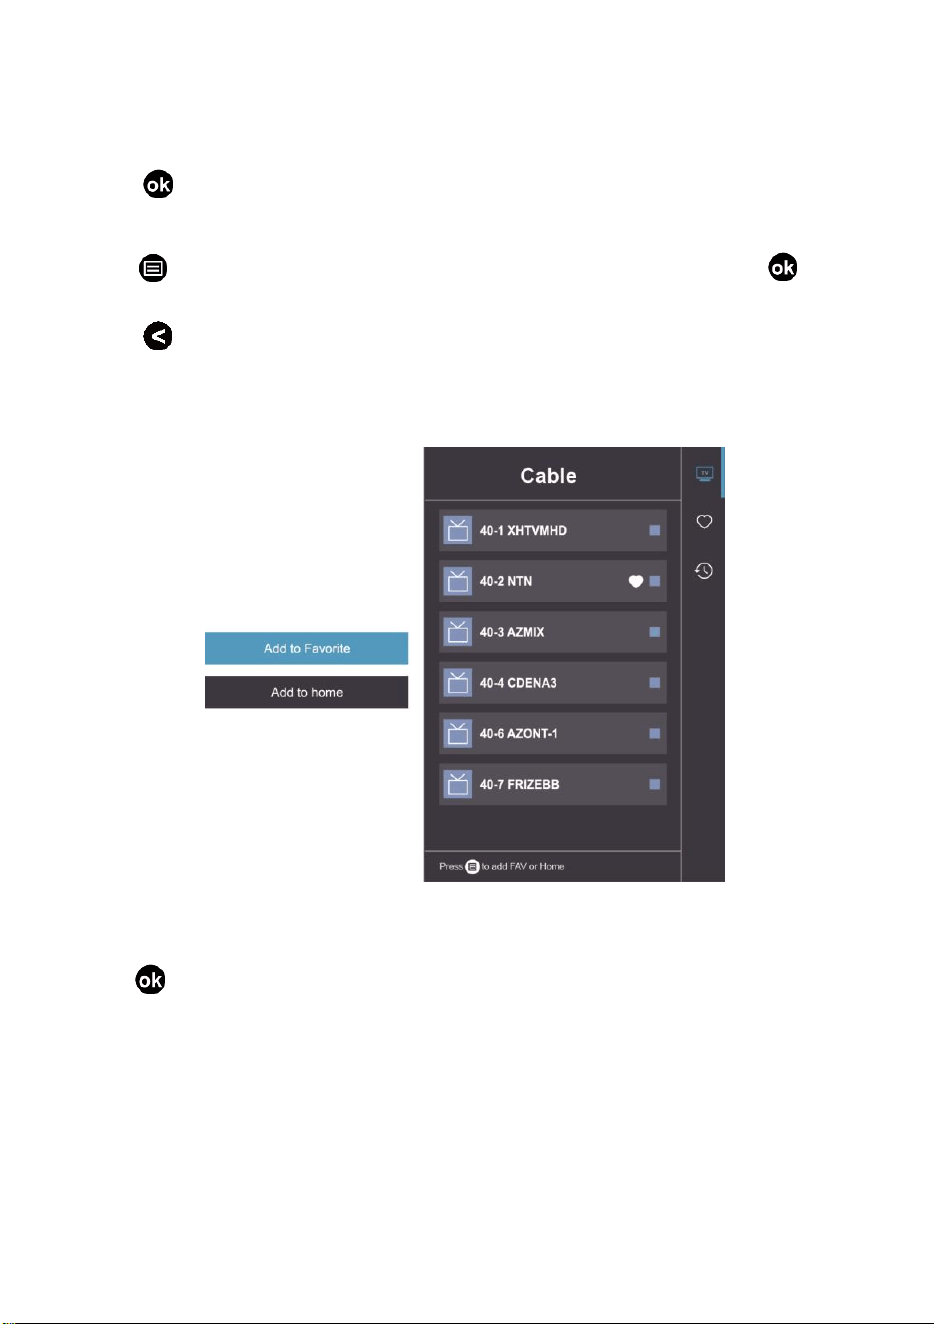
Favorite
Adding channels to your 'Favorites' list
Press
button to call out the channel list, the channel list appears on the right side of
the screen.
Press button and Navigation button to select your favorite channel; Press button
to confirm.
Press and Choose Add to Favorite; press OK button and a heart-shaped icon will
appear next to your favorite channel.
Viewing your 'Favorites' list
Press
to call out the channel list, the channel list appears on the right side of the
screen.
Press Navigation buttons to select Favorite icon and press OK button to confirm, then
your favorite channel with a heart-shaped icon will appear on the favorite list.
22
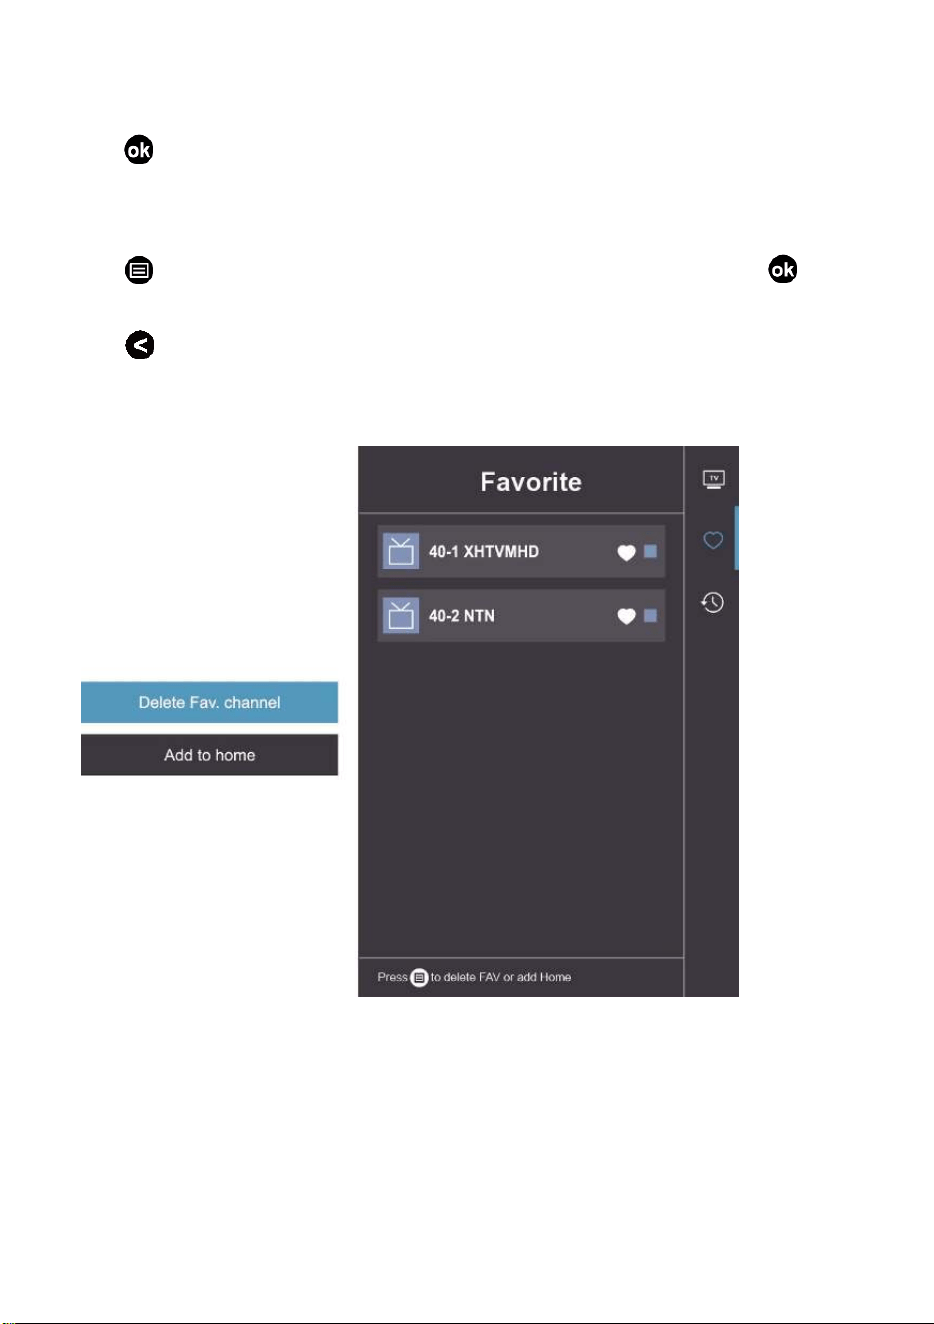
Deleting channels from your 'Favorite' list
Press
to call out the channel list, the channel list appears on the right side of the
screen.
Press Navigation buttons to select heart-shaped icon and press OK button to confirm;
Press button and Navigation buttons to select your desired channel; Press button
to confirm.
Press and Choose Delete Fav. Channel; press OK button to delete the selected
channel.
Note:
These steps should be operated under TV inputs.
Before you edit the favorite lists, complete channel scan first.
23
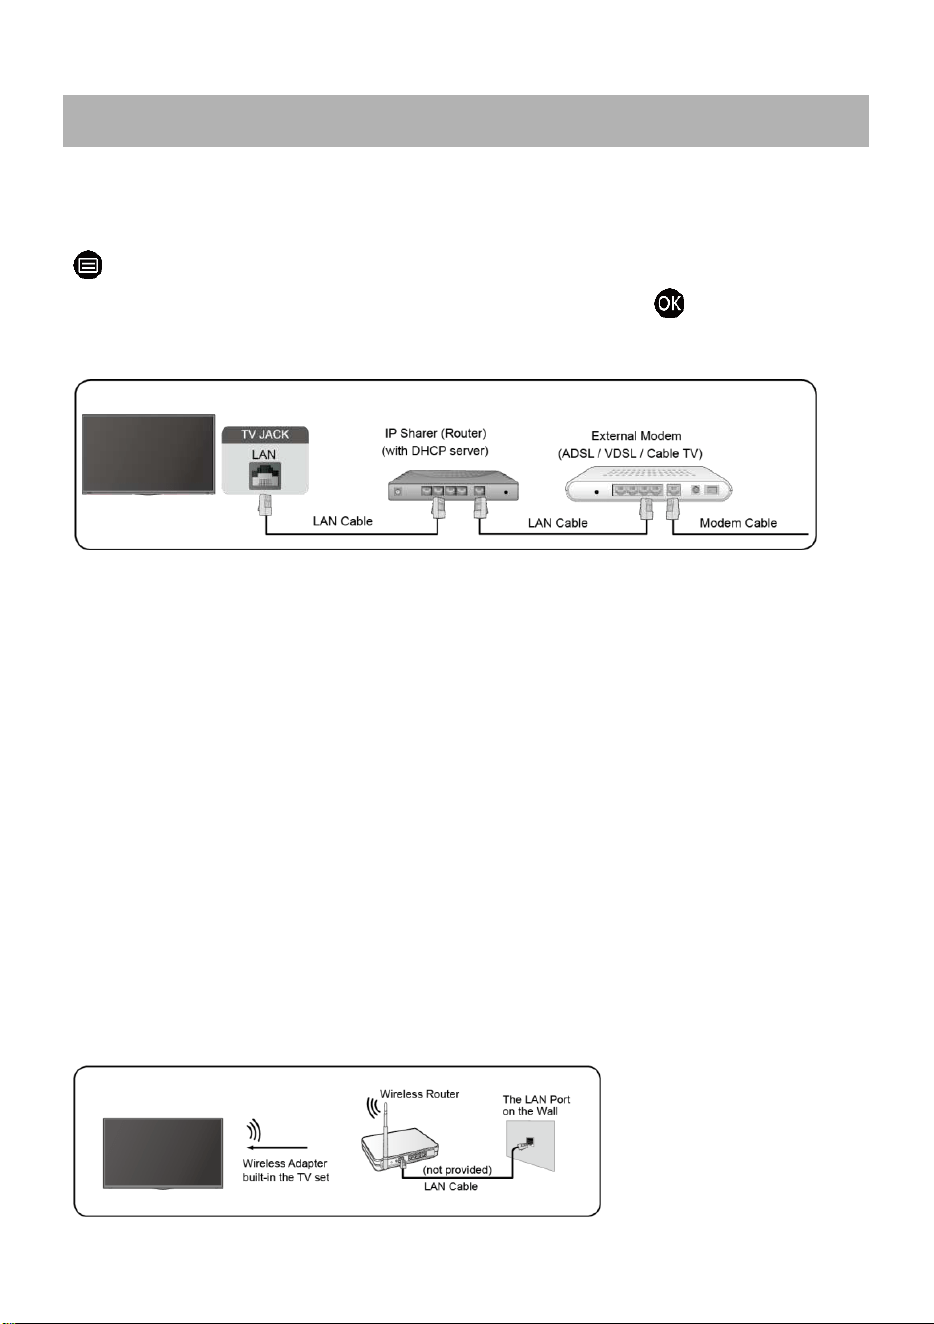
Wired LAN
Connecting to the Internet
> Settings > Network > Network Configuration
You set the TV network by selecting Configuration and press the
button to enter the
sub-menu.
Automatically obtain an IP address
1. If you connect to the wired network, the TV will automatically obtain an IP address and
connect to the network.
2. If the connection fails, disconnected message will display for the Ethernet status. Retry
or enter the IP settings, and select Manual to input the information again.
Manually enter the IP address
1. Enter the IP settings to select Manual.
2. Enter the IP Address, Netmask, Gateway, DNS Server 1 and DNS Server 2 in the menu.
Note:
This section is only for 4K models.
You get access to the Internet through your TV.
The default option of IP Settings Mode is DHCP.
Wireless
Connecting to the Internet
CONNECTION

24
Note:
You get access to the Internet through your TV.
Connect to an available wireless network.
Make sure that you have the wireless router's SSID and password before attempting
to connect.
Connecting to a Wireless Network
> Settings > Network > Network Configuration
You set the TV network by selecting Configuration and press the button to
enter the
submenu.
Connection Type
Choose a wireless network connection to access the Internet.
Refresh
Refresh wireless network.
Advanced Settings
Configure the advanced wireless network settings for the TV.
Add
You can add wireless network.
Note:
If no wireless router is found, select Add and enter the network name in the SSID.
If no wireless router is found, select Refresh.
HDMI-CEC
You can use your TV remote to control the external devices that are connected to the
TV by HDMI cable. The external devices need to support HDMI & CEC Function
(HDMI-CEC).
Connecting an external device through HDMI-CEC Function
>
Settings > System > HDMI-CEC
1.
Set CEC control to On.
2.
Connect an HDMI-CEC-compliant device to the TV.
3.
Turn on the connected external device. The device is automatically
connected to
25
the TV. After connection is finished, you can access the
menu of the connected
device on your TV screen using your TV remote
and control the device.
Note:
HDMI cables must be used to connect HDMI CEC-compatible devices to your TV.
The HDMI CEC feature of the connected device must be turned on.
If you connect an HDMI device that is not HDMI CEC-compatible, all the HDMI-CEC
control features do not work.
Depending on the connected HDMI device, the HDMI-CEC Control feature may
not work.
HDMI Device
Connect an HDMI cable from an external A/V equipment.
Some devices such as DVD player require HDMI signal to be set to output in the device's
settings. Please consult your device user manual for instructions.
Please note that the HDMI connector provides both video and audio signals, it's not
necessary to connect an audio cable.
USB Device
Connect the USB devices such as hard drives, USB sticks and digital cameras for
browsing photos, listening to music.
Support format: FAT32.
26
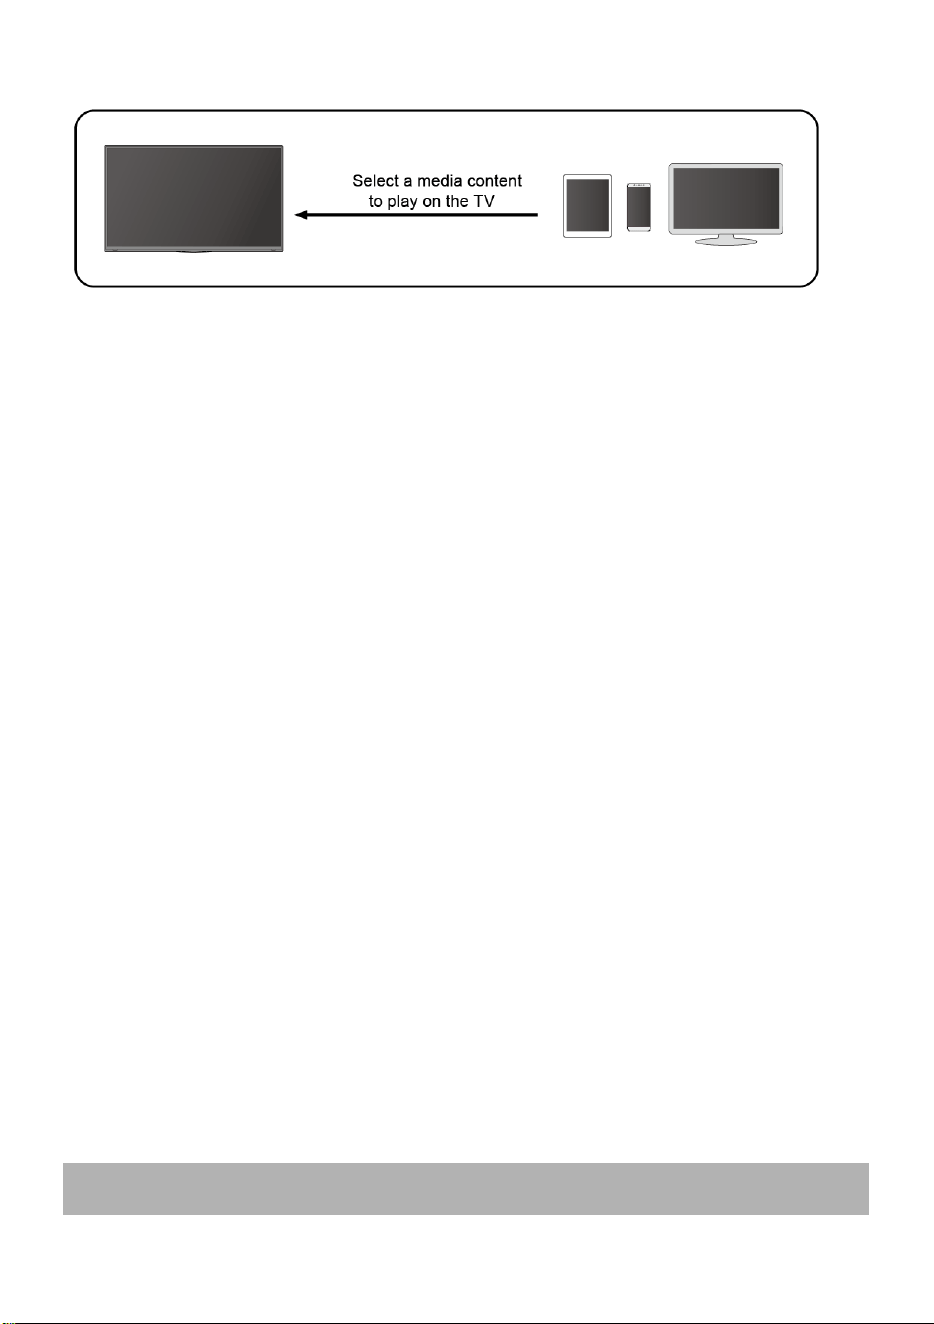
Screen Sharing
Mirror content from your device to the TV.
INPUT > Screen Sharing
Turn on the casting function of your Android/Windows10 device.
Find the TV name in the searching list of your device and select it. Wait for the
connection progress to complete and the content on your device will be displayed on
the TV.
Note:
Some Android devices may not support casting.
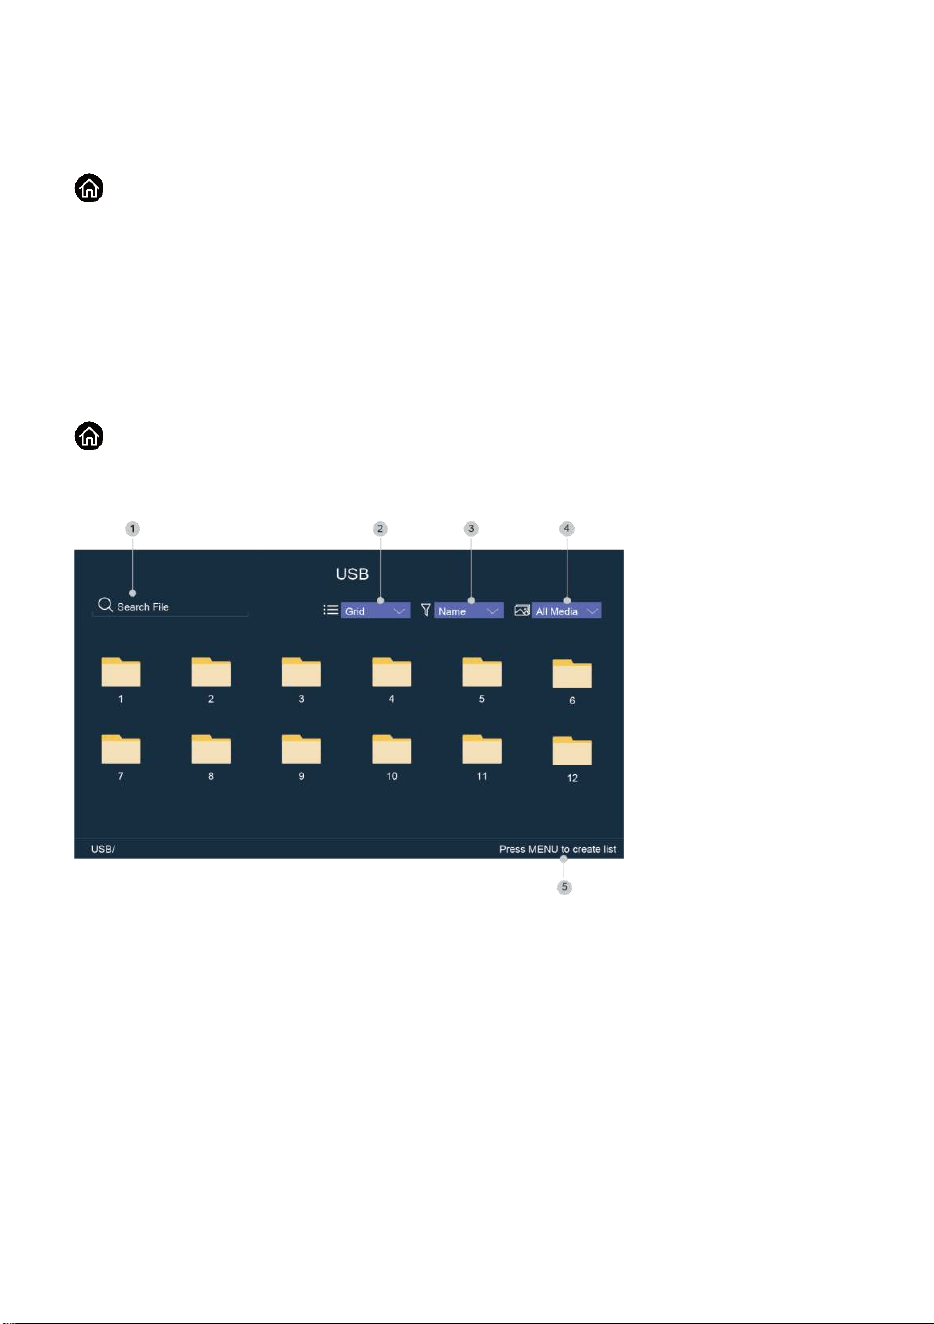
Content Sharing
Share media content, like videos, music or photos, from your device to the TV screen.
Before you use this function, turn on Content Sharing at
> Settings >
System > Application Manager > Content Sharing.
Establishing Content Sharing connection between the TV and your device
1. Turn on the content sharing function of your device.
2. Find the TV name in the searching list of your device and select it.
3. Wait for the connection progress to complete, and select the content you want to
share.
View media content of your device
Press INPUT button on your remote, and select a media content on the
screen.
Multi-screen
27
Note:
Make sure our device and the TV are connected to the same network.
Some devices may not support content sharing. If your device doesn't support content
sharing, you can download an app that supports the function.
If you want to mirror content from your device, go to INPUT >Screen Sharing.
Smart Functions
28
Media
Playing Media contents
> My Apps > Media
By default, there are Content Sharing displayed on the Media screen. If your mobile
device is connected to the TV, its name also appears on the Media screen.
Note:
For more information about Content Sharing, refer to its detailed
introduction.
> My Apps > Media > connected device
Select the content you want to play on the screen, like pictures, videos and music.
1. Input the content name you want to play.
2. Arrange the content list by Grid, List.
3. Arrange the content list by Name, Date Modified, Size.
4. Filter the content list by All Media, Photo, Video, Music.
5. Create a photo, music, or video playlist.
Playing background music during viewing pictures
You need to:
29
⚫ Choose a picture to playback.
⚫ Press
/ button to call out playbar.
⚫ Select Background Music and choose your music to create a Music Playlist.
⚫ Play the background music during viewing pictures.
Note:
The TV may be support the following file formats:
Medium
File Format
Video
.MP4, .MOV, .MPG, .MPEG, .FLV
Picture
.jpg, .BMP, .PNG, .GIF
Music
.MP3, .AAC, .wav
For more information about connection to other device, refer to the detailed
introduction of each part.
Home
Getting familiar with the Home screen
Run the TV more conveniently by selecting the corresponding sections. Press
button.

30
You can always view the current time at the top of the Home screen.
If your TV is connected to the Internet through a wireless connection, then the icon
will be at the top right corner of the screen.
Manage apps
Select the item you want to move, press
button to manage.
Search
Search the app you want.
Inputs
Select the input you want.
Settings
Display the Settings menu.
Notifications
Allow pop-up notifications to appear for useful information and events that occur with your
TV.
Select Notifications on the Home screen, and select Settings then display Advertising,
New Arrivals, Warnings And Legal Statements, System Message, from which you
can choose the types of notifications you would like to receive.
VIDAA Account
Sign in your VIDAA account.
A VIDAA account gives you all the best feature of your smart TV and always keeps it up to
date.
Adjusting the Picture Quality
Picture and Sound
31
Adjust current picture mode to apply to all sources or just current source.
The menu is only for reference. The following modes may differ from the actual product.
Choosing a picture mode
> Settings > Picture > Picture Mode
You can select the Picture Mode that provides the best viewing experience.
Vivid
Standard
Energy Saving
Theater
Game
Sports
Galibrated
Choosing a Picture Size
> Settings > Picture > Picture Size
You can adjust the picture aspect ratio based on the content you are watching.
Auto
Normal
Zoom
32
Wide
Direct
Dot-By-Dot
Panoramic
Cinema
Configuring advanced picture settings
> Settings > Picture > Picture Mode Settings
Adjust display setting for each Picture Mode.
Apply Picture Settings: Adjust current picture mode to apply to all sources or just
current source.
Backlight: Adjust image backlight.
Contrast: Adjust image contrast.
Brightness: Adjust image brightness.
33
Color : Adjust image color density.
Tint: Adjust the image tint to view the natural skin tons of people on the screen.
Sharpness: Adjust the image edge sharpness.
Overscan: Turn on if you are receiving analog antenna or cable input.
Color Temperature: Adjust the overall color of the image. (Optional:
High/Medium/Mid-Low/Low).
Noise Reduction: Improve how clear the picture appears by reducing noise.
Digital Noise Reduction: Improve picture clarity by reducing video noise.
HDMI Dynamic Range: Select Limit for 480p DVD players and select Full for Blu-ray.
Active Contrast: Automatically adjust contrast according to video content to improve
detail.
Expert Settings: Adjust the color space and Gamma to best suit the content you’re
viewing.
Reset Picture Settings: Restore all the picture settings in the current picture mode to
the factory default values.
Adjusting the Sound Quality
Adjust current sound mode to apply to all sources or just current source.
34
The menu is only for reference. The following modes may differ from the actual product.
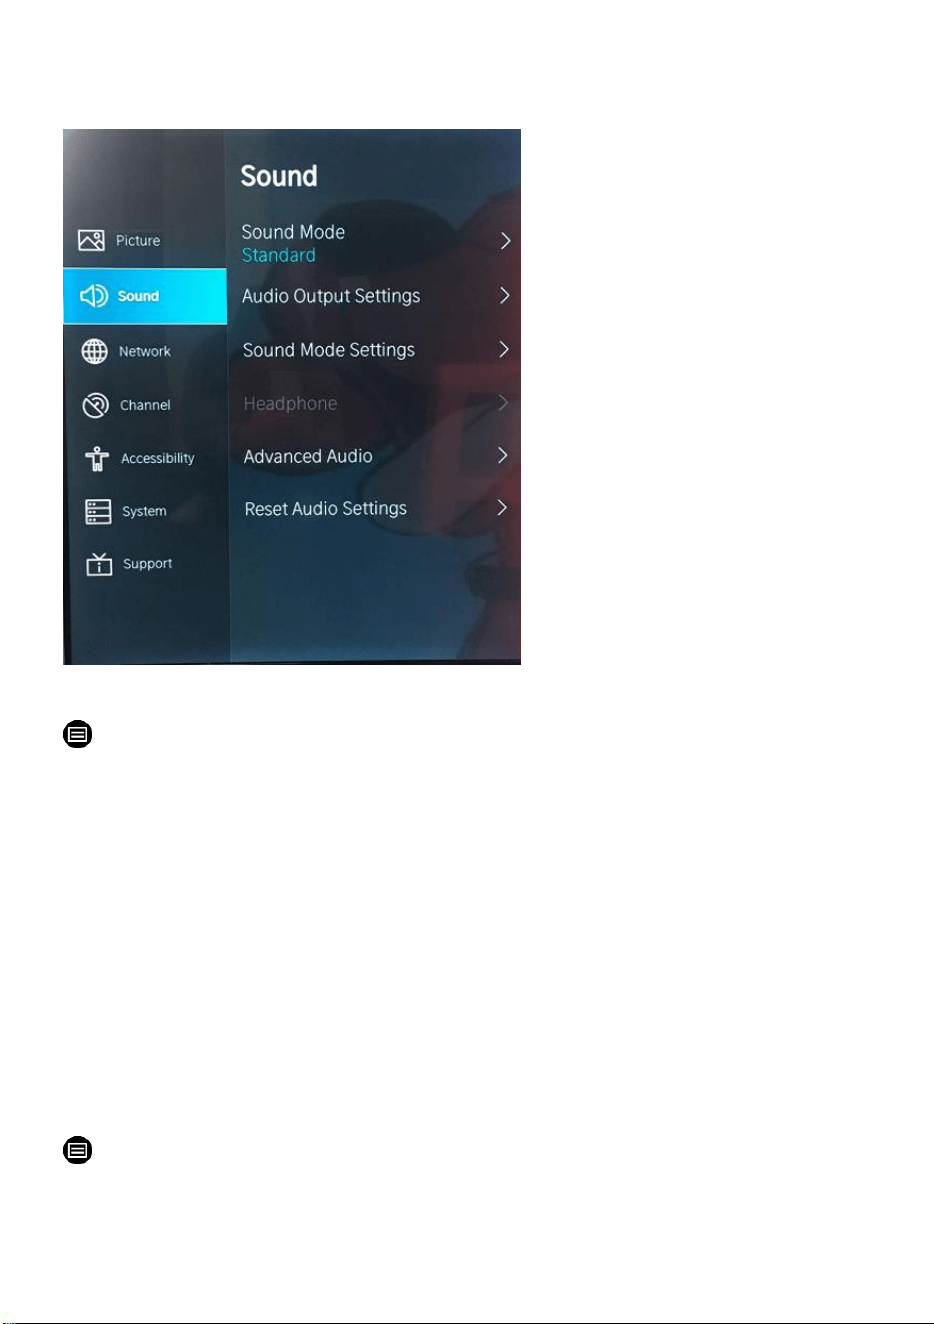
Choosing a sound mode
> Settings > Sound > Sound Mode
You can select a favorite sound mode suitable for the content type or the listening
environment.
Standard: Produced a balanced sound in all environment.
Theater: Increase the surround sound effect and provides a more prominent
subwoofer response.
Music: Preserves the original sound. Good for musical programs.
Speech: Low and high frequencies are attenuated to improve the reproduction and
clarity of the human voice.
Sports: Optimized sound for watching football.
Late Night: Improve the reproduction and clarity of the human voice with a low volume
level.
> Settings > Sound > Audio Output Settings
Switches the sound from the TV speakers to Optical or HDMI ARC output connectors..
35
> Settings > Sound > Sound Mode Settings
Customize selected Sound Mode.
> Settings > Sound > Headphone
Set the sound out mode for headphones.
> Settings > Sound > Advanced Audio
Tune the audio settings to improve sound quality.
> Settings > Sound > Reset Audio Settings
Reset all Audio settings in current audio mode to the factory default values.
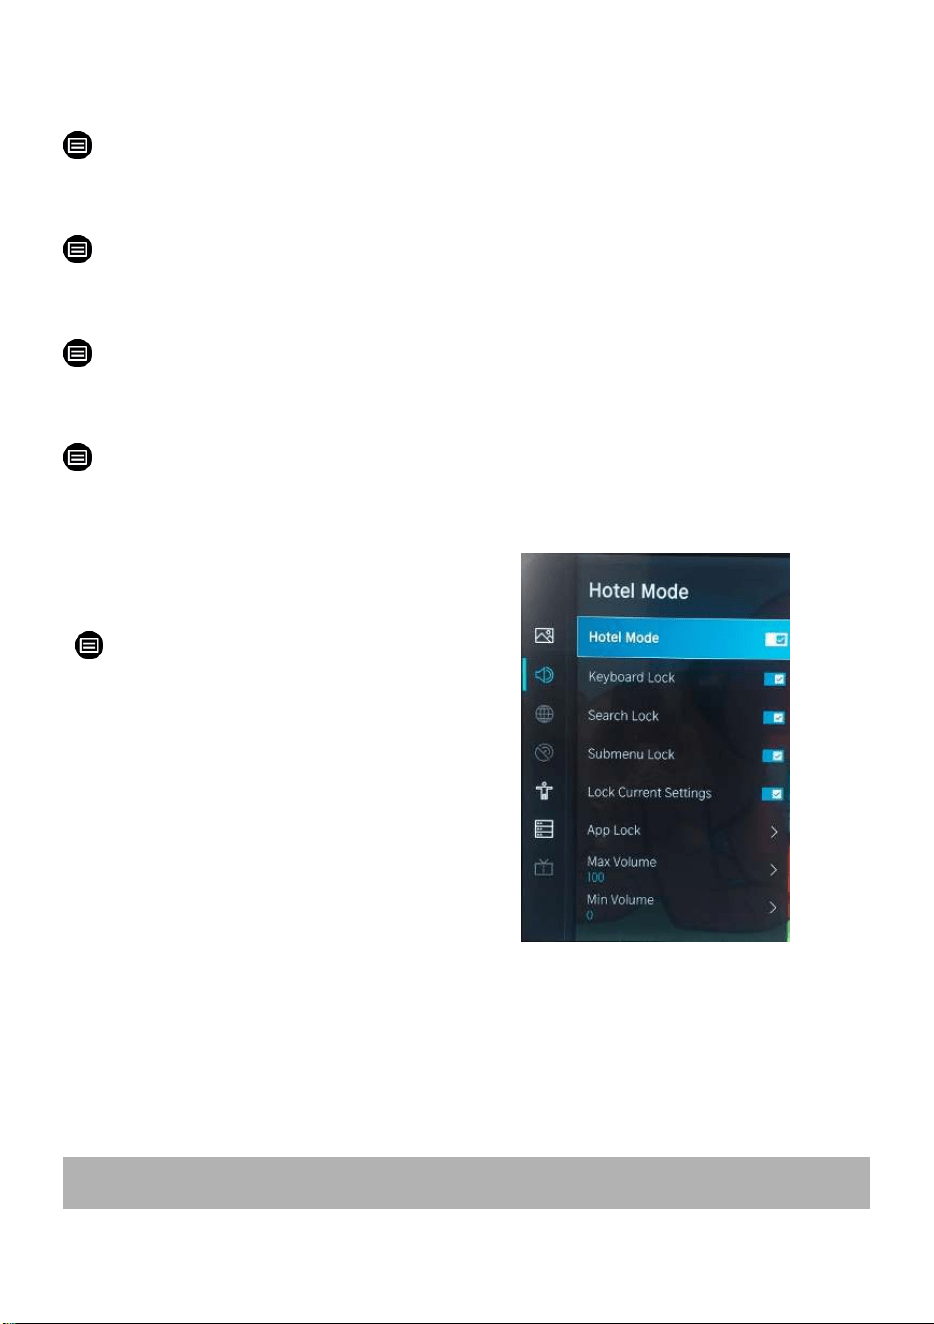
Hotel Mode
> Settings > Sound > Audio Output
Settings>Balance
Press 0548, then the Hotel Mode will display.
Press OK to set the hotel Mode On.
Press OK again to set the Hotel Mode OFF.
Channel
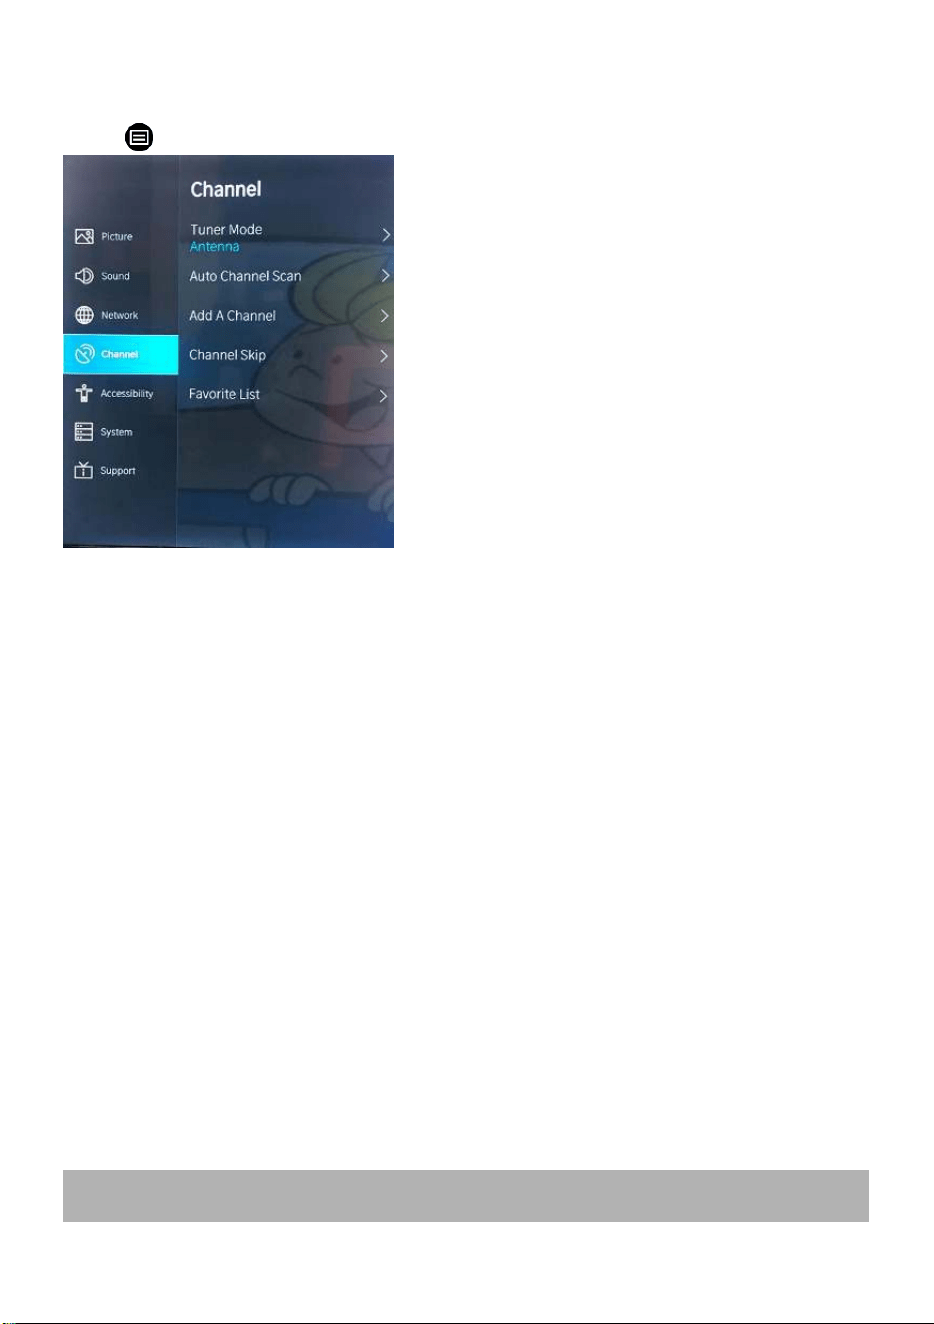
36
Press
> Settings > Channel
Press Navigation buttons to select the option that you want to adjust in the Channel menu.
Press OK button to adjust.
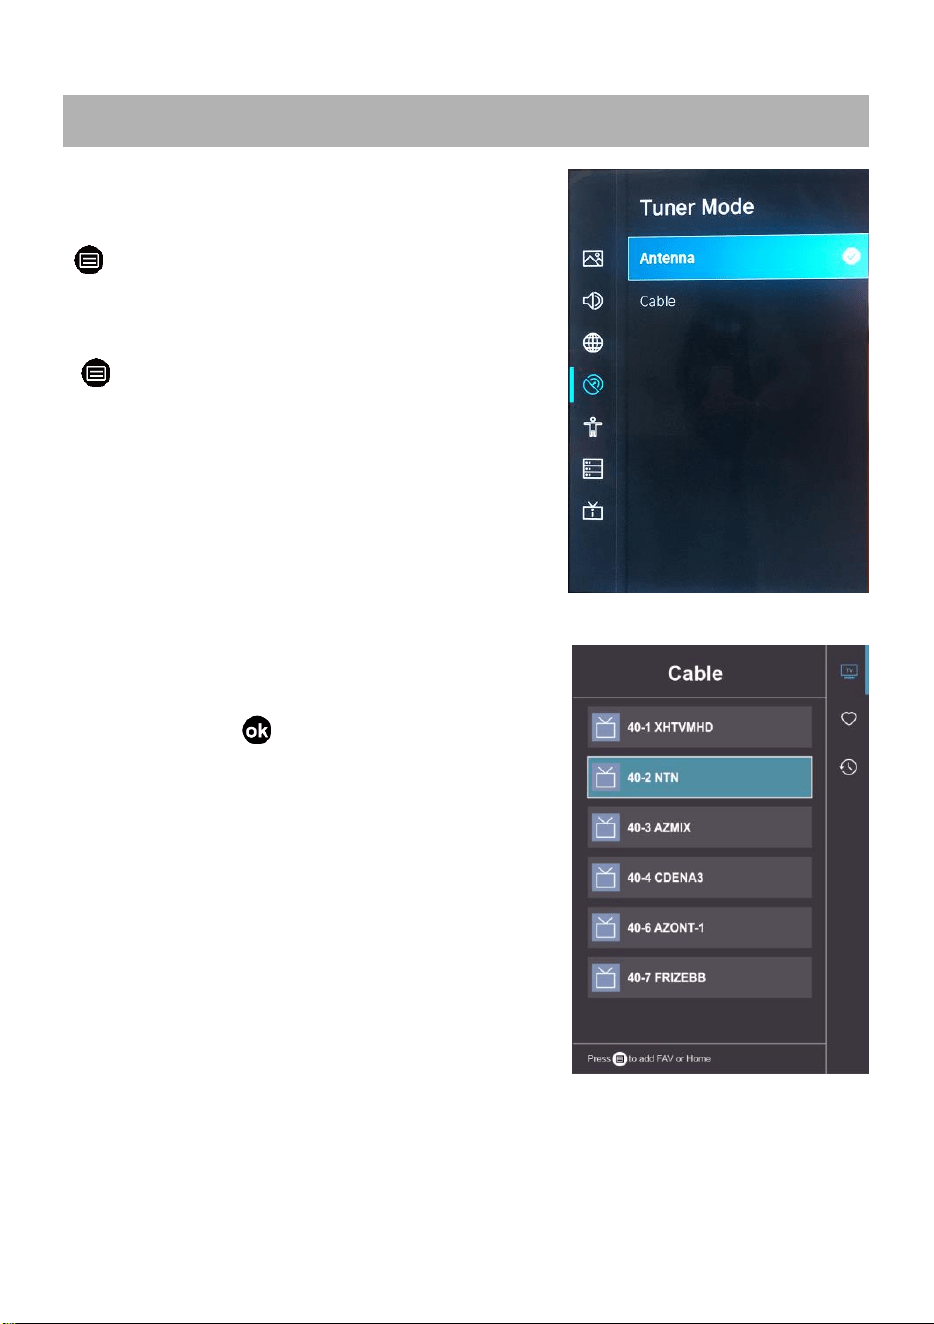
Tuner Mode
Select if you receive TV channel over the air(antenna) or trough a cable set top box.
Automatic Channel Scan
Automatic search can search for effective program channel automatically.
Add A Channel
Type in a channel to add it manually to your TV.
Channel Skip
Skip selected channels from your Channel List.
Favorite List
Add Channels to your Favorite List.
Accessibility

37
Press Navigation button to select Accessibility
> Settings > Accessibility
Closed Captioning: Set closed captions display mode.
Narration: Enables broadcasted descriptive audio for visually impaired.
Narration Volume: Independently adjust the volume of voiceover.
Voice Guide: Reads the menu items for visually impaired.
High Contrast Menu: Turn High Contrast Menu on or off.
Closed Caption Settings: Allows customization of closed caption text display.
Voice Guide Settings: Allows customization of spoken menu language.
System and Support
38
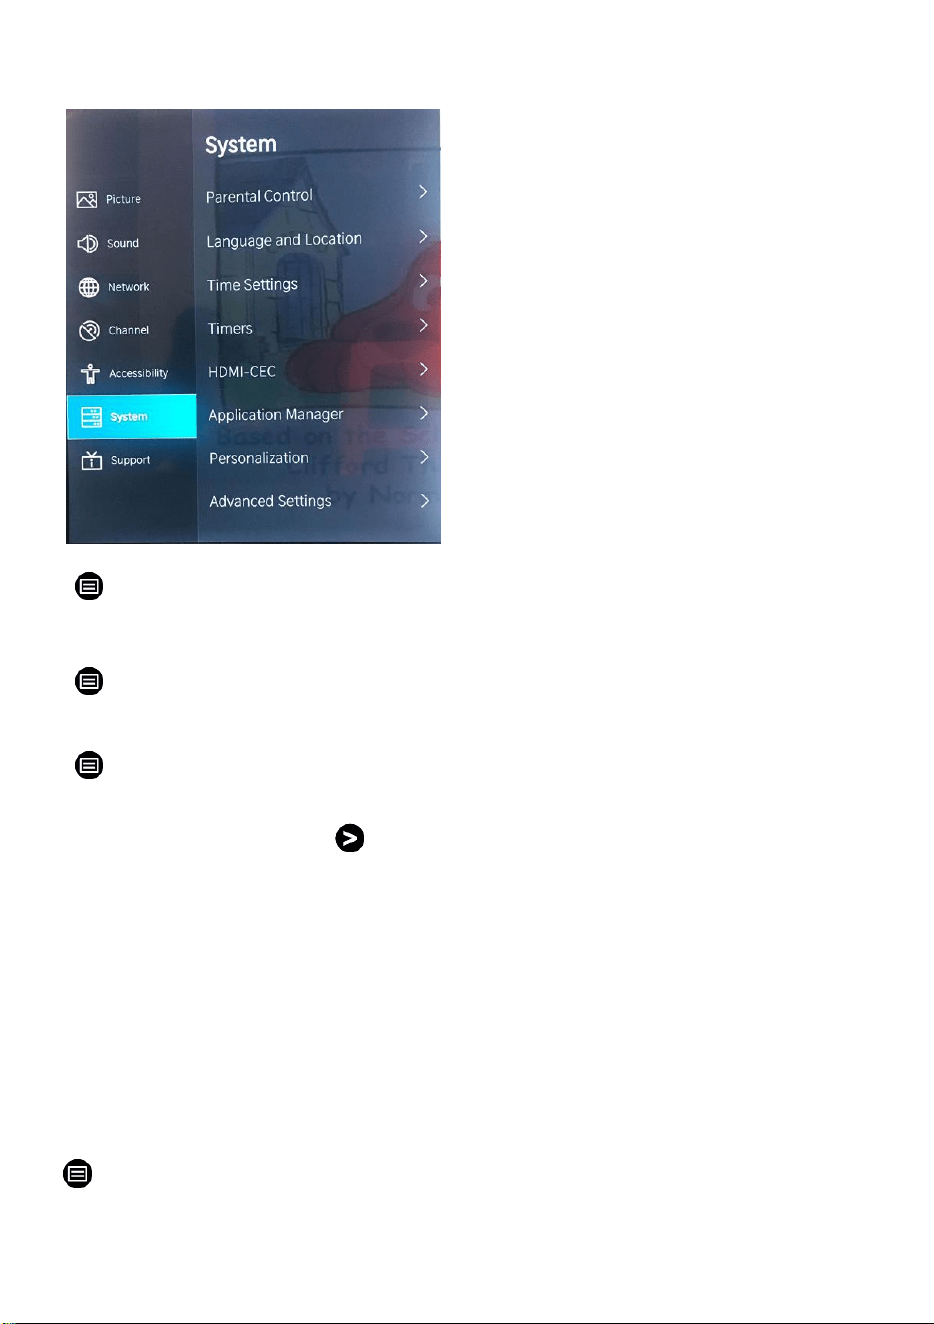
> Settings > System > Parental Control
Turn on Parental Control to block children from being able to view certain programs.
> Settings > System > Language and Location
Select the language used for this TV and your location.
> Settings > System > Time Settings
Time Zone
Select your time zone; press
to enter sub-menu to setup.
Time Format
Set the time format(Optional: 12-hour/24-hour).
Date Format
Select the date format mm-dd-yyyy/dd-mm-yyyy/yyyy-mm-dd.
Daylight Savings
Select whether to apply Daylight Savings Time to the TV.
Date and Time
Set the date and time.
> Settings > System > Timers

39
Adjust the timer settings to suit your preference.
Sleep Timer
Set the sleep timer to automatically turn the TV Off within a specified time: Off, 10 / 20/ 30/
40/ 50/ 60/ 90/ 120 Minutes.
Power On Timer
Set the clock for the time you want the TV to turn on automatically. You can set the time
only once or set the time in specified date weekly.
Power Off Timer
Set the clock for the time you want the TV to turn off automatically. You can set the time
only once or set the time in specified date weekly.
Menu Timeout
Set the amount of time that you would like for the menu to display: 10s/ 20s/ 30s/ 60/ 90s/
Off.
> Settings > System > HDMI-CEC
Control your TV and CEC-enabled devices with one remote.
> Settings > System > Application Manager
Play content from another device and remove this TV from your application accounts.
> Settings > System > Personalization
Menu display personalization settings.
> Settings > System > Advanced Settings
Access the Advance Settings menu.
Press
> Settings > Support

40
System Info
View System information.
Self Diagnosis
Perform self diagnosis to test sound, picture and connections.
E-Manual
Launch E-Manual and get to know more about your TV.
Bandwidth Monitoring
Test the speed with a third-party website.
Mobile App Installation
Install Remote NOW app on your smart phone to control your TV..
Terms and Conditions, Privacy Policy
Click to read our terms and policy.
System Update
Set your TV to receive the latest firmware.
Factory Reset
Reset your TV to the factory settings.
● Be sure to press POWER button to set the player to the standby mode and disconnect
MAINTENANCE
41
the power plug before maintaining the player.
● Wipe the player with a dry, soft cloth.
● If the surface is extremely dirty, wipe clean with a cloth which has been dipped in a
weak soap-water solution and wrung out thoroughly, and then wipe again with a dry
cloth.
● Never use alcohol, benzene, thinner, cleaning fluid or other chemicals. And do not
use compressed air to remove dust.
● Contact a professional for assistance when wall mounting your TV. We are not
responsible for any damage to the product or injury to yourself, if you mount the TV on your
own.
● Do not wall mount the TV while TV is turned on. It may cause personal injury due to
electric shock.
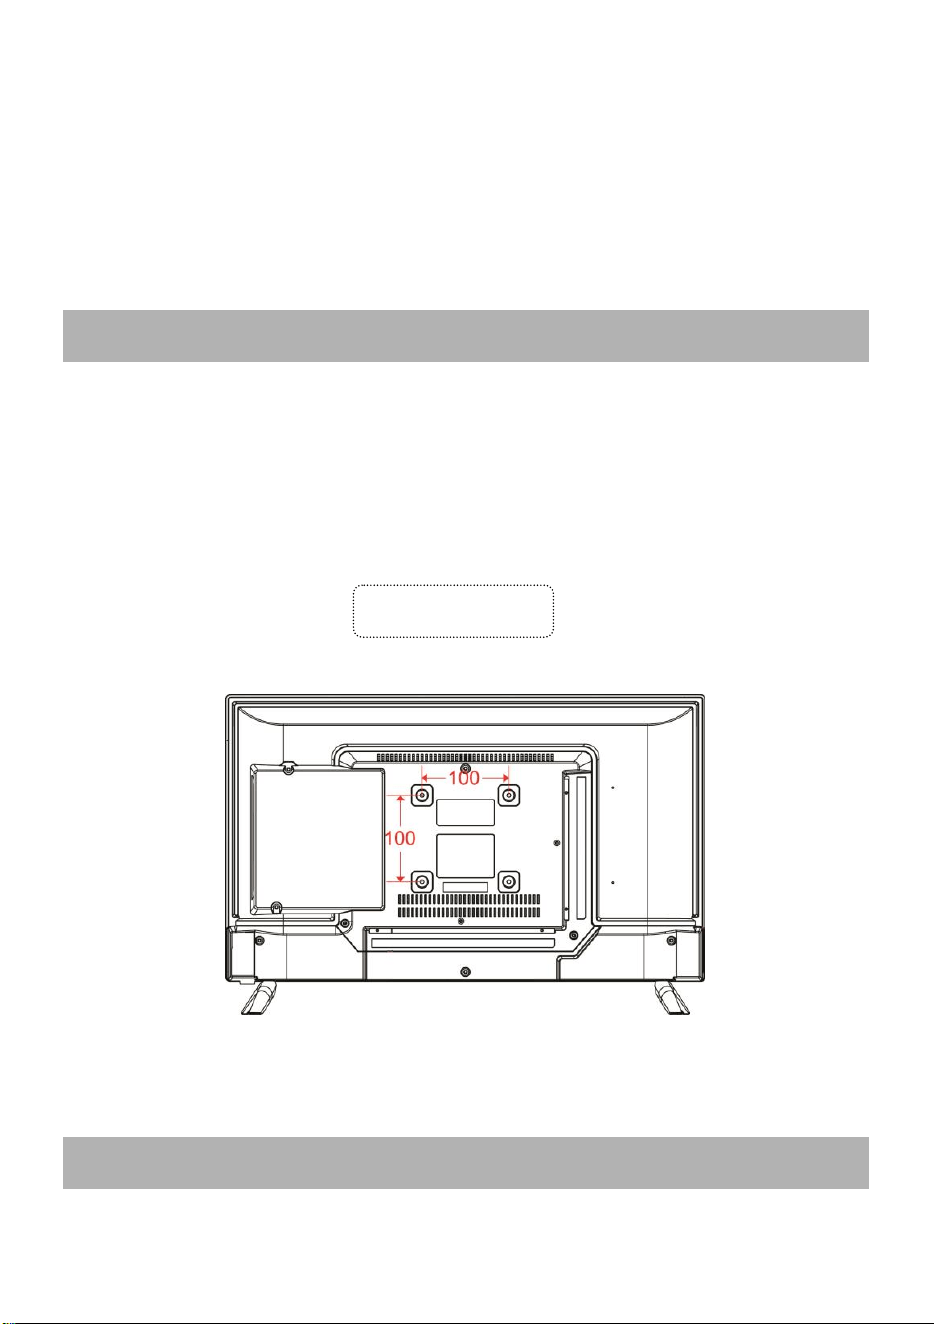
● Use standard M4*10mm screws (4 pieces) to mount this TV.
WALL MOUNTING
Back of your TV
STAND INSTALLATION
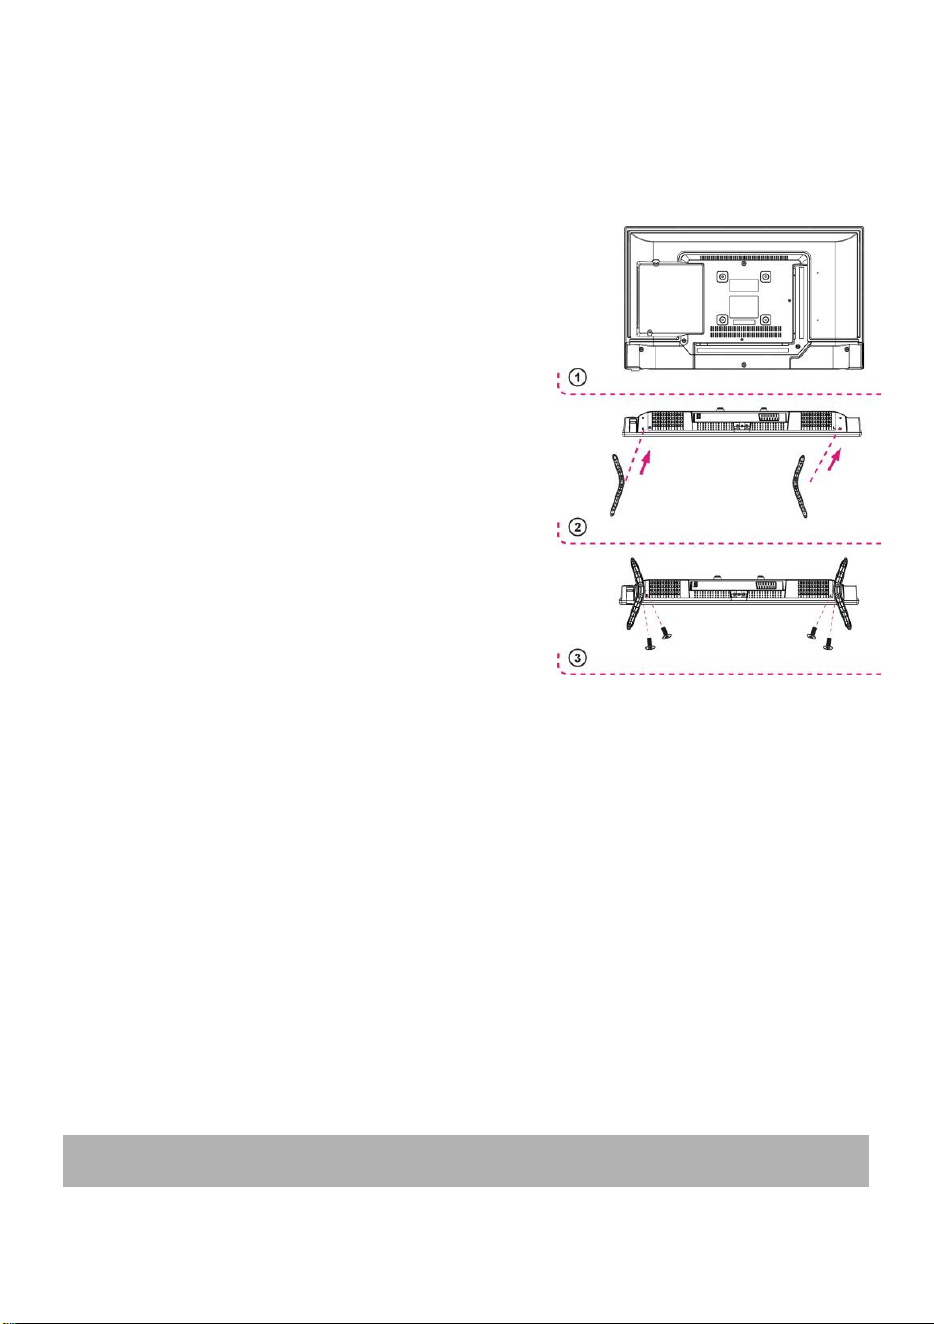
42
Your TV is packaged with the Stand and the Cabinet separated. Before enjoying this TV,
please carry out the Stand Installation according to the instructions below.
Step 1
Place the TV faced down on a soft cloth or cushion
to prevent the panel from being damaged.
Step 2
Align the stand and the bottom of this TV.
Step 3
Tighten the included screws with a screw driver.
NOTES:
- Unplug the power plug first when installing or
removing the TV Stand.
- To avoid any damage to this TV, contact one or
more partner for assistance when installing or
removing the TV stand.
SPECIFICATIONS
43
Display Device
23.6 inch LED TV
Resolution
1366×768
Display Colors
16.7M
Contrast Ratio
3000:1
Aspect Ratio
16:9
Life Time
30,000 Hrs
Supported Discs
DVD/CD/CD-RW/CD-R/VCD Compatible
Multimedia Playback
Music
Photo
Video
POWER SOURCE
AC 100-240V, 50/60Hz + DC 12V
POWER
CONSUMPTION
Max.42W
OPERATION
TEMPERATURE
-5℃ to 45℃
MEASUREMENT
553 (W)×166(D)×370(H) mm
WEIGHT
Approx. 2.72 kg
USB 2.0/Max 128G
Medium
File Format
Video
.MP4, .MOV, .MPG, .MPEG, .FLV
Picture
.jpg, .BMP, .PNG, .GIF
Music
.MP3, .AAC, .wav
Specifications are subject to change without notice.
GENERAL TROUBLESHOOTING

44
Check the following points before assuming malfunctions of this unit:
Symptom[COMMON]
Remedy
No power.
Insert the power plug securely into the power outlet.
No picture.
Ensure that the equipment is connected properly.
● No sound.
● Distorted sound.
● Ensure that the equipment is connected properly.
● Ensure that the input setting for the TV and stereo system are
correct.
● Adjust the master volume to a suitable volume by pressing
VOL+/VOL- button.
No operations can be
performed with the remote
control unit.
● Check the batteries are installed with the correct polarities.
● The batteries are exhausted: Replace them with new ones.
● Point remote control at the remote control sensor and operate it
again.
● Operate the remote control unit at a distance of no more than 6m
from the remote control sensor.
● Remove the obstacles between the remote control and remote
control sensor.
No key operation (by the
main unit and/or the remote
control unit) is effective.
Disconnect the power plug from power source and then reconnect it.
(This TV may not be operating properly due to lightning, static
electricity or some other factors.)
Symptom[TV]
Remedy
No or poor picture.
● Adjust antenna or use an external antenna.
● Relocate the unit near a window (if inside a building).
● Move units away from this product that causes interference.
● Do Auto Tuning again.
● Try another channel.
No sound or poor sound.
● Check the audio settings.
● Press MUTE button on remote control to cancel mute function.
● Unplug the headphone.
Noise or other interface.
Electronic equipment near the unit is causing interface. Relocate the
unit or move the equipment.
Symptom [DVD
compatible]
Remedy
Play does not start even
when title is selected.
Confirm the region code setting is right.
Symptom [Video CD
compatible]
Remedy
No menu play.
This function works only for Video CDs with playback control.
Region code setting
Region coding: All DVD discs are coded by the sales territory. Please note the player is set

45
The region number for this DVD player is
to region 1 coding by the factory which cannot be changed. This is in compliance with the
DVD patent requirements.

Warranty
Basic Warranty Statement
Supersonic Inc.("Supersonic") warrants this product to the original purchaser ONLY, to be
free from defects in materials and workmanship under normal use, for ninety (90) DAYS
from the date of original purchase. Proof of purchase (receipt) required.
Please visit http://www.supersonicinc.com/warranty for additional information.

