Instruction Booklet
Model: FC2149
touchscreen coffee maker
stainless steel – 14 cup

IMPORTANT SAFEGUARDS
When using electrical appliances, basic safety precautions should
always be followed, including the following:
1. Read all instructions.
2. DO NOT touch hot surfaces. Use handles or knobs.
3. To protect against electrical hazards, do not immerse cord, plugs, or
the appliance in water or other liquid.
4. Close supervision is necessary when any appliance is used by or
near children. Children should be supervised to ensure that they do
not play with the appliance.
5. This appliance is not intended for use by persons (including children)
with reduced physical, sensory or mental capabilities or lack of
experience and knowledge, unless they have been given supervision
or instruction concerning the use of the appliance by a person
responsible for their safety.
6. Unplug from outlet when not in use and before cleaning. Allow to
cool before putting on or taking off parts, and before cleaning the
appliance.
7. DO NOT operate any appliance with a damaged cord or plug or
after the appliance malfunctions, or is dropped or damaged in any
manner. Return appliance to the manufacturer for examination,
repair or electrical or mechanical adjustment. All servicing, other
than cleaning, should be performed by an authorized service
representative. See Warranty section.
8. To disconnect ensure that the Coff ee Maker is off then remove the
plug from the wall outlet. Always hold the plug, never pull the cord.
9. The use of accessories or attachments not recommended by Salton
may result in fi re, electric shock or injury.
10. DO NOT use outdoors.
11. Place the Coff ee Maker on a fl at level surface. DO NOT let cord
hang over edge of table or counter, or touch hot surfaces.
12. DO NOT place on or near a hot gas or electric burner, or in a heated
oven.
13. DO NOT use appliance for other than intended use.
14. DO NOT leave unit unattended while in use.
15. DO NOT turn on the Coff ee Maker without water in the reservoir.
16. DO NOT place the carafe on a wet or cold surface or in a microwave
oven.
17. DO NOT use the carafe if it is cracked or has a loose or weakened
handle.
18. DO NOT clean the carafe with cleansers, steel wool pads or other
abrasive material.
2

19. DO NOT open the water reservoir cover or the fi lter basket holder
when coff ee is brewing. Scalding may occur if these parts are
opened during the brew cycle.
20. Extreme caution must be used when moving an appliance
containing hot liquids.
21. The carafe is designed for use with this appliance. It must never be
used on a range top.
22. Never leave the empty carafe on the ‘Keep Warm Plate’ as the
carafe is likely to crack.
23. Any maintenance other than cleaning should be performed by an
authorized service facility.
SAVE THESE INSTRUCTIONS
HOUSEHOLD USE ONLY
SHORT CORD INSTRUCTIONS
1. A short power supply cord (or cord set) is provided to reduce the
hazards of entanglement or tripping over a longer cord.
2. Longer detachable power-supply cords or extension cords are
available and may be used if care is exercised in their use.
3. If a longer detachable power-supply extension cord is used:
a) The marked electrical rating of the extension cord should be at
least as great as the electrical rating of the appliance.
b) The cord should be arranged so that it will not drape over the
countertop or tabletop where it can be pulled on by children or
tripped over unintentionally.
POLARIZED PLUG
This appliance has a polarized plug (one blade is wider than the other).
To reduce the risk of electric shock, this plug will fi t in a polarized outlet
only one way. If the plug does not fi t fully in the outlet, reverse the plug.
If it still does not fi t, contact a qualifi ed electrician. Do not modify the
plug in any way.
3
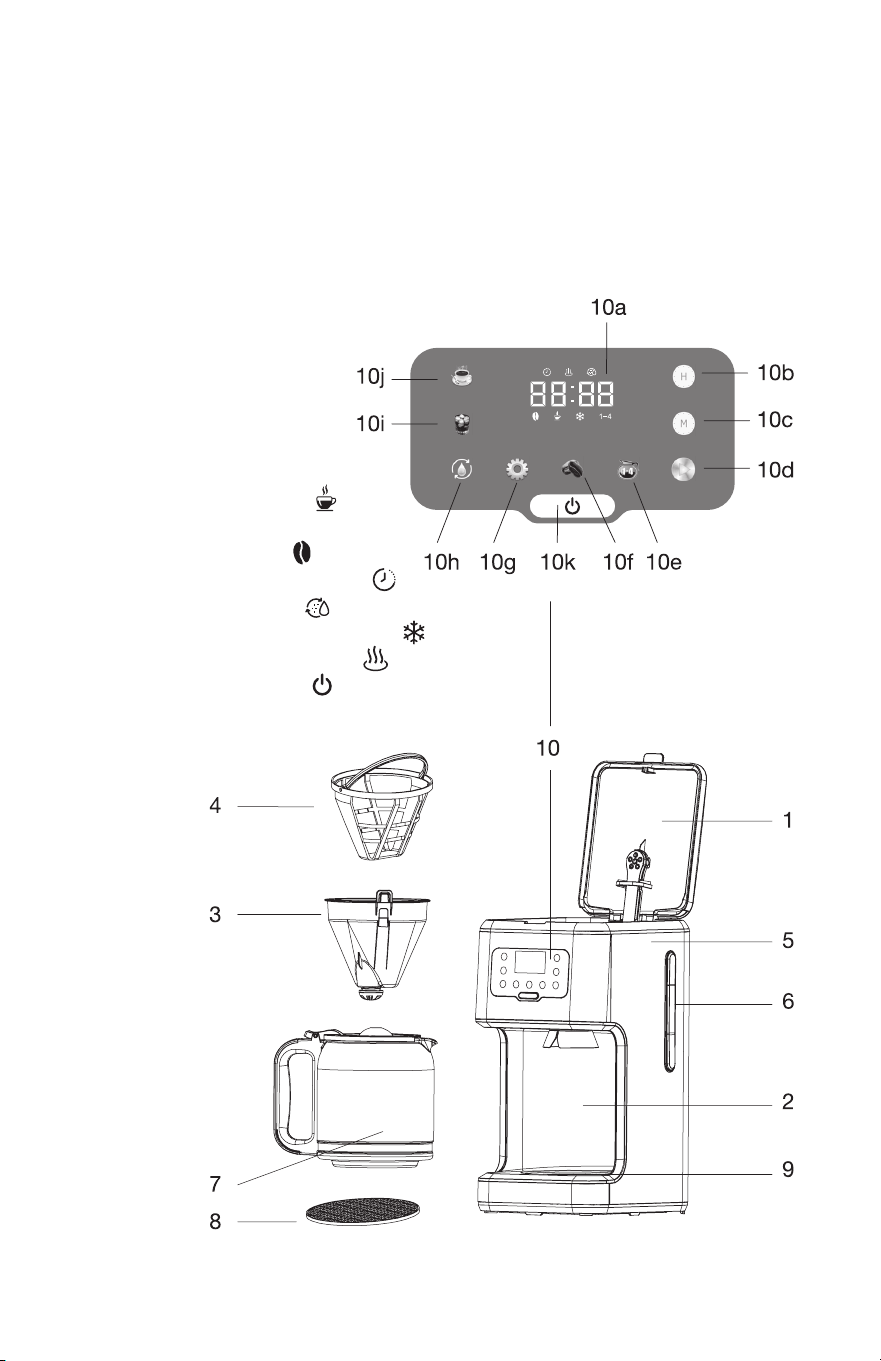
DESCRIPTION OF PARTS
1. Lid
2. Main Housing
3. Filter Holder (removable)
4. Reusable Filter
5. Water Reservoir
6. Water Level Window
7. Carafe
8. Silicone Mat – for use with
BREW OVER ICE Button
9. Keep Warm Plate
10. Control Panel
a) Digital Display
b) HOUR Button
c) MIN Button
d) ON/OFF Button (
)
e) 1-4 CUPS Button ( 1-4 )
f ) BOLD Button ( )
g) DELAY BREW Button ( )
h) CLEAN Button ( )
i ) BREW OVER ICE Button ( )
j ) KEEP WARM Button ( )
k) POWER Button ( )
4

BEFORE FIRST USE
Wash the Carafe, Filter Holder and Reusable Filter in warm soapy water.
Rinse thoroughly and dry. Wipe the Main Housing with a soft damp
cloth. DO NOT immerse the Main Housing in water or any other liquid.
Prior to brewing coff ee for the fi rst time, run the machine with water
only. Follow the directions in the “HOW TO USE” section omitting the
coff ee and Reusable Filter.
HOW TO USE
To Set the Clock
1. Plug into a 120 Volt AC wall outlet.
2. Press the POWER Button
3. Press the H (hour) and M (minutes) Buttons to set the time.
a) The clock will show a 12-hour cycle and the AM and PM will
change.
b) To scroll through the numbers faster, press and hold the H and M
Buttons.
Immediate Brewing
1. Lift the Lid and fi ll the Water Reservoir with fresh cold water for the
desired number of cups. Fill the Water Reservoir by fi lling the Carafe
and pouring water into the Water Reservoir.
NOTE: DO NOT fi ll above the maximum Water Line (14) indicated on
the Carafe and Water Reservoir.
2. Remove the Reusable Filter and fi ll with the desired amount of
ground coff ee.
NOTE: Use coff ee that is ground specifi cally for automatic drip
Coff ee Makers. Usually, one Coff ee Measuring Scoop or a level
tablespoon of ground coff ee is used for each cup of coff ee. Adjust
the amount to your personal taste.
3. Reposition the Reusable Filter and close the Lid.
NOTE: If the Lid does not close completely, ensure that the Filter
Holder and Reusable Filter are properly seated in position.
4. Place the Carafe with Lid on the Keep Warm Plate.
5. Press the ON/OFF Button and the (
) Indicator Light will illuminate,
and the brew cycle will start. (To use the delay start function follow
the directions in the “Delayed Brewing section” below.)
NOTE: The brew cycle can be interrupted by pressing the ON/OFF
Button at any time. Hot water which has already entered the Filter
will continue to drip until the Filter is empty so long as the Carafe
5
remains in position. If you press the ON/OFF button again the brew
cycle will continue.
6. In a few minutes the coff ee will be brewed, and the Coff ee Maker
will automatically switch over to KEEP WARM mode for the next two
hours and the ( ) Indicator Light will illuminate.
7. The Keep Warm cycle will shut off automatically and the Indicator
Lights will turn off at the end of the factory-set default 2-hour
setting. If you wish to turn off the Coff ee Maker before 2 hours has
elapsed, press the ON/OFF Button once.
8. See the “Pause & Serve” section to pour a cup of coff ee before the
brew cycle ends.
9. Always turn off the Coff ee Maker when not in use.
1-4 CUPS
This function is designed to optimize the brewing process to extract
maximum fl avor from the smaller amount of coff ee. If making only
1-4 CUPS of coff ee, only fi ll the carafe with desired amount of water
between the 1 to 4 Water Line indicated on the Carafe and pour the
water into the Water Reservoir. Then press the 1-4 CUPS Button before
starting the Coff ee Maker. The ( 1-4 ) Indicator Light will illuminate.
BOLD
For a stronger, more intense cup of coff ee, press the BOLD Button
before starting the Coff ee Maker. The (
) Indicator Light will illuminate.
This function will enhance the strength and fl avor of your coff ee, by
adjusting the brewing process and prolonging hot water retention in the
brewing chamber, resulting in a richer and bolder cup of coff ee.
KEEP WARM
The default Keep Warm cycle on this Coff ee Maker is set to 2 hours after
the brew cycle is complete
However, you can change/customize the Keep Warm time (between 1 to
4 hours). This feature is useful for those who prefer to have their coff ee
stay warm over a longer (or shorter) period of time. Each press of the
button allows you to scroll from 1 hour to 4 hours (displayed as 1H, 2H,
3H, 4H). Once set, the customized setting will be used every time you
brew coff ee until you adjust it again.
NOTE: While Coff ee Maker is in Keep Warm mode press the KEEP
WARM Button to check the remaining Keep Warm time left.
At any time If you wish to turn off the Coff ee Maker before elapsed Keep
Warm time, press the ON/OFF Button once.
6
DELAYED Brewing
1. Follow steps 1 through 4 in above section “Immediate Brewing”.
2. Press the DELAY BREW Button to set the time for the Delayed Brew
Cycle. The Indicator Light (
) will blink in the display.
3. Press the H (hour) and M (minute) buttons until the desired brew
start time displays. Ensure that the AM or PM display is correct.
4. Press the DELAY BREW Button again and ( ) Indicator Light will
remain illuminated in the display to indicate DELAY BREW has been
activated.
5. To see the preset start time, press the DELAY BREW Button once.
NOTE: You must press it again to activate the Delay Brew. The
indicator Light must be solid (not blinking) in the display.
TIP: You can cancel the delay start time by pressing the DELAY
BREW Button and the ( ) Indicator Light goes off .
6. Once the clock reaches the preset time to start the Delay Brew
Cycle, the ( ) Indicator Light will illuminate, and the brew cycle will
start.
7. After the brew cycle is fi nished, the Coff ee Maker will automatically
switch over to Keep Warm mode and the ( ) Indicator Light will
illuminate.. The Keep Warm cycle will shut off automatically and
the Indicator Lights will turn off at the end of the factory-set default
2-hour setting. If you wish to turn off the Coff ee Maker before 2
hours has elapsed, press the ON/OFF Button once.
8. See the “Pause & Serve” section to pour a cup of coff ee before the
brew cycle ends.
9. Always turn off the Coff ee Maker when not in use.
Pause & serve
The “Pause & Serve” feature allows you to pour a cup of coff ee before
the brew cycle is completed. Remove the Carafe slowly to temporarily
stop the fl ow of coff ee. Quickly pour a cup of coff ee and reposition the
Carafe securely on the Keep Warm Plate. NOTE: DO NOT remove the
Carafe for longer than 30 seconds.
OVER ICE Brewing
Designed to brew coff ee directly over ice, allowing you to make iced
coff ee that is full-fl avored and not diluted. This function brews coff ee
at a higher concentration, which ensures that the fl avor remains strong
even after the ice melts.
1. Lift the Lid and fi ll the Water Reservoir with 6 CUPS of fresh cold
water. Fill the Water Reservoir by fi lling the Carafe to the 6 CUP
marking then pour the water into the Water Reservoir. NOTE: DO
NOT fi ll above the 6 CUP capacity or you risk overfl owing the carafe.
2. Remove the Reusable Filter and fi ll with 14 leveled scoops of ground
7

coff ee.
NOTE: Use coff ee that is ground specifi cally for automatic drip
Coff ee Makers. Usually, one Coff ee Measuring Scoop or a level
tablespoon of ground coff ee is used for each cup of coff ee, however
you can adjust the amount to your personal taste.
3. Reposition the Reusable Filter and close the Lid.
NOTE: If the Lid does not close completely, ensure that the Filter
Holder and Reusable Filter are properly seated in position.
4. Place the Silicone Mat directly on the Keep Warm Plate.
5. Fill Carafe with ice cubes to the 12-cup ( ) marking indicated on
the carafe.
6. Place fi lled Carafe with Lid on the Keep Warm Plate on top of the
Silicone Mat.
7. Press the OVER ICE Button and then press the ON/OFF Button.
The ( ) and ( ) Indicator Lights will both illuminate, and the brew
cycle will start.
8. In a few minutes the coff ee will be brewed, and the Coff ee Maker will
automatically turn off . IMPORTANT: There is no Keep Warm cycle
on this setting. Once coff ee is brewed, the Keep Warm Plate will
automatically turn off .
9. Always turn off the Coff ee Maker and unplug from the wall outlet
when not in use.
TIP:
• Use Fresh Ice: For the best results, use fresh, clean ice to avoid any
off fl avors.
• Experiment with Ratios: Depending on your taste preference,
you might need to adjust the amount of coff ee grounds or water to
achieve the perfect strength.
HELPFUL HINTS
1. Regularly clean the Coff ee Maker to ensure great tasting coff ee.
Follow the directions in the Care & Cleaning Section.
2. After opening a package of ground coff ee, reseal it tightly to
maintain its freshness. Store in the refrigerator, or in a cool dry
place.
3. For optimum coff ee taste, buy whole coff ee beans and grind them
just before brewing.
4. Reheating coff ee is not recommended. Coff ee is at its peak fl avor
immediately after brewing.
8
CARE AND CLEANING
1. Unplug the Coff ee Maker and allow it cool before cleaning.
2. Remove the Reusable Filter and the Filter Holder from the Coff ee
Maker.
3. The Filter Holder, Reusable Filter and Carafe can be washed in warm
soapy water. NEVER use abrasive cleansers on any part of the
Coff ee Maker.
4. Wipe the Main Housing and Warming Plate with a soft damp cloth.
NEVER IMMERSE THE MAIN HOUSING IN WATER OR ANY
OTHER LIQUID.
5. All servicing, other than cleaning, should be performed by an
authorized service representative. See Warranty section.
Descaling - CLEAN
Over a period of time, minerals and calcium found in water will
accumulate in your Coff ee Maker and may aff ect its operation. For best
performance, descale the coff ee maker when the (
) Indicator Light is
blinking by following the below instructions.
1. Fill the Water Reservoir to the maximum Water Line (14) with equal
parts of distilled white vinegar and cold water. Close the Lid.
2. Place the Filter Holder and Reusable Filter into position.
3. Place the Carafe with Lid on the Warming Plate.
4. Press the CLEAN Button. The ( ) and ( ) Indicator Lights will
both illuminate, and the Coff ee Maker will start.
5. Let the whole quantity of the vinegar/water solution run through the
machine. The Coff ee Maker will turn off once descaling is complete.
Discard the solution from the Carafe.
6. Fill the Water Reservoir to the maximum Water Line (14) with fresh
cold water and press the ON/OFF Button to rinse away any residual
vinegar. Repeat this step twice.
9
10