www.klarstein.com
SWEET SWIRL
Eiscrememaschine
Ice Cream Maker
Máquina de helado
Machine à crème glacée
Gelatiera
10046255 10046256


3
DE
Sehr geehrter Kunde,
wir gratulieren Ihnen zum Erwerb Ihres Gerätes. Lesen Sie
die folgenden Hinweise sorgfältig durch und befolgen Sie
diese, um möglichen Schäden vorzubeugen. Für Schäden,
die durch Missachtung der Hinweise und unsachgemäßen
Gebrauch entstehen, übernehmen wir keine Haftung.
Scannen Sie den folgenden QR-Code, um Zugriff auf die
aktuellste Bedienungsanleitung und weitere Informationen
rund um das Produkt zu erhalten:
TECHNISCHE DATEN
Artikelnummer 10046255, 10046256
Stromversorgung 220–240 V – 50 Hz
Stromverbrauch 250 W
Schutzklasse I
Klimatyp N/ SN
Kapazität 1,5 Liter
Maße (LxBxH) 417x280x517 mm
Verpackungsmaße (LxBxH) 465x342x495 mm
Nettogewicht 16,5 kg
Bruttogewicht 18,5 kg
English 25
Español 45
Français 65
Italiano
85
INHALT
Sicherheitshinweise 4
Beschreibung 7
Installation 9
Bedienung 11
Eiscreme-Produktion 15
Rezepte 18
Reinigung und Wartung 20
Fehlersuche und Fehlerbehebung 21
Spezielle Entsorgungshinweise für Verbraucher in Deutschland 22
Hinweise zur Entsorgung 24
Hersteller & Importeur (UK) 24

4
DE
SICHERHEITSHINWEISE
• Um Schäden durch unsachgemäßen Gebrauch zu vermeiden, lesen Sie
bitte die Bedienungsanleitung sorgfältig durch, bevor Sie dieses Produkt
verwenden, und verwenden Sie dieses Produkt nur entsprechend dem in der
Bedienungsanleitung angegebenen Zweck.
• Stellen Sie das Gerät auf eine ebene Fläche.
• Verwenden Sie das Gerät ausschließlich in Innenräumen.
• Ziehen Sie den Netzstecker aus der Steckdose, wenn das Gerät nicht in
Verwendung ist.
• Tauchen Sie das Netzkabel niemals in Wasser oder andere Flüssigkeiten ein.
• Verwenden Sie nur Zubehör, das vom Hersteller ausdrücklich für dieses Gerät
empfohlen wird.
• Stellen Sie das Gerät nicht direkt unter eine Steckdose.
• Lassen Sie das Netzkabel nicht über die Arbeitsäche hängen, sodass Kinder
nicht daran ziehen können.
• Überfüllen Sie das Gerät nicht, da es sonst zu Kurzschlüssen und
Stromschlägen kommen könnte.
• Achten Sie darauf, dass der Deckel während des Betriebs immer geschlossen
ist.
• Ziehen Sie den Stecker nicht am Kabel aus der Steckdose, sondern halten Sie
ihn beim Ausstecken mit der Hand fest.
• Verwenden Sie dieses Gerät nur für den vorgesehenen Zweck. Für Schäden,
die durch Nichtbeachtung der Anleitung und unsachgemäßen Gebrauch
entstehen, wird keine Haftung übernommen. Verwenden Sie das Gerät
ausschließlich im Haushalt.
• Schließen Sie das Gerät nicht an einen Timer oder eine Funksteckdose an.
• Tauchen Sie das Gerät nicht in Wasser ein.
• Wir raten von der Verwendung eines Verlängerungskabels ab, weil dieses
überhitzen und ein Brandrisiko darstellen könnte.
• Wenn das Netzkabel beschädigt ist, muss es durch den Hersteller, den
Kundendienst oder eine ähnlich qualizierte Person ersetzt werden, um
Gefahren zu vermeiden.
• Befolgen Sie die örtlichen Vorschriften für die Entsorgung von Geräten, die
brennbare Gase enthalten.
• Lagern Sie keine leicht entzündlichen oder explosiven Stoffe in dem Gerät.
• Kippen Sie das Gerät nicht um. Wenn das Gerät umgekippt sein sollte, lassen
Sie sie 2 Stunden lang stehen, bevor Sie es wieder einschalten.
• Wurde der Eisbereiter im Winter von draußen nach drinnen gebracht, warten
Sie vor dem Einschalten einige Stunden, bis er sich auf Raumtemperatur
erwärmt hat.
• Entsorgen Sie das Gerät nur bei einer zugelassenen
Abfallentsorgungseinrichtung. Setzen Sie das Gerät keinen offenen Flammen
aus.
• Dieses Gerät ist nicht für die Benutzung durch Personen (einschließlich
Kindern) mit eingeschränkten physischen, sensorischen oder geistigen
Fähigkeiten oder denen es an Erfahrung und/oder Kenntnissen mangelt

5
DE
bestimmt, außer diese werden von einer verantwortlichen Person
beaufsichtigt oder unterwiesen, die dafür sorgt, dass sie das Gerät sicher
benutzen können.
• Kinder dürfen mit dem Gerät nicht spielen. Die Reinigung und Benutzer-
Wartung darf nicht von Kindern ohne Aufsicht durchgeführt werden.
• Kinder im Alter von 3 bis 8 Jahren dürfen keine Kühlgeräte be- und entladen.
• Halten Sie das Gerät 8 cm von anderen Gegenständen entfernt, um eine gute
Wärmeableitung zu gewährleisten.
• Verwenden Sie das Gerät nicht in der Nähe von Flammen, Kochplatten oder
Öfen.
• Schalten Sie das Gerät nicht zu häug ein (mindestens alle 5 Minuten), um
eine Beschädigung des Kompressors zu vermeiden.
• Stecken Sie keine Metallteile oder andere elektrische Gegenstände in das
Gerät, um Brände und Kurzschlüsse zu vermeiden.
• Schlagen Sie beim Herausnehmen des Eises nicht gegen den Behälter oder
den Rand des Behälters, um eine Beschädigung zu vermeiden.
• Schalten Sie die Stromzufuhr erst ein, wenn die Trommel oder das Mischblatt
ordnungsgemäß installiert ist.
• Die Ausgangstemperatur der Zutaten sollte 25±5 °C betragen. Legen Sie die
Zutaten nicht zum Vorgefrieren in den Gefrierschrank, da andernfalls die
Mixerklinge blockiert werden könnte, bevor sich die Eiscreme im gewünschten
Zustand bendet.
• Entfernen Sie keinesfalls die Klinge des Mixers, während das Gerät in Betrieb
ist.
• Verwenden Sie das Gerät nicht im Freien.
• Niemals mit Scheuermitteln oder scharfen Gegenständen reinigen.
• Dieses Gerät ist für die Verwendung in Haushalten und ähnlichen
Anwendungen vorgesehen, wie z. B.:
– Küchenbereiche für Personal in Geschäften, Büros und anderen
Arbeitsumgebungen;
– von Kunden in Hotels, Motels und anderen Wohnumgebungen;
– Bed-and-Breakfasts, Catering und ähnliche Bereiche außerhalb des
Einzelhandels.
Dieses Gerät enthält das Kühlmittel Isobutan (R600a), ein natürliches,
umweltfreundliches Gas. Obwohl es brennbar ist, schädigt es die Ozonschicht
nicht und trägt nicht zum Treibhauseffekt bei. Die Verwendung dieses
Kältemittels hat jedoch zu einem leichten Anstieg des Geräuschpegels des
Geräts geführt. Zusätzlich zu den Geräuschen des Kompressors können Sie
möglicherweise auch das Kältemittel hören, das durch das System ießt. Dies
ist unvermeidlich und hat keine nachteiligen Auswirkungen auf die Leistung
des Geräts. Dies ist unvermeidlich und hat keine negativen Auswirkungen
auf die Leistung des Geräts. Während des Transports und der Aufstellung
des Geräts muss darauf geachtet werden, dass keine Teile des Kühlsystems
beschädigt werden. Auslaufendes Kältemittel kann zu Augenschäden führen.
• Halten Sie die Lüftungsöffnungen im Gerätegehäuse frei von Hindernissen.
• Der Kältemittelkreislauf darf nicht beschädigt werden.
• Das Kühlsystem enthält eine Hochdruck-Kältemittel. Beschädigen Sie das

6
DE
Kühlsystem nicht.
• Die Wartung des Kühlsystems sollte von Fachleuten durchgeführt werden.
• Verwenden Sie keine mechanischen Vorrichtungen oder andere Mittel zur
Beschleunigung des Abtauvorgangs oder der Eisrückgewinnung.
• Verwenden Sie keine elektrischen Geräte in den
Lebensmittelaufbewahrungsfächern des Geräts, es sei denn, es handelt sich
um den vom Hersteller empfohlenen Typ.
• Ziehen Sie den Stecker des Eisbereiters aus der Steckdose, bevor Sie diesen
reinigen oder Reparaturen oder Wartungsarbeiten durchführen.
• Reinigen Sie den Eisbereiter nicht mit brennbaren Flüssigkeiten, weil dies zu
einem Brand oder einer Explosion führen kann.
• Kältemittel und Isoliergas sind entammbar.
•
WARNUNG
Brandgefahr durch unsachgemäße Entsorgung! Beachten Sie die
örtlichen Vorschriften für die Entsorgung von Geräten, die
brennbare Kältemittel und Gase enthalten.
Spezielle Hinweise
• Achten Sie beim Aufstellen des Geräts darauf, dass das Netzkabel nicht
eingeklemmt oder beschädigt wird.
• Vergewissern Sie sich, dass sich auf der Rückseite des Geräts keine
Mehrfachsteckdosen oder Netzteile benden.
Um eine Kontamination von Lebensmitteln zu vermeiden, beachten Sie bitte
die nachstehenden Anweisungen:
• Wenn die Tür längere Zeit geöffnet bleibt, kann die Temperatur in den Fächern
des Geräts erheblich ansteigen.
• Reinigen Sie die mit Lebensmitteln in Berührung kommenden Flächen und die
zugänglichen Abusssysteme regelmäßig.
WARNUNG
Achten Sie beim Gebrauch, bei der Wartung und bei der
Entsorgung des Geräts auf das linke Symbol auf der Rückseite des
Geräts oder auf dem Kompressor. Dieses Symbol warnt vor
möglichen Bränden. In den Kältemittelleitungen und im
Kompressor benden sich brennbare Stoffe. Halten Sie das Gerät
während des Gebrauchs, der Wartung und der Entsorgung von Brandquellen
fern.

7
DE
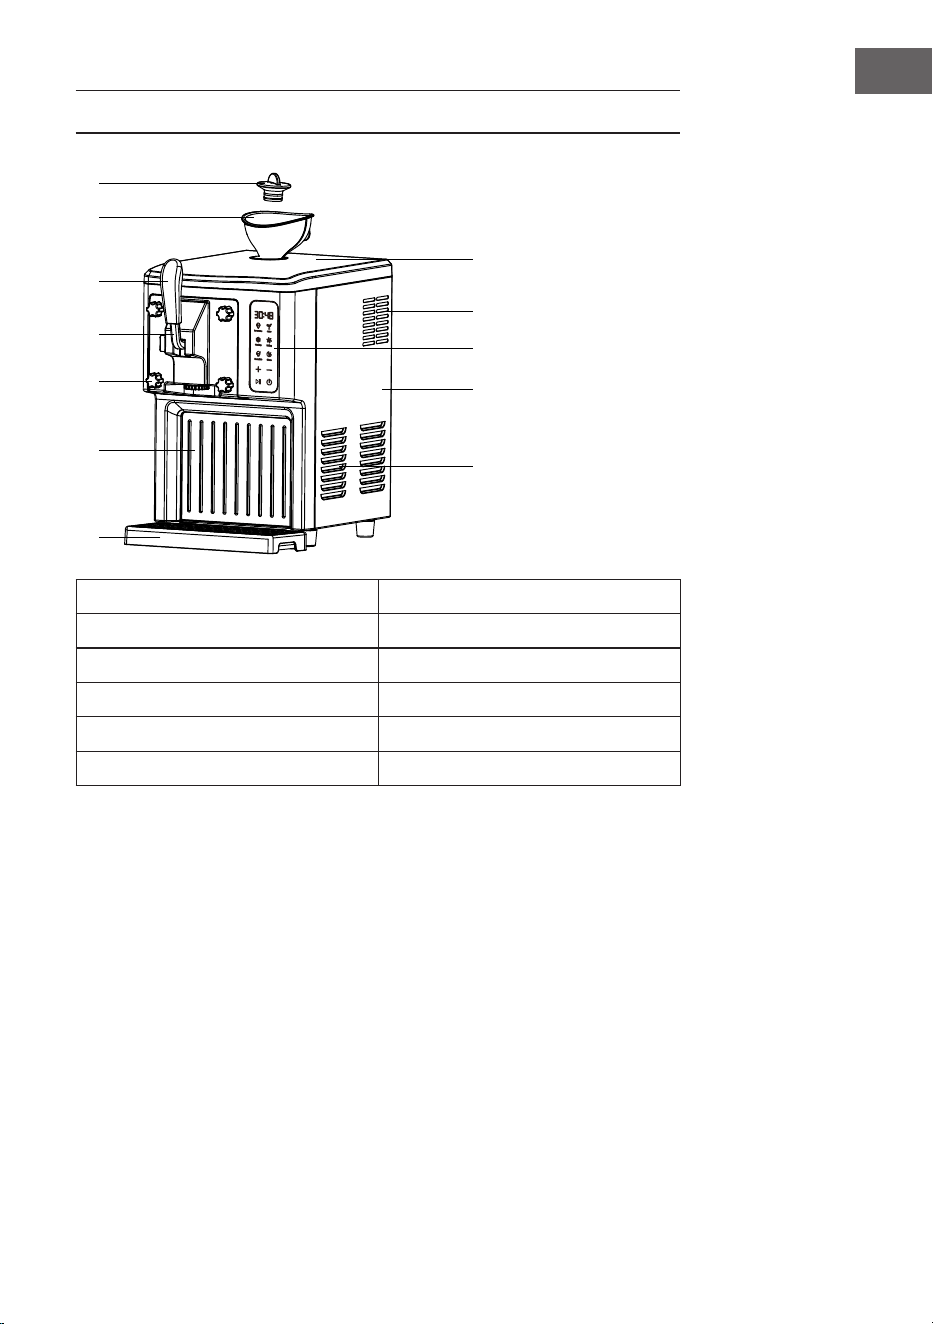
BESCHREIBUNG
1
2
8
9
10
11
12
3
4
5
6
7
1 Verschlussstopfen der Einspeiseöff-
nung
7 Wasserbehälter
2 Trichter 8 Obere Abdeckung
3 Griff 9 Bildschirmabdeckung
4 Griff 10 Entlüftungsöffnung
5 Sicherungsmutter 11 Seitenwand
6 Vordere Zierabdeckung 10 Entlüftungsöffnung
8
DE
Funktionstasten
➀ Zeitangabe ➆ Saftmodus
➁ Eiscrememodus ➇ Mix-Taste
➂ Kühlmodus ➈ Reinigungsmodus
➃ Shakesmodus ➉ Zeit senken
➄ Zeit erhöhen ⑪ Ein/Aus
➅ Start/Pause
Zubehör
Rührügel 1 Gebrauchsanleitung 1
Bürste 1 Trichter 1
➀
➁
➂
➃
➄
➅
➆
➇
➈
➉
⑪
9
DE
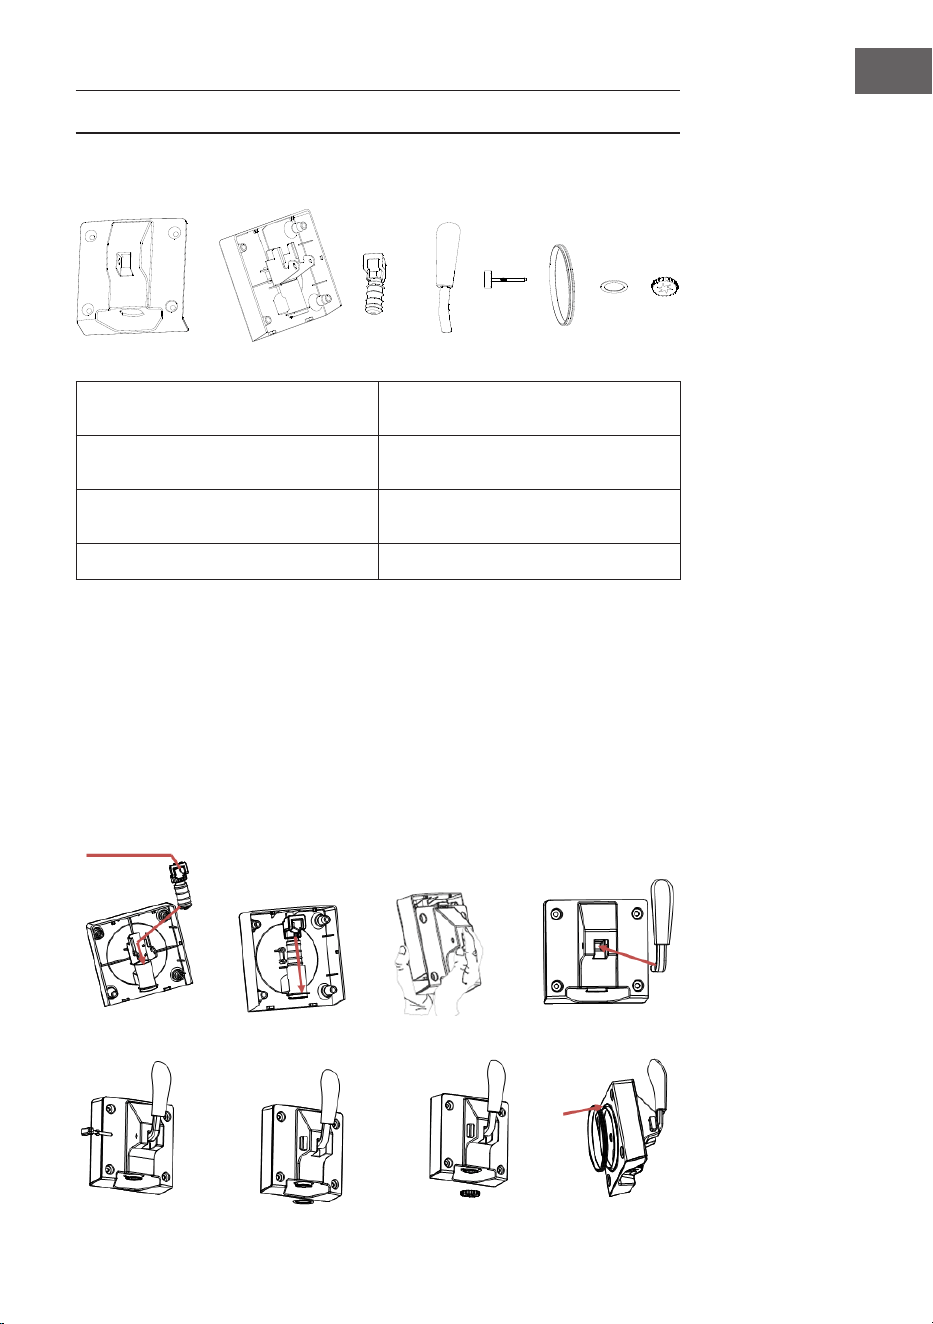
INSTALLATION
Montage und Demontage des Griffs
➀ obere Abdeckung der Einspeise-
öffnung
➄ Griffende
➁ Basis der Einspeiseöffnung ➅ Dichtungsring
➂ Verschlussstopfen der Einspeise-
öffnung
➆ Dichtungsring der Einspeiseöff-
nung
➃ Griff ➇ Abdeckung der Einspeiseöffnung
1. Fügen Sie ➀ in ➁ ein, wie in Abbildung 1 dargestellt.
2. Drücken Sie ➂ mit der Hand in ➁, wie in Abbildung 2 dargestellt.
3. Drücken Sie ➀ in ➁ und dann nach oben, bis Sie ein Klickgeräusch hören, wie
in Abbildung 3 dargestellt.
4. Fügen Sie ➃ in ➂ ein, wie in Abbildung 4 gezeigt.
5. Fügen Sie ➄ in ➀ ein, wie in Abbildung 5 gezeigt.
6. Klemmen Sie ➆ in ➁, wie in Abbildung 6 gezeigt.
7. Klemmen Sie ➇ in ➁ und ziehen Sie es im Uhrzeigersinn fest, wie in Abbildung
7 gezeigt.
8. Klemmen Sie ➇ in ➁, wie in Abbildung 8 gezeigt.
Abbildung 1 Abbildung 2 Abbildung 3 Abbildung 4
Abbildung 5 Abbildung 6 Abbildung 7 Abbildung 8
➀
➁
➂
➃
➄
➅
➆
➇
Ausrichten und
in den Boden
einsetzen
Schlitzposition
oben

10
DE
Demontage des Griffs
Führen Sie die Schritte von Abbildung 1 bis Abbildung 8 in umgekehrter
Reihenfolge aus.
Eigenschaften
• Automatische Mikrocomputer-Steuerung, einfach und zuverlässig in der
Anwendung und ohne große Kosten.
• Die LED-Anzeige zeigt den Betriebszustand an, was die Überwachung des
Betriebszustandes erleichtert.
• Rotierende Eiscrememaschine, die gut mischt und einfach zu bedienen ist.
• Geeignet für die kontinuierliche Herstellung von Speiseeis.
• 1,5 l Fassungsvermögen.
• Die Teile sind abnehmbar, leicht zu reinigen, hygienisch und sicher.

11
DE
BEDIENUNG
1. Schließen Sie das Gerät an das Stromnetz an und stecken Sie das Netzkabel
in eine geeignete Steckdose. Die Form und die Spannung der Steckdose
müssen mit den Angaben auf dem Typenschild übereinstimmen.
2. Halten Sie die Ein-/Ausschalttaste gedrückt, der Bildschirm wird
vollständig beleuchtet und Sie können die Menüoberäche aufrufen, um
den Funktionsmodus auszuwählen.
Eiscreme-Modus
• Klicken Sie auf der Menüoberäche, um den Eiscreme-Modus
aufzurufen. Die Standardzeit beträgt 50 Minuten, die Zeit ist einstellbar.
• Klicken Sie auf , um den Eiscreme-Modus zu starten. Der Kompressor
und der Rührwerkmotor werden gestartet und der Countdown von 50
Minuten beginnt.
• Wenn die Eiscremeproduktion abgeschlossen ist, zeigt der Bildschirm
„COOL“ an, die Isolationsphase I wird eingeleitet und der Summer
ertönt 6 Mal. In dieser Phase läuft der Rührwerkmotor weiter. Die erste
Isolationsphase dauert 60 Minuten.
• Nach 60 Minuten der Isolationsstufe I ertönt der Summer 6 Mal und
das Gerät geht in die Isolationsstufe II über. Wenn der Kompressor
eingeschaltet ist, läuft auch der Rührwerkmotor. Wenn der Rührwerkmotor
anhält, können Sie die Taste drücken, um die Entladung des
Rührwerkmotors zu starten. Die Dauer der zweiten Isolationsphase beträgt
120 Minuten. Am Ende der zweiten Isolationsphase kehren Sie zur Standby-
Schnittstelle zurück.
• Wenn Sie die Eiscreme kalt halten, können Sie durch Drücken des
Eissymbols in den Betriebsmodus für die Eiscreme zurückkehren, mit einer
Standardzeit von 10 Minuten und einer einstellbaren Zeit.
• Während des Eiscremeherstellungsprozesses kann der Benutzer die Taste
drücken, um den Prozess anzuhalten. Der Kompressor wird erst 3
Minuten vor der Pause abgeschaltet. Während der Pause kann der Benutzer
die Taste
/
drücken, um die Eiscremeproduktionszeit einzustellen. Wenn
das Gerät 10 Minuten lang nicht bedient wird, ertönt der Summer 6 Mal, um
zur Standby-Schnittstelle zurückzukehren.
12
DE
Saftmodus
• Klicken Sie auf der Menüoberäche, um den Saft-Modus aufzurufen.
Der Benutzer kann die Kühlzeit des Saftes durch Drücken der Taste
/
nach seinen Bedürfnissen einstellen. Die Standardzeit ist 30 Minuten.
Klicken Sie auf , um den Saft-Modus zu starten. Zu diesem Zeitpunkt
werden der Kompressor und der Rührwerkmotor gestartet und die Zeit
heruntergezählt.r
• Der Countdown endet, auf dem Display wird „COOL“ angezeigt, das
Gerät geht in den Isolationsmodus über und der Summer ertönt 6 Mal
gleichzeitig. Kehren Sie nach 60 Minuten der Isolierung zur Standby-
Schnittstelle zurück.
• Während des Entsaftungsvorgangs kann der Benutzer die Taste
drücken, um den Vorgang zu pausieren. Der Kompressor stoppt erst 3
Minuten vor der Pause und während der Pause können Sie
/
drücken,
um die Kühlzeit des Saftes einzustellen. Wenn das Gerät 10 Minuten lang
nicht bedient wird, ertönt der Summer 6 Mal, um zur Standby-Schnittstelle
zurückzukehren.
Kühlmodus
• Klicken Sie auf der Menüoberäche, um den Kühlmodus aufzurufen. Mit
der Taste
/
kann der Benutzer die für den Einzelkühlbetrieb erforderliche
Kühlzeit nach seinen Bedürfnissen einstellen. Die Standardeinstellung
ist 10 Minuten. Klicken Sie auf , um den Einzelkühlmodus zu starten.
Der Kompressor und der Rührwerkmotors werden gestartet und die Zeit
heruntergezählt.
• Der Countdown endet, der Summer ertönt 6 Mal und der Bildschirm kehrt
in die Standby-Anzeige zurück.
• Während des Einzelkühlungsmodus kann der Benutzer die Taste
drücken, um den Vorgang zu pausieren. Der Kompressor stoppt erst 3
Minuten vor der Pause und während der Pause können Sie
/
drücken,
um die Kühlzeit anzupassen. Wenn das Gerät 10 Minuten lang nicht
bedient wird, ertönt der Summer 6 Mal, um zur Standby-Schnittstelle
zurückzukehren.
13
DE
Mischmodus
• Klicken Sie auf der Menüoberäche, um den Mischmodus aufzurufen.
Mit den Tasten
/
kann der Benutzer die gewünschte Mischzeit nach
seinen Bedürfnissen einstellen. Die Standardeinstellung ist 30 Minuten.
Klicken Sie auf , um den Mischmodus zu starten. Der Rührwerkmotor
läuft an und die Zeit wird heruntergezählt.
• Der Countdown endet, der Summer ertönt 6 Mal und der Bildschirm kehrt
in die Standby-Anzeige zurück.
• Während des Produktionsprozesses der Einzelmischungen können
Benutzer den Betrieb mit der Taste unterbrechen und während der
Unterbrechung mit
/
die gewünschte Mischzeit einstellen. Wenn das
Gerät 10 Minuten lang nicht bedient wird, ertönt der Summer 6 Mal, um zur
Standby-Schnittstelle zurückzukehren.
Shakes-Modus
• Klicken Sie auf der Menüoberäche, um den Shakes-Modus aufzurufen.
Mit der Taste
/
können Benutzer die gewünschte Zeit für Milkshakes
nach ihren Bedürfnissen einstellen. Die Standardeinstellung ist 30 Minuten.
Klicken Sie auf , um den Shakes-Modus zu starten. Zu diesem Zeitpunkt
werden der Kompressor und der Rührwerkmotor gestartet und die Zeit
heruntergezählt.
• Der Countdown endet, auf dem Display wird „COOL“ angezeigt, das Gerät
geht in den Isolationsmodus über und der Summer ertönt 6 Mal. Kehren Sie
nach 60 Minuten der Isolierung zur Standby-Schnittstelle zurück.
• Während der Milchshake-Produktion können Benutzer die Taste
drücken, um den Vorgang anzuhalten. Der Kompressor wird erst 3 Minuten
vor der Pause abgeschaltet. Mit der Taste
/
können Benutzer die
gewünschte Zeit für Milkshakes nach ihren Bedürfnissen einstellen. Wenn
das Gerät 10 Minuten lang nicht bedient wird, ertönt der Summer 6 Mal, um
zur Standby-Schnittstelle zurückzukehren.
Reinigungsmodus
• Klicken Sie auf der Menüoberäche, um den Reinigungsmodus
aufzurufen. Benutzer können die Reinigungszeit durch Drücken der Taste
/
nach ihren Bedürfnissen einstellen. Die Standardeinstellung ist 10
Minuten. Klicken Sie auf , um den Einzelmischmodus zu starten. Der
Rührwerkmotor startet für 1 Minute, stoppt für 1 Minute und beginnt dann
zu arbeiten. Der Timer ist abgelaufen.
• Der Countdown endet, der Summer ertönt 6 Mal und der Bildschirm kehrt
in die Standby-Anzeige zurück.
• Während des Reinigungsvorgangs können Benutzer den Betrieb mit der
Taste unterbrechen und während der Unterbrechung mit
/
die
gewünschte Reinigungszeit einstellen. Wenn das Gerät 10 Minuten lang
nicht bedient wird, ertönt der Summer 6 Mal, um zur Standby-Schnittstelle
zurückzukehren.

14
DE
Zurück
• Wenn die Funktion ausgewählt und nicht aktiviert ist, drücken Sie die
entsprechende Menüfunktionstaste, um zum Desktop zurückzukehren.
• Wenn das Gerät bereits läuft, drücken Sie Pause und dann die entsprechende
Funktionstaste, um zum Desktop zurückzukehren.
Motorschutzfunktion
Mit zunehmender Produktionszeit wird das Eis immer härter und der Mischmotor
könnte blockieren. Zu diesem Zeitpunkt überwacht der Motorschutz den Strom
und die Temperatur des Motors und schaltet den Motor automatisch ab, um die
Lebensdauer des Rührmotors zu gewährleisten. Nach kurzer Zeit schaltet sich der
Motor automatisch wieder ein.
Die größte Produktionskapazität
Um unnötiges Verschütten und Abfälle zu vermeiden, sollte darauf geachtet
werden, dass die Eiszutaten nicht mehr als 60 % des inneren Behältervolumens
von ca. 900 g ausmachen (da sich die Eiscreme nach der Herstellung etwas
ausdehnt). Bei der kontinuierlichen Produktion wird das Gewicht innerhalb
von 600 g kontrolliert, wenn neues Material hinzugefügt wird. Dadurch wird
verhindert, dass sich die Eiscreme ausdehnt und überläuft (da ein Teil des
Materials im Behälter verbleibt).
15
DE
EISCREME-PRODUKTION
Hinweis: Reinigen Sie alle Teile, die mit Speiseeis in Berührung kommen,
vor dem Gebrauch gründlich, einschließlich: Kühlschüssel, Einfüllschüssel,
Mischmesser, Auslassdichtung, innere Auslassabdeckung und Trichter
usw. Vergewissern Sie sich vor der Reinigung, dass das Netzkabel aus der
Steckdose gezogen ist. Stellen Sie das Gerät bei der Eiscremeherstellung ach
auf eine ebene Fläche, um sicherzustellen, dass der Kompressor des Geräts
ordnungsgemäß funktioniert.
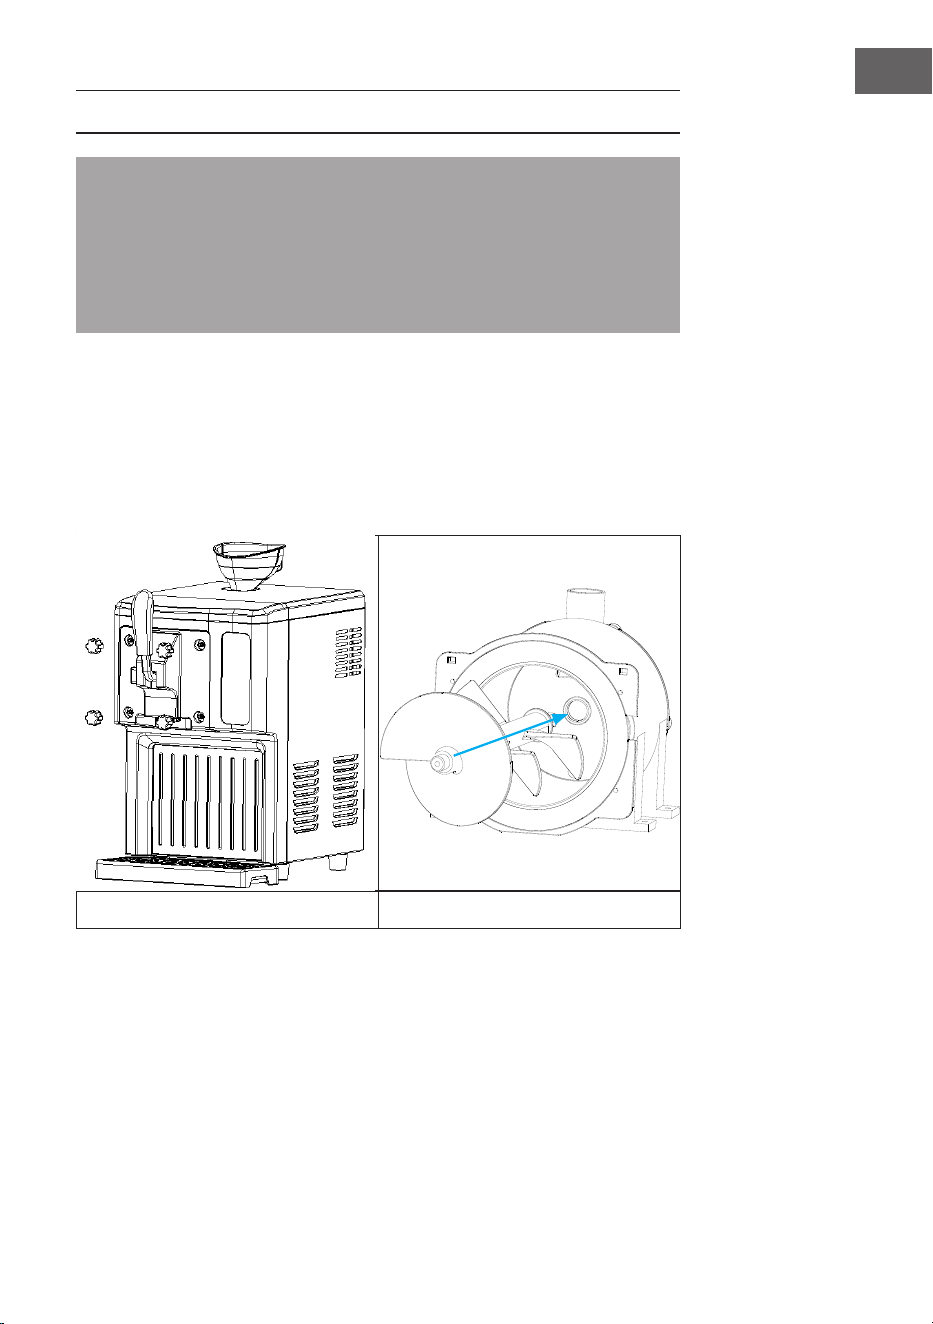
Lösen Sie die vier Sicherungsmuttern gegen den Uhrzeigersinn und entfernen
Sie die Griffeinheit wie in Abbildung 1 dargestellt. Prüfen Sie, ob das Innere des
Behälters sauber ist, nehmen Sie das Rührwerk heraus, wischen Sie es mit einem
feuchten Tuch ab und setzen Sie das Rührwerk nach der Reinigung wieder ein,
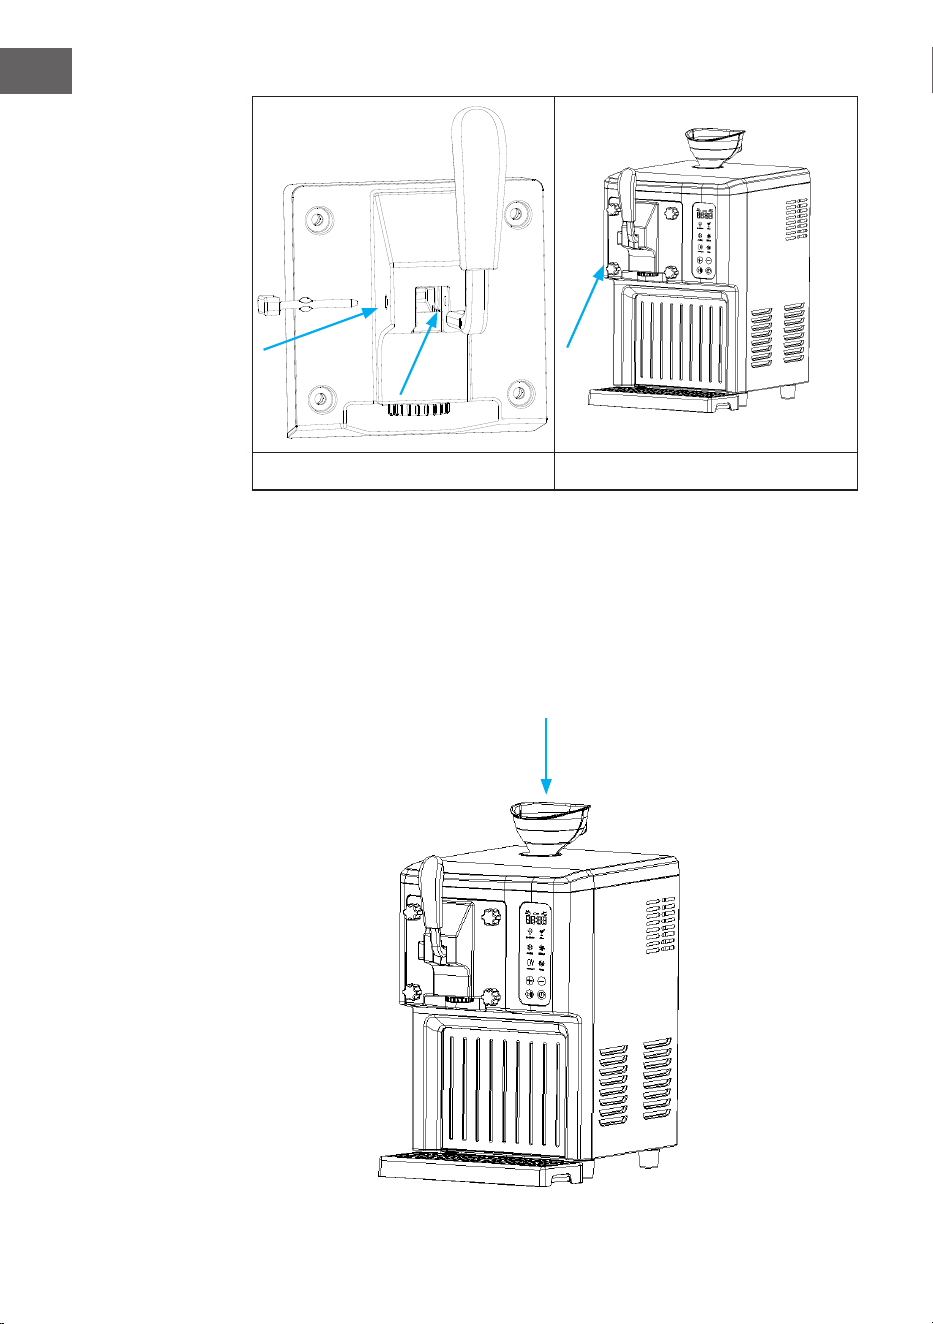
wie in Abbildung 2 dargestellt. Montieren Sie den Griff und die Griffeinheit wie
in Abbildung 3 dargestellt. Ziehen Sie die Mutter im Uhrzeigersinn an, wie in
Abbildung 4 dargestellt.
Abbildung 1 Abbildung 2
➀: Lösen Sie die Sicherungsmutter gegen den Uhrzeigersinn
➁: Nehmen Sie die Griffeinheit und das Rührblatt zum Reinigen heraus.
➂: Richten Sie beim Einbau des Mischerügels den Innensechskant auf die
Lochposition aus und achten Sie auf die Richtung des Mischerügels.
➀
➁
➂
16
DE
Abbildung 3 Abbildung 4
➃: Richten Sie den Griff auf das Loch aus und achten Sie auf die Richtung.
➄: An der Position des Schlitzes ausrichten.
➅: Ziehen Sie die vier Muttern im Uhrzeigersinn fest.
Vorbereitung der Zutaten
1. Bereiten Sie die Rezeptzutaten nach Ihrem eigenen Rezept oder nach den
Rezepten in diesem Handbuch zu. Es wird empfohlen, 800 g (das optimale
Gewicht liegt bei 600 bis 900 g) der Zutaten zu verwenden.
➃
➄
➅

17
DE
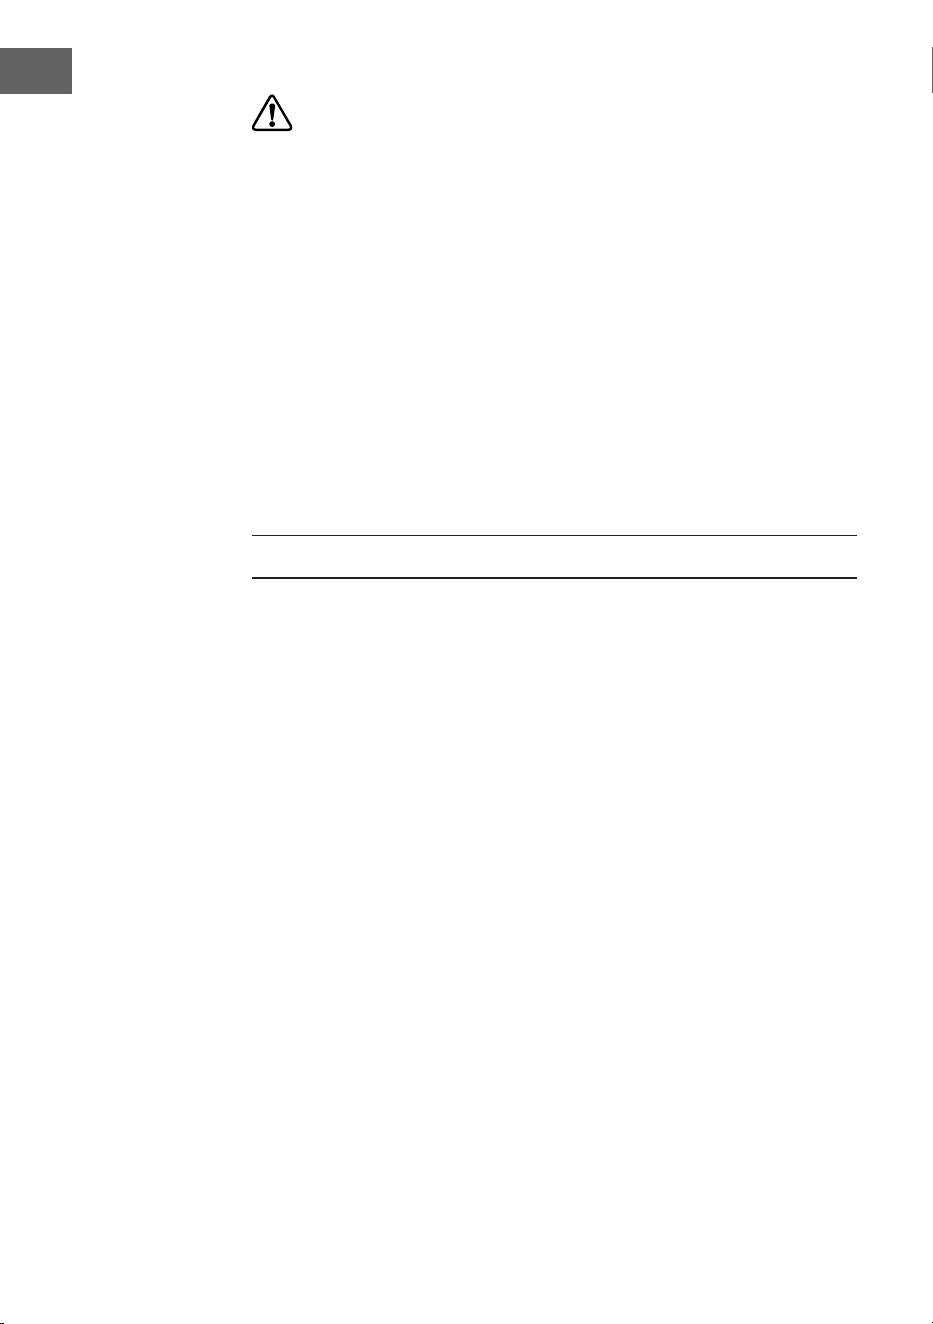
2. Füllen Sie die richtige Menge an Zutaten in den Trichter.
3. Entfernen Sie den Trichter und setzen Sie den Verschlussstopfen wieder ein.
4. Stecken Sie den Netzstecker in die Steckdose.
5. Drücken Sie die Ein-/Ausschalttaste ➆.
6. Wählen Sie mit den Funktionstasten das gewünschte Menü aus.
7. Das Gerät beginnt mit der Eiscremeherstellung.
8. Wenn die Produktion abgeschlossen ist, ziehen Sie am Hebel, um die Eiscreme
zu entnehmen.
➇: Ziehen Sie am Hebel, um die Eiscreme zu entnehmen.
➆
➇
18
DE
1. Bereiten Sie die Rezeptzutaten nach Ihrem eigenen Rezept oder nach den
Rezepten in diesem Handbuch zu. Hinweis: Sie müssen die Schüssel nicht
vorher stundenlang im Gefrierschrank einfrieren, da dieses Gerät über einen
eingebauten Kompressor verfügt, der die Zutaten des Rezepts während
des Betriebs einfriert, um die Eiscremeproduktion zu gewährleisten. Es
wird empfohlen, 800 g (optimal sind 600 bis 900 g) der Zutaten bei einer
Temperatur von 18 bis 22 °C zu verarbeiten.
2. Bei der Herstellung von Speiseeis können Sie zehn Minuten vor der
Zubereitung andere Lieblingszutaten hinzufügen. Vermeiden Sie die Zugabe
von Granulat, um eine Blockade des Auslasses zu vermeiden. Für Früchte
können Sie einen Mixer verwenden, um sie zu verüssigen und sie dann
hineinschütten.
3. Wenn die Eiscreme fertig ist, können Sie weitere Zutaten hinzufügen. Bei
der Zugabe neuer Zutaten sollte das Gewicht innerhalb von 600 g gehalten
werden, um ein Ausdehnen und Überlaufen des Eises zu vermeiden (da einige
Materialien in der Trommel verbleiben).
REZEPTE
Empfohlene Rezeptur des Speiseeis-Rohstoffs und Herstellungsmethode (die
folgenden Angaben dienen nur als Anhaltspunkte; bitte achten Sie darauf, dass die
Speiseeiszutaten nicht mehr als 60 % des Volumens der Ladetrommel ausmachen).
Eiscreme Grundrezept
Zutaten: 300 g Wasser, 200 g Milchpulver, 300 g Sahne
4. Wasser, Milchpulver und Sahne mischen, bis keine Körnchen mehr vorhanden
sind.
5. Durch den Trichter in den Eisbehälter gießen, um das Eismenü zu starten.
Frische Erdbeer-Eiscreme
Zutaten: 120 g Wasser, 180 g Milchpulver, 260 g Sahne und 220 g Erdbeeren
Benötigtes Zubehör: Mixer
1. Die Erdbeeren waschen, mit dem Wasser und dem Milchpulver in den Mixer
geben und pürieren.
2. Die Sahne in die Schüssel gießen und gut verrühren.
3. Durch den Trichter in den Eisbehälter gießen, um das Eismenü zu starten.
VORSICHT

19
DE
Frische Mango-Eiscreme
Zutaten: 200 g Wasser, 200 g Milchpulver, 300 g Sahne und 160 g Mango
Benötigtes Zubehör: Mixer
1. Die geschälte Mango zusammen mit dem Milchpulver und dem Wasser in den
Mixer geben und pürieren, bis sie glatt ist.
2. Die Sahne in die Schüssel gießen und gut verrühren.
3. Durch den Trichter in den Eisbehälter gießen, um das Eismenü zu starten.
Pitaya-Eiscreme
Zutaten: 400 g Milch, 240 g Sahne und 260 g Pitaya
Benötigtes Zubehör: Mixer
1. Die Pitaya schälen und zusammen mit der Milch in den Mixer geben, bis sie
glatt ist.
2. Die Sahne in das Glas gießen und gut vermischen.
3. Durch den Trichter in den Eisbehälter gießen, um das Eismenü zu starten.
Milch-Speiseeis
Zutaten: 360 g reine Milch, 30 g ranierter Rohrzucker und 300 g Sahne
1. Die reine Milch, die Sahne und den ranierten Rohrzucker verrühren, bis
keine Körnchen mehr vorhanden sind.
2. Durch den Trichter in den Eisbehälter gießen, um das Eismenü zu starten.
Speiseeis in Pulverform
Zutaten: 600 g reine Milch, 200 g Speiseeispulver
1. Die Milch und das Eispulver verrühren, bis keine Körnchen mehr vorhanden
sind.
2. Durch den Trichter in den Eisbehälter gießen, um das Eismenü zu starten.

20
DE
REINIGUNG UND WARTUNG
Achtung! Um einen Stromschlag zu vermeiden, muss der Stecker vor der
Reinigung gezogen werden.
• Verwenden Sie ein feuchtes Tuch, um verschmutzte Bereiche wie das Kühlfach
und den Rumpf zu reinigen.
• Tauchen Sie das Gehäuse nicht in Wasser ein und lassen Sie kein Wasser durch
den seitlichen Luftauslass oder -einlass eindringen.
• Nach der Reinigung müssen der Innenbehälter und das Griffzubehör vor dem
Wiederzusammenbau getrocknet werden, um zu verhindern, dass Restwasser
im Innenbehälter Gerüche verursacht.
Reinigungsmodus
1. Reinigen Sie den Eiscremebereiter nach der Verkostung mit der
Reinigungsfunktion. Gießen Sie zunächst etwa 1 Liter sauberes Wasser aus
dem Trichter, drücken Sie die Taste und rufen Sie den Reinigungsmodus
auf. Nach einer Einwirkzeit von etwa 1 Minute das Wasser ablassen, das
Wasser wechseln und erneut spülen, circa 5 Mal hintereinander, bis das
Wasser klar ist. Es wird empfohlen, Reinigungsmittel oder Limonade zu
verwenden, um eine bessere Wirkung zu erzielen. Reinigen Sie gleichzeitig
die Einfüllöffnung mit einer Bürste.
2. Wenn das Wasser abgelassen ist, schrauben Sie die Mutter ab (siehe
Abbildung 1), nehmen Sie die Griffteile ab und reinigen Sie das Rührblatt
separat.
3. Auf der nächsten Seite nden Sie Einzelheiten zur Demontage und Montage
der Griffkomponenten, die nach der Demontage in der Spülmaschine
gereinigt werden müssen.
4. Nach dem Reinigen des Rührügels, der Griffteile und der Innenbehälters
müssen diese vollständig getrocknet und dann wieder zusammengebaut
werden, um Geruchsbildung durch Wasserspuren zu vermeiden. Bringen
Sie die Griffeinheit an. Weitere Informationen nden Sie unter „Demontage
des Griffs“.
21
DE
FEHLERSUCHE UND FEHLERBEHEBUNG
Problem Mögliche Ursache Lösung
Eiscreme kann nicht
entnommen werden,
wenn die Eiscreme fertig
ist.
Die Eiscreme ist zu
hart oder enthält
Körnchen.
Lassen Sie die Eiscreme
vor der Entnahme
auf natürliche Weise
schmelzen.
Die Griffeinheit passt
nicht richtig.
Das Rührblatt ist nicht
an seinem Platz oder
zeigt in die falsche
Richtung.
Richten Sie das
Mischblatt an der
Bohrung aus oder
drehen Sie es um 180
Grad und bauen Sie es
wieder ein.
Bei der ersten Reinigung
tritt kein Wasser aus.
Der Wasserauslass ist
durch Eis blockiert.
Lassen Sie das Eis
schmelzen und das
Wasser abießen.
Undichtigkeit an der
Griffposition.
Dichtungsring nicht
montiert oder Mutter
nicht angezogen.
Bringen Sie den
Dichtungsring an und
ziehen Sie die Mutter
fest.
Schabendes Geräusch
nach dem Essen von
Eiscreme.
Das Eis an der
Behälterwand ist zu hart.
Halten Sie das Gerät
rechtzeitig an oder
fügen Sie Rohstoffe
hinzu, um die Produktion
fortzusetzen.
Der Handgriff lässt sich
nicht leichtgängig ein-
und ausziehen.
Falsche Richtung des
Handgriffs.
Um 90 Grad drehen
und einstecken oder
herausziehen.
Der Motor dreht sich
nicht.
Motorüberhitzungs-
schutz.
Warten Sie einen
Moment und versuchen
Sie es erneut.

22
DE
SPEZIELLE ENTSORGUNGSHINWEISE FÜR
VERBRAUCHER IN DEUTSCHLAND
Entsorgen Sie Ihre Altgeräte fachgerecht. Dadurch wird gewährleistet, dass die
Altgeräte umweltgerecht verwertet und negative Auswirkungen auf die Umwelt
und menschliche Gesundheit vermieden werden. Bei der Entsorgung sind
folgende Regeln zu beachten:
• Jeder Verbraucher ist gesetzlich verpichtet, Elektro- und Elek-
tronikaltgeräte (Altgeräte) sowie Batterien und Akkus getrennt
vom Hausmüll zu entsorgen. Sie erkennen die entsprechenden
Altgeräte durch folgendes Symbol der durchgestrichene Müll-
tonne (WEEE Symbol).
• Sie haben Altbatterien und Altakkumulatoren, die nicht vom Altgerät
umschlossen sind, sowie Lampen, die zerstörungsfrei aus dem Altgerät
entnommen werden können, vor der Abgabe an einer Entsorgungsstelle vom
Altgerät zerstörungsfrei zu trennen.
• Bestimmte Lampen und Leuchtmittel fallen ebenso unter das Elektro- und
Elektronikgesetz und sind dementsprechend wie Altgeräte zu behandeln.
Ausgenommen sind Glühbirnen und Halogenlampen. Entsorgen Sie
Glühbirnen und Halogenlampen bitte über den Hausmüll, sofern Sie nicht das
WEEE Symbol tragen.
• Jeder Verbraucher ist für das Löschen von personenbezogenen Daten auf dem
Elektro- bzw. Elektronikgerät selbst verantwortlich.
Rücknahmepicht der Vertreiber
Vertreiber mit einer Verkaufsäche für Elektro- und Elektronikgeräte von
mindestens 400 Quadratmetern sowie Vertreiber von Lebensmitteln mit einer
Gesamtverkauäche von mindestens 800 Quadratmetern, die mehrmals im
Kalenderjahr oder dauerhaft Elektro- und Elektronikgeräte anbieten und auf dem
Markt bereitstellen, sind verpichtet,
1 bei der Abgabe eines neuen Elektro- oder Elektronikgerätes an einen Endnutzer
ein Altgerät des Endnutzers der gleichen Geräteart, das im Wesentlichen die
gleichen Funktionen wie das neue Gerät erfüllt, am Ort der Abgabe oder in
unmittelbarer Nähe hierzu unentgeltlich zurückzunehmen und
2 auf Verlangen des Endnutzers Altgeräte, die in keiner äußeren Abmessung
größer als 25 Zentimeter sind, im Einzelhandelsgeschäft oder in unmittelbarer
Nähe hierzu unentgeltlich zurückzunehmen; die Rücknahme darf nicht an den
Kauf eines Elektro- oder Elektronikgerätes geknüpft werden und ist auf drei
Altgeräte pro Geräteart beschränkt.

23
DE
• Bei einem Vertrieb unter Verwendung von Fernkommunikationsmitteln
ist die unentgeltliche Abholung am Ort der Abgabe auf Elektro- und
Elektronikgeräte der Kategorien 1, 2 und 4 gemäß § 2 Abs. 1 ElektroG, nämlich
„Wärmeüberträger“, „Bildschirmgeräte“ (Oberäche von mehr als 100 cm²)
oder „Großgeräte“ (letztere mit mindestens einer äußeren Abmessung
über 50 Zentimeter) beschränkt. Für andere Elektro- und Elektronikgeräte
(Kategorien 3, 5 ,6) ist eine Rückgabemöglichkeit in zumutbarer Entfernung
zum jeweiligen Endnutzer zu gewährleisten
• Altgeräte dürfen kostenlos auf dem lokalen Wertstoffhof oder in folgenden
Sammelstellen in Ihrer Nähe abgegeben werden: www.take-e-back.de
• Für Elektro- und Elektronikgeräte der Kategorien 1, 2 und 4 an bieten wir auch
die Möglichkeit einer unentgeltlichen Abholung am Ort der Abgabe. Beim
Kauf eines Neugeräts haben sie die Möglichkeit eine Altgerätabholung über
die Webseite auszuwählen.
• Batterien können überall dort kostenfrei zurückgegeben werden, wo sie
verkauft werden (z. B. Super-, Bau-, Drogeriemarkt). Auch Wertstoff- und
Recyclinghöfe nehmen Batterien zurück. Sie können Batterien auch per Post
an uns zurücksenden. Altbatterien in haushaltsüblichen Mengen können Sie
direkt bei uns von Montag bis Freitag zwischen 08:00 und 16:00 Uhr unter der
folgenden Adresse unentgeltlich zurückgeben:
Chal-Tec Fulllment GmbH
Norddeutschlandstr. 3
47475 Kamp-Lintfort
• Wichtig zu beachten ist, dass Lithiumbatterien aus Sicherheitsgründen vor der
Rückgabe gegen Kurzschluss gesichert werden müssen (z. B. durch Abkleben
der Pole).
• Finden sich unter der durchgestrichenen Mülltonne auf der Batterie zusätzlich
die Zeichen Cd, Hg oder Pb ist das ein Hinweis darauf, dass die Batterie
gefährliche Schadstoffe enthält. (»Cd« steht für Cadmium, »Pb« für Blei und
»Hg« für Quecksilber).
Hinweis zur Abfallvermeidung
Indem Sie die Lebensdauer Ihrer Altgeräte verlängern, tragen Sie dazu bei,
Ressourcen ezient zu nutzen und zusätzlichen Müll zu vermeiden. Die
Lebensdauer Ihrer Altgeräte können Sie verlängern indem Sie defekte Altgeräte
reparieren lassen. Wenn sich Ihr Altgerät in gutem Zustand bendet, könnten Sie
es spenden, verschenken oder verkaufen.
24
DE
HINWEISE ZUR ENTSORGUNG
Wenn es in Ihrem Land eine gesetzliche Regelung
zur Entsorgung von elektrischen und elektronischen
Geräten gibt, weist dieses Symbol auf dem Produkt oder
auf der Verpackung darauf hin, dass dieses Produkt
nicht im Hausmüll entsorgt werden darf. Stattdessen
muss es zu einer Sammelstelle für das Recycling von
elektrischen und elektronischen Geräten gebracht
werden. Durch regelkonforme Entsorgung schützen
Sie die Umwelt und die Gesundheit Ihrer Mitmenschen
vor negativen Konsequenzen. Informationen zum
Recycling und zur Entsorgung dieses Produkts,
erhalten Sie von Ihrer örtlichen Verwaltung oder Ihrem
Hausmüllentsorgungsdienst.
HERSTELLER & IMPORTEUR (UK)
Hersteller:
Chal-Tec GmbH, Wallstraße 16, 10179 Berlin, Deutschland.
Importeur für Großbritannien:
Berlin Brands Group UK Limited
PO Box 42
272 Kensington High Street
London, W8 6ND
United Kingdom
25
EN
Dear Customer,
Congratulations on purchasing this device. Please read the
following instructions carefully and follow them to prevent
possible damages. We assume no liability for damage
caused by disregard of the instructions and improper use.
Scan the QR code to get access to the latest user manual
and more product information.
CONTENTS
TECHNICAL DATA
Item number 10046255, 10046256
Power supply 220–240 V – 50 Hz
Power consumption 250 W
Protection class I
Climate type N/ SN
Capacity 1.5 litres
Dimensions (LxWxH) 417x280x517 mm
Package dimensions (LxWxH) 465x342x495 mm
Netto weight 16.5 kg
Brutto weight 18.5 kg
Technical Data 25
Safety Instructions 26
Device Description 29
Installation 31
Operation 33
Ice-cream Production 36
Recipes 40
Cleaning and Maintenance 42
Troubleshooting 43
Disposal Considerations 44
Manufacturer & Importer (UK) 44

26
EN
SAFETY INSTRUCTIONS
• In order to avoid harm caused by misuse, please read the instruction manual
carefully before using this product and use this product strictly in accordance
with the purpose stated in the instruction manual.
• Place the device on a level surface.
• Use the device indoors only.
• Unplug the device from the power outlet when not in use.
• Never immerse the power cord and plug in water or other liquids.
• Only use accessories that are expressly recommended by the manufacturer
for this device.
• Do not place the device directly under an electrical outlet.
• Do not let the power cord hang from the work surface so that children cannot
pull on it.
• Do not overll the unit, otherwise short circuits and electric shocks may occur.
• Make sure that the lid is always closed during operation.
• Do not pull the plug out of the outlet by the cord, but hold it by hand when
unplugging.
• Use this device only for its intended purpose. We accept no liability for
damage caused by disregarding the instructions and improper use. Only use
the device in the household.
• Do not connect the device to a timer or remote-controlled socket.
• Do not immerse the device in water.
• The use of an extension cord is not recommended, as it may overheat and
become a risk of re.
• If the power cord or plug is damaged, it must be replaced by the
manufacturer, an authorized service centre, or a similarly qualied person.
• Follow local regulations for disposal of equipment containing ammable gas.
• Do not store highly ammable or explosive substances in the device.
• Do not overturn the appliance. If the machine is overturned, leave it to stand
for 2 hours before switching it on.
• If the Ice Maker is brought in from outside in winter, allow it to warm up to
room temperature for a few hours before switching it on.
• Dispose of the appliance only at an authorised waste disposal facility. Do not
expose to ame.
• This appliance is not intended for use by persons (including children) with
reduced physical, sensory or mental capabilities, or lack of experience and
knowledge, unless they have been given supervision or instruction concerning
use of the appliance by a person being responsible for their safety.
• Children shall not play with the appliance. Cleaning and user maintenance
shall not be made by children without supervision.
• Children between the ages of 3 and 8 are not allowed to load and unload
refrigeration equipment.
• Keep the appliance 8 cm away from other objects to ensure good heat
dissipation.
• Do not use the appliance near ames, hotplates or stoves.
• Do not switch on the appliance frequently (at least every 5 minutes) to avoid

27
EN
damaging the compressor.
• Do not insert metal sheets or other electrical objects into the appliance to
avoid re and short circuits.
• When removing the ice-cream, do not hit the drum or the edge of the drum to
avoid damaging the drum.
• Do not switch on the power supply until the drum or mixer blade has been
properly installed.
• The initial temperature of the ingredients is 25±5 °C. Do not put the
ingredients in the freezer to pre-freeze, as it will easily block the blender blade
before the ice-cream is in good condition.
• Do not remove the blender blade while the machine is operating.
• Do not use outdoors.
• Never clean with abrasive cleaners or hard objects.
• This appliance is intended to be used in household and similar applications
such as
– staff kitchen areas in shops, oces and other working environments;
– farm houses and by clients in hotels, motels and other residential type
environments;
– bed and breakfast type environments and catering and similar non-retail
applications.
This appliance contains the coolant isobutane (R600a),a natural gas which is
environmentally friendly. Although it is ammable, it does not damage the
ozone layer and does not increase the greenhouse effect. The use of this
coolant has,however,led to a slight increase in the noise level of the appliance.
In addition to the noise of the compressor,you might be able to hear the
coolant owing around the system. This is unavoidable,and does not have any
adverse effect on the performance of the appliance. Care must be taken during
the transportation and setting up of the appliance that no parts of the cooling
system are damaged. Leaking coolant can damage the eyes.
• Keep ventilation openings in the unit housing free of obstacles.
• Do not damage the refrigerant circuit.
• The refrigeration system contains a high-pressure refrigerant. Do not damage
the refrigeration system.
• The maintenance of the refrigeration system shall be done by professionals.
• Do not use any mechanical devices or other means to accelerate the
defrosting process or the ice recovery process.
• Do not use electrical appliances inside the food storage compartments of the
appliance, unless they are of the type recommended by the manufacturer.
• Unplug the ice maker before cleaning or making any repairs or servicing.
• Do not clean the ice maker with ammable liquids, as this could cause a re or
explosion.
• Refrigerant and insulation blowing gas are ammable.
•
WARNING
Fire hazard due to improper disposal! Please observe the local
regulations for the disposal of appliances containing ammable
refrigerants and gases.

28
EN
Special Notes
• When positioning the unit, make sure that the power cord is not pinched or
damaged.
• Make sure that there are no multiple sockets or power supplies on the back of
the unit.
To avoid contamination of food, please follow the instructions below:
• If the door is left open for a long time, the temperature in the compartments
of the appliance may rise signicantly.
• Clean food contact surfaces and accessible drainage systems regularly.
WARNING
When using, servicing and disposing of the unit, pay attention to
the left symbol on the rear of the unit or on the compressor. This
symbol warns of possible res. There are ammable substances in
the refrigerant lines and in the compressor. Keep the appliance
away from sources of re during use, maintenance and disposal.
29
EN
DEVICE DESCRIPTION
1
2
8
9
10
11
12
3
4
5
6
7
1 Feed port plug 7 Water pan
2 Funnel 8 Upper cover
3 Handle 9 Display screen cover
4 Handle 10 Exhaust vent
5 Locking nut 11 Side panel
6 Front decorative cover 12 Exhaust vent
30
EN
Function buttons
➀ Time ➆ Juice mode button
➁ Ice cream mode button ➇ Mixing button
➂ Refrigeration mode button ➈ Cleaning function button
➃ Shakes mode button ➉ Time decrease button
➄ Time increase button
⑪ Power button
➅ Start/Pause button
Attachments
Mixing blade 1 User manual 1
Brush 1 Funnel 1
➀
➁
➂
➃
➄
➅
➆
➇
➈
➉
⑪

31
EN
INSTALLATION
Handle assemby and disassembly
➀ Feed port upper cover
➄ Handle tip
➁ Feed port base
➅ Sealing ring
➂ Feed port plug ➆ Feed port sealing ring
➃ Handle ➇ Feed port cover
1. Insert ➂ into ➁ as shown in Figure 1.
2. Push ➂ into ➁ by hand, as shown in Figure 2.
3. Push ➀ into ➁ and then upward until you hear a clicking sound, as shown in
Figure 3.
4. Insert ➃ into ➂ as shown in Figure 4.
5. Insert ➄ into ➀ as shown in Figure 5.
6. Clip ➆ into ➁ as shown in Figure 6.
7. Clamp ➇ into ➁ and tighten clockwise, as shown in Figure 7.
8. Put ➇ into ➁ as shown in Figure 8.
Figure 1 Figure 2 Figure 3 Figure 4
Figure 5 Figure 6 Figure 7 Figure 8
➀
➁
➂
➃
➄
➅
➆
➇
Allign and
insert into the
bottom
Slot position up

32
EN
Handle disassembly
Follow the steps from Figure 1 to Figure 8 in reverse order.
Features
• Automatic microcomputer control, easy and reliable to use and won't cost you
much.
• LED display shows the working status, it is more convenient to monitor the
working status.
• Rotary extrusion type ice-cream maker, good mixing and easy to operate.
• Suitable for continuous ice-cream production.
• 1.5L large capacity.
• The parts are removable, easy to clean, hygienic and safe.

33
EN
OPERATION
1. Connect the power supply and plug the power cord into a suitable outlet.
The shape and voltage of the socket must match those shown.
2. Press and hold the on/off key , the screen will be fully lit and you can
enter the menu interface to select the function mode.
Ice-cream mode
• Click on the menu interface to enter Ice mode. The default time is 50
minutes and the time is adjustable.
• Click to start the Ice-cream mode. The compressor and mixer motor will
start and the 50 minute countdown will start.
• When the ice-cream production is completed, the display will show "COOL",
entering isolation stage I, and the buzzer will sound 6 times. At this stage
the mixer motor continues to run. The rst isolation stage lasts for 60
minutes.
• After 60 minutes of isolation stage I, the buzzer sounds 6 times and the
unit enters isolation stage II. When the compressor is running, the mixer
motor is running. When the mixer motor stops, you can press the key to
start the discharge of the mixer motor. The duration of the second isolation
stage is 120 minutes. At the end of the second isolation stage, return to the
standby interface.
• When keeping the ice-cream cold, you can press the ice-cream icon to
return to the ice-cream operating mode, with a default time of 10 minutes
and an adjustable time.
• During the ice-cream production process, the user can press the key to
pause the process. The compressor will not stop for 3 minutes before the
pause. During the pause, the user can press the
/
button to adjust the
ice production time. There is no operation for 10 minutes and the buzzer
sounds 6 times to return to the standby interface.

34
EN
Juice Mode
• Click on the menu interface to enter the juice mode. Users can press
/
button according to their needs to adjust the cooling time of the juice.
The default time is 30 minutes, click to start the juice mode. At this time,
the compressor and blender motor will start and the time will count down.
• The countdown will end, the display will show "COOL", the machine will
enter isolation mode and the buzzer will sound 6 times simultaneously.
After 60 minutes of isolation, return to the Standby interface.
• During the juice extraction process, users can press to pause the
process. The compressor will not stop for 3 minutes before the pause and
during the pause you can press
/
to adjust the cooling time of the juice.
There is no operation for 10 minutes and the buzzer sounds 6 times to
return to the standby interface.
Refrigeration mode
• Click on the menu interface to enter the single chill mode. Users can
press
/
to adjust the cooling time required for the single cooling mode
according to their needs. The default setting is 10 minutes. Click to start
the single chill mode. The compressor will start and the time will count
down.
• The countdown ends, the buzzer sounds 6 times and the display returns to
the Standby interface.
• During the single chill mode, the user can press to pause the process.
The compressor will not stop for 3 minutes before the pause, and during
the pause, the desired cooling time can be set by pressing
/
. There is
no operation for 10 minutes and the buzzer sounds 6 times to return to the
standby interface.
Mixing mode
• Click on the menu interface to enter the single mix mode. Users can
press
/
to set the required mixing time to suit their needs. The default
setting is 30 minutes. Click to start the single mix mode. The mixing
motor will start and the time will count down.
• The countdown ends, the buzzer rings 6 times and returns to the standby
interface.
• During the single mix production process, users can press to pause
the work and during the pause process, they can press
/
to adjust the
desired mixing time. There will be no operation for 10 minutes and the
buzzer will sound 6 times and return to the standby interface.

35
EN
Shakes Mode
• Click on the menu interface to enter the shakes mode. Users can press
/
to adjust the cooling time required for the milkshake to suit their
needs. The default setting is 30 minutes. Click to start the shakes mode.
At this point, the compressor and mixer motor will start and the time will
count down.
• The countdown will end, the display will show "COOL", the machine will
enter the isolation mode and the buzzer will sound 6 times. After 60
minutes of isolation, return to the Standby interface.
• During the milk shake production process, users can press to pause the
process. The compressor will not stop for 3 minutes before pausing. During
the pause, users can press
/
to adjust the cooling time required for the
milkshake. There is no operation for 10 minutes and the buzzer sounds 6
times to return to the standby interface.
Cleaning Mode
• Click on the menu interface to enter the cleaning mode. Users can
press
/
to adjust the cleaning time according to their needs. The default
setting is 10 minutes. Click to start the single mix mode and the mix
motor will start for 1 minute, stop for 1 minute and start working. The time
is counted down.
• The countdown ends, the buzzer sounds 6 times and returns to the Standby
interface.
• During the cleaning process, users can press to pause work, and during
the pause process, they can press
/
adjust the desired cleaning time.
There will be no operation for 10 minutes and the buzzer will sound 6 times
to return to the standby interface.
Return
• If the function is selected and not activated, press the appropriate menu
function key to return to the desktop.
• If the machine is already running, press Pause and then the appropriate
function key to return to the desktop.
Motor protection function
As the production time increases, the ice-cream becomes harder and harder
and the mixing motor is blocked. At this point, the motor protector will monitor
the current and temperature of the motor and automatically stop the motor
to ensure the life of the mixing motor. After a short time, the motor will restart
automatically.
36
EN
The largest production capacity
To avoid unnecessary spillage and waste, please ensure that the ice-cream
ingredients do not exceed 60 % of the inner drum volume by approximately
900 g (as there is some expansion after the ice-cream is formed). In continuous
production, the weight is controlled within 600 g when new material is added. This
prevents the ice-cream from expanding and overowing (because some of the
material remains in the barrel).
ICE-CREAM PRODUCTION
Note: Thoroughly clean all parts that come into contact with ice-cream before
use, including: cooling bowl, feed bowl, mixing knife, outlet gasket, outlet
inner cover and hopper, etc. Before cleaning, ensure that the power cord is
unplugged from the wall outlet. When making ice-cream, keep the machine at
on a level surface to ensure that the machine's compressor works properly.
Loosen the four counter-clockwise locking nuts and remove the handle assembly
as shown in Figure 1. Check that the inside of the drum is clean, remove the mixing
fan blade, wipe it with a damp cloth and re-insert the mixing blade after cleaning
as shown in Figure 2. Fit the handle and handle assembly as shown in Figure 3.
Tighten the nut clockwise as shown in Figure 4.
Figure 1 Figure 2
➀: Loosen the locking nut counterclockwise
➁: Take out the handle assembly and mixing blade for cleaning.
➂: When installing the mixing fan blade, align the inner hexagon with the hole
position and pay attention to the direction of the mixing blade.
➀
➁
➂

37
EN
Figure 3 Figure 4
➃: Align the handle with the hole and pay attention to the direction.
➄: Align with slot position.
➅: Lock the four nuts clockwise.
Prepare recipe ingredients
1. Prepare recipe ingredients from your own recipe or from the recipes included
in this manual. It is recommended to put in 800 g (the optimal weight is from
600 to 900 g) of ingredients.
➃
➄
➅
38
EN
2. Fill the correct amount of ice material into the funnel.
3. Remove the funnel and replace the inlet plug.
4. Plug in the power supply.
5. Press the power button ➆.
6. Choose a menu function with the function buttons.
7. The appliance starts preparing ice-cream.
8. When production is complete, pull the handle to pour out the ice-cream.
➇: Pull the handle to pour out the ice-cream.
➇
➆

39
EN
1. Prepare the recipe ingredients from your own recipe or from the recipe
booklet here. Note: You do not need to freeze the bowl in the freezer for
hours beforehand, as this machine has a built-in compressor that freezes
the recipe ingredients during operation to ensure ice-cream output. It is
recommended to place 800g (the optimal weight is 600 to 900g) of ingredients
at a temperature of 18 to 22 °C.
2. When making ice-cream, you can add other favourite seasonings ten minutes
before making the ice-cream. Avoid adding granules to avoid clogging the
spout. For fruit, you can use a blender to make it liquid and pour it in.
3. When the ice-cream is ready, you can continue to add ingredients. When
adding new ingredients, the weight should be controlled within 600 g to avoid
expansion and overow of the ice-cream (because some materials remain in
the drum).

40
EN
RECIPES
Recommended ice-cream raw material formula and production method (the
following is for reference only, please ensure that the ice cream ingredients do not
exceed 60% of the volume of the loading drum).
Basic ice-cream
Ingredients: 300 g of water, 200 g of powdered milk, 300 g of cream
1. Mix the water, milk powder and cream until there are no more granules.
2. Pour through the funnel into the ice-cream tub to start the ice-cream menu.
Fresh strawberry ice-cream
Ingredients: 120 g of water, 180 g of powdered milk, 260 g of cream and 220 g of
strawberries
Tools needed: blender
1. Wash the strawberries, put them in the blender with the water and milk
powder and blend.
2. Pour the cream into the bowl and mix well.
3. Pour through the funnel into the ice-cream tub to start the ice-cream menu.
Fresh mango ice-cream
Ingredients: 200 g of water, 200 g of milk powder, 300 g of creamand 160 g of
mango
Tools needed: blender
1. After peeling the mango, place it in the blender with the milk powder and
water and blend until smooth.
2. Pour the cream into the bowl and mix well.
3. Pour into the ice-cream tub through the funnel to start the ice-cream menu.

41
EN
Pitaya ice-cream
Ingredients: 400 g of milk, 240 g of cream and 260 g of pitaya
Tools needed: blender
1. After peeling the pitaya, place it in the blender with the milk and blend until
smooth.
2. Pour the cream into the jar and mix well.
3. Pour through the funnel into the ice-cream tub to start the ice-cream menu.
Milk ice-cream
Ingredients: 360 g of pure milk, 30 g of rened cane sugar and 300 g of cream
1. Mix the pure milk, cream and rened cane sugar until there are no more
granules.
2. Pour through the funnel into the ice-cream tub to start the ice-cream menu.
Powdered ice-cream
Ingredients: 600 g of pure milk, 200 g of ice-cream powder
1. Mix the milk and ice cream powder until there are no more granules.
2. Pour through the funnel into the ice-cream tub to start the ice-cream menu.

42
EN
CLEANING AND MAINTENANCE
Warning: The plug must be removed before cleaning to avoid electric shock.
• Use a damp cloth to clean dirty areas such as the refrigerator compartment
and the hull.
• Do not immerse the hull in water or allow water to enter through the side air
outlet or inlet.
• After cleaning, it is necessary to dry the inner bowl and handle accessories
before reassembly to prevent residual water in the inner bowl from causing
odours.
Cleaning Function
1. Wash the ice-cream maker after tasting using the cleaning function. First,
pour about 1 litre of clean water from the funnel, press the button and
enter the cleaning mode. After working for about 1 minute, drain the water,
change the water and wash again, 5 times in succession until the water is
clear. It is recommended to use the detergent or lemonade for a better
effect. At the same time, clean the feed opening with a brush.
2. When the water is drained, unscrew the nut as shown in Figure 1, remove
the handle parts and clean the mixing blade separately.
3. Refer to the next page for details of disassembly and assembly of the
handle components and place in the dishwasher for cleaning after
disassembly.
4. After cleaning the mixing blade, handle components and inner barrels,
they must be completely dried and then reassembled to avoid any odour
caused by traces of water. Install the handle assembly. Refer to "Handlle
disassembly" for details.

43
EN
TROUBLESHOOTING
Problem Possible Cause Solution
Unable to empty
after the ice cream is
nished.
The ice cream is too hard
or contains granules.
Allow the ice cream to
melt naturally before
discharging.
Handle assembly does
not t properly.
The mixing blade is not
in place or facing the
wrong way.
Align the mixing blade
with the hole or turn 180
degrees and reinstall.
No water comes out
during the rst cleaning.
Ice is blocking the water
outlet.
Allow the ice to melt and
drain.
Leakage at the handle
position.
Sealing ring not tted or
nut not tightened.
Fit the sealing ring and
tighten the nut.
Scraping noise after
eating ice cream.
The ice cream on the
drum wall is too hard.
Stop the machine in time
or add raw materials to
continue production.
The handle tip does
not slide in and out
smoothly.
Wrong direction of the
handle tip.
Turn 90 degrees and
insert or pull out.
There is no rotation of
the motor.
Motor overheating
protection.
Wait a moment and try
again.
44
EN
DISPOSAL CONSIDERATIONS
If there is a legal regulation for the disposal of electrical
and electronic devices in your country, this symbol on the
product or on the packaging indicates that this product
must not be disposed of with household waste. Instead,
it must be taken to a collection point for the recycling
of electrical and electronic equipment. By disposing of
it in accordance with the rules, you are protecting the
environment and the health of your fellow human beings
from negative consequences. For information about the
recycling and disposal of this product, please contact your
local authority or your household waste disposal service.
MANUFACTURER & IMPORTER (UK)
Manufacturer:
Chal-Tec GmbH, Wallstrasse 16, 10179 Berlin, Germany.
Importer for Great Britain:
Berlin Brands Group UK Limited
PO Box 42
272 Kensington High Street
London, W8 6ND
United Kingdom

45
ES
Estimado cliente:
Le felicitamos por la adquisición de este producto. Lea
atentamente el siguiente manual y siga cuidadosamente las
instrucciones de uso con el n de evitar posibles daños. La
empresa no se responsabiliza de los daños ocasionados por
un uso indebido del producto o por haber desatendido las
indicaciones de seguridad. Escanee el siguiente código QR
para obtener acceso al manual de usuario más reciente y
otra información sobre el producto:
DATOS TÉCNICOS
Número del artículo 10046255, 10046256
Suministro eléctrico 220-240 V ~ 50 Hz
Consumo eléctrico 250 W
Clase de protección I
Tipo de clima N/ SN
Capacidad 1,5 litros
Dimensiones (LxAxA) 417x280x517 mm
Dimensiones del embalaje (LxAxAl) 465x342x495 mm
Peso neto 16,5 kg
Peso bruto 18,5 kg
CONTENIDO
Indicaciones de seguridad 46
Descripción 49
Instalación 51
Funcionamiento 53
Producción de helados 57
Recetas 60
Limpieza y mantenimiento 62
Detección y reparación de anomalías 63
Indicaciones sobre la retirada del aparato 64
Fabricante 64

46
ES
INDICACIONES DE SEGURIDAD
• Para evitar daños debidos a un uso inadecuado, lea atentamente el manual de
instrucciones antes de utilizar este producto y utilícelo únicamente para el n
especicado.
• Coloque el aparato en una supercie plana.
• Utilice el aparato sólo en interiores.
• Desenchufe el aparato de la toma de corriente cuando ya no lo use.
• No sumerja el cable de alimentación en agua ni en ningún otro líquido.
• Emplee únicamente los accesorios expresamente recomendados por el
fabricante para este aparato.
• No coloque el aparato directamente debajo de una toma de corriente.
• No deje que el cable de alimentación cuelgue sobre la supercie de trabajo de
manera que los niños no puedan tirar de él.
• No llene el aparato en exceso, pues podrían producirse cortocircuitos y
descargas eléctricas.
• Asegúrese de que la tapa esté siempre cerrada durante el funcionamiento.
• No desconecte el enchufe tirando del cable, sino del cuerpo del enchufe.
• Utilice este aparato solo para el n al que está destinado. La empresa no
se hace responsable de los daños causados por el incumplimiento de las
instrucciones y el uso indebido del aparato. Utilice el aparato sólo para uso
doméstico.
• No conecte el aparato a un temporizador o una toma de corriente con control
remoto.
• No sumerja el aparato en agua.
• Le aconsejamos evitar el uso de un cable alargador, ya que puede
sobrecalentarse y provocar un incendio.
• Si el cable de alimentación está dañado, debe ser sustituido por el fabricante,
el servicio técnico o una persona con cualicación similar para evitar peligros.
• Respete la normativa local para la eliminación de aparatos que contengan
refrigerantes y gases inamables.
• No almacene sustancias inamables o explosivas en el aparato.
• No vuelque el aparato. Si el aparato se ha volcado, déjelo 2 horas antes de
volver a encenderla.
• Si la máquina de cubitos se ha traído del exterior al interior en invierno,
espere unas horas a que se caliente a temperatura ambiente antes de
encenderla.
• Elimine el aparato únicamente en un punto de recogida de residuos
autorizado. No exponga el aparato a llamas abiertas.
• Este aparato no está destinado a ser utilizado por personas (incluidos niños)
con capacidades físicas, sensoriales o mentales reducidas, o con falta de
experiencia y/o conocimientos, a menos que hayan sido supervisadas o
instruidas acerca del uso del aparato por una persona responsable de su
seguridad.
• No permita que los niños jueguen con el aparato. La limpieza y el
mantenimiento del usuario no deben ser realizados por niños sin supervisión.
• Los niños de 3 a 8 años no deben llenar o vaciar frigorícos.

47
ES
• Mantenga el aparato a 8 cm de otros objetos para garantizar una buena
disipación del calor.
• No use el aparato cerca de llamas, placas de cocción calientes u hornos.
• No encienda el aparato con demasiada frecuencia (al menos cada 5 minutos)
para evitar dañar el compresor.
• No introduzca piezas metálicas ni otros objetos eléctricos en el aparato para
evitar incendios y cortocircuitos.
• No golpee el recipiente ni el borde del mismo al retirar el helado para evitar
dañarlo.
• No conecte la alimentación eléctrica hasta que el tambor o la cuchilla
mezcladora estén correctamente instalados.
• La temperatura inicial de los ingredientes debe ser de 25±5 °C. No coloque
los ingredientes en el congelador para la precongelación, de lo contrario la
cuchilla de la batidora podría bloquearse antes de que el helado esté en el
estado deseado.
• No retire nunca la cuchilla de la batidora mientras el aparato esté en
funcionamiento.
• No utilice el aparato al aire libre.
• Nunca limpie con limpiadores abrasivos u objetos alados.
• Este aparato está destinado al uso en hogares y lugares similares, como por
ejemplo
- Áreas de cocina para el personal en tiendas, ocinas y otros entornos de
trabajo;
- Para clientes en hoteles, moteles y otros entornos residenciales;
-En Bed-and-Breakfast, encaterings y usos similares fuera del comercio
minorista
Este aparato contiene el refrigerante Isobutano (R290), un gas natural y
respetuoso con el medio ambiente. Aunque sea inamable, no es perjudicial
para la capa de ozono ni aumenta el efecto invernadero. Sin embargo, el
uso de este refrigerante provoca un ligero aumento del nivel de ruido del
aparato. Además del sonido del compresor, es posible que también pueda oír
el refrigerante uyendo por el sistema. Este hecho es inevitable y no produce
ningún efecto negativo en el rendimiento del aparato. Este hecho es inevitable
y no produce ningún efecto negativo en el rendimiento del aparato. Durante
el transporte y la instalación del aparato, debe prestarse atención a que no
se dañe ninguna pieza del sistema de refrigeración. Las fugas de refrigerante
pueden causar lesiones oculares.
• Mantenga las aberturas de ventilación de la carcasa del aparato libres de
obstrucciones.
• El circuito del refrigerante no debe estar dañado
• El sistema de refrigeración contiene un refrigerante de alta presión. No dañe
el sistema de refrigeración.
• El mantenimiento del sistema de refrigeración debe ser realizado por
especialistas.
• No utilice dispositivos mecánicos u otros medios para acelerar el proceso de
descongelación o recuperación de hielo.
• No utilice aparatos eléctricos en los compartimentos de almacenamiento

48
ES
de alimentos del aparato a menos que sean del tipo recomendado por el
fabricante.
• Desenchufe la máquina de hielo de la toma de corriente antes de limpiarlo o
realizar reparaciones o trabajos de mantenimiento.
• No limpie la máquina de hielo con líquidos inamables, ya que podría
provocar un incendio o una explosión.
• El refrigerante y el gas aislante son inamables.
•
ADVERTENCIA
¡Peligro de incendio por eliminación inadecuada! Tenga en cuenta la
normativa local para la eliminación de aparatos que contengan
refrigerantes y gases inamables.
Instrucciones especiales
• Al colocar el aparato, procure no doblar o dañar el cable de alimentación.
• Asegúrese de que no haya varios enchufes o fuentes de alimentación en la
parte posterior del dispositivo.
Para evitar la contaminación de los alimentos, siga las estas instrucciones:
• Si la puerta permanece abierta durante mucho tiempo, la temperatura en los
compartimentos del aparato puede aumentar considerablemente.
• Limpie las supercies que entran en contacto con los alimentos y los sistemas
de desagüe accesibles regularmente.
ADVERTENCIA
Cuando utilice, repare o deseche el aparato, busque el símbolo de
la izquierda situado en la parte posterior o en el compresor del
aparato. Este símbolo advierte de posibles incendios. Hay
sustancias inamables en los conductos de refrigerante y en el
compresor. Mantenga el dispositivo alejado de fuentes de incendio
durante el uso, mantenimiento y eliminación.
49
ES
DESCRIPCIÓN
1
2
8
9
10
11
12
3
4
5
6
7
1 tapón para el oricio de alimentación 7 Depósitos de agua
2 Tolvas 8 Tapas superiores
3 Asa 9 Tapas de pantalla
4 Asas 10 Aberturas de ventilación
5 Tuercas de seguridad 11 Paredes laterales
6 Cubierta decorativa delantera 10 Aberturas de ventilación

50
ES
Botones de función
➀ Especificación de tiempo ➆ Modo zumo
➁ Modo helado ➇ Botón de mezcla
➂ Modo refrigerado ➈ Modo de limpieza
➃ Modo vibración ➉ Reducir el tiempo
➄ Aumetar el tiempo ⑪ Encendido/Apagado
➅ Start/Pausa
Accesorios
Cuchilla mezcladora 1 Instrucciones de uso
y mantenimiento
1
Cepillo 1 Tolva 1
➀
➁
➂
➃
➄
➅
➆
➇
➈
➉
⑪
51
ES
INSTALACIÓN
Montaje y desmontaje de la empuñadura
➀ Tapa superior de la abertura de
alimentación
➄ Extremo del asa
➁ Base de la abertura de ali-
mentación
➅ Junta de estanqueidad
➂ tapón para el oricio de ali-
mentación
➆ Anillo de sellado de la abertura de
alimentación
➃ Asa ➇Tapa de la abertura de alimentación
1. Inserta ➀ en ➁ como se muestra en la gura 1.
2. Pulse ➂ con la mano en ➁, como se muestra en la gura 2.
3. Pulse ➀ en ➁ y luego hacia arriba hasta que oiga un chasquido, como se
muestra en la gura 3.
4. Inserta ➃ en ➂ como se muestra en la gura 4.
5. Inserta ➄en ➀ como se muestra en la gura 5.
6. Sujete ➆ en ➁, como se muestra en la figura 6.
7. Sujete ➇ en ➁ y apriételo en el sentido de las agujas del reloj como se muestra
en la gura 7.
8. Sujete ➇ en ➁ como se muestra en la gura 8.
Figura 1 Figura 2 Figura 3 Figura 4
Figura 5 Figura 6 Figura 7 Figura 8
➀
➁
➂
➃
➄
➅
➆
➇
Alinear e insertar
en el suelo
Posición más
alta

52
ES
Desmontaje de la empuñadura
Realice los pasos de la Figura 1 a la Figura 8 en orden inverso.
Características
• Control automático por microordenador, de uso sencillo y able y sin costes
elevados.
• La pantalla LED muestra el estado de funcionamiento, lo que facilita la
supervisión del mismo.
• Heladera giratoria que mezcla bien y es fácil de usar.
• Adecuada para la producción continua de helado.
• Capacidad de 1,5 litros
• Las piezas son desmontables, fáciles de limpiar, higiénicas y seguras.

53
ES
FUNCIONAMIENTO
1. Conecte el aparato a la red eléctrica y enchufe el cable de alimentación a
una toma adecuada. La forma y la tensión de la toma de corriente deben
coincidir con las especicaciones de la placa de características.
2. Mantenga pulsado el botón de encendido/apagado , la pantalla
se iluminará por completo y podrá acceder a la interfaz de menú para
seleccionar el modo de función.
Modo helado
• Haga clic en la interfaz del menú para acceder al modo helado. El tiempo
estándar es de 50 minutos, el tiempo es ajustable.
• Haga clic en para iniciar el modo helado. El compresor y el motor del
agitador se ponen en marcha y comienza la cuenta atrás de 50 minutos.
• Cuando se completa la producción de helado, la pantalla muestra "COOL",
se inicia la fase de aislamiento I y el zumbido suena 6 veces. El motor
del agitador sigue funcionando durante esta fase. La primera fase de
aislamiento dura 60 minutos.
• Después de 60 minutos en el nivel de aislamiento I, el zumbido suena 6
veces y el aparato pasa al nivel de aislamiento II. Cuando el compresor
está encendido, el motor del agitador también está en marcha. Si el motor
agitador se para, puede pulsar el botón para iniciar la descarga del
motor agitador. La duración de la segunda fase de aislamiento es de 120
minutos. Al nal de la segunda fase de aislamiento, vuelva a la interfaz de
espera.
• Si mantiene el helado frío, puede volver al modo de funcionamiento de
helado pulsando el símbolo de helado, con un tiempo estándar de 10
minutos y un tiempo ajustable.
• Durante el proceso de producción del helado, el usuario puede pulsar el
botón para detener el proceso. El compresor sólo se apaga 3 minutos
antes de la pausa. Durante la pausa, el usuario puede pulsar el botón
/
para ajustar el tiempo de producción de helado. Si el aparato no se utiliza
durante 10 minutos, el zumbido sonará 6 veces para volver a la interfaz de
espera.
54
ES
Modo zumo
• Haga clic en la interfaz del menú para acceder al modo zumo. El usuario
puede ajustar el tiempo de enfriamiento del zumo según sus necesidades
pulsando el botón
/
. El tiempo estándar es de 30 minutos. Haga clic en
para iniciar el modo zumo. En ese momento, el compresor y el motor
del agitador se ponen en marcha y se inicia la cuenta atrás.
• La cuenta atrás naliza, aparece "COOL" en la pantalla, el aparato pasa al
modo de aislamiento y el zumbido suena 6 veces simultáneamente. Volver a
la interfaz de espera tras 60 minutos de aislamiento.
• Durante el proceso de exprimido, el usuario puede pulsar el botón
para pausar el proceso. El compresor sólo se detiene 3 minutos antes de
la pausa y durante la pausa puede pulsar
/
para ajustar el tiempo de
enfriamiento del zumo. Si el aparato no se utiliza durante 10 minutos, el
zumbador sonará 6 veces para volver a la interfaz de espera.
Modo de refrigeración
• Haga clic en la interfaz del menú para acceder al modo congelar. El
usuario puede utilizar el botón
/
para ajustar el tiempo de enfriamiento
requerido para la operación de enfriamiento individual según sus
necesidades. El ajuste por defecto es de 10 minutos. Haga clic en para
iniciar , el modo de refrigeración individual. El compresor y el motor del
agitador se ponen en marcha y se inicia la cuenta atrás.
• La cuenta atrás naliza, el zumbador suena 6 veces y la pantalla vuelve al
modo de espera.
• Durante el modo de refrigeración simple, el usuario puede pulsar el botón
para pausar el proceso. El compresor sólo se detiene 3 minutos antes
de la pausa y durante la pausa puede pulsar
/
para ajustar el tiempo de
refrigeración. Si el aparato no se utiliza durante 10 minutos, el zumbador
sonará 6 veces para volver a la interfaz de espera.

55
ES
Modo de mezcla
• Haz clic en la interfaz del menú para acceder al modo de mezcla.
Mediante los botones
/
, el usuario puede ajustar el tiempo de mezcla
deseado en función de sus necesidades. El ajuste por defecto es de 30
minutos. Haga clic en para iniciar el modo zumo. El motor del agitador
se pone en marcha y se inicia la cuenta atrás.
• La cuenta atrás naliza, el zumbador suena 6 veces y la pantalla vuelve al
modo de espera.
• Durante el proceso de producción de las mezclas individuales, los usuarios
pueden interrumpir el funcionamiento con el botón y ajustar el tiempo
de mezcla deseado durante la interrupción con
/
. Si el aparato no se
utiliza durante 10 minutos, el zumbador sonará 6 veces para volver a la
interfaz de espera.
Modo batido
• Haga clic en la interfaz del menú para acceder al modo batido. El botón
permite
/
a los usuarios ajustar el tiempo deseado para los batidos
según sus necesidades. El ajuste por defecto es de 30 minutos. Haga clic en
para iniciar el modo batido. En ese momento, el compresor y el motor
del agitador se ponen en marcha y se inicia la cuenta atrás.
• La cuenta atrás naliza, aparece "COOL" en la pantalla, el aparato pasa al
modo de aislamiento y el zumbido suena 6 veces simultáneamente. Volver a
la interfaz de espera tras 60 minutos de aislamiento.
• Durante la producción del batido, los usuarios pueden pulsar el botón
para pausar el proceso. El compresor sólo se apaga 3 minutos antes de la
pausa. El botón permite
/
a los usuarios ajustar el tiempo deseado para
los batidos según sus necesidades. Si el aparato no se utiliza durante 10
minutos, el zumbador sonará 6 veces para volver a la interfaz de espera.
Modo de limpieza
• Haz clic en la interfaz del menú para acceder al modo de mezcla. Los
usuarios pueden ajustar el tiempo de limpieza según sus necesidades
/
pulsando el botón. El ajuste por defecto es de 10 minutos. Haga clic en
para iniciar el modo zumo. El motor del agitador se pone en marcha
durante 1 minuto, se para durante 1 minuto y luego empieza a funcionar. El
temporizador ha expirado.
• La cuenta atrás naliza, el zumbador suena 6 veces y la pantalla vuelve al
modo de espera.
• Durante el proceso de limpieza, los usuarios pueden interrumpir el
funcionamiento con el botón y ajustar el tiempo de limpieza deseado
durante la interrupción con
/
. Si el aparato no se utiliza durante 10
minutos, el zumbador sonará 6 veces para volver a la interfaz de espera.

56
ES
Atrás
• Si la función está seleccionada y no activada, pulse el botón de función de
menú correspondiente para volver al escritorio.
• Si el aparato ya está en marcha, pulse Pausa y, a continuación, la tecla de
función correspondiente para volver al escritorio.
Función de protección del motor
A medida que aumenta el tiempo de producción, el helado se vuelve cada vez
más duro y el motor de mezcla podría bloquearse. En este punto, la protección
del motor supervisa la corriente y la temperatura del motor y lo desconecta
automáticamente para garantizar la vida útil del motor del agitador. El motor
vuelve a encenderse automáticamente al cabo de poco tiempo.
La mayor capacidad de producción
Para evitar derrames y residuos innecesarios, asegúrese de que los ingredientes
del helado no representen más del 60 % del volumen interior del recipiente de
unos 900 g (ya que el helado se expande ligeramente después de la producción).
En la producción continua, el peso se controla dentro de los 600 g cuando se
añade material nuevo. Esto evita que el helado se expanda y rebose (ya que parte
del material permanece en el recipiente).

57
ES
PRODUCCIÓN DE HELADOS
Nota: Limpie a fondo todas las piezas que entran en contacto con el helado
antes de usarla, incluyendo: el bol de enfriamiento, el bol de llenado, la cuchilla
mezcladora, la junta de la salida, la tapa interior de la salida y el embudo, etc.
Antes de limpiar, asegúrese de que el cable de alimentación esté desenchufado
de la toma de corriente. Cuando prepare helado, coloque el aparato en posición
horizontal sobre una supercie nivelada para asegurarse de que el compresor
del aparato funciona correctamente.
Aoje las cuatro contratuercas en el sentido contrario a las agujas del reloj y retire
la unidad de empuñadura como se muestra en la gura 1. Compruebe que el
interior del recipiente está limpio, retire el batidor, límpielo con un paño húmedo
y vuelva a insertar el agitador después de limpiarlo, como se muestra en la gura
2. Coloque la empuñadura y la unidad de empuñadura como se muestra en la
gura 3. Apriete la tuerca en el sentido de las agujas del reloj como se muestra en
la gura 4.
Figura 1 Figura 2
➀: Aojar la contratuerca en sentido antihorario
➁: Retire la unidad de mango y la cuchilla mezcladora para su limpieza.
➂: Al instalar la pala mezcladora, alinee el hexágono interior con la posición del
oricio y preste atención a la dirección de la pala mezcladora.
➀
➁
➂

58
ES
Figura 3 Figura 4
➃: Alinee el mango con el oricio y preste atención a la dirección.
➄: Alinear con la posición de la ranura.
➅: Apriete las cuatro tuercas en el sentido de las agujas del reloj.
Preparación de los ingredientes
1. Prepare los ingredientes de la receta según su propia receta o según las
recetas de este manual. Se recomienda utilizar 800 g (el peso óptimo es de
600 a 900 g) de los ingredientes.
➃
➄
➅

59
ES
2. Vierta la cantidad correcta de ingredientes en el embudo.
3. Retire el embudo y vuelva a colocar el tapón de cierre.
4. Enchufe el cable de alimentación a la toma de corriente.
5. Pulse el botón de encendido/apagado➆.
6. Utilice los botones de función para seleccionar el menú deseado.
7. El aparato empieza a hacer helado.
8. Una vez nalizada la producción, tire de la palanca para retirar el helado.
➇: Tire de la palanca para retirar el helado.
➆
➇

60
ES
1. Prepare los ingredientes de la receta según su propia receta o según
las recetas de este manual. Nota: No es necesario congelar el bol en el
congelador durante horas antes, ya que este aparato tiene un compresor
incorporado que congela los ingredientes de la receta durante el
funcionamiento para garantizar la producción de helado. Se recomienda
procesar 800 g (de 600 a 900 g es lo óptimo) de los ingredientes a una
temperatura de 18 a 22 °C.
2. Para hacer helado, puede añadir otros ingredientes favoritos diez minutos
antes de la preparación. Evite añadir granulado para evitar la obstrucción de
la salida. Para la fruta, puede utilizar una licuadora y luego verterla.
3. Cuando el helado esté listo, puedes añadir más ingredientes. Al añadir nuevos
ingredientes, el peso debe mantenerse dentro de los 600 g para evitar que el
helado se expanda y desborde (ya que algunos materiales permanecen en el
tambor).
RECETAS
Receta recomendada de la materia prima del helado y método de producción
(la siguiente información es meramente orientativa; asegúrese de que los
ingredientes del helado no representen más del 60 % del volumen del tambor de
carga).
Receta básica de helado
Ingredientes: 300 g de agua, 200 g de leche en polvo, 300 g de nata
4. Mezclar el agua, la leche en polvo y la nata hasta que no queden gránulos.
5. Verter a través del embudo en el recipiente de helado para iniciar el menú de
helado.
Helado de fresa fresca
Ingredientes: 120 g de agua, 180 g de leche en polvo, 260 g de nata y 220 g de
fresas
Accesorios necesarios: batidora
1. Lavar las fresas, ponerlas en una batidora con el agua y la leche en polvo y
hacer un puré.
2. Verter la nata en el bol y mezclar bien.
3. Verter a través del embudo en el recipiente de helado para iniciar el menú de
helado.
ATENCIÓN

61
ES
Helado de mango fresco
Ingredientes: 200 g de agua, 200 g de leche en polvo, 300 g de nata
Accesorios necesarios: batidora
1. Poner el mango pelado en una batidora con la leche en polvo y el agua y batir
hasta obtener una mezcla homogénea.
2. Verter la nata en el bol y mezclar bien.
3. Verter a través del embudo en el recipiente de helado para iniciar el menú de
helado.
Helado de pitaya o fruta del dragón
Ingredientes: 400 g de leche, 240 g de nata y 260 g de pitaya
Accesorios necesarios: batidora
1. Pelar la pitaya y ponerla en la licuadora con la leche hasta que quede suave.
2. Verter la nata en el vaso y mezclar bien.
3. Verter a través del embudo en el recipiente de helado para iniciar el menú de
helado.
Helado de leche
Ingredientes: 360 g de leche pura, 30 g de azúcar de caña renado y 300 g de
nata
1. Mezclar la leche pura, la nata y el azúcar de caña renado hasta que no
queden gránulos.
2. Verter a través del embudo en el recipiente de helado para iniciar el menú de
helado.
Helado en polvo
Ingredientes: 600 g de leche pura, 200 g de helado en polvo
1. Mezclar la leche y el helado en polvo hasta que no queden gránulos.
2. Verter a través del embudo en el recipiente de helado para iniciar el menú de
helado.

62
ES
LIMPIEZA Y MANTENIMIENTO
¡Atención! Para evitar descargas eléctricas, desconecte el enchufe antes de
limpiar el aparato.
• Utilice un paño húmedo para limpiar las zonas sucias, como el compartimento
de refrigeración y la carrocería.
• No sumerja la carcasa en agua ni permita que entre agua por la salida o
entrada de aire lateral.
• Después de la limpieza, el recipiente interior y los accesorios del asa deben
secarse antes de volver a montarse para evitar que el agua residual en el
recipiente interior provoque olores.
Modo de limpieza
1. Limpie la heladora después de la degustación utilizando la función de
limpieza. Primero vierta aproximadamente 1 litro de agua limpia del
embudo, pulse el botón y entre en el modo de limpieza. Después de
un tiempo de reacción de aproximadamente 1 minuto, escurrir el agua,
cambiar el agua y aclarar de nuevo, unas 5 veces seguidas, hasta que
el agua esté clara. Se recomienda utilizar detergente o limonada para
conseguir un mejor efecto. Al mismo tiempo, limpie la abertura de llenado
con un cepillo.
2. Cuando se haya vaciado el agua, desenrosque la tuerca (véase la gura 1),
retire las piezas del mango y limpie la cuchilla agitadora por separado.
3. En la página siguiente encontrará información detallada sobre el
desmontaje y montaje de los componentes del asa, que deben limpiarse en
el lavavajillas después del desmontaje.
4. Después de limpiar la cuchilla agitadora, las piezas del mango y el
recipiente interior, deben secarse completamente y volver a montarse
para evitar olores causados por restos de agua. Coloque la unidad de
asa. Encontrará más información en el apartado "Desmontaje de la
empuñadura".

63
ES
DETECCIÓN Y REPARACIÓN DE ANOMALÍAS
Anomalía Posible causa Solución
El helado no puede
retirarse cuando está
listo.
El helado está
demasiado duro o
contiene gránulos.
Deje que el helado se
derrita de forma natural
antes de retirarlo.
La unidad de
asa no encaja
correctamente.
La cuchilla agitadora
no está en su sitio o
apunta en la dirección
equivocada.
Alinee la cuchilla
mezcladora con el
oricio o gírela 180
grados y vuelva a
instalarla.
No sale agua durante la
primera limpieza.
La salida de agua está
bloqueada por hielo.
Deja que el hielo se
derrita y el agua escurra.
Fuga en la posición de la
empuñadura.
Anillo de estanqueidad
no colocado o tuerca no
apretada.
Coloque la junta de
estanqueidad y apriete
la tuerca.
Sonido de raspado
después de comer
helado.
El hielo de la pared
del contenedor es
demasiado duro.
Detenga el aparato a
tiempo o añada materias
primas para continuar la
producción.
El asa no se puede
meter ni sacar con
suavidad.
Dirección incorrecta de
la manilla.
Girar 90 grados e
insertar o extraer.
El motor no gira. Protección contra
sobrecalentamiento del
motor.
Espere un momento y
vuelva a intentarlo de
nuevo.
64
ES
INDICACIONES SOBRE LA RETIRADA DEL
APARATO
Si en su país existe una disposición legal relativa a la
eliminación de aparatos eléctricos y electrónicos, este
símbolo estampado en el producto o en el embalaje
advierte que no debe eliminarse como residuo doméstico.
En lugar de ello, debe depositarse en un punto de
recogida de reciclaje de aparatos eléctricos y electrónicos.
Una gestión adecuada de estos residuos previene
consecuencias potencialmente negativas para el medio
ambiente y la salud de las personas. Puede consultar más
información sobre el reciclaje y la eliminación de este
producto contactando con su administración local o con
su servicio de recogida de residuos.
FABRICANTE
Chal-Tec GmbH, Wallstraße 16, 10179 Berlín, Alemania.
Importador para Gran Bretaña:
Berlin Brands Group UK Limited
PO Box 42
272 Kensington High Street
London, W8 6ND
United Kingdom

65
FR
Cher client, chère cliente,
Toutes nos félicitations pour l’acquisition de ce nouvel
appareil. Lisez attentivement les consignes suivantes et
suivez-les pour éviter d'éventuels dommages. Nous ne
saurions être tenus pour responsables des dommages dus
au non-respect des consignes et à la mauvaise utilisation
de l’appareil. Scannez le QR-Code pour obtenir la dernière
version du mode d'emploi ainsi que d'autres informations
concernant le produit :
FICHE TECHNIQUE
Numéro d'article 10046255, 10046256
Alimentation 220 - 240 V ~ 50 Hz
Consommation électrique 250 W
Norme de protection I
Type de climat N/ SN
Capacité 1,5 litres
Dimensions (L x l x H) 417 x 280 x 517 mm
Dimensions de l'emballage (LxlxH) 465 x 342 x 495 mm
Poids net 16,5 kg
Poids brut 18,5 kg
SOMMAIRE
Consignes de sécurité 66
Description 69
Installation 71
Utilisation 73
Production de crème glacée 77
Recettes 80
Nettoyage et maintenance 82
Identication et résolution des problèmes 83
Informations sur le recyclage 84
Fabricant 84

66
FR
CONSIGNES DE SÉCURITÉ
• Pour éviter tout dommage dû à une mauvaise utilisation, veuillez lire
attentivement le mode d'emploi avant d'utiliser ce produit et ne l'utiliser que
conformément à l'objectif indiqué dans le mode d'emploi.
• Placez l'appareil sur une surface horizontale.
• Utilisez l'appareil uniquement à l'intérieur.
• Lorsque vous n'utilisez plus l'appareil, débranchez la che de la prise.
• Ne plongez jamais l'appareil dans l'eau ou dans d'autres liquides.
• Utilisez uniquement des accessoires expressément recommandés par le
fabricant pour cet appareil.
• Ne placez pas l'appareil directement sous une prise de courant.
• Ne laissez pas le cordon d'alimentation pendre du plan de travail, pour éviter
que les enfants ne puissent le tirer.
• Ne remplissez pas trop l'appareil pour éviter de provoquer un court-circuit ou
un choc électrique.
• Veillez à ce que le couvercle soit toujours fermé pendant le fonctionnement.
• Ne tirez pas sur le câble pour le débrancher de la prise, mais tirez sur la che
elle-même.
• Utilisez l'appareil aux ns prévues uniquement. Nous ne saurions être tenus
pour responsables des dommages causés par le non-respect des instructions
et une utilisation inappropriée. Utilisez l'appareil exclusivement à l'intérieur.
• Ne connectez pas l'appareil à une minuterie ou à une prise radiocommandée.
• Ne plongez pas l'appareil dans l'eau.
• Nous vous déconseillons d'utiliser une rallonge car elle pourrait surchauffer et
présenter un risque d'incendie.
• Si le cordon d'alimentation est endommagé, il doit être remplacé par le
fabricant, le service client ou une personne de qualication similaire pour
éviter tout danger.
• Respectez la réglementation locale pour l'élimination des équipements
contenant des gaz inammables.
• Ne conservez pas de substances facilement inammables ou explosives dans
l'appareil.
• Ne pas renverser l'appareil. Si vous devez retourner la machine, laissez-la
reposer pendant 2 heures avant de la remettre en marche.
• En hiver, si vous déplacez la machine à glaçons de l'extérieur vers l'intérieur,
attendez quelques heures qu'elle se réchauffe à la température ambiante
avant de la mettre en marche.
• Ne vous débarrassez de l'appareil que dans un centre de traitement des
déchets agréé. N'exposez pas l'appareil à des ammes nues.
• Cet appareil n'est pas destiné à être utilisé par des personnes (enfants y
compris) ayant des capacités physiques, sensorielles ou mentales réduites
ou manquant d'expérience et/ou de connaissances, à moins d'être sous
surveillance ou d'avoir été formés par une personne responsable pour
s'assurer qu'elles peuvent utiliser l'appareil en toute sécurité.
• Les enfants ne sont pas autorisés à jouer avec l'appareil. Le nettoyage et la
maintenance utilisateur ne doivent pas être réalisés par des enfants sans

67
FR
surveillance.
• Les enfants âgés de 3 à 8 ans ne sont pas autorisés à charger ou décharger les
réfrigérateurs.
• Maintenir l'appareil à 8 cm d'autres objets pour assurer une bonne dissipation
de la chaleur.
• N'utilisez pas l'appareil à proximité de ammes, de plaques de cuisson ou
d'un four.
• Ne mettez pas l'appareil en marche trop souvent (au moins toutes les 5
minutes) an d'éviter d'endommager le compresseur.
• N'insérez pas de pièces métalliques ou d'autres objets électriques dans
l'appareil an d'éviter les incendies et les courts-circuits.
• Ne frappez pas le bac ou le bord du bac lorsque vous retirez la glace an
d'éviter de l'endommager.
• Ne mettez pas l'alimentation électrique en marche tant que le tambour ou la
lame de mélange n'est pas correctement installé.
• La température de départ des ingrédients doit être de 25±5 °C. Ne placez pas
les ingrédients dans le congélateur pour les congeler au préalable, car cela
pourrait bloquer la lame du mixeur avant que la crème glacée ne soit à l'état
souhaité.
• Ne retirez en aucun cas la lame du mixeur lorsque l'appareil est en marche.
• N'utilisez pas l'appareil à l'extérieur.
• Ne jamais nettoyer avec des produits abrasifs ou des objets pointus.
• Cet appareil est destiné aux environnements domestiques et similaires telles
que par exemple :
- les cuisines du personnel dans les magasins, bureaux et autres
environnements de travail,
- les clients des hôtels, motels et autres lieux d'hébergement ;
– Chambres d'hôtes, restauration et surfaces assimilées non commerciales.
Cet appareil contient le réfrigérant propane (R290), un gaz naturel et
respectueux de l'environnement. Bien qu’inammable, il n’endommage pas
la couche d’ozone et ne contribue pas à l’effet de serre. L'utilisation de ce
réfrigérant a toutefois entraîné une légère augmentation du niveau sonore
de l'appareil. En plus du bruit du compresseur, vous pourrez peut-être
également entendre le réfrigérant circuler dans le système. Ceci est inévitable
et n'a aucune conséquence négative sur les performances de l'appareil. Ceci
est inévitable et n'a aucun effet négatif sur les performances de l'appareil.
Pendant le transport et l'installation de l'appareil, veillez à ce qu'aucune pièce
du système réfrigérant ne soit endommagée. Une fuite de réfrigérant peut
provoquer des lésions oculaires.
• Maintenez les ouvertures d'aération du boîtier de l'appareil libres de tout
obstacle.
• Le circuit du réfrigérant ne doit pas être endommagé.
• Le système réfrigérant contient un uide frigorigène à haute pression.
N'endommagez pas le système réfrigérant.
• L'entretien du système réfrigérant doit être effectué par des professionnels.
• N'utilisez pas de dispositifs mécaniques ou autres moyens pour accélérer le
dégivrage ou la récupération de la glace.

68
FR
• N'utilisez pas d'appareils électriques dans les compartiments de conservation
des aliments de l'appareil, à moins qu'il ne s'agisse du type recommandé par
le fabricant.
• Débranchez la machine à glaçons de la prise de courant avant de la nettoyer
ou d'effectuer des réparations ou des travaux d'entretien.
• Ne nettoyez pas la machine à glaçons avec des liquides inammables, car cela
pourrait provoquer un incendie ou une explosion.
• Le uide frigorigène et le gaz isolant sont inammables.
•
MISE EN GARDE
Risque d'incendie en cas d'élimination incorrecte ! Veuillez respecter
la réglementation locale en matière d'élimination des appareils
contenant des réfrigérants et des gaz inammables.
Remarques spéciques
• Au moment d'installer l'appareil, assurez-vous de ne pas pincer ni
endommager le cordon d'alimentation.
• Assurez-vous qu'il n'y a pas de multiprises ou d'adaptateurs secteur à
l'arrière de l'appareil.
Pour éviter de contaminer les aliments, respectez les consignes suivantes :
• Si la porte reste ouverte pendant une longue période, la température dans les
compartiments de l'appareil peut augmenter considérablement.
• Nettoyez régulièrement les surfaces en contact avec les aliments et les
systèmes de drainage accessibles.
MISE EN GARDE
Lors de l'utilisation, de l'entretien et de la mise au rebut de
l'appareil, soyez attentif au symbole à gauche à l'arrière ou sur le
compresseur de l'appareil. Ce symbole met en garde contre les
risques d'incendie. Les conduites de réfrigérant et le compresseur
contiennent des substances inammables. Tenez l'appareil à
l'écart des sources de ammes pendant son utilisation, sa maintenance et son
élimination.
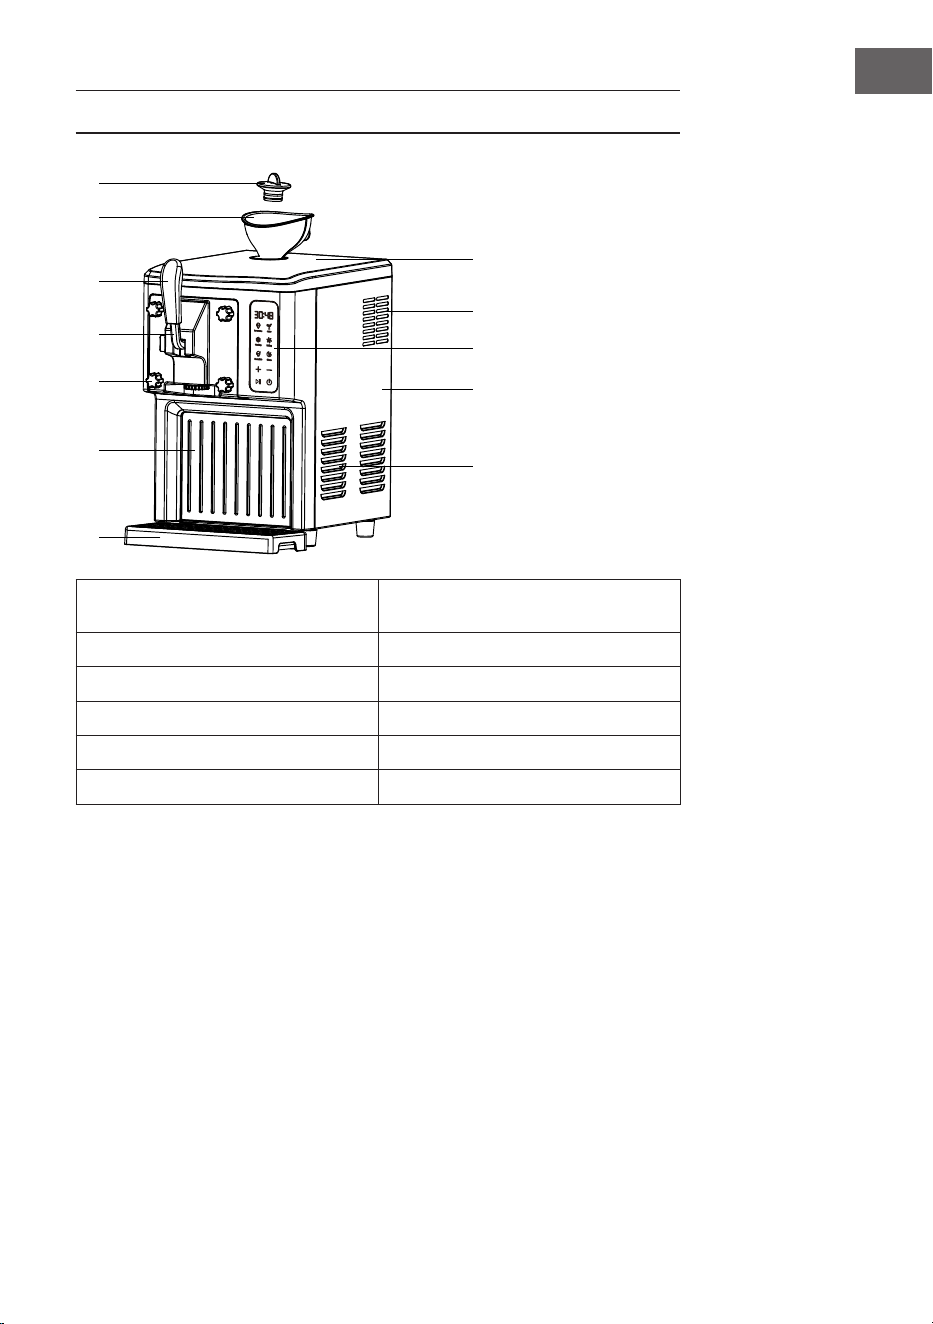
69
FR
DESCRIPTION
1
2
8
9
10
11
12
3
4
5
6
7
1 bouchon de l'ouverture d'alimen-
tation
7 Réservoir d'eau
2 Entonnoir 8 Couvercle supérieur
3 Poignée 9 Cache de l'écran
4 Poignée 10 Ouverture de ventilation
5 Écrou de blocage 11 Paroi latérale
6 Cache décoratif avant 10 Ouverture de ventilation
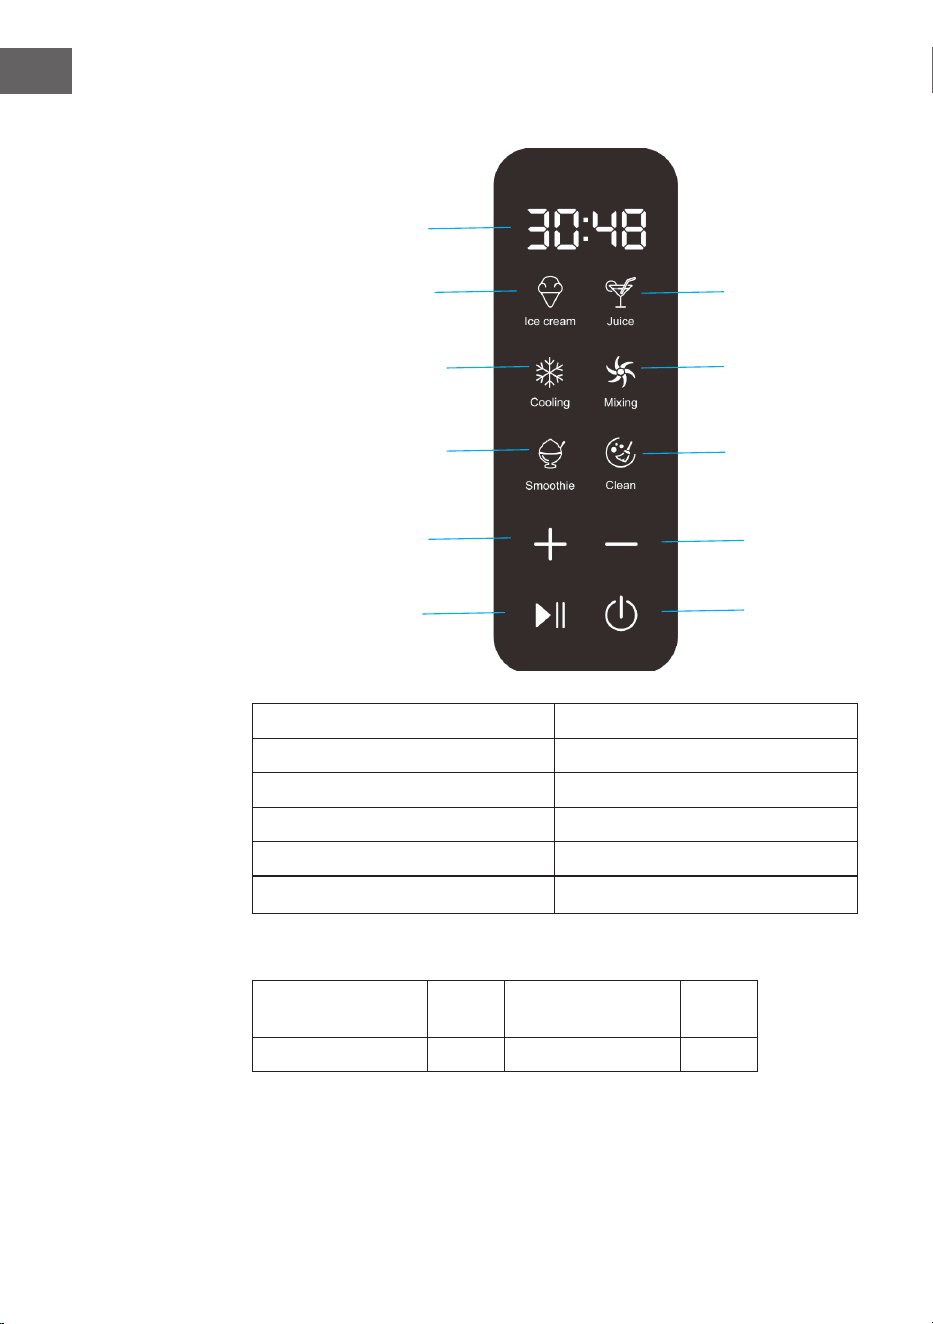
70
FR
Touches de fonction
➀ Indication de temps ➆ Mode jus de fruits
➁ Mode crème glacée ➇ Bouton de mixage
➂ Mode de refroidissement ➈ Mode de nettoyage
➃ Mode Shakes ➉ Réduire le temps
➄ Augmenter le temps ⑪ marche/arrêt
➅ Démarrage / pause
Accessoires
Pale du batteur 1 Instructions
d'utilisation
1
Brosse 1 Entonnoir 1
➀
➁
➂
➃
➄
➅
➆
➇
➈
➉
⑪

71
FR
INSTALLATION
Montage et démontage de la poignée
➀ couvercle supérieur de l'ouverture
d'alimentation
➄ Extrémité de la poignée
➁ Base de l'ouverture d'alimentation ➅ bague d'étanchéité
➂ bouchon de l'ouverture d'alimen-
tation
➆ Joint d'étanchéité de l'ouverture
d'alimentation
➃ Poignée ➀ Cache supérieur de l'ouverture
d'alimentation
1. Insérez ➀ dans ➁, comme indiqué dans la gure 1.
2. Appuyez sur ➂ avec la main en ➁, comme indiqué sur la gure 2.
3. Appuyez sur ➀ en ➁ puis vers le haut jusqu'à ce que vous entendiez un clic,
comme illustré dans la gure 3.
4. Insérez ➃ dans ➂, comme indiqué dans la gure 4.
5. Insérez ➄ dans ➀ comme indiqué dans la gure 5.
6. Pincez ➆ dans ➁, comme indiqué sur la gure 6.
7. Pincez ➇ dans ➁ et serrez dans le sens des aiguilles d'une montre, comme
indiqué sur la gure 7.
8. Pincez➇dans ➁, comme indiqué sur la gure 8.
Figure 1 Figure 2 Figure 3 Figure 4
Figure 5 Figure 6 Figure 7 Figure 8
➀
➁
➂
➃
➄
➅
➆
➇
Aligner et insérer
dans le fond
Position haute
de la fente

72
FR
Démontage de la poignée
Suivez les étapes de la gure 1 à la gure 8 dans l'ordre inverse.
Caractéristiques
• Commande automatique par micro-ordinateur, simple et able dans son
utilisation et à peu de frais.
• L'achage LED indique l'état de fonctionnement, ce qui facilite la surveillance
de l'état de fonctionnement.
• Machine à glace rotative qui mélange bien et est facile à utiliser.
• Convient à la fabrication en continu de glaces.
• Capacité 1,5 l
• Les pièces sont amovibles, faciles à nettoyer, hygiéniques et sûres.

73
FR
UTILISATION
1. Branchez l'appareil sur le secteur et branchez le câble d'alimentation dans
une prise électrique appropriée. La forme et la tension de la prise doivent
correspondre aux indications de la plaque signalétique.
2. Maintenez le bouton marche/arrêt , l'écran s'illumine complètement et
vous pouvez accéder à l'interface du menu pour sélectionner le mode de
fonctionnement.
Mode crème glacée
• Cliquez sur dans l'interface du menu pour accéder au mode "crème
glacée". Le temps standard est de 50 minutes, le temps est réglable.
• Cliquez sur pour démarrer le mode crème glacée. Le compresseur et
le moteur de l'agitateur démarrent et le compte à rebours de 50 minutes
commence.
• Lorsque la production de crème glacée est terminée, l'écran ache COOL,
la phase d'isolation I est lancée et le buzzer retentit 6 fois. Pendant cette
phase, le moteur de l'agitateur continue de tourner. La première phase
d'isolation dure 60 minutes.
• Après 60 minutes de niveau d'isolation I, le buzzer retentit 6 fois et
l'appareil passe au niveau d'isolation II. Lorsque le compresseur est en
marche, le moteur de l'agitateur fonctionne également. Si le moteur de
l'agitateur s'arrête, vous pouvez appuyer sur le bouton pour démarrer
la décharge du moteur de l'agitateur. La durée de la deuxième phase
d'isolation est de 120 minutes. À la n de la deuxième phase d'isolation,
vous revenez à l'interface de veille.
• Si vous gardez la crème glacée froide, vous pouvez revenir au mode de
fonctionnement pour la crème glacée en appuyant sur l'icône de la glace,
avec une durée standard de 10 minutes et une durée réglable.
• Pendant le processus de fabrication de la glace, l'utilisateur peut appuyer
sur le bouton pour arrêter le processus. Le compresseur ne s'arrête
que 3 minutes avant la pause. Pendant la pause, l'utilisateur peut appuyer
sur le bouton
/
pour régler le temps de production de la crème glacée. Si
l'appareil n'est pas utilisé pendant 10 minutes, le buzzer retentit 6 fois pour
revenir à l'interface de veille.
74
FR
Mode jus de fruits
• Cliquez sur dans l'interface du menu pour accéder au mode jus.
L'utilisateur peut régler la durée de refroidissement du jus selon ses
besoins en appuyant sur le bouton
/
. La durée standard est de 30
minutes. Cliquez sur pour démarrer le mode jus. A ce moment-là,
le compresseur et le moteur de l'agitateur démarrent et le temps est
décompté.
• Le compte à rebours se termine, l'écran ache COOL, l'appareil passe
en mode d'isolation et le buzzer retentit 6 fois simultanément. Revenez à
l'interface de veille après 60 minutes d'isolation.
• Pendant le processus d'extraction du jus, l'utilisateur peut appuyer sur le
bouton pour mettre le processus en pause. Le compresseur ne s'arrête
que 3 minutes avant la pause et pendant la pause, vous pouvez appuyer sur
/
pour régler le temps de refroidissement du jus. Si l'appareil n'est pas
utilisé pendant 10 minutes, le buzzer retentit 6 fois pour revenir à l'interface
de veille.
Mode de refroidissement
• Cliquez sur dans l'interface du menu pour accéder au mode
refroidissement. La touche
/
permet à l'utilisateur de régler le temps de
refroidissement nécessaire pour le mode de refroidissement individuel en
fonction de ses besoins. Le réglage par défaut est de 10 minutes. Cliquez
sur pour démarrer le mode refroidissement seul. Le compresseur et le
moteur de l'agitateur démarrent et le temps est décompté.
• Le compte à rebours se termine, le buzzer retentit 6 fois et l'écran revient à
l'achage de veille.
• Pendant le processus de refroidissement seul, l'utilisateur peut appuyer
sur le bouton pour mettre le processus en pause. Le compresseur ne
s'arrête que 3 minutes avant la pause et pendant la pause, vous pouvez
appuyer sur
/
pour régler le temps de refroidissement. Si l'appareil
n'est pas utilisé pendant 10 minutes, le buzzer retentit 6 fois pour revenir à
l'interface de veille.

75
FR
Mode de mélange
• Cliquez sur dans l'interface du menu pour accéder au mode mélange.
Les touches
/
permettent à l'utilisateur de régler le temps de mélange
souhaité en fonction de ses besoins. Le réglage par défaut est de 30
minutes. Cliquez sur pour démarrer le mode mélange. Le moteur de
l'agitateur se met en marche et le temps est décompté.
• Le compte à rebours se termine, le buzzer retentit 6 fois et l'écran revient à
l'achage de veille.
• Pendant le processus de production des mélanges individuels, les
utilisateurs peuvent interrompre le fonctionnement en appuyant sur le
bouton et, pendant l'interruption, régler le temps de mélange souhaité
en appuyant sur
/
. Si l'appareil n'est pas utilisé pendant 10 minutes, le
buzzer retentit 6 fois pour revenir à l'interface de veille.
Mode Shakes
• Cliquez sur dans l'interface du menu pour accéder au mode Shakes.
La touche
/
permet à l'utilisateur de régler le temps souhaité pour les
milkshakes en fonction de ses besoin. Le réglage par défaut est de 30
minutes. Cliquez sur pour démarrer le mode shakes. A ce moment-
là, le compresseur et le moteur de l'agitateur démarrent et le temps est
décompté.
• Le compte à rebours se termine, l'écran ache COOL, l'appareil passe
en mode d'isolation et le buzzer retentit 6 fois simultanément. Revenez à
l'interface de veille après 60 minutes d'isolation.
• Pendant la production de milk-shake, les utilisateurs peuvent appuyer sur
le bouton pour arrêter le processus. Le compresseur ne s'arrête que
3 minutes avant la pause. La touche
/
permet à l'utilisateur de régler le
temps souhaité pour les milkshakes en fonction de ses besoin. Si l'appareil
n'est pas utilisé pendant 10 minutes, le buzzer retentit 6 fois pour revenir à
l'interface de veille.
Mode de nettoyage
• Cliquez sur l'interface du menu pour accéder au mode nettoyage.
L'utilisateur peut régler la durée de nettoyage selon ses besoins en
appuyant sur le bouton
/
. Le réglage par défaut est de 10 minutes.
Cliquez sur pour démarrer le mode mélange seul. Le moteur de
l'agitateur démarre pendant 1 minute, s'arrête pendant 1 minute, puis
commence à fonctionner. La minuterie a expiré.
• Le compte à rebours se termine, le buzzer retentit 6 fois et l'écran revient à
l'achage de veille.
• Pendant le processus de nettoyage, l'utilisateur peut interrompre le
fonctionnement en appuyant sur le bouton et, pendant l'interruption,
régler le temps de nettoyage souhaité en appuyant sur
/
. Si l'appareil
n'est pas utilisé pendant 10 minutes, le buzzer retentit 6 fois pour revenir à
l'interface de veille.

76
FR
Retour
• Si la fonction est sélectionnée et non activée, appuyez sur la touche de
fonction de menu correspondante pour revenir au bureau.
• Si l'appareil est déjà en marche, appuyez sur Pause, puis sur la touche de
fonction correspondante pour revenir au bureau.
Fonction de protection du moteur
Au fur et à mesure que le temps de production augmente, la glace devient de
plus en plus dure et le moteur de mélange risque de se bloquer. À ce moment-
là, la protection du moteur surveille le courant et la température du moteur et
arrête automatiquement le moteur an de garantir la durée de vie du moteur
d'agitation. Après un court laps de temps, le moteur se remet automatiquement
en marche.
La plus grande capacité de production
Pour éviter les déversements inutiles et les déchets, il faut veiller à ce que les
ingrédients de la glace ne dépassent pas 60 % du volume intérieur du récipient,
qui est d'environ 900 g (car la crème glacée se dilate un peu après sa fabrication).
Dans la production en continu, le poids est contrôlé dans les 600 g lorsqu'un
nouveau matériau est ajouté. Cela permet d'éviter que la crème glacée ne se dilate
et ne déborde (car une partie du matériau reste dans le bac).

77
FR
PRODUCTION DE CRÈME GLACÉE
Remarque : Nettoyez soigneusement toutes les pièces qui entrent en contact
avec la crème glacée avant de l'utiliser, y compris : le bol de refroidissement,
le bol de remplissage, la lame de mélange, le joint de sortie, le couvercle de
sortie interne et l'entonnoir, etc. Avant de procéder au nettoyage, assurez-vous
que le cordon d'alimentation est débranché de la prise électrique. Lors de la
fabrication de la glace, placez l'appareil à plat sur une surface plane an de
vous assurer que le compresseur de l'appareil fonctionne correctement.
Desserrez les quatre écrous de blocage en les tournant dans le sens inverse des
aiguilles d'une montre et retirez l'unité de poignée comme indiqué sur la gure 1.
Vériez que l'intérieur du récipient est propre, retirez l'agitateur, essuyez-le avec
un chiffon humide et remettez l'agitateur en place après l'avoir nettoyé, comme
indiqué dans la gure 2. Montez la poignée et l'unité de poignée comme indiqué
sur la gure 3. Serrez l'écrou dans le sens des aiguilles d'une montre, comme
indiqué sur la gure 4.
Figure 1 Figure 2
➀ : Desserrez l'écrou de blocage en le tournant dans le sens inverse des aiguilles
d'une montre
➁ : Retirez l'unité de poignée et la lame d'agitation pour les nettoyer.
➂ : Lors de l'installation de l'aile du mélangeur, alignez le six pans creux sur la
position du trou et faites attention à la direction de l'aile du mélangeur.
➀
➁
➂

78
FR
Figure 3 Figure 4
➃ : Alignez la poignée sur le trou et faites attention à la direction.
➄ : Aligner avec la position de la fente.
➅ : Serrez l'écrou dans le sens des aiguilles d'une montre.
Préparation des ingrédients
1. Préparez les ingrédients selon votre propre recette ou selon celles de ce
manuel. Il est recommandé d'utiliser 800 g d'ingrédients (le poids optimal est
de 600 à 900 g).
➃
➄
➅
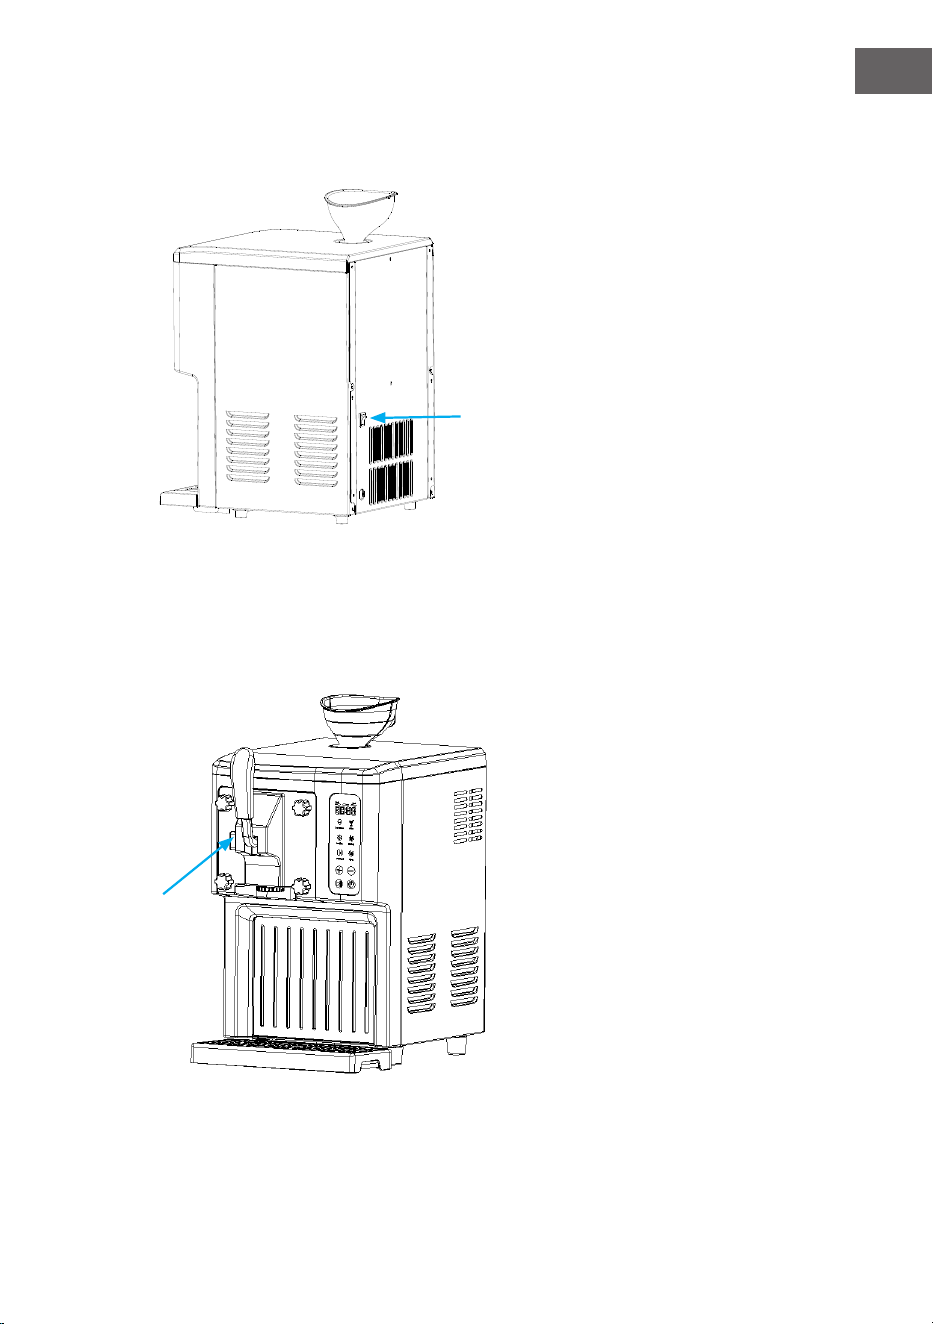
79
FR
2. Versez la bonne quantité d'ingrédients dans l'entonnoir.
3. Retirez l'entonnoir et remettez le bouchon en place.
4. Branchez la che dans la prise.
5. Appuyez sur la touche marche/arrêt ➆.
6. Sélectionnez le menu souhaité à l'aide des touches de fonction.
7. L'appareil commence à fabriquer de la glace.
8. Lorsque la production est terminée, tirez sur le levier pour retirer la crème
glacée.
➇ : Tirer sur le levier pour retirer la crème glacée.
➆
➇

80
FR
1. Préparez les ingrédients selon votre propre recette ou selon celles de ce
manuel. Remarque : il n'est pas nécessaire de congeler le bol pendant des
heures au préalable dans le congélateur, car cet appareil dispose d'un
compresseur intégré qui congèle les ingrédients de la recette pendant
son fonctionnement an de garantir la production de crème glacée. Il est
recommandé de traiter 800 g d'ingrédients (l'idéal étant 600 à 900 g) à une
température comprise entre 18 et 22 °C.
2. Pendant la fabrication de la crème glacée, vous pouvez ajouter d'autres
ingrédients préférés dix minutes avant la préparation. Évitez d'ajouter des
granulés pour ne pas bloquer la sortie. Pour les fruits, vous pouvez utiliser un
mixeur pour les liquéer et les verser ensuite dedans.
3. Lorsque la crème glacée est prête, vous pouvez ajouter d'autres ingrédients.
Lors de l'ajout de nouveaux ingrédients, le poids doit être maintenu dans les
600 g an d'éviter l'expansion et le débordement de la glace (car certains
matériaux restent dans le tambour).
RECETTES
Recette recommandée pour la matière première de la crème glacée et méthode de
fabrication (les informations suivantes sont données à titre indicatif uniquement ;
veillez à ce que les ingrédients de la crème glacée ne représentent pas plus de 60
% du volume du tambour de chargement).
Recette de base de la crème glacée
Ingrédients : 300 g d'eau, 200 g de lait en poudre, 300 g de crème fraîche
4. Mélanger l'eau, le lait en poudre et la crème jusqu'à ce qu'il n'y ait plus de
granulés.
5. Verser par l'entonnoir dans le bac à glace pour démarrer le menu glace.
Crème glacée fraîche à la fraise
Ingrédients : 120 g d'eau, 180 g de lait en poudre, 260 g de crème et 220 g de
fraises
Accessoires nécessaires : mixeur
1. Laver les fraises, les mettre dans le mixeur avec l'eau et le lait en poudre et les
réduire en purée.
2. Verser la crème dans le saladier et bien mélanger.
3. Verser par l'entonnoir dans le bac à glace pour démarrer le menu glace.
ATTENTION

81
FR
Crème glacée à la mangue fraîche
Ingrédients : 200 g d'eau, 200 g de lait en poudre, 300 g de crème fraîche et 160 g
de mangue
Accessoires nécessaires : mixeur
1. Mettez la mangue pelée dans le mixeur avec le lait en poudre et l'eau et
réduisez-la en purée jusqu'à ce qu'elle soit lisse.
2. Verser la crème dans le saladier et bien mélanger.
3. Verser par l'entonnoir dans le bac à glace pour démarrer le menu glace.
Crème glacée à la pitaya
Ingrédients : 400 g de lait, 240 g de crème et 260 g de pitaya
Accessoires nécessaires : mixeur
1. Peler la pitaya et la mettre dans le mixeur avec le lait jusqu'à ce qu'elle soit
lisse.
2. Verser la crème dans le verre et bien mélanger.
3. Verser par l'entonnoir dans le bac à glace pour démarrer le menu glace.
Glace au lait
Ingrédients : 360 g de lait pur, 30 g de sucre de canne rané et 300 g de crème
fraîche
1. Mélangez le lait pur, la crème et le sucre de canne rané jusqu'à ce qu'il n'y
ait plus de granulés.
2. Verser par l'entonnoir dans le bac à glace pour démarrer le menu glace.
Glaces en poudre
Ingrédients : 600 g de lait pur, 200 g poudre de glace
1. Mélangez le lait et la poudre de glace jusqu'à ce qu'il n'y ait plus de granulés.
2. Verser par l'entonnoir dans le bac à glace pour démarrer le menu glace.

82
FR
NETTOYAGE ET MAINTENANCE
Attention ! Pour éviter tout risque d'électrocution, la che doit être débranchée
avant le nettoyage.
• Utilisez un chiffon humide pour nettoyer les zones sales comme le
compartiment réfrigéré et la coque.
• N'immergez pas le boîtier dans l'eau et ne laissez pas l'eau pénétrer par la
sortie ou l'entrée d'air latérale.
• Après le nettoyage, le récipient intérieur et les accessoires de la poignée
doivent être séchés avant le remontage, an d'éviter que l'eau résiduelle dans
le récipient intérieur ne dégage des odeurs.
Mode de nettoyage
1. Nettoyez la sorbetière après la dégustation à l'aide de la fonction de
nettoyage. Versez d'abord environ 1 litre d'eau propre de l'entonnoir,
appuyez sur le bouton et accédez au mode de nettoyage. Après un
temps d'action d'environ 1 minute, vider l'eau, changer l'eau et rincer
à nouveau, environ 5 fois de suite, jusqu'à ce que l'eau soit claire. Il est
recommandé d'utiliser des détergents ou de la limonade pour obtenir un
meilleur effet. Nettoyez en même temps l'ouverture de remplissage avec
une brosse.
2. Une fois l'eau vidée, dévissez l'écrou (voir gure 1), retirez les parties de la
poignée et nettoyez la lame d'agitation séparément.
3. Vous trouverez à la page suivante des détails sur le démontage et le
montage des composants de la poignée, qui doivent être nettoyés au lave-
vaisselle après le démontage.
4. Après le nettoyage de la pale d'agitation, des parties de la poignée et du
récipient intérieur, ceux-ci doivent être complètement séchés puis remontés
an d'éviter la formation d'odeurs dues aux traces d'eau. Installez l'unité
de poignée. Pour plus d'informations, voir « Démontage de la poignée ».
83
FR
IDENTIFICATION ET RÉSOLUTION DES
PROBLÈMES
Problème Cause possible Solution
Impossible de retirer la
crème glacée lorsqu'elle
est prête.
La crème glacée est trop
dure ou contient des
granulés.
Laissez la crème glacée
fondre naturellement
avant de la prélever.
L'unité de poignée
ne s'adapte pas
correctement.
La pale d'agitation
n'est pas à sa place ou
pointe dans la mauvaise
direction.
Alignez la lame de
mélange sur le trou ou
faites-la pivoter de 180
degrés et remontez-la.
Lors du premier
nettoyage, il n'y a pas de
fuite d'eau.
La sortie d'eau est
bloquée par de la glace.
Laissez la glace fondre et
l'eau s'écouler.
Fuite au niveau de la
position de la poignée.
Bague d'étanchéité non
montée ou écrou non
serré.
Installez le joint
d'étanchéité et serrez
l'écrou.
Bruit de raclement après
avoir mangé de la crème
glacée.
La glace sur la paroi du
récipient est trop dure.
Arrêtez l'appareil à
temps ou ajoutez des
matières premières
pour poursuivre la
production.
La poignée ne s'insère
pas et ne se retire pas
facilement.
Mauvais sens de la
poignée.
Tourner de 90 degrés et
brancher ou débrancher.
Le moteur ne tourne
pas.
Protection contre la
surchauffe du moteur.
Attendez un moment et
essayez à nouveau.
84
FR
INFORMATIONS SUR LE RECYCLAGE
S‘il existe une réglementation pour l‘élimination ou le
recyclage des appareils électriques et électroniques dans
votre pays, ce symbole sur le produit ou sur l‘emballage
indique que cet appareil ne doit pas être jeté avec les
ordures ménagères. Vous devez le déposer dans un point
de collecte pour le recyclage des équipements électriques
et électroniques. La mise au rebut conforme aux règles
protège l‘environnement et la santé de vos semblables
des conséquences négatives. Pour plus d‘informations
sur le recyclage et l‘élimination de ce produit, veuillez
contacter votre autorité locale ou votre service de
recyclage des déchets ménagers.
FABRICANT
Chal-Tec GmbH, Wallstraße 16, 10179 Berlin, Allemagne.
Importateur pour la Grande Bretagne :
Berlin Brands Group UK Limited
PO Box 42
272 Kensington High Street
London, W8 6ND
United Kingdom
85
IT
Gentile cliente,
La ringraziamo per l'acquisto del dispositivo. La preghiamo
di leggere attentamente le seguenti indicazioni e di
seguirle per evitare eventuali danni. Non ci assumiamo
alcuna responsabilità per danni scaturiti da una mancata
osservanza delle indicazioni relative alla sicurezza e da
un uso improprio del dispositivo. Scansionare il codice
QR seguente per accedere al manuale d'uso più attuale e
ricevere informazioni sul prodotto.
DATI TECNICI
Numero articolo 10046255, 10046256
Alimentazione 220–240 V – 50 Hz
Consumo energetico 250 W
Grado di protezione I
Classe climatica N/SN
Capacità 1,5 litri
Dimensioni (Lung.xLarg.xAlt.) 417x280x517 mm
Dimensioni dell'imballaggio (Lung.
xLarg.xAlt.)
465x342x495 mm
Peso netto 16,5 kg
Peso lordo 18,5 kg
INDICE
Avvertenze di sicurezza 86
Descrizione 89
Installazione 91
Utilizzo 93
Produzione di gelato 97
Ricette 100
Pulizia e manutenzione 102
Ricerca e correzione degli errori 103
Avviso di smaltimento 104
Produttore 104

86
IT
AVVERTENZE DI SICUREZZA
• Per evitare danni dovuti a un uso improprio, leggere attentamente le istruzioni
prima di utilizzare il prodotto e utilizzarlo solo per lo scopo specicato nel
manuale.
• Posizionare il dispositivo su una supercie piana.
• Utilizzare il dispositivo solo in ambienti chiusi.
• Quando non si usa il dispositivo, staccare la spina dalla presa.
• Non immergere il cavo di alimentazione in acqua o altri liquidi.
• Utilizzare solo accessori espressamente consigliati dal produttore per questo
dispositivo.
• Non posizionare il dispositivo direttamente sotto a una presa elettrica.
• Non lasciare che il cavo di alimentazione penda dalla supercie di lavoro, per
evitare che i bambini possano tirarlo.
• Non riempire eccessivamente il dispositivo, altrimenti potrebbero vericarsi
cortocircuiti e scosse elettriche.
• Assicurarsi che il coperchio sia sempre chiuso durante il funzionamento.
• Non tirare il cavo per staccare la spina, ma impugnare saldamente la spina
stessa.
• Utilizzare il dispositivo esclusivamente per lo scopo previsto. Non ci
assumiamo alcuna responsabilità per danni scaturiti da una mancata
osservanza del manuale e da un uso improprio. Utilizzare il dispositivo solo in
casa.
• Non collegare il dispositivo a un timer o a prese elettriche con comando radio.
• Non immergere il dispositivo in acqua.
• Si sconsiglia l'utilizzo di prolunghe, dato che potrebbero surriscaldarsi e
causare incendi.
• Se il cavo di alimentazione è danneggiato, deve essere sostituito dal
produttore, dal servizio di assistenza ai clienti o da una persona con qualica
equivalente, in modo da evitare pericoli.
• Si prega di rispettare le norme locali per lo smaltimento di dispositivi
contenenti gas inammabili.
• Non conservare sostanze facilmente inammabili o esplosive nel dispositivo.
• Non capovolgere il dispositivo. Se il dispositivo si è ribaltato, posizionarlo
correttamente e attendere 2 ore prima di riaccenderlo.
• Se il dispositivo è stato portato al chiuso dall'esterno durante l'inverno,
attendere qualche ora anché si riscaldi a temperatura ambiente prima di
accenderlo.
• Smaltire il dispositivo solo presso un centro autorizzato. Non esporre il
dispositivo a amme libere.
• Questo dispositivo non è progettato per essere utilizzato da persone (inclusi
bambini) con limitate facoltà siche, psichiche e sensoriali o carenza di
esperienza e/o conoscenze, a meno che siano supervisionate da una persona
responsabile del loro controllo o abbiano ricevuto istruzioni, in modo da poter
usare il dispositivo in sicurezza.
• I bambini non devono giocare con il dispositivo. Pulizia e manutenzione da
parte dell'utente non possono essere realizzate da bambini senza la dovuta

87
IT
supervisione.
• I bambini di età compresa tra 3 e 8 anni non possono caricare o scaricare il
dispositivo.
• Tenere il dispositivo a 8 cm di distanza da altri oggetti per garantire una
buona dissipazione del calore.
• Non usare il dispositivo vicino a amme, fornelli o forni.
• Non accendere il dispositivo troppo frequentemente (almeno ogni 5 minuti)
per evitare di danneggiare il compressore.
• Non inserire parti metalliche o altri oggetti elettrici nel dispositivo per evitare
incendi e cortocircuiti.
• Non urtare il contenitore o il bordo del contenitore quando si rimuove il gelato
per evitare di danneggiarlo.
• Non collegare l'alimentazione nché il cestello o la pala mescolatrice non sono
stati installati correttamente.
• La temperatura iniziale degli ingredienti deve essere di 25±5 °C. Non mettere
gli ingredienti nel congelatore per il pre-congelamento, altrimenti la pala
potrebbe bloccarsi prima che il gelato raggiunga la consistenza desiderata.
• Non rimuovere mai la pala mentre il dispositivo è in funzione.
• Non utilizzare il dispositivo all'aperto.
• Non pulire mai con detergenti abrasivi o oggetti appuntiti.
• Questo dispositivo è destinato all'uso domestico e in contesti simili, come ad
esempio:
- cucine per il personale presso negozi, uci e altri contesti lavorativi;
- dai clienti di alberghi, motel e altri tipi di alloggio;
- bed and breakfast, catering e contesti di utilizzo similari, al di fuori del
commercio al dettaglio.
Questo dispositivo contiene il refrigerante isobutano (R600a), un gas naturale
ed ecologico. Sebbene sia inammabile, non è dannoso per lo strato di ozono
e non incrementa l’effetto serra. Tuttavia, l'utilizzo di questo refrigerante
ha comportato un leggero aumento del livello di rumorosità del dispositivo.
Oltre al rumore del compressore, è possibile sentire il usso del refrigerante
nel sistema di raffreddamento. Questo è inevitabile e non interferisce con le
prestazioni del dispositivo. Questo è inevitabile e non ha conseguenze negative
sulle prestazioni del dispositivo. Durante il trasporto e l'installazione del
dispositivo, è necessario prestare attenzione a non danneggiare alcuna parte
del sistema di raffreddamento. Le perdite di refrigerante possono causare
danni agli occhi.
• Mantenere le aperture di ventilazione nell'alloggiamento del dispositivo libere
da ostruzioni.
• Non danneggiare il circuito del refrigerante.
• Il sistema di raffreddamento contiene un refrigerante ad alta pressione. Non
danneggiare il sistema di raffreddamento.
• La manutenzione del sistema di raffreddamento deve essere eseguita da
specialisti.
• Non usare dispositivi meccanici o altri mezzi per accelerare il processo di
sbrinamento o il recupero di ghiaccio.
• Non utilizzare apparecchi elettrici nei vani di conservazione degli alimenti del

88
IT
dispositivo, a meno che non siano del tipo raccomandato dal produttore.
• Scollegare la macchina del ghiaccio dalla presa di corrente prima di pulirla o di
eseguire lavori di riparazione o manutenzione.
• Non pulire la macchina del ghiaccio con liquidi inammabili per evitare incendi
o esplosioni.
• Il refrigerante e il gas isolante sono inammabili.
•
AVVERTENZA
Pericolo di incendio a causa di uno smaltimento improprio!
Rispettare le norme locali per lo smaltimento di dispositivi
contenenti refrigeranti e gas inammabili.
Note speciali
• Durante il posizionamento del dispositivo, assicurarsi di non schiacciare o
danneggiare il cavo di alimentazione.
• Assicurarsi che non ci siano prese multiple o alimentatori sul retro del
dispositivo.
Per evitare la contaminazione di alimenti, seguire queste indicazioni:
• Se lo sportello viene lasciato aperto per lungo tempo, la temperatura nei vani
del dispositivo può aumentare notevolmente.
• Pulire regolarmente le superci che entrano in contatto con gli alimenti e i
sistemi di scarico accessibili.
AVVERTIMENTO
Durante l’utilizzo, la manutenzione e lo smaltimento del
dispositivo, fare attenzione al simbolo a sinistra, che si trova sul
retro del dispositivo o sul compressore. Questo simbolo avverte
della possibilità di eventuali incendi. Nei condotti del refrigerante e
nel compressore si trovano sostanze inammabili. Tenere il
dispositivo lontano da fonti inammabili durante l'utilizzo, la manutenzione e lo
smaltimento.

89
IT
DESCRIZIONE
1
2
8
9
10
11
12
3
4
5
6
7
1 Tappo per l'apertura da cui si inseri-
scono gli ingredienti
7 Contenitore dell'acqua
2 Imbuto 8 Copertura superiore
3 Impugnatura 9 Copertura dello schermo
4 Impugnatura 10 Apertura di sato
5 Dado di bloccaggio 11 Parete laterale
6 Copertura decorativa anteriore 10 Apertura di sato

90
IT
Tasti delle funzioni
➀ Indicazione della durata ➆ Modalità succo
➁ Modalità gelato ➇ Tasto di miscelazione
➂ Modalità di raffreddamento ➈ Modalità di pulizia
➃ Modalità frullato ➉ Ridurre la durata
➄ Aumentare la durata ⑪ On/Off
➅ Start/Pausa
Accessori
Paletta di
miscelazione
1 Manuale d'uso 1
Spazzola 1 Imbuto 1
➀
➁
➂
➃
➄
➅
➆
➇
➈
➉
⑪

91
IT
INSTALLAZIONE
Montaggio e smontaggio dell'impugnatura
➀ Copertura superiore dell'apertura
da cui si ineriscono gli ingredienti
➄ Estremità dell'impugnatura
➁ Base dell'apertura da cui si ineri-
scono gli ingredienti
➅ Guarnizione ad anello
➂ Tappo per l'apertura da cui si
inseriscono gli ingredienti
➆ Guarnizione ad anello dell'apertu-
ra da cui si inseriscono gli ingredienti
➃ Impugnatura ➇ Copertura dell'apertura da cui si
ineriscono gli ingredienti
1. Inserire ➀ in ➁ come illustrato nell'immagine 1.
2. Premere ➂ con la mano in ➁, come mostrato nell'immagine 2.
3. Premere ➀ in ➁ e poi verso l'alto nché non si sente un clic, come mostrato
nell'immagine 3.
4. Inserire ➃ in ➂ come illustrato nell'immagine 4.
5. Inserire ➄ in ➀ come illustrato nell'immagine 5.
6. Fissare ➆ in ➁, come mostrato nell'immagine 6.
7. Fissare ➇ in ➁ e serrare in senso orario come mostrato nell'immagine 7.
8. Fissare ➇ in ➁, come mostrato nell'immagine 8.
Immagine 1 Immagine 2 Immagine 3 Immagine 4
Immagine 5 Immagine 6 Immagine 7 Immagine 8
➀
➁
➂
➃
➄
➅
➆
➇
Allineare e
inserire nel fondo
Posizione della
scanalatura in alto

92
IT
Smontaggio dell'impugnatura
Eseguire i passaggi dall'immagine 1 all'immagine 8 in ordine inverso.
Caratteristiche
• Controllo automatico con microcomputer, semplice e adabile nell'uso e
senza costi elevati.
• Il display a LED mostra lo stato di funzionamento, facilitandone il
monitoraggio.
• Gelatiera rotante facile da utilizzare, per una miscelazione ottimale.
• Adatta alla produzione continua di gelato.
• Capacità di 1,5 litri
• I componenti sono rimovibili, facili da pulire, igienici e sicuri.

93
IT
UTILIZZO
1. Collegare il dispositivo alla rete elettrica e inserire il cavo di alimentazione in
una presa adeguata. La forma e la tensione della presa di corrente devono
corrispondere alle speciche riportate sulla targhetta.
2. Tenere premuto il tasto di accensione/spegnimento , lo schermo si
illuminerà completamente e si potrà accedere all'interfaccia del menu per
selezionare la modalità di funzionamento.
Modalità gelato
• Fare clic su nell'interfaccia del menu per accedere alla modalità gelato.
La durata standard è di 50 minuti ed è regolabile.
• Cliccare su per avviare la modalità gelato. Il compressore e il motore
del miscelatore vengono avviati e inizia il conto alla rovescia di 50 minuti.
• Quando la produzione di gelato è completa, lo schermo mostra "COOL",
viene avviata la fase di isolamento I e il cicalino suona 6 volte. Il motore del
miscelatore continua a funzionare durante questa fase. La prima fase di
isolamento dura 60 minuti.
• Dopo 60 minuti di livello di isolamento I, il cicalino suona 6 volte e il
dispositivo passa al livello di isolamento II. Quando il compressore è acceso,
anche il motore del miscelatore è in funzione. Se il motore del miscelatore si
ferma, è possibile premere il tasto per avviare lo scarico del motore del
miscelatore. La seconda fase di isolamento dura 120 minuti. Al termine della
seconda fase di isolamento, tornare all'interfaccia di standby.
• Se si mantiene freddo il gelato, si può tornare alla modalità gelato
premendo il simbolo del gelato, con una durata standard di 10 minuti e la
possibilità di regolarla.
• Durante il processo di produzione del gelato, l'utente può premere il tasto
per interrompere il processo. Il compressore viene spento solo 3 minuti
prima della pausa. Durante la pausa, l'utente può premere il tasto
/
per
impostare la durata di produzione del gelato. Se il dispositivo non viene
utilizzato per 10 minuti, il cicalino suona 6 volte per tornare all'interfaccia di
standby.
94
IT
Modalità succo
• Fare clic su nell'interfaccia del menu per accedere alla modalità succo.
L'utente può impostare la durata di raffreddamento del succo in base
alle proprie esigenze premendo il tasto
/
. La durata standard è di 30
minuti. Cliccare su per avviare la modalità succo. A questo punto, il
compressore e il motore del miscelatore vengono avviati e inizia il conto alla
rovescia della durata.
• Il conto alla rovescia termina, sul display appare "COOL", il dispositivo passa
in modalità di isolamento e il cicalino suona 6 volte contemporaneamente.
Ritornare all'interfaccia di standby dopo 60 minuti di isolamento.
• Durante il processo di spremitura, l'utente può premere il tasto per
mettere in pausa la procedura. Il compressore si ferma solo 3 minuti prima
della pausa e durante la pausa è possibile premere
/
per impostare la
durata di raffreddamento del succo. Se il dispositivo non viene utilizzato per
10 minuti, il cicalino suona 6 volte per tornare all'interfaccia di standby.
Modalità di raffreddamento
• Fare clic su nell'interfaccia del menu per accedere alla modalità di
raffreddamento. L'utente può utilizzare il tasto
/
per impostare la durata
di raffreddamento richiesta per il funzionamento individuale in base alle
proprie esigenze. L'impostazione standard è 10 minuti. Cliccare su per
avviare la modalità di raffreddamento singola. Il compressore e il motore
del miscelatore vengono avviati e inizia il conto alla rovescia della durata.
• Il conto alla rovescia nisce, il cicalino suona 6 volte e lo schermo torna
all'indicazione di standby.
• Durante la modalità di raffreddamento singolo, l'utente può premere il
tasto per mettere in pausa il processo. Il compressore si ferma solo 3
minuti prima della pausa e durante la pausa è possibile premere
/
per
regolare la durata del raffreddamento. Se il dispositivo non viene utilizzato
per 10 minuti, il cicalino suona 6 volte per tornare all'interfaccia di standby.
95
IT
Modalità di miscelazione
• Fare clic su nell'interfaccia del menu per accedere alla modalità di
miscelazione. Utilizzando i tasti
/
, l'utente può impostare la durata
di miscelazione desiderata in base alle proprie esigenze. L'impostazione
standard è 30 minuti. Cliccare su per avviare la modalità di
miscelazione. Il motore del miscelatore si avvia e inizia il conto alla rovescia
della durata.
• Il conto alla rovescia nisce, il cicalino suona 6 volte e lo schermo torna
all'indicazione di standby.
• Durante il processo di produzione delle singole miscele, gli utenti possono
interrompere il funzionamento con il tasto e impostare la durata di
miscelazione desiderata durante l'interruzione con
/
. Se il dispositivo
non viene utilizzato per 10 minuti, il cicalino suona 6 volte per tornare
all'interfaccia di standby.
Modalità frullato
• Fare clic su nell'interfaccia del menu per accedere alla modalità frullato.
Utilizzando il tasto
/
, l'utente può impostare la durata per i frullati
desiderata in base alle proprie esigenze. L'impostazione standard è 30
minuti. Cliccare su per avviare la modalità frullato. A questo punto, il
compressore e il motore del miscelatore vengono avviati e inizia il conto alla
rovescia della durata.
• Il conto alla rovescia termina, sul display appare "COOL", il dispositivo passa
in modalità di isolamento e il cicalino suona 6 volte. Ritornare all'interfaccia
di standby dopo 60 minuti di isolamento.
• Durante la produzione del frullato, gli utenti possono premere il tasto
per mettere in pausa il processo. Il compressore viene spento solo 3
minuti prima della pausa. Utilizzando il tasto
/
, l'utente può impostare la
durata per i frullati desiderata in base alle proprie esigenze. Se il dispositivo
non viene utilizzato per 10 minuti, il cicalino suona 6 volte per tornare
all'interfaccia di standby.
Modalità di pulizia
• Fare clic su nell'interfaccia del menu per accedere alla modalità di
pulizia. L'utente può impostare la durata della pulizia in base alle proprie
esigenze premendo il tasto
/
. L'impostazione standard è 10 minuti.
Cliccare su per avviare la modalità di miscelazione singola. Il motore
del miscelatore si avvia per 1 minuto, si ferma per 1 minuto e poi entra in
funzione. Il timer è scaduto.
• Il conto alla rovescia nisce, il cicalino suona 6 volte e lo schermo torna
all'indicazione di standby.
• Durante il processo di pulizia, gli utenti possono interrompere il
funzionamento con il tasto e impostare la durata di pulizia desiderata
durante l'interruzione con
/
. Se il dispositivo non viene utilizzato per 10
minuti, il cicalino suona 6 volte per tornare all'interfaccia di standby.

96
IT
Indietro
• Se la funzione è selezionata e non è attivata, premere il tasto della funzione
del menu corrispondente per tornare al desktop.
• Se il dispositivo è già in funzione, premere Pausa e poi il tasto della funzione
corrispondente per tornare al desktop.
Funzione di protezione del motore
Con l'aumentare della durata di produzione, il gelato diventa sempre più duro
e il motore di miscelazione potrebbe bloccarsi. A questo punto, la protezione
del motore controlla la corrente e la temperatura del motore e lo spegne
automaticamente per evitare danni al motore del miscelatore. Il motore si
riaccende automaticamente dopo un breve periodo di tempo.
La massima capacità produttiva
Per evitare inutili fuoriuscite e sprechi, assicurarsi che gli ingredienti del gelato
non costituiscano più del 60% del volume interno del contenitore di circa 900 g
(poiché il gelato si espande leggermente dopo la produzione). Nella produzione
continua, il peso viene controllato entro 600 g quando vengono aggiunti nuovi
ingredienti. In questo modo si evita che il gelato si espanda e trabocchi (poiché
una parte degli ingredienti rimane nel contenitore).
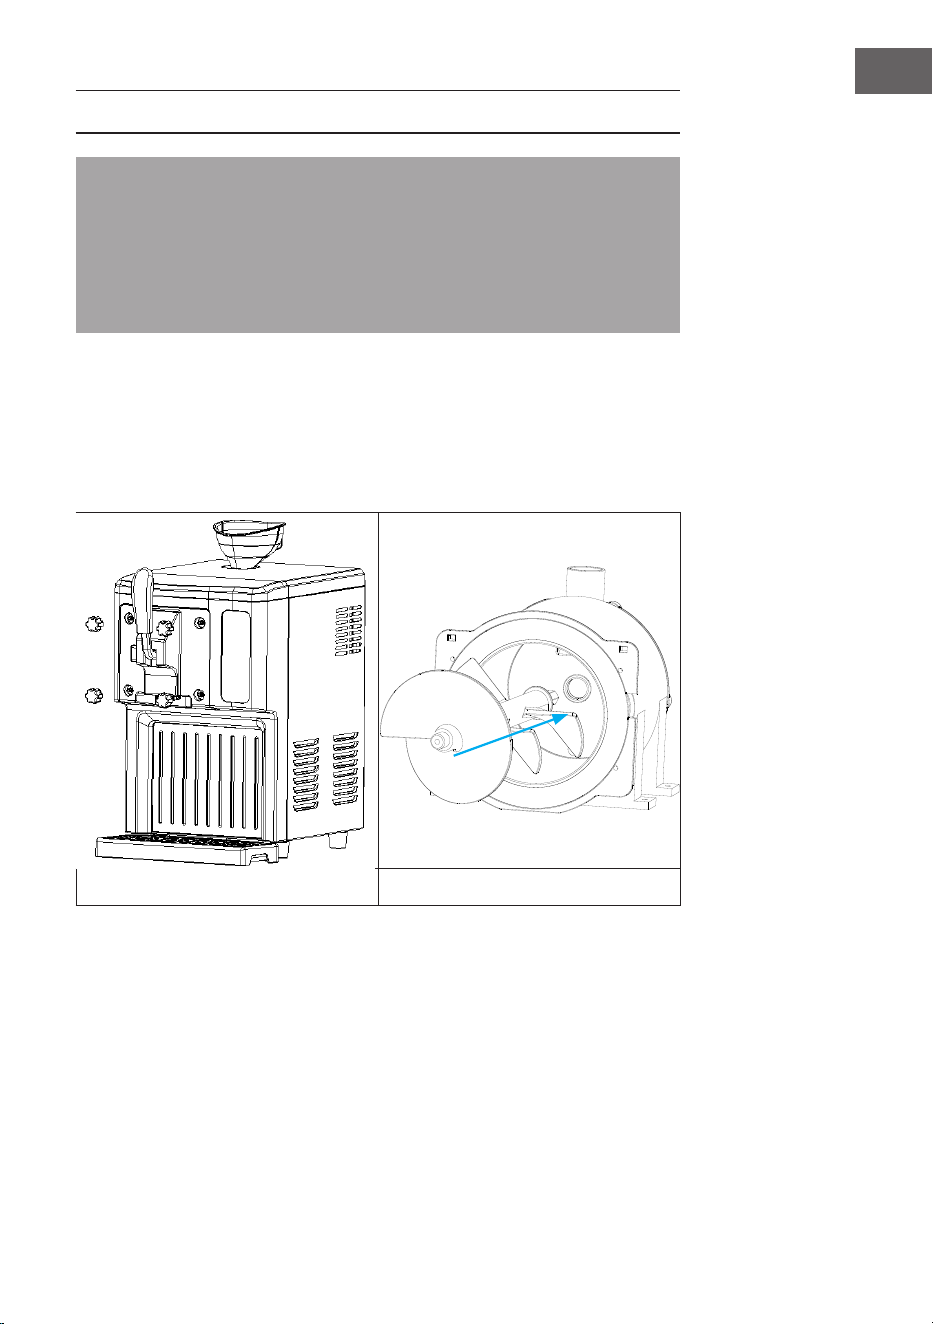
97
IT
PRODUZIONE DI GELATO
Nota: prima dell'uso, pulire accuratamente tutti i componenti che entrano
in contatto con il gelato, tra cui: la ciotola di raffreddamento, la ciotola di
riempimento, la pala di miscelazione, la guarnizione di uscita, il coperchio
interno dell'uscita e l'imbuto, ecc. Prima di procedere alla pulizia, assicurarsi
che il cavo di alimentazione sia scollegato dalla presa di corrente. Quando
si prepara il gelato, posizionare il dispositivo su una supercie piana per
assicurarsi che il compressore funzioni correttamente.
Allentare i quattro dadi di bloccaggio in senso antiorario e rimuovere l'unità
dell'impugnatura, come mostrato nell'immagine 1. Controllare che l'interno del
contenitore sia pulito, rimuovere il miscelatore, pulirlo con un panno umido e
reinserirlo dopo la pulizia, come illustrato nell'immagine 2. Montare l'impugnatura
e il gruppo dell'impugnatura come mostrato nell'immagine 3. Serrare il dado in
senso orario come mostrato nell'immagine 4.
Immagine 1 Immagine 2
➀: allentare il dado di bloccaggio in senso antiorario
➁: per la pulizia, rimuovere l'unità dell'impugnatura e la pala mescolatrice.
➂: quando si installa la pala del miscelatore, allineare l'esagono incassato con la
posizione del foro e prestare attenzione alla direzione della pala del miscelatore.
➀
➁
➂

98
IT
Immagine 3 Immagine 4
➃: allineare l'impugnatura al foro e prestare attenzione alla direzione.
➄: allineare alla posizione della scanalatura.
➅: stringere saldamente i quattro dadi in senso orario.
Preparazione degli ingredienti
1. Preparare gli ingredienti secondo la propria ricetta o secondo le ricette di
questo manuale. Si consiglia di utilizzare 800 g (il peso ottimale è compreso
tra 600 e 900 g) di ingredienti.
➃
➄
➅
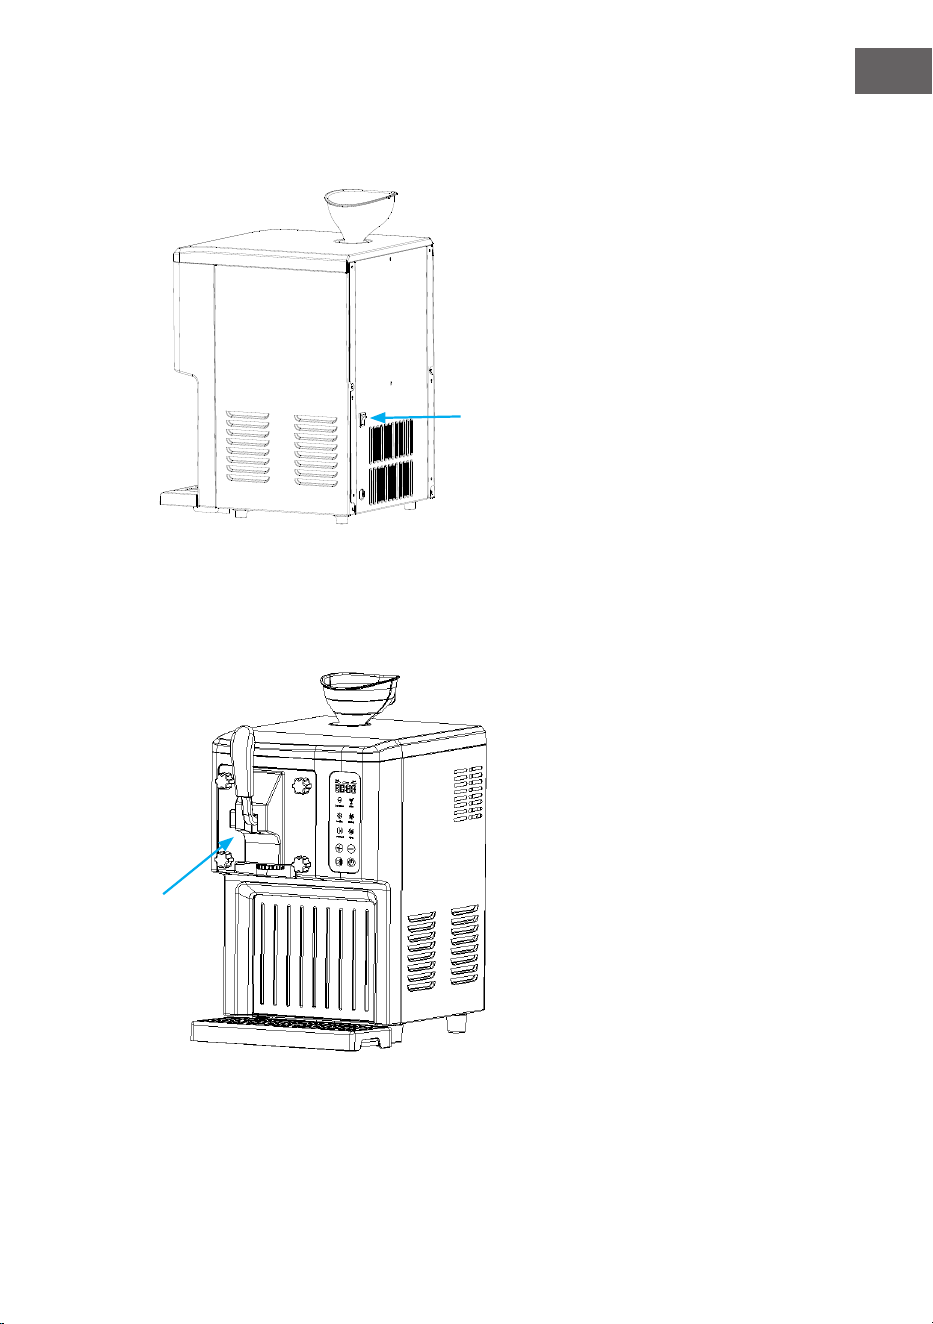
99
IT
2. Versare la quantità corretta di ingredienti nell'imbuto.
3. Rimuovere l'imbuto e riposizionare il tappo di chiusura.
4. Inserire la spina nella presa elettrica.
5. Premere il tasto di accensione/spegnimento ➆.
6. Utilizzare i tasti funzione per selezionare il menu desiderato.
7. Il dispositivo inizia a produrre gelato.
8. Al termine della produzione, tirare la leva per rimuovere il gelato.
➇: tirare la leva per rimuovere il gelato.
➆
➇

100
IT
1. Preparare gli ingredienti secondo la propria ricetta o secondo le ricette di
questo manuale. Nota: non è necessario congelare la ciotola nel freezer per
ore prima di procedere, poiché questo dispositivo è dotato di un compressore
incorporato che congela gli ingredienti della ricetta durante il funzionamento
per garantire la produzione di gelato. Si consiglia di lavorare 800 g (da 600 a
900 g è ottimale) di ingredienti a una temperatura compresa tra 18 e 22 °C.
2. Quando si prepara il gelato, si possono aggiungere gli altri ingredienti
preferiti dieci minuti prima della preparazione. Evitare di aggiungere
granulato per evitare l'intasamento dell'uscita. Per la frutta, si può usare un
frullatore per liquefarla e poi versarla all'interno.
3. Quando il gelato è pronto, si possono aggiungere altri ingredienti. Quando si
aggiungono nuovi ingredienti, il peso deve essere mantenuto entro i 600 g per
evitare che il gelato si espanda e trabocchi (poiché alcuni materiali rimangono
nel cestello).
RICETTE
Ricetta consigliata della materia prima per il gelato e metodo di produzione (le
seguenti informazioni sono solo a titolo indicativo; assicurarsi che gli ingredienti
del gelato non costituiscano più del 60% del volume del cestello di carico).
Ricetta base del gelato
Ingredienti: 300 g di acqua, 200 g di latte in polvere, 300 g di panna
4. Mescolare l'acqua, il latte in polvere e la panna nché non ci sono più granuli.
5. Versare attraverso l'imbuto nel contenitore del gelato per avviare il menu del
gelato.
Gelato fresco alla fragola
Ingredienti: 120 g di acqua, 180 g di latte in polvere, 260 g di panna e 220 g di
fragole
Accessori necessari: frullatore
1. Lavare le fragole, metterle in un frullatore con l'acqua e il latte in polvere e
ridurle in purea.
2. Versare la crema nella ciotola e mescolare bene.
3. Versare attraverso l'imbuto nel contenitore del gelato per avviare il menu del
gelato.
ATTENZIONE

101
IT
Gelato al mango fresco
Ingredienti: 200 g di acqua, 200 g di latte in polvere, 300 g di panna e 160 g di
mango
Accessori necessari: frullatore
1. Mettere il mango sbucciato in un frullatore con il latte in polvere e l'acqua e
frullare no a ottenere un composto omogeneo.
2. Versare la crema nella ciotola e mescolare bene.
3. Versare attraverso l'imbuto nel contenitore del gelato per avviare il menu del
gelato.
Gelato alla pitaya
Ingredienti: 400 g di latte, 240 g di panna e 260 g di pitaya
Accessori necessari: frullatore
1. Sbucciare la pitaya e metterla nel frullatore con il latte no a ottenere un
composto omogeneo.
2. Versare la crema nel recipiente e mescolare bene.
3. Versare attraverso l'imbuto nel contenitore del gelato per avviare il menu del
gelato.
Gelato al latte
Ingredienti: 360 g di latte puro, 30 g di zucchero di canna ranato e 300 g di
panna
1. Mescolare il latte puro, la panna e lo zucchero di canna ranato nché non ci
sono più granelli.
2. Versare attraverso l'imbuto nel contenitore del gelato per avviare il menu del
gelato.
Gelato in polvere
Ingredienti: 600 g di latte puro, 200 g di preparato in polvere per gelato
1. Mescolare il latte e il preparato in polvere per gelato nché non ci sono più
granuli.
2. Versare attraverso l'imbuto nel contenitore del gelato per avviare il menu del
gelato.

102
IT
PULIZIA E MANUTENZIONE
Attenzione! Per evitare scosse elettriche, la spina deve essere scollegata prima
della pulizia.
• Utilizzare un panno umido per pulire le aree sporche, come il vano di
raffreddamento e la zona centrale.
• Non immergere l'alloggiamento in acqua e non permettere all'acqua di
entrare attraverso l'uscita o l'ingresso dell'aria laterale.
• Dopo la pulizia, il contenitore interno e gli accessori dell'impugnatura devono
essere asciugati prima di essere rimontati, per evitare che l'acqua residua nel
contenitore interno provochi cattivi odori.
Modalità di pulizia
1. Pulire la gelatiera utilizzando la funzione di pulizia. Per prima cosa versare
circa 1 litro di acqua pulita dall'imbuto, premere il tasto e accedere
alla modalità di pulizia. Lasciare agire per circa 1 minuto, scolare l'acqua,
cambiare l'acqua e risciacquare di nuovo per circa 5 volte di seguito,
nché l'acqua non è limpida. Si consiglia di utilizzare un detergente o una
soluzione a base di limone per ottenere un effetto migliore. Allo stesso
tempo, pulire l'apertura di riempimento con una spazzola.
2. Quando l'acqua è stata scaricata, svitare il dado (v. immagine 1), rimuovere
le parti dell'impugnatura e pulire separatamente la pala del miscelatore.
3. Nella pagina successiva sono disponibili i dettagli sullo smontaggio e sul
montaggio dei componenti dell'impugnatura, che devono essere puliti in
lavastoviglie dopo lo smontaggio.
4. Dopo la pulizia della pala del miscelatore, delle parti dell'impugnatura e
del contenitore interno, questi devono essere completamente asciugati
e poi rimontati per evitare odori causati da tracce d'acqua. Montare
l'unità dell'impugnatura. Per ulteriori informazioni, consultare la sezione
"Smontaggio dell'impugnatura".
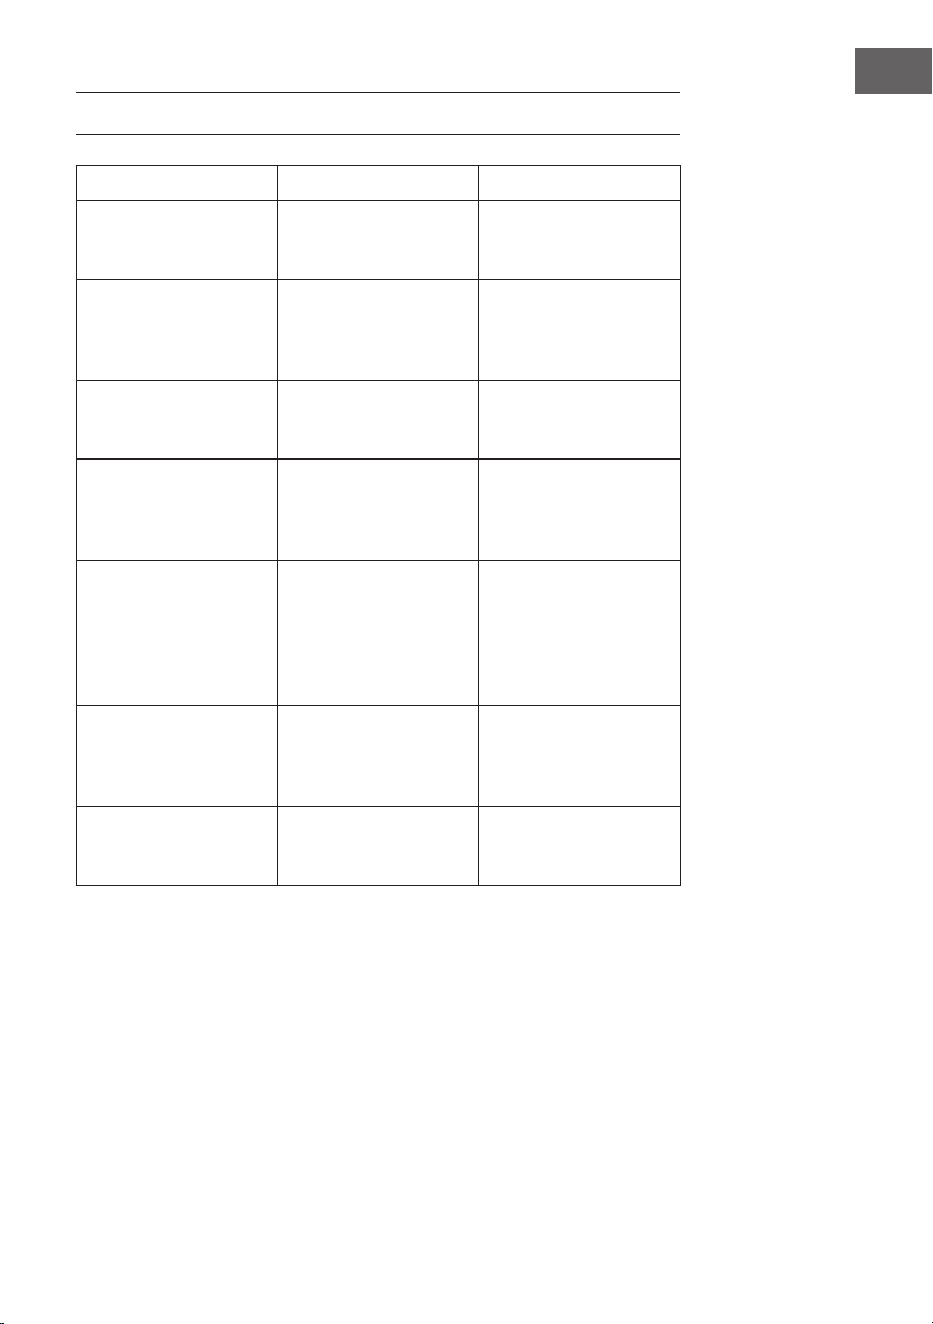
103
IT
RICERCA E CORREZIONE DEGLI ERRORI
Problema Possibile causa Soluzione
Il gelato non può essere
rimosso quando è
pronto.
Il gelato è troppo duro o
contiene granuli.
Lasciare che il gelato si
sciolga naturalmente
prima di rimuoverlo.
Il gruppo
dell'impugnatura non
può essere posizionato
correttamente.
La pala del miscelatore
non è in posizione o è
rivolta nella direzione
sbagliata.
Allineare la pala
mescolatrice al foro o
ruotarla di 180 gradi e
reinstallarla.
Durante la prima pulizia
non fuoriesce acqua.
L'uscita dell'acqua è
bloccata dal gelato.
Lasciare che il gelato
si sciolga e che l'acqua
deuisca.
Perdita in
corrispondenza
della posizione
dell'impugnatura.
Guarnizione ad anello
non montata o dado non
serrato.
Montare la guarnizione
ad anello e serrare il
dado.
Rumore di raschiamento
dopo aver preparato il
gelato.
Il gelato sulla parete del
contenitore è troppo
duro.
Interrompere
tempestivamente
il dispositivo o
aggiungere ingredienti
per continuare la
produzione.
L'impugnatura non può
essere tirata in dentro
e in fuori in modo
uido.
Direzione errata
dell'impugnatura.
Ruotare di 90 gradi e
inserire o estrarre.
Il motore non gira. Protezione contro il
surriscaldamento del
motore.
Aspettare un momento e
riprovare.

104
IT
AVVISO DI SMALTIMENTO
Se nel proprio paese si applicano le regolamentazioni
inerenti lo smaltimento di dispositivi elettrici ed
elettronici, questo simbolo sul prodotto o sulla confezione
segnala che questi prodotti non possono essere
smaltiti con i riuti normali e devono essere portati a
un punto di raccolta di dispositivi elettrici ed elettronici.
Grazie al corretto smaltimento dei vecchi dispositivi si
tutela il pianeta e la salute delle persone da possibili
conseguenze negative. Informazioni riguardanti il riciclo
e lo smaltimento di questi prodotti si ottengono presso
l’amministrazione locale oppure il servizio di gestione dei
riuti domestici.
PRODUTTORE
Chal-Tec GmbH, Wallstraße 16, 10179 Berlino, Germania.
Importatore per la Gran Bretagna:
Berlin Brands Group UK Limited
PO Box 42
272 Kensington High Street
London, W8 6ND
United Kingdom