
www.klarstein.com
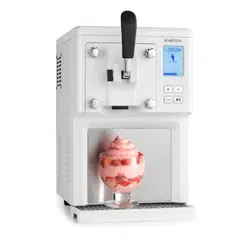
SWEET SUNDAE
Eiscrememaschine
Ice Cream Maker
Máquina de helado
Machine à crème glacée
Gelatiera
10034911 10034912


3
DE
Sehr geehrter Kunde,
wir gratulieren Ihnen zum Erwerb Ihres Gerätes. Lesen Sie
die folgenden Hinweise sorgfältig durch und befolgen Sie
diese, um möglichen Schäden vorzubeugen. Für Schäden,
die durch Missachtung der Hinweise und unsachgemäßen
Gebrauch entstehen, übernehmen wir keine Haftung. Scannen
Sie den folgenden QR-Code, um Zugriff auf die aktuellste
Bedienungsanleitung und weitere Informationen rund um das
Produkt zu erhalten.
INHALTSVERZEICHNIS
Sicherheitshinweise4
Geräteübersicht6
Inbetriebnahme und allgemeine Bedienung7
Bedienung und Funktionen9
Reinigung und Pege10
Fehlerbehebung13
Eisrezepte13
Hinweise zur Entsorgung14
Hersteller14
TECHNISCHE DATEN
Artikelnummer 10034911. 10034912
Stromversorgung 220-240 V ~ 50 Hz
Fassungsvermögen 1.5 L
English 15
Español 27
Français 39
Italiano 51

4
DE
SICHERHEITSHINWEISE
• Lesen Sie sich alle Hinweise sorgfältig durch und bewahren Sie die
Bedienungsanleitung zum Nachschlagen gut auf.
• Prüfen Sie vor der Benutzung die Spannung auf dem Typenschild und schließen Sie
das Gerät nur an Steckdosen an, die der Spannung des Geräts entsprechen.
• Falls das Netzkabel beschädigt ist, muss es vom Hersteller, einem autorisierten
Fachbetrieb oder einer ähnlich qualizierten Person ersetzt werden.
• Drehen Sie das Gerät nicht auf den Kopf und neigen Sie es nicht mehr als 45°.
• Tauchen Sie das Gerät nie komplett in Wasser oder andere Flüssigkeiten und
achten Sie drauf, dass Stecker und Netzkabel nicht nass werden.
• Ziehen Sie den Stecker aus der Steckdose, wenn Sie das Gerät nicht mehr
benutzen oder reinigen.
• Lassen Sie um das Gerät herum 8 cm Platz, um ausreichende Luftzirkulation zu
gewährleisten.
• Benutzen Sie nur Zubehör, das vom Hersteller ausdrücklich dafür zugelassen ist.
• Kinder ab 8 Jahren, psychisch, sensorisch und körperlich eingeschränkte Menschen
dürfen das Gerät nur benutzen, wenn sie vorher von einer für sie verantwortlichen
Aufsichtsperson ausführlich mit den Funktionen und den Sicherheitsvorkehrungen
vertraut gemacht wurden und die damit verbundenen Risiken verstehen.
• Benutzen Sie das Gerät nicht in der Nähe von Flammen, heißen Kochplatten oder Öfen.
• Schalten Sie das Gerät nicht mehrmals hintereinander ein und aus. Warten Sie
mindestens 5 Minuten, bevor sie das Gerät wieder einschalten, um den Kompressor
nicht zu beschädigen.
• Stecken Sie keine Bleche oder andere Objekt ins Gerät, um Feuer und Kurzschlüsse
zu vermeiden.
• Wenn Sie das Eis entnehmen, schlagen Sie nicht gegen den Behälter oder den
Rand des Behälters, um ihn nicht zu beschädigen.
• Schalten Sie das Gerät erst ein, wenn Sie den Behälter und das Rührmesser
angebracht haben.
• Die Temperatur für Zutaten beträgt 25±5°C. Kühlen Sie die Zutaten nicht vor,
andernfalls könnte das Messer blockieren, bevor die Eiscreme fertig zubereitet ist.
• Entfernen Sie das Rührmesser nicht, solange es in Betrieb ist.
• Verwenden Sie das Gerät nicht im Freien.
• Reinigen Sie das Gerät nicht mit Scheuerpulver oder Scheuerschwämmen.
• Bewahren Sie im Gerät keine explosiven Substanzen auf, wie beispielsweise
Sprühdosen mit leicht entzündlichen Treibgasen.
• Das Gerät ist nicht für den kommerziellen Gebrauch, sondern nur für Gebrauch im
Haushalt und in ähnlichen Umgebungen vorgesehen.

5
DE
Besondere Hinweise
• Achten Sie bei der Positionierung des Gerätes darauf, dass das Netzkabel nicht
eingeklemmt oder beschädigt ist.
• Achten Sie darauf, dass sich keine Mehrfachsteckdosen oder Netzteile auf der
Rückseite des Geräts be nden.
Um eine Kontamination von Lebensmitteln zu vermeiden, beachten Sie bitte die
folgenden Anweisungen:
• Reinigen Sie regelmäßig Ober ächen, die mit Lebensmitteln in Berührung kommen
können.
WARNUNG
Achten Sie bei Gebrauch, Wartung und Entsorgung des Gerätes auf
das linke Symbol, das sich auf der Rückseite oder am Kompressor des
Gerätes be ndet. Dieses Symbol warnt vor möglichen Bränden. In
den Kältemittelleitungen und im Kompressor be nden sich brennbare
Stoffe. Halten Sie das Gerät bei Gebrauch, Wartung und Entsorgung
von Feuerquellen fern.

6
DE
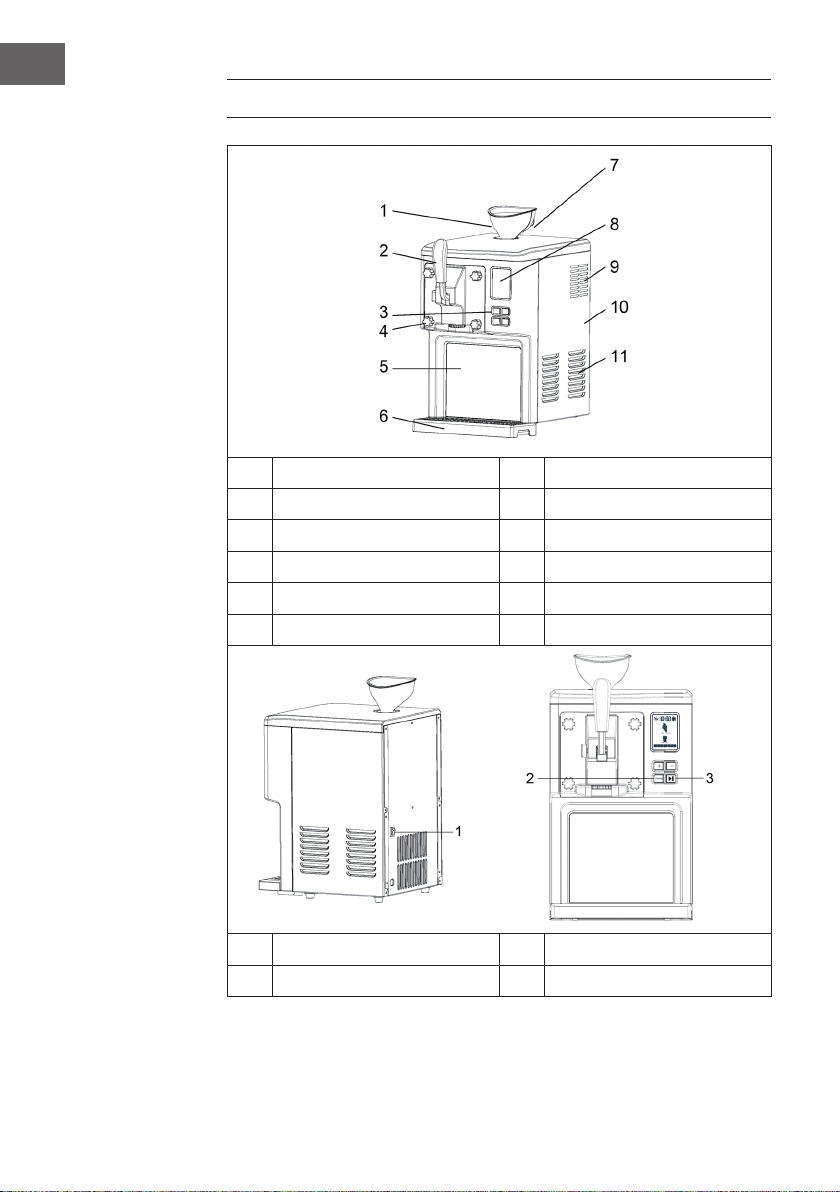
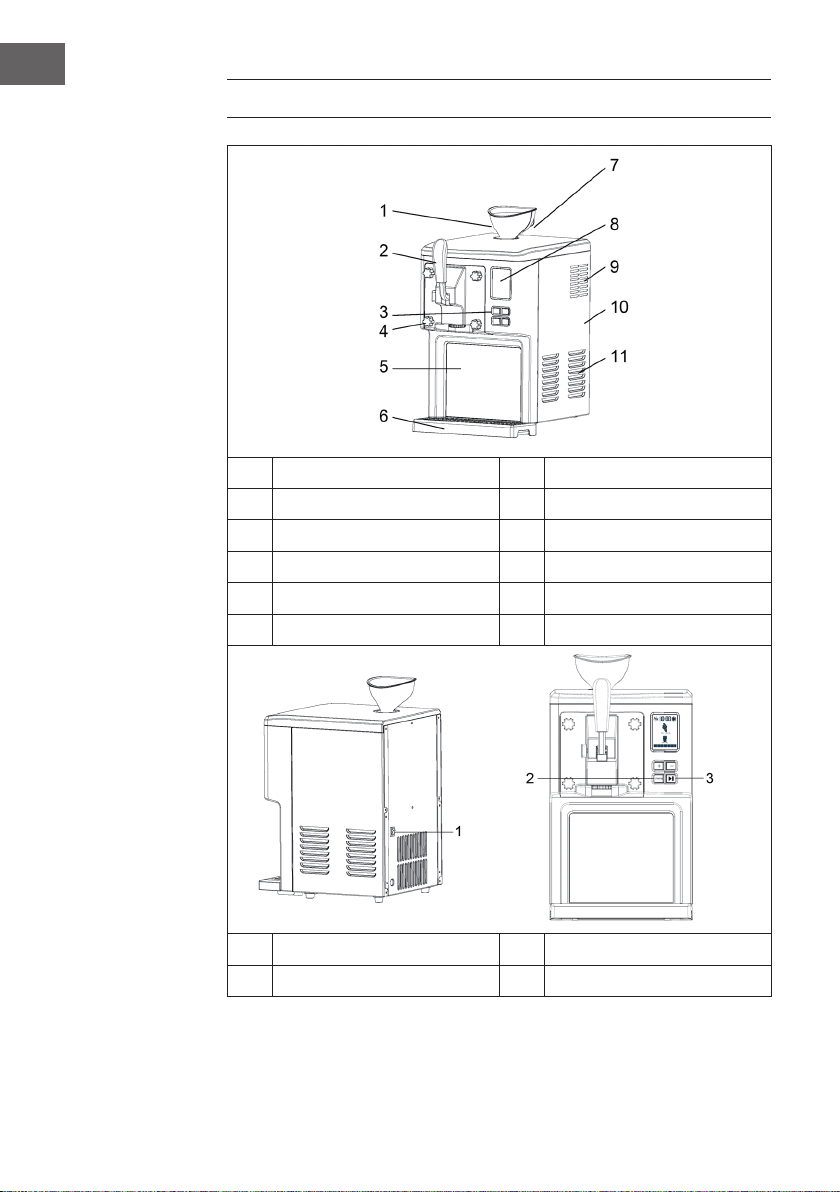
GERÄTEÜBERSICHT
1
Trichter
7
Oberer Deckel
2
Griffeinheit
8
Display
3
Tasten
9
Belüftungsschlitze
4
Verschlussschraube
10
Seitliche Abdeckung
5
Vordere Abdeckung
11
Belüftungsschlitze
6
Auffangschale
1
EIN/AUS
3
START/PAUSE
2
Cleaning (Reinigung)

7
DE
INBETRIEBNAHME UND ALLGEMEINE
BEDIENUNG
Hinweis: Reinigen Sie alle Teile, die mit Eiscreme in Berührung kommen, vor
dem Gebrauch gründlich, einschließlich Kühleimer, Mischventilatorügel,
Auslaufdichtring, Auslaunnenhaube, Trichter usw. Vergewissern Sie sich vor der
Reinigung, dass der Stecker aus der Steckdose gezogen wurde.
Wenn Sie Eiscreme herstellen, stellen Sie das Gerät auf eine ebene Fläche, um
sicherzustellen, dass der Kompressor der Maschine richtig funktioniert.
Allgemeine Anleitung zum Herstellen von Eiscreme
Die Eiscreme kann nach einem individuellen Rezept oder nach dem beigefügten Rezept
(siehe Kapitel Eis-Rezepte) zubereitet werden. Die Zutaten müssen vorher nicht im
Gefrierschrank eingefroren werden. Der eingebaute Kompressor der Maschine kann die
Zutaten direkt einfrieren und zu Eiscreme verarbeiten.
1. Installieren Sie den Mischventilatorügel an der Antriebswellenbohrung.
2. Die Griffbaugruppe ist vorinstalliert.
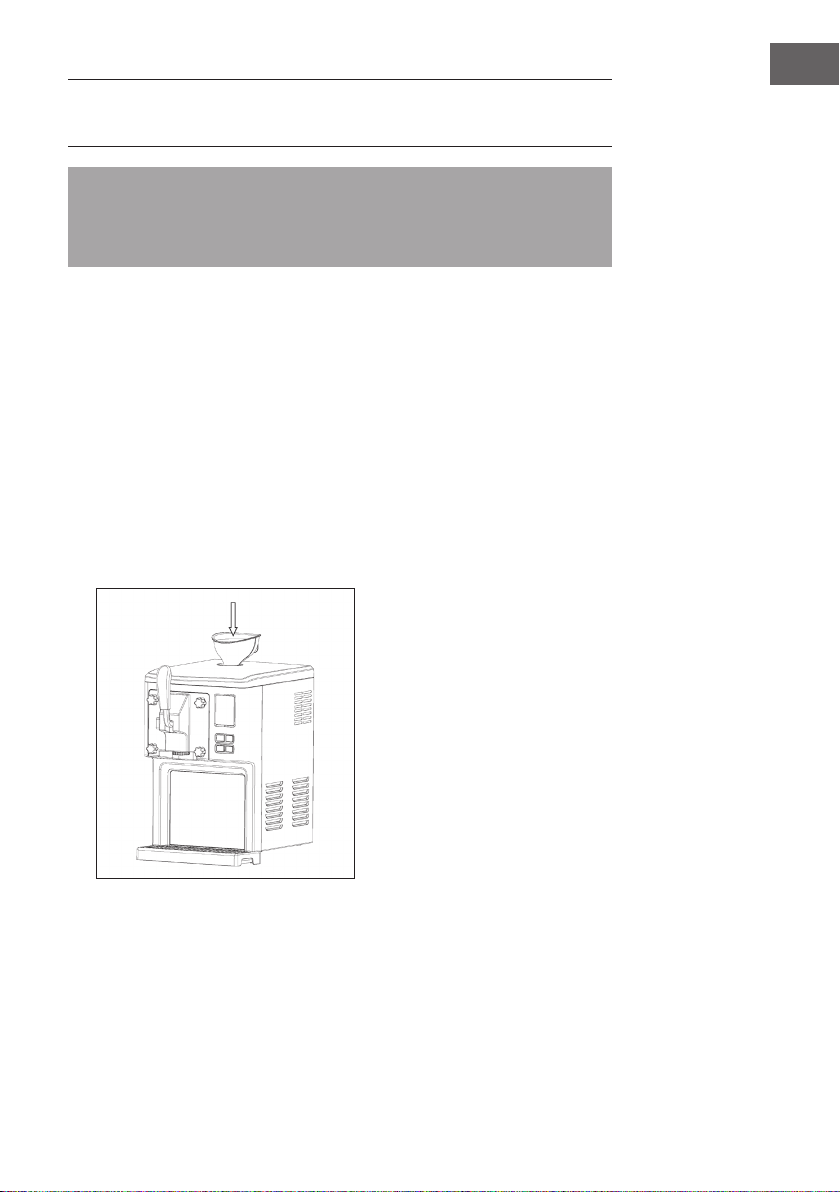
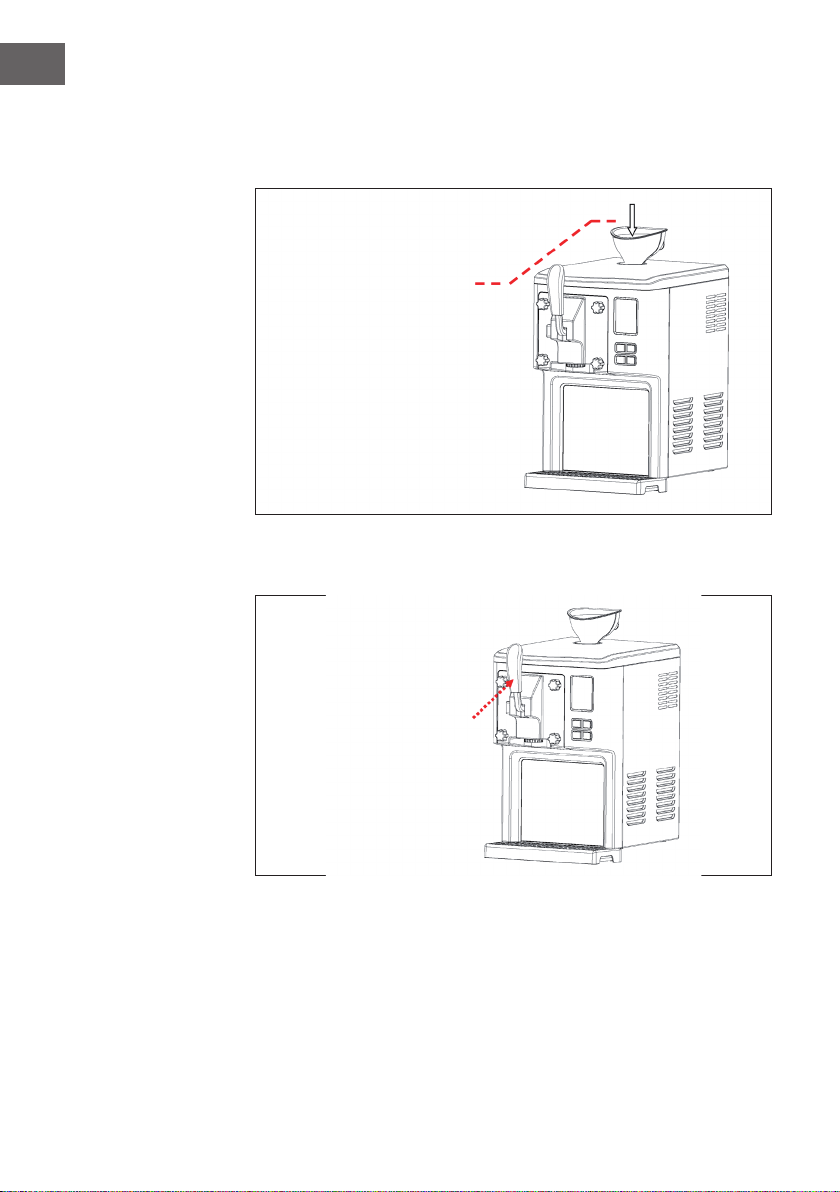
3. Geben Sie die entsprechende Menge gleichmäßig gemischte Eiszutaten in den
Trichter.
4. Entfernen Sie den Trichter und setzen Sie den Stöpsel in das Loch ein.

8
DE
5. Drücken Sie auf den EIN/AUS-Schalter an der Rückseite des Geräts.
6. Die Maschine beginnt mit der Eiszubereitung. Sie können während des
Produktionsprozesses noch weitere Gewürze hinzufügen, wobei Sie die Zugabe
von körnigen Materialien vermeiden sollten, um die Öffnungen nicht zu verstopfen.
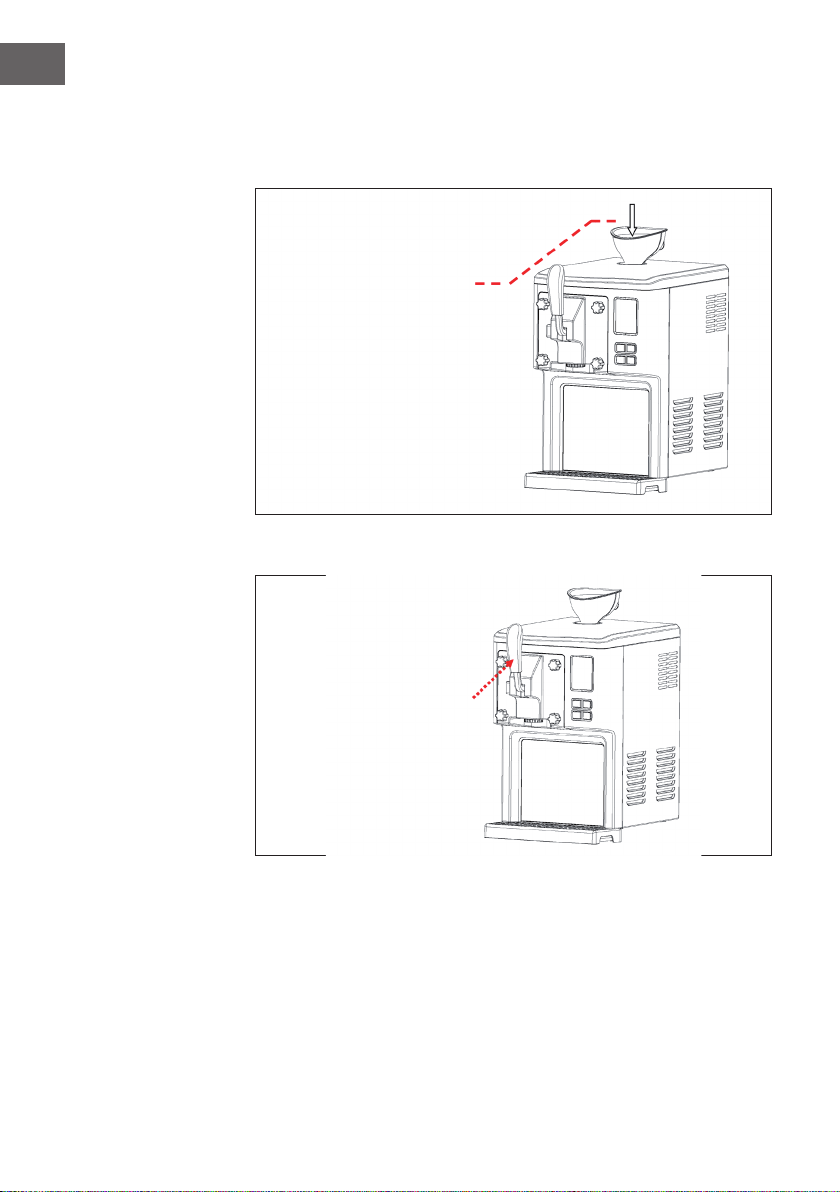
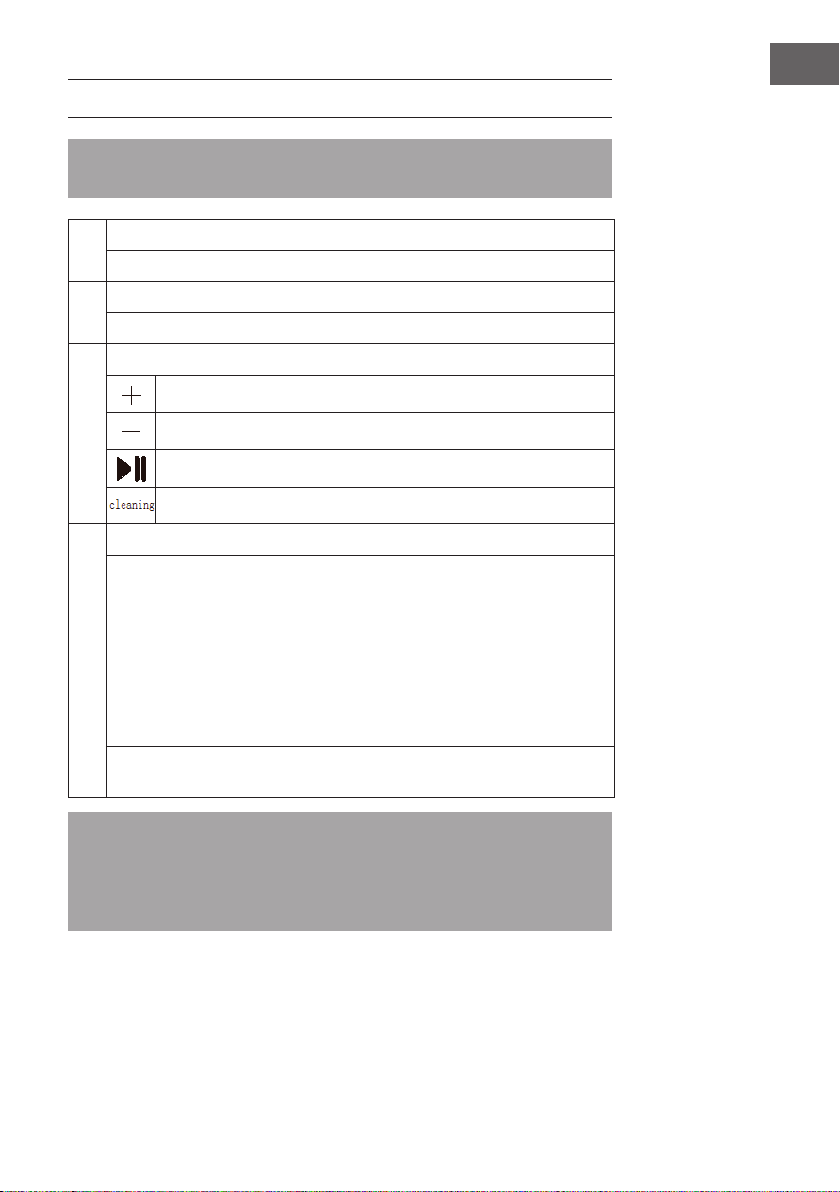
7. Wenn die Eiscreme fertig ist, ertönt ein Signalton. Ziehen Sie am Griff, um das Eis
zu entnehmen.
8. Sobald Sie die Eiscreme entnommen haben, können Sie weitere Eiscreme
zubereiten.
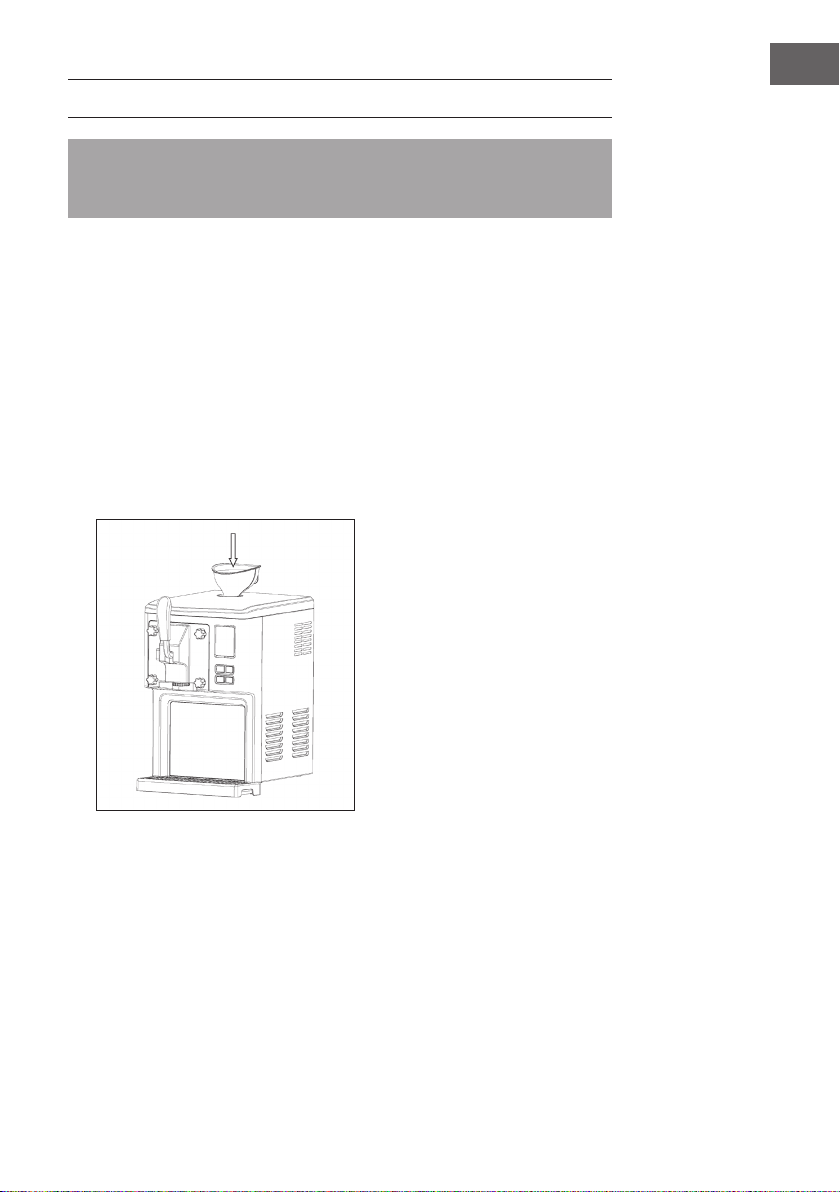
Entfernen Sie den Stöpsel
und setzen Sie den
Trichter ein, um während
der Zubereitung weitere
Zutaten oder Eissauce
hinzuzugeben.
Am Griff ziehen

9
DE
BEDIENUNG UND FUNKTIONEN
Hinweis: Vor und nach der Zubereitung des Eises muss das Gerät mit der
Reinigungsfunktion gereinigt werden (siehe Kapitel „Reinigung und Pege“).
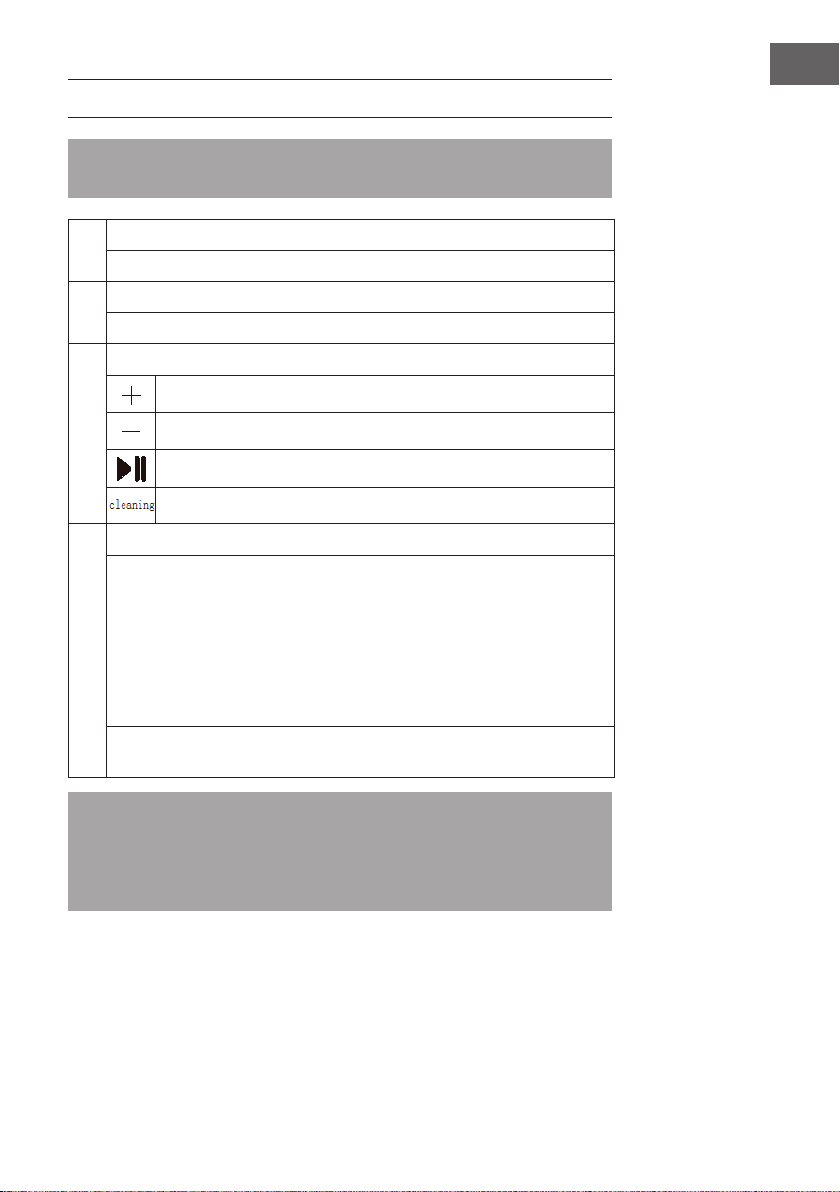
1 Stromanschluss
Stecken Sie den Stecker in die Steckdose.
2 Gerät einschalten
Drücken Sie auf den EIN/AUS-Schalter an der Rückseite des Geräts.
3 Funktion wählen
Zeit erhöhen
Zeit verringern
Gerät starten / pausieren
Reinigungsfunktion
4 Eiszubereitung starten
Wenn Sie den Stecker Einstecken und den EIN/AUS-Schalter drücken zeigt
das Display die voreingestellte Zeit von [40:00] Minuten an. Das Eis-Symbol
blinkt und die Hintergrundbeleuchtung geht kurz an. Benutzen Sie die Tasten [+]
und [-], um die Zeit anzupassen. Sobald Sie die START-Taste drücken, startet
der Zubereitungszuklus. Die Eiszubereitung dauert 40 Minuten, gefolgt von
einer 10-minütigen Reinigung. Drücken Sie während der Zubereitung START/
PAUSE, um die Zubereitung kurz anzuhalten. Drücken Sie die Taste erneut, um
mit der Zubereitung fortzufahren. Drücken Sie während der Zubereitung lang
auf START/PAUSE, um in den Standby-Modus zu wechseln.
Um zu verhindern, dass das Eis nach der Herstellung schmilzt, wird das
Eis nach der Herstellung automatisch 3 Stunden lang gekühlt.
Hinweis: Um Auslaufen zu vermeiden, achten Sie darauf, dass die Eiszutaten 60%
des Fassungsvermögens (900 g) nicht überschreiten, da während der Eiszubereitung
eine gewisse Ausdehnung stattndet. Bei kontinuierlicher Herstellung darf das
Gewicht bei erneuter Zugabe von Zutaten 600 g nicht überschreiten, da ein Teil des
Eises im Eisbehälter zurückbleibt.

10
DE
Motorschutzfunktion
Wenn die Produktionszeit länger ist, wird das Eis immer härter und der Rührmotor kann
unter Umständen blockieren. Das Gerät überwacht automatisch die Temperatur des
Rührmotors und schaltet ihn im Notfall automatisch ab, um ihn vor einer Überhitzung zu
schützen.
REINIGUNG UND PFLEGE
Reinigungsfunktion
Hinweis: Vor und nach der Zubereitung des Eises muss das Gerät mit der
Reinigungsfunktion gereinigt werden.
Gießen Sie dafür etwa 1 Liter Wasser in den Trichter. Drücken Sie dann die Taste
CLEANING, um in den Reinigungsmodus zu gelangen. Nach 1Minute wird das
Wasser freigesetzt und das Gerät wird gereinigt. Die Reinigung wird 5 Mal wiederholt.
Entfernen Sie das Wasser nach der vollendeten Reinigung.
Reinigung der Griffkonstruktion
Die Griffkonstruktion kann ebenfalls entfernt und gereinigt werden. Nach der
Reinigung müssen der innere Lauf und die Griffeinheit vollständig getrocknet sein, um
unangenehme Gerüche durch Wasserreste zu vermeiden.
11
DE
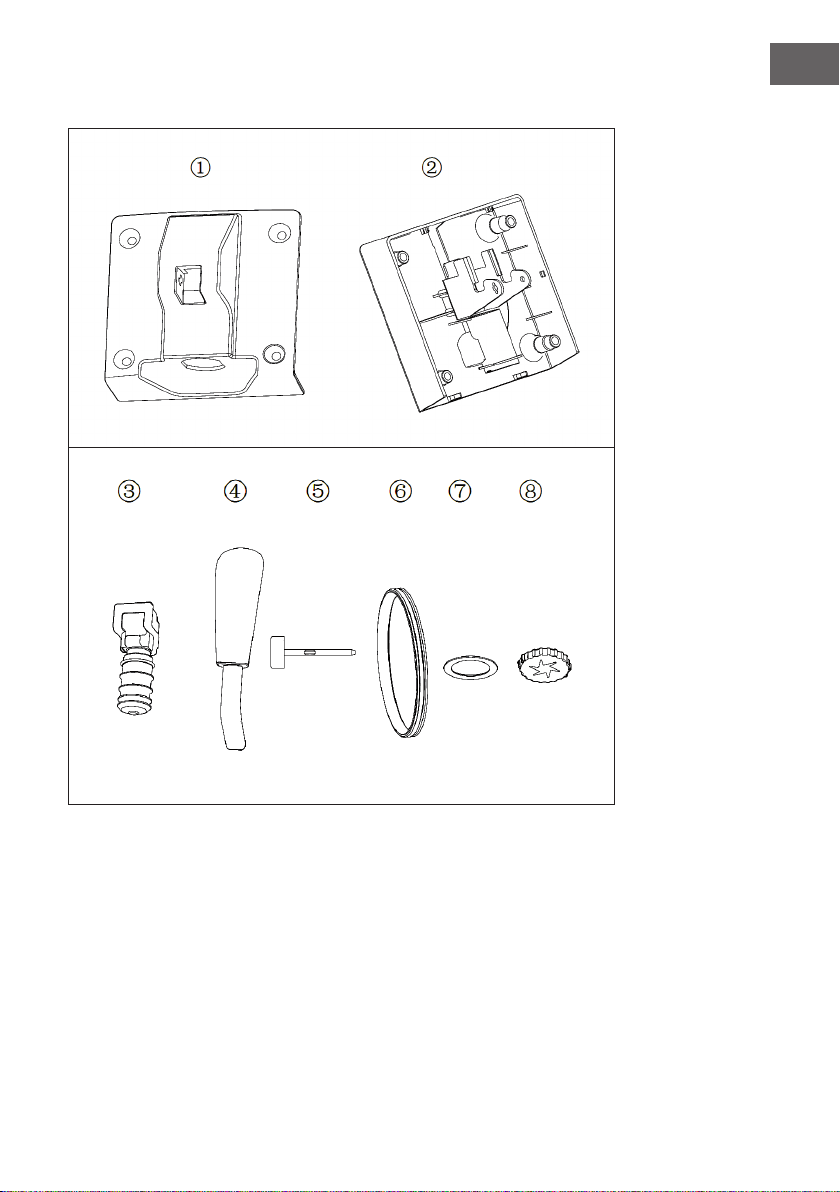
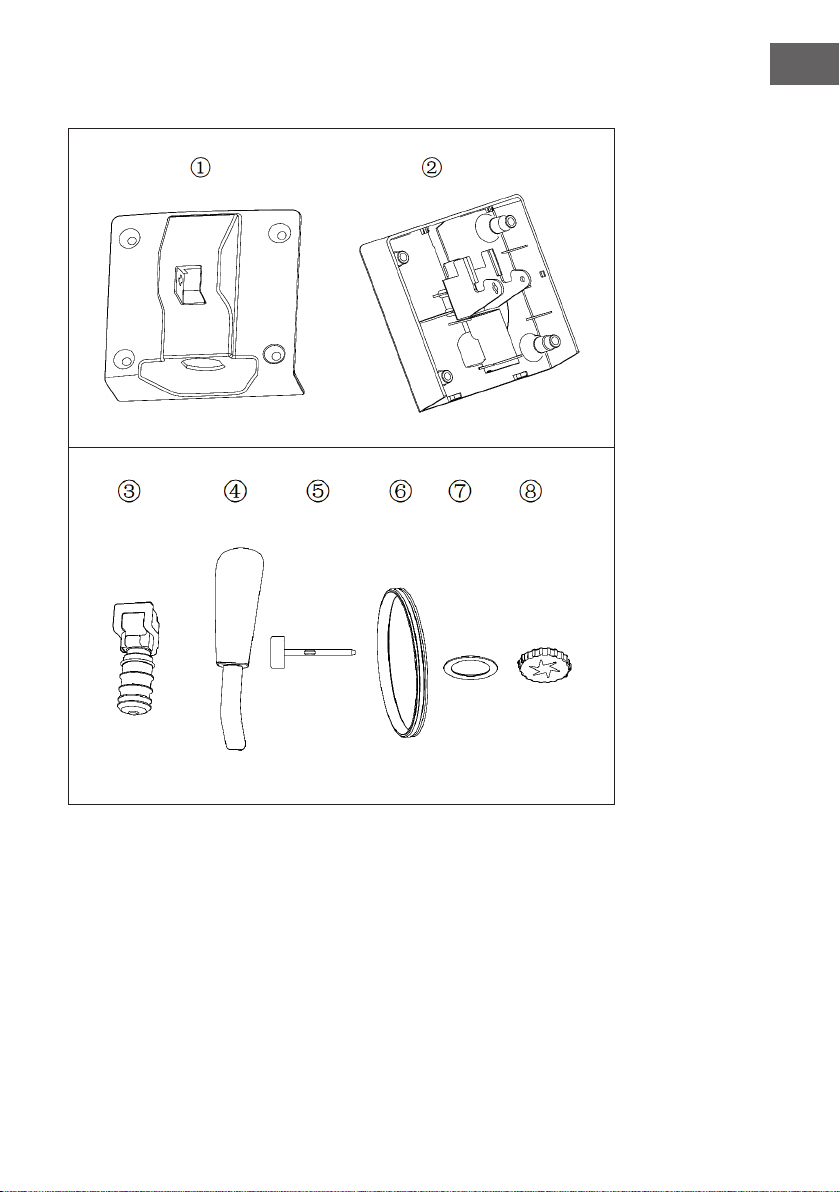
Bauteile der Griffeinheit:
12
DE
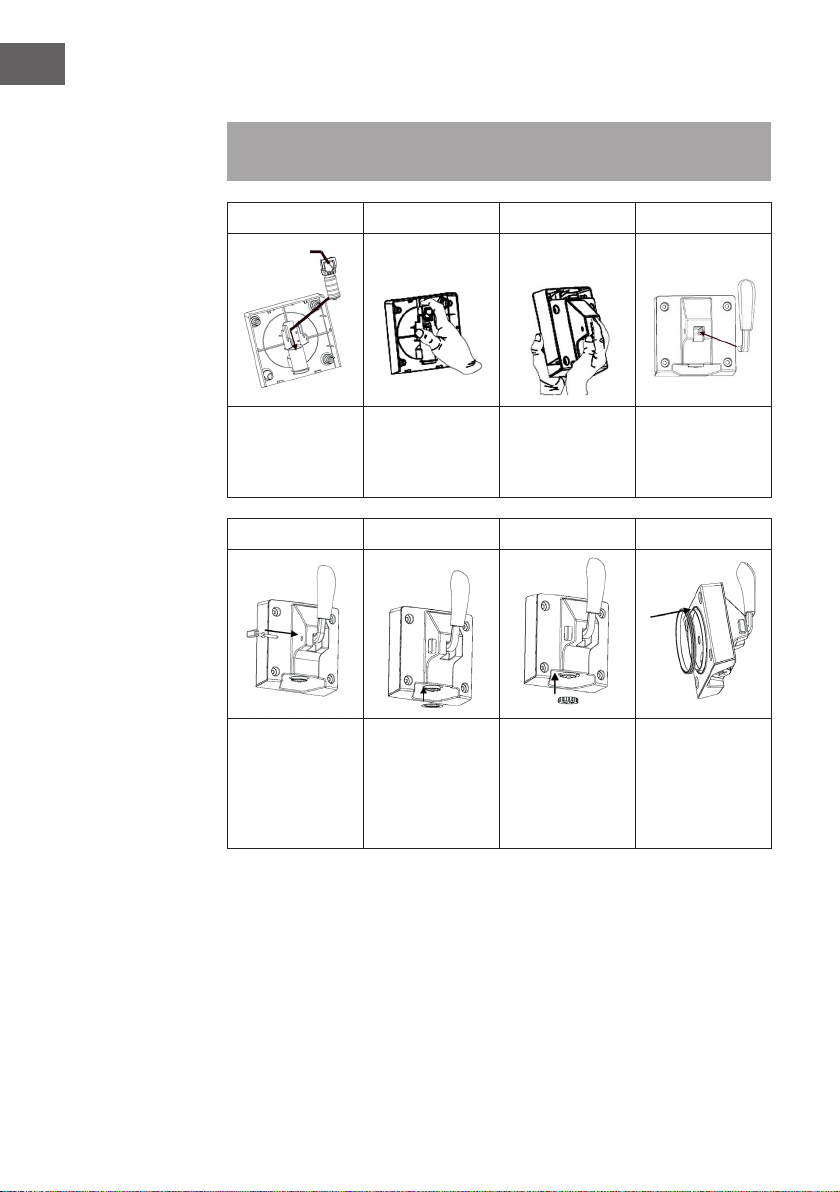
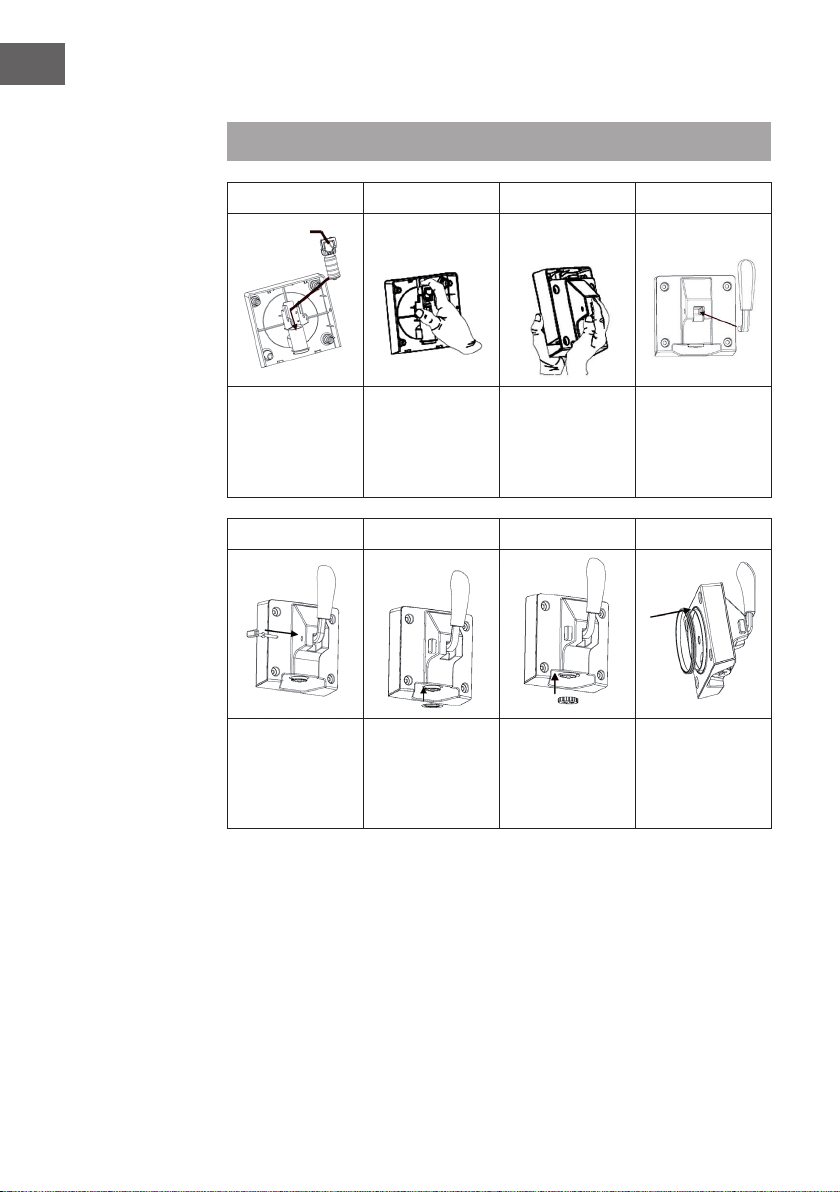
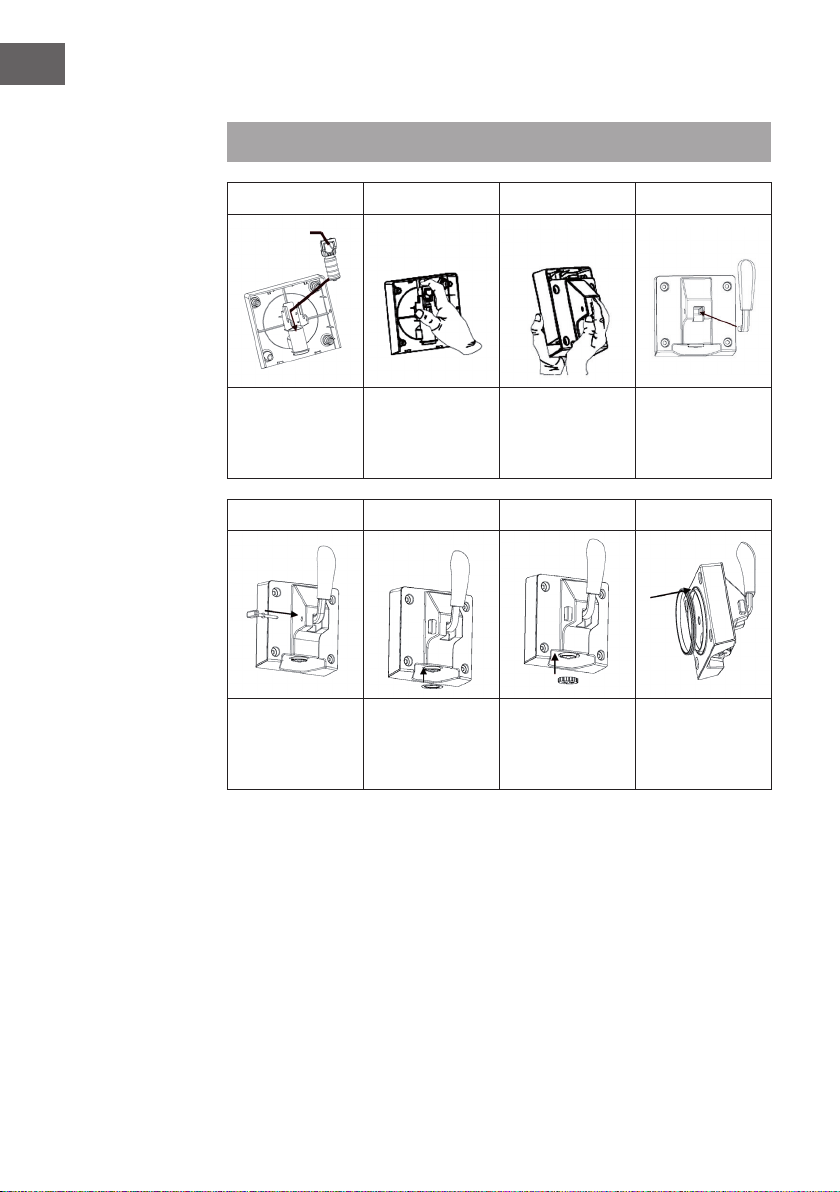
Zusammenbau der Griffeinheit:
Hinweis: Um das Gerät auseinander zu bauen, gehen Sie in umgekehrter
Reihenfolge vor.
1 2 3 4
Bei der Befestigung
von Bauteil 3 muss
der Schlitz nach
oben zeigen.
Drücken Bauteil3
mit der Hand in
Bauteil1.
Befestigen Sie
Bauteil1 an
Bauteil 2.
Befestigen Sie
Bauteil4 an
Bauteil3.
5 6 7 8
Befestigen Sie
Bauteil 5 an
Bauteil1.
Befestigen Sie
Bauteil7 an
Bauteil2.
Befestigen
Sie Bauteil 8
an Bauteil2,
indem Sie es im
Uhrzeigersinn
festdrehen.
Befestigen Sie zum
Schluss Bauteil6
an Bauteil2.
Der Schlitz
zeigt nach
oben

13
DE
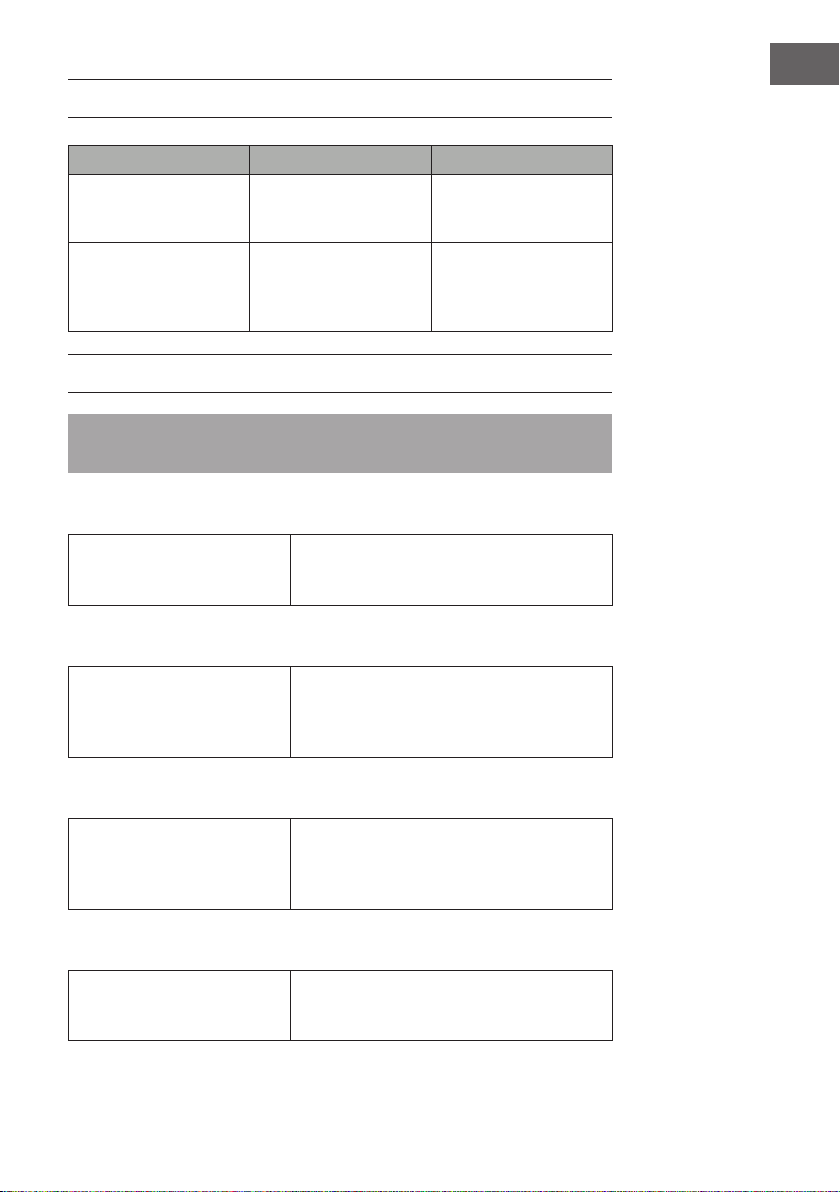
FEHLERBEHEBUNG
Problem Mögliche Ursache Lösungsansatz
Das Eis lässt sich nach
der Eiszubereitung nicht
entfernen.
Das Eis ist zu hart. Warten Sie bis das
Eis angetaut ist und
entnehmen Sie es dann.
Der Griff lässt sich beim
Zusammenbau nicht richtig
einsetzen.
Der Mischventilatorügel
ist nicht richtig montiert.
Installieren Sie den
Ventilatorügel an der
Antriebswellenbohrung.
EISREZEPTE
Hinweis: Achten Sie immer darauf, dass der Zutatenmenge 60% der Füllmenge nicht
überschreiten, da sich das Eis während der Zubereitung ausdehnt.
Grundrezept
• 300 g Wasser
• 200 g Milchpulver
• 300 g Sahne
Milchpulver im Wasser auösen und zusammen
mit den restlichen Zutaten in den Trichter gießen.
Erdbeereis
• 120 g Wasser
• 180 g Milchpulver
• 260 g Sahne
• 220 g Erdbeeren
Erdbeeren waschen und zusammen mit
dem Wasser und dem Milchpulver im Mixer
vermischen. Zusammen mit der Sahne in den
Trichter gießen.
Mangoeis
• 200 g Wasser
• 200 g Milchpulver
• 300 g Sahne
• 160 g Mango
Mango schälen und zusammen mit dem Wasser
und dem Milchpulver im Mixer vermischen.
Zusammen mit der Sahne in den Trichter gießen.
Milcheis
• 360 g Milch
• 100 g Zucker, weiß
• 300 g Sahne
Milch, Zucker und Sahne verrühren, bis sich der
Zucker vollständig aufgelöst hat und dann alles
zusammen in den Trichter gießen.

14
DE
HINWEISE ZUR ENTSORGUNG
Wenn es in Ihrem Land eine gesetzliche Regelung zur
Entsorgung von elektrischen und elektronischen Geräten
gibt, weist dieses Symbol auf dem Produkt oder auf der
Verpackung darauf hin, dass dieses Produkt nicht im
Hausmüll entsorgt werden darf. Stattdessen muss es zu
einer Sammelstelle für das Recycling von elektrischen
und elektronischen Geräten gebracht werden. Durch
regelkonforme Entsorgung schützen Sie die Umwelt und die
Gesundheit Ihrer Mitmenschen vor negativen Konsequenzen.
Informationen zum Recycling und zur Entsorgung dieses
Produkts, erhalten Sie von Ihrer örtlichen Verwaltung oder
Ihrem Hausmüllentsorgungsdienst.
HERSTELLER & IMPORTEUR (UK)
Hersteller:
Chal-Tec GmbH, Wallstraße 16, 10179 Berlin, Deutschland.
Importeur für Großbritannien:
Chal-Tec UK limited
Unit 6 Riverside Business Centre
Brighton Road
Shoreham-by-Sea
BN43 6RE
United Kingdom

15
EN
Dear Customer,
Congratulations on purchasing this device. Please read the
following instructions carefully and follow them to prevent
possible damages. We assume no liability for damage caused
by disregard of the instructions and improper use. Scan the QR
code to get access to the latest user manual and more product
information.
CONTENT
Safety Instructions16
Product Overview18
Commissioning and General Operation19
Operation and Functions21
Cleaning and Maintenance22
Troubleshooting25
Ice Cream Recipes25
Hints on Disposal26
Producer26
TECHNICAL DATA
Order number 10034911. 10034912
Power supply 220-240 V ~ 50 Hz
Capacity 1.5 L

16
EN
SAFETY INSTRUCTIONS
• Read all the safety and operating instructions carefully and retain them for future
reference.
• Ensure the voltage is compliant with the voltage range stated on the rating label,
and ensure the earthing of the socket is in good condition.
• If the supply cord is damaged, it must be replaced by the manufacturer or its service
agent or a similarly qualied person in order to avoid a hazard.
• Do not upend this product or incline it over a 45° angle.
• To protect against risk of electric shock, do not pour water on cord, plug and
ventilation, immerse the appliance in water or any other liquid.
• Unplug the appliance after using or before cleaning.
• Keep the appliance 8 cm from other objects to ensure the good heat releasing.
• Do not use the accessories which are not recommended by Manufacturer.
• This device may be only used by children 8 years old or older and persons with
limited physical, sensory and mental capabilities and / or lack of experience
and knowledge, provided that they have been instructed in use of the device by a
responsible person who understands the associated risks.
• Do not use the appliance close by ames, hot plates or stoves.
• Do not switch on the power button frequently (ensure 5 min. interval at least) to
avoid the damage of compressor.
• Metal sheet or other electric objects are not allowed to be inserted into the
appliance to avoid re and short circuit.
• When take out the ice cream, do not knock the barrel or edge of barrel to protect
the barrel from damage.
• Do not switch on the power before install well the barrel or blender blade.
• The initial temperature of the ingredients is 25±5°C. Do not put the ingredients into
freezer for pre-freeze, as it will easily make the blender blade blocked before the ice
cream is in good condition.
• Do not remove the blender blade when the appliance is on working.
• Do not use outdoors.
• Never clean with scouring powders or hard implements.
• Do not store explosive substances such as aerosol cans with a ammable propellant
in this appliance.
• This appliance is intended to be used in household and similar applications.

17
EN
Special Notes
• When positioning the unit, make sure that the power cord is not pinched or
damaged.
• Make sure that there are no multiple sockets or power supplies on the back of the
unit.
To avoid contamination of food, please follow the instructions below:
• Regularly clean surfaces that may come into contact with food.
WARNING
When using, servicing and disposing of the unit, pay attention to the
left symbol on the rear of the unit or on the compressor. This symbol
warns of possible res. There are ammable substances in the
refrigerant lines and in the compressor. Keep the appliance away
from sources of re during use, maintenance and disposal.

18
EN
PRODUCT OVERVIEW
1
Funnel
7
Upper cover
2
Handle unit
8
Display
3
Keys
9
Ventilation slots
4
Locking screw
10
Side cover
5
Front cover
11
Ventilation slots
6
Collecting tray
1
ON/OFF
3
START/PAUSE
2
Cleaning
19
EN
COMMISSIONING AND GENERAL OPERATION
Note: Thoroughly clean all parts that come into contact with ice cream before use,
including the cooling bucket, mixing fan blades, outlet sealing ring, inner outlet hood,
funnel, etc. Make sure that the plug is unplugged from the outlet before cleaning.
When making ice cream, place the machine on a at surface to ensure that the
machine‘s compressor is working properly.
General instructions for making ice cream
The ice cream can be prepared according to an individual recipe or according to
the recipe enclosed (see chapter Ice Cream Recipes). It is not necessary to freeze the
ingredients in the freezer beforehand. The machine‘s built-in compressor can freeze the
ingredients directly and process them into ice cream.
1. Install the mixing fan blade on the drive shaft bore.
2. The handle assembly is pre-installed.
3. Pour the appropriate amount of evenly mixed ice cream ingredients into the funnel.
4. Remove the funnel and insert the plug into the hole.

20
EN
5. Press the ON/OFF switch on the back of the unit.
6. The machine starts to prepare ice cream. You can add more spices during the
production process, but you should avoid adding granular materials to avoid
clogging the openings.
7. When the ice cream is ready, a beep sounds. Pull the handle to remove the ice
cream.
8. Once you have removed the ice cream, you can prepare more ice cream.
Remove the stopper and
insert the funnel to add
more ingredients or ice
sauce during preparation.
Pull the handle
21
EN
OPERATION AND FUNCTIONS
Note: Before and after preparing the ice cream, the appliance must be cleaned using
the cleaning function (see chapter „Cleaning and Care“).
1 Power connection
Insert the plug into the socket.
2 Switch on the device
Press the ON/OFF switch on the back of the unit.
3 Select function
Increase time
Reduce time
Start / Pause device
Purication function
4 Start ice preparation
When you plug in the connector and press the ON/OFF switch, the display
shows the preset time of [40:00] minutes. The ice symbol ashes and the
backlight briey goes on. Use the [+] and [-] buttons to adjust the time. As soon
as you press the START button, the preparation timer starts. Ice preparation
takes 40 minutes, followed by 10 minutes cleaning. During preparation, press
START/PAUSE to pause the preparation briey. Press the button again to
resume preparation. During preparation, press START/PAUSE for a long time to
switch to standby mode.
To prevent the ice cream from melting after preparation, the ice cream is
automatically cooled for 3 hours after preparation.
Note: To prevent leakage, make sure that the ice cream ingredients do not
exceed 60% of the capacity (900 g), as some expansion occurs during ice cream
preparation. In the case of continuous production, the weight when ingredients are
added again must not exceed 600 g, as part of the ice cream remains in the ice
cream container.

22
EN
Motor protection function
If the production time is longer, the ice cream becomes harder and harder and the stirrer
motor may block under certain circumstances. The appliance automatically monitors the
temperature of the stirring motor and switches it off automatically in an emergency to
protect it from overheating.
CLEANING AND MAINTENANCE
Cleaning function
Note: Before and after preparing the ice cream, the appliance must be cleaned using
the cleaning function.
Pour about 1 litre of water into the funnel. Then press the CLEANING button to enter the
cleaning mode. After 1 minute the water is released and the appliance is cleaned. The
cleaning is repeated 5 times. Remove the water after the cleaning is complete.
Cleaning the handle construction
The handle construction can also be removed and cleaned. After cleaning, the inner
barrel and the handle unit must be completely dry to avoid unpleasant odours caused
by water residues.

23
EN
Components of the handle unit:

24
EN
Assembly of the handle unit:
Note: To disassemble the unit, proceed in reverse order.
1 2 3 4
When xing
component 3, the
slot must point
upwards.
Press component 3
into component 1
by hand.
Fasten
component1 to
component 2.
Fasten
component4 to
component 3.
5 6 7 8
Fasten
component5 to
component 1.
Fasten
component7 to
component 2.
Fasten
component8 to
component 2 by
turning it clockwise.
Finally fasten
component 6 to
component 2.
The slot has
to point
upwards

25
EN
TROUBLESHOOTING
Problem Possible cause Approach
The ice cannot be removed
after the ice cream
preparation.
The ice is too hard. Wait until the ice has
melted and then remove it.
The handle cannot be
inserted properly during
assembly.
The mixing fan blade is not
mounted correctly.
Install the fan blade on the
drive shaft bore.
ICE CREAM RECIPES
Note: Always make sure that the quantity of ingredients does not exceed 60% of the
lling quantity, as the ice cream expands during preparation.
Basic recipe
• 300 g water
• 200 g milk powder
• 300 g cream
Dissolve milk powder in water and pour into the
funnel together with the remaining ingredients.
Strawberry ice cream
• 120 g water
• 180 g milk powder
• 260 g cream
• 220 g strawberries
Wash the strawberries and mix them with the
water and the milk powder in a blender. Pour into
the funnel together with the cream.
Mango ice cream
• 200 g water
• 200 g milk powder
• 300 g cream
• 160 g mango
Peel the mango and mix in the blender together
with the water and milk powder. Pour into the
funnel together with the cream.
Milk ice cream
• 360 g milk
• 100 g sugar, white
• 300 g cream
Mix milk, sugar and cream until the sugar is
completely dissolved and then pour everything
together into the funnel.

26
EN
DISPOSAL CONSIDERATIONS
If there is a legal regulation for the disposal of electrical
and electronic devices in your country, this symbol on the
product or on the packaging indicates that this product must
not be disposed of with household waste. Instead, it must be
taken to a collection point for the recycling of electrical and
electronic equipment. By disposing of it in accordance with
the rules, you are protecting the environment and the health of
your fellow human beings from negative consequences. For
information about the recycling and disposal of this product,
please contact your local authority or your household waste
disposal service.
MANUFACTURER & IMPORTER (UK)
Manufacturer:
Chal-Tec GmbH, Wallstrasse 16, 10179 Berlin, Germany.
Importer for Great Britain:
Chal-Tec UK limited
Unit 6 Riverside Business Centre
Brighton Road
Shoreham-by-Sea
BN43 6RE
United Kingdom

27
ES
Estimado cliente:
Le felicitamos por la adquisición de este producto. Lea
atentamente el siguiente manual y siga cuidadosamente las
instrucciones de uso con el n de evitar posibles daños. La
empresa no se responsabiliza de los daños ocasionados por
un uso indebido del producto o por haber desatendido las
indicaciones de seguridad. Escanee el código QR para obtener
acceso al manual de usuario más reciente y otra información
sobre el producto:
ÍNDICE DE CONTENIDOS
Indicaciones de seguridad28
Visión general del aparato30
Puesta en funcionamiento y manejo general31
Uso y funciones33
Limpieza y cuidado34
Resolución de problemas37
Recetas de helados37
Retirada del aparato38
Fabricante38
DATOS TÉCNICOS
Número de artículo 10034911. 10034912
Suministro eléctrico 220-240 V ~ 50 Hz
Capacidad 1.5 L

28
ES
INDICACIONES DE SEGURIDAD
• Lea atentamente estas indicaciones y conserve el manual de instrucciones para
consultas posteriores.
• Antes de utilizar el aparato, compruebe la tensión del mismo en la placa técnica y
conéctelo a tomas de corriente que se adecuen a esos valores.
• Si el cable de alimentación está dañado deberá ser reparado por un servicio
técnico autorizado o una persona igualmente cualicada.
• No vuelque el aparato ni lo incline más de 45°.
• Nunca sumerja el aparato completamente en agua ni en ningún otro líquido y
asegúrese de que ni el enchufe ni el cable de alimentación se mojan.
• Desenchufe el aparato cuando no lo utilice o al limpiarlo.
• Deje una distancia de 8 cm alrededor de la máquina para garantizar suciente
ventilación.
• Utilice accesorios expresamente recomendados por el fabricante.
• Este aparato puede ser utilizado por niños mayores de 8 años y personas con
discapacidades físicas, sensoriales y mentales y/o con falta de experiencia y
conocimientos, siempre y cuando hayan sido instruidos sobre el uso del aparato y
comprendan los peligros y riesgos asociados.
• No utilice el aparato cerca de fuentes de ignición ni fogones u hornos calientes.
• No apague y encienda el aparato varias veces seguidas. Espere durante al menos
5 minutos antes de encender el aparato de nuevo para no dañar el compresor.
• No introduzca chapas ni otros objetos eléctricos en el aparato para evitar un
incendio o un cortocircuito.
• Al sacar el helado no golpee el recipiente ni el canto del mismo para no dañarlo.
• Encienda el aparato cuando haya colocado el recipiente y la pala mezcladora.
• La temperatura inicial de los ingredientes es de 25±5 °C. No congele previamente
los ingredientes, podría bloquear la pala mezcladora antes de que el helado esté
listo.
• No retire la pala mezcladora mientras esté en funcionamiento.
• No utilice este aparato al aire libre.
• No limpie el aparato con polvos o esponjas abrasivas.
• No almacene en el aparato sustancias explosivas, como sprays con gases
propulsores inamables.
• Este aparato no está indicado para un uso comercial, sino doméstico o similar.

29
ES
Notas especiales
• Cuando coloque la unidad, asegúrese de que el cable de alimentación no esté
pellizcado ni dañado.
• Asegúrese de que no haya varias tomas o fuentes de alimentación en la parte
posterior de la unidad.
Para evitar la contaminación de los alimentos, siga las siguientes instrucciones:
• Limpie regularmente las super cies que puedan entrar en contacto con los
alimentos.
ADVERTENCIA
Cuando utilice, repare y elimine la unidad, preste atención al símbolo
izquierdo en la parte posterior de la unidad o en el compresor. Este
símbolo advierte de posibles incendios. Hay sustancias in amables en
las líneas de refrigerante y en el compresor. Mantenga el aparato
alejado de fuentes de fuego durante su uso, mantenimiento y
eliminación.
30
ES
VISIÓN GENERAL DEL APARATO
1
Embudo
7
Tapa superior
2
Mango
8
Pantalla
3
Teclas
9
Ranuras de ventilación
4
Tornillo de bloqueo
10
Cubierta lateral
5
Cubierta delantera
11
Ranuras de ventilación
6
Bandeja antigoteo
1
ON/OFF
3
INICIO/PAUSA
2
Cleaning (Limpieza)
31
ES
PUESTA EN FUNCIONAMIENTO Y MANEJO
GENERAL
Nota: Limpie todas las piezas que entran en contacto con el helado antes de su
uso, incluido el recipiente de refrigeración, las aspas del ventilador de mezcla, la
junta selladora de salida, la campana interior de salida, el embudo etc. Antes de la
limpieza, asegúrese de que el enchufe se haya desconectado.
Cuando fabrique helados, coloque el aparato en una supercie plana para garantizar
que el compresor de la máquina funcione correctamente.
Instrucciones generales para preparar helado
El helado puede prepararse siguiendo una receta individual o una de las recetas
adjuntas (consulte el capítulo Recetas de helado). Los ingredientes no deben congelarse
previamente en el congelador. El compresor integrado de la máquina puede congelar
directamente los alimentos y procesar helados.
1. Instale el aspa del ventilador de mezcla en el oricio del eje de accionamiento.
2. El conjunto del mango ya está instalado previamente.
3. Introduzca la cantidad correspondiente de los ingredientes mezclados para el
helado en el embudo.
4. Retire el embudo y coloque los tapones en el oricio.
32
ES
5. Pulse el interruptor on/off situado en la parte trasera del aparato.
6. La máquina comienza a preparar helado. Durante el proceso de producción,
todavía puede añadir más ingredientes, si bien debe evitar la adición de
materiales de grano para no obstaculizar los oricios.
7. Cuando el helado esté listo, suena una señal. Tire del mango para retirar el helado.
8. En cuanto haya retirado el helado, puede preparar más helado.
Retire el tapón y coloque
el embudo para añadir
más ingredientes o siropes
durante la preparación.
Tire de la manija

33
ES
USO Y FUNCIONES
Nota: Antes y después de la preparación de helado, el aparato debe limpiarse con
su función de limpieza (consulte el capítulo „Limpieza y cuidado“).
1 Toma para suministro eléctrico
Conecte el enchufe a la toma de corriente.
2 Encender el aparato
Pulse el interruptor on/off situado en la parte trasera del aparato.
3 Seleccionar función
Aumentar tiempo
Reducir tiempo
Iniciar/pausar aparato
Función de limpieza
4 Iniciar la preparación del helado
Si conecta el enchufe y presiona ON/OFF, la pantalla muestra el tiempo
predeterminado de [40:00]. El símbolo del helado parpadea y la iluminación
de fondo se enciende brevemente. Utilice los botones [+] y [-] para ajustar
el tiempo. En cuanto pulsa el botón START, se inicia el ciclo de preparación.
La preparación de helado dura 40 minutos, seguida de una limpieza de
10 minutos. Durante la preparación, pulse START/PAUSE para detener
temporalmente la preparación. Pulse de nuevo el botón para continuar con
la preparación. Durante la producción del helado, pulse START/PAUSE para
cambiar al modo standby.
Para evitar que el helado se derrita tras la preparación, este se enfriará
automáticamente durante 3 horas tras su fabricación.
Nota: Para evitar vertidos, asegúrese de que los ingredientes del helado no superen
el 60% de la capacidad (900 g), pues durante la preparación se producirá una
cierta expansión. Con una fabricación continuada, el peso de una nueva tanda de
ingredientes no debe superar los 600 g, pues una parte del helado permanece en el
recipiente.

34
ES
Función de protección del motor
Si el tiempo de producción es más largo, el helado se endurecerá cada vez más
y el motor mezclador podría bloquearse. El aparato controla automáticamente la
temperatura del motor removedor y se apaga automáticamente en caso de emergencia
para protegerlo de un sobrecalentamiento.
LIMPIEZA Y CUIDADO
Función de limpieza
Nota: Antes y después de la preparación de helado, el aparato debe limpiarse con
su función de limpieza.
Para ello, vierta 1 litro de agua en el embudo. A continuación, pulse el botón
CLEANING para acceder al modo de limpieza. Tras 1 minuto, el agua se libera y el
aparato se limpia. Este proceso se repite 5 veces. Deseche el agua cuando se complete
la limpieza.
Limpieza de la estructura del mango
La estructura del mango también se puede desmontar y limpiar. Tras la limpieza, el
circuito interior y el mango deben secarse para evitar malos olores provocados por los
restos de agua.
35
ES
Componentes del mango:
36
ES
Montaje del mango:
Nota: Para desmontar el aparato, proceda del modo inverso.
1 2 3 4
Con la jación
del componente
3, la ranura debe
orientarse hacia
arriba.
Con la mano,
presione el
componente 3 en
el componente 1.
Fije el componente
1 en el
componente 2.
Fije el componente
4 en el
componente 3.
5 6 7 8
Fije el componente
5 en el
componente 1.
Fije el componente
7 en el
componente 2.
Fije el componente
8 en el
componente 2
enroscándolo en
sentido horario.
Fije el componente
6 en el
componente 2.
La ranura está
apuntando
hacia arriba
37
ES
RESOLUCIÓN DE PROBLEMAS
Problema Posible causa Solución propuesta
El helado no se puede
retirar tras su preparación.
El helado está muy duro. Espere a que el helado se
descongele y retírelo.
El mango no se puede
colocar correctamente
durante el montaje.
El aspa del ventilador de
mezcla no está montada
correctamente.
Instale el aspa del
ventilador de mezcla
en el oricio del eje de
accionamiento.
RECETAS DE HELADOS
Nota: Asegúrese siempre de que la cantidad de ingredientes no supere el 60 % de
la capacidad máxima, pues durante la preparación la mezcla se expandirá.
Receta básica
• 300 g de agua
• 200 g de leche en polvo
• 300 g de nata
Disuelva la leche en polvo en agua e
introdúzcala con el resto de ingredientes en el
embudo.
Helado de fresa
• 120 g de agua
• 180 g de leche en polvo
• 260 g de nata
• 220 g de fresas
Lave las fresas y mézclelas con el agua y la
leche en polvo en la batidora. Junto con la nata,
viértalas en el embudo.
Helado de mango
• 200 g de agua
• 200 g de leche en polvo
• 300 g de nata
• 160 g de mango
Lave el mango y mézclelo con el agua y la
leche en polvo en la batidora. Junto con la nata,
viértalas en el embudo.
Helado de leche
• 360 g de leche
• 100 g de azúcar blanco
• 300 g de nata
Remueva la leche, el azúcar y la nata hasta que
se disuelva completamente el azúcar y luego
viértalo todo en el embudo.

38
ES
INDICACIONES SOBRE LA RETIRADA DEL
APARATO
Si en su país existe una disposición legal relativa a la
eliminación de aparatos eléctricos y electrónicos, este
símbolo estampado en el producto o en el embalaje
advierte que no debe eliminarse como residuo doméstico.
En lugar de ello, debe depositarse en un punto de recogida
de reciclaje de aparatos eléctricos y electrónicos. Una
gestión adecuada de estos residuos previene consecuencias
potencialmente negativas para el medio ambiente y la salud
de las personas. Puede consultar más información sobre el
reciclaje y la eliminación de este producto contactando con
su administración local o con su servicio de recogida de
residuos.
FABRICANTE E IMPORTADOR (REINO UNIDO)
Fabricante:
Chal-Tec GmbH, Wallstraße 16, 10179 Berlín, Alemania.
Importador para Gran Bretaña:
Chal-Tec UK limited
Unit 6 Riverside Business Centre
Brighton Road
Shoreham-by-Sea
BN43 6RE
United Kingdom

39
FR
Cher client,
Toutes nos félicitations pour l’acquisition de ce nouvel
appareil. Veuillez lire attentivement les instructions suivantes de
branchement et d’utilisation an d’éviter d’éventuels dommages.
Le fabricant ne saurait être tenu pour responsable des dommages
dus au non-respect des consignes de sécurité et à la mauvaise
utilisation de l’appareil. Scannez le QR-Code pour accéder à
la dernière version du mode d‘emploi et à d‘autres informations
concernant le produit:
SOMMAIRE
Consignes de sécurité40
Aperçu de l‘appareil42
Mise en marche et fonctionnement général43
Utilisation et fonctions45
Nettoyage et entretien46
Résolution des problèmes49
Recettes de crème glacée49
Conseils pour le recyclage50
Fabricant50
FICHE TECHNIQUE
Numéro d'article 10034911. 10034912
Alimentation 220-240 V ~ 50 Hz
Capacité 1.5 L

40
FR
CONSIGNES DE SÉCURITÉ
• Veuillez lire attentivement toutes les indications et conservez ce mode d’emploi
soigneusement pour pouvoir le consulter à tout moment.
• Brancher l’appareil à une prise dont la tension correspond à celle indiquée sur la
plaque signalétique de l’appareil.
• Si le cordon d’alimentation est endommagé, le faire remplacer par le fabricant, un
atelier autorisé ou un professionnel qualié.
• Ne pas retourner l’appareil et ne pas l‘incliner à plus de 45°.
• Ne pas faire tremper l’appareil complètement dans l’eau ou tout autre liquide.
S’assurer de ne pas mouiller le cordon d’alimentation et la che.
• Débrancher l’appareil lorsqu’il ne va pas être utilisé pendant une période prolongée ou
pour le nettoyer.
• Maintenir un espace libre de 8 centimètres autour de l’appareil pour assurer une
ventilation sufsante.
• Utiliser seulement les accessoires recommandés par le fabricant.
• Cet appareil peut être utilisé par des enfants de 8 ans ou plus et des personnes
ayant des capacités physiques, sensorielles et mentales limitées et / ou
dénuées d‘expérience et de connaissances, à condition d‘avoir été instruits au
fonctionnement de l‘appareil par une personne responsable et d‘en comprendre les
risques associés.
• Ne pas utiliser l’appareil à proximité de ammes, de plaques électriques chaudes
ou de fours.
• Ne pas allumer et éteindre l’appareil plusieurs fois de suite. Attendre au moins 5
minutes avant de rallumer l’appareil pour ne pas endommager le compresseur.
• Ne pas introduire d’objets (métalliques ou non) dans l’appareil pour éviter tout
risque d’incendie et de court-circuit.
• Pour extraire la glace, ne pas donner de coup sur l’appareil ou sur les bords du
récipient pour ne pas les endommager.
• Ne pas allumer l’appareil avant d’avoir installé le récipient et les lames.
• La température des aliments doit être de 25 ± 5 °C. Ne pas pré-congeler les
aliments avant de préparer la glace, ou les lames pourraient se bloquer.
• Ne pas retirer les lames lorsque l’appareil est en fonctionnement.
• Ne pas utiliser l’appareil en extérieur.
• Ne pas nettoyer l’appareil avec de la poudre abrasive ou avec une éponge abrasive.
• Ne pas stocker de substances explosives dans l’appareil telles que des bombes
aérosols contenant du gaz facilement inammable.
• L’appareil n’a pas été conçu pour un usage commercial, mais pour un usage
domestique ou dans un environnement similaire.

41
FR
Remarques particulières
• Lors du positionnement de l‘appareil, assurez-vous que le cordon d‘alimentation
n‘est pas pincé ou endommagé.
• Assurez-vous qu‘il n‘y a pas de prises multiples ou d‘alimentations multiples à
l‘arrière de l‘appareil.
Pour éviter la contamination des aliments, veuillez suivre les instructions ci-dessous :
• Nettoyer régulièrement les surfaces qui peuvent entrer en contact avec les aliments.
MISE EN GARDE
Lors de l‘utilisation, de l‘entretien et de la mise au rebut de l‘appareil,
faites attention au symbole de gauche à l‘arrière de l‘appareil ou sur
le compresseur. Ce symbole avertit d‘un éventuel incendie. Il y a des
substances in ammables dans les conduites de uide frigorigène et
dans le compresseur. Tenez l‘appareil à l‘écart de toute source
d‘incendie pendant son utilisation, son entretien et son élimination.
42
FR
APERÇU DE L‘APPAREIL
1
Entonnoir
7
Couvercle supérieur
2
Poignée
8
Ecran
3
Touches
9
Fente d'aération
4
Bouchon à vis
10
Cache latéral
5
Cache frontal
11
Fente d'aération
6
Bac d'égouttement
1
MARCHE/ARRÊT
3
START/PAUSE
2
Cleaning (nettoyage)

43
FR
MISE EN MARCHE ET FONCTIONNEMENT
GÉNÉRAL
Remarque : Avant utilisation, nettoyez soigneusement toutes les pièces qui entrent
en contact avec la crème glacée, y compris le seau de refroidissement, les pales du
ventilateur de mélange, la bague d‘étanchéité du bec, le capot intérieur du bec,
l‘entonnoir, etc. Avant le nettoyage, assurez-vous que la che est retirée de la prise.
Lorsque vous faites de la crème glacée, placez la machine sur une surface plane pour
vous assurer que le compresseur de la machine fonctionne correctement.
Instructions générales pour faire de la crème glacée
Vous pouvez préparer de la glace suivant une recette personnelle ou suivant la recette
jointe (voir chapitre Recettes de glaces). Les ingrédients n‘ont pas besoin d‘être congelés
au préalable. Le compresseur intégré de la machine peut congeler les ingrédients
directement et les transformer en crème glacée.
1. Installez la pale du ventilateur de mélange sur l‘alésage de l‘arbre d‘entraînement.
2. L‘ensemble poignée est préinstallé.
3. Mettez la quantité appropriée d‘ingrédients de crème glacée mélangés
uniformément dans l‘entonnoir.
4. Retirez l‘entonnoir et insérez le bouchon dans le trou.
44
FR
5. Appuyez sur l‘interrupteur MARCHE/ARRÊT à l‘arrière de l‘appareil.
6. La machine commence à préparer de la glace. Vous pouvez ajouter plus d‘épices
pendant le processus de production, en évitant l‘ajout de matériaux granulaires
pour éviter de boucher les ouvertures.
7. Un bip retentit lorsque la crème glacée est prête. Tirez la poignée pour retirer la
glace.
8. Dès que vous avez retiré la crème glacée, vous pouvez à nouveau en préparer.
Retirez le bouchon et
insérez l‘entonnoir pour
ajouter plus d‘ingrédients
ou de sauce glacée
pendant la préparation.
Tirez sur la poignée
45
FR
UTILISATION ET FONCTIONS
Remarque : Avant et après la préparation de la glace, nettoyez l‘appareil avec la
fonction de nettoyage (voir chapitre „Nettoyage et entretien“).
1 Prise d'alimentation
Branchez la che dans la prise.
2 Pour allumer l'appareil
Appuyez sur l'interrupteur de MARCHE/ARRÊT au dos de l'appareil.
3 Choix d'une fonction
Pour augmenter la durée
Pour réduire la durée
Démarrer / mettre en pause l'appareil
Fonction de nettoyage
4 Démarrage de la fabrication de crème glacée
Lorsque vous insérez la che et appuyez sur l'interrupteur MARCHE/ARRÊT,
l'écran afche la durée par défaut de [40:00] minutes. Le symbole de glace
clignote et le rétroéclairage s'allume brièvement. Utilisez les touches [+] et [-]
pour régler la durée. Dès que vous appuyez sur la touche START, le cycle de
préparation démarre. La préparation de la glace dure 40 minutes, suivie d'un
nettoyage de 10 minutes. Appuyez sur START / PAUSE pendant la préparation
pour l'arrêter brièvement. Appuyez à nouveau sur la touche pour poursuivre
la préparation. Appuyez et maintenez START / PAUSE pendant la préparation
pour passer en mode veille.
Pour empêcher la glace de fondre, celle-ci est automatiquement
refroidie pendant 3 heures après sa fabrication.
Remarque : Pour éviter les fuites, assurez-vous que les ingrédients de la glace ne
dépassent pas 60 % de la capacité (900 g), car il se produit une certaine expansion
lors de la préparation de la glace. En cas de production en continu, le poids ne doit
pas dépasser 600 g lorsque vous ajoutez de nouveaux ingrédients car une partie de
la glace reste dans le seau à glace.

46
FR
Fonction de protection du moteur
Si le temps de production est plus long, la glace devient plus dure et le moteur de
l‘agitateur peut se bloquer. L‘appareil surveille automatiquement la température du
moteur d‘agitation et l‘arrête automatiquement en cas d‘urgence pour le protéger de la
surchauffe.
NETTOYAGE ET ENTRETIEN
Fonction de nettoyage
Remarque : Avant et après la préparation de la glace, l‘appareil doit être nettoyé
avec la fonction de nettoyage.
Pour ce faire, versez environ 1 litre d‘eau dans l‘entonnoir. Appuyez ensuite sur la
touche NETTOYAGE pour accéder au mode de nettoyage. Après 1 minute, l‘eau est
libérée et l‘appareil est nettoyé. Le nettoyage se répète 5 fois. Retirez l‘eau une fois le
nettoyage terminé.
Nettoyage de la partie poignée
La partie poignée peut également se retirer pour le nettoyage. Après le nettoyage,
l‘intérieur et l‘unité de poignée doivent être complètement secs pour éviter les odeurs
désagréables causées par les résidus d‘eau.

47
FR
Eléments de l‘unité de poignée :
48
FR
Assemblage de l‘unité de poignée :
Remarque : Pour démonter l‘appareil, procédez dans l‘ordre inverse.
1 2 3 4
Lors de la xation
de l'élément 3, la
fente doit pointer
vers le haut.
Enfoncez à la main
l'élément 3 dans
l'élément 1.
Fixez l'élément 1
sur l'élément 2.
Fixez l'élément 4
sur l'élément 3.
5 6 7 8
Fixez l'élément 5
sur l'élément 1.
Fixez l'élément 7
sur l'élément 2.
Fixez l'élément 8
sur l'élément 2 en
le serrant dans le
sens horaire.
Fixez enn
l'élément 6 sur
l'élément 2.
La fente est
dirigée vers
le haut

49
FR
RÉSOLUTION DES PROBLÈMES
Problème Cause possible Solution
Impossible de récupérer
la crème glacée après la
préparation.
La glace est trop dure. Laissez la glace dégeler
puis retirez-la.
Impossible de monter la
poignée correctement.
La pale du ventilateur de
mélange n'est pas installée
correctement.
Installez la pale de
ventilateur sur l'alésage de
l'arbre d'entraînement.
RECETTES DE CRÈME GLACÉE
Remarque : Assurez-vous toujours que la quantité d‘ingrédients ne dépasse pas
60% de la quantité de remplissage, car la glace se dilate pendant la préparation.
Recette de base
• 300 g d‘eau
• 200 g de lait en poudre
• 300 g de crème
Mélangez le lait en poudre avec l‘eau et versez
dans l‘entonnoir avec les autres ingrédients.
Glace à la fraise
• 120 g d‘eau
• 180 g de lait en poudre
• 260 g de crème
• 220 g de fraises
Lavez les fraises et mélangez avec l‘eau et le
lait en poudre dans le mélangeur. Versez dans
l‘entonnoir avec la crème.
Glace à la mangue
• 200 g d‘eau
• 200 g de lait en poudre
• 300 g de crème
• 160 g de mangues
Pelez la mangue et mélangez avec l‘eau et le
lait en poudre dans le mélangeur. Versez dans
l‘entonnoir avec la crème.
Glace au lait
• 360 g de lait
• 100 g de sucre, blanc
• 300 g de crème
Mélangez le lait, le sucre et la crème jusqu‘à
dissolution complète du sucre, puis versez le tout
dans l‘entonnoir.

50
FR
INFORMATIONS SUR LE RECYCLAGE
S‘il existe une réglementation pour l‘élimination ou le
recyclage des appareils électriques et électroniques dans
votre pays, ce symbole sur le produit ou sur l‘emballage
indique que cet appareil ne doit pas être jeté avec les
ordures ménagères. Vous devez le déposer dans un point
de collecte pour le recyclage des équipements électriques
et électroniques. La mise au rebut conforme aux règles
protège l‘environnement et la santé de vos semblables des
conséquences négatives. Pour plus d‘informations sur le
recyclage et l‘élimination de ce produit, veuillez contacter
votre autorité locale ou votre service de recyclage des
déchets ménagers.
FABRICANT ET IMPORTATEUR (UK)
Fabricant :
Chal-Tec GmbH, Wallstraße 16, 10179 Berlin, Allemagne.
Importateur pour la Grande Bretagne :
Chal-Tec UK limited
Unit 6 Riverside Business Centre
Brighton Road
Shoreham-by-Sea
BN43 6RE
United Kingdom

51
IT
Gentile cliente,
La ringraziamo per aver acquistato il dispositivo. La preghiamo
di leggere attentamente le seguenti istruzioni per l’uso e di
seguirle per evitare possibili danni tecnici. Non ci assumiamo
alcuna responsabilità per danni scaturiti da una mancata
osservazione delle avvertenze di sicurezza e da un uso
improprio del dispositivo. Scansionare il codice QR seguente,
per accedere al manuale d’uso più attuale e per ricevere
informazioni sul prodotto.
INDICE
Avvertenze di sicurezza52
Descrizione del dispositivo54
Messa in funzione e utilizzo generico55
Utilizzo e funzioni57
Pulizia e manutenzione58
Correzione degli errori61
Ricette per il gelato61
Smaltimento62
Produttore62
DATI TECNICI
Numero articolo 10034911. 10034912
Alimentazione 220-240 V ~ 50 Hz
Capacità 1.5 L

52
IT
AVVERTENZE DI SICUREZZA
• Leggere attentamente tutte le indicazioni di sicurezza e conservare il presente
libretto d’istruzioni per consultazioni future.
• Prima di accendere il dispositivo, controllare la tensione sulla targhetta identicativa
e collegare il dispositivo solo a prese con tensione corrispondente a quella
indicata.
• Nel caso in cui il cavo di rete sia danneggiato, questo deve essere sostituito dal
produttore, da un centro assistenza specializzato o da una persona qualicata.
• Non capovolgere il dispositivo e non inclinarlo più di 45°.
• Non immergere il dispositivo in acqua o in altri liquidi e prestare attenzione che la
spina e il cavo di rete non si bagnino.
• Staccare la spina dalla presa in caso di inutilizzo prolungato o prima di pulirlo.
• Lasciare 8 cm di spazio intorno al dispositivo, per garantire un’adeguata
circolazione dell’aria.
• Utilizzare solo accessori autorizzati dal produttore.
• Questo dispositivo può essere utilizzato da bambini a partire da 8 anni e da
persone con limitate capacità siche e psichiche o con conoscenza ed esperienza
limitate, solo se sono stati istruiti sulle modalità d’uso e comprendono i rischi e i
pericoli connessi.
• Non utilizzare il dispositivo nelle vicinanze di amme vive, fornelli accesi o forni.
• Non accendere e spegnere il dispositivo più volte consecutive. Attendere almeno 5
minuti prima di riaccendere il dispositivo per non danneggiare il compressore.
• Non inlare oggetti nel dispositivo per evitare il pericolo d’incendio o di corto
circuito.
• Rimuovere con la massima cautela il gelato dal contenitore per danneggiarlo.
• Accendere il dispositivo solamente dopo aver inserito il contenitore e la lama per
mescolare.
• La temperatura per gli ingredienti è di 25±5°C. Non preraffreddare gli ingredienti,
altrimenti la lama per mescolare potrebbe bloccarsi prima di terminare la
preparazione.
• Rimuovere la lama per mescolare solo quando questa non è più in funzione.
• Non utilizzare il dispositivo all’aperto.
• Non pulire il dispositivo con polveri o spugne abrasive.
• Non conservare all’interno del dispositivo sostanze esplosive come ad esempio
bombolette spray contenenti gas propellenti.
• Il dispositivo non è destinato ad un uso commerciale, ma esclusivamente per un uso
domestico e in ambienti simili.

53
IT
Note speciali
• Quando si posiziona l‘unità, assicurarsi che il cavo di alimentazione non sia
schiacciato o danneggiato.
• Assicurarsi che non vi siano prese multiple o alimentatori sul retro dell‘unità.
Per evitare la contaminazione degli alimenti, seguire le seguenti istruzioni:
• Pulire regolarmente le super ci che possono venire a contatto con gli alimenti.
AVVERTENZA
Durante l‘uso, la manutenzione e lo smaltimento dell‘unità, prestare
attenzione al simbolo a sinistra sul retro dell‘unità o sul compressore.
Questo simbolo avverte di possibili incendi. Ci sono sostanze
in ammabili nelle linee frigorifere e nel compressore. Tenere
l‘apparecchio lontano da fonti di incendio durante l‘uso, la
manutenzione e lo smaltimento.

54
IT
DESCRIZIONE DEL DISPOSITIVO
1
Imbuto
7
Coperchio superiore
2
Impugnatura
8
Display
3
Tasti
9
Fessure di ventilazione
4
Vite di bloccaggio
10
Copertura laterale
5
Copertura anteriore
11
Fessure di ventilazione
6
Vaschetta di raccolta
1
ON/OFF
3
START/PAUSA
2
Cleaning (pulizia)

55
IT
MESSA IN FUNZIONE E UTILIZZO GENERICO
Nota: pulire a fondo tutti i componenti che entrano in contatto con il gelato prima
dell’uso, inclusi cestello di raffreddamento, miscelatore, guarnizione ad anello del
punto di uscita, copertura interna del punto di uscita, imbuto, ecc. Prima della pulizia,
assicurarsi che la spina sia staccata dalla presa.
Quando si prepara il gelato, posizionare il dispositivo su una supercie piana, in modo
da garantire il corretto funzionamento del compressore.
Guida generica per la preparazione del gelato
Il gelato può essere preparato seguendo ricette individuali o le ricette incluse nel
presente manuale (v. capitolo Ricette per il gelato). Non è necessario congelare
previamente gli ingredienti. Il compressore integrato è in grado di congelare
direttamente gli ingredienti e di trasformarli in gelato.
1. Installare il miscelatore sul foro dell’albero di trasmissione.
2. Il gruppo strutturale dell’impugnatura è preinstallato.
3. Mettere nell’imbuto la quantità corretta di ingredienti mischiati per il gelato.
4. Togliere l’imbuto e mettere il pestello nel foro.

56
IT
5. Premere ON/OFF sul retro del dispositivo.
6. Il dispositivo inizia la preparazione del gelato. Durante il processo di preparazione
è possibile aggiungere altre spezie e aromi, evitando però materiali granulari, in
modo da evitare che si otturino le aperture.
7. Quando il gelato è pronto, viene emesso un segnale acustico. Tirare l’impugnatura
per far uscire il gelato.
8. Una volta tolto il gelato, è possibile procedere alla preparazione di altri gelati.
Togliere il pestello e
inserire l’imbuto per
aggiungere ingredienti
o sciroppi durante la
preparazione.
Tirare l’impugnatura

57
IT
UTILIZZO E FUNZIONI
Nota: prima e dopo la preparazione del gelato, è necessario pulire il dispositivo
utilizzando l’apposita funzione (v. capitolo Pulizia e manutenzione).
1 Connessione di alimentazione
Inserire la spina nella presa elettrica.
2 Accendere il dispositivo
Premere ON/OFF sul retro del dispositivo.
3 Selezionare la funzione
Aumentare il tempo.
Diminuire il tempo.
Avviare/mettere in pausa il dispositivo.
Funzione di pulizia.
4 Iniziare la preparazione del gelato
Quando si inserisce la spina e si preme ON/OFF, il display mostra il tempo
predenito di (40:00). Il simbolo del gelato lampeggia e l’illuminazione di
fondo si accende brevemente. Utilizzare + e – per regolare il tempo. Quando
si preme START, inizia il ciclo di preparazione. La preparazione del gelato dura
40 minuti, seguita da 10 minuti di funzione di pulizia. Premere START/PAUSA
durante la preparazione per interromperla brevemente. Premere di nuovo il
tasto per procedere con la preparazione. Premere START/PAUSA a lungo
durante la preparazione per passare in modalità standby.
Per evitare che il gelato si sciolga dopo la preparazione, viene tenuto
automaticamente in temperatura per 3 ore.
Nota: per evitare che trabocchi, assicurarsi che gli ingredienti non superino il 60%
della capacità (900 g), dato che durante la preparazione si verica una certa
espansione. Nel caso di produzione continuata, il peso della nuova aggiunta di
ingredienti non deve superare 600 g, dato che una parte del gelato rimane nel
contenitore.

58
IT
Funzione di protezione del motore
Se il tempo di produzione è più lungo, il gelato diventa sempre più duro e il
motore di miscela può bloccarsi in determinate condizioni. Il dispositivo controlla
automaticamente la temperatura del motore di miscela e, in caso di emergenza, lo
spegne per proteggerlo dal surriscaldamento.
PULIZIA E MANUTENZIONE
Funzione di pulizia
Nota: prima e dopo la preparazione del gelato è necessario pulire il dispositivo con
l’apposita funzione.
Versare circa 1 litro d’acqua nell’imbuto. Premere poi CLEANING per raggiungere la
modalità di pulizia. Dopo 1 minuto viene rilasciata l’acqua e pulito il dispositivo. La
pulizia viene ripetuta 5 volte. Rimuovere l’acqua a pulizia completata.
Pulizia della struttura dell’impugnatura
La struttura dell’impugnatura può essere rimossa e pulita. Dopo la pulizia, il condotto
interno e l’unità dell’impugnatura devono essere completamente asciutti, in modo da
evitare odori spiacevoli dovuti a residui d’acqua.

59
IT
Componenti strutturali dell’unità dell’impugnatura:

60
IT
Assemblaggio dell’unità dell’impugnatura:
Nota: per disassemblare il dispositivo, procedere in ordine inverso.
1 2 3 4
Durante il ssaggio
del componente
3, la fessura deve
essere rivolta verso
l’alto.
Premere
componente 3 in
componente 1 con
la mano.
Fissare
componente 1 a
componente 2.
Fissare
componente 4 a
componente 3.
5 6 7 8
Fissare
componente 5 a
componente 1.
Fissare
componente 7 a
componente 2.
Fissare
componente 8
a componente
2 ruotandolo in
senso orario.
Fissare inne
componente 6 a
componente 2.
La fessura è
rivolta verso
l’alto
61
IT
CORREZIONE DEGLI ERRORI
Problema Possibile causa Soluzioni
Il gelato non può essere
tolto dal dispositivo a
preparazione conclusa.
Il gelato è troppo duro. Attendere no a quando il
gelato si è ammorbidito e
procedere a toglierlo.
L’impugnatura non
può essere inserita
correttamente durante
l’assemblaggio.
Il miscelatore non è
montato correttamente.
Inserire il miscelatore
nel foro dell’albero di
trasmissione.
RICETTE PER IL GELATO
Nota: assicurarsi che la quantità di ingredienti non superi mai il 60% della capacità
di riempimento, dato che il gelato si espande durante la preparazione.
Ricetta base
• 300 g d’acqua
• 200 g di latte in polvere
• 300 g di panna
Sciogliere il latte in polvere nell’acqua e versare
con gli altri ingredienti nell’imbuto.
Gelato alla fragola
• 120 g d’acqua
• 180 g di latte in polvere
• 260 g di panna
• 220 g di fragole
Lavare le fragole e mescolarle con acqua e
latte in polvere nel mixer. Versare con la panna
nell’imbuto.
Gelato al mango
• 200 g d’acqua
• 200 g di latte in polvere
• 300 g di panna
• 160 g di mango
Sbucciare il mango e mescolarlo con acqua e
latte in polvere nel mixer. Versare con la panna
nell’imbuto.
Gelato al or di latte
• 360 g di latte
• 100 g di zucchero bianco
• 300 g di panna
Mescolare latte, zucchero e panna, no a
quando lo zucchero è completamente sciolto e
versare poi tutto nell’imbuto.

62
IT
AVVISO DI SMALTIMENTO
Se nel proprio paese si applicano le regolamentazioni
inerenti lo smaltimento di dispositivi elettrici ed elettronici,
questo simbolo sul prodotto o sulla confezione segnala che
questi prodotti non possono essere smaltiti con i riuti normali
e devono essere portati a un punto di raccolta di dispositivi
elettrici ed elettronici. Grazie al corretto smaltimento dei
vecchi dispositivi si tutela il pianeta e la salute delle persone
da possibili conseguenze negative. Informazioni riguardanti il
riciclo e lo smaltimento di questi prodotti si ottengono presso
l’amministrazione locale oppure il servizio di gestione dei
riuti domestici.
PRODUTTORE E IMPORTATORE (UK)
Produttore:
Chal-Tec GmbH, Wallstraße 16, 10179 Berlino, Germania.
Importatore per la Gran Bretagna:
Chal-Tec UK limited
Unit 6 Riverside Business Centre
Brighton Road
Shoreham-by-Sea
BN43 6RE
United Kingdom