

G2 E-SCOOTER
COMMUTING ELECTRIC SCOOTER
USER MANUAL

CONGRATULATIONS
ON YOUR PURCHASE!

This user manual will help you assemble and
operate your new electric scooter. Be sure to read
ALL OF THE INFORMATION in this manual
before riding.
NOTE TO ALL RIDERS UNDER 18 YEARS OF
AGE: It’s very important that you get parental
permission before riding your scooter.
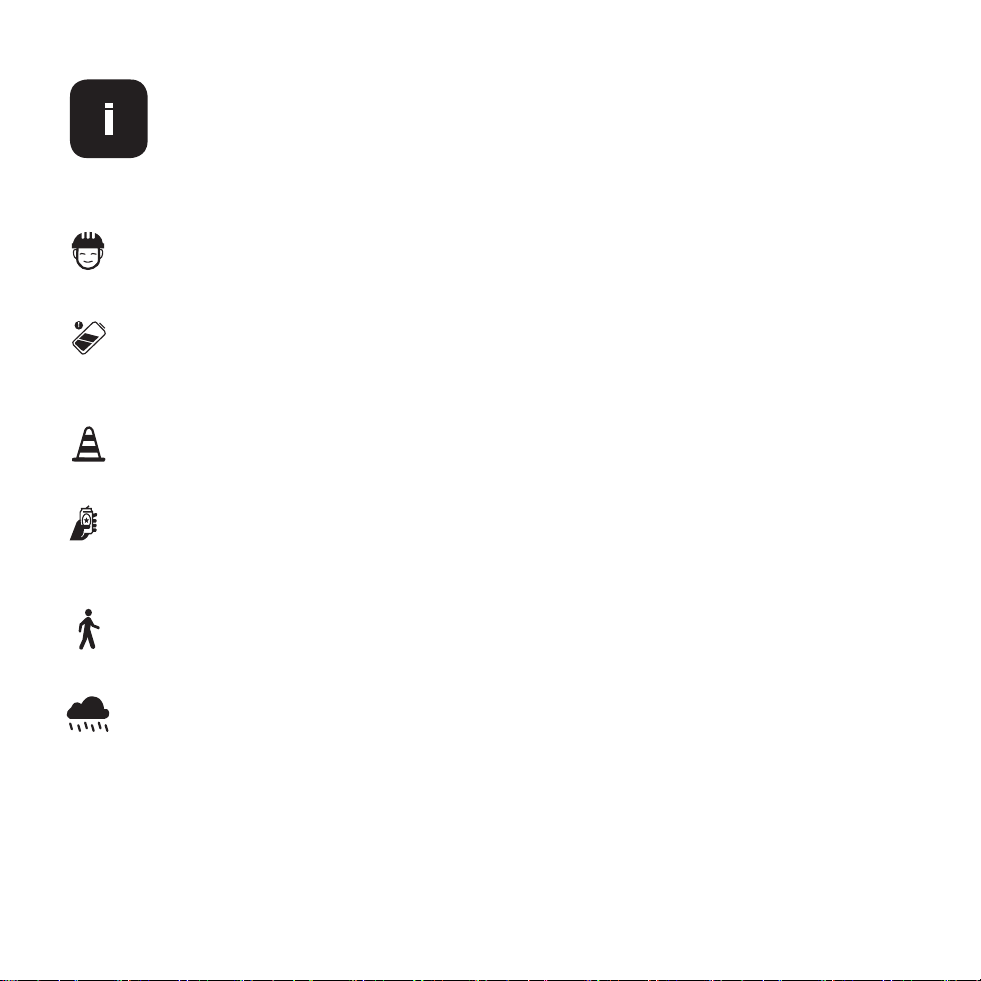
ALWAYS wear a helmet when riding your electric scooter.
Make sure your scooter has a full battery before taking it out
to ride.
Always be aware of local road laws, and follow them.
Do not ride the scooter under the inuence of drugs or
alcohol.
Always respect pedestrians.
Do not ride under wet conditions. The scooter may slide from
under your feet causing injury. Wet conditions may damage the
electronics and void the warranty.
DON’T RIDE UNTIL YOU READ THIS:

1. Avoid water - The scooter is not waterproof. The electronics may be
damaged due to water and water damage is not covered by our warranty.
Riding in wet conditions is also very dangerous and may result in injury.
2. Abuse - We do not cover physical damage due to negligent care and
extreme riding.
3. Whenever you ride the Gotrax scooter, you risk severe injury or
even death from loss of control, collisions, and falls. Use caution and ride at
your own risk.
4. Do not modify the product from the manufacturers original design.
5. Keep hands and all body parts away from moving parts while operating
the scooter.
6. Before riding - be sure to check the scooter over and make sure the
scooter is operating correctly before each use.
7. Before riding - be sure to check that the braking system is functioning
properly; also be sure to check that all safety labels are in place and you
understand the safety warnings.
8. Before riding - be sure that any and all axle guards, chain guards, or
other covers or guards supplied by the manufacturer are in place and in
serviceable condition.
9. Before riding - be sure to check that the tires are in good condition,
inated properly, and have sufcient tread remaining.
10. Never exceed the 220 lb (100 kg) maximum load rating.
11. The electric scooter should never be used by children under the age of 13.
12. Maximum Speed - Your electric scooter goes the maximum speed of
12.5 mph.
WARNING MESSAGE
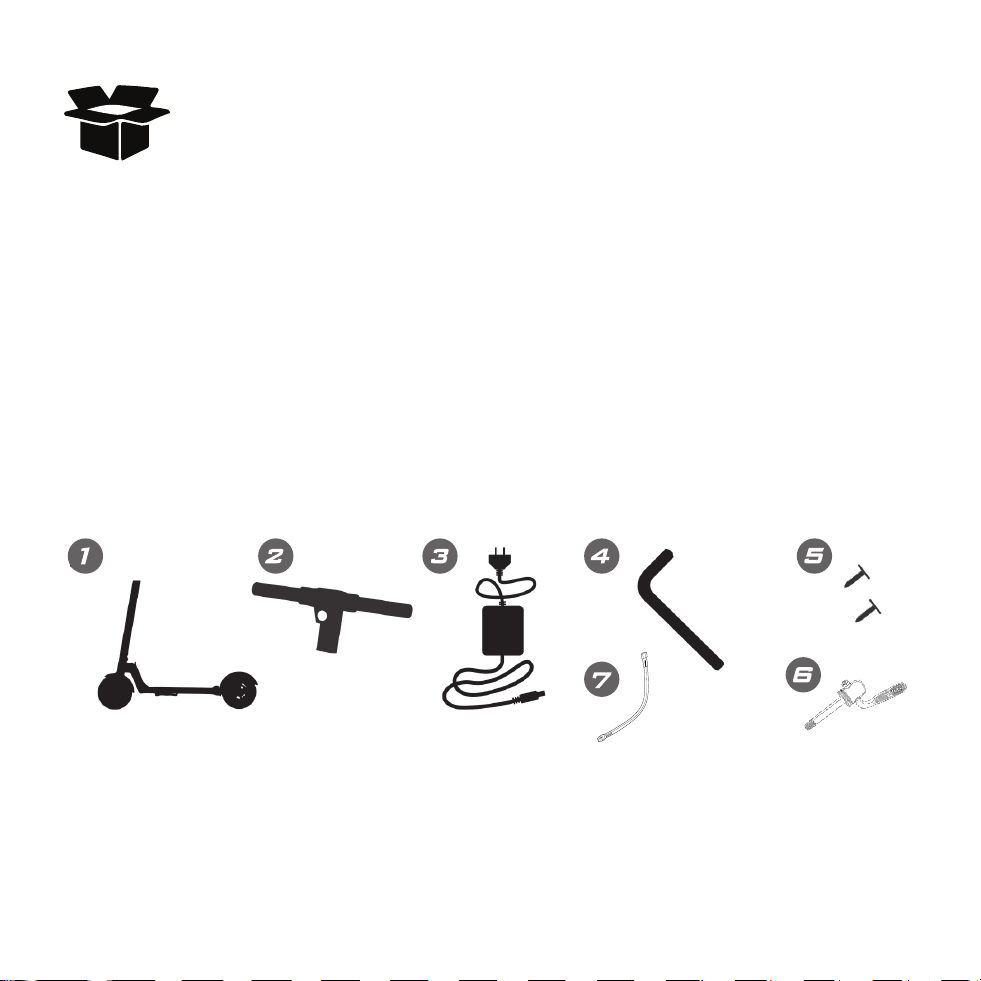
You should nd each of these items in your box:
1. Electric Scooter
2. Console & Handlebars
3. Approved Power Adapter / Charging Unit
4. Allen Wrench
5. Screws
6. Safety Pin
7. Tire pump extender
Remove all packaging material, then inspect each item for any accidental
damage that may have occurred during shipping.
UNPACK
The G2 Scooter comes partially assembled.
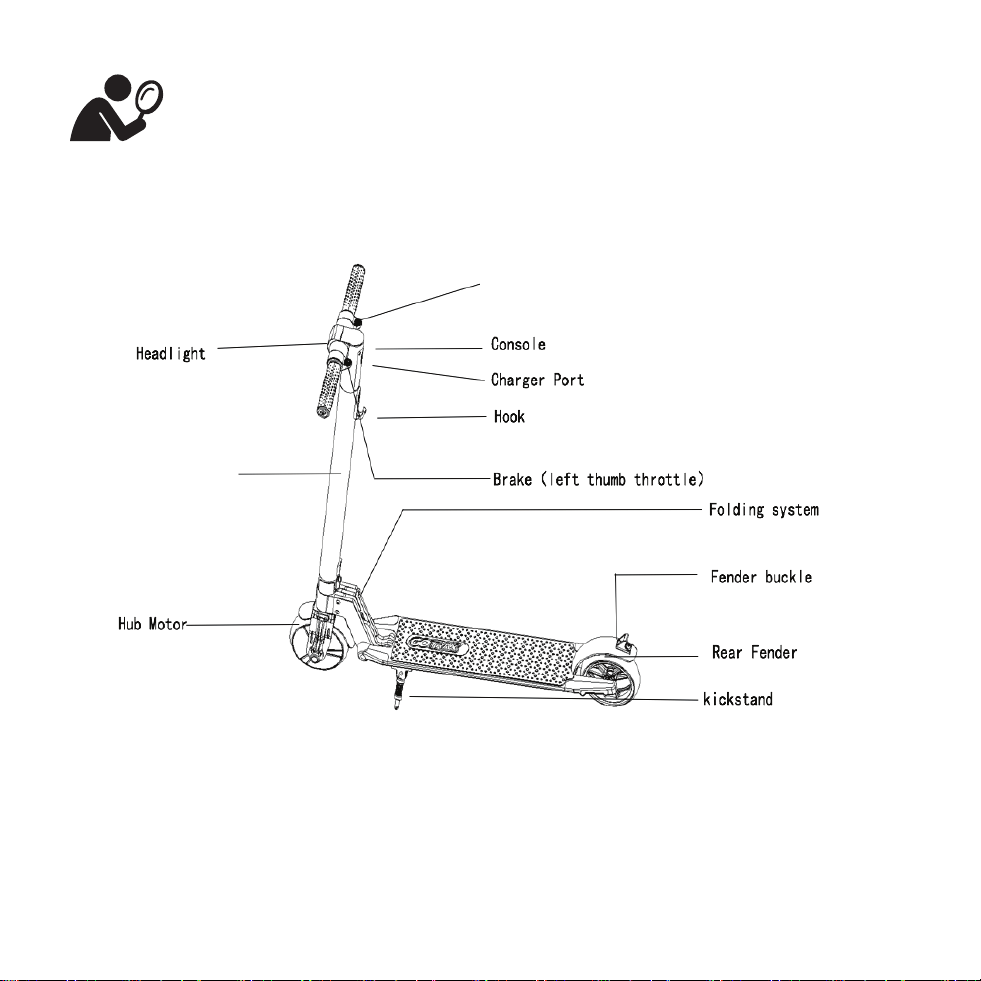
GET TO KNOW
YOUR SCOOTER
Tiller
Accelerator ( throttle)
The electric scooter comes partially assembled.
GET TO KNOW YOUR SCOOTER
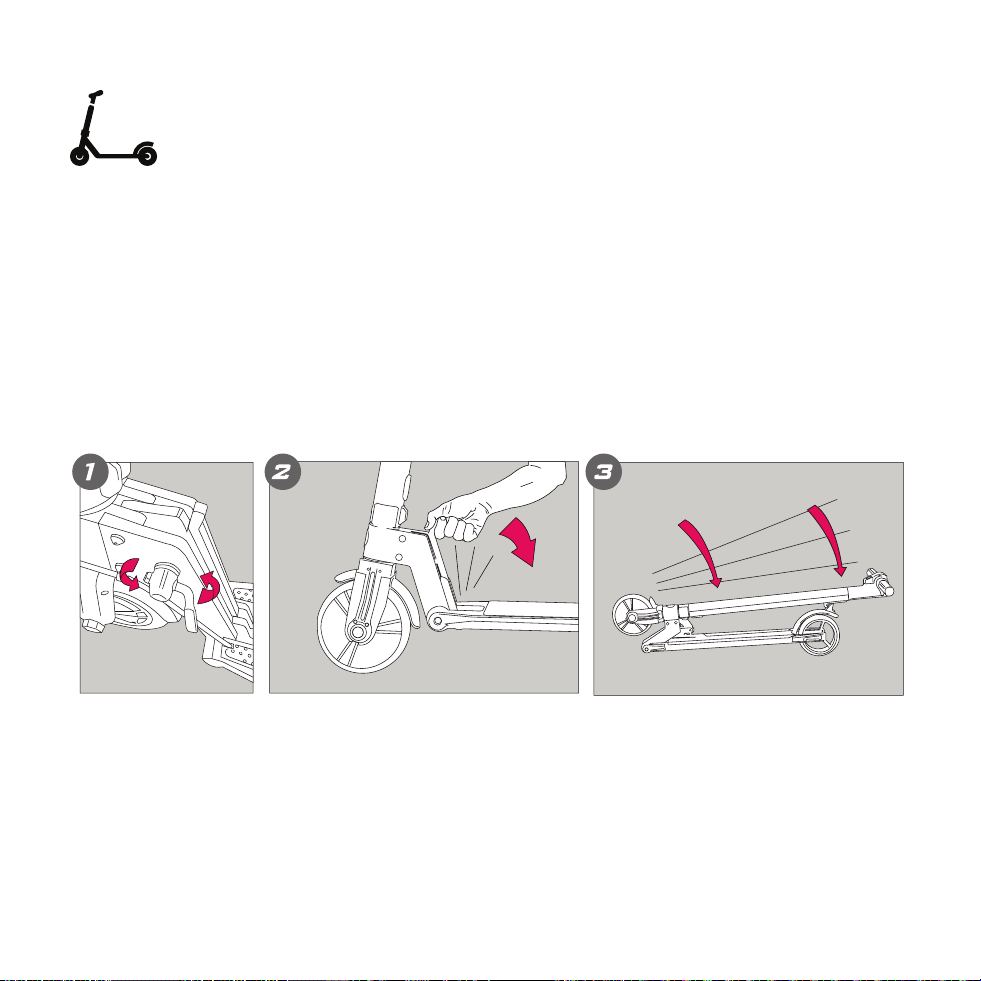
Press down on the rear fender, separate
the folding hook and fender buckle, then
lift the tiller upright (as shown in the gure).
Once the scooter is locked in the upright
position, verify by gently trying to fold.
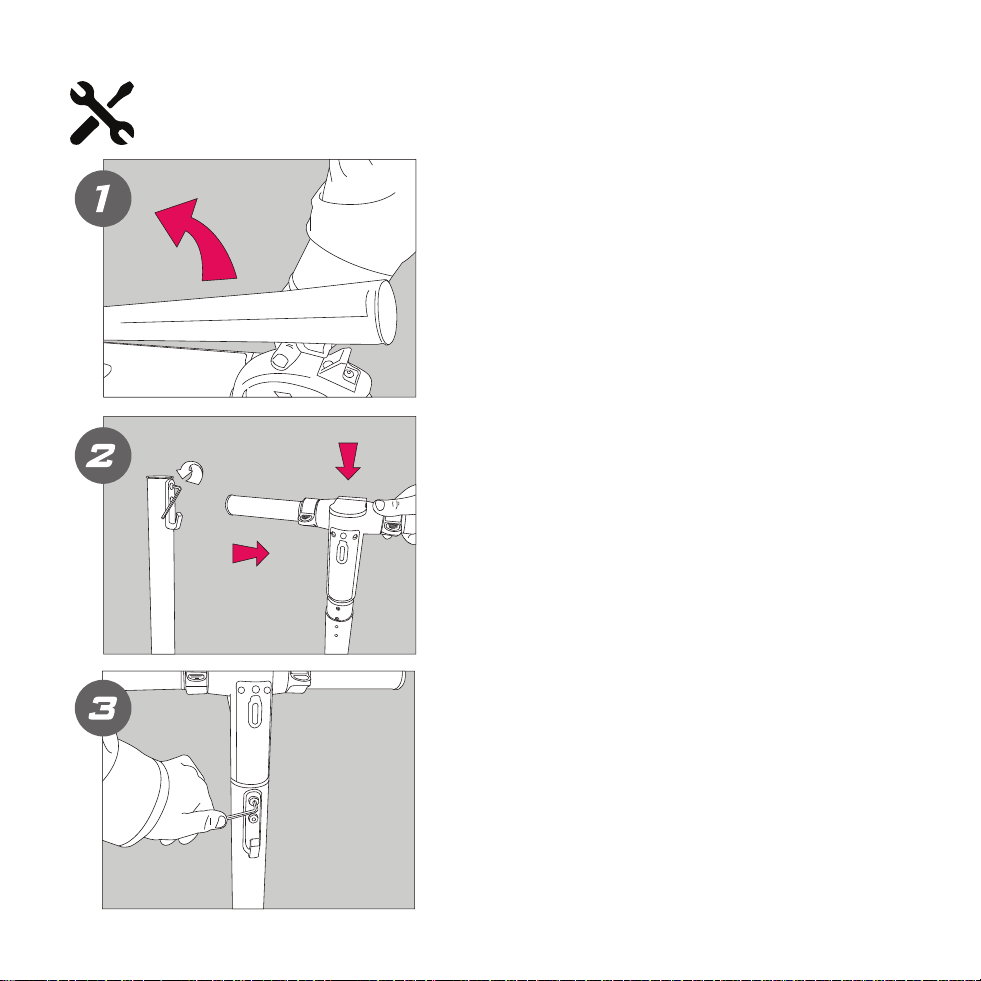
ASSEMBLE YOUR SCOOTER
Unfold Scooter & Lock
in Upright Position
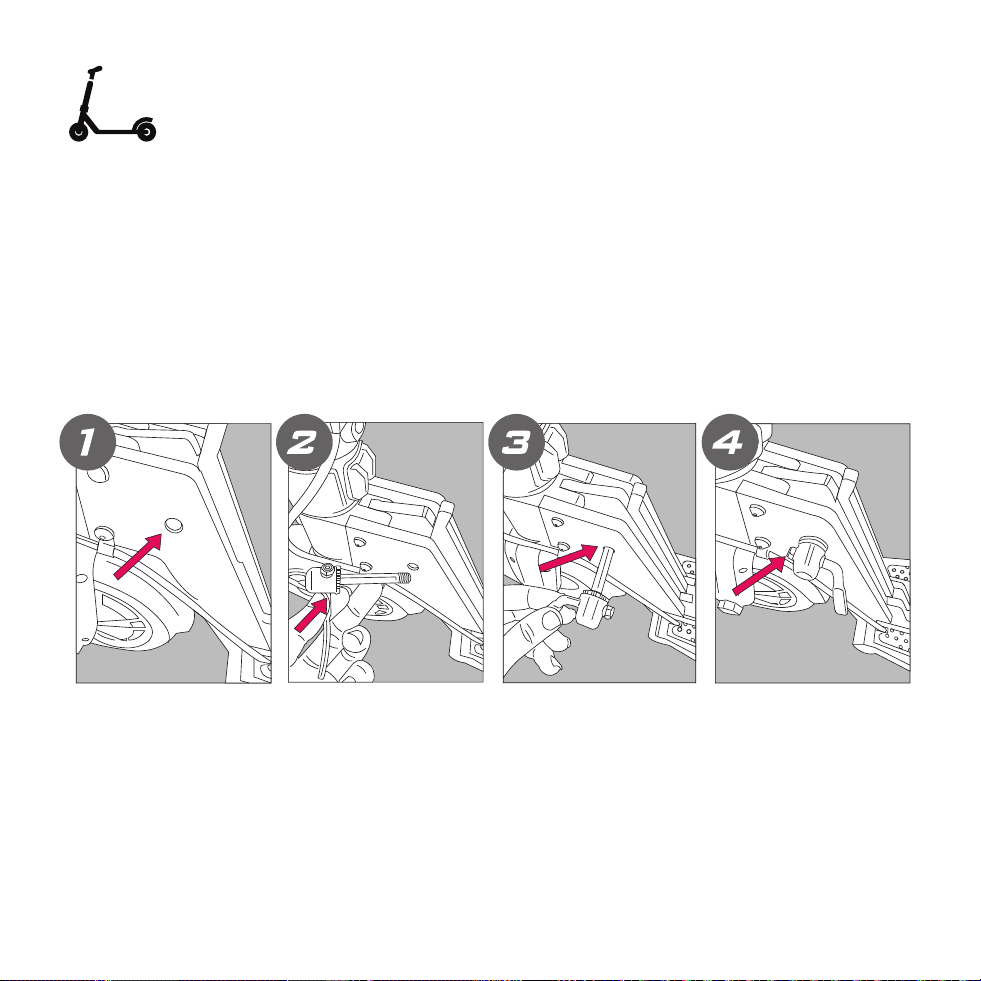
Use the Allen wrench to loosen the screws
located at the hook and detach. Once
you’ve remove the hook and screws, make
sure to remove the plug inside of the top
of the tiller.
Detach Hook and Remove
Plug Inside Tiller
Place the console into the top of the tiller.
Once the console is attached, use the Allen
wrench to attach the hook back to the tiller
with the two screws.
Place Console Into Tiller
& Reattach
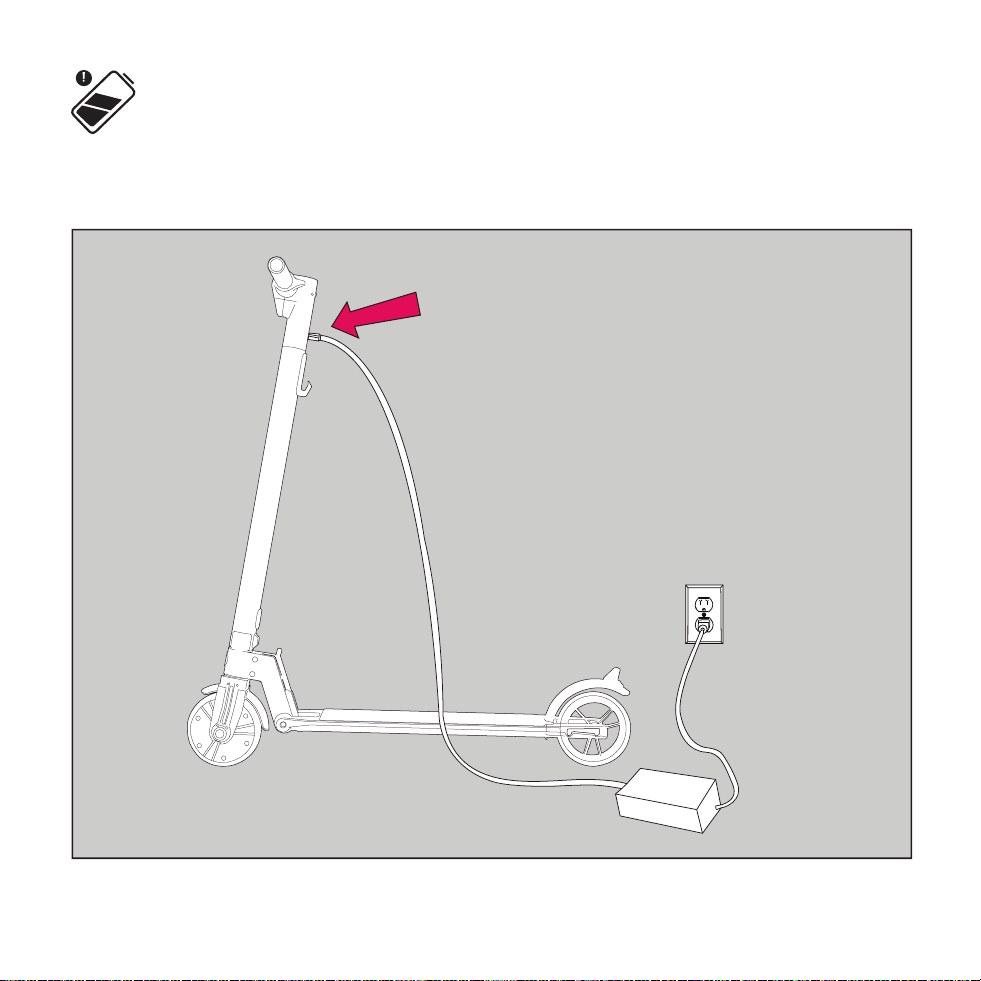
Before using the scooter, you must fully charge the battery.
CHARGE YOUR SCOOTER

1. Open the rubber charging port cover.
2. Insert the charging plug into the port.
3. The charger box will have a green light when fully charged and a red
light when charging.
4. When you are done charging be sure cover the charging port to keep it
clear of dust and debris.

To power the scooter on, press and hold the red
button for 1 seconds.
To power the scooter o, press and hold the red
button for 5 seconds.
To power the headlight on or o, press the red button for 1 second
while the scooter is powered on.
To change between 1st and 2nd gear, press the red button for 2
seconds. The display screen on the console will switch from the number 1 for
1st gear and number 2 for the 2nd gear.
The console on the Scooter displays speed in MPH, Battery life, and
what gear the scooter is currently in.
SCOOTER CONSOLE FUNCTIONS

1. You will want to start riding your scooter with one foot on the platform and
one foot on the ground. Use your foot on the ground to push off and at
the same time, press the throttle button to begin movement.
2. Press the brake-throttle to slow down or stop. For quicker stopping step
on the rear fender foot brake.
3. The scooter performs best when on a smooth surface e.g. carparks,
smooth roads, footpaths, & bike lanes.
4. Always clean your scooter (wheels, platform, etc.), it’s a machine and it
needs to be maintained.
5. Do not press the throttle while walking with the scooter beside you.
6. Be aware of the terrain you are riding on, watch out for curbs and
obstacles!
7. Use the red button to change between gears as you would on a bike,
cycle through them according to the terrain and elevation. First gear
equals more torque for going uphill, Second gear is more speed for
straightaways.
8. Cruise Control: To activate the cruise control press the right-hand throttle
down for 10 seconds. To deactivate the cruise control press either the
right-hand throttle or brake button to deactivate the cruise control.
9. CAUTION: The left paddle control on the console controls the motor’s
Electro-Magnetic brake. This brake is energized by the operation of
the motor and will NOT be 100% effective until the motor has been in
operation for 30 seconds
RIDING TIPS
Before folding the scooter, make sure that the scooter is powered off and
remove the safety pin.
Pull the Tiller towards the back wheel, as shown in the gures. Insert the hook
on the tiller into the loop on the rear fender buckle. You may hear a click
which indicates that you were successful in folding and locking the scooter.
PUTTING YOUR SCOOTER
AWAY/FOLDING

If you regularly clean and maintain your electric scooter, it will
extend its life.
Cleaning and storage: If the scooter is dirty, wipe it clean with a soft
damp cloth.
Brake Adjustments & Service: If you notice you need brake adjustments
or any service on your scooter, contact our customer service team and we
will adjust and repair your scooter. Do not repair your scooter yourself, this
can void your warranty and you risk damaging the scooter.
DO NOT use alcohol, gasoline, kerosene, or other corrosive chemical solvents
to clean the scooter. It can severely damage the appearance and structure of
the scooter. Please do not use a pressure washer as it may also cause damage
to the electronics.
Storage: When you’re not using your scooter store in a dry and cool location.
Avoid storing your scooter outdoors because sun exposure can damage its
appearance and may cause wear on the life of the battery and tires.
Tightening the Tiller: If you notice that the tiller is loose or wiggles while
riding, you can tighten the screws. Open the plastic cover, and use the Allen
wrench to tighten the screws.
MAINTENANCE & REPAIR
1. Unfolding: Lift the tiller in the upright position and insert the safety
lock. Rotate the safety lock clockwise to tighten the safety lock before
you ride!
2. Folding: Rotate the Safety Lock counterclockwise to pull out the safety
lock. Fold the scooter and then insert the safety lock and rotate clock-
wise to lock the safety lock again.
SAFETY LOCK INSTRUCTIONS
The hole is located
next to the red lever
on the bottom of the
scooter.
Arrow points to the
Safety Pin (pictured).
Insert the Safety Pin. Twist the Safety Pin
into the hole and se-
cure it. Make sure it
twists rmly in place.

Only use the approved Gotrax power adapter to charge your scooter,
others may cause risk of re & equipment may be damaged.
Improper disposal of used batteries may seriously pollute the environment.
Please comply with local disposal regulations.
Make sure to store your scooter and power adapter in conditions that do
not exceed 122 degrees fahrenheit or below -4 degrees fahrenheit.
Warning - Risk of Fire - No User Serviceable Parts, The prolonged
exposure to UV Rays, Rain and the Elements may damage the enclosed
materials, store indoors when not in use.
BATTERY INFORMATION

We frequently update our user manuals at gotrax.com, and reserve the
rights to update and change manuals online.
Please contact our customer service team if you are
experiencing problems or need more detailed information.
They can be reached at gotrax.com
TROUBLESHOOTING
This scooter is covered by a 90-day manufacturer’s warranty that covers
defects in workmanship and material. This does not cover misuse, neglect,
abuse, accident, or water damage. For warranty claims and details, please
visit gotrax.com. Always keep your original shipping box in case the
scooter needs to be returned or repaired.
WARRANTY


WWW.GOTRAX.COM
#RIDEGOTRAX

GOLABS, INC
GoTrax.com
2201 Luna Rd.
Carrollton, TX 75006