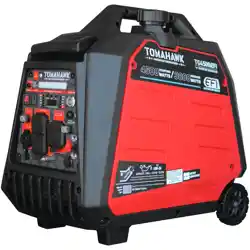
TG5500i
INVERTER GENERATOR
Operations Manual
FIND THE HOW TO GUIDE ON


Thank you for choosing a Tomahawk Generator!
Please read this manual carefully before operating. Safely and
correctly operating your generator will ensure you get the best
results.
All information in this publication is based on the latest
product information available at the time of printing. The contents
in this manual may be different from the actual parts due to revision
and other changes.
Tomahawk Power, LLC reserves the right to make changes at
any time without notice and without incurring any obligation. No
part of this publication may be reproduced without written
permission from Tomahawk Power, LLC.
This manual should be considered a permanent part of the
generator and should remain with the generator if it is resold.

SAFETY
Your safety and the safety of others are very important. We have
provided important safety information in this manual and on the
generator. Please read these messages carefully.
A safety message alerts you to potential hazards that could hurt
you or others. Each safety message is preceded by a safety alert
symbol and one of three words: DANGER, WARNING, or
CAUTION:
You WILL be KILLED or SERIOUSLY HURT if you do not follow
instructions.
You CAN be KILLED or SERIOUSLY HURT if you do not follow
instructions.
You CAN be SERIOUSLY HURT if you do not follow instructions.
Your generator or other property could be DAMAGED if you do not
follow instructions.

CONTENTS
GENERATOR......................................................................................... 1
SAFETY MESSAGES ............................................................................ 3
1. SAFETY NOTICE ............................................................................... 5
1. Safety Standard ......................................................................... 5
2. Special Requirements ................................................................ 6
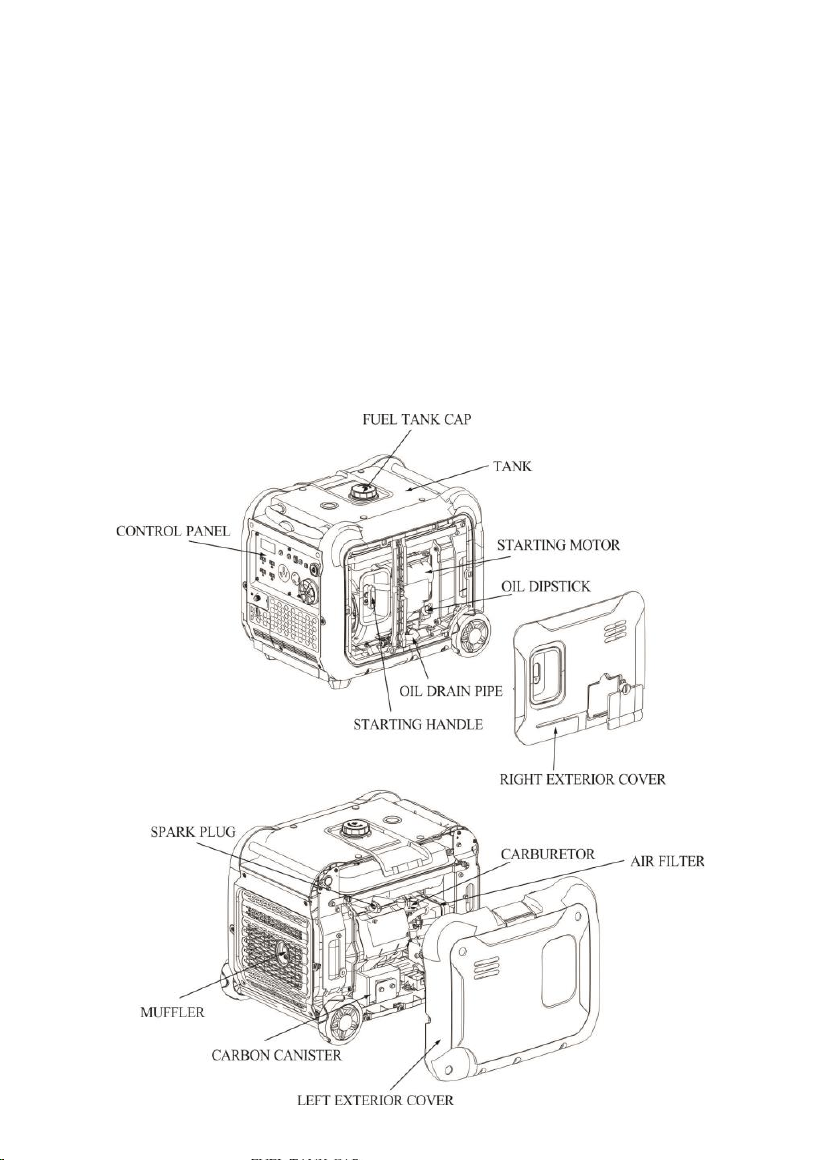
2.COMPONENT IDENTIFICATION ........................................................ 7
1. Component Identification ........................................................... 7
2. Engine Type & Serial Number .................................................... 8
3. CONTROLFUNCTION ....................................................................... 9
1. Oil warning light (red) ................................................................. 9
2. Overload indicator light (Red) .................................................... 9
4. PREPARATION ................................................................................ 11
1. Fuel .......................................................................................... 11
2 Engine oil .................................................................................. 11
3. Recoil Starter ........................................................................... 12
4. Fuel Valve ................................................................................ 12
5. AC Circuit Breaker/Over current Protector ............................... 12
6. Ground
Terminal ........................................................................ 13
5. GENERATOR OPERATION ............................................................ 14
1. Connection to the Household Power Supply ............................ 14
2.
Generator
Grounding .................................................................. 15
3.ACCurrent ................................................................................. 15
4. DC Current ............................................................................... 16
5. High Altitude Operation ............................................................ 16
6. STARTING THE ENGINE ................................................................ 17
1. Recoil Starter ........................................................................... 17
2. Electric starting ........................................................................ 18
7. STOPPING THE ENGINE ................................................................ 18
8. MAINTENANCE ............................................................................... 19
1. Engine Oil Change ................................................................... 20
2. Air Cleaner Service .................................................................. 21
3. Fuel Sediment Cup Cleaning ................................................... 22
4. Spark Plug Service .................................................................. 23
9. STORAGE ........................................................................................ 23
10. TROUBLESHOOTING ................................................................... 25
11. WIRING DIAGRAM ........................................................................ 26
12. SPECIFICATIONS ......................................................................... 27
1. SAFETY NOTICE
1. Safety Standard
Read and understand this owner’s manual before
operating your generator. You can help prevent accidents
by being familiar with your generator’s controls, and by
observing safe operating procedures.
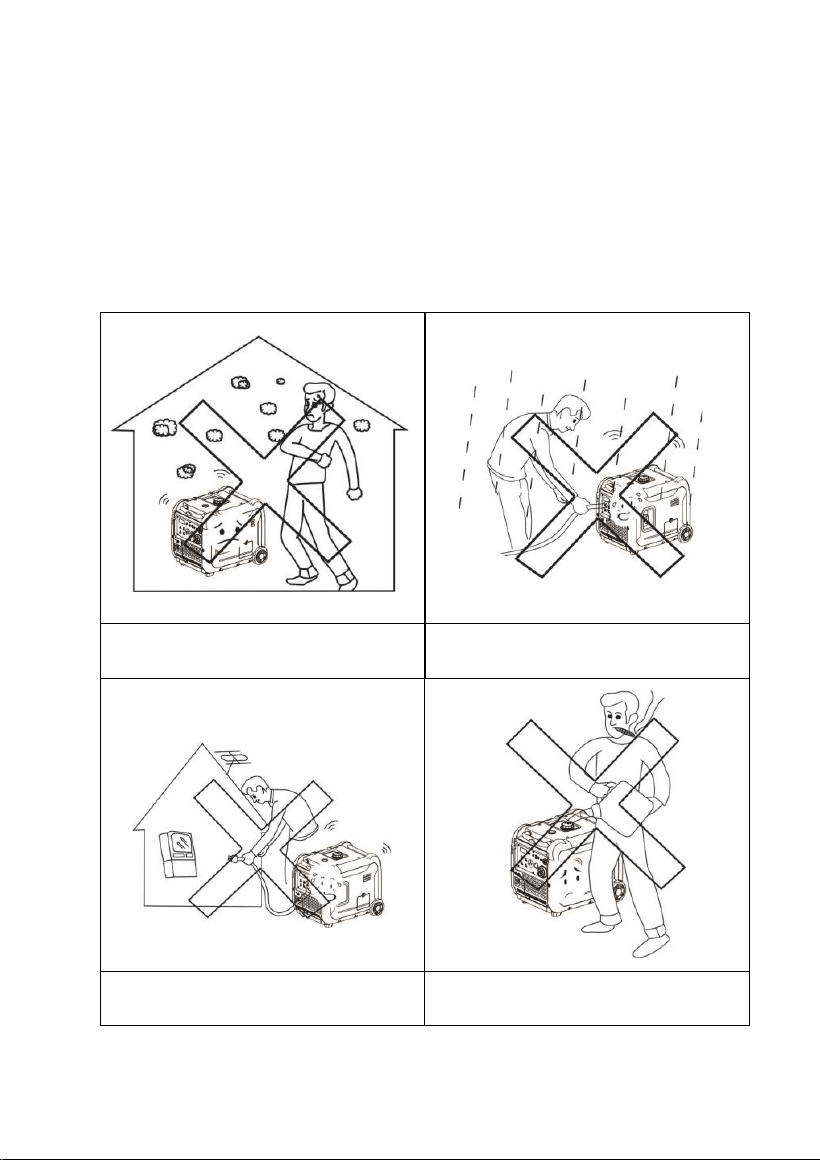
DO NOT operate indoors
DO NOT operate in the wet
conditions
DO NOT directly connect to a
household power supply
DO NOT smoke when refueling
DO NOT overflow the fuel
when refueling
Stop the engine before refueling
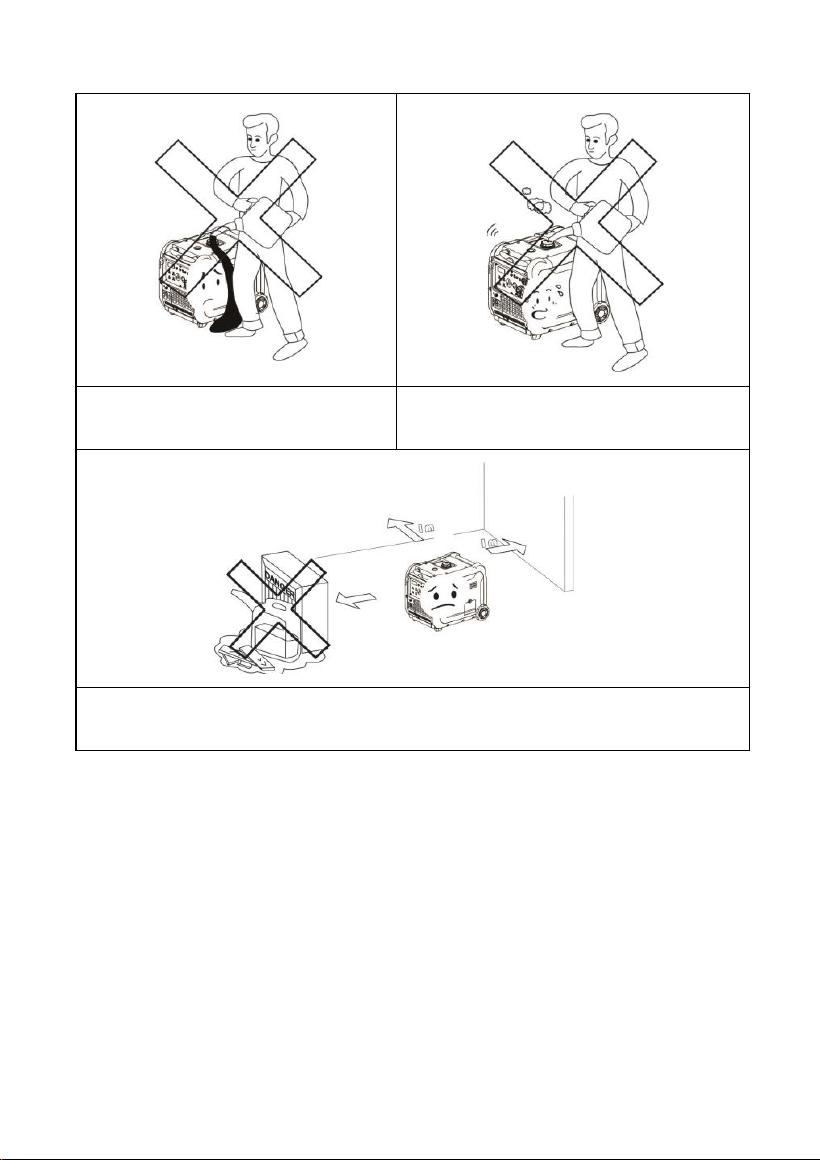
Keep the generator at least 10 feet far away from any
flammable materials
2. Special Requirements
Electrical equipment including lines and plug connections
should not be damaged in any way or have exposed wires.
The circuit breakers that have been installed match with the
provided generator.
If the circuit breakers require replacement, the replacement
must be a circuit breaker with identical ratings and
performance characteristics.
DO NOT operate the generator before grounding.
If using extension cords, be sure to check the electrical needs
of your appliance, as electrical power is lost over distance. Use
this rule: if your extension cord is #16 gauge wire,
you can have a cord up to 50 feet. For the same appliance,
if your cord is #10 gauge, your maximum length is 250 feet.
2.COMPONENT IDENTIFICATION
1. Component Identification
TG5500i
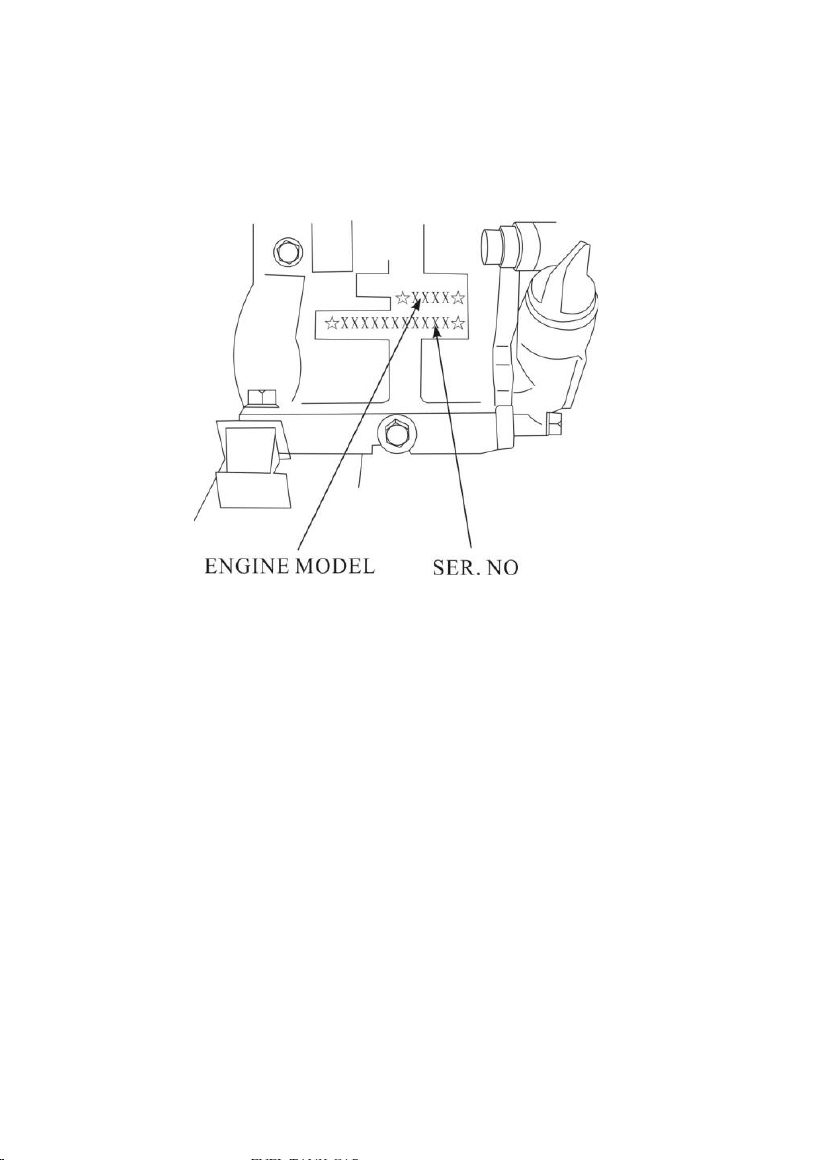
2. Engine Type & Serial Number
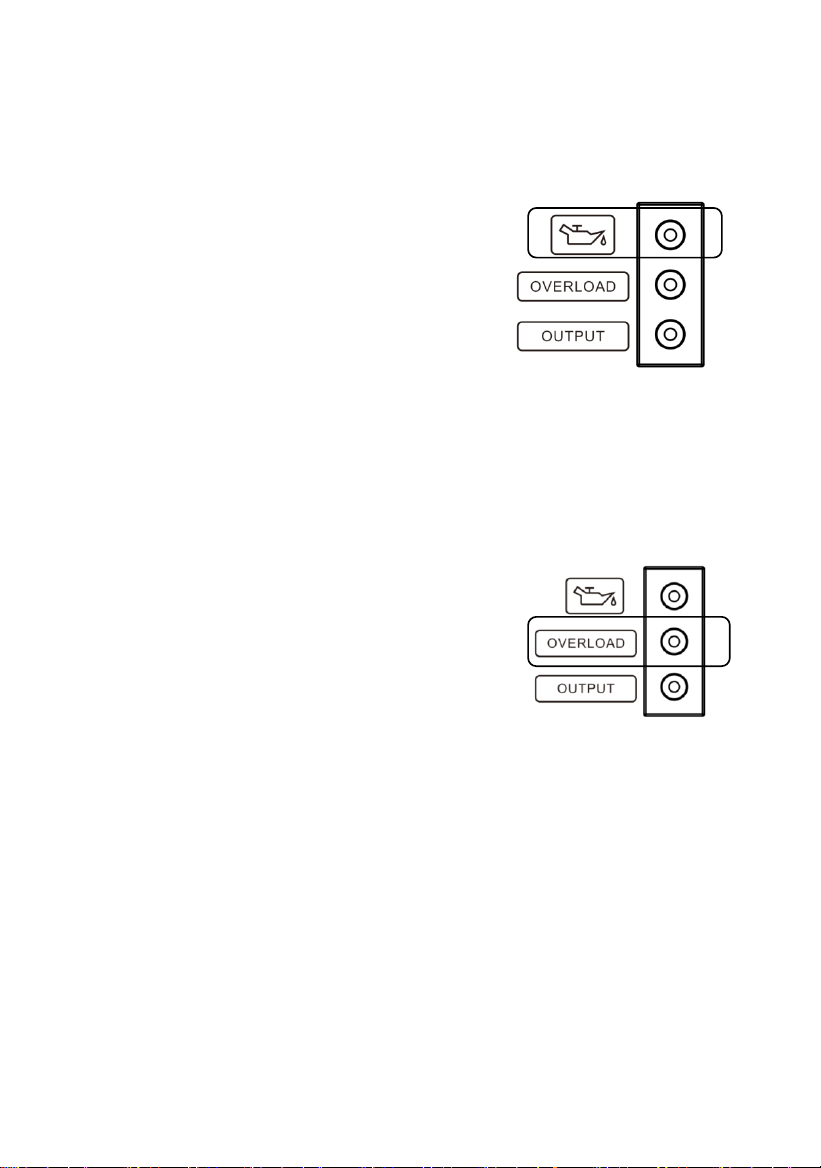
3. CONTROL FUNCTION
1. Oil warning light (red)
When the oil level falls below the
required level, the oil warning light
will turn on and the engine will stop
automatically. Unless you refill with
oil, the engine will not start again.
Tip: If the engine stalls or does not
start, turn the engine switch to “ON”
and then pull the recoil starter.
If the oil warning light flickers for a few seconds,
the engine oil is insufficient. Add oil and restart.
2. Overload indicator light (Red)
The overload indicator light comes on
when an overload of a connected
electrical device is detected, the
inverter control unit overheats, or the
AC output voltage rises. Then, the AC
protector will trip, stopping power
generation to protect the generator and any connected
electrical devices. The AC pilot light (Green) will go off and the
overload indicator light (Red) will stay on, but the engine will
not stop running.
When the overload indicator light comes on and power
generation stops, proceed as follows:
1) Turn off any connected electrical devices and stop the
engine.
2) Reduce the total wattage of connected electrical
devices within the rated output.
3)Check for blockages in the cooling air inlet and around
the control unit.
If any blockages are found, remove.
4) After checking, restart the engine.
Tip: The overload indicator light may come on for a few
seconds at first when using electrical devices that require a
large starting current, such as a
compressor or a submersible pump.
However, this is not a malfunction.
3. AC pilot light (Green)
The AC pilot light comes on when
the engine starts and produces
power.
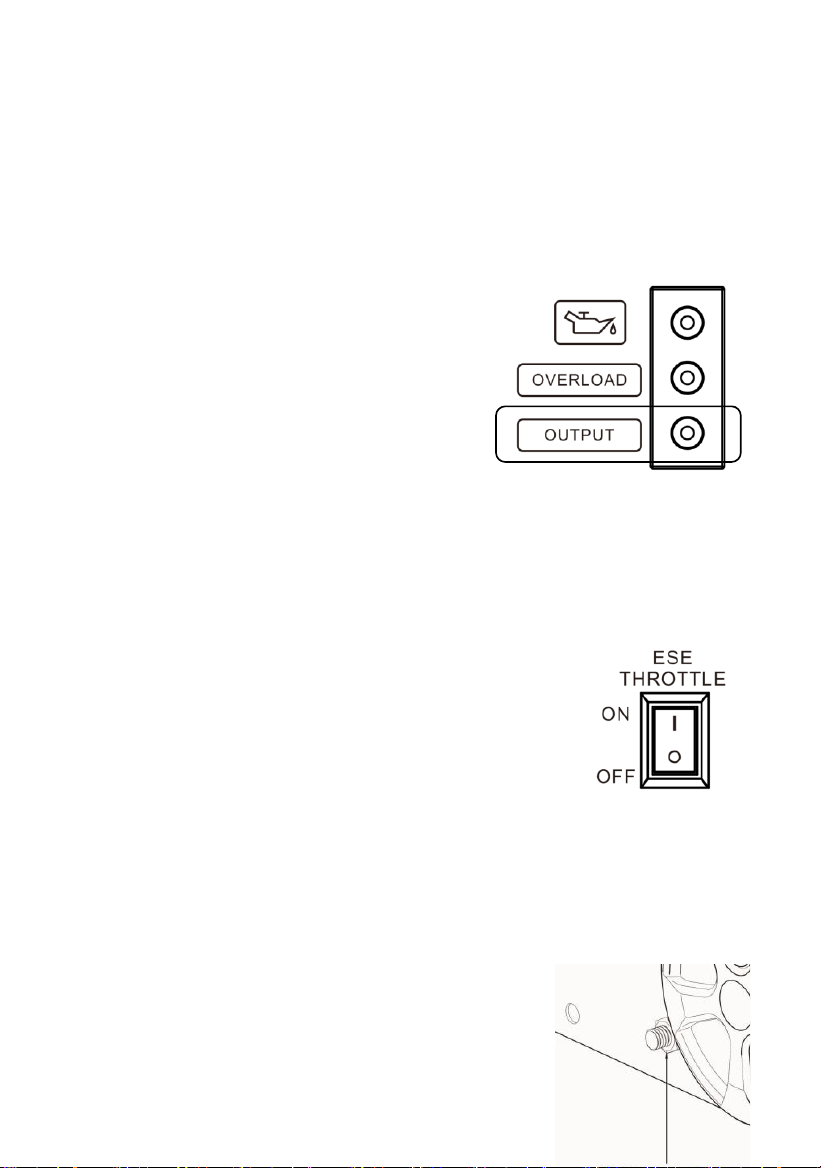
4. Engine smart control (ECO)
① “ON”
When the ECO switch is turned to “ON”, the economy control unit
controls the engine speed according to the connected load. The
results are better fuel consumption and less noise.
② “OFF”
When the ECO switch is turned to “OFF”, the
engine runs at the rated/min (3600r/min)
regardless of whether it is connected to a load.
Tip: The ECO switch must be turned to “OFF”
when using electrical devices that require a
large starting current, such as a compressor or a submersible
pump.
5. Ground (Earth) Terminal
The Ground (Earth) terminal connects the ground line for
prevention of electric shock. When the electric devices are
grounded, always ground the generator.
4. PREPARATION
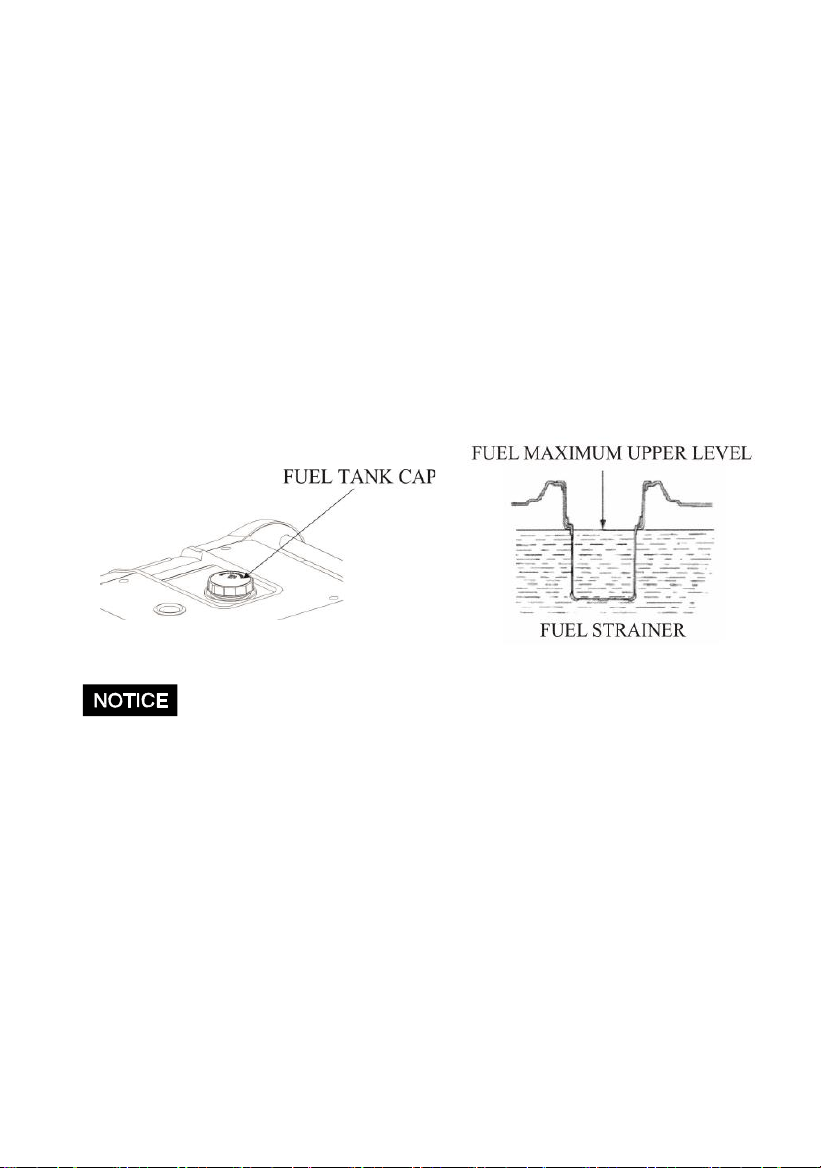
1. Fuel
DANGER!
Fuel is highly flammable and dangerous. Check “SAFETY
INFORMATION” carefully before filling.
Do not overfill the fuel tank, or it may overflow when the fuel
warms up and expands.
After filling the fuel tank, make sure the fuel tank cap is
tightened securely.
Immediately wipe off spilled fuel with a clean, dry, soft cloth.
Fuel may deteriorate painted surfaces or plastic parts.
Use unleaded gasoline only, as leaded gasoline can severely
damage internal parts of the generator.
Remove the fuel tank cap and fill the tank to the red level.
Recommended fuel: Unleaded gasoline
Fuel tank capacity: 4.5 gallons
2. Engine Oil
The generator has been shipped without engine oil. DO NOT
start the engine until it is filled with sufficient engine oil.
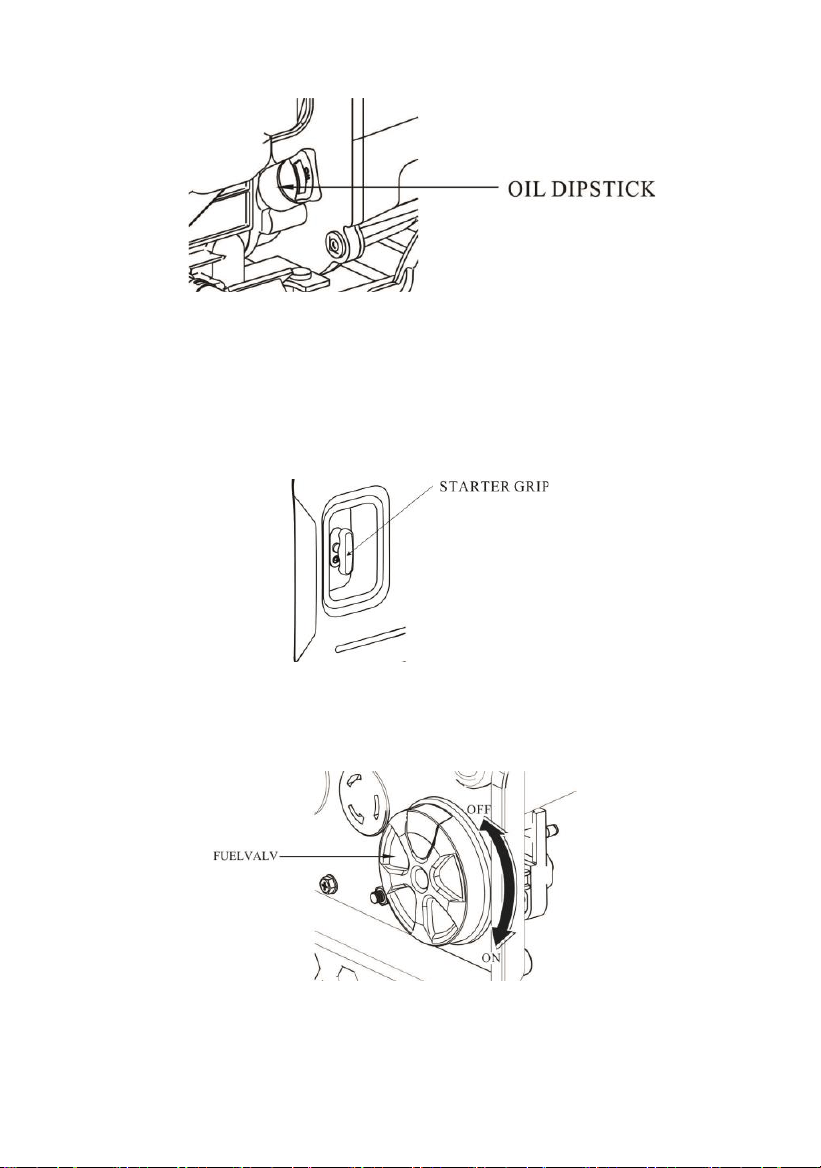
3. Recoil Starter
To start the engine, pull the starter grip lightly until resistance
is felt, then
pull quickly.
Do not allow the starter to snap back against the engine.
Return it gently to prevent damage to the starter.
4. Fuel Valve
The fuel valve controls fuel flowing from the fuel tank to the
carburetor. Be
sure to return the lever to “OFF” after stopping the
engine.
5. AC Circuit Breaker/Over Current Protector
The overload current will automatically switch off the circuit
breaker to avoid a short
circuit
of
the load
or
overload.
If
the indicator
of the
AC
Over current Protector is
raised, the Over current
Protector is now in the “OFF” position. Press the button of the
AC Over current Protector to the “ON” position again 1 min later. If
the circuit
breaker is switched
OFF
automatically, switch the circuit
breaker
ON again.
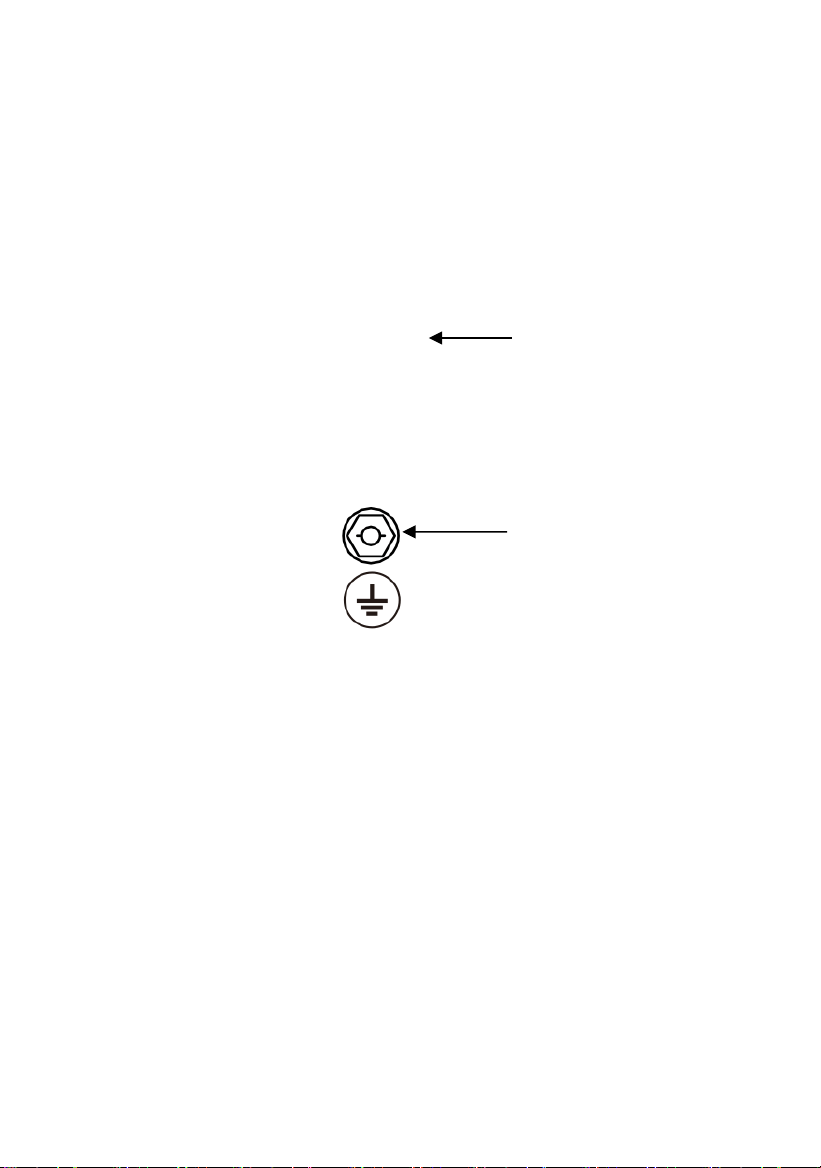
6. Ground
Terminal
This ground terminal is used to connect the generator.
OVERCURRENT
PROTECTOR
GROUND
TERMINAL
5. GENERATOR OPERATION
Generator operation environment:
·
Temperature: 23
°
F ~ 100
°
F (-5
℃
~
40
℃)
·
Humidity
:
Below
95%
·
Height above sea level:
Power output can be expected to decrease by an
average of 3.5% per 1000ft above sea level. When
operating at extreme altitudes, carburetor
adjustments are recommended to maintain proper
output.
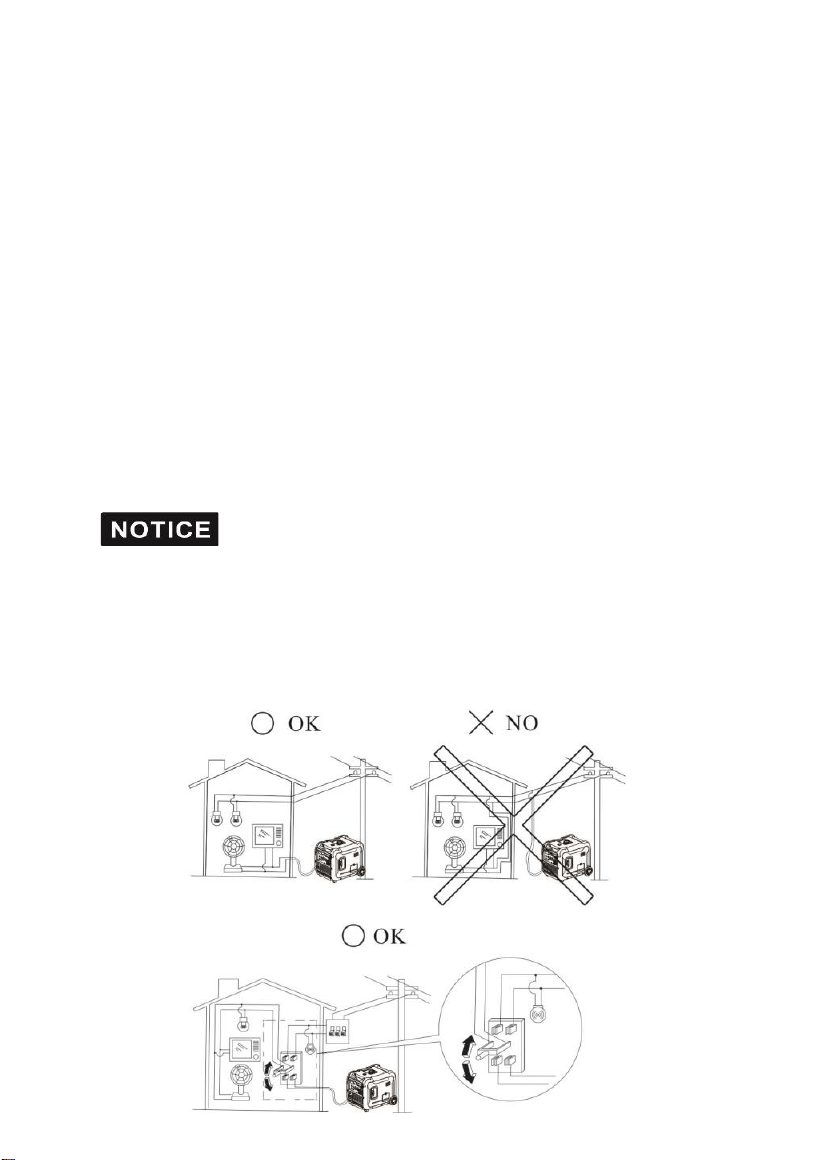
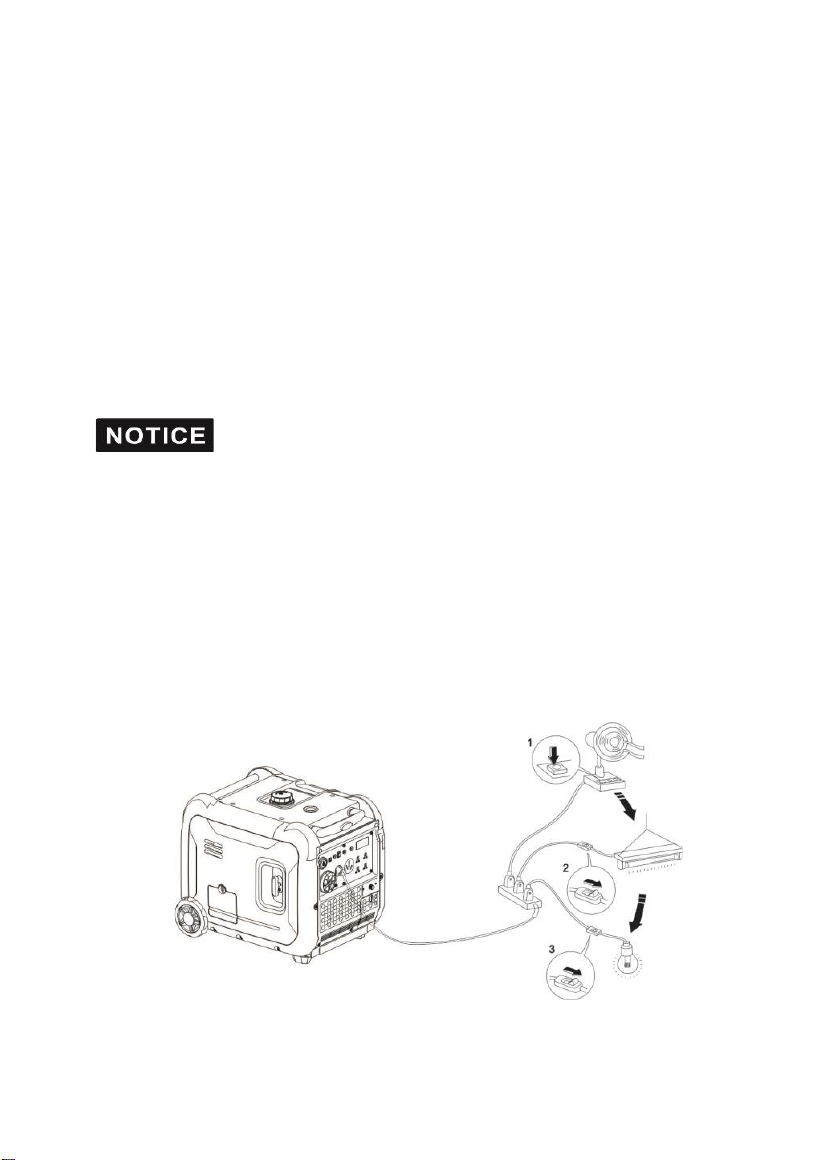
1. Connection to the Household Power Supply
When connecting the generator to the household power
supply, connection must be made by a qualified electrician.
After connecting, carefully check the electric connection for
safety and reliability. Incorrect electrical connections may
cause generator damage and/or a fire hazard.
2.
Generator
Grounding
To prevent electrical shock or misuse from faulty
appliances, the generator should be grounded with an
insulated lead.
3.AC Current
Before starting the generator, make sure that the total
load (Total resistance, capacitive and inductive)
does
not exceed the rated power of the generator.
Overload operation will shorten generator life.
If the generator set is connected to multiple loads or
electric appliances, connect each appliance 1 at a time,
starting with the highest load appliance first. Allow the
generator to adjust to each load before adding more.
The following table is a reference for when connecting to
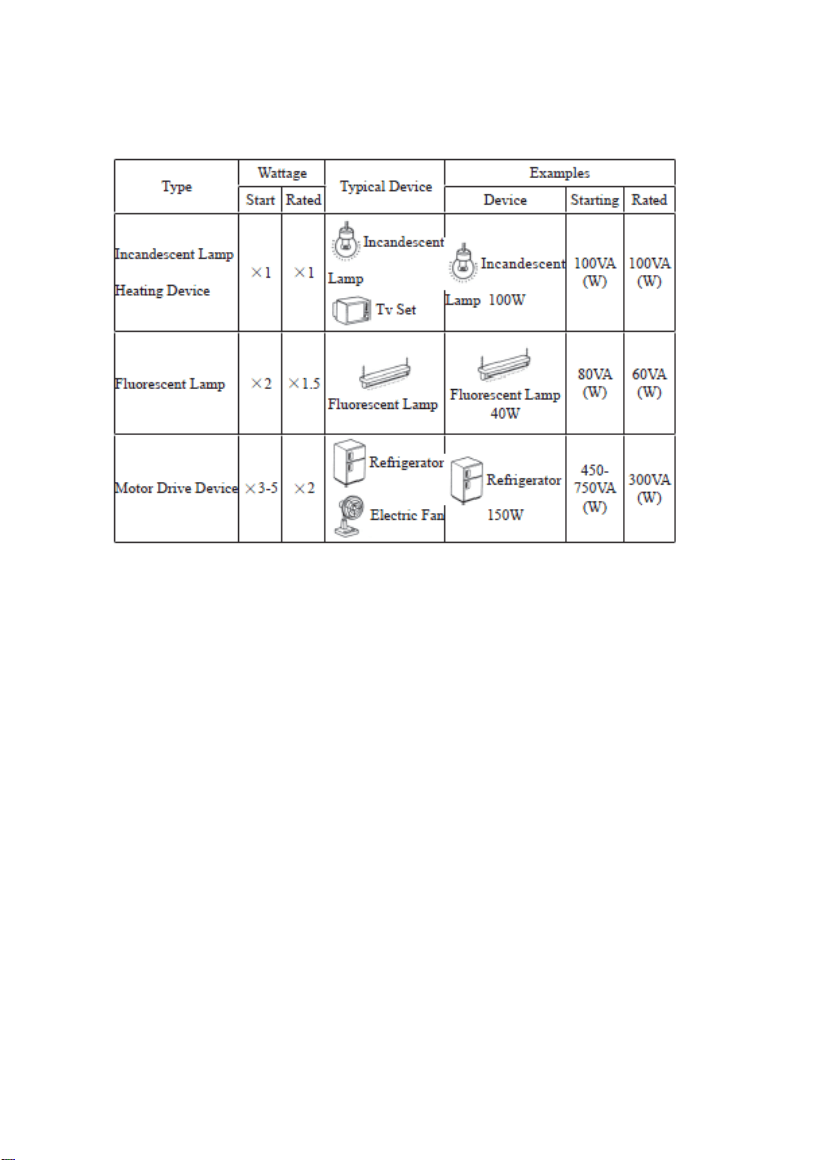
the electric appliances.
4. DC Current
DC Terminals
The DC terminals are used to provide a DC power supply
for lower power loads such as charging a battery.
The terminals are colored red to identify the positive (+)
terminal and black to identify the negative (-) terminal.
Load connection method: The load must be connected to
DC terminals with the proper polarity (load positive to
positive of DC terminal and load negative to negative of
DC terminal).
5. High Altitude Operation
At high altitude, the standard carburetor air-fuel mixture will
be excessively rich. Output power will decrease, and fuel
consumption will increase.
Engine performance can be improved by installing a smaller
diameter main fuel jet in the carburetor and readjusting the

pilot screw. If you always operate the engine at altitudes
3500 feet above sea level, you should have a Tomahawk
Power authorized dealer perform this carburetor
modification. If not, you should lower the load in the
operating generator.
Even with the right carburetor, engine horsepower will
decrease approximately 3.5% for every 1000-foot increase
in altitude. If no carburetor adjustments are made for high
altitude operation, this will have a major negative effect on
horsepower output.
If a carburetor for high altitude is equipped with an engine
and operated at a lower altitude, the lean air fuel mixture will
cause the engine output power to lower, over-heat and
seriously damage the unit.
6. STARTING THE ENGINE
1. Recoil Starter
(1) Remove all the loads out of the output.
(2) Turn the fuel valve to the “ON” position.
(3) Turn the AC circuit breaker to the “OFF” position.
(4) Turn the choke lever to the “CLOSE” position.
Don’t close the choke when starting a warm engine
(5) Turn the generator switch to the “ON” position.
(6) Pull the starter grip until compression is felt, then pull
briskly.
(7) Turn the choke lever to the “OPEN” position after the
engine is warm.

(8) Don’t use any electric apparatus before setting the
circuit breaker to the “ON” position.
2. Electric starting
(1) Remove all the loads out of the output.
(2) Turn the fuel valve to the “ON” position.
(3) Turn the choke lever to the “CLOSE” position.
Don’t close the choke when starting a warm engine
(4) Turn the generator switch to electric starting position.
(5) After starting engine, immediately release generator
switch and generator switch can automatically return to
open position.
(6) Turn the choke lever to “OPEN” position after the engine
is warm.
Turning the gasoline switch to the electric starting position
for more than 5 seconds can damage the starting motor. If
failing to start, release the switch and wait 10 seconds
before operating it again.
If the speed of the starting motor drops fast after a period of
time, it means that the battery should be recharged.
7. STOPPING THE ENGINE
(1) Turn the AC circuit breaker to the “OFF” position.
(2) Turn the generator switch to the “OFF” position.
(3) Turn the fuel valve to the “OFF” position.

To stop the engine in an emergency, turn the generator
switch to the “OFF” position.
8. MAINTENANCE
The engine must be properly maintained to ensure its
operation is safe, trouble-free, as well as eco-friendly.
In order to keep your gasoline engine in good working
condition, it must be periodically serviced. The following
maintenance schedule and routine inspection
procedures must be carefully followed:
● If the gasoline engine is frequently worked under high
temperature or at a high load, change the oil every 25 hours.
● If the engine is frequently worked under dusty or other
Frequency
Items
Each
time
First 1
month or
first 20hrs
of
operation
Thereafter,
every 3 months
or every 50hrs
of operation
Every year
or every
100 hrs of
operation
Engine oil
Check- Refill
√
Replace
√
√
Air filter
element
Check
√
Clean
√
Replace
√
Deposit Cup(if
equipped)
Clean
√
Spark Plug
Check -
adjust
√*
Spark arrester
Clean
√
Idling (if
equipped) **
Check -
adjust
√
Valve
clearance **
Check-adjust
√
Fuel tank &
fuel filter **
Clean
√
Fuel line
Check
Every 2 years(change if necessary)
Cylinder head,
piston
Clean up
carbon **
<225cc, Every 125hrs
≧225cc, Every 250hrs
* These items should be replaced if replacement needed.
** These items should be maintained and repaired by our authorized dealer, unless the
owner has appropriate tools and is proficient with mechanical maintenance.

severe circumstances, clean the air filter element every 10
hours; If necessary, change the air filter element every 25
hours.
● Maintain the generator based on whatever number comes
first: the hours of operation, or the timeframe (ex: oil change
every 3 months)
● If you have missed the scheduled time to maintain your
engine, do it as soon as possible.
Stop the engine before servicing. Put the engine on a
level surface and remove the spark plug cap to prevent
the engine from starting.
Never run your engine in a poorly ventilated room or
other enclosed area, be sure to keep good ventilation in
the working area. The exhaust from the engine may
contain poisonous CO, and inhalation can cause shock,
unconsciousness and even death.
1. Engine Oil Change
Drain the oil while the engine is warm to assure complete
and rapid draining.
1. Remove the oil dipstick and drain plug to drain the oil.
2.Reinstall the drain plug, then tighten the plug securely.
3. Refill oil and check the oil level.
Oil capacity: 28.7 fl oz

Used engine oil may cause skin cancer if repeatedly left
in contact with the skin for prolonged periods. Although
this is unlikely unless you handle used oil on a daily
basis, it is still advisable to thoroughly wash your hands
with soap and water as soon as possible after handling
used oil.
Please dispose of used engine oil in a manner that is
compatible with the environment. We suggest you take it in a
sealed container to your local service station or recycling
center for reclamation. Do not throw it in the trash or pour it
on the ground.
2. Air Filter Service
A dirty air cleaner will prevent air from flowing into the
carburetor. To prevent carburetor malfunction, maintain
the air Filter regularly. Maintain more frequently when
operating the generator in extremely dusty areas.
Using gasoline or flammable solvent to clean the filter
element can cause a fire or explosion. Use only soapy
water or nonflammable solvent.
Never run the generator without the air filter. If not, rapid
engine wear will result.
(1) Open the air filter clip and open the air cover. Check
the air filter element for complete and clean.
(2) If the air filter element is dirty, please clean the air filter
element:
Wash the air filter element in a solution of household
detergent and warm water, then rinse thoroughly or wash
in nonflammable or high flash point solvent: Drop a few
points engine oil in, then, squeeze out.

(3) Reinstall the air filter element and the cover.
3. Fuel Sediment Float Bowl Cleaning
(1) Turn the fuel valve to the OFF position. Remove the
float bowl cup, O-ring and strainer according to the arrow
direction.
(2) Clean the sediment cup, and O-ring, and strainer in a
nonflammable or high flash point solvent.
(3) Reinstall O-ring, and strainer and screw down the
sediment cup.
(4) Turn the fuel valve ON and check for leaks.
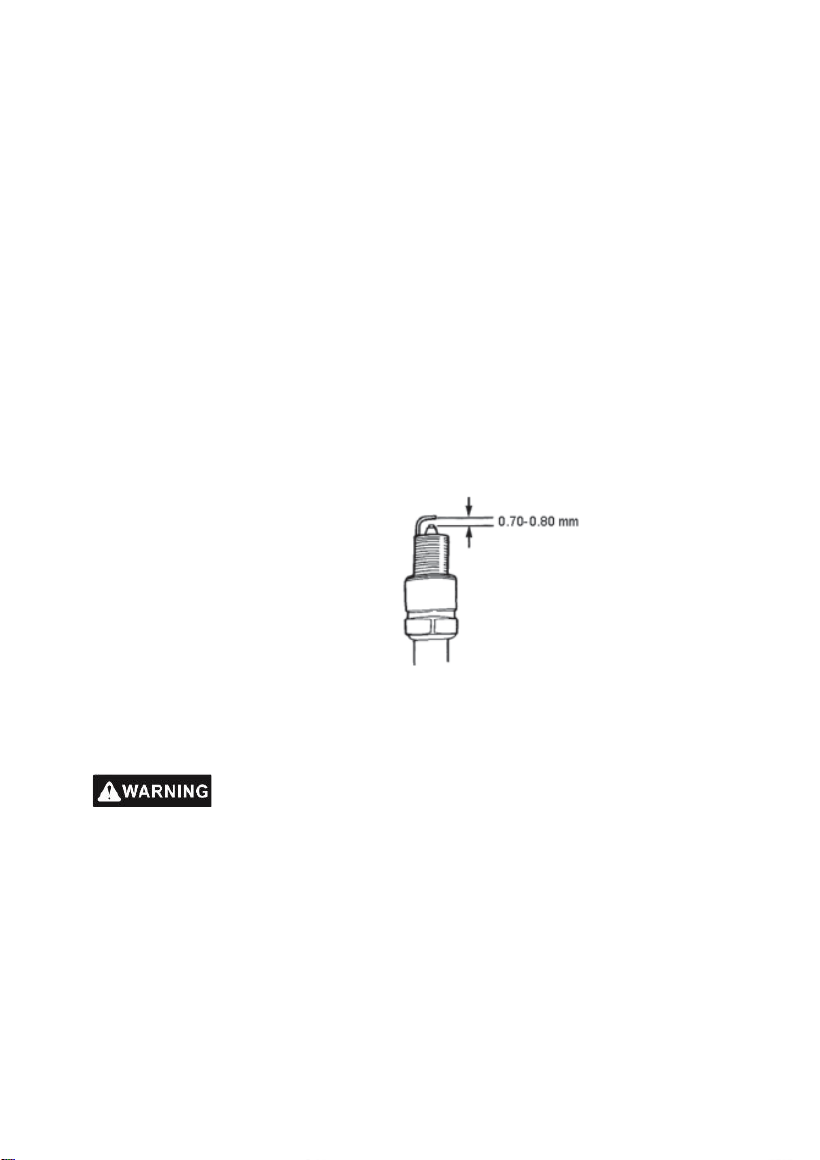
4. Spark Plug Service
Recommended spark plugs: F7RTCor other equivalents
(1) Remove the spark plug cap.
(2) Use the plug wrench to remove the spark plug.
(3) Visually inspect the spark plug if the insulator is
cracked, if cracked, replace with new the spark plug.
(4) Measure the plug gap with a feeler gauge. Correct as
necessary by carefully bending the side electrode. The gap
should be: 0.70-0.80 mm.
(5) Check the spark plug washer.
(6) Reinstall the spark plug, tighten it with a plug wrench
and impact the washer. Reinstall the spark plug.
9. STORAGE
In order to prevent a hot engine or exhaust system
causing burns or fires, let the engine cool before storing
the generator. If storing the unit for an extended period of
time, be sure the storage area is free of excessive
humidity and dust.
(1) Drain the fuel in the fuel tank out, clean strainer, O-ring
and sediment, and replace. Drain the fuel out of the carburetor
by loosening the drain bolt, then refitting it and screwing down

the carburetor bolt.
Gasoline is extremely flammable and is explosive under
certain conditions. Drain fuel in a well-ventilated area
with the engine stopped. Do not smoke or allow flames or
sparks in the area during this procedure.
(2) Screw the oil dipstick off and screw the drain bolt off
the crankcase to completely drain the oil out. Then screw
down the drain bolt and fill fresh oil to the upper mark,
finally replace the oil dipstick.
(3) Remove the spark plug and pour about a tablespoon
of clean engine oil into the cylinder. Crank the engine
several revolutions to distribute the oil, then reinstall the
spark plug.
(4) Slowly pull the starter grip until resistance is felt. Let
the intake and exhaust valves in closing position.
(5) Place the generator in the clean area.
10. TROUBLESHOOTING
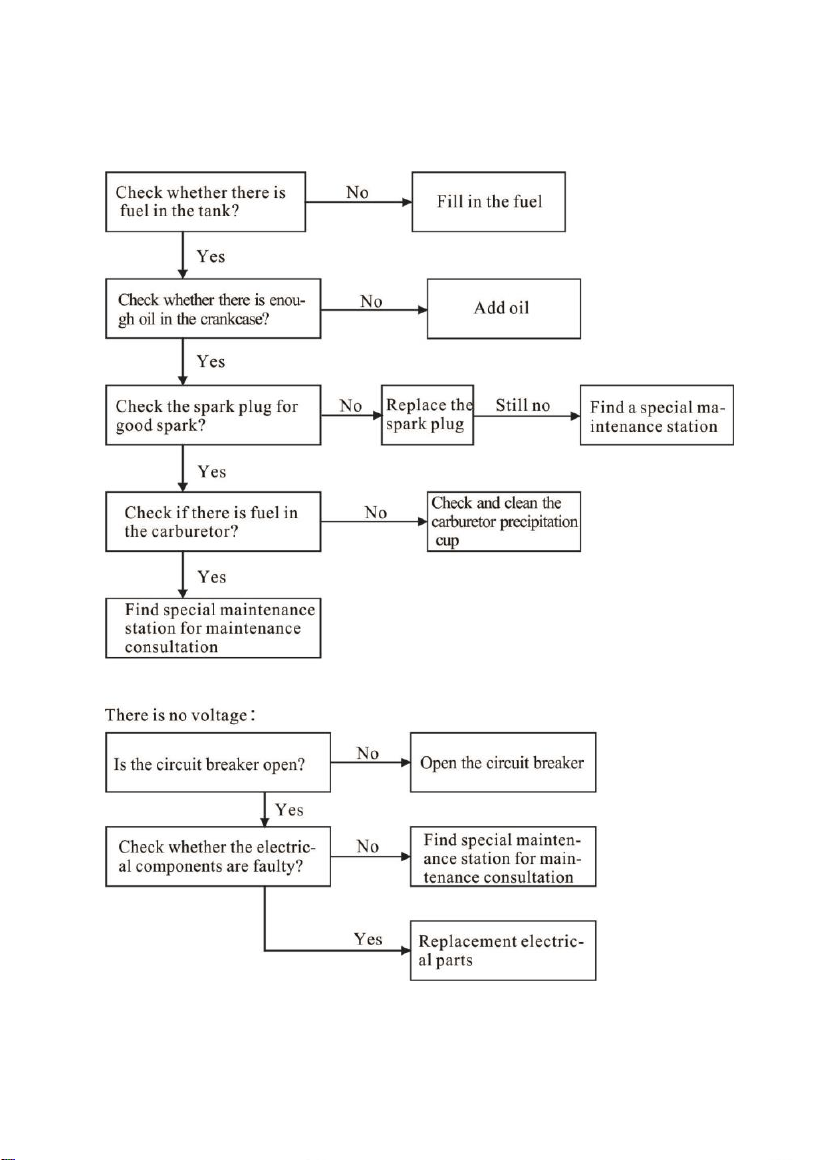
Engine will not start:
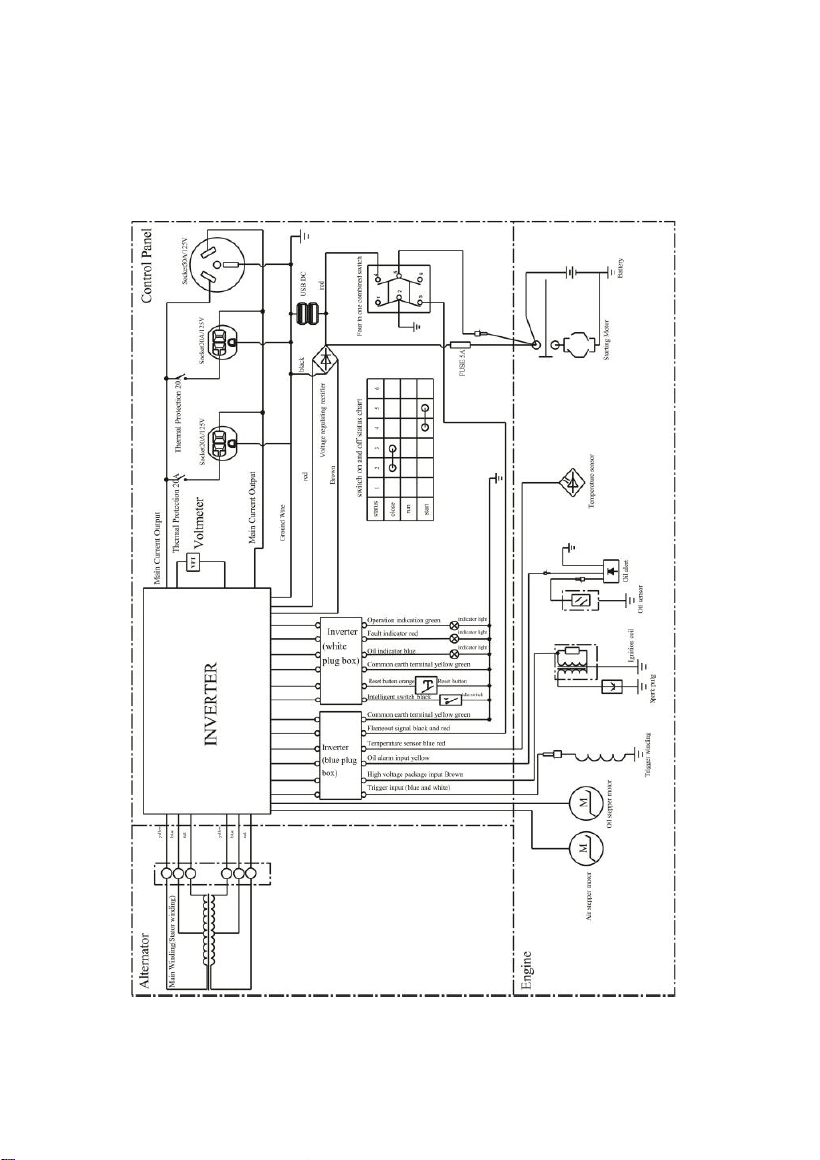
11. WIRING DIAGRAM
TG5500i Electrical schematic diagram

12. SPECIFICATIONS
Item
TG5500i
Gasoline
Engine
Gasoline Engine
Type
Single Cylinder, 4-Stroke, Forced Air Cooling,
OHV
Displacement (cc)
312
Igniting System
CDI
Oil Capacity (L)
0.85
Generator
Fuel Volume (L)
17
Rated Frequency
(Hz)
50/60
Rated Voltage (V)
230/120/240
Rated Output
Power (kW)
5
Maximum Output
Power (kW)
5.5
DC(V/A)
12/8.3
Generator
Set
Length (mm)
565
Width (mm)
460
Height (mm)
450
General-
Purpose
Accessory
Large Air Cleaner
●
Large Muffler
●
Large Fuel Tank
●
Fuel Gauge
●
Voltmeter
●
Automatic Voltage
Regulator(AVR)
●
Oil Alert System
●
Non-fuse Breaker
●
Electric Starting
Accessory
●
Notes: ● means available, - means unavailable


INVERTER SERIES INVERTER SERIES
HAVE QUESTIONS?
Contact us. We’re here to help!
Email us at [email protected]
3,550 lbs/ft Vibratory Rammer
Part#: TR68H
3.6 HP Honda GXR120 Engine
Easily achieve a 100% compaction rating
3-in-One Fuel System with carburetor protection
13” x 11” plate for narrow trenches and corners
3 Year Engine Warranty & 1 Year Product Warranty
3,400 lbs/ft Plate Compactor
Part#: TPC90H
5.5 HP Honda GX160 Engine
Easily achieve a 100% compaction rating
22” x 20” cold, rolled steel beveled base plate
Includes 3.5 gallon water tank for asphalt compaction
3 Year Engine Warranty & 1 Year Product Warranty
3,000 lbs/ft Plate Compactor
Part#: TPC80 & TPC80H
6 HP Kohler CH260 & 5.5 HP Honda GX160 Engines
Easily achieve a 100% compaction rating
16.5” x 21.5” plate for narrow trenches and corners
Optional Honda Engine model: TPC80H
3 Year Engine Warranty & 1 Year Product Warranty
COMPACTION
6.5 Gal Backpack Concrete Sprayer
Part#: TCS6.5
Maintain constant, adjustable pressure up to 450 PSI
Achieve superior concrete finishes with even spraying
Spray 15,000 sq ft in less than 10 minutes
Compatible with major manufacturer wands
1 Year Product Warranty
1.6 HP Vibratory Concrete Screed
Part#: TVSA-H
1.6 HP Honda GX35 Engine
Aluminum Magnesium blades available from 8ft - 14ft
Finish concrete 4X faster than other screed methods
360° adjustable handle placement
3 Year Engine Warranty & 1 Year Product Warranty
6” Early Entry Green Concrete Saw
Part#: TFS6H
5.5 HP Honda GX160 Engine
Maximum cutting depth of 1 3/16 inches
OSHA compliant vacuum port for dust collection
Includes 6” early entry concrete blade
3 Year Engine Warranty & 1 Year Product Warranty
FINISHING
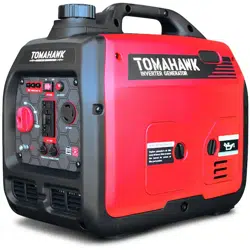
Part#: TG2000i
2000 Max Watts, 1600 Rated Watts
Run Time of 8 hours on 1 gallon of gas
OSHA and GFCI Compliant
Parallel technology capable for double the power
2 Year Product Warranty
3500 Watt Inverter Generator
Part#: TG3500i
3500 Max Watts, 3000 Rated Watts
Run Time of 20 hours on 3.5 gallon of gas
OSHA and GFCI Compliant with Electric Start
Parallel technology capable for double the power
2 Year Product Warranty
4000 & 7000 Watt Generators
Part#: TG4000 & TG7000
4000 / 7000 Max Watts, 2500 / 5500 Rated Watts
Voltage Selector gives Full Wattage for 120V or 240V
Run Time of 8 hours at 50% Load
OSHA and GFCI Compliant
2 Year Product Warranty
GENERATORS
2000 Watt Inverter Generator
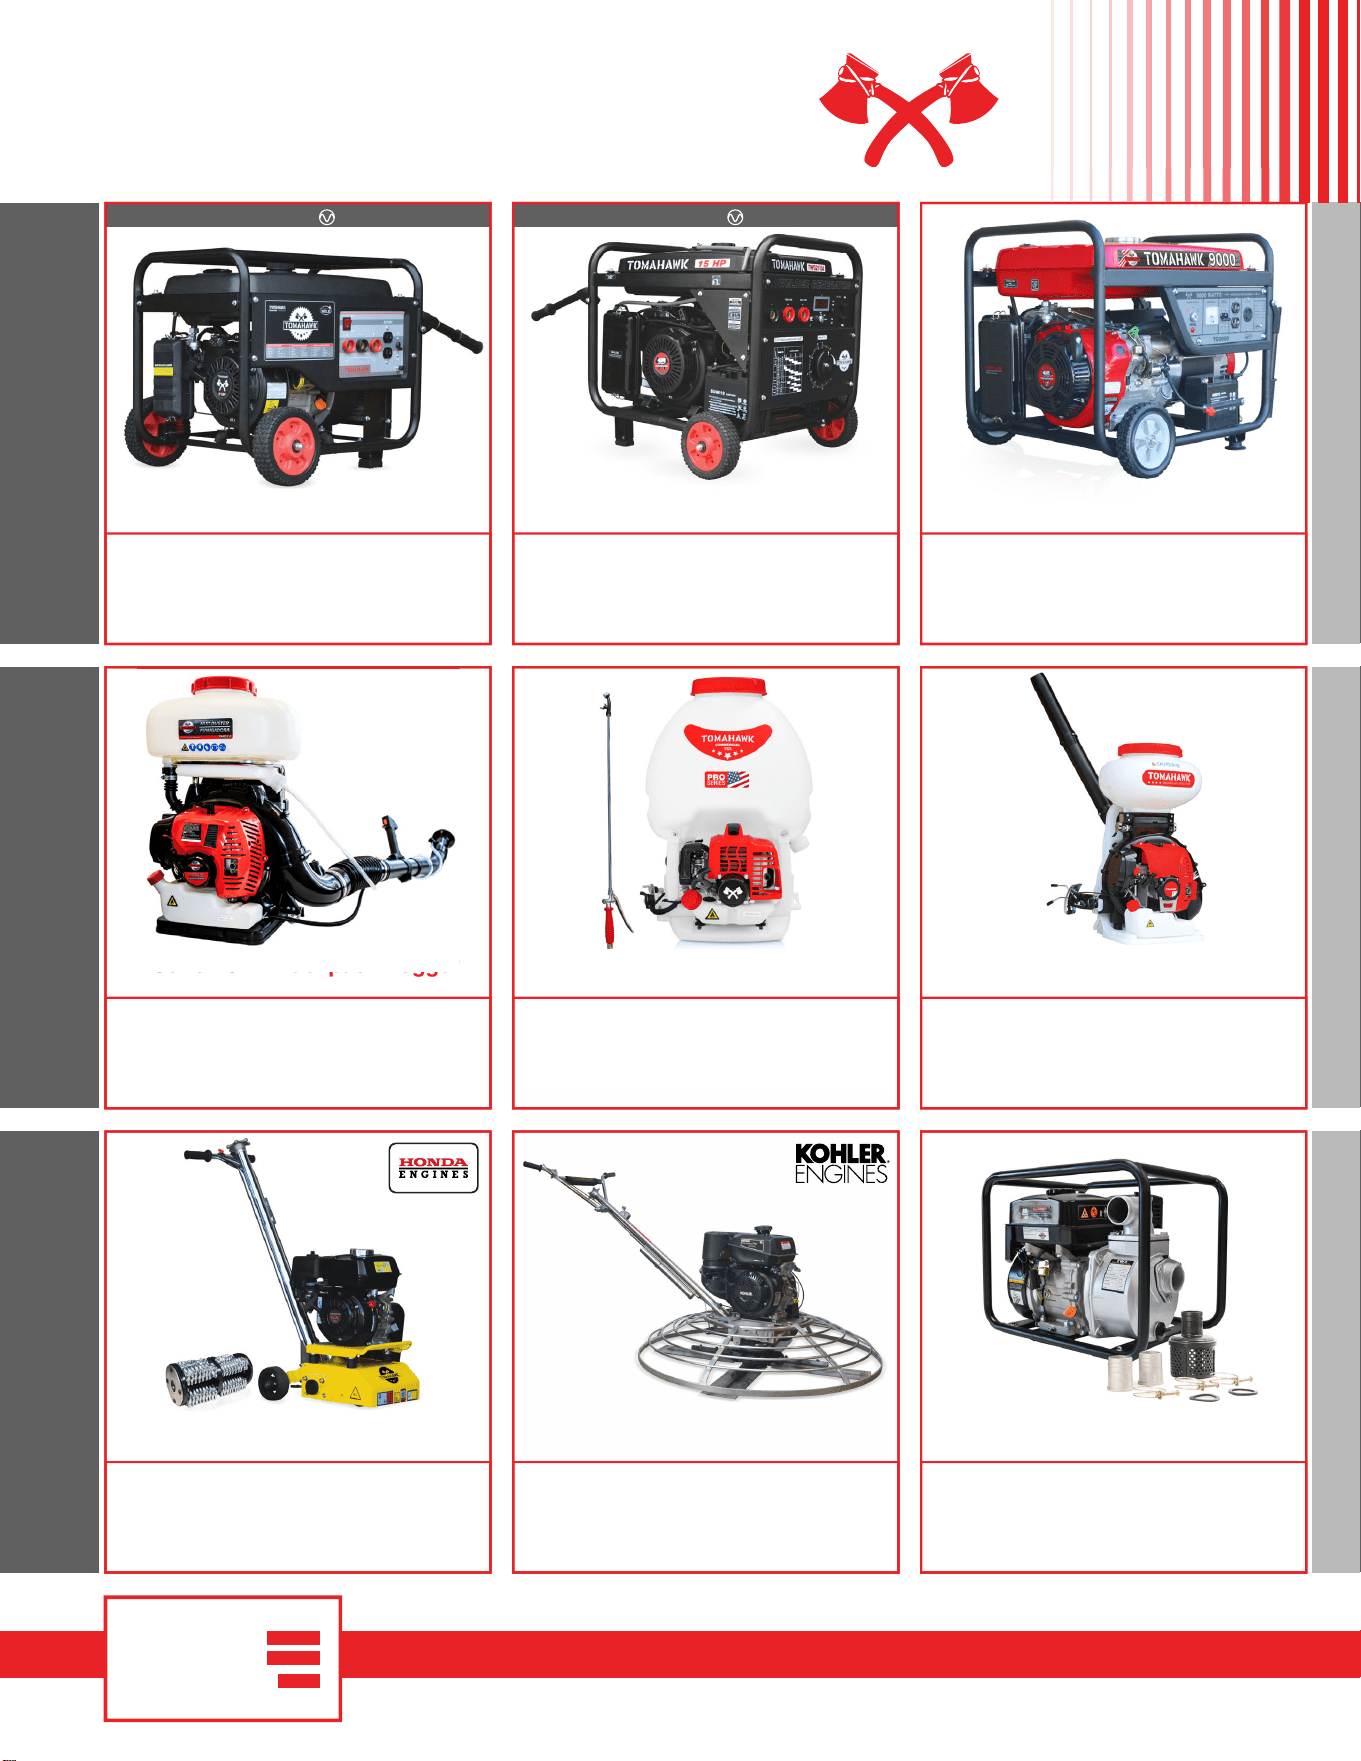
9000 Watt Generators
Part#: TG9000
9000 Max Watts, 8500 Rated Watts
Run Time of 10 hours at 50% Load
7 gallon fuel tank for extended use
Electric Key Start with battery included
2 Year Product Warranty
8” Gas Powered Concrete Scarifier
Part#: TSCAR8H
5.5 HP Honda GX160 Engine
Remove traffic lines at 800 - 1,000 linear ft/hr
Tungsten Carbide Blade Kit Available
OSHA approved dust port for silica vacuum removal
3 Year Engine Warranty & 1 Year Product Warranty
36” & 46” Concrete Power Trowel
Part#: TPT36K & TPT46K
6 HP Kohler CH260 & 14 HP Kohler CH440 Engines
Adjust trowel blade pitch from 0-28°
60-115 RPM rotor speed for superior concrete finishes
Includes float pan and trowel blades
3 Year Engine Warranty & 1 Year Product Warranty
2” and 3” Trash Water Pumps
Part#: TW2 & TW3
Moves liquids at a rate up to 9,240 gallons/hour
Handle solids up to 0.6"
Cast iron impeller for smooth performance
6.5 HP engine protected by rugged all purpose frame
1 Year Product Warranty
INVERTER SERIES
120 Amp Portable Welder Generator
Part#: TWG120A
Steady 120 Amp DC welding output
60% Duty Cycle for extended use
Suitable for welding rods from 6010 to 6013
Includes wheel kit for job site portability
2 Year Product Warranty
INVERTER SERIES
210 Amp Portable Welder Generator
Part#: TWG210A
Steady 50 - 210 Amp DC welding output
60% Duty Cycle for extended use
Suitable for welding rods from 6010 to 7024
Electric Key Start with battery included
2 Year Product Warranty
3.7 Gallon 3HP Backpack Fogger
Part#: TMD14
Turbo Boosted Pump with 40ft + Horizontal Reach
Sprays 1 acre in 30 minutes
10X Faster than Manual Pump Sprayers
Converts to Leaf Blower with 200 MPH Air Velocity
1 Year Engine Warranty & 1 Year Product Warranty
5 Gallon 1.8HP Backpack Sprayer
Part#: TPS25
Reach Up to 30ft Horizontal Reach
Sprays 1 acre in 15 minutes
10X Faster than Manual Pump Sprayers
450 PSI Commercial Grade Pump
1 Year Engine Warranty & 1 Year Product Warranty
4 Gallon 3HP Backpack Spreader
Part#: TGS30
AND MORE WELDING / POWERPEST CONTROL
www.tomahawk-power.com
(866) 577-4476
Reach Up to 30ft Horizontal Reach
Covers 1 acre in less than 30 minutes
20X Faster than Manual Broadcast Spreaders
Converts to Fogger with Liquid Tank Accessory
1 Year Engine Warranty & 1 Year Product Warranty
ASSEMBLED IN THE
PARTS SOURCED GLOBALLY
USA
7 Gallon 3HP Backpack Fogger

Tomahawk Power, LLC
San Diego, CA
Sales Support
(866) 577-4476
Equipment Support
(866) 577-4476
www.tomahawk-power.com
Tomahawk understands to keep a job-site running smoothly the proper equipment and
spare parts are needed at the drop of a hat. With same day shipping and faster
delivery times, count on Tomahawk to keep you powered throughout the day! With
long lasting parts and engines, Tomahawk equipment will be the star of your fleet for
years to come. Visit www.tomahawk-power.com to get started today!
Power Your World