

Technical Support and E-Warranty Certificate
www.vevor.com/support
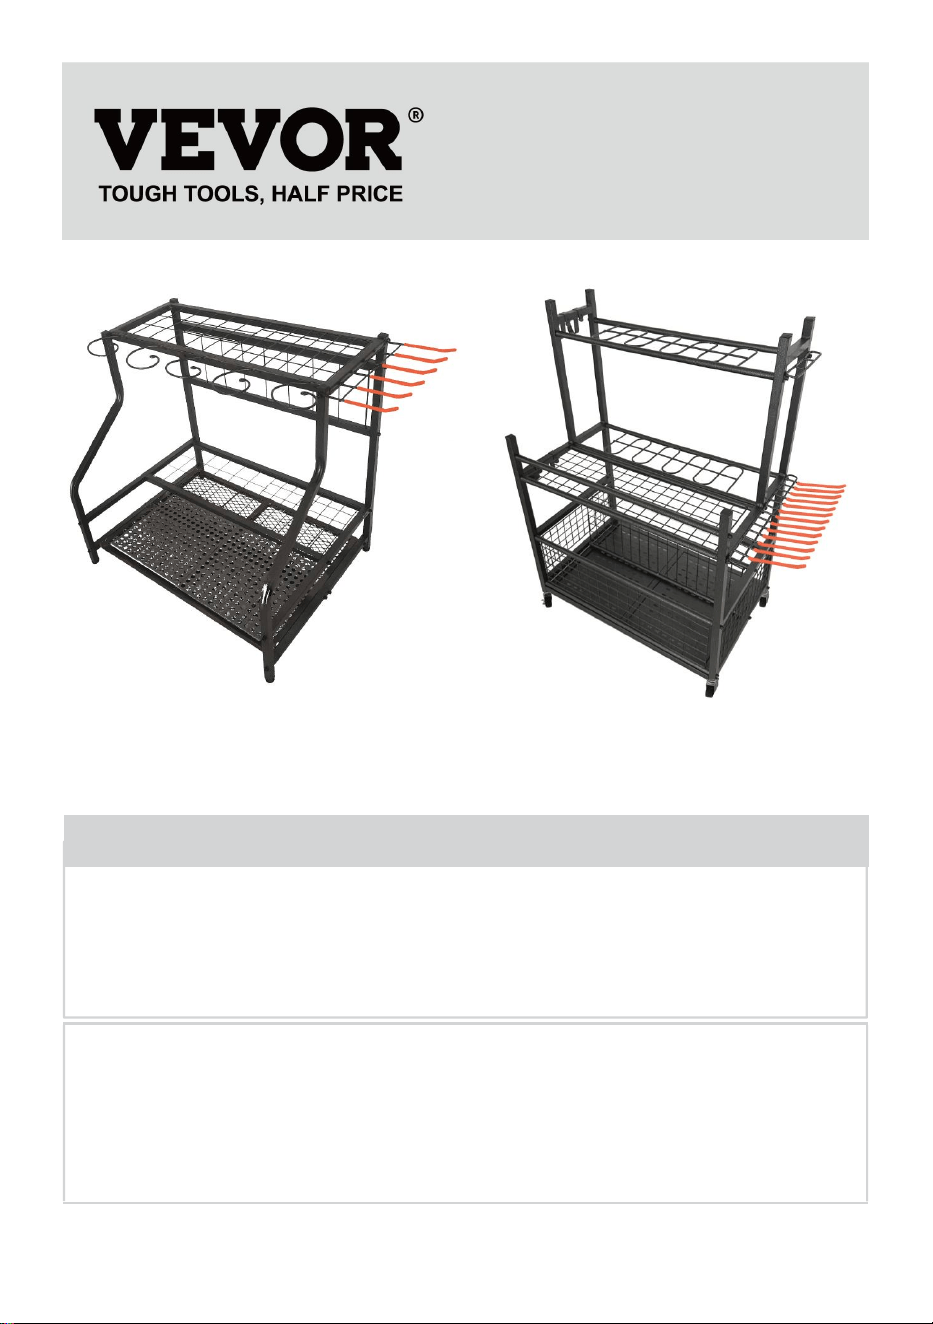
GARAGE TOOL STORAGE RACK
We continue to be committed to provide you tools with competitive price.
"Save Half", "Half Price" or any other similar expressions used by us only represents an
estimate of savings you might benefit from buying certain tools with us compared to the
major top brands and does not necessarily mean to cover all categories of tools offered by
us. You are kindly reminded to verify carefully when you are placing an order with us if you
are actually saving half in comparison with the top major brands.
- 1 -
Have product questions? Need technical support? Please feel free to
contact us:
Technical Support and E-Warranty Certificate
www.vevor.com/support
NEED HELP? CONTACT US!
This is the original instruction, please read all manual instructions
carefully before operating. VEVOR reserves a clear interpretation of our
user manual. The appearance of the product shall be subject to the
product you received. Please forgive us that we won't inform you again if
there are any technology or software updates on our product.
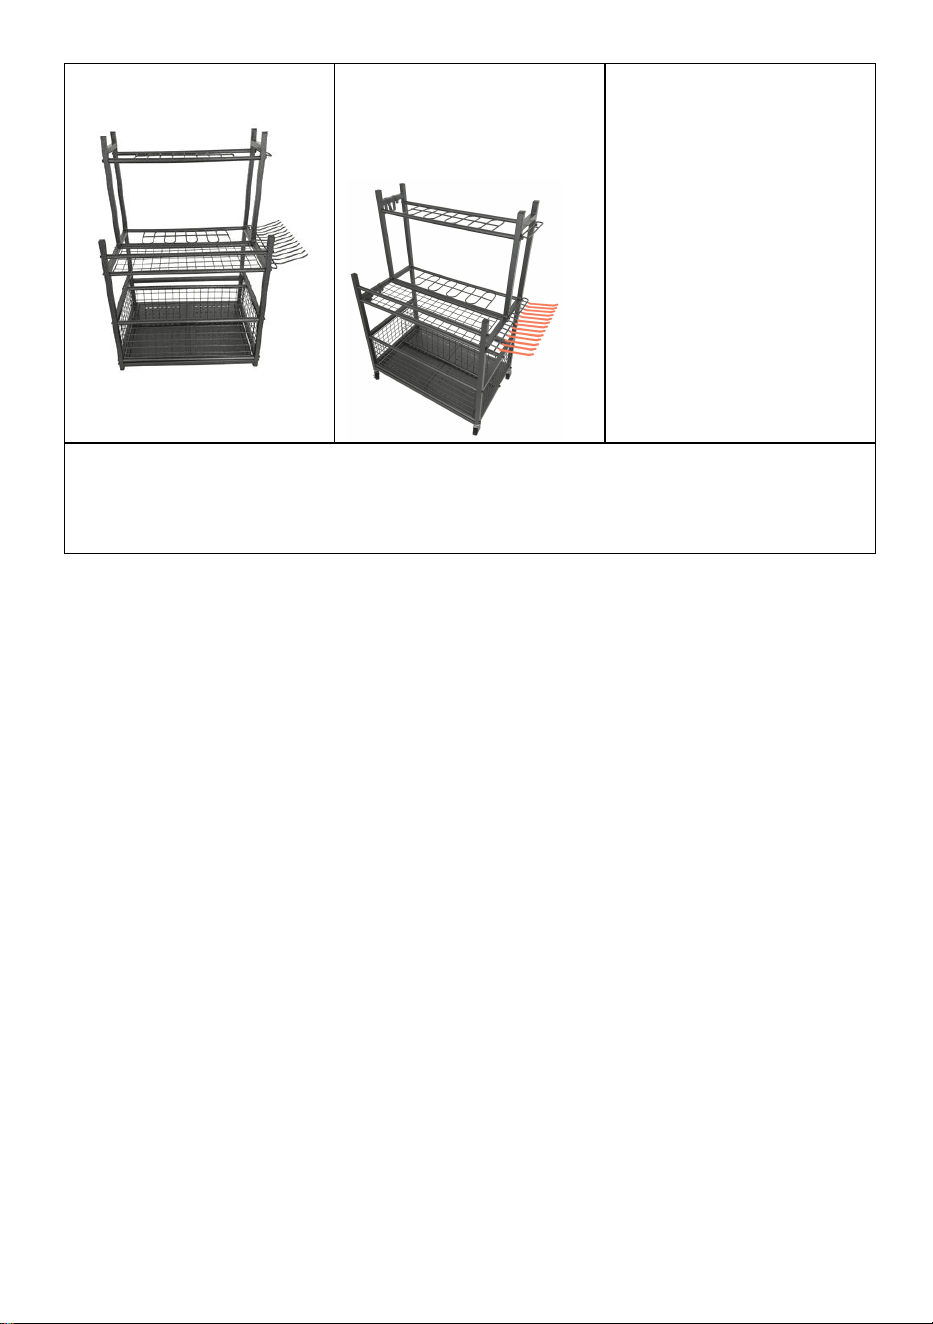
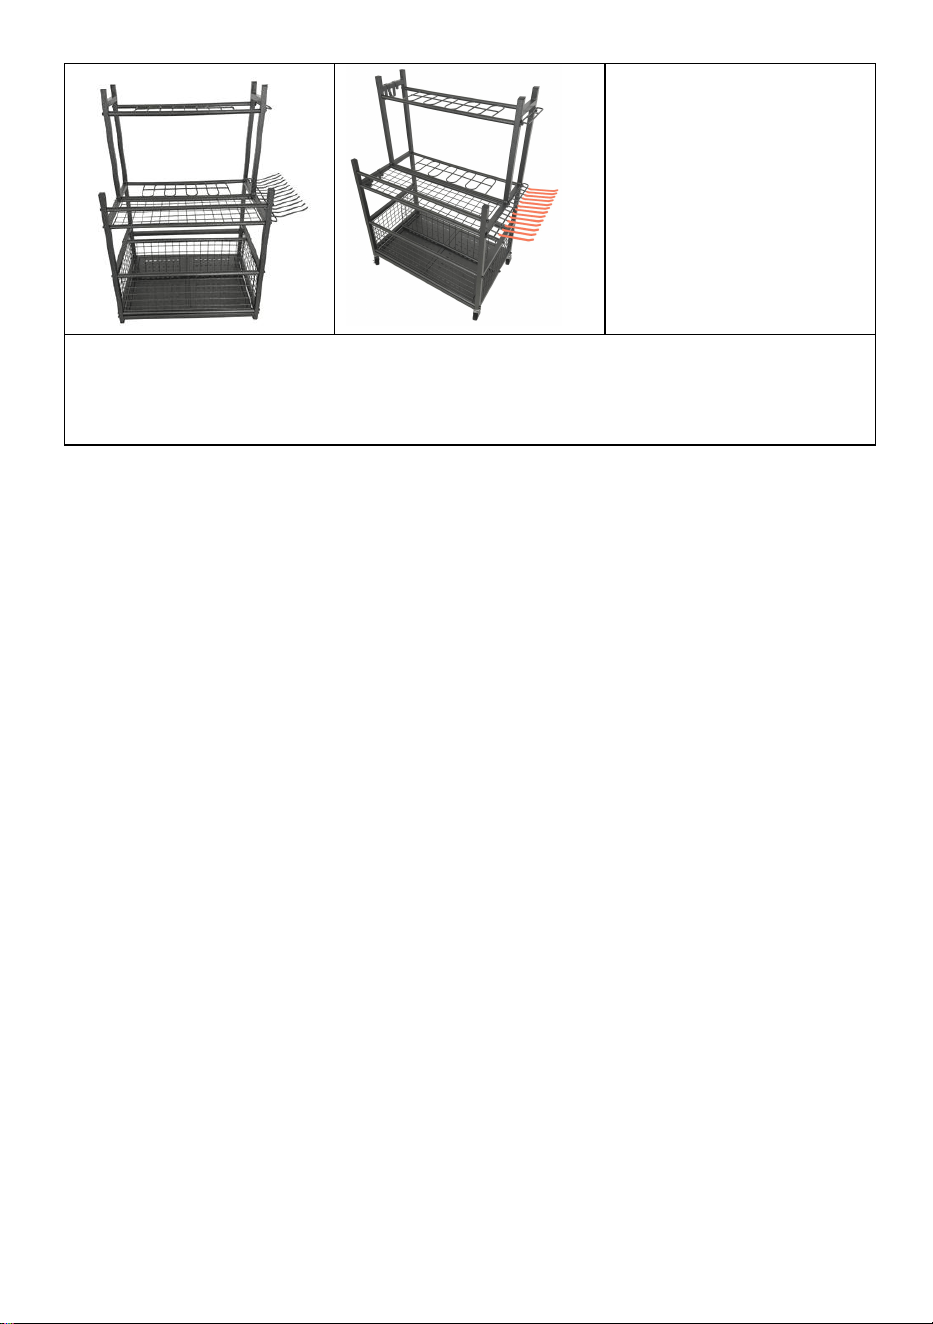
Model#: RF-RY-028
Model#: RF-RY-029
GARAGE TOOL
STORAGE RACK

- 2 -
INSTRUCTIONS
Thank you very much for choosing this Garage Tool Storage Rack.
Please read all of the instructions before using it. The information will help
you achieve the best possible results. This garage tool storage rack
prevents tools from cluttering the floor and is ideal for gardens, sheds, and
garages.
Safety and Maintenance:
1. Please install and use this product on a stable surface to prevent
tilting.
2. Ensure the brakes are engaged when using the caster wheels with
brake functions.
3. It's not recommended to use on slopes, especially when loaded, as
the caster wheels might slide.
4. Avoid climbing or standing on the rack.
5. When children are using it, ensure they are under adult supervision.
6. Heavy objects should be placed on the bottom shelf to avoid offsetting
the center of gravity.
7. Keep away from open flames and avoid high temperatures.
8. Avoid prolonged exposure to sunlight to prevent plastic aging.
9. When cleaning, use a mild detergent and avoid corrosive chemicals.
10. Regularly check all connection points to ensure all parts are securely
installed.
11. Regularly check all connection points to ensure screws are tightened.
12. The hooks are only for hanging lightweight tools. Do not hang heavy
objects to avoid deforming the hooks
SAVE THESE INSTRUCTIONS
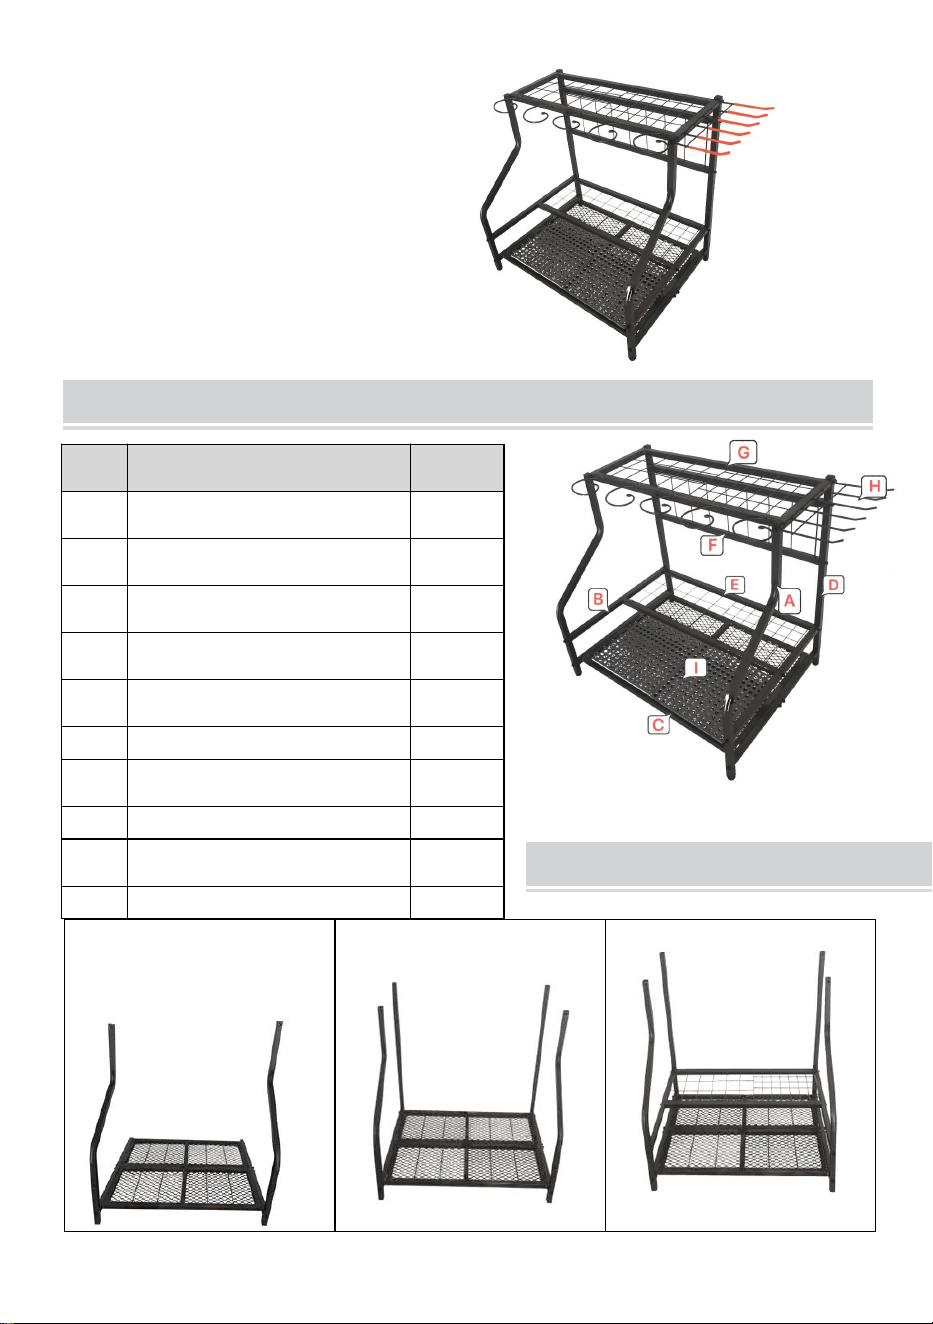
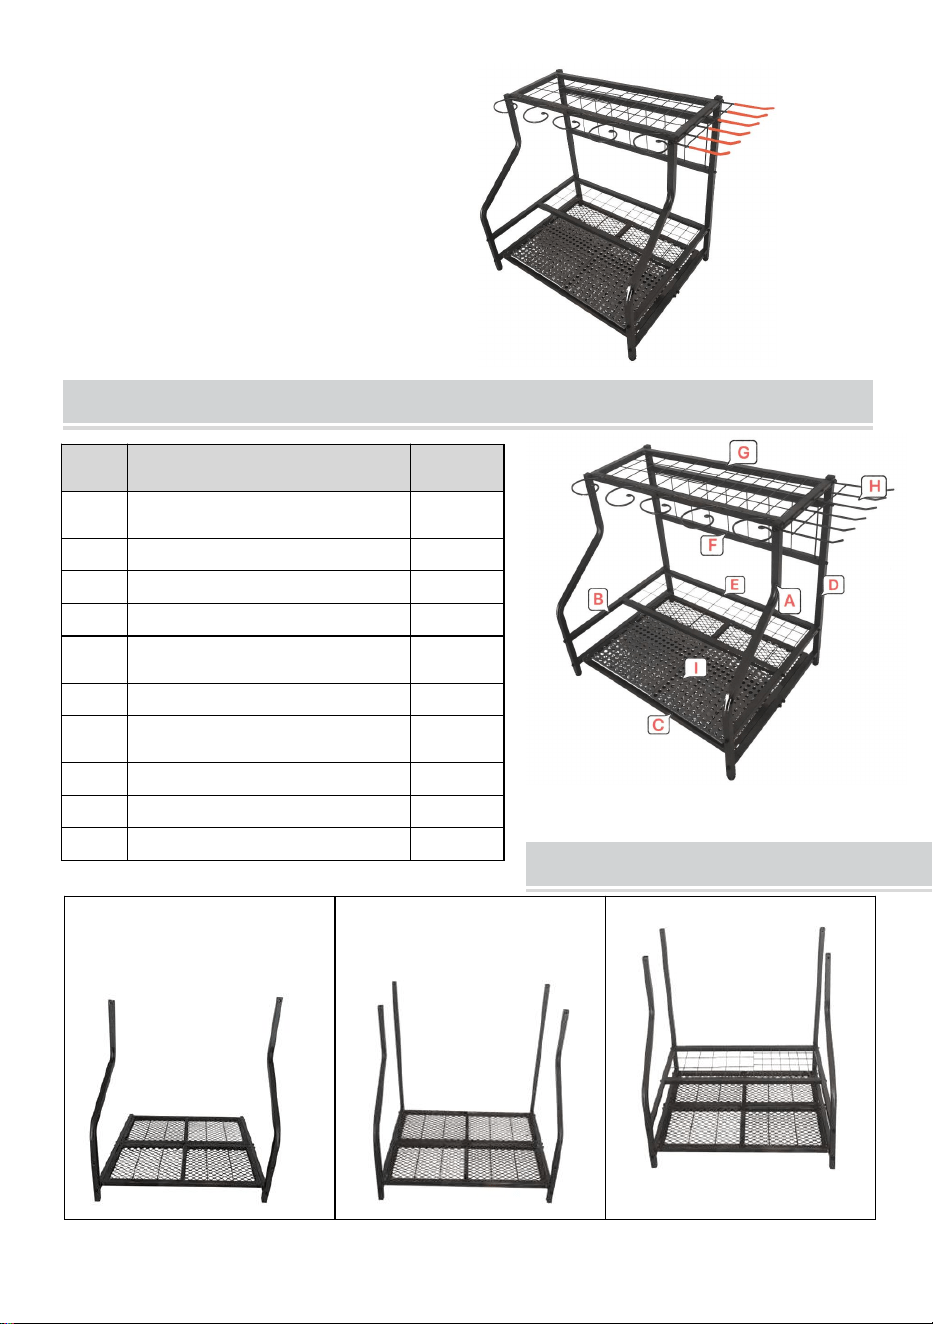
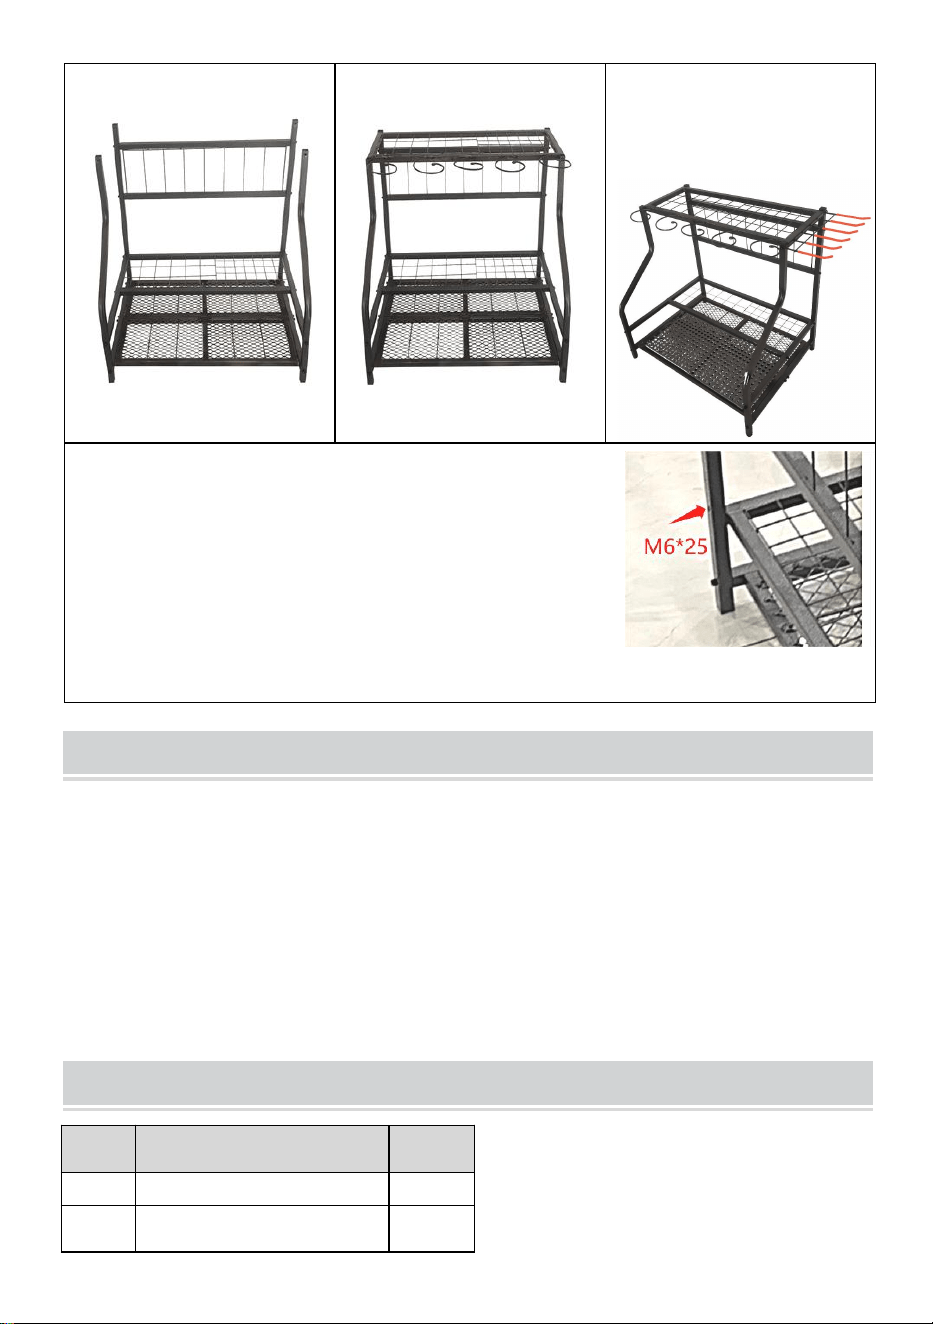
PARAMETERS- Model A
1. Model: RF-RY-028
2. Straight Hook: 6 pieces
3. G-Shape Hook: 5 pieces
4. Adjustable Support Foot ×4pcs
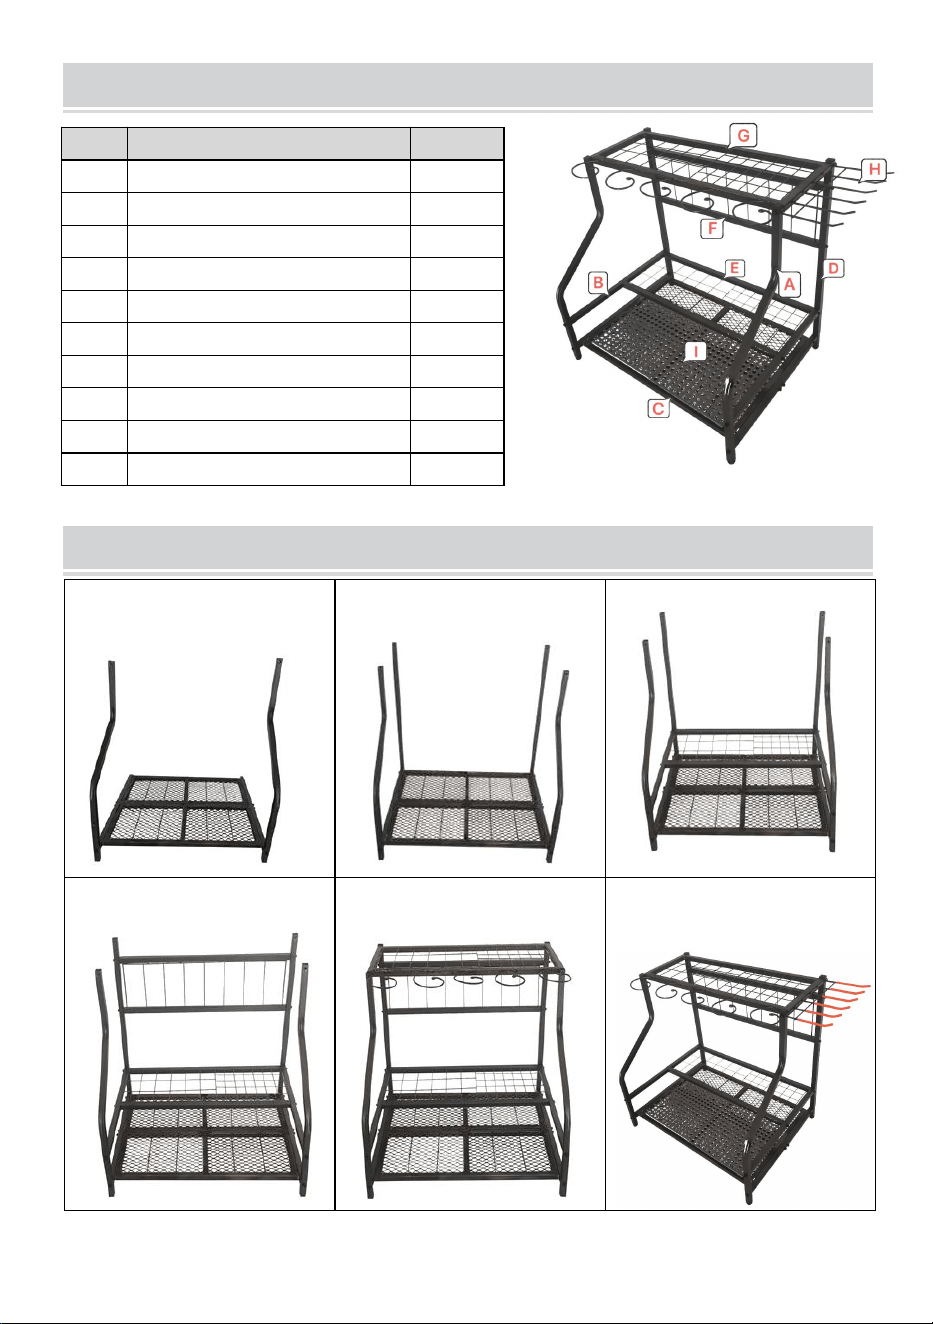
- 3 -
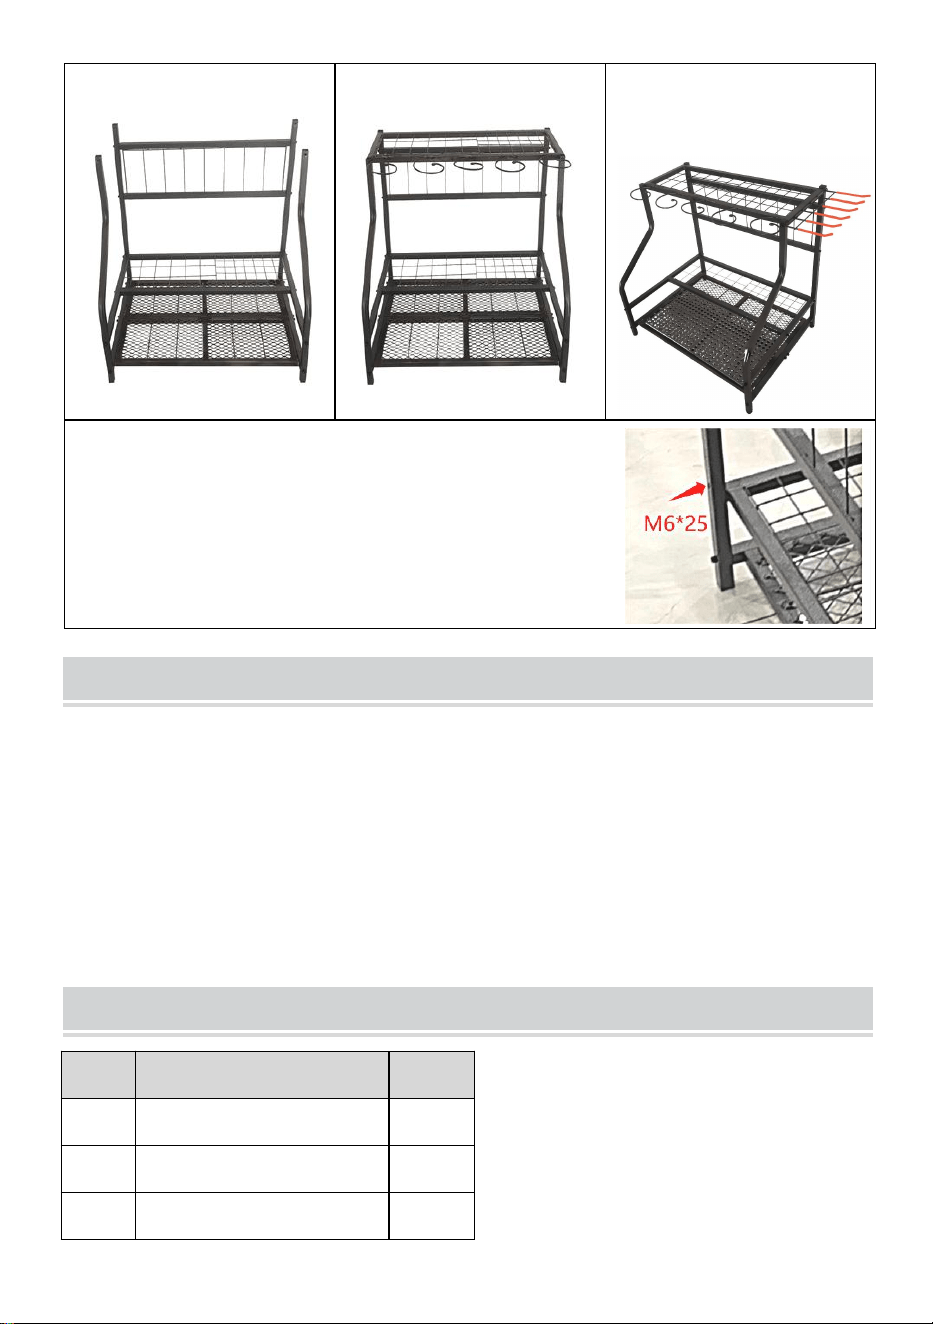
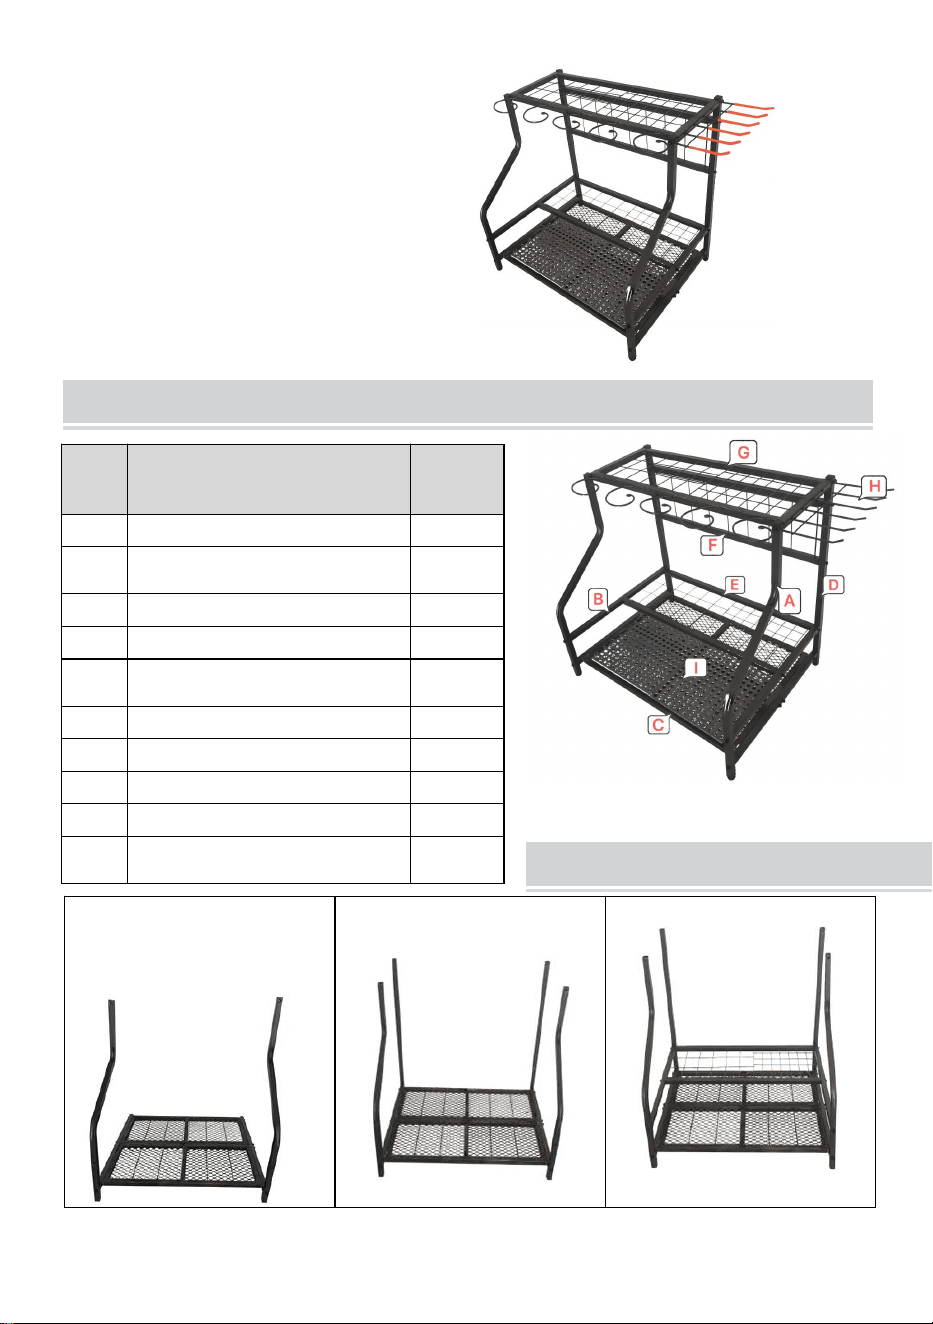
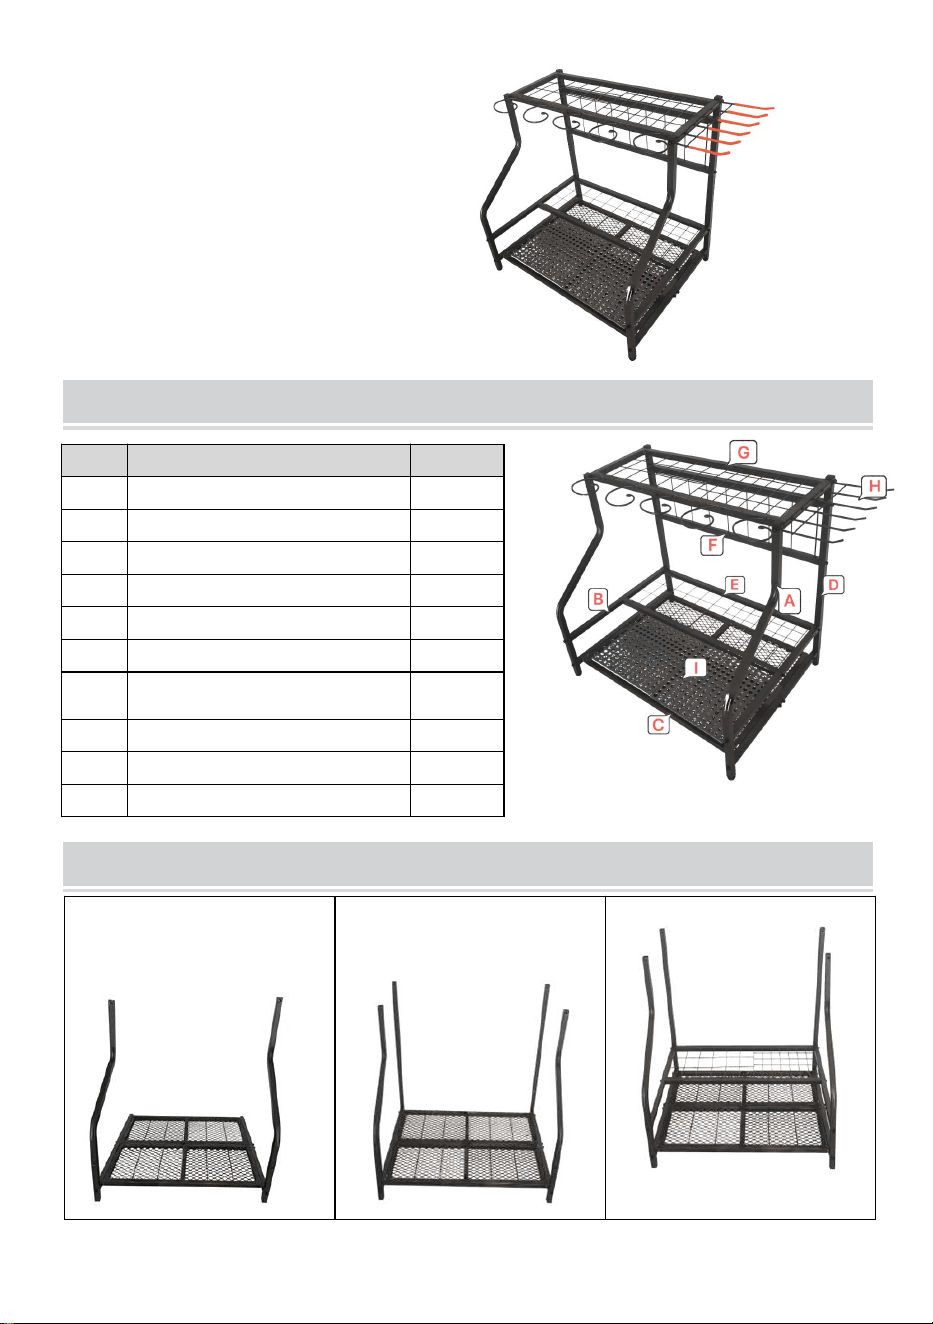
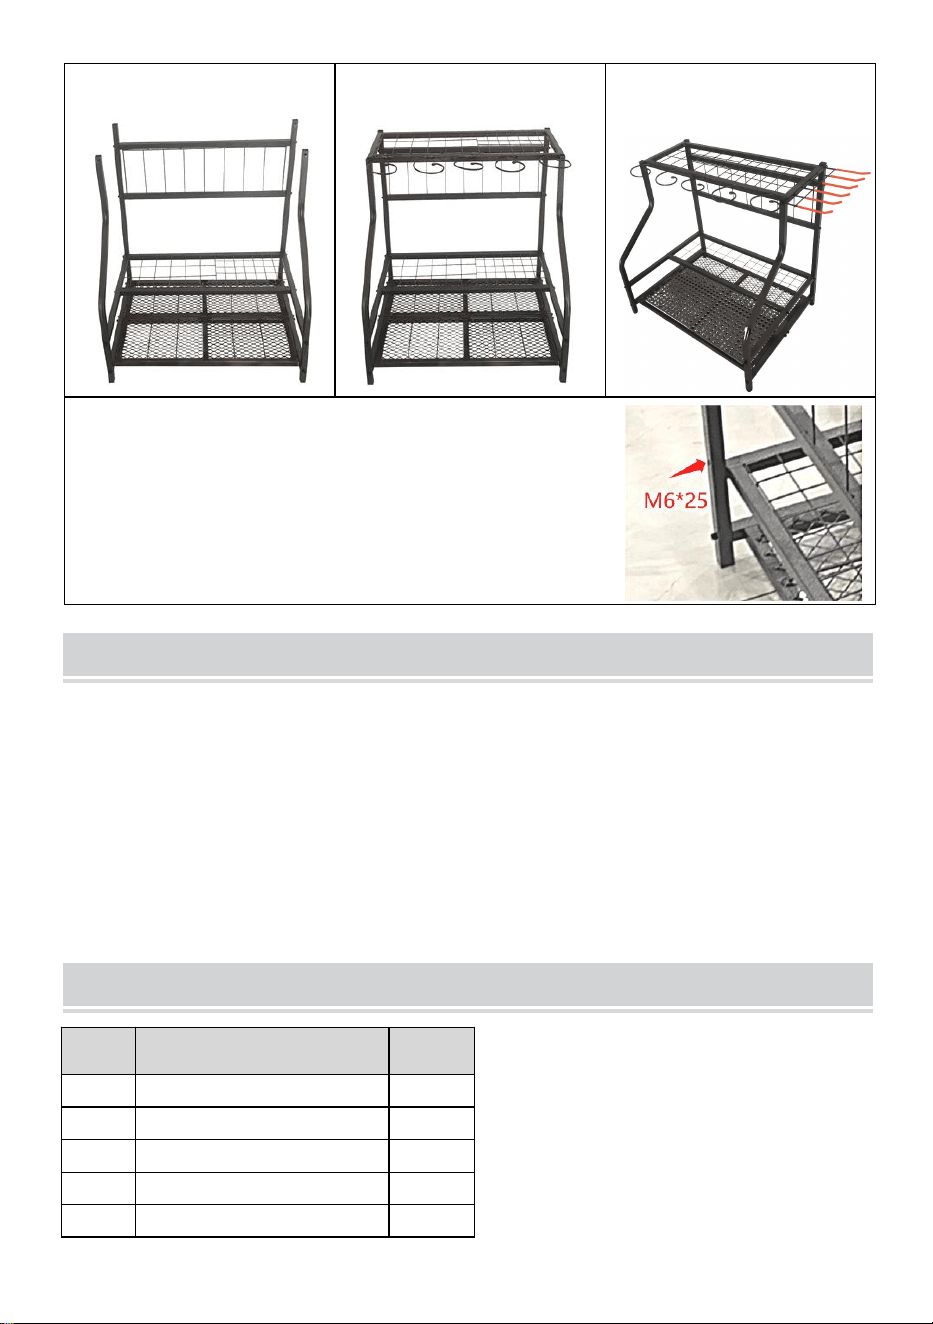
PART LIST AND PRODUCT
Installation procedures
1.Fine part A, C,and
assemble them with screw
2. Install part D on part C
and tighten screws
3.Install Part E
4.Install Part F
5.Install Part G
6.Install Part H , and insert
the tube covers,assembly
is completed
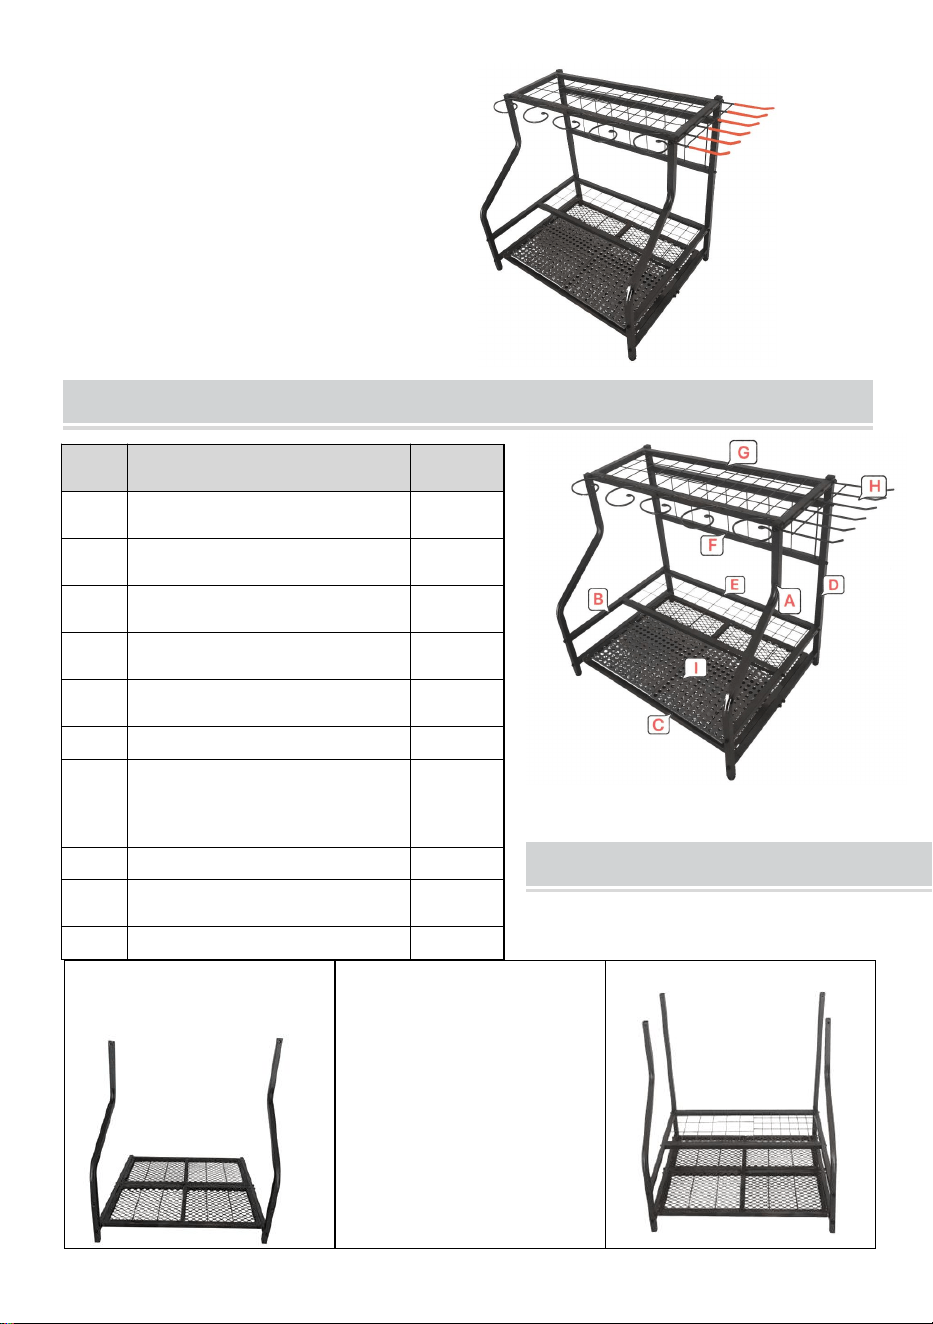
Item
Description
Qty
A
Front Vertical Rod
2pcs
B
Connecting Square Tube
4pcs
C
Shelf Base
2pcs
D
Rear Vertical Rod
2pcs
E
Mid Connecting Mesh Plate
1pc
F
Back Plane
1pc
G
Top Connecting Mesh Plate
1pc
H
Stationary Hook
1pc
I
Anti-Slip Pad
2pcs
J
Accessory Package
1set
- 4 -
Note:
1. All screws must be tightened before use.
2. There are total of 30 hexagonal screws, with two
as spare screws.
3. The accessory pack has 3pcs M6*25 screws; two
for the back of PART E, one spare.
PARAMETERS- MODEL B
Model B:
1. Model: RF-RY-029
2. Stationary Hook: 1pcs with 6 Straight hook
3. Movable Hook: 5 pieces ( S shape)
4. Adjustable Support Foot ×4pcs
5. 3inch Caster Wheel ×4pcs;
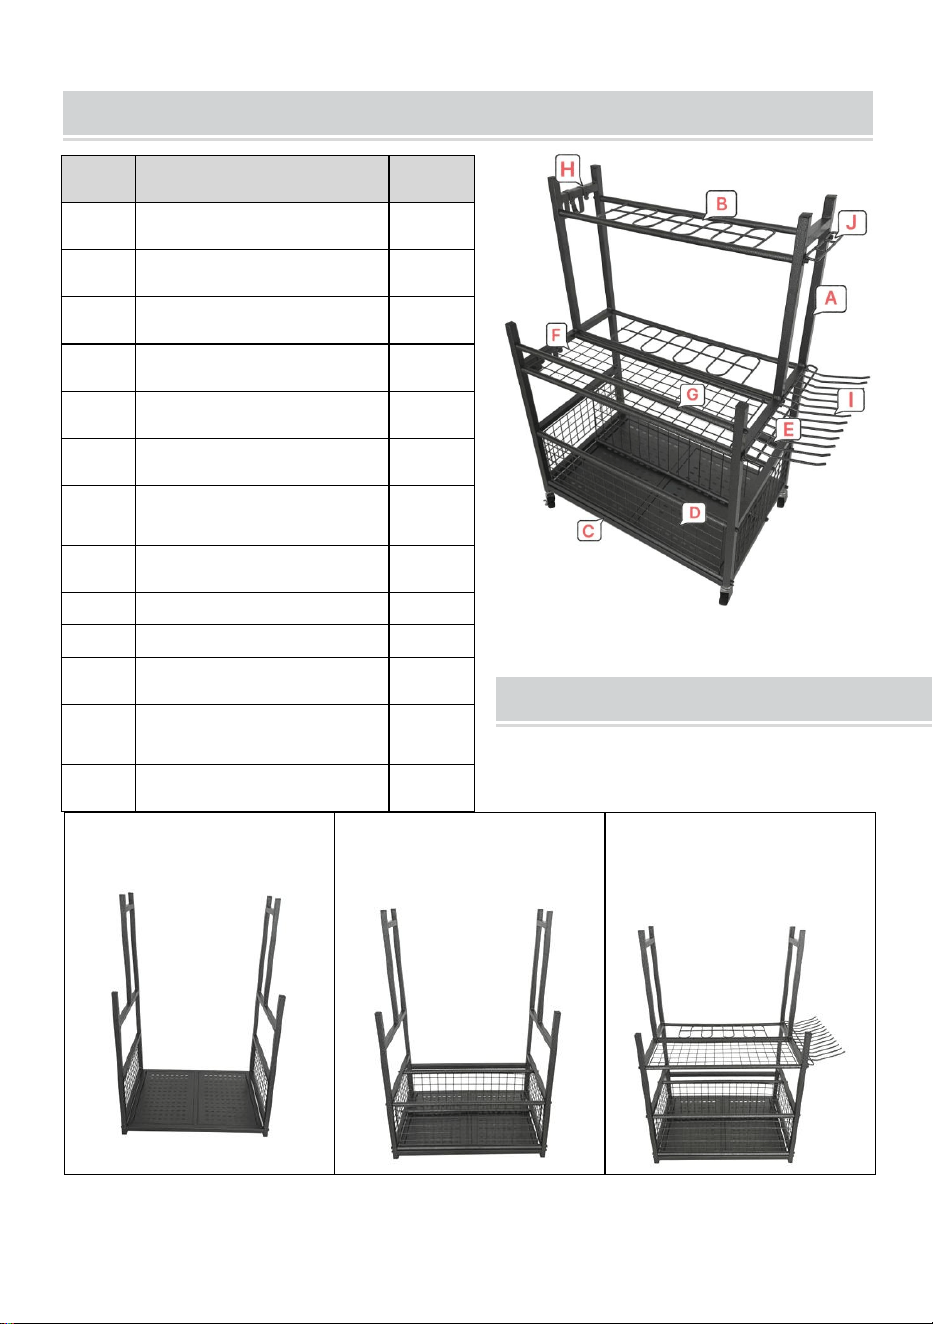
PART LIST AND PRODUCT
Item
Description
Qty
A
Side Rack
2pcs
B
Positioning Mesh Panel
2pcs
C
Base Plate
2pcs
D
Connecting Mesh Plate
2pcs
E
Connecting Square Tube
1pc
F
Intermediate Mesh Panel
1pc
G
Connecting Round Tube
1pc
H
Movable Hook
5pcs
I
Stationary Hook
1pcs
J
Small Hook
1pcs
L
Wheel
4pcs
M
Adjustable Support Foot
4pcs
N
Accessory Package
1set
- 5 -
Installation procedures
1.Fine part A, C,and
assemble them with screw
2. Install part D and part E
3.Install Part I first and then
install Part F and part B.
4. install Part B and Part J
5.install Part H and S;
Screw the wheel tighten
with screw,insert the tube
covers,assembly is
completed.
6.the Adjustable Support
Foot(part M)
Can be replaced with
wheel (Part L)
Note:
1.All screws must be tightened before use.
2.Here are a total of 29 hexagonal screws, with one as a spare screw

- 6 -
Address: Baoshanqu Shuangchenglu 803long 11hao 1602A-1609shi
Shanghai
Imported to AUS: SIHAO PTY LTD. 1 ROKEVA STREETEASTWOOD
NSW 2122 Australia
Imported to USA: Sanven Technology Ltd.Suite 250, 9166 Anaheim
Place, Rancho Cucamonga, CA 91730
REP
EC
SHUNSHUN GmbH
Römeräcker 9 Z2021, 76351
Linkenheim-Hochstetten, Germany
REP
UK
Pooledas Group Ltd
Unit 5 Albert Edward House, The
Pavilions Preston, United Kingdom
Made In China


Assistance technique et certificat de garantie électronique
www.vevor.com/support
SUPPORT DE RANGEMENT POUR OUTILS DE
GARAGE
We continue to be committed to provide you tools with competitive price.
"Save Half", "Half Price" or any other similar expressions used by us only represents an
estimate of savings you might benefit from buying certain tools with us compared to the
major top brands and does not necessarily mean to cover all categories of tools offered by
us. You are kindly reminded to verify carefully when you are placing an order with us if you
are actually saving half in comparison with the top major brands.

- 1 -
Have product questions? Need technical support? Please feel free to
contact us:
Technical Support and E-Warranty Certificate
www.vevor.com/support
NEED HELP? CONTACT US!
This is the original instruction, please read all manual instructions
carefully before operating. VEVOR reserves a clear interpretation of our
user manual. The appearance of the product shall be subject to the
product you received. Please forgive us that we won't inform you again if
there are any technology or software updates on our product.
Modèle n° : RF-RY-028
Modèle n° : RF-RY-029
GARAGE TOOL
STORAGE RACK

- 2 -
INSTRUCTIONS
Merci beaucoup d'avoir choisi ce support de rangement pour outils de
garage . Veuillez lire toutes les instructions avant de l'utiliser. Les
informations vous aideront à obtenir les meilleurs résultats possibles. Ce
support de rangement pour outils de garage empêche les outils
d'encombrer le sol et est idéal pour les jardins, les remises et les garages.
Sécurité et entretien :
13. Veuillez installer et utiliser ce produit sur une surface stable pour
éviter tout basculement.
14. Assurez-vous que les freins sont engagés lorsque vous utilisez les
roulettes avec fonctions de freinage.
15. Il n'est pas recommandé de l'utiliser sur des pentes, surtout lorsqu'il
est chargé, car les roulettes pourraient glisser.
16. Évitez de grimper ou de vous tenir debout sur le support.
17. Lorsque des enfants l'utilisent, assurez-vous qu'ils sont sous la
surveillance d'un adulte.
18. Les objets lourds doivent être placés sur l'étagère inférieure pour
éviter de décaler le centre de gravité.
19. Tenir à l'écart des flammes nues et éviter les températures élevées.
20. Évitez l'exposition prolongée au soleil pour éviter le vieillissement du
plastique.
21. Lors du nettoyage, utilisez un détergent doux et évitez les produits
chimiques corrosifs.
22. Vérifiez régulièrement tous les points de connexion pour vous assurer
que toutes les pièces sont solidement installées.
23. Vérifiez régulièrement tous les points de connexion pour vous assurer
que les vis sont serrées.
24. Les crochets servent uniquement à suspendre des outils légers. Ne
pas accrocher d'objets lourds pour éviter de déformer les crochets
CONSERVEZ CES INSTRUCTIONS
PARAMETERS- Model A
- 3 -
1. Modèle : RF-RY-028
5. Crochet droit : 6 pièces
6. G -S hape : 5 pièces
7. Pied de support réglable × 4
pièces
PART LIST AND PRODUCT
Installation procedures
1. Finessez les parties A ,
C et assemblez-les avec
des vis.
2. Installez la pièce D sur la
pièce C et serrez les vis.
3.Installer la partie E
Arti
cle
Description
Quantit
é
UN
Tige verticale avant _ _
2
pièces
B
Connexion du tube carré _
4
pièces
C
Base d' étagère
2
pièces
D
Tige verticale arrière _ _
2
pièces
E
Plaque de maille de
connexion intermédiaire
1 pc
F
Voie arrière _
1 pc
g
Plaque de maille de
connexion supérieure
1 pc
H
Crochet stationnaire
1 pc
je
PAPIER ANTIDÉRAPANT _
_ _
2
pièces
J.
Coffret d' accessoires
1 jeu
- 4 -
4.Installer la partie F
5.Installer la partie G
6. Installez la partie H et
insérez les couvercles de
tubes, l'assemblage est
terminé.
Note:
4. Toutes les vis doivent être serrées avant
utilisation .
5. Il y a au total 30 vis hexagonales, dont deux
comme vis de rechange .
6. Le pack d'accessoires comprend 3 vis M6*25 ;
deux pour l'arrière de la PARTIE E, un de rechange .
PARAMETERS- MODEL B
Modèle B :
1. Modèle : RF-RY-029
2. Crochet stationnaire : 1 pièce avec 6 crochets droits
3. Crochet mobile : 5 pièces (forme S)
4. Pied de support réglable × 4 pièces
5. Roulette de 3 pouces × 4 pièces ;
PART LIST AND PRODUCT
Artic
le
Description
Quanti
té
UN
Support latéral
2
pièces
B
Panneau de maillage de
positionnement
2
pièces
C
Plaque de base
2
pièces

- 5 -
Installation procedures
1. Affinez les pièces A , C
et assemblez-les avec des
vis.
2. Installez la partie D et la
partie E
3. Installez d'abord la partie
I, puis installez la partie F
et la partie B.
4. installer la partie B et la
partie J
5.installez les parties H et
S ;
Vissez la roue avec la vis,
insérez les cache-tubes,
l'assemblage est terminé.
6.le pied de support
réglable (partie M)
Peut être remplacé par une
roue (pièce L)
D
Plaque de connexion en
maille
2
pièces
E
Tube carré de connexion
1 pc
F
Panneau de maille
intermédiaire
1 pc
g
Tube rond de connexion
1 pc
H
Crochet mobile
5
pièces
je
Crochet stationnaire
1 PCS
J.
Petit crochet
1 PCS
L
Roue
4
pièces
M.
Pied de support réglable
4
pièces
N
Coffret d' accessoires
1 jeu

- 6 -
Note:
1. Toutes les vis doivent être serrées avant utilisation.
2. Voici un total de 29 vis hexagonales, dont une comme vis de rechange

- 7 -
Adresse : Baoshanqu Shuangchenglu 803long 11hao 1602A-1609shi
Shanghai
Importé en Australie : SIHAO PTY LTD . 1 ROKEVA
STREETASTWOOD NSW 2122 Australie
Importé aux États-Unis : Sanven Technology Ltd. Bureau 250, 9166
Anaheim Place, Rancho Cucamonga, CA 91730
REP
EC
SHUNSHUN GmbH
Römeräcker 9 Z2021, 76351
Linkenheim-Hochstetten, Germany
REP
UK
Pooledas Group Ltd
Unit 5 Albert Edward House, The
Pavilions Preston, United Kingdom
Fabriqué en Chine


Zertifikat für technischen Support und E-Garantie
www.vevor.com/support
AUFBEWAHRUNGSREGAL FÜR GARAGEN-
WERKZEUGE
We continue to be committed to provide you tools with competitive price.
"Save Half", "Half Price" or any other similar expressions used by us only represents an
estimate of savings you might benefit from buying certain tools with us compared to the
major top brands and does not necessarily mean to cover all categories of tools offered by
us. You are kindly reminded to verify carefully when you are placing an order with us if you
are actually saving half in comparison with the top major brands.
- 1 -
Have product questions? Need technical support? Please feel free to
contact us:
Technical Support and E-Warranty Certificate
www.vevor.com/support
NEED HELP? CONTACT US!
This is the original instruction, please read all manual instructions
carefully before operating. VEVOR reserves a clear interpretation of our
user manual. The appearance of the product shall be subject to the
product you received. Please forgive us that we won't inform you again if
there are any technology or software updates on our product.
Modellnummer: RF-RY-028
Modellnummer: RF-RY-029
GARAGE TOOL
STORAGE RACK

- 2 -
INSTRUCTIONS
Vielen Dank, dass Sie sich für dieses Garagen-Werkzeugregal
entschieden haben . Bitte lesen Sie alle Anweisungen, bevor Sie es
verwenden. Die Informationen helfen Ihnen, die bestmöglichen
Ergebnisse zu erzielen. Dieses Werkzeugregal für die Garage verhindert,
dass Werkzeuge den Boden verstopfen, und ist ideal für Gärten,
Schuppen und Garagen.
Sicherheit und Wartung:
25. Bitte installieren und verwenden Sie dieses Produkt auf einer stabilen
Oberfläche, um ein Kippen zu verhindern.
26. Stellen Sie sicher, dass die Bremsen aktiviert sind, wenn Sie die
Lenkräder mit Bremsfunktion verwenden.
27. Von der Verwendung an Hängen, insbesondere im beladenen
Zustand, wird abgeraten, da die Lenkrollen verrutschen könnten.
28. Vermeiden Sie es, auf das Gestell zu klettern oder darauf zu stehen.
29. Wenn Kinder es benutzen, stellen Sie sicher, dass sie unter Aufsicht
eines Erwachsenen stehen.
30. Schwere Gegenstände sollten auf der unteren Ablage abgelegt
werden, um eine Schwerpunktverlagerung zu vermeiden.
31. Von offenen Flammen fernhalten und hohe Temperaturen vermeiden.
32. Vermeiden Sie längere Sonneneinstrahlung, um einer Alterung des
Kunststoffs vorzubeugen.
33. Verwenden Sie zum Reinigen ein mildes Reinigungsmittel und
vermeiden Sie ätzende Chemikalien.
34. Überprüfen Sie regelmäßig alle Verbindungspunkte, um
sicherzustellen, dass alle Teile sicher installiert sind.
35. Überprüfen Sie regelmäßig alle Verbindungspunkte, um
sicherzustellen, dass die Schrauben fest angezogen sind.
36. Die Haken dienen nur zum Aufhängen von leichten Werkzeugen.
Hängen Sie keine schweren Gegenstände auf, um eine Verformung
der Haken zu vermeiden
ANLEITUNG AUFBEWAHREN
PARAMETERS- Model A
- 3 -
1. Modell: RF-RY-028
8. Gerader Haken: 6 Stück
9. G -förmiger Haken: 5 Stück
10. Verstellbarer Stützfuß × 4 Stück
PART LIST AND PRODUCT
Installation procedures
1.Teile A und C verfeinern
und mit einer Schraube
zusammenbauen
2. Montieren Sie Teil D an
Teil C und ziehen Sie die
Schrauben fest
3. Installieren Sie Teil E
Arti
kel
Beschreibung
Menge
A
Vordere vertikale Stange od
_
2Stk
B
Vierkantrohr verbinden _ _ _
4 Stück
C
Regalboden _ _
2Stk
D
Hintere vertikale Stange od _
2Stk
E
Mittlere verbindende
Netzplatte
1 Stk
F
Hintere P- Spur
1 Stk
G
Obere
Verbindungsgitterplatte
1 Stk
H
Stationärer Haken
1 Stk
ICH
Anti - Rutsch - Pad
2Stk
J
Zubehörpaket _ _
1 Satz
- 4 -
4. Installieren Sie Teil F
5. Installieren Sie Teil G
6. Installieren Sie Teil H
und setzen Sie die
Rohrabdeckungen ein. Der
Zusammenbau ist
abgeschlossen
Notiz:
7. Alle Schrauben müssen vor der Verwendung
festgezogen werden .
8. Im Lieferumfang sind insgesamt 30
Sechskantschrauben enthalten, davon zwei als
Ersatzschrauben .
9. Das Zubehörpaket enthält 3 Stück M6*25-
Schrauben; zwei für die Rückseite von TEIL E, ein
Ersatz .
PARAMETERS- MODEL B
Modell B:
1. Modell: RF-RY-029
2. Stationärer Haken: 1 Stück mit 6 geraden Haken
3. Beweglicher Haken: 5 Stück (S-Form)
4. Verstellbarer Stützfuß × 4 Stück
5. 3-Zoll-Lenkräder × 4 Stück;
PART LIST AND PRODUCT
Artik
el
Beschreibung
Meng
e
A
Seitenregal
2Stk
B
Positionieren des Mesh-
Panels
2Stk

- 5 -
Installation procedures
1. Teilen Sie die Teile A
und C fein und montieren
Sie sie mit einer Schraube
2. Installieren Sie Teil D
und Teil E
3. Installieren Sie zuerst
Teil I und installieren Sie
dann Teil F und Teil B.
4. Installieren Sie Teil B
und Teil J
5. Teil H und S installieren;
Schrauben Sie das Rad
fest, ziehen Sie es mit der
Schraube fest, setzen Sie
die Rohrabdeckungen ein,
die Montage ist
abgeschlossen.
6.der verstellbare Stützfuß
(Teil M)
Kann durch Rad (Teil L)
ersetzt werden
C
Grundplatte
2Stk
D
Verbindungsgitterplatte
2Stk
E
Vierkantrohr verbinden
1 Stk
F
Mittleres Mesh-Panel
1 Stk
G
Rundrohr verbinden
1 Stk
H
Beweglicher Haken
5
Stück
ICH
Stationärer Haken
1
Stück
J
Kleiner Haken
1
Stück
L
Rad
4
Stück
M
Verstellbarer Stützfuß
4
Stück
N
Zubehörpaket _ _
1 Satz
- 6 -
Notiz:
1. Alle Schrauben müssen vor der Verwendung festgezogen werden.
2.Hier sind insgesamt 29 Sechskantschrauben, davon eine als Ersatzschraube

- 7 -
Adresse: Baoshanqu Shuangchenglu 803long 11hao 1602A-1609shi
Shanghai
Importiert nach AUS: SIHAO PTY LTD . 1 ROKEVA
STREETEASTWOOD NSW 2122 Australien
Importiert in die USA: Sanven Technology Ltd. Suite 250, 9166 Anaheim
Place, Rancho Cucamonga, CA 91730
REP
EC
SHUNSHUN GmbH
Römeräcker 9 Z2021, 76351
Linkenheim-Hochstetten, Germany
REP
UK
Pooledas Group Ltd
Unit 5 Albert Edward House, The
Pavilions Preston, United Kingdom
In China hergestellt


Supporto tecnico e certificato di garanzia elettronica
www.vevor.com/support
PORTAUTENSILI PER GARAGE
We continue to be committed to provide you tools with competitive price.
"Save Half", "Half Price" or any other similar expressions used by us only represents an
estimate of savings you might benefit from buying certain tools with us compared to the
major top brands and does not necessarily mean to cover all categories of tools offered by
us. You are kindly reminded to verify carefully when you are placing an order with us if you
are actually saving half in comparison with the top major brands.

- 1 -
Have product questions? Need technical support? Please feel free to
contact us:
Technical Support and E-Warranty Certificate
www.vevor.com/support
NEED HELP? CONTACT US!
This is the original instruction, please read all manual instructions
carefully before operating. VEVOR reserves a clear interpretation of our
user manual. The appearance of the product shall be subject to the
product you received. Please forgive us that we won't inform you again if
there are any technology or software updates on our product.
Modello n.: RF-RY-028
Modello n.: RF-RY-029
GARAGE TOOL
STORAGE RACK

- 2 -
INSTRUCTIONS
Grazie mille per aver scelto questo scaffale per attrezzi da garage . Si
prega di leggere tutte le istruzioni prima di utilizzarlo. Le informazioni ti
aiuteranno a ottenere i migliori risultati possibili. Questo porta attrezzi da
garage impedisce agli attrezzi di ingombrare il pavimento ed è ideale per
giardini, capannoni e garage.
Sicurezza e manutenzione:
37. Installare e utilizzare questo prodotto su una superficie stabile per
evitare il ribaltamento.
38. Assicurarsi che i freni siano inseriti quando si utilizzano le ruote
piroettanti con funzioni di freno.
39. Se ne sconsiglia l'uso in pendenza, soprattutto se carico, poiché le
ruote piroettanti potrebbero scivolare.
40. Evitare di arrampicarsi o di stare in piedi sulla rastrelliera.
41. Quando i bambini lo utilizzano, assicurarsi che siano sotto la
supervisione di un adulto.
42. Gli oggetti pesanti devono essere posizionati sul ripiano inferiore per
evitare di spostare il baricentro.
43. Tenere lontano da fiamme libere ed evitare temperature elevate.
44. Evitare l'esposizione prolungata alla luce solare per prevenire
l'invecchiamento della plastica.
45. Durante la pulizia, utilizzare un detergente delicato ed evitare prodotti
chimici corrosivi.
46. Controllare regolarmente tutti i punti di connessione per garantire che
tutte le parti siano installate in modo sicuro.
47. Controllare regolarmente tutti i punti di connessione per garantire che
le viti siano serrate.
48. I ganci servono solo per appendere utensili leggeri. Non appendere
oggetti pesanti per evitare di deformare i ganci
CONSERVA QUESTE ISTRUZIONI
PARAMETERS- Model A

- 3 -
1. Modello: RF-RY-028
11. Gancio dritto: 6 pezzi
12. G -S Gancio: 5 pezzi
13. Piede di supporto regolabile × 4
pezzi
PART LIST AND PRODUCT
Installation procedures
1.Finire la parte A , C e
assemblarli con la vite
2. Installare la parte D sulla
parte C e serrare le viti
3.Installare la Parte E
Arti
colo
Descrizione
Qtà
UN
Asta verticale anteriore _ _
2 pezzi
B
Collegamento del tubo
quadrato _
4 pezzi
C
Ripiano B _
2 pezzi
D
Asta verticale posteriore _ _
2 pezzi
E
Piastra a rete di
collegamento centrale
1 pc
F
Corsia del piano posteriore
1 pc
G
Piastra in rete di
collegamento superiore
1 pc
H
Gancio stazionario
1 pc
IO
Anti - Slip Pad ad
2 pezzi
J
Pacchetto accessori _
1 set

- 4 -
4.Installare la Parte F
5.Installare la Parte G
6.Installare la Parte H e
inserire i coperchi dei tubi,
l'assemblaggio è
completato
Nota:
10. Tutte le viti devono essere serrate prima dell'uso .
11. Ci sono un totale di 30 viti esagonali, di cui due di
riserva .
12. Il pacchetto di accessori contiene 3 viti M6*25;
due per il retro della PARTE E, uno di riserva .
PARAMETERS- MODEL B
Modello B:
1. Modello: RF-RY-029
2. Gancio fisso: 1 pezzo con 6 ganci dritti
3. Gancio mobile: 5 pezzi (forma S)
4. Piede di supporto regolabile × 4 pezzi
5. Ruota girevole da 3 pollici × 4 pezzi;
PART LIST AND PRODUCT
Artic
olo
Descrizione
Qtà
UN
Portapacchi laterale
2
pezzi
B
Posizionamento del
pannello a rete
2
pezzi
C
Piastra di base
2
pezzi

- 5 -
Installation procedures
1. Parte fine A , C e
assemblarli con la vite
2. Installare la parte D e la
parte E
3.Installare prima la Parte I,
quindi installare la Parte F
e la Parte B.
4. installare la Parte B e la
Parte J
5.installare le parti H e S;
Avvitare la ruota e serrarla
con la vite, inserire i
copritubo e il montaggio è
completato.
6.il piedino di supporto
regolabile (parte M)
Può essere sostituito con la
ruota (Parte L)
D
Piastra a rete di
collegamento
2
pezzi
E
Collegamento del tubo
quadrato
1 pc
F
Pannello in rete
intermedio
1 pc
G
Collegamento del tubo
tondo
1 pc
H
Gancio mobile
5
pezzi
IO
Gancio stazionario
1 pz
J
Piccolo gancio
1 pz
l
Ruota
4
pezzi
M
Piede di supporto
regolabile
4
pezzi
N
Pacchetto accessori _
1 set

- 6 -
Nota:
1.Tutte le viti devono essere serrate prima dell'uso.
2.Ecco un totale di 29 viti esagonali, di cui una come vite di riserva

- 7 -
Indirizzo: Baoshanqu Shuangchenglu 803long 11hao 1602A-1609shi
Shanghai
Importato in AUS: SIHAO PTY LTD . 1 ROKEVA STREETEASTWOOD
NSW 2122 Australia
Importato negli Stati Uniti: Sanven Technology Ltd. Suite 250, 9166
Anaheim Place, Rancho Cucamonga, CA 91730
REP
EC
SHUNSHUN GmbH
Römeräcker 9 Z2021, 76351
Linkenheim-Hochstetten, Germany
REP
UK
Pooledas Group Ltd
Unit 5 Albert Edward House, The
Pavilions Preston, United Kingdom
Made in China


Soporte técnico y certificado de garantía electrónica
www.vevor.com/support
ESTANTE DE ALMACENAMIENTO DE
HERRAMIENTAS DE GARAJE
We continue to be committed to provide you tools with competitive price.
"Save Half", "Half Price" or any other similar expressions used by us only represents an
estimate of savings you might benefit from buying certain tools with us compared to the
major top brands and does not necessarily mean to cover all categories of tools offered by
us. You are kindly reminded to verify carefully when you are placing an order with us if you
are actually saving half in comparison with the top major brands.

- 1 -
Have product questions? Need technical support? Please feel free to
contact us:
Technical Support and E-Warranty Certificate
www.vevor.com/support
NEED HELP? CONTACT US!
This is the original instruction, please read all manual instructions
carefully before operating. VEVOR reserves a clear interpretation of our
user manual. The appearance of the product shall be subject to the
product you received. Please forgive us that we won't inform you again if
there are any technology or software updates on our product.
Modelo #: RF-RY-028
Modelo #: RF-RY-029
GARAGE TOOL
STORAGE RACK

- 2 -
INSTRUCTIONS
Muchas gracias por elegir este estante para almacenamiento de
herramientas de garaje . Lea todas las instrucciones antes de usarlo. La
información le ayudará a conseguir los mejores resultados posibles. Este
estante para almacenamiento de herramientas de garaje evita que las
herramientas abarroten el suelo y es ideal para jardines, cobertizos y
garajes.
Seguridad y mantenimiento:
49. Instale y utilice este producto sobre una superficie estable para evitar
que se incline.
50. Asegúrese de que los frenos estén activados cuando utilice ruedas
giratorias con funciones de freno.
51. No se recomienda su uso en pendientes, especialmente cuando está
cargado, ya que las ruedas podrían deslizarse.
52. Evite subirse o pararse sobre el estante.
53. Cuando los niños lo utilicen, asegúrese de que estén bajo la
supervisión de un adulto.
54. Los objetos pesados deben colocarse en el estante inferior para
evitar desviar el centro de gravedad.
55. Mantener alejado de llamas abiertas y evitar altas temperaturas.
56. Evite la exposición prolongada a la luz solar para prevenir el
envejecimiento del plástico.
57. Al limpiar, utilice un detergente suave y evite productos químicos
corrosivos.
58. Verifique periódicamente todos los puntos de conexión para
asegurarse de que todas las piezas estén instaladas de forma segura.
59. Verifique periódicamente todos los puntos de conexión para
asegurarse de que los tornillos estén apretados.
60. Los ganchos son sólo para colgar herramientas livianas. No cuelgues
objetos pesados para evitar deformar los ganchos.
GUARDA ESTAS INSTRUCCIONES
PARAMETERS- Model A
- 3 -
1. Modelo: RF-RY-028
14. Gancho recto: 6 piezas
15. Gancho forma G -S : 5 piezas
16. Pie de soporte ajustable × 4
piezas
PART LIST AND PRODUCT
Installation procedures
1.Fina la parte A , C y
móntalas con el tornillo.
2. Instale la parte D en la
parte C y apriete los
tornillos.
3.Instale la Parte E
Artí
culo
Descripción
Cantida
d
A
Varilla vertical delantera _ _
2
piezas
B
Conexión del tubo cuadrado
_
4
piezas
C
Base del estante
2
piezas
D
Varilla vertical trasera _ _
2
piezas
mi
Placa de malla de conexión
media
1 PC
F
Carril trasero _
1 PC
GR
AM
O
Placa de malla de conexión
superior
1 PC
h
Gancho estacionario
1 PC
I
Almohadilla antideslizante _
_ _
2
piezas
j
Paquete de accesorios
1 juego

- 4 -
4.Instale la Parte F
5.Instale la Parte G
6.Instale la pieza H e
inserte las cubiertas de los
tubos; el ensamblaje estará
completo.
Nota:
13. Todos los tornillos deben apretarse antes de su
uso .
14. Hay un total de 30 tornillos hexagonales, dos de
ellos como tornillos de repuesto .
15. El paquete de accesorios tiene 3 tornillos M6*25;
dos para la parte trasera de la PARTE E, uno de
repuesto .
PARAMETERS- MODEL B
Modelo B:
1. Modelo: RF-RY-029
2. Gancho estacionario: 1 unidad con 6 ganchos rectos
3. Gancho móvil: 5 piezas (forma de S)
4. Pie de soporte ajustable × 4 piezas
Rueda giratoria de 5, 3 pulgadas × 4 Uds.;
- 5 -
PART LIST AND PRODUCT
Installation procedures
1. Afina las partes A , C y
móntalas con el tornillo.
2. Instale la parte D y la
parte E.
3.Instale primero la Parte I
y luego instale la Parte F y
la Parte B.
Artíc
ulo
Descripción
Cantid
ad
A
Estante lateral
2
piezas
B
Panel de malla de
posicionamiento
2
piezas
C
Plato base
2
piezas
D
Placa de malla de
conexión
2
piezas
mi
Conexión de tubo
cuadrado
1 PC
F
Panel de malla
intermedio
1 PC
GRA
MO
Conexión de tubo
redondo
1 PC
h
Gancho móvil
5
piezas
I
Gancho estacionario
PC 1
j
Gancho pequeño
PC 1
l
Rueda
4
piezas
MET
RO
Pie de apoyo ajustable
4
piezas
norte
Paquete de accesorios
1
juego
- 6 -
4. instale la Parte B y la
Parte J
5.instale las Partes H y S;
Atornille la rueda y apriete
con el tornillo, inserte las
cubiertas de los tubos y se
completará el montaje.
6.el pie de apoyo ajustable
(parte M)
Se puede reemplazar con
rueda (Parte L)
Nota:
1.Todos los tornillos deben apretarse antes de su uso.
2. Aquí hay un total de 29 tornillos hexagonales, uno de ellos como tornillo de
repuesto.

- 7 -
Dirección: Baoshanqu Shuangchenglu 803long 11hao 1602A-1609shi
Shanghai
Importado a AUS: SIHAO PTY LTD . 1 ROKEVA STREET ASTWOOD
NSW 2122 Australia
Importado a EE. UU.: Sanven Technology Ltd. Suite 250, 9166 Anaheim
Place, Rancho Cucamonga, CA 91730
REP
EC
SHUNSHUN GmbH
Römeräcker 9 Z2021, 76351
Linkenheim-Hochstetten, Germany
REP
UK
Pooledas Group Ltd
Unit 5 Albert Edward House, The
Pavilions Preston, United Kingdom
Hecho en china


Wsparcie techniczne i certyfikat e-gwarancji
www.vevor.com/support
REGAŁ DO PRZECHOWYWANIA NARZĘDZI
GARAŻOWYCH
We continue to be committed to provide you tools with competitive price.
"Save Half", "Half Price" or any other similar expressions used by us only represents an
estimate of savings you might benefit from buying certain tools with us compared to the
major top brands and does not necessarily mean to cover all categories of tools offered by
us. You are kindly reminded to verify carefully when you are placing an order with us if you
are actually saving half in comparison with the top major brands.

- 1 -
Have product questions? Need technical support? Please feel free to
contact us:
Technical Support and E-Warranty Certificate
www.vevor.com/support
NEED HELP? CONTACT US!
This is the original instruction, please read all manual instructions
carefully before operating. VEVOR reserves a clear interpretation of our
user manual. The appearance of the product shall be subject to the
product you received. Please forgive us that we won't inform you again if
there are any technology or software updates on our product.
Numer modelu: RF-RY-028
Numer modelu: RF-RY-029
GARAGE TOOL
STORAGE RACK

- 2 -
INSTRUCTIONS
Dziękujemy bardzo za wybranie tego stojaka do przechowywania
narzędzi garażowych . Przed użyciem przeczytaj wszystkie instrukcje.
Informacje te pomogą Ci osiągnąć najlepsze możliwe rezultaty. Ten
garażowy stojak do przechowywania narzędzi zapobiega zaśmiecaniu
podłogi przez narzędzia i jest idealny do ogrodów, szop i garaży.
Bezpieczeństwo i konserwacja:
61. Zainstaluj i używaj tego produktu na stabilnej powierzchni, aby
zapobiec przechylaniu.
62. Podczas używania kół samonastawnych z funkcją hamulca należy
upewnić się, że hamulce są włączone.
63. Nie zaleca się używania go na pochyłościach, zwłaszcza pod
obciążeniem, ponieważ kółka samonastawne mogą się ślizgać.
64. Unikaj wspinania się i stania na stojaku.
65. Gdy korzystają z niego dzieci, należy upewnić się, że znajdują się one
pod nadzorem osoby dorosłej.
66. Ciężkie przedmioty należy umieszczać na dolnej półce, aby nie
przesunąć środka ciężkości.
67. Trzymać z dala od otwartego ognia i unikać wysokich temperatur.
68. Unikaj długotrwałego narażenia na działanie promieni słonecznych,
aby zapobiec starzeniu się plastiku.
69. Do czyszczenia używaj łagodnego detergentu i unikaj żrących
środków chemicznych.
70. Regularnie sprawdzaj wszystkie punkty połączeń, aby upewnić się, że
wszystkie części są bezpiecznie zamontowane.
71. Regularnie sprawdzaj wszystkie punkty połączeń, aby upewnić się, że
śruby są dokręcone.
72. Haczyki służą wyłącznie do zawieszania lekkich narzędzi. Nie wieszaj
ciężkich przedmiotów, aby uniknąć odkształcenia haczyków
ZACHOWAJ TE INSTRUKCJE
PARAMETERS- Model A
- 3 -
1. Model: RF-RY-028
17. Hak prosty: 6 sztuk
18. G -S hape: 5 sztuk
19. Regulowana stopka
podpierająca × 4 szt
PART LIST AND PRODUCT
Installation procedures
1.Dopracuj część A , C i
zamontuj je za pomocą
śruby
2. Zamontuj część D na
części C i dokręć śruby
3. Zainstaluj część E
Prz
edm
iot
Opis
Ilość
A
Przedni drążek pionowy od _
2 szt
B
Podłączanie rurki
kwadratowej _ _
4szt
C
Półka B as
2 szt
D
Tylny drążek pionowy _ _
2 szt
mi
Środkowa płyta łącząca z
siatki
1 szt
F
Tylny pas P
1 szt
G
Górna płyta łącząca z siatki
1 szt
H
Hak stacjonarny
1 szt
I
Reklama Anti- S Lip P
2 szt
J
Pakiet akcesoriów _
1
zestaw

- 4 -
4. Zainstaluj część F
5. Zainstaluj część G
6. Zamontuj część H i włóż
osłony rurek, montaż
zostanie zakończony
Notatka:
16. Wszystkie śruby należy dokręcić przed użyciem .
17. W sumie jest 30 śrub sześciokątnych, w tym dwie
jako śruby zapasowe .
18. Pakiet akcesoriów zawiera 3 sztuki śrub M6*25;
dwa na tył CZĘŚCI E, jeden zapasowy .
PARAMETERS- MODEL B
Model B:
1. Model: RF-RY-029
2. Hak stacjonarny: 1 szt. Z 6 prostymi hakami
3. Ruchomy hak: 5 sztuk (kształt S)
4. Regulowana stopka podpierająca × 4 szt
5. 3-calowe kółko × 4 sztuki;
PART LIST AND PRODUCT
Prze
dmio
t
Opis
Ilość
A
Stojak boczny
2 szt
B
Pozycjonowanie panelu
siatkowego
2 szt
C
Płyta podstawowa
2 szt
D
Łącząca płyta siatkowa
2 szt

- 5 -
Installation procedures
1. Dopracuj część A , C i
zmontuj je za pomocą
śruby
2. Zainstaluj część D i
część E
3. Najpierw zainstaluj część
I, a następnie zainstaluj
część F i część B.
4. zainstaluj Część B i
Część J
5.zainstalować część H i S;
Przykręć koło dokręć
śrubą, włóż osłony rur,
montaż jest zako
ń
czony.
6. Regulowana stopka
podpierająca (część M)
Można zastąpić kołem
(część L)
mi
Łączenie rurki
kwadratowej
1 szt
F
Pośredni panel siatkowy
1 szt
G
Łączenie okrągłej rurki
1 szt
H
Ruchomy hak
5szt
I
Hak stacjonarny
1 szt
J
Mały hak
1 szt
L
Koło
4szt
M
Regulowana stopka
podporowa
4szt
N
Pakiet akcesoriów _
1
zesta
w

- 6 -
Notatka:
1. Wszystkie śruby należy dokręcić przed użyciem.
2. Oto łącznie 29 śrub sześciokątnych, w tym jedna jako śruba zapasowa

- 7 -
Adres: Baoshanqu Shuangchenglu 803long 11hao 1602A-1609shi
Szanghaj
Import do AUS: SIHAO PTY LTD . 1 ROKEVA STREETEASTWOOD
NSW 2122 Australia
Import do USA: Sanven Technology Ltd. Apartament 250, 9166 Anaheim
Place, Rancho Cucamonga, Kalifornia 91730
REP
EC
SHUNSHUN GmbH
Römeräcker 9 Z2021, 76351
Linkenheim-Hochstetten, Germany
REP
UK
Pooledas Group Ltd
Unit 5 Albert Edward House, The
Pavilions Preston, United Kingdom
Wyprodukowano w Chinach


Technische ondersteuning en e-garantiecertificaat
www.vevor.com/support
OPBERGREK VOOR GARAGEGEREEDSCHAP
We continue to be committed to provide you tools with competitive price.
"Save Half", "Half Price" or any other similar expressions used by us only represents an
estimate of savings you might benefit from buying certain tools with us compared to the
major top brands and does not necessarily mean to cover all categories of tools offered by
us. You are kindly reminded to verify carefully when you are placing an order with us if you
are actually saving half in comparison with the top major brands.

- 1 -
Have product questions? Need technical support? Please feel free to
contact us:
Technical Support and E-Warranty Certificate
www.vevor.com/support
NEED HELP? CONTACT US!
This is the original instruction, please read all manual instructions
carefully before operating. VEVOR reserves a clear interpretation of our
user manual. The appearance of the product shall be subject to the
product you received. Please forgive us that we won't inform you again if
there are any technology or software updates on our product.
Modelnummer: RF-RY-028
Modelnummer: RF-RY-029
GARAGE TOOL
STORAGE RACK

- 2 -
INSTRUCTIONS
Hartelijk dank dat u voor dit garagegereedschapsopbergrek hebt
gekozen . Lees alle instructies voordat u het gebruikt. De informatie zal u
helpen de best mogelijke resultaten te bereiken. Dit opbergrek voor
gereedschap in de garage voorkomt dat gereedschap de vloer rommelig
maakt en is ideaal voor tuinen, schuren en garages.
Veiligheid en onderhoud:
73. Installeer en gebruik dit product op een stabiel oppervlak om kantelen
te voorkomen.
74. Zorg ervoor dat de remmen ingeschakeld zijn als u de zwenkwielen
met remfunctie gebruikt.
75. Het wordt afgeraden om op hellingen te gebruiken, vooral niet
wanneer deze belast zijn, omdat de zwenkwielen kunnen gaan glijden.
76. Vermijd klimmen of staan op het rek.
77. Als kinderen het gebruiken, zorg er dan voor dat ze onder toezicht
van een volwassene staan.
78. Zware voorwerpen moeten op de onderste plank worden geplaatst
om te voorkomen dat het zwaartepunt wordt verschoven.
79. Blijf uit de buurt van open vuur en vermijd hoge temperaturen.
80. Vermijd langdurige blootstelling aan zonlicht om plasticveroudering te
voorkomen.
81. Gebruik bij het schoonmaken een mild schoonmaakmiddel en vermijd
bijtende chemicaliën.
82. Controleer regelmatig alle verbindingspunten om er zeker van te zijn
dat alle onderdelen veilig zijn geïnstalleerd.
83. Controleer regelmatig alle verbindingspunten om er zeker van te zijn
dat de schroeven goed vastzitten.
84. De haken zijn alleen bedoeld voor het ophangen van lichtgewicht
gereedschap. Hang geen zware voorwerpen op om vervorming van
de haken te voorkomen
BEWAAR DEZE INSTRUCTIES
PARAMETERS- Model A
- 3 -
1. Model: RF-RY-028
20. Rechte haak: 6 stuks
21. G -vormige haak: 5 stuks
22. Verstelbare steunvoet ×4 stuks
PART LIST AND PRODUCT
Installation procedures
1. Fijn onderdeel A , C, en
monteer ze met een
schroef
2. Installeer onderdeel D op
onderdeel C en draai de
schroeven vast
3.Installeer onderdeel E
Item
Beschrijving
Aantal
A
Voorste verticale staaf _ _
2 stuks
B
Vierkante buis aansluiten _ _
4 stuks
C
Plank B as
2 stuks
D
Achterste verticale stang _ _
2 stuks
E
Middenverbindingsgaasplaat
1 st
F
Terug P- laan
1 st
G
Bovenste verbindende
gaasplaat
1 st
H
Stationaire haak
1 st
I
Anti - Slip P ad
2 stuks
J
Accessoirepakket _ _
1set

- 4 -
4.Installeer onderdeel F
5.Installeer onderdeel G
6. Installeer onderdeel H en
plaats de buisafdekkingen.
De montage is voltooid
Opmerking:
19. Alle schroeven moeten vóór gebruik worden
vastgedraaid .
20. Er zijn in totaal 30 zeshoekige schroeven,
waarvan twee als reserveschroeven .
21. Het accessoirepakket bevat 3 stuks M6*25
schroeven; twee voor de achterkant van DEEL E,
één reserve .
PARAMETERS- MODEL B
Model B:
1. Model: RF-RY-029
2. Stationaire haak: 1 stuks met 6 rechte haken
3. Beweegbare haak: 5 stuks (S-vorm)
4. Verstelbare steunvoet × 4 stuks
5. 3 inch zwenkwiel × 4 stuks;
PART LIST AND PRODUCT
Item
Beschrijving
Aantal
A
Zijrek
2
stuks
B
Positionering van
gaaspaneel
2
stuks
C
Basisplaat
2
stuks

- 5 -
Installation procedures
1. Maak deel A , C fijn en
monteer ze met een
schroef
2. Installeer onderdeel D en
onderdeel E
3.Installeer eerst deel I en
installeer vervolgens deel F
en deel B.
4. installeer Deel B en Deel
J
5.Deel H en S installeren;
Schroef het wiel vast met
een schroef, plaats de
buisafdekkingen en de
montage is voltooid.
6. de verstelbare steunvoet
(deel M)
Kan worden vervangen
door wiel (onderdeel L)
D
Verbindingsgaasplaat
2
stuks
E
Vierkante buis aansluiten
1 st
F
Tussenliggend
gaaspaneel
1 st
G
Ronde buis aansluiten
1 st
H
Beweegbare haak
5
stuks
I
Stationaire haak
1 stuk
J
Kleine haak
1 stuk
L
Wiel
4
stuks
M
Verstelbare steunvoet
4
stuks
N
Accessoirepakket _ _
1set
- 6 -
Opmerking:
1. Alle schroeven moeten vóór gebruik worden vastgedraaid.
2. Hier zitten in totaal 29 zeshoekige schroeven, waarvan één als
reserveschroef

- 7 -
Adres: Baoshanqu Shuangchenglu 803long 11hao 1602A-1609shi
Shanghai
Geïmporteerd naar AUS: SIHAO PTY LTD . 1 ROKEVA
STREETEASTWOOD NSW 2122 Australië
Geïmporteerd naar de VS: Sanven Technology Ltd. Suite 250, 9166
Anaheim Place, Rancho Cucamonga, CA 91730
REP
EC
SHUNSHUN GmbH
Römeräcker 9 Z2021, 76351
Linkenheim-Hochstetten, Germany
REP
UK
Pooledas Group Ltd
Unit 5 Albert Edward House, The
Pavilions Preston, United Kingdom
Gemaakt in China


Teknisk support och e-garanticertifikat
www.vevor.com/support
VERKTYGSSTÄLL FÖR GARAGE
We continue to be committed to provide you tools with competitive price.
"Save Half", "Half Price" or any other similar expressions used by us only represents an
estimate of savings you might benefit from buying certain tools with us compared to the
major top brands and does not necessarily mean to cover all categories of tools offered by
us. You are kindly reminded to verify carefully when you are placing an order with us if you
are actually saving half in comparison with the top major brands.

- 1 -
Have product questions? Need technical support? Please feel free to
contact us:
Technical Support and E-Warranty Certificate
www.vevor.com/support
NEED HELP? CONTACT US!
This is the original instruction, please read all manual instructions
carefully before operating. VEVOR reserves a clear interpretation of our
user manual. The appearance of the product shall be subject to the
product you received. Please forgive us that we won't inform you again if
there are any technology or software updates on our product.
Modell#: RF-RY-028
Modell#: RF-RY-029
GARAGE TOOL
STORAGE RACK

- 2 -
INSTRUCTIONS
Tack så mycket för att du valde detta förvaringsställ för garageverktyg .
Läs alla instruktioner innan du använder den. Informationen hjälper dig att
uppnå bästa möjliga resultat. Detta förvaringsställ för garageverktyg
förhindrar att verktyg blir rörigt på golvet och är idealiskt för trädgårdar,
skjul och garage.
Säkerhet och underhåll:
85. Installera och använd denna produkt på en stabil yta för att förhindra
lutning.
86. Se till att bromsarna är aktiverade när du använder länkhjulen med
bromsfunktioner.
87. Det rekommenderas inte att använda det i sluttningar, särskilt när det
är lastat, eftersom länkhjulen kan glida.
88. Undvik att klättra eller stå på ställningen.
89. När barn använder den, se till att de är under uppsikt av vuxen.
90. Tunga föremål bör placeras på den nedre hyllan för att undvika att
tyngdpunkten förskjuts.
91. Håll borta från öppen låga och undvik höga temperaturer.
92. Undvik långvarig exponering för solljus för att förhindra plaståldring.
93. Vid rengöring, använd ett milt rengöringsmedel och undvik frätande
kemikalier.
94. Kontrollera regelbundet alla anslutningspunkter för att säkerställa att
alla delar är säkert installerade.
95. Kontrollera regelbundet alla anslutningspunkter för att säkerställa att
skruvarna är åtdragna.
96. Krokarna är endast till för att hänga lätta verktyg. Häng inte tunga
föremål för att undvika att krokarna deformeras
SPARA DESSA INSTRUKTIONER
PARAMETERS- Model A

- 3 -
1. Modell: RF-RY-028
23. Rak krok: 6 stycken
24. G -S hape Krok: 5 st
25. Justerbar stödfot ×4st
PART LIST AND PRODUCT
Installation procedures
1. Fina del A , C, och
montera dem med skruv
2. Montera del D på del C
och dra åt skruvarna
3. Installera del E
Arti
kel
Beskrivning
Antal
A
Främre V ertikal R od
2 st
B
Ansluter S quare T ube
4 st
C
Hylla B ase
2 st
D
Bakre Vertikal R od _
2 st
E
Mellananslutande nätplatta
1 st
F
Tillbaka P -fil
1 st
G
Toppanslutande nätplatta
1 st
H
Stationär krok
1 st
jag
Anti- Slip P ad _
2 st
J
Tillbehörspaket _ _
1 set
- 4 -
4. Installera del F
5. Installera del G
6. Installera del H och sätt
in rörkåporna, monteringen
är klar
Notera:
22. Alla skruvar måste dras åt före användning .
23. Det finns totalt 30 sexkantskruvar, med två som
reservskruvar .
24. Tillbehörspaketet har 3 st M6*25 skruvar; två för
baksidan av DEL E, en reserv .
PARAMETERS- MODEL B
Modell B:
1. Modell: RF-RY-029
2. Stationär krok: 1 st med 6 raka krokar
3. Rörlig krok: 5 stycken (S-form)
4. Justerbar stödfot × 4 st
5. 3 tums hjul × 4 st;
PART LIST AND PRODUCT
Artik
el
Beskrivning
Antal
A
Sidoställ
2 st
B
Positionerande nätpanel
2 st
C
Basplatta
2 st
D
Anslutande nätplatta
2 st
E
Anslutande fyrkantsrör
1 st

- 5 -
Installation procedures
1. Fina del A , C, och sätt
ihop dem med skruv
2. Installera del D och del E
3. Installera först del I och
sedan del F och del B.
4. installera del B och del J
5.installera del H och S;
Skruva åt hjulet med skruv,
sätt i rörkåporna,
monteringen är klar.
6. den justerbara stödfoten
(del M)
Kan bytas ut mot hjul (del
L)
F
Mellannätpanel
1 st
G
Anslutande runt rör
1 st
H
Rörlig krok
5 st
jag
Stationär krok
1 st
J
Liten krok
1 st
L
Hjul
4 st
M
Justerbar stödfot
4 st
N
Tillbehörspaket _ _
1 set

- 6 -
Notera:
1. Alla skruvar måste dras åt före användning.
2.Här finns totalt 29 sexkantskruvar, med en som reservskruv

- 7 -
Adress: Baoshanqu Shuangchenglu 803long 11hao 1602A-1609shi
Shanghai
Importerad till AUS: SIHAO PTY LTD . 1 ROKEVA
STREETEASTWOOD NSW 2122 Australien
till USA: Sanven Technology Ltd. Suite 250, 9166 Anaheim Place,
Rancho Cucamonga, CA 91730
REP
EC
SHUNSHUN GmbH
Römeräcker 9 Z2021, 76351
Linkenheim-Hochstetten, Germany
REP
UK
Pooledas Group Ltd
Unit 5 Albert Edward House, The
Pavilions Preston, United Kingdom
Tillverkad i Kina