
Technical Support and E-Warranty Certificate
www.vevor.com/support
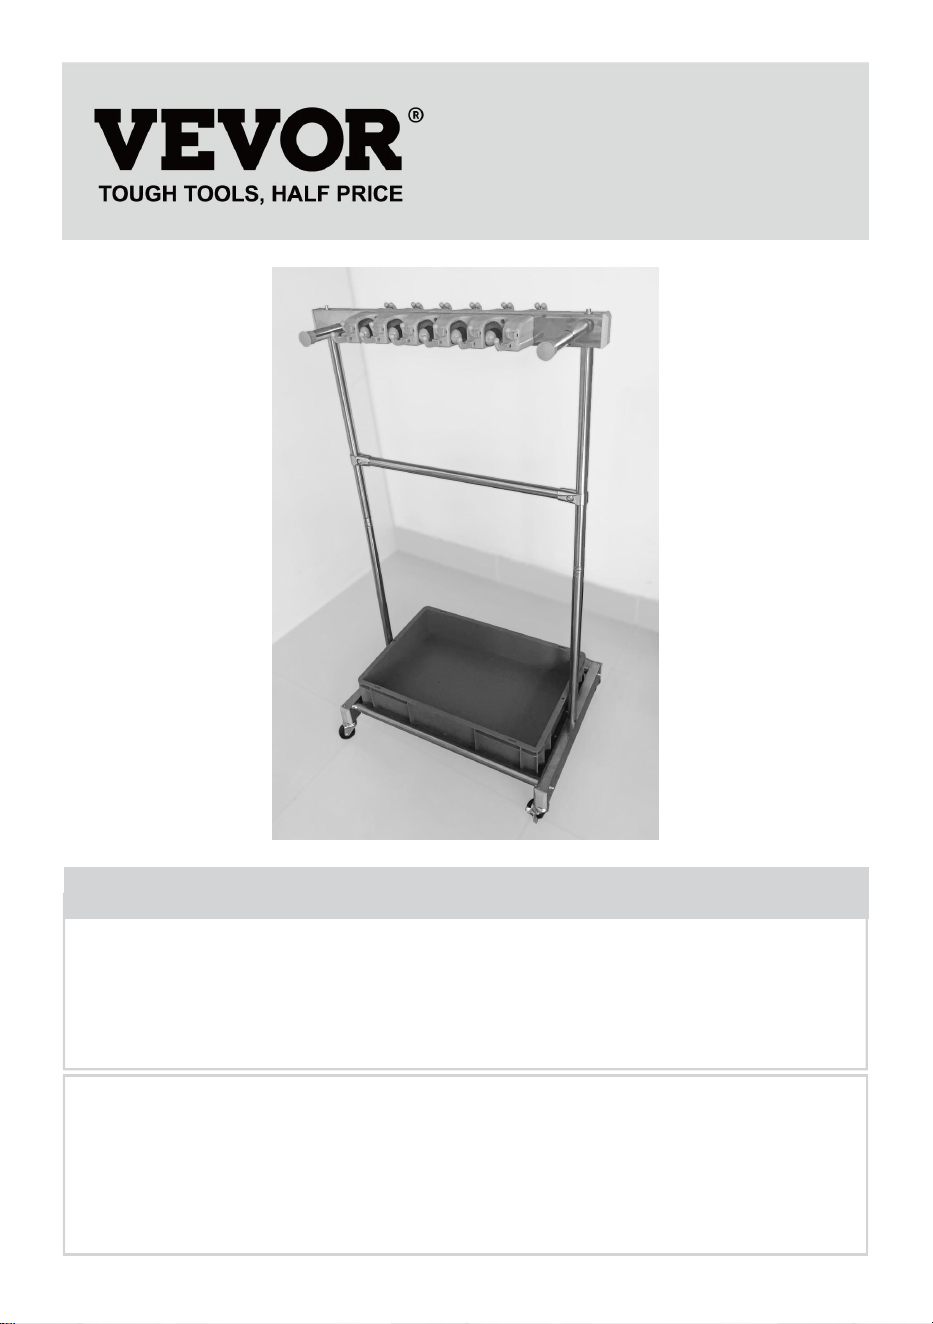
GARAGE TOOL STORAGE RACK
We continue to be committed to provide you tools with competitive price.
"Save Half", "Half Price" or any other similar expressions used by us only represents an
estimate of savings you might benefit from buying certain tools with us compared to the
major top brands and does not necessarily mean to cover all categories of tools offered by
us. You are kindly reminded to verify carefully when you are placing an order with us if you
are actually saving half in comparison with the top major brands.

- 1 -
MODEL:T60B
Have product questions? Need technical support? Please feel free to
contact us:
Technical Support and E-Warranty Certificate
www.vevor.com/support
NEED HELP? CONTACT US!
This is the original instruction, please read all manual instructions
carefully before operating. VEVOR reserves a clear interpretation of our
user manual. The appearance of the product shall be subject to the
product you received. Please forgive us that we won't inform you again if
there are any technology or software updates on our product.
GARAGE TOOL
STORAGE RACK

- 2 -
INSTRUCTIONS
Thank you very much for choosing this Garage Tool Storage Rack.
Please read all of the instructions before using it. The information will help
you achieve the best possible results.
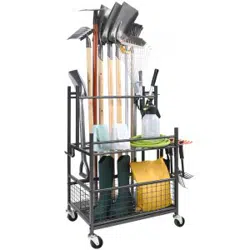
This garage tool storage rack prevents tools from cluttering the floor and
is ideal for gardens, sheds, and garages. It has 4 casters, two with brakes,
for easy mobility. A plastic tray is included to prevent water spills, keeping
the workspace clean.
Safety and Maintenance:
1. Please install and use this product on a stable surface to prevent
tilting.
2. Ensure the brakes are engaged when using the caster wheels with
brake functions.
3. It's not recommended to use on slopes, especially when loaded, as
the caster wheels might slide.
4. Avoid climbing or standing on the rack.
5. When children are using it, ensure they are under adult supervision.
6. Heavy objects should be placed on the bottom shelf to avoid offsetting
the center of gravity.
7. Keep away from open flames and avoid high temperatures.
8. Avoid prolonged exposure to sunlight to prevent plastic aging.
9. When cleaning, use a mild detergent and avoid corrosive chemicals.
10. Regularly check all connection points to ensure all parts are securely
installed.
11. Regularly check all connection points to ensure screws are tightened.
SAVE THESE INSTRUCTIONS
PARAMETERS
1. Model: T60B
2. Elastic clip hooks: 10 pieces
3. universal wheels, 2 of which have brakes, wheel diameter: 50mm
4. N.W.: 5.8kg
- 3 -
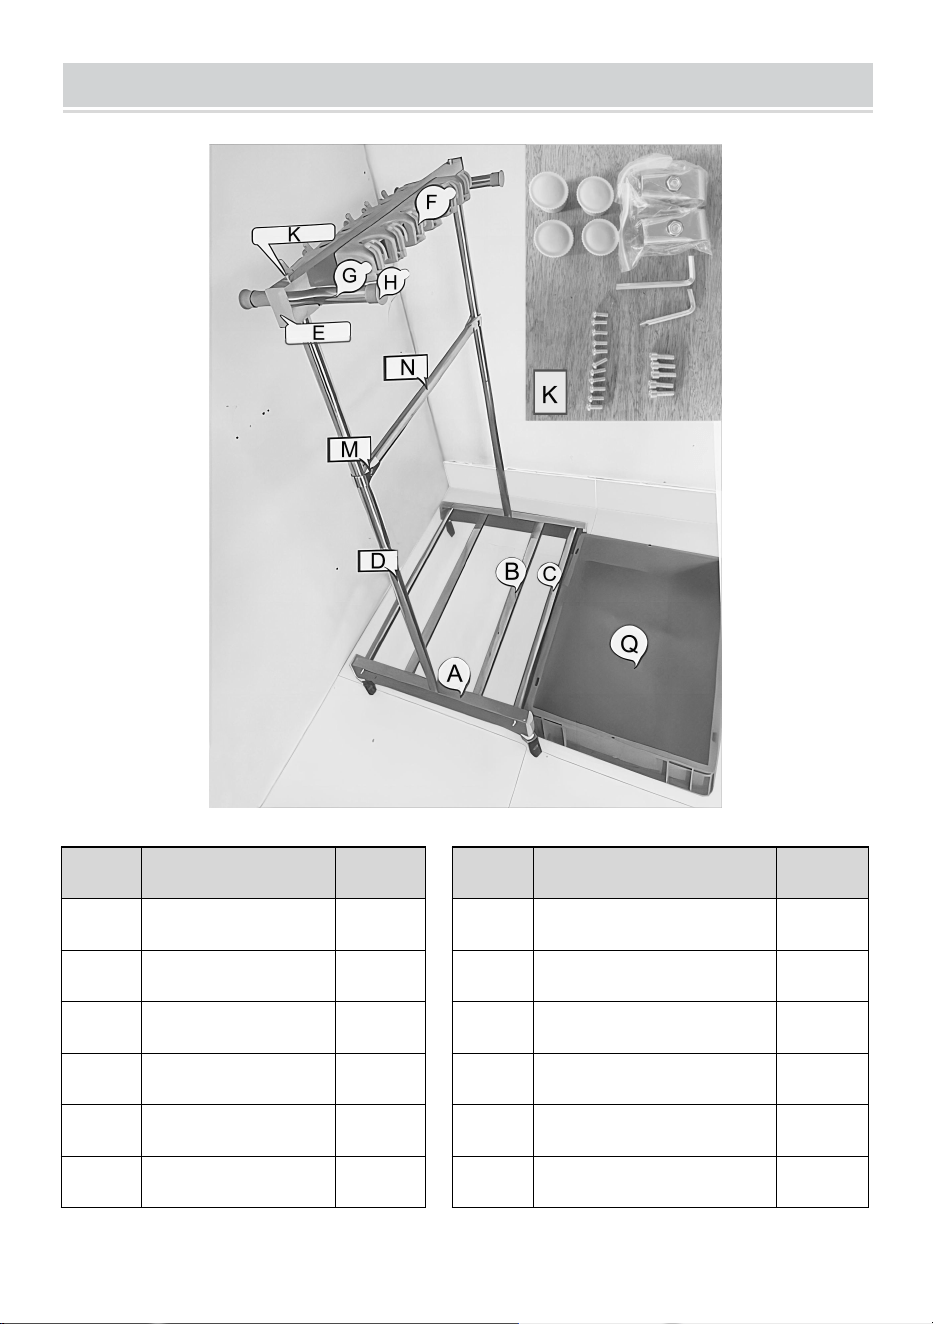
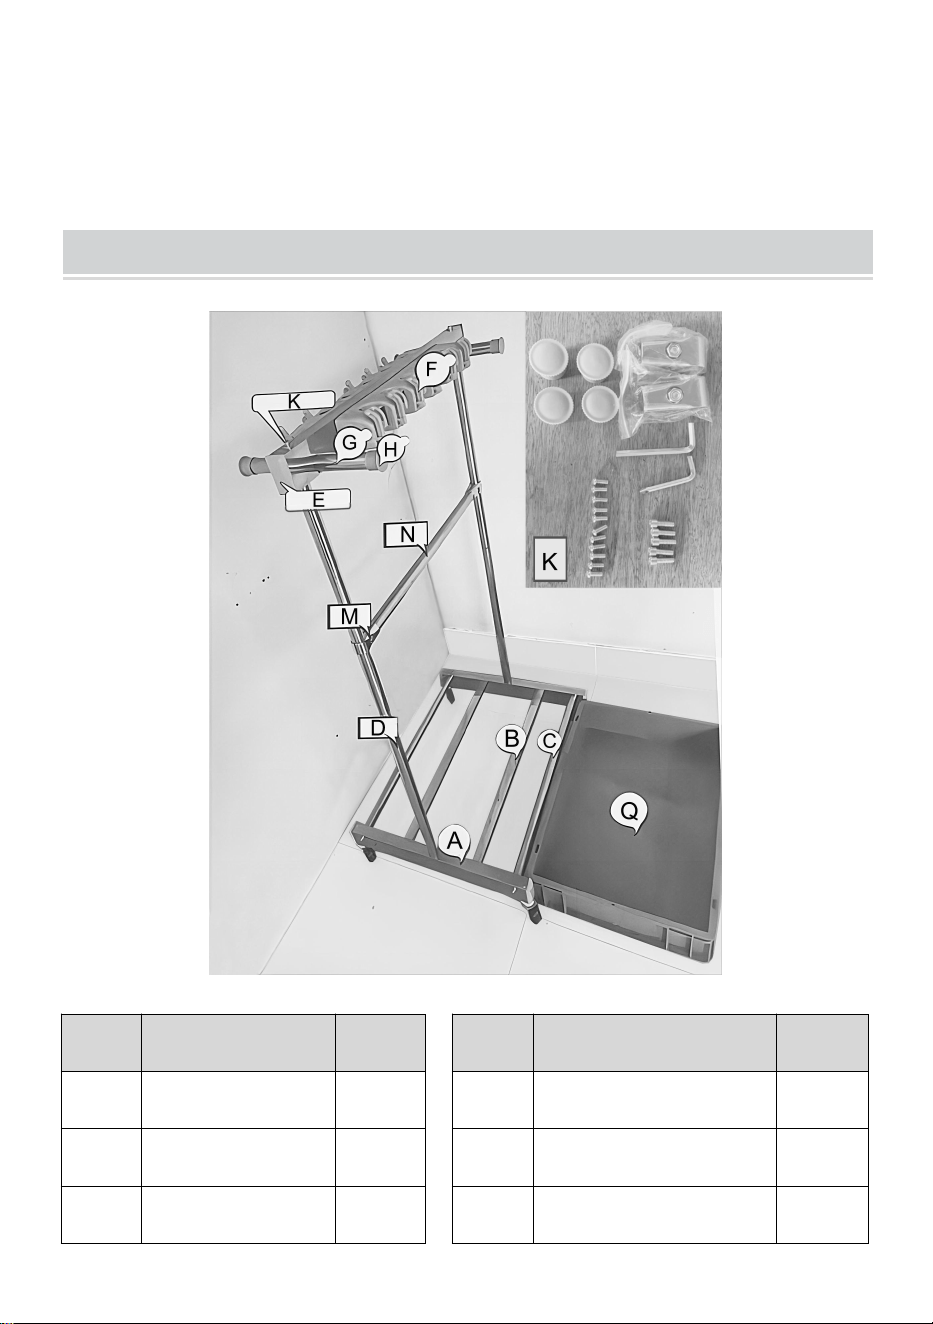
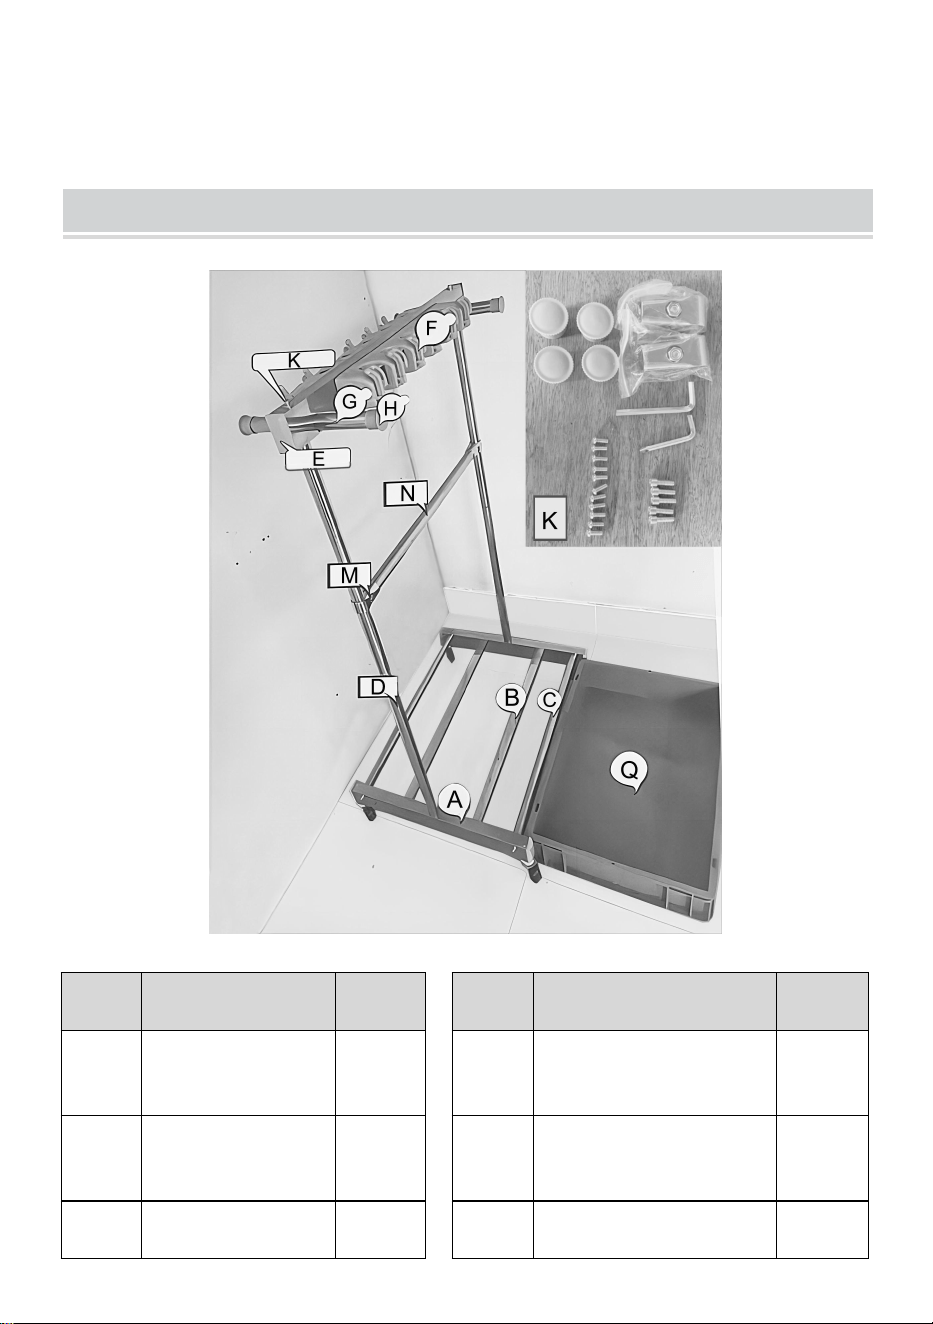
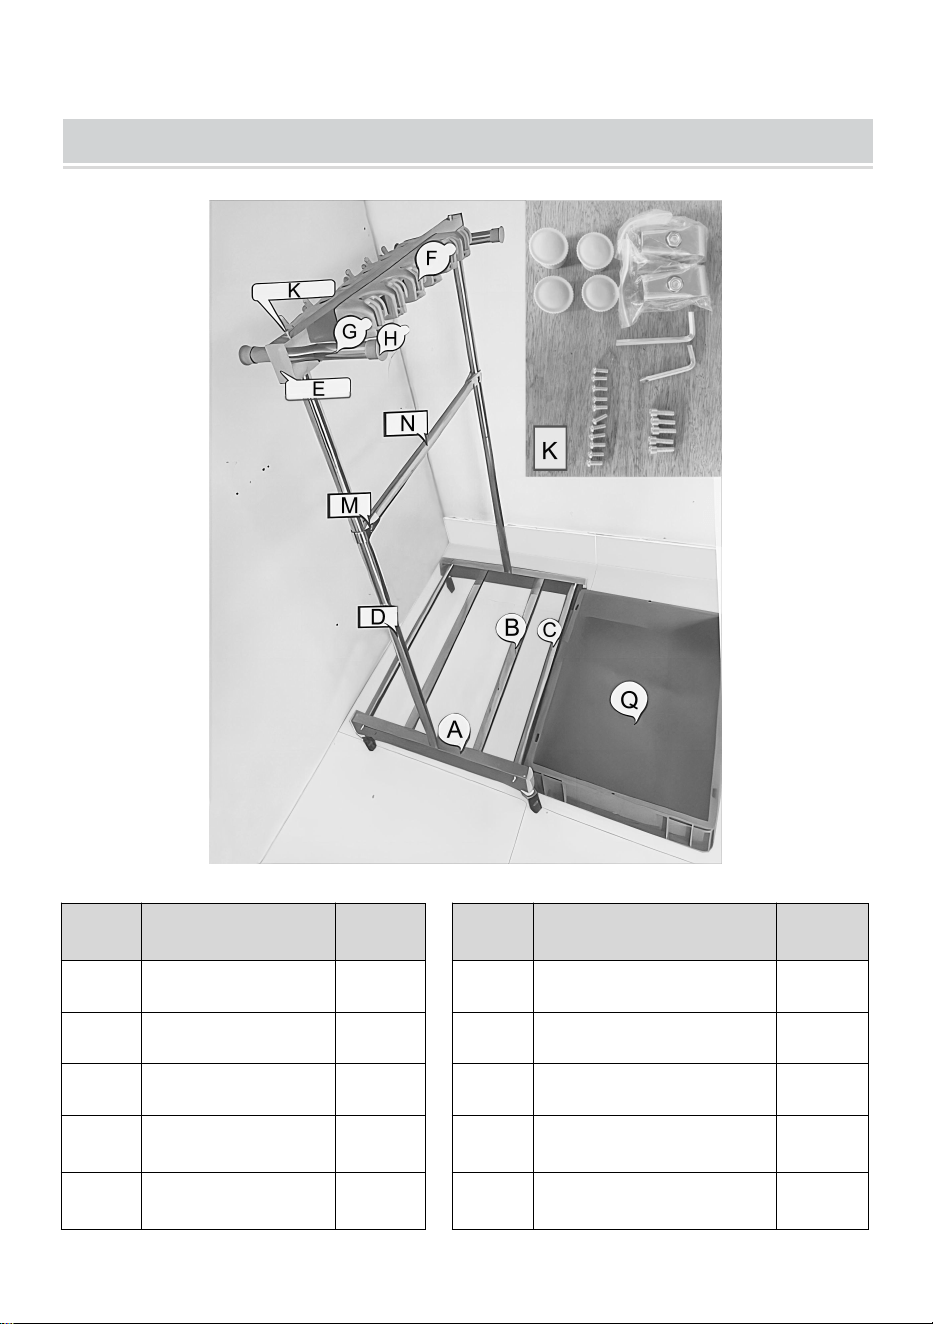
PART LIST AND PRODUCT
Item
Description
Qty
Item
Description
Qty
A
Base tube
1pc
G
Handrail tube
2pcs
B
Base hosting
2pcs
H
Handrail plug
4pcs
C
Base fixed tube
2pcs
Q
Water box
1pc
D
Upright tube
4pcs
N
Reinforced tube
1pc
E
Main beam
1pc
M
Aluminum alloy joint
2pcs
F
Mop hanger
2pcs
K
Accessory package
1set
- 4 -
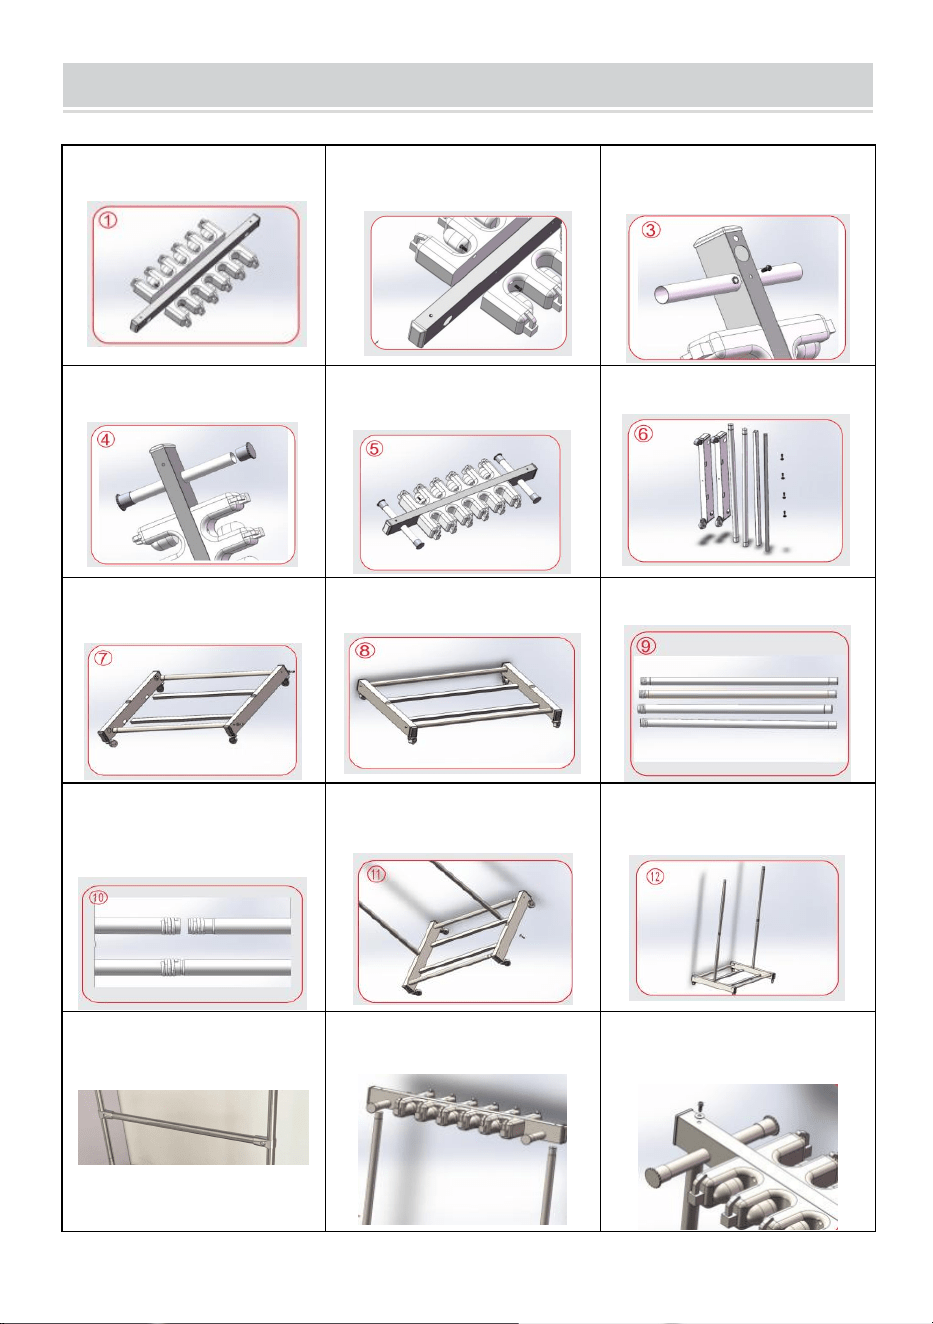
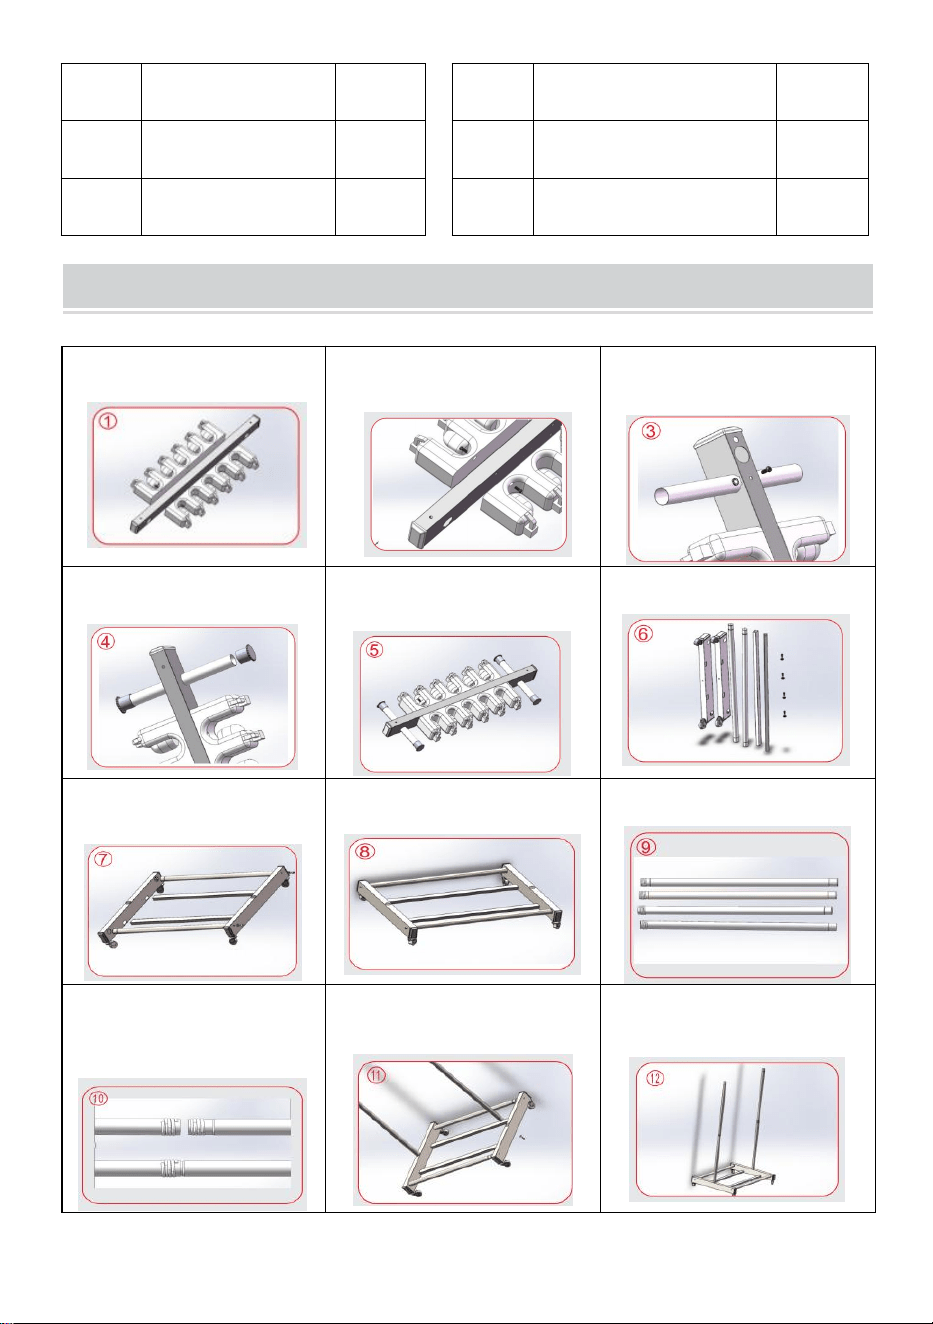
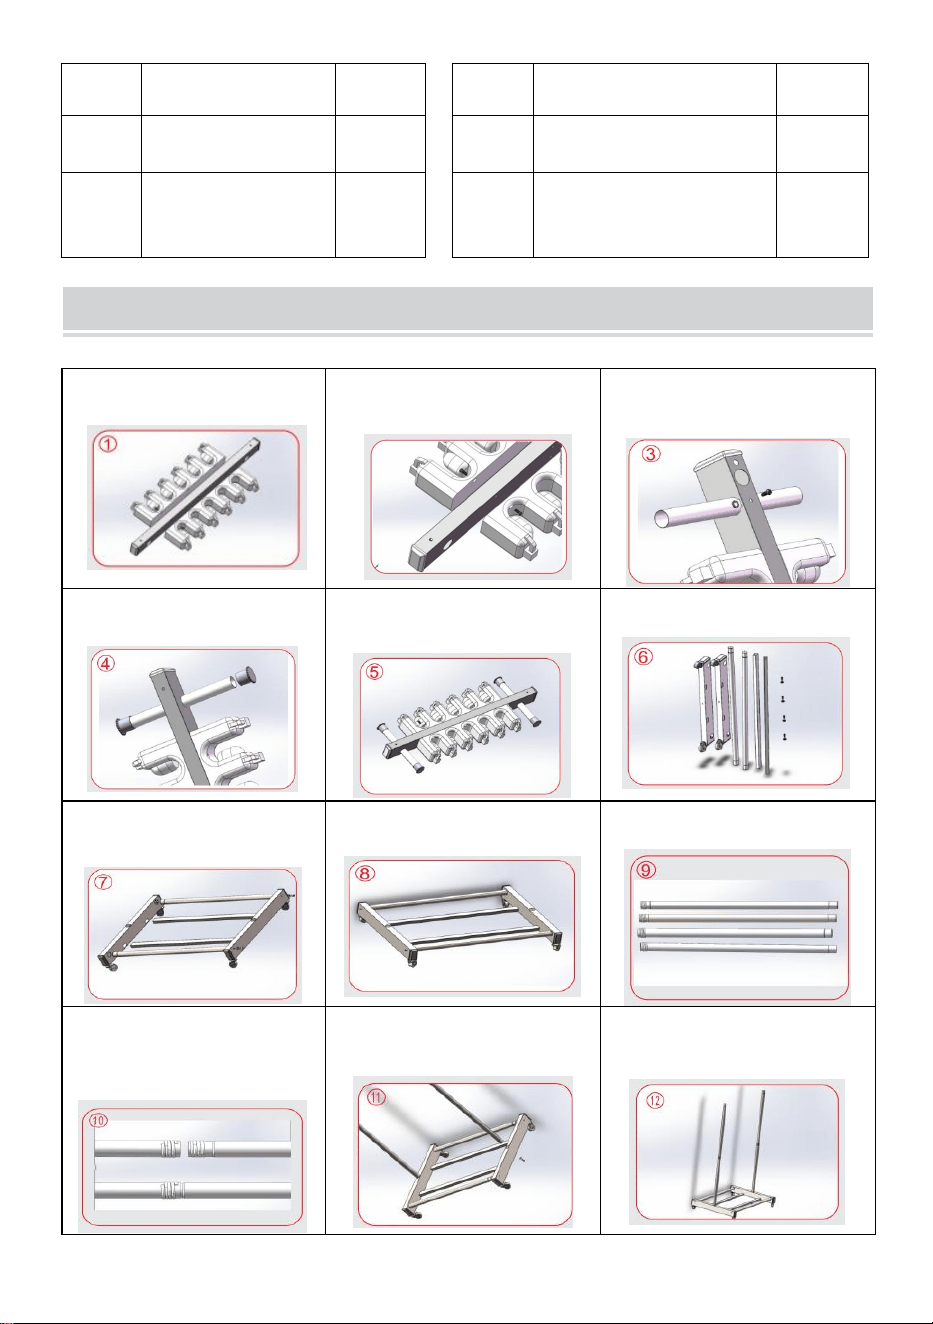
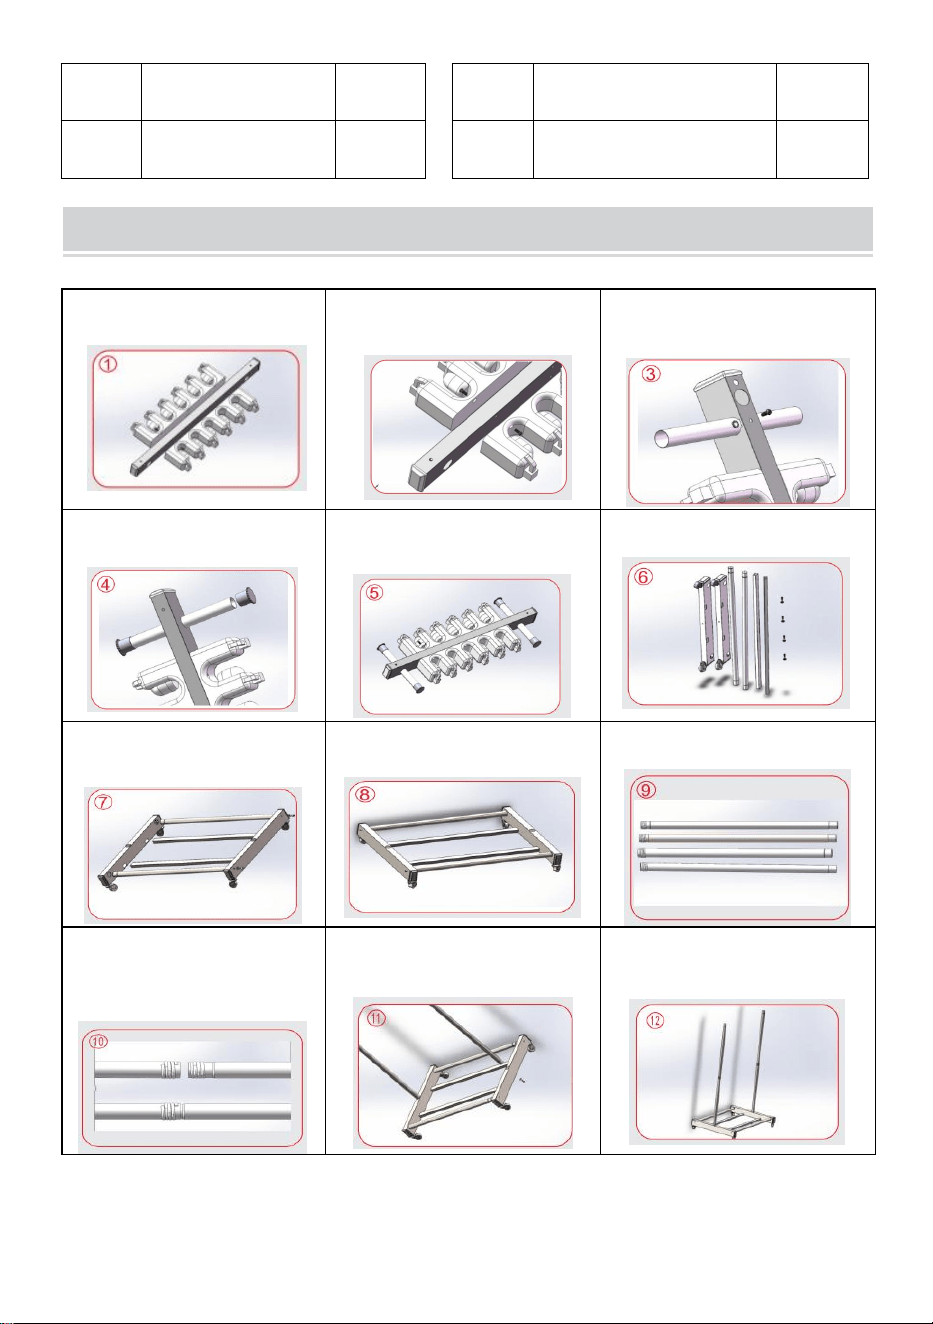
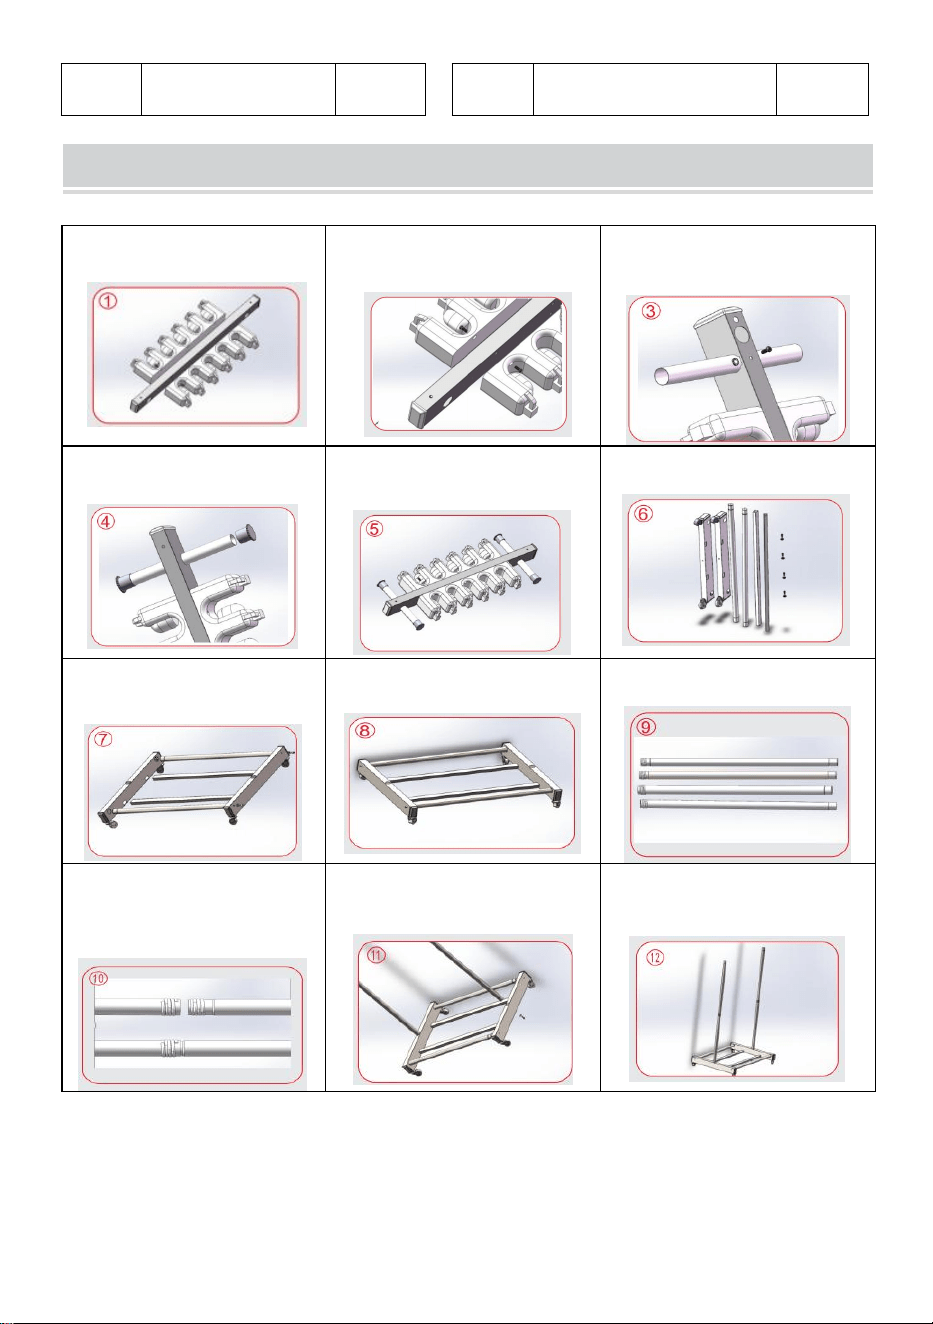
Installation procedures
1.Fine part E, F
2.Align the screw holes
and secure with screws.
3.Assemble part G and
secure with screws.
4.Assemble part H .
5.Top shelf assembly is
completed
6.Find part A, B, C
7.Insert into the
corresponding hole
8.secure with screws.
9 .Find part D
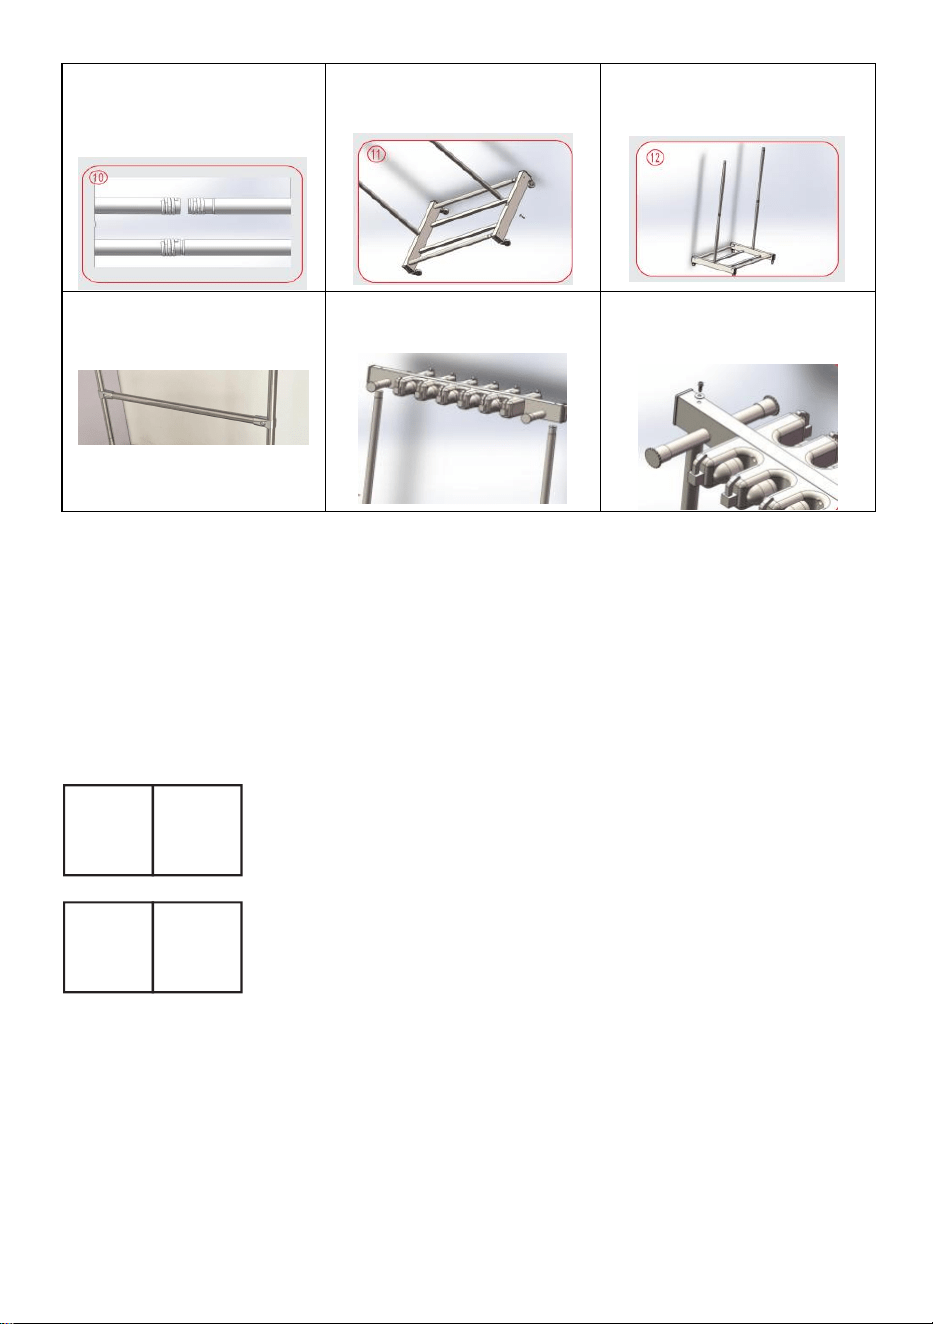
10.Connect the male and
female threads and
tighten
11. Insert into the tripod
hole and tighten
12. Secure the bottom
with hexagonal screws.
13. Assemble part N, M
and secure with screws
13. Assemble with top shelf
14. secure with screws,
Assembling is completed

- 5 -
Address: Baoshanqu Shuangchenglu 803long 11hao 1602A-1609shi
Shanghai
Imported to AUS: SIHAO PTY LTD, 1 ROKEVA STREETEASTWOOD
NSW 2122 Australia
Imported to USA: Sanven Technology Ltd, Suite 250, 9166 Anaheim
Place, Rancho Cucamonga, CA 91730
REP
EC
SHUNSHUN GmbH
Römeräcker 9 Z2021, 76351
Linkenheim-Hochstetten, Germany
REP
UK
Pooledas Group Ltd
Unit 5 Albert Edward House, The
Pavilions Preston, United Kingdom
Made In China


Assistance technique et certificat de garantie électronique
www.vevor.com/support
SUPPORT DE RANGEMENT POUR OUTILS DE
GARAGE
We continue to be committed to provide you tools with competitive price.
"Save Half", "Half Price" or any other similar expressions used by us only represents an
estimate of savings you might benefit from buying certain tools with us compared to the
major top brands and does not necessarily mean to cover all categories of tools offered by
us. You are kindly reminded to verify carefully when you are placing an order with us if you
are actually saving half in comparison with the top major brands.

- 1 -
MODÈLE:T60B
Have product questions? Need technical support? Please feel free to
contact us:
Technical Support and E-Warranty Certificate
www.vevor.com/support
NEED HELP? CONTACT US!
This is the original instruction, please read all manual instructions
carefully before operating. VEVOR reserves a clear interpretation of our
user manual. The appearance of the product shall be subject to the
product you received. Please forgive us that we won't inform you again if
there are any technology or software updates on our product.
GARAGE TOOL
STORAGE RACK

- 2 -
INSTRUCTIONS
Merci beaucoup d'avoir choisi ce support de rangement pour outils de
garage . Veuillez lire toutes les instructions avant de l'utiliser. Les
informations vous aideront à obtenir les meilleurs résultats possibles.
Ce support de rangement pour outils de garage empêche les outils
d'encombrer le sol et est idéal pour les jardins, les remises et les garages.
Il dispose de 4 roulettes, dont deux avec freins, pour une mobilité aisée.
Un plateau en plastique est inclus pour éviter les déversements d'eau et
garder l'espace de travail propre.
Sécurité et Entretien :
12. Veuillez installer et utiliser ce produit sur une surface stable pour
éviter tout basculement.
13. Assurez-vous que les freins sont engagés lorsque vous utilisez les
roulettes avec fonctions de freinage.
14. Il n'est pas recommandé de l'utiliser sur des pentes, surtout lorsqu'il
est chargé, car les roulettes pourraient glisser.
15. Évitez de grimper ou de vous tenir debout sur le support.
16. Lorsque des enfants l'utilisent, assurez-vous qu'ils sont sous la
surveillance d'un adulte.
17. Les objets lourds doivent être placés sur l'étagère inférieure pour
éviter de décaler le centre de gravité.
18. Tenir à l'écart des flammes nues et éviter les températures élevées.
19. Évitez l'exposition prolongée au soleil pour éviter le vieillissement du
plastique.
20. Lors du nettoyage, utilisez un détergent doux et évitez les produits
chimiques corrosifs.
21. Vérifiez régulièrement tous les points de connexion pour vous assurer
que toutes les pièces sont solidement installées.
22. Vérifiez régulièrement tous les points de connexion pour vous assurer
que les vis sont serrées.
CONSERVEZ CES INSTRUCTIONS
PARAMETERS
1. Modèle : T60B
5. Crochets élastiques : 10 pièces
6. roues universelles dont 2 avec freins, diamètre de roue : 50mm

- 3 -
7. NO : 5,8 kg
PART LIST AND PRODUCT
Artic
le
Description
Quan
tité
Artic
le
Description
Quant
ité
UN
Tube de base
1 pc
g
Tube de main
courante
2
pièce
s
B
Hébergement
de base
2
pièce
s
H
Bouchon de main
courante
4
pièce
s
C
Tube fixe de
base
2
pièce
Q
Boîte à eau
1 pc

- 4 -
Installation procedures
1.Fine part E, F
2.Align the screw holes
and secure with screws.
3.Assemble part G and
secure with screws.
4.Assemble part H .
5.Top shelf assembly is
completed
6.Find part A, B, C
7.Insert into the
corresponding hole
8.secure with screws.
9 .Find part D
s
D
Tube vertical
4
pièce
s
N
Tube renforcé
1 pc
E
Faisceau
principal
1 pc
M.
Joint en alliage
d'aluminium
2
pièce
s
F
Cintre à
vadrouille
2
pièce
s
K
Pack d'accessoires
1 jeu

- 5 -
10.Connect the male and
female threads and
tighten
11. Insert into the tripod
hole and tighten
12. Secure the bottom
with hexagonal screws.
13. Assemble part N, M
and secure with screws
13. Assemble with top shelf
14. secure with screws,
Assembling is completed
Adresse : Baoshanqu Shuangchenglu 803long 11hao 1602A-1609shi
Shanghai
Importé en Australie : SIHAO PTY LTD, 1 ROKEVA STREETASTWOOD
NSW 2122 Australie
Importé aux États-Unis : Sanven Technology Ltd, Suite 250, 9166
Anaheim Place, Rancho Cucamonga, CA 91730
REP
EC
SHUNSHUN GmbH
Römeräcker 9 Z2021, 76351
Linkenheim-Hochstetten, Germany
REP
UK
Pooledas Group Ltd
Unit 5 Albert Edward House, The
Pavilions Preston, United Kingdom
Fabriqué en Chine


Zertifikat für technischen Support und E-Garantie
www.vevor.com/support
AUFBEWAHRUNGSREGAL FÜR GARAGEN-
WERKZEUGE
We continue to be committed to provide you tools with competitive price.
"Save Half", "Half Price" or any other similar expressions used by us only represents an
estimate of savings you might benefit from buying certain tools with us compared to the
major top brands and does not necessarily mean to cover all categories of tools offered by
us. You are kindly reminded to verify carefully when you are placing an order with us if you
are actually saving half in comparison with the top major brands.
- 1 -
MODELL:T60B
Have product questions? Need technical support? Please feel free to
contact us:
Technical Support and E-Warranty Certificate
www.vevor.com/support
NEED HELP? CONTACT US!
This is the original instruction, please read all manual instructions
carefully before operating. VEVOR reserves a clear interpretation of our
user manual. The appearance of the product shall be subject to the
product you received. Please forgive us that we won't inform you again if
there are any technology or software updates on our product.
GARAGE TOOL
STORAGE RACK

- 2 -
INSTRUCTIONS
Vielen Dank, dass Sie sich für dieses Garagen-Werkzeugregal
entschieden haben . Bitte lesen Sie alle Anweisungen, bevor Sie es
verwenden. Die Informationen helfen Ihnen, die bestmöglichen
Ergebnisse zu erzielen.
Dieses Werkzeugregal für die Garage verhindert, dass Werkzeuge den
Boden verstopfen, und ist ideal für Gärten, Schuppen und Garagen. Es
verfügt über 4 Rollen, zwei davon mit Bremsen, für einfache Mobilität.
Eine Kunststoffschale ist im Lieferumfang enthalten, um das Verschütten
von Wasser zu verhindern und den Arbeitsbereich sauber zu halten.
Sicherheit und Wartung :
23. Bitte installieren und verwenden Sie dieses Produkt auf einer stabilen
Oberfläche, um ein Kippen zu verhindern.
24. Stellen Sie sicher, dass die Bremsen aktiviert sind, wenn Sie die
Lenkräder mit Bremsfunktion verwenden.
25. Von der Verwendung an Hängen, insbesondere im beladenen
Zustand, wird abgeraten, da die Lenkrollen verrutschen könnten.
26. Vermeiden Sie es, auf das Gestell zu klettern oder darauf zu stehen.
27. Wenn Kinder es benutzen, stellen Sie sicher, dass sie unter Aufsicht
eines Erwachsenen stehen.
28. Schwere Gegenstände sollten auf der unteren Ablage abgelegt
werden, um eine Schwerpunktverlagerung zu vermeiden.
29. Von offenen Flammen fernhalten und hohe Temperaturen vermeiden.
30. Vermeiden Sie längere Sonneneinstrahlung, um einer Alterung des
Kunststoffs vorzubeugen.
31. Verwenden Sie zum Reinigen ein mildes Reinigungsmittel und
vermeiden Sie ätzende Chemikalien.
32. Überprüfen Sie regelmäßig alle Verbindungspunkte, um
sicherzustellen, dass alle Teile sicher installiert sind.
33. Überprüfen Sie regelmäßig alle Verbindungspunkte, um
sicherzustellen, dass die Schrauben fest angezogen sind.
ANLEITUNG AUFBEWAHREN
PARAMETERS
1. Modell: T60B
8. Elastische Cliphaken: 10 Stück
- 3 -
9. Universalräder, davon 2 mit Bremse, Raddurchmesser: 50 mm
10. Gewicht: 5,8 kg
PART LIST AND PRODUCT
Artik
el
Beschreibung
Meng
e
Artik
el
Beschreibung
Meng
e
A
Basisrohr
1 Stk
G
Handschienenrohr
_
2Stk
B
Basis -Hosting
2Stk
H
Handlaufstopfen
4
Stück
C
Basis festes
Rohr
2Stk
Q
Wasserkasten _
1 Stk
- 4 -
Installation procedures
1.Fine part E, F
2.Align the screw holes
and secure with screws.
3.Assemble part G and
secure with screws.
4.Assemble part H .
5.Top shelf assembly is
completed
6.Find part A, B, C
7.Insert into the
corresponding hole
8.secure with screws.
9 .Find part D
10.Connect the male and
female threads and
tighten
11. Insert into the tripod
hole and tighten
12. Secure the bottom
with hexagonal screws.
D
Aufrechtes
Rohr
4
Stück
N
Verstärktes Rohr
1 Stk
E
Fernlicht
1 Stk
M
Gelenk aus
Aluminiumlegierung
2Stk
F
Mop-
Kleiderbügel
2Stk
K
Zubehörpaket
1
Satz

- 5 -
13. Assemble part N, M
and secure with screws
13. Assemble with top shelf
14. secure with screws,
Assembling is completed
Adresse: Baoshanqu Shuangchenglu 803long 11hao 1602A-1609shi
Shanghai
Importiert nach AUS: SIHAO PTY LTD, 1 ROKEVA
STREETEASTWOOD NSW 2122 Australien
In die USA importiert: Sanven Technology Ltd, Suite 250, 9166 Anaheim
Place, Rancho Cucamonga, CA 91730
REP
EC
SHUNSHUN GmbH
Römeräcker 9 Z2021, 76351
Linkenheim-Hochstetten, Germany
REP
UK
Pooledas Group Ltd
Unit 5 Albert Edward House, The
Pavilions Preston, United Kingdom
In China hergestellt


Supporto tecnico e certificato di garanzia elettronica
www.vevor.com/support
PORTAUTENSILI PER GARAGE
We continue to be committed to provide you tools with competitive price.
"Save Half", "Half Price" or any other similar expressions used by us only represents an
estimate of savings you might benefit from buying certain tools with us compared to the
major top brands and does not necessarily mean to cover all categories of tools offered by
us. You are kindly reminded to verify carefully when you are placing an order with us if you
are actually saving half in comparison with the top major brands.

- 1 -
MODELLO:T60B
Have product questions? Need technical support? Please feel free to
contact us:
Technical Support and E-Warranty Certificate
www.vevor.com/support
NEED HELP? CONTACT US!
This is the original instruction, please read all manual instructions
carefully before operating. VEVOR reserves a clear interpretation of our
user manual. The appearance of the product shall be subject to the
product you received. Please forgive us that we won't inform you again if
there are any technology or software updates on our product.
GARAGE TOOL
STORAGE RACK

- 2 -
INSTRUCTIONS
Grazie mille per aver scelto questo scaffale per attrezzi da garage . Si
prega di leggere tutte le istruzioni prima di utilizzarlo. Le informazioni ti
aiuteranno a ottenere i migliori risultati possibili.
Questo porta attrezzi da garage impedisce agli attrezzi di ingombrare il
pavimento ed è ideale per giardini, capannoni e garage. Dispone di 4
ruote, due con freno, per una facile mobilità. È incluso un vassoio in
plastica per evitare fuoriuscite d'acqua, mantenendo pulito lo spazio di
lavoro.
Sicurezza e manutenzione :
34. Installare e utilizzare questo prodotto su una superficie stabile per
evitare il ribaltamento.
35. Assicurarsi che i freni siano inseriti quando si utilizzano le ruote
piroettanti con funzioni di freno.
36. Se ne sconsiglia l'uso in pendenza, soprattutto se carico, poiché le
ruote piroettanti potrebbero scivolare.
37. Evitare di arrampicarsi o di stare in piedi sulla rastrelliera.
38. Quando i bambini lo utilizzano, assicurarsi che siano sotto la
supervisione di un adulto.
39. Gli oggetti pesanti devono essere posizionati sul ripiano inferiore per
evitare di spostare il baricentro.
40. Tenere lontano da fiamme libere ed evitare temperature elevate.
41. Evitare l'esposizione prolungata alla luce solare per prevenire
l'invecchiamento della plastica.
42. Durante la pulizia, utilizzare un detergente delicato ed evitare prodotti
chimici corrosivi.
43. Controllare regolarmente tutti i punti di connessione per garantire che
tutte le parti siano installate in modo sicuro.
44. Controllare regolarmente tutti i punti di connessione per garantire che
le viti siano serrate.
CONSERVA QUESTE ISTRUZIONI
PARAMETERS
1. Modello: T60B
11. Ganci a clip elastici: 10 pezzi
12. ruote universali, di cui 2 con freno, diametro ruota: 50mm

- 3 -
13. NO: 5,8 kg
PART LIST AND PRODUCT
Artic
olo
Descrizione
Qtà
Artic
olo
Descrizione
Qtà
UN
Tubo di base
1 pc
G
Tubo per corrimano
H
2
pezzi
B
Base hosting
2
pezzi
H
Tappo per
corrimano
4
pezzi
C
Base in tubo
fisso
2
pezzi
Q
Cassetta dell'acqua
1 pc
D
Tubo verticale
4
pezzi
N
Tubo rinforzato
1 pc

- 4 -
Installation procedures
1.Fine part E, F
2.Align the screw holes
and secure with screws.
3.Assemble part G and
secure with screws.
4.Assemble part H .
5.Top shelf assembly is
completed
6.Find part A, B, C
7.Insert into the
corresponding hole
8.secure with screws.
9 .Find part D
10.Connect the male and
female threads and
tighten
11. Insert into the tripod
hole and tighten
12. Secure the bottom
with hexagonal screws.
E
Raggio
principale
1 pc
M
Giunto in lega di
alluminio
2
pezzi
F
Appendiabiti M
2
pezzi
K
Pacchetto
accessori
1 set

- 5 -
13. Assemble part N, M
and secure with screws
13. Assemble with top shelf
14. secure with screws,
Assembling is completed
Indirizzo: Baoshanqu Shuangchenglu 803long 11hao 1602A-1609shi
Shanghai
Importato in AUS: SIHAO PTY LTD, 1 ROKEVA STREETEASTWOOD
NSW 2122 Australia
Importato negli Stati Uniti: Sanven Technology Ltd, Suite 250, 9166
Anaheim Place, Rancho Cucamonga, CA 91730
REP
EC
SHUNSHUN GmbH
Römeräcker 9 Z2021, 76351
Linkenheim-Hochstetten, Germany
REP
UK
Pooledas Group Ltd
Unit 5 Albert Edward House, The
Pavilions Preston, United Kingdom
Made in China


Soporte técnico y certificado de garantía electrónica
www.vevor.com/support
ESTANTE DE ALMACENAMIENTO DE
HERRAMIENTAS DE GARAJE
We continue to be committed to provide you tools with competitive price.
"Save Half", "Half Price" or any other similar expressions used by us only represents an
estimate of savings you might benefit from buying certain tools with us compared to the
major top brands and does not necessarily mean to cover all categories of tools offered by
us. You are kindly reminded to verify carefully when you are placing an order with us if you
are actually saving half in comparison with the top major brands.

- 1 -
MODELO:T60B
Have product questions? Need technical support? Please feel free to
contact us:
Technical Support and E-Warranty Certificate
www.vevor.com/support
NEED HELP? CONTACT US!
This is the original instruction, please read all manual instructions
carefully before operating. VEVOR reserves a clear interpretation of our
user manual. The appearance of the product shall be subject to the
product you received. Please forgive us that we won't inform you again if
there are any technology or software updates on our product.
GARAGE TOOL
STORAGE RACK

- 2 -
INSTRUCTIONS
Muchas gracias por elegir este estante para almacenamiento de
herramientas de garaje . Lea todas las instrucciones antes de usarlo. La
información le ayudará a conseguir los mejores resultados posibles.
Este estante para almacenamiento de herramientas de garaje evita que
las herramientas abarroten el suelo y es ideal para jardines, cobertizos y
garajes. Tiene 4 ruedas, dos con freno, para facilitar su movilidad. Se
incluye una bandeja de plástico para evitar derrames de agua,
manteniendo limpio el espacio de trabajo.
Seguridad y mantenimiento :
45. Instale y utilice este producto sobre una superficie estable para evitar
que se incline.
46. Asegúrese de que los frenos estén activados cuando utilice ruedas
giratorias con funciones de freno.
47. No se recomienda su uso en pendientes, especialmente cuando está
cargado, ya que las ruedas podrían deslizarse.
48. Evite subirse o pararse sobre el estante.
49. Cuando los niños lo utilicen, asegúrese de que estén bajo la
supervisión de un adulto.
50. Los objetos pesados deben colocarse en el estante inferior para
evitar desviar el centro de gravedad.
51. Mantener alejado de llamas abiertas y evitar altas temperaturas.
52. Evite la exposición prolongada a la luz solar para prevenir el
envejecimiento del plástico.
53. Al limpiar, utilice un detergente suave y evite productos químicos
corrosivos.
54. Verifique periódicamente todos los puntos de conexión para
asegurarse de que todas las piezas estén instaladas de forma segura.
55. Verifique periódicamente todos los puntos de conexión para
asegurarse de que los tornillos estén apretados.
GUARDA ESTAS INSTRUCCIONES
PARAMETERS
1. Modelo: T60B
14. Ganchos de clip elásticos: 10 piezas
15. ruedas universales, 2 de ellas con freno, diámetro de rueda: 50 mm
- 3 -
16. NO: 5,8 kg
PART LIST AND PRODUCT
Artíc
ulo
Descripción
Canti
dad
Artíc
ulo
Descripción
Canti
dad
A
tubo base
1 PC
GRA
MO
tubo andrail
2
pieza
s
B
Alojamiento
base
2
pieza
s
h
Tapón de
pasamanos
4
pieza
s
C
Tubo fijo base
2
pieza
q
Caja de Agua
1 PC

- 4 -
Installation procedures
1.Fine part E, F
2.Align the screw holes
and secure with screws.
3.Assemble part G and
secure with screws.
4.Assemble part H .
5.Top shelf assembly is
completed
6.Find part A, B, C
7.Insert into the
corresponding hole
8.secure with screws.
9 .Find part D
s
D
tubo vertical
4
pieza
s
nort
e
tubo reforzado
1 PC
mi
Haz principal
1 PC
MET
RO
Junta de aleación
de aluminio
2
pieza
s
F
colgador de
fregona
2
pieza
s
k
Paquete de
accesorios
1
juego
- 5 -
10.Connect the male and
female threads and
tighten
11. Insert into the tripod
hole and tighten
12. Secure the bottom
with hexagonal screws.
13. Assemble part N, M
and secure with screws
13. Assemble with top shelf
14. secure with screws,
Assembling is completed
Dirección: Baoshanqu Shuangchenglu 803long 11hao 1602A-1609shi
Shanghai
Importado a AUS: SIHAO PTY LTD, 1 ROKEVA STREETEASTWOOD
NSW 2122 Australia
Importado a EE. UU.: Sanven Technology Ltd, Suite 250, 9166 Anaheim
Place, Rancho Cucamonga, CA 91730
REP
EC
SHUNSHUN GmbH
Römeräcker 9 Z2021, 76351
Linkenheim-Hochstetten, Germany
REP
UK
Pooledas Group Ltd
Unit 5 Albert Edward House, The
Pavilions Preston, United Kingdom
Hecho en china


Wsparcie techniczne i certyfikat e-gwarancji
www.vevor.com/support
REGAŁ DO PRZECHOWYWANIA NARZĘDZI
GARAŻOWYCH
We continue to be committed to provide you tools with competitive price.
"Save Half", "Half Price" or any other similar expressions used by us only represents an
estimate of savings you might benefit from buying certain tools with us compared to the
major top brands and does not necessarily mean to cover all categories of tools offered by
us. You are kindly reminded to verify carefully when you are placing an order with us if you
are actually saving half in comparison with the top major brands.

- 1 -
MODEL: T60B
Have product questions? Need technical support? Please feel free to
contact us:
Technical Support and E-Warranty Certificate
www.vevor.com/support
NEED HELP? CONTACT US!
This is the original instruction, please read all manual instructions
carefully before operating. VEVOR reserves a clear interpretation of our
user manual. The appearance of the product shall be subject to the
product you received. Please forgive us that we won't inform you again if
there are any technology or software updates on our product.
GARAGE TOOL
STORAGE RACK

- 2 -
INSTRUCTIONS
Dziękujemy bardzo za wybranie tego stojaka do przechowywania
narzędzi garażowych . Przed użyciem przeczytaj wszystkie instrukcje.
Informacje te pomogą Ci osiągnąć najlepsze możliwe rezultaty.
Ten garażowy stojak do przechowywania narzędzi zapobiega
zaśmiecaniu podłogi przez narzędzia i jest idealny do ogrodów, szop i
garaży. Posiada 4 kółka, w tym dwa z hamulcami, co ułatwia mobilność.
Do zestawu dołączona jest plastikowa taca, która zapobiega rozlaniu się
wody i utrzymuje przestrzeń roboczą w czystości.
Bezpieczeństwo i konserwacja :
56. Zainstaluj i używaj tego produktu na stabilnej powierzchni, aby
zapobiec przechylaniu.
57. Podczas używania kół samonastawnych z funkcją hamulca należy
upewnić się, że hamulce są włączone.
58. Nie zaleca się używania go na pochyłościach, zwłaszcza pod
obciążeniem, ponieważ kółka samonastawne mogą się ślizgać.
59. Unikaj wspinania się i stania na stojaku.
60. Gdy korzystają z niego dzieci, należy upewnić się, że znajdują się one
pod nadzorem osoby dorosłej.
61. Ciężkie przedmioty należy umieszczać na dolnej półce, aby nie
przesunąć środka ciężkości.
62. Trzymać z dala od otwartego ognia i unikać wysokich temperatur.
63. Unikaj długotrwałego narażenia na działanie promieni słonecznych,
aby zapobiec starzeniu się plastiku.
64. Do czyszczenia używaj łagodnego detergentu i unikaj żrących
środków chemicznych.
65. Regularnie sprawdzaj wszystkie punkty połączeń, aby upewnić się, że
wszystkie części są bezpiecznie zamontowane.
66. Regularnie sprawdzaj wszystkie punkty połączeń, aby upewnić się, że
śruby są dokręcone.
ZACHOWAJ TE INSTRUKCJE
PARAMETERS
1. Model: T60B
17. Elastyczne haczyki zaciskowe: 10 sztuk
18. koła uniwersalne, w tym 2 z hamulcami, średnica koła: 50mm

- 3 -
19. NW: 5,8 kg
PART LIST AND PRODUCT
Prze
dmi
ot
Opis
Ilość
Prze
dmi
ot
Opis
Ilość
A
Rura
podstawowa
1 szt
G
H i rura szynowa
2 szt
B
Hosting
podstawowy
2 szt
H
Wtyczka poręczy
4szt
C
Stała rura
podstawy
2 szt
Q
Skrzynka na wodę
1 szt
- 4 -
Installation procedures
1.Fine part E, F
2.Align the screw holes
and secure with screws.
3.Assemble part G and
secure with screws.
4.Assemble part H .
5.Top shelf assembly is
completed
6.Find part A, B, C
7.Insert into the
corresponding hole
8.secure with screws.
9 .Find part D
10.Connect the male and
female threads and
tighten
11. Insert into the tripod
hole and tighten
12. Secure the bottom
with hexagonal screws.
D
Pionowa rurka
4szt
N
Wzmocniona rura
1 szt
mi
Główna wiązka
1 szt
M
Złącze ze stopu
aluminium
2 szt
F
Wieszak M op
2 szt
K
Pakiet akcesoriów
1
zesta
w

- 5 -
13. Assemble part N, M
and secure with screws
13. Assemble with top shelf
14. secure with screws,
Assembling is completed
Adres: Baoshanqu Shuangchenglu 803long 11hao 1602A-1609shi
Szanghaj
Import do AUS: SIHAO PTY LTD, 1 ROKEVA STREETEASTWOOD
NSW 2122 Australia
Import do USA: Sanven Technology Ltd, Suite 250, 9166 Anaheim Place,
Rancho Cucamonga, CA 91730
REP
EC
SHUNSHUN GmbH
Römeräcker 9 Z2021, 76351
Linkenheim-Hochstetten, Germany
REP
UK
Pooledas Group Ltd
Unit 5 Albert Edward House, The
Pavilions Preston, United Kingdom
Wyprodukowano w Chinach


Technische ondersteuning en e-garantiecertificaat
www.vevor.com/support
OPBERGREK VOOR GARAGEGEREEDSCHAP
We continue to be committed to provide you tools with competitive price.
"Save Half", "Half Price" or any other similar expressions used by us only represents an
estimate of savings you might benefit from buying certain tools with us compared to the
major top brands and does not necessarily mean to cover all categories of tools offered by
us. You are kindly reminded to verify carefully when you are placing an order with us if you
are actually saving half in comparison with the top major brands.

- 1 -
MODEL:T60B
Have product questions? Need technical support? Please feel free to
contact us:
Technical Support and E-Warranty Certificate
www.vevor.com/support
NEED HELP? CONTACT US!
This is the original instruction, please read all manual instructions
carefully before operating. VEVOR reserves a clear interpretation of our
user manual. The appearance of the product shall be subject to the
product you received. Please forgive us that we won't inform you again if
there are any technology or software updates on our product.
GARAGE TOOL
STORAGE RACK

- 2 -
INSTRUCTIONS
Hartelijk dank dat u voor dit garagegereedschapsopbergrek hebt
gekozen . Lees alle instructies voordat u het gebruikt. De informatie zal u
helpen de best mogelijke resultaten te bereiken.
Dit opbergrek voor gereedschap in de garage voorkomt dat
gereedschap de vloer rommelig maakt en is ideaal voor tuinen, schuren
en garages. Het heeft 4 zwenkwielen, waarvan twee met rem, voor
gemakkelijke mobiliteit. Er wordt een plastic bak meegeleverd om morsen
van water te voorkomen en de werkruimte schoon te houden.
Veiligheid en onderhoud :
67. Installeer en gebruik dit product op een stabiel oppervlak om kantelen
te voorkomen.
68. Zorg ervoor dat de remmen ingeschakeld zijn als u de zwenkwielen
met remfunctie gebruikt.
69. Het wordt afgeraden om op hellingen te gebruiken, vooral niet
wanneer deze belast zijn, omdat de zwenkwielen kunnen gaan glijden.
70. Vermijd klimmen of staan op het rek.
71. Als kinderen het gebruiken, zorg er dan voor dat ze onder toezicht
van een volwassene staan.
72. Zware voorwerpen moeten op de onderste plank worden geplaatst
om te voorkomen dat het zwaartepunt wordt verschoven.
73. Blijf uit de buurt van open vuur en vermijd hoge temperaturen.
74. Vermijd langdurige blootstelling aan zonlicht om plasticveroudering te
voorkomen.
75. Gebruik bij het schoonmaken een mild schoonmaakmiddel en vermijd
bijtende chemicaliën.
76. Controleer regelmatig alle verbindingspunten om er zeker van te zijn
dat alle onderdelen veilig zijn geïnstalleerd.
77. Controleer regelmatig alle verbindingspunten om er zeker van te zijn
dat de schroeven goed vastzitten.
BEWAAR DEZE INSTRUCTIES
PARAMETERS
1. Model: T60B
20. Elastische cliphaken: 10 stuks
21. universele wielen waarvan 2 met rem, wieldiameter: 50mm

- 3 -
22. NW: 5,8 kg
PART LIST AND PRODUCT
Item
Beschrijving
Aanta
l
Item
Beschrijving
Aanta
l
A
Basis buis
1 st
G
H andrailbuis
2
stuks
B
Basis hosting
2
stuks
H
Leuning plug
4
stuks
C
Basis vaste
buis
2
stuks
Q
Waterbox _
1 st
D
Rechtopstaand
e buis
4
stuks
N
Versterkte buis
1 st
- 4 -
Installation procedures
1.Fine part E, F
2.Align the screw holes
and secure with screws.
3.Assemble part G and
secure with screws.
4.Assemble part H .
5.Top shelf assembly is
completed
6.Find part A, B, C
7.Insert into the
corresponding hole
8.secure with screws.
9 .Find part D
10.Connect the male and
female threads and
tighten
11. Insert into the tripod
hole and tighten
12. Secure the bottom
with hexagonal screws.
E
Hoofdstraal
1 st
M
Verbinding van
aluminiumlegering
2
stuks
F
M op hanger
2
stuks
K
Accessoirepakket
1set

- 5 -
13. Assemble part N, M
and secure with screws
13. Assemble with top shelf
14. secure with screws,
Assembling is completed
Adres: Baoshanqu Shuangchenglu 803long 11hao 1602A-1609shi
Shanghai
Geïmporteerd naar AUS: SIHAO PTY LTD, 1 ROKEVA
STREETEASTWOOD NSW 2122 Australië
Geïmporteerd naar de VS: Sanven Technology Ltd, Suite 250, 9166
Anaheim Place, Rancho Cucamonga, CA 91730
REP
EC
SHUNSHUN GmbH
Römeräcker 9 Z2021, 76351
Linkenheim-Hochstetten, Germany
REP
UK
Pooledas Group Ltd
Unit 5 Albert Edward House, The
Pavilions Preston, United Kingdom
Gemaakt in China


Teknisk support och e-garanticertifikat
www.vevor.com/support
VERKTYGSSTÄLL FÖR GARAGE
We continue to be committed to provide you tools with competitive price.
"Save Half", "Half Price" or any other similar expressions used by us only represents an
estimate of savings you might benefit from buying certain tools with us compared to the
major top brands and does not necessarily mean to cover all categories of tools offered by
us. You are kindly reminded to verify carefully when you are placing an order with us if you
are actually saving half in comparison with the top major brands.

- 1 -
MODELL: T60B
Have product questions? Need technical support? Please feel free to
contact us:
Technical Support and E-Warranty Certificate
www.vevor.com/support
NEED HELP? CONTACT US!
This is the original instruction, please read all manual instructions
carefully before operating. VEVOR reserves a clear interpretation of our
user manual. The appearance of the product shall be subject to the
product you received. Please forgive us that we won't inform you again if
there are any technology or software updates on our product.
GARAGE TOOL
STORAGE RACK

- 2 -
INSTRUCTIONS
Tack så mycket för att du valde detta förvaringsställ för garageverktyg .
Läs alla instruktioner innan du använder den. Informationen hjälper dig att
uppnå bästa möjliga resultat.
Detta förvaringsställ för garageverktyg förhindrar att verktyg blir rörigt på
golvet och är idealiskt för trädgårdar, skjul och garage. Den har 4 hjul, två
med bromsar, för enkel rörlighet. En plastbricka medföljer för att förhindra
vattenspill och hålla arbetsytan ren.
Säkerhet och underhåll :
78. Installera och använd denna produkt på en stabil yta för att förhindra
lutning.
79. Se till att bromsarna är aktiverade när du använder länkhjulen med
bromsfunktioner.
80. Det rekommenderas inte att använda det i sluttningar, särskilt när det
är lastat, eftersom länkhjulen kan glida.
81. Undvik att klättra eller stå på ställningen.
82. När barn använder den, se till att de är under uppsikt av vuxen.
83. Tunga föremål bör placeras på den nedre hyllan för att undvika att
tyngdpunkten förskjuts.
84. Håll borta från öppen låga och undvik höga temperaturer.
85. Undvik långvarig exponering för solljus för att förhindra plaståldring.
86. Vid rengöring, använd ett milt rengöringsmedel och undvik frätande
kemikalier.
87. Kontrollera regelbundet alla anslutningspunkter för att säkerställa att
alla delar är säkert installerade.
88. Kontrollera regelbundet alla anslutningspunkter för att säkerställa att
skruvarna är åtdragna.
SPARA DESSA INSTRUKTIONER
PARAMETERS
1. Modell: T60B
23. Elastiska klämkrokar: 10 st
24. universalhjul, varav 2 har bromsar, hjuldiameter: 50mm
25. NW: 5,8 kg
- 3 -
PART LIST AND PRODUCT
Artik
el
Beskrivning
Antal
Artik
el
Beskrivning
Antal
A
Basrör
1 st
G
H andragelrör
2 st
B
B ase hosting
2 st
H
Ledstångsplugg
4 st
C
Bas fast rör
2 st
F
Vattenlåda _
1 st
D
Upprättstående
rör
4 st
N
Förstärkt rör
1 st
E
Helljus
1 st
M
Led av
aluminiumlegering
2 st
- 4 -
Installation procedures
1.Fine part E, F
2.Align the screw holes
and secure with screws.
3.Assemble part G and
secure with screws.
4.Assemble part H .
5.Top shelf assembly is
completed
6.Find part A, B, C
7.Insert into the
corresponding hole
8.secure with screws.
9 .Find part D
10.Connect the male and
female threads and
tighten
11. Insert into the tripod
hole and tighten
12. Secure the bottom
with hexagonal screws.
F
M op hängare
2 st
K
Tillbehörspaket
1 set

- 5 -
13. Assemble part N, M
and secure with screws
13. Assemble with top shelf
14. secure with screws,
Assembling is completed
Adress: Baoshanqu Shuangchenglu 803long 11hao 1602A-1609shi
Shanghai
Importerad till AUS: SIHAO PTY LTD, 1 ROKEVA STREETEASTWOOD
NSW 2122 Australien
Importerad till USA: Sanven Technology Ltd, Suite 250, 9166 Anaheim
Place, Rancho Cucamonga, CA 91730
REP
EC
SHUNSHUN GmbH
Römeräcker 9 Z2021, 76351
Linkenheim-Hochstetten, Germany
REP
UK
Pooledas Group Ltd
Unit 5 Albert Edward House, The
Pavilions Preston, United Kingdom
Tillverkad i Kina