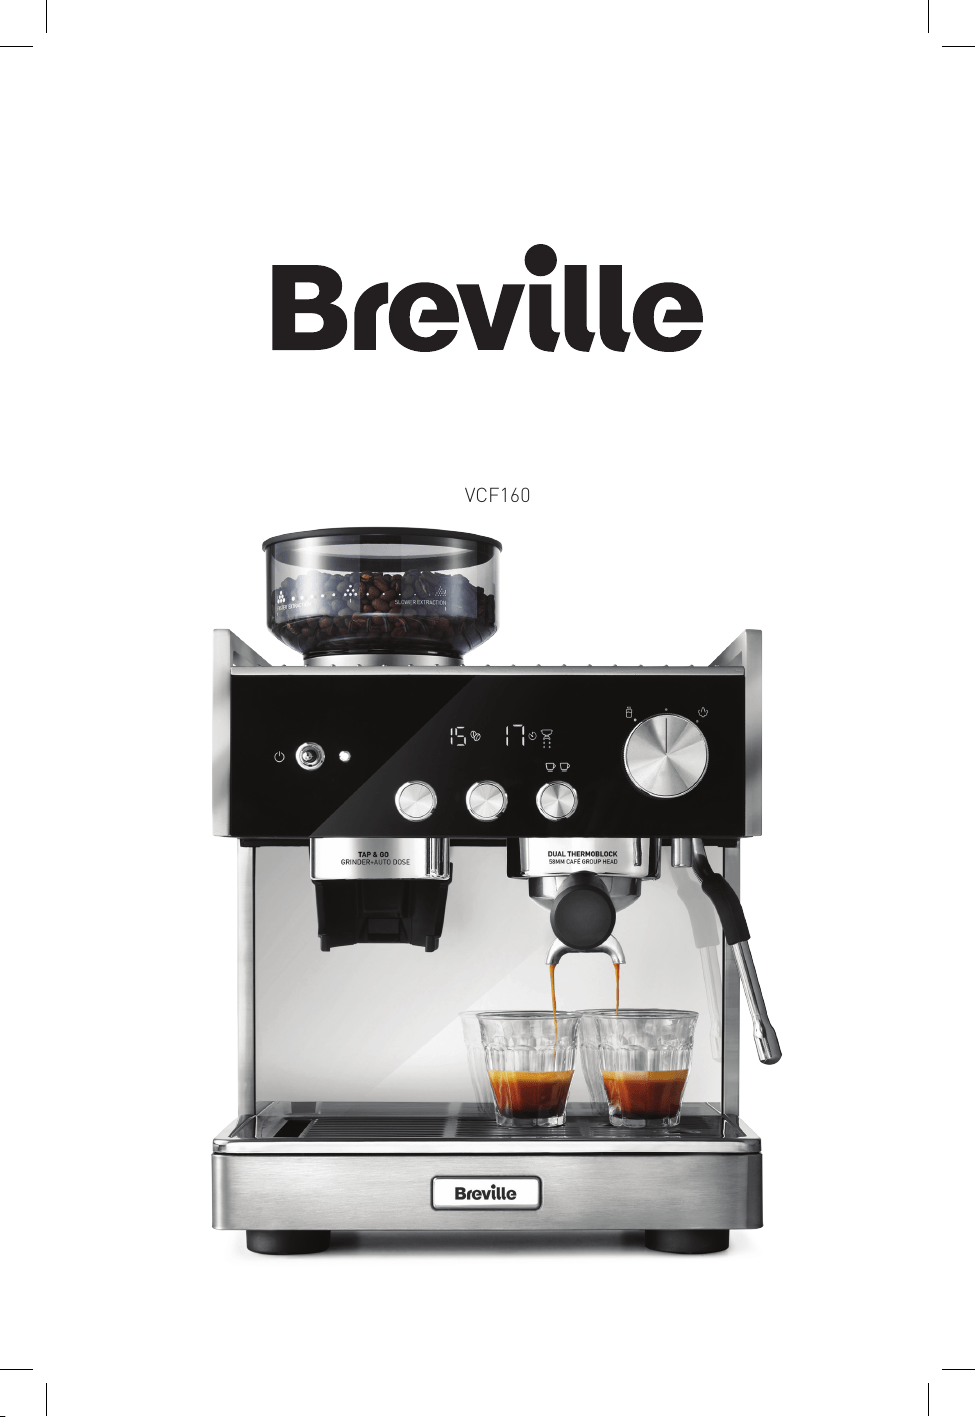
Barista Signature Espresso Maker
User Guide
VCF160
32 4
Contents
Breville’s Safety Precautions
Features of your Barista Signature Espresso Maker
Breville’s Safety Precautions
Breville is very safety conscious when designing and manufacturing
consumer products, but it is essential that the product user also exercise
care when using an electrical appliance. Listed below are precautions
which are essential for the safe use of an electrical appliance
SAFETY PRECAUTIONS FOR YOUR
BREVILLE ESPRESSO MACHINE
• Read carefully and save all the instructions
provided with an appliance.
• Do not remove the Portafilter during the espresso
pour or water flow as the unit is under pressure.
Removing the Portafilter during either of these
operations can lead to a scalding or injury.
• The Steam & Hot Water Wand becomes very hot
during texturing milk and water flow. This may
cause burns in case of contact, therefore avoid
any direct contact with the wand.
• Always disconnect the plug from the power outlet
prior to cleaning the espresso machine or if there
is any problem during the coffee making process.
• Do not place hands directly under the steam,
hot water or espresso pour as this can lead to a
scalding or injury.
• The temperature of accessible surfaces may be
high when the appliance is operating. Even after
use, the heating element surface is subject to
residual heat after use.
• Do not use an appliance for any purpose other
than its intended use. Injury could occur from
misuse.
• CAUTION: To prevent damage to the appliance do
not use alkaline cleaning agents when cleaning,
use a soft cloth and mild detergent.
• Do not immerse the appliance or power cord
and plug in water or any other liquid. Wash the
following 10 parts in warm water with a mild
detergent; milk jug, drip tray grill, one cup and
two cup filter baskets, portafilter, drip tray,
tamper, top burr, bean hopper and water reservoir.
Rinse and dry each part thoroughly before
replacing. Wipe the steam wand with a damp
cloth. See Care & Cleaning section for full details.
• This appliance is intended to be used in
household and similar applications such as: staff
kitchen areas in shops, offices and other working
environments; farm houses; by clients in hotels,
motels and other residential type environments;
bed and breakfast type environments.
• This appliance shall not be used by children.
• Appliances can be used by persons with reduced
physical, sensory or mental capabilities or lack of
experience and knowledge if they have been given
supervision or instruction concerning use of the
appliance in a safe way and if they understand
the hazards involved.
• Cleaning and maintenance shall not be made by
children. Keep the appliance and its cord out of
the reach of children. Children shall not play with
the appliance.
• Always place the unit on a flat, level surface.
• Do not operate without water in reservoir. Fill
reservoir with only clean and cold water. Observe
the maximum filling volume is 2.8 litres.
• Do not allow the Power Cord to come into contact
with the hot parts of the espresso machine,
including the Cup Warming Plate and the Steam
and Hot Water Wand.
• Do not operate this appliance with a damaged
cord or plug or if the appliance has been
damaged in any manner. If the supply cord
is damaged it must be replaced by the
manufacturer, its service agent or similarly
qualified persons in order to avoid a hazard.
• Appliances are not intended to be operated by
means of an external timer or separate remote
control system.
• Always turn the power off at the power outlet
before you insert or remove a plug. Remove by
grasping the plug - do not pull on the cord.
• Turn the power off and remove the plug when the
appliance is not in use and before assembling,
disassembling or cleaning.
• Always use your appliance from a power outlet of
the voltage (A.C. only) marked on the appliance.
• Never leave an appliance unattended while in use.
• Do not use an appliance for any purpose other
than its intended use.
• Do not place an appliance on or near a hot gas
flame, electric element or on a heated oven.
• Do not place on top of any other appliance.
• Do not let the power cord of an appliance hang
over the edge of a table or bench top or touch
any hot surface.
• The coffee-maker shall not be placed in a cabinet
when in use.
• If you have any concerns regarding the
performance and use of your appliance, please
visit the Breville Website or contact Breville
Consumer Care - details are on the back
page. Ensure the above safety precautions are
understood.
• Do not use any accessory not recommended by
the manufacturer as this may result in injury or
damage to the appliance.
2 - 3 Breville’s safety precautions
4 - 9 Features of your Barista Signature Espresso Maker
10 Before first use
11 - 12 Quick coffee making guide
13 Espresso Extraction guide
14 - 19 Troubleshooting guide
20 Tips for grinding, tamping & brewing
21 Tips for brewing
22 - 24
Tips for milk texturing
22 - 29
Fine tuning your espresso
30 - 33 Care and cleaning – espresso machine
34 - 36 Care and cleaning – grinder
37 - 39 Descaling cycle – espresso machine
40 Accessories available for purchase
41 Additional Info
42 - 43 Notes
65 7
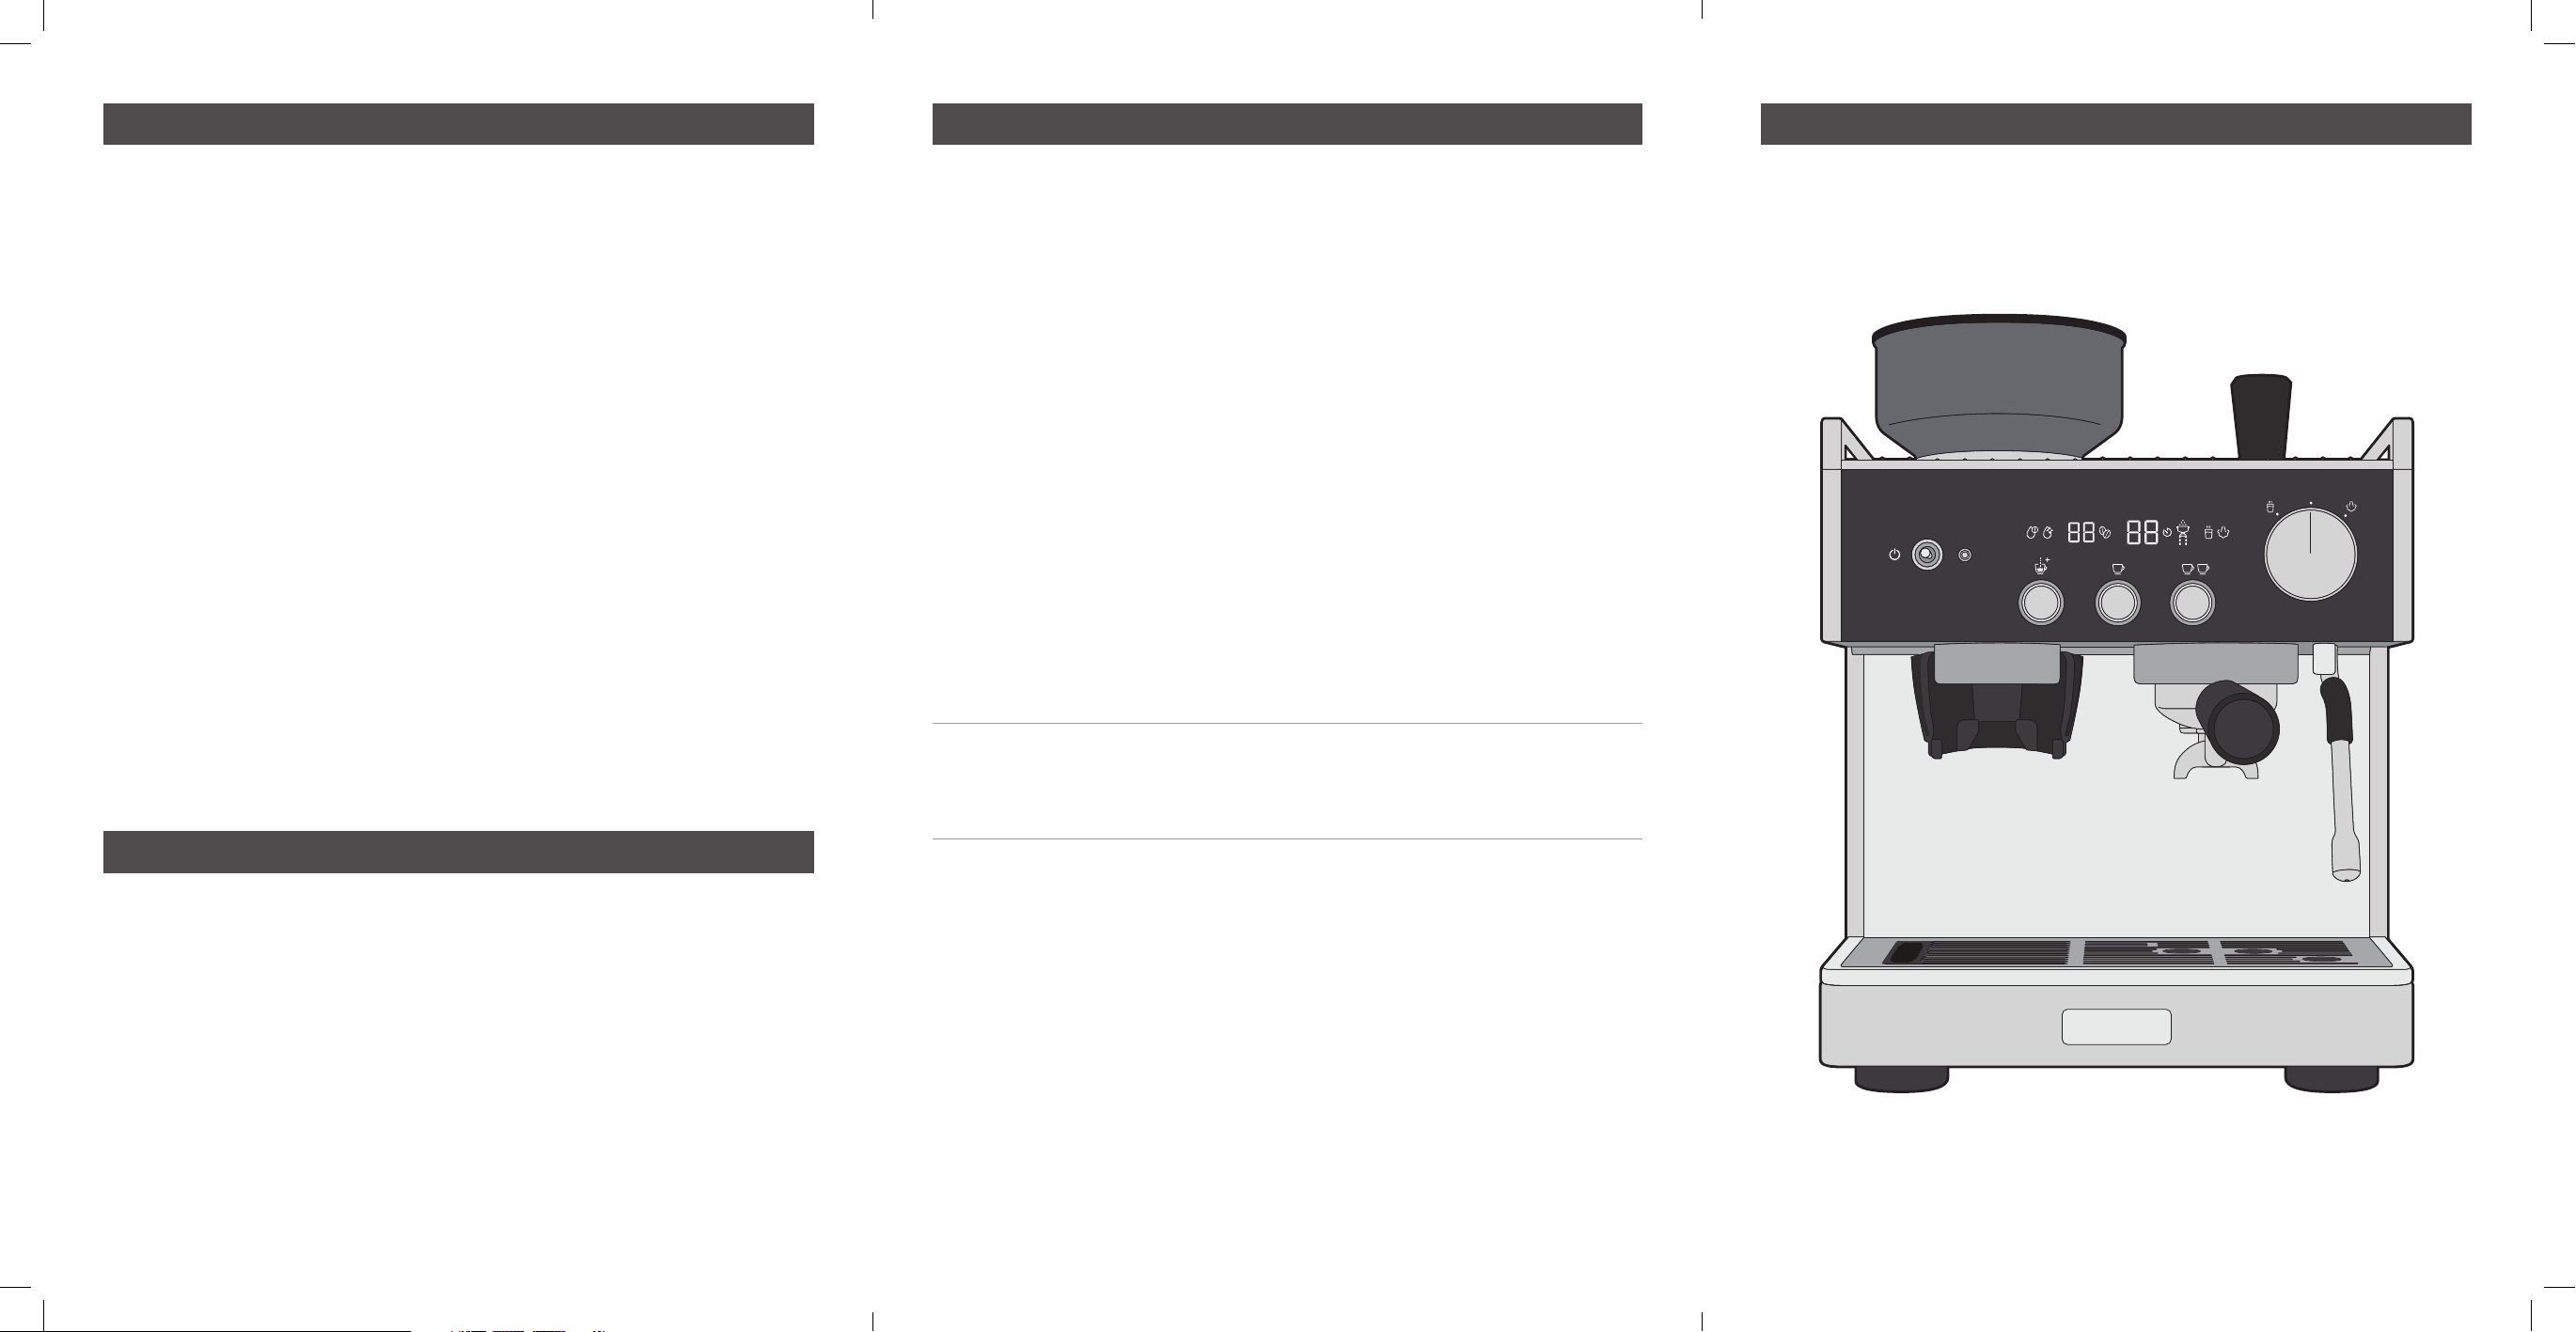
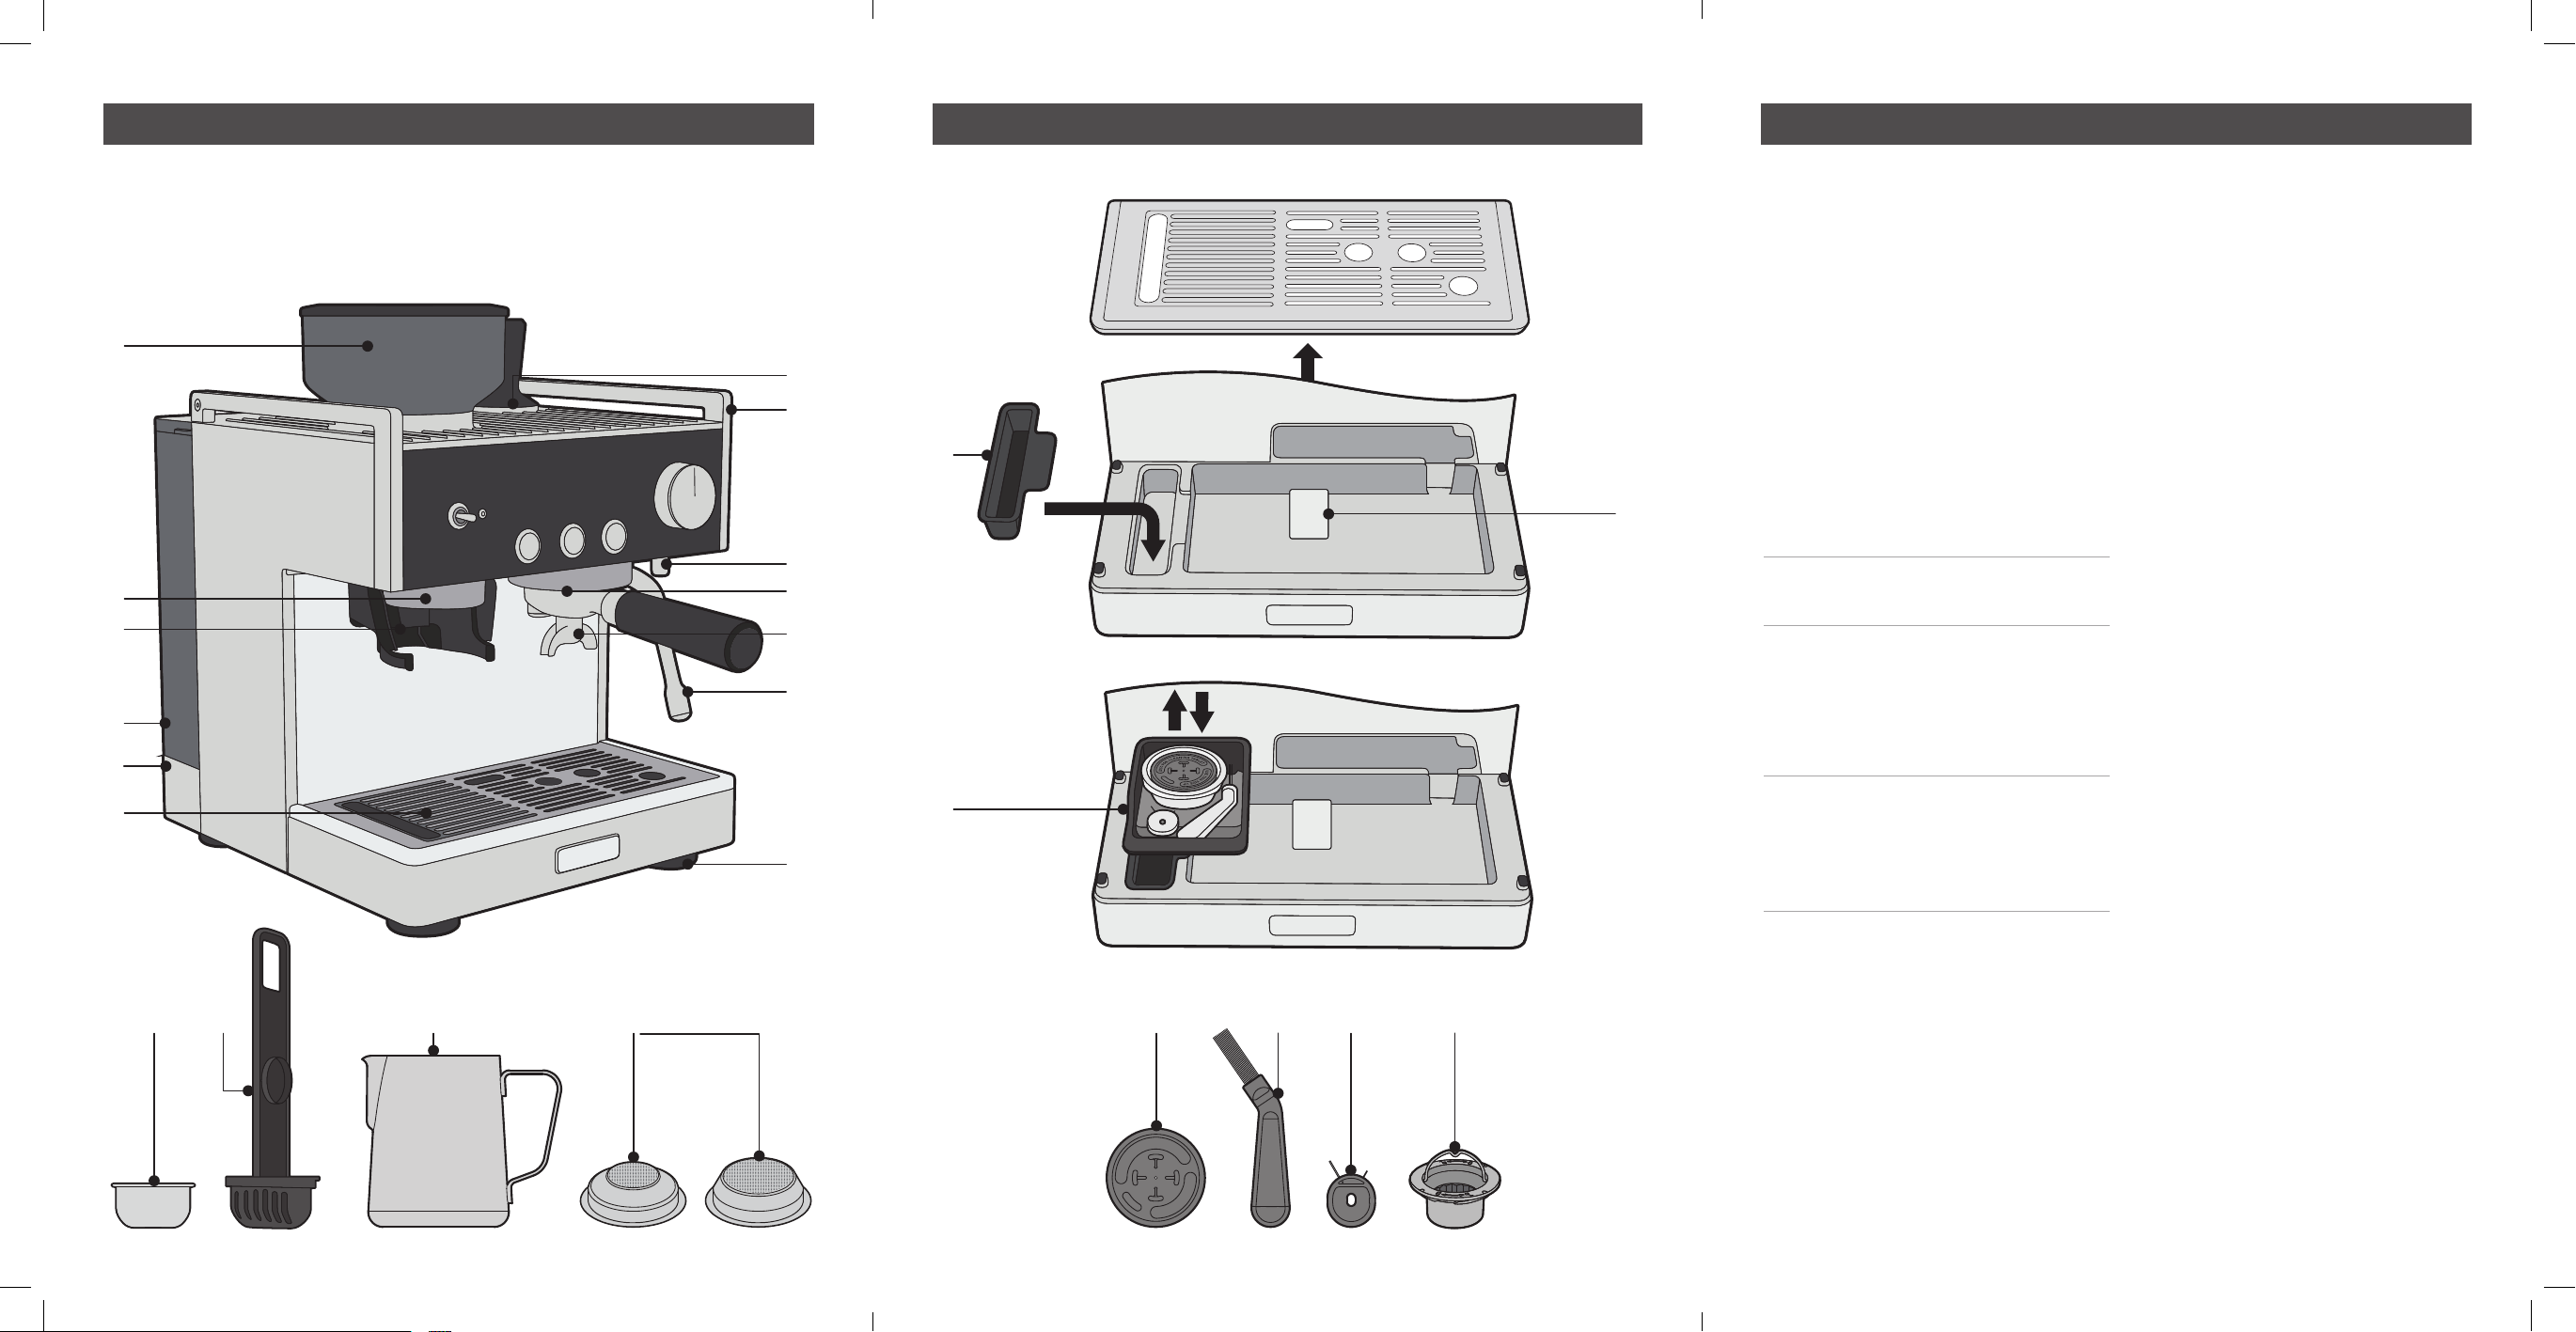
Features of your Barista Signature Espresso Maker Features of your Barista Signature Espresso Maker Features of your Barista Signature Espresso Maker
A. Removable Bean Hopper
B. Illuminated Grind Area
C. Tap & Go™ Grinds Cradle
D. Removable 2.8L Water Reservoir
E. Cord Storage
F. Removable Drip Tray,
Grill & Grind Bin
G. Warming Plate with Tamper Home
H. Cast Aluminium Top Bar
Note: This is not a handle and should
not be used to lift or to move the unit
I. Hot Water Tap
J. 58mm Commercial Size Group Head
K. 58mm Commercial Size Portafilter
Important: When not being used,
we recommend not to leave the
Portafilter inserted into the Group
Head, as this will reduce the life
of the Silicone Se
al.
L. Steam Wand
M. Non-slip Feet
N. Removable Grinds Bin
O. Accessories Storage Tray
P. Drip Tray ‘full’ indicator
Q. Water Filter Cartridge
R. Filter Holder
S. Milk Jug
T. Filter baskets
U. Silicon cleaning disc
V. Cleaning brush (fitted inside
Accessory Storage Tray (O))
W. Cleaning Pin (fitted inside
Accessory Storage Tray (O))
X. Removable Top Burr
D
I
S
C
F
O
R
C
L
E
A
N
I
N
G
T
A
B
L
E
T
U
S
E
T
H
I
S
S
I
D
E
U
P
D
I
S
C
F
O
R
C
L
E
A
N
I
N
G
T
A
B
L
E
T
U
S
E
T
H
I
S
S
I
D
E
U
P
D
I
S
C
F
O
R
C
L
E
A
N
I
N
G
T
A
B
L
E
T
U
S
E
T
H
I
S
S
I
D
E
U
P
D
I
S
C
F
O
R
C
L
E
A
N
I
N
G
T
A
B
L
E
T
U
S
E
T
H
I
S
S
I
D
E
U
P
Q SR T U W XV
A
B
C
I
G
H
P
J
K
L
M
O
N
F
D
E
8 9
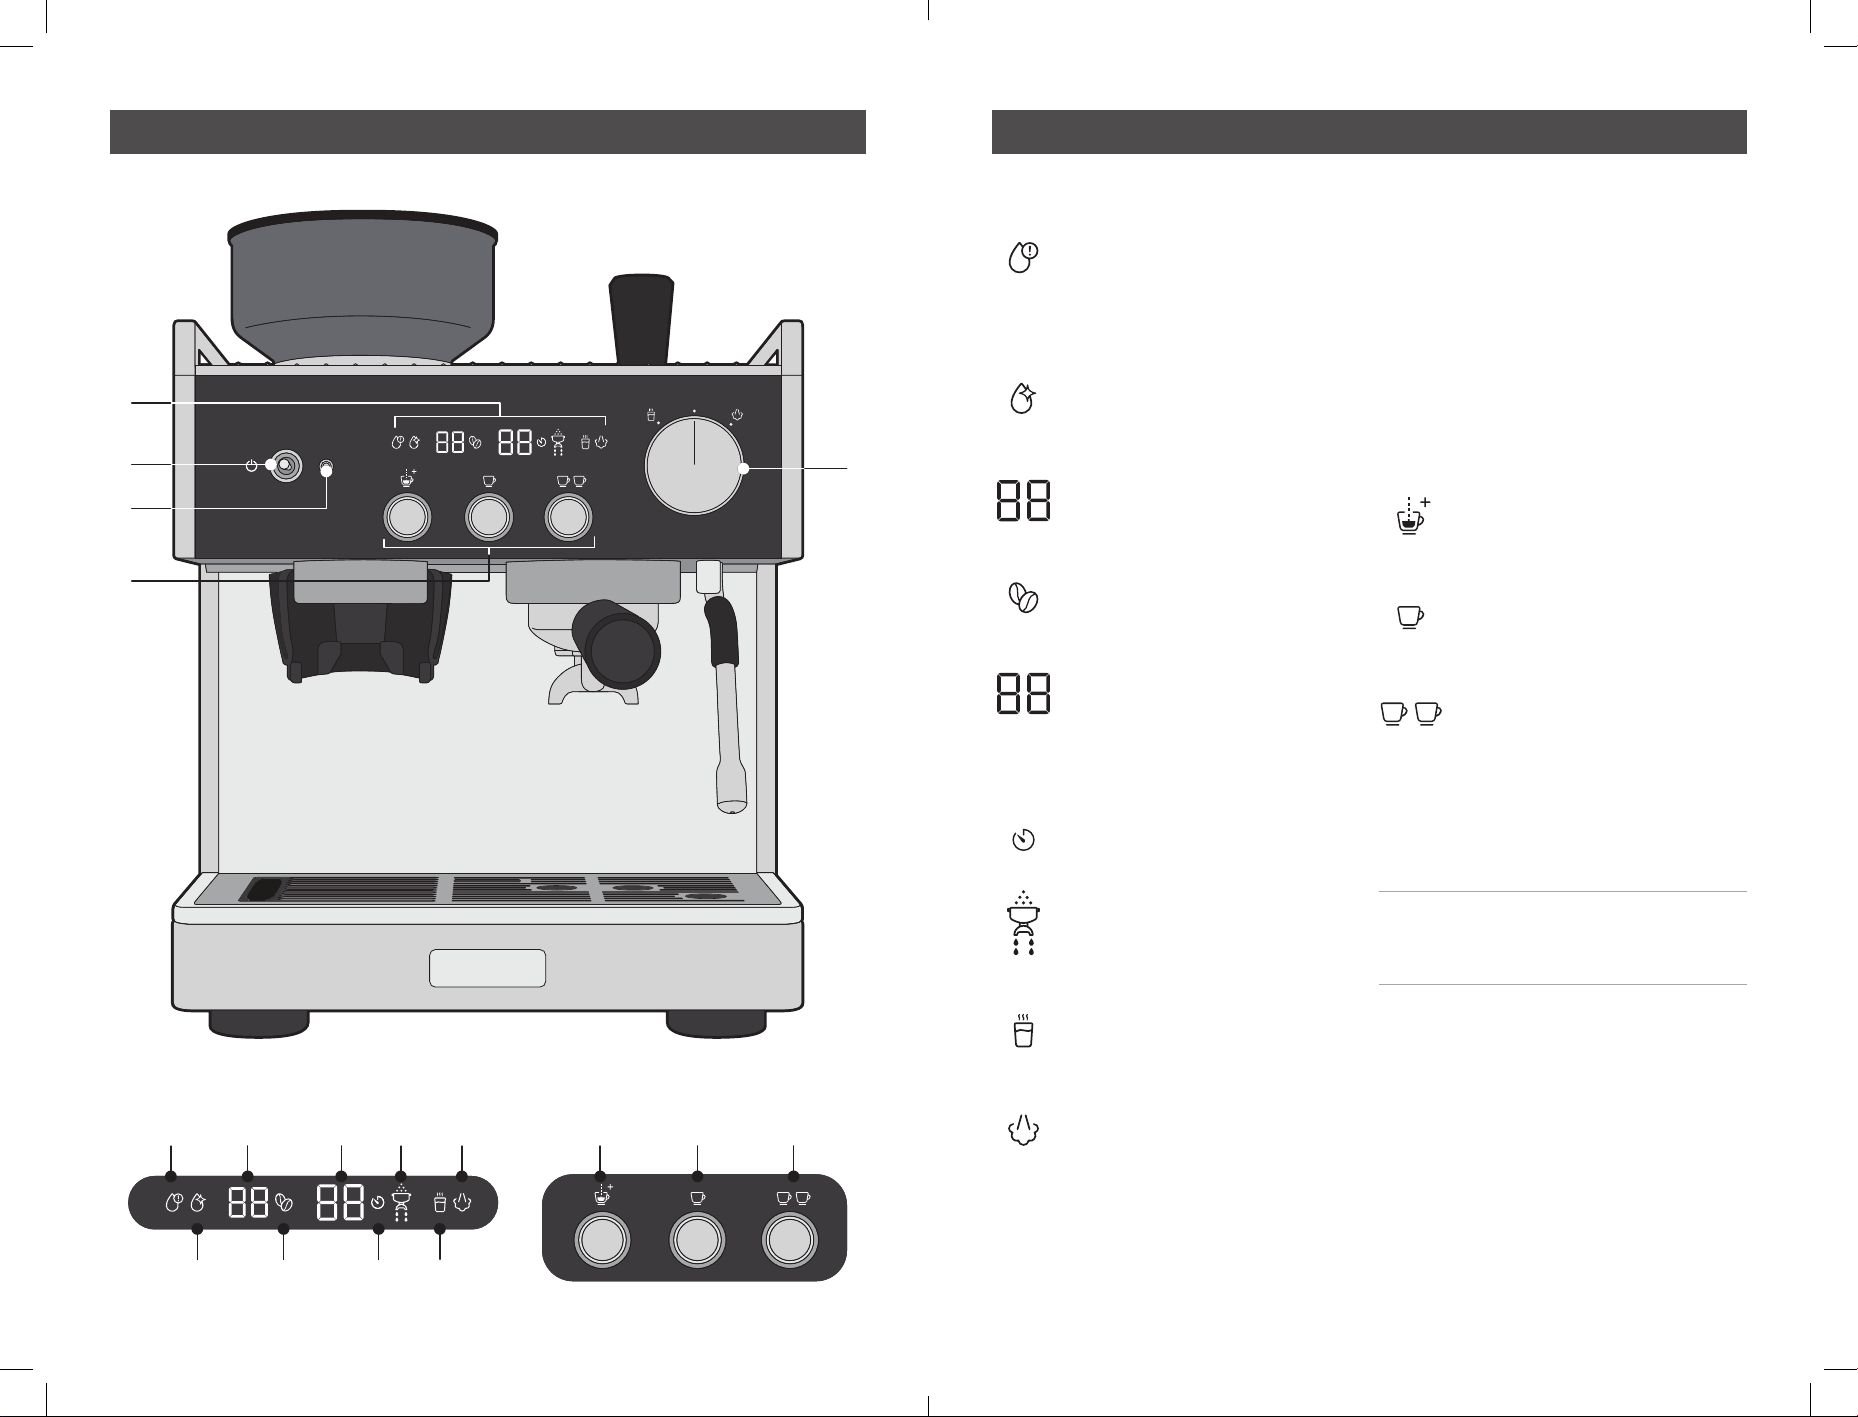
Features of your Barista Signature Espresso Maker Features of your Barista Signature Espresso Maker
1. LED Display
(Icons displayed left to right).
1A. Low Water Alert
Illuminates when the water in
the reservoir needs topping up
and flashes when the unit has
run out of water.
1B. Clean Icon
Illuminates when the cleaning
cycle needs to be performed.
1C. Grind Setting Position
Indicates the grind size selected
when rotating the bean hopper.
1D. Grind Icon
Illuminates whenever the bean
hopper is installed.
1E. Extraction Timer
Counts in one second intervals
whilst your espresso is brewing
to allow timing of the perfect
espresso.
1F. Timer Icon
Illuminates during extraction.
1G. Portafilter Icon
Illuminates to show the unit is
performing grind or brewing
functions.
1H. Hot Water Icon
Illuminates when Hot Water
is being dispensed.
1I. Steam Icon
Illuminates when steam
is being dispensed.
2. Power on Toggle Switch
Push down to turn espresso
machine on and off.
3. Power on Indicator
Illuminates whenever the unit
is turned on, illumination will
pulse during heat-up.
4. Espresso Extraction Buttons
Indicator lights will brighten
when chosen button is pressed,
and the other lights will go out.
4A. Manual Shot Button
Press to start and stop the
manual dose of your espresso
.
4B. ONE CUP Button
Press for a perfectly dosed
single espresso shot.
4C. TWO CUP Button
Press for a perfectly dosed
double espresso shot.
5. Hot Water and Steam Selection Dial
Rotate to select the appropriate
function.
Note: You can steam at the same
time as brewing an espresso,
but not dispense hot water.
1
4
2
3
5
4A 4B 4C1A
1B 1D 1F 1H
1C 1E 1G 1I
10 11
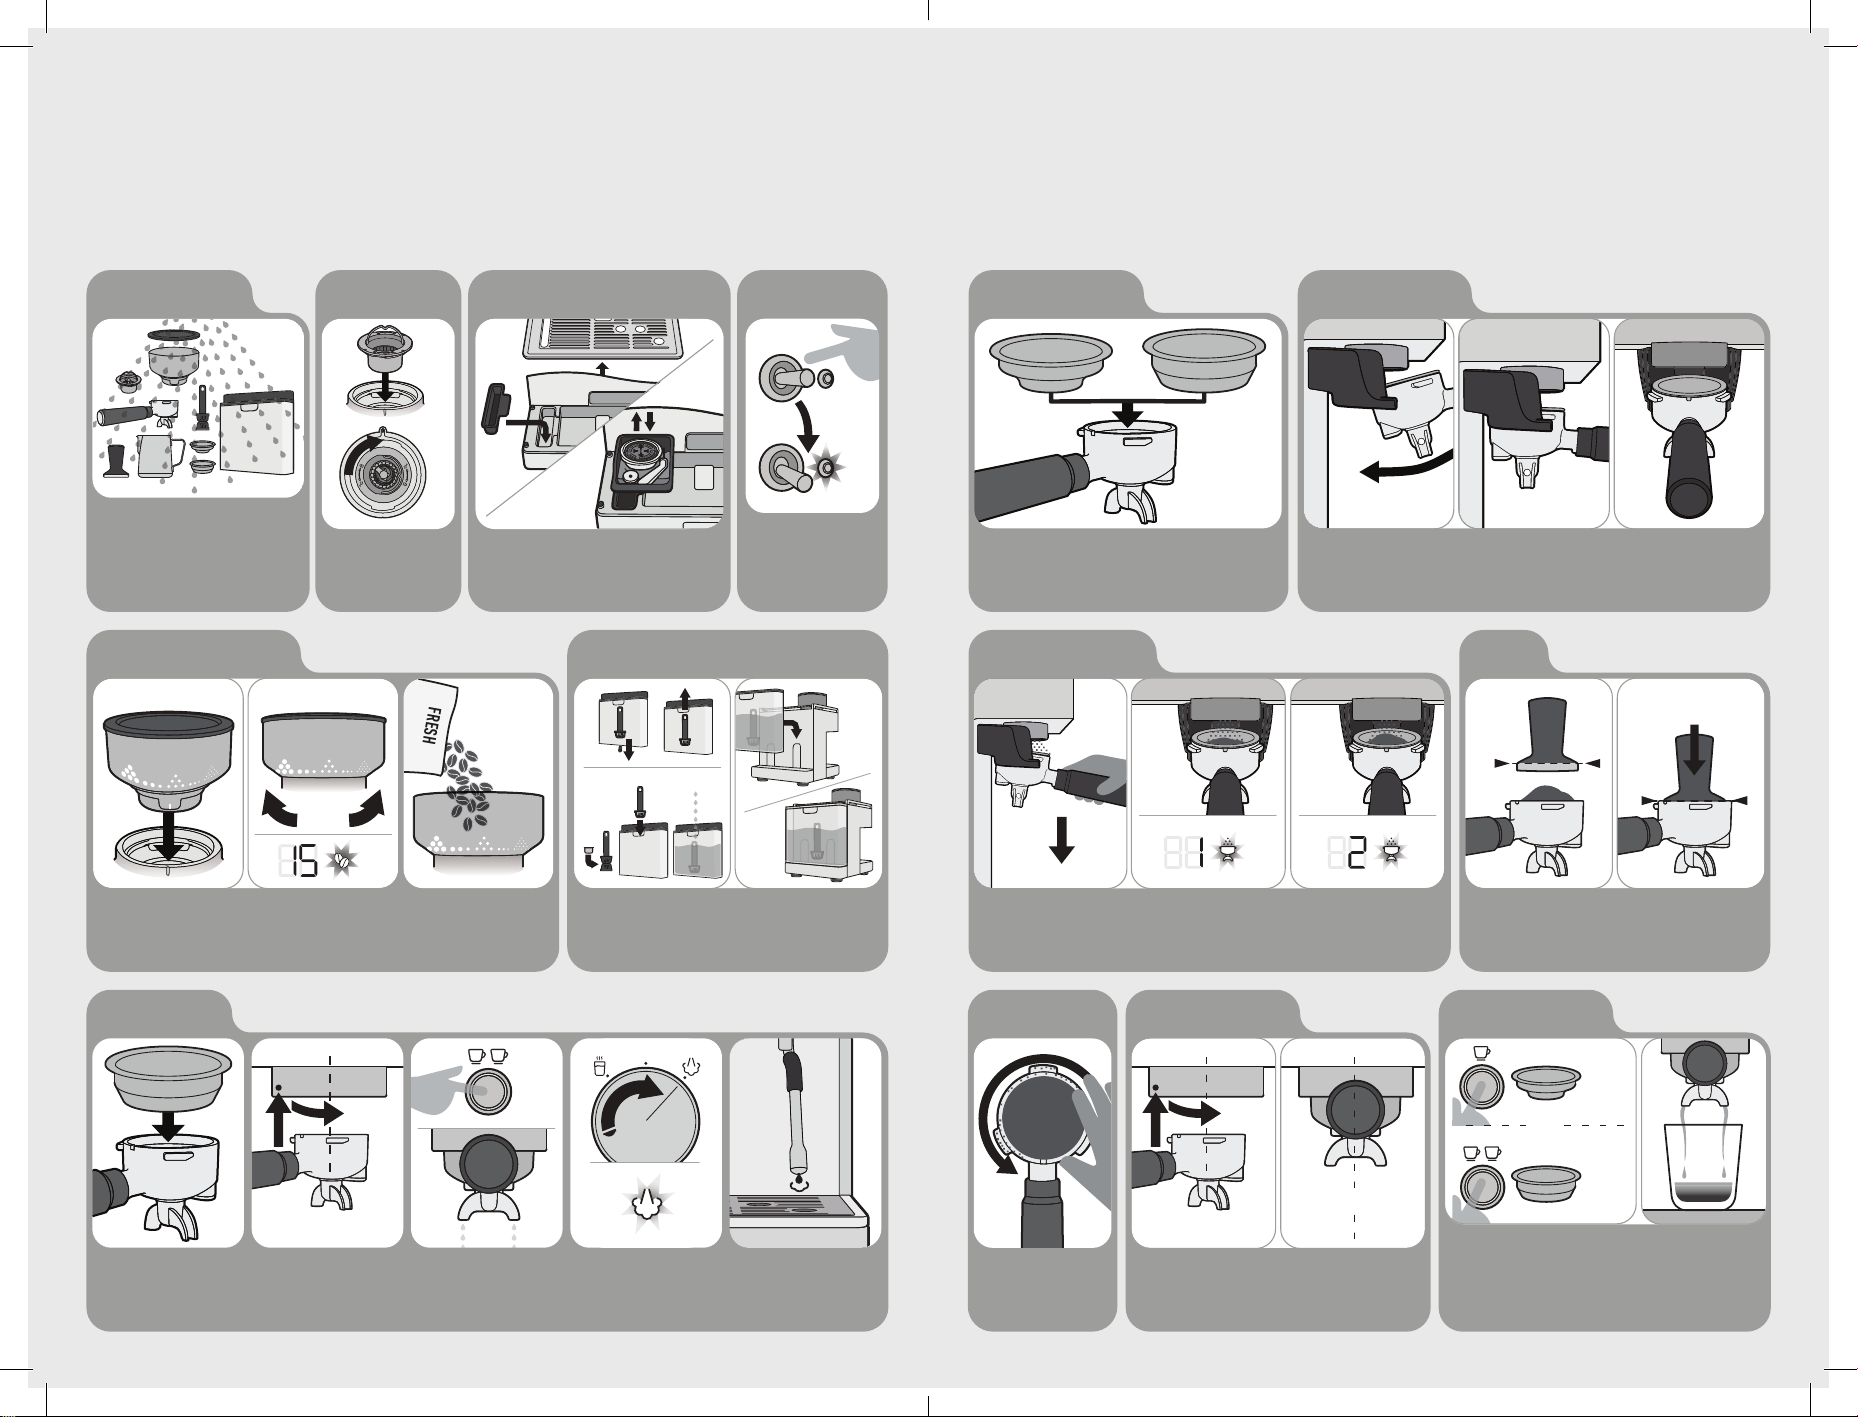
Before First Use
1. Wash & Dry Parts
5. Insert & Set Bean Hopper
Wash the Milk Jug, Filter Baskets, Portafilter,
Bean Hopper, Top Burr, Tamper and Water
Reservoir in warm water with a mild detergent.
Rinse and allow thorough air drying.
Note: For further Grind Setting adjustment see Extraction Guide.
Insert & turn Hopper to set Grind Setting.
As a starting point try Grind Setting 15.
Remove the red plug at the bottom of the water reservoir and safely
discard. Place the charcoal filter into the holder and insert it into the
reservoir. Fill reservoir with water and install.
Fill with roasted coffee beans.
6. Remove Red Plug, and set up Water Reservoir
GRIND
SETTING
7. Prime Machine
Insert Two Cup Filter Basket
into Portafilter.
Insert Portafilter into
Group Head, turn to centre.
Note: Turning Portafilter might be tight for first few uses.
Press TWO CUP BUTTON.
Allow water to run through
until it stops.
Turn DIAL to STEAM
and run for 20 sec.
TWO CUP
INSERT
2. TURN
1. ALIGN & INSERT
FRESH
1. ALIGN & INSERT 2. TURN TO SET
3. Drip Tray & Accessories Storage Tray2. Insert Top Burr
Use the handle to
insert Top Burr, rotating
clockwise to lock.
Assembly of drip tray and accessory
tray into position.
Use below information to help with the first time set up.
4. Start Up
Plug in at socket. Flick power
switch downwards, the switch
will return to centre. Indicator
light will pulse during heat up.
2. Insert Portafilter
SLIDE IN
FROM ABOVE
Quick Coee Making Guide
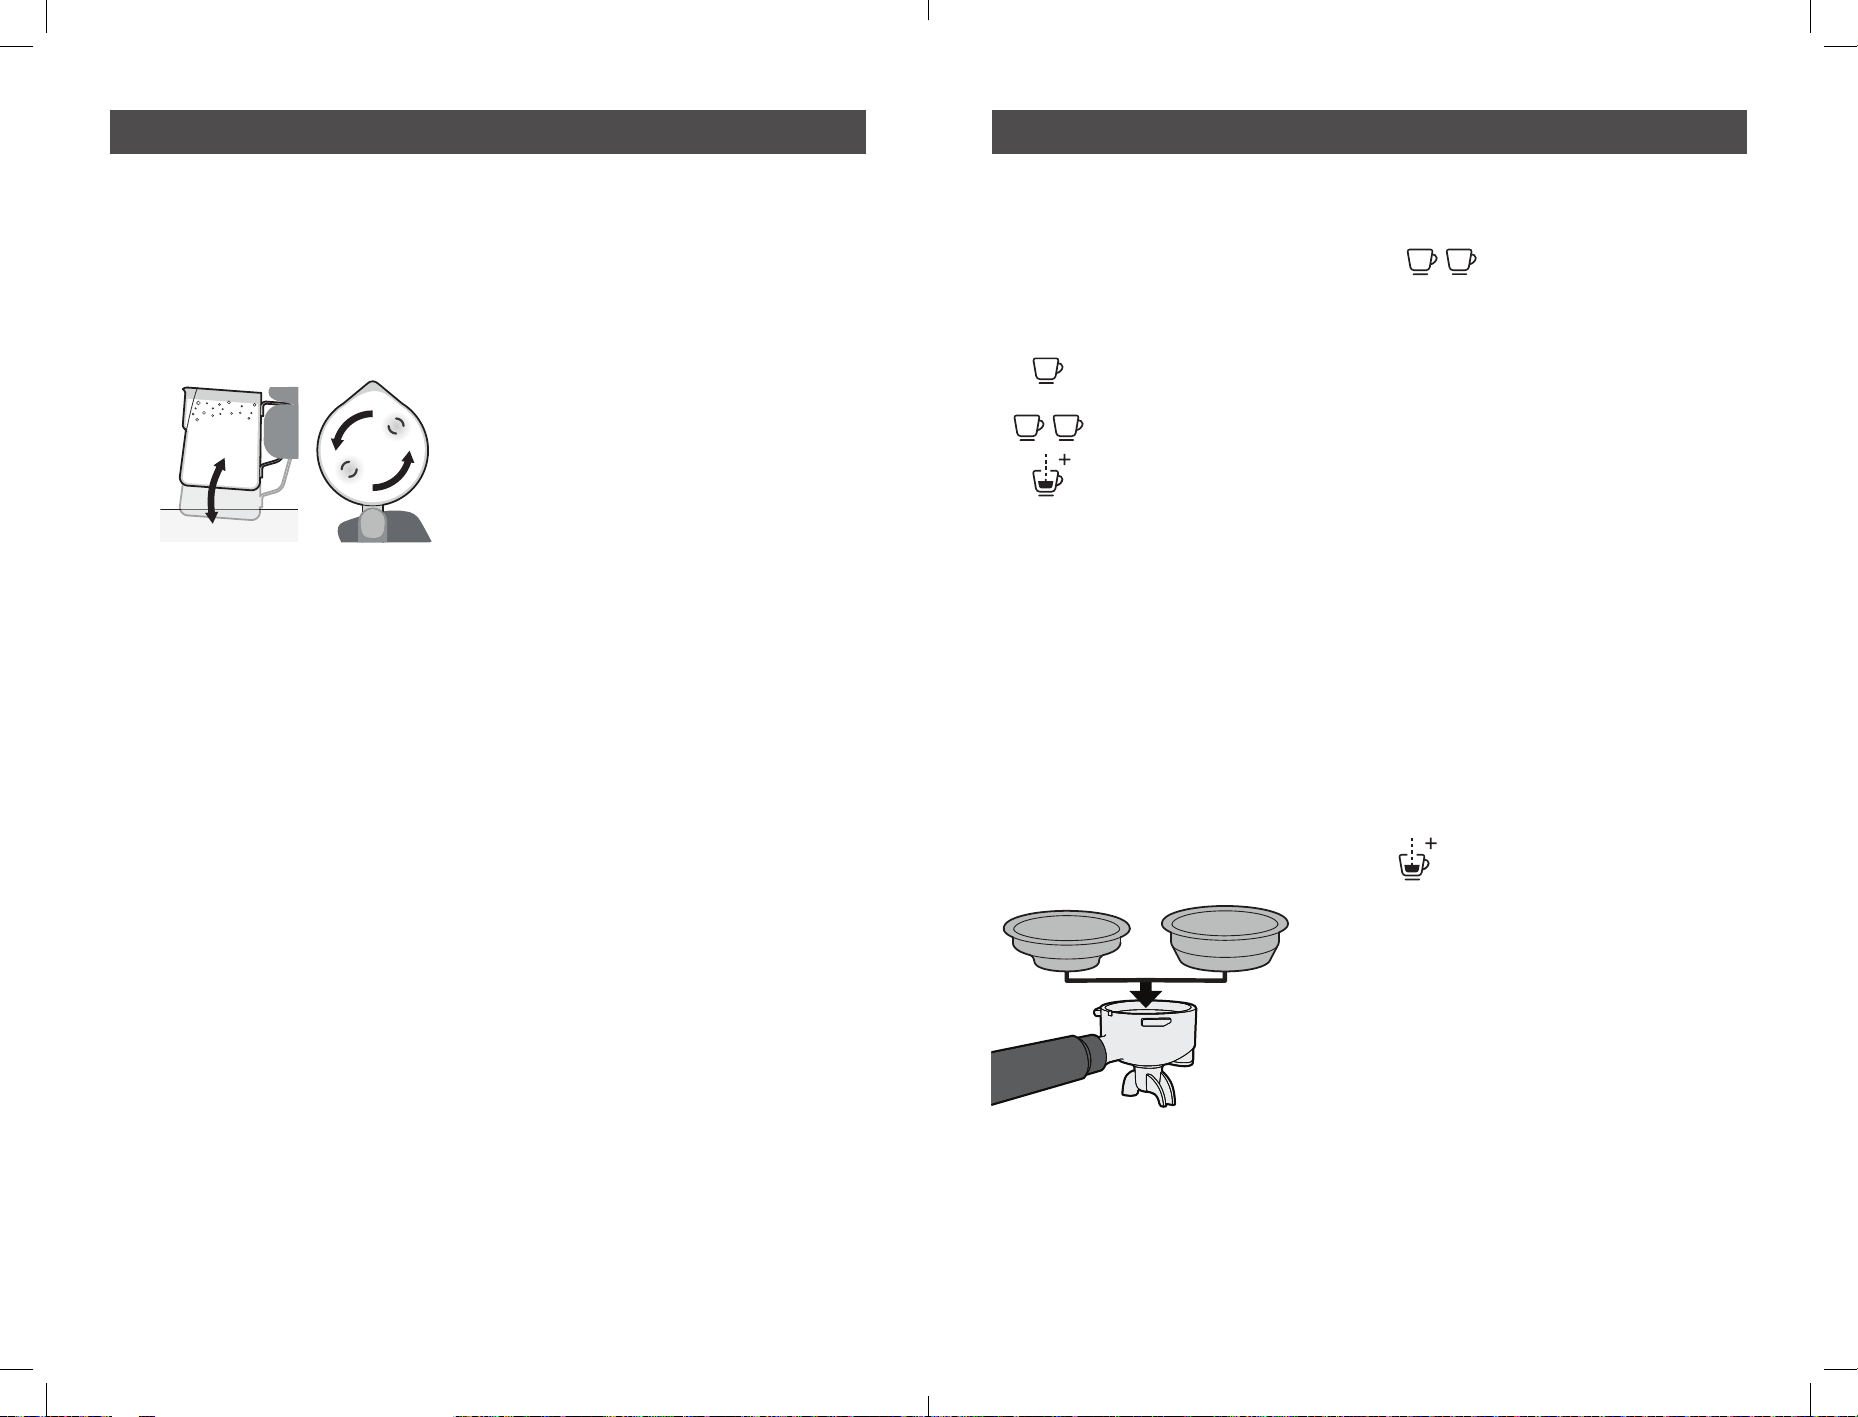
1. Select Filter Basket
3. Activating the Grinder
Select either:
- 1 Cup (Single Shot) Filter Basket
- 2 Cup (Double Shot) Filter Basket
Tap twice downwards on the Portafilter to select a double shot, or tap once for a single shot (tap again to
cancel). The grinder will start automatically and stop once the correct amount
of grounds have been dispensed. To manually dispense grounds push downwards and hold.
Insert Portafilter
into Grinding Cradle.
5. Wipe Edge
Wipe away any excess
coffee grounds to
clear edges.
Portafilter will sit flat, unsupported, in the Grinding Cradle.
4. Tamp
One cup target is 13g of coffee grounds
Two cup target is 19.5g of coffee grounds
Evenly tamp (press) grinds to level indicated.
TAMP FORCE
10-15KG
OR
ONE CUP
TWO CUP
OR
ONE CUP
TWO CUP
= 60mL
= 30mL
INSERT
2. TURN
1. ALIGN & INSERT
CENTRE
7. Espresso Extraction
6. Insert Portafilter
Press either: One Cup Button or
Two Cup Button. Pressing the button
a second time will stop dispense.
Press the manual button for
continuous water dispense.
Extraction
begins and will
automatically stop.
Keep Portafilter flat, align, insert
& turn handle to the right.
Portafilter should be
in the centre position.
PUSH
DOWN
1X
PUSH
SINGLE
SHOT
2X
PUSH
DOUBLE
SHOT
Use below guide to help you make your first cup of coffee.
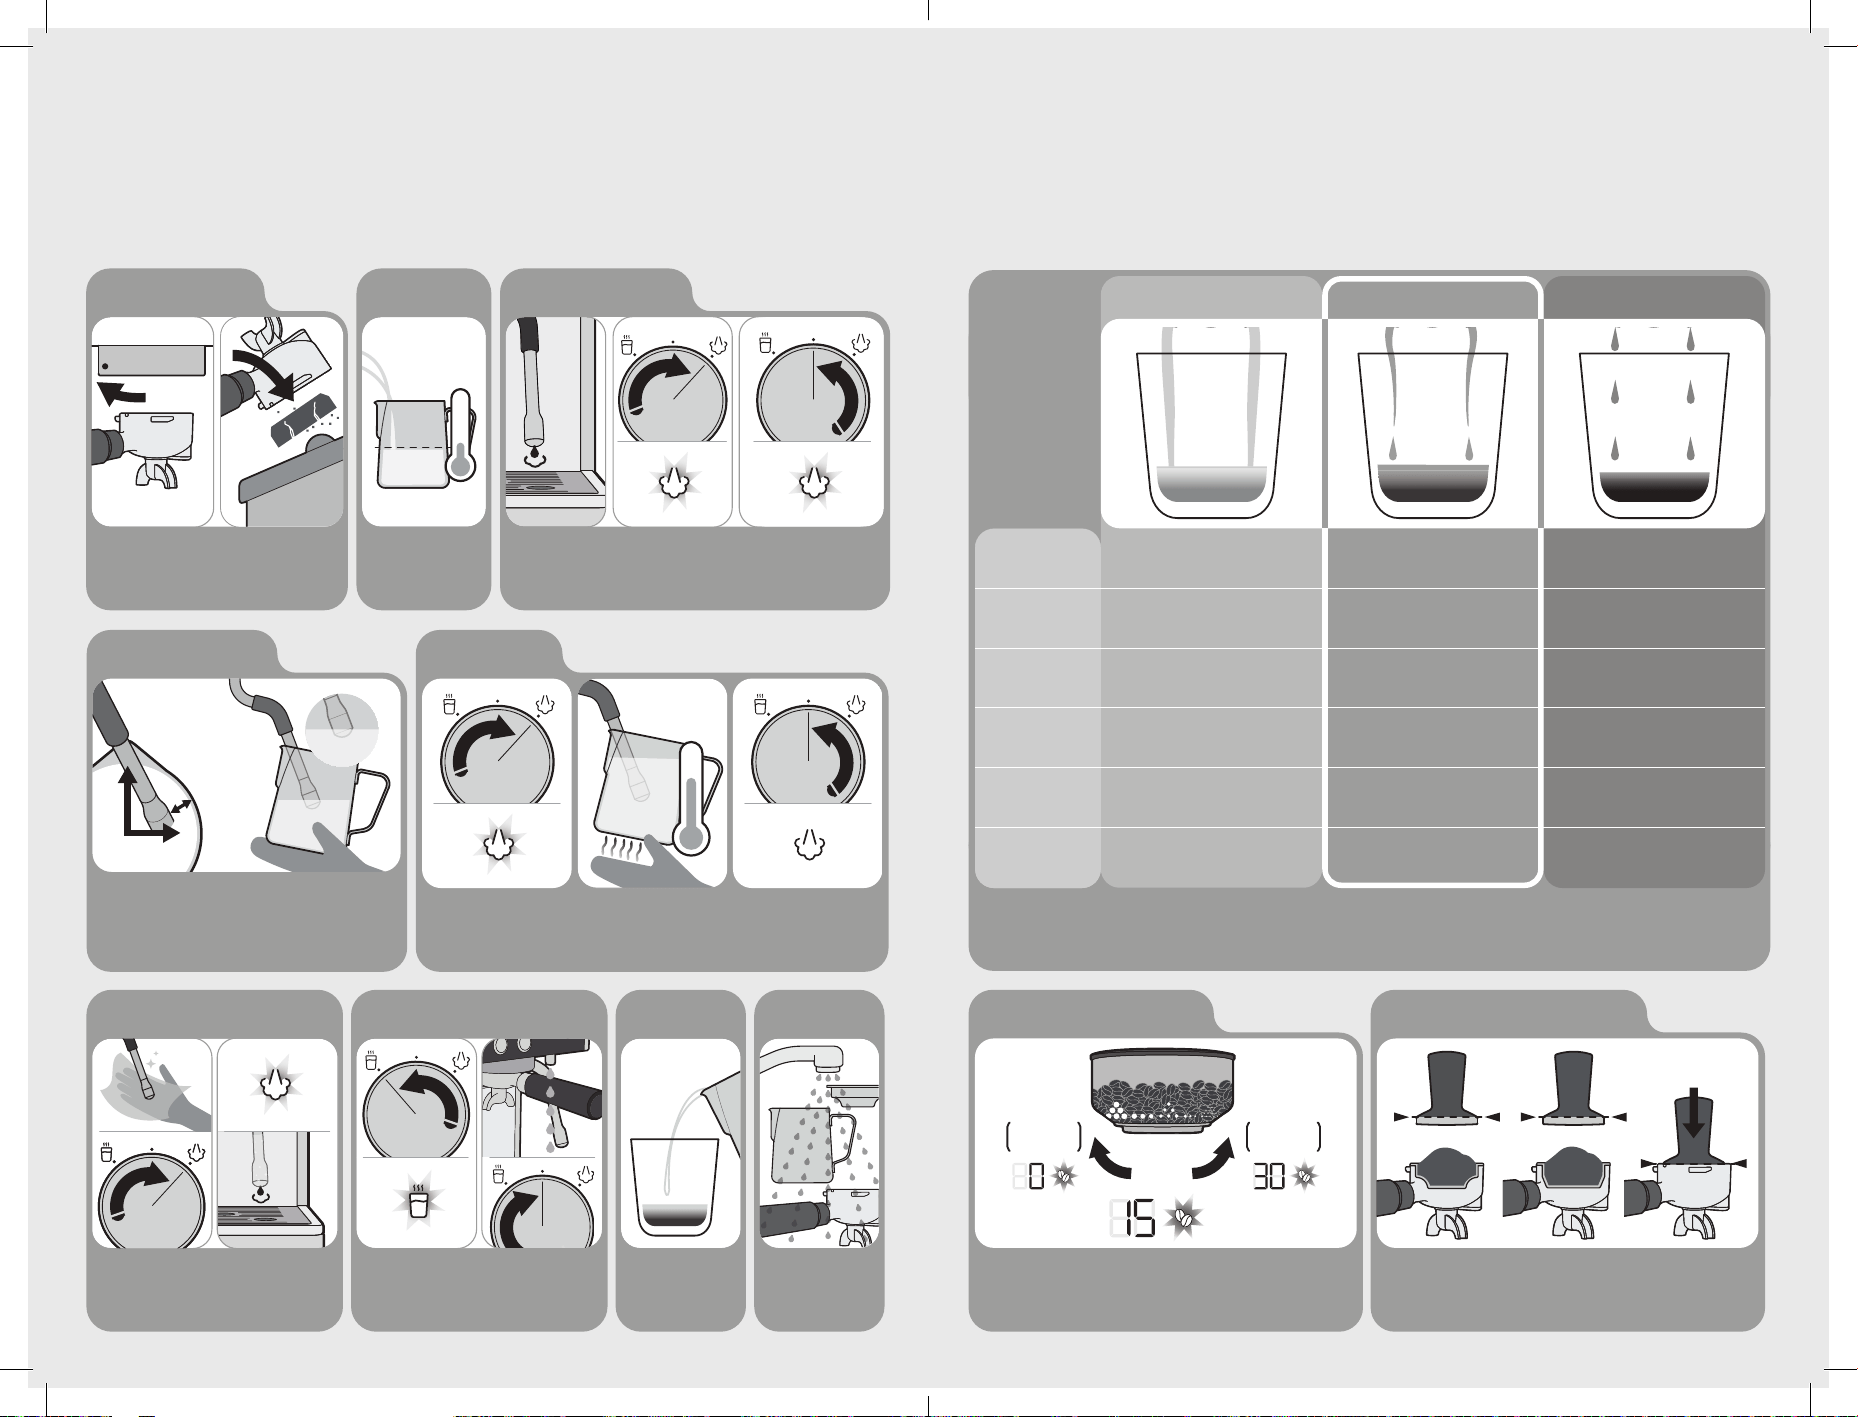
12 13
60-65°C
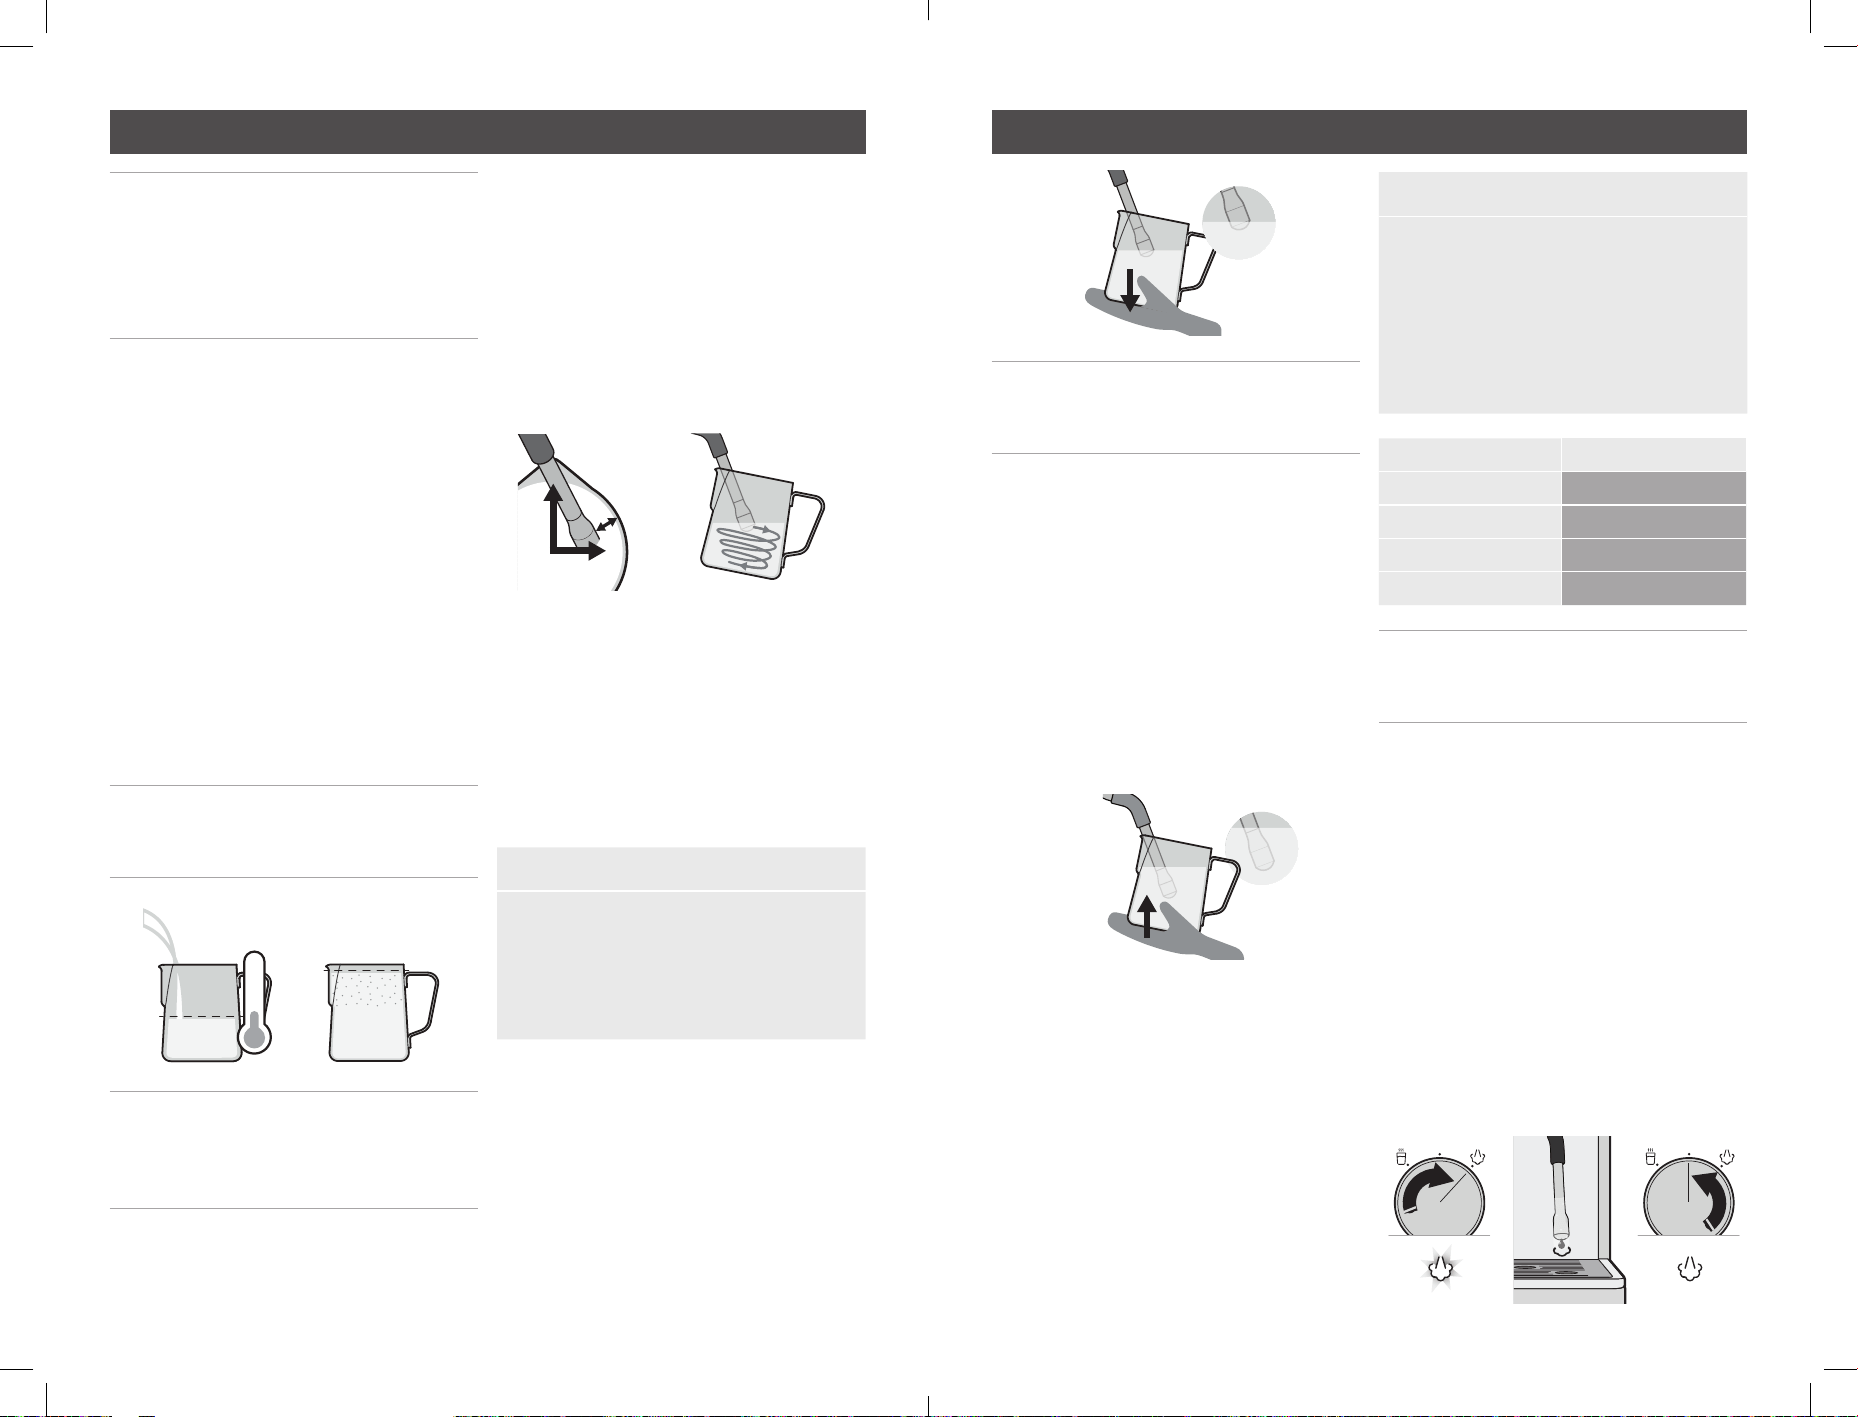
Insert Steam Wand Arm at the 12 o'clock position, resting the
arm in the spout of the Milk Jug. The Steam Wand Tip should sit at
3 o'clock position, a finger width distance from the edge of the Milk
Jug. The Steam Wand Tip should sit just below the surface
of the milk.
The milk is ready when
Milk Jug base is too hot
to touch for 3 secs.
Return DIAL to vertical
position.
11. Position Steam Wand 12. Milk Texturing
FINGER
WIDTH
12
3
Wipe Steam Wand & Tip with a damp cloth.
Turn dial to STEAM for 1-2secs.
Return DIAL to vertical position.
Turn dial to HOT WATER, water will be dispensed from
the hot water tap. Return DIAL to vertical to stop
dispense.
Pour milk in one steady
motion.
Wash parts with warm
water.
13. Purge & Clean Steam Wand Optional: Add Hot Water if required 15. Pour Milk 16. Clean Up
9. Prep Milk Jug 10. Before Texturing Milk
Fill Milk Jug with cold milk
just below the bottom of
the spout.
Turn Portafilter and
remove from Group
Head.
Remove spent (used)
coffee cake from
Portafilter.
8. Remove Coee Cake
BANG
FILL
MAX
4°C
Quick Coee Making Guide
Note: Dual Thermoblock Heating System means you can pour espresso at the same time as steaming milk.
Turn dial to steam, the
icon will illuminate, and
steam will dispense
immediately.
Return DIAL to vertical position
to stop steam. the unit is always
ready to produce steam due to the
dual thermoblock heating system.
Ensure the wand
is pointing down as
a small amount of
water may come out.
When you are in position, turn
DIAL back to STEAM position to
start texturing milk.
Espresso Extraction Guide
S
INSERT
THERMOBLOCK
58MM CAFÉ GROUP HEAD
S
INSERT
THERMOBLOCK
58MM CAFÉ GROUP HEAD
S
INSERT
THERMOBLOCK
58MM CAFÉ GROUP HEAD
^ Ensure coffee beans are fresh.
^^ Old coffee beans no matter the Grind Setting will have a fast extraction and will
produce an under extracted tasting espresso.
New Burrs are bedding in during the first few uses. The Grind
Setting may require incremental adjustments before you reach
your optimum espresso extraction.
It is normal for the correct dose of coffee grinds to appear overfilled in the Filter
Basket before tamping. Evenly tamp (press) coffee grinds to the level indicated.
Under Extraction
Pour^
Colour
Taste
Grind Size^^
Dosage
Tamp
Extraction too fast
Pours for under 15 sec
Pale brown
Crema-light brown
Sour, acidic, watery
Too coarse
Use a finer grind
Not enough grinds
Use more grinds
Not enough tamp force
Tamp firmer
Steady-flow extraction
Pours for 20-30 sec
Rich caramel
Crema-dark golden
Rich, sweet, vibrant
Just right
One cup = target 13g
Two cup = target 19.5g
Just right-firm force
10-15Kg of force
Extraction too slow
Pours for over 35 sec
Very dark brown
Crema-dark brown
Bitter, dry, grainy
Too fine
Use a coarser grind
Too many grinds
Use less grinds
Too much tamp force
Tamp lighter
Optimum Extraction Over Extraction
Adjust Grind to Improve Extraction Consistent Grind Dosage & Tamp Force
TWO CUP
19.5g
ONE CUP
13g
TAMP FORCE
10-15KG
This guide will help to improve espresso extraction, to achieve grat tasting coffee, every time.
GRIND
SETTING
TURN
CLOCKWISE
FOR
FINER GRIND
SLOWER
EXTRACTION
TURN
ANTI-CLOCKWISE
FOR
COASER GRIND
FASTER
EXTRACTION
14 15
Troubleshooting guide Troubleshooting guide
PROBLEM Possible cause What to do
Portafilter is
tight to turn
in the Group
Head
The Group Head Silicone Seal is
new and needs bedding in.
Keep using. This Seal will bed in during
the first few uses and become easier
to turn.
Too many coffee grinds used. Fill with less coffee grinds.
Portafilter
is loose
or comes
off during
espresso
extraction
Portafilter is not attached correctly
or has not been tightened
sufficiently.
Ensure all three tabs of the Portafilter
are fully inserted into the Group Head
and rotated to the centre position.
No Filter Basket inserted in the
Portafilter.
Ensure a Filter Basket is inserted
into the Portafilter before using in the
Group Head.
Espresso
squirts or
trickles down
the side of
the Group
Head during
extraction
Coffee grind is too fine and is
stopping the flow of water through
the grounds.
Change grinder to a coarser Grind
Setting.
Too many coffee grinds used. Fill with less coffee grinds.
Coffee grinds tamped too hard. Apply less force during tamping.
Top edge of Filter Basket has not
been cleaned of loose coffee grinds.
Wipe around top edge of the Filter
Basket before inserting into Group Head.
See Coffee Making Guide.
Group Head inside rim, Silicon Seal
or Shower Head is dirty.
Clean the parts with the Cleaning Brush
and damp cloth.
Group Head Silicone Seal is damaged
or worn.
Contact Breville Customer Care.
Espresso
is too cold
Coffee beans being stored in the
fridge or freezer.
Store coffee beans in a dry, airtight
container. Place in a cool dark cupboard.
Custom extraction temperature being
used.
Use the default 92°C extraction
temperature. See Customisable -
Extraction Temperature.
Cup or glass was cold prior to
espresso pour.
Pour hot water from the Hot Water Tap
into the cup before extracting espresso.
Group Head or Portafilter not
warmed before use.
Hold the Portafilter under the Group
Head and press the ONE CUP BUTTON.
Allow water to run through.
PROBLEM Possible cause What to do
No espresso
pours or
pours out in
drips (over
extracted)
No water in the Water Reservoir.
Fill reservoir with water. Prime water
through the Group Head, press the
ONE CUP BUTTON. Allow water to run
through.
Coffee grind is too fine. Change to a coarser Grind Setting.
Too many coffee grinds used. Fill with less coffee grinds.
Coffee grinds tamped (compacted)
too hard.
Apply less force during tamping.
Custom shot volume being used. Reset to the default shot volumes.
The Filter Basket is blocked. See Care & Cleaning.
Group Head is dirty. A Cleaning Cycle is required.
See Cleaning Cycle.
Group Head is blocked. A Descaling Cycle is required.
See Descaling Cycle.
Espresso
does not
have any
crema, or
crema is
thin (Under
Extracted)
Coffee beans are old or dry.
Use freshly roasted coffee beans.
Coffee grinds too coarse. Change to a finer Grind Setting.
Not enough coffee grinds used. Fill with more coffee grinds.
Grinds not tamped (compacted)
enough.
Tamp more firmly. See Espresso
Extraction Guide section.
Espresso shot
volume too
much or too
little
Custom shot volumes being used. Restore to default shot volumes or
change your custom shot volume(s).
See Customisable - Shot Volumes.
Espresso
tastes bitter
Type of coffee beans being used. Try different brands of coffee beans.
Espresso has been over extracted. See problems earlier in this table.
Spent (used)
coffee cake
is wet
A little water will remain on top of the
used coffee cake.
Rest Portafilter on the Drip Tray for 5
sec to allow the water to dissipate before
disposing cake.
Too many coffee grinds used. Fill with less coffee grinds.
Dual Wall Filter Baskets being used. Dual Wall Filter Baskets will keep the
coffee cake wetter than Single Wall Filter
Baskets.
16 17
Troubleshooting guide Troubleshooting guide
PROBLEM Possible cause What to do
Espresso
pours into
cup unevenly
Uneven tamping.
Ensure coffee grinds are tamped
evenly.
Obstruction in the Group Head or
Portafilter.
Check there is nothing obstructing the
Group Head or Portafilter & clean.
Pump makes
an unusual
noise
No water in the reservoir, and the
pump is 'dry'.
Fill reservoir with water, then press the
one cup button to prime unit before
brewing espresso. The pump noise will
decrease once water is flowing through
the system.
Water Reservoir is not correctly
positioned.
Insert the Water Reservoir into the
back of the unit, then press the one cup
button to prime unit before brewing
espresso.
Red Plug from the packaging may
still be inserted (the low water alert
will be illuminated).
Remove the red packaging plug found
at the base of the Water Reservoir.
New Pre-infusion Profiles has been
selected.
Different Pre-infusion Profiles make
different noise at the start of an
espresso extraction.
Water around
Drip Tray area
or on benchtop
Water overflowing from Drip Tray. Empty if the red Water Level Indicator
appears through the Drip Tray Stainless
Steel Grill.
Drip Dray not present, or not fully
inserted when Thermoblock is auto
purging.
Always Keep Drip Tray in place during
brewing espresso as a small amount
of water will be purged into the drip
tray under certain, normal operation
circumstances.
Milky coffee
is too cold
Milk may not be heated enough. Ensure that milk is heated properly
during texturing.
See Tip for Milk Texturing.
No steam
from the
Steam Wand
Steam Wand Tip is blocked. See Care & Cleaning for cleaning
methods.
No water in the Water Reservoir. Fill reservoir with water. Run hot water
through the Steam Wand to ensure
water flows.
Espresso Machine has scale build up. A Descaling Cycle is required.
See Descaling Cycle.
Steam Wand
making a
screeching
noise
Steam Wand Tip too deep. Lower Milk Jug. Ensure the Steam Wand
Tip is positioned correctly (just below
milk surface) when texturing.
See Tip for Milk Texturing.
PROBLEM Possible cause What to do
Not enough
foam when
texturing
Steam wand tip is wrongly
positioned in milk jug.
Ensure the Steam Wand Tip is
positioned correctly (just below milk
surface) when texturing.
See Tip for Milk Texturing.
Milk is not fresh. Ensure the milk being used is fresh.
Milk temperature is too warm. Ensure you start texturing with milk that
is around 4°C.
Type of Milk Jug being used. For best texturing results use a chilled
Stainless Steel Milk Jug.
Milk has been boiled. Start again with fresh, chilled milk. Heat
till the Milk Jug can only be held for
approximately 3 second, 60-65°C.
The milk is making bubbles rather
than microfoam.
Ensure the Steam Wand Tip is positioned
correctly when texturing. Tap the Jug on
the benchtop when finished to release
trapped air bubbles. See Tip for Milk
Texturing.
Milk is not taking in enough air. Keep the Steam Wand Tip just under the
surface of the milk.
Optimum
Grind Setting
is producing
an under
extracted
espresso
New Burrs are bedding in. This is
normal for the first few uses.
Turn the Bean Hopper clockwise in
small increments to a finer Grind.
Beans are losing freshness. Adjust grind setting to obtain
an optimum extraction.
Not enough coffee grinds used. Fill with more coffee grinds.
Grinds not tamped (compacted)
enough.
Tamp more firmly. See Espresso
Extraction Guide section.
No coffee
grinds coming
from the
Grinder Outlet
No coffee beans in the Bean Hopper. Fill the Bean Hopper with freshly roasted
coffee beans.
Hopper is not fully installed and gates
are not fully open.
Turn the Bean Hopper in a clockwise
direction. At Grind Setting 30, Hopper
Gates are then fully open.
The Grind Chamber or Outlet is
blocked.
Grinder needs cleaning.
See Care & Cleaning.
18 19
Troubleshooting guide Troubleshooting guide
PROBLEM Possible cause What to do
Coffee grinds
are coarse
when on a fine
Grind Setting
Grind Setting not correct. Adjust the Grind Settings by turning the
Bean Hopper. See Tips for Grinding, &
Extraction.
Top Burr not seated correctly. Coffee
beans or grinds are caught around &
under the Top Burr.
Top burr needs removing and the areas
cleaning, before reinstalling.
Grinder Calibration needs resetting. See Grinder Recalibration.
Grind Setting
cannot be
adjusted
The Bean Hopper is not seated
correctly.
Remove the Bean Hopper & reinstall.
Coffee beans or grinds are caught
around the Top Burr or Grinder
Collar.
Remove the Bean Hopper & Top Burr.
Use the Cleaning Brush or Vacuum
Cleaner as necessary to clear loose
coffee beans or grinds.
Bean Hopper
cannot be
locked into
position
Grinder Collar not aligned to the Top
Cover.
Ensure markings on Top Cover and
Grinder are lined up.
Coffee beans or grinds are caught in
the Top Burr or Grinder Collar.
Remove the Bean Hopper & Top Burr.
Use the Cleaning Brush or Vacuum
Cleaner as necessary to clear loose
coffee beans or grinds.
The Top Burr is not seated correctly. Make sure the Top Burr is correctly
aligned and that the handle is folded
down.
Top Burr does
not sit in the
Grinder Collar
correctly
Coffee beans or grinds are caught
around & under the Top Burr.
Remove the Top Burr and replace the
Bean Hopper. Hold the Bean Hopper
down with your hand, do not turn. Insert
the Portafilter into the Grinding Cradle
and push down to activate the Grinder.
The coffee grinds will fall out the Grind
Outlet.
The Top Burr is not seated correctly. Make sure the Top Burr is correctly
aligned and that the handle is folded
down.
Grinder burrs
have small
spots and
marks
These are part of the hardening
process (for extra-long life). These
marks do not affect the performance
of the Grinder or the taste of the
espresso.
No action needed.
PROBLEM Possible cause What to do
Espresso
Machine turns
itself off
Your Espresso machine will go into
Standby mode after 20 minutes to
conserve power.
Flick on/off power switch downwards to
reactivate your machine.
Grinder will
not operate
after a large
amount of
grinding, and
grind icon is
flashing
Your grinder has overheated.
Wait for 6 minutes, once the auto-cool
down cycle has finished your machine
will be ready to use again.
Machine beeps
and Grinder
Icon flashes
when trying
to use the
grinder
Rapid icon flashing, and 3 beeps -
grinder has overheated.
Wait for 6 minutes, once the auto-cool
down cycle has finished your machine
will be ready to use again.
Slower icon flashing and beeping
for 3 seconds- bean hopper is not
correctly installed.
Correctly install the Bean Hopper.
Not possible to
pour espresso
and dispense
hot water at
the same time
Initially the dual thermoblock
heater functionality allows
simultaneous dispense of either
espresso or hot water, at the same
time as steam.
Finish brewing your espresso before
adding hot water.
Not all lights
illuminate
when the unit
is switched on
When switched on initially the unit
will enter a warm-up mode, during
this time the power-on light will
pulse.
Wait until the unit is warmed up, the
power light will stop pulsing, and the
display will illuminate.
Dispensed
quantity of
grinds is too
much or too
little
The factory grinder settings do not
match your personal preferences.
The grinder can be stopped at any time
during the grinding process by tapping
once downwards on the portafilter
handle if over dispensing.
If the grind dispense amount is too
small, the quantity of grinds in the
portafilter can be topped up by pushing
down on the portafilter handle to
manually activate the grinder. Release
the handle when grind amount is correct.
The grinder dispense volume can be
customised to your requirements, see
'Fine tuning your espresso' section.
A double grind shot was selected
instead of a single.
Ensure that '1' is displayed on the Grind
Setting Position (1C).
20 21
‘Dialling In’
Setting up your Barista Signature Espresso
Maker to make perfect Espresso is
something that you are unlikely to get right
first time. Baristas perform an operation
called ‘dialling in’ and this is performed
whenever a variable is changed, such as
a new bag of beans are used, and is often
performed at the start of each day.
The dialling in process is not complicated,
however it may take a number of iterations
to identify your optimum grind setting and
your perfect espresso.
There are 3 key variables to control when
dialling in your machine:
1. Amount of coffee grounds - Your Barista
Signature Espresso Maker will ensure
this remains consistent espresso to
espresso as it will automatically doses
the correct amount of grounds for the
selected shot size.
2. Tamp force – best results can be
achieved using a manual tamp, but a
little practise is necessary to apply the
same force every time. Try using your
kitchen scales, pushing down to reliably
apply 10-15kg force.
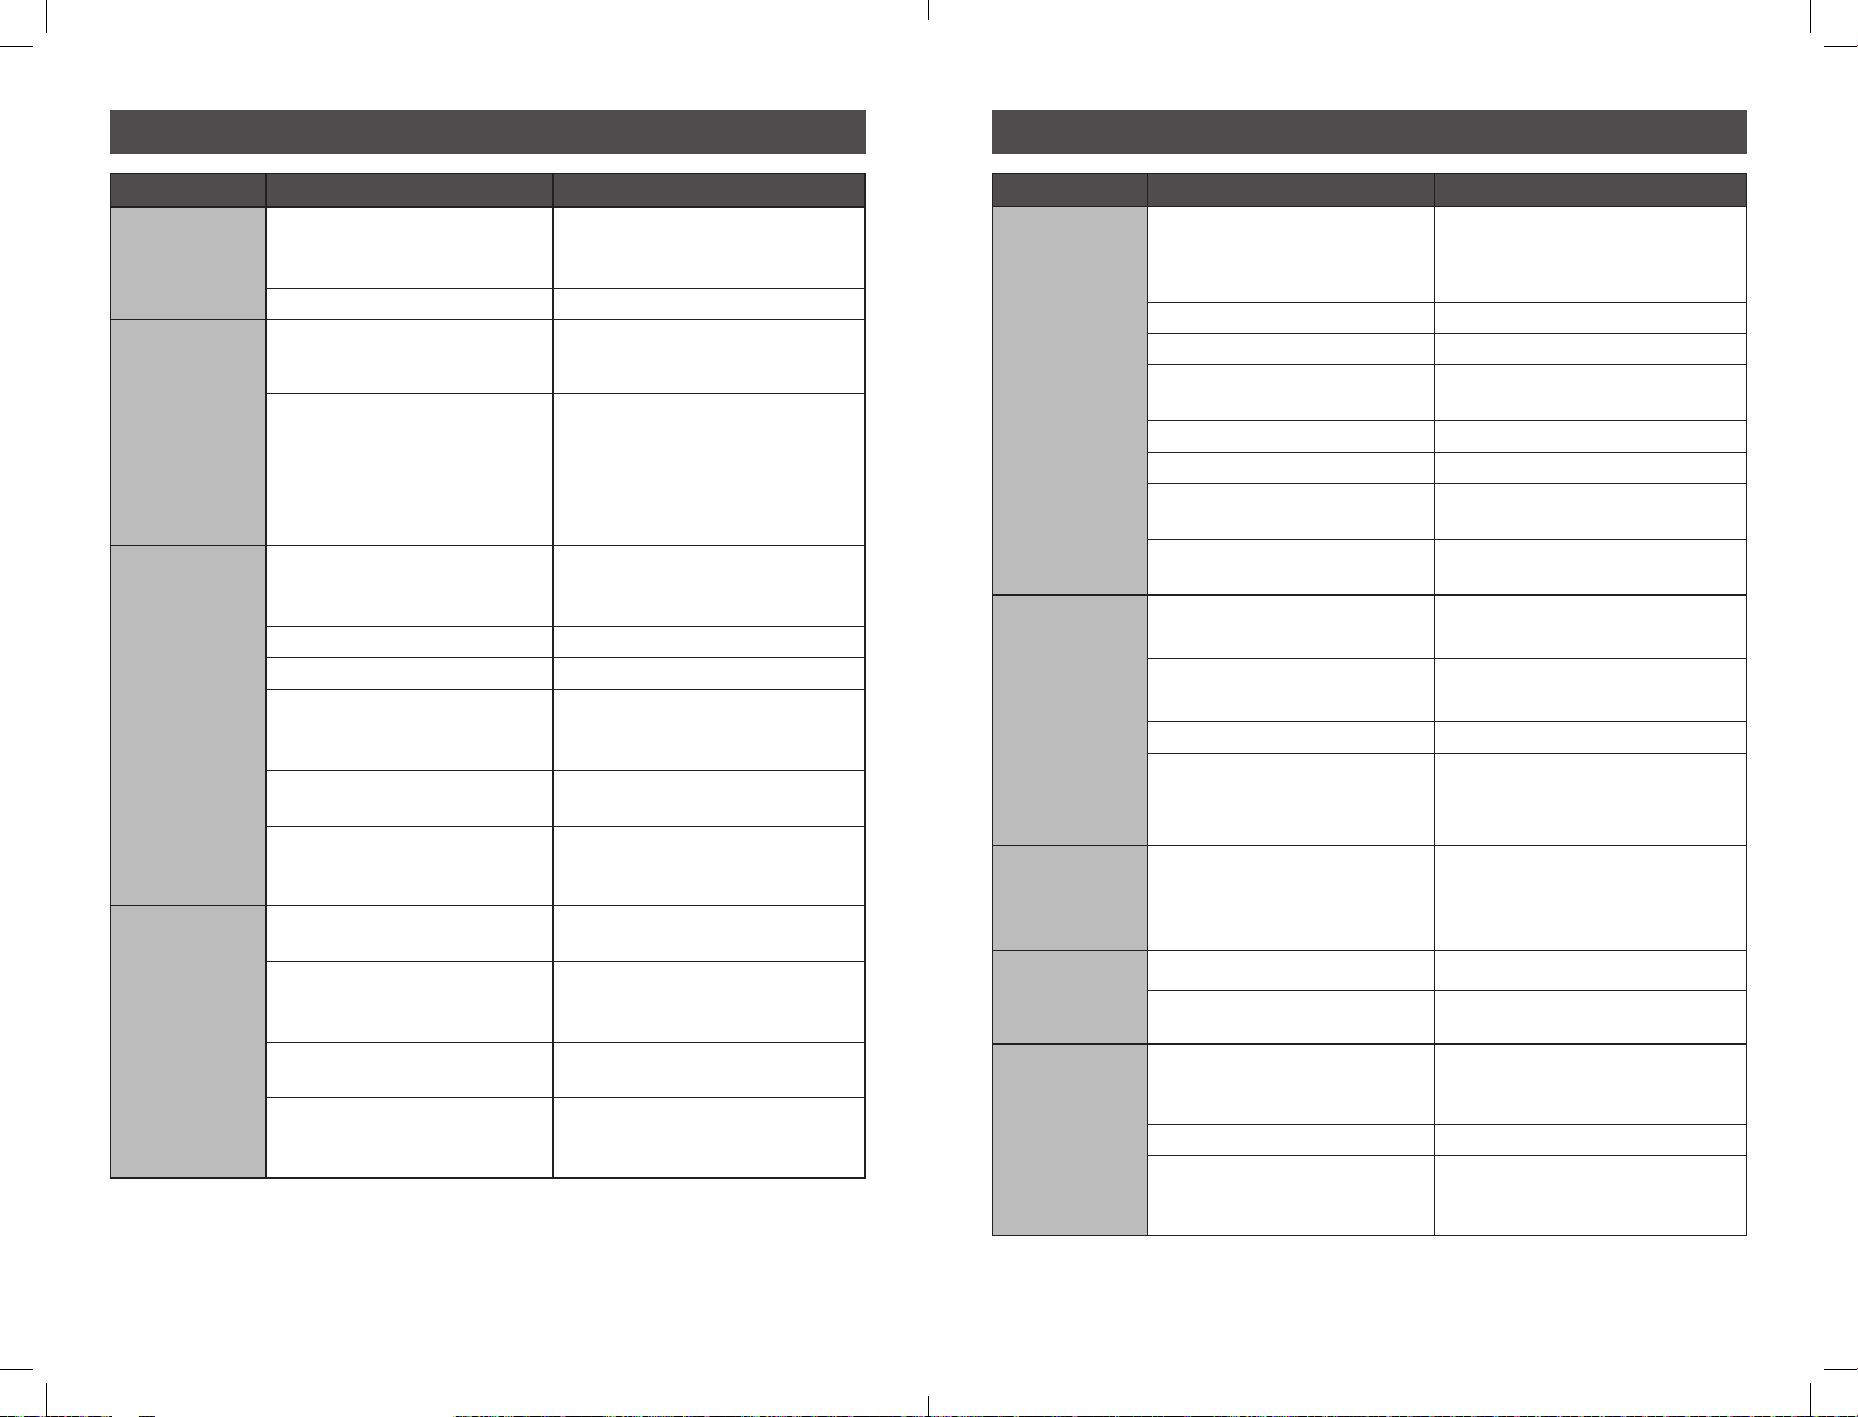
3. Coffee grind size – this is the variable we
will adjust when ‘dialling in’.
Make your espresso as shown in the
pictorial guide, starting with a grind size
of 15.
When extracting you should aim for an
extraction time between 25-30s for a
double shot.
If the extraction takes longer the grind is
too fine. If the extraction is shorter then
the grind is too coarse. Adjust the grind
size up or down as needed.
When you brew an espresso in 25-30s,
then you have identified the correct grinder
setting for specific machine and beans.
Espresso dialling in optimisation examples
Example 1. Grinding a double espresso.
The extraction finishes dispensing in
15s. The water is flowing through the
grinds too easily, and the coffee will be
under extracted and light in colour.
- Reduce the grind size to a finer
setting, and tamp with the same
pressure. When the coffee dispenses
in 25- 30s the espresso will be
perfectly extracted.
Example 2. Grinding a double espresso.
The extraction finishes dispensing in
45s. The water is struggling to pass
through the grounds, and coffee drips
slowly from the portafilter. The coffee
will be over extracted and very dark in
colour.
- Increase the grind size to a coarser
setting and tamp with the same
pressure. When the coffee dispenses
in 25 - 30s the espresso will be
perfectly extracted.
Hot Water
If wanting to make a long espresso based
drink, you can add extra hot water using
the Hot Water Tap (H). Water flow is
activated by turning the dial anti clockwise.
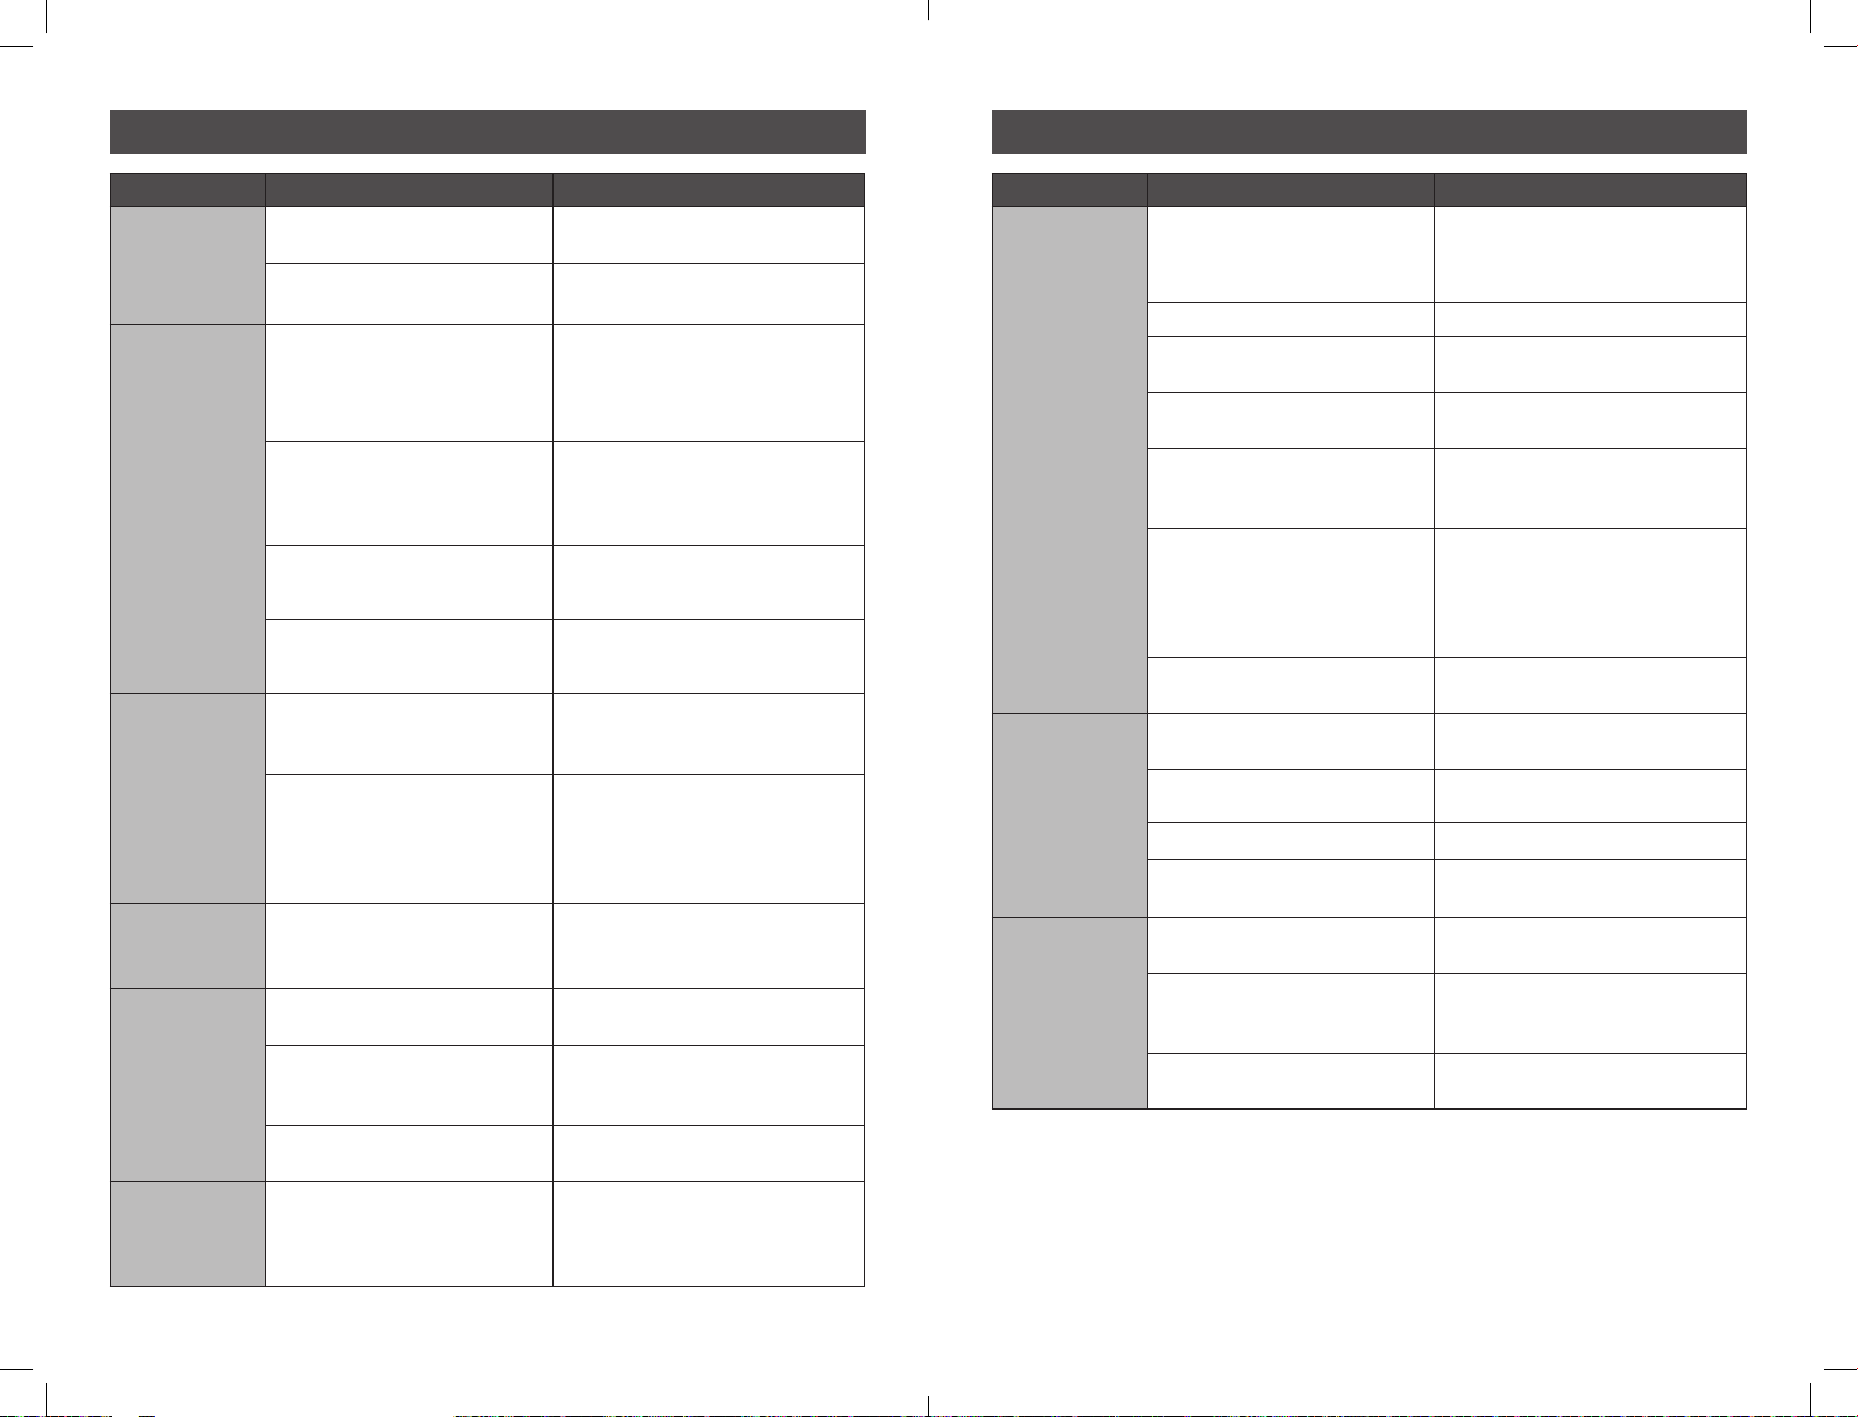
The Hot water icon will be
displayed, and water will flow.
To stop the water flow simply
return the dial back to the
vertical position.
Note: Due to the fact the Barista
Signature Espresso Maker is fitted
with twin heaters, it is possible to
Steam milk and dispense hot water
simultaneously.
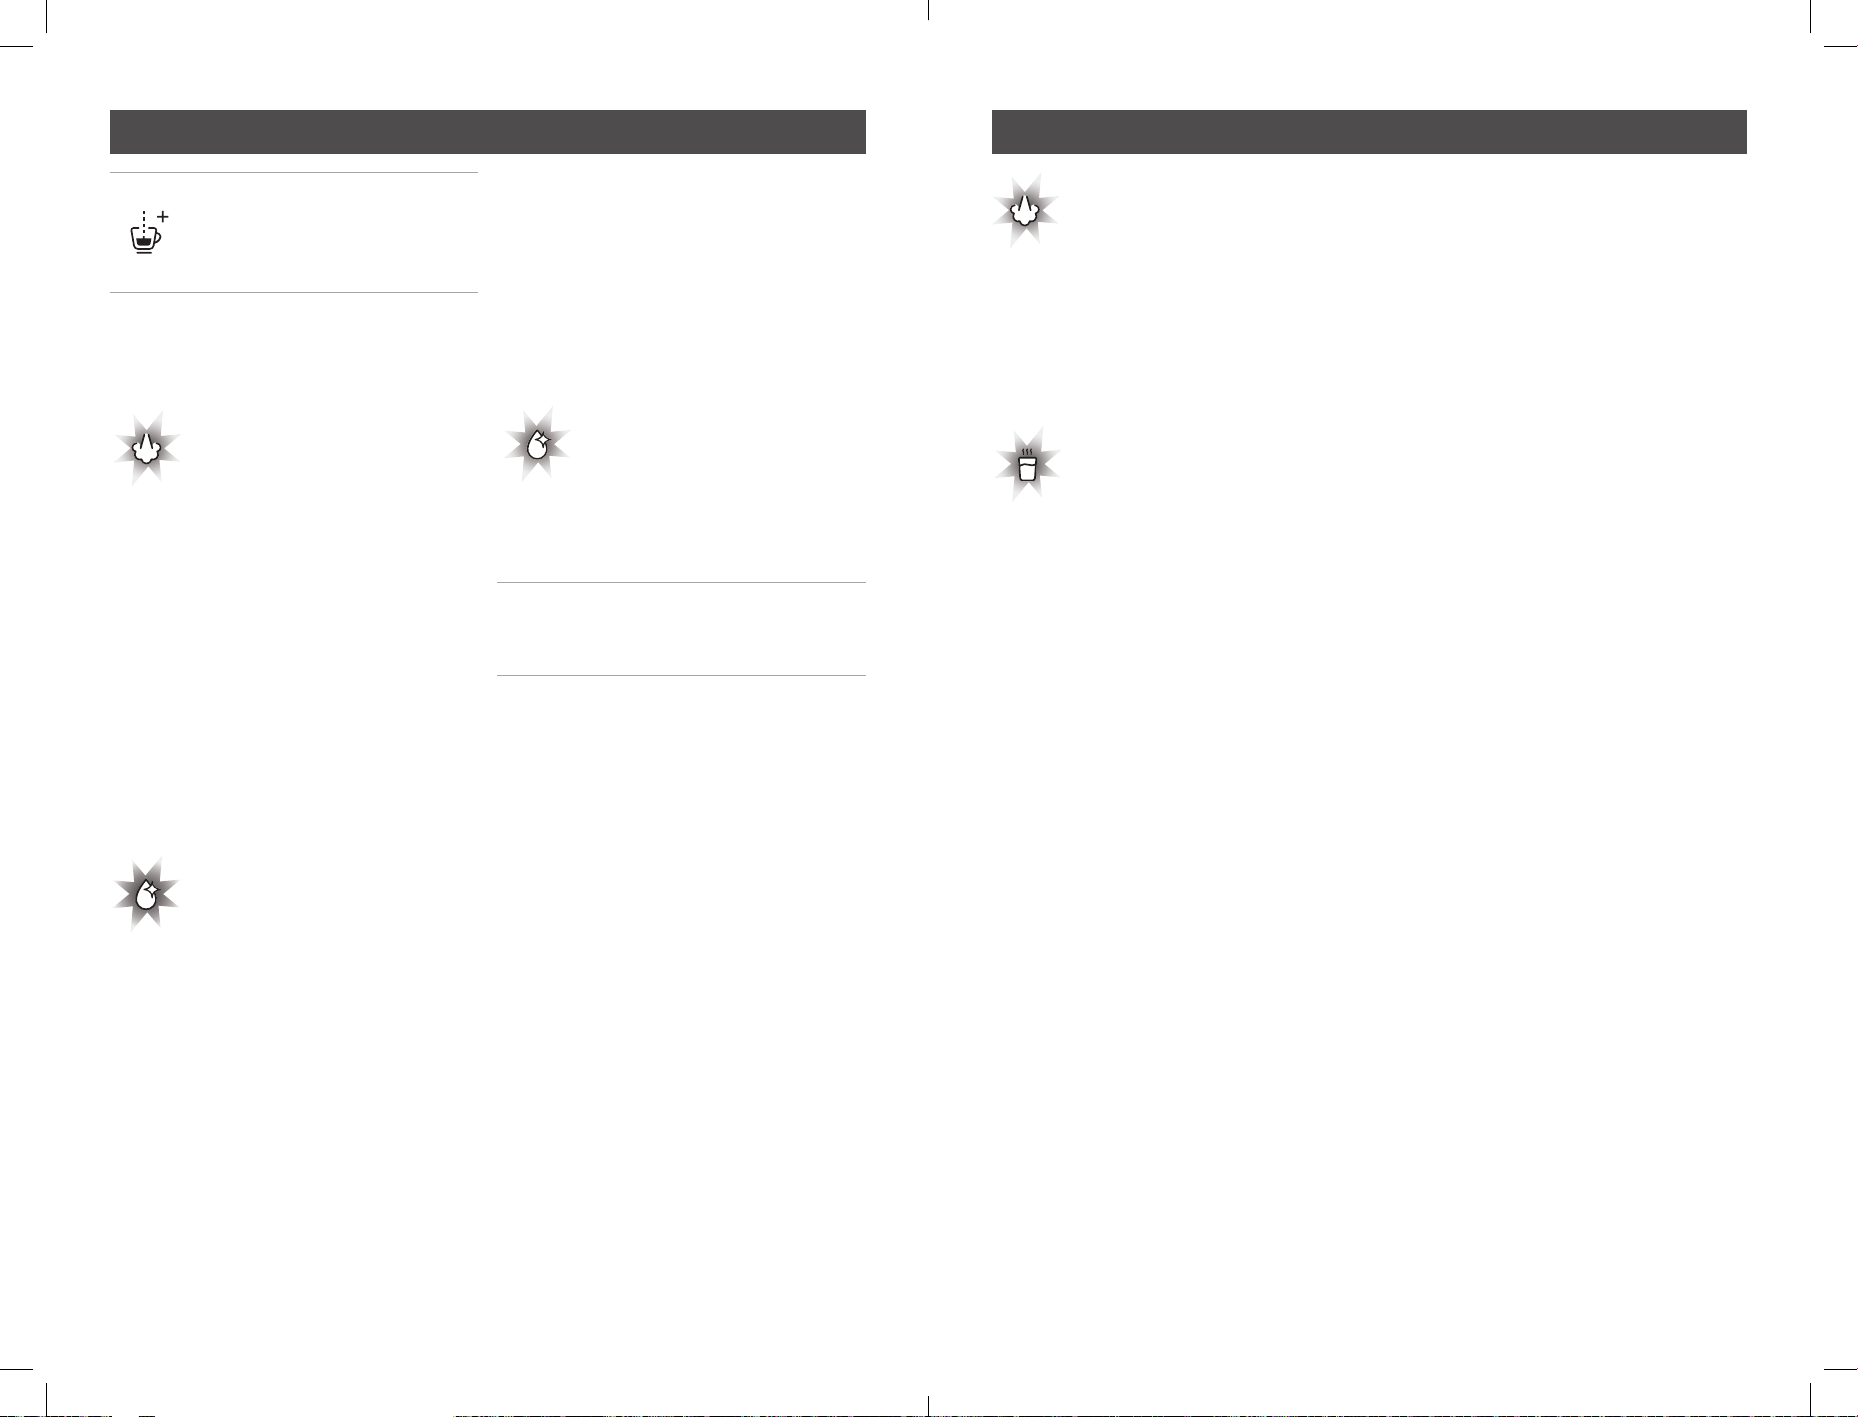
Low Water and Empty tank alerts
Your Barista Signature Espresso Maker
monitors the water level in the reservoir
and has two levels of alert:
Low Water level alert – your
Barista Signature Espresso
Maker will beep once and
the low water alert will be
illuminated.
- This indicates that the water level in the
reservoir has dropped below what will be
needed for subsequent brews. If the alert
happens midway through making your
coffee, there will be plenty of water for
your needs, just refill before next use.
Empty Tank Alert – when it runs out of
water your Barista Signature Espresso
Maker will beep three times and will
display ‘- -’. Depending on the operation
being performed either the;
Portafilter icon will flash,
Hot water icon will flash,
or Steam icon will flash.
- This means your Barista Signature
Espresso Maker has run out of water and
immediately needs refilling. Once refilled
ensure the dial is positioned vertically,
then either the single, double or manual
brew button will then need pressing
to allow the unit to charge its internal
system with water before the flashing
icon will go out.
Water Filtration
The Charcoal water filtration system helps
make coffee taste better by reducing
impurities.
- When replacing the water filter, the
calendar dial can be set to the month the
filter was changed as a reminder.
- It is recommended that the filter is
replaced every month, to ensure the taste
of your coffee is optimized.
- Replacement cartridges are available
from Breville Customer Services, details
on final pages.
Tips for grinding, tamping & brewing Tips for brewing
GRIND
SETTING
TURN
CLOCKWISE
FOR
FINER GRIND
SLOWER
EXTRACTION
TURN
ANTI-CLOCKWISE
FOR
COASER GRIND
FASTER
EXTRACTION
22 23
Note: Due to the twin heaters in your
Barista Signature Espresso Maker
Machine, frothing the milk can be
performed at the same time as brewing
your espresso, or at the same time as
dispensing hot water.
Milk texturing is the steaming of milk.
Key Elements of Textured Milk
Milk that has been textured correctly
has a thick, rich microfoam with a silky
sheen. Texturing involves both heating and
aerating milk using steam. Vital elements
include positioning of the Steam Wand,
when to adjust the Milk Jug position and
reaching the correct temperature. Use the
below steps to help you create café-style
microfoam.
1. Fill Milk Jug
Add cold milk around 4°C into a chilled
clean Stainless Steel Jug. Fill to the
bottom of the spout.
Note: The volume of milk will increase
or ’stretch’ during texturing, so don’t
overfill the Jug.
Note: Due to the twin thermoblock
technology on your Breville unit there
is no steam warm-up period, steam is
available on demand.
2. Position the Jug
Place the Steam Wand Arm in the Jug
spout at the 12 o’clock position, with
the Steam Wand Tip in the milk at the
3 o’clock position, a finger width away
from the edge of the Jug. Keep Steam
Wand Tip just under the surface of the
milk. Turn DIAL back to position to start
texturing. A whirlpool action should be
created in the Jug.
3. Sound
How air is introduced to the milk
determines the consistency of the
foam. If large gulps of air are added
to the milk, the foam will have large
bubbles. Introducing air to the milk in a
controlled, gentle fashion indicated by
a gentle hissing sound, will ensure the
milk has fine aerated microfoam.
Barista Tip: Milk Texturing Sounds
Gurgling - Tip not deep enough,
raise the Jug.
Smooth Hissing - Just right for latte.
Screeching - Tip too deep, lower Jug.
4. Keeping Steam Tip Position
As the steam heats & textures the milk,
the milk will stretch causing the level
of the milk in the Jug to rise. As this
happens follow the level of the milk by
lowering the Jug, keeping the Steam
Wand Tip just below the surface.
Note: Some adjustments to technique
will be required when using non-dairy
milk.
5. Amount of Foam
Create the amount of microfoam you
want. Cappuccinos traditionally have
more microfoam than flat whites.
6. Immerse Tip
After creating the desired amount of
foam, immerse the Steam Wand half
depth way into the milk. This heats all
the milk and pulls in milk instead of
air. This ensures the milk & foam are
blended together, making it denser &
smoother.
7. Correct Temperature
An indication of reaching correct milk
temperature is when the Milk Jug base
can only be touched comfortably for
approximately 3 seconds.
Barista Tip: Milk Temperature
Under - If not heated long enough, it
will be warm with little texture.
Optimum - See below table.
Over - If heated for too long it will start
to boil around 72°C and will have
a burnt taste with all texture lost.
Milk
Temperature
Full and Skim
60-65
°C
Almond 55-65°C
Soy 55-60°C
Coconut 65-70°C
Note: Above recommendations might
vary from one milk brand to another and
depending on your taste preference.
8. Wipe Steam Wand
Wipe the Steam Wand Arm & Tip with
a clean damp cloth to remove any milk
residue.
9. Purging the Steam Wand
When correct milk temperature has
been reached, turn the DIAL to the
vertical position and remove the Jug
from the Steam Wand. Place Milk Jug to
one side. Place the Steam Wand over the
Drip Tray. Turn the DIAL to the position
for a few seconds, then return the DIAL
to the vertical position. This will remove
any milk that has been sucked into the
Steam Wand Tip.
Tips for milk texturing Tips for milk texturing
FINISHED
MAX
FILL
MAX
4°C
FINGER
WIDTH
12
3
24 25
Customisable - Shot Volumes
The Barista Signature Espresso Maker
features Auto Shot Volumetric Control.
It extracts just the right amount of
espresso then automatically stops.
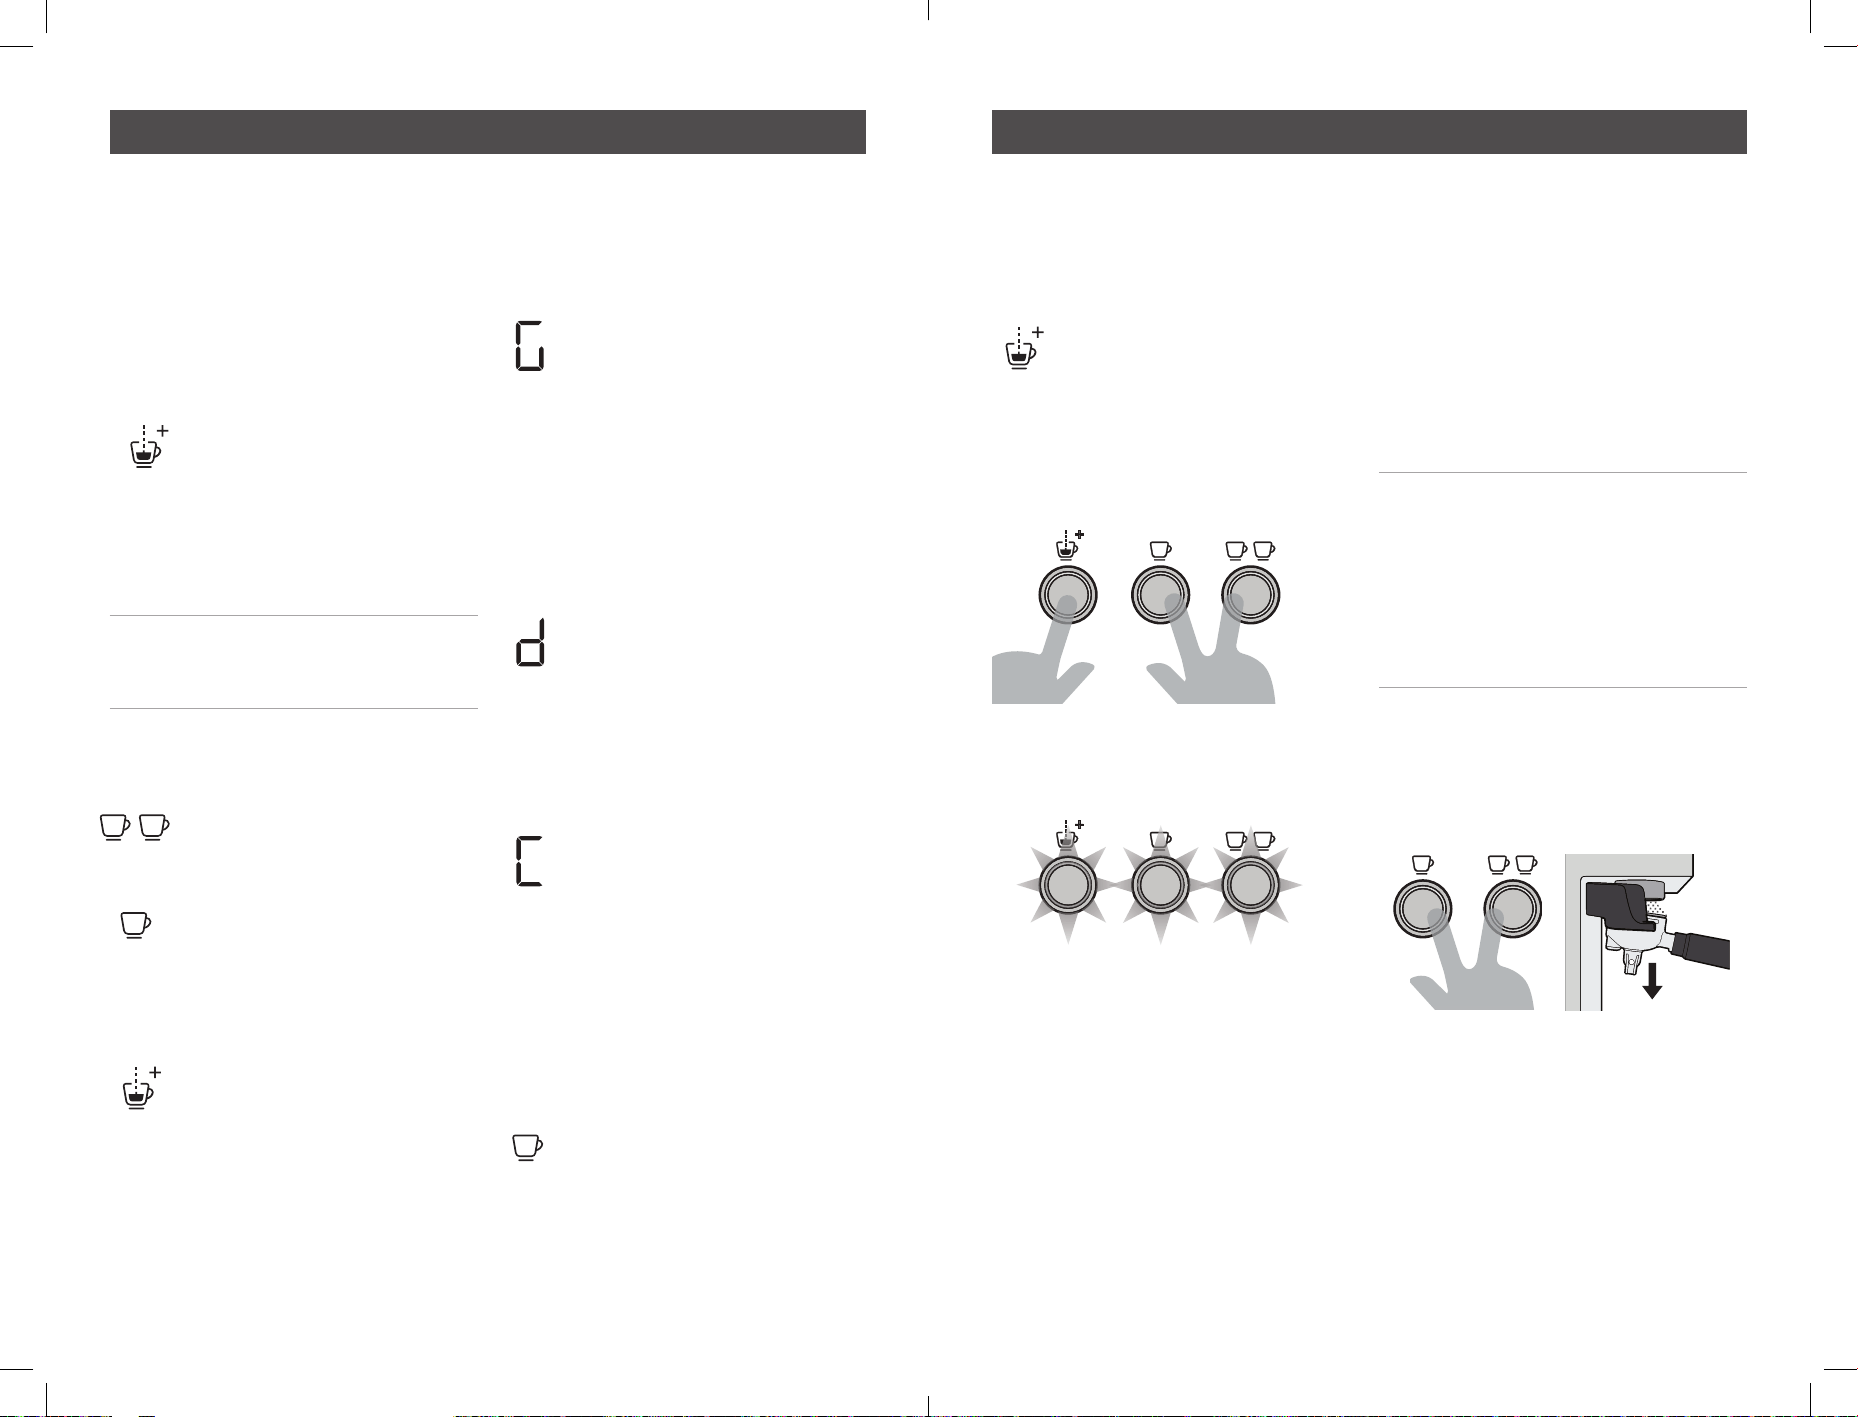
Pours 1 shot of espresso.
Pours 2 shots of espresso.
Pours water for 99 seconds.
At any point during espresso extraction you
can stop the pour by pressing the same
button again.
You can adjust the default shot volumes to
suit how you like your coffee.
Customise – Single or Double Cup Shot
Volume
- Insert appropriate Filter Basket into the
Portafilter.
- Fill with coffee grinds then tamp.
- Insert Portafilter into the Group Head.
- Press & hold the
Double shot BUTTON
for 3 seconds.
- The Single and Double shot button icons
will pulse to indicate it is in custom
mode.
- PRESS the button for the shot volume you
wish to customise (single or double), the
other button will extinguish.
- PRESS and HOLD the selected button
and Espresso will start to pour and the
EXTRACTION TIMER will begin counting.
- When you reach your desired shot
volume, release the selected button to
stop flow. The espresso pour will stop.
- The machine will beep & the LIGHT will
stop flashing.
- The new espresso shot volume has been
saved.
- Press the Manual Brew
Button and the machine will
return to the READY state.
10. Tap & Swirl the Jug
Gently tapping the Jug on the benchtop
helps to release larger trapped air
bubbles.
Swirling helps the milk & froth to
combine for an even consistency
and a silky appearance.
11. The Finishing Touches
Pour from the Milk Jug into your cup
in one steady motion.
Tips for milk texturing Fine tuning your espresso
ONE CUP
TWO CUP
OR
26 27
Customisable - Extraction Temperature
You can adjust the water temperature used
for espresso extraction, in 2°C increments,
to cater for different types of roasted coffee
beans and for personal preference.
• Adjusting Extraction Temperature
- Starting from the READY
state, press & hold the
MANUAL BUTTON for 3
seconds. The MANUAL
BUTTON light will beep and
the light begins to pulse.
The current programmed preset
temperature will be displayed.
Note: The MANUAL LIGHT will continue
to pulse to indicate you are in a custom
mode.
The temperature can be adjusted in 2
degrees C increments:
- Press the double shot button
to increase temperature.
- Press the single shot button
to decrease temperature.
- The Extraction Timer will display the
corresponding temperature.
- To save the selected
temperature press the
MANUAL BUTTON.
Customisable - Extraction Pre-Infusion
Profile
You can select from three Pre-infusion
Profiles to cater for personal preferences.
- Gentle Pre-infusion: Small
defined amounts of water are
introduced into the tamped
coffee grinds, gently adding
moisture to bloom the coffee
grinds in preparation for
a steady water flow. For a
balanced tasting espresso.
This is the default profile
setting.
- Distinct Pre-infusion: A
single distinct dose of water
is released into the tamped
coffee grinds, followed by
a brief rest period, then a
steady water flow. For a more
bright tasting espresso.
- Constant Pre-infusion:
Delivers a constant, steady
water flow from start to finish.
For a more sharp tasting
espresso.
Access Pre-infusion Custom Mode
- The Barista Signature Espresso Maker is
ON and in the READY state.
- Press and hold the SINGLE
shot button for 3 seconds.
The machine will beep and
the single and double shot
indicators will begin to pulse.
- The current pre-infusion profile will
displayed.
- The preprogrammed settings can be
scrolled through by pressing the single
shot button.
- To save the selected profile
press the MANUAL BUTTON.
Restore – factory brew settings
- Press & hold all 3 EXTRACTION
BUTTONS at the same time for 3
seconds.
- The Barista Signature Espresso Maker
will beep and all 3 EXTRACTION BUTTON
LIGHTS will flash together.
- The default espresso volumes have been
restored.
- The Barista Signature Espresso Maker
machine will return to the READY state.
Customisable – Grinder Time Adjustments
Due to a number of reasons, such as a
changing your type of coffee bean, it may
be that you want to adjust the factory
settings for the amount of coffee dispensed
for each dose. Adjusting the grinder in
the following manner will change all 30
grinder position settings at the same time,
increasing or decreasing how long the
grinder operates for by the same amount
proportionally.
Note: If you want to add a small amount
of extra grounds to your shot, you
don’t have to adjust your settings as
described below, you can simply top up
the grinds in your Portafilter using the
manual grind function on the grinder
(push the portafilter handle down, and
hold).
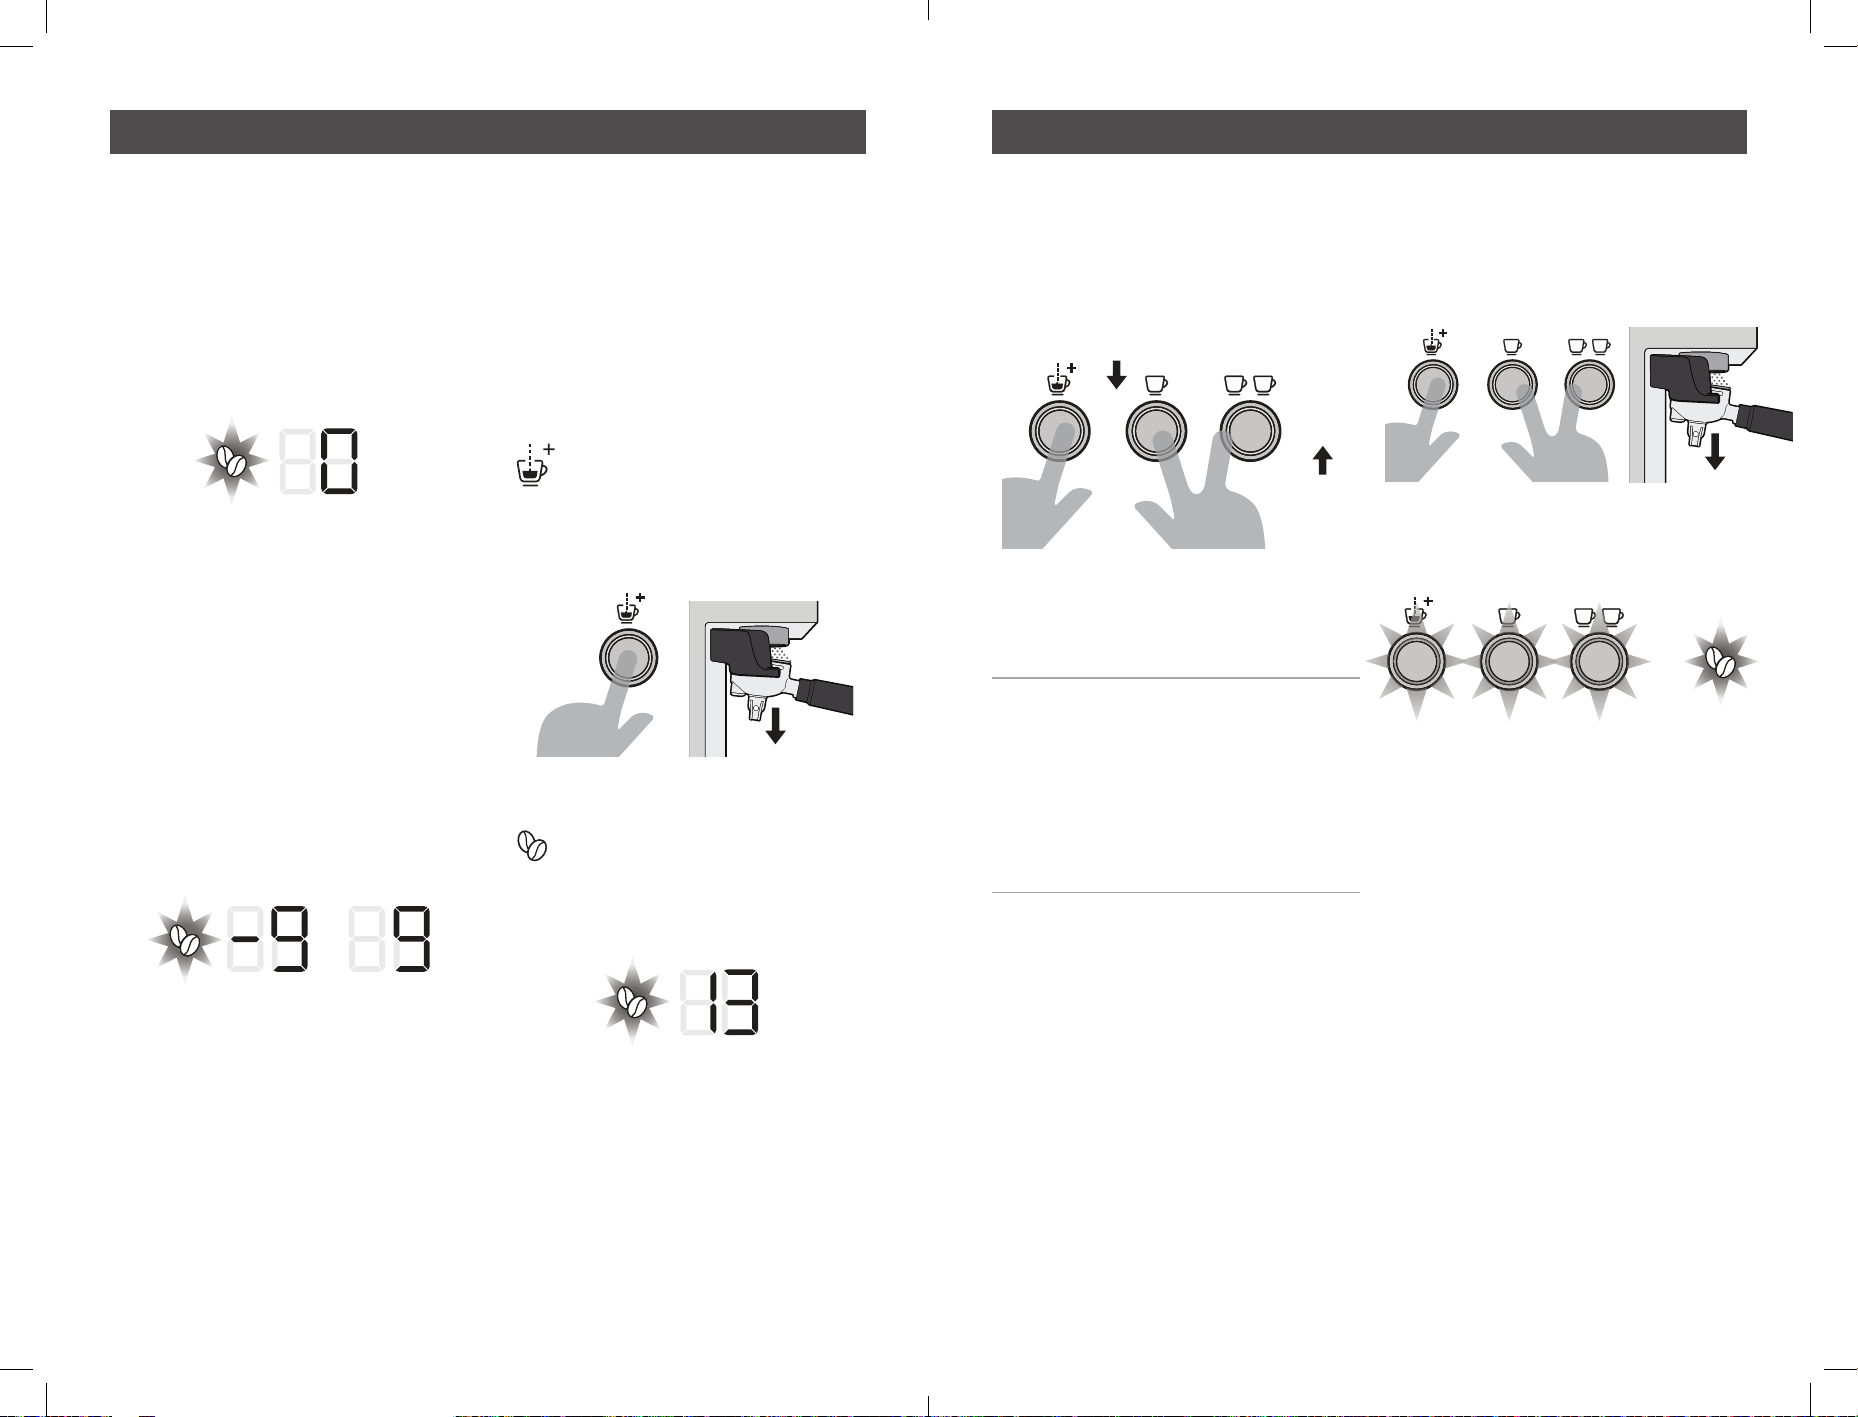
- Starting from the READY state, press
and hold the single and double shot
brew buttons at the same time whilst
simultaneously pushing down
on the portafilter handle. for 3 seconds.
Fine tuning your espresso Fine tuning your espresso
PUSH
DOWN
28 29
- The machine will beep and the grind
icon will pulse, and one of the following
options will be displayed:
a. If this is the first time the Barista
Signature Espresso Maker machine
is being adjusted away from factory
settings then the Extraction Timer (9)
will display ‘0’.
b. If the Barista Signature Espresso Maker
machine has previously been adjusted
from factory settings, then that figure
will be displayed instead. The numbers
-9 to 9 nominally represent a range of
adjustment possible for the grinder.
Adjusting the number further towards
-9 will decrease the volume of coffee
grounds being dispensed for all grind
settings (0-30), and increasing the
number further towards 9 will increase
the volume of coffee grounds being
dispensed for all grind settings (0-30).
- Once the correct adjustment has been
made press the manual button, the
Barista Signature Espresso Maker
machine will beep once, and the
adjusted timings will be saved.
Customisable – Grinder Recalibration
As the burrs on your grinder wear, the gap
between the burrs will increase slightly,
this will cause the size of your grounds to
increase slightly, which could cause your
espresso to under extract. If this becomes
an issue you may wish to recalibrate your
grinder. To do this:
- Starting from the READY
state, press and hold the
manual brew button for 3
seconds whilst pushing down
on the portafilter handle at
the same time.
- The machine will beep and
the grind icon will begin to
pulse, and the current Grind
setting position will be shown
on the display.
- The grind setting can then be adjusted.
Use the double shot button to increase
the Grind setting, or the single shot
button to decrease.
- Press the manual brew button to save the
new setting. The unit will beep once and
return to the steady state condition.
Example; if you always used to make
your coffee at grind size 13, but now
believe the machine is under extracting
at this position, you may want to change
to setting 12 or 11. As the burrs are
not adjusted during this process, this
recalibrates the unit and dials out the
adjustment lost due to burr wear
Restore – factory grind settings
- Press and hold all 3 EXTRACTION
BUTTONS, simultaneously pushing
downwards on the portafilter handle at
the same time for 3 seconds.
- The machine will beep and all 3
EXTRACTION BUTTON LIGHT ICONS and
the grind icon will flash together.
- The default espresso volumes have been
restored.
- The machine will return to the READY
state.
Fine tuning your espresso Fine tuning your espresso
PUSH
DOWN
+
PUSH
DOWN
PRESS
SINGLE SHOT
TO DECREASE
PRESS
DOUBLE SHOT
TO INCREASE
30 31
The espresso making process involves
extracting oils out of coffee grinds.
Deposits of grinds & oils build up over
time, affecting the taste of the coffee &
operation of the Espresso Machine.
Purging water through the Group Head &
Steam Wand, before & after making each
coffee, is the easiest way to keep your
Espresso Machine clean.
Cleaning Accessories & Removable Parts
- Do not immerse the appliance, power
cord and plug in water or any other liquid.
- Clean parts in warm water with a mild
detergent, rinse & dry.
Note: Do not use alkaline cleaning
agents, abrasives or metal scourers, as
these will scratch the surfaces of parts.
Dishwasher Safe parts:
- Stainless Steel Milk Jug
- Stainless Steel Drip Tray Grill
- Stainless Steel One Cup Filter Basket
- Stainless Steel Two Cup Filter Basket
- Cleaning Disc
Dishwasher Safe TOP SHELF ONLY parts:
- Hardened Stainless Steel Top Burr
- Grind Bin
NON Dishwasher Safe parts:
- Water Reservoir
- Portafilter
- Bean Hopper
- Drip Tray
- Tamper
- Cleaning Pin
- Cleaning Brush
Cleaning Warming Plate & Exterior
• When Required
- Wipe over the machine with a soft damp
cloth with a mild detergent and wipe dry.
CAUTION: To prevent damage to the
appliance do not use alkaline cleaning
agents, abrasives or metal scourers.
Cleaning Drip Tray & Grind Bin
• When Required
- Empty water if the red Water Level
Indicator appears through the Stainless
Steel Grill, otherwise water will overflow.
Note: Over time it is normal for the
inside of the Drip Tray & Grind Bin to be
stained by the oils in the coffee grinds.
• Weekly
- Clean in warm water with a mild
detergent, rinse & dry.
- Cleaning Portafilter & Filter Basket.
• Every Time
- Wash after each use by rinsing them with
warm water under the tap.
• Regular Intervals
- In warm soapy water using a mild
detergent, rinse & dry.
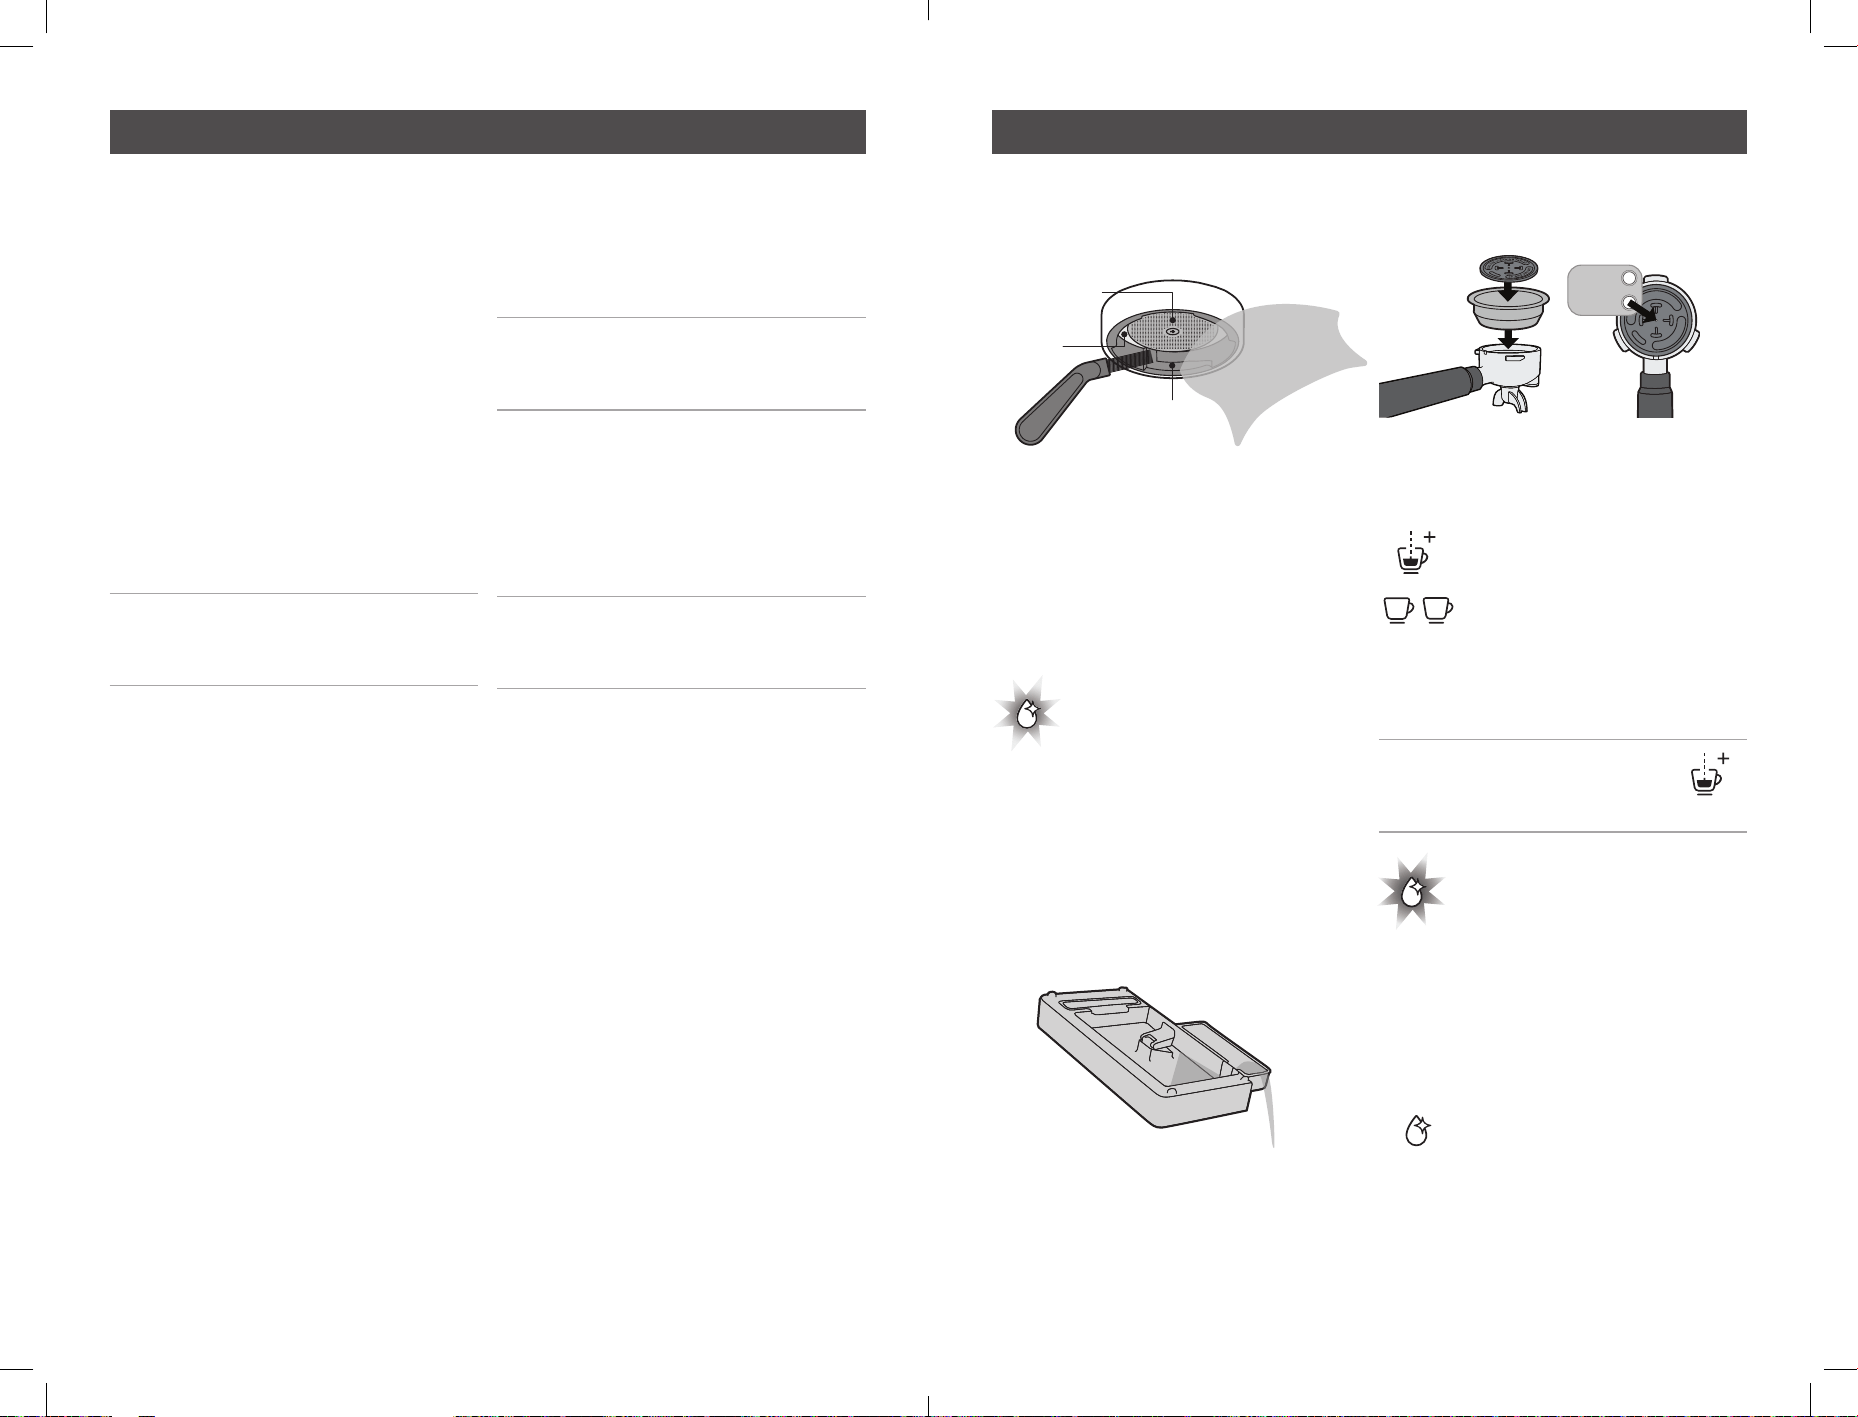
- Cleaning Shower & Group Head.
• Every Time
- Run water through before making an
espresso.
• Weekly
- Purge water through the Group head by
pressing the ONE CUP BUTTON.
- Allow water to run through until it stops.
- With the Cleaning Brush remove any
coffee grinds from around the Group
Head inside rim and Silicone Seal. Wipe
the Shower Head with a damp cloth.
Cleaning Tablet
Cleaning tablets are perfect for removing
coffee oil build up to prolong the life of
your coffee machine. Espresso Machine
Cleaning Tablets can be purchased online.
Cleaning Cycle
The CLEAN LIGHT will
illuminate to indicate a
Cleaning Cycle is required.
The Cleaning Cycle takes approximately 7
minutes to complete.
• Preparing for Cleaning Cycle
- Ensure there is at least 1 Litre of water in
the Reservoir.
- Empty the Drip Tray & replace.
- The machine is on and in the READY
state.
- Place the Two Cup Filter Basket & the
Cleaning Disc into the Portafilter.
- Place one Cleaning Tablet in the middle
of the Cleaning Disc in the space
provided.
- Insert Portafilter into the Group Head.
• Start the Cleaning Cycle
- Simultaneously press & hold
the MANUAL and DOUBLE
SHOT BREW BUTTONS
for 3 seconds. The Barista
Signature Espresso Maker will
beep 3 times and the Cleaning
Cycle will start.
Note: The Cleaning Cycle can
be exited at any point by pressing
the MANUAL BUTTON.
- The CLEAN LIGHT will pulse
during the cleaning cycle.
- Water will purge into the Drip Tray and
small amounts of water will pour from
the Portafilter spouts.
• Cleaning Cycle Complete
- The Barista Signature
Espresso Maker will beep and
the CLEAN LIGHT will stop
pulsing.
- The Barista Signature Espresso Maker
will return to the READY state.
- Remove the Portafilter from the Group
Care and cleaning – Espresso machine Care and cleaning – Espresso machine
SHOWER HEAD
GROUP HEAD
INSIDE RIM
SILICONE
SEAL
D
I
S
C
F
O
R
C
L
E
A
N
I
N
G
T
A
B
L
E
T
U
S
E
T
H
I
S
S
I
D
E
U
P
ESPRESSO
MACHINE
CLEANING
TABLETS
32 33
Head. Check tablet has been dissolved.
Note: If the tablet has not been
dissolved, insert the Portafilter back into
the Group Head, empty the Drip Tray &
replace. Repeat the ‘Start the Cleaning
Cycle’ section.
• Cleaning Cycle Clean Up
- Purge the Group Head by pressing the
ONE CUP BUTTON and water should
flow.
- Allow water to run through until it stops.
- Wash the Drip Tray, Portafilter & Cleaning
Disc in warm water with a mild detergent,
rinse & dry.
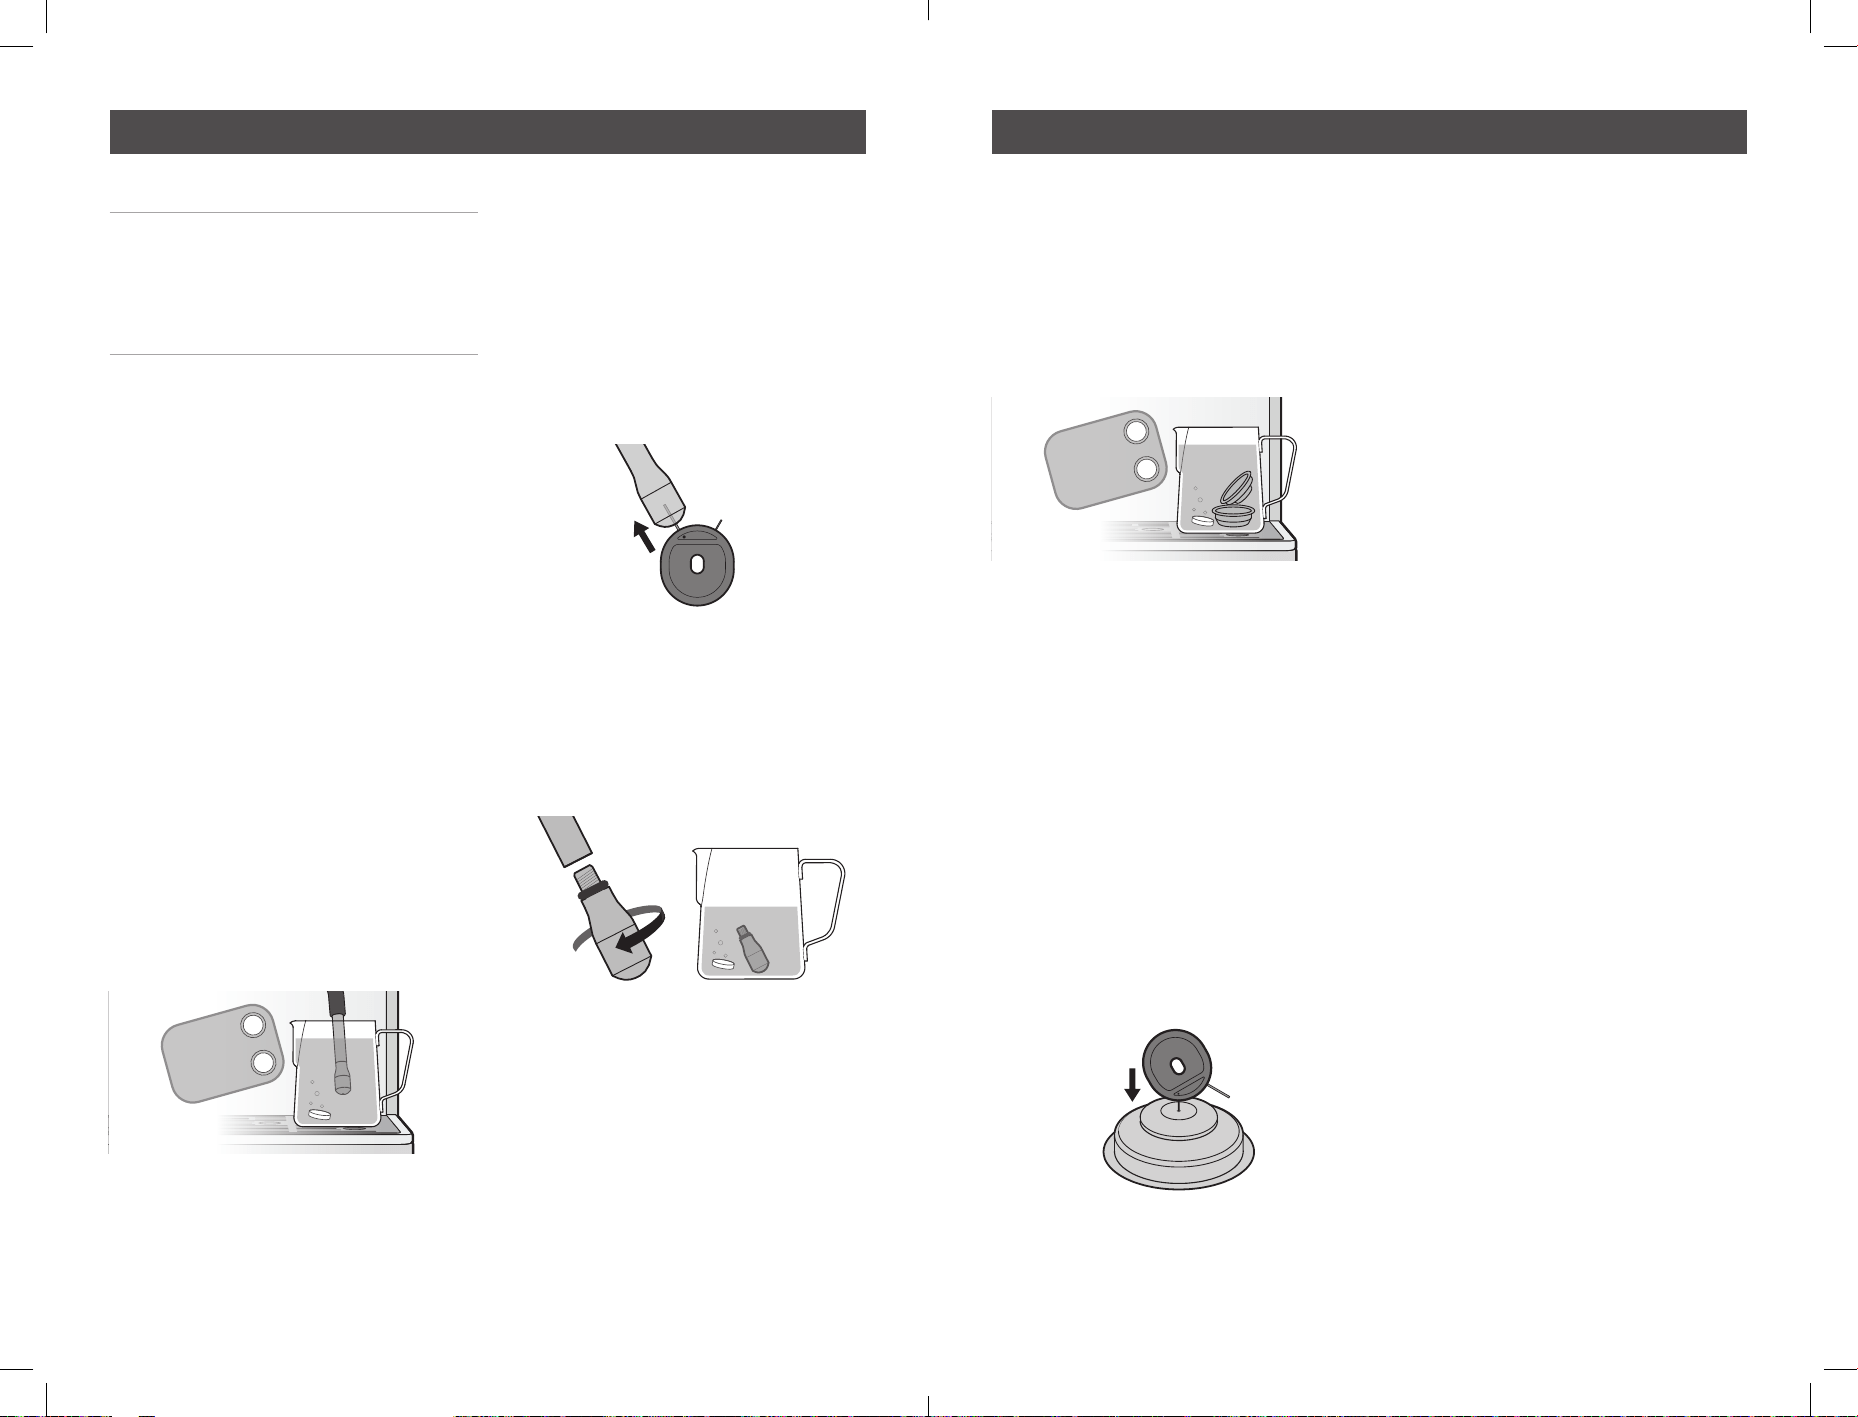
Cleaning Steam Wand
• Every time
- Wipe the Steam Wand with a damp cloth.
(See Coffee Making Guide page 13).
- After texturing milk purge the Steam
Wand by turning the DIAL to HOT WATER
for just 1-2 seconds.
• 2-3 Months
- Soak the Steam Wand overnight in the
Milk Jug with warm water & one Cleaning
Tablet.
- In the morning remove the Jug and rinse
ensuring that all traces of the solution
have been removed.
- Wipe Steam Wand with a damp cloth
ensuring that all traces of the cleaning
tablet have been removed.
- Run Steam through the Steam Wand for
40 seconds.
• Unblocking Steam Wand
If the Steam Wand Tip becomes clogged
with milk residue:
- Insert the thicker ‘STEAM’ Cleaning Pin
up the Steam Wand Tip hole and remove.
- Run Steam through the Steam Wand for
40 seconds.
• Steam Wand Remains Blocked:
Unscrew the Steam Wand Tip and soak
overnight in the Milk Jug with warm water
& one Breville Cleaning Tablet.
- In the morning rinse the Jug & Steam
Wand Tip under running water ensuring
all traces of the cleaning tablet have been
removed.
- Use the thicker ‘Steam’ Cleaning Pin to
clean the Steam Wand Tip.
- Ensure red O-ring is present &
undamaged.
- Screw the Steam Wand Tip back into the
Steam Wand Arm.
- Run Steam through the Steam Wand for
40 seconds.
Cleaning Filter Baskets
• 2-3 Months
Soak the Filter Basket(s) overnight in the
Milk Jug with warm water & one Cleaning
Tablet.
- In the morning rinse the Jug & Filter
Basket(s) under running water ensuring
all traces of the cleaning tablet have been
removed.
- Place a Filter Basket into Portafilter
(without coffee grinds) and insert into
Group Head.
- Press the ONE CUP BUTTON.
- Allow water to run through until it stops.
• Unblocking Dual Wall Filter Baskets
If the Dual Wall Filter Basket (if supplied)
becomes clogged with coffee grinds:
- Insert the thinner ‘FILTER’ Cleaning Pin
in the exit hole and remove.
- Place Filter Basket into Portafilter
(without coffee grinds) and insert into
Group Head.
- Press the ONE CUP BUTTON.
- Allow water to run through
Care and cleaning – Espresso machine Care and cleaning – Espresso machine
ESPRESSO
MACHINE
CLEANING
TABLETS
STEAM
INSERT
UNSCREW
ESPRESSO
MACHINE
CLEANING
TABLETS
D
U
A
L
W
A
L
L
FILTER
INSERT
34 35
Conical Burrs are used to grind coffee beans
to a suitable size for espresso extraction.
Deposits of grinds & oils build up over time,
affecting the taste of the espresso and
operation of the integrated Grinder.
Cleaning Grinding Cradle & Grind Outlet
• Weekly
Remove any coffee grinds from the
Grinding Cradle & Grind Outlet with the
Cleaning Brush and wipe with a damp
cloth, wipe dry.
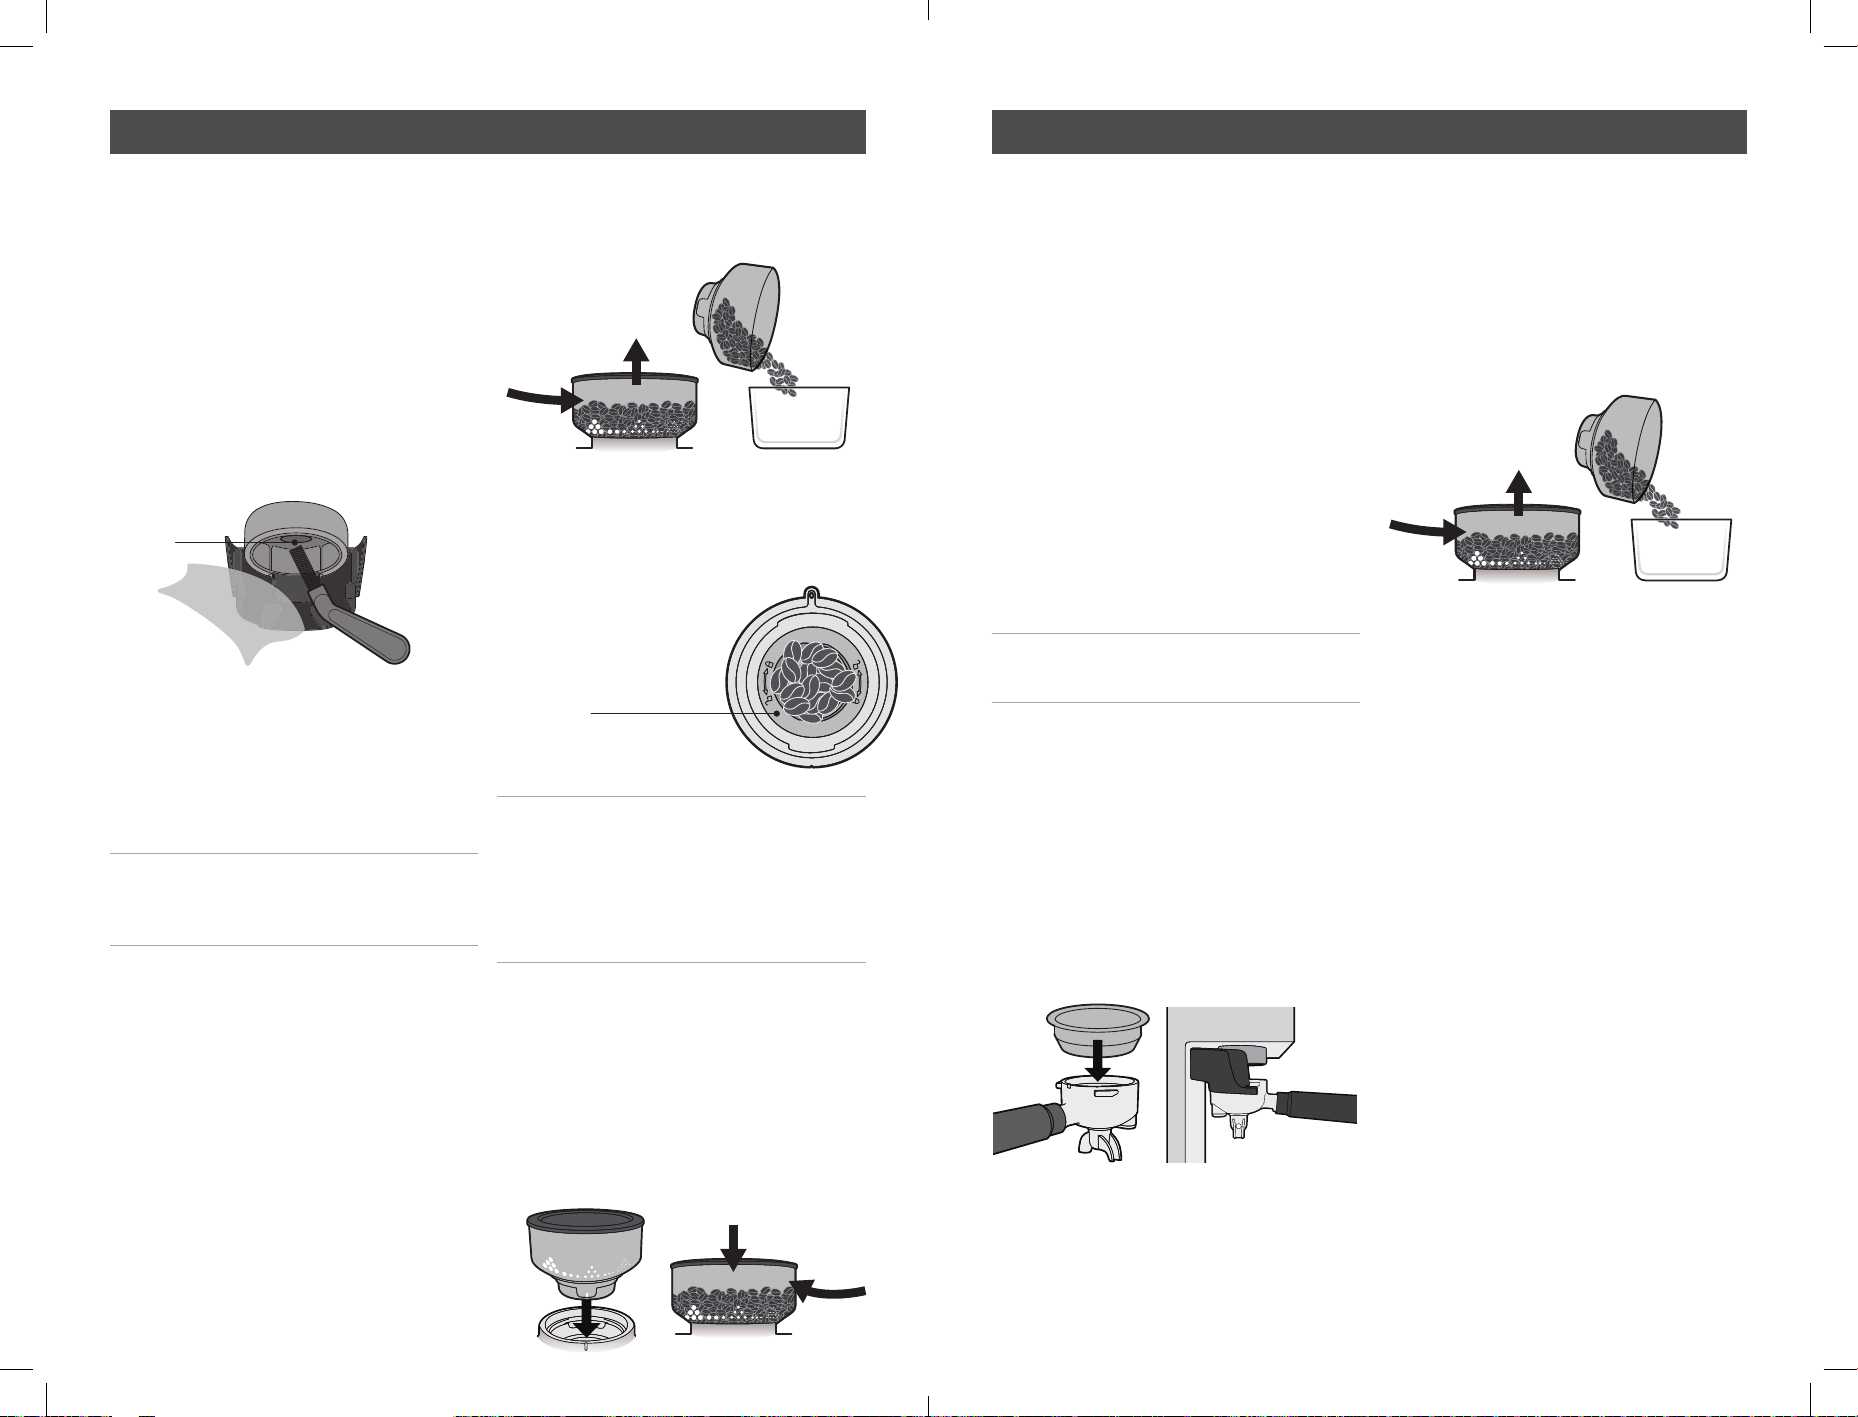
Cleaning the Bean Hopper
• 2-3 Months
If the Grinder is used frequently (everyday),
the Bean Hopper needs to be cleaned to
ensure best performance.
CAUTION: To prevent damage to the
appliance do not use alkaline cleaning
agents, abrasives or metal scourers.
WARNING: Do not immerse the machine
in water.
• Preparing to Clean Bean Hopper
- Turn off the machine, switch off & unplug
at power outlet.
- Make note of the current Grind Setting (to
use as the starting point after cleaning).
• Remove and Clean Bean Hopper
- Turn Bean Hopper fully anti-clockwise, to
close the Hopper Gates and unlock the
Bean Hopper.
Remove the Bean Hopper from the Grinder
Collar and store any remaining beans
in an airtight container to preserve their
freshness.
- Wash the Bean Hopper in warm soapy
water, then rinse & dry. Let the Bean
Hopper stand to allow thorough air drying
before replacing.
• Replace Bean Hopper
- Ensure the Grinder
Collar is clear of
coffee beans or grinds.
Note: Coffee beans and grinds caught
under the Top Burr may prevent the Top
Burr from inserting properly and the
Bean Hopper will not fit correctly. See
“Cleaning Top Burr” for instructions on
emptying the grind system.
- Ensure the Hopper Guide is aligned with
the vertical white lines on the Hopper
base.
- Align & insert the Bean Hopper into the
Grinder Collar and firmly pushing down
turn clockwise to lock into place and
open the Hopper Guide.
- Reset to the Grind Setting noted prior to
cleaning.
Cleaning & Unblocking Grinder Burrs,
Collar, Grind Chamber and Outlet
• 1-2 Months
If the Grinder is used frequently (everyday),
the Burrs need to be cleaned to ensure
best performance of the integrated Grinder.
Regular cleaning helps the Burrs achieve
consistent grinding results, which is
especially important when grinding coffee
beans for espresso.
• Preparing to Clean
- Turn off the machine, switch off and
unplug at power outlet.
CAUTION: Care should be taken when
cleaning Grinder Burrs as they are sharp.
• Grind Off Excess Coffee Beans
- The machine is on and in the READY
state.
- Make note of the current Grind Setting (to
use as the starting point after cleaning).
- Insert Two Cup Filter Basket into the
Portafilter.
- Insert Portafilter into Grinding Cradle.
- Turn Bean Hopper fully anti-clockwise to
close the Hopper Gates and unlock the
Bean Hopper. The Bean Hopper will pop
up slightly.
- Remove the Bean Hopper from the
Grinder Collar and store any remaining
coffee beans in an airtight container to
preserve their freshness.
- Reinstall the bean hopper and rotate to
setting 30. Push down on the portafilter
to activate the grinder, and hold until the
remain beans are ground and dispensed
(you will hear the sound of the motor
change).
- Rotate and remove the bean hopper again
- Remove the Portafilter and dispose of the
waste grinds as these will be too coarse
for espresso coffee.
• Cleaning Top Burr
- Rotate to unlock and lift the Top Burr
from the Grinder Collar using the handle.
- Wash the Top Burr in warm soapy water
with a mild detergent, rinse & dry.
Care and cleaning – Grinder Care and cleaning – Grinder
IMAGE IB014
CLEAR OF
COFFEE BEANS
& GRINDS
1. TURN
2. REMOVE
AIR TIGHT
CONTAINER
1. ALIGN HOPPER GUIDE
3. TURN
2. INSERT
GRINDER
OUTLET
TWO CUP
AIR TIGHT
CONTAINER
1. TURN
2. REMOVE
36 37
• Cleaning & Unblocking Bottom Burr and
Grind Chamber
- Use the Cleaning Brush or a Vacuum
Cleaner to thoroughly clear the parts and
surfaces in the Grind Chamber of fine
coffee grinds. A damp cloth can be used
to wipe the inside of the Grind Collar.
- Allow thorough air drying.
WARNING: Do not pour water or any
other liquid into the Grind Chamber.
• Cleaning & Unblocking Grind Outlet
- Feed the Cleaning Brush up into the
Grind Outlet from below, wiping &
brushing the inside surfaces.
- If the Grind Outlet is clear the bristles
will be visible inside the Grind Chamber.
• Replace Top Burr
- Identify the locking fixtures on the
underside of the Top Burr, underneath
the moulded padlock symbols.
- Using the handle insert the Top Burr
into the Grinder Collar, ensuring locking
features align.
- Rotate the Top Bur approximately 30
degrees clockwise to lock, the burr
should click into position.
- When correctly seated, the Top Burr will
be flush with the surface of the Grinder
Collar.
Replace Bean Hopper
- Ensure the Hopper Guide is aligned, and
the tab on the Hopper base locates into
the cut-out on the rear of the housing.
- Align & insert the Bean Hopper into the
Grinder Collar and firmly pushing down
turn clockwise to lock into place and
open the Hopper Guide.
- Reset to the Grinder Setting noted prior
to cleaning.
- Refill the Bean Hopper with coffee beans.
Note: We strongly advise not to use
Torrefacto style coffee beans in your
Barista Signature Espresso Maker.
Due to the high sugar content, the burr
grinder assembly will quickly clog.
After continued use, your Barista Signature
Espresso Maker Machine may develop a
build-up of mineral deposits and therefore
require occasional descaling.
We recommend descaling your Barista
Signature Espresso Maker Machine every
4-6 months, although this period will
depend on the hardness of water and
frequency of use.
Descaling Solution
You have 2 options:
A. Espresso Machine Descaling Tablets.
or
B. White vinegar & warm water.
Descaling Cycle
The Descaling Cycle takes approximately
10 minutes to complete.
Important: If the Descaling Cycle is not
completed or stopped part way through
any of the Descaling Steps, then you will
need to start the Descaling Cycle again
from the beginning.
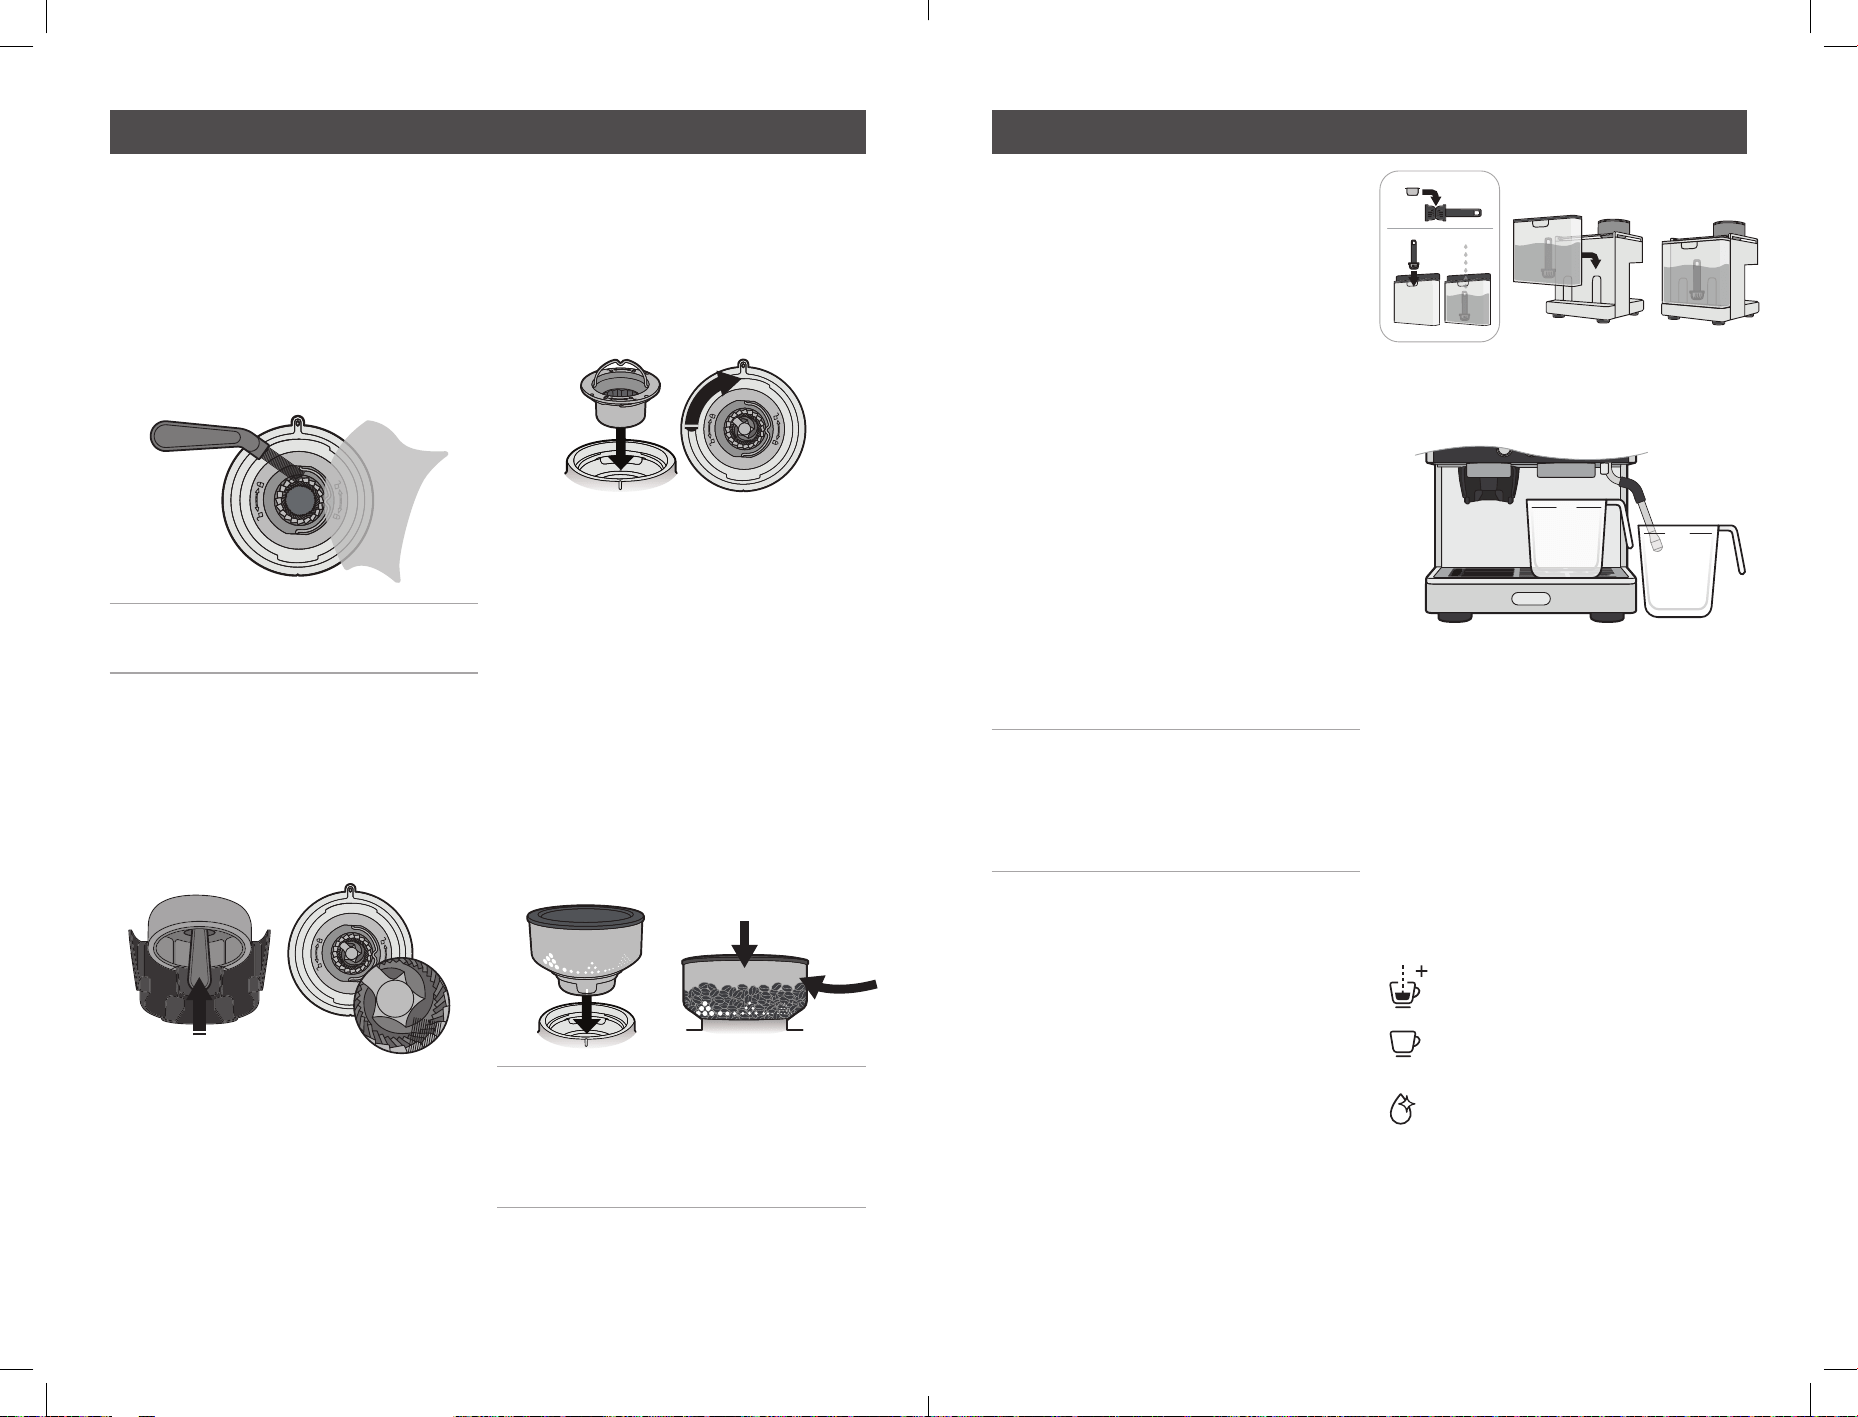
Preparing for Descaling Cycle
- Remove water filter and water filter
holder from the water reservoir.
• Fill Water Reservoir with Solution
A. Fill Water Reservoir with 1 Litre of warm
water. Add one Descaling Tablet. Allow
tablet to fully dissolve.
or
B. In an empty Water Reservoir add 1½
tablespoons of white vinegar. Fill Water
Reservoir with 1 Litre of warm water. Allow
solution to mix thoroughly.
- Insert the Water Reservoir into position.
- Place a 1 Litre container under the
Group Head and the hot water tap.
• Check Power
Ensure that:
- The Power Plug is inserted into the outlet
& switched on.
- The DIAL is in the vertical position.
- The Barista Signature Espresso Maker
machine is on and in the READY state.
• Access the Descaling Cycle
Simultaneously press & hold
the Manual Brew and Single
shot brew buttons for 3
seconds. The Barista Signature
Espresso Maker machine will
beep 3 times and the clean/
descale icon will begin to pulse.
- The descale icon will Pulse throughout
the duration of the Descaling cycle.
Care and cleaning – Grinder Descaling cycle – Espresso machine
1. ALIGN HOPPER GUIDE
3. TURN
2. INSERT
1L
1L
38 39
Important: The Descaling Cycle
can be exited at any point by
pressing the MANUAL BREW
BUTTON.
Step 1. Descaling Cycle of Portafilter
and steam wand
- Turn the DIAL to the STEAM position.
- The STEAM LIGHT will
now be fully illuminated.
- The Pump will start and hot water will
run from the Group Head & Steam Wand.
Over a pre-defined period the Pump will
make different noises.
- When hot water has stopped being
released from the Group Head & Steam
Wand, this step is finished.
- To indicate the machine has finished this
step the machine will beep, the STEAM
LIGHT will now start to flash.
- Turn the DIAL to the vertical position, and
the Steam light will extinguish.
- The Descale icon will
continue to pulse.
Move to Step 2.
Step 2. Descaling Cycle of Hot water tap
Turn the DIAL to the HOT WATER position.
- The HOT WATER LIGHT will now be fully
illuminated.
- The Pump will start and hot water will
run from the Hot Water tap. Over a
pre-defined period the Pump will make
different noises.
- When hot water has stopped being
released from the Hot water tap, this step
is finished.
- To indicate the machine has finished
this step the machine will beep, the HOT
WATER LIGHT will now start to flash.
- Turn the DIAL to the vertical position, and
the hot water light will extinguish
- The Descale icon
will continue to pulse.
Move to Step 3.
Step 3. Preparing for Purge
Important: There is a maximum of 5
minutes allowed to complete this step
before the Descaling Cycle will exit.
- The Steam Wand & Group Head now need
to be purged clean with fresh water to
remove descaling solution.
• Rinse Water Reservoir
Remove the Water Reservoir and rinse
thoroughly under running water, ensuring
that all traces of the descaling solution.
• Fill Water Reservoir
- Fill the Water Reservoir to the ‘Max’ line
with cold water and insert into position.
• Empty Containers
- Empty water from the containers and
replace.
Move to Step 4.
Step 4. Start Purge
- Turn the DIAL to the STEAM position.
- The STEAM LIGHT will
now be fully illuminated.
- The Pump will start and hot water will
run from the Group Head & Steam Wand.
- After 2 minutes water will stop pumping
and the steam light will flash.
- Return the dial to the vertical position.
- The HOT WATER LIGHT
will now be fully illuminated.
- Turn the DIAL to the HOT WATER position.
- The Pump will start and hot water will
run from the HOT WATER TAP.
- After 2 minutes water will stop pumping
and the HOT WATER TAP will flash.
- Return the dial to the vertical position.
- The Descaling Cycle is complete.
Descaling Cycle Complete
- To indicate the completion of the
Descaling Cycle the machine will beep
and the Descale LIGHT will stop flashing.
Descaling Cycle Clean Up
- Empty water from the containers and
clean, ensuring that all traces of the
descaling solution have been removed.
- Reinstall the water filter and water filter
holder into the water reservoir.
Descaling cycle – Espresso machine Descaling cycle – Espresso machine
40 41
Accessories available for purchase
Additional Info
REPLACEMENT PARTS
For additional or replacement parts,
please visit www.breville.co.uk or
call us on 0161 621 6900.
TROUBLESHOOTING
For troubleshooting and FAQs visit:
www.breville.co.uk/faqs
AFTER SALES SERVICE
& REPLACEMENT PARTS
In the case the appliance does not
operate but is under warranty, return the
product to the place it was purchased for
a replacement. Please be aware that a
valid form of proof of purchase will be
required. For additional support, please
contact our Consumer Service Department:
Phone: 0800 028 7154
Email: BrevilleEur[email protected]om
WASTE DISPOSAL
Waste electrical products should not be
disposed of with household waste. Please
recycle where facilities exist. E-mail us at
BrevilleEur[email protected]om for further
recycling and WEEE information.
ELECTRICAL SAFETY
This appliance must be earthed. If the plug
is not suitable for the socket outlets in your
home, it can be removed and replaced by a
plug of the correct type.
If the fuse is moulded plug needs to be
changed, the fuse cover must be refitted.
The appliance must not used without the
fuse cover fitted.
If the plug fuse requires replacement,
a fuse of the same rating as that fitted by
the manufacturer must be used. In order
to prevent a hazard do not fit a fuse of
a lower or higher rating.
If the plug is unsuitable, it should be
dismantled and removed from the supply
cord and an appropriate plug fitted as
detailed. If you remove the plug it must not
be connected to a 13 amp socket and the
lug must be disposed of immediately.
If the terminals in the plus are not marked
or if you are unsure about the installation
of the plug please contact a qualified
electrician.
Contact Breville customer care on
0800 525 089
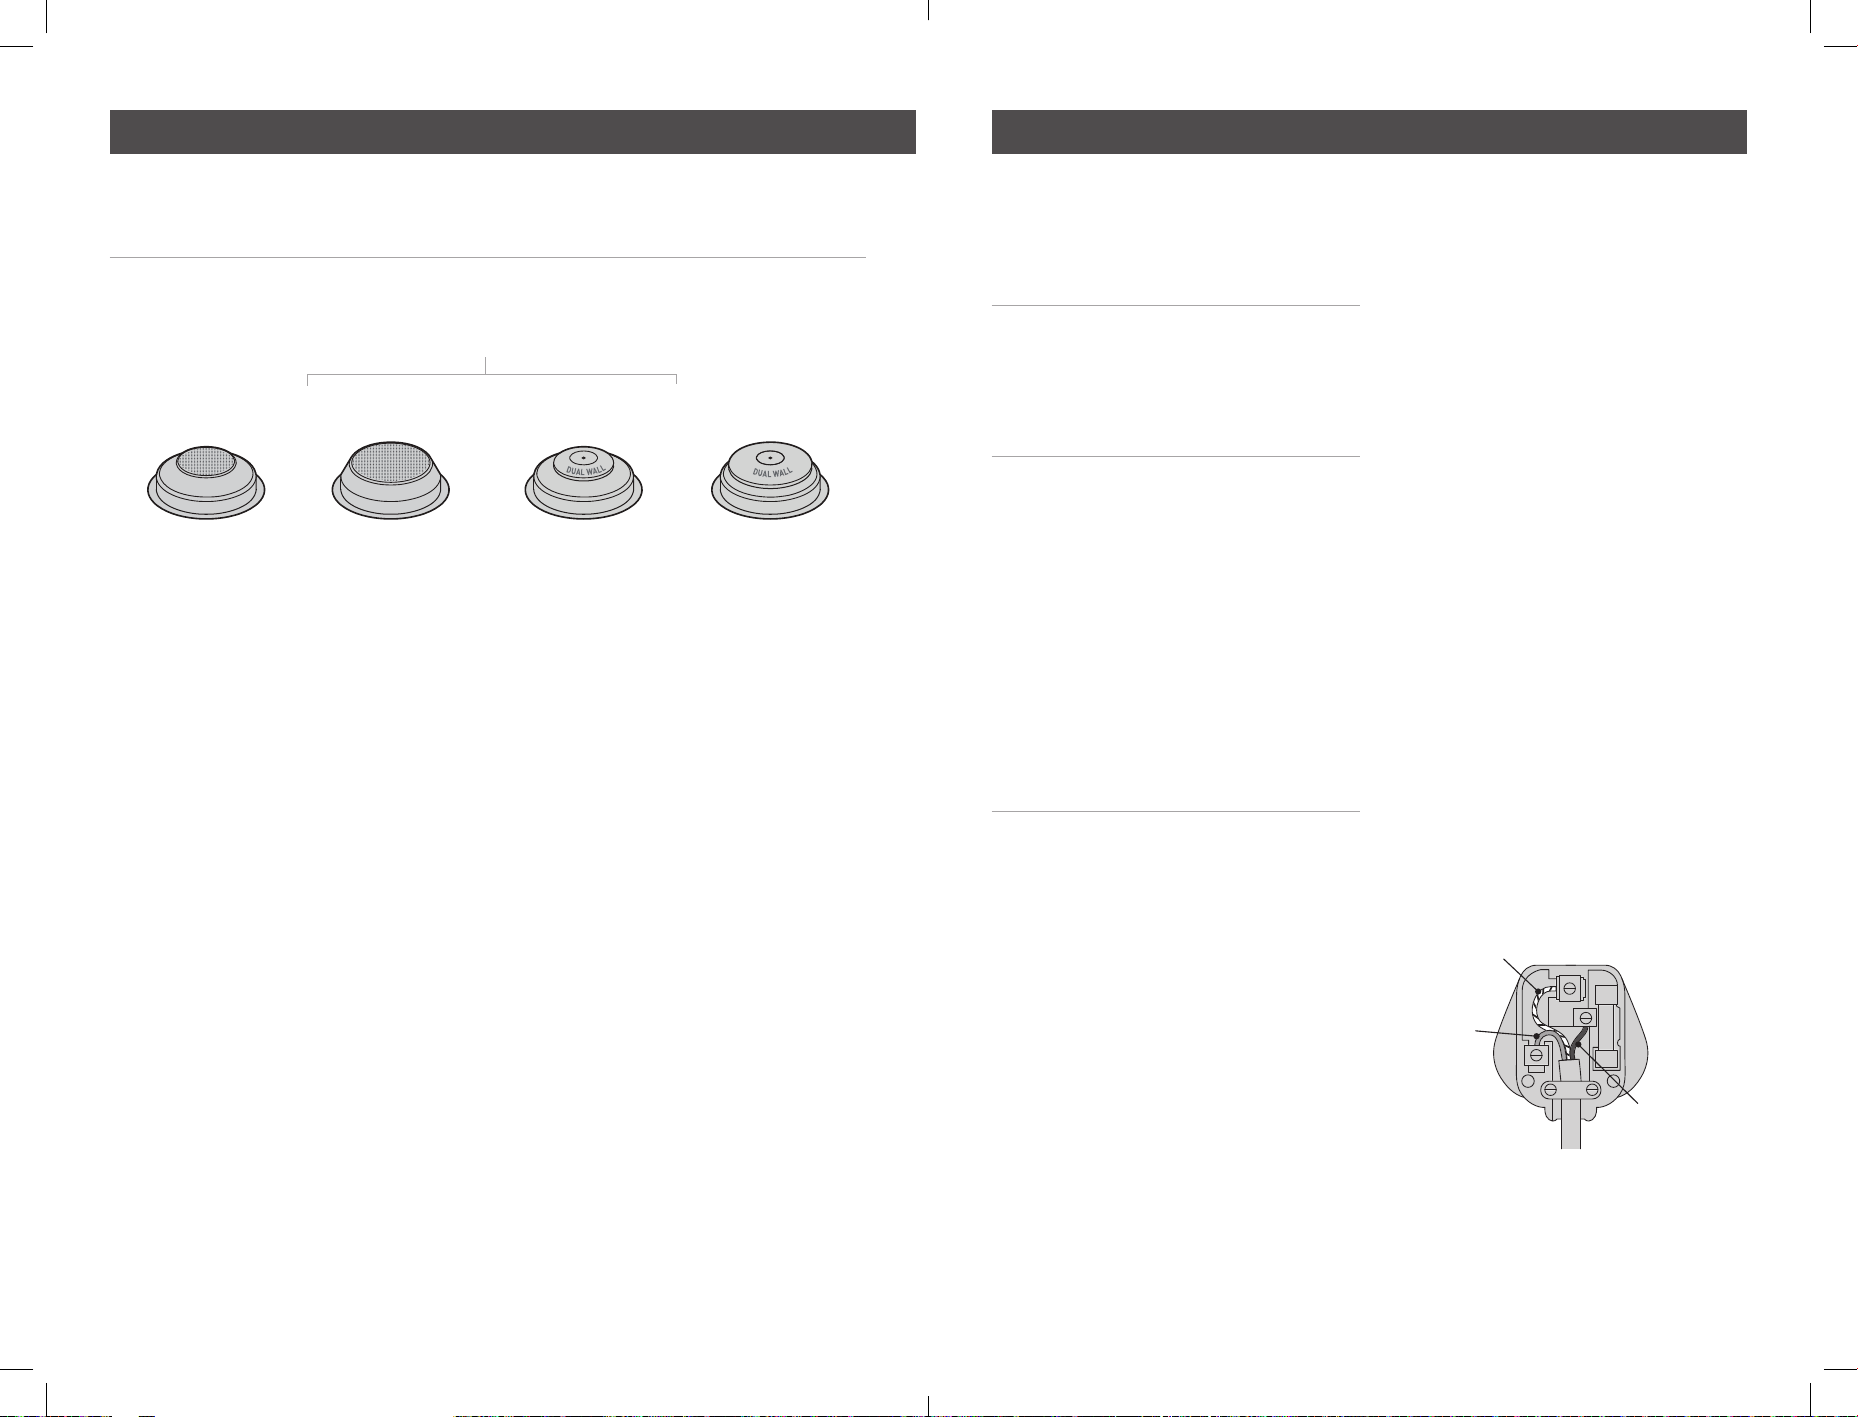
58mm Filter Baskets
Single Wall
1 CUP 1 CUP
Dual Wall
2 CUP 2 CUP
Visit Breville website to see full Espresso Machine range & accessories available.
www.breville.co.uk
D
I
S
C
F
O
R
C
L
E
A
N
I
N
G
T
A
B
L
E
T
U
S
E
T
H
I
S
S
I
D
E
U
P
D
I
S
C
F
O
R
C
L
E
A
N
I
N
G
T
A
B
L
E
T
U
S
E
T
H
I
S
S
I
D
E
U
P
D
I
S
C
F
O
R
C
L
E
A
N
I
N
G
T
A
B
L
E
T
U
S
E
T
H
I
S
S
I
D
E
U
P
D
I
S
C
F
O
R
C
L
E
A
N
I
N
G
T
A
B
L
E
T
U
S
E
T
H
I
S
S
I
D
E
U
P
D
I
S
C
F
O
R
C
L
E
A
N
I
N
G
T
A
B
L
E
T
U
S
E
T
H
I
S
S
I
D
E
U
P
D
I
S
C
F
O
R
C
L
E
A
N
I
N
G
T
A
B
L
E
T
U
S
E
T
H
I
S
S
I
D
E
U
P
D
I
S
C
F
O
R
C
L
E
A
N
I
N
G
T
A
B
L
E
T
U
S
E
T
H
I
S
S
I
D
E
U
P
D
I
S
C
F
O
R
C
L
E
A
N
I
N
G
T
A
B
L
E
T
U
S
E
T
H
I
S
S
I
D
E
U
P
BLUE
(NEUTRAL)
BROWN
(LIVE)
GREEN/YELLOW
Plug should be ASTA approved to BS1363
Fuse should be ASTA approved to BS1362
Ensure that the outer sheath of the
cable is firmly held by the cord grip
(EARTH)

42 43
Notes
Notes

Newell Brands UK Limited
5400 Lakeside, Cheadle Royal Business Park,
Cheadle, SK8 3
GQ, United Kingdom
Newell Poland Services Sp. z o. o.,
Plac Andersa 7, 61-894 Poznań, Poland
Email: BrevilleEur[email protected]om
UK Phone: 0800 028 7154
©2023 Newell Brands UK Limited. All rights reserved.
Newell Brands UK Limited and Newell Poland Services Sp. z o. o. are subsidiaries of
Newell Brands Inc. The product you buy may differ slightly from the one shown in this
Use Guide due to continuing product development.
P/N: ART0000986274