

SMART40, SMART 40E, SMART48, SMART
48E, SMART56, SMART 56E, SMART65
EN Operator's manual 2-16

Contents
Introduction..................................................................... 2
Safety..............................................................................3
Operation........................................................................ 6
Maintenance................................................................... 8
Troubleshooting............................................................ 11
Storage and disposal.................................................... 13
Technical data.............................................................. 14
Declaration of Conformity............................................. 16
Introduction
Product description
The product is a concrete vibrator with a built-in
frequency converter.
Intended use
The product is for professional operation only. The
product removes air bubbles from wet concrete. Do not
use the product for other tasks.
Product overview
1
2
3
9
8
7
6
5
4
10
1. End cap
2. Vibrator head
3. Hose
4. LED indicator
5. ON/OFF button
6. Frequency converter
7. Rating plate
8. Rubber sleeve
9. Electrical cable with power plug
10. Operator's manual
Symbols on the product
WARNING: This product can be
dangerous and cause serious injury or
death to the operator or others. Be careful
and use the product correctly.
Read the manual carefully and make
sure that you understand the instructions
before you use the product.
Use approved protective gloves.
Use hearing protection.
This product is in compliance with
applicable EC directives.
2 1004 - 005 -
Note: Other symbols/decals on the product refer to
special certification requirements for some markets.
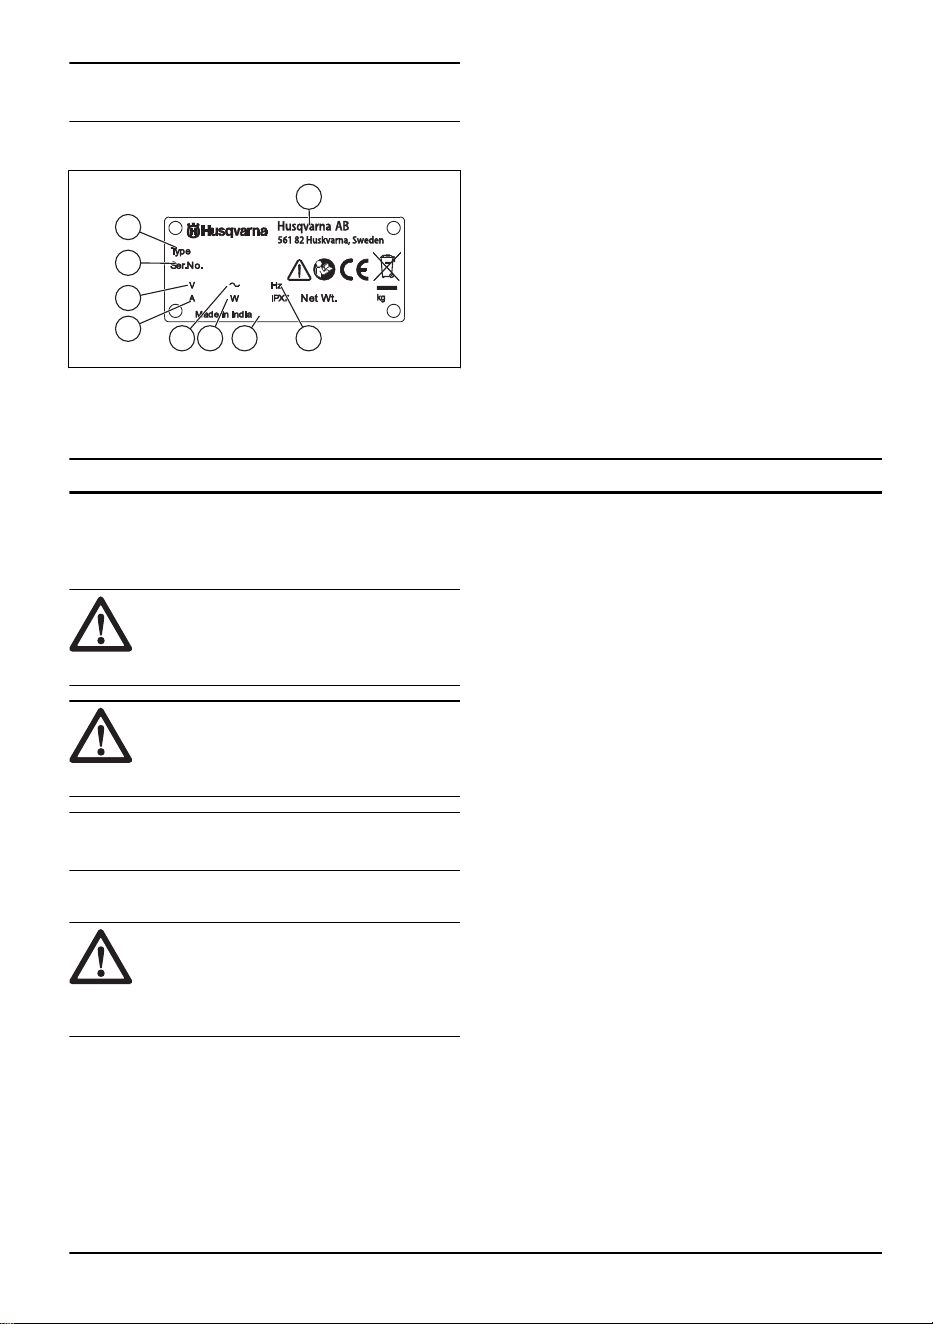
Type plate
3
4
5
9876
1
2
1. Current, A
2. Voltage, V
3. Serial number
4. Product type
5. Manufacturer
6. Phase
7. Rated power
8. Production year
9. Frequency, Hz
Product damage
We are not responsible for damages to our product if:
• the product is incorrectly repaired.
• the product is repaired with parts that are not
from the manufacturer or not approved by the
manufacturer.
• the product has an accessory that is not from the
manufacturer or not approved by the manufacturer.
• the product is not repaired at an approved service
center or by an approved authority.
Safety
Safety definitions
Warnings, cautions and notes are used to point out
specially important parts of the manual.
WARNING: Used if there is a risk of
injury or death for the operator or bystanders
if the instructions in the manual are not
obeyed.
CAUTION: Used if there is a risk of
damage to the product, other materials or
the adjacent area if the instructions in the
manual are not obeyed.
Note: Used to give more information that is necessary
in a given situation.
General machine safety warnings
WARNING: Read all safety warnings,
instructions, illustrations and specifications
provided with this machine. Failure to follow
all instructions listed below may result in
electric shock, fire and/or serious injury.
• Save all warnings and instructions for future
reference. The term "machine" in the warnings refers
to your mains-operated (corded) machine or battery-
operated (cordless) machine.
Work area safety
• Keep work area clean and well lit. Cluttered or dark
areas invite accidents.
•
Do not operate machines in explosive atmospheres,
such as in the presence of flammable liquids, gases
or dust.Machines create sparks which may ignite the
dust or fumes.
• Keep children and bystanders away while operating
a machine. Distractions can cause you to lose
control.
Electrical safety
• Machine plugs must match the outlet. Never modify
the plug in any way. Do not use any adapter plugs
with earthed (grounded) machines. Unmodified plugs
and matching outlets will reduce risk of electric
shock.
• Avoid body contact with earthed or grounded
surfaces, such as pipes, radiators, ranges and
refrigerators. There is an increased risk of electric
shock if your body is earthed or grounded.
• Do not expose machines to rain or wet conditions.
Water entering a machine will increase the risk of
electric shock.
• Do not abuse the cord. Never use the cord for
carrying, pulling or unplugging the machine. Keep
cord away from heat, oil, sharp edges or moving
parts. Damaged or entangled cords increase the risk
of electric shock.
• When operating a machine outdoors, use an
extension cord suitable for outdoor use. Use of a
cord suitable for outdoor use reduces the risk of
electric shock.
• If operating a machine in a damp location is
unavoidable, use a residual current device (RCD)
protected supply. Use of a RCD reduces the risk of
electric shock.
1004 - 005 -
3

Personal safety
• Stay alert, watch what you are doing and use
common sense when operating a machine. Do not
use a machine while you are tired or under the
influence of drugs, alcohol or medication. A moment
of inattention while operating machines may result in
serious personal injury.
• Use personal protective equipment. Always wear
eye protection. Protective equipment such as dust
mask, non-skid safety shoes, hard hat or hearing
protection used for appropriate conditions will reduce
personal injuries.
• Prevent unintentional starting. Ensure the switch
is in the off-position before connecting to power
source and/or battery pack, picking up or carrying
the machine. Carrying machines with your finger
on the switch or energising machines that have the
switch on invites accidents.
• Remove any adjusting key or wrench before turning
the machine on. A wrench or a key left attached to
a rotating part of the machine may result in personal
injury.
• Do not overreach. Keep proper footing and balance
at all times. This enables better control of the
machine in unexpected situations.
• Dress properly. Do not wear loose clothing or
jewellery. Keep your hair and clothing away from
moving parts. Loose clothes, jewellery or long hair
can be caught in moving parts.
• If devices are provided for the connection of dust
extraction and collection facilities, ensure these are
connected and properly used. Use of dust collection
can reduce dust-related hazards.
• Do not let familiarity gained from frequent use of
machines allow you to become complacent and
ignore machine safety principles. A careless action
can cause severe injury within a fraction of a second.
Machine use and care
• Do not force the machine. Use the correct machine
for your application. The correct machine will do the
job better and safer at the rate for which it was
designed.
• Do not use the machine if the switch does not turn
it on and off. Any machine that cannot be controlled
with the switch is dangerous and must be repaired.
• Disconnect the plug from the power source and/or
remove the battery pack, if detachable, from the
machine before making any adjustments, changing
accessories, or storing machines. Such preventive
safety measures reduce the risk of starting the
machine accidentally.
• Store idle machines out of the reach of children and
do not allow persons unfamiliar with the machines
or these instructions to operate the machines.
Machines are dangerous in the hands of untrained
users.
• Maintain machines and accessories. Check for
misalignment or binding of moving parts, breakage
of parts and any other condition that may affect
the machines´s operation. If damaged, have the
machine repaired before use. Many accidents are
caused by poorly maintained machines.
• Keep cutting tools sharp and clean. Properly
maintained cutting machines with sharp cutting
edges are less likely to bind and are easier to
control.
• Use the machine, accessories and bits etc. in
accordance with these instructions, taking into
account the working conditions and the work to
be performed. Use of the machine for operations
different from those intended could result in a
hazardous situation.
• Keep handles and grasping surfaces dry, clean
and free from oil and grease. Slippery handles and
grasping surfaces do not allow for safe handling and
control of the machine in unexpected situations.
Service
• Have your power tool serviced by a qualified repair
person using only identical replacement parts. This
will ensure that the safety of the power tool is
maintained.
• Never service damaged battery packs. Service of
battery packs should only be performed by the
manufacturer or authorized service providers.
General safety instructions
WARNING: Read the warning
instructions that follow before you use the
product.
• This product is a dangerous tool if you are not
careful or if you use the product incorrectly. This
product can cause serious injury or death to the
operator or others. Before you use the product,
you must read and understand the contents of this
operator’s manual.
• This product is not intended for use by persons
(including children) with reduced physical, sensory
or mental capabilities, or lack of experience and
knowledge.
• Save all warnings and instructions.
• Comply with all applicable laws and regulations.
• The operator and the employer of the operator must
know and prevent the risks during operation of the
product.
• Do not let a person operate the product unless they
read and understand the contents of the operator's
manual.
• Do not operate the product unless you receive
training before use. Make sure that all operators
receive training.
• Do not let a child operate the product.
• Only let approved persons operate the product.
• The operator is responsible for accidents that occur
to other persons or their property.
4
1004 - 005 -

• Do not use the product if you are tired, ill, or under
the influence of alcohol, drugs or medicine.
• Always be careful and use your common sense.
• This product produces an electromagnetic field
during operation. This field can under some
circumstances interfere with active or passive
medical implants. To decrease the risk of serious
injury or death, we recommend persons with medical
implants to speak to their physician and the medical
implant manufacturer before operating this product.
• Keep the product clean. Make sure that you can
clearly read signs and decals.
• Do not use the product if it is damaged.
• Do not make modifications to this product.
• Do not operate the product if it is possible that other
persons have made modifications to the product.
Safety instructions for operation
WARNING: Read the warning
instructions that follow before you use the
product.
• Make sure that you know how to stop the product
quickly in an emergency.
• The operator must have the physical strength that is
necessary to operate the product safely.
• Use personal protective equipment. Refer to
Personal protective equipment on page 6
.
• Make sure that only approved persons are in the
work area.
• Keep the work area clean and bright.
• Make sure that you are in a safe and stable position
during operation.
• Make sure that there is no risk that you or the
product can fall from a height.
• Make sure that there is no grease or oil on the
handle.
• Do not use the product in areas where fire or
explosions can occur.
• The product can cause objects to eject at high
speed. Make sure that all persons in the work
area use approved personal protective equipment.
Remove loose objects from the work area.
• Before you go away from the product, stop the
product and disconnect the power source.
• Make sure that the power outlet voltage agrees with
the voltage that is given on the rating plate of the
product.
• Make sure that clothes, long hair and jewelry do not
get caught in moving parts.
• Do not sit on the product.
• Do not hit the product.
• Make sure that you or other persons cannot get
caught in and fall on cables, hoses and shafts in the
work area.
• Before you operate the product, find out if there are
hidden wires, electrical cables or other sources of
electricity. Do not operate the product unless you
know that it is in a safe work area.
Vibration safety
WARNING: Read the warning
instructions that follow before you use the
product.
• During operation of the product, vibrations go from
the product to the operator. Regular and frequent
operation of the product can cause or increase the
degree of injuries to the operator. Injuries can occur
in fingers, hands, wrists, arms, shoulders, and/or
nerves and blood supply or other body parts. The
injuries can be debilitating and/or permanent, and
can increase gradually during weeks, months or
years. Possible injuries include damage to the blood
circulation system, the nervous system, joints, and
other body structures.
• Symptoms can occur during operation of the product
or at other times. If you have symptoms and
continue to operate the product, the symptoms can
increase or become permanent. If these or other
symptoms occur, get medical aid:
• Numbness, loss of feeling, tingling, pricking,
pain, burning, throbbing, stiffness, clumsiness,
loss of strength, changes in skin color or
condition.
• Symptoms can increase in cold temperatures. Use
warm clothing and keep your hands warm and dry
when you operate the product in cold environments.
• Do maintenance on and operate the product as
given in the operator's manual, to keep a correct
vibration level.
• The product has a vibration damping system that
decreases the vibrations from the handles to the
operator. Let the product do the work. Do not
push the product with force. Hold the product at
the handles lightly, but make sure that you control
the product and operate it safely. Do not push the
handles into the end stops more than necessary.
• Keep your hands on the handle or handles only.
Keep all other body parts away from the product.
• Stop the product immediately if strong vibrations
suddenly occurs. Do not continue the operation
before the cause of the increased vibrations is
removed.
Dust safety
WARNING:
Read the warning
instructions that follow before you use the
product.
• Operation of the product can cause dust in the
air. Dust can cause serious injury and permanent
health problems. Silica dust is regulated as harmful
by several authorities. These are examples of such
health problems:
1004 - 005 -
5
• The fatal lung diseases chronic bronchitis,
silicosis and pulmonary fibrosis
• Cancer
• Birth defects
• Skin inflammation
• Use correct equipment to decrease the quantity of
dust and fumes in the air and to decrease dust on
work equipment, surfaces, clothing and body parts.
Examples of controls are dust collection systems
and water sprays to bind dust. Decrease dust at
the source where possible. Make sure that the
equipment is correctly installed and used and that
regular maintenance is done.
• Use approved respiratory protection. Make sure
that the respiratory protection is applicable for the
dangerous materials in the work area.
• Make sure that the airflow is sufficient in the work
area.
• If it is possible, point the exhaust of the product
where it cannot cause dust to go into the air.
Noise safety
WARNING: Read the warning
instructions that follow before you use the
product.
• High noise levels and long-term exposure to noise
can cause noise-induced hearing loss.
• To keep the noise level to a minimum, do
maintenance on and operate the product as given
in the operator's manual.
• Use approved hearing protection while you operate
the product.
• Listen for warning signals and voices when you use
hearing protection. Remove the hearing protection
when the product is stopped, unless hearing
protection is necessary for the noise level in the work
area.
Personal protective equipment
WARNING:
Read the warning
instructions that follow before you use the
product.
• Always use approved personal protective equipment
when you operate the product. Personal protective
equipment cannot fully prevent injury but it
decreases the degree of injury if an accident does
occur. Let your dealer help you select the correct
personal protective equipment.
• Regularly do a check of the condition of the personal
protective equipment.
• Use an approved protective helmet.
• Use approved hearing protection.
• Use approved respiratory protection.
• Use approved eye protection with side protection.
• Use protective gloves.
• Use boots with steel toe-cap and non-slip sole.
• Use approved work clothing or equivalent close-
fitting clothing that has long sleeves and long legs.
Safety instructions for maintenance
WARNING: Read the warning
instructions that follow before you use the
product.
• If the maintenance is not done correctly and
regularly, the risk of injury and damage to the
product increases.
• Use personal protective equipment. Refer to
Personal protective equipment on page 6
.
• Clean the product to remove dangerous material
before you do the maintenance.
• Disconnect the product from the power source
before you do the maintenance.
• Do not do modifications to the product. Modifications
that are not approved by the manufacturer can
cause serious injury or death.
• Always use original accessories and spare parts.
Accessories and spare parts that are not approved
by the manufacturer, can cause serious injury or
death.
• Replace damaged, worn or broken parts.
• Only do the maintenance as given in this operator's
manual. Let an approved service agent do all other
servicing.
• After maintenance, do a check of the vibration level
in the product. If it is not correct, speak to an
approved service agent.
• Let an approved service agent do servicing on the
product regularly.
Operation
Introduction
WARNING: Read and understand the
safety chapter before you use the product.
To start and stop the product
Note: Only use the product with a residual-current
device (RCD). The RCD must have a protection for 16 A
or more. The product is a grounded class 1 device.
6 1004 - 005 -
Note: Portable Residual Device (PRCD) is not
included. Refer to
PRCD on page 7
.
1. Connect the product to an applicable power socket.
2. Push the ON/OFF button to start the product. The
vibration starts after 1.5 seconds.
Note: The vibrations start at a very low speed and
then increases slowly to maximum speed.
3. Push the ON/OFF button to stop the product.
4. Disconnect the product from the power socket.
5. Push and hold the ON/OFF button pushed for
5 seconds. This removes the voltage from the
capacitors and prevents injury from remaining
electricity on the plug pins.
PRCD
Only use a PRCD with applicable requirements.
Requirements
for all regions
except North
America
Requirements
for North
America
Rated voltage,
VAC/Hz
220-240/50 100-130/60
Maximum rated cur-
rent, A
16 N/A
Nominal fault cur-
rent, mA
10 N/A
Switch-off time, ms <30 N/A
Protection class >IPX4 N/A
Standard IEC 61540 UL 943 or CSA
C22.2 NO.
144-1
Type class N/A A
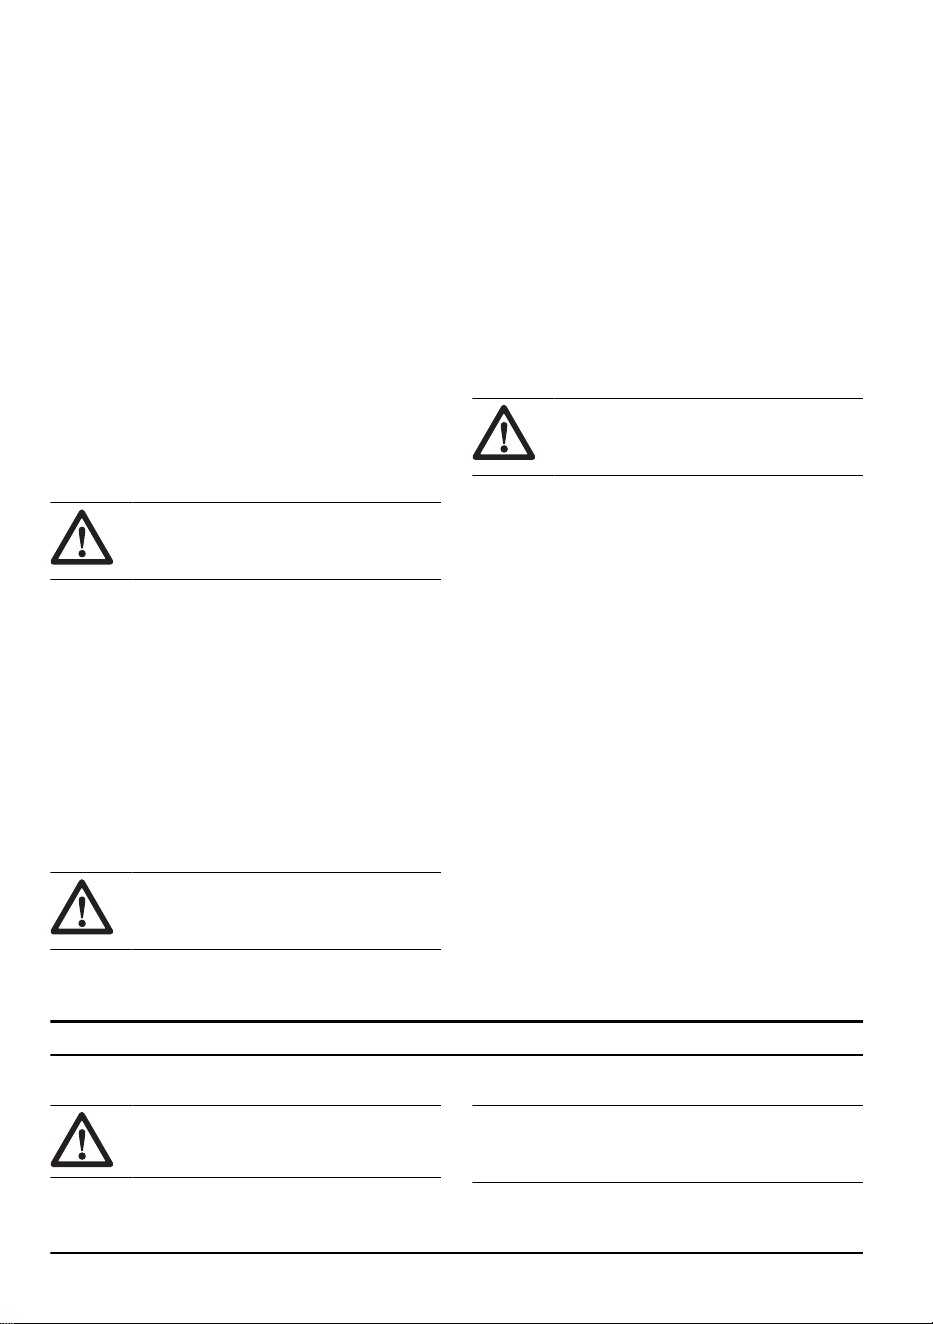
To operate the product
CAUTION: Do not use the product to
move the concrete to the side.
1. Fill concrete in equally thick layers, 30–50 cm/2–19
in. (A).
A
B
2. Put the vibrator head approximately 15 cm/6 in. (B)
down into the nearest lower layer of concrete. This
causes the layers of concrete to mix correctly.
CAUTION: Do not tilt the product
more than 45° when you put the vibrator
head in the concrete.
3. Wait approximately 10–20 seconds until the surface
around the vibrator head is shiny and no air bubbles
come to the surface.
4. Remove the vibrator head slowly to let the concrete
fill the hole from the vibrator head.
1004 - 005 -
7
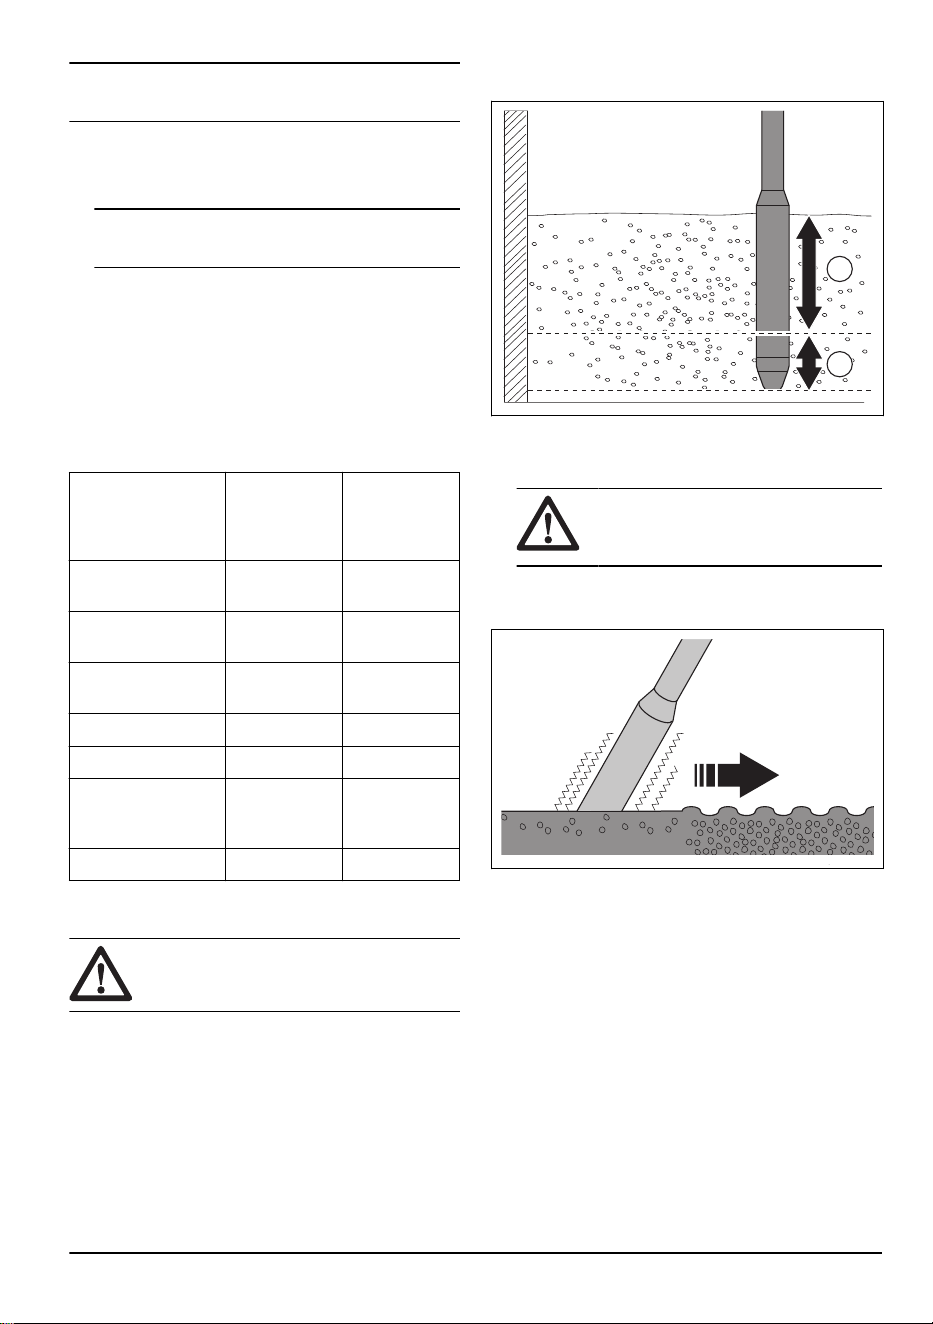
5. Put the vibrator head down into the concrete at a
distance of 30–50 cm/12–19 in. (C) from where you
put it before.
C
6. Do step 4 and 5 again and again. Continue until
the air bubbles are fully removed from the area of
concrete.
Maintenance
Introduction
WARNING: Read and understand the
safety chapter before you do maintenance
on the product.
WARNING: Before you do
maintenance on the product, push and hold
the ON/OFF button for 5 seconds. This
removes the voltage from the capacitors and
prevents injury from remaining electricity on
the plug pins.
To clean the product
CAUTION: Do not use a high-pressure
washer to clean the product.
• Use running water from a hose to clean the product.
• Remove concrete from the surfaces of the product
after each operation before the concrete becomes
hard.
• Remove grease and oil from the handle.
To remove the vibrator head
1. Disconnect the product from the power outlet.
2. Cut and discard the clamp that holds the wires
on the hose end that is adjacent to the frequency
converter.
3. Remove the cover from the frequency converter.
4. Cut the 3 connector wires and disconnect the ground
wire from the frequency converter.
5. Pull the hose from the end that is adjacent to the
frequency converter and remove the nut from the
casing.
6. Put the vibrator head in a tube vise and tighten the
tube vise fully.
7. Cut and discard the clamp that holds the wires on
the hose end that is adjacent to the vibrator head.
Pull the red hose until you can see the connectors.
8. Cut and discard the thermal insulation and
disconnect the terminals.
9. Disconnect the ground wire from the hose nipple.
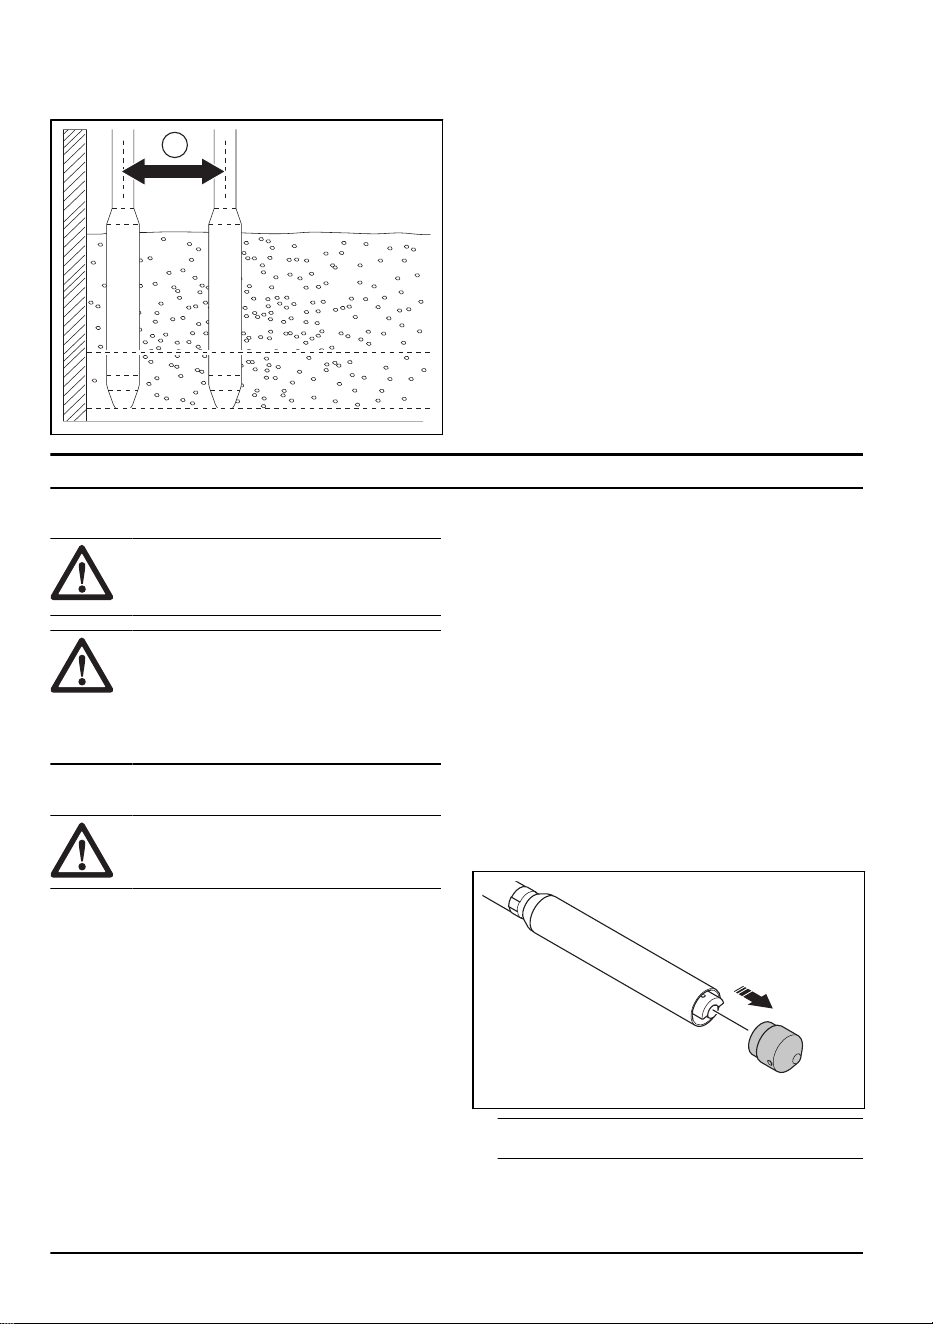
To disassemble and assemble the
vibrator head
1. Use a heat gun to apply heat to the theads of the
end cap.
2. Remove the end cap from the stator tube.
Note: The end cap has a right hand thread.
8 1004 - 005 -
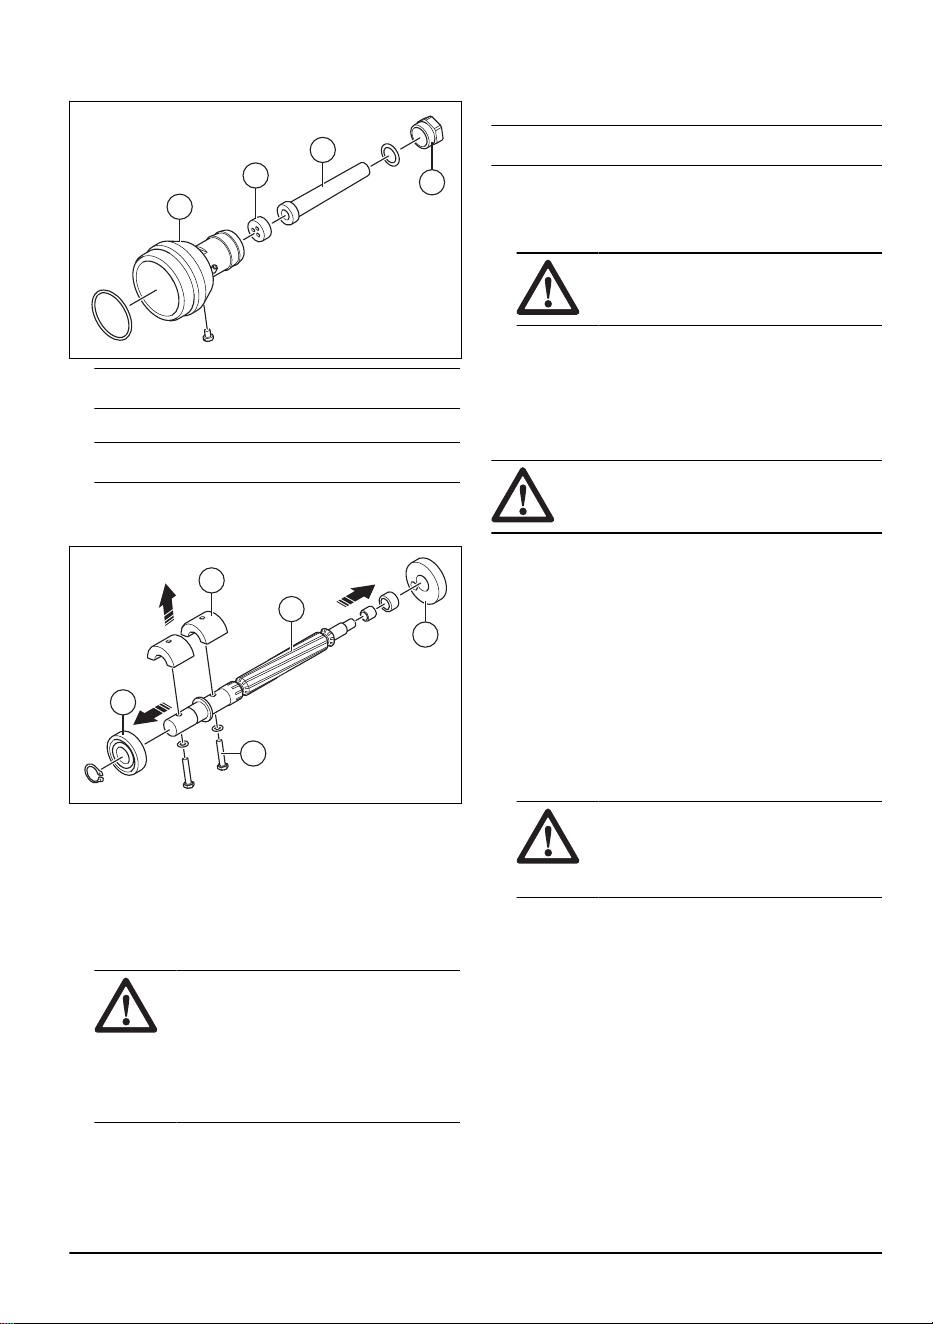
3. Remove the nut (A), the wire cover (B) and the
rubber gasket (C).
C
B
A
D
Note: The nut (A) has a right hand thread.
4. Remove the hose nipple (D).
Note: The hose nipple (D) has a right hand thread.
5. Use an applicable rod and rubber hammer to
carefully push the rotor (E) through the bearing
holder (F).
I
H
G
E
F
6. Remove the bearing holder (F), the screws (G) and
the eccentric element (H).
7. Remove the bearing (I).
8. Clean and examine the vibrator head. Refer to
To
clean and examine the vibrator head on page 9
.
9. Assemble the vibrator head in the opposite
sequence.
CAUTION:
If you replace the
screws (G), make sure that they are not
too long. If the screws go through the
eccentric element, they can touch the
inner surface of the stator tube. This
prevents movement of the rotor and can
cause damage to the product.
To clean and examine the vibrator
head
Note: Replace the O-rings regularly.
1. Examine the vibrator head for damage and wear.
Replace damaged parts.
2. Clean all parts.
CAUTION: Do not use high
pressure water to clean the drive unit.
3. Fill the vibrator head with oil, refer to
Lubrication on
page 10
.
4. Examine the end cap for damage. Replace the end
cap if it is damaged.
To install the end cap
CAUTION: Wait 6 hours after you install
the end cap before you use the product.
1. Carefully clean the threads of the vibrator head.
Make sure that the parts are dry with no oil, grease
or dirt.
2. Put oil into the end cap. Keep the end cap vertical
and make sure that no oil goes on the end cap
threads.
3. Apply 4 strings of threadlocker vertically on the end
cap threads. Make sure that you use the correct
threadlocker type, refer to
Tightening torque and
threadlocker type on page 10
. Make sure that no
threadlocker goes into the vibrator head.
4. Keep the end cap vertical and install the stator tube.
CAUTION:
Do not tilt the end cap
when you install the stator tube. If
oil goes on the end cap thread, the
threadlocker does not lock the thread.
5. Tighten the end cap to the specified torque, refer
to
Tightening torque and threadlocker type on page
10
.
To install the vibrator head
1. Connect the ground wire to the the hose nipple on
the vibrator head.
2. Attach the screw to the hose nipple and the vibrator
head with a threadlocker. Make sure that you use
the correct threadlocker type, refer to
Tightening
torque and threadlocker type on page 10
.
3. Use connectors to keep the wires together. Use
thermal insulation to connect the wires to the stator.
4. Put the wires into the red hose and put the red hose
adjacent to the gland.
1004 - 005 -
9
5. Use a clamp to connect the hose to the hose nipple
on the vibrator head.
6. Move the wires into the frequency converter casing,
through the gland.
7. Tighten the nut and put the red hose on the hose
nipple on the frequency converter. Attach the red
hose with a clamp.
8. Use connectors to connect the wires in the
frequency converter.
9. Put the cover on the frequency converter.
Lubrication
Vibrator head
SMART 40/
SMART 40E
SMART 48/
SMART 48E
SMART 56/
SMART 56E
SMART 65
Shell T46, cm
3
(cl) 5 (0.5) 10 (1) 15 (1.5) 20 (2)
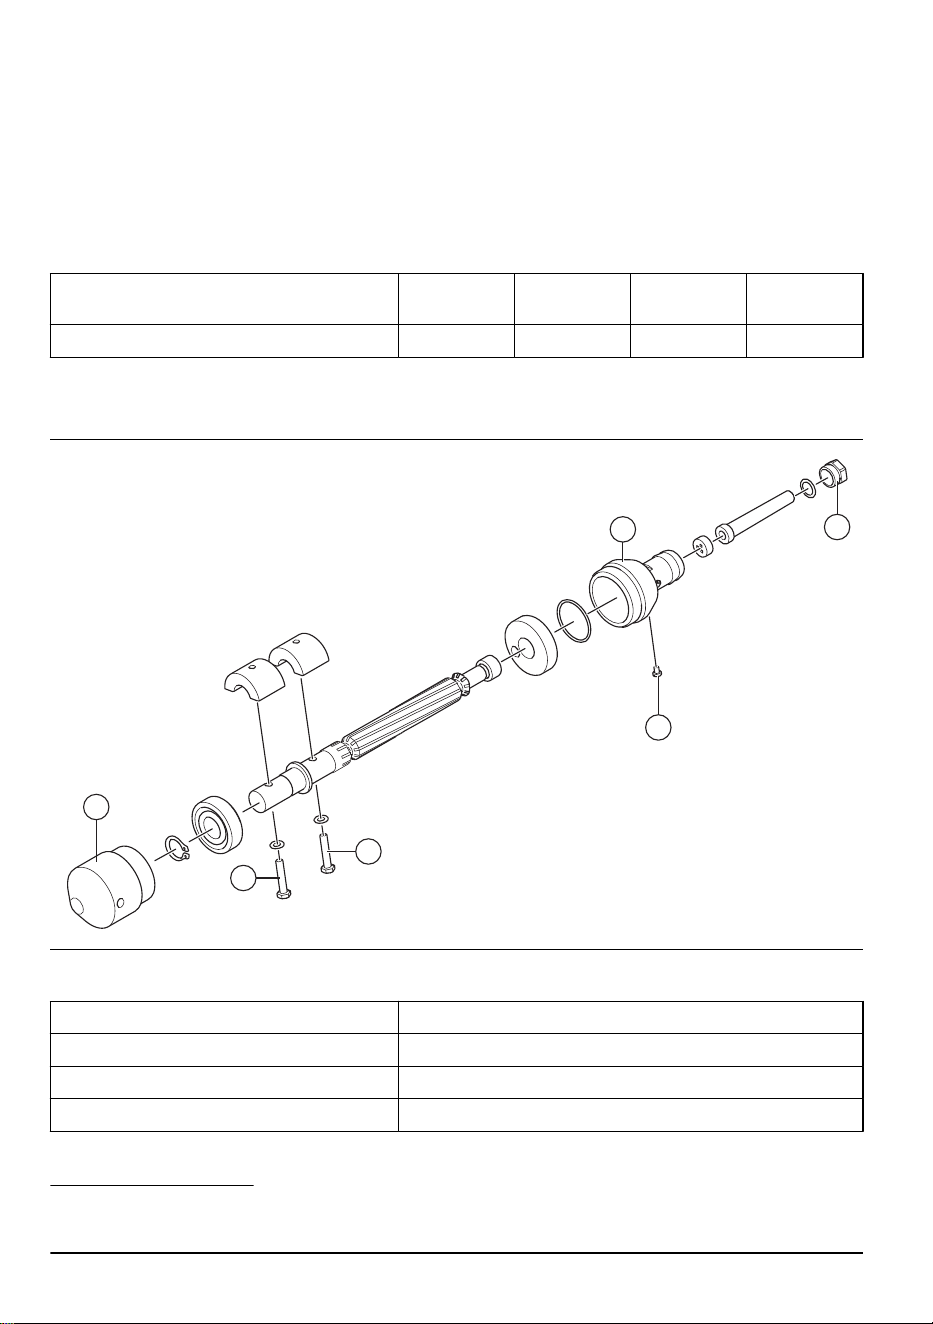
Tightening torque and threadlocker
type
A
B
B
C
D
E
Threadlocker type
End cap (A) LOCTITE
®
638
™
Nipple (C) LOCTITE
®
243
™
Thrust screw (D)
1
LOCTITE
®
243
™
1
The thrust screw holds the ground cable and seals the vibrator head. If the thrust screw is not sealed
correctly, oil can leak from the vibrator head.
10 1004 - 005 -

Threadlocker type
Screw (E) LOCTITE
®
243
™
Tightening torque
SMART 40/
SMART 40E
SMART 48/
SMART 48E
SMART 56/
SMART 56E
SMART 65
End cap (A) 170 Nm 350 Nm 520 Nm 750 Nm
Screw (B) 5 Nm 8 Nm 8 Nm 20 Nm
Nipple (C) 120 Nm 200 Nm 250 Nm 250 Nm
Troubleshooting
Problem
Cause Solution
The residual-current device is re-
leased.
The electrical cable or the power plug
is damaged.
Examine the cable and plug. If it is
necessary, replace damaged parts.
The frequency converter is damaged. Replace the frequency converter.
The frequency converter does not
operate correctly.
There is an overload in the frequen-
cy converter because of a damaged
part.
Replace the damaged part.
The vibrator head can not move free-
ly.
Stop the frequency converter and
wait 30 seconds. Start the frequency
converter.
1004 - 005 - 11

Problem Cause Solution
There is not sufficient vibration.
The stator tube or the wires are dam-
aged.
Disconnect the product from the fre-
quency converter. Disconnect the
wires between the frequency convert-
er and the vibrator head. Measure
the resistance between phases on
the side of the vibrator head. Com-
pare the values with those on the
rating plate and with the table, refer
to
Technical data on page 14
. If
the values are incorrect, examine the
wires and the stator tube. Replace
the damaged part.
There is a short circuit between pha-
ses and ground.
Measure the resistance between
each phase and the ground. If the
resistance is 10 mega-ohms or less,
examine the wires and the stator
tube. Replace the damaged part.
There are damaged parts.
Lift the product from the concrete,
wait 2 minutes. Measure the input
current to the product, refer to
Tech-
nical data on page 14
for maximum
values. If the values are incorrect,
disassemble the vibrator head and
examine the parts. Replace damaged
parts.
There is an overload in the frequency
converter.
Put the vibrator head into concrete.
Measure the input current to the
product. Make sure that the current
is not more than the values on the
rating plate.
The temperature of the frequency
converter casing is more than 60
°C/140 °F).
Wait until the temperature of the cas-
ing decreases 10 °C/50 °F.
The product stops during operation.
The residual-current device found a
fault.
Examine the cables and the frequen-
cy converter. Replace the cable or
the frequency converter.
The product is too hot.
Stop the product and move it from
sunlight.
There is an overload in the product.
Examine if there is a short circuit
between the phases on the vibrator
head side.
Examine if there is a short circuit be-
tween the phases and ground on the
side of the vibrator head.
12 1004 - 005 -
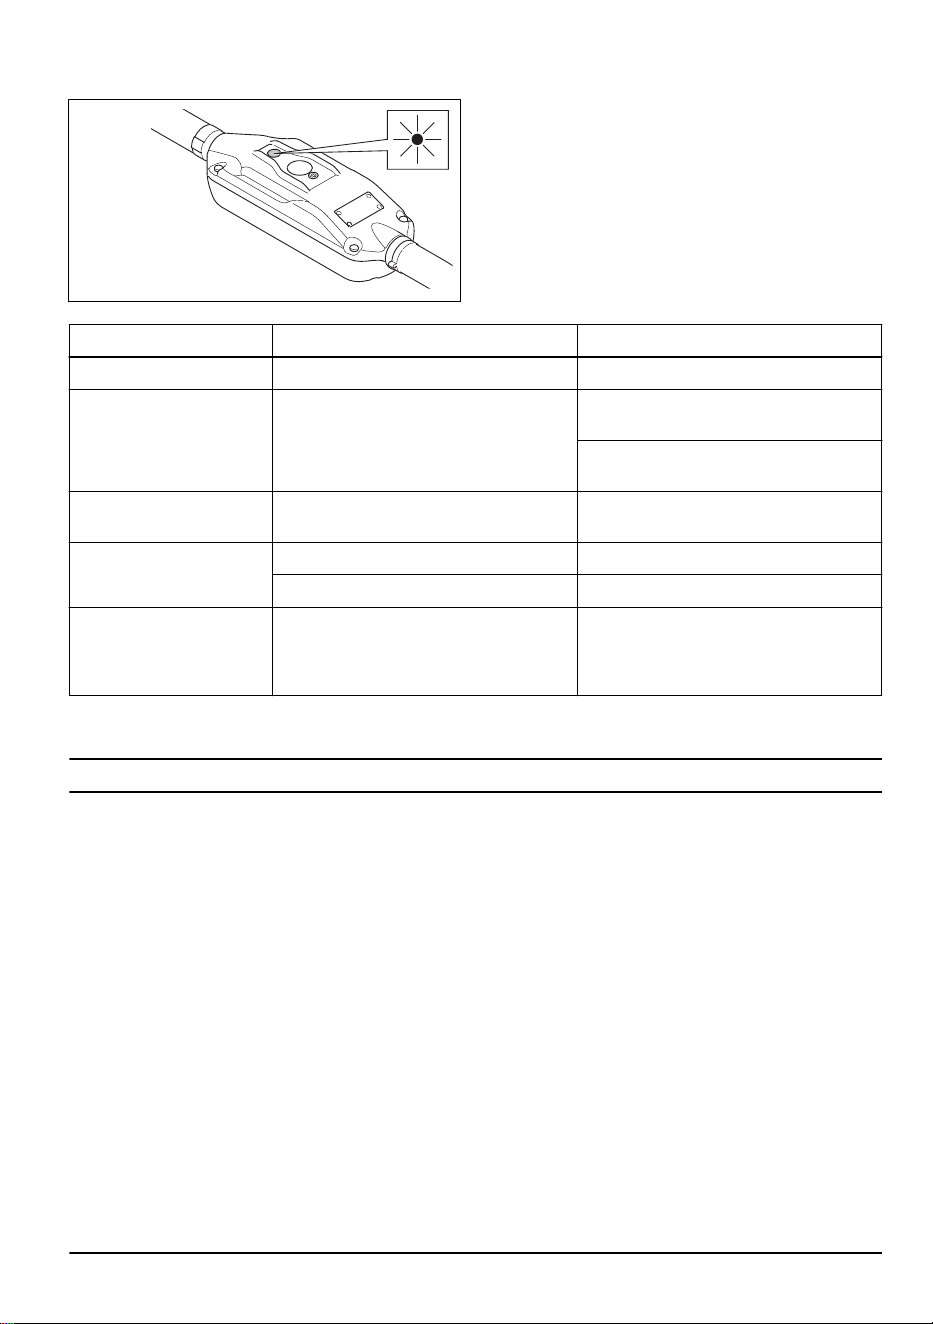
LED light status
LED status Product status Procedure
Green light Connected to the power source N/A
Flashes green
Work in progress. Too high current or too
close to limit.
Examine if the vibrator head is blocked or
overload.
Make sure that you use the correct diame-
ter.
Flashes red
The frequency converter box or the vibra-
tor head is too hot.
Let the frequency converter and vibrator
head cool down.
Flashes green and red
Too high or too low voltage. Examine the voltage of the power source.
There is a voltage drop for a short time. Push the ON/OFF button 2 times.
Red light
Overload. Short circuit between phases.
Insulation fault in the vibrator head. Prob-
lem in the frequency converter.
Examine the frequency converter and vi-
brator head for damage. If it is necessary,
send the product to an authorised service
center.
Storage and disposal
Storage
• Clean the product before storage.
• Keep the product in a dry and frost-free area.
• Keep the product in a locked area to prevent access
for children or persons that are not approved.
Disposal of the product
• Obey the local recycling requirements and applicable
regulations.
• When the product no longer is used, send it to the
dealer or discard it at a recycling location.
1004 - 005 - 13

Technical data
Technical data
SMART
40
SMART
40E
SMART
48
SMART
48E
SMART
56
SMART
56E
SMART
65
Performance
Rated voltage, V 230/115 230/115 230/115 230/115 230/115 230/115 230/115
Rated current, A 2.5/5 2.5/5 4.5/9 4.5/9 6.4/12.8 6.4/12.8 10/N/A
Rated frequency, Hz 50/60 50/60 50/60 50/60 50/60 50/60 50/60
Rated power, W 400 400 920 920 1170 1170 1800
Phases, ~ 1 1 1 1 1 1 1
Stator resistance, Ohm 26.5/6.6 26.5/6.6 9.3/2.4 9.3/2.4 5.6/1.5 5.6/1.5 2.6/N/A
Oscillations, 1/min 12600 12600 12600 12600 12600 12600 12600
Oscillations, Hz 210 210 210 210 210 210 210
Input power, kW (electric
drive unit)
0.40 0.40 0.92 0.92 1.17 1.17 1.80
Protection IPX7 IPX7 IPX7 IPX7 IPX7 IPX7 IPX7
Weighted effective accelera-
tion uncertainty (K) m/s
22
3.81
(0.42)
2.6 (1.5)
2.47
(0.44)
2.8 (1.5)
5.87
(1.00)
2.6 (1.5)
4.62
(0.66)
Dimensions
Cable length (plug to fre-
quency converter), m/ft
15/49.2 1.7/5.6 15/49.2 1.7/5.6 15/49.2 1.7/5.6 15/49.2
Cable length (frequency con-
verter to handle) 230 V, m/ft
N/A 15/49.2 N/A 15/49.2 N/A 15/49.2 N/A
Cable length (frequency con-
verter to handle) 115 V, m/ft
N/A 10/32.8 N/A 10/32.8 N/A 10/32.8 N/A
Frequency converter weight,
kg/lbs
2.8/6.17 2.8/6.17 2.8/6.17 2.8/6.17 2.8/6.17 2.8/6.17 2.8/6.17
Operating weight, kg/lbs 13.1/28.9 12/26.4 14.7/32.4 13.6/30 15.9/35.1 14.8/32.6 18.5/40.8
Frequency converter length,
mm/in.
300/11.8 300/11.8 300/11.8 300/11.8 300/11.8 300/11.8 300/11.8
Frequency converter width,
mm/in.
103/4.05 103/4.05 103/4.05 103/4.05 103/4.05 103/4.05 103/4.05
Frequency converter height,
mm/in.
80/3.14 80/3.14 80/3.14 80/3.14 80/3.14 80/3.14 80/3.14
Vibrator head diameter,
mm/in.
40/1.58 40/1.58 48/1.90 48/1.90 56/2.20 56/2.20 65/2.56
2
Weighted effective acceleration measured in water at 2 meter (6.56 ft.) from the end of the poker according to
EN ISO 5349.
14 1004 - 005 -

SMART
40
SMART
40E
SMART
48
SMART
48E
SMART
56
SMART
56E
SMART
65
Vibrator head length, mm/in. 320/12.59 320/12.59 350/13.78 350/13.78 380/14.96 380/14.96 410/16.14
Total weight, kg/lbs 2.3/5.0 2.3/5.0 3.9/8.6 4.2/9.3 5.1/11.2 5.2/11.5 7.7/16.9
Noise emissions
Sound pressure level L
P
at
the operators ear, dB(A)
3
75 75 80 80 83 83 88
Sound power level L
W
meas-
ured, dB(A) rel 1pW
4
86 86 91 91 94 94 99
Noise and vibration declaration
statement
These declared values were obtained by laboratory
type testing in accordance with the stated directive or
standards and are suitable for comparison with the
declared values of other products tested in accordance
with the same directive or standards. These declared
values are not suitable for use in risk assessments
and values measured in individual work places may
be higher. The actual exposure values and risk of
harm experienced by an individual user are unique and
depend upon the way the user works, in what material
the product is used, as well as upon the exposure time
and the physical condition of the user, and the condition
of the product.
3
Noise level measured in air at 1m from the product according to EN ISO 3744. Uncertainty: ± 3dB
4
Noise level measured in air at 1m from the product according to EN ISO 3744. Uncertainty: ± 3dB
1004 - 005 - 15

Declaration of Conformity
EC Declaration of Conformity
We, Husqvarna AB, SE-561 82 Huskvarna, Sweden, tel:
+46-36-146500, declare on our sole responsibility that
the product:
Description Concrete Vibrator
Brand Husqvarna
Type/Model SMART40/40E/48/48E/56/56E/65
Identification Serial numbers dating from 2020 and onwards
complies fully with the following EU directives and
regulations:
Directive/Regulation Description
2006/42/EC "relating to machinery"
2014/30/EU "relating to electromagnetic compatibility"
2011/65/EU "relating to restriction of hazardous substances"
and that the following harmonized standards and/or
technical specifications are applied;
EN 12649:2008+A1:2011
EN 55014-1:2017
EN 55014-2:2015
EN 61000-3-2:2014
EN 61000-3-3:2013
Partille, 2020-03-05
Martin Huber
R&D Director, Concrete Surfaces & Floors
Husqvarna AB, Construction Division
Responsibe for technical documentation
16 1004 - 005 -

1004 - 005 - 17

18 1004 - 005 -

1004 - 005 - 19

www.husqvarnaconstruction.com
Original instructions
1144746-26
2025-06-25

