
Technical Support and E-Warranty Certificate www.vevor.com/support
Air Conditioner Wall Sleeve
MODEL:DWS-42/DWS-42G
We continue to be committed to provide you tools with competitive price.
"Save Half", "Half Price" or any other similar expressions used by us only
represents an estimate of savings you might benefit from buying certain tools
with us compared to the major top brands and does not necessarily mean to cover
all categories of tools offered by us. You are kindly reminded to verify carefully
when you are placing an order with us if you are actually Saving
Half in comparison with the top major brands.


- 1 -
Model:DWS-42/DWS-42G
NEED HELP? CONTACT US!
Have product questions? Need technical support? Please feel free to
contact us:
Technical Support and E-Warranty Certificate
www.vevor.com/support
This is the original instruction, please read all manual instructions carefully
before operating. VEVOR reserves a clear interpretation of our user
manual. The appearance of the product shall be subject to the product you
received. Please forgive us that we won't inform you again if there are any
technology or software updates on our product.
Air Conditioner Wall Sleeve

- 2 -
SAFETY INSTRUCTIONS
1.Products shall be installed by professionals;
2.Products are installed away from children and pets;
3.Please wear gloves to install the product to avoid hand injury;
4.Install the product as per this instruction to avoid personnel injury or
product damage.
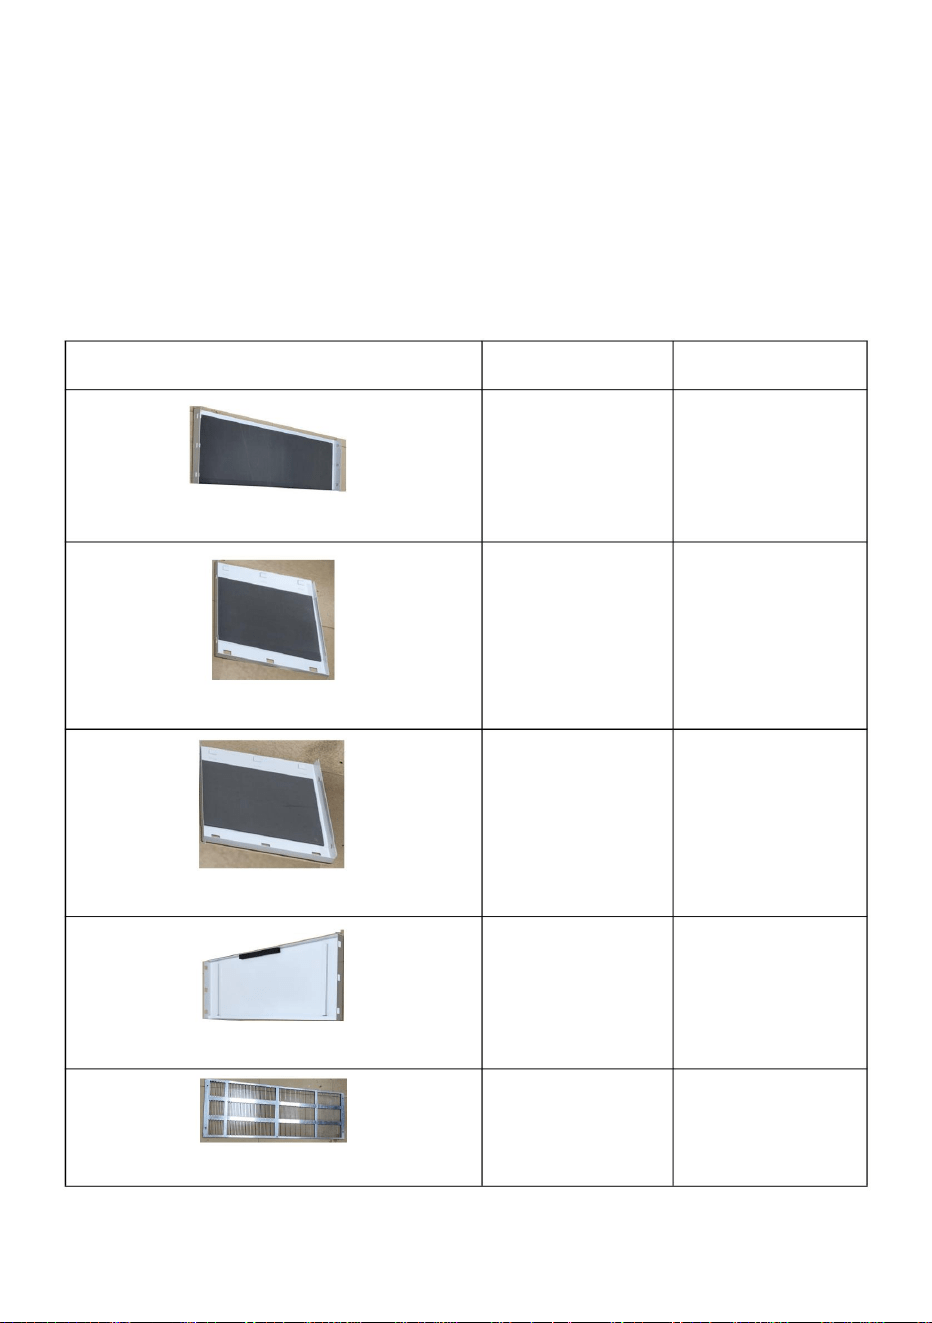
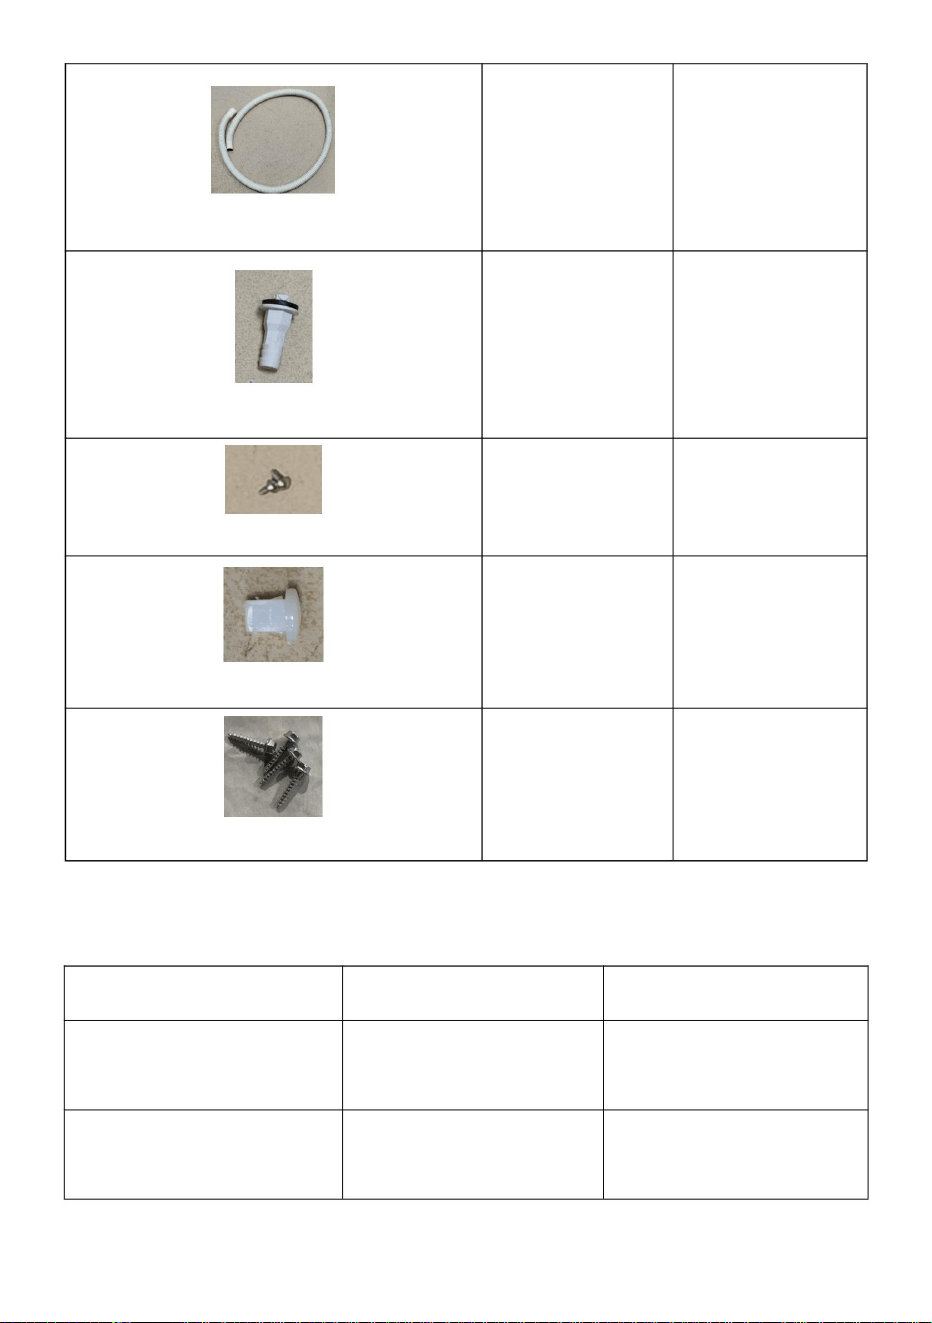
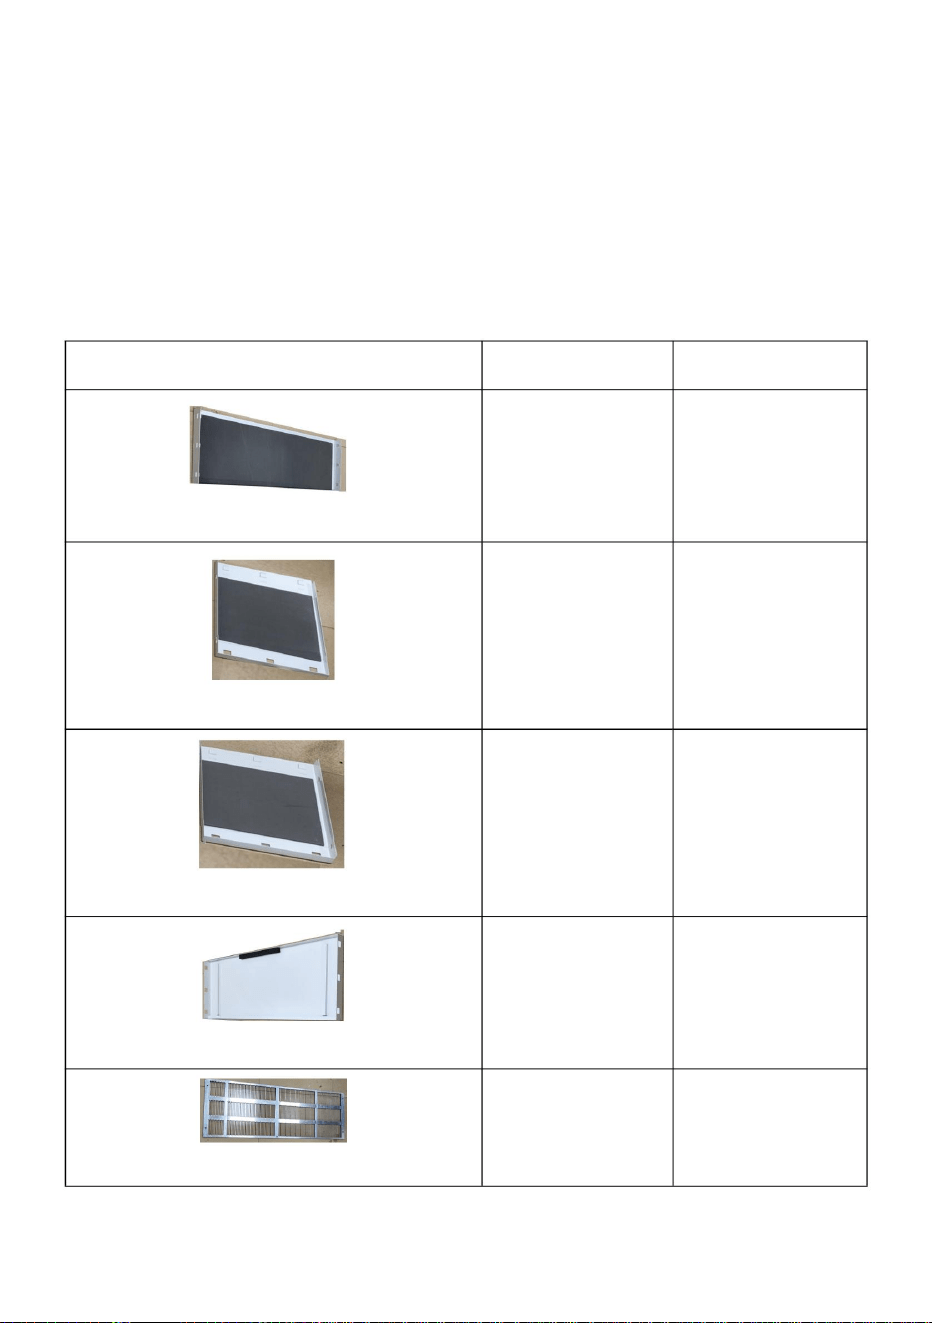
Parts List
Model
DWS-42
DWS-42G
Top cover
1
1
Left cover
1
1
Right cover
1
1
Bottom cover
1
1
Stamped grille
0
1
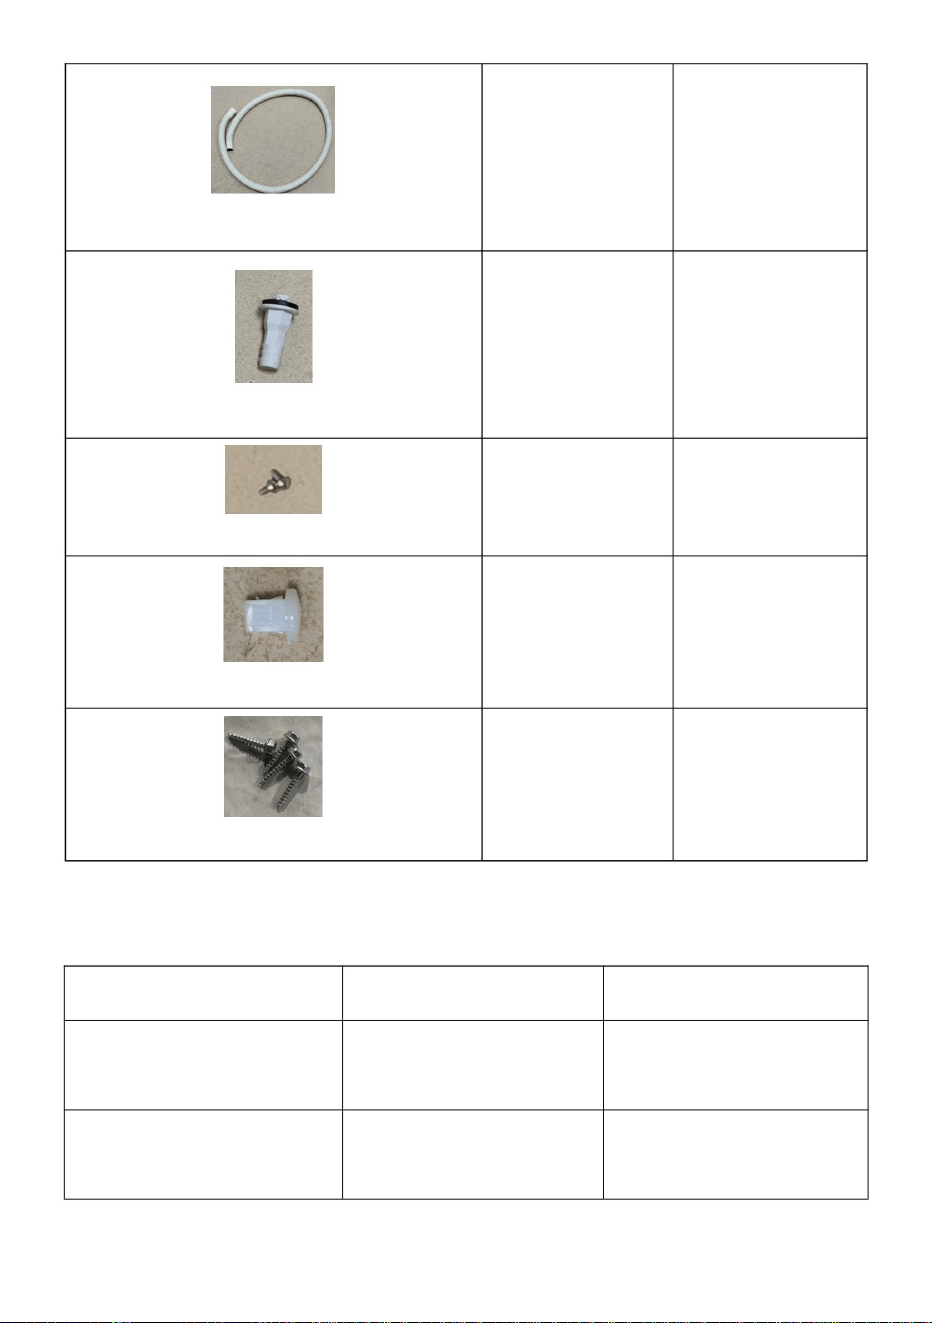
- 3 -
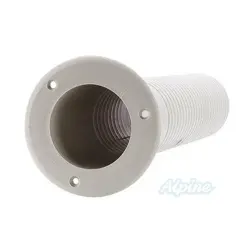
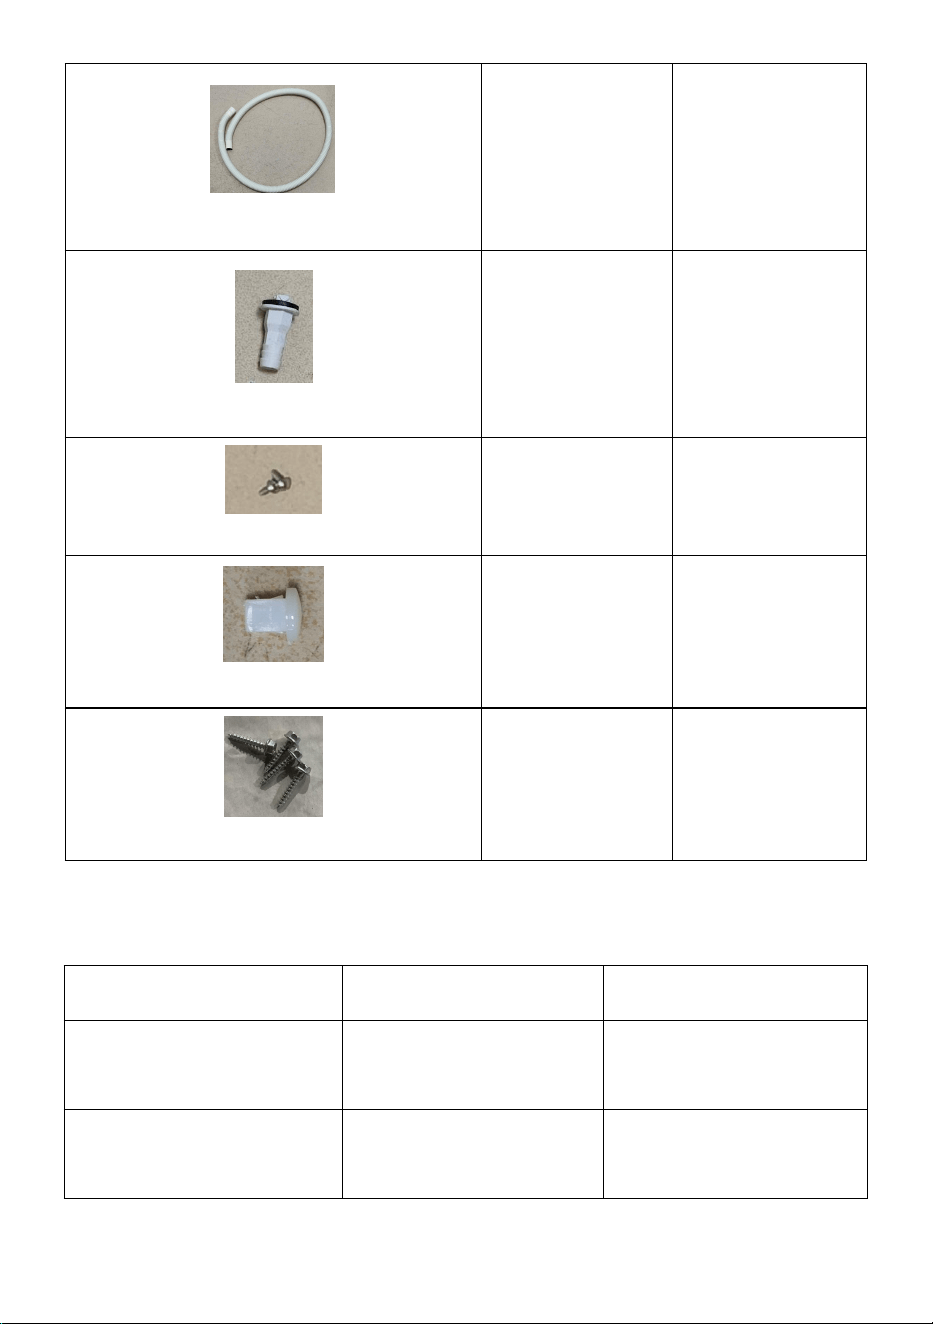
drain-pipe
1
1
Drainage connector
1
1
M4×12 screw
0
5
Plastic screw bracket
0
5
ST5×25 Self-tapping screws
4
4
Parameter List
Model
DWS-42
DWS-42G
outline dimension
(A×B×C)
1067×350×410 mm
1067×365×410 mm
Internal cavity size
(A×B×C)
1015×348×375mm
1015×348×375mm

- 4 -
Minimum wall slot size
(width×height)
1077×420mm
1077×420mm
Stamped grille
No
Yes
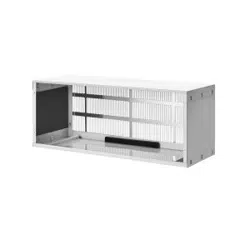
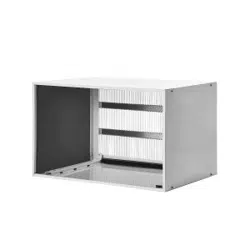
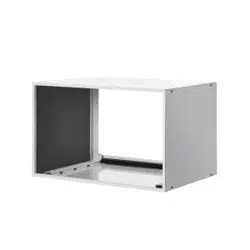
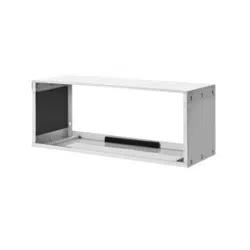
Product shape and size
Product inner cavity size
Bottom cover square hole

- 5 -
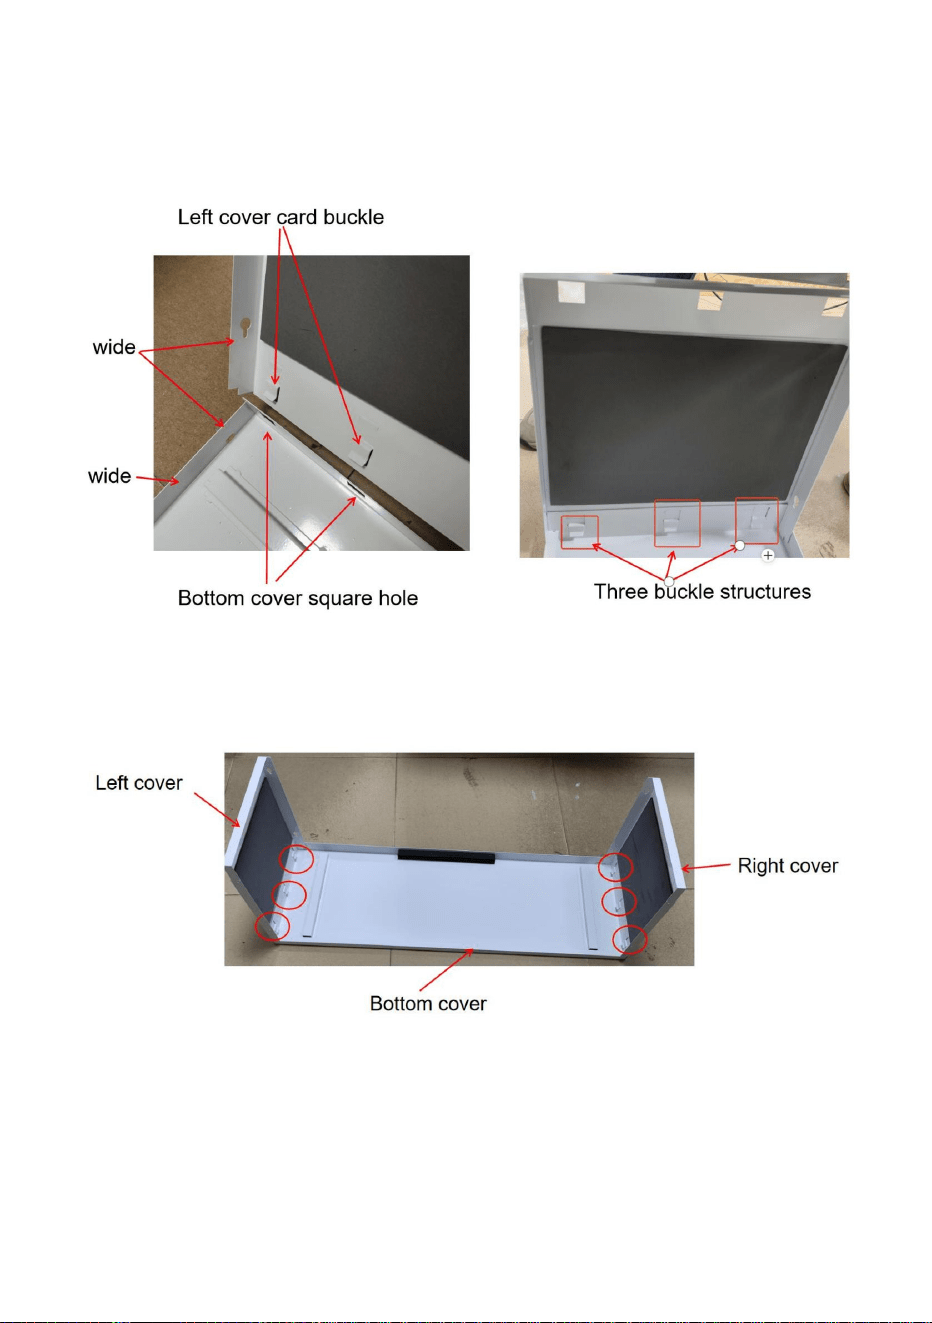
Assembly method of air conditioning wall sleeve
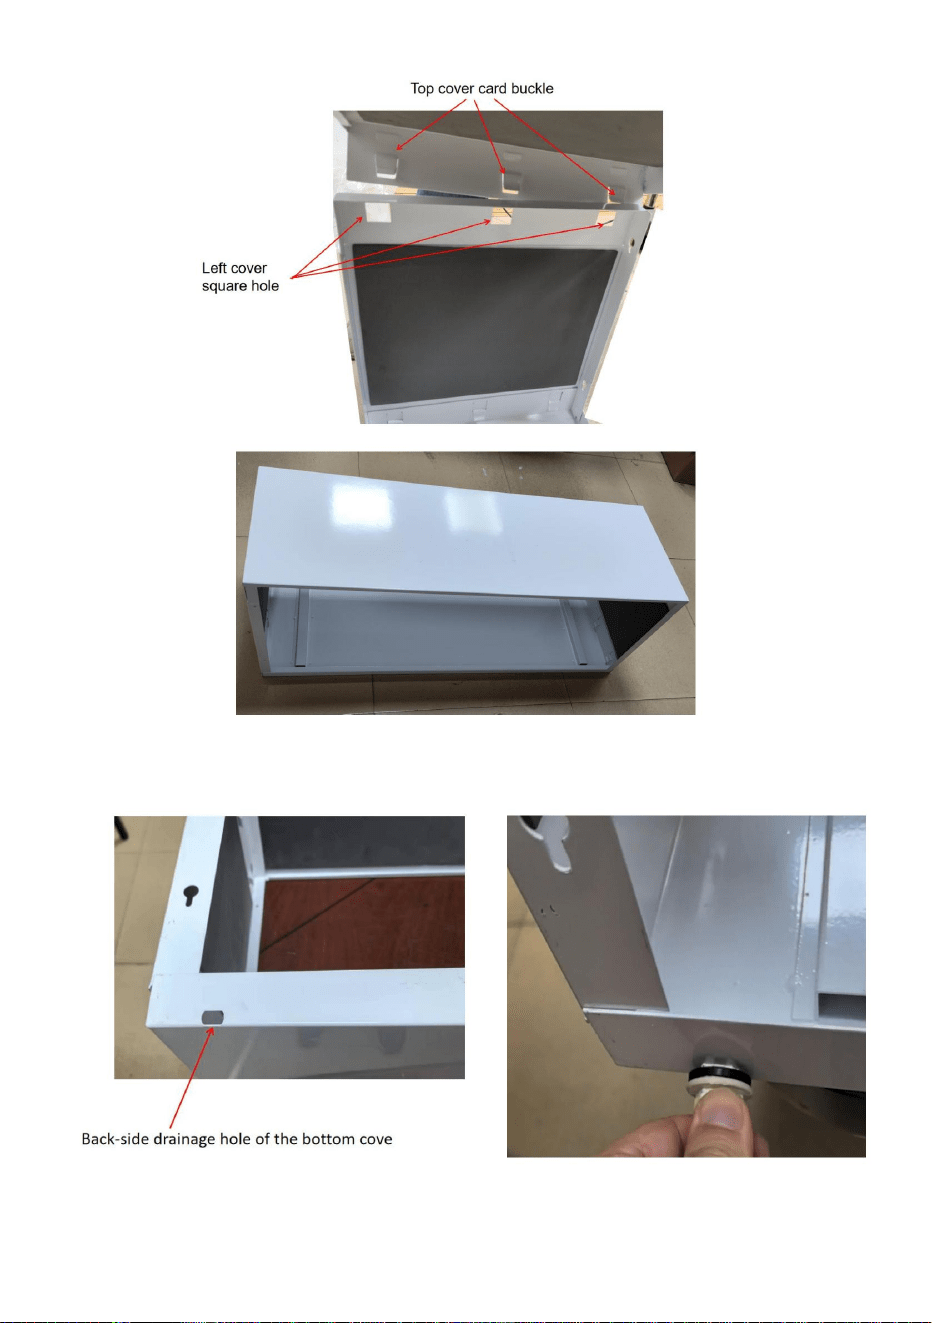
1.Insert the three clips of the left cover into the three square holes of the
left side of the bottom cover. Note that the wide edge of the left cover
corresponds to the wide edge of the bottom plate.
2.Install the right side cover in the same way.
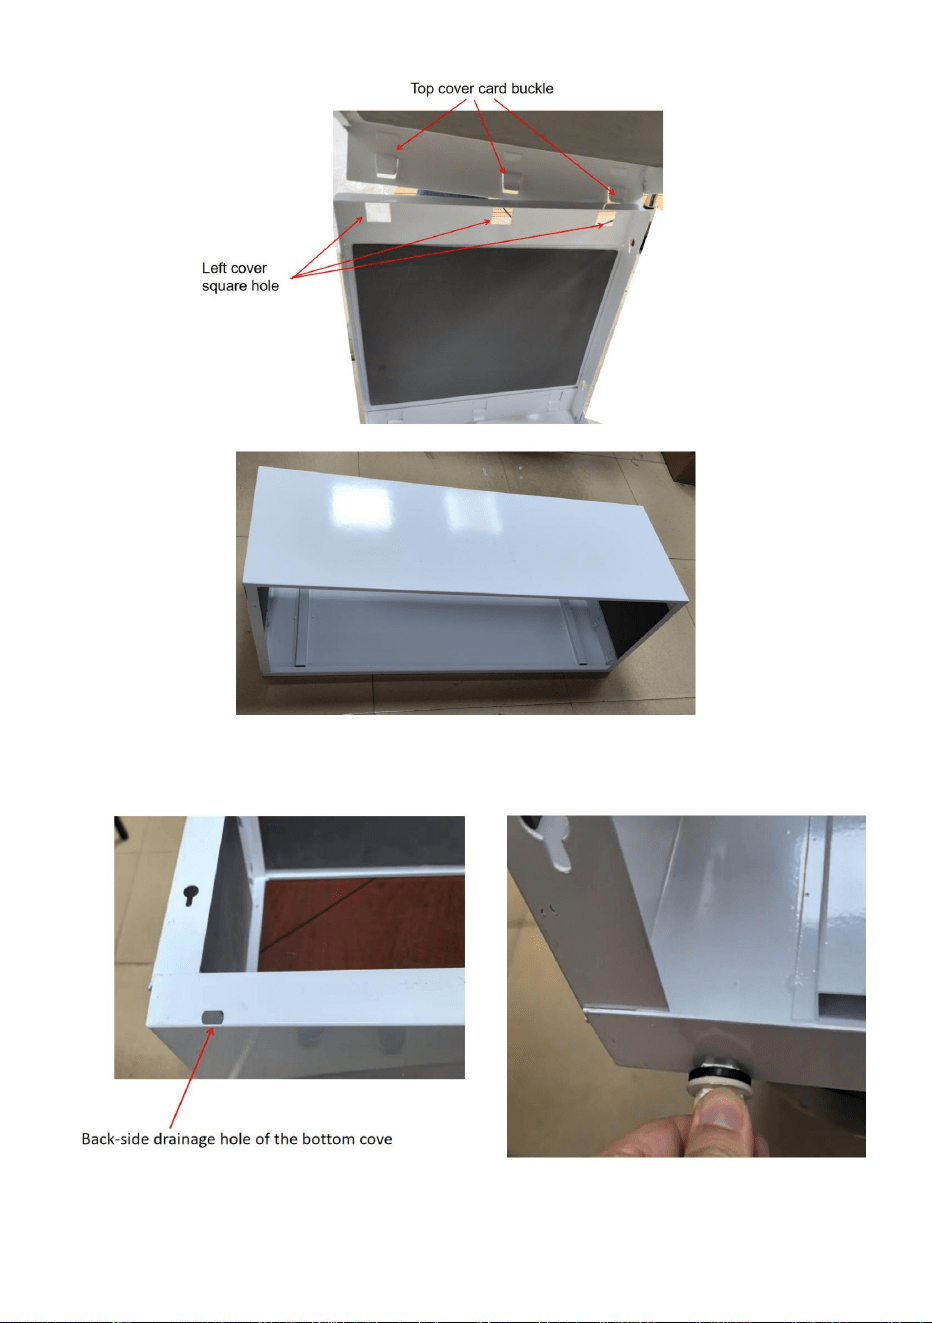
3.Insert 6 clips of the top cover into the corresponding square holes of the
left and right covers.

- 6 -
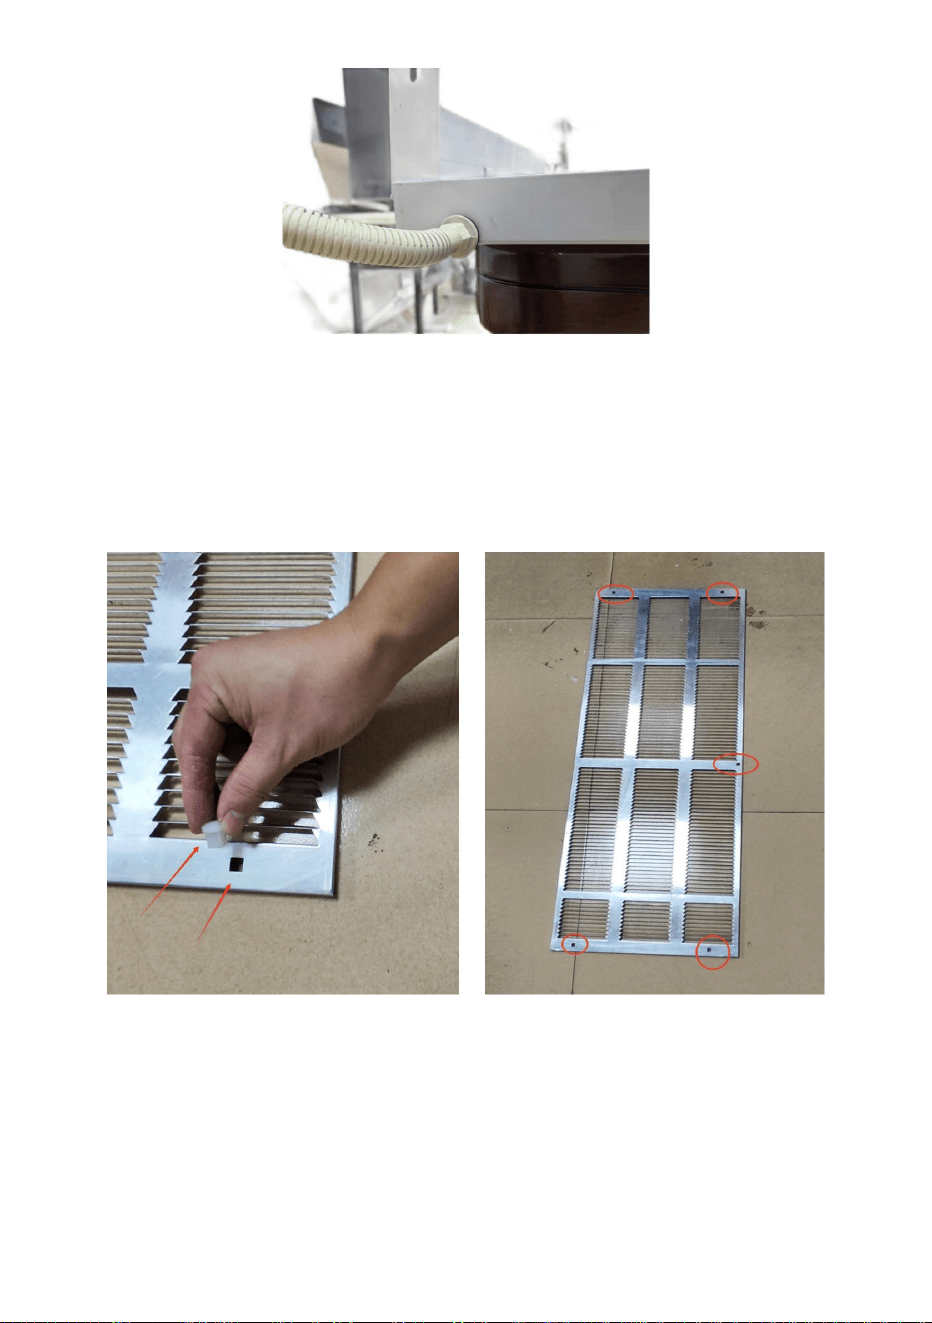
4.Insert the drain joint into the rear drain hole of the bottom cover
5.Drain pipe is inserted into the drain connector.
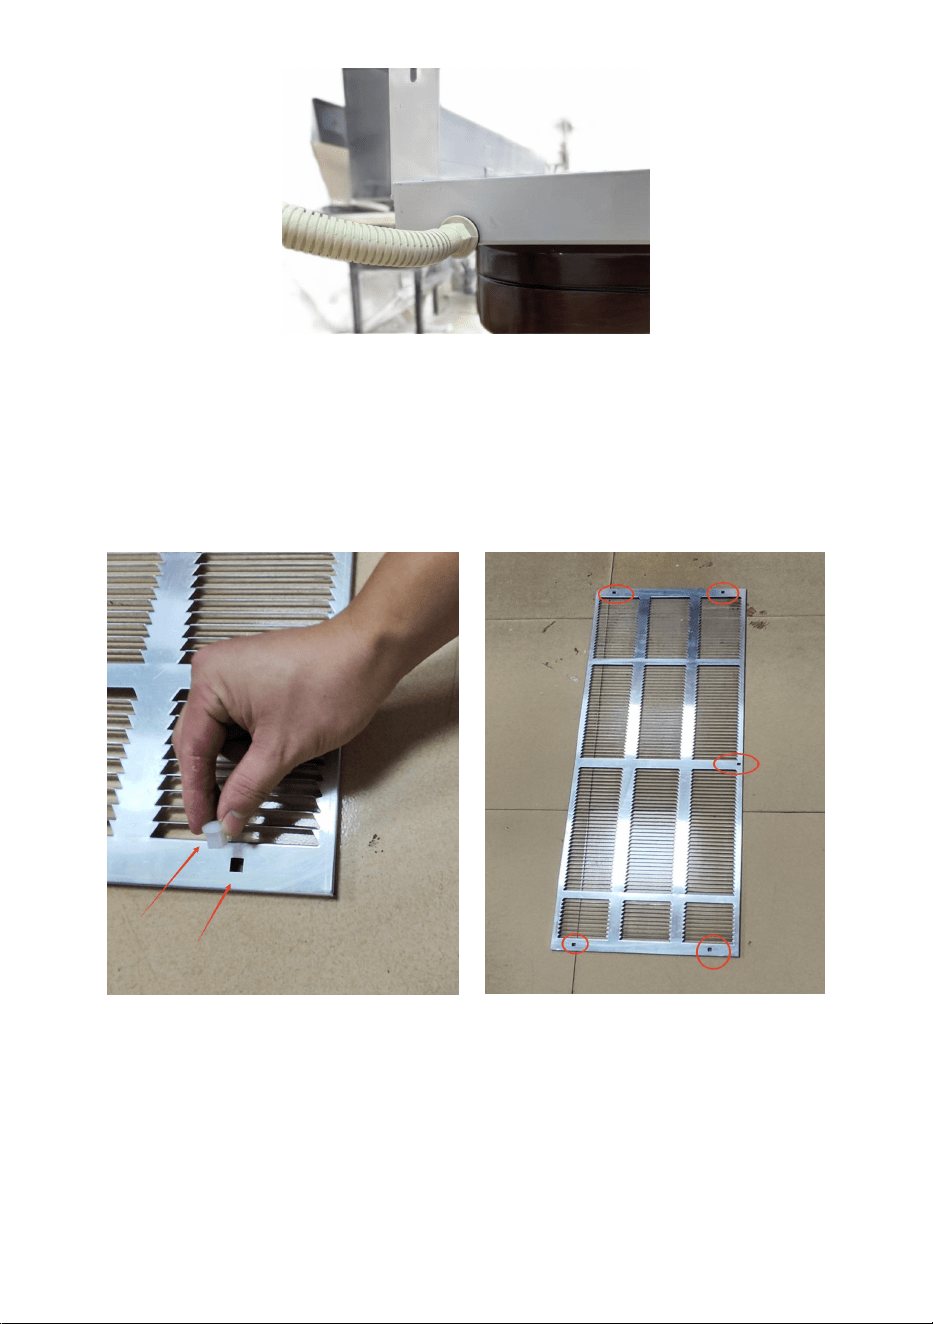
- 7 -
Note:The DWS-42 installation is complete ;If it is DWS-42g, go to step 6-7
to install the grille and then step 4 to install the drain structure.
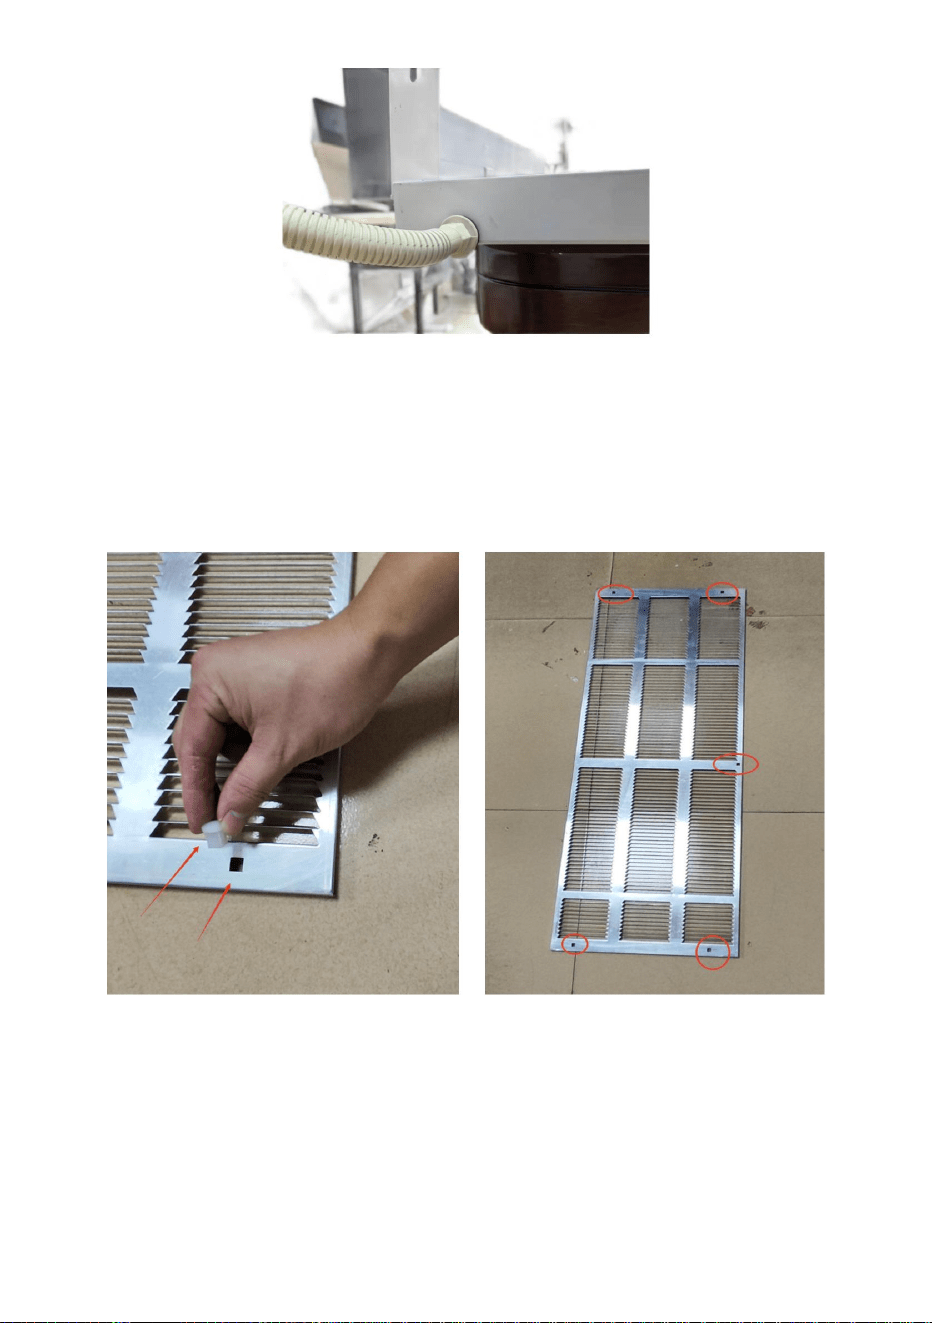
6.Press the five plastic screw holders into the five square holes of the
grille;Note pressing the plastic screw holder from the end of the grille
plane.
7.First, align the plastic screw holder of the grille with the five screw holes
at the back side of the air conditioning wall sleeve, and lock the
M4×12screw seat of the grille in the air conditioning wall sleeve.
Note:Do not screw the screws too tight.

- 8 -
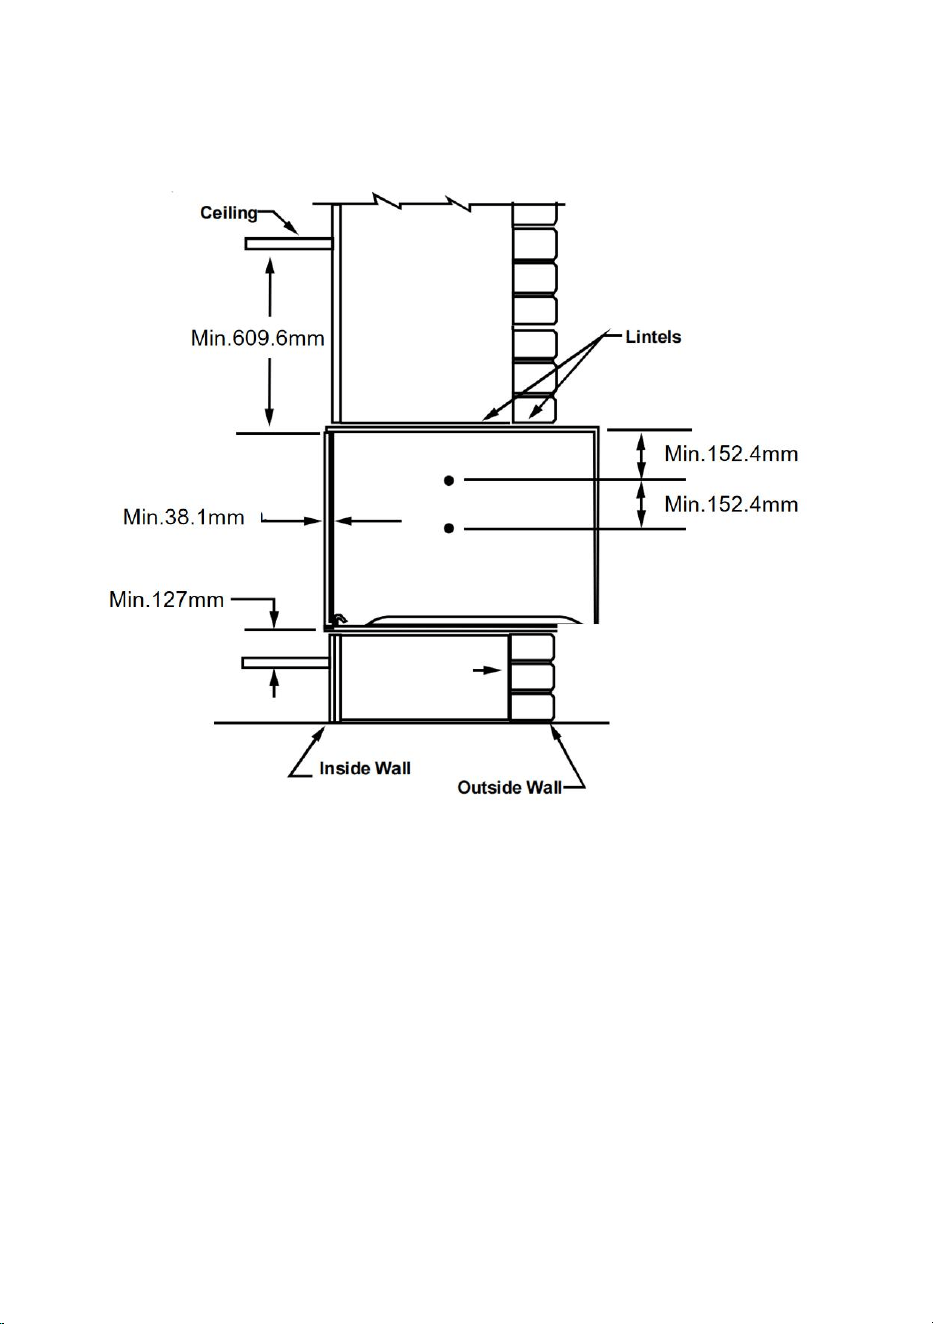
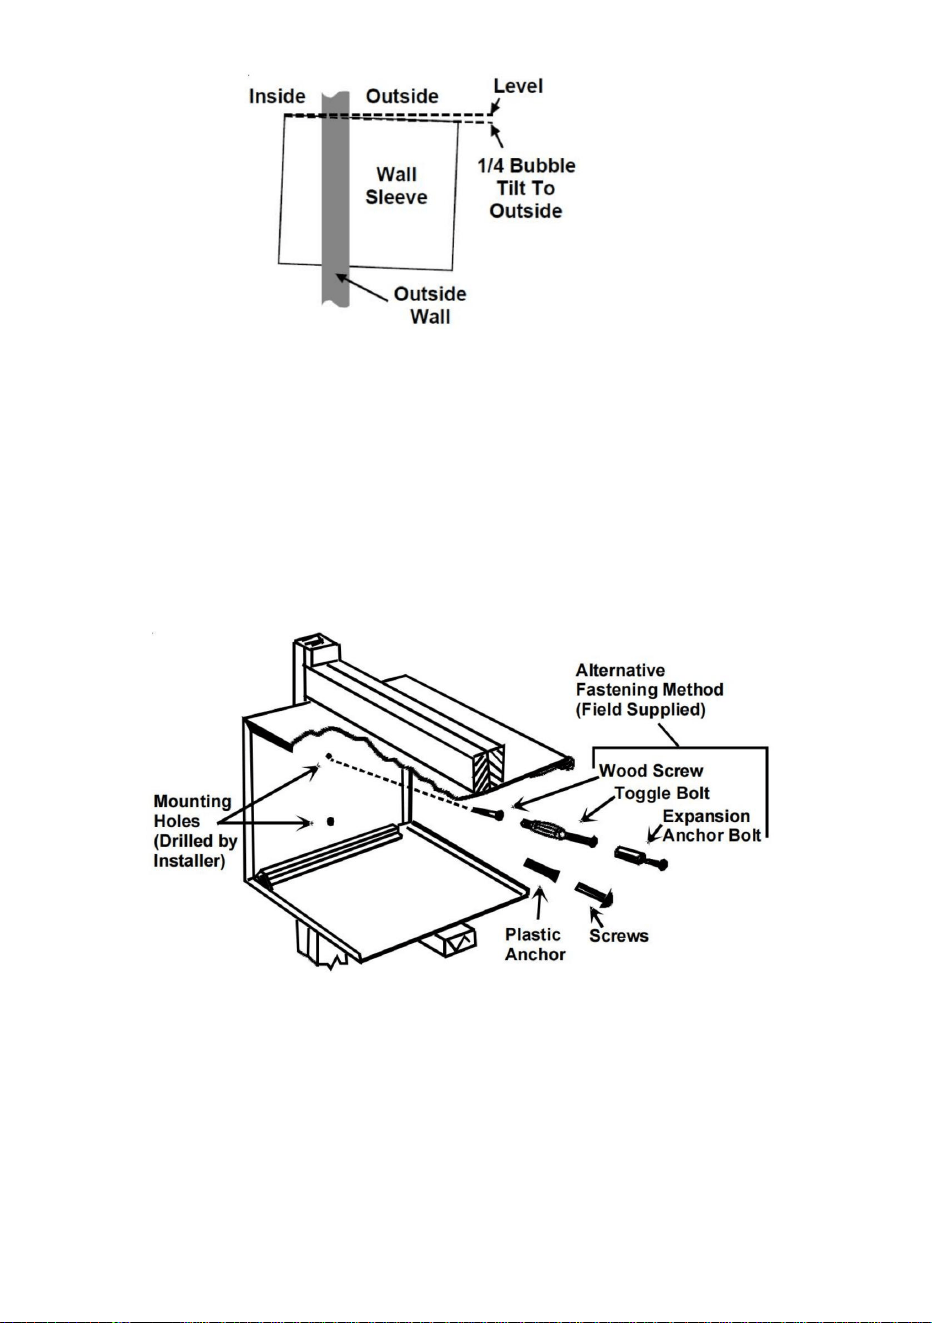
Air conditioning wall cover installed on the wall method
1.The size of the wall opening must be correct, and the minimum wall
opening size is shown in Figure 1.
Figure 1
- 9 -
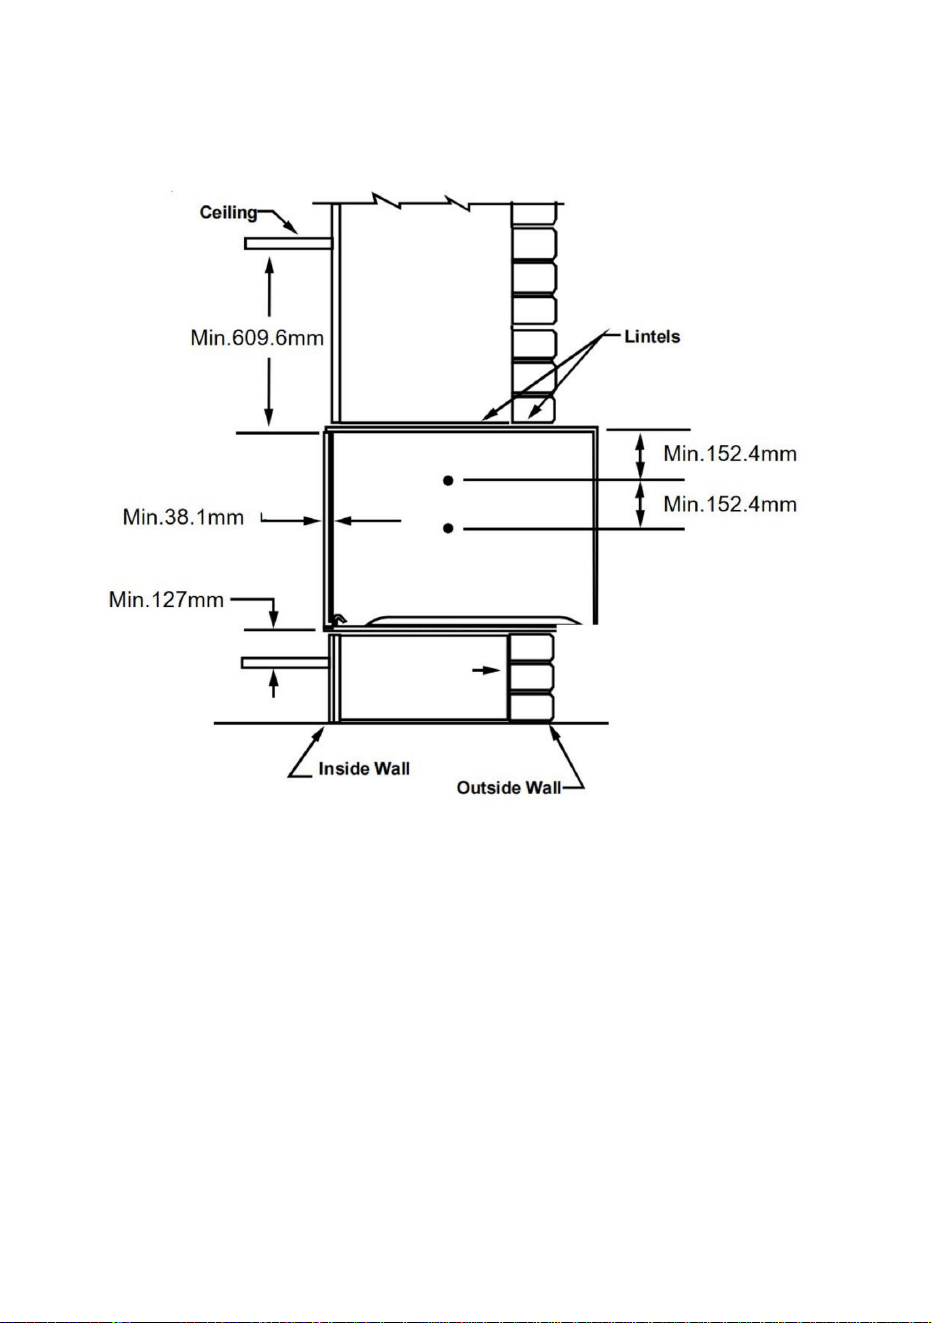
2.The wall sleeve must be installed with a 127mm minimum clearance to
the floor and 38.1mm to adjacent walls. See Figure 2 for minimum
projections of the sleeve into and out of the room.
Figure 2
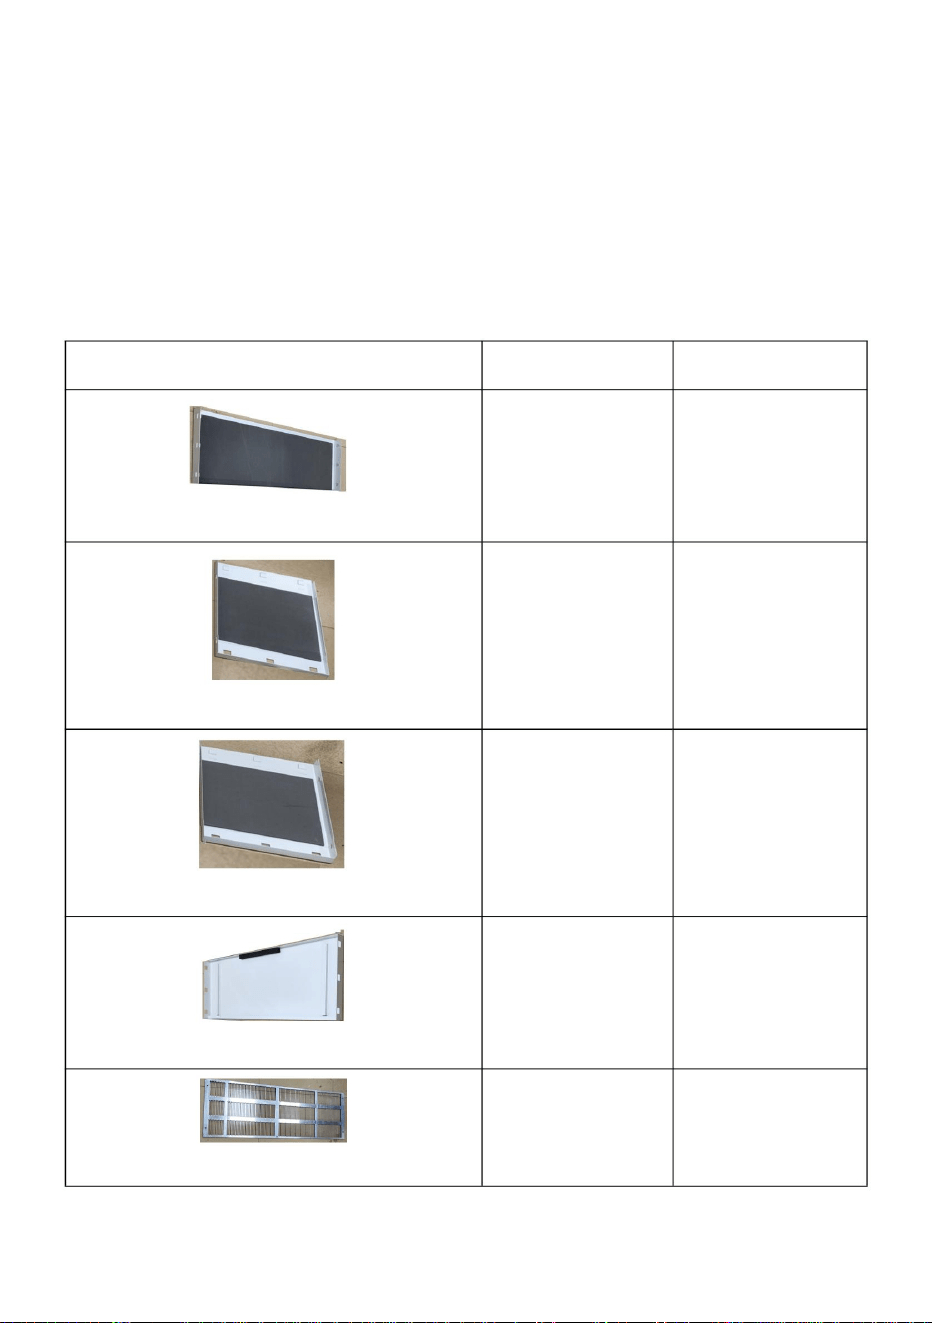
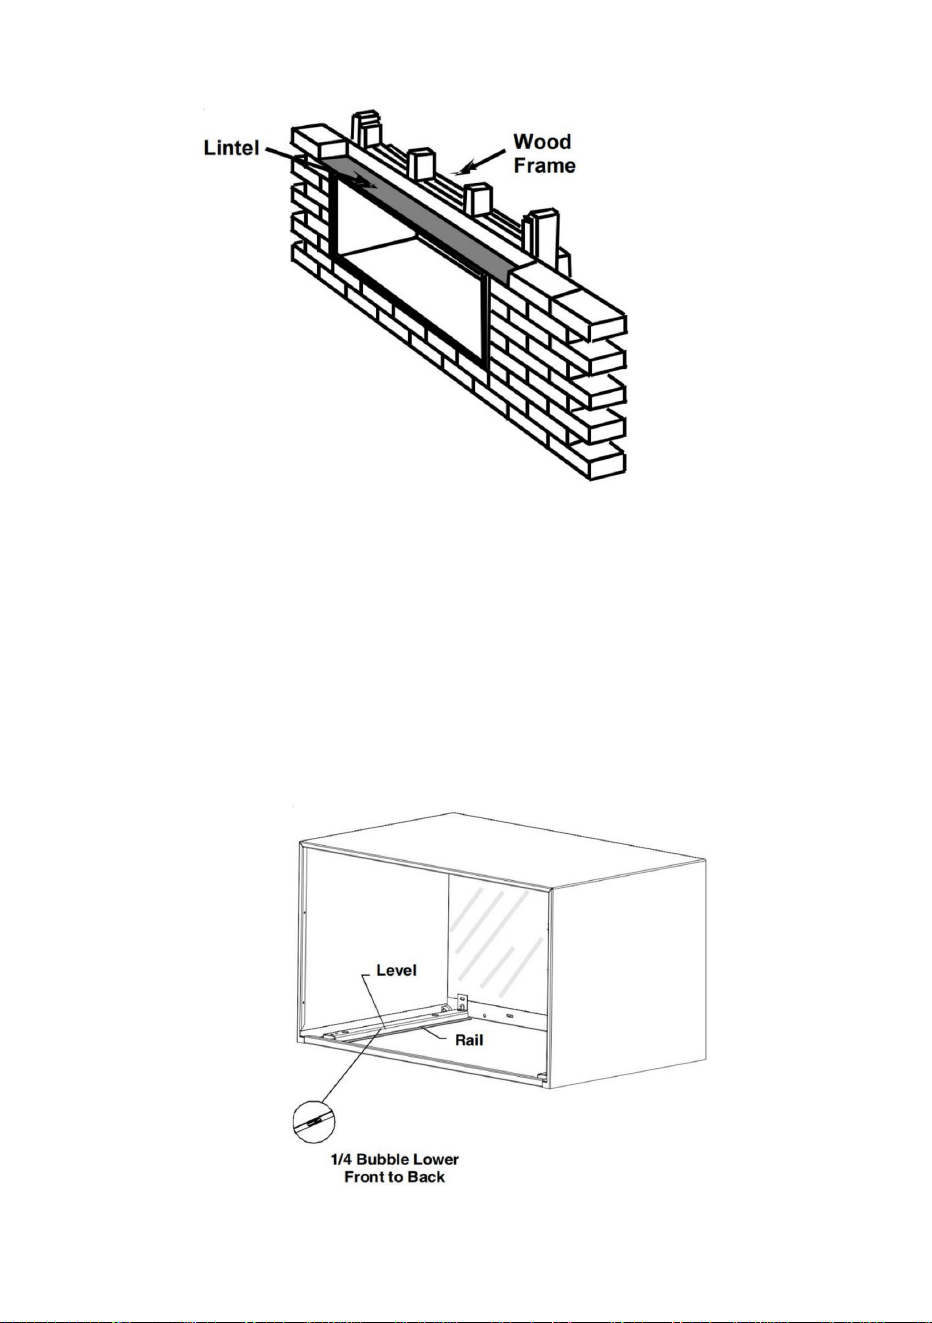
3.If installed in a concrete or masonry wall, a lintel must be provided in the
wall opening for support. Do not use the wall sleeve as a lintel. If the wall is
less than 203.2mm thick or of hollow construction, an alternate means of
support for the sleeve must be provided. See Figure 3 for a typical lintel
construction.

- 10 -
Figure 3
4.Slide the wall sleeve into the wall opening. Do not distort the cabinet
shape of the wall sleeve to fit the wall opening; the unit chassis must fit
snug and uniform into the wall sleeve.
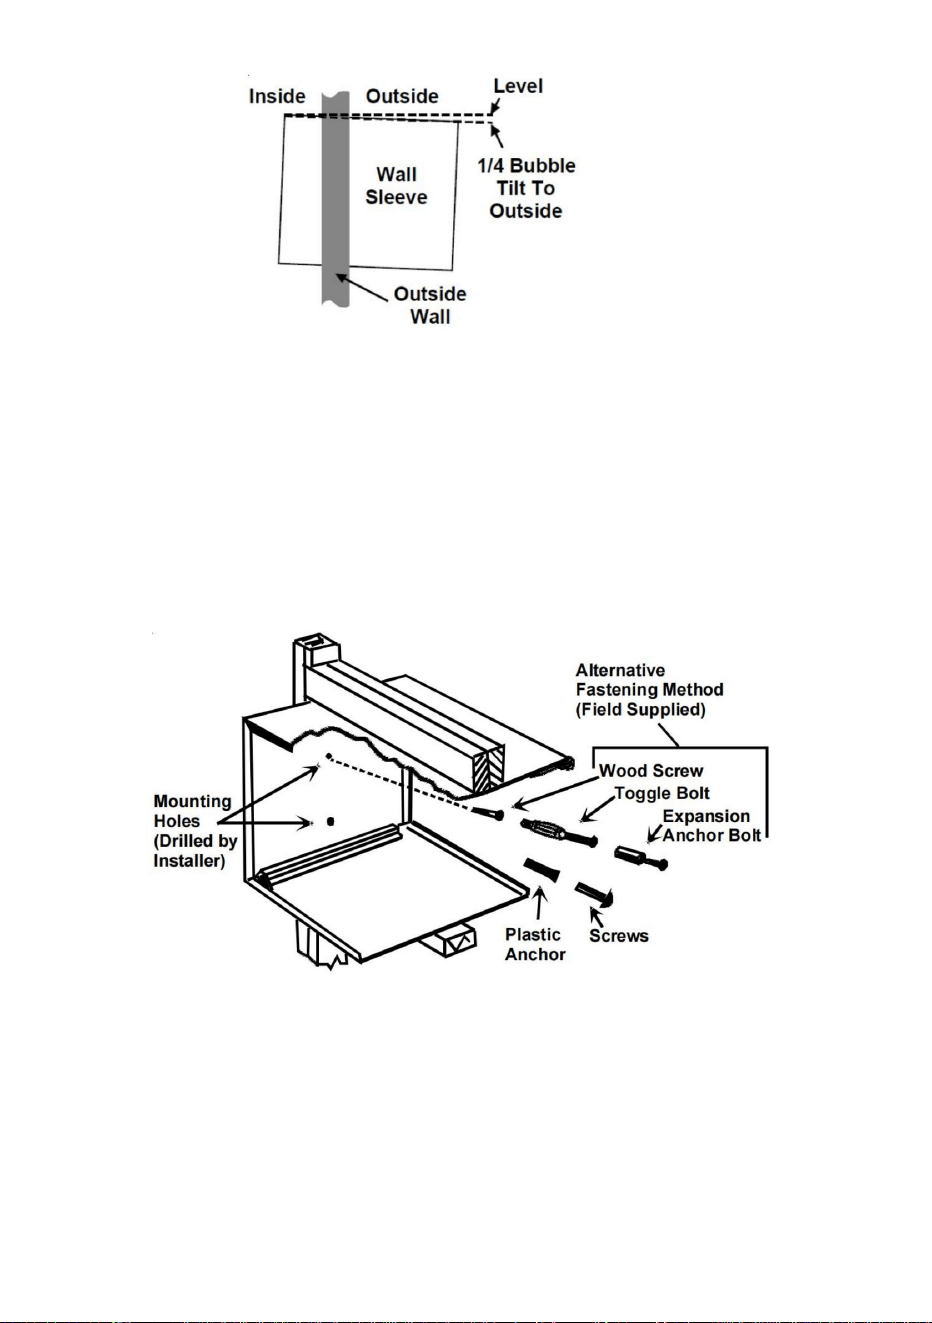
5.When installed in the opening, the wall sleeve must be level from side to
side and sloped one quarter bubble front to back. DO NOT SLOPE THE
WALL SLEEVE TOWARD THE ROOM. See Figure 5.
This is for the condensate to discharge .
outside

- 11 -
Figure 4
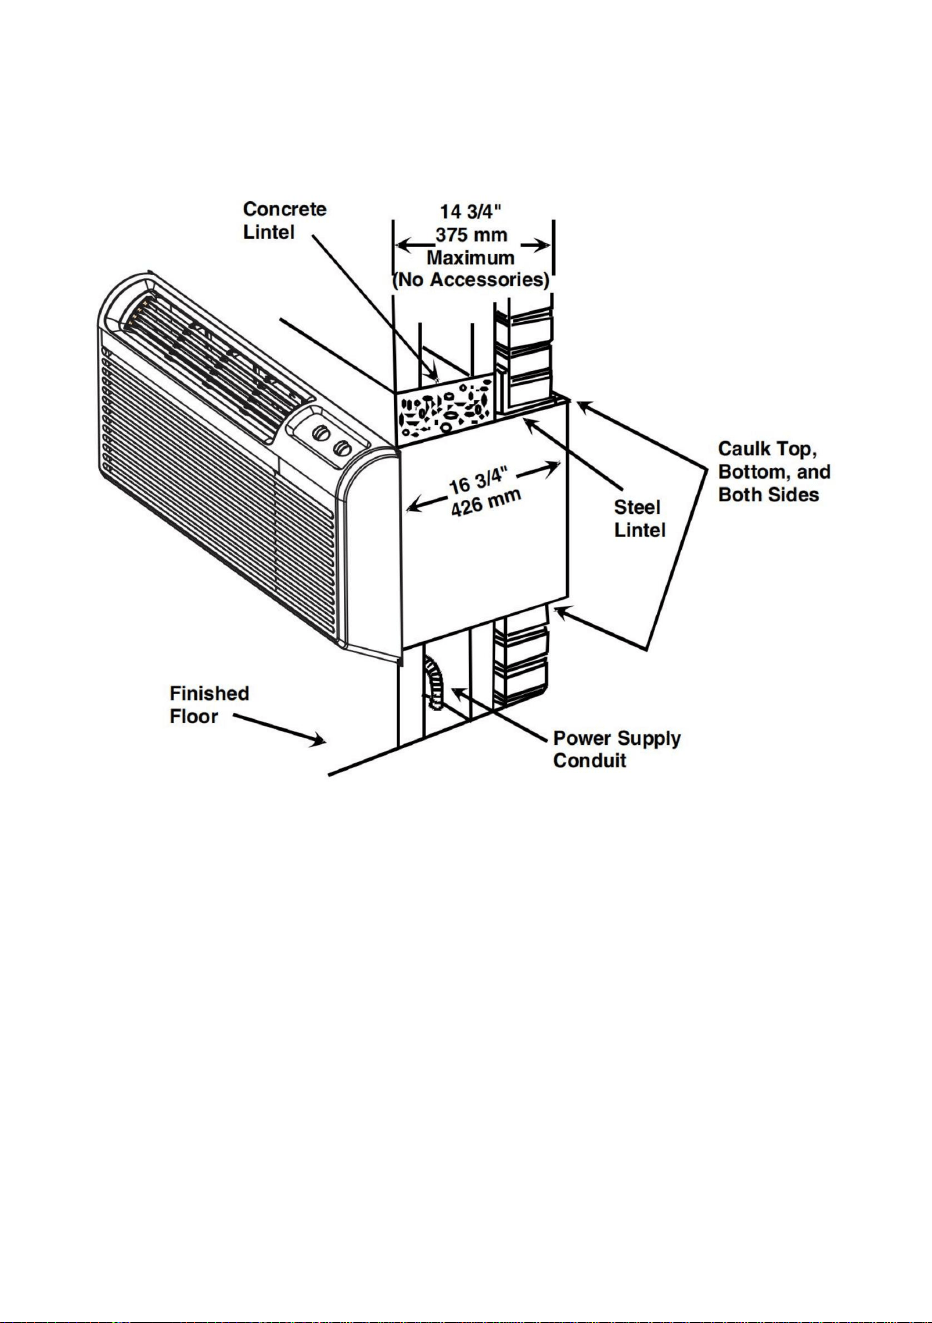
6.Waterproof barrier should remain in place until the unit is installed. An
accessory metal front panel, PBWMFC, is also available, but must be
purchased separately.
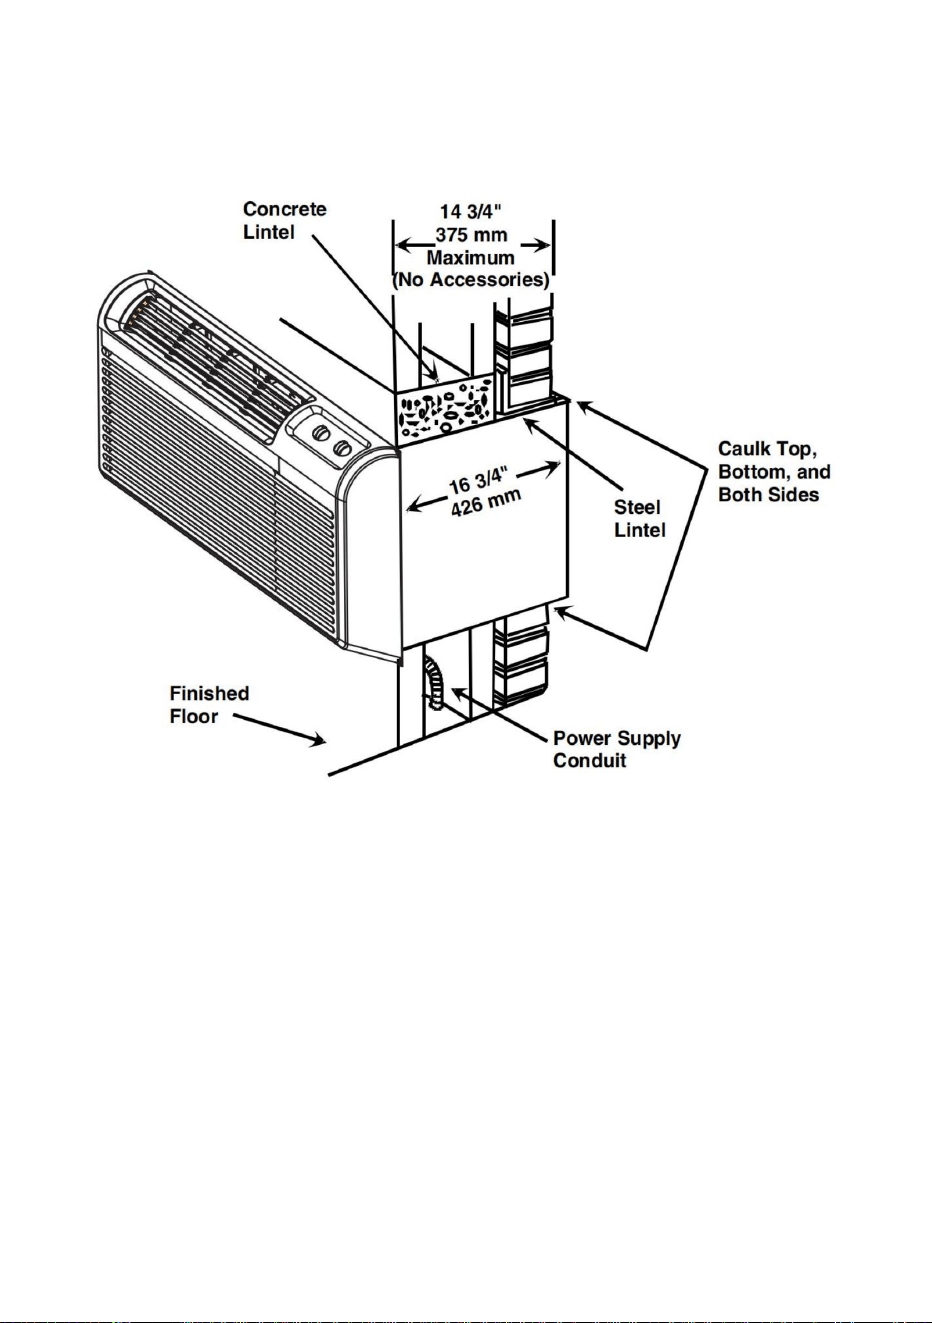
7.Attach the sleeve using four #12x2” wood screws (for wood constructed
buildings) or four #12x2” masonry screws (for cement or brick constructed
buildings) (Figure 5).Fixed 2 places on the left and right sides,Make sure
the wall construction is adequate to support the unit.
Figure 5
Note:Do not drill through the bottom of the sleeve for screw fixing.
We provide 4 Self-tapping screws ST5×25, but you need to judge whether
your wall panel material is suitable or not.

- 12 -
8.After installation, add sealing material and insulation material to the
cracks around the sleeve, which can be added by using a flat screwdriver
or putty knife.See Figure 6 for one example of construction.
Figure 6
9.Air conditioning wall cover Installation is complete,You can also adjust
the installation method according to your air conditioning device, but this
needs to consult a professional air conditioning device installation
personnel.
- 13 -
Manufacturer: Shanghaimuxinmuyeyouxiangongsi
Address: Shuangchenglu 803nong11hao1602A-1609shi, baoshanqu,
shanghai 200000 CN.
Imported to AUS: SIHAO PTY LTD. 1 ROKEVA STREETEASTWOOD
NSW 2122 Australia
Imported to USA: Sanven Technology Ltd. Suite 250, 9166 Anaheim
Place, Rancho Cucamonga, CA 91730
REP
UK
YH CONSULTING LIMITED. C/O YH Consulting
Limited Office 147, Centurion House, London
Road, Staines-upon-Thames, Surrey, TW18 4AX
REP
EC
E-CrossStu GmbH
Mainzer Landstr.69,
60329 Frankfurt am Main.


MODÈLE:DWS42/DWS42G
Nouscontinuonsànousengageràvousfournirdesoutilsàdesprixcompétitifs.
«Économisezlamoitié»,«Moitiéprix»outouteautreexpressionsimilaireutiliséepar
nousnereprésentequ'uneestimationdeséconomiesquevouspourriezréaliserenachetant
certainsoutilscheznousparrapportauxgrandesmarquesetnecouvrepasnécessairementtoutes
lescatégoriesd'outilsquenousproposons.Nousvousrappelonsdebienvouloirvérifier
soigneusementlorsquevouspassezunecommandecheznoussivous
économisezréellementlamoitiéparrapportauxgrandesmarques.
Manchonmuralpourclimatiseur
Assistancetechniqueetcertificatdegarantieélectroniquewww.vevor.com/support
Machine Translated by Google

Machine Translated by Google

Assistancetechniqueetcertificatdegarantieélectronique
www.vevor.com/support
Vousavezdesquestionssurlesproduits?Vousavezbesoind'uneassistancetechnique?N'hésitezpasà
nouscontacter:
Modèle:DWS42/DWS42G
Ils'agitdelanoticed'utilisationd'origine.Veuillezlireattentivementtoutesles
instructionsdumanuelavantdel'utiliser.VEVORseréserveledroitd'interpréter
clairementnotremanueld'utilisation.L'apparenceduproduitdépendduproduitque
vousavezreçu.Veuilleznousexcuser,nousnevousinformeronsplusencasdemise
àjourtechnologiqueoulogicielledenotreproduit.
BESOIND'AIDE?CONTACTEZNOUS!
Manchonmuralpourclimatiseur
1
Machine Translated by Google

4.Installezleproduitconformémentàcesinstructionspouréviterlesblessuresdupersonnelou
Couverclegauche
DWS42
1
1
Grilleestampée
1.Lesproduitsdoiventêtreinstalléspardesprofessionnels;
1
1
Modèle
DWS42G
Couverturedroite
3.Veuillezporterdesgantspourinstallerleproduitafind'éviterlesblessuresauxmains;
1 1
2.Lesproduitssontinstallésloindesenfantsetdesanimauxdomestiques;
1
Couvercleinférieur
Couverclesupérieur
dommageauproduit.
1 1
0
CONSIGNESDESÉCURITÉ
Listedespièces
2
Machine Translated by Google

Listedesparamètres
1
(A×B×C)
5
1015×348×375mm
Modèle
1015×348×375mm
0
1
5
DWS42
1
0
VisM4×12
1
DWS42G
dimensionducontour
(A×B×C)
tuyaud'évacuation
Supportàvisenplastique
1067×350×410mm1067×365×410mm
4
Connecteurdedrainage
4
VisautotaraudeusesST5×25
Tailledelacavitéinterne
3
Machine Translated by Google

Formeettailleduproduit
OuiNon
1077×420mm
Tailledelacavitéintérieureduproduit
(largeur×hauteur)
1077×420mm
Grilleestampée
Tailleminimaledelafentemurale
Troucarréducouvercleinférieur
4
Machine Translated by Google

2.Installezlecouverclelatéraldroitdelamêmemanière.
3.Insérezles6clipsducapotsupérieurdanslestrouscarréscorrespondantsdescapots
gaucheetdroit.
Méthoded'assemblagedumanchonmuraldeclimatisation
1.Insérezlestroisclipsducouverclegauchedanslestroistrouscarrésdu
côtégaucheducouvercleinférieur.Notezquelebordlargeducouvercle
gauchecorrespondaubordlargedelaplaqueinférieure.
5
Machine Translated by Google

6
5.Letuyaudevidangeestinsérédansleconnecteurdevidange.
4.Insérezlejointdevidangedansletroudevidangearrièreducouvercleinférieur
Machine Translated by Google

7
6.Appuyezsurlescinqsupportsdevisenplastiquedanslescinqtrouscarrésdelagrille;
notezquevousappuyezsurlesupportdevisenplastiqueàpartirdel'extrémitéduplan
delagrille.
Remarque:neserrezpastroplesvis.
7.Toutd’abord,alignezlesupportdevisenplastiquedelagrilleaveclescinqtrousdevisà
l’arrièredumanchonmuraldeclimatisationetverrouillezlesiègedevisM4×12de
lagrilledanslemanchonmuraldeclimatisation.
Remarque:l'installationduDWS42estterminée;s'ils'agitduDWS42g,passezàl'étape67
pourinstallerlagrille,puisàl'étape4pourinstallerlastructurededrainage.
Machine Translated by Google

Figure1
Revêtementmuraldeclimatisationinstallésurlaméthodemurale1.La
tailledel'ouverturemuraledoitêtrecorrecteetlatailleminimaledel'ouverture
muraleestindiquéedanslafigure1.
8
Machine Translated by Google

9
Figure2
2.Lemanchonmuraldoitêtreinstalléavecunespacelibreminimumde127mmparrapport
ausoletde38,1mmparrapportauxmursadjacents.Voirlafigure2pourles
projectionsminimalesdumanchondansethorsdelapièce.
3.Silemurestinstallédansunmurenbétonouenmaçonnerie,unlinteaudoitêtreprévu
dansl'ouverturedumurpourlesoutenir.N'utilisezpaslemanchonmuralcommelinteau.Sile
murauneépaisseurinférieureà203,2mmouestdeconstructioncreuse,unautremoyen
desoutienpourlemanchondoitêtreprévu.Voirlafigure3pouruneconstructiondelinteau
typique.
Machine Translated by Google

10
4.Faitesglisserlemanchonmuraldansl'ouverturemurale.Nedéformezpaslaformedu
manchonmuraldel'armoirepourl'adapteràl'ouverturemurale;lechâssisdel'unitédoit
s'adapterparfaitementetuniformémentaumanchonmural.
Cecipermetd'évacuerlecondensat.
5.Unefoisinstallédansl'ouverture,lemanchonmuraldoitêtredeniveaud'uncôtéà
l'autreetinclinéd'unquartdebulled'avantenarrière.NEPASINCLINERLE
MANCHONMURALVERSLAPIÈCE.Voirlafigure5.
Figure3
dehors
Machine Translated by Google

7.Fixezlemanchonàl'aidedequatrevisàboisn°12x2po(pourlesbâtimentsconstruits
enbois)oudequatrevisàmaçonnerien°12x2po(pourlesbâtimentsconstruitsen
cimentouenbriques)(Figure5).Fixéà2endroitssurlescôtésgaucheetdroit,assurez
vousquelaconstructiondumurestadéquatepoursupporterl'unité.
Figure5
6.Labarrièreétanchedoitresterenplacejusqu'àl'installationdel'appareil.Unpanneau
avantmétalliqueaccessoire,PBWMFC,estégalementdisponible,maisdoitêtre
achetéséparément.
Figure4
Remarque:nepaspercerlebasdumanchonpourlafixationparvis.
Nousfournissons4visautotaraudeusesST5×25,maisvousdevezjugersilematériaude
votrepanneaumuralestadaptéounon.
11
Machine Translated by Google
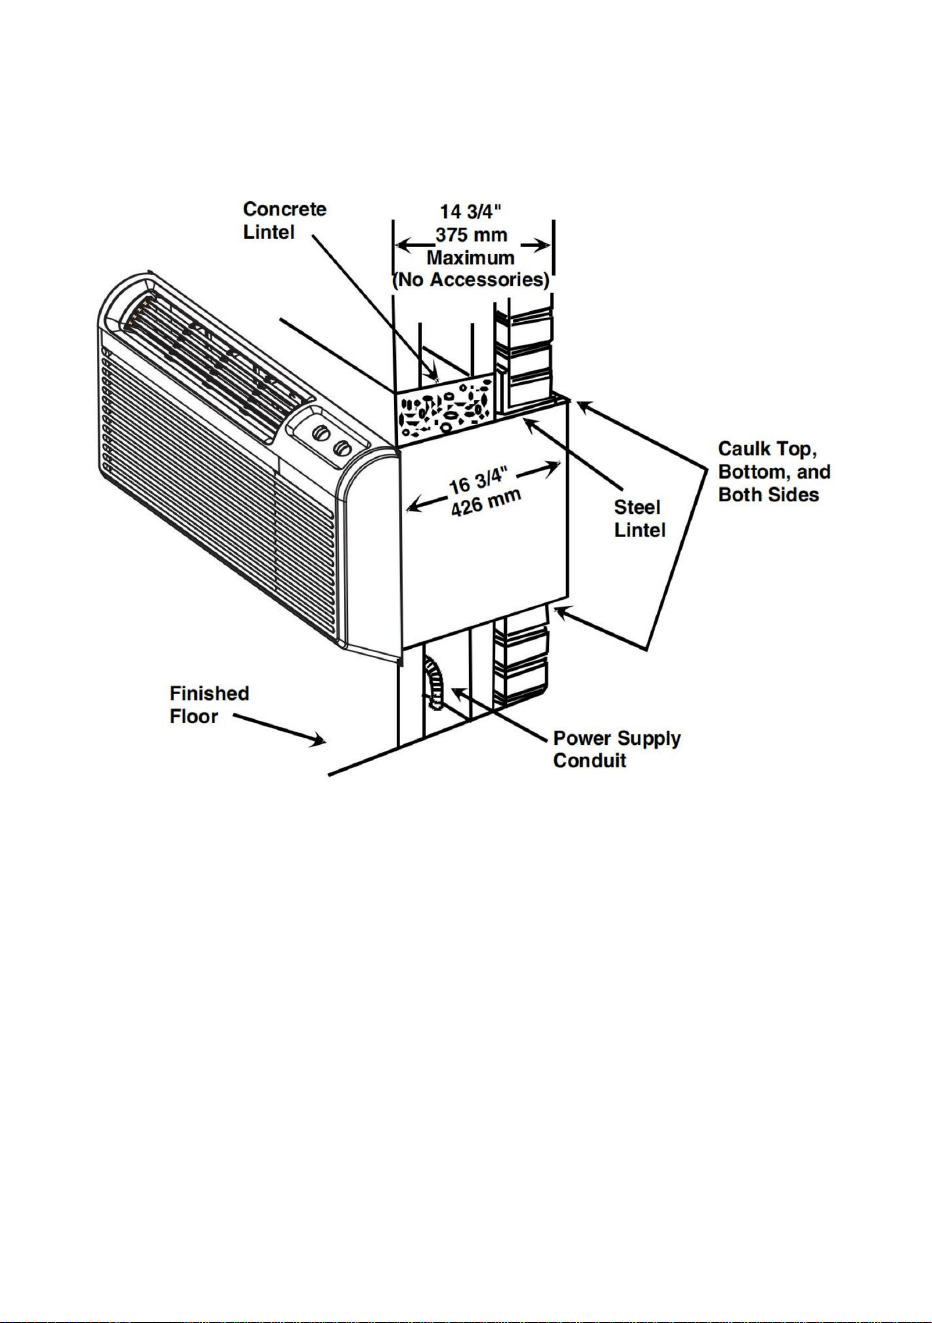
Figure6
9.L'installationducouverclemuralduclimatiseurestterminée.Vouspouvezégalement
ajusterlaméthoded'installationenfonctiondevotreappareildeclimatisation,maiscela
nécessitedeconsulterunpersonneld'installationd'appareildeclimatisation
professionnel.
8.Aprèsl'installation,ajoutezdumatériaud'étanchéitéetdumatériauisolantdans
lesfissuresautourdumanchon,quipeuventêtreajoutésàl'aided'untournevisplatou
d'uncouteauàmastic.Voirlafigure6pourunexempledeconstruction.
12
Machine Translated by Google

13
ImportéauxÉtatsUnis:SanvenTechnologyLtd.Suite250,9166AnaheimPlace,
RanchoCucamonga,CA91730
YHCONSULTINGLIMITED.C/OYHConsultingLimited
Bureau147,CenturionHouse,LondonRoad,Staines
uponThames,Surrey,TW184AX
ImportéenAustralie:SIHAOPTYLTD.1ROKEVASTREETEASTWOODNSW2122
Australie
Fabricant:ShanghaimuxinmuyeyouxiangongsiAdresse:
Shuangchenglu803nong11hao1602A1609shi,baoshanqu,shanghai200000CN.
ECrossStuGmbH
MainzerLandstr.69,
60329FrancfortsurleMain.
REPRÉSENTANTDUROYAUMEUNI
REPRÉSENTANTDELACE
Machine Translated by Google


MODELL: DWS-42/DWS-42G
„Sparen Sie die Hälfte“, „Halber Preis“ oder andere ähnliche Ausdrücke, die wir verwenden,
stellen nur eine Schätzung der Ersparnis dar, die Sie beim Kauf bestimmter Werkzeuge bei uns
im Vergleich zu den großen Topmarken erzielen können, und decken nicht unbedingt alle von uns
angebotenen Werkzeugkategorien ab. Wir möchten Sie freundlich daran erinnern, bei der
Bestellung bei uns sorgfältig zu prüfen, ob Sie im Vergleich zu den großen
Topmarken tatsächlich die Hälfte sparen.
Wir sind weiterhin bestrebt, Ihnen Werkzeuge zu wettbewerbsfähigen Preisen anzubieten.
Wandhülse für Klimaanlage
Technischer Support und E-Garantie-Zertifikat www.vevor.com/support
Machine Translated by Google

Machine Translated by Google

Technischer Support und E-Garantie-Zertifikat www.vevor.com/
support
Dies ist die Originalanleitung. Bitte lesen Sie alle Anweisungen sorgfältig durch, bevor Sie das Gerät
in Betrieb nehmen. VEVOR behält sich eine klare Auslegung unserer Bedienungsanleitung
vor. Das Erscheinungsbild des Produkts richtet sich nach dem Produkt, das Sie erhalten haben.
Bitte verzeihen Sie uns, dass wir Sie nicht erneut informieren, wenn es Technologie- oder Software-
Updates für unser Produkt gibt.
Sie haben Fragen zu unseren Produkten? Sie benötigen technischen Support? Dann kontaktieren
Sie uns gerne:
Modell: DWS-42/DWS-42G
Brauchen Sie Hilfe? Kontaktieren Sie uns!
Wandhülse für Klimaanlage
- 1 -
Machine Translated by Google
1
Rechte Abdeckung
1
1. Die Produkte müssen von Fachleuten installiert werden.
DWS-42G
1
1
Modell
DWS-42
1
1
Linke Abdeckung
Geprägter Kühlergrill
Produktschäden.
1
1
4.Installieren Sie das Produkt gemäß dieser Anleitung, um Verletzungen oder
1
0
3. Bitte tragen Sie bei der Installation des Produkts Handschuhe, um Handverletzungen zu vermeiden.
Obere Abdeckung
Untere Abdeckung
2. Produkte werden außerhalb der Reichweite von Kindern und Haustieren installiert.
Ersatzteilliste
SICHERHEITSHINWEISE
- 2 -
Machine Translated by Google

Parameterliste
Schraubhalterung aus Kunststoff
DWS-42G
(A × B × C)
1
M4×12 Schraube
5
DWS-42
1
5
0
Modell
Umrissdimension
1015×348×375mm
0
1015×348×375mm
Ablaufanschluss
ST5×25 Blechschrauben
(A × B × C)
1
4
Innere Hohlraumgröße
1
4
1067×350×410 mm 1067×365×410 mm
Abflussrohr
- 3 -
Machine Translated by Google

Produktform und -größe
1077×420mm 1077×420mm
Ja
(Breite×Höhe)
NEIN
Geprägter Kühlergrill
Minimale Wandschlitzgröße
Quadratisches Loch an der Bodenabdeckung
Größe des inneren Hohlraums des Produkts
- 4 -
Machine Translated by Google

3. Stecken Sie 6 Clips der oberen Abdeckung in die entsprechenden quadratischen Löcher der linken und
rechten Abdeckung.
2.Installieren Sie die rechte Seitenabdeckung auf die gleiche Weise.
Montagemethode für die Wandhülse der Klimaanlage 1.
Stecken Sie die drei Clips der linken Abdeckung in die drei quadratischen Löcher
auf der linken Seite der unteren Abdeckung. Beachten Sie, dass die breite
Kante der linken Abdeckung der breiten Kante der Bodenplatte entspricht.
- 5 -
Machine Translated by Google

- 6 -
4.Stecken Sie den Ablaufstutzen in die hintere Ablauföffnung der Bodenabdeckung
5. Das Abflussrohr wird in den Abflussanschluss eingesetzt.
Machine Translated by Google

- 7 -
7. Richten Sie zunächst den Kunststoffschraubenhalter des Gitters an den fünf Schraubenlöchern auf der Rückseite der
Wandhülse der Klimaanlage aus und verriegeln Sie den Schraubensitz M4×12 des Gitters in der
Wandhülse der Klimaanlage.
6. Drücken Sie die fünf Kunststoff-Schraubenhalter in die fünf quadratischen Löcher des Gitters. Beachten Sie,
dass Sie die Kunststoff-Schraubenhalter vom Ende der Gitterebene aus drücken.
Hinweis: Die Installation des DWS-42 ist abgeschlossen. Wenn es sich um DWS-42g handelt, fahren Sie mit Schritt 6–7
fort, um das Gitter zu installieren, und anschließend mit Schritt 4, um die Abflussstruktur zu installieren.
Hinweis: Die Schrauben nicht zu fest anziehen.
Machine Translated by Google

Abbildung 1
An der Wand installierte Wandabdeckung für Klimaanlagen
Methode 1. Die Größe der Wandöffnung muss stimmen. Die Mindestgröße
der Wandöffnung ist in Abbildung 1 dargestellt.
- 8 -
Machine Translated by Google

- 9 -
3. Bei Einbau in eine Beton- oder Mauerwand muss in der Wandöffnung ein Sturz zur Unterstützung
vorgesehen werden. Verwenden Sie die Wandhülse nicht als Sturz. Wenn die Wand weniger als 203,2 mm
dick ist oder eine Hohlkonstruktion aufweist, muss eine alternative Stützmöglichkeit für die Hülse vorgesehen
werden. Eine typische Sturzkonstruktion finden Sie in Abbildung 3.
2. Die Wandhülse muss mit einem Mindestabstand von 127 mm zum Boden und 38,1 mm zu angrenzenden
Wänden installiert werden. Die Mindestabstände der Hülse in den Raum hinein und aus ihm
heraus finden Sie in Abbildung 2.
Abbildung 2
Machine Translated by Google

- 10 -
5. Bei der Installation in der Öffnung muss die Wandhülse von Seite zu Seite eben sein und von vorne nach
hinten eine Viertelblase geneigt sein. NEIGEN SIE DIE WANDHÜLSE NICHT ZUM RAUM HIN. Siehe
Abbildung 5.
4. Schieben Sie die Wandhülse in die Wandöffnung. Achten Sie darauf, dass die Gehäuseform der
Wandhülse nicht verformt wird, damit sie in die Wandöffnung passt. Das Gerätegehäuse muss fest und
gleichmäßig in die Wandhülse passen.
Abbildung 3
draußen
Dieser dient der Ableitung des Kondensats.
Machine Translated by Google
7. Befestigen Sie die Hülse mit vier Holzschrauben #12 x 2 Zoll (für Gebäude aus Holz) oder vier
Mauerwerkschrauben #12 x 2 Zoll (für Gebäude aus Zement oder Ziegeln) (Abbildung 5). Befestigen Sie sie
an zwei Stellen auf der linken und rechten Seite. Stellen Sie sicher, dass die Wandkonstruktion ausreichend
groß ist, um das Gerät zu tragen.
Wir liefern 4 selbstschneidende Schrauben ST5×25, Sie müssen jedoch beurteilen, ob das Material Ihrer
Wandplatte geeignet ist oder nicht.
6. Die wasserdichte Barriere sollte bis zur Installation des Geräts an Ort und Stelle bleiben. Eine
zusätzliche Metallfrontplatte, PBWMFC, ist ebenfalls erhältlich, muss jedoch separat erworben werden.
Abbildung 4
Abbildung 5
Hinweis: Zur Schraubbefestigung nicht den Hülsenboden durchbohren.
- 11 -
Machine Translated by Google
Abbildung
6 9. Die Installation der Wandabdeckung für die Klimaanlage ist abgeschlossen. Sie
können die Installationsmethode auch an Ihre Klimaanlage anpassen. Hierzu müssen
Sie jedoch professionelles Klimaanlageninstallationspersonal konsultieren.
8. Nach der Installation fügen Sie Dichtungsmaterial und Isoliermaterial zu den
Rissen rund um die Hülse hinzu. Dies können Sie mit einem flachen Schraubendreher
oder einem Spachtel tun. Ein Konstruktionsbeispiel finden Sie in Abbildung 6.
- 12 -
Machine Translated by Google

- 13 -
Importiert in die USA: Sanven Technology Ltd. Suite 250, 9166 Anaheim Place,
Rancho Cucamonga, CA 91730
Nach AUS importiert: SIHAO PTY LTD. 1 ROKEVA STREETEASTWOOD NSW 2122
Australien
Hersteller: Shanghaimuxinmuyeyouxiangongsi Adresse:
Shuangchenglu 803nong11hao1602A-1609shi, baoshanqu, Shanghai 200000 CN.
E-CrossStu GmbH
Mainzer Landstr.69,
60329 Frankfurt am Main.
YH CONSULTING LIMITED. C/O YH Consulting Limited
Office 147, Centurion House, London Road, Staines-
upon-Thames, Surrey, TW18 4AX
Vertreter der EG
UK REP
Machine Translated by Google


MODELLO:DWS-42/DWS-42G
"Risparmia la metà", "Metà prezzo" o qualsiasi altra espressione simile da noi
utilizzata rappresenta solo una stima del risparmio che potresti ottenere acquistando
determinati utensili con noi rispetto ai principali marchi principali e non significa
necessariamente coprire tutte le categorie di utensili da noi offerti. Ti ricordiamo
gentilmente di verificare attentamente quando effettui un ordine con noi
se stai effettivamente risparmiando la metà rispetto ai principali marchi principali.
Continuiamo a impegnarci per fornirvi strumenti a prezzi competitivi.
Manicotto per parete del condizionatore d'aria
Supporto tecnico e certificato di garanzia elettronica www.vevor.com/support
Machine Translated by Google

Machine Translated by Google

- 1 -
HAI BISOGNO DI AIUTO? CONTATTACI!
Manicotto per parete del condizionatore d'aria
Supporto tecnico e certificato di garanzia elettronica
www.vevor.com/support
Questa è l'istruzione originale, si prega di leggere attentamente tutte le istruzioni del manuale
prima di utilizzare. VEVOR si riserva una chiara interpretazione del nostro manuale
utente. L'aspetto del prodotto sarà soggetto al prodotto ricevuto. Vi preghiamo di perdonarci se
non vi informeremo di nuovo se ci sono aggiornamenti tecnologici o software sul nostro prodotto.
Hai domande sui prodotti? Hai bisogno di supporto tecnico? Non esitare a contattarci:
Modello:DWS-42/DWS-42G
Machine Translated by Google
- 2 -
Elenco delle parti
ISTRUZIONI DI SICUREZZA
1
Copertura destra
1
1. I prodotti devono essere installati da professionisti;
Modello DWS-42G
1
1
Modello
Il DWS-42
1
1
Copertura sinistra
Griglia stampata
danni al prodotto.
1
1
4. Installare il prodotto secondo queste istruzioni per evitare lesioni personali o
1
0
3. Indossare guanti durante l'installazione del prodotto per evitare lesioni alle mani;
Copertura superiore
Copertura inferiore
2. I prodotti siano installati lontano dalla portata di bambini e animali domestici;
Machine Translated by Google

- 3 -
Supporto a vite in plastica
Modello DWS-42G
(A×B×C)
1
Vite M4×12
5
Il DWS-42
1
0
5
Modello
dimensione del contorno
Dimensioni: 1015×348×375mm
0
Dimensioni: 1015×348×375mm
Connettore di drenaggio
Viti autofilettanti ST5×25
(A×B×C)
1
4
Dimensioni della cavità interna
1
4
Dimensioni: 1067×350×410 mm
tubo di scarico
Elenco dei parametri
Machine Translated by Google
- 4 -
1077×420mm 1077×420mm
SÌ
(larghezza×altezza)
NO
Griglia stampata
Dimensione minima della fessura della parete
Coperchio inferiore foro quadrato
Dimensioni della cavità interna del prodotto
Forma e dimensione del prodotto
Machine Translated by Google

3. Inserire 6 clip del coperchio superiore nei fori quadrati corrispondenti dei coperchi sinistro e
destro.
2. Installare la copertura laterale destra nello stesso modo.
Metodo di assemblaggio del manicotto a parete dell'aria
condizionata 1.Inserire le tre clip del coperchio sinistro nei tre fori quadrati
del lato sinistro del coperchio inferiore. Notare che il bordo largo del
coperchio sinistro corrisponde al bordo largo della piastra inferiore.
- 5 -
Machine Translated by Google

- 6 -
5. Il tubo di scarico viene inserito nel connettore di scarico.
4.Inserire il giunto di scarico nel foro di scarico posteriore del coperchio inferiore
Machine Translated by Google

- 7 -
7. Per prima cosa, allineare il supporto per vite in plastica della griglia con i cinque fori per viti
sul lato posteriore del manicotto a parete del climatizzatore e bloccare la sede
della vite M4×12 della griglia nel manicotto a parete del climatizzatore.
6. Premere i cinque supporti per viti in plastica nei cinque fori quadrati della griglia; notare
la pressione del supporto per viti in plastica dall'estremità del piano della griglia.
Nota: l' installazione del DWS-42 è completa; se si tratta del DWS-42g, passare ai passaggi 6-7
per installare la griglia e quindi al passaggio 4 per installare la struttura di scarico.
Nota: non stringere troppo le viti.
Machine Translated by Google

Figura 1
Metodo di installazione della copertura murale dell'aria condizionata sulla parete
1. La dimensione dell'apertura nella parete deve essere corretta e la dimensione minima
dell'apertura nella parete è mostrata nella Figura 1.
- 8 -
Machine Translated by Google

- 9 -
3.Se installato in un muro di cemento o muratura, deve essere previsto un architrave
nell'apertura del muro per il supporto. Non utilizzare il manicotto del muro come architrave. Se il
muro è spesso meno di 203,2 mm o di costruzione cava, deve essere previsto un mezzo di
supporto alternativo per il manicotto. Vedere la Figura 3 per una tipica costruzione
dell'architrave.
2. Il manicotto a parete deve essere installato con una distanza minima di 127 mm dal
pavimento e di 38,1 mm dalle pareti adiacenti. Vedere la Figura 2 per le sporgenze
minime del manicotto dentro e fuori dalla stanza.
Figura 2
Machine Translated by Google

- 10 -
5. Quando installato nell'apertura, il manicotto a parete deve essere livellato da un lato all'altro e
inclinato di un quarto di bolla da davanti a dietro. NON INCLINARE IL MANICOTTO A PARETE
VERSO LA STANZA. Vedere Figura 5.
4. Far scorrere il manicotto a parete nell'apertura a parete. Non deformare la forma del
mobiletto del manicotto a parete per adattarlo all'apertura a parete; il telaio dell'unità deve
adattarsi perfettamente e uniformemente al manicotto a parete.
Figura 3
al di fuori
Questo serve per scaricare la condensa.
Machine Translated by Google

- 11 -
7. Fissare il manicotto utilizzando quattro viti per legno n. 12x2” (per edifici costruiti in legno)
o quattro viti per muratura n. 12x2” (per edifici costruiti in cemento o mattoni) (Figura 5).
Fissare in 2 punti sul lato sinistro e destro. Assicurarsi che la costruzione della parete sia
adeguata a supportare l'unità.
Forniamo 4 viti autofilettanti ST5×25, ma spetta a te valutare se il materiale del pannello
della tua parete è adatto o meno.
6.La barriera impermeabile deve rimanere in posizione fino all'installazione dell'unità. È
disponibile anche un pannello frontale in metallo accessorio, PBWMFC, ma deve
essere acquistato separatamente.
Figura 4
Figura 5
Nota: non forare la parte inferiore del manicotto per il fissaggio con le viti.
Machine Translated by Google

- 12 -
Figura 6
9. L'installazione della copertura murale dell'aria condizionata è completata. È inoltre
possibile adattare il metodo di installazione in base al dispositivo di aria condizionata in
uso, ma in tal caso è necessario consultare un installatore professionista di
dispositivi di aria condizionata.
8. Dopo l'installazione, aggiungere materiale sigillante e isolante alle crepe attorno al
manicotto, utilizzando un cacciavite piatto o una spatola. Vedere la Figura 6 per un esempio
di costruzione.
Machine Translated by Google

Rappresentante della CE
RAPPRESENTANZA DEL REGNO UNITO
Importato negli USA: Sanven Technology Ltd. Suite 250, 9166 Anaheim Place,
Rancho Cucamonga, CA 91730
Importato in AUS: SIHAO PTY LTD. 1 ROKEVA STREETEASTWOOD NSW 2122
Australia
Produttore: Shanghaimuxinmuyeyouxiangongsi Indirizzo:
Shuangchenglu 803nong11hao1602A-1609shi, baoshanqu, shanghai 200000 CN.
YH CONSULTING LIMITED. C/O YH Consulting Limited
Ufficio 147, Centurion House, London Road, Staines-
upon-Thames, Surrey, TW18 4AX
E-CrossStu GmbH
Mainzer Landstr.69,
60329 Francoforte sul Meno.
- 13 -
Machine Translated by Google


MODELO:DWS42/DWS42G
Seguimoscomprometidosabrindarleherramientasaprecioscompetitivos.
"Ahorrelamitad","mitaddeprecio"ocualquierotraexpresiónsimilarqueutilicemos
solorepresentaunaestimacióndelahorroquepodríaobteneralcomprarciertas
herramientasconnosotrosencomparaciónconlasprincipalesmarcasynonecesariamente
significaquecubratodaslascategoríasdeherramientasqueofrecemos.Lerecordamos
que,alrealizarunpedidoconnosotros,verifiquecuidadosamentesi
realmenteestáahorrandolamitadencomparaciónconlasprincipalesmarcas.
Manguitodeparedparaaireacondicionado
Soportetécnicoycertificadodegarantíaelectrónicawww.vevor.com/support
Machine Translated by Google

Machine Translated by Google

Soportetécnicoycertificadodegarantíaelectrónicawww.vevor.com/
support
¿Tienepreguntassobreelproducto?¿Necesitaasistenciatécnica?Nodudeenponerseencontacto
connosotros:
Modelo:DWS42/DWS42G
Estassonlasinstruccionesoriginales,leaatentamentetodaslasinstruccionesdelmanualantesde
utilizarelproducto.VEVORsereservaunainterpretaciónclaradenuestromanualde
usuario.Laaparienciadelproductoestarásujetaalproductoquerecibió.Perdónenosporno
informarlenuevamentesihayactualizacionesdetecnologíaosoftwareennuestroproducto.
¿NECESITAAYUDA?¡CONTÁCTENOS!
Manguitodeparedparaaireacondicionado
1
Machine Translated by Google

4.Instaleelproductosegúnestasinstruccionesparaevitarlesionespersonaleso
Cubiertaizquierda
DWS42
1
1
Rejillaestampada
1.Losproductosdeberánserinstaladosporprofesionales;
1
1
Modelo
DWS42G
Tapaderecha
3.Utiliceguantesparainstalarelproductoparaevitarlesionesenlasmanos;
1 1
2.Losproductosseinstalanlejosdelosniñosylasmascotas;
1
Cubiertainferior
Cubiertasuperior
Dañoalproducto.
1 1
0
Listadepiezas
INSTRUCCIONESDESEGURIDAD
2
Machine Translated by Google
Listadeparámetros
1
(A×B×C)
5
1015×348×375mm
Modelo
1015×348×375mm
0
1
5
DWS42
1
0
TornilloM4×12
1
DWS42G
dimensióndelcontorno
(A×B×C)
tubodedesagüe
Soportedetornillodeplástico
1067×350×410mm1067×365×410mm
4
Conectordedrenaje
4
TornillosautorroscantesST5×25
Tamañodelacavidadinterna
3
Machine Translated by Google

Formaytamañodelproducto
1077×420mm
No Sí
Tamañodelacavidadinternadelproducto
Rejillaestampada
1077×420mm
(ancho×alto)
Tamañomínimoderanuradepared
Agujerocuadradodelatapainferior
4
Machine Translated by Google

2.Instalelacubiertalateralderechadelamismamanera.
3.Inserte6clipsdelacubiertasuperiorenlosorificioscuadradoscorrespondientesdelas
cubiertasizquierdayderecha.
Métododemontajedelafundadepareddelaireacondicionado
1.Insertelostresclipsdelatapaizquierdaenlostresorificioscuadradosdellado
izquierdodelatapainferior.Tengaencuentaqueelbordeanchodelatapa
izquierdacorrespondealbordeanchodelaplacainferior.
5
Machine Translated by Google

6
5.Eltubodedrenajeseinsertaenelconectordedrenaje.
4.Insertelajuntadedrenajeenelorificiodedrenajetraserodelacubiertainferior.
Machine Translated by Google

7
6.Presioneloscincosoportesdetornillosdeplásticoenloscincoorificioscuadradosdelarejilla;
tengaencuentaquedebepresionarelsoportedetornillosdeplásticodesdeelextremodelplano
delarejilla.
7.Primero,alineeelsoportedetornillodeplásticodelarejillaconloscincoorificiosparatornillosenla
parteposteriordelafundadepareddelaireacondicionadoybloqueeelasientodeltornillo
M4×12delarejillaenlafundadepareddelaireacondicionado.
Nota:LainstalacióndelDWS42estácompleta;siesDWS42g,vayaalpaso67parainstalarlarejillay
luegoalpaso4parainstalarlaestructuradedrenaje.
Nota:Noaprietedemasiadolostornillos.
Machine Translated by Google

Figura1
CubiertadepareddelaireacondicionadoinstaladaenlaparedMétodo1.El
tamañodelaaberturadelapareddebesercorrectoyeltamañomínimodela
aberturadelaparedsemuestraenlaFigura1.
8
Machine Translated by Google

9
Figura2
2.Elmanguitodepareddebeinstalarseconunadistanciamínimade127mmhastaelpiso
yde38,1mmhastalasparedesadyacentes.ConsultelaFigura2paraverlas
proyeccionesmínimasdelmanguitodentroyfueradelahabitación.
3.Siseinstalaenunapareddehormigónomampostería,sedebecolocarundintelenla
aberturadelaparedparaquesirvadesoporte.Noutiliceelmanguitodeparedcomodintel.Si
laparedtieneunespesorinferiora203,2mmoesdeconstrucciónhueca,sedebecolocar
unmedioalternativodesoporteparaelmanguito.ConsultelaFigura3paraveruna
construccióndedinteltípica.
Machine Translated by Google

10
5.Cuandoseinstaleenlaabertura,elmanguitodepareddebeestarniveladodeladoalado
yconunainclinacióndeuncuartodeburbujadeadelantehaciaatrás.NOINCLINEEL
MANGUITODEPAREDHACIALAHABITACIÓN.ConsultelaFigura5.
afuera
4.Desliceelsoportedeparedenlaaberturadelapared.Nodeformelaformadelgabinetedel
soportedeparedparaqueencajeenlaaberturadelapared;elchasisdelaunidaddebeencajar
demanerafirmeyuniformeenelsoportedepared.
Figura3
Estoesparadescargarelcondensado.
Machine Translated by Google
11
7.Fijelafundaconcuatrotornillosparamaderan.°12x2”(paraedificiosconstruidoscon
madera)ocuatrotornillosparamamposterían.°12x2”(paraedificiosconstruidoscon
cementooladrillo)(Figura5).Fíjelaen2lugaresenlosladosizquierdoyderecho.Asegúrese
dequelaconstruccióndelaparedseaadecuadaparasoportarlaunidad.
Figura5
6.Labarreraimpermeabledebepermanecerensulugarhastaqueseinstalelaunidad.
Tambiénestádisponibleunpanelfrontalmetálicoadicional,PBWMFC,perodebe
comprarseporseparado.
Figura4
Nota:Notaladrelaparteinferiordelmanguitoparafijarloconlostornillos.
Proporcionamos4tornillosautorroscantesST5×25,perodebeevaluarsielmaterialdesu
paneldeparedesadecuadoono.
Machine Translated by Google

12
Figura6
9.CubiertadepareddelaireacondicionadoLainstalaciónestácompleta.Tambiénpuede
ajustarelmétododeinstalacióndeacuerdoconsudispositivodeaireacondicionado,pero
paraestodebeconsultaraunpersonaldeinstalacióndedispositivosdeaire
acondicionadoprofesional.
8.Despuésdelainstalación,agreguematerialdeselladoymaterialdeaislamientoalas
grietasalrededordelamanga,quesepuedenagregarusandoundestornilladorplanoouna
espátula.ConsultelaFigura6paraverunejemplodeconstrucción.
Machine Translated by Google
REPRESENTANTECE
REPRESENTANTEDELREINOUNIDO
ImportadoaEE.UU.:SanvenTechnologyLtd.Suite250,9166AnaheimPlace,Rancho
Cucamonga,CA91730
YHCONSULTINGLIMITED.ALADIRECCIÓNDEYH
ConsultingLimitedOficina147,CenturionHouse,London
Road,StainesuponThames,Surrey,TW184AX
ImportadoaAUS:SIHAOPTYLTD.1ROKEVASTREETEASTWOODNSW2122
Australia
Fabricante:ShanghaimuxinmuyeyouxiangongsiDirección:
Shuangchenglu803nong11hao1602A1609shi,baoshanqu,shanghai200000CN.
ECrossStuGmbH
MainzerLandstr.69,
60329FráncfortdelMeno.
13
Machine Translated by Google


MODEL:DWS-42/DWS-42G
„Oszczędzaj połowę”, „Połowa ceny” lub inne podobne wyrażenia używane przez
nas stanowią jedynie szacunkowe oszczędności, jakie możesz uzyskać, kupując u nas
określone narzędzia w porównaniu z głównymi markami i niekoniecznie oznaczają one
objęcie wszystkich kategorii oferowanych przez nas narzędzi. Uprzejmie przypominamy,
aby przy składaniu zamówienia dokładnie sprawdzić, czy faktycznie
oszczędzasz połowę w porównaniu z głównymi markami.
Nadal staramy się oferować Państwu narzędzia w konkurencyjnych cenach.
Rękaw ścienny do klimatyzatora
Wsparcie techniczne i certyfikat gwarancji elektronicznej www.vevor.com/support
Machine Translated by Google

Machine Translated by Google

Wsparcie techniczne i certyfikat gwarancji elektronicznej
www.vevor.com/support
To jest oryginalna instrukcja, przed użyciem należy uważnie przeczytać wszystkie instrukcje.
VEVOR zastrzega sobie jasną interpretację naszej instrukcji obsługi. Wygląd produktu
będzie zależał od produktu, który otrzymałeś. Prosimy o wybaczenie, że nie poinformujemy Cię
ponownie, jeśli w naszym produkcie pojawią się jakiekolwiek aktualizacje technologiczne lub
oprogramowania.
Masz pytania dotyczące produktu? Potrzebujesz wsparcia technicznego? Skontaktuj się z nami:
Modele:DWS-42/DWS-42G
Rękaw ścienny do klimatyzatora
POTRZEBUJESZ POMOCY? SKONTAKTUJ SIĘ Z NAMI!
- 1 -
Machine Translated by Google

1
1
1
2. Produkty należy instalować w miejscu niedostępnym dla dzieci i zwierząt domowych;
1
Dolna okładka
3. Aby uniknąć obrażeń dłoni, podczas instalacji produktu należy założyć rękawice.
4. Zainstaluj produkt zgodnie z niniejszą instrukcją, aby uniknąć obrażeń ciała lub
Górna pokrywa
1
uszkodzenie produktu.
1
0
1
Lewa okładka
Tłoczona kratka
1
DWS-42 DWS-42G
Model
1
Prawa okładka
1. Produkty powinny być instalowane przez profesjonalistów;
Lista części
INSTRUKCJE BEZPIECZEŃSTWA
- 2 -
Machine Translated by Google

Lista parametrów
5
wymiar obrysu
Plastikowy uchwyt śrubowy
rura odpływowa
(A × B × C)
Wymiary: 1067×350×410 mm
1 1
4 4
Złącze odwadniające
Wkręty samogwintujące ST5×25
Rozmiar wewnętrznej komory
(A × B × C)
0
Wymiary: 1015×348×375 mm
Model
5
Wymiary: 1015×348×375 mm
Śruba M4×12
1
0
DWS-42 DWS-42G
1
- 3 -
Machine Translated by Google

Kształt i rozmiar produktu
NIE Tak
1077×420 mm
Rozmiar wewnętrznej komory produktu
Tłoczona kratka
1077×420 mm
(szerokość×wysokość)
Minimalny rozmiar szczeliny ściennej
Otwór kwadratowy w dolnej pokrywie
- 4 -
Machine Translated by Google

2. Zamontuj prawą osłonę w ten sam sposób.
3. Włóż 6 klipsów górnej pokrywy w odpowiednie kwadratowe otwory lewej
i prawej pokrywy.
Metoda montażu osłony ściennej klimatyzatora 1. Włóż
trzy klipsy lewej osłony do trzech kwadratowych otworów po lewej stronie
dolnej osłony. Zwróć uwagę, że szeroka krawędź lewej osłony
odpowiada szerokiej krawędzi dolnej płyty.
- 5 -
Machine Translated by Google

- 6 -
5. Rurę spustową należy włożyć do przyłącza spustowego.
4. Włóż złącze spustowe do tylnego otworu spustowego dolnej pokrywy
Machine Translated by Google
- 7 -
7. Najpierw należy dopasować plastikowy uchwyt śruby kratki do pięciu otworów na śruby
znajdujących się z tyłu osłony ściennej klimatyzatora i zablokować gniazdo śruby
M4×12 kratki w osłonie ściennej klimatyzatora.
Uwaga: Nie dokręcaj śrub zbyt mocno.
6. Wciśnij pięć plastikowych uchwytów na śruby w pięć kwadratowych otworów kratki.
Pamiętaj, aby wciskać plastikowy uchwyt na śruby od końca płaszczyzny kratki.
Uwaga: Instalacja DWS-42 jest zakończona. W przypadku DWS-42g przejdź do kroków 6–7, aby
zainstalować kratkę, a następnie do kroku 4, aby zainstalować konstrukcję odpływową.
Machine Translated by Google

Rysunek 1
Montaż osłony ściennej klimatyzatora na ścianie metodą 1.
Rozmiar otworu w ścianie musi być prawidłowy, a minimalny rozmiar
otworu w ścianie pokazano na rysunku 1.
- 8 -
Machine Translated by Google

- 9 -
Rysunek 2
2. Tuleja ścienna musi być zainstalowana z minimalnym odstępem 127 mm od podłogi i 38,1
mm od sąsiednich ścian. Zobacz Rysunek 2, aby uzyskać minimalne wystające
elementy tulei do i z pomieszczenia.
3. W przypadku montażu w ścianie betonowej lub murowanej, w otworze ściennym należy
umieścić nadproże w celu wsparcia. Nie należy używać tulei ściennej jako nadproża. Jeśli ściana
ma grubość mniejszą niż 203,2 mm lub jest pusta, należy zapewnić alternatywny sposób
podparcia tulei. Typową konstrukcję nadproża przedstawiono na rysunku 3.
Machine Translated by Google
- 10 -
5. Po zainstalowaniu w otworze tuleja ścienna musi być wypoziomowana z boku na bok i
nachylona o jedną czwartą od przodu do tyłu. NIE NACHYLAĆ TULEI ŚCIENNEJ W
KIERUNKU POMIESZCZENIA. Zobacz rysunek 5.
Służy do odprowadzania kondensatu.
4. Wsuń tuleję ścienną do otworu ściennego. Nie zniekształcaj kształtu obudowy
tulei ściennej, aby pasowała do otworu ściennego; obudowa urządzenia musi ściśle i
jednolicie pasować do tulei ściennej.
Rysunek 3
poza
Machine Translated by Google

- 11 -
6. Bariera wodoodporna powinna pozostać na miejscu do momentu zainstalowania urządzenia.
Dostępny jest również dodatkowy metalowy panel przedni, PBWMFC, ale należy go zakupić
osobno.
Rysunek 5
7. Przymocuj tuleję za pomocą czterech wkrętów do drewna #12x2” (w przypadku budynków z
drewnianą konstrukcją) lub czterech wkrętów do muru #12x2” (w przypadku budynków z cementem
lub cegłą) (Rysunek 5). Zamocuj w dwóch miejscach po lewej i prawej stronie. Upewnij się, że
konstrukcja ściany jest odpowiednia do podtrzymania jednostki.
Rysunek 4
Dostarczamy 4 wkręty samogwintujące ST5×25, ale musisz sam ocenić, czy materiał, z którego wykonane
są Twoje panele ścienne, nadaje się do tego celu, czy nie.
Uwaga: Nie wiercić otworów w dolnej części tulei w celu przykręcenia śrub.
Machine Translated by Google

- 12 -
Rysunek
6 9. Instalacja ściennej osłony klimatyzatora jest zakończona. Możesz również
dostosować metodę instalacji do posiadanego klimatyzatora, ale wymaga to
konsultacji z profesjonalnym instalatorem urządzeń klimatyzacyjnych.
8. Po zakończeniu montażu należy wypełnić szczeliny wokół tulei materiałem
uszczelniającym i izolacyjnym. Można to zrobić za pomocą płaskiego śrubokręta
lub szpachelki. Przykład montażu przedstawiono na rysunku 6.
Machine Translated by Google

REP WIELKIEJ BRYTANII
Przedstawiciel UE
Importowane do AUS: SIHAO PTY LTD. 1 ROKEVA STREETEASTWOOD NSW 2122 Australia
YH CONSULTING LIMITED. C/O YH Consulting Limited Biuro
147, Centurion House, London Road, Staines-upon-
Thames, Surrey, TW18 4AX
Importowane do USA: Sanven Technology Ltd. Suite 250, 9166 Anaheim Place, Rancho
Cucamonga, CA 91730
Producent: Shanghaimuxinmuyeyouxiangongsi Adres:
Shuangchenglu 803nong11hao1602A-1609shi, baoshanqu, szanghaj 200000 CN.
E-CrossStu GmbH
Mainzer Landstr.69,
60329 Frankfurt nad Menem.
- 13 -
Machine Translated by Google


MODEL: DWS-42/DWS-42G
Muurhuls voor airconditioner
Technische ondersteuning en e-garantiecertificaat www.vevor.com/support
"Save Half", "Half Price" of andere soortgelijke uitdrukkingen die wij gebruiken, geven alleen
een schatting weer van de besparingen die u kunt behalen door bepaalde gereedschappen bij ons
te kopen in vergelijking met de grote topmerken en betekent niet noodzakelijkerwijs dat alle categorieën
gereedschappen die wij aanbieden, worden gedekt. Wij herinneren u eraan om zorgvuldig te
controleren of u daadwerkelijk de helft bespaart in vergelijking met de grote
topmerken wanneer u een bestelling bij ons plaatst.
Wij streven er voortdurend naar om u gereedschappen tegen concurrerende prijzen te leveren.
Machine Translated by Google

Machine Translated by Google

Technische ondersteuning en e-garantiecertificaat
www.vevor.com/support
Dit is de originele instructie, lees alle handleidingen zorgvuldig door voordat u het product gebruikt.
VEVOR behoudt zich een duidelijke interpretatie van onze gebruikershandleiding voor. Het
uiterlijk van het product is afhankelijk van het product dat u hebt ontvangen. Vergeef ons dat we u
niet opnieuw zullen informeren als er technologie- of software-updates voor ons product zijn.
Heeft u vragen over het product? Heeft u technische ondersteuning nodig? Neem dan gerust
contact met ons op:
Model: DWS-42/DWS-42G
HULP NODIG? NEEM CONTACT MET ONS OP!
Muurhuls voor airconditioner
- 1 -
Machine Translated by Google
productschade.
1
Linker deksel
Gestempeld rooster
DWS-42
1
Model
DWS-42G
1
1. Producten moeten door professionals worden geïnstalleerd;
1
Rechter deksel
2. Producten worden buiten bereik van kinderen en huisdieren geïnstalleerd;
1
1 1
3. Draag handschoenen bij de installatie van het product om handletsel te voorkomen;
Bovenste deksel
Onderste deksel
1
0
4. Installeer het product volgens deze instructies om persoonlijk letsel of
1
VEILIGHEIDSINSTRUCTIES
Onderdelenlijst
- 2 -
Machine Translated by Google

Parameterlijst
Afvoeraansluiting
ST5×25 Zelftappende schroeven
0
1015×348×375mm
5
Model
1015×348×375mm
1
M4×12 schroef
0
DWS-42
1
5
DWS-42G
afvoerbuis
Kunststof schroefbeugel
omtrek dimensie
(A×B×C)
1
4
Afmetingen: 1067×350×410mm 1067×365×410mm
4
Interne holtegrootte
1
(A×B×C)
- 3 -
Machine Translated by Google

Productvorm en -grootte
1077×420mm
Nee Ja
Grootte van de binnenholte van het product
Gestempeld rooster
1077×420mm
(breedte×hoogte)
Minimale muursleufgrootte
Onderste deksel vierkant gat
- 4 -
Machine Translated by Google

3. Plaats de 6 clips van de bovenklep in de overeenkomstige vierkante gaten van
de linker- en rechterklep.
2. Monteer de rechterzijkap op dezelfde manier.
Montagemethode van de wandhuls van de airconditioning
1. Plaats de drie clips van de linker afdekking in de drie vierkante gaten aan de
linkerkant van de onderste afdekking. Let op dat de brede rand van de linker
afdekking overeenkomt met de brede rand van de onderste plaat.
- 5 -
Machine Translated by Google
- 6 -
5. De afvoerbuis wordt in de afvoeraansluiting gestoken.
4. Plaats de afvoeraansluiting in het achterste afvoergat van de onderste afdekking
Machine Translated by Google

- 7 -
7. Lijn eerst de kunststof schroefhouder van het rooster uit met de vijf schroefgaten aan de achterkant
van de wandhuls van de airconditioning en vergrendel de M4×12-schroefzitting van het
rooster in de wandhuls van de airconditioning.
Let op: Draai de schroeven niet te vast.
6. Druk de vijf kunststof schroefhouders in de vijf vierkante gaten van het rooster. Let op dat u de
kunststof schroefhouder vanaf het uiteinde van het roostervlak indrukt.
Let op: De installatie van de DWS-42 is voltooid. Als het om een DWS-42g gaat, ga dan naar stap 6-7
om het rooster te installeren en vervolgens naar stap 4 om de afvoerstructuur te installeren.
Machine Translated by Google
Figuur 1
Methode voor het monteren van een airconditioningwandkap op de muur :
1. De grootte van de muuropening moet correct zijn. De minimale grootte van de
muuropening wordt weergegeven in Afbeelding 1.
- 8 -
Machine Translated by Google

- 9 -
Figuur 2
2. De muurhuls moet worden geïnstalleerd met een minimale afstand van 127 mm tot de
vloer en 38,1 mm tot aangrenzende muren. Zie Afbeelding 2 voor minimale projecties
van de huls in en uit de kamer.
3. Indien geïnstalleerd in een betonnen of stenen muur, moet er een latei in de muuropening
worden aangebracht ter ondersteuning. Gebruik de muurhuls niet als latei. Indien de muur
minder dan 203,2 mm dik is of een holle constructie heeft, moet er een alternatieve manier
van ondersteuning voor de huls worden aangebracht. Zie Afbeelding 3 voor een typische
lateiconstructie.
Machine Translated by Google

- 10 -
4. Schuif de wandhuls in de muuropening. Vervorm de kastvorm van de
wandhuls niet om deze in de muuropening te laten passen; het chassis van de
unit moet strak en gelijkmatig in de wandhuls passen.
Dit is om het condensaat af te voeren.
5.Wanneer geïnstalleerd in de opening, moet de wandhuls waterpas zijn van zijkant
tot zijkant en een kwart bubbel van voor naar achter aflopen. LAAT DE WANDHULS
NIET NAAR DE KAMER AFHANGEN. Zie Afbeelding 5.
Figuur 3
buiten
Machine Translated by Google

- 11 -
6. De waterdichte barrière moet op zijn plaats blijven totdat de unit is geïnstalleerd.
Een accessoire metalen frontpaneel, PBWMFC, is ook beschikbaar, maar moet
apart worden aangeschaft.
Figuur 5
7. Bevestig de huls met vier #12x2” houtschroeven (voor gebouwen van hout) of vier
#12x2” metselwerkschroeven (voor gebouwen van cement of baksteen) (Figuur 5).
Bevestig op 2 plaatsen aan de linker- en rechterkant. Zorg ervoor dat de
muurconstructie voldoende is om de eenheid te dragen.
Figuur 4
Let op: Boor niet door de onderkant van de huls om deze vast te schroeven.
Wij leveren 4 zelftappende schroeven ST5×25 mee, maar u moet zelf beoordelen of het
materiaal van uw wandpaneel geschikt is of niet.
Machine Translated by Google

- 12 -
8.Na de installatie brengt u afdichtingsmateriaal en isolatiemateriaal aan op de
scheuren rondom de huls. U kunt dit doen met een platte schroevendraaier of
plamuurmes. Zie Afbeelding 6 voor een voorbeeld van de constructie.
Afbeelding
6 9. De installatie van de wandafdekking van de airconditioning is voltooid. U kunt
de installatiemethode ook aanpassen aan uw airconditioningapparaat, maar u
moet hiervoor een professional in de installatie van airconditioningapparaten
raadplegen.
Machine Translated by Google

EC-REP
VK REP
Geïmporteerd naar de VS: Sanven Technology Ltd. Suite 250, 9166 Anaheim Place,
Rancho Cucamonga, CA 91730
YH CONSULTING LIMITED. C/O YH Consulting Limited
Kantoor 147, Centurion House, London Road, Staines-
upon-Thames, Surrey, TW18 4AX
Geïmporteerd naar AUS: SIHAO PTY LTD. 1 ROKEVA STREETEASTWOOD NSW
2122 Australië
Fabrikant: Shanghaimuxinmuyeyouxiangongsi Adres:
Shuangchenglu 803nong11hao1602A-1609shi, baoshanqu, shanghai 200000 CN.
E-CrossStu GmbH
Mainzer Landstr.69,
60329 Frankfurt am Main.
- 13 -
Machine Translated by Google


Vägghylsa för luftkonditionering
"Spara hälften", "halva priset" eller andra liknande uttryck som används av oss
representerar bara en uppskattning av besparingar du kan dra nytta av att köpa vissa
verktyg hos oss jämfört med de stora toppmärkena och betyder inte nödvändigtvis att täcka
alla kategorier av verktyg som erbjuds av oss. Du påminns om att noggrant kontrollera
när du gör en beställning hos oss om du verkligen sparar hälften i
jämförelse med de främsta varumärkena.
Vi fortsätter att vara engagerade i att ge dig verktyg till konkurrenskraftiga priser.
MODELL:DWS-42/DWS-42G
Teknisk support och e-garanticertifikat www.vevor.com/support
Machine Translated by Google

Machine Translated by Google

Har du produktfrågor? Behöver du teknisk support? Kontakta oss gärna:
Teknisk support och e-garanticertifikat www.vevor.com/
support
Modell: DWS-42/DWS-42G
Detta är den ursprungliga instruktionen, läs alla instruktioner noggrant innan du använder den.
VEVOR reserverar sig för en tydlig tolkning av vår användarmanual. Utseendet på
produkten är beroende av den produkt du fått. Ursäkta oss att vi inte kommer att informera dig igen
om det finns någon teknik eller mjukvaruuppdateringar på vår produkt.
BEHÖVER HJÄLP? KONTAKTA OSS!
Vägghylsa för luftkonditionering
- 1 -
Machine Translated by Google
1. Produkterna ska installeras av fackmän.
1
1
Höger omslag
Modell
DWS-42G
11
DWS-42
Vänster lock
Stämplat galler
1
produktskada.
11
4. Installera produkten enligt denna instruktion för att undvika personskador eller
0
Nedre omslag
Topplock
3. Använd handskar för att installera produkten för att undvika handskador;
1
2. Produkter installeras på avstånd från barn och husdjur;
1
SÄKERHETSINSTRUKTIONER
Delarlista
- 2 -
Machine Translated by Google
Parameterlista
1
5
konturdimension
DWS-42G
1
0
M4×12 skruv
DWS-42
Modell
5
1015×348×375 mm
0
1015×348×375 mm
(A×B×C)
Dräneringsanslutning
ST5×25 Självgängande skruvar
4
1
Storlek på inre kavitet
1067×350×410 mm 1067×365×410 mm
1
4
Plastskruvfäste
avloppsrör
(A×B×C)
- 3 -
Machine Translated by Google

Produktens form och storlek
JaInga
1077×420 mm
Stämplat galler
1077×420 mm
(bredd×höjd)
Minsta väggöppningsstorlek
Produktens inre kavitetsstorlek
Fyrkantigt hål i bottenkåpan
- 4 -
Machine Translated by Google
2. Montera den högra sidokåpan på samma sätt.
3. Sätt i 6 klämmor på den övre luckan i motsvarande fyrkantiga hål på vänster
och höger lucka.
Monteringsmetod för luftkonditioneringsvägghylsan 1.
Sätt i de tre klämmorna på vänster kåpa i de tre fyrkantiga hålen på
vänster sida av bottenkåpan. Observera att den breda kanten på det
vänstra locket motsvarar den breda kanten på bottenplattan.
- 5 -
Machine Translated by Google
- 6 -
4. Sätt in dräneringsskarven i det bakre dräneringshålet på bottenkåpan
5. Avloppsröret sätts in i avloppsanslutningen.
Machine Translated by Google
- 7 -
7. Passa först in gallrets plastskruvhållare med de fem skruvhålen på baksidan
av luftkonditioneringens vägghylsa, och lås fast M4×12-skruvsätet
på gallret i luftkonditioneringsväggens hylsa.
Obs: Skruva inte åt skruvarna för hårt.
6. Tryck in de fem plastskruvhållarna i de fem fyrkantiga hålen på gallret;
Observera att du trycker på plastskruvhållaren från änden av gallerplanet.
Obs: DWS-42-installationen är klar ;Om det är DWS-42g, gå till steg 6-7 för att
installera gallret och sedan steg 4 för att installera avloppsstrukturen.
Machine Translated by Google

Bild 1
Väggkåpa för luftkonditionering installerad på väggmetoden 1.
Storleken på väggöppningen måste vara korrekt, och den minsta
väggöppningens storlek visas i figur 1.
- 8 -
Machine Translated by Google
- 9 -
3.Om den installeras i en betong- eller murad vägg måste en överliggare finnas i väggöppningen
för stöd. Använd inte vägghylsan som överliggare. Om väggen är mindre än 203,2 mm tjock eller
av ihålig konstruktion måste ett alternativt stöd för hylsan tillhandahållas. Se figur 3 för en typisk
överliggarkonstruktion.
2. Vägghylsan måste installeras med minst 127 mm avstånd till golvet och 38,1 mm till
intilliggande väggar. Se figur 2 för minsta utskjutande av hylsan in i och ut ur rummet.
Figur 2
Machine Translated by Google

- 10 -
4. Skjut in vägghylsan i väggöppningen. Förvräng inte skåpformen på vägghylsan
så att den passar väggöppningen; enhetens chassi måste sitta tätt och enhetligt i
vägghylsan.
Detta är för att kondensatet ska tömmas.
5.När den installeras i öppningen måste vägghylsan vara jämn från sida till sida och
lutande en kvarts bubbla fram och bak. LUTA INTE VÄGGHÄRMEN MOT RUMMET.
Se figur 5.
Figur 3
utanför
Machine Translated by Google

- 11 -
7. Fäst hylsan med fyra #12x2" träskruvar (för träbyggda byggnader) eller fyra
#12x2" murskruvar (för cement- eller tegelbyggnader) (Figur 5). Fixat 2 ställen
på vänster och höger sida, se till att väggkonstruktionen är tillräcklig för att
stödja enheten.
Figur 5
6. Vattentät barriär ska sitta kvar tills enheten är installerad. En tillbehörspanel
i metall, PBWMFC, finns också tillgänglig, men måste köpas separat.
Figur 4
Obs: Borra inte genom hylsan för att skruva fast.
Vi tillhandahåller 4 st självgängande skruvar ST5×25, men du måste bedöma
om ditt väggpanelmaterial är lämpligt eller inte.
Machine Translated by Google
- 12 -
Figur 6
9. Väggkåpa för luftkonditionering Installationen är klar. Du kan också
justera installationsmetoden efter din luftkonditioneringsenhet, men detta
måste rådfråga en professionell installationspersonal för
luftkonditioneringsutrustning.
8. Efter installationen, lägg till tätningsmaterial och isoleringsmaterial i
sprickorna runt hylsan, som kan läggas till med hjälp av en platt skruvmejsel
eller spackel. Se figur 6 för ett exempel på konstruktion.
Machine Translated by Google

EC REP
UK REP
Importerad till USA: Sanven Technology Ltd. Suite 250, 9166 Anaheim Place,
Rancho Cucamonga, CA 91730
YH CONSULTING LIMITED. C/O YH Consulting Limited
Office 147, Centurion House, London Road, Staines-
upon-Thames, Surrey, TW18 4AX
Importerad till AUS: SIHAO PTY LTD. 1 ROKEVA STREETEASTWOOD NSW 2122
Australien
Tillverkare: Shanghaimuxinmuyeyouxiangongsi Adress:
Shuangchenglu 803nong11hao1602A-1609shi, baoshanqu, shanghai 200000 CN.
E-CrossStu GmbH
Mainzer Landstr.69,
60329 Frankfurt am Main.
- 13 -
Machine Translated by Google