Instruction Booklet
Model: WM2159
rotating double
belgian waffle maker

IMPORTANT SAFEGUARDS
When using electrical appliances, basic safety precautions should
always be followed including the following:
1. Read all instructions.
2. DO NOT touch hot surfaces. Use handles or knobs.
3. To protect against electrical hazards, DO NOT immerse cord, plugs,
or the appliance in water or other liquid.
4. Close supervision is necessary when any appliance is used by or
near children. Children should be supervised to ensure that they do
not play with the appliance.
5. This appliance is not intended for use by persons (including children)
with reduced physical, sensory or mental capabilities or lack of
experience and knowledge, unless they have been given supervision
or instruction concerning the use of the appliance by a person
responsible for their safety.
6. Unplug from outlet when not in use and before cleaning. Allow to
cool before putting on or taking o parts, and before cleaning the
appliance.
7. DO NOT operate any appliance with a damaged cord or plug or after
the appliance malfunctions, or has been damaged in any manner.
Return appliance to Salton for examination, repair or adjustment.
See Warranty.
8. The use of accessories or attachments not recommended by Salton
may cause hazards.
9. DO NOT use outdoors.
10. DO NOT let cord hang over edge of table or counter, or touch hot
surfaces.
11. DO NOT place on or near a hot gas or electric burner, or in a heated
oven.
12. Extreme caution must be used when moving an appliance
containing hot oil or other hot liquids.
13. DO NOT move the unit when it is still hot.
14. Wear oven mitts when handling hot components or touching hot
surfaces.
15. Prior to connecting or disconnecting plug from wall outlet, turn any
control to ‘O’.
16. Always unplug appliance immediately after using. Allow to cool
before cleaning and storing.
17. Always place appliance on a heat resistant surface.
2

18. CAUTION: This appliance generates heat during use. Proper
precautions must be taken to prevent the risk of burns, res or other
damage to property caused by touching the sides or top while in use
or during cooling.
19. DO NOT use appliance for other than intended use
20. DO NOT leave appliance unattended while in use.
SAVE THESE INSTRUCTIONS
HOUSEHOLD USE ONLY
POLARIZED PLUG
This appliance has a polarized plug (one blade is wider than the other).
To reduce the risk of electric shock, this plug will t in a polarized outlet
only one way. If the plug does not t fully in the outlet, reverse the plug.
If it still does not t, contact a qualied electrician. Do not modify the
plug in any way.
A short supply cord is provided to reduce the hazards of becoming
entangled in or tripping over a long cord. Extension cords may be used
if care is exercised in their use. If an extension cord is used, the marked
electrical rating of the detachable power-supply cord or extension cord
should be at least as great as the electrical rating of the appliance. If
the appliance is of the grounded type, the extension cord should be a
grounded 3-wire cord. The extension cord should be arranged so that it
will not drape over the counter top or table top, where it can be pulled
on by children or tripped over.
3
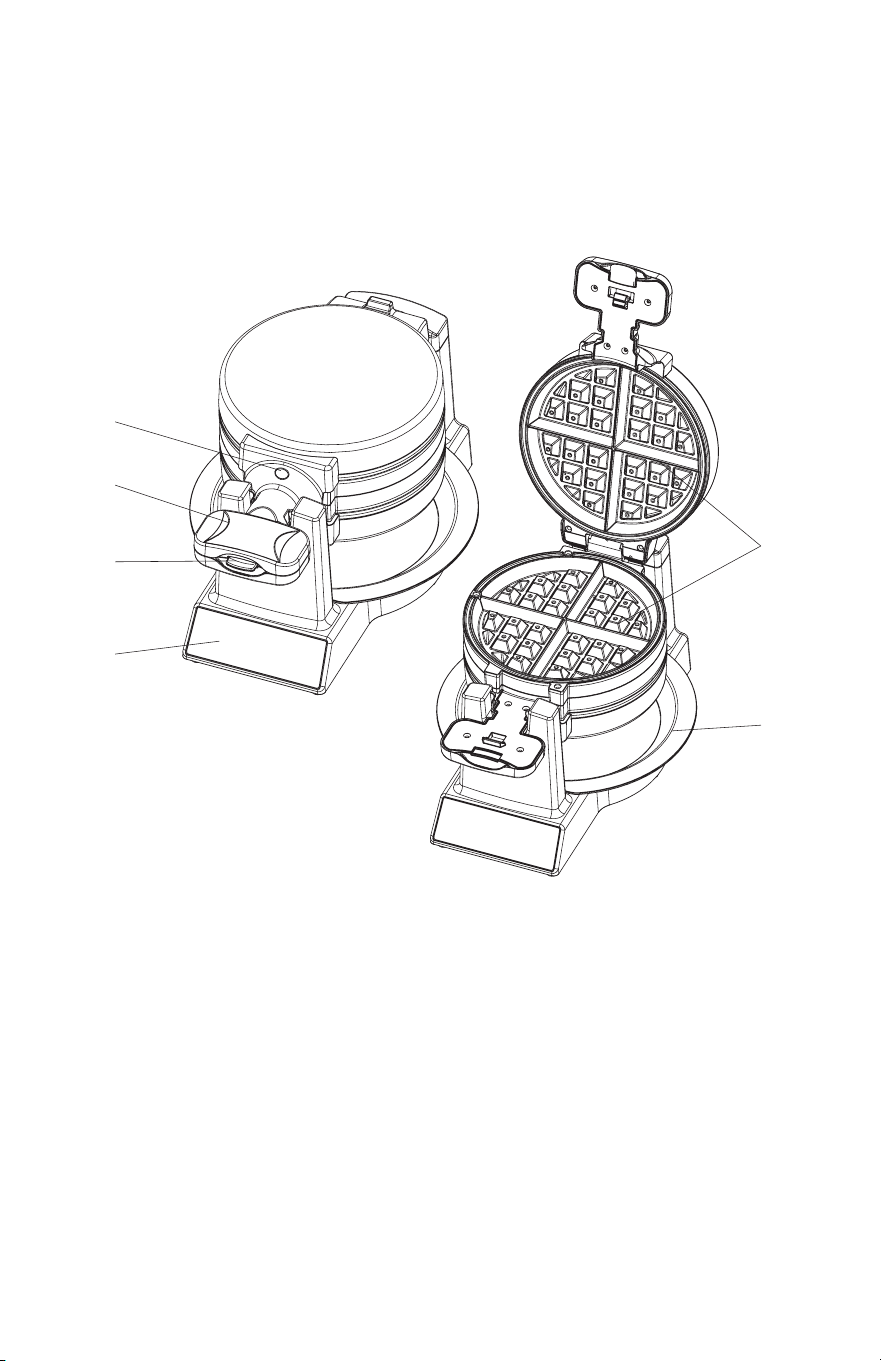
DESCRIPTION OF PARTS
1. Handle
2. Lid Release Button
3. Indicator Light
4. Cooking Plates
5. Removable Drip Tray
6. Base/Support
BEFORE FIRST USE
1. Read all instructions carefully and keep them for future reference.
2. Remove all packaging.
3. Clean the Cooking Plates by wiping with a sponge or cloth
dampened in warm water. DO NOT IMMERSE THE UNIT AND DO
NOT RUN WATER DIRECTLY ONTO THE COOKING SURFACE.
4. DO NOT use steel wool pads or other abrasive cleansers on the
cooking plates as this may damage the non-stick coating.
5. Dry with a cloth or paper towel.
6. Place the unit onto a smooth, dry, at surface and plug into a 120V
AC outlet WITHOUT food.
4
3
1
2
4
5
6

7. Allow the unit to heat with the lid closed. The unit may emit some
smoke or odor as it burns o any manufacturing oils. This is normal
and does not aect the safety of the appliance.
8. When the smoke has stopped, unplug the unit from the wall outlet.
9. Allow the appliance to cool down and wipe the cooking plates
with a sponge or cloth dampened in warm water to remove any
residue. DO NOT IMMERSE THE UNIT AND DO NOT RUN WATER
DIRECTLY ONTO THE COOKING SURFACE.
10. Your unit is now ready to use.
HOW TO USE
1. Place the Removable Drip Tray in position on the Base/Support
underneath the Cooking Plates.
2. Plug unit into a 120V AC outlet. The Indicator Light will come on.
3. Close the lid until the unit is preheated and the Indicator Light goes
o.
4. To make a single wae:
Press the Release Button and open the lid (side that says “FILL
THIS SIDE FIRST”) and pour batter (approx. ¾ cup) to ll the lower
cooking plate. If necessary, use a spatula to spread the batter to
the edges of the cooking plate. NOTE: Although it is not necessary,
you may lightly coat the cooking plates with a little cooking oil or a
cooking spray prior to pouring batter.
5. Close the lid. The Indicator Light will come on.
6. Rotate the unit 180° to the right (clockwise). NOTE: DO NOT open
for at least 1 1/2 minutes. Opening too soon will cause under-baked
waes to split, making them dicult to remove.
7. After about 2 minutes, rotate the unit back 180° to the left
(counterclockwise).
8. Steam will escape from the wae maker as the wae is cooking.
9. The wae is done when there is no more steam escaping from the
wae maker and the Indicator Light goes o.
10. Once the wae is cooked, carefully remove it from the wae maker
with a wooden or plastic spatula. Never touch the cooking surface
with sharp, pointy or metal objects. This could damage the non-
stick surface. NOTE: For a darker wae, close the lid and continue
baking until the desired color is achieved.
11. To make two waes:
Follow steps 4 to 6. Press the Release Button and open the lid on
the secondary side and pour batter (approx. ¾ cup) to ll the lower
cooking plate. If necessary, use a spatula to spread the batter to the
edges of the cooking plate.
5

12. Close the lid. The Indicator Light will come on. Rotate the unit back
180° to the left (counterclockwise) to the original position (the side
with the words “FILL THIS SIDE FIRST”)
13. Steam will escape from the wae maker as the wae is cooking.
14. The wae is done when there is no more steam escaping from the
wae maker and the Indicator Light goes o.
15. Once the wae is cooked, carefully remove it from the wae maker
with a wooden or plastic spatula. Never touch the cooking surface
with sharp, pointy or metal objects. This could damage the non-
stick surface. NOTE: For a darker wae, close the lid and continue
baking until the desired color is achieved.
16. Once the 1st wae is removed, rotate the wae maker 180° to the
right (clockwise) and monitor, until the Indicator Light goes o.
17. Once the 2nd wae is cooked, carefully remove it from the wae
maker with a wooden or plastic spatula. Never touch the cooking
surface with sharp, pointy or metal objects. This could damage
the non-stick surface. Again for a darker wae, close the lid and
continue baking until desired color is achieved.
18. Once you are nished cooking, disconnect the plug from the wall
outlet and leave unit open to cool.
HELPFUL HINTS
1. DO NOT over mix batter or waes will be tough. Stir batter only
until large lumps of dry ingredients disappear. The amount of batter
required varies between 3/4 and 1 cup.
2. To retain crispness, let the baked wae cool on a wire rack to
prevent steam from accumulating underneath.
3. Cooled waes can be re-warmed by returning them to the hot wae
maker. Place the wae on the grid, close the lid and heat for 1 to 2
minutes, watching carefully to prevent burning.
4. The Belgian Wae Maker has a non-stick surface for even baking
and easy cleaning.
5. Waes can be baked ahead of time. Prepare according to the
recipes and cool on a rack for approximately 10 minutes. Store in
your freezer for up to 2 weeks. Waes can be heated by toasting in
a toaster or toaster oven.
6. Unused batter can be stored in the refrigerator for up to 3 days.
6

CARE AND CLEANING
1. Unplug the Wae Maker and allow it to cool.
2. Wipe the Cooking Plates with a cloth dampened with warm soapy
water. DO NOT IMMERSE THE UNIT AND DO NOT RUN WATER
DIRECTLY ONTO THE COOKING PLATES.
3. Dry the cooking plates with a cloth or paper towel.
4. DO NOT use steel wool pads or other abrasive cleansers on the
Cooking Plates as they may damage the non-stick coating.
5. If batter has adhered to the Cooking Plates, pour a small amount
of cooking oil onto the baked-on food and allow to stand for 5 – 10
minutes. Wipe with paper towels.
6. Wipe the outside of the Wae Maker with a soft cloth dampened in
warm soapy water. DO NOT use scouring pads or steel wool.
7. Rinse with a dampened clean cloth. Dry.
8. All servicing, other than cleaning, should be performed by an
authorized service representative. See Warranty section.
7

8