
INSTRUCTION MANUAL
Model #22030
ENGLISH


ENGLISH I 3
CONTENTS
WHAT’S IN THE BOX. . . . . . . . . . . . . . . . . . . . . . . . . . . . . . . . . . . . . . . . . . . . . . . . 5
Parts List . . . . . . . . . . . . . . . . . . . . . . . . . . . . . . . . . . . . . . . . . . . . . . . . . . . . . . . . . . . . 5
SOLAR WARNING . . . . . . . . . . . . . . . . . . . . . . . . . . . . . . . . . . . . . . . . . . . . . . . . . 5
ASSEMBLY . . . . . . . . . . . . . . . . . . . . . . . . . . . . . . . . . . . . . . . . . . . . . . . . . . . . . 6
Setting up the Tripod . . . . . . . . . . . . . . . . . . . . . . . . . . . . . . . . . . . . . . . . . . . . . . . . . . . . . 6
Attaching the Telescope Optical Tube to the Tripod . . . . . . . . . . . . . . . . . . . . . . . . . . . . . . . . . . . . . 7
Moving the Telescope Manually. . . . . . . . . . . . . . . . . . . . . . . . . . . . . . . . . . . . . . . . . . . . . . . . 7
Installing the Diagonal and Eyepiece . . . . . . . . . . . . . . . . . . . . . . . . . . . . . . . . . . . . . . . . . . . . . 8
Installing the Finderscope . . . . . . . . . . . . . . . . . . . . . . . . . . . . . . . . . . . . . . . . . . . . . . . . . . . 8
Aligning the Finderscope . . . . . . . . . . . . . . . . . . . . . . . . . . . . . . . . . . . . . . . . . . . . . . . . . . . 9
Focusing . . . . . . . . . . . . . . . . . . . . . . . . . . . . . . . . . . . . . . . . . . . . . . . . . . . . . . . . . . . . 9
GENERAL OBSERVING HINTS . . . . . . . . . . . . . . . . . . . . . . . . . . . . . . . . . . . . . . . . . . 10
WARRANTY . . . . . . . . . . . . . . . . . . . . . . . . . . . . . . . . . . . . . . . . . . . . . . . . . . . . . 10
NOTES. . . . . . . . . . . . . . . . . . . . . . . . . . . . . . . . . . . . . . . . . . . . . . . . . . . . . . . . 11

4 I ENGLISH
ENGLISH I 5
• Never look directly at the Sun with the naked eye or with a telescope unless you have the proper solar fi lter. Permanent and
irreversible eye damage may result.
• Never use your telescope to project an image of the Sun onto any surface. Internal heat build-up can damage the
telescope and any accessories attached to it.
• Never use an eyepiece solar fi lter or a Herschel wedge. Internal heat build-up inside the telescope can cause these devices
to crack or break, allowing unfi ltered sunlight to pass through to the eye.
• Do not leave the telescope unsupervised, either when children are present or adults unfamiliar with the correct operating
procedures of your telescope are present.
SOLAR WARNING
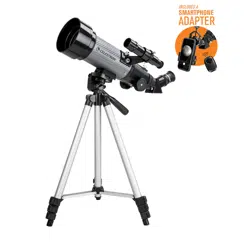
We recommend saving your telescope box so it can be used to store the telescope when it is not in use. Unpack the box
carefully as some parts are small. Use the parts list below to verify that all parts and accessories are present.
PARTS LIST
WHAT’S IN THE BOX
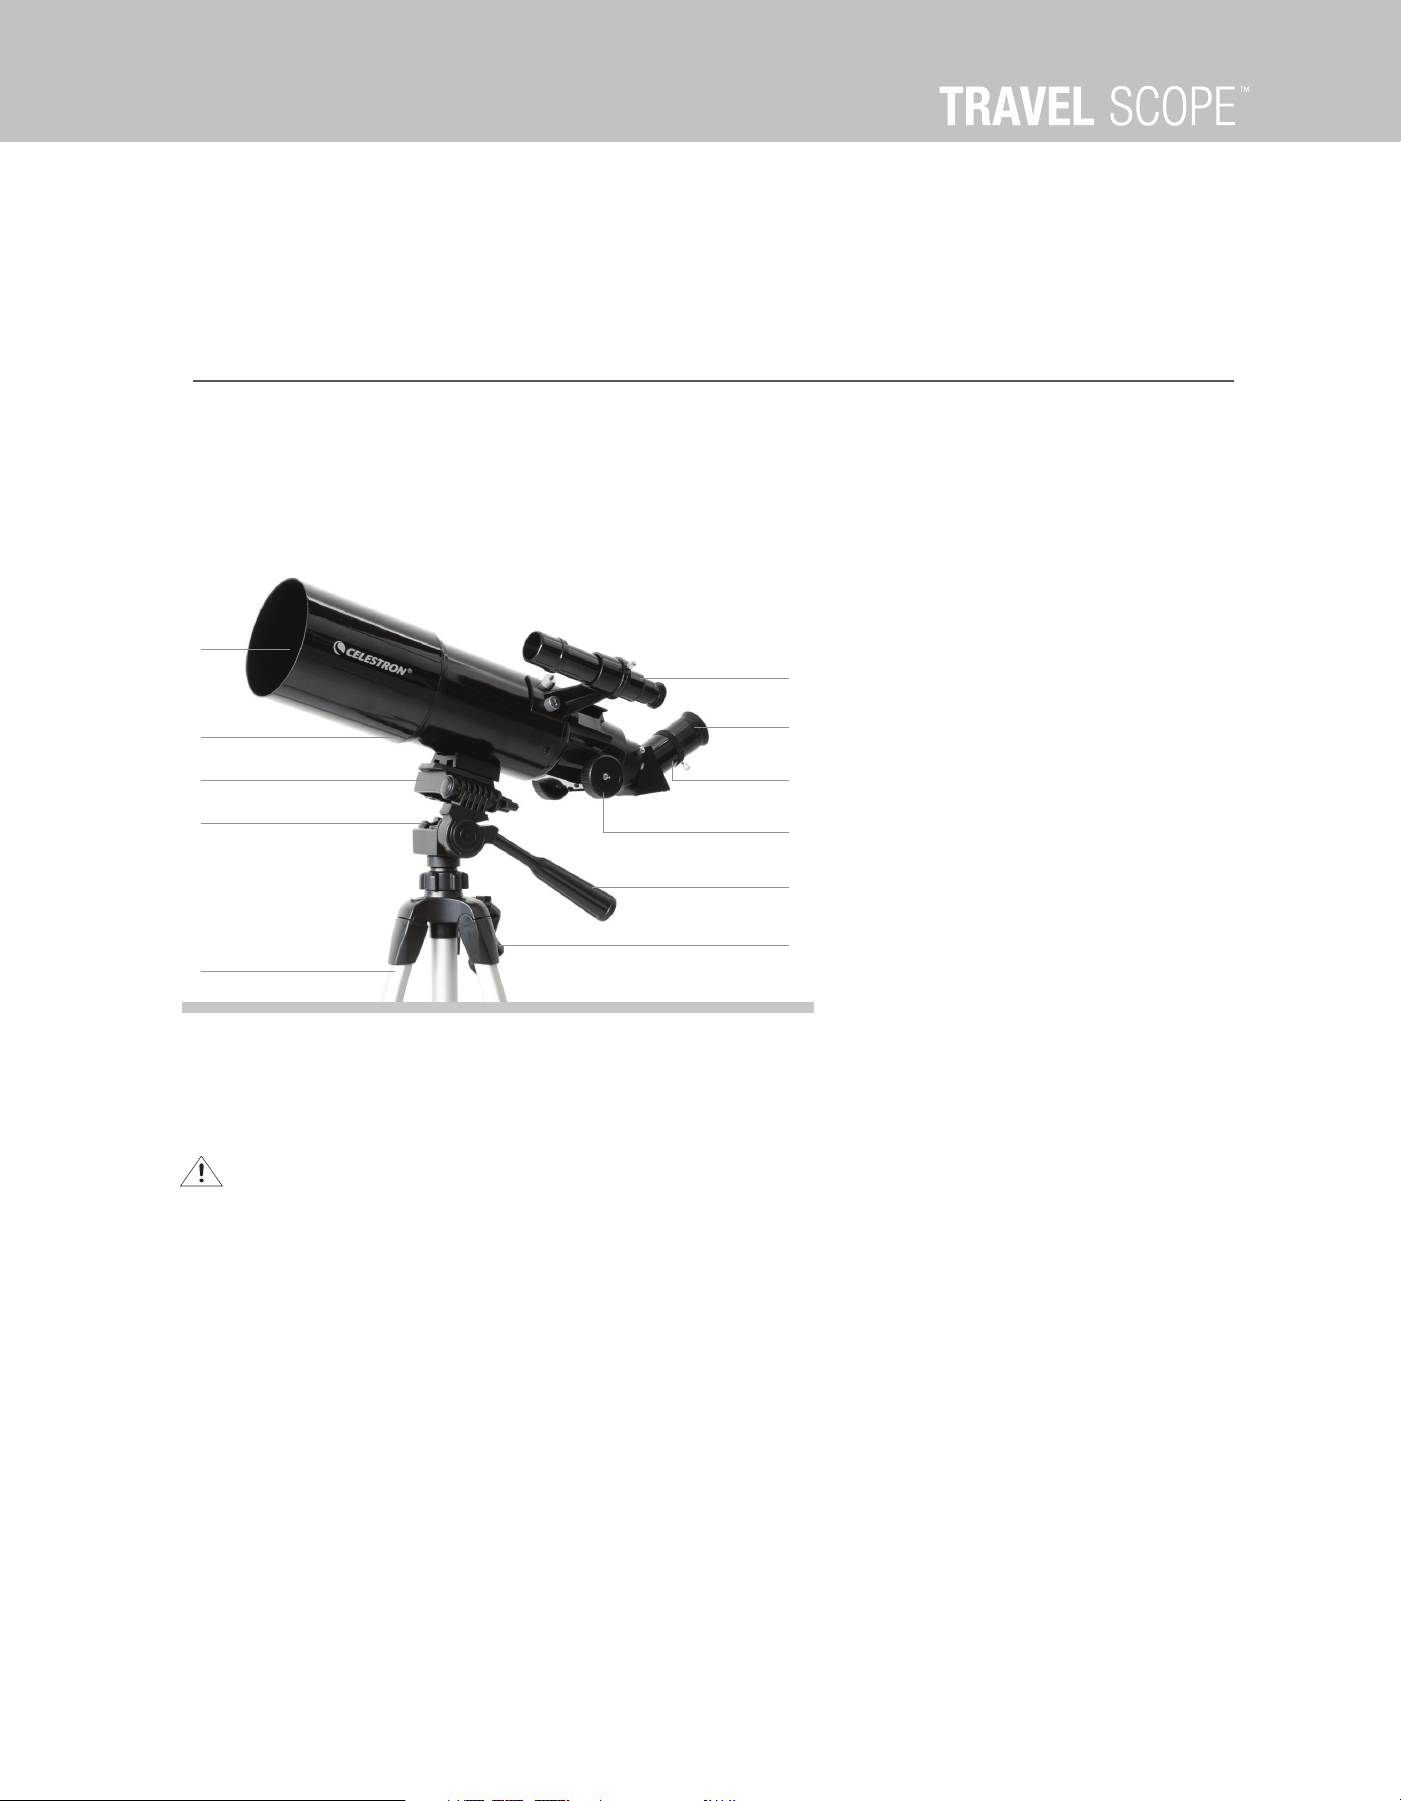
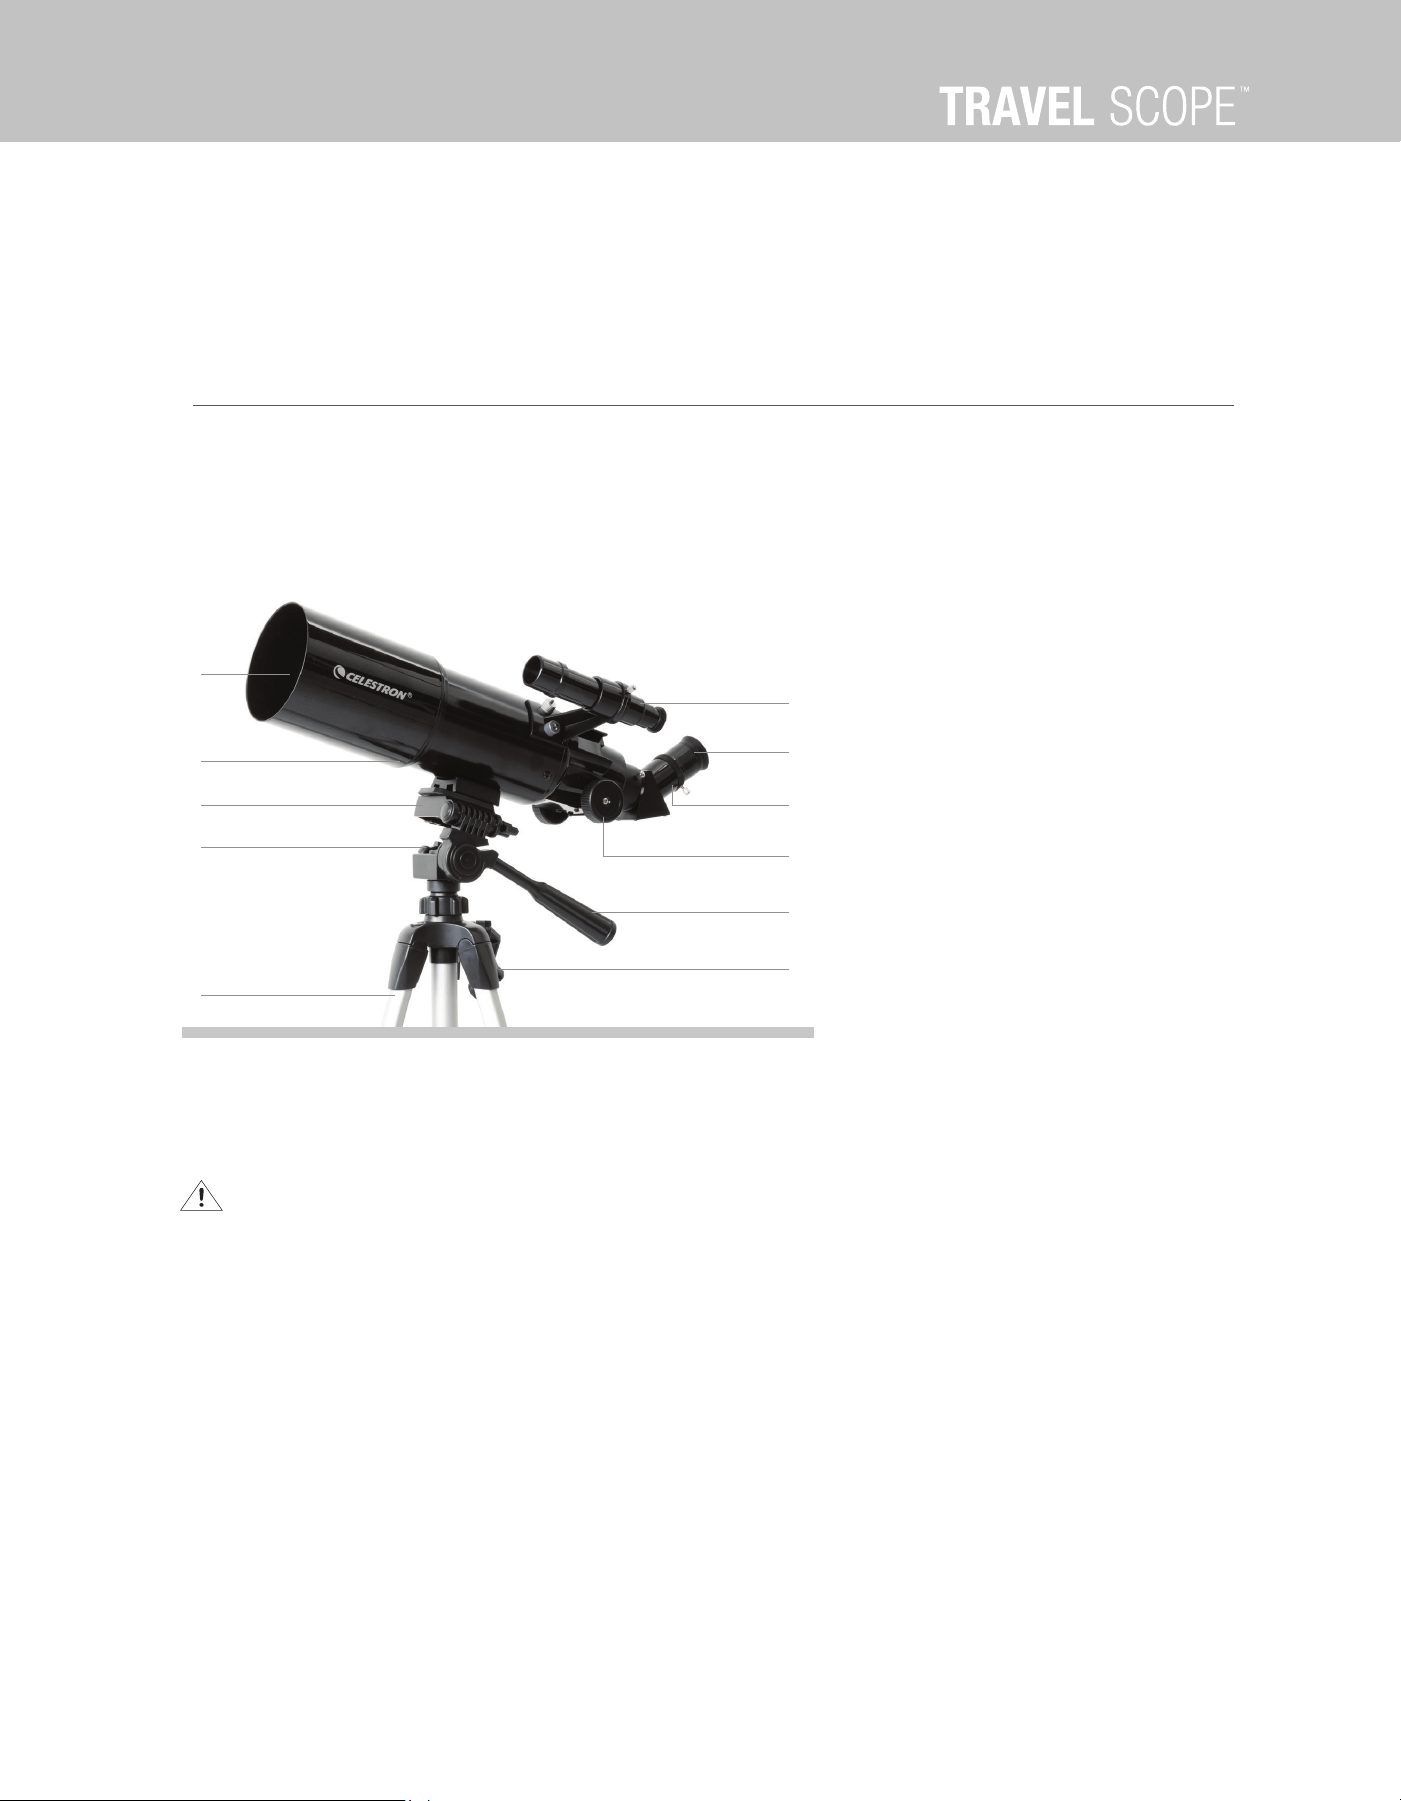
1. Objective Lens
2. Telescope Optical Tube
3. Quick Release Mounting Plate
4. Azimuth Tension Knob
5. Tripod
6. Finderscope
7. Eyepiece
8. Erect Image Diagonal
9. Focus Knob
10. Pan Handle/Altitude Lock
11. Central Column Locking Knob
2
1
6
3
4
8
7
9
10
5
11
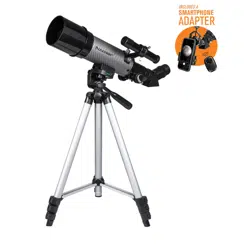
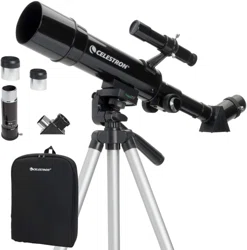
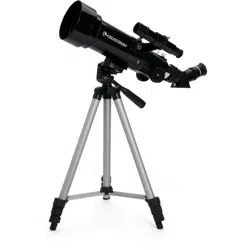
• Telescope Optical Tube
• Finderscope & Bracket
• Erect image diagonal
• 20 mm & 10 mm Eyepieces
• Tripod & Mount
• Tripod quick release mounting plate
• Backpack
6 I ENGLISH
Set up your Travel Scope indoors the fi rst time and familiarize yourself with the correct assembly procedure before
attempting it outdoors.
ASSEMBLY
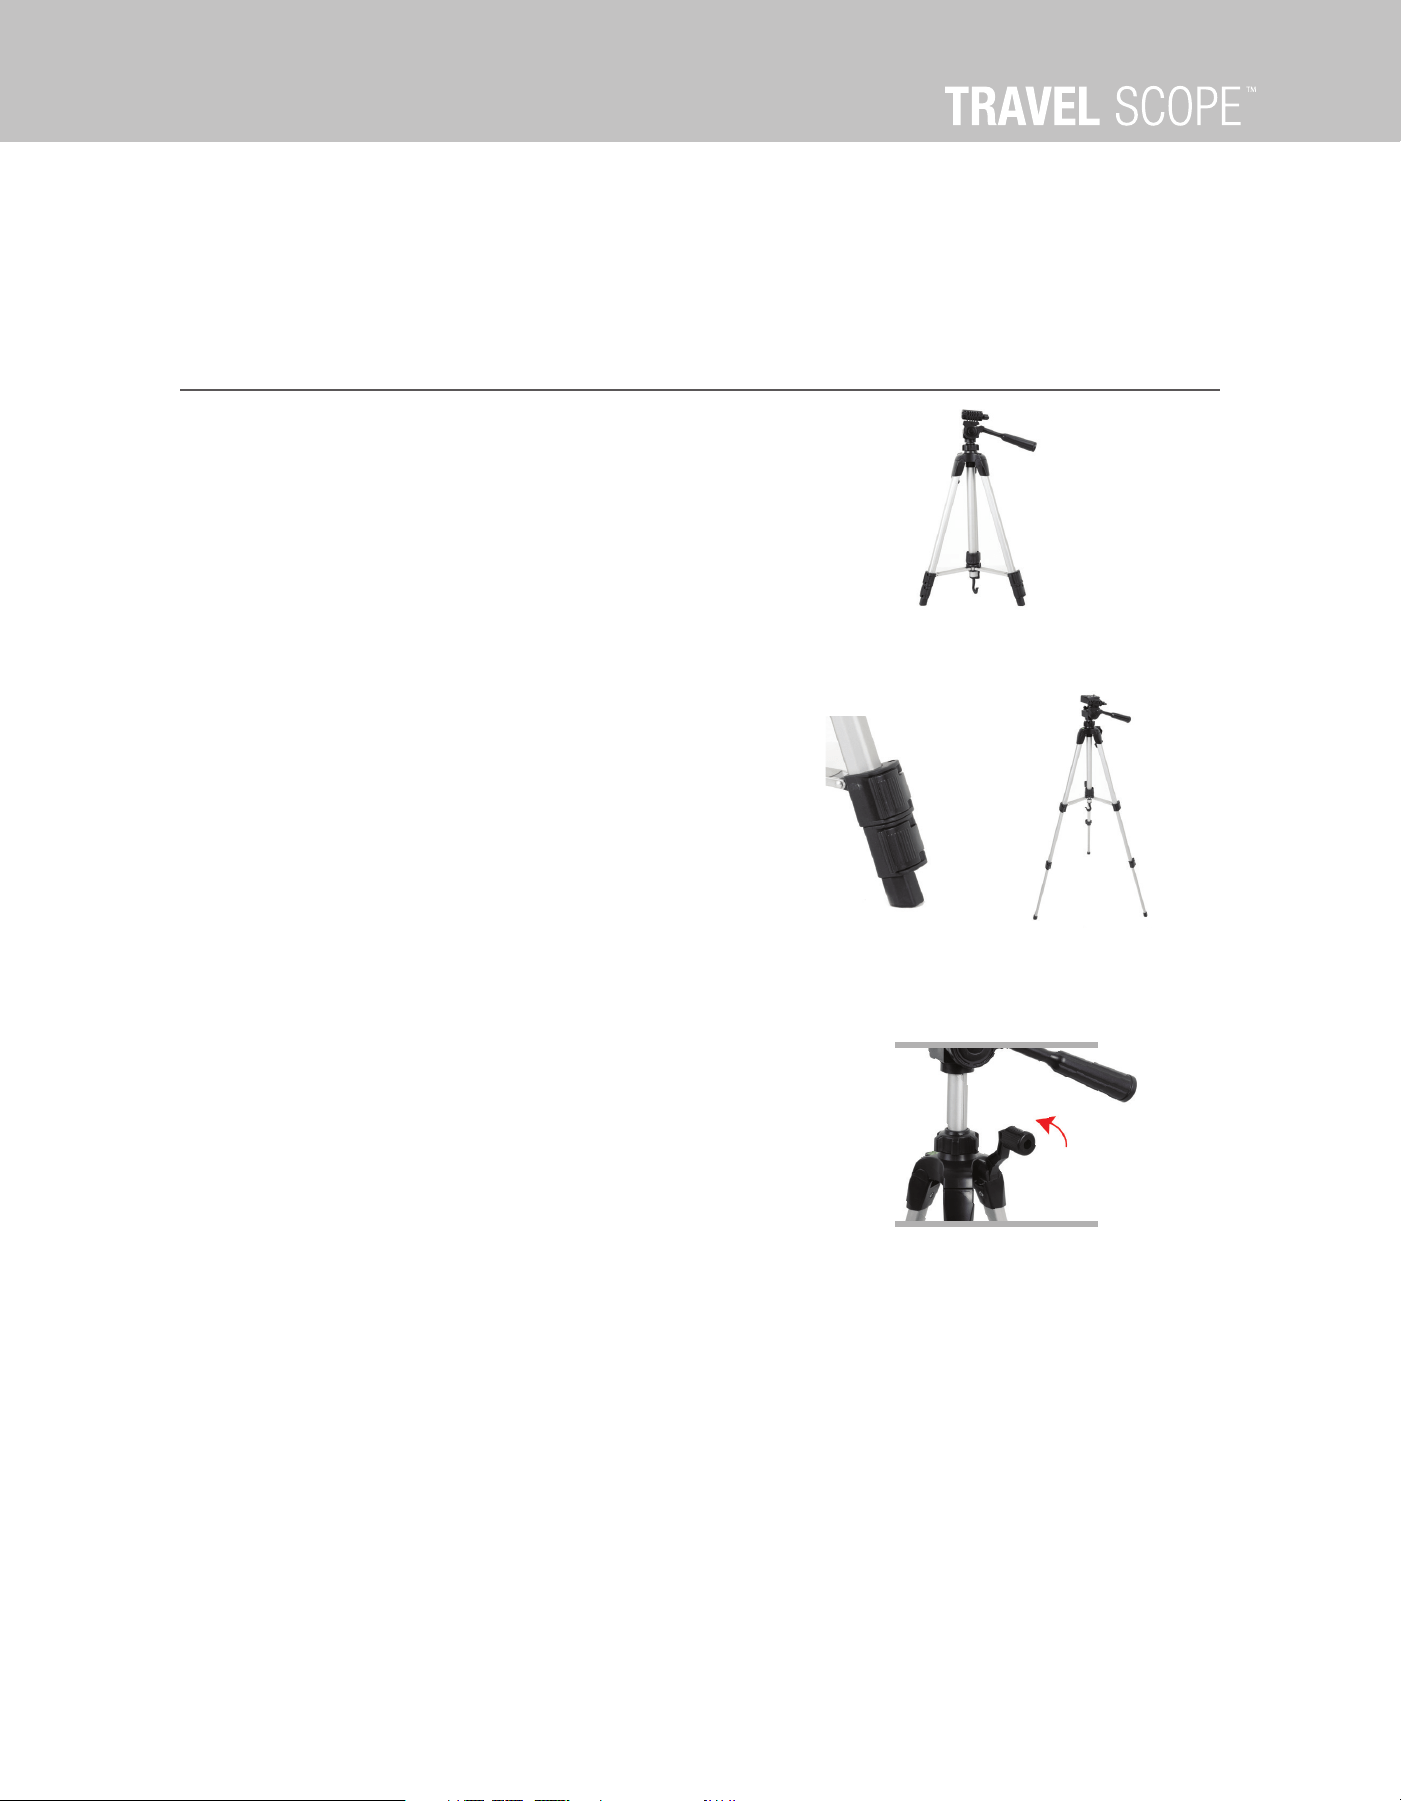
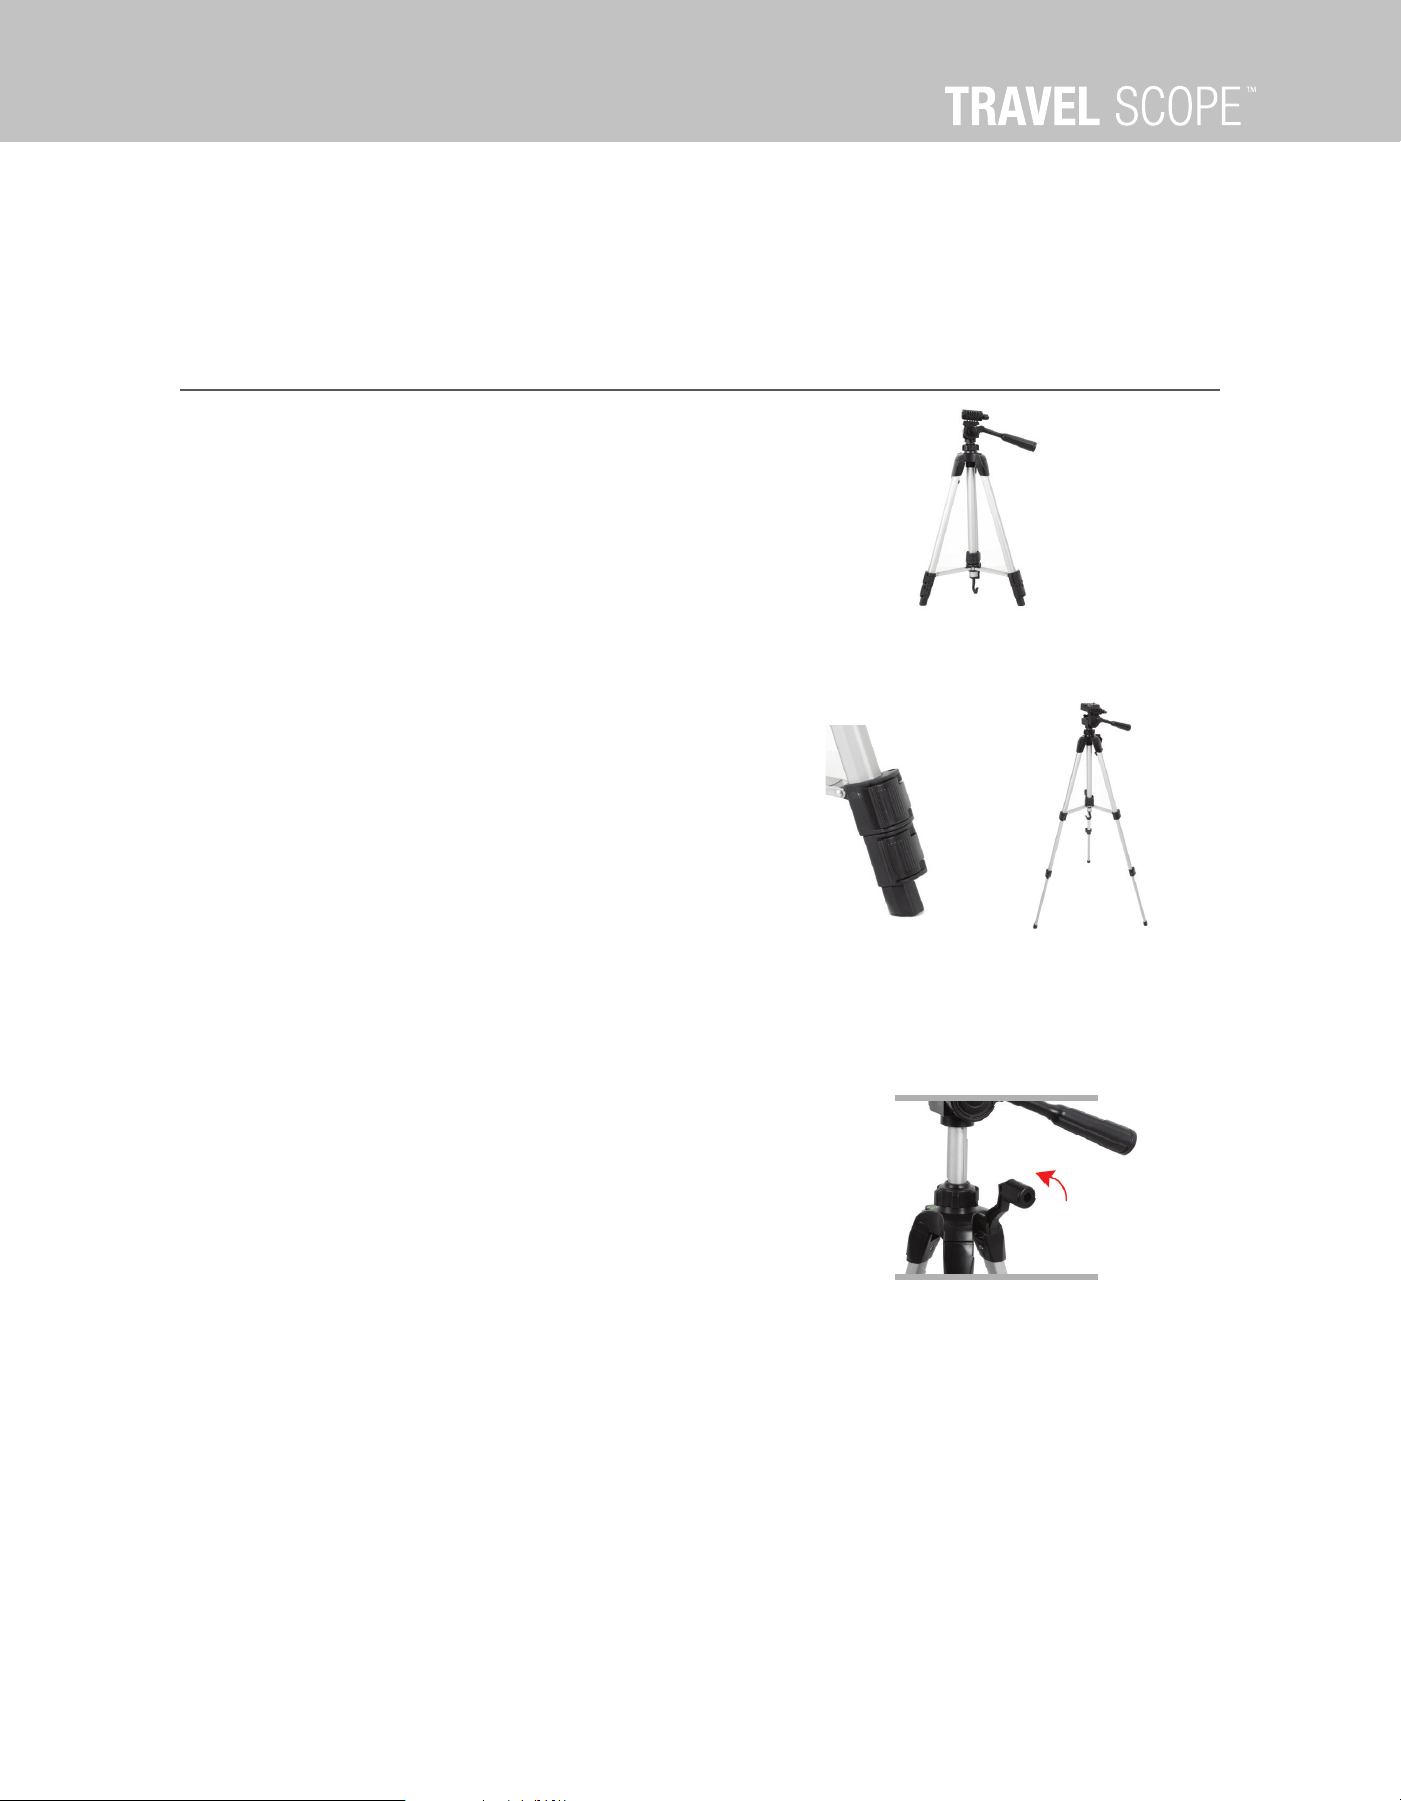
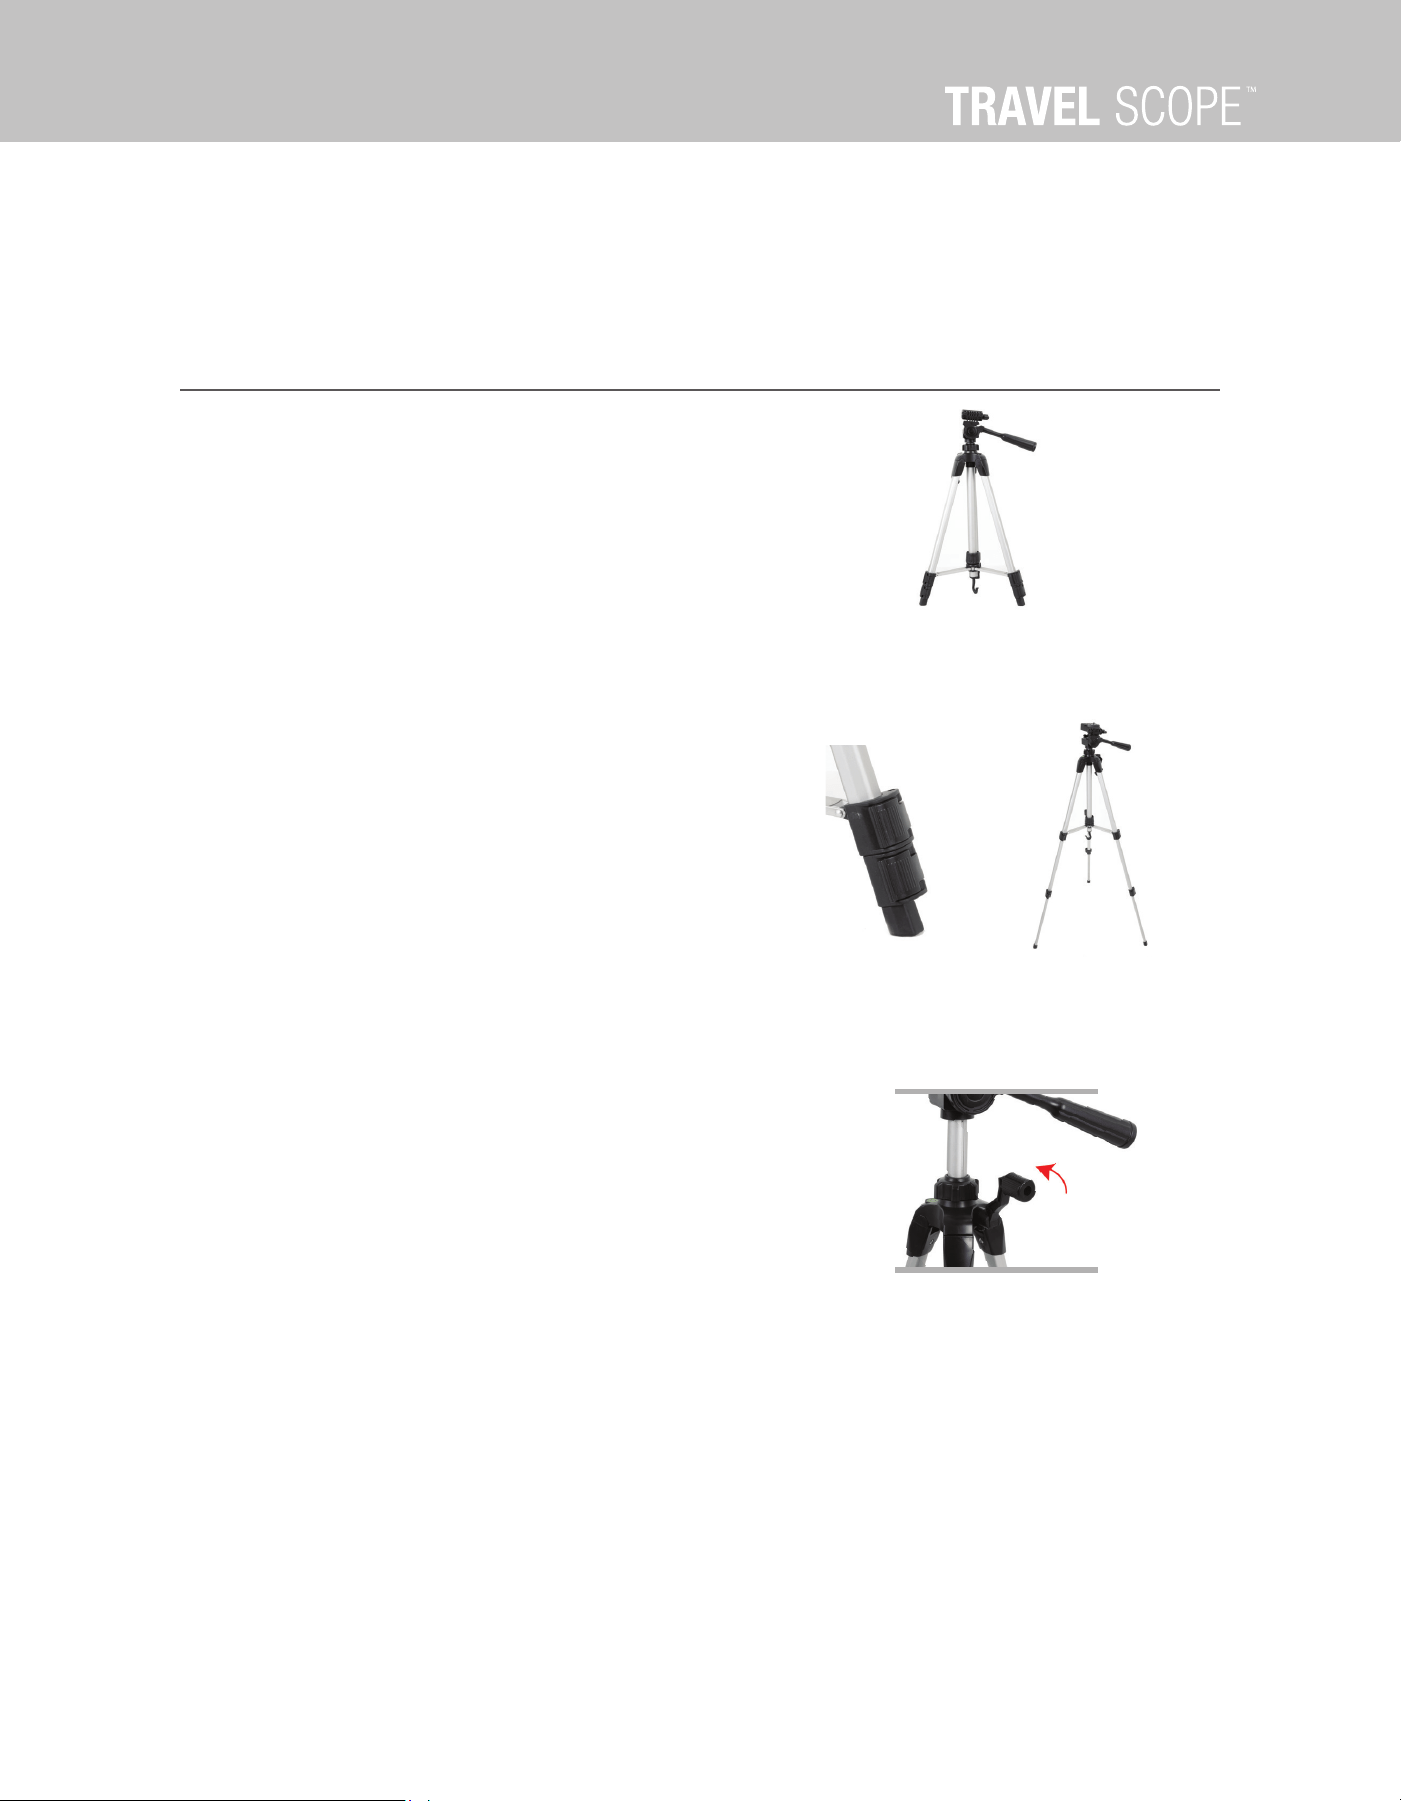
SETTING UP THE TRIPOD
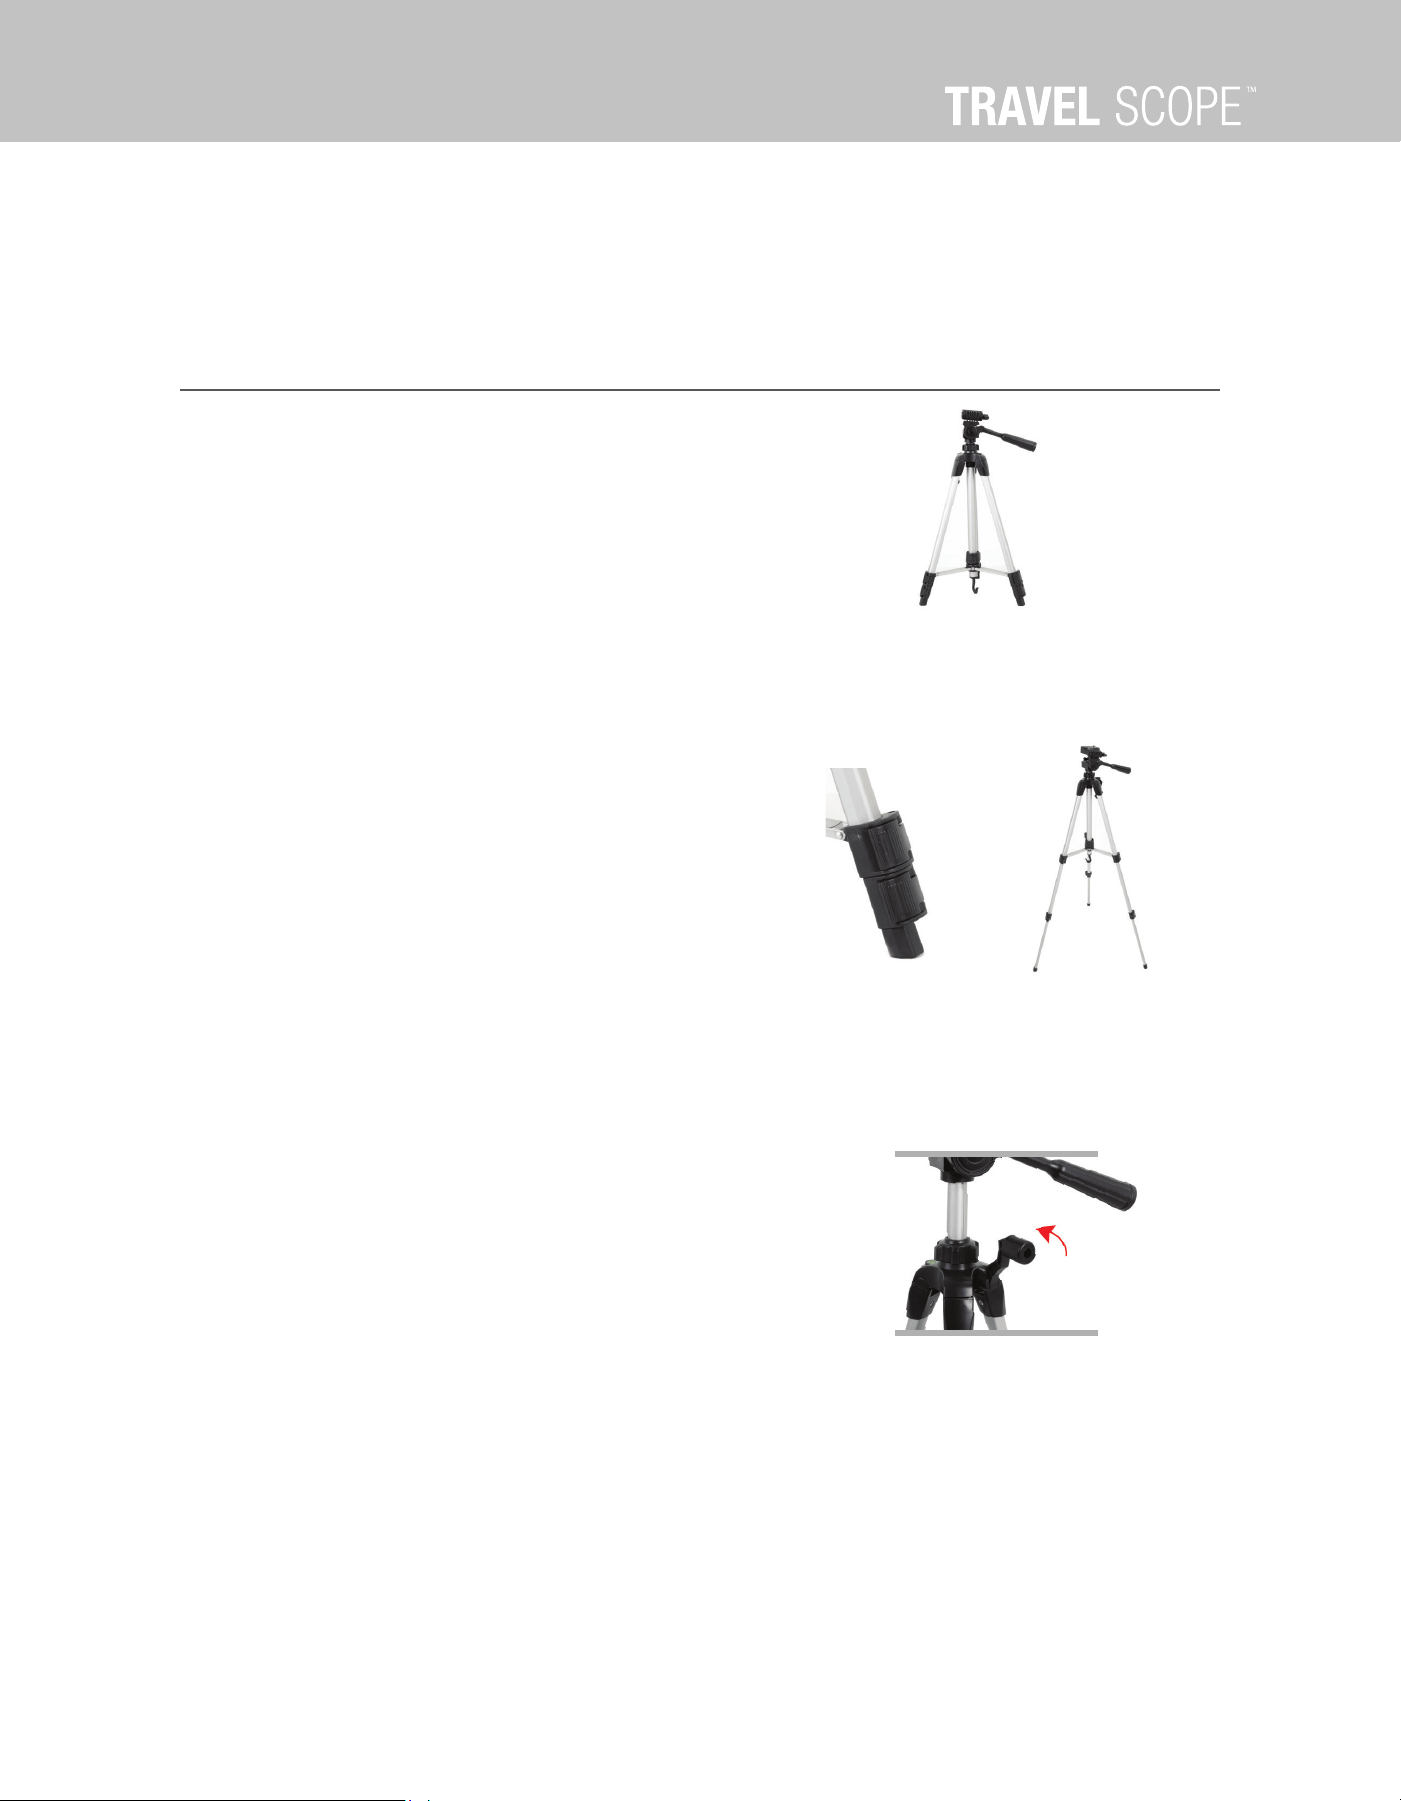
1. The tripod comes preassembled. Stand the tripod upright and
pull the tripod legs outward until each leg is fully extended.
2. To raise the height of the tripod, unlock the tripod leg lock
clamps at the bottom of each tripod leg by opening the clamp
for each section and pulling outward. Once a clamp is unlocked,
pull the tripod leg out as far as it will go, and then close the
leg lock to secure it. Continue doing this for each tripod leg
and each section to raise the height to the level you desire.
3.
If you want to raise the tripod height up further, use the central
column locking knob. Turn the locking knob counterclockwise
until loose. Then, pull up on the head of the tripod. Continue
pulling to the height you desire and then tighten the locking
knob. To ensure the stability of the mount, make sure the column
extension knob is tight.

ENGLISH I 7
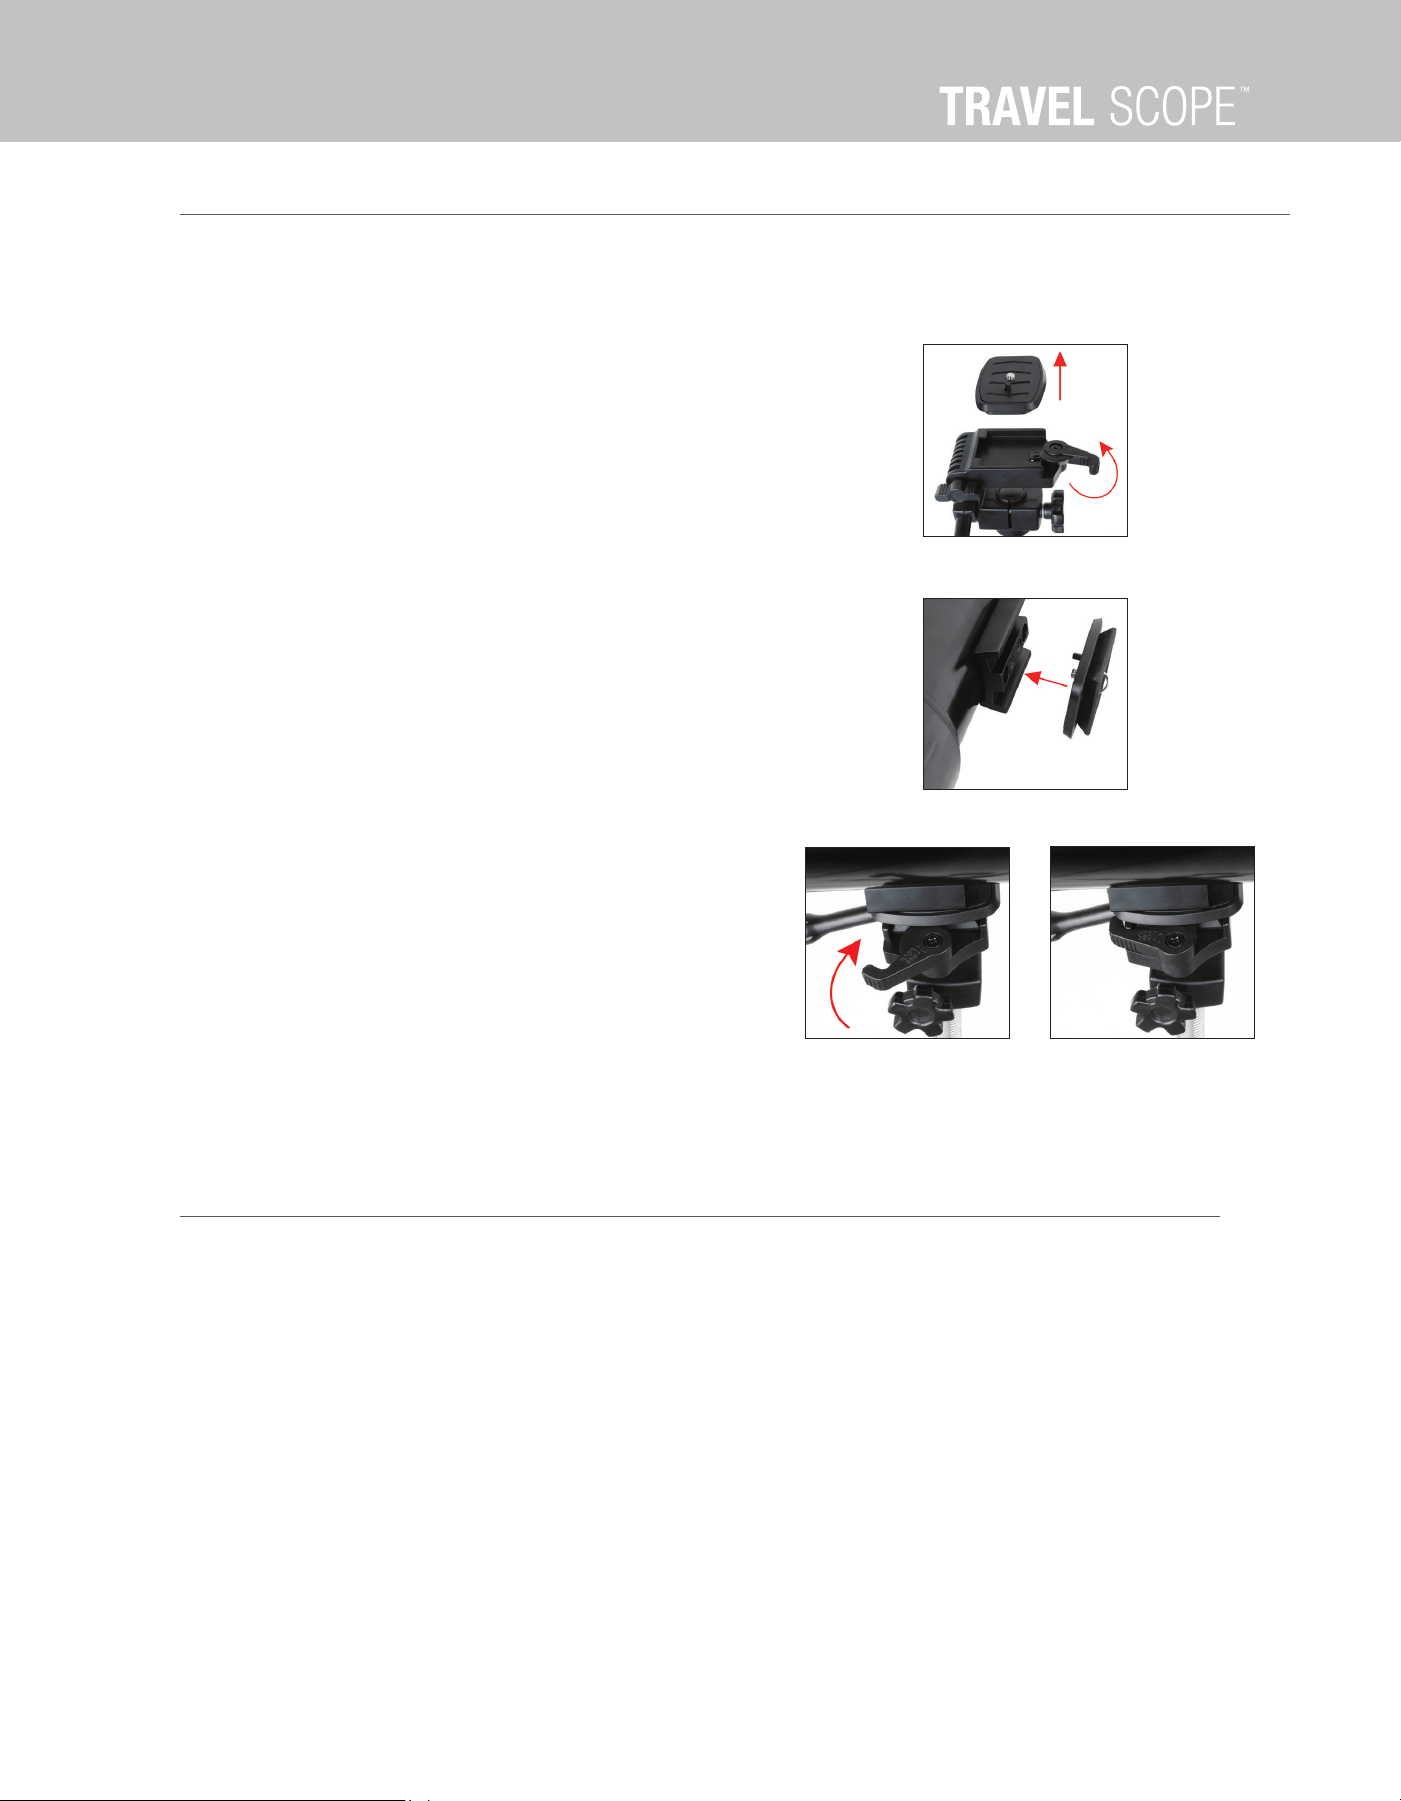
ATTACHING THE TELESCOPE OPTICAL TUBE TO THE TRIPOD
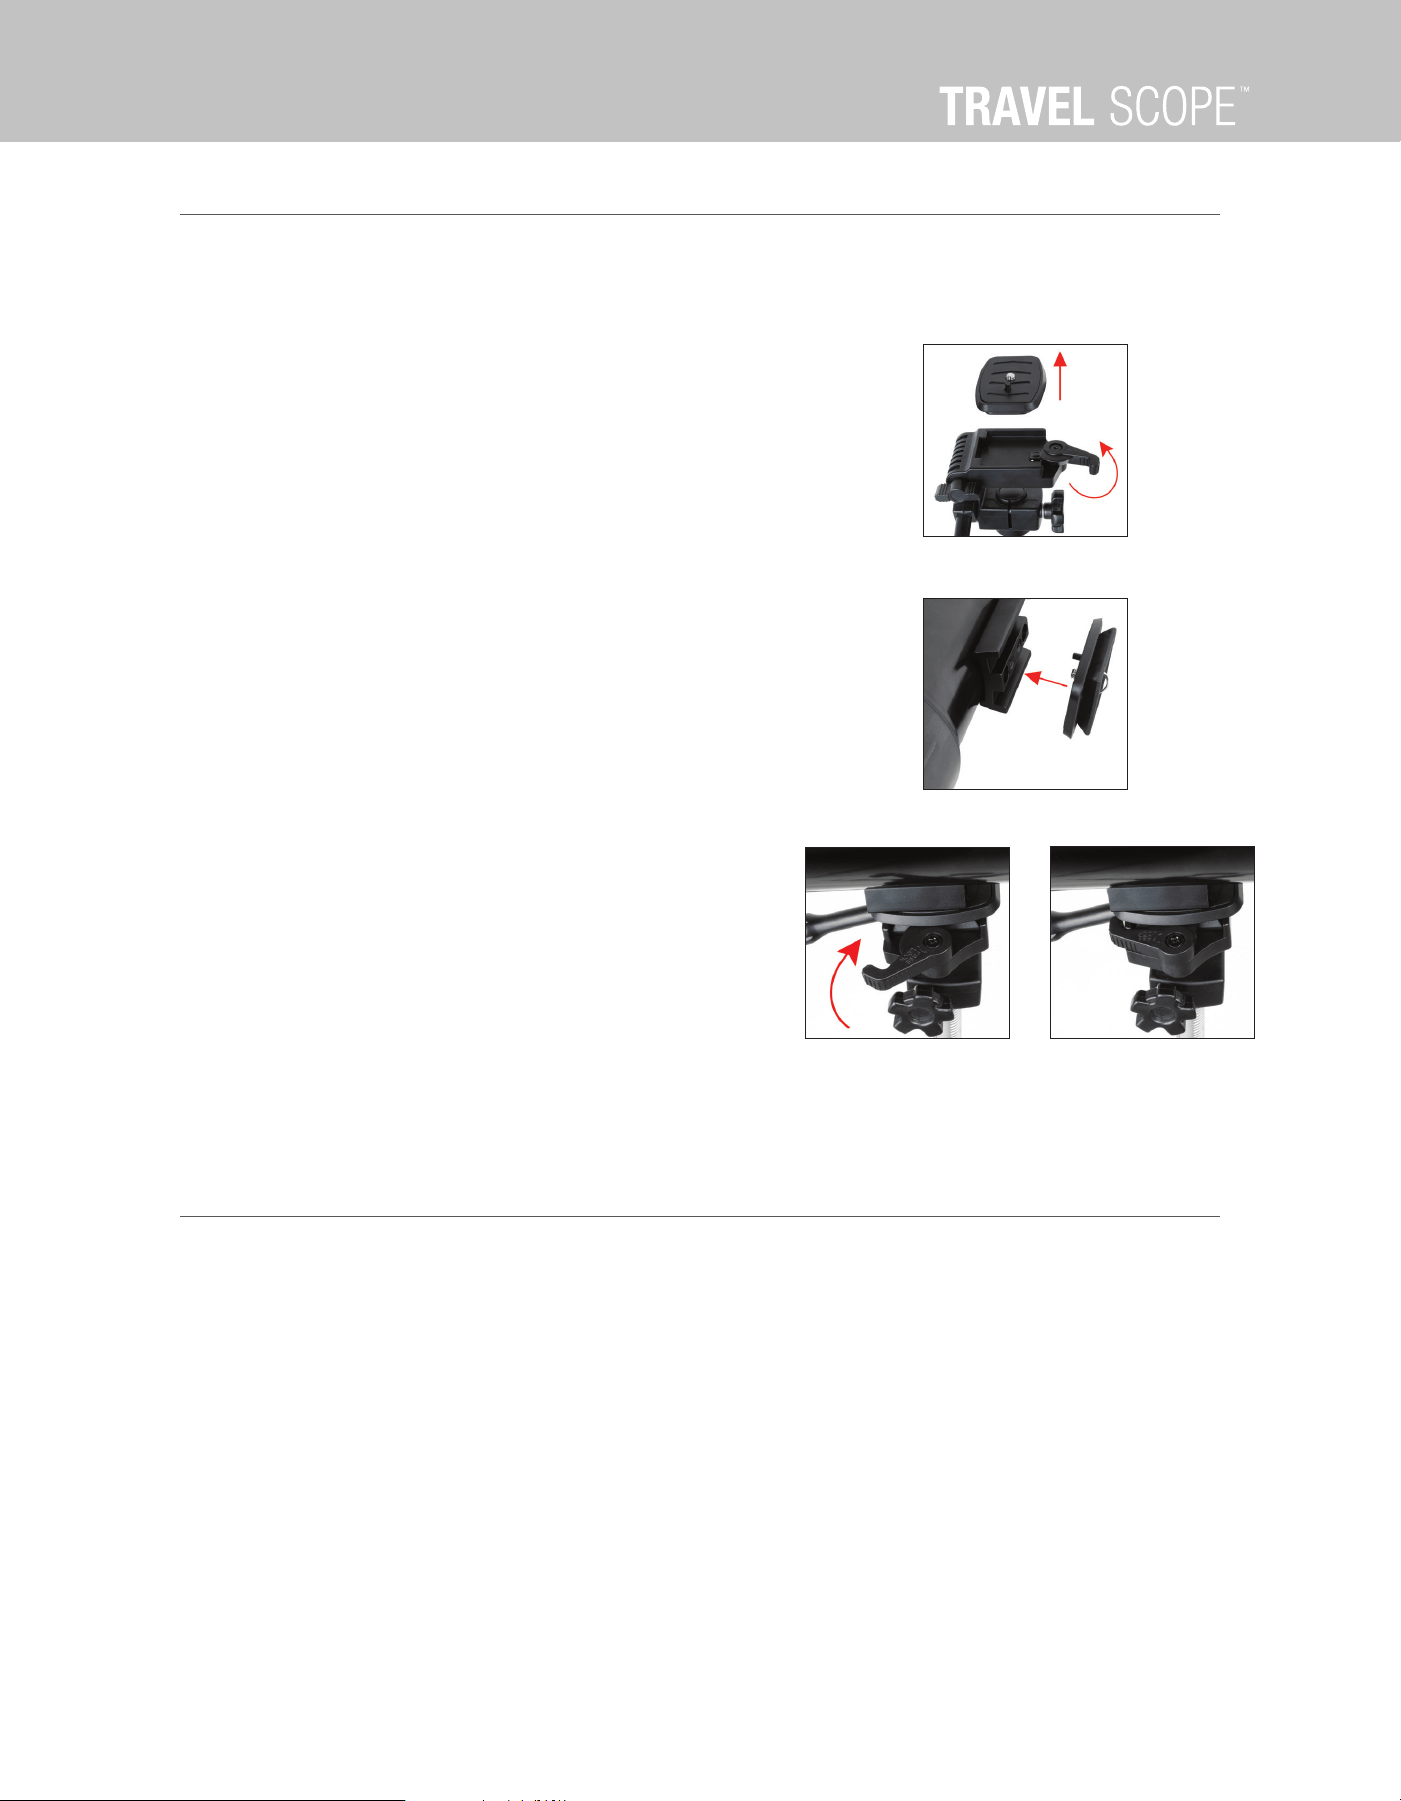
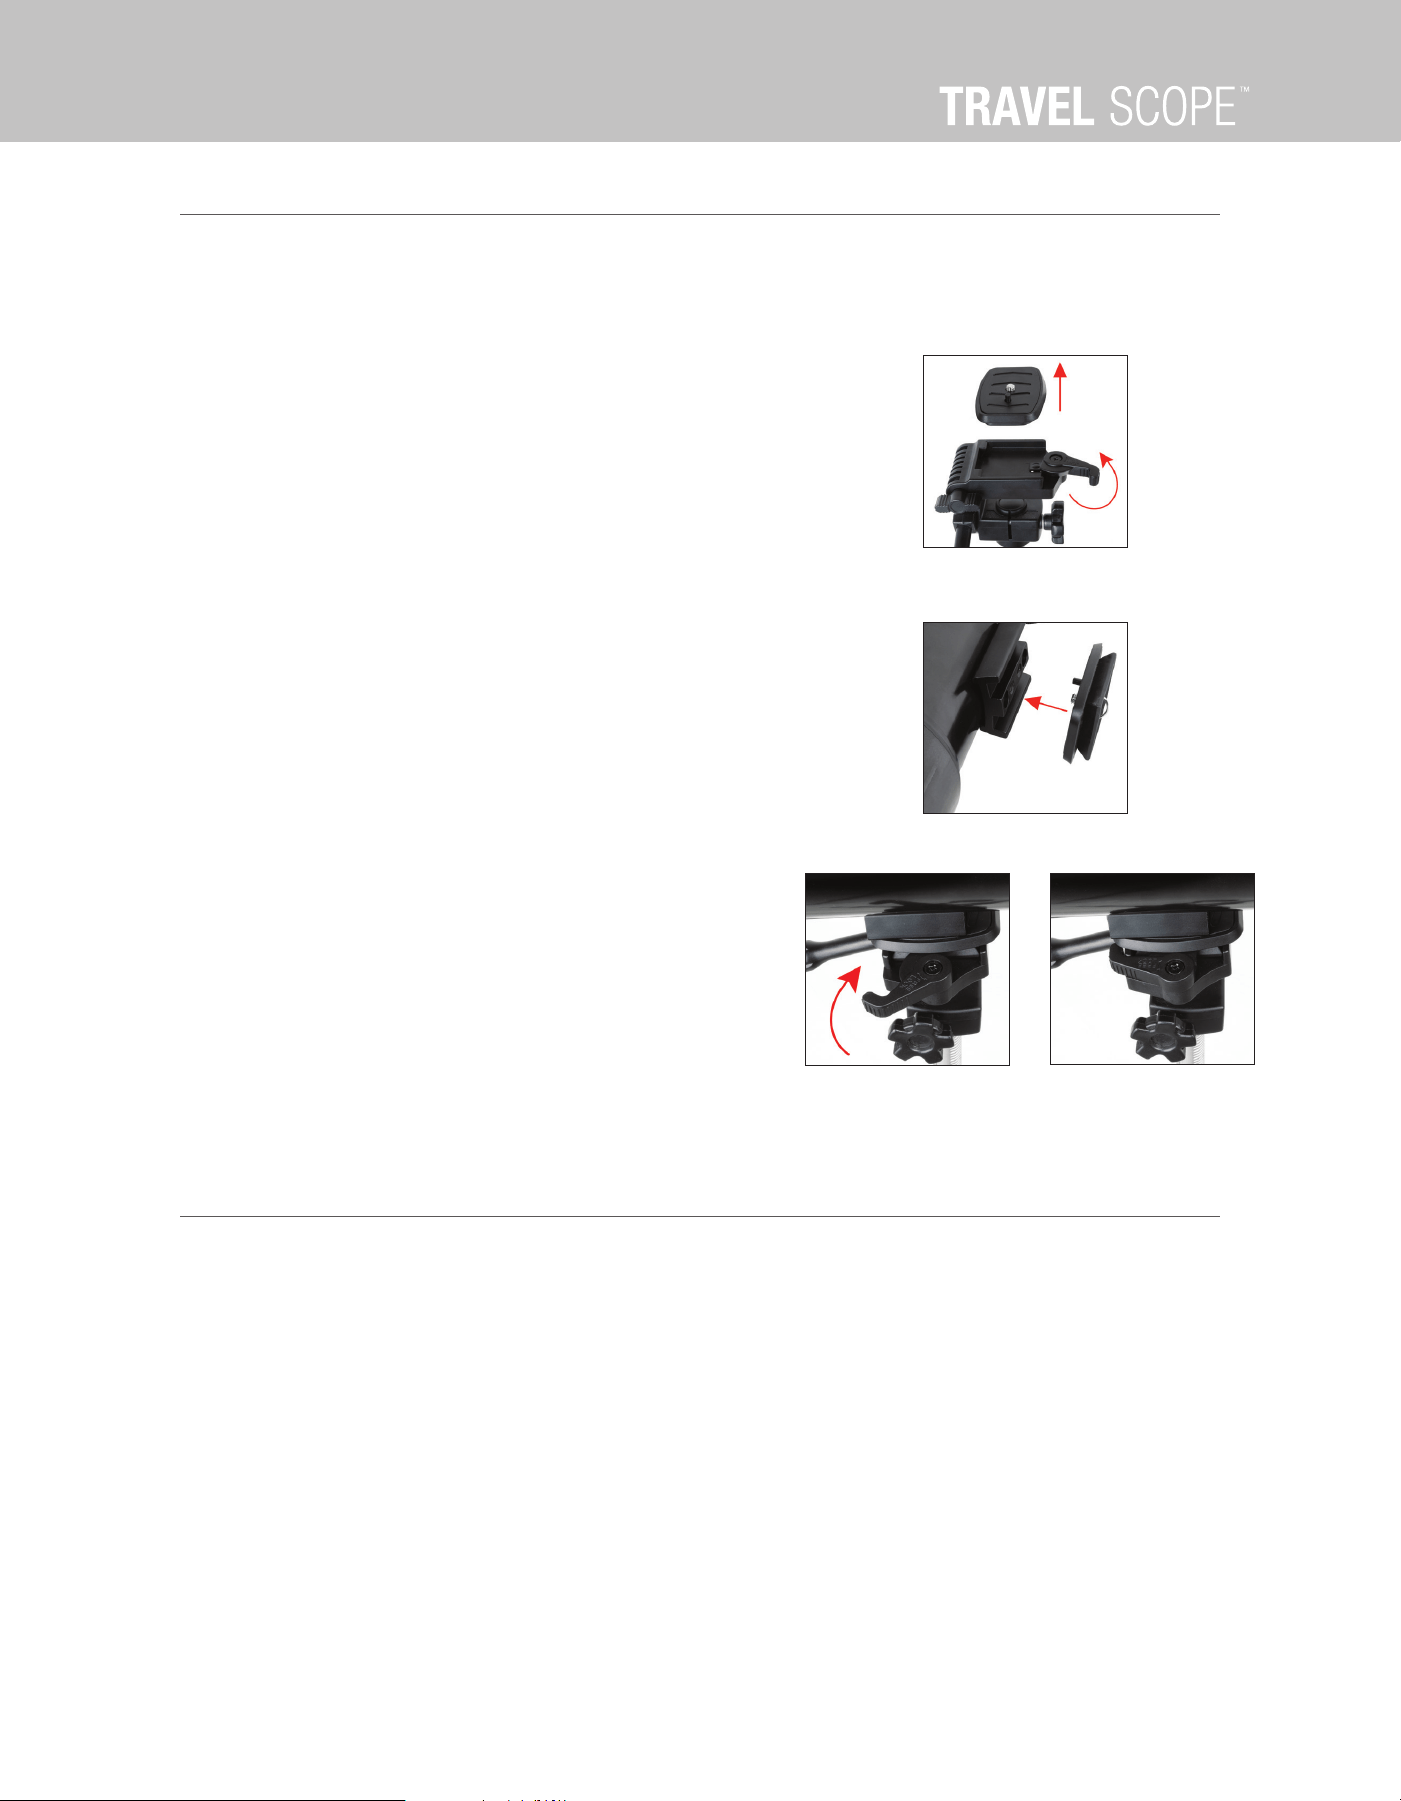
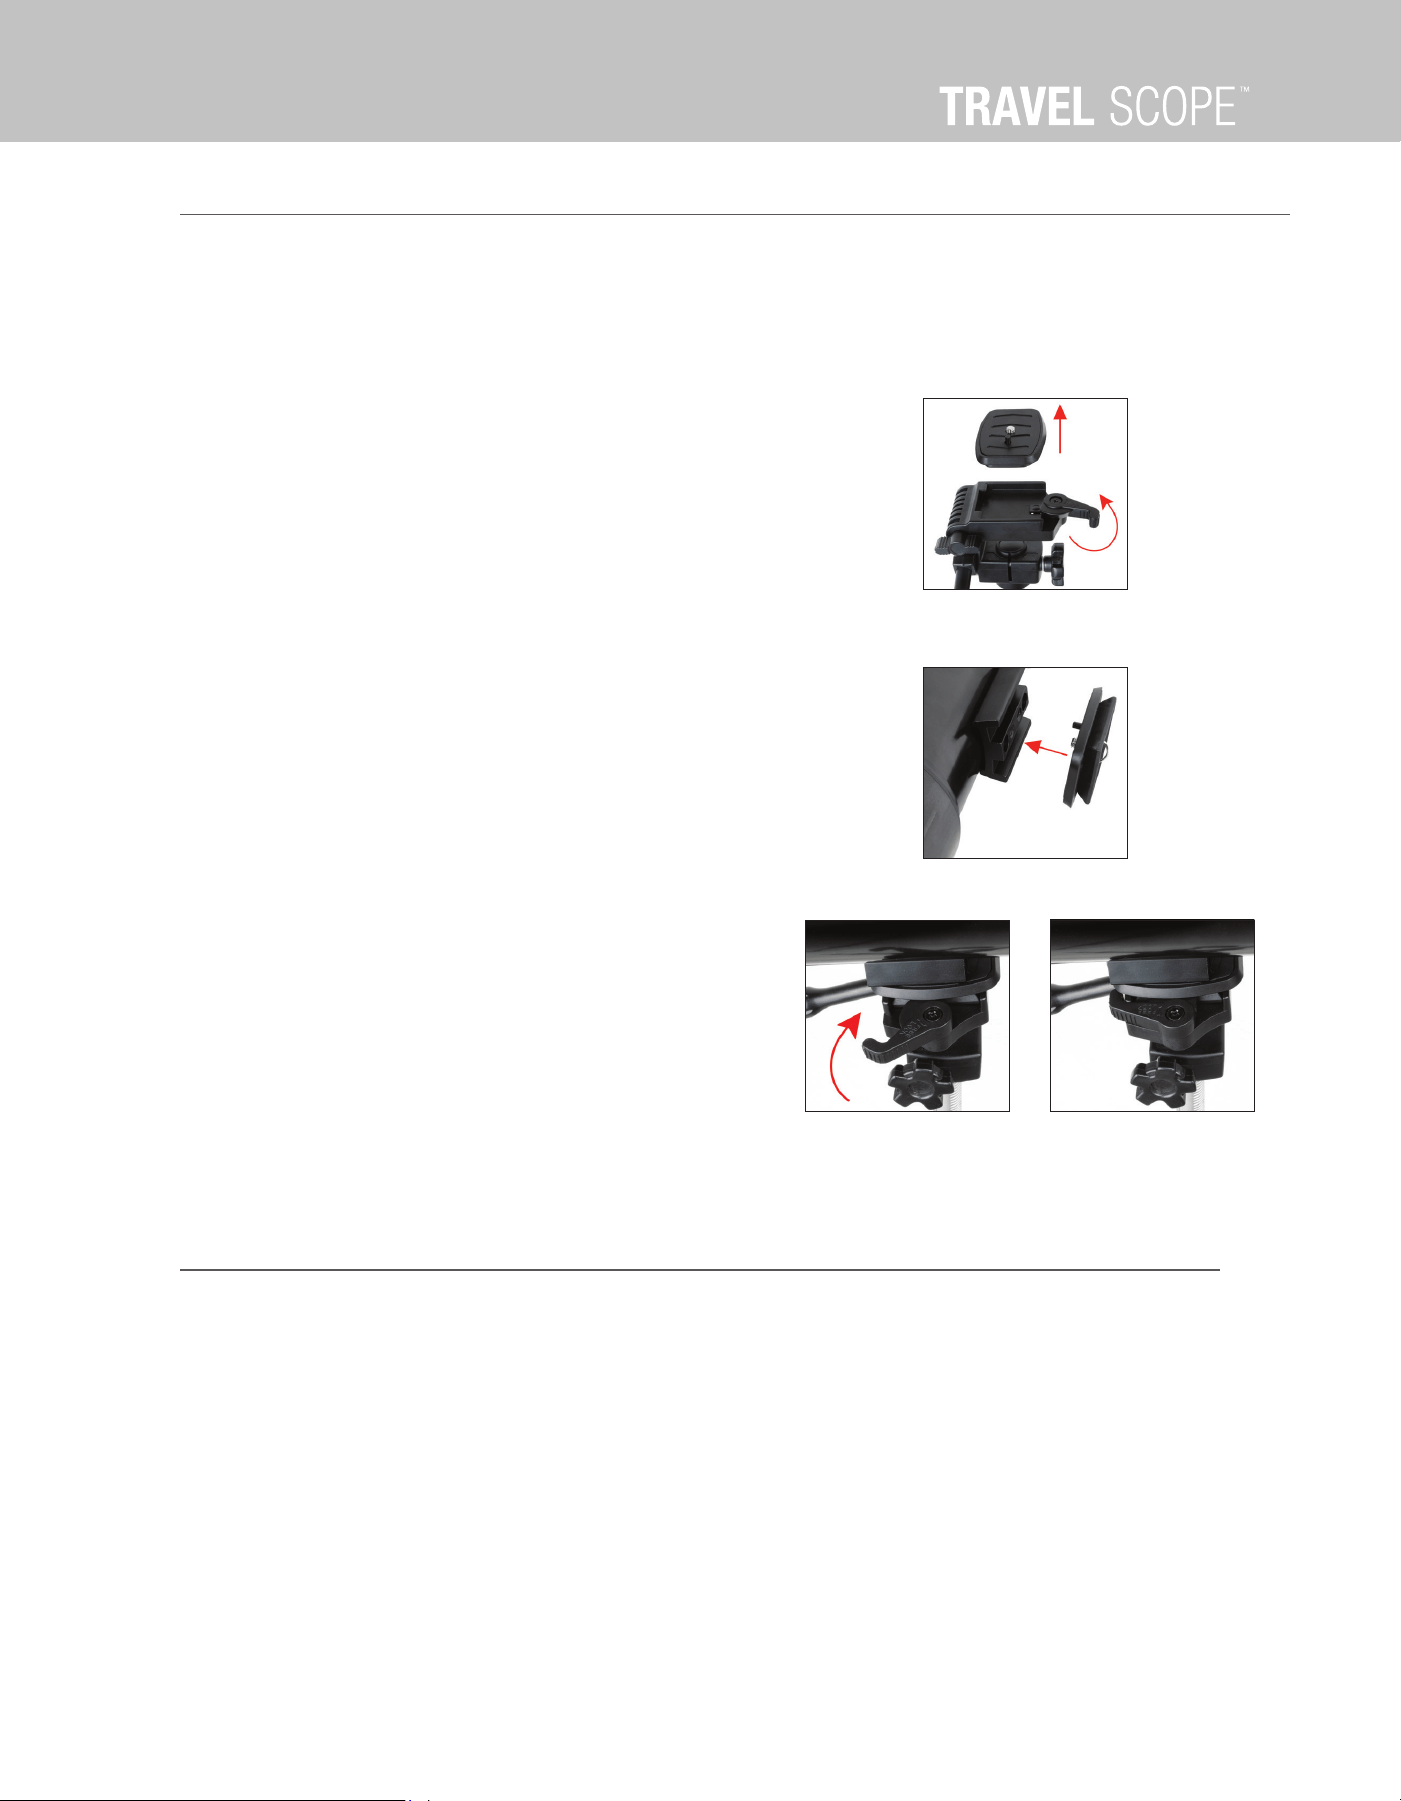
The telescope optical tube attaches to the tripod using the mounting bracket on the bottom of the optical tube and the
mounting platform of the tripod. Before starting, make sure all of the knobs on the tripod are locked.
1. Flip the lever on the side of the tripod head to release the
quick-release mounting plate and lift it out of the tripod head.
2. Screw the quick-release mounting plate to the bottom of the
telescope optical tube.
3. Place the telescope optical tube with the quick-release
plate back into the tripod head and secure it by pushing the
quick-release lever so it is fl ush against the mount.
MOVING THE TELESCOPE MANUALLY
The Travel Scope is easy to move wherever you want to point it. The up and down (altitude) is controlled by the pan handle.
Unlock the up and down motion by rotating the pan handle counterclockwise, move the telescope up or down as needed and
then rotate the pan handle clockwise to lock it in place. You can adjust how much force it takes to turn the telescope left and
right by adjusting the azimuth tension knob.

8 I ENGLISH
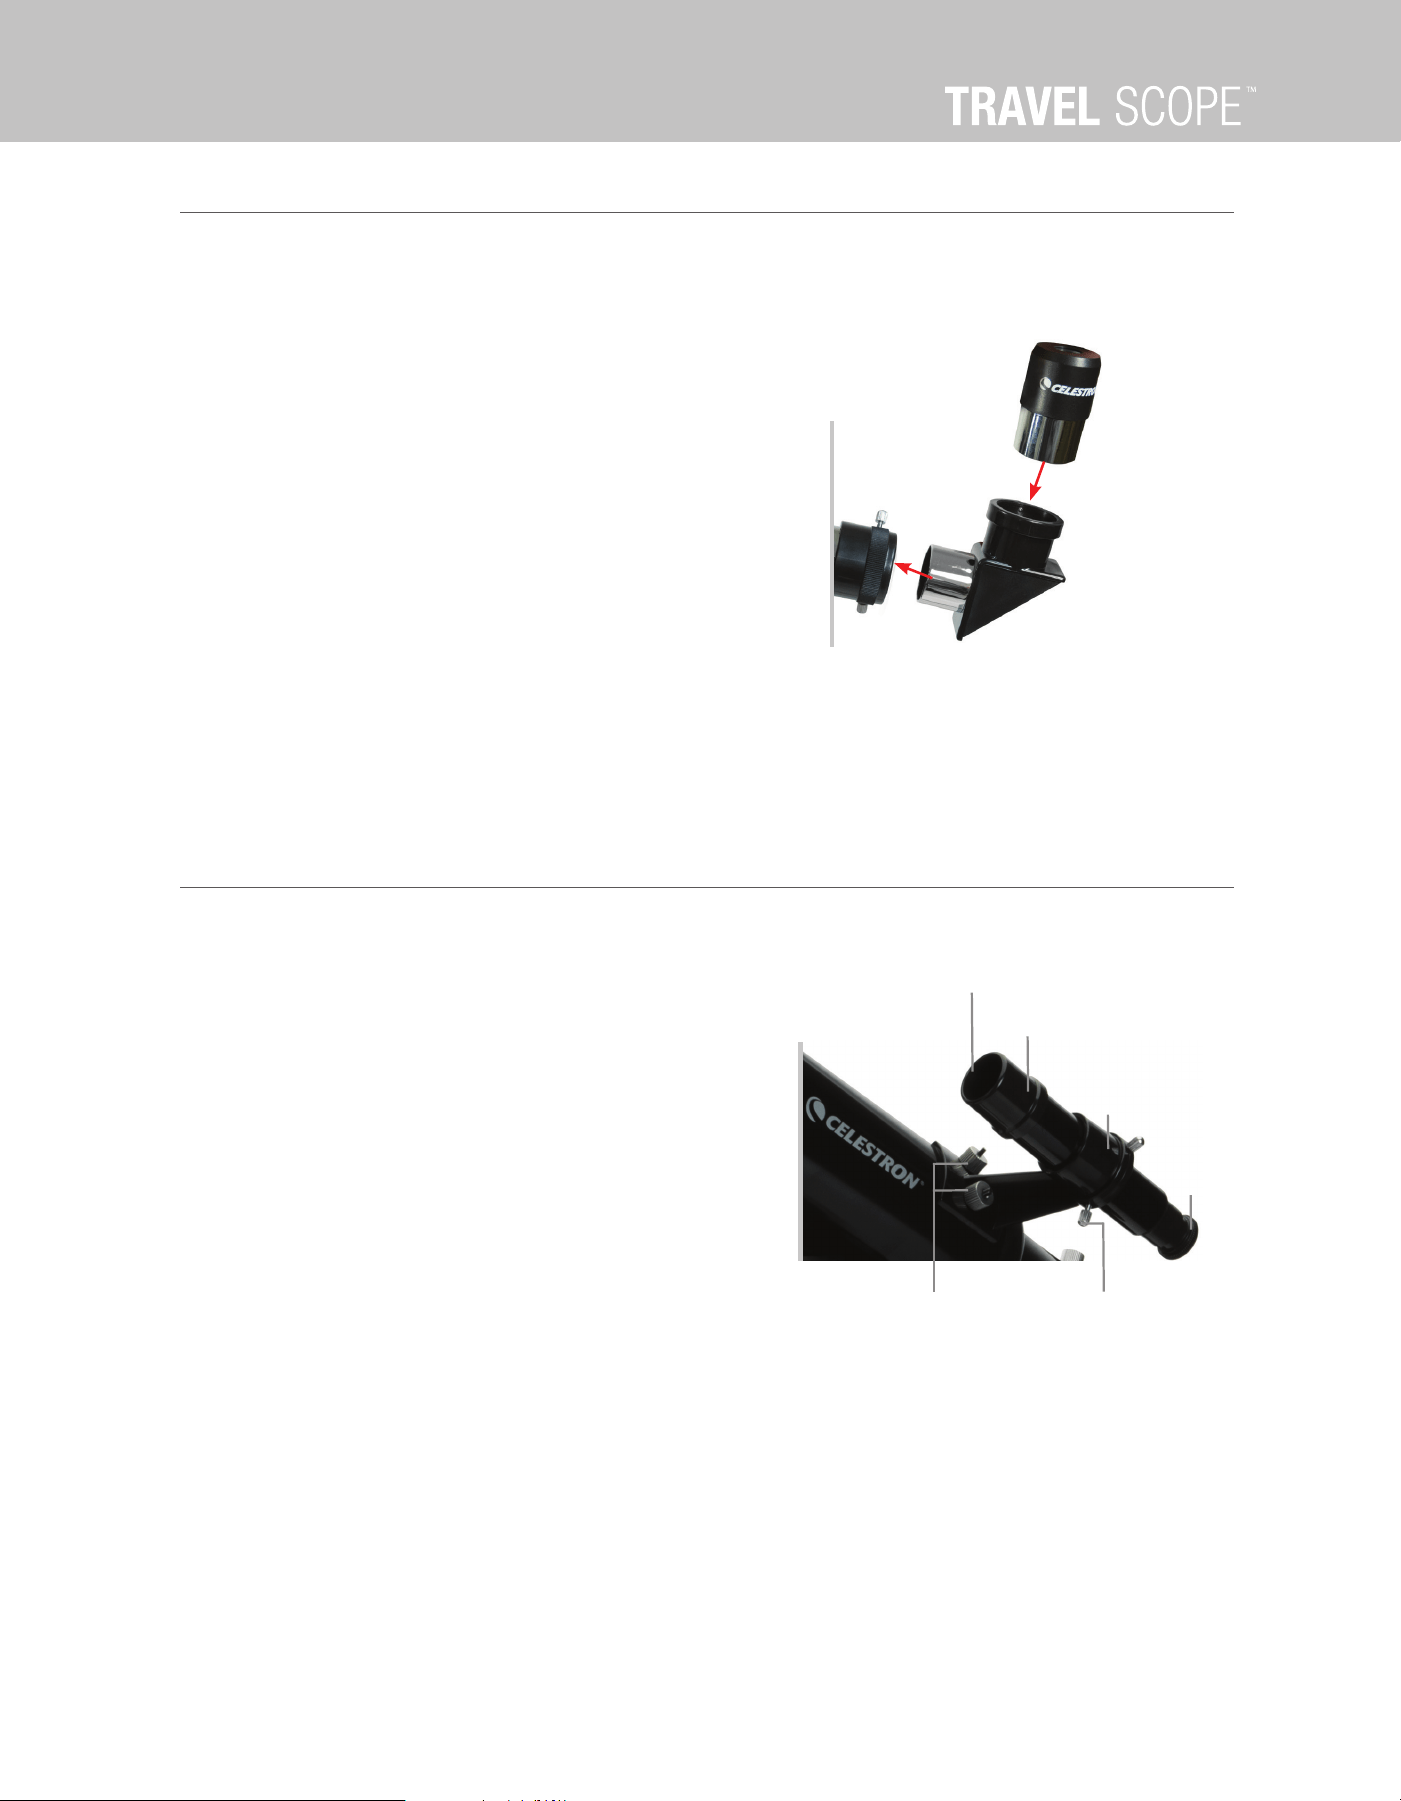
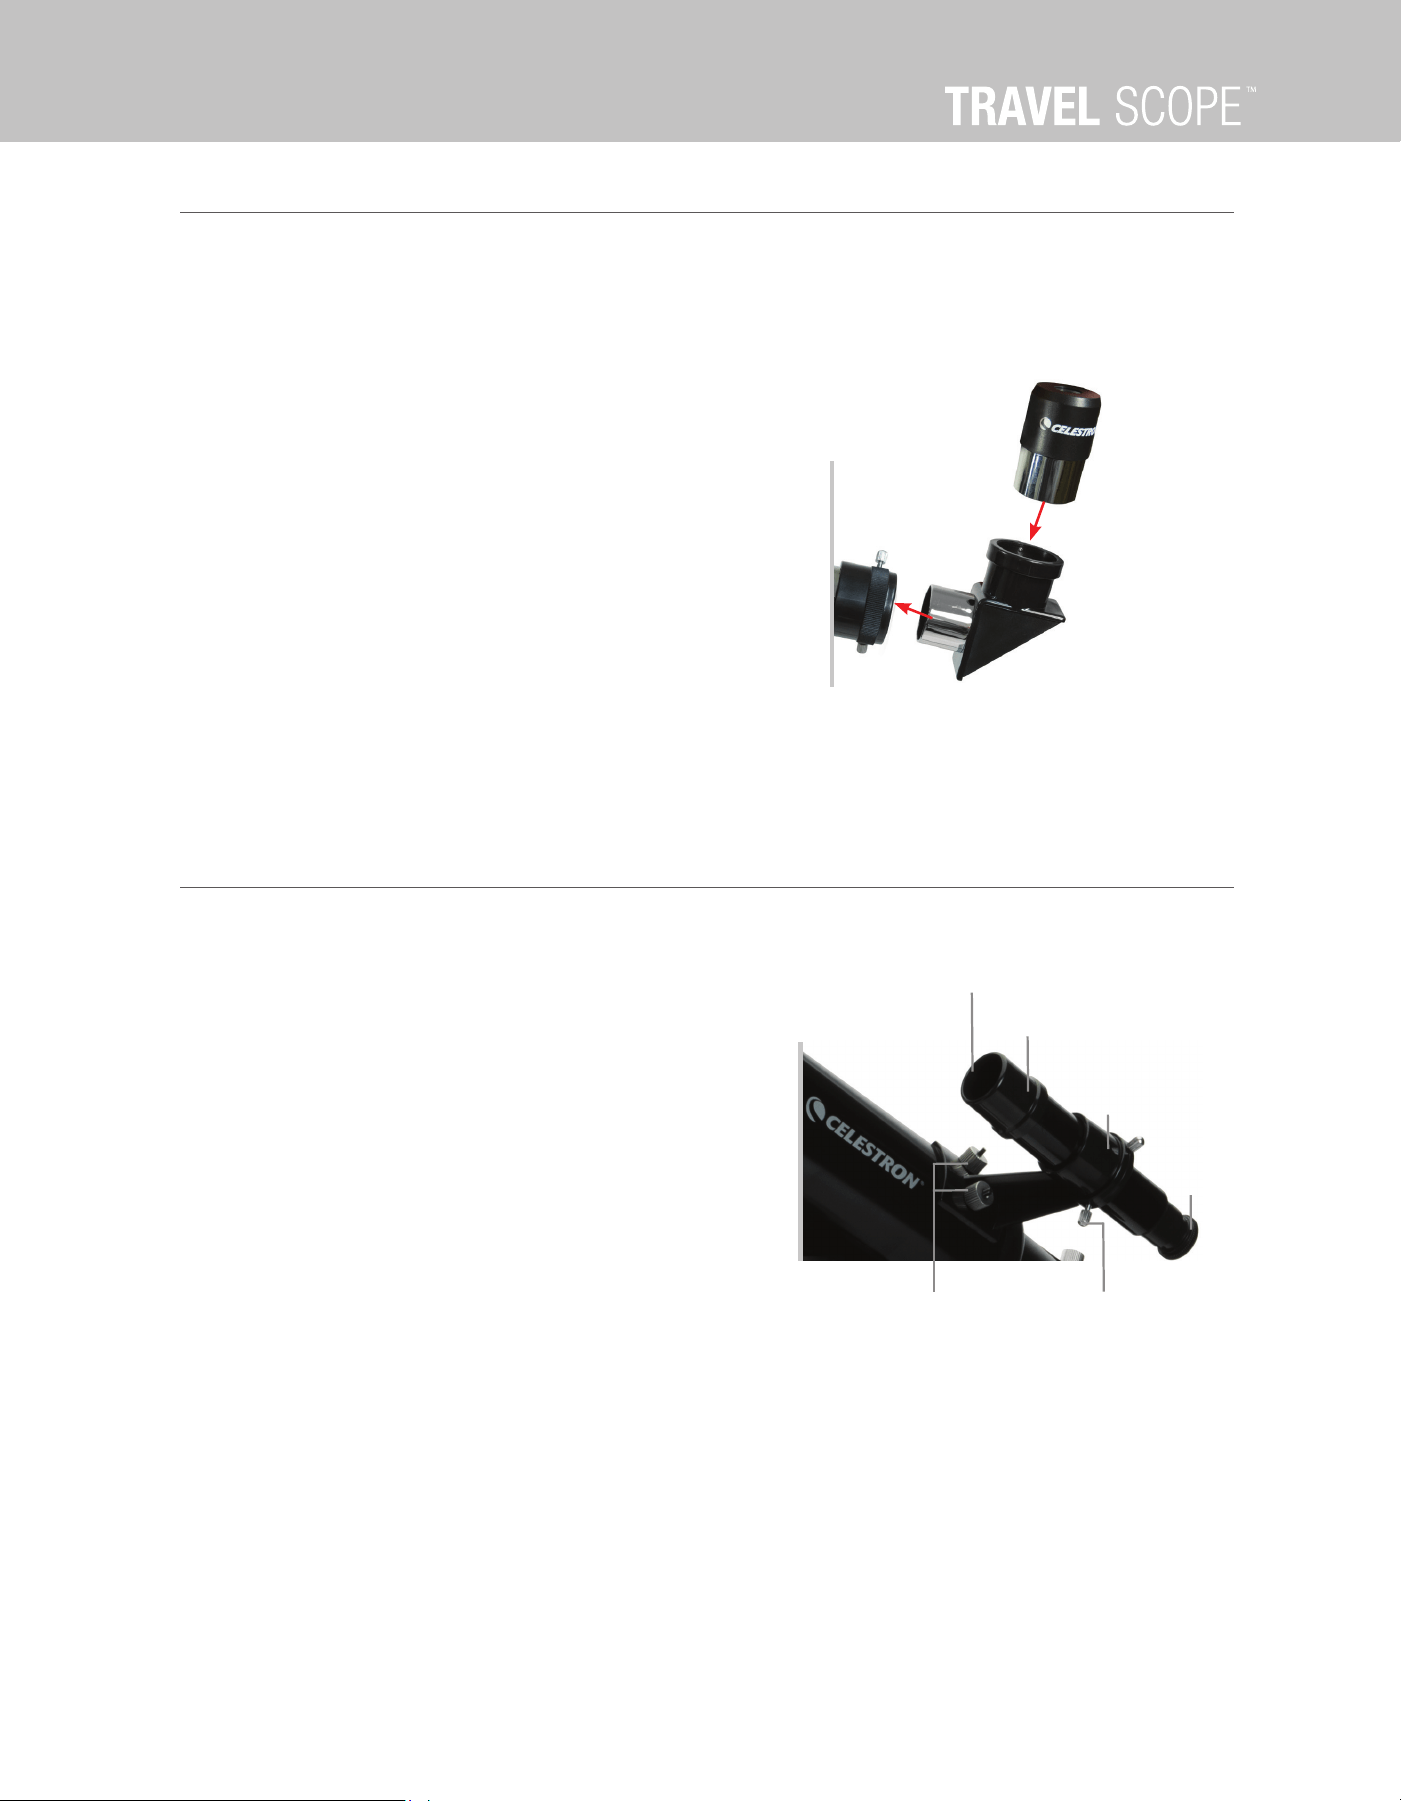
INSTALLING THE DIAGONAL AND EYEPIECE
The Travel Scope uses a 45 degree erect image diagonal that corrects the image to be right side up and oriented
correctly left-to-right which is much easier to use for terrestrial observing. The diagonal can be rotated to any position.
To install the diagonal and eyepiece:
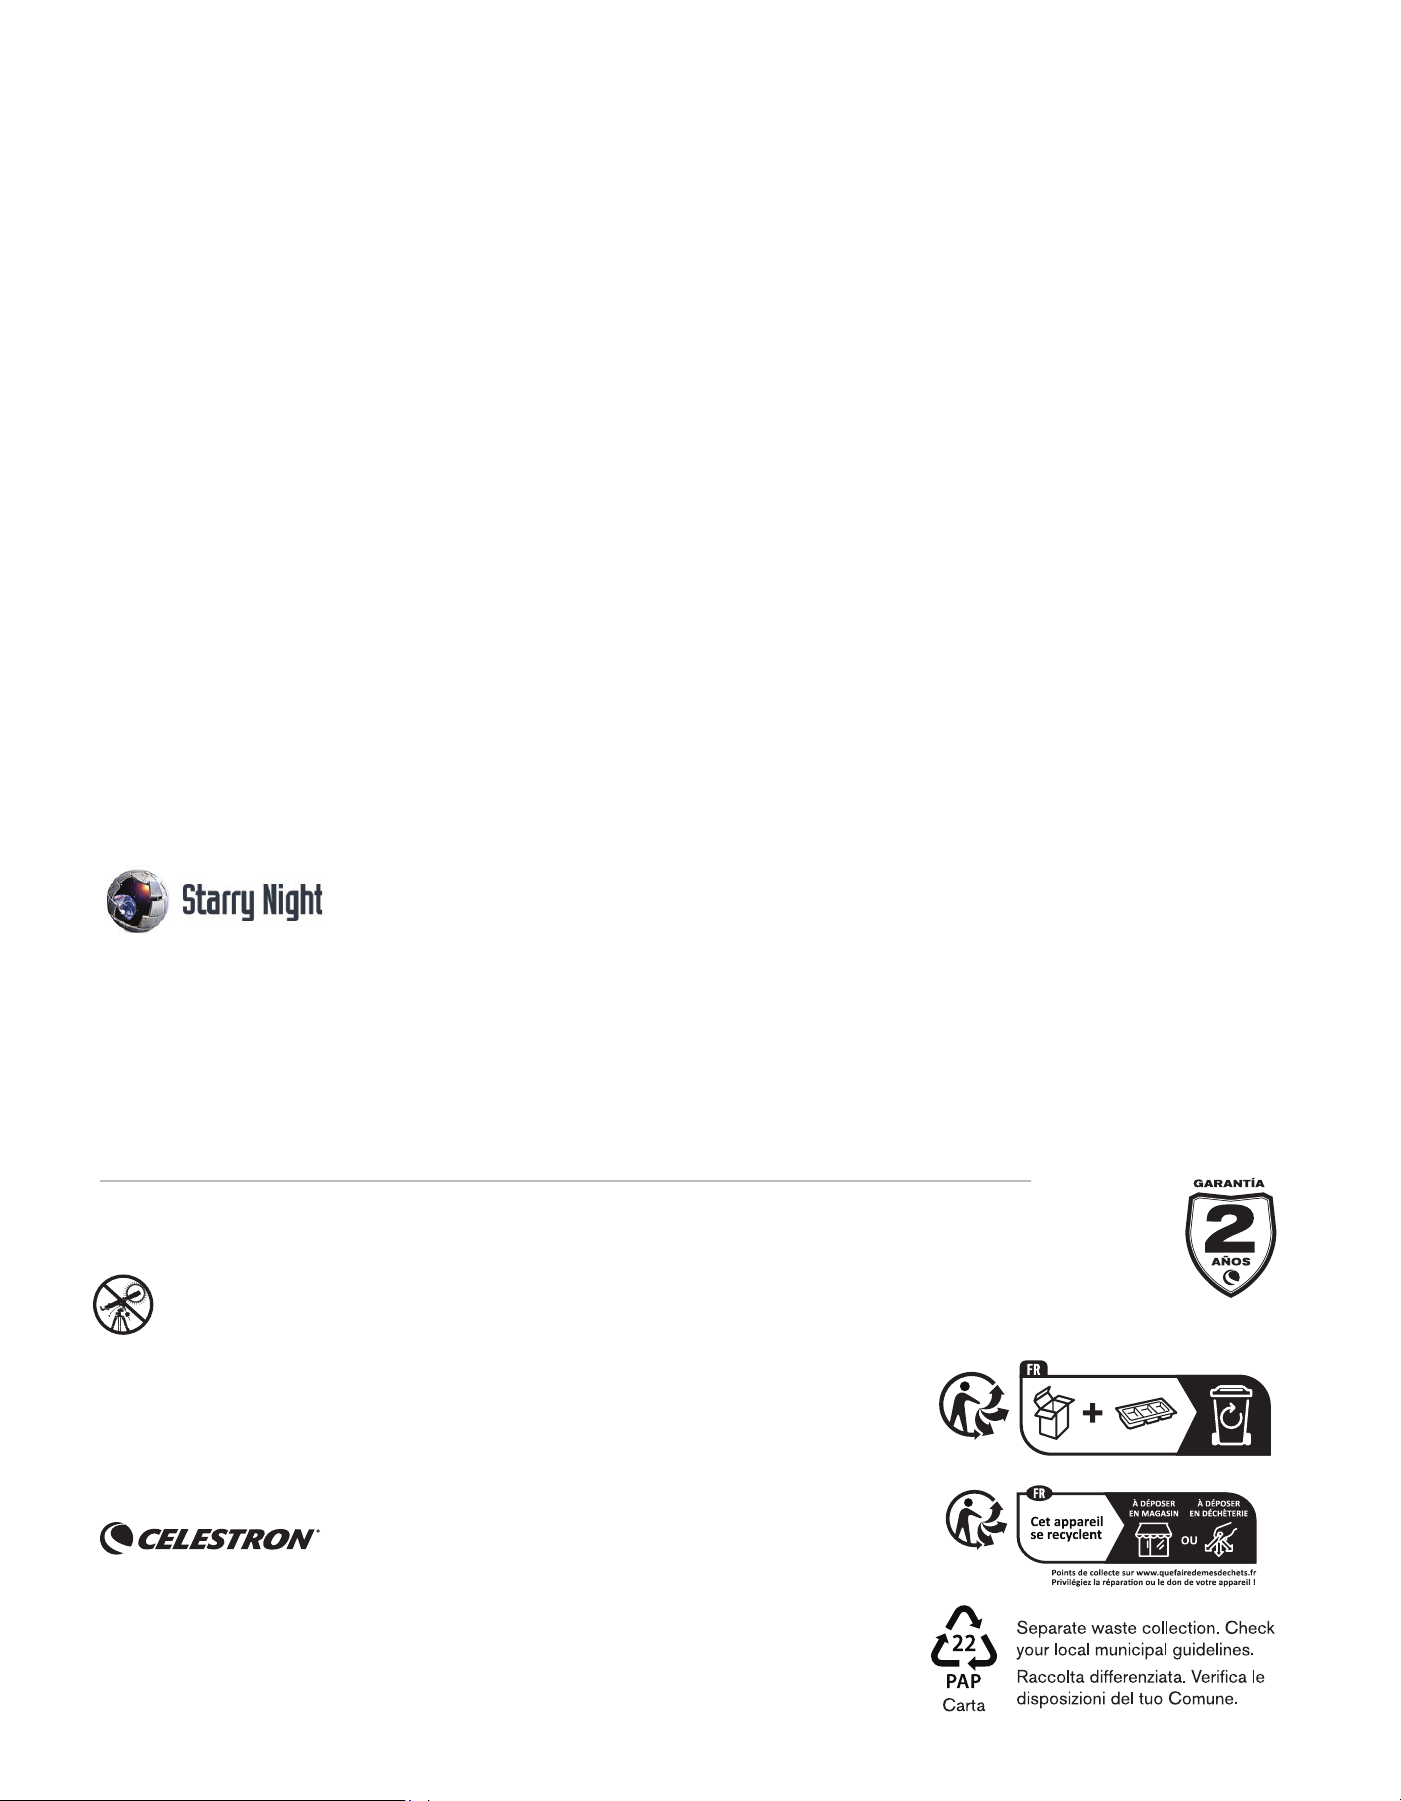
INSTALLING THE FINDERSCOPE
The Travel Scope comes with a small optical fi nderscope to help
you aim the main scope at a distant target.
To install the fi nderscope:
1. Locate and remove the two silver thumb nuts on the left side of
the telescope tube.
2. Place the fi nder bracket over the two exposed threaded shafts.
3.
Replace the nuts to hold the fi nderscope in place.
Finderscope
Bracket
Finderscope
Eyepiece
Adjustment
Screws
Knurled
Nuts
Objective Lens
1. Loosen the two thumbscrews on the rear on the telescope
optical tube and remove the cap covering the focuser.
2. Remove the caps from both ends of the diagonal and insert
the chrome barrel of the diagonal inside the focuser of the
telescope optical tube. Secure the two thumbscrews to hold it
in place.
3.
Loosen the set screws on the side of the diagonal and insert
the chrome barrel of the eyepiece into the diagonal. Secure the
thumbscrews to hold the eyepiece in place.

ENGLISH I 9
FOCUSING
To focus your Travel Scope turn the focus knob located near the rear of the telescope while looking through the telescope’s
eyepiece. If you wear glasses, you may want to remove them when observing with an eyepiece attached to the telescope.
However, if you have astigmatism, corrective lenses should be worn at all times. You will need to refocus the telescope each
time you change eyepieces or view targets at different distances from you.
ALIGNING THE FINDERSCOPE
In order to use your fi nderscope, you need to ensure it is pointing in the same direction as your main telescope. It is
recommended that you do this during the day. To do this:
1. Take the scope outside, remove the lens cap, and locate a distant daytime object such as a signpost, light pole, radio
antenna, etc. We recommend an object at least a quarter of a mile away but if this is not possible, use an object as far
away as you can.
2. Center this object in the main telescope using a low power (20 mm) eyepiece in the main telescope.
3. Look through the eyepiece of the fi nderscope and take notice of the position of the same object.
4. Without moving the main telescope, turn the adjustment thumbscrews located around the fi nderscope bracket until the
crosshairs of the fi nderscope are centered on the object chosen with the main telescope.
Your telescope and fi nderscope are now aligned. To aim the main telescope, grab the mount’s pan handle and loosen the
altitude lock. Look through your fi nderscope until the crosshairs are on the target you want to view and lock the altitude
lock to hold the scope in place. Now look through your low power eyepiece in the main telescope and the target should be
visible. To zoom in on the target, change to your higher power eyepiece and refocus the telescope using the focus knobs.
Note: Objects viewed through a fi nderscope are upside down and backwards, which is normal.

10 I ENGLISH
When using any optical instrument, there are a few things to remember to ensure you get the best possible image.
• Never look through window glass. Glass found in household windows is optically imperfect, and as a result, may vary in
thickness from one part of a window to the next. This inconsistency can and will affect the ability to focus your telescope. In
most cases you will not be able to achieve a truly sharp image, while in some cases you may actually see a double image.
• Never look across or over objects that are producing heat waves. This includes asphalt parking lots on hot summer days or
building rooftops.
• Hazy skies, fog, and mist can also make it diffi cult to focus when viewing terrestrially. The amount of detail seen under these
conditions is greatly reduced.
Note: Your telescope was designed for terrestrial observation. Knowing how to use it for this purpose has been described
already as it is quite simple and straightforward. Your telescope can also be used for casual astronomical observing
which will be discussed in the next sections.
GENERAL OBSERVING HINTS
Your telescope has a Two Year Limited Warranty. For detailed information and to register your new product, please
visit celestron.com.
WARRANTY

ENGLISH I 11
NOTES
BONUS SOFTWARE
Your purchase includes software for your computer. You don’t need to download this software to use your telescope, but it can enhance
your experience.
MINIMUM SYSTEM REQUIREMENTS
Windows:
• Windows 7 or higher
• 500MHz or higher processor
• 128 MB RAM
• 850 MB hard disk space
• 32 MB OpenGL-capable graphics card
• Monitor with 1024x768 pixel resolution (recommended)
Mac:
• Universal binary (PPC/Intel-compatible)
• OS X 10.4 or higher (10.5 or higher for Elementary)
• G3 450 MHz or higher processor
• 128 MB RAM
• 850 MB hard disk space
• 32 MB OpenGL-capable graphics card
• Monitor with 1024x768 pixel resolution (recommended)
Celestron Starry Night Astronomy Software
Celestron Starry Night, the premier astronomy software on the market, takes you on a guided tour of our Solar System’s past, present,
and future. It can help you learn about the night sky and plan your next observing session. Use Starry Night to model exactly how the night
sky will appear from your backyard, a nearby dark-sky site, or anywhere on Earth.
NEED ASSISTANCE? Contact Celestron Technical Support
celestron.com/pages/technical-support
Product design and specifi cations are subject to change without prior notifi cation.
This product is designed and intended for use by those 14 years of age and older.
©2024 Celestron. Celestron and Symbol are trademarks of Celestron, LLC.
All rights reserved. • Celestron.com
US: Celestron, 2835 Columbia Street, Torrance, CA 90503 USA
UK: Celestron Global Ltd., Unit 2 Transigo, Gables Way, Thatcham RG19 4JZ, United Kingdom
Made in China | 12-24
celestron.com/pages/warranty
SOLAR WARNING: Never attempt to view the sun through any telescope.

MODE D'EMPLOI
Modèle #22030
FRANÇAIS

2 I FRANÇAIS

FRANÇAIS I 3
SOMMAIRE
CONTENU DE LA BOÎTE . . . . . . . . . . . . . . . . . . . . . . . . . . . . . . . . . . . . . . . . . . . . . . 5
Liste des pièces . . . . . . . . . . . . . . . . . . . . . . . . . . . . . . . . . . . . . . . . . . . . . . . . . . . . . . . . 5
AVERTISSEMENT SUR LE SOLEIL. . . . . . . . . . . . . . . . . . . . . . . . . . . . . . . . . . . . . . . . 5
ASSEMBLAGE . . . . . . . . . . . . . . . . . . . . . . . . . . . . . . . . . . . . . . . . . . . . . . . . . . . 6
Positionner le trépied . . . . . . . . . . . . . . . . . . . . . . . . . . . . . . . . . . . . . . . . . . . . . . . . . . . . . 6
Attacher le tube optique du télescope au trépied . . . . . . . . . . . . . . . . . . . . . . . . . . . . . . . . . . . . . . 7
Orienter le télescope manuellement . . . . . . . . . . . . . . . . . . . . . . . . . . . . . . . . . . . . . . . . . . . . . 7
Installer la diagonale et l'oculaire . . . . . . . . . . . . . . . . . . . . . . . . . . . . . . . . . . . . . . . . . . . . . . . 8
Installer le chercheur . . . . . . . . . . . . . . . . . . . . . . . . . . . . . . . . . . . . . . . . . . . . . . . . . . . . . 8
Aligner le chercheur . . . . . . . . . . . . . . . . . . . . . . . . . . . . . . . . . . . . . . . . . . . . . . . . . . . . . . 9
Mise au point . . . . . . . . . . . . . . . . . . . . . . . . . . . . . . . . . . . . . . . . . . . . . . . . . . . . . . . . . 9
CONSEILS D'OBSERVATION GÉNÉRAUX. . . . . . . . . . . . . . . . . . . . . . . . . . . . . . . . . . . . 10
GARANTIE. . . . . . . . . . . . . . . . . . . . . . . . . . . . . . . . . . . . . . . . . . . . . . . . . . . . . . 10
NOTES. . . . . . . . . . . . . . . . . . . . . . . . . . . . . . . . . . . . . . . . . . . . . . . . . . . . . . . . 11

4 I FRANÇAIS

FRANÇAIS I 5
• Ne regardez jamais directement le Soleil à l'œil nu ou avec un télescope, à moins d'utiliser un fi ltre adapté. Cela pourrait
entraîner des lésions oculaires permanentes et irréversibles.
• Ne jamais utiliser votre télescope pour projeter une image du Soleil sur n'importe quelle surface. Une concentration de
chaleur dangereuse peut être générée à l’intérieur et endommager le télescope et les accessoires attachés.
• Ne jamais utiliser un fi ltre solaire d'oculaire ou une cale de Herschel. La concentration de chaleur au sein du télescope peut
causer l'apparition de fêlure ou même casser ces accessoires, laissant la lumière du Soleil non fi ltrée arriver directement à
vos yeux.
• Ne laissez pas le télescope sans surveillance, particulièrement en présence d’enfants ou d’adultes qui ne sont pas familiarisés
avec son utilisation.
AVERTISSEMENT SUR LE SOLEIL
Nous vous recommandons de conserver la boîte de votre télescope afi n de pouvoir l'utiliser pour son rangement lorsqu'il
n'est pas utilisé. Déballez le contenu de la boîte avec soin, car certaines pièces sont de petite taille. Utilisez la liste des
pièces ci-dessous pour vous assurer que toutes les pièces et tous les accessoires sont inclus dans la boîte.
LISTE DES PIÈCES
CONTENU DE LA BOÎTE
1. Lentille de l’objectif
2. Tube du télescope
3. Plaque de montage à libération rapide
4. Molette de tension de l’azimut
5. Trépied
6. Chercheur
7. Oculaire
8. Redresseur d'image
9. Molette de mise au point
10. Poignée d'orientation/Verrouillage d'altitude
11. Molette de verrouillage de la colonne centrale
2
1
6
3
4
8
7
9
10
5
11
• Tube optique du télescope
• Chercheur et support
• Redresseur d'image
• Oculaires 20 mm & 10 mm
• Trépied et monture
• Plaque de montage à libération rapide de trépied
• Sac à dos

6 I FRANÇAIS
Assemblez votre Travel Scope à l'intérieur la première fois, pour vous familiariser avec les procédure d'assemblage correctes
avant de l'utiliser en extérieur.
ASSEMBLAGE
POSITIONNER LE TRÉPIED
1. Le trépied est livré assemblé. Mettez le trépied à la
verticale, et écartez les pieds vers l'extérieur jusqu'à
ce que chacun d'eux soit complètement étendu.
2. Pour augmenter la hauteur du trépied, ouvrez les leviers
de verrouillage situées sur le bas de chaque pied du
trépied. Ouvrez chaque levier de chaque chaque section,
puis tirez-les vers l'extérieur. Après avoir ouvert un levier,
tirez le pied au maximum, puis refermez le levier pour le
maintenir en place. Faites cela avec chaque section de
chaque pied, jusqu'à obtention de la hauteur désirée.
3. Si vous souhaitez élever le trépied encore plus, utilisez la
molette de verrouillage de la colonne centrale. Faites tourner
la molette dans le sens inverse des aiguilles d'une montre pour
desserrer. Tirez ensuite sur la tête du trépied. Continuez à tirer
jusqu'à obtention de la hauteur désirée, puis serrez la molette de
verrouillage. Pour garantir la stabilité de la monture, assurez-vous
que la molette d'extension de la colonne est serrée.
FRANÇAIS I 7
ATTACHER LE TUBE OPTIQUE DU TÉLESCOPE AU TRÉPIED
Le tube optique du télescope s'attache au trépied à l'aide du support de montage situé sur le dessous du tube optique et
sur la plateforme de montage située sur le trépied. Avant de commencer, assurez-vous que toutes les molettes du trépied
sont serrées.
1. Ouvrez le levier sur le côté du trépied pour libérer la plaque de
montage à libération rapide et soulevez-la de la tête du trépied.
2. Vissez la plaque de montage à libération rapide sur le dessous
du tube optique du télescope.
3. Remettez le tube optique du télescope avec la plaque à
libération rapide en place sur la tête du trépied et sécurisez-les
en poussant le levier de libération rapide, de manière à ce qu'il
soit à niveau contre la monture.
ORIENTER LE TÉLESCOPE MANUELLEMENT
Le Travel Scope est aisé à orienter dans la direction vers laquelle vous désirez le pointer. L'orientation haut et bas (altitude)
est contrôlée avec la poignée d'orientation Déverrouillez l'orientation verticale en faisant tourner la poignée d'orientation
dans le sens inverse des aiguilles d'une montre, orientez le télescope comme désiré verticalement, puis faites tourner
la poignée d'orientation dans le sens des aiguilles d'une montre pour le verrouiller. Vous pouvez régler la résistance du
télescope au mouvement d'orientation gauche et droite à l'aide de la molette de tension de l’azimut.
8 I FRANÇAIS
INSTALLER LA DIAGONALE ET L'OCULAIRE
Le Travel Scope utilise un redresseur d'image à 45° qui corrige l'orientation de l'image de manière à ce qu'elle soit bien
orientée verticalement et horizontalement, ce qui rend l'observation terrestre bien plus aisée. La diagonale peut pivoter
dans le sens désiré.
Installer la diagonale et l'oculaire:
1. Desserrez les deux vis à l’arrière du tube optique du télescope
et retirez le capuchon recouvrant le dispositif de mise au point.
2. Retirez les capuchons des deux extrémités de la diagonale et
insérez le canon chromé de la diagonale à l’intérieur du dispositif
de mise au point du tube optique du télescope. Fixez les deux
vis à serrage à main pour le maintenir en place.
3.
Desserrer les vis de réglage sur le côté de la diagonale et
insérer le canon chromé de l’oculaire dans la diagonale. Fixez
les vis à ailettes pour maintenir l’oculaire en place.
INSTALLER LE CHERCHEUR
Le Travel Scope est livré avec un petit chercheur qui vous aide à
orienter le tube principal vers une cible éloignée.
Pour installer le chercheur:
1. Localisez et retirez les deux écrous à main argentés situés sur
le côté gauche du tube du télescope.
2. Placez le support du chercheur sur les deux tiges fi letées
exposées.
3.
Remettez les écrous en place pour fi xer le chercheur.
Support du
chercheur
Chercheur
Oculaire
Vis
de réglage
Écrous
striés
Lentille de l’objectif

FRANÇAIS I 9
MISE AU POINT
Pour mettre votre Travel Scope au point, faites tourner la molette de mise au point située sur l'arrière du télescope lorsque vous
regardez dans l'oculaire du télescope. Si vous portez des lunettes, nous recommandons de les retirer lorsque vous observez dans
un oculaire sur le télescope. Cependant, si vous souffrez d'astigmatisme, il est nécessaire de porter des verres correcteurs. Il est
nécessaire de refaire la mise au point du télescope à chaque changement d'oculaire ou lorsque vous observez un objet situé à
une distance différente par-rapport à votre position.
ALIGNER LE CHERCHEUR
Avant d'utiliser le chercheur, vous devez vous assurer qu'il pointe dans la même direction que le télescope principal. Nous
recommandons de faire cela de jour. Procédure :
1. Sortez le télescope en extérieur, retirez le cache de lentille, et localisez un objet distant visible de jour, comme un
panneau de signalisation, un lampadaire, une antenne, etc. Nous recommandons de choisir un objet situé à au moins un
quart de mile, mais si cela n'est pas possible, un objet aussi éloigné que possible fera l'affaire.
2. Centrez l'objet dans le télescope principal en utilisant un oculaire de basse puissance (20 mm).
3. Regardez dans l'oculaire du chercheur et repérez la position du même objet .
4. Sans déplacer le télescope principal, faites tourner les vis à main situées sur le pourtour du support du chercheur
jusqu'à ce que le viseur du chercheur soit centré sur l'objet choisit dans le télescope principal.
Votre télescope et chercheur sont maintenant alignés. Pour orienter le télescope principal, tenez la poignée d'orientation et
desserez le verrou d'altitude. Regardez dans votre chercheur jusqu'à ce que le viseur soit sur la cible que vous souhaitez observer,
puis verrouillez le verrou d'altitude pour maintenir le télescope en position. Regardez maintenant dans votre oculaire basse
puissance dans le télescope principal. La cible doit être visible. Pour agrandir la cible, changez l'oculaire avec un oculaire de plus
grande puissance, puis refaites la mise au point du télescope à l'aide des molettes de mise au point.
Note : Les objets observés dans le chercheur apparaissent retourné verticalement et horizontalement, ce qui est normal.

10 I FRANÇAIS
Gardez ces quelques conseils à l'esprit lorsque vous utilisez des instruments optiques, pour garantir la meilleur image possible.
• Ne jamais observer au-travers de la vitre d'une fenêtre. Le verre utilisé pour les fenêtres des maisons est optiquement
imparfait, et peut donc varier en épaisseur d'une région de la vitre à une autre. Ce manque d'homogénéité peut et
affectera la capacité de mise au point de votre télescope. Dans la plupart des cas, vous ne pourrez pas obtenir une
image réellement nette, et dans certaines situations, vous pourriez même obtenir une image dédoublée.
• Ne jamais observer au-travers ou par-dessus des objets qui créent un miroitement de chaleur. Cela inclus par exemple les
parkings les jours de grande chaleur ou les toits des bâtiments.
• Un ciel laiteux, le brouillard et la brume peuvent rendre l'observation terrestre diffi cile. La quantité de détails observables dans
ces conditions est grandement réduite.
Note : Votre télescope est conçu pour l'observation terrestre. Le présent document a décrit comment l'utiliser dans ce
but, et cela est plutôt simple et ne présente pas de diffi cultés. Votre télescope peut également être utilisé pour une
observation astronomique occasionnelle, qui sera décrite dans les sections suivantes.
CONSEILS D'OBSERVATION GÉNÉRAUX
Votre télescope est accompagné d'une garantie limitée de deux ans. Pour obtenir des informations détaillées, et pour
enregistrer votre nouveau produit, visitez celestron.com.
GARANTIE

FRANÇAIS I 11
NOTES

BESOIN D'ASSISTANCE? Contactez le support technique de Celestron
celestron.com/pages/technical-support
Le design et les spécifi cations du produit sont sujettes à modifi cation sans préavis. Ce produit est conçu et prévu pour être utilisé par
des personnes âgées de 14 ans et plus
©2024 Celestron. Celestron et le Symbol sont des marques déposées de Celestron, LLC. • Tous droits réservés • Celestron.com
US: Celestron.com • 2835 Columbia Street, Torrance, CA 90503 USA
UK: Celestron Global Ltd., Unit 2 Transigo, Gables Way, Thatcham RG19 4JZ, Royaume-Uni
Fabriqué en Chine | 12-24
celestron.com/pages/warranty
Windows:
• Windows 7 ou version ultérieure
• Processeur de 500 MHz ou plus
• 128 Mo de mémoire vive
• 850 Mo d’espace sur le disque dur
• Carte graphique compatible OpenGL de 32 Mo
• Moniteur d’une résolution de 1024x768 pixels (recommandé)
CONFIGURATION MINIMALE REQUISE
Mac:
• Binaire universel (compatible PC/Intel)
• OS X 10,4 ou version ultérieure (10,5 ou version ultérieure pour la
version Elementary)
• Processeur G3 450 MHz ou plus
• 128 Mo de mémoire vive
• 850 Mo d’espace sur le disque dur
• Carte graphique compatible OpenGL de 32 Mo
• Moniteur d’une résolution de 1024x768 pixels (recommandé)
LOGICIEL BONUS
Votre achat inclus un logiciel pour votre ordinateur. Vous n'avez pas besoin de télécharger ce logiciel pour utiliser votre télescope; il est capable d'améliorer votre expérience.
Logiciel d'astronomie Celestron Starry Night
Celestron Starry Night, le logiciel d’astronomie leader sur le marché, vous emmène dans une visite guidée du passé, du présent et du futur de notre système solaire. Cela peut vous aider à en savoir plus sur
le ciel nocturne et à planifi er votre prochaine session d’observation. Utilisez Starry Night pour modéliser exactement comment le ciel nocturne apparaîtra depuis votre jardin, une ville voisine ou n’importe
où sur Terre.
AVERTISSEMENT SUR LE SOLEIL: N’essayez jamais d’observer le soleil l’aide d’un
télescope, quel que soit son type.

BEDIENUNGSANLEITUNG
Modell #22030
DEUTSCH


DEUTSCH I 3
INHALTSVERZEICHNIS
WAS IST IN DEM PAKET? . . . . . . . . . . . . . . . . . . . . . . . . . . . . . . . . . . . . . . . . . . . . . 5
Teileliste . . . . . . . . . . . . . . . . . . . . . . . . . . . . . . . . . . . . . . . . . . . . . . . . . . . . . . . . . . . . 5
SOLARWARNUNG . . . . . . . . . . . . . . . . . . . . . . . . . . . . . . . . . . . . . . . . . . . . . . . . . 5
ZUSAMMENBAU . . . . . . . . . . . . . . . . . . . . . . . . . . . . . . . . . . . . . . . . . . . . . . . . . . 6
Stativ aufbauen . . . . . . . . . . . . . . . . . . . . . . . . . . . . . . . . . . . . . . . . . . . . . . . . . . . . . . . . 6
Teleskoptubus am stativ befestigen. . . . . . . . . . . . . . . . . . . . . . . . . . . . . . . . . . . . . . . . . . . . . . 7
Das Teleskop manuell bewegen . . . . . . . . . . . . . . . . . . . . . . . . . . . . . . . . . . . . . . . . . . . . . . . 7
Zenitspiegel und okular installieren . . . . . . . . . . . . . . . . . . . . . . . . . . . . . . . . . . . . . . . . . . . . . .8
Sucherfernrohr installieren . . . . . . . . . . . . . . . . . . . . . . . . . . . . . . . . . . . . . . . . . . . . . . . . . . 8
Sucherfernrohr ausrichten. . . . . . . . . . . . . . . . . . . . . . . . . . . . . . . . . . . . . . . . . . . . . . . . . . . 9
Fokussierung. . . . . . . . . . . . . . . . . . . . . . . . . . . . . . . . . . . . . . . . . . . . . . . . . . . . . . . . . . 9
ALLGEMEINE TIPPS ZUM BEOBACHTEN. . . . . . . . . . . . . . . . . . . . . . . . . . . . . . . . . . . . 10
GARANTIE. . . . . . . . . . . . . . . . . . . . . . . . . . . . . . . . . . . . . . . . . . . . . . . . . . . . . . 10
HINWEISE . . . . . . . . . . . . . . . . . . . . . . . . . . . . . . . . . . . . . . . . . . . . . . . . . . . . . 11

4 I DEUTSCH

DEUTSCH I 5
• Schauen Sie niemals mit bloßem Auge oder mit dem Teleskop direkt in die Sonne, außer Sie verwenden einen richtigen
Sonnenfi lter. Es können bleibende und irreversible Augenschäden entstehen.
• Verwenden Sie niemals ein Teleskop, um ein Bild der Sonne auf irgendeine Oberfl äche zu projizieren. Interne
Wärmeentwicklung kann das Teleskop und alle daran befestigten Zubehörteile beschädigen.
• Verwenden Sie niemals einen Okular-Sonnenfi lter oder einen Herschelkeil. Interne Wärmeentwicklung im Innern des
Teleskops kann dazu führen, dass die Geräte reißen oder brechen und ungefi ltertes Sonnenlicht ins Auge gelangen kann.
• Lassen Sie das Teleskop nicht unbeaufsichtigt, wenn Kinder oder Erwachsene anwesend sind, die mit der richtigen Bedienung
Ihres Teleskops nicht vertraut sind.
SOLARWARNUNG
Wir empfehlen Ihnen die Teleskopverpackung so aufzubewahren, sodass Sie Ihr Teleskop, wenn es nicht verwendet
wird, darin aufbewahren können. Packen sie den Karton sorgfältig aus, da einige Teile klein sind. Überprüfen Sie nun
anhand der Teileliste, ob alle Teile und Zubehörteile vorhanden sind.
TEILELISTE
WAS IST IN DEM PAKET?
1. Objektivlinse
2. Teleskoptubus
3. Schnellwechselplatte
4. Azimuth-Einstellungsschraube
5. Stativ
6. Sucherfernrohr
7. Okular
8. Prisma zur Bildumkehrung
9. Fokussierknopf
10. Schwenkgriff/Höhenverriegelung
11. Mittelsäule-Feststellknopf
2
1
6
3
4
8
7
9
10
5
11
• Teleskoptubus
• Sucherfernrohr und Halterung
• Prisma zur Bildaufrichtung
• 20 mm und 10 mm Okulare
• Stativ und Montierung
• Schnellwechselplatte fürs Stativ
• Rucksack
6 I DEUTSCH
Bauen Sie Ihr Reiseteleskop das erste Mal in einem Innenraum auf, damit Sie sich besser mit dem richtigen
Aufbauverfahren vertraut machen können, bevor Sie es im Freien versuchen.
ZUSAMMENBAU
STATIV AUFBAUEN
1. Das Stativ ist bereits vormontiert. Stellen Sie das Stativ auf und
ziehen die Stativbeine auseinander, bis sie ganz ausgezogen sind.
2. Um die Stativhöhe einzustellen, entriegeln Sie die
Feststellklemmen unten an jedem Stativbein, indem Sie die
Klemme für jeden Abschnitt öffnen und das Bein nach außen
ziehen. Sobald eine Klemme entriegelt ist, das Stativbein so weit
wie möglich ausziehen und zum Sichern die Feststellklemme
wieder verriegeln. Wiederholen Sie dies bei jedem Stativbein
und jedem Abschnitt, um die gewünschte Höhe einzustellen.
3. Mithilfe des Feststellknopfs der Mittelsäule können Sie die
Stativhöhe noch höher stellen, wenn Sie möchten. Um den
Feststellknopf zu lösen, drehen Sie ihn gegen den Uhrzeigersinn.
Ziehen Sie dann am Stativkopf bis zur gewünschten Höhe nach
oben und ziehen dann den Feststellknopf fest. Um die Stabilität
der Montierung zu gewährleisten, vergewissern Sie sich, dass
der Säulenverlängerungsknopf festgezogen ist.
DEUTSCH I 7
TELESKOPTUBUS AM STATIV BEFESTIGEN
Der optische Tubus des Teleskops wird mithilfe der Montagehalterung auf der Unterseite des optischen Tubus und der
Montageplattform des Stativs befestigt. Vergewissern Sie sich, dass bevor Sie anfangen alle Knöpfe verriegelt sind.
1. Den Hebel an der Seite des Stativs umlegen, um die
Schnellwechselplatte zu lösen und um sie vom Stativkopf
abzuheben.
2. Schrauben Sie die Schnellwechselplatte an die Unterseite
des optischen Teleskoptubus.
3. Setzen Sie den Teleskoptubus mit der Schnellwechselplatte
wieder auf den Stativkopf und sichern ihn, indem Sie den
Schnellspannhebel so umlegen, dass er bündig an der
Montierung anliegt.
DAS TELESKOP MANUELL BEWEGEN
Das Reiseteleskop lässt sich leicht überall hinbewegen, wohin auch immer Sie es richten möchten. Die Auf- und
Abwärtsbewegung (Höhe) wird mit dem Schwenkgriff gesteuert. Entriegeln Sie die Auf- und Abwärtsbewegung, indem
Sie den Schwenkgriff gegen den Uhrzeigersinn drehen, das Teleskop nach Bedarf nach oben oder unten bewegen
und dann den Schwenkgriff im Uhrzeigersinn drehen, um es festzuziehen. Sie können voreinstellen, wie viel Kraft Sie
aufwenden möchten, um das Teleskop nach links und nach rechts zu drehen, in dem Sie den Azimuth-Feststellknopf
entsprechend einstellen.

8 I DEUTSCH
ZENITSPIEGEL UND OKULAR INSTALLIEREN
Bei dem Travel Scope wird ein 45 Grad Zenitspiegel verwendet, der das Bild so korrigiert, dass es mit der richtigen Seite
nach oben und mit seitenrichtiger Ausrichtung erscheint. Das ist für den Einsatz zur terrestrischen Beobachtung viel
einfacher. Der Zenitspiegel kann in jegliche Position gedrecht werden.
Installation des Zenitspiegels und des Okulars:
1. Lösen Sie die beiden Rändelschrauben an der Rückseite
des Teleskoprohrs und entfernen Sie die Kappe, die den
Fokussierer abdeckt.
2. Entfernen Sie die Kappen von beiden Enden der Diagonale
und setzen Sie den Chromzylinder der Diagonale in den
Fokussierer des optischen Teleskoprohrs ein. Sichern Sie die
beiden Rändelschrauben, um sie zu fi xieren.
3.
Lösen Sie die Stellschrauben an der Seite der Diagonale und
setzen Sie den Chromzylinder des Okulars in die Diagonale
ein. Sichern Sie die Rändelschrauben, um das Okular in
Position zu halten.
SUCHERFERNROHR INSTALLIEREN
Das Travel Scope wird mit einem kleinen optischen Sucherfernrohr
geliefert, mit dem Sie das Hauptfernrohr auf ein entferntes Ziel
ausrichten können.
Sucher Halterung
Sucherfernrohr
Okular
Feststell-
schrauben
Rändel-
mutter
Objektivlinse
Installation des Sucherfernrohrs:
1. Schauen Sie auf der linken Seite des Teleskops nach den beiden
silbernen Fllügelmuttern und schrauben sie ab.
2. Setzen Sie die Halterung des Sucherfernrohrs auf die zwei
freiliegenden Gewinde.
3. Sichern Sie das Sucherfernrohr mit den beiden Flügelmuttern.

DEUTSCH I 9
FOKUSSIERUNG
Um Ihr Reiseteleskop zu fokussieren, drehen Sie an dem Fokusknopf, der sich in der Nähe auf der Rückseite des Telekops
befi ndet, wenn Sie durch das Okular des Teleskops schauen. Fall Sie Brillenträger sind, können Sie Ihre Brille beim Beobachten
durch das Okular am Teleskop abnehmen. Wenn Sie jedoch Astigmatismus haben, sollten ständig Korrekturgläser getragen
werden. Sie müssen das Teleskop jedes Mal neu fokussieren, wenn Sie die Okulare wechseln oder Ziele in unterschiedlichen
Entfernungen vor Ihnen betrachten.
SUCHERFERNROHR AUSRICHTEN
Um Ihr Sucherfernrohr zu verwenden, müssen Sie sicherstellen, dass es in die gleiche Richtung zeigt wie Ihr Hauptteleskop.
Es wird empfohlen, dies tagsüber zu tun. Dazu:
1. Stellen Sie das Teleskop draußen auf, nehmen den Objektivdeckel ab und suchen nach einem entfernten Objekt wie
einem Wegweiser, einem Lichtmast, einer Radioantenne usw. Wir empfehlen ein Objekt, das mindestens 400 Meter
entfernt ist, aber wenn das nicht möglich ist, nehmen Sie ein Objekt, das so weit wie möglich entfernt ist.
2. Zentrieren Sie das Objekt mit einem Okular mit geringerer Brennweite (20 mm) im Hauptteleskop.
3. Schauen Sie jetzt durch das Okular des Sucherfernrohrs und achten auf die Position des gleichen Objekts.
4. Ohne das Hauptteleskop zu bewegen, drehen Sie die Rändelschrauben, an der Halterung des Sucherfernrohrs, bis
das Fadenkreuz des Sucherfernrohrs auf das mit dem Hauptteleskop gewählten Objekt zentriert ist.
Ihr Teleskop und Ihr Sucherfernrohr sind jetzt ausgerichtet. Um das Hauptteleskop anzuvisieren, greifen Sie den
Schwenkgriff der Montierung und lösen damit die Höhenverriegelung. Sehen Sie jetzt durch Ihr Sucherfernrohr, bis sich
das Fadenkreuz auf dem Ziel befi ndet, das Sie sehen möchten, und sperren die Höhenverriegelung, um das Teleskop
zu fi xieren. Schauen Sie nun im Hauptteleskop durch das Okular mit geringerer Brennweite und das Ziel sollte sichtbar
sein. Um das Ziel heranzuzoomen, wechseln Sie zu Ihrem Okular mit höherer Brennweite und fokussieren das Teleskop
mit den Fokusknöpfen erneut.
Hinweis: Normalerweise erscheinen Objekte, die durch ein Sucherfernrohr betrachtet werden, auf dem Kopf stehend
und seitenverkehrt.

10 I DEUTSCH
Wenn Sie ein optisches Instrument verwenden, müssen Sie einige Dinge beachten, um sicherzustellen, sodass Sie das
bestmögliche Bild erhalten.
• Niemals durch Fensterglas schauen. Glas in Haushaltsfenstern ist optisch unvollkommen, und deshalb kann die Dicke
von einem Fensterteil zum nächsten variieren. Diese Inkonsistenz kann und wird die Fähigkeit Ihr Teleskop zu fokussieren,
beeinträchtigen. In den meisten Fällen können Sie kein wirklich scharfes Bild erhalten, während Sie in manchen Fällen sogar
ein doppeltes Bild sehen.
• Schauen Sie niemals über Objekte hinweg, die Hitzewellen erzeugen. Dazu gehören an heißen Sommertagen
Asphaltparkplätze oder Gebäudedächer.
• Trüber Himmel, Nebel und Dunst können das Scharfstellen beim terrestrischem Beobachten ebenfalls erschweren. Die
Details, die unter diesen Bedingungen gesehen werden, sind erheblich reduziert.
Hinweis: Ihr Teleskop wurde für die terrestrische Beobachtung entwickelt. Wie es verwendet wird, wurde bereits
ziemlich einfach und unkompliziert beschrieben. Ihr Teleskop kann auch für gelegentliche astronomische
Beobachtungen verwendet werden, die in den nächsten Abschnitten besprochen werden.
ALLGEMEINE TIPPS ZUM BEOBACHTEN
Ihr Teleskop hat ein zweijährige eingeschränkte Garantie. Für detaillierte Informationen und um Ihr neues Produkt zu
registrieren, besuchen Sie uns bitte auf celestron.com.
GARANTIE

DEUTSCH I 11
HINWEISE
BENÖTIGEN SIE UNTERSTÜTZUNG? Wenden Sie sich an die technische Unterstützung von Celestron unter
celestron.com/pages/technical-support
Produktdesign und technische Daten können ohne vorherige Ankündigung geändert werden. Dieses Produkt ist für Personen ab 14
Jahren konzipiert und vorgesehen.
©2024 Celestron. Celestron und Symbol sind Warenzeichen von Celestron, LLC. Alle Rechte vorbehalten. Celestron.com
USA: Celestron, 2835 Columbia Street, Torrance, CA 90503 USA
UK: Celestron Global Ltd., Einheit 2 Transigo, Gables Way, Thatcham RG19 4JZ, Vereinigtes Königreich
Hergestellt in China | 12-24
celestron.com/pages/warranty
Windows:
• Windows 7 oder höher
• Prozessor mit 500 MHz oder mehr
• 128 MB RAM
• 850 MB Festplattenspeicher
• 32 MB OpenGL-fähige Grafi kkarte
• Monitor mit einer Aufl ösung von 1024 x 768 Pixeln(empfohlen)
BONUS SOFTWARE
Ihr Kauf beinhaltet Software für Ihren Computer. Sie müssen diese Software nicht herunterladen, um Ihr Teleskop zu verwenden, aber sie kann Ihr Erlebnis verbessern.
MINDESTANFORDERUNGEN AN DAS GERÄT:
Mac:
• Universal Binary (PPC/Intel-kompatibel)
• OS X 10.4 oder höher (10.5 oder höher für Elementary)
• G3 Prozessor mit 450 MHz oder mehr
• 128 MB RAM
• 850 MB Festplattenspeicher
• 32 MB OpenGL-fähige Grafi kkarte
• Monitor mit einer Aufl ösung von 1024 x 768 Pixeln (empfohlen)
Celestron Sternennacht-Astronomiesoftware
Celestron Starry Night, die führende Astronomiesoftware auf dem Markt, nimmt Sie mit auf eine geführte Tour durch die Vergangenheit, Gegenwart und Zukunft unseres Sonnensystems. Sie kann Ihnen dabei
helfen, mehr über den Nachthimmel zu erfahren und Ihre nächste Beobachtungssitzung zu planen. Verwenden Sie Starry Night, um mehr über den Nachthimmel von Ihrem Garten, einem nahe gelegenen Standort
mit dunklem Himmel oder von jedem anderen Ort der Erde aus aussehen wird.
WARNUNG BEI SONNENBEOBACHTUNG: Versuchen Sie niemals,
die Sonne durch ein Teleskop zu betrachten.
MANUALE DI ISTRUZIONI
Modello n. 22030
ITALIANO


ITALIANO I 3
INDICE
CONTENUTO DELLA CONFEZIONE . . . . . . . . . . . . . . . . . . . . . . . . . . . . . . . . . . . . . . . 5
Elenco componenti . . . . . . . . . . . . . . . . . . . . . . . . . . . . . . . . . . . . . . . . . . . . . . . . . . . . . . 5
AVVERTENZA SOLARE
. . . . . . . . . . . . . . . . . . . . . . . . . . . . . . . . . . . . . . . 5
MONTAGGIO . . . . . . . . . . . . . . . . . . . . . . . . . . . . . . . . . . . . . . . . . . . . . . . . . . . . 6
Confi gurazione del treppiede . . . . . . . . . . . . . . . . . . . . . . . . . . . . . . . . . . . . . . . . . . . . . . . . . 6
Collegamento del tubo ottico del telescopio al treppiede . . . . . . . . . . . . . . . . . . . . . . . . . . . . . . . . . . 7
Spostamento manuale del telescopio . . . . . . . . . . . . . . . . . . . . . . . . . . . . . . . . . . . . . . . . . . . . 7
Installazione del diagonale e dell’oculare . . . . . . . . . . . . . . . . . . . . . . . . . . . . . . . . . . . . . . . . . . . 8
Installazione del cercatore. . . . . . . . . . . . . . . . . . . . . . . . . . . . . . . . . . . . . . . . . . . . . . . . . . . 8
Allineamento del cercatore . . . . . . . . . . . . . . . . . . . . . . . . . . . . . . . . . . . . . . . . . . . . . . . . . . 9
Messa a fuoco . . . . . . . . . . . . . . . . . . . . . . . . . . . . . . . . . . . . . . . . . . . . . . . . . . . . . . . . . 9
SUGGERIMENTI GENERALI PER L'OSSERVAZIONE . . . . . . . . . . . . . . . . . . . . . . . . . . . . . 10
GARANZIA . . . . . . . . . . . . . . . . . . . . . . . . . . . . . . . . . . . . . . . . . . . . . . . . . . . . . 10
NOTE. . . . . . . . . . . . . . . . . . . . . . . . . . . . . . . . . . . . . . . . . . . . . . . . . . . . . . . . . 11

4 I ITALIANO
ITALIANO I 5
• Mai guardare direttamente il Sole a occhio nudo o con un telescopio, a meno che non si disponga di un fi ltro solare adeguato.
Ciò potrebbe causare danni irreversibili agli occhi.
• Mai utilizzare il telescopio per proiettare un'immagine del Sole su una qualsiasi superfi cie. L'accumulo interno di calore può
danneggiare il telescopio e i relativi accessori ad esso fi ssati.
• Non utilizzare mai un fi ltro solare per oculare o un prisma di Herschel. L'accumulo di calore all'interno del telescopio può
causare l'incrinatura o la rottura di tali dispositivi, lasciando che la luce solare non fi ltrata passi attraverso l'occhio.
• Mai lasciare il telescopio incustodito, sia in presenza di bambini sia di adulti che potrebbero non avere familiarità con le
corrette procedure di funzionamento del telescopio.
AVVERTENZA SOLARE
Si consiglia di conservare la confezione del telescopio per riporre il telescopio quando non è in uso. Aprire la confezione
con attenzione, in quanto sono presenti parti di piccole dimensioni. Utilizzare l'elenco dei componenti fornito di seguito
per verifi care che siano presenti tutti i componenti e gli accessori.
ELENCO COMPONENTI
CONTENUTO DELLA CONFEZIONE
1. Lente obiettivo
2. Tubo ottico del telescopio
3. Piastra di montaggio a rilascio rapido
4. Manopola tensionamento azimut
5. Treppiede
6. Cercatore
7. Oculare
8. Diagonale raddrizzatore di immagini
9. Manopola di messa a fuoco
10. Manopola panoramica/Blocco altezza
11. Manopola di bloccaggio della colonna centrale
2
1
6
3
4
8
7
9
10
5
11
• Tubo ottico del telescopio
• Cercatore e staffa
• Diagonale raddrizzatore di immagini
• Oculari da 20 mm e 10 mm
• Treppiede e montatura
• Piastra di montaggio a rilascio rapido treppiede
• Zaino
6 I ITALIANO
Confi gurare il Travel Scope all'interno la prima volta e prendere familiarità con la corretta procedura di montaggio prima di
provare a ripeterla all'esterno.
MONTAGGIO
CONFIGURAZIONE DEL TREPPIEDE
1. Il treppiede è fornito pre-assemblato. Sistemare il treppiede in
posizione verticale e spingere le gambe dello stesso verso
l’esterno fi no a quando non raggiungeranno la propria estensione
massima.
2. Per aumentare l’altezza del treppiede, sbloccare i morsetti
di bloccaggio delle relative gambe posti sulla parte inferiore
di ciascuna gamba del treppiede aprendo il morsetto per
ciascuna sezione e tirando verso l’esterno. Una volta sbloccato
il morsetto, estrarre la gamba del treppiede fi no in fondo e
quindi chiudere il blocco della gamba per fermarlo. Continuare
questo procedimento per ogni gamba del treppiede e per
ciascuna sezione per aumentare l’altezza al livello desiderato.
3.
Se si desidera aumentare ulteriormente l’altezza del treppiede,
utilizzare la manopola di bloccaggio della colonna centrale.
Ruotare la manopola di bloccaggio in senso antiorario fi no ad
allentarla. Quindi, estrarre sulla testa del treppiede. Continuare
a tirare fi no all’altezza desiderata, quindi serrare nuovamente
la manopola di bloccaggio. Per garantire la stabilità della
montatura, assicurarsi che la manopola di estensione della
colonna sia serrata.
ITALIANO I 7
COLLEGAMENTO DEL TUBO OTTICO DEL TELESCOPIO AL TREPPIEDE
Il tubo ottico del telescopio si collega al treppiede utilizzando la staffa di montaggio posta sulla parte inferiore del tubo
ottico e la piattaforma di montaggio del treppiede. Prima di cominciare, assicurarsi che tutte le manopole del treppiede
siano bloccate.
1. Far scorrere la leva sul lato della testa del treppiede per rilasciare
la piastra di montaggio a rilascio rapido ed estrarre la testa dl
treppiede.
2. Avvitare la piastra di montaggio a rilascio rapido sul fondo del
tubo ottico del telescopio.
3. Posizionare nuovamente il tubo ottico del telescopio insieme
alla piastra a rilascio rapido sulla testa del treppiede e fi ssarlo
spingendo la leva del rilascio rapido in modo che sia a fi lo con la
montatura.
SPOSTAMENTO MANUALE DEL TELESCOPIO
Il Travel Scope è semplice da spostare in qualsiasi luogo si desideri puntarlo. Lo spostamento verso l’alto e il basso
(altitudine) è controllato dalla manopola panoramica. Sbloccare il movimento verso l'alto e il basso ruotando in senso
antiorario la manopola panoramica, spostare il telescopio verso l'alto o il basso secondo necessità, quindi ruotare la
manopola panoramica in senso orario per bloccare in posizione. È possibile regolare la quantità di forza necessaria per
ruotare il telescopio a sinistra e a destra regolando la manopola di tensionamento azimut.

8 I ITALIANO
INSTALLAZIONE DEL DIAGONALE E DELL'OCULARE
Il Travel Scope utilizza un diagonale raddrizzatore di immagini a 45 gradi che corregge l’immagine in modo che risulti dritta
e orientata correttamente da sinistra a destra, il che è più facile da utilizzare per l'osservazione terrestre. Il diagonale può
essere ruotato in qualsiasi posizione.
Per installare il diagonale e l’oculare:
1. Allentare le due viti a testa zigrinata sul retro del tubo ottico del
telescopio e rimuovere il tappo che copre il focheggiatore.
2. Rimuovere i cappucci da entrambe le estremità della diagonale
e inserire la canna cromata della diagonale all’interno del
focheggiatore del tubo ottico del telescopio. Fissare le due viti
a testa zigrinata per tenerlo in posizione.
3.
Allentare le viti di fermo sul lato della diagonale e inserire la
canna cromata dell’oculare nella diagonale. Fissare le viti a
testa zigrinata per tenere l’oculare in posizione.
INSTALLAZIONE DEL CERCATORE
Il Travel Scope è fornito con un piccolo cercatore ottico per aiutare
a puntare il telescopio principale verso un obiettivo lontano.
Per installare il cercatore procedere come segue:
1. Localizzare e rimuovere i due dadi argentati sul lato sinistro del
tubo del telescopio.
2. Sistemare la staffa del cercatore sulle due aste filettate
così esposte.
3.
Posizionare nuovamente i dadi per tenere il cercatore in
posizione.
Staffa cercatore
Cercatore
Oculare
Viti di
regolazione
Dadi
zigrinati
Lente obiettivo

ITALIANO I 9
MESSA A FUOCO
Per mettere a fuoco il Travel Scope ruotare la manopola di messa a fuoco vicino alla parte posteriore del telescopio mentre
si osserva attraverso l'oculare del telescopio. Se si indossano occhiali, si potrebbe volerli togliere durante l’osservazione
con un oculare collegato al telescopio. Se si soffre di astigmatismo, le lenti correttive devono essere indossate sempre.
È necessario mettere nuovamente a fuoco il telescopio ogni volta che si cambia oculare o che si osservano oggetti a
diverse distanze.
ALLINEAMENTO DEL CERCATORE
Per utilizzare il cercatore è necessario assicurarsi che punti nella stessa direzione del telescopio principale. Si consiglia di
eseguire questa operazione durante il giorno. Per fare ciò procedere come segue:
1. Sistemare il telescopio all'esterno, rimuovere il tappo dell'oculare e localizzare un oggetto distante come un cartello, un
palo della luce, un antenna radio, ecc. Si consiglia di scegliere un oggetto ad almeno 400 metri di distanza, ma, se ciò
non è possibile, scegliere un oggetto il più lontano possibile.
2. Centrare l'oggetto con il telescopio principale utilizzando un oculare a basso indice di ingrandimento (20 mm) sul
telescopio principale.
3. Guardare attraverso l’oculare del cercatore e prendere nota della posizione dello stesso oggetto.
4. Senza spostare il telescopio principale, ruotare le viti di regolazione posizionate attorno alla staffa del cercatore fi nché i
mirini del cercatore saranno centrati sull'oggetto scelto con il telescopio principale.
Il telescopio e il cercatore sono ora allineati. Per puntare il telescopio principale, afferrare la manopola panoramica della
montatura e allentare il blocco dell'altezza. Osservare attraverso il cercatore fi no a quando i mirini si trovano sull'oggetto
che si vuole osservare e bloccare il blocco altezza per mantenere il telescopio in posizione. Ora osservare attraverso
l'oculare a basso indice di ingrandimento del telescopio principale e dovrebbe essere visibile l'oggetto. Per ingrandire
l'oggetto, passare all'oculare con maggiore indice di ingrandimento e mettere nuovamente a fuoco il telescopio utilizzando
le manopole di messa a fuoco.
Nota: Gli oggetti osservati attraverso un cercatore sono capovolti e alla rovescia, il che è normale.

10 I ITALIANO
Quando si utilizza uno strumento ottico, è necessario ricordare alcune cose per garantire di ottenere la migliore
immagine possibile.
• Mai guardare attraverso una fi nestra. Il vetro delle fi nestre domestiche è imperfetto a livello ottico e, di conseguenza, potreb-
be avere delle variazioni di spessore da una parte all’altra della fi nestra. Questa incoerenza di spessore può infl uenzare e di
fatto infl uenzerà la capacità di messa a fuoco del telescopio. Nella maggior parte dei casi non si sarà in grado di raggiungere
un’immagine veramente nitida, mentre in alcuni casi si potrebbe di fatto osservare una doppia immagine.
• Mai guardare attraverso o al di sopra di oggetti che producono onde di calore. Ciò comprende lotti di parcheggi in asfalto
nelle giornate estive o i tetti degli edifi ci.
• Cieli velati, nebbia e foschia possono altresì rendere diffi cile la messa a fuoco durante l'osservazione terrestre. La quantità
di dettagli osservati in queste condizioni è fortemente ridotta.
Nota: Il telescopio è ideato per l'osservazione terrestre. Sono state fornite sopra le indicazioni sull'uso per questa fi nalità
e la procedura è semplice e chiara. Il telescopio può inoltre essere utilizzato per un'osservazione astronomica
superfi ciale che verrà trattata nei capitoli successivi.
SUGGERIMENTI GENERALI PER L'OSSERVAZIONE
Il telescopio è coperto da una garanzia limitata di due anni. Per informazioni dettagliate e per registrare il nuovo prodotto,
visitare il sito celestron.com.
GARANZIA

ITALIANO I 11
NOTE
BISOGNO DI AIUTO? Contattare il supporto tecnico Celestron
celestron.com/pages/technical-support
Il design del prodotto e le specifi che sono soggetti a modifi che senza previa notifi ca. Questo prodotto è progettato per essere utilizzato da
persone di età pari o superiore ai 14 anni
©2024 Celestron. Celetron e Symbol sono marchi di Celestron, LLC. • Tutti i diritti riservati. • Celestron.com
Stati Uniti: Celestron, 2835 Columbia Street, Torrance, CA 90503 Stati Uniti
Regno Unito: Celestron Global Ltd., Unit 2 Transigo, Gables Way, Thatcham RG18 4JZ Regno Unito
Prodotto in Cina | 12-24
celestron.com/pages/warranty
Windows:
• Windows 7 o superiore
• Processore 500 MHz o superiore
• 128 MB RAM
• 850 MB spazio su disco rigido
• Scheda video da 32 MB che supporta OpenGL
• Monitor con risoluzione 1024x768 pixel (consigliato)
SOFTWARE IN OMAGGIO
Nell’acquisto è incluso un software per il computer. Non occorre scaricare il software per utilizzare il telescopio, ma può migliorarne l’esperienza generale.
REQUISITI MINIMI DI SISTEMA
Mac:
• Universal binary (compatibile PPC/Intel)
• OS X 10.4 o superiore (10.5 o superiore per Elementary)
• Processore G3 450 MHz o superiore
• 128 MB RAM
• 850 MB spazio su disco rigido
• Scheda video da 32 MB che supporta OpenGL
• Monitor con risoluzione 1024x768 pixel (consigliato)
Software di astronomia Celestron Starry Night
Celestron Starry Night, software di astronomia premier nel mercato, conduce l’utente in un viaggio nel sistema solare passato, presente e futuro. Fornisce informazioni sulla volta stellata e aiuta a pianifi care le
successive sessioni di osservazione. Utilizzare Starry Night per creare un modello esatto del cielo notturno osservato dal proprio cortile, da un luogo vicino immerso nel buio o da un qualsiasi punto sulla Terra.
AVVERTENZA SOLARE: Non tentare mai
di osservare il Sole attraverso il telescopio.

MANUAL DE INSTRUCCIONES
Modelo #22030
ESPAÑOL


ESPAÑOL I 3
ÍNDICE
CONTENIDO DE LA CAJA . . . . . . . . . . . . . . . . . . . . . . . . . . . . . . . . . . . . . . . . . . . . . 5
Lista de piezas. . . . . . . . . . . . . . . . . . . . . . . . . . . . . . . . . . . . . . . . . . . . . . . . . . . . . . . . .5
AVISO SOLAR
. . . . . . . . . . . . . . . . . . . . . . . . . . . . . . . . . . . . . . . . . . . 5
MONTAJE . . . . . . . . . . . . . . . . . . . . . . . . . . . . . . . . . . . . . . . . . . . . . . . . . . . . . . 6
Instalación del trípode . . . . . . . . . . . . . . . . . . . . . . . . . . . . . . . . . . . . . . . . . . . . . . . . . . . . . 6
Instalación del tubo del telescopio al trípode. . . . . . . . . . . . . . . . . . . . . . . . . . . . . . . . . . . . . . . . . 7
Movimiento manual del telescopio . . . . . . . . . . . . . . . . . . . . . . . . . . . . . . . . . . . . . . . . . . . . . . 7
Instalación de la diagonal y el ocular . . . . . . . . . . . . . . . . . . . . . . . . . . . . . . . . . . . . . . . . . . . . . 8
Instalación del localizador . . . . . . . . . . . . . . . . . . . . . . . . . . . . . . . . . . . . . . . . . . . . . . . . . . . 8
Alineación del localizador . . . . . . . . . . . . . . . . . . . . . . . . . . . . . . . . . . . . . . . . . . . . . . . . . . . 9
Enfoque . . . . . . . . . . . . . . . . . . . . . . . . . . . . . . . . . . . . . . . . . . . . . . . . . . . . . . . . . . . . 9
RECOMENDACIONES GENERALES DE OBSERVACIÓN . . . . . . . . . . . . . . . . . . . . . . . . . . . 10
GARANTÍA. . . . . . . . . . . . . . . . . . . . . . . . . . . . . . . . . . . . . . . . . . . . . . . . . . . . . . 10
NOTAS . . . . . . . . . . . . . . . . . . . . . . . . . . . . . . . . . . . . . . . . . . . . . . . . . . . . . . . . 11

4 I ESPAÑOL

ESPAÑOL I 5
• No mire nunca directamente al Sol con los ojos descubiertos o un telescopio, a menos que tenga un fi ltro solar adecuado.
Puede producir daños oculares permanentes e irreversibles.
• No use nunca su telescopio para proyectar una imagen del Sol sobre ninguna superfi cie. La acumulación interna de calor
puede dañar el telescopio y cualquier accesorio que tenga instalado.
• No use nunca un fi ltro solar de ocular ni una cuña Herschel. La acumulación interna de calor en el telescopio puede hacer
que los dispositivos se agrieten o rompan, permitiendo pasar la luz solar sin fi ltrar hasta el ojo.
• No deje el telescopio sin supervisión, especialmente cuando estén presentes niños o adultos no familiarizados con los
procedimientos operativos correctos del telescopio.
AVISO SOLAR
Recomendamos guardar la caja de su telescopio para poder usarla para guardarlo cuando no lo use. Desembale
cuidadosamente la caja, algunas piezas son pequeñas. Use la lista de piezas siguiente para comprobar que dispone de
todas las piezas y accesorios.
LISTA DE PIEZAS
CONTENIDO DE LA CAJA
1. Lente de objetivo
2. Tubo óptico del telescopio
3. Placa de montaje de liberación rápida
4. Mando de tensión de azimut
5. Trípode
6. Localizador
7. Ocular
8. Diagonal de imagen recta
9. Mando de enfoque
10. Mango de desplazamiento/bloqueo de altitud
11. Mando de bloqueo de la columna central
2
1
6
3
4
8
7
9
10
5
11
• Tubo óptico del telescopio
• Localizador y soporte
• Diagonal de imagen derecha
• Oculares de 20 mm y 10 mm
• Trípode y soporte
• Placa de montaje de liberación rápida del trípode
• Mochila
6 I ESPAÑOL
Instale su Travel Scope en interiores la primera vez y familiarícese con el procedimiento de montaje correcto antes de
intentarlo en exteriores.
MONTAJE
INSTALACIÓN DEL TRÍPODE
1. El trípode se entrega premontado. Coloque el trípode de pie y
tire de las patas hacia fuera hasta que cada pata esté totalmente
extendida.
2. Para elevar la altura del trípode, desbloquee las abrazaderas
de la pata en la parte inferior de cada pata del trípode
abriendo la pinza de cada sección y estirando. Cuando se
haya desbloqueado una pata, estire la pata tanto como pueda
y ciérrela para asegurarla. Haga lo mismo para cada pata
de trípode y sección para elevarlo hasta la altura que desee.
3.
Si quiere elevar más el trípode debe usar el mando de bloqueo de
la columna central. Gire el mando de bloqueo hacia la izquierda
hasta que quede suelto. A continuación tire hacia arriba el
cabezal del trípode. Siga tirando hasta la altura que desee y
apriete el mando de bloqueo. Para garantizar la estabilidad
del soporte, asegúrese de que el mando de extensión de la
columna esté apretado.
ESPAÑOL I 7
INSTALACIÓN DEL TUBO ÓPTICO DEL TELESCOPIO AL TRÍPODE
El tubo óptico del telescopio se fi ja al trípode mediante el soporte de montaje de la parte inferior del tubo y la plataforma
de montaje del trípode. Antes de comenzar, asegúrese de que todos los mandos del trípode estén bloqueados.
1. Levante la palanca del lateral del cabezal del trípode para soltar
la placa de montaje de liberación rápida y levántela del cabezal
del trípode.
2. Enrosque la placa de montaje de liberación rápida a la parte
inferior del tubo óptico del telescopio.
3. Coloque el tubo óptico del telescopio con la placa de
liberación rápida de nuevo en el cabezal del trípode y asegúrelo
presionando la palanca de liberación rápida hasta que quede a
nivel del soporte.
MOVIMIENTO MANUAL DEL TELESCOPIO
El Travel Scope es fácil de mover a cualquier lugar al que quiera orientarlo. El ascenso y descenso (altitud) se controla con
el mango de desplazamiento. Desbloquee el movimiento ascendente y descendente girando el mango de desplazamiento
en sentido contrario a las agujas del reloj, mueva el telescopio hacia arriba o abajo como sea necesario y gire el mango
de desplazamiento en sentido de las agujas del reloj para bloquearlo en posición. Puede ajustar la fuerza necesaria para
girar el telescopio a izquierda y derecha ajustando el mando de tensión de azimut.
8 I ESPAÑOL
INSTALACIÓN DE LA DIAGONAL Y EL OCULAR
El Travel Scope usa una diagonal de 45 grados de imagen recta que corrige la imagen para que esté derecha y orientada
correctamente de derecha a izquierda, lo que facilita mucho la observación terrestre. La diagonal puede girarse en
cualquier posición.
Para instalar la diagonal y el ocular:
1. Afl oje los dos tornillos de mariposa en la parte posterior
del tubo óptico del telescopio y quite la tapa que cubre el
enfocador.
2. Retire las tapas de ambos extremos de la diagonal e inserte el
cilindro de cromo de la diagonal dentro del enfocador del tubo
óptico del telescopio. Asegure los dos tornillos de mariposa
para mantenerlo en su lugar.
3.
Afl oje los tornillos de fi jación en el lado de la diagonal e inserte
el cilindro de cromo del ocular en la diagonal. Asegure los
tornillos de mariposa para mantener el ocular en su lugar.
INSTALACIÓN DEL LOCALIZADOR
El Travel Scope incluye un pequeño localizador óptico para
ayudarle a apuntar el telescopio principal a objetivos lejanos.
Para instalar el localizador:
1. Localice y retire las dos rocas manuales plateadas del lado
izquierdo del tubo del telescopio.
2. Coloque el soporte del localizador sobre los dos ejes
estriados visibles.
3.
Vuelva a colocar las roscas para fi jar el localizador en posición.
Soporte del
localizador
Localizador
Ocular
Tornillos de
ajuste
Roscas
estriadas
Lente de objetivo

ESPAÑOL I 9
ENFOQUE
Para enfocar su TravelScope, gire el mando de enfoque situado cerca de la parte posterior del telescopio mientras mira por el
ocular. Si lleva gafas, puede que desee quitárselas al observar con un ocular en el telescopio. Si tiene astigmatismo debe
llevar las gafas en todo momento. Deberá volver a enfocar el telescopio cada vez que cambie de ocular u observe objetivos a
distancias distintas.
ALINEACIÓN DEL LOCALIZADOR
Para usar el localizador, debe asegurarse de que esté orientado en la misma dirección que el telescopio principal. Se
recomienda que lo haga de día. Para hacerlo:
1. Saque el telescopio al exterior, retire la tapa de la lente y localice un objeto distante diurno, como una señal vial, farola,
antena de radio, etc. Recomendamos un objeto que esté como mínimo a un cuarto de milla (400 m) de distancia, pero si
no resulta posible puede usar el objeto más lejano que pueda localizar.
2. Centre este objeto en el telescopio principal usando un ocular de baja potencia (20 mm) en el telescopio principal.
3. Mire por el extremo del ocular del localizador y observe la posición de dicho objeto.
4. Sin mover el telescopio, gire los tornillos de ajuste situados alrededor del soporte del localizador hasta que la mira del
localizador esté centrada en el objeto elegido con el telescopio.
Su telescopio y localizador estarán alineados. Para apuntar el telescopio principal, agarre el mango de desplazamiento y
desbloquee el bloqueo de altitud. Mire por el localizador hasta que la mira esté en el objetivo que desee ver y bloquee el bloqueo
de altitud para fi jar el telescopio en posición. A continuación, mire por el ocular de baja potencia del telescopio principal, el
objetivo debería ser visible. Para aumentar el objetivo, cambie al ocular de mayor potencia y vuelva a enfocar el telescopio con
los mandos de enfoque.
Nota: Los objetos observados por el localizador están invertidos y al revés, es normal.

10 I ESPAÑOL
Cuando use cualquier instrumento óptico, debe recordar algunos aspectos para obtener la mejor imagen posible.
• No observe nunca a través de ventanas. El cristal de las ventanas domésticas es ópticamente imperfecto y, por lo tanto,
puede variar en grosor de una zona a otra de la ventana. Estas irregularidades afectarán a la capacidad de enfoque del
telescopio. En la mayoría de los casos no podrá obtener una imagen realmente clara, mientras que en otros puede llegar a
ver doble imagen.
• No mire nunca a través o por encima de objetos que generen ondas de calor. Esto incluye aparcamientos asfaltados en días
calurosos de verano o terrados de edifi cios.
• Los cielos nubosos, la niebla y el rocío pueden difi cultar el enfoque en observación terrestre. La cantidad de detalle obser-
vado en estas condiciones se reduce notablemente.
Nota: Su telescopio ha sido diseñado para observación terrestre. Saber usarlo para este fi n ya se ha descrito anteriormente
y es bastante sencillo. Su telescopio también puede usarse para observación astronómica ocasional, lo que se
comentará en las secciones siguientes.
RECOMENDACIONES GENERALES DE OBSERVACIÓN
Su telescopio tiene una garantía limitada por dos años. Para información detallada y para registrar su producto,
visite www.celestron.com.
GARANTÍA

ESPAÑOL I 11
NOTAS
¿NECESITA AYUDA? Contacte con el soporte técnico de Celestron
celestron.com/pages/technical-support
El diseño y las especifi caciones del producto están sujetos a cambios sin notifi cación previa. Este producto ha sido diseñado y está
pensado para ser usado por personas de 14 años o más de edad.
©2024 Celestron. Celestron y su símbolo son marcas comerciales de Celestron, LLC. • Todos los derechos reservados.
• Celestron.com
EE.UU.: Celestron, 2835 Columbia Street, Torrance, CA 90503 EE.UU.
GB: Celestron Global Ltd., Unit 2 Transigo, Gables Way, Thatcham RG19 4JZ, Reino Unido
Fabricado en China | 12-24
celestron.com/pages/warranty
Windows:
• Windows 7 o superior
• Procesador de 500MHz o superior
• 128 MB RAM
• Espacio en el disco duro de 850 MB
• Tarjeta gráfi ca de 32 MB con capacidad de OpenGL
• Monitor con resolución de 1024x768 píxeles (recomendado)
SOFTWARE COMPLEMENTARIO
Su adquisición incluye software para su ordenador. No necesita descargar este software para usar su telescopio, pero puede mejorar su experiencia.
REQUISITOS MÍNIMOS DEL SISTEMA
Mac:
• Binario universal (PPC/compatible con Intel)
• OS X 10.4 o superior (10.5 o superior para Elementary)
• Procesador G3 450 MHz o superior
• 128 MB RAM
• Espacio en el disco duro de 850 MB
• Tarjeta gráfi ca de 32 MB con capacidad de OpenGL
• Monitor con resolución de 1024x768 píxeles (recomendado)
Software de astronomía Celestron Starry Night
Celestron Starry Night, el principal software de astronomía del mercado, le lleva en una visita guiada del pasado, presente y futuro de nuestro sistema solar. Puede ayudarle a aprender sobre el fi rmamento
nocturno y a planifi car su siguiente sesión de observación. Use Starry Night para modelar con exactitud el aspecto del fi rmamento nocturno desde su patio trasero, una ubicación con fi rmamento oscuro cercana,
o cualquier lugar de la Tierra.
AVISO SOLAR: No intente nunca observar
el Sol con ningún telescopio.