


Home 3000
Portable Power Station User Manual
Please read this user manual carefully and use the product correctly. About all safety
tips, warning messages, terms of use, and disclaimers at :
https://www.gendome.com/pages/faq

CONTENTS
1.1 Basic Info
1.2 Output
1.3 Input
1.4 Battery Module
1.5 Temperature
1.6 Others
.......................................................................................................................................
...........................................................................................................................................
...............................................................................................................................................
...........................................................................................................................
...............................................................................................................................
...........................................................................................................................................
1
1
1
2
2
2
1. Specifications
2. Safety Instructions
1
3.1 Application
3.2 Dimensions
3.3 Display and Interfaces
3.3.1 Display
3.3.2 Description of Functions
3.3.3 Device Side Interfaces
3.3.4 Main Power Switch & DC Output Interfaces
3.3.5 AC Output Interfaces
3.3.6 Input Interfaces
3.4 Product Operation
3.4.1 Turn on, Shutdown, and LED Lighting
3.4.2 DC Output
3.4.3 AC Output
3.5 Charging
3.5.1 AC Charging
3.5.2 Solar Power Charging
3.5.3 Wind Power Charging
..................................................................................................................................
.................................................................................................................................
............................................................................................................
..................................................................................................................................
.................................................................................................
.....................................................................................................
..............................................................
.......................................................................................................
.................................................................................................................
....................................................................................................................
............................................................................
...........................................................................................................................
...........................................................................................................................
.....................................................................................................................................
.......................................................................................................................
....................................................................................................
.....................................................................................................
4
5
6
6
7
9
10
11
12
13
13
14
15
16
16
18
19
3. Instructions for Beginners
4
3
2.1 Caution
.......................................................................................................................................
.................................................................................................
3
2.2 Warning
.......................................................................................................................................
3

.................................................................................................................
...................................................................................................................................
...............................................................................................................................
20
21
21
3.5.4 External Battery
3.6 Use of APP
3.7 UPS Function
4. Equipment Inspection and Storage
22
4.1 Inspection before Acceptance
4.2 Equipment Storage
..............................................................................................
..................................................................................................................
22
22
5. Fault Indication and Troubleshooting
23
5.1 End-of-Life Equipment
5.2 Troubleshooting
.............................................................................................................
........................................................................................................................
23
23
6. Maintenance and Preservation
25
6.1 Maintenance
6.2 Preservation
...............................................................................................................................
...............................................................................................................................
25
25
7. In-the-box
26
1.1 Basic Info
Weight
Dimensions
(L*W*H)
Battery Capacity
Wi-Fi
Bluetooth
83.8lbs / 38kg
22.0*9.1*21.4 in / 560*230*543 mm
3072Wh
Support
Support
1
1. SPECIFICAITONS
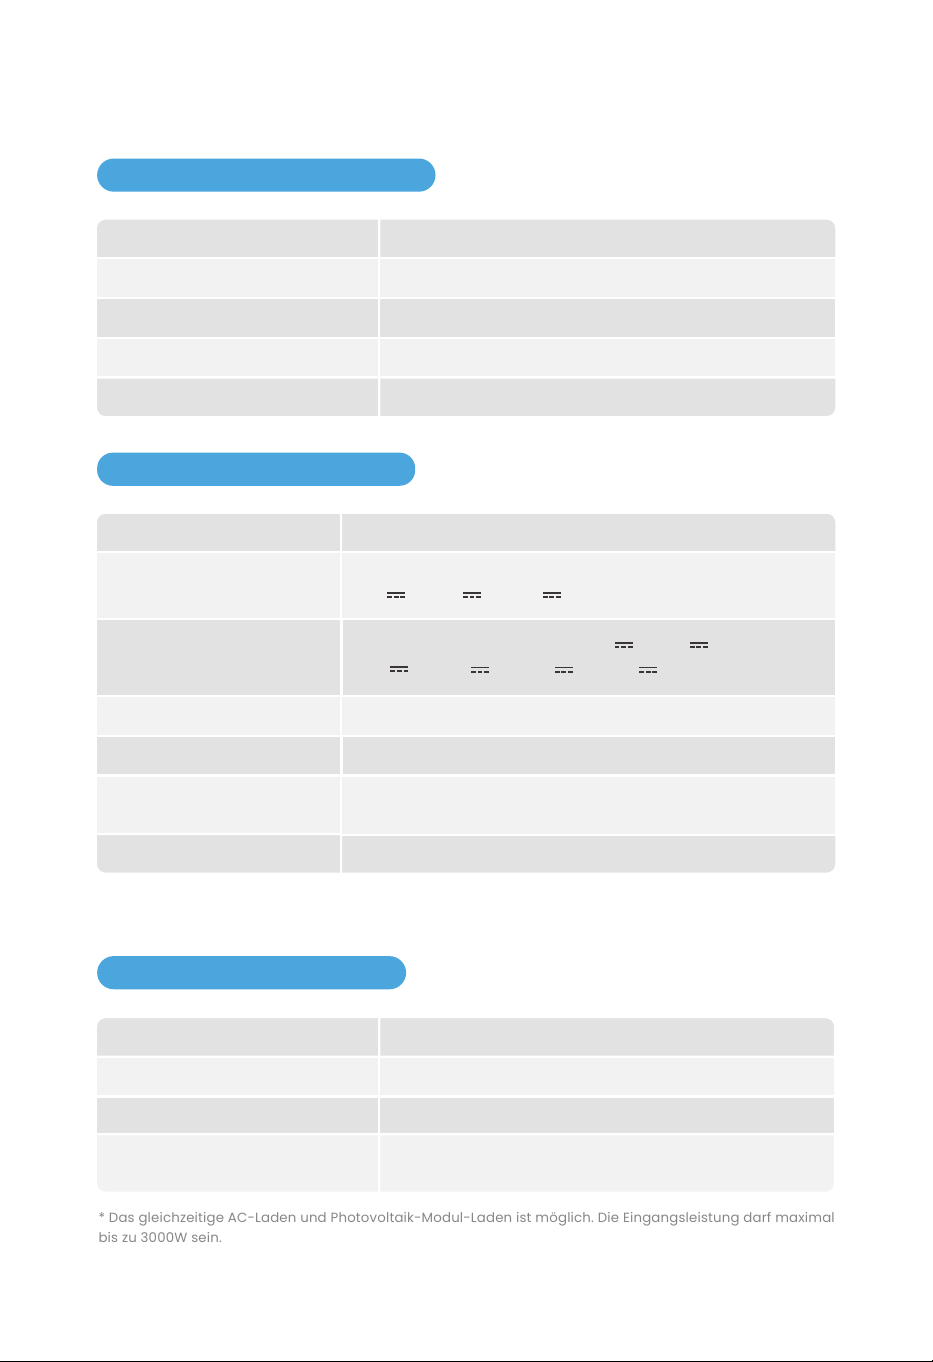
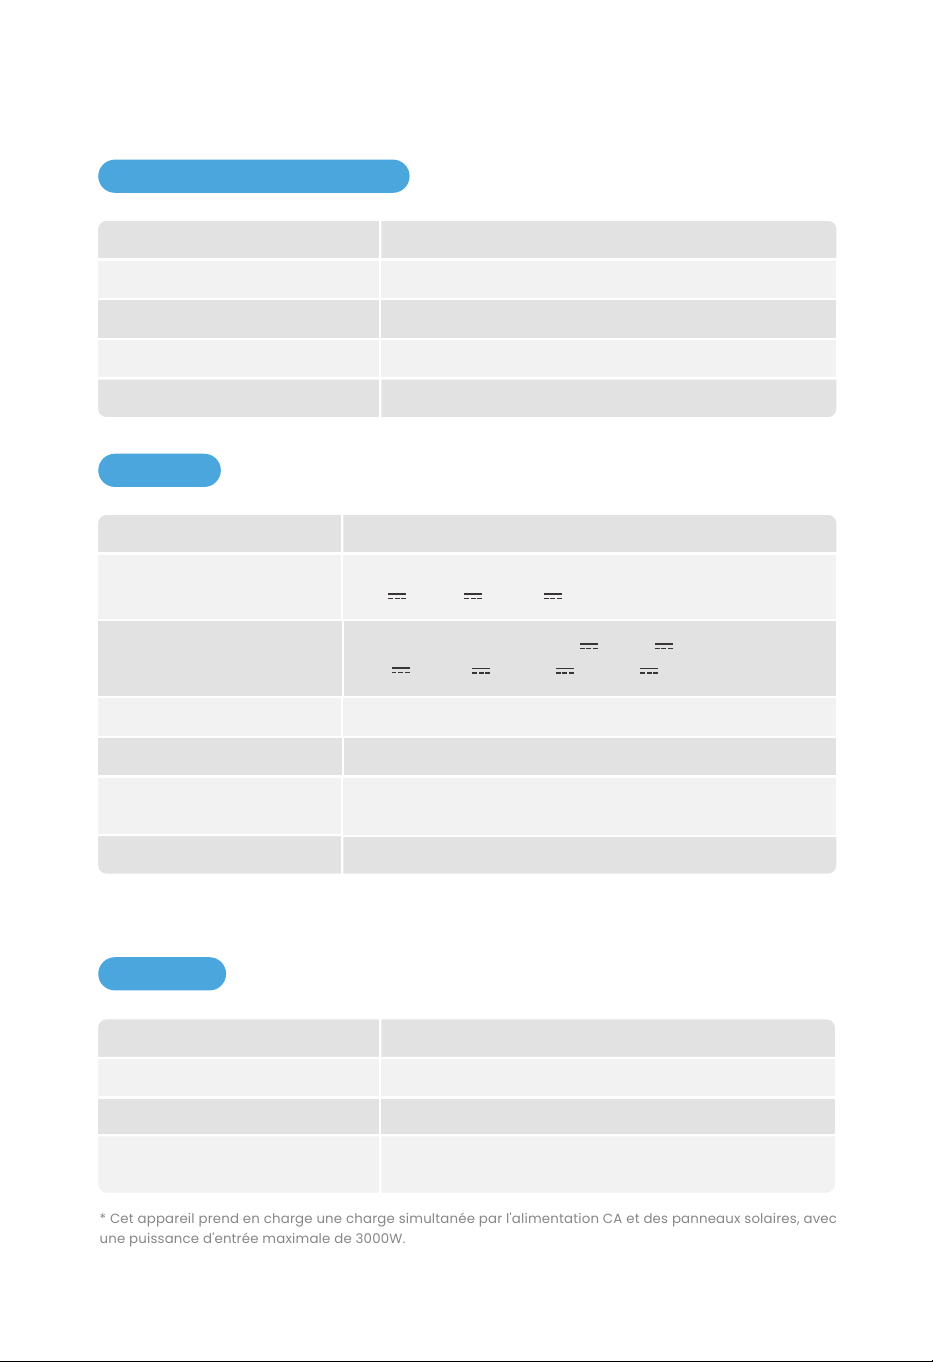
1.3 Input
1.2 Output
AC Output (×4)
USB-A (×4)
RV Output (×1)
DC5521 Output (×2)
Cigarette Lighter Output (×1)
Wireless Output (×2)
USB-C (×2)
Max 3000W (Surge 6000W)
Max 18W, 5V 3A/9V 2A/12V 1.5A
Max 360W, 12V
Max 36W, 12V
Max 120W, 12V
Max 15W
PD3.1, Max 140W, 5V 3A/9V 3A/12V 3A/
15V 3A/20V 5A/28V 5A
* Cigarette lighter, DC5521 and RV output ports share the power of maximum 360W.
* The maximum output power of the device is 3742W.
* Support AC and Solar charging simultaneously, up to 3000W input power.
Max 3000W, 230V
Max 1500W, 12~75V
Max 200W, 12~75V
Slow charging: 500W;
Fast charging: 500~1800W adjustable
AC Input
Solar Power Input
Wind Power Input
Slow/Fast charging mode

1.4 Battery Module
External Battery Pack Supports up to 2 External Batteries
1.6 Others
2
Ambient Temp. for Discharging
Ambient Temp. for Charging
Optimal Operating Temp.
Ambient Temp. for Storage
32~113°F/0°C~45°C
32~113°F/0°C~45°C
68~86°F/20°C~30°C
32~113°F/0°C~45°C
1.5 Temperature
Nominal Voltage
Protection
51.2V
High temperature protection, low temperature protection,
over discharge protection, over charge protection,
overload protection, short circuit protection, over current
protection.
2500 cycles to 80+% capacity, max 6500 cyclesCycle Life
EV-Grade LFPBattery cell

2.1 Caution
2. SAFETY INSTRUCTIONS
a.
b.
c.
d.
e.
Risk of Electric Shock. Do not remove the cover. No user serviceable parts inside. Refer servic-
ing to qualified service personnel.
For continued protection against risk of fire, replace only with the same type and rating of
fuse. Refer replacement to qualified service personnel.
Risk of Electric Shock. Connect only to properly grounded outlets.
Risk of Injury to Persons. Do not use this product if the power cord or the battery cables are
damaged in any way.
This device is not intended for use in a commercial repair facility.
2.2 Warning
a.
b.
c.
d.
e.
Do not overcharge the internal battery.
Do not smoke, strike a match, or cause a spark in the vicinity of the power pack.
Only charge the internal battery in a well ventilated area.
Risk of Electric Shock and Risk of Fire. This device is not preferred to be stored in a vehicle.
The device is prefered to be used indoors. For outdoor using, please avoid dust and water.
3
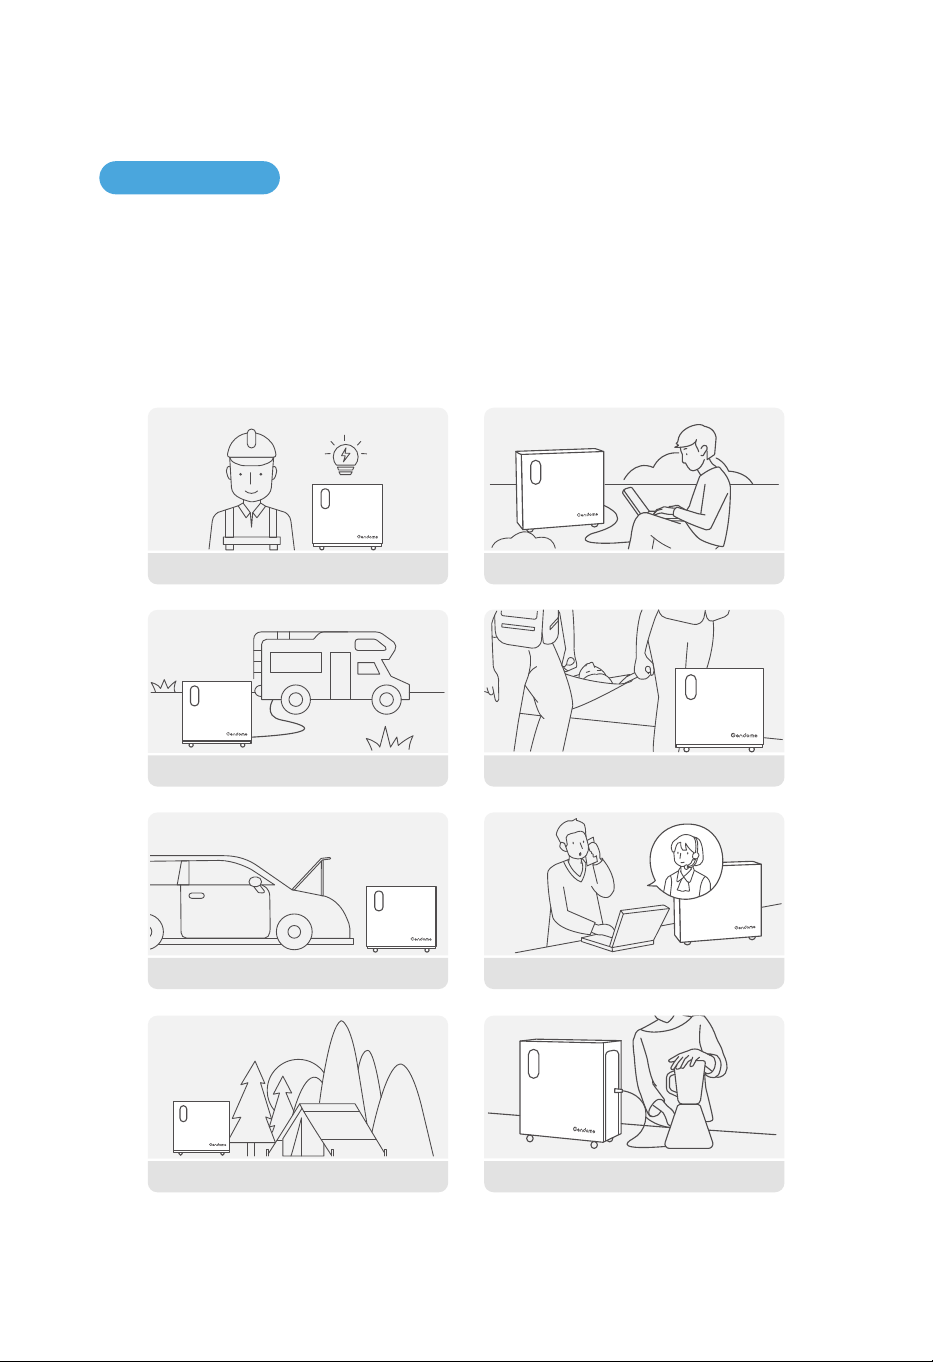
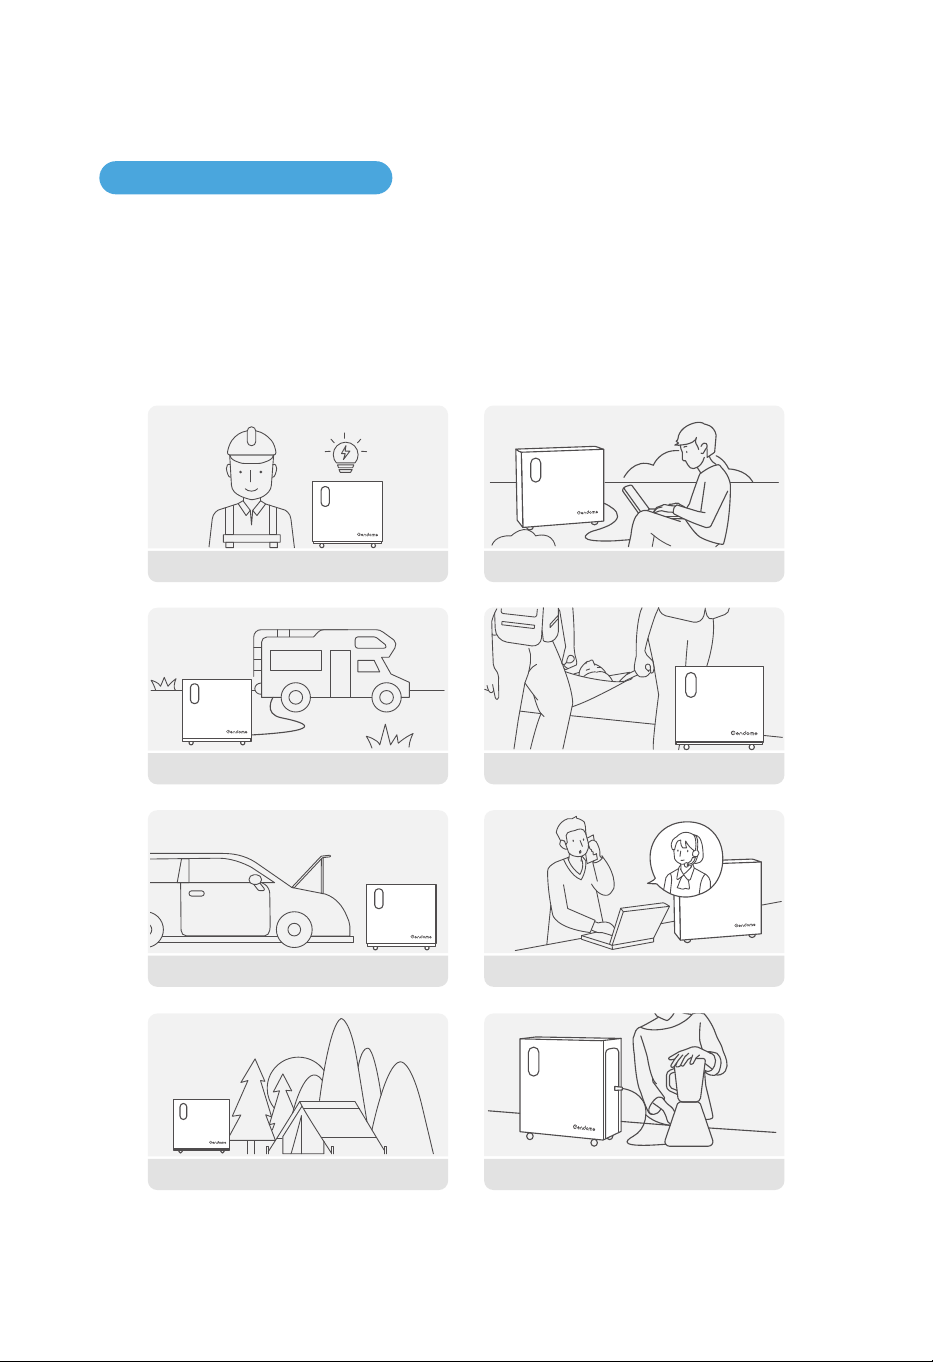
3.1 Application
Portable power stations are widely used for power supply to almost all electrical products
through interface conversion. In addition to charging through utility power input interface, equip-
ment charging through solar power charging interface and wind power charging interface are
also available. It is widely used for emergency communication, emergency rescue, outdoor
office, off-grid power, backup power during outage and mountainous areas without utility power.
4
3. INSTRUCTIONS FOR BEGINNERS
Emergency Power Supply Outdoor Office
Emergency CommunicationVehicle Emergency
Travel in RV Emergency Rescue
Camping
Home Life
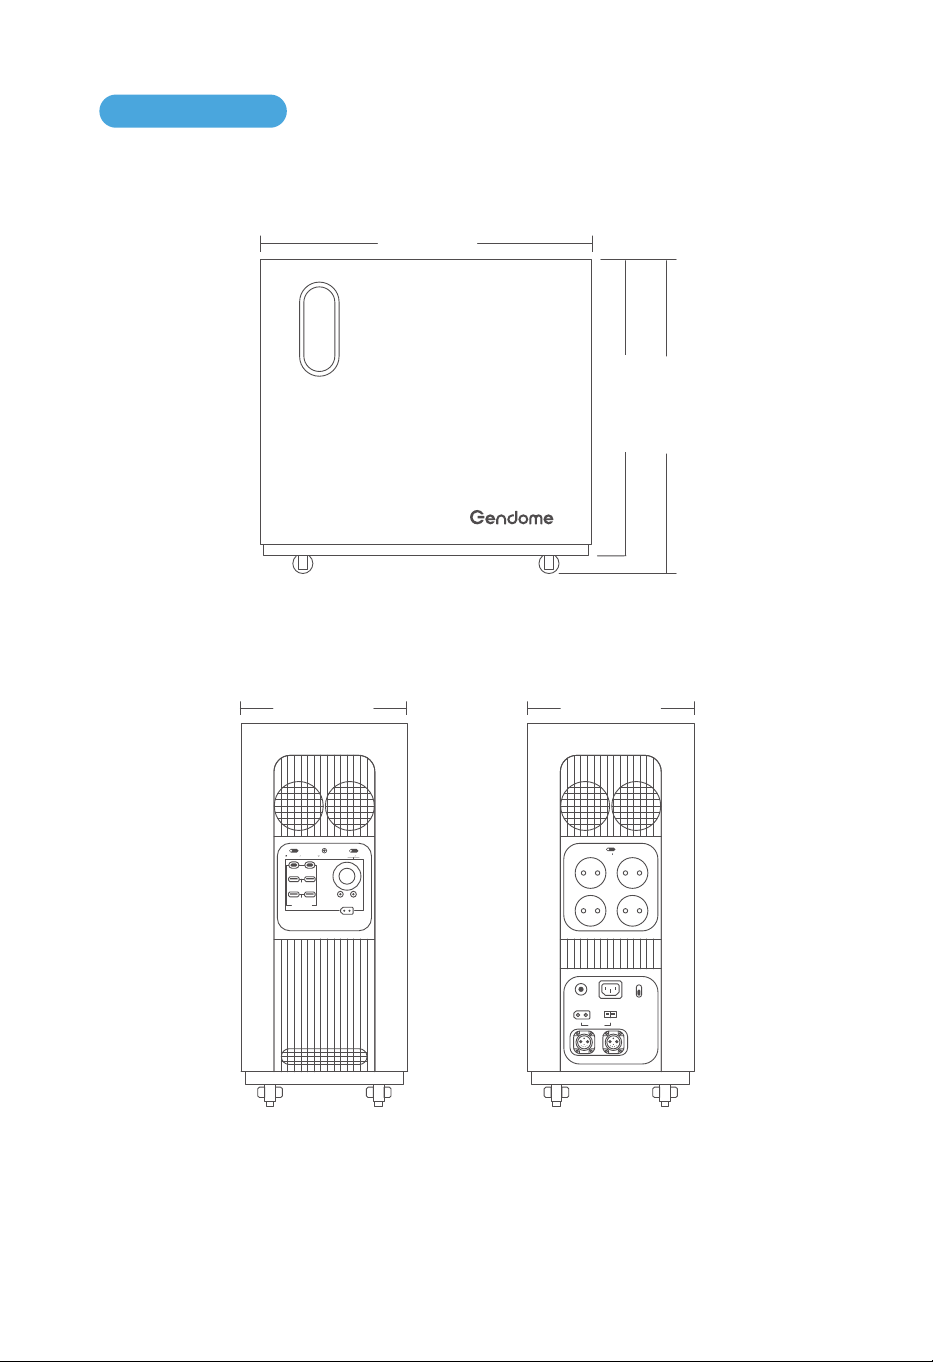
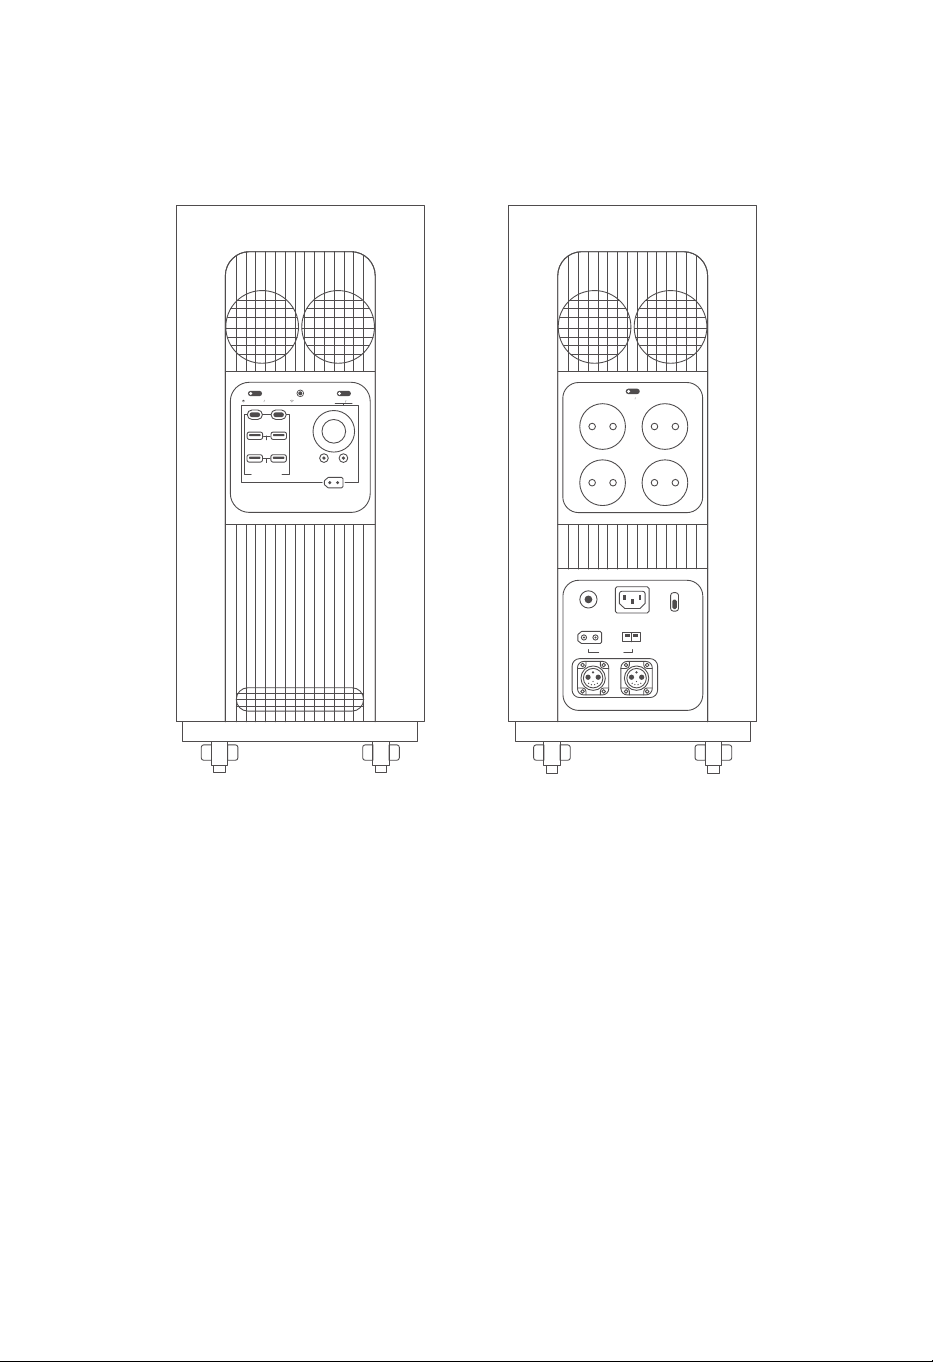
a. Length and Height
560mm
498mm
543mm
b. Left Side c. Right Side
230mm
IOT RESET
USB-A 18W
USB FAST CHARGE
DC 12V 120W
12V 360W MAX
+-
USB-C 140WUSB-C 140W
DC ON OFF
POWER ON OFF
USB-A 18W
3.2 Dimensions
5
230mm
+-
OVERLOAD
PROTECTION
INPUT 12-75V
BATTERY-1 BATTERY-2
AC INPUT
230V 3000W MAX
WIND 200W
FAST
SLOW
AC CHARGE SPEED
+-
SOLAR 1500W
AC ON OFF
230V 15A
6
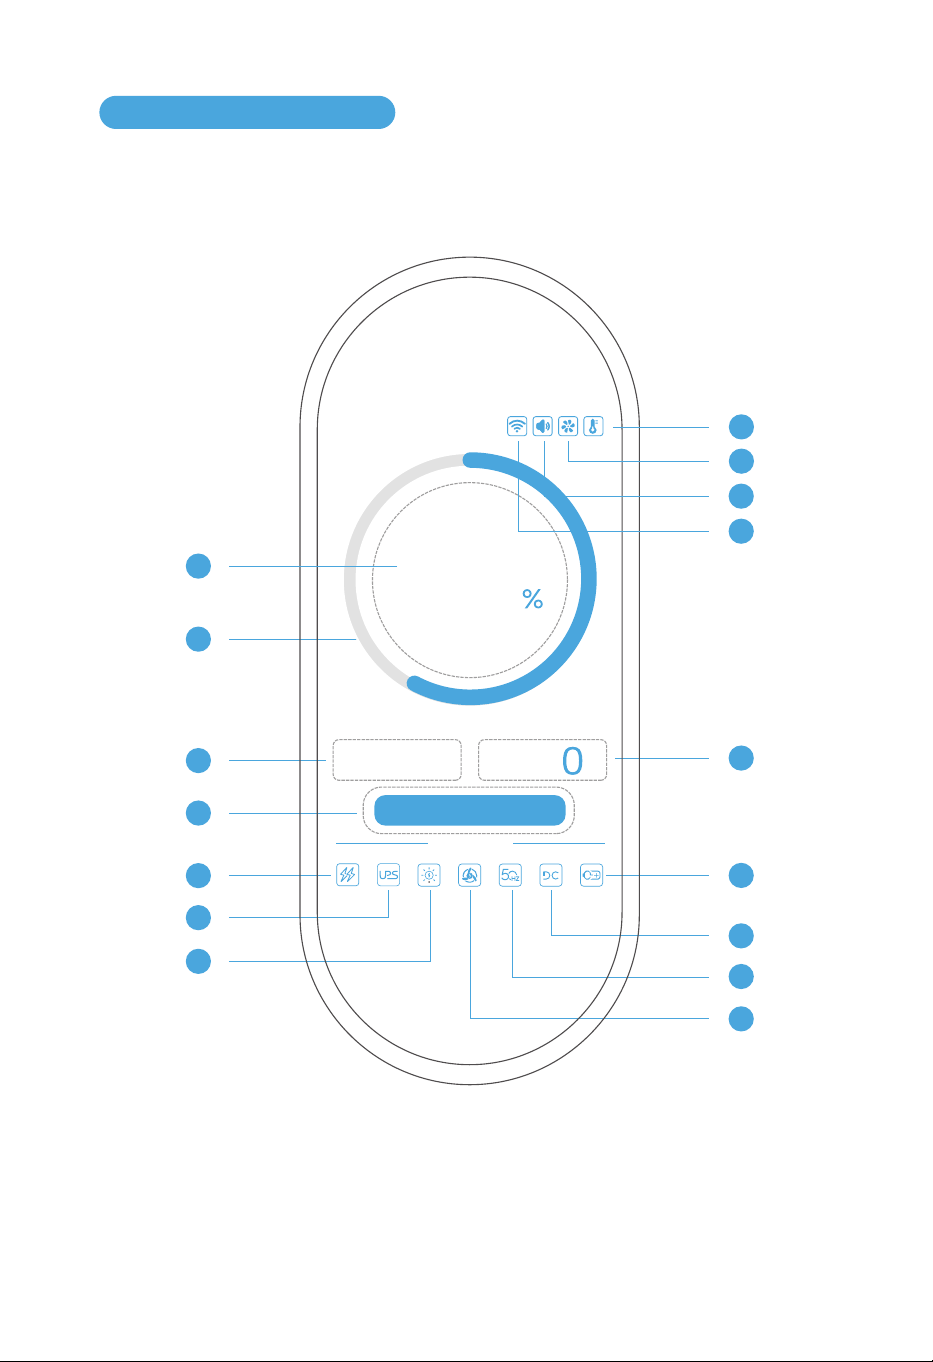
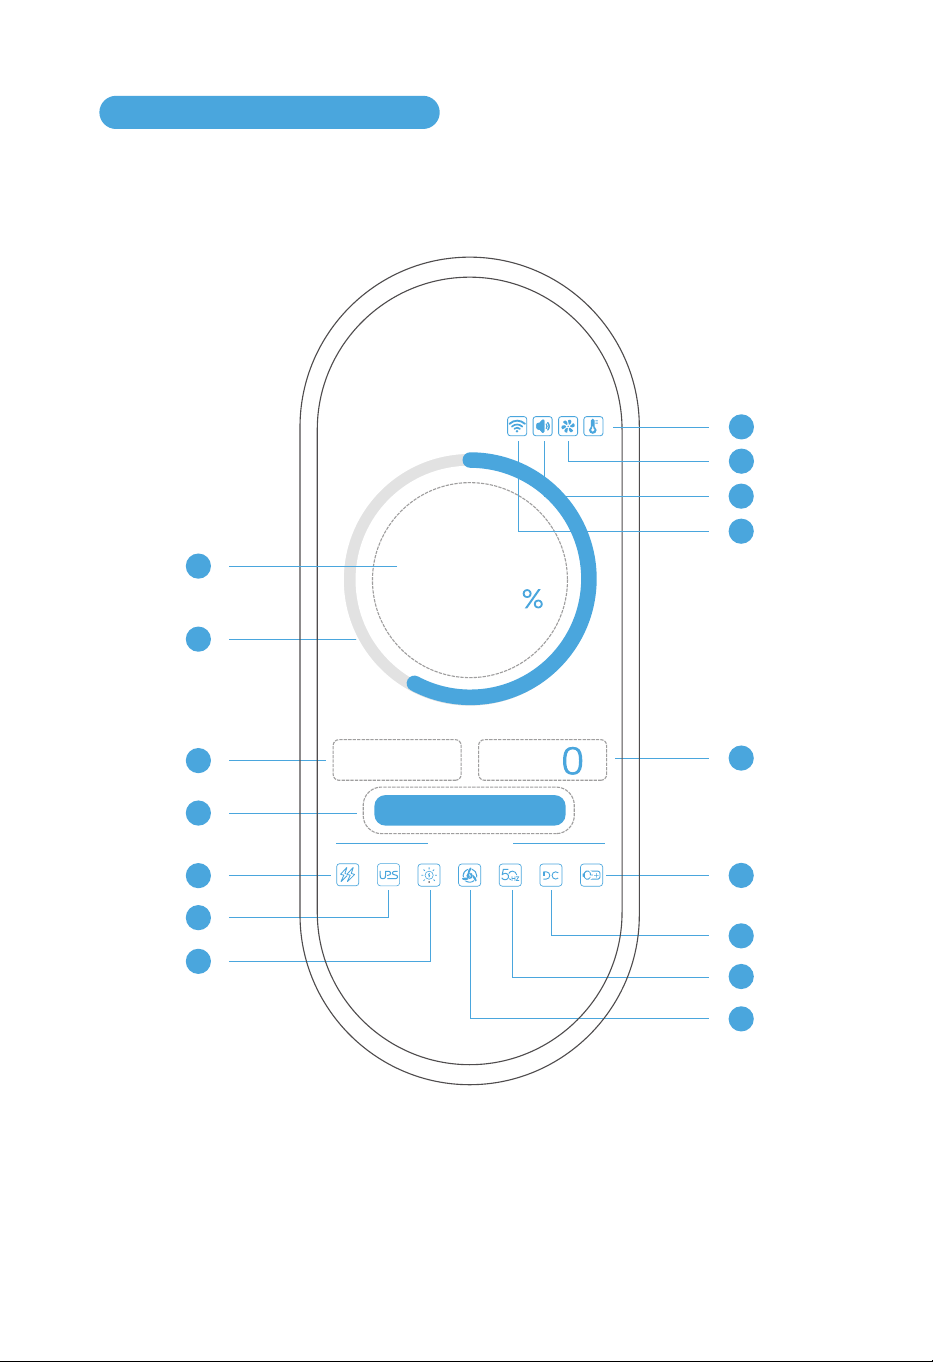
3.3.1 Display
3.3 Display and Interfaces
1
3
4
5
6
7
12
11
10
9
8
2
w
INPUT OUTPUT
OUTPUT
w
Use Status
Remaining Time: -- h -- m
60
0
14
13
15
16
7
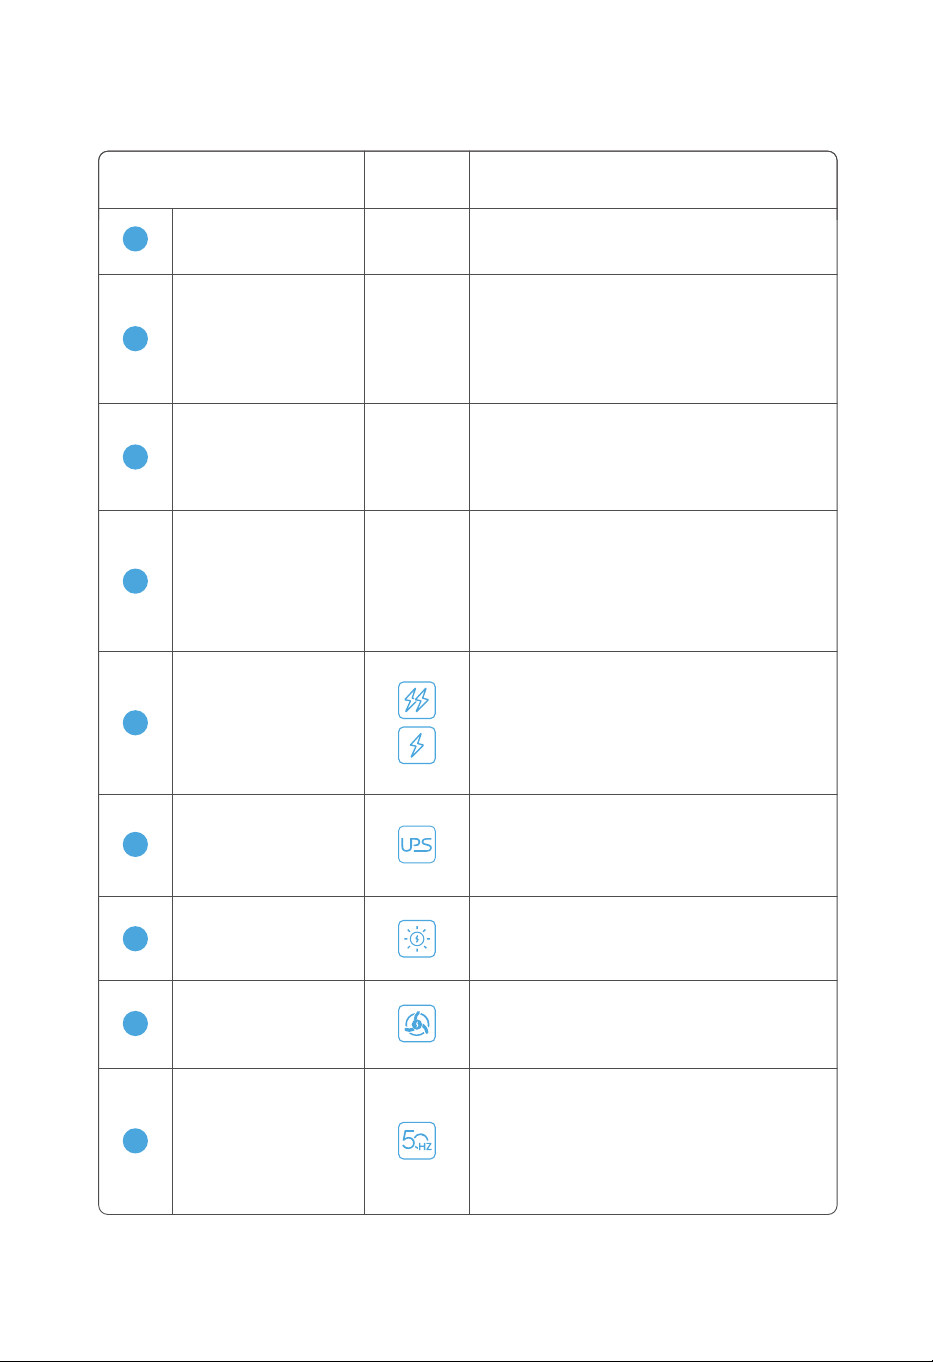
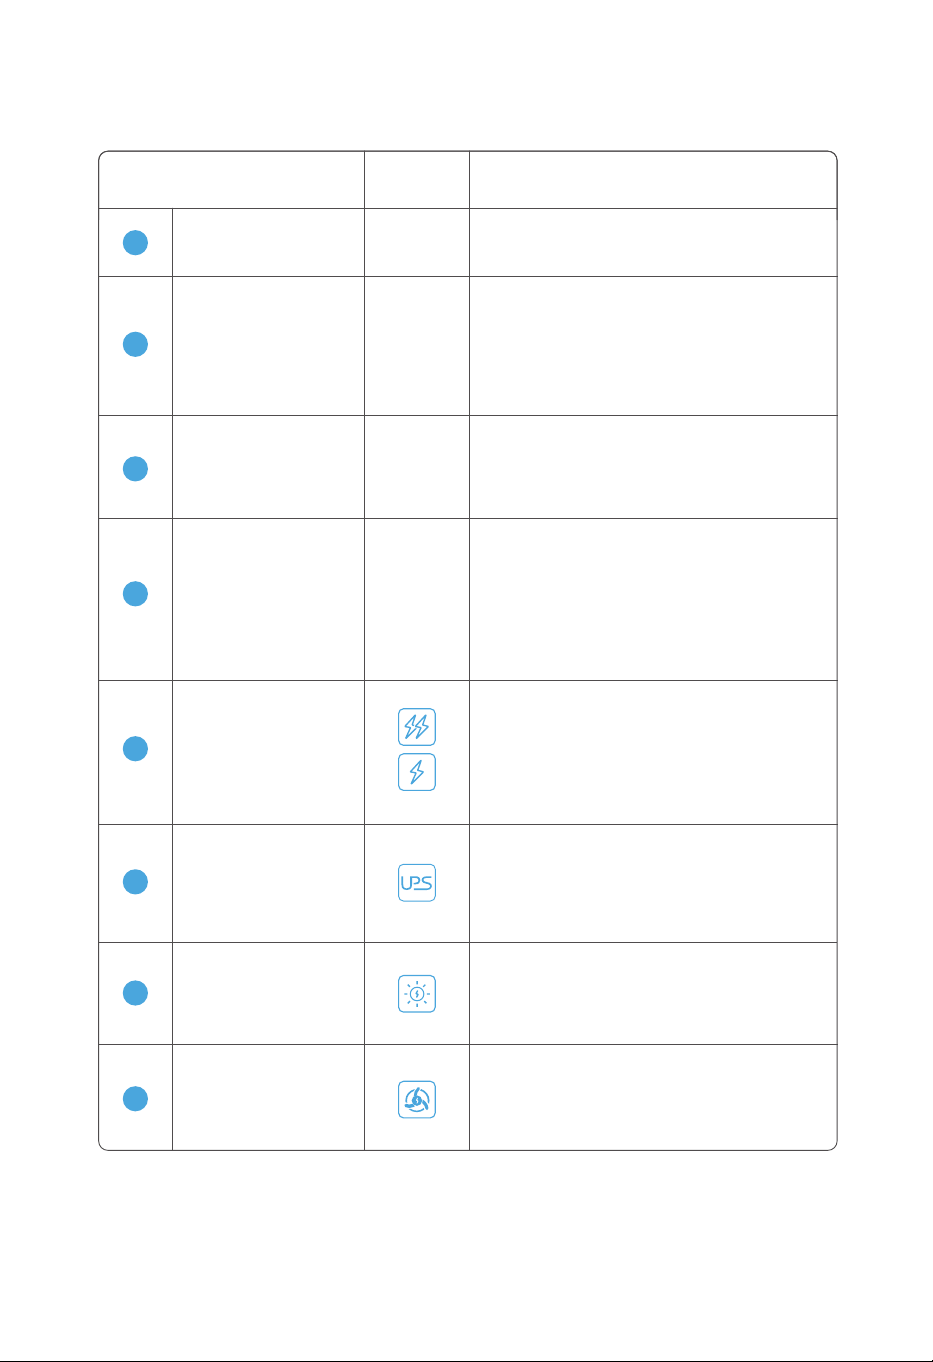
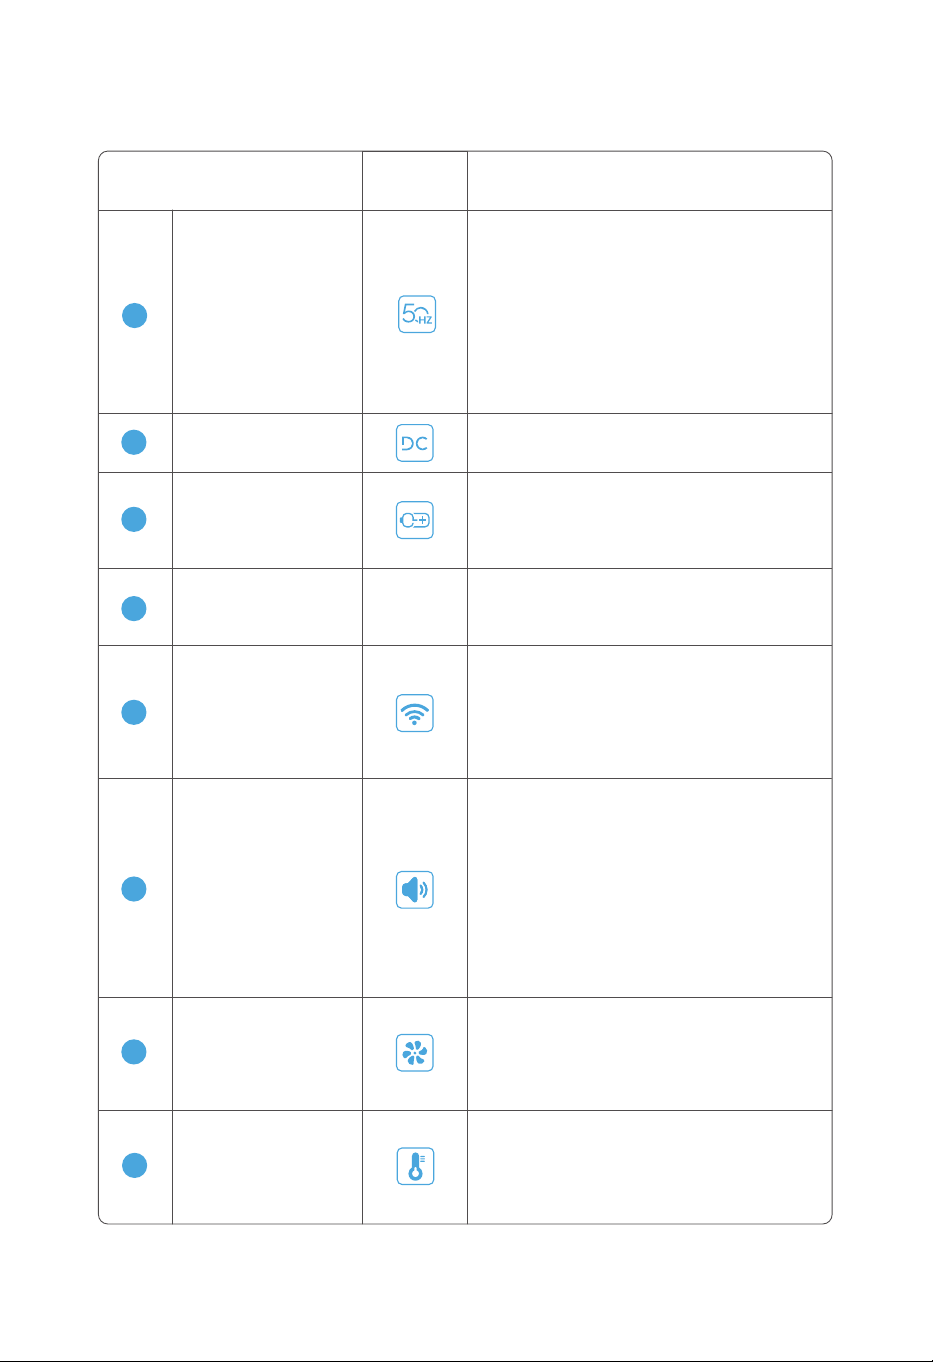
3.3.2 Description of Functions
Icon Display DescriptionName
-
2
It is dynamically displayed according to the
actual value of the power. It displays green
when the power is higher than 50%. it displays
yellow when the power is between 20% ~ 50%.
It displays red when the power is less than 20%.
Power Ring
1
-
Represents the specific power level, the
value ranges from 0% to 100%.
Battery Percentage
-
Represents the total input power when
charging the device with wall charger, solar
and wind power, in W (Watts). It will display
0W when it is not charging.
3
Input Power
-
4
When charging, it shows the estimated
remaining charging time; when discharging,
it shows the estimated remaining discharg-
ing time; when charging and discharging, it
is calculated by the state of charging. "h"
represents hours, "m" represents minutes.
Remaining Time
9
AC Output
6
Represents a protection measure to take over
the work when power outage. The icon is gray
in normal conditions, lights on during protec-
tion, and flashes in red when a fault occurs.
UPS
When using the solar panel to charge the
device, the icon is always on. Flashing red
when a fault occurs, and gray when not in use.
7
Solar Power Charging
8
Wind Power Charging
When using the wind to charge the device, the
icon is always on. Flashing red when a fault
occurs, and gray when not in use.
5
When the left icon is displayed, the device is
in fast charging mode, and the input power
can be adjusted in the app.
When the right icon is displayed, the device
is in slow charging mode, and the input
power is limited to 500W.
Slow charging
Fast charging
Represents the output frequency of the AC.
When the AC switch is turned on, the icon is
always on. Flashing red when a fault occurs,
and gray when not in use.
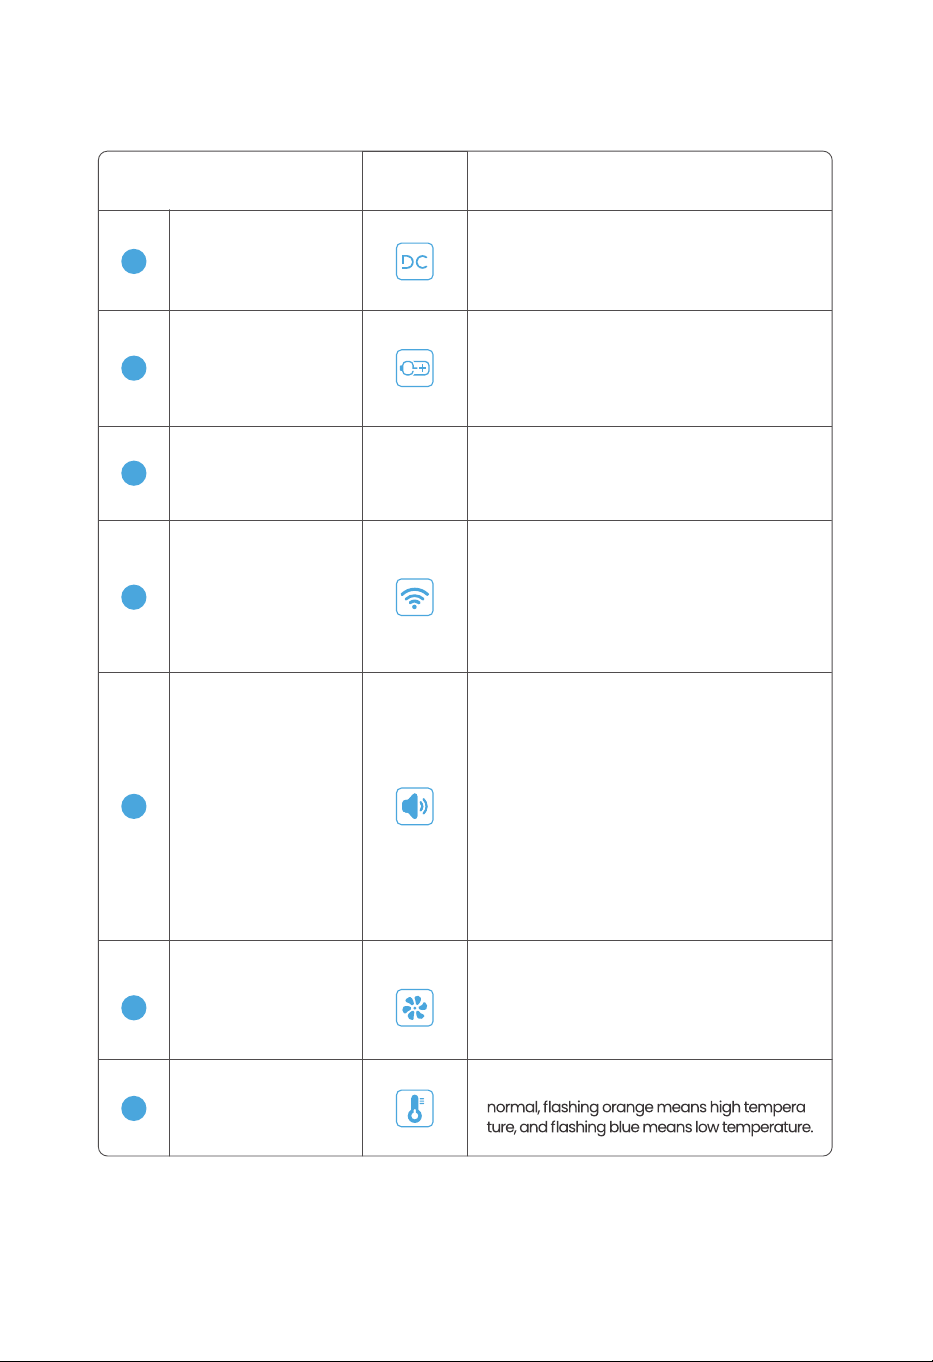
8
Icon Display DescriptionName
Output Power
Represents the total output power of the
device when it is discharged, in W (Watts),
and displays 0W when there is no output.
-
DC Output
Represents the ON/OFF state of the DC
switch, it is always on when DC switch is
turned on, and it is gray when turned off.
Wi-Fi
Represents the networking status of the
device. When the icon is on, it means
the networking is successful. Flashing
icon indicates that the networking is in
progress. The icon does not display
when it is not connected to the network.
External Battery Pack
Represents the external battery pack of
the device. The icon is always on when
external battery pack connected, and the
icon is gray when not connected.
13
12
Temperature
Steady light on means the temperature is
-
16
14
11
10
Cooling Fan
Represents the operation of the cooling
fan. The icon is always on when cooling fan
is running, and the icon is gray when not
running. Flashing red when a fault occurs.
15
Buzzer
Steady light means the buzzer is turned
on, gray means the buzzer is turned off.
Only the APP can turn on/off buzzer switch.
If an alarm/failure has occurred, there will
be beep sounds, a pop-up window and
an exclamation mark on the top right of
the icon.
Alarm/failure content shows on the
pop-up window. Beep sound will last 10
seconds, and also can be turned off by
pressing the power button.
3.3.2 Description of Functions
9
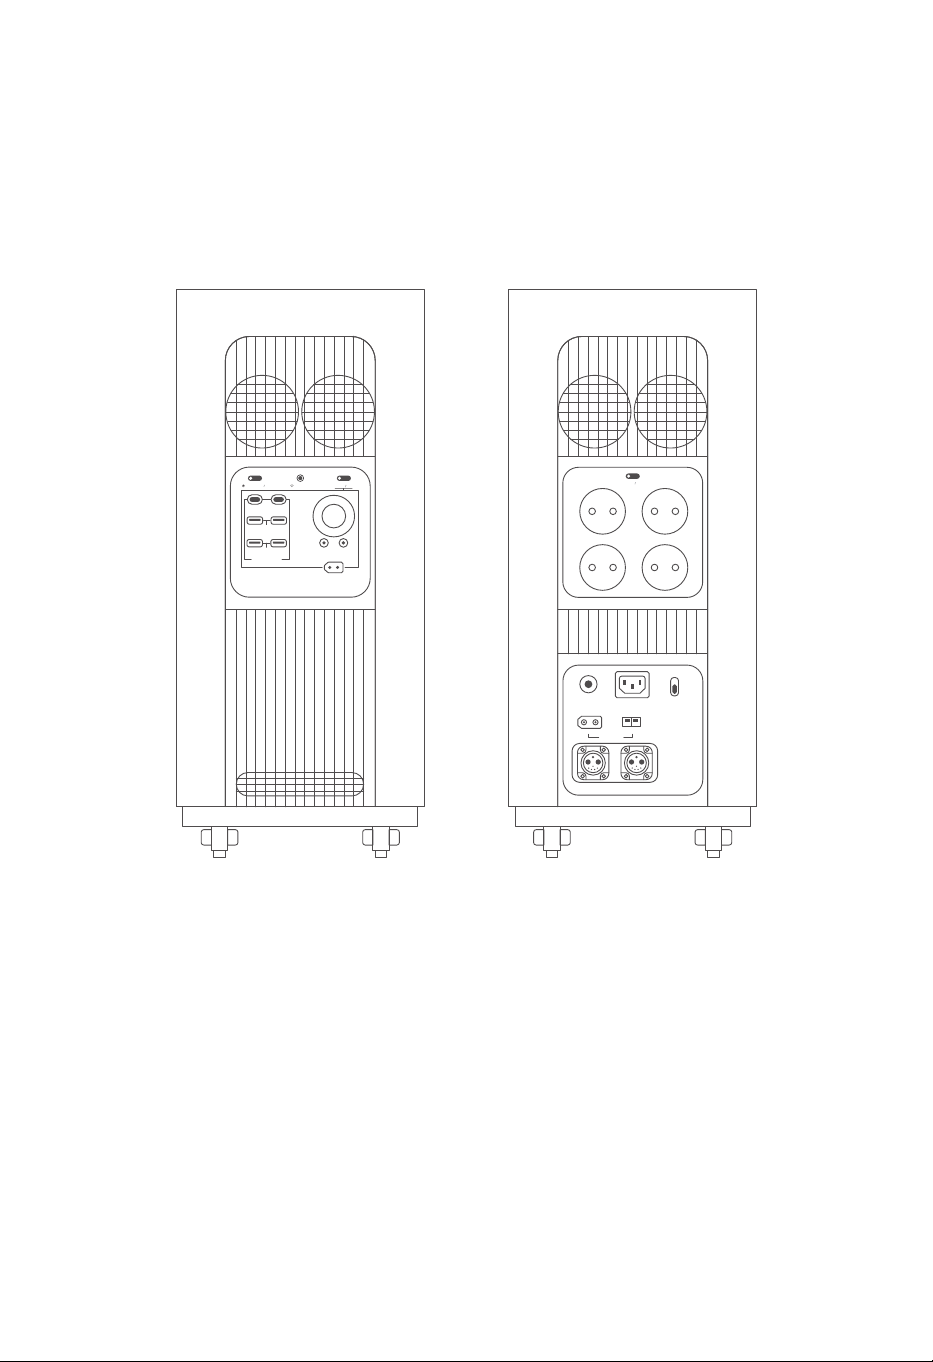
3.3.3 Device Side Interfaces
a. Interfaces on the left b. Interfaces on the right
IOT RESET
USB-A 18W
USB FAST CHARGE
DC 12V 120W
12V 360W MAX
+-
USB-C 140WUSB-C 140W
DC ON OFF
POWER ON OFF
USB-A 18W
+-
OVERLOAD
PROTECTION
INPUT 12-75V
BATTERY-1 BATTERY-2
AC INPUT
230V 3000W MAX
WIND 200W
FAST
SLOW
AC CHARGE SPEED
+-
SOLAR 1500W
AC ON OFF
230V 15A
10
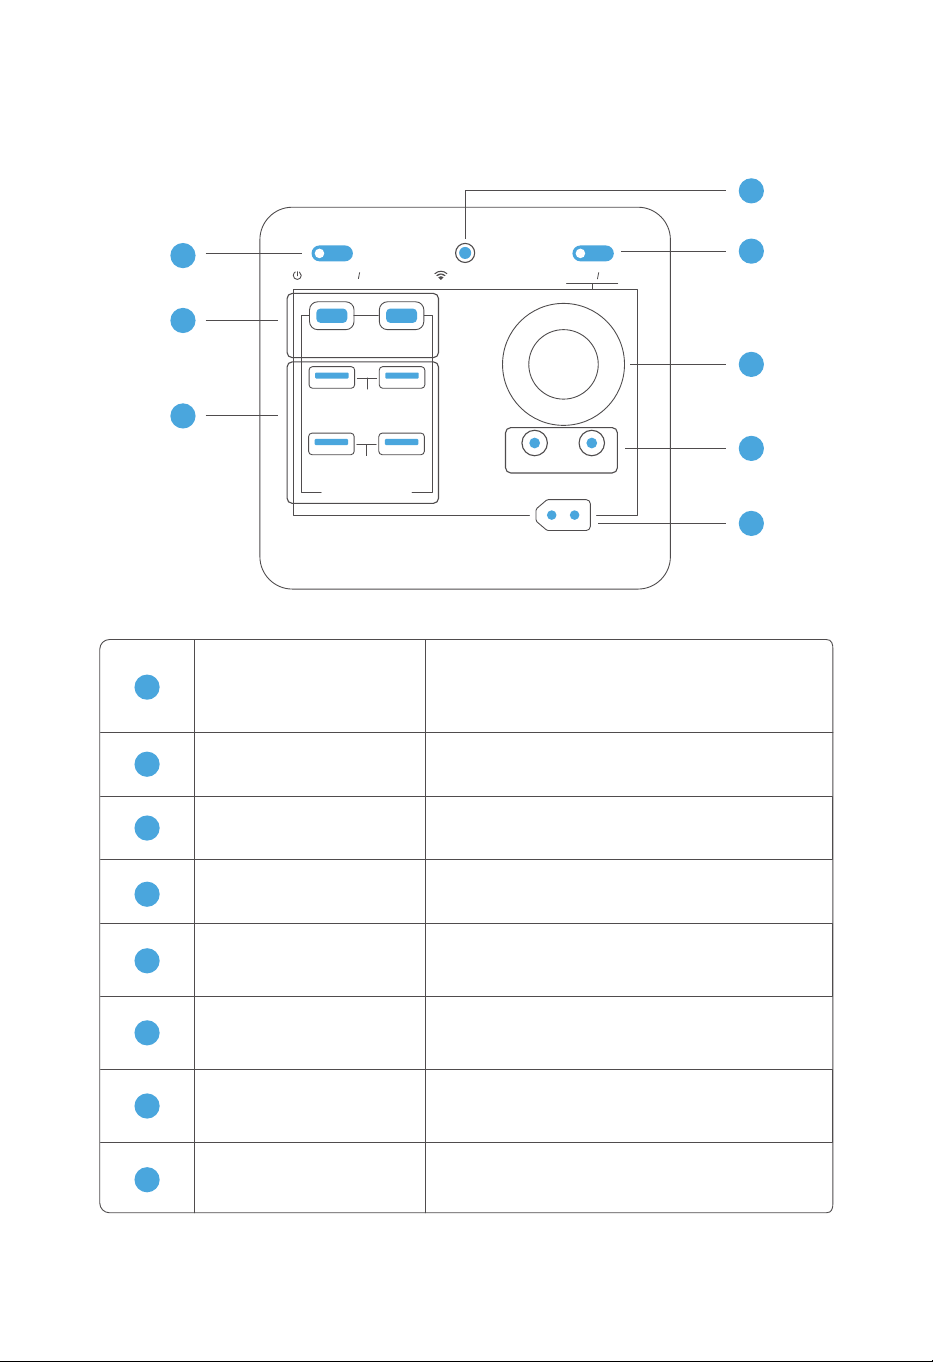
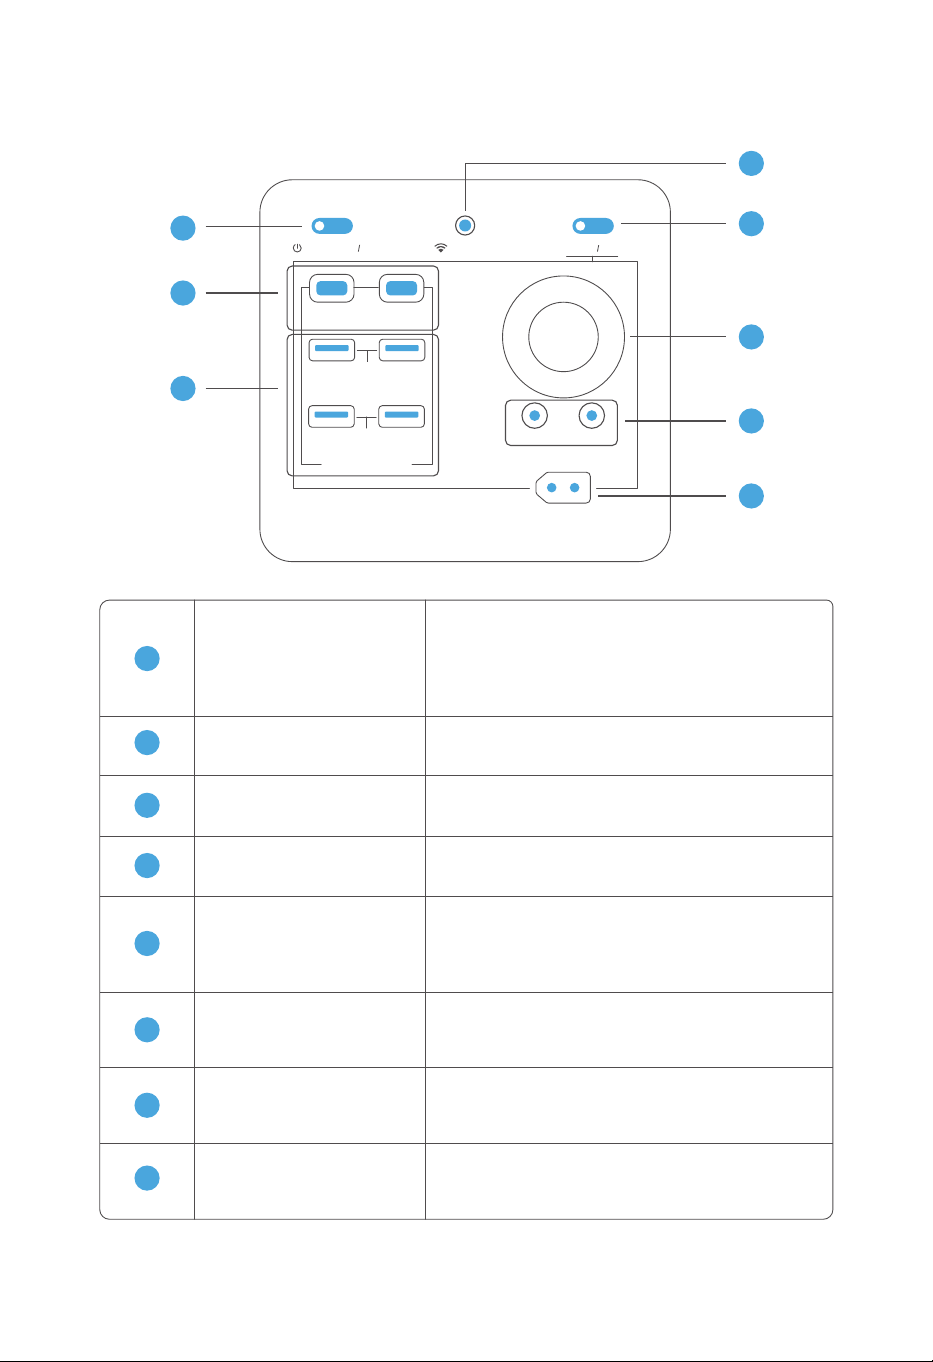
3.3.4 Main Power Switch & DC Output Interfaces
8
7
6
5
4
1
2
3
IOT RESET
USB-C 140W
USB-A 18W
USB FAST CHARGE
DC 12V 120W
12V 360W MAX
+-
USB-C 140W
DC ON OFF
POWER ON OFF
USB-A 18W
Main Power Switch
USB-C Output
USB-A Output
RV Output
DC Output
Cigarette Lighter Output
DC Output Switch
IOT Switch
Hold the switch for 3 seconds to turn on/off
the equipment. Press once to close pop-ups
and turn off sounds for alarms.
Two independent USB-C output ports, each
with an output power of 140W.
Four independent USB-A output ports, each
with an output power of 18W.
It provides 12V constant voltage output of up
to 360W.
1
2
3
4
5
6
7
8
Two DC output ports for 12V constant voltage
output of up to 36W, which is shared with the
cigarette lighter.
It provides 12V output that can be connected
to a converter plug for charging electrical
appliances.
Short press the button to turn on or turn off
DC output. Hold the button for 3 seconds to
turn on or turn off the screen.
Hold the button for 3 seconds to turn on the
Wi-Fi module for network configuration.
11
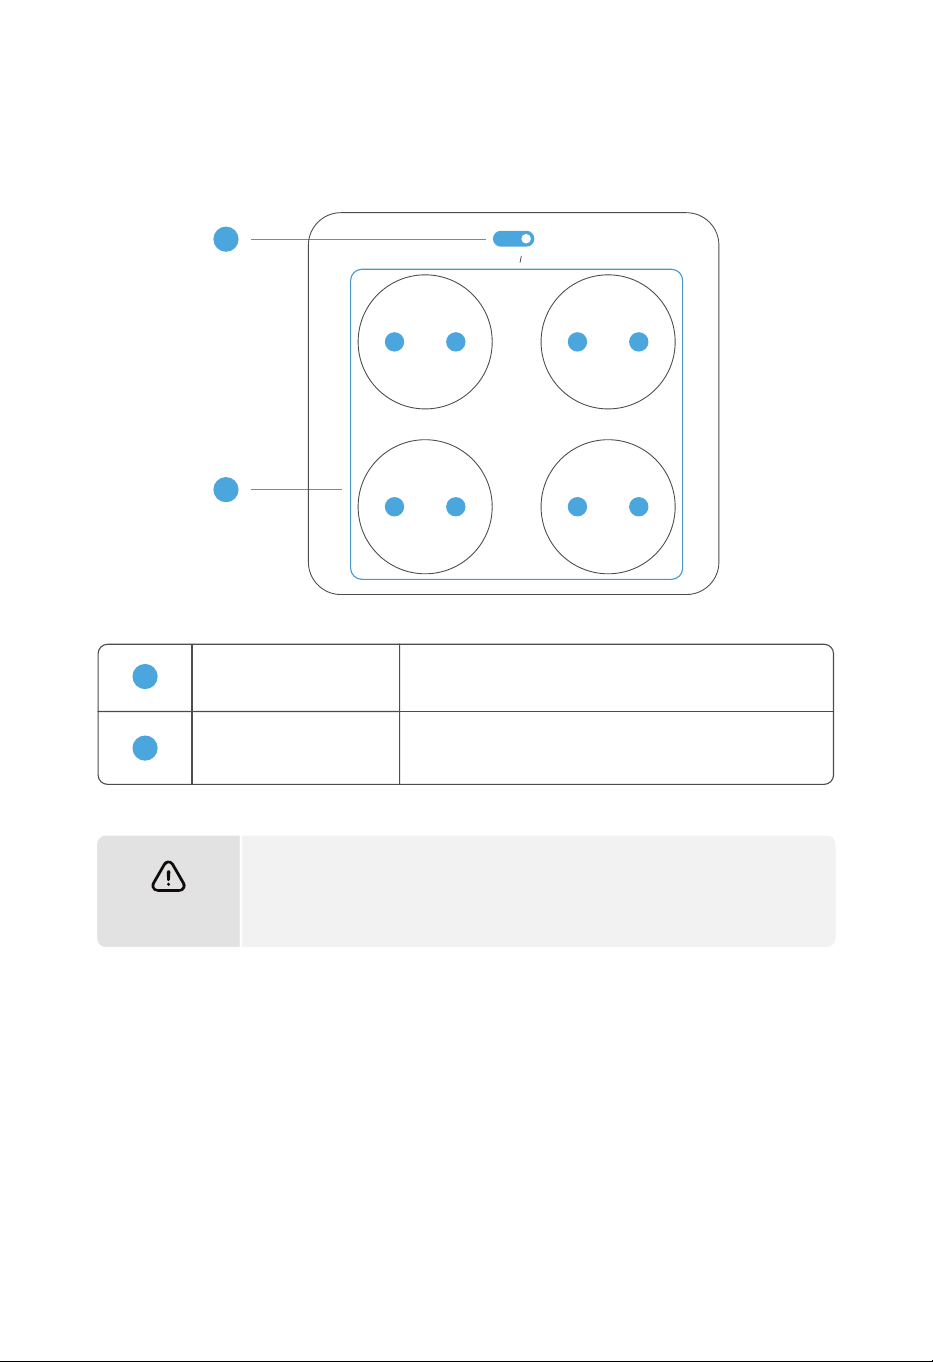
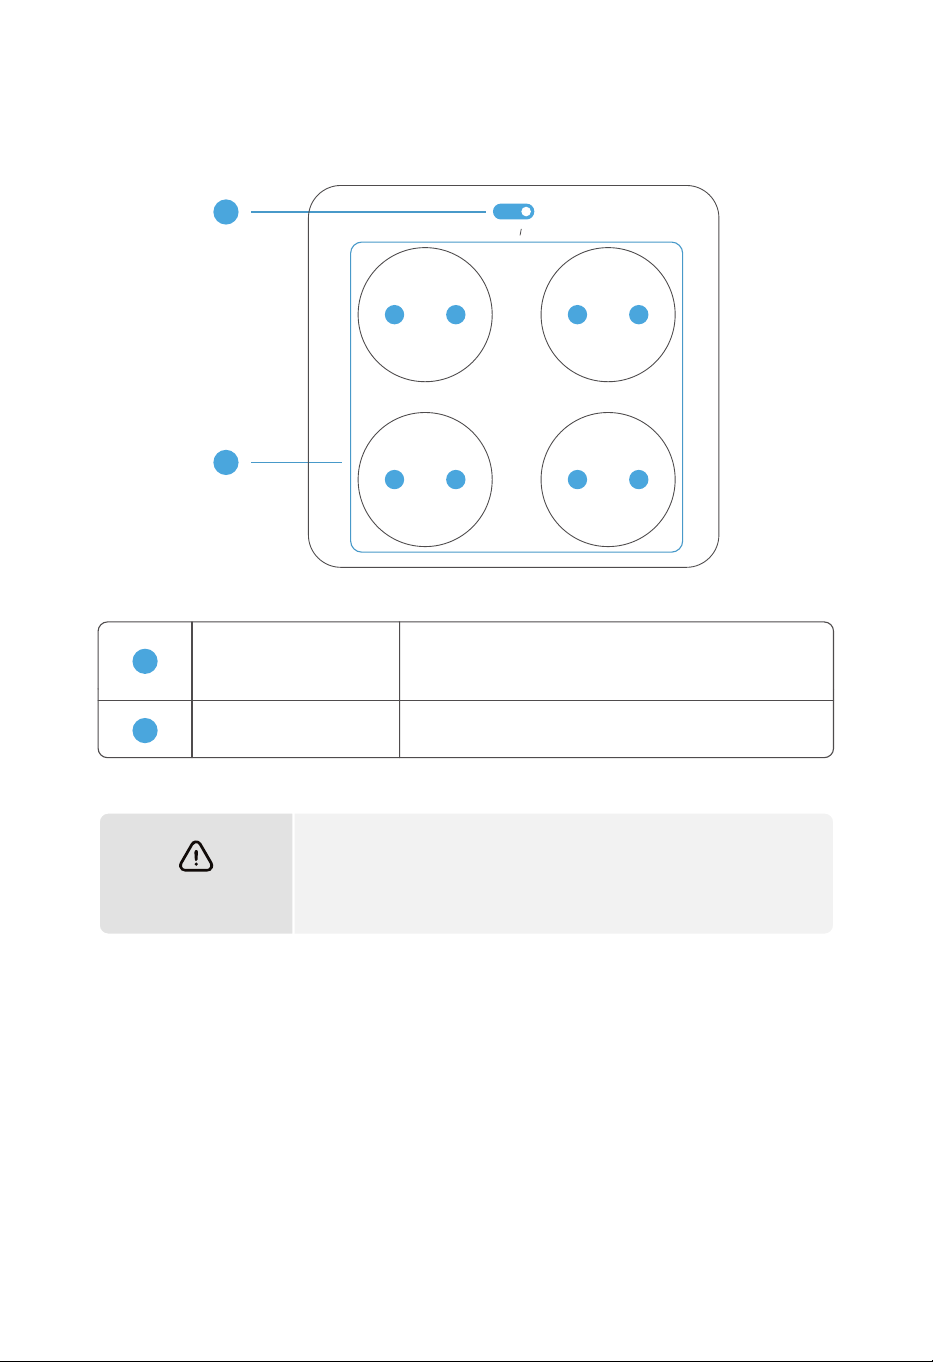
AC Output Switch
15A AC Ports
Each of the 4 sockets provides an output of up to
15A for electrical appliances.
The maximum output current of all AC output ports shall not
exceed 15A. Once the limit is exceeded, the automatic protection
mechanism will be triggered and the equipment will stop working.
Note
1
2
3.3.5 AC Output Interfaces
1
2
AC ON OFF
230V 15A
Short press the button to turn on/off AC output,
including four 15A outlet.
12
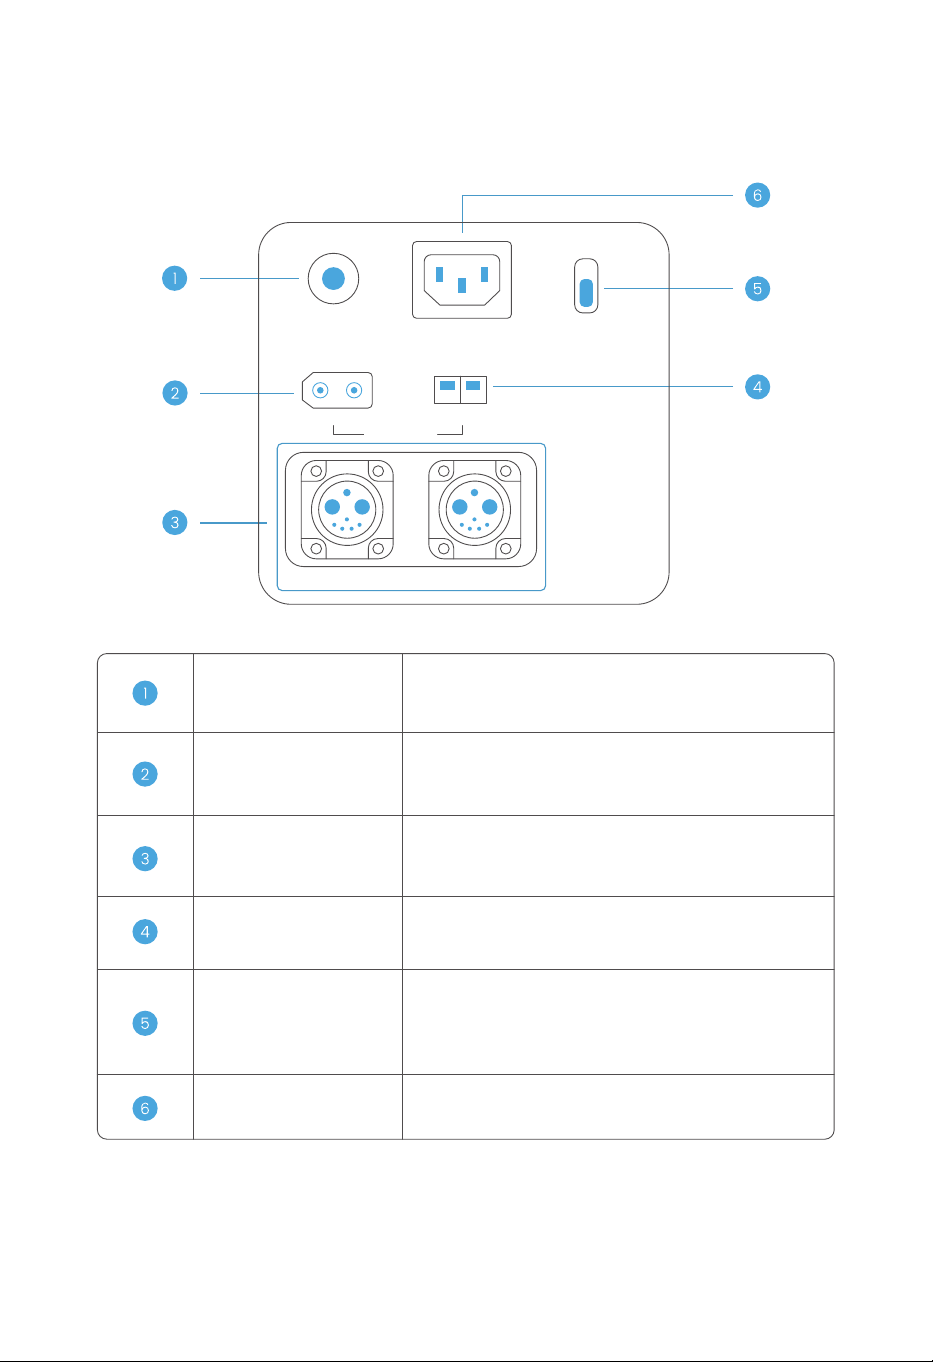
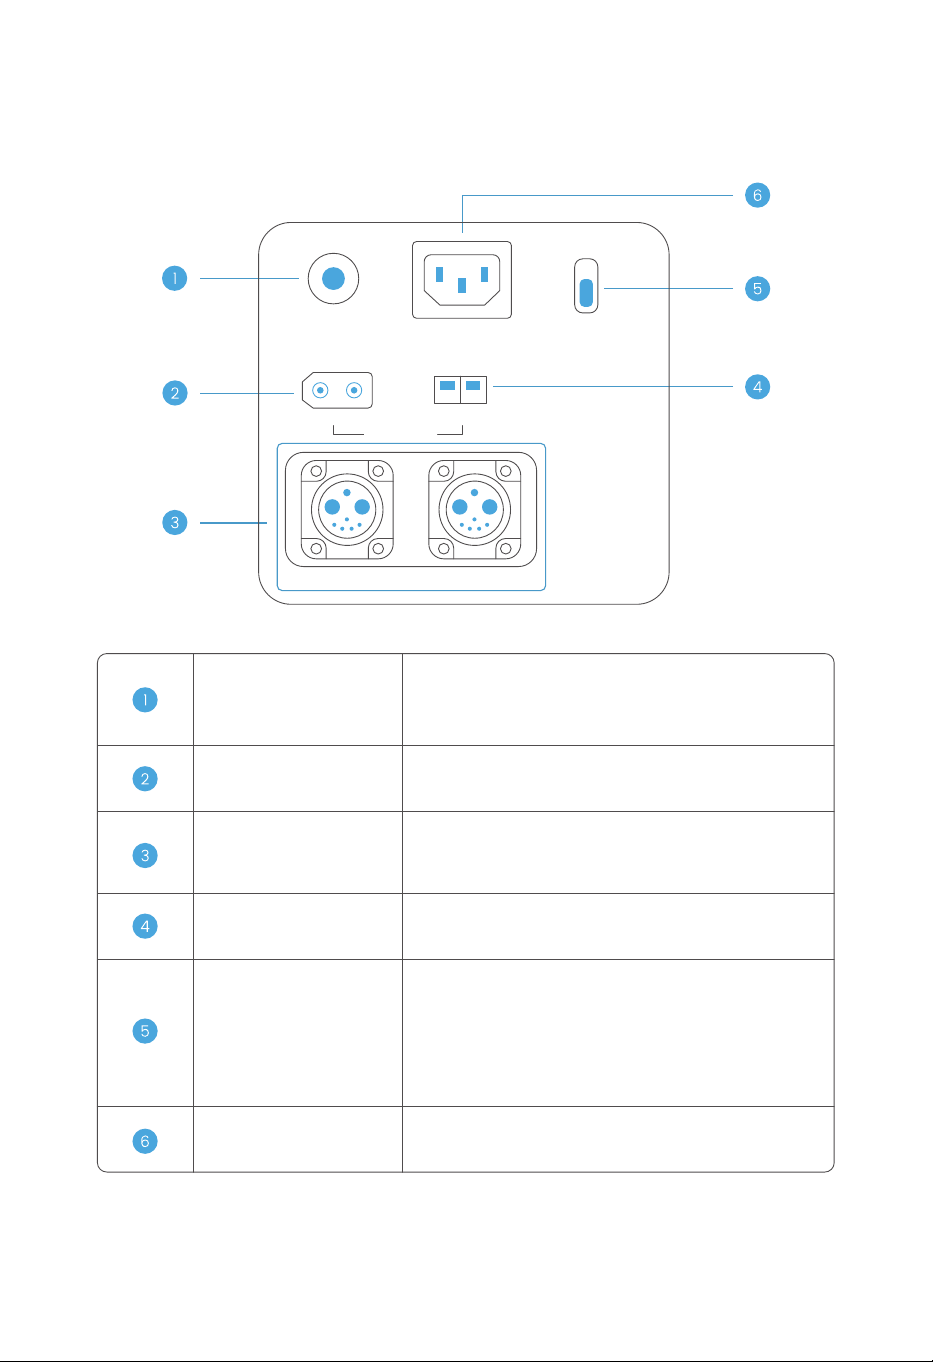
AC Overload Protector
Wind Power Charging Port
When the AC input current exceeds 50A, it will
disconnect automatically. It must be reset manually.
Solar Power Charging Port
It can be connected to solar power charging, pro-
viding a voltage of 12~75V and a charging power of
up to 1500W.
Battery Pack Parallel
Operation Port
It can be connected to a battery pack manufac-
tured by the Company to increase the equipment
capacity.
It can be connected to wind power charging, pro-
viding a voltage of 12~75V and a charging power
of up to 200W.
Charging Speed Switch
It adjusts the power of utility power charging. The
power of slow charging is constant at 500W. The
power of fast charging is adjustable by APP from
500W to 3000W at 230V.
AC Charging Port
It is connected to utility power supply for equip-
ment charging.
3.3.6 Input Interfaces
+-
OVERLOAD
PROTECTION
INPUT 12-75V
BATTERY-1 BATTERY-2
AC INPUT
230V 3000W MAX
WIND 200W
FAST
SLOW
AC CHARGE SPEED
+-
SOLAR 1500W
13
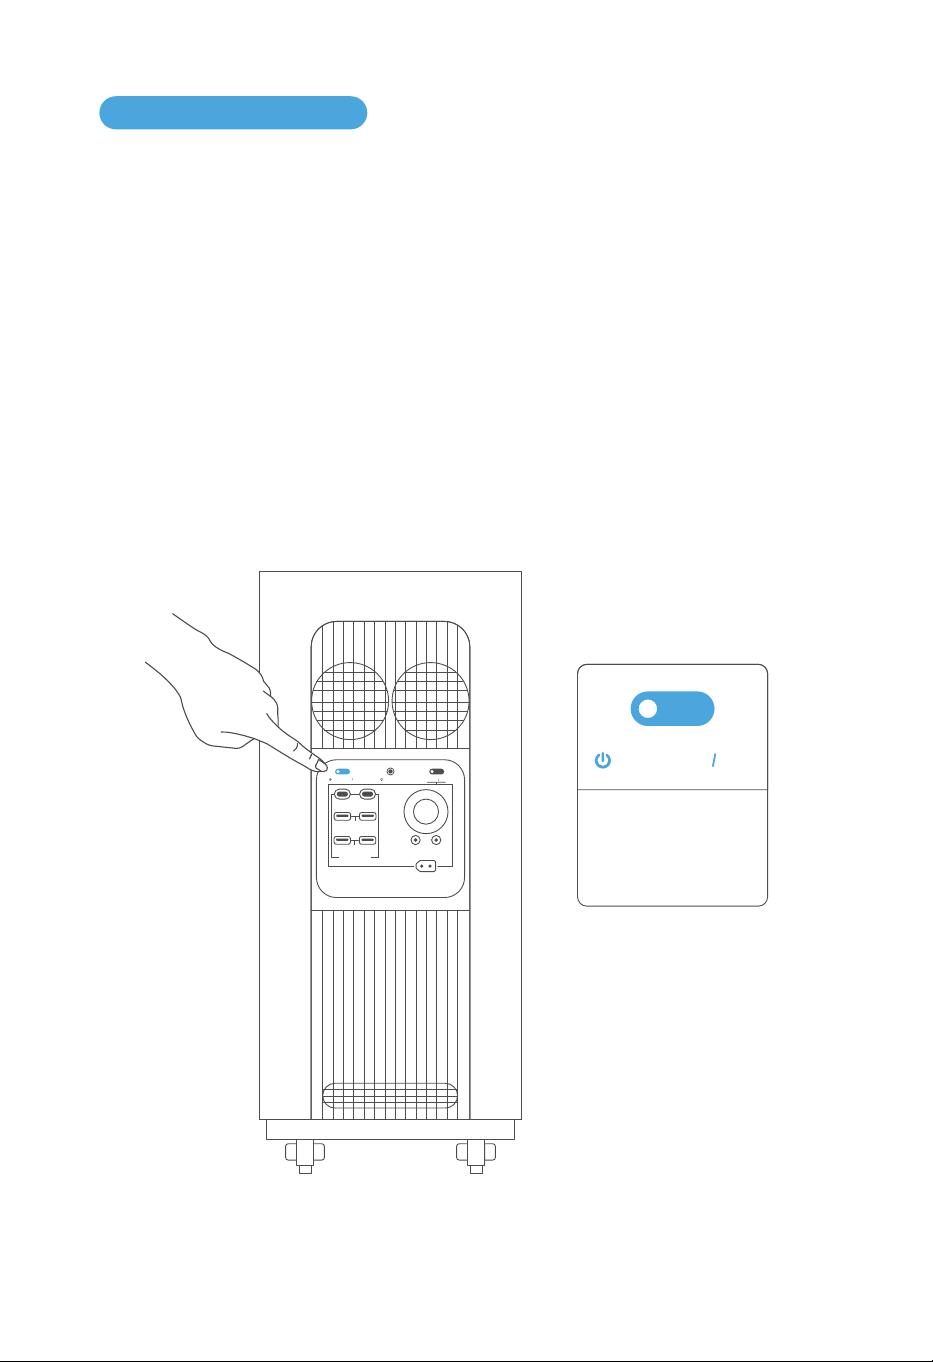
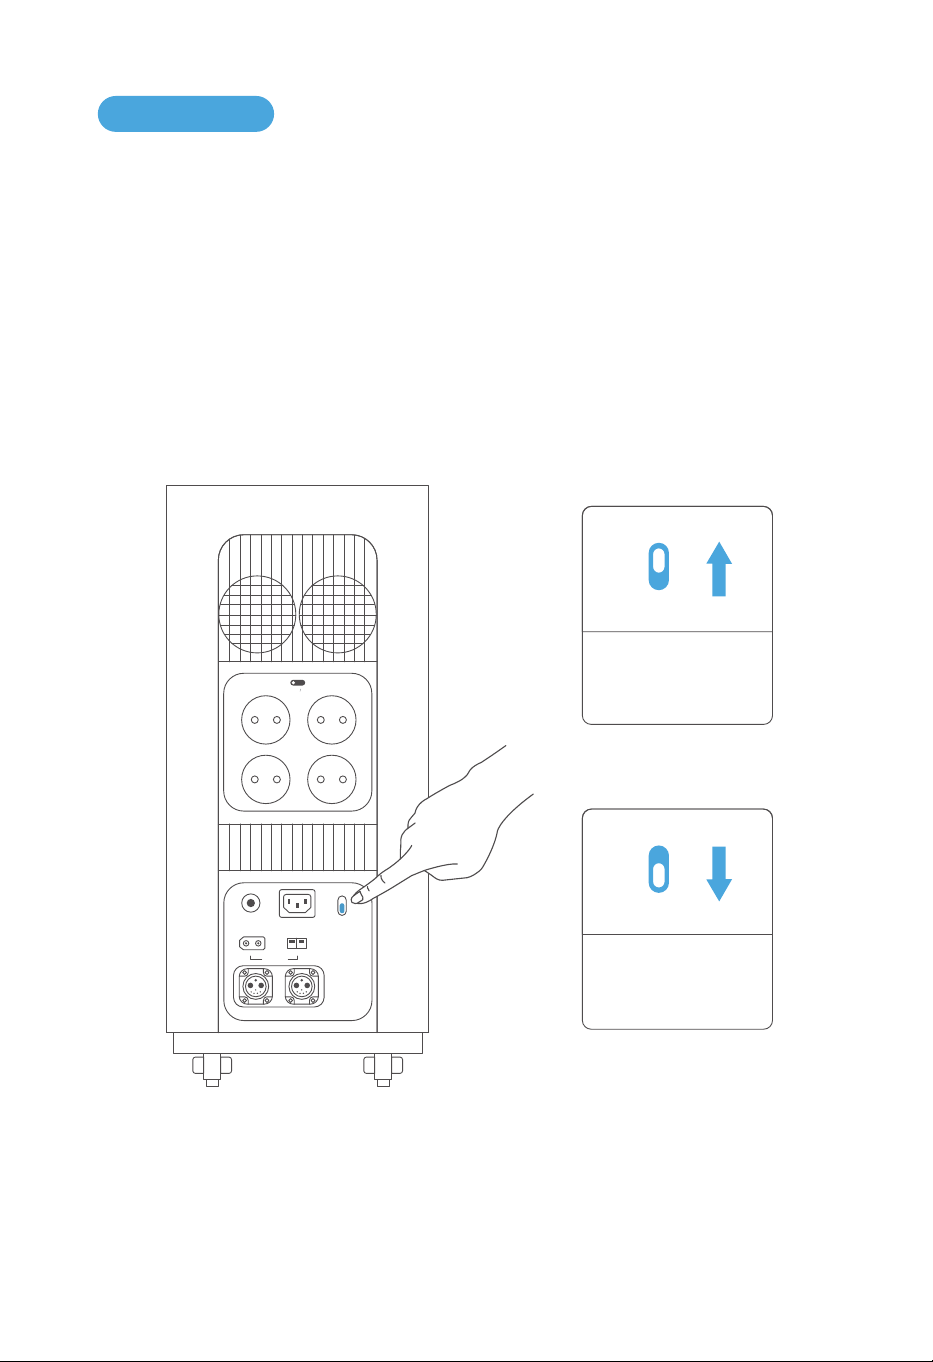
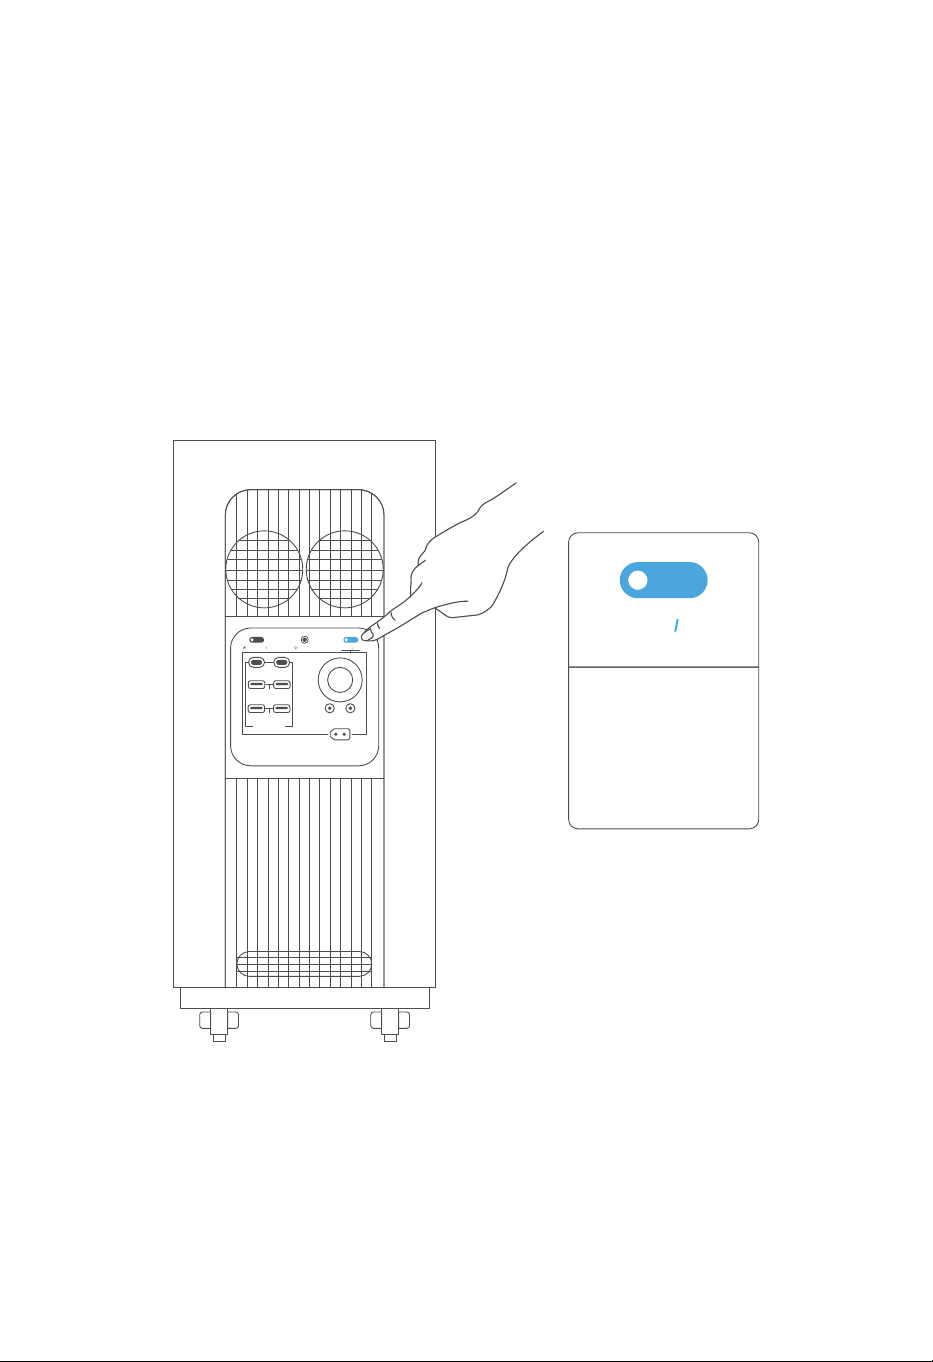
3.4.1 Turn on, Shutdown, and LED Lighting
3.4 Product Operation
Press and hold the power button for 3 seconds, after a "beep" sound, the power is on. The LED
screen lights up and the main power indicator enters the breathing light mode.
When the product does not operate for 2 minutes, it will enter the sleep mode. The LED screen
will also switch to the sleep mode.
When the product has a button operation or is charged or discharged, the sleep mode will be
ended immediately. And the LED screen will switch to the normal mode.
After use, press and hold the power button for 3 seconds, after a "beep" sound, the device is
successfully shut down.
The default automatic shutdown time is 12 hours. If there is no charging, discharging, button
operation, or APP operation, the product will automatically shut down after 12 hours.
Press the power button once to close pop-ups and turn off sounds for alarms.
POWER ON OFF
Main Power Button:
Press Turn On
Press Turn Off
IOT RESET
USB-A 18W
USB FAST CHARGE
DC 12V 120W
12V 360W MAX
+-
USB-C 140WUSB-C 140W
DC ON OFF
POWER ON OFF
USB-A 18W
14
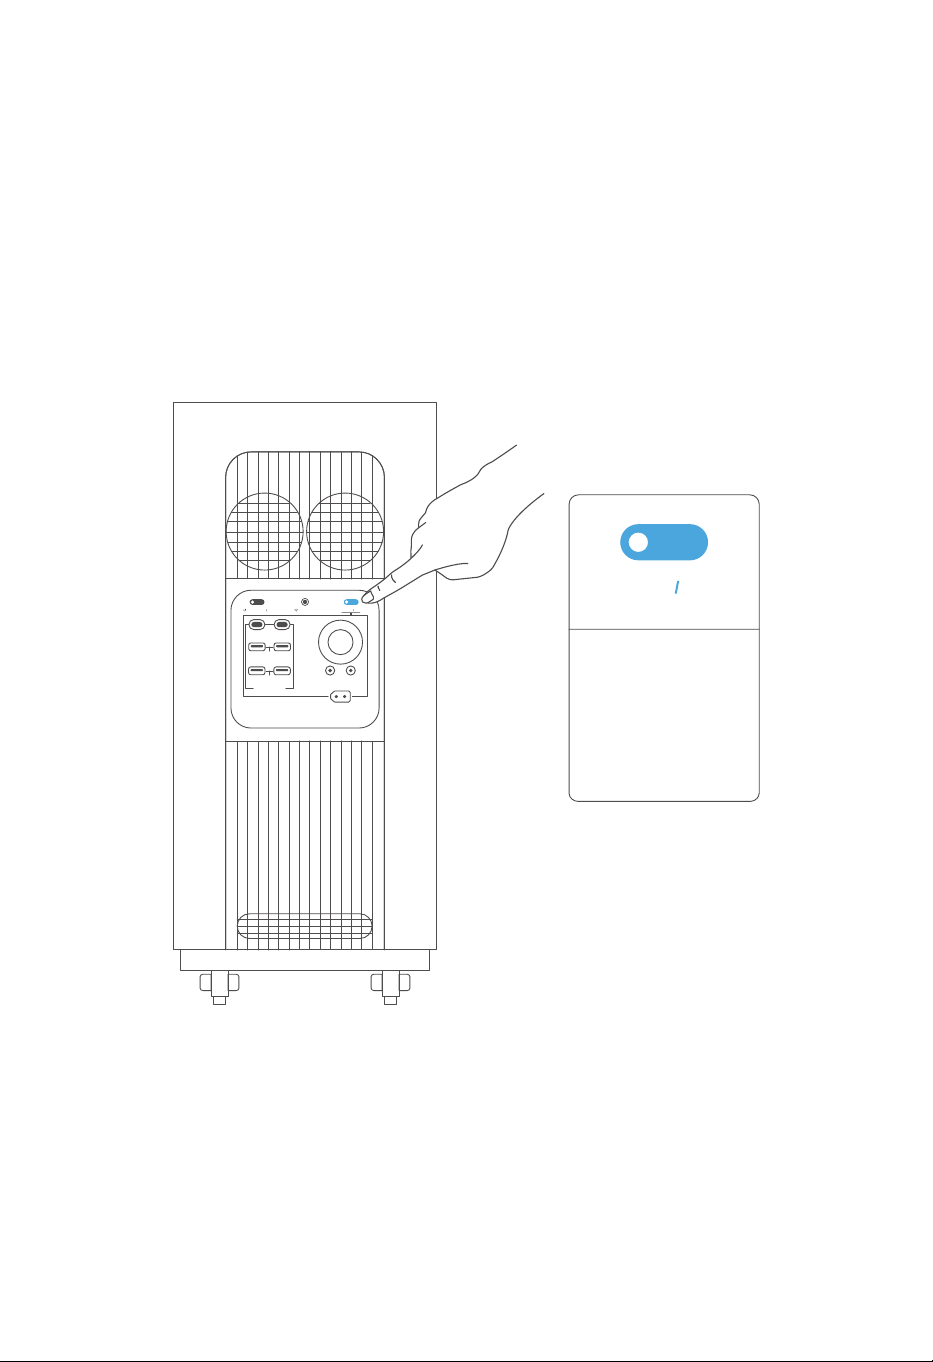
3.4.2 DC Output
The DC output is off by default after the device turning on. The light indicator on the button is off,
and there is no power output. After short pressing the DC on/off button, the power output is
turned on. The light indicator on the button is on, and power output is ready to use.
DC Output Switch:
Short press to button to
change DC on/off
setting. Hold the button
for 3 seconds to turn off
the screen.
DC ON OFF
IOT RESET
USB-A 18W
USB FAST CHARGE
DC 12V 120W
12V 360W MAX
+-
USB-C 140WUSB-C 140W
DC ON OFF
POWER ON OFF
USB-A 18W
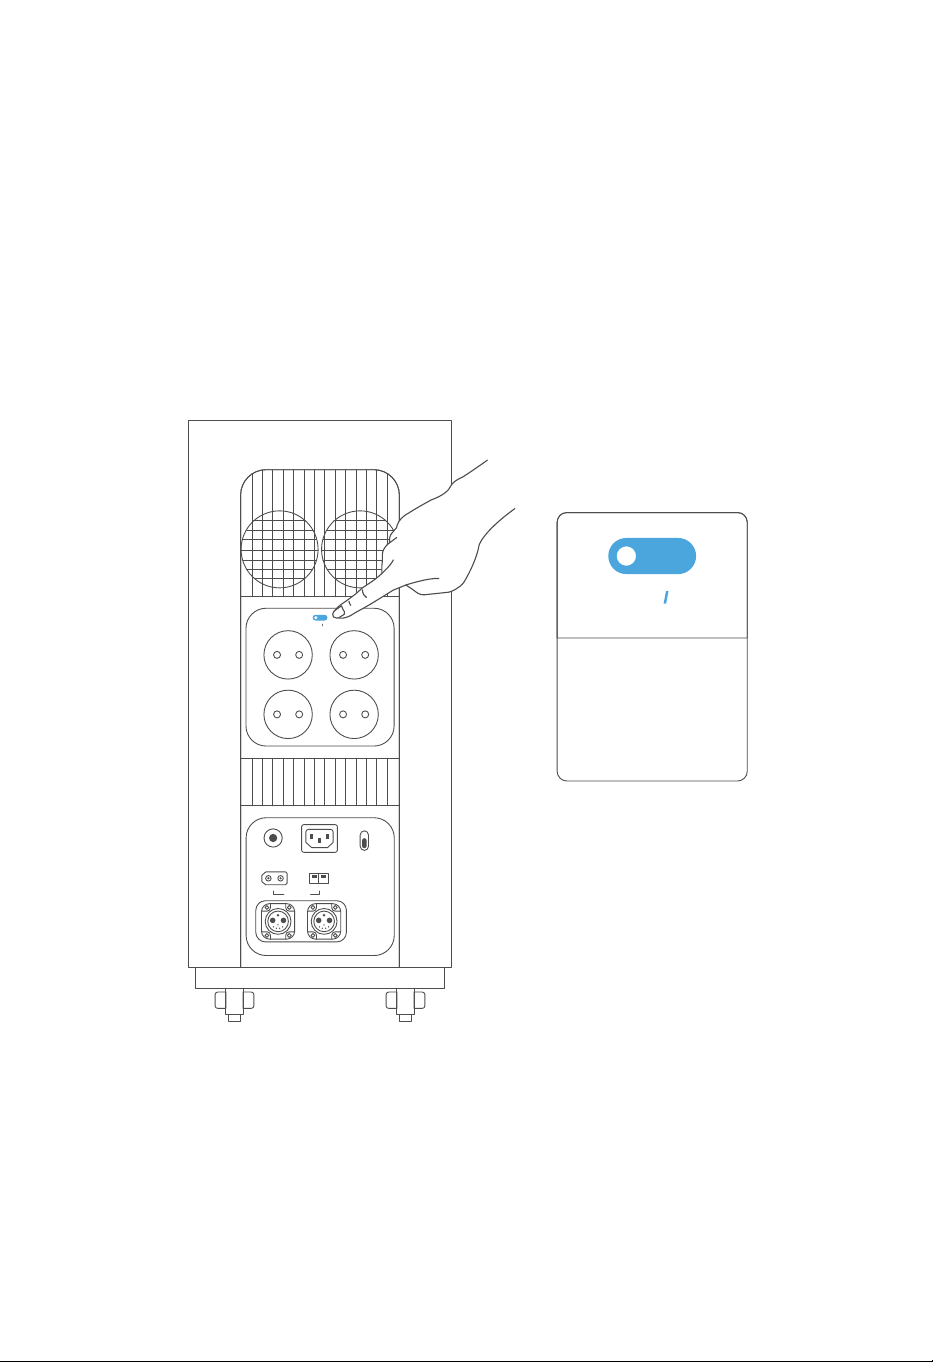
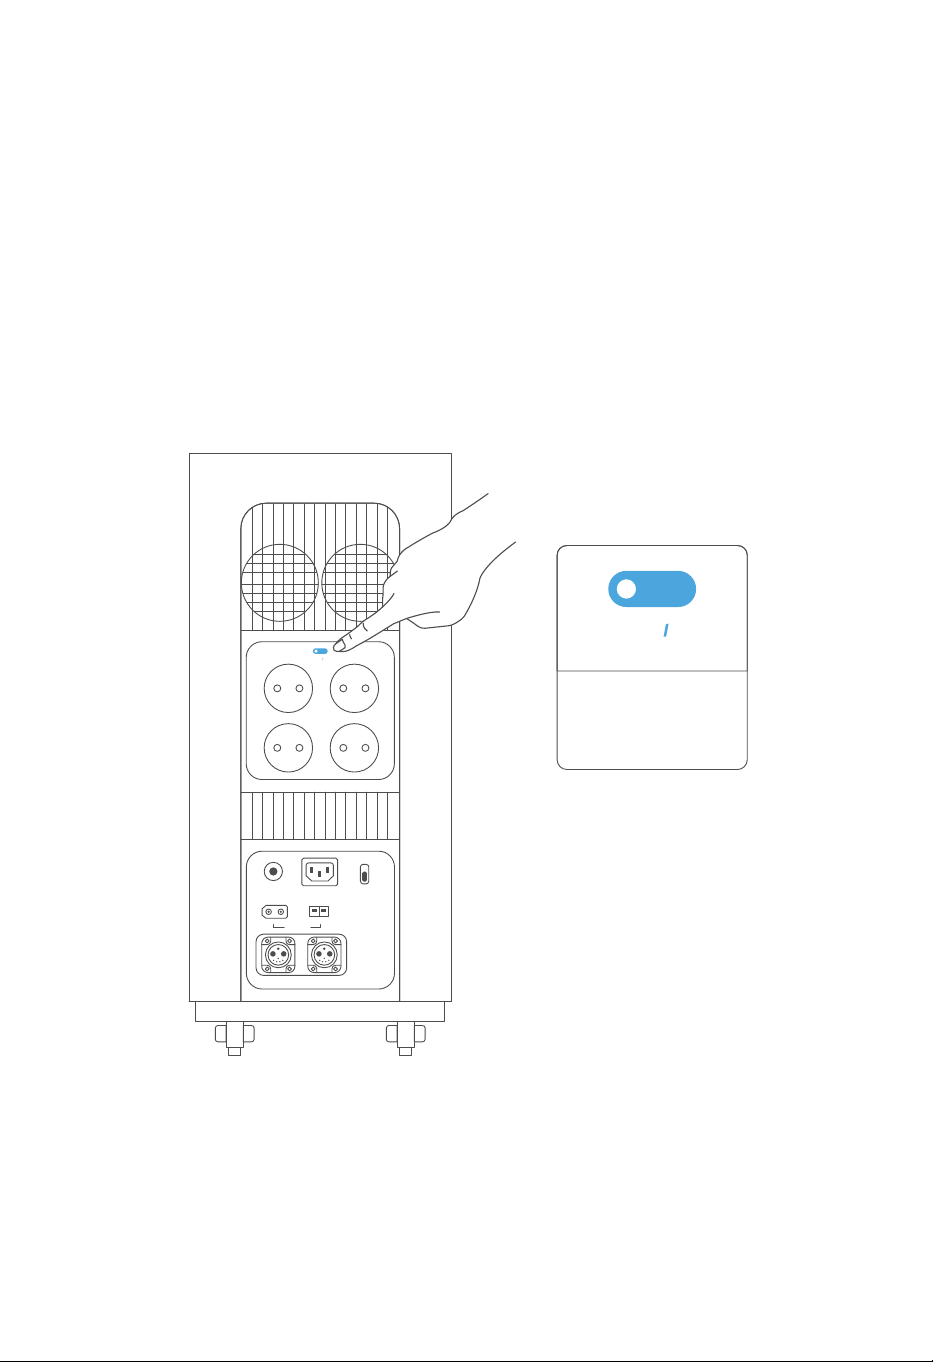
3.4.3 AC Output
15
The AC output is off by default after the device turning on. The light indicator on the button is
off, and there is no power output. After short pressing the AC on/off button, the power output
is turned on. The light indicator on the button is on, and power output is ready to use. Short
press the button again to turn off AC output.
The overload protector will be triggered if AC output current over 15A. The device will auto-
matically shut down AC and DC output. And the Overload Protection Switch needs to be
reset manually.
AC ON OFF
AC Output Switch:
Short press to button
to change AC on/off
setting.
+-
OVERLOAD
PROTECTION
INPUT 12-75V
BATTERY-1 BATTERY-2
AC INPUT
230V 3000W MAX
WIND 200W
FAST
SLOW
AC CHARGE SPEED
+-
SOLAR 1500W
AC ON OFF
230V 15A
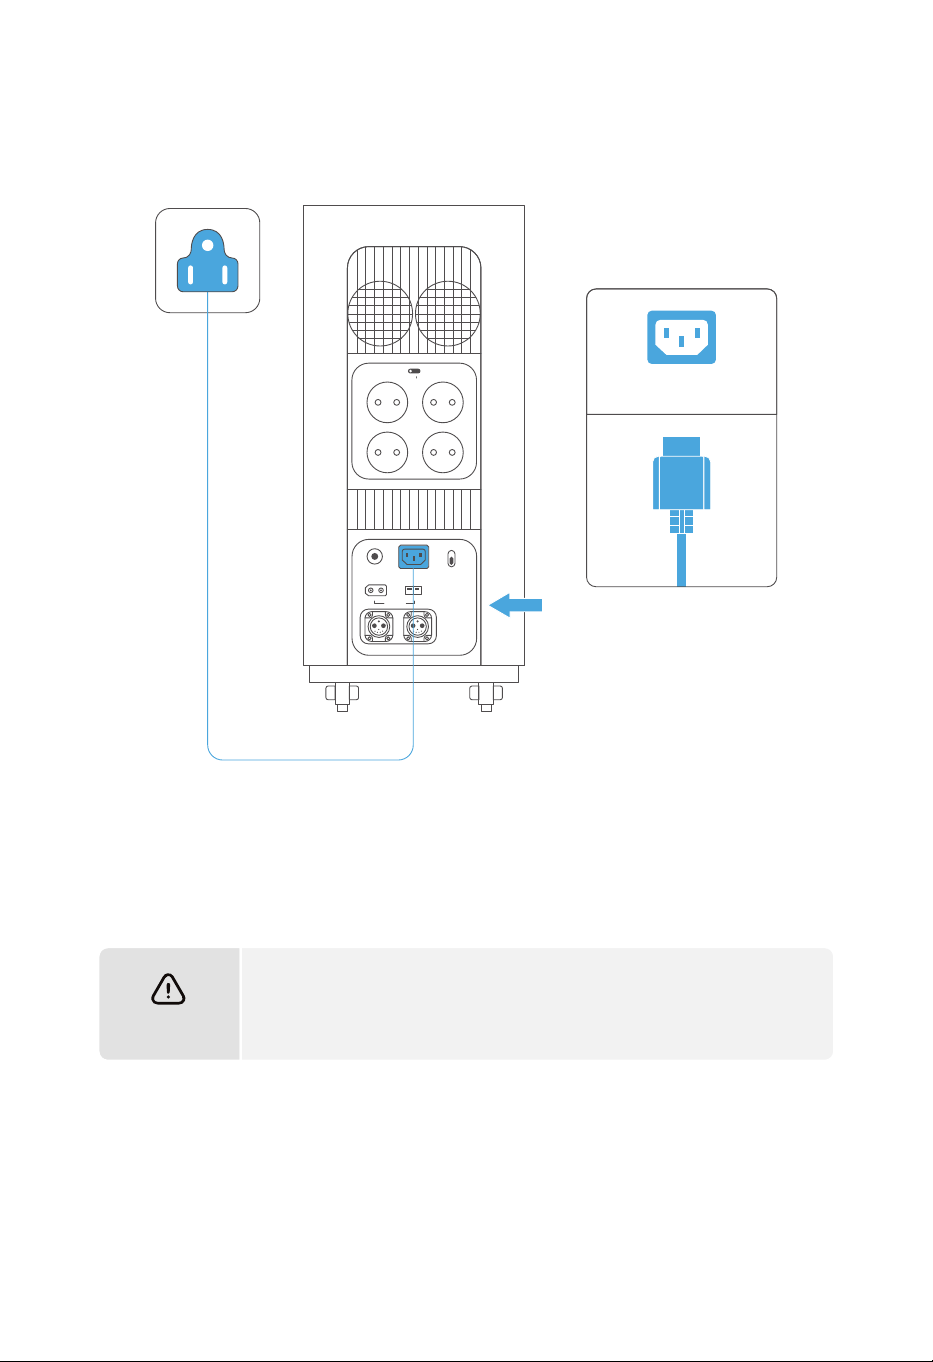
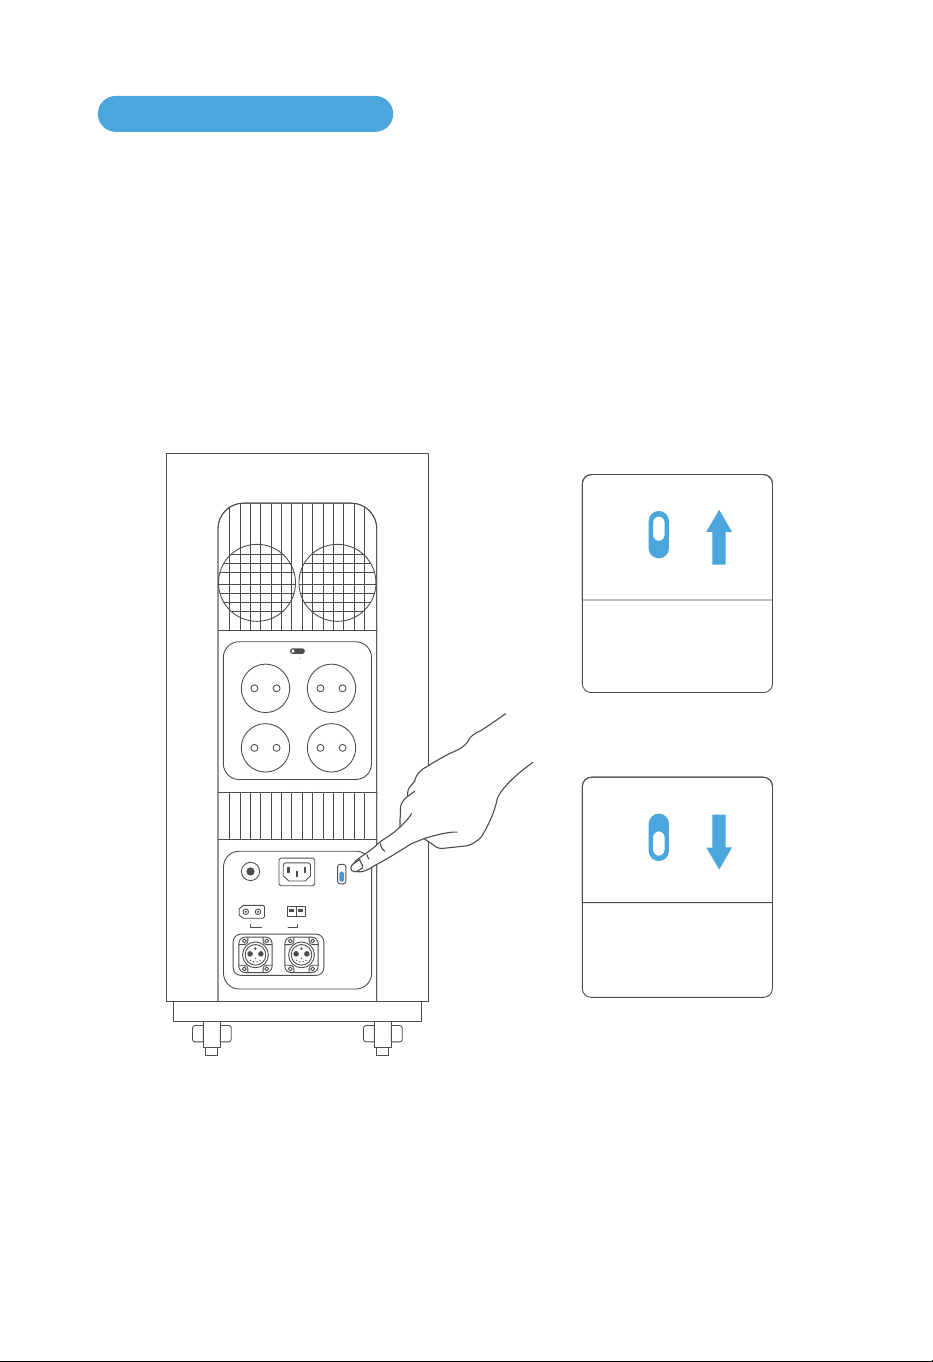
3.5.1 AC Charging
16
3.5 Charging
FAST
SLOW
Push it down to enter
slow charging mode.
FAST
SLOW
Push it up to enter fast
charging mode.
There are two modes for AC charging: fast charging and slow charging.
The maximum input power of fast charging mode is 3000W, and can be adjusted from 500 to
3000W in Gendome App.
The maximum input power of slow charging mode is 500W, and cannot be adjusted.
+-
OVERLOAD
PROTECTION
INPUT 12-75V
BATTERY-1 BATTERY-2
AC INPUT
230V 3000W MAX
WIND 200W
FAST
SLOW
AC CHARGE SPEED
+-
SOLAR 1500W
AC ON OFF
230V 15A
17
Please use the original Gendome charging cable in the box for AC
charging. Gendome responses no liability for the damage caused by
using other non-genuine charging cables.
ATTENTION
AC INPUT
+-
OVERLOAD
PROTECTION
INPUT 12-75V
BATTERY-1 BATTERY-2
AC INPUT
230V 3000W MAX
WIND 200W
FAST
SLOW
AC CHARGE SPEED
+-
SOLAR 1500W
AC ON OFF
230V 15A
18
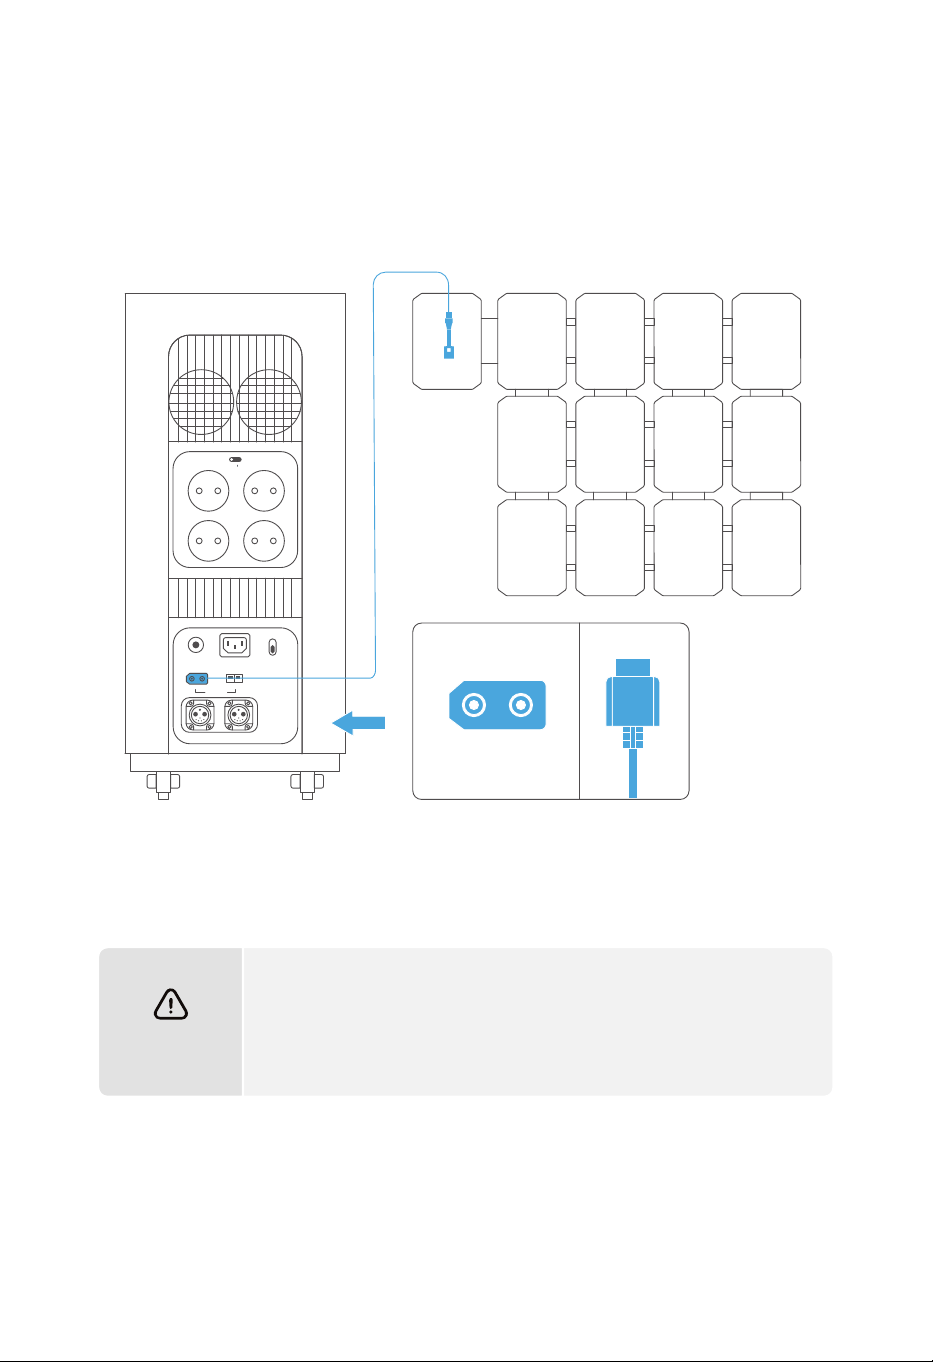
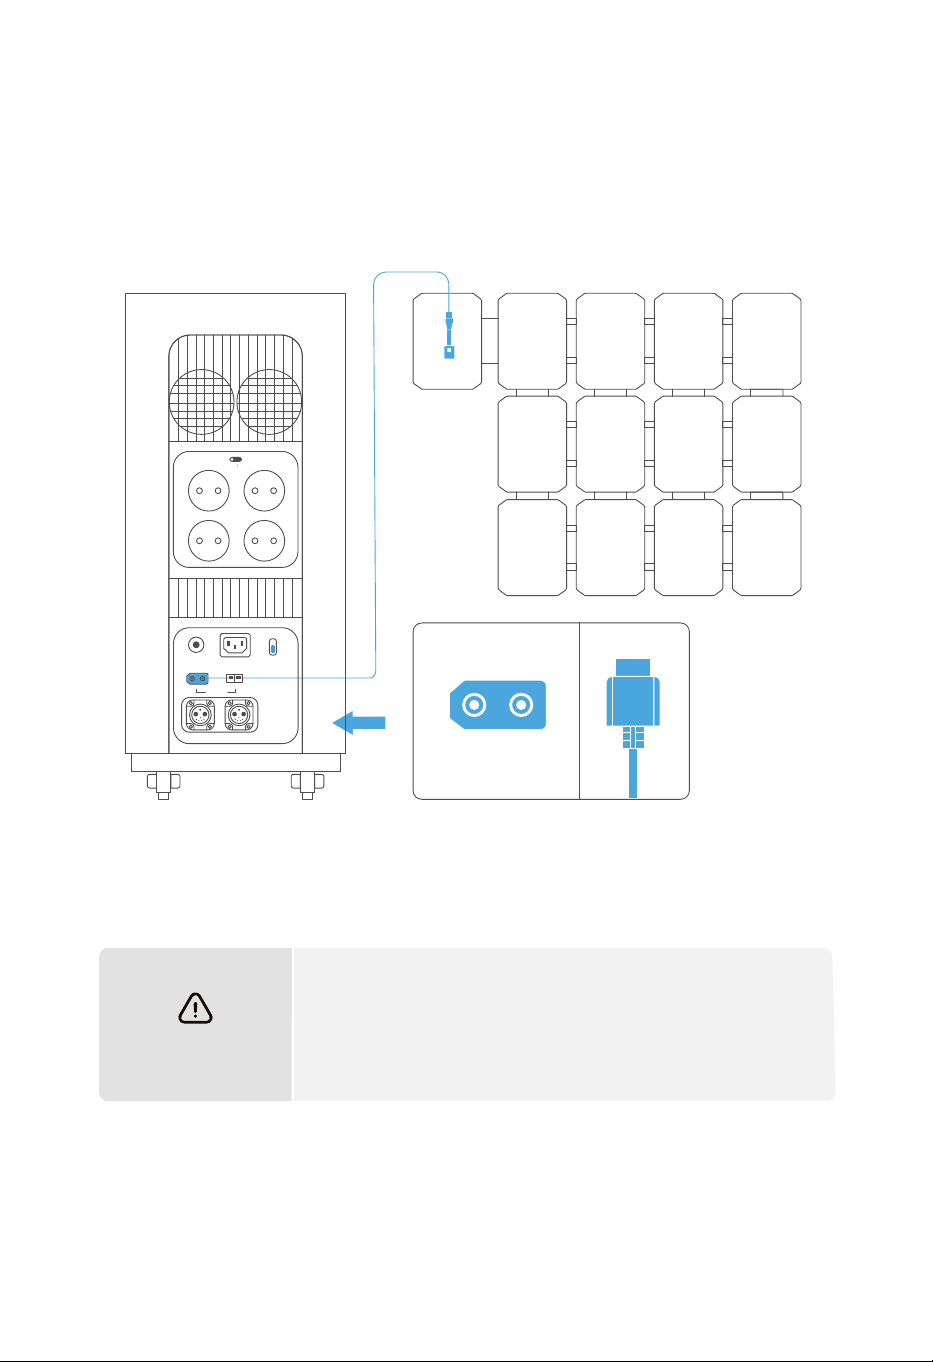
3.5.2 Solar Power Charging
Users shall connect solar panels in series to charge the product as shown in the figure. The
product supports DC input voltage from 12V to 75V and charging power up to 1500W.
ATTENTION
b.
a.
When connecting the solar panel to charge the device, please
make the connection according to the instruction above.
Before connecting the solar panel, please make sure that the
output voltage of the solar panel is between 12~75V, otherwise the
device may be damaged.
+-
SOLAR 1500W
+-
OVERLOAD
PROTECTION
INPUT 12-75V
BATTERY-1 BATTERY-2
AC INPUT
230V 3000W MAX
WIND 200W
FAST
SLOW
AC CHARGE SPEED
+-
SOLAR 1500W
AC ON OFF
230V 15A
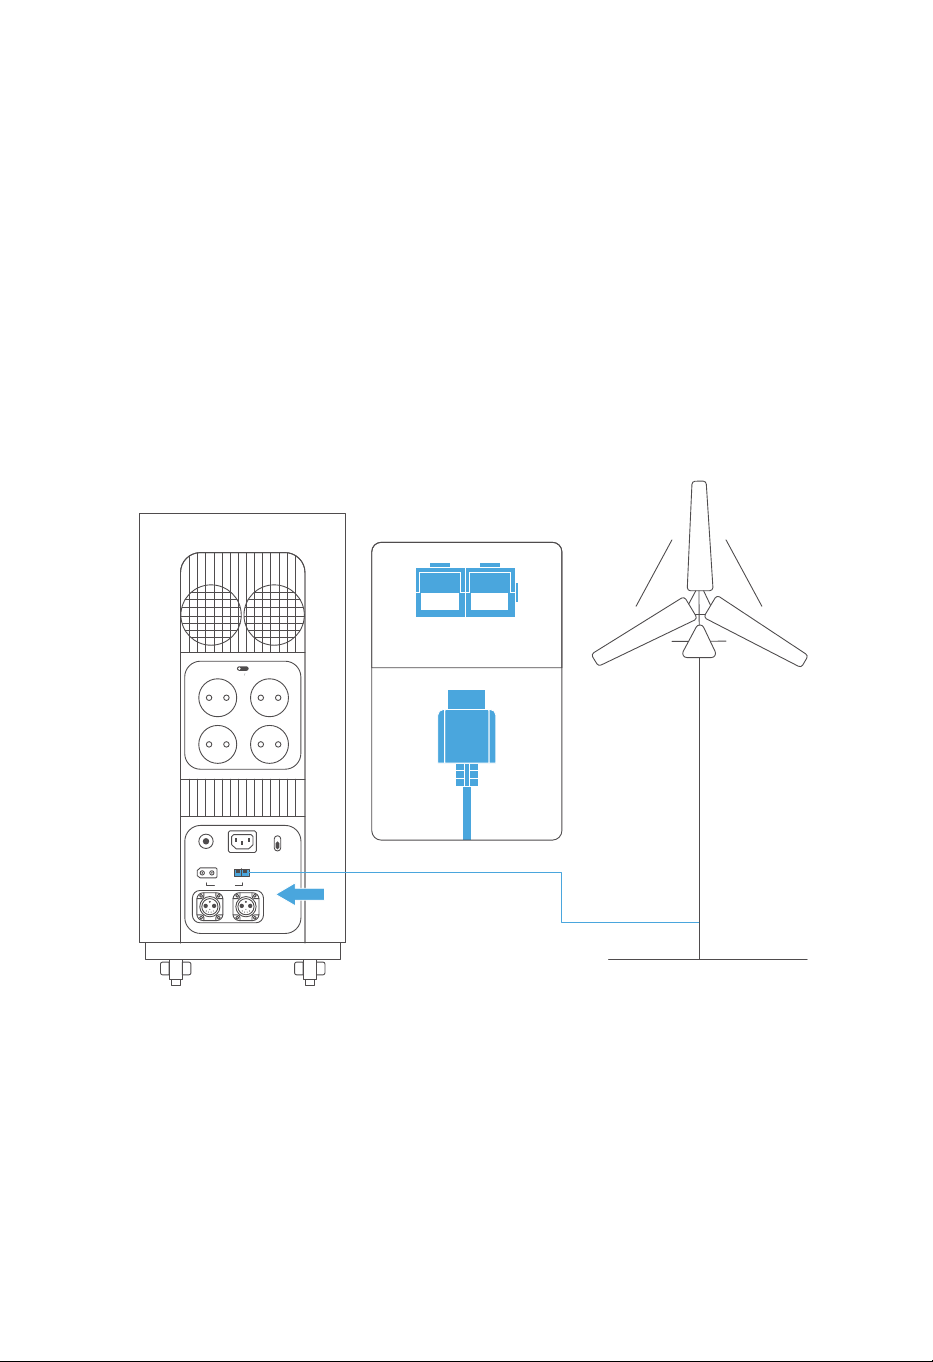
3.5.3 Wind Power Charging
19
The device supports up to 200W wind power input.
As the below instruction, the device can be charged by the wind turbine by a wind power cable.
Please make sure input power of the wind turbine is between 12~75V before charging.cable.
WIND 200W
+-
OVERLOAD
PROTECTION
INPUT 12-75V
BATTERY-1 BATTERY-2
AC INPUT
230V 3000W MAX
WIND 200W
FAST
SLOW
AC CHARGE SPEED
+-
SOLAR 1500W
AC ON OFF
230V 15A
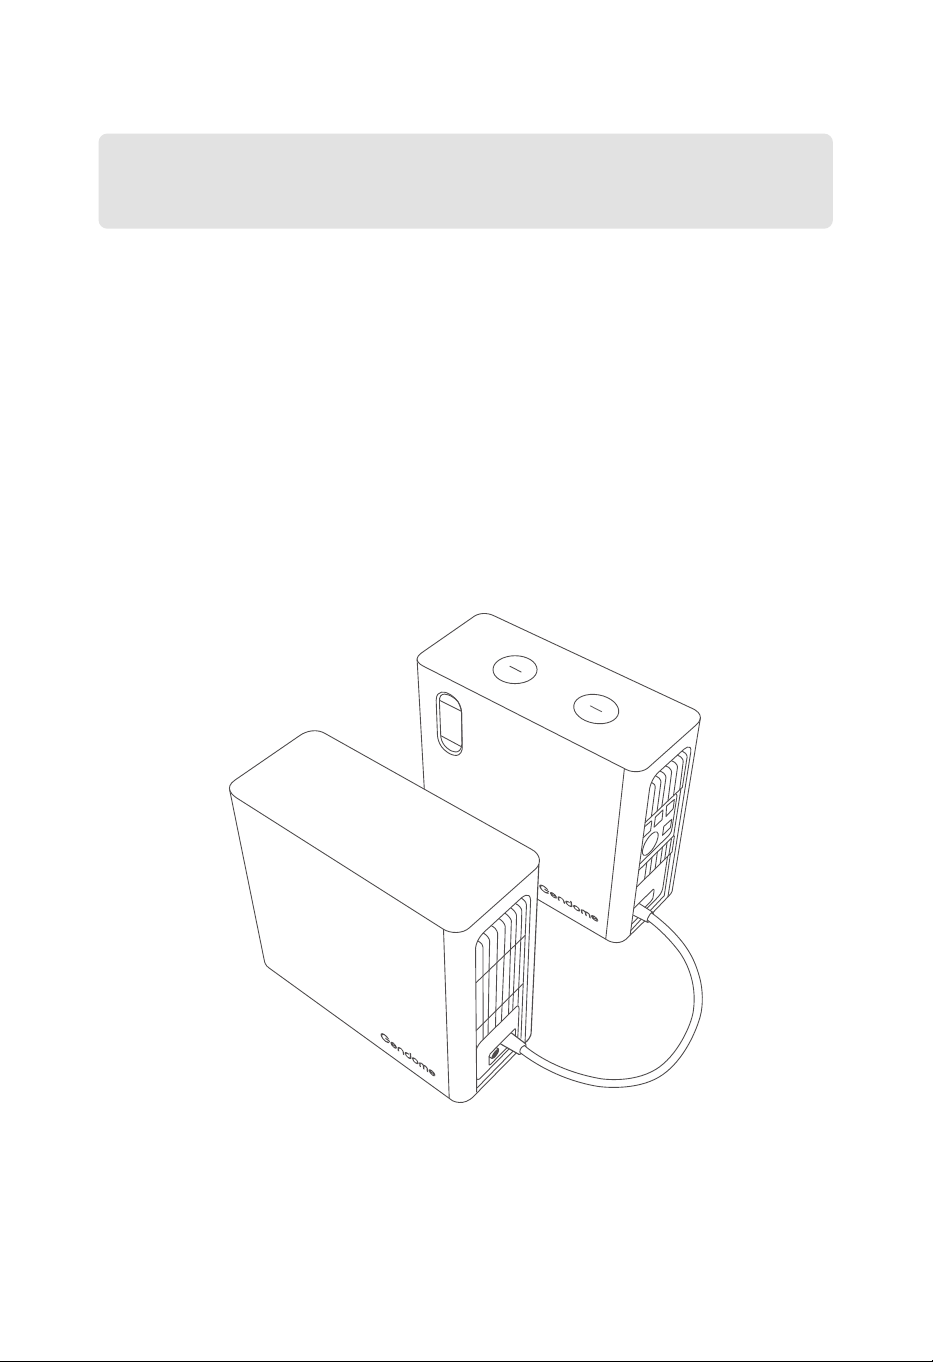
3.5.4 Extra Battery
20
Before connecting the equipment to an external battery pack, please make sure that the
product and the external battery pack are both turned off.
After the battery pack is connected, make sure that the icons appear on the display of both
the product and the battery pack before use.
Do not connect or disconnect the battery pack during charging or discharging. Please shut
down the power station before disconnecting the battery pack.
Do not touch the metal part of the battery pack output port with hands or other objects. The
foreign matters attached on the metal terminals shall be gently wiped off with a dry cloth.
a.
b.
c.
d.
This product can be connected to up to two external battery packs at the same time to provide
a larger capacity. Please pay attention to the following matters during operation:
21
3.6 Use of APP
Users may control and view information and data about this product through the Gendome
App. For more information about the download and use of the App, please check Gendome
official website: www.gendome.com
3.7 UPS Function
This product supports UPS (Uninterruptible power supply). Connect the device to power grid
with the AC charging cable, and the electrical appliances can obtain power supply through
the product’s AC output ports (in this case, the AC power supply comes from the power grid
instead of the power station). When there is an power outage, the device will switch to UPS
mode and automatically supply power from the product’s internal battery. This is a non-pro-
fessional UPS and does not support 0 ms switching. Do not connect it to devices requiring a 0
compatibility between the product and the devices by multiple tests before using the
function. Besides, it is recommended to connect only one device at a time. Simultaneous
operation of more than one device may trigger overload protection of the product. If the
devices fail to function properly or data loss is caused due to operation against the instruc-
tions, the Company assumes no liability.
Download APP

22
4.2 Equipment Storage
Ensure that the outer packing box is not removed and the desiccant in the box is not lost.
Ensure that the storage environment is clean, with appropriate temperature and humidity,
and free from condensation.
Ensure that the equipment is placed according to the label instructions on the packaging
box.
Ensure that the equipment is stored away from flammable, explosive, corrosive and other
dangerous goods.
For a long-term storage, in order to prolong the life of the product and maintain the best
performance of the battery, it is recommended to discharge and recharge it every 3
months, or discharge a
nd recharge it completely once within 6 months at least.
4.1 Inspection before Acceptance
Check the outer package for damage, such as deformation, holes, cracks or other signs that
may cause damage to the equipment in the packing box. If any, do not unpack and contact
your dealer.
Before unpacking, check whether the equipment is the correct model. If not, do not unpack
and contact your dealer.
Check the product appearance for damage. Contact your dealer if any.
4. EQUIPEMENT INSPECTION AND STORAGE
a.
b.
c.
a.
b.
c.
d.
e.
Before signing for the product, please check the following in detail:
If your Portable Power Station is not put into use immediately, please store it by the
following requirements:

23
5.1 Equipment Scrap
If the product cannot serve anymore and scrap is required, please dispose of it according to
the laws and regulations concerning the electrical waste disposal of the country/region
where the product is used. It shall never be disposed of as domestic waste or discarded at will.
List of Fault Codes Indicated on Display:
5.2 Troubleshooting
5. FAULT INDICATION AND TROUBLESHOOTING
Definition SolutionCodes
Under-Voltage Protection, The device is
charging in low speed to protect battery
health, and will resumer fast charge shortly.
E02
High-Temperature Protection, The device
needs to cool down before continue using.
E03
Under-Voltage Protection
High-Temperature Protection
Over-Current Protection, Please turn off the
device, unplug all cables, and restart in 30s.
If the issue is still not fixed, please contact
customer service.
E05 Over-Current Protection
System Malfunction, The device will turn
off in 10 seconds. Please contact customer
service for further support.
E06 BMS Mulfunction
System Malfunction, The device will turn
off in 10 seconds. Please contact custom-
er service for further support.
E07 Converter Maulfunction
1. Low-Temperature Protection, The device
needs to warm up before continue using.
2. Low-Temperature Protection, Please
reduce the connected equipment, and
keep within 1500W in total to prevent the
device shutting down.
E04 Low-Temperature Protection
Over-Voltage Protection
Over-Voltage Protection, Please turn off the
device, unplug all cables, and restart in 30s.
If the issue is still not fixed, please contact
customer service for further support."
E01
High-Temperature Protection, The device
needs to cool down before continue using.
E08
Converter High-Temperature
Protection

24
Definition SolutionCodes
Over-Current Protection
Over-Current Protection, Please reduce the
connected equipment and turn on the AC
or DC switch again.
E09
Overload Protection
Overload Protection, Please reduce the
input source and restart again.
If the issue is still not fixed, please contact
customer service.
E10
Output Malfunction
System Malfunction, The device will turn
off in 10 seconds. Please contact custom-
er service for further support.
E11
Abnorrmal Grid Voltage
Abnorrmal Grid Voltage, The electrical grid
is unstable right now. Please disconnect
AC input to avoid damaging the device.
E12
Abnorrmal Grid Frequency
Abnorrmal Grid Frequency, The electrical
grid is unstable right now. Please disconnect
AC input to avoid damaging the device.
E13
Short Circuit
System Malfunction. The device will turn
off in 10 seconds. Please contact custom-
er service for further support.
E14
Other Malfunction
System Protection, Please turn off the
device, unplug all cables, and restart in 30s.
If the issue is still not fixed, please contact
customer service for further support.
E15
If a warning appears during the use of this product, please apply the solutions above, and then
reboot the equipment. If the warning is still shown, please stop using the equipment immedi-
ately and contact customer service (do not try to charge or discharge the equipment).
If the information above cannot solve your problem, please contact our professional customer
service for consultation.
25
6.1 Maintenance
CycleItems
Once a year
Once a year
Once every half year to
once a year
6. MAINTENANCE AND PRESERVATION
For equipment maintenance, please power off the product. Operating the equipment
with power on may cause damage to the equipment or electric shock.
Fan
DC Switch
Product
cleaning
Methods
Check whether the fan operates nor-
mally, whether there is noise and
whether the appearance is normal.
Turn on and off the DC switch continu-
ously for 10 cycles to make sure that
the switch functions properly.
Check the cooling fin and air inlet/out-
let for foreign matters and dust.
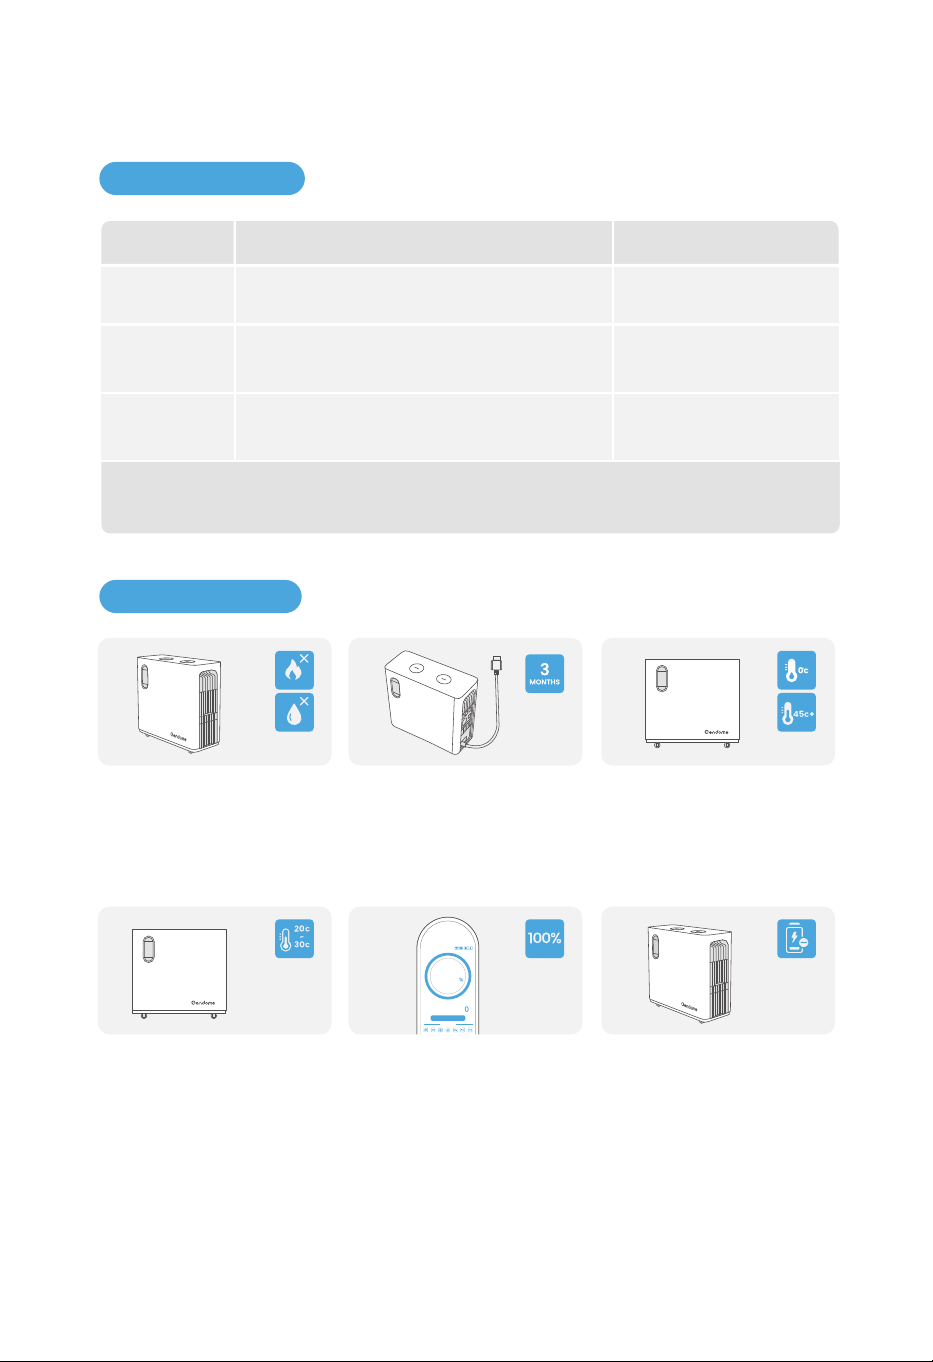
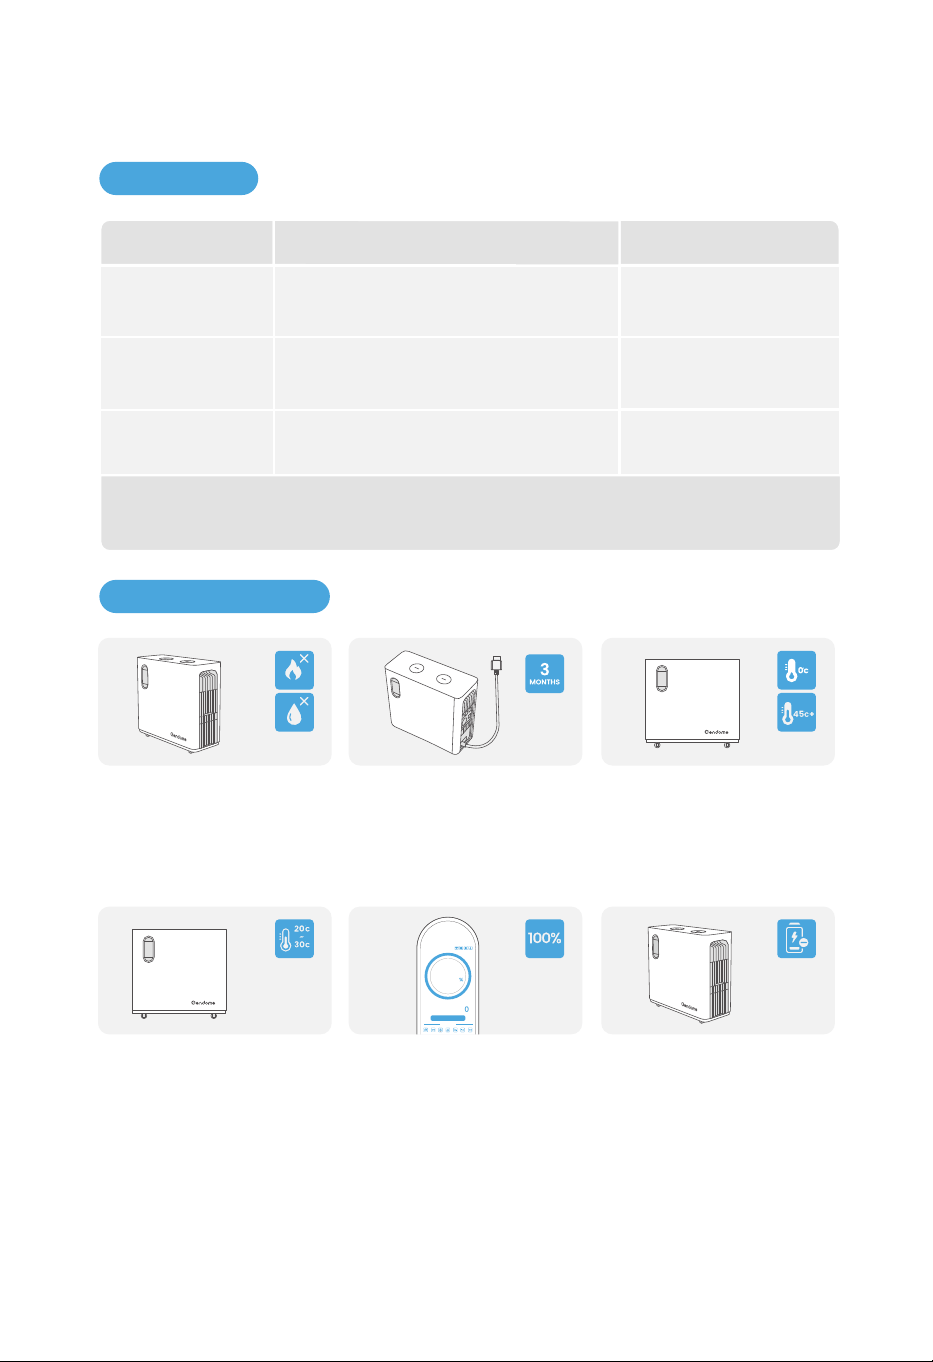
6.2 Preservation
For safety, do not store this
product in an environment
with a temperature lower
than 0°C(32° F) or higher than
45°C(113°F)for a long time.
If the product is at an exces-
sively low battery level and
has not been used for a long
time, it will enter deep sleep
mode, which means it needs
to be charged before reuse.
It is recommended to use or
store the product at 20°C to
30°C (68°F to 86°F) and away
from water, heat, and other
metal objects.
In order to prolong the life of
the battery, it is recommend-
ed that this product be used
in an environment of 20°C to
30°C (68°F to 86°F).
For long-term storage, please
discharge and recharge the
product once every 3 months
(i.e. discharge the product to
30% battery level first and then
charge it to 60% battery level).
If the product will not be used
for a long time, please charge
it to 100% battery level before
storage. If the product is not
used for a long time at a low
battery level, irreversible
damage may happen to the
battery cell and the life of the
product may be shortened.
w
INPUT OUTPUT
OUTPUT
w
Use Status
Remaining Time: -- h -- m
100
0
Download APP
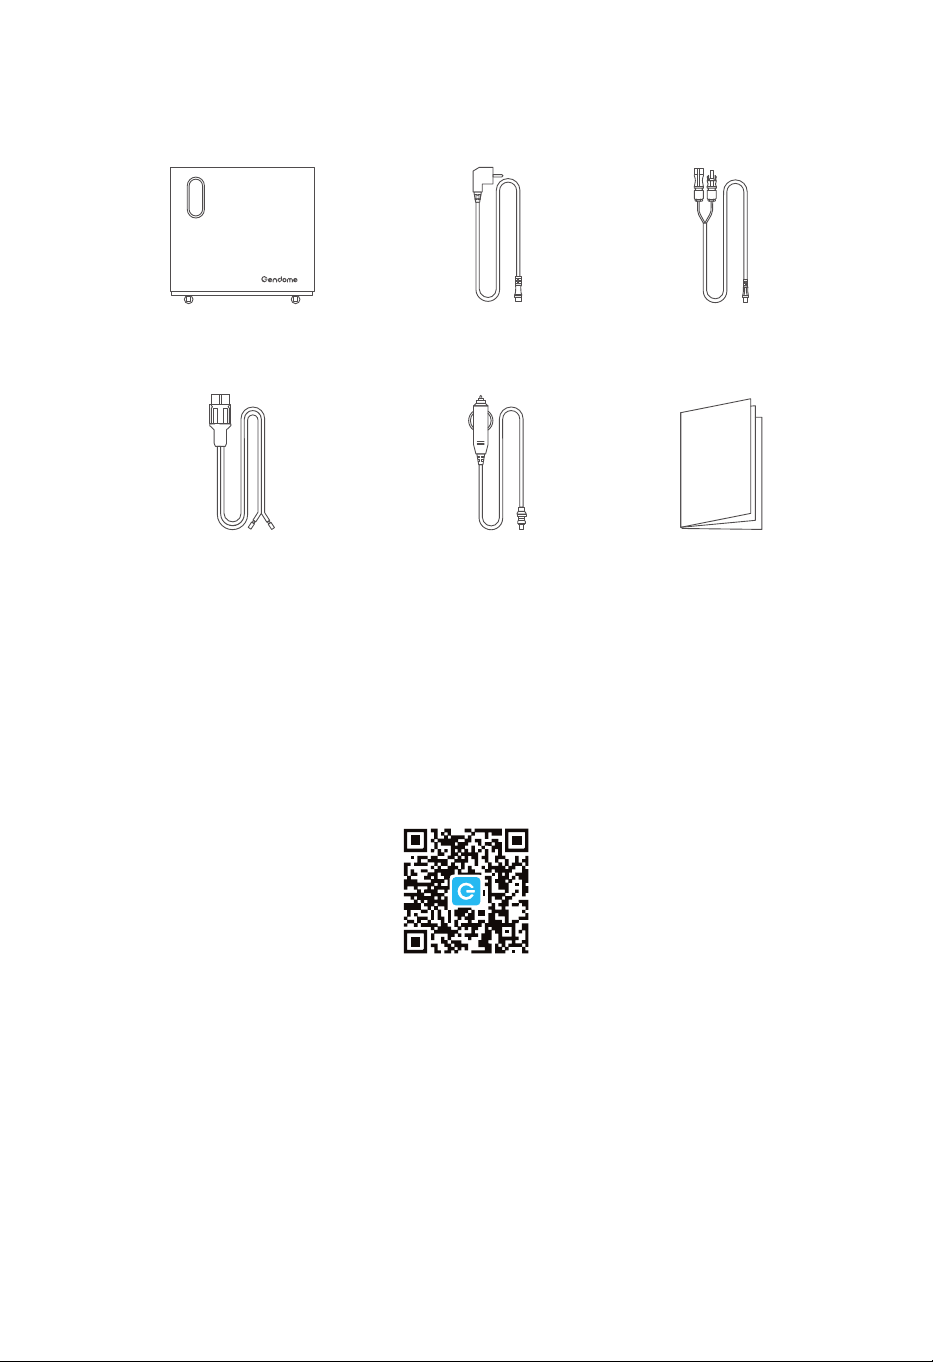
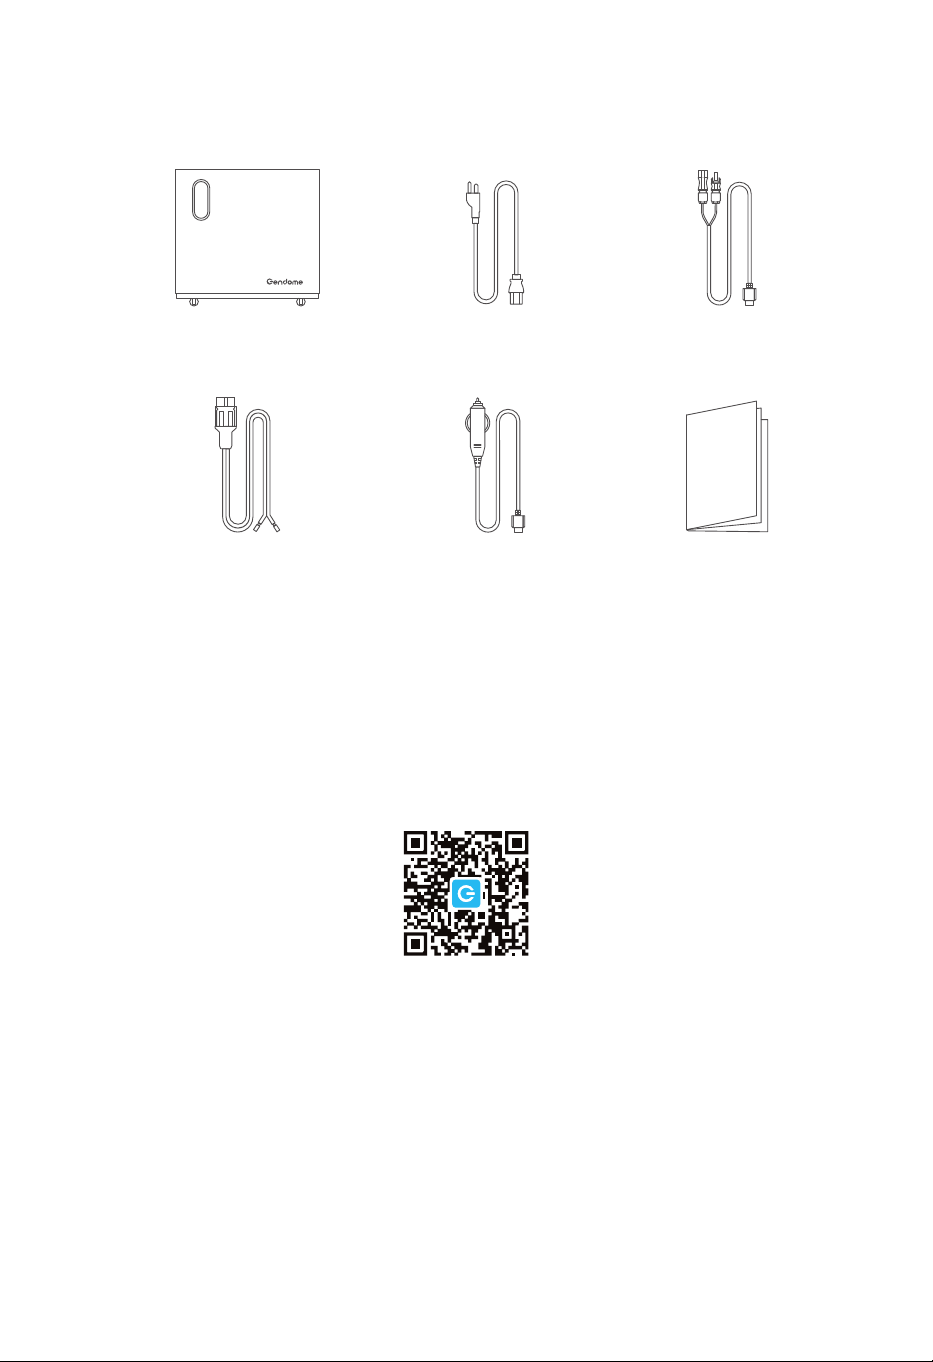
7. IN-THE-BOX
Solar Charge Cable
User Manual
AC Charge Cable
Cigarette Lighter to XT60 Cabl
Gendome Home 3000
Wind Turbine Charge Cable
26

Home 3000
Tragbare Powerstation Benutzerhandbuch

Bitte lesen Sie vor der Produktverwendung das Benutzerhandbuch sorgfältig durch,
damit Sie das Produkt sicher und richtig verwenden können.
Alle Sicherheits- & Warnhinweise, Nutzungsbedingungen und Haftungsausschlüsse
finden Sie unter:
https://www.gendome.com/pages/faq

KATALOG
1.1 Grundlegende Parameter
1.2 Ausgangsspezifikationen
1.3 Eingangsspezifikationen
1.4 Spezifikation des Batteriemoduls
1.5 Temperaturparameter
1.6 Sonstiges
........................................................................................................
.......................................................................................................
.........................................................................................................
.........................................................................................
............................................................................................................
.....................................................................................................................................
1
1
1
2
2
2
1. Parameterspezifikation
2. Sicherheitshinweise
1
3.1 Anwendungsszenarien
3.2 Produktmaß
3.3 Bildschirm und Anschlüsse
3.3.1 Bildschirmanzeige
3.3.2 Beschreibung der Bildschirmfunktionen
3.3.3 Geräteseitige Anschlüsse
3.3.4 Powertaste und DC-Ausgangsanschlüsse
3.3.5 AC-Ausgangsanschluss
3.3.6 Eingangsanschluss
3.4 Produktverwendung
3.4.1 Ein-&Ausschalten und Leuchten des LCD-Bildschirms
3.4.2 Gleichstromausgang (DC)
3.4.3 Wechselstromausgang (AC)
3.5 Aufladen des Geräts
3.5.1 AC-Ladung
3.5.2 Ladung durch Solarenergie
3.5.3 Ladung durch Windenergie
............................................................................................................
..............................................................................................................................
...................................................................................................
...........................................................................................................
...................................................................
.............................................................................................
.............................................................
...............................................................................................
.........................................................................................................
...............................................................................................................
.........................................
...........................................................................................
.......................................................................................
...............................................................................................................
.........................................................................................................................
..........................................................................................
..........................................................................................
4
5
6
6
7
9
10
11
12
13
13
14
15
16
16
18
19
3. Hinweise für Anfänger
4
3
2.1 Sicherheitsrisiken
.....................................................................................................................
3
2.2 Nutzungsbedingungen
............................................................................................................
3

...................................................................................................
.......................................................................................................................
.............................................................................................................................
20
21
21
3.5.4 Externes Batteriepaket
3.6 Nutzung der APP
3.7 UPS-Funktion
4. Inspektion und Lagerung des Geräts
22
4.1 Inspektion vor Abnahme
4.2 Lagerung des Geräts
........................................................................................................
..............................................................................................................
22
22
5. Fehleranzeige und -behandlung
23
5.1 Entsorgung des Geräts
5.2 Fehlerbehandlung
.............................................................................................................
...................................................................................................................
23
23
6. Wartung und Instandhaltung
25
6.1 Wartung
6.2 Instandhaltung
.......................................................................................................................................
.........................................................................................................................
25
25
7. Packliste
26
1.1 Grundlegende Spezifikation
Gewicht
Produktmaß (L*B*H)
Akkukapazität
Wi-Fi
Bluetooth
83.8lbs / 38kg
22.0*9.1*21.4 in / 560*230*543 mm
3072Wh
Unterstützt
Unterstützt
1
1. PARAMETERSPEZIFIKATION
1.3 Eingangsspezifikationen
1.2 Ausgangsspezifikationen
AC-Ausgang (x4)
USB-A (×4)
RV-Wohnwagen-Ausgang
DC5521-Ausgang (x2)
USB-C (×2)
Ausgang des
Zigarettenanzünders
Kabellose Ladestelle (x2)
12V Konstantspannungsausgang, maximal 120W
12V Konstantspannungsausgang, maximal 15W pro Port
Maximal 3000W, Spitze 6000W
12V Konstantspannungsausgang, maximal 360W
12V Konstantspannungsausgang, maximal 36W pro Anschluss
5V 3A/9V 3A/
PD3.1, maximal 140W pro Port,
12V
15V 3A/20V 5A/28V 5A 3A/
5V 3A/9V 2A/12V 1.5A
Maximal 18W pro Anschluss
* Ausgänge von Zigarettenanzünder, DC5521und RV-Wohnwagen teilen sich eine Gesamtleistung von 360W.
* Maximale Gesamtausgangsleistung des Geräts: 3742W.
* Das gleichzeitige AC-Laden und Photovoltaik-Modul-Laden ist möglich. Die Eingangsleistung darf maximal
bis zu 3000W sein.
230V, maximal 3000W
12~75V, maximal 1500W Aufladung
12~75V, maximal 200W Aufladung
Schnellladung: 500 ~ 3000W, einstellbar
Langsamladung: 500W
AC-Eingangsleistung
Ladeeingang der Solarenergie
Ladeeingang der Windenergie
Schnell- und Langsamlademodus

1.4 Spezifikation des Batteriemoduls
Externes Batteriepaket Anschluss mit maximal 2 externen Batteriepaketen möglich
1.6 Sonstiges
2
Umgebungstemperatur für Entladen
Umgebungstemperatur für Laden
Optimale Betriebstemperatur
Umgebungstemperatur für Lagern
32~113°F/0°C~45°C
32~113°F/0°C~45°C
68~86°F/20°C~30°C
32~113°F/0°C~45°C
1.5 Temperaturparameter
Nennspannung
Schutztyp
51.2V
Hochtemperatur-, Niedertemperatur-, Überentladungs-,
Überladungs-, Überlast-, Kurzschluss-, Überstromschutz usw.
Über 2500 Male, Restkapazität 80%Zyklenlebensdauer
Lithium-Eisen-Phosphat in AutomobilqualitätBatteriezelle

2.1 Sicherheitsrisiken
2. SICHERHEITSHINWEISE
a.
b.
c.
d.
e.
Stromschlaggefahr: Öffnen Sie bitte nicht die Abdeckung. Keine Teile im Inneren des
Produkts dürfen vom Benutzer selbst repariert werden. Überlassen Sie die Reparatur bitte
dem qualifizierten Personal.
Um das Gerät langfristig vor Brandgefahr zu schützen, ersetzen Sie die Sicherung bitte nur
durch die mit demselben Typ und derselben Leistung.
Ableitstromrisiko: Nur Steckdose mit Erdung ist zulässig.
Verletzungsgefahr: Ist das Netz- oder Batteriekabel in irgendeiner Weise beschädigt, bitte
verwenden Sie es nicht mehr.
Dieses Gerät ist nicht für den Einsatz in gewerblichen Reparaturwerkstätten vorgesehen.
2.2 Nutzungsbedingungen
a.
b.
d.
e.
c.
Überladen Sie bitte die interne Batterie nicht.
Rauchen, Zünden oder Funken sind in der Nähe des Geräts verboten.
Laden Sie bitte die interne Batterie nur in einer gut belüfteten Umgebung auf.
Um Stromschlag- und Brandgefahr zu vermeiden, bitte lagern Sie dieses Gerät nicht im Auto.
Dieses Gerät ist für den Innenraum geeignet. Bei Verwendung im Outdoor bitte achten Sie
auf Wasser- und Staubdichtigkeit.
3
3.1 Anwendungsszenarien
Mobile Energiespeicherprodukte haben einen sehr breiten Anwendungsbereich. Alle elektrischen
Produkte können durch Anschlussumwandlung von diesem Produkt mit Strom versorgt werden.
Es kann sowohl über den Stadtnetzeingang als auch über Solar- bzw. Windenergie aufgeladen
werden. Das Produkt wird breit verwendet für Notkommunikation & -rettung, Outdoor-Geschäft,
Haushaltnotversorgung bei Stromausfall, nicht mit Strom versorgte Berggebiete usw.
4
3. HINWEISE FÜR ANFÄNGER
Notstromversorgung Outdoor-Geschäft
NotkommunikationNotversorgung im Auto
Wohnmobilreisen Notrettung
Outdoor-Camping
Häusliches Leben

a. Kastenlänge und -höhe
560mm
498mm
543mm
3.2 Produktmaß
5
b. Linke Ansicht c. Rechte Ansicht
230mm
IOT RESET
USB-A 18W
USB FAST CHARGE
DC 12V 120W
12V 360W MAX
+-
USB-C 140WUSB-C 140W
DC ON OFF
POWER ON OFF
USB-A 18W
230mm
+-
OVERLOAD
PROTECTION
INPUT 12-75V
BATTERY-1 BATTERY-2
AC INPUT
230V 3000W MAX
WIND 200W
FAST
SLOW
AC CHARGE SPEED
+-
SOLAR 1500W
AC ON OFF
230V 15A
6
3.3.1 Bildschirmanzeige
3.3 Bildschirm und Anschlüsse
1
3
4
5
6
7
12
11
10
9
8
2
w
INPUT OUTPUT
OUTPUT
w
Use Status
Remaining Time: -- h -- m
60
0
14
13
15
16
3.3.2 Beschreibung der Bildschirmfunktionen
Symbol AnzeigemethodeBezeichnung des Symbols
-
2
Die Elektrizitätsmenge durch Grafik gemäß
dem tatsächlichen Restwert dynamisch
anzeigen. Wenn der Restwert über 50% liegt,
zeigt sie sich grün an. Wenn der Restwert unter
50% liegt, zeigt sie sich gelb an. Wenn der
Restwert unter 20% liegt, zeigt sie sich rot an.
Elektrizitätsring
1
-
Die genaue Elektrizitätsmenge anzeigen.
Wertebereich: 0%~100%.
Elektrizitätsmenge
-
Die gesamte Eingangsleistung beim Auf-
laden durch Stadtnetz, Solar- und Winde-
nergie. Einheit: W (Watt). Wenn kein Lade-
vorgang stattfindet, wird 0W angezeigt.
3
Eingangsleistung
-
4
Beim Laden wird die geschätzte verbleibende
Ladezeit gezeigt. Beim Entladen wird die
geschätzte verbleibende Entladezeit gezeigt.
Beim gleichzeitigen Laden und Entladen wird
die verbleibende Zeit gemäß dem Ladezu-
stand berechnet.
"h" steht für Stunden und "m" für Minuten.
Verbleibende Lade-
/Entladezeit
6
Eine Schutzmaßnahme als Ersatz der Stadt-
netzversorgung nach dem Haushaltstrom-
ausfall. Das Symbol bleibt unter normalen
Bedingungen grau und leuchtet dauerhaft
im Schutzmodus. Beim Fehler blinkt es rot.
UPS
Wenn die Solarenergie zum Aufladen des
Geräts verwendet wird, leuchtet das Symbol
dauerhaft. Beim Fehler blinkt es rot und bleibt
beim nicht Verwenden grau.
7
Ladung durch
Solarenergie
8
Ladung durch
Windenergie
Wenn die Windenergie zum Aufladen des
Geräts verwendet wird, leuchtet das Symbol
dauerhaft. Beim Fehler blinkt es rot und bleibt
beim nicht Verwenden grau.
5
Wenn das linke Symbol leuchtet, befindet
sich das Gerät in Schnellladung. Die Eingangs-
leistung kann in der APP eingestellt werden.
Wenn das rechte Symbol leuchtet, befindet
sich das Gerät in Langsamladung. Die
Eingangsleistung ist auf 500 W begrenzt.
Schnell-
/Langsamladung
7
Symbol AnzeigemethodeBezeichnung des Symbols
3.3.2 Beschreibung der Bildschirmfunktionen
9
AC-Entladung
AC-Entladungsfrequenz. Wenn der AC-Schal-
ter eingeschaltet ist, leuchtet das Symbol
dauerhaft. Beim Fehler blinkt es rot und bleibt
beim unter normalen Bedingungen grau.
Wi-Fi
Internetverbindung des Geräts. Wenn das
Symbol dauerhaft leuchtet, bedeutet eine
erfolgreiche Internetverbindung. Wenn es
blinkt, ist es noch im Verbinden mit dem Inter-
net. Wenn keine Internetverbindung stattfindet,
zeigt sich das Symbol nicht an.
13
Ausgangsleistung
Die Gesamtausgangsleistung beim Geräte-
laden. Einheit: W (Watt). Wenn kein Entladevor-
gang stattfindet, wird 0W angezeigt.
-
12
Externes Batteriepaket
Externes Batteriepaket für das Gerät. Wenn
das angeschlossen ist, leuchtet das Symbol
dauerhaft. Wenn es nicht angeschlossen ist,
bleibt es grau.
11
DC-Entladungz
EIN/AUS des DC-Schalters. Bei EIN leuchtet
es dauerhaft und bei AUS bleibt es grau.
10
14
Summer
Wenn der Summer eingeschaltet ist, leuchtet
das Symbol dauerhaft. Wenn der Summer
ausgeschaltet ist, bleibt das Symbol grau. Der
Summer kann nur durch die APP gesteuert
werden.
Wenn ein Alarm oder Fehler auftritt, erscheint
oben rechts ein Ausrufezeichen. Der Alarmin-
halt wird im Popup-Fenster auf dem LCD-Bild-
schirm angezeigt. Der Alarm ertönt gleichzeitig
und schaltet sich nach 10 Sekunden automa-
tisch aus. Man kann den Alarm oder Fehler
auch durch die EIN/AUS-Taste ausschalten.
Temperatur
Innentemperatur des Geräts. Wenn die Tem-
peratur normal ist, leuchtet das Symbol dau-
erhaft. Wenn die Temperatur zu hoch ist, blinkt
das Symbol rotorange. Wenn die Temperatur
zu niedrig ist, blinkt das Symbol blau.
16
Lüfter
Betriebsstatus des Lüfters vom Gerät. Wenn es
nicht in Betrieb ist, bleibt das Symbol grau.
Wenn es in Betrieb ist, leuchtet das Symbol
dauerhaft. Wenn ein Fehler auftritt, blinkt das
Symbol rot.
15
8
9
3.3.3 Geräteseitige Anschlüsse
a. Linke Anschlüsse b. Rechte Anschlüsse
IOT RESET
USB-A 18W
USB FAST CHARGE
DC 12V 120W
12V 360W MAX
+-
USB-C 140WUSB-C 140W
DC ON OFF
POWER ON OFF
USB-A 18W
+-
OVERLOAD
PROTECTION
INPUT 12-75V
BATTERY-1 BATTERY-2
AC INPUT
230V 3000W MAX
WIND 200W
FAST
SLOW
AC CHARGE SPEED
+-
SOLAR 1500W
AC ON OFF
230V 15A
10
3.3.4 Powertaste und DC-Ausgangsanschlüsse
8
7
6
5
4
1
2
3
IOT RESET
USB-C 140W
USB-A 18W
USB FAST CHARGE
DC 12V 120W
12V 360W MAX
+-
USB-C 140W
DC ON OFF
POWER ON OFF
USB-A 18W
DC-Anschluss
5
Die 2 DC-Ausgangsanschlüsse unterstützen
einen 12V Konstantspannungsausgang mit maxi-
mal 36 W Leistung. Es teilt mit Zigarettenanzünder
und RV eine gemeinsame Leistung von 360W.
Anschluss des
Zigarettenanzünders
6
12V-Ausgang ist zulässig. Es kann an einen
Umwandlungsstecker bzw. zum Aufladen an
Elektrogeräte angeschlossen werden.
DC-Ausgangsschalter
7
EIN-/AUS-Taste kann durch kurzes Drücken
eingestellt werden. Nach 3 Sekunden langem
Drücken tritt der Bildschirm in den Schlafmodus.
IOT-Starttaste
8
Halten Sie die Taste bitte 3 Sekunden lang
gedrückt. Das Gerät beginnt nach verfügbarem
Wi-Fi zu suchen.
Hauptstromschalter
1
Zum Ein-/Ausschalten bitte halten Sie die
Powertaste 3 Sekunden lang.
Sie können darauf kurz drücken, um das
Popup-Fenster sowie den Ton vom Alarm/Feh-
ler zu schließen.
USB-C-Ausgang
2
2 unabhängige USB-C-Ausgangsports. Die
Leistung jedes Ausgangsports beträgt 140W.
USB-A-Ausgang
3
4 unabhängige USB-A-Ausgangsports. Die
Leistung jedes Ausgangsports beträgt 18W.
RV-Wohnwagen-Ausgang
4
12V Konstantspannungsausgang mit maxi-
mal 360W Leistung ist zulässig.
11
AC-Ausgangsschalter
15A-AC-Steckdose
Alle vier Steckdosen unterstützen eine elektrische
Ausgangsleistung von maximal 15A.
1
2
Gefahrenwarnung
Der maximale Ausgangsstrom aller AC-Ausgangssteck-
dosen darf 15A nicht überschreiten. Bei der Überschreitung
wird der automatische Überlastschutz ausgelöst und das
Gerät stellt den Betrieb ein.
3.3.5 AC-Ausgangsanschluss
1
2
AC ON OFF
230V 15A
EIN-/AUS-Taste kann durch kurzes Drücken
eingestellt werden. Es kann den Ausgang von
vier 15A-Steckdose steuern.
12
AC-Überstromschutz
Ladeanschluss für
Windenergie
Wenn der AC-Eingangsstrom 50A überschreitet, trennt
es sich automatisch.
Die Wiedereinschaltung muss man manuell erledigen.
Ladeanschluss für
Solarenergie
Laden durch Anschluss an Solaranlage. Zulässige
Spannung: 12 ~ 75V. Maximale Eingangsleistung: 1500W.
Erweiterungsanschluss
für Batteriepaket
Das von unserem Unternehmen hergestellte Bat-
teriepaket kann dadurch angeschlossen werden,
um die Kapazität zu erweitern.
Laden durch Anschluss an Windanlage. Zulässige
Spannung: 12~75V. Maximale Eingangsleistung: 200W.
Schalter für Schnell-
/Langsamladung
Die Ladeleistung des Stadtnetzes kann dadurch
eingestellt werden. Bei Langsamladung beträgt
die Leistung stabil 500W.
Bei Langsamladung ist die maximale Leistung bis
zu 3000W zulässig. Der in der APP einstellbare
Leistungsbereich: 500 ~ 3000W.
AC-Ladesteckdose
Das Gerät kann dadurch mit dem Stadtnetz zum
Laden angeschlossen werden.
3.3.6 Eingangsanschluss
+-
OVERLOAD
PROTECTION
INPUT 12-75V
BATTERY-1 BATTERY-2
AC INPUT
230V 3000W MAX
WIND 200W
FAST
SLOW
AC CHARGE SPEED
+-
SOLAR 1500W

13
3.4.1 Ein-&Ausschalten und Leuchten des LCD-Bildschirms
3.4 Produktverwendung
Halten Sie bitte die EIN/AUS-Taste 3 Sekunden lang gedrückt. Nach einem „Piep“-Ton wird das
Gerät erfolgreich eingeschaltet. Nach dem Einschalten leuchtet der LCD-Bildschirm auf.
EIN/AUS-Anzeige tritt in den Atemlichtmodus.
Halten Sie bitte nach der Verwendung die EIN/AUS-Taste 3 Sekunden lang gedrückt. Nach
einem „Piep “-Ton wird das Gerät erfolgreich ausgeschaltet. Die Wartezeit für automatisches
Ausschalten dieses Produkts beträgt 12 Stunden. Wenn kein Laden, Entladen, Tasten- oder
APP-Bedienung erfolgt, wird das Produkt nach 12 Stunden automatisch heruntergefahren.
Sie können darauf kurz drücken, um das Popup-Fenster sowie den Ton vom Alarm/Fehler zu
schließen.
POWER ON OFF
Zum Ein-/Ausschalten
bitte 3 Sekunden drücken.
IOT RESET
USB-A 18W
USB FAST CHARGE
DC 12V 120W
12V 360W MAX
+-
USB-C 140WUSB-C 140W
DC ON OFF
POWER ON OFF
USB-A 18W
Hauptstromschalter:
a. Wenn dieses Produkt 2 Minuten lang nicht bedient wird, treten das Gerät und der LCD-Bild-
schirm in den Schlafmodus.
b. Wenn das Produkt durch Taste geladen oder entladen wird, beendet das Gerät sofort den
Schlafmodus und der LCD-Bildschirm wechselt auch in den normalen Modus.
14
3.4.2 Gleichstromausgang (DC)
Drücken Sie nach dem Einschalten des Geräts bitte kurz die DC-Schaltertaste, um den
EIN-/AUS-Status des DC-Ausgangsports zu steuern. Drücken Sie die DC-Schaltertaste bitte 3
Sekunden lang, dann tritt der Bildschirm in den Schlafmodus.
Nach dem Einschalten des Geräts bleibt die DC-Schaltertaste standardmäßig ausgeschaltet.
Die Tastenanzeige leuchtet nicht. Der angeschlossene Verbraucher kann zu diesem Zeitpunkt
nicht verwendet werden. Nach kurzem Drücken der DC-Schaltertaste ist der Ausgangsport
eingeschaltet. Die Tastenanzeige leuchtet dauerhaft. Der angeschlossene Verbraucher kann zu
diesem Zeitpunkt normal verwendet werden.
DC-Schalte:
EIN/AUS durch kurzes
Drücken einstellen. Nach
3 Sekunden Drücken tritt
der Bildschirm in den
Schlafmodus.
DC ON OFF
IOT RESET
USB-A 18W
USB FAST CHARGE
DC 12V 120W
12V 360W MAX
+-
USB-C 140WUSB-C 140W
DC ON OFF
POWER ON OFF
USB-A 18W
3.4.3 Wechselstromausgang (AC)
15
Nach dem Einschalten des Geräts bleibt die AC-Schaltertaste standardmäßig ausgeschaltet.
Die Tastenanzeige leuchtet nicht. Der angeschlossene Verbraucher kann zu diesem Zeitpunkt
nicht verwendet werden. Nach kurzem Drücken der AC-Schaltertaste ist der Ausgangsport
eingeschaltet. Die Tastenanzeige leuchtet dauerhaft. Der angeschlossene Verbraucher kann
zu diesem Zeitpunkt normal verwendet werden. Drücken Sie bitte die Taste nochmal kurz,
wechselt es wieder in den Aus-Zustand.
Wenn alle AC-Ausgangsports länger als 12 Stunden keinen Strom haben, wechselt die
AC-Schaltertaste automatisch in den Aus-Zustand. Wenn der Gesamtstrom des AC-Ausgang-
sports 15A überschreitet, wird das Gerät den Überstromschutz aktivieren. Der Ausgang des
Geräts wird automatisch ausgeschaltet. Die AC- bzw. DC-Schaltertasten wechseln gleichzeitig
in den Aus-Zustand.
AC ON OFF
AC-Schalter:
EIN/AUS durch kuzes
Drücken einstellen.
+-
OVERLOAD
PROTECTION
INPUT 12-75V
BATTERY-1 BATTERY-2
AC INPUT
230V 3000W MAX
WIND 200W
FAST
SLOW
AC CHARGE SPEED
+-
SOLAR 1500W
AC ON OFF
230V 15A
3.5.1 AC-Ladung
16
3.5 Aufladen des Geräts
Während der AC-Ladung kann man Schnell- oder Langsamlademodus einstellen. Im Schnell-
lademodus kann die maximale Eingangsleistung 3000W erreichen. Über APP kann man es von
500 bis 3000W einstellen. Im Langsamlademodus beträgt die maximale Eingangsleistung
500W und ist nicht einstellbar.
FAST
SLOW
Nach unten drücken,um
in den Langsamlade-
modus zu wechseln.
FAST
SLOW
Nach oben drücken,um
in den Schnelllademo-
dus zu wechseln.
+-
OVERLOAD
PROTECTION
INPUT 12-75V
BATTERY-1 BATTERY-2
AC INPUT
230V 3000W MAX
WIND 200W
FAST
SLOW
AC CHARGE SPEED
+-
SOLAR 1500W
AC ON OFF
230V 15A

17
Gefahrenwarnung
Während der AC-Ladung bitte verwenden Sie das von
unserem Unternehmen hergestellte Standard-AC-Ladeka-
bel. Wir haften nicht für die Schäden, die wegen Verwendung
von anderen inoffiziellen Ladekabeln verursacht werden.
AC INPUT
+-
OVERLOAD
PROTECTION
INPUT 12-75V
BATTERY-1 BATTERY-2
AC INPUT
230V 3000W MAX
WIND 200W
FAST
SLOW
AC CHARGE SPEED
+-
SOLAR 1500W
AC ON OFF
230V 15A
18
3.5.2 Ladung durch Solarenergie
Benutzer können Solarmodule in Reihe schalten, wie in der Abbildung gezeigt, um das Produkt
aufladen zu lassen. Die DC-Eingangsspannung dieses Produkts liegt zwischen 12 und 75V. Die
maximale Eingangsleistung beträgt 1500W.
Gefahrenwarnung
b.
a.
Bitte schließen Sie den Solarmodul gemäß der obigen
Abbildung zum Aufladen des Geräts an.
Bitte stellen Sie vor dem Anschließen des Solarmoduls sicher,
dass die Ausgangsspannung des Solarmoduls zwischen 12
und 75 V liegt, um Beschädigung des Geräts zu vermeiden.
+-
SOLAR 1500W
+-
OVERLOAD
PROTECTION
INPUT 12-75V
BATTERY-1 BATTERY-2
AC INPUT
230V 3000W MAX
WIND 200W
FAST
SLOW
AC CHARGE SPEED
+-
SOLAR 1500W
AC ON OFF
230V 15A

3.5.3 Ladung durch Windenergie
19
Dieses Gerät unterstützt Ladung durch Windenergie. Die maximale zulässige Eingangsleistung
beträgt 200 W.
Bitte schließen Sie den Windenergiegenerator über das Windenergie-Datenkabel gemäß der
folgenden Abbildung zum Aufladen mit dem Gerät an. Stellen Sie bitte vor dem Anschließen
sicher, dass die Ausgangsspannung des Windenergiegenerators zwischen 12~75 V liegt, um
Beschädigung des Geräts zu vermeiden.
WIND 200W
+-
OVERLOAD
PROTECTION
INPUT 12-75V
BATTERY-1 BATTERY-2
AC INPUT
230V 3000W MAX
WIND 200W
FAST
SLOW
AC CHARGE SPEED
+-
SOLAR 1500W
AC ON OFF
230V 15A

3.5.4 Externes Batteriepaket
20
Bevor Sie das Produkt an das externe Batteriepaket anschließen, stellen Sie bitte sicher,
dass sowohl das Produkt als auch das externe Batteriepaket ausgeschaltet sind.
Nachdem das Produkt an das externe Batteriepaket angeschlossen ist, verwenden Sie bitte
nur das Produkt, wenn das Symbol des externen Batteriepakets auf dem LCD-Bildschirm
des Produkts angezeigt wird.
Verbinden / entfernen Sie bitte das Produkt während des Lade- / Entladevorgangs nicht
direkt mit / vom externen Batteriepaket. Wenn Sie das externe Batteriepaket dazwischen
anschließen oder entfernen müssen, schalten Sie bitte das Produkt vor dem Betrieb aus.
Berühren Sie das Metallende am Anschlussport des externen Batteriepakets nicht mit Ihren
Händen oder anderen Gegenständen. Wenn Fremdkörper am Metallende auftritt, wischen
Sie sie bitte mit einem trockenen Tuch ab.
a.
b.
c.
d.
Dieses Produkt kann bis zu zwei externe Batteriepakete gleichzeitig anschließen, um eine
größere Kapazität bereitzustellen. Bitte beachten Sie im Betrieb folgendes:

21
3.6 Nutzung der APP
Benutzer können Informationen und Daten dieses Produkts über die Gendome-App steuern und
ansehen.
Weitere Informationen zum Herunterladen und zur Verwendung finden Sie bitte auf der offiziel-
len Website von Gendome: www.gendome.com.
3.7 UPS-Funktion
Dieses Produkt unterstützt die UPS-Funktion (Notstromversorgung). Sie können das Gerät über
das AC-Ladekabel an das Stromnetz und den Stromverbraucher an den AC-Ausgangsan-
schluss anschließen (Zu dem Zeitpunkt kommt der Wechselstrom aus dem Stromnetz anstatt
aus der Batterie). Wenn das Netzstrom plötzlich ausfällt, wechselt das Produkt über die
UPS-Funktion automatisch in den Batteriestromversorgungsmodus. Dies ist eine grundlegende
UPS-Funktion, unterstützt aber übergangsloses Umschalten nicht. Bitte schließen Sie das
Produkt nicht an den Verbraucher an, der eine unterbrechungsfreie Stromversorgung benötigt
(z. B. Datenserver usw.), oder testen Sie das Produkt bitte vor der Verwendung mehrmals, bis Sie
sicherstellen, dass das Produkt kompatibel ist. Es wird empfohlen, während des Betriebs nur
einen statt mehreren Verbrauchern gleichzeitig zu verwenden, um die Überlastung des Geräts
zu vermeiden. Wenn das Gerät wegen unangemessener Verwendung nicht normal funktioniert
oder Daten verloren gehen, haftet unser Unternehmen nicht dafür.
APP scannen und
herunterladen

22
4.2 Lagerung des Geräts
Stellen Sie bitte sicher, dass die äußere Verpackung nicht entfernt wird und das Trockenmittel
in der Verpackung nicht verloren geht.
Stellen Sie bitte sicher, dass die Lagerumgebung sauber und mit geeigneter Temperatur bzw.
Feuchtigkeit ist und keine Kondensation auftritt.
Stellen Sie bitte sicher, dass das Gerät gemäß den Anweisungen auf dem Verpackungse-
tikett platziert wird.
Stellen Sie bitte sicher, dass das Gerät fern von brennbaren, explosiven, ätzenden und
anderen gefährlichen Gegenständen gelagert wird.
Wenn das Gerät für längere Zeit gelagert wird, um die Lebensdauer des Geräts (Lithiumbat-
terie) zu schützen und die optimale Leistung der Batterie aufrechtzuerhalten, wird es
empfohlen, das Gerät alle 3 Monate einmal zu laden bzw. zu entladen und alle 6 Monate
mindestens einmal komplett zu laden bzw. zu entladen.
4.1 Inspektion vor Abnahme
Überprüfen Sie bitte, ob die äußere Verpackung beschädigt, verformt, geöffnet, gerissen ist
oder andere Spuren hat, die zur Geräteschädigung führen können. Wenn es Schäden gibt,
öffnen Sie bitte die Verpackung nicht und wenden Sie sich an Ihren Händler.
Überprüfen Sie bitte vor dem Auspacken, ob das Gerätemodell korrekt ist. Bei Abweichungen
öffnen Sie bitte nicht die Verpackung und wenden Sie sich an Ihren Händler.
Prüfen Sie bitte nach dem Auspacken, ob das Produkt optisch beschädigt ist. Wenn es
Schäden gibt, bitte wenden Sie sich an Ihren Händler.
4. INSPEKTION UND LAGERUNG DES GERÄTS
a.
b.
c.
a.
b.
c.
d.
e.
Bevor Sie das Produkt annehmen, überprüfen Sie bitte Folgendes im Detail:
Wenn das mobile Energiespeicherprodukt nicht sofort in Betrieb genommen wird, lagern
Sie es bitte gemäß den folgenden Hinweisen:

23
5.1 Entsorgung des Geräts
Wenn das mobile Energiespeicherprodukt nicht mehr verwendbar und zu verschrotten ist, bitte
entsorgen Sie es gemäß den Elektroschrott-Entsorgungsvorschriften des Landes/der Region für
Energiespeicherprodukt. Energiespeicher darf nicht als Hausmüll behandelt oder beliebig
entsorgt werden.
Liste der Warn- oder Fehlercodes auf dem Bildschirm:
5.2 Fehlerbehandlung
5. FEHLERANZEIGE UND -BEHANDLUNG
Erläuterung Lösung
Anzeige auf
dem Bildschirm
E05
Überstromschutz
Wenn die Ladetemperatur zu niedrig ist,
wird der Ladeschutz automatisch aktiv-
iert. Bitte laden Sie das Gerät, nachdem
es aufgeheizt ist.
Beim Entladen bei niedriger Temperatur
bitte entfernen Sie Stromverbraucher mit
hoher Leistung. Bitte kontrollieren Sie die
Gesamtausgangsleistung unter 1500 W,
um den Systemabschaltschutz zu aktivieren.
E04
Untertemperatur
der Batterie
Der Überstromschutz wird aktiviert. Bitte
das Gerät herunterfahren und den Netzs-
tecker ausziehen. Nach 30 Sekunden bitte
das Gerät neu starten. Wenn das Problem
immer noch nicht behoben ist, wenden
Sie sich bitte an den Kundendienst.
Das System ist fehlerhaft. Das Gerät
schaltet sich innerhalb von 10 Sekunden
automatisch ab. Bitte wenden Sie sich an
den Kundendienst.
E06 BMS-Fehler
Überspannung
der Batterie
Überspannungsschutz wird aktiviert. Bitte
das Gerät herunterfahren und den Netz-
stecker ausziehen. Nach 30 Sekunden bitte
das Gerät neu starten. Wenn das Problem
immer noch nicht behoben ist, wenden Sie
sich bitte an den Kundendienst.
E01
Unterspannungsschutz wird aktiviert. Die
Elektrizität ist zu niedrig. Um die Batterie zu
schützen, kann es nur langsam geladen
werden. Später ist eine Schnellladung
wieder möglich.
E02
Unterspannung
der Batterie
E03
Der Übertemperaturschutz wird aktiviert.
Bitte warten Sie, bis das Gerät abgekühlt ist.
Übertemperatur
der Batterie

24
Wenn während der Verwendung dieses Produkts eine Warnung auftritt, bitte verwenden Sie die
oben genannten Lösungen und starten Sie das Gerät neu. Wenn die Warnung nicht aufgehoben
wird, verwenden Sie das Gerät bitte nicht mehr und wenden Sie sich an den Kundendienst (Bitte
versuchen Sie Laden bzw. Entladen nicht).
Wenn keine der oben genannten Informationen Ihr Problem lösen kann, wenden Sie sich bitte an
unseren professionellen Kundendienst.
Lösung
Anzeige auf
dem Bildschirm
Das System ist fehlerhaft. Das Gerät
schaltet sich innerhalb von 10 Sekunden
automatisch ab. Bitte wenden Sie sich an
den Kundendienst.
E07
Der Übertemperaturschutz wird aktiviert.
Bitte warten Sie, bis das Gerät abgekühlt ist.
E08
Der Überentladungsschutz wird aktiviert.
Bitte reduzieren Sie die Anzahl der anges-
chlossenen Verbraucher und schalten Sie
den AC- oder DC-Ausgangsschalter
wieder ein.
E09
Der Überlastungsschutz wird aktiviert. Bitte
reduzieren Sie die Anzahl der angeschloss-
enen Ladeeingänge und starten Sie es neu.
Wenn das Problem immer noch nicht
behoben ist, wenden Sie sich bitte an den
Kundendienst.
E10
Das System ist fehlerhaft. Das Gerät
schaltet sich innerhalb von 10 Sekunden
automatisch ab. Bitte wenden Sie sich an
den Kundendienst.
E11
Erläuterung
Kurzschluss
am Ausgang
Übertemperatur des
Wechselrichters
Überlastung des
Ausgangs
Überlastung
am Eingang
Abnormale
Ausgangsspannung
Die Netzspannung ist abnormal und der
Netzeingang ist instabil. Bitte trennen Sie
den AC-Eingang, um Geräteschäden zu
vermeiden.
E12
Abnormale
Netzspannung
Die Netzfrequenz ist abnormal und der
Netzeingang ist instabil. Bitte trennen Sie
den AC-Eingang, um Geräteschäden zu
vermeiden.
E13
Abnormale
Netzfrequenz
Das System ist fehlerhaft. Das Gerät
schaltet sich innerhalb von 10 Sekunden
automatisch ab. Bitte wenden Sie sich an
den Kundendienst.
E14
Kurzschluss
Der Systemschutz wird aktiviert. Bitte das
Gerät herunterfahren und den Netzstecker
ausziehen. Nach 30 Sekunden bitte das
Gerät neu starten. Wenn das Problem
immer noch nicht behoben ist, wenden Sie
sich bitte an den Kundendienst.
E15
Sonstige Fehler
und Warnungen
25
6.1 Wartung
Wartungsintervall
6. WARTUNG UND INSTANDHALTUNG
Bei Wartung des Geräts bitte schalten Sie die Stromversorgung des Produkts aus. Der
Betrieb des eingeschalteten Geräts kann zur Beschädigung oder zum Stromschlag führen.
Systemreinigung
Wartungsmethode
Einmal im JahrLüfter
Überprüfen Sie bitte, ob der Lüfter ord-
nungsgemäß funktioniert, ob es Lärm
gibt, oder ob es optisch normal aussieht.
Einmal im JahrDC-Schalter
Schalten Sie bitte den DC-Schalter 10 Mal
hintereinander ein und aus, um zu prüfen,
ob der DC-Schalter normal funktioniert.
Überprüfen Sie bitte, ob es Fremdkörper
und Staub auf dem Kühlkörper bzw.
Lufteinlass/-auslass gibt.
Einmal alle sechs Monate
oder einmal im Jahr
6.2 Instandhaltung
Lagern Sie bitte dieses Gerät
aus Sicherheitsgründen nicht
für längere Zeit bei Tempera-
turen unter 0 °C (32 °F) oder über
45 °C (113 °F).
Wenn das Gerät zu wenig
Kapazität hat und zu lange
stillsteht, wechselt das Gerät
in einen Tiefschlafmodus. Das
Gerät m uss vo r der Wie-
derverwendung aufgeladen
werden.
Es wird empfohlen, dieses
Gerät bei 20 °C bis 30 °C (68 °F
bis 86 ° F) und fern von Wasser,
Hitze und anderen Metallge-
genständen zu verwenden bzw.
zu lagern.
Um die Batterielebensdauer
zu verlängern, wird es emp-
fohlen, dieses Gerät in einer
Umgebung mit 20 °C bis 30 °C
(68 °F bis 86 °F) zu verwenden.
Bei längerer Lagerung bitte
entladen und laden Sie das
Gerät einmal alle 3 Monate
(Zuerst komplett leer entladen
und dann wieder komplett voll
aufladen).
Wenn das Gerät längere Zeit
nicht verwendet wird, bitte
laden Sie es vor der Lagerung
auf 100% Kapazität auf. Wenn
das Ger ät bei nie driger
Kapazität längere Zeit nicht
verwendet wird, kann dies zu
irreversiblen Schäden an der
Batteriezelle führen und die
Lebensdauer des Geräts
verkürzen.
w
INPUT OUTPUT
OUTPUT
w
Use Status
Remaining Time: -- h -- m
100
0
Wartungsumfang
APP scannen und
herunterladen
7. PACKLISTE
26
Gendome Home 3000
Ladekabel für
Windenergie
Ladekabel für
Solarenergie
Produkthandbuch
AC-Ladekabel
Zigarettenanzünder
-XT60-Adapterkabel

Home 3000
Station d'énergie portable Guide de l’utilisateur
Pour garantir une utilisation sûre et correcte, veuillez lire attentivement ce guide
avant d'utiliser l'appareil.
Pour toutes les consignes de sécurité, les messages d'alarme, les conditions d'utilisa-
tion et les clauses de non-responsabilité, veuillez consulter le site web suivant :
https://www.gendome.com/pages/faq

TABLE DES MATIÈRES
1.1 Spécifications générales
1.2 Sortie
1.3 Entrée
1.4 Batterie
1.5 Température
1.6 Divers
.........................................................................................................
.............................................................................................................................................
............................................................................................................................................
........................................................................................................................................
..............................................................................................................................
...........................................................................................................................................
1
1
1
2
2
2
1. Spécifications techniques
2. Consignes de sécurité
1
3.1 Champ d'application
3.2 Dimensions
3.3 Écran et ports
3.3.1 Écran
3.3.2 Fonctions de l'écran
3.3.3 Ports
3.3.4 Bouton d'alimentation et ports de sortie CC
3.3.5 Ports de sortie CA
3.3.6 Ports d’entrée
3.4 Utilisation de l'appareil
3.4.1 Mise en marche/arrêt de l'appareil et allumage de l'écran LCD
3.4.2 Sortie CC
3.4.3 Sortie CA
3.5 Charge de l'appareil
3.5.1 Charge CA
3.5.2 Charge solaire
3.5.3 Charge éolienne
...............................................................................................................
................................................................................................................................
............................................................................................................................
....................................................................................................................................
........................................................................................................
....................................................................................................................................
..........................................................
............................................................................................................
...................................................................................................................
...........................................................................................................
.......................
............................................................................................................................
............................................................................................................................
...............................................................................................................
..........................................................................................................................
..................................................................................................................
..............................................................................................................
4
5
6
6
7
9
10
11
12
13
13
14
15
16
16
18
19
3. Guide du débutant
4
3
2.1 Risques de sécurité
.................................................................................................................
3
2.2 Conditions d’utilisation
.............................................................................................................
3

................................................................................................................
....................................................................................................................
................................................................................................................................................
20
21
21
3.5.4 Batterie externe
3.6 Utilisation de l'APP
3.7 UPS
4. Contrôle et stockage de l'appareil
22
4.1 Contrôle lors de la réception
4.2 Stockage
................................................................................................
....................................................................................................................................
22
22
5. Affichage des pannes et dépannage
23
5.1 Mise au rebut de l'appareil
5.2 Dépannage
....................................................................................................
...............................................................................................................................
23
23
6. Maintenance et entretien
25
6.1 Maintenance
6.2 Entretien
..............................................................................................................................
.....................................................................................................................................
25
25
7. Contenu de l'emballage
26
1.1 Spécifications générales
Poids
Dimensions
Capacité de la batterie
Wi-Fi
Bluetooth
83.8lbs / 38kg
22.0*9.1*21.4 in / 560*230*543 mm
3072Wh
Oui
Oui
1
1. SPÉCIFICATIONS TECHNIQUES
1.3 Entrée
1.2 Sortie
Sortie CA (x4)
USB-A (x4)
Sortie caravane
Sortie DC5521 (x2)
USB-C (x2)
Sortie allume-cigare
Chargeur sans fil (x2)
Sortie à tension constante de 12V, 120W Max
Sortie à tension constante de 12V, 15W Max par port
3000W Max/6000W (Crête)
Sortie à tension constante de 12V, 360W Max
Sortie à tension constante de 12V, 36W Max par port
5V 3A/9V 3A/
PD3.1, 140W Max par port,
12V
15V 3A/20V 5A/28V 5A 3A/
5V 3A/9V 2A/12V 1.5A
18W Max par port
* Les ports de sortie allume-cigare, DC5521 et caravane partagent une puissance de 360W.
* Puissance de sortie totale maximale de l'appareil : 3742W.
* Cet appareil prend en charge une charge simultanée par l'alimentation CA et des panneaux solaires, avec
une puissance d'entrée maximale de 3000W.
230V, 3000W Max
12 à 75V, 1500W Max
12 à 75V, 200W Max
Charge accélérée : 500 à 3000W, réglable
Charge normale : 500W
Puissance d'entrée CA
Entrée de la charge solaire
Entrée de la charge éolienne
Charge accélérée/normale

1.4 Batterie
Batterie externe 2 batteries externes au maximum
1.6 Divers
2
1.5 Température
Tension nominale
Type de protection
51.2V
Protection contre les hautes températures, protection contre
les basses températures, protection contre les surdécharges,
protection contre les surcharges, protection contre les
courts-circuits, protection contre les surintensités, etc.
Plus de 2500 cycles à 80% de DOD (profondeur de décharge)Cycle de vie
Phosphate de fer et de lithium de qualité automobileCellule
Température ambiante de décharge
Température ambiante de charge
Température d'utilisation optimale
Umgebungstemperatur für Lagern
32 à 113°F/0°C à 45°C
32 à 113°F/0°C à 45°C
68 à 86°F/20°C à 30°C
32 à 113°F/0°C à 45°C

2.1 Risques de sécurité
2. CONSIGNES DE SÉCURITÉ
a.
b.
c.
d.
e.
Pour réduire le risque de choc électrique, n’ouvrez pas le couvercle. Aucune pièce interne ne
peut être réparée par l'utilisateur. Confiez toutes les réparations à un personnel qualifié.
Pour protéger l'appareil contre les risques d'incendie à long terme, ne remplacez le fusible que
par un fusible de même modèle et de même puissance.
Pour réduire le risque de fuite d'électricité, seules les prises de courant avec la masse sont
autorisées à connecter avec l'appareil.
Pour réduire le risque de blessure, n'utilisez pas les câbles d'alimentation ou de batterie endommagés.
Cet appareil ne s’applique pas aux installations de maintenance commerciales.
2.2 Conditions d’utilisation
a.
b.
d.
e.
c.
Ne surchargez pas la batterie interne.
Ne fumez ni ne faites usage du feu ou du matériel provoquant des étincelles à proximité
de l'appareil.
Chargez la batterie interne dans un environnement bien ventilé.
Pour éviter tout risque de choc électrique et d'incendie, ne stockez pas cet appareil dans un
véhicule.
Cet appareil est adapté à une utilisation en intérieur. Veuillez prendre des mesures de
protection contre l'eau et la poussière si vous l'utilisez en extérieur.
3

3.1 Champ d'application
La station d'énergie portable peut être utilisée dans un large éventail d'applications. Tous les
produits électriques peuvent être alimentés par cet appareil par le biais des ports. L'appareil
peut être chargé par le port d'entrée du secteur, et prend en charge également une charge
solaire ainsi qu'une charge éolienne. Cet appareil est idéal pour une variété de situations, y com-
pris les communications d'urgence, le sauvetage et les secours, le travail en plein air, les urgen-
ces liées aux pannes de courant domestique et les zones montagneuses sans électricité, etc.
4
3. GUIDE DU DÉBUTANT
Alimentation de secours Travail en plein air
Communication d'urgenceAlimentation de secours de bord
Caravaning Sauvetage et secours
Camping
Alimentation domestique

a. Longueur et hauteur du boîtier
560mm
498mm
543mm
3.2 Dimensions
5
b. Vue de gauche c. Vue de droite
230mm 230mm
IOT RESET
USB-A 18W
USB FAST CHARGE
DC 12V 120W
12V 360W MAX
+-
USB-C 140WUSB-C 140W
DC ON OFF
POWER ON OFF
USB-A 18W
+-
OVERLOAD
PROTECTION
INPUT 12-75V
BATTERY-1 BATTERY-2
AC INPUT
230V 3000W MAX
WIND 200W
FAST
SLOW
AC CHARGE SPEED
+-
SOLAR 1500W
AC ON OFF
230V 15A
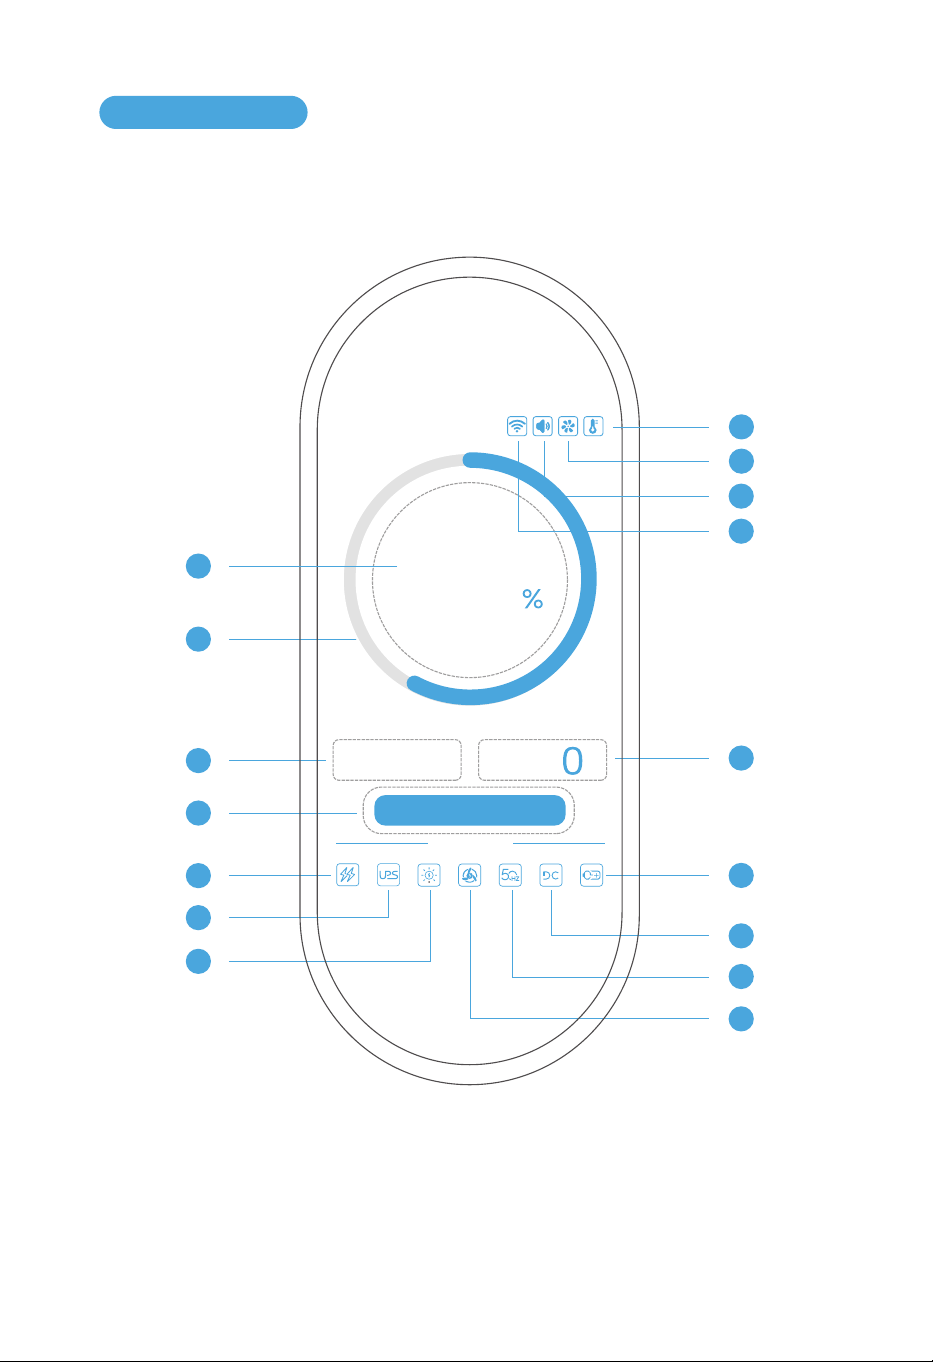
6
3.3.1 Écran
3.3 Écran et ports
1
3
4
5
6
7
12
13
14
15
16
2
w
INPUT OUTPUT
OUTPUT
w
Use Status
Remaining Time: -- h -- m
60
0
10
11
9
8
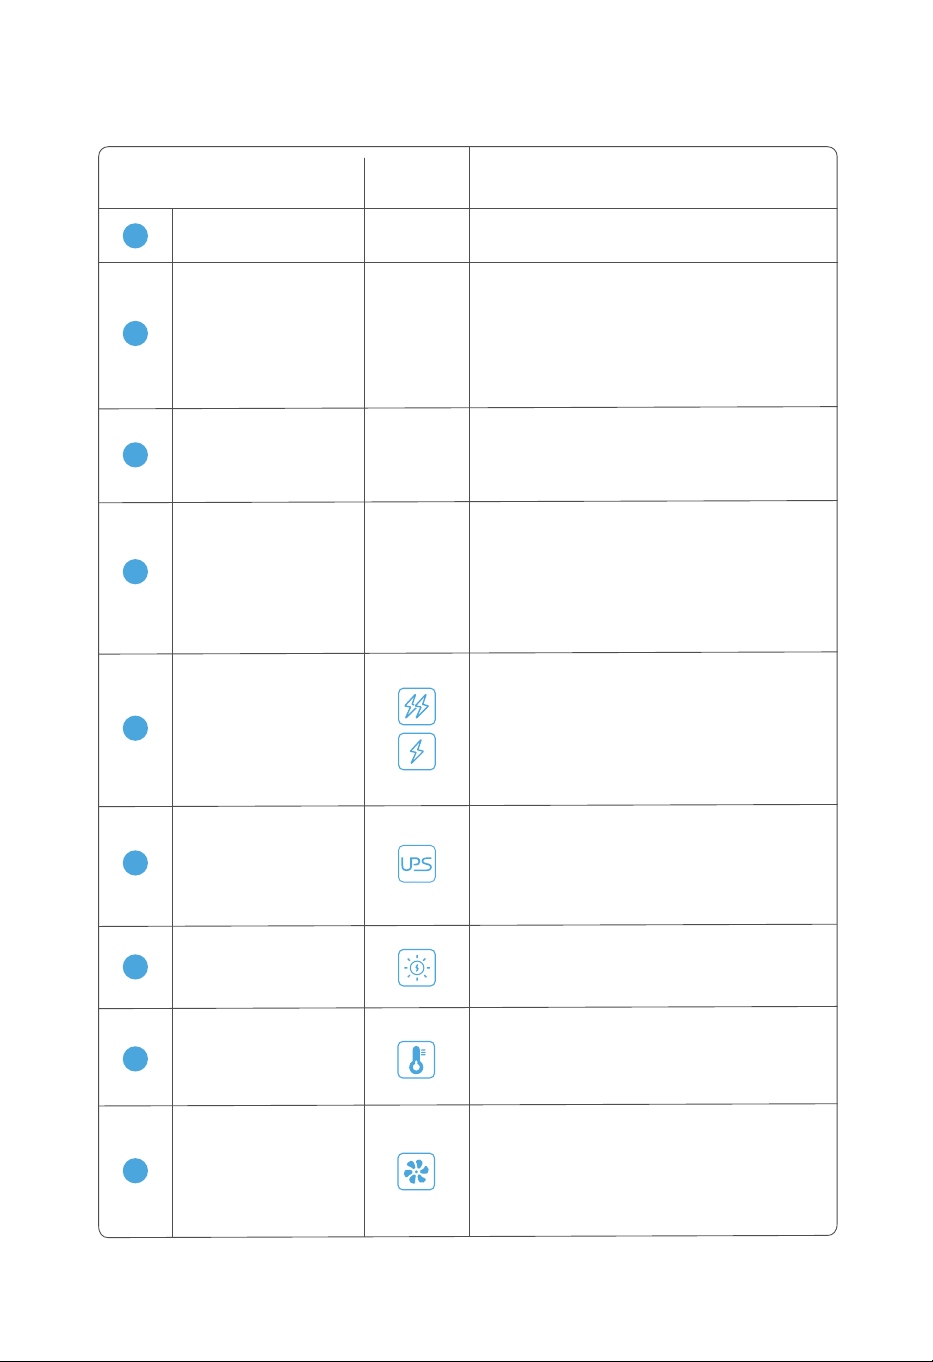
3.3.2 Fonctions de l'écran
Icône Mode d’affichageNom de l'icône
-
2
Une icône qui indique la charge restante et
s'affiche dynamiquement en fonction de la
charge restante. Elle est verte lorsque la
charge restante est supérieure à 50 %,
jaune lorsque la charge restante est inféri-
eure à 50 % et rouge lorsque la charge
restante est inférieure à 20 %.
Indicateur du niveau de
charge de la batterie
1
-
Indique la charge restante (0% à 100%).
Pourcentage
de la batterie
-
Indique la puissance d'entrée totale en W
(watt) lorsque l'appareil est chargé par le
secteur, l'énergie solaire ou éolienne. 0W
s'affichera en l'absence de charge.
3
Puissance d’entrée
-
4
Indique le temps de charge estimé sous
régime de charge ou le temps de déchar-
ge estimé sous régime de décharge, et est
calculé selon l'état de charge en cas d'une
charge et d'une décharge simultanées.
h représente l'heure et m représente la
minute.
Temps de charge
/décharge restant
6
Indique une mesure de protection qui prend
la place du secteur après une panne de
courant domestique. L'icône reste grisée
dans des conditions normales ; l'icône est
allumée en continu lors de la protection ;
l'icône rouge clignote en cas de défaut.
UPS
L'icône est allumée en continu lors d'une
charge à l'aide de panneaux solaires ; l'icône
rouge clignote en cas de défaut ; l'icône reste
grisée lorsque cette fonction n'est pas activée.
7
Charge solaire
5
Lorsque l'icône de gauche est affichée,
l'appareil est en mode de charge accélérée
et la puissance d'entrée peut être ajustée à
l’aide de l'APP.
Lorsque l'icône de droite est affichée, l'appa-
reil est en état de charge normale et la puis-
sance d'entrée est limitée à 500W.
Charge accélérée
/normale
Température
Indique la température interne de l'appareil.
L'icône est allumée en continu en cas de
température normale ; l'icône orange cligno-
te en cas de température élevée ; l'icône
bleue clignote en cas de basse température.
8
Ventilateur de
refroidissement
Indique l'état de fonctionnement du ventila-
teur de refroidissement de l'appareil. L'icône
reste grisée lorsque le ventilateur de refroid-
issement est désactivé ; l'icône est allumée
en continu lorsque le ventilateur de refroid-
issement est activé ; l'icône rouge clignote
en cas de défaut.
9
7
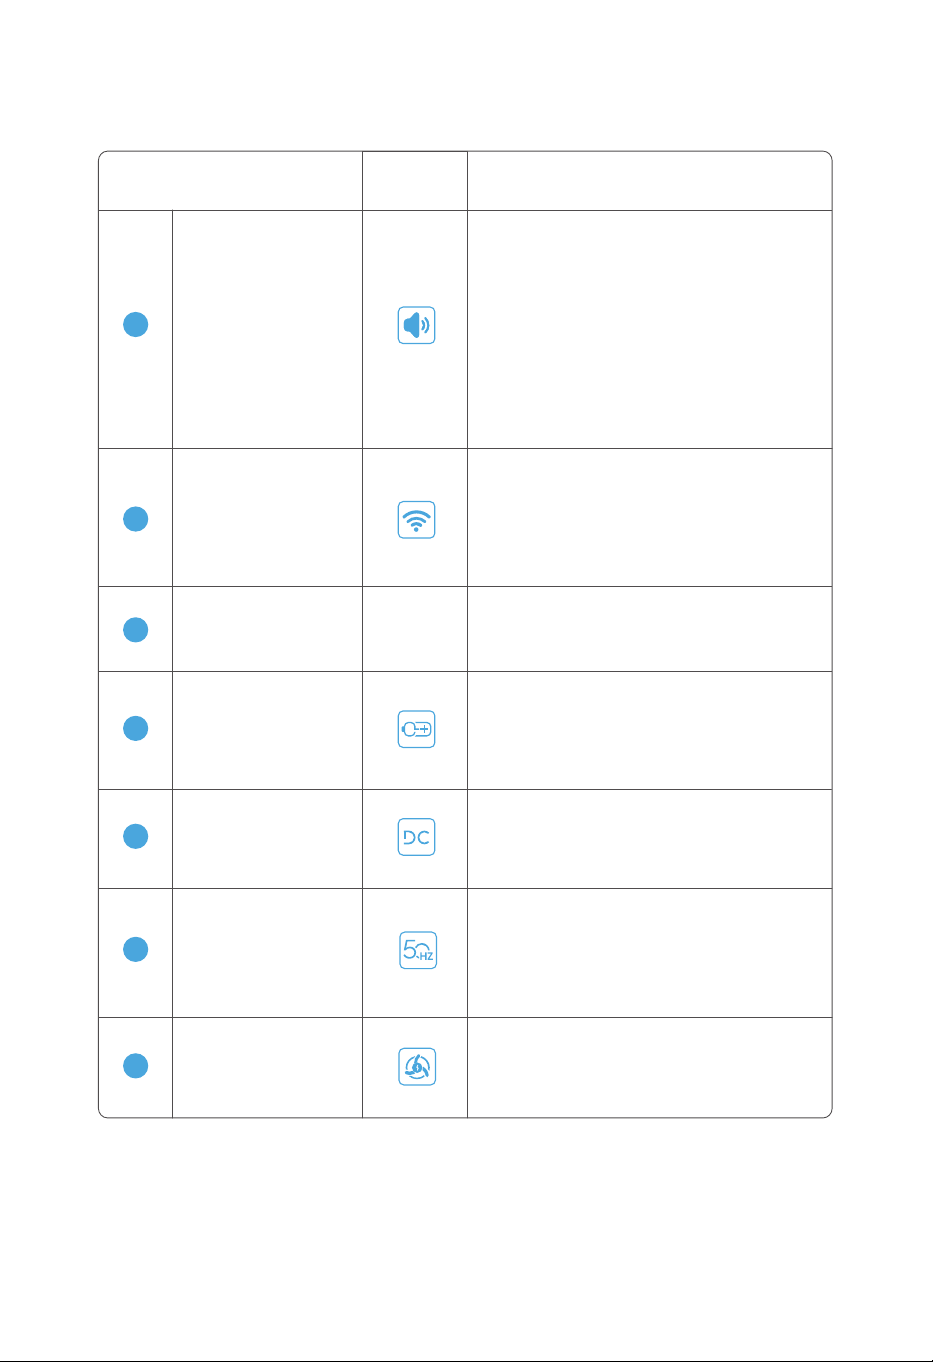
Icône Mode d’affichageNom de l'icône
3.3.2 Fonctions de l'écran
15
Décharge CA
Indique la fréquence de décharge CA. L'icône
est allumée en continu lorsque le bouton
ON/OFF de la sortie CA est activée ; l'icône
rouge clignote en cas de défaut ; l'icône
reste grisée dans des conditions normales.
Wi-Fi
Indique l'état de mise en réseau de l'appareil.
L'icône est allumée en continu lorsque la con-
nexion au réseau est réussie ; l'icône clignote
lorsque la connexion au réseau est en cours ;
l'icône ne s'affiche pas lorsque l'appareil n'est
pas connecté au réseau.
11
Puissance de sortie
Indique la puissance de sortie totale en W
(watt) lorsque l'appareil est déchargé. 0W
s'affichera en l'absence de sortie.
-
12
Batterie externe
Indique la batterie externe connectée à
l'appareil. L'icône est allumée en continu
lorsque la batterie externe est connectée ;
l'icône reste grisée lorsque la batterie externe
n'est pas connectée.
13
Décharge CC
Indique l'état du bouton ON/OFF de la sortie
CC. L'icône est allumée en continu lorsque la
décharge CC est activée ; l'icône reste grisée
lorsque la décharge CC est désactivée.
14
10
Buzzer
L'icône est allumée en continu lorsque le
buzzer est activé ; l'icône reste grisée
lorsque le buzzer est désactivé. L'activation
et la désactivation du buzzer ne peuvent
être réalisées que par le biais de l'APP.
En cas d'une alarme ou d'un défaut, un
point d'exclamation apparaîtra dans le coin
supérieur droit de l'écran, et une fenêtre
contextuelle indiquant le contenu de
l'alarme sera affichée sur l'écran LCD, avec
une alarme sonore, qui disparaîtront après
10 secondes ou peuvent être désactivées
en appuyant sur le bouton d'alimentation.
8
16
Charge éolienne
L'icône est allumée en continu lors d'une
charge éolienne ; l'icône rouge clignote en
cas de défaut ; l'icône reste grisée lorsque
cette fonction n'est pas activée.

9
3.3.3 Ports
a. Ports du côté gauche b. Ports du côté droit
IOT RESET
USB-A 18W
USB FAST CHARGE
DC 12V 120W
12V 360W MAX
+-
USB-C 140WUSB-C 140W
DC ON OFF
POWER ON OFF
USB-A 18W
+-
OVERLOAD
PROTECTION
INPUT 12-75V
BATTERY-1 BATTERY-2
AC INPUT
230V 3000W MAX
WIND 200W
FAST
SLOW
AC CHARGE SPEED
+-
SOLAR 1500W
AC ON OFF
230V 15A
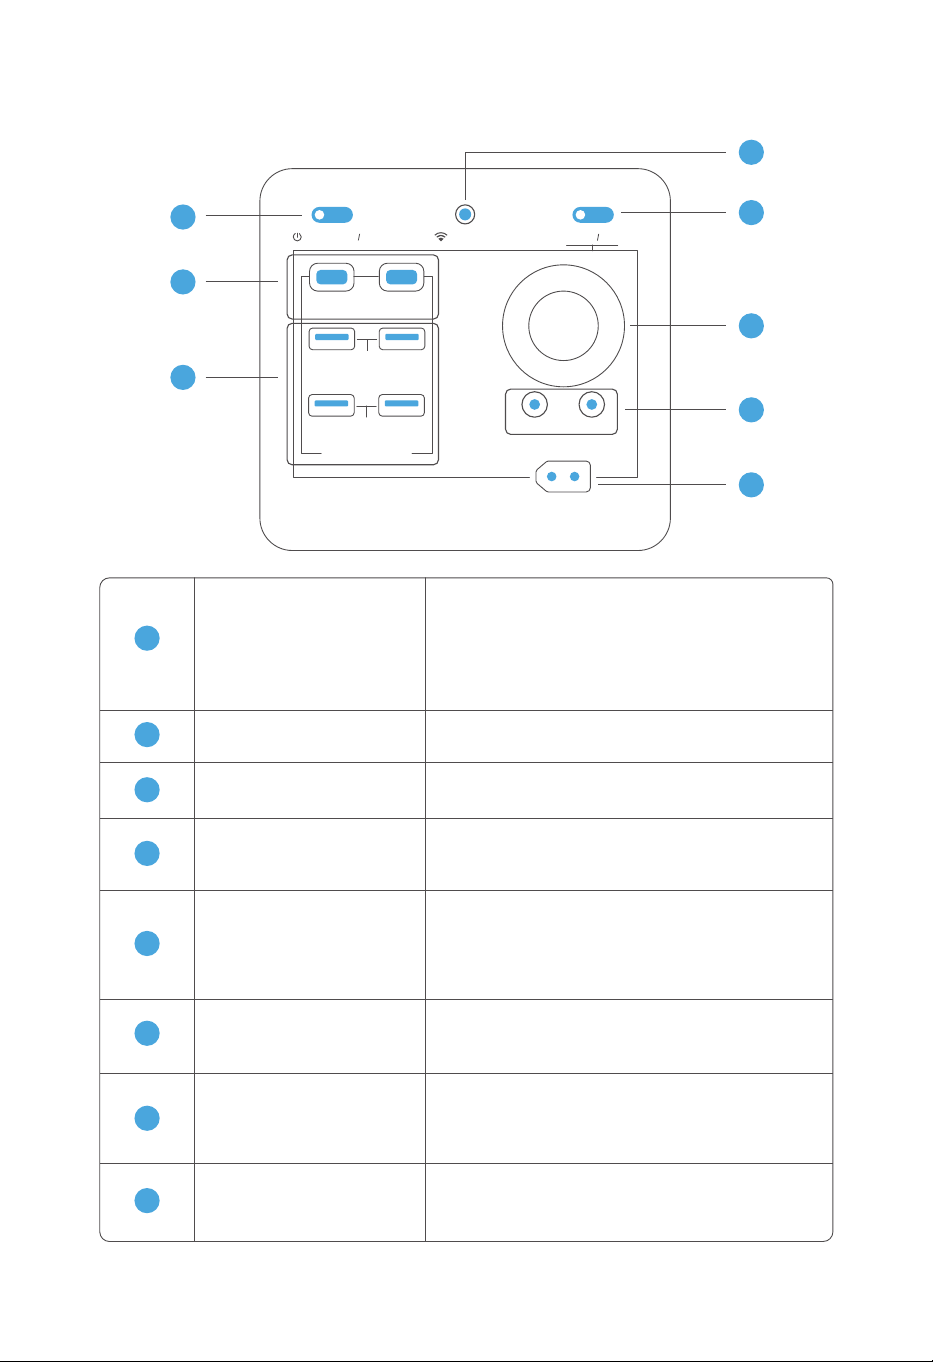
10
3.3.4 Bouton d'alimentation et ports de sortie CC
8
7
6
5
4
1
2
3
IOT RESET
USB-C 140W
USB-A 18W
USB FAST CHARGE
DC 12V 120W
12V 360W MAX
+-
USB-C 140W
DC ON OFF
POWER ON OFF
USB-A 18W
Port CC
5
2 ports de sortie CC qui prennent en charge
une sortie à tension constante de 12V avec une
puissance de sortie maximale de 36W, et part-
agent une puissance de 360W avec les ports
de sortie allume-cigare et caravane.
Port allume-cigare
6
Prend en charge une sortie de 12V et peut être
connecté à un adapteur de prise de courant
pour charger les appareils électriques.
Bouton ON/OFF
de la sortie CC
7
Appuyez brièvement sur le bouton pour l'acti-
ver ou le désactiver. Appuyez sur le bouton et
maintenez-le enfoncé pendant 3 secondes
pour éteindre l'écran.
Bouton de réinstallation
de l'IOT
8
Appuyez sur le bouton et maintenez-le enfoncé
pendant 3 secondes pour que l'appareil passe
en mode de configuration Wi-Fi.
Bouton d'alimentation
1
Appuyez sur le bouton et maintenez-le
enfoncé pendant 3 secondes pour allu-
mer/éteindre l'appareil.
Appuyez sur le bouton pour désactiver la
fenêtre contextuelle et l'alarme sonore en
cas d'alarme/défaut.
Sortie USB-C
2
2 ports de sortie USB-C indépendants (140W
par port).
Sortie USB-A
3
4 ports de sortie USB-A indépendants (18W
par port).
Sortie caravane
4
Prend en charge une sortie à tension constante
de 12V avec une puissance de sortie maximale
de 360W.
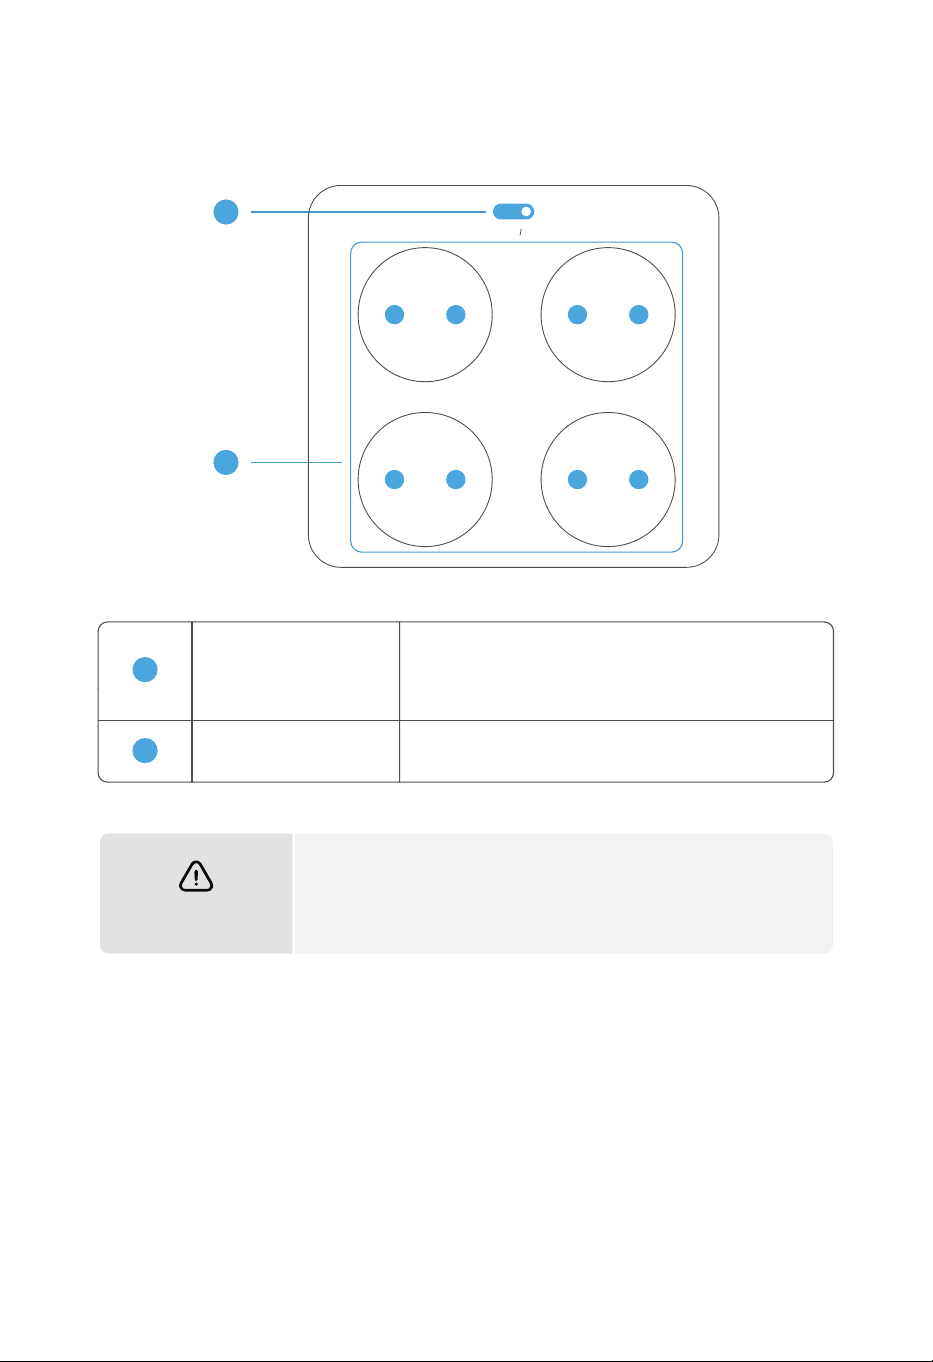
11
Bouton ON/OFF
de la sortie CA
Prise de courant
CA de 13A
Les 4 prises de courant prennent en charge une
sortie maximale de 15A des appareils électriques.
1
2
AVERTISSEMENT
Le courant maximal sorti par toutes les prises de courant de
sortie CA ne doit pas dépasser 15A, sinon le mécanisme de
protection automatique contre les surcharges se déclenchera
et l'appareil cessera de fonctionner.
3.3.5 Ports de sortie CA
Appuyez brièvement sur le bouton pour l'activer
ou le désactiver. Ce bouton contrôle la sortie de 4
prises de courant de 15A.
1
2
AC ON OFF
230V 15A
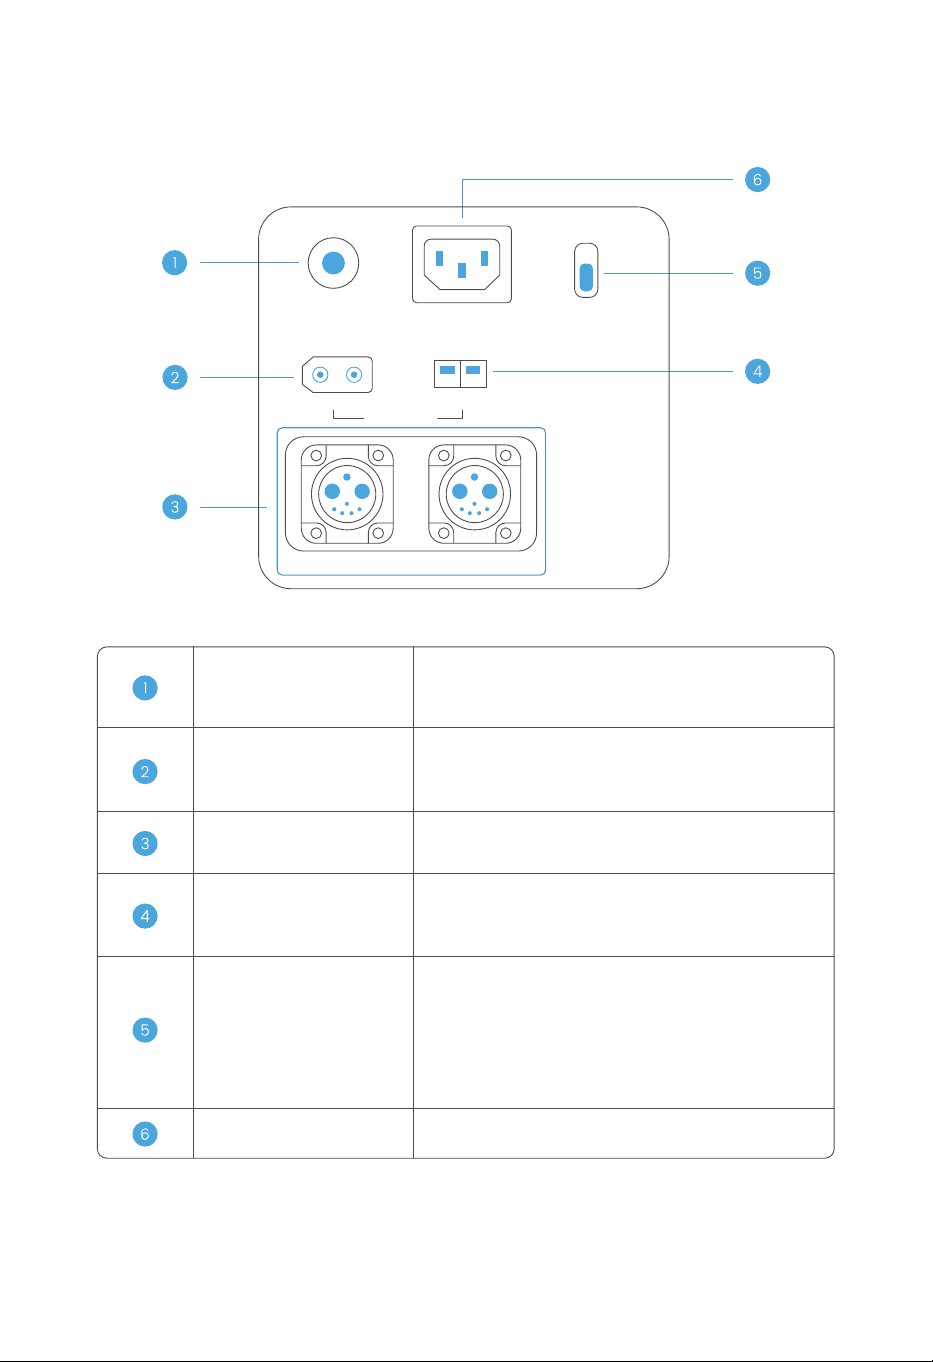
12
Dispositif de protection
contre les surintensités CA
Port de charge éolienne
Lorsque ce dispositif détecte que le courant d'entrée
CA dépasse 50A, il se déconnecte automatiquement
et doit être réinstallé manuellement.
Port de charge solaire
Connecté à l'énergie solaire (panneaux solaires) pour
charger l'appareil avec une tension de 12 à 75V ainsi
qu'une puissance d'entrée maximale de 1500W.
Port d'extension
de la batterie
Peut être connecté à la batterie externe fabriquée
par notre société pour en augmenter la capacité.
Connecté à l'énergie éolienne (éolienne) pour charger
l'appareil avec une tension de 12 à 75V ainsi qu'une
puissance d'entrée maximale de 200W.
Commutateur de charge
accélérée/normale
Règle la puissance de charge du secteur. En
mode de charge normale, la puissance est de
500W (non réglable) ;
En mode de charge accélérée, la puissance max-
imale est de 3000W et peut être réglée de 500 à
3000W par le biais de l'APP.
Prise de charge CA
Connectée au secteur pour charger l'appareil.
3.3.6 Ports d’entrée
+-
OVERLOAD
PROTECTION
INPUT 12-75V
BATTERY-1 BATTERY-2
AC INPUT
230V 3000W MAX
WIND 200W
FAST
SLOW
AC CHARGE SPEED
+-
SOLAR 1500W
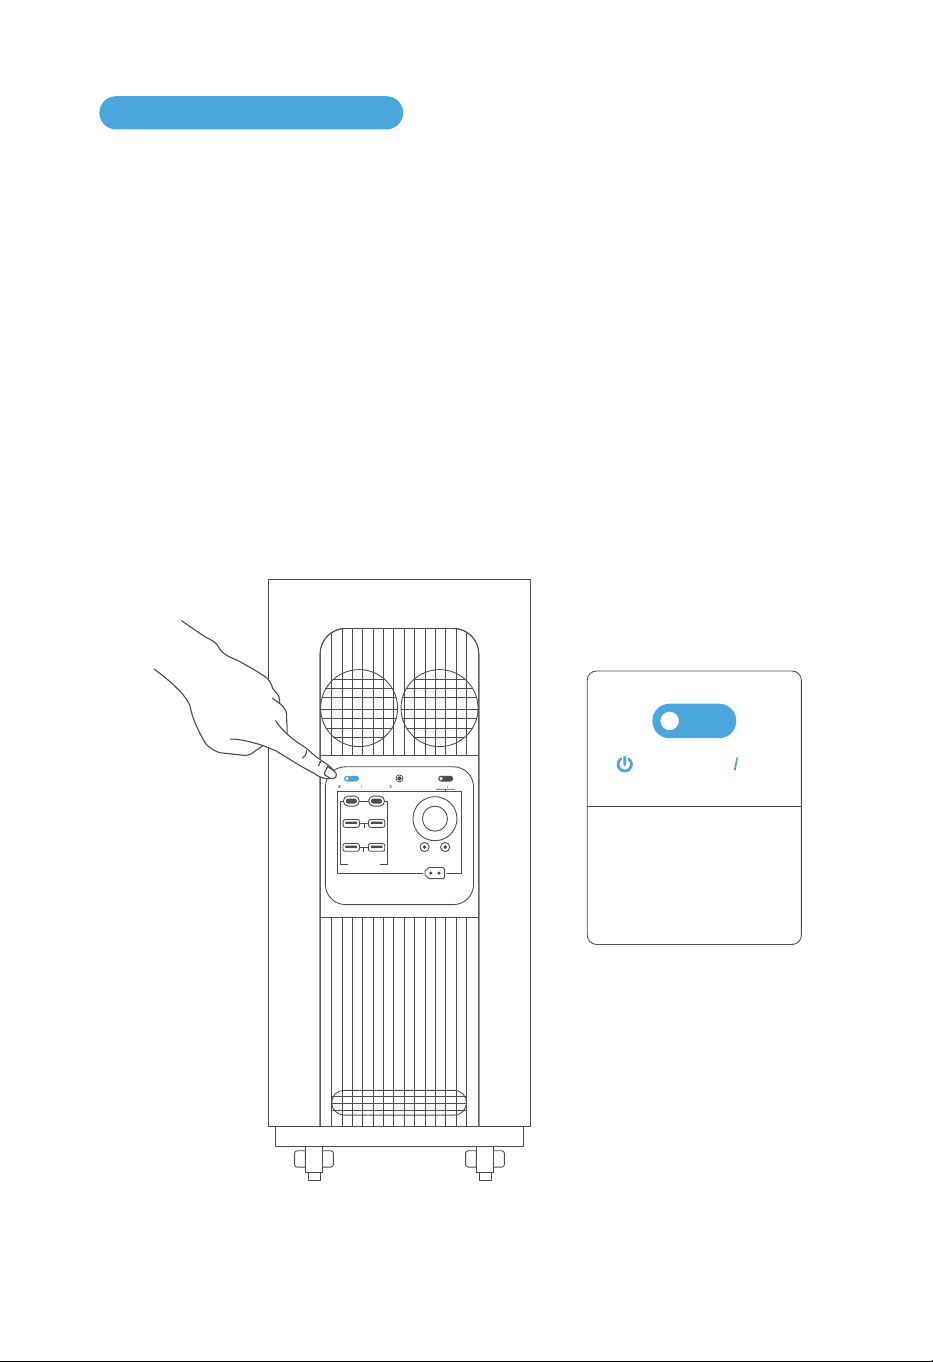
13
3.4.1 Mise en marche/arrêt de l'appareil et allumage de l'écran LCD
3.4 Utilisation de l'appareil
Appuyez sur le bouton d'alimentation et maintenez-le enfoncé pendant 3 secondes jusqu'à ce
que vous entendez un « bip », l'appareil s'allume. L'écran LCD s'allume après la mise sous tension
de l'appareil et le voyant d'alimentation passe en mode de veille.
À la fin de l'utilisation, appuyez sur le bouton d'alimentation et maintenez-le enfoncé pendant
3 secondes jusqu'à ce que vous entendez un « bip », l'appareil s'éteint. Le temps d'arrêt
automatique par défaut de cet appareil est de 12 heures. S'il n'y a aucune charge, décharge,
opération des boutons ou de l'APP, l'appareil s'éteindra automatiquement après 12 heures.
Appuyez sur le bouton pour désactiver la fenêtre contextuelle et l'alarme sonore en cas
d'alarme/défaut.
POWER ON OFF
Appuyez sur le bouton
et maintenez-lé enfonce
pendant 3 secondes pour
allumer/éteindre I'appareil
IOT RESET
USB-A 18W
USB FAST CHARGE
DC 12V 120W
12V 360W MAX
+-
USB-C 140WUSB-C 140W
DC ON OFF
POWER ON OFF
USB-A 18W
Bouton d'alimentation
a. Après 2 minutes sans aucune opération, l'appareil passe en état de veille et l'écran LCD
passe en mode de veille.
b. Lorsque l'appareil est actionné, chargé ou déchargé, il sort immédiatement de son état de
veille et l'écran LCD passe en mode normal.
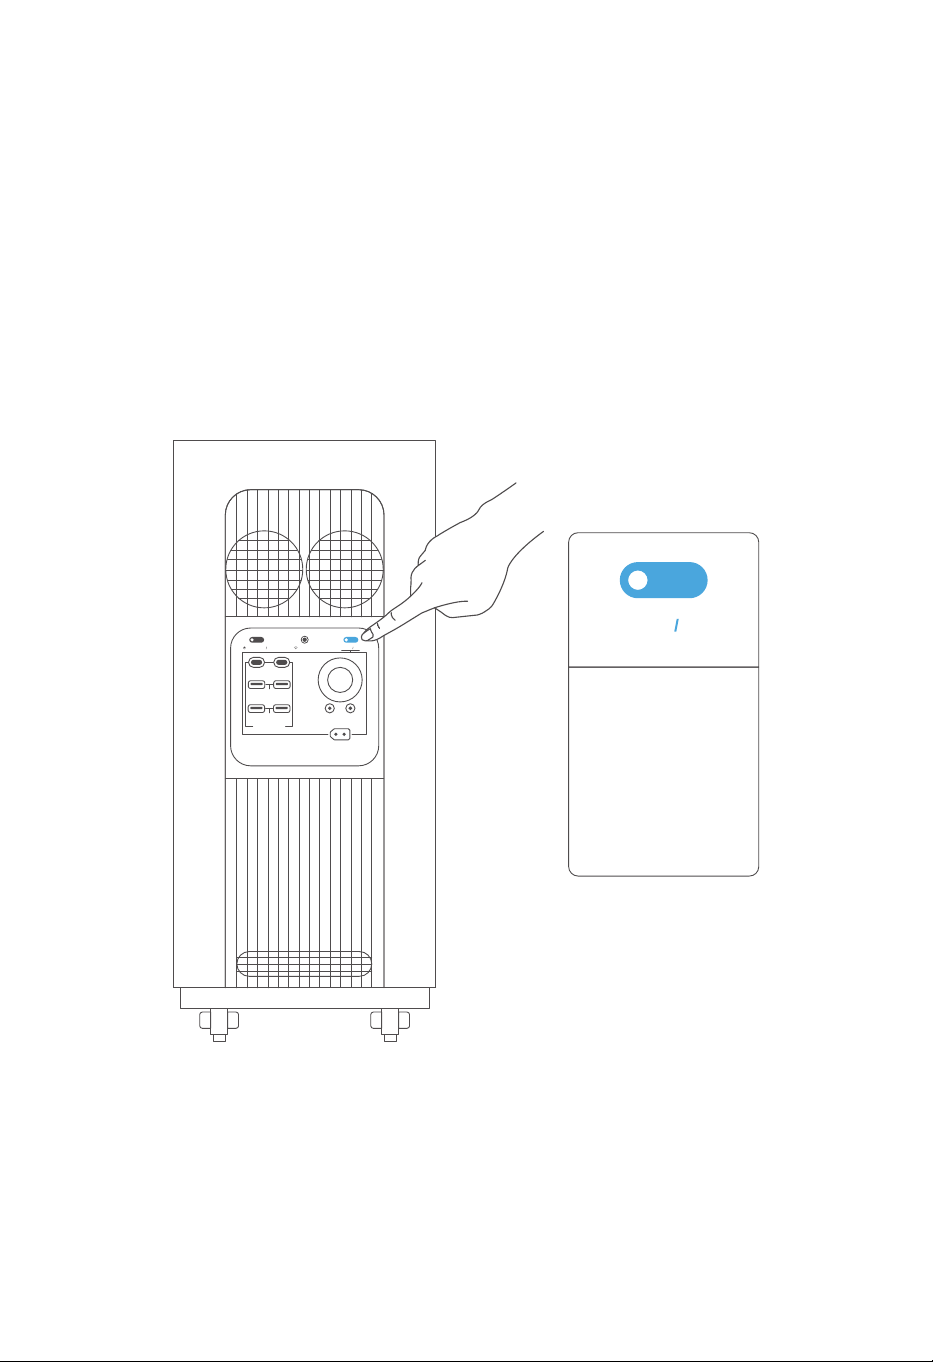
14
3.4.2 Sortie CC
Une fois l'appareil allumé, appuyez brièvement sur le bouton ON/OFF de la sortie CC pour
activer ou désactiver le port de sortie CC, et appuyez sur le bouton ON/OFF de la sortie CC et
maintenez-le enfoncé pendant 3 secondes pour éteindre l'écran.
Après la mise sous tension de l'appareil, le bouton ON/OFF de la sortie CC est désactivé par
défaut et le voyant du bouton n'est pas allumé, à ce moment-là, la charge connectée ne peut
pas être chargée ; appuyez brièvement sur le bouton ON/OFF de la sortie CC, ce bouton est
activé et le voyant du bouton est allumé en continu, à ce moment-là, la charge connectée peut
être chargée normalement.
Bouton ON/OFF de
la sortie CC
Appuyez brièvement sur
le bouton pour l'activer
ou le désactiver.
Appuyez sur le bouton et
maintenez-le enfoncé
pendant 3 secondes
pour éteindre l'écran.
DC ON OFF
IOT RESET
USB-A 18W
USB FAST CHARGE
DC 12V 120W
12V 360W MAX
+-
USB-C 140WUSB-C 140W
DC ON OFF
POWER ON OFF
USB-A 18W

3.4.3 Sortie CA
15
Après la mise sous tension de l'appareil, le bouton ON/OFF de la sortie CA est désactivé par
défaut et le voyant du bouton n'est pas allumé, à ce moment-là, la charge connectée ne peut
pas être chargée ; appuyez brièvement sur le bouton ON/OFF de la sortie CA, ce bouton est
activé et le voyant du bouton est allumé en continu, à ce moment-là, la charge connectée
peut être chargée normalement. Appuyez à nouveau brièvement sur ce bouton pour le dés-
activer.
Le bouton ON/OFF de la sortie CA est automatiquement désactivé lorsque tous les ports de
sortie CA ne sortent pas aucun courant pendant plus de 12 heures. Lorsque le courant total au
niveau des ports de sortie CA dépasse 15A, la protection contre les surintensités sera mis en
service, auquel cas l'appareil déconnectera automatiquement la sortie, et le bouton ON/OFF
de la sortie CA ainsi que le bouton ON/OFF de la sortie CC seront désactivés.
AC ON OFF
Bouton ON/OFF
Appuyez brièvement sur
le bouton pour l'activer
ou le désactiver.
de la sortie CA
+-
OVERLOAD
PROTECTION
INPUT 12-75V
BATTERY-1 BATTERY-2
AC INPUT
230V 3000W MAX
WIND 200W
FAST
SLOW
AC CHARGE SPEED
+-
SOLAR 1500W
AC ON OFF
230V 15A

3.5.1 Charge CA
16
3.5 Charge de l'appareil
La charge CA peut être divisée en deux modes, soit la charge accélérée et la charge normale.
En mode de charge accélérée, la puissance d'entrée maximale peut atteindre 3000W et peut
être réglée de 500 à 3000W par le biais de l'APP ; en mode de charge normale, la puissance
d'entrée maximale est de 500W (non réglable).
FAST
SLOW
Tirez vers le bas le
bouton pour passer
en mode de charge
normale.
FAST
SLOW
Tirez vers le haut le
bouton pour passer
en mode de charge
accélérée.
+-
OVERLOAD
PROTECTION
INPUT 12-75V
BATTERY-1 BATTERY-2
AC INPUT
230V 3000W MAX
WIND 200W
FAST
SLOW
AC CHARGE SPEED
+-
SOLAR 1500W
AC ON OFF
230V 15A
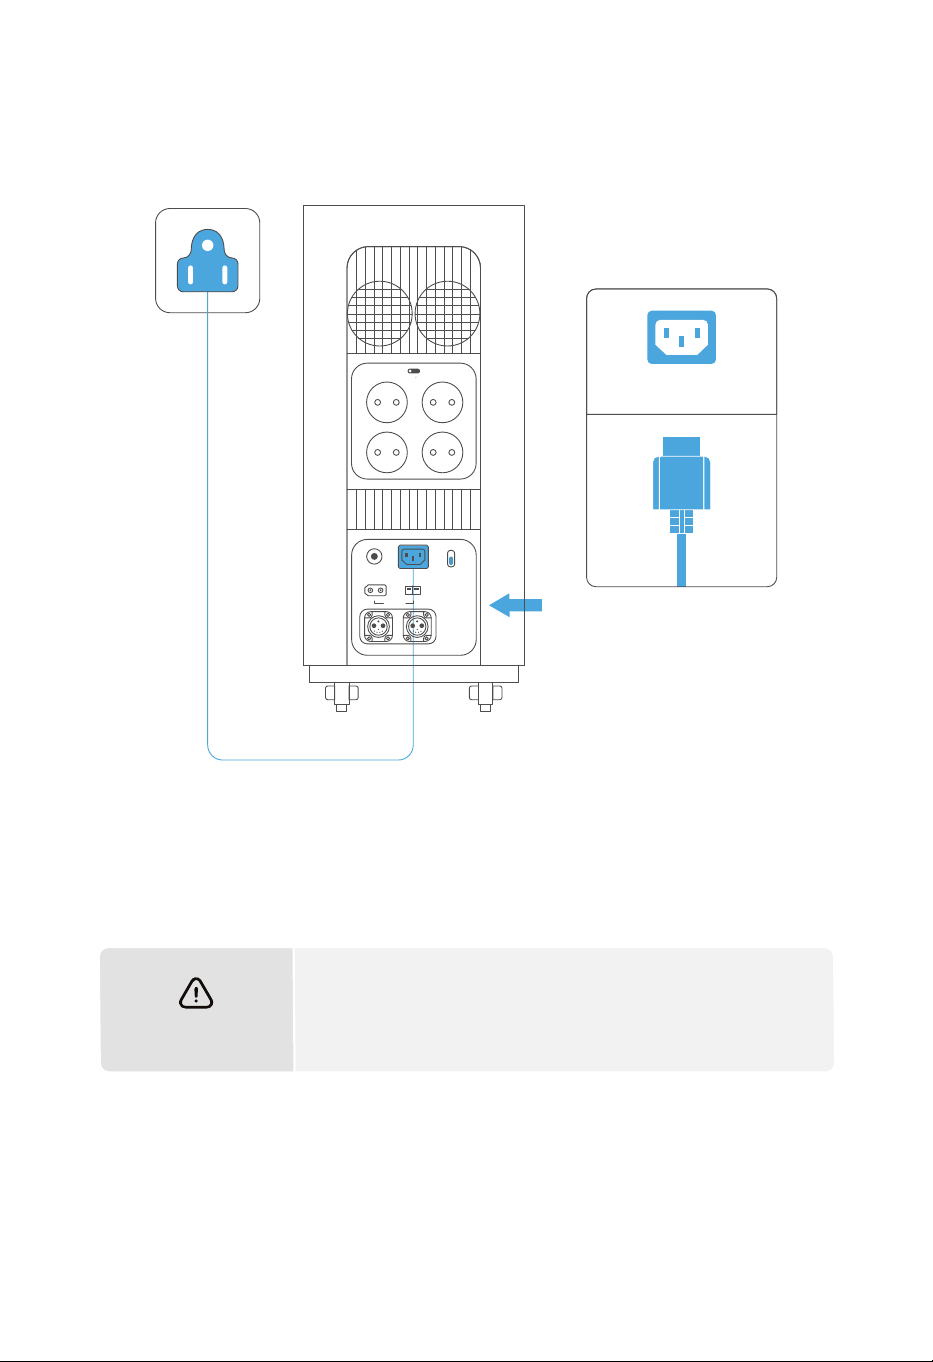
17
AVERTISSEMENT
Lors de la charge CA, veuillez utiliser notre câble de charge
standard. Nous ne sommes pas responsables de tout dom-
mage causé par l'utilisation d’ un câble de charge autre que
notre câble de charge standard.
AC INPUT
+-
OVERLOAD
PROTECTION
INPUT 12-75V
BATTERY-1 BATTERY-2
AC INPUT
230V 3000W MAX
WIND 200W
FAST
SLOW
AC CHARGE SPEED
+-
SOLAR 1500W
AC ON OFF
230V 15A
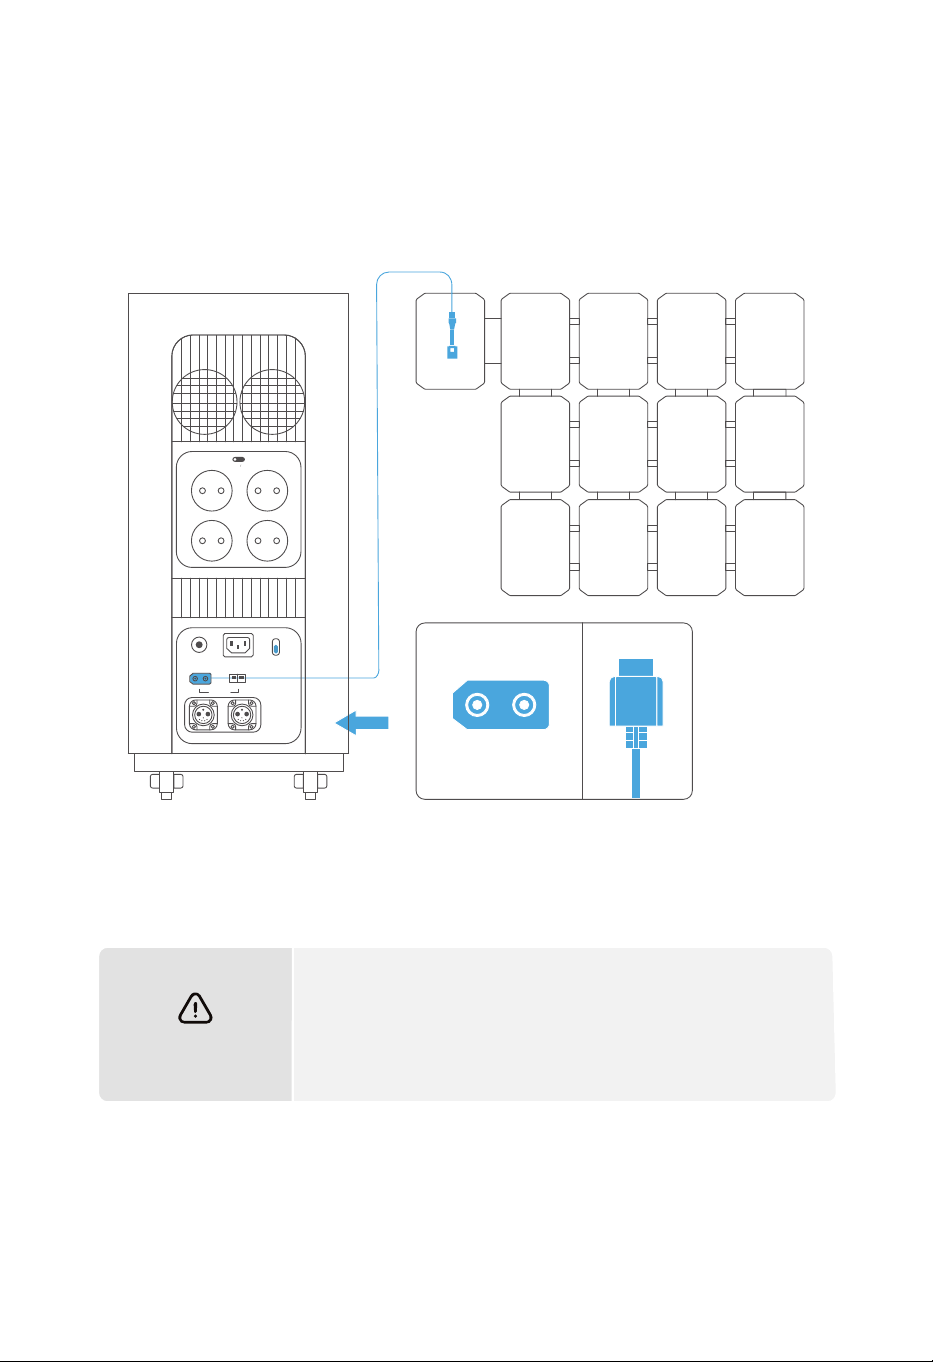
18
3.5.2 Charge solaire
Les utilisateurs peuvent charger l'appareil en connectant en série les panneaux solaires, tel
qu'il est indiqué dans le schéma suivant. L'appareil est conçu avec une tension d'entrée CC de
12 à 75V ainsi qu'une puissance d'entrée maximale de 1500W.
AVERTISSEMENT
b.
a.
Lorsque vous connectez les panneaux solaires pour charger
l'appareil, veuillez suivre le schéma ci-dessus.
Avant de connecter les panneaux solaires, assurez-vous que
leur tension de sortie est comprise entre 12 et 75V, sinon l'ap-
pareil risque d'être endommagé.
+-
SOLAR 1500W
+-
OVERLOAD
PROTECTION
INPUT 12-75V
BATTERY-1 BATTERY-2
AC INPUT
230V 3000W MAX
WIND 200W
FAST
SLOW
AC CHARGE SPEED
+-
SOLAR 1500W
AC ON OFF
230V 15A

3.5.3 Charge éolienne
19
Cet appareil prend en charge la charge à l'aide d'une éolienne avec une puissance d'entrée
maximale de 200W.
Comme indiqué dans le schéma ci-dessous, connectez une éolienne à l'appareil par le biais
d'un câble de transmission de données afin de charger l'appareil via l'énergie éolienne ; avant
de connecter l'éolienne, assurez-vous que sa tension de sortie est comprise entre 12 et 75V pour
éviter tout dommage à l'appareil.
WIND 200W
+-
OVERLOAD
PROTECTION
INPUT 12-75V
BATTERY-1 BATTERY-2
AC INPUT
230V 3000W MAX
WIND 200W
FAST
SLOW
AC CHARGE SPEED
+-
SOLAR 1500W
AC ON OFF
230V 15A
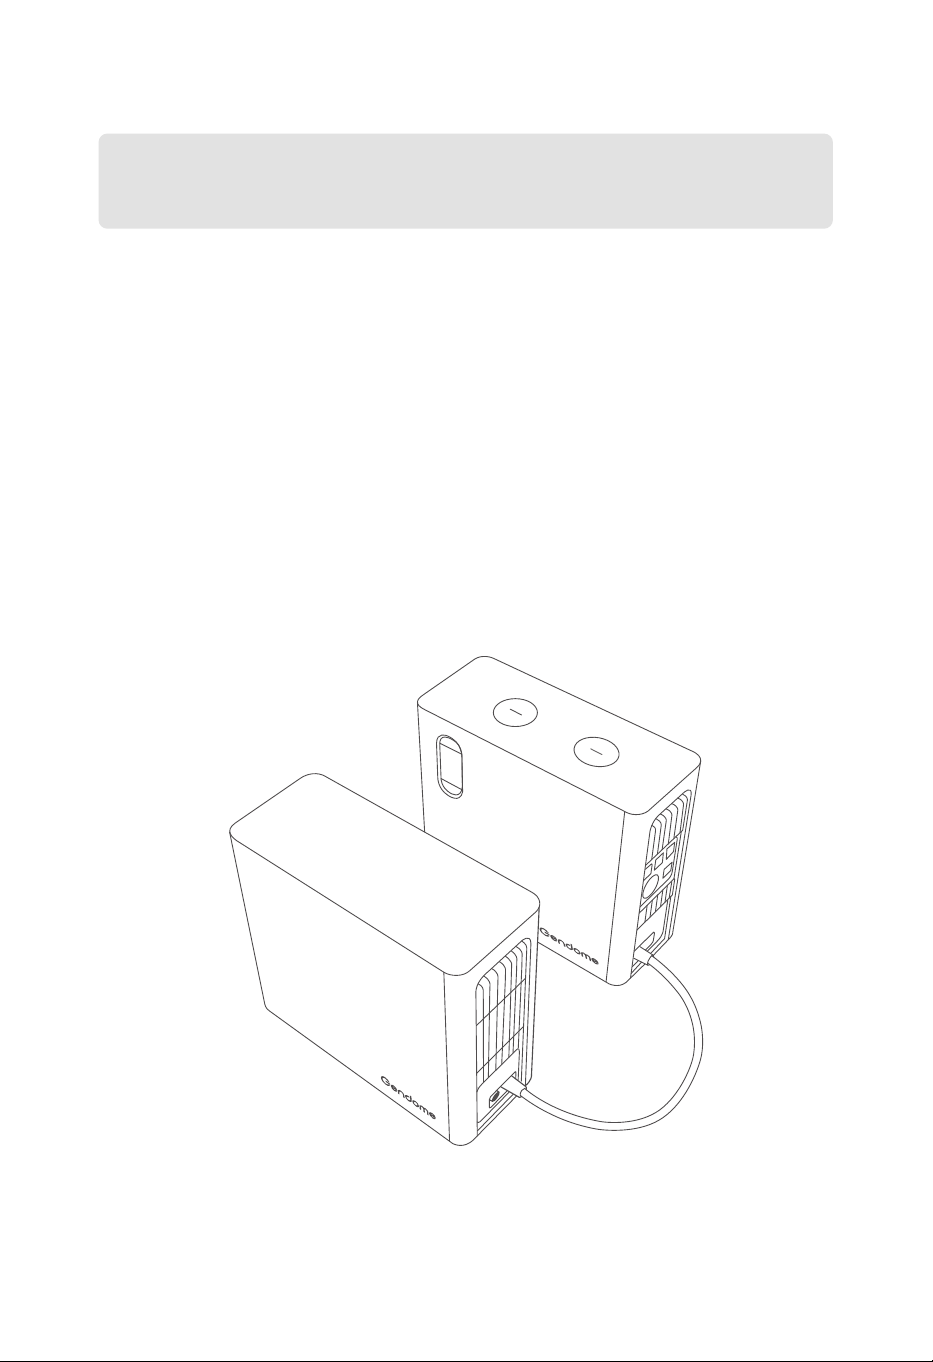
3.5.4 Batterie externe
20
Avant de connecter cet appareil à une batterie externe, assurez-vous que l'appareil et la
batterie externe sont éteints.
Lorsque cet appareil est connecté à une batterie externe, assurez-vous que l'icône de la
batterie externe apparaît sur l'écran LCD de cet appareil avant de commencer à l'utiliser.
Ne connectez ni ne déconnectez directement l'appareil de la batterie externe lors de la
charge ou la décharge. Si vous avez besoin de connecter ou de déconnecter la batterie
externe lors de la charge ou la décharge, veuillez éteindre l'appareil avant de le connecter
ou déconnecter de la batterie.
Ne touchez pas les bornes au niveau des ports des batteries externes avec vos mains ou
d'autres objets. Si des corps étrangers sont attachés aux bornes, essuyez-les doucement
avec un chiffon sec.
a.
b.
c.
d.
Cet appareil peut être simultanément connecté à deux batteries externes au maximum,
ce qui lui permet d'avoir une plus grande capacité. Veuillez suivre les instructions
suivantes lors de la connexion des batteries externes :

21
3.6 Utilisation de l'APP
Les utilisateurs peuvent contrôler et consulter les informations et les données sur cet appareil
via l'application Gendome (Gendome App).
Pour plus d'informations sur le téléchargement et l'utilisation de l'APP, veuillez consulter le site
officiel de Gendome : www.gendome.com.
3.7 UPS
Ce produit prend en charge la fonction UPS (alimentation de secours). Lorsque cet appareil est
connecté au réseau électrique via le câble de charge CA et qu'un appareil électrique est
connecté au port de sortie CA de cet appareil (dans ce cas, l'alimentation CA provient du
réseau électrique, mais pas de la batterie), cet appareil permet d'assurer une fonction UPS en
passant automatiquement au mode d'alimentation par son batterie en cas d'une coupure du
courant intempestive. Cette fonction est une fonction UPS de base, qui ne prend pas en charge
la commutation sans interruption. Veuillez ne pas le connecter à un appareil électrique qui
nécessite une alimentation sans interruption (par exemple, des serveurs de données, etc.) ou le
tester plusieurs fois pour vous assurer qu'il est compatible avant de l'utiliser. Il est recommandé
de ne connecter qu'un seul appareil électrique pendant l'utilisation afin d'éviter une protection
contre les surcharges due à la connexion simultanée de plusieurs appareils électriques. Nous
ne serons pas responsables de tout fonctionnement anormal de l'appareil ou perte de données
due au non-respect des instructions.
Scannez le code QR
pour télécharger l'APP

22
4.2 Stockage
Assurez-vous que l'emballage extérieur n'a pas été retiré et que le déshydratant ne manque
pas dans l'emballage.
Assurez-vous que l'environnement de stockage est propre, que la température et l'humidité
sont appropriées et qu'il n'y a aucune condensation.
Assurez-vous que l'appareil est placé conformément aux instructions indiquées sur
l'étiquette sur l'emballage.
Veillez à ce que l'appareil soit stocké à l'écart des matières inflammables, explosives,
corrosives et d'autres matières dangereuses.
Lorsque l'appareil est stocké pendant une longue période, veuillez le charger et décharger
une fois tous les 3 mois et au moins une fois tous les 6 mois afin de protéger la durée de vie
de l'appareil (batterie au lithium) et de maintenir des performances optimales de la batterie.
4.1 Contrôle lors de la réception
Vérifiez que l'emballage extérieur ne présente pas de dommages tels que des déformations,
des trous, des fissures ou d'autres signes de dégradation physique susceptibles d'endom-
mager l'appareil dans l'emballage. En cas de dommages, n'ouvrez pas l'emballage et contac-
tez votre distributeur.
Vérifiez que le modèle de l'appareil est correct avant le déballage. Si le modèle de l'appareil
ne répond pas à vos besoins, n'ouvrez pas l'emballage et contactez votre distributeur.
Après le déballage, vérifiez que l'aspect de l'appareil n'est pas endommagé. En cas de
dommages, veuillez contacter votre distributeur.
4. CONTRÔLE ET STOCKAGE DE L'APPAREIL
a.
b.
c.
a.
b.
c.
d.
e.
Veuillez effectuer les contrôles suivants lors de la réception de l'appareil :
Si la station d'énergie portable n'est pas mise en service immédiatement, stockez-la con-
formément aux exigences suivantes :

23
5.1 Mise au rebut de l'appareil
Lorsque la station d'énergie portable n'est plus utilisable et doit être mise au rebut, veuillez la
mettre au rebut conformément aux exigences de traitement des déchets d'équipements
électriques des lois et réglementations du pays/de la région où elle se trouve. Ne traitez pas la
station d'énergie portable comme une ordure ménagère. Ne jetez pas la station d'énergie
portable à votre gré.
5. AFFICHAGE DES PANNES ET DÉPANNAGE
Les codes d'alarme ou de panne qui peuvent s'afficher sur l'écran sont les suivants :
5.2 Dépannage
Interprétation SolutionCode
E05
Protection contre
les surintensités
Lors de la charge à basse température, la pro-
tection de la charge est automatiquement
activée. Veuillez attendre que l'appareil se soit
réchauffé avant de le charger.
Lors de la décharge à basse température,
veuillez enlever les appareils électriques à
grande puissance et contrôler la puissance de
sortie globale en dessous de 1500W pour éviter
l'arrêt du système.
E04
Basse température
de la batterie
La protection contre les surintensités est
activée. Veuillez éteindre l'appareil, débrancher
l'alimentation et rallumer l'appareil après 30s. Si
le problème n'est toujours pas résolu, veuillez
contacter le service après-vente.
En cas de panne du système, l'appareil s'éteint
automatiquement dans les 10 secondes,
veuillez contacter le service après-vente.
E06 Panne BMS
Surtension de
la batterie
La protection contre les surtensions est activée.
Veuillez éteindre l'appareil, débrancher l'alimen-
tation et rallumer l'appareil après 30s. Si le prob-
lème n'est toujours pas résolu, veuillez contacter
le service après-vente.
E01
La protection contre les sous-tensions est acti-
vée. La charge restante étant très faible, la batte-
rie fait donc l'objet d'une protection et d'une
charge lente, et la charge accélérée reprendra
plus tard.
E02
Sous-tension
de la batterie
E03
La protection contre les surchauffes est activée,
veuillez attendre que l'appareil refroidisse avant
de l'utiliser.
Surchauffe de
la batterie

24
Si une alarme apparaît pendant l'utilisation de l'appareil, veuillez la traiter en fonction des
solutions ci-dessus, et puis rallumer l'appareil. Si l'alarme persiste, cessez immédiatement
d'utiliser l'appareil et contactez le service après-vente (n'essayez pas de le charger ou de le
décharger).
Si aucune des solutions ci-dessus ne permet de résoudre votre problème, veuillez contacter
notre service client pour obtenir des conseils.
En cas de panne du système, l'appareil s'éteint
automatiquement dans les 10 secondes, veuillez
contacter le service après-vente.
E07
La protection contre les surchauffes est activée,
veuillez attendre que l'appareil refroidisse avant
de l'utiliser.
E08
La protection contre les surdécharges est activée,
réduisez le nombre d'appareils électriques con-
nectés et rallumez le bouton ON/OFF de la sortie
CA ou CC.
E09
La protection contre les surcharges est activée.
Veuillez réduire le nombre de sources d'entrée et
rallumer l'appareil. Si le problème n'est toujours
pas résolu, veuillez contacter le service
après-vente.
E10
En cas de panne du système, l'appareil s'éteint
automatiquement dans les 10 secondes, veuillez
contacter le service après-vente.
E11
Court-circuit de sortie
Température très
élevée de l'onduleur
Surcharge de la sortie
Surcharge de l'entrée
Tension de
sortie anormale
l'entrée du réseau électrique est instable. Veuillez
déconnecter l'entrée CA pour éviter tout dom-
mage à l'appareil.
E12
Tension anormale
du réseau électrique
La fréquence du réseau électrique est anormale
et l'entrée du réseau électrique est instable.
Veuillez déconnecter l'entrée CA pour éviter tout
dommage à l'appareil.
E13
Fréquence anormale
du réseau électrique
En cas de panne du système, l'appareil s'éteint
automatiquement dans les 10 secondes, veuillez
contacter le service après-vente.
E14 Court-circuit
La protection du système est activée. Veuillez
éteindre l'appareil, débrancher l'alimentation et
rallumer l'appareil après 30s. Si le problème n'est
toujours pas résolu, veuillez contacter le service
après-vente.
E15 Autres pannes
et alarmes
Interprétation SolutionCode
25
6.1 Maintenance
Cycle de maintenance
6. MAINTENANCE ET ENTRETIEN
Lors de la maintenance de l'appareil, veuillez le mettre hors tension. Une maintenance
de l'appareil sous tension peut entraîner des dommages à l'appareil ou un risque de
choc électrique.
Nettoyage du
système
Méthode
Une fois par anVentilateur
Vérifiez que le ventilateur fonctionne nor-
malement, qu'il n'y a pas de bruit et que
son aspect est normal.
Une fois par an
Bouton ON/OFF
de la sortie CC
Allumez et éteignez le bouton ON/OFF de la
sortie CC 10 fois de suite pour vous assurer
qu'il fonctionne normalement.
Vérifiez que les ailettes de refroidissement
ainsi que l'entrée/sortie d'air sont exemptes
de corps étrangers et de poussières.
Une fois tous les six mois
ou une fois par an
6.2 Entretien
Pour des raisons de sécurité, ne
stockez pas l'appareil pendant
de longues périodes dans un
environnement où la tempéra-
ture est inférieure à 0°C (32°F)
ou supérieure à 45°C (113°F).
Si l'appareil est fortement
déchargé et reste inutilisé
pendant trop longtemps, il
passe en mode veille pro-
fonde et doit être rechargé
avant d'être réutilisé.
Il est recommandé d'utiliser ou
de stocker l'appareil dans un
environnement de 20°C à 30°C
(68°F à 86°F) et de le tenir éloigné
de l'eau, des sources de chaleur
et d'autres objets métalliques.
Pour prolonger la durée de vie
de la batterie, il est recom-
mandé d'utiliser l'appareil
dans un environnement de
20°C à 30°C (68°F à 86°F).
Pour un stockage pendant une
longue période, déchargez et
rechargez l'appareil une fois tous
les 3 mois (le déchargez d'abord,
et puis le rechargez).
Si l'appareil n'est pas utilisé pen-
dant une période prolongée,
chargez-le à 100 % du niveau de
charge de la batterie avant de le
stocker. Si l'appareil reste inutilisé
pendant une longue période
alors que la charge restante de
la batterie est faible, des dom-
mages irréversibles peuvent se
produire sur sa cellule, ce qui
réduira l
a durée de vie de
l'appareil.
w
INPUT OUTPUT
OUTPUT
w
Use Status
Remaining Time: -- h -- m
100
0
Contenu

Scannez le code QR pour
télécharger l'APP
7. CONTENU DE L'EMBALLAGE
26
Gendome Home 3000
Câble de charge
éolienne
Câble de charge solaire
Guide de l'utilisateur
Câble de charge CA
Câble adapteur
allume-cigare/XT60