Danby Products Limited, Guelph, Ontario, Canada N1H 6Z9
Danby Products Inc. Findlay, Ohio, U.S.A. 45840
www.danby.com
30” ELECTRIC RANGE
Owner’s Manual.............................1 - 30
ESTUFA ELÉCTRICA 30”
Manual del propietario.................31 - 60
MODEL * MODELO
DRRM300BSS
DRRM300W
2025.07.29
Printed in China | Impreso en China
OWNER’S MANUAL
MANUAL DEL PROPIETARIO

1
Welcome to the Danby family.
We are proud of our quality products and we believe in dependable service. We suggest
that you read this owner’s manual before plugging in your new appliance as it contains
important operation information, safety information, troubleshooting, and maintenance tips
to ensure the reliability and longevity of your appliance.
You are entitled to the warranty coverage as described in the owner’s manual provided with
your new appliance.
1. Please write down your appliance information below. You must keep the original proof
of purchase receipt to validate and receive warranty services.
2. Register your product online and receive a FREE 2 MONTH WARRANTY EXTENSION
after filling out a product survey, at www.danby.com/support/product-registration/
Need Help?
1. Read your Owner’s Manual for installation help, troubleshooting, and maintenance
assistance.
2. Visit www.Danby.com to access self-service tools, FAQs and much more by searching
your model number in the search bar.
3. For the Quickest Customer Service, please fill out the web form at www.danby.com/
support. Your submission will go directly to an expert on your particular appliance.
Our average response times are between 20 minutes and 2 hours, during EST business
hours.
4. Call 1-800-263-2629 - please note that during peak hours, hold times can exceed one
hour.
Model Number: ____________________________________________________
Serial Number: ____________________________________________________
Date of Purchase: __________________________________________________
WARNING - TIP OVER HAZARD
• A child or adult can tip the appliance and be killed.
• Verify the anti-tip bracket has been properly installed to the floor or wall.
• Ensure the anti-tip bracket is re-engaged when the range is moved.
• Do not operate the range without the anti-tip bracket in place and engaged.
• Failure to follow these instructions can result in death or serious burns to children or adults.
ANTI-TIP DEVICE
To reduce the risk of the range tipping by abnormal usage or improper door loading, the range must be
secured by installing an anti-tip device.
Note: If the range is ever relocated the anti-tip bracket must be removed and installed at the new location.
WARNING
SUFFOCATION AND RISK OF CHILD ENTRAPMENT
To avoid the possibility of child entrapment please take the following
precautions before throwing out the appliance:
• Remove the oven door completely
• Never allow children to operate, play with or crawl inside the electric range
Important Safety Information
READ AND FOLLOW ALL SAFETY INSTRUCTIONS
SAVE THESE INSTRUCTIONS!
Important Safety Information
READ AND FOLLOW ALL SAFETY INSTRUCTIONS
SAVE THESE INSTRUCTIONS!
NOTICE - BEFORE FIRST TIME USE OVEN
Before use of this oven for the first time, the heating elements have a protective coating, which must be
burned off before use. To do this:
• Remove all packaging from the inside of the oven
• Ensure door is closed
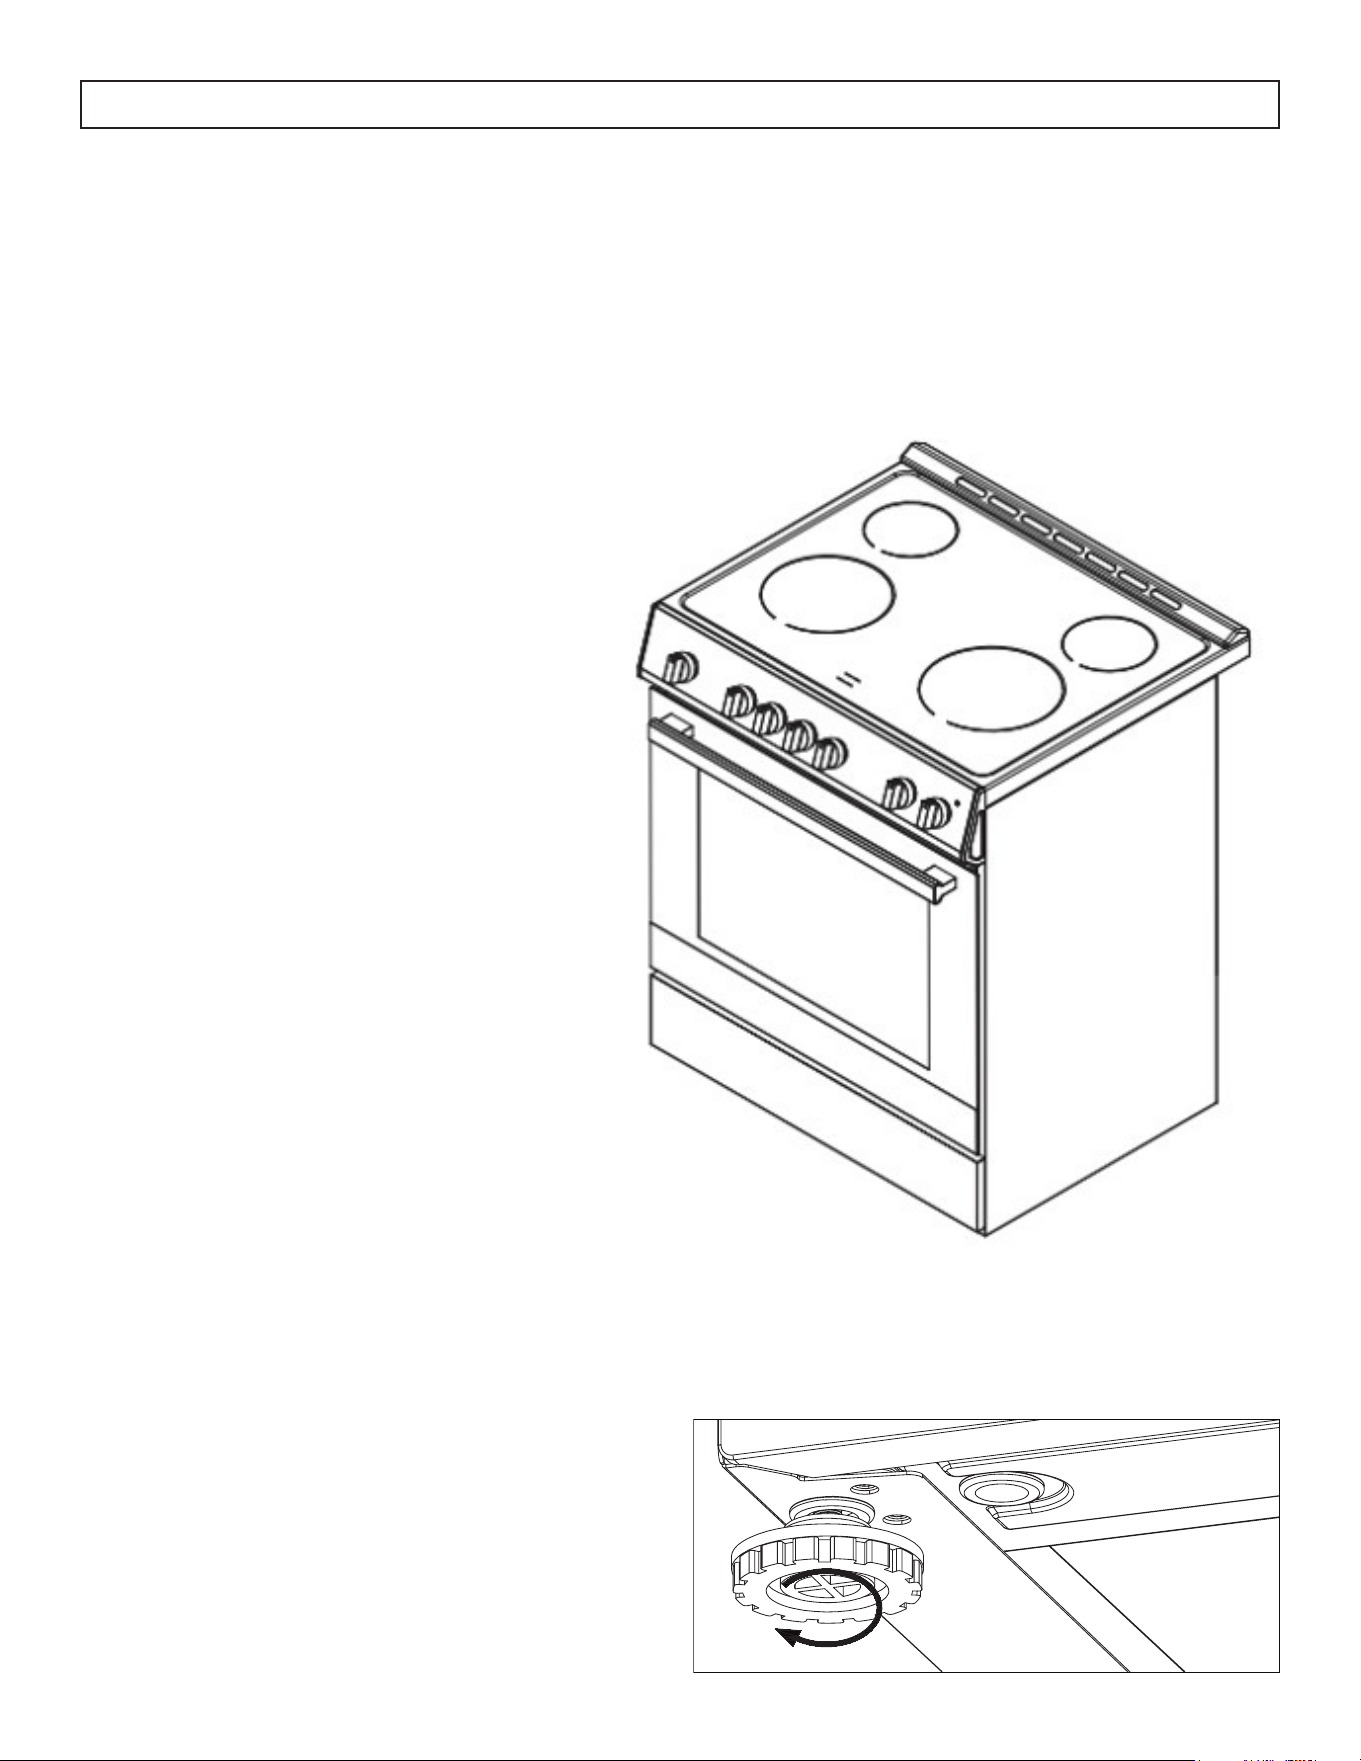
• Rotate the cooking feature knob to Bake.
• Rotate the temperature feature knob to MAX.
• Rotate the timer knob to 30 minutes.
NOTE: Allow the oven to operate for 30 minutes with no food in the cavity. Once it has completed the 30
minutes, open the oven door to allow it to cool. Any odor that may be detected during this initial use is
due to the evaporation of sutbstances used to protect the oven during storage.
NOTE: Do not place anything, including dishes, foil and oven trays, on the bottom of the oven when it is
in operation to avoid damaging the enamel.
NOTICE - BEFORE FIRST TIME USE COOKTOP
Before use of the cooktop for the first time, the heating elements have a protective coating, which must be
burned off before use. To do this:
• Clean the ceramic glass top. It is recommended to use a glass top cleaner.
• Place a saucepan of water on each front burner and turn the heat on HI for at least 30 minutes. Turn
off the front burners.
• Repeat previous step for both of the rear burners.
NOTES:
This procedure will evaporate any protective oils and humidity collected during the manufacturing
process, and enables the electronic control circuits to operate properly.
There may be a slight odor during the first several uses: this is normal and will dissipate.
After use, the ceramic cooktop will remain hot for over 20 minutes after it has been turned off. The Hot
Surface Indicator will remain lit when the cooktop is hot.
DANGER - GREASE FIRES
In the event of a fire, never pick up a flaming pot
or pan. Turn the element off if it is safe to do so.
Extinguish the fire with a dry chemical or foam-
type extinguisher.
Do not use water on grease fires. Water will
spread the grease and will not extinguish the fire.
Smother the fire with a tight fitting pot lid, cookie
sheet or flat tray or use dry chemical or foam-type
extinguisher.
If there is a fire in the oven while in use, smother
the fire by closing the oven door and turning
the oven off or use dry chemical or foam-type
extinguisher.
DANGER - FIRE RISKDO NOT TOUCH HEATING ELEMENTS OR
AREAS NEAR THEM
Heating elements on the surface or in the interior
of the appliance may be hot even though they are
dark in colour. Areas near the heating elements
may become hot enough to cause burns. During
and after use do not touch or let clothing or
other flammable materials contact the heating
elements or areas near them until they have had
sufficient time to cool. Surfaces of the appliance
may become hot enough to cause burns, among
them are the cook top, oven vent openings and
surfaces near these openings, oven doors and
oven windows.
Important Safety Information
READ AND FOLLOW ALL SAFETY INSTRUCTIONS
SAVE THESE INSTRUCTIONS!
• It is recommended that this appliance be
connected to a separate circuit that is not
shared with any other appliance.
• Never clean appliance parts with flammable
fluids. These fumes can create a fire hazard
or explosion. Never use or store gasoline or
other flammable vapors or liquids inside or in
the proximity of this appliance, failing to do so
may result in a fire hazard or explosion.
• Before cleaning or servicing this appliance,
unplug the appliance completely from the
electrical outlet or disconnect the range power
supply at the household distribution panel by
removing the fuse or switching off the circuit
breaker. Failure to do so can result in electrical
shock or death.
• Do not attempt to repair or replace any part
of your appliance unless it is specifically
recommended in this manual. All other
servicing should be referred to a qualified
service technician.
• For your safety, this appliance should never be
used as a source of heat or as a space heater.
The cooktop elements should not be operated
without proper cookware.
• All openings in the wall behind the appliance
and the floor under the appliance shall be
sealed.
• Keep the area around the appliance clear
and free from combustible materials, gasoline
and other flammable vapors. Always keep
combustible wall coverings, curtains or drapes
a safe distance from the range.
• Do not obstruct the flow of air around the
appliance.
• Storage in or on the appliance: flammable
materials should not be stored in an oven or
near cooktop elements.
• Do not cover any slots, holes or passages in
the oven bottom or cover an entire rack with
materials such as aluminum foil.
GENERAL SAFETY REQUIREMENTS
Ensure the appliance is properly installed and grounded by a qualified technician.
Children should not be left alone or unattended in the area where the appliance is in use. Children should
never be allowed to sit or stand on any part of the appliance.
Do not store items of interest to children in cabinets above a range or on the back guard of a range.
Children climbing on the range to reach items could be seriously injured.
To eliminate the risk of burns or fire by reaching over heated surface units, cabinet storage space located
above the surface units should be avoided. If cabinet storage is to be provided, the risk can be reduced by
installing a range hood that projects horizontally a minimum of 5 inches (12.7 cm) beyond the bottom of
the cabinets.
Loose fitting or hanging garments should never be worn while using the appliance.
Use only dry pot holders. Moist or damp pot holders on hot surfaces may result in burns from steam. Do
not let the pot holder touch hot heating elements. Do not use a towel or other bulky cloth.
If power is lost to an electric cooktop while a surface element is ON, the surface element will turn back on
as soon as power is restored. In the event of power loss, failure to turn all surface element knobs to the OFF
position may result in ignition of items on or near the cooktop, leading to serious injury or death.
This range is designed and manufactured solely for the cooking of domestic (household) food and is not
suitable for any non domestic application and therefore should not be used in a commercial environment.
The range warranty will be void if the range is used within a non domestic environment.
WARNING
To reduce the risk of burns, do not move this
appliance while it is hot. To reduce the risk of
injury due to tipping of the appliance, verify
the re-installation of this appliance into the
anti-tipping device provided after returning the
appliance to the original installed position.
WARNING
The manufacturer declines all liability for injury to
persons or damage to property cause by incorrect
or improper use of the range.
Important Safety Information
READ AND FOLLOW ALL SAFETY INSTRUCTIONS
SAVE THESE INSTRUCTIONS!
SAVE THESE INSTRUCTIONS!
OVEN SAFETY REQUIREMENTS
Use care when opening the door. Allow hot air or
steam to escape before removing or replacing food.
Do not heat unopened food containers. Build up of
pressure may cause the container to burst and result
in injury.
Keep oven vents unobstructed.
Always place oven racks in the desired location
while the oven is cool. If the rack must be moved
while the oven is hot, do not let the pot holder
contact the hot heating element in the oven.
Do not use the oven if a heating element develops
a glowing spot during use or shows other signs
of damage. A glowing spot indicates the heating
element may fail and present a potential burn, fire,
or shock hazard. Turn the oven off immediately and
have the heating element replaced by a qualified
service technician.
Do not line the oven walls or racks with aluminum
foil.
Do not place shelves, pans, baking trays, broil trays
or other cooking utensils in the bottom of the oven
chamber. Always place on an oven shelf.
Never clean the oven with any high pressure steam
cleaning devices.
Do not leave anything on the top of the oven vent.
Never cover the oven vent opening with aluminum
foil or any other material.
Important Safety Information
READ AND FOLLOW ALL SAFETY INSTRUCTIONS
COOKTOP SAFETY REQUIREMENTS
• Use the proper pan size. This appliance is
equipped with four burners of different sizes.
Select utensils that have flat bottoms large
enough to cover the surface of the heating
element. The use of undersized utensils will
expose a portion of the heating element to direct
contact and may result in ignition of clothing.
Proper relationship of utensil to burner will also
improve efficiency.
• Never leave the appliance unattended while in
use. Boil over causes smoking and greasy spills
can ignite.
• Never leave oil unattended while frying. If
allowed to heat beyond its smoking point, oil
may ignite resulting in fire that may spread
to surrounding cabinets. Use a deep fat
thermometer whenever possible to monitor oil
temperature.
• To avoid oil spillover and fire, use a minimum
amount of oil when shallow pan-frying and
avoid cooking frozen foods with excessive
amounts of ice.
• Only certain types of glass, ceramic,
earthenware or other glazed utensils are
suitable for range top service without breaking
due to sudden change in temperature.
• To reduce risk of burns, ignition of flammable
materials and spillage due to unintentional
contact, the handle of a utensil should be
positioned so that it is turned inward and does
not extend over adjacent burners.
• Do not cook on broken cooktop. If the cooktop
should break, cleaning solutions and spill overs
may penetrate the broken cooktop and create
a risk of electric shock. Contact a qualified
technician immediately.
• Do not use a griddle or long pan on more than
one burner at once.
• Clean Cook-Top With Caution - If a wet sponge
or cloth is used to wipe spills on a hot cooking
are, be careful to avoid steam burn. Some
cleaners can produce noxious fumes if applied
to a hot surface.

Important Safety Information
READ AND FOLLOW ALL SAFETY INSTRUCTIONS
SAVE THESE INSTRUCTIONS!
GROUNDING INSTRUCTIONS
This appliance must be grounded. Grounding reduces the risk of electrical shock by providing an escape
wire for the electrical current.
When this appliance is fitted with a power cord that has a grounding wire with a 4-prong plug. The power
cord must be plugged into an outlet that is properly grounded. If the outlet is is not a 4-prong plug, it must
be replaced with a properly grounded 4-prong wall outlet. The rating plate indicates the voltage and
frequency the appliance is designed for.
WARNING - Improper use of the grounding plug can result in a risk of electric shock. Consult a qualified
electrician if the grounding instructions are not completely understood, or if doubt exists as to whether the
appliance is properly grounded.
Do not connect the appliance to extension cords, adapters or together with another appliance in the
same wall outlet.
Do not splice the power cord. Do not under any circumstances cut or remove the ground prong from the
power cord.
If the power supply cord is damaged, it must be replaced by the manufacturer, its service agent or similar
qualified person in order to avoid hazard.
Note: Turning the appliance off does not disconnect the appliance from the power supply.
It is recommended that the power cord and the plug be placed parallel with the floor so that the cord runs
parallel with the floor.
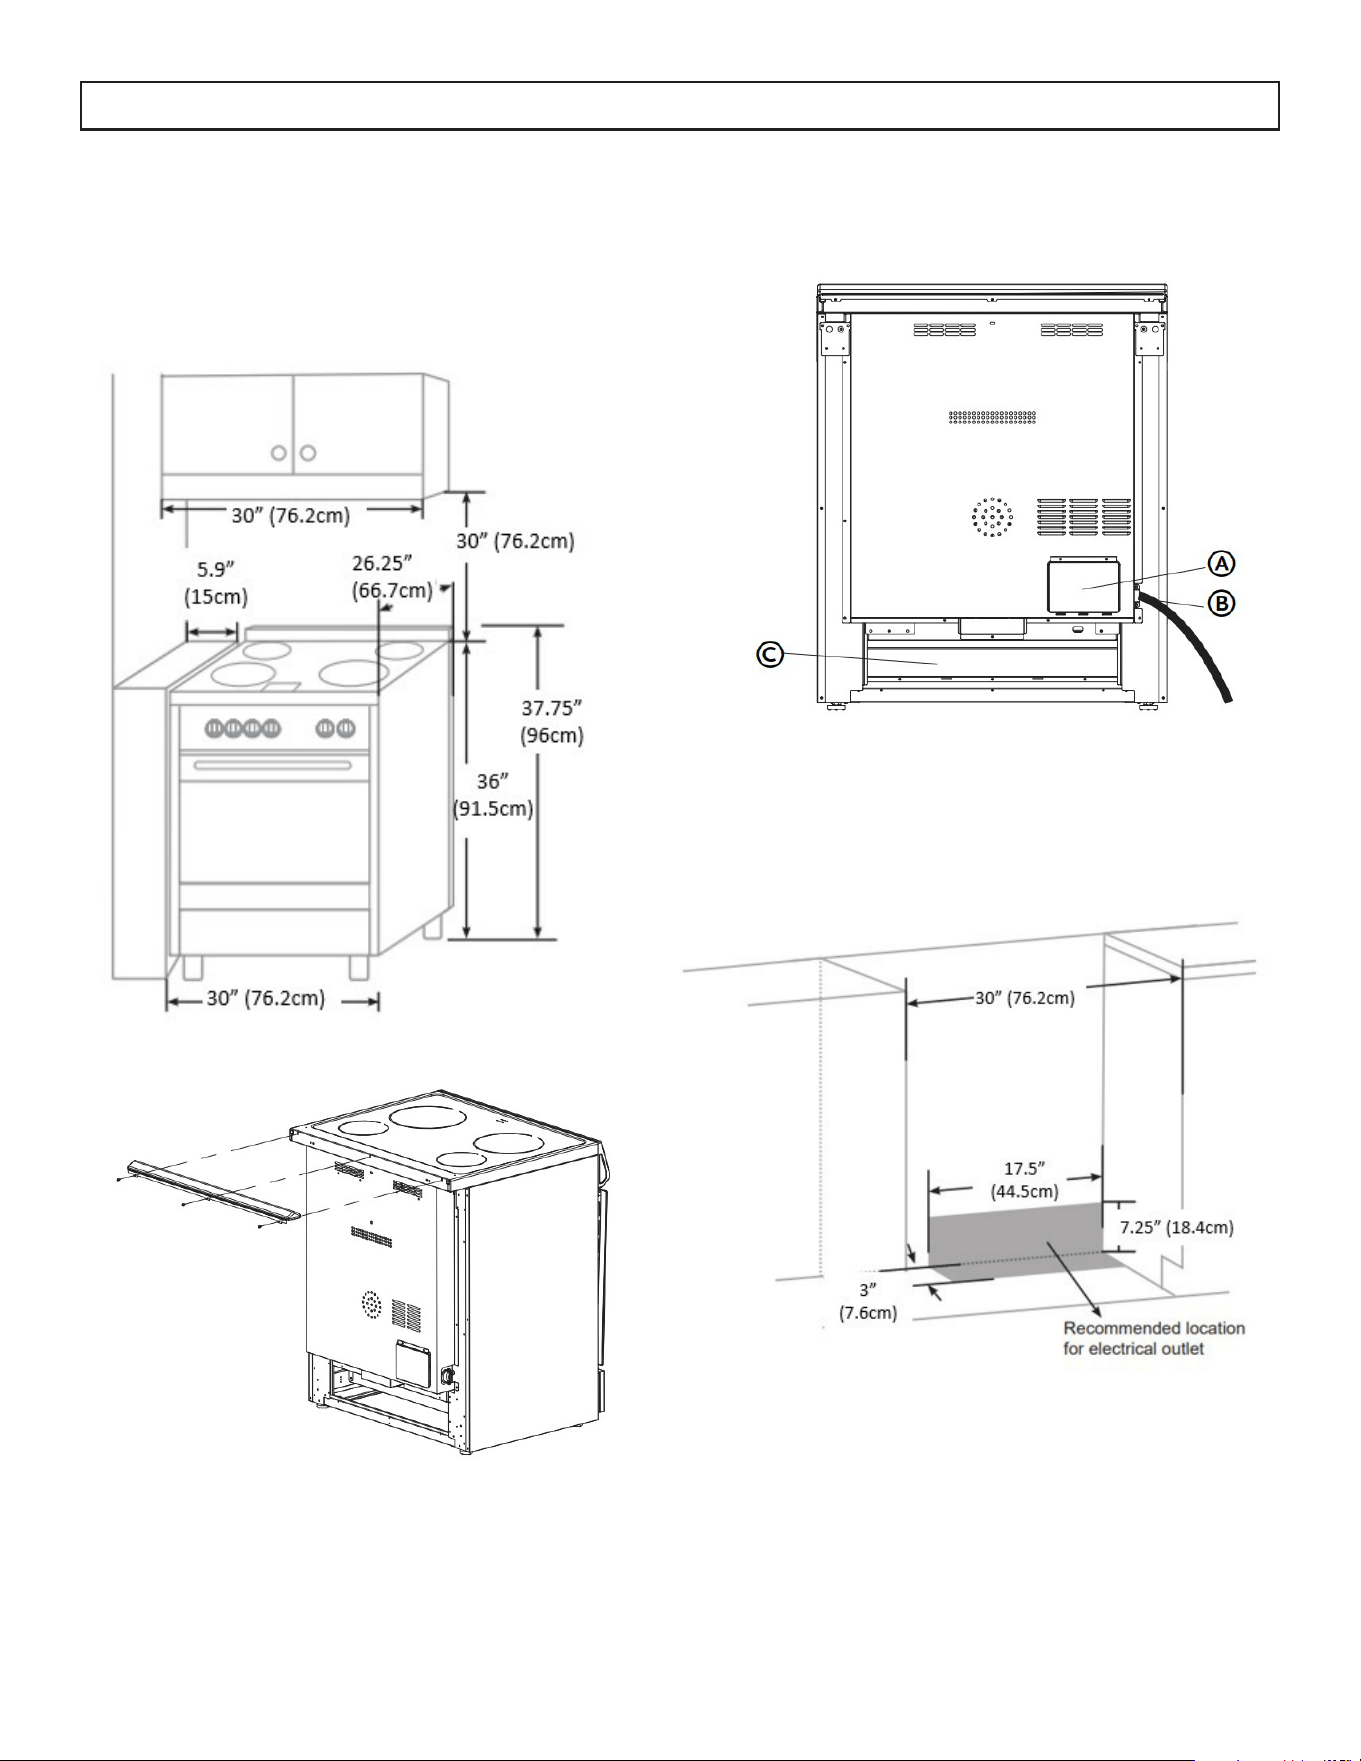
8
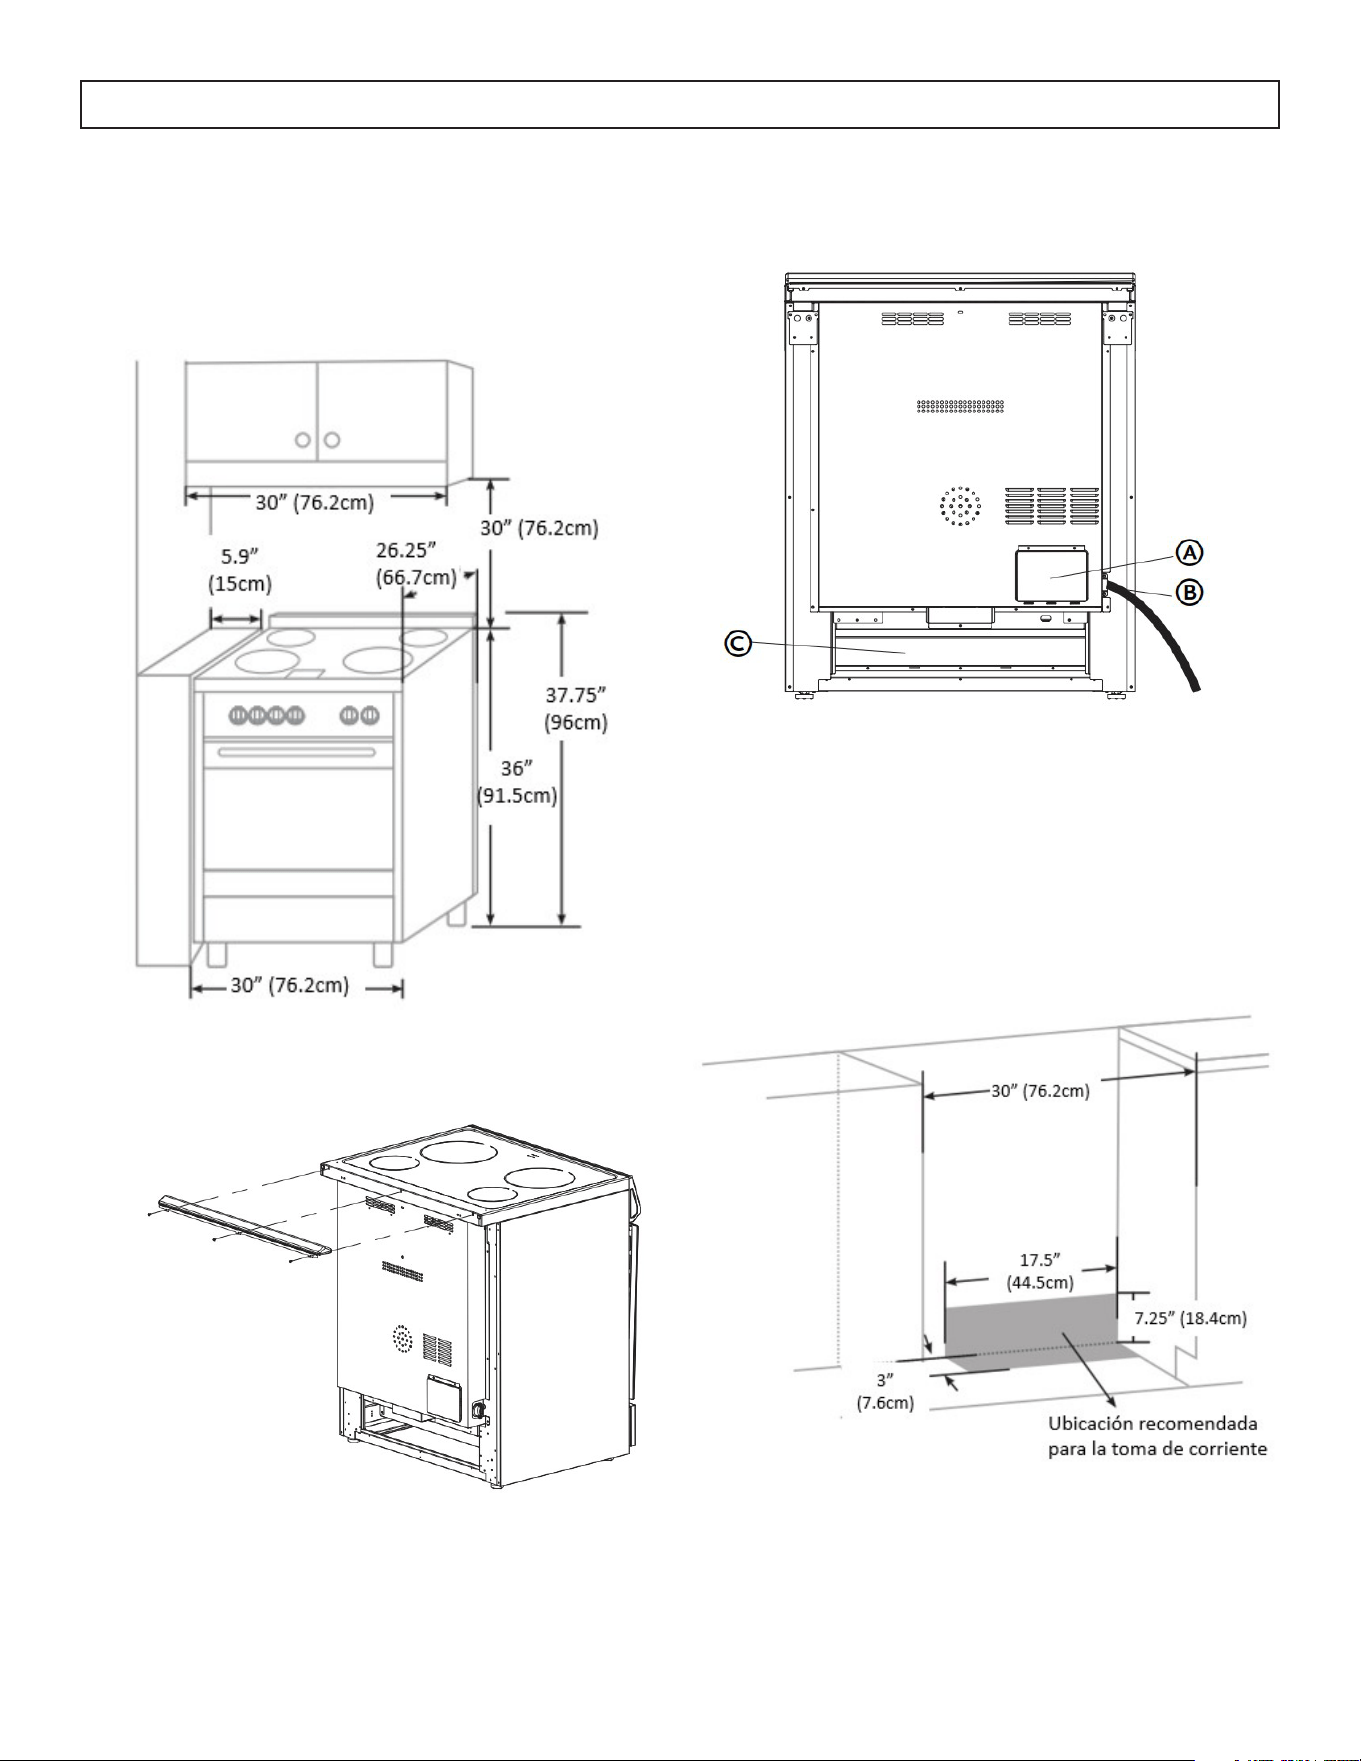
Installation Measurements
INSTALLATION INSTRUCTIONS
NOTE: Range can be raised approximately 1 inch
(2.5 cm) by adjusting the leveling legs. The front
of door and drawer may extend farther forward
depending on styling.
Power Supply
A: Access Panel to Electrical Supply Cord
B: Power Cord Opening
C: Recessed Area
NOTE: To connect to an outlet in the wall, the
electrical outlet must be recessed. If the electrical
outlet is on the floor, it must be either recessed or
surface mounted.
BACKSPLASH INSTALLATION:
Install the backsplash to rear of the range with the
screws provided.

9
INSTALLATION INSTRUCTIONS
IMPORTANT
Disconnect power before servicing. Improper connection of aluminum house wiring and copper
appliance leads can result in an electrical hazard or fire. If the home has aluminum wiring, only
use connections designed and UL listed for joining copper to aluminum and precisely follow the
manufacturer’s recommend procedure. Aluminum-to-Copper connections must conform with local
codes. Use 8-gauge copper or 6-gauge aluminum wire. Electrically ground range.
CONNECTION TO HOUSE ELECTRICAL SUPPLY
Be sure your appliance is properly installed and grounded by a qualified technician.
• A circuit breaker is recommended.
• The range can be connected directly to the circuit breaker box (or fused disconnect) through flexible or
nonmetallic sheathed, copper or aluminum cable.
• Allow at least 6 ft (1.8M) of slack in the line so that the range can be moved if servicing is every
necessary.
• A UL listed conduit connector must be provided at each end of the power supply cable (at the range
and at the junction box).
The wiring diagram is included with the range. This appliance is manufactured with the chassis connected
to a neutral by a green ground jumper wire. After making sure that the power has been turned off, connect
the flexible conduit from the range to the junction box using a UL listed conduit connector. The Grounded
Neutral and Ungrounded Neutral Graphics on the following pages and the instruction provided, present
the most common way of connecting the range. Your local codes and ordinances take precedence over
these instruction. Complete electrical connections according to local codes and ordinances.
PARTS NEEDED:
If using a power supply cord:
• UL listed power supply cord kit marked for use with ranges. The cord should be rated at 250V
minimum, 40 amps or 50 amps that is marked for use with nominal 1 3/8” (3.5 cm) diameter
connection opening and must end in ring terminals or open-end spade terminals with upturned ends.
• UL listed strain relief.
If direct wiring:
• Flexible Metal Conduit
• UL Listed Conduit Connector
• 4-wire or 3-wire Electrical Cable (where local codes permit a 3-wire connection)
• UL Listed Wire Connectors
NOTES:
• Check local codes.
• Check existing electrical supply.
10
INSTALLATION INSTRUCTIONS
IMPORTANT
Only for models sold in the United States. This model does not include a pre-installed power cord. Use
the following wiring instructions before using the range. The power cord is not provided. Follow all
local and national wiring codes and standards.
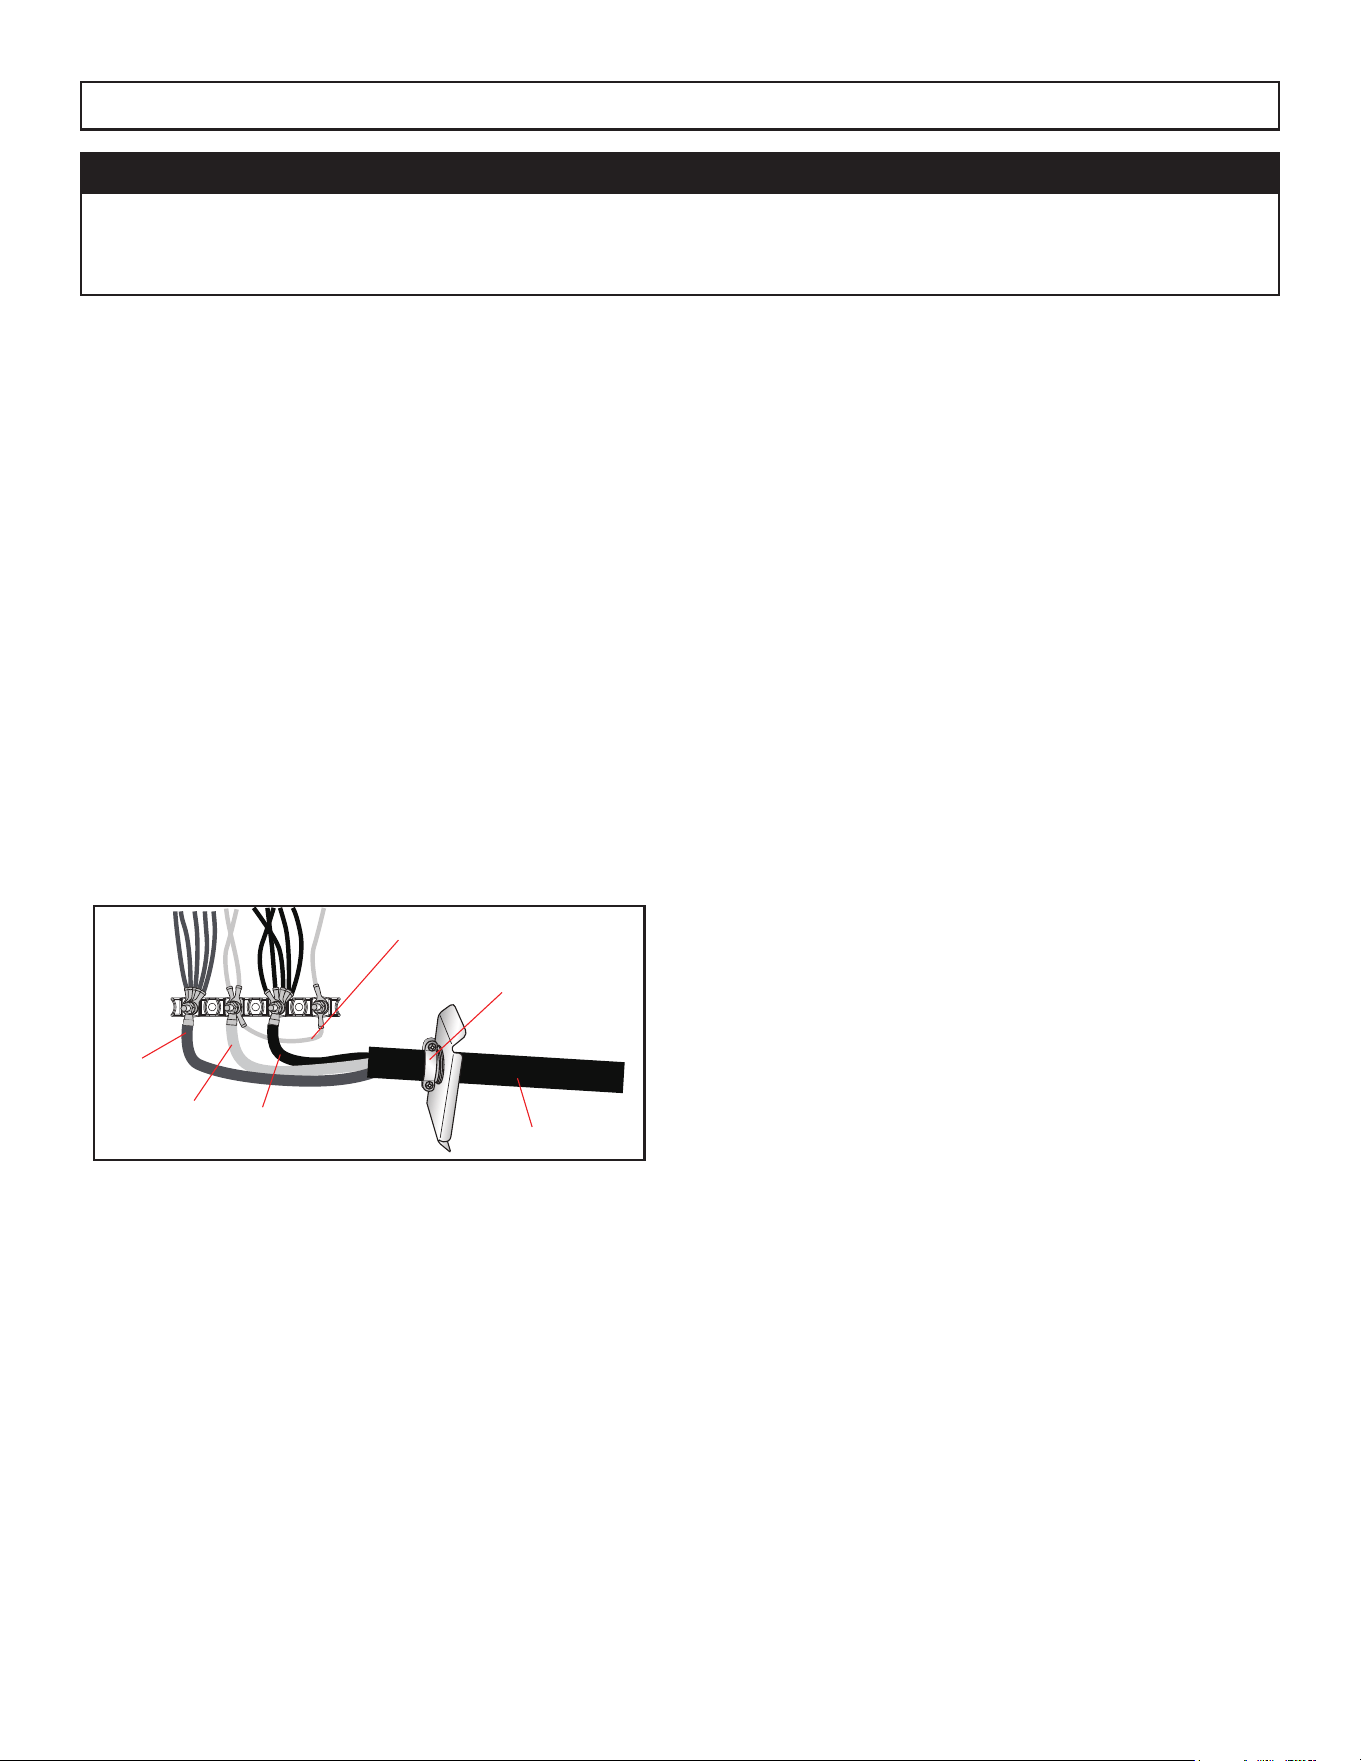
3-WIRE POWER CABLE INSTALLATION
WARNING: Use this method only if local codes permit connecting chassis ground conductor to neutral wire
of power supply cord.
1. Feed the electric cable wires through the flexible metal conduit.
NOTE: Allow enough slack to easily attach the wires to the terminal block.
2. Remove the access panel located on the bottom right-hand side of the back panel to uncover the
electrical terminal block.
3. Install a UL listed strain relief to the flexible metal conduit opening in the support bracket and fully
tighten the strain relief nut.
4. Feed the flexible metal conduit through the strain relief
NOTE: Allow enough slack to easily attach the wiring to the terminal block.
5. Using a 5/16” nut driver and one of the 10-32 hex nuts, connect the ground (green or bare) wire from
the flexible metal conduit to the center terminal block post along with the green jumper wire from the
range.
6. Using 10-32 hex nuts, connect the red and black wires from the power cord to the outer posts of the
terminal block with the corresponding red and black wires from the range.
7. Tighten the hex nuts completely and then verify the connection.
8. Position the lower part of the strain relief under the flexible metal conduit and tighten the strain relief
screws.
NOTE: Before tightening, make sure the strain relief is positioned over the flexible metal conduit and NOT
the wires.
9. Replace the electrical access panel.
10. Tuck excess conduit into the recessed are of the back panel.
Red
UL Listed Strain Relief
Not Provided
Power Cord
White Black
11
INSTALLATION INSTRUCTIONS
IMPORTANT
Grounding through the neutral conductor is prohibited for new branch-circuit installations (1996 NEC);
mobile homes; and recreational vehicles, or in an area where local codes prohibit grounding through
the neutral conductor. For installations where grounding through the neutral conductor is prohibited,
see the Ungrounded Neutral graphic. Use grounding terminal or lead to ground unit. Connect neutral
terminal or lead to branch circuit neutral in usual manner.
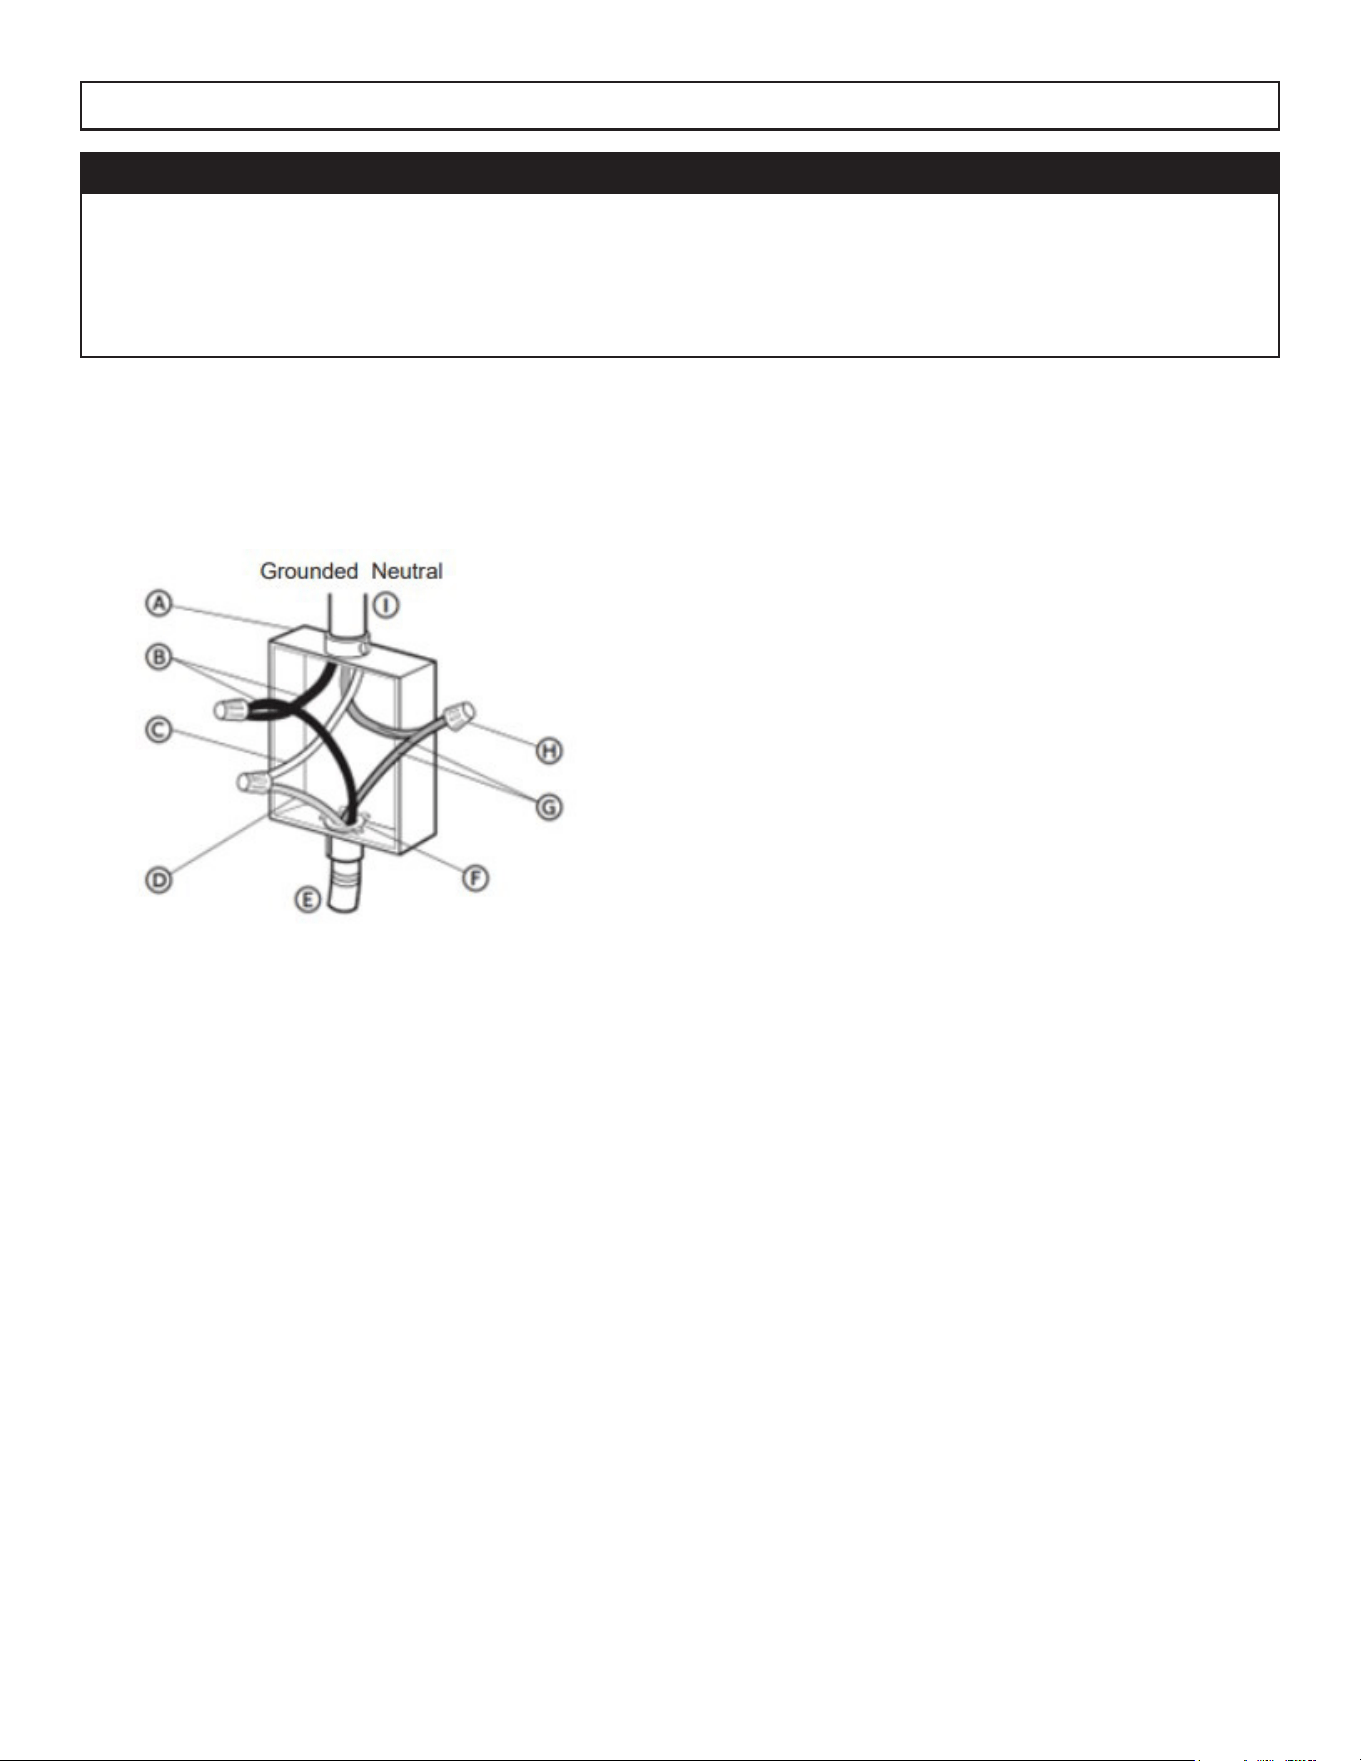
3-WIRE POWER CABLE CONNECTION TO HOUSE ELECTRICAL SUPPLY
NOTE: Use the 3-wire cable from home power supply where local codes permit a 3-wire connection.
1. Disconnect power.
A: Junction Box
B: Black Wires
C: Neutral (white) Wire
D: Ground (green or bare) Wire
E: Cable from range
F: UL Listed Conduit Connector
G: Red Wires
H: UL Listed Wire Connectors
I: House Electrical Supply
2. Connect the 2 black wires together using a UL listed wire connector.
3. Connect the neutral (white) wire and the ground (green or bare) wire (of the range cable) using a UL
listed wire connector.
4. Connect the 2 red wires together using a UL listed wire connector.
5. Install junction box cover.
12
INSTALLATION INSTRUCTIONS
4-WIRE POWER CABLE INSTALLATION
NOTE: Use this method for new branch-circuit-installations (1996 nec), mobile homes, recreational
vehicles, or in an area where local codes prohibit grounding through the neutral wire.
1. Feed the electric cable wires through the flexible metal conduit.
NOTE: Allow enough slack to easily attach the wires to the terminal block.
2. Remove the access panel located on the bottom right-hand side of the back panel to expose the
electrical terminal block.
3. Install a UL listed strain relief to the flexible metal conduit opening in the support bracket and fully
tighten the strain relief nut.
4. Feed the flexible metal conduit through the strain relief. Allow enough slack to easily attach the wiring
to the terminal block.
IMPORTANT
Only for models sold in the United States. This model does not include a pre-installed power cord. Use
the following wiring instructions before using the range. The power cord is not provided. Follow all
local and national wiring codes and standards.
Red
Green
UL Listed Strain Relief
Power Cord
White
Black
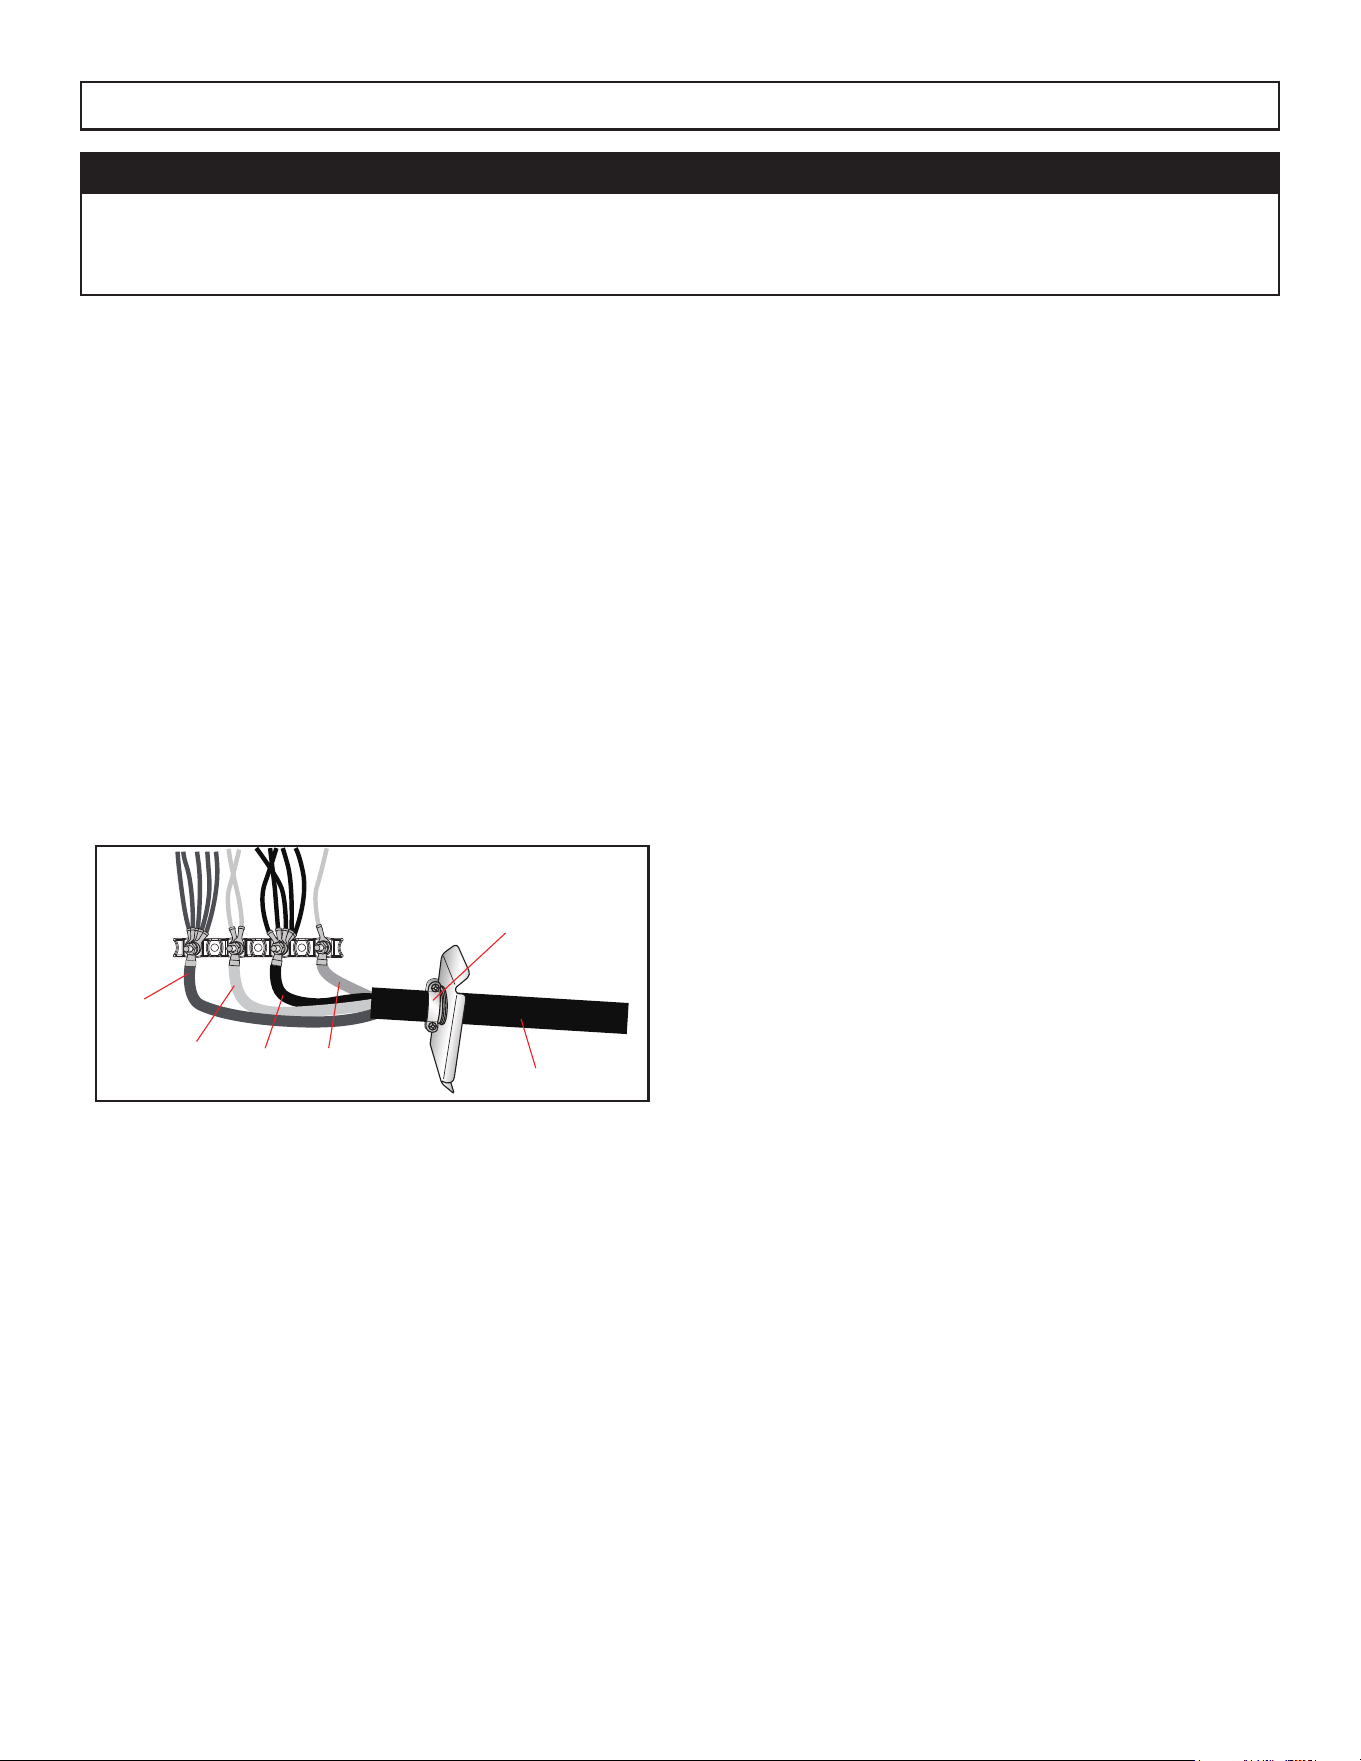
5. Using a 5/16” nut driver and one of the 10-32 hex nuts, connect the ground (green or bare) wire from
the flexible metal conduit to the center terminal block post along with the green wire from the range
6. Use a 5/15” nut driver to connect the neutral (white) wire to the center terminal block post with one of
the 10-32 hex nuts.
7. Using 10-32 hex nuts, connect the red and black wires from the power cord to the outer posts of the
terminal block with the corresponding red and black wires from the range.
8. Tighten the hex nuts completely and then verify the connection
9. Position the lower part of the strain relief under the flexible metal conduit and tighten the strain relief
screws.
NOTE: Before tightening, make sure the strain relief is positioned over the flexible metal conduit and
NOT the wires.
10. Replace the electrical access panel.
11. Tuck excess conduit into the recessed area of the back panel.

13
INSTALLATION INSTRUCTIONS
IMPORTANT
Use the 4-wire cable from home power supply where local codes do not allow grounding through
neutral, new branch circuit installation (I996 NEC), mobile homes and recreational vehicles, new
construction.
4-WIRE POWER CABLE CONNECTION TO HOUSE ELECTRICAL SUPPLY
A: Junction Box
B: Black Wires
C: Ground (green or bare) Wires
D: Cable from range
E: UL Listed Conduit Connector
F: Red Wires
G: UL Listed Wire Connectors
H: Neutral (white) Wires
I: House Electrical Supply

14
INSTALLATION INSTRUCTIONS
REQUIRED TOOLS
1. Tape Measure
2. Flat Blade Screwdriver
3. Phillips Screwdriver
4. Level
5. Cordless Electric Drill
6. Hammer
7. Wrench or Pliers
8. Metal Saw
9. Metal Snips or Large Wire Cutters
10. 15/N6” Combination Wrench
11. 3/8” Nut Driver
12. 1/4” Nut Driver
13. 1/8” (3.2mm) Drill Bit (for wood floors)
14. Marker or Pencil
15. Masking Tape
Gather the required tools and parts before starting
installation.
LOCATION REQUIREMENT
Temperature
• The range should be located for convenient use
in the kitchen.
• Recessed installations must provide complete
enclosure of the sides and rear of the range.
• To eliminate the risk of burns or fire by reaching
over heated surface units, cabinet storage
space located above the surface units should be
avoided. If cabinet storage is to be provided, the
risk can be reduced by installing a range hood
or microwave hood combination that projects
horizontally a minimum of 5 inches (12.7 cm)
beyond the bottom of the cabinets.
• All openings in the wall or floor were the range
is to be installed must be sealed.
• Do not seal the range to the side cabinets.
• Ground electric supply is required. See
“Electrical Requirements” section.
NOTE: Some cabinet and building materials are
not designed to withstand the heat produced by
the oven for baking and self-cleaning. Check with
your builder or cabinet supplier to make sure that
the material used will not discolour, delaminate or
sustain other damage.
• Contact a qualified floor covering installer to
check that the floor covering can withstand at
least 200°F (93°C).
• Use an insulated pad or 1/4 inch (0.64cm)
plywood under range if installing range over
carpeting.
Ventilation
It is the installer’s responsibility to comply with
installation clearances, if specified, on the model/
serial rating plate. The model/serial rating plate is
located on the rear side of the oven frame. Open
the oven door to view the label. See label on the
back panel of the range for additional element and
oven power ratings.
NOTE: Observe all governing codes and
ordinances.
15
INSTALLATION INSTRUCTIONS
ANTI-TIP BRACKET
An anti-tip bracket kit is provided with the range.
WARNING: Tip Over Hazard
• A child or adult can tip the range and be seriously injured.
• Connect the anti-tip bracket to the rear foot of the range.
• Reconnect the anti-tip bracket if the range is moved.
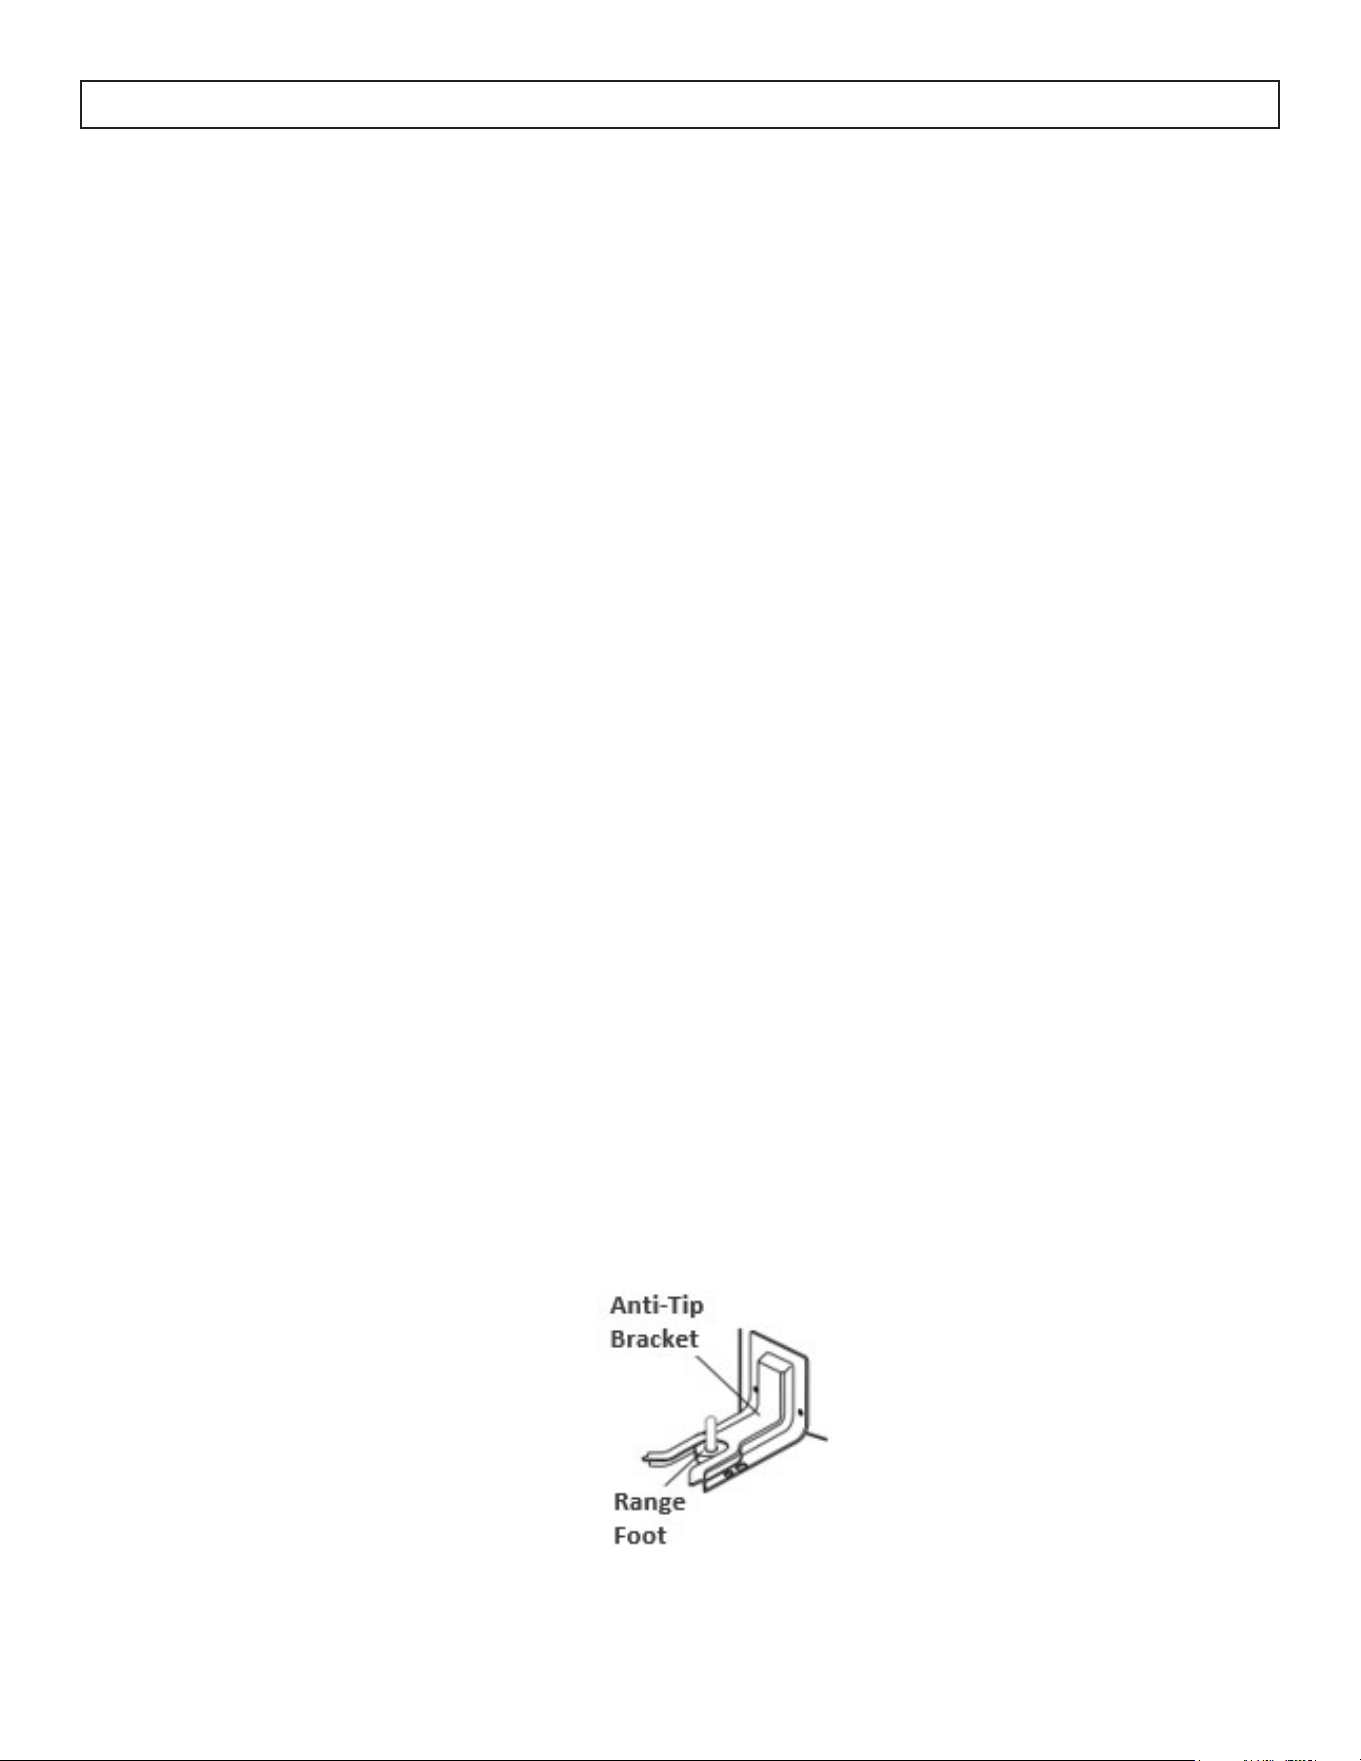
NOTE: DO NOT completely remove the rear leveling leg. The anti-tip bracket uses either the right-hand or
left-hand rear leveling leg to secure the range to the floor or wall.
Bracket Location
Determine the final location of the range before attempting to install the bracket.
Place the bracket on the floor with the back edge against the rear wall. If the range does not reach the rear
wall, align the back edge of the bracket with the rear panel of the range in its final location.
NOTE: If the bracket does not touch the rear wall, you MUST screw the bracket to the FLOOR.
Position the site of the bracket against either the left or right cabinet. If there is no adjacent cabinet, align
the edge of the bracket with the side panel of the range in its final location. If the countertop overhangs the
cabinet, offset the bracket from the cabinet by the amount of overhang.
Mark the location for the pair of holes to be used (see illustration below).
NOTE: For FLOOR installation use either Loc A or B. For REAR WALL installation use Loc C.
16
INSTALLATION INSTRUCTIONS
Securing Bracket
The bracket must be screwed to either the FLOOR or REAR WALL.
Floor Installation
• Wood Floor: use the screws provided to secure the bracket using the pair of marked holes (either Loc A
or B).
• Concrete floor: Using a concrete drill bit, drill a 5/32 inch (0.4 cm) pilot hole 2 inches (5 cm) deep
into the concrete at the center of each of the marked holes (either Loc A or B). Use the screws provided
to secure the bracket into the floor.
Rear Wall Installation
Use the 2 screws provided to secure the bracket using the pair of marked holes at Loc C. The screws MUST
enter a wood sill plate. If the wall contains any metal studs or similar materials, then the floor must be used.
Checking Bracket
After installing the bracket, slide the range into its final location. The rear leveling leg must be fully inserted
into the ANTI-TIP bracket as shown below. To check if the bracket is installed and engaged properly, look
underneath the range to see that the leveling leg is engaged in the bracket. On some models, the storage
drawer or kick plate can be removed for easier inspection. If visual inspection is not possible, slide the
range forward, confirm the anti-tip bracket is securely attached to the floor or wall, and slide the range
back so the leveling leg is under the anti-tip bracket. If the range is pull from the wall for any reason,
always repeat this procedure to verify the range is properly secured by the anti-tip bracket.
NOTE: The anti-tip bracket must be PROPERLY INSTALLED, and the rear leveling leg must be FULLY
ENGAGED into the bracket to prevent the range from tipping. NEVER remove the leveling legs as this will
prevent the range from being secured to the ANTI-TIP bracket properly.
17
INSTALLATION INSTRUCTIONS
NOTE: If the range is moved to adjust the leveling legs, ensure
that when the range is moved back into the final location that the
anti-tip bracket is engaged by repeating steps 1 through 9.
1. Slide range into final location, making sure rear leveling
leg slides into ant-tip bracket. Leave a 1 inch (2.5cm) gap
between the back of the range and the back wall.
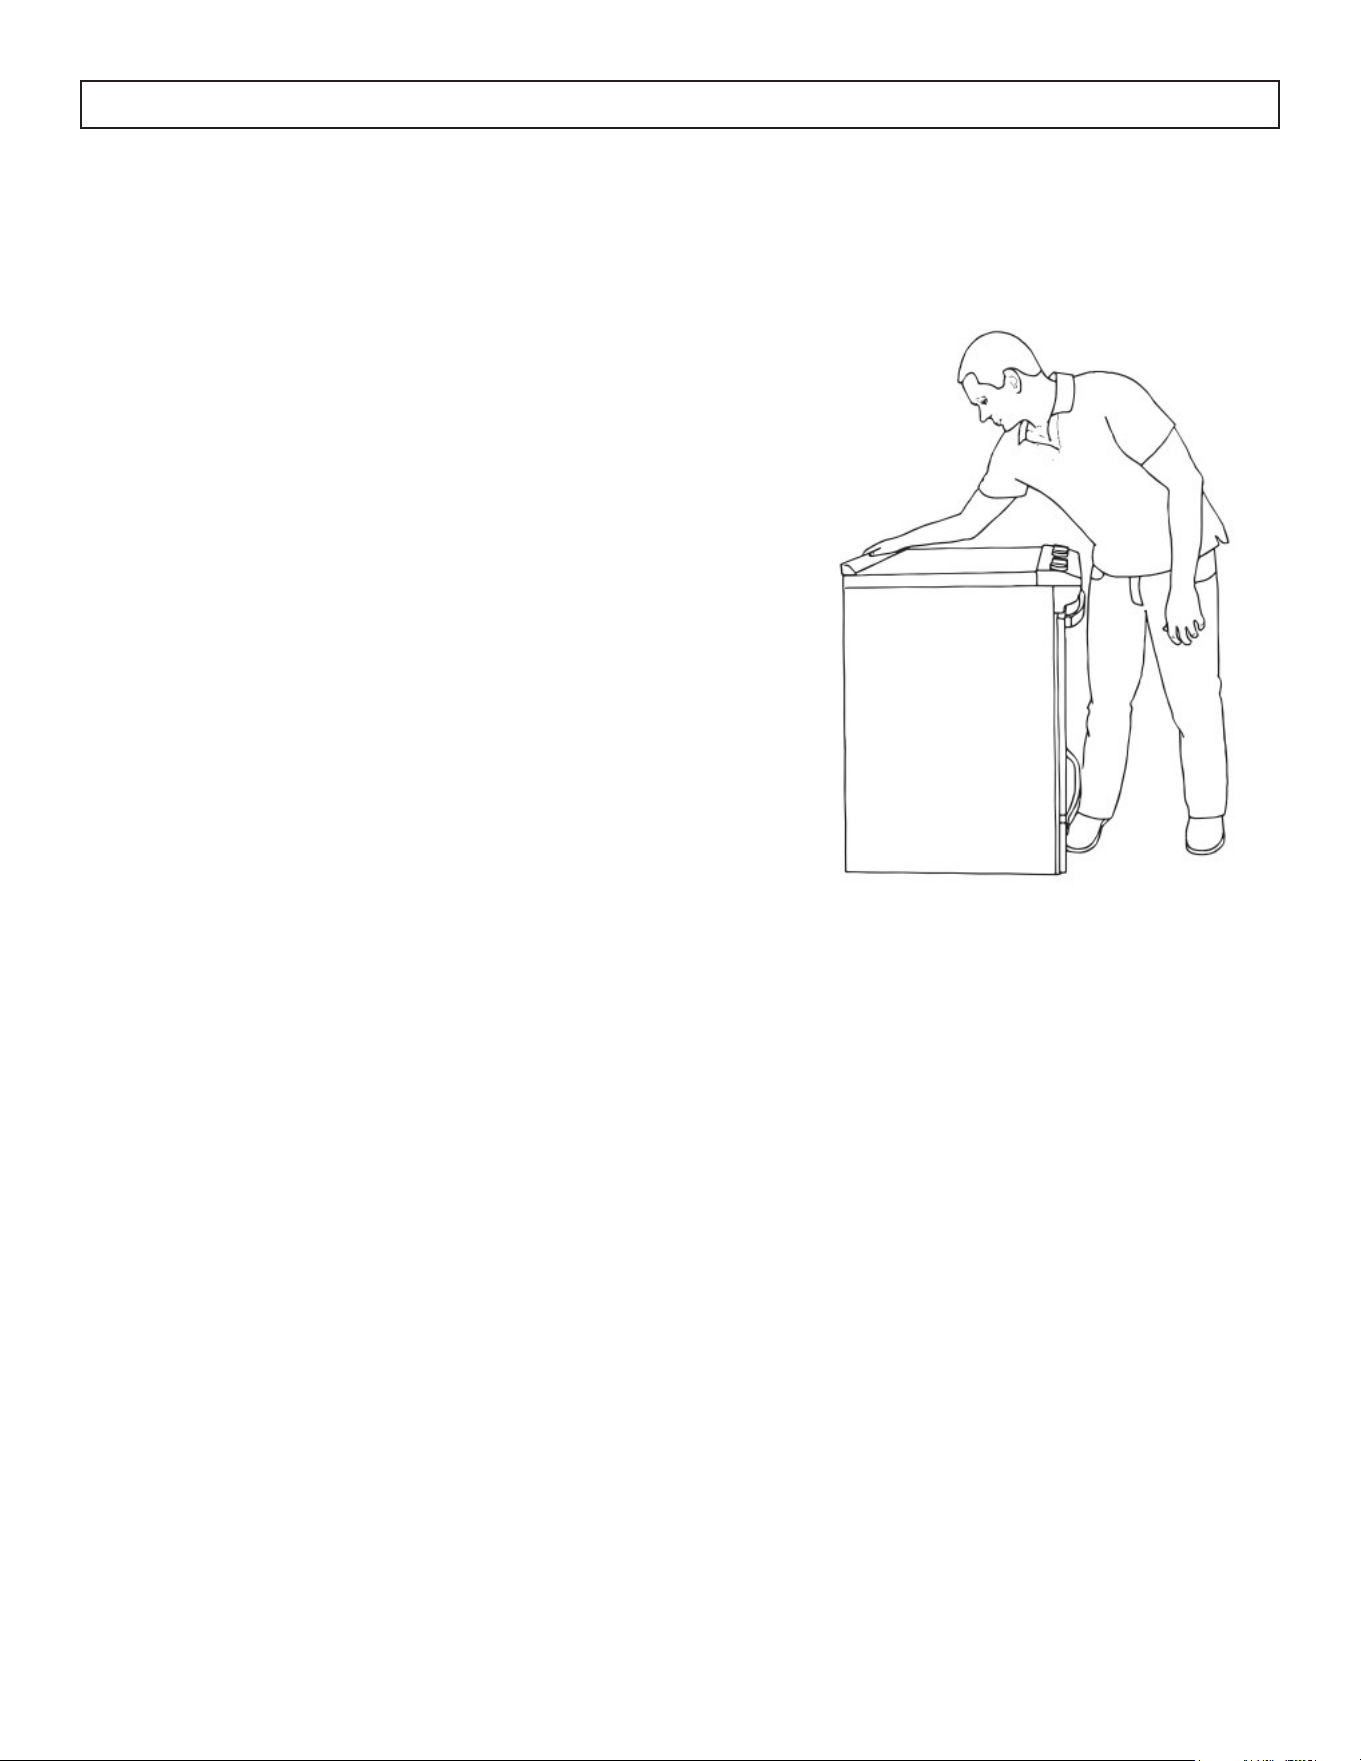
2. Place the outside of your foot against the bottom front to keep
the range from moving and then grasp the back of the range,
as shown.
3. Slowly attempt to tilt the range forward. If you encounter
immediate resistance, the range foot is engaged in the anti-tip
bracket. Go to Step 8.
4. If the rear of the range lifts more than 1/2 inch (1.3cm) off
the floor without resistance, stop tilting the range and lower it
gently back to the floor. The range foot is not engaged in the
anti-tip bracket.
NOTE: If there is a snapping or popping sound when lifting the
range, the range may not be fully engaged in the bracket. Check
to see if there are obstructions keeping the range from sliding to
the wall or keeping the range foot from sliding into the bracket.
Verify that the bracket is held securely in place by the mounting
screws.
INSTALLING RANGE
5. Slide the range forward and verify that the anti-tip bracket is securely attached to the floor or wall.
6. Slide the range back so the rear range foot is inserted into the slot of the anti-tip bracket.
7. Repeat steps 1 through 3 to ensure that the range foot is engaged in the anti-tip bracket. If the rear of
the range lifts more than 1/2 inch (1.3cm) off the floor without resistance, the anti-tip bracket may not
be installed correctly. Do not operate the range without anti-tip bracket installed and engaged.
8. Move the range into its final location. Check that the range is level by placing a level on the oven
bottom.
NOTE: The range must be level for optimum cooking and baking performance.
9. If needed, use a wrench to adjust the height of the leveling legs until the range is level from side to side
and back to back.

18
ACCESSORIES
1. Backsplash
2. M4*8 Screw for backsplash installation x5
3. Racks x2
4. Anti-Tip Bracket
5. M5*45 Screw for anti-tip bracket x2
OPERATING INSTRUCTIONS
19
DIMENSIONS
The dimensions of this appliance are:
A. 37.9 ~ 37.12 inches (96.3 ~ 94.3 cm) from the floor to the top of the cooktop (with backsplash
installed).
B. 27.6 inches (70 cm) deep
C. 29.9 inches (76 cm) wide
LEVELING INSTRUCTIONS
The appliance must be level to operate safely and
properly. There are four leveling legs located at
the corners of the bottom of the appliance. Adjust
the leveling legs until the appliance is level. Use a
carpenter’s level to confirm.
OPERATING INSTRUCTIONS
It is the installer’s responsibility to comply
with installation clearances specified in the
manual. The minimum cabinet opening
dimensions and clearances must be used.
The minimum spacings must be maintained
between the appliance cooking surface and
the horizontal surface above the cooktop.
30 inches (65 cm) is the minimum clearance
between the top of the cooking surface and
the bottom of an unprotected wood or metal
cabinet.
20
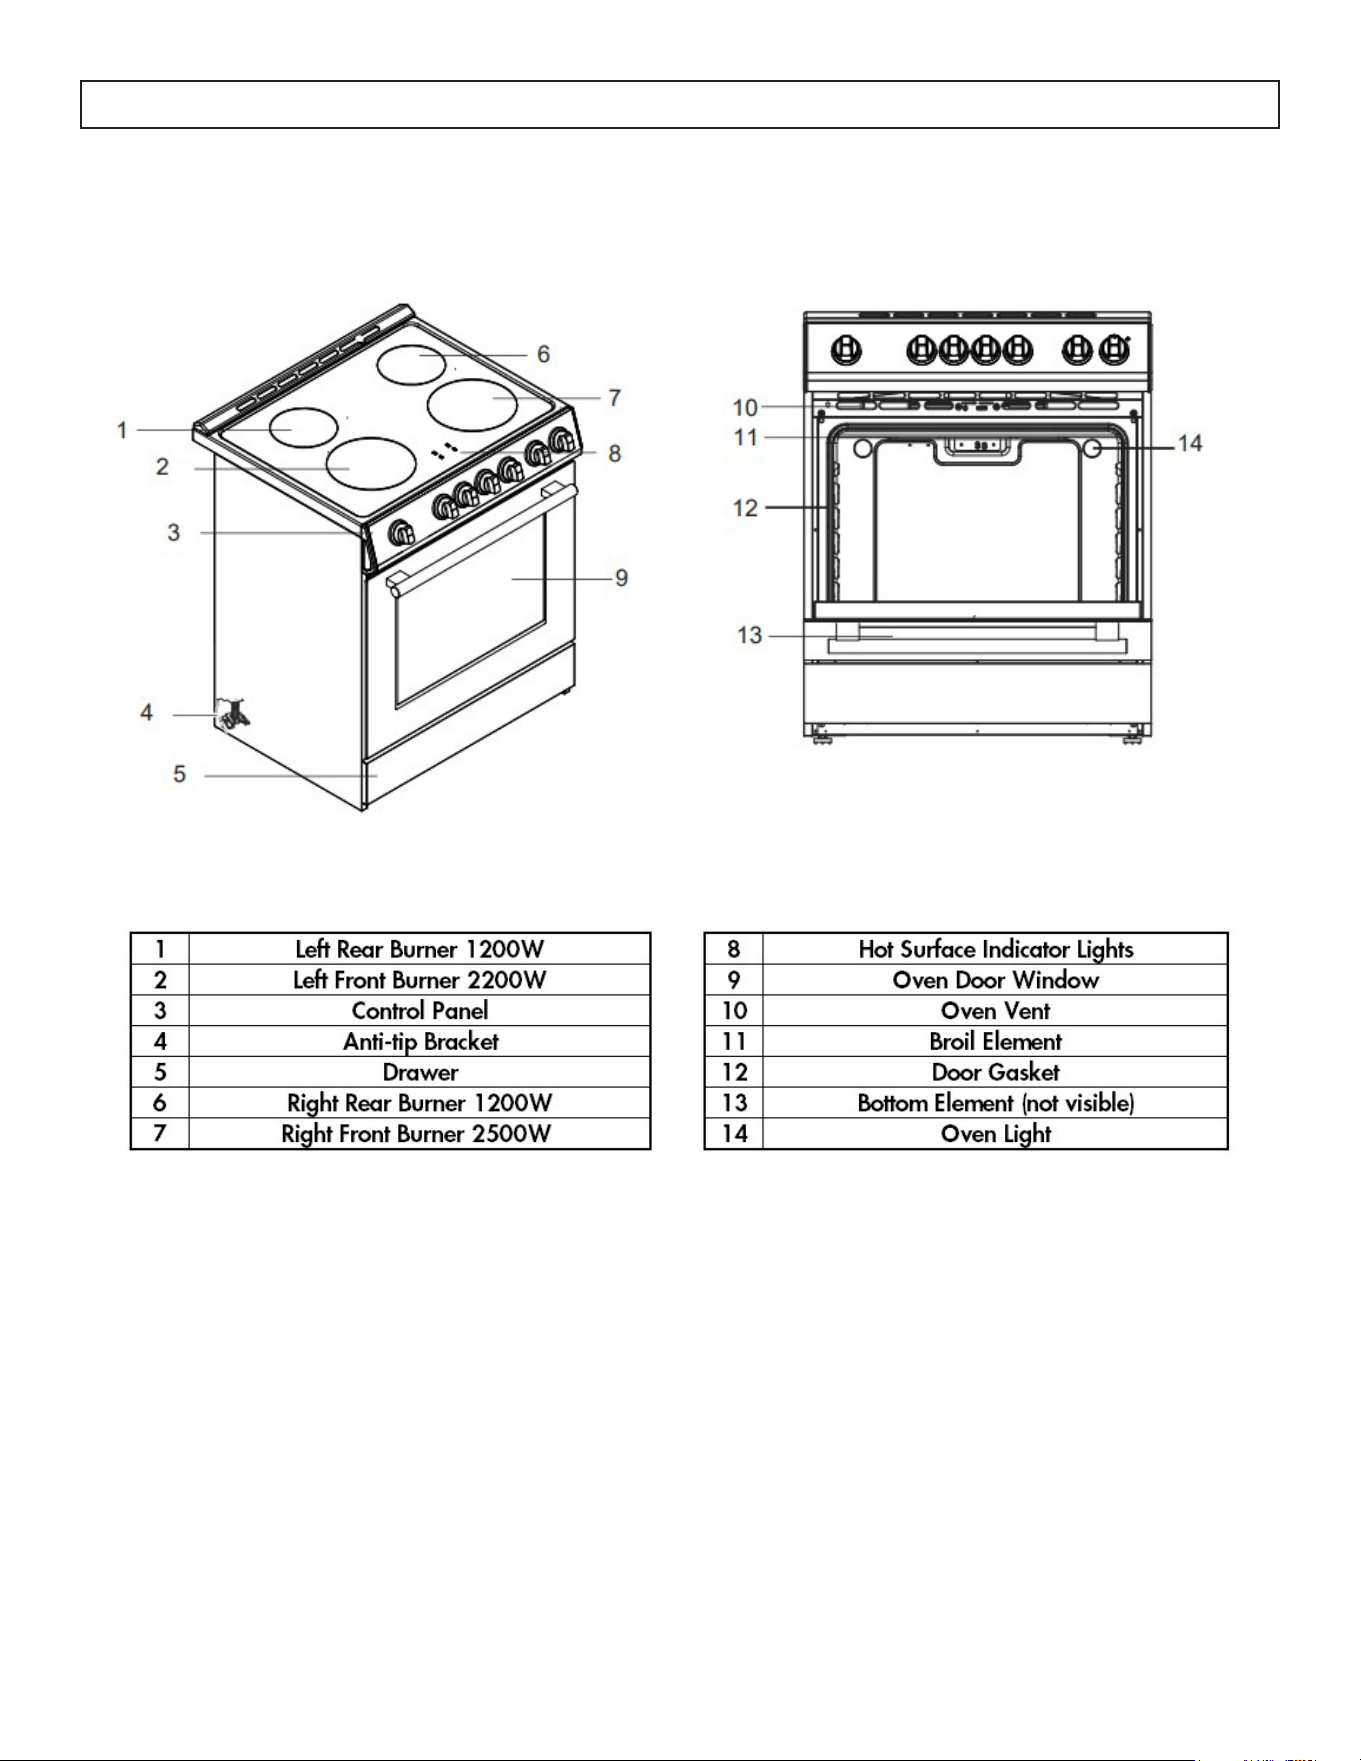
OPERATING INSTRUCTIONS
EXTERIOR PARTS INTERIOR PARTS
21
OPERATING INSTRUCTIONS
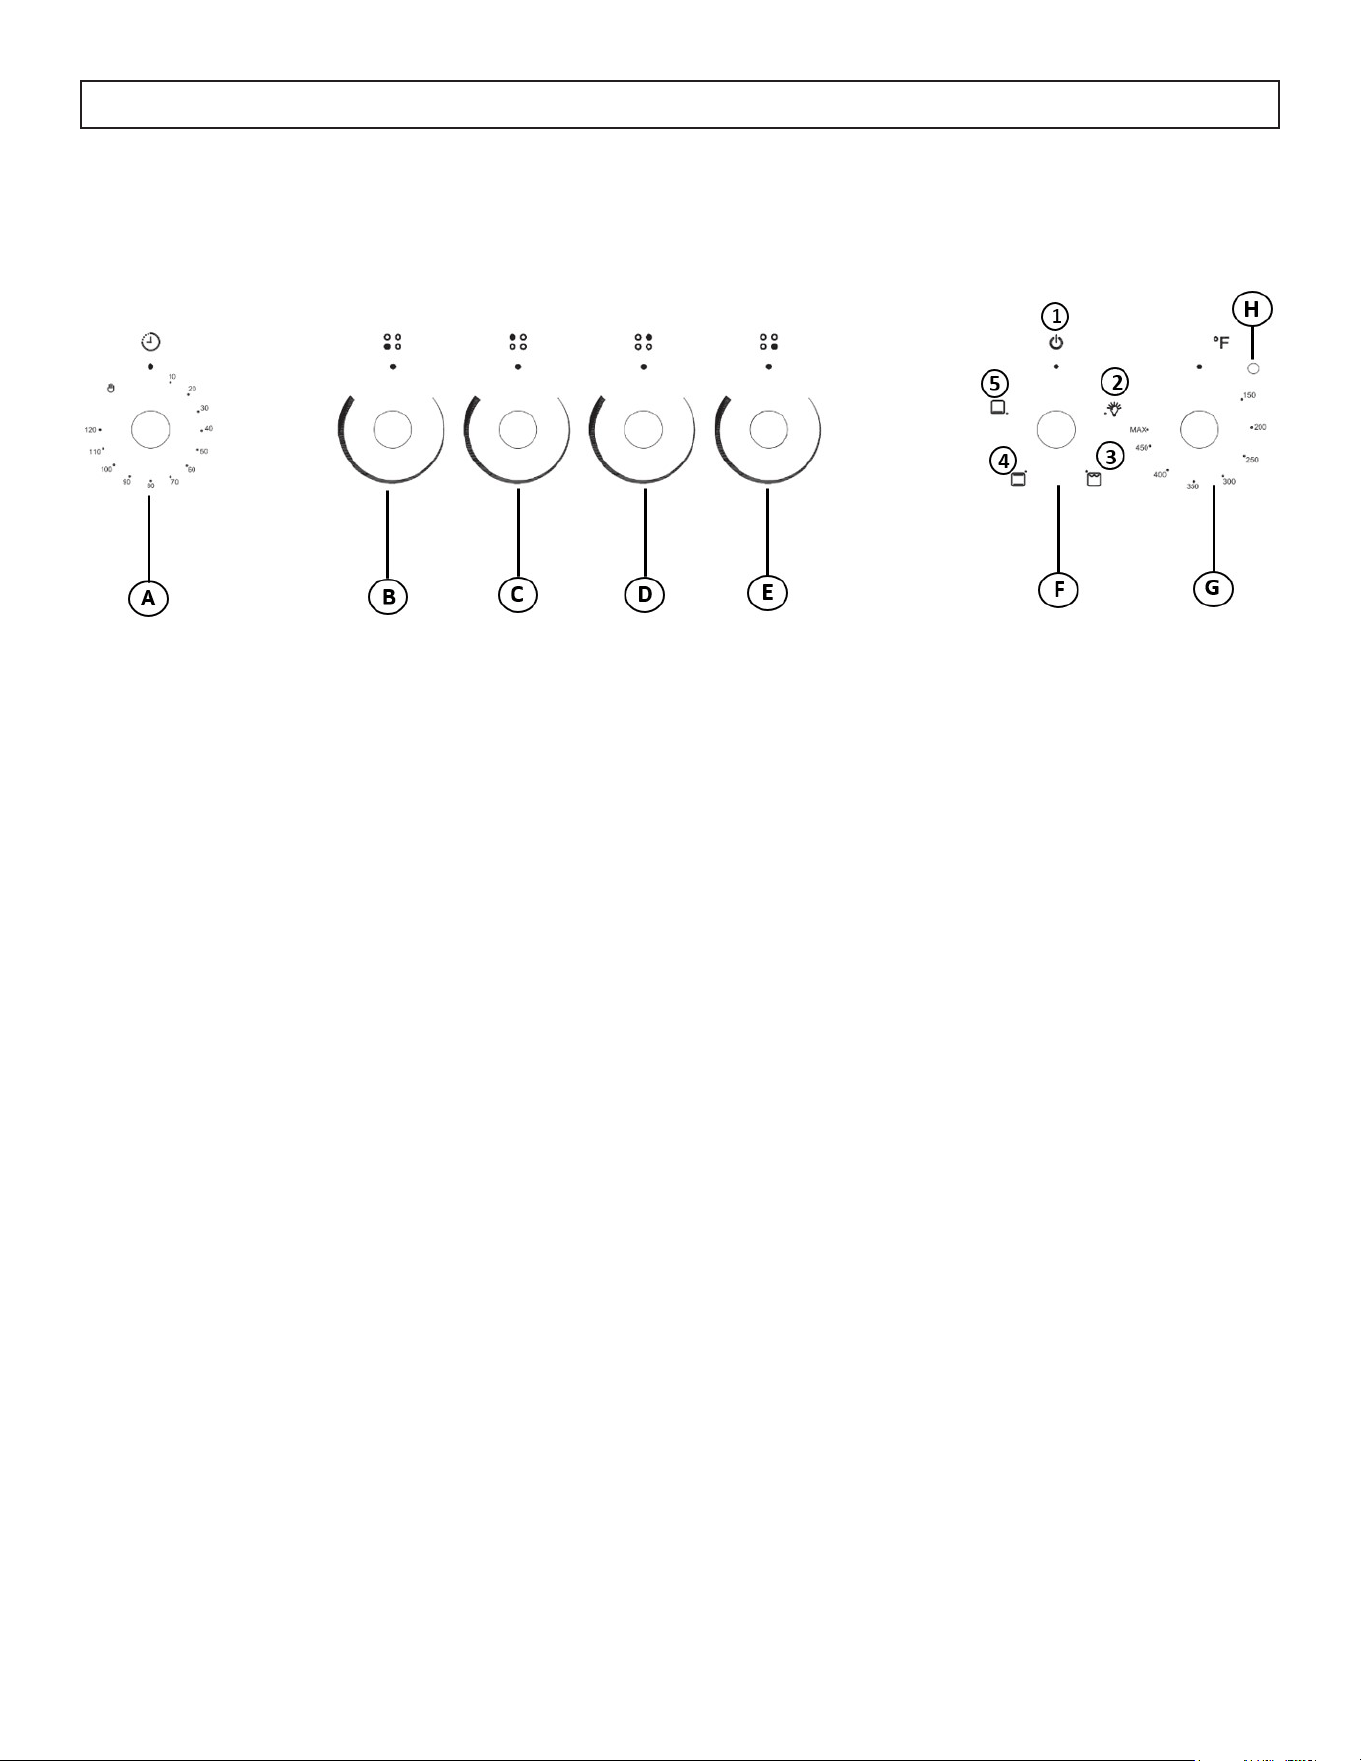
CONTROL PANEL
A. Timer Knob 1. Oven Power
B. Front Left Burner 2. Light
C. Rear Left Burner 3. Broil
D. Rear Right Burner 4. Bake
E. Front Right Burner 5. Roast
F. Oven Settings
G. Temperature
H. Light Indicator
Operation of Oven
• Ensure that the shelves are inserted at the correct height.
• Select the desired oven mode.
• Set the oven to the desired preheat temperature.
• Set the timer to activate and preheat the oven (time as necessary)
• Once the preheat indicator light (H) extinguishes, place bakeware with food on one or both of the
selves provided with the oven.
• Close the door
• Reset the time for the desired cook time.
NOTE: The timer affects the operation of the oven, if the timer is in OFF, the oven will not work.
NOTE: Do not place anything, including dishes, foil and oven trays on the bottom of the oven when it is in
operation to avoid damaging the enamel finish.
NOTE: The interior oven light remains on in all modes. When not in an operational mode, the interior oven
light is off.
22
OPERATING INSTRUCTIONS
This oven combines the functions of traditional oven modes with the functions of modern, fan-assisted
convection modes in a single oven. Use the Oven Settings knob to select the oven mode.
NOTE: To maintain oven temperature, limit door openings during cooking.
OVEN OPERATIONAL MODES
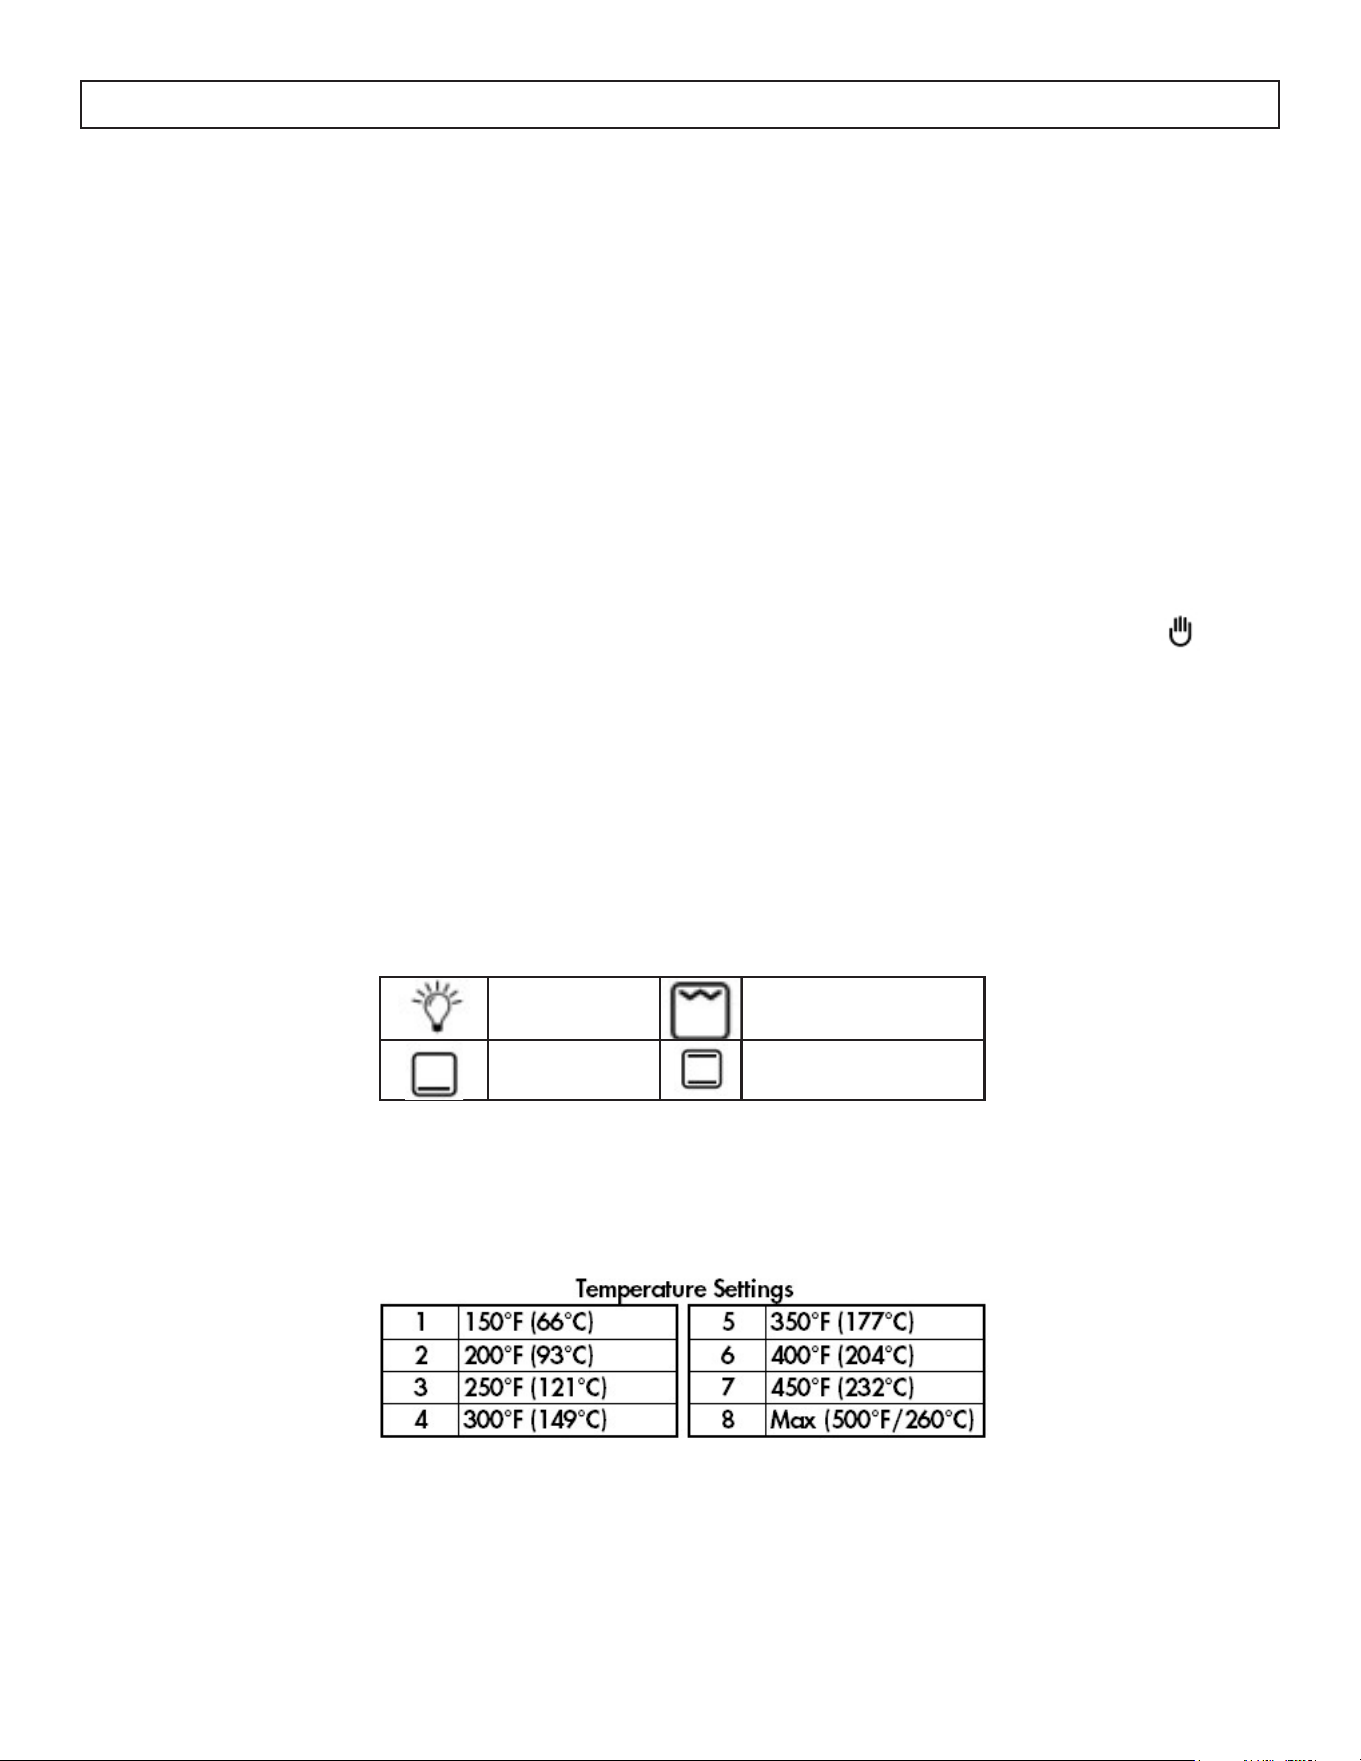
Oven Settings and Temperatures
There are 4 oven settings and 8 temperature setting to select from as shown in the tables below.
Timer
For your enhanced safety, our oven has been designed to operate with a timer. To set the timer, turn the
knob clockwise to your desired amount of time. Once the timer reaches 0, the oven will turn off.
If you prefer to use the oven without the timer, simply turn the timer knob counterclockwise to the
(manual), and the oven will stay on continuously.
Light Broil
Roast Bake

23
OPERATING INSTRUCTIONS
PREHEATING
1. Turn the cooking functions knob to the desired function.
2. Rotate the Temperature knob to the desired temperature.
NOTE: The higher the temperature selected, the longer it will take to preheat. The actual oven temperature
will go higher than your set temperature to offset the heat lost when you open the oven door to place the
food on the rack. This ensures that cooking will begin at the proper temperature. Do not open the door
while the oven is preheating. When the oven has reached the set temperature, the indicator light on the
control panel will turn off. The door can then be opened and food placed into the oven.
BAKE
Baking is cooking with heated air. Both elements in the oven are used. Follow the recipe or food direction
for baking temperature, time, and rack position. The temperature can be set from 150°F (66 °C) to MAX.
• Use one rack when selecting the bake mode.
• Occasionally check the oven to see if the food is cooked.
• Use metal bakeware (with or without non-stick finish), heatproof glass, glass ceramic, potter, or other
utensils suitable for the oven.
• Leave at least 1-1.5 inches (2.5-4cm) of space between the bakeware and oven walls.
• Do not use aluminum foil or disposable aluminum trays to line any part of the oven as it will alter the
cooking performance and can damage the finish of the oven.
• If required a baking tray can be lined with foil and used on the bottom shelf.
• Avoid using the opened door as a shelf to place pans.
BROIL
Broiling uses direct radiant heat to cook food. Only the upper element in the oven is used. Thicker cuts
and unevenly shaped meat, fish and poultry may cook better al lower broiling temperatures. For best
results, use the two piece broiler pan with grid. It is designed to drain juices which helps to avoid spills and
platters. Do not cover the grid with foil. The bottom of the pan may be lined with aluminum foil for easier
cleaning.
• Place rack in required position before turning on the oven.
• Select temperature.
• Pull out oven rack to stop position before turning or removing food.
• Do not preheat the oven.
• Turn meats once halfway through the cooking time.
NOTE: The oven door remains closed during broil. When inspecting the food, open the oven door no more
than two inches.

24
OPERATING INSTRUCTIONS
COOKTOP
The ceramic cooking area will glow red when a heating element is on. Some parts of the cooktop may not
glow red when an element is on. This is normal. The cooking area cycles on and off, even when set to HI,
to keep the cooktop glass from overheating. It is normal for the surface of the ceramic glass to appear to
change color when surface cooking areas are hot. As the glass cools, it will return to its original color.
• Make sure the bottoms of pots and pans are clean and dry before using them. Residue and water can
leave deposits when heated.
• Avoid storing jars or cans above the cooktop. Dropping a heavy or had object onto the cooktop could
crack the cooktop.
• To avoid damage to the cooktop, do not leave a hot lid on the cooktop. As the cooktop cools, air can
become trapped between the lid and the cooktop. This could cause the ceramic glass to break when the
lid is removed.
• For foods containing sugar in any form, clean up all spills as soon as possible. If sugary spills are
allowed to cool down, they can adhere to the cooktop and cause pitting and permanent marks.
• Do not slide cookware or bakewware across the cooktop. Aluminum or copper bottoms and rough
finishes on cookware or bakeware could leave scratches or marks on the cooktop.
• Do not cook popcorn in prepackaged aluminum containers on the cooktop. They could leave aluminum
marks that cannot be completely removed.
• Do not allow objects that could melt, such as plastic or aluminum foil, to touch any part of the entire
cooktop.
• Do not use the cooktop as a cutting board.
• Do not cook foods directly on the cooktop.
NOTE: Clean the cooktop after each use to avoid permanent damage from pitting or scratching to the
cooktop surface.
ROAST
When roasting set the desired temperature as shown below. Only the lower element is used. The oven can
be preheated before placing the food into the oven.
1. Turn the cooking functions knob to Roast.
2. Rotate the temperature dial to the desired temperature.
3. Open the door and place the food into the oven
Guidelines
• Roast in a low-sided, uncovered pan.
• Use a 2-piece broil pan for roasting uncovered.
• It is recommend to use a probe or meat thermometer to determine the internal doneness of the meat.
• Large poultry may need to be covered with foil during a portion of the roasting time to prevent over
browning.
25
OPERATING INSTRUCTIONS
COOKTOP
Cooking Rings
The general rule of thumb with cookware, the diameter of the cookware should match the diameter of the
elements that are being used. If the cookware is small than the element by 1 inch (2.5cm), it will still be
effective. Anything that is over 1 inch (2.5cm), will not be effective.
Cookware Characteristics
• Aluminum: heats and cools quickly. May leave metal markings on glass.
• Cast Iron: heats and cools slowly, retains heat and cooks evenly.
• Copper: tin heats and cools quickly.
• Enamel cookware: not recommended. Imperfections in enamel may scratch cooktop.
• Glass Ceramic: not recommended. Imperfections in finish may scratch cooktop.
• Stainless Steel: heats and cools moderately.
Heating Zone
• Turn the control knob to the desired position. Heat intensity goes from LOW on the right to HIGH on the
left.
• Adjustment is continuous so the cooking zone will operate at any intermediate setting between low and
high.
• Once the cooking zone is hot, the LED corresponding to the zone illuminates.
• To switch off the cooking zone, turn the knob in either direction to the “OFF” position.
• The residual heat warning light remains illuminated when the temperature of the ceramic glass surface
is hot and will switch off once the surface temperature has cooled.
Hot Surface Indicator Light
On ceramic glass cooktops, the Hot Surface Indicator lights are located on the glass cooktop. The Hot
Surface Indicator lights will glow as long as any cooking area is too hot to touch, even after the surface
cooking area is turned off.
The “red circle” will indicate which
cooking element is actively hot.

26
CARE & MAINTENANCE
CLEANING
Before cleaning, make sure all controls are turned
off, and the oven and cooktop are cool. Always
follow label instruction on cleaning products. It is
recommended that soap, water and a soft cloth or
sponge is used first unless otherwise noted. Do not
use abrasive cleaning products.
Exterior Porcelain Enamel Surfaces
Food spills containing acids, such as vinegar and
tomato, should be cleaned as soon as the entire
appliance is cool. These spills may affect the finish.
Use glass cleaner, mild liquid cleaner or
nonabrasive scrubbing pad. Gently clean around
the model and serial number plate as scrubbing
may remove numbers.
Exterior Stainless Steel
Use liquid detergent or all-purpose cleaner. Rinse
well with clean water and dry soft, lint-free cloth.
Stainless Steel Cleaner and Polish Vinegar can be
used for hard water spots.
NOTE: Do not use soap-filled scouring pads,
abrasive cleaners, cooktop polishing cream, steel-
wool pads, gritty washcloths or some paper towels.
Damage may occur even with one-time or limited
use. Rub in direction of grain to avoid damaging.
Oven Door Exterior
Use glass cleaner and paper towels or nonabrasive
plastic scrubbing pad. Apply glass cleaner to soft
cloth or sponge, not directly on panel.
Ceramic Glass Cooktop
To avoid damaging the cooktop, do not use steel
wool, abrasive powder cleansers, chlorine bleach,
rust remover or ammonia. Ceramic cooktop
cleaning materials include cooktop cleaner, cooktop
scraper and cooktop cleaning pads available at
most grocery stores.
1. Remove food/residue with a cooktop scraper.
• For best results, use the cooktop scraper while
the cooktop is still warm but not hot to the
touch.
• It is recommended to wear an oven mitt while
scraping the warm cooktop.
• Hold the cooktop scraper at approximately
a 45° angle against the glass surface and
scrape the residue. It will be necessary to apply
pressure in order to remove the residue.
• Allow the cooktop to cool down completely
before proceeding to Step 2.
2. Apply a few dime-sized drops of cooktop
cleaner to the affected areas.
• Rub cooktop cleaner onto the cooktop surface
with a nylon or similar cooktop cleaning pad.
Some pressure is needed to remove stubborn
stains.
• Allow the cleaner to dry to a white haze before
proceeding to Step 3.
3. Polish with a clean, dry cloth or a clean, dry
paper towel.
Smudges from Aluminum Bottom Pans
Use a cloth dampened in vinegar.
Cooktop Control Knobs
Use soap and water or dishwasher detergent.
• Pull knobs straight out from the control panel to
remove.
• When replacing knobs, make sure knobs are
turned to the Off position.
NOTE: Do not use steel-wool, abrasive cleansers or
oven cleaner. Do not soak knobs.
27
CARE & MAINTENANCE
Oven Cavity
Food spills should be cleaned when oven cools. At
high temperatures, foods react with porcelain so
staining, etching, pitting or faint white spots can
result.
Use mild detergent and warm water.
NOTE: Do not use oven cleaners.
Oven Racks
Use a steel-wool pad.
Control Panel
Clean using a glass cleaner and soft cloth or
sponge. Apply glass cleaner to soft cloth or sponge,
not directly on the panel.
NOTE: Do not use abrasive cleaners, steel-wool
pads, gritty washcloths or some paper towels as
damage may occur.
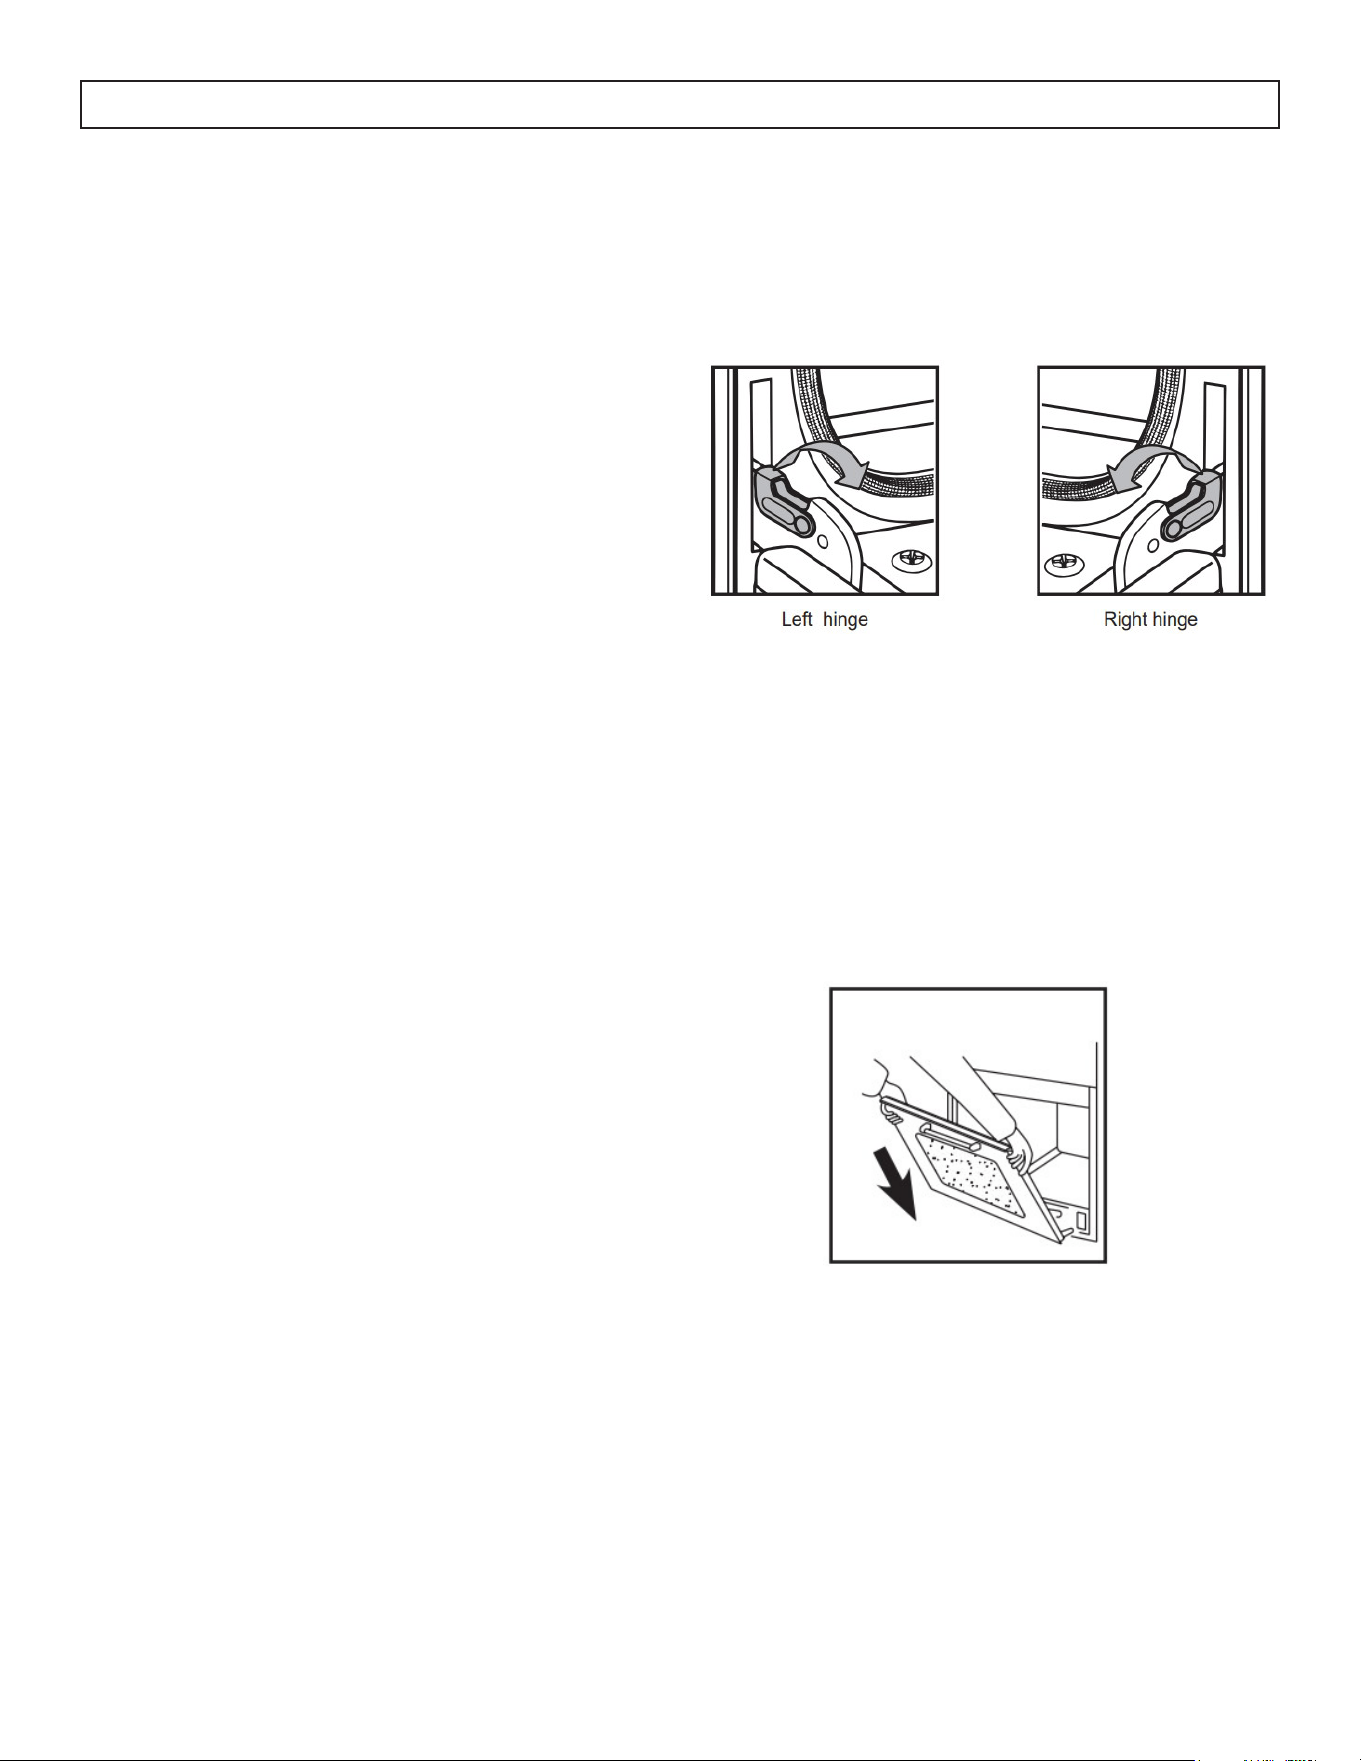
Door removal
1. Open the oven door completely.
2. Lift up the hinge latch on each side.
3. Close the oven door as far as it will shut.
4. While grasping both outside edges of the door,
lift up on the door.
5. Continue to push the top of the door closed
while pulling the bottom of the door out of the
hinge receivers in the door frame.
Oven Door Removal
For normal oven use, there is no need to remove the
oven door. However, should it become necessary,
please follow the instructions below.
NOTE:
• Make sure the oven is cool and power to the
oven has been turned off before removing the
door.
• The oven door is heavy and fragile as well as
the door front is glass. To avoid oven door glass
breakage, use both hands and grasp on the
sides of the oven door to remove.
• Be sure both levers are securely in place before
removing the door.
28
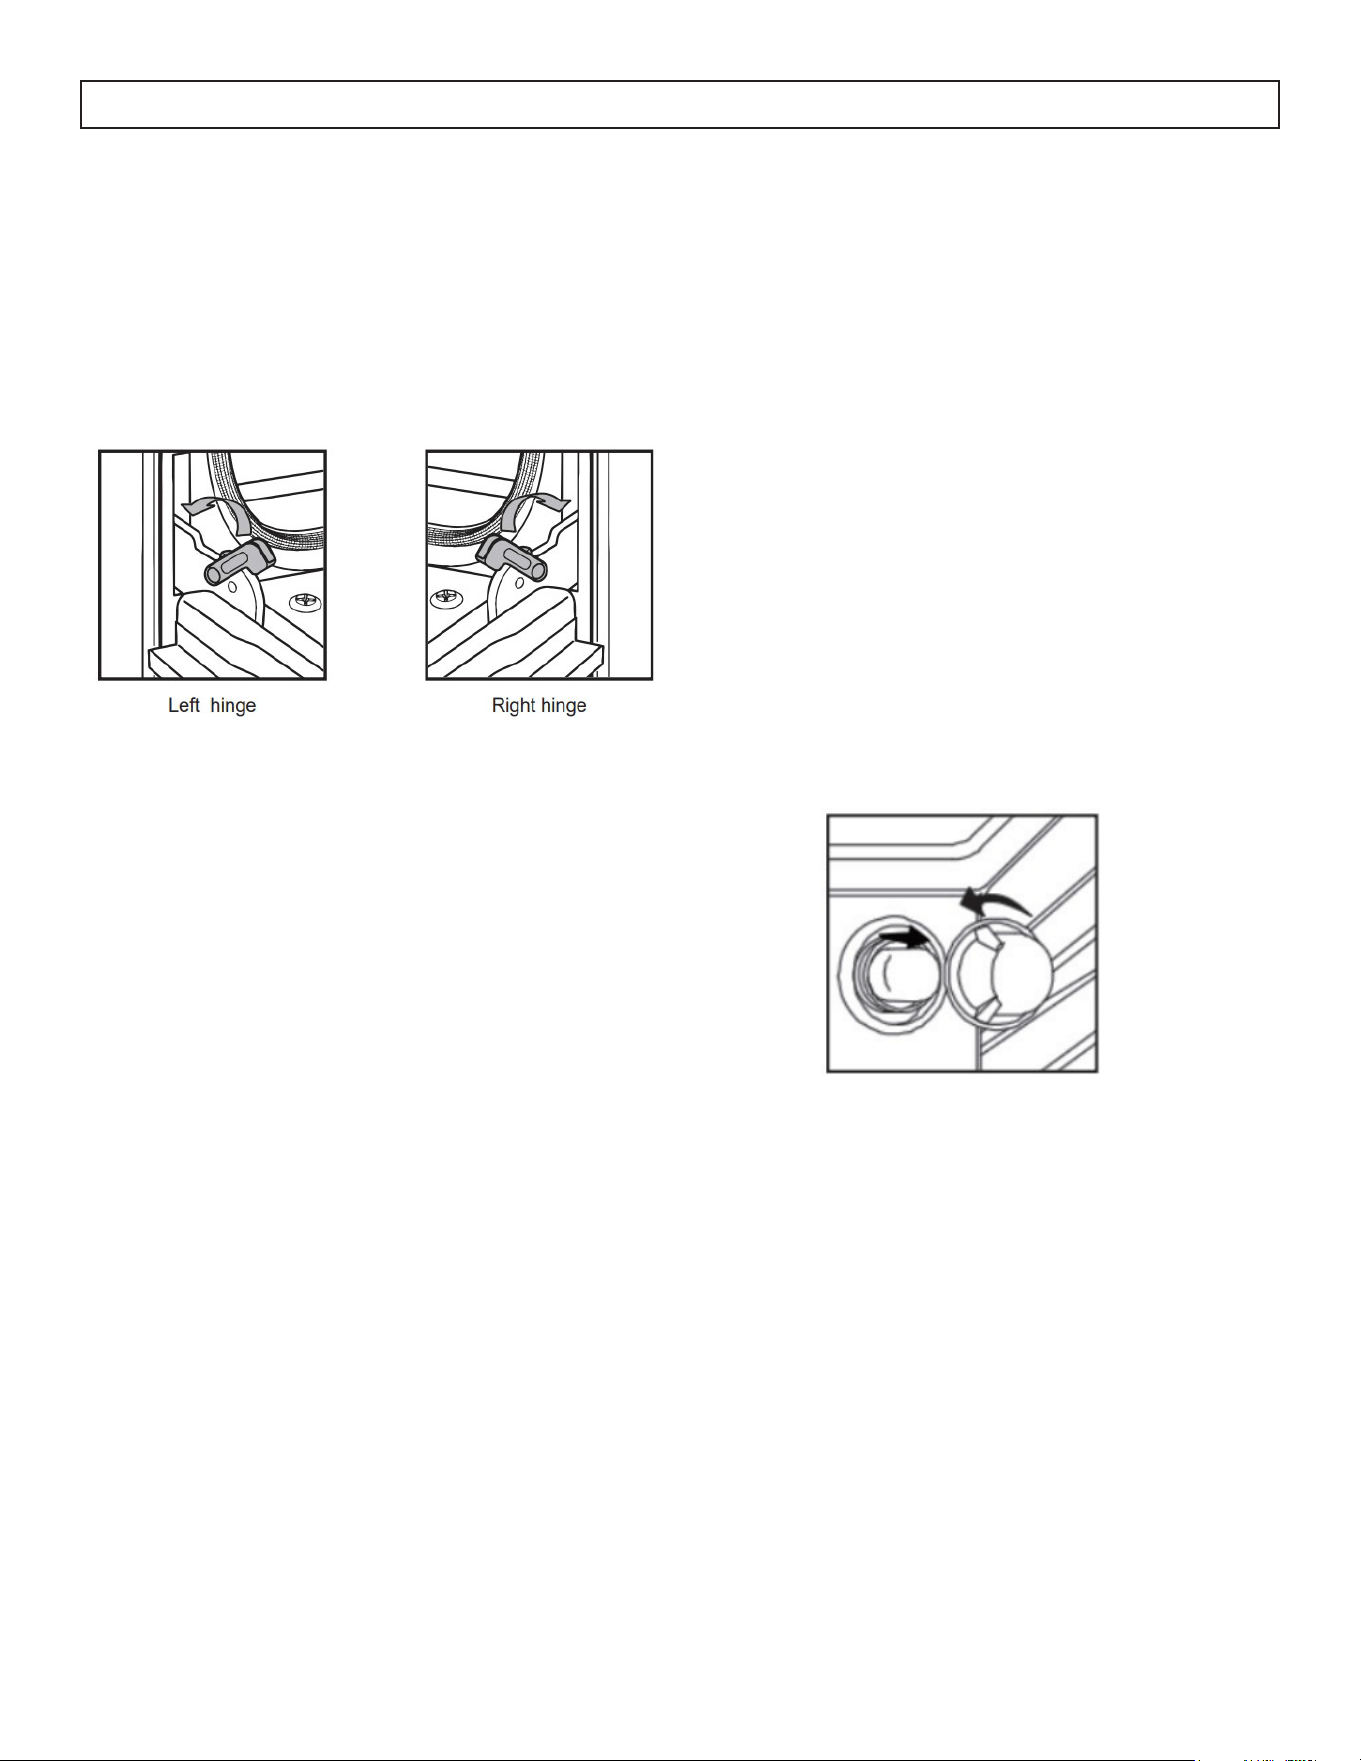
Door Reinstallation
1. Insert both hanger arms into the hinge receivers
in the door frame.
2. Slowly open the oven door and you will feel the
door set into place.
3. Move the hinge latches back into the locked
position.
4. Check that the door opens and closes freely.
If it does not, repeat door removal and
reinstallation.
CARE & MAINTENANCE
Replacing Oven Light
The oven light is a standard 25-watt (G) appliance
bulb.
NOTE:
• Make sure the oven and lights are cool and
power to the oven has been turned off.
• The lenses must be in place when using the
oven. The lenses serve to protect the light bulb
from breaking.
• The lenses are made of glass. Handle carefully
to avoid breakage.
• Failure to do so could result in death, electrical
shock, cuts or burns.
1. Disconnect the power.
2. Remove the bulb by turning it anti-clockwise.
3. Remove the burned-out bulb from the socket.
NOTE: To avoid damage or decreasing the life
of the new bulb, do not touch the bulb with bare
fingers. Wear gloves or use a tissue when replacing
the light bulb.
4. Replace the bulb and then replace the bulb
cover.
5. Reconnect the power.

29
TROUBLESHOOTING
No power
• A fuse may be blown or the circuit breaker tripped
• Plug not fully inserted into the wall outlet
Cooktop elements not working properly
• Improper cookware is being used
• No power
• Heating elements cycle off even when turned to highest setting: temperature limiters are temporarily
shutting off the elements due to exceding the maximum allowable temperature
• Glass ceramic surface is see through or appears to be red in colour: Under direct or bright lighting it
may be possible to see through the glass and it may have a red tint. This is normal
Cooling fan continues to run after oven is turned off
• Electronic components have not yet cooled sufficiently
Oven light
• Not working properly: Bulb is loose or burned out
• Stays on: door is not closing completely
• Cannot remove lens cover: Soil build-up around the lens cover

30
Limit
ed “In-Home” Warranty
Te
rms of Warranty
Ex
clusions
Gener
al Provisions
Th
is quality product is warranted to be free from manufacturer’s defects in material and workmanship, provided that the unit is used
under the normal oper
ating conditions intended by the manufacturer. This warranty is available only to the person to whom the unit was
originally sold
by Danby Products Limited (Canada) or Danby Products Inc. (U.S.A.) (hereafter “Danby”) or by an authorized distributor
of Danb
y, and is non-transferable.
Sa
ve as herein provided, by Danby, there are no other warranties, conditions, representations or guarantees, express or implied, made or
int
ended by Danby or its authorized distributors and all other warranties, conditions, representations or guarantees, including any
w
arranties, conditions, representations or guarantees under any Sale of Goods Act or like legislation or statute is hereby expressly
ex
cluded. Save as herein provided, Danby shall not be responsible for any damages to persons or property, including the unit itself,
ho
wsoever caused or any consequential damages arising from the malfunction of the unit and by the purchase of the unit, the purchaser
does her
eby agree to indemnify and hold harmless Danby from any claim for damages to persons or property caused by the unit.
1.
Power failure.
2.
Damage in transit or when moving the appliance.
3.
Improper power supply such as low voltage, defective house wiring or inadequate fuses.
4.
Accident, alteration, abuse or misuse of the appliance such as inadequate air circulation in the room or abnormal operating
conditions (ie. extremely high or low room temperature).
5.
Use for commercial or industrial purposes (ie. If the appliance is not installed in a domestic residence).
6.
Fire, water damage, theft, war, riot, hostility, acts of God such as hurricanes, floods etc.
7.
Service calls resulting in customer education.
8.
Improper Installation (ie. Building-in of a free standing appliance or using an appliance outdoors that is not approved for outdoor
application, including but not limited to: garages, patios, porches or anywhere that is not properly insulated or climate controlled).
During the first twenty four (24) months, any functional parts of this product found to be defective, will
be repaired or replaced, at warrantor’s option, at no charge to the original purchaser.
Contact the dealer where the unit was purchased, or contact the nearest authorized Danby service depot, where
service must be performed by a qualified service technician. If service is performed on the unit by anyone other
than an authorized service depot, all obligations of Danby under this warranty shall be void.
Danby reserves the right to limit the boundaries of “In Home Service” to the proximity of an authorized service
depot. Any appliance requiring service outside the limited boundaries of “In Home Service”, will be the
consumer’s responsibility to transport at their own expense to the original point of purchase or a service depot
for repair. If the appliance is installed in a location that is 100 kilometers (62 miles) or more from the nearest
service center, it must be delivered to the nearest authorized Danby Service Depot by the purchaser.
Transportation charges to and from the service location are not protected by this warranty and are the
responsibility of the purchaser.
Plastic parts ar
e warranted for thirty (30) days from the date of purchase, with no extensions provided.
No
warranty or insurance herein contained or set out shall apply when damage or repair is caused by any of the following:
First
24 months
To
obtain service
Boundaries of
in-home servi
ce
Pr
oof of purchase date will be required for warranty claims; retain bills of sale. In the event that warranty service is
r
equired, present the proof of purchase to our authorized service depot.
Danb
y Products Limited | Guelph, Ontario, Canada N1H 6Z9
Danb
y Products Inc. | Findlay, Ohio, U.S.A. 45840
1-800-263-2629
08/24

31
Bienvenido a la familia Danby.
Estamos orgullosos de nuestros productos de calidad y creemos en un servicio
confiable. Le sugerimos que lea este manual del propietario antes de enchufar su nuevo
electrodoméstico, ya que contiene información importante de funcionamiento, información
de seguridad, solución de problemas y consejos de mantenimiento para garantizar la
confiabilidad y longevidad de su electrodoméstico.
Tiene derecho a la cobertura de la garantía como se describe en el manual del propietario
que se proporciona con su nuevo electrodoméstico.
1. Escriba la información de su aparato a continuación. Debe conservar el comprobante
de compra original para validar y recibir los servicios de garantía.
2. Registre su producto en línea y reciba una EXTENSIÓN DE GARANTÍA GRATUITA DE 2
MESES después de completar una encuesta sobre el producto, en
www.danby.com/support/product-registration/
Número de modelo: _______________________________________________
Número de serie: _________________________________________________
Fecha de compra: _________________________________________________
Necesitas ayuda?
1. Lea el manual del propietario para obtener ayuda con la instalación, resolución de
problemas y asistencia de mantenimiento.
2. Visite www.Danby.com para acceder a herramientas de autoservicio, preguntas
frecuentes y mucho más buscando su número de modelo en la barra de búsqueda.
3. Para obtener el servicio al cliente más rápido, complete el formulario web en www.
danby.com/support. Su envío irá directamente a un experto en su dispositivo en
particular. Nuestros tiempos de respuesta promedio son entre 20 minutos y 2 horas,
durante el horario comercial EST.
4. Llame al 1-800-263-2629; tenga en cuenta que durante las horas pico, los tiempos de
espera pueden exceder una hora.
Informacion de Seguridad Importante
LEA Y SIGA TODAS LAS INSTRUCCIONES DE SEGURIDAD
ADVERTENCIA - PELIGRO DE VUELCO
• Un niño o un adulto puede volcar el aparato y morir.
• Verifique que el soporte antivuelco se haya instalado correctamente en el piso o pared.
• Asegúrese de que el soporte antivuelco se vuelva a acoplar cuando se mueva la estufa.
• No opere la estufa sin el soporte antivuelco en su lugar y acoplado.
• El incumplimiento de estas instrucciones puede causar la muerte o quemaduras graves a niños o adultos.
DISPOSITIVO ANTIVUELCO
Para reducir el riesgo de que la estufa se vuelque debido a un uso anormal o a una carga incorrecta de
la puerta, la estufa debe asegurarse instalando un dispositivo antivuelco. Hay dos dispositivos antivuelco
diferentes incluidos con este aparato.
Nota: Si alguna vez se reubica la estufa, se debe quitar el soporte antivuelco e instalarlo en la nueva
ubicación.
ADVERTENCIA
ASFIXIA Y RIESGO DE ATRAPAMIENTO INFANTIL
Para evitar la posibilidad de que los niños queden atrapados, tome las siguientes precauciones antes de
desechar el aparato:
• Retire la puerta del horno por completo.
• Nunca permita que los niños operen, jueguen o gateen dentro de la estufa eléctrica.
¡GUARDA ESTAS INSTRUCCIONES!
Informacion de Seguridad Importante
LEA Y SIGA TODAS LAS INSTRUCCIONES DE SEGURIDAD
¡GUARDA ESTAS INSTRUCCIONES!
AVISO - ANTES DE USAR LA COCINA POR PRIMERA VEZ
Antes de utilizar la placa de cocción por primera vez, los elementos calefactores tienen una capa
protectora, que debe quemarse antes de su uso. Para ello:
• Limpie la vitrocerámica. Se recomienda utilizar un limpiacristales.
• Coloque un cazo con agua en cada quemador delantero y encienda la estufa a fuego alto durante al
menos 30 minutos. Apague los quemadores delanteros.
• Repita el paso anterior para los dos quemadores traseros.
NOTAS:
Este procedimiento evapora los aceites protectores y la humedad acumulada durante el proceso de
fabricación, y permite que los circuitos electrónicos de control funcionen correctamente.
Puede haber un ligero olor durante los primeros usos: esto es normal y se disipará.
Después de su uso, la placa de cocción de cerámica permanecerá caliente durante más de 20 minutos
después de haber sido apagada. El indicador de superficie caliente permanecerá encendido cuando la
placa de cocción esté caliente.
AVISO - ANTES DE USAR EL HORNO POR PRIMERA VEZ
Antes de utilizar este horno por primera vez, los elementos calefactores tienen una capa protectora, que
debe quemarse antes de su uso. Para ello:
• Retire todo el embalaje del interior del horno.
• Asegúrese de que la puerta está cerrada.
• Gire el botón de función de cocción a Bake (Hornear).
• Gire la perilla de temperatura a 500°F (260°C).
• Gire el mando del temporizador hasta 30 minutos
NOTA: Deje que el horno funcione durante 30 minutos sin alimentos en la cavidad. Una vez
transcurridos los 30 minutos, abra la puerta del horno para que se enfríe. Cualquier olor que pueda
detectarse durante este uso inicial se debe a la evaporación de sustancias utilizadas para proteger el
horno durante el almacenamiento.
NOTA: No coloque nada, incluidos platos, papel de aluminio y bandejas de horno, en la parte inferior
del horno cuando esté en funcionamiento para evitar dañar el esmalte.
PELIGRO - INCENDIOS CAUSADOS POR
GRASA
En caso de incendio, no recoja nunca una olla o
sartén en llamas. Apague el elemento si puede
hacerlo sin peligro. Apague el fuego con un
extintor químico seco o de espuma.
No utilice agua en incendios provocados por
grasa. El agua esparcirá la grasa y no extinguirá
el fuego. Apague el fuego con una tapa de olla
bien ajustada, una bandeja para galletas o una
bandeja plana, o utilice un extintor químico seco
o de espuma.
Si se produce un incendio en el horno mientras
está en uso, sofoque el fuego cerrando la puerta
del horno y apagándolo o utilice un extintor
químico seco o de espuma.
PELIGRO - RIESGO DE INCENDIONO TOQUE LOS ELEMENTOS
CALEFACTORES NI LAS ZONAS
PRÓXIMAS A ELLOS
Los elementos calefactores de la superficie o
del interior del aparato pueden estar calientes
aunque sean de color oscuro. Las zonas cercanas
a los elementos calefactores pueden calentarse lo
suficiente como para causar quemaduras. Durante
y después del uso, no toque ni deje que la ropa
u otros materiales inflamables entren en contacto
con los elementos calefactores o las zonas
cercanas hasta que hayan tenido tiempo suficiente
para enfriarse. Las superficies del aparato pueden
calentarse lo suficiente como para provocar
quemaduras, entre ellas la encimera de cocción,
las aberturas de ventilación del horno y las
superficies cercanas a estas aberturas, las puertas
y las ventanas del horno.
• Se recomienda conectar este aparato a un
circuito separado que no esté compartido con
ningún otro aparato.
• No limpie nunca las piezas del aparato con
líquidos inflamables. Estos vapores pueden
crear un peligro de incendio o explosión.
Nunca utilice ni almacene gasolina u otros
vapores o líquidos inflamables en el interior
o en las proximidades de este aparato; de
lo contrario, podría producirse un riesgo de
incendio o explosión.
• Antes de limpiar o reparar este aparato,
desenchúfelo completamente de la toma de
corriente o desconecte la alimentación eléctrica
de la cocina en el panel de distribución
doméstico quitando el fusible o desconectando
el disyuntor. De lo contrario, puede producirse
una descarga eléctrica o la muerte.
• No intente reparar o sustituir ninguna pieza
de su aparato a menos que se recomiende
específicamente en este manual. Cualquier otra
reparación debe ser realizada por un técnico
cualificado.
• Por su seguridad, este aparato no debe
utilizarse nunca como fuente de calor ni
como calefactor. Los elementos de la placa de
cocción no deben utilizarse sin los utensilios de
cocina adecuados.
• Todas las aberturas en la pared detrás del
aparato y el suelo debajo del aparato deben
estar selladas.
• Mantenga la zona alrededor del aparato
despejada y libre de materiales combustibles,
gasolina y otros vapores inflamables.
Mantenga siempre los revestimientos de
paredes, cortinas o cortinajes combustibles a
una distancia segura de la cocina.
• No obstruya el flujo de aire alrededor del
aparatol.
• Almacenamiento dentro o sobre el aparato: no
deben almacenarse materiales inflamables en
el horno ni cerca de los elementos de la placa
de cocción.
• No cubra ninguna ranura, orificio o paso del
fondo del horno ni cubra una rejilla entera con
materiales como papel de aluminio.
Informacion de Seguridad Importante
LEA Y SIGA TODAS LAS INSTRUCCIONES DE SEGURIDAD
¡GUARDA ESTAS INSTRUCCIONES!
REQUISITOS GENERALES DE SEGURIDAD
Asegúrese de que el aparato esté correctamente instalado y conectado a tierra por un técnico cualificado.
No deje a los niños solos o desatendidos en la zona donde se utiliza el aparato. No permita que los niños
se sienten o se pongan de pie sobre ninguna parte del aparato.
No guarde objetos de interés para los niños en armarios situados encima de una cocina o en la
protección trasera de una cocina. Los niños que se suban a la cocina para alcanzar objetos podrían sufrir
lesiones graves.
Para eliminar el riesgo de quemaduras o incendio por alcanzar objetos por encima de las unidades de
superficie calientes, debe evitarse el almacenamiento en armarios situados por encima de las unidades de
superficie. Si es necesario colocar armarios, el riesgo puede reducirse instalando una campana extractora
que sobresalga horizontalmente un mínimo de 5 pulgadas (12,7 cm) por encima de la parte inferior de
los armarios.
Nunca se deben llevar prendas sueltas o que cuelguen mientras se utiliza el aparato.
Utilice sólo agarraderas secas. Los soportes húmedos sobre superficies calientes pueden provocar
quemaduras por vapor. No deje que el agarrador toque los elementos calefactores calientes. No utilice
toallas ni otros paños voluminosos.
Si se interrumpe el suministro eléctrico a una placa de cocción eléctrica mientras un elemento de superficie
está ENCENDIDO, el elemento de superficie volverá a encenderse tan pronto como se restablezca el
suministro. En caso de pérdida de alimentación eléctrica, si no se giran todos los mandos de los elementos
de superficie a la posición OFF (apagado), pueden encenderse los elementos que se encuentren sobre la
placa de cocción o cerca de ella, lo que podría provocar lesiones graves o incluso la muerte.
Esta cocina está diseñada y fabricada exclusivamente para cocinar alimentos domésticos y no es
adecuada para aplicaciones no domésticas, por lo que no debe utilizarse en un entorno comercial. La
garantía de la cocina quedará anulada si se utiliza en un entorno no doméstico.
ADVERTENCIA
Para reducir el riesgo de quemaduras, no mueva
este aparato mientras esté caliente. Para reducir el
riesgo de lesiones debidas al vuelco del aparato,
verifique la reinstalación de este aparato en el
dispositivo antivuelco suministrado después de
volver a colocar el aparato en la posición de
instalación original.
ADVERTENCIA
El fabricante declina toda responsabilidad por
daños personales o materiales causados por un
uso incorrecto o inadecuado de la cocina.
Informacion de Seguridad Importante
LEA Y SIGA TODAS LAS INSTRUCCIONES DE SEGURIDAD
¡GUARDA ESTAS INSTRUCCIONES!
REQUISITOS DE SEGURIDAD DE LA PLACA
DE COCCIÓN
• Utilice el tamaño de cacerola adecuado. Este
aparato está equipado con cuatro quemadores de
diferentes tamaños. Seleccione utensilios que tengan
fondos planos lo suficientemente grandes como
para cubrir la superficie de la resistencia. El uso de
utensilios de tamaño inferior expondrá una parte de
la resistencia al contacto directo y puede provocar
la ignición de la ropa. La relación adecuada entre
el utensilio y el quemador también mejorará la
eficiencia.
• No deje nunca el aparato desatendido mientras esté
en uso. El hervor produce humo y los derrames de
grasa pueden incendiarse.
• Nunca deje el aceite desatendido mientras fríe.
Si se permite que se caliente más allá de su punto
de humeo, el aceite puede inflamarse y provocar
un incendio que puede propagarse a los armarios
circundantes. Siempre que sea posible, utilice un
termómetro para controlar la temperatura del aceite.
• Para evitar derrames de aceite e incendios, utilice
una cantidad mínima de aceite al freír en sartén
poco profunda y evite cocinar alimentos congelados
con cantidades excesivas de hielo.
• Sólo ciertos tipos de utensilios de vidrio, cerámica,
loza u otros esmaltados son adecuados para el
servicio en la encimera de la cocina sin romperse
debido a un cambio brusco de temperatura.
• Para reducir el riesgo de quemaduras, ignición de
materiales inflamables y derrames debidos a un
contacto involuntario, el mango de un utensilio debe
colocarse de forma que quede girado hacia dentro y
no se extienda sobre los quemadores adyacentes.
• No cocine sobre una placa de cocción rota. Si la
encimera se rompe, las soluciones de limpieza y los
derrames pueden penetrar en la encimera rota y
crear un riesgo de descarga eléctrica. Póngase en
contacto inmediatamente con un técnico cualificado.
• No utilice una plancha o una sartén larga en más de
un quemador a la vez.
• Limpie la encimera de cocción con precaución - Si
utiliza una esponja o paño húmedo para limpiar
derrames sobre una encimera de cocción caliente,
tenga cuidado para evitar quemaduras por vapor.
Algunos limpiadores pueden producir vapores
nocivos si se aplican sobre una superficie caliente.
REQUISITOS DE SEGURIDAD DEL HORNO
Tenga cuidado al abrir la puerta. Deje salir el aire
caliente o el vapor antes de retirar o volver a colocar los
alimentos.
No caliente recipientes de alimentos sin abrir. La
acumulación de presión puede hacer que el recipiente
estalle y provocar lesiones.
No obstruya las rejillas de ventilación del horno.
Coloque siempre las rejillas del horno en el lugar
deseado mientras el horno esté frío. Si es necesario
mover la rejilla mientras el horno está caliente, no
deje que el soporte de la olla entre en contacto con el
elemento calefactor caliente del horno.
No utilice el horno si un elemento calefactor presenta
un punto brillante durante el uso o muestra otros
signos de daño. Un punto incandescente indica que el
elemento calefactor puede fallar y presentar un riesgo
potencial de quemadura, incendio o descarga eléctrica.
Apague inmediatamente el horno y solicite a un técnico
cualificado que sustituya la resistencia.
No forre las paredes del horno ni las rejillas con papel
de aluminio.
No coloque estantes, sartenes, bandejas de hornear,
bandejas de asar u otros utensilios de cocina en el fondo
de la cámara del horno. Coloque siempre en un estante
del horno.
No limpie nunca el horno con aparatos de limpieza a
vapor de alta presión.
No deje nada en la parte superior de la abertura de
ventilación del horno. Nunca cubra la abertura de
ventilación del horno con papel de aluminio o cualquier
otro material.
Informacion de Seguridad Importante
LEA Y SIGA TODAS LAS INSTRUCCIONES DE SEGURIDAD
¡GUARDA ESTAS INSTRUCCIONES!

Informacion de Seguridad Importante
LEA Y SIGA TODAS LAS INSTRUCCIONES DE SEGURIDAD
¡GUARDA ESTAS INSTRUCCIONES!
INSTRUCCIONES DE CONEXIÓN A TIERRA
Este aparato debe conectarse a tierra. La conexión a tierra reduce el riesgo de descarga eléctrica al
proporcionar un cable de escape para la corriente eléctrica.
Cuando este aparato está equipado con un cable de alimentación que tiene un cable de conexión a tierra
con un enchufe de 4 clavijas. El cable de alimentación debe conectarse a una toma de corriente con
conexión a tierra. Si la toma de corriente no tiene un enchufe de 4 clavijas, debe sustituirse por una toma
de corriente de 4 clavijas con toma de tierra. La placa de características indica el voltaje y la frecuencia
para los que está diseñado el aparato.
ADVERTENCIA - El uso inadecuado del enchufe de conexión a tierra puede provocar un riesgo de
descarga eléctrica. Consulte a un electricista cualificado si no comprende completamente las instrucciones
de conexión a tierra o si tiene dudas sobre si el aparato está correctamente conectado a tierra.
No conecte el aparato a alargadores, adaptadores o junto con otro aparato en la misma toma de
corriente.
No empalme el cable de alimentación. En ningún caso corte ni retire la clavija de toma de tierra del cable
de alimentación.
Si el cable de alimentación está dañado, debe ser sustituido por el fabricante, su servicio técnico o una
persona cualificada similar para evitar riesgos.
Nota: Apagar el aparato no lo desconecta de la red eléctrica.
Se recomienda colocar el cable de alimentación y el enchufe en paralelo al suelo para que el cable
discurra paralelo al suelo.
38
INSTRUCCIONES DE INSTALACIÓN
Medidas de instalación
NOTA: La cocina puede elevarse aproximadamente
2,5 cm ajustando las patas niveladoras. El frente de
la puerta y el cajón pueden extenderse más hacia
adelante dependiendo del estilo.
Fuente de alimentación
A: Panel de acceso al cable de alimentación
eléctrica
B: Abertura para el cable de alimentación
C: Zona empotrada
NOTA: Para conectar a una toma de corriente en
la pared, ésta debe estar empotrada. Si la toma de
corriente está en el suelo, debe estar empotrada o
montada en superficie.
INSTALACIÓN DEL SALPICADERO:
Instale el salpicadero en la parte trasera de la
cocina con los tornillos suministrados.

39
INSTRUCCIONES DE INSTALACIÓN
IMPORTANTE
Desconecte la alimentación antes de realizar el mantenimiento. La conexión incorrecta del cableado
de aluminio de la casa y los cables de cobre de los aparatos puede provocar un peligro eléctrico
o un incendio. Si la vivienda tiene cableado de aluminio, utilice únicamente conexiones diseñadas
y homologadas por UL para unir cobre con aluminio y siga con precisión el procedimiento
recomendado por el fabricante. Las conexiones de aluminio a cobre deben cumplir los códigos
locales. Utilice cables de cobre de calibre 8 o de aluminio de calibre 6. Conecte eléctricamente a tierra
la gama.
CONEXIÓN A LA RED ELÉCTRICA DOMÉSTICA
Asegúrese de que su aparato está correctamente instalado y conectado a tierra por un técnico cualificado.
• Se recomienda utilizar un disyuntor.
• El horno puede conectarse directamente a la caja del disyuntor (o al desconectador con fusibles)
mediante cable flexible o no metálico, de cobre o aluminio.
• Deje al menos 1,8 m (6 pies) de holgura en el cable para poder mover la cocina si es necesario
realizar tareas de mantenimiento.
• En cada extremo del cable de alimentación (en el horno y en la caja de conexiones) debe haber un
conector homologado por UL..
El diagrama de cableado se incluye con la gama. Este aparato se fabrica con el chasis conectado a un
neutro mediante un cable puente verde de tierra. Después de asegurarse de que la alimentación ha sido
desconectada, conecte el conducto flexible de la cocina a la caja de conexiones utilizando un conector de
conducto homologado por UL. Los gráficos de neutro conectado a tierra y neutro no conectado a tierra de
las páginas siguientes y las instrucciones proporcionadas, presentan la forma más común de conectar la
cocina. Los códigos y ordenanzas locales tienen prioridad sobre estas instrucciones. Realice las conexiones
eléctricas de acuerdo con los códigos y ordenanzas locales.
PIEZAS NECESARIAS:
Si utiliza un cable de alimentación:
• Kit de cable de alimentación homologado por UL y marcado para su uso con cocinas. El cable debe
tener una tensión nominal mínima de 250 V, 40 amperios o 50 amperios, estar marcado para su uso
con una abertura de conexión de 3,5 cm (1 3/8”) de diámetro nominal y debe terminar en terminales
de anillo o terminales de pala abiertos con extremos hacia arriba.
• Alivio de tensión aprobado por UL.
Si el cableado es directo:
• Conducto metálico flexible
• Conector de conducto homologado por UL
• Cable eléctrico de 4 ó 3 hilos (donde los códigos locales permitan una conexión de 3 hilos)
• Conectores de cable aprobados por UL
NOTAS:
• Compruebe los códigos locales.
• Compruebe el suministro eléctrico existente.

40
INSTRUCCIONES DE INSTALACIÓN
IMPORTANTE
Sólo para modelos vendidos en Estados Unidos. Este modelo no incluye un cable de alimentación
preinstalado. Siga las siguientes instrucciones de cableado antes de utilizar la cocina. No se
suministra el cable de alimentación. Siga todos los códigos y normas de cableado locales y
nacionales.
INSTALACIÓN DE CABLE DE ALIMENTACIÓN DE 3 HILOS
ADVERTENCIA: Utilice este método sólo si los códigos locales permiten conectar el conductor de tierra del
chasis al conductor neutro del cable de alimentación.
1. Pase los hilos del cable eléctrico por el conducto metálico flexible.
NOTA: Deje suficiente holgura para conectar fácilmente los cables al bloque de terminales.
2. Retire el panel de acceso situado en la parte inferior derecha del panel posterior para descubrir el
bloque de terminales eléctricos.
3. Instale un aliviador de tensión con certificación UL en la abertura del conducto metálico flexible en el
soporte y apriete completamente la tuerca del aliviador de tensión.
4. Pase el conducto metálico flexible a través del aliviador de tensión.
NOTA: Deje suficiente holgura para conectar fácilmente el cableado al bloque de terminales.
5. Con una llave de tuercas de 5/16” y una de las tuercas hexagonales 10-32, conecte el cable de tierra
(verde o desnudo) del conducto metálico flexible al poste central del bloque de terminales junto con el
cable de puente verde de la cocina.
6. Utilizando tuercas hexagonales 10-32, conecte los cables rojo y negro del cable de alimentación a los
postes exteriores del bloque de terminales con los correspondientes cables rojo y negro de la cocina.
7. Apriete completamente las tuercas hexagonales y compruebe la conexión.
8. Coloque la parte inferior del aliviador de tensión debajo del conducto metálico flexible y apriete los
tornillos del aliviador de tensión.
NOTA: Antes de apretar, asegúrese de que el aliviador de tensión está colocado sobre el conducto
metálico flexible y NO sobre los cables.
9. Vuelva a colocar el panel de acceso eléctrico.
10. Meta el conducto sobrante en el hueco del panel trasero.
Rojo
Alivio de tensión UL
No suministrado
Cable de
alimentación
Blanco Negro
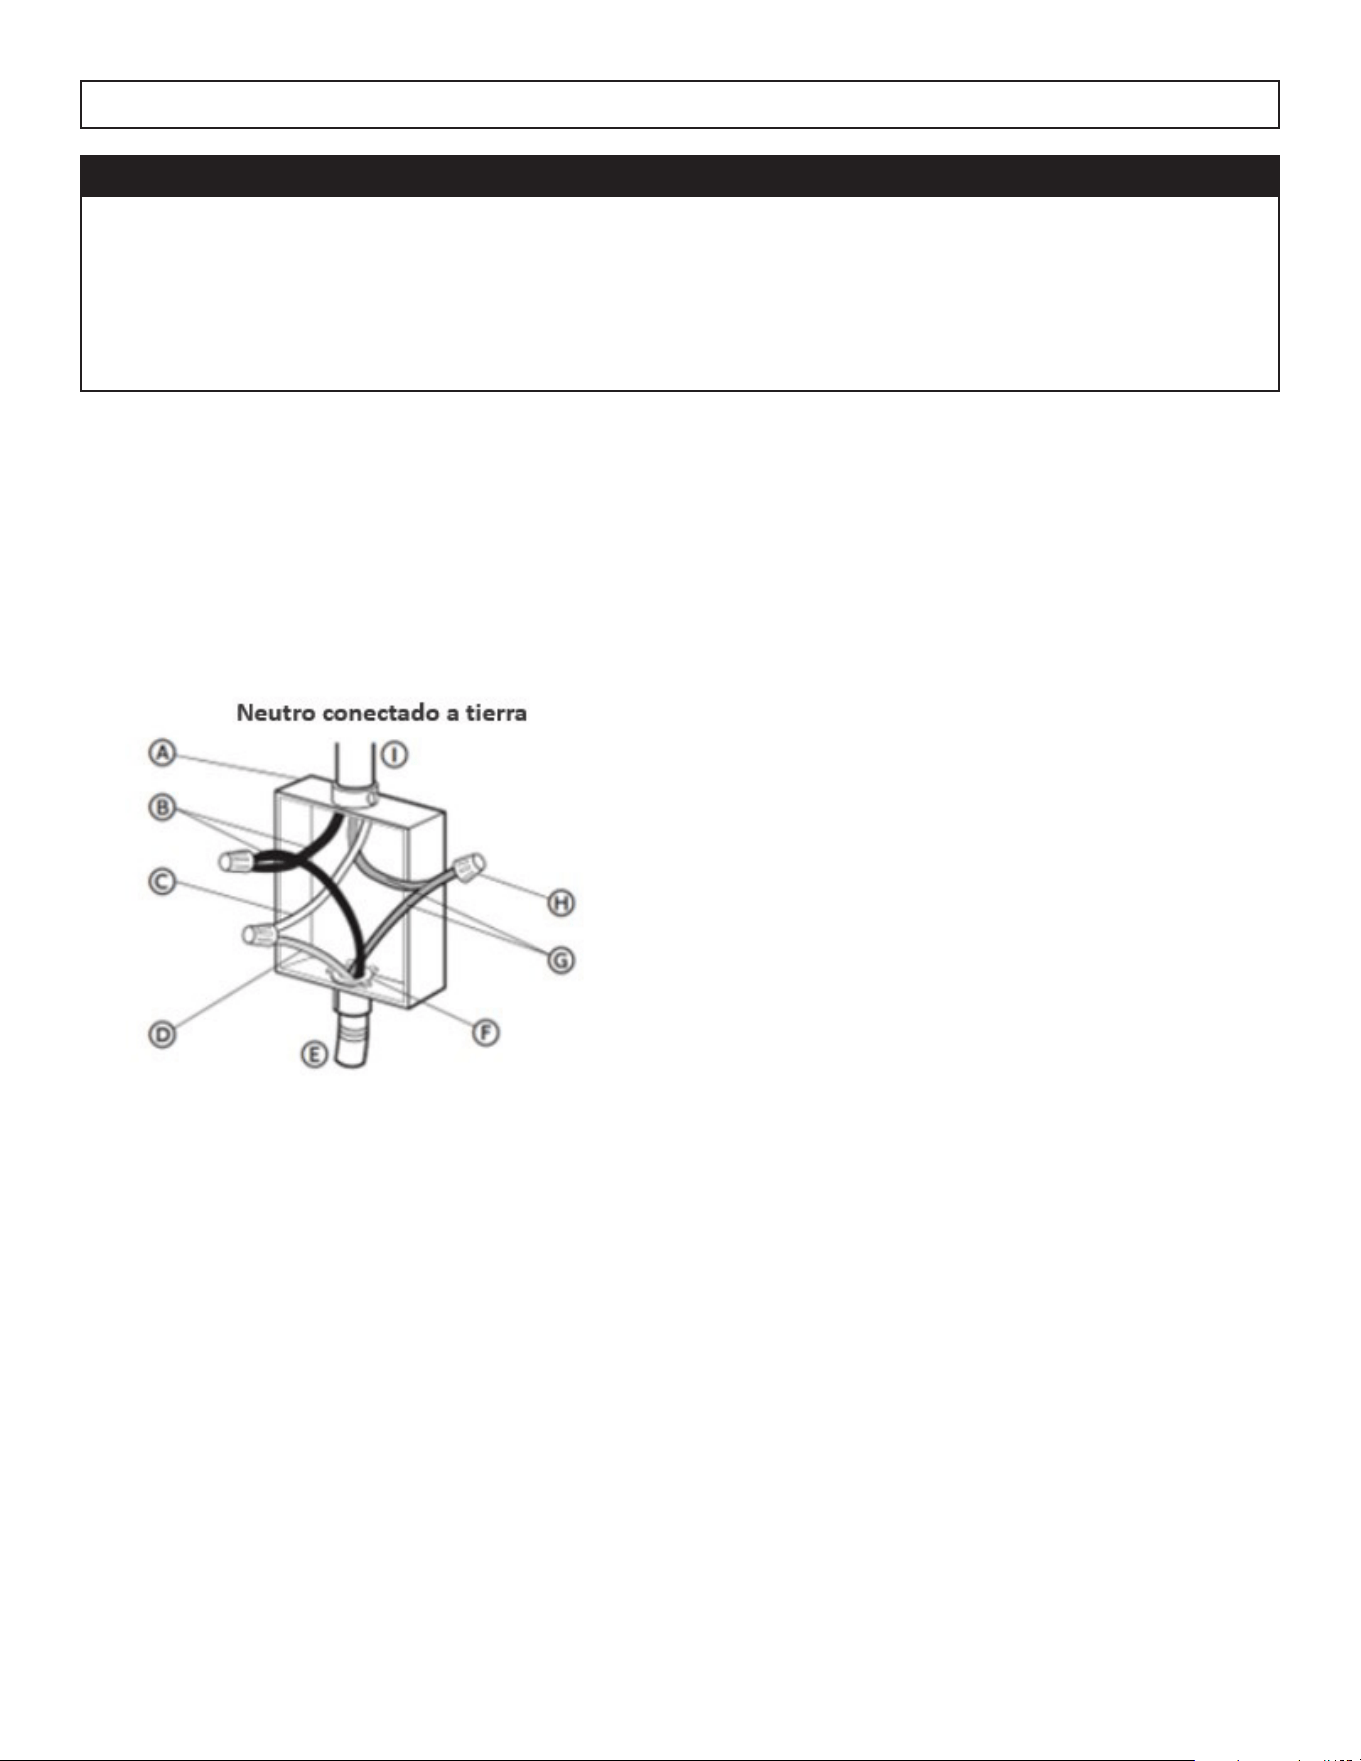
41
INSTRUCCIONES DE INSTALACIÓN
CONEXIÓN DEL CABLE DE ALIMENTACIÓN DE 3 HILOS A LA RED ELÉCTRICA DE LA CASA
NOTA: Utilice el cable de 3 hilos de la fuente de alimentación doméstica donde los códigos locales
permitan una conexión de 3 hilos.
1. Desconecte la alimentación.
2. Conecte los 2 cables negros entre sí utilizando un conector de cables homologado por UL.
3. Conecte el cable neutro (blanco) y el cable de tierra (verde o desnudo) (del cable de la cocina)
mediante un conector de cables homologado por UL.
4. Conecte los 2 cables rojos entre sí mediante un conector de cables homologado por UL.
5. Instale la tapa de la caja de conexiones.
A: Caja de conexiones
B: Cables negros
C: Cable neutro (blanco)
D: Cable de tierra (verde o desnudo)
E: Cable del horno
F: Conector de conducto aprobado por UL
G: Cables rojos
H: Conectores de cable aprobados por UL
I: Suministro eléctrico doméstico
IMPORTANTE
La conexión a tierra a través del conductor neutro está prohibida para las nuevas instalaciones
de circuitos derivados (NEC 1996); casas móviles; y vehículos recreativos, o en un área donde los
códigos locales prohíben la conexión a tierra a través del conductor neutro. Para instalaciones en
las que está prohibida la conexión a tierra a través del conductor neutro, consulte el gráfico Neutro
sin conexión a tierra. Utilice el terminal o cable de tierra para conectar la unidad a tierra. Conecte el
terminal o cable neutro al neutro del circuito derivado de la forma habitual.
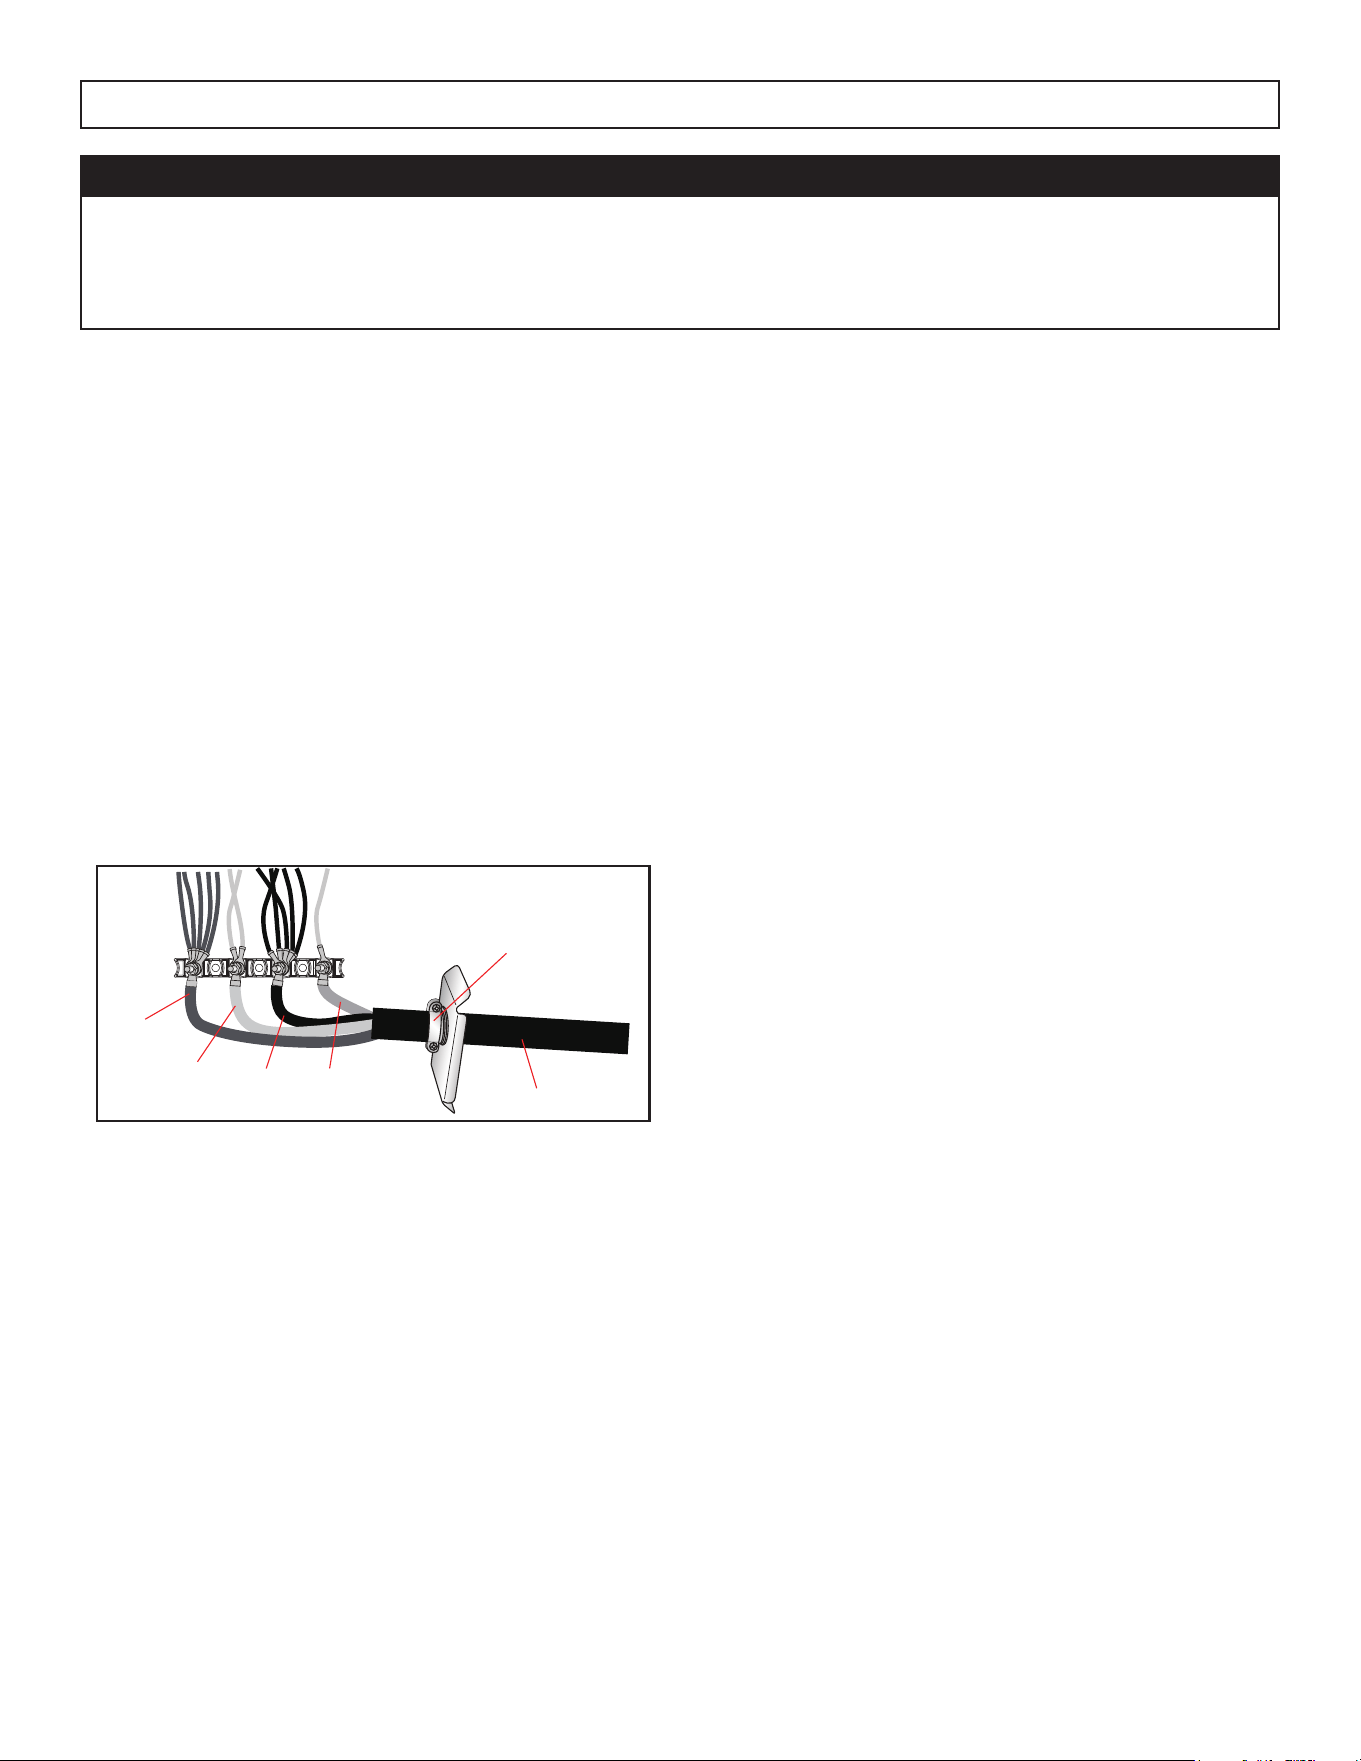
42
INSTRUCCIONES DE INSTALACIÓN
IMPORTANTE
Sólo para modelos vendidos en Estados Unidos. Este modelo no incluye un cable de alimentación
preinstalado. Siga las siguientes instrucciones de cableado antes de utilizar la cocina. No se
suministra el cable de alimentación. Siga todos los códigos y normas de cableado locales y
nacionales.
INSTALACIÓN DE CABLE DE ALIMENTACIÓN DE 4 HILOS
NOTA: Utilice este método para nuevas instalaciones de circuitos derivados (1996 nec), casas móviles,
vehículos recreativos, o en un área donde los códigos locales prohíben la conexión a tierra a través del
cable neutro.
1. Pase los hilos del cable eléctrico por el conducto metálico flexible.
NOTA: Deje suficiente holgura para conectar fácilmente los cables al bloque de terminales.
2. Retire el panel de acceso situado en la parte inferior derecha del panel posterior para exponer el
bloque de terminales eléctricos.
3. Instale un aliviador de tensión con certificación UL en la abertura del conducto metálico flexible en el
soporte y apriete completamente la tuerca del aliviador de tensión.
4. Pase el conducto metálico flexible a través del aliviador de tensión. Deje suficiente holgura para
conectar fácilmente el cableado al bloque de terminales.
Rojo
Verde
Alivio de tensión UL
Cable de
alimentación
Blanco
Negro
5. Utilizando una llave de tuercas de 5/16” y una de las tuercas hexagonales 10-32, conecte el cable de
tierra (verde o desnudo) del conducto metálico flexible al borne central del bloque de terminales junto
con el cable verde de la cocina.
6. Utilice una llave de tuercas de 5/15” para conectar el cable neutro (blanco) al poste central del bloque
de terminales con una de las tuercas hexagonales 10-32.
7. Utilizando tuercas hexagonales 10-32, conecte los hilos rojo y negro del cable de alimentación a los
postes exteriores del bloque de terminales con los correspondientes hilos rojo y negro de la cocina.
8. Apriete completamente las tuercas hexagonales y compruebe la conexión
9. Coloque la parte inferior del aliviador de tensión debajo del conducto metálico flexible y apriete los
tornillos del aliviador de tensión.
NOTA: Antes de apretar, asegúrese de que el aliviador de tensión está colocado sobre el conducto
metálico flexible y NO sobre los cables.
10. Vuelva a colocar el panel de acceso eléctrico.
11. Introduzca el conducto sobrante en la zona empotrada del panel trasero.
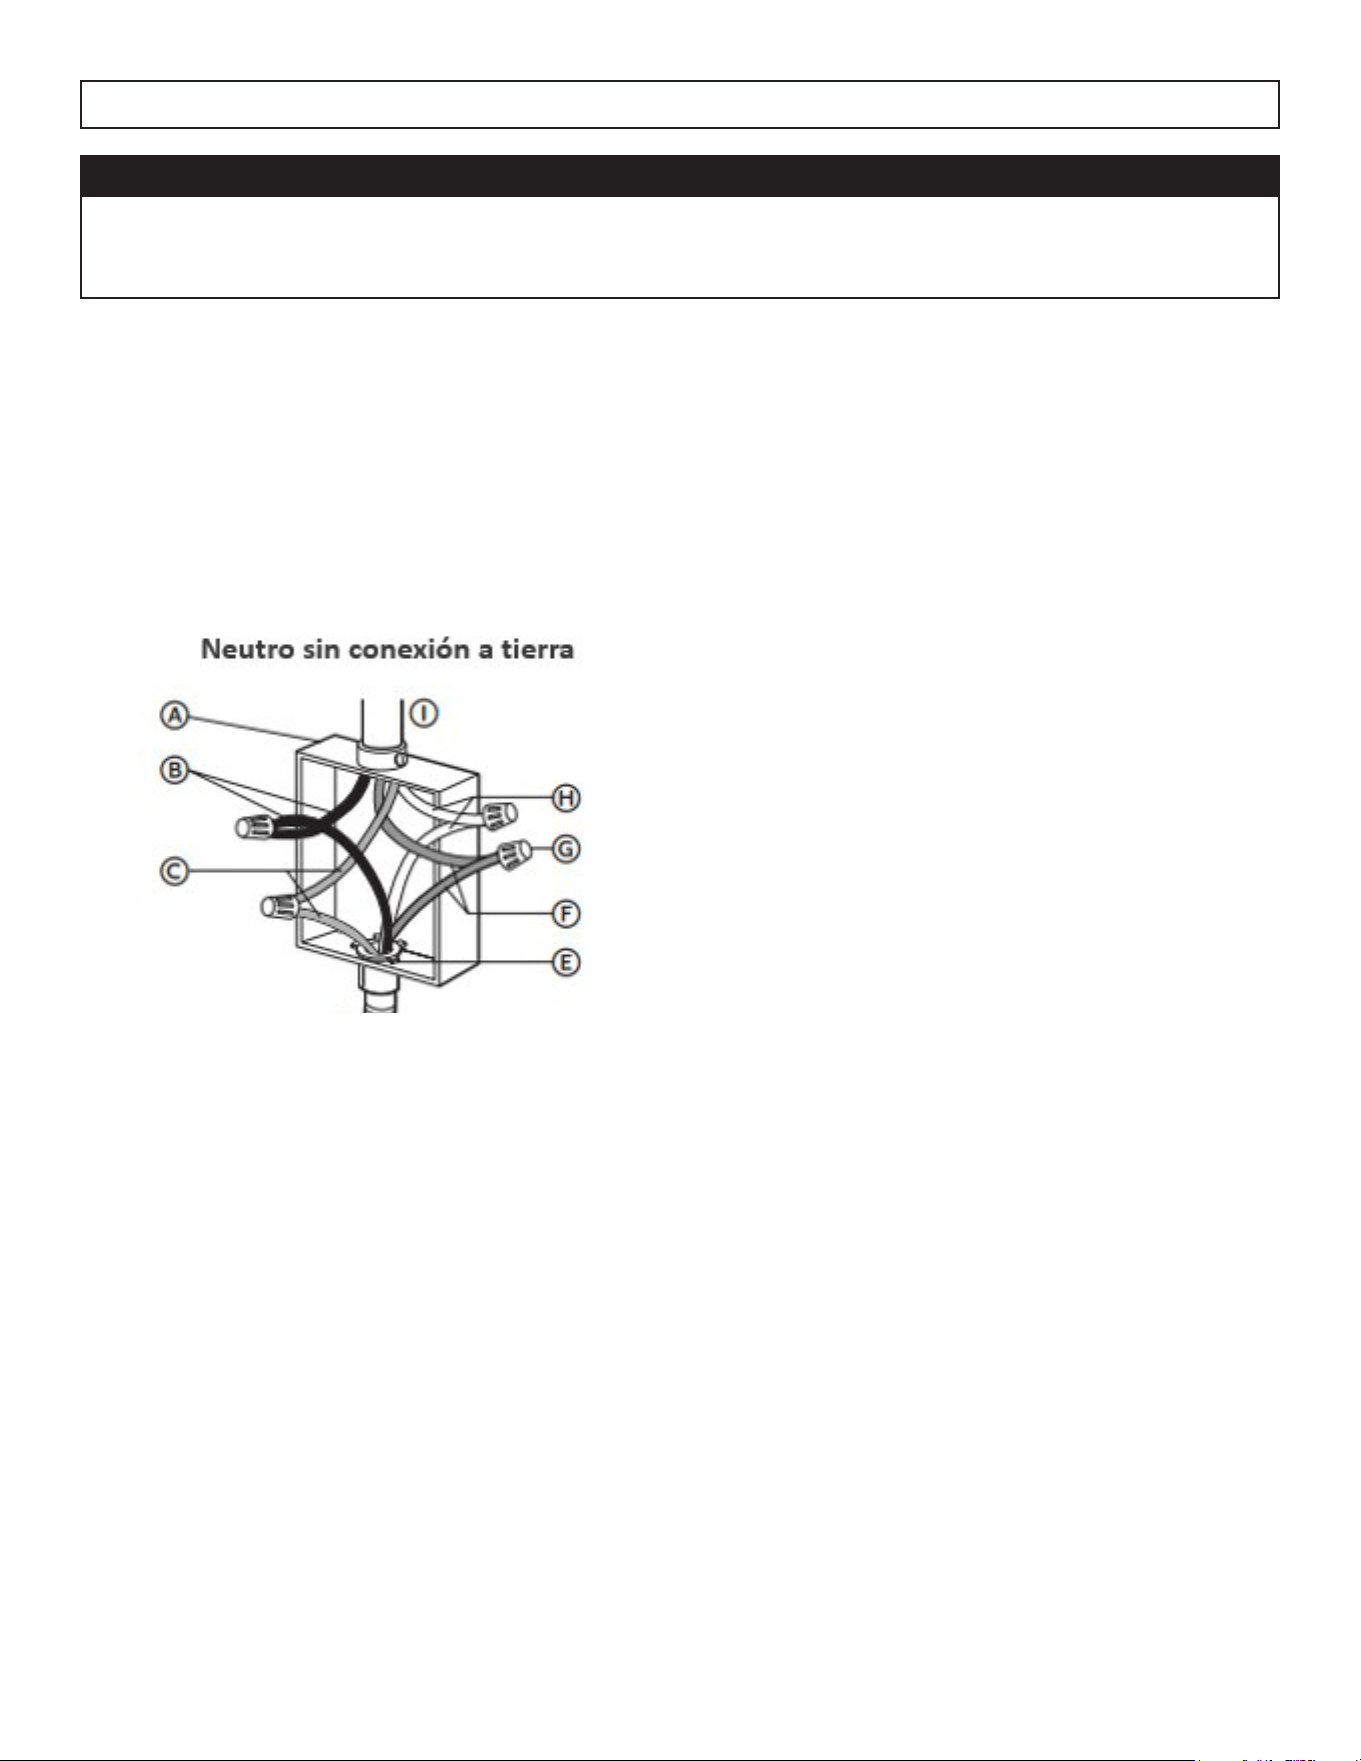
43
INSTRUCCIONES DE INSTALACIÓN
IMPORTANTE
Utilice el cable de 4 hilos de la fuente de alimentación doméstica cuando los códigos locales no
permitan la conexión a tierra a través del neutro, instalación de circuitos derivados nuevos (I996
NEC), casas móviles y vehículos recreativos, construcciones nuevas.
CONEXIÓN DEL CABLE DE ALIMENTACIÓN DE 4 HILOS A LA RED ELÉCTRICA DOMÉSTICA
A: Caja de conexiones
B: Cables negros
C: Cables de tierra (verdes o desnudos)
D: Cable de la gama
E: Conector de conducto aprobado por UL
F: Cables rojos
G: Conectores de cable aprobados por UL
H: Cables neutros (blancos)
I: Suministro eléctrico doméstico

44
Reúna las herramientas y piezas necesarias antes
de comenzar la instalación.
HERRAMIENTAS NECESARIAS
1. Cinta métrica
2. Destornillador plano
3. Destornillador Phillips
4. Nivel
5. Taladro eléctrico inalámbrico
6. Martillo
7. Llave inglesa o alicates
8. Sierra de metal
9. Tijeras de metal o cortaalambres grandes
10. Llave combinada 15/N6”
11. Destornillador para tuercas de 3/8”
12. Destornillador para tuercas de 1/4”
13. Broca de 1/8” (3,2 mm) (para suelos de
madera)
14. Marcador o lápiz
15. Cinta adhesiva
REQUISITO DE UBICACIÓN
Ventilación
Es responsabilidad del instalador cumplir con las
distancias de instalación, si se especifican, en la
placa de características del modelo/serie. La placa
de características del modelo/serie se encuentra
en la parte posterior del bastidor del horno. Abra
la puerta del horno para ver la etiqueta. Consulte
la etiqueta en el panel posterior de la cocina para
conocer los valores nominales adicionales de los
elementos y de la potencia del horno.
NOTA: Respete todos los códigos y ordenanzas
vigentes
Temperatura
• La cocina debe estar situada en un lugar
cómodo de la cocina.
• Las instalaciones empotradas deben
proporcionar un cerramiento completo de los
laterales y la parte trasera de la cocina.
• Para eliminar el riesgo de quemaduras o
incendios por alcanzar las unidades de
superficie calientes, debe evitarse el espacio
de almacenamiento en armarios situado por
encima de las unidades de superficie. Si es
necesario colocar armarios, el riesgo puede
reducirse instalando una campana extractora o
una combinación de campana extractora para
microondas que sobresalga horizontalmente un
mínimo de 5 pulgadas (12,7 cm) por encima de
la parte inferior de los armarios.
• Todas las aberturas en la pared o en el suelo
donde se vaya a instalar la cocina deben estar
selladas.
• No selle la cocina a los armarios laterales.
• El suministro eléctrico debe estar conectado a
tierra. Consulte la sección “Requisitos eléctricos.
NOTA: Algunos materiales de construcción y
armarios no están diseñados para soportar el
calor producido por el horno para la cocción y la
autolimpieza. Consulte a su constructor o proveedor
de armarios para asegurarse de que el material
utilizado no se decolore, deslamine o sufra otros
daños.
• Póngase en contacto con un instalador de
revestimientos de suelo cualificado para
comprobar que el revestimiento de suelo puede
soportar al menos 93°C (200°F).
• Si instala la cocina sobre una alfombra,
utilice una almohadilla aislante o madera
contrachapada de 0,64 cm debajo de la cocina.
INSTRUCCIONES DE INSTALACIÓN
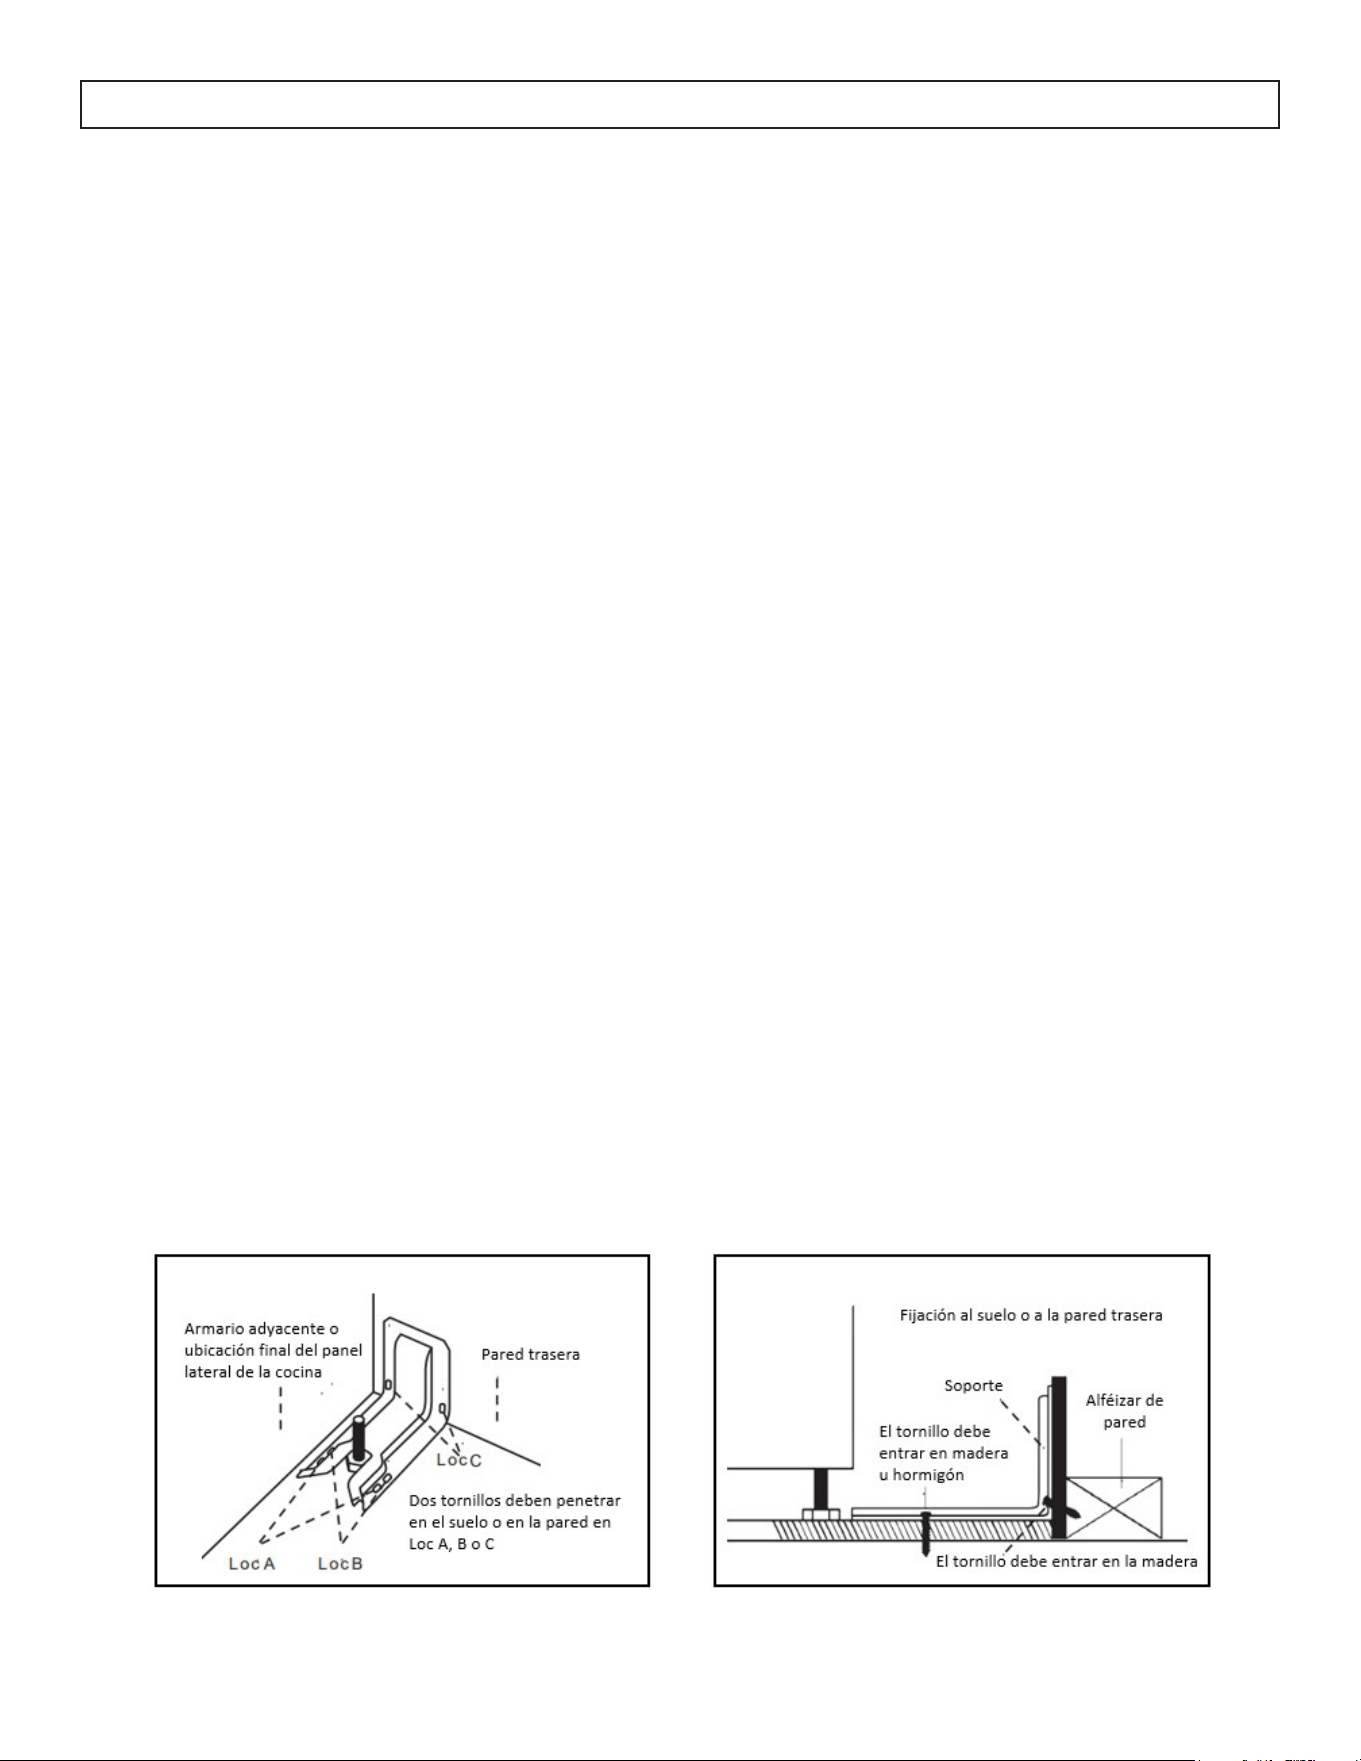
45
SOPORTE ANTIVUELCO
Con el horno se suministra un kit de soporte antivuelco
ADVERTENCIA: Peligro de vuelco
• Un niño o un adulto pueden volcar la cocina y sufrir lesiones graves.
• Conecte el soporte antivuelco al pie trasero de la cocina.
• Vuelva a conectar el soporte antivuelco si se mueve el horno.
NOTA: NO retire completamente la pata de nivelación trasera. El soporte antivuelco utiliza la pata de
nivelación trasera derecha o izquierda para fijar la cocina al suelo o pared.
Ubicación del soporte
Determine la ubicación definitiva del horno antes de intentar instalar el soporte.
Coloque el soporte en el suelo con el borde posterior contra la pared trasera. Si el horno no llega a la
pared trasera, alinee el borde trasero del soporte con el panel trasero del horno en su ubicación definitiva.
NOTA: Si el soporte no toca la pared trasera, DEBE atornillar el soporte al SUELO
Coloque el emplazamiento del soporte contra el armario izquierdo o derecho. Si no hay armario
adyacente, alinee el borde del soporte con el panel lateral del horno en su ubicación final. Si la encimera
sobresale del mueble, separe el soporte del mueble en la misma medida que sobresalga.
Marque la ubicación del par de orificios que va a utilizar (véase la ilustración siguiente).
NOTA: Para la instalación en SUELO, utilice Loc A o B. Para la instalación en PARED POSTERIOR, utilice
Loc C.
INSTRUCCIONES DE INSTALACIÓN
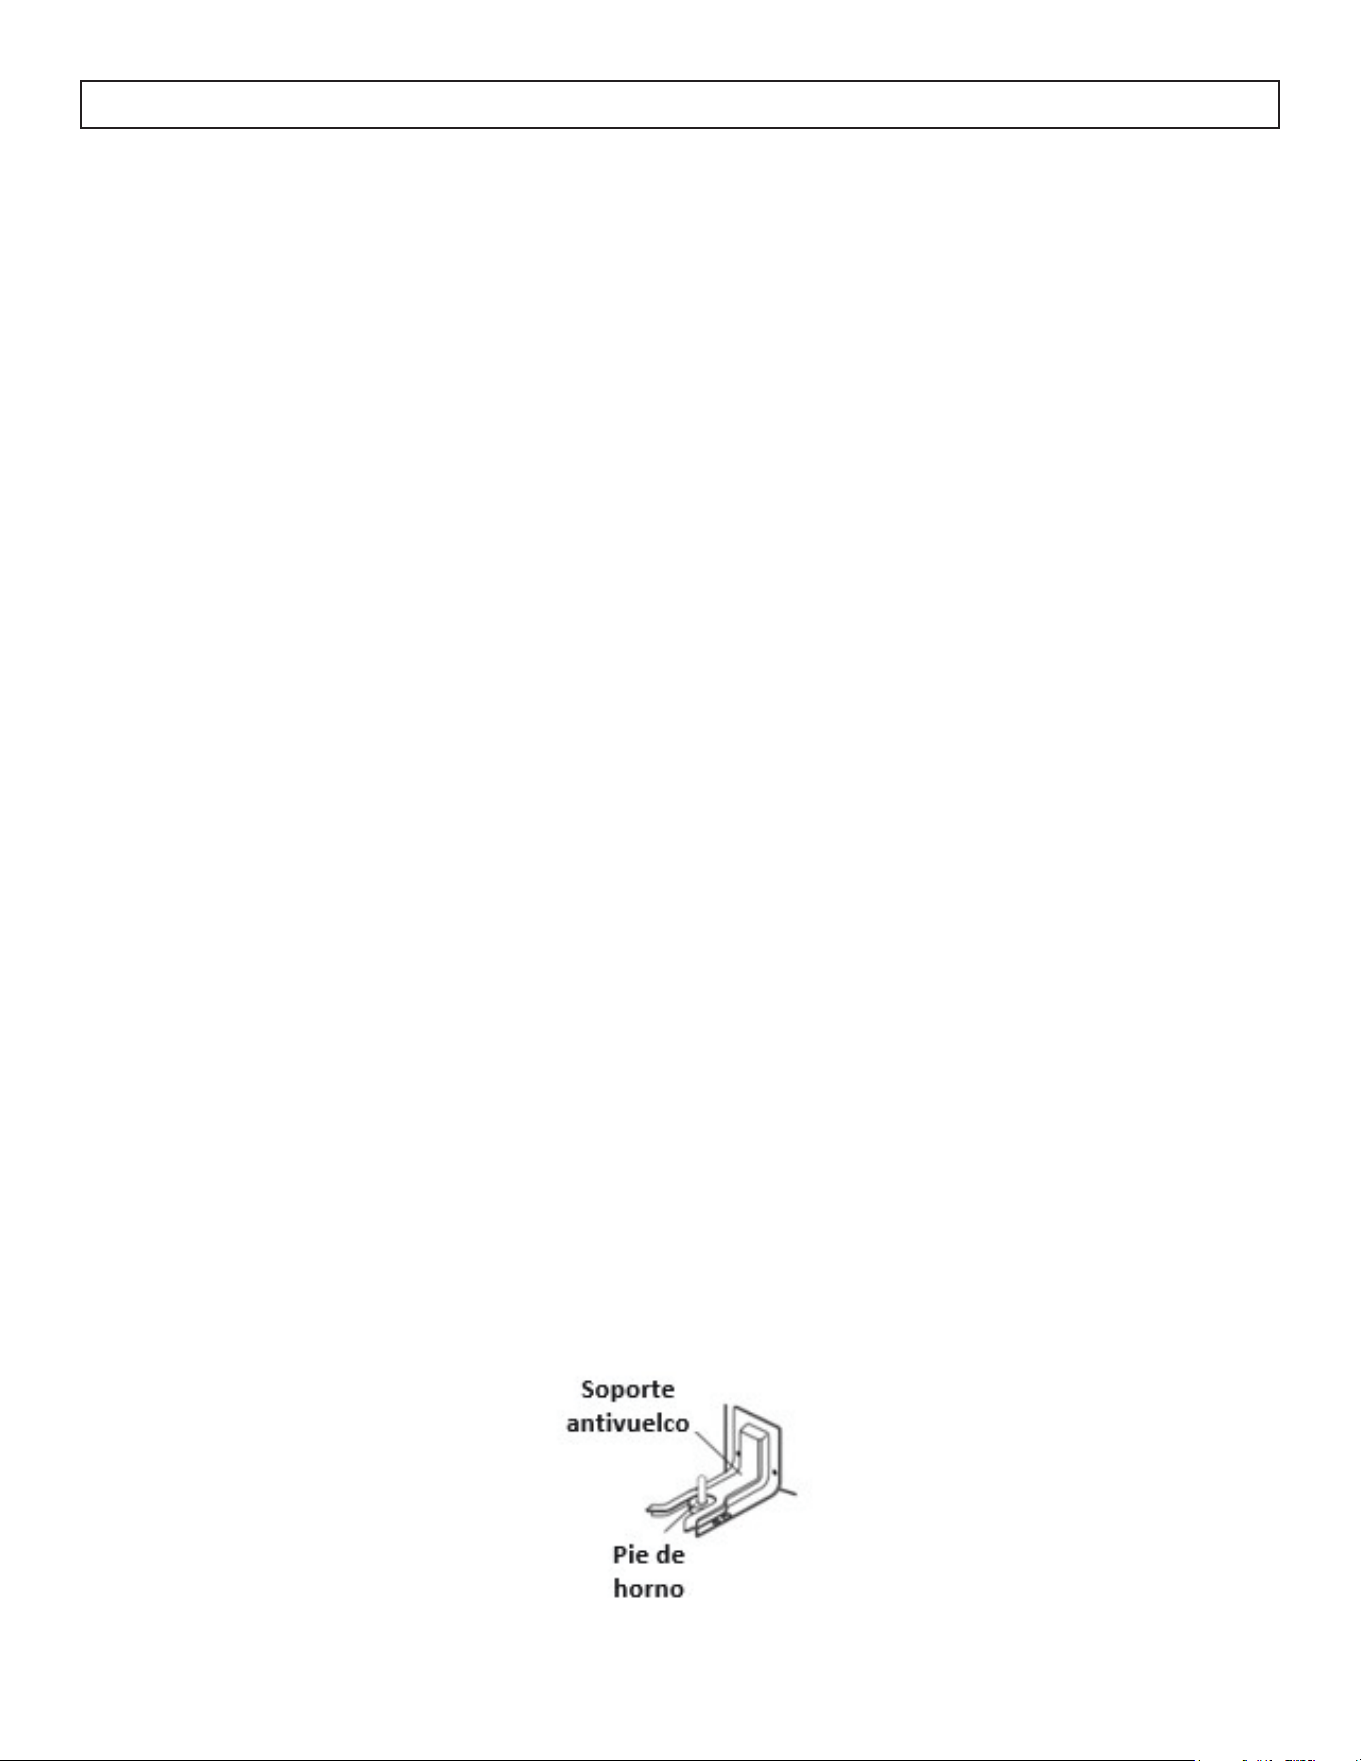
46
Soporte de fijación
El soporte debe atornillarse al SUELO o a la PARED TRASERA.
Instalación del suelo
• Suelo de madera: utilice los tornillos suministrados para fijar el soporte utilizando el par de orificios
marcados (Loc A o B).
• Suelo de hormigón: Utilizando una broca para hormigón, perfore un orificio piloto de 0,4 cm (5
pulgadas) de profundidad en el hormigón en el centro de cada uno de los orificios marcados (Loc A o
B). Utilice los tornillos suministrados para fijar el soporte al suelo.
Instalación en la pared trasera
Utilice los 2 tornillos suministrados para fijar el soporte utilizando el par de orificios marcados en Loc
C. Los tornillos DEBEN entrar en una placa de umbral de madera. Si la pared contiene algún montante
metálico o materiales similares, entonces se debe utilizar el suelo.
Soporte de control
Después de instalar el soporte, deslice la cocina hasta su ubicación definitiva. La pata de nivelación
trasera debe estar completamente insertada en el soporte ANTI-TIP como se muestra a continuación. Para
comprobar si el soporte está instalado y encajado correctamente, mire debajo de la cocina para ver si la
pata niveladora está encajada en el soporte. En algunos modelos, el cajón de almacenamiento o la placa
protectora pueden retirarse para facilitar la inspección. Si no es posible realizar una inspección visual,
deslice la cocina hacia delante, confirme que el soporte antivuelco está bien sujeto al suelo o a la pared
y deslice la cocina hacia atrás para que la pata niveladora quede debajo del soporte antivuelco. Si la
cocina se separa de la pared por cualquier motivo, repita siempre este procedimiento para comprobar
que el soporte antivuelco sujeta correctamente la cocina.
NOTA: El soporte antivuelco debe estar INSTALADO ADECUADAMENTE, y la pata niveladora trasera
debe estar COMPLETAMENTE ENCLAVADA en el soporte para evitar que la cocina se vuelque. NUNCA
retire las patas niveladoras, ya que esto impedirá que la cocina se fije correctamente al soporte antivuelco.
INSTRUCCIONES DE INSTALACIÓN
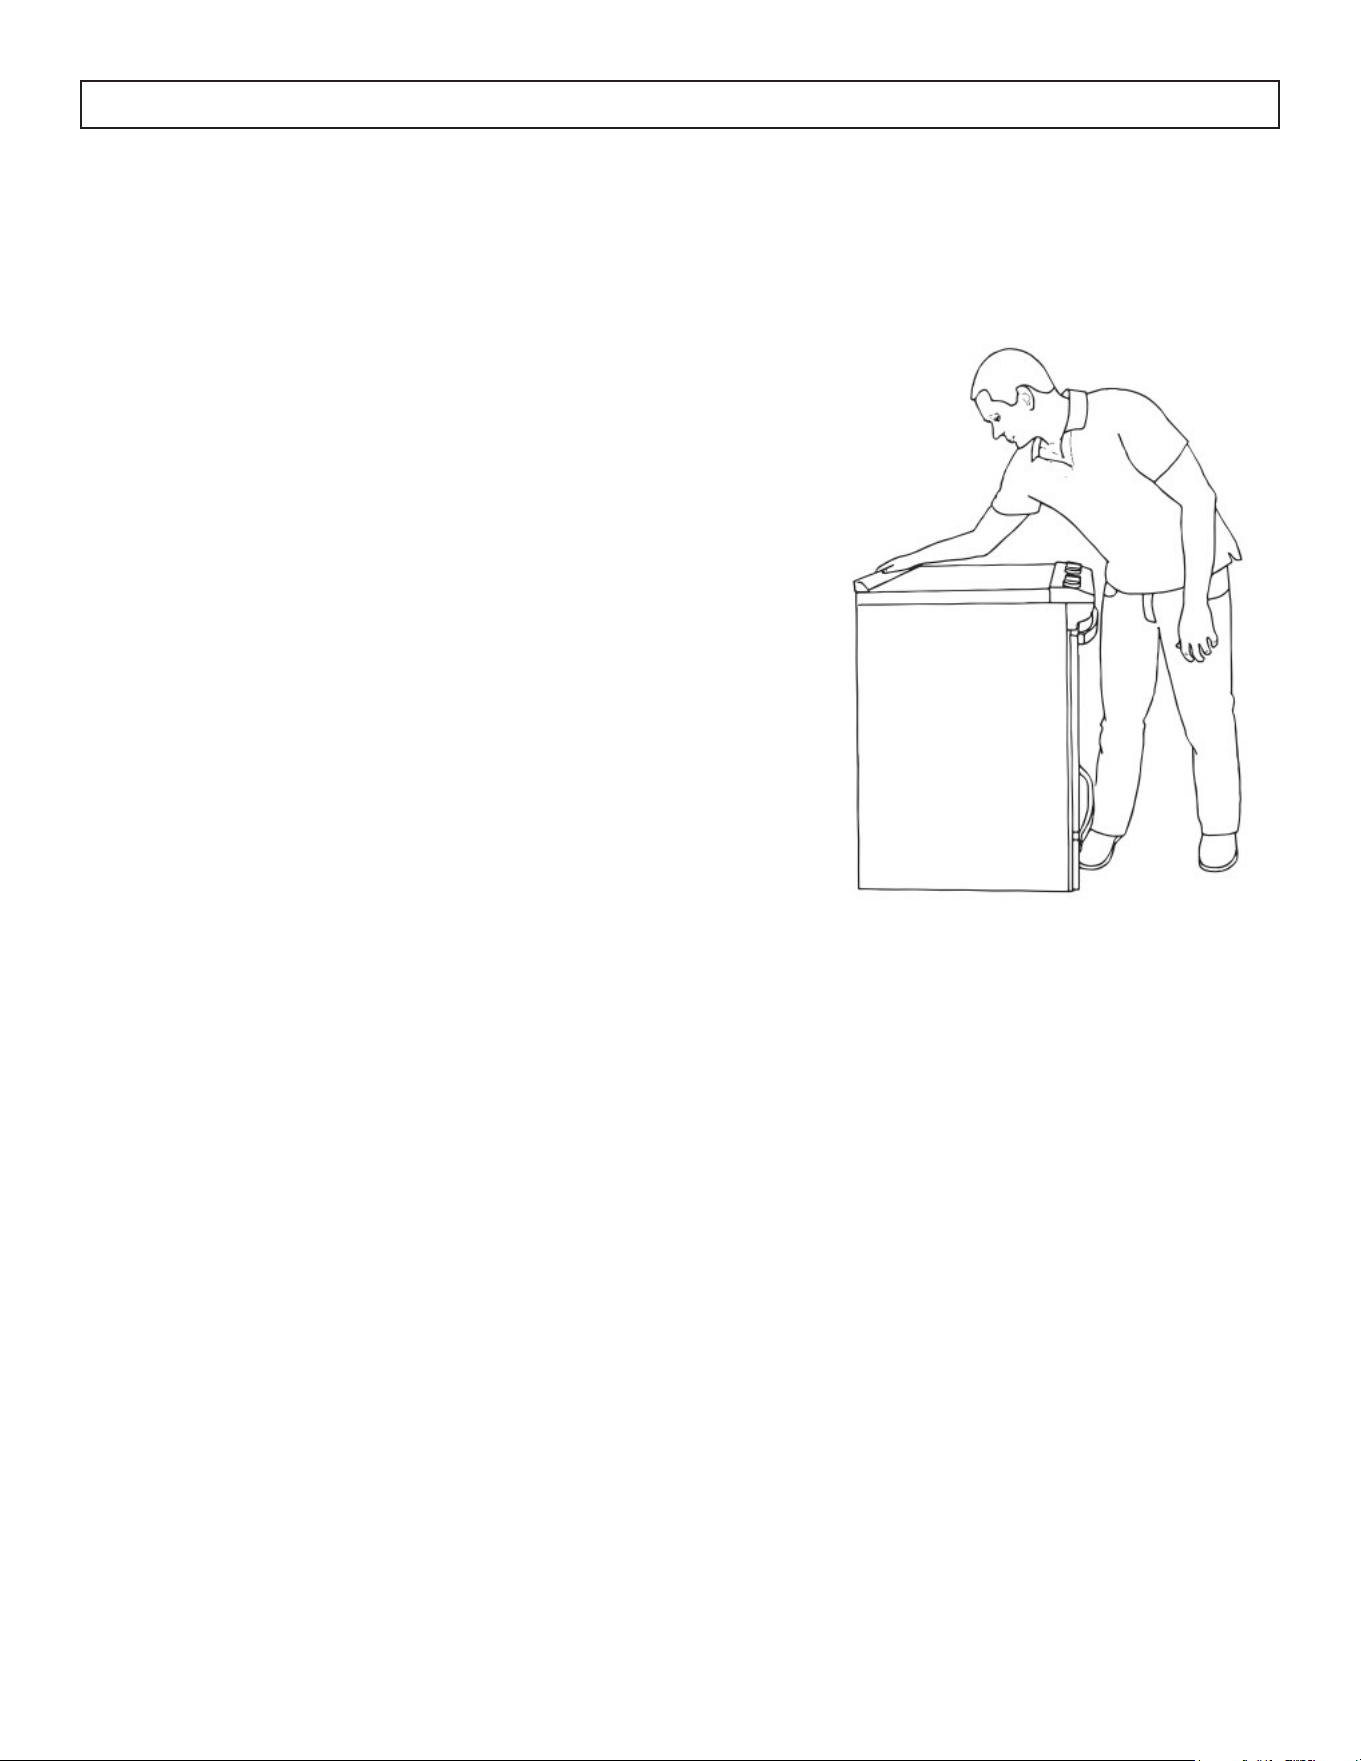
47
INSTALACIÓN DEL HORNO
NOTA: Si se desplaza el horno para ajustar las patas de
nivelación, asegúrese de que, al volver a colocar el horno en su
ubicación definitiva, el soporte antivuelco quede enganchado
repitiendo los pasos del 1 al 9.
1. Deslice la cocina en su ubicación final, asegurándose de que
la pata de nivelación trasera se desliza en el soporte de la
punta. Deje un espacio de 2,5 cm (1 pulgada) entre la parte
trasera de la cocina y la pared trasera.
2. Coloque la parte exterior del pie contra la parte inferior
delantera para evitar que la cocina se mueva y, a
continuación, agarre la parte trasera de la cocina, tal y como
se muestra en la figura.
3. Intente inclinar lentamente la cocina hacia delante. Si
encuentra resistencia inmediata, el pie de la cocina está
enganchado en el soporte antivuelco. Vaya al paso 8.
4. Si la parte trasera de la cocina se levanta más de 1,3 cm
del suelo sin resistencia, deje de inclinar la cocina y bájela
suavemente hasta el suelo. El pie de la cocina no está
enganchado en el soporte antivuelco.
NOTA: Si se oye un chasquido o un estallido al levantar el horno,
es posible que el horno no esté completamente encajado en el
soporte. Verifique si hay obstrucciones que impidan que el horno
se deslice hacia la pared o que impidan que el pie del horno se
deslice dentro del soporte. Compruebe que el soporte está bien
sujeto por los tornillos de montaje.
5. Deslice el horno hacia delante y compruebe que el soporte antivuelco está bien sujeto al suelo o a la
pared.
6. Deslice el horno hacia atrás para que la pata trasera de la cocina se inserte en la ranura del soporte
antivuelco.
7. Repita los pasos 1 a 3 para asegurarse de que la pata del horno esté enganchada en el soporte
antivuelco. Si la parte trasera del horno se levanta más de 1/2 pulgada (1,3 cm) del suelo sin
resistencia, es posible que el soporte antivuelco no esté instalado correctamente. No utilice el horno sin
el soporte antivuelco instalado y enganchado.
8. Coloque el horno en su ubicación definitiva. Compruebe que el horno está nivelado colocando un nivel
en la parte inferior del horno.
NOTA: El horno debe estar nivelado para que la cocción y el horneado sean óptimos.
9. Si es necesario, utilice una llave para ajustar la altura de las patas niveladoras hasta que el horno esté
nivelado de lado a lado y de atrás hacia atrás.
INSTRUCCIONES DE INSTALACIÓN
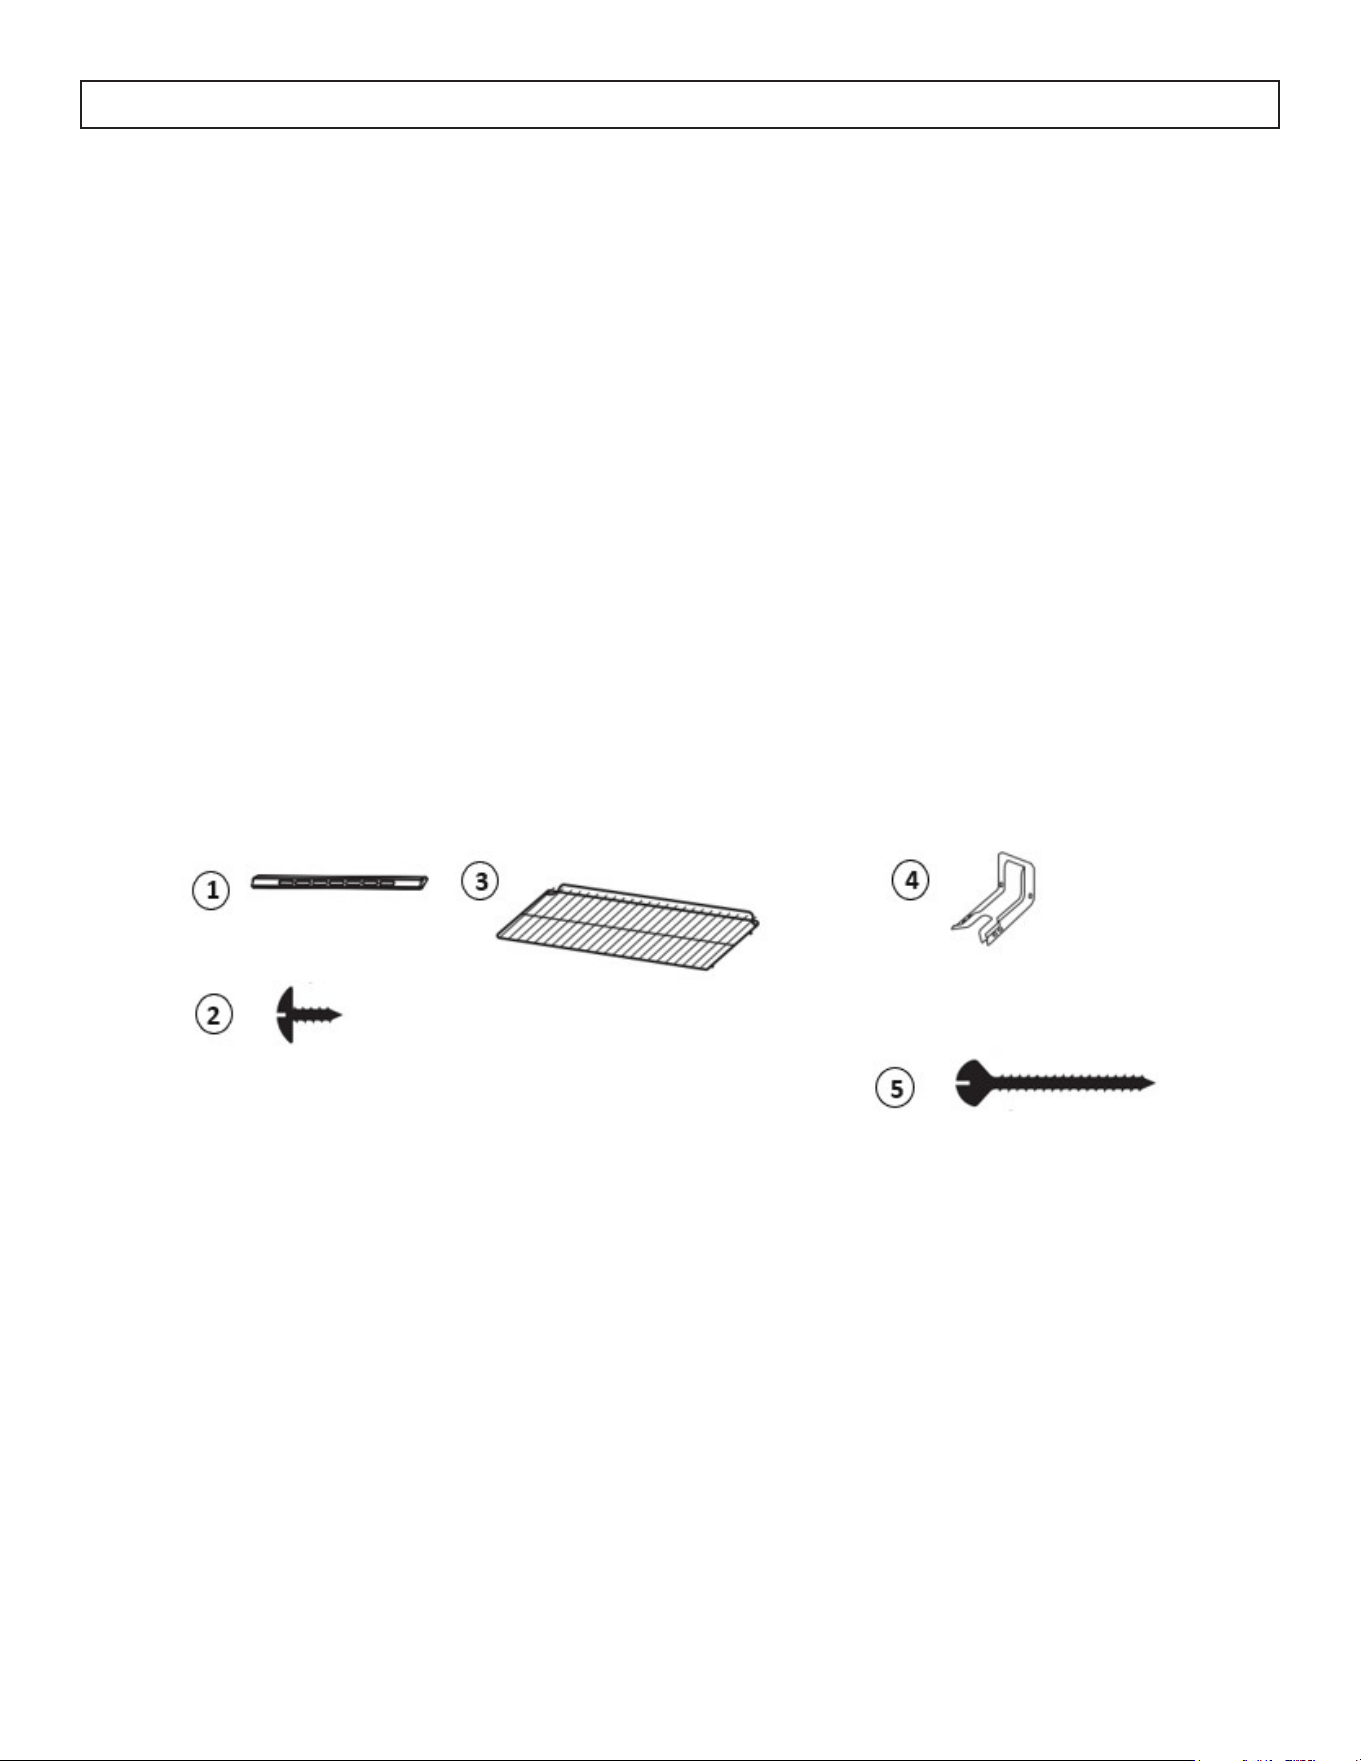
48
ACCESORIOS
1. Salpicadero
2. M4*8 Tornillo para la instalación del protector x5
3. Rejillas x2
4. Soporte antivuelco
5. M5*45 Tornillo para soporte antivuelco x2
INSTRUCCIONES DE OPERACIÓN
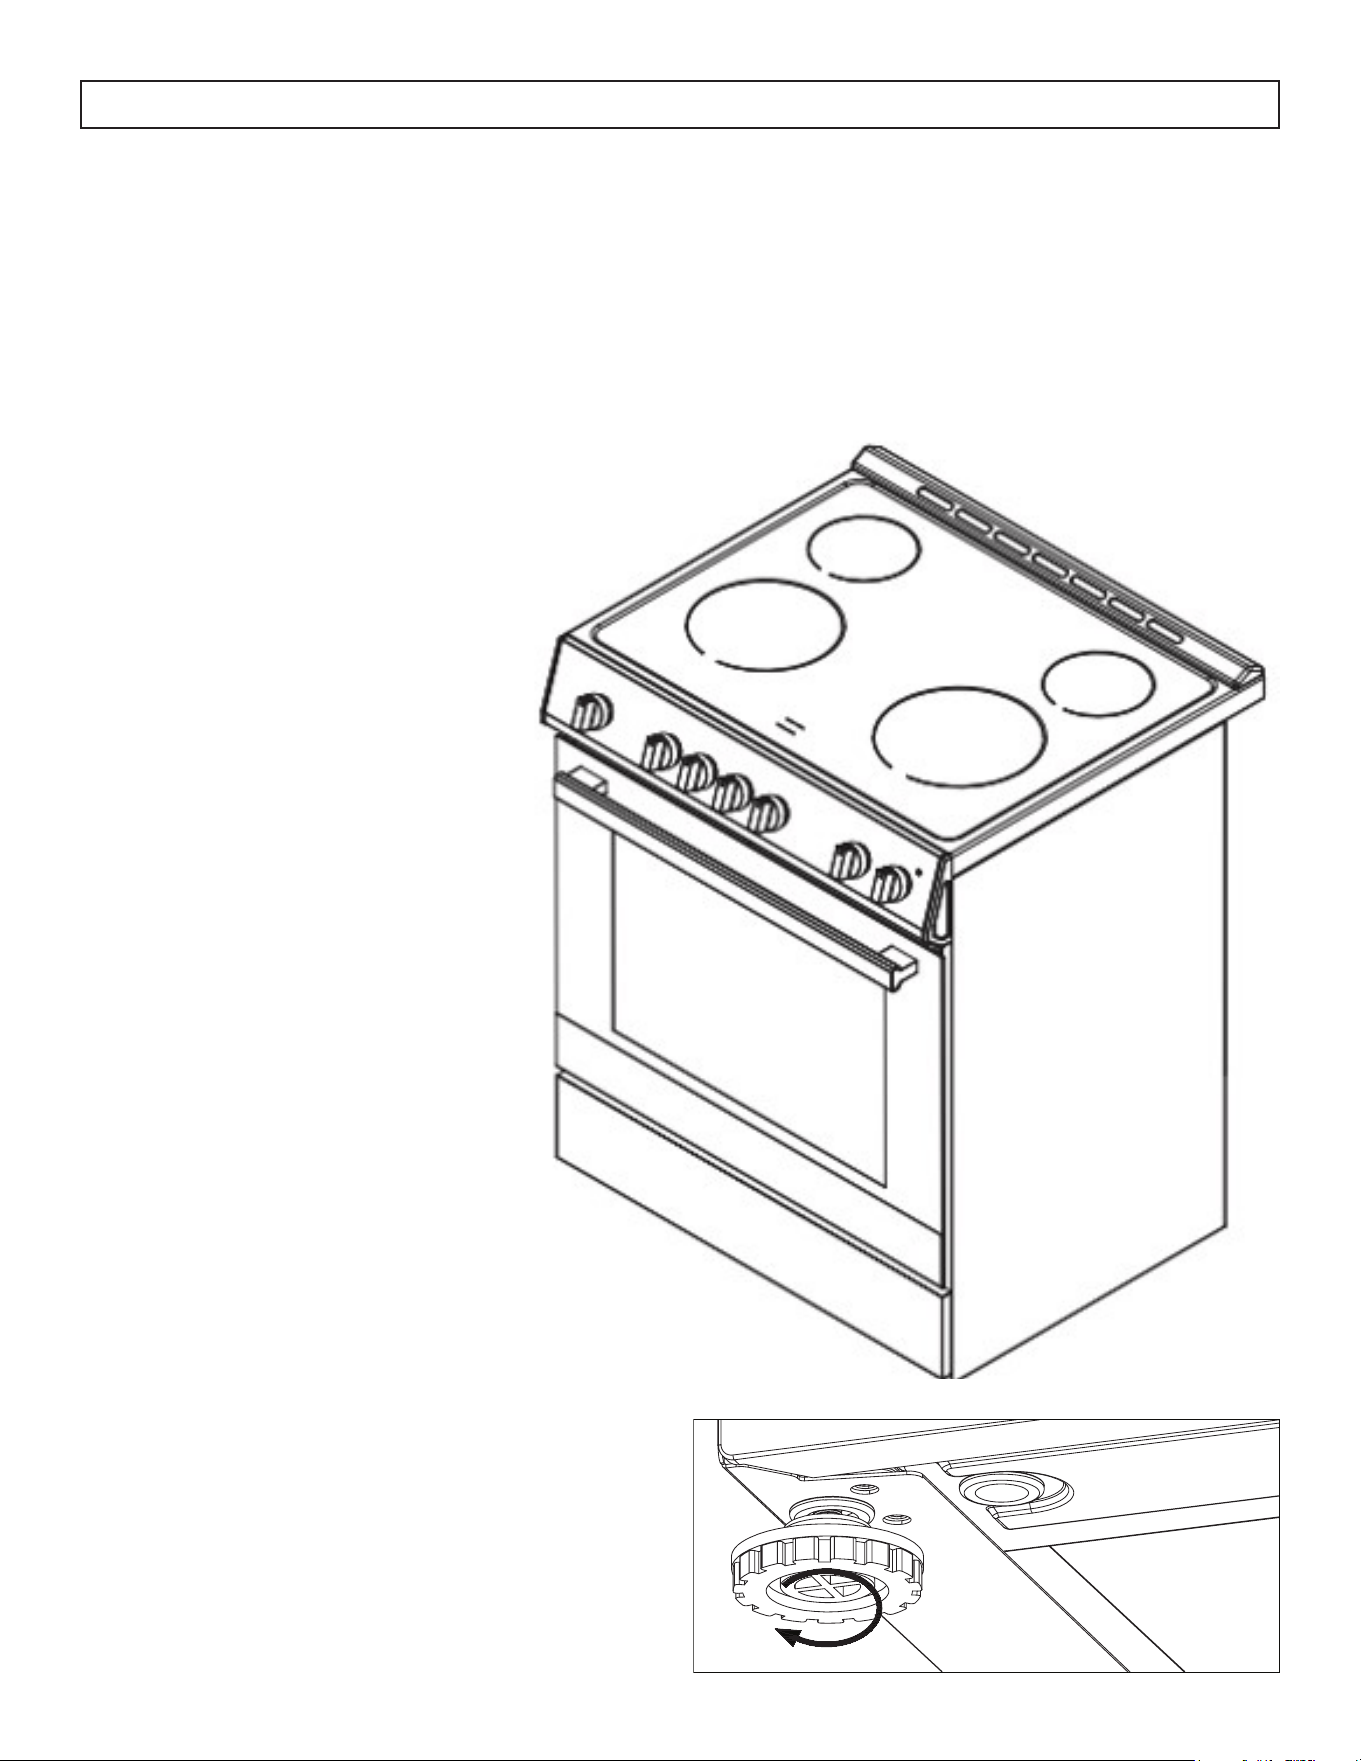
49
DIMENSIONES
Las dimensiones de este aparato son:
A. 37,9 ~ 37,12 pulgadas (96,3 ~ 94,3 cm) desde el suelo hasta la parte superior de la placa de cocción
(con salpicadero instalado).
B. 27.6 pulgadas (70 cm) de profundidad
C. 29,9 pulgadas (76 cm) de ancho
INSTRUCCIONES DE NIVELACIÓN
El aparato debe estar nivelado para funcionar
correctamente y con seguridad. Hay cuatro patas
de nivelación situadas en las esquinas de la parte
inferior del aparato. Ajuste las patas niveladoras
hasta que el aparato esté nivelado. Utilice un nivel
de carpintero para confirmar.
Es responsabilidad del instalador
cumplir con las distancias de
instalación especificadas en el
manual. Deben utilizarse las
dimensiones mínimas de apertura
del armario y las distancias mínimas.
Deben mantenerse las distancias
mínimas entre la superficie de
cocción del aparato y la superficie
horizontal por encima de la placa de
cocción.
30 pulgadas (65 cm) es la
separación mínima entre la parte
superior de la superficie de cocción
y la parte inferior de un armario de
madera o metal sin protección.
INSTRUCCIONES DE OPERACIÓN
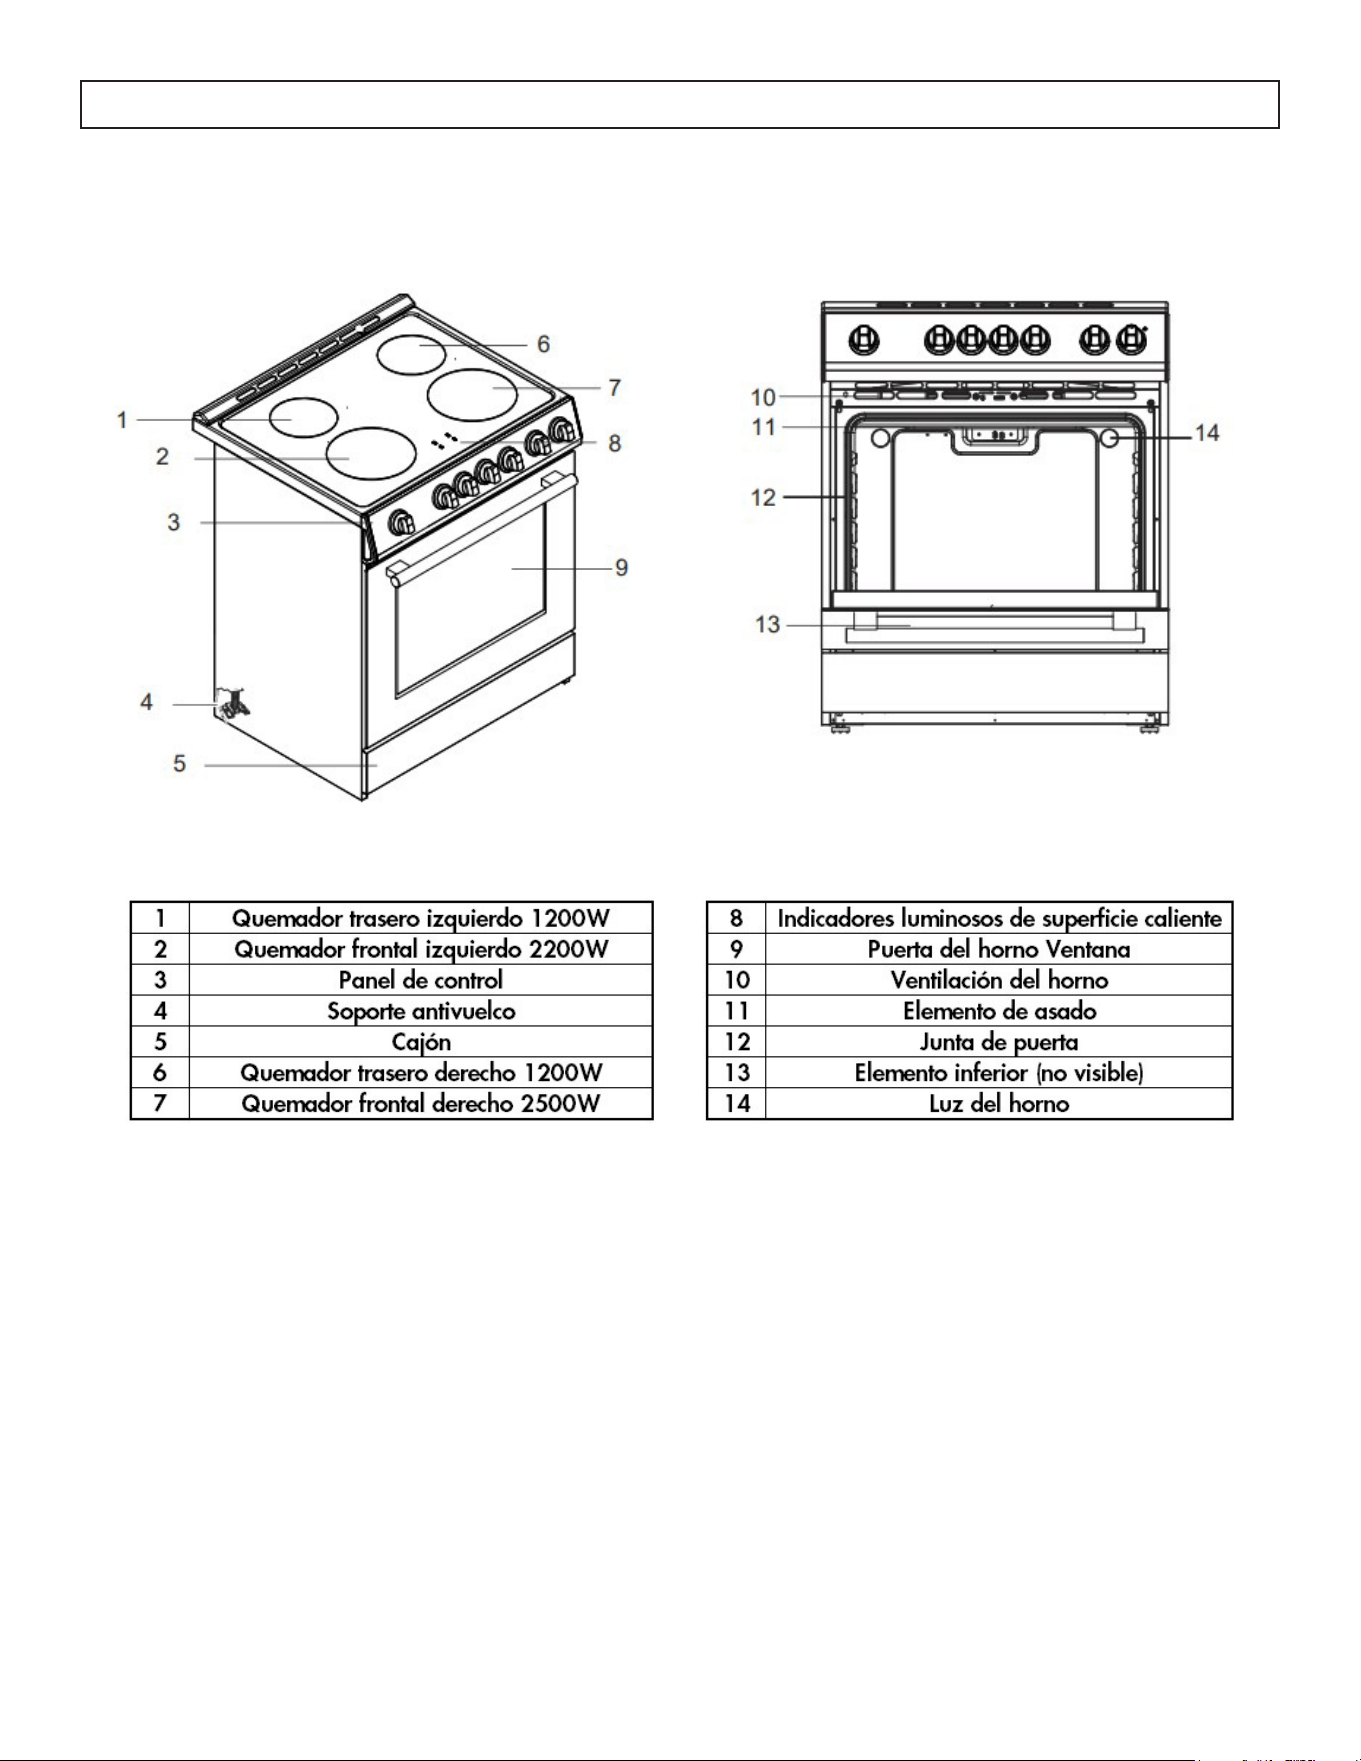
50
PIEZAS EXTERIORES PIEZAS INTERIORES
INSTRUCCIONES DE OPERACIÓN
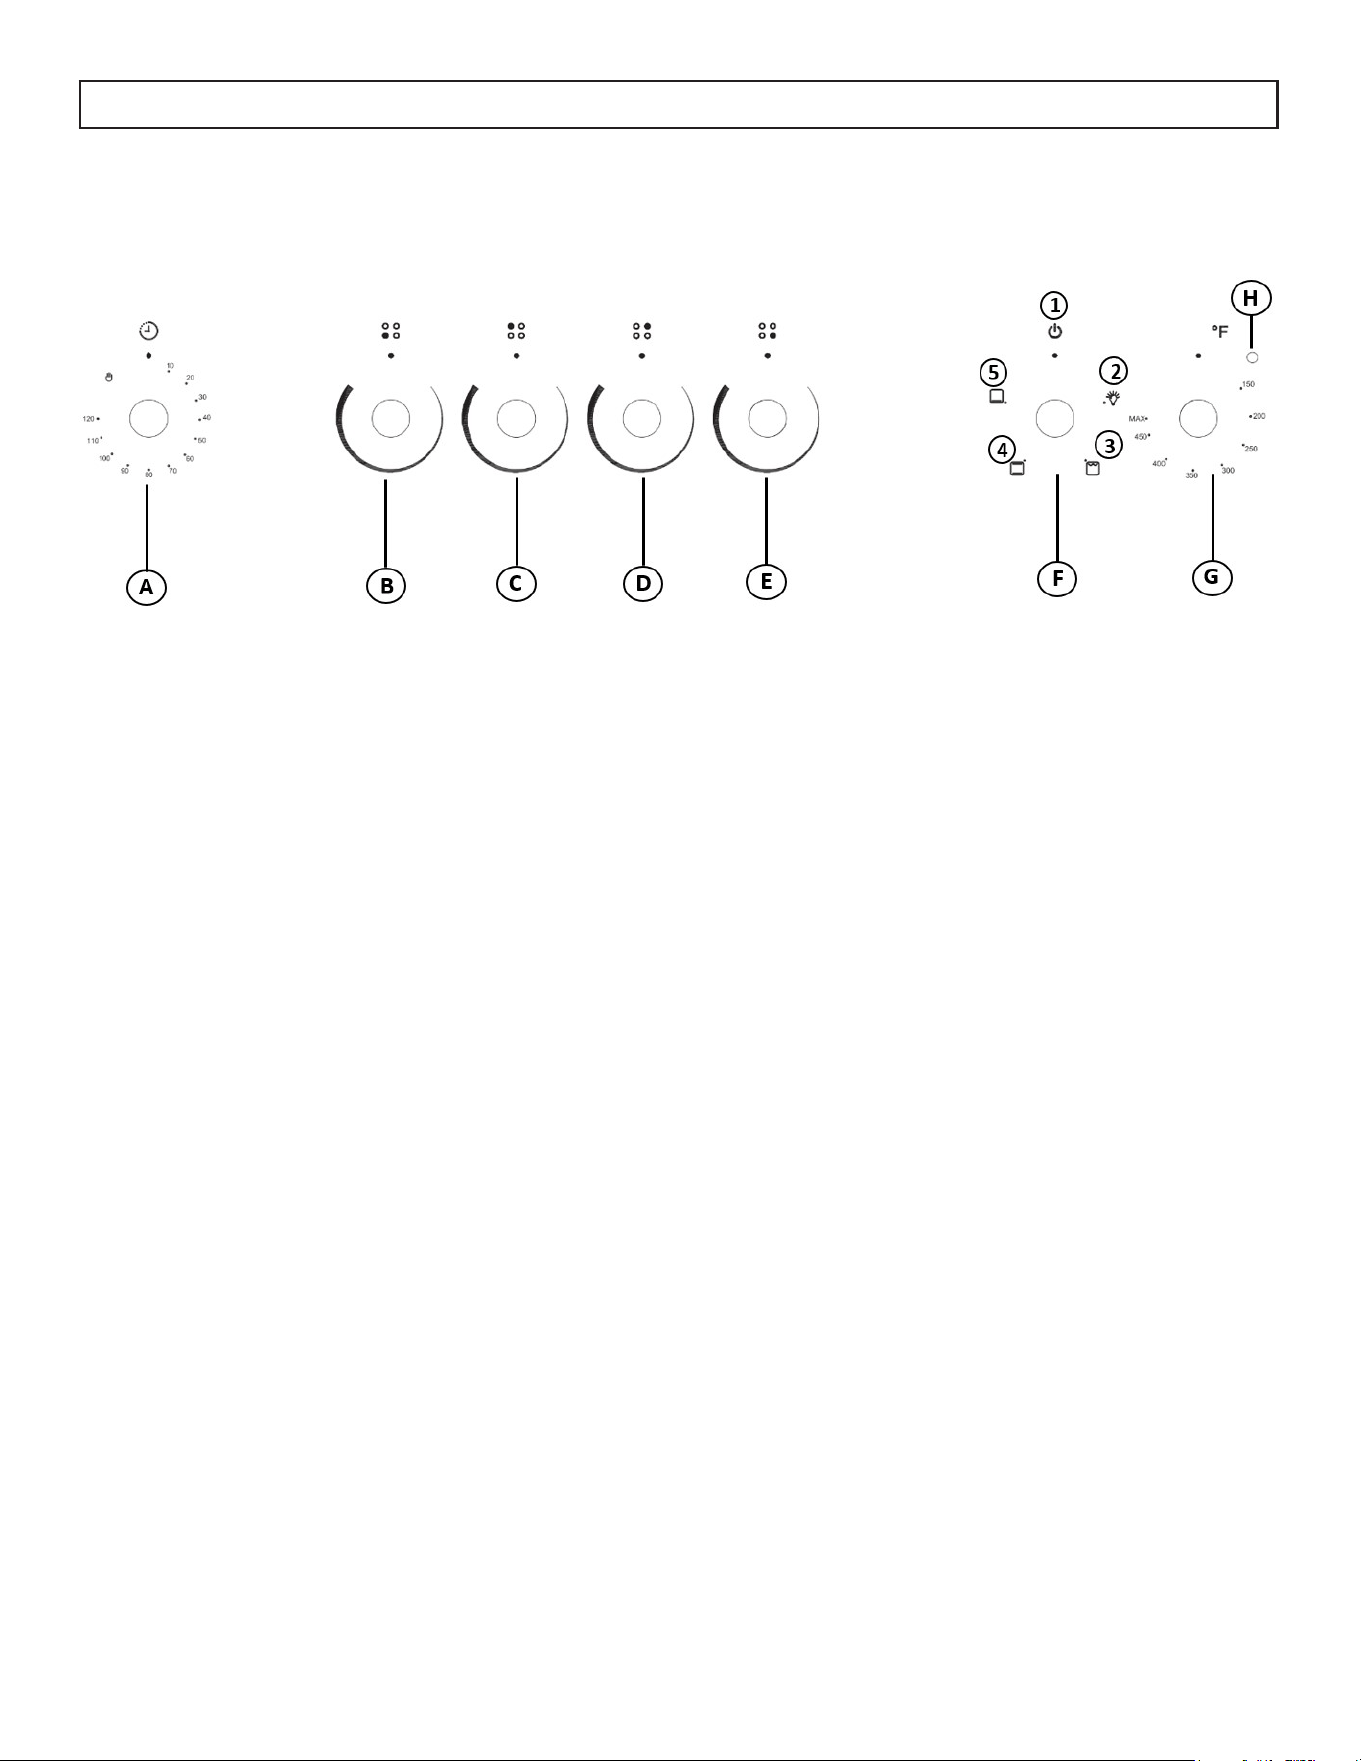
51
PANEL DE MANDO
INSTRUCCIONES DE OPERACIÓN
A. Pomo del temporizador 1. Horno Encendido
B. Quemador delantero izquierdo 2. Luz
C. Quemador trasero izquierdo 3. Asar
D. Quemador trasero derecho 4. Hornear
E. Quemador delantero derecho 5. Asado
F. Ajustes del horno
G. Temperatura
H. Indicador luminoso
Funcionamiento del horno
• Asegúrese de que los estantes están insertados a la altura correcta.
• Seleccione el modo de horno deseado.
• Ajuste el horno a la temperatura de precalentamiento deseada.
• Ajuste el temporizador para activar y precalentar el horno (el tiempo que sea necesario)
• Una vez que la luz indicadora de precalentamiento (H) se apague, coloque los recipientes con los
alimentos sobre uno o ambos estantes suministrados con el horno.
• Cierre la puerta
• Reajuste el tiempo para el tiempo de cocción deseado.
NOTA: El temporizador afecta al funcionamiento del horno, si el temporizador está en OFF, el horno no
funcionará.
NOTA: No coloque nada, incluyendo platos, papel de aluminio y bandejas de horno en la parte inferior
del horno cuando esté en funcionamiento para evitar dañar el acabado del esmalte.
NOTA: La luz interior del horno permanece encendida en todos los modos. Cuando no está en un modo
operativo, la luz interior del horno está apagada.
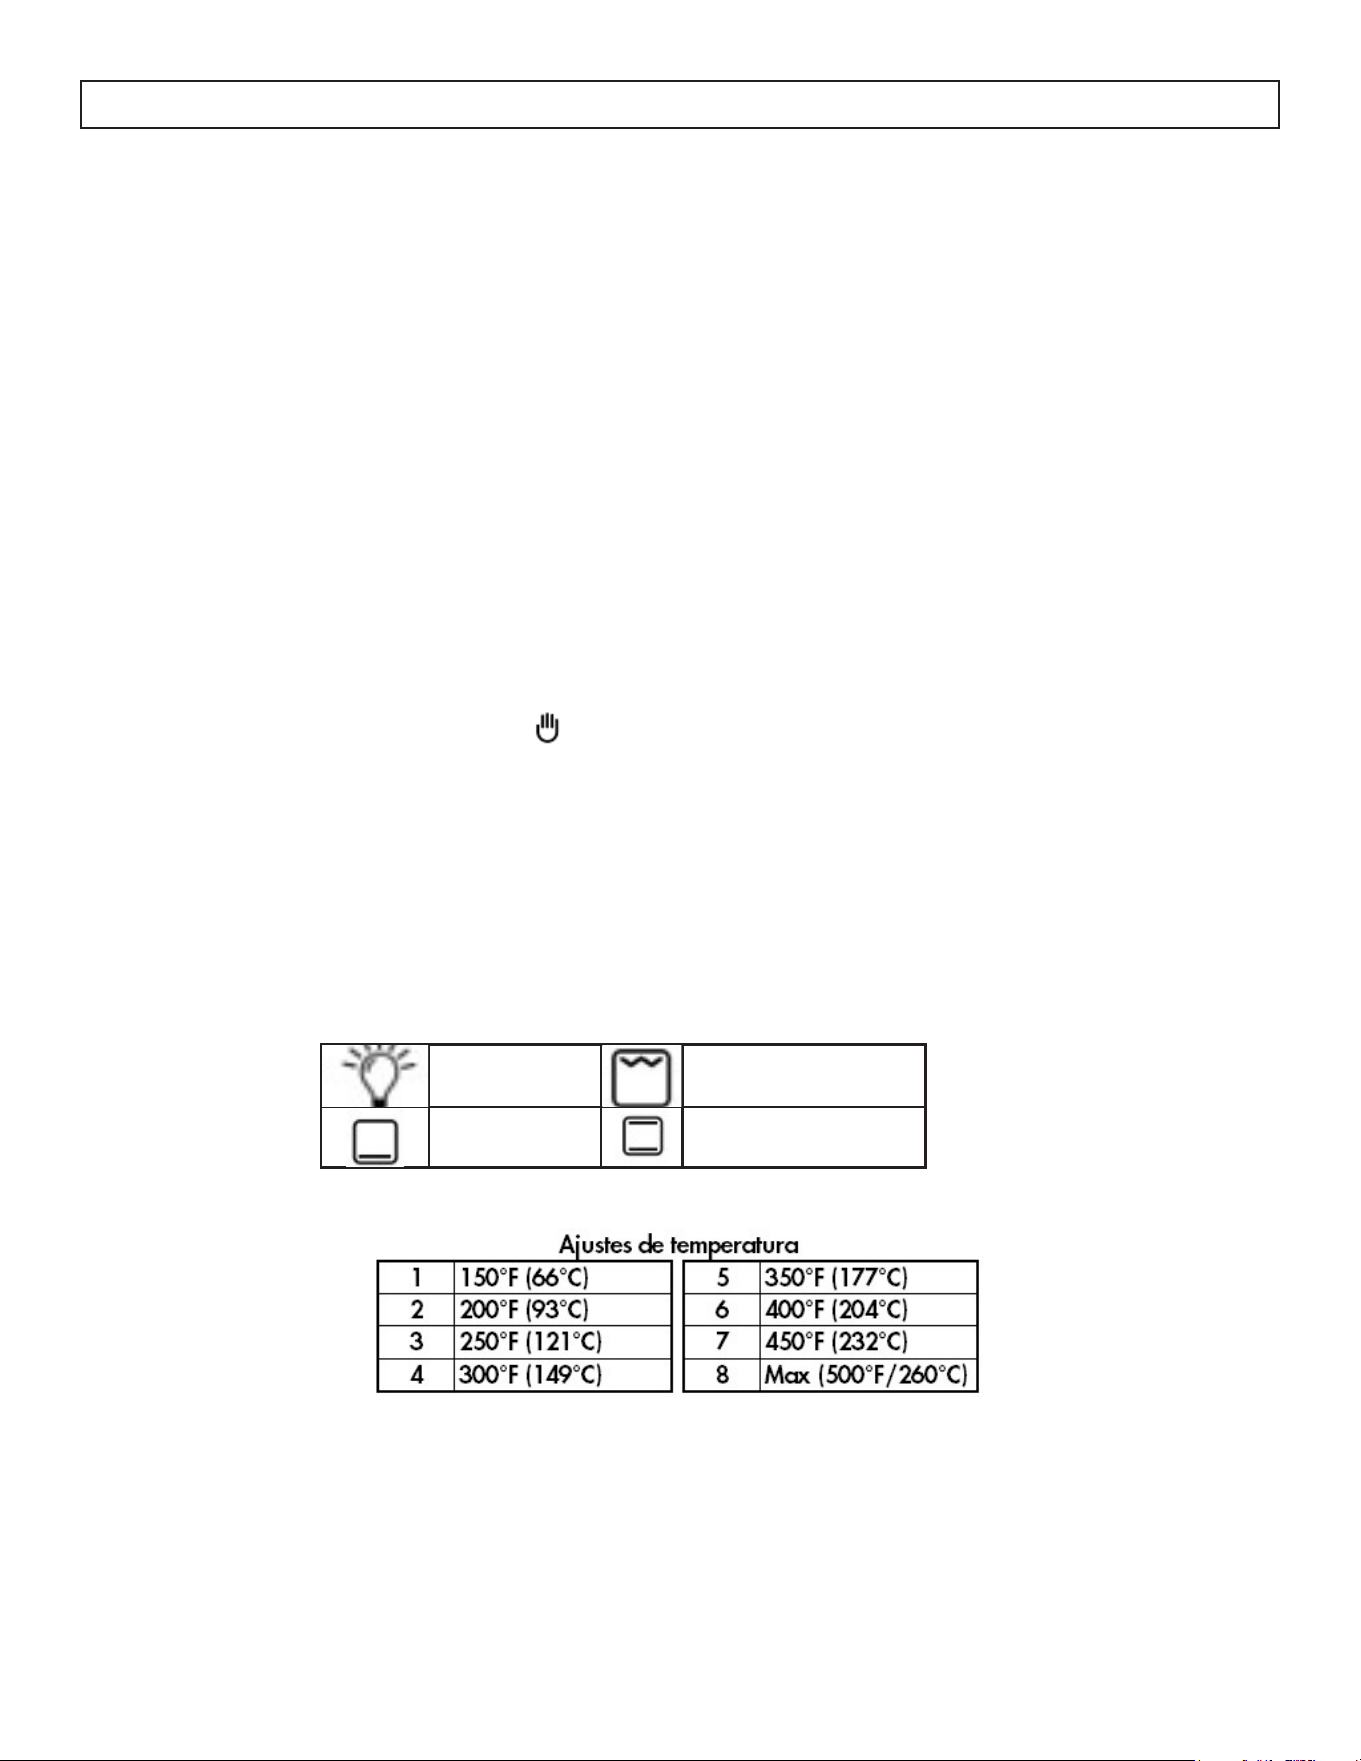
52
MODOS DE FUNCIONAMIENTO DEL ORNO
Este horno combina las funciones de los modos de cocción tradicionales con las funciones de los modernos
modos de convección asistida por ventilador en un solo horno. Utilice el control de modo de cocción,
situado en el panel de control, para seleccionar el modo de horno.
NOTA: Para mantener la temperatura del horno, limite la apertura de la puerta durante la cocción.
INSTRUCCIONES DE OPERACIÓN
Temporizador
Para su mayor seguridad, nuestro horno ha sido diseñado para funcionar con un temporizador. Para
ajustar el temporizador, gire el mando en el sentido de las agujas del reloj hasta la cantidad de tiempo
que desee. Una vez que el temporizador llegue a 0, el horno se apagará.
Si prefiere utilizar el horno sin el temporizador, simplemente gire el mando del temporizador en sentido
contrario a las agujas del reloj hasta la (manual), y el horno permanecerá encendido continuamente.
Ajustes y temperaturas del horno
Hay 4 ajustes de horno y 8 ajustes de temperatura para seleccionar como se muestra en las tablas
siguientes.
Luz Asar
Asado Hornear

53
INSTRUCCIONES DE OPERACIÓN
PRECALENTAMIENTO
1. Gire el mando de las funciones de cocción hasta la función deseada.
2. Gire el mando Temperatura hasta la temperatura deseada.
NOTA: Cuanto más alta sea la temperatura seleccionada, más tiempo tardará en precalentarse. La
temperatura real del horno será superior a la temperatura seleccionada para compensar el calor que se
pierde al abrir la puerta del horno para colocar los alimentos en la rejilla. Esto asegura que la cocción
comenzará a la temperatura adecuada. No abra la puerta mientras el horno se esté precalentando.
Cuando el horno haya alcanzado la temperatura programada, el indicador luminoso del panel de
mandos se apagar. A continuación, podrá abrir la puerta e introducir los alimentos en el horno.
HORNEA
Hornear es cocinar con aire caliente. Se utilizan los dos elementos del horno. Siga la receta o las
instrucciones del alimento para la temperatura de horneado, el tiempo y la posición de la rejilla. La
temperatura puede ajustarse desde 150°F (66 °C) hasta MAX.
• Utilice una rejilla cuando seleccione el modo de horneado.
• Compruebe de vez en cuando si los alimentos están cocidos.
• Utilice utensilios de metal para hornear (con o sin acabado antiadherente), vidrio resistente al calor,
vitrocerámica, alfarería u otros utensilios adecuados para el horno.
• Deje al menos 1-1,5 pulgadas (2,5-4cm) de espacio entre la bandeja y las paredes del horno.
• No utilice papel de aluminio ni bandejas de aluminio desechables para forrar ninguna parte del
horno, ya que alterará el rendimiento de cocción y puede dañar el acabado del horno.
• Si es necesario, se puede forrar una bandeja de horno con papel de aluminio y utilizarla en el estante
inferior.
• Evite utilizar la puerta abierta como estante para colocar cacerolas.
ASAR
La cocción a la parrilla utiliza calor radiante directo para cocinar los alimentos. Sólo se utiliza el elemento
superior. Los cortes más gruesos y las carnes, pescados y aves de forma irregular pueden cocinarse mejor
a temperaturas más bajas. Para obtener los mejores resultados, utilice la bandeja de asar de dos piezas
con rejilla. Está diseñada para drenar los jugos, lo que ayuda a evitar derrames y emplatados. No cubra
la rejilla con papel de aluminio. El fondo de la sartén puede forrarse con papel de aluminio para facilitar
la limpieza.
• Coloque la rejilla en la posición deseada antes de encender el horno.
• Seleccione la temperatura.
• Tire de la rejilla del horno hasta la posición de parada antes de girar o retirar los alimentos.
• No precaliente el horno.
• Dar la vuelta a la carne a mitad de cocción.
NOTA: Dé la vuelta a las carnes una vez a mitad del tiempo de cocción.

54
INSTRUCCIONES DE OPERACIÓN
ASADO
Al asar, ajuste la temperatura deseada como se indica a continuación. Sólo se utiliza el elemento inferior.
El horno puede precalentarse antes de introducir los alimentos.
1. Gire el mando de las funciones de cocción a la posición Asado.
2. Gire el selector de temperatura hasta la temperatura deseada.
3. Abra la puerta e introduzca los alimentos en el horno.
Pautas
• Ase en una bandeja baja sin tapa.
• Utilice una bandeja de asar de 2 piezas para asar sin tapar.
• Se recomienda utilizar una sonda o un termómetro de carne para determinar el punto de cocción
interno de la carne.
• Puede ser necesario cubrir las aves grandes con papel de aluminio durante una parte del tiempo de
asado para evitar que se doren demasiado.
COCINA
La zona de cocción cerámica se iluminará en rojo cuando una resistencia esté encendida. Es posible que
algunas partes de la placa de cocción no se iluminen en rojo cuando una resistencia está encendida. Esto
es normal. La zona de cocción se enciende y apaga cíclicamente, incluso cuando está ajustada en HI,
para evitar que el cristal de la placa de cocción se sobrecaliente. Es normal que la superficie del vidrio
cerámico parezca cambiar de color cuando las zonas de cocción de la superficie están calientes. Cuando
el cristal se enfríe, volverá a su color original.
• Asegúrate de que el fondo de las ollas y sartenes esté limpio y seco antes de utilizarlas. Los residuos y
el agua pueden dejar depósitos cuando se calientan.
• Evite guardar tarros o latas encima de la placa de cocina. La caída de objetos pesados sobre la placa
de cocción puede romperla.
• Para evitar daños en la placa de cocción, no deje una tapa caliente sobre la placa. Cuando la placa
se enfría, puede quedar aire atrapado entre la tapa y la placa. Esto podría provocar la rotura de la
vitrocerámica al retirar la tapa.
• En el caso de alimentos que contengan azúcar en cualquiera de sus formas, limpie todos los derrames
lo antes posible. Si se dejan enfriar, pueden adherirse a la placa de cocción y provocar picaduras y
marcas permanentes.
• No deslice los utensilios de cocina sobre la encimera. Los fondos de aluminio o cobre y los acabados
rugosos de los utensilios de cocina o para hornear podrían dejar arañazos o marcas en la placa de
cocción.
• No cocine palomitas de maíz en recipientes de aluminio preenvasados sobre la placa de cocción.
Podrían dejar marcas de aluminio que no se pueden eliminar por completo.
• No permita que objetos que puedan derretirse, como plástico o papel de aluminio, toquen ninguna
parte de la placa de cocción.
• No utilice la placa de cocción como tabla de cortar.
• No cocine alimentos directamente sobre la placa de cocción.
NOTA: Limpie la placa de cocción después de cada uso para evitar daños permanentes por picaduras o
arañazos en la superficie de la placa.
55
COCINA
INSTRUCCIONES DE OPERACIÓN
Anillos de cocción
Por regla general, el diámetro de los utensilios de cocina debe coincidir con el diámetro de los elementos
que se utilizan. Si el utensilio de cocina es más pequeño que el elemento por 1 pulgada (2.5cm), todavía
será eficaz. Todo lo que supere 2,5 cm no será eficaz.
Características de los utensilios de cocina
• Aluminio: se calienta y enfría rápidamente. Puede dejar marcas metálicas en el cristal.
• Hierro fundido: se calienta y enfría lentamente, retiene el calor y cocina uniformemente.
• Cobre: el estaño se calienta y enfría rápidamente.
• Batería de cocina de esmalte: no recomendada. Las imperfecciones del esmalte pueden rayar la placa
de cocina.
• Vitrocerámica: no recomendada. Las imperfecciones en el acabado pueden rayar la placa de cocina.
• Acero inoxidable: se calienta y enfría moderadamente.
Zona de calefacción
• Gire el mando de control a la posición deseada. La intensidad del calor va de BAJA a la derecha a
ALTA a la izquierda.
• El ajuste es continuo, por lo que la zona de cocción funcionará en cualquier ajuste intermedio entre
bajo y alto.
• Una vez que la zona de cocción está caliente, el LED correspondiente a la zona se ilumina.
• Para apagar la zona de cocción, gire el mando en cualquier dirección hasta la posición “OFF”.
• El piloto de aviso de calor residual permanece encendido cuando la temperatura de la superficie
vitrocerámica está caliente y se apagará una vez que la tempreatura de la superficie se haya enfriado.
El “círculo rojo” indicará qué elemento
de cocción está activamente caliente.
Indicador luminoso de superficie caliente
En las cocinas vitrocerámicas, las luces indicadoras de superficie caliente están situadas en la encimera de
cristal. Las luces indicadoras de superficie caliente se encenderán mientras alguna zona de cocción esté
demasiado caliente para tocarla, incluso después de apagar la zona de cocción de la superficie.

56
LIMPIEZA
Antes de limpiar, asegúrese de que todos los
controles estén apagados y de que el horno y la
cocina estén fríos. Siga siempre las instrucciones
de la etiqueta de los productos de limpieza. Se
recomienda utilizar primero jabón, agua y un
paño suave o una esponja, a menos que se indique
lo contrario. No utilice productos de limpieza
abrasivos.
Superficies exteriores de esmalte porcelánico
Los derrames de alimentos que contengan ácidos,
como el vinagre y el tomate, deben limpiarse en
cuanto se enfríe todo el aparato. Estos derrames
pueden afectar al acabado.
Utilice limpiacristales, un limpiador líquido suave
o un estropajo no abrasivo. Limpie suavemente
alrededor de la placa del modelo y del número
de serie, ya que el fregado puede eliminar los
números.
Acero inoxidable exterior
Utilice detergente líquido o limpiador multiusos.
Aclare bien con agua limpia y seque con un paño
suave y sin pelusas. El limpiador y abrillantador de
acero inoxidable Vinagre puede utilizarse para las
manchas de agua dura.
NOTA: No utilice estropajos llenos de jabón,
limpiadores abrasivos, crema abrillantadora para
encimeras, estropajos de lana de acero, paños
arenosos o algunas toallas de papel. Pueden
producirse daños incluso con un uso único o
limitado. Frote en el sentido de la veta para evitar
dañar.
Puerta exterior del horno
Utilice limpiacristales y toallitas de papel o
estropajo de plástico no abrasivo. Aplique el
limpiacristales sobre un paño suave o una esponja,
no directamente sobre el panel.
Manchas de las sartenes con fondo de aluminio
Utilice un paño humedecido en vinagre.
Vitrocerámica
Para evitar dañar la placa de cocina, no utilice
estropajos de acero, limpiadores abrasivos en
polvo, lejía, antioxidantes ni amoniaco. Los
materiales de limpieza de la encimera de cerámica
incluyen limpiador de encimera, rascador de
encimera y almohadillas de limpieza de encimera
disponibles en la mayoría de las tiendas de
comestibles.
1. Retire los restos de comida con una espátula de
cocina.
• Para obtener los mejores resultados, utilice
el rascador mientras la placa de cocina esté
todavía caliente, pero no al tacto.
• Se recomienda usar un guante de cocina
mientras se raspa la placa caliente.
• Sujete el rascador de la placa de cocina en un
ángulo aproximado de 45° contra la superficie
de cristal y rasque los residuos. Será necesario
aplicar presión para eliminar los residuos.
• Deje que la placa de cocción se enfríe
completamente antes de pasar al paso 2.
2. Aplique unas gotas pequeñas de limpiador de
encimeras en las zonas afectadas.
• Frote el limpiador sobre la superficie de la
encimera con un estropajo de nylon o similar.
Se necesita un poco de presión para eliminar
las manchas difíciles.
• Deje que el limpiador se seque hasta formar
una neblina blanca antes de pasar a la etapa
3.
3. Pulir con un paño limpio y seco o una toalla de
papel limpia y seca.
CUIDADO Y MANTENIMIENTO
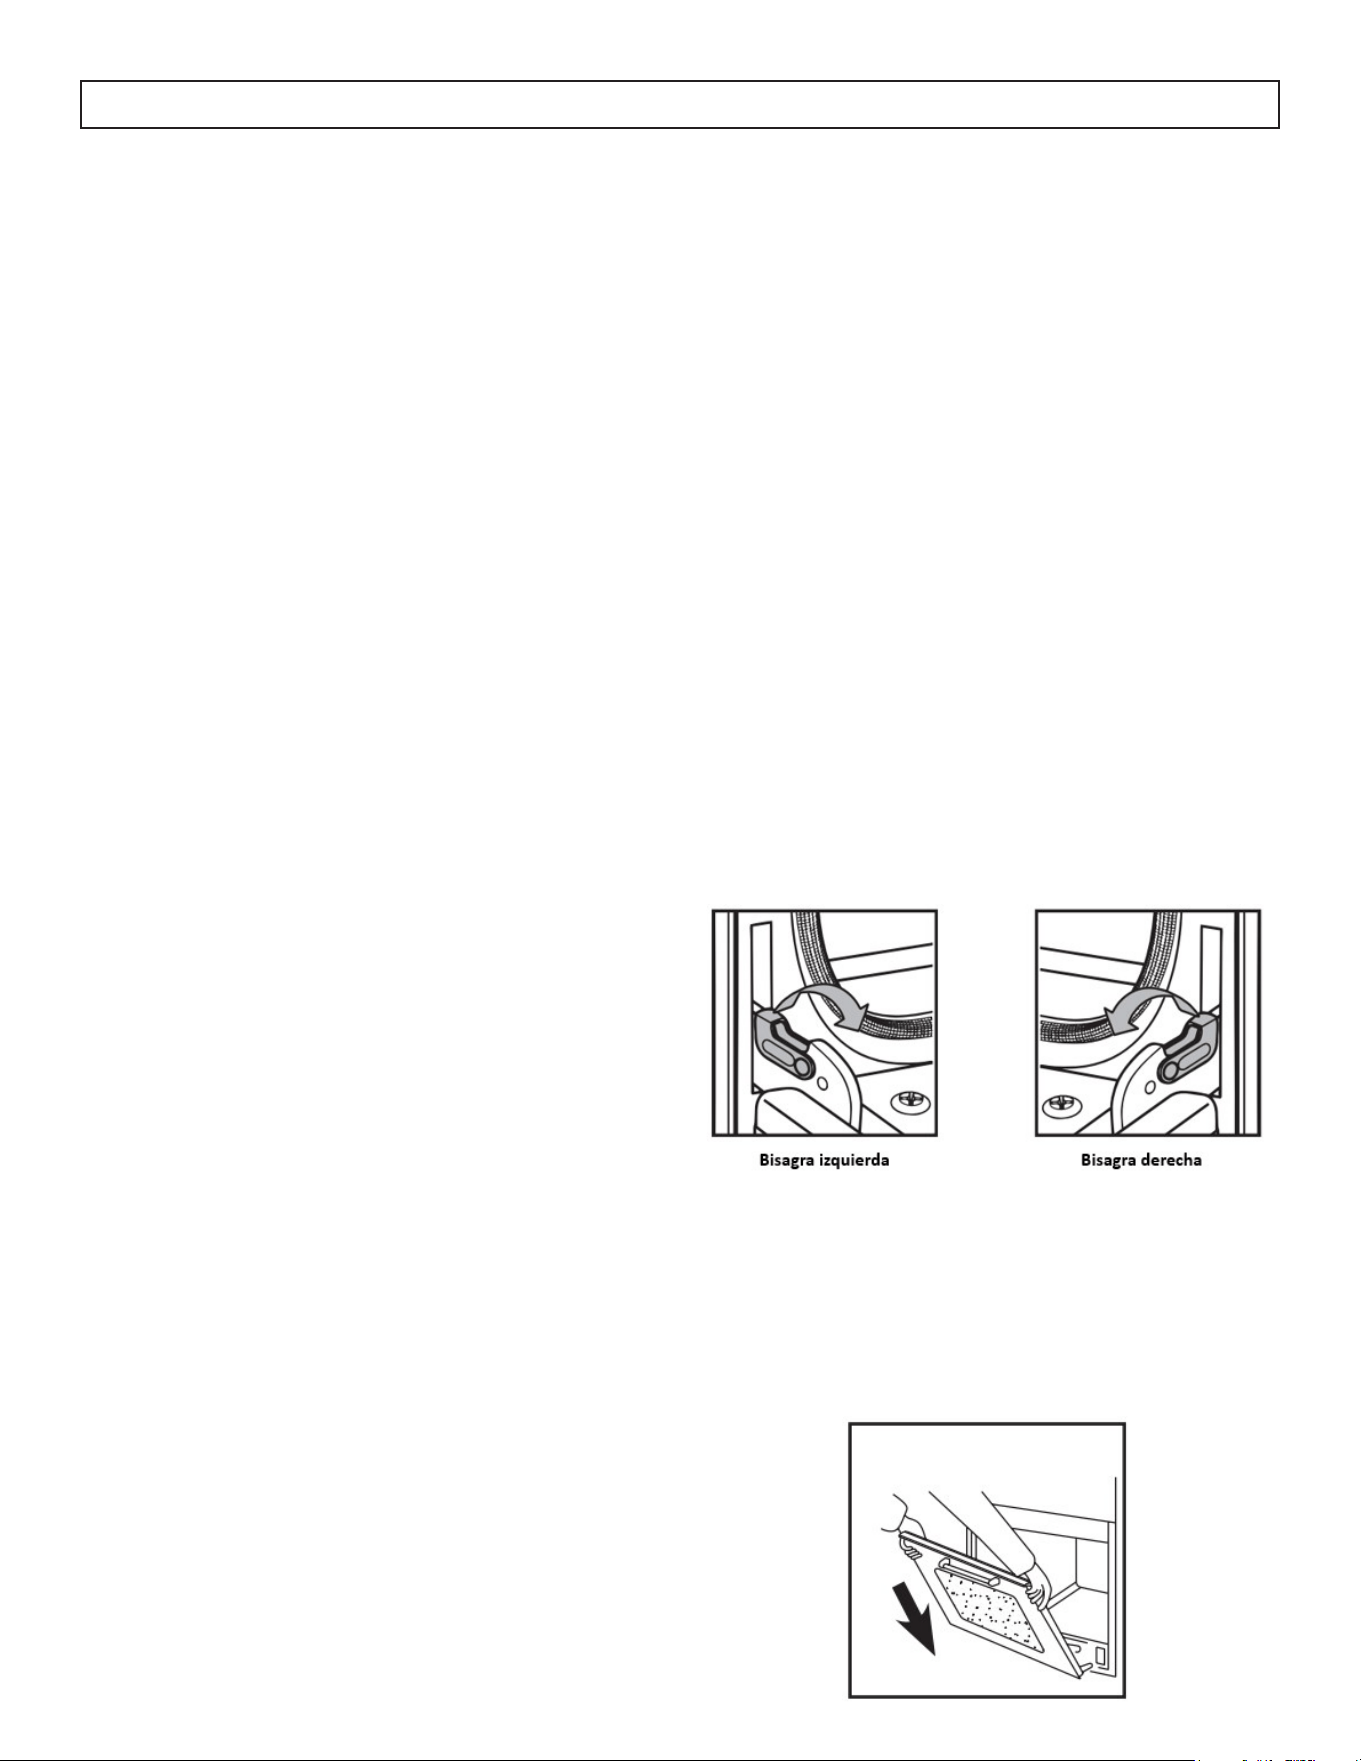
57
Mandos de la cocina
Utilice agua y jabón o detergente para lavavajillas.
• Tire de los mandos en línea recta hacia fuera
del panel de control para extraerlos.
• Cuando cambie los mandos, asegúrese de que
están en la posición de apagado.
NOTA: No utilice lana de acero, limpiadores
abrasivos ni limpiadores para hornos. No empape
los mandos.
Cavidad del horno
Los alimentos derramados deben limpiarse cuando
el horno se enfríe. A altas temperaturas, los
alimentos reaccionan con la porcelana, por lo que
pueden producirse manchas, grabados, picaduras
o tenues manchas blancas.
Utilice un detergente suave y agua tibia.
NOTA: No utilice limpiadores para horno.
Rejillas del horno
Utilice una almohadilla de lana de acero.
Panel de control
Límpielo con un limpiacristales y un paño suave
o una esponja. Aplique el limpiacristales sobre el
paño suave o la esponja, no directamente sobre el
panel.
NOTA: No utilice limpiadores abrasivos, estropajos
de lana de acero, paños arenosos ni toallitas de
papel, ya que podrían dañarse.
CUIDADO Y MANTENIMIENTO
Extracción de la puerta del horno
Para un uso normal del horno, no es necesario
quitar la puerta del horno. Sin embargo, si fuera
necesario, siga las instrucciones a continuación.
NOTA:
• Asegúrese de que el horno esté frío y que se
haya apagado la alimentación del horno antes
de retirar la puerta.
• La puerta del horno es pesada y frágil y el
frente de la puerta es de vidrio. Para evitar que
se rompa el vidrio de la puerta del horno, use
ambas manos y agarre los lados de la puerta
del horno para quitarlo.
• Asegúrese de que ambas palancas estén
firmemente en su lugar antes de quitar la
puerta.
Desmontaje de puertas
1. Abra la puerta del horno por completo.
2. Levante el pestillo de la bisagra a cada lado.
3. Cierre la puerta del horno hasta el tope.
4. Mientras agarra ambos bordes exteriores de la
puerta, levante la puerta.
5. Continúe empujando la parte superior de la
puerta para cerrarla mientras saca la parte
inferior de la puerta de los receptores de las
bisagras en el marco de la puerta.
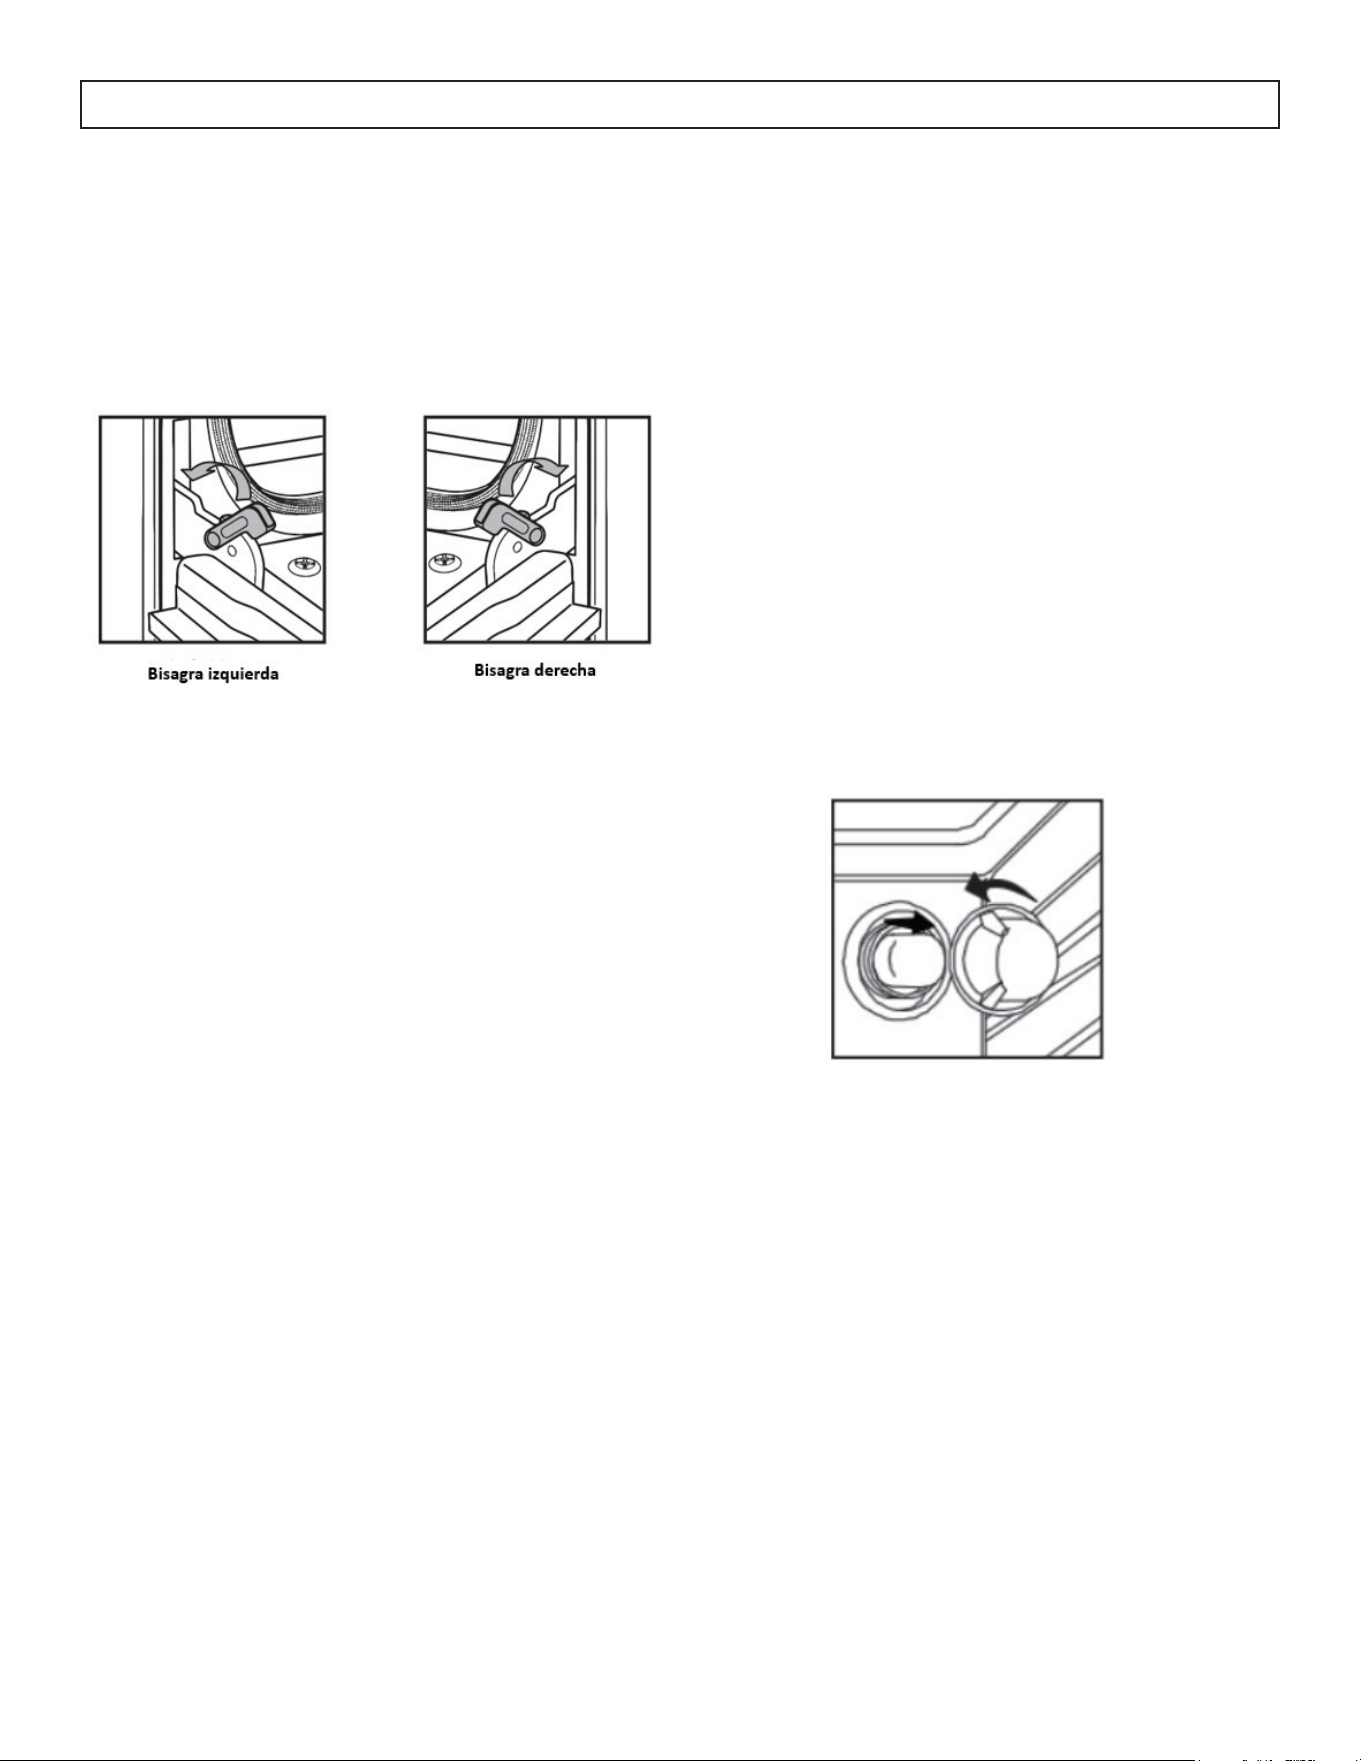
58
Reinstalación de puertas
1. Inserte ambos brazos de suspensión en los
receptores de bisagra en el marco de la puerta.
2. Abra lentamente la puerta del horno y sentirá
que la puerta se coloca en su lugar.
3. Mueva los pestillos de las bisagras nuevamente
a la posición bloqueada.
4. Compruebe que la puerta se abre y cierra
libremente. Si no es así, repita el desmontaje y
la reinstalación de la puerta.
CUIDADO Y MANTENIMIENTO
Reemplazo de la luz del horno
La luz del horno es una bombilla estándar para
electrodomésticos de 25 vatios (G).
NOTA:
• Asegúrese de que el horno y las luces estén fríos
y que el horno esté apagado.
• Las lentes deben estar en su lugar cuando se
utiliza el horno. Las lentes sirven para proteger
la bombilla contra roturas.
• Las lentes están hechas de vidrio. Manipular con
cuidado para evitar roturas.
• De lo contrario, podría provocar la muerte,
descargas eléctricas, cortes o quemaduras.
1. Desconecte la energía.
2. Retire la bombilla girándola en el sentido
contrario a las agujas del reloj.
3. Retire la bombilla fundida del casquillo.
NOTA:
Para evitar daños o disminuir la vida útil de
la nueva bombilla, no la toque con los dedos
desnudos. Use guantes o use un pañuelo de papel
cuando reemplace la bombilla.
4. Reemplace la bombilla y luego reemplace la
tapa de la bombilla.
5. Vuelva a conectar la energía.

59
Ninguna energía
• Es posible que se haya fundido un fusible o que se haya disparado el disyuntor
• El enchufe no está completamente insertado en el tomacorriente de pared
Los elementos de la cocina no funcionan correctamente
• Se están utilizando utensilios de cocina inadecuados.
• Ninguna energía
• Los elementos calefactores se apagan incluso cuando se colocan en la configuración más alta:
los limitadores de temperatura apagan temporalmente los elementos debido a que se excede la
temperatura máxima permitida
• La superficie de vitrocerámica es transparente o parece de color rojo: bajo iluminación directa o
brillante, es posible ver a través del vidrio y puede tener un tinte rojo. Esto es normal
El ventilador de enfriamiento continúa funcionando después de apagar el horno
• Los componentes electrónicos aún no se han enfriado lo suficiente
Luz del horno
• No funciona correctamente: la bombilla está suelta o quemada
• Permanece encendido: la puerta no cierra completamente
• No se puede quitar la cubierta de la lente: acumulación de suciedad alrededor de la cubierta de la
lente
SOLUCIÓN DE PROBLEMAS

60
Gar
antía limitada “a domicilio”
Condiciones
Ex
clusiones
Disposiciones gener
ales
Es
te producto de calidad está garantizado contra defectos de fabricación, incluyendo partes y mano de obra, siempre y
cuando la unidad se utilic
e bajo las condiciones normales de funcionamiento para las que fue diseñado. Esta garantía está solamente
disponible pa
ra la persona que haya comprado originalmente esta unidad directamente de Danby Products Limited (Canada) o Danby
Pr
oducts Inc. (U.S.A.) (en adelante “Danby”) o uno de sus distribuidores autorizados, y no es transferible.
Salv
o lo aquí indicado por Danby, no existen otras garantías, condiciones o representaciones, explícitas o implícitas, concretas o
int
encionales por parte de Danby o sus distribuidores autorizados y todas las demás garantías, condiciones o representaciones,
incluy
endo cualquier garantía, condiciones o representaciones bajo cualquier Acta de Venta de Productos o legislación o estatuto
simila
r, quedan de esta forma expresamente excluidas. Salvo lo aquí indicado, Danby no serán responsables por ningún daño a personas
o bienes, incluy
endo la propia unidad, sin importar su causa, o de ningún daño indirecto causado por el desperfecto de la unidad, y al
c
omprar esta unidad, el comprador acepta por la presente, indemnizar y proteger a Danby contra cualquier reclamo por daños a
personas o bienes causados por la unidad.
1.
Falla del suministro eléctrico.
2.
Daños en tránsito o durante el transporte de la unidad.
3.
Alimentación incorrecta, como bajo voltaje, instalación eléctrica defectuosa o fusibles inadecuados.
4.
Accidente, modificación, abuso o uso incorrecto del artefacto, tal como insuficiente ventilación del ambiente o condiciones de
operación anormales (temperatura ambiente extremadamente alta o baja).
5.
Utilización comercial o industrial (v.g., si el electrodoméstico no está instalado en una vivienda particular).
6.
Incendio, daños por agua, robo, guerra, disturbios, hostilidades, actos de fuerza mayor como huracanes, inundaciones, etc.
7.
Pedidos de servicio debido a desinformación del usuario.
8.
Instalación inadecuada (v.g., instalación empotrada de un electrodoméstico diseñado como unidad independiente o uso de un
electrodoméstico al aire libre que no esté aprobado para dicho fin, incluyendo pero no limitado a: garajes, patios, porches o en
cualquier lugar que no esté bien aislado o controlado por el clima).
Durante los primeros veinticuatro (24) meses, cualquier parte en buen estado de este producto que resulte
defectuosa, incluyendo cualquier sistema sellado, será reparado o reemplazado, a opción del fabricante, sin
cargo para el comprador original.
Comuníquese con el distribuidor donde haya comprado la unidad, o llame al Taller de Servicio Autorizado más
cercano, donde debe ser reparada por un técnico calificado. Si esta unidad es reparada en otro lugar que no
sea un Ta ller de Servicio Autorizado, o si la unidad se utiliza para aplicaciones comerciales, Danby no se hará
responsable de ninguna forma y la garantía será anulada.
Danby se reserva el derecho de limitar la cobertura de "Servicio en Domicilio" sujeto a la proximidad de un Ta ller
de Servicio Autorizado. Para todo artefacto que requiera servicio fuera del área limitada de "Servicio en
Domicilio", el cliente será responsable por transportar dicho artefacto hasta el Taller de Servicio Autorizado mas
cercano. Si el electrodoméstico está instalado en un lugar que se encuentra a 100 kilómetros (62 millas) o más del
centro de servicios más cercano, se debe llevar la unidad al Centro de servicios Danby autorizado más cercano, ya
que dicho servicio sólo puede realizarlo un técnico calificado y certificado por Danby para prestar servicios de
garantía. Los cargos por transporte desde y hacia el lugar en que se efectúe el servicio técnico no están cubiertos
por esta garantía y son de responsabilidad del comprador.
Las pie
zas plásticas, se autorizan por treinta (30) días solamente a partir de la fecha de la compra, sin las extensiones
pr
oporcionadas.
No se c
onsiderará ninguna de estas garantías o seguros cuando el daño o la necesidad de reparación sea el producto de los
siguient
es casos:
Primer
os 24 meses
Pa
ra obtener
servicio
Límit
es del
servicio
técnico
a domicilio
Danb
y Products Limited | Guelph, Ontario, Canada N1H 6Z9
Danb
y Products Inc. | Findlay, Ohio, U.S.A. 45840
1-800-263-2629
08/24
Se r
equerirá una prueba de la fecha de compra para las reclamaciones de garantía; conserve las facturas de venta. En
caso de que se r
equiera servicio de garantía, presente la prueba de compra en nuestro centro de servicio autorizado.

NOTES / NOTAS :
__________________________________________________________________________________________
__________________________________________________________________________________________
__________________________________________________________________________________________
__________________________________________________________________________________________
__________________________________________________________________________________________
__________________________________________________________________________________________
__________________________________________________________________________________________
__________________________________________________________________________________________
__________________________________________________________________________________________
__________________________________________________________________________________________
__________________________________________________________________________________________
__________________________________________________________________________________________
__________________________________________________________________________________________
__________________________________________________________________________________________
__________________________________________________________________________________________
__________________________________________________________________________________________
__________________________________________________________________________________________
__________________________________________________________________________________________
__________________________________________________________________________________________
__________________________________________________________________________________________
__________________________________________________________________________________________
__________________________________________________________________________________________

Danby Products Limited, Guelph, Ontario, Canada N1H 6Z9
Danby Products Inc. Findlay, Ohio, U.S.A. 45840
www.danby.com