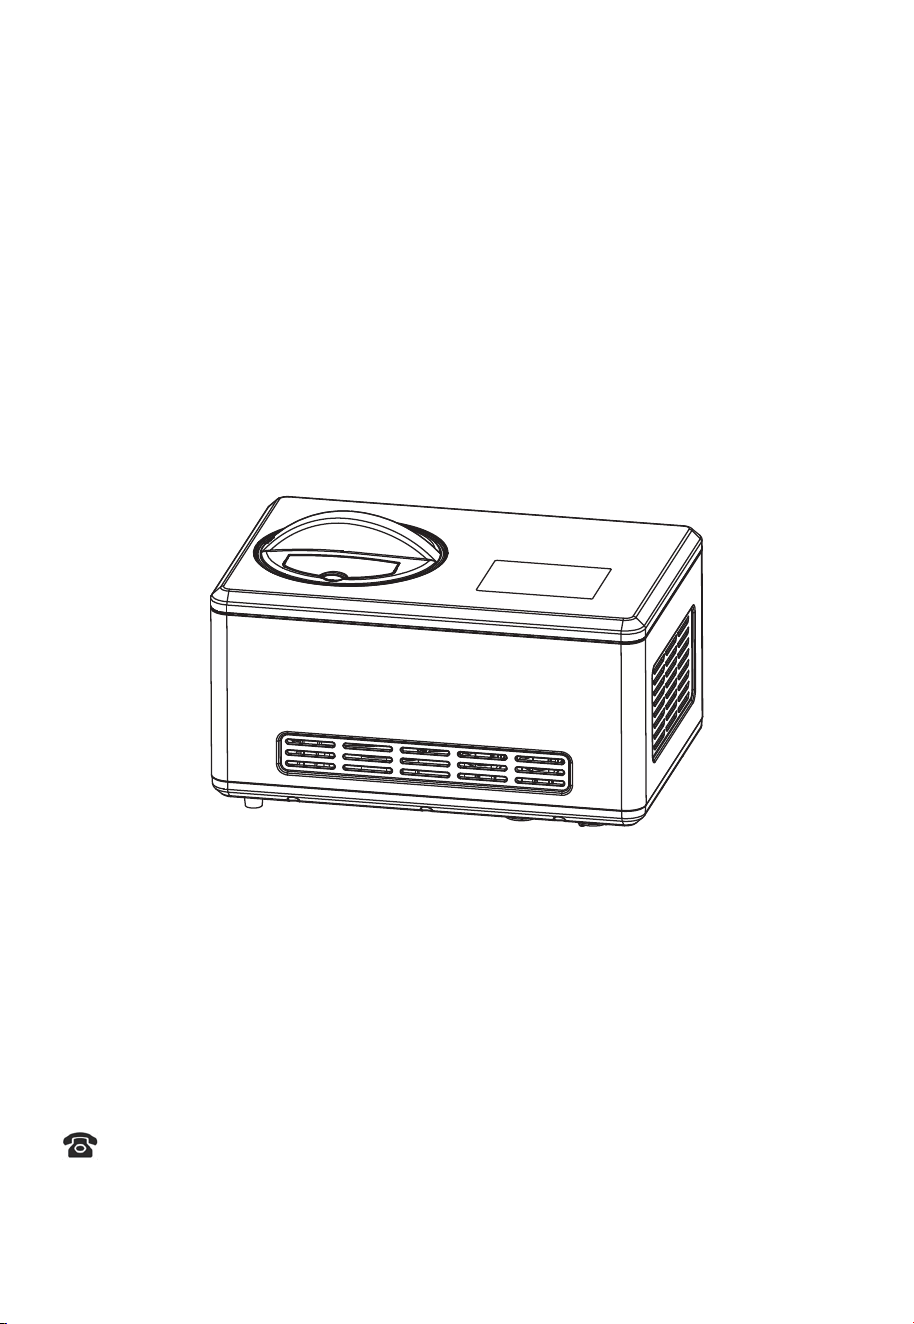
ICE CREAM MAKER
IMPORTANT INSTRUCTIONS
AND OPERATING MANUAL
Model No.: ICE-2038BY
Item No.: IC3938-SILVER
Thank you for purchasing this product! If you have questions about the prod-
uct such as missing parts, damaged products, product assembling and opera-
tion etc., please contact us via Amazon Message or customer service phone:
213-4467172 or 661-4358826.

When using an electrical appliance, basic safety precautions should always be
followed to reduce the risk of fire, electric shock, and/or injury, including the
following:
1. Read all instructions before using.
2. Ensure the voltage is compliant with the voltage range stated on the rating
label, and ensure the earthing of the socket is in good condition.
3. If the supply cord is damaged, it must be replaced by the manufacturer or its
service agent or a similarly qualified person in order to avoid a hazard.
4. This appliance is not intended for use by persons (including children) with
reduced physical,sensory or mental capabilities, or lack of experience and knowl-
edge, unless they have been given supervision or instruction concerning use of
the appliance by a person responsible for their safety. Children should be super-
vised to ensure that they do not play with the appliance.
This appliance can be used by children aged from 8 years and above and
persons with reduced physical, sensory or mental capabilities or lack of experi-
ence and knowledge if they have been given supervision or instruction concern-
ing use of the appliance in a safe way and understand the hazards involved.
Children shall not play with the appliance. Cleaning and user maintenance shall
not be made by children without supervision.
5. This appliance is intended to be used in household and similar applications
such as
–staff kitchen areas in shops, offices and other working environments;
–farm houses and by clients in hotels, motels and other residential type environ-
ments;
–bed and breakfast type environments;
–catering and similar non-retail applications.
6. –Warning: Do not use electrical appliances inside the food storage compart-
ments of the appliance, unless they are of the type recommended by the manu-
facturer.
–WARNING: When positioning the appliance, ensure the supply cord is not
trapped or damaged.
–WARNING: Do not locate multiple portable socket-outlets or portable power
supplies at the rear of the appliance.
7. The plug must be removed before cleaning, maintaining or filling the appliance
8. Do not upend this product or incline it over a 45° angle.
9. To protect against risk of electric shock, do not pour water on cord, plug and
ventilation, immerse the appliance in water or any other liquid.
10. Unplug the appliance after using or before cleaning.
11. Keep the appliance 8cm from other objects to ensure the good heat releasing.
12. Do not use the accessories which are not recommended by Manufacturer.
13. Do not use the appliance close by flames, hot plates or stoves.
14. Do not switch on the power button frequently (ensure 5min. interval at least)
to avoid the damage of compressor.
IMPORTANT NOTICES
1

15. Metal sheet or other electric objects are not allowed to be inserted into the
appliance to avoid fire and short circuit.
16. When take out the ice cream, do not knock the barrel or edge of barrel to
protect the barrel from damage.
17. Do not switch on the power before install well the barrel or blender blade.
18. The initial temperature of the ingredients is 20±3℃.Do not put the ingredients
into freezer for pre-freeze, as it will easily make the blender blade blocked before
the ice cream is in good condition.
19. Do not remove the blender blade when the appliance is on working.
20. Do not use outdoors.
21. Never clean with scouring powders or hard implements.
22. Please keep the instruction manual.
23. When service personnel during service operations, if it is possible to touch the
motor metal enclosure/electrical control box cover, please power off for service
operations.
Model NO.: ICE-2038BY
ITEM NO.: IC3938-SILVER
Capacity: 1.9 Quarts
Voltage: 120V/60Hz
Anti-shock protection class: I
Climate type: N
Power consumption: 180W
Max overall dimensions (L*W*H): 16.7*11.2*10.3 inch
Max packing dimensions (L*W*H): 19.5*13.8*12.5 inch
N.W: 26.4 LBS
G.W: 30.14 LBS
SPECIFICATIONS
1. Built-in Compressor- No Pre-Frozen Required
2. Quick Icream Maker- Within 60mins
3. Touch Control with LCD Display-Easy to View and Operate
4. Multiple Modes and Keep Cool
5. Ice Cream Mode--Make various ice creams
6. Yogurt mode--Make delicious yogurt
7. Single Refrigeration mode-- COOL
8. Single Mixing mode--Stirring
9. Keep Cool Function- Holding 3 hour
10. Removable Parts & Transparent Lid- Easy to Clean, sanitary & safe
11. Low Noise- Less than 55dB(A)
12. Stainless steel metal housing
PRODUCT FEATURE
2
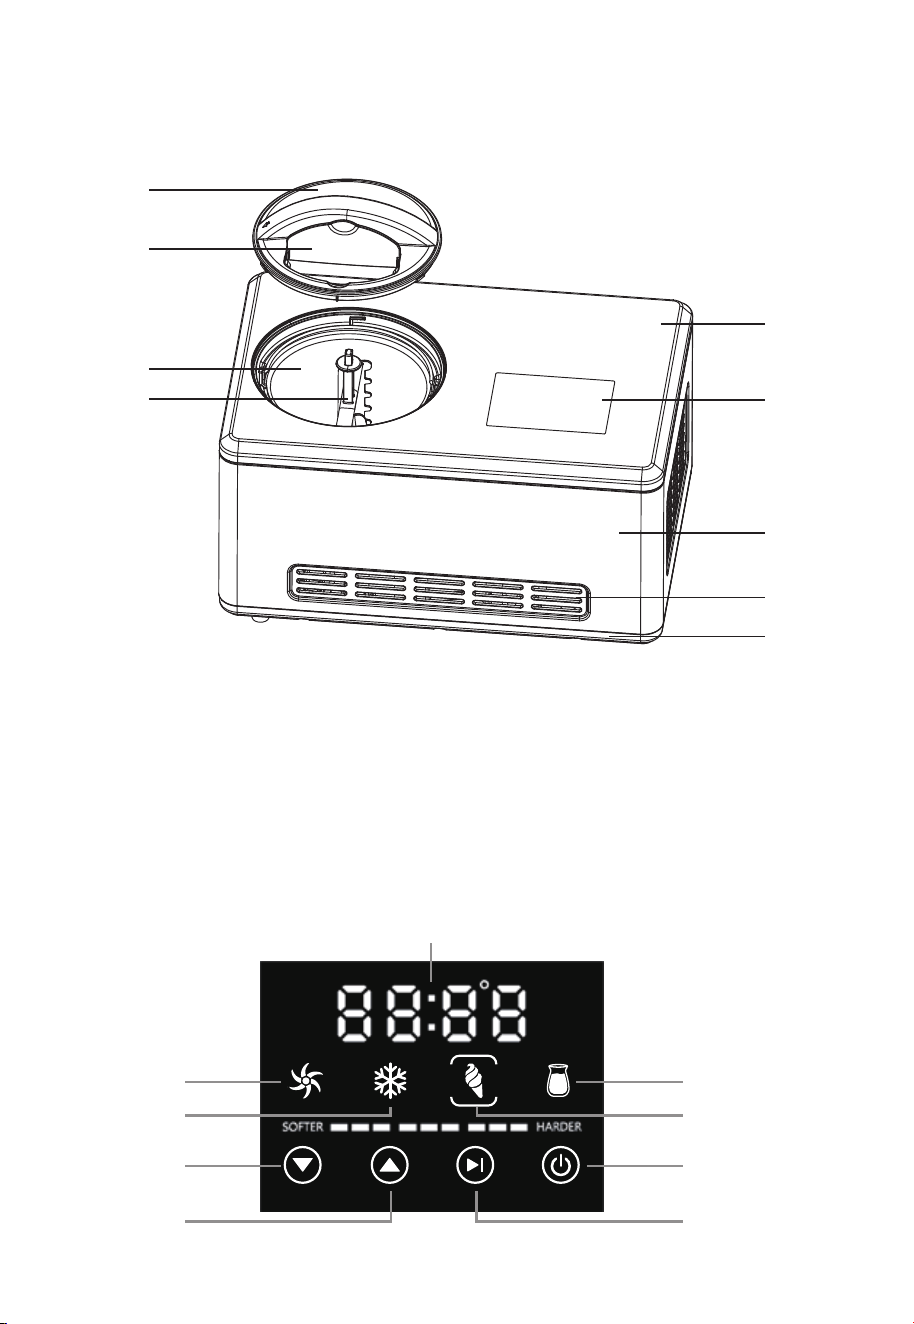
1) Structure
2) Function buttons
PRODUCT INSTRUCTION
3
Mixing
Time Display Area
Ice cream
Yogurt
On/Off button
Start/Stop button
Cooling
- button
+ button
6. Touch screen
7. Stainless Steel housing
8. Air Vent
9. Baseplate
1. Transparent lid
2. Transparent small lid
3. Removable bowl
4. Mixing blade
5. Stainless steel cover
1
2
3
4
5
7
8
9
6

NOTE: Please thoroughly clean all parts that will contact with ice cream before
use, including: cooling bowl, removable bowl, mixing blade, transparent cover,
refill lid and ice cream shovel, etc.
Before cleaning, you must ensure that the power cord plug is disconnected from
the outlet. When making ice cream, keep the machine flat on a level surface to
ensure that the compressor of the machine is working properly.
Here are the steps to make an ice cream:
Step 1.
Pour the well prepared recipe ingredients in proportion into the removable bowl,
then have a uniform mixing.
Step 2.
Then put the removable bowl into the ice cream machine and press it tightly.
HOW TO MAKE ICE CREAM
4
Step 3
In ICE CREAM mode, place the mixing blade into the removable bowl and keep
the mixing blade bottom hole fitted well. In YOGURT mode, please remove the
mixing blade. Then put the transparent lid onto the machine and lock it
anticlockwise.
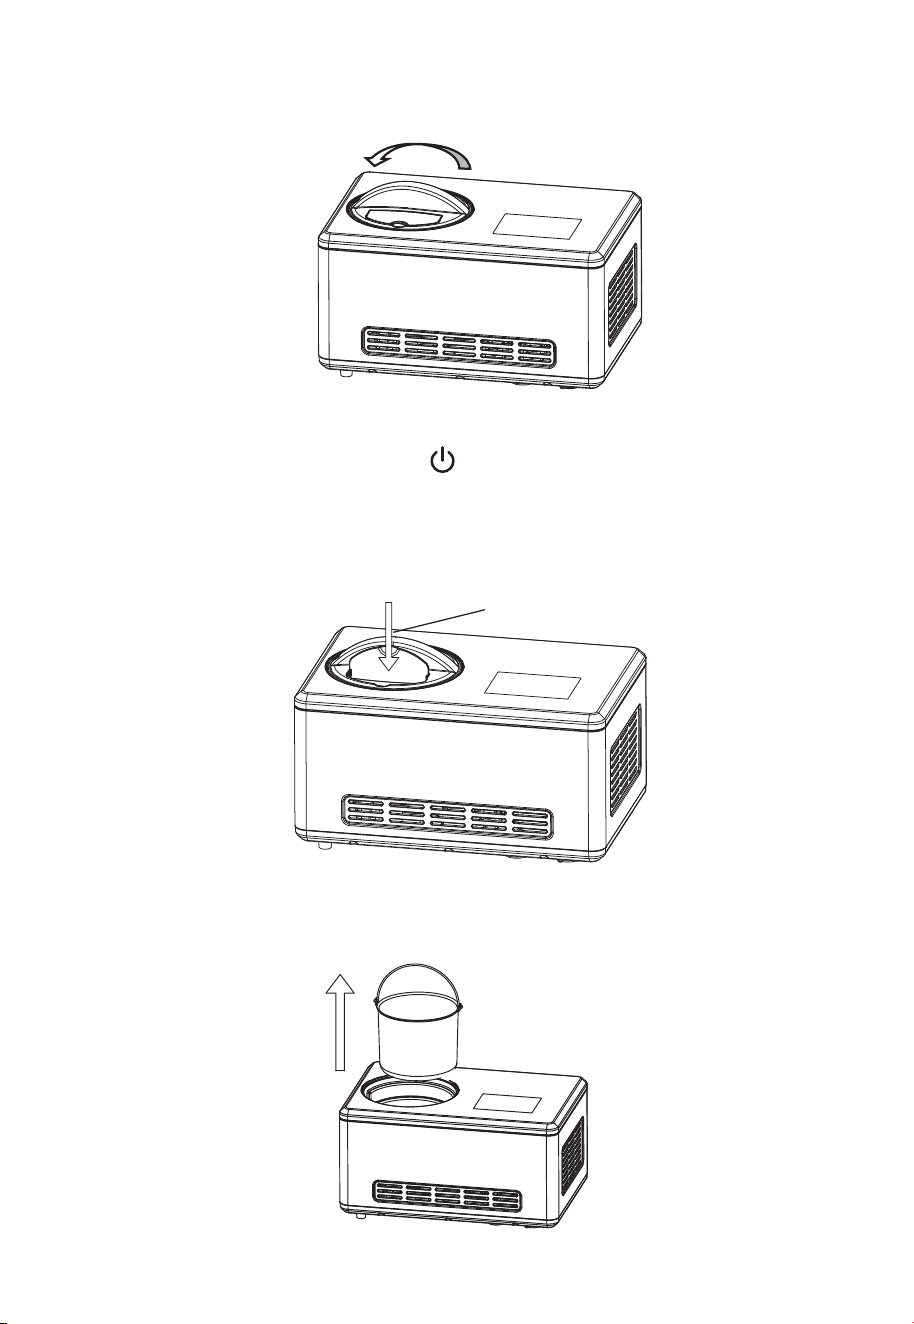
Step 5
Plug in power, and touch the ON/OFF icon to make the machine electrified.
Step 6
You can add the favorite ingredients by opening the refill cover.
Step 7
After the operation is over, turn off the machine first, and then pull the removable
bowl out.
Step 4
Put the transparent lid onto the machine and lock it anticlockwise.
5
You can add the favorite
ingredients by opening
the refill cover
1. Connect the power supply and plug the power cord into a suitable socket. The
shape and voltage of the socket must be the same as those indicated on the
label. Connect the AC 120V power supply.
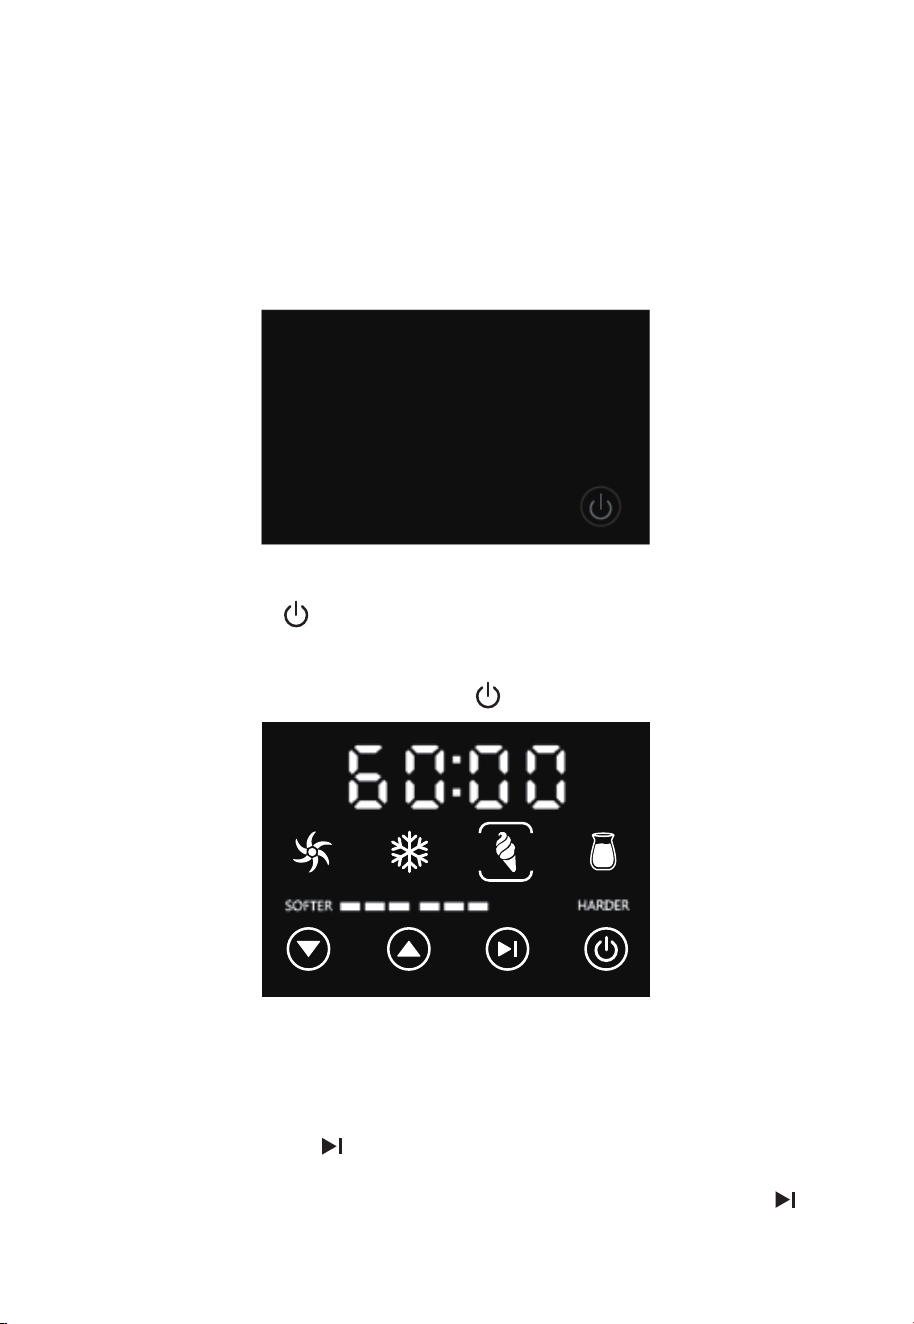
2. Plug the power plug into a suitable power outlet, the buzzer “beep” sounds once
and the screen displays the switch button (light, flashing). This is the power-on
state, as shown below.
3.2 Touch the screen to add and subtract the time icon, adjust the production
time. Ice cream, mixing only, cooling only mode working time is displayed in
minutes: seconds (such as 60:00). Yogurt production time shows hours (such as
24H).
3.3 Touch the Start/Pause icon, the machine starts working, the working mode
and time addition and subtraction buttons are locked. If you need to change the
production mode or adjust the production time, touch the Start/Pause icon,
pause the machine, and then perform the corresponding operation
OPERATING INSTRUCTIONS
6
3. Screen operation
3.1 Touch the ON/OFF icon to enter the mode selection interface, touch the
screen mode icon, and the upper and lower brackets appear on the icon to
indicate that the current mode is selected. As shown below (ice cream mode). If
you need to shut down, touch the ON/OFF icon.

3.4 The production mode of ice cream is divided into two modes: time and hard-
ness.
3.4.1 Hardness mode
In the ice cream mode, touch the “ ” icon to select the hardness mode, touch
the increase icon " " once to increase the hardness by one gear at a time, and
touch the decrease icon " " once to decrease the hardness by one gear at a
time, with a total of three kinds hardness. The time starts from "00:00" after start-
up.
When suspending the hardness ice cream mode, touch the " " or " " icon to
adjust the ice cream forming hardness, but the hardness of the real ice cream
has reached the second level, which can only be increased to the third level or
the unfinished second level, and the time is not adjustable.
3.4.2 Time mode
In precondition time ice cream mode, touch " " or " " icon once to increase or
decrease 1 minute, long press for 2 seconds to increase or decrease quickly, up
to 60 minutes and reduce to 0 minutes at lowest.
In the pause time ice cream mode, touch the " " or " " icon to adjust the ice
cream forming time. The adjustment method is the same as the above, and the
hardness cannot be selected.
3.5. [Single Stirring] Mode:
Touch the " " icon to select the single mixing mode, with a default time of 10
minutes. Touch the " " or " " icon once to increase/decrease by 1 minute. Long
press for 2 seconds to quickly increase/decrease, up to 60 minutes at most and
down to 0 minutes at least. Tap the start/stop icon on the screen, the machine
starts working, and the working mode and time addition/subtraction icons are
locked; Return to standby mode after completion.
3.6. [Single Cooling] Mode:
Touch the " " icon to select single cooling mode, with a default time of 30
minutes. Touch the " " or " " icon once to increase/decrease by 1 minute. Long
press for 2 seconds to quickly increase/decrease, with a maximum increase of
60 minutes and a minimum decrease of 0 minutes. Tap the start/pause icon on
the screen, the machine starts working, and the working mode and time addi-
tion/subtraction icons are locked; Return to standby mode after completion.
4. Insulation function
1) After the machine finishes making ice cream mode, automatically enters the
insulation state, the screen displays “COOL”. After 3 hours, the machine stops
working, and the machine is returned to the power-on state.
2) After the machine completes the yogurt mode production, automatically
enters the refrigerating mode, the screen displays “COOL”. If there is no other
operation, the machine will always be in the refrigerated mode.
5. Motor protection function
In case of abnormal locked rotor of mixing motor, at this time, the temperature
7
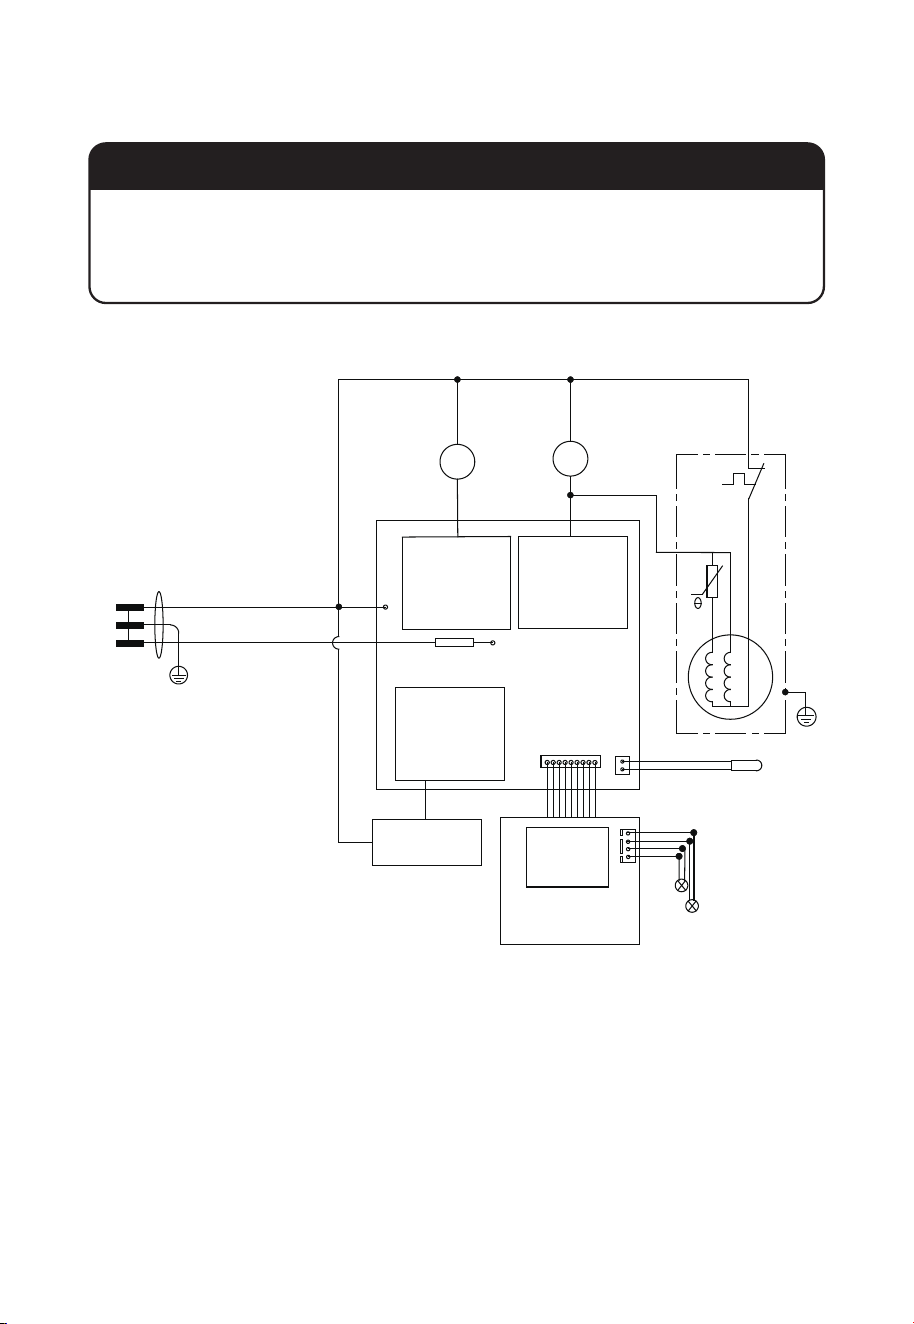
Protector
Condenser
Motor
Blending
motor
Fuse
120V/60Hz
N
E
L
M
power supply
Switching
Control
circuitry of
blending
motor
M
Control
circuitry of
condenser
motor
Temperature sensor
display
screen
Control board
Control
circuitry of
heating element
heating element
Power Plug
Compressor
Starter
led1
led2
controller of the motor will monitor the temperature of the motor and automati-
cally stop the motor to ensure the life of the blending motor.
Caution: The plug must be removed before cleaning to avoid electric shock.
a) Take out the mixing blade, wipe it with a dampened cloth.
b) Take out the removable bowl, clean it with a dampened soft cloth.
c) Wipe the transparent lid and refill lid with a dampened cloth.
d) Remove the dirty on the body or other places with a dampened cloth, and do
not pour water on cord, plug and ventilation, immerse the appliance in water or
any other liquid.
e) Allow drying thoroughly with a dry cloth, then return the component to the
home position.
MAINTENANCE
ELECTRICAL DIAGRAM
8
To avoid unnecessary spillage and waste, make sure that the ice
cream ingredients do not exceed 60% of the inner barrel volume
(because the ice cream will expand to some extent after molding).
The largest production capacity

Cleaning the Stainless steel housing
1. Wipe the exterior of the stainless steel housing and the LCD screen with a soft
damp cloth. A non-abrasive liquid cleanser or mild spray solution may be used
to avoid build up of stains. Apply the cleanser to the sponge, not the outer surface
or LCD screen, before cleaning. Do not use a dry paper towel or cloth to clean the
LCD screen, or use an abrasive cleanser or metal scouring pad to clean any part
of the ice cream machine as these will scratch the surface.
NOTE: Never immerse the stainless steel housing in water or place in the dish-
washer. Take care not to allow water or cleaning fluids to seep under the buttons
or LCD screen on the control panel.
2. If over-spill of cream, milk, chocolate etc. occurs in the interior chamber, care-
fully remove them using a soft, damp cloth.
3. Let all surfaces dry thoroughly prior to inserting the power plug into a power
outlet.
Cleaning the lid
The lid can be cleaned in warm soapy water, using a soft sponge. Do not use an
abrasive cleanser or metal scouring pad as these will scratch the surface. Let all
surfaces dry thoroughly prior to placing into the ice cream machine.
Cleaning the Ice cream Bowl
Fill the ice cream bowl up half way with warm soapy water. A non-abrasive liquid
cleanser or mild spray solution may be used. Allow to stand for 10-20 minutes.
NOTE: Ice Cream Bowl is NOT dishwasher safe.
NOTE: To clean the ice cream chamber ensure that the machine is at room tem-
perature. Wipe inside chamber with a damp cloth and soapy water. Once clean,
dry thoroughly.
STORAGE
1. Ensure the ice cream machine is turned OFF. Remove power plug from the
power outlet.
2. Ensure the ice cream machine and all accessories are completely clean and
dry.
3. Place the ice cream bowl and paddle into the chamber.
4. Ensure the lid is on.
5. Store the appliance in an up right position and level on it support legs. Do not
store anything on top of the ice cream machine.
CARE & CLEANING
9
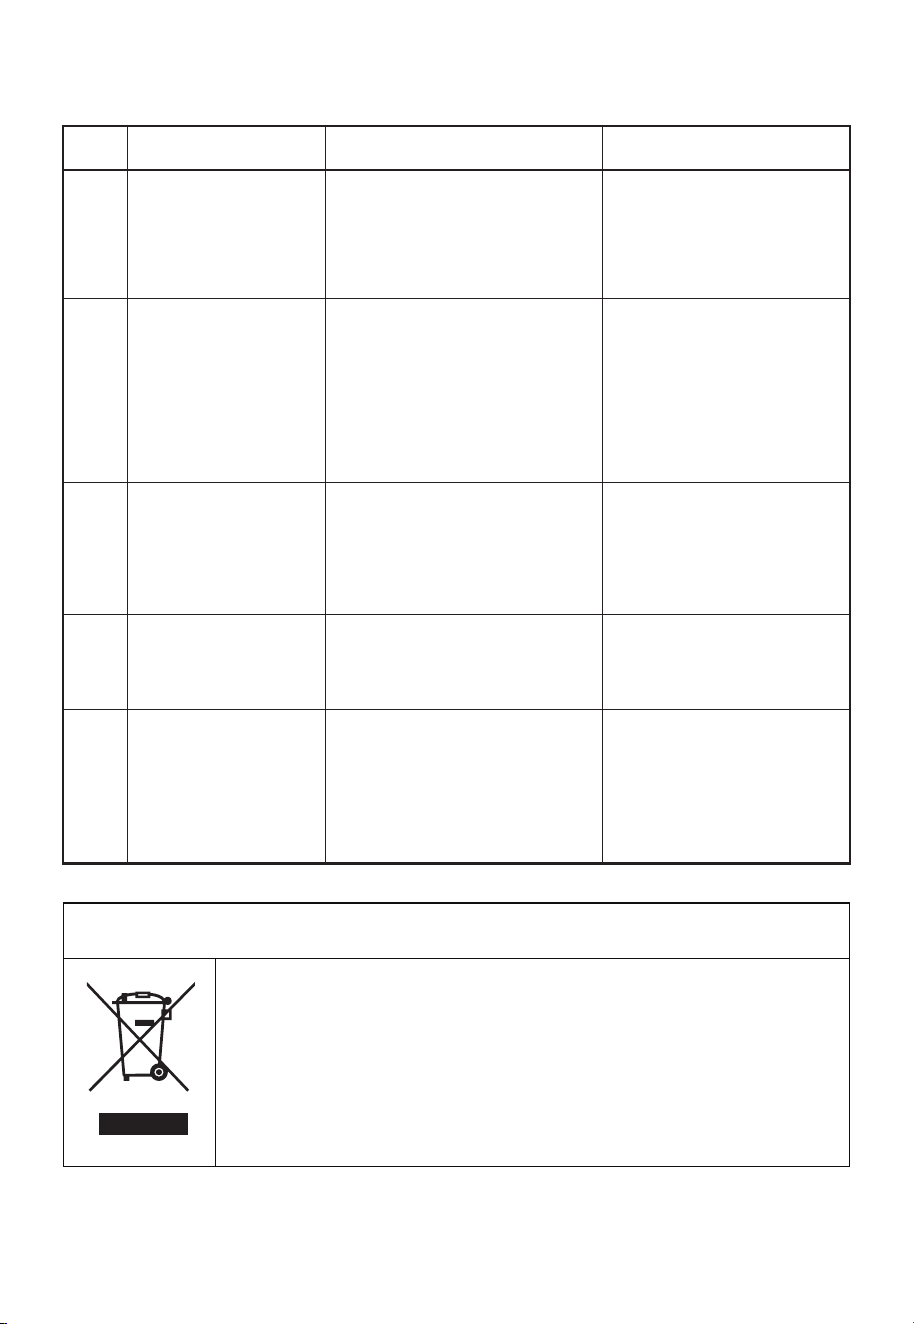
TROUBLESHOOTING
Reason analysisExist problemNo. Resolutions
There are water drops
between the refrigeration
barrel and the loading
bowl that are not wiped
clean, resulting in freezing
Not easy to take
out loading bowl
after the ice
cream is finished
Wait 1-2 minutes before
taking out the ice cream
bucket.
Normal phenomenon:
as the ice cream hardens,
the mixing fan may be
stuck. When the motor
temperature rises, it will
automatically protect and
cut off the power supply
of the motor
The production
time of ice cream
maker is not
finished, but the
mixing has
stopped
Take out the loading
bowl and restart it after
shutdown to return to
normal
The mixing fan blades not
in place, and pay
attention to the alignment
of the hexagon
The transparent lid
is lifted to the
mixing fan blade,
and it cannot be
stuck in place
Put the mixing fan in
place and rotate the
transparent cover in
place
Deformation caused by
improper use of loading
bowl
The loading bowl
cannot be placed
in the cold bucket
Buy a new loading bowl
Deformation caused by
improper use of loading
bowl
At the beginning
of making ice
cream, the mixing
fan seriously
scratched or
jammed.
Buy a new loading bowl
Correct Disposal of this product
This marking indicates that this product should not be disposed of with
other household wastes throughout the EU. To prevent possible harm to
the environment or human health from uncontrolled waste disposal,
recycle it responsibly to promote the sustainable reuse of material
resources. To return your used device, please use the return and collec-
tion systems or contact the retailer where the product was purchased.
They can take this product for environmental safe recycling.
10
1
2
3
4
5

Recipe1:1000ml cool storage milk+ leavening agent/50ml cool storage yoghourt.
Recipe2:1000ml pure milk+ leavening agent/50ml cool storage yoghourt.
Recipe3:1000ml milk powder + leavening agent/50ml cool storage yoghourt.
Recipe4:1000ml soybean milk+ leavening agent/50ml cool storage yoghourt.
1. Before adding the above ingredients, please check whether they are expired or
deteriorated.
2. The addition amount of lactic acid bacteria starter is in accordance with the
instructions of starter.
3. When filling milk powder, please brew according to the proportion marked on
the market milk powder, or according to the proportion of 250ml milk powder +
750ml water.
4. After soybean milk is cooked or milk powder is filled, the temperature must be
cooled to below 40 ℃ before adding lactic acid bacteria starter or pure yogurt.
5. The fermentation time will be affected by the environment temperature and
the initial temperature of raw materials, so the fermentation time should be
extended when the environment temperature is low or the milk is refrigerated. But
the longest time is not more than 14 hours (when pure yogurt is used as fermen-
tation source, the longest time is not more than 10 hours).
6. The active lactic acid bacteria starter is preferred as fermentation source.
When the starter is inconvenient to purchase, the commercially available pure
yogurt or the last self-made pure yogurt can also be used as fermentation
source.
YOGHOURT RECIPE MANUAL
BASIC ICE CREAM
Make according to the following formula. After mixing the formula mixture evenly,
it can be made into ice cream within 60 minutes.
375g cream
250g powdered milk
375g water
VANILLA ICE CREAM
320g whole milk
152g granulated sugar
240g heavy cream, well chilled
2 – 3 teaspoons pure vanilla extract, to taste
In a medium bowl, use a hand mixer or a whisk to combine the milk and granu-
lated sugar until the sugar is dissolved, about 1 – 2 minutes on low speed. Stir in
the heavy cream and vanilla to taste. Turn machine on, pour mixture into freezer
bowl through ingredient spout and let mix until thickened, about 50 – 60 minutes.
ICE CREAM RECIPE MANUAL
11
CAUTION

BASIC CHOCOLATE ICE CREAM
320g whole milk
152g granulated sugar
320g semi-sweet chocolate (your favorite), broken into 1.2cm pieces
320g heavy cream, well chilled
1.2 teaspoon pure vanilla extract
Heat the whole milk until it is just bubbling around the edges (this may be done
on the stovetop or in a microwave). In a blender or food processor fitted with the
metal blade, pulse to process the sugar with the chocolate until the chocolate is
very finely chopped. Add the hot milk, process until well blended and smooth.
Transfer to a medium bowl and let the chocolate mixture cool completely. Stir in
the heavy cream and vanilla to taste. It is best to pre-cooled in the refrigerator
for about 15 minutes before making.
Turn the machine on, pour mixture into removable bowl through ingredient spout
and let mix until thickened, about 30 – 40 minutes.
FRESH STRAWBERRY ICE CREAM
334g fresh ripe strawberries, stemmed and sliced
70g freshly squeezed lemon juice
152g granulated sugar
320g whole milk
320g heavy cream
1.2 teaspoon pure vanilla extract
In a small bowl, combine the strawberries with the lemon juice and 80g granulat-
ed sugar, stir gently and allow to the strawberries to macerate in the juices for 2
hours.
In a medium bowl, use a hand mixer or a whisk to combine the milk and granu-
lated sugar until the sugar is dissolved.
Stir in the heavy cream plus any accumulated juices from the strawberries and
vanilla. Turn the machine on, pour mixture into removable bowl through ingredi-
ent spout and let mix until thickened, about 30 – 40 minutes. Add the sliced
strawberries during the last 5 minutes of freezing.
FRESH LEMON SORBET
470g granulated sugar
560g pure water
160g freshly squeezed lemon juice
0.5 tablespoon finely chopped lemon zest*
Combine the granulated sugar and water in a medium saucepan and bring to a
boil over medium-high heat. Reduce heat to low and simmer without stirring until
the sugar dissolves, about 3 – 5 minutes. Cool completely. This is called a simple
syrup, and may be made ahead in larger quantities to have on hand for making
fresh lemon sorbet. Keep refrigerated until ready to use.
After cooling, add the lemon juice and zest; stir to combine. Turn the machine on,
12

pour the lemon mixture into freezer bowl through ingredient spout and mix until
thickened, about 50 – 60 minutes.
CHOCOLATE FROZEN YOGURT
320g whole milk
180g bittersweet or semisweet chocolate, chopped
536g low-fat vanilla yogurt
66g granulated sugar
Combine the milk and chocolate in a blender or food processor fitted with the
metal blade and process until well blended and smooth, 15 seconds. Add the
yogurt and sugar; process until smooth, about 15 seconds. Turn the machine on,
pour mixture into removable bowl through ingredient spout and let mix until
thickened, about 50 – 60 minutes.
13
Thank you for purchasing this product! If you have any questions about the
product, such as missing parts, damaged products, product assembling, and
operation, please contact us via Amazon Message or customer service
number: 213-4467172 or 661-4358826