Product Overview
A. Wand
B. Stretch Hose
C. Wand Release Button
D. Tank Release Button
E. Carry Handle
F. Dirt Tank
G. Cord Rewind Button
H. Power Pedal
I. Recline Pedal
J. Swivel Steering
K. Height Adjustment
Meet your new BISSELL® product!
Go to support.BISSELL.com for a walkthrough of your new pur-
chase, including videos, tips, support, and more. Want to get started
right away? This guide has all the information you need to set up
your new product. Let’s take a look...
A
B
E
F
H
I
C
D
K
G
J
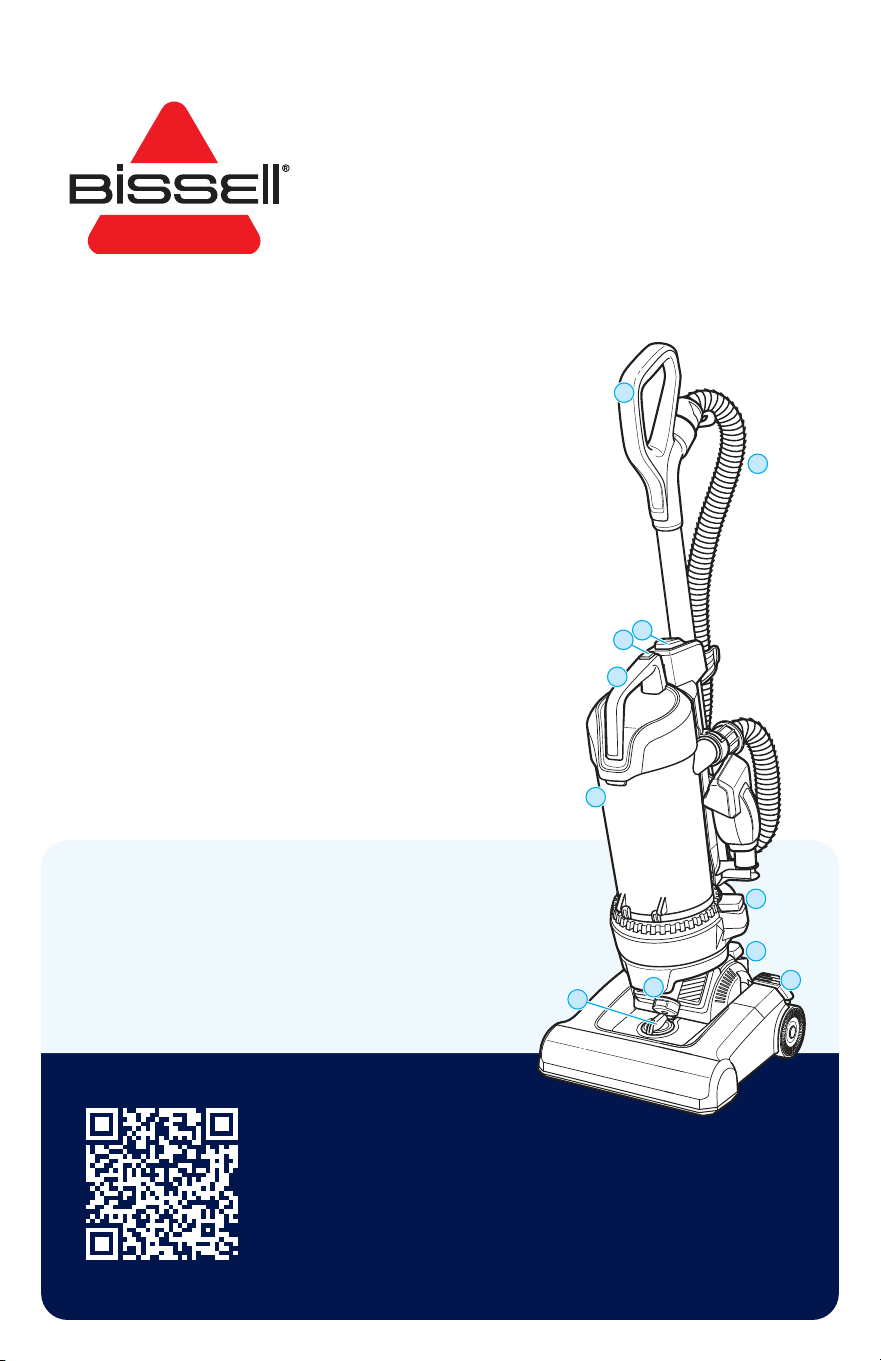
What’s in the Box? .........................................................3
Assembly .............................................................................. 3
Using the Vacuum ..........................................................4
Emptying the Dirt Tank...............................................5
Cleaning the Pre-Motor Filter .................................6
Maintaining the TurboEraser® Tool ..................... 6
Replacing the Brush Roll and Belt ...................... 7
Clearing a Clog ................................................................. 7
Troubleshooting ............................................................... 7
Warranty ............................................................................... 7
CleanView
®
Max
TANGLE-FREE REWIND
UPRIGHT VACCUM
MODELS 4073, 4073L

2 BISSELL.com
WARNING
TO REDUCE THE RISK OF FIRE, ELECTRIC SHOCK OR INJURY:
• Do not leave vacuum cleaner when it is plugged in. Unplug from outlet
when not in use and before servicing.
• Do not use outdoors or on wet surfaces.
• Do not allow to be used as a toy. Close attention is necessary when
used by or near children.
• Do not use for any purpose other than described in this user guide.
• Use only manufacturer’s recommended attachments.
• Do not use with damaged cord or plug. If appliance is not working as
it should, has been dropped, damaged, left outdoors, or dropped into
water, have it repaired at an authorized service center.
• Do not pull or carry by cord, use cord as a handle, close a door on cord,
or pull cord around sharp edges or corners. Do not run appliance over
cord. Keep cord away from heated surfaces.
• Do not unplug by pulling on cord. To unplug, grasp the plug, not the
cord.
• Do not handle plug or vacuum cleaner with wet hands.
• Do not put any object into openings. Do not use with any opening
blocked; keep openings free of dust, lint, hair, and anything that may
reduce air flow.
• Keep hair, loose clothing, fingers, and all parts of body away from
openings and moving parts.
• Turn OFF all controls before plugging or unplugging vacuum cleaner.
• Use extra care when cleaning on stairs.
• Do not use to pick up flammable or combustible materials
(lighter fluid, gasoline, kerosene, etc.) or use in areas where they may
be present.
• Do not use vacuum cleaner in an enclosed space filled with vapors
given off by oil-based paint, paint thinner, some moth-proofing
substances, flammable dust, or other explosive or toxic vapors.
• Do not use to pick up toxic material (chlorine bleach, ammonia, drain
cleaner, etc.).
• Do not pick up anything that is burning or smoking, such as cigarettes,
matches or hot ashes.
• Do not use without filters in place.
• Do not pick up hard or sharp objects such as glass, nails, screws, coins,
etc.
• Use only on dry, indoor surfaces.
• Keep appliance on a level surface.
• Do not carry the vacuum cleaner while it is running.
• Before using your vacuum, make sure the dirt tank is in locked position
and that all filters, both pre- and post-filters, are in place. DO NOT
operate your vacuum without these filters.
• Plastic film can be dangerous. To avoid danger of suffocation, keep
away from children.
• Do not plug in your vacuum UNTIL you are familiar with all instructions
and operating procedures.
• To reduce the risk of electrical shock, turn power switch OFF and
disconnect polarized plug from electrical outlet BEFORE performing
maintenance or troubleshooting checks.
• Hold plug when rewinding into cord reel. Do not allow plug to whip
when rewinding.
• If the appliance has a hand-held accessory like pet brush, motor driven
head, etc. the user shall avoid entrapment.
• Risk of injury from moving parts. Brush may start unexpectedly.
Unplug before cleaning or servicing.
• Unplug before connecting or disconnecting the TurboEraser® Pet Tool
and 2-in-1 Dusting Brush and Crevice Tool.
THIS APPLIANCE HAS A POLARIZED PLUG To reduce the risk
of electric shock, this appliance has a polarized plug (one blade is wider than the other). This plug will fi t in a polarized outlet only
one way. If the plug does not fi t fully in the outlet, reverse the plug. If it still does not fi t, contact a qualifi ed electrician to install a
proper outlet. Do not change the plug in any way.
IMPORTANT SAFETY INSTRUCTIONS
READ ALL INSTRUCTIONS BEFORE USING YOUR APPLIANCE.
When using an electrical appliance, basic precautions should be observed, including the following:
SAVE THESE INSTRUCTIONS
THIS MODEL IS FOR HOUSEHOLD USE ONLY. COMMERCIAL USE OF THIS UNIT VOIDS THE MANUFACTURER’S WARRANTY.
Do not wash the pleated fi lter. Replace with a new pleated fi lter every 6 months.
IMPORTANT INFORMATION
• Brush roll continues to turn while product is turned ON and handle is in use. To avoid damage to carpet, rugs, furniture and flooring,
avoid tipping cleaner or setting it on furniture, fringed area rugs, or carpeted stairs during tool use.
• With brush roll on, do not allow cleaner to sit in one location for an extended period of time, as damage to floor can result.
BISSELL.com 3
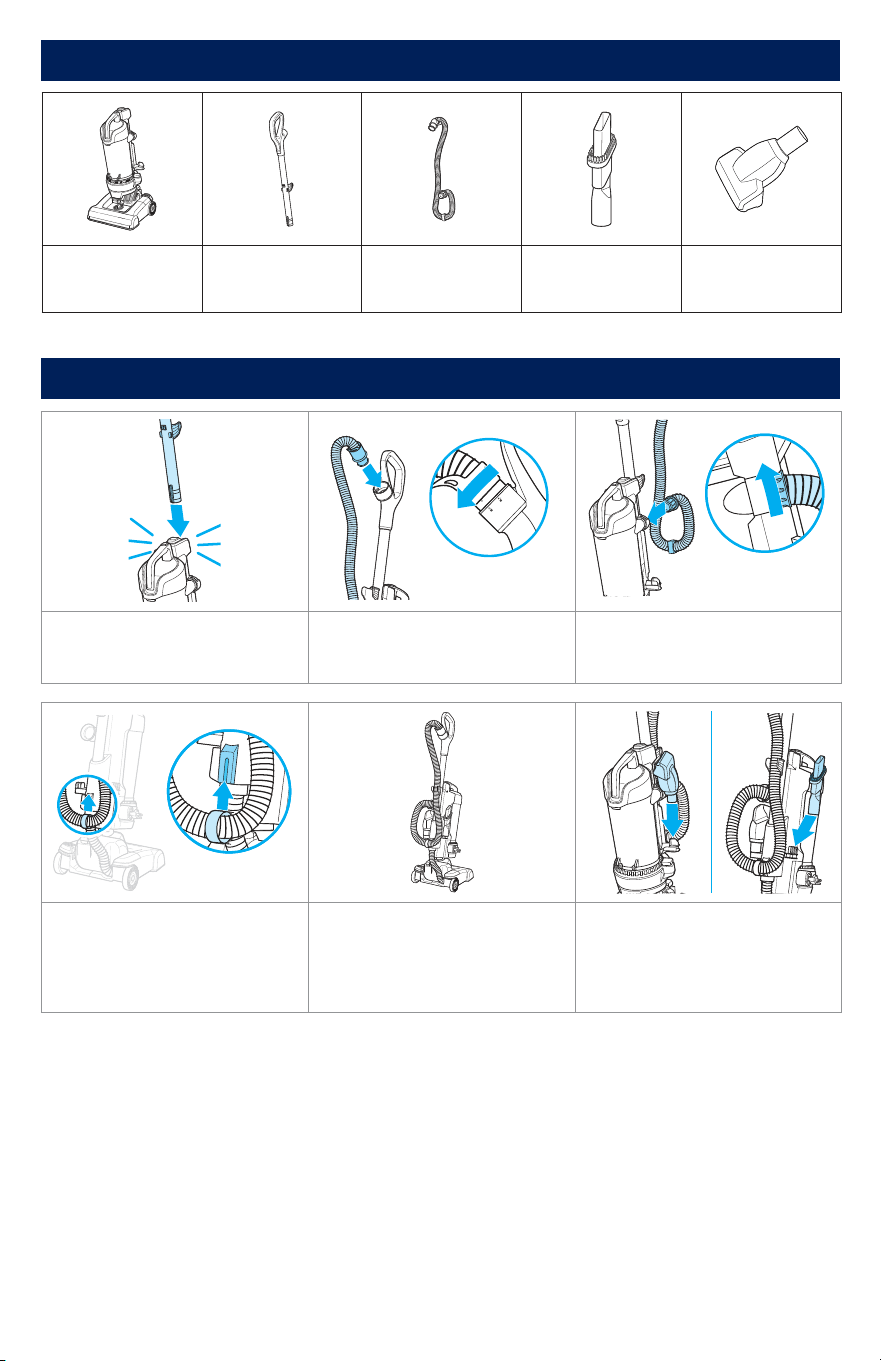
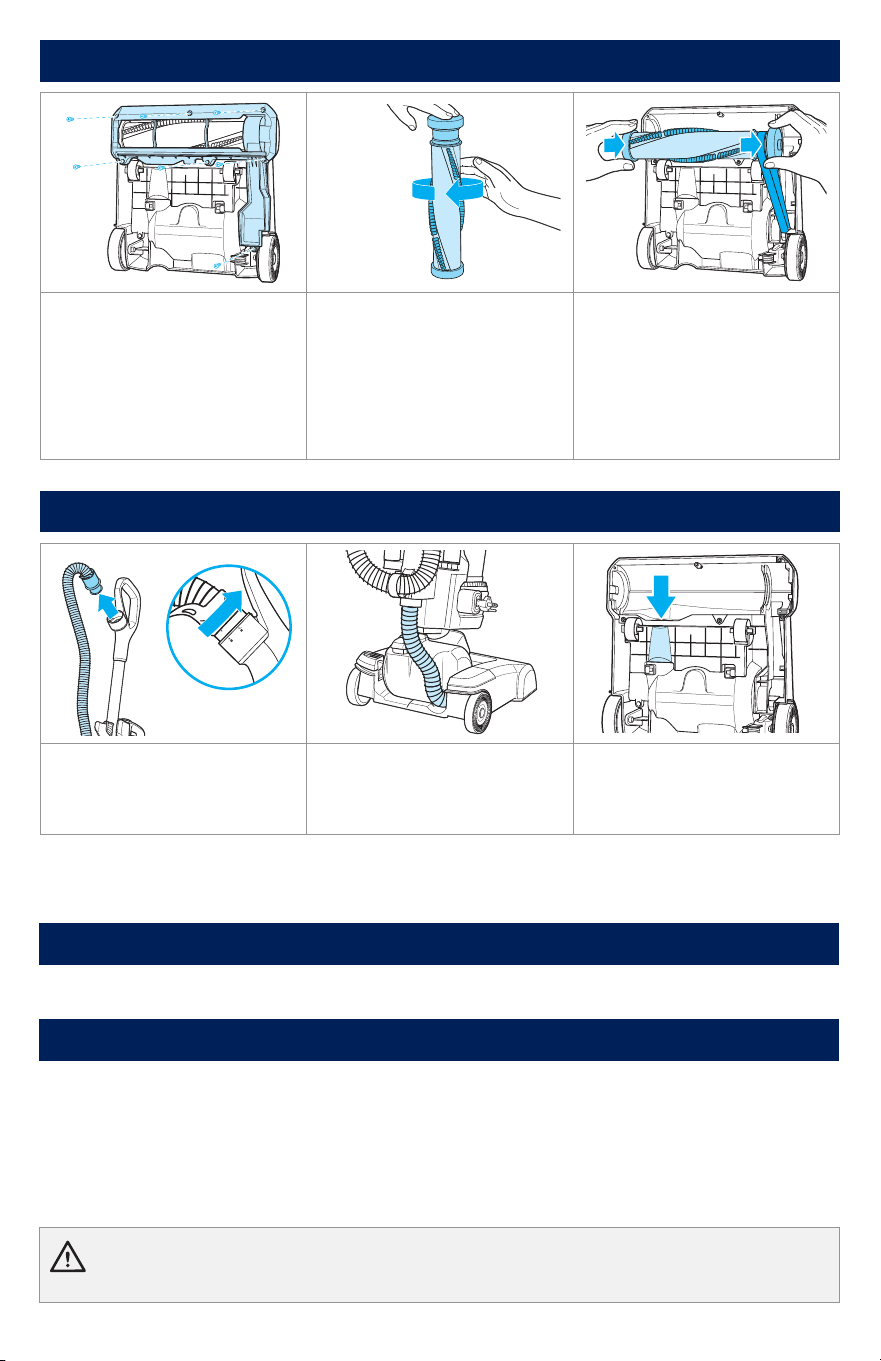
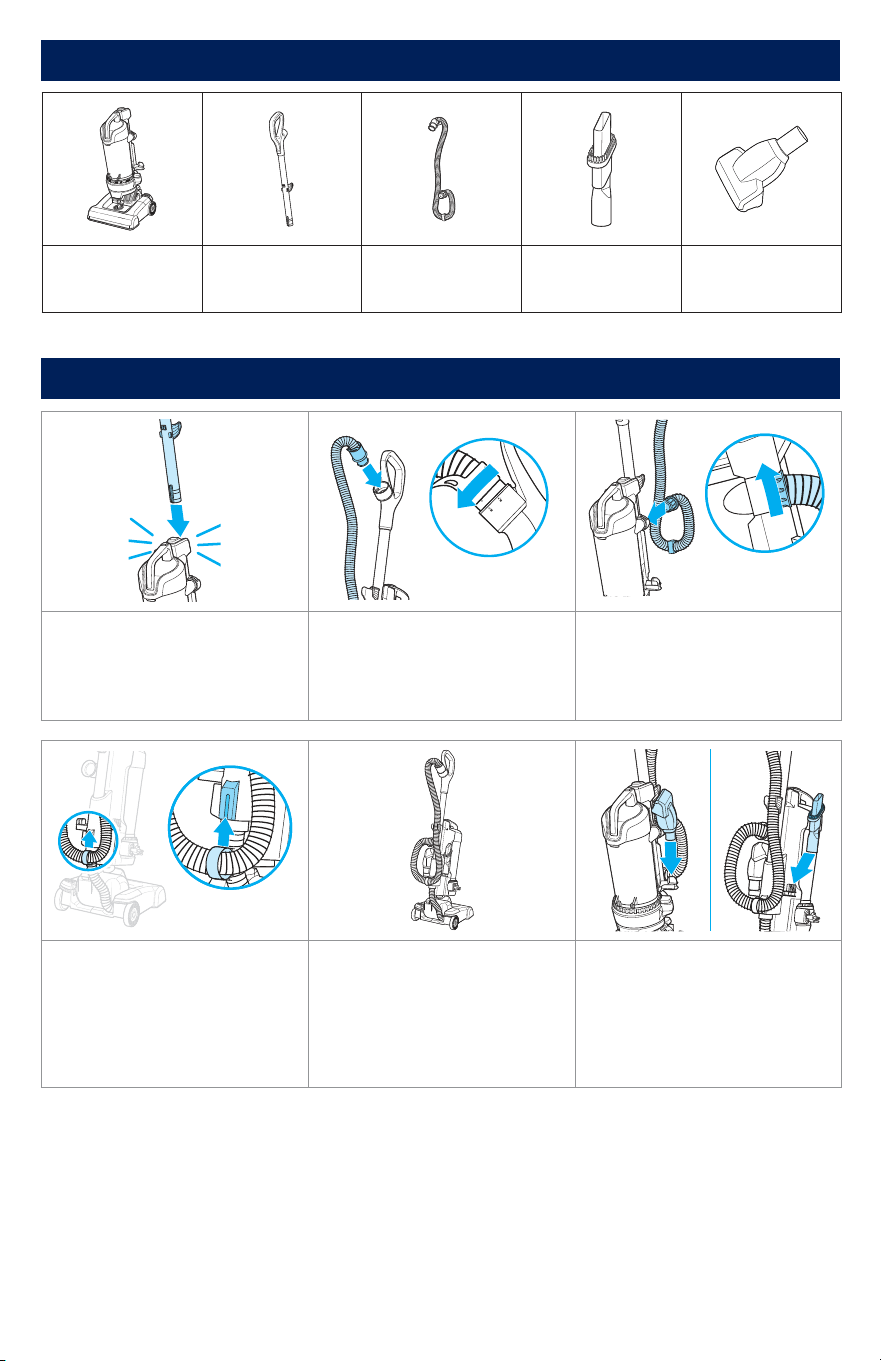
Assembly
1. Attach wand to vacuum base. 2. Attach stretch hose to wand
and twist clockwise to lock into
place.
3. Attach stretch hose to back
of vacuum and twist clockwise
to lock into place.
4. Attach hose clip to body
of vacuum by sliding up until
it clicks into place. Remove
hose clip for extended cleaning
reach when in use.
5. The hose should sit on the
vacuum without any twists.
6. Attach tools to tool holders.
Base Wand Hose 2-in-1 Dusting
Brush and
Crevice Tool
TurboEraser®
Pet Tool
What’s in the Box?
4 BISSELL.com
WARNING To reduce the risk of injury from moving parts while the vacuum is turned ON, always move the
vacuum via the rolling wheels by using the upper handle at the back of the vacuum. Do not carry the vacuum while it is running.
Always place vacuum on fl oor with handle in upright position when using tools.
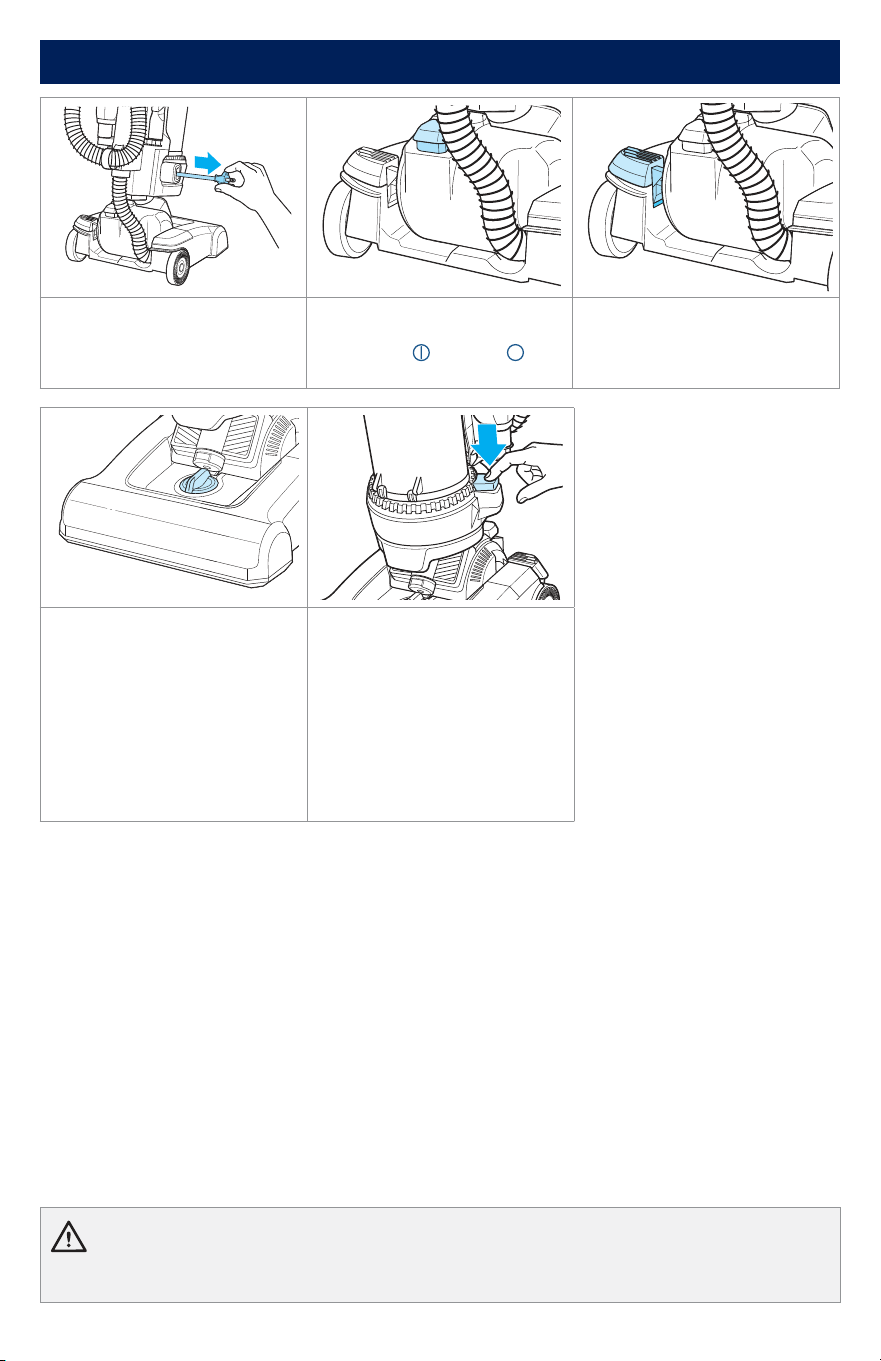
Using the Vacuum
1. Gently pull the cord out,
stopping at the yellow mark on
the cord. Do not pull past the
red mark.
2. Press the red power button
with your foot to turn the
vacuum ON
and OFF .
3. Press the recline pedal and
pull handle back towards you.
4. Turn dial on foot to desired
height setting. If dial is difficult
to turn, tilt the vacuum back
slightly to take the weight off
the foot while turning.
Tip: For best performance,
adjust to the lowest practical
setting. If your vacuum is
difficult to push, adjust to the
next higher setting.
5. Hold onto the plug and
press automatic cord rewind
button until fully retracted.
If cord doesn’t fully retract on
the first try, pull a little bit of
cord out and press the rewind
button again.
Note: Rotating floor brush continues to rotate while tools are in use. Never place fingers under the
vacuum when it is running. Never place powerfoot on furniture or uneven surfaces.
Certain carpets and low humidity conditions may generate small static discharges. Static discharges
are entirely harmless and are not associated in any way with the main power supply.
BISSELL.com 5
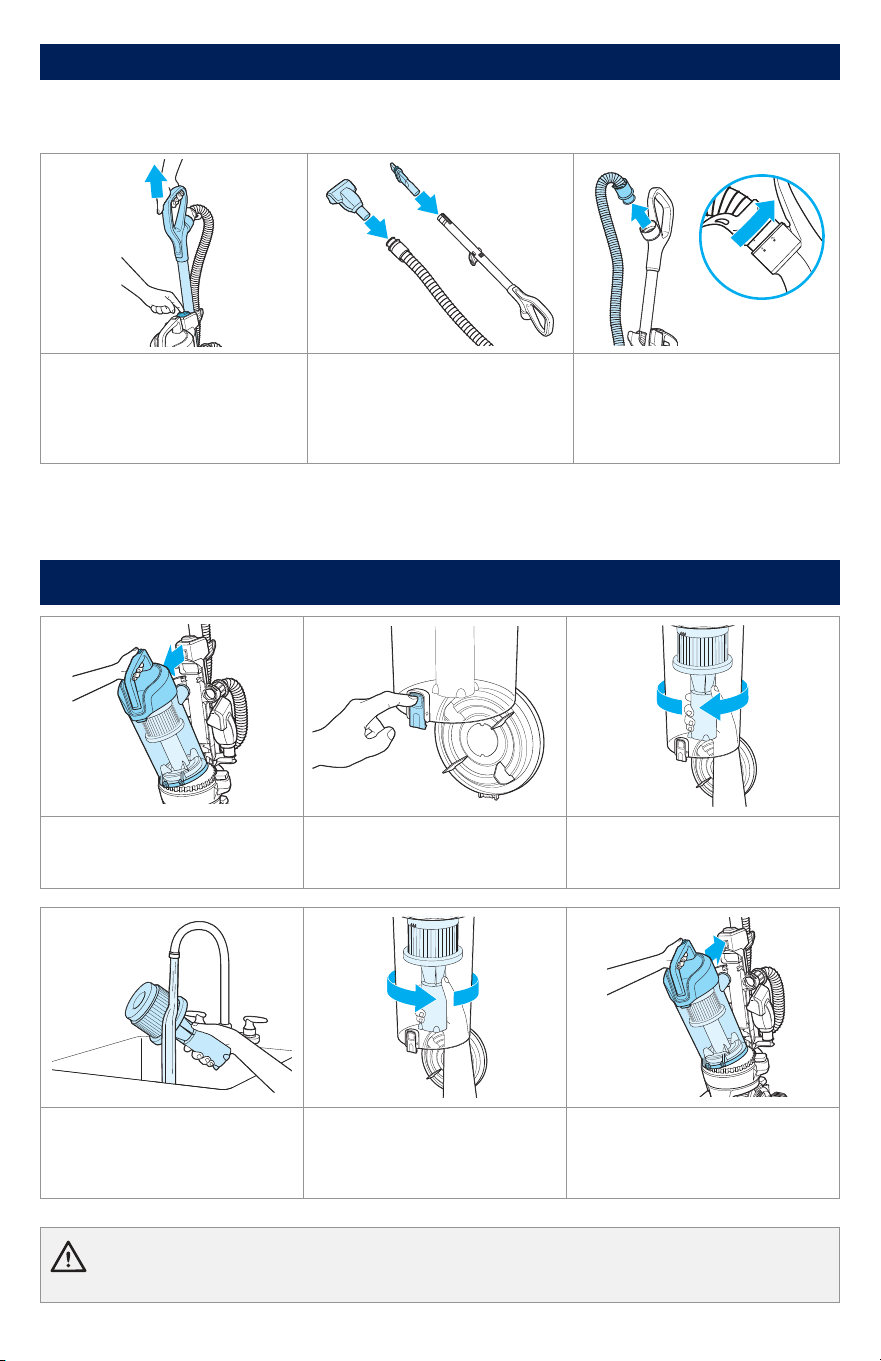
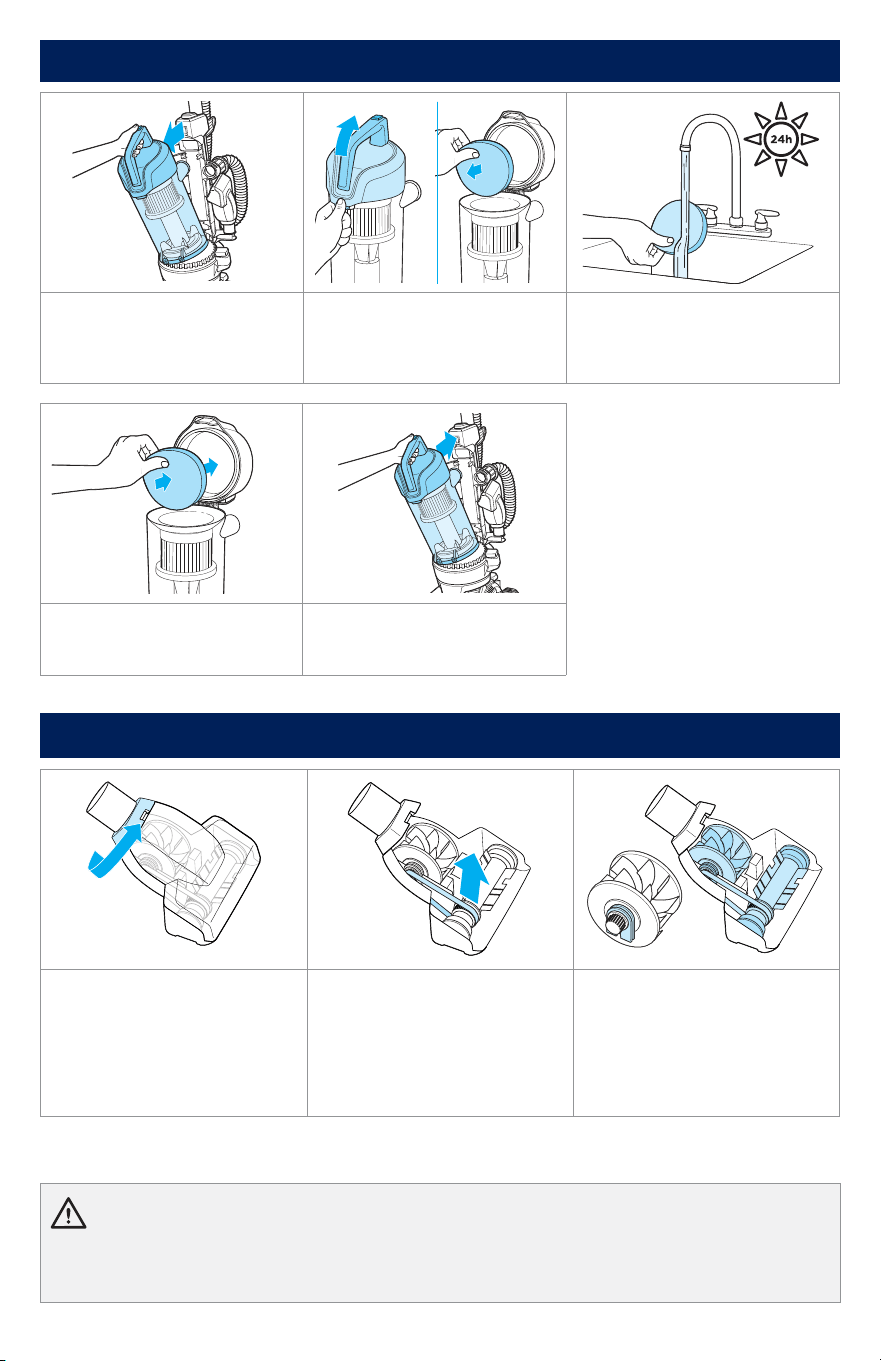
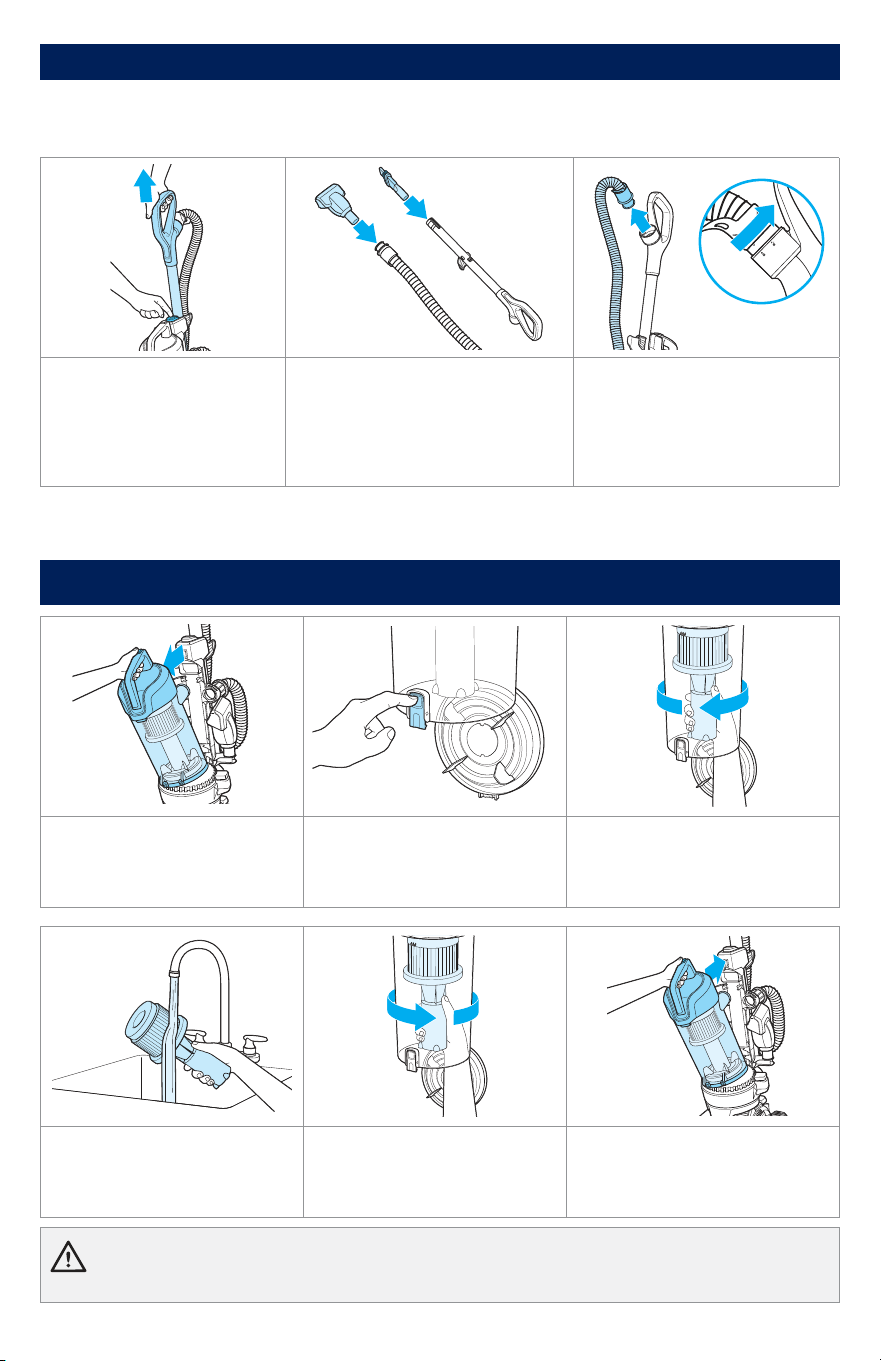
Emptying the Dirt Tank
1. Press the tank release
button and pull out to remove
dirt tank.
2. Hold the dirt tank over a
trash bin. Press the bottom
release button to empty.
3. Twist cyclone counter-
clockwise and pull down to
remove from tank.
4. Clean cyclone with warm
water and mild detergent.
Let dry for 24 hours before
reinstalling.
5. Twist cyclone clockwise to
reinstall.
6. Place tank back on vacuum
and press firmly until it clicks
into place.
WARNING To reduce the risk of electric shock, turn power OFF and disconnect plug from electrical outlet
before performing maintenance or troubleshooting checks.
Above Floor Cleaning
Clean hard-to-reach spaces with the Quick Release Extension Wand.
1. Press the wand release
button to remove extension
wand and attach desired tool.
2. Attach desired tool.
Note: For optimal
performance, attach the
TurboEraser® Pet tool directly to
the hose instead of the wand.
3. Twist hose counter-clockwise
to remove from handle, if
desired. To do so, twist circular
hose cuff counter-clockwise
and remove from handle.
When finished using the machine, wrap cord around cord wrap for storage. Store unit indoors in a dry
location in an area where the product is not likely to get damaged.
Using the Vacuum (continued)
6 BISSELL.com
WARNING
• To reduce the risk of electric shock, turn power OFF and disconnect plug from electrical outlet before performing maintenance or
troubleshooting checks.
• Do not operate vacuum with damp or wet filters or without all filters in place.
Maintaining the TurboEraser® Tool
1. Twist gray collar counter-
clockwise, until slot appears,
then separate faceplate.
2. Remove brush roll, belt
and paddle wheel. Inspect
for damages and replace if
necessary.
3. To reassemble, align two
clips on each end of paddle
wheel with belt on and pop
back into place. Place brush
roll with belt back in. Faceplate
will not close properly if all
parts are not aligned correctly.
Cleaning the Pre-Motor Filter
24h
1. Press the tank release
button and pull out to remove
dirt tank.
2. Lift release latch to access
filter. Remove foam filter from
lid.
3. Hand wash in warm water and
rinse well; mild detergent may
be used if desired. Let dry for 24
hours before reinstalling.
4. Reinstall foam filter and
close lid.
5. Place tank back on vacuum
and press firmly until it clicks
into place.
BISSELL.com 7
WARNING To reduce the risk of electric shock, turn power OFF and disconnect plug from electrical outlet
before performing maintenance or troubleshooting checks.
Troubleshooting
For a comprehensive walkthrough of your product and support tips visit support.BISSELL.com.
Warranty
Replacing the Brush Roll and Belt
1. Unplug vacuum, turn
over and unscrew seven (7)
Phillips-head screws to remove
the bottom cover. Lift brush
straight out.
2. Clean debris from brush
roll. Inspect by placing on its
end and spinning. The brush
roll should spin freely, multiple
times by one flick. If it doesn’t,
replace brush roll. Check belt
for wear or cuts and replace if
necessary.
3. Replace the brush roll and
belt by looping the belt over
the motor shaft and the brush
roll. Line up the endcaps and
pull the brush forward into
place. This will stretch the belt.
Return bottom cover back on
and replace the screws.
Clearing a Clog
1. Remove the hose from the
back of the vacuum by twisting
it counter-clockwise. Remove
any debris.
2. Check the foot hose on the
back. If necessary, remove the
screw from the foot hose and
check for clogs.
3. Check the air passageway
on the bottom of your vacuum.
Remove the bottom cover and
the brush. Remove any debris.
Note: Any other maintenance or servicing not included in this manual should be performed by an
authorized service representative.
Limited 3-year warranty, may vary by state. Visit support.BISSELL.com or call 1-800-237-7691 for
complete warranty information.
Terms and Conditions
Your purchase is subject to the BISSELL® Terms and Conditions, which includes dispute resolution
through arbitration and class waiver. For complete terms or to opt out from arbitration or class waiver,
visit BISSELL.com/terms-of-use or call 1-800-237-7691.

VIDEOSINFOREGISTER PARTS SUPPORT
Need more support?
Head to support.BISSELL.com to troubleshoot, register your product,
order spare parts, view your warranty, and more.
INFO
REGISTER VIDEOS PARTS SUPPORT
Every purchase makes it possible for BISSELL to continue
our support of BISSELL Pet Foundation® and its mission of
saving pets in need. Since 2011, BISSELL has donated over
$26 million in support of BISSELL Pet Foundation®.
When you purchase a BISSELL® product, you help save pets,
too. Our products are engineered to clean even the toughest
messes so pets can stay at home and out of shelters.
Visit BISSELLsavespets.com to learn more.
WE
PROUDLY
SUPPORT
©2025 BISSELL Inc. All rights reserved.
Part Number 1645905 01/25 v7

Cada compra hace posible que BISSELL continúe apoyando
a BISSELL Pet Foundation® y su misión de salvar mascotas en
situación de riesgo. Desde 2011, BISSELL ha donado más de
26 millones de dólares en apoyo a BISSELL Pet Foundation®.
Cuando compra un producto BISSELL®, también ayuda a salvar
mascotas. Nuestros productos han sido diseñados para limpiar
incluso las suciedades más difíciles, de modo que las mascotas
puedan permanecer en casa y alejadas de los refugios.
Visite BISSELLsavespets.com para obtenermás información.
WE
PROUDLY
SUPPORT
©2025 BISSELL Inc. Todos los derechos reservados.
Número de pieza 1645905 01/25 v7
¿Necesita ayuda adicional?
Diríjase al centro de ayuda.BISSELL.com para solucionar problemas,
registrar su producto, pedir piezas de repuesto, consultar su garantía y más.
INFORMACIÓN
REGISTRO VIDEOS PIEZAS ASISTENCIA
BISSELL.com 7
ADVERTENCIA Para reducir el riesgo de descarga eléctrica, apague el electrodoméstico y desconecte
el enchufe de la toma de corriente antes de realizar el mantenimiento o las comprobaciones para la solución de problemas.
Solución de problemas
Para una guía completa de su producto y consejos de asistencia, visite el centro de ayuda.BISSELL.com.
Garantía
Reemplazo del rodillo de cepillado y la banda
1. Desconecte la
aspiradora, dele la vuelta
y desenrosque los siete (7)
tornillos de cabeza Phillips
para retirar la tapa inferior.
Retire el cepillo hacia
arriba.
2. Limpie los residuos del rodillo de
cepillado. Inspeccione colocándolo
sobre su extremo y haciéndolo
girar. El rodillo de cepillado debería
girar libremente, varias veces con
un movimiento rápido. Si no es así,
reemplace el rodillo de cepillado.
Revise la banda para ver si está
gastada y cortada y reemplácela si
es necesario.
3. Reemplace el rodillo
de cepillado y la banda
enroscando la banda sobre el
eje del motor y el rodillo de
cepillado. Alinee las tapas de
los extremos y jale el cepillo
hacia adelante para colocarlo.
Esto estirará la banda. Vuelva
a colocar la tapa inferior y los
tornillos.
Eliminación de obstrucciones
1. Retire la manguera de la
parte posterior de la aspiradora
girándola hacia la izquierda.
Elimine cualquier residuo.
2. Revise la manguera de la base en
la parte posterior. Si es necesario,
retire el tornillo de la manguera de la
base y verifique si hay obstrucciones.
3. Revise el conducto de aire en
la parte inferior de su aspiradora.
Retire la tapa inferior y el cepillo.
Elimine cualquier residuo.
Nota: Cualquier otro mantenimiento o servicio no incluido en este manual debe ser realizado por un
representante de servicio autorizado.
Garantía limitada de 3 años, puede variar según el estado. Visite el centro de ayuda.BISSELL.com o
llame a 1-800-237-7691 para obtener información completa sobre la garantía.
Términos y condiciones
Su compra está sujeta a los Términos y condiciones de BISSELL®, que incluyen la resolución de disputas
a través de arbitraje y la renuncia a demandas colectivas. Para conocer los términos completos o para
renunciar al arbitraje o a la demanda colectiva, visite BISSELL.com/terms-of-use o llame al 1-800-237-7691.
6 BISSELL.com
ADVERTENCIA
• Para reducir el riesgo de descarga eléctrica, apague la alimentación y desconecte el enchufe de la toma de corriente antes de realizar
el mantenimiento o las verificaciones de solución de problemas.
• No opere la aspiradora con filtros húmedos o mojados o sin todos los filtros en su lugar.
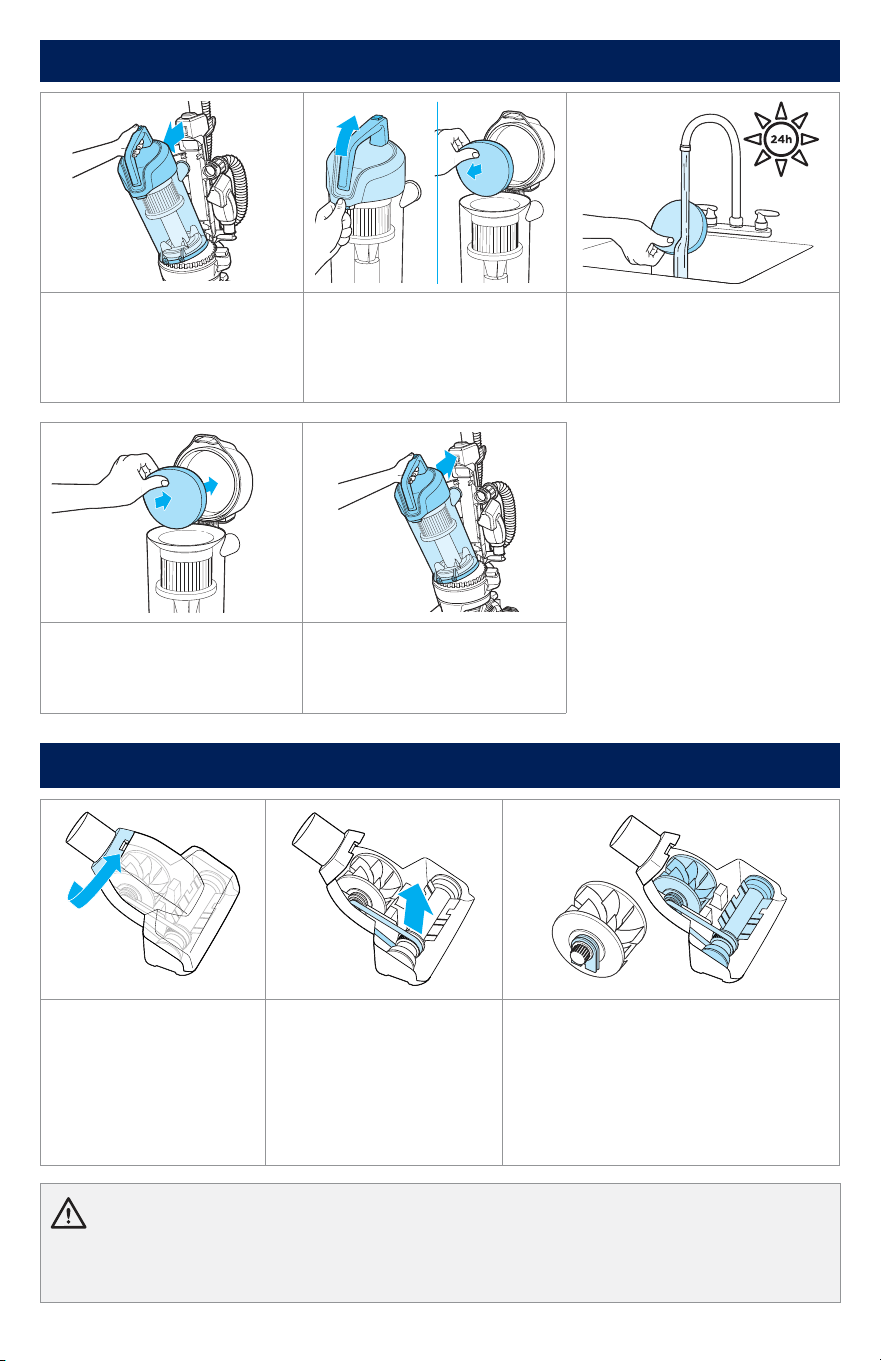
Mantenimiento de la herramienta TurboEraser®
1. Gire el anillo gris hacia
la izquierda hasta que
aparezca la ranura, luego
separe la placa frontal.
2. Retire el rodillo de
cepillado, la correa y
la rueda de paletas.
Revíselos para buscar
daños y reemplácelos si es
necesario.
3. Para volver a ensamblar, alinee dos
clips en cada extremo de la rueda de
paletas con la banda puesta y vuelva
a colocarlos en su lugar. Vuelva a
colocar el rodillo de cepillado con la
correa. La placa frontal no se cerrará
correctamente si todas las partes no
están bien alineadas.
Limpieza del filtro premotor
24h
1. Presione el botón de
liberación del tanque y tire
para retirar el tanque de
suciedad.
2. Levante el pestillo de
liberación para acceder al
filtro. Retire el filtro de espuma
de la tapa.
3. Lave a mano con agua tibia
y enjuague bien; se puede usar
un detergente suave si lo desea.
Deje secar durante 24 horas
antes de volver a instalarlo.
4. Vuelva a instalar el filtro de
espuma y cierre la tapa.
5. Vuelva a colocar el tanque
en la aspiradora y presione
firmemente hasta que encaje
en su lugar.
BISSELL.com 5
Vaciado del tanque de suciedad
1. Presione el botón de
liberación del tanque y tire
para retirar el tanque de
suciedad.
2. Sostenga el tanque de
suciedad sobre una papelera.
Presione el botón de liberación
inferior para vaciar.
3. Gire el ciclón hacia la
izquierda y tire hacia abajo para
retirarlo del tanque.
4. Limpie el ciclón con agua
tibia y detergente suave. Deje
secar durante 24 horas antes
de volver a instalarlo.
5. Gire el ciclón hacia la
derecha para volver a
instalarlo.
6. Vuelva a colocar el tanque
en la aspiradora y presione
firmemente hasta que encaje en
su lugar.
ADVERTENCIA Para reducir el riesgo de descarga eléctrica, apague el electrodoméstico y desconecte
el enchufe de la toma de corriente antes de realizar el mantenimiento o las comprobaciones para la solución de problemas.
Limpieza de superficies elevadas
Limpie los espacios de difícil acceso con la varilla de extensión de liberación rápida.
1. Presione el botón de
liberación de la varilla para
retirar la varilla de extensión
y conectar la herramienta
deseada.
2. Conecte la herramienta
deseada. Nota: Para un
rendimiento óptimo, conecte la
herramienta para herramientas
TurboEraser® directamente a la
manguera en lugar de a la varilla.
3. Gire la manguera hacia la
izquierda para retirarla de la
manija, si lo desea. Para hacerlo,
gire el manguito circular de la
manguera hacia la izquierda y
retírelo de la manija.
Cuando haya terminado de usar el equipo, enrolle el cable alrededor del soporte para almacenamiento. Guarde
la unidad en el interior en un lugar seco en un lugar donde sea poco probable que el producto se dañe.
Uso de la aspiradora (continuación)

4 BISSELL.com
ADVERTENCIA Para reducir el riesgo de lesiones por piezas en movimiento mientras la aspiradora
está encendida, desplácela siempre a través de las ruedas de desplazamiento utilizando la manija superior situada en la parte
posterior de la aspiradora. No cargue la aspiradora mientras esté funcionando. Coloque siempre la aspiradora en el suelo con la manija
en posición vertical al usar las herramientas.
Uso de la aspiradora
1. Tire suavemente del cable,
deteniéndose en la marca
amarilla en este. No tire más
allá de la marca roja.
2. Presione el botón rojo de
encendido con el pie para
encender
y apagar la
aspiradora
.
3. Presione el pedal de
reclinación y tire de la manija
hacia usted.
4. Gire la perilla en la base
hasta la configuración de altura
deseada. Si la perilla es difícil
de girar, incline ligeramente
la aspiradora para quitarle el
peso a la base mientras gira.
Consejo: para obtener el
mejor rendimiento, ajuste a la
configuración más baja posible.
Si su aspiradora es difícil de
empujar, ajuste a la siguiente
configuración más alta.
5. Mantenga el enchufe y
presione el botón de enrollado
automático del cable hasta
que se enrolle por completo.
Si el cable no se retrae
completamente en el primer
intento, saque un poco de
cable y presione el botón de
enrollado nuevamente.
Nota: El cepillo giratorio para suelo sigue girando mientras las herramientas están en uso. Nunca coloque
los dedos debajo de la aspiradora cuando esté funcionando. Nunca coloque la base eléctrica sobre
muebles o superficies irregulares.
Ciertas alfombras y condiciones de baja humedad pueden generar pequeñas descargas estáticas.
Las descargas estáticas son completamente inofensivas y no están asociadas de ninguna manera con la
fuente de alimentación principal.
BISSELL.com 3
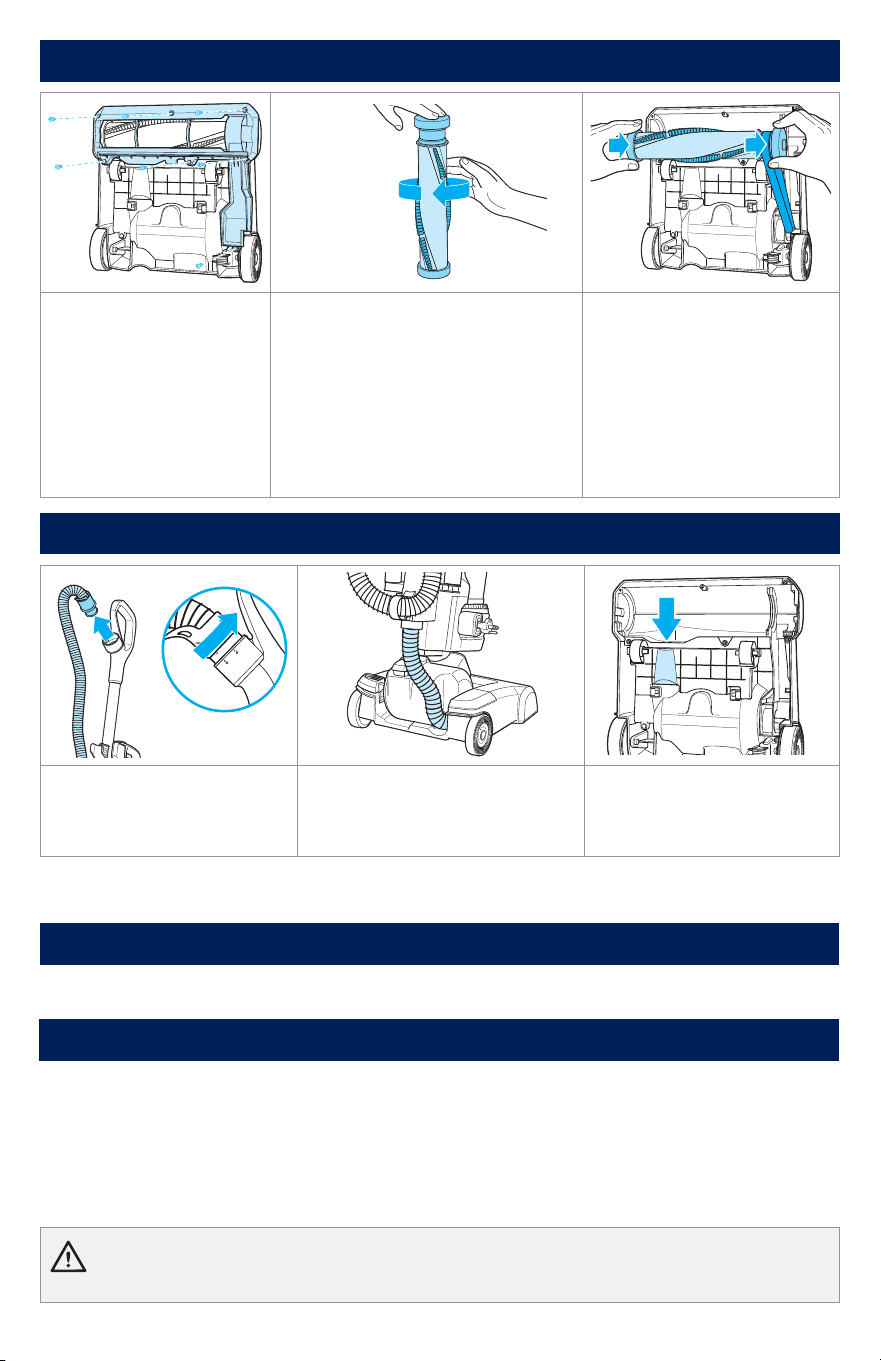
Ensamblaje
1. Conecte la varilla a la base
de la aspiradora.
2. Conecte la manguera
elástica a la varilla y hágala
girar a la derecha para
asegurarla en su lugar.
3. Conecte la manguera
elástica a la parte posterior de
la aspiradora y hágala girar a
la derecha para asegurarla en
su lugar.
4. Conecte el clip de la
manguera al cuerpo de la
aspiradora deslizándolo hacia
arriba hasta que encaje. Retire
el clip de la manguera para
un mejor alcance de limpieza
cuando esté en uso.
5. La manguera debe
colocarse sobre la aspiradora
sin torsiones.
6. Conecte las herramientas a
los portaherramientas.
Base Varilla Manguera Cepillo 2 en 1 para
polvo y boquilla
para ranuras
Herramienta
para mascotas
TurboEraser®
¿Qué hay en la caja?
2 BISSELL.com
ADVERTENCIA
PARA REDUCIR EL RIESGO DE INCENDIOS, DESCARGAS ELÉCTRICAS
O LESIONES:
• No deje la aspiradora cuando esté conectada. Desenchúfela de la
toma de corriente cuando no esté en uso y antes de realizar el
mantenimiento.
• No utilice al aire libre o en superficies mojadas.
• No permita que se utilice como juguete. Se requiere mucha atención
cuando se utiliza por o cerca de los niños.
• No utilice este electrodoméstico para ningún propósito que no esté
descrito en esta guía de usuario.
• Utilice solo los accesorios recomendados por el fabricante.
• No utilice con un cable o enchufe dañado. Si el electrodoméstico no
funciona correctamente, se ha caído, dañado, dejado al aire libre
o sumergido en agua, llévelo a reparar en un centro de servicio
autorizado.
• No tire ni cargue del cable, no use el cable como manija, no cierre una
puerta sobre el cable ni tire del cable alrededor de bordes o esquinas
afiladas. No pase el electrodoméstico sobre el cable. Mantenga el
cable lejos de las superficies calientes.
• No desenchufe tirando del cable. Para desenchufar, agarre del
enchufe, no del cable.
• No manipule el enchufe o la aspiradora con las manos mojadas.
• No coloque objetos sobre las aberturas. No la use si alguna abertura
está bloqueada; mantenga las aberturas libres de polvo, pelusas,
cabello y cualquier objeto que pueda reducir el flujo de aire.
• Mantenga el cabello, la ropa suelta, los dedos y todas las partes del
cuerpo lejos de las aberturas y las partes móviles.
• APAGUE todos los controles antes de enchufar o desenchufar la
aspiradora.
• Tenga especial cuidado al limpiar escaleras.
• No la use para recoger materiales inflamables o combustibles (líquido
de encendedor, gasolina, queroseno, etc.) ni la use en áreas donde
estos materiales puedan estar presentes.
• No utilice la aspiradora en un espacio cerrado lleno de vapores
emitidos por pintura a base de aceite, diluyente de pintura, algunas
sustancias para proteger de las polillas, polvo inflamable u otros
vapores explosivos o tóxicos.
• No lo use para recoger material tóxico (cloro, amoniaco, limpiador de
desagües, etc.).
• No recoja nada que esté ardiendo o humeando, como cigarrillos,
fósforos o cenizas calientes.
• No use sin los filtros colocados.
• No recoja objetos duros o afilados como vidrio, clavos, tornillos,
monedas, etc.
• Solo utilice en superficies secas y en interiores.
• Mantenga el electrodoméstico en una superficie nivelada.
• No cargue la aspiradora mientras esté funcionando.
• Antes de usar su aspiradora, asegúrese de que el tanque de suciedad
esté en posición bloqueada y que todos los filtros, tanto los prefiltros
como los postfiltros, estén en su lugar. NO haga funcionar su
aspiradora sin estos filtros.
• La película de plástico puede ser peligrosa. Para evitar el peligro de
asfixia, manténgala lejos del alcance de los niños.
• No conecte su aspiradora hasta que esté familiarizado con todas las
instrucciones y procedimientos de operación.
• Para reducir el riesgo de descarga eléctrica, apague el interruptor de
encendido y desconecta el enchufe polarizado de la toma de corriente
o las comprobaciones de solución de problemas.
• Sostenga el enchufe cuando vuelva a enrollar en el carrete del cable.
No deje que el enchufe se mueva al enrollarse.
• Si el electrodoméstico tiene un accesorio portátil como cepillo para
mascotas, cabezal accionado por motor, etc., el usuario debe evitar
que quede atrapado.
• Riesgo de lesiones por partes móviles. El cepillo puede activarse
inesperadamente.Desenchúfelo antes de limpiarlo o revisarlo.
• Desenchúfelo antes de conectar o desconectar la herramienta para
mascotas TurboEraser® y el cepillo para polvo y la boquilla para
ranuras 2-in-1.
ESTE ELECTRODOMÉSTICO TIENE UN ENCHUFE
POLARIZADO
Para reducir el riesgo de descarga eléctrica, este equipo tiene un enchufe polarizado (una clavija
es más ancha que la otra). Este enchufe solo encajará en una toma de corriente polarizada de una manera. Si el enchufe no encaja
completamente en la toma de corriente, invierta el enchufe. Si aún no encaja, póngase en contacto con un electricista califi cado para
instalar una toma de corriente adecuada. No cambie el enchufe de ninguna manera.
INSTRUCCIONES IMPORTANTES DE SEGURIDAD
LEA TODAS LAS INSTRUCCIONES ANTES DE USAR SU APARATO.
Al usar un electrodoméstico, se deben observar precauciones básicas, incluyendo lo siguiente:
GUARDE ESTAS INSTRUCCIONES
ESTE MODELO ES SOLO PARA USO DOMÉSTICO. EL USO COMERCIAL DE ESTA UNIDAD ANULA LA GARANTÍA DEL FABRICANTE.
No lave el fi ltro plisado. Reemplace el fi ltro plisado cada 6 meses.
INFORMACIÓN IMPORTANTE
• El rodillo de cepillado sigue girando mientras el producto está encendido y la manija está en uso. Para evitar daños en la alfombra, las alfombras, los
muebles y los suelos, evite volcar el limpiador o colocarlo en muebles, alfombras con flecos o escaleras alfombradas durante el uso de la herramienta.
• Con el rodillo de cepillado encendido, no permita que el limpiador permanezca en un lugar por mucho tiempo, ya que puede dañar el suelo.

A. Varilla
B. Manguera extensible
C. Botón de liberación de la varilla
D. Botón de liberación del tanque
E. Manija de transporte
F. Tanque de suciedad
G. Botón de enrollado del cable
H. Pedal de encendido
I. Pedal de reclinación
J. Dirección giratoria
K. Ajuste de altura
¡Conozca su nuevo producto BISSELL®!
Consulte el centro de asistencia.BISSELL.com para una guía de su
nueva compra, con videos, consejos, asistencia y más. ¿Quiere empezar
ya mismo? Esta guía contiene toda la información que necesita para
confi gurar su nuevo producto. Vamos a echar un vistazo...
A
B
E
F
H
I
C
D
K
G
J
¿Qué hay en la caja? ..............................................................3
Ensamblaje .................................................................................3
Uso de la aspiradora ............................................................. 4
Vaciado del tanque de suciedad ....................................5
Limpieza del fi ltro premotor ............................................ 6
Mantenimiento de la herramienta TurboEraser® ..... 6
Reemplazo del rodillo de cepillado y la banda .......7
Eliminación de obstrucciones ..........................................7
Solución de problemas ........................................................7
Garantía ........................................................................................7
Descripción general del producto
CleanView
®
Max
REBOBINADO SIN ENREDOS
ASPIRADORA VERTICAL
MODELOS 4073, 4073L